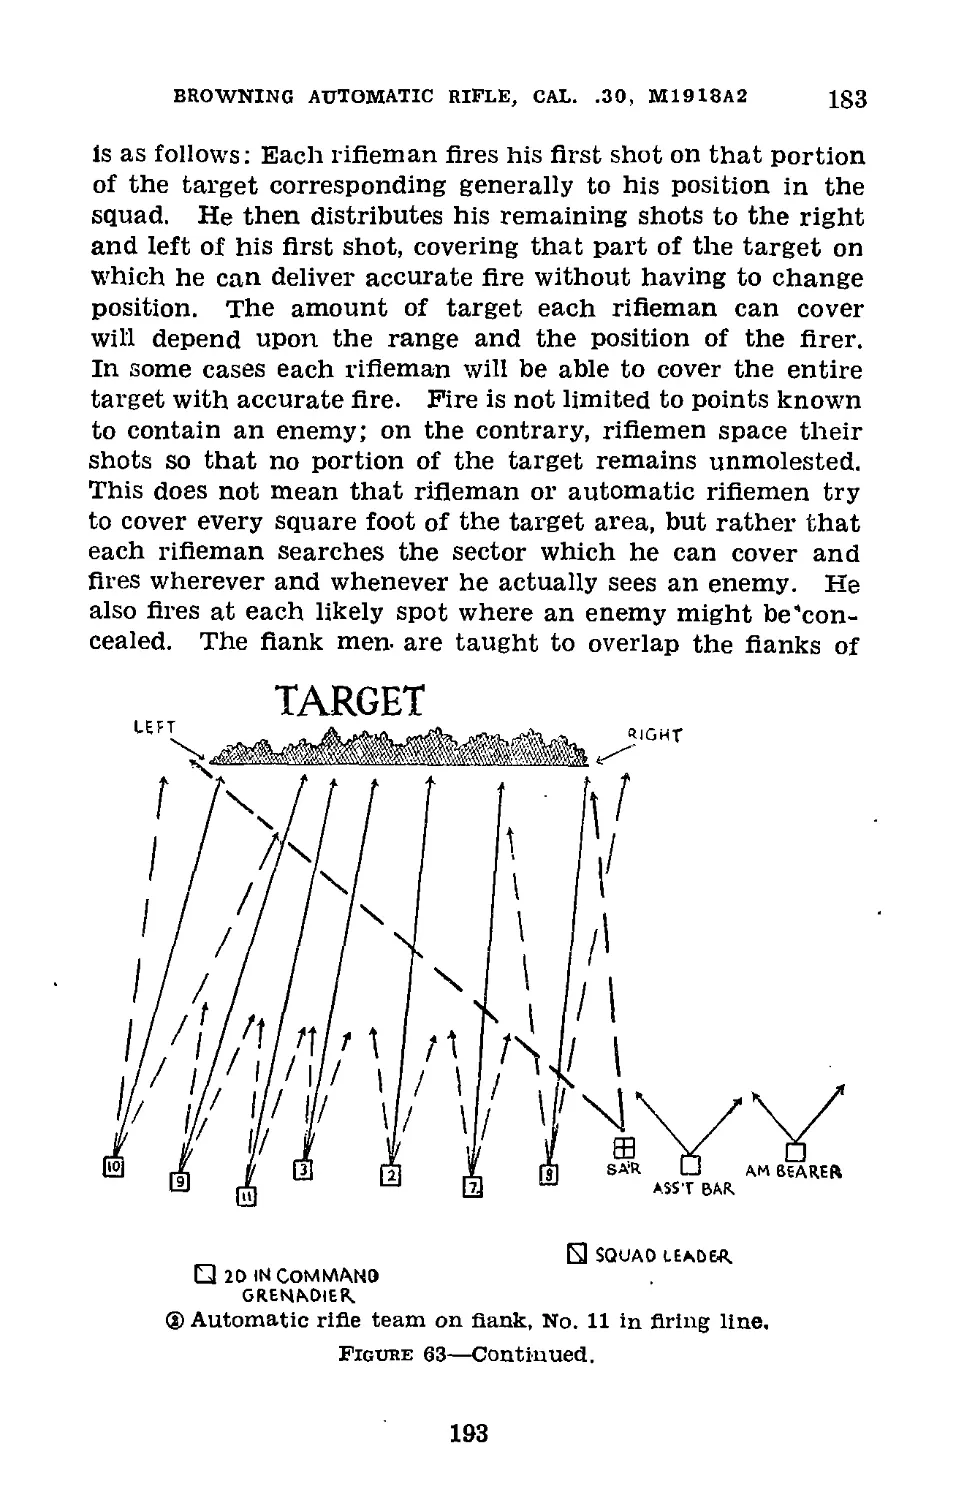
/


Теги: weapons military affairs
Год: 1943


Текст
FM 23-15
DEPARTMENT
BASIC FIELD MANUAL
A «3®
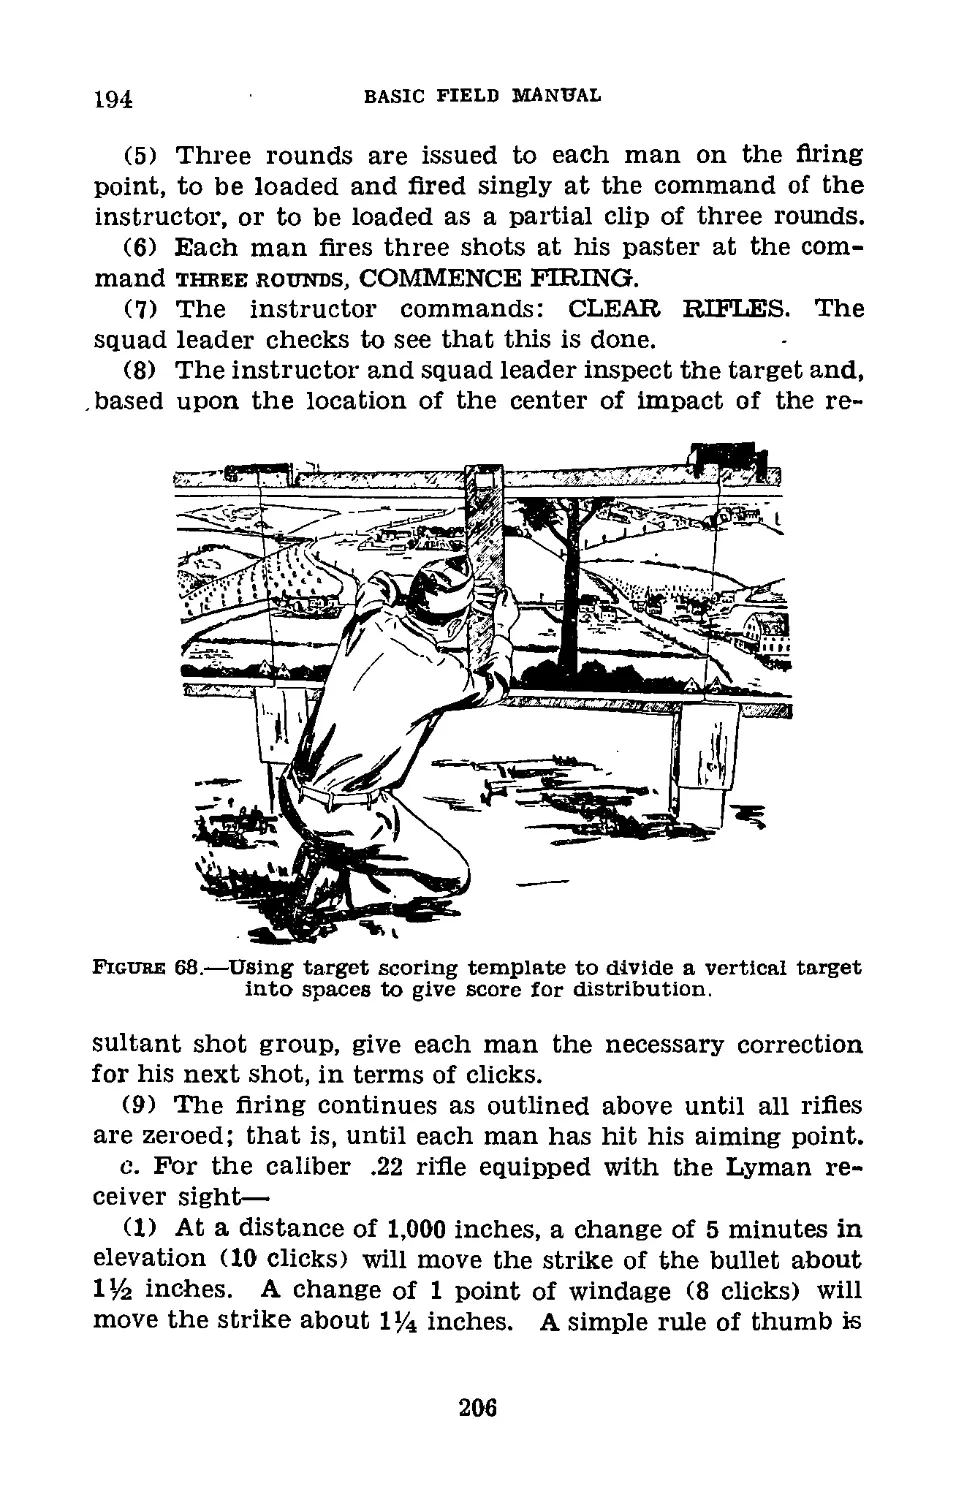
BROWNING AUTOMATIC RIFLE
CALIBER .30, M1918A2
30 June 1943
к
FM 23-15
BASIC FIELD MANUAL
BROWNING AUTOMATIC RIFLE
CALIBER .30, M1918A2
UNITED STATES
GOVERNMENT PRINTING OFFICE
WASHINGTON : 1943
UNCLASSIFIED
WAR DEPARTMENT,
Washington 25, D. C., 30 June 1943.
FM 23-15, Browning Automatic Rifle, Caliber .30, M1918A2,
is published for the information and guidance of all con-
cerned.
[A. G. 300.7 (5 May 43).]
By order of the Secretary of War:
G. C. MARSHALL,
Chief of Staff.
Official :
J. A. ULIO,
Major General,
The Adjutant General.
Distribution i' !
В 7 (2) ; R3,7 (10); Bn 3, 7 ( 5); C 7 (5), 9 (2); IC 3
(5), 7 (15). ' '''’•С ,
(For explanation of symbols see FM 21-6.)
TABLE OF CONTENTS
Paragraphs Page
Chapter 1. Mechanical training.
Section I. General_______________________________ 1-3 1
II. Disassembly and assembly_________________ 4-12 3
III. Care and cleaning______________________ 13-16 16
IV. Functioning_____________________________ 17-28 25
V. Operation_______________________________ 29-37 37
VI. Stoppages and immediate action__38-41 41
VIJ. Spare parts and accessories_____ 42-43 44
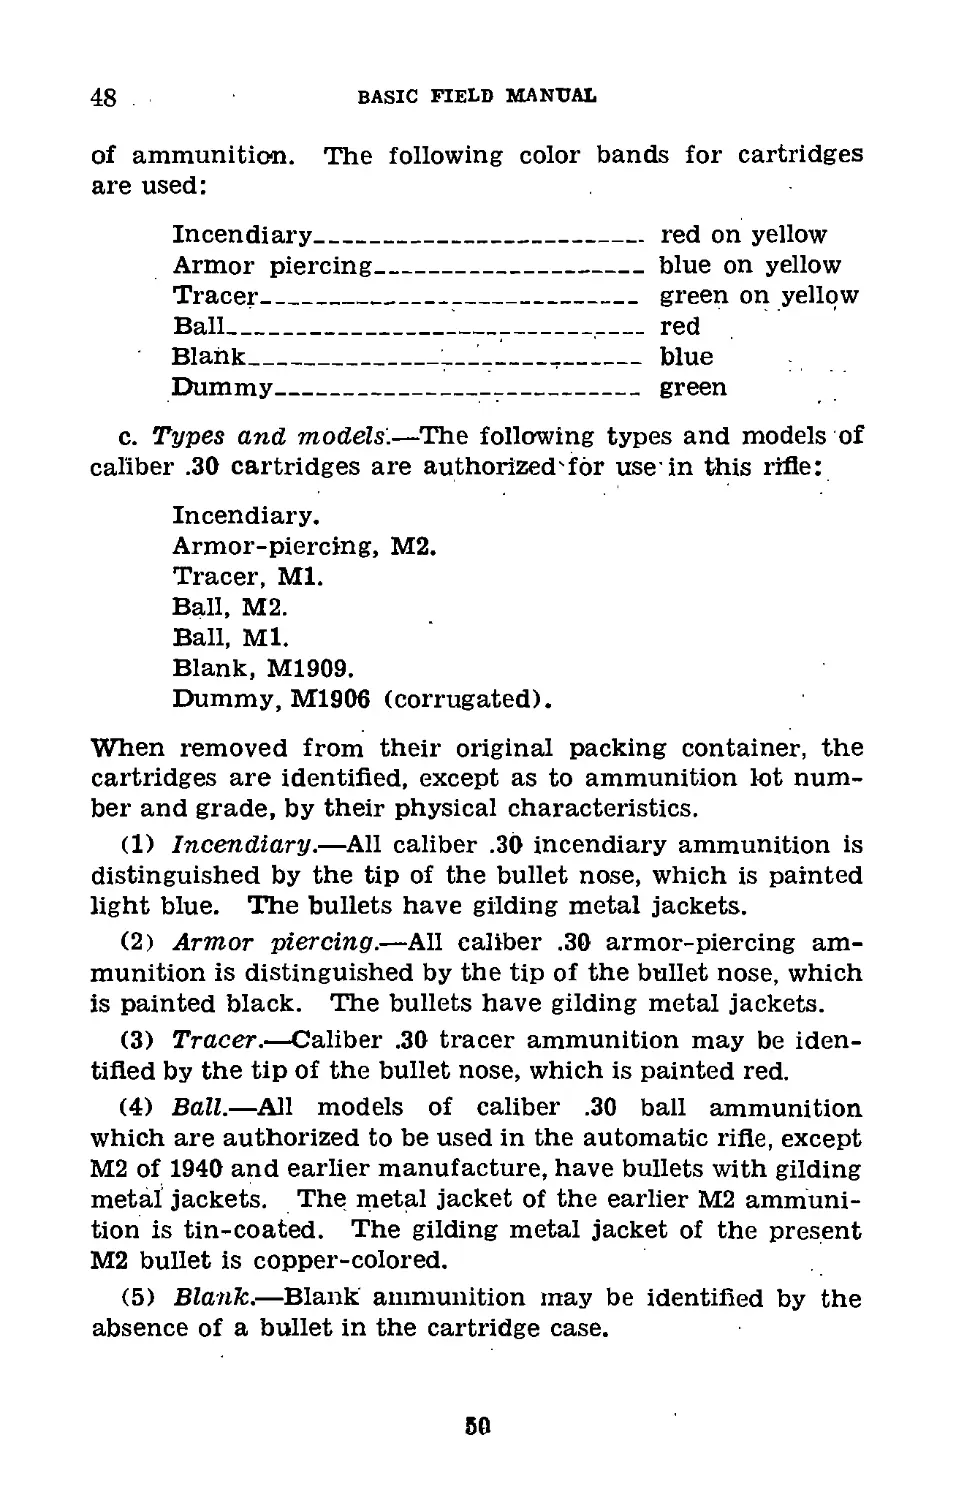
VIII. Ammunition_______________________________44-51 48
Chapter 2. Marksmanship, known distanee targets.
Section I. General_________________________________ 52-54 53
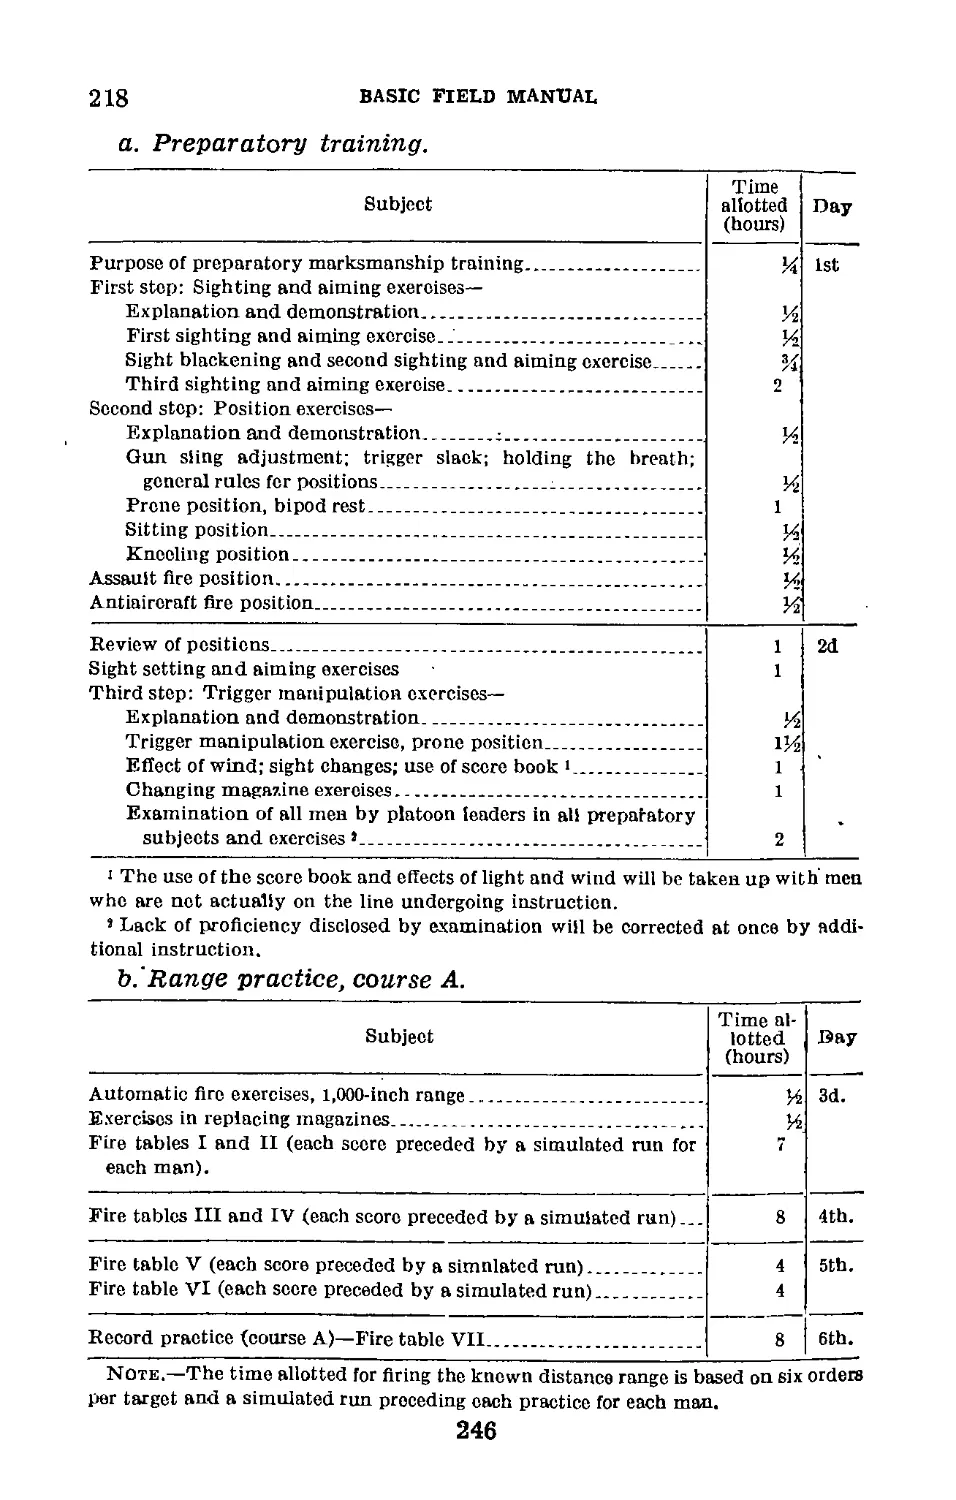
II. Preparatory marksmanship train-
ing----------------------------------------- 55-80 54
III. Courses to be flred____________________ 81-83 86
IV. Range practice__________________________ 84-93 94
V. Regulations governing record prac-
tice_______________________________________ 94-124 100
VI. Targets and ranges____________________ 125-126 112
Chapter 3. Marksmanship, moving ground targets.
Section I. General___________________________________ 127-128 117
II. Moving vehicles______________________ 129-131 118
III. Moving personnel_____________________ 132-133 119
IV. Moving targets, ranges, and range
precautions________________________________ 134-135 121
Chapter 4. Marksmanship, aerial targets.
Section I. Nature of aerial targets for auto-
matic rifles_______________________ 136-137 124
II. Technique of fire________ 138-142 124
III. Marksmanship training___ 143-147 129
IV. Miniature range practice_148-151 142
V. Towed target and radio-controlled
plane target firing__________ 152-156 146
VI. Ranges, targets, and equipment- 157-162 152
Chapter 5. Technique of fire.
Section I. General__________________ 163-165 163
II. Range estimation_________ 166-170 164
III. Target designation______ 171-174 169
IV. Automatic rifle Are and its effect- 175-181 - 181
V. Application of fire_____ 182-189 186
VI. Landscape target firing_ 190-197 199
VII. Field target firing_____ 198-201 211
VIII. Destruction of ordnance matAriel_________ 202 228
Chapter 6. Advice to instructors.
Section I. Mechanical training___________ 203-211 231
II. Marksmanship, known distance
targets___________________________________ 212-225 242
III. Marksmanship, aerial targets_ 226—230 258
IV. Technique of fire____________________ 231-240 262
Chapter 7. Safety precautions___________________________ 241 272
Index________________________________________________ 277
III
FM 23-15
BASIC FIELD MANUAL
BROWNING AUTOMATIC RIFLE, CALIBER .30, M1918A2
JThls manual supersedes FM 23-15, 27 Aug. 1940; including
сЛ, 15 July 1941; C 2, 15 Nov. 1941; C 3, 10 July 1942; C 4, 5 Nov.
Й42; and C 5, 18 Dec. 1942.
Attention is directed to FM 21-7 for details as to how appropriate
training films and film strips are intended to be used and how
they are made available for use during training with the Brown-
ing automatic rifle, caliber .30, M1918A2.
CHAPTER 1
MECHANICAL TRAINING
Paragraphs
Section I. General________________________________________ 1-3
II. Disassembly and assembly_____________________ 4-12
III. Care and cleaning--------------------------- 13-16
IV. Functioning__________________________________ 17-28
V. Operation_____________________________________29—37
VI. Stoppages and immediate action________________38-41
VII. Spare parts and accessories-_________________42-43
VIII. Ammunition__________________________________44^-51
Section I
GENERAL
1. Object.—This chapter is designed to give the soldier
training that will insure his ability to maintain the rifle and
keep it in operation.
2. Description.—The Browning automatic rifle, caliber .30,
M1918A2, is an air-cooled, gas-operated, magazine-fed shoul-
der weapon with bipod (fig. 1). It weighs approximately 20
pounds with sling. The ammunition is loaded in magazines
of 20 rounds. The weight of the magazine when empty is
7 ounces; when filled, 1 pound 7 ounces.
3. Fire Power.—The Browning automatic rifle, caliber .30,
M1918A2, is not mechanically capable of semiautomatic fire,
though it can be fired single shot by proper trigger manipu-
1
AND
SPRING
Figure 1.—Browning automatic rifle, caliber .30, M1918A2.
BASIC FIELD MANUAL
BROWNING AUTOMATIC RIFLE, CAL. .30, M1918A2 3~7
lation. There are two cyclic rates of full automatic fire,
normal and slow, which may be selected by the flrer. The
normal cyclic rate is approximately 550 rounds per minute;
the slow cyclic rate is approximately 350 rounds per minute.
The most effective rate of fire for this weapon is from 120
to 150 rounds per minute. The sustained rate, however, is
from 40 to 60 rounds per minute.
Section П
DISASSEMBLY AND ASSEMBLY
4. Training.—Training in disassembly and assembly will be
taken up as soon as practicable after the soldier receives
his rifle. In any case, it will be completed before any firing
is done with the rifle by the individual. Instruction in the
care and cleaning of the automatic rifle will also be covered.
5. Organization.—In the company or platoon, all enlisted
men of the automatic rifle teams are combined in one or
more groups, for instruction, under selected officer and non-
commissioned officer instructors. Rifle squad leaders or as-
sistant squad leaders supervise the work of their respective
automatic rifle teams.
6. Care To Be Exercised.—a. The rifle can normally be
disassembled and assembled without applying undue force.
When undue resistance is met, force will be applied cautiously.
b. The rifle will not be disassembled or assembled against
time. Instruction, blindfolded, may be given to men who
have passed their tests in mechanical training. In all work
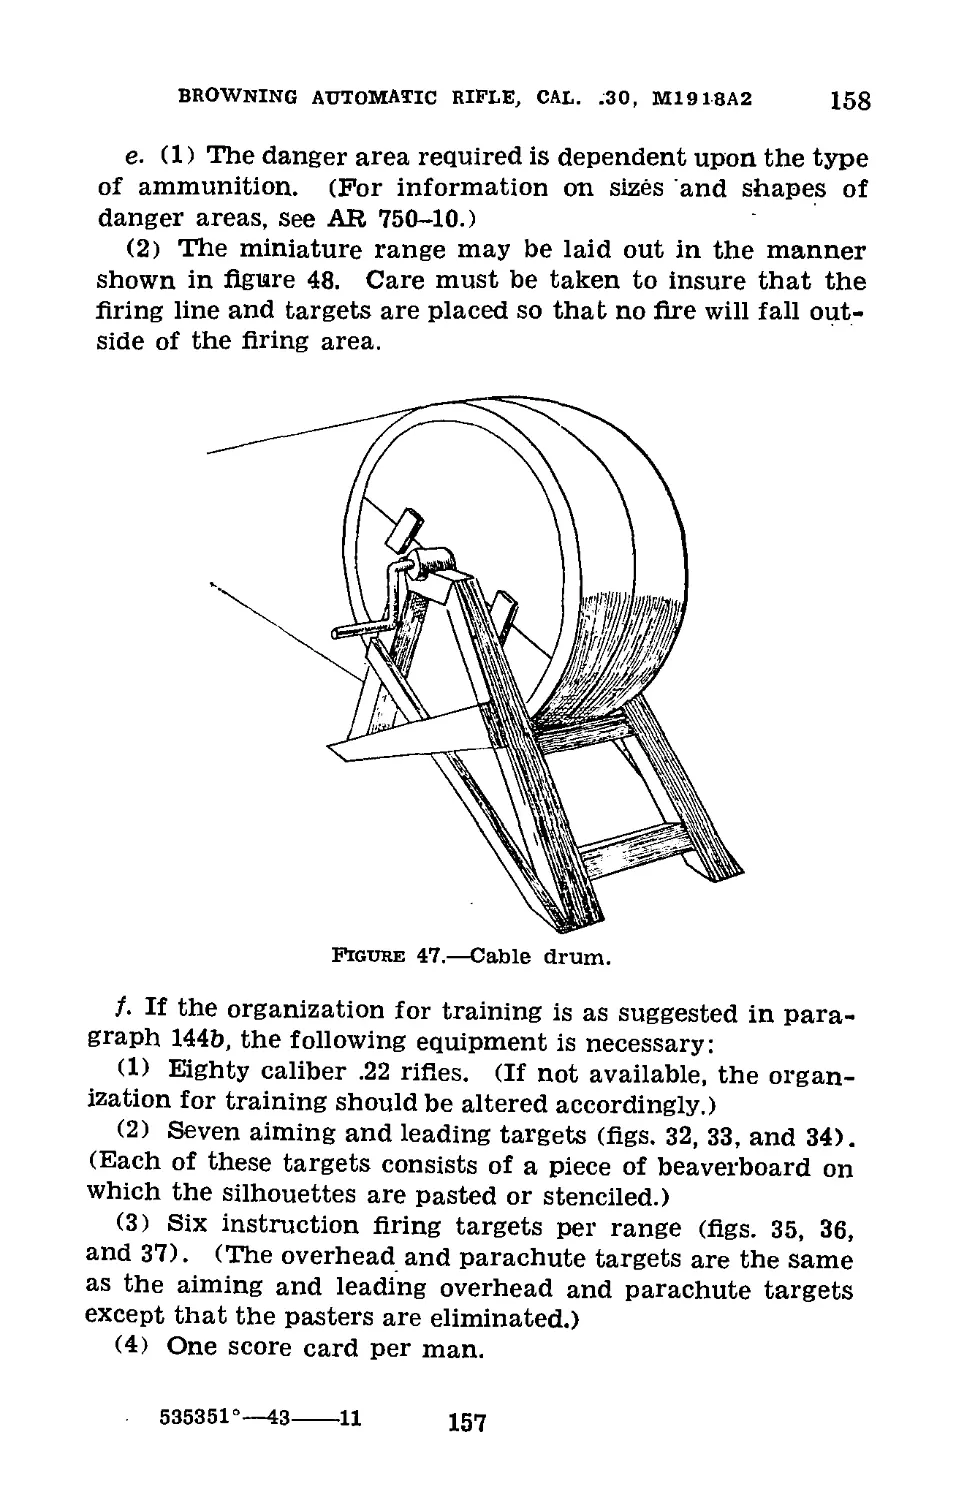
in disassembling the rifle, the men will be taught to lay out
the parts on a smooth, clean surface from left to right, in
the same sequence as they are disassembled from the rifle.
The trigger mechapism will not be disassembled or assembled
blindfolded.
7. Nomenclature.—The names of the parts to which ref-
erence js made in mechanical training are readily learned
as this training progresses. Instructors will therefore take
care to name the parts clearly and correctly in their work.
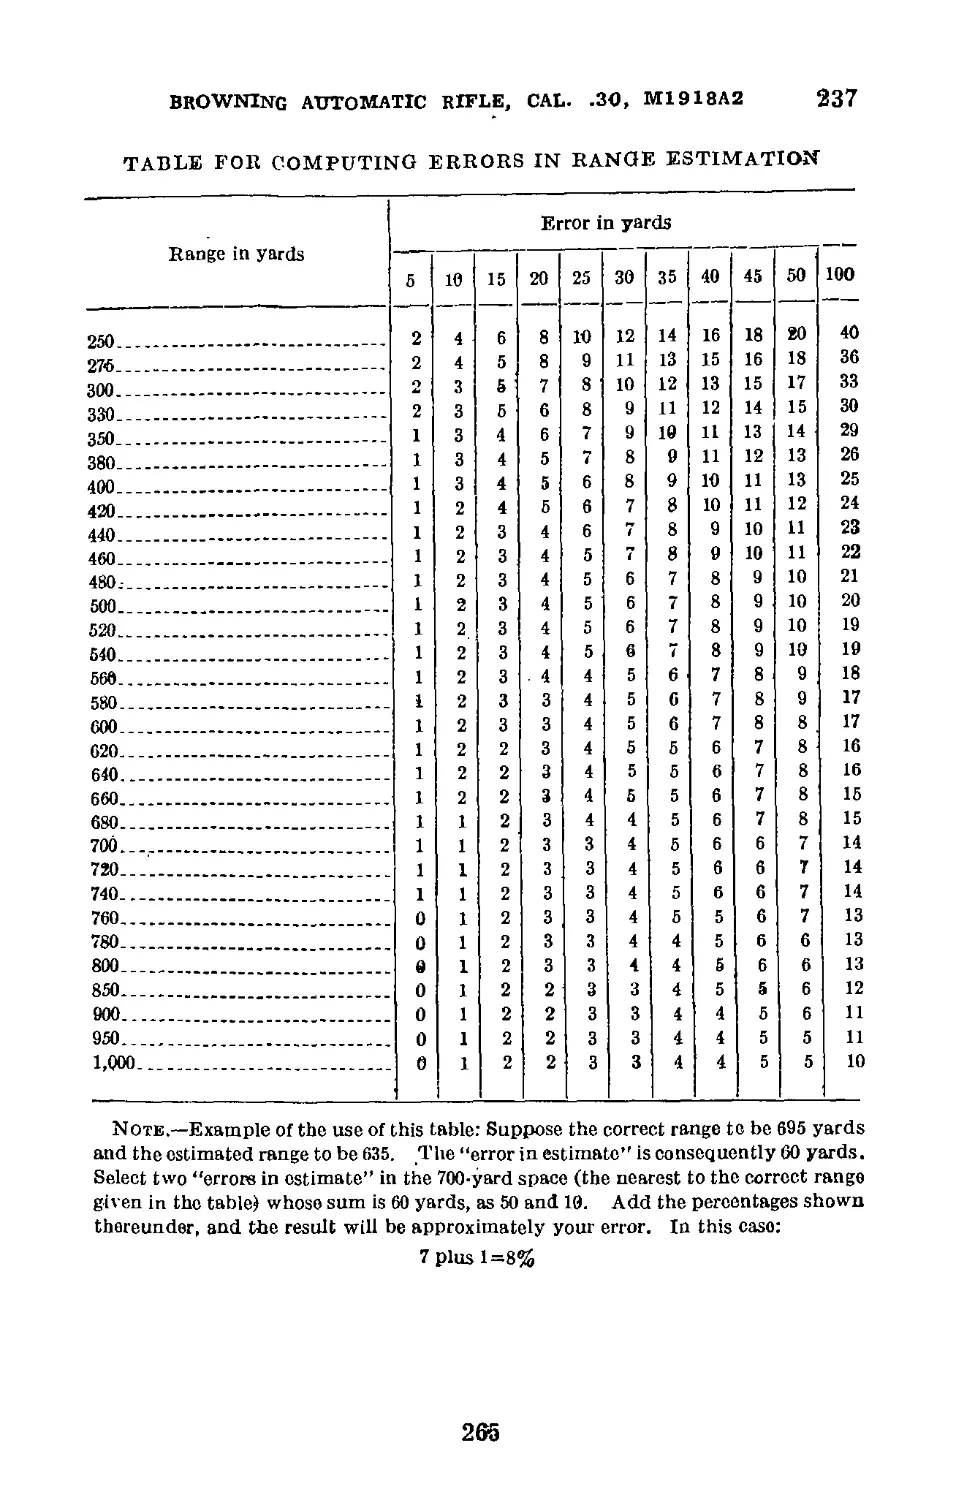
A sufficient knowledge of the nomenclature of the rifle is
3
7-8
BASIC FIELD MANUAL
gained by the soldier during the instruction in mechanical
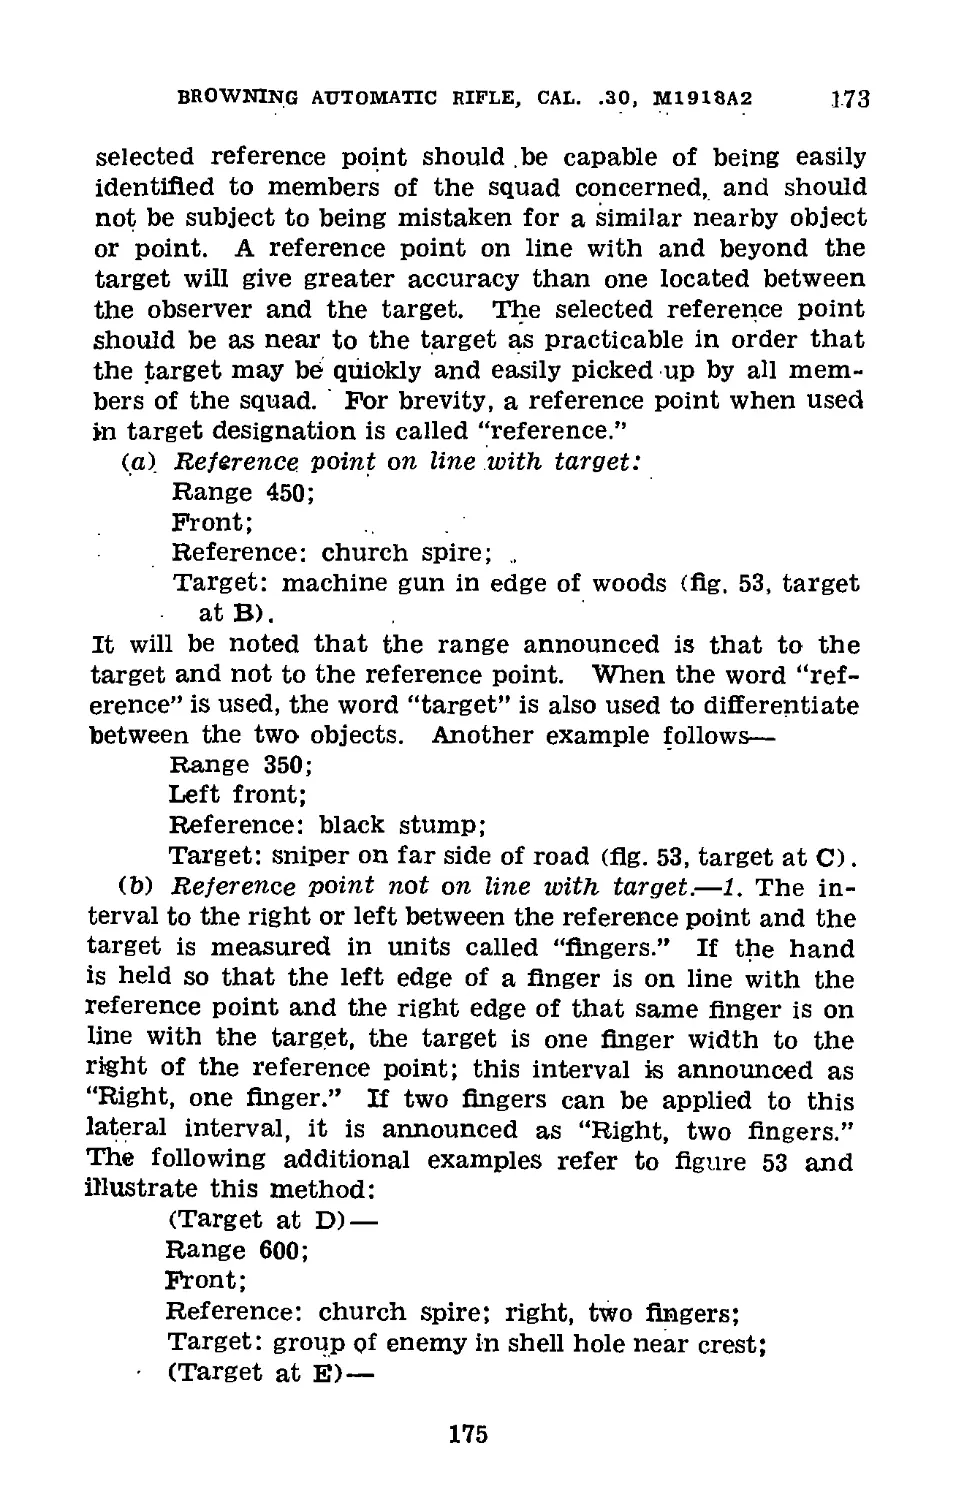
training.
8. Disassembling.—a. General.—Authorized disassembly
by the soldier is limited to that required for proper care and
maintenance of the rifle. Further disassembly will be done
under the supervision of an officer or ordnance personnel.
The individual soldier is prohibited from disassembling
the—
(1) Forearm group.
(2) Barrel group.
(3) Butt stock and buffer group.
(4) Rear sight group.
(5) Receiver group.
b. Sequence.—The steps in the disassembly of the rifle
authorized to be performed by the individual soldier without
supervision are performed in the following sequence:
(1) Operating group.—(a) Cock the rifle and remove—
1. Gas cylinder tube retaining pin and spring.
2. Gas cylinder tube and forearm.
(b) Let the slide forward and remove—
1. Trigger guard retaining pin and spring.
2. Trigger guard.
3. Recoil spring guide.
4. Recoil spring.
5. Operating handle.
6. Hammer pin.
7. Hammer.
8. Slide.
9. Bolt assembly.
10. Firing pin.
11. Bolt link pin.
12. Bolt link.
13. Extractor.
14. Extractor spring.
(2) Trigger group.—Remove—
(a) Ejector.
(b) Magazine catch spring.
(c) Magazine catch pin.
(d) Magazine catch.
4
BROWNING AUTOMATIC RIFLE, CAL. .30, M1918A2
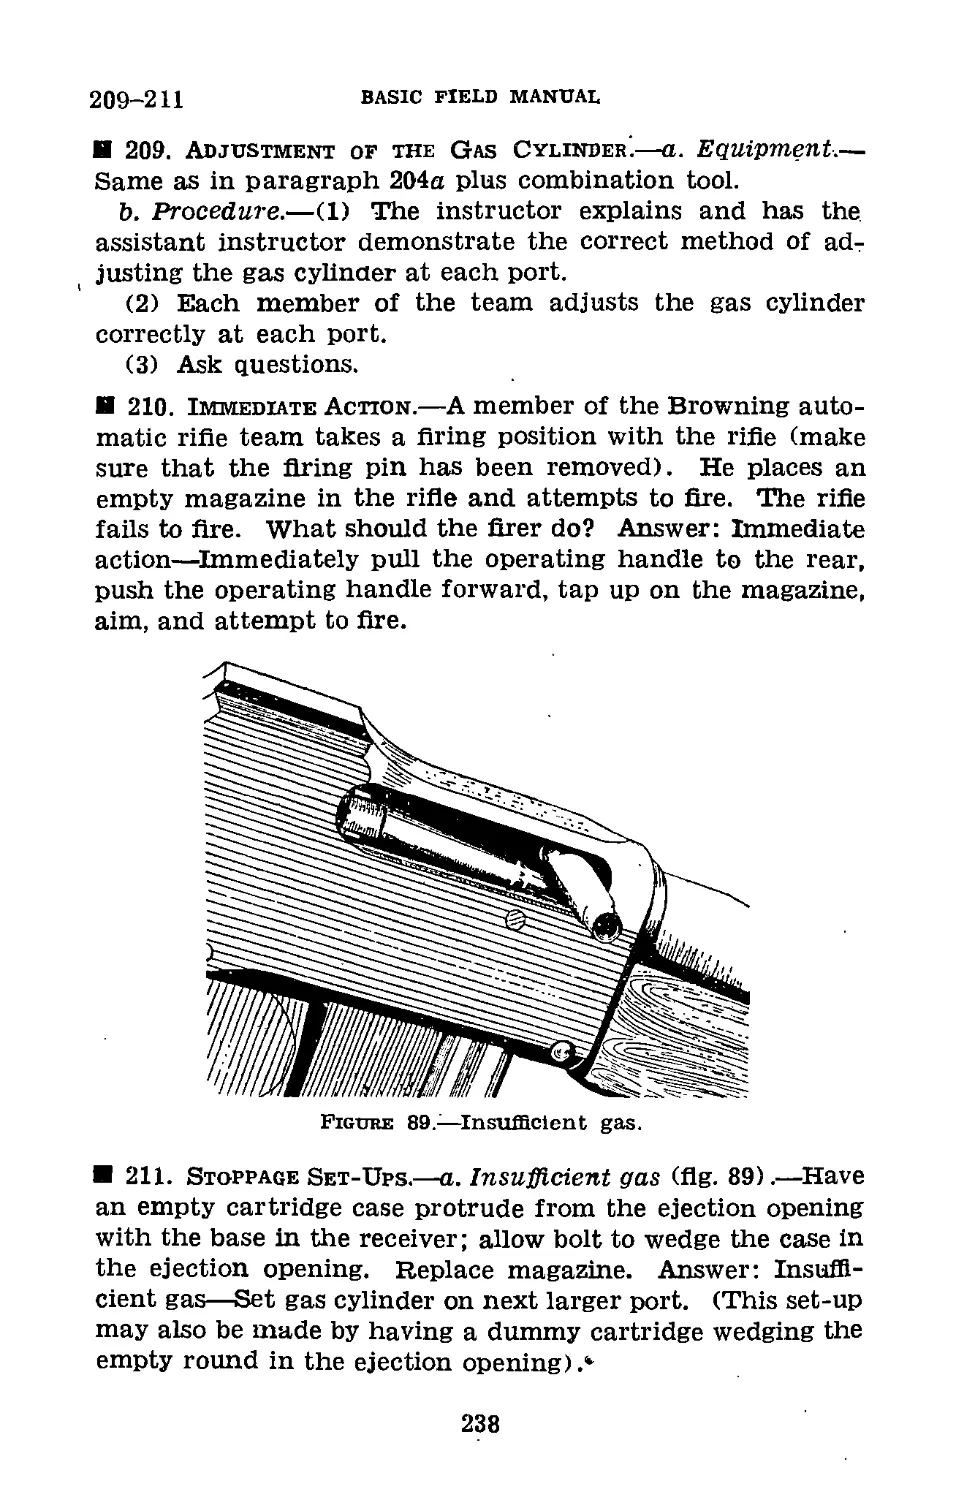
8
(e) Magazine release.
(/) Sear spring.
(g) Trigger pin.
(7i) Trigger.
(i) Connector.
(j) Sear pin.
ik) Sear.
(Z) Sear release stop lever.
(m) Sear carrier.
(n) Counterrecoil spring.
(o) Change lever.
(p) Change lever spring.
(3) Bipod group.—Remove—
(a) Mash hider.
(t>) Two bipod leg clamp wing screws.
(c> Right and left bipod leg assemblies.
(d) Two bipod clamp leg guides.
(e) Two bipod body wing screws.
(/) Right and left bipod leg tubes.
(g) Bipod spring-lock washer.
c. Method.—The following detailed explanation of the
method of disassembling the automatic rifle is furnished as
an aid to instructors:
(1) Operating group (figs. 1 and 2).—Lay rifle on a table,
barrel down, pointing to the left. Cock the rifle. Turn gas
cylinder tube retaining pin spring (1) 180° in a clockwise di-
rection and pull out gas cylinder tube retaining pin and
spring (1). Remove gas cylinder tube and forearm (2). Let
slide (10) forward easily by pressing trigger with thumb of
the right hand and at the same time grasping the slide with
the left hand so that the middle and index Angers are astride
the gas piston. Turn trigger guard retaining pin spring (3)
90° in a clockwise direction and pull out the pin and spring
(3). Lift out trigger group (4). Remove recoil spring guide
(5) by pressing right index finger on checkered surface of
its head and turning it until ends are clear of the retaining
shoulders. Remove recoil spring (6). Line up hammer pin
holes in receiver and operating handle by inserting point of
recoil spring guide in hole in operating handle with right
hand, press against hammer pin (8) until it clears the
6
8
BASIC FIELD MANUAL
operating handle by jutting through its hole in the receiver
as the operating handle is pushed slowly to the rear with
the left hand. Remove operating handle (7) by pulling
straight to the rear. Remove hammer pin (8). Push ham-
mer (9) forward out of its seat in the slide (10.) and lift out
of the receiver. Push the bolt link (13) to the rear and down.
Being careful to avoid striking the gas piston or rings against
the gas cylinder tube bracket, remove slide (10) by pulling it
forward out of the receiver. Pry bolt guide (17) outward
with the rim of a cartridge. Lift out bolt assembly (14)
by pulling it slowly to the rear end of the receiver and rais-
ing it with the right thumb and forefinger. (As an alter-
nate method of removing the bolt, move bolt assembly all the
way to the rear end of receiver, bolt link up and forward.
Then, grasp front end of bolt between left forefinger and
thumb, rotate bolt assembly gently to clear bolt guide and
bolt support on sides of receiver, and lift bolt assembly out
of receiver.) Pull out firing pin (11) from its aperture in
the bolt. Remove bolt link pin (12). Remove bolt link
(13). Remove extractor (15) by pressing the point of a
dummy cartridge against claw and exerting pressure out-
ward and to the front: Remove extractor spring (16).
(2) Trigger group (fig. 3).—(a) Depress ejector lock with
the point of a dummy cartridge. Hold thumb in front of
magazine catch spring to prevent it from flying out, and
then slide ejector (18) out of its seat. Remove magazine
catch spring (19). Remove magazine catch pin (20), lift out
magazine catch (21) and magazine release (22).
(b) Holding trigger guard so that its rear is away from the
body, insert trigger guard retaining pin spring under the
three leaves of the sear spring above the connector stop.
Pry up so that center leaf trips above front end of sear.
Rotating the trigger guard retaining pin forward while
pressing firmly down and forward on sear spring with the
left thumb, unseat the sear spring and pull it out to the
front. Remove the trigger pin (24). The trigger pin must
always be removed before the sear pin in order that ten-
sion of the counterrecoil spring will always be on the sear
pin. Remove trigger (25) and connector (26) through tap
of the trigger guard. Push out sear pin (27) with the recoil
6
BROWNING AUTOMATIC RIFLE, CAL. .30, M1918A2
8
spring guide. Remove sear (28) and sear release stop lever
(29). Noting the manner in which these parts are fitted
together prior to separating them, separate the sear and
sear release stop lever. Pry up on the sear carrier (30) by
inserting the point of the recoil spring guide in either of
the sear pin holes in the sear carrier. Lift out the sear car-
rier and counterrecoil spring (31). Remove the change lever
(32) by prying up on the forward end of the change lever
spring with the rounded end of the sear spring held in the
7
00
Jo
EJECTOR
§ 1
® @
MAGAZINE
CATCH MAGAZINE
SPRING CATCH
PIN
MAGAZINE
CATCH
@
MAGAZINE
RELEASE
SEAR
SPRING
J
TRIGGER
PIN
@ CONNECTOR
TRIGGER
1
©
SEAR
PIN
SEAR
Io
©
SEAR
RELEASE
STOP
LEVER
¥
SEAR
CARRIER
BASIC FIELD MANUAL
COUNTER-
RECOIL
SPRING
CHANGE
LEVER
(33)
CHANGE
LEVER
SPRING
Figure 3.—Trigger group.
BROWNING AUTOMATIC RIFLE, CAL. .30, M1918A2 8-9
right hand, withdrawing the change lever to the left with
the left hand. Being' careful not to bend or break the sear
release stop lever spring which is riveted to the change
lever spring (33), remove the change lever spring by prying
it to the rear with the rounded end of the sear spring so
as to unseat the shoulders of the change lever spring from
their slots in the trigger guard.
(3) Bipod group (fig. 4).—The disassembling of the bipod
group generally is not performed as a part of mechanical
training. However, it may become necessary to disassemble
this group to replace damaged or broken parts, and the fol-
lowing procedure is prescribed: Unscrew the flash hider (34).
Remove the bipod assembly. Unscrew the two bipod leg clamp
wing screws (35). Remove right and left bipod legs (36).
Remove the two bipod clamp leg guides (37). Unscrew the
two bipod body wing screws (38). Remove right and left
bipod leg tubes (39) from bipod body (40). Remove bipod
spring-lock washer (41).
9. Assembling.—The rifle and its component parts are as-
sembled in the reverse order of their disassembly as given
in paragraph 8c. The following detailed explanation of
the method of assembling the rifle is furnished as an aid
to instructors:
a. Bipod group (fig. 4).—Replace bipod spring-lock.
washer (41). Replace the right and left bipod leg tubes (39)
on the bipod body (40). Screw the two bipod wing screws
(38) into the bipod body. Replace the two bipod clamp
leg guides (37) in their slots on the right and left bipod legs.
Replace bipod legs (36) in the bipod leg tubes (39). Aline
U-shaped opening of the bipod clamp leg guides with the
holes in the bipod leg clamps, and replace the bipod leg clamp
wing screws (35). Replace bipod assembly on the rifle.
Screw flash hider (34) on to the rifle.
b. Trigger group (flg. 3).—(1) Replace the change lever
spring (33) with sear release stop lever spring up and to
the rear, by pressing down and forward on the rivet with
the thumb of the right hand and engaging the ears of the
change lever spring in their slots in the rear of the trigger
guard. Then, being careful not to bend or break the sear re-
9
CO
FLASH WING SCREWS
HIDER
BIPOD
BODY
WING
SCREWS
BIPOD LEGS
Figure 4.—Bipod group.
BIPOD
SPRING-
LOCK
WASHER
BIPOD LEG
TUBES
BASIC FIELD MANUAL
BROWNING AUTOMATIC RIFLE, CAL. .30, M1918A2
9
lease stop lever spring, continue the pressure with the right
thumb, using rounded end of the sear spring as a ramp, and
seat the rear end of the change lever spring in its slot. Re-
place change lever (32) by inserting it in its hole in the trig-
ger guard with the left hand while with the right hand prying
up on the forward end of the change lever spring with the
rounded end of the sear spring. Replace counterrecoil spring
(31) on counterrecoil spring guide (front end of sear carrier).
Insert counterrecoil spring guide into its seat in the trigger
guard. Brace forward end of trigger guard against an im-
movable object,, and with the thumbs pressing on the rear
of the sear carrier, push sear carrier (30) forward until its
rear end is held by the ears of the change lever spring. Re-
place the sear release stop lever (29) in its proper seat in
the sear (28) by holding the sear in the left hand with the
thumb and forefinger at the holes, sear nose up and to the
rear; then, taking the long end of the sear release stop lever
in the right hand, short end up and to the front, inserting
its short end upward through the slot in the forward part
of the sear and alining the holes. Replace sear and sear
release stop lever on sear carrier with sear nose up and to
the rear. Replace sear pin (27) by alining the holes in the
sear release stop lever, sear, sear carrier, and trigger guard
with the recoil spring guide and inserting the sear pin as the
recoil spring guide is slowly worked out (considerable pressure
must be exerted by means of the recoil spring guide in order
to overcome the resistance of the strong counterrecoil spring).
The sear pin must be replaced before the trigger pin in order
that tension of the counterrecoil spring will always be on
the sear pin.
(2) Replace connector (26) in the trigger (25) by holding
the trigger in the left hand with the thumb and forefinger
at the hole and the toe of the trigger in the palm of the
hand. Pick up the connector in the right hand, toe to the
rear and down, and place it in its seat in the trigger. Place
the trigger and connector in the trigger guard by holding
the trigger guard in the palm of the right hand with the sear
carrier up, forward end of trigger guard tipped downward
at about a 45° angle, and placing the trigger and connector
down through the sear carrier until the connector passes un-
it
9
BASIC field manual
der and to the rear of the connector stop. Replace trigger
pin (24). Place the two outer leaves of the sear spring on
top of the forward shoulders of the sear and the middle leaf
under the forward end of the sear release stop lever, depress
the rear end of the sear and slide the sear spring to the rear
until its shoulders are in the rear of the slots in the trigger-
guard, press down and forward on the sear spring with the
thumb of the right hand until the front end of the sear
spring (23) rests in the depression stop.
(3) Replace magazine release (22). Replace magazine
catch (21), spring depression facing out. Replace magazine
catch pin (20). Replace magazine catch spring (19). Insert
ejector (18) into recess and move it down until it is flush with
the magazine catch spring. Compress magazine catch spring
in its seat and move ejector down until it is flush with the
ejector lock. Depress the ejector lock with the base of a
dummy cartridge and push ejector home until the ejector
i lock is i*i its proper position.
(4) After trigger mechanism has been assembled, turn
change lever to forward position, and pull trigger. If con-
nector will not rise, it is not in place correctly. It should
rise and snap out from under sear. If connector will rise but
does not raise sear, the middle leaf of the sear spring is weak
and the sear spring should be replaced.
c. Operating group (figs. 1 and 2).—Replace extractor
spring (16) in the extractor with the short end in the hole
and the long end along the groove in the side. Place ex-
tractor (15) in its seat in the bolt. Replace bolt link (13)
in the bolt lock with the shoulder of the link against the
flat surface of the bolt lock. Replace bolt link pin (12).
Lift bolt lock and insert the firing pin (11) in its receptacle
in the bolt. Lay rifle barrel down and pointing to the left
so that rifle is resting on the front sight cover and rear
sight base. With bolt (14) and its assembly held in a per-
pendicular position, insert it in the receiver between the
bolt guide and the rear ends of the bolt supports. Press
the assembled bolt down so it will lie flat in its place. With
bolt link down, push bolt forward. Replace slide (10) with
the sear notch up, and push it back all the way. With
hammer (9) held with the thumb and forefinger of the left
12
BROWNING AUTOMATIC RIFLE, CAL. .30, М1Э18А2 9-1Q
hand, place it in its seat in the slide, rounded end to the
rear. Push bolt lock fully into its locking recess and push
slide forward. Using the recoil spring guide as a drift, aline
the hammer pin holes of the bolt link, hammer, and slide
with the hammer pin holes in the sides of the receiver.
Insert hammer pin (8) to the right, allowing about ’A inch
of the hammer pin to protrude from the receiver. Replace
operating handle (7). Push protruding hammer pin all
the way home. Replace recoil spring (6). Insert recoil
spring guide (5) in the recoil spring, and, with the end
of the index finger on the checkered end of the recoil spring
guide, turn it until it is properly seated. Replace trigger
group (4). Replace trigger guard retaining pin and spring
(3). Cock the rifle. Slide gas cylinder tube and forearm
(2) to the rear over the gas piston until its rear end is
seated in the slot in the front end of the receiver. Replace
the gas cylinder tube retaining pin and spring (1). Test
rifle by pulling the trigger.
10. To Remove Firing Pin Without Disassembling (fig.
5).—To remove firing pin without disassembling the rifle,
lay rifle upside down on table, muzzle to the front. Remove
the trigger group. Place rim of cartridge under center of
bolt guide. With the right hand, slowly pull the operating
handle all the way to the rear, taking care not to dislodge
the rim of the cartridge from beneath the bolt guide. With
the left hand, palm up, grasp the stock so that at least two
Angers of the left hand are on the operating handle, hold-
ing it to the rear, while the thumb of the left hand is on
the bolt link in the rear of the receiver (fig. 5 ®). Release
the operating handle with the-right hand, it still being held
in the rearmost position by the fingers of the left hand. Pry
the bolt guide outward with the right hand by placing the
middle finger of the right hand under the base of the cart-
ridge while the thumb exerts pressure on the nose (flg. 5 ©).
Press down on the bolt link with the thumb of the left hand,
causing the bolt to break at the bolt lock pin (flg. 5 ®). Al-
low bolt to go forward until it stops. Change firing pin.
Pull operating handle to the rear again and push bolt into
position.
535351°—43---- 2
13
11
BASIC FIELD MANUAL
11. To Remove and Replace Extractor Without Disas-
sembling.—a. Removal (fig. 6).—Pull operating handle
toward the rear and insert an empty cartridge case, base to
Figure 5.—Removing firing pin without disassembling.
14
BROWNING AUTOMATIC RIFLE, CAL. .30, M191BA2
11
the front, between the bolt and chamber, exposing the ex-
tractor in the ejection opening (fig. 6 ®). Lay rifle on its
side so that the ejection opening is up. With forefinger of
Figuhe 6.—Removing extractor without disassembling.
15
11-13
BASIC FIELD MANUAL
the left hand, pull out claw of the extractor, then place
nose of a cartridge behind the extractor shoulder (fig. 6 ®)
and pry it forward until extractor is free of the recess (flg.
6 ®). Remove extractor and extractor spring.
b. Replacement.—Insert short end of extractor spring in
the hole in the shank of the extractor so that the long end
on the spring is along the slot in the extractor. Insert ex-
tractor and spring in the end of the bolt and push them into
position. Remove empty cartridge case.
И 12. Disassembling and Assembling Magazine (flg. 7).—
Raise rear end of magazine base until indentations are clear,
then slide it to the rear. The magazine spring and follower
will then fall out. It is assembled in the reverse order.
MAGAZINE
BASE
MAGAZINE
SPRING
Figure 7.—Magazine.
Section III
CARE AND CLEANING
13. General.—a. Importance.—Care and cleaning includes
the care of the automatic rifle necessary to preserve its con-
dition and appearance under all conditions at all times.
Unserviceable rifles are usually the result of improper care
16
BROWNING AUTOMATIC RIFLE, CAL. .30, M1918A2
13
and cleaning. Rifles in the hands of troops should be in-
spected daily to insure proper condition and cleanliness.
b. Lubricants, cleaning materials, and rust preventives.—
The following are the only materials authorized and issued
for the care and cleaning of the Browning automatic rifle.
The use of unauthorized materials such as abrasives is
prohibited.
(1) Cleaner, rifle bore.—(a) Rifle bore cleaner is issued
for cleaning the bore of the rifle after firing. It possesses
rust-preventive properties and provides temporary protec-
tion against rust. It is preferable, however, to dry the bore
immediately after cleaning and oil it lightly with light pre-
servative lubricating oil.
(b) Rifle bore cleaner will freeze at temperatures below
32° F. Therefore, closed containers should not be filled more
than three-fourths full in freezing weather as full contain-
ers, when frozen, will burst. Once frozen and thawed out,
it must be shaken well before using.
(2) Oil, light preservative, lubricating.—This oil is used
for lubrication of all moving parts and is also effective as
a rust-preventive for short term storage of the automatic
rifle. Depending on climatic conditions, it is effective for
periods of 2 to 6 weeks. However, rifles in short-term stor-
age must be inspected every 4 or 5 days to renew the pre-
servative film, if necessary. For longer periods of storage,
the rifles will be protected with light rust-preventive
compound.
(3) Oil, lubricating, for aircraft instruments and machine
guns.—This oil may be used for lubricating the rifles when
light preservative oil is not available or in temperatures
below 32° F. It is an extremely light oil which relies entirely
upon maintenance of a film to protect metal surfaces from
rusting. When used as a preservative, the metal parts must
be inspected daily for rust, cleaned, and again lightly coated
with the oil.
(4) Oil, engine, SAE 10 or other light machine oil.—Any
good, light oil may be used when oils previously mentioned
can not be obtained. However, in cold weather any of the
heavier oils will cause sluggish operation or rifles may not
work at all. Alternate oils do not possess the rust-preventive
17
13-14
BASIC FIELD MANUAL
properties of preservative lubricating oil, and when used,
matdriel should be examined, cleaned, and reoiled frequently.
(5) Compound, light rust-preventive.—This compound is
issued for protecting metal parts for long periods of time
while rifles are boxed and in storage. It should be warmed
before application. However, when heating facilities are not
available, it can be effectively brushed onto the parts, pro-
vided the temperature is above 80° F. Below 80° F., light
rust-preventive compound becomes sluggish and its use
without preheating is uneconomical.
(6) Solvent, dry-cleaning.—This is a petroleum distillate
and therefore inflammable. Smoking is prohibited where it
is employed. Dry-cleaning solvent is used for removing
grease, oil, or rust-preventive compound. Metal surfaces
are bathed in the solvent with rag swabs. After bathing, the
solvent must be thoroughly wiped off all metal surfaces with
clean rags. After cleaning with solvent, metal parts are
especially susceptible to corrosion from finger marks. Finger
marks must be wiped off. Cleaning solvent will attack and
discolor rubber.
(7) Soap and water.—If rifle bore cleaner is not available,
water will be used; warm water is good, but warm, soapy
water is better. It is used to clean the bore and gas system.
(8) Soda ash.—Soda ash, a commercial sodium carbonate,
may be used in water in lieu of soap.
(9) Oil, linseed.—Raw linseed oil is applied to the wood-
work of the rifle at intervals to preserve the wood and to keep
out moisture.
(10) Oil, neat's-foot.—This oil is used for cleaning and
softening the sling. It should be used sparingly, rubbed in,
and wiped off carefully to prevent soiling clothing.
14. Care and Cleaning.—a. General.—(1) Automatic rifles
and magazines in the hands of troops and in temporary
storage within the unit must receive daily attention.
(2) Automatic rifles will be disassembled only to the extent
necessary for proper cleaning. Whenever necessary, maga-
zines will be disassembled for cleaning and light lubrication.
(3) Proper oiling is second in importance only to intelli-
gent cleaning. It is a vital necessity for the working parts,
18
BROWNING AUTOMATIC RIFLE, CAL. .30, M1918A2
14
but the oil should be used sparingly; wiping with a well-oiled
rag is the best method. '
b. When no firing is being done.—Care and cleaning of the
automatic rifle and magazines when no firing is being done
will include the care necessary to preserve their condition
and appearance.
(1) To clean the bore of the automatic rifle, pass a dry
patch through the bore by inserting the cleaning rod through
the muzzle end. Repeat with dry patches, unless the bore
is unduly dry in which case an oily patch will be used to
loosen the dry film, until several successive patches have
come out clean. Push a patch dampened with oil through
the bore to protect its surface. Dust out all screw heads
and crevices with a small cleaning brush or wood splinter.
Wipe all metal surfaces with a dry cloth to remove moisture,
perspiration, and dirt. Wipe the outer surfaces of the auto-
matic rifle, including the forearm, with a lightly oiled cloth
(see par. 13b for proper lubricants). This protective film
on all metal parts will be maintained at all times. At least
once a month, and always after the stock and forearm have
become wet, they should be rubbed thoroughly with a little
linseed oil in the palm of the hand. Rub oil in until dry.’
JUse neat’s-foot oil moderately for cleaning and softening the
' sling.
(2) It is imperative that magazines be given the best of
care and kept in perfect condition. They must be kept
free from dirt and rust and handled so as to avoid any dents
or abrasions. To clean, they should be disassembled when
necessary, wiped clean and dry, and thinly coated with oil.
c. After firing.—(1) The bore of the rifle will be thoroughly
cleaned by the evening of the day on which it is fired and
similarly cleaned for the next three days.
(2) Disassemble the rifle. The bore is cleaned by swabbing
with a patch saturated with rifle bore cleaner. Repeat with
several patches. If rifle bore cleaner is not available, water
will be used. The water should be soapy and preferably
warm. Soda ash may be used in lieu of soap. While swab-
bing the bore with water, rest the rifle en the toe of the butt,
muzzle elevated slightly so that the water drips out of the re-
ceiver and does not get into the buffer, rate-reducing mechan-
14
BASIC FIELD MANUAL
ism, and the locking recess. While the bore is still wet, run
the metal brush through it several times. Remove the brush
and swab the bore again with a patch saturated with cleaner
or with water. Follow this with dry patches until several
patches come out clean and dry. When it is clean, push a
patch dampened with oil through the bore to protect its
surface.
(3) Clean the chamber with the chamber cleaning brush,
wipe clean with a cloth, and oil lightly.
(4) To clean the gas system, remove the gas cylinder from
the gas cylinder tube. Insert the smooth end of the body
of the gas cylinder cleaning tool into the gas cylinder. Turn
it to the right while gradually scraping into the cylinder
head. As it reaches the head, apply additional pressure to the
tool and give it a few turns to cut the carbon from the bot-
tom inside surface. Withdraw and reverse the tool. Using
the recess cutter as a gage, remove the carbon from the
recesses at the forward end of the interior of the gas cylinder.
With the drift point, clean the gas ports in the barrel, gas cyl-
inder tube, and gas cylinder. Scrape the carbon from the
face of the piston with the front cutting edge of the tool body,
and remove the deposit from between the piston rings with
the drift point. Wipe thoroughly with a rag saturated with
rifle bore cleaner, if available. Otherwise, wash with hot
water and soap or soda ash solution (if not avialable, use
plain water) and dry thoroughly. Inspect for cleanliness.
When it is clean, oil lightly. Clean the gas cylinder tube by
washing with hot water and soap or soda ash solution (if un-
available, use plain hot or cold water). This cleaning may be
facilitated by tying a cloth tightly into the center part of a
string or thong and pulling it back and forth inside the tube.
Dry thoroughly and inspect. When clean, oil lightly.
(5) Wipe the remaining parts of the operating group dry
and clean; apply a thin film of oil.
, (6) Wipe the trigger group dry, disassembling it only pe-
riodically or when necessary, and oil lightly.
(7) Wipe the outer metal parts of the rifle dry and apply
a thin film of oil.
(8) Clean the stock and forearm of the rifle and wipe
the sling with a clean, dry cloth.
20
BROWNING AUTOMATIC RIFLE, CAL. .30, M1918A2 14-15
(9) Inspect the interior of the magazines by depressing
the follower with the thumb. If the interior is dirty, disas-
semble, clean thoroughly, and oil lightly. Otherwise, merely
wipe clean and dry, and oil. Much magazine trouble can be
avoided by proper handling to avoid dirt and dents. It is
imperative that magazines be given proper care and han-
dling.
d. Points to be observed before, during, and after firing.—
See paragraph 40.
15. Storage.—For preserving and lubricating materials,
see paragraph 13b.
a. Preparation for storage.—Automatic rifles should be
cleaned and prepared for storage with particular care. The
bore, all parts of the mechanism, and the exterior of the
rifles should be thoroughly cleaned and then completely
dried with rags. In damp climates, particular care must be
taken to see that the rags are dry. After drying a metal
part, the bare hands should not touch that part. Special
care should be taken to insure that the gas system is
thoroughly cleaned and that the gas ports are free from
fouling. All metal parts should then be coated with either
light preservative lubricating oil, or light rust-preventive
compound, depending on the length of storage required. Be-
fore placing the automatic rifle in the packing chest, the
wooden supports for the butt and muzzle will be painted
with. rust-preventive compound. Under no circumstances
will a rifle be placed in storage while in a cloth or other
cover, or with a plug in the bore. Such articles collect mois-
ture which causes the weapon to rust.
b. Cleaning when received from long-term storage.—Auto-
matic rifles which have been stored in accordance with a
above will be coated with either light preservative lubricating
oil or with rust-preventive compound. Weapons received
from ordnance storage will in general be coated with rust-
preventive compound. Use dry-cleaning solvent to remove
all traces of the compound or oil, particular care being taken
that the gas system, gas ports, firing pin, and all recesses
in which springs or plungers operate are cleaned thoroughly.
21
15-16
BASIC FIELD MANUAL
After using the cleaning solvent, make sure it is completely
removed from all parts by wiping with a dry cloth.
Note.—Failure to clean the gas system, the firing pin, and the
recesses of the bolt in which it operates may result in gun failure
at normal temperatures and will certainly result in serious mal-
functions if the rifle is operated in low temperature areas, as
rust-preventive compound and other foreign matter will cause the
lubricating oil to congeal on the mechanism.
16. Care and Cleaning Under Unusual Conditions.—a. In
cold climates.— (1) For temperatures below freezing, it is
necessary that the moving parts of the weapon be kept abso-
lutely free from moisture. It has also been found that exeess
oil on the working parts will solidify to such an extent as
to cause sluggish operation or complete failure. Oil must be
applied very sparingly by wiping with a cloth which has
first been wet with light preservative lubricating oil and then
wrung out.
(2) The metal parts of the weapon should be taken apart
and completely cleaned with dry-cleaning solvent or equiva-
lent before use in temperatures below 0° F. The working
surfaces of parts which show signs of wear may be lubricated
by rubbing with a cloth slightly dampened with light pre-
servative lubricating oil as prescribed in (1) above. At
temperatures above 0<f F., all metal surfaces of the weapon
may be oiled lightly after cleaning, by wiping with a slightly
oiled cloth, using light preservative lubricating oil.
(3) When it is brought indoors, the weapon should first be
allowed to come to room temperature. It should then be
disassembled, wiped completely dry of the moisture which
will have condensed on the cold metal surfaces, and thor-
oughly oiled with light preservative lubricating oil. This
will be done every time a weapon is carried into a warm room
after exposure to low temperature. If possible, such con-
densation should be avoided by providing a cold place in
which to keep rifles when not in use. For example, a sep-
arate cold room with appropriate racks may be used, or in the
field, racks under proper cover may be set up outdoors.
(4) If the weapon has been fired, it should be thoroughly
cleaned and oiled. The bore may be swabbed out with an
oily patch and when the weapon reaches room temperature,
thoroughly cleaned and oiled as prescribed in paragraph 14c.
22
BROWNING AUTOMATIC RIFLE, CAL. .30, M1918A2
16
(5) Before firing, the weapon should be cleaned and oil
removed as prescribed in (2) above. The bore and chamber
should be entirely free of oil before firing. In cold climates,
the medium gas port will usually be found to be the most
satisfactory initial setting of the gas cylinder.
b. In hot climates.—(1) Tropical climates.—(a) Light pre-
servative lubricating oil should be used for lubrication.
(t>) In tropical climates where temperatures and humid-
ity are high, or where salt air is present, and during rainy
seasons, the weapon should be thoroughly inspected daily
and kept lightly oiled when not in use. The groups should
be dismounted at regular intervals and, if necessary, disas-
sembled sufficiently to permit the drying and oiling of parts.
(c) Care should be exercised to see that unexposed parts
and surfaces are kept clean and oiled.
(d) Wood parts should also be inspected to see that swell-
ing due to moisture does not bind working parts. (In such
cases shave off only enough wood to relieve binding.) A
light coat of raw linseed oil applied at intervals and well
rubbed in with the heel of the hand will help to keep moist-
ture out. Allow oil to soak in for a few hours and then
wipe and polish wood with a dry clean rag.
Note.—Care should be taken that linseed oil does not get into
mechanism or on metal parts as it will gum up when dry.
(2) Hot, dry climates.—(a) In hot, dry climates where sand
and dust are likely to'get into the mechanism and bore, the
weapon should be wiped clean daily or oftener if necessary.
Groups should be dismounted and disassembled as far as
necessary to facilitate thorough cleaning.
(b) When the weapon is being used under sandy condi-
tions, the weapon should be wiped completely dry of all
lubricant. This will prevent sand carried by the wind from
sticking to the lubricant and forming an abrasive compound
which will ruin the mechanism. Immediately upon leaving
sandy terrain, the weapon must be relubricated with light
preservative lubricating oil.
(c) In such climates, wood parts are apt to dry out and
shrink, and a light application of linseed oil, applied as in
(1) (d) above, will help to keep wood in condition.
(d) Perspiration from the hands is a contributing factor
23
16
BASIC field manual
to rust because it contains acid, and metal parts should be
wiped dry frequently.
(e) During sand or dust storms, the breech and muzzle
should be kept covered.
c. Care when subject to gas attack.—(1) It is important
to prevent chemicals used in a gas attack from coming into
contact with the automatic rifle, ammunition, and accesso-
ries. When a gas attack is anticipated, the following action
will be taken: apply oil to all outer metal surfaces of the
automatic rifle and accessories. If it is not to be used, cover
rifle, accessories, and ammunition. Do not apply oil to
ammunition.
(2) After the attack, determine by means of detector
crayon or paper whether or not the materiel is contaminated
(par. 127, FM 21-40). If uncontaminated, clean materiel
with dry-cleaning solvent. Prepare for use as required.
(3) If contaminated, the following action will be taken:
(a) A suit of protective clothing (permeable or imper-
meable) and a service gas mask must be worn for decon-
tamination.
(b) Materiel contaminated with chemicals other than
mustard or lewisite must be cleaned as soon as possible with
dry-cleaning solvent or denatured alcohol.
(c) Do not allow the chemical agent to come into contact
with the skin. Burn, or preferably bury, all rags or wiping
materials used for decontamination. Extreme caution
should be taken to protect men against fumes created by
burning.
(d) If the surface of the materiel is coated with grease or
oil and has been in a mustard or lewisite attack, first remove
the grease or oil by wiping with rags wet with dry-cleaning
solvent.
(e) Decontaminate the rifle with a solution of agent, de-
contaminating, noncorrosive (par. 132, FM 21-40). Prepare
this by mixing one part of agent, decontaminating, non-
corrosive, to 15 parts of solvent (acetylene tetrachloride)
by weight, or by mixing one part of decontaminating agent,
noncorrosive, with six parts of solvent by volume.
(/) After decontamination, clean the materiel thoroughly
and prepare for use as required.
24
BROWNING AUTOMATIC RIFLE, CAL. .30, M1918A2 16-20
(g) Detailed information on decontamination is contained
in FM 21-40, TM 9-850, and TM 3-220.
Section IV
FUNCTIONING
S 17. General.—a. Object.—This section is designed to pro-
vide a nontechnical description of the functioning of the rifle.
The object of instruction in this subject is.to lead the soldier
to an understanding of the simple functioning of his weapon
without emphasis on memorizing the matter of the text.
b. When taken up.—Instruction in functioning will be
taken up after instruction in the disassembly, assembly, care
and cleaning of the rifle.
И 18. Use of Dummy Cartridges.—The corrugated type of
dummy cartridge (cal. .30, M1906) may be used for instruc-
tion in functioning. The use of the slotted type of dummy
cartridge (range, cal. .30, Ml) is prohibited. Special care
must be exercised in the use of dummy cartridges that they
do not introduce dirt or grit into the chamber of the rifle.
19. Mechanical Means of Functioning.—All automatic
weapons must have mechanical means for performing the
following functions: extraction, ejection, feeding, locking the
breech while there is a high pressure in the bore, and igniting
the cartridge. Operations such as extraction and ejection
are performed by various cams, lugs, and springs, and the
energy necessary to perform this work and to overcome
friction in the rifle is derived from the explosion of the
powder in the chamber.
20. Cycle.—a. One rearward and one forward movement
of the mechanism is a cycle. This begins with the ignition
of the cartridge in the chamber and ends at the ignition of
the succeeding cartridge. The functioning of the automatic
rifle is divided into two phases based on the operation of the
mechanism in one cycle. These two phases are the rearward
movement and the forward movement. The striking of the
buffer by the slide marks the division of the two phases.
25
20-21
BASIC FIELD MANUAL
Figure 8.—Wooden working model showing bolt action.
b. The'operations which take place in the rearward move-
ment are—
(1) Action of gas.
(2) Movement of slide to rear.
(3) Unlocking.
(4) Withdrawal of firing pin.
(5) Extraction.
(6) Ejection.
(7) Termination of first phase.
c. The operations which take place in the forward move-
ment are—
(1) Action of recoil spring.
(2) Feeding.
(3) Locking.
(4) Ignition.
(5) Termination of second phase.
21. Description of Cycle.—a. Hearward movement.—(1)
Action of gas.—A cartridge having been ignited, the bullet,
under the pressure of the expanding powder gases, travels
through the barrel, and when it reaches a point 6 inches from
the muzzle it passes a port in the bottom of the barrel. The
barrel pressure, which at this instant is still very high, seeks
26
BROWNING AUTOMATIC RIFLE, CAL. .30, M1918A2
21
this first natural vent. Alined with the barrel port are other
similar ports in the gas cylinder tube bracket, gas cylinder
tube, and gas cylinder. The-port in the gas cylinder is the
smallest and serves to throttle the barrel pressure. The
port in the gas cylinder leads radially into a well about Ув
inch in diameter in the head of the gas cylinder. The
throttled barrel pressure is conducted through this well to
the gas piston plug. This pressure acts on the piston for the
very short time which it takes for the bullet to travel the 6
inches of distance from the barrel port to the muzzle. Its
effect is that of a sudden severe blow on the piston plug.
Under the impact of this blow, the gas piston is driven to the
Figure 9.—Action of gas.
rear carrying the slide with it. When the piston has traveled
about %e inch backward, the bearing rings on its head and the
gas piston plug pass out of the cylinder. The gas expands
around the piston head and into the gas cylinder tube and is
exhausted through the six portholes in the tube. The gas is
prevented from traveling back through the gas cylinder tube
by the two rings on the piston, about % inch apart and 1Уа
inches from the piston head. These rings also serve as bear-
ings to hold the front end of the piston in the center of the
gas cylinder tube after the piston head has passed out of the
gas cylinder.
(2) The slide.—As the piston is forced back, it carries the
slide with it. The first and the immediate result of the back-
27
21
BASIC FIELD MANUAL
ward movement of the slide is to begin the compression of
the recoil spring, thereby storing energy for the forward ac-
tion. The hammer pin is slightly in advance of the bolt link
pin, about 0.19 inch. The center rib of the hammer is very
slightly in rear of the head of the firing pin. When the slide
begins its motion to the rear, it imparts no motion whatever
to the bolt and bolt lock. The slide moves back 0.19 inch,
and its only effect during this travel is to carry the hammer
from the firing pin and the hammer pin directly under the
bolt link pin.
(3) Unlocking.—At this point the unlocking begins. The
bolt link revolves forward about the hammer pin, drawing
the bolt lock down and to the rear. The motion of the lock
and bolt, which is zero at the instant the hammer pin passes
under the bolt link pin, accelerates from this point until the
slide has traveled about 1.2 inches, at which latter point the
bolt lock is drawn completely down out of the locking recess
and away from the locking shoulder of the receiver. It is
now supported in front on the bolt supports. The front upper
surface of the bolt link has revolved forward and bears upon
the locking surface of the bolt lock. These two influences
prevent the bolt loek from revolving down below the line of
backward travel of the bolt.
(4) Withdrawal of firing pin.—As the bolt lock revolves
down from its locked position, a cam surface in a slot in the
rear bottom side of the bolt lock comes in contact with a
similar cam surface on the firing pin lug. This action cams
the firing pin from the face of the bolt.
(5) Extraction.—The backward motion of the bolt begins
when the bolt lock has been drawn down so that the circular
cam surface on its under side is operating on the rear shoul-
ders of the bolt supports. This produces a strong lever action
which slowly loosens the cartridge case. Th backward travel
of the bolt has been slight, only about %s inch when the
firing pin is withdrawn; its travel is about inch when
the bolt lock is completely drawn down. From this point the
bolt moves to the rear, drawn by the bolt lock and bolt link,
with the same speed as the slide and carries with it the
empty cartridge case which is held firmly in its seat on the
face of the bolt by the extractor. The extractor is on the
28
BROWNING AUTOMATIC RIFLE, CAL. .30, M1918A2
21
upper right side of the bolt next to the ejection opening in
the receiver. A slot cut in the left side of the bolt lock near
the back end passes over the bolt guide, which supports the
bolt lock and bolt when they are in the rear position.
(6) Ejection.—When the.slide reaches a point about Vi inch
from the end of its travel, the base of the cartridge case
strikes the ejector. This action causes the cartridge case to
be pivoted with considerable force about the extractor and
through the ejection opening in the receiver. The front end
of the cartridge case passes first out of the receiver and is
pivoted so that it strikes the outside of the receiver at a point
about ! inch in rear of the ejection opening. It rebounds
from the receiver toward the right front.
(7) Termination of rearward movement.—The rearward
motion terminates when the rear end of the slide strikes the
buffer head and sear release. The slide, under the action of
the recoil spring, moves forward Vlo inch after striking the
buffer head and sear release. If the sear nose is not de-
pressed, it engages the sear notch on the slide and the piece
is cocked for the next burst or shot.
Note.—The motion of the bolt, bolt lock, and bolt link mecha-
nism begins slowly at first and does not attain the speed of the
slide until the latter has traveled about 1 % inches backward. This
is a very important characteristic of the rifle, since on this account
the mechanism is not subjected to an excess strain due to a sudden
start at the instant the gas strikes the piston. This slow start also
allows the bullet to clear the muzzle thereby preventing a blow-
back of the expanding gases.
b. Forward movement.—(1) Action of recoil spring.—When
the trigger is pressed, the sear nose is depressed, disengaging
the sear, and the slide moves forward under the action of
the recoil spring. The position of the bolt link pin is slightly
below a line joining the bolt lock pin and the hammer pin;
therefore, as the slide starts forward, the joint at the bolt
link pin has a tendency to buckle downward. It is prevented
from doing this by the tail of the feed rib on the bolt which
extends backward under the bolt lock, also by the upper front
surface of the bolt link being in contact with the locking sur-
face of the bolt lock. Since the joint cannot buckle, the en-
tire mechanism moves forward with the slide. When it has
traveled about Vi inch, the front end of the feed rib strikes
535351°—43--3 29
21
BASIC FIELD MANUAL
on the base of the top cartridge, which the magazine spring
and lips are holding up in its path.
(2) Feeding (flg. 10).—The cartridge is carried forward
about 54 inch, when the nose of the bullet strikes the bullet
ramp or guide on the breech of the barrel and is deflected up-
ward toward the chamber. This action also guides the front
end of the cartridge from under the magazine lips. The
base of the cartridge approaches the center of the magazine,
where the lips are cut away and the opening enlarged, and
at this point is forced out of the magazine by the magazine
spring. The base of the cartridge slides up the face of the
bolt and under the extractor. Should the cartridge fail to
Figuae 10.—Feeding.
slide under the extractor, the extractor will snap over its
head as the bolt reaches the forward position. When the
cartridge is released by the magazine, the nose of the bullet
is so far in the chamber that it is guided by the chamber
from this point on.
(3) Locking.—When the slide is about 2 inches from its
forward position, the circular cam surface on the under side
of the bolt lock begins to ride over the rear shoulders of
the bolt supports on the sides of the receiver and the rear
end of the bolt lock is cammed upward. The bolt link pin
passes up above the line joining the bolt lock pin and ham-
mer pin. The joint at the bolt link pin now has a tendency
30
BROWNING AUTOMATIC RIFLE, CAL. .30, M1918A2 21-22
to buckle upward, and the bolt lock being opposite the locking
recess in the receiver is free to and does pivot upward about
the bolt lock pin. The bolt link revolves upward about the
hammer pin, forcing the bolt lock up, and a rounded surface
on. the bolt lock just above the locking face slips over the lock-
ing shoulder in the receiver, giving the lock a lever action
which forces the bolt home to its final position. The two
locking sufaces on the bolt lock and the receiver register as
the hammer pin passes under the bolt link pin.
(4) Igniting cartridge.—The lug on the firing pin is buried
in the slot on the under side of the bolt lock at all times
except when the bolt is locked in the forward position. There-
fore, the firing pin is locked away from the face of the bolt
during all the rearward and forward motion of the bolt.
When the hammer pin passes under the bolt link pin, which
places the bolt lock into the locking recess in the top of the
receiver, the firing pin has been released by the bolt lock,
The slide and hammer move forward about Ho inch farther,
and the center rib of the hammer strikes the head of the
firing pin a smart blow, thereby igniting the cartridge.
(5) Termination of second phase.—The forward end of
the slide strikes a shoulder at the rear end of the gas cylinder
tube, terminating the forward motion. The forward motion
is not terminated by the hammer on the firing pin. This can
be seen by examining the head of the firing pin when the
gas cylinder tube is assembled to the receiver, and the bolt
mechanism is in the forward position. The firing pin has
still about Не-inch clearance from its extreme forward posi-.
tion.
Note.—The locking shoulder of the receiver is inclined forward.
Its surface is perpendicular to the line through the bolt lock
which the shock of the explosion follows; therefore the force of
this shock is exerted squarely against the normal surface. The
speed of the bolt mechanism is slowed down gradually from the
instant that the bolt lock starts to rise until the hammer pin
passes under the bolt link pin, when the speed is zero.
22. Functioning of Combination Buffer and Rate Re-
ducing Mechanism (fig. 11).—a. Parts.—The buffer and rate
reducing mechanism consists of the following parts in the
order given from front to rear:
(1) Buffer tube, which has four splined slots on the inside
of the forward end for use in positioning the buffer head.
31
22
BASIC FIELD MANUAL
One of these slots only is used to anchor the buffer tube to
the buffer head by means of the buffer key.
(2) Buffer head.
(3) Sear release, inserted in buffer head.
(4) Buffer key, which holds sear release in buffer head
and anchors buffer tube to buffer head.
(5) Brass friction cup with concave interior which is split
to allow for expansion; and a steel cone to fit into the cup.
Figure 11.—Wooden working model of the combination buffer and
rate-reducing mechanism.
Four of these cups and cones are<placed one after the other
in series.
(6) Buffer spring.
(7) Actuator, inside of cups, cones, and buffer spring.
(8) Buffer tube cap.
(9) Actuator tube.
(10) Actuator spring, inside actuator tube.
(11) Stock retaining sleeve lock washer.
(12) Stock retaining sleeve.
(13) Actuator stop.
(14) Pin.
32
BROWNING AUTOMATIC RIFLE, CAL. .30, M1918A2 22-23
b. Action.—(1) When the automatic rifle is fired at the
slow cyclic rate, the buffer head and sear release, struck by
the rear end of the slide, move to the rear. The buffer
head forces the friction cups over the cones, causing them
to expand tightly against the tube, consequently producing
considerable friction as the cups move back and compress
the buffer spring. Thus the rearward action of the slide
is checked gradually and there is practically no rebound.
The buffer spring returns the buffer head and friction cups
and cones to their original positions. After striking the
buffer head and sear release, the slide moves forward until
it is engaged by the sear. The delayed release of the sear
is then accomplished as follows: The sear release when
struck by the slide in turn strikes the actuator in the buffer.
The actuator is driven to the rear inside the actuator tube
against the actuator spring, it returns under the force of
expansion of the actuator spring to drive the sear release
forward against the camming surface on the rear of the
sear, thus releasing the sear and permitting the rifle to con-
tinue its cycle.
(2) When the rifle is fired at the normal cyclic rate, the
functioning of the combination buffer and rate reducing
mechanism is the same as explained for the slow cyclic rate in
(1) above except that the sear release is prevented from
engaging the camming surface on the rear end of the sear by
the sear release stop lever.
23. Functioning of Trigger Mechanism.—a. The trigger
mechanism (fig. 12) has three settings:
(1) Normal cyclic rate (A).—When so set, the sear is
depressed as long as the trigger is held back, and the rifle
will continue firing at a cyclic rate of about 550 rounds per
minute until the magazine is emptied.
(2) Slow cyclic rate (F).—When so set, the sear is de-
pressed, thereby disengaging the sear from the sear notch on
the under side of the slide when the trigger is pulled. How-
ever, the mechanism is so constructed that the sear rises and
engages in the sear notch when the slide comes back again,
and the sear notch will not disengage until the sear release
in the buffer depresses the rear end of the sear by riding over
33
23-24
BASIC FIELD MANUAL
the cammed end on the sear or until the trigger is fully
released and then pressed. With this setting, the rifle will
fire at the slow cyclic rate of 350 rounds per minute for the
length of time the trigger is held completely to the rear, or
one shot may be fired for each press and quick release of the
trigger.
(3) Safe (S).—When so set, the sear cannot be released
from the sear notch by pressing on the trigger.
b. The action of the trigger mechanism is taken up in
phases and should be followed on the mechanism itself as
the explanation proceeds. Have the trigger group disas-
Figure 12.—Wooden working model showing trigger action.
sembled completely. Study the shape of the change lever
and note the following:
(1) It is a bar about inch in diameter.
(2) It has three shallow longitudinal slots cut on top of
the bar as the handle is held vertically.
(3) The side of the bar is slotted in such a way as to
leave a little tongue of metal in the center of the lower edge
of the slot.
24. Setting Change Lever.—a. Assemble the change lever
and spring to the trigger guard. The toe of the change
lever spring is seated in one of the longitudinal slots on the
change lever, and as the lever is turned from one position
to another it seats in the other slots. The only function
34
BROWNING AUTOMATIC RIFLE, CAL. .30, M1918A2 24-25
of the forward end of the spring and the longitudinal slots
is to hold the change lever in the position in which it is set.
b. Assemble the trigger and pin to the guard.
c. Turn the change lever to rear or safe position. In this
position the slot is turned slightly upward, and the full sur-
face of the bar is on the bottom. Pull the trigger. The rear
top end of the trigger is slotted longitudinally, and the metal
on each side of the slot forms two shoulders which rise
against the bottom of the change lever bar.
d. Push the change lever over to the vertical position, which
is the normal cyclic rate setting. Pull the trigger. The
slot in the change lever is now turned to the front, and
the two shoulders of the trigger, which before engaged the
full surface of the change lever bar, now are free to pass up
into the slot of the change lever; also the tongue of metal on
the bottom of the change lever slot passes through the longi-
tudinal slot in the end of the trigger.
e. Push the change lever forward to the slow cyclic rate
position. The slot is now turned partially down and when
the trigger is pulled the rear end of the trigger passes up into
the change lever slot; also the tongue of metal in the bottom
of the change lever slot is now turned back and does not
pass through the slot in the end of the trigger as it did in
the normal cyclic rate position.
25. Functioning of Connector.—a. Place the connector in
its seat in the trigger. Set the change lever at “Safe.” The
trigger cannot be pulled as the shoulders on the heel of the
trigger are against the change lever bar. Since the trigger
cannot be pulled, the connector does not rise up through the
slot in the sear carrier.
b. Set the change lever at the normal cyclic rate (vertical).
Pull the trigger. The connector is now raised and held in
a vertical position. The tongue on the change lever engages
the toe of the connector as the trigger is pulled and holds
the connector firmly in an upright position.
c. Set the change lever at the slow cyclic rate (forward).
Pull the trigger. The connector is now raised and tips for-
ward since the tongue on the change lever does not engage
the toe of the connector. This tipping forward of the con-
nector is aided by the cammed surface underneath the sear
35
25-27-
BASIC FIELD MANUAL
carrier, and the connector is prevented from tipping too far
forward by the connector stop which is the cross pin in the
sear carrier,
26. Functioning of Sear.—a. Completely assemble the trig-
ger group. Set the change lever at “Safe.” With the change
lever in this position, as previously stated, the connector
does not rise as pressure is applied against the trigger.
Since the connector cannot be raised to lift the forward end
of the sear which is pivoted in the middle, the sear nose
on the rear end of the sear will remain engaged in the sear
notch on the slide and the rifle will not Are.
b. Set the change lever at the normal cyclic rate (vertical).
Press the trigger. The connector, being raised and held in
a vertical position, raises the forward end of the sear, thus
depressing the rear end. The rear end of the sear, being
depressed, disengages the sear nose from the sear notch in
the slide, allowing the operating parts to go forward. The
slide will be free to move backward and forward as long as
the sear nose on the sear is depressed by holding back on
the trigger. The sear release stop lever operates as part
of the sear and prohibits the camming action of the sear
release on the rear end of the sear,
c. Set the change lever at the slow cyclic rate (forward).
Press the trigger. As the trigger is pressed the connector
rises, lifts the forward end of the sear, and depresses the rear
end, thus disengaging the sear nose from the sear notch and
allowing the slide to go forward. The connector is then
cammed forward from under the sear, allowing the sear to
return to its original position. The sear nose will then en-
gage the slide and hold it momentarily to the rear until it
is released by the sear release in the buffer mechanism acting
on the cammed surfaces on the rear of the sear (par. 22b).
This action of the sear release on the cammed surface of the
sear will continue as long as the trigger is held, and the rifle
will continue to Are at the slow cyclic rate of about 350
rounds per minute.
27. Functioning of Sear Release Stop Lever.—a. With
the change lever set at “Safe,” the'sear release stop lever
functions as a part of the sear as outlined in paragraph 26a.
36
BROWNING AUTOMATIC RIFLE, CAL. .30, M1918A2 27-29
b. With the change lever set at the normal cyclic rate, the
sear release stop lever functions as a part of and with the
sear. As long as the trigger is pressed to the rear, the rear
ends of both the sear and the sear release stop lever remain
depressed and the rifle fires at the normal cyclic rate.
c. With the change lever set at the slow cyclic rate, as
long as the trigger is pressed fully to the rear, the sear nose
will rise to engage the slide after each shot; but, since the
sear release stop lever remains depressed (held up at the
front end by the connector), the sear release cams down the
cammed end of the sear, thereby releasing the slide for each
Figure 13.—Combined wooden working model to show functioning.
succeeding shot. If the trigger is quickly released as soon
as pressed, both sear and sear release stop lever rise, thereby
permitting the firing of single shots.
28. Functioning of Springs.—The springs in the trigger
group operate either to return the parts on which they work
to their original positions or to hold them in such positions.
Section V
OPERATION
29. General.—a. Object.—This section is designed to give
the soldier instruction necessary for the operation of the
rifle.
37
29-34
BASIC FIELD MANUAL
b. When taken up.—The operation of the automatic rifle
will be taken up at any convenient time after instruction in
care and cleaning (pars. 13 to 16) has been completed.
30. Use of Dummy Cartridges.—As prescribed in para-
graph 18.
31. To Load the Magazine.—To load the magazine, place
the wide end of the magazine filler over the top of the maga-
zine, so that the groove *in the magazine filler fits over the
catch rib of the magazine. Hold the magazine in the same
relative position that it occupies in the rifle, that is, with
the catch rib toward the operator. Then, insert a clip of
cartridges in the guides provided in the filler; and, with the
right thumb near the base, push the cartridges into the
magazine. Each magazine will hold 20 rounds (fig. 14).
In case a magazine filler is not available, the magazine may
be loaded by hand. This is accomplished by holding the
magazine in the left hand, top up, catch rib toward the op-
erator. Insert the cartridges singly in the top of the maga-
zine, base of the cartridge toward the operator, with the
thumb of the right hand, pressing downward until the car-
tridge is held firmly by the lips at the top of the magazine.
S 32. To Load the Rifle.—Press the magazine release, with-
draw the empty magazine, if it has not already fallen out.
Hold a loaded magazine with its base in the palm ef the
right hand, cartridges pointing to the front. Insert the
magazine between the magazine guides in front of the trigger
guard and push it home. Tap the bottom of the magazine
with the right hand to insure that it is properly seated. The
magazine can be inserted with the operating parts in either
the rearward or forward position. It is ordinarily inserted
after the rifle has been cocked.
33. To Unload the Rifle.—Press the magazine release and
withdraw the magazine, if it has not already fallen out.
Let the bolt go forward by pulling the trigger.
34. To Set the Change Lever.—a. For the slow cyclic rate
of automatic fire, push the change lever to the forward
position marked “F.”
38
BROWNING AUTOMATIC RIFLE, CAL. .30, M1918A2 34-35
b. For the normal cyclic rate of automatic fire, set the
change lever in the vertical position against the change lever
stop marked “A.”
c. To set the rifle at safe, depress the change lever stop
and pull the change lever rearward until it covers the change
lever stop. This position is marked “S.” The change lever
stop prevents the accidental setting of the change lever at
safe and, at the same time, permits a quick change from safe
to either normal cyclic rate or slow cyclic rate.
И 35. To Fire the Rifle.—Select the cyclic rate desired and
press the trigger, holding it for the length of burst desired.
39
35-36
BASIC FIELD MANUAL
If single shots are desired, set the change lever for the slow
cyclic rate, press the trigger, and immediately release it as
the slide begins its forward movement.
36. Gas Adjustment.—a. General.—(1) The rifle normally
should be operated on the smallest port, and this setting will
never be varied unless the rifle shows signs of insufficient gas.
To aline the smallest port, screw the gas cylinder all the way
into the gas cylinder tube, turn it back one complete turn,
and then, by turning the gas cylinder through the shortest
arc, place the smallest circle on the cylinder head toward
the barrel. Lock the cylinder in position. If, upon firing, the
rifle shows signs of insufficient gas, try to secure a better
alinement of the small port, either by backing the cylinder
off one complete turn or by screwing it in one complete turn.
As soon as the proper setting has been obtained, the rifle-
man must note the position so that he can quickly assemble
the cylinder to the proper point without trial. If the rifle
still shows signs of insufficient gas, then set the cylinder
on the next larger port by the method described above for
the initial setting.
(2) The larger ports are provided for use in case the action
of the rifle has been made sluggish through the collection
of dirt and grit or the lack of oil under conditions which
render prompt correction impracticable. For this reason the
threads should be kept clean and oiled and the cylinder free
to turn. The extractor, ejector, and the chamber of the
barrel should be examined and cleaned and defects corrected
when possible. Under adverse conditions, and when signs
of insufficient gas become apparent, the cylinder should be
unscrewed one-third.turn, thus registering the medium circle
and alining the medium port with the gas orifice. Repeat
this operation in order to connect the largest port with the
barrel port.
b. Results of insufficient gas.—(1) Failure to recoil (usually
due to misalined or excessively clogged gas port or extremely
dirty mechanism).
(2) Failure to eject.
(3) Weak ejection.
(4) Uncontrolled automatic fire (exceptional).
40
BROWNING AUTOMATIC RIFLE, CAb. .30, M1918A2 36-40
c. Results of too much gas.—(1) Excessive speed causing
pounding.
(2) Excessive heat in gas operating mechanism.
37. Safety Precautions.—For safety precautions to be ex-
ercised in handling and firing the automatic rifle see para-
graph 241.
Section VI
STOPPAGES AND IMMEDIATE ACTION
38. General.—A stoppage is any unintentional cessation of
fire. For combat efficiency, the automatic rifleman must
understand the cause of common stoppages, observe a defi-
nite routine to prevent the cause, and act promptly to reduce
a stoppage should one occur.
39. Causes of Stoppages.—The following table gives the
usual cause(s) of common stoppages:
Nature of stoppage Usual causes Other causes
Failure to feed Insufficient gas Dirty or dented magazine; weak magazine spring; worn notch on magazine rib or spread lips at magazine opening. Dirty gas cylinder; clogged gas ports; improper adjust- ment of gas cylinder; gas cylinder not oiled. Empty or ruptured cartridge case in chamber; excessive friction in operating parts.
Sluggish operation of Dirty parts; lack of oil; weak Excessive oil (especially in
parts. recoil spring; oil too heavy for cool weather. chamber) may collect dirt or become sticky after heat- ing.
Defective or improp- Worn or broken firing pin, ex- Improper or incomplete as-
erly assembled tractor, magazine catch, sear sembly such as incorrectly
parts. Faulty ammunition- spring. Defective primer; lack of or reduced powder charge; bulged round. placing, or omitting, the connector.
40. Prevention of Stoppages.—Almost all stoppages can
be prevented by timely care and cleaning of the automatic
rifle as set forth in paragraph 14 and in the following table:
41
41
BASIC FIELD MANUAL
POINTS TO BE OBSERVED BEFORE, DURING, AND AFTER FIRING
Item Before During (including tem- porary cessations) Alter. (See par. 14.)
Bore 2 Remove oil. _ Keep free from dirt, Clean and oil.
Chamber Clean thoroughly with mud, water and suow; clean during pauses. Clean frequently. Use Olean thor-
0 porating chamber cleaning brush and patches. Work slide back and chamber cleaning brush during pauses while rifle is hot. Keep free from oil. Oil periodically. Keep oughly. Oil lightly. Clean and oil.
parts. Gas system. __ forth to insure free movement. Oil light- ly if necessary. Verify proper setting of out dirt and dust. Place 3 or 4 drops of oil Olean and oil.
Trigger mech- gas port. Tost at safe, slow and in end of gas cylinder periodically during pauses. Olean and oil.
anism. Magazines. normal cyclic rate set- tings. Clean; remove dents; see Handle carefully; keep Disassemble;
that springs and catch function properly. out dirt and grit; avoid throwing in sand. clean and oil.
41. Immediate Action.—a. Immediate action is the proce-
dure used to reduce common stoppages in the minimum time.
This procedure, given in the table below, consists of a posi-
tive and unhesitating manual operation without detailed con-
sideration of the cause.
b. It will be seen that the first phase (Pull, Push, Tap,
Aim, Fire) is an automatic action, and that the second
phase, when necessary, consists of only enough analysis and
inspection to provide quick and positive action.
c. Ruptured cartridges may result from any one of several
causes—excessive head space, dirty or sticky chamber, or de-
fective cartridge cases.
d. If the rifle on a cold day fires single shots when the
change lever is set on slow cyclic rate, it is due to sluggish-
ness in the rate reducing mechanism or too heavy oil on the
42
If rifle then fires
one shot only
CHANGE MAGAZINE
AND TEST MAGAZINE CATCH
/ If rifle again fires one\
I shot only—SET GAS \
I CYLINDER ON NEXT I
X LARGER PORT /
4.
RIFLE FAILS TO FIRE
i
. IMMEDIATE ACTION
(Pull, Push, Tap, Aim, and Fire) (note 1)
4
Ejection
opening
(note 2)
I
Receiver
(note 3)
Ф. -
If rifle still fails to fire, look info
ejection opening while pulling
operating han.dle to rear and lo-
cate stoppage. If stoppage is
detected in—
_________________J._______
.. i
Chamber
(note 4)
1 J.
Lire Empty
round case
SET GAS
CYLINDER
ON NEXT
LARGER
PORT
CHANGE
MAGAZINE
CLEAN
CHAMBER
AND OIL
WORKING
PARTS
. RARE
(Primer
unmarked)
If this stoppage
recurs—
CHANGE RECOIL
SPRING
4
CHANGE
FIRING
PIN
CHANGE
EX-
TRACTOR
RELOAD, AIM, AND FIRE
41-42
BASIC FIELD MANUAL
operating parts. Set the change lever on the normal cyclic
rate until the rifle warms up.
e. In the event of stoppages that can not be remedied, the
rifle should be reported for repair. (Such a stoppage would
be the repeated rupturing of cartridges near the base due
to excessive head space.)
NOTES
1. Pull operating handle to rear; Push operating handle forward;
Tap up on magazine; Aim, and attempt to Fire. This action will
relieve 90 percent of all stoppages.
2. This stoppage will be detected by empty case wedged in
ejection' opening by live round attempting to get into chamber.
3. This stoppage will be detected by absence of cartridge in
receiver and chamber, or two cartridges attempting to get into
chamber at same time, or bolt riding over cartridge and wedging
it while it is halfway in chamber.
4. This stoppage will be detected by live round jammed into
ruptured cartridge in chamber, or live round in chamber with
primer marked, or (RARE) live round in chamber with primer
unmarked, or (RARE) empty case in chamber.
Section VII
SPARE PARTS AND ACCESSORIES
42. Spare Parts (fig. 15).—a. The parts of any rifle in
time will become unserviceable through breakage or wear
resulting from continuous usage. For this reason, spare
parts are provided for replacement of the parts most likely
to fail. These parts are for use in making minor repairs
and in the general upkeep of the rifle. Twenty-round maga-
zines also are issued as spares, the quantity being based on
the allowance of ammunition authorized. Sets of spare
parts should be maintained as complete as possible at all
times, and all parts should be kept clean and lightly oiled
to prevent rust. Whenever a spare part is used to replace
a defective part in the rifle, the defective part should be re-
paired and substituted in the spare parts set, or a new one
should be obtained. Parts that are carried in complete sets
at all times should be assembled correctly and ready for
immediate insertion in the rifle. The allowances of spare
parts and of 20-round magazines are prescribed in Standard
Nomenclature List No. A-4.
b. With the exception of the spare parts mentioned in
44
BROWNING AUTOMATIC RIFLE, CAL. .30, M1918A2 42-43
paragraph 43b (4), repairs or alterations by the using organi-
zations are prohibited.
43. Accessories.—a. General.—Accessories include the tools
required for disassembling and assembling and for the clean-
ing and preservation of the rifle. They must not be used for
any purpose other than as prescribed. There are a number
of accessories the names or general characteristics of which
indicate their uses or application. Therefore, detailed de-
scription or methods of use of such items are not outlined
herein. However, accessories embodying special features or
having special uses are described in b below.
b. Special.—(1) Brush and thong, caliber .30, complete.—
This consists of the brush, the tip, the weight, and the cord.
The thong weight and tip are made of brass and are pro-
vided with holes in which the thong cord is knotted. The
tip. is provided with a cleaning patch : ~4t and is threaded
on the end to receive the fiber bristle brush.
(2) Brush, cleaning, caliber .30, М2.—The brush consists
of a brass wire core with brass bristles and tip. The core is
twisted in a spiral and holds the bristles in place. This brush
is distinguished from the one that is a part of the brush
and thong by the type of bristles and lengths of threads on
the tip, and is for use with the cleaning rod. It can be
used with the thong only with difficulty, because of its stiff
bristles.
(3) Brush, chamber-cleaning, Ml.—The 'chamber-clean-
ing brush consists of a curved, flat, steel handle to which are
hinged a chamber-cleaning brush at one end and a small,
bristled dusting brush at the other end.
(4) Case, accessory, and spare parts, M1918.—This is a
leather box-shaped case, approximately 2 inches wide, 4
inches high, and 6 inches long. This case should be carried
at all times, and will normally be complete with the following
spare parts and small accessories:
(a) Spare parts.—
1. Recoil spring.
2. Connector.
3. Two trigger pins.
4. Two firing pins.
535351°—43----4
45
43
BASIC FIELD MANUAL
5. Extractor and extractor spring.
6. Trigger guard retaining pin and spring.
7. Gas cylinder tube retaining pin and spring.
8. Sear spring.
9. Change lever spring.
, 10. Magazine catch spring.
11. Change lever stop and spring.
12. Change lever.
(b) Accessories.—
1. Fabric envelope, 3 by 5 inches, two-button.
2. Fabric envelope, 3 by 3 inches, one-button.
3. Oval oiler, 3-ounce with cap and chain (full of oil).
4. Chamber cleaning brush Ml.
5. Combination tool.
6. Gas cylinder cleaning tool.
7. Ruptured cartridge extractor.
8. Brush and thong, complete.
(5) Case, cleaning rod Ml.—This fabric case has five
pockets, four of which hold the sections of the cleaning rod
Ml, while the fifth holds the cleaning brush, caliber .30, М2.
The contents are secured in their pockets by a web flap
and a buckle.
(6) Rod, cleaning, jointed, Ml.—This steel rod consists
of five sections, the first two permanently fastened together
by a swivel joint. The first section has a slot for attaching
the cleaning patch, and a threaded hole is provided for hold-
ing the cleaning brush. The rear section is provided with a
tubular steel handle which turns on the rod. There are
many other types of cleaning rods in use in the military
service that may be used to clean the automatic rifle in
garrison or bivouac. The cleaning rod Ml, or the brush and
thong complete, are the most practical cleaning accessories
in the field or in combat.
(7) Filler, magazine.—The magazine filler is a pressed-
steel adapter which is fitted over the top of an empty maga-
zine when loading. Its method of use is shown in figure 14.
(8) Extractor, ruptured cartridge, Mk. II.—The ruptured
cartridge extractor has the general form of a caliber .30 car-
tridge. It consists of three parts—the spindle, head, and
sleeve. To use the ruptured cartridge extractor, the live car-
46
Figure 15—Spare parts and accessories.
BROWNING AUTOMATIC RIFLE, CAL. .30, M1918A2
CO
43-44 basic field manual
tridges must be removed from the rifle. The ruptured car-
tridge extractor is then inserted through the opening of the
ruptured cartridge case and pushed forward into the cham-
ber. The bolt is let forward without shock so that the ex-
tractor of the rifle engages the ruptured cartridge extractor.
As the operating handle is drawn back, the ruptured car-
tridge extractor, holding the ruptured cartridge on its sleeve,
is extracted.
(9) Sling, gun, M1907.—The gun sling is fastened to the
swivels provided on the rifle and is always carried thereon.
It consists of a long and a short strap, either of which may
be lengthened or shortened to suit the particular soldier
using it.
(10) Tool, combination.—This tool consists of a steel body
having two spanner wrenches and a screw driver end. The
small spanner is used to turn the gas cylinder, and the large
spanner will fit the rear of the barrel. The large screw
driver is used to remove or tighten the forearm screws.
(11) Tool, cleaning, gas cylinder.—This is a special tool
for cleaning the gas-operating mechanism. The ends of the
tool body may be used to scrape carbon from the interior of
the gas cylinder and from the face of the gas piston. The
drift, which is attached to the body, may be used to remove
carbon deposits from the gas ports and the grooves of the
gas piston. The carbon must be completely removed, but care
must be exercised to avoid scoring or damaging the gas
cylinder walls or the grooves of the gas piston.
(12) Wrench.—There is no special wrench issued to remove
the flash hider and bipod bearing from the muzzle end of
the rifle barrel. Any suitable wrench that will fit a 1-inch
nut may be used for this purpose.
(13) Stock rest.—The stock rest is used when it is desired
to employ the automatic rifle for the delivery of fire on a final
protective line, or to fire on a fixed point when the visibility
is poor (par. 239).
Section VIII
AMMUNITION
44. General.—Information in this section describes the
several types of cartridges authorizd for use in the Browning
48
BROWNING AUTOMATIC RIFLE, CAL. .30, M1918A2 44—48
automatic rifle, caliber .30, M1918A2, means of identification,
care, use, and ballistic data.
45. Classification (fig. 16).—Based upon use, the principal
classifications of ammunition for this rifle are—
a. Incendiary, for use against inflammable materiel.
b. Armor piercing, for use against lightly armored vehicles,
concrete shelters, and personnel.
c. Tracer, for observation of fire and incendiary purposes.
d. Ball, for use against personnel and light materiel targets.
e. Blank, for simulated fire.
f. Dummy, for training. (Cartridges are inert.)
46. Lot Number.—When ammunition is manufactured, an
ammunition lot number, which becomes an essential part of
the marking, is assigned in accordance with specifications.
This lot number is marked on all packing containers and on
the identification card inclosed in each packing box. It is
required for all purposes of record, including grading and
use, reports on condition, functioning, and accidents in which
the ammunition might be involved. Since it is impracticable
to mark the ammunition lot number on each individual car-
tridge, every effort should be made to maintain the ammuni-
tion lot number with the cartridges after they are removed
from their original packing. Cartridges which have been
removed from the original packing and for which the am-
munition lot number has been lost are placed in grade 3. It is
therefore necessary when cartridges are removed from orig-
inal packings that they be so marked that the ammunition
lot number is preserved.
47. Grade.—Current grades of existing lots of small-arms
ammunition are established by the Chief, of Ordnance and
are published in Ordnance Field Service Bulletin No. 3-5.
И 48. Identification.—a. Markings.—The contents of orig-
inal boxes are readily identified by the markings on the box.
Similar markings on the carton label identify the contents
of each carton.
b. Color bands.—Color bands painted on the sides and
ends of the packing boxes further identify the various types
49
48
BASIC field manual
of ammunition. The following color bands for cartridges
are used:
Incendiary_________________________ red on yellow
Armor piercing_____________________blue on yellow
Tracer________________________ green on yellow
Ball___________________________red
Blank__________________________blue
Dummy__________________________ green
c. Types and models.—The following types and models of
caliber .30 cartridges are authorized'for use'in this rifle:
Incendiary.
Armor-piercing, М2.
Tracer, Ml.
Ball, М2.
Ball, Ml.
Blank, M1909.
Dummy, M1906 (corrugated).
When removed from their original packing container, the
cartridges are identified, except as to ammunition lot num-
ber and grade, by their physical characteristics.
(1) Incendiary.—All caliber .30 incendiary ammunition is
distinguished by the tip of the bullet nose, which is painted
light blue. The bullets have gilding metal jackets.
(2) Armor piercing.—All caliber .30 armor-piercing am-
munition is distinguished by the tip of the bullet nose, which
is painted black. The bullets have gilding metal jackets.
(3) Tracer.—Caliber .30 tracer ammunition may be iden-
tified by the tip of the bullet nose, which is painted red.
(4) Ball.—All models of caliber .30 ball ammunition
which are authorized to be used in the automatic rifle, except
М2 of 1940 and earlier manufacture, have bullets with gilding
metal jackets. The metal jacket of the earlier М2 ammuni-
tion is tin-coated. The gilding metal jacket of the present
М2 bullet is copper-colored.
(5) Blank.—Blank ammunition may be identified by the
absence of a bullet in the cartridge case.
SO
BROWNING AUTOMATIC RIFLE, CAL. .30, M1918A2 48-51
(6) Dummy.—The caliber .30 corrugated dummy cartridge
may be identified by the corrugations formed in the cartridge
case.
49. Care, Handling, and Preservation.—a. Small-arms am-
munition is not dangerous to handle. Care, however, must
be exercised to keep the boxes from becoming broken or
damaged. All broken boxes must be repaired immediately
and all original markings transferred to the new parts of
the box. The metal liner should be air-tested and sealed, if
equipment for this work is available.
b. Ammunition boxes should not be opened until the am-
munition is to be used. Ammunition removed from the
airtight container, particularly in damp climates, is likely to
corrode, thereby causing the ammunition to become un-
serviceable.
c. The ammunition should be protected from mud, sand,
dirt, and water. If it gets wet or dirty, wipe if off at once.
Light corrosion, if it forms on cartridges, should be wiped off.
However, cartridges should not be polished to make them
look cleaner or brighter.
d. During marksmanship and combat training, no caliber
.30 ammunition will be fired until it has been identified by
ammunition lot number and grade.
e. Do not allow the ammunition to be exposed to the
direct rays of the sun for any length of time. This is likely
to affect seriously its firing qualities. Small-arms ammuni-
tion of all classes should be stored away from radiators,
hot water pipes, and other sources of heat, since heat not
only deteriorates ammunition, but also creates a fire hazard.
50. Storage.—Whenever practicable, small-arms ammuni-
tion should be stored under cover. Should it be necessary to
leave small-arms ammunition in the open, it should be raised
at least 6 inches from the ground and covered with a double
thickness of tarpaulin. Suitable trenches should be dug to
prevent water from flowing under the pile.
51. Ballistic Data.—The approximate maximum ranges
of the several types of models of caliber .30 ammunition
51
51
BASIC FIELD MANUAL
authorized for use in the Browning automatic rifle are shown
below:
Yards
Incendiary (Incendiary action up to 400 yards)_______
Armor piercing, М2______________________________4, 000
Tracer, Ml______________________________________ 3, 500
Ball, М2________________________________________4,000
Ball, Ml_________________________________________5,500
Blank______________________________________________ 20
Dummy, MI906 (corrugated)________________________None
©
©
©
INCENDIARY-LIGHT BLUE—.
ARMOR PIERCING—BLACK-
TRACER—RED-
INCENDIARY, ARMOR PIERCING,
AND TRACER
DUMMY (Corrugated) M1906
Figure 16.—Ammunition.
52
CHAPTER 2
MARKSMANSHIP, KNOWN DISTANCE TARGETS
Paragraphs
Section I. General______________________________________ 52-54
П. Preparatory marksmanship training------------ 55-80
П1. Courses to be fired-------------------------- 81-83
IV. Range practice_______________________________ 84-93
V. Regulations governing record practice------- 94-124
VI. Targets and ranges------------------------- 125-126
Section I
GENERAL ,
52. Object.—The object of this chapter is to provide a
thorough and uniform method of training individuals to be
good automatic rifle shots, and of testing their proficiency in
firing at known distance targets with the Browning automatic
rifle, caliber .30, M1918A2. This proficiency is vital to the
effective use of the weapon in field firing, both for aimed fire
and other types of fire (such as fire along a final protective
line, par. 239), described in succeeding chapters.
53. Fundamentals.—To become a good automatic rifle shot,
the soldier must be trained in the following essentials of good
shooting:
a. Correct sighting and aiming.
b. Correct positions.
c. Correct trigger manipulation.
d. Correct application of the fundamentals of automatic
fire.
e. Knowledge of proper sight adjustments.
54. Phases of training.—a. Marksmanship training is di-
vided into the following phases:
(1) Preparatory marksmanship training.
(2) Range practice.
b. No individual should be given range practice until he
has had a thorough course in preparatory training.
53
54-56
BASIC FIELD MANUAL
c. The soldier should be proflcient in mechanical training
before he receives instruction in marksmanship training.
d. Every man who is to Are on the range will be put through
the preparatory course regardless of previous qualifications.
Section II
' WCEPhRKHGR'Y MARKSMANSHIP TRAINING
55. General.—a. Steps in training.—The purpose of pre-
paratory marksmanship training is to teach the soldier the
essentials of good shooting and to develop fixed and correct
shooting habits before he undertakes range practice. Pre-
paratory marksmanship training is divided into six steps, as
follows:
(1) Sighting and aiming exercises.
(2) Position exercises.
(3) Trigger manipulation exercises.
(4) Automatic Are exercises.
(5) Instruction in the effect of wind, sight changes, and
use of the score book.
(6) An examination covering all previous instruction in
the Browning automatic riffe.
b. Training in the Arst four steps listed in a above is given
in the sequence listed; each succeeding step involves the use
of technique learned in preceding steps. Instruction in the
effect of wind, sight changes, and the use of the score book
is not a training step that need be given in any particular
sequence, but will be given before the examination which
is the final step prior to range practice. These subjects can
be taught indoors during inclement weather.
56. Equipment.—a. List.—For each Browning automatic
rifle team—
1 sighting bar.
1 automatic rifle and rest. (Rest partially Ailed with
sand for stability.)
1 3-inch sighting disk (fig. 17).
2 small aiming targets.
1 long range sighting disk.
I small box.
54
BROWNING AUTOMATIC RIFLE, CAL. .30, M1918A2 56
1 target frame covered with blank paper for long
range triangles.
1 score book for each man.
1 blank examination form as shown in paragraph' 57e.
1 D-target with curtain for each three teams.
b. Preparation.—(1) Sighting bar.—Construct the sight-
ing bar from trim lumber and tin strip to the dimensions and
design shown in figure 17. The sighting bar, like all other
equipment, should be constructed so as to present a neat
appearance. The' top of the sighting bar, its front and rear
sight, and its eyepiece are painted black.
(2) Automatic rifle and rest.—An empty ammunition box,
or any similar box with notches cut in the ends to fit the
automatic rifle closely, makes a good automatic rifle rest.
The automatic rifle is placed in those notches with the
trigger guard just outside one end. The sling is loosened and
pulled to one side. The box is half filled with earth or sand
to give it stability.
(3) Sighting disks.—Sighting disks are of two sizes. The
disk to be used at a distance of 50 feet is shown in figure 17.
The disk to be used at 200 yards is constructed by pasting
the black silhouette of a standard D-target on stiff backing
and attaching a 4-foot handle. In the center of the sighting
Figure 17.—Construction of sighting bar and sighting disk.
55
56-57
BASIC FIELD MANUAL
disks are holes of a size sufficient to admit the point of a
pencil.
(4) Blackening the sights.—In all preparatory exercises in-
volving aiming and in all range firing, when the sight or
sights of the rifle have become so shiny that a clear-cut sight
picture cannot be obtained, the sights should be blackened.
Before blackening, the sights are cleaned and all traces of
oil removed. The blackening is done by holding each sight for
a few seconds in the point of a small flame, which is of such
a nature that a uniform coating of lampblack will be de-
posited on the metal. Materials commonly used for this pur-
pose include carbide or kerosene lamps, candles, small pine
sticks, and shoe paste.
57. Duties of Leaders.—a. Battalion commander.—He re-
quires the officers and noncommissioned officers to be familiar
with the prescribed methods of instruction and coaching,
supervises the instruction within his battalion, and requires
the companies to follow the preparatory exercises and meth-
ods of coaching carefully and in detail.
b. Company commander.—He requires that the prescribed
methods of instruction and coaching be carried out carefully
and in detail within his company, and supervises and directs
the platoon leaders.
c. Platoon leader.—He supervises and directs the rifle squad
leaders in training the Browning automatic rifle teams and
examines the automatic riflemen in his platoon as outlined
in paragraph 80.
d. Platoon sergeant and guide.—They assist in the instruc-
tion and perform any other duties as directed by the company
commander and platoon leader. They may assist the pla-
toon leader in conducting the examination referred to in c
above.
e. Squad leader.—(1) He, or his assistant, sees that each
man in his Browning automatic rifle team is occupied in the
designated preparatory training.
(2) He, or his assistant, keeps a copy of the form shown
below, and promptly enters the grades made by his men as
the work progresses. He has this form ready for inspection
by the platoon leader, or other higher commander at any
time.
56
BROWNING AUTOMATIC RIFLE, CAL. .30, M1918A2 57-58
STATE OF INSTRUCTION
X
Good
Very
good
Excellent
Excellent
and has in-
structional
ability
Fair
(3) He, or his assistant, requires the coaches to correct
errors.
58. Method of Instruction.—a. The Browning automatic
rifle team is the basic unit for preparatory marksmanship
training. The duties of coach and pupil are rotated among
the members of the team.
b. Correct shooting habits are developed during the pre-
paratory exercises, and to this end careful execution of de-
tails is required. Training proceeds expeditiously to main-
tain interest. Care is taken to avoid holding the men in.
position until they become uncomfortable. Frequent short
rests are given.
c. Instructors should receive a short refresher course in
57
58-60
BASIC FIELD MANUAL
preparatory marksmanship training prior to beginning the
instruction of their men.
59. Duties of Coaches.—The successful conduct of the
preparatory exercise largely depends upon the attention of
the coaches to their duties. Officers and noncommissioned
officers are specifically charged with the supervision of
coaches as well as of pupils. They will require the coaches
to have their pupils execute all steps of the preparatory
exercises correctly. The positions of a coach are prescribed
in paragraph 70. The duties of a coach are specific and,
during the progress of the preparatory exercises, include nec-
essary corrections of the pupil to see that—
a. Sights are blackened, if necessary.
b. Gun sling is properly adjusted, if used.
c. Position is taken correctly.
d. Slack is taken up promptly.
e. Aim is taken carefully.
j. Breath is held during aiming.
g. Trigger is pressed properly.
h. Pupil calls the shot.
i. Firer observes proper safety precautions.
60. First Sighting and Aiming Exercise: Sighting Bar.—
Being careful to point out the various parts of the sighting
bar as he refers ’to them, the instructor or squad leader
shows a sighting bar to his group and explains its use as
follows:
a. The front and rear sights on the sighting bar represent
enlarged rifle sights. The rear sight is movable so that
various sight alinements can be set.
b. The sighting bar is used in the first sighting and aiming
exercise, because it shows the sights on a large scale and
small errors can be seen easily and explained to the pupil.
c. The eyepiece has no counterpart on the rifle. The
pupil is merely required to place his eye so that he will see
the sights in exactly the same alinement as seen by the coach.
d. The movable target on the sighting bar provides a
simple method of alining the sights upon a target.
e. The instructor explains the correct sight alinement,
using a diagram similar to figure 18®. He adjusts the
58
BROWNING AUTOMATIC RIFLE, CAL. .30, M1918A2 60-61
movable rear sight on the sighting bar to illustrate the cor-
rect sight alinement. The top edge of the front sight should
fall on the horizontal diameter of the peep sight. There
should be an equal amount of space on both sides of the
front sight. Thus, the center of the top edge of the front
sight is in the exact center of the peep sight. He has each
pupil examine the set-up.
/. He sets off small errors in alinement and requires the
pupils to detect and correct the errors noted.
g. The instructor illustrates a correct aim with the movable
target in place so that the bottom edge of the target meets
the top edge of the front sight in the exact center of the
peep sight and has each pupil examine it (fig. 18®).
h. He adjusts the rear sight and movable target to illus-
trate small errors and has the pupils detect and correct them.
i. Then each man will be required to adjust the sighting
bar with the correct aim until he is proficient.
® A correct sight alinement. ® A correct sight picture.
FrarniE 18.—Correct sight alinement and sight picture.
61. Second Sighting and Aiming Exercise: Alining Sil-
houette and Sights.—-An automatic rifle for each team is
placed in an automatic rifle rest and pointed at a blank
sheet of. paper mounted on a box. At each box, which is
located 50 feet from the position of the rifle, a soldier is
stationed as marker. The marker will have a small disk
and a sharp-pointed pencil. The sights of the automatic
rifle are blackened, if necessary, and set at 400 yards eleva-
tion. Being careful not to move the rifle or the rifle rest,
the instructor takes'a prone position (fig. 19) in rear of
one of the automatic rifles, the line of the rifle barrel ex-
tending through the center of his right shoulder and hip
59
61-62
BASIC FIELD MANUAL
bone. His legs are spread well apart, and the inside of
his feet are flat on the ground, or as nearly so as can be
obtained without strain. Both elbows are on the ground.
The chin rests in the palm of the left hand; the right hand
is free for signaling to the marker. The cheek rests lightly
on the stock and at such a point that the eye is approximately
the same distance from the peep sight as it will be in actual
firing. The instructor then directs the marker by com-
mand or improvised signals to move the small disk until the
bottom of the silhouette is in correct alinement with the
sights. The breath should be held when checking the final
sight alinement with the silhouette. The instructor com-
mands: HOLD to the marker, and then moves away from the
rifle and directs each pupil to look through the sights in order
to observe the correct aim. The pupils are then required
to execute the exercise, the instructor being careful to check
the aim which each pupil obtains.
62. Third Sighting and Aiming Exercise: Making Shot
Groups.—a. The object of this exercise is to insure uniform
and correct aiming.
60
BROWNING AUTOMATIC RIFLE, CAL. .30, M1918A2 62-63
b. The exercise is conducted as follows: the automatic rifle,
with sights blackened if necessary, is placed in an automatic
rifle rest and pointed at a blank sheet of paper mounted on
a box 50 feet away (fig. 19). The pupil takes the correct
prone position, as described in paragraph 61, and looks
through the sights. The pupil or coach directs the marker
to move the small disk until the bottom of the silhouette is in
correct alinement with the sights, and then calls “Hold.” The
instructor checks the alinement and then calls, “Mark.” The
marker immediately marks a dot on the paper with a sharp-
pointed pencil inserted through the hole in the silhouette.
The small disk is removed and the dot numbered. The pupil
repeats this operation until three dots, numbered 1, 2, and 3,
have been made. These dots outline the shot group and the
pupil’s name is written under it. The size and shape of the
group will be discussed with the coach or instructor and the
cause of error pointed out and corrected (fig. 94). This
exercise is repeated until proficiency is attained. A good
group of three marks can be covered by the eraser of an
ordinary pencil.
c. A similar exercise is held during the period of prepara-
tory marksmanship training at 200 yards with the 26-inch
movable silhouette. Properly handled, the exercise helps
greatly to sustain interest in the work and to teach correct
aiming. At 200 yards, a man should be able to make a shot
group that can be covered with the small (3-inch) sighting
disk. Movement of the disk is controlled by prearranged sig-
nals from the coach or instructor (flg. 20).
d. Tracings are made of each man’s 200-yard shot group.
These tracings are marked with the men’s names, turned over
to the platoon leader for his information, and shown to the
men with appropriate mention of errors to be corrected.
Competition between the automatic rifle teams, to see which
can make the smallest shot groups, is of value in creating
interest in this exercise.
63. Position Exercises.—Instruction in postion will in-
clude the use of the gun sling, use of the hinged butt plate,
adjustment of the bipod legs, holding the breath, and aiming
in each position. Small targets are set up for each position
to assist the aim.
635351°—43
-s
61
у
Figure 20.—Third sighting and aiming exercise with the aid
of an assistant instructor.
BASIC FIELD MANUAL
BROWNING AUTOMATIC RIFLE, CAL. .30, M1918A2
63
a. General rules.—(1) All positions should be learned thor-
oughly, but it is impressed upon the soldier that the prone
position with the bipod rest is used whenever possible, and
that he must seek terrain which will enable him to use this
position.
(2) Upon assuming any position there is some point to
which the rifle naturally points, without effort on the part
of the flrer. If this point is not the center of the target, the
whole body must be shifted so as to bring the rifle into proper
alinement. Otherwise, the flrer will be firing under a strain,
because he will be pulling the rifle toward the target by mus-
cular effort for each shot.
(3) In all position, except prone, the bipod legs are locked
along the barrel (they need not be telescoped).
(4) The right hand grasps the small of the stock with the
thumb on top of the stock.
(5) In the sitting and kneeling positions, the left hand is
underneath the forearm of the rifle at such a place as will
enable the flrer to keep the rifle elevated and pointed at the
target. The left wrist is straight. The rifle is resting on the
heel of the hand in the crotch formed by the thumb and index
finger. The left elbow is as nearly under the rifle as it can be
placed without strain. In the prone position, the left hand
grasps the small of the stock behind the right hand.
(6) The trigger is pressed with the index Anger.
(7) The cheek rests firmly against the stock and as far
forward as possible without strain to bring the eye near
the rear sight.
(8) The automatic rifle is not fired from the left shoulder.
(9) The hinged butt plate is optional except in the prone
position.
b. Gun sling.—(1) The gun sling, properly adjusted, is
of great assistance in shooting in all positions except prone
in that it helps to steady the rifle. Each man is assisted
by the instructor in securing the correct adjustment for his
sling. In a firing.position, the sling is adjusted to give firm
support without discomfort to the soldier. The gun sling
is readjusted for drill purposes by means of the lower loop
without changing the adjustment of the upper loop.
(2) There are three authorized adjustments: the loop
63
63 BASIC FIELD MANUAL
sling, the hasty sling, and a special adjustment for the
assault fire position. The hasty sling is more rapidly ad-
justed than the loop sling, but it gives less support. The
sling is not used on the arm when firing in the prone position.
(a) Loop adjustment.
1. Loosen the lower loop.
2. Pull the sling over to the left of the rifle, insert the
left arm through the upper loop from the right
side of the sling to the left. Work the left arm
through the sling so that the upper loop is near
the shoulder and well above the biceps muscle.
3. Pull the keepers and hook close against the arm to
keep the upper loop in place.
4. Carry the left hand out and over the sling and
grasp the forearm of the rifle near the center
so as to cause the sling to lie smoothly along the
back of the hand and wrist. The lower loop, not
used in this adjustment, should be loose enough
to prevent any tension. The ends should not be
removed from the swivels.
(b) Hasty sling adjustment.
1. Loosen the lower loop and readjust to the proper
length.
2. Twist the sling one-half turn to the left.
3. Grasp the forearm of the rifle near the center with
the left hand and grasp the small of the stock with
the right hand.
4. Throw the sling to the left and catch it above the
elbow and high on the arm.
5. Remove the left hand from the rifle, pass the left
hand under then over the sling, and regrasp the
rifle with the left hand so as to cause the sling
to lie flat along the hand and wrist.
(c) Assault fire adjustment.
1. Loosen the sling to approximately its full length
(depending upon the size of the flrer).
2. Pass the sling over the head and place it upon the
• left shoulder so that it lies smoothly over the
shoulder and across the back.
64
BROWNING AUTOMATIC RIFLE, CAL. .30, M1918A2
63
3. With the right hand, loop the sling under and
around the outside of the stock.
4. With the left hand between the sling and forearm
of the piece, grasp the forearm near the center
so that the sling lies smoothly along the back of
the hand and wrist.
c. Hinged butt plate.—In the sitting, kneeling and if pos-
sible, in the antiaircraft positions, the hinged butt plate
should be used, providing the conformity of the man’s body
permits. The hinged butt plate should be placed on the
right shoulder as near to the junction of the neck and
shoulder as possible. The hinged butt plate is always used
in the prone position.
d. Bipod.—In adjusting the bipod for the prone firing
position, the ends of the bipod leg tubes are seated in the
recesses provided in the bipod body and then tightened by
the bipod body wing screws. This prevents the legs from
folding during firing. Next, the bipod legs are adjusted
in length so that the rifle is pointing at the target when the
butt is placed on the shoulder of the firer, and tightened to
prevent telescoping.
e. Holding the breath.—To insure steadiness, the breath is
held during aiming. To accomplish this, take an ordinary
breath, let out a little, and hold the rest by closing the
throat, not by action of the diaphragm. The firer should be
comfortable, relaxed, and steady while aiming and pressing
the trigger. He should not attempt to hold the breath so
long as to become unsteady.
f. Aiming.—The rifle is carefully aimed in each position.
g. Canting the rifle.—In all positions the rifle is held
squarely, that is, not tipped or canted from a vertical plane
passing through its long axis. It should be understood, how-
ever, that unless it is pronounced, this error in position will
not materially affect the aim nor the strike of the burst at
short ranges.
h. Procedure in conducting position exercises.—Following
explanations and demonstrations, the instruction becomes
individual by the coach and pupil method. Small silhouettes
are used as aiming points. These silhouettes are placed at
a range of 1,000 inches and at different heights so that, in
65
63-64
BASIC FIELD MANUAL
aiming from various positions, the automatic rifle will be
nearly horizontal. Standard known distance targets may
be installed at distances used on the known distance range.
The instructor may initiate an exercise by a command such
as PRONE (SITTING, KNEELING) POSITION EXERCISES! WORK AT
will. Each pupil, after checking to see that his sights are
not shiny, adjusts his sling, takes position, takes up the
slack, aims carefully, and holds his breath while aiming.
As soon as his aim becomes unsteady, the exercise ceases.
After a short rest, the pupil repeats the exercise without
further command. The trigger is not pressed in the position
exercise. Exercises are conducted in all positions.
i. Duties of coach.—In the position exercises, the coach
sees that the—
(1) Sights are blackened (when necessary).
(2) Gun sling, when used, is properly adjusted, is tight
enough to give support, and is high up on the arm.
(3) Proper position is taken.
(4) Slack is taken up properly.
(5) Pupil aims.
(6) Breath is held while aiming. The coach checks the
pupil’s manner of holding his breath by watching his back.
64. Prone Position (flg. 21).—a. The automatic rifleman
lies down in rear of the rifle, the line of the barrel extending
through the center of his right shoulder and right hip bone.
His legs are spread well apart, the inside of the feet flat on
the ground or as nearly so as can be attained without sprain.
The hinged butt plate fits snugly on the back part of the
shoulder, near the neck; the butt of the rifle is pressed firmly
into the hollow of the shoulder. The shoulders are on the
same level. The elbows are out to the sides and on the same
line, so that the forearms form an angle at the small of
the stock approximately equal to the angle formed by the
bipod legs at the muzzle. The right hand grasps the rifle
at the small of the stock with the thumb on top, the index
finger on the trigger, and the remaining fingers curled with
a strong grip under and around the stock exerting pressure
to the rear. The left hand grasps the small of the stock
in rear of the right hand, wrist straight, fingers uppermost,
thumb extending under the stock, exerting pressure down
66
BROWNING AUTOMATIC RIFLE, CAL. .30, М1918Л2
64
and to the left. Both hands hold the piece firmly against
the shoulder.
b. When the firer is in the correct position, the rifle is
pointed at the center of the target. Small adjustments in
elevation, to cause the rifle to point at the exact part of the
target desired, are made by moving the elbows closer together
Figube 21.—Prone position.
or farther apart. Large vertical corrections are made by
readjusting the bipod legs. All lateral movements of the
rifle are made by shifting the entire body right or left, as
desired. Figure 95 shows poor shot patterns due to a faulty
prone position.
67
64-65
BASIC FIELD MANUAL
c. The soldier is trained to assume the correct - prone
position, aided by a coach who adjusts the legs of the tripod
for height.
d. Following this training, the soldier will assume the cor-
rect prone position, adjusting the bipod without the aid of a
coach. In doing this, it is necessary to remove the weapon
from the shoulder, slide around to the side, and make the
adjustment. The firer should be trained to adjust the bipod
correctly for his height the first time. (Coach and pupil
should be required to handle the rifle habitually by means
of the wooden forearm to prevent serious burns during range
and field firing.)
Figube 22.—Sitting position
65. Sitting Position (fig. 22).—The firer sits half faced to
the right; feet well apart and well braced on the heels which
are slightly dug into the ground; ankles relaxed; body lean-
ing well forward from the hips with back straight; both arms
resting inside the legs and well supported; cheek resting
firmly against the stock and placed as far forward as possible
without straining; left hand grasping the rifle as far forward
as convenient and comfortable, wrist straight, rifle placed
in the crotch formed by the thumb and index finger and rest-
ing on the heel of the hand. In this position the feet may
be slightly lower than the ground on which the firer sits. Sit-
68
BROWNING AUTOMATIC RIFLE, CAL. .30, M1918A2 65-67
ting on a low sandbag is authorized. Necessary changes to
adapt the position to the conformation of the man are au-
thorized. Instruction in the sitting position is limited to that
sufficient to acquaint the men with it, as the use of this posi-
ion is regarded as exceptional.
66. Kneeling Position (fig. 23).—The firer kneels half
faced to the right on the right knee, sitting on the right heel,
the left knee bent so that the lower left leg is vertical as
viewed from the front; left arm well under the rifle and rest-
ing on the left knee with the point of the elbow beyond the
kneecap; right elbow approximately at the height of the
shoulder; cheek resting firmly against the stock and placed
Figure 23.—Kneeling position.
as far forward as possible without strain. Sitting on the side
of the foot instead of the heel is authorized. The center of
balance of the firer should be low and forward. Like that in
the sitting position, instruction in the kneeling position is
limited to that sufficient to acquaint the men with it, as the
use of this position is regarded as exceptional.
67. Assault Fire Position (fig. 24).—In this position, the
automatic rifle is held with the butt pressed firmly against
the body under the right arm. For sling adjustment, see
paragraph 63b(2)(c).
69
68
BASIC FIELD MANUAL
©
Figure 24.—Assault fire position.
68. Antiaircraft Fire Position (flg. 25).—a. The position
used in firing at aerial targets is a modified kneeling position.
b. In assuming this position, the flrer kneels on his right
knee, body erect, buttocks not resting on the right heel. The
left leg is straight without stiffness, the foot pushed well to
the left front and turned slightly to the right at the ankle.
The sling is not used. The rifle is held with the right hand
grasping firmly at the small of the stock, the left hand grasp-
70
BROWNING AUTOMATIC RIFLE, CAL. .30, М1Э18А2
68
ing the forearm. The right elbow is on a level with or higher
than the right shoulder; the left elbow is as nearly under
the rifle as possible. The bipod legs are folded and clamped
along the barrel if time permits.
71
69-71
BASIC FIELD MANUAL
69. Moving Ground Target Firing Positions.—The prone
position is used when the angular traverse is small and per-
mits the tracking of the moving ground target. When this
is not possible, the antiaircraft position (par. 68) or a modi-
fied antiaircraft position is used.
70. Positions of Coach.—a. Firer in prone position.—The
coach lies on his left side, on the left of the firer, his head
slightly in advance of the head of the firer so that he can
observe the firer’s eyes, chest, hands and shoulders. From
this position, the coach may rise to observe the back, legs,
and general position of the firer.
b. Firer in any position other than prone.—The coach
kneels or stands directly in rear of the firer, to support the
firer in the event of a runaway gun. The coach may move
to other positions, if necessary, to carry out his duties. He
must never allow any part of his body to get in front of the
rifle, and must stay clear of the ejection opening.
71. Sight Setting Exercise.—a. The purpose of sight set-
ting exercises is to teach accurate and rapid sight setting.
b. The instructor explains that there is an open sight and
a peep sight; that the open sight (battle sight) corresponds
to a sight setting of 300 yards; that the peep sight is set at
the desired elevation when the index line through the peep
sight is set opposite the desired elevation graduation on the
sight leaf, and that, if the click brings the index line slightly
above or below the desired range, the sight adjustment is left
in that position and not at a part click. He explains that the
elevation scale on the sight leaf is not graduated below the
300 yards elevation and usually the index line of the peep
sight can be lowered little below the 300 yard elevation. (The
mil scale on the left side of the sight leaf is used in setting
the sights when firing from position defilade (par. 240) and
in low visibility firing (par. 239). Turning the knob on top
of the sight leaf clockwise moves the sight slide up 1 mil
for each click; turning the knob counterclockwise moves the
sight slide down 1 mil for each click.) He explains that one
click of the windage knob moves the rear sight 1 mil
(point of windage), that turning the windage knob forward
(up) moves the rear sight to the right, that turning it to the
72
BROWNING AUTOMATIC RIFLE, CAL. .30, M1918A2 71-72
rear (downward) moves the sight to the left. Fractions of a
point of windage may be set on the rear sight. (On earlier
type rear sights that have no windage gage, the rifle is
zeroed by moving the front sight blade right or left as re-
quired. After being zeroed by moving the front sight, correc-
tions for wind are made by aiming to the right or left). The
instructor then has a trained soldier assume the correct prone
position with the automatic rifle and demonstrate the sight
setting exercise as follows:
(1) The instructor announces the range and windage, for
example, “Range 500, left one-half click.”
(2) The soldier at the rifle raises the sight leaf, sets the
sight with the announced range and one-half click (point)
of left windage, and resumes the correct firing position.
(3) The instructor checks the sight setting.
c. Each group then performs the exercise explained above,
under the supervision of its group instructor, until all are
proficient in accurate and rapid sight setting.
72. Sight Setting and Aiming Exercise.—a. The purpose
of the sight setting and aiming exercise is to develop accuracy
and speed in setting the sights and aiming the rifle.
b. The . target shown in figure 27 is set up 1,000 inches
from the rifle; a trained soldier is in the correct prone posi-
tion with the bipod correctly adjusted. The instructor then
demonstrates the exercise as follows:
(1) The instructor announces the range and windage and
designates the target, for example, “Range 300, right three-
fourths click, figure No. 1.” After announcing the range and
windage, the instructor pauses a sufficient length of time to
permit the automatic rifleman to set the sights, and then des-
ignates the target. The automatic rifleman, having set the
sights, then moves his body and the rifle until the sights are
accurately alined upon the designated aiming point.
(2) The instructor then checks the sight setting, pointing
out the errors, if any.
c. The men then perform the exercise explained above
under the supervision of the group instructors until all are
proficient in setting the sight and aiming the rifle on a
designated aiming point within a time limit of 10 seconds.
73
72-73
BASIC FIELD MANUAL
Each exercise will start with the sight leaf down and the
slide set at 500 yards.
73. Trigger Manipulation Exercise.—a. General.—The
trigger is pressed in such a way as to fire the first shot with-
out affecting the aim. This is accomplished by holding the
aim steadily while pressing the trigger promptly with a con-
stantly increasing pressure. This pressure is applied toward
the rear by the independent action of the index finger,
until the bolt is released. The length . of burst is de-
pendent on the amount of time the trigger is held all the
way to the rear. In firing bursts at the slow cyclic rate,
the trigged must be pressed quickly all the way to the rear
or a burst at the normal cyclic rate will occur. To fire single
shots, the change lever is set at the slow cyclic rate, the
trigger must be pressed quickly all the way to the rear, and
immediately released. This can be accomplished if the trig-
ger is released before the slide reaches its forward position.
Once taught, these methods of pressing the trigger are car-
ried out in all preparatory exercises or the value of the
practice will be lost.
b. Trigger manipulation.—Trigger manipulation exercises
are carried out in the preparatory exercises regardless of the
fact that the men undergoing instruction may have just com-
pleted firing with the United States rifle, caliber .30, M1903,
or the United States rifle, caliber .30, Ml. The forward
movement of the bolt when the trigger is pressed is confusing
to many men and causes them to allow the alinement of the
sights to become incorrect. The rifle is held steady and in
perfect alinement during this forward movement.
c. Taking up trigger slack.—The first movement of the
trigger which takes place when light pressure is applied is
called “taking up the slack.” It is part of the position exer-
cise, because this play must be taken up by the finger as soon
as the correct position is assumed and before careful aiming
is begun. The entire amount of slack in the trigger is taken
up by one positive movement of the finger.
d. Calling the shot.—The pupil always notices where the
sights are pointed at the instant the rifle is fired, or when the
bolt reaches its forward position in simulated fire, and calls
74
BROWNING AUTOMATIC RIFLE, CAL. .30, M1918A2 73-74
out at once where he thinks the bullet will hit. In automatic
fire he calls the first shot.
e. Scope of instruction.—(1) The pupil is first taught trig-
ger manipulation in the prone position. In this position, he
can hold steadily while he presses the trigger. After profi-
ciency is obtained in the prone position, trigger manipula-
tion is practiced in the sitting and kneeling positions.
(2) In all exercises where fire is simulated, men will assume
the correct position, carry out the correct principles of aim-
ing, pressing the trigger, and calling the shot.
74. Exercises in Changing Magazines (fig. 26).—a. Exer-
cises should be conducted in which the soldier changes his
own magazines. In these exercises, the following points
should be stressed:
(1) In the prone position when the last shot (burst) in
the magazine is fired, the automatic rifleman pushes the
magazine release with his right thumb, at the same time
pulling the operating handle all the way to the rear and
pushing it forward with the left hand. He then withdraws
the magazine with his left hand, if it has not fallen out of
its own weight. When in the kneeling, sitting, and anti-
aircraft positions, the automatic rifleman removes the rifle
from the shoulder, places the butt on the thigh, presses the
magazine release with the right thumb (if necessary, re-
moves the magazine from the rifle with his left hand), then
with the right hand pulls the operating handle to the rear
and then pushes it forward.
(2) Full magazines are so placed in the belt that, when
grasped and carried forward, the long portion will be to the
rear. Thus, they may be readily inserted in the magazine
opening in the receiver.
(3) Empty magazines are picked up and placed in the
belt. This habit will minimize loss of magazines during firing
and field combat.
(4) Each soldier changes his own magazines. He must be
able to do it in 2 to 4 seconds while in any position. He
tests all magazines before loading them to see that they will
fall out of their own weight when empty.
75
74
BASIC FIELD MANUAL
b. These operations are taught as a drill, in which the
following points should be carefully observed:
(1) Magazines are placed in the magazine belt so that
when grasped and carried forward by the right hand the long
portion will be to the rear.
® Pressing magazine release with right thumb and drawing operat-
ing handle to rear with left hand.
® Inserting new magazine.
Figure 26.—Changing magazine.
76
BROWNING AUTOMATIC RIFLE, CAL. .30, M1918A2 74-75
(2) After the last shot, the operating handle is drawn
to the rear and then pushed forward.
: (3) Magazine is dropped out after the last shot.
(4) The new magazine is drawn from the belt and placed
in the receiver with one rapid, smooth movement.
(5) Empty magazines are picked up and placed in the belt.
In known distance range firing, they will be placed in the
belt at the conclusion of the firing of the exercise.
75. Automatic Fire Exercise.—a. Automatic fire exercises
enable the soldier to gain skill in the manipulation of the
automatic rifle. Efficient manipulation is an important
factor in automatic rifle firing.
b. Automatic fire exercises are .held at 1,000 inches on the
United States rifle, caliber .30, Ml, target (fig,. 27). The
exercises include observance of the fundamentals of sight-'-1
ing, positions, and trigger manipulation as taught in the
preceding exercises.
c. Automatic fire exercises are conducted as follows:
(1) The instructor announces the range as “Range, 300,”
and designates the target and number of rounds as “Figures
5 to 6, 16 rounds.”
(2) The automatic rifleman sets his sights at the an-
nounced range and aims at figure No. 5. He simulates firing
a 2-round burst, traverses right to the next figure, and simu-
lates firing another burst of 2 rounds, and so on until he
has completed the simulated firing of 16 rounds.
d. The duties of the coach in automatic fire exercises are
to insure that—
(1) The sight.is.set for the range designated.
(2) The correct position is taken.
(3) The slack is taken up promptly.
(4) The breath is held while aiming.
(5) The trigger is pressed properly.
(6) Each time the pupil completes the simulated firing
of two rounds on a figure, he promptly traverses right to the
next figure.
(7) The pupil aims at the proper figure on the target
by cautioning him after each burst to shift his aim to the
next figure.
535351°—43-
£
77
75-77
BASIC FIELD MANUAL
(8) The eye is kept on the target, the elbows are kept
in place, and the butt of the rifle is kept to the shoulder.
(9) The automatic rifle is reloaded with an empty maga-
zine quickly and without fumbling.
76. Windage.—a. Direction of wind.—The horizontal clock
system is used to describe the direction of the wind. In this
system, the flrer is assumed to be at the center of a clock
and the target at 12 o’clock. A 3 o’clock wind then blows
directly from the right, a 9 o’clock wind directly from the
left, and other winds from their corresponding directions
on the clock. Right windage is taken to counteract the ef-
fects of winds coming from the right of the clock and left
windage to counteract those coming from the left.
b. Windage rule.—The range (expressed in hundreds of
yards) multiplied by the velocity of the wind and divided
by 40, equals the number of clicks to allow for a 3 o’clock
or a 9 o’clock wind. The amount of windage to use for
the first shot is determined by the above rule. W. D., A. G. O.
Form No. 82 (Combination Score Book) (29 March 1942)
will be altered to conform with this rule.
c. Windage-gage rule.—One click of the windage knob
(or one point of windage), which corresponds to 1 mil,
moves the strike of the bullet 1 inch on a target at 1,000
inches, 36 inches (1 yard) at 1,000 yards, or one-tenth of
36 inches, 3.6 inches, per 100 yards of range. For purposes
of this rule, a click of the windage knob will be considered
to move the strike of the bullet 4 inches for each 100 yards,
of range. Right windage moves the strike of the bullet to
the right, left windage to the left. W. D., A. G. O. Form
No. 82 (29 March 1942) will be altered to conform with this
rule.
77. Elevation.—a Range.—Changes in elevation are
made on the sight of the rifle for the primary purpose of
adjusting for range.
b. Effect of light.—Light has an effect upon aim, generally
causing men to aim slightly lower in a poor light than in a
good one. Slight corrections in elevation are therefore neces-
sary at times for this reason.
78
BROWNING AUTOMATIC RIFLE, CAL. .30, M1918A2 77-80
c. Elevation rule.—One click of the elevating knob, which
is 1 mil, moves the strike of the bullet 1 inch on a target
at 1,000 inches, 36 inches (1 yard) at 1,000 yards, and one-
tenth of 36 inches, or 3.6 inches, per each 100 yards of range.
For purposes of this rule, a click of the elevating knob will
be considered to move the strike of the bullet 4 inches for
each 100 yards of range. W. D., A. G. O. Form No. 82
(29 March 1942) will be altered to conform with this rule.
78. Explanation of Zero.—a. The zero of an automatic
rifle for each range is that sight setting, both elevation and
windage, which will place the center of the shot group in the
center of the silhouette on a normal day when there is no
wind. It may vary for the same rifle with different men on
account of differences in eyesight. Each man should be re-
quired to know the zero for his own rifle for the various
ranges.
b. Instructions for zeroing the rifle on a 1,000-inch range
and on the known distance range are given in paragraph 90.
79. Score Book.—W. D., A. G. O. Form No. 82 (29 March
1942) is used for both the automatic rifle and the service
rifle.
80. Examination.—a. Men will be examined by the platoon
leader prior to proceeding to range practice to determine
their proficiency in the subjects covered in chapter 1 and
in this section.
b. This examination consists of questions, as indicated be-
low, which are designed to bring out the soldier’s knowledge
of the weapon, and of demonstrations on his part to test
his practical ability in the subjects which have been covered.
The questions are answered by the soldier in his own words.
Q. What is the name of the automatic rifle? A. The
Browning automatic rifle, caliber .30, M1918A2.
Q. What type weapon is it? A. Shoulder weapon, gas op-
erated, air cooled, magazine fed.
Q. How is the barrel cooled? A. There is no special cool-
ing device. The barrel is exposed to the air.
Q. What is meant by gas operated? A. All of the func-
tions of the automatic rifle, such as extraction and feeding.
79
80
BASIC FIELD MANUAL
are accomplished by a small portion of gas escaping through
a port in the barrel and striking on a piston.
Q. How is the automatic rifle disassembled and assembled
and what are the names of the parts? A. (Man being ex-
amined disassembles the rifle, names the parts as he lays
them out in order from left to right, and then assembles the
rifle.)
Q. How many rounds will the magazine hold? A. Twenty.
Q. What care must be taken of the magazines? A. They
will be kept cleaned and well oiled. They will not be dented
or bent.
Q. How are magazines filled? A. By using the magazine
filler or by hand.
Q. How are the magazines changed in this rifle? A. (Man
being examined demonstrates changing magazines.)
Q. Why should the accessory and spare parts kit be carried
complete at all times? A. Because it contains equipment
which is necessary to keep the rifle in action.
Q. How is the firing pin removed without disassembling the
rifle? A. (Man being examined shows how it is done.)
Q. How is the extractor removed without disassembling
the rifle? A. (Man being examined shows how it is done.)
Q. What is the first thing to do in case of any stoppage?
A. Pull back and push forward the operating handle, tap the
magazine, aim, and try to fire again.
Q. What is the next thing to do in case you have tried to
fire again and the rifle still fails to fire? A. Remove the
rifle from the shoulder and look in the ejection opening.
Q. What are the two main causes of the rifle firing a
single shot after the first phase of immediate action has
been applied? A. Insufficient gas and magazine trouble.
Q. What should always be done before firing to minimize
stoppages? A. Inspect the magazines, properly adjust the
gas cylinder, clean and oil the gas cylinder and operating
parts, clean the chamber, and simulate firing two shots with
the change lever set at the slow cyclic rate.
Q. What should be done during firing to minimize stop-
pages? A. Clean the chamber, note the force of ejection,
oil the gas cylinder frequently, clean the gas cylinder, and
oil operating parts.
80
BROWNING AUTOMATIC RIFLE, OAL, .30, M1918A2
80
Q. What usually causes failure to feed? A. Magazine
trouble.
Q. How can you tell when the rifle is not getting enough
gas? A. The rifle will fire but the bolt will not go to the
rear.
Q. If your rifle is giving you trouble, due to failure to
extract, what is probably the trouble? A. The chamber of
the rifle has not been properly cleaned.
Q. What is this (drawing a circle on the ground or on
paper) ?—A. A circle.
Q. Where is the center of it? A. Here (pointing to the
center).
Q. Suppose that circle represents a peep sight through
which you are looking and that you are told to bring the
top of the front sight to the center of it; where would the
top of the front sight be? A. Here (pointing to the center
of the circle).
Q. Make a mark in the circle to represent the front sight.
Make a small silhouette to represent the target. Is the
silhouette in the center of the peep sight? A. No; the cen-
ter of the bottom edge of it is in the center of the peep sight.
Q. Why. A. Because the top of the front sight is in the
center and just touches the bottom edge of the silhouette.
Q. Should the front sight be held up into the bottom of
the silhouette? A. No; it just touches the bottom edge of
the silhouette, so that all of the silhouette still can be seen
clearly.
Q. What is this (indicating sighting bar) ? A. Sighting
bar.
Q. What is it for? A. To teach me how to aim.
Q. Why is it better than an automatic rifle for this pur-
pose? A. Because the sights on it are much larger, and
slight errors can be seen and pointed out more easily.
Q. What does this represent? A. The front sight.
Q. And this? A. The rear sight.
Q. What is this? A. The eyepiece.
Q. What is the eyepiece for? A. To cause me to place my
eye in such a position as to see the sights in the same aline-
ment as that set by the coach.
Q. Is there any eyepiece on the automatic rifle? A. No;
81
80
BASIC FIELD MANUAL
I learn by the sighting bar how the sights look when properly
alined, and I must hold my head so as to see the sights the
same way when aiming an automatic rifle.
Q. How do you hold your head steadily in this position
when aiming an automatic rifle? A. By resting my cheek
firmly against the stock.
- Q. Where do you focus the eye when aiming the auto-
matic rifle? A. On the front sight.
Q. What is wrong with the sight setting shown on this
sighting bar? A. (The instructor now adjusts the sights of
the bar, making various slight errors; first, to show the cor-
rect and incorrect adjustment of the sights, and then, with
the sights properly adjusted, he sights on the small silhouette
to demonstrate correct and incorrect adjustments, requiring
the men to point out any errors.)
Q. Can you demonstrate the proper sight picture on the
sighting bar? A. (The man being examined adjusts the
movable rear sight and silhouette so that the sights are cor-
rectly alined on the target, and then hands it to the in-
structor for verification.)
Q. How do you hold the breath while aiming? A. I take
in an ordinary breath and then let out a little; then, by
closing the throat, hold the remainder while aiming and
pressing the trigger.
Q. Take the prone position, aim, and simulate firing a
shot at that mark. (The instructor must assure himself
that the man knows how to hold his breath properly while
aiming. Many men have great difficulty in learning to do
this correctly.)
Q. What is the best position from which to fire the auto-
matic rifle? A. The prone>position, using the hinged butt
plate and the bipod rest.
Q. Why is the sling used with the automatic rifle in the
sitting and kneeling positions? A. To assist the firer in hold-
ing the rifle steady.
Q. What is wrong with these positions? A. (The instructor
assumes the kneeling, sitting, and prone positions and has
the man being examined point out errors, if any. The gun
sling is properly adjusted in the sitting and kneeling posi-
tions.)
82
BROWNING AUTOMATIC RIFLE, CAL. .30, M1918A2 80
Q. How do you assume the firing positions for the auto-
matic rifle? A. The man being examined then assumes the
correct prone, sitting, kneeling, antiaircraft, and assault fire
positions.
Q. How do you press the trigger in firing bursts at the
slow cyclic rate? A. I press the trigger rapidly all the way to
the rear with a constantly increasing pressure, applied by
the independent action of the index finger, and hold the
trigger all the way to the rear for the length of burst
desired.
Q. What care must be taken, with reference to your sight
alinement of the automatic rifle, after pressing the trigger?
A. I must be careful to keep my sights alined correctly on the
target from the time the bolt starts forward until the car-
tridge is fired.
Q. When firing bursts, are all shots aimed shots? A. No;
the first shot of each burst is an aimed shot.
Q. How do you insure that each shot, after the first shot
of the burst, hits the target? A. I insure that succeeding
shots of the burst will hit the target by taking the correct
position and holding the rifle steady throughout the burst.
Q. Is it necessary to take a long time in pressing the trig-
ger? A. No; necessary rapidity is developed by practice in
trigger manipulation exercises.
Q. How do you press the trigger in firing single shots? A.
I press it quickly all the way to the rear and release it im-
mediately.
Q. In firing several bursts, how do you gain time so as not
to be compelled to hurry in aiming? A. I gain time by
changing magazines rapidly and by keeping my eye on the
target while firing.
Q. How does keeping your eye on the target help you to
gain time? A. A man who looks away from his target loses
time in finding his own target again.
Q. Now show me how you load a magazine into the re-
ceiver. A. (Soldier demonstrates.)
Q. How are the magazines changed while firing in the
prone position? A. (Soldier demonstrates.)
Q. Is it important to get into the correct position before
beginning to shoot? A. Yes; even though it takes more
83
80
BASIC FIELD MANUAL
time, I should always get into the correct position before
beginning to shoot.
Q. What is meant by calling the shot? A. To say where
you think the bullet hit in firing single shots and where
the first round hit in firing bursts.
Q. How can you do this? A. By noticing exactly where
the sights point when the single shot or the first round is
fired.
Q. What is this (holding up a score book)'? A. A score
book.
Q. What are these numbers for (indicating the numbers
above and below a represented target in the score book) ?
A. Vertical lines drawn through those numbers show the
amount of change in windage (clicks) necessary to bring the
next shot into the center of the silhouette.
Q. If you are firing at a range of 200 yards and a shot
hits here (indicating), what change would you make on your
sight to bring the next shot into the center of the sil-
houette? A. (Soldier explains.)
Q. What are these numbers for (indicating the numbers
on the right and left of a represented target in the score
book) ? A. Horizontal lines through those numbers show the
amount of change in elevation (clicks) necessary to bring
the next shot into the center of the silhouette.
Q. What effect does moving the rear sight have on the
shot? A. It moves it in the same direction as the rear sight
moves.
Q. If you want to make a shot hit higher, what do you do?
A. I increase my elevation.
Q. If you want to make your shots hit more to the right,
what do you do? A. I move my rear sight to the right.
Q. If you move your rear sight one click of windage, how ’
much will it move the strike of the bullet? A. Four inches
for each 100 yards of range.
Q. It you change‘the elevation setting by one click, how
much will it move the strike of the bullet? A. Four inches
for each 10 Oyards of range.
Q. What sight changes would you make to cause the next
shot to hit in the center of the target (the instructor places a
spotter at some place other than the center of the full-sized
84
BROWNING AUTOMATIC RIFLE, CAL. .30, M1918A2
80
D target to represent a shot properly fired at 500 yards with
zero windage and sights set at 500 yards)? A. (The man
being examined makes the required sight changes, and the
instructor verifies the sight setting.)
Q. What are the three principal uses of the score book?
A. To show me where my shot group is located, to indicate
how much change in the sight is necessary to move a shot
or group of shots to the center of the target, and to make
a record of the sight settings of my rifle for the different
ranges under various conditions so that I will know the zero
of my rifle.
Q. In firing at ranges up to and including 600 yards, what
is the only weather condition for which you make sight
corrections? A. Wind.
Q. What four things do you do in cleaning a rifle bore after
it has been fired? A. I first remove the powder fouling from
the bore. I then dry the bore thoroughly of the liquid used to
remove the fouling. Then I inspect the bore, repeating the
cleaning if necessary. Finally, I oil the bore.
Q. How do you remove powder fouling from the bore? A.
by swabbing it thoroughly with patches saturated with bore
cleaner; or, in the absence of bore cleaner, with soapy water,
preferably warm.
Q. How do you dry the bore? A. By running clean patches
through the bore until it is thoroughly dry.
Q. How do you protect the bore from rust? A. By swab-
bing it thoroughly with a cleaning patch dampened with oil.
Q. How should the metal parts of the rifle be oiled? A.
The rifle should be oiled by placing a thin film of oil over all
metal parts after cleaning.
Q. Why should the barrel not be removed from the breech
and cleaned? A. It is very difficult to replace the barrel
as tightly as it should be, and as soon as the barrel works
loose the rifle will develop head space trouble.
c. As an essential part of this examination, the form shown
in paragraph 57e will be completed by the platoon leader for
each individual who is to Are.
85
81-83
BASIC FIELD MANUAL
Section III
COURSES TO BE FIRED
81. Scope and Object of Range Practice.—a. Range prac-
tice is divided into two phases:
(1) 1,000-inch range practice.
(2) Known distance range practice.
b. In all range firing, the automatic rifle will be set for the
slow cyclic rate.
c. Practice on the 1,000-inch range is included in all marks-
manship courses to conserve time and troop labor during the
range season. The 1,000-inch range provides a convenient,
short-distance range whereon the soldier can receive train-
ing with service ammunition in the fundamentals of auto-
matic rifle marksmanship. Firing on the 1,000-inch range
will be included in instruction practice for every individual
firing a qualification course. The amount of such firing
within the limits set forth in the tables will be determined
by the company or higher commander. In general, recruits
will require more of this type of firing in their instruction
than previously qualified men.
E 82. Sequence of Firing.—The instruction practice out-
lined for each course is intended to serve as a guide. Varia-
tions may be made in the sequence prescribed within instruc-
tion practice to take advantage of time, weather, and range
facilities. Variations may be made in the sequence prescribed
within record practice for the same reasons. In no case
will an individual’s record practice in a course be inter-
spersed with his instruction practice.
83. Marksmanship Courses.—One of the following courses
will be fired by each automatic rifleman. The conduct and
rules governing these courses are covered in paragraphs
84 to 124, inclusive. The particular course to be fired will
be designated by higher authority in accordance with the
provisions of AR 775-10. In all exercises which require
single shots, the magazine will be loaded with the five rounds
necessary for the complete score.
86
BROWNING AUTOMATIC RIFLE, CAL. .30, M1918A2 83
a. Course A.—(1) 1,000-inch range.—(a) To zero the rifle.
TABLE I
Range (inches) Time1 Shots Target (1,000- inch) Position Remarks
1,000_ __ No limit 4_.__ No. 1 Prone, bipod rest _ Single shot.
I,000--_ do 3____ No. 2 Sitting Loop or hasty sling. Single shot.
1,000--- do 3..._ No. 3 Kneeling Do.
(b) Instruction practice.
TABLE II
Range (inches) Time Shots Target (1,000-inch) Position Remarks
1,000.-- 5 minutes... 5 No. 1 Prone, bipod rest.. Single shot.
1,000--. do 5._.. No. 2 Sitting. Loop or hasty sling. Single shot.
1,000... do л No.3_.__ Kneeling Do.
1,000... 2 minutes 15 seconds. 40...- No. 5 to No. 6. Prone, bipod rest.. Search and traverse, 8 magazines of 5 rounds, each in short bursts.1
1,000... 1 minute 25 seconds. 40.__ No. 7 to No. 8. do Search and traverse, 2 magazines of 20 rounds, each in short bursts.।
1,000... 20 15... No. 4 do One magazine, 15 rounds, 5-round bursts.
1 In bursts of 2 and 3 or 3 and 2 rounds.
87
83
BASIC FIELD MANUAL
(2) Known distance range.—(a) Instruction practice.
table in
Range (yards) Time Shots Target Position Remarks
200 No limit. 5 Rifle D Prone, bipod rest. Single shot.
200 .__do 5 do Kneeling Loop or hasty sling. Single shot.
300 .. _do 6 do Prone, biped rest. Single shot.
600 ...do 5 do do Do.
TABLE IV
Range (yards) Time Shots Target Position Remarks
200 No limit. 5 Rifle D Kneeling Loop or hasty sling. Single Shot.
200 _..do 5 do Prone, bipod rest. 1 magazine. 5 rounds, in short bursts.
300 . --do 5 do do 1 magazine, 5 rounds, in short bursts.
500 . __-do 5 do do Single shot.
500 ___do 10 do .. ..do 1 magazine, 10 rounds, in short bursts.
TABLE V
Range (yards) Time (seconds ) Shots Target Position Remarks
200 No limit. 5 Rifle D Kneeling Loop or hasty sling. Single shot.
200 40 15 do Prone, bipod rest. 3 magazines, 5 rounds each, in short bursts.
300 40 15 do do 3 magazines, 5 rounds each, in short bursts.
500 No limit. 5 do do Single shot.
500 25 10 do do 1 magazine, 10 rounds, in short bursts.
88
BROWNING AUTOMATIC RIFLE, CAL. .30, M1918A2
83
TABLE VI
Range (yards) Timo (seconds) Shots Target Position Remarks
200 40 15 Rifle D Prone, bipod rest. 3 magazines, 5 rounds each, in short bursts.
300 40 15 do do 3 magazines, 5 rounds each, in short bursts.
500 25 10 do do 1 magazine, 10 rounds, in short bursts.
(b) Record practice.
TABLE VII
Range (yards) Time (seconds) Shots Target Position Remarks
200 No limit. 5 Rifle D Prone, bipod rest. .do Single shot. 3 magazines, 5 rounds each, in short bursts. 3 magazines, 5 rounds each, in short bursts. Single shot. 1 magazine, 10 rounds, in short bursts.
200 40 15 .do
300 40 15 ... .do do. .
500 No limit. 5 .do do
500... 25.... . . 10 do do
b. Course B.—(1) 1,000-inch range.—Иге tables I and П.
(2) Known distance range.—(a) Instruction practice.
TABLE VIII
Range (yards) Time Shots Target Position Romarks
200 No limit.. 5 Rifle D Prone, bipod rest. Single shot.
200 ...do 5 do Kneeling Loop or hasty sling. Single shot.
300 ...do 5 do Prone, bipod rest. Single shot.
89
83
BASIC FIELD MANUAL
TABLE IX
Range (•yards) Time Shots Target Position Remarks
200 No limit. 6 Rifle D Kneeling Loop or hasty sling.
Prone, bipod rest. : Single shot.
200.-_.-_ ...do 6 do 1 magazine, 5 rounds, in short bursts.
300 ...do 6 •_ do do !Do.
TABLE X
Range (yards) Time (seconds) Shots Target Position Remarks
200 No limit. 5 Rifle D..._. Kneeling. __ 2. Loop or hasty sling. Single shot.
200 40 15 do Prone, bipod rest. ' 3 magazines, 5 rounds each, in short] bursts.
300 40 15 do do J. Do.
TABLE XI
Range (yards) Ttaie (seconds) Shots Target Position Remarks
200. .... 40 15 10 Rifle D do Prone, bipod rest. do 3 magazines, 5 rounds each, in short bursts. Do.
300 40
(b) Record practice.
TABLE XII
Range (yards) Time (seconds) Shots Target Position Remarks
200 No limit. 6 Rifle D ; Prone, bipod rest. Single shot.
200 40 16 do do 3 magazines, 6 rounds each, in short bursts.
300 40 15 do do Do.
90
BROWNING AUTOMATIC RIFLE, CAL. .30, M1918A2 83
c. Course C.—(1) 1,000-inch range.—Fire tables I and П.
(2) Known distance range.—(a) Instruction practice.
TABLE XIII
Range (yards) Time Shots Target Position Remarks
200 No limit. 6 Rifle D Prone, bipod rest. Single shot.
200 .-•-do 5 do Kneeling Loop or hasty sling. Single shot.
TABLE XIV
Range (yards) Time Shots Target Position Remarks
200 No limit ...do 5 5 Rifle D do Kneeling Prone, biped rest. Loop or hasty sling. Single shot. 1 magazine, 5 rounds, in shoit bursts.
200
TABLE XV
Range (yards) Time (seconds) Shots Target Position Remarks
200 200 No limit. 40 5 16 Rifle D do Kneeling Prone, bipod rest. Loop or hasty sling. Single shot. 3 magazines, 5 rounds each, in short bursts.
TABLE XVI
Range (yards) Time (seconds) Shots Target Position Remarks
200 40 15 Rifle D Prone, bipod rest. 3 magazines, 5 rounds each, in short bursts.
91
83
BASIC FIELD MANUAL
(b) Record practice.
TABLE XVII
Range (yards) Time (seconds) Shots Target Position Remarks
200 No limit 5 Rifle D Prone, bipod rest. Single shot.
200 ...do 5 do Kneeling Loop or hasty sling. Single shot.
200 80 30 do Prone, bipod rest. в magazines, 5 rounds each, in short bursts.
d. Course D.—1,00.0-inch range.— (1) Instruction prac-
tice.—Fire tables I and II and repeat table II.
(2) Record practice.—Fire table П.
e. Transition firing.—(1) This practice is conducted on
field firing range according to the procedure explained below
(see also par. 238). Tables I and II will be fired after record
practice and prior to firing combat exercises.
TABLE I
Range (yards) Time (seconds) Shots Target.1 Position Remarks
200 60 10... 3 E silhou- Prone, bipod Bursts of 2 rounds.
ettes.. rest.
300 60 10-.. do do Do.
500 60 10... do do Do.
। Targets should be approximately 5 yards apart and as near the prescribed range
as the terrain admits.
TABLE II
Rango 1 Time (seconds) Shots Target Position Remarks
120 20... 6 E silhou- ettes. Prone, bipod rest. Bursts of 2 rounds.
1 Two targets between ranges of 200 and 300 yards, two targets between 300 and
400 yards, and two between 400 and 500 yards. Each pair of targets will he staggered
and separated in depth from 25 to 50 yards.
92
BROWNING AUTOMATIC RIFLE, CAL. .30, M1918A2 83
(2) Targets are fastened to sticks and operated by men
protected in individual pits.
(3) Targets are exposed on signal of the officer in charge
of firing. Targets are withdrawn individually when hit.
Ricochets are counted as hits. No marking of targets is re-
quired, since a hit is scored when the target is withdrawn.
(4) The following method of scoring will be used:
(a) Table I.
For each target hit---------------------------- 1
For each two unexpended rounds, not exceeding
four rounds, if all targets are hit---------- 1
Note.—И an odd number of unexpended rounds remain, the next
lower (even) number is used in computing the score.
(&) Table II.
For each target hit:
Between 200 and 300 yards.
Between 300 and 400 yards.
Between 400 and 500 yards.
For each two unexpended rounds, not exceeding
eight rounds, if all targets are hit------------- 3
Note.—If an odd number of unexpended rounds remain, the next
lower (even) number is used in computing the score.
(5) Only one person will be assigned to a group of targets
in each order. Prior to the start of the exercise, the auto-
matic rifleman will be in the prone position with the bipod ad-
justed. The coach will set the sights off in elevation sufficient
to require an adjustment of sights. When all is ready, the
officer in charge of firing commands: LOAD. When the
targets appear, the automatic rifleman will adjust his sights
before commencing fire.
(6) Each automatic rifleman will fire tables I and II. With-
in prescribed ammunition allowances for qualification in
arms, each automatic rifleman will retire table II until he
fires a satisfactory score. The satisfactory score is 8.
535351°—43-
-7
93
84-85
BASIC FIELD MANUAL
Section IV
RANGE PRACTICE
84. General.—a. Training programs and schedules.—
Training programs and schedules will provide a period for
range practice.
b. Range practice.—Range practice includes both 1,000-
inch firing and known distance firing.
c. Officers’ range practice.—The officers of an organization
should be enabled to complete their own range practice in
advance of their men whenever practicable in order that their
entire attention may be given to their instructional duties.
d. Uniform.—The uniform to be worn during instruction
practice and record practice will be prescribed by the com-
manding officer. The automatic rifleman’s belt will be worn
during instruction practice and record practice.
e. Use of pads.—The use of elbow pads is recommended.
The use of shoulder pads is unnecessary but is permitted.
85. Organization.—The officers, noncommissioned officers,
and coaches of the units on the range will perform duties
generally similar to those prescribed for them in prepara-
tory marksmanship instruction (par. 57).
a. Officer in charge of firing.—An officer in charge of firing
will be designated by the responsible commander. This officer
or his deputy will be present during all firing and will be in
charge of the practice and safety precautions on the range.
b. Range officer.—A range officer with such commissioned
and enlisted assistants as are necessary will be appointed by
the post or station commander well in advance of range
practice. At large camps or stations where the coordination
of range practice for different organizations is involved, he
may function as the direct representative of the camp or
station commander. In other cases he is responsible to
the officer in charge of firing and in all cases he cooperates
closely with him. The range , officer will make timely esti-
mates for material and labor to place the range in proper
condition for range practice, and will supervise and direct
all necessary repairs to shelters, butts, targets, firing points,
and telephone lines. He exercises direct supervision over
94
BROWNING AUTOMATIC RIFLE, CAL. .30, M1918A2 85-88
the practical operation of the rifle range during the prac-
tice season. He regulates the distribution of ranges and
targets and in general assists the officer in charge of firing
by using the means necessary to secure efficient and accurate
service from the working force of the range. He provides
safe conditions for the markers and any visitors. Whenever
necessary he provides range guards and instructs them in
the methods to be used for the protection of life and property
in the danger area.
c. Unit range officers.—During the operation of any range
by a unit the commanding officer thereof may detail an offi-
cer as unit range officer. The unit range officer will be
responsible to the commanding officer of the organization
to which the range is assigned for its efficient operation.
d. Pit detail.—An officer or noncommissioned officer with
such assistants as may be necessary will be detailed in charge
of arrangements in the pit. He will be responsible to the
officer in charge of firing for the discipline, efficiency, and
safety of all pit details. He sees that all of the target equip-
ment is kept in serviceable condition; that the desired tar-
gets are ready for firing at the appointed time; and tljat all
target details are provided with the proper flags, marking
disks, paste, pasters, and spotters.
86. Use of Dummy Cartridges.—The corrugated type of
dummy cartridges may be used in range practice. When
ammunition must be conserved, a proportion of the corru-
gated type dummies may be included in magazines with live
ammunition. The use of any other type of range dummies
is prohibited.
87. Firing Points.—All firing points should have firm soil.
Loose loam or sand on the firing point has an adverse effect
on accuracy.
88. Coaching.—a. General.—(1) During instruction prac-
tice, each man on the firing line will have a coach to watch
him and to help him correct his errors. An average soldier
who has been properly instructed in the preparatory work
or who has been given instruction in coaching methods can
be used with good results and is used when more experienced
coaches are not available.
95
88-89
BASIC FIELD MANUAL
(2) It is good practice to have experienced coaches in
charge of one or more targets, usually on a flank, to which
pupils are sent for special coaching if required.
(3) Great patience should be exercised by the coach so
as not to excite or confuse the flrer. Everything is done
to encourage him. It is often a good plan to change
coaches. It is necessary to do so if the coach shows signs
of impatience.
b. Position of coach.—The position of the coach is as out-
lined in paragraph 70.
c. Duties of coach.—The success of the instruction de-
pends to a great extent on the thoroughness and exactness
with which the coach performs his duties. Duties of the
coach, in addition to those given in paragraph 59, are as
follows:
(1) To insure that the flrer has inspected his rifle for
cleanliness, proper adjustment, and functioning.
(2) To check the sight setting.
(3) To observe the flrer and see that he reaims after each
shot or burst.
(4) . To require the flrer to fire as required for each target.
(5) Point out errors and explain their effect.
(6) Keep constant watch on the adjustment and condi-
tion of the rifle.
(7) Keep constant watch to see that all safety measures
are strictly carried out.
E 89. To Aline Front Sight.—a. The front sight will be ad-
justed only as directed by an officer. If the front sight is
badly out of alinement, it should be adjusted at the first
opportunity by a qualified soldier. This is done by tapping
the front sight with a hammer and punch, then test firing,
and repeating this procedure as many times as necessary to
secure the proper sight alinement. Tapping the front sight
to the right moves the strike of the next bullet to the left,
and vice versa.
b. In'this firing, the windage setting is set at 0 and the
soldier aims at the bottom edge of a designated figure on
the 1,000-inch target. United States rifle, caliber .30, Ml. He
fires two or more rounds very carefully, using exactly the
same aiming point for all shots. The center of the resulting
96
BROWNING AUTOMATIC RIFLE, CAL. .30, M1918A2 89-90
shot group indicates how much and in what direction to move
the front sight. The soldier then verifies the front sight
adjustment by firing two more rounds.
c. If the shot group is to the right of the aiming point,
move the front sight to the right; if to the left, move the
front sight to the left. To move the strike of the bullet 1 inch
at a range of 1,000 inches requires a movement of the front
sight of only 0.025 inch. .
90. To Determine Zero of Rifle.—Each rifle will be
“zeroed” for the 1,000-inch range in the firing provided for
that purpose in table I. Each rifle will be zeroed for 300 and
500 yards during the instruction practice provided for those
ranges. Each man will keep a record of these zeroes in his
score book. It will be noted that the lowest graduation on
the rear sight leaf is 300 yards. When the rifle is fired at 200
yards with a sight setting of 300 yards, a shot will hit the
target approximately 6 inches above the point of aim. How-
ever, since the dimensions of the silhouette of the D target
are 26 inches wide and 19 inches high, a shot fired at 200
yards with a sight setting of 300 yards will be well within
the silhouette.
a. To zero rifle for 1,000-inch range.—(1) When the auto-
matic rifle is fired with the sights properly alined on the
bottom edge of the silhouette and the resultant shot group is
in the center of the silhouette, the rifle is zeroed.
(2) The first two or more rounds are fired at the black
silhouette of figure 1 (see fig. 27) with the sight set at 400
yards and zero windage. If necessary, corrections in eleva-
tion and windage to bring subsequent shots into the center
of the black silhouette are then made by turning the elevating
and windage knobs. Such corrections are applied after
every two or more shots under the direction of an instructor.
If the visibility of the shot groups is limited, the instructor,
after taking necessary safety precautions, may move along
the line of targets arid announce the corrections to the
coaches in terms of clicks. Changing the elevation or wind-
age one click moves the strike of the bullet on the target
approximately 1 inch on the 1,000-inch range.
b. To zero rifle for known-distance ranges.—(1) General.—
The position of the spotters on the target will permit the
97.
90-91
BASIC FIELD MANUAL
necessary c6rrections in elevation and windage to be com-
puted by the elevating and windage rules, or by use of the
windage and elevation corrections shown in the score book.
They are then applied as clicks to the sight. These sight
settings should be made under the supervision of an instructor
or experienced coach after groups of two or more rounds are
fired.
(2) At each range.—Set the elevation at the desired range.
Set the windage so as to allow for existing wind, or, if there is
no wind, at zero. Fire two rounds, or more if necessary,
single shot to obtain a shot group, and then apply corrections
in clicks of elevation and windage to bring the center of the
shot group into the center of the target. Record these cor-
rections in the score book as the zero for that range.
91. Instruction Practice on 1,000-Inch Range.—a. In-
struction practice on the 1,000-inch range will conform to the
regulations given in paragraphs 94 to 124, inclusive, for record
practice except that coaching is permitted and additional
personnel to score targets is not required.
b. Each exercise on the 1,000-inch range will be preceded
by an appropriate fire order.
(1) The form of fire order for firing without time limit
is as follows:
(a) Announce the position.
(b) rounds single shot, with ball cartridges, load.
(c) Figure 1.
(d) commence firing.
(e) CEASE FIRING.
(f ) CLEAR RIFLE.
(2) For firing with time limit, the form of the fire order
is as follows:
(a) Announce the position, number of magazines, and
number of rounds per magazine.
(b) With ball cartridges, load.
(c) Figures 3 and 4. ___rounds on each figure in __2_
round bursts.
(d) commence firing.
(e) CEASE FIRING.
(7) CLEAR RIFLE.
98
BROWNING AUTOMATIC RIFLE, CAL. .30, M1918A2 91-92
c. If the 1,000-inch range is equipped with pits and sliding
targets similar to those of a known distance range, the fire
orders for firing prescribed for the known distance range
under paragraph 92 apply except that b(2) (c) above is sub-
stituted for paragraph 92b(2) (c).
92. Instruction Practice on Known Distance Range.—a.
Instruction practice is carried out in conformity with the
regulations governing record practice as given in paragraphs
94 to 124, inclusive, except that additional personnel for
scoring targets are not required and each firer will have a
coach with him on the firing line. The officer in charge of
firing may prescribe the sequence of firing the courses of
instruction practice.
b. Each exercise on the known distance range will be
preceded by an appropriate fire order.
(1) The form of fire order for firing without time limit
is as follows:
(a) Announce the position and number of rounds to be
fired.
(b) With ball cartridges, load.
(c) Single shots.
(d) COMMENCE FIRING.
(e) CEASE FIRING.
(/) CLEAR RIFLE.
(2) For firing with time limit, the form of the fire order
is as follows:
(a) Announce the position, number of magazines, and
number of rounds per magazine.
(b) With ball cartridges, load.
(c) round bursts.
(d) Ready on the right?
(e) Ready on the left?
(/) READY ON THE FIRING LINE.
(д') CEASE FIRING.
(Л) CLEAR RIFLE.
The targets are withdrawn before the exercise starts and
the red flag displayed at the center target. The command
ready on the firing Ыне is transmitted to the officer or
noncommissioned officer in charge in the pits who will have
99
92-96
BASIC FIELD MANUAL
the red flag waved and lowered on its receipt and who will
cause the targets to be run up simultaneously 5 seconds
after the flag is lowered. Upon the expiration of the proper
time interval he causes the targets to be withdrawn. The
offieer in charge of the firing line gives the commands cease
firing and clear rifle when targets are withdrawn.
И 93. Safety Precautions.—For safety precautions to be
observed in handling and firing the automatic rifle, see
paragraph 241.
Section V
REGULATIONS GOVERNING RECORD PRACTICE
И 94. General.—a. Record practice for course, A, B, or C
is fired on the known distance range. Record practice for
course D is fired on the 1,000-inch range. Additional pro-
visions applicable to course D are given in paragraph 124.
b. Record practice will follow instruction practice.
c. When the record practice of an individual has com-
menced, it will be completed without interruption by any
other form of firing. Instruction practice and record prac-
tice will not be conducted simultaneously unless the two
types of practice are conducted on different parts of the
range.
d. The officer in charge of firing may, at his discretion,
require record practice upon the day on which instruction
practice is completed.
e. When no additional compensation for qualification in
arms is authorized, provided that ammunition allowances
for qualification are not exceeded, an individual may be
permitted to retire a qualification course until he has
qualified.
95. Fire Orders.—Every time-fire exercise fired in record
practice will be preceded by an appropriate fire order. Suit-
able forms for such orders are given in paragraphs 91 and 92.
96. Sequence of Exercises.—The exercises given in the
tables for record practice will be fired in the sequence di-
rected by the officer in charge of firing.
100
BROWNING AUTOMATIC RIFLE, CAL. .30, M1918A2 97-99
97. Stoppages.—a. When a stoppage occurs which cannot
be cleared by the application of the first phase of imme-
diate action, the firer will call “Time.” The officer in charge
of firing or one of his assistants will note the time left to
complete the exercise, and will then investigate the stoppage.
The stoppage will be reduced. If the stoppage was not due to
any fault of the firer, he will be authorized to load, aim, and
commence firing on command from the officer investigating
the stoppage, who will allow him the unexpired time. In
cases where the exact time remaining was not determined by
the officer in charge, the firer will be allowed 2 seconds per
round for the remaining rounds. When time and ammuni-
tion permit, the complete exercise will be retired.
b. If the stoppage is manifestly the fault of the firer in
failing to inspect either the rifle, magazines, or ammunition,
or is due to incorrect loading or replacing of magazines, no
time will be allowed to complete the exercise and only that
part of the exercise which was completed will be scored.
c. Hie firer will be allowed to fire rounds ejected in clear-
ing stoppages.
d. The soldier firing will not be given any information with
reference to the location of his previous hits on the incom-
pleted target until the score is completed.
e. Should a breakage occur, the rifle will be repaired or
a different rifle substituted and the exercise completed. If
a different rifle is substituted, the firer will be allowed extra
rounds to determine the zero of the substituted rifle.
/. The officer in charge or his assistants will render all
decisions on stoppages.
g. A firer, firing part of a time-fire exercise, will begin his
firing with the entire target exposed.
98. Men Marking Targets Not to Know Who Is Firing.—
Officers and men in the pit will not be informed as to who
is firing on any particular target. In case of such violation,
the firer will be required to repeat his score and appropriate
disciplinary action taken.
99. Target Details.—When the keeping of pit score cards
is not required the personnel necessary to execute properly
the remaining functions of pit details as described below
101
99-101 BASIC FIELD MANUAL
will be specified by the local commander. When the keeping
of pit score cards is required, the details for the supervision,
operation, marking, and scoring of targets during record
practice consist of officers, noncommissioned officers, and
privates, as follows:
a. One commissioned officer assigned to each two targets.
When it is impracticable to detail one officer to each two tar-
gets in the pit, an officer will be assigned to supervise the
marking and scoring of not to exceed four targets. In this
case the pit scores will be kept by the noncommissioned officer
in charge of each target who will sign the score cards. The
officer will take up and sign each score card as soon as the
complete score is recorded.
b. One noncommissioned officer assigned to each target to
direct and supervise the markers. This noncommissioned
officer will be selected from an organization other than the
one firing on the target which he supervises. If this is not
possible the officer assigned to the target will exercise special
care to insure correct scoring.
c. One or two privates assigned to operate and mark each
target. These privates may be selected from the organiza-
tion firing.
100. Organization of Firing Line.—a. Scorers are seated
in rear of and to the right of the person firing.
b. Telephone operators 5 paces in rear of the firing line.
c. Persons awaiting their turn to fire 10 paces in rear of
the firing line.
d. Low arm racks or rifle racks and cleaning racks 20
paces in rear of the firing line.
101. Score Cards and Scoring.—a. One score card will be
kept at the firing point. An additional score card will be
kept in the pits when firing is being conducted for additional
compensation for arms qualification, except that, for the
duration of the war, these pit score cards will not be required.
However, local commanders may specify that pit score cards
be kept. If both cards are required, they should be of differ-
ent colors. The cards at the firing point will bear the date,
the firer’s name, the number of the target, and the order
of firing; the pit card, when used, will not show the firer’s
102
BROWNING AUTOMATIC RIFLE, CAL. .30, M1918A2 101-102
name but will bear the date, the number of the target, and
the order of firing.
b. Entries on all score cards will be made in ink or with
indelible pencil when firing is being conducted for compen-
sation for qualification in arms. Also, under the same
condition, no alteration or correction will be made on the
card except by the organization commander or officer scorer
in the pit, who will initial each alteration or correction made.
c. The scores at each firing point will be kept by a non-
commissioned officer of some organization other than the
organization firing on the target to which he is assigned;
when no compensation for qualification in arms is author-
ized, selected privates or privates first class may act as
scorers. If this is not possible, company officers will exer-
cise special care to insure correct scoring. As soon as the
score is completed, the score card will be signed by the scorer,
taken up, and signed by the officer supervising the scoring.
As soon after the day’s firing as possible, the score cards
are turned over to the organization commander. Except
when required for entering new scores on the range, score
cards will be retained in the personal possession of the or-
ganization commander.
d. In the pit, the officer keeps the scores for the targets to
which he is assigned. As soon as a score is completed, he
signs the score card. He turns these cards over to the or-
ganization commander at the end of the day’s firing. They
will be checked for accuracy with the firing point cards after
the completion of each day’s firing. The score kept at the
firing point is the record score. All cases of discrepancy be-
tween the two record cards will be adjusted at the time they
are discovered by the officer in charge of the firing point.
(AR 345-1000.)
e. Upon completion of record firing and after the qualifica-
tion order is issued, all score cards and reports of boards in
his possession will be destroyed by the organization com-
mander.
102. Marking.—a. The value of the shot is indicated as
follows:
(1) A five by a white disk.
(2) A four by a red disk.
103
102-103
BASIC FIELD MANUAL
(3) A three by a white disk with a black cross.
(4) A two by a black disk.
(5) A miss by waving a red flag across the front of the
target.
(6) Ricochet hits will be counted as a miss and so indicated.
b. Spotters are placed in shot holes before running the
target up for marking.
c. The marking begins with the hits of the highest value.
The center of the disk is placed over the spotter, then swung
off the target and back again to the next spotter, care being
taken each time to show the correct face of the disk. The
marking must be slow enough to avoid confusing the scorer
at the firing point. When one spotter covers more than one
shot hole the disk is placed over it the required number of
times. Misses are indicated by slowly waving the red flag
across the face of the target one time for each miss.
103. Procedure in Firing Without Time Limit.—a. On the
firing line.—(1) One person only will be assigned to each
target in each order.
(2) As the values of each shot are signaled, the scorer
announces, in a tone sufficiently loud to be heard by the firer,
the target number, the number of the shot, and the value of
the hit. The scorer then records the value of the hits on
the score card.
(3) In the event that more than one round is fired in an
exercise calling for single shots, the number of rounds fired
in the burst will be scored as though they were fired singly.
(4) Whenever a target is marked before the individual who
is assigned thereto has fired, as will occur when another man
fires on the wrong target, the scorer will notify the officer in
charge of firing. The latter will notify the officer in the pit
assigned to the target to disregard the shot. This precaution
is necessary to prevent errors in the pit record. When pit
score cards are not required, the provision of this paragraph
may be amended by local commanders.
(5) When an individual fires on the wrong target, he will
not be scored a miss until the target to which he is assigned
has been pulled down and the miss signaled from the pit.
(6) If the target is not half masked at the completion of a
score thereon, or if it is half masked at the wrong time, the
104
BROWNING AUTOMATIC RIFLE, CAL. .30, M1918A2 ЮЗ-104
officer in charge of that firing point will adjust the matter at
once over the telephone. This precaution is necessary to
prevent the error from being carried through the scores that
follow. When keeping of pit score cards is not required, the
provisions of this paragraph will be disregarded.
b. In the pit.—(1) The target is withdrawn and marked
after each shot.
(2) In the event that more than one round is fired in an
exercise calling for single shots, the number of rounds fired
in the burst will be marked as though they were fired singly.
(3) When a shot is fired at a target, it is pulled down. The
noncommissioned officer indicates the location of the hit to
the officer assigned to the target who announces its value
and records it on the score card. A spotter is then placed in
the shot hole, the previous shot hole, if any, is pasted, and the
target is run up and marked. The noncommissioned officer
supervises the marking of each shot; the officer exercises
general supervision over the marking. When pit score cards
are not required, the provisions of this paragraph may be
amended by local commanders.
(4) When the pit score card indicates a score has been
completed, the target is half masked for about 30 seconds
as a signal to the firing line of such completion. At the
end of the 30 seconds, the target is pulled fully down, the
spotter removed, the shot hole pasted, and the target run
up for the beginning of a new score. When the keeping of
pit score cards is not required, the provisions of this para-
graph will be disregarded.
(5) When a target frame is used as a counterweight for a
double sliding target, the blank side of such frame will be
toward the firing line.
104. Procedure for Firing With Time Limit.—a. On the
firing line.—(1) One person only will be assigned to a tar-
get in each order.
(2) When all is ready in the pit, the red flag is displayed
at the center target. At that signal, the officer in charge of
the firing line will conduct the exercise to be fired in ac-
cordance with the procedure given in paragraph 92.
(3) If any individual fails to fire at all, he will be given an-
other opportunity. If he fires one or more bursts, the score
105
104
BASIC FIELD MANUAL
must stand as his record except as provided in paragraph 97.
He will not be permitted to repeat his score on the claim
that he was not ready to fire.
(4) As each shot is signaled from the pits, it is announced
by the scorer at the firing line. A score of 15 shots is an-
nounced as follows as each shot is disked: “Target 22; 1 five,
2 fives, 3 fives, 4 fives, 5 fives, 6 fives, 7 fives; 1 four, 2 fours,
3 fours, 4 fours, 5 fours, 6 fours, 7 fours; 1 two.” The scorer
notes these values on a pad and watches the target as he calls
the shot. After disking is finished, he counts the number of
shots, and if it is more or less than 15, calls “Redisk No_”
If 15 shots have been disked, he then enters the value of each
hit and their total value on the soldier’s score card.
b. In the pit.—(1) The time allowed for each exercise is
regulated by the officer in charge of the pit. The procedure
is as follows: The targets are withdrawn before the exercise
starts, and the red flag is displayed at the center target. The
command ready on the firing line is transmitted to the
officer or noncommissioned officer in charge in the pits
who will have the red flag waved and lowered on its receipt
and who will cause the targets to be run up simultaneously
5 seconds after the flag is lowered. The targets are fully ex-
posed for the prescribed length of time, and upon the ex-
piration of the proper time interval, he causes the targets
to be withdrawn.
(2) The officers scoring in the pit examine each of their
targets in turn, announce the score, and record it on the pit
score cards. Spotters are then placed in the shot holes and
the targets run up and marked. The noncommissioned offi-
cers supervise the marking of each shot; the officers exercise
general supervision over the marking of their targets. When
pit score cards are not required, the provision of this para-
graph may be amended by local commanders.
(3) The targets are left up for about 1 minute after being
marked. They are then withdrawn, pasted, and made ready
for another score. They may be left up until ordered pasted
by the officer in charge of the firing line. When the keeping
of pit score cards is not required, the provisions of this para-
graph may be disregarded.
106
BROWNING AUTOMATIC RIFLE, CAL. .30, M1918A2 104-106
(4) If more than the number of shots to be fired are
found on any target in record practice, it will not be marked
unless all of the hits are of the same value. The officer in
charge of the firing line will be notified of the facts by
telephone.
105. Use of Telephones.—a. Telephones will be used for
official communication only.
b. No one will ask over the telephone for information as
to the name or organization of any person firing on any
particular target, and no information of this nature will be
transmitted.
c. The following expressions will be used over the telephone
in the cases enumerated:
(1) When a shot has been fired and the target has not
been withdrawn from the firing position, “Mark No._______”
(2) When a shot has been fired and a target has been
withdrawn from the firing position but not marked, “Disk
No ”
(3) When the target has been withdrawn from the firing
position and marked but the value of the shot has not been
understood, “Redisk No._______”
(4) When the firing line is ready for time fire, “Ready on
the firing line.”
(5) When a shot is marked on a target and the person
assigned thereto has not fired, “Disregard the last shot on
No. ”
106. Coaching Prohibited.—a. When additional compensa-
tion for qualification in arms is authorized, coaching of any
nature after the firer takes his place on the firing line is
prohibited. No person will render or attempt to render the
firer any assistance whatever while he is taking his position
or after he has taken his position at the firing line.
b. When no additional compensation for qualification in
arms is authorized, coaching is permitted during record
practice, with the following restrictions:
(1) The coach will not use any mechanical aid to assist the
firer.
(2) The coach will not touch any part of the firer’s body
or rifle while the firer is sighting or firing.
107
107-115
BASIC FIELD MANUAL
Э 107. Use of Instruments.—a. The use of binoculars is au-
thorized and encouraged.
b. The use of instruments or devices for determining the
force and "direction of the wind is prohibited during record
practice.
108. Shelter for Firer.—Sheds or shelter for the indi-
vidual at the firing point will not be permitted at any range.
109. Restrictions as to Rifle.—Troops will use the Brown-
ing automatic rifle, caliber .30, M1918A2, as it is issued by the
Ordnance Department. The use of additional appliances is
prohibited. The sights may be blackened. Ordnance De-
partment test equipment will not be used for determining
the classification.
110. Ammunition.—The ammunition used will be the
service cartridge as issued by the Ordnance Department.
\ 111. Cleaning.—Cleaning is permitted at any time.
‘ 112. Gun Sling.—The gun sling will be used as prescribed
in this manual for the various positions and in no other
manner.
113. Pads and Gloves.—a. Pads of moderate size and thick-
ness may be worn on both elbows to protect them from
bruising. A smooth pad of moderate size and thickness
may be worn on the right shoulder. The use of other forms
of pads is prohibited. The use of a hook or ridge on the
sleeve of the shooting coat or shirt to keep the sling in
place on the arm is prohibited.
b. A glove may be worn on either hand provided it is not
used to form an artificial support for the rifle.
114. Warming, Fouling, and Sighting Shots.—No warm-
ing, fouling, or sighting shots will be allowed.
115. Shots Cutting Edge of Silhouette or Line.—Any
shot cutting the edge of the silhouette will be indicated and
recorded as a hit in the silhouette. Because the limiting
line of each division of the target is the outer edge of the
line separating it from the exterior division, a shot touching
108
BROWNING AUTOMATIC RIFLE, CAL. .30, M1918A2 115-121
this line will be indicated and recorded as a hit in the
higher division.
116. Score Interrupted.—If a score which is being fired
without time limit is interrupted through no fault of the
person firing, the unfired shots necessary to complete the
score will be fired at the first opportunity.
117. Misses.—Before misses are signaled in record firing,
the target will be withdrawn and carefully examined by an
officer. Whenever a target is run up and a miss is indi-
cated, it will be presumed that this examination has been
thoroughly made. No challenge of the value indicated will
be entertained or resignaling of the shot allowed.
118. Shots To Be Included in Score.—All shots fired by
the soldier in his proper turn after he has taken his place
at the firing line and the target is ready will be considered
as part of his score.
119. Firing on Wrong Target.—Shots fired on the wrong
targets will be recorded as misses on the score of the man
firing, no matter what the value of the hits on the wrong
target may be. The soldier at fault is credited with only such
hits as he may have made on his own target.
120. Two Shots of Same Target.—If two shots strike a tar-
get at approximately the same time and were fired by one
man, the firer is entitled to count the value of both shots. If
two shots strike a target at the same time or nearly the same
time and it is determined they were fired by different men,
both will be disked The individual who fired on his own
target will be allowed the higher of the values of the two
shots; the firer who fired on a target other than his own will
be scored a miss.
121. Withdrawing Target Prematurely.—If the target is
withdrawn from the firing position just as a shot is fired,
the scorer at that firing point will at once report the fact
to the officer in charge of the scoring on that target. The
officer will investigate to see if the case is as represented.
Being satisfied that such is the case, he will direct that the
shot be disregarded and that the man fire another shot.
535351°—43—S
109
122-124
BASIC FIELD MANUAL
122. Unfired Cartridges in Firing With Time Limit.—Each
unfired cartridge will be recorded as a miss, except as stated
in paragraph 97.
123. More Shots Than Prescribed in Firing With Time
Limit.—When target has more than the prescribed number
of shots for a time-fire exercise in record practice and these
hits are of different values, the target will not be marked.
The soldier firing on that target will repeat the firing of his
score. If all the hits on the target have the same value, the
target will be marked and he will be given the value of the
authorized number of shots.
124. Record Practice for Course D, 1,000-Inch Range.—a.
The following special provisions apply only to record prac-
tice for course D which is fired on the 1,000-inch range.
b. So much of the foregoing provisions for record practice
as can be applied will be followed. Suitable fire orders for
use on the type of 1,000-inch range which is equipped with
pits and movable targets, as well as suitable fire orders for
use on the type of 1,000-inch range which is not so equipped,
will be found in paragraph 91.
c. When the record practice is fired on 1,000-inch ranges
not equipped with pits and movable targets the following
rules will apply:
(1) Sufficient assistants will be detailed from companies
other than the ones firing to assist the officer in charge.
From the assistants, officers will be detailed as scorers at the
rate of one for every four targets.
(2) The officers detailed as assistants will aid the officer
in charge in every way possible. They will—
(a) Note deductions for penalties and report same to the
scorer (see e(3) below).
(b) Note the time out for stoppages and inspect to deter-
mine whether the stoppage was due to any fault of the soldier.
(c) Superintend the firing of rounds remaining from stop-
pages not the fault of the firer.
(d) Scorers will count the bullet holes in each target and
report any that have more than the prescribed number.
(e) Scorers will score the targets in accordance with the
provisions of e below.
110
BROWNING AUTOMATIC RIFLE, CAL. .30, M1918A2 124
d. (1) When a stoppage occurs that cannot be cleared
by the application of the first phase of immediate action, the
firer will call “Time.” The officer in charge of firing or an
assistant will note the time left to complete the exercise.
The stoppage will be reduced. The firer will load and com-
plete the firing on command from the officer in charge who
will allow the remaining time. In cases where the exact
time remaining was not determined by the officer in charge,
the firer will be allowed 2 Seconds per round for the remaining
rounds.
(2) If the stoppage is manifestly the fault of the firer, no
time will be allowed to complete the exercise, and only that
part of the exercise which was fired will be scored.
(3) Should a breakage occur, the rifle will be repaired or
a different rifle substituted. If a different rifle is substituted,
the firer will then be allowed extra rounds to determine the
zero of the substituted rifle. He will then complete the
exercise.
e. The 1,000-inch record target will be scored in accord-
ance with the requirements for record firing as follows:
(1) The course shown in table П, paragraph 83a, will
constitute the record course. The course consists of the six
exercises shown in this table and includes a total of 110 shots.
(2) In all exercises the soldier will be credited with five
points for hitting the scoring space included within or touch-
ing the outer scoring line of each figure at which he fires. In
addition, he will be credited with one point for each shot
placed in or touching this scoring space. Example: In the
first exercise the soldier fires his five shots at figure No. 1 and
scores five hits. He is credited with five points for hitting the
scoring space and an additional point for each shot therein.
His total score is ten points.
(3) In all of the exercises except the sixth, a total of 5
shots only per scoring space will be allowed. Additional
shots placed in the scoring space will not be counted. In
the sixth exercise, 15 shots will be fired on figure No. 4 in
5-round bursts. Hits in excess of 15 on target No. 4 will not
be allowed.
Ill
124-125
BASIC FIELD MANUAL
(4) The total possible score for each exercise and for the
record course is as follows:
Exercise:
First______________________________
Second_____________________________
Third______________________________
Fourth_____________________________
Fifth______________________________
Sixth______________________________
Total
possible
Shots score
5 10
5 10
5 10
40 80
40 80
15 20
Total possible score__________________________210
(5) For firing before commence firing or after cease
firing, five points will be deducted for each round so fired.
(6) In case of hits on the wrong target, the firer who
received the erroneous hits will refire his score. The firer
who placed his hits on the wrong target will count those
upon his own and will not be permitted to retire the exercise.
Section VI
TARGETS AND RANGES
125. Targets.—The designations and dimensions of the
two types of target used for marksmanship courses for the
Browning automatic rifle, caliber .30, M1918A2, are as follows:
a. 1,000-inch target, United States rifle, caliber .30, Ml
(fig. 27).—This target is used for fire on the 1,000-inch range.
The scoring figures numbered from 1 to 8, inclusive, are
utilized in known distance marksmanship (ch. 2). Each of
these scoring figures is composed of three silhouettes. These
silhouettes are reduced in scale to represent the appearance
of target D on the known distance range. The inner sil-
houette of the 1,000-inch target represents the silhouette of
target D at 500 yards; the middle silhouette represents the
four space of target D at 300 yards; the outer silhouette
target represents the four space of target D at 200 yards.
b. Target D.—This target is used for all types of fire on
the known distance range. It consists essentially of a square
target, 6 by 6 feet in dimensions, upon which a black silhou-
112
BROWNING AUTOMATIC RIFLE, CAL. .30, M1918A2 125-126
ette, representing a prone figure, is centered. Hits in the
silhouette count 5, in the next space 4, and in the next 3.
Hits on the remainder of the target count 2.
126. Ranges.—a. Suitability.—Ranges suitable for range
firing with the United States rifle, caliber .30, M1903 and Ml,
are equally suitable for range firing with the automatic rifle,
caliber .30, M1918A2.
b. Installation and construction.- The installation and
construction of target ranges for small arms target practice
is governed by AR 30-1505. The installation of range com-
munication systems is governed by AR 105-20. Range regu-
lations for firing ammunition in time of peace are given in
AR 750-10 and include the safety limits and danger areas
of ranges.
c. Selection of known distance ranges—(1) Direction.—If
possible, a range should be so located that the firing is toward
or slightly to the east of north. Such location gives a good
light on the face of the targets during the greater part of
the day. However, security and suitable ground are more
important than direction.
(2) Best ground.—The targets should be on the same
level with the firer or only slightly above him. Firing down-
hill should be avoided.
(3) Size.—The size of the range is determined by its plan
and by the number of troops that will fire over it at a time.
There are two general plans used in range construction: one
with a single target pit and firing points for each range; the
other with firing points on one continuous line, the target
pits for the various ranges being in echelon.
(4) Intervals between targets.—The targets should be no
farther apart than is necessary to reduce the chance of shots
being fired on wrong targets. As a general rule, the inter-
vals between targets are equal to the width of the targets
themselves. Where the necessity exists for as many targets
as possible in a limited space, this interval may be reduced
one-half without materially affecting the value of the
instruction.
(5) Protection for markers.—(a) Protection is provided
for the pit details by excavating a pit, by constructing a
parapet in front of them, or by a combination of both
methods.
113
Figube 27.—Target, United States rifle, caliber .30, Ml, 1,000-inch range.
to
05
BASIC FIELD MANUAL
BROWNING AUTOMATIC RIFLE, CAL. .30, M1918A2
126
(b) Where there are several targets in a row, the shelter
should be continuous. It must be high enough to protect the
markers. The parapet may be of earth with a timber or con-
crete revetment of sufficient thickness to stop bullets and from
iy2 to 8 feet high above the ground or platform,on which
the markers stand.
(6) Artificial butts.—If an artificial butt is constructed as
a bullet stop, it should be of earth not less than 30 feet high
and with a slope of not less than 45°. The slopes should be
sodded. The provisions of AR 750-10 must also be met by
the range.
(7) Hills as butts.—A natural hill to form an effective butt
should have a slope of not less than 45°.
(8) Numbering of targets.—Each target is designated by
a number. The numbers for ranges up to 600 yards should
be at least 6 feet in height and should be painted black on
a white background. Arabic numerals of the size suggested
will always be quickly recognized. They should be placed
on the butt behind each target or on the parapet in front,
and not so far above or below as to prevent the firer seeing
the number when aiming at the target.
(9) Measuring the range.—The range should be carefully
measured and marked with stakes at the firing points in
front of each target. These stakes should be about 12 inches
above the ground and painted white. Black figures indicate
the number of the corresponding target.
(10) Ranges parallel.—The different ranges for the same
distance should all be parallel so that similar conditions with
respect to wind and light may exist.
(11) Firing mounds.—If it is necessary to raise a firing
point, a low mound of earth no higher than required should
be made. The mound should be level, sodded, and not less
than 12 feet square. If the entire firing line is raised, the
firing mound should be level, sodded, and not less than 12
feet wide on top.
(12) Pit shed.—A small house or shed should be built in
or near the target pit for storing equipment.
(13) Danger signals.—A danger signal will be placed in
front of the targets when firing has been suspended. One
115
126
BASIC FIELD MANUAL
or more red streamers will be prominently displayed on all
ranges and at all times during firing.
(14) Range house.—On large ranges, a house containing
a storeroom and office room is desirable.
(15) Telephone service.—Ranges should be equipped with
a telephone system connecting the target pit with each firing
point,'the range house, and the station headquarters. The
number of telephones should not be less than one to each
10 targets.
(16) Electric bells.—On large ranges the installation for
each five targets of an electric bell that can be controlled
from a central point in the pit adds materially to the celerity
and uniformity of target manipulation for time fire.
(17) Covered ways between pits.—Where the pits are in
echelon, covered ways or tunnels should be provided between
the various pits. This construction will allow the pit details
to be shifted with safety without interrupting the firing.
(18) 1,000-inch range.—A 1,000-inch range without a land
danger area behind its backstop must meet the following
minimum requirements:
(a) Vertical bulletproof backstop and wing walls (natural
or artificial) not less than 30 feet high. Wing walls must
cover at least 15° on each flank. In case of artificial wing
walls, they should be set at an angle of 15° with the backstop
toward the firing points.
(b) Ricochet pit in front of firing points providing at
least a 4° slope downward from the normal line of fire from
a prone position and extending to within 30 feet of the
backstop and wing walls. • If a vertical cliff or wall over 40
feet high is available, no ricochet pit need be provided.
116
CHAPTER 3
MARKSMANSHIP, MOVING GROUND TARGETS
Paragraphs
Section I. General_______________________________________ 127-128
II. Moving vehicles_____________________________ 129-131
П1. Moving personnel____________________________ 132-133
IV. Moving targets, ranges, and range precautions_13Ф-135
Section I
GENERAL
127. Employment.—Automatic riflemen will be trained to
fire at moving ground targets such as tanks, armored vehicles,
trucks, and personnel. For tactical employment, see FM
7-10.
128. Fundamentals.—The fundamentals of shooting as pre-
sented in paragraphs 52 to 93, inclusive, apply to firing at
moving targets. In applying these fundamentals, the auto-
matic rifleman must adjust his aim and trigger press to the
movement of the target. According to the individual ability
of the automatic rifleman, he should fire as long a burst as
he can control and still secure reasonable accuracy. If the
angular traverse of the moving ground target is such that
the automatic rifleman can lead it while in the prone posi-
tion, he does so by moving his. shoulders. If the angular
traverse is too great to permit leading the target while in
the prone position, the automatic rifleman then assumes the
antiaircraft position or a modified antiaircraft position and
fires bursts as described above.
a. Effective range.—Training in the technique of fire at
moving ground targets is normally limited to ranges of 500
yards or less; however, on proper occasions such fire may be
delivered at longer ranges with effect comparable to that
obtained by the light machine gun.
b. Sights to be used.—Moving ground targets are seldom
exposed for long periods and can be expected to move at
maximum speed during periods of exposure. Accurate cor-
117
128-129 BASIC FIELD MANUAL
rection of sight setting is often impracticable; therefore, in-
struction in technique should favor the use of the battle
sight (300 yards). Corrections for range are made by ad-
justment of the aiming point on the target. In either case,
correct estimation of the range is necessary.
c. Leads.—Targets which cross the line of sight at any
angle are classified as crossing targets. In firing at such
targets, the firer must aim ahead of the target so that the
paths of the target and bullet will meet. The distance
ahead of the target is called the “lead.” Targets which ap-
proach directly toward the firer or recede directly from
the firer will, for all practical purposes, require no lead.
Section П
MOVING VEHICLES
129. Determination and Application of Leads.—a. The lead
necessary to hit a moving vehicle is dependent upon the
speed of the target, the range to the target, and the direction,
of movement with respect to the line of sight. A vehicle
moving at 15 miles an hour will traverse approximately 7
yards in 1 second. A rifle bullet moves 300 yards in about
0.4 second and 500 yards in about 0.7 second. Therefore, to
hit a vehicle moving at 15 miles an hour at ranges of 300
yards and 500 yards, the leads should be 3 yards and 5 yards,
respectively.
b. Leads are applied by using the length of the target (as
it appears to the flrer) as the unit of measure. This elimi-
nates the necessity for corrections due to the angle at which
the target crosses the line of sight, because the more acute
the angle the smaller the target appears and the less lateral
speed it attains.
c. The following lead table is furnished as a guide:
TARGET LENGTHS
Miles per hour 300 yards 500 yards
15 и 1
118
BROWNING AUTOMATIC RIFLE, CAL. .30, M1918A2 130^132
130. Technique of Fire.—The following technique is sug-
gested for firing at rapidly moving targets, using the battle
sight.
a. Approaching or receding targets.—The firer holds his
aim directly on the target and presses off single shots or short
bursts.
b. Crossing targets.—(1) At ranges less than 300 yards, the
firer alines his sights on the bottom of the target, swings
the point of aim laterally in the direction the target is mov-
ing, and takes the estimated lead. The automatic rifle is
moved with the required lead and the shot is pressed off
while the rifle is carried on with a follow-through swing.
(2) At ranges of more than 300 yards, the firer proceeds
as in (1) above, except that he swings his point of aim across
the top of the target.
c. Fire is executed as rapidly as proper aiming will permit.
d. When no other facilities are available, practice in tak-
ing aim and leads may be obtained by tracking vehicles
engaged in normal traffic along roads near the training area.
131. Place in Training.—The technique of firing at mov-
ing vehicles with live ammunition properly follows individual
training in known distance firing, and should be preceded
by instruction in range estimation. When time and ammuni-
tion allowances permit, caliber .22, followed by caliber .30,
firing on the 1,000-inch range may be added as preliminary
instruction.
Section 1П
MOVING PERSONNEL
132. Technique.—a. Sight to be used.—Under field condi-
tions, moving personnel presents a fleeting target which is
more difficult to hit than a moving vehicle. This fact in-
creases the importance of an accurate sight setting. How-
ever, when targets appear suddenly, allowing no time for
sight adjustment, the use of the battle sight may be re-
quired. It is therefore desirable that the automatic rifleman
be trained in the employment of both types of firing.
119
132
BASIC FIELD MANUAL
b. Method of aiming.—(1) Hold off.—This method is used
in aiming the automatic rifle for proper elevation using the
battle sight. When firing at a man at a range of—
(a) 300 yards or less, aim at the middle of the body.
(b) More than 300 yards, aim at the top of his head (fig.
28).
WOLD Off
3oo YDS or LESS NODE. THAN ЗооЖ
LEADS
(ПАИ WALKING)
Figure 28.—Hold-off and leads for use against enemy personnel,
using battle sight (300 yards).
120
BROWNING AUTOMATIC RIFLE, CAL. .30, M1918A2 132-134
(2) Leading.—To fire at a man walking across the front,
aim as follows (fig. 28):
(a) At 100 yards, aim at forward half of the body.
(b) At 200 yards, aim at the forward edge of the body.
(c) At 300 yards, lead equals one-half of the width of
the body.
(d) At 400 yards, lead equals the width of the body.
(3) Proficiency in this type of firing depends largely upon
the amount of time devoted by the individual to the practice
of aiming, pressing the trigger, leading with appropriate
speed, and “following through.”
c. Size of burst.—At moving personnel, the firing of shots
is regulated by the proximity of the hostile group and the
size of the group. As a general rule, at ranges of 300 yards
and beyond, use single or double shots carefully aimed;
at 200 yards, use bursts of 2 to 4 rounds; and at 100 yards
against mass assaults, use larger bursts, even up to 10 or
more rounds.
133. When to Conduct Training.—Like practice in firing
at moving vehicles, training in firing on moving personnel
follows instructions in known distance firing and should be
preceded by instruction in range estimation.
Section TV
MOVING TARGETS, RANGES, AND RANGE
PRECAUTIONS
134. Moving Targets and Ranges.—a. Firing at moving
vehicles.—(1) Target.—A sled of the type shown in figure
29® has proved to be the most satisfactory kind of target.
It has the advantage of a low center of gravity, which pre-
vents the target from upsetting when traversing rough
ground or making changes of direction. The sled shown in
the figure is 5У> by ЗУ2 by 4У2 feet high and weighs only 45
pounds. Figure 29® shows a similar sled covered with target
cloth.
(2) Towing.—For towing the target, a y2-inch rope has
been found satisfactory, the power being furnished by a
iy2-ton truck. The pulley must be on an iron shaft
121
134
BASIC FIELD MANUAL
(threaded at one end to permit bolting) imbedded in concrete
which is sunk in the ground. The concrete block is placed
at a point where a change in direction of the target is
desired. The knot shown in the figure should be 10 or 12
feet from the sled, depending on the speed at which the
Edge covered with sheet metal
ELEVATION OF BASE
©Target frame for moving-target range.
® Sled target covered with target cloth; pulley and trip Knot for
effecting changes of direction.
Figube 29.—Ground-towed target.
122
BROWNING AUTOMATIC RIFLE, CAL. .30, M1918A2 134-135
target is to be run. At faster speeds, the knot must be
at a greater distance from the sled to prevent the latter
from overrunning the pulley.
(3) Set-up.—With 500 yards of rope, a set-up as shown in
figure 30 can be made. This set-up is only one of many
which can be made with 500 yards of rope.
«"Gun
Figure 30.—Set-up for towing a target.
b. Firing at moving personnel.—Any class A range is suit-
able for firing at moving personnel. E targets on sticks car-
ried by men walking or running in the pits are sufficient.
135. Range Precautions.—For general range precautions,
see paragraph 241.
123
CHAPTER 4
MARKSMANSHIP, AERIAL TARGETS
Paragraphs
Section I. Nature of aerial targets for automatic rifles_136-137
II. Technique of fire________________________ 138-142
HI. Marksmanship training_____________________ 143—147
IV. Miniature range practice__________________ 148-151
V. Towed target and radio-controlled plane target
firing_______________________________________ 152-156
VI. Ranges, targets, and equipment_____________157-162
Section I
NATURE OF AERIAL TARGETS FOR AUTOMATIC RIFLES
136. Aerial Targets Suitable for Automatic Rifle Fire.—
Combat arms take the necessary measures for their own im-
mediate protection against low-flying hostile aircraft and
descending parachutists. Therefore, all troops must be fully
trained and imbued with the determination to protect them-
selves against hostile aerial attacks without reliance upon
other arms. All low-flying hostile aircraft and descending
parachutists are suitable targets for automatic rifle Are.
137. Classification of Aerial Targets.—a. Overhead.—
Overhead targets are those which pass directly over or nearly
over the firer.
b. Nonoverhead.—Nonoverhead targets are those which do
not pass directly over or nearly over the flrer.
Note.—Either of these types may be flying at a constant altitude
or may be either increasing or decreasing in altitude.
c. Direct diving.—Direct diving targets are those which
dive directly toward the firer.
d. Direct climbing.—Direct climbing targets are those
which climb directly away from the firer.
Section П
TECHNIQUE OF FIRE
138. General.—When concealment is essential and is be-
lieved to have been achieved, no weapons fire at hostile
124
BROWNING AUTOMATIC RIFLE, CAL. .30, М1Э18А2 138-139
aircraft. When concealment is not essential or obviously
does not exist, all men armed with automatic rifles open fire
as soon as attacking aircraft are within effective range.
Such targets usually remain in view only for short periods
of time. Therefore, they must be engaged promptly. Auto-
matic riflemen must be taught a simple method of firing on
hostile low-flying aircraft. This section on the technique
of fire deals entirely with actual fire on hostile planes and
gliders. Details of antiaircraft marksmanship training are
contained in sections Ш, TV, and V.
139. Leads.—a. General.—In order to hit a target, such as
an airplane in flight, it is necessary to aim an appropriate
distance ahead of it and on its projected path of flight so
that the target and the bullet will meet. This distance ahead
of the airplane is called “lead.” A lead must be applied in
all firing except when the target is at extremely close range
(100 feet), when it is diving directly at the firer, or is flying
directly from him. The process of leading a target is called
“tracking.”
b. Determination of leads.—(1) The lead necessary to en-
gage any target depends upon—
(a) The speed of the target.
(b) The range to the target.
(c) The time required for the bullet to hit the target (time
of flight).
(d) The direction in which the target is moving with re-
spect to the line of fire.
(2) When a target appears, it is impossible for automatic
riflemen or leaders of rifle units to consider all of the-factors
contained in (1) above and compute accurately the lead
required.
c. Application of leads.—The unit of measure for leading an
airplane is one length of the plane—one target length. The
number of leads to be used against planes which normally
attack ground troops is six leads. The six target-length
lead is the estimated average number of leads required to
hit a 35-foot plane traveling at 300 miles per hour at ranges
between 600 yards (maximum range at which ground troops
fire at planes) and point blank range. The plane being
visible to the firer, one target length can be applied quickly as
635351°—43---9 125
139-140
BASIC FIELD MANUAL
a unit of measure; and when a plane flies at an angle other
than directly across the firer’s front, the length of the target
is foreshortened, as seen by the firer, in about the same pro-
portion as its lateral rate of movement across the front is
diminished. This last feature of the “target length” system
of applying leads results in an automatic correction for dif-
ferent angles of flight across the front. A lead of six target
lengths is used because the range to a flying plane changes so
rapidly that a corresponding change in the number of leads
is impracticable and, therefore, the estimated average num-
ber of leads required to hit a plane traveling at 300 miles
per hour at ranges between 600 yards and point blank range
is used. For faster or slower planes, the six target length
lead is proportionately increased or decreased. The num-
ber of leads to be used, based on experience for a particular
type of enemy plane, may be prescribed as Standing Oper-
ating Procedure, or it may be announced in a fire order.
140. Massing of Fire.—a. More effective results are ob-
tained by massing the fire of a squad or platoon on a single
target. When planes are flying in formation, Standing Oper-
ating Procedure should require that the fire of the squad or
platoon be concentrated on the leading plane. The leader
of the flight is the most important and the sight of tracers
going into his plane tends to cause the following planes to
turn away. For this reason, when no question of disclosing
positions is involved, the use of tracer ammunition for anti-
aircraft missions is' desirable. Absolute accuracy in anti-
aircraft fire is impossible; but if the maximum volume of fire
consistent with accuracy is delivered, hits will be secured.
According to the individual ability of the automatic rifleman,
he should fire as long a burst as he can control and still
secure reasonable accuracy. Fire should be opened at the
command or signal of the platoon or squad leader. It should
be directed only at recognized enemy planes; if planes can-
not be identified as hostile, they will not be fired upon until
they open fire or take other aggressive action.
b. The normal assignment of a target extends from its
initial appearance until it passes beyond range. If there is a
succession of groups of hostile airplanes or .gliders, the leader
will cause his unit to cease firing at one group in time to
126
BROWNING AUTOMATIC RIFLE, CAL. .30, M1918A2 140-142
bring fire on the following groups as they approach within
effective range. However, consideration should be given to
the fact that the dive bomber, just after dropping its bombs
and leveling off to escape, is most vulnerable to fire from the
rear.
141. Fire Distribution.—a. The fire of rifle units will be
distributed along the path of flight of the target as long as
the target is within effective range when leads are applied
as follows:
(1) For all targets except parachutists and direct diving
or direct climbing aircraft, use the method prescribed in
paragraph 139c.
(2) For all direct diving or direct climbing targets, aim
and fire each burst at the target.
(3) Against parachute targets, aim and fire each burst
with one target length lead.
b. The above methods of fire distribution are based upon
the fact that, as the target is approaching or receding, the
range and the leads are constantly changing and the target
is engaged with a constant sight setting. The lead used
for aircraft is the average for all leads necessary to engage
a target between the extreme effective range of 600 yards
and point blank range. The parachute target lead is based
bn an average of all leads necessary to engage such targets
at ranges from 500 to 100 yards.
c. The target considered in determining the lead of six
target lengths is a 35-foot airplane flying at 300 miles per
hour. In towed target firing, the same number of leads is
applicable, since the towed sleeve is 15 feet long and its aver-
age speed is 140 miles per hour.
d. Other methods of fire distribution may be used by unit
commanders in training their units.
142. Delivery of Fire.—a. Range.—The maximum effec-
tive range of rifle fire at airplanes (gliders) is approximately
600 yards, and 500 yards for parachutists. However, rifle-
men should take the firing position as soon as possible after
receiving warning of the approach of hostile aircraft and
track the target until it comes within range.
127
142
BASIC FIELD MANUAL
b. Rate of fire.—The rate of fire at aerial targets is about
the same as the rapid fire rate at ground targets. Everything
must be done to increase the rate of fire without affecting its
accuracy. Repeated tests have proved that automatic rifle
fire, delivered faster than is consistent with proper aim and
trigger press, results in waste of ammunition. Each burst
must be aimed and the trigger properly pressed. A well-
trained automatic rifleman can fire a short burst every 3
seconds. A faster rate should not be permitted.
c. Sight used.—No attempt should be made to use the peep
sight when firing at airplanes. Instead, the sight leaf is put
down and the battle sight is used. When firing at para-
chutists, the peep sight is used. When firing on miniature
ranges with caliber .22 rifles equipped with Lyman receiver
sights, the peep sight should be unscrewed and removed so
that the large opening which remains may be used in lieu
of the peep sight.
d. Effect of caliber .30 fire on the airplane.—(1) There are
various degrees of possible damage to an airplane from auto-
matic rifle fire. Hits upon the cylinder wall and other im-
portant working parts are likely to stop an engine immedi-
ately. A hit through the metal propeller is also serious since
it throws the engine out of balance. Unless the bombs
carried by the airplane are bullet-proof, hits by armor-
piercing small-arms bullets will detonate them. Of course
the pilot is especially vulnerable. When tracer bullets pene-
trate the gasoline tank before the tracer composition ceases
burning, the gasoline will be ignited instantaneously. When
ball or armor-piercing bullets penetrate non-self-sealing gas-
oline tanks, they will cause gasoline leakage, which fre-
quently also will be ignited by engine exhaust.,
(2) There are also many lesser ways in which automatic
rifle fire can damage an airplane. Holes through the crank-
case may cause the oil to drain out, which will in turn
cause the engine to “freeze” before the airplane returns to
friendly territory. Hits of any kind require varying degrees
of repair, even if they do not cause the destruction of the
airplane. Finally, if the enemy knows he will receive effec-
tive small-arms fire from our troops, he will tend to avoid
such fire, thereby decreasing the effectiveness of his action.
128
BROWNING AUTOMATIC RIFLE, CAL. .30, M1918A2
143
SECTION IH
MARKSMANSHIP TRAINING
143. Instruction.—a. Object.—(1) The object of antiair-
craft marksmanship instruction is to train the automatic
rifleman in the technique of firing at rapidly moving aerial
targets.
(2) Automatic rifle antiaircraft marksmanship training
should be given to the automatic rifle team in conjunction
with the antiaircraft marksmanship training given to the
riflemen of the squad.
b. Basis.—(1) Prior to instruction in automatic rifle anti-
aircraft marksmanship, automatic rifle teams should com-
plete a course of training in automatic rifle marksmanship
and thereby acquire the fundamentals of good shooting. To
become a good antiaircraft marksman, the firer must be able
to apply the fundamentals of automatic rifle marksmanship
to firing at rapidly moving targets and must be able to per-
form the following operations with accuracy and precision:
(a) Apply the required lead by using the length of the
target as a unit of measure.
(b) Aline the sights of the automatic rifle, with the re-
quired lead, rapidly.
(c) Swing the automatic rifle with a smooth, uniform mo-
tion so as to maintain the aim at the required lead while
getting off the burst.
(d) Apply correct trigger press so as to fire in a minimum
of time without disturbing the aim;
(e) Follow through after the short burst is fired.
(2) The correct performance of the foregoing operations
combined into one continuous, smooth motion when firing
in any direction at rapidly moving aerial targets is the basis
for the course of training outlined herein.
c. Sequence of training.—Since the automatic rifle team
should receive its antiaircraft training in conjunction with
the riflemen of the squad (a above), the sequence of training
is as follows:
(1) Preparatory exercises using the automatic rifle.
(2) Miniature range practice with the caliber .22 rifle.
129
143-144
BASIC FIELD MANUAL
(3) Miniature range practice with the automatic rifle, if
ammunition allowances and range facilities permit.
(4) Firing at towed flag, towed sleeve, and radio-controlled
plane targets when this firing is done by the rifle platoon.
d. Personnel to receive training.—All members of the auto-
matic rifle team should receive automatic rifle-antiaircraft
marksmanship training consistent with available time and
ammunition allowance.
144. Preparatory Exercises. — a. General.—(1) Descrip-
tion.—The preparatory exercises are designed to teach the
soldier the correct method of performing each of the opera-
tions listed in paragraph 143b(l), and to drill him therein
until the correct procedure becomes a fixed habit. In addi-
tion to a brief explanation of the technique of antiaircraft
fire, the preparatory exercises consist of the following three
distinct steps which should be completed on each of the
targets described in c below, prior to firing:
(a) Position exercise.
(b) Aiming and leading exercise.
(c) Trigger-press exercise.
(2) Methods.—A conference by the instructor should pre-
cede each exercise. This conference should include an ex-
planation of the necessity of the exercise and demonstrations
by the instructor and a qualified squad. In order to awaken
interest and to stimulate the soldier’s enthusiasm, the pre-
liminary instruction should be conducted individually and
should be thorough. Each man should understand and be
able to explain each point.
(3) Coaching.—During all preparatory exercises and min-
iature range firing, when a man is in a firing position he
should have a coach whose duty is to watch him and to point
out his errors. For this purpose, the soldiers should be
grouped in pairs and take turns in acting as coach and pupil
(fig. 31). Unit leaders are the instructors and should super-
vise and prompt the coaches.
b. Organization.—With the targets described in c below,
and the target range described in paragraph 158, a group
of 32 men (fig. 31) per target is the most economical training
unit. For the preparatory exercises this will permit 16
men to perform the exercises on each type of target while
130
BROWNING AUTOMATIC RIFLE, CAL, ,30, M1918A2
144
the remaining 16 men act as coaches. The automatic rifle-
man uses the automatic rifle in these exercises, while the
riflemen use rifles. Each group should complete all prepara-
tory exercises and instruction firing on one type of target
on the miniature range before preparatory training and in-
© Nonoverhead and parachute targets.
® Overhead targets.
Figure 31.—Organization for miniature range training.
struction firing is undertaken on the next type of target
(par. 150). Groups change places as they complete the
exercises on the targets assigned them. This procedure
should be followed until each man of each group has com-
pleted his instruction, respectively, on the horizontal, climb-
ing and diving, overhead, and parachute targets.
131
144
BASIC FIELD MANUAL
c. Targets used on 500-inch miniature range in preparatory
exercises and during firing both with caliber .22 and caliber
.30 automatic rifles.—(1) Nonoverhead aiming and leading
targets (fig. 32).—Nonoverhead aiming and leading targets
represent two towed sleeve targets (silhouettes). When
moved at a rate of approximately 15 feet per second hori-
zontally on the nonoverhead carrier, they represent targets
being towed directly across the front; when moved diagonally
upward and downward, respectively, on the climbing and
Figure 32.—Nonoverhead aiming and leading target.
diving target carrier, they represent targets in front of the
firers which are climbing or diving, depending upon the
direction of movement.
(2) Overhead aiming and leading targets.—Overhead aim-
ing and leading targets represent four towed sleeve targets
(silhouettes) approaching or moving away from the firer
at a constant elevation (altitude). These targets also are
moved at a rate of approximately 15 feet per second (fig. 33).
The frames are placed on the carrier so that one set of sil-
houettes represents an approaching target and the other
132
BROWNING AUTOMATIC RIFLE, CAL. .30, M1918A2
144
set, a receding target. Additional silhouettes may be added
if it becomes necessary to instruct more men.
Note.—Both the nonoverhead and the overhead aiming and
leading targets represent targets being towed at approximately
245 miles an hour. The nonoverhead targets, being placed at 500
inches from the flrer, represent targets at 330 yards range; over-
head targets approaching the flrer similarly are placed initially
at 500 Inches, representing a range of 330 yards, gradually there-
after decreasing to zero range when directly overhead. The speed
at which the nonoverhead target carrier drum must be turned
so that the silhouette will travel its own length during the time
required for the flight of the bullet should be determined for each
range by actual experiment.
(3) Parachute aiming and leading target.—Parachute aim-
ing and leading targets (flg. 34) represent four descending
Figure 34.—Parachute aiming and leading target.
133
144
BASIC FIELD MANUAL
parachute targets (silhouettes) which should operate at a
rate of 1 foot per second. Under this condition, these tar-
gets represent actual parachutists at 300 yards descending
at 17 feet per second.
Note.—Nonoverhead aiming and leading targets are provided with
several black squares (pasters) which are used as aiming points for
announced leads. Overhead and parachute targets are also provided
with one similar square (paster) used for the same purpose.
Figure 35.—Nonoverhead instruction target.
(4) Trigger-press targets.—Trigger-press targets are those
which are actually used subsequently in instruction firing
(figs. 35, 36, and 37.)
(5) Instruction firing targets.—(a) Nonoverhead type tar-
get.—The nonoverhead type target consists of eight sil-
houettes for each of which there are two scoring spaces; four
silhouettes are used for pupils leading from left to right, and
the remaining four silhouettes are used for pupils leading
from right to left.
134
BROWNING AUTOMATIC RIFLE, CAL. .30, M1918A2 144
(b) Overhead type target.—The overhead type target con-
sists of four silhouettes for each of which there is one scoring
space.
(c) Parachute type.—The parachute type target consists
of four silhouettes for each of which there is one scoring
space.
Figure 36.—Overhead instruction target.
(6) Group flring targets (fig. 38).—Group firing targets
consist of two stakes suspended vertically from the moving
cable on the horizontal nonoverhead target carrier. Four
black silhouettes are mounted on each stake. The right
stake is used for firing by pupils when tracking from left to
Figure 37,-—-Parachute instruction firing targets.
135
144-145
BASIC FIELD MANUAL
right; the left stake is used for firing by pupils when tracking
from right to left.
145. First Step: Position Exercises.—a. General.—The
position used in antiaircraft firing should be one which can
be assumed rapidly, afford the maximum flexibility to the
body for manipulation of the automatic rifle, and one which
136
BROWNING AUTOMATIC RIFLE, CAL. .30, M1918A2 145-146
does not require undue exposure of the firer. This position
will usually be kneeling, since it best meets the above re-
quirements (par. 68 and fig. 25).
b. Field expedients.—Due to the inherent characteristics
of the automatic rifle, the modified kneeling position is con-
sidered the usual position for firing at aerial targets. Under
certain circumstances the automatic rifleman may be re-
quired to fire from the standing or reclining position and
should receive some training in these positions (see FM 23-5).
c. Position training.—(1) All positions except the reclin-
ing position must be such that the automatic rifle, the body
from the waist up, the arms, and the head move as one unit.
When leading a target the rifle must be swung with a smooth,
uniform motion. This is accomplished by pivoting the body
at the waist; there should be no independent movement of
the arms, shoulders, head, or the automatic rifle.
(2) The instructor explains and demonstrates the posi-
tions, and he explains that if the rifle is pulled or pushed in
the desired direction by means of the left hand and arm it
will move with a jerky motion. This increases the possibility
of jerking the trigger or of pulling or pushing the front sight
out of alinement.
(3) The instructor then requires his group to practice
taking each antiaircraft position correctly, using the coach
and pupil method of instruction. Through repetition and
practice, each soldier is required to become proficient in
assuming each position rapidly for firing at hostile aircraft
moving in any direction.
146. Second Step: Aiming and Leading Exercise.—a. Pur-
pose.—The purpose of the aiming and leading exercises is to
teach the correct method of aiming and to develop skill in
swinging the automatic rifle with a smooth, uniform motion
so as to maintain the aim on aerial targets. Initially, stu-
dents aim at a small black paster in order to practice taking
an announced lead. Thus the instructor can vary the
announced lead by having pupils aim at various pasters
representing the announced lead.
b. Method.—(1) In the case of the nonoverhead targets
(fig. 32), the pupils stand relaxed with their rifles pointing
upward and in the general direction of the targets, elbows at
137
146 BASIC FIELD MANUAL
sides, and hands grasping the automatic rifle at the small of
the stock and the forearm, ready to assume the designated
position promptly. Pupils are placed in one line at intervals
of about V/z yards, and 500 inches from and facing the as-
signed target (fig. 31®). The coaches take positions that
enable them to observe their pupils. The commands for the
exercise are: 1. aiming and leading exercise, 2. one (two,
three or more) lead(s), 3. TARGETS. At the command
targets, the targets are operated at an approximate speed
of 15 feet per second. The pupils assume the designated fir-
ing position rapidly, alining the sights on the silhouette
or black paster representing the announced lead on the aim-
ing and leading target. Then they swing their rifles with
a smooth, uniform motion by pivoting their bodies at the
waist, maintaining the aim on the announced lead during
the travel of the target. The operation is continued until
the target has been moved five times in each direction.
The coaches and pupils then change places and the exercise
is continued until all men have acquired skill in aiming and
leading with various leads, both from right to left and from
left to right, on the horizontal and the climbing and diving
target (fig. 33).
(2) The group assigned to the two overhead aiming and
leading targets is divided into four parallel lines facing the
targets and perpendicular to the line of travel (flg. 31®).
Pupils are arranged in the first and third lines; coaches,
close behind their pupils, are placed in the second and fourth
lines. Half of the pupils in each line aim and lead on the
target as it approaches, while remaining pupils are aiming
and leading on the other target as it recedes. All pupils
continue to aim and lead their silhouettes as they change
direction until each target has made five complete approach-
ing and returning trips. Then pupils and coaches change
places and repeat this procedure until all men have acquired
skill in aiming and leading on the overhead target. Either
one or no lead is used.
(3) The group assigned to practice on the parachute aim-
ing and leading targets (fig. 34) is divided equally as coaches
and pupils (fig. 31®)- All pupils aim and lead on the de-
scending target, tracking until the target reaches its lowest
138
BROWNING AUTOMATIC RIFLE, CAL. .30, M1918A2 146-147
point. All pupils continue to aim and lead their silhouettes
until each target has made one or more descending trips.
Either one or no lead is used. Coaches and pupils change
places and the exercise is repeated.
c. Duties of coach.—In the aiming and leading exercise, the
coach insures that the—
(1) Proper position is taken.
(2) Rifle is swung with a smooth motion.
(3) Rifle is swung by pivoting the body at the waist.
(4) Arms, shoulders, automatic rifle, and head move as a
unit.
И 147. Third Step: Trigger-Press Exercises.—a. Impor-
tance.—(1) Correct trigger press is the most important
operation to be performed in firing the automatic rifle. The
automatic rifleman should be trained to press the trigger
exactly as when firing rapid single shots at stationary ground
targets, except that the automatic rifle is kept in motion dur-
ing the trigger press, during the firing of the burst, and after
the firing of the burst (follow-through).
(2) In firing at a rapidly moving target, the untrained
automatic rifleman has a tendency to permit the automatic
rifle to come to rest momentarily while applying the final
pressure. This results is the shot passing behind the target.
Another fault of the untrained man is that of pulling the
trigger quickly the instant the aim is on the required lead.
This causes the alinement of the sight to become disarranged.
(3) Because of the short period of time during which the
usual aerial target will be within effective range, fire should
be opened as soon as possible and delivered as rapidly as pos-
sible consistent with accuracy. The trigger should therefore
be pressed promptly and decisively. Once started, the press
should be continued until the slide is released.
(4) Skill in pressing the trigger properly when firing at
rapidly moving targets is difficult to acquire. Although auto-
matic riflemen will have had training in trigger pressing
during their course in stationary ground target marksman-
ship, firing at rapidly moving targets introduces certain addi-
tional elements which must be overcome before skill is ac-
quired. Since practice in taking correct positions rapidly,
aiming, and leading are included in trigger-press exercises,
139
147
BASIC field manual
the greater part of the time allotted to preparatory exercises
should be devoted to trigger press.
b. Object.—The primary object of the trigger-press exer-
cises is to train the automatic rifleman to apply pressure on
the trigger while keeping the automatic rifle in motion, to
develop a decisive trigger press so that fire can be opened in
a minimum of time without loss of accuracy, and to train him
to follow through with the shot. In this training, the neces-
sity of a smooth swing and follow-through, at the time the
bolt strikes home, is second in importance only to the trigger
press itself.
c. Method.—(1) Trigger-press exercises on nonoverhead
targets are conducted in a manner similar to that used in
conducting the aiming and leading exercises except as noted
below.
(2) The commands for the exercise are: 1. trigger-press
EXERCISE, 2. SIMULATE LOAD, 3. SQUADS ONE AND THREE FROM
RIGHT TO LEFT (OR LEFT TO RIGHT), 4. SQUADS TWO AND FOUR FROM
. LEFT TO RIGHT (OR RIGHT TO LEFT), 5. ONE (TWO, OR MORE)
' lead (S), 6. TARGETS.
Note.—Squads one, two, three, and four refer only to the organ-
ization for training, shown in figure 31.
At the command TARGETS, the targets are operated at the
prescribed speed; the pupils rapidly assume the designated
firing position; mentally apply the target length as a unit
of measure in measuring the lead announced in the order;
direct the aim on that point; and, by swinging the rifle in the
manner taught and practiced in the aiming and leading
exercise, maintain the aim at the announced lead. At the
same time they apply a constantly increasing pressure on
the trigger until the slide (hammer) is released. The aim
is maintained during the entire length of travel of the target
regardless of the time of release of the slide. The importance
of following through with the shot cannot be too strongly
emphasized. It is only by this means that men will develop
the habit of keeping their rifle in motion during the entire
process of firing. All of these steps are performed as one
continuous operation. The exercise consists of pressing the
trigger each time the target moves across the front. The
target having reached the end of its movement across the
140
BROWNING AUTOMATIC RIFLE, CAL. .30, M1918A2
147
firer’s front, the automatic rifleman quickly swings his rifle
back to the beginning of the target run, cocks the piece, and
anticipates the return of the target to that end of the run.
The exercise consists of five passages of the target in each
direction. The coach and pupil then change places, and
work is continued until all men have become proficient in
pressing the trigger correctly, using various leads. It is
essential that training be provided for targets moving in both
directions. Experience has shown that leading from left to
right is more difficult than leading from right to left.
Note.—All preparatory exercises of the automatic rifle in anti-
aircraft marksmanship training should be carried on with the
Browning automatic rifle M1918A2, in order to acquaint the flrer
with the proper trigger press, weight of rifle, and movement of the
rifle when the slide moves forward. .
- (3) The group receiving instruction in trigger-press ex-
ercises on overhead targets is arranged as for aiming and
leading exercises (fig. 31®). The instruction is conducted
in a similar manner, except that when the target reaches
the end of its run the firer does not track the movement in
the opposite direction. He swings his point of aim quickly
back to the starting point and continues the trigger-press ex-
ercise as described above for nonoverhead targets. The com-
mands for this exercise are: 1. trigger-press exercise, 2. sim-
ulate LOAD, 3. SQUADS ONE AND THREE. APPROACHING TARGETS,
4. SQUADS TWO AND FOUR, RECEDING TARGETS, 5. ZERO (ONE) LEAD,
6. TARGETS.
(4) The group receiving instruction in trigger-press exer- .
cises on the parachute targets is arranged as for aiming and
leading exercises (fig. 31®). The commands for the exer-
cise are: 1. trigger-press exercise, 2. simulate load, 3. zero
(one) lead, 4.TARGETS. At the command targets, the tar-
gets are operated at the prescribed speed; squads one and
two simulate fire at the descending right targets. When the
left targets reach the top of the carrier and start down,
squads three and four simulate fire thereon.
d. Duties о/ coach.—In trigger-press exercises the coach
sees that the—
(1) Proper position is taken.
(2) Rifle is swung with a smooth, uniform motion.
(3) Rifle is swung by pivoting the body at the waist.
535351°—43----10 141
147-150 BASIC FIELD manual
(4) Arms, shoulders, and head move as a unit as the rifle
is moved.
(5) Pressure on the trigger is applied promptly, decisively,
and continuously.
(6) Eye is kept open and does not blink at the instant the
slide is released, if using the automatic rifle.
(7) Muzzle does not jerk coincident with the release of the
hammer if using the caliber .22 rifle.
(8) Pupil continues the aim during the entire length of
travel of the target.
(9) Rifle butt is kept on the shoulder while reloading the
caliber .22 rifle.
Section IV
MINIATURE RANGE PRACTICE
148. General.—a. Miniature range practice is divided, into
two parts, instruction firing and group firing. There is no
record firing.
b. All firing is on moving targets on the 500-inch range.
A suggested arrangement of the range is given in paragraph
158. Provision is made for simultaneous firing by separate
groups on the horizontal, the climbing and diving, the over-
head, and the parachute targets.
c. The course should first be fired with the caliber .22 rifle,
after which, if the supply of ammunition and the danger area
permit, the Browning automatic rifle, caliber .30, M1918A2
should be used. Single shots or short bursts of two or three
rounds will be fired.
149. Safety Precautions.—The applicable safety precau-
tions given in paragraph 241 will be observed.
150. Instruction Firing.—a. General.—(1) The purpose
of instruction firing is to provide a means of applying the
principles taught in the preparatory exercises.
(2) During instruction firing, the soldier works under the
supervision of a coach.
(3) As a group completes the preparatory training on a
target, instruction firing should be taken up on that target
and completed before the group moves to another target.
142
BROWNING AUTOMATIC RIFLE, CAL. .30, M1918A2
150
(4) Instruction firing consists of the exercises indicated
in table I, below.
b. Procedure.—(1) As the instruction firing on each type of
target follows immediately after the preparatory exercises on
that target, the organization of the training unit for firing
should be the same as that given in paragraph 144b.
(2) The front rank of each group is formed on the firing
line in the designated firing position. The men in the rear
rank act as coaches.
(3) One-half of the front rank pupils of the group fires
while the remaining front rank men simulate firing (fig.
31®). In this way, men are kept busy and receive additional
preparatory instruction while waiting their turn to fire. This
organization is, in effect, a “double” coaching system for
squads (fig. 31).
(4) Silhouettes are assigned to each individual firer. For
example, the four silhouettes on the right of the targets are
assigned the first four men on the right of the line; the
four silhouettes on the left of the targets are assigned the
next four men. Silhouettes for the men simulating firing
are assigned in the same manner; for example, the right
four are assigned silhouettes on the right of the target and
the left four are assigned silhouettes on the left of the
target (par. 144c).
(5) When the men are in the desired firing position, the
officer in charge of the firing commands: 1. squads one and
TWO, LOAD, 2. SQUADS THREE AND FOUR, SIMULATE LOAD, 3. SQUADS
ONE AND THREE, FROM RIGHT TO LEFT, 4. SQUADS TWO AND FOUR,
FROM LEFT TO RIGHT, 5. ONE (TWO OR MORE) LEADS, 6. TARGETS.
At the command targets, the targets are operated at the pre-
scribed speed. Pupils on the right half of the nonoverhead
targets mentally apply the length in measuring the an-
nounced lead. They direct their aim on that point, and,
while maintaining the aim, press the trigger until the shot
is fired. They continue to aim during the entire length of
travel of the target, regardless of the time at which the
shot was fired. When the target reaches the end of its run,
firers quickly swing their point of aim back to the starting
point and promptly begin to aim when the target begins
its next trip. They fire one shot each time the target crosses
143
150
BASIC FIELD MANUAL
from their left to right. Pupils on the left half of the same
targets aim and fire one shot in the same manner as ex-
plained above each time the target crosses from their right
to left.
(6) Pupils on the overhead target fire one round each time
the target is operated; those assigned to the approaching tar-
get fire only as the target approaches; similarly, those as-
signed to the receding target fire only as the target recedes
from the firing point. All pupils apply the announced target
length lead, aim, press the trigger, follow through, and then
swing back to the starting point as described above for the
pupils firing on the nonoverhead targets. The commands
given in (5) above are made applicable to overhead target
firing by substituting the words “approaching targets,” and
“receding targets’’ for “right to left” and “left to right,”
respectively.
(7) When firing on parachute targets, the men on the right
(left) being in the designated firing position, the officer in
charge of firing commands: 1. squads one (two) and three
(FOUR) LOAD, 2. SQUADS TWO (ONE) AND FOUR (THREE) SIMU-
LATE load, 3. zero (one) lead, 4. TARGETS. At the com-
mand targets, squad one fires while squad two simulates fire
at the right descending target. When the left target reaches
the top of the carrier and starts down, squad three fires
on that target during its descent while' squad four simulates
fire thereon. After all pupils have fired, coaches and pupils
change places, and the exercises are repeated in a similar
manner until all men have fired.
(8) Four rounds constitute a score. However, nonoverhead
and overhead targets are usually operated for five complete
round trips. Thus men whose rifles have malfunctioned
(jammed) are allowed an opportunity to fire any remaining
shots. After each string of four rounds has been fired,
targets are scored and the shot holes are marked. One
method for such marking is to place a piece of white chalk
on the shot hole and give the chalk a quick twist.
(9) One point is awarded for each hit in the silhouette
when using one lead or in the proper scoring space when
using more than one lead.
(10) Half groups alternate firing and simulating firing.
144
BROWNING AUTOMATIC RIFLE, CAL. .30, M1918A2 150-151
(11) When front rank men have fired two scores, one
as the target moved in each direction, they change places
with the men in the rear rank. They then coach the rear
rank men.
(12) This procedure is followed until all men.of the group
have performed the required firing at that target.
(13) Upon completion of the firing prescribed in table I
for any one type of target, the group moves to another type
target and continues until all have completed the preparatory
training and instruction firing.
TABLE I.—INSTRUCTION FIRING (RANGE 500 INCHES)
Target Sitting Kneeling Standing To- tal Remarks
Horizontal.. 1 lead 4 rounds L to R 4 rounds R to L 2 leads 4 rounds L to R 4 rounds R to L 3 leads 4 rounds L to R 4 rounds R to L 24 Fig. 42©.
Climbing or diving. 4 rounds L to R 4 rounds R to L 4 rounds L to R 4 rounds R to L 4 rounds L to R 4 rounds R to L 24 Fig. 42®.
Overhead... 0 lead 4 rounds ap- proaching. 4 ro inds reced- ing. 0 lead 4 rounds ap- proaching. 4 rounds recod- ing. / lead 4 rounds ap- proaching. 4 rounds recod- ing. 24 Fig. 42®.
Parachute... 0 leads 4 rounds 0 leads 4 rounds 1 lead 4 rounds. 12 Fig. 46.
Speed of all targets except the parachute target, 15 feet per second.
Speed of the parachute target, 1 foot per second.
(14) Modifications of the above method of firing to meet
local conditions are authorized.
151. Group Firing.—a. General.—(1) Group firing is the
final phase of antiaircraft marksmanship training on the
miniature range.
(2) It provides for competition and illustrates the effective-
ness of the combined fire of a number of riflemen.
(3) Group firing should not be undertaken until the pre-
145
151-152
BASIC field manual
paratory training and instruction firing have been com-
pleted.
b. Procedure.—(1) Two group firing targets (fig. 38), one
to be fired upon as the target moves from left to right and
one to be fired upon as the target moves in the opposite
direction, are assigned to each squad or similar group.
(2) All men are arranged as shown in figure 31®. All
pupils fire four rounds on assigned silhouettes as the target
moves from right to left and then from left to right. Coaches
and pupils change places and the exercise is repeated for
rear rank men, now in position as pupils.
(3) Targets are not scored until completion of the firing
of the entire squad or group.
c. Scoring.—A value of one is given each hit on the
silhouette.
Section V
TOWED TARGET AND RADIO-CONTROLLED PLANE
TARGET FIRING
152. General.—a. The following types of targets are used
in towed target and radio-controlled plane target firing using
ball, armor-piercing, tracer, or a combination of tracer and
one of the other types of ammunition.
(1) Towed sleeve targets.—Fifteen feet long with a diam-
eter of 3 feet.
(2) Towdd flag targets.—Forty feet by nine feet, equipped
with weights so that the width (9 feet) is displayed to the
firer as width and height, respectively, when the target is
moving directly toward (away from) the man, or across the
front.
(3) Radio-controlled plane targets.—Approximately 10 feet
long, 12-foot wing spread, and 2 feet high.
Note.—Prior to actual firing, practice. In aiming and leading and
trigger-press exercise may be conducted, using airplanes as targets.
b. Towed target or radio-controlled plane target firing will
follow miniature range instruction firing. If, because of lack
of facilities, a unit is unable to conduct miniature range
firing, it may be permitted to conduct towed target or radio-
146
BROWNING AUTOMATIC RIFLE, CAL. .30, M1918A2 152-155
controlled plane target firing, provided antiaircraft marks-
manship preparatory training has been completed.
c. A hit on the engine or radio of the radio-controlled plane
target will cause the parachute to open. The command to
cease firing will be given as soon as the parachute is released.
153. Courses to Be Fired.—Units authorized to fire will
fire one or more of the courses enumerated in table II or
table III.
154. Safety Precautions.—See applicable safety precau-
tions in paragraph 241,-
155. Procedure of Firing.—a. The men to fire take their
places on the firing line with at least 1Уг yards interval be-
tween men. They then assume the antiaircraft firing posi-
sition designated by the officer in charge of firing.
b. The officer in charge of firing takes position in rear of
the center of the firing line.
c. Safety officers take position at either flank of the firing
line.
d. As the target approaches the left (right) side of the dan-
ger area, the officer in charge of firing gives the command:
1. (So many) rounds, load, 2. TARGET FROM THE LEFT
(RIGHT). Each automatic rifleman cocks his piece, inserts
a magazine, and turns the change lever to safe.
e. As the target approaches the danger area, the officer in
charge of firing commands: 3. SIX LEADS (par. 141c). At
this preparatory command, each automatic rifleman turns
the change lever to the slow cyclic rate, aims by swinging to
the announced lead, pivoting at the waist, and maintains
the estimated lead.
f. For exercises in firing at crossing targets, the safety offi-
cer stationed at the end of the firing line, opposite to the
target’s approach, signals or commands COMMENCE FIRING
when the target has completely crossed the line marking the
firing area. The officer in charge of firing and such assistants
as he desires repeat the command or signal to insure that
all firers hear it. Each automatic rifleman presses the
trigger until the slide is released. He continues to aim and
fire rapidly until the command or signal cease firing is given.
•147
Table IL—TOWED TARGET COURSES TO BE FIRED
Course No. Type of flight Altitude of target Horizontal range (yards) i Speed Remarks
1 Nonoverhead horizontal (parallel to firing line from L to R). Nonoverhead horizontal Minimum consistent with safety. do Minimum, 100; maximum depends on width of dan- ger area of range. __._do 15 foot sleeve, 140 mph.... 40 foot flag, 165 mph None.
2 do None.
3 (parallel to firing line from R to L). Overhead (perpendicular to firing line). Combined courses 1, 2, and 3. do. f_,. . [in accordance [Minimum ,t. L, . s with safety .do Fig. 39. Fig. 40.
4 do Maximum L ( precautions. Same as for courses 1, 2, do. __
and 3.
i The horizontal distance from the firing point to a point directly under the target.
BROWNING AUTOMATIC RIFLE, CAL. .30, M1918A2 155
Figure 39.—Course No. 3. (Firing takes place when target is on
shaded portion of course. Fire is opened when towing airplane Is
50 yards or less from firing point.)
Figure 40.—Course No. 4. (Heavy lines indicate when towed target
is fired upon.)
149
Table III.—RADIO-CONTROLLED PLANE TARGET COURSES TO BE FIRED
on
о
Course Type of flight Ground range to nearest 25 yards Altitude to nearest 25 feet Slant range in yards (approximate) Speed Number of runs Remarks
1 Nonoverhead 300 200 300 95 1 L to R 1 R to L None.
2 Nonoverhead 300 800 400 95 1 L to R 1 R to L None.
3 Nonoverhead 300 1,200 500 95 1 LtoR 1 R to L None.
4 Overhead.. 550-150 750 600-300 95 1 approaching... None.
5 Overhead 150-550 750 300-600 95 1 Receding None.
6 Overhead diving.... 550-150 750-250 600-175 Max. 1 approaching... Fig. 41.
7 Overhead climbing. _ ... _ 150-550 250-500 175-600 Max. 1 receding Fig. 41.
8 Oblique diving 500-225 1,000-600 600-750 600-300 Max. 1 incoming Fig. 41. Fig. 41.
9 Oblique climbing 225-500 300-600 Max. 1 outgoing
BASIC FIELD MANUAL
Note.—Courses 1,2, and 3 will be flown on an arc of constant range, elevation, and speed. The maximum slant range for all courses
should not exceed 600 yards.
Figure 41.—Radio-controlled
plane target course.
BROWNING AUTOMATIC RIFLE, CAL. .30, M1918A2 155
155-158
BASIC FIELD MANUAL
The safety officer at the end of the firing point opposite to the
target’s departure observes the flight of the target during
the firing. When he observes that the target is about to leave
the firing area, he signals or commands CEASE FIRING.
The officer in charge of firing and his assistants repeat the
command or signal to insure that all firers hear it.
g. In firing at overhead targets, the same procedure is
followed except that the officer in charge of firing (from
his position behind the center of the firing line) determines
when firing commences and ceases; in towed target firing,
he gives the command or signal to commence firing when the
towing plane is 50 yards or less in front of the firing line and
gives cease firing before the sleeve is 100 yards in front of
the firing line (par. 241).
156. Scoring.—a. The number of hits is found by dividing
the number of holes in the target by 2. An odd hole is
counted as a hit.
b. The hit percentage is obtained by dividing the number
of hits as obtained in a above by the total number of rounds
fired at the target.
Section VI
RANGES, TARGETS, AND EQUIPMENT
157. Range Officer.—A range officer is appointed well in
advance of range practice. His chief duties are—
a. To make timely estimates for material and labor to place
the range in proper condition for firing.
b. To supervise and direct the repairs and alterations to
installations.
c. Where safety demands, to instruct and supervise range
guards.
158. Miniature Range.—a. The miniature range consists
of—
(1) One horizontal target (fig. 42®).
(2) One double climbing and diving target (fig. 42®).
(3) One overhead target (fig. 42®).
(4) One parachute target (fig. 46).
152
BROWNING AUTOMATIC RIFLE, CAL. .30, M1918A2 158
b. A suggested arrangement, of the targets is shown in
figure 48.
c. For details of targets, see figures 32 to 38, inclusive.
d. For details of range apparatus, see figures 42 to 48,
inclusive, and TM 9-855.
® Horizontal.
® Overhead.
Figure 42.—Diagrams showing types of miniature range targets
153
158
BASIC FIELD MANUAL
60'
-Я
Figube 43.—Target carrier used on horizontal and on climbing and
diving miniature range targets. (See fig. 42® and ®).
154
browning automatic rifle, cal. .30, M1918A2
158
155
158
BASIC FIELD MANUAL
TO DEUM
Figure 46.—Miniature parachute target course and target carrier.
156
BROWNING AUTOMATIC RIFLE, CAL. .30, M1918A2
158
e. (1) The danger area required is dependent upon the type
of ammunition. (For information on sizes and shapes of
danger areas, see AR 750-10.)
(2) The miniature range may be laid out in the manner
shown in figure 48. Care must be taken to insure that the
firing line and targets are placed so that no fire will fall out-
side of the firing area.
f. If the organization for training is as suggested in para-
graph 144b, the following equipment is necessary:
(1) Eighty caliber .22 rifles. (If not available, the organ-
ization for training should be altered accordingly.)
(2) Seven aiming and leading targets (figs. 32, 33, and 34).
(Each of these targets consists of a piece of beaverboard on
which the silhouettes are pasted or stenciled.)
(3) Six instruction firing targets per range (figs. 35, 36,
and 37). (The overhead and parachute targets are the same
as the aiming and leading overhead and parachute targets
except that the pasters are eliminated.)
(4) One score card per man.
535351“—43----11
157
сл
00
Figures shown below each firing point Indicate the number of men who can be satisfactorily trained on
such a range. If an increased capacity is desired, appropriate increases In available facilities should be made.
BASIC FIELD MANUAL
(82) (64) (32) (32)
Figube 48.—Arrangement of targets.
BROWNING AUTOMATIC RIFLE, CAL. .30, M1918A2 158-159
INDIVIDUAL SC OKE CARD'
antiaircraft rifle marksmanship
for field firing at aerial targets, the danger area is the chief
consideration (AR 750-10).
b. The firing point should accommodate at least 50 men
in line with a iy2-yard interval between men. A level strip
of ground, preferably on a hill, 75 yards long and 2 yards wide,
is suitable. A firing point similar to the firing point of a
class A rifle range may be built.
c. (1) After the range has been selected, the firing point,
limits of fire, and danger area should be plotted on a map
or sketch of the area.
(2) From this map or sketch, the range is then laid out
on the ground. First, each end of the firing point is marked
by a large stake. The right and left limits of fire are then
each marked by a post. The posts are located in azimuth
159
159-160
BASIC FIELD MANUAL
by the following method: To locate the post marking the
left limit of fire, an aiming circle or other angle measuring
instrument is set up at the right end stake of the firing
point. It is then oriented and laid on an azimuth which,
by reference to the map or sketch, is known to be the farthest
to the left that the rifle can safely be fired from its position
at the right end of the firing point. The post marking the
right limit of fire is similarly located with the instrument
set up at the left end stake of the firing point. Each post is
placed at the maximum distance at which it will be plainly
visible from the firing point (fig. 49).
Figure 49.—Towed target range showing firing point and limits of
fire; dotted lines show danger area.
(3) Direction guides for the towing airplane to follow
should, within the limits of fire, be distinctly marked on the
ground for each course. White targets or strips of cloth,
placed fiat on the ground about 30 feet apart, are suitable.
160. Targets.—a. Type and source.—The targets used in
towed target firing are sleeve or flag targets furnished by the
air force unit assigned the towing mission (par. 152). They
are returned to the air force unit after they have been scored.
160
BROWNING AUTOMATIC RIFLE, CAL. .30, M1918A2 160-162
Radio-controlled plane targets will be obtained through the
division commander.
b. Towline.—The towing line for the towed target will be
not less than 600 yards long.
161. Instructions to Pilots for Towing Missions.—a.
Towed target firing requires the closest cooperation between
the pilot of the towing plane and the officer in charge of fir-
ing. Decisions affecting the safety of the plane rest with air
force personnel.
b. The air mission for towed target firing should be specifi-
cally stated. The commanding officer requesting airplanes
for towed target firing should furnish in writing to the air
force unit commander concerned, the following information:
(1) Place of firing.
(2) Date and hour of firing.
(3) Number of missions to be flown; altitude, course, speed,
and number of runs for each.
(4) Ground signals to be used.
(5) Map of the area with the firing line, angle of fire, dan-
ger area, course of each mission, and location of the grounds
for dropping targets and messages plotted thereon. An alter-
nate dropping ground should be designated when practicable
with either or both dropping grounds subject to approval by
the pilot.
(6) Length of the towline, within limits established by the
air force and subject to approval of the pilot.
(7) Number of targets required.
c. Whenever practicable, the officer in charge of the firing
will discuss with the pilot the detailed arrangements men-
tioned in b above. This discussion should take place where
the various range features can be pointed out to the pilot.
The courses over which the airplane is to be flown should be
distinguished on the ground (within the angle of Are). Ma-
chine-gun targets placed fiat on the ground about 30 feet
apart or strips of target cloth are practicable for this purpose
on some courses. On others a terrain feature such as a beach
line may be used.
162. Signals.—a. Direct radio communication is the most
effective means by which the officer in charge of firing and
161
162
BASIC FIELD MANUAL
the pilot of the towing plane maintain contact with each
other. Even though radio is being used, panels should be
available in case radio communication fails.
b. For signaling from the ground to the pilot, any method
agreed upon by the officer in charge of firing and the pilot
of the towing airplane may be used. The panel signals gen-
erally used are as follows:
Stand by_______________________________
Ready to fire__________________________
Repeat run No. 1_______________________
Repeat run No. 2_______________________
Repeat run No. 3_______________________
Repeat course__________________________
0 0 2.
0 0 0.
0 9 1.
0 9 2.
0 9 3.
0 9 4.
Mission complete___________________
Pick up panels.
. c. The pilot may alsb communicate with the officer in
charge of firing by dropped messages or by rocking his wings.
d. When the radio-controlled plane target is used, it is
essential that the radio control operator be able to cause the
firing to cease immediately. This can best be accomplished
by the use of a klaxon or siren. Some system of prearranged
signal^ must exist between the radio control operator and
the officer in charge of firing.
162
CHAPTER 5
TECHNIQUE OF FIRE
Paragraphs
Section I. General______________________________________ 163-165
II. Range estimation_____________________________ 166-170
П1. Target designation___________________________ 171-174
IV. Automatic rifle fire and its effect__________175—181
V. Application of fire__________________________ 182-189
VI. Landscape target firing_____________________ 190-197
VII. Field target firing_________________________ 196-201
VIII. Destruction of ordnance materiel________________ 202
Section I -
GENERAL
163. Definitions.—a. The training of riflemen and auto-
matic riflemen for combat is progressive in nature and in-
cludes three phases. The first phase is individual training
and comprises such allied subjects as marksmanhip, ex-
tended order, drill and combat signals, and certain elements
of scouting and patrolling. The second phase is called
“technique of fire” and is team training consisting of instruc-
tion in the application and control of the collective fire of
rifle fire units. In the third phase, the individual and team
training learned in the first and second phases are combined
with tactical training. This chapter deals with the second
phase of training.
b. Collective fire is the combined fire of a group of indi-
viduals.
c. A fire unit is one whose fire in battle is under the imme-
diate and effective control of its leader. The usual rifle fire
unit is the squad.
164. Importance of Automatic Rifle Fire.—Effective au-
tomatic rifle and rifle fire is an element which may deter-
mine the issue of battle. Collective fire is most effective
when it is the product of teamwork. Training in the tech-
nique of fire, as set forth in this chapter, is designed to
train rifle squads to act as efficient and dependable teams in
the application and control of collective fire.
165-166
BASIC FIELD MANUAL
165. Scope.—a. Training in the technique of fire does not
involve the solution of tactical situations. However, a tac-
tical situation is presented in each exercise to form the basis
for instruction in the principles of technique of fire; and
such subjects as the use of cover and concealment in the
selection and occupation of positions, the selection and en-
gagement of targets, and others used in the application of
fire, should be included in the training in technique of fire.
Instruction is progressive and is divided into six consecutive
steps. Each step includes some or all of the technique learned
in previous steps. The steps are as follows:
(1) Range estimation.
(2) Target designation.
(3) Rifle and automatic rifle fire and its effect.
(4) Application of fire.
(5) Landscape target firing.
(6) Field target firing.
b. It is not essential that perfection be reached in each
step before proceeding to the next step; it is better that such
a standard be attained by repetition, applying in the steps
that follow everything that has been learned. However,
each step should be understood before proceeding to the next.
The instructor explains each step in detail. He then makes
plain its relation to the subject as a whole. This is followed
by a demonstration, which in turn is explained by the in-
structor. The troops then practice the principles and
methods previously explained and demonstrated. Exercises
pertaining to each step are hereinafter described in detail.
They can be used for demonstrations and instructional prac-
tice. Some of them can be used to test fire units, thus in-
troducing the desirable element of competition. These exer-
cises may be changed to conform to local conditions.
Section П
RANGE ESTIMATION
166. Importance.—In battle, ranges are seldom known in
advance, so that the effectiveness of fire depends in large
measure upon the accuracy of range estimation.
164
BROWNING AUTOMATIC RIFLE, CAL. .30, M1918A2 167-170
167. Methods.—Of the various methods of estimating
ranges, only the following are considered in instruction in
the technique of fire:
a. Use of tracer bullets.
b. Observation of fire.
c. Estimation by eye.
168. Use of Tracer Bullets.—When the range to a target
is being estimated by the use of tracer bullets, one of the
scouts or the leader estimates the range by eye, sets his
sight for that range, and fires a tracer bullet the path and
strike of which are observed by the second scout or a desig-
nated observer. The firer corrects the sight setting accord-
ing to the strike of the bullet and continues to fire and
correct the sight setting until a tracer appears to strike the
target. The firer then announces by voice or signal the re-
quired range setting to hit the target, taking into considera-
tion the zero of his rifle.
169. Observation of Fire.—This method can be used when
the ground is dry and the strike of the bullets can be ob-
served. The procedure is the same as‘that used in deter-
mining the range by tracer bullets. The following points
must be taken into consideration:
a. Dust will appear slightly above the striking point of
the bullet.
b. If observing from the firing point, dust will appear on
the side toward which the wind is blowing.
c. If observing from a point on the flank, shots which pass
over the objective will appear to strike on the side toward
which the observer is posted; those which fall short, toward
the opposite side.
170. Estimation by Eye.—a. Necessity for training.—The
usual method of estimating ranges in combat is estimation
by eye. Untrained men make an average error of 15 per-
cent of the range when estimating by eye. Hence a definite
system of range estimation, coupled with frequent practice
on varied terrain, is essential to success with this method.
b. Unit of measure method.—(1) Ranges less than 500 yards
are measured by applying a mental unit of measure 100 yards
165
170
BASIC FIELD MANUAL
long. Thorough familiarity with the 100-yard unit and with
its appearance on varied terrain and at different distances
is necessary, if the soldier is to apply it accurately.
(2) Ranges greater than 500 yards are estimated by select-
ing a point halfway to the target, applying the unit of meas-
ure to this halfway point, and then doubling the result.
(3) The average of a number of estimates by different men
will generally be more accurate than a single estimate. This
variation of the suggested method is used when time per-
mits by taking the average of the estimates of members of
the squad or specially qualified men.
c. Appearance of objects.—In some cases, much of the
ground between the observer and the target will be hidden
from view, and the application of the unit of measure will be
impossible. In such cases, the range is estimated by the
appearance of objects. Whenever the appearance of objects
is used as a basis for range estimation, the observer must
make allowance for the following effects:
(1) Objects seem nearer—
(a) When the object is in a bright light.
(b) When the color of the object contrasts sharply with
the color -of the background.
(c) When looking over water, snow, a Wheatfield or any
uniform surface.
(d) When looking downward from a height.
(e) In the clear atmosphere of high altitudes.
(/) When looking over a depression most of which is
hidden.
(2) Objects seem more distant—
(a) When looking over a depression most of which is
visible.
(b) When there is a poor light, or fog.
(c) When only a small part of the object can be seen.
(d) When looking from low ground upward toward higher
ground.
d. Exercises.—(1) No. 1.—(a) Purpose.—To familiarize the
soldier with the unit of measure—100 yards.
(b) Method.—The unit of measure (100 yards) is previ-
ously staked out on one or more courses over varied ground
(fig. 50), using markers that will be visible up to 500 yards.
166
BROWNING AUTOMATIC RIFLE, CAL. .30, M1918A2 170
in order to familiarize the men with the appearance of the
unit of measure, they are conducted to a starting point which
should be centrally located if more than one course is to be
practiced. They are then moved to a point that is 100 yards
(400-yard marker) from the selected 500-yard marker and
are formed approximately on line facing that marker. Then
they are required to move back toward the starting point
until all are on line with the 300-yard marker, actually thus
being 200 yards from the 500-yard marker. Successively they
are moved to a point on line with the 200- and 100-yard
Figure 50.—Schematic lay-out illustrating an area used for teaching
the 100-yard unit of measure.
markers, thence to the starting point. At each of the stop-
ping points, men are required to study the appearance of the
unit of measure and to apply it successively up to 500 yards.
This exercise should be practiced at each of the several ranges
in the prone, sitting, squatting, kneeling, and standing posi-
tions. The unit receiving instruction may be divided into
two or more smaller groups, each practicing successively on
the several courses. The exercise is repeated until the desired
proficiency is attained.
167
170
BASIC FIELD MANUAL
(2) No. 2.—(a) Purpose.—To illustrate the application of
the unit of measure.
(b) Method.
1. Ranges up to 900 yards are measured accurately and
marked at every 100 yards by large markers or
target frames, each bearing a number to indicate
its range. Men undergoing instruction are then
placed about 25 yards to one side of the prolonged
line of markers and directed to place a hat or
other object before their eyes so as to exclude
from view all of the markers. They are then di-
rected to apply the unit of measure five times
along a straight line parallel to the line of mark-
ers. When they have selected the final point, the
eye cover is removed and the estimations of the
successive 100-yard points and the final point are
checked against the markers. Accuracy is gained
by repeating the exercise.
2. Ranges greater than 500 yards are then considered.
With the markers concealed from view, men esti-
mate the ranges to points which are obviously over
500 yards distant and a little to one side of the
line of markers. As soon as they have announced
each range, they remove their eye covers and
check the range to the target and to the halfway
point by means of the markers. Prone, sitting,
squatting, kneeling, and standing positions are
used during this exercise.
(3) No. 3.—(a) Purpose.—To give practice in range esti-
mation.
(b) Method.—From a suitable point, ranges are previously
measured to objects within 1,000 yards. The men are re-
quired to estimate the ranges to the various objects as they
are pointed out by the instructor, writing their estimates
upon paper or cards previously issued (par. 232). At least
one-half of the estimates are made from the prone or sitting
(squatting) positions. Thirty seconds are allowed for each
estimate. When all ranges have been estimated, the papers
are collected and the true ranges announced to the class.
168
BROWNING AUTOMATIC RIFLE, CAL. .30, M1918A2 170-171
To create interest, individual estimates and squad averages
may be posted on bulletin boards.
(4) No. 4.—(a) Purpose.—To demonstrate a soldier’s
appearance at various ranges.
(b) Method.
1. From a suitable point, measure off 500 yards across
smooth terrain: place men at 100 yard intervals
and have them take concealed positions. As an
introduction, the men undergoing instruction are
told that they will have an opportunity to study
the appearance of men at various ranges.
2. On signal, have all men stand. Then instruct the
group to observe the gradual disappearance of de-
tail (facial features, helmet, belt, rifle, hands,
and leggings), and the fact that men seem to get
smaller and smaller as the distance increases.
Then call attention to distances at which various
details vanish.
3. On signal, have the posted men kneel. Have the
group study the appearance of the posted men.
The instructor calls attention to the fact that the
details fade at shorter ranges than they did when
the posted men were standing.
4. On signal, have the posted men take up prone firing
positions with rifles aimed at the group. Have the
group study the appearance of the posted men.
The instructor again calls attention to the fact
that the details fade at even shorter distances than
they did when the posted men were in the standing
or kneeling position.
5. This exercise should be conducted both looking into
the sun and away from the sun.
Section III
TARGET DESIGNATION
171. Importance.—Target designation is a vital element in
technique of fire. Battlefield targets are generally so in-
distinct that leaders and individuals must make every attempt
169
171-173 BASIC FIELD MANUAL
to designate their location and extent carefully and accu-
rately. Enemy troops will usually be so well concealed that
the location of most individuals of the hostile unit will not
be visible. To cover such a target, squad leaders must be
able to designate the area in which hostile troops are located,,
and members of the squad must be trained to place heavy
fire on the designated area even though no specific targets
are visible.
172. Topographical Terms.—Prior to instruction in target
designation, riflemen should understand the topographical
terms normally employed in designating targets; for example,
crest, military crest, hill, cut, ridge, bluff, fill, ravine, cross-
roads, road junction, road center, road fork, skyline, etc.,
(fig. 51).
173. Target Designation.—a. General.—(1) A complete
target designation includes the following elements:
(a) Range (how far to look).
(b) Direction (where to look),
(c) Description (what to look for).
(2) These elements are always given in the above sequence,
with a slight pause between elements. An exception to this
rule occurs when the target is expected to be visible for a
short time only. In such cases, the target is pointed out as
quickly as possible with a brief oral description as, for ex-
ample, “Those men.”
b. Range.—Range tells the man how far he must look to
see the target when the direction is announced. It is
announced first so that the man may set his sights and be
ready to fire as soon as the two remaining elements of target
designation are given and understood. It may be given
either by voice or by arm-and-hand signal, and is determined
by visual estimation or by observing the strike of bullets on
the ground or the path of tracer bullets.
c. Direction.—Direction tells the man where to look, and
may be indicated in the following three ways, or combina-
tion thereof:
(1) Orally.—The terms front (left front, right front, left
flank, right flank, left rear, right rear, and rear) may be
used to indicate the general direction of the target (fig. 52).
170
Figube 51.—Military terms for terrain features.
BROWNING AUTOMATIC RIFLE, CAL. .30, M1918A2
173
BASIC FIELD MANUAL
(2) Pointing.—In pointing, either the arm or rifle may be
used. When using the rifle to indicate the direction to a
target, cant the rifle to the right and aim it at the target;
without moving the rifle, move the head to the left so as to
permit the man behind the rifle to look through the sights
and locate the target. If time permits,, a bayonet may be
stuck diagonally into the ground to serve as a rest for the
rifle in order to keep it in place after it is laid on the target.
Figure 52.—Target designation—general directions.
In lieu of the bayonet, a log, the crotch of a tree,, or any
other suitable rest may be used; or the automatic rifle may
be pointed, using the bipod as a rest.
(3) Tracer bullets.—The use of tracer bullets is a quick
and sure method of indicating the direction to an indistinct
battlefield target and the most accurate method of indicat-
ing the flanks of an obscure target. Their use is invariable
172
BROWNING AUTOMATIC RIFLE, CAL. .30, M1918A2 173
when scouts or other members of the squad are already under'
fire, when the squad is separated and out of voice-range of
the leader, or when cover is scarce so that the movement
required for pointing out the target will expose personnel
to hostile fire. Designating a target by tracers, notwith-
standing its advantages, has certain handicaps in that it dis-
closes the position of the firer and at the same time lessens
the surprise effect of a sudden burst of fire laid on the
enemy position. Before firing tracers, it is helpful to indicate
the general direction of the target orally in order that the
squad members will be sure to look in the required direction
and that they will be able to pick up the flight of the tracers.
d. Description.—Description tells the man what he is ex-
pected to see as well as the nature of his target—whether it
is a point, linear, or oblique target, or one which extends
in depth. Though oral designation is often used, battlefield
conditions will rarely permit a leader thus to designate a
target directly to all members of his unit. Therefore, when a
scout or leader has preceded the squad, he frequently an-
nounces, “Range 500, right front, watch my tracer,’’ and fires
a tracer at the target. He then describes the target, for ex-
ample, “machine gun.” To designate a linear target, a scout
or leader indicates its limits by firing tracers at each flank.
He also announces or signals any range or windage correc-
tion obtained by tracer firing. '
e. Examples.—The simplest form of target designation is
the most effective. The adopted method should be the
one best suited to the conditions existing at the time the
target appears. Troops must be trained to use all methods.
The following examples illustrate how several types of tar-
gets may be designated in specific situations:
(1) Target plainly visible, or near an easily recognized
object or terrain feature.
Range 425.
Left front.
Sniper at base of dead tree (point marked A in fig. 53).
(2) Target invisible, indistinct, or not located near an easily
recognized object or terrain feature.—The direction to the
target is indicated by the use of a reference point. The
535351"—43-
42
173
Figure 53.
BASIC FIELD MANUAL
BROWNING AUTOMATIC RIFLE, CAL. .30, M1918A2 173
selected reference point should .be capable of being easily
identified to members of the squad concerned, and should
not be subject to being mistaken for a similar nearby object
or point. A reference point on line with and beyond the
target will give greater accuracy than one located between
the observer and the target. The selected reference point
should be as near to the target as practicable in order that
the target may be quickly and easily picked up by all mem-
bers of the squad. For brevity, a reference point when used
in target designation is called “reference.”
(a) Re/erence point on line with target:
Range 450;
Front;
Reference: church spire; ..
Target: machine gun in edge of woods (fig. 53, target
at B).
It will be noted that the range announced is that to the
target and not to the reference point. When the word “ref-
erence” is used, the word “target” is also used to differentiate
between the two objects. Another example follows—
Range 350;
Left front;
Reference: black stump;
Target: sniper on far side of road (fig. 53, target at C).
(b) Reference point not on line with target.—1. The in-
terval to the right or left between the reference point and the
target is measured in units called “fingers.” If the hand
is held so that the left edge of a finger is on line with the
reference point and the right edge of that same finger is on
line with the target, the target is one finger width to the
right of the reference point; this interval is announced as
“Right, one finger.” If two fingers can be applied to this
lateral interval, it is announced as “Right, two fingers.”
The following additional examples refer to figure 53 and
illustrate this method:
(Target at D) —
Range 600;
Front;
Reference: church spire; right, two fingers;
Target: group of enemy in shell hole near crest;
• (Target at E)—
175
173
BASIC FIELD MANUAL
Range 425;
Left front;
Reference: dead tree; right, one and one-half fingers;
Target: sniper in edge of woods.
(Target at F) —
Range 450;
Front;
Reference: church spire; left, one-half finger;
Target: machine gun in corner of woods.
2. The width or extent of targets is also measured in
fingers (target G to H):
Range 425;
Front;
Reference: church spire; left, two fingers;
Target: enemy groups in edge of woods extending left,
two fingers.
(c) Successive reference points.—These may be used in-
stead of finger measurements from one reference point
(target at I):
Range 500;
Front;
Reference: church spire; to the right and at a shorter
range, a group of three trees; to the right and at
the same range;
Target: machine gun at left end of mound of earth.
(d) Combination of successive reference points and fingers
may be used.—Example (target at J):
Range 600.
Front.
Reference: church spire; to the left and at a shorter
range, lone tree; left one finger and at the same
range.
Target: machine gun in clump of brush.
f. Variations.—If one end of a target is considerably nearer
than the other, the average range is announced since disper-
sion will cover the target. Battlefield conditions will im-
pose many practical substitutions and combinations of
methods in. target designation. Frequently the squad leader
will be able to designate the target to only one or two mem-
bers of his squad. Therefore, each member of the squad
176
BROWNING AUTOMATIC RIFLE, CAL. .30, M1918A2 173-174
must be taught to assist in designating the targets to other
members of the squad team. At times the entire target desig-
nation will be furnished by the scouts to other members of
the squad as they arrive in the vicinity. Formal, long-winded
oral target designation will often confuse more than help.
174. Exercises.—a. No. 1.—(1) Purpose.—To teach the use
of fingers for lateral measurement.
(2) Method.—(a) A number of short vertical lines 1 foot
apart are plainly marked on a wall or other vertical surface
(fig. 54). At a distance of io feet from the wall, a testing line
is drawn or marked out by stakes. The instructor explains
that the vertical lines are one finger (50 mils) apart when
measured from the testing line, and are used for the pur-
pose of determining the correct distance from the eye that
the index finger must be held so that it will cover the space
between one of the vertical lines and the next line to the right
or left.
(b) The instructor then explains and demonstrates the
use of the index finger in lateral measurement. First he
holds his hand, with palm to the rear and finger pointing up-
ward, at such a distance from his eye that the finger will
cover the space between one vertical line and the next line
to the right or left. Then he lowers his hand to his side
without changing the angle of the wrist or elbow and notes
the exact point at which the hand strikes the body. There-
after, when measuring with the finger, he first places his
hand at this point and raises his arm to the front without
changing the angle of the wrist or elbow. His hand will
then be in the correct position for measuring fingers. The
men then determine the proper distance of the finger from
the eye as explained by the instructor. The men should
then practice until they know exactly how far from the eye
to hold the finger. When proficient, this should be done
without reference to the point where the hand touched the
body, so they can use the finger measurement from any posi-
tion. The instructor explains that the one finger measure-
ment may be repeated or two or three fingers may be used
in measuring intervals between points.
(c) Using convenient objects within view, practice in mak-
ing lateral measurement is given.
177
Figube 54.—Finger calibration court.
BASIC FIELD MANUAL
BROWNING AUTOMATIC RIFLE, CAL. .30, M1918A2 174
b. No. 2.—(1) Purpose.—To afford practice in target des-
ignation (indicating direction by oral description).
(2) Method.—(a) The squad is deployed and faced to the
rear. The squad leader is at the firing point, where sand-
bags or bayonet rests have been provided for each rifle.
(b) At a prearranged signal, the target is indicated by dis-
playing a flag, by firing a burst of blank cartridges from a
machine gun, or by other suitable ballistic means. When the
squad leader states that he understands the nature and
position of the target, the flag is withdrawn.
(c) The squad is then brought to the firing point and
placed in the prone position. The squad leader, also in the
prone position, estimates the range and gives his designa-
tion. Each man is required to set his sight, use the sandbag
or bayonet rest, and sight his rifle on the point at which he
believes the target is located.
(d) The instructor checks the designation given by the
squad leader from a position similar to that assumed by the
squad leader. The men are required to leave their rifles on
the rests, properly pointed, until verified by the instructor
or squad leader.
(e) After the rifles have been checked, the flag is waved
again or another burst of blanks is fired so that all men .may
be given an opportunity to check on their knowledge as to
the location of the target.
c. No. 3.—(1) Purpose.—To afford practice in target desig-
nation (indicating direction by pointing with the rifle).
(2) Method.—(a) The squad is formed faced to the rear.
The instructor then points out the target to the squad leader
who takes the kneeling or prone position, estimates the range,
adjusts the rear sight, alines his sights on the target, and
then calls “Ready.”
(b) The members of the squad then move in turn to a
position directly behind the squad leader and look through
the sights until they have located the target. The range and
a brief description of the target are given orally by the squad
leader to each individual.
(c) As soon as each man has located the target he moves
to the right or left of the squad leader, sets his sight, places
179
174
BASIC FIELD MANUAL
his rifle on a bayonet rest or sandbag, and alines his sights
on the target.
(d) The instructor, assisted by the squad leader, verifies
the sight setting and the alinement of the sights of each
rifle.
d. No. 4.—(1) Purpose.—To afford practice in target desig-
nation (indicating direction by firing tracer bullets).
(2) Method.—(a) A concealed target representing a ma-
chine gun is placed near a pit or other bulletproof shelter.
About 500 yards in front of the target, a firing position suit-
able for a squad is selected. The location of the target will
be visible from the firing position but the target itself may
be invisible because of its concealment. This concealment
should have a natural appearance in order not to attract
attention.
(b) The squad is deployed along the firing position and all
except the scouts are then faced to the rear.
(c) The scouts take the prone position and are told that
the waving of a red flag to their front will represent the firing
and smoke from the machine gun.
(d) A man stationed in the pit waves a flag in front of the
target for about 30 seconds and retires to the protection of
the pit. In lieu of the red flag, a machine gun inside a pit
at the target location may be fired.
(e) The squad is faced to the front and men take the prone
position with their rifles loaded and locked. The scouts use
tracer ammunition and the remainder of the squad use ball
cartridges.
(/) One scout estimates the range and adjusts his rear
sight, alines his sights on the target, and opens fire. He
adjusts his sights by increasing or decreasing his elevation as
directed by the other scout who observes the fire. Thus hav-
ing determined the correct range, the scouts have identified
the target for the remainder of the squad. The scouts then
announce the range which is passed orally from man to man.
(p) As soon as each man understands the location of the
target, he opens fire with the proper sight setting.
(Л) The instructor causes firing to cease shortly after all
men commence firing.
(i) Noncommissioned officers do not participate in the fire.
180
BROWNING AUTOMATIC’RIFLE, CAL. .30, M1918A2 174г-177
Squad leaders move about freely behind their men and ob-
serve the firing. The assistant squad leader assists the squad
leader.
(?) After firing ceases, sight settings are checked by the
squad leader and the target is examined or the hits are sig-
naled to the squad.
Section IV
AUTOMATIC RIFLE FIRE AND ITS EFFECT
175. Trajectory.—a. Nature.—The trajectory is the path
followed by a bullet in its flight through the air. Using М2
armor-piercing ammunition, the bullet leaves the automatic
rifle at a speed of 2,775 feet per second. Because of this great
speed the trajectory at short ranges is almost straight or
flat.
b. Danger space.—The space over level or uniformly sloping
ground between the rifle and the target in which the tra-
jectory does not rise above a man of average height is called
the “danger space.” The trajectory for a range of 750 yards
does not rise above 68 inches. Therefore, it is said that the
danger space over level or uniformly sloping ground for that
range is continuous between the muzzle of the gun and the
target. For ranges greater than 750 yards, the bullet rises
above the height of a man standing, so that only part of
the space between the gun and the target are danger spaces
<fig. 55).
176. Dispersion.—Because of differences in ammunition,
aiming, holding, and wind effects, a number of bullets fired
from an automatic rifle at a target are subject to slight
dispersion. The trajectories of those bullets form a cone-
shaped figure (fig. 56) called the “cone of dispersion.”
177. Shot Patterns.—The pattern formed by the cone of
dispersion on a vertical target is narrow, in width and the
height of the pattern is slightly longer than the width. Be-
cause of the flatness of the trajectory, the pattern formed
by the cone of dispersion on a horizontal target is much
greater in length than in width. On level ground the length
181
(H=MAXIMUM ORDINATE - HIGHEST POINT OF TRAJECTORY )
ANGLE OF ONE DEGREE (H . К
DANGER SPACES
01 23456789 1000 YARDS
BASIC FIELD MANUAL
CONTINUOUS TO 750 YARDS
___..800 YARDS______
__________________________IOOO YARDS__________________________
'/70
Figure 55.—Trajectory and danger space diagram for М2 armor- piercing ammunition. (Vertical scale
is approximately 27 times Horizontal scale.)
BROWNING AUTOMATIC RIFLE, CAL. .30, M1918A2 177-178
Figure 56.—Cone of dispersion, vertical and horizontal shot patterns.
of the horizontal pattern varies in length from 100 yards at
the longer ranges to 400 yards at short ranges.
178. Beaten Zone (fig. 57).—The beaten zone is the area
on the ground struck by the bullets. The slope of the ground
therefore has great effect on the shape and size of the beaten
zone. Rising ground shortens the beaten zone. Ground
that slopes downward and in the approximate curve of the
trajectories will greatly lengthen the beaten zone. Falling
ground with greater slope than the trajectory will escape
fire and is said to be in defilade.
dangei? space-----------------и
Figure 57.—Grazing and plunging fire showing beaten zone.
183
179
BASIC FIELD MANUAL
179. Classes of Fire.—a. According to direction, fire is
classified as follows (fig. 58):
(1) Frontal.—Frontal fire is fire delivered at right angles
to the front of the objective. It is least effective against a
target shallow in depth, such as a line of skirmishers, be-
cause it fails to take advantage of the depth (length) of the
beaten zone. It is most effective against targets which are
narrow and deep, for example, a column of squads approach-
ing the rifle.
(2) Flanking.—Fire delivered against the flank of a target
is called flanking fire. This type of fire (except for its sur-
prise and morale effect) is not very effective against the flank
of column targets of small width, because only a small part
of the target will be covered by the narrow beaten zone of
the automatic rifle fire. However, flanking fire is very effec-
tive against a line target such as a skirmish line, for here,
the long axis of the target coincides with the long axis of the
beaten zone.
(3) Oblique.—Fire delivered from a direction oblique to the
long axis of the target is called oblique fire.
(4) Enfilade.—Enfilade fire is fire, either frontal or flank-
ing, in which the long axis of the beaten zone coincides with
the long axis of the target. It is the most effective type of
fire. Columns of approaching troops engaged from the front,
or line targets engaged from positions on their flanks, are
said to be taken in enfilade.
b. According to trajectory, fire is classified as follows:
(1) Grazing (fig. 57®).—Grazing fire is that fire which
Figure 58.—Classes of fire with respect to target.
184
BROWNING AUTOMATIC RIFLE, CAL. .30, M1918A2 179-180
does not rise above the height of a man standing. Where
the automatic rifle is fired from the prone position, the
trajectories of the bullets at ranges up to 750 yards, over
level or uniformly sloping ground, produce grazing fire.
(2) Plunging.—Plunging fire (fig. 57®) is fire in which
the bullet’s angle of fall with reference to the slope of the
ground is such that the danger space is practically confined
to the beaten zone. The length of the beaten zone is ma-
terially lessened. Fires delivered from high ground on
ground lying approximately at right angles to the cone of
fire, or against ground rising abruptly to the front with
respect to the position of the rifle, are examples of plunging
fire (fig. 57®). As the range increases, fire becomes increas-
ingly plunging, because the angle of fall of the bullets
becomes greater.
(3) Overhead,.—Overhead fire is fire delivered over the
heads of friendly troops, and may be employed when the
conformation of the ground is such that the fire will not
be dangerous to friendly troops.
180. Effect of Fire.—a. Automatic riflemen secure the
most decisive results when close to the enemy. The entire
squad usualjy holds its fire until the range to the target
is 500 yards or less. However, under favorable conditions,
the automatic rifle is effective against enemy troops or areas
known to contain enemy groups at ranges between 500 yards
and 1,000 yards, the effectiveness of the fire being about the
same as that of the light machine gun under the same con-
ditions.
b. Automatic rifle fire is effective and should be used against
low-flying planes. It can be used effectively against tanks
to cause the crew to keep doors and shields closed. When
armor-piercing ammunition is used, the fire is effective
against lightly armored vehicles and concrete emplacements,
as well as personnel.
c. Fire may be continued when the morale effect and
hazard are sufficient to keep the enemy under cover, render
his fire ineffective, and maintain fire superiority. However,
when opposing forces are intrenched and neither is trying
to advance, fire for morale effect alone is worthless.
185
181-182
BASIC FIELD MANUAL
181. Exercise.—a. Purpose.—To show trajectories.
b. Method.—(1) The unit under instruction watches the
firing of a few tracer bullets at targets the ranges to which
are announced. Ranges of 300, 600, and 800 yards are suit-
able selections. The flatness of the trajectories is called to:
the attention of the men.
(2) The automatic riflemen Are several bursts of tracer
bullets at the slow cyclic rate to acquaint the unit under
instruction with the cone of fire made by the trajectories of
the automatic rifle.
Section V
APPLICATION OF FERE
182. General.—a. Means of action.—Rifle units have two
general means of action—fire and movement. Fire, move-
ment, and hand-to-hand fighting are combined in the combat
action of the squad and larger units. The application of fire
by such units is essential to their success.
b. Application of fire.—(1) In attack.—The squad and
smaller groups must be trained to place a large volume of
accurate fire upon probable enemy locations and indistinct or
concealed targets such as enemy machine guns or small
groups. The squad and smaller groups must be trained to
apply such Are quickly upon order or signal of their leader
and, in appropriate circumstances, to apply it without such
order. During the Are fight, the primary duty of the squad
leader is to place the fire of his squad on the target. In ac-
complishing this, he keeps in mind the fire power of the
automatic rifie team which he employs within the squad to
place automatic fire on suitable targets and to support the
advance of other members of the squad (figs. 58 and 60). For
this reason he selects positions for the automatic rifleman
from which he can deliver effective fire on any target holding
up the remainder of the squad. When practicable this posi-
tion should permit the automatic rifle to cover the entire
squad front. The selected position will usually be the one
with the best field of fire.
(2) In defense (figs. 61 and 62).—In defense, the fire of a
small rifle unit such as a squad is delivered by small groups
186
BROWNING AUTOMATIC RIFLE, CAL. .30, M1918A2
182
and individuals from positions which they must hold. The
automatic rifle team is placed where it can obtain the best
field of fire, and at the same time take advantage of cover and
concealment. Consideration should also be given to placing
it where it will be able to assist adjacent units. The auto-
matic rifle can be used to establish a final protective line by
the grazing fire method outlined in paragraph 239. The pos-
sibility of such use should be considered in selecting the
position for the automatic rifle.
Figure 59,—Diagram showing use of automatic rifle to support ad-
vance of the riflemen of the squad. (Four of the riflemen are
firing to give additional fire support while the remainder of the
equad continues the advance.)
187
182
BASIC FIELD MANUAL
(3) In delaying actions.—Because of its high mobility,
and fire power, the automatic rifle is particularly adapted
to use in delaying actions to harass the enemy and to cover,
road blocks, stream crossings, and defiles. To cover these’
with fire, a well trained automatic rifle team should take
advantage of opportunities to fire from position defilade
as described in paragraph 240.
AM BEARER
Figure 60.—Diagram showing Use of automatic rifle to support ad-
vance of the riflemen of the squad. (The riflemen are divided
into two groups, one on each flank. One group fires to support
the advance of the other; or the groups alternately fire and
advance, each supporting the advance of the other.)
188
BROWNING AUTOMATIC RIFLE, CAL. .30, M1918A2
182
c. Actions of members of automatic rifle team.—The au-
tomatic rifle team is a fire unit within the rifle squad. This
team should be kept together and duties alternated in all
phases of training so that each member knows all the duties
of the other members, thus insuring that the fire power
of this weapon will not be materially affected by battle
casualties.
□ SUPPLEMENTARY POSITIONS
Figure 61,—Diagram of a squad in a defensive position showing
the location of the automatic rifle team in primary, alternate,
and supplementary positions.
535351°——43----13
189
182
BASIC FIELD MANUAL
(1) ТЬё automatic rifleman receives orders from the rifle
squad leader or the assistant squad leader. Pursuant to
such orders, he takes position and brings under fire any
designated targets and such targets of opportunity as may
present themselves. He is ever watchful for opportunities
to further the advance of the remainder of the squad by
the timely use of the fire power of his automatic weapon.
(2) The assistant automatic rifleman takes position so
that he can see the target, the squad leader (or assistant
squad leader), and the automatic rifleman. He aids the
automatic rifleman in getting on the target, transmits to
him orders and signals from the squad leader (or assistant
squad leader), observes for new targets, assists the auto-
matic riflemaa in the reduction of stoppages, and replaces
ENEMY
у P-Primary BAR position
A-Alternare BAR positiorf
S-Supplementary BAR position
© Automatic rifle sectors of fire.
Figure 62.—Diagram of a platoon in a defensive position show-
ing location of automatic rifle teams to support adjacent squads,
the location of alternate and supplementary positions, and the
coordination of the fires of the automatic rifles with the squad
sectors of fire.
190
BROWNING AUTOMATIC RIFLE, CAL. .30, M1918A2
182
him should he become a casualty. When necessary, he
participates in the Are with his rifle.
(3) The ammunition bearer’s primary duty is to keep
the automatic rifleman supplied at all times with ammuni-
tion. When he is not engaged in supplying ammunition he
performs the duties of a rifleman, and promptly engages
those targets which threaten the automatic rifle. He also
aids the assistant automatic rifleman in carrying out his
duties and assumes the duties of the automatic rifleman
in case both the automatic rifleman and assistant automatic
rifleman become casualties.
d. Requirements of position.—In the occupation of a firing
position, the location of squads in the platoon area should
be made with due regard to the following requirements:
(1) Suitability for desired fire support.
(2) Field of Are to the front.
(3) Maximum use of available cover and concealment.
(4) Fire control by unit leader.
ENEMY
® squad sectors of fire.
Figure 62—Continued.
191
182-183
BASIC FIELD MANUAL
When these requirements conflict, it is the duty of leaders
to weigh the importance of each and make the best dispo-
sitions.
183. Concentrated and Distributed Fire.—The size and
nature of the target presented may call for the fire' power
of the entire group or only certain parts. The fire of a group
must necessarily be either concentrated or distributed fire.
a. Concentrated fire.—Concentrated fire is fire directed at
a single point. This fire is very effective. Machine guns
and other crew-served weapons are examples of suitable tar-
gets for concentrated fire.
b. Distributed fire (fig. 63® and ®).—(1) Distributed
fire is fire distributed in width for the purpose of keeping
all parts of the target under effective fire. It is habitually
used on targets having any considerable width.
(2) The method of fire distribution employed by a squad
TARGET
©Automatic rifle team centrally located,
no. 11 on the flank.
Figure 63.—Squad fire distribution.
192
BROWNING AUTOMATIC RIFLE, CAL. .30, M1918A2
183
Is as follows: Each rifleman fires his first shot on that portion
of the target corresponding generally to his position in the
squad. He then distributes his remaining shots to the right
and left of his first shot, covering that part of the target on
which he can deliver accurate fire without having to change
position. The amount of target each rifleman can cover
will depend upon the range and the position of the firer.
In some cases each rifleman will be able to cover the entire
target with accurate fire. Fire is not limited to points known
to contain an enemy; on the contrary, riflemen space their
shots so that no portion of the target remains unmolested.
This does not mean that rifleman or automatic riflemen try
to cover every square foot of the target area, but rather that
each rifleman searches the sector which he can cover and
fires wherever and whenever he actually sees an enemy. He
also fires at each likely spot where an enemy might be’con-
cealed. The flank men- are taught to overlap the flanks of
□ SQUAO LEADER.
□ 20 IN COMMAND
GRENADIER.
® Automatic rifle team on flank, No. 11 in firing line.
Figure 63—Continued.
193
183-185 BASIC FIELD MANUAL
the target slightly to be sure that both flanks are covered.
This method of fire distribution is employed without com-
mand. It enables squad leaders to distribute the fire of their
units so as to cause the entire target to be kept under fire.
(3) From a position best suited to provide support, the
automatic rifleman distributes his Are over the entire target,
or on any target which will best support the advance of other
members of the squad. The automatic rifleman, his assist-
ant, and the ammunition bearer function as a team in order
to keep the automatic rifle in a state of constant readiness
for action.
(4) If a squad is employing this method of fire distribu-
tion and other targets appear, the squad leader announces
such changes in the fire distribution as are necessary.
(5) When a target can be engaged by the entire platoon
and is narrow in width, each squad engages the entire
target. When this is impracticable, the platoon leader as-
signs a portion of the target to each squad.
И 184. Assault Fire.—Assault fire is that fire' delivered by
a unit during its assault on a hostile position. Riflemen
with bayonets fixed, and the automatic rifleman, his assist-
ant, and the ammunition bearer, taking full advantage of
existing cover, such as tanks, boulders, trees, walls, and
mounds, walk rapidly toward the enemy and fire as they
advance at areas known or believed to be occupied by hostile
personnel. Such fire is usually delivered from the standing
position and is executed at a rapid rate. This fire may also
be delivered from the hip or any other convenient position.
The automatic rifleman fires from the assault fire position
(fig. 24) and at a rapid rate.
185. Rate of Fire.—The automatic rifleman fires at the
rate of fire most effective under existing conditions. He
therefore determines the rate of fire to use by considering
the type of fire (frontal, oblique, enfilade), the size of the
target, the proximity (range) of the target, and the available
supply of ammunition. The maximum rate at which the
automatic rifle should be fired is determined by the speed and
ability of the gunner to aline the sights and press off accurate
bursts. To exceed this rate is a waste of ammunition. Con-
194
BROWNING AUTOMATIC RIFLE, CAL. .30, M1918A2 185~186
siderable skill is required to fire single shots. The accuracy
of this fire is the same as that of a rifle. When bursts of
2 or 3 rounds are fired, there is a small loss in accuracy when
compared to single shot firing. A longer burst causes dis-
persion of the shots in depth. Hence the size of the burst is
determined by the type of target on which fire is to be placed.
In the case of frontal fire without enfilade effect, bursts of
2 or 3 rounds are the most effective to use. Against compact
targets or small areas known to contain compact groups and
against targets taken in enfilade, bursts of 4 or 5 rounds
should be used. Where a long target is taken in enfilade, a
skilled automatic rifleman, by aiming initially at the near
end of the target, can fire a burst of 20 rounds and obtain
good fire effect. At ranges beyond 600 yards, bursts of 2 or 3
rounds should be used when accuracy of fire is necessary.
The initial burst may be long in order to provide observation
of the strike of the bullets. To obtain the element of surprise,
the first few bursts should be delivered at the maximum rate
in order to pin the enemy to the ground. Thereafter,
the rate of fire should be slowed down to a rate which is
just sufficient to maintain fire superiority. This allows for
adjustment of the fire by the squad leader and conserves
ammunition.
186. Fire Discipline.—a. Fire discipline implies the careful
observance of instructions relative to the use of the rifle and
automatic rifle in combat, and exact execution of the orders
of the leader. When fire discipline is good, men fight as
they have been trained to fight and obey orders promptly
and carefully; they resist and overcome the influence of dan-
ger, excitement, and confusion. Fire discipline is necessary^
for proper control by leaders; teamwork and effectiveness of
the collective fire of the unit depend upon this control. The
training necessary to insure good fire discipline cannot be
completed during the brief period devoted to technique of
fire. Training in fire discipline starts with the soldier’s first
drill and continues throughout his military training. Any
drill or exercise which develops alertness and the habit of
obedience or other soldierly qualities will aid in developing
the character essential to fire discipline.
195
186-187 BASIC FIELD MANUAL
b. Fire discipline is maintained by leaders chiefly by their
example of coolness and courage. Replacement of casualties
is an element of fire discipline which keeps the unit working
as a team in spite of losses. If any group finds itself without
a leader, it is essential for one of the group to assume leader-
ship and carry out the assigned mission or attach the group
to the nearest organized unit. An individual separated from
his squad fights on his own initiative only when he has reason
to believe that his single effort will accomplish some im-
portant result. Otherwise he reports to the nearest leader
at once.
c. Fire discipline in the squad is the responsibility of the
squad leader; he is assisted by the assistant squad leader.
The position of the squad leader during the fire fight will be
where he can best control his squad. The assistant squad
leader will be where he can best assist the squad leader.
187. Fire Control.—a. General.—Fire control consists of
the initiation and supervision of the fire of a unit or group
by its leader. It implies the ability of the leader to have his
men open fire or cease fire at the instant he desires, to adjust
the fire upon the target, to shift all or a part of the Are from
one target to another, and to regulate the rate of fire. Fire
control pertains chiefly to the squad or smaller group. The
leader of the squad or smaller group must supervise and con-
trol the fire of his men so that it is directed and maintained
at suitable targets. All must understand that controlled fire
is always the most effective fire. On the other hand, the
irregular formations adopted for an advance will often ren-
der such control impracticable. In such case, fire must be
opened and maintained on the initiative of individuals, as
circumstances require. However, the leader should seek to
regain control of the fire of his men at the first opportunity.
b. How exercised.—Squad leaders and assistant squad lead-
ers exercise fire control by means of orders, commands, and
signals. The signals most frequently used are—
Signals for range.
Commence firing.
Fire faster.
Fire slower.
196
BROWNING AUTOMATIC RIFLE, CAL. .30, M1918A2 187-188
Cease firing.
Are you ready?
I am ready.
Fix bayonets.
188. Fire Orders.—a. Purpose.—The leader of a rifle fire
unit or group of riflemen, having made a decision to fire on
a target, must give certain instructions as to how the target
is to be engaged. The instructions by which the fire of a
squad is directed and controlled form the fire order.
b. Basic elements.—A fire order contains three basic ele-
ments which are announced or implied in every case. Only
such elements or parts thereof will be included as are essen-
tial. Except when the squad is to engage more than one tar-
get, in which case the fire distribution element may be given
first, the sequence is always as follows:
Target designation element.
Fire distribution element.
Fire control element.
(1) Target designation element.—The target may be desig-
nated by any one or a combination of the prescribed methods.
This element tells where the target is and what it is (par. 173).
(2) Fire distribution element.—This tells who is to fire.
It may be omitted from the fire order when all members
of the squad are firing at the same target. The method of
fire distribution described in paragraph 183b is habitually
employed against targets of width in the absence of instruc-
tions to the contrary. When necessary to engage more than
one target, the fire distribution element includes the sub-
division of the target. In this case, the fire distribution
element may be given first.
(a) A squad leader desires to engage two machine-gun
nests; the fire distribution element of his order might be as
indicated by the italicized words below:
Cooper, Emerson, Crane, Hines, Turner (.riflemen).
Range 400.
Front.
Machine gun at base of lone pine.
Brown (automatic rifleman), Smith, Jones, Howard,
Stone (riflemen).
197
188
BASIC FIELD MANUAL
Range 500.
Left flank.
Machine gun at base of haystack.
(b) The squad leader may engage two targets by placing
a number of riflemen under the command of the assistant
squad leader, directing him to engage one target, while he
(the squad leader) engages the other target with the auto-
matic rifleman and other-members of the squad; or, the squad
leader may place the automatic rifleman and certain mem-
bers of the squad under the assistant squad leader to engage
one target, while, with remaining members of the squad, he
(the squad leader) engages the second target.
(3) Fire control element.—(a) The fire control element
normally consists of only the command or signal commence
firing. It tells when to fire. It may also include the num-
ber of rounds and, for the automatic rifle, may include the
number of bursts or the number of rounds in the burst or
both. Examples are:
EIGHT ROUNDS, COMMENCE FIRING.
one (two or more) magazine <s), commence firing,
bursts of two (three, four, or more), commence firing,
two bursts of two (three, four, or more), COMMENCE
FIRING.
(b) An example of a complete fire order follows:
1. Target designation element.
(Range)_________________Range 600.
(Direction)_____________Front (left front, etc.),
(Description of target)_Group of enemy.
2. Fire distribution element__ (Implied.)
3. Fire control element______Commence firing.
c. Surprise fire.—To secure the maximum surprise and
shock effect, it is important that all weapons of a unit open
fire at the same instant. To insure this, the leader may
preface the command or signal for. commencing fire by the
words “upon command” or “upon signal.” Men are trained
so that each one, as soon as he reaches a firing position and
picks up his target, aims his rifle or automatic rifle at the
target. As soon as the leader has determined that all men
are in position and are aiming at the target, he gives the
command or signal commence firing. In some situations,
198
BROWNING AUTOMATIC RIFLE, CAL. .30, M1918A2 188-190
the leader may delay in giving the command commence
firing until the critical moment for opening fire is at hand.
In this case, to insure that all men open fire at the same
time, a sufficient pause is made between the words “com-
mence” and “firing” to permit the men to realine their sights
on the target and be ready to fire at the word “firing.”
d. Other than surprise fire.—If surprise fire is not re-
quired, the command commence firing is announced imme-
diately after the target designation element of the fire order.
Each man then opens fire as soon as he is in a firing position
and has picked up his target.
189. Duties of Leaders.—The following summary of duties
of leaders relates only to their duties in the technique of fire:
a. Squad leader.—(1) Carries out orders of platoon leader.
(2) Selects firing positions for squad.
(3) Designates targets and issues fire orders.
(4) Controls fire of squad, when possible.
(5) Maintains fire discipline.
(6) Observes targets and effect of fire.
(7) Directs the assistant squad leader to control the fire
of a portion of the squad, when desirable.
b. Assistant squad leader.—(1) Carries out orders of squad
leader.
(2) Assists squad leader to maintain fire discipline.
(3) Assumes command of squad in absence of squad leader.
(4) Participates in firing when the fire of his rifle is con-
sidered more important than other assistance to the squad
leader.
(5) Controls any portion of the squad, as directed by the
squad leader.
Section VI
LANDSCAPE TARGET PTRING
И 190. Scope and Importance.—a. After satisfactory progress
has been made in the preceding^ steps, the soldier may be
given practice in the application of those lessons by firing
at landscape targets.
b. The advantages of this training are as follows:
(1) Immediate supervision over all members of the firing
190-193
BASIC. FIELD MANUAL
unit is made possible by their close proximity. The instruc-
tion is therefore more individual than would be otherwise
possible.
(2) The accessibility and nature of the targets permit the
application and effect of the fire to be shown in a minimum
of time.
(3) This form of instruction lends itself to indoor train-
ing when lack of facilities or weather conditions make it
desirable.
c. In circumstances where there is a choice between land-
scape target firing as covered in this section and field target
firing as covered in section VH of this chapter, the latter
is to be preferred. Firing at landscape targets is therefore
not required as a part of training.
И 191. Description of Target.—A landscape target is a
panoramic picture of a landscape and is of such size that
all or nearly all of the salient features will be recognizable
at a distance of 1,000 inches. The standard target is the
series A target of five sheets in black and white.
И 192. Weapons To Be Used.—Firing at landscape targets
should be with caliber .22 rifles, preferably the M1922M2
equipped with the Lyman receiver sight. When a sufficient
number of these rifles are not available, the caliber .30, Ml
and M1903 rifles, and the automatic rifle may be used.
193. Preparation of Targets.—a. Mounting.—(1) The
target sheets are mounted on frames made of 1- by 2-inch
dressed lumber, with knee braces at the corners. The frames
for the target sheets are 24 by 60 inches. These frames’
are covered with target cloth which is tacked to the edges.
(2) The target sheets are mounted as follows: Dampen
the cloth with a thin coat of flour paste and let it dry for
about an hour; apply a coat of paste similarly to the back
of the paper sheet and let it dry about an hour; apply a
second coat of paste to trie back of the paper and mount
it on the cloth; smooth out wrinkles, using a wet brush or
sponge and working from the center to the edges. The
frame must be placed on some surface which will prevent
200 a “id л •*.
BROWNING AUTOMATIC RIFLE, CAL. .30, M1918A2 193
the cloth from sagging when the paper is pressed on it.
A form for this purpose can easily be constructed. It must
be of the same thickness as the lumber from which the
frames are built and must have approximately the same di-
mensions as the aperture of the target frame.
b. Target frame supports.—Panels mounted on frames as
described above are set in vertical frame supports consist-
ing of posts (about 4 by 4 inches) of sufficient height, placed
upright in the ground, 5 feet from center to center, with
horizontal pieces of 2 to 4 inches to support the panels,
braced to insure stability (fig. 64). The panels are sup-
ported by cleats and dowels in order to allow for easy
removal.
c. Range indicators.—In order to make all elements of
target designation complete, assumed ranges must be used
on landscape targets. Small cards on which are painted
appropriate numbers representing yards of range are tacked
along one or both sides of a series of panels (fig. 64). The
flrers must be cautioned that the range announced in any
target designation is for the sole purpose of designating
the target, and that the sight setting necessary to zero their
rifles must not be changed.
d. Direction cards.—In order to provide the direction ele-
ment in oral target designation, small cards on which are
painted “Front,” “Right front,” “Left front,” “Right flank,”
and “Left flank,” are tacked above the appropriate panels
of the landscape series (fig. 64).
e. Scoring devices.—(1) Scoring the exercises will tend
to create competition between squads and will enable the
instructor to grade their relative proficiency. A scoring
device for a point target (fig. 65), conforming in size to the
50- and 75-percent shot groups to be expected of average
shots firing at 1,000 inches and at reduced ranges, can
easily be made from wire. A better one may be prepared
by imprinting a scoring diagram on a sheet of transparent
celluloid. By using a scoring template constructed from
celluloid, plywood, beaverboard, or any similar material, the
scoring space can be outlined on the target in pencil before
the target is shown to squad leaders (fig. 65). This pro-
cedure prevents any misunderstanding of squad leaders as
201
CO
W
202
BASIC FIELD MANUAL
BROWNING AUTOMATIC RIFLE, CAL. .30, M1918A2 193
to the limits of the designated target. Upon completion of
firing, the entire squad is shown the target and the results
of the firing.
(2) While shot groups are in the form of a vertical ellipse,
the 50- and 75-percent zones should be shown by the devices
as rectangles. This is for convenience in their preparation.
For a distance of 1,000 inches, the 50-percent zone is a rec-
tangle 2У2 inches high by 2 inches wide; the 75-percent
Figure 65.—Lining In scoring area (point target) with scoring
template.
rectangle is 5 inches high by 4 inches wide. For a distance
of 50 feet, the 50-percent zone is a rectangle 1 y2 inches high
by 1.2 inches wide; the 75-percent rectangle is 3 inches high
by 2.4 inches wide. The target is at the center of the inner
rectangle or 50-percent zone.
(3) For a linear target, such as a small area over which
the riflemen will distribute their fire, the 50-percent zone is
formed by two lines drawn parallel to the longer axis of the
target (area) and with the target midway between those
203
193-194
BASIC FIELD MANUAL
lines. A suitable scoring device (fig. 66), conforming in size
to the 50- and 75-percent shot groups expected of average
shots at 1,000 inches and at reduced ranges, can be made for
a linear or vertical target as described above for a point
target. Also, it is used in a similar manner (fig. 67). For a
distance of 1,000 inches, the lines should be 2'/2 inches apart;
for a distance of 50 feet, the lines should be 1 Yz inches apart.
Two additional lines similarly drawn form the 75-percent
zone. For a distance of 1,000 inches, the lines should be
5 inches apart; for a distance of 50 feet, the lines should be
3 inches apart. The width of the zones will vary according
to the size of the target selected. For a distance of 1,000
inches, the zones extend 1 inch beyond each end of the tar-
get; for a distance of 50 feet, the zones extend 0.6 inch beyond
each end of the target. The zones are then divided into a
convenient number of equal parts, the number depending on
the length (width) of the target and the number of men
firing. This is done in order to give a score for distribution of
shots fired on a linear target (par. 196).
(4) Figure 68 shows a scorer placing the scoring template
on a vertical target.
194. Zeroing of Rifles.—a. It will be necessary to zero the
rifles used before firing exercises on the landscape target. A
target with two rows of ten 1-inch-square black pasters
(Nos. 1 to 10, from right to left, fig. 69) with bottom row about
6 inches from and parallel to the bottom edge of the target,
should be prepared and used for zeroing. In all firing for
zeroing, sandbag rests are used.
b. The procedure in detail is as follows:
(1) The sights of the rifles are blackened if necessary.
(2) The squad is deployed on the firing point; the squad
leader, takes the proper position in rear of the squad.
(3) The instructor causes each firer to set his sights at
zero elevation and zero windage, or minimum range and zero
windage for the automatic rifle, and then checks each sight
setting.
(4) Each man is assigned the particular small black paster
which corresponds to his position in the squad as his aiming
point.
204
BROWNING AUTOMATIC RIFLE, CAL. .30, M1918A2
194
Figure 67.—Landscape target panel showing linear target with
scoring areas and distribution spaces.
535351°—43---14 205
194
BASIC FIELD MANUAL
(5) Three rounds are issued to each man on the firing
point, to be loaded and fired singly at the command of the
instructor, or to be loaded as a partial clip of three rounds.
(6) Each man fires three shots at his paster at the com-
mand three rounds, COMMENCE FIRING.
(7) The instructor commands: CLEAR RIFLES. The
squad leader checks to see that this is done.
(8) The instructor and squad leader inspect the target and,
based upon the location of the center of impact of the re-
Figure 68.—Using target scoring template to divide a vertical target
into spaces to give score for distribution.
suitant shot group, give each man the necessary correction
for his next shot, in terms of clicks.
(9) The firing continues as outlined above until all rifles
are zeroed; that is, until each man has hit his aiming point.
c. For the caliber .22 rifle equipped with the Lyman re-
ceiver sight—
(1) At a distance of 1,000 inches, a change of 5 minutes in
elevation (10 clicks) will move the strike of the bullet about
1Уг inches. A change of 1 point of windage (8 clicks) will
move the strike about 1 */4 inches. A simple rule of thumb is
206
207
Figure 69.—Number bar under zeroing panel.
BROWNING AUTOMATIC RIFLE, CAL. .30, M1918A2
о
194-195
BASIC FIELD MANUAL
that 1 click of elevation or windage will move the center of
impact of the bullet approximately Уз of an inch.
Note.—Actually, 1 click of elevation moves the strike of the bullet
%o of an Inch, at 1,000 inches.
(2) At a distance of 50 feet, a change of 6 minutes in
elevation will move the strike of the bulletin about 1 inch,
and a change of 1 point of windage will move the strike about
% of an inch. For additional details, see TM 9-280.
d. For the caliber .30, Ml rifle—
(1) At a distance of 1,000 inches, changes of one click in
elevation and windage, respectively, will move the strike of
the bullet about y4 of an inch in the changed direction.
(2) At a distance of 50 feet, a change of one click in ele-
vation and windage, respectively, will move the strike of the
bullet about l/6 of an inch in the changed direction.
e. For the Browning automatic rifle, caliber .30 M1918A2—
(1) At a distance of 1,000 inches, changes of one click in
elevation and windage, respectively, will move the strike of
the bullet about 1 inch in the changed direction.
(2) At a distance of 50 feet, a change of one click in ele-
vation and windage, respectively, will move the strike of the
bullet about */2 inch in the changed direction.
195. Firing Procedure.—The sequence of events in con-
ducting firing exercises is as follows:
a. All members of the squad except the squad leader face
to the rear, •
b. The instructor takes the squad leader to the panels
and points out the target to him. They return to the firing
point and the squad leader then takes charge of the squad
and has the men resume their firing positions.
c.----The squad leader gives the command LOAD, cautioning,
“ rounds.” If the automatic rifle is being used, it should
be given more rounds than the rifles. If caliber .22 rifles
are being used by the automatic rifle team, each man of
the team is given the same number of rounds as a rifleman.
The three members of the team then represent the fire power
of the automatic rifle and distribute their fire on linear
targets as prescribed for the automatic rifle.
d. The squad leader designates the target orally. Refer-
208
BROWNING AUTOMATIC RIFLE, CAL. .30, M1918A2 195-197
ence to panels to indicate direction should not be allowed
in the designation. To complete the fire order, the squad
leader adds: COMMENCE FLRING.
e. When the squad has completed firing, the squad leader
commands: CEASE FIRING, CLEAR RIFLES. The squad
then examines the target. The target panel is scored and
marked with the squad number.
f. The instructor holds a critique after each exercise.
196. Scoring.—a. Concentrated fire.—In concentrated fire,
the sum of the value of the hits within the 2 zones is the
score for the exercise. For convenience of scoring and com-
parison, 100 is fixed as the maximum score. Any method
of scoring and of distribution of ammunition among mem-
bers of the squad may be used. The following examples,
based on firing 50 rounds, are given as suggested methods:
(1) Value of each hit in 50-percent zone, 2.
(2) Value of each hit in 75-percent zone but outside the
50-percent zone, 1.
b. Distributed fire.—A method of scoring for distributed
fire of the squad on a target of width is as follows:
(1) Value of each hit in 50-percent zone, 2.
(2) Value of each hit in 75-percent zone but outside the
50-percent zone, 1.
(3) Value of each distribution space which is hit (if target
is divided into 10 equal spaces), 10.
(4) The score for distribution (100 possible), plus the
value of all hits (100 possible), divided by 2, is the score for
the exercise. Again, 100 is fixed as the maximum score.
197. Exercises.—a. (1) No. 1.—(a) Purpose.—To teach
target designation and to show the effect of concentrated
fire.
(b) Method.—The squad leader employs the fire of his
squad on one point target indicated to him by the instructor.
(2) No. 2.—(a) Purpose.—To teach target designation and
the division of the squad fire on two points of concentration.
(b) Method.—The instructor indicates two point targets
to the squad leader, giving the nature of each. The squad
leader applies the fire of his squad on the two targets
in the proportions directed by the instructor. The scoring
209
197
BASIC FIELD MANUAL
will be as for concentrated fire on each target, the several
scores being combined in totals for the score of the exercise.
(3) No. 3.—(a) Purpose.—To teach target designation,
fire distribution, and fire control in diverting part of the
fire of the squad to a suddenly appearing target.
(b) Method.—The instructor indicates a target of width
(linear target) to the squad leader. After firing has com-
menced, the instructor indicates and gives the nature of a
new (point) target to a flank. After this second target is
indicated and he is directed by the instructor, the squad
leader shifts the fire of the automatic rifle (group of 3 or
more caliber .22 rifles) to the new point target. A simple
method of scoring this type of exercise is to add the value
of hits on the point target, the value of hits on the target
of width, and the score for distribution on the target of
width, and divide this sum by 2. This provides a score
for the problem on a basis of a possible of 100 points.
(4) No. 4.—(a) Purpose.—To teach the application of fire
on an enemy group marching in formation, the fire control
necessary to obtain fire for surprise effect, and to show the
effect of Are on troops in formation.
(b) Method.—The instructor indicates to the squad leader
a target that represents a small group of the enemy marching
in approach march, patrol, or other formation. It is as-
sumed that the enemy is not aware of the presence of the
squad. The squad leader applies the fire of his squad; his
instructions must result in the simultaneous opening of fire
of all weapons and the distribution of fire over the entire
target. The assignment of half the riflemen to fire at the
rear half of the target and the remaining riflemen to fire at
the forward half, with the automatic rifleman covering the
entire target, is a satisfactory method of distributing fire over
such a target (par. 179).
b. The assistant squad leader will be given instruction and
practice in the same type of exercises as outlined in a above.
c. Caliber .30 as well as caliber .22 ammunition may be used
to provide training for the automatic rifleman.
(1) Using caliber .30 ammunition.—When caliber .30 am-
munition is available it is desirable to fire the automatic
rifle on landscape targets so as to provide training for the
automatic rifle team.
210
BROWNING AUTOMATIC RIFLE, CAL. .30, M1918A2 197-199
(2) Using caliber .22 ammunition.—When caliber .30 am-
munition is not available but caliber .22 ammunition is to be
had, the fire effect of the automatic rifle team may be simu-
lated with the squad by grouping the automatic rifle team
together when engaging targets.
Section VII
FIELD TARGET "FIRING
198. Scope of Training.—The training in this phase is
similar to that given the soldier in landscape target firing
but with the added features of the use of cover and conceal-
ment, range estimation, firing the caliber Ml rifle and the
automatic rifle with ball, armor-piercing, and tracer ammu-
nition at field targets, at unknown ranges, and fire control
under more difficult conditions. Training must be progres-
sive, the soldier first being given an opportunity to fire at
more or less exposed targets, followed by fire at targets which
are concealed from view but exposed to fire. Individuals
should preferably receive this training in the squad or in
smaller groups.
199. Terrain, Targets, and Ranges.—a. Terrain.—(1) The
availability of ground and considerations for safety deter-
mine the selection of terrain for field firing ranges. Where
possible, varied ground suitable for the employment of the
weapons of the squad will be selected. It is a great advan-
tage from the instructional standpoint to use ground that
is unfamiliar to the unit to be trained.
(2) In the absence of other facilities, the known distance
ranges can be used by arranging the exercises so that they
will begin off the range and require the delivery of fire on
the range and in a safe direction.
b. Targets.—(1) Targets may be improvised from available
material or they may be obtained from the Ordnance
Department.
(2) With the field targets furnished by the Ordnance
Department, a stationary target may be represented by E
or F targets placed on stakes and driven in the ground or set
in sockets (flg. 85).
211
199
BASIC FIELD MANUAL
(3) A surprise target that can appear and disappear may
be made by using either E or F targets or dummies, fastened
to an I-beam, rope, or pole, and operated by a man in a
pit (figs. 70 to 84).
(4) A movable field target may be made by fastening E or F
targets to a sled (fig. 29), or by suspending such targets from
a wire (figs. 75 and 77).
(5) In the field, targets should be placed in locations that
would be used by intelligent enemy. They should not be
prominently exposed nor in a regular line. Targets used
should vary in size and the degree of concealment (at ranges
unknown to the firer) in which they are placed. The ex-
posure of targets kept out of sight at the beginning of an
exercise may be indicated by the firing of blank ammunition
or-the operation of other noise or smoke-producing equip-
ment in the vicinity of the target when it does appear (fig.
86). To test the proficiency and skill of the squad leader in
designating the target and adjusting fire, targets may be so
placed as to be visible with the binocular but entirely invisi-
ble to the naked eye.
(6) The appearance of the targets from the firing line will
depend a great deal upon the direction of the sun, the back-
ground of the targets, and the angle at which the targets are
placed. These factors should be taken into consideration
when placing the targets for any particular exercise.
c. Ranges—shelter.—(1) Ranges for field firing exercises
can be efficiently operated without an elaborate system of
shelters and dugouts. Simple pits to accommodate the tar-
get operators are sufficient.
(2) Every effort should be made to avoid altering the natu-
ral appearance of the terrain when locating and camouflag-
ing targets and when locating and constructing pits (figs. 70,
74, 77, and 83).
(3) When targets are placed in the rear or to one side of
the pits, the likelihood of ricochets falling into the pits is
minimized (figs. 73, 79, and 80). If tracer ammunition is to
be used, it is best to have covered pits. (See fig. 70 (view from
firing line) and figs. 77 and 83 (rear view).) It is desirable
to have all pits and the firing line connected by telephone.
Small portable two-way voice radio sets may be used if
available.
212
BROWNING AUTOMATIC RIFLE, CAL. .30, M1918A2
199
Figure 70.—Surprise target at pit. (See figs. 82 and 83 for operating
details.)
Figure 71.—Method of raising surprise point targets. (Note pull
rope and counterweight in rear.)
213
199
BASIC FIELD MANUAL
Figube 72.—Arrangements for raising surprise targets and produc-
ing fire to attract attention. (Cardbord shield protects light
machine gun from dirt and dust.)
Figure 73.—Arrangement for showing surprise (point) target and
creating machine-gun fire for sound effect. (Dust is raised by
light machine gun rounds striking into earth.)
214
BROWNING AUTOMATIC RIFLE, CAL. .30, M1918A2
199
Figure 74.—Method of breaking outlines of silhouette targets.
Figure 75.—Arrangement for moving surprise target along horizon-
tai line (running figure).
215
199
BASIC FIELD MANUAL
Figure 76.—A method of raising surprise targets (linear target).
Figure 77.—Method of exposing surprise target moving horizontally'
along the ground (crawling man).
216
BROWNING AUTOMATIC RIFLE, CAL. .30, M1918A2
199
Figote 79—Arrangement for raising surprise target in window from
pit.
217
200
BASIC FIELD MANUAL
200. General Considerations.—a. Progressive training.—
Although field target firing does not involve the tactical
application of fire and movement, training in moving from
an approach march formation or a place of concealment
to firing positions is included primarily for the following
two purposes:
(1) To teach the soldier the proper use of cover and con-
cealment and the intelligent selection of firing positions.
(2) To combine the technique of applying and controlling
collective fire with scouting and patrolling and other related
subjects.
b. Firing positions and. representation of enemy.—In battle,
a unit is not deployed with individuals abreast and at regular
intervals apart. The selection of individual and group posi-
tions is governed by the field of fire, cover or concealment
while firing, covered route (s) of approach to those positions,
218
BROWNING AUTOMATIC RIFLE, CAL. .30, M1918A2 200
fire control, and nature of target. The representation of the
enemy will conform to irregular battle formations.
c. Use of cover.—(1) The proper use of available cover is
important because—
(a) The man who neglects the use of cover will be seen
and hit.
Figure 81.—Arrangement for raising and lowering surprise target
(parachutes). (Control rope leads to pit.)
(b) His squad not only loses the fire effect of one rifle or
automatic rifle, but its position is unnecessarily disclosed and
other casualties may follow.
(2) The individual use of cover and concealment is taught
in FM 21-45. For training in firing at field targets, the prin-
ciples are the same.
(3) In seeking covered and concealed firing positions, men
must avoid those places which mask the fire of others or
219
200
BASIC FIELD MANUAL
Figure 82.—Method of displaying surprise target to represent
skirmishers.
Figure 83.—Method of exposing surprise target. (See fig. 70 for
front view.)
220
BROWNING AUTOMATIC RIFLE, CAL. .30, M1918A2 200
cause their fire to be dangerous to other men of their unit.
Also, if there is the probability of hostile detection while mov-
ing into a firing position, men should understand that a few
yards movement in any direction, if it can be made by a
covered or concealed path, will permit fire from an undis-
closed position. Bunching must be avoided. In selecting
a covered position, however, the field of fire should receive
first consideration. No attempt should be made to secure
Figube 84.—One method of withdrawing a stationary field target.
Figube 85.—Method of setting up targets to represent skirmishes.
535351°—43---15 221
200
BASIC FIELD MANUAL
cover in a defiladed position which necessitates firing while
sitting, kneeling, or standing. Usually a position nearer the
erest to the front can be found which will permit firing in
the prone position and which will give a better field of fire.
d. Marksmanship applied.—(1) The principles of rifle and
automatic rifle marksmanship are followed in this training
so far as they suit existing conditions.
(2) These principles should be applied to the technique
of fire and to combat in a common sense way. It should be
Figure 86.—Details showing method of installing light machine gun
to produce sound effect.
appreciated that the conditions encountered in combat situa-
tions will differ from those found on the target range. On
the target range the soldier is expressly prohibited from rest-
ing his rifle against an unauthorized rest while firing. In
firing at a field target and in battle, the soldier takes ad-
vantage of trees, rocks, or any other rest which will make his
fire more accurate. The positions prescribed in marksman-
ship are used whenever the ground will permit, but on rough
222
BROWNING AUTOMATIC RIFLE, CAL. .30, M1918A2 200-201
ground it is often necessary to modify them in order to
get a comfortable and steady position. In aiming at a target
in combat, the sights should be alined on that point of the
target that it is desired to hit; this differs from the method
of aiming on the target range.
e. Use of battle sight.—The battle sight corresponds to a
sight setting of 300 yards. It is used on targets from 0 to
400 yards when time is lacking for setting the sight or in
firing at moving targets.
/. Firing at field targets.—Squad members should receive
practice in firing at field targets before firing squad problems.
The preliminary practice in firing at field targets should be
at ranges of 400 yards or less. Provisions for preliminary
field target firing may be made on any field target firing
range. The scope and the method of conducting this train-
ing are outlined in paragraph 238.
201. Exercise.—a. General.—(1) Exercises for firing at
field targets should be suitable to the actual terrain upon
which they are conducted. Some of these exercises will be
fired with the gas mask adjusted, and should be repeated
until all men have demonstrated their proficiency in firing
the rifle and automatic rifle with the gas mask adjusted.
(2) Each exercise should be initiated by a unit either—
(a) Already deployed in a firing position.
(b) Halted in approach march formation or in a place of
concealment with scouts present in formation, the unit either
acting along or as part of a larger force.
(e) Advancing in approach march formation with scouts
out.
(3) (a) In the first case, all men should be in selected firing
positions, special attention being paid to individual cover and
concealment.
(b) In the second case, when practicable, squad leaders
conduct their squads forward by covered and concealed routes
and send the riflemen and the automatic riflemen to their
firing positions by individual directions. Occupation of the
initial firing position of a unit is done with the minimum of
exposure.
(c) In the third case, the advance of the scouts must be
checked by either represented or assumed enemy fire when
223
201
BASIC FIELD MANUAL
they are in the vicinity of a suitable location for a firing
position for the squad; otherwise, to insure their safety, the
scouts may have to be withdrawn from the exercise before
firing is begun by the squad.
b. Critique.—Upon completion of any firing exercise, when
the range is clear, the targets are scored, after which the in-
structor conducts a critique of that exercise. A suggested
list of items to be covered during such a critique is shown
in the outline below. Only those items are discussed which
are specifically applicable to the exercise being critiqued.
FIELD TARGET FIRING CRITIQUE
I. Purpose of problem.
П. Orders of squad leader.
a. Method of target designation. (Was it appro-
priate?)
1. Accuracy of range, direction, and description.
2. Brevity—clearness.
3. Use of concealment during designation.
b. Method of completing fire order (appropriate).
HI. Approach and occupation of the firing position.
a. Method.
b. Time taken (if time is a factor).
c. Distribution on firing point.
IV. Actions of individuals.
a. Use of cover and. concealment.
b. Attention to orders.
c. Looking to leader for signals.
d. Individual initiative.
V. Rate of fire.
a. Initially rapid to pin enemy to ground.
b. Controlled to conserve ammunition with maxi-
mum effect.
VI. Fire control.
a. Position.
1. Initial position of leader.
2. Initial position of second in command.
3. Movement of leaders during firing.
224
BROWNING AUTOMATIC RIFLE, CAL. .30, M1918A2
201
b. Methods used.
1. Signals.
2. Verbal orders.
3. Use of assistant squad leader.
4. Time required to shift fire to new targets.
5. Distribution of fire.
6. Adjustment of fire.
7. Teamwork developed.
VII. Effect of fire.
a. Were all targets fired on?
b. Were all targets hit?
c. Score.
c. Exercises.—(1) No. 1.—(a) Purpose.—Practice in fire
orders, application of the fire of a squad in position, fire
control, and proper individual concealment .in the occupa-
tion of the firing position.
(b) Method.—Enemy represented by one group of targets
exposed to fire but partially concealed from view; requiring a
simple fire order. Squad leader is shown the targets (per-
sonnel with flag) and safety limits for firing position of the
squad. When the squad leader fully understands the loca-
tion and nature of the target and the instructor informs
him that the range is clear, he will load ball ammunition, give
the fire order, and fire the problem. The range should,
be estimated by eye, and the target should be designated by
oral description.
(2) No. 2.—(a) Purpose.—Practice in correct issuance of
fire orders, application of the fire of a rifle squad on a linear
target, fire control, proper deployment and individual con-
cealment in the occupation of the firing position, and engage-
ment of a surprise target.
(b) Method.—Silhouette targets representing an enemy
squad deployed in a firing position are partially concealed
from view but exposed to fire. Squad is in rear of the firing
position; squad leader is shown the linear target (by flag)
and then conducts squad forward and disposes it in a con-
cealed firing position. When squad leader is told the range
is clear, he will engage the target with fire. A surprise tar-
get, well to the flank of the first target and representing an
enemy machine gun, appears shortly after the squad has
225
201
BASIC FIELD MANUAL
engaged the linear target. The squad leader is told the
amount of fire to shift to the surprise target.
(3) No. 3.— (a) Purpose.—To -show the fire action of
scouts when fired on, including the designation of a target by
the scouts using tracer bullets, and to give the squad practice
in approaching and occupying firing positions.
(b) Method.—The squad is marching in approach march
formation with both scouts well in advance. When the
scouts reach the firing position they are told that they are
under fire from any enemy group represented by targets
about 400 yards to their front. They determine the range
by firing on the target with tracer bullets. The squad leader
conducts his squad forward, establishes the men in firing
positions, and engages the targets with the proper class of
fire after the targets have been designated by the scouts
by the use of tracers. Special attention is paid to the use
of cover and concealment by all men while moving up and
during the selection and occupation of positions.
(4) Additional exercises.—Suggested subject matter for
additional problems is listed below:
(a) A situation to show the fire action of the squad when
the scouts observe an enemy group without the enemy hav-
ing detected their presence.
(b) A situation which requires the leader to use his auto-
matic rifle, while keeping his rifilemen, initially, under
cover.
(c) A situation which requires the initial use of either
a part or all of the riflemen, and then, later in the exercise,
a surprise target appearing which requires the use of the
automatic rifle team on the surprise target.
(d) A situation requiring the automatic rifleman to deliver
fixed fire under conditions of low visibility; for example, the
firing of grazing fire along a final protective line (see par.
239).
(e) A situation requiring the automatic riflemen to fire
from position defilade. This method is described in para-
graph 240. Suggested situations are:
1. In defense of a road block.
2. In defense of a stream crossing.
3. In delaying action.
226
BROWNING AUTOMATIC RIFLE, CAL. .30, M1918A2 201
4. In providing support for an adjacent unit without
committing the automatic rifle team to such an
extent that it cannot be withdrawn for other use.
5. Delivering Are over the heads of forward defiladed
elements.
(/) A situation requiring the cooperation of the automatic
rifle team and the rifle grenadier. Examples of such situ-
ations are:
1. A group of enemy in a depression, such as a quarry
or cellar, is driven into the open by the rifle
grenadier using antipersonnel grenades. The
automatic rifle, which has been placed in position
to enfilade the avenues of escape, covers a “killing
zone,” assuring destruction of the enemy when
he is forced into the open.
2. While the automatic rifle engages an enemy tank
to prevent the crew from opening doors to throw
grenades into fox holes and emplacements, the
rifle grenadier knocks out the tank when it comes
within range.
3. The use of the automatic rifle to prevent the escape
of the crew from a disabled hostile tank, or to
prevent enemy salvage crews from rendering
assistance to the disabled tank, after it has been
disabled by the rifle grenadier.
(g) A situation to show the use of the automatic rifle team
in street fighting. Suitable uses are:
1. To establish “killing zones” in streets and alleys.
2. To fire on doors and windows to cover the approach
of the riflemen of the squad.
3. To cover a street barricade with fire.
(ft) A situation requiring the use of the automatic rifle
in wooded areas. Examples are:
1. To spray brushy areas where enemy are known to
be concealed.
2. To cover lanes, gaps, or small open spaces.
(г) A situation requiring the use of the automatic rifle to
deceive the enemy as to our own strength. Examples are:
1. Use of single shots to hide the fact that it is an
automatic weapon.
227
201-202
BASIC FIELD MANUAL
2. Use of rapid single shots to make the strength in
riflemen appear greater than it actually is.
(J) A situation requiring the use of the automatic rifle
team against aerial targets. Examples are:
1. Low-flying enemy planes (radio-controlled planes
may be used, if available).
2. Enemy paratroopers.
(fc) A situation requiring the use of large bursts of fire
with the automatic rifle. Examples are:
1. Against assaulting troops.
2. Against a hostile machine gun at a short range (100
yards).
3. Against a large enemy column.
4. Against compact, well-concealed groups.
(5) Related training.—Depending upon the availability of
time, range facilities, and sufficient quantities of ammuni-
tion, field target firing exercises should be extended to in-
clude tactical situations requiring actions and orders of
platoon, squad, and assistant squad leaders. This type of
training is referred to as “combat training exercises.” Fre-
quently, these exercises are conducted over extended periods
of time and often should include the wearing of gas masks
until all men have demonstrated their proficiency in firing
the rifle, advancing, and engaging in hand-to-hand combat
without appreciable physical discomfort. At the end of this
training period, higher commanders conduct their tests to
determine the proficiency of rifle platoons. These tests are
called “platoon combat proficiency tests.”
Section VUI
DESTRUCTION OF ORDNANCE MATERIEL IN EVENT OF
IMMINENT CAPTURE IN COMBAT ZONE
202. General Principles.—The decision to destroy ord-
nance materiel to prevent its capture and use by the enemy
is a command decision and will be ordered and carried out
only on authority delegated by the division or higher
commander.
228
BROWNING AUTOMATIC RIFLE, CAL. .30, M1918A2 202
a. Principles governing destruction.—The following are the
fundamental principles to be observed in the execution of
an order to destroy small arms:
(1) The destruction must be as complete as the circum-
stances will permit.
(2) Lacking time for complete destruction, the parts es-
sential to operation of the weapon must be destroyed, begin-
ning with those parts most difficult for duplication by the
enemy.
(3) The same essential parts of each weapon must be
destroyed to prevent the reconstruction of a complete weapon
from several damaged ones.
b. Training.—The training of individuals before they reach
the combat zone will be such as to insure their ability to
destroy quickly and adequately the weapon(s) with which
they are armed in an established and uniform sequence
based on the principles stated in a above. Training will not
involve the actual destruction of materiel.
c. Methods.—Of the two methods outlined herein for the
destruction of the automatic rifle, the first is preferred.
(1) Method No. 1.—Remove the bolt and slide. Grasp the
butt with both hands and smash the barrel against a tree,
rock, or firm ground until it is bent. Remove and distort the
recoil spring. Remove the firing pin, insert its point into the
hole in the face of the bolt, and break it off. Break the slide
by inserting the piston end into the front end of the receiver
and pulling up on the other end of the slide. Elapsed time
required for this method: 1 minute.
(2) Method No. 2.—Insert the bullet end of a complete
round into the slot in either side of the bipod body and bend
the case slightly, distending the mouth of the case to permit
pulling out the bullet. Retain sufficient powder to cover the
bottom of the case to a depth of approximately Vs inch, and
spill the remainder. Reinsert the bullet in the case, point
first. Chamber and fire this round with the reduced charge;
the bullet will stick in the bore. Chamber one complete round,
lay the rifle on the ground, and fire it, using a 30-foot
lanyard. Use the best available cover, as this means of
destruction may be dangerous to the person destroying the
229
202
BASIC FIELD MANUAL
weapon. Elapsed time required for this method: 2 or 3
minutes.
(3) Warning.,—Do not attempt to destroy the automatic
rifle by firing it with the muzzle stuck in the ground. De-
struction by this means is not assured.
d. Destruction of ammunition.—When time and materials
are available, ammunition may be destroyed as follows:
Break out all packed ammunition from boxes or cartons.
Stack the ammunition in a heap. Stack or pile wood, or
available gasoline and oil in cans or drums, around the am-
munition. Throw onto the pile all available inflammable
material such as scrap wood and brush. Pour any remaining
gasoline or oil over the pile. Sufficient inflammable material
must be used to insure a very hot fire. Ignite the materials
and take cover. Thirty to sixty minutes will be required to
destroy the ammunition carried by small combat units.
230
CHAPTER 6
ADVICE TO INSTRUCTORS
Paragraphs
Section I. Mechanical training_______________________ 203-211
II. Marksmanship, known distance targets------212-225
1П. Marksmanship, aerial targets--------------- 226-230
IV. Technique of fire__________________________ 231—240
Note.—The provisions of this chapter are to be accepted as a
guide and will not be considered as having the force of regulations.
They are particularly applicable to emergency conditions when
large bodies of troops are being trained under officers and non-
commissioned officers who are not thoroughly familiar with ap-
proved training methods.
Section I
MECHANICAL TRAINING
203. General.—Mechanical training lends itself readily to
the use of the applicatory system of instruction. The auto-
matic rifle teams of the entire battalion, company, or platoon,
each with its set of equipment and under the direct super-
vision of a trained assistant instructor, are assembled in a
suitable area or building. The unit instructor supervises the
instruction of the teams. Explanation and demonstration
are concurrent, each assistant instructor demonstrating the
elements of the phase of instruction as the unit instructor
explains it. For short periods of practical work the instruc-
tion is decentralized under the assistant instructors.
204. Disassembly and Assembly of Automatic Rifle.—a.
Equipment necessary for each automatic rifle team.
1 Automatic rifle.
1. magazine.
1 shelter-half or blanket (to keep parts out of dirt) or
table if training is conducted indoors.
1 dummy cartridge.
b. Procedure.—(1) Have assistant instructors disassemble
and assemble the rifles, step by step, while the unit instructor
is explaining the procedure. It is helpful to the instructor
to have an assistant beside him performing the operations
described.
(2) Turn the rifles over to the students for practical work.
(3) Ask questions.
205. Disassembly and Assembly of Groups.—a. Equipment.
Same as in paragraph 204a. Extra rifles, magazines, and
one spare combination buffer and rate-reducing mechanism
are desirable, if available.
231
205
BASIC FIELD MANUAL
b. Procedure.—(1) The instructor has one assistant in-
structor with him. This man performs every step of dis-
assembly and assembly as directed by the instructor, thereby
serving as a time-gage for the speed of instruction and
explanation. Also, this assistant instructor, as well as the
assistant instructor with each team, points out each part on
the automatic rifle as the instructor names the part.
(2) When the instructor starts his disassembly lecture, the
assistant instructors will remove each part from the rifle
when and in the exact manner as the instructor prescribes.
As soon as the operating group (fig. 2) has been disassembled
and laid out in order from left to right, the instructor calls
on members of the various teams to name certain parts in
the order of their disassembly. As the parts are named, the
instructor repeats the name of each part to make sure that
everyone knows the correct name. When the instructor
feels that every man knows the names of the 16 operating
parts, he has the assistant instructors correctly assemble the
parts. He should make sure that the assistant instructors
work in unison, replacing each part as directed. Practical
work follows, with each team member disassembling and
assembling the operating parts under the watchful super-
vision of an assistant instructor.
(3) The removal of the firing pin and extractor, without
disassembling the rifle, is performed by the assistant in-
structors under the direction of the instructor. This is fol-
lowed by practical work in this operation by the team
members.
(4) The disassembly and assembly of the trigger group,
bipod group, and magazine are carried on in the same man-
ner as the operating group. Some instructors prefer to give
the function of each group following the practical work on
disassembly and assembly of that specific group.
(5) During the practical work, distribute the extra rifles,
if any, among the men so that the three team members can
work simultaneously. If this is not possible, after one in-
dividual has completed the disassembly and assembly of a
group, he should pass the rifle on to the next man. (The
combination buffer and rate reducing mechanism should be
fastened to a board and circulated among the teams so that
they will be able to see the various parts of this mechanism.)
(6) Ask questions.
232
BROWNING AUTOMATIC RIFLE, CAL. .30, M1918A2 206-207
206. Care and Cleaning.—a. Equipment.—Same as in para-
graph 204a, plus additional equipment necessary for special
demonstrations (fig. 15).
b. Procedure.—(1) Explain and demonstrate the cleaning
of the rifle, including the gas system, operating parts, sling,
and magazine.
(2) Turn the rifle over to the students for practical work.
(3) Ask questions.
c. An explanation and demonstration- of the points to be
observed before, during, and after firing will prove valuable.
207. Functioning.—a. Equipment.—Same as in paragraph
204a, plus a piece of cardboard, measuring approximately
2 by 4 inches, with which to make set-ups (fig. 87). In lieu
of the piece of cardboard, a wooden frame can be constructed
to represent the receiver of the automatic rifle (fig. 88). A
“cutaway” rifle or wooden working models (figs. 8, 11, and 12)
of operating parts of the automatic rifle will greatly facilitate
instruction.
b. It is necessary that the automatic rifleman have a prac-
tical working knowledge of the functioning of the rifle if
he is to exact its best performance. Some knowledge of
functioning is essential in the application of immediate ac-
tion. Men should be encouraged to visualize the function in
question, for example: “Explain the functioning of all the
parts involved in releasing the slide when the trigger is
pressed,” or “The firing pin has just struck a cartridge—ex-
plain what parts were directly concerned in causing the
firing pin to strike the primer of the cartridge.” Other sim-
ilar questions may be asked.
c. A method of dividing functioning into operation of
groups and demonstrating this operation.—(1) General.—
The functioning of the Browning automatic rifle should be
taken up in a logical sequence of the functioning of the re-
spective parts. The various parts should be assembled on a
table or other fiat surface. With these parts laid out in the
same relative position that they occupy in the rifle, the
complete operational cycle can be carefully demonstrated
and explained. Assume that the slide is to the rear and
caught by the sear; take up the functioning of the parts
in the following sequence:
(a) Trigger action.
233
207
BASIC FIELD MANUAL
(b) Forward movement of the slide.
(c) Rearward movement of slide.
(d) Functioning of rate-reducing mechanism and buffer.
(2) Trigger action.—(a) Set-up.—Trigger group, com-
pletely assembled, removed from rifle. Slide removed from
rifle and held so the sear notch is engaged by the sear.
(b) Demonstration on trigger group.—Observe the sear
nose on the sear being depressed as the forward end of
the sear is raised by the connector, which rises when the
trigger is pressed toward the rear, thus releasing the slide.
(c) Explanation.—Since the trigger is fastened at its for-
ward end by the trigger pin, the rear end is raised by press-
ing toward the rear. The connector is raised by the rear
end of the trigger and strikes the forward end of the sear
raising it. Since the sear is pivoted at its center, the rear
end is lowered as its forward end is raised, thus releasing
the slide.
Figvhe 87.—Use of set-up board.
(d) The above demonstration may be made using the
wooden frame (fig. 88) in lieu of the cardboard set-up.
(3) Forward movement of slide.—(a) Set-up on rifle.—
Rifle completely assembled.
(b) Demonstration on rifle.—Pull the operating handle to
the rear, cocking the rifle, press the trigger, and allow the
slide to slam forward.
(e) Explanation.—The energy which was stored in the
recoil spring by compressing it is used to push the slide for-
ward when it is released by the sear.
(d) Set-up on table (fig. 87).—Slide, hammer, bolt as-
sembly, and bolt link assembled and placed on the table or
234
BROWNING AUTOMATIC RIFLE, CAL. .30, M1918A2 207
other flat surface as they would be in the rifle. The 2- by
4-inch cardboard is placed on the slide to hold up the bolt.
A magazine with one or two dummy cartridges loaded in it
is used to demonstrate feeding.
(e) Demonstration on table.
1. Pick up the entire cardboard set-up (fig. 87). Hold
the magazine so that the top fits between the sides
of the slide with the feed rib on the bolt engaging
the top cartridge. Push the set-up along the
magazine, picking up a cartridge and carrying it
out of the magazine.
2. Place the slide on the table, the bolt resting on the
piece of cardboard, a dummy cartridge gripped by
the extractor. Hold the cartridge from moving
forward and pull on the slide until the bolt lock
rises and the hammer strikes the firing pin,
3. Demonstrate 2 above several times, having the center
rib of the hammer strike the firing pin a sharp
blow.
(/) Explanation.—As the slide goes forward under the force
of the expanding recoil spring, it pushes the bolt forward.
The magazine spring holds the cartridge up so that it is
picked up by the rib under the bolt. The cartridge is carried
forward into the chamber where it is stopped. As soon as the
forward movement of the bolt is checked, the bolt link re-
volves upward (over rear shoulders of the bolt supports) and
forces the bolt lock into the locking recess in the receiver.
The hammer then continues a short distance forward, strik-
ing the rear of the firing pin a sharp blow. The firing pin
ignites the cartridge.
(g) The above demonstrations may be made using the
wooden frame (fig. 88) in lieu of the cardboard set-up.
(4) Action of gas.—(a) Set-up on rifle.—Rifle completely
assembled, bolt forward and dummy round in the chamber.
(b) Demonstration on rifle.—Pull the operating handle
smartly to the rear, cocking the rifle. Do this several times.
(c) Explanation.—When a cartridge is fired, the expanding
powder gases drive the bullet forward. As soon as the bullet
passes the gas port, a portion of the gas escapes through the
port and strikes the head of the piston, driving it to the
rear. This movement of the slide to the rear corresponds
235
207
BASIC FIELD MANUAL
to the movement demonstrated by pulling the operating
handle smartly, to the rear.
(5) Rearward movement of slide.—(a) Set-up on rifle.—
Rifle assembled, less gas cylinder tube and forearm and
trigger group.
(b) Demonstration on rifle.
1. Place rifle down, resting on shoulders of rear sight
and front sight cover. Grasp the slide at the
guide rings and push it slowly to the rear, having
the students observe in the opening in the bottom
of the receiver (trigger guard opening).
2. Place rifle on left side and insert trigger group in
rifle and a dummy cartridge in the chamber, bolt
forward. Push slide slowly to the rear, having
the students observe in the ejection opening.
® Set-up to demonstrate action of operating parts.
M— --------------------------------(6"-----—------------------------——Я
® Wooden frame to represent the receiver.
Figure 88.—Action of operating parts.
(c) Explanation.—There is a slight movement of the slide
to the rear before unlocking begins. This allows the bullet
to clear the muzzle, thus insuring against a blow-back of
the expanding gases. The link is then rotated downward,
withdrawing the bolt lock from the locking recess and
camming the firing pin back from the fired cartridge. The
recoil spring is compressed. The empty cartridge, gripped
by the extractor, is withdrawn from the chamber, slowly at
first, and gaining momentum when the bolt lock comes out
of the locking recess and then moves rearward with the speed
of the slide. The slide continues to the rear and the car-
tridge is ejected from the rifle by striking the ejector on the
236
BROWNING AUTOMATIC RIFLE, CAL. .30, M1918A2 207-208
trigger guard. The rearward movement of the slide is slowed
down, as the recoil spring is compressed and by striking the
rate-reducing mechanism. It is finally stopped without
shock by the shock-absorbing mechanism (buffer). The
slide starts forward under the action of the recoil spring and
is eaught by the sear nose engaging the sear notch on the
under side of the slide.
(d) The above demonstration may be made using the
wooden frame (fig. 88).
(6) Functioning of rate-reducing and buffer mechanism.—
(a) Set-up on rifle.—Rifle disassembled with slide replaced
without recoil spring and guide.
(b) Demonstration on rifle.—Push slide to the rear slowly
and have students observe in trigger guard opening noting
that the rate-reducing mechanism is struck first and driven
back, then the buffer is struck, stopping the slide. Pull the
slide forward slowly, noting that the rate-reducing mech-
anism follows it.
(c) Explanation.—The expanding gases drive the slide to
the rear with considerable force. The rear of the slide
strikes the rate-reducing mechanism a hard blow, driving it
to the rear and compressing the actuator spring. The slide
then strikes the buffer head and sear release and is stopped
without shock by means of the cups, cones, and buffer spring.
The slide moves forward immediately and is engaged by the
sear nose. In the meantime, the sear release has overcome
its acceleration to the rear against the action of the actuator
spring. The actuator spring drives the sear release forward
and it cams down the rear of the sear, allowing the slide to
go forward.
(d) Set-up on board.—The instructor should have an ex-
hibit board showing a disassembled combination buffer and
rate-reducing mechanism, and explain the functioning of the
mechanism by means of this board.
208. Spare Parts and Accessories.—a. A piece of beaver-
board 3 feet square with all the spare parts and accessories
attached (see fig. 15).
b. Procedure.—(1) The instructor tells why and how the
spare parts and accessories are carried; also gives use of each
accessory. ®
(2) Ask questions.
535351°—43-
16
237
209-211
BASIC FIELD MANUAL
209. Adjustment of the Gas Cylinder’.—a. Equipment.—
Same as in paragraph 204a plus combination tool.
b. Procedure.—(1) The instructor explains and has the
assistant instructor demonstrate the correct method of ad-
justing the gas cylinder at each port.
(2) Each member of the team adjusts the gas cylinder
correctly at each port.
(3) Ask questions.
210. Immediate Action.—A member of the Browning auto-
matic rifle team takes a firing position with the rifle (make
sure that the firing pin has been removed). He places an
empty magazine in the rifle and attempts to fire. The rifle
fails to fire. What should the firer do? Answer: Immediate
action—Immediately pull the operating handle to the rear,
push the operating handle forward, tap up on the magazine,
aim, and attempt to fire.
Figure 89.—Insufficient gas.
211. Stoppage Set-Ups.—a. Insufficient gas (fig. 89).—Have
an empty cartridge case protrude from the ejection opening
with the base in the receiver; allow bolt to wedge the case in
the ejection opening. Replace magazine. Answer: Insuffi-
cient gas—Set gas cylinder on next larger port. (This set-up
may also be made by having a dummy cartridge wedging the
empty round in the ejection opening) Л
238
browning automatic rifle, cal. .30, M1918A2
211
b. Failure to teed (fig. 90).—Place two dummy cartridges
in the receiver with their noses wedged in the chamber by the
bcflt, or one dummy cartridge with bolt riding over it. Re-
place magazine. Answer: Magazine trouble—Change maga-
zine.
c. Ruptured cartridge (fig. 91).—Insert a dummy cartridge
into a ruptured cartridge case, feed the dummy cartridge
With the ruptured cartridge case attached into the chamber,
and then allow the bolt to slam forward and jam the ruptured
cartridge case in the chamber. Answer: Ruptured car-
tridge—If the ruptured cartridge case is not extracted with
the dummy round when the operating handle is pulled to
the rear, use the ruptured cartridge extractor to remove the
ruptured case.
239
211
BASIC FIELD MANUAL
d. Single shot after application of first phase of immedi-
ate action.—What will cause the rifle to fire a single shot
after application of the first phase of immediate action?
Answer: Faulty magazine or insufficient gas—Change the
magazine and, if this does not correct the malfunction, set
the gas cylinder on the next larger port.
240
BROWNING AUTOMATIC RIFLE, CAL. .30, M1918A2
211
e. Failure to extract (rare)
cartridge in the chamber with
ing to get into the chamber,
extractor spring—Change the
(fig. 92).—Place an empty
a dummy cartridge attempt-
Answer: Faulty extractor or
extractor.
241
212
BASIC FIELD MANUAL
Section П
MARKSMANSHIP, KNOWN DISTANCE TARGETS
212. General.—a. Marksmanship is the basic step in
training the automatic rifleman to employ his weapon in
combat. An automatic rifleman will subconsciously apply in
combat the fundamentals he has been taught in marksman-
ship, hence these fundamentals must be sound. This fact
should be kept uppermost in the mind of the instructor, and
242
BROWNING AUTOMATIC RIFLE, CAL. .30, M1918A2 212-213
constant effort made to eliminate any artificialities which
tend to creep in for the purpose of obtaining scores.
b. During instruction in the preparatory exercises, the
entire unit is assembled in a suitable place (ravine or natural
amphitheater), and attention focused on the instructor while
he is giving the lecture and on the demonstration while it
is being conducted. Following the demonstration,- the teams
move to their sets of equipment for practical work under
the direct supervision of the assistant instructors.
c. Although not strictly a part of instruction in automatic
rifle marksmanship, the soldier should be so trained as to be
able to wear the gas mask over extended periods without
material discomfort and attendant loss of battlefield effi-
ciency. Therefore, this subject is considered to be directly
related to proper physical conditioning for automatic rifle
marksmanship, and subsequent training with the automatic
rifle—field target firing exercises and combat training exer-
cises. Extensive practice in having the soldier wear his gas
mask while marching to and from the preparatory training
area and the target range should be held.
213. Assistant Instructors.—a. It is advantageous to
have all officers and as many noncommissioned officers as
possible trained in advance in the prescribed methods of in-
struction. When units are undergoing automatic rifle
marksmanship training for the first time, this is not always
practicable. A good instructor can give a elear idea of
how to carry on the work in his lecture and demonstration
preceding each step. In the supervision of the work follow-
ing the demonstration, he should correct any mistaken ideas
or misinterpretations.
b. When an officer in charge of automatic rifle instruction
is to conduct successive organizations through the pre-
paratory marksmanship training and range practice, it is
advisable to attach officers and noncommissioned officers
of following units to the organization taking the course of
preparatory marksmanship training. These act as assistant
Instructors when their own units take up preparatory marks-
manship training. Such assistants are particularly useful
when one group is firing on the range and another is going
through the preparatory exercises, both under the supervision
of one instructor.
243
214-217
BASIC FIELD MANUAL
214. Equipment.—a. A loud speaker will be found very
useful in this instruction. All equipment used in the pre-
paratory exercises must be accurate and carefully made.
One of the objects of these exercises is to cultivate a sense
of exactness in the minds of the men undergoing instruction.
They cannot be exact with poor equipment.
b. The instructor should personally inspect the equipment
for the preparatory exercises before the training begins. A
set of model equipment should be prepared in advance by the
instructor for the information and guidance of the organi-
zation about to take up the preparatory work. The sighting
bars must be made as described, and the hole representing
the peep sight must be absolutely circular. If the sights are
made of tin, the holes should be bored by a drill. Good rear
sights can be made for the sighting bars by using cardboard
and cutting the holes with a punch of the type used for cut-
ting wads for 10-gage shotgun shells. Silhouettes painted
on a white background are not satisfactory. The silhouette
targets from the Ml 1,000-inch target pasted on tin or stiff
backing make the best aiming points either for sighting and
aiming exercises or for use in position and trigger manipu-
lation exercises.
215. Inspection of Rifles.—No man is required to fire
with an unserviceable or inaccurate rifle. All automatic
rifles should be carefully inspected far enough in advance of
the period of training to permit organization commanders to
replace all inaccurate or defective rifles. Automatic rifles
having badly pitted barrels are not accurate and should not
be used.
216. Ammunition.—The best ammunition available should
be reserved for record firing, and the men should have a
chance to learn their sight settings with that ammunition be-
fore record practice begins. Ammunition of different makes
and of different lots should not be used indiscriminately.
217. Organization of the Work.—a. In preparatory train-
ing.—(1) The field upon which the preparatory work is to be
given should be selected in advance and a section of it as-
signed to each group. The equipment and apparatus for the
work should be on the ground and in place before the morning
244
BROWNING AUTOMATIC RIFLE, CAL. .30, M1918A2 217-218
lecture is given, so that each group can move to its place and
begin work immediately and without confusion. Figures 93®
and © show suggested organizations for the work when a
number of groups are undergoing instruction at the same
time.
(2) Each company should be organized in two lines, fac-
ing away from each other. In this way the instructors, whose
positions are normally between the lines, have all of their
men under close supervision.
(3) The arrangement of the equipment is as follows (fig.
93®):
(a) On each line are placed the sighting bars and rifle rests
at sufficient intervals to permit efficient work.
(b) Fifty feet from each line is placed a line of small boxes
with blank paper tacked on one side, one box and one small
sighting disk to each rifle rest.
(e) Two hundred yards from each line is placed a line of
frames suitable for use in making triangles at 200 yards, one
frame to each platoon. These frames have blank paper
tacked or pasted on the front. A long-range sighting disk
is placed with each frame. Machine-gun targets make ac-
ceptable frames for this work.
(4) In position and trigger manipulation exercises, targets
should be placed at 1,000 inches and 200 yards (fig. 93©).
(5) When sufficient level ground is not available for the
above arrangement, the organizations will have to vary from
it in some particulars. It will nearly always be found, how-
ever, that all of the work, except making triangles at 200
yards, can be carried on in two lines.
b. In range practice.—(1) The range work should be so
organized that there will be a minimum of lost time on the
part of each man. Long periods of inactivity while awaiting
a turn on the firing line should be avoided. For this reason,
the number of targets available should be sufficient to accom-
modate the men on the range. <
(2) As a general rule, six men per target is about the maxi-
mum and four men per target the minimum for efficient
handling.
218. Model Schedules.—The following schedules are sug-
gested for guides in a course in preparatory marksmanship
and firing course A:
245
218
BASIC FIELD MANUAL
a. Preparatory training.
Subject
Time
allotted
(hours)
Day
Purpose of preparatory marksmanship training...................
First step: Sighting and aiming exercises—
Explanation and demonstration...............................
First sighting and aiming exercise..________________________
Sight blackening and second sighting and aiming exercise____
Third sighting and aiming exercise..........................
Second step: Position exercises—
Explanation and demonstration-------------:_____________________
Gun sling adjustment; trigger slack; holding the breath;
general rules for positions_______________________________
Prone position, bipod rest__________________________________
Sitting position____________________________________________
Kneeling position___________________________________________
Assault fire position___________________________________________
Antiaircraft fire position_____________________________________
И
Vi
I
И
и
и
Review of positions____________________________________________
Sight setting and aiming exercises
Third step: Trigger manipulation exercises—
Explanation and demonstration.................................
Trigger manipulation exercise, prone position...........
Effect of wind; sight changes; use of score book 1_________
Changing magazine exercises________________________________
Examination of all men by platoon leaders in all preparatory
subjects and exercises 8___________________________________
1 2d
1
1И
1
1
2
i The use of the score book and effects of light and wind will be taken up with men
who are net actually on the line undergoing instruction.
8 Lack of proficiency disclosed by examination will be corrected at once by addi-
tional instruction.
Ъ.'Range practice, course A.
Subject Time al- lotted (hours) Day
Automatic fire exercises, 1,000-inch range Exercises in replacing magazines. Fire tables I and II (each score preceded by a simulated run for each man). и и 7 3d.
Fire tables III and IV (each score preceded by a simulated run)... 8 4th.
Fire table V (each score preceded by a simulated run) 4 5th.
Fire table VI (each score preceded by a simulated run) 4
Record practice (course A)—Fire table VII 8 6th.
Note.—The time allotted for firing the known distance range is based on six orders
per target and a simulated run preceding each practice for each man.
246
И
И
BROWNING AUTOMATIC RIFLE, CAL. .30, M1918A2
218
2oo yd. aiming target
© Field lay-out for sighting and aiming exercises.
*P“ targets.
200 yds.
Ю00' targets on stakes.
1000".
Firing line.
Center, rifle racks.
Firing line.
1000 ".
looo “ targets on stakes.
200 ydS.
targets.
® Field lay-out for position and trigger manipulation exercises.
‘‘igure 93.—Field lay-out for sighting and aiming, position, and
trigger manipulation exercises.
.247
218-220
BASIC FIELD MANUAL
c. For courses В, C, and D.—The preparatory exercises and
1,000-inch firing are the same as in course A. All other firing
is conducted in a manner similar to course A, reducing the
time accordingly.
219. Lectures and Demonstrations.—a. Lectures may be
given at the beginning of each step of the instruction to the
assembled automatic riflemen of the unit undergoing training
to facilitate the work.
b. The notes on lectures which follow are to be used merely
as a guide. The points which experience has shown to be
the ones which usually require elucidation and demonstration
are placed in headings in italics. The notes which follow
each heading are merely to assist the instructor in preparing
his lecture.
e. It is important to show the men undergoing instruction,
by explanation and demonstration, just how to go through
the exercises and to tell them why they are given these
exercises.
220. First Lecture: Sighting and Aiming.—a. The group
is assembled in a suitable outdoor location or in a building.
b. The following equipment is necessary for the demonstra-
tion:
1 sighting bar.
1 automatic rifle rest.
1 automatic rifle.
1 small sighting disk.
1 long range sighting disk.
1 small box.
Material for blackening sights.
e. The following subjects are usually discussed in the first
lecture:
(1) Value of automatic rifle fire. —(a) The automatic rifle
greatly increases the fire effect of the rifle squad.
(b) Individual proficiency consists in the automatic rifle-
man’s ability to place a large volume of accurate fire upon
appropriate targets.
(2) Object of target practice.—(a) To attain this indi-
vidual proficiency.
<b) To show riflemen how to teach others.
248
BROWNING AUTOMATIC RIFLE, CAL. .30, M1918A2 220
(c) To train future instructors.
(3) Method of instruction.—(a) The instruction is divided
into steps. The man is taught each step and practices it
before going to the next step. When he has been taught all
of the steps he is taken to the known distance range to apply
what he has learned.
(b) Careful instruction in the various preparatory steps
will be of material benefit in range practice.
(c) Explain coach and pupil method. Why used.
(4) Reflecting attitude of instructor.—If the instructor is
interested, enthusiastic, and energetic, the men will follow his
example.
(5) Examination of men on preparatory work.—Each man
is examined in the preparatory work before going to the
range. An outline of this examination is given in para-
graph 80.
(6) Method of marking blank form.—Explain in blank
form, paragraph 57e. Explain marking system by use of a
blackboard, if available.
(7) Five essentials to automatic rifle marksmanship.
Correct sighting and aiming.
Correct position.
Correct trigger manipulation.
Correct application of automatic fire fundamentals.
Knowledge of proper sight adjustments.
(8) Today’s work.—First step, sighting and aiming.
(9) Demonstration of first sighting and aiming exercise.—
Require a previously trained group to demonstrate just how
this exercise is carried on.
(10) Blackening the sights.—Explain why this is done and
demonstrate it.
(11) Demonstration of second sighting and aiming exer-
cise.—Require a previously trained group to demonstrate the
second sighting and aiming exercise.
(12) Demonstration of third sighting and aiming exer-
cise.—(a) Require a previously trained group to demonstrate
the third sighting and aiming exercise.
(b) Show how the group is organized by the coach and
pupil method so as to keep each man busy all the time.
(c) Discuss incorrect sight alinement, sight picture, and
their effect on shot groups (fig. 94).
249
220
BASIC FIELD MANUAL
(13) Long range shot group work.—Show the class the dis
for 200-yard shot group work. Explain how this work is cai
ried on and why. Show some simple system of signals the
may be used.
half way up in the peep. to front sight.
Either type of error (d or £>) will produce
a triangle of the type C.
Front sigh! not centered Silhouette tangent to
from right to left in front sight but not at
peep. its mid-point.
Either type of error (cf or g) will produce
a triangle of the tgpe f.
Figure 94.—Effect of incorrect sight picture.
250
BROWNING AUTOMATIC RIFEE, CAL. .30, M1918A2 220-221
(14) Final word.—(a) Start keeping your blank form
today.
(b) Organize your work so that all men are busy at all
times.
(15) Are there any questions?
(16) Next lecture will be____________ (State hour and
place.)
221. Second Lecture: Position.—a. The following equip-
ment is necessary for the demonstrations in this lecture:
1 automatic rifle with sling.
1 box with small aiming target.
b. The following subjects are the ones usually discussed in
the second lecture:
(1) Importance of each step.—(a) Each step includes all
that has preceded.
(b) Each step must be thoroughly learned and practiced or
the instruction will not be a success.
. (2) Necessity for correct positions.—Correct and comfort-
able positions are essentials of automatic rifle marksmanship.
The prone position is especially important. Instruction in
positions involves correct aiming.
(3) Gun sling.—State that the sling is used in the kneeling
and sitting positions but not in the prone or in the antiair-
craft firing position. Demonstrate the adjustments of the
loop and hasty sling and explain why they are used.
(4) Talcing up slack.—Show the class the slack on the
trigger. Expalin why it is taken up in the position exercises.
(Cannot begin to press the trigger until the slack has been
taken up.)
(5) Holding breath.—Explain the correct manner of hold-
ing the breath and have the class practice it a few times.
Explain how the coach observes the pupil’s breathing by
watching his back.
(6) Position of thumb.—May be either over the stock or
on top of the stock but never along the side of the stock.
Explain why.
(7) Joints of finger.—The trigger may be pressed with
either the first or second joint of the index finger. How-
ever, it will be found that in firing single shots only a small
percentage of men can successfully use the second joint
of the finger.
251
221
BASIC FIELD MANUAL
This *shot-group pattern will or-
cur If the firer Is not behind the
rifie or if the firer’s right elbow
slips out ol position and he at*
tempts to hold the rifle on the tar»
get by raising his right shoulder.
This shot-group pattern will oe-
cur If the flrer does not -hold the
rifle tightly while firing his three
burets of fire rounds eaeh.
This shot-group pattern wilt oc-
cur if the flrer allows his elbows
to' elide out while firing each
burst. (The bipod is evidently
adjusted too low, causing the flrer
Co' hare his elbows out loo far).
Figure 95.—Faulty shot patterns due to incorrect position.
(8) Prone position.—(a) Demonstrate correct prone posi-
tion, calling attention to the elements which go to make
up a correct prone position—body straight behind piece,
252
BROWNING AUTOMATIC RIFLE, CAL. .30, M1918A2 221-222
legs spread well apart, position of the butt on shoulder,
position of the hands on the rifle, position of cheek against
the stock, position of elbows. Demonstrate adjusting the
bipod.
(b) Mention the usual faults which occur in prone posi-
tion and especially the fault of having the body at an angle
to the piece (fig. 95).
(c) Demonstrate the correct position again.
(9) Sitting position.—Demonstrate in the same manner as
described above for the prone position.
(10) Kneeling position.—Demonstrate in the same man-
ner as described above for the prone position.
(11) Antiaircraft firing position.—Demonstrate in the
same manner as described above for the prone position.
(12) Assault fire position.—Demonstrate in the same
manner as described for the prone position.
(13) Today’s work: position exercise.—(a) Demonstrate
the duties of a coach in a position exercise calling attention
to each item (par. 63i).
(b) Demonstrate the positions of the coach, as described
in paragraph 70.
(e) Show how the instructor organizes a group to employ
the coach and pupil method so as to keep every man
occupied.
(d) Continue the long range shot group work today.
(14) Do not press trigger today.—Take up the slack in
these exercises but do not press the trigger.
(15) Keep blank forms up-to-date.—Examine each man
in the group at the end of the day’s work and assign him a
mark.
(16) Are there any questions?
(17) Next lecture will be____________________ (State
hour and place.)
222. Third Lecture: Trigger Manipulation.—a. The fol-
lowing equipment is necessary for the demonstration:
1 automatic rifle.
1 box with small aiming target.
b. The following subjects are the ones usually discussed in
the third lecture:
(1) Methods of trigger manipulation.—Explain that trig-
ger manipulation for the automatic rifle differs materially
535351°—43---n 253
222
BASIC FIELD MANUAL
from the procedure employed in firing the Springfield or Ml
rifle or the caliber .30 heavy machine gun. Marksmanship
with the Browning automatic rifle, caliber .30, M1918A2, em-
braces two classes of fire, both of which are obtained by
appropriate trigger manipulation with the automatic rifle
set to fire at its slow cyclic rate. These two classes of fire
and the trigger manipulation for each will be discussed
separately.
(a) Firing single shots.—Single shots are fired by taking
up the slack and pressing the trigger, being careful to main-
tain the alinement of the sights while the bolt is going home.
An immediate release of the trigger is required when the bolt
is released. Most men are able to attain this quick trigger
release with a little practice. Explain to the group that if
sometimes two or three shots instead of a single shot are
obtained it makes no serious difference. Inform the group
that in such event in qualification practice the several shots
which are thus fired are inclUded-in the score. Explain that
this is necessary because the weapon is not equipped with an
adjustment for semiautomatic fire. Explain that single shots
fired as explained above give a very effective form of field
firing when it is necessary to conserve ammunition or for
other tactical reasons.
(b) Firing short bursts.—Short bursts are fired by taking
up the slack and pressing the trigger, retaining the pressure
for the length of burst desired. Short bursts of two or three
rounds are utilized in the marksmanship courses. Most men
are able to manipulate the trigger to obtain such bursts with
a little practice. Explain that these short bursts constitute
the type of fire employed in the field when it is desired to
take full tactical advantage of the fire power of this weapon.
Explain that longer bursts would be seldom profitable in field
firing and are not justified by the ammunition supply avail-
able to this weapon in the platoon.
(2) Pulsations of body.—In firing single shots in the sitting
and kneeling positions, the natural movements of the body
and its pulsations produce more or less parallel movement
of the automatic rifle. These are not sufficient to affect the
shot, and the alinement of the sights is maintained as steadily
as possible without worrying about these small and natural
254
BROWNING AUTOMATIC RIFLE, CAL. .30, M1918A2 222-223
displacements of the aim as the trigger is pressed and the
bolt is going home.
(3) Aim and hold.—Any man can easily learn to hold a
good aim for 5 to 10 seconds, which is a much longer period
than is necessary to fire a well-aimed single shot.
(4) Calling the shot.—Explain calling the shot and why it
is done.
(5) Today’s work; trigger manipulation exercise.—(a)
Demonstrate the duties of a coach in the trigger manipula-
tion exercises by calling attention to each item.
(b) The work is carried on as in position exercises with,
the pressing of the trigger added.
(c) Practice trigger manipulation for firing bursts and for
firing single shots in the prone position only.
(d) Finish up the making of long range shot groups today.
(6) Keep blank form up to date.—Examine each man in
the group at the end of the day’s work and assign him a
mark.-
(7) Are there any questions?
(8) Next lecture will be----------- (State hour and
place.)
223. Fourth Lecture: Replacing Magazines and Auto-
matic Fire.—a. The following equipment is necessary for the
demonstration:
1 automatic rifle.
2 magazines.
1 target, United States rifle, caliber .30, Ml.
b. The following subjects are the ones usually discussed in
the fourth lecture:
(1) Replacing magazine drill.—(a) Explain how the exer-
cise is carried on.
(b) Demonstrate and call attention to each item.
(2) Meaning of automatic fire.—Repeat the fact that auto-
matic fire employs short bursts and the slow cyclic rate.
Rapidity in sustained fire comes from skill in changing
magazines.
(3) Keeping eye on target.—Explain the advantages of
keeping the eye on the target while reloading and how it gains
time.
(4) Application in war.—Explain the advantages of keep-
ing the eye on the target in combat.
255
223-224
BASIC FIELD MANUAL
(5) Automatic fire exercises.—(a) Explain how the exer-
cise is carried on.
(b) Demonstrate and call attention to each item.
(6) Today’s work; automatic fire exercise and replacing
magazine drill.—The remaining time today will be given to
automatic fire exercises and drill in replacing magazines.
The exercises will be repeated in short periods until each man
is proficient.
(7) Keep blank forms up-to-date.—Examine each man in
the squad at the end of the day’s work and assign him a mark.
(8) Are there any questions?
(9) Next lecture will be_______(State hour and place.)
224. Fifth Lecture: Effect of Wind and Light; Sight
Changes; Score Book.—a. This part of the preparatory in-
struction can be given on any day on which the weather forces
the work to be done indoors. If no bad weather occurs, this
work should follow the fourth lecture.
b. The following equipment is necessary for the demon-
strations :
1 D target (to be mounted on a frame and marked
with the proper windage lines).
5 spotters that can readily be stuck into the target.
1 automatic rifle.
1 score book for each man.
C. The following subjects are the ones usually discussed in
the fifth lecture:
(1) Targets.—(a) Explain the divisions on the target and
give the dimensions of each.
(b) Call attention to windage lines. Have class compare
them with diagram in the score book. Explain why lines are
farther apart as the range increases.
(2) Weather conditions.—All weather conditions disre-
garded except wind.
(3) Wind.—(a) Explain how the direction of the wind is
described.
(b) Explain how the velocity of the wind is estimated.
(c) Explain the effect of wind. This effect increases with
the distance from the target.
(4) Windage for first shot.—Show windage diagram in the
individual score book and explain its use as set forth in para-
graph 76.
256
BROWNING AUTOMATIC RIFLE, CAL. .30, M1918A2 224-225
(5) Windage-gage rule.—State rule and explain it.
(6) Elevation rule.—State rule and explain it.
(7) Light.—Explain effect.
(8) Score book.—(a) Explain use of score book on range.
(b) Have class open score books and explain items of
keeping score.
(9) Exercises.—Give the class a number of small problems
as a demonstration as to how the day’s work is to be carried
on.
(10) Today’s work.—(a) Study and practice in sight set-
ting, sight changing, and use of score book. Instructors will
work up problems for their groups.
(b) Additional practice in the exercises of the preceding
days.
(11) Are there any question?
(12) Next lecture will be___________ (State hour and
place.)
225. Sixth Lecture: Range Practice.—This lecture and
demonstration should immediately precede range firing. If
the class is not too large it should be given on a firing point
of the rifle range.
a. The following equipment is necessary for the demon-
strations:
Material for blackening sight.
1 automatic rifle with gun sling.
Corrugated type dummy cartridges (par. 18).
b. The following subjects are the ones usually discussed in
the sixth lecture.
(1) Preparatory work applied.—Range practice is carried
on practically the same as the preparatory exercises except
that ball cartridges are used.
(2) Coaching.—Coach watches the man not the target.
Coach does not keep the score for the pupil. Pupil must make
his own entries in his score book. Coach sees that he does
this.
(3) Officers and noncommissioned officers.—(a) Supervise
and prompt the men acting as coaches.
(b) Personally coach pupils who are having difficulty in
making good scores.
(4) Spotters.—Use in firing with and without time limit.
(5) Read safety precautions.
257
226-227
BASIC FIELD MANUAL
Section III
MARKSMANSHIP, AERIAL TARGETS
226. Preliminary Preparation.—a. The officer in charge
of antiaircraft training should be thoroughly familiar with
the subject; should have sufficient officers detailed as assist-
ant instructors; and should train the assistant instructors
and a demonstration group before the first training period.
b. He should inspect the range and equipment in sufficient
time prior to the first training period to permit correction of
deficiencies.
227. Description of Miniature Range.—a. Targets.—(1)
Horizontal.—This target is designed to represent a sleeve
target towed by an airplane flying parallel to the firing point
(figs. 35 and 42®)'.
(2) Double diving and climbing.—This target is in two
sections. The right section is designed to represent a sleeve
target towed so as to pass obliquely across the front of the
firing line in the maimer of an airplane diving, if run from
left to right, or climbing, if run from right to left. The
left section is the same but represents an airplane diving
from right to left and climbing from left to right (figs. 35
and 42®).
(3) Overhead.—This target is designed to represent a
sleeve target towed by an airplane which is approaching the
firing line from the front and will pass overhead, or when
run in the opposite direction represents an airplane that has
passed over the firing line from the rear (figs. 36 and 42®).
(4) Parachute.—The target is designed to represent a
parachutist descending vertically (figs. 37 and 46).
b. Size and speed of silhouette.—(1) The black silhouette
of the horizontal and the climbing and diving target is a
representation at 500 inches of a 15-foot sleeve at a range
of 330 yards. It is 7.5 inches long. The speed of the sil-
houette should, be not less than 15 feet per second. This
speed represents that of an airplane flying 245 miles per
hour at a range of 330 yards. The size and speed of the
silhouette are based upon the time of flight of the caliber .22
bullet for 500 inches. This time of flight is approximately
0.04 second. When the target is moved at a speed of 15
258
BROWNING AUTOMATIC RIFLE, CAL. .30, M1918A2 227-229
feet or 180 inches per second, it will move 180x0.04 or 7.2
inches. Therefore, in order to hit the silhouette, the aim
must be directed approximately one silhouette length (lead)
in front of it. If two or three leads are used, the shot will
hit in the appropriate scoring space. This does not hold
equally true on the overhead target. If the shot is fired
when the range is less than 500 inches from the flrer, the
required lead will be less than one target length.
(2) The black silhouette of the parachute target at 500
inches is a representation of a parachutist at a range of
300 yards. The target is operated at a speed of descent of
1 foot per second, which corresponds approximately to the
angular travel of a parachutist descending 17 feet per second
at a range of 300 yards. No lead is required to obtain hits
on the black silhouette.
228. Preparatory Exercises.—a. A method of conducting
preparatory exercises is given in paragraph 144.
b. Each assistant instructor is assigned a target and con-
ducts the preparatory training and firing of all groups on
his target.
e. In preparatory training, coaches and pupils should
change places frequently.
d. Forty-five minutes at each type of target should be
sufficient to train each soldier in the preparatory exercises.
e. A detail of one noncommissioned officer and four or six
men should be provided to operate each type of target except
the parachute, which only requires one man.
229. Miniature Range Practice.—a. Caliber .22 rifle.—(1)
The .22 caliber rifle, as issued, is equipped with a Lyman
sight. The ordnance, upon request, will replace this Lyman
sight with an open sight which is more practicable for anti-
aircraft firing (par. 142c). However, the replacement of
this sight is not necessary. If the aperture of the Lyman
sight is unscrewed and removed from its frame, the frame
itself can be used as a peep sight. This procedure is recom-
mended as a time and labor saving expedient.
(2) Two magazines for each caliber .22 rifle should be
provided.
(3) Ammunition should be available immediately in rear
of the firing line at each type of target.
(4) Coaches should load magazines as they become empty.
259
229-230
BASIC FIELD MANUAL
(5) Scorers should be detailed for each type of target.
After each score is fired, they score the target. They call
off the number of hits made on each silhouette and pencil
or chalk the shot holes. The coaches enter the scores on.
the firer’s score card.
(6) A platform permitting the scorer to score the target
should be provided for each type of target.
(7) To stimulate interest_the instruction can be concluded
with a competition between individuals, squads, or training
groups.
(8) If available, targets shown in figure 38 may be used on
nonoverhead targets for group firing or competitions. One
lead should be used in firing on this target.
(9) Considerable supervision is required in order to main-
tain target operation at the proper speed. Correct operation
is required because the lead is based upon a speed of 15 feet
per second.
(10) Safety precautions must be constantly observed.
b. Caliber .30 automatic rifle.—If the size of the danger
area permits, the caliber .30 automatic rifle may be fired on
the miniature range in the same manner as with the caliber
.22 rifle, with the following exceptions:
(1) Use battle sight.
(2) The lead necessary to hit the black silhouette is ap-
proximately 2.5 inches. This is caused by the difference in
the time of flight of the caliber .30 and caliber .22 bullets
for 500 inches. The time of flight of the caliber .30 bullet for
500 inches is 0.015 second. When the target is operated at
the speed of 15 feet per second, the silhouette will move
approximately 2.5 inches during the time of flight of the
bullet.
(3) Men must be constantly cautioned to keep the weight
of the body forward.
(4) Preparatory exercises using the caliber .30 automatic
rifle should precede firing that weapon. These exercises are
conducted as explained for the caliber .22 rifle.
(5) The interval between individuals on the firing line
should be increased. This may be accomplished by placing
only one-half the group on the firing line at one time.
230. Towed Target (Sleeve or Flag) and Radio-Con-
trolled Plane Target Firing.—a. Range organization.— (1)
260
BROWNING AUTOMATIC RIFLE, CAL. .30, M1918A2
230
Firing at a towed sleeve (flag) target or a radio-controlled
plane target by an individual is impracticable and uneconomi-
cal. All firing is done by units of such size that Are can be
readily controlled and directed. The platoon is the most
convenient unit for such firing.
(2) An ammunition line should be established 5 yards in
rear of the firing line. One small table for every 10 men in
a firing group is desirable.
(3) Immediately in rear of the ammunition line the ready
line should be established.
(4) The first platoon or similar group to fire is deployed
along the ready line with each individual in rear of his place
on the firing line. Other platoons or groups are similarly
deployed in a series of lines in rear of the first unit to fire.
(5) Upon command of the officer in charge of firing, the
group on the ready line moves forward to the firing line, se-
curing ammunition en route; other groups close up.
„ (6) Upon completion of firing by one group, it moves off
the firing line, passing around the flanks of the ready line so
as not to interfere with the group moving forward.
(7) An ammunition detail sufficient to issue ammunition to
groups as they move forward to the firing line and to collect
unfired ammunition from the group which just completed
firing should be provided. These two operations should be
performed simultaneously. Unfired ammunition is delivered
to the statistical officer.
(8) The officer in charge should have at least three assist-
ants, two safety officers and one statistical officer.
b. Ammunition.—(1) Ball or tracer ammunition may be
used. Tracer ammunition is useful to show the groups wait-
ing to fire the size and density of the cone of Are delivered
by the firing group.
(2) Tracer ammunition will assist the officer in charge of
firing in verifying the lead announced' in the Are order. It
also provides a means of checking the flrer’s estimate of the
lead ordered.
c. Technique of fire.—(1) Leads.—The lead used in the
technique of fire described in paragraph 139 is the average of
two theoretical extremes. For example: If the maximum
slant range to a passing airplane is 600 yards and the mini-
mum slant range is 300 yards, the lead used would be that
261
230-231
BASIC FIELB MANUAL
required for a slant range of 450 yards. Fire is delivered with
one fixed lead in order to simplify the procedure. Experience
indicates such technique is readily taught and that it is effec-
tive. This method will be taught in towed target range
practice.
(2) The lead table given below may be helpful. It is based
upon a 15-foot sleeve towed at 140 miles per hour and caliber
.30, М2, ammunition. Since the average speed of the radio-
controlled plane target is 95 miles per hour and its Length is
10 feet, the leads listed below are equally applicable to this
target.
Slant range (yards)
Lead
required
100 ? 2
200 . . 3
300 5
400 - . . ... . _ ... 7
500 10
600 '. 12
The average of these is between six and seven leads. To hit
a flag target 40 feet long, being towed at a speed of 165 miles
per hour, requires an average of three leads.
d. Precautions.—Safety precautions as given in paragraph
241 must be rigidly enforced. This requires constant super-
vision by the officers in charge of firing.
e. Record.—The results of all firing should be recorded and
analyzed. The statistical officer should record the total num-
ber of rounds fired and the hits obtained on each target. If
the number of hits falls below the number expected, the
reason should be sought and explained to the men. -On the
other hand, when results are satisfactory the men should be
impressed with the value of rifle antiaircraft fire.
Section IV
TECHNIQUE OF FIRE
231. General.—The instructor should secure necessary
equipment, inspect ranges, and detail and train necessary
assistants, including demonstration units, prior to the first
262
BROWNING AUTOMATIC RIFLE, CAL. .30, M1918A2 231-237
period of instruction. Instructors should use their initiative
in arranging additional exercises in the application of the
fundamentals and methods herein contained. It should be
explained to trainees how the exercises used illustrate the
methods in the technique of fire. Good work in the conduct
of the exercises as well as errors should be called to the atten-
tion of all trainees.
232. Range Estimation.—a. A number of ranges to promi-
nent points on the terrain should be measured so that a few
minutes of each period can be devoted to range estimation.
b. Range cards as shown below will be of assistance in figur-
ing percentage of errors.
233. Target Designation.:—a. The major portion of the time
devoted to target designation should be spent on oral descrip-
tion. Simple designations should be required at first. The
instruction should not be confined to the landscape panels.
b. An explanation should be made to the trainees as to why
an angle of 50 mils will be subtended by 1 foot at 20 feet.
234. Automatic Rifle Fire and Its Effect.—This step of
instruction can best be covered by use of a blackboard and
an automatic rifleman firing several bursts of tracer bullets
to demonstrate the trajectories, danger space, dispersion,
classes of fire, and related matters.
235. Application of Fire.—a. Sufficient time and explana-
tion should be devoted to the method of Are distribution to
insure that all men fully understand it and can explain it in
their own words.
b. A demonstration group can be used to show the tech-
nique employed in assault fire.
236. Landscape Target Firing.—a. An explanation and
demonstration will be necessary to show the technique and
procedure of zeroing rifles and the firing of exercises on the
landscape targets.
b. Units should be given practical work in writing fire
orders for targets on the landscape panels prior to their
firing of any exercises.
237. Field Target Firing.—a. The most difficult factor in
the preparation of problems for field firing is the selection
of the terrain which complies with the safety regulations
contained in AR 750-10. A drawing should be made on a
263
237
BASIC FIELD MANUAL
RANGE ESTIMATION
Name_____________________________________________
Company__________________________________________
Squad_________;_________________________________
No. Esti- mate Correct % Remarks No. Esti- mate Correct % Remarks
1 21
2 22
3 23
4 24
5 25
6 26
7 27
8 28
9 29
10 30
11 31
12 32
13 33
14 34
15 35
16 36
17 37
18 38
19 39
20 40-
(Front)
264
BROWNING AUTOMATIC RIFLE, CAL. .30, M1918A2
237
TABLE FOR COMPUTING ERRORS IN RANGE ESTIMATION
Range in yards Error in yards 100
5 10 15 20 25 30 35 40 45 50
250.. 2 4 6 8 10 12 14 16 18 20 40
27*5 2 4 5 8 9 11 13 15 16 18 36
300 2 3 5 7 8 10 12 13 15 17 33
330 2 3 5 6 8 9 11 12 14 15 30
350.. 1 3 4 6 9 10 11 13 14 29
380 1 3 4 5 8 9 11 12 13 26
400 1 3 4 5 6 8 9 10 11 13 25
420 1 2 4 5 6 7 8 10 11 12 24
440 1 2 3 4 6 7 8 9 10 11 23
460... 1 2 3 4 5 8 9 10 II 22
480... 1 2 3 4 5 6 7 8 9 10 21
500 1 2 3 4 5 6 8 9 10 20
520 1 2 3 4 5 6 7 8 9 10 19
540 1 2 3 4 5 6 7 8 9 10 19
566 1 2 3 4 4 5 6 7 8 9 18
580 1 2 3 3 4 5 6 7 8 9 17
600 1 2 3 3 4 5 6 7 8 8 17
620... 1 2 2 3 4 5 5 6 7 8 16
640... 1 2 2 3 4 5 5 6 7 8 16
660 1 2 2 3 4 5 5 6 7 8 15
680 1 1 2 3 4 4 5 6 7 8 15
700 1 1 2 3 3 4 5 6 6 14
720 1 1 2 3 3 4 5 6 6 7 14
740 1 1 2 3 3 4 5 6 6 7 14
760 0 1 2 3 3 4 5 5 6 7 13
780 0 1 2 3 3 4 4 5 6 6 13
800 0 1 2 3 3 4 4 5 6 6 13
850... 0 1 2 2 3 3 4 5 5 6 12
900 0 1 2 2 3 3 4 4 5 6 11
950 0 I 2 2 3 3 4 4 5 5 11
1,000 0 1 2 2 3 3 4 4 5 5 10
Note.—Example of the use of this table: Suppose the correct range te be 695 yards
and the estimated range to be 635. The “error in estimate*' is consequently 60 yards.
Select two “errors in estimate’’ in the 700-yard space (the nearest to the correct range
given in the table) whose sum is 60 yards, as 50 and 10. Add the percentages shown
thereunder, and the result will be approximately your error. In this case;
7 plus 1=8%
2G5
237-238 BASIC FIELD MANUAL
map showing all safety angles, target positions, and other
required data.
b. The appearance of the ordinary prone or kneeling
silhouette (E or F target) depends a great deal upon the
direction of the sun, the background of the targets, and the
angle at which the targets are placed. The effect of solidity
can be obtained by using two figures placed at right angles to
one another.
c. The firing should be controlled from a central location.
Telephone communication between the firing point and the
pits will facilitate this instruction. During this type of train-
ing the individuals of the team should approach and occupy
the firing position with due regard to Cover and concealment.
238. Transition Firing.—a. General.—This phase of train-
ing gives the automatic rifleman practice in searching for
targets, estimating ranges, and getting off an accurate burst
quickly; and prepares him for combat firing exercises which
follow later in his training.
b. Use of ranges.—(1) Ranges will vary greatly due to
local conditions of space and terrain. There is no prescribed
or exact arrangement of the lanes which constitute transi-
tion firing course ranges. Each range will require an organ-
ization for use adapted to its particular lay-out.
(2) A suggested arrangement (fig. 96), provides five lanes
as shown, three lanes being used to fire the exercises in
table I, and two lanes being used to Are the exercise in table
II (par. 83e). If the above arrangement is impracticable,
one or more lanes may be constructed in each of which all
exercises of tables I and П are fired. This set-up may be
accomplished by combining the set-up in lanes 1, 2, and 3
and adding the extra pits as indicated by the broken lines
in figure 96.
(3) For the protection of the pit detail, individual open
pits of the fox hole type (flg. 97) should be used; or for
lanes 1, 2, and 3, trenches 18 feet long may be used.
(4) To control the raising and lowering of targets, tele-
phone or radio communication between the firing points and
pits is necessary. For lanes 1, 2, and 3, a telephone con-
nection or radio is necessary only for the center pit. Targets
in the other two pits may be controlled either orally or by
attaching a piece of twine or wire to the arm of the operator
266
BROWNING AUTOMATIC RIFLE, CAL. .30, M1918A2
238
and extending it to the operator in the center pit. The
wires are pulled when the targets are to be raised or lowered.
For lanes 4 or 5, three telephones or radios will normally
be required, one for each set of two pits. However, by ju-
500
300
200
-50 yd»—
25 to SO
25 to 50
yds -
Л
25 to 5a
25to5O
yds
LANE
2
LANE
5
LANE
4
FIRING POINTS
Figure 96,—Suggested lay-out for transition firing range.
267
238
BASIC FIELD MANUAL
dicious location of the pits, this number may be reduced
to two.
c. Personnel.—Two officers should be used to control the
firing at the firing points; one officer for the three firing
points for the exercises of table I, and one officer for the
two firing points used in firing the exercise of table IL
One coach for each firing point, necessary pit details, and
telephone orderlies or radio operators are required.
d. Procedure (see par. 88e).—(1) After the command load,
the officer in charge of firing gives the signal for raising the
Figure 97.—Construction of open pit.
268
BROWNING AUTOMATIC RIFLE, CAL, .30, M1918A2 238-239
targets. The three lanes for table I may be operated to-
gether, and the two lanes for table П operated together.
If this is not possible, lanes are operated independently of
each other. When the signal is given, all targets are raised.
Unless hit, they remain up until the signal to withdraw them
is given.
(2) Each man should first fire the exercises in table I, and
then'progress to the exercise in table II. It is not necessary
that the exercises in table I be fired in the order listed.
In table II the firer may select any one of the three groups
of two targets to fire on first. However, it is suggested that
the course be fired by having the men start in lane 1 and
progress through lanes 2 and 3 to either lane 4 or 5. This
method permits the use of two men on the firing point in
lane 1; one man fires while the other man goes through a
dry run. Another arrangement would be to have three men
fire the exercises in lanes 1, 2 and 3; and progressively change
places until they have fired in all three lanes, and then move
to lanes 4 or 5 where they fire the exercise in table П.
e. Ammunition allowances and scoring are based on firing
bursts of two rounds each. Inasmuch as the scoring is in-
dicated by the lowering of the target, no extra credit is given
for more than one hit on a target. If two targets are hit
by one bullet, both targets are scored. Also, there is no
penalty for not firing a burst of two rounds, other than as
indicated in the method of computing the score.
/. The course in transition firing for the automatic rifle-
man corresponds in time and procedure to the course for
United States rifles, caliber .39, Ml, M1903, and M1917 so
that the automatic rifleman may be trained at the same
time and on the same course as the riflemen of the squad.
239. Low Visibility Firing.—a. To deliver grazing (final
protective line) or fixed (harassing) fire with the automatic
rifle under conditions of low visibility, the following proce-
dure must be accomplished in daylight:
(1) Determine the line on the ground along which the
grazing fire is to be placed, or the point upon which fixed
fire is to be placed, and then hold the gun in position so that
the rifle can be fired along the line or at the point selected.
(The stock rest may be used, as a convenience, to assist in
holding the rifle.)
635351°—43--18 289
239-240
BASIC FIELD MANUAL
(2) Set the sight with zero windage and the estimated
range to a point at the far end of the final protective line,
if grazing fire is to be employed; or, the estimated range to
the point, if fixed fire is to be used. Aim and hold the rifle
on the point selected. With the automatic rifleman in posi-
tion holding the automatic rifle motionless, the assistant
automatic rifleman turns off full left (right) windage. The
ammunition bearer, directed by the automatic rifleman,
places an aiming stake on the new line of aim. The aiming
stake is placed at such distance that an aiming point on the
stake can be seen at night. The automatic rifleman, without
moving the rifle, sights along the new line of aim and directs
the ammunition bearer in placing a suitable marker on the
stake in line with the sights to be used as an aiming point.
A cleaning patch tied on the aiming stake makes a satisfac-
tory aiming point. For grazing fire, the assistant automatic
rifleman then raises the rear sight 2 mils in elevation to
insure that the lower half of the cone of fire will not be lost
by the bullets striking the ground short of the far end of the
final protective line.
(3) Small stakes are next driven into the ground at the
foot of each bipod leg to mark the position of the automatic
rifle, so that if it is moved it may be replaced exactly in its
former position. The use of stakes is applicable in the
preparation of alternate and supplementary positions from
which firing under conditions of poor visibility is to be done.
b. After the automatic rifle has been sited, and if the
situation permits, the rifle should be fired for adjustment,
and necessary sight corrections made. Sight settings are re-
corded for all positions prepared. See paragraph 201c for
exercises in low visibility firing.
240. Position Defilade Firing.—a. General.—The auto-
matic rifleman should be given instruction in firing from
position defilade. The minimum and maximum ranges
which can be used in this type of firing and still obtain good
fire effect are, respectively, 700 and 000 yards. The adjust-
ment of the fire and the consequent fire effect depend upon
the observation of the strike of the bullets. Up to ranges of
900 yards, the effect of automatic rifle fire compares favor-
ably with that of light and heavy machine guns. The stock
rest is not used in firing from position defilade.
270
BROWNING AUTOMATIC RIFLE, CAL. .30, M1918A2 240
b. Positions.—The defiladed positions may be on the re-
verse slope of a hill or on a forward slope with an interven-
ing hiH in front. In either ease, the ground from the posi-
tion to the mask must have a gentle slope. The position
selected must also have only sufficient defilade, so that a man
in the kneeling or a lower position can see the target.
c. Siting for direction.—The initial direction of fire is ob-
tained by the gunner raising his body to a position where
he can see the target, alining the rifle on the target, and
then selecting a weed or similar object to his front as an
aiming point; or a stake may be placed in line with the
rifle and the target. If traversing fire is to be used, two
stakes to indicate the limits of traverse may be used. In
firing from a forward slope, a visible terrain feature near or
beyond the target is preferable.
d. Siting for elevation.—(1) If the defiladed position is on
a reverse slope, set the sight at 300 yards elevation and, if the
target is at 700 yards, then raise the sight 2 mils; if the target
is at 800 yards, 4 mils; and if the target is at 900 yards, 6 mils.
The gunner aims at the top of the mask or selected aiming
point and fires a burst of five rounds. He then adjusts the fire
as directed by the observer, preferably the ammunition bearer,
who is in the kneeling or a lower position. Adjustment of the
fire is made by the observer directing the gunner to shift the
fire right, left, up, or down the necessary number of yards.
The gunner then selects a new aiming point, which he esti-
mates will place the next burst of five on the target, and fires
again. Adjustment of the fire is made by selecting a new
aiming point; changes in sight settings are not made. When
the fire has been adjusted, bursts of two or three rounds are
fired.
(2) If the defiladed position is on a forward slope, set the
sight at the estimated range to the target, lower the eleva-
tion 3 or 4 mils, aim at the top of the mask or selected aim-
ing point, and fire a burst of five rounds. Adjustment of
the fire is then made as described in (1) above. If a visible
aiming point such as a tree has been selected near or beyond
the target, set the sight at the range to the target, estimate
the height of the aiming point above the target in mils, lower
the sight that amount, and aim at the selected aiming point.
Fire an initial burst of five rounds, and then adjust as
describedin (1) above.
271'
Chapter 7
SAFETY PRECAUTIONS
241. Observance.—Safety precautions for observance by
troops are self-contained and complete in this manual. Ref-
erence to AR 750-10 is necessary for range officers, the officer
in charge of firing, and the commander responsible for the
location of ranges and the conduct of firing thereon. All
officers and men who are to fire or who are concerned with
range practice or field firing must be familiar with all safety
precautions listed in this chapter before firing is commenced.
a. General.—The safety precautions used at known dis-
tance ranges apply with equal force to instruction in firing
at any field or aerial target. Safety of personnel is of
primary importance in conducting exercises which require
the firing of live ammunition. To this end, exercises should
be drawn to conform to the state of training of the units
concerned.
(1) The officer in charge of an exercise is responsible for
the safety of the firing. It is his duty to initiate and enforce
such precautions as he deems necessary under existing con-
ditions. No other officer can modify his instructions without
assuming the responsibility for the safety of the firing.
(2) Firing will not start nor will ammunition be issued
until it has been ascertained that the range is clear, pit details
are not exposed, and all safety precautions have been com-
plied with. Upon completion of firing, rifles and belts must
be inspected by an officer to insure that no ammunition
remains in the possession of the men returning to camp or
barracks.
b. Individual precautions.—(1) Consider every rifle to be
loaded until it is examined and found to be unloaded. Never
trust your memory as to its condition in this respect. Auto-
matic rifles will be assumed to be loaded whenever a maga-
zine is in the receiver or the bolt is to the rear.
(2) Never point the rifle in any direction where an acci-
dental discharge may cause harm. When on the range,
the rifle will be carried with the muzzle elevated at all times.
During the firing of exercises, rifles will be pointed in the di-
rection of the target at all times. (Special vigilance is re-
quired to enforce this rule while men are using cleaning rods
to remove obstructions from the chamber.)
(3) Automatic rifles will be carried with the bolt forward
at all times except in the presence of an actual enemy.
272
BROWNING AUTOMATIC RIFLE, CAL. .30, M1918A2 241
(4) Automatic rifles will not be carried loaded except in
the presence of an enemy dr simulated enemy. Loaded rifles
will be carried with the muzzle elevated or pointed to the
front.
(5) Never leave a patch, plug, or other obstruction in the
muzzle or bore.
(6) Never fire a rifle with any rust-preventive compound,
cleaning patch, dust, dirt, mud, snow, or other obstruction
in the bore. To do so may burst the barrel.
(7) If the caliber .22 rifle is used, the bolt will not be forced
home if difficulty in feeding is experienced. Attempting to
force the bolt home may result in igniting a rim fire cartridge
before the cartridge is seated in the chamber.
(8) Never grease or oil the ammunition. See that the am-
munition is clean and dry. Do not expose it to the direct rays
of the sun.
(9) Examine all live or dummy ammunition. Turn in all
cartridges with loose bullets or which appear to be otherwise
defective.
c. Range precautions.—(1) Danger flags will be displayed
at prominent positions on the range during firing. Do not
fire unless such flags are displayed.
(2) At least one officer will be present at all firing.
(3) Upon arrival at the range, the automatic rifles of an
organization will be inspected by the officer(s) to see that
the chambers and barrels are free from obstruction.
(4) All automatic rifles on the range except those in use on
the firing line will have bolts in the forward position and
magazines withdrawn. Rifles on the firing line will be loaded
only upon command and, when loaded, the muzzles will be
pointed in the direction of the target.
(5) All loading and unloading will be executed on the firing
line with the muzzles directed toward the target. Rifles will
never be loaded in rear of the firing line.
(6) Rifles are never to be pointed in such a direction that
the fire will extend outside the prescribed limits outlined on
the range.
(7) All firing must be controlled by suitable signals or
commands, commence firing and cease firing must be given
in such a manner as to be understood clearly and promptly
by everyone engaged in firing. Firing will not begin on any
273
241
BASIC FIELD MANUAL
range until the officer in charge of firing has ascertained that
the range is clear and has given the commands load and
commence firing. All firing will immediately cease and rifles
will be set at “safe” (or cleared if ordered) at the command
cease firing.
(8) No person will be allowed in front of the firing line for
any purpose until directed by an officer who first orders all
rifles to be cleared and ascertains that the order has been
carried out. No rifles will be carried in front of the firing line.
(9) No automatic rifle will be removed from the firing line
until an officer has inspected it to see that the bolt is in its
forward position and the magazine is withdrawn.
(10) Before leaving the range, all rifles and belts will be
inspected by an officer to see that they do not contain ammu-
nition, and men will be questioned as to whether they have
any ammunition in their possession.
(11) Target personnel will not leave the designated safety
area until the signal or command to do so has been given.
(12) No magazine test or magazine drill will be conducted
in rear of the firing line.
(13) See AR 45-30 for regulations covering report of acci-
dent involving ordnance materiel.
d. Precautions in firing at moving targets.—Additional
safety precautions must be taken when exercises are being
conducted in firing at moving targets.
(1) Firing at moving targets will not be permitted on any
range until the safety angles have been carefully checked and
markers have been placed so as to define clearly the right and
left limits of fire.
(2) Personnel of trucks towing moving targets will operate
at such distance from the line of fire as to be protected from
direct hits and ricochets.
(3) Trucks replacing targets on the course, or personnel
effecting repairs will be equipped with red flags.
e. Safety precautions for antiaircraft firing.—The follow-
ing list of precautions must be taken when exercises are being
conducted in firing at aerial targets. These, also, are in
addition to the precautions listed in this paragraph.
(1) Towed target firing will be conducted with due regard
for the safety of the pilot of the towing airplane, the per-
sonnel engaged in the firing, and all spectators.
274
BROWNING AUTOMATIC RIFLE, CAL. .30, M1918A2
241
(2) The signals or commands for commence firing and
cease firing must be given at such time during the course of
the flight of the target as to prevent any bullets from falling
outside the danger area.
(3) In firing at towed targets, for all overhead flights, the
signal or command for commence firing will not be given until
the towing plane has reached a point 50 yards or less (meas-
ured horizontally on the ground) from the firing line, and
there is no danger of bullets striking the plane. The signal
or command for cease firing will be given before the sleeve
target is 100 yards (measured horizontally on the ground)
in advance of the firing line, in order that there will be no
hazard of bullets dropping outside the firing area.
(4) All personnel will be warned that, in case a towing cable
breaks and the towing airplane is on a course which passes
'near the firing point, they must lie fiat on the ground until
danger from the loose cable is passed.
(5) In firing at towed targets, no rifle will be pointed at
or near the towing airplane. All tracking will be on the towed
target. Muzzles will be depressed during loading.
(6) At least two safety officers will be designated to assist
the officer in charge of firing in carrying out safety precau-
tions.
(7) Firing at towed targets will be permitted only when
the angle target-gun-airplane exceeds 300 mils or 17°.
(8) . For the purpose of giving supplemental instruction and
checking the safety measures taken, an air force officer should
be at the firing point during an organization’s initial practice
for the season in towed target firing.
(9) No firing will be permitted at a slant range of less than
150 yards for any overhead flight of the radio-controlled plane
target.
(10) As the radio-controlled plane target may get out of
control, all men should be prepared to take cover upon the
signal from the officer in charge of firing, the safety officers,
or the target operator. Cover in the form of trenches or sub-.
stantial obstacles must be provided for all personnel in case
the target gets out of control and danger appears imminent.
A loud, prearranged signal, such as a klaxon or siren, will be
provided.
275
INDEX
Paragraph Page
Accessories_____________________________________ 43, 208 45, 237
Advice to instructors___________________________ 203 231
Aerial targets__________________________________-- 160 160
Classification______________________________ 137,144 41, 130
Leads in firing________________________________ 139 125
Marksmanship___________________________________ 226 258
Suitable for automatic rifle fire-------------- 136 124
Aiming and leading exercises_______________________ 146 137
Alining front sight__________________________________ 89 96
Alining silhouettes and sights_______________________ 61 59
Ammunition__________________________________ 44,110, 216 48, 108,
244
Ballistic data__________________________________ 51 51
Care, handling, and preservation________________ 49 51
Classification________________________________ 45 49
Grade___________________________________________ 47 49
Identification__________________________________ 48 49
Lot number_____________________________________ 46 49
Storage_________________________________________ 50 51
Antiaircraft fire:
Delivery_______________________________________ 142 127
Distribution___________________________________ 141 127
General technique______________________________ 138 124
Leads;_________________________________________ 139 125
Marksmanship___________________________________ 143 129
Preparatory exercises___________________ 144,.228 130,259
First step_________________________________ 145 136
Second step________________________________ 146 137
Third step_________________________________ 147 139
Target designation____________________________ 140 126
Position________________________________________ 68 70
Application of fire_____________________________ 182, 235 186, 263
Assault fire_______________________________________ 184 194
Position________________________________________ 67 69
Assembling rifle_________________________________ 9,204 9,231
Assistant instructors______________________________ 213 243
Automatic fire and replacing magazines_____________ 223 255
Automatic fire exercise_____________________________ 75 77
Automatic rifle fire:
Effect_________________________________________ 234 263
Importance_____________________________________ 164 163
Fifth lecture__________________________________ 224 256
Ballistic data______________________________________ 51 51
Beaten zone________________________________________ 178 183
Bipod, adjusting____________________________________ 63 61
Breath, holding_____________________________________ 63 61
Buffer and rate-reducing mechanism, functioning. 22,207 31,233
Butt plate, hinged__________________________________ 63 61
Care and cleaning of rifle__________________ 13,14, 206 16, 18, 233
Under unusual conditions________________________ 16 22
Care in disassembling and assembling_________________ 6 3
Change lever, to set____________________________ 24, 34 34, 38
277
INDEX
Paragraph
Page
Changing magazine, exercise in___________________ 74 75
Classes of Are____________________________________ 179 184
Cleaning__________________________________________ 111 108
Coaches:
Duties__________________________1___________ 59, 88 58, 95
Positions___________________________________ 70 72
Coaching________________________________________ 88, 144 95, 130
Prohibited____________________________________ 106 107
Concentrated fire_________________________________ 183 192
Connector, functioning__________________________ . 25 35
Courses, marksmanship_______________________________ 83 86
Courses to be fired, towed or radio-controlled plane
target_____________________________________________ 153 147
Cover, use_____________________________1________ 200 218
Critique__________________________________________ 201 223
Cycle of functioning________________________________ 20 25
Description.____________________________________ 21 26
Cyclic rate of fire_________________________________ 23 33
Danger space______________________________________ 175 181
Defilade, position, firing________________________ 240 270
Delivery of fire__________________________________ 142 127
Demonstrations____________________________________ 219 248
Destruction of ordnance materiel__________________ 202 228
Disassembling:
Groups________________________________________ 205 231
Magazine_______________________________________ 12 16
Rifle_______________________________________ 8, 204 4, 231
Dispersion________________________________________ 176 181
Distributed fire________________________________ 141,183 127, 192
Dummy cartridges, use___________________________ 18, 86 25, 95
Duties:
Coaches_____________________________________ 59, 88 58, 95
Leaders_____________________________________ 57,189 56, 199
Ejection____________________________________________ 21 26
Elevation__________________________________________ 77 78
Estimation by eye_________________________________ 170 165
Examination_________________________________________ 80 79
Exercises:
Aiming and leading________________________________ 146 137
Automatic fire_________________________________ 75 77
Changing magazines_____________________________ 74 75
Field_________________________________________ 201 223
Position_______________________________________ 63 61
First step, antiaircraft fire_____________ 145 136
Preparatory, antiaircraft fire___________ 144, 226 130,259
Sequence of____________________________________ 96 100
Sight setting____________________________’__ 71 72
Sight setting and aiming_______________________ 72 73
Sighting and aiming_________________________ 60-62 58
Situations for firing_________________________ 201 223
Target designation____________________________ 174 177
Trigger manipulation___________________________ 73 74
Third step________________________________ 147 139
Extraction_________________________________________ 21 26
Extractor, to remove and replace without dis-
assembling _________________________________________ 11 14
278
INDEX
Failure to— Paragraph Page
Extract-_______________________________________ 211 238
Feed___________________________________________ 211 238
Feeding____________________________________________ 21’ 26
Field firing, antiaircraft________________________ 159 159
Field target firing_____________________________ 200, 237 218, 263
Scope of training______________________________ 108 211
Terrain, targets, and ranges____________________ 1" 211
Fifth lecture (effect of wind and light; sight
changes; score book)_______________________________ 224 256
Fire: „
Antiaircraft___________________________________ 136 124
Application_______________________________182, 235 186, 263
Assault________________________________________ 184 1Э4
Classes________________________________________ 179 184
Concentrated and distributed___________________ 183 192
Control________________________________________ 187 196
Delivery_______________________________________ 142 127
Discipline_____________________________________ 186 1'95
Distribution_________________________,______ 141 127
Effect_________________________________________ 180 M.5
Automatic rifle_________________•______ 234 263
Importance of rifle______________________ 164. 163
Observation_________________________________ 169 165
Orders_________1____________________________ 95, 188 100, 197
Rate________________________________________ 185 194
Technique________________________-__________ 163, 231 163, 262
Fire power of rifle__________________________________ 3 1
Fire, rifle_________________________________________ 35 39
Firer, shelter for_________________________________ 108 108
Firing:
Antiaircraft, field________________________________ 159 159
Exercises, situation for_______________________ 201 223
Field target________________________________ 198, 237 211,263
Group, miniature range practice_____________ 151 145
Instruction, miniature range practice_______ 150 142
Landscape target____________________________ 190, 236 199,263
Line, organization____________________________ 100" 102
Low visibility______________________________ 239J 269
Miniature range________________________________ 229 259
On wrong target________________________________ 119 109
Pin, to remove without disassembling____________ 10 13
Points__________________________________________ 87 95
Position defilade______________________________ 240 270
Procedure_____________________________________ 155’ 147
With time limit_________________ 104, 122, 123 105,110
Without time limit________________________ 103 104
Radio-controlled plane target_______________ 152, 153 147
Sequence of_____________________________________ 82 86
Towed target________________________________ 152, 153 146,147
Transition_____________________________________ 238 266
First lecture (sighting and aiming)________________ 220 248
First sighting and aiming exercise__________________ 60 58
First step (antiaircraft position exercise)_____ 145 136
Fouling shots______________________________________ 114 108
Fourth lecture (automatic fire and replacing
magazines)_________________________________________ 223 255
Front sight, to aline_______________________________ 89 96
279
INDEX
Paragraph Page
Functioning cycle___________________________________ 21 26
Functioning of—
Buffer and rate-reducing mechanism-------------- 22 31
Connector______________________________________ 25 35
Rifle___________________________________________ 17 25
Mechanical means___________________________ 19 25
To demonstrate____________________________ 207 233
Sear___________________________________________ 26 36
Sear release stop_______________________________ 27 36
Spring_________________________________________ 28 37
Trigger mechanism_______________________________ 23 33
Gas:
Action_____________________________________________ 21 26
Adjustment__________________________-______ 36. 209 40,238
Insufficient__________________________________ 211 238
Gloves_________________________________________ 113 108
Grade of ammunition________________________________ 47 49
Group firing, miniature range practice____________ 151 145
Groups, shot___________________________________ 62, 177 60,181
Gun sling______________________________________ 63, 112 61,108
Hinged butt plate__________________________________ 63 61
Hold-off method of aiming_________________________ 132 119
Holding breath_________________________________-_ 63 61
Immediate action_______________________________ 41, 210 42, 238
Inspection of rifles______________________________ 215 244
Insufficient gas__________________________________ 211 238
Instruction firing, miniature range practice___ 150 142
Instruction practice:
On known distance range________________________ 92 99
On 1,000-inch range____________________________ 91 98
Instruction to pilots for towing missions_________ 161 161
Instructors:
Assistant_____________________________________ 213 243
Advice to_____________________________________ 203 231
Instruments, use__________________________________ 107 108
Interrupted score_________________________________ 116 109
Kneeling position__________________________________ 66 164
Known distance range___________________________ 92,126 99,113
Landscape target firing___________________________ 236 263
Scope and importance__________________________ 190 199
Weapons to be used____________________________ 192 200
Leaders, duties________________________________ 57,189 56,199
Leads_____________________________ 128, 129, 132, 139, 230 117,118,
119,125,
200
Lectures__________________________________________ 219 248
Position______________________________________ 221 251
Replacing magazine and automatic fire______ 223 255
Sighting and aiming___________________________ 220 248
Trigger manipulation__________________________ 222 253
Wind and light, sighting changes, and score
book__________________________________________ 224 256
Light, effect______________________________________ 77 78
Load:
Magazine________________________________________ 31 38
Rifle___________________________________________ 82 38
280
index
Paragraph Page
Locking___________________________________________ 21 26
Lot number of ammunition__________________________ 46 49
Low visibility firing___________________________ 239 269
Magazine:
Disassembly and assembly______________________ 12 16
To load_______________________________________ 31 36
Magazines, exercise in changing______________ 74, 223 75, 255
Marking______________________________________ 98, 102 101,103
Marksmanship_________________________________ 52-54 53
258
Courses_________________________________________ 83 86
Fundamentals------------------------------------ 53 53
Known distance targets_________________________ 212 242
Equipment__________________________________ 214 244
Organization_______________________________ 217 244
Schedule----------------------------------- 218 245
Moving ground targets______________________ 127—135 117
Object__________________________________________ 52 53
Phases of training______________________________ 54 63
Preliminary preparation, aerial targets_____ 226 258
Preparatory training____________________________ 55 54
Materiel, ordnance, destruction of_________________ 202 228
Mechanical means of functioning_____________________ 19 25
Mechanical training________________________________ 203 231
Miniature rangel___________________________________ 158 152
Description___________________________'— 227 258
Firing _ _ _________________________________ 229 259
Practice____________________________________ 148, 229 142, 259
Misses_____________________________________________ 117 109
Moving personnel, method of aiming at-------------- 132 127
Moving targets and ranges__________________________ 134 121
Moving vehicles_________________________________ 129,130 118, 119
Place in training______________________________ 131 119
Nomenclature_________________________________________ 7 3
Observation of fire________________________________ 169 165
Officer, range_____________________________________ 157 152
Operation of rifle__________________________________ 29 37
Oral target designation____________________________ 173 170
Orders, Are_________________________________________ 95 100
Ordnance materiel, destruction_____________________ 202 228
Organization_________________________________________ 5 3
Of firing line_________________________________ 100 102
Of work, known-distance marksmanship________ 217 244
On the range____________________________________ 85 94
Pads-------------------------------------------- 84, 113 94, 108
Pit detail__________________________________________ 85 94
Position:
Antiaircraft fire_______________________________ 68 70
Assault Are___________________________________ 67 69
Defilade firing________________________________ 240 270
Kneeling---------------------------------------- 66 69
Of coach________________________________________ 70 72
Prone___________________________________________ 64 66
Second lecture_________________________________ 221 251
Sitting_________________________________________ 65 68
281
INDEX
Paragraph Page
Position exercises_________________________________ 63
First step, antiaircraft fire__________________ 145
Position stoppage set-ups__________________________ 211
Precautions:
Range__________________________________________ 135
Safety_________________________________________ 241
Preliminary preparation, marksmanship, aerial
targets________________________________________ 226
Preparation of targets___________________________ 193
Preparatory exercises, antiaircraft____________ 144, 228
Preparatory marksmanship training__________________ 55
Duties of coaches_______________1___________ 59
61
136
238
123
272
258
200
130, 259
54
58
Duties of leaders__________________,________ 57 56
Equipment_______________________________________ 56 54
Method of instruction___________________________ 58 57
Procedure in firing_______________________________ 155 147
With time limit_______________________________ 104 105
Witheut time limit________________:_________ 103 104
Prone position______________________________________ 64 66
Radio-controlled plane target firing_______ 152,153, 260 146,147,
260
Procedure-------------------------------------- 155 147
Safety precautions_____________________________ 154 147
Range:
Estimation_________________________________________ 282 263
Importance_________________________________ 166 164
Methods____________________________________ 167 165
Known distance______________________________•_ 92 99
Miniature, aerial___________________________ 158, 227 152, 258
Officer_____________________________________ 85,157 94,152
1,000-inch__________________________________ 91, 124 98,110
Practice________________________________________ 84 94
Object and scope____________________________ 81 86
Organization________________________________ 85 94
Sixth lecture______________________________ 225 257
Precautions____________________________________ 135 123
Towed target___________________________________ 159 159
Ranges__________________________________________ 126,199 113, 211
Moving targets, and---------------------------- 134 121
Rate of fire_______________________________________ 185 194
Record practice:
Course D, 1,000-inch range_____________________ 124 110
Regulations governing___________________________ 94 100
Restrictions as to rifle--------------------------- 109 108
Rifle:
Assembling------------------------------------ 9, 204 9, 231
Description-------------------------------------- 2 1
Disassembling_________________________________ 8. 204 4, 231
Operation--------------------------------------- 29 37
Restrictions----------------------------------- 109 JOB
To demonstrate functioning_____________________ 207 233
To fire_________________________________________ 35 39
To load______:-------------------------------- 32 88
To unload--------------------------------------- 33 38
Rifles:
Inspection------------------------------------- 215 244
Zeroing-in_____________________________________ 194 204
Ruptured cartridge--------------------------------- 211 238
;82
INDEX
Paragraph.
Safety precautions_______________________________ 241
Schedules, model_________________________________ 218
Score book—______‘______________________________ 79 '
Fifth lecture________________________________ 224
Score interrupted--------------------------------- 116
Score cards and scoring___________________________ 101, 158
Scoring________________________________ 101, 156, 193, 196
Sear, functioning--------------------------------
Sear release stop, functioning-------------------
Second lecture (position)________________________
Second sighting and aiming exercise--------------
Second step (antiaircraft aiming exercise)--------
Shelter for firer________________________________
Shot groups:
Description__________________________________
Long-range work______________________________
Making, in preparatory marksmanship----------
Shots:
Cutting edge of silhouette or line___________
More than prescribed in time limit___________
To be included in score______________________
26
27
221
61
146
108
177
220
62
Two on same target__________________________
Warming, fouling, and sighting______________
Sight changes____________________________________
Sight setting and aiming exercise________________
Sight setting exercises__________________________-
Sighting and aiming exercises____________________
Sighting and aiming lecture______________________
Sighting bar:
Construction________________________________
First sighting and aiming exercise__________
Sighting! disks__________________________________
Sighting shots.__________________________________
Signals__________________________________________
Sitting position________s._______________________
Situations for firing exercises__________________
Sixth lecture (range practice)___________________
Slide, demonstration of__________________________
Sling, gun_______________________________________
Spare parts______________________________________
Springs, functioning_____________________________
Stoppages________________________________________
Causes________________________________________
Prevention__________________________________
Set-ups_______________________________________
Storage:
Ammunition____________________________________
Rifles________________________________________
Page
272
245
79
256
109
102,152
102, 152,
200,209
137
108
181
248
60
108
110
109
10’9
108
256
73
72
58
248
54
58
54
108
161
68
223
257
233
61, 108
44, 237
37
41, 101
41
41
238
51
21
223
115
123
118
120
114
224
72
71
60-62
220
50
15
56
60
56
114
162
65
201
225
207
63, 112
42, 208
28
38,97
39
40
211
Suggested exercises___________-_______________ 201
Target:.
Description________________________________ 173, 191 170, 200
Designation________________________ 140, 171, 173, 233 126, 169,
170, 263
Exercise__________________________________ 197 209
Importance________________________________ 171, 169
Oral.;____________________________________ 173 170
Details__________________________________________ 99 101
283
INDEX
Target—Continued. Paragraoh
Field, firing______________________________ 190
Firing on wrong____________________________119
Landscape, firing__________________________236
More shots than prescribed_________________123
Two shots on same__________________________ 126
Withdrawing prematurely____________________ 121
Targets______________________________________125,199
Aerial___________________________ 136, 137, 144, 160
Aerial____________________________ 136, 137, 144, 160
Page
211
109
263
- 110
' 100
109
112, 211
124, 130’,
160
Men marking_________________________________ 98 - - 101
Miniature aerial___________________________ 158 15?
Moving____________________________________ 129-135 118
Preparation.._______:_______________________ 193 200
Towed or radio-controlled plane_______ 152,153, 230 146, 147.
' - 260
Team, action________________________________:____
Technique of— ••
Antiaircraft fire____________________,__.___ 138
Moving target fire_____________:________130, 132
Fire_____L_____________________________163,231
Scope__________________________________ 165
Telephones, use_______________________-_________ 105 ’
Third lecture (trigger manipulation) ___r'.'.L-z.. 222
Third sighting and aiming exercise (making shot
groups)._________________________________________ 62
Third step (trigger press exercises)-'__________ 147'
Topographical terms_____________________________ 172
182 186
1 124
' 119
.163, 262
164
107
253
60
. 13»
. 170
Towed target:
Firing___________________________________ 152, 153, 230 146, 147?
260
Range_________-_____________________________ .159 . 15»
Signals-______'______________-______________ .' 162 161
Scoring________________:_____:_____;____— 156 ' 152
Towing missions, instruction to pilots____________ 161 161
Tracer bullets, use___________________________ 168, 173 165,170
Trajectory -____:_____________________________ 175,181 181,186
Transition firing__________________________________ 238 266
Trigger:
Action, demonstration_______________________ 207 233
Manipulation, .1ес1тйЙ_2_1^_^2._______________-222 ,253
Manipulation :eierciSe_i_L_."____________д__ 73 .74
Mechanism, functioning__________________________23 S3
Press__________.2. -________________________ 147 139
Two shots on same target------'_________________ 120 109
Unfired cartridges_________________________________ 122 110
Unload rifle_______________________________________ 33 38
Unlocking__________________________________________ 21 26
Warming shots_____________________________________ 114 108
Wind and light, effect_____________________________ 224 256
Windage____________________________________________ 76 48
Withdrawing target prematurely_____________________ 121 109
Work, organization_________________________________ 217 244
Zero, explanation__________________________________ 78 79
Zero of rifle, to determine______________________ 90 97
Zeroing-in of rifles______________________________ 194 204
О
284
ГМ 23-15
*с 1
BASIC FIELD MANUAL
BROWNING AUTOMATIC RIFLE CALIBER .30,
M1918A2
Changes'! WAR DEPARTMENT,
No. 1 J Washington 25, D. C., 24 December 1943.
FM 23-15, 30 June 1943, is changed as follows :
8. Disassembling the Rifle.—a.
*****
(3) (Superseded.) (a) Butt plate assembly.
(&) Buffer tube from the receiver.
* * * * . *
b. Sequence.
* * * * *
(4) (Added.) Buffer and rate reducing group.—Remove—
(a) Large butt plate screw.
(&) Small butt plate screw.
(c) Butt plate assembly.
(d) Stock retaining sleeve.
(e) Actuator spring.
(f) Actuator.
(g) Washer.
(h) Stock.
(i) Actuator tube and buffer cap assembly.
(j) Buffer spring.
(fc) Four steel cones.
(() Four brass cups.
(m) Buffer key.
fn) Sear release.
(o) Buffer head.
*The individual items in this change will be cut apart and pasted over the
specific paragraphs or subparagraphs affected.
663551 —43
FM 23-15
С 1 BASIC FIELD MANUAL
c. Method.
* * * * Ф
(4) (Added.) Buffer and rate-reducing group (fig. 3.1).—
The disassembly of the buffer and rate-reducing group is habit-
ually performed as a part of mechanical training. The pro-
cedure of disassembly is as follows: Lay the rifle on a table,
barrel down, muzzle pointed away from the soldier, and remove
the sling and trigger guard retaining pin and spring. Lift out
the trigger group. With the screw driver end of the combina-
tioh tool, unscrew the large butt plate screw (42) from the
face of the butt plate assembly (44). Similarly, remove the
small butt plate screw (43) from the lug on top of the butt
plate assembly, and lift off the butt plate assembly. Insert the
screw driver end of the combination tool into the slot in the
end of the stock retaining sleeve (45) and turn counterclock-
wise while gripping the stock (49) of the rifle with the left
hand. Remove in order: the stock retaining sleeve (45), the
actuator spring (4G), the actuator (47), and the stock (49).
Next, take out the washer (48) from the stock retaining sleeve
recess in the butt end of the stock. . Using the small spanner
of the combination tool on the buffer cap in the rear end of the
buffer tube (fig. 3.2), unscrew and remove the actuator tube
and buffer cap assembly (50) from the buffer tube. Using the
forefinger, remove the buffer spring (51), the steel cones (52),
and the brass cups (53). Push the buffer head (56) to the rear
with tlie forefinger and remove it from the buffer tube. Remove
the buffer key (54) and sear release (55) from the buffer head.
The buffer tube is threaded into the receiver and should never
be removed except for replacement or repair and then only by
Ordnance (fig. 3.2).
[A. G. 300.7 (16 Oct 43).] (С 1, 24 Dec 43.)
2
[A. G. 300.7 (16 Oct 43).1 (С 1, 24 Dec 43.)
Figure 3.1.—Buffer and rate-reducing group.
СЛ
d
FM 23-15
с 1
BASIC FIELD MANUAL
Fiobr® 3.2.—Buffer tube and receiver.
[A. G. 300.7 (1G Oct 43).] (С 1, 24 Dec 43.)
9. Assembling the Rutte.
* * * * *
<1. (Added.) Buffer and rate reducing group.—Replace the
sear release (55) and buffer key (54) into the buffer head (5b)
and then insert the buffer head into the buffer tube, using the
forefinger as a guide. lu seating the buffer head into its position
in the buffer tube, care must be taken that the rounded portion
of the sear release is directly toward the top of the receiver.
Beginning with a brass cup (53), replace the four brass cups
and four steel cones (52) alternately into the buffer tube. Re-
place the buffer spring (51) in the buffer tube. Screw the
actuator tube and buffer cap assembly (50) clockwise into the
buffer tube. Using the small spanner of the combination tool,
securely tighten the actuator tube and buffer cap assembly into
position. Replace the stock (49). Return the washer (48)
to its seat in the stock retaining sleeve recess. Next, engage
the tapered end of the actuator (47) in either end of the actu-
ator spring (46). Then, with the actuator foremost, return
the two parts into the actuator tube. Place the open end of
the stock-retaining sleeve (45) ov.er the actuator spring, and
using the screw driver end of the combination tool, screw it
tightly into position on the actuator tube. Turning the rifle
barrel up, replace the butt plate assembly (44). Fasten the
4
FM 23-15
BROWNING AUTOMATIC RIFLE С 1
butt plate assembly securely into position first by screwing the
small butt plate screw (43) and then the large butt plate screw
(42) into their respective seats. Turning the rifle barrel down,
replace the trigger group and trigger guard retaining pin and
spring.
[A. G. 300.7 (16 Oct 43).] (C 1. 24 Dec 43.)
13. General.
*****
b. Lubricants, cleaning materials, and rust preventives.
*****
(2) Oil. lubricating, preservative, light.
*****
(3) (Superseded.) Oil, medium preservative, lubricating.—
This oil is superior to light preservative lubricating oil for small
arms exposed to salt water atmosphere. It is heavier and pos-
sesses better preservative characteristics for such conditions.
It contains rust inhibitors and forms a relatively heavy film,
which resists the direct washing action of spray. These char-
acteristics make it useful for coating all parts of the weapons
prior to landing operations, and it should be used in preference
to light preservative lubricating oil under such conditions.
Use medium preservative lubricating oil only where the rifle
is to be exposed to the conditions described in this paragraph.
Under other conditions, use the lubricant prescribed in (2)
above.
(314) (Added.) Oil, special preservative, lubricating.—This
is a thin oil chosen for lubricating at low temperatures and
providing temporary protection against corrosion. Special pre-
servative lubricating oil should always be used for preserving
the bore between times when the rifle is fired. It is applied
after the rifle has been cleaned. Frequent inspections should be
made to assure maintenance of an adequate protective film
of oil.
(4) Oil, engine, SA.E 10.—This oil may be used when oils pre-
viously mentioned cannot be obtained. However, in cold
* * * and reoiled frequently.
(5) Compound, rust-preventive, light.—This compound is
* *. * preheating is uneconomical.
5
FM 23-15
с 1 BASIC FIELD MANUAL
*****
[A. G. 300.7 (16 Oct 43).1 (Cl, 24 Dec 43.)
14. Сане and Cleaning.—a.
* * * * *
(4) (Added.) The buffer and rate-reducing group is not nor-
mally disassembled each time the rifle is cleaned. It will be dis-
assembled, cleaned, and lightly oiled only when such cleaning
is necessary.
*****
[A. G. 300.7 (16 Oct 43).] (С 1, 24 Dec 43.)
15. Storage.—For preserving and lubricating materials, see
paragraph 13b.
a. Preparation for storage.—Automatic rifles should * * *
dried with rags. The buffer and rate reducing group should
be disassembled, thoroughly cleaned, and then completely
dried with rags. In damp climates, * * * the weapon to
rust.
*****
[A. G. 300.7 (16 Oct 43).] (С 1, 24 Dec 43.)
16. Care and Cleaning Under Unusual Conditions.—a. In
cold climates.— (1) For temperatures below * * * or com-
plete failure. Oil must be applied very sparingly by wiping with
a cloth which has first been wet with special preservative lubri-
cating oil and then wrung out.
(2) The metal parts * * * below 0° F. The working
surfaces of parts which show signs of wear may be lubricated
by rubbing with a cloth slightly dampened with special preserva-
tive lubricating oil as prescribed in (1) above. At temperatures
above * * * preservative lubricating oil.
*****
c. Care when subject to gas attack.
* . * * * *
(3) If contaminated, the following action will be taken:
*****
FM 23-15
BROWNING AUTOMATIC RIFLE С 1
(e) Decontaminate the rifle * * * solvent by volume.
After decontamination, clean the materiel thoroughly and
prepare for use as required.
(f) (Superseded.) For emergency decontamination of the
automatic rifle, protective ointment M4 may be used. The ap-
plication of this ointment and the decontamination procedure
are as follows:
(1) Wipe dry of all liquid contaminants and bury or burn
wiping material.
(2) Spread M4 ointment well over till metal, wood, and leather
surfaces apparently contaminated, rub well, and allow to remain
for 15 minutes.
(3) Wipe all surfaces dry of ointment.
(4) As soon as tactically permissible, disassemble the rifle,
including the buffer and rate-reducing group, clean thoroughly,
oil all metal parts, and reassemble.
ft * * * $
[A. G. 300.7 (16 Oct 43).1 . (С 1, 24 Dec 43.)
2(15. Disassembly and Assembly of Groups.
* * * * »
b. Procedure.
* * * * *
(4) The disassembly and assembly of the trigger group, buffer
and rate-reducing group, bipod group, and magazine are carried
on in the same manner as the operating group. Some instructors
prefer * * * that specific group.
(5) During the practical * * * the next man.
(6) Ask questions.
[A. G. 300.7 (16 Oct 43).] (C 1. 24 Dec 43.)
By order of the Secretary of War :
G. C. MARSHADD,-
Chief of Staff.
Official :
J. A. ULIO,
Major General,
The Adjutant General.
7
U. S. GOVERNMENT PRINTING OFFICEt 1943