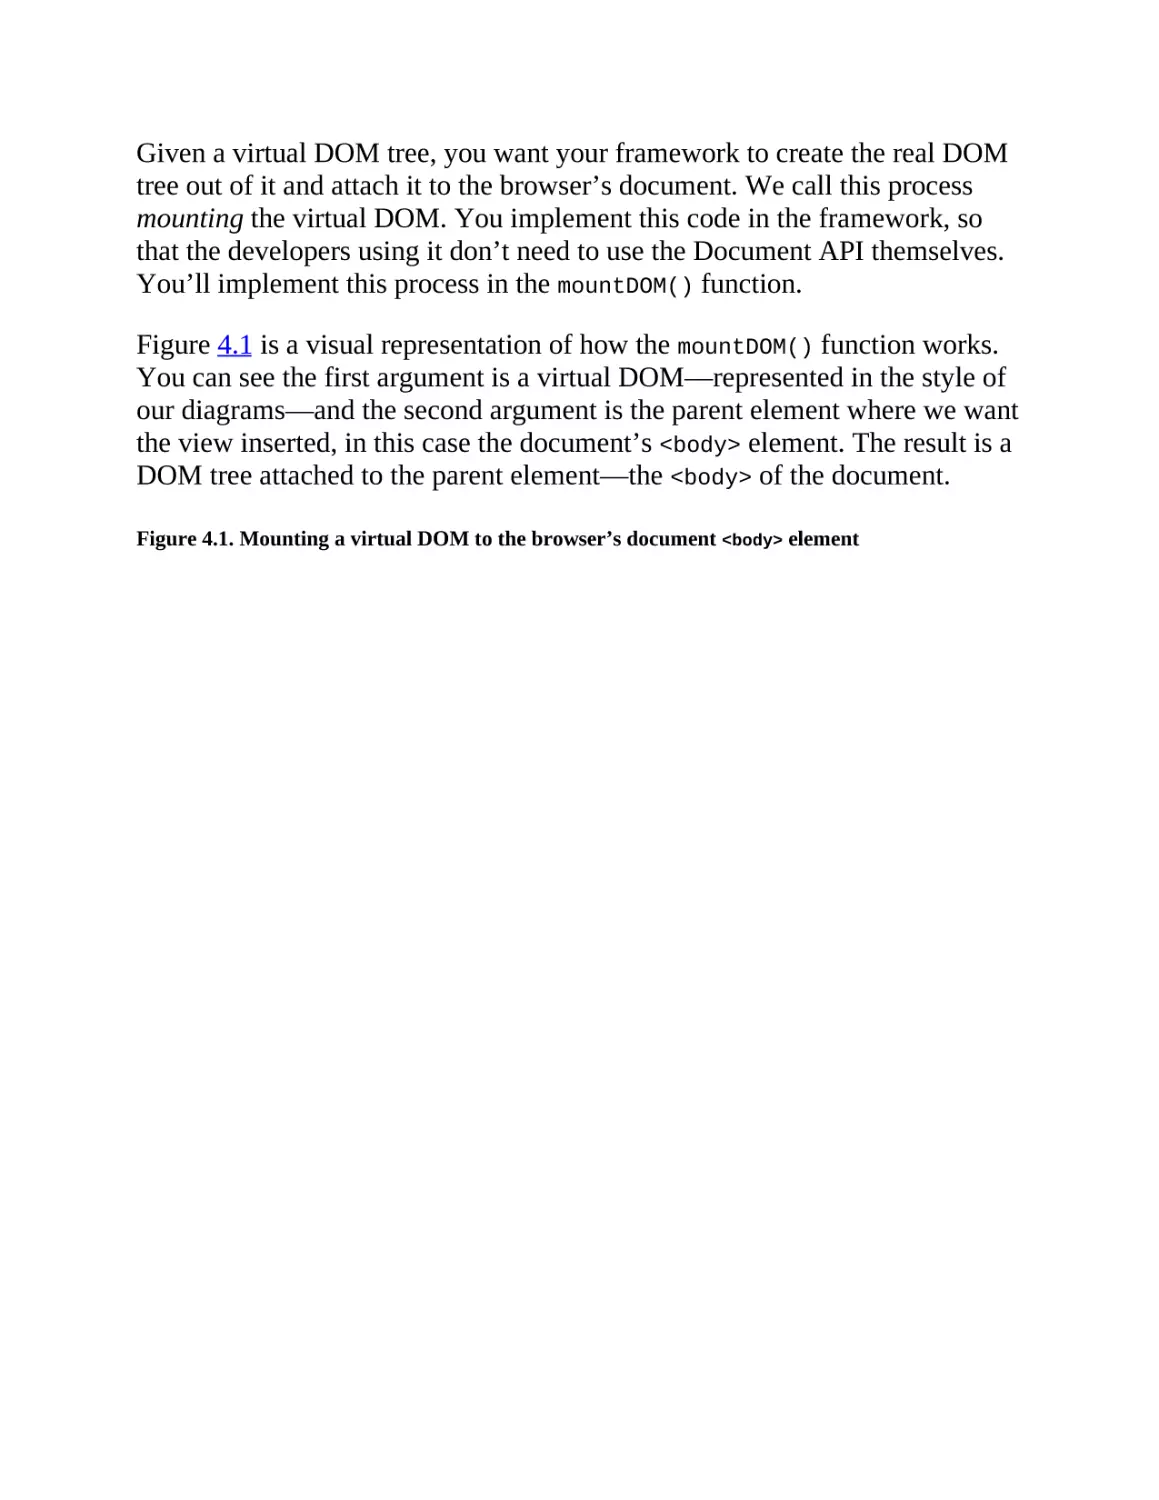
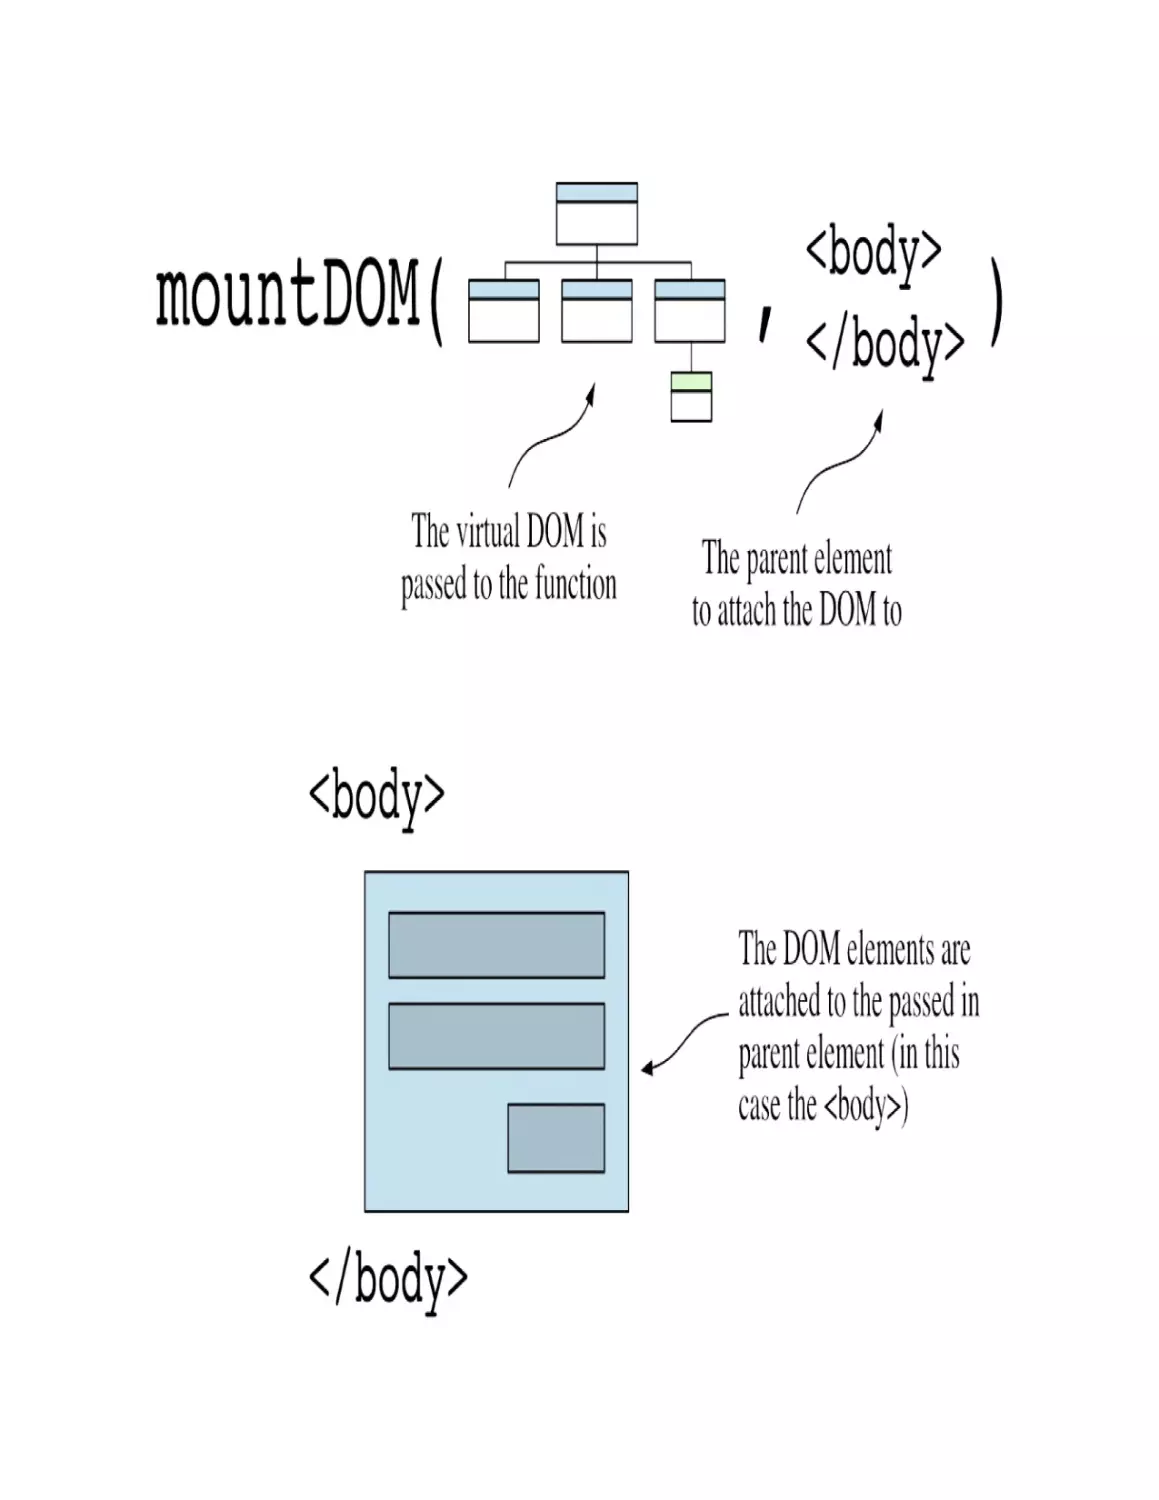
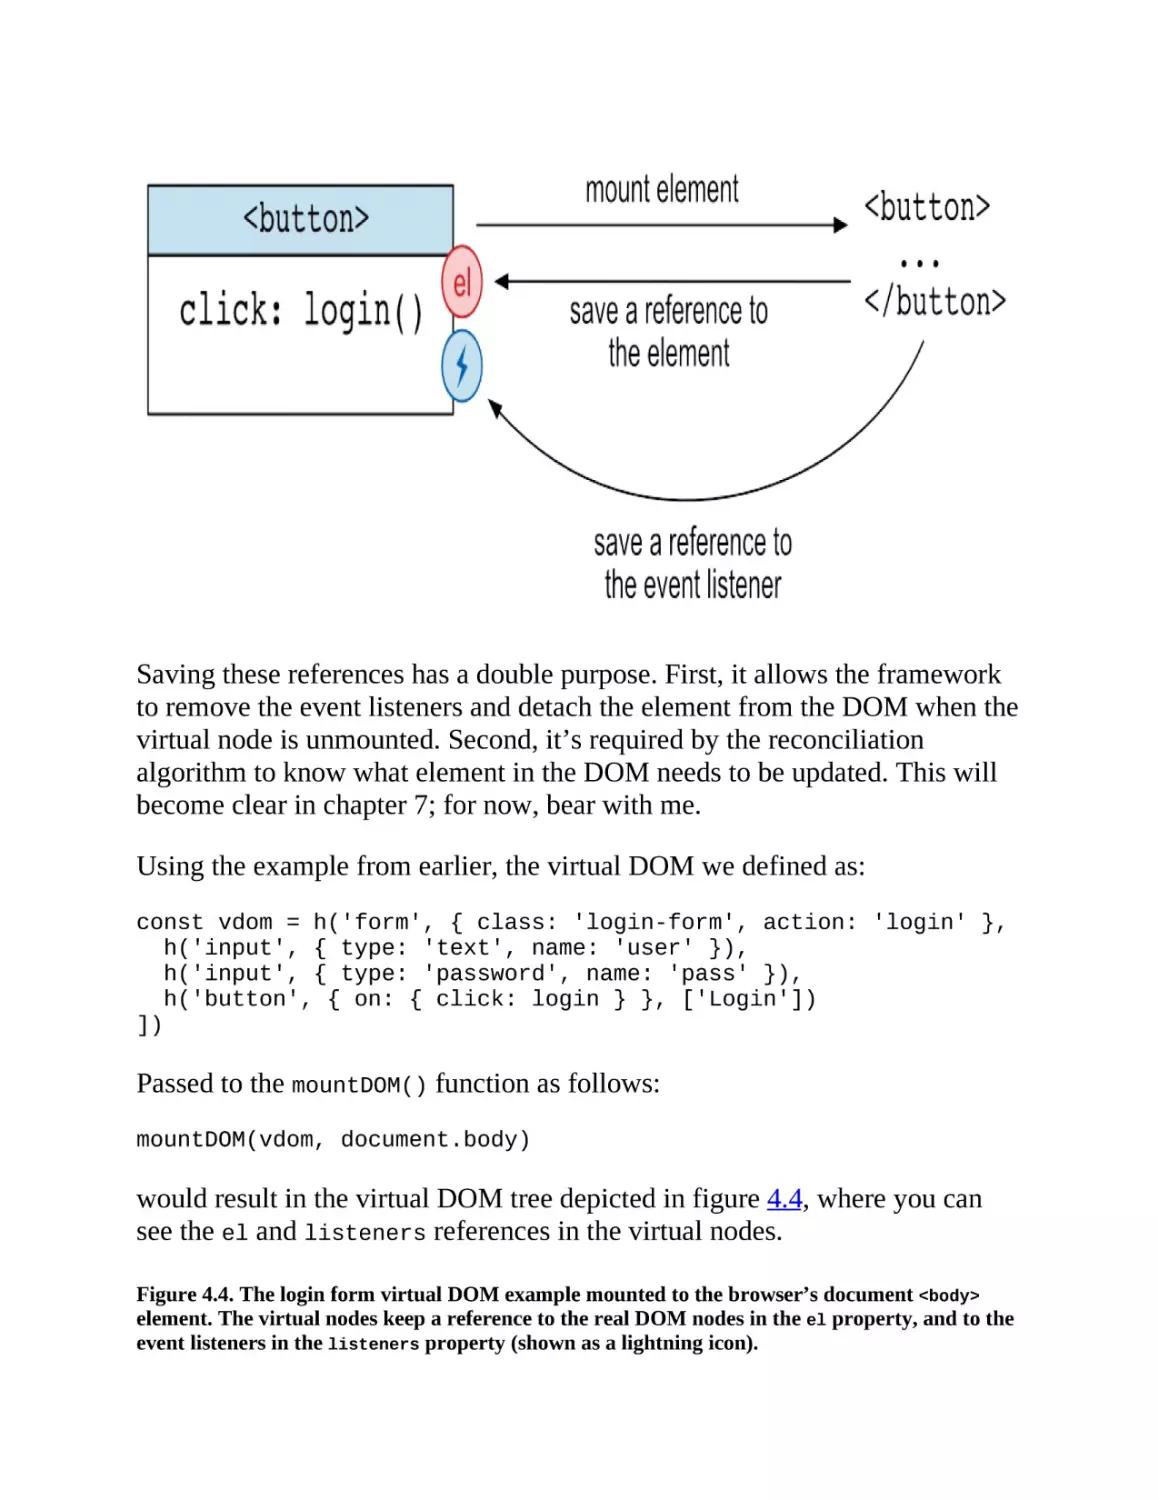
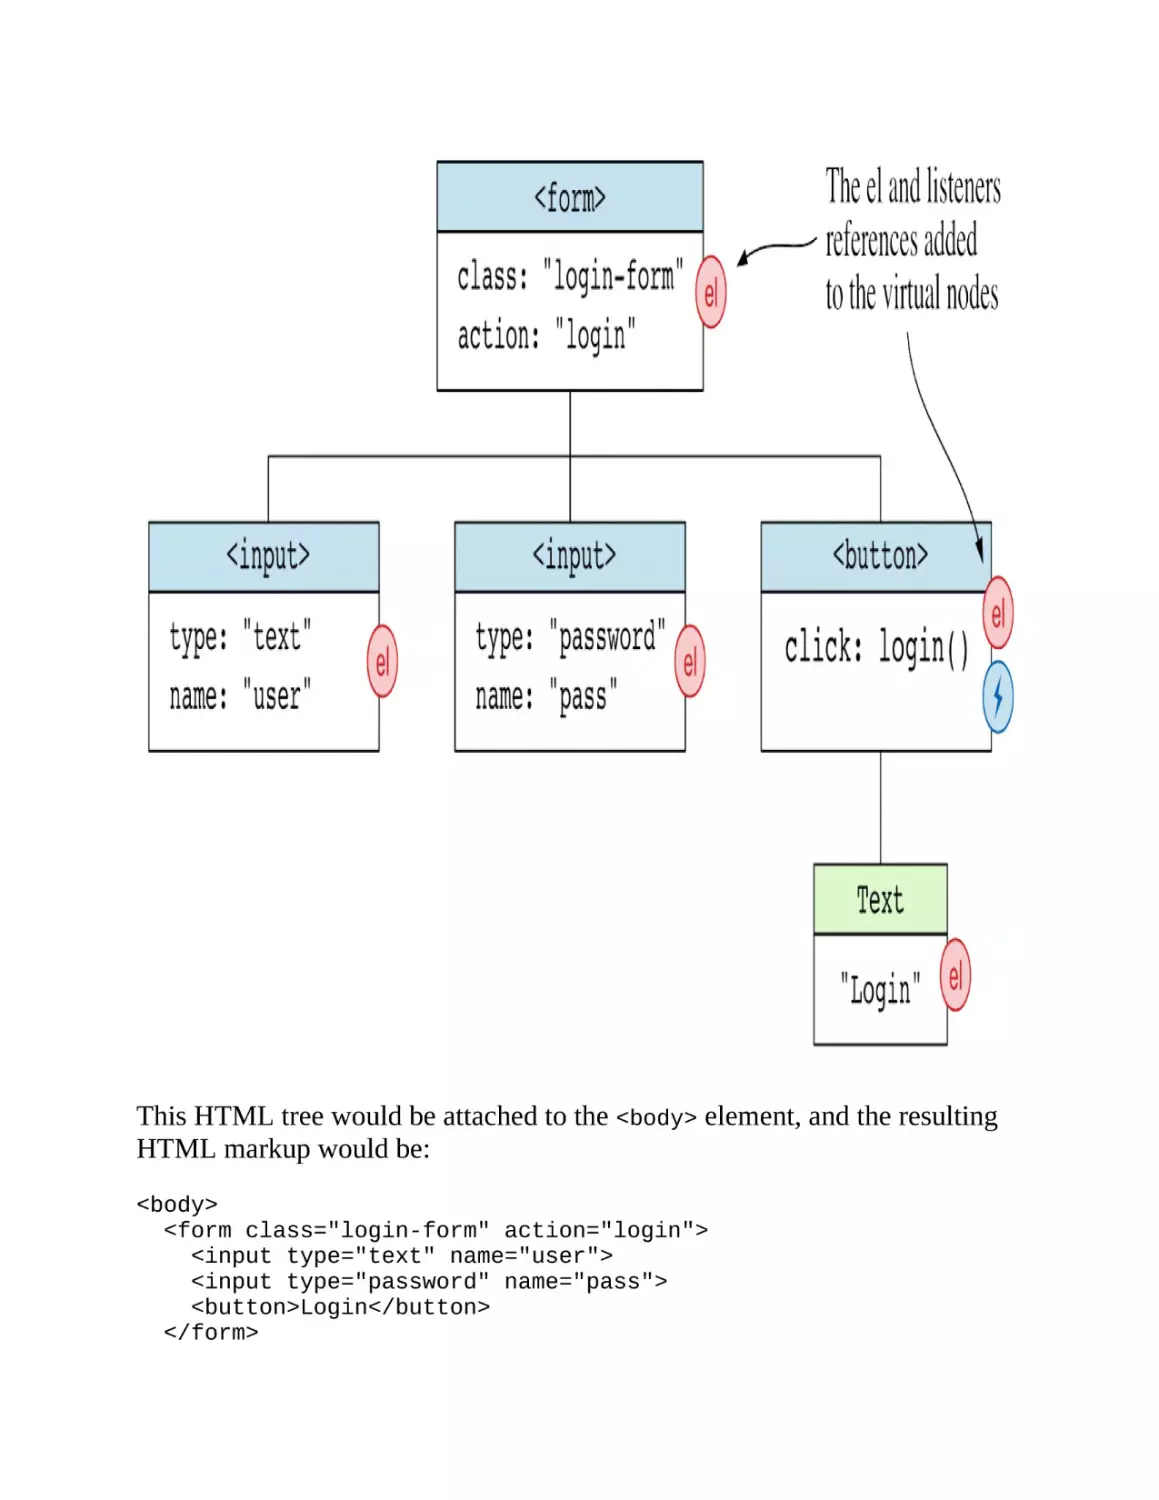
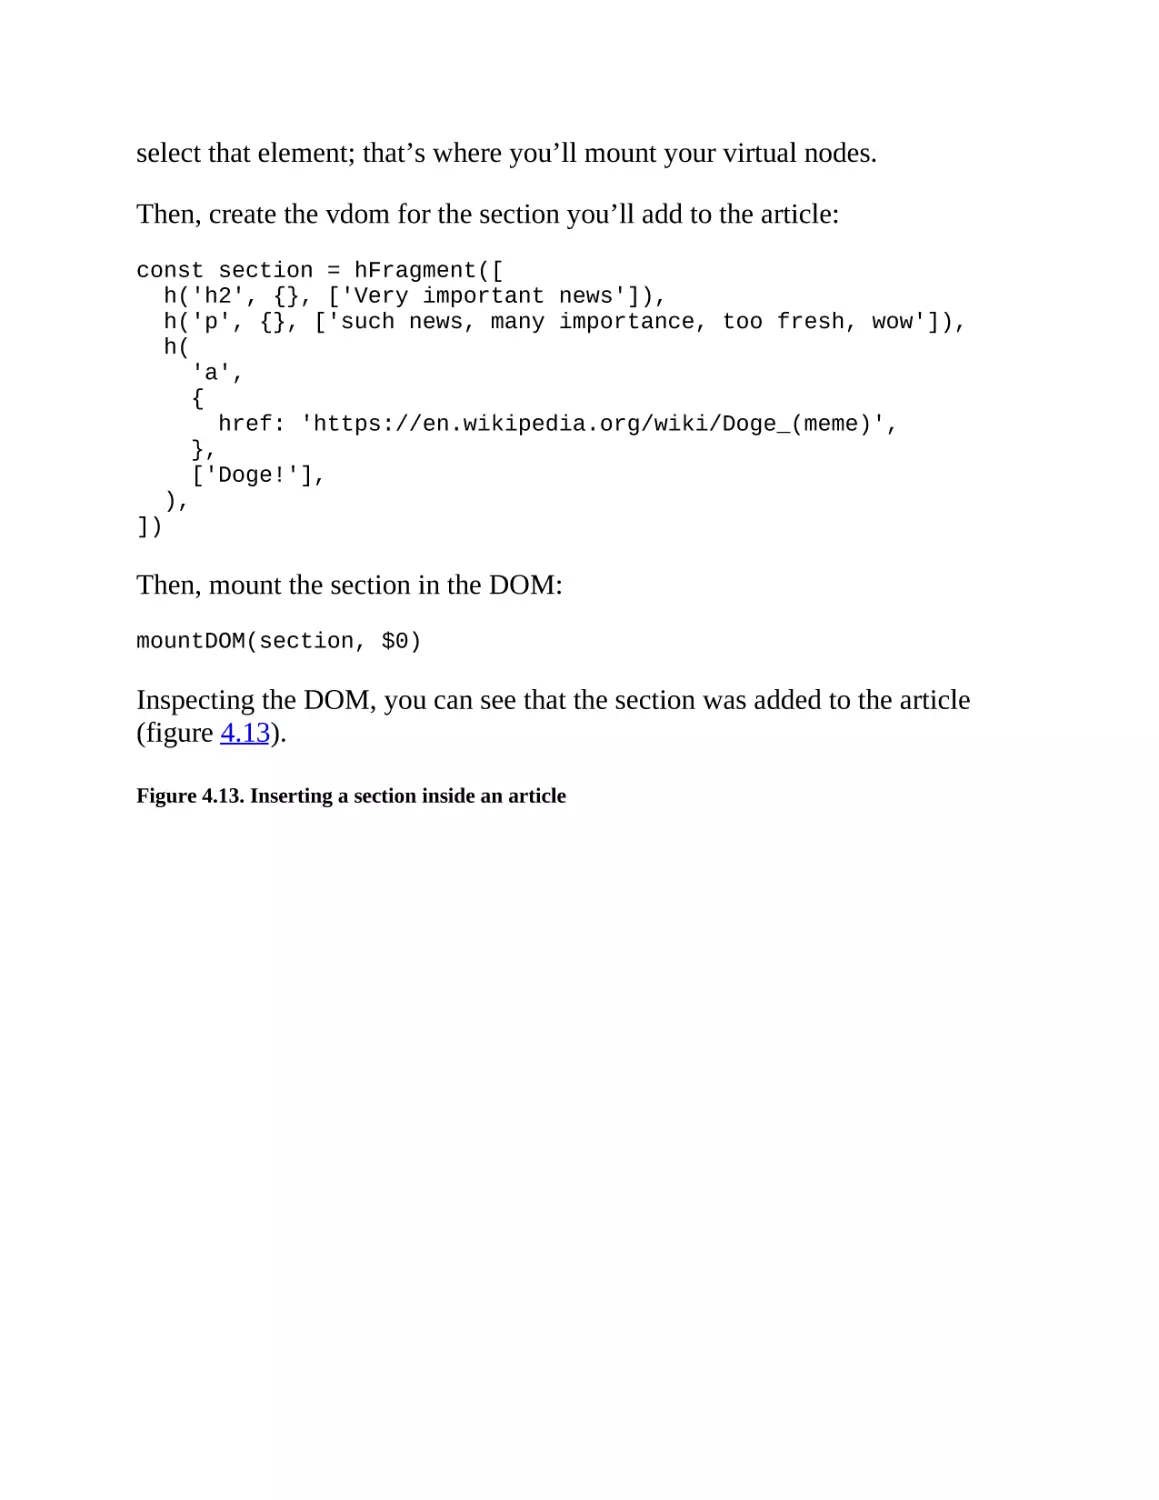
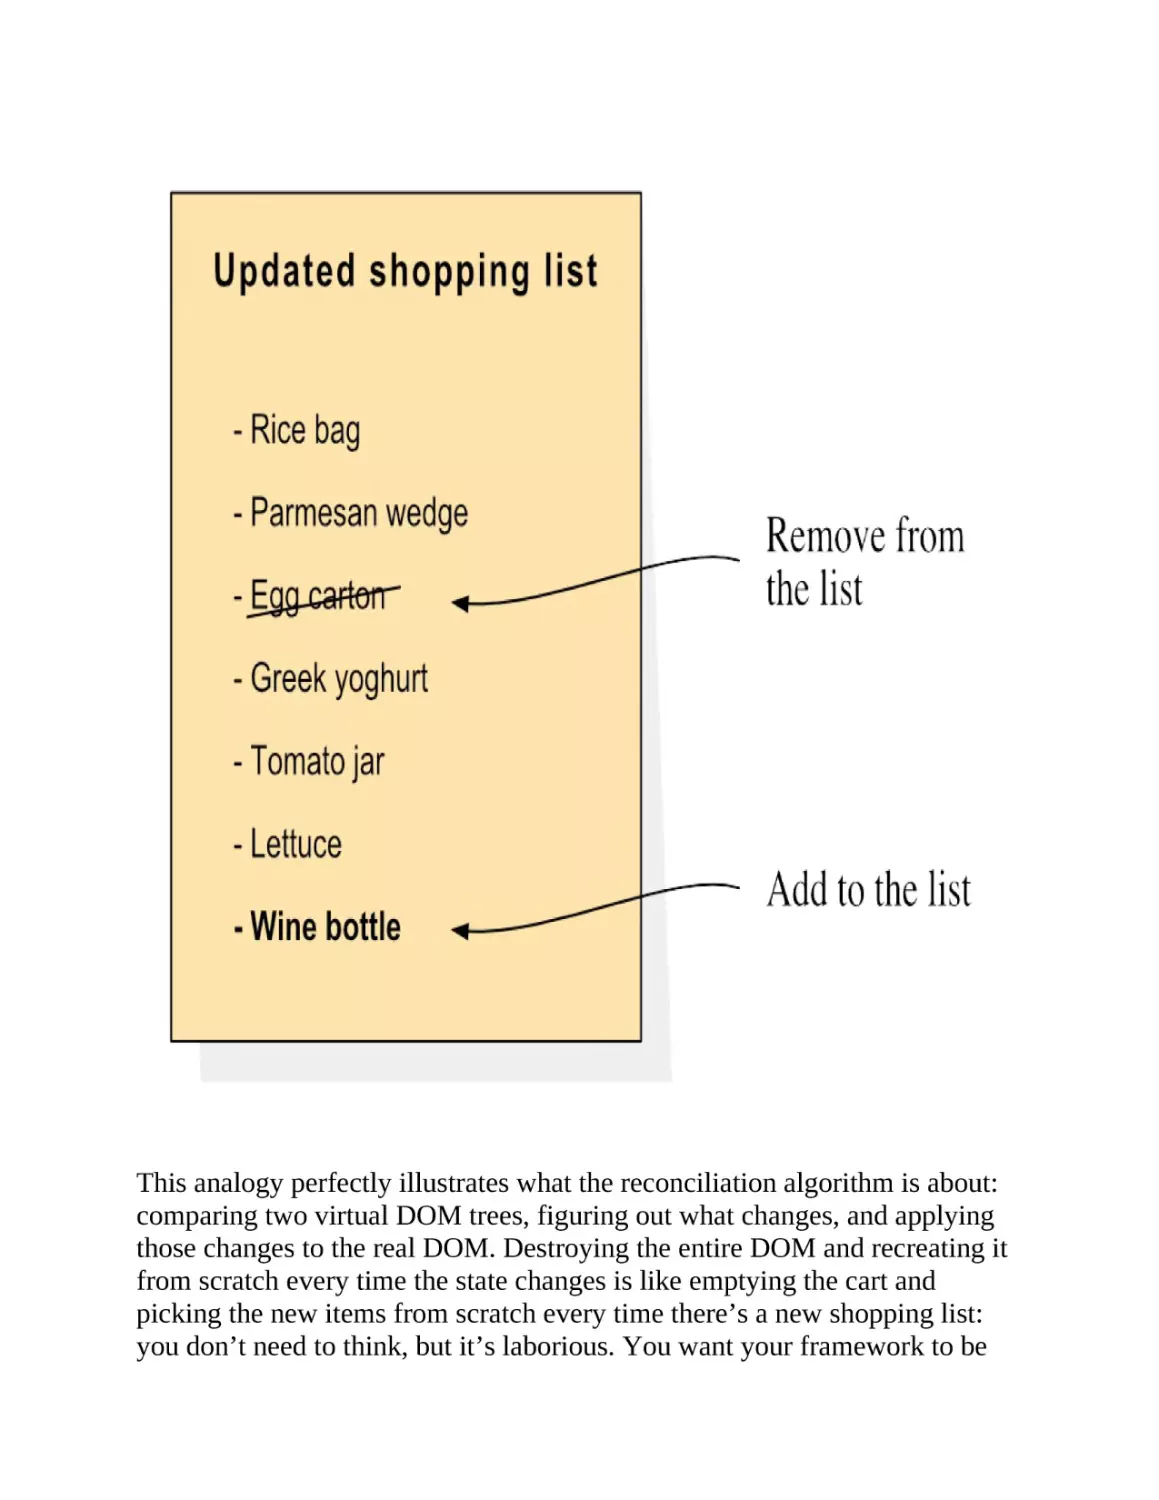
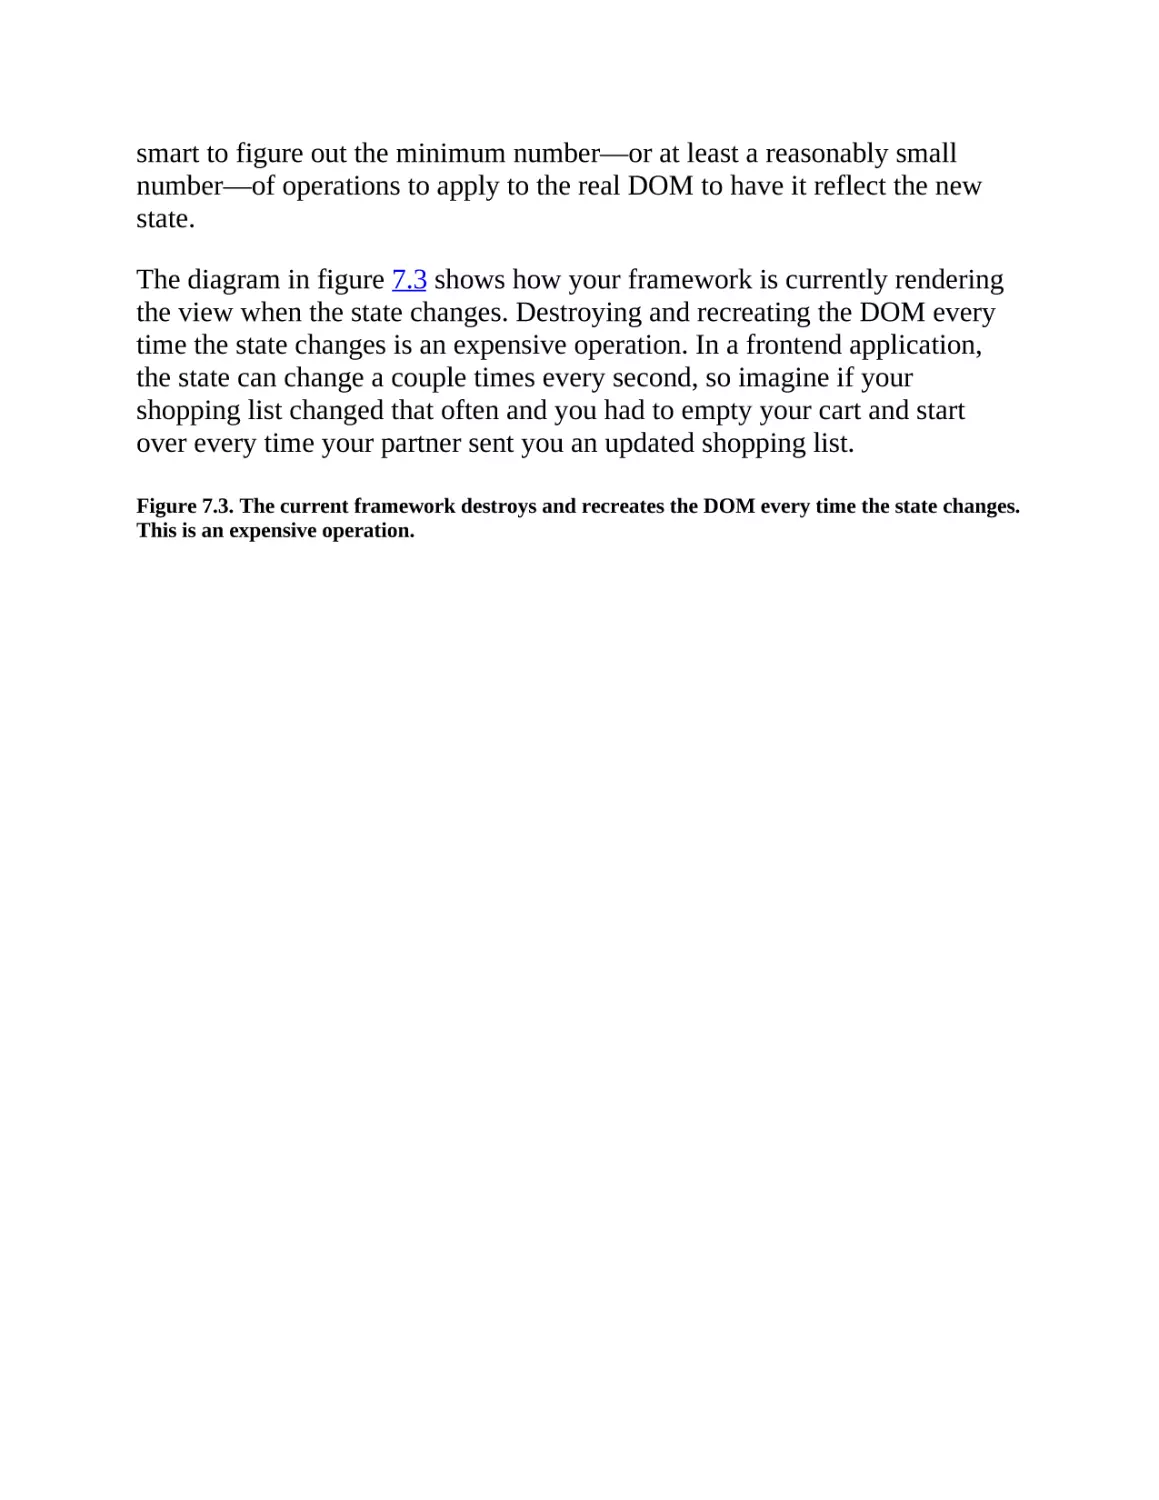
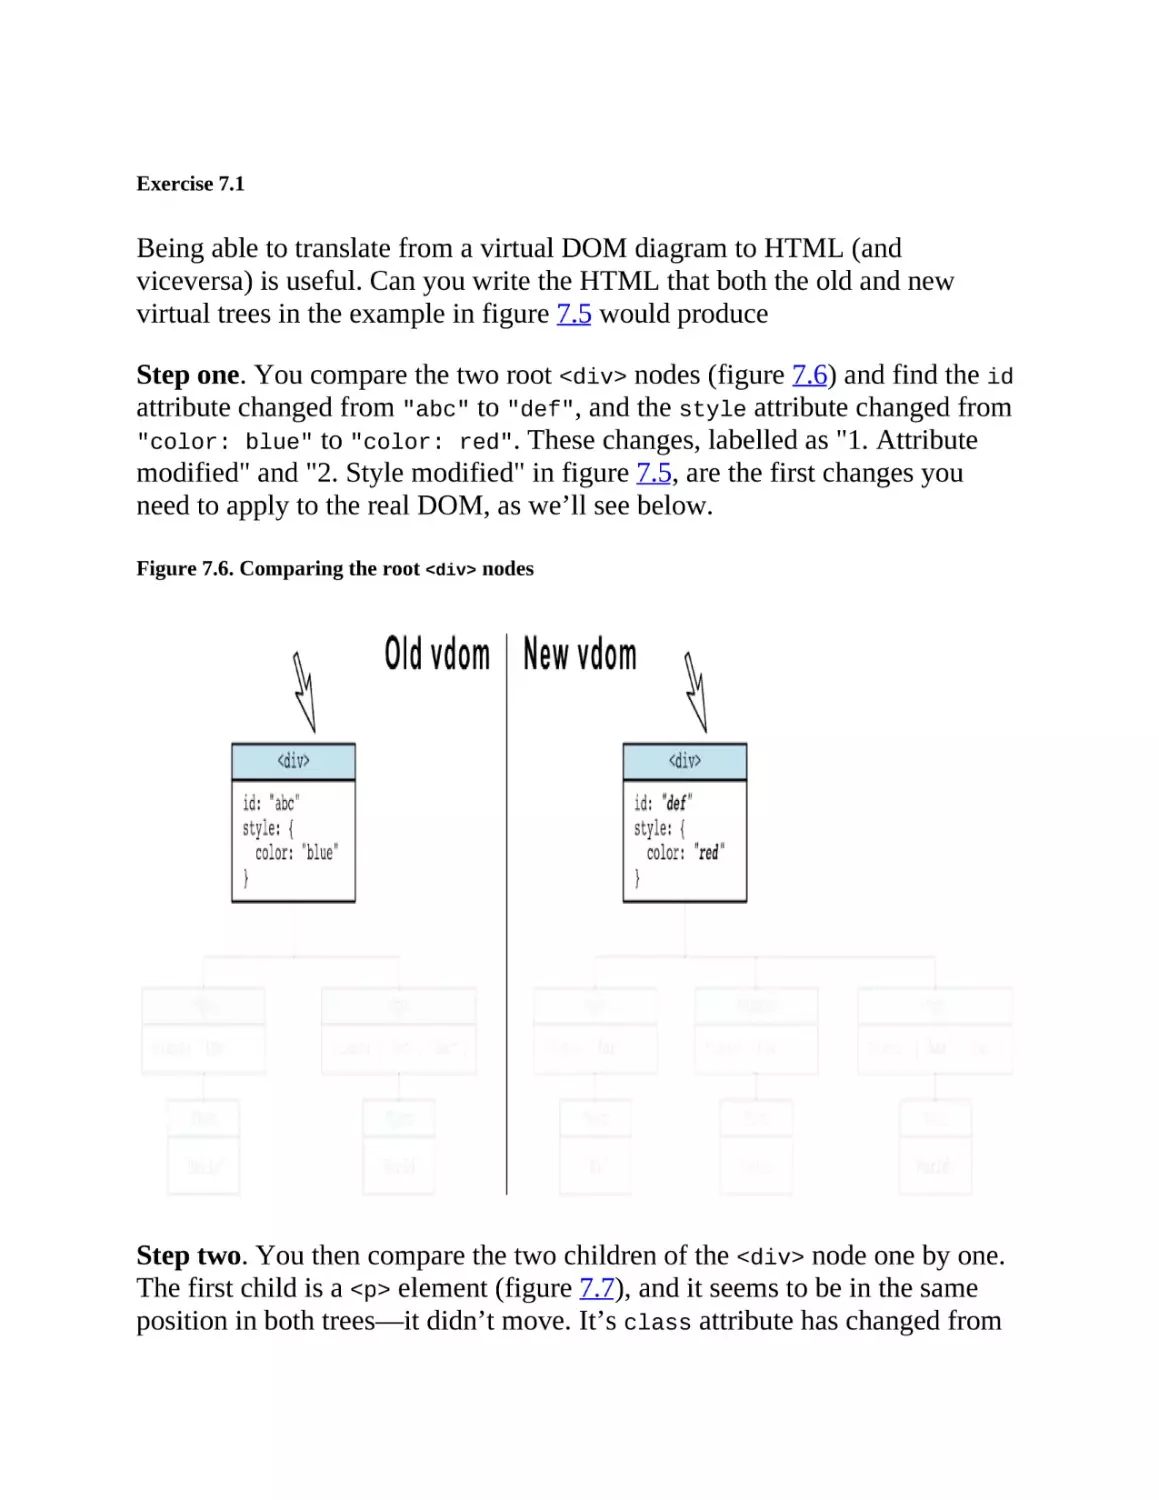
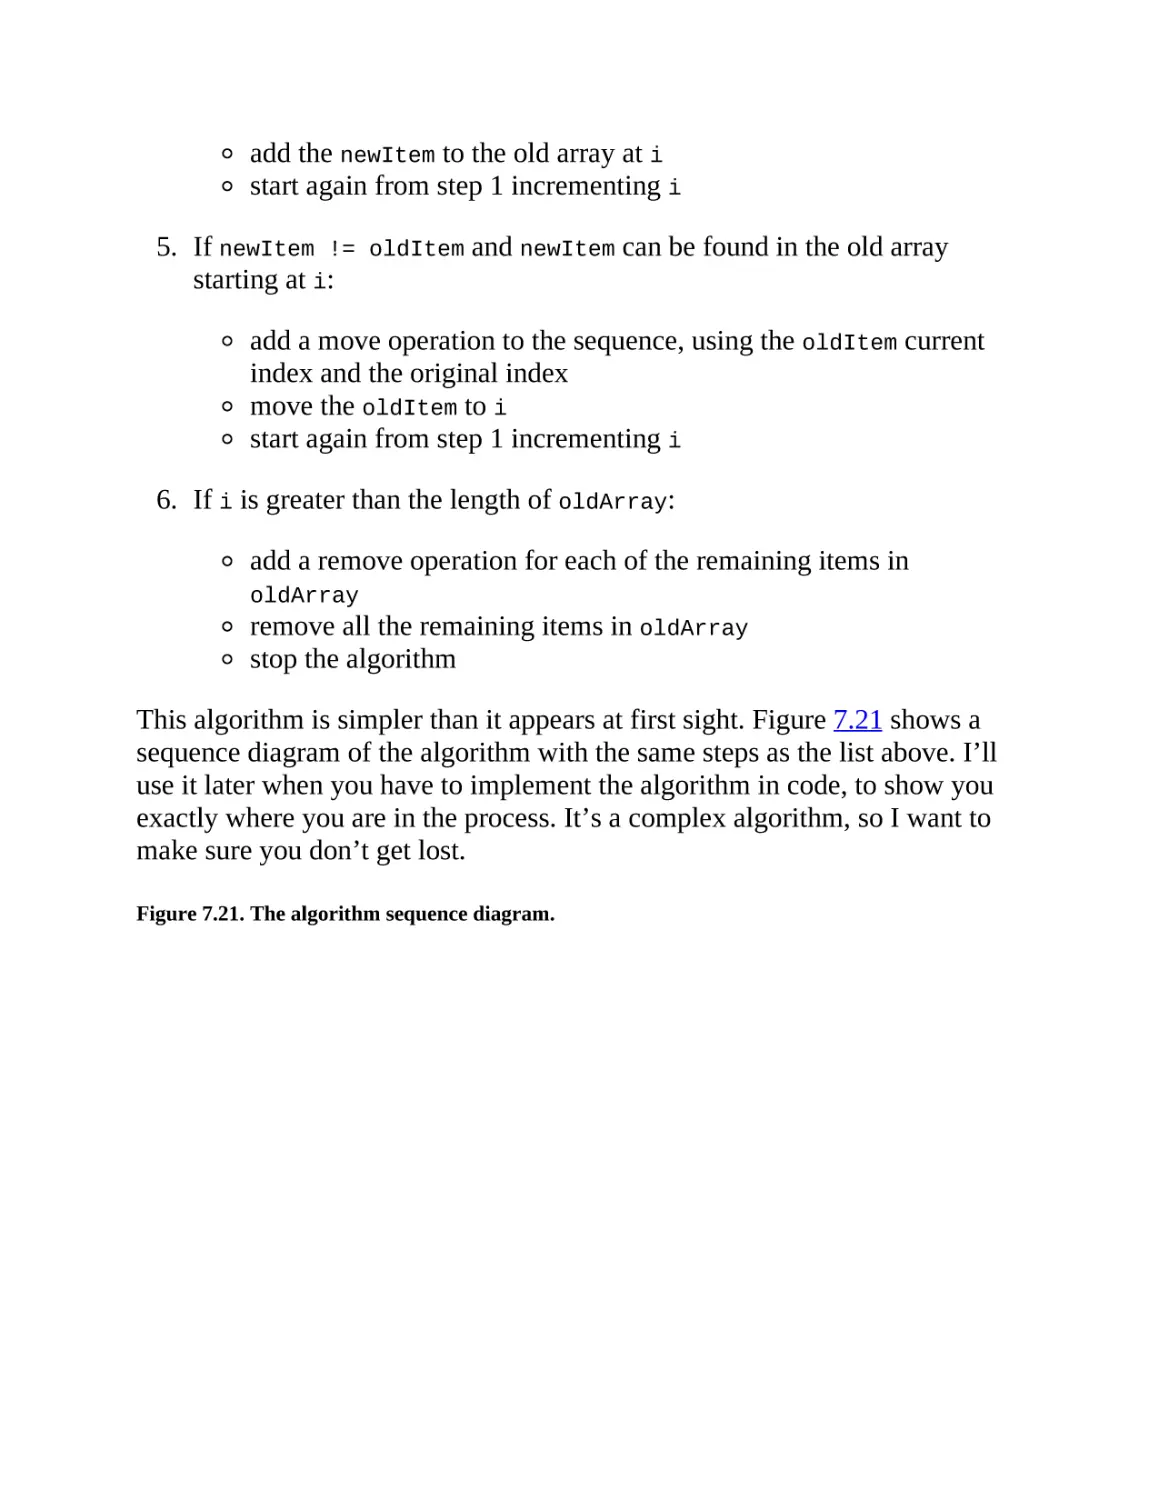
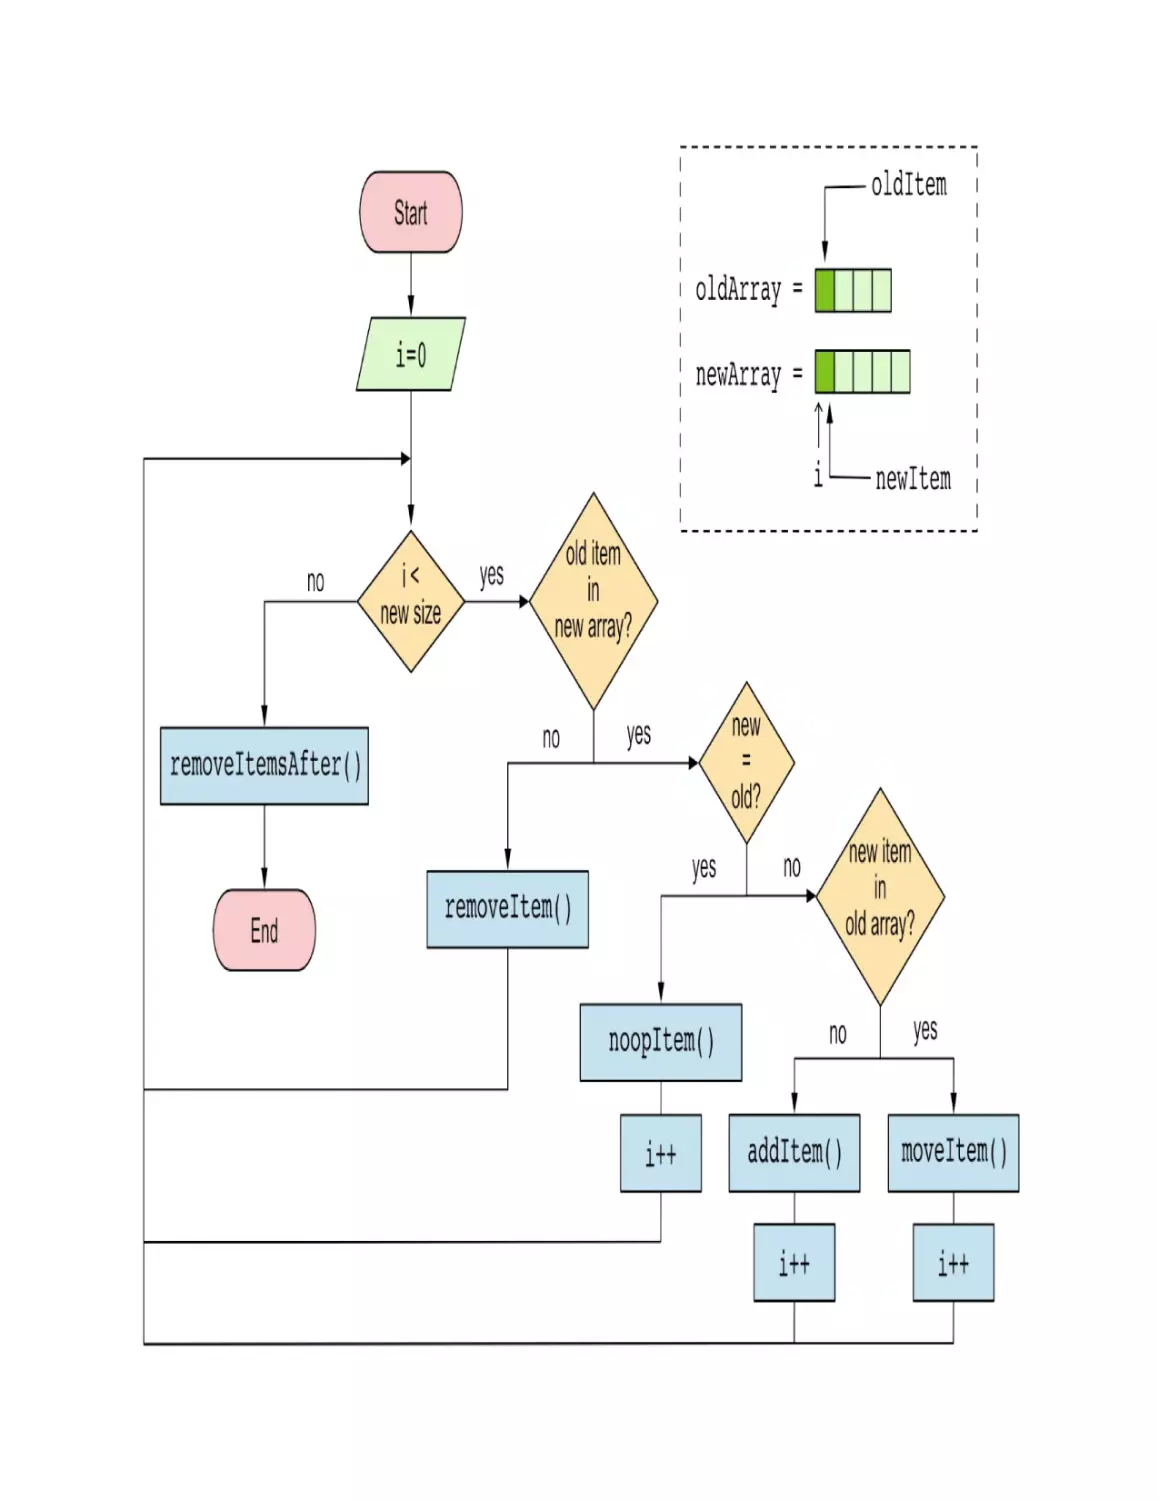
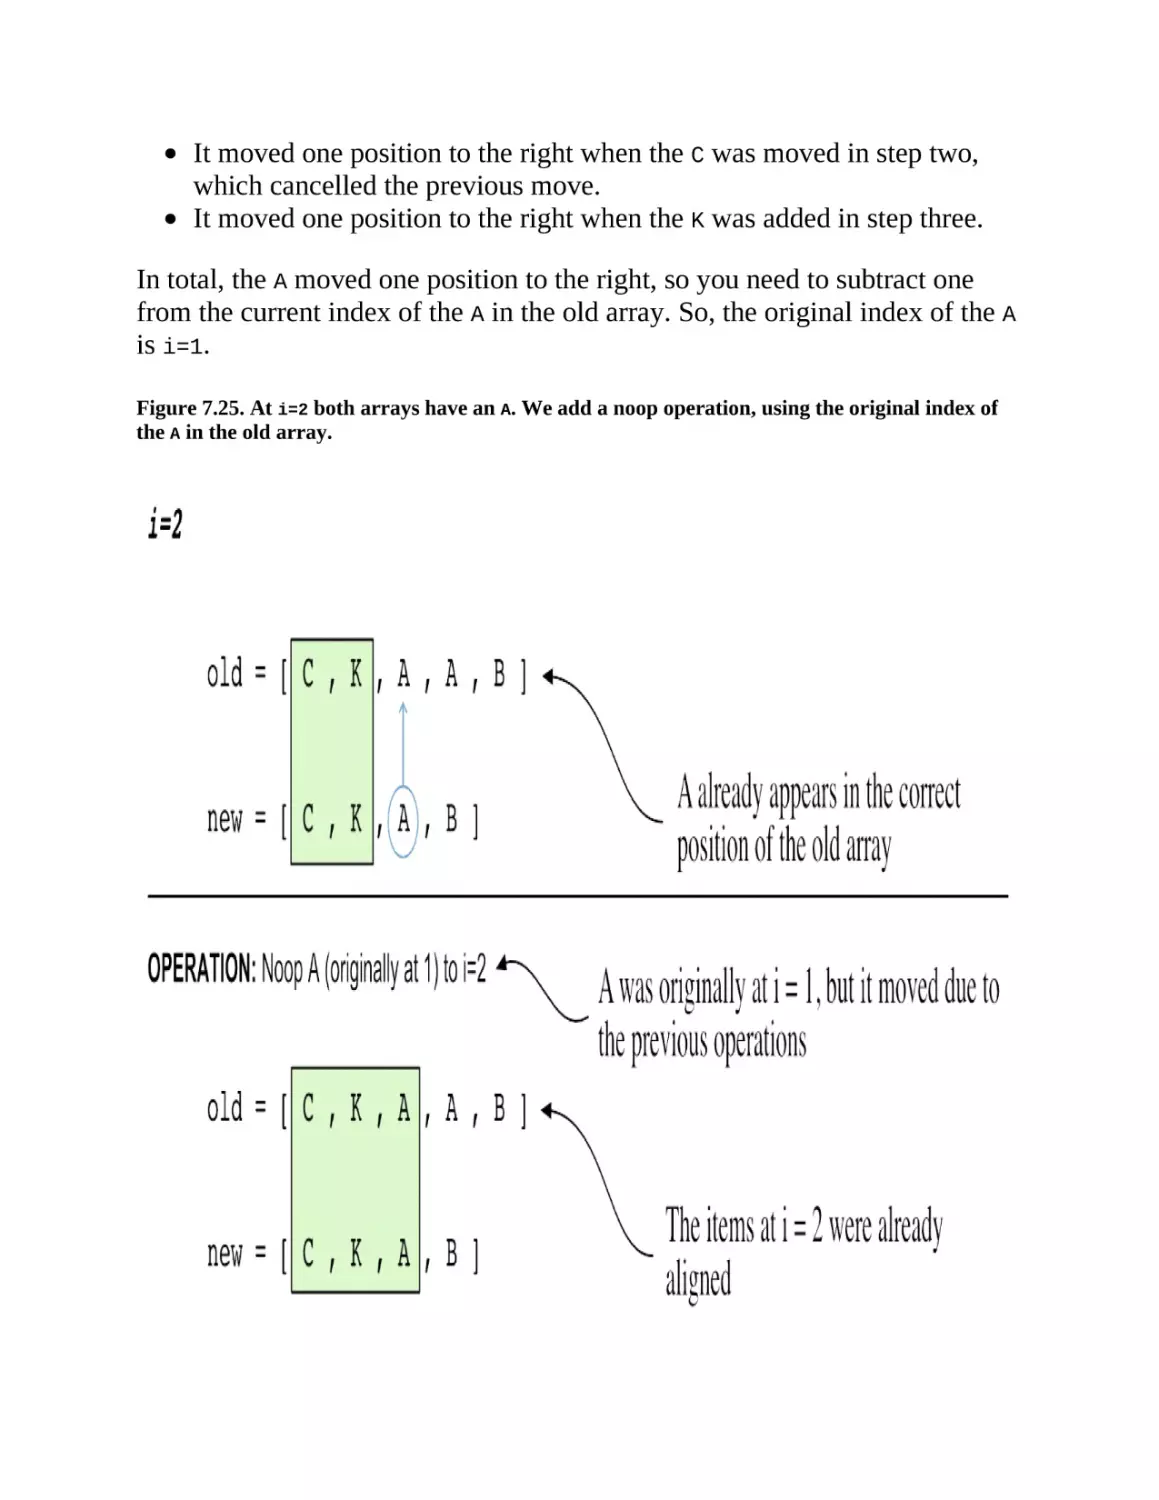
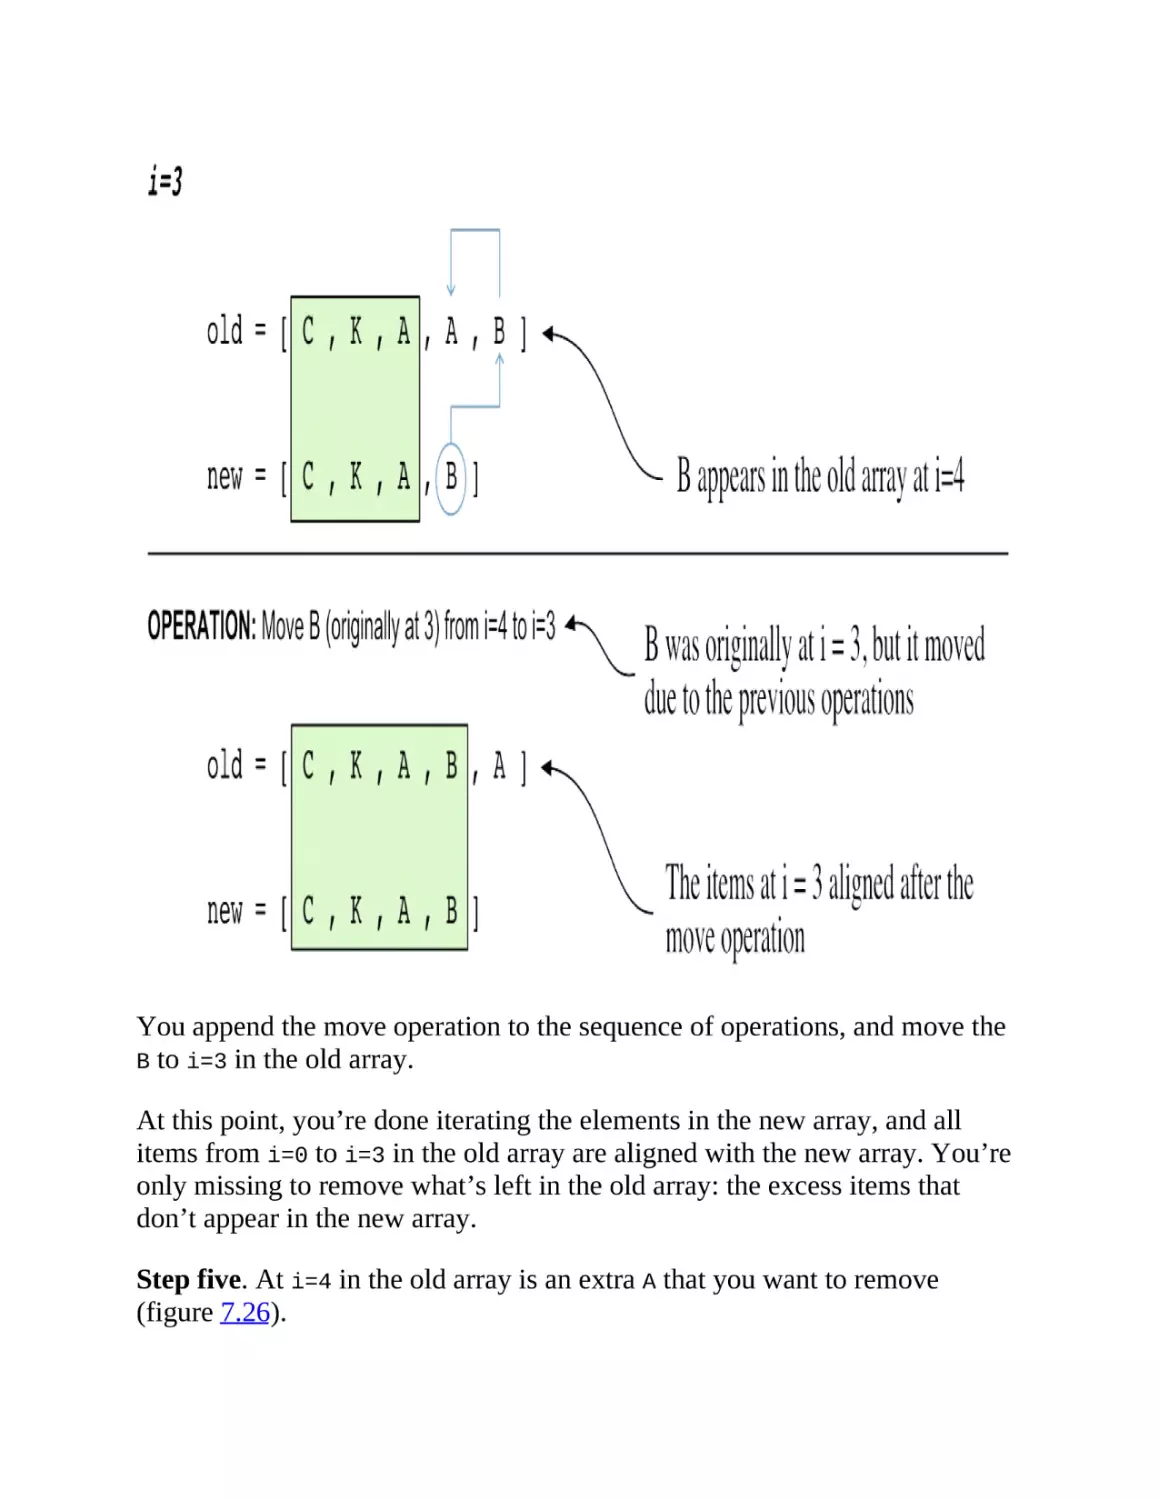
/


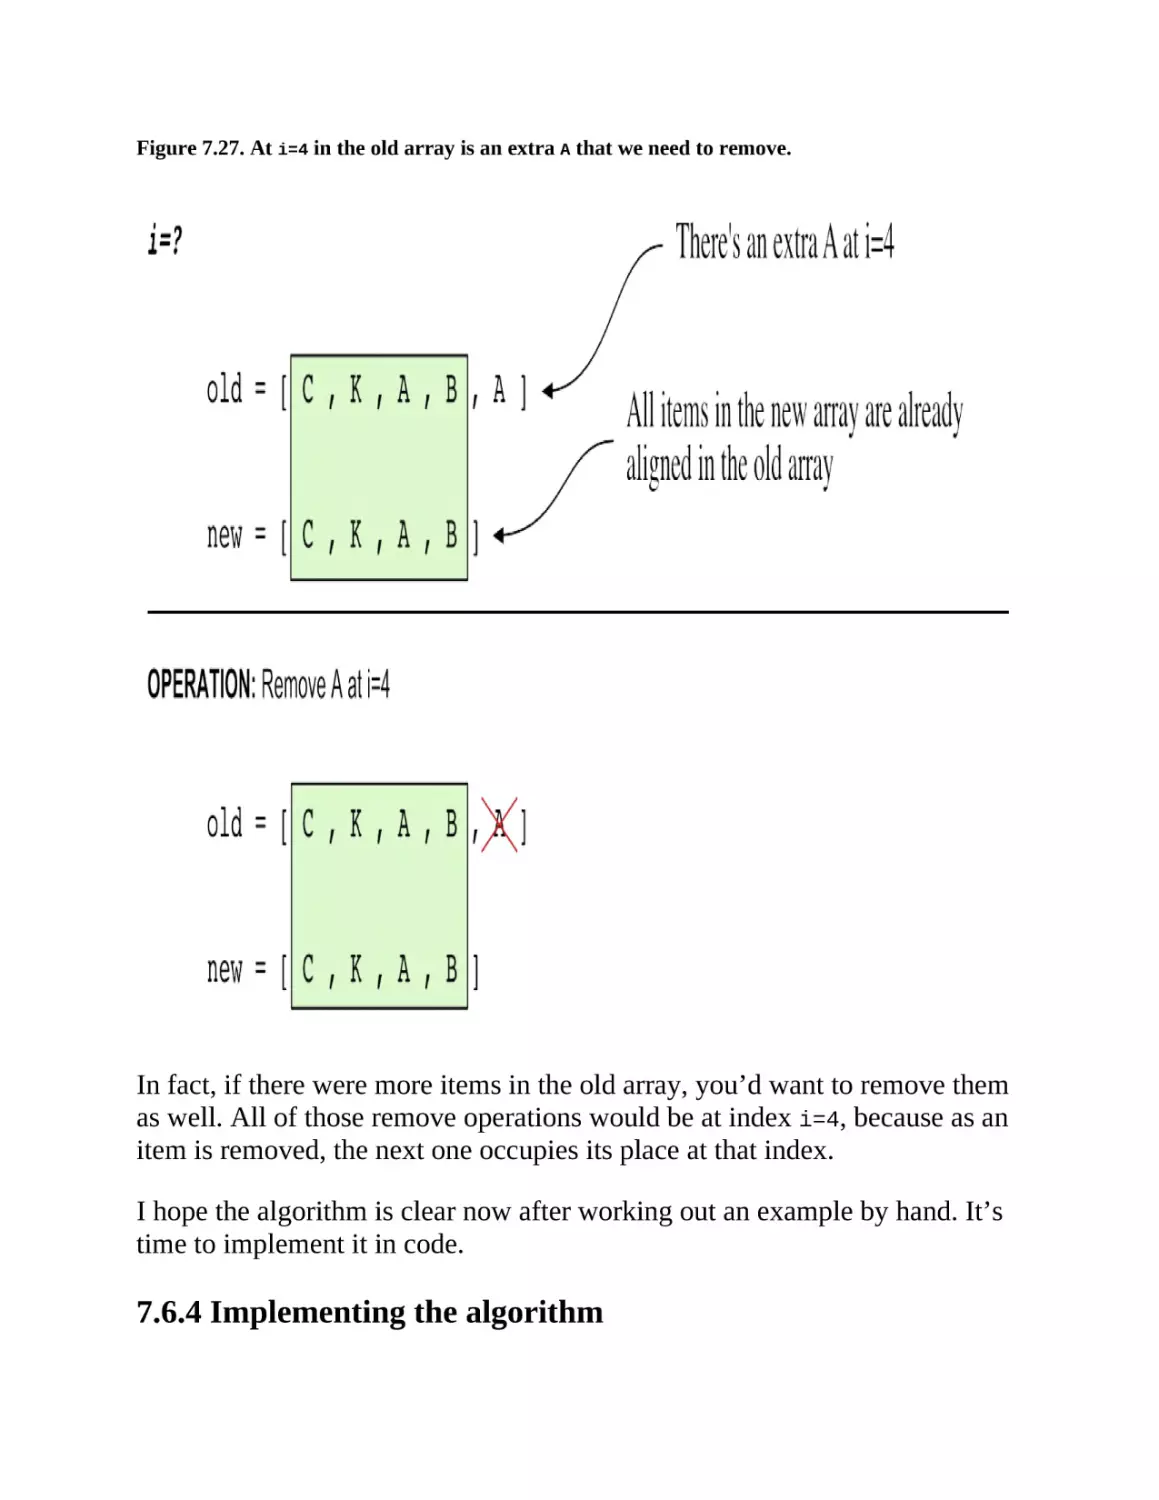


Похожие


Текст
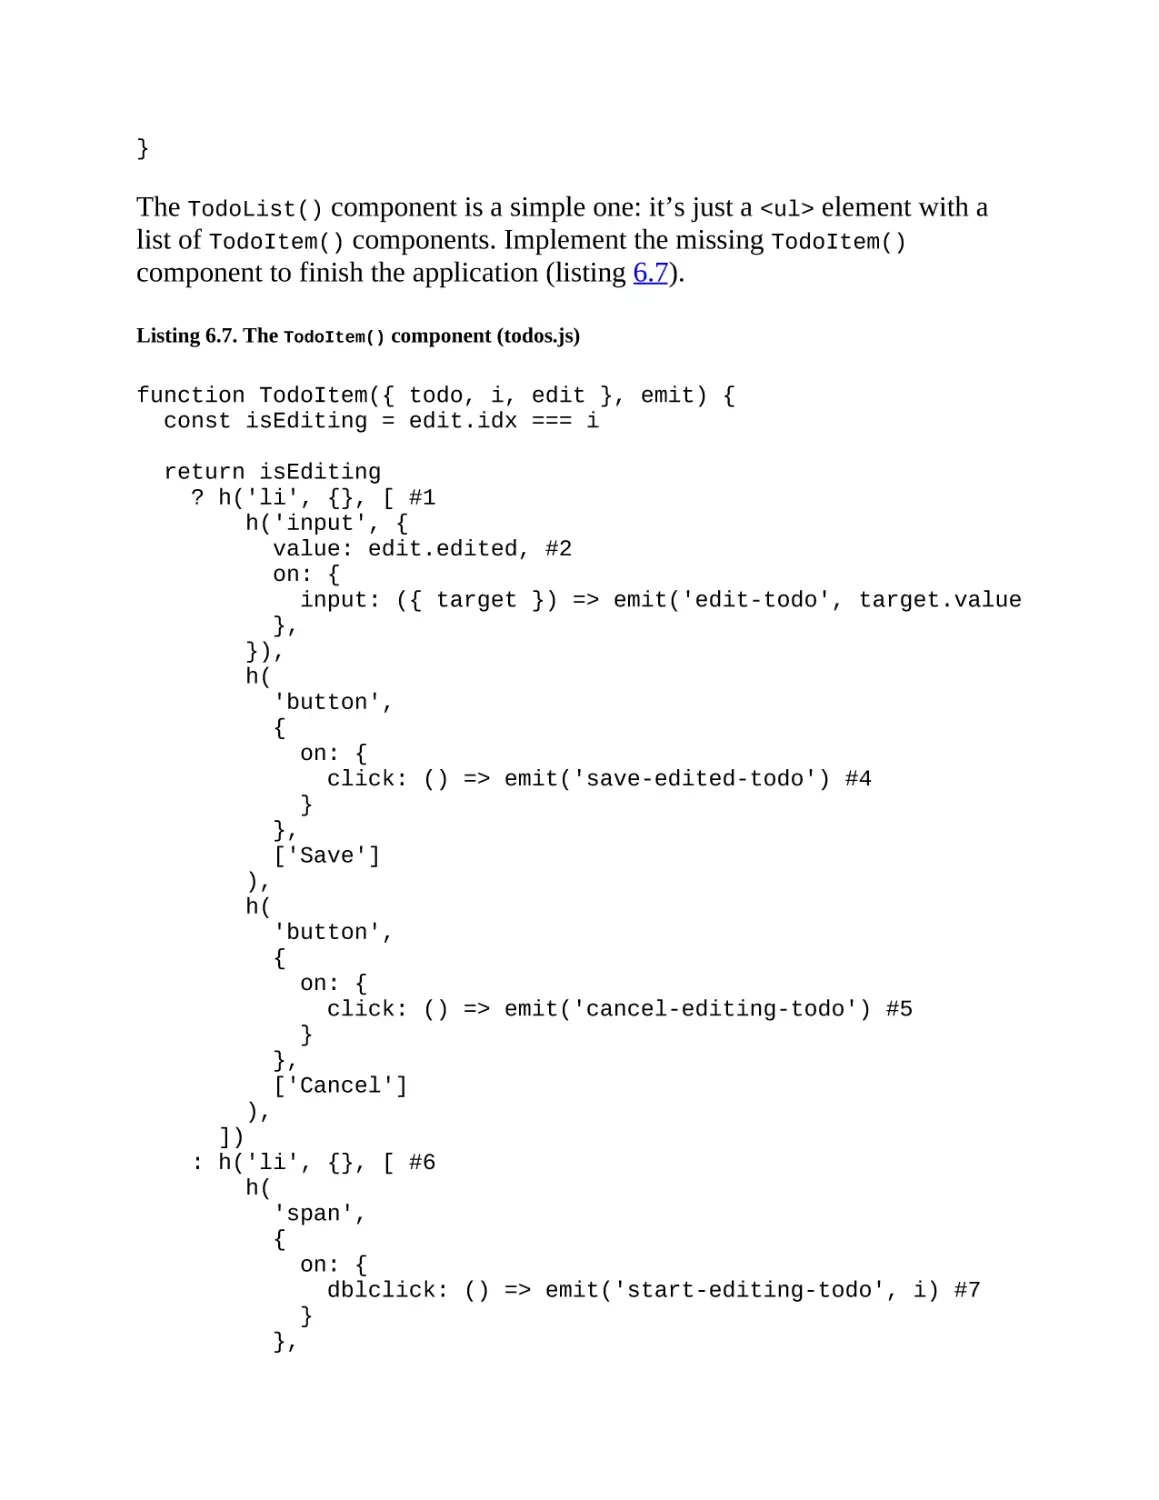
Build a Frontend Web Framework (From Scratch)
MEAP V05
1.
2.
3.
4.
5.
6.
7.
8.
9.
10.
MEAP_VERSION_5
Welcome
1_Are_frontend_frameworks_magic_to_you?
2_Vanilla_JavaScript—like_in_the_old_days
3_Rendering_and_the_virtual_DOM
4_Mounting_and_destroying_the_virtual_DOM
5_State_management_and_the_application’s_lifecycle
6_Publishing_and_using_your_framework’s_first_version
7_The_reconciliation_algorithm:_diffing_virtual_trees
Appendix._Setting_up_the_project
MEAP VERSION 5
Welcome
Thank you for purchasing the MEAP for Build a Frontend Web Framework
(From Scratch). I hope you enjoy reading this book as much as I’ve enjoyed
writing it. I’m looking forward to you getting the same feeling of
accomplishment as I did when you see your own frontend framework—
written from the ground up—power web applications. There’s something
magical about building your own tools and seeing them working.
Throughout the book, you’ll learn the most important concepts behind what
makes frontend frameworks such useful tools, but not through lots of theory,
but by writing all the code yourself. To make the most out of this book, I’ll
assume that you’ve got a decent understanding of JavaScript, Node JS and
the Document API in the browser.
You’ll start by writing an application using just JavaScript, without a
framework. From that exercise, you’ll identify what are the pain points of
writing applications without the help of a framework. It’s crucial that you
understand the need for them in the first place; after all, we take them for
granted these days. You’ll then create your own simple framework to address
what you’ll discover is the main problem with vanilla JavaScript
applications: the mix of DOM manipulation and business logic code.
After just two chapters (chapters three and four) you’ll have a working
framework, a very simple one, but a framework that you can use in small
applications nevertheless. From there onwards, you’ll keep adding
improvements to it, such as a Single Page Application (SPA) router that
changes the page without reloading it, or a Webpack loader to transform
HTML templates into render functions.
By the end of the book, you’ll have written a pretty decent framework of your
own. Not only can you use this framework for your own projects (something
that’s extraordinarily satisfactory), but you’ll share it with the rest of the
world via NPM. You heard me well! You will be publishing it the same way
the big frameworks get released. Sure, the framework won’t be even close to
competing with the big frameworks out there, but you’ll have a good
understanding of how they work that you can use to keep improving yours.
But more important than creating a framework that can compete is the
amount of fun, gratification and learning that you’ll get from working on this
project.
There’s one last thing I want to mention. I’m writing this book for you, so it
doesn’t matter how much effort I put into it if my explanations aren’t clear
enough for you to follow. If you get lost, it’s definitely not because you don’t
know enough, it’s because I’m not expressing my thoughts as clearly as I
could. So, if you do get lost or think I could be explaining things in more
detail, I’d love to hear from you. Conversely, if you think I spend too much
time explaining things you already know, also let me know. You, as a MEAP
reader, have a very important role in making this book useful for the readers
that’ll come after you. Oh! and if you’re enjoying the book as is, please do
tell me as well. Your feedback is essential in developing the best book
possible, so please visit the liveBook's Discussion Forum and leave your
comments.
—Angel Sola Orbaiceta
In this book
MEAP VERSION 5 About this MEAP Welcome Brief Table of Contents 1
Are frontend frameworks magic to you? 2 Vanilla JavaScript—like in the old
days 3 Rendering and the virtual DOM 4 Mounting and destroying the virtual
DOM 5 State management and the application’s lifecycle 6 Publishing and
using your framework’s first version 7 The reconciliation algorithm: diffing
virtual trees
Appendix. Setting up the project
1 Are frontend frameworks magic
to you?
This chapter covers
Why you should build your own frontend framework
The features of the framework we’ll build together
The big picture of how frontend frameworks work
How you ever wondered how the frontend frameworks you use work
internally? Are you curious about how they decide when to re-render a
component, and how they do to only update the parts of the DOM that
change? Isn’t it interesting how a single HTML page can change its content
without reloading? That the URL in the browser’s address bar changes
without requesting the new page to a server? The inner workings of frontend
frameworks are fascinating, and there is no better way to learn about them
than by building one yourself, from scratch. But why would you want to learn
how frontend frameworks work? Is’t it enough to just know how to use them?
—you might ask.
Good cooks know their tools; they can use knives skillfully. Great chefs go
beyond that: they know the different types of knives, when to use each one,
and how to keep their blade sharp. Carpenters know how to use a saw to cut
wood, but great carpenters also understand how the saw works and can fix it
in case it breaks. Electrical engineers not only understand that electricity is
the flow of electrons through a conductor, but also have a deep understanding
of the instruments they use to measure and manipulate it; for example, they
could build a multimeter themselves. If their multimeter breaks, they can
disassemble it, figure out what’s wrong, and repair it.
As a developer, you have a frontend framework in your toolbox, but do you
know how it works? Or, is it magic to you? If it broke—if you found a bug in
it—would you be able to find its source and fix it? When a single-page
application changes the route in the browser’s URL bar and renders a new
page without requesting it from the server, do you understand how that
happens?
1.1 Why build your own frontend framework?
The use of frontend frameworks is on the rise; it’s uncommon to write purevanilla JavaScript applications nowadays, and rightly so. Modern frontend
frameworks boost productivity and make building complex interactive
applications a breeze. Frontend frameworks have become so popular that
there are jokes about the unwieldy amount of them at our disposal. (In the
time it took you to read this paragraph so far, a new frontend framework was
created.) Some of the most popular frontend frameworks even have their own
fan groups, with people arguing about why theirs is the best. Let’s not forget
that frontend frameworks are tools, a means to an end, and that the end is to
build applications that solve real problems.
Framework vs. library
Frameworks and libraries are different. When you use a library, you import
its code and call its functions. When you use a framework, you write code
that the framework executes. The framework is in charge of running the
application, and it executes your code when appropriate trigger happens.
Conversely, you call the library’s functions when you need them. Angular is
an example of a frontend framework, whereas React claims to be a library
that you can use to build UIs.
For convenience, I’ll refer to both frameworks and libraries as frameworks in
this book.
The most popular frameworks currently available, such as Vue, Svelte,
Angular, and React, are all exceptional. You might be wondering, why
create your own frontend framework with so many great options already
available? Well, aside from the satisfaction and enjoyment of building a
complex software piece from scratch, there are practical reasons to consider.
Let me tell you a little story about a personal experience to illustrate this.
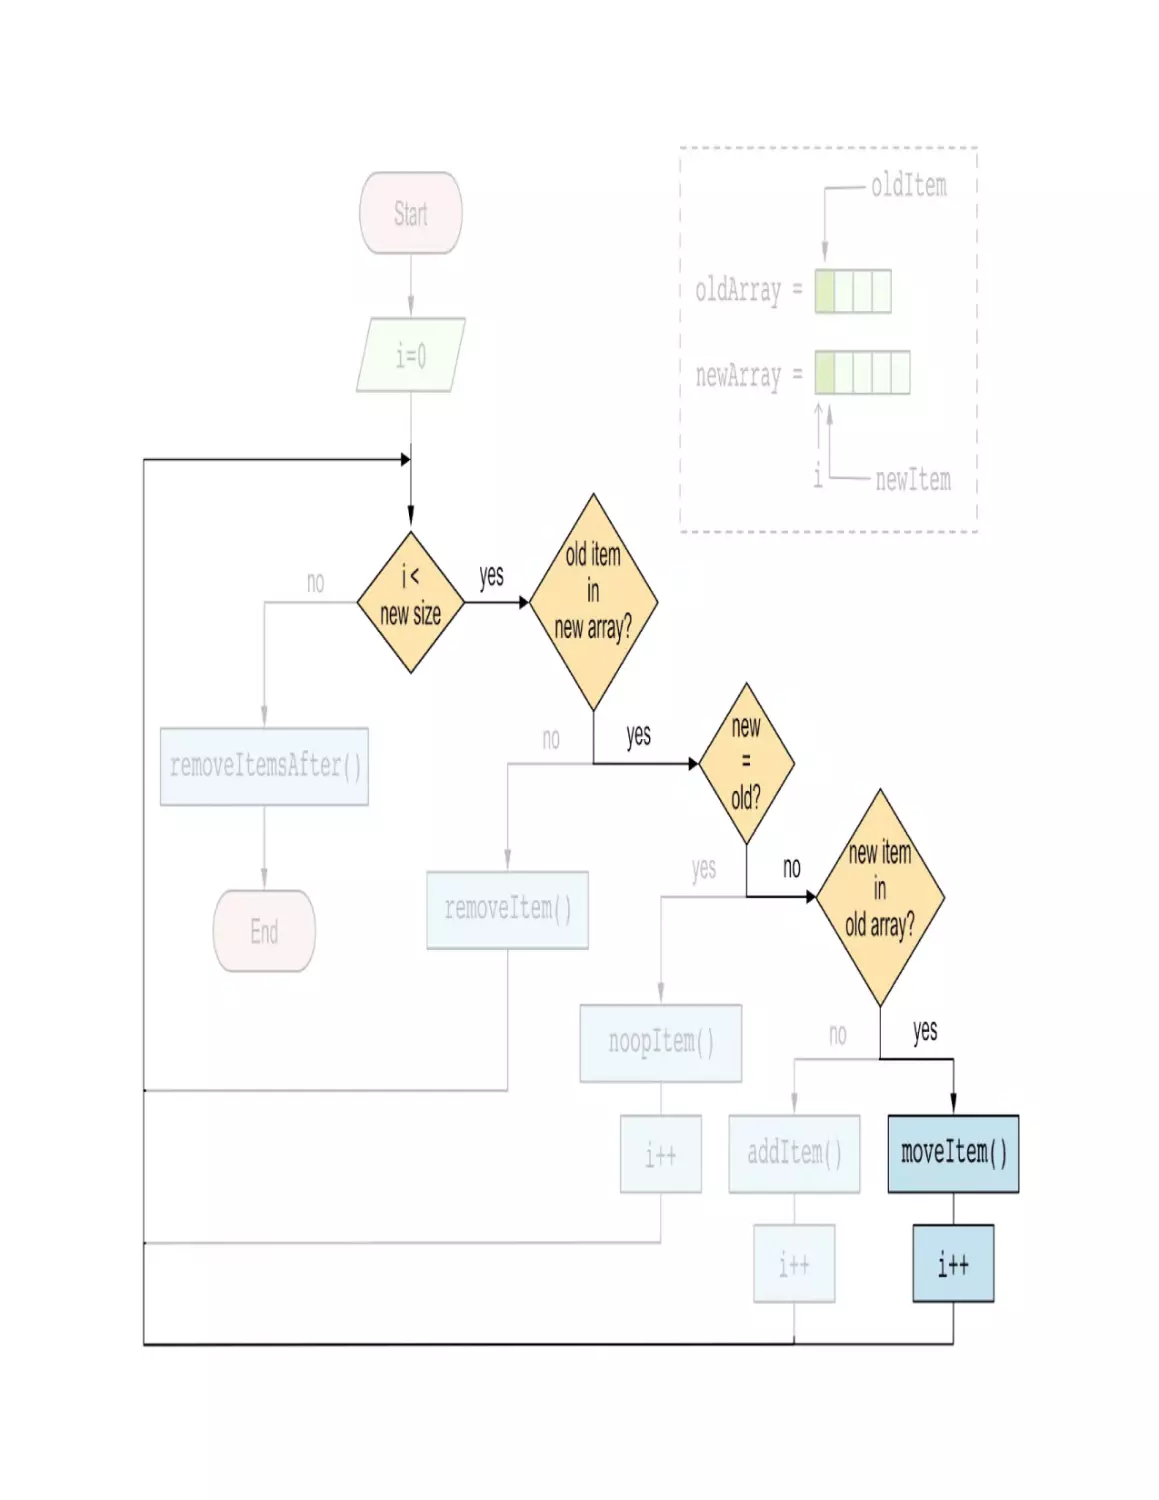
1.1.1 "Do you understand how that works?"
When I was a little kid I went to one of my cousins' house to hang out. He
was a few years older than me and a handyman. His cabinets were full of
cables, screwdrivers, and other tools, and I’d spend hours just observing how
he fixed all kinds of appliances. I remember once bringing a remote control
car with me so we could play with it. He stared at it for some time, then asked
me a question that got me by surprise: "Do you understand how this thing
works?" I didn’t; I was just a kid with zero electronics knowledge. He then
said, "I like to know how the stuff I use works, so what do you say we take it
apart and see what’s inside?" I sometimes still think about that.
So now, let me ask you a question similar to that my cousin asked me: you
use frontend frameworks every day, but do you really understand how they
work? You write the code for your components, then hand it over to the
framework for it to do its magic. When you load the application into the
browser, it just works. It renders the views and handles user interactions,
always keeping the page updated (in sync with the application’s state). For
most frontend developers—and this includes me from years ago—how this
happens is a mystery. Is the frontend framework you use a mystery to you?
Sure, most of us have heard about that thing called the "virtual DOM," and
that there needs to be a "reconciliation algorithm" that decides what is the
smallest set of changes required to update the browser’s DOM. We also know
that single-page applications (SPAs for short) modify the URL in the
browser’s address bar without reloading the page, and if you’re the curious
kind of developer, you might have read about how the browser’s history API
is used to achieve this. But do you really understand how all of this works
together? Have you disassembled and debugged the code of the framework
you use? Don’t feel bad if you have not; most developers haven’t, including
some very experienced ones. This reverse-engineering process isn’t easy; it
requires lots of effort (and motivation).
In this book, you and I—together as a team—will build a frontend framework
from scratch. It’ll be a simple one, but it’ll be complete enough to understand
how frontend frameworks work. From then on, what the framework does will
no longer be a mystery to you. Oh! And it’ll be lots of fun as well.
1.2 The framework we’ll build
I like to set expectations early on, so here it goes: We won’t build the next
Vue or React as part of the book. You might be able to do that yourself after
reading this book by filling in the missing details and optimizing a couple
things here and there. The framework you’ll build can’t compete with the
mainstream frameworks—that’s not the objective anyway. The objective of
this book is to teach you how these frameworks work in general, so what they
do isn’t magic to you anymore. You don’t need to build the most advanced
framework in the world to achieve this. In fact, that’d require a book four
times as thick as this one, and the process of writing it wouldn’t be as fun.
(Did I mention that writing your own framework is fun?)
The framework we’ll build borrows ideas from a few existing frameworks,
most notably Vue, Mithril, Svelte, React, Preact, Angular and Hyperapp. Our
goal is to build a framework that’s simple enough to understand, but that at
the same time includes the typical features you’d expect from a frontend
framework. I also wanted it to be representative of some of the most relevant
concepts that are behind the source code of the most popular frameworks.
For example, not all frameworks use the virtual DOM abstraction (Svelte in
particular considers it to be "pure overhead," and the reasons are simply
brilliant—I recommend you read their blog post), but a big portion of them
do. I chose our framework to implement a virtual DOM so that’s
representative of the framework you’re likely using today. In essence, I chose
the approach that I thought would result in the most learning for you, the
reader. I’ll be covering the virtual DOM in detail in chapter 3, but in a
nutshell, it’s a lightweight representation of the DOM that’s used to calculate
the smallest set of changes required to update the browser’s DOM. For
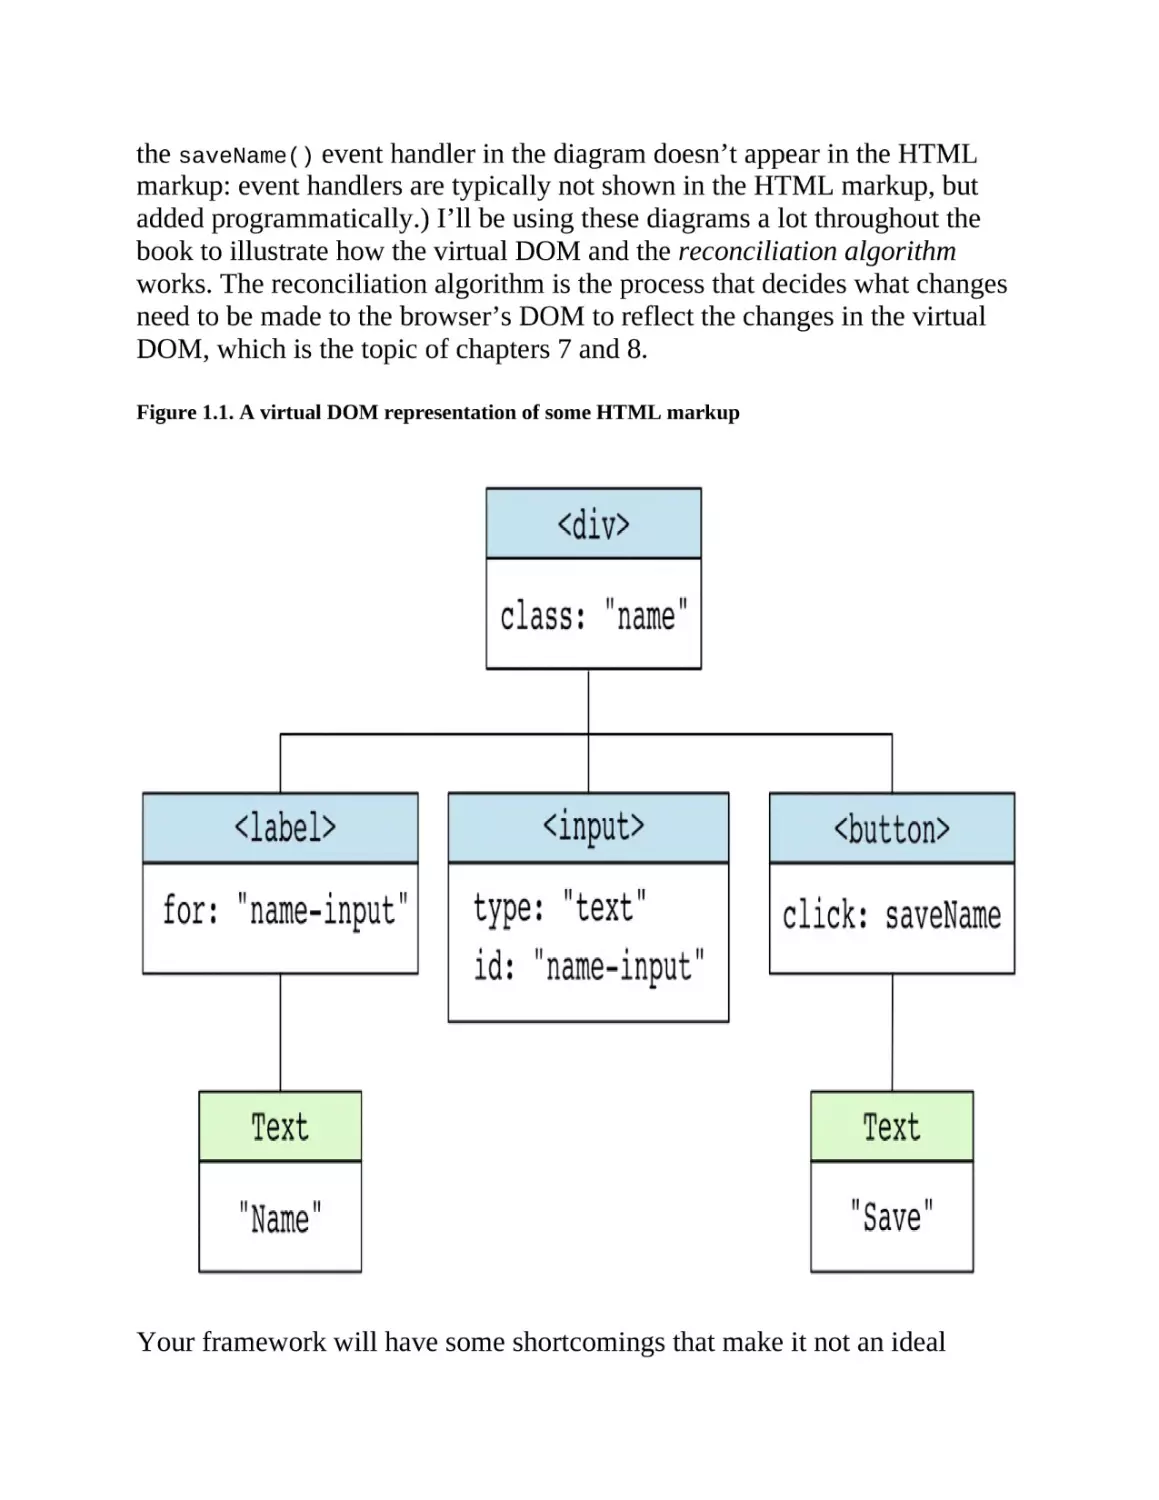
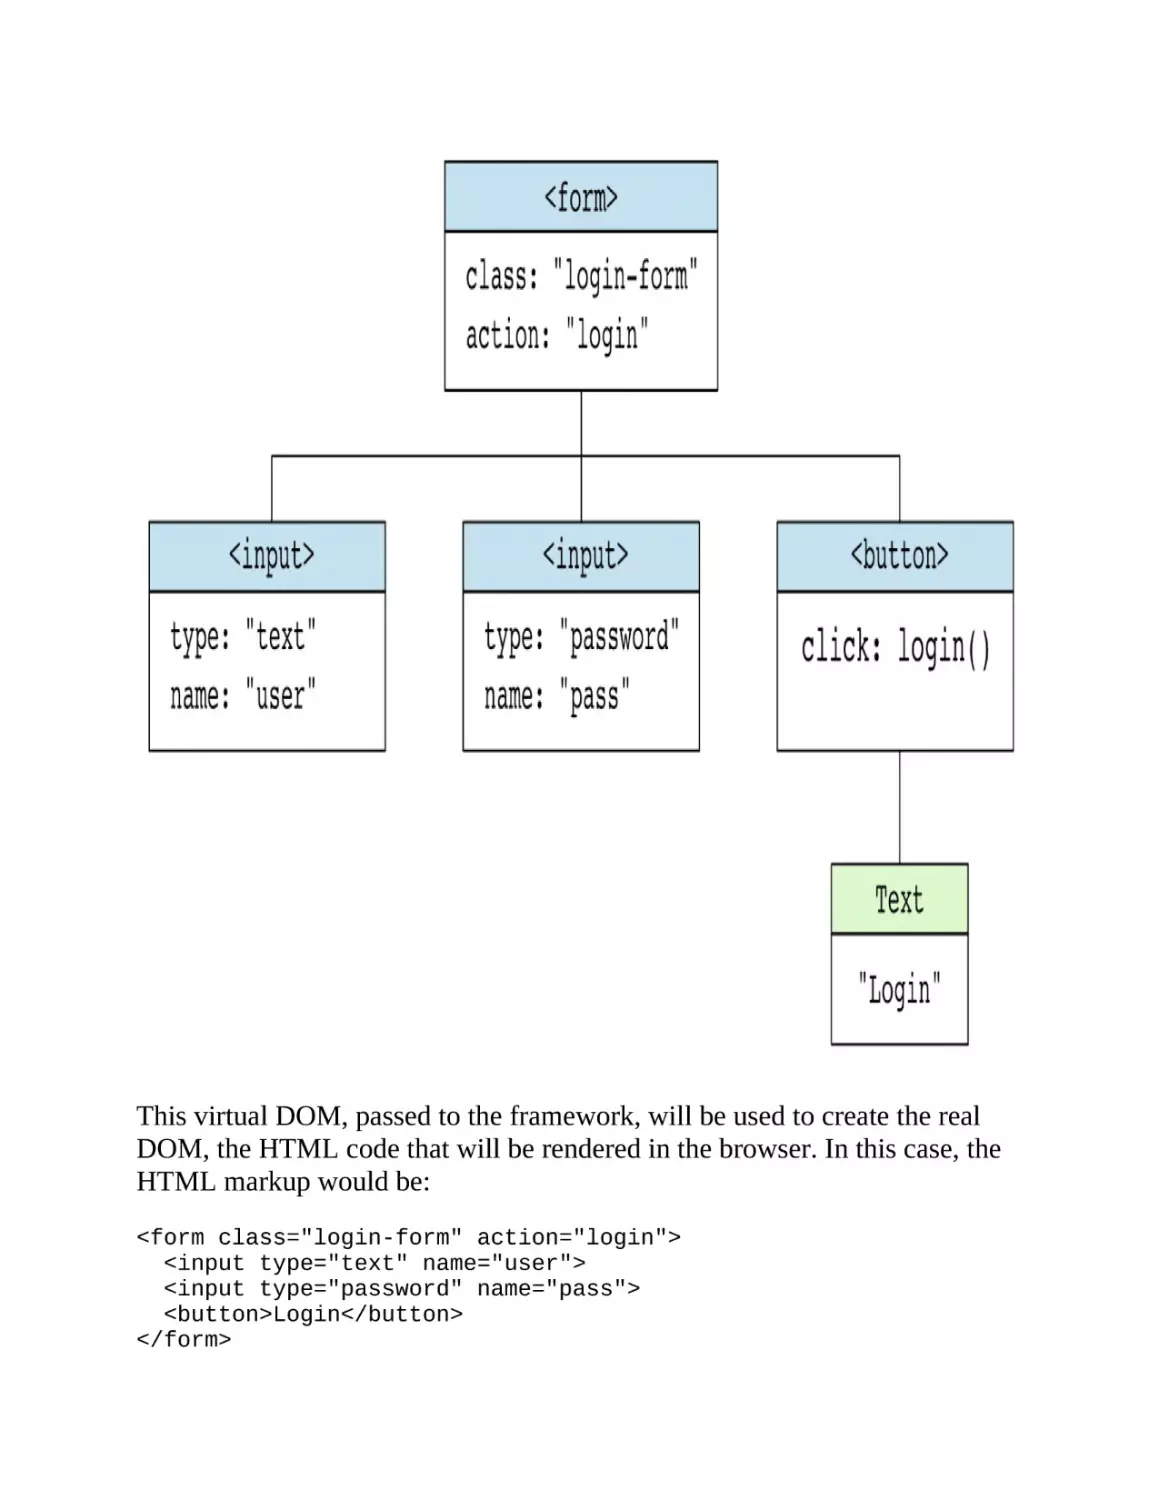
example, the following HTML markup:
<div class="name">
<label for="name-input">Name</label>
<input type="text" id="name-input" />
<button>Save</button>
</div>
would have a virtual DOM representation like that in figure 1.1. (Note that
the saveName() event handler in the diagram doesn’t appear in the HTML
markup: event handlers are typically not shown in the HTML markup, but
added programmatically.) I’ll be using these diagrams a lot throughout the
book to illustrate how the virtual DOM and the reconciliation algorithm
works. The reconciliation algorithm is the process that decides what changes
need to be made to the browser’s DOM to reflect the changes in the virtual
DOM, which is the topic of chapters 7 and 8.
Figure 1.1. A virtual DOM representation of some HTML markup
Your framework will have some shortcomings that make it not an ideal
choice for complex production applications, but definitely fit for your latest
side project. For example, it’ll only support the standard HTML namespace,
which means that SVG won’t be supported. Most of the popular frameworks
support this namespace, but we’ll leave it out for simplicity. There are other
features that—for the sake of keeping the book to a reasonable size and the
project fun to build—we’ll leave out as well. For example, we’ll leave out
component-scoped CSS support, which is a feature that’s present in most of
the popular frameworks, one way or another.
1.2.1 Features
Your framework will have the following features, which you’ll build from
scratch:
A virtual DOM abstraction.
A reconciliation algorithm that updates the browser’s DOM.
A component-based architecture where each component does the
following:
holds its own state,
manages its own lifecycle,
re-renders itself and its children when it states changes.
An SPA router that updates the URL in the browser’s address bar
without reloading the page.
Slots to render content inside a component.
HTML templates that are compiled into JavaScript render functions.
Server-side rendering.
As you can see, it’s a pretty complete framework. It’s not a full-blown
framework like Vue or React, but it’s enough to understand how they work.
And the neat thing is that you’ll build it line by line, so you’ll understand
how it all fits together. I’ll use lots of diagrams and illustrations to help you
understand the concepts that might be harder to grasp. I recommend you to
write the source code yourself as you read the book. Try to understand it line
by line, take your time, debug it, and make sure you understand the decisions
and trade-offs we make along the way.
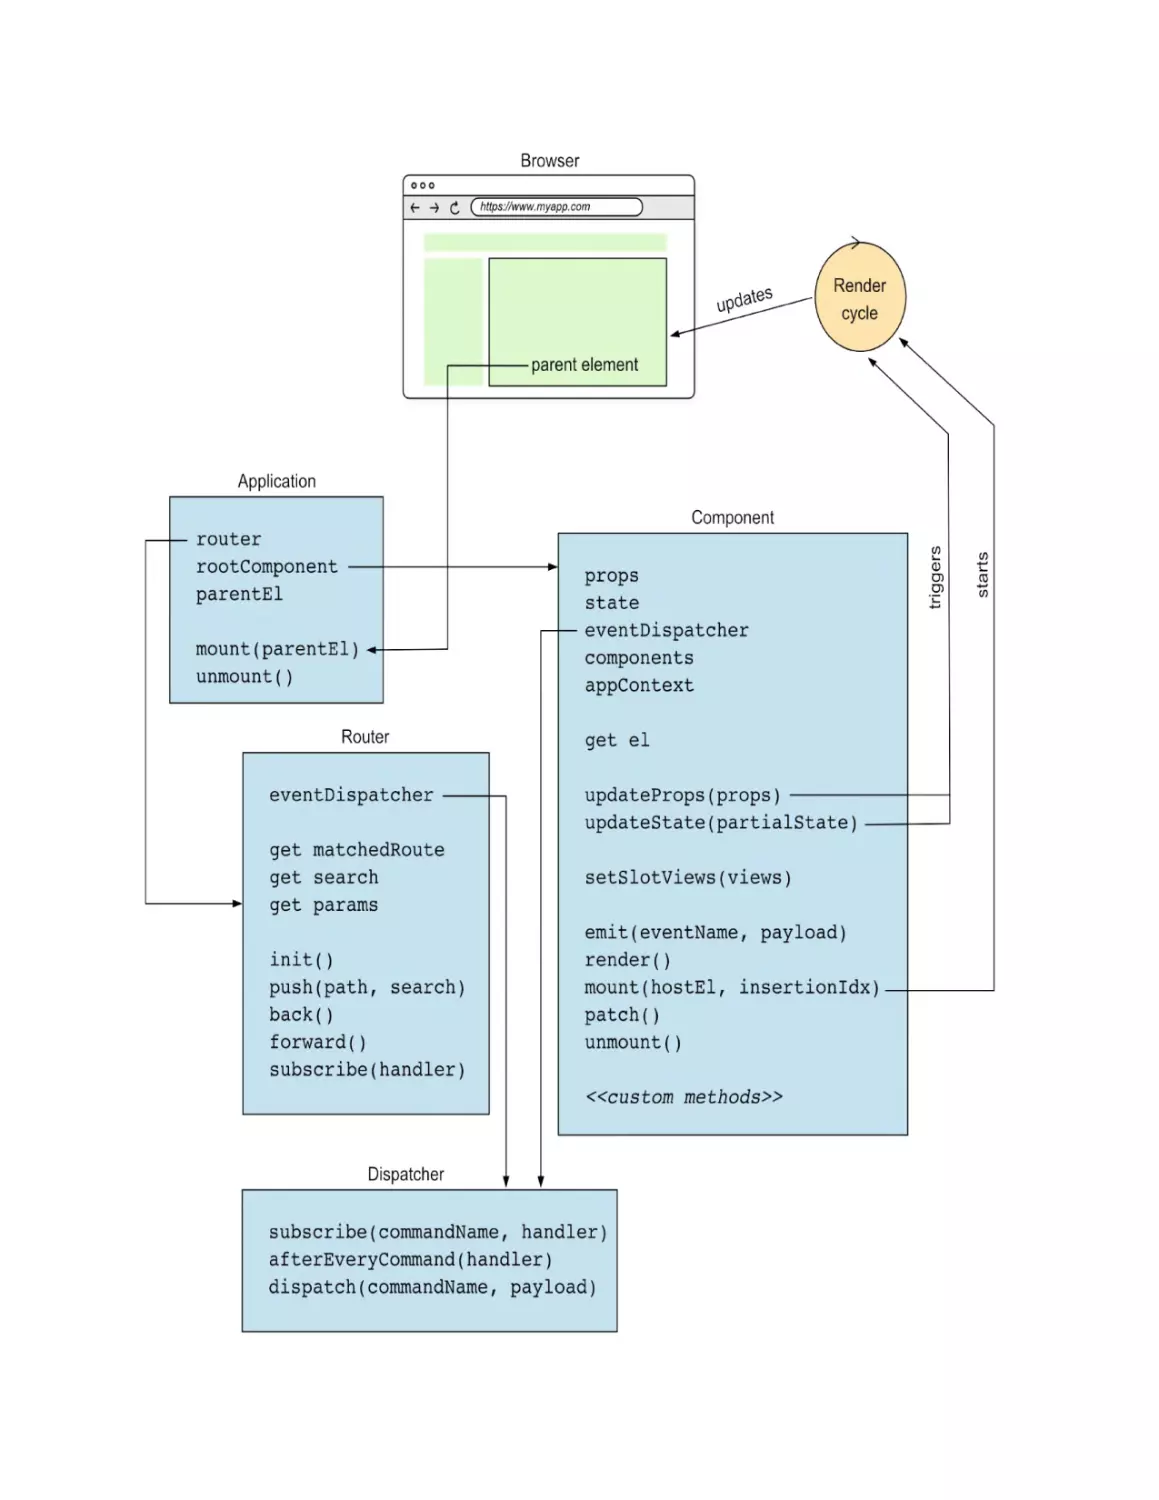
Figure 1.2 shows the architecture of the framework we’ll build. It includes all
the parts of the framework you’ll implement, and how they interact with each
other.
Figure 1.2. Architecture of the framework we’ll build
I will revisit this figure, making sure to highlight each part of the framework
as we build it. You don’t need to understand all the details of the architecture
right now, but it’s good to have a high-level understanding of it. At the end of
the book, this figure will make a lot of sense to you: you’ll recognize each
and every part, as you’ll have built them yourself.
1.2.2 Implementation plan
As you can imagine, you can’t build all of this in a single chapter. We want
to break it down into smaller pieces so that you can focus on one thing at a
time. Figure 1.3 shows the implementation plan for the framework. It
resembles a kanban board, where each post-it represents the work of one or
more chapters. You’ll pick up a post-it in each chapter.
Figure 1.3. Implementation plan for the framework we’ll build
You’ll start by implementing a simple example application using just vanilla
JavaScript, which will help you understand how frameworks can simplify the
code of a frontend app. (Once you’ve suffered the "pain", you’ll be in a better
position to appreciate the benefits of a framework.)
Stateless components and global application state
Once you have a better understanding of the benefits of frameworks, you’ll
extract parts of the application’s view to stateless components modeled by
pure functions that return the virtual DOM representation of their view. The
application will hold the entire state of the application and pass it to the
components. This allows you to focus on the DOM reconciliation algorithm
—likely the most complex part of the framework.
Stateful components
Next, you’ll allow components to have their own state, which makes state
management much simpler. The application will no longer need to hold the
entire state; it’ll be split among components instead. Pure functions will turn
into classes that implement a render() method, and each component will be
its own little application with its own lifecycle.
Lifecycle hooks
You’ll then add lifecycle hooks to the components, which make possible
executing code at certain moments in time, like when the component is
mounted into the DOM. An example of using a lifecycle hook is to fetch data
from a remote server when the component is mounted.
Slots to insert content inside a component
You’ll also add support for slots, which allow you to render content inside a
component, making it more reusable and customizable.
SPA router
You’ll then implement a router, which allows the application to navigate
between different pages without reloading the page.
Note
Most frameworks don’t come with a router bundled; it’s typically a plugin or
a separate library that you have to install in your project. For the sake of
learning, you’ll include our router in the framework itself.
HTML templates
Finally, you’ll add a Webpack loader module that reads HTML templates and
compiles them into JavaScript render functions, making it more convenient to
write our components' view in HTML. So, instead of writing this:
function render() {
return h('div', { class: 'container' }, [
h('h1', {}, ['Look, Ma!']),
h('p', {}, ["I'm building a framework!"])
])
}
you’ll be able to write this:
<div class="container">
<h1>Look, Ma!</h1>
<p>I'm building a framework!</p>
</div>
Isn’t that much nicer? Don’t worry if you don’t understand what the h() call
is; we’ll devote the whole chapter 3 to explaining it. In a nutshell, it’s a
function that creates virtual DOM nodes.
Server-side rendering & hydration
Finally, you’ll implement server-side rendering and the DOM hydration
algorithm. Server-side rendering (SSR) renders the view on the server instead
of in the browser, improving page loading times and aiding SEO.
SSR Hydration
Hydration is the process by which the framework matches HTML elements
with their corresponding virtual DOM nodes and attaches event handlers to
make the HTML markup interactive in the browser. The hydration algorithm
binds the browser’s HTML to each component’s virtual DOM, allowing for
dynamic updates.
SSR requires a server to run, but serving static files is generally cheaper than
rendering pages as users request them. As you know, all good things come
with a price.
Now that you know what you’ll build and you have a plan, let’s take a quick
look at how frontend frameworks work.
1.3 Overview of how a frontend framework works
Let’s quickly review how a frontend framework works when observed from
the outside. (We’ll learn about the internals in the next chapters.) Let’s start
from the side of the developer—someone using the framework to build an
application. We’ll then learn about the browser’s perspective.
1.3.1 The developer’s side
A developer starts by creating a new project with the framework’s CLI
(Command Line Interface) tool or by manually installing the dependencies
and configuring the project. Reading the framework’s documentation is
important, as every framework works a little bit differently.
A note on using Node JS
A frontend project is usually a regular Node JS project with its package.json
file and its node_modules directory with the dependencies, including the
framework used to build the app. Using Node JS is just for convenience; it
helps by providing an infrastructure to run scripts, compile, and bundle our
code, as well as managing dependencies, but we could very well go without
Node JS, download the framework’s JavaScript files from a CDN and include
them in our HTML file. We’d be responsible to manually upgrade the
dependencies when a new version is available and create a script that bundles
our JavaScript code, but it’s definitely doable—just not convenient.
Another benefit of using Node JS is that all Node JS projects follow the same
structure and conventions, something that helps other developers to
understand how to work with our codebase.
In a web application, developers create components that define a part of the
application’s view and how the user interacts with it. Components are written
using HTML, CSS, and JavaScript code. Most frameworks use single file
components (SFCs), where all the component’s code lives in a single file:
HTML, CSS, and JavaScript. A notable exception is Angular, which uses
three files for each component: one for the HTML, one for the TypeScript
code, and one for the CSS. This allows the developer to keep the languages
separate and potentially get better syntax support from their IDE. However, it
may be inconvenient to jump between files to see the entire component. In
this book, we will follow Angular’s approach and use three files for each
component.
React and Preact use JSX—an extension of JavaScript—instead of writing
HTML directly. Other frameworks, like Vue, Svelte, and Angular, use
HTML templates with directives to add or modify the behavior of DOM
elements, like iterating over and displaying an array of items or showing
specific elements conditionally. For example, the following is how you’d
conditionally show a paragraph in Vue:
<p v-if="hasDiscount">
You get a discount!
</p>
The v-if directive is a custom directive that Vue provides to conditionally
show an element. Other frameworks use slightly different syntaxes, but all of
them provide the developer with a way to show or hide elements based on the
application’s state. Just for the sake of comparison, here’s how you’d do the
same in Svelte:
{#if hasDiscount}
<p>
You get a discount!
</p>
{/if}
And this would be how you’d write it in the case of React:
{hasDiscount && <p>You get a discount!</p>}
Once the developer is satisfied with the application, the code needs to be
bundled into fewer files than were originally written, so the browser can load
the application using fewer requests to the server. The files can also be
minified, that is, made smaller by removing whitespace and comments, and
renaming variables to shorter names. This process of turning the application’s
source source code into the files that are shipped to the users is called
building.
Building the application
To deploy a frontend application to production, we first need to build it. Most
of the work of building an application using a specific framework is done by
the framework itself. The framework—typically—provides a CLI tool that
we can use to build the application by running a simple NPM script such as
npm run build.
Note
There are many different ways an application can be built, resulting in a wide
variety of bundle formats. Here, I’ll explain a build process that encapsulates
some of the most common practices.
Building the application includes a few steps:
1. The template for each component is transformed—by the template
compiler—into JavaScript code that, executed in the browser, creates the
component’s view.
2. The components' code—split in multiple files—is transformed and
bundled into a single JavaScript file, app.bundle.js. (For larger
3.
4.
5.
6.
applications it’s common to have more than one bundle and lazy-load
them; that is, load them only when they’ll become visible to the user.)
The third-party code used by the application is bundled into a single
JavaScript file, vendors.bundle.js. This file includes the code for the
framework itself, along with other third-party libraries.
The CSS code in the components is extracted and bundled into a single
CSS file: bundle.css. (Same as before, larger applications may have
more than one CSS bundle.)
The HTML file that will be served to the user (index.html) is generated
or copied from the static assets directory.
The static assets (such as images, fonts or audio clips) are copied to the
output directory. They can optionally be preprocessed, for example, to
optimize images or convert audio files to a different format.
So, a typical build process results in four (or more, in the case of larger apps)
files:
app.bundle.js with the application’s code,
vendors.bundle.js with the third-party code,
bundle.css with the application’s CSS, and
index.html, the HTML file that will be served to the user.
These files are uploaded to a server, and the application is ready to be served
to the user. When a user requests the website, the HTML, JS, and CSS files
are statically served.
Note
When a file is statically served, the server doesn’t need to do anything before
sending it to the user. The server simply reads the file from disk and sends it.
In contrast, when the application is rendered on the server, the server
generates the HTML file before sending it to the user’s browser.
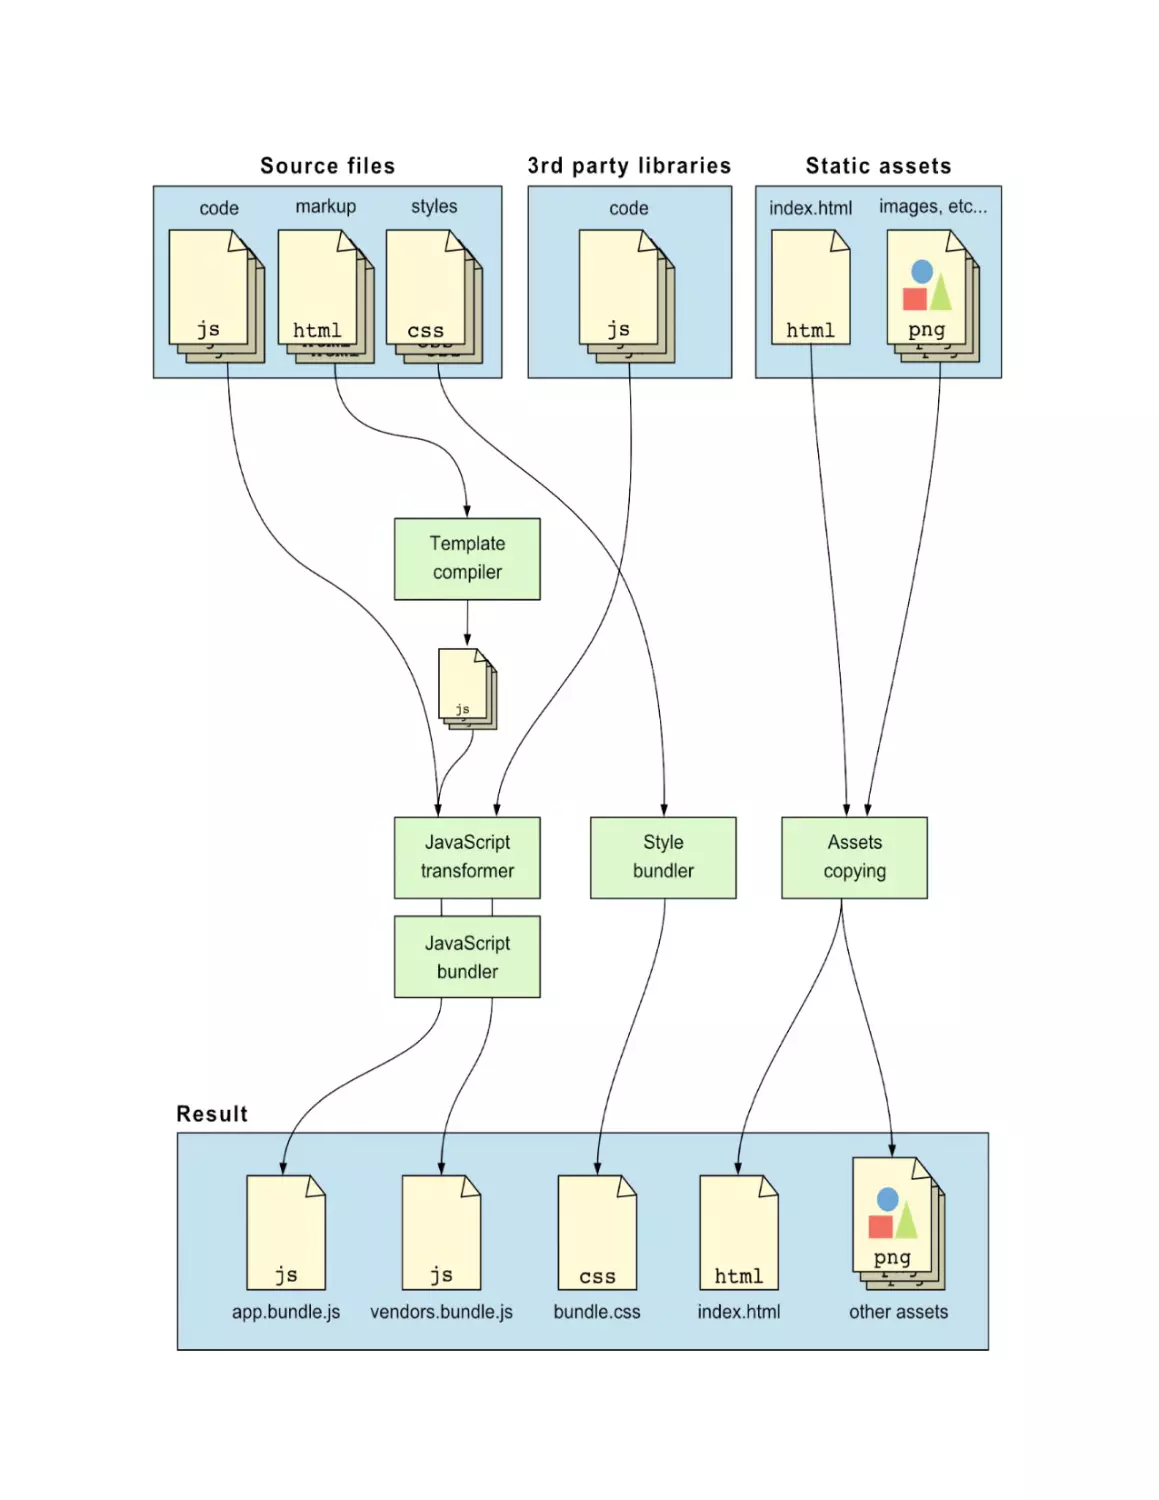
Figure 1.4 shows a diagram of the build process I just described. Note that, a
typical build process is more complex than the one shown in the figure, but
this is enough to understand the concepts. I’ve included a step that transforms
the JavaScript code. This is a generic step that refers to any transformation
that needs to be done to the code before it’s bundled, like for example
transpiling it using Babel or TypeScript.
Figure 1.4. A simplified diagram of a frontend application’s build process
Let’s see what happens in the browser once these files are loaded. The flow is
slightly different, depending on whether the application is rendered on the
server (SSR) or statically served as a single page application (SPA). Let’s
start with the slightly simpler latter case.
1.3.2 The browser side of an SPA
In an SPA, the server responds with a—mostly empty—HTML file that’s
used to load the application’s JavaScript and CSS files. The framework then
creates and updates the application’s view using the Document API. A router
makes sure not to reload the entire application when the user navigates to a
different URL, but rather updates the view to show the new content. Oh, and
it also updates the URL in the browser’s address bar to give the user a nice
experience. Let’s see this process step by step.
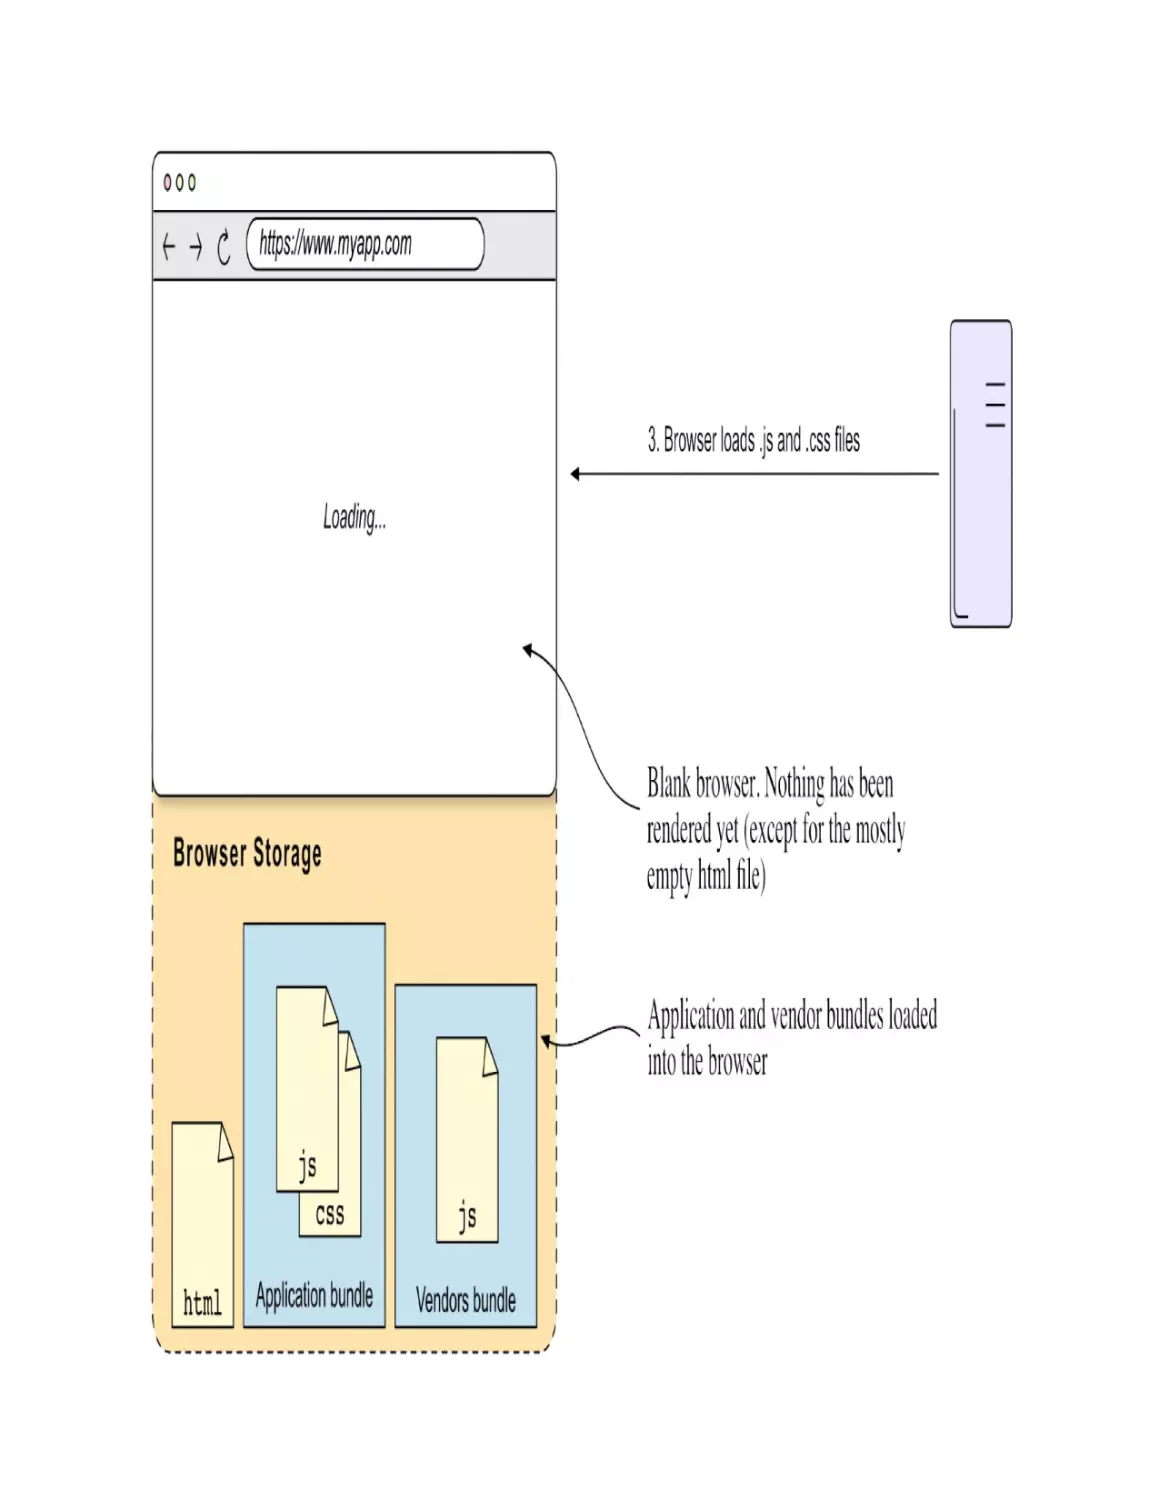
Step 1: Loading the HTML file
When the user navigates to the application by writing its URL, the browser
requests the page’s HTML file (1), which is returned by the server (2), as
illustrated in figure 1.5.
Figure 1.5. Single-page application requesting the—mostly empty—HTML page
The browser loads the HTML file and parses it. This HTML is mostly empty
and is used to load the JavaScript and CSS bundles declared in the <script>
and <link> tags. These are the application and vendor bundles we talked
about in the previous section.
Step 2: Loading the JavaScript and CSS files
The browser loads the JavaScript and CSS files referenced in the HTML file
(3) and parses the JavaScript code. This is depicted in figure 1.6.
Figure 1.6. The browser loads the JavaScript and CSS files referenced in the HTML
The browser is still blank at this point. It has rendered the HTML file, but this
file’s <body> element is mostly empty (except maybe for a <div id="app">
tag that some frameworks use to render the app). The view of an SPA is
created dynamically by the framework’s JavaScript code, which is what
happens next.
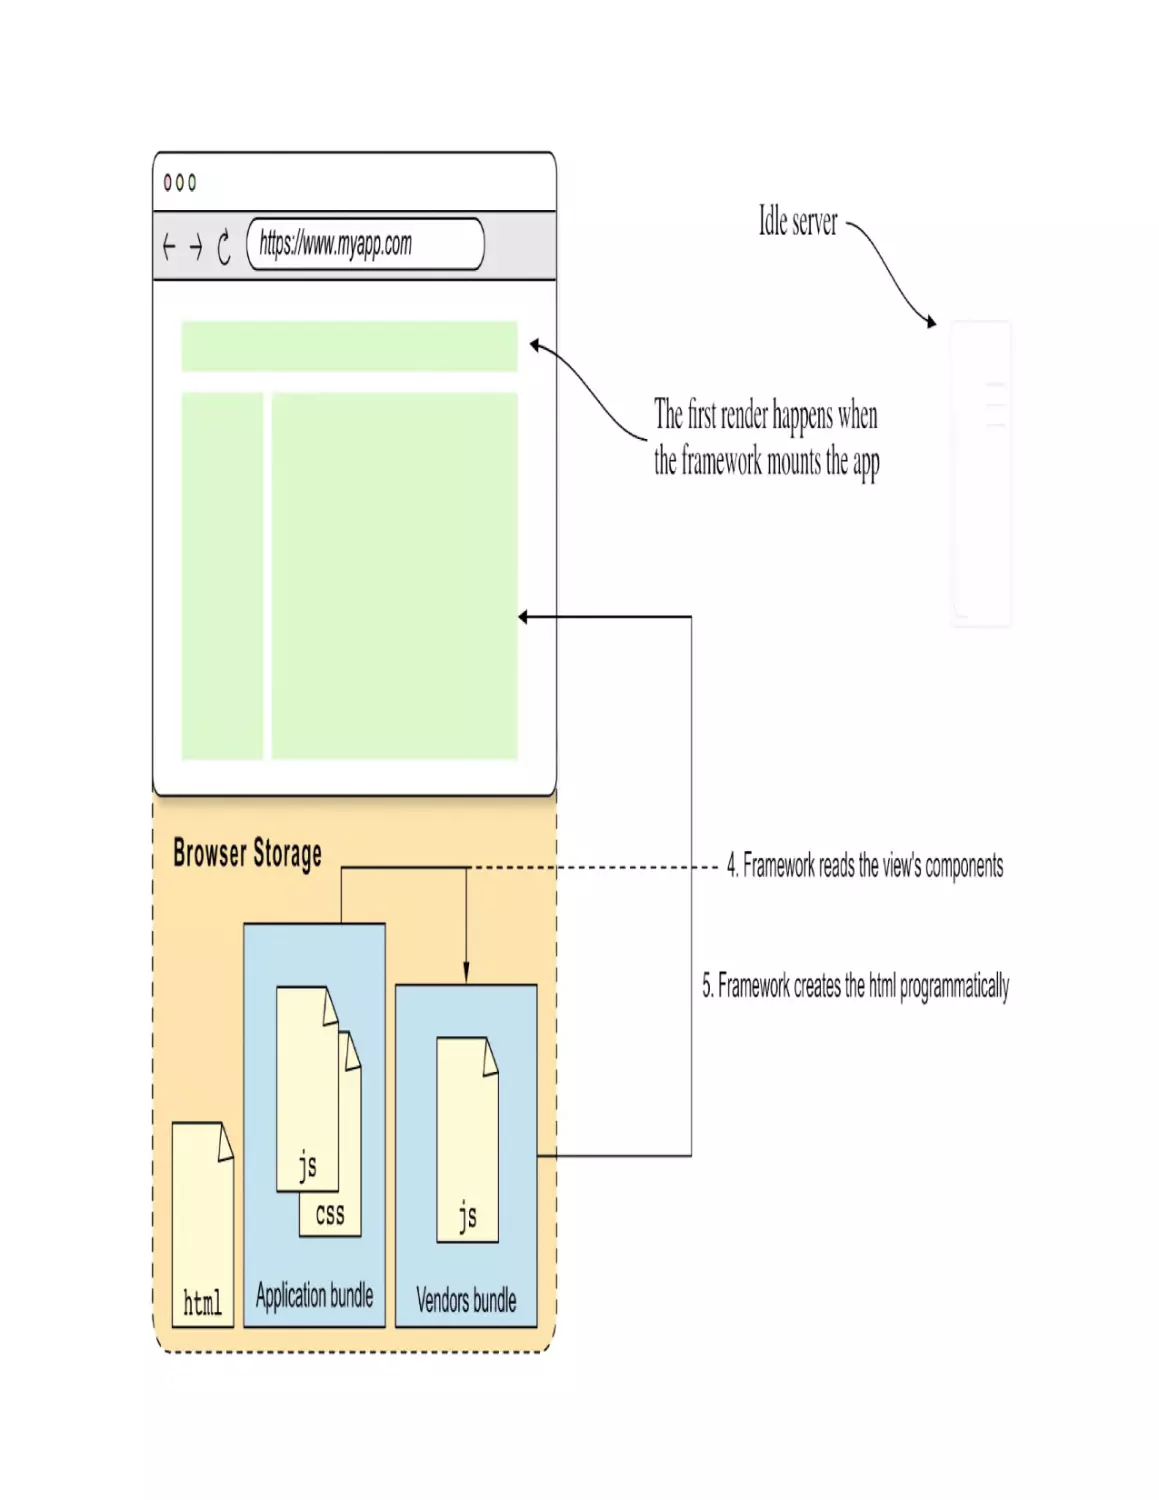
Step 3: Creating the application’s view (mounting the app)
The framework JavaScript code (living in the vendors bundle) finds the
components defined in the application’s code that need to be rendered (4) and
creates the application’s view (5). This is depicted in figure 1.7. This initial
rendering is called mounting the application.
Figure 1.7. The framework creates the application’s view using the Document API
To create the application’s HTML programmatically, the framework uses the
Document API. The Document API allows the creation of HTML elements
programmatically, using JavaScript. Let’s take a quick detour to see how this
works.
For example, given an empty HTML <body> element like the following:
<body></body>
A paragraph can be programmatically created and appended to the document
like so:
const paragraph = document.createElement('p')
paragraph.textContent = 'Hello, World!'
document.append(paragraph)
This would result in the following HTML:
<body>
<p>Hello, World!</p>
</body>
Going back to how SPAs work: what happens when the user interacts with
the application?
Step 4: Handling user interactions
When the user interacts with the application (6), the framework handles the
event and updates the view accordingly. This is depicted in figure 1.8. The
framework handles the event from the browser by executing the event
handling code defined in the application’s code (7) and then updating the
view to reflect the changes in the application’s state (8).
Figure 1.8. SPA handling user interactions
The framework is responsible for updating only the parts of the HTML that
need to be updated, a process that we call patching the DOM.
Patching the DOM
A single change made to the DOM by the framework is called a patch. The
process of updating the view to reflect the changes in the application’s state is
called patching the DOM.
Making changes to the document is expensive, so a well-implemented
framework minimizes the number of changes to the document for it to reflect
the required updates. By expensive, I mean that the browser needs to repaint
and reflow the document to reflect the changes, and that consumes resources.
To better understand why the changes to the DOM are expensive in terms of
computation, I recommend you read web.dev/critical-rendering-path-rendertree-construction. This article explains how the browser renders the
document, and gives you an overview of everything that happens under the
hood.
How this is achieved varies heavily across frameworks. Some frameworks
use a virtual DOM—like yours will—to compare the current state of the
document with the desired state and apply only the necessary changes, and
some use a completely different approach. To learn more about how some
frameworks update the view, check the sidebar note.
How some frameworks update the view
Svelte understands the ways the view can be updated at compilation time, and
produces JavaScript code to update the exact parts of the view that need to be
patched for each possible state change. Svelte is remarkably performant
because it does only the least amount of work in the browser to update the
view.
Angular runs a change detection routine—comparing the last state it used to
render the view with the current state—every time it detects the state might
have changed. Changes to the state of a component typically happen when an
event listener runs, when data is requested to a server via an HTTP request,
or when MacroTasks (such as setTimeout()) or MicroTasks (such as
Promise.then()) are executed. Angular makes this possible thanks to
zone.js, an execution context that’s aware of the asynchronous tasks running
at any given time. Thanks to zone.js, Angular can detect when a MacroTask
or MicroTask is executed and run the change detection routine.
(javascript.info/event-loop is a wonderful resource to learn more about the
JavaScript event loop and the difference between the micro- and macro-task
queues.)
Most other widely used frameworks—including Vue, React, Preact or Inferno
—use a virtual DOM representation of the view. So by comparing the last
known virtual DOM with the virtual DOM after the state has changed, they
compute the minimum changes required to update the HTML. React does this
virtual DOM comparison every time the state is changed by the component,
using either setState() or the useState() hook’s mechanism. Vue uses a
remarkably smart approach and includes a reactivity layer the developer can
use to define the application’s state. These reactivity primitives wrap regular
JavaScript objects (this includes arrays or sets) and primitives (such as
strings, numbers or booleans) and automatically detect when values change
and notify the components that use them they need to re-render.
The last step we need to cover is how the framework handles navigation
between routes.
Step 5: Navigating between routes
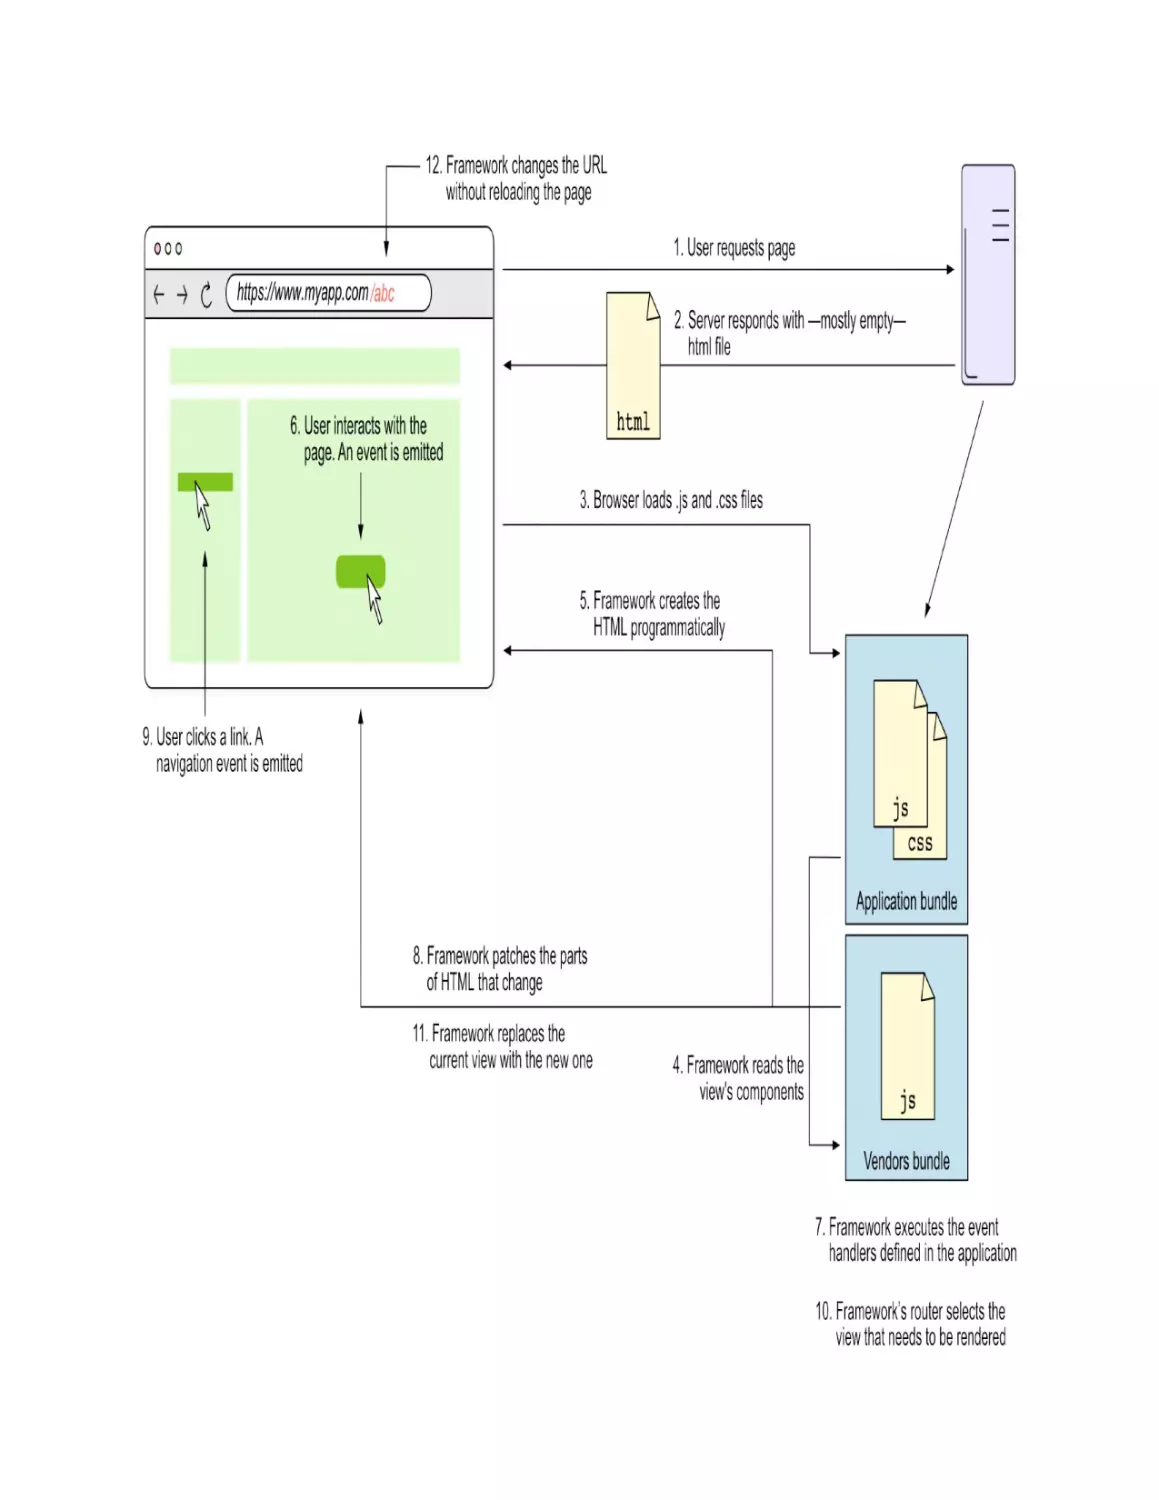
When the user clicks a link (9), the framework’s router prevents the default
behavior of reloading the page, and instead renders the component that’s
configured for the new route (10 and 11). The router is also in charge of
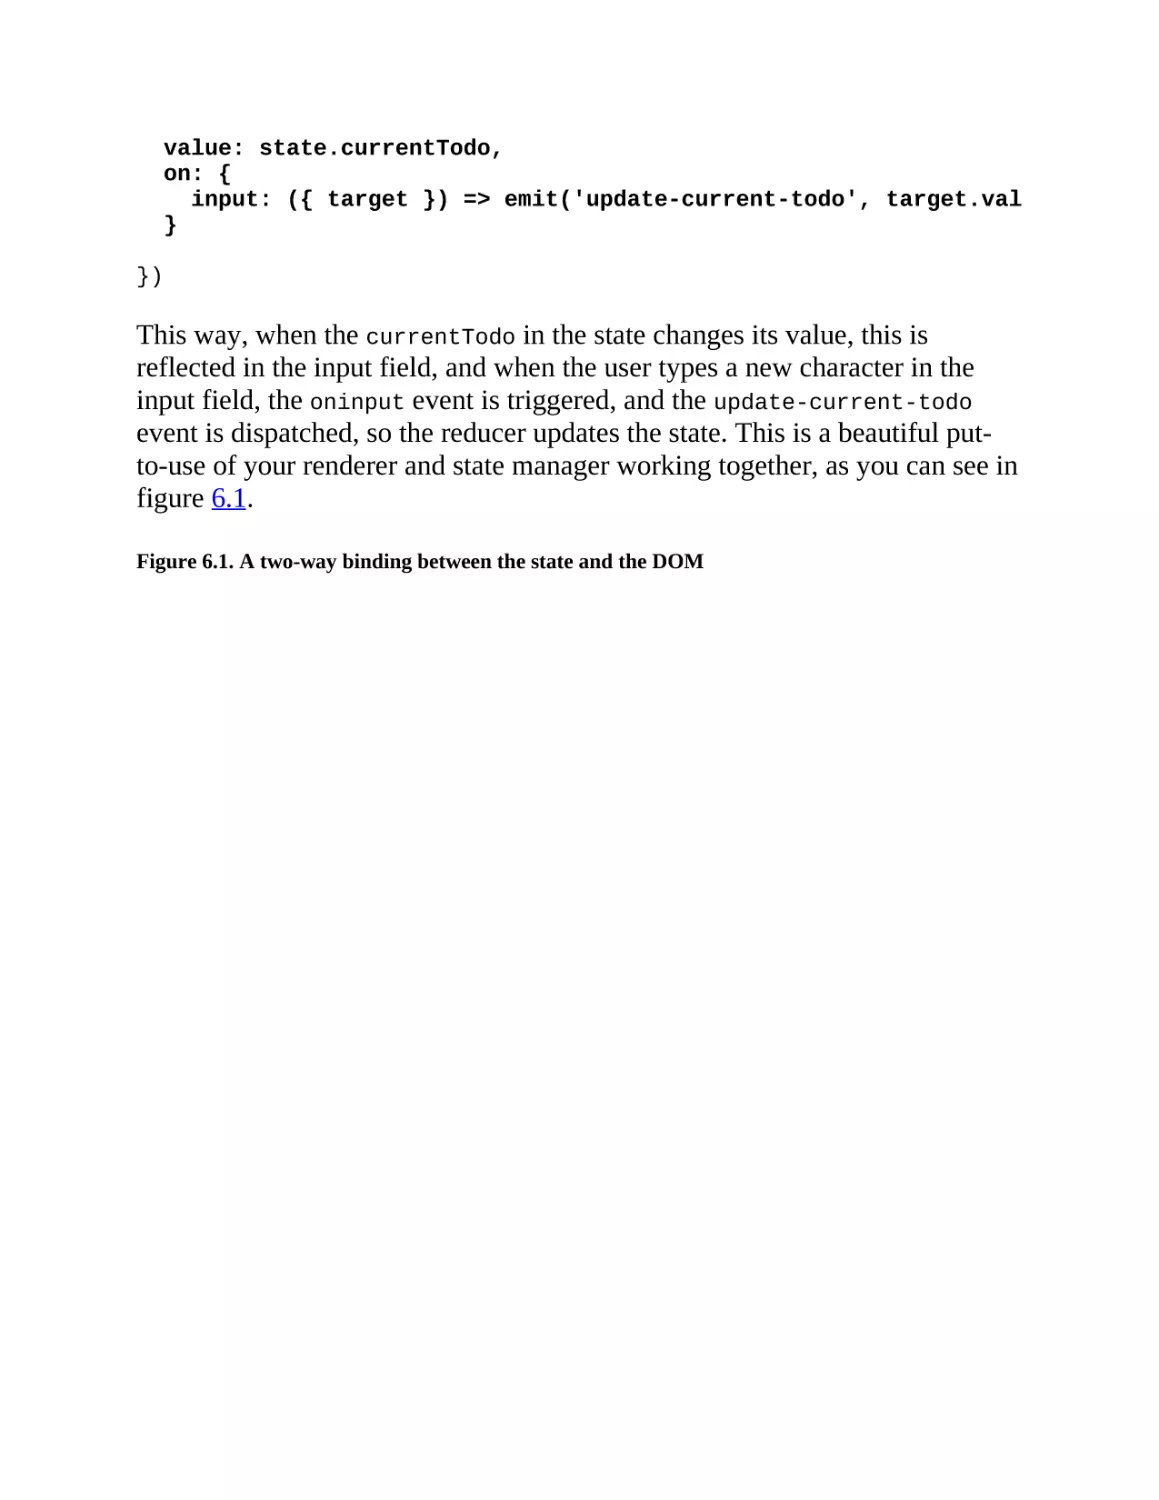
changing the URL (12) to reflect the new route. This is depicted in figure 1.9.
Figure 1.9. SPA navigation between routes
An SPA works with a single HTML file were the HTML markup code is
programmatically updated by the framework, so new HTML pages aren’t
requested to the server when the user navigates to a different route. This is
why they are called single page applications, because there a single HTML
file. The illusion of multiple pages is created by the framework, which
renders the components that are configured for each route.
The complete flow of an SPA
Figure 1.10 shows the complete flow of a single-page application, including
all the steps described earlier, but in a more schematic way.
Figure 1.10. The complete flow of a single-page application rendered in the browser
Now that you know how single-page applications work, let’s compare them
with an application that’s server-side rendered.
1.3.3 The browser and server side of a SSR application
A server-side rendered application is a web application that renders the
HTML markup on the server and sends it to the browser. Therefore, there
needs to be a backend that handles requests and renders the HTML pages. In
the browser, the frontend code is responsible for handling user interactions
and updating the view to reflect the changes in the application’s state—just
like in a SPA. But when the user navigates to a different route, the browser
requests a new HTML page from the server instead of programmatically
updating the HTML markup.
Let’s see how a SSR application works step by step.
Step 1: Loading an HTML page
When the user types the application’s URL into their browser, the browser
asks the server for the HTML file (1). The server sends back a complete page
that is created each time someone requests it. To create the page, the server
uses the application’s router to figure out which components to show based
on the requested route and instantiates them (2). Then, each component loads
data from other servers or databases and executes its mounting code before
being rendered. Finally, the components are turned into HTML (3) and sent
to the user (4). This is illustrated in figure 1.11.
Figure 1.11. SSR application requesting an HTML page to the server
Even though it looks like a static HTML file to the user, the server generates
the page each time it’s requested. The HTML file served to the user displays
already rendered HTML markup, so the framework doesn’t need to use the
Document API to programmatically generate it. But, the HTML coming from
the server lacks the event handlers defined in the application code, so the
application doesn’t respond to user interactions. Here’s where the hydration
process comes into play.
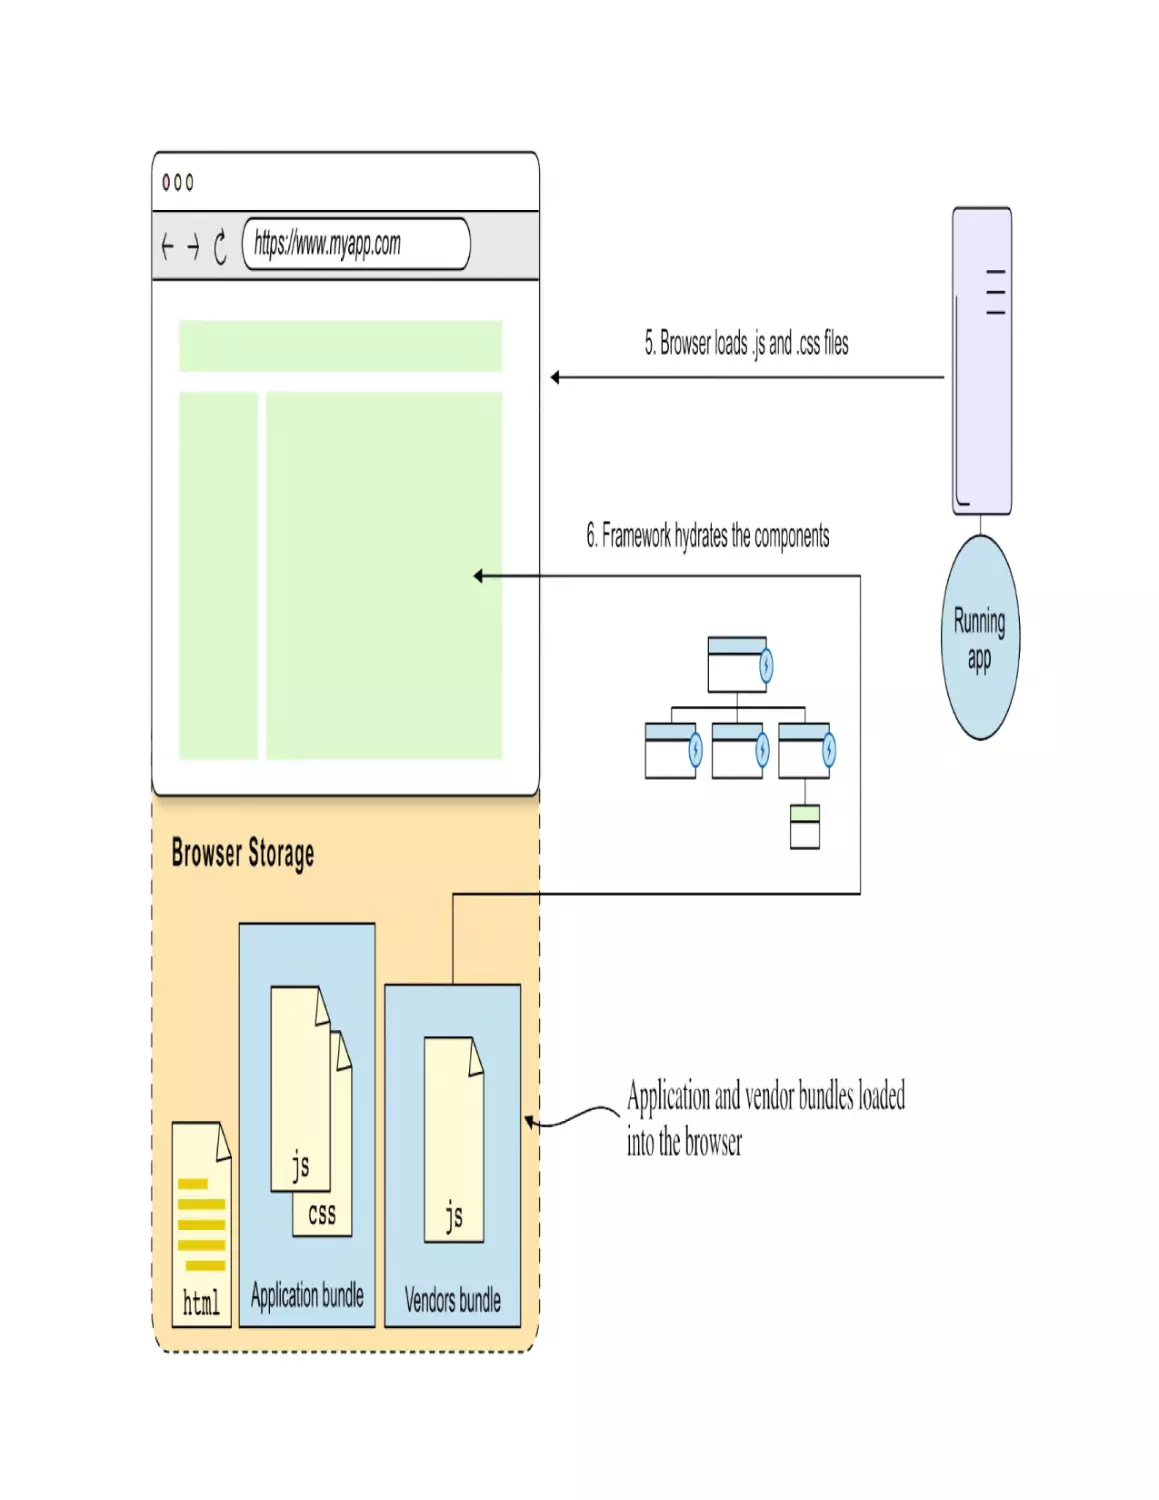
Step 2: Hydrating the HTML page
The HTML document instructs the browser to load the application JavaScript
files and CSS style sheets (5)—the same as in the case of an SPA. Once the
JavaScript code is parsed, the framework code needs to connect the existing
HTML—produced in the server—to the component’s virtual DOM, as well
as attach event handlers (6). This is called the hydration process, and it’s
depicted in figure 1.12.
Figure 1.12. The framework hydrates the HTML page
Once the page is made responsive by the framework’s hydration process, the
user can interact with it.
Step 3: Handling user interactions
When the user interacts with the page (7), the framework’s event handlers are
triggered (8), and—same as in the SPA case—the framework patches the
parts of the HTML that need to be updated (9). All of this happens in the
browser, so the server isn’t involved in this process, as you can appreciate in
figure 1.13.
Figure 1.13. SSR application handling user interactions
What happens when the user navigates to a different route?
Step 4: Navigating between routes
When the user clicks a link (10), the URL is changed by the browser (the
framework doesn’t do anything in the browser side this time), and the page is
reloaded. A new HTML page is requested from the server, and the process
starts again from step 1.
Figure 1.14. SSR application navigating between routes
As you can see, navigating between pages is quite different in a SSR
application than in an SPA. In the case of an SPA, the server isn’t involved in
the process. With SSR applications, pages are generated in the server.
The complete flow of a SSR application
Figure 1.15 shows the complete flow of a server-side rendered application,
including all the steps described earlier, but in a more schematic way.
Figure 1.15. The complete flow of a SSR application—rendered in the server and hydrated in the
browser
And this is how both single-page applications and server-side rendered
applications work. What about building a simple application yourself,
without using a framework?
1.4 Summary
Building a frontend framework from scratch is a great way to learn how
they work.
Frontend frameworks bundle the application’s code into a single
JavaScript file, the third party dependencies into another file, and the
CSS styles into yet another file. If the application is large, the
framework might split the application’s code into multiple bundles that
are loaded "lazily," that is, just as they’re needed.
The Document API allows the creation of HTML elements
programmatically, using JavaScript. The Document API is used by
frontend frameworks to create the application’s view.
Single-page applications consist on a single HTML file that’s loaded by
the browser and updated by the framework to reflect the application’s
state. When the route changes, it’s the framework changing the view.
The browser doesn’t reload the page.
The hydration process is the process of connecting the existing HTML
markup, rendered in the server, to the component’s state and event
listeners.
2 Vanilla JavaScript—like in the old
days
This chapter covers
Building an application using vanilla JavaScript and HTML
Programmatically creating DOM elements
Using the Document API to manipulate the DOM
To understand the benefits of using a frontend framework, you first need to
understand the problems that it solves, and there is no better way to do this
than to write an application without a framework—do the framework’s job
yourself. The objective of this chapter is making you "suffer the pain" of
writing applications without a framework, so that you can build some
appreciation for the job that frameworks do for you.
In the old days (I’m not that old, it’s just that technology evolves fast), we’d
write applications using only vanilla JavaScript and HTML. JQuery was the
best we had: it provided a nice API to interact with the DOM, hiding away
the browser differences. But we’d still have to write code down to the level of
working with the DOM, and to be fair, it wasn’t that bad. That is, until we
used our first modern frontend framework (it was Angular, in my case). Now
there’s no going back; we’ve been there; we know how much simpler it’s
become to write JavaScript applications.
You’re probably accustomed to writing applications leveraging the power of
a framework—something you should keep on doing if you get paid to ship
applications quickly—so it might be hard for you to realize the problems the
framework solves. Or maybe you’ve been, like me, in the pre-framework era
but haven’t written an application without a framework in a long time, in
which case this chapter will be good for refreshing your memory. If your case
is the former, I’m positive that by taking away the framework from you,
you’ll quickly realize why you were using it in the first place. It’s like when
you always find your working space clean and tidy, but you rarely appreciate
it because you’re used to seeing it that way. That is until the cleaning
personnel get sick and you have to clean things up yourself. You suddenly
realize that vacuuming every corner of the office is arduous, removing the
dust from the shelves and behind your computer is a pain, let alone cleaning
the bathroom. Only then you realize how much you value working when
things are clean and tidy around you, and start to really appreciate the
cleaning personnel’s job.
In this chapter, you’ll do the cleaning yourself; that is, you’ll build a simple
application from scratch using only vanilla JavaScript and HTML. The
cleaning personnel—the existing frontend frameworks—will be on strike.
Despite the simplicity of the app, you’ll notice how the code operates at a low
abstraction level by directly manipulating the DOM, and it’s very imperative
in nature. You’ll need to write code explicitly to update the HTML document
with every change in the application state. It’s evident that not using a
framework will become a challenge as the complexity and size of an
application increase. However, the purpose of this chapter is for you to
realize this on your own by experiencing the process of creating an
application without framework support.
Important
Before you go any further, go to appendix A and follow the instructions to set
up the project where you’ll be writing the code. Bear in mind that appendix A
will be a little detour from the main topic of this chapter, but it’s necessary to
set up the project. When you finish and without further ado, let’s begin the
application you’ll be building in this chapter.
You can find the code you’ll be writing in this chapter in the GitHub
repository, inside the examples/ch02 directory:
https://github.com/angelsolaorbaiceta/fe-fwk-book/tree/main/examples/ch02
2.1 The assignment: a TODOs app
So you’re a developer in a consulting company, and your manager has just
assigned you a new project. There is this new client with an innovative idea
for a new application, and they want you to build it. They say it has the
potential to disrupt the market, so it might be interesting. Your manager sets
up a meeting with the client to discuss the project. In the meeting you make
sure you understand the requirements, which you summarize as the
following:
Main idea: keep a list of the things you need to do (to-dos) in a day.
A to-do can be marked as done, so it’s removed from the list.
A to-do can be modified, for the cases where the user makes a typo or
wants to change the description.
The idea is so simple that you’re a bit wary of it being "super-mega
revolutionary" (you noted that down; that’s what the client said), but your job
is to build it, not to question its disruptiveness.
TODOs applications and frontend frameworks
The TODOs application is a classic in the frontend framework world. They’re
the equivalent of "Hello World" when learning a new programming language.
Framework authors like to use it as an example when they’re working on
their framework, both to test it and to show other developers how it’s used.
We don’t want to break the tradition, so we’ll be using it as well.
Vue.js implemented one, which can be found from the earliest versions,
inside the examples directory of the framework’s old repository:
github.com/vuejs/vue/tree/v0.7.0/examples/todomvc. React did as well, as
early as in its initial public release, v0.3.0, which can be found inside the
examples directory:
github.com/facebook/react/tree/v0.3.0/examples/todomvc. And one more
example is Mithril’s, which can be found in the examples directory of the
framework’s repository as well:
github.com/MithrilJS/mithril.js/tree/v1.0.0/examples/todomvc.
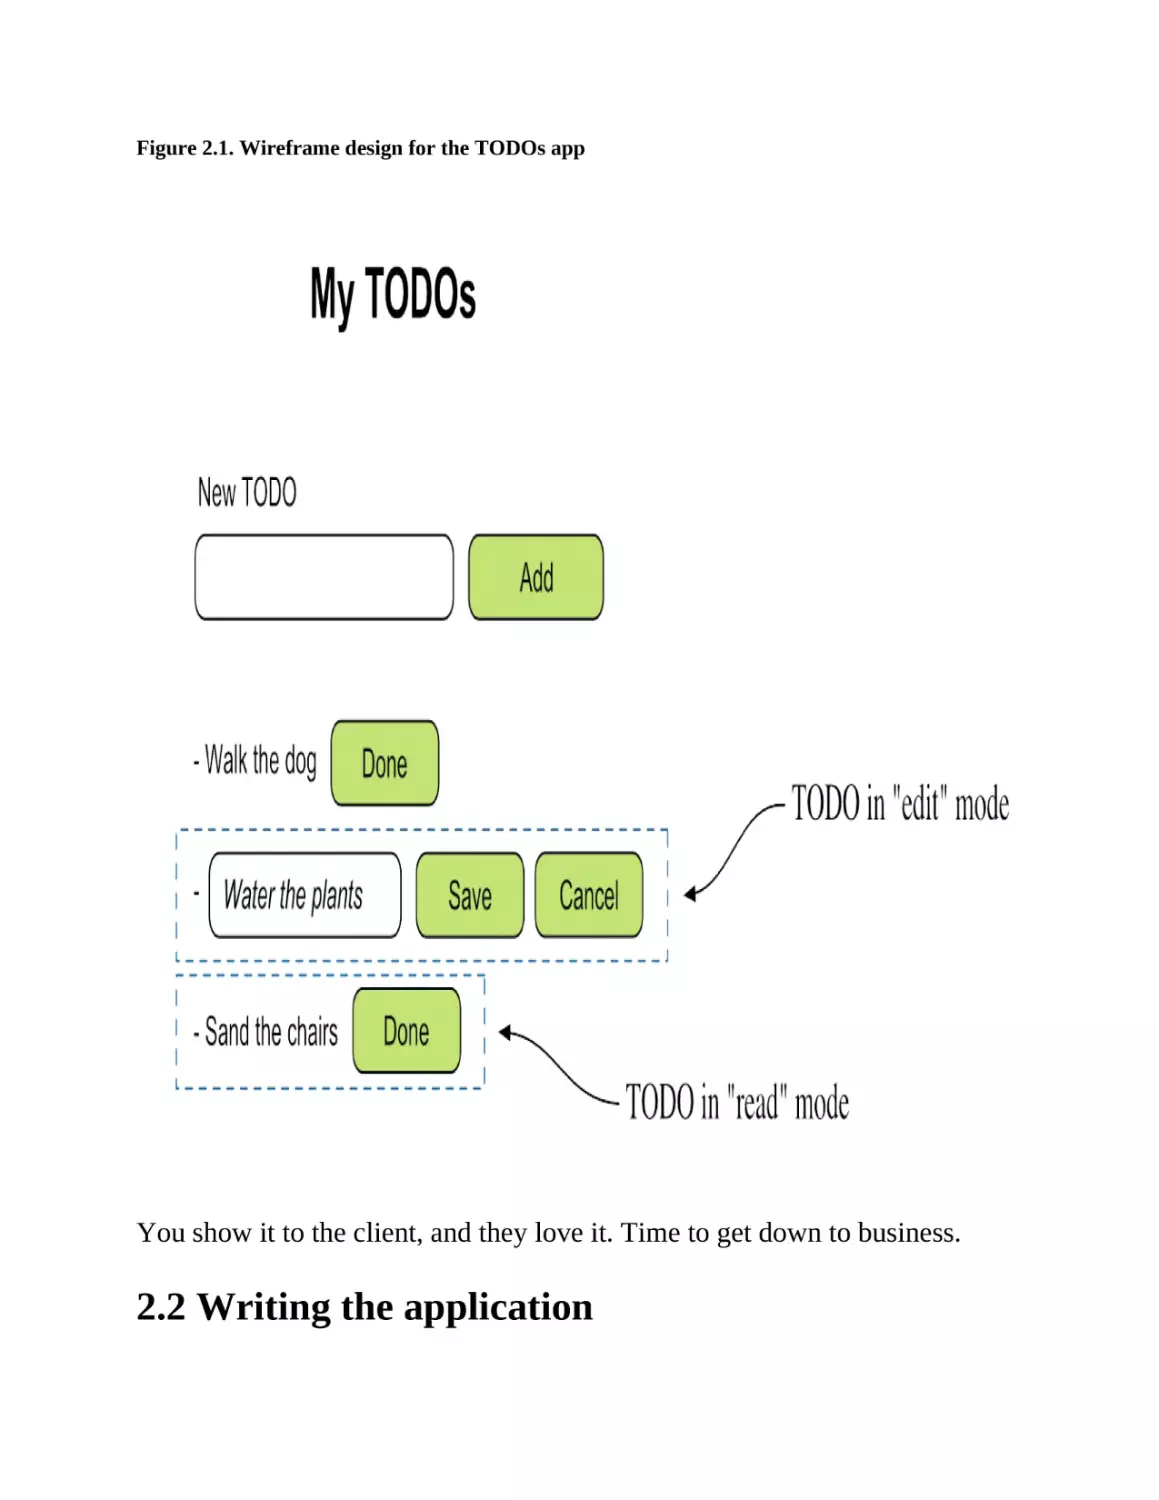
What you do next is talk with the design team to get the mockups for the
application. They love the idea—although they swear they’ve seen something
similar before—and they come up with a quick wireframe design that looks
like figure 2.1.
Figure 2.1. Wireframe design for the TODOs app
You show it to the client, and they love it. Time to get down to business.
2.2 Writing the application
Now that you have the requirements and the design for the TODOs app, it’s
time to start writing the code. Before you start, you decide to take some time
to plan ahead how you’re going to tackle the task—as every good developer
does. You realize the application is a simple one: it doesn’t have fancy
features or complex requirements. So, the first decision you make is to use
plain JavaScript and HTML, without any framework. You might use one
later, if the application grows in complexity; but for now you want to keep
things simple.
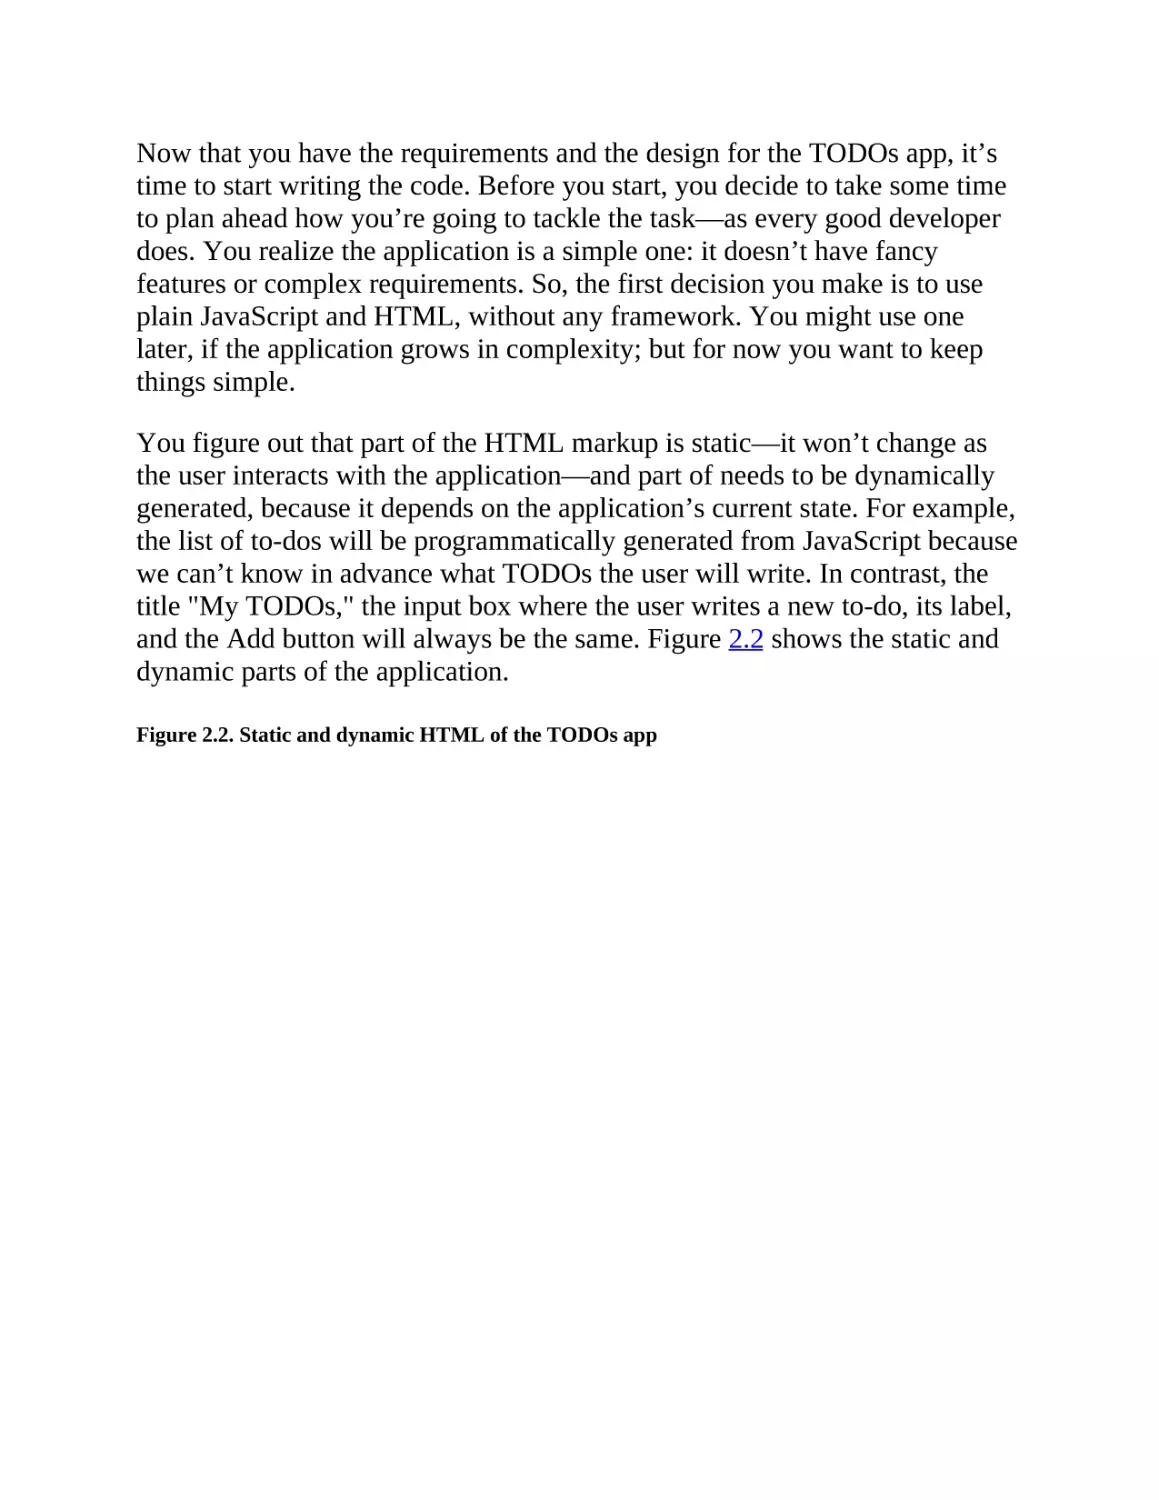
You figure out that part of the HTML markup is static—it won’t change as
the user interacts with the application—and part of needs to be dynamically
generated, because it depends on the application’s current state. For example,
the list of to-dos will be programmatically generated from JavaScript because
we can’t know in advance what TODOs the user will write. In contrast, the
title "My TODOs," the input box where the user writes a new to-do, its label,
and the Add button will always be the same. Figure 2.2 shows the static and
dynamic parts of the application.
Figure 2.2. Static and dynamic HTML of the TODOs app
Then, you think about what makes up the application’s state.
State
The state is the information that the application keeps track of that makes it
look and behave the way it does at a particular moment in time.
The application will look different when there are no to-dos than when there
are some, for example. This means that the list of to-dos is part of the
application’s state, so you’ll need an array of strings to keep track of the
existing to-dos. The strings represent the to-dos descriptions.
Last, before you start coding, you think about the application’s behavior.
Based on the requirements, the design, and a short conversation you had with
the user-experience specialist, you decide that the application will behave as
follows:
When the user writes a new to-do and clicks Add, the to-do is added to
the list of to-dos.
If the user presses the Enter key while the input field is focused, the todo is appended to the list of to-dos as well.
Don’t allow the user to add to-dos that are shorter than three characters.
To edit a to-do, the user has to double-click on it.
If the user discards the changes by clicking the Cancel button, the to-do
is restored to its previous state; the changes are lost.
When a to-do is marked as done, it’s removed from the list of to-dos.
With this in mind, it’s time to start writing the code. Let’s start by setting up
the project.
2.2.1 Setting up the project
You’ll write the vanilla JavaScript version of the TODOs application inside
the examples directory in your project. (Make sure you’ve completed the set
up from appendix A.) First, create a new folder inside the examples directory
for this chapter: ch02.
$ cd examples
$ mkdir ch02
Then, create two new files inside the ch02 directory:
todos.html—where you’ll write the HTML markup for the application
todos.js—where you’ll write the JavaScript code for the application
Your examples directory should look like this:
examples/
└── ch02/
├── todos.html
└── todos.js
You want to move your terminal’s working directory back to the project’s
root directory, so you can run the serve:examples script from there:
$ cd ..
$ npm run serve:examples
Your browser should open the examples directory and show the ch02
directory; click on it. Then click on the todos.html file to open it. It should
show an empty page because you haven’t written any HTML markup yet.
Let’s write the static part of the HTML markup now.
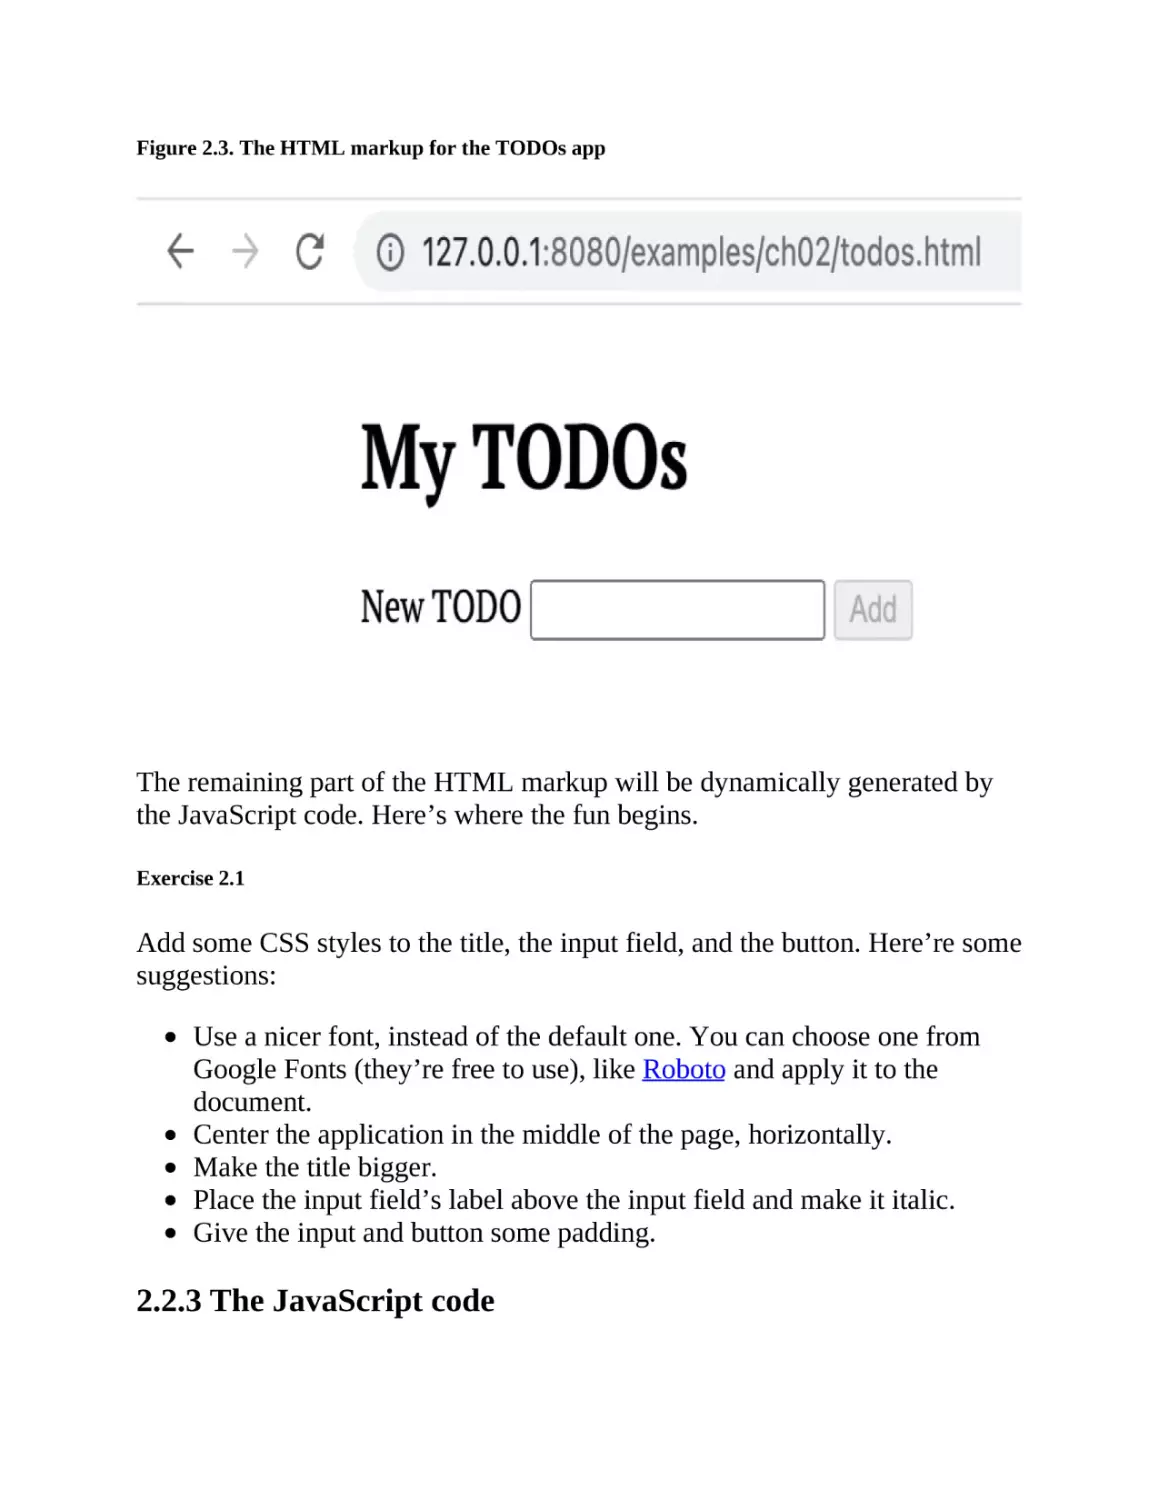
2.2.2 The HTML markup
The static part of the HTML markup is pretty simple: it consists of a title
(<h1>), an input field (<input>) with its label (<label>), and a button
(<button>). There should also be a list—empty to start with—where the todos will be rendered programmatically (<ul>). And, very importantly, the
HTML document should load the JavaScript file that will contain the
application’s code: todos.js.
The first thing you need to do is load the todos.js file as an ES module inside
the <head> of the document. This is done by adding the type="module"
attribute to the <script> element. ES modules are supported by all modern
browsers, and a neat feature of them is that they are deferred by default,
which means that it won’t start executing the JavaScript code until the HTML
document has been parsed. That’s why we can load the JavaScript file at the
top of the document, the <head>, and still be sure the HTML markup is
already available when the JavaScript code starts executing.
Tip
Read more about how ES modules are different from classic scripts in the
browser in V8’s blog at v8.dev/features/modules. It’s a good read that
clarifies a lot of concepts around ES modules and their behavior in the
browser, written by the people who work on V8 itself.
Then, you’ll add the input field, its label, and the Add button inside a <div>
element. Note that we need to add id attributes to the input field and the
button so we can reference them from the JavaScript code. The same goes for
the <ul> element that will contain the to-dos, which is below the <div>
element and is empty to start with. The to-dos will be rendered
programmatically by the JavaScript code, as <li> elements inside the <ul>
element.
Open the todos.html file and add the markup in listing 2.1.
Listing 2.1. The static HTML markup for the TODOs app (todos.html)
<!DOCTYPE html>
<html lang="en">
<head>
<meta charset="UTF-8" />
<title>My TODOs</title>
<script type="module" src="todos.js"></script> #1
</head>
<body>
<h1>My TODOs</h1>
<div> #2
<label for="todo-input">New TODO</label>
<input type="text" id="todo-input" />
<button id="add-todo-btn" disabled>Add</button>
</div>
<ul id="todos-list"></ul> #3
</body>
</html>
If you now refresh the browser window, you should see something like
Figure 2.3.
Figure 2.3. The HTML markup for the TODOs app
The remaining part of the HTML markup will be dynamically generated by
the JavaScript code. Here’s where the fun begins.
Exercise 2.1
Add some CSS styles to the title, the input field, and the button. Here’re some
suggestions:
Use a nicer font, instead of the default one. You can choose one from
Google Fonts (they’re free to use), like Roboto and apply it to the
document.
Center the application in the middle of the page, horizontally.
Make the title bigger.
Place the input field’s label above the input field and make it italic.
Give the input and button some padding.
2.2.3 The JavaScript code
You will write the JavaScript code in the todos.js file, so make sure you have
it open in your editor.
First of all, you want to define the application’s state, which is a list of to-dos
—an array of strings. You’ll add some to-dos already populated in the array,
so that when you open the page in the browser, you can see some to-dos
already rendered. Then you want to grab references to the DOM elements
that you need to interact with, using the document.getElementById()
function from the Document API.
Open the todos.js file and write the code in listing 2.2.
Listing 2.2. The state and HTML element references (todos.js)
// State of the app
const todos = ['Walk the dog', 'Water the plants', 'Sand the chairs']
// HTML element references
const addTodoInput = document.getElementById('todo-input')
const addTodoButton = document.getElementById('add-todo-btn')
const todosList = document.getElementById('todos-list')
So far, your application doesn’t do anything when you type a new to-do
description in the input field and click the Add button. The to-do items in the
state aren’t rendered either. This is because you have neither added event
listeners nor written the code that renders the to-dos. Let’s fix that.
Initializing the view
Now, you want to initialize the view of the application—that is, dynamically
generate the HTML markup that depends on the application’s state—and
attach event listeners to the DOM elements that need them. To initialize the
view, you iterate over the to-dos in the application’s state and render each
one using a function you’ll call renderTodoInReadMode(). Each element is
then append it to the <ul> element using the todosList element append()
method.
Rendering
To render means to transform some data into a visual representation;
something we can see.
In this context, when we render a to-do, what we’re doing is creating the
HTML elements that represent the to-do in our application.
Rendering a to-do—a JavaScript string—into an HTML representation will
by done by a function that you’ll call renderTodoInReadMode(). The naming
is important here: we’re saying that the to-do is rendered in read mode. If you
remember from your discussion with the client, the to-do can be edited, so we
need to render it in "edit mode" as well. In short: a to-do can be rendered in
two different ways (it has two different visual representations). You’ll also
write a renderTodoInEditMode() function later on.
After rendering the to-dos in read mode you need to add a few event listeners
to the DOM elements. First, you’ll add a listener on the <input> field’s
input event—fired every time the user types something in the input field.
This handler function should check if the input field has less than three
characters, in which case the button is kept disabled to prevent the user from
adding empty (or very short) to-do items. The button is enabled—by
removing the disabled attribute—when the to-do has at least three characters
(figure 2.4). If you remember from the HTML markup (see listing 2.1), the
Add <button> element is disabled by default.
Figure 2.4. The field is disabled when the input field has fewer than three characters
Then, you’ll add a listener on the <input> field’s keydown event, which fires
every time the user presses a key—any key. But you’re not interested in
responding to every key the user presses, only the "Enter" key is relevant. For
this, you want to check if the key pressed is "Enter", and if so, call a function
you’ll name addTodo(), which you’ll implement in a minute an will be used
to add a new to-do to the application’s state, and render it in the HTML.
Finally, you need a listener on the Add <button> element’s click event. The
event handler is the same as the one for the keydown event: it calls the
addTodo() function, clears the input field and disables the Add button
In the todos.js file write the code in listing 2.3.
Listing 2.3. The initialization of the application (todos.js)
// Initialize the view
for (const todo of todos) { #1
todosList.append(renderTodoInReadMode(todo))
}
addTodoInput.addEventListener('input', () => { #2
addTodoButton.disabled = addTodoInput.value.length < 3
})
addTodoInput.addEventListener('keydown', ({ key }) => { #3
if (key === 'Enter' && addTodoInput.value.length >= 3) {
addTodo()
}
})
addTodoButton.addEventListener('click', () => { #4
addTodo()
})
// Functions
function renderTodoInReadMode(todo) {
// TODO: implement me!
}
function addTodo() {
// TODO: implement me!
}
Figure 2.5 shows a visual representation of the events you’ve added to the
static part of the HTML markup.
Figure 2.5. The event listeners added to the HTML elements
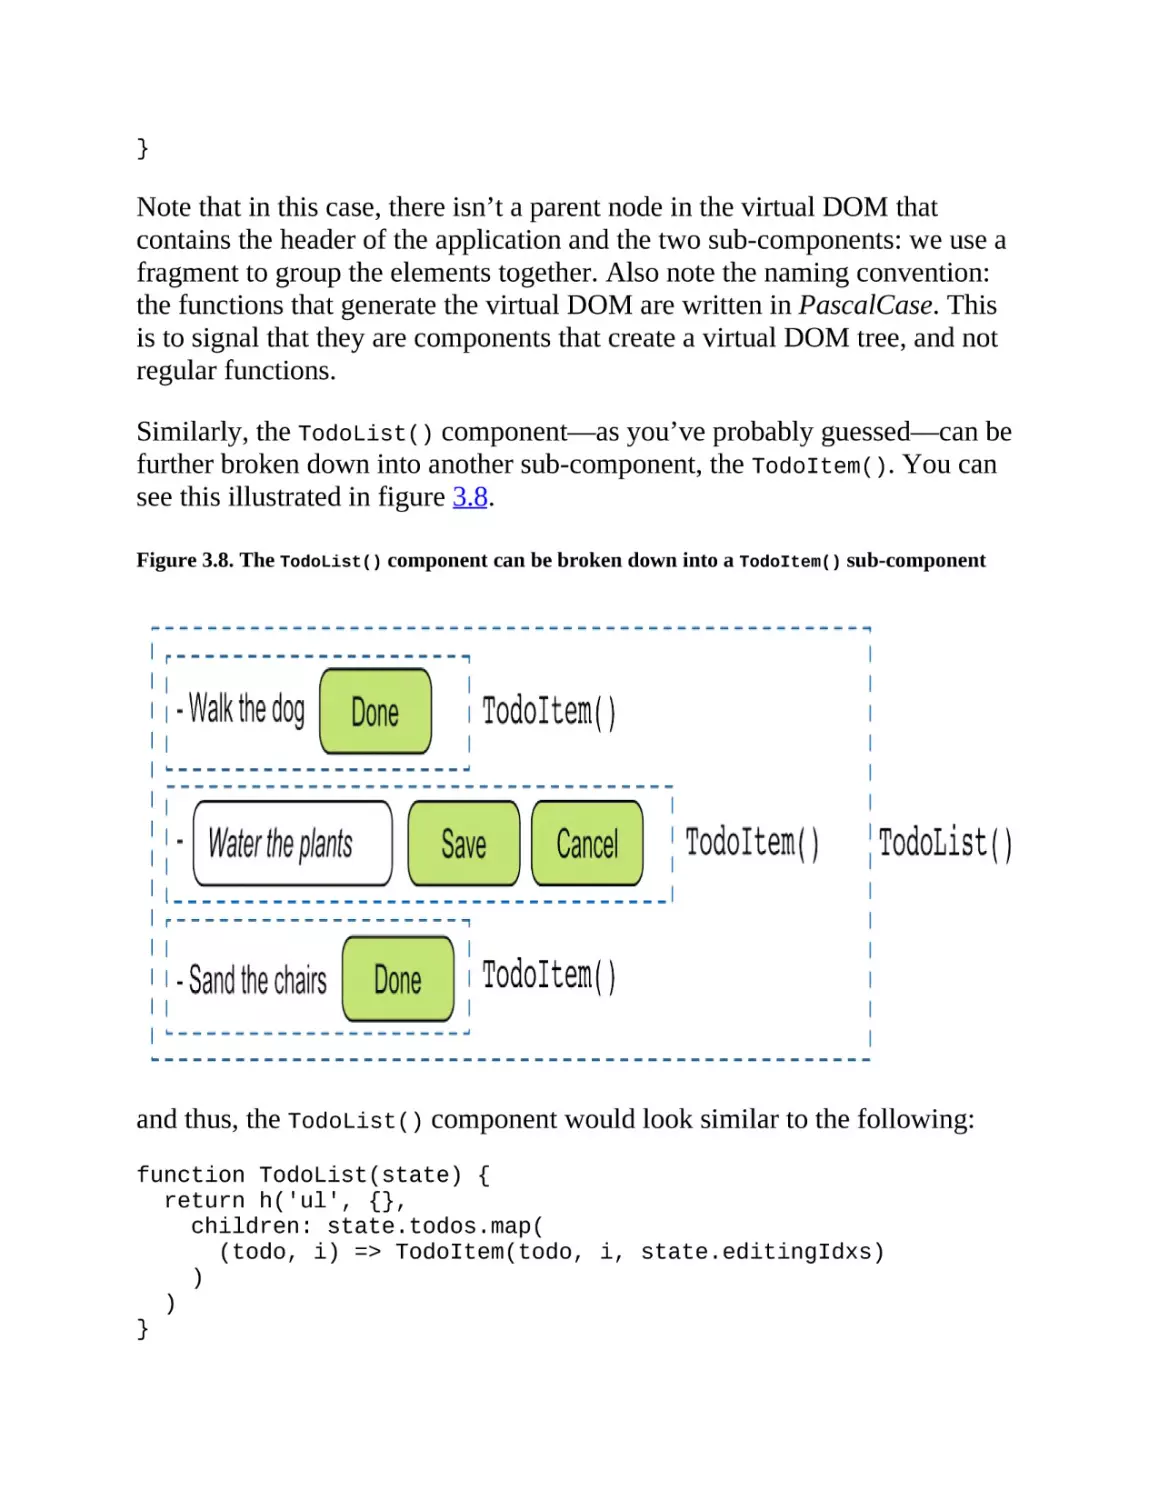
Now we’re getting to the meat of the application: rendering to-dos! This is
the part that a framework would do for you, but you’re going to do it yourself
in this chapter.
Exercise 2.2
Add a CSS transition to the color property of the button when it’s enabled or
disabled. This will make the button’s color change smoothly when it’s
enabled or disabled.
Here’re some tips in case you get stuck:
You can use the transition CSS property. Go ahead and read about it
in the MDN documentation if you need a refresher.
You can use the :disabled pseudo-class to style the button when it’s
disabled.
You can use the :enabled pseudo-class to style the button when it’s
enabled.
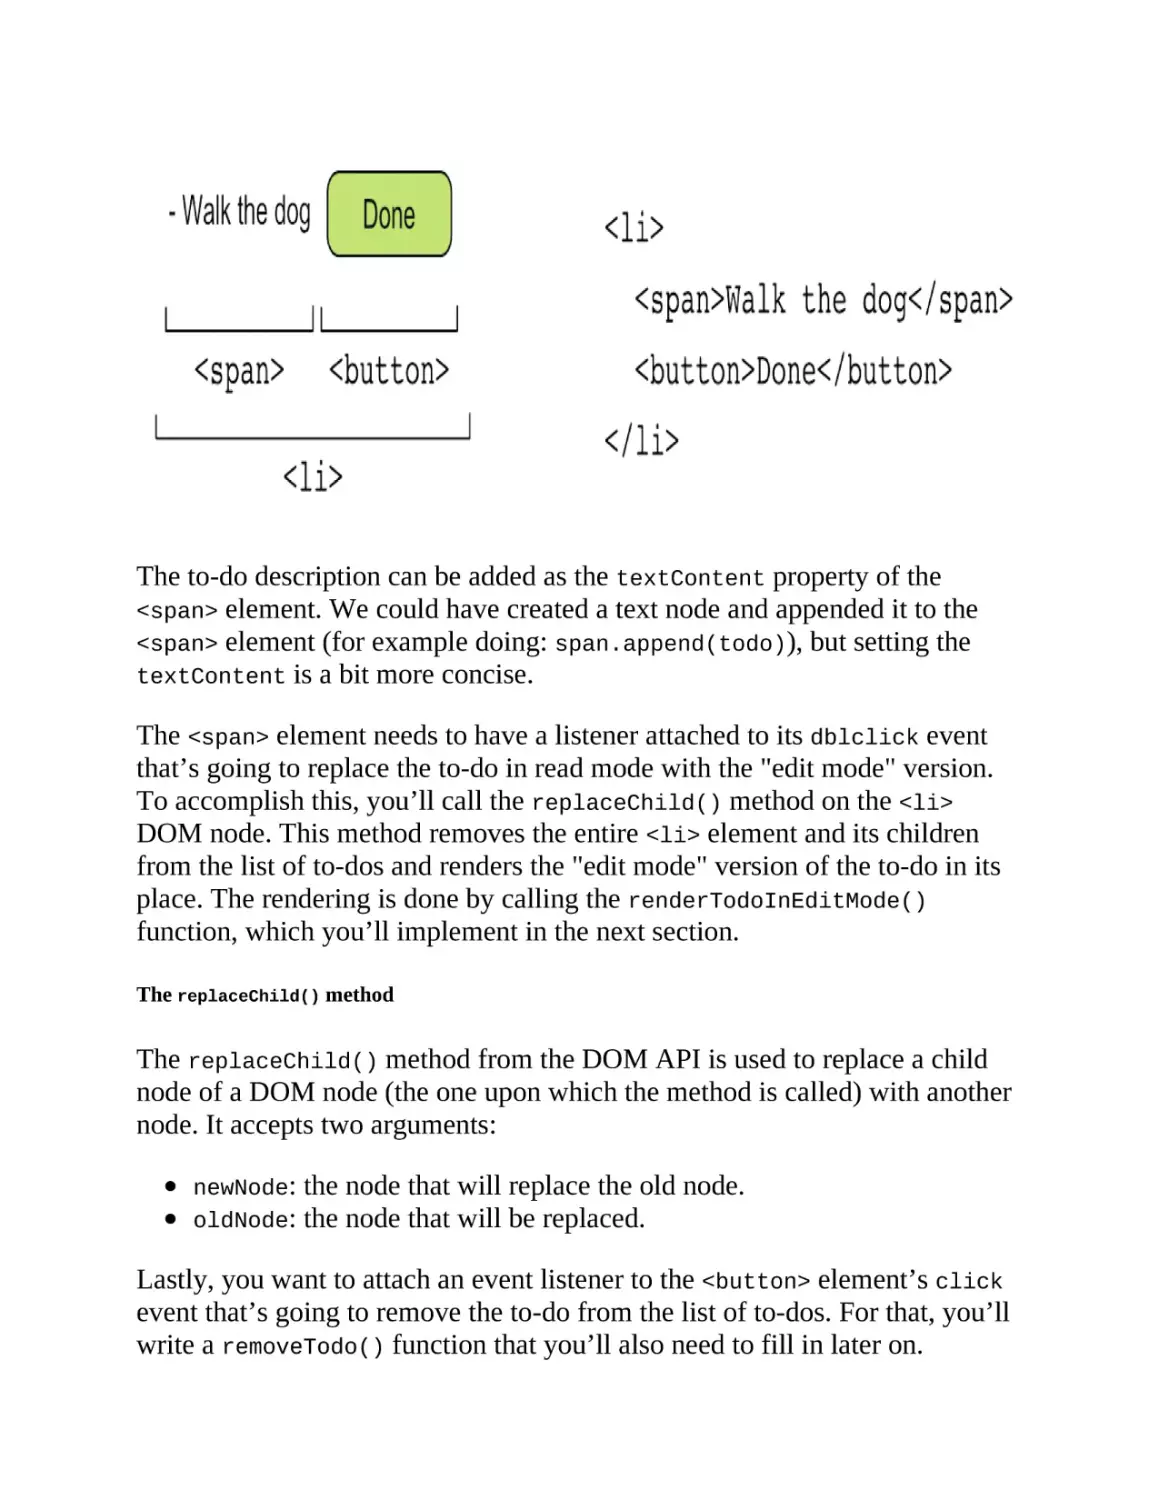
Rendering to-dos in "read mode"
To render a to-do in read mode, you need to use the
document.createElement() method of the Document API to create some
HTML elements:
The to-do items are inside an unordered list element (<ul>), so each todo should go inside a list item element (<li>).
The to-do itself is a simple text that you can render inside a <span>
element.
Then, the user should be able to mark a to-do as done, so you need a
button to do that.
Figure 2.6 depicts the HTML markup for a to-do in read mode.
Figure 2.6. A TODO in "read mode" is rendered as a <li> element containing a <span> element
with the to-do text and a button to mark it as done
The to-do description can be added as the textContent property of the
<span> element. We could have created a text node and appended it to the
<span> element (for example doing: span.append(todo)), but setting the
textContent is a bit more concise.
The <span> element needs to have a listener attached to its dblclick event
that’s going to replace the to-do in read mode with the "edit mode" version.
To accomplish this, you’ll call the replaceChild() method on the <li>
DOM node. This method removes the entire <li> element and its children
from the list of to-dos and renders the "edit mode" version of the to-do in its
place. The rendering is done by calling the renderTodoInEditMode()
function, which you’ll implement in the next section.
The replaceChild() method
The replaceChild() method from the DOM API is used to replace a child
node of a DOM node (the one upon which the method is called) with another
node. It accepts two arguments:
newNode:
oldNode:
the node that will replace the old node.
the node that will be replaced.
Lastly, you want to attach an event listener to the <button> element’s click
event that’s going to remove the to-do from the list of to-dos. For that, you’ll
write a removeTodo() function that you’ll also need to fill in later on.
Now that you know what the plan is, fill in the renderTodoInReadMode()
function as in listing 2.4.
Listing 2.4. Rendering the to-dos in "read mode" (todos.js)
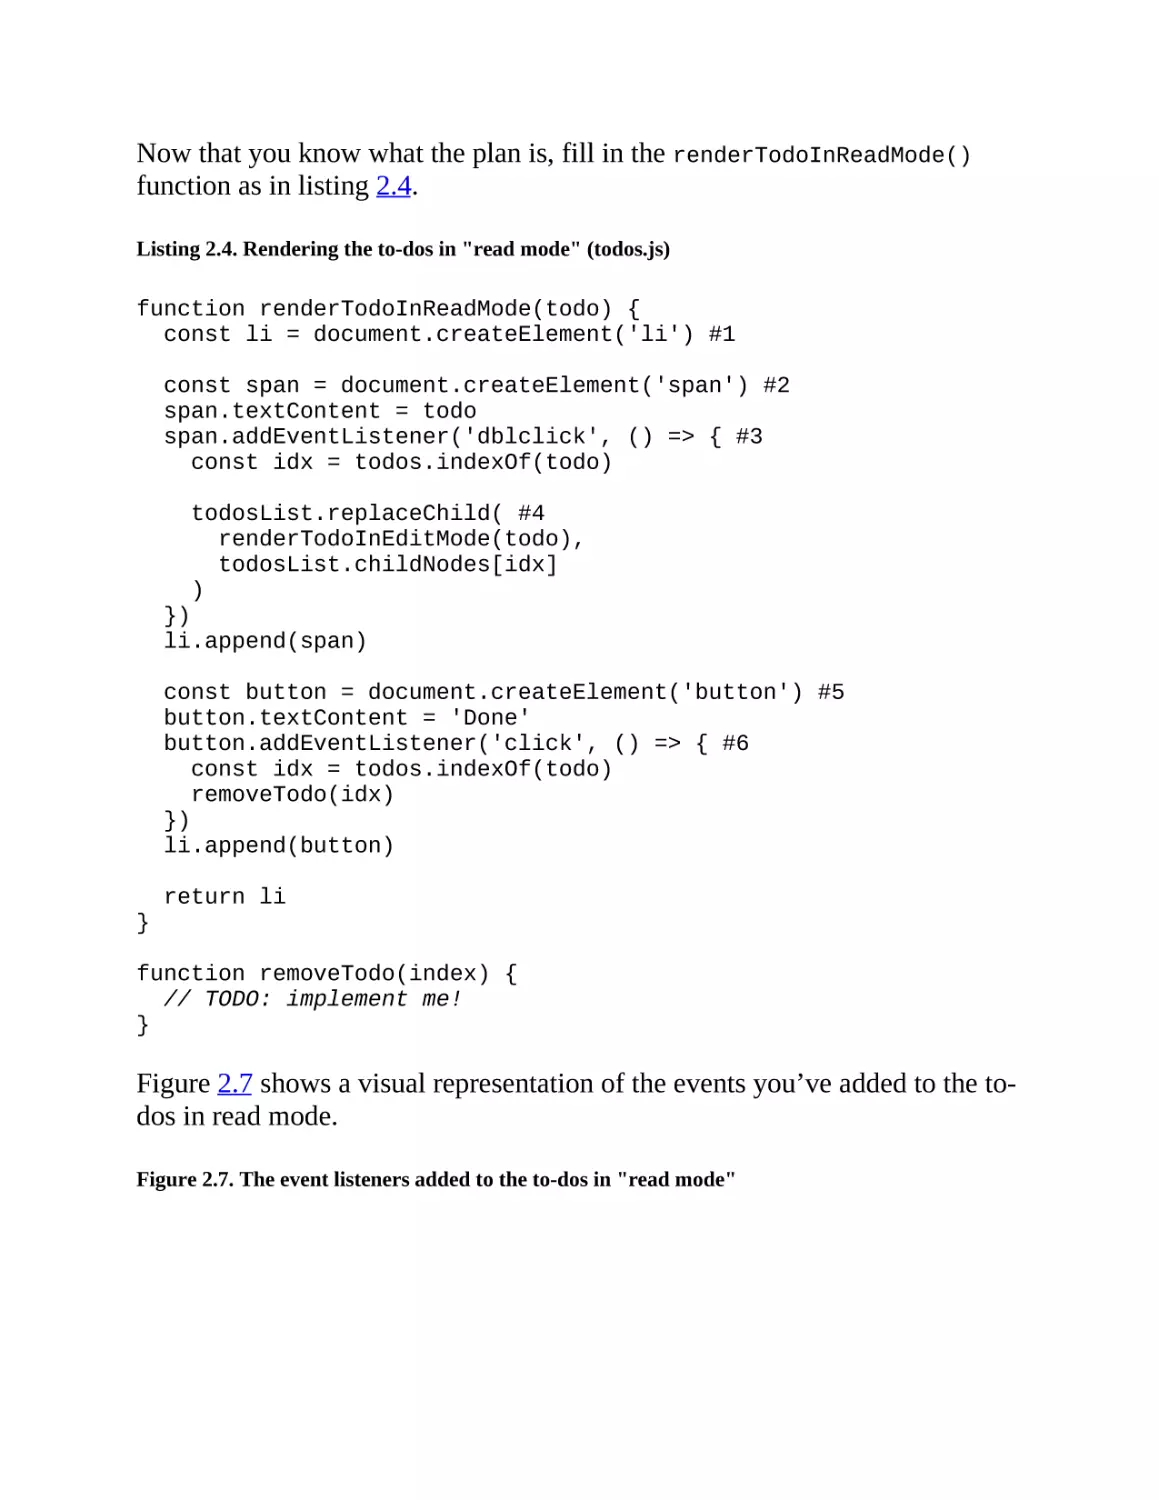
function renderTodoInReadMode(todo) {
const li = document.createElement('li') #1
const span = document.createElement('span') #2
span.textContent = todo
span.addEventListener('dblclick', () => { #3
const idx = todos.indexOf(todo)
todosList.replaceChild( #4
renderTodoInEditMode(todo),
todosList.childNodes[idx]
)
})
li.append(span)
const button = document.createElement('button') #5
button.textContent = 'Done'
button.addEventListener('click', () => { #6
const idx = todos.indexOf(todo)
removeTodo(idx)
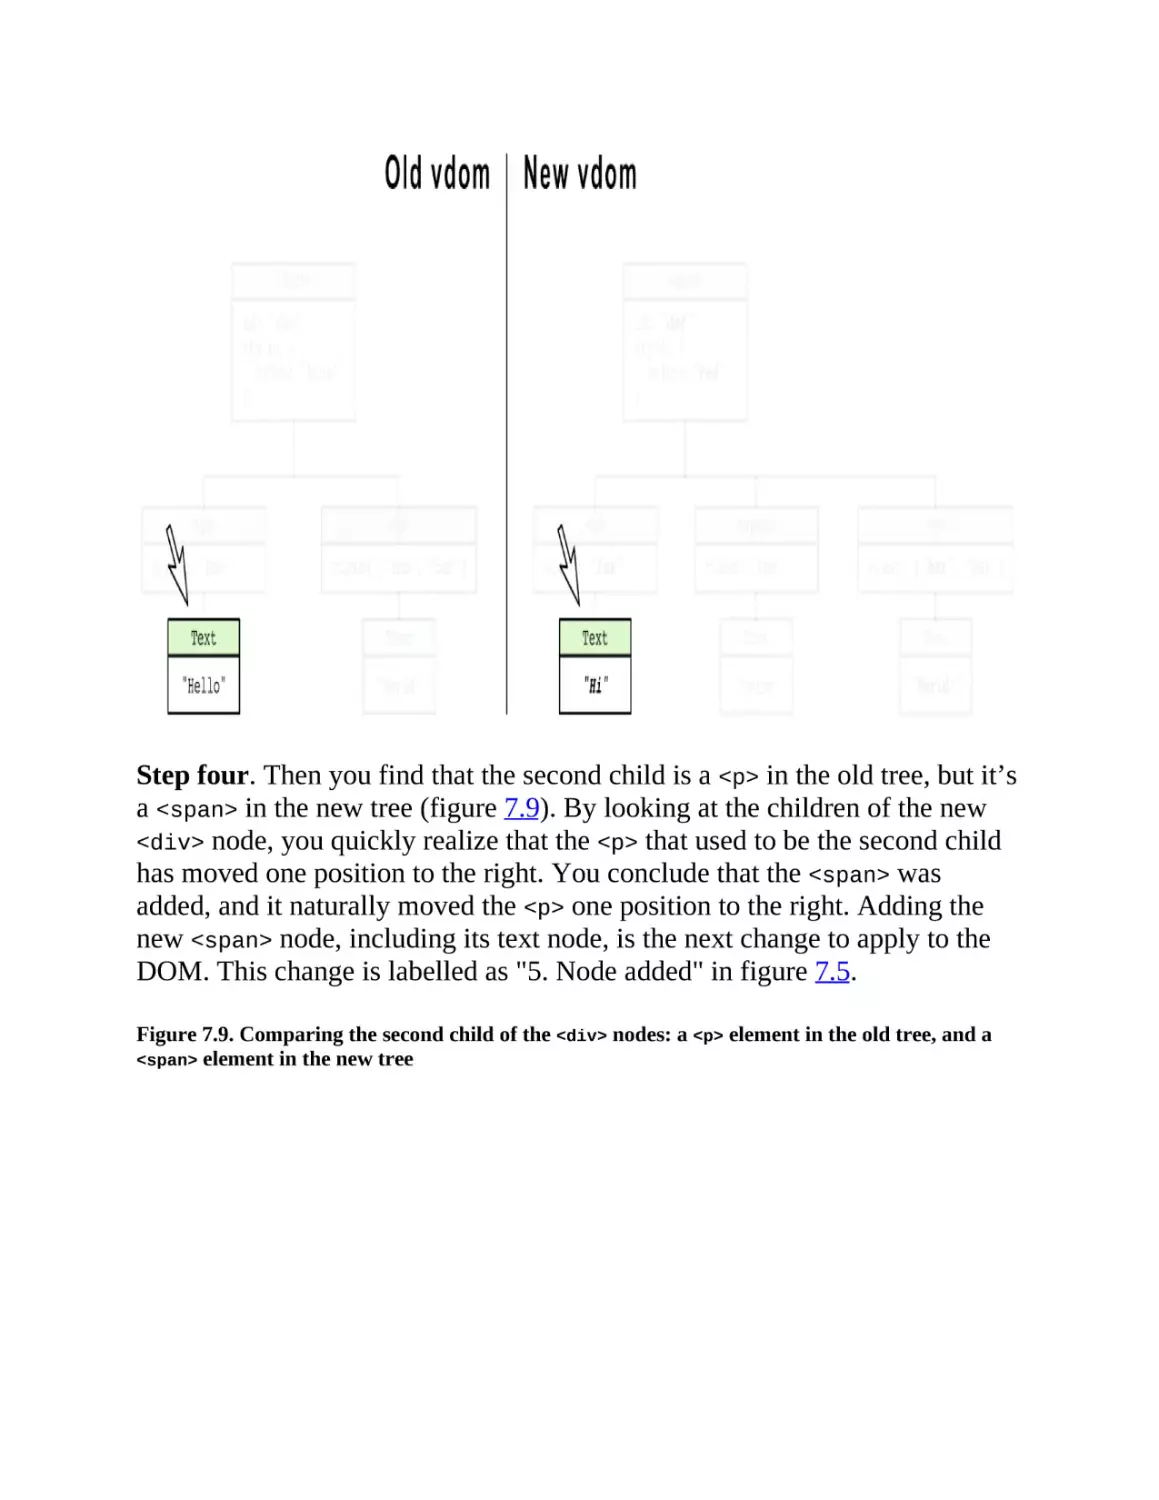
})
li.append(button)
return li
}
function removeTodo(index) {
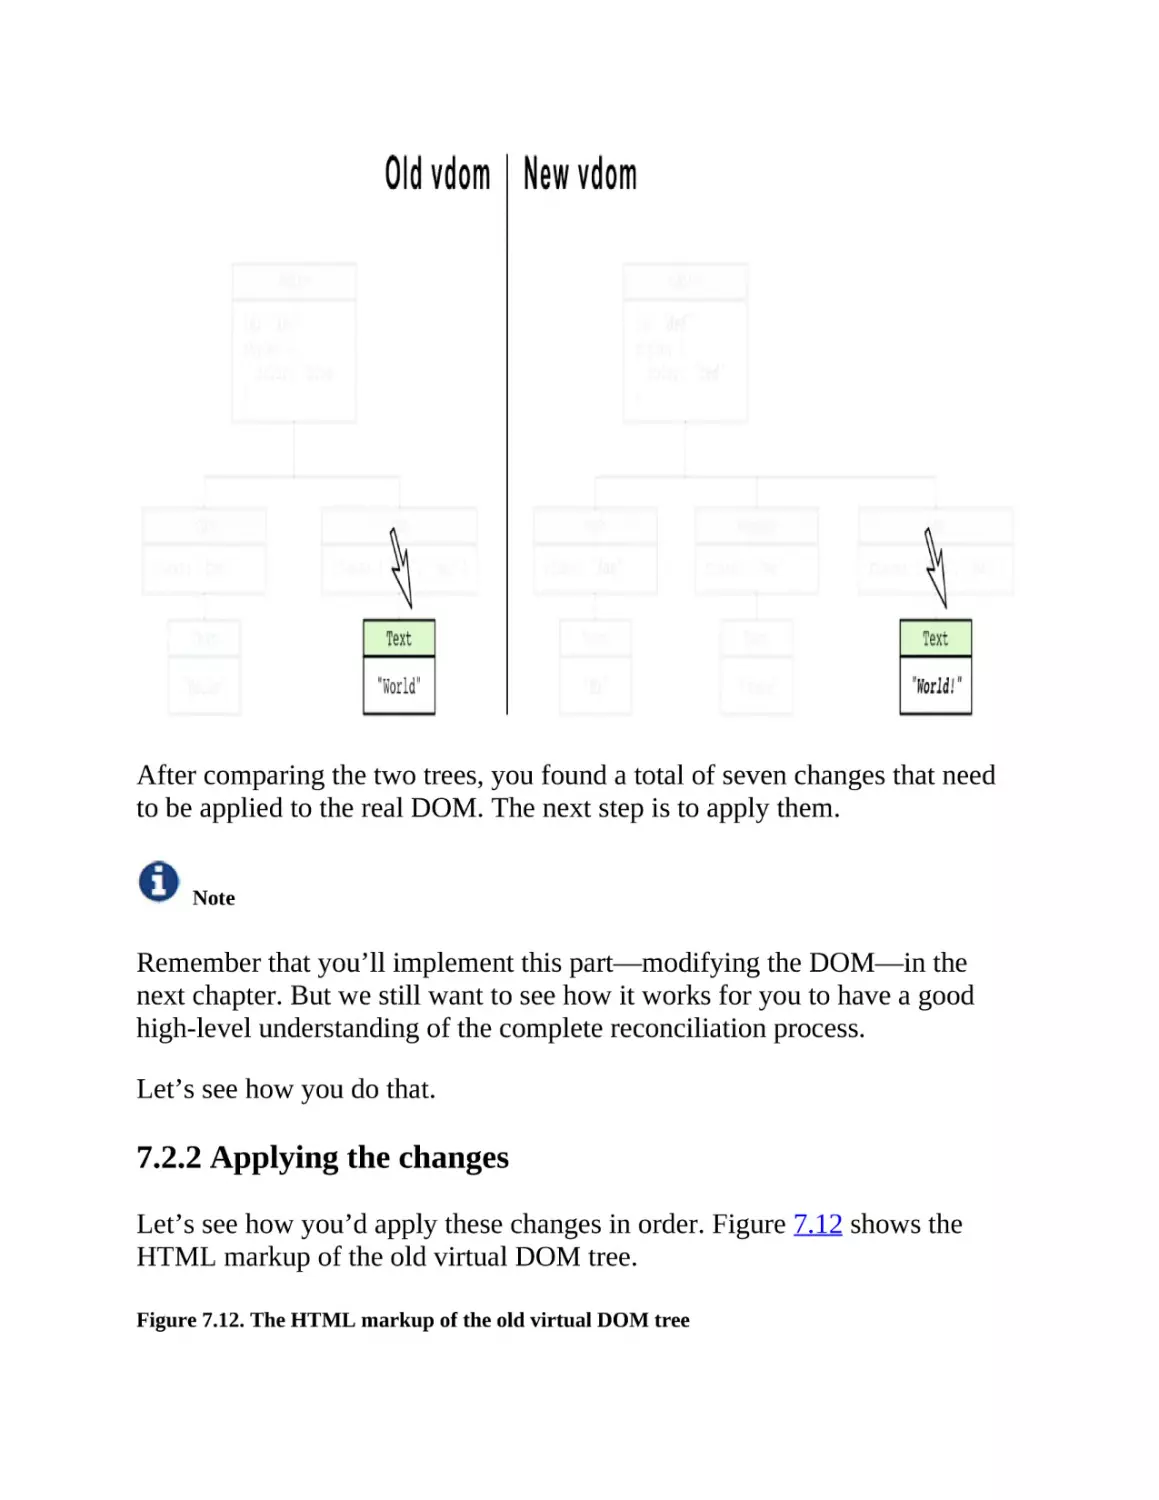
// TODO: implement me!
}
Figure 2.7 shows a visual representation of the events you’ve added to the todos in read mode.
Figure 2.7. The event listeners added to the to-dos in "read mode"
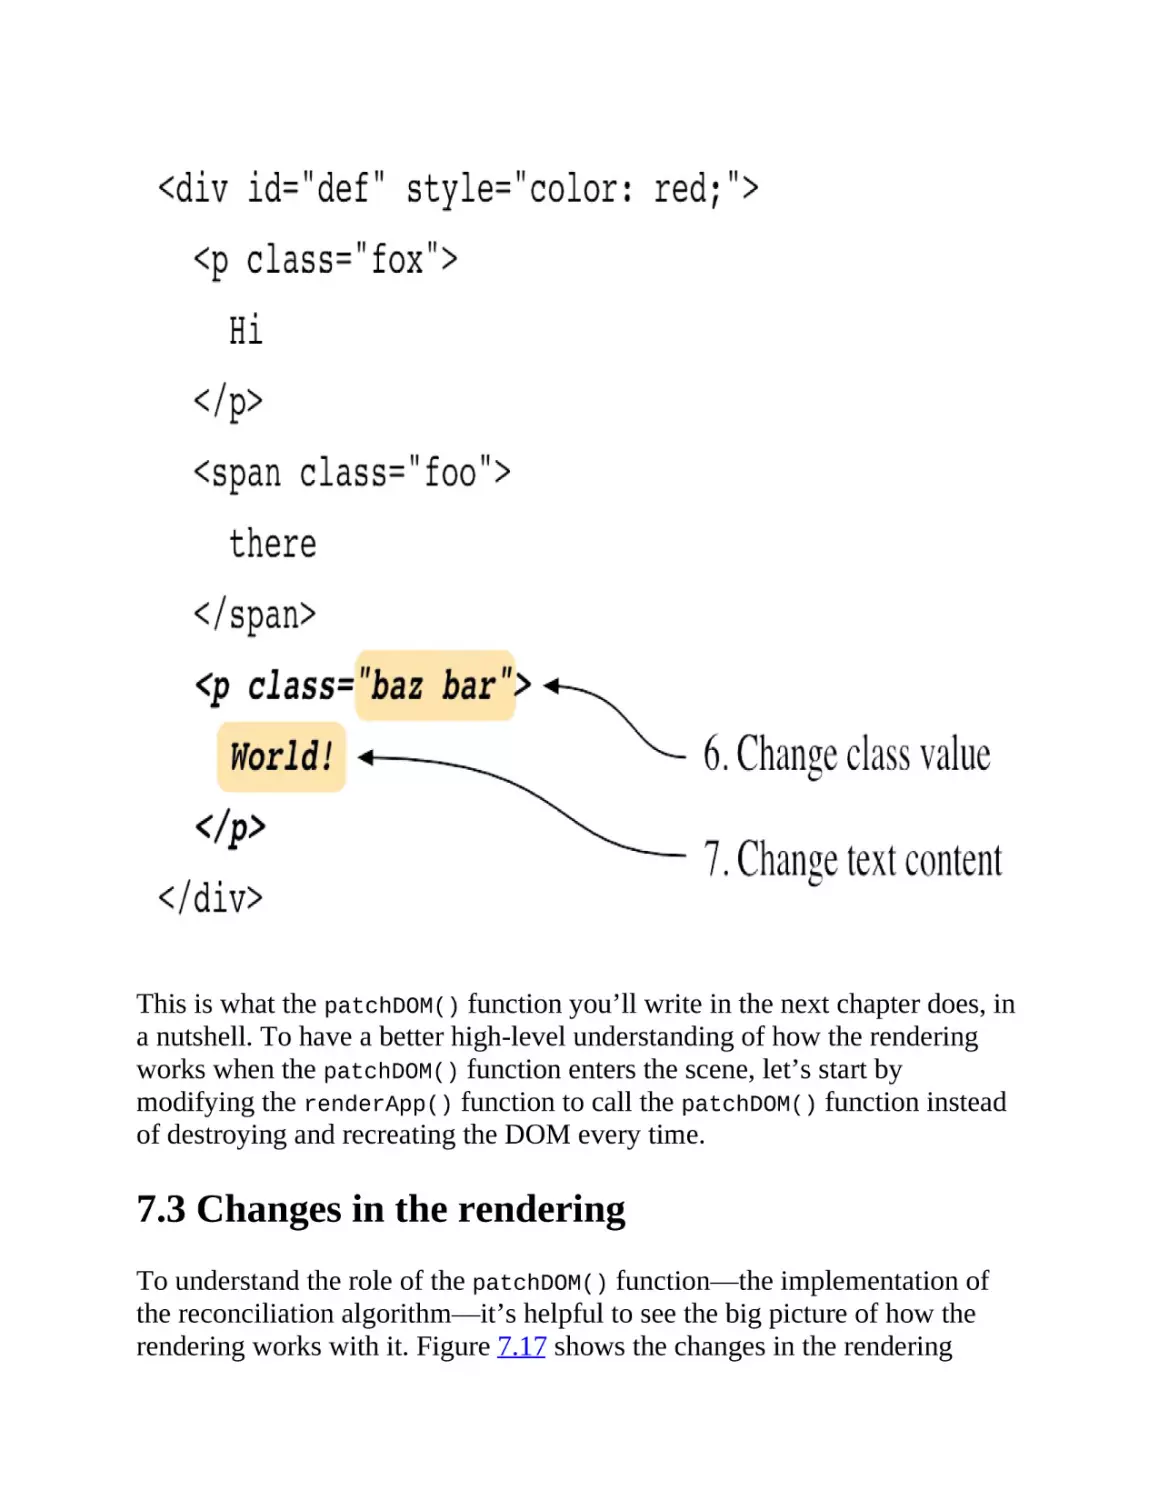
Let’s now implement the renderInEditMode() function.
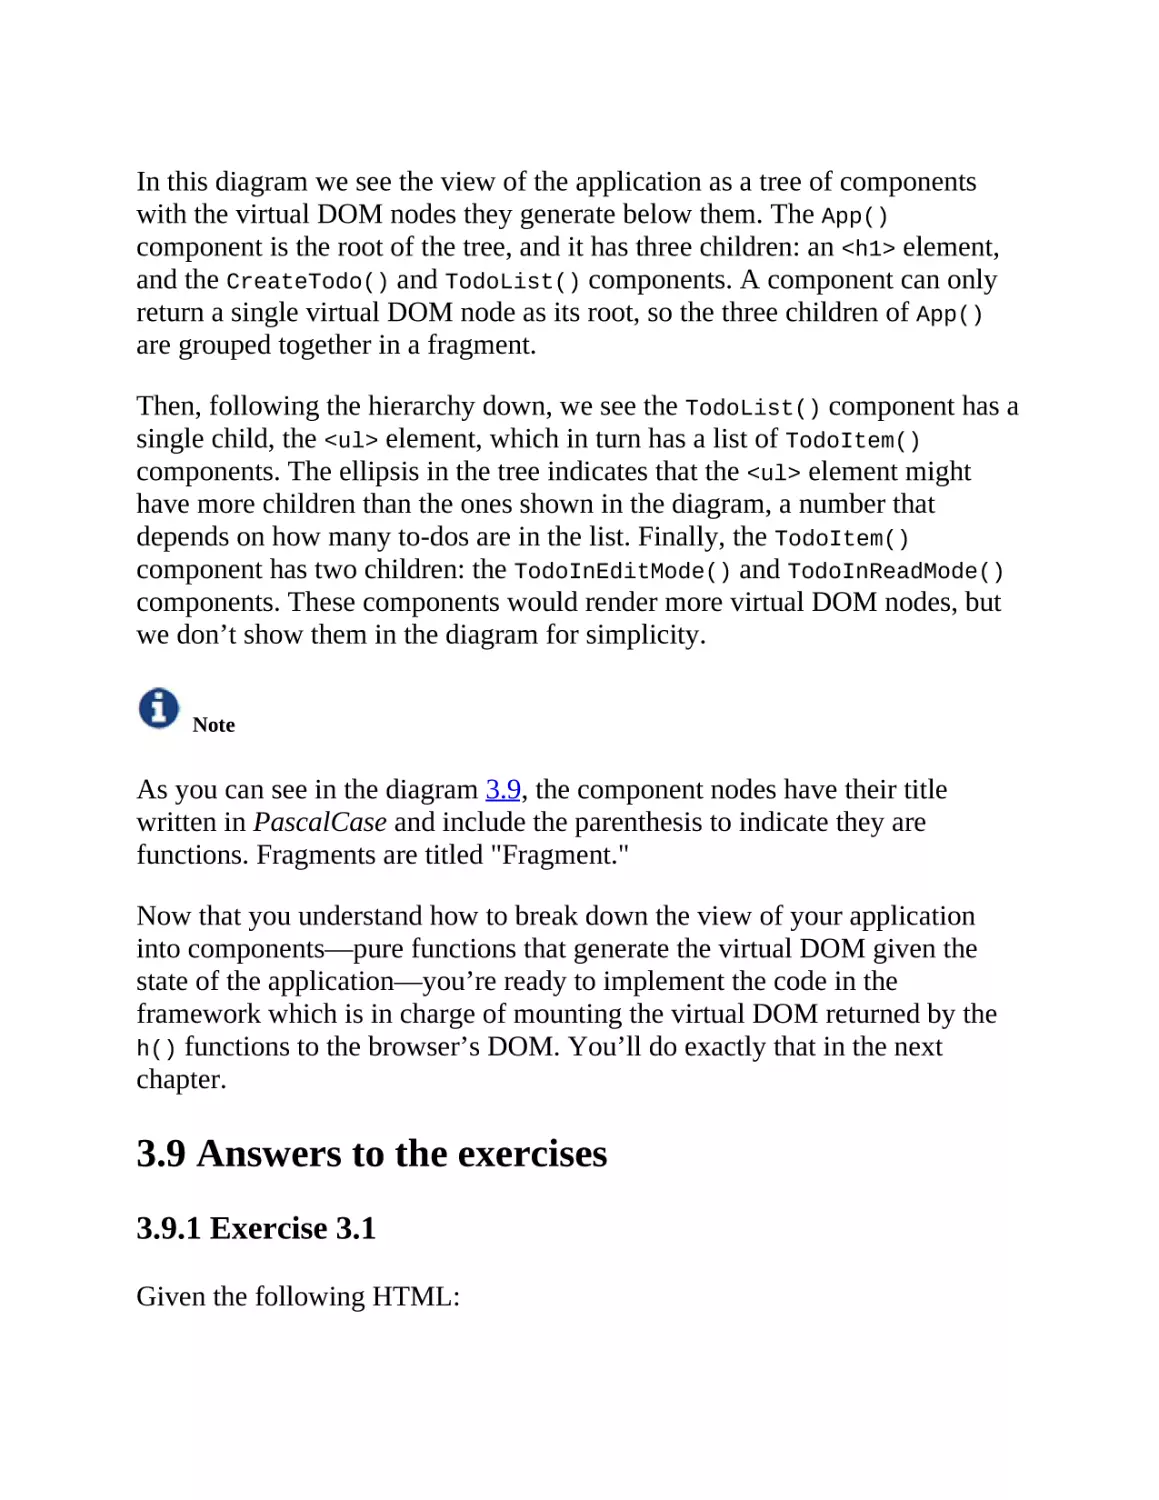
Rendering to-dos in "edit mode"
The to-do in edit mode is also part of the unordered list of to-dos, thus it
should also appear inside a <li> element. But this time, the <li> element
should contain an <input> element instead of a <span> element, so that the
user can modify the to-do description. And instead of having one button, we
need two: one to save the changes and another to cancel them. Figure 2.8
shows the HTML markup for a to-do in "edit mode".
Figure 2.8. A TODO in "edit mode" is rendered as a <li> element containing an <input> element
with the to-do text and two buttons to save or cancel the changes
When the user clicks on the save button, a function that you’ll write later
named updateTodo() will modify the to-do description in the state, and
replace the to-do in edit mode with the read mode version (once the user is
done editing the to-do, we want them to see the updated version back in read
mode). When the user clicks on the Cancel button instead, you just need to
call the renderTodoInReadMode() function.
Write the code for the renderTodoInEditMode() function as in listing 2.5.
Listing 2.5. Rendering the to-dos in "edit mode" (todos.js)
function renderTodoInEditMode(todo) {
const li = document.createElement('li') #1
const input = document.createElement('input') #2
input.type = 'text'
input.value = todo
li.append(input)
const saveBtn = document.createElement('button') #3
saveBtn.textContent = 'Save'
saveBtn.addEventListener('click', () => { #4
const idx = todos.indexOf(todo)
updateTodo(idx, input.value)
})
li.append(saveBtn)
const cancelBtn = document.createElement('button') #5
cancelBtn.textContent = 'Cancel'
cancelBtn.addEventListener('click', () => { #6
const idx = todos.indexOf(todo)
todosList.replaceChild( #7
renderTodoInReadMode(todo),
todosList.childNodes[idx]
)
})
li.append(cancelBtn)
return li
}
function updateTodo(index, description) {
// TODO: implement me!
}
The code is very similar to the one for the read mode version of the to-do.
Figure 2.9 shows the events you’ve added to the to-dos in "edit mode".
Figure 2.9. The events added to the to-dos in "edit mode"
So, all that’s missing to implement are the addTodo(), removeTodo(),
updateTodo() functions. Let’s do that now.
Adding, removing and updating to-dos
The functions to add, remove and update to-dos are defined in our todos.js
file, but they’re not implemented yet. We left "TODO" comments (oh, the
irony!) in the code to remind us of that. The implementation of these
functions is straightforward, so let’s see what each of them does.
The addTodo() function reads the description for the new to-do from the
<input> element’s value property, and pushes it into the array of to-dos.
Then it calls the renderTodoInReadMode() function to render the HTML for
the new to-do and appends it to the todosList element. Lastly, it clears the
<input> element’s value property so that the user can enter a new to-do
description, and disables the add button.
The removeTodo() function removes the to-do from the array of to-dos and
the <li> element from the document. To remove the <li> element from its
parent <ul>, it calls the remove() method on the target node, which you can
locate by index inside the childNodes array of the <ul> element.
The updateTodo() function needs two parameters passed to it: the index of
the to-do to update, and the new description for the to-do. The passed
description overwrites whatever is in the array of to-dos at the given index.
Then, using the renderTodoInReadMode() function, you can render the
HTML for the updated to-do, and finally replace the to-do at the given index
inside the todosList element’s childNodes array with the new HTML.
Listing 2.6 shows the code for the addTodo(), removeTodo() and
updateTodo() functions.
Listing 2.6. Functions to add, remove and edit to-dos (todos.js)
function addTodo() { #1
const description = addTodoInput.value
todos.push(description)
const todo = renderTodoInReadMode(description)
todosList.append(todo)
addTodoInput.value = ''
addTodoButton.disabled = true
}
function removeTodo(index) { #2
todos.splice(index, 1)
todosList.childNodes[index].remove()
}
function updateTodo(index, description) { #3
todos[index] = description
const todo = renderTodoInReadMode(description)
todosList.replaceChild(todo, todosList.childNodes[index])
}
If you refresh the page now, you should be able to add, remove and update
to-dos. Your application should look similar to Figure 2.10. You’ve written a
web application without a framework. It wasn’t that painful, was it?
Figure 2.10. The finished TODOs app
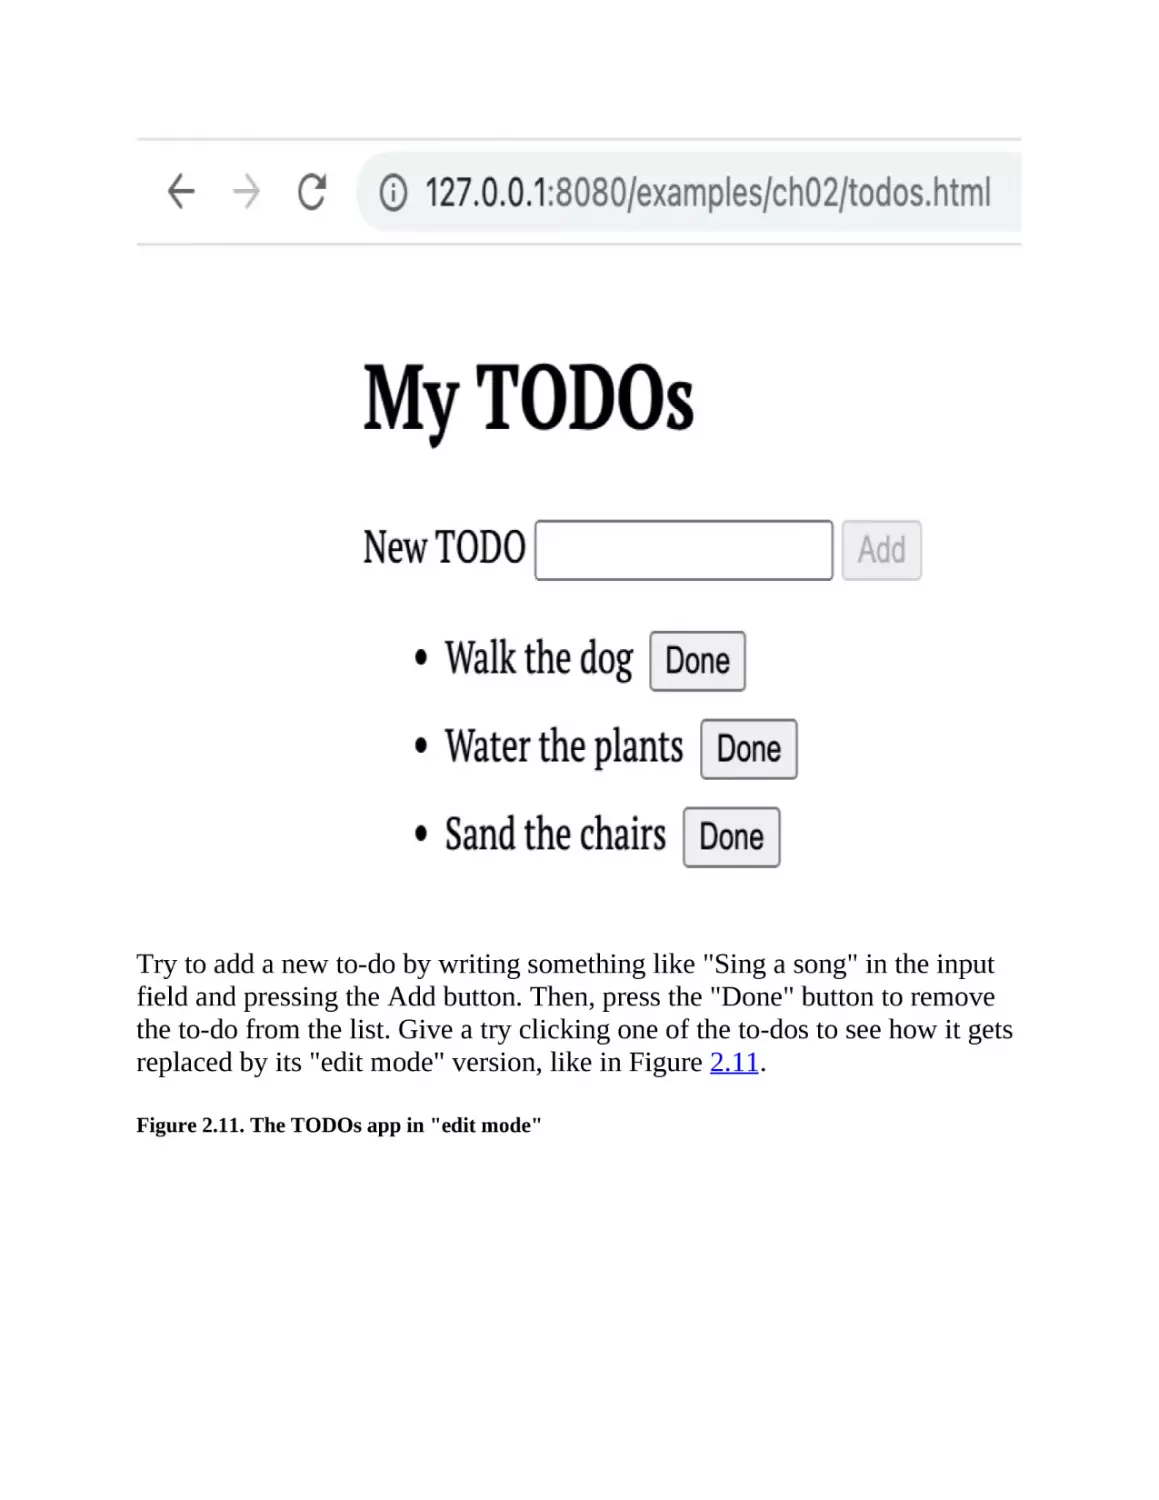
Try to add a new to-do by writing something like "Sing a song" in the input
field and pressing the Add button. Then, press the "Done" button to remove
the to-do from the list. Give a try clicking one of the to-dos to see how it gets
replaced by its "edit mode" version, like in Figure 2.11.
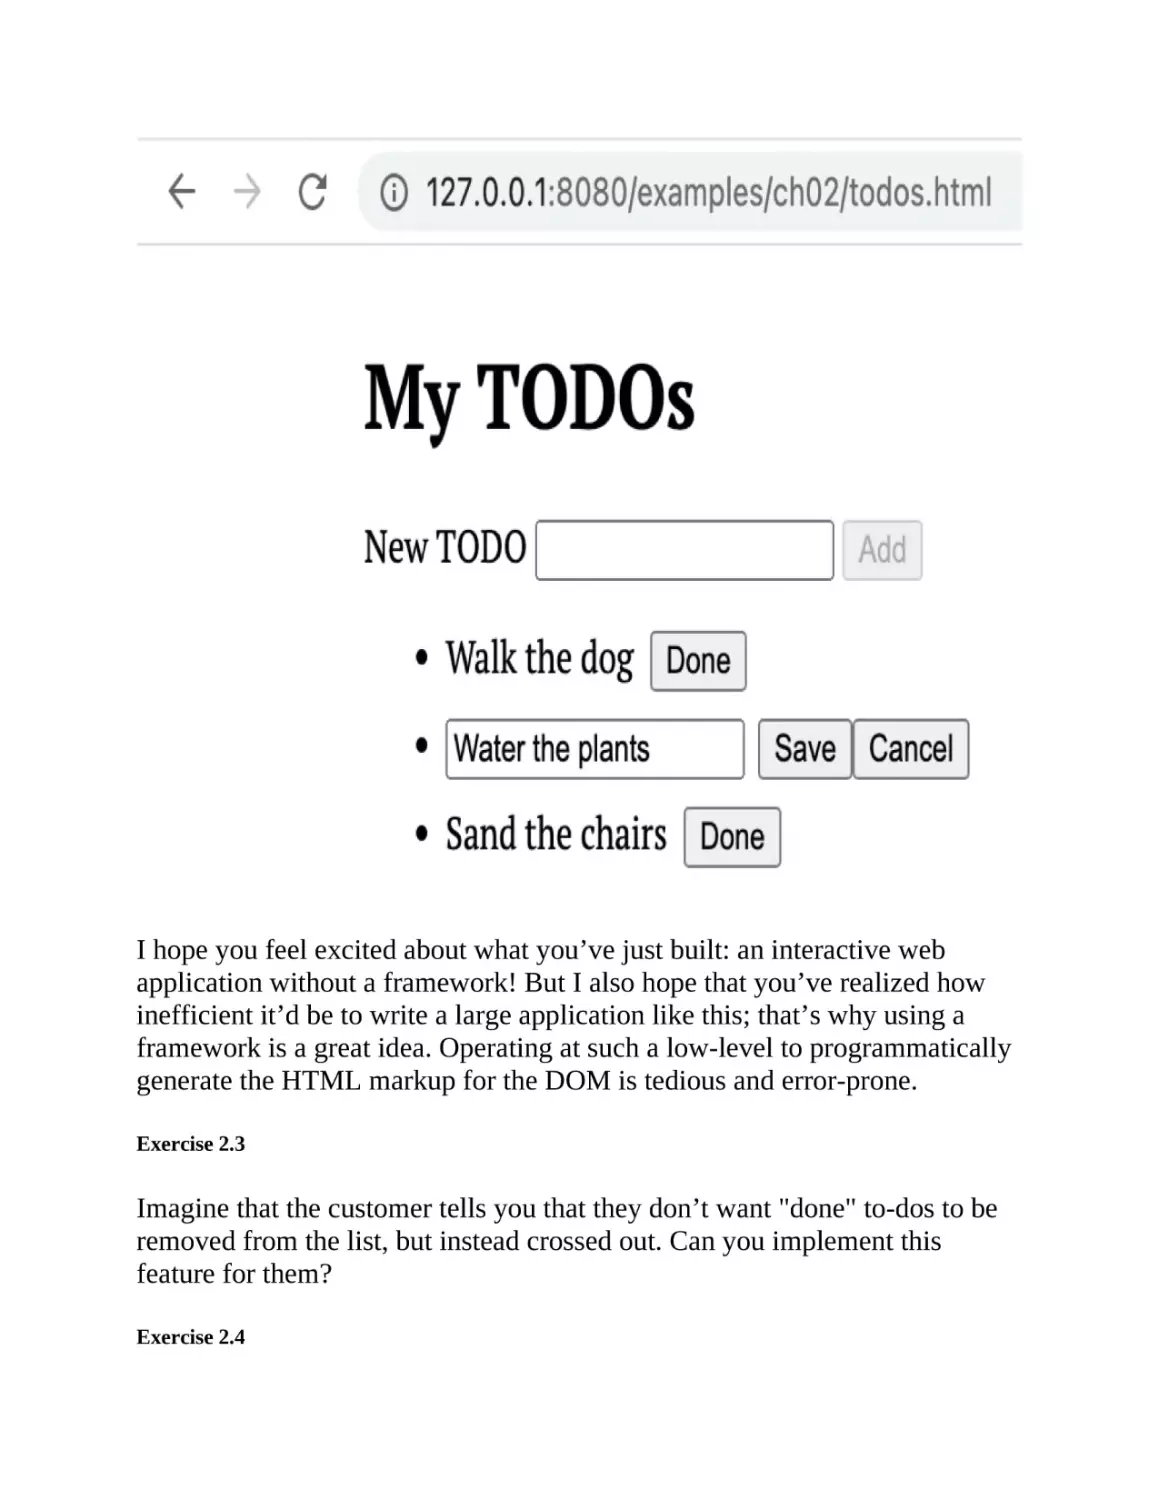
Figure 2.11. The TODOs app in "edit mode"
I hope you feel excited about what you’ve just built: an interactive web
application without a framework! But I also hope that you’ve realized how
inefficient it’d be to write a large application like this; that’s why using a
framework is a great idea. Operating at such a low-level to programmatically
generate the HTML markup for the DOM is tedious and error-prone.
Exercise 2.3
Imagine that the customer tells you that they don’t want "done" to-dos to be
removed from the list, but instead crossed out. Can you implement this
feature for them?
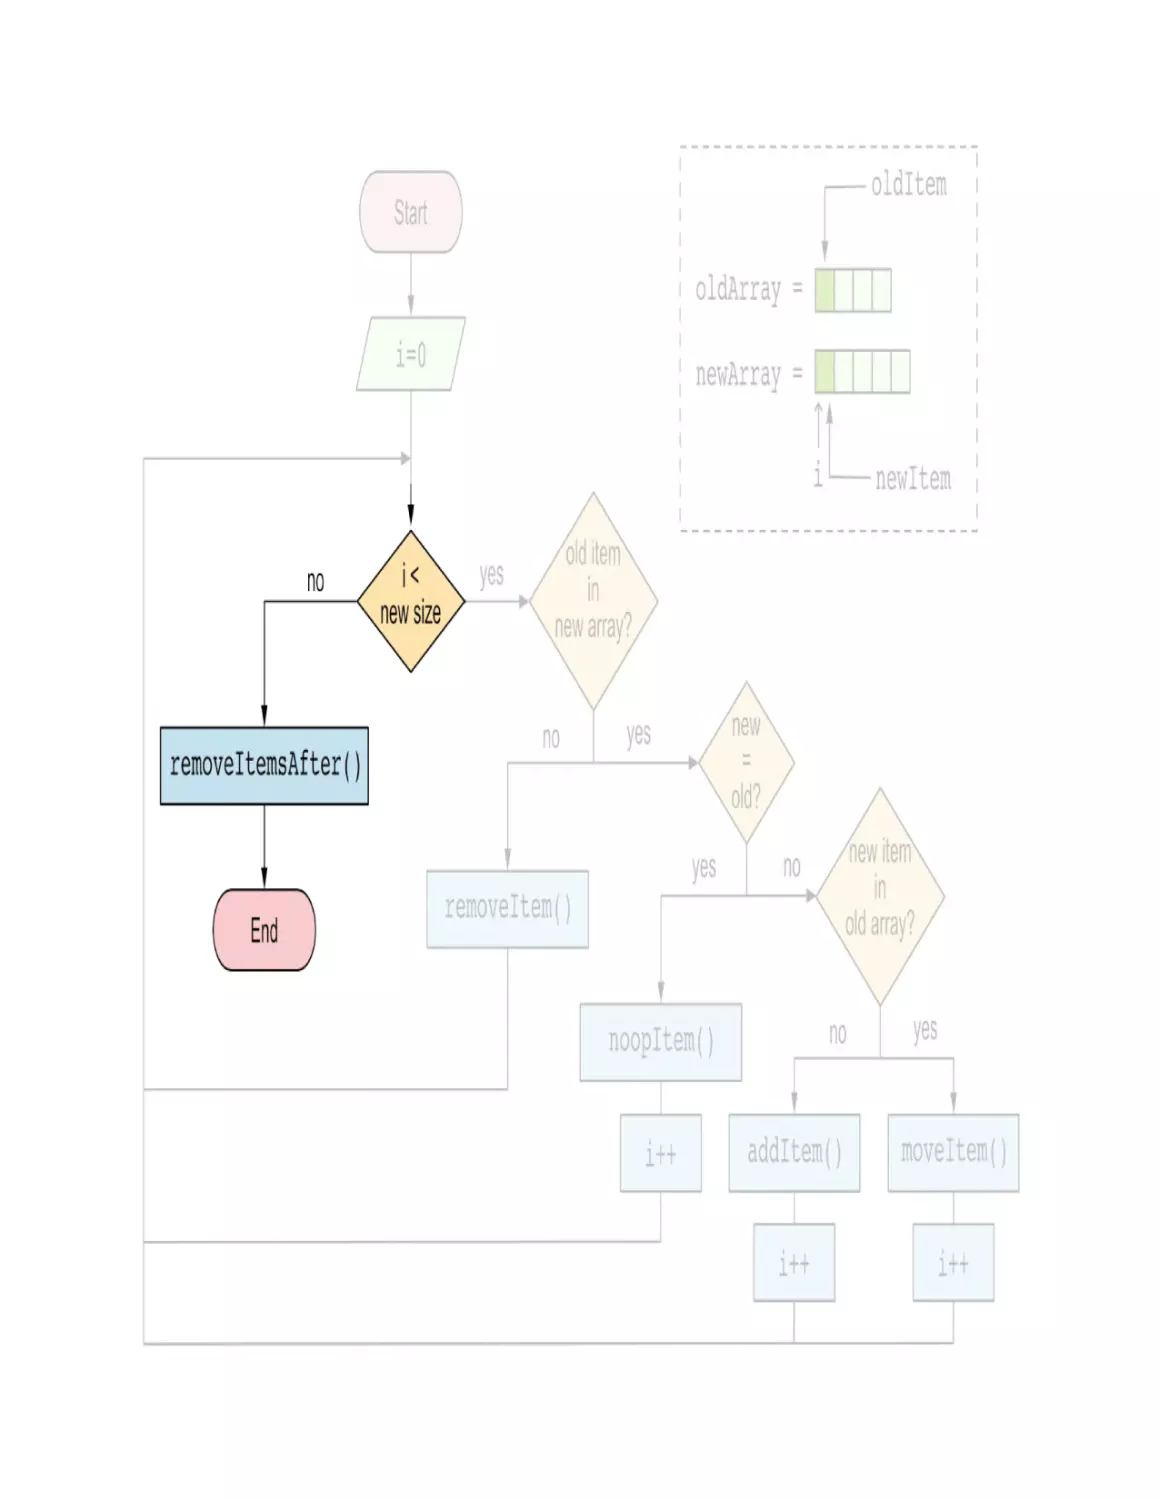
Exercise 2.4
The customer tried the application and loved it! But they realized they can
add the same to-do multiple times—unacceptable! Can you fix this bug, so
that if the user tries to add a to-do that already exists, the application doesn’t
add it again and warns the user about it?
Exercise 2.5
The customer came with a challenging request for you. To aid their users
with a hearing impairment, they’d like the application to read out loud a to-do
when it’s added to the list. Can you implement this feature for them?
Psss… here’s a little tip from a senior developer at your company. You might
want to read about the Web Speech API.
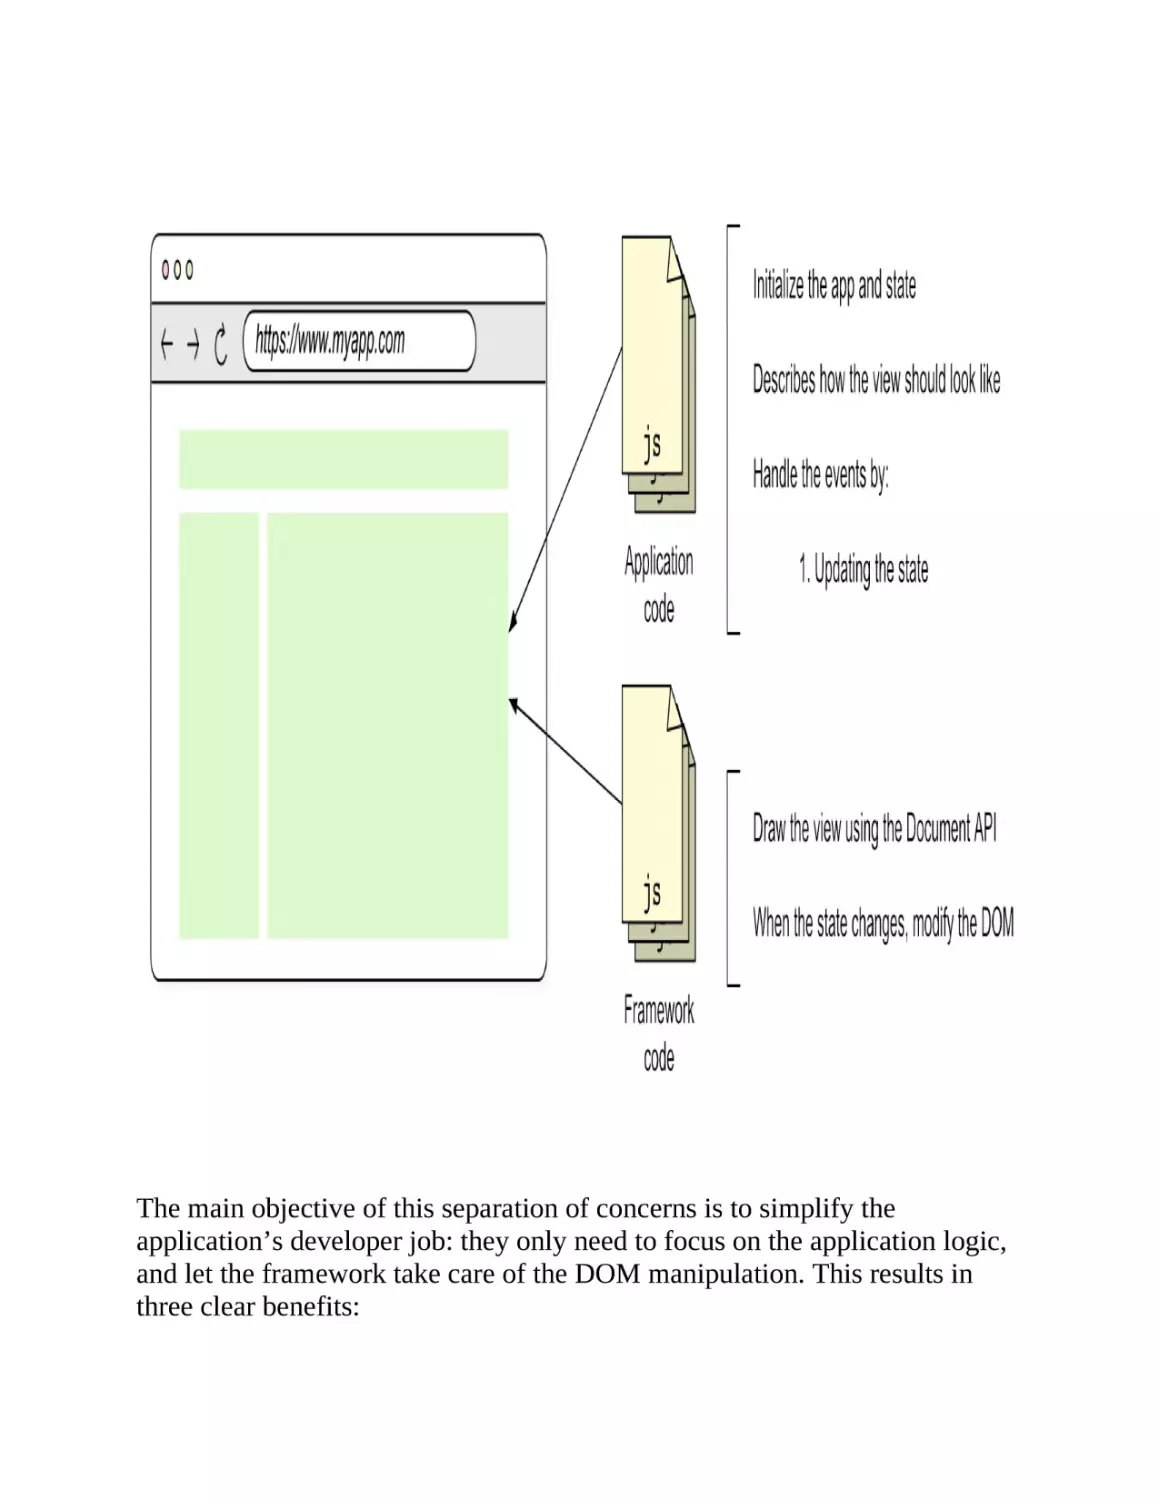
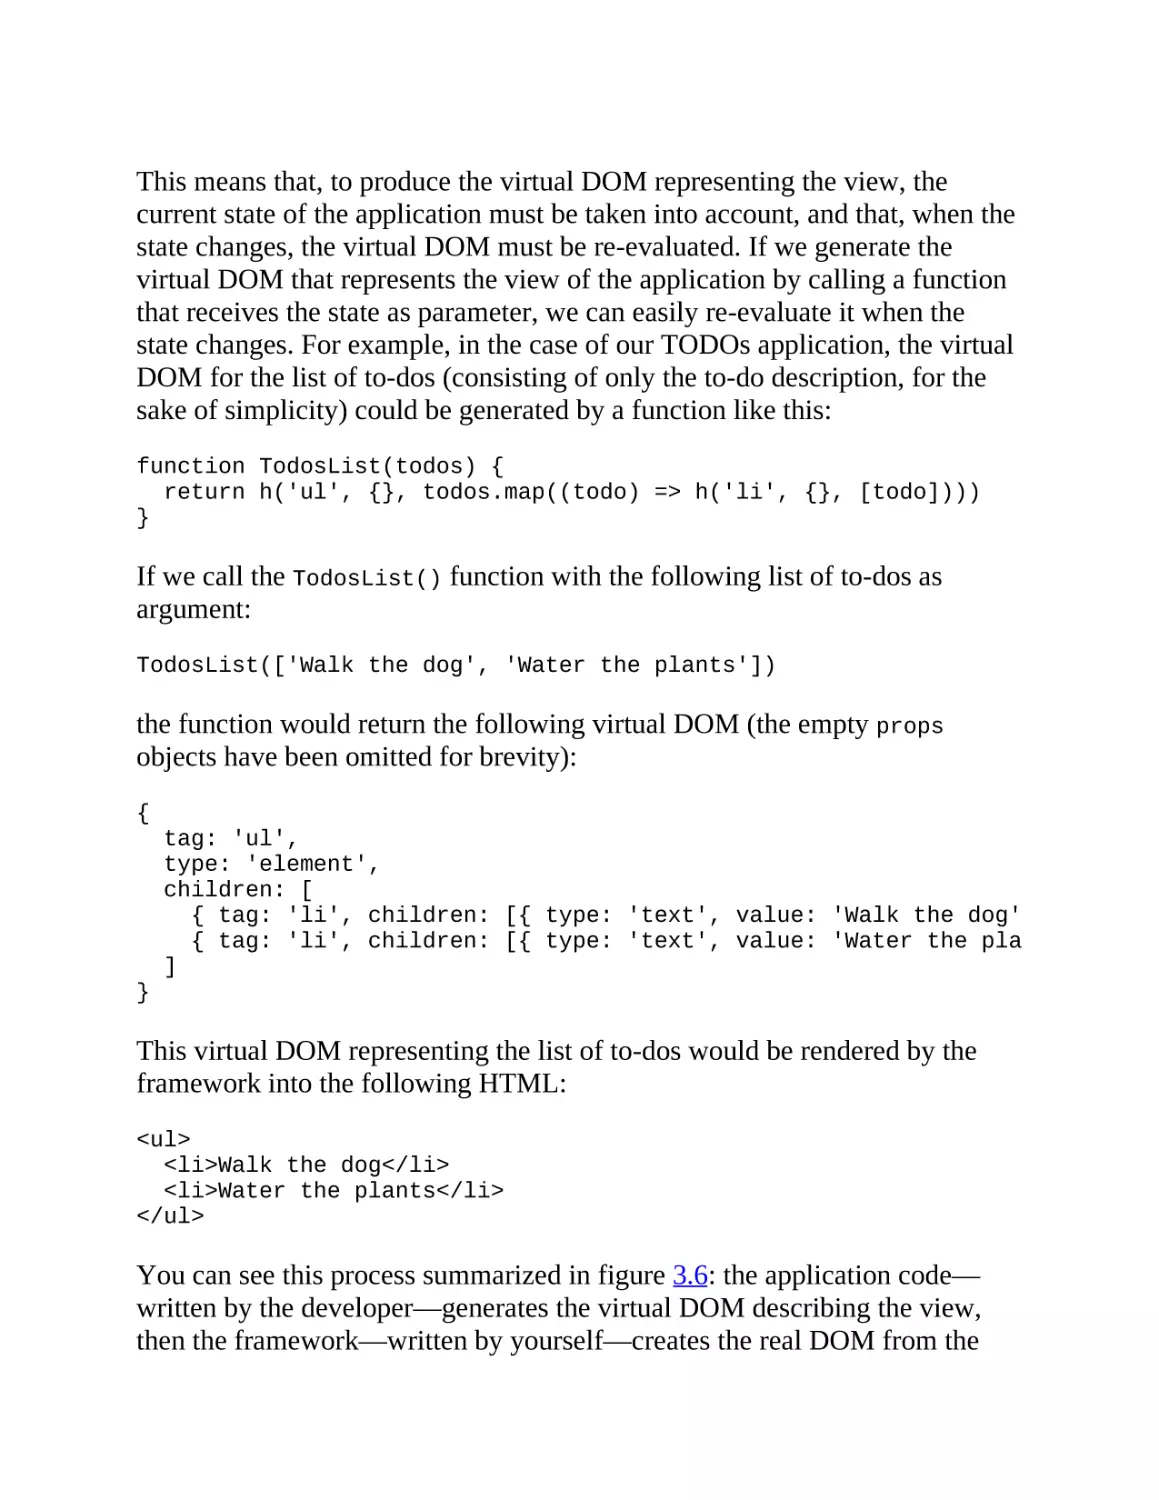
The first thing we want our framework to take care for us is the usage of the
Document API to create and manipulate the DOM; that’s the part that’s the
most burdensome to write. If we can abstract away the manipulation of the
DOM, we can focus on the application logic, which is what makes our
applications useful. Think about it: the time spent working on manipulating
the DOM doesn’t really add value to the final user. We need to do it for the
application to be interactive, but it’s not what the user cares about. A good
framework should allow us to forget about dealing with the DOM and focus
on the application logic. That’s exactly what we’ll do in the next chapter.
2.3 Answers to the exercises
2.3.1 Exercise 2.1
To add some nice CSS, first create a styles.css file in the examples/ch02
directory and load it from the HTML file’s <head> tag, like so:
<head>
<meta charset="UTF-8" />
<meta http-equiv="X-UA-Compatible" content="IE=edge" />
<meta name="viewport" content="width=device-width, initial-scale=1.0" />
<link rel="stylesheet" href="styles.css" />
<script type="module" src="todos.js"></script>
<title>My TODOs</title>
</head>
Then, add the following CSS rules to the styles.css file to use the Roboto
font:
@import url('https://fonts.googleapis.com/css2?family=Roboto:ital,wght@0,400
body {
font-family: 'Roboto', sans-serif;
width: 500px;
margin: 2em auto;
}
Add some CSS rules to center the application, add some padding to the input
field and the button, and to place the label on top of the input field, displayed
in italic font:
body {
font-family: 'Roboto', sans-serif;
width: 500px;
margin: 2em auto;
}
label {
display: block;
font-style: italic;
margin-bottom: 0.25em;
}
h1 {
font-size: 3.5rem;
}
button,
input {
font-family: inherit;
padding: 0.25em 0.5em;
font-size: 1rem;
}
Feel free to experiment and add your own styles to the application. The result
of using the styles above is shown in Figure 2.12.
Figure 2.12. The TODOs app with some CSS styles
Looking much nicer, don’t you think?
2.3.2 Exercise 2.2
To add a transition to the button, for when it gets enabled or disabled, you
can use the following CSS rules:
button:disabled {
transition: color 0.5s ease-out;
}
button:enabled {
transition: color 0.5s ease-out;
}
If you start typing in the input field, once you’ve typed three characters,
you’ll see how the button’s text color changes from gray to black. That’s the
transition you’ve just added. When you remove the characters from the input
field, the button’s text color smoothly transitions back to gray.
2.3.3 Exercise 2.3
Implementing the crossed-out to-dos feature is a bit more challenging that it
appears at first sight. You need to change how the state is stored to keep track
of whether a to-do is done or not:
// State of the app
const todos = [
{ description: 'Walk the dog', done: false },
{ description: 'Water the plants', done: false },
{ description: 'Sand the chairs', done: false },
]
Then you need to change the code in all the places where the sate is used. For
example, inside the renderTodoInReadMode() you need to change the
following line:
span.textContent = todo
span.textContent = todo.description
And in the renderTodoInEditMode() function, you need to change the
following line:
input.value = todo
input.value = todo.description
You also need to edit the code in the addTodo() and updateTodo() functions.
I leave this part as an exercise for you to do.
Then, when the Done button is clicked, the removeTodo() function needs to
set the done property of the to-do to true instead of removing it from the
array:
function removeTodo(index) {
todos.splice(index, 1)
todosList.childNodes[index].remove()
todos[index].done = true
}
And lastly, you need to modify the renderTodoInReadMode() so that, when a
to-do is done, it adds a class to the <span> element to cross out the text,
doesn’t include the Done button, and doesn’t allow the user to edit the to-do:
function renderTodoInReadMode(todo) {
const li = document.createElement('li')
const span = document.createElement('span')
span.textContent = todo.description
if (todo.done) {
span.classList.add('done')
}
if (!todo.done) {
span.addEventListener('dblclick', () => {
const idx = todos.indexOf(todo)
todosList.replaceChild(
renderTodoInEditMode(todo),
todosList.childNodes[idx]
)
})
}
li.append(span)
if (!todo.done) {
const button = document.createElement('button')
button.textContent = 'Done'
button.addEventListener('click', () => {
const idx = todos.indexOf(todo)
removeTodo(idx)
})
li.append(button)
}
return li
}
And add the following CSS rule to the styles.css file (or inside a <style> tag
in the document’s <head>) to cross out the text:
.done {
text-decoration: line-through;
}
You can see the result in Figure 2.13.
Figure 2.13. The TODOs app with crossed-out to-dos
Now, when a to-do is done, it’s crossed out and the Done button is removed.
2.3.4 Exercise 2.4
To prevent the user from adding the same to-do multiple times, you need to
check if the to-do already exists in the array before adding it. The comparison
should be done against the trimmed and lowercased version of the to-do’s
description. In case the to-do already exists, you can show an alert to the
user:
function addTodo() {
const description = addTodoInput.value
if (todoExists(description)) {
alert('Todo already exists')
return
}
todos.push(description)
const todo = renderTodoInReadMode(description)
todosList.append(todo)
addTodoInput.value = ''
addTodoButton.disabled = true
}
function todoExists(description) {
const cleanTodos = todos.map((todo) => todo.trim().toLowerCase())
return cleanTodos.includes(description.trim().toLowerCase())
}
If you try now to add a to-do that’s already in your list, you’ll see an alert like
the one in Figure 2.14.
Figure 2.14. Alert shown when trying to add a to-do that already exists
2.3.5 Exercise 2.5
You can use the Web Speech API to read out loud the to-dos when they’re
added to the list. To read a text out loud, you need to create a
SpeechSynthesisUtterance object and set its text property to the text you
want to read. Then you need to set the voice property to one of the voices
available in the browser. You can get the list of voices available in the
browser using the speechSynthesis.getVoices() method. Last, call the
speakingSynthesis.speak() method to read the text out loud:
function addTodo() {
const description = addTodoInput.value
todos.push(description)
const todo = renderTodoInReadMode(description)
todosList.append(todo)
addTodoInput.value = ''
addTodoButton.disabled = true
readTodo(description)
}
function readTodo(description) {
const message = new SpeechSynthesisUtterance()
message.text = description
message.voice = speechSynthesis.getVoices()[0]
speechSynthesis.speak(message)
}
Enjoy!
2.4 Summary
Nothing prevents us from writing complete frontend applications
without a framework, but doing so can easily result in code that’s a mix
of application logic and DOM manipulation, that is, using the Document
API to modify the browser’s document.
Using vanilla JavaScript to write a fronted application, every event that
changes the state of the application forces us to write the code that
updates the DOM to reflect the new state. This code tends to be very
imperative, and verbose.
3 Rendering and the virtual DOM
This chapter covers
What the virtual DOM is
What problem the virtual DOM solves
Implementing functions to create virtual DOM nodes
Defining the concept of a stateless component
As you’ve seen in the previous chapter, mixing application and DOM
manipulation code gets unwieldy quickly. If for every event resulting from
the user interacting with the application, we have to implement not only the
business logic—the one that gives value to the application—but also the code
to update the DOM, the codebase becomes a hard-to-maintain mess. This is
because we mix two different levels of abstraction together: the application
logic and the DOM manipulation. What a maintenance nightmare!
Manipulating the DOM results is very imperative code, that is, code that
describes how to do something, step by step. This is in contrast with
declarative code, which describes what to do, without specifying how to do it
—those details are implemented somewhere else. Also, manipulating the
DOM is a very low level operation, that is, it requires a lot of knowledge of
the Document API, and sits below the application logic. Contrast this with
higher level application code, which is framed in a language that is close to
the business, and anyone working in the project can—should—understand.
We would have a much cleaner codebase if we could describe in a more
declarative manner what we want the view of our application to look like and
let the framework take care of manipulating the DOM to create the view.
What we need is similar to the blueprints of a house: a description of what
needs to be built without specifying how to build it. The architect designs the
blueprints for the house and lets the construction company take care of
building it. Imagine if the architect had to, not only design the house, but also
go to the construction site and build it; or at least tell the construction
workers how they need to do their job, step by step, without missing any
single detail. That would be a very inefficient way of building.
For the sake of productivity, the architect focuses on the "what" needs to be
built, and let the construction company take care of the "how" it’s built.
Similarly, we want the application developer to focus on the "what" (what the
view should look like), and let the framework take care of the "how" (how to
assemble the view using the Document API).
Important
You can find all the listings in this chapter in the listings/ch03 directory of
the book’s repository.
The code you write in this chapter is for the framework’s first version, which
you’ll publish in chapter 6. Therefore, the code in this chapter can be checked
out from the ch6 label:
$ git switch ch6
3.1 Separating concerns—DOM manipulation vs.
application logic
In the previous chapter, you wrote all the code together as part of the
application, like you can see in figure 3.1. That code was in charge of
initializing the application and its state, programmatically build the view
using the Document API, and handling the events that result from the user
interacting with the application by modifying the DOM accordingly.
Figure 3.1. So far, all the code is written together as part of the application
What we want to accomplish in this chapter is separating the code that
describes the view—the application’s code—from the code that uses the
Document API to manipulate the DOM and create the view—the
framework’s code. There’s a term widely used in the software industry:
separation of concerns.
Separation of concerns
Separating concerns means splitting the code so that the parts of it that carry
out different responsibilities can be found separated from each other, which
helps the developer understand the code and maintain it.
Figure 3.2 shows the separation of concerns we want to achieve: splitting the
application code from the framework code that deals with the DOM
manipulation and keeps track of the state. We will be focusing on rendering
the view in this and the next chapter, and leave the state management for
chapter 5.
Figure 3.2. By the end of next chapter, you’ll have separated the code that describes the view
from the code that manipulates the DOM
The main objective of this separation of concerns is to simplify the
application’s developer job: they only need to focus on the application logic,
and let the framework take care of the DOM manipulation. This results in
three clear benefits:
Developer productivity—the application developer doesn’t need to write
DOM manipulation code, they can instead focus on the application
logic. They have to write less code, and that makes them ship value
faster.
Code maintainability—the DOM manipulation and application logic
aren’t mixed together, and that makes the code more succinct and easier
to understand.
Framework performance—the framework author, who’s likely to
understand how to produce efficient DOM manipulation code better than
the application developer, can optimize how the DOM is manipulated to
make the framework more performant.
Going back to the blueprint analogy: how do you define how the view should
look like, the same way the architect does with the blueprints? The answer is
the virtual DOM.
3.2 The virtual DOM
The word "virtual" is used to describe something that isn’t real, but mimics
something that is. A virtual machine is, for example, software written to
mimic the behavior of a real machine—hardware. It gives you the impression
that you’re running a real machine, but it’s actually software running on top
of your computer’s hardware.
Virtual DOM
The virtual DOM is a representation of the actual DOM (the Document
Object Model in the browser). The DOM is an in-memory tree of JavaScript
objects representing the HTML in the page. Each node in this tree is a virtual
node, and the tree itself is what we call virtual DOM.
The nodes in the actual DOM are heavy objects that have hundreds of
properties, whereas the virtual nodes are lightweight objects that only contain
the information needed to render the view. Virtual nodes are cheap to create
and manipulate.
Let’s imagine that we want to produce the following HTML:
<form action="/login" class="login-form">
<input type="text" name="user" />
<input type="password" name="pass" />
<button>Log in</button>
</form>
The HTML consists of a <form> with three child nodes: two <input> and a
<button>. A virtual DOM representation for this HTML needs to contain the
same information as the DOM, namely:
What nodes are in the tree and their attributes.
The hierarchy of the nodes in the tree.
The relative position of the nodes in the tree.
For example, it’s important that the virtual DOM includes the <form> as the
root node, and that the two <input> and <button> are its children. The form
has an action and a class attribute, and the button—although not visible in
the HTML—has an onclick event handler. The type and name attributes of
the <input> elements are also crucial: it’s not the same an <input> of type
text and an <input> of type password. Also, the relative position of the
form’s children is important: the button should go below the inputs. The
framework needs all this information for the view to be rendered correctly.
A possible virtual DOM representation—made of pure JavaScript objects—
for this HTML could be the following:
{
type: 'element',
tag: 'form',
props: { action: '/login', class: 'login-form' },
children: [
{
type: 'element',
tag: 'input',
props: { type: 'text', name: 'user' }
},
{
type: 'element',
tag: 'input',
props: { type: 'password', name: 'pass' }
},
{
type: 'element',
tag: 'button',
props: { on: { click: () => login() } },
children: [
{
type: 'text',
value: 'Log in'
}
]
}
]
}
Each node in the virtual DOM is an object with a type property that identifies
what kind of node it is. In this example, there are two types of nodes:
element—represents a regular HTML element, such as <form>, <input>,
or <button>.
text—represents a text node, such as the "Log in" text of the <button>
element in the example above.
We’ll see one more type of node later in the chapter, the fragment node: a
node used to group other nodes together, but has no semantic meaning of its
own.
Each type of node has its own set of properties that describe it. Text nodes,
for example, have one property apart from the type:
value:
the string of text.
Element virtual nodes have three properties:
tag: the tag name of the HTML element.
props: the attributes of the HTML element, including the event handlers
inside an on property.
children: the ordered children of the HTML element. If absent, the
element is a leaf node.
And as we’ll see, fragment nodes have a children array of nodes, similar to
the children array of element nodes.
Using this virtual DOM representation allows the developer to describe how
the view of their application—the rendered HTML—should look like. You—
the framework author—implement the code that takes that virtual DOM
representation and builds the real one in the browser. This way, you
effectively separate the code that describes the view from the code that
manipulates the DOM.
We can represent the virtual DOM in the previous example graphically as a
tree, as shown in figure 3.3. The <form> element is the root node of the tree,
and the two <input> and <button> elements are its children. The properties
of each node are inside the node’s box, such as the action and class
attributes of the <form> element. The <button> element has a child node, a
text node with the text "Login."
Figure 3.3. The virtual DOM is a representation of the DOM made of JavaScript objects
Note
As you can see in the diagram 3.3, the nodes of the tree have a title indicating
their type. The HTML elements are written in all lowercase letters and
between angle brackets, such as "<form>" or "<input>." Text nodes are
inside a box whose title is simply "Text."
This representation of an application’s view holds all the information that we
need to know in order to unequivocally build the DOM. It maintains the
hierarchy of the elements, the attributes, event handlers and position of the
child elements. If you are given such a virtual DOM, you can derive the
corresponding HTML markup without any ambiguity.
Important
The virtual DOM is the blueprint of the view of an application. It describes
how the final rendered HTML should look like, but it doesn’t tell the
framework how it should handle the details of building it.
Creating virtual trees manually is a tedious task that can result in errors, such
as misspelling property names. To simplify the process of defining an
application’s view, you will write functions that generate each type of virtual
node instead of having the developer do it manually. Although using these
functions makes the virtual DOM definition process less painful, it’s still not
as convenient as writing HTML templates or JSX. However, it’s a starting
point. Towards the end of the book, you will implement a template engine
that streamlines the view definition process. For now, let’s focus on creating
the virtual DOM creation functions.
Exercise 3.1
Given the HTML markup below, can you draw the corresponding virtual
DOM tree diagram (similar to figure 3.3)?
<div id="app">
<h1>TODOs</h1>
<input type="text" placeholder="What needs to be done?">
<ul>
<li>
<input type="checkbox">
<label>Buy milk</label>
<button>Remove</button>
</li>
<li>
<input type="checkbox">
<label>Buy eggs</label>
<button>Remove</button>
</li>
</ul>
</div>
3.3 Getting ready
You want to make sure you’ve read appendix A and set up the project
structure. All the code you’ll write in this and the following chapters will be
part of the runtime package, which is the part of the framework that runs in
the browser. So, when I refer to the src/ directory, I mean that of the runtime
package until further notice.
You want to create a file called h.js inside the src/ directory. This file is
where you’ll write most of the code in this chapter. Also create a utils/
directory inside src/, and add a file called arrays.js inside it. Here you’ll write
an utility function to filter null and undefined values from an array.
Your runtime package should look like this (the configuration files have been
omitted, and in bold font are the files you just created):
runtime/
└── src/
├──utils/
│
└── arrays.js
├── h.js
└── index.js
Let’s get started writing some code.
3.4 Types of nodes
As far as we’ve seen, you can have three different types of DOM nodes that
need to be represented as virtual nodes:
Text nodes—They represent text content.
Element nodes—The most common type of node; they represent HTML
elements that have a tag name, such as a 'div' or a 'p'.
Fragment nodes—They represent a collection of nodes that don’t have a
parent node until they are attached to the DOM. (We haven’t covered
them yet, but we will shortly.)
These have different properties, so we need to represent them differently.
Later on, you’ll have to write code that operates on the virtual nodes and do
something different depending on the type of node. It’s therefore a good idea
to define a constant for each of these types, so you avoid typos.
Inside the h.js file, write the following code:
export const DOM_TYPES = {
TEXT: 'text',
ELEMENT: 'element',
FRAGMENT: 'fragment',
}
You have defined three constants, one for each type of node:
DOM_TYPES.TEXT: the type for a text node, which is 'text'.
DOM_TYPES.ELEMENT: the type for an element node, which is 'element'.
DOM_TYPES.FRAGMENT: the type for a fragment node, which is
'fragment'.
Let’s now implement the functions that create the virtual nodes, starting with
element nodes.
3.5 Element nodes
Element nodes are the most common type of virtual node: they represent the
regular HTML elements that you use to define the structure of your web
pages. To name a few, you have <h1> trough <h6> for headings, <p> for
paragraphs, <ul> and <ol> for lists, <a> for links, and <div> for generic
containers. These nodes have a tag name (such as 'p'), attributes (such as a
class name or the type attribute of an <input> element), and children nodes
(the nodes that are inside of them, between the opening and closing tags).
You’ll now implement a function h() to create element nodes taking three
arguments:
tag—the element’s tag name.
props—an object with its attributes
(that we’ll call props, for
properties).
children—an array of its children nodes.
The name h() is short for hyperscript, or a script that creates hypertext.
(Recall that HTML is acronym for HyperText Markup Language.) The name
h() for the function is a common one used in some frontend frameworks,
probably because it’s short and easy to type, which is important because
you’ll be using it a lot.
h(), hyperscript(),
or createElement()
React uses the React.createElement() function to create virtual nodes. It’s
a long name, but you typically never call that function directly, as you use
JSX instead. Each HTML element you write in JSX is transpiled to a
React.createElement() call.
Other frameworks, such as Vue, do name the virtual node producing function
h(). Mithril, for example, gives the user a function called m() to create the
virtual DOM, but it’s the same idea. Internally, Mithril implements the virtual
node creating function named as hyperscript(). The user facing function
has a nice and short name (m()), but the internal function has this more
descriptive name.
The h() function should return a virtual node object with the passed in tag
name, props, and children, plus a type property set to DOM_TYPES.ELEMENT.
You want to give default values to the props and children parameters, so
that you can call the function with only the tag name, as in h('div'). This
should be equivalent to calling h('div', {}, []).
Some child nodes might come as null (I’ll explain why in a minute), so you
want to filter them out. To filter null values from an array, you’ll write a
function called withoutNulls() in the next section (you’ll see that function
imported in the next listing, but it’s not implemented yet).
Some child nodes inside the passed in children array might happen to be
strings, not objects representing virtual nodes. In this case, you want to
transform them into virtual nodes of type DOM_TYPES.TEXT. You’ll do this
using a function called mapTextNodes() that you’ll write later.
Let’s now implement the h() function. In the h.js file, write the code in bold
in listing 3.1.
Listing 3.1. The h() function to create element virtual nodes (h.js)
import { withoutNulls } from './utils/arrays'
export const DOM_TYPES = {
TEXT: 'text',
ELEMENT: 'element',
FRAGMENT: 'fragment',
}
export function h(tag, props = {}, children = []) {
return {
tag,
props,
children: mapTextNodes(withoutNulls(children)),
type: DOM_TYPES.ELEMENT,
}
}
Let’s implement the withoutNulls() and mapTextNodes() functions now.
3.5.1 Conditional rendering—removing null values
When using conditional rendering, that is, rendering nodes only when a
condition is met, some children might be null in the array, and this means
that they shouldn’t be rendered at all. We want these null values to be
removed from the array of children.
Let’s use our TODO app as an example. Recall that the add new to-do button
is disabled when there’s no text in the input, or the text is too short. If instead
of disabling the button you decided to remove it from the page, you’d have a
conditional like the following:
{
tag: 'div',
children: [
{ tag: 'input', props: { type: 'text' } },
addTodoInput.value.length > 2
? { tag: 'button', children: ['Add'] }
: null
]
}
When the condition addTodoInput.value.length > 2 is false, a null node
is added to the div node’s children array:
{
tag: 'div',
children: [
{ tag: 'input', props: { type: 'text' } },
null
]
}
This null value means that the button shouldn’t be added to the DOM. The
simplest way to make this work is to filter out null values from the children
array when a new virtual node is created, so that a null node isn’t passed
around the framework:
{
tag: 'div',
children: [
{ tag: 'input', props: { type: 'text' } }
]
}
Inside the utils/arrays.js file, write a function called withoutNulls() that
takes an array and returns a new array with all the null values removed.
export function withoutNulls(arr) {
return arr.filter((item) => item != null)
}
Note the usage of the != operator, as opposed to using !==: this is so you
remove both null and undefined values. You aren’t expecting undefined
values, but this way you’ll remove them if they appeared—just in case. (Your
linter might complain about this if you have the eqeqeq rule enabled, but you
can disable it for this line; tell the linter you know what you’re doing.)
3.5.2 Mapping strings to text nodes
After filtering out the null values from the children array, you pass the result
to a the mapTextNodes() function. We said that this function transforms
strings into text virtual nodes. Why do we want to do this? Well, just as a
convenience for creating text nodes, so instead of doing:
h('div', {}, [hString('Hello '), hString('world!')])
we can do:
h('div', {}, ['Hello ', 'world!'])
As you can anticipate, you’ll use text children a lot, so this will make your
life easier—if only a little bit. Let’s now write that missing mapTextNodes()
function. In the h.js file, below the h() function, write the code for the
function as follows:
function mapTextNodes(children) {
return children.map((child) =>
typeof child === 'string' ? hString(child) : child
)
}
You’ve used the hString() function to create text virtual nodes out of
strings, but that function doesn’t exist yet. That’s the next thing you’ll do:
implement the function that creates text virtual nodes.
3.6 Text nodes
Text nodes are the nodes in the DOM that contain text. They have no tag
name, no attributes, and no children; just text.
Creating text nodes is the simplest of the three types of virtual nodes. A text
virtual node is simply an object with the type property set to
DOM_TYPES.TEXT, and the value property set to the text content. In the h.js
file, write the hString() function like so:
export function hString(str) {
return { type: DOM_TYPES.TEXT, value: str }
}
That was easy! You’re just missing the hFragment() function to create
fragment virtual nodes.
3.7 Fragment nodes
A fragment is a type of virtual node used to group multiple nodes that need to
be attached to the DOM together, but don’t have a parent node in the DOM.
You can think of them as simply being a container for an array of virtual
nodes.
Note
Fragments exist in the Document API, they’re used to create subtrees of the
DOM that can be appended to the document at once. They’re represented by
the DocumentFragment class, and can be created using the
document.createDocumentFragment() method. We won’t be using the
DocumentFragment to insert the virtual fragment nodes into the DOM, but it’s
good to know that they exist.
Let’s implement the hFragment() function to create fragment virtual nodes.
3.7.1 Implementing fragment nodes
Fragments are just an array of child nodes, so it’s implementation is very
simple. In the h.js file, write the hFragment() function as follows:
export function hFragment(vNodes) {
return {
type: DOM_TYPES.FRAGMENT,
children: mapTextNodes(withoutNulls(vNodes)),
}
}
Same as before, you’ve filtered out the null values from the array of
children, and then you’ve mapped the strings in the children array to text
virtual nodes. That’s all there is to it!
3.7.2 Testing the virtual DOM functions
You can now use the h(), hString(), and hFragment() functions to create
virtual DOM representations of the view of your application. What we’ll
implement next is the code that takes in a virtual DOM and creates the real
DOM for it, but first, let’s put the virtual DOM functions to the test. Let’s use
the h() function to define the view of a login form:
h('form', { class: 'login-form', action: 'login' }, [
h('input', { type: 'text', name: 'user' }),
h('input', { type: 'password', name: 'pass' }),
h('button', { on: { click: login } }, ['Login'])
])
This will create a virtual DOM depicted in figure 3.4. Arguably, using the
h() functions is more concise than defining the virtual DOM manually, as a
tree of JavaScript objects.
Figure 3.4. Example of creating a virtual DOM tree
This virtual DOM, passed to the framework, will be used to create the real
DOM, the HTML code that will be rendered in the browser. In this case, the
HTML markup would be:
<form class="login-form" action="login">
<input type="text" name="user">
<input type="password" name="pass">
<button>Login</button>
</form>
Note
The <button> element doesn’t have a click event handler rendered in the
HTML markup. This is because the framework will add the event handler to
the button programmatically, when it is attached to the DOM. The event
handlers added from JavaScript aren’t shown in the HTML.
As you can imagine, you typically don’t define the virtual DOM for your
entire application in one place; that can get unwieldy as the application grows
in size. What you do instead is split the view into subparts, each of which we
call a component. Components are the cornerstone of frontend frameworks:
they allow us to break down a large application into smaller, more
manageable pieces, each of which in charge of a specific part of the view.
Exercise 3.2
Using the h() function, define the virtual DOM equivalent to the following
HTML markup:
<h1 class="title">My counter</h1>
<div class="container">
<button>decrement</button>
<span>0</span>
<button>increment</button>
</div>
Exercise 3.3
Create a function, called lipsum(), that takes in a number, and returns a
virtual DOM consisting of a fragment with as many paragraphs as the
number passed to the function. Every paragraph should contain the text:
"Lorem ipsum dolor sit amet, consectetur adipiscing elit, sed do eiusmod
tempor incididunt ut labore et dolore magna aliqua. Ut enim ad minim
veniam, quis nostrud exercitation ullamco laboris nisi ut aliquip ex ea
commodo consequat.".
This function might come in handy when you’re building a UI and need some
placeholder text to fill in the space, so you can see how the UI looks like with
real content.
Let’s see what makes a component in your early version of the framework.
3.8 Components—the cornerstone of frontend
frameworks
The component has emerged as the revolutionary concept that has made
frontend frameworks so popular. The ability to break down a large
application into smaller parts, each of which defines a specific part of the
view, and manages its interaction with the user, has been a game changer
(well, arguably; because a good use of the MVC or MVVM patterns could
already get us as far). Every frontend framework uses the concept of
components, and yours will be no different.
Let’s take a small detour from the implementation of the virtual DOM to
understand how you’ll decompose the view of your application into
components using your first version of the framework.
3.8.1 What is a component?
A component in your framework will be a mini-application of its own: it’ll
have its own internal state and lifecycle, and it’ll be in charge of rendering a
part of the view. It’ll communicate with the rest of the application emitting
events, and receive props (data passed to the component from the outside),
re-rendering its view when a new set of props is passed to it. But it’ll take us
a few chapters to get there. Your first version of a component will be much
simpler: a pure function that takes in the state of the whole application and
returns the virtual DOM representing the view of the component. In a later
chapter, you’ll make components have their own internal state and lifecycle,
but for now, let’s start by breaking down the view of the application into pure
functions that, given the state, return the virtual DOM representing a part of
it.
3.8.2 The virtual DOM as a function of the state
The view of an application depends on the state of the application, thus we
can say that the virtual DOM is a function of the state. Each time the state
changes, the virtual DOM should be re-evaluated, and the framework needs
to update the real DOM accordingly. This dependency between the state and
the view is depicted in figure 3.5. In the left column, the state consists in a list
of to-dos with just one to-do, "Walk the dog." In the right column, the state
changes to also include a second to-do, "Water the plants." Notice how the
virtual DOM changes accordingly, and how the HTML markup changes as
well.
Figure 3.5. The view of an application is a function of the state. When a new to-do is added to the
state, the virtual DOM is re-evaluated and the DOM is updated with the new to-do
This means that, to produce the virtual DOM representing the view, the
current state of the application must be taken into account, and that, when the
state changes, the virtual DOM must be re-evaluated. If we generate the
virtual DOM that represents the view of the application by calling a function
that receives the state as parameter, we can easily re-evaluate it when the
state changes. For example, in the case of our TODOs application, the virtual
DOM for the list of to-dos (consisting of only the to-do description, for the
sake of simplicity) could be generated by a function like this:
function TodosList(todos) {
return h('ul', {}, todos.map((todo) => h('li', {}, [todo])))
}
If we call the TodosList() function with the following list of to-dos as
argument:
TodosList(['Walk the dog', 'Water the plants'])
the function would return the following virtual DOM (the empty props
objects have been omitted for brevity):
{
tag: 'ul',
type: 'element',
children: [
{ tag: 'li', children: [{ type: 'text', value: 'Walk the dog' }] },
{ tag: 'li', children: [{ type: 'text', value: 'Water the plants' }] }
]
}
This virtual DOM representing the list of to-dos would be rendered by the
framework into the following HTML:
<ul>
<li>Walk the dog</li>
<li>Water the plants</li>
</ul>
You can see this process summarized in figure 3.6: the application code—
written by the developer—generates the virtual DOM describing the view,
then the framework—written by yourself—creates the real DOM from the
virtual DOM and inserts it into the browser’s document.
Figure 3.6. The application creates the virtual DOM that the framework renders into the DOM
One nice property of using functions to produce the virtual DOM, receiving
the application’s state as argument, is that we can break the view into smaller
parts. Pure functions—functions which don’t produce any side effects and
always return the same result for the same input arguments—can be easily
composed to build more complex views.
Exercise 3.4
Write a function called MessageComponent() that takes an object with two
properties:
level—a string that can be either 'info', 'warning',
message—a string with the message to display.
or 'error'
The function should return a virtual DOM that represents a message box with
the message and the corresponding CSS class depending on the level. The
CSS classes are message—info, message—warning, and message—error for
the different levels, and the markup should look like this:
<div class="message message--info">
<p>This is an info message</p>
</div>
3.8.3 Composing views—components as children
Pure functions have the nice property that they can be composed nicely to
build more complex functions. If we generate the virtual DOM to represent
the view of the application by composing smaller functions, we can easily
break the view into smaller parts. These sub-functions represent a part of the
view, the components. The arguments passed to a component are known as
props, as we’ve already mentioned.
Components v1.0
Components are functions that generate the virtual DOM for a part of the
application’s view. They take the state of the application, or part of it, as their
argument. The arguments passed to a component, the data coming from
outside the component, are known as props.
This definition of a component will change later in chapter 9, as components
will be more than pure functions and will handle their own state and lifecycle.
Let’s work an example with the TODOs application view. If we don’t break
the view into smaller parts, we’ll have a single function that generates the
virtual DOM for the entire application. Such a function would be long and
hard to understand by other developers—and probably by ourselves as well.
But we can clearly distinguish two parts in the view: the form to add a new
to-do and the list of to-dos (figure 3.7); those can be generated by two
different functions. That is, we can break the view into two sub-components.
Figure 3.7. The TODOs application can be broken into two sub-components: CreateTodo() and
TodoList()
So the virtual DOM for the whole application could be created by a
component like the following:
function App(state) {
return hFragment([
h('h1', {}, ['My TODOs']),
CreateTodo(state),
TodoList(state)
])
}
Note that in this case, there isn’t a parent node in the virtual DOM that
contains the header of the application and the two sub-components: we use a
fragment to group the elements together. Also note the naming convention:
the functions that generate the virtual DOM are written in PascalCase. This
is to signal that they are components that create a virtual DOM tree, and not
regular functions.
Similarly, the TodoList() component—as you’ve probably guessed—can be
further broken down into another sub-component, the TodoItem(). You can
see this illustrated in figure 3.8.
Figure 3.8. The TodoList() component can be broken down into a TodoItem() sub-component
and thus, the TodoList() component would look similar to the following:
function TodoList(state) {
return h('ul', {},
children: state.todos.map(
(todo, i) => TodoItem(todo, i, state.editingIdxs)
)
)
}
The TodoItem() component would render a different thing depending on
whether the to-do is in "read" or "edit" mode. Those could be further
decomposed into two different sub-components: TodoInReadMode() and
TodoInEditMode(). It’d be something like the following:
// idxInList is the index of this todo item in the list of todos.
// editingIdxs is a Set of indexes of todos that are being edited.
function TodoItem(todo, idxInList, editingIdxs) {
const isEditing = editingIdxs.has(idxInList)
return h('li', {}, [
isEditing
? TodoInEditMode(todo, idxInList)
: TodoInReadMode(todo, idxInList)
]
)
}
Defining the views of our application using pure functions—the components
—allows you to easily compose them to build more complex views. This is
probably not new to you; you’ve been decomposing your applications into a
hierarchy of components when using frontend frameworks like React, Vue,
Svelte or Angular.
We can visualize the hierarchy of components for the example above in a
tree, as shown in figure 3.9.
Figure 3.9. The hierarchy of components of the TODOs application, where each component has
below the virtual DOM nodes it generates
In this diagram we see the view of the application as a tree of components
with the virtual DOM nodes they generate below them. The App()
component is the root of the tree, and it has three children: an <h1> element,
and the CreateTodo() and TodoList() components. A component can only
return a single virtual DOM node as its root, so the three children of App()
are grouped together in a fragment.
Then, following the hierarchy down, we see the TodoList() component has a
single child, the <ul> element, which in turn has a list of TodoItem()
components. The ellipsis in the tree indicates that the <ul> element might
have more children than the ones shown in the diagram, a number that
depends on how many to-dos are in the list. Finally, the TodoItem()
component has two children: the TodoInEditMode() and TodoInReadMode()
components. These components would render more virtual DOM nodes, but
we don’t show them in the diagram for simplicity.
Note
As you can see in the diagram 3.9, the component nodes have their title
written in PascalCase and include the parenthesis to indicate they are
functions. Fragments are titled "Fragment."
Now that you understand how to break down the view of your application
into components—pure functions that generate the virtual DOM given the
state of the application—you’re ready to implement the code in the
framework which is in charge of mounting the virtual DOM returned by the
h() functions to the browser’s DOM. You’ll do exactly that in the next
chapter.
3.9 Answers to the exercises
3.9.1 Exercise 3.1
Given the following HTML:
<div id="app">
<h1>TODOs</h1>
<input type="text" placeholder="What needs to be done?">
<ul>
<li>
<input type="checkbox">
<label>Buy milk</label>
<button>Remove</button>
</li>
<li>
<input type="checkbox">
<label>Buy eggs</label>
<button>Remove</button>
</li>
</ul>
</div>
The virtual DOM diagram for it would be the following:
Figure 3.10. The virtual DOM for the HTML in exercise 1
3.9.2 Exercise 3.2
Given the following HTML:
<h1 class="title">My counter</h1>
<div class="container">
<button>decrement</button>
<span>0</span>
<button>increment</button>
</div>
Here’s how you can use the hFragment() and h() functions to create its
virtual DOM:
hFragment([
h('h1', { class: 'title' }, ['My counter']),
h('div', { class: 'container' }, [
h('button', {}, ['decrement']),
h('span', {}, ['0']),
h('button', {}, ['increment'])
])
])
3.9.3 Exercise 3.3
Here’s the lipsum() function:
function lipsum(n) {
const text = `Lorem ipsum dolor sit amet, consectetur adipiscing elit,
sed do eiusmod tempor incididunt ut labore et dolore magna aliqua. Ut
enim ad minim veniam, quis nostrud exercitation ullamco laboris nisi
ut aliquip ex ea commodo consequat.`
return hFragment(
Array(n).fill(h('p', {}, [text]))
)
}
Note that I had to split the lines of the text variable to make it fit in the page.
You can keep it in a single line in your code.
3.9.4 Exercise 3.4
Here’s the code for the MessageComponent():
function MessageComponent({ level, message }) {
return h('div', { class: `message message--${level}` }, [message])
}
You could complement this component with some CSS rules to add colors to
the different levels of messages, and a bit of padding and border to make
them look nicer:
.message {
padding: 1rem;
border: 1px solid black;
}
.message--info {
background-color: #C5E0EF;
}
.message--warning {
background-color: #FFFAD5;
}
.message--error {
background-color: #F9CBCD;
}
3.10 Summary
The virtual DOM is the blueprint for the view of the application: it
allows the developer describe how the view should look like in a
declarative way (similar to what an architect does with the blueprints of
a house) and moves the responsibility of manipulating the DOM to the
framework.
Thanks to using a virtual DOM to declare how the view should look
like, the application developer is freed from having to know how to
manipulate the DOM using the Document API, and they don’t need to
mix business logic with DOM manipulation code.
A component is a pure function—a function with no side effects—that
takes the state of the application as input and returns a virtual DOM tree
representing a chunk of the view of the application. In later chapters, the
definition of a component will be extended to include the ability to have
internal state and a lifecycle that’s independent from that of the
application.
There are three types of virtual nodes: text nodes, element nodes, and
fragment nodes. The most interesting one is the element node, as it
represents the regular HTML elements that can have attributes, children,
and event listeners.
The hString(), h(), and hFragment() functions are used to create text,
element, and fragment virtual nodes, respectively. The virtual DOM can
be directly declared as a tree of JavaScript objects, but calling these
functions makes the process simpler.
Fragment virtual nodes consist of an array of children virtual nodes.
Fragment virtual nodes are useful when a component would return a list
of virtual nodes without a parent node. The DOM—and by extension the
virtual DOM—is a tree data structure, every level in the tree (except the
root) must have a parent node, so a fragment node can be used to group
a list of virtual nodes.
4 Mounting and destroying the
virtual DOM
This chapter covers
Creating HTML nodes from virtual DOM nodes
Inserting the HTML nodes into the browser’s document
Removing HTML nodes from the browser’s document
In the previous chapter, you learnt what the virtual DOM is and how to create
it. You implemented the h(), hString(), and hFragment() functions to
create virtual nodes of type element, text, and fragment, respectively. Now
it’s time to learn how to create the real DOM nodes from the virtual DOM
nodes, and insert them into the browser’s document. This is achieved using
the Document API, as you’ll see in this chapter.
When the view of your application is no longer needed, you want to remove
the HTML nodes from the browser’s document. You’ll learn how to do this
in this chapter as well.
Important
You can find all the listings in this chapter in the listings/ch04 directory of
the book’s repository.
The code you write in this chapter is for the framework’s first version, which
you’ll publish in chapter 6. Therefore, the code in this chapter can be checked
out from the ch6 label:
$ git switch ch6
4.1 Mounting the virtual DOM
Given a virtual DOM tree, you want your framework to create the real DOM
tree out of it and attach it to the browser’s document. We call this process
mounting the virtual DOM. You implement this code in the framework, so
that the developers using it don’t need to use the Document API themselves.
You’ll implement this process in the mountDOM() function.
Figure 4.1 is a visual representation of how the mountDOM() function works.
You can see the first argument is a virtual DOM—represented in the style of
our diagrams—and the second argument is the parent element where we want
the view inserted, in this case the document’s <body> element. The result is a
DOM tree attached to the parent element—the <body> of the document.
Figure 4.1. Mounting a virtual DOM to the browser’s document <body> element
When the mountDOM() function creates each of the DOM nodes for the virtual
DOM, it needs to save a reference to the real DOM node in the virtual node,
under the el property (el for element). You can see this in figure 4.2. This
reference is used by the reconciliation algorithm you’ll write in chapters 7
and 8, to know what DOM nodes to update.
Figure 4.2. The virtual node’s el property keeps a reference to the real DOM node
Similarly, if the node included event listeners, the mountDOM() function saves
a reference to the event listener in the virtual node, under the listeners
property.
Figure 4.3. The virtual node’s listeners property keeps a reference to the event listener
Saving these references has a double purpose. First, it allows the framework
to remove the event listeners and detach the element from the DOM when the
virtual node is unmounted. Second, it’s required by the reconciliation
algorithm to know what element in the DOM needs to be updated. This will
become clear in chapter 7; for now, bear with me.
Using the example from earlier, the virtual DOM we defined as:
const vdom = h('form', { class: 'login-form', action: 'login' }, [
h('input', { type: 'text', name: 'user' }),
h('input', { type: 'password', name: 'pass' }),
h('button', { on: { click: login } }, ['Login'])
])
Passed to the mountDOM() function as follows:
mountDOM(vdom, document.body)
would result in the virtual DOM tree depicted in figure 4.4, where you can
see the el and listeners references in the virtual nodes.
Figure 4.4. The login form virtual DOM example mounted to the browser’s document <body>
element. The virtual nodes keep a reference to the real DOM nodes in the el property, and to the
event listeners in the listeners property (shown as a lightning icon).
This HTML tree would be attached to the <body> element, and the resulting
HTML markup would be:
<body>
<form class="login-form" action="login">
<input type="text" name="user">
<input type="password" name="pass">
<button>Login</button>
</form>
</body>
Different types of virtual nodes require different DOM nodes to be created,
namely:
A virtual node of type text requires a Text node to be created (via the
document.createTextNode() method).
A virtual node of type element requires an Element node to be created
(via the document.createElement() method).
The mountDOM() function needs to differentiate between the different values
of the type property of the virtual node, and create the appropriate DOM
node.
With this in mind, let’s implement the mountDOM() function.
4.1.1 Mounting virtual nodes into the DOM
Create a new file called mount-dom.js in the src/ directory. Then, write the
mountDOM() function as is in listing 4.1. The listing also includes some
TODO comments towards the end of the file. You don’t need to write those
comments in your code; there are there as placeholders to show you were you
will be implementing the missing functions later.
Listing 4.1. The mountDOM() function used to mount the virtual DOM to the browser’s document
(mount-dom.js)
import { DOM_TYPES } from './h'
export function mountDOM(vdom, parentEl) {
switch (vdom.type) {
case DOM_TYPES.TEXT: {
createTextNode(vdom, parentEl) #1
break
}
case DOM_TYPES.ELEMENT: {
createElementNode(vdom, parentEl) #2
break
}
case DOM_TYPES.FRAGMENT: {
createFragmentNodes(vdom, parentEl) #3
break
}
default: {
throw new Error(`Can't mount DOM of type: ${vdom.type}`)
}
}
}
// TODO: implement createTextNode()
// TODO: implement createElementNode()
// TODO: implement createFragmentNodes()
The function uses a switch statement that checks the type of the virtual node.
Depending on the node’s type, the appropriate function to create the real
DOM node gets called. If the node type isn’t one of the three supported types,
the function throws an error. (If you made a mistake, like misspelling the type
of a virtual node, this error will help you find it.)
4.1.2 Mounting text nodes
Text nodes are the simplest type of node to create because they don’t have
any attributes or event listeners. To create a text node, the Document API
provides you with the createTextNode() method. It expects a string as an
argument, which is the text that the text node will contain.
If you recall, the virtual nodes created by the hString() function you
implemented earlier have the following structure:
{
type: DOM_TYPES.TEXT,
value: 'I need more coffee'
}
These virtual nodes have a type property, identifying them as a text node,
and a value property, which is set to the string that the hString() function
receives as an argument. This is the text that you need to pass to the
createTextNode() method. After creating the text DOM node, you need to
do two things:
1. Save a reference to the real DOM node in the virtual node, under the el
property.
2. Attach the text node to the parent element.
Inside the mount-dom.js file, write the createTextNode() function as
follows:
function createTextNode(vdom, parentEl) {
const { value } = vdom
const textNode = document.createTextNode(value) #1
vdom.el = textNode #2
parentEl.append(textNode) #3
}
Let’s now implement the createFragmentNodes() function.
Exercise 4.1
Using the hString() and mountDOM() functions, insert the text "OMG, so
interesting!" below the headline of your local’s newspaper website. (You’ll
need to copy/paste some of your code in the browser’s console to do this.)
4.1.3 Mounting fragment nodes
Fragment nodes are very simple to mount: you just need to mount the
children of the fragment. What’s important to remember about fragments is
that they aren’t a node that gets attached to the DOM; they’re just an array of
children. It’s for this reason that the el property of a fragment virtual node
should point to the parent element where the fragment’s children are attached
to, as depicted in figure 4.5.
Figure 4.5. Fragment’s el should reference the parent element where its children are attached to
Note that, if you have nested fragment nodes, all the fragment nodes' children
will be appended to the same parent element. This means that all the el
references of those fragment virtual nodes should point to the same parent
element, as you can see depicted in figure 4.6.
Figure 4.6. Nested fragments will all point to the same parent element
Now that you have a good understanding of how fragments work, it’s time to
write some code. Write the createFragmentNode() function inside the
mount-dom.js file as follows:
function createFragmentNodes(vdom, parentEl) {
const { children } = vdom
vdom.el = parentEl #1
children.forEach((child) => mountDOM(child, parentEl)) #2
}
Great—Now you’re ready to implement the createElementNode() function.
It’s the most important one, because it’s the one that creates the element
nodes; the visual bits of the DOM tree.
4.1.4 Mounting element nodes
To create element nodes (those regular HTML elements with tags like <div>
and <span>), you use the createElement() method from the Document API.
You have to pass the tag name to the createElement() function, and the
Document API will return an element node that matches that tag, or
HTMLUnknownElement if the tag is unrecognized.
You can try this yourself in the browser console:
Object.getPrototypeOf(document.createElement('foobar')) // HTMLUnknownElemen
An obviously inexistent tag like foobar will return an HTMLUnknownElement
node. So, if a virtual node has a tag that isn’t recognized by the Document
API, the document.createElement() function returns an
HTMLUnknownElement node. We’re not going to worry about this case: if an
HTMLUnknownElement results from the createElement() function: we’ll
assume it’s an error on the developer’s part.
If you recall, calling the h() function to create element virtual nodes returns
an object with the type property set to DOM_TYPES.ELEMENT, a tag property
with the tag name, and a props property with the attributes and event
listeners. If the virtual node has children, they appear inside the children
property.
For example, a <button> virtual node with a class of btn and an onclick
event listener would look like this:
{
type: DOM_TYPES.ELEMENT,
tag: 'button',
props: {
class: 'btn',
on: { click: () => console.log('yay!') }
},
children: [
{
type: DOM_TYPES.TEXT,
value: 'Click me!'
}
]
}
To create the corresponding DOM element from the virtual node, you need
to:
1. Create the element node using the document.createElement() function.
2. Add the attributes and event listeners to the element node, saving the
added event listeners in a new property of the virtual node, called
listeners.
3. Save a reference to the element node in the virtual node, under the el
property.
4. Mount the children, recursively, into the element node.
5. Append the element node to the parent element.
As you can see, the props property of the virtual node is the one that contains
the attributes and event listeners, both together. But attributes and event
listeners are handled differently, so you’ll need to separate them.
Then, from the attributes, there are two special cases that need special
handling as well, and are those related to styling: style and class. You’ll
extract those from the props object as well, and handle them separately.
Go ahead and write the createElementNode() function inside the mountdom.js file:
Listing 4.2. Mounting an element node into a parent element (mount-dom.js)
import { setAttributes } from './attributes'
import { addEventListeners } from './events'
// --snip-- //
function createElementNode(vdom, parentEl) {
const { tag, props, children } = vdom
const element = document.createElement(tag) #1
addProps(element, props, vdom) #2
vdom.el = element
children.forEach((child) => mountDOM(child, element))
parentEl.append(element)
}
function addProps(el, props, vdom) {
const { on: events, ...attrs } = props #3
vdom.listeners = addEventListeners(events, el) #4
setAttributes(el, attrs) #5
}
Note that you’re using two functions you haven’t implemented yet:
setAttributes() and addEventListeners(), imported from the attributes.js
and events.js files, respectively. You will write them in a minute.
Setting the attributes and adding event listeners is the part where the code
differs from text nodes. With text nodes, you want to attach event listeners
and set attributes to it’s parent element node, not to the text node itself.
Note
The Text type defined in the Document API inherits from the EventTarget
interface, which declares the addEventListener() method. So, in principle,
you can add event listeners to a text node. But if you go ahead and try to do
that in the browser, you’ll see that the event listeners are never called—it just
doesn’t work.
Let’s now implement the addEventListeners() function, in charge of
adding event listeners to an element node. After it, we shall look at the
setAttributes() function, and we’ll be done with creating element nodes.
4.1.5 Adding event listeners
To add an event listener to an element node, you call its
addEventListener() method. This method is available because an element
node is an instance of the EventTarget interface. This interface—which
declares the addEventListener() method—is implemented by all the DOM
nodes that can receive events. All instances returned by calling
document.createElement() implement the EventTarget interface, so you
can safely call the addEventListener() method on them.
Our implementation of the addEventListener() function in this chapter of
the book is going to be very simple: it’ll just call the addEventListener()
method on the element and return the event handler function it registered.
You want to return the function registered as event handler, because later on,
when you implement the destroyDOM() method—which as you can figure
out it does the opposite of mountDOM()—you’ll need to remove the event
listeners to avoid memory leaks. You need the handler function that was
registered in the event listener to be able to remove it, by passing it as an
argument to the removeEventListener() method.
Later, in chapter 9, when you make the components of your framework
stateful (recall that they’ll be pure functions with no state for the moment),
you’ll also have references to the event listeners added to the components,
which will behave in a different way than the event handlers of the DOM
nodes. At this point in the book, you’ll need to come back and modify the
implementation of the addEventListener() function to account for this new
case. So if you wonder why we’re implementing a function that does so little
of its own, this is the reason; it’s just a placeholder for the more complex
implementation that you’ll write later.
Create a new file under the src/ directory called events.js and add the
following code:
export function addEventListener(eventName, handler, el) {
el.addEventListener(eventName, handler)
return handler
}
As promised, the addEventListener() function is very simple. But, if you
recall, the event listeners defined in a virtual node come packed in an object,
where the keys are the event names and the values are the event handler
functions, like so:
{
type: DOM_TYPES.ELEMENT,
tag: 'button',
props: {
on: {
mouseover: () => console.log('almost yay!'),
click: () => console.log('yay!') ,
dblclick: () => console.log('double yay!'),
}
}
}
So it makes sense to have another function—if only for convenience—that
allows you to add multiple event listeners in the form of an object to an
element node. So, inside the events.js file, add another function called
addEventListeners() (in plural):
export function addEventListeners(listeners = {}, el) {
const addedListeners = {}
Object.entries(listeners).forEach(([eventName, handler]) => {
const listener = addEventListener(eventName, handler, el)
addedListeners[eventName] = listener
})
return addedListeners
}
You might feel tempted to simplify that function by removing the
addedListeners variable, and simply return the same listeners object the
function got as input:
export function addEventListeners(listeners = {}, el) {
Object.entries(listeners).forEach( ... )
return listeners
}
After all, the same event handler functions that we got as input we’re
returning as output, so the refactor seems legit. But, that is now; it won’t be
the case later when you make the components have their own state. You
won’t be adding the same functions as event handlers, but new functions that
will be created by the framework with some extra logic around them. This
might sound confusing now, but stick with me, and you’ll see how this makes
sense later.
Now that you’ve implemented the event listeners, let’s move on and
implement the setAttributes() function. We’re getting closer to having a
working mountDOM() function.
4.1.6 Setting the attributes
To set an attribute in an HTMLElement instance in code, you set the value in
the corresponding property of the element. Setting the property of the
element will reflect the value in the corresponding attribute of the rendered
HTML. It’s important to understand that, when you’re manipulating the
DOM through code, you’re working with DOM nodes, instances of the
HTMLElement class. These instances have properties that you can set in code,
as any other JavaScript object do. When these properties are set, the
corresponding attribute is automatically reflected in the rendered HTML.
For instance, if you have a paragraph in HTML, such as the following:
<p id="foo">Hello, world!</p>
Assuming you have a reference to the <p> element in a variable called p, you
can set the id property of the p element to a different value, like so:
p.id = 'bar'
And the rendered HTML reflects the change:
<p id="bar">Hello, world!</p>
In a nutshell: HTMLElement instances (such the <p> element, which is an
instance of the HTMLParagraphElement class) have properties that correspond
to the attributes that are rendered in the HTML markup. When you set the
value of these properties, the corresponding attributes in the rendered HTML
are automatically updated. Even though things are a bit more nuanced than
that, this is the gist of it.
Caution
There are some attributes that work a bit differently. For instance, the value
attribute of an <input> element is not reflected in the rendered HTML. If you
you have the following HTML:
<input type="text" />
And you programmatically set its value like so:
input.value = 'yolo'
You’ll see the string "yolo" in the input, but the rendered HTML will still be
the same; no value attribute will be rendered. But even more interesting is
the fact that, you can add the attribute in the HTML markup:
<input type="text" value="yolo" />
And the "yolo" string will appear in the input when it first renders, but if you
type in something different, the same value for the value attribute will
remain in the rendered HTML. But you can read whatever was typed in the
input by reading the value property of the input element.
Read more about this behavior in the HTML specification at
http://mng.bz/yQ17.
There are, nevertheless, two special attributes that we’ll handle differently:
the style attribute and the class attribute. You’ll see why in a moment.
Let’s start by writing the setAttributes() function: the one you used in
listing 4.2 to set the attributes on the element node. The role of this function
is to extract the attributes that require special handling (the style and class
attributes) from the rest of the attributes, and then call the setStyle() and
setClass() functions to set those attributes. The rest of the attributes are
passed to the setAttribute() function. You’ll write these setStyle(),
setClass(), and setAttribute() functions later.
Start by creating the attributes.js file under the src/ directory and write the
code in listing 4.3.
Listing 4.3. Setting the attributes of an element node (attributes.js)
export function setAttributes(el, attrs) {
const { class: className, style, ...otherAttrs } = attrs #1
if (className) {
setClass(el, className) #2
}
if (style) {
Object.entries(style).forEach(([prop, value]) => {
setStyle(el, prop, value) #3
})
}
for (const [name, value] of Object.entries(otherAttrs)) {
setAttribute(el, name, value) #4
}
}
// TODO: implement setClass
// TODO: implement setStyle
// TODO: implement setAttribute
Now that you have the function that splits the attributes into the ones that
require special handling and the rest, and calls the appropriate functions to set
them, let’s go ahead and look at each of those in turn. In order of appearance,
the first one is the setClass() function, which is in charge of setting the
class attribute. Note that you’ve destructured the attrs property and aliased
the class attribute to the className variable, as class is a reserved word in
JavaScript.
Setting the "class" attribute
When you write HTML, you set the class attribute of an element node like
this:
<div class="foo bar baz"></div>
In this case, the <div> element has three classes: foo, bar, and baz. Easy! But
now comes the tricky part: a DOM element (an instance of the Element class)
doesn’t have a class property, but instead has two properties, namely
className and classList, that are related to the class attribute. Let’s look
at the classList first.
The classList property returns an object, a DOMTokenList to be more
specific, that comes in pretty handy when you want to add, remove, or toggle
classes on an element. A DOMTokenList object has an add() method, which
takes multiple class names, and adds them to the element. For example, if
you had a <div> element like the following:
<div></div>
and wanted to add the foo, bar, and baz classes to it, you could do it like this:
div.classList.add('foo', 'bar', 'baz')
This would result in the following HTML:
<div class="foo bar baz"></div>
Then is the className property, which is a string that contains the value of
the class attribute. Following the example above, if you wanted to add the
same three classes to the <div> element, you could do it like this:
div.className = 'foo bar baz'
And this would yield the same HTML as the previous example.
You actually want to use both ways of setting the class attribute, depending
on the situation. We should allow the developers using your framework to set
the class attribute in two ways: either as a string or as an array of string
items. So, to add multiple classes to an element, the developer could define
the following virtual node:
{
type: DOM_TYPES.ELEMENT,
tag: 'div',
props: {
class: ['foo', 'bar', 'baz']
}
}
Or, alternatively, they can use a single string like this:
{
type: DOM_TYPES.ELEMENT,
tag: 'div',
props: {
class: 'foo bar baz'
}
}
Both of these options should work. Thus, the setClass() function needs to
distinguish between the two cases and handle them accordingly. With this in
mind, write the following code in the attributes.js file:
function setClass(el, className) {
el.className = '' #1
if (typeof className === 'string') {
el.className = className #2
}
if (Array.isArray(className)) {
el.classList.add(...className) #3
}
}
With the setClass() function out of the way, let’s move on to the
setStyle() function, which is in charge of setting the style attribute of an
element.
Setting the "style" attribute
The style property of an HTMLElement instance is a CSSStyleDeclaration
object. What you need to know about this object is that you can set the value
of a CSS property using conventional object notation, like this:
element.style.color = 'red'
element.style.fontFamily = 'Georgia'
Changing the style property key-value pairs of an HTMLElement instance is
reflected in the value of the style attribute of the element. If the element in
the previous snippet was a paragraph (<p>), the resulting HTML would be:
<p style="color: red; font-family: Georgia;"></p>
The CSSStyleDeclaration is converted into a string with the set of semicolon-separated key-value pairs. You can inspect this string representation of
the style attribute by using the cssText property in code:
element.style.cssText // 'color: red; font-family: Georgia;'
For example, using the element from the previous snippet, you could remove
the color style by doing this:
element.style.color = null
element.style.cssText // 'font-family: Georgia;'
Now that you know how to work with the style property of an HTMLElement
instance, go ahead and write the setStyle() and removeStyle() functions.
The first function takes an HTMLElement instance, the name of the style to set,
and the value of the style, and sets that style on the element. The second
function takes an HTMLElement instance and the name of the style to remove,
and removes that style from the element.
Inside the attributes.js file, write the following code:
export function setStyle(el, name, value) {
el.style[name] = value
}
export function removeStyle(el, name) {
el.style[name] = null
}
Note that you haven’t used the removeStyle() function yet. The code you
wrote before only used the setStyle() function, but as you’ll need to remove
styles later on, this was a good time to write it.
You’re almost done; you’re only missing the setAttributes() function,
which is in charge of setting the rest of the attributes other than the class and
style.
Setting the rest of the attributes
The setAttribute() function takes three arguments: an HTMLElement
instance, the name of the attribute to set, and the value of the attribute. If the
value of the attribute is null, the attribute is removed from the element.
(Conventionally, setting a DOM element’s property to null is the same as
removing the attribute.) If the attribute is of the form data-*, the attribute is
set using the setAttribute() function. Otherwise, the attribute is set to the
given value using object notation (object.key = value). (Or we shall say
the property of the DOM element is set to the given value, and the attribute in
the HTML will reflect that value.) To remove an attribute, you want to both
set it to null and remove it from the attributes object, using the
removeAttribute() method.
Inside the attributes.js file, write the following code:
export function setAttribute(el, name, value) {
if (value == null) {
removeAttribute(el, name)
} else if (name.startsWith('data-')) {
el.setAttribute(name, value)
} else {
el[name] = value
}
}
export function removeAttribute(el, name) {
el[name] = null
el.removeAttribute(name)
}
And with this last function, you’re done implementing the mountDOM()
function, that takes a virtual DOM and mounts it to the real DOM inside the
passed in parent element. Congratulations!
4.1.7 A mountDOM() example
Thanks to this function, you can now define a view using the virtual DOM
representation of it, and mount it to the real DOM. For example, you can
create a view like this:
const vdom = h('section', {} [
h('h1', {}, ['My Blog']),
h('p', {}, ['Welcome to my blog!'])
])
mountDOM(vdom, document.body)
And the resulting HTML would be:
<body>
<section>
<h1>My Blog</h1>
<p>Welcome to my blog!</p>
</section>
</body>
You now want to have a function that, given a mounted virtual DOM,
destroys it and removes it from the document: destroyDOM(). With this
function you’ll be able to clear the document’s body from the previous
example, like so:
destroyDOM(vdom, document.body)
The work done by mountDOM() is undone by destroyDOM(). This would
result in the document’s body being empty again:
<body></body>
Let’s close this chapter implementing the destroyDOM() function.
Exercise 4.2
Using the hFragment(), h(), and mountDOM() functions, insert a new section
below the headline of your local’s newspaper website. The section should
have a title, a paragraph, and a link to an article in Wikipedia. Be creative!
Exercise 4.3
Following up on the previous exercise, inspect the virtual DOM tree in the
browser’s console. Check the el property of the fragment virtual node. What
does it point to? What about the el property of the paragraph and link virtual
nodes?
4.2 Destroying the DOM
Destroying the DOM is simpler than mounting it. Well, destroying anything
is always simpler than creating it in the first place. Destroying the DOM is
the process by which the HTML elements that were created by the
mountDOM() function are removed from the document. This process is
depicted in 4.7.
Figure 4.7. Destroying the DOM
To destroy the DOM associated to a virtual node, you have to take into
account what type of node it is:
text node—remove the text node from its parent element using the
remove() method.
fragment node—remove each of its children from the parent element,
which if you recall, is referenced in the el property of the fragment
virtual node.
element node—do the two previous things, plus remove the event
listeners from the element.
In all of the cases, you want to remove the el property from the virtual node,
and in the case of an element node, also remove the listeners property. This
is so that you can tell that the virtual node has been destroyed and allow the
garbage collector to free the memory of the HTML element. When a virtual
node doesn’t have an el property, you can safely assume that it’s not
mounted to the real DOM, and therefore can’t be destroyed.
To handle these three cases, you need a switch statement that, depending on
the type property of the virtual node calls a different function.
You are ready to implement the destroyDOM() function. Create a new file
inside the src folder called destroy-dom.js and write the code in Listing 4.4.
Listing 4.4. Destroying the virtual DOM (destroy-dom.js)
import { removeEventListeners } from './events'
import { DOM_TYPES } from './h'
export function destroyDOM(vdom) {
const { type } = vdom
switch (type) {
case DOM_TYPES.TEXT: {
removeTextNode(vdom)
break
}
case DOM_TYPES.ELEMENT: {
removeElementNode(vdom)
break
}
case DOM_TYPES.FRAGMENT: {
removeFragmentNodes(vdom)
break
}
default: {
throw new Error(`Can't destroy DOM of type: ${type}`)
}
}
delete vdom.el
}
// TODO: implement removeTextNode()
// TODO: implement removeElementNode()
// TODO: implement removeFragmentNodes()
You’ve written the algorithm for destroying the DOM associated with a
passed in virtual node: vdom. You’ve handled each type of virtual node
separately—you’ll need to write the missing functions in a minute—and
you’ve lastly deleted the el property from the virtual node. This process is
depicted in 4.8.
Figure 4.8. Removing the el references from the virtual nodes
Note that you’ve imported the removeEventListeners() function from the
events.js file, but you haven’t implemented that one yet. You will in a minute.
Let’s start with the code for destroying a text node.
4.2.1 Destroying a text node
Destroying a text node is the simplest case:
function removeTextNode(vdom) {
const { el } = vdom
el.remove()
}
Let’s move on to the code for destroying an element, which is a bit more
interesting.
4.2.2 Destroying an element
To destroy an element you start by removing it from the DOM, in a similar
fashion to how you just did with a text node. Then, you want to recursively
destroy the children of the element, by calling the destroyDOM() function for
each of them. Finally, you want to remove the event listeners from the
element and delete the listeners property from the virtual node.
Go ahead and implement the destroyElement() function in the destroydom.js file:
function removeElementNode(vdom) {
const { el, children, listeners } = vdom
el.remove()
children.forEach(destroyDOM)
if (listeners) {
removeEventListeners(listeners, el)
delete vdom.listeners
}
}
Here’s where you’ve used the missing removeEventListeners() function to
remove the event listeners from the element. Then, you’ve also deleted the
listeners property from the virtual node.
Let’s write the removeEventListeners() function now. It’s a function that
given an object of event names and event handlers, it removes the event
listeners from the element. Recall that the listeners property of the virtual
node is an object that maps event names to event handlers. the following
could be an example of the listeners object for a virtual node representing a
button:
{
mouseover: () => { ... },
click: () => { ... },
dblclick: () => { ... }
}
There would be three event handlers to remove in the case above. So, for
each of them, you want to call the Element object’s removeEventListener()
method (that it inherits from the EventTarget interface):
el.removeEventListener('mouseover', listeners['mouseover'])
el.removeEventListener('click', listeners['click'])
el.removeEventListener('dblclick', listeners['dblclick'])
Open the events.js file and fill in the missing code:
export function removeEventListeners(listeners = {}, el) {
Object.entries(listeners).forEach(([eventName, handler]) => {
el.removeEventListener(eventName, handler)
})
}
Great! You’re only missing the code for destroying a fragment.
4.2.3 Destroying a fragment
Destroying a fragment is simple: you simply need to call the destroyDOM()
function for each of its children. But you have to be careful not to remove the
el referenced in the fragment’s virtual node from the DOM, because that
references the element where the fragment children are mounted, not the
fragment itself. If the fragment children were mounted inside the <body>, and
you called the remove() method on the element, you would remove the
whole document from the DOM. That’s not what you want—or do you?
Figure 4.9 shows the problem in a more graphical way.
Figure 4.9. When destroying a fragment, don’t remove it’s referenced element from the DOM; it
might be the <body> or some other element that you didn’t create, and therefore don’t own
The implementation of the removeFragmentNodes() is therefore very simple:
function removeFragmentNodes(vdom) {
const { children } = vdom
children.forEach(destroyDOM)
}
That’s it! You’ve implemented the mountDOM() and destroyDOM() functions.
These functions, together with the state management system that you’ll
implement in the next chapter, will be the core of the first version of your
framework. You will use the framework to refactor the TODOs application.
Exercise 4.4
Using the destroyDOM() function, remove the section that you added to your
local newspaper website in the previous exercise from the DOM. Make sure
that the fragment’s referenced element is not removed from the DOM, as it
was originally created by the newspaper website, not by you.
Then, check the vdom tree you used to create the section, and make sure that
the el property has been removed from all the virtual nodes.
The first version won’t be very sophisticated—it’ll destroy the entire DOM
using destroyDOM() and mount it from scratch using mountDOM() every time
the state changes—but it will be a great starting point. After finishing the
next chapter you’ll have a working framework, so I hope you’re excited
about it!
See you in the next chapter!
4.3 Answers to the exercises
4.3.1 Exercise 4.1
For this exercise, you first need to open your local—or favorite—newspaper
website and inspect the DOM. Locate where the headline of the article is, and
select it in the inspector, as in figure 4.10. (When you have an element
highlighted in the inspector, you can reference it in the console by using the
$0 variable.)
Figure 4.10. Locating the headline of an article in the DOM
Next, open the console and paste the code that you need for the hString()
and mountDOM() functions to work. That includes the DOM_TYPES object and
the createTextNode() function. Then, create a text virtual node with the text
"OMG, so interesting!" and use the mountDOM() function to insert the text
inside the <div> that contains the headline of the article:
const node = hString('OMG, so interesting!')
mountDOM(node, $0)
You can see the result in figure 4.11.
Figure 4.11. Inserting the "OMG, so interesting!" text inside the headline of an article
If head over to the inspector and inspect the <div> element that contains the
headline, you’ll see that the text you just inserted is there (figure 4.12).
Figure 4.12. Locating the inserted text in the DOM
As you can see, the text is inside the <div> element, beside the <h1> element
that contains the headline.
4.3.2 Exercise 4.2
This exercise’s solution is similar to the previous one. This time you need to
find where the paragraphs (<p>) of the article are located in the DOM, and
select that element; that’s where you’ll mount your virtual nodes.
Then, create the vdom for the section you’ll add to the article:
const section = hFragment([
h('h2', {}, ['Very important news']),
h('p', {}, ['such news, many importance, too fresh, wow']),
h(
'a',
{
href: 'https://en.wikipedia.org/wiki/Doge_(meme)',
},
['Doge!'],
),
])
Then, mount the section in the DOM:
mountDOM(section, $0)
Inspecting the DOM, you can see that the section was added to the article
(figure 4.13).
Figure 4.13. Inserting a section inside an article
4.3.3 Exercise 4.3
For this exercise, you want to print to the console the section vdom tree that
you created in the previous exercise. Simply type in the browser’s console:
section
You’ll see something similar to figure 4.14.
Figure 4.14. Printing the section vdom tree to the console
As expected, the fragment’s el reference points to the parent element where
the fragment children were mounted (in my case, it was the <div> element
that contains the article’s paragraphs). The el references of the paragraph and
link, naturally point at the <p> and <a> elements that were created out of
them.
4.3.4 Exercise 4.4
For this exercise, you need to remove the section that you added to the article
in the previous exercise. To do that, you need to use the destroyDOM()
function that you implemented in this chapter. You’ll need to copy/paste the
destroyDOM() function in the console, and then call it with the section vdom
tree as an argument in the console:
destroyDOM(section)
Then, you can inspect the section vdom again (figure 4.15).
Figure 4.15. Inspecting the section vdom tree after removing it from the DOM
As you can see, the el references of the virtual nodes have all been removed.
If you check the DOM, you’ll see that all the nodes were correctly removed
from the DOM, but the <div> element that was the parent of the fragment
was not removed, as it was created by the newspaper website, not by you.
(Remember that the fragment’s el reference points to the parent element
where the fragment children were mounted.)
4.4 Summary
Mounting a virtual DOM means to create the DOM nodes that represent
each virtual node in the tree, and to insert them into the DOM, inside a
parent element.
Destroying a virtual DOM means to remove the DOM nodes created out
of it, also making sure to remove the event listeners from the DOM
nodes.
5 State management and the
application’s lifecycle
This chapter covers
What state management is
Implementing a state management solution
Mapping JavaScript events to commands that change the state
Updating the state using reducer functions
Re-rendering the view when the state changes
I remember some time ago I went to the coast in the south of Spain, to a
small village in Cadiz. There was this restaurant, so popular that they’d run
out of food quickly; they had a limited number of each of the dishes they
served, and they would update a chalkboard with the number of servings they
had left. When there was no more of a particular dish, they’d cross it out. The
waiter took orders from the customers and updated the chalkboard to reflect
the new state of the restaurant: having one less of that dish. Us, the
customers, could easily know what we could order by looking at the
chalkboard. But from time to time, and due to the work load, the waiter
forgot to update the chalkboard, and customers would find out the dish
they’ve been waiting so long in line to order was sold out. You can picture
the drama. It’s clearly important for the restaurant to have an updated
chalkboard that matched the remaining servings of each dish.
To have a working framework, you’re missing a key piece that does a similar
job as to the waiter in the restaurant, a state manager. In the restaurant
anecdote, the waiter is in charge of keeping the chalkboard in sync with the
state of the restaurant: the number of servings of each dish they had left. In a
frontend application, the state changes as the user interacts with it, and the
view needs to be updated to reflect that changes. The state manager keeps the
application’s state in sync with the view, responding to user input by
modifying the state accordingly, and notifying the renderer when the state
has changed. The renderer is the entity in your framework that takes the
virtual DOM and mounts it into the DOM.
In this chapter, you’ll implement both the renderer (using the mountDOM() and
destroyDOM() functions from the previous chapter) and the state manager
entities, and you’ll learn how they communicate. By the end of the chapter,
you’ll have your first version of the framework, whose architecture (shown in
figure 5.1) is basically the state manager and renderer glued together. (The
state manager is displayed with a question mark because we’ll discover how
it works in this chapter.)
Figure 5.1. Your first framework is just a state manager and a renderer glued together.
The framework you’ll have at the end of the chapter is very rudimentary: to
ensure the view reflects the current state, its renderer completely destroys and
mounts the DOM every time the state changes. As you can see in the diagram
in figure 5.1, the renderer draws the view as a three-step process:
1. Completely destroy the current DOM (calling destroyDOM()).
2. Produce the virtual DOM representing the view given the current state
(calling the View() function, the top level component).
3. Mount the virtual DOM into the real DOM (calling mountDOM()).
Destroying and mounting the DOM from scratch is far from ideal, and we’ll
discuss why later on. In any case, it’s a good starting point, and you’ll
improve the rendering mechanism in chapters 7 and 8, where thanks to the
reconciliation algorithm, your framework can update the DOM in a more
efficient way. You have to walk before you can run, they say.
How does what you’ll do in this chapter—implementing a renderer and state
manager—fit into the bigger picture of your framework? Let’s briefly take a
step back. If you recall from our discussion in chapter 1, when the browser
loads an application, the framework code renders the application’s view (step
5 in figure 5.2, reproduced from figure 1.7 for convenience). This can be
done by the renderer alone—the state manager doesn’t intervene here. (Well
—it might. But let’s leave that case for now.)
Figure 5.2. Single-page application first render in the browser
Then, when the user interacts with the application (step 6 in figure 5.3,
reproduced from figure 1.8), the state manager updates the state (step 7) and
notifies the renderer to re-render the view (step 8). This dynamic is a bit more
complex and requires the state manager and renderer to work together.
Figure 5.3. Single-page application responding to events
The state manager somehow needs to be aware of the events that the user
interactions can trigger, such as clicking a button or typing in an input field,
and know what to do with the state when those events take place. In a way, it
needs to know beforehand everything the user might do with the application,
and how that affects the state.
In this chapter, you’ll learn exactly how to do that. So, with the big picture in
mind, let’s start working on the state manager.
Important
You can find all the listings in this chapter in the listings/ch05 directory of
the book’s repository.
The code you write in this chapter is for the framework’s first version, which
you’ll publish in chapter 6. Therefore, the code in this chapter can be checked
out from the ch6 label:
$ git switch ch6
5.1 The state manager
Let’s study the chronology of everything that happens between the user
interacting with the application and the view being updated. In the list that
follows, the actor goes first, then the action it performs.
1. The user—interacts with the application’s view (for example, clicks a
button).
2. The browser—dispatches a native JavaScript event (for example,
MouseEvent, KeyboardEvent).
3. The application developer—programmed the framework on how to
update the state for each event.
4. The framework’s state manager—updates the state according to the
instructions given by the application developer.
5. The framework’s state manager—notifies the renderer that the state has
changed.
6. The framework’s renderer—re-renders the view with the new state.
Well, this isn’t exactly a chronology, because the application developer
doesn’t intervene between the user interacting with the application and the
state manager updating the state, but rather gives those instructions on how to
update the state during the application development (not at runtime). But still,
it’s a good way to understand the flow of events. Figure 5.4 illustrates this
pseudo-chronology in the architectural diagram of the framework I presented
in figure 5.1.
Figure 5.4. The pseudo-chronology of events in a frontend application
From this pseudo-chronology, there’re two key questions that we should ask
ourselves: how does the application developer instruct the framework how to
update the state when a particular event is dispatched? And, how does the
state manager execute those instructions? In the answer to these questions
lays the key to understanding the state manager.
5.1.1 From JavaScript events to application domain commands
The first thing that you need to notice is that the JavaScript events dispatched
by the browser don’t have a concrete meaning in the application domain on
their own. The user clicked this button, so what? It’s the application
developer who translates user actions into something meaningful for the
application. Think about the TODOs application:
When the user clicked the Add button or pressed the Enter key, that
meant they wanted to add a new TODO item to the list.
"Adding a to-do" is framed in the language of the application, whereas
"clicking a button" is a very generic thing to do. (You click buttons in all
sorts of applications, but that only translates to "adding a to-do" in the
TODOs application.)
If the application developer wants to update the state when a particular event
is dispatched, they first need to determine what that event means in terms of
the application domain. They then map that event to a command that the
framework can understand. A command is a request to do something, as
opposed to an event, which is a notification about something that has
happened. These commands are a request to the framework to update the
state, and are expressed using the domain language of the application.
Events vs. commands
An event is a notification about something that has happened. "A button was
clicked," "a key was pressed," "a network request was completed" are all
examples of events. Events aren’t requesting the framework or application to
do anything, they’re just notifications with some additional information.
Event names are usually framed in the past tense: 'button-clicked', 'key-
pressed', 'network-request-completed',
and so on.
A command is a request to do something in a particular context. "Add todo,"
"edit todo," "remove todo" are three examples of commands. Commands are
written in imperative tense, because they’re requests to do something: 'addtodo', 'edit-todo', 'remove-todo', and more.
Following with the TODOs application example, here’s a table of a few
events that the user can trigger and the commands that the application
developer would dispatch to the framework in response to those events.
Table 5.1. Mapping between browser events and application commands in the TODOs
application
Browser Event
Command
Explanation
add-todo
Clicking the Add button
adds a new to-do item to
the list.
add-todo
Pressing the Enter key
adds a new to-do item to
the list.
Click the Done button
remove-todo
Clicking the Done
button marks the to-do
item as done, removing
it from the list.
Double-click a to-do
item
start-editing-todo
Double-clicking a on a
to-do item sets the to-do
item in edit mode.
Click the Add button
Press the Enter key
(while the input field is
focused)
And in figure 5.5 you can see the same mapping in the form of a diagram. In
it, you can establish a link between the browser events and the application
commands, which are dispatched by the application developer to the
framework, using the dispatch() function. You’ll learn more about this
function in a minute.
Figure 5.5. The mapping between browser events and application commands
Why is this relevant to answer the previous questions? you might be asking.
Because once the application domain commands are identified, the
application developer can supply functions that update the state as a response
to those commands. The state manager executes those functions to update the
state. Let’s look into what these functions are and how they’re executed.
Exercise 5.1
Imagine an application consisting in a counter and two buttons: one to
increment the counter and another one to decrement it. It’s HTML could look
like this:
<button>-</button>
<span>0</span>
<button>+</button>
When each of the buttons is clicked, what commands would you dispatch to
the framework? Can you draw a diagram similar to the one in figure 5.5 that
maps browser events to application commands?
5.1.2 The reducer functions
Reducer functions can be implemented in a few different ways, but if we
decide to stick to the functional programming principles of using pure
functions and making data immutable, instead of updating the state by
mutating it, these functions should create a new one. This is illustrated in
figure 5.6.
Figure 5.6. A reducer function takes the current state and a payload and returns a new state
Note
This might sound familiar to you if you’ve used Redux before: these
functions are the reducers. (The term reducer comes from the reduce
function in functional programming.) A reducer, in our context, is a function
that takes the current state and a payload (the command’s data) and returns a
new updated state. These functions never mutate the state that’s passed to
them (that’d be considered a side effect, and therefore the function wouldn’t
be pure), but instead create a new state.
Let’s see an example with the TODOs application. To create a new version of
the state when the user removes a to-do item from the list (recall that the state
was just the list of to-dos), the reducer function associated to this 'removetodo' command would look like this:
function removeTodo(state, todoIndex) {
return state.toSpliced(todoIndex, 1)
}
If we had the following state:
let todos = ['Walk the dog', 'Water the plants', 'Sand the chairs']
And we wanted to remove the to-do item at index 1, the new state would be
computed using the removeTodo() reducer, as follows:
todos = removeTodo(todos, 1)
// todos = ['Walk the dog', 'Sand the chairs']
In this case, the payload associated with the 'remove-todo' command is the
index of the to-do item to remove. Note how the original array is not mutated,
but a new one is created instead (the filter() method of an array returns a
new array).
Exercise 5.2—challenge
Imagine you’re building a Tic-Tac-Toe game as a web application. You have
a 3x3 grid of squares, and when one of the two players clicks on one of them,
you want to mark it with an X (cross) or an O (nought). The player who places
three of their marks in a horizontal, vertical, or diagonal row wins the game.
How would you design the state of the application? What commands would
you dispatch to the framework in response to the user clicking on a square?
What reducer functions would you implement to update the state?
Here are some tips to help you get started:
The state needs to have, at least, three pieces of information: the grid of
squares, the player who’s turn it is, and the winner of the game (if any).
To design what commands are needed, think about what actions the user
can perform in the application.
The reducers can be deduced from the commands, and how the state
needs to be updated in response to them.
Let’s do a quick recap of what we’ve seen so far. We’ve seen that the
application developer translates browser events into application domain
commands, and that the state manager executes the reducer functions
associated to those commands to update the state. But, how does the state
manager know which reducer function to execute when a command is
dispatched? There needs to be something that maps the commands to the
reducer functions. We’ll call this mechanism a dispatcher, and it’s the state
manager’s central piece.
5.1.3 The dispatcher
The association between commands and reducer functions is done by an
entity we’ll call the dispatcher. The name dispatcher reflects the fact that this
entity is responsible for dispatching the commands to the functions that
handle the command, that is, for executing the corresponding handler
functions in response to commands. To do this, it needs to be told—by the
application developer—which handler function (or functions, as there might
be more than one) to execute in response to each command.
These command handler functions are consumers. Consumer is the technical
term to refer to a function that accepts a single parameter—the command’s
payload in our case—and returns no value, as figure 5.7 shows.
Figure 5.7. A consumer function takes a single parameter and returns no value
A consumer that handles a command can easily wrap a reducer function, as
the following example shows:
function removeTodoHandler(todoIndex) {
// Calls the removeTodo() reducer function to update the state.
state = removeTodo(state, todoIndex)
}
As you can see, the command handler function that removes a to-do from the
list receives the to-do index as its single parameter, and then calls the
removeTodo() reducer function to update the state. The handler simply wraps
the reducer function, and it’s the dispatcher’s responsibility to execute the
handler function in response to the 'remove-todo' command.
But how do you tell the dispatcher which handler function to execute in
response to a command?
Assigning handlers to commands
Your dispatcher needs to have a subscribe() method that registers a
consumer function—the handler—to respond to commands with a given
name. And the same way you can register a handler for a command, you
should be able to un-register it when it doesn’t need to be executed anymore
(because the relevant view has been removed from the DOM, for example).
To accomplish this, the subscribe() method should return a function that
can be called to un-register the handler.
Your dispatcher also needs to have a dispatch() method that executes the
handler functions associated to a command. You can see in figure 5.8 a
sequence diagram of how the dispatcher works.
Figure 5.8. The dispatcher’s subscribe() method registers handlers to respond to commands
with a given name, and dispatch() executes the handlers associated to a command
It’s time to implement the dispatcher. Create a new file called dispatcher.js in
the src/ directory. Your runtime/src/ directory should look like this (in bold
font the new files):
src/
├──
│
├──
├──
├──
├──
├──
├──
└──
utils/
└── arrays.js
attributes.js
destroy-dom.js
dispatcher.js
events.js
h.js
index.js
mount-dom.js
Then, write the following code in listing 5.1.
Note
The hash # in front of the variable name is the ES2020 way to make the
variable private inside a class. Starting from ES2020, any variable or method
that starts with a hash is private and can only be accessed from within the
class.
Listing 5.1. Registering handlers to respond to commands (dispatcher.js)
export class Dispatcher {
#subs = new Map()
subscribe(commandName, handler) {
if (!this.#subs.has(commandName)) { #1
this.#subs.set(commandName, [])
}
const handlers = this.#subs.get(commandName)
if (handlers.includes(handler)) { #2
return () => {}
}
handlers.push(handler) #3
return () => { #4
const idx = handlers.indexOf(handler)
handlers.splice(idx, 1)
}
}
}
The Dispatcher is a class with a private variable called subs (short for
subscriptions): a JavaScript map to store the registered handlers by event
name. Note how more than one handler can be registered for the same
command name.
The subscribe() method takes a command name and a handler function as
parameters, checks if there’s an entry in subs for that command name, and
creates one with an empty array if there isn’t. Then appends the handler to the
array in case it wasn’t already registered. If the handler was already
registered, you simply return a function that does nothing, because there’s
nothing to unregister.
If the handler function was registered, the subscribe() method returns a
function that removes the handler from the corresponding array of handlers,
so it’s never notified again. To do this, you first look for the index of the
handler in the array, and then call its splice() method to remove the element
at that index. Note that the index lookup only happens when the returned
function—the un-registering function—is called. This is a very important
detail, because if you did the lookup outside that function—inside the
subscribe() method body—the index that you’d get might not be valid by
the time you want to unregister the handler, because the array might have
changed in the meantime.
Warning
In the case where the handler is already registered, instead of returning an
empty function, you might be tempted to return a function that un-registers
the existing handler. But returning an empty function is a better idea, because
it avoids the side effects of a developer inadvertently calling the returned
function twice (one for each time they called subscribe() using the same
handler). In this case, when the same handler is unregistered for the second
time, indexOf() returns -1, because the handler isn’t in the array anymore.
It’d then call splice() with an index of -1, which would remove the last
handler in the array, and this is not what you want.
This silent failure—something going wrong without throwing an exception—
is something we want to avoid at all costs, as debugging these kinds of issues
can be a nightmare.
Now that you’ve implemented the dispatcher first method, subscribe(),
there’s something we haven’t addressed yet: how does the dispatcher tell the
renderer about state changes? Let’s try to figure this out next.
Notifying the renderer about state changes
In the beginning of this chapter we said that the state manager is in charge of
keeping the state in sync with the views. It does so by notifying the renderer
about state changes, so that the renderer can update the views accordingly.
The question is then: how does the dispatcher notify the renderer?
You know that the state can change only in response to commands. A
command triggers the execution of one or more handler functions, which
execute reducers, which in turn update the state. Therefore, the best moment
to notify the renderer about state changes is after the handlers for a given
command have been executed. You should allow the dispatcher to register
special handler functions, which we’ll call after-command handlers, and are
executed after the handlers for any dispatched command have been executed.
The framework uses these handlers to notify the renderer about potential state
changes, so it can update the view.
The diagram in figure 5.9 shows how the afterEveryCommand() as part of
the dispatcher’s architecture. The functions registered with this method are
called after every command is handled, which you can use to notify the
renderer about state changes.
Figure 5.9. The dispatcher’s afterEveryCommand() method registers handlers to run after every
command is handled
Write the code in bold font that’s shown inside the Dispatcher class, to add
the afterEveryCommand() method:
Listing 5.2. Registering functions to run after commands (dispatcher.js)
export class Dispatcher {
#subs = new Map()
#afterHandlers = []
// --snip-- //
afterEveryCommand(handler) {
this.#afterHandlers.push(handler) #1
return () => { #2
const idx = this.#afterHandlers.indexOf(handler)
this.#afterHandlers.splice(idx, 1)
}
}
}
This method is very similar to the subscribe() method, except that it doesn’t
take a command name as a parameter: these handlers are called for all
dispatched commands. This time we’re not checking for duplicates; we’re
allowing for the same handler to be registered multiple times. Aftercommand handlers don’t modify the state, they are a notification mechanism,
and so notifying about the same event multiple times might be a valid usecase.
The last part that’s missing is the dispatch() method, to dispatch a
command and call all the registered handlers.
Dispatching commands
A dispatcher wouldn’t be much of a dispatcher if it didn’t have a dispatch()
method, would it? This method takes two parameters: the name of the
command to dispatch and its payload. It looks up the handlers registered for
the given command name, and calls them one by one, in order, passing them
the command’s payload as parameter. Last, it runs the after-command
handlers.
Listing 5.3. Dispatching a command given its name and payload (dispatcher.js)
export class Dispatcher {
// --snip-- //
dispatch(commandName, payload) {
if (this.#subs.has(commandName)) { #1
this.#subs.get(commandName).forEach((handler) => handler(payload))
} else {
console.warn(`No handlers for command: ${commandName}`)
}
this.#afterHandlers.forEach((handler) => handler()) #2
}
}
Note that, if a command with no handlers associated is dispatched, we warn
the developer about it in the console. This will be handy later on when we
write our example applications, because it’s easy to misspell a command
name and not notice it, but then bang your head against the wall because you
don’t understand why your code isn’t working.
That’s it! Figure 5.10 shows the framework’s first version architecture.
You’ve implemented the dispatcher—the state manager—and now it’s time
to integrate it with the renderer to form a working framework.
Figure 5.10. The framework’s first version architecture
Before integrating the dispatcher with the rendering system, make sure the
code you wrote matches the one in listing 5.4 in the next section. If you need
to copy and paste to compare, you can find the complete listing at the book’s
GitHub repository (see appendix A for more information).
Result
Just for your reference, here’s the complete Dispatcher class
implementation:
Listing 5.4. Complete Dispatcher implementation (dispatcher.js)
export class Dispatcher {
#subs = new Map()
#afterHandlers = []
subscribe(commandName, handler) {
if (!this.#subs.has(commandName)) {
this.#subs.set(commandName, [])
}
const handlers = this.#subs.get(commandName)
if (handlers.includes(handler)) {
return () => {}
}
handlers.push(handler)
return () => {
const idx = handlers.indexOf(handler)
handlers.splice(idx, 1)
}
}
afterEveryCommand(handler) {
this.#afterHandlers.push(handler)
return () => {
const idx = this.#afterHandlers.indexOf(handler)
this.#afterHandlers.splice(idx, 1)
}
}
dispatch(commandName, payload) {
if (this.#subs.has(commandName)) {
this.#subs.get(commandName).forEach((handler) => handler(payload))
} else {
console.warn(\`No handlers for command: ${commandName}`)
}
this.#afterHandlers.forEach((handler) => handler())
}
}
Make sure you wrote the code correctly and your implementation matches the
one in listing 5.4. If so, let’s move on to the next section.
Exercise 5.3
To put your newly implemented Dispatcher class to use, paste the code in
listing 5.4 into the browser’s console (remember to leave the export
statement out). Then, create a new instance of the Dispatcher class and
register a handler for a command called 'greet'. This' command payload
should be a string with the name of the person to greet. When the command
is dispatched, the handler should log a greeting to the console: 'Hello,
<name>!' (where <name> is the name of the person in the payload). You also
want to have an after-command handler that logs a message to the console
saying "Done greeting!".
For example, when the command 'greet' is dispatched with the payload
’John':
dispatcher.dispatch('greet', 'John')
the console should log the following:
Hello, John!
Done greeting!
5.2 Assembling the state manager into the
framework
Assemble is defined by Merriam-Webster as to bring together (as in a
particular place or for a particular purpose). To assemble the state manager
and renderer, you need a "particular place" where to bring them together.
This would be an object that contains and connects them so they can
communicate. If you think about it, this object represents the running
application that uses your framework, so we can refer to it as the application
instance. Let’s think about how you want developers to create an application
instance in your framework.
5.2.1 The application instance
The application instance is the object that manages the lifecycle of the
application: it manages the state, renders the views, and updates the state in
response to user input. There are three things that developers need to pass to
the application instance:
The initial state of the application.
The reducers that update the state in response to commands.
The top-level component of the application.
Your framework can take care of the rest: instantiating a renderer and a state
manager, and wiring them together. (Remember, your initial version of the
framework won’t be much more than these two things glued together.) The
application instance can expose a mount() method that takes a DOM element
as parameter, mounts the application in it, and kicks off the application’s
lifecycle. From this point on, the application instance is in charge of keeping
the state in sync with the views, like the waiter in the restaurant from the
beginning of the chapter.
This might sound a bit abstract a the moment, but it’ll become clear later on
when you rewrite the TODO application using your framework. For now,
bear with me and let’s move on to implementing the application instance.
Let’s start with the renderer.
5.2.2 The application instance’s renderer
To start, you implement a function called createApp() that returns an object
with a single method, mount(), which takes a DOM element as parameter and
mounts the application in it. This object is the application instance inside
which you implement the renderer and the state manager.
The createApp() function takes an object with two properties: state and
view. The state property is the initial state of the application, and the view
property is the top-level component of the application. You’ll add the
reducers later.
You need two variables in the closure of the createApp() function: parentEl
and vdom. They keep track of the DOM element where the application is
mounted and the virtual DOM tree of the previous view, respectively. They
should both be initialized to null because the application hasn’t been
mounted yet.
Then goes the renderer, which is implemented as a function: renderApp().
This function, as previously discussed, renders the view by first destroying
the current DOM tree—if there is one—and mounting the new one. At this
point, this function is called only once: when the application is mounted by
the mount() method, the only method exposed to the developer. It takes a
DOM element as parameter and mounts the application in it. Note how you
save the DOM element in the parentEl variable so that you can use it later to
unmount the application.
Create a new file called app.js and write the code in listing 5.5.
Listing 5.5. The application instance with its renderer (app.js)
import { destroyDOM } from './destroy-dom'
import { mountDOM } from './mount-dom'
export function createApp({ state, view }) { #1
let parentEl = null
let vdom = null
function renderApp() {
if (vdom) {
destroyDOM(vdom) #2
}
vdom = view(state)
mountDOM(vdom, parentEl) #3
}
return {
mount(_parentEl) { #4
parentEl = _parentEl
renderApp()
},
}
}
Okay, you’ve got the renderer, you could already render an application in the
browser, but it wouldn’t respond to user input. For that, you need the state
manager, that tells the renderer to re-render the application when the state
changes. Let’s move on to that.
5.2.3 The application instance’s state manager
The state manager is a bit more complex that just a function, like the renderer
was. The Dispatcher class you implemented in the previous section is the
central piece of the state manager, but you have to hook some things up.
Most notably, you need to wrap the state reducers—given by the developer—
in a consumer function that will be called by the dispatcher every time a
command is dispatched. Let’s see how this is done.
Write the code in bold in listing 5.6. Note that part of the code you wrote
earlier is elided for clarity.
Listing 5.6. Adding the state manager to the application instance (app.js)
import { destroyDOM } from './destroy-dom'
import { Dispatcher } from './dispatcher'
import { mountDOM } from './mount-dom'
export function createApp({ state, view, reducers = {} }) {
let parentEl = null
let vdom = null
const dispatcher = new Dispatcher()
const subscriptions = [dispatcher.afterEveryCommand(renderApp)]
for (const actionName in reducers) {
const reducer = reducers[actionName]
const subs = dispatcher.subscribe(actionName, (payload) => {
state = reducer(state, payload) #2
})
subscriptions.push(subs) #3
}
// --snip-- //
}
Let’s unpack what you’ve done here. First, you’ve added a reducers
property into the createApp() function parameter. This property is an object
which maps command names to reducer functions, functions that take the
current state and the command’s payload and return a new state.
Next, you’ve created an instance of the Dispatcher class and saved it in the
dispatcher variable. The line below that is crucial: you’ve subscribed the
renderApp() function to be an after-command handler, so that the application
is re-rendered after every command is handled. Not every command
necessarily changes the state, but you don’t know that in advance, so you
have to re-render the application after every command.
Note
To avoid re-rendering the application when the state didn’t change, you could
compare the state before and after the command was handled. This
comparison can nevertheless become expensive if the state is a heavy and
deeply nested object and the commands are frequent. In chapters 7 and 8
you’ll improve the performance of the renderer, by only patching the DOM
where it’s necessary, so re-rendering the application will be a reasonably fast
operation. Not checking if the state changed is a trade-off we’re making to
keep the code simple.
Can you see why the concept of after-command handlers were a good idea
now? Note that, the afterEveryCommand() function returns a function that
unsubscribes the handler, so you’ve saved it in the subscriptions array, an
array that you’ve initialized to have this function as its first element.
You then iterate the reducers object, wrap each of the reducers inside a
handler function that calls the reducer and updates the state, and subscribe
that handler to the dispatcher. You’ve been careful to save the subscription
functions in the subscriptions array, so that you can unsubscribe them later
when the application is unmounted.
Great—you’ve got the state manager hooked up to the renderer. But there’s
something we haven’t talked about yet: how do the components dispatch
commands? Let’s look at that next.
5.2.4 Components dispatching commands
If you recall, you virtual DOM implementation allows to attach event
listeners to DOM elements:
h(
'button',
{ on: { click: () => { ... } } },
['Click me']
)
If you want to be able to dispatch commands from within those event
listeners, you need to pass the dispatcher to the components. In a way, you
can imagine the dispatcher as a remote control, where each button dispatches
a command whose handler function can modify the state of the application
(figure 5.11). By passing the dispatcher to the components, you give them the
ability to dispatch commands in response to user input.
Figure 5.11. The dispatcher can be thought of as a remote control, where each button dispatches
a command whose handler function can modify the state of the application
The dispatcher in the application instance has the command handlers that the
developer has provided. The component can dispatch those commands using
the dispatch() method of the dispatcher. For example, to remove a to-do
item from the list, the component can dispatch a remove-todo command like
this:
h(
'button',
{
on: {
click: () => dispatcher.dispatch('remove-todo', todoIdx)
}
},
['Done']
)
To allow the components to dispatch commands, change your code in app.js,
adding the code in bold in listing 5.7.
Listing 5.7. Allowing components to dispatch commands (app.js)
export function createApp({ state, view, reducers = {} }) {
let parentEl = null
let vdom = null
const dispatcher = new Dispatcher()
const subscriptions = [dispatcher.afterEveryCommand(renderApp)]
function emit(eventName, payload) {
dispatcher.dispatch(eventName, payload)
}
// --snip-- //
function renderApp() {
if (vdom) {
destroyDOM(vdom)
}
vdom = view(state, emit)
mountDOM(vdom, parentEl)
}
// --snip-- //
}
To allow components to dispatch commands in a more convenient way,
you’ve implemented an emit() function. So instead of writing
dispatcher.dispatch(), you can write emit() inside the components,
which is a bit more concise. Then, you’ve passed the emit() function to the
components as a second argument.
Bear in mind that, from now onward, components will receive two
arguments: the state and the emit() function. If a component doesn’t need to
dispatch commands, it can ignore the second argument.
You’re almost done! There’s only one thing missing: unmounting the
application.
5.2.5 Unmounting the application
When an application instance is created, the state reducers are subscribed to
the dispatcher, and the renderApp() function is subscribed to the dispatcher
as an after-command handler. When the application is unmounted, apart from
destroying the view, you need to unsubscribe the reducers and the
renderApp() function from the dispatcher.
To clean up the subscriptions and destroy the view, you need to add an
unmount() method to the application instance, as shown in bold in listing 5.8.
Listing 5.8. Unmounting the application (app.js)
export function createApp({ state, view, reducers = {} }) {
let parentEl = null
let vdom = null
// --snip-- //
return {
mount(_parentEl) {
parentEl = _parentEl
renderApp()
},
unmount() {
destroyDOM(vdom)
vdom = null
subscriptions.forEach((unsubscribe) => unsubscribe())
},
}
}
The unmount() method uses the destroyDOM() from last chapter to destroy
the view, sets the vdom property to null, and unsubscribes the reducers and
the renderApp() function from the dispatcher.
That’s it! It’s a good time to review the code you wrote in app.js to make sure
you got it right.
5.2.6 Result
Your app.js should look like the code in listing 5.9.
Listing 5.9. The application instance (app.js)
import { destroyDOM } from './destroy-dom'
import { Dispatcher } from './dispatcher'
import { mountDOM } from './mount-dom'
export function createApp({ state, view, reducers = {} }) {
let parentEl = null
let vdom = null
const dispatcher = new Dispatcher()
const subscriptions = [dispatcher.afterEveryCommand(renderApp)]
function emit(eventName, payload) {
dispatcher.dispatch(eventName, payload)
}
for (const actionName in reducers) {
const reducer = reducers[actionName]
const subs = dispatcher.subscribe(actionName, (payload) => {
state = reducer(state, payload)
})
subscriptions.push(subs)
}
function renderApp() {
if (vdom) {
destroyDOM(vdom)
}
vdom = view(state, emit)
mountDOM(vdom, parentEl)
}
return {
mount(_parentEl) {
parentEl = _parentEl
renderApp()
},
unmount() {
destroyDOM(vdom)
vdom = null
subscriptions.forEach((unsubscribe) => unsubscribe())
},
}
}
That’s the first version of your framework! Put together in less than 50 lines
of code, it’s a pretty simple framework, but it’s enough to build simple
applications.
In the next chapter, you build and publish your framework to NPM and
refactor the TODOs application to use it.
5.3 Answers to the exercises
5.3.1 Exercise 5.1
For this simple application, we can use two commands:
'increment-count'—increments the counter by one.
'decrement-count'—decrements the counter by one.
These commands are mapped to the browser’s click event on the buttons as
illustrated in figure 5.12.
Figure 5.12. The commands are mapped to the browser’s click event on the buttons
5.3.2 Exercise 5.2—Challenge
For the state, we need three things:
The 3x3 board of the game (a 2D array of null, X, or O)
Who the current player is (X or O)
Who the winner of the game is (X, O, or null if no one has won yet).
Let’s create a function that returns the initial state of the application:
function makeInitialState() {
return {
board: [
[null, null, null],
[null, null, null],
[null, null, null],
],
player: 'X',
winner: null,
}
}
At the start of the game, the board is empty, the current player is X, and
there’s no winner yet.
The only way players can interact with the application is by clicking on the
board, thus we only need one command, which we’ll call 'mark-cell'. This
command’s payload will be the coordinates of the cell that the player has
clicked on (the row and column).
The reducer function for the 'mark-cell' command will update the board,
switch the current player, and set who the winner is, if any. The reducer
function will throw an error if the player clicks on a cell that’s already
marked or if the player clicks on a cell that doesn’t exist—those cases should
be prevented by the view. Then, the reducer creates a new and updated board,
switches the current player, and checks if there’s a winner.
Here’s the code for the reducer function:
function markReducer(state, { row, col }) {
if (row > 3 || row < 0 || col > 3 || col < 0) { #1
throw new Error('Invalid move')
}
if (state.board[row][col]) { #2
throw new Error('Invalid move')
}
const newBoard = [ #3
...state.board[0],
...state.board[1],
...state.board[2]
]
newBoard[row][col] = state.player #4
const newPlayer = state.player === 'X' ? 'O' : 'X' #5
const winner = checkWinner(newBoard) #6
return { #7
board: newBoard,
player: newPlayer,
winner,
}
}
There’s a function, checkWinner(), that checks if there’s a winner. We
haven’t implemented this function for this exercise, but you can attempt to
implement it yourself if you feel adventurous.
5.3.3 Exercise 5.3
First of all, copy and paste the code for the Dispatcher class into the
browser’s console. Then, create an instance of the Dispatcher class and
subscribe a handler for a command named 'greet'. Lastly, add an aftercommand handler:
const dispatcher = new Dispatcher()
dispatcher.subscribe('greet', (name) => {
console.log(`Hello, ${name}!`)
})
dispatcher.afterEveryCommand(() => {
console.log('Done greeting!')
})
Now, call the dispatch() method with the command name 'greet' and the
payload 'John':
dispatcher.dispatch('greet', 'John')
You should see the following output in the console:
Hello, John!
Done greeting!
Your Dispatcher is working perfectly!
5.4 Summary
Your framework’s first version is made of a renderer and a state
manager wired together.
The renderer first destroys the DOM (if it exists) and then creates it from
scratch. This isn’t very efficient and creates problems with the focus of
input fields, among other things.
The state manager is in charge of keeping the state and view of the
application in sync.
The developer of an application maps the user interactions to
commands, framed in the business language, that are dispatched to the
state manager.
The commands are processed by the state manager, updating the state
and notifying the renderer that the DOM needs to be updated.
The state manager uses a reducer function to derive the new state from
the old state and the command’s payload.
6 Publishing and using your
framework’s first version
This chapter covers
Publishing the first version of your framework to NPM
Refactoring the TODOs application to use your framework
In the previous chapter you implemented a state manager and assembled it,
together with a renderer, to build the first version of your frontend
framework. In this chapter, you’ll publish the first version of your
framework, and then refactor the TODOs application you built using vanilla
JavaScript to use it.
Important
You can find all the listings in this chapter in the listings/ch06 directory of
the book’s repository. The code in this chapter can be checked out from the
ch6 label:
$ git switch ch6
6.1 Building and publishing the framework
The first thing you want to do to build your framework is export the functions
that you want to expose to the developer using it from the src/index.js barrel
file. Whatever you export from this file is what makes the public API of the
framework. The src/index.js is the entry point of the build process, so
everything that’s exported from this file will be made available in the final
bundle.
You want developers to use the h(), hString(), and hFragment() functions
to create virtual DOM nodes, and the createApp() function to create an
application. You don’t need to export the mountDOM() and destroyDOM()
functions, because they’re only used internally by the framework.
Open the src/index.js file, delete whatever is in there, and add the following
lines:
export { createApp } from './app'
export { h, hFragment, hString } from './h'
Now, run the build script inside the runtime workspace to build the
framework:
$ npm run build
As you’ve seen in appendix A, this script bundles the JavaScript code into a
single ESM file: dist/<fwk-name>.js. (Recall that <fwk-name> is the name of
your framework, as named in the package.json file’s name property.)
Important
Before you proceed, make sure you followed the instructions in appendix A
to set up your NPM account to publish your package.
You can import this file directly from packages/runtime/dist/<fwk-name>.js
in your examples to use the framework, but you can also publish it to NPM
using the following command, so that you and other developers can install it
in their projects using NPM:
$ npm install <fwk-name>
You want the version field in your package.json file to be 1.0.0; this is the
first version of your framework, but you’ll be publishing more versions later.
"version": "1.0.0",
To publish the package to https://www.npmjs.com/, make sure your
terminal’s working directory is the runtime workspace, and run the publish
NPM script, as follows:
$ npm run publish
And that’s it: You’ve published the first version of your frontend framework
to NPM.
You can find it at https://www.npmjs.com/package/ followed by the name of
your framework (the name field in your package.json file), and can install it in
your projects through NPM by running the command, npm install <fwkname>. You can also find it at https://unpkg.com/ followed by the name of
your package, where you can import it directly in your HTML files. We’ll
use the latter method in most of the examples in the book.
6.2 A short example
You’re probably excited to start using your framework to see how it works;
we haven’t seen a complete example yet. You’ll rewrite your TODOs app to
use the framework in a minute, but I want to help you make sense of
everything you’ve done so far; to that end, you’d probably appreciate a short
example that shows how the framework works.
You don’t need to write the code in this section (unless you want to try it for
yourself); you can just read it and see how the framework works. You’ll get
your hands dirty in the next section.
I can’t think of anything simpler than a button that counts how many times
you click it. This application’s view is just a button, but it’s interactive: it
renders something different based on the state, which is a number
representing a count. You can implement this simple application with the
following few lines of code:
createApp({
state: 0,
reducers: {
add: (state, amount) => state + amount,
},
view: (state, emit) =>
h(
'button',
{ on: { click: () => emit('add', 1) } },
[state]
),
}).mount(document.body)
This is how little code you need to make a simple application with the
framework. No DOM manipulation drama; that’s handled by the framework
now so you can focus on the important stuff: the application’s logic.
This application renders as a single button with the number 0 on it (you
haven’t clicked it yet):
<body>
<button>0</button>
</body>
When you click the button, the number it displays increments by one, and the
button renders the new number:
<body>
<button>1</button>
</body>
The framework removes the <button> element from the DOM and creates a
new one every time the state changes—that is, when you click the button. But
this happens in a fraction of a millisecond, so your eye can’t even notice it.
To you, it looks like the button is updating its number, but in reality, you
never click the same button twice. (How philosophical is that?)
Exercise 6.1
Using your framework, implement a counter application that allows the user
to increment and decrement a counter. The counter should start at 0 and the
user should be able to increment it by clicking on a button with a "+" (plus
sign) label. The user should also be able to decrement it by clicking on
another button, this time with the "-" (minus sign) label. The counter should
be displayed between the two buttons. You can create the application inside
the examples/ directory.
Let’s put the framework to use in the TODOs application, shall we?
6.3 Refactoring the TODOs app
Let’s now take the TODOs application you built without a framework and
refactor it to use the framework you just built. You’ll see how much simpler
the code becomes (except for the nuances of writing virtual DOMs instead of
HTML), and be in a good position to assess the benefits of using a frontend
framework versus writing your own DOM-manipulation code.
The first thing you want to do to refactor the TODOs application is to clean
up the <body> tag in the todos.html file. All the HTML markup will be
created by your framework this time, so the <body> tag should be empty.
Your todos.html file should look like listing 6.1.
Listing 6.1. Remove all the markup from the HTML file (todos.html)
<!DOCTYPE html>
<html lang="en">
<head>
<meta charset="UTF-8" />
<script type="module" src="todos.js"></script>
<title>My TODOs</title>
</head>
<body></body> #1
</html>
Do the same with the todos.js file; you’ll be writing all the code from scratch.
Then, import the functions exported by the framework from either the dist/
directory or, preferably, from unpkg.com. (I will be using the unpkg.com in
this book, but you can use whichever method you prefer.) Here’s what your
todos.js file should look like:
import { createApp, h, hFragment } from 'https://unpkg.com/<fwk-name>
Note
Please recall (and this will be the last time I mention it to avoid sounding
repetitive) that <fwk-name> is the name of your framework, as named in the
package.json file’s name property.
Next, you want to define the application’s state. This time, it’ll be a bit more
nuanced than a simple array of to-do items.
6.3.1 Defining the state
The state of the TODOs application, when you wrote it using vanilla
JavaScript, was simply an array of strings, where each string was a to-do
item. But there were other pieces of information that you didn’t need to keep
as part of the state, like the text of the new to-do item that the user was typing
into the input field, because we could simply grab it from the DOM, like so:
const addTodoInput = document.getElementById('todo-input')
// The text of the new to-do item
addTodoInput.value
The idea of using a framework is to abstract away the manipulation of the
DOM, so we want to avoid accessing the DOM at all. Any piece of
information that’s relevant to the application should be part of the state. The
value of the input field where the user writes the new to-do item’s text has to
be part of the state, and it needs to be up to date with what the user is typing.
There are three pieces of information that you’ll need to keep in the state this
time:
todos: the array of to-do items (the same as before).
currentTodo: the text of the new to-do item that the user
is typing into
the input field.
edit:
an object containing information about the to-do item being edited
by the user:
idx:
the index of the to-do item in the todos array that’s being
edited.
original: the original text of the to-do item before the user started
editing it (in case the edition is cancelled and we need to bring the
original value back).
edited: the text of the to-do item as the user is editing it.
With this in mind, write the code in listing 6.2 to define the new state.
Listing 6.2. The state for the TODOs application (todos.js)
import { createApp, h, hFragment } from 'https://unpkg.com/<fwk-name>
const state = {
currentTodo: '',
edit: {
idx: null,
original: null,
edited: null,
},
todos: ['Walk the dog', 'Water the plants'],
}
Let’s now think about the actions that the user can perform on the application
and how they affect the state.
6.3.2 Defining the reducers
This seemingly simple application has a few actions that the user can perform
on it. We need to write a reducer function to update the state for each of these
actions. If you think about the different ways a user can interact with the
application, you’ll come up with a list similar to the following:
Update the current to-do—The user types a new character in the input
field, so the current to-do needs to be updated.
Add a new to-do—The user clicks the add button to add a new to-do to
the list.
Start editing a to-do—The user double clicks a to-do item to start
editing it.
Edit a to-do—The user types a new character in the input field while
editing a to-do item.
Save an edited to-do—The user finishes editing a to-do and saves the
changes.
Cancel editing a to-do—The user cancels editing a to-do and discards
the changes.
Remove a to-do—The user marks a to-do as completed so it can be
removed from the list.
Write a reducer function for each of these actions below the state definition,
as shown in listing 6.3. Recall that a reducer must be a pure function, so it
can’t have side effects or mutate its arguments; it has to return a new state
object, not a modified version of the current state.
Listing 6.3. The reducer functions of the state (todos.js)
const reducers = {
'update-current-todo': (state, currentTodo) => ({ #1
...state,
currentTodo, #2
}),
'add-todo': (state) => ({
...state,
currentTodo: '', #3
todos: [...state.todos, state.currentTodo], #4
}),
'start-editing-todo': (state, idx) => ({ #5
...state,
edit: {
idx,
original: state.todos[idx], #6
edited: state.todos[idx], #7
},
}),
'edit-todo': (state, edited) => ({ #8
...state,
edit: { ...state.edit, edited }, #9
}),
'save-edited-todo': (state) => {
const todos = [...state.todos] #10
todos[state.edit.idx] = state.edit.edited #11
return {
...state,
edit: { idx: null, original: null, edited: null }, #12
todos,
}
},
'cancel-editing-todo': (state) => ({
...state,
edit: { idx: null, original: null, edited: null }, #13
}),
'remove-todo': (state, idx) => ({ #14
...state,
todos: state.todos.filter((_, i) => i !== idx), #15
}),
}
One interesting thing to note is that some events, like 'add-todo' don’t have
a payload associated with them. It isn’t necessary because the new to-do
description is now part of the state, so the reducer can access it directly:
'add-todo': (state) => ({
...state,
currentTodo: '',
todos: [...state.todos, state.currentTodo],
})
Now that you have the state and the reducers, you can define the view.
6.3.3 Defining the view
Let’s break the application down into small components. We’ll start with the
top-level component, which you’ll call App(). This component consists on a
fragment containing the title (a <h1> element), a CreateTodo() and
TodoList() components. Write the code in listing 6.4.
Listing 6.4. The App() component, the top-level view (todos.js)
function App(state, emit) {
return hFragment([
h('h1', {}, ['My TODOs']),
CreateTodo(state, emit),
TodoList(state, emit),
])
}
As you recall from earlier, the components are now functions that take in not
only the state, but also the emit() function to dispatch events to the
application’s dispatcher. Implement the CreateTodo() component next, as
shown in listing 6.5. This component is equivalent to the static HTML
markup you had in the todos.html file: the <label>, <input> and <button>
elements.
Listing 6.5. The CreateTodo() component (todos.js)
function CreateTodo({ currentTodo }, emit) { #1
return h('div', {}, [
h('label', { for: 'todo-input' }, ['New TODO']), #2
h('input', {
type: 'text',
id: 'todo-input',
value: currentTodo, #3
on: {
input: ({ target }) =>
emit('update-current-todo', target.value), #4
keydown: ({ key }) => {
if (key === 'Enter' && currentTodo.length >= 3) { #5
emit('add-todo') #6
}
},
},
}),
h(
'button',
{
disabled: currentTodo.length < 3, #7
on: { click: () => emit('add-todo') }, #8
},
['Add']
),
])
}
It’s the first time you see the emit() function being used inside a component,
so a few words of explanation are in order. The case of the <input> is
particularly interesting, because you’ve set up a two-way binding between the
input field and the state. A two-way binding reflects the changes in the state
in the input field and anything typed in the input field is set in the state.
Whatever side changes (the state or the DOM), the other is updated. You’ve
accomplished this two-way binding by using the value attribute of the
<input> element, and by setting an event listener on the oninput event:
h('input', {
type: 'text',
value: state.currentTodo,
on: {
input: ({ target }) => emit('update-current-todo', target.value)
}
})
This way, when the currentTodo in the state changes its value, this is
reflected in the input field, and when the user types a new character in the
input field, the oninput event is triggered, and the update-current-todo
event is dispatched, so the reducer updates the state. This is a beautiful putto-use of your renderer and state manager working together, as you can see in
figure 6.1.
Figure 6.1. A two-way binding between the state and the DOM
Let’s now implement the TodoList() component, which is the list of to-do
items. Write the following code below the CreateTodo() component (listing
6.6).
Listing 6.6. The TodoList() component (todos.js)
function TodoList({ todos, edit }, emit) {
return h(
'ul',
{},
todos.map((todo, i) => TodoItem({ todo, i, edit }, emit))
)
}
The TodoList() component is a simple one: it’s just a <ul> element with a
list of TodoItem() components. Implement the missing TodoItem()
component to finish the application (listing 6.7).
Listing 6.7. The TodoItem() component (todos.js)
function TodoItem({ todo, i, edit }, emit) {
const isEditing = edit.idx === i
return isEditing
? h('li', {}, [ #1
h('input', {
value: edit.edited, #2
on: {
input: ({ target }) => emit('edit-todo', target.value) #3
},
}),
h(
'button',
{
on: {
click: () => emit('save-edited-todo') #4
}
},
['Save']
),
h(
'button',
{
on: {
click: () => emit('cancel-editing-todo') #5
}
},
['Cancel']
),
])
: h('li', {}, [ #6
h(
'span',
{
on: {
dblclick: () => emit('start-editing-todo', i) #7
}
},
[todo] #8
),
h(
'button',
{
on: {
click: () => emit('remove-todo', i) #9
}
},
['Done']
),
])
}
You’re passing the index the to-do item occupies in the list, because some of
the dispatched events need to know the index of the to-do item, like when
you want to edit or remove a to-do. That index is known by the parent
component, TodoList(), so it needs to pass it to the child component as a
prop. It isn’t part of the application’s state—what we typically pass as the
first argument to the component—but it’s relevant to the component.
The only piece that you’re missing is putting everything together. Write the
last line of the todos.js file as follows:
createApp({ state, reducers, view: App }).mount(document.body)
If you now run the serve:examples script, you’ll be able to see the
application running in your browser:
$ npm run serve:examples
You can now add new to-do items, edit them, and remove them. Everything
works the same as before, but this time you wrote no DOM manipulation
code, so you should be proud of yourself for having built your first frontend
framework. Congratulations!
There’s one thing though that you’ve probably noticed when you attempted
to add a new to-do item: every keystroke you type in the input field removes
the focus from the input field, so you have to click it again to type the next
character. Can you guess why this is happening? It’s because every time the
state changes, your framework is destroying the DOM and re-creating it from
scratch. It means that the field where you wrote the last character is no longer
in the DOM; you’re writing in a new input field. (You never write two
characters in the same input field—oh philosophy!) This is far from ideal, but
worry not: you’ll fix this in the next chapter.
Exercise 6.2—Challenge
Write the tic-tac-toe game using your framework. If you need a refresher on
how the game works, you can find the rules in the Wikipedia page:
https://en.wikipedia.org/wiki/Tic-tac-toe.
The game should have the following features:
The game should start with an empty board (you can use a <table>
element to represent the board).
The first player is always the X player. There should be a title that says
whose turn it is: "It’s X’s turn" or "It’s O’s turn".
When a player clicks on a cell, the cell should be filled with the player’s
symbol (X or O) and the turn should be passed to the other player.
When a player wins the game, a message should be displayed saying
who won the game: "Player X wins!" or "Player O wins!". The
remaining cells should be disabled.
When all the cells are filled and there’s no winner, a message should be
displayed saying that the game ended in a draw: "It’s a draw!".
You can use the same state and reducer you used in exercise 5.2, but this time
you’ll need to write the logic to determine if a player has won the game (the
checkWinner() function).
The next two chapters are two of the most challenging in the book: you’ll
write the reconciliation algorithm, thanks to which your framework can
update the DOM when the state changes, without needing to completely
destroy and recreate it. The reconciliation algorithm is complex, but it’s also
lots of fun to write, so I hope you’ll enjoy it. Be sure to grab a cup of coffee
and maybe go out for a relaxing walk before you move on to the next chapter.
If you’re into Yoga, you want to do a couple Sun Salutations. Whatever you
do, come back refreshed and ready to write some code!
6.4 Answers to the exercises
6.4.1 Exercise 6.1
You can find the solution in the examples/ch06/counter/ directory. As you
can see, for a such a simple application I used just an HTML file named
counter.html. Create a similar file for your application and write the
following base HTML code:
<html>
<head>
<title>Counter</title>
</head>
<body>
<h1>Counter</h1>
</body>
</html>
Serve the application by running the serve:examples script:
$ npm run serve:examples
Your browser will open the root of the examples/ directory at
http://127.0.0.1:8080/. Navigate to the counter/ directory and open the
counter.html file. You should see the title of the application, Counter, in the
browser’s tab.
Then, add a <script> tag to the <head> of the HTML file, and import the
framework from the unpkg.com CDN. Define the state and reducers
objects:
<html>
<head>
<script type="module">
import {
createApp,
h,
hString,
hFragment,
} from 'https://unpkg.com/fe-fwk@1'
const state = { count: 0 }
const reducers = {
add: (state) => ({ count: state.count + 1 }),
sub: (state) => ({ count: state.count - 1 }),
}
</script>
<title>Counter</title>
</head>
<body>
<h1>Counter</h1>
</body>
</html>
Next, define the view function:
<html>
<head>
<script type="module">
import {
createApp,
h,
hString,
hFragment,
} from 'https://unpkg.com/fe-fwk@1'
const state = { count: 0 }
const reducers = {
add: (state) => ({ count: state.count + 1 }),
sub: (state) => ({ count: state.count - 1 }),
}
function View(state, emit) {
return hFragment([
h('button', { on: { click: () => emit('sub') } }, ['-']),
h('span', {}, [hString(state.count)]),
h('button', { on: { click: () => emit('add') } }, ['+']),
])
}
</script>
<title>Counter</title>
</head>
<body>
<h1>Counter</h1>
</body>
</html>
Lastly, create the application and mount it to the DOM:
<html>
<head>
<script type="module">
import {
createApp,
h,
hString,
hFragment,
} from 'https://unpkg.com/fe-fwk@1'
const state = { count: 0 }
const reducers = {
add: (state) => ({ count: state.count + 1 }),
sub: (state) => ({ count: state.count - 1 }),
}
function View(state, emit) {
return hFragment([
h('button', { on: { click: () => emit('sub') } }, ['-']),
h('span', {}, [hString(state.count)]),
h('button', { on: { click: () => emit('add') } }, ['+']),
])
}
createApp({ state, view: View, reducers }).mount(document.body)
</script>
<title>Counter</title>
</head>
<body>
<h1>Counter</h1>
</body>
</html>
Reload the browser and you should see the counter application working,
similar to figure 6.2.
Figure 6.2. The counter application
Try clicking the buttons and make sure the counter is incremented and
decremented accordingly.
6.4.2 Exercise 6.2
You can find the solution in the examples/ch06/tic-tac-toe/ directory. This
time, since the game logic is a bit more complex, I decided to split the code
into three different files:
game.js: contains the game logic
tictactoe.js: contains the view function and the code to create and mount
the application
tictactoe.html: contains the HTML code
Go ahead and create those files in the examples/ch06/tic-tac-toe/ directory.
Then, add the following code to the tictactoe.html file:
<html>
<head>
<script type="module" src="tictactoe.js"></script>
<title>Tic Tac Toe</title>
</head>
<body>
<h1>Tic Tac Toe</h1>
</body>
</html>
We’ll need to come back to this file later to add some CSS styles. But let’s
first focus on the game.js file. In this file, you need to define the state object
and the markReducer() reducer function that creates a new state object based
on the current state and the mark that was played. You wrote this function in
exercise 5.2, so you can copy it from there:
export function makeInitialState() {
return {
board: [
[null, null, null],
[null, null, null],
[null, null, null],
],
player: 'X',
draw: false,
winner: null,
}
}
export function markReducer(state, { row, col }) {
if (row > 3 || row < 0 || col > 3 || col < 0) {
throw new Error('Invalid move')
}
if (state.board[row][col]) {
throw new Error('Invalid move')
}
const newBoard = [
[...state.board[0]],
[...state.board[1]],
[...state.board[2]],
]
newBoard[row][col] = state.player
const newPlayer = state.player === 'X' ? 'O' : 'X'
const winner = checkWinner(newBoard, state.player)
const draw = !winner && newBoard.every((row) => row.every((cell) => cell))
return {
board: newBoard,
player: newPlayer,
draw,
winner,
}
}
What’s left is to define the checkWinner() function. This function receives
the board and the player that just played as arguments, and returns that player
if he or she covered a row, column or diagonal with his or her marks, or null
otherwise. Only the player who just played can win, so we don’t need to
check the other player.
Write the checkWinner() function in the game.js file, as follows:
function checkWinner(board, player) {
for (let i = 0; i < 3; i++) {
if (checkRow(board, i, player)) { #1
return player
}
if (checkColumn(board, i, player)) { #2
return player
}
}
if (checkMainDiagonal(board, player)) { #3
return player
}
if (checkSecondaryDiagonal(board, player)) { #4
return player
}
return null #5
}
Let’s now fill in those missing functions:
function checkRow(board, idx, player) {
const row = board[idx]
return row.every((cell) => cell === player)
}
function checkColumn(board, idx, player) {
const column = [board[0][idx], board[1][idx], board[2][idx]]
return column.every((cell) => cell === player)
}
function checkMainDiagonal(board, player) {
const diagonal = [board[0][0], board[1][1], board[2][2]]
return diagonal.every((cell) => cell === player)
}
function checkSecondaryDiagonal(board, player) {
const diagonal = [board[0][2], board[1][1], board[2][0]]
return diagonal.every((cell) => cell === player)
}
Next, let’s work on the view of the application. In the tictactoe.js file, you
need to import your framework, and then define the View() component.
We’ll break down the view into two components: the Header() and Board():
import { createApp, h, hFragment } from 'https://unpkg.com/fe-fwk@1'
function View(state, emit) {
return hFragment([Header(state), Board(state, emit)])
}
function Header(state) {
// TODO: implement me
}
function Board(state, emit) {
// TODO: implement me
}
The Header() component is pretty simple: it just renders current player, or
who’s won the game, or that the game ended in a draw. You want to return an
<h3> element in all cases, but with different contents and CSS classes. You’ll
use the classes to add different colors to the text: green for the winner and
orange for the draw:
function Header(state) {
if (state.winner) { #1
return h('h3', { class: 'win-title' }, [`Player ${state.winner} wins!`])
}
if (state.draw) { #2
return h('h3', { class: 'draw-title' }, [`It's a draw!`])
}
return h('h3', {}, [`It's ${state.player}'s turn!`]) #3
}
Let’s focus on the board now. We’ll use a <table> element for it where every
row is rendered by another component, which we’ll call Row(). When a
player has won or there’s a draw, we want to add a CSS class to the <table>
element to prevent the user from clicking on the cells:
function Board(state, emit) {
const freezeBoard = state.winner || state.draw
return h('table', { class: freezeBoard ? 'frozen' : '' }, [ #1
h(
'tbody',
{},
state.board.map((row, i) => Row({ row, i }, emit)) #2
),
])
}
Let’s implement the missing Row() component now. A row is rendered as a
<tr> element (a table’s row), and each cell is rendered by another
component, which we’ll call Cell(). Each cell is a <td> element (a table’s
cell). Inside the <td> is either a <span> element with the player’s mark, or a
<div> element that the user can click on to mark the cell:
function Row({ row, i }, emit) {
return h(
'tr',
{},
row.map((cell, j) => Cell({ cell, i, j }, emit)) #1
)
}
function Cell({ cell, i, j }, emit) {
const mark = cell
? h('span', { class: 'cell-text' }, [cell]) #2
: h(
'div',
{
class: 'cell',
on: { click: () => emit('mark', { row: i, col: j }) }, #3
},
[]
)
return h('td', {}, [mark]) #4
}
Next, you want to import the makeInitialState() and makeReducer()
functions from the game.js_ file, and then create the application:
import { createApp, h, hFragment } from 'https://unpkg.com/fe-fwk@1'
import { makeInitialState, markReducer } from './game.js'
function View(state, emit) {
return hFragment([Header(state), Board(state, emit)])
}
function Header(state) {
if (state.winner) {
return h('h3', { class: 'win-title' },
[`Player ${state.winner} wins!`])
}
if (state.draw) {
return h('h3', { class: 'draw-title' }, [`It's a draw!`])
}
return h('h3', {}, [`It's ${state.player}'s turn!`])
}
function Board(state, emit) {
const freezeBoard = state.winner || state.draw
return h('table', { class: freezeBoard ? 'frozen' : '' }, [
h(
'tbody',
{},
state.board.map((row, i) => Row({ row, i }, emit))
),
])
}
function Row({ row, i }, emit) {
return h(
'tr',
{},
row.map((cell, j) => Cell({ cell, i, j }, emit))
)
}
function Cell({ cell, i, j }, emit) {
const mark = cell
? h('span', { class: 'cell-text' }, [cell])
: h(
'div',
{
class: 'cell',
on: { click: () => emit('mark', { row: i, col: j }) },
},
[]
)
return h('td', {}, [mark])
}
createApp({
state: makeInitialState(),
reducers: {
mark: markReducer,
},
view: View,
}).mount(document.body)
Last, let’s add some CSS to make the application look nicer. Inside the
tictactoe.html file, add the following <style> element, with the CSS rules:
<html>
<head>
<script type="module" src="tictactoe.js"></script>
<style>
body {
text-align: center;
}
table {
margin: 4em auto;
border-collapse: collapse;
}
table.frozen {
pointer-events: none;
}
tr:not(:last-child) {
border-bottom: 1px solid black;
}
td {
width: 6em;
height: 6em;
text-align: center;
}
td:not(:last-child) {
border-right: 1px solid black;
}
td.winner {
background-color: lightgreen;
border: 3px solid seagreen;
}
.win-title {
color: seagreen;
}
.draw-title {
color: darkorange;
}
.cell {
width: 100%;
height: 100%;
cursor: pointer;
}
.cell-text {
font-size: 3em;
font-family: monospace;
}
</style>
<title>Tic Tac Toe</title>
</head>
<body>
<h1>Tic Tac Toe</h1>
</body>
</html>
And that’s it! Your tic-tac-toe application is ready to be played, and it should
look similar to figure 6.3.
Figure 6.3. The tic-tac-toe application: in the first image, it’s player O’s turn, in the second
image, player X has won. The third image shows the draw case.
It might not be the first time you implement a tic-tac-toe game, but I’m pretty
confident it’s the first one you implement using a framework you built
yourself. Go ahead and add that to your resume!
6.5 Summary
To publish your framework on NPM, you first bundle it using npm run
build, then you publish it using the npm publish command.
Whatever you export from the src/index.js file is what’s going to be
available to the users of your framework. (You configured it this way in
appendix A.)
In a two-way binding, the state and the DOM are synchronized:
whatever changes in one side is reflected in the other.
Using the first version of your framework, you’ve rewritten the to-do
application you wrote in chapter 2. This time, you didn’t have to worry
about DOM manipulation, but only about the application’s logic.
7 The reconciliation algorithm:
diffing virtual trees
This chapter covers
Comparing two virtual DOM trees
Finding the differences between two objects
Finding the differences between two arrays
Finding a sequence of operations that transform one array into another
Picture this: you’re in the supermarket doing the groceries using the shopping
list your partner gave you. You walk around the aisles, picking up the items
one by one, and putting them in the cart. When you’re done, you head to the
checkout counter, but at that very moment something vibrates in your pocket
—it must be a message from your partner. She realized you already had a
dozen eggs in the fridge, and what’s actually missing is a bottle of wine for
that fancy dinner you’re going to have tonight with some friends. She texts
you the updated shopping list.
You now have two lists: the original one—whose items are already in your
cart—and the updated one, as you can see in figure 7.1.
Figure 7.1. The two shopping lists: the original one and the updated one
You have two options:
1. You can start over, emptying the cart and putting back the items to the
shelves, then picking up the items in the updated list. This way you
make sure you have the right items—the ones in the updated list—in
your cart.
2. You can pause for a minute, compare the two lists and figure out what
items where removed and what items were added. Then you can get rid
of the items that were removed from the original list, and pick the items
that were added to the updated list.
You’re a smart person (after all, you’re reading this book, aren’t you?), so
you choose the second option. It requires some extra brain power, but it’s less
labor-intensive. It only takes you a few seconds to realize that, if you take the
original list, strike out the egg carton, and add the bottle of wine, you’ll have
the updated list (figure 7.2). You figured out the minimum number of
operations you need to have the items in the new list in your cart.
Figure 7.2. The updated shopping list: the original list with the egg carton struck out and the
bottle of wine added
This analogy perfectly illustrates what the reconciliation algorithm is about:
comparing two virtual DOM trees, figuring out what changes, and applying
those changes to the real DOM. Destroying the entire DOM and recreating it
from scratch every time the state changes is like emptying the cart and
picking the new items from scratch every time there’s a new shopping list:
you don’t need to think, but it’s laborious. You want your framework to be
smart to figure out the minimum number—or at least a reasonably small
number—of operations to apply to the real DOM to have it reflect the new
state.
The diagram in figure 7.3 shows how your framework is currently rendering
the view when the state changes. Destroying and recreating the DOM every
time the state changes is an expensive operation. In a frontend application,
the state can change a couple times every second, so imagine if your
shopping list changed that often and you had to empty your cart and start
over every time your partner sent you an updated shopping list.
Figure 7.3. The current framework destroys and recreates the DOM every time the state changes.
This is an expensive operation.
The objective of this chapter is to implement the first half of the
reconciliation algorithm (you’ll implement the rest in the next chapter). This
algorithm does two things:
1. It figures out the differences between two virtual DOM trees (this
chapter), and
2. It applies those differences to the real DOM, so that the framework can
update the DOM in a more efficient way (next chapter).
The same way that when you get a new shopping list, you have to first
compare it with the original one, find the differences, and then make the
changes to the items in your cart. You have to compare the old virtual DOM
with the new virtual DOM, find the differences, and then apply those
differences to the real DOM. You’ll focus on the first part in this chapter.
In the next chapter, you’ll write a patchDOM() function implementing the
algorithm, putting all the pieces together, and your framework will update the
view in a much more efficient way, as you can see in figure 7.4.
Figure 7.4. The framework will update the DOM in a more efficient way, using the reconciliation
algorithm written in the patchDOM() function.
So, what are the mistery ingredients of the reconciliation algorithm?
Important
You can find all the listings in this chapter in the listings/ch07 directory of
the book’s repository.
The code you write in this chapter is for the framework’s second version,
which you’ll publish in chapter 8. Therefore, the code in this chapter can be
checked out from the ch8 label:
$ git switch ch8
7.1 The three key functions of the reconciliation
algorithm
Believe it or not, finding the differences between two virtual DOMs—which
is the most complex part of the reconciliation algorithm—can be solved with
three functions, as follows:
A function to find the differences between two objects, returning the
keys that were added, the keys that were removed, and the keys whose
associated value changed (used to compare the attributes and CSS style
objects).
A function to find the differences between two arrays, returning the
items that were added, and the items that were removed (used to
compare two CSS classes arrays).
A function that given two arrays figures out a sequence of operations
that, if applied to the first array, transform it into the second array (used
to find a sequence of operations that turn an array of a node’s children
into its new shape).
The two first functions are somehow straightforward, but the third is a bit
more complex. In fact, I’d say that it’s where 90% of the complexity of the
reconciliation algorithm lies. In this chapter, you’ll write these functions,
which you’ll use in the next chapter to implement the patchDOM() function.
Let’s start by exploring what we mean by "figuring out what changed and
applying those changes to the real DOM."
7.2 Comparing two virtual DOM trees
As we’ve seen, the view is a function of the state: when the state changes, the
virtual DOM representing the view also changes. The reconciliation
algorithm compares the old virtual DOM—the one used to render the current
view—with the new virtual DOM after the state changes. It’s job is to
reconcile the two virtual DOM trees, that is, figure out what changed and
apply those changes to the real DOM, so that the view reflects the new state.
To compare two virtual DOM trees, you start comparing the two root nodes,
checking if they’re equal (we’ll see what it takes for two nodes to be equal)
and if their attributes or event listeners have changed. If you find that the
node is not the same, you look no further, destroy the subtree rooted at the
old node, and replace it with the new node and everything under it (we’ll
explore this more in detail later on). You then compare the children of the
two nodes, traversing the trees recursively in a depth-first manner. When you
compare two arrays of child nodes, you need to figure out if a node was
added, removed, or moved to a different position.
7.2.1 Finding the differences
Let’s look at an example. Imagine that you’re comparing the two virtual
DOM trees in figure 7.5: the old virtual DOM tree at top and the new virtual
DOM tree at the bottom. In this illustration the differences have already been
highlighted, but we’ll explore how to find them step by step.
Figure 7.5. Comparing two virtual DOM trees to find what changed
Exercise 7.1
Being able to translate from a virtual DOM diagram to HTML (and
viceversa) is useful. Can you write the HTML that both the old and new
virtual trees in the example in figure 7.5 would produce
Step one. You compare the two root <div> nodes (figure 7.6) and find the id
attribute changed from "abc" to "def", and the style attribute changed from
"color: blue" to "color: red". These changes, labelled as "1. Attribute
modified" and "2. Style modified" in figure 7.5, are the first changes you
need to apply to the real DOM, as we’ll see below.
Figure 7.6. Comparing the root <div> nodes
Step two. You then compare the two children of the <div> node one by one.
The first child is a <p> element (figure 7.7), and it seems to be in the same
position in both trees—it didn’t move. It’s class attribute has changed from
to "fox". This change is labelled as "3. Class modified" in figure 7.5,
and is the next change to apply to the real DOM.
"foo"
Figure 7.7. Comparing the first child of the <div> nodes: a <p> element
Step three. Remember that we want to iterate the trees in a depth-first
manner, so you’d compare the children of the <p> element next: their text
content. The text content has changed from "Hello" to "Hi" (figure 7.8). This
change, labelled as "4. Text changed" in figure 7.5, is applied to the real
DOM next.
Figure 7.8. Comparing the text nodes of the <p> element
Step four. Then you find that the second child is a <p> in the old tree, but it’s
a <span> in the new tree (figure 7.9). By looking at the children of the new
<div> node, you quickly realize that the <p> that used to be the second child
has moved one position to the right. You conclude that the <span> was
added, and it naturally moved the <p> one position to the right. Adding the
new <span> node, including its text node, is the next change to apply to the
DOM. This change is labelled as "5. Node added" in figure 7.5.
Figure 7.9. Comparing the second child of the <div> nodes: a <p> element in the old tree, and a
<span> element in the new tree
Step five. Then you look at the <p> node that you know moved one position
(figure 7.10), and see that its class attribute changed from ["foo", "bar"]
to ["baz", "bar"], which means that the class "foo" was removed and the
class "baz" was added. This change is labelled as "6. Class added and class
removed" in figure 7.5.
Figure 7.10. Comparing the <p> element that moved one position to the right
Step six. Last, you check the children of the <p> element (figure 7.11), and
find that the text content changed from "World" to "World!". This change is
labelled as "7. Text changed" in figure 7.5.
Figure 7.11. Comparing the text nodes of the <p> element that moved one position to the right
After comparing the two trees, you found a total of seven changes that need
to be applied to the real DOM. The next step is to apply them.
Note
Remember that you’ll implement this part—modifying the DOM—in the
next chapter. But we still want to see how it works for you to have a good
high-level understanding of the complete reconciliation process.
Let’s see how you do that.
7.2.2 Applying the changes
Let’s see how you’d apply these changes in order. Figure 7.12 shows the
HTML markup of the old virtual DOM tree.
Figure 7.12. The HTML markup of the old virtual DOM tree
You’ll now apply the changes you identified by comparing the two trees in
the previous section. Applying a change means modifying the real DOM to
match the new virtual DOM tree. Every change we make will be shown in the
figure, so you can see how the DOM changes with each operation.
Modifying the id and style attributes of the parent <div> node
The first two changes were to the root <div> node’s attributes, as shown in
figure 7.13. To apply these changes, you’d need to update the id and style
attributes of the <div> node:
div.id = 'def'
div.style.color = 'red'
Figure 7.13. Applying the attribute and style changes to the DOM’s <div> node
Modifying the class attribute and text content of the first <p> node
Then go the changes to the first <p> node, as shown in figure 7.14. In this
case, you’d need to update the class attribute and the text content of the <p>
node:
p1.className = 'fox'
p1Text.nodeValue = 'Hi'
Figure 7.14. Applying the changes to the first <p> node
Adding the new <span> node
The next change is to add the <span> node, as shown in figure 7.15. To add a
new node (and its children) to the DOM, you can pass the virtual node to the
mountDOM() function you wrote earlier, passing the <div> node as the parent
node:
mountDOM(spanVdom, div)
Note that, as is, the mountDOM() function would append the <span> node to
the children array of the <div> node, but that’s not what we want. We want to
specify that the <span> node should be inserted at the second position (index
1) of the children array. We’ll need to modify the mountDOM() function to
accept a third argument, the index where the new node should be inserted:
mountDOM(spanVdom, div, 1)
You will modify the mountDOM() function in the next chapter, but for now,
you can just assume that it takes an index as the third argument and inserts
the new node at that position.
Figure 7.15. Adding the new <span> node and its text node
Modifying the class attribute and text content of the second <p> node
Last, you reach the second <p> node. You don’t need to move it because
when the <span> node was added, it naturally moved the second <p> node
one position to the right. When we say that it was naturally moved, we mean
that the movement happened as the result of another operation, but it’s not a
move operation you need to explicitly do yourself. (Keep this in mind; it’ll be
important later on.) The class attribute changes from ["foo", "bar"] to
["baz", "bar"], so you need to change the classList property of the <p>
node:
p2.classList.remove('foo')
p2.classList.add('baz')
The text content changed from "World" to "World!", so you need to update
the text node, as follows:
p2Text.nodeValue = 'World!'
You can see these changes in figure 7.16.
Figure 7.16. Applying the changes to the second <p> node
This is what the patchDOM() function you’ll write in the next chapter does, in
a nutshell. To have a better high-level understanding of how the rendering
works when the patchDOM() function enters the scene, let’s start by
modifying the renderApp() function to call the patchDOM() function instead
of destroying and recreating the DOM every time.
7.3 Changes in the rendering
To understand the role of the patchDOM() function—the implementation of
the reconciliation algorithm—it’s helpful to see the big picture of how the
rendering works with it. Figure 7.17 shows the changes in the rendering
mechanism, using the patchDOM() function. As you can see, the renderer is
now split in three sections: mounting, patching, and unmounting. Whereas in
the previous chapter, the same renderApp() function was responsible for
mounting and updating the DOM, you’ll now split that into the two following
functions:
mount(), which internally uses mountDOM()
renderApp(), which internally uses patchDOM()
Figure 7.17. Changes in the rendering mechanism, using the patchDOM() function
You need to modify the code so the renderApp() function doesn’t
completely destroy and recreate the DOM anymore; and this is thanks to the
patchDOM() function. patchDOM() takes the last saved virtual DOM (stored in
the vdom variable inside the application’s instance), the new virtual DOM
resulting from calling the view() function, and the parent element (stored in
the parentEl instance) of the DOM, where the view was mounted, and
figures out the changes that need to be applied to the DOM.
The application’s instance mount() method doesn’t need to use the
renderApp() function anymore; renderApp() is only called when the state
changes. mount() calls the view() function to get the virtual DOM, and then
calls the mountDOM() function to mount the DOM. The user is supposed to
call the mount() method only once. If they call it more than once, the same
application will be mounted multiple times, which is not what we want. You
can add a check to prevent this from happening by throwing an error if the
vdom variable is not null (you’ll do this as an exercise).
Let’s reflect this important change in the code. Open the app.js file, and make
the changes shown in listing 7.1.
Listing 7.1. Changes in the rendering
import
import
import
import
{
{
{
{
destroyDOM
Dispatcher
mountDOM }
patchDOM }
} from './destroy-dom'
} from './dispatcher'
from './mount-dom'
from './patch-dom'
export function createApp({ state, view, reducers = {} }) {
let parentEl = null
let vdom = null
// --snip-- //
function renderApp() {
if (vdom) {
destroyDOM(vdom)
}
const newVdom = view(state, emit) #1
mountDOM(vdom, parentEl)
vdom = patchDOM(vdom, newVdom, parentEl) #2
}
return {
mount(_parentEl) {
parentEl = _parentEl
renderApp()
vdom = view(state, emit)
mountDOM(vdom, parentEl)
#3
},
// --snip-- //
}
}
Warning
You’re importing the patchDOM() from the patch-dom.js file, which you’ll
write in the next chapter (your IDE might complain that such file doesn’t
exist, but that’s okay for now).
Now that you’ve changed the rendering flow, let’s start thinking about the
three functions used to compare two virtual DOM trees: objectsDiff(),
arraysDiff(), and arraysDiffSequence().
Exercise 7.2
Implement a check that doesn’t allow the user to call the mount() method
more than once to prevent the same application from being mounted multiple
times. If you detect that the application was already mounted, throw an error.
7.4 Diffing objects
When comparing two virtual nodes, you need to find the differences between
the attributes of the two nodes (the props object) to patch the DOM
accordingly. You want to know what attributes were added, what attributes
were removed, and what attributes changed.
To illustrate this let’s look at the example in figure 7.18, the attributes of an
<input> element. In the example, there’s an old object (the one on top) and a
new object (the one on the bottom). By observing the two objects, you can
see that the min key was added in the new object, the max key was removed,
and the disabled key changed from false to true.
Figure 7.18. Finding the difference between two objects: what keys were added, removed, or
changed?
This exercise that you’ve done by mere observation is what the
objectsDiff() function that you’ll implement now does. The code you write
works very similar to your observation, described in the following list:
1. Take a key in the old object. If you don’t see it in the new object, you
know that the key was removed. Repeat with all keys.
2. Take a key in the new object. If you don’t see it in the old object, you
know that the key was added. Repeat with all keys.
3. Take a key in the new object. If you see it in the old object, and the
value associated with the key is different, you know that the value
associated with the key changed.
Create a new file inside the utils folder called objects.js, and write the
objectsDiff() function as shown in listing 7.2.
Listing 7.2. Finding the difference between two objects (utils/objects.js)
export function objectsDiff(oldObj, newObj) {
const oldKeys = Object.keys(oldObj)
const newKeys = Object.keys(newObj)
return {
added: newKeys.filter((key) => !(key in oldObj)), #1
removed: oldKeys.filter((key) => !(key in newObj)), #2
updated: newKeys.filter(
(key) => key in oldObj && oldObj[key] !== newObj[key] #3
),
}
}
Fantastic—you’ve implemented the objectsDiff() function. Can you think
of a set of unit tests that would help you verify that the function works as
expected?
Exercise 7.3
Implement a set of test cases to cover all the possible scenarios for the
objectsDiff() function. If you’re not familiar with unit testing, try to think
of the different cases your function should handle, and execute the function in
the Browser’s console with different inputs to see if it works as expected.
Let’s now look at the second function that you’ll implement, one that does a
similar job for arrays.
7.5 Diffing arrays
Remember that the classes in an element virtual node can be given in the
form of an array:
h('p', { class: ['foo', 'bar'] }, ['Hello world'])
When you compare two virtual nodes, you need to find the differences
between the classes of the two nodes (the class array) to patch the DOM
accordingly (as you did in the example of figure 7.5, in step 5). In this case, it
doesn’t matter if the items in the array are in a different order, we care about
only the items that were added or removed. For this, you’ll implement the
arraysDiff() function next. But first, let’s look at the example in figure
7.19.
In the example, there’s an old array (the one on top) and a new array (the one
on the bottom). When we compare the two arrays, we see the following:
A
B
D
appears in both arrays
and C were removed (only appear in the old array)
and E were added (only appear in the new array)
Figure 7.19. Finding the difference between two arrays: what items were added or removed?
Note that in this comparison, items are either added or removed, but they are
never changed. If an item is changed, we detect it as a removal of the old item
and an addition of the new item.
With this in mind, open the utils/arrays.js file (where you previously
implemented the withoutNulls() function) and write the arraysDiff()
function as shown in listing 7.3.
Listing 7.3. Finding the differences between two arrays (utils/arrays.js)
export function arraysDiff(oldArray, newArray) {
return {
added: newArray.filter(
(newItem) => !oldArray.includes(newItem) #1
),
removed: oldArray.filter(
(oldItem) => !newArray.includes(oldItem) #2
),
}
}
Warning
In the arraysDiff() function, you’re not specifying at what index an item
was added or removed, because to modify the classList of an element,
you’ll simply add or remove the classes. This might be problematic because,
as you know, the order of classes in the classList matters. A class that
comes later in the list can override the styles of a class that comes earlier in
the list. This is a trade-off that you’re making to keep the code simple, but
bear in mind that a more robust solution is to maintain the order of classes in
the classList.
With these two out of the way, you’re ready to tackle the beast: the
arrayDiffSequence() function. That’s the function were we might sweat a
bit. But once you’ve written that function, the rest of the book will feel like a
breeze (or something like that). Take a deep breath, and let’s move on.
7.6 Diffing arrays as a sequence of operations
A virtual node has children, and those children can move around from a
render to the next one. Child nodes are added and removed all the time as
well. When you compare two virtual nodes, you need to find the differences
between the children of the two nodes (the children array) to patch the
DOM accordingly. You want to find a sequence of operations that, executed
on the DOM, transform the old children array—rendered as HTML elements
—into the new children array.
If you’re given two arrays and I ask you to come up with a list of add,
remove, and move operations that transform the first array into the second
one, how would you go about it? You can see an example in figure 7.20. In
this example, the old array is [A, B, C] and the new array is [C, B, D], and
I was able to find a sequence of three operations that, if applied in order,
transform the old array into the new array.
Figure 7.20. Finding a sequence of operations that transform the original array into the new one
Important
Notice how the move operation’s from index is different from the original
index that C had in the old array? C appeared at i=2, but after removing A, it
moved to i=1. The indices in the operations are always relative to how they
find things in the array at the moment of the operation. But you still want to
keep track of the original index of the item, and I’ll explain why in a moment.
There are many other sequences of operations (infinite, in fact) that would
yield the same result. In other words, the sequence of operations that
transforms the old array into the new array is not unique.
Exercise 7.4
Can you find another sequence of similar operations that would also
transform the old array into the new array?
One constraint that we can impose on the sequence is that we want to
minimize the number of operations. (You could come up with a sequence that
starts with moving an item from its position to another one, and then moving
it back to its original position, and repeat that a lot of times, but that’s not
what we want.) DOM modifications are relatively expensive, so the fewer
operations we perform, the better.
7.6.1 Defining the operations you can use
Let’s start by defining the operations that you’ll use to transform the old array
into the new array. In the example before we used three operations: add,
remove, and move. You actually need to add a fourth operation: noop (no
operation).
You’ll use a noop operation when you find an item that’s in both arrays,
which requires no action to stay where it ends up. Notice how I said ends up
and not starts at; this distinction is important.
There are items that move naturally to their final position, because items are
added, removed or moved around them. For example, if we want to go from
[A, B] to [B], we just need to remove A. B falls into place naturally: without
any explicit move operation it goes from i=1 to i=0.
When an item moves naturally, you need to include a noop operation in the
sequence. This helps you keep track of the items that moved naturally, from
where they started to where they ended up. You need this operation because
patching the DOM is a recursive process: each of the items in the children
array that moved around also need to be compared to look for differences.
For this to be possible, you need to know where each item started and where
it ended up, in other words, their initial and final indexes in the array. This
will become much clearer in the next chapter.
The following list is the operations and the data they need for them to be
completely characterized:
add: { op: 'add', item: 'D', index: 2 }
remove: { op: 'remove', item: 'B', index: 0 }
move: { op: 'move', item: 'C', originalIndex: 2, from: 2,
index: 0 }
noop: { op: 'noop', item: 'A', originalIndex: 0, index: 1 }
As you can see, in all cases, the object that describes the operation has an op
property that indicates the type of operation. The item property is the item
that’s being added, removed, or moved (naturally or forcefully). The index
property is the index where the item ends up, except in the case of a remove
operation, where it’s the index where the item was removed from. For the
move and noop operations, the originalIndex property indicates the index
where the item started. Last, for the move operation, we also keep track of the
from property, which is the index where the item was moved from. Note that
in the case of a move operation, the from and originalIndices need not be
the same.
Following the example in figure 7.20, the sequence of operations that
transforms the old array into the new array is:
[
{op:
{op:
{op:
{op:
'remove', index: 0, item: 'A'}
'move', originalIndex: 2, from: 1, index: 0, item: 'C'}
'noop', index: 1, originalIndex: 1, item: 'B'}
'add', index: 2, item: 'D'}
]
Exercise 7.5
Apply the operations in the previous sequence to the old array ([A, B, C]),
and check that you end up with the new array ([C, B, D]). You’ll likely be
doing this by hand a couple times this chapter, to debug the code you’ll write.
Let’s now talk about how the algorithm to find the sequence of operations
works.
7.6.2 Finding the sequence of operations—the algorithm
The idea is to iterate over the indices of the new array, and for each step, find
the way of transforming the old array so that at the current index, the items in
both arrays are the same. You focus on one item at a time, so after each step,
that item and all the previous ones are in their final position. The algorithm
modifies the old array (a copy of it, to avoid mutating the original one) as it
goes, and it keeps track of the operations that transform the old array into the
new one.
Going one item at a time and modifying a copy of the old array ensures that
every operation is performed over the updated indices of the old array. When
the new array is completely iterated over, any excess items in the old array
are removed; the new array doesn’t have them, so they’re not needed.
The algorithm is as follows:
1. Iterate over the indices of the new array
Let i be the index (0 ≤ i < newArray.length)
Let newItem be the item at i in the new array
Let oldItem be the item at i in the old array (provided there’s one)
2. If oldItem doesn’t appear in the new array:
add a remove operation to the sequence,
remove the oldItem from the array, and
start again from step 1 without incrementing i (stay at the same
index)
3. If newItem == oldItem:
add a noop operation to the sequence, using the oldItem original
index (its index at the beginning of the process)
start again from step 1 incrementing i
4. If newItem != oldItem and newItem can’t be found in the old array
starting at i:
add an add operation to the sequence
add the newItem to the old array at i
start again from step 1 incrementing i
5. If newItem != oldItem and newItem can be found in the old array
starting at i:
add a move operation to the sequence, using the oldItem current
index and the original index
move the oldItem to i
start again from step 1 incrementing i
6. If i is greater than the length of oldArray:
add a remove operation for each of the remaining items in
oldArray
remove all the remaining items in oldArray
stop the algorithm
This algorithm is simpler than it appears at first sight. Figure 7.21 shows a
sequence diagram of the algorithm with the same steps as the list above. I’ll
use it later when you have to implement the algorithm in code, to show you
exactly where you are in the process. It’s a complex algorithm, so I want to
make sure you don’t get lost.
Figure 7.21. The algorithm sequence diagram.
Let’s work through an example to see how the algorithm works.
7.6.3 An example by hand
Let’s say you have the following arrays:
oldArray = [X, A, A, B, C]
newArray = [C, K, A, B]
Let’s apply the algorithm step by step.
Step one (i=0). The X in the old array doesn’t appear in the new array, so you
want to remove it (figure 7.21).
Figure 7.22. At i=0 in the old array is X, which doesn’t appear in the new array: it’s a remove
operation.
After removing the item and adding the remove operation to the list of
operations, you keep the index at i=0 because you haven’t fulfilled the
condition of having the same item in both arrays at that index.
Let’s move on to the next step.
Step two (i=0). You find a C in the new array, but there’s an A in the old
array at that same index. Let’s look for the C in the old array, starting at i=0.
Oh! There’s one at i=3 (figure 7.22). Note that, if there were more than one C
in the old array, you’d choose the first one you find.
Figure 7.23. At i=0 there’s a C in the new array. We can move the C in the old array from i=4.
You add the move operation to the sequence of operations, and move the C to
i=0 in the old array. Note that in this case, the original index and the current
index of C are the same. I both cases C appears at i=0.
On to the next step!
Step three (i=1). There’s a K in the new array, but an A in the old array. You
look for a K in the old array, starting at i=1. In this case there isn’t one, so
you need an add it (figure 7.23).
Figure 7.24. At i=0 is a K in the new array, but there’s no K in the old array. We need an add
operation.
You add the K to the old array at i=1, and append the operation to the
sequence of operations. Let’s move on.
Step four (i=2). At i=2 both arrays have an A—hooray! (figure 7.24). You
add a noop operation in these cases. For that, you need the original index of A
in the old array. But that A moved naturally due to the previous operations:
It moved one position to the left when the X was removed in step one.
It moved one position to the right when the C was moved in step two,
which cancelled the previous move.
It moved one position to the right when the K was added in step three.
In total, the A moved one position to the right, so you need to subtract one
from the current index of the A in the old array. So, the original index of the A
is i=1.
Figure 7.25. At i=2 both arrays have an A. We add a noop operation, using the original index of
the A in the old array.
You want to keep track of the old array items original indexes, so you have
them available when you add noop and move operations. As you can
imagine, calculating the original index of an item based on the previous
operations isn’t complicated, but it’s much better if you just save it at the
beginning of the process—keep this in mind. Let’s move on to the next step.
Step five (i=3). At i=3 the new array has a B, but the old array has an A. Look
for a B in the old array, starting at i=3. There’s one at i=4, so you can move it
(figure 7.25).
Figure 7.26. At i=3 there’s a B in the new array. We can move the B in the old array from i=4.
You append the move operation to the sequence of operations, and move the
B to i=3 in the old array.
At this point, you’re done iterating the elements in the new array, and all
items from i=0 to i=3 in the old array are aligned with the new array. You’re
only missing to remove what’s left in the old array: the excess items that
don’t appear in the new array.
Step five. At i=4 in the old array is an extra A that you want to remove
(figure 7.26).
Figure 7.27. At i=4 in the old array is an extra A that we need to remove.
In fact, if there were more items in the old array, you’d want to remove them
as well. All of those remove operations would be at index i=4, because as an
item is removed, the next one occupies its place at that index.
I hope the algorithm is clear now after working out an example by hand. It’s
time to implement it in code.
7.6.4 Implementing the algorithm
Let’s start by defining a constant for the operation names. Inside the
utils/arrays.js file, add the following constant:
export const ARRAY_DIFF_OP = {
ADD: 'add',
REMOVE: 'remove',
MOVE: 'move',
NOOP: 'noop',
}
You want a way of keeping track of the old array original indices, so when
you modify a copy of the old array as you apply each operation, you can still
keep the original indices. A good solution is to create a class, let’s call it
ArrayWithOriginalIndices, that wraps a copy of the old array and keeps
track of the original indices. Whatever item is moved inside that array
wrapper, the original index is also moved.
This wrapper class is going to search for a given item in the wrapped array
(like in step two of the previous example, where you looked if there was a C
somewhere in the array) for which you want a custom comparison function.
The items inside the array will be virtual nodes in the next chapter, and you
want a function that tells you if two virtual nodes are equal. (You’ll
implement this function that checks if two virtual nodes are equal in the next
chapter.)
Warning
Recall that, for JavaScript, two objects are equal if they’re the same reference
—that is, the same object in memory. Because our virtual nodes are objects,
you need to define a custom function to compare them. You can’t rely on the
default === comparison, because if a virtual node is the same as another one
but it’s a different object, the comparison will return false, and that’s not
what you want.
You can test that yourself like so:
const a = { foo: 'bar' }
const b = { foo: 'bar' }
console.log(a === b) // false
In the utils/arrays.js file, add the class in listing 7.4. You’ll add functionality
to this class in a minute.
Listing 7.4. The ArrayWithOriginalIndices class wraps an array and keeps track of the original
indices (utils/arrays.js)
class ArrayWithOriginalIndices { #1
#array = []
#originalIndices = []
#equalsFn
constructor(array, equalsFn) {
this.#array = [...array] #2
this.#originalIndices = array.map((_, i) => i) #3
this.#equalsFn = equalsFn #4
}
get length() { #5
return this.#array.length
}
}
Let’s define the arraysDiffSequence() function with some TO-DO
comments where each case of the algorithm will be implemented. Inside the
utils/arrays.js file, add the function in listing 7.5.
Listing 7.5. The arraysDiffSequence() function (utils/arrays.js)
export function arraysDiffSequence(
oldArray,
newArray,
equalsFn = (a, b) => a === b #1
) {
const sequence = []
const array = new ArrayWithOriginalIndices(oldArray, equalsFn) #2
for (let index = 0; index < newArray.length; index++) { #3
// TODO: removal case
// TODO: noop case
// TODO: addition case
// TODO: move case
}
// TODO: remove extra items
return sequence #4
}
Giving the equalsFn parameter a default value using the default equality
operator (===) will be handy, as you’ll test this function passing it arrays of
strings in this chapter, mostly. Let’s start with the remove case.
The remove case
To find if an item was removed, you check if the item in the old array at the
current index doesn’t exist in the new array. This branch in the sequence
diagram is shown in figure 7.28.
Figure 7.28. At i=4 in the old array is an extra A that we need to remove.
Implement this logic inside a method called isRemoval() in the
ArrayWithOriginalIndices class, as shown in bold font in listing 7.6.
Listing 7.6. Detecting if an operation is a removal (utils/arrays.js)
class ArrayWithOriginalIndices {
#array = []
#originalIndices = []
#equalsFn
constructor(array, equalsFn) {
this.#array = [...array]
this.#originalIndices = array.map((_, i) => i)
this.#equalsFn = equalsFn
}
get length() {
return this.#array.length
}
isRemoval(index, newArray) {
if (index >= this.length) { #1
return false
}
const item = this.#array[index] #2
const indexInNewArray = newArray.findIndex((newItem) => #3
this.#equalsFn(item, newItem) #4
)
return indexInNewArray === -1 #5
}
}
And now, let’s implement a method to handle the removal of an item and
return the operation. Yoy want to reflect the removal operation both in the
#array and #originalIndices properties of the ArrayWithOriginalIndices
instance. Add the removeItem() method to the ArrayWithOriginalIndices
class, as shown in listing 7.7.
Listing 7.7. Removing an item from the old array and returning the operation (utils/arrays.js)
class ArrayWithOriginalIndices {
// --snip-- //
isRemoval(index, newArray) {
// --snip-- //
}
removeItem(index) {
const operation = { #1
op: ARRAY_DIFF_OP.REMOVE,
index,
item: this.#array[index], #2
}
this.#array.splice(index, 1) #3
this.#originalIndices.splice(index, 1) #4
return operation #5
}
}
And with these two methods, you can implement the remove case in the
arraysDiffSequence() function. Add the code in bold font in listing 7.8 to
the arraysDiffSequence() function.
Listing 7.8. Implementing the removal case (utils/arrays.js)
export function arraysDiffSequence(
oldArray,
newArray,
equalsFn = (a, b) => a === b
) {
const sequence = []
const array = new ArrayWithOriginalIndices(oldArray, equalsFn)
for (let index = 0; index < newArray.length; index++) {
if (array.isRemoval(index, newArray)) { #1
sequence.push(array.removeItem(index)) #2
index#3
continue #4
}
// TODO: noop case
// TODO: addition case
// TODO: move case
}
// TODO: remove extra items
return sequence
}
Great! Let’s take care of the noop case next.
The noop case
The noop case happens when at the current index, both the old and new
arrays have the same item. Thus, detecting this case is straightforward. You
can see the noop case highlighted in the sequence diagram in figure 7.29.
Figure 7.29. The noop case in the sequence diagram
Implement a method called isNoop() in the ArrayWithOriginalIndices
class, as shown in bold font in listing 7.9.
Listing 7.9. Detecting if an operation is a noop (utils/arrays.js)
class ArrayWithOriginalIndices {
// --snip-- //
isNoop(index, newArray) {
if (index >= this.length) { #1
return false
}
const item = this.#array[index] #2
const newItem = newArray[index] #3
return this.#equalsFn(item, newItem) #4
}
}
Once you detect there’s a noop at the current index, you need to return the
noop operation. And here’s where the original indices come in handy.
Implement a method called noopItem() in the ArrayWithOriginalIndices
class, as shown in bold font in listing 7.10. Note that you also implement an
originalIndexAt() method to get the original index of an item in the old
array.
Listing 7.10. Returning a noop operation (utils/arrays.js)
class ArrayWithOriginalIndices {
// --snip-- //
isNoop(index, newArray) {
// --snip-- //
}
originalIndexAt(index) {
return this.#originalIndices[index] #1
}
noopItem(index) {
return { #2
op: ARRAY_DIFF_OP.NOOP,
originalIndex: this.originalIndexAt(index), #3
index,
item: this.#array[index], #4
}
}
}
As you can see, you don’t need to do anything to the old array to reflect the
noop operation. Things stay the same. With these methods in place you can
go ahead and implement the noop case in the arraysDiffSequence()
function. Write the code in bold font in listing 7.11 inside the
arraysDiffSequence() function.
Listing 7.11. Implementing the noop case (utils/arrays.js)
export function arraysDiffSequence(
oldArray,
newArray,
equalsFn = (a, b) => a === b
) {
const sequence = []
const array = new ArrayWithOriginalIndices(oldArray, equalsFn)
for (let index = 0; index < newArray.length; index++) {
if (array.isRemoval(index, newArray)) {
sequence.push(array.removeItem(index))
index-continue
}
if (array.isNoop(index, newArray)) { #1
sequence.push(array.noopItem(index)) #2
continue #3
}
// TODO: addition case
// TODO: move case
}
// TODO: remove extra items
return sequence
}
Time to move on to the addition case.
The addition case
To check if an item was added in the new array, you need to check if that
item doesn’t exist in the old array, starting from the current index. Figure
7.30 shows the addition case in the sequence diagram.
Figure 7.30. The addition case in the sequence diagram
To find the item in the old array starting from a given index, you implement a
method called findIndexFrom(). Using that method, the isAddition()
method is straightforward to implement.
Add the code in bold font in listing 7.12 to the ArrayWithOriginalIndices
class.
Listing 7.12. Detecting if an operation is an addition (utils/arrays.js)
class ArrayWithOriginalIndices {
// --snip-- //
isAddition(item, fromIdx) {
return this.findIndexFrom(item, fromIdx) === -1 #1
}
findIndexFrom(item, fromIndex) {
for (let i = fromIndex; i < this.length; i++) { #2
if (this.#equalsFn(item, this.#array[i])) { #3
return i
}
}
return -1 #4
}
}
Dealing with an addition is as simple as adding the item to the old array and
returning the add operation. You have to add an entry to the
#originalIndices property, but the added item wasn’t present in the original
old array, so you can use a -1 in this case.
Add the addItem() method in bold font in listing 7.13 to the
ArrayWithOriginalIndices class.
Listing 7.13. Adding an item to the old array and returning an add operation (utils/arrays.js)
class ArrayWithOriginalIndices {
// --snip-- //
isAddition(item, fromIdx) {
return this.findIndexFrom(item, fromIdx) === -1
}
findIndexFrom(item, fromIndex) {
for (let i = fromIndex; i < this.length; i++) {
if (this.#equalsFn(item, this.#array[i])) {
return i
}
}
return -1
}
addItem(item, index) {
const operation = { #1
op: ARRAY_DIFF_OP.ADD,
index,
item,
}
this.#array.splice(index, 0, item) #2
this.#originalIndices.splice(index, 0, -1) #3
return operation #4
}
}
These two methods make it easy to implement the addition case in the
arraysDiffSequence() function. Add the code in bold font in listing 7.14 to
the arraysDiffSequence() function.
Listing 7.14. Implementing the addition case (utils/arrays.js)
export function arraysDiffSequence(
oldArray,
newArray,
equalsFn = (a, b) => a === b
) {
const sequence = []
const array = new ArrayWithOriginalIndices(oldArray, equalsFn)
for (let index = 0; index < newArray.length; index++) {
if (array.isRemoval(index, newArray)) {
sequence.push(array.removeItem(index))
index-continue
}
if (array.isNoop(index, newArray)) {
sequence.push(array.noopItem(index))
continue
}
const item = newArray[index] #1
if (array.isAddition(item, index)) { #2
sequence.push(array.addItem(item, index)) #3
continue #4
}
// TODO: move case
}
// TODO: remove extra items
return sequence
}
Let’s move on with the move case. This one is interesting.
The move case
The neat thing about the move case is that you don’t need to explicitly test for
it; if the operation isn’t a removal, an addition, or a noop, it must be a move.
This branch is highlighted in the sequence diagram in figure 7.31.
Figure 7.31. The move case in the sequence diagram
To move an item, you want to extract it from the array (you can use the
splice() method for that) and insert it in the new position (you can use the
splice() method again). There are two things you want to keep in mind: one
is that you need to remember to also move the original index to its new
position, and the other is that you have to include the original index in the
move operation. The importance of this will become clear in the next chapter.
Inside the ArrayWithOriginalIndices class, add the code in bold font in
listing 7.15 to implement the moveItem() method.
Listing 7.15. Detecting if an operation is an addition (utils/arrays.js)
class ArrayWithOriginalIndices {
// --snip-- //
moveItem(item, toIndex) {
const fromIndex = this.findIndexFrom(item, toIndex) #1
const operation = { #2
op: ARRAY_DIFF_OP.MOVE,
originalIndex: this.originalIndexAt(fromIndex), #3
from: fromIndex,
index: toIndex,
item: this.#array[fromIndex],
}
const [_item] = this.#array.splice(fromIndex, 1) #4
this.#array.splice(toIndex, 0, _item) #5
const [originalIndex] = this.#originalIndices.splice(fromIndex, 1)
this.#originalIndices.splice(toIndex, 0, originalIndex) #7
return operation #8
}
}
Adding the move case to the arraysDiffSequence() function is
straightforward. Include the line in bold font in listing 7.16 in the
arraysDiffSequence() function.
Listing 7.16. Adding an item to the old array and returning an add operation (utils/arrays.js)
export function arraysDiffSequence(
oldArray,
newArray,
equalsFn = (a, b) => a === b
) {
const sequence = []
const array = new ArrayWithOriginalIndices(oldArray, equalsFn)
for (let index = 0; index < newArray.length; index++) {
if (array.isRemoval(index, newArray)) {
sequence.push(array.removeItem(index))
index-continue
}
if (array.isNoop(index, newArray)) {
sequence.push(array.noopItem(index))
continue
}
const item = newArray[index]
if (array.isAddition(item, index)) {
sequence.push(array.addItem(item, index))
continue
}
sequence.push(array.moveItem(item, index))
}
// TODO: remove extra items
return sequence
}
You’re almost there! You’re only missing to remove the outstanding items
from the old array.
Removing the outstanding items
What happens when you reach the end of the new array but there are still
items in the old array? You remove them all, of course. Figure 7.32 shows the
removal case in the sequence diagram.
Figure 7.32. The removal case in the sequence diagram
To remove the outstanding items, you want to remove all items past the
current index (which is the length of the new array) from the old array. You
can use a while loop that keeps removing items while the old array is longer
than the index. Write the code for the removeItemsAfter() method in bold
font in listing 7.17.
Listing 7.17. Detecting if an operation is an addition (utils/arrays.js)
class ArrayWithOriginalIndices {
// --snip-- //
removeItemsAfter(index) {
const operations = []
while (this.length > index) { #1
operations.push(this.removeItem(index)) #2
}
return operations #3
}
}
Finally, add the code in bold font in listing 7.18 to the
arraysDiffSequence() function to remove the outstanding items. Note that
removeItemsFrom() doesn’t return a single operation, but an array of
operations.
Listing 7.18. Adding an item to the old array and returning an add operation (utils/arrays.js)
export function arraysDiffSequence(
oldArray,
newArray,
equalsFn = (a, b) => a === b
) {
const sequence = []
const array = new ArrayWithOriginalIndices(oldArray, equalsFn)
for (let index = 0; index < newArray.length; index++) {
if (array.isRemoval(index, newArray)) {
sequence.push(array.removeItem(index))
index-continue
}
if (array.isNoop(index, newArray)) {
sequence.push(array.noopItem(index))
continue
}
const item = newArray[index]
if (array.isAddition(item, index)) {
sequence.push(array.addItem(item, index))
continue
}
sequence.push(array.moveItem(item, index))
}
sequence.push(...array.removeItemsAfter(newArray.length))
return sequence
}
And just like that, you have a working implementation of the
arraysDiffSequence() function! Believe it or not, this was the hardest
algorithm to implement in the whole book. If you’re still with me, the rest of
the book will be easy to follow.
Exercise 7.6
Write a function called applyArraysDiffSequence() that given an array and
a sequence of operations, applies the operations to the array and returns the
resulting array.
To test it, pass the following arrays to the arraysDiffSequence() function:
old array: ['A', 'A', 'B', 'C']
new array: ['C', 'K', 'A', 'B']
Save the resulting operations in a variable called sequence. Then pass the old
array and the sequence to the applyArraysDiffSequence() function and
check that the resulting array is the same as the new array.
7.7 Answers to the exercises
7.7.1 Exercise 7.1
The HTML for the old virtual tree is:
<div id="abc" style="color: blue;">
<p class="foo">Hello</p>
<p class="foo bar">World</p>
</div>
And the HTML for the new virtual tree is:
<div id="def" style="color: red;">
<p class="fox">Hi</p>
<span class="foo">there</span>
<p class="baz bar">World!</p>
</div>
7.7.2 Exercise 7.2
To disallow the user to call the mount() method more than once, you can add
a property called isMounted to the application object and set it to true when
the mount() method is called. Then, you can check if the mounted property is
true before calling the mount() method. If so, throw an error:
export function createApp({ state, view, reducers = {} }) {
let parentEl = null
let vdom = null
let isMounted = false
// -- snip -- //
return {
mount(_parentEl) {
if (isMounted) {
throw new Error('The application is already mounted')
}
parentEl = _parentEl
vdom = view(state, emit)
mountDOM(vdom, parentEl)
isMounted = true
},
unmount() {
destroyDOM(vdom)
vdom = null
subscriptions.forEach((unsubscribe) => unsubscribe())
isMounted = false
},
}
}
7.7.3 Exercise 7.3
Here are the tests I implemented for the objectsDiff() function in the
project (I’m using the vitest testing library). You can find the tests inside the
__tests__/objects.test.js file.
import { expect, test } from 'vitest'
import { objectsDiff } from '../utils/objects'
test('same object, no change', () => {
const oldObj = { foo: 'bar' }
const newObj = { foo: 'bar' }
const { added, removed, updated } = objectsDiff(oldObj, newObj)
expect(added).toEqual([])
expect(removed).toEqual([])
expect(updated).toEqual([])
})
test('add key', () => {
const oldObj = {}
const newObj = { foo: 'bar' }
const { added, removed, updated } = objectsDiff(oldObj, newObj)
expect(added).toEqual(['foo'])
expect(removed).toEqual([])
expect(updated).toEqual([])
})
test('remove key', () => {
const oldObj = { foo: 'bar' }
const newObj = {}
const { added, removed, updated } = objectsDiff(oldObj, newObj)
expect(added).toEqual([])
expect(removed).toEqual(['foo'])
expect(updated).toEqual([])
})
test('update value', () => {
const arr = [1, 2, 3]
const oldObj = { foo: 'bar', arr }
const newObj = { foo: 'baz', arr }
const { added, removed, updated } = objectsDiff(oldObj, newObj)
expect(added).toEqual([])
expect(removed).toEqual([])
expect(updated).toEqual(['foo'])
})
7.7.4 Exercise 7.4
Here’s another sequence of operations that transform the [A, B, C] array
into the [C, B, D] array:
1. Move C from i=2 to i=1. Result: [A, C, B]
2. Add D at i=3. Result: [A, C, B, D]
3. Remove A at i=0. Result: [C, B, D]
7.7.5 Exercise 7.5
Let’s apply to the [A, B, C] array the following sequence of operations:
[
{op:
{op:
{op:
{op:
'remove', index: 0, item: 'A'}
'move', originalIndex: 2, from: 1, index: 0, item: 'C'}
'noop', index: 1, originalIndex: 1, item: 'B'}
'add', index: 2, item: 'D'}
]
1. Remove A at i=0. Result: [B, C]
2. Move C (originally at 2) from i=1 to i=0. Result: [C, B]
3. Noop B at i=1. Result: [C, B]
4. Add D at i=2. Result: [C, B, D]
As expected, the result is the [C, B, D] array.
7.7.6 Exercise 7.6
Here’s the implementation of the applyArraysDiffSequence() function:
function applyArraysDiffSequence(oldArray, diffSeq) {
return diffSeq.reduce((array, { op, item, index, from }) => {
switch (op) {
case ARRAY_DIFF_OP.ADD:
array.splice(index, 0, item)
break
case ARRAY_DIFF_OP.REMOVE:
array.splice(index, 1)
break
case ARRAY_DIFF_OP.MOVE:
array.splice(index, 0, array.splice(from, 1)[0])
break
}
return array
}, oldArray)
}
Now, if you pass the two arrays described in the exercise to the
arraysDiffSequence():
const oldArray = ['A', 'A', 'B', 'C']
const newArray = ['C', 'K', 'A', 'B']
const sequence = arraysDiffSequence(oldArray, newArray)
You get the following sequence of operations:
[
{op:
{op:
{op:
{op:
{op:
'move', originalIndex: 3, from: 3, index: 0, item: 'C'}
'add', index: 1, item: 'K'}
'noop', index: 2, originalIndex: 0, item: 'A'}
'move', originalIndex: 2, from: 4, index: 3, item: 'B'}
'remove', index: 4, item: 'A'}
]
Let’s pass this sequence to the applyArraysDiffSequence() function,
together with the old array:
const result = applyArraysDiffSequence(oldArray, sequence)
The result is the new array:
['C', 'K', 'A', 'B']
7.8 Summary
The reconciliation algorithm has two main steps: diffing and patching.
Diffing is the process of finding the differences between two virtual
trees.
Patching is the process of applying the differences to the real DOM.
Diffing two virtual trees to find their differences boils down to solving
three problems: finding the differences between to objects, finding the
differences between two arrays, and finding a sequence of operations
that applied to an array will transform it into another array.
Appendix. Setting up the project
Before you write any code, you need to have an NPM project set up. In this
appendix, I’ll help you create and configure a project to write the code for
your framework.
I understand you might not typically configure an NPM project from scratch
with a bundler, a linter, and a test library yourself, as most frameworks come
with a CLI tool (like, for example create-react-app or angular-cli) which
does the scaffolding and generating the boilerplate code structure for you. So
I’ll give you two options to create your project:
1. Use the CLI tool I created for this book. With a single command, you
can create a project where you can start writing your code right away.
2. Configure the project yourself, from scratch. It’s more laborious, but
you get to learn how to configure the project.
If you want to get started quickly with the book and can’t wait to write your
awesome frontend framework, I recommend you use the CLI tool. In this
case, you need to read section A.6. But if you are the kind of developer who
enjoys configuring everything from scratch, you can follow the steps to
configure the project yourself in section A.7.
Before you start configuring your project, let’s first cover some basics about
where you can find the code for the book and the technologies you’ll use.
These sections are optional, but I recommend you to read them before you
start configuring your project. If you can’t wait to start writing code, you can
skip them and move on to sections A.6 and A.7. You can always come back
and read the rest of the appendix later.
A.1 Where to find the source code
The source code for the book is publicly available at:
https://github.com/angelsolaorbaiceta/fe-fwk-book
I recommend you to clone the repository or download the ZIP archive of the
repository, to follow along with the book. It contains all the listings that
appear the book (in the listings folder), sorted by chapter. I’m assuming
you’re familiar with git and know how to clone a repository and checkout
tags or branches. If previous sentence sounded like nonsense to you, don’t
worry, you can still follow along with the book. Download the project as a
ZIP archive by clicking the <> Code button in the repository and then
clicking on the Download ZIP button.
Warning
The code you’ll find in the repository is the final version of the framework,
the one you’ll have written by the end of the book. If you want to check the
code for each chapter, you need to checkout the corresponding Git tag as
explained below. You can also refer to the listings/ directory in the
repository, which contains all the listings from the book, sorted by chapter.
Let’s take a look at how you can find the code for each chapter.
A.1.1 Checking out the code for each chapter
I tagged the source code with the number of each chapter where a new
version of the framework is available. The tag name follows the pattern chX,
where X is the number of the chapter. For example, the first working version
of the framework appears in chapter 6, so the corresponding code can be
checked out with the following git command:
$ git checkout ch6
Then, in chapters 7 and 8, you implement the reconciliation algorithm,
resulting in a new, more performant version of the framework. The
corresponding code can be checked out as follows:
$ git checkout ch8
By checking out the code for each chapter, you can see how the framework
evolves as we add new features. You can also compare your code by the end
of each chapter with the code in the repository. Note that not all chapters
have a tag in the repository, only those that have a working version of the
framework. I also wrote unit tests for the framework that I won’t cover in the
book, but you can look at them to find ideas on how to test your code.
Note
If you’re not familiar with the concept of git tags, you can learn about them
in https://git-scm.com/book/en/v2/Git-Basics-Tagging. Basic git knowledge
is assumed for this book.
I recommend you to avoid copy/pasting the code from the book and instead
type it yourself. If you get stuck because your code doesn’t seem to work,
look at the code in the repository, try to figure out the differences, and then
fix it yourself. If you write a unit test to reproduce the problem, much better.
I know this is more cumbersome, but it’s the best way to learn, and it’s
actually how you’d probably want to tackle a real-world bug in your code.
You can also refer to the listings/ directory in the repository, which contains
all the listings from the book, sorted by chapter.
You can find instructions on how to run and work with the code in the
README file of the repository. This file contains up-to-date documentation
on everything you need to know about the code. Make sure to quickly read it
before you start working with the code. (When you get started with the code
of an open-source repository, reading the README file is the first thing you
should do.)
A.1.2 A note on the code
The emphasis of the code I wrote wasn’t to be the most performant and safest
code possible. There are a lot of places in the code that could use better error
handling, or where I could have done things in a more performant way by
applying some optimizations. But I didn’t, because I put the emphasis on
writing code that’s easy to understand, that’s clean and concise. Code that
you read and immediately understand what it does.
I pruned the code of all the unnecessary details that would’ve made it harder
to understand, and left just the essence of the concept which I want to teach.
I’ve gone to great lengths to simplify the code as much as I could, and I hope
you’ll find it easy to follow and make sense of.
So, just bear in mind that the code you’ll find in the repository and the book
has the purpose of teaching efficiently, not being production-ready.
A.1.3 Reporting issues in the code
As many tests as I wrote and as many times as I reviewed the code, I’m sure
there are still bugs in it. Frontend frameworks are complex beasts, and it’s
hard to get everything right. If you find a bug in the code, please report it in
the repository by opening a new issue.
To open a new issue, go to the issues tab of the repository:
https://github.com/angelsolaorbaiceta/fe-fwk-book/issues
Then, click on the New issue button. In the row that reads Bug report, click
on the Get started button. Fill in the form with the details of the bug you
found, and click on the Submit new issue button.
You’ll need to give enough information for me to easily reproduce and fix the
bug. I know it takes time to file a bug report with these many details, but it’s
considered good etiquette in the open source community. It shows respect
from your side towards the maintainers of a project, who use their free time
to create and maintain it for everyone to use free of charge. It’s good that we
get used to being respectful citizens of the open source community.
A.1.4 Fixing a bug yourself
If you find a bug in the code, and you know how to fix it, you can open a pull
request with the fix. Even better than opening an issue is to offer a solution to
it yourself—that’s how open source projects work. You might also want to
take a look at bugs that other people reported and try to fix them yourself.
This is a great exercise to learn how to contribute to open source projects, and
I’ll be forever grateful if you do so.
If you don’t know what GitHub pull requests are, I recommend you to read
about them at https://docs.github.com/en/pull-requests. Pull requests are the
way to contribute to open source projects on GitHub (and also how many
software companies add changes to their codebase), so it’s good to know how
they work.
Moving on. Before you create your project, let’s take a look at the
technologies you’ll use and how the project will be structured.
A.2 Note on the technologies used
There are heated discussions in the frontend ecosystem about what are the
best tools. You’ll hear things like "you should use Bun, because it’s much
faster than Node JS," or "Webpack is old now, you should start using Vite for
all your projects." Some people argue over which bundler is the best, or
which linter and transpiler you should be using. Something that I find
especially harmful are the "top 10 reasons why you should stop using X"kind of blog posts. Apart from being obvious clickbait, they don’t usually
help the frontend community, let alone junior developers that have a hard
time understanding what set of tools they "should be using."
A cautionary tale on getting overly attached to tools
I once worked for a start-up that grew quickly but wasn’t doing great. We had
very few customers using our app—if any at all—and every time we added
something in the code, we’d introduce new bugs. (Code quality wasn’t a
priority; speed was, and automated testing was nowhere to be found.)
Surprisingly, we blamed it on the tools we were using. We were convinced
that, when we migrated the code to the newest version of the framework we
were using, we would get more customers and things would work great from
then onwards. Yes, I know how ridiculous this sounds now. But we made it
to "modernize" the tooling, and guess what? the code was still the same: a
hard-to-maintain mess that would break if you stared at it for too long. Turns
out that using more modern tools doesn’t make your code better if the code is
poorly written in the first place.
What do I want to say with this? That I believe your time is better used
writing quality code than arguing about what tools will make your
application successful. Well architected and modularized code with a
great suite of automated tests that, apart from making sure the code works
and can be refactored safely, also serves as documentation, beats any
tooling. That is not to say the tools don’t matter, because they obviously do.
Ask a carpenter if they can be productive using a rusty hammer or a blunt
saw.
For this book, I’ve tried to choose tools that are mature and that most
frontend developers might be familiar with. Choosing the newest, shiniest or
trendiest tool wasn’t my goal.
I want to teach you how frontend frameworks work, and the truth is, that
most tools work perfectly fine for this purpose. The knowledge that I’ll teach
you in this book transcends the tools we choose to use. So, having said this, if
you have a preference for a tool and some experience with it, feel free to use
it instead of the ones I’ll recommend here.
A.2.1 Package manager—NPM
We’ll use the NPM package manager to create the project and run the scripts.
If you’re more comfortable with yarn or pnpm, you can use them instead.
They work very similarly, so you shouldn’t have any problems using your
preferred one.
We’ll use NPM workspaces, which were introduced in version 7, so you want
to make sure you have at least version 7 installed:
$ npm --version
8.19.2
Both yarn and pnpm also support workspaces, so you can use them as well.
(In fact, they introduced workspaces before NPM did.)
A.2.2 Bundler—Rollup and Webpack
To bundle the JavaScript code together into a single file, we’ll use Rollup.
Rollup is very popular among JavaScript libraries, and it’s very simple to use.
If you prefer Webpack, Parcel or Vite, you can use them instead. You’ll have
to make sure you configure them to output a single ESM file (as we’ll see
later).
Towards the end of the book, when you use your framework to build
applications, you’ll also use Webpack. In fact, you’ll write a Webpack loader
that’ll transform the templates for your components into render functions.
In summary: you’ll use Rollup to bundle your framework, and Webpack to
bundle the applications you’ll build with your framework.
A.2.3 Linter—ESLint
To lint the code, we’ll use ESLint. It’s a very popular linter, and it’s very easy
to configure. I’m a firm believer that static analysis tools are a must for any
serious project where the quality of the code is important (as it always is the
case).
ESLint will prevent us from having unused variables declared, imports that
are not used, and many other things that can go wrong in our code. ESLint is
super configurable, but most developers are happy with the default
configuration: it’s a good starting point. We’ll use the default configuration
for this book as well, but you can always change it to your liking. If there’s a
linting rule you deem important, you can add it to your configuration.
A.2.4 (Optional) Testing—Vitest
I won’t be showing unit tests for the code which you’ll write in this book to
keep its size reasonable, but if you check the source code of the framework I
wrote for the book, you’ll see lots of them. (In fact, you can use them to
better understand how the framework works. Tests are—when well written—
a great source of documentation.) You might want to write tests yourself as
well, to make sure the framework works as expected and you don’t break it
when you make new changes. Every serious project should have tests
accompanying it and serving as a safety net as well as documentation.
I’ve worked a lot with Jest; it’s been my go-to testing framework for a long
time, but I recently started using Vitest and decided to stick with it as it’s
orders of magnitude faster. The API is very similar to Jest, so you won’t have
any problems if you do decide to use it as well. If you want to use Jest, that’ll
do just fine.
A.2.5 The language—JavaScript
Saying we’ll use JavaScript might seem obvious, but if I was writing the
framework for myself, I’d use TypeScript without any hesitation. TypeScript
is fantastic for large projects: types tell you a lot about the code, and the
compiler will help you catch bugs before you even run the code (how many
times have you accessed a property that didn’t exist in an object using
JavaScript? Does TypeError sends shivers down your spine?). Non-typed
languages are great for scripting, but for large projects, I’d recommend
having a compiler as your companion.
So why am I using JavaScript for this book? Because the code tends to be
shorter without types, and what I want to do here is teach you the principles
of how frontend frameworks work, principles that apply equally well to both
JavaScript and TypeScript. I prefer to use JavaScript because the code listings
will be shorter and I can get to the point faster, and thus teach you more
efficiently.
As with the previous tools, if you feel strongly about using TypeScript, you
can use it instead of JavaScript. You’ll need to figure out the types yourself,
but that’s part of the fun, right? Also, don’t forget to setup the compilation
step in your build process.
A.3 Read the docs
Explaining how to configure the tools you’ll use in detail, and how they
work, is out of the scope of this book. I want to encourage you to go to their
websites or repository pages and read the documentation. One great thing
about frontend tools is that they tend to be extremely well documented. In
fact, I’m convinced that they compete against each other to see which one has
the best documentation.
If you’re not familiar with any of the tools you’ll be using, take some time to
read the documentation. That’ll save you a lot of time in the long run. I’m a
firm believer that developers should strive to understand the tools they use,
and not just use them blindly (that’s what got me into understanding how
frontend frameworks work in the first place—which explains why I’m
writing this book).
One of the most important lessons I’ve learned over the years is that taking
the time to read the documentation is a great investment of your time.
Reading the docs before you start using a new tool or library saves you the
time you’d spend trying to figure out how to do something that, somewhere
in the documentation, someone has taken the time and care to explain in
detail. The time that you end up spending trying to figure things out on your
own, and searching StackOverflow for answers, is—in my personal
experience—usually greater than the time you’d have spent should you read
the documentation upfront.
6 hours of debugging can save you 5 minutes of reading documentation
-- Jakob (@jcsrb) Twitter
Be a good developer—read the docs.
A.4 Structure of the project
Let’s briefly go over the structure of the project where you’ll write the code
for your framework. Your framework will consist of three packages (NPM
workspaces):
runtime—the framework’s runtime, the code that’s executed in the
browser and is in charge of rendering the views and handling the events.
Basically, the framework itself.
compiler—the compiler that transforms HTML templates into render
functions.
loader—the Webpack loader that uses the compiler to transform
templates at build time.
The main package, and where you’ll spend most of the time, is the runtime
package. This package is the framework itself. The other two, compiler and
loader, are tooling—dev dependencies in NPM parlance—that developers
need at build time if they want to write templates instead of render functions.
(This might sound confusing at the moment, but it’ll eventually make sense.)
Note
If you’re not familiar with the concept of NPM workspaces, you can read
more about at https://docs.npmjs.com/cli/v9/using-npm/workspaces. It’s
important that you understand how they work, so the structure of the project
makes sense to you and you can follow along the instructions that follow.
The folder structure of the project will be as follows:
examples/
packages/
├── compiler/
├── loader/
└── runtime/
Each package has its own package.json file, with its dependencies, and it’s
bundled separately. It’s effectively three separate projects, but they are all
part of the same repository. This project structure is very common these days,
and it’s called a monorepo.
The three packages will define the same scripts:
build—builds the package, bundling all the JavaScript files into a single
file, which is published to NPM.
test—runs the automated tests in watch mode.
test:run—runs the automated tests once.
lint—runs the linter to detect issues in your code.
lint:fix—runs the linter and automatically fixes the issues it can.
prepack—a special life cycle script that runs before the package is
published to NPM. It’s used to make sure the package is built before
being published.
Caution
The aforementioned scripts are defined in each of the three packages'
package.json files (those inside packages/runtime, packages/compiler, and
packages/loader), not in the root package.json file. Bear this in mind in case
you decide to configure the project yourself, because there will be four
package.json files in total.
A.5 Finding a name for your framework
Before you create the project or write any code, you need a name for your
framework. Be creative! It needs to be a name that no one else is using in
NPM (you will be publishing your framework to NPM), so you need to be
original. If you’re not sure what to call it, you can simply call it <your
name>-fe-fwk (your name followed by -fe-fwk). You want to make sure the
name is unique, so check if it’s available on npmjs.com, by adding it to the
URL:
www.npmjs.com/package/<your framework name>
If the URL displays the 404—not found page, that means nobody is using that
name for a Node JS package yet, so you’re good to go; you can use that
name.
Important
I will use the <fwk-name> placeholder to refer to the name of your
framework in the sections that follow. Whenever you see <fwk-name> in a
command, you should replace it with the name you chose for your
framework.
Let’s now create the project. Remember that you have two options. If you
want to configure things yourself, you want to skip the next section and jump
to section A.7. If you want to use the CLI tool to get started quickly, read the
next section.
A.6 Option A—Using the CLI tool
Using the CLI tool I created for the book is the fastest way to get started. It’ll
save you the time it takes to create and configure the project from scratch, so
you can start writing code right away. You just need to open your terminal,
move to the directory where you want the project to be created, and run the
following command:
$ npx fe-fwk-cli init <fwk-name>
With npx you don’t even need to install the CLI tool locally, it will be
downloaded and executed automatically.
When the command finishes executing, it’ll instruct you to cd in to the
project directory and run npm install to install the dependencies:
$ cd <fwk-name>
$ npm install
That’s it! You can now jump to the A.8 section to learn how to publish your
framework to NPM.
A.7 Option B—Configuring the project from
scratch
Note
If you created your project using the CLI tool, you can skip this section.
To create the project yourself, you first want to create a directory for it. Using
the command line, you can do that by running the following command:
$ mkdir <fwk-name>
Then, you want to initialize an NPM project in that directory:
$ cd <fwk-name>
$ npm init -y
This command creates a package.json file in the directory. There are a few
edits you need to make to the file. You want to edit the description field to
something like:
"description": "A project to learn how to write a frontend framework"
Then, you want to make this package private, so you don’t accidentally
publish it to NPM. It’s the workspace packages you’ll create in a minute that
you’ll publish to NPM, not the parent project itself:
"private": true
You also want to change the name of this package to <fwk-name>-project to
avoid conflicts with the name of your framework (which you’ll use to name
the runtime package you create in the next section). Every NPM package in
the repository requires a unique name, and you want to reserve the name you
chose for your framework for the runtime package.
Append -project to the name field:
"name": "<fwk-name>-project"
Finally, you want to add a workspaces field to the file, with an array of the
directories where you’ll be creating the three packages your project will
consist of:
"workspaces": [
"packages/runtime",
"packages/compiler",
"packages/loader"
]
Your package.json file should look similar to this:
{
"name": "<fwk-name>-project",
"version": "1.0.0",
"description": "A project to learn how to write a frontend framework",
"private": true,
"workspaces": [
"packages/runtime",
"packages/compiler",
"packages/loader"
]
}
You might have other fields, such as author, license, etc., but the ones in
the previous snippet are the ones you need to make sure are there. Let’s now
create a directory in your project where you can add example applications to
test your framework.
A.7.1 The examples folder
Throughout the book, you’ll be improving your framework and adding new
features to it. Each time you add a new feature, you’ll want to test it by using
it in example applications. Here, you’ll configure a directory where you can
add these applications, and a script to serve them locally.
Create an examples directory at the root of your project:
$ mkdir examples
Tip
While the examples folder remains empty, that is, before you write any
example application, you might want to add a .gitkeep file to it, so that git
picks up the directory and includes it in the repository. (Git doesn’t track
empty directories.) As soon as you put a file in the directory, you can remove
the .gitkeep file, but keeping it doesn’t hurt anyway.
To keep the examples directory tidy, you want to create a subdirectory for
each chapter: examples/ch02, examples/ch03, etc. Each subdirectory will
contain the example applications using the framework resulting from the
chapter, which allows you to see the progress in how the framework becomes
more and more powerful, and easier to use. You don’t need to create the
subdirectories now, you’ll create them as you need them in the book.
Now you need a script to serve the example applications. Your applications
will consist of an entry HTML file, which loads other files, such as
JavaScript files, CSS files, and images. For the browser to be able to load
these files, you need to serve them from a web server. The http-server
package is a very simple web server that you can use to serve the example
applications.
In the package.json file, add the following script:
"scripts": {
"serve:examples": "npx http-server . -o ./examples/"
}
Important
This is the only script that you need to add to the project root package.json
file. All the other scripts you’ll add to the project will be added to the
package.json files of the packages you’ll create in the next sections. Bear this
in mind. You won’t add any other script to the root package.json file.
The project doesn’t require the http-server package installed, as you’re
using npx to run it. The -o flag tells the server to open the browser and
navigate to the specified directory, in the case of the previous command, the
examples directory.
Your project should have the following structure so far:
<fwk-name>/
├── package.json
└── examples/
└── .gitkeep
Great—Let’s now create the three packages that will make up your
framework code.
A.7.2 Creating the packages
As we’ve already discussed, your framework will consist of three packages:
runtime, compiler, and loader. They all have the same dependencies and
scripts, so, once you’ve created the first of them, you can copy and paste it,
making sure to change the name of the folder and the name of the package in
the package.json file.
Before you create the packages, you need to create a directory where you’ll
put them, the packages directory you specified in the workspaces field of the
package.json file.
Make sure your terminal is inside the project’s root directory by running the
pwd command:
$ pwd
The output should be similar to this (where path/to/your/framework is the
path to the directory where you created the project):
path/to/your/framework/<fwk-name>
If your terminal is not in the project’s root directory, use the cd command to
navigate to it. Then, create a packages directory:
$ mkdir packages
Let’s start with the runtime package.
The runtime package
First, make sure you cd into the packages folder:
$ cd packages
Then create the folder for the runtime package and cd into it:
$ mkdir runtime
$ cd runtime
Next, initialize an NPM project in the runtime folder:
$ npm init -y
Open the package.json file that was created for you and make sure the
following fields have the right values (you can leave the other fields as they
are):
{
"name": "<fwk-name>",
"version": "1.0.0",
"main": "dist/<fwk-name>.js",
"files": [
"dist/<fwk-name>.js"
]
}
Remember to replace <fwk-name> with the name of your framework. The
main field specifies the entry point of the package, which is the file that will
be loaded when you import the package. This means that, when you import
code from this package like so:
import { something } from '<fwk-name>'
JavaScript resolves the path to the file specified in the main field. You’ve told
NPM that the file is the dist/<fwk-name>.js file, which is the bundled file
containing all the code for the runtime package. This file will be generated by
Rollup, by running the build script you’ll add to the package.json file in the
next section.
The files field specifies the files that will be included in the package when
you publish it to the NPM repository. The only file that you want to include
is the bundled file, so you’ve specified that in the files field. Files like the
README, the LICENSE, and the package.json file are automatically
included in the package, so you don’t need to include them here.
Your project should have the following structure (in bold font is what you’ve
just created):
<fwk-name>/
├── package.json
├── examples/
│
└── .gitkeep
└── packages/
└── runtime/
└── package.json
Let’s now add Rollup to bundle the framework code.
Installing and configuring Rollup
Rollup is the bundler that you’ll use to bundle your framework code. It’s very
simple to configure and use.
Let’s install Rollup. Make sure your terminal is inside the runtime package
directory by running the pwd command:
$ pwd
The output should be similar to this:
path/to/your/framework/<fwk-name>/packages/runtime
If your terminal is not inside the packages/runtime directory, use the cd
command to navigate to it. Install the rollup package by running the
following command:
$ npm install --save-dev rollup
You also want to install two plugins for Rollup:
rollup-plugin-cleanup:
to remove comments from the generated
bundle.
rollup-plugin-filesize:
to display the size of the generated bundle.
Install them with the following command:
$ npm install --save-dev rollup-plugin-cleanup rollup-plugin-filesize
Now, you need to configure Rollup. Create a rollup.config.mjs file (note the
.mjs extension, to tell Node JS this file should be treated as an ES module
and thus can use the import syntax) in the runtime folder and add the
following code:
import cleanup from 'rollup-plugin-cleanup'
import filesize from 'rollup-plugin-filesize'
export default {
input: 'src/index.js', #1
plugins: [cleanup()], #2
output: [
{
file: 'dist/<fwk-name>.js', #3
format: 'esm', #4
plugins: [filesize()], #5
},
],
}
The configuration, explained in plain english, means the following:
The entry point of the framework code is the src/index.js file: starting
from this file, Rollup will bundle all the code that is imported from it.
The comments in the source code should be removed from the generated
bundle (they occupy space and are not needed for the code to execute).
This is what the plugin-rollup-cleanup plugin does.
The generated bundle should be an ES module (using import/export
syntax, supported by all major browsers) that is saved in the dist folder,
as <fwk-name>.js.
We want the size of the generated bundle to be displayed in the terminal
to keep an eye on it and make sure it doesn’t grow too much. This is
what the plugin-rollup-filesize plugin does.
Now add a script to the package.json file (the one inside the runtime
package) to run Rollup and bundle all the code, and another one to run it
automatically before publishing the package:
"scripts": {
"prepack": "npm run build",
"build": "rollup -c"
}
The prepack script is a special script that is run automatically by NPM before
publishing the package, which you do by running the npm publish command
(more on this later). This makes sure that, whenever you publish a new
version of the package, the bundle is generated. The prepack script simply
runs the build script, which in turn runs Rollup.
To run Rollup, you simply call the rollup command and pass the -c flag to
tell it to use the rollup.config.mjs file as configuration. (If you don’t pass a
specific file to the -c flag, Rollup will look for a rollup.config.js or
rollup.config.mjs file.)
Before you test the build command, you need to create the src folder and the
src/index.js file. You can do that with the following commands:
$ mkdir src
$ touch src/index.js
(In windows shell touch will not work use call > filename instead.)
Inside the src/index.js file, add the following code:
console.log('This will soon be a frontend framework!')
You can now run the build command to bundle the code:
$ npm run build
This command processes all the files imported from the src/index.js file
(none at the moment) and bundles them into the dist folder. The output in
your terminal should look similar to the following:
src/index.js → dist/<fwk-name>.js...
┌─────────────────────────────────────┐
│
│
│
Destination: dist/<fwk-name>.js │
│
Bundle Size: 56 B
│
│
Minified Size: 55 B
│
│
Gzipped Size: 73 B
│
│
│
└─────────────────────────────────────┘
created dist/<fwk-name>.js in 62ms
Recall that, instead of <fwk-name>, you should use the name of your
framework. That rectangle in the middle of the output is the rollup-pluginfilesize plugin in action. It’s reporting the size of the generated bundle (56
bytes in this case), and also the size it’d have if the file was minified and
gzipped. We won’t be minifying the code for this book, as the framework is
going to be small anyway, but for a production-ready framework, you should
definitely do it. A minified JavaScript can be loaded faster by the browser,
and thus improve the TTI (Time to Interactive) of the web application using
it.
A new file, dist/<fwk-name>.js, has been created in the dist folder. If you
open it, you’ll see it just contains the console.log() statement you added to
the src/index.js file.
Great!—Let’s now install and configure ESLint.
Installing and configuring ESLint
ESLint is a linter that will help you write better code. It analyzes the code you
write and reports any errors or potential problems.
To install it, run the following command:
$ npm install --save-dev eslint
You’ll use the ESLint recommended configuration, which is a set of rules
that ESLint will enforce in your code. Create a .eslintrc.js file inside the
packages/runtime directory with the following content:
module.exports = {
env: {
browser: true,
es2021: true,
},
extends: 'eslint:recommended',
overrides: [],
parserOptions: {
ecmaVersion: 'latest',
sourceType: 'module',
},
rules: {},
}
And lastly, add the following two scripts to the package.json file:
"scripts": {
"prepack": "npm run build",
"build": "rollup -c",
"lint": "eslint src",
"lint:fix": "eslint src --fix"
}
You can run the lint script to check the code for errors, and the lint:fix
script to automatically fix some of them, those that ESLint knows the fix for.
I won’t be showing the output of the lint script in the book, but you can run
it yourself to see what it reports as you write your code.
Let’s now install Vitest to run the automated tests.
Installing Vitest (optional)
As I’ve mentioned, I used a lot of tests while developing the code for this
book, but I won’t be showing them in the book. You can take a look at them
in the source code of the framework and try to write your own as you follow
along. Having tests in your code will help you make sure things work as
expected as you move forward with the development of your framework.
We’ll use Vitest to run the tests. To install Vitest, run the following
command:
$ npm install --save-dev vitest
Tests can run in different environments, such as Node JS, JSDOM, or a real
browser. Because we will use the Document API to create DOM elements,
we’ll use JSDOM as the environment. (If you want to know more about
JSDOM, please refer to their repository: https://github.com/jsdom/jsdom.)
To install JSDOM, run the following command:
$ npm install --save-dev jsdom
With Vitest and JSDOM installed, you can now create the vitest.config.js file
with the following content:
import { defineConfig } from 'vitest/config'
export default defineConfig({
test: {
reporters: 'verbose',
environment: 'jsdom',
},
})
This configuration tells Vitest to use the JSDOM environment and to use the
verbose reporter, which outputs a very descriptive report of the tests.
You should place your test files inside the src/__tests__ folder, and name
them *.test.js for Vitest to find them. Go ahead and create the src/__tests__
folder:
$ mkdir src/__tests__
Inside, you can create a sample.test.js file with the following content:
import { expect, test } from 'vitest'
test('sample test', () => {
expect(1).toBe(1)
})
Now, add the following two scripts to the package.json file:
"scripts": {
"prepack": "npm run build",
"build": "rollup -c",
"lint": "eslint src",
"lint:fix": "eslint src --fix",
"test": "vitest",
"test:run": "vitest run"
}
The test script runs the tests in watch mode, and the test:run script runs
the tests once and exits. Tests in watch mode are handy when you’re working
with TDD (Test Driven Development), as they run again every time you
make changes in the test file or the code being tested.
Give a try to the tests by running the following command:
$ npm run test:run
You should see the following output:
✓ src/__tests__/sample.test.js (1)
✓ sample test
Test Files
Tests
Start at
Duration
1 passed (1)
1 passed (1)
15:50:11
1.47s (transform 436ms, setup 1ms, collect 20ms, tests 3ms)
You can run individual tests passing the name or path of the test file as an
argument to the test:run and test scripts. All the tests matching the name
or path will be run. For example, to run the sample.test.js test, you can run
the following command:
$ npm run test:run sample
This will run only the sample.test.js test and produce the following output:
✓ src/__tests__/sample.test.js (1)
✓ sample test
Test Files
Tests
Start at
Duration
1 passed (1)
1 passed (1)
15:55:42
1.28s (transform 429ms, setup 0ms, collect 32ms, tests 3ms)
Your project structure should look like the following at this point (in bold
font are the files and folders that you’ve created):
<fwk-name>/
├── package.json
├── examples/
│
└── .gitkeep
└── packages/
└── runtime/
├── package.json
├── rollup.config.mjs
├── .eslintrc.js
├── vitest.config.js
└── src/
├── index.js
└── __tests__/
└── sample.test.js
Let’s now create the compiler and loader packages.
The compiler package
Before creating the compiler package, you want to cd back to the packages
folder:
$ cd ..
$ cd ..
$ cp -r runtime compiler
$ pwd
You should see the following output:
path/to/your/framework/<fwk-name>/packages
The compiler package will use the exact same structure and configuration as
the runtime package. So, you can copy the runtime folder and rename it to
compiler using the following command:
$ cp -r runtime compiler
This copies everything, including the node_modules folder. The only thing
that you need to change is the package.json's name field, like so:
"name": "<fwk-name>-compiler",
That is, the name of your framework followed by the -compiler suffix. That’s
it.
Your project’s structure should look like the following (the compiler package
is in bold font, and the contents of the packages are elided for brevity):
<fwk-name>/
├── package.json
├── examples/
│
└── .gitkeep
└── packages/
├── runtime/
└── compiler/
Let’s now create the loader package.
The loader package
You can also copy the runtime folder and rename it to loader using the
following command (recall that your current working directory should be the
packages folder):
$ cp -r runtime loader
And make sure that you change the package.json's name field to:
"name": "<fwk-name>-loader",
For reference, your project’s structure should look like the following (once
again, the contents of the packages are elided for brevity):
<fwk-name>/
├── package.json
├── examples/
│
└── .gitkeep
└── packages/
├── runtime/
├── compiler/
└── loader/
One last thing you want to do for the package.lock file to be correctly
generated, including the dependencies of the compiler and loader packages,
is to cd into the root folder of the project (where the root package.json file
is):
$ cd ..
And run the following command:
$ npm install
Done! You’re all set to start developing your framework.
A.8 Publishing your framework to NPM
As exciting as it is to develop your own framework, it’s even more exciting
to share it with the world. NPM allows us to ship our package with just one
simple command:
$ npm publish
But before you can do that, you need to create an account on NPM and log in
to it from the command line. Let’s do that now. If you don’t plan to publish
your framework, you can skip this section.
A.8.1 Creating an NPM account
To create an NPM account, go to https://www.npmjs.com/signup and fill out
the form. It’s that simple, and it’s free.
A.8.2 Logging in to NPM
To log in to NPM in your terminal, run the following command:
$ npm login
and follow the prompts. To make sure you’re logged in, run the following
command:
$ npm whoami
You should see your username printed in the terminal.
A.8.3 Publishing your framework
To publish your framework, you need to make sure your terminal is in the
right directory: inside packages/runtime:
$ cd runtime
Your terminal’s working directory should now be packages/runtime,
highlighted in bold font in this listing:
<fwk-name>/
├── package.json
├── examples/
│
└── .gitkeep
└── packages/
├── runtime/ #1
├── compiler/
└── loader/
Warning
Make sure you’re not in the root folder of the project. The root folder’s
package.json file has the private field set to true, which means that it’s not
meant to be published to NPM. It’s the runtime package that you want to
publish to NPM.
Remember that the runtime package is the code for the framework (what you
want to publish), and the root of the project is just the monorepo containing
the runtime, compiler, and loader packages (not to be published to NPM).
With your terminal in the runtime directory, run the following command:
$ npm publish
You might be wondering what gets published to NPM. There are some files
in your project that always get published, and these are the package.json file,
the README.md file, and the LICENSE file. Apart from these, you can
specify which files to publish in the files field of the package.json file. If you
recall from a previous section, the files field in the package.json file of the
runtime package looks like this:
"files": [
"dist/<fwk-name>.js"
],
So, you’re only publishing the dist/<fwk-name>.js file, the bundled version
of your framework. The source files inside the src/ folder are not published.
The package is published with the version specified in the package.json file’s
version field. Bear in mind that you can’t publish a package with the same
version twice. Throughout the book, we’ll increment the version number
every time we publish a new version of the framework.
A.9 Using a CDN to import the framework
Once you’ve published your framework to NPM, you can create a Node JS
project and install it as a dependency:
$ npm install <fwk-name>
This is great if you plan to set up an NPM project with a bundler (such as
Rollup or Webpack) configured to bundle your application and the
framework together. This is what you typically do when you’re building a
production application with a frontend framework. But for small projects or
quick experiments that use only a handful of files—as those you’ll work on in
this book—it’s simpler to import the framework directly from the dist/
directory in your project, or from a Content Delivery Network (CDN).
One free CDN that you can use is unpkg.com. Everything that’s published to
NPM is also available on unpkg.com, so once you’ve published your
framework to NPM, you can import it from there, like so:
import { createApp, h } from 'https://unpkg.com/<fwk-name>'
In fact, if you browse to https://unpkg.com/fwk-name, you’ll see the
dist/<fwk-name>.js file you published in NPM. This is what the CDN serves
to your browser when you import the framework from there. If you don’t
specify a version, it’ll serve the latest version of the package. If you want to
use a specific version of your framework, you can specify it in the URL, like
so:
import { createApp, h } from 'https://unpkg.com/<fwk-name>@1.0.0'
Or, if you want to use the last minor version of the framework, you can just
request a major version, like so:
import { createApp, h } from 'https://unpkg.com/<fwk-name>@1'
I recommend you to use unpkg using the versioned URL, so that you don’t
have to worry about breaking changes in the framework that might break
your examples as you publish new versions of it. If you import the
framework directly from the dist/ folder in your project, every time you
bundle a new version that’s not backwards compatible, your example
applications will break. You could overcome this by instructing Rollup to
include the framework version in the bundled file name, but I’ll be using
unpkg in this book.
You’re all set! Time to start developing your framework.