/


Теги: weapons military affairs machine gun
Год: 1943
Похожие


Текст
WAR DEPARTMENT
Washington 25, D. C., 13 April 1943
TM E9-206A, German 7.9-mm Dual Purpose Machine Gun
MG34, is published for the information and guidance of all concerned.
Г A.G. 300.7 (10 Aug 1943) 1
[ 0.0. 461/38198 0.0. (4 Nov 1943) J
By order of the Secretary of War:
G. C. MARSHALL,
Chief of Staff.
Official:
J. A. ULIO,
Major General,
The Adjutant General.
Distribution: X
(For explanation of symbols, see FM 21-6.)
ТМ Е9-206А
CONTENTS
Paragraph*
Section I. Introduction 1- 4 4-10
II. Operation 5-11 10-36
III. Sighting equipment 12 37-40
IV. Malfunctions and corrections. .. . 13-15 40-42
V. Disassembly and assembly 16-18 43-48
VI. Care and preservation 19-25 49-52
VII. Ammunition 26-34 52-63
VIII. Inspection 35-40 63-65
IX. Maintenance under unusual con- ditions 41-43 65-66
X. Glossary 44-45 66-70
XI. References 46-47 70
71-72
Index
3
ТМ Е9-206А
1-4
GERMAN 7.9-MM DUAL PURPOSE MACHINE GUN MG34
Section I
INTRODUCTION
Paragraph
Scope ........................................................ 1
Characteristics .............................................. 2
Data ......................................................... 3
Cautions ..................................................... 4
1, SCOPE.
a. This manual is published for the information and guidance of
the using arms and services. It contains information required by the
using arms to identify, operate, disassemble, assemble, and preserve
the German 7.9-mm Dual Purpose Machine Gun MG34.
2. CHARACTERISTICS.
a. The German 7.9-mm Dual Purpose Machine Gun MG34 is a
recoil-operated, air-cooled weapon capable of delivering single or full
automatic fire. The gun is normally fed from 50-round flexible,
metal belts, two or more of which can be joined end to end. However,
in operations where rapid movement is required, or for antiaircraft
fire, a 50-round belt drum magazine or a 75-round spring-operated
drum magazine is used. The gun can be identified easily by the recoil
booster (fig. 1), perforated barrel casing (fig. 1), grooves for mounting
the weapon (fig. 1), front and rear sights (fig. 1), seat for the anti-
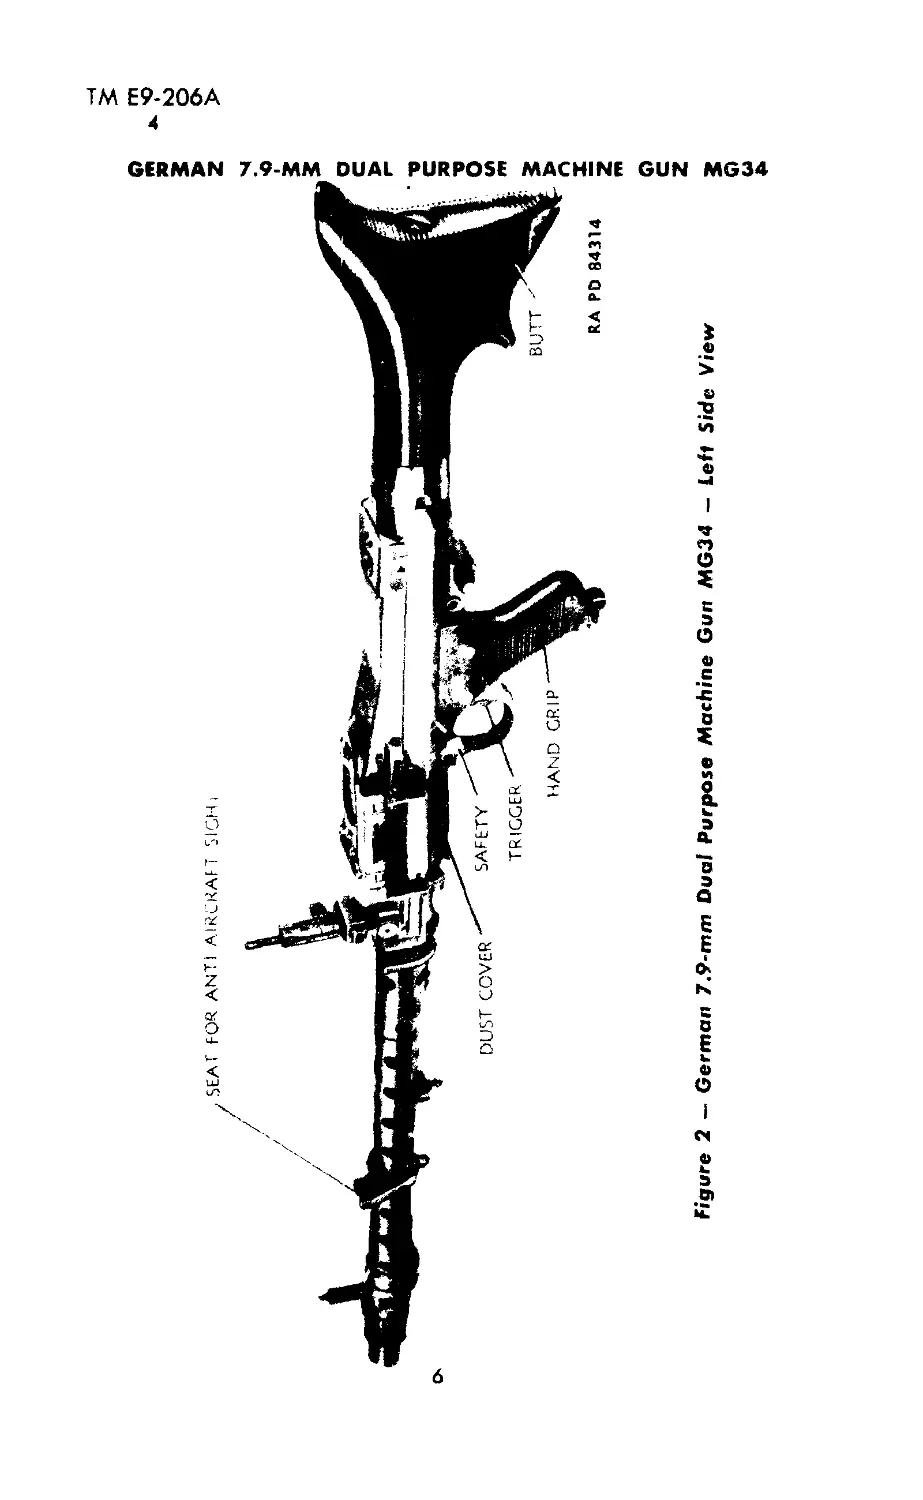
aircraft sight (fig. 2), hand grip with trigger and safety,dust cover
(fig. 2), and fin-shaped butt (fig. 2). It can be used on a bipod (fig.
3), on an antiaircraft tripod (fig. 4), or on a tripod mount (fig. 5).
3. DATA.
Weight of machine gun, with bipod..................... 2б3/ч lb
Weight of machine gun, without bipod.............. 24 Уч lb
Weight of barrel ...................................... 4.44 lb
Over-all length ........... 48 Уч in.
Length of barrel....................................... 24Уг in.
Caliber........................................(7.9 mm) 0.312 in.
Sight radius.............................................20l%ein.
Rifling.............................4 right-hand concentric grooves
Cyclic rate of fire .....................800 to 900 rounds per min
4. CAUTIONS.
a. All preservative and dirt must be removed from the gun before
firing. To do this, disassemble the gun (par. 17) and clean as in-
structed in paragraph 22.
4
INTRODUCTION
Figure 1 — Gorman 7.9-mm Dual Purpose Machine Gun MG34 — Right Side View
£
m
-p
KJ
О
о
>
Figure 2 — German 7.9-mtn Dual Purpose Machine Gun MG34 — Left Side View
ТМ Е9-206А
4
introduction
Figure 3 - Machine Gun - on Bipod
7
ТМ Е9-206А
4
GERMAN 7.9-MM DUAL PURPOSE MACHINE GUN MG34
Figure 4 — Machine Gun — on Antiaircraft Tripod
8
figure Machine Gun — on Tripod Mount
INTRODUCTION
m
45
K5
О
О
>
ТМ Е9-206А
4-5
GERMAN 7.9-MM DUAL PURPOSE MACHINE GUN MG34
b. Do not attempt to fire this gun with ammunition issued only for
United States weapons, as it will damage the gun and injure the
operator. Use only enemy ammunition or other ammunition specifi-
cally authorized by ordnance personnel (par. 31).
c. Before using any ammunition, make certain the ammunition and
belt are clean and free of all traces of sand and dust.
d. The mechanism of the gun is very sensitive to dust or sand.
When the gun is not in action, keep the dust cover (fig. 2) on the
ejection opening closed.
c. It is dangerous to investigate a feed stoppage or malfunction by
raising the feed cover without first cocking the gun or retaining a hold
on the cocking handle. Should a live round remain in the chamber,
the raising of the feed cover would allow the bolt to continue forward
to fire the round, thus causing damage. Should a stoppage occur dur-
ing firing, cock the gun and move the. safety to SAFE. Then push the
feed cover catch forward, raise the feed cover, and lift out the belt.
If the gun cannot be cocked, apply a backward рц1| on the cocking
handle and, at the same time, raise the feed cover'and remove the
belt. The gun can then be cocked. For further' instructions, see
section IV.
f. Unload the gun before transporting the gun from one place to
another (par. 10).
Section II
OPERATION
Paragraph
Mounting the machine gun................................ 5
Dismounting the machine gun............................ 6
Filling the belts and magazines.......................... 7
Loading the machine gun.................................. 8
Firing the machine gun................................... 9
Unloading the machine gun............................... 10
Changing barrels ....................................... 11
5. MOUNTING THE MACHINE GUN.
a. On the Bipod. Slide the curved head of the bipod into the
front mounting guide on the barrel casing. Depress the bipod catch
spring on the underside of the casing (fig. 6), and rotate the bipod in
the guide until the spring snaps into position. Turn the bipod legs
toward the muzzle end and set them on the ground. To adjust the
10
ТМ Е9-206А
5
OPERATION
Figure 7 — Attaching Bipod Legs to Barrel Casing
spread of the bipod legs, rotate the thumbscrew at the junction of
the legs.
NOTE; If tlie gun is to be carried, collapse the bipod legs, fold
11
ТМ Е9-206А
5
GERMAN 7.9-ММ DUAL PURPOSE MACHINE GUN MG34
them backward against the barrel casing, and secure them to the knob
on the casing (fig. 7).
b. On the Xntiaircraft Tripod. Place the machine gun on the
tripod so that the curved head on the tripod slides into the rear mount-
ing guide on the barrel casing. Depress the tripod catch spring, and
rotate the machine gun until the spring snaps into position (fig. 8).
The tripod legs are both hinged and telescopic, to permit large adjust-
ments in the height of the firing position. Smaller adjustments can be
made by means of the adjustable support at the top of the tripod.
r. On the Tripod Mount.
v 1) If the tripod mount is folded, it should be unfolded and erected
as follows:
(a) Release the clamping lever on the front leg, extend the front
leg to the required position, and then lock the clamping lever.
(b) Loosen the wing nuts on the rear legs, and push the rear legs
hack. Raise the mount the required height and tighten the wing nuts
(c) With one hand, grasp the handie, with the other hand, grasp
the cradle. Push the press lever forward and raise the cradle, drawing
the elevating gear smartly back (fig. 9) until it stands erect and
engages the upper part of the mount.
(d) Adjust the legs, so that the cradle is horizontal when the ele-
vating gear is adjusted to its old position. The machine gun can now
be mounted on the mount.
Figure 8 — Mounting Machine Gun on Antiaircraft Tripod
12
ТМ Е9-206А
5-7
OPERATION
(2) Place the machine gun (muzzle end up) on the mount, so that
the projections on each side of the gun fit into the claws on the cradle
(fig. 10). Lower the front part of the gun on the cradle and secure it
by means of the hinge clamp.
d. On Antiaircraft Adapter of Tripod Mount. For antiaircraft fire
from the tripod mount, an adapter is secured in the short tube near
the swivel (fig. 5). The adapter is similar to the adjustable support
at the top of the tripod. The gun is mounted on the adapter as on
the tripod. The cradle must be folded when the adapter is used and
the adapter should be in a vertical position.
6. DISMOUNTING THE MACHINE GUN.
a. To dismount the machine gun, proceed in the reverse order of
mounting (par. 5).
7. FILLING THE BELTS AND MAGAZINES.
a. Belts.
(1) Place a 50-round leading belt on a flat surface, with the leading
tab to the right and the tongues up. Insert a round into each link, and
push it forward until the tongue snaps into the groove at the rear of
the cartridge case (fig. 11).
NOTE: Do not insert a round into the first link. This link is short
and has no tongue (fig. 11).
(2) The 50-round leading belt can be extended by joining it to
50-round extension belts. Fill a 50-round extension belt, but do not
fill the first link having the rectangular opening (fig. 11). Insert the
tongue at the end of the leading belt into the rectangular opening in
the first link of the extension belt, and join belts by inserting a round
(fig. 11). It is common practice to join as many as four extension
belts to a 50-round leading belt.
(3) Instead of a 50-round leading belt, it is possible to join five
50-round extension belts to a short leading belt (fig. 12).
(4) If a short leading belt is not available, an extension belt (or
belts) can still be used. However, when loading the belt, do not insert
rounds in first three links.
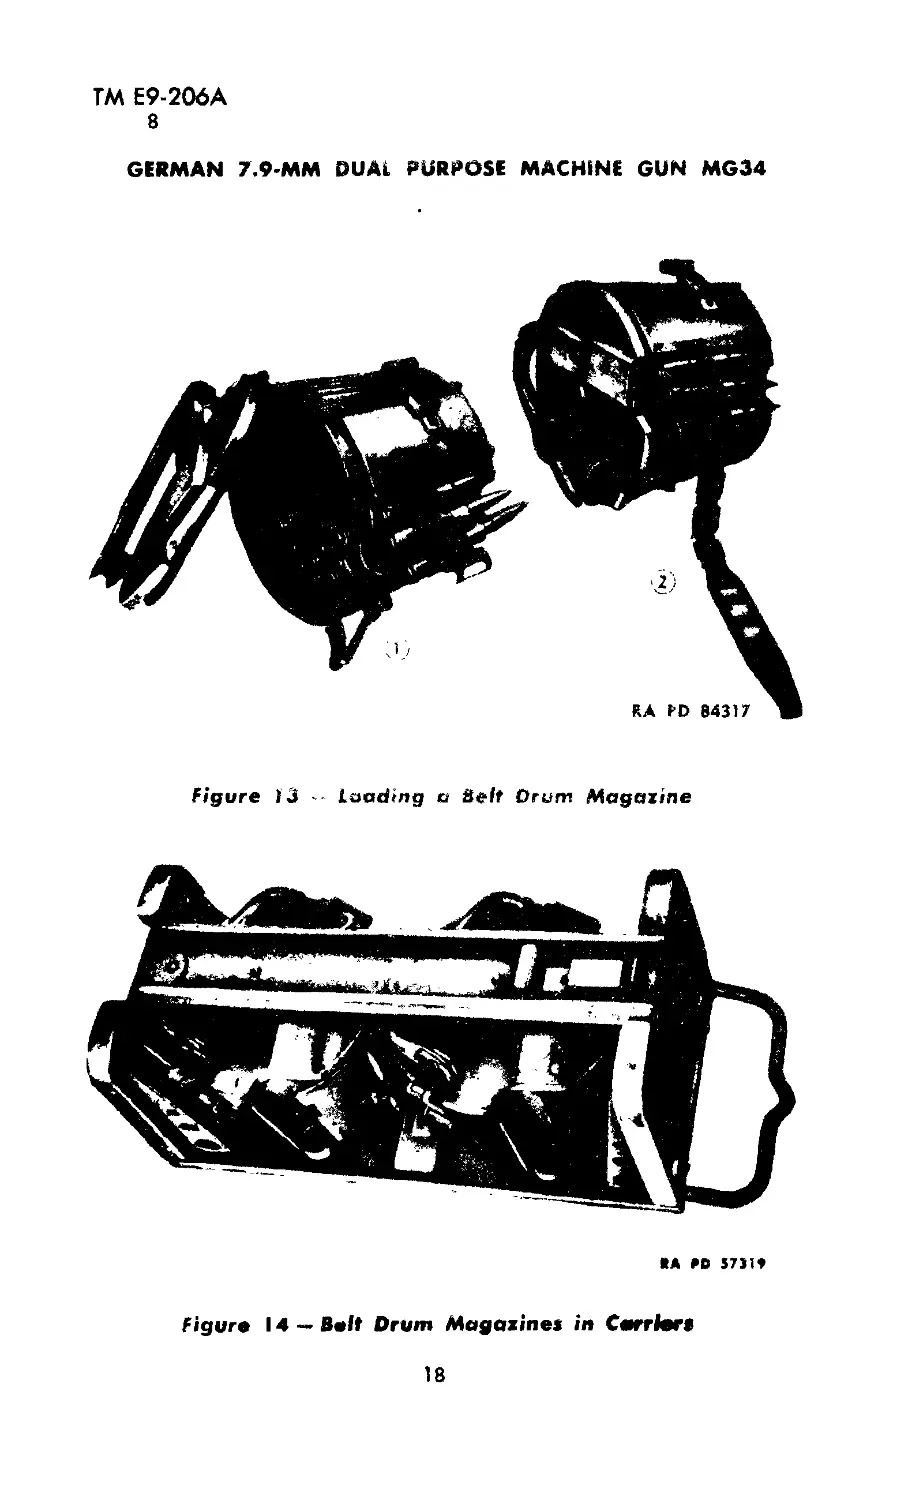
b. 50-round Belt Drum Magazine.
(1) Fill an extension belt and turn it over with tongues on bottom
and empty link to the right. Roll up the belt from the left end and
insert it into the belt drum magazine with the empty link on the
outside (® fig. 13).
(2) If the magazine is to be used immediately or within a short
time, fill a short leading belt and attach it (® fig. 13). If the maga-
zine is not to be used for some time, do not join a short leading belt.
Instead, close the magazine slide and the cover, to keep dust out.
(3) The magazines are transported in carriers shown in figure 14.
13
ТМ Е9-206А
7
GERMAN 7.9-MM DUAL PURPOSE MACHINE GUN MG34
НА ₽t> 57324
figure 9 — Raising Cradle of Tripod Mount
BA *0 57323
Figure 10 — Mounting the Machine Gun on the Tripod Mount
14
ТМ Е9-206А
7-8
OPERATION
с. Spring-operated 75-round Drum Magazine. Apply tension to
the magazine springs by turning the two tensioning ratchets on the
magazirie (fig. 27). Use an enemy tool (if available) or an impro-
vised todl. Then, place the magazine with the mouth up and insert
one round after another (fig. 15) until the magazine is filled.
8. LOADING THE MACHINE GUN.
a. General. Belt feed can be employed when the gun is mounted
on the bipod, antiaircraft tripod, tripod mount, or tripod mount attach-
ment. The 50-round belt drum magazine, and the 75-round spring-
operated drum magazine, can be employed when the gun is mounted
on the bipod, antiaircraft tripod, or tripod mount attachment, but not
on the tripod mount.
b. Loading the Machine Gun With the Belt.
(1) If the bolt is fully home (in most forward position), press the
safety lever (fig. 16), and move the safety forward to uncover the
letter “F” (fig. 17). If the bolt is retracted, grasp the cocking handle,
and, at the same time, pull the trigger, allowing the bolt to go slowly
home. Set the safety at FIRE (move it forward to uncover letter
“F”).
(2) Push the feed cover catch forward and open the feed cover
(fig. 18).
(3) Place the loaded belt on the feed block, so that the first round
is on the slot of the feed block, and the leading tab is to the right
(fig. 19).
(Text continued on page 21.)
15
Figure 11 — Loading and Joining of Extension Bolt and Leading Belt
Figure 12 — Leading and Joining of Extension Bolt and Short Leading Belt
OPERATION
5
m
Ю
oo ।
ГМ Е9-206А
8
GERMAN 7.9-MM DUAL PURPOSE MACHINE GUN MG34
Figure 13 -- Loading ю Belt Drum Magazine
*a so stm»
Figure 14 — Balt Drum Magazines in Carriere
18
ТМ Е9-206А
8
OPERATION
К* Ptl ЗТ11О
Figure 15 — Loading 75-round Magazine
«А PC 37141
Figure 16 — Adjustment of Safety
19
ТМ Е9-206А
8
GERMAN 7.9-ММ DUAL PURPOSE MACHINE GUN MG34
Figure 17 — Safety at Fire — Letter "F," Uncovered
Figure 18 — Opening Feed Cover
20
ТМ Е9-206А
8
OPERATION
Figure 19 — Positioning Belt on Feed Block
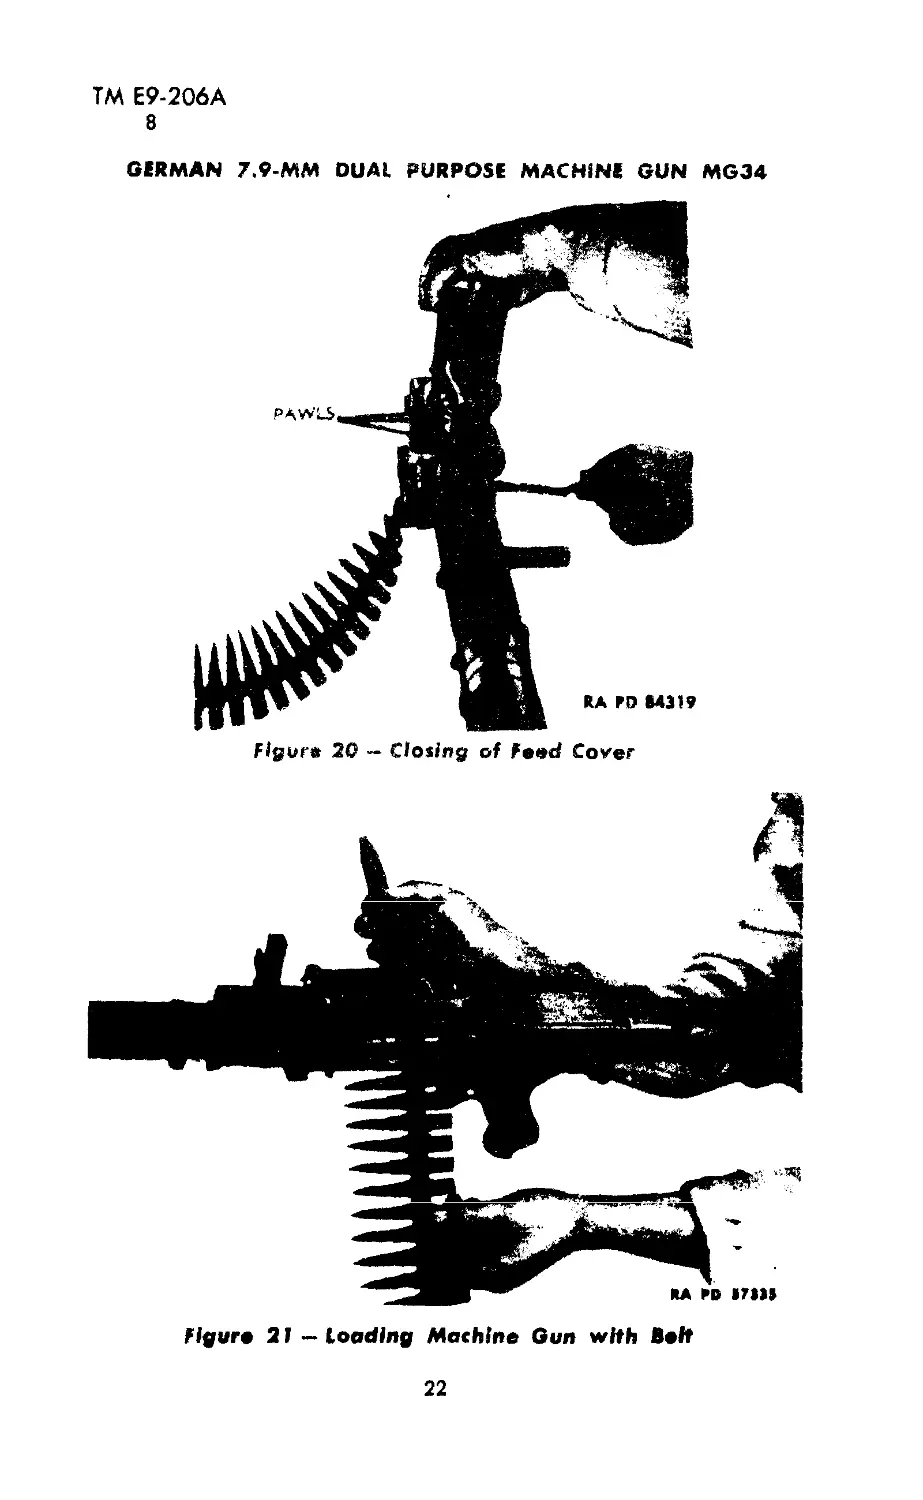
(4) Close the teed cover, making certain that the three pawls on
the underside of teed cover engage the first round (fig. 20), that is,
the three pawls are between the first and second rounds.
(5) After the operator has become proficient in loading the gun,
he may keep the feed cover closed while loading. In that case, make
certain the bolt is fully home and the safety at FIRE (letter “F”
uncovered). Then, insert the leading tab into the feed opening on the
left side of the gun, and pull it to the right until the three pawls on
the underside of the feed cover engage the first round (fig. 21).
NOTE: In case of right-hand feed, the leading tab is inserted into
the feed opening on the right side of the gun.
c. Loading the Machine Gun With a 50-round Belt Drum Maga-
zine. See that the bolt is fully home and the safety set at FIRE
(move safety forward to uncover letter "F,” (fig. 17)). Take a fully
loaded belt drum magazine (® fig. 13) and insert the leading tab into
the feed opening on the left side of the gun. Attach the magazine to
the front hook on the feed block (fig. 22), press the latch on the
magazine, and secure it to the rear hook on the feed block. Pull the
21
ТМ Е9-206А
8
GERMAN 7.9-ММ DUAL PURPOSE MACHINE GUN MG34
Figure 20 — Closing of Feed Cover
Figure 21 — Loading Machine Gun with Belt
22
ТМ Е9-206А
8-9
OPERATION
leading tab to the right until the three pawls on the underside of the
feed cover engage the first round.
d. Loading the Machine Gun With a 7.5-round Spring-operated
Drum Magazine.
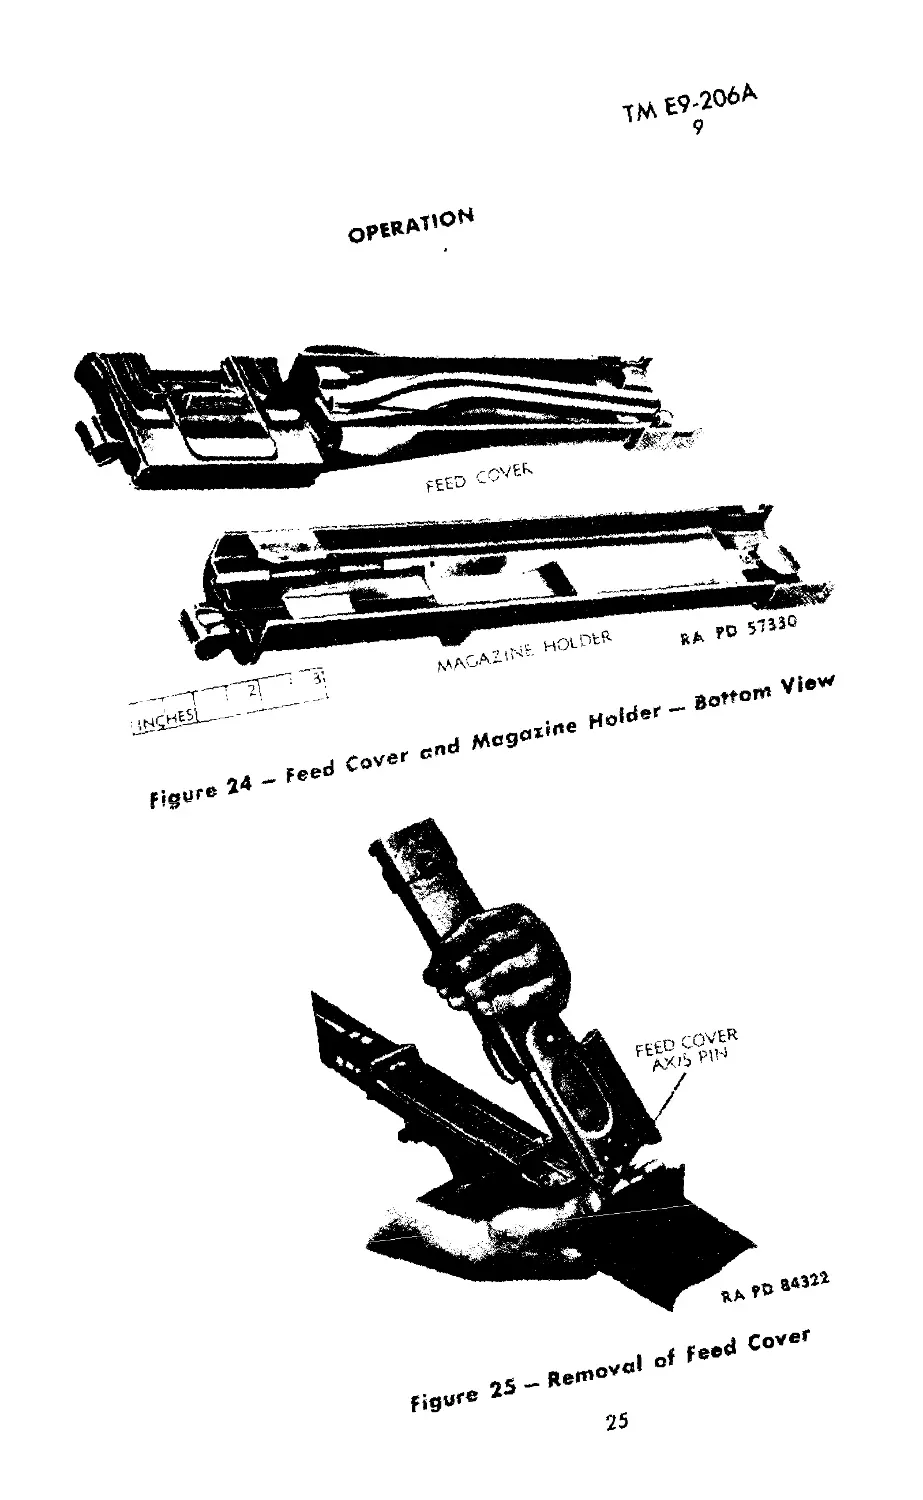
(1) To load the machine gun with the 75-round magazine, it is
necessary to remove the feed cover and feed block, and to replace
these with rhe magazine holder. To facilitate identification, the feed
cu'.’c: and. rr.agezme bolder ere compared in figures 23 and 24.
'2 > See that the bolt is fully home and the safety set at FIRE
(move- safety forward to uncover letter “F.” (fig. 17)). Push the feed
cover catch forward and raise the feed cover (fig. 18). Press the feed
cover axis pm to the left and remove the feed cover (fig. 25).
(3) Remove the feed block (fig. 26). Press the feed cover axis
pm to the left and replace with the magazine holder.
(4) Place e full 75-round magazine on the magazine holder, front
end down, and press it down until the latch on the holder snaps into
position (fig. 27).
9. FIRING THE MACHINE GUN.
a. General. Before carrying out the following instructions, make
certain that the machine gun has been loaded with a belt or magazine,
and the safetv set at FIRE (move safety forward to uncover letter
'F,” (fig. 17))
Figure 22 — Mounting Belt Drum Magazine
23
ТМ Е9-206А
9
GERMAN 7.9-MM DUAL PURPOSE MACHINE GUN MG34
I». f iring Gun on Bipod. Antiaircraft Tripod, or Tripod Mount
Attachment.
(1) With one hand, grasp the cocking handle in its most forward
position (fig. 28) and retract it until the bolt is cocked (fig. 29). Then
push the cocking handle forward as far as it will go (fig. 30).
(2) Single Fire. For single fire, pull the upper part of the trigger
marked with the letter "E'’ (fig. 17) and release it immediately. It
is necessary to pull the trigger for every shot to be fired. During lulls
in firing, the safety should be kept at SAFE. This is done by pressing
the safety lever (fig. 16) and moving the safety to the rear to uncover
the letter ' S'’ (fig. 31).
(3) Automatic Fire. For automatic fire, pull the lower part of
the trigger marked with the letter “D" (fig. 17). The machine gun
will deliver automatic fire as long as the trigger is pulled and ammu-
nition is being fed into the gun. Between bursts, set the safety at
SAFE (move it to the rear to uncover letter "S’’ (fig. 31)).
<. Firing the Gun on the Tripod Mount.
(1) Grasp the cocking handle in its most forward position (fig.
28) and retract it until the bolt is cocked (fig. 29). Then push the
cocking handle forward as far as it will go (fig. 30).
(2) Single Fire. For single fire, push up the trigger finger on the
mount (fig. 32). Then pull the bigger handle on the mount (fig. 33)
and release it. The handle must be pulled for each shot to be fired.
During lulls in firing, set the safety at SAFE (move it to rear to
uncover letter "S” (fig. 31)).
Figure 23 — Feed Cover and Magazine Holder — Top View
24
тм E9-206A
9
qPERM’°H
RA 5753°
HOLptP-
MACAZtb
ЯчШИг
, . gottorn View
Mogo*^ Ho,de
. 24 _ Feed Caver ^«9
figure 2“
figure
i «f Feed Cover
25 _ Removol of r
25
ТМ Е9-206А
9
GERMAN 7.9-ММ DUAL PURPOSE MACHINE GUN MG34
(3) Automatic Fire. Push the trigger finger on the mount down
(fig. 34), then pull the trigger handle. The machine gun will continue
to deliver automatic fire as long as the handle is pulled and ammuni-
tion is fed into the gun. Between bursts, set the safety at SAFE
(move it to rear to uncover letter “S” (fig. 31)).
(4) Elevation and Traverse.
(a) The front end of the cradle is carried on a swivel mounting at
the junction of the three tripod legs, while the rear end is supported
by the elevating gear. The front leg is telescopically adjustable, and
is provided with a clamping lever for fixing the telescopic parts after
they have been adjusted. A traversing arc, on which the elevating
gear is carried by a traversing slide, acts as a brace between the two
rear legs which are jointed, each joint being fitted with a clamping
wing nut. An adjustable center stay provided with a clamping lever
is connected between the traversing arc and the front leg.
RA RD I7SM
Figure 26 — Removal of Feed Block
26
ТМ Е9-206А
9
OPERATION
figure 27 — Mounting of 75- round Magazine
KA n 1ПН
figure 28 — Cocking Handle in Mort Forward Petition —
Bolt fully Home
27
ТМ Е9-206А
9
GERMAN 7.9-ММ DUAL PURPOSE MACHINE GUN MG34
Figure 30 — Cocking Handle in Forward Position — Gun Cocked
28
ТМ Е9-206А
9
OPERATION
figure 31 — Safety at Safe — Letter "S,“ Uncovered
Figure 32 — Adjustment of Trigger Finger for Single Fire
29
ТМ Е9-206А
9
GERMAN 7,9-ММ DUAL PURPOSE MACHINE GUN MG34
Я*. FO 57JJ7
Figure 33 ~ Firing at Machine Gun
RA Fb 57J2S
Figure 34 — Adjustment of Trigger Finger for Automatic Fire
30
ТМ Е9-206А
9
OPERATION
(b) Elevation is adjusted by a hand-wheel on the left of the elevat-
ing gear, while adjustments for line are made by shifting the traversing
slide along the traversing arc by means of a handle on the right, in
which an oil bottle is fitted. A wing nut is provided for clamping the
elevating gear and a clamping lever for locking the traversing slide.
Adjustable elevating and traversing stops are also provided to enable
the gun to be elevated and traversed between predetermined limits.
The traversing stops are arranged for the traversing arc, which is
graduated to facilitate adjustment of the stops (fig. 36).
(c) In front of the elevating gear is an automatic searching fire
device, operated by the recoil of the gun in the cradle, which causes a
projection on the cradle slide to strike a roller on the device. Actuated
in this manner, the device alternately elevates the cradle step by step,
and depresses it similarly each time a shot is fired. The limits of the
searching fire, and consequently the distance on the ground covered
by it, can be increased or reduced by means of a graduated setting
ring (fig. 36).
d. Metric and English Units.
(1) The divisions on the rear sight in meters and yards are shown
in figure 35
(2) The Overhead Firing Table and Table of Minimum Clearance
are shown in figure 36 (ranges given in meters) and in figure 37
(ranges given in yards).
Figure 35 — Rear Sight — Maters and Yards
31
ГМ Е9-206А
10
GERMAN 7.9-ММ DUAL PURPOSE MACHINE GUN MG34
10. UNLOADING THE MACHINE GUN.
a. Removal of Bell. Cock the gun and set the safety at SAFE
(fig. 31). Push the feed cover catch forward and raise the feed cover
(fig. 18). Lift out the belt. See that there is no round in the barrel.
Set the safety at FIRE. Grasp the cocking handle and pull the trig-
ger, allowing ihe bolt to go slowly home.
h. Removal of 50-round Belt Drum Magazine. Cock the gun
and set the saiety at SAFE (fig. 31 l Push the feed covet catch for-
ward and raise the feed cover (fig. 18). Lift out the belt and dis-
connect the magazine from the gun. See that there is no round in the
barrel. Set the safety at FIRE. Grasp the cocking handle and pull
the trigger, allowing the bolt to go slowly home.
Figure 36 — Overhead Firing Table and Table of Minimum
Clearance — Ranges in Meters
32
OVERHEAD FIRING TABLE
DISTANCE TO OWN TROOPS SAFETY DISTANCE TO OWN TROOPS SAFETY
DIVISIONS SIGHT DIVISIONS SIGHT
55 YARDS 6) 2250YARDS 1970 YARDS 66
80 49 2030 2080 73
110 39 1800 2190 81
140 35 1730 2300 90
165 31 1550 2400 99
190 29 1500 2520 109
220 27 1450 2620 119
250 23 1350 2730 131
280 23 1350 2840 143
330 2C 1250 2950 156
S 440 20 1250 3060 170
550 20 1250 3170 184 -
660 22 1300 3280 199
770 23 1350 3390 215
880 27 1450
990 29 1500 TABLE OF MINIMUM CLEARANCE
1100 21 1550
1200 35 1730 TARGET DEPTH DOUBLE DEPTH
1300 37 1750
1400 41 1860 1300YARDS 1 2
1500 44 1920 2190 2 4
1670 49 2030 2840 3 6
1750 55 2)30 3280 4 8
I860 60 3600 5 10
о
о
z
RA ГО 84325
Figure 37 — Overhead Firing Table and Table of Minimum Clearance — Ranges in Yards
S
ТМ Е9-206А
10
GERMAN 7.9-ММ DUAL PURPOSE MACHINE GUN MG34
Figure 39 — Unlocking and Rotating Receiver
c. Removal of 75-round Spring-operated Drum Magazine.
Cock the gun and set the safety at SAFE (fig. 31). Place the right
hand under the strap on the magazine, and remove the magazine by
pressing the hand against the strap and pushing with the fingers
against the latch on top of the magazine (fig. 38).
34
ТМ Е9-206А
10-11
OPERATION
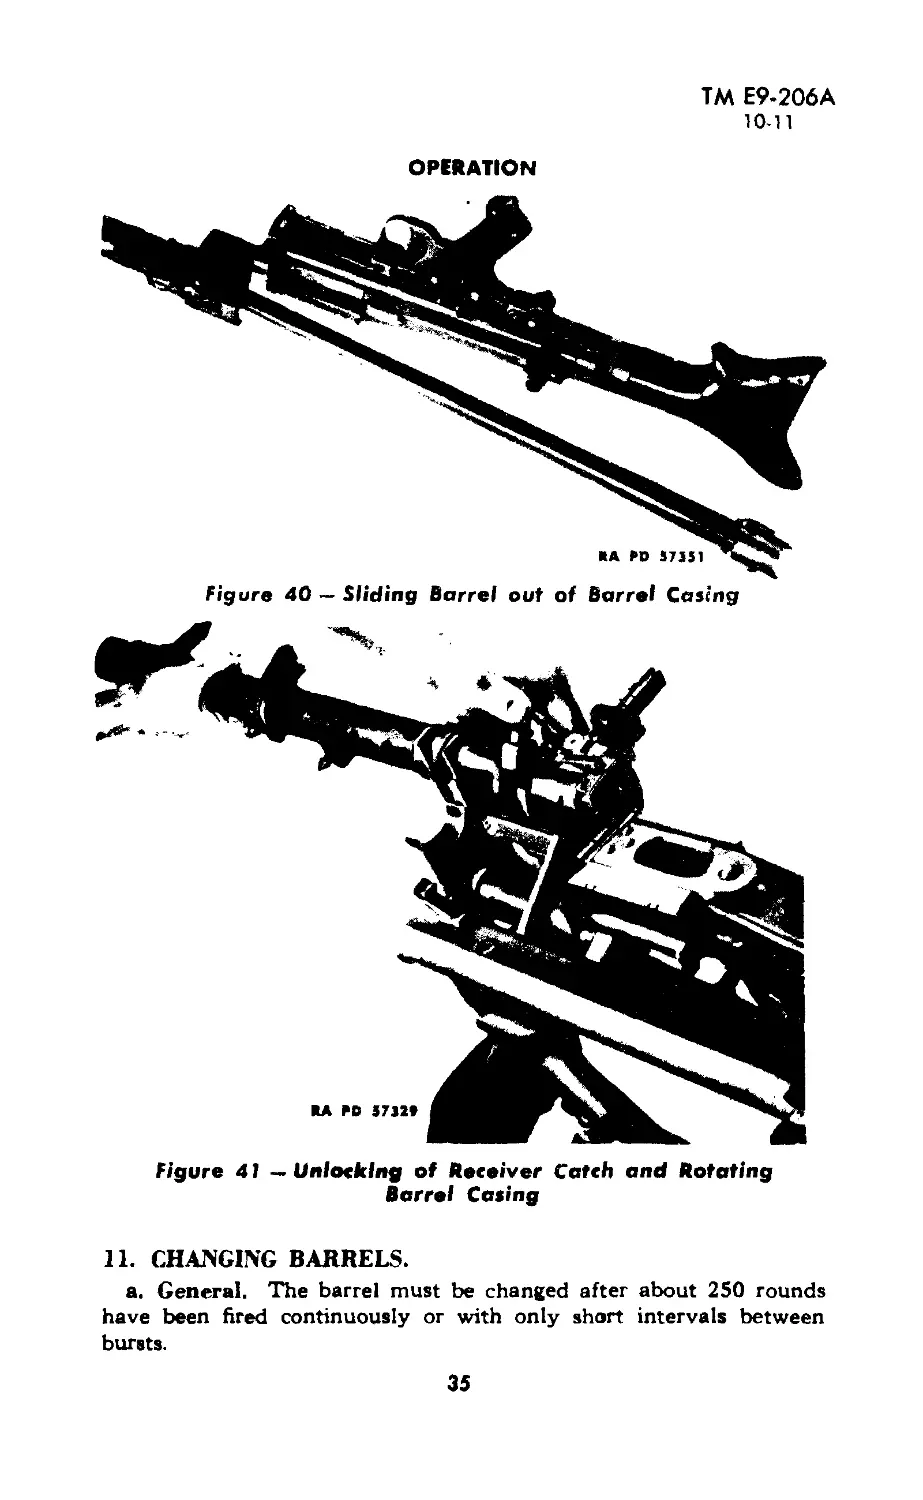
figure 40 — Sliding Barrel out of Barrel Casing
Figure 41 — Unlodtlng of Receiver Catch and Rotating
Barrel Casing
11. CHANGING BARRELS.
a. General. The barrel must be changed after about 250 rounds
have been fired continuously or with only short intervals between
bursts.
35
ТМ Е9-206А
11
GERMAN 7.9-ММ DUAL PURPOSE MACHINE GUN MG34
ЯА PD 57326
Figure 42 — Removing a Hot Barrel
b. ( hanging Barrels W hen Machine Gun Is Mounted on the Bi-
pod, Antiaircraft Tripod, or Tripod Mount ЛА Adapter.
(1) Unload the gun (par. 10). Cock the gun and set the safety
at SAFE. Depress the receiver catch and rotate the receiver nearly
180 degrees (fig. 39).
(2) Raise the muzzle end of the gun to allow the barrel to slide out
(fig. 40). Insert a fresh barrel and rotate the receiver until the
receiver catch snaps into position. Set safety at FIRE. Grasp the
cocking handle and pull the trigger, allowing the bolt to move slowly
home.
c. Changing Barrels Vi hen Machine Gun I» Mounted on Tripod
Mount.
(1) Unload the gun (par. 10). Cock the gun and set the safety
at SAFE. Depress the receiver catch by means of the cranked lever,
and rotate the barrel rasing nearly 180 degrees (fig. 41).
(2) Remove the hot barrel with the leading tab or any other con-
venient tool (fig. 42). Insert a fresh barrel and rotate the barrel cas-
ing until the receiver catch snaps into position. Set safety at FIRE.
Grasp the cocking handle and pull trigger, allowing bolt to move
slowly home.
36
ТМ Е9-206А
12
Section III
SIGHTING EQUIPMENT
Poragraph
Telescopic sight for the German 7.9-mm dual purpose machine
gun MG34.............................................. 12
12. TELESCOPIC SIGHT FOR THE GERMAN 7.9-MM DI AL
PI RPOSE M ACHINE Gl N MG3L
a. The telescopic sight (figs. 43 to 45) is used for aiming the
machine gun in either direct or indirect fire.
Figure 43 — Telescopic Sight Assembled on German 7.9~mm
Dual Purpose Machine Gun MG34
37
ГМ Е9-206А
12
GERMAN 7.9-ММ DUAL PURPOSE MACHINE GUN MG34
Figure 44 — Telescopic Sight for German 7.9-mm Dual Purpose
Machine Oun MG34 — Hear View
b. The sight consists essentially of a telescope which can be moved
in azimuth and elevation tn relation to the machine gun. The tele-
scope has a 3-power magnification and e field of view of 13 degrees
30 minutes. A graduated reticle pattern is seen superimposed on the
target image when looking through the eyepiece. The light window
near the eyepiece admits light for reticle illumination when the sight
is used at night. A removable eyeshield (not shown in the figures)
fits over the eyepiece; the eyeshield is removed to permit sighting
while wearing a gas mask.
c. The telescope is moved in azimuth (traversed) by turning the
azimuth knob. For rapid motion through large azimuth angles, the
telescope can be turned directly by holding the throw-out lever down.
Azimuth angles from 0 to 6400 mils are read on the azimuth scale
(coarse, 100-mil divisions) and azimuth micrometer (fine, 1-mil
divisions). The azimuth micrometer has two rows of graduations.
The inner row only is used for reading azimuth angles in indirect
fire; either row is used in setting in small deflection angles for
direct fire.
d. The telescope is moved in elevation by turning the elevating
knob. Elevation can be read either in meters for direct fire, or in
38
ТМ Е9-206А
12
SIGHTING EQUIPMENT
mils for indirect fire. When the shutter (figs. 43 and 44) is set to
“DIREKT" (direct), the elevation drum carrying the meter gradua-
tions is exposed. When the shutter is set to “INDIREKT” (indirect),
the elevation drum is covered and an index is brought into position
for reading the elevation micrometer. Elevation in mils is read on
the elevation scale (coarse, 100-mil divisions) and elevation microm-
eter (fine, 1-mil divisions). The 300-mil setting corresponds to zero
elevation. The elevation scale graduations read from 0 to 10 (0 to
1000 mils) for actual elevations of from minus 300 to plus 700 mils.
e. The collimator traverses with the telescope, but can be elevated
or depressed independently of the telescope When sighting into the
collimator, a cross is seen which remains stationary as though it were
at an infinite distance. Aiming is accomplished by lining this cross
up with the target. The principal use of the collimator is to establish
a safety point of minimum elevation for firing over a crest, or over the
heads of friendly troops.
Figuro 45 — Telescopic Sight for Gorman 7.9-mm Dual Purpose
Machine Gun MG34 — Front View
f. Operation, Direct Fire.
(1) Turn the shutter to “DIREKT’ (fig. 43), exposing the eleva-
tion drum. Set the required elevation for range, in meters, on the
39
ГМ Е9-206А
12-14
GERMAN 7.9-ММ DUAL PURPOSE MACHINE GUN MG34
elevation drum by turning the elevating knob. For conversion of
meters to yards, see figures 36 and 37.
(2) Set the azimuth scale and azimuth micrometer to ZERO.
Deflections up to 100 mils right or left can be set on the azimuth
micrometer.
(3) Keep the machine gun leveled laterally to eliminate error due
to cant. The machine gun is properly leveled when the cross-level
bubble is centered.
(4) Traverse and elevate the machine gun while looking through
the telescope eyepiece until the target is centered in the telescope
reticle.
g. Operation, Indirect Fire.
(1) Turn the shutter to “INDIREKT” (fig. 44), exposing the
elevation micrometer. Set the required elevation, in mils, on the
elevation scale and elevation micrometer. The required setting for
any given target will be the angle of site (in mils) plus the range
elevation (in mils) plus 300 mils. Range elevation in mils can be
read on the Overhead Firing Table (figs. 36 and 37).
(2) Set the azimuth scale and azimuth micrometer to the required
deflection.
(3) Keep the machine gun leveled laterally to eliminate error due
to cant. The machine gun is properly leveled when the cross-level
bubble is centered.
(4) Traverse the machine gun while looking through the telescope
eyepiece until the aiming point is centered in the telescope reticle.
Elevate the machine gun until the cross-level bubble is centered.
Section IV
MALFUNCTIONS AND CORRECTIONS
Paragreplt
General.............................................. 13
Immediate action .................................... 14
Malfunctions and corrections......................... 15
13. GENERAL.
a. This section is intended to provide necessary instructions in
immediate action, and malfunctions and corrections. These instruc-
tions should be studied before any firing is done by the individual.
14. IMMEDIATE ACTION.
a. Immediate action is the immediate and automatic application
of a remedy. It is to be applied immediately and automatically to a
gun that jams, or otherwise malfunctions, in actual or simulated com-
bat When a stoppage occurs during firing, perform the immediate
40
ТМ Е9-206А
14-15
MALFUNCTIONS AND CORRECTIONS
action described below, or such portions thereof as are required to
remedy the stoppage.
b. Failure of Gun to Fire. If the loaded gun fails to fire when
the trigger is squeezed, proceed immediately as follows:
(1) Wait 5 seconds before opening chamber.
(2 ) Cock the gun by a sharp, quick pull on the cocking handle.
(3) If the round is ejected, squeeze the trigger and fire.
(4) If the round is not ejected, set the safety at SAFE, and unload
the gun.
(5) Turn the gun over on its side and shake it to allow the round
to fall out. If the round does not fall out, remove it by pushing a
rod through the bore from the muzzle end, making certain that the
gun points in a safe direction.
(6) Load the gun and resume firing.
15. MALFUNCTIONS AND CORRECTIONS.
a. Proper care of the gun before, during, and after firing will usually
eliminate most stoppages. Stoppages or other malfunctions which
cannot be remedied by the application of immediate action should be
dealt with in accordance with instructions described in the following
paragraphs.
b. Feed Stoppage or Malfunction. It is dangerous to investigate
a feed stoppage or malfunctions by raising the feed cover without first
cocking the gun or retaining a hold on the cocking handle. Should a
live round remain in the chamber, the raising of the feed cover would
allow the bolt to continue forward to fire a round, thus causing dam-
age. Should a stoppage occur during firing, cock the gun and move
the safety to SAFE. Then, raise the cover and remove the magazine
or belt. If the gun cannot be cocked, apply a backward pull on the
cocking handle, at the same time raising the feed cover and unloading
the gun. The gun can then be cocked.
c. Failure to Fire.
(1) Causes. Failure to fire is generally caused by:
(a) Defective ammunition.
(b) Defective firing pin or firing pin spring.
(c) Bolt not fully closed.
(2) Remedies.
(a) If the primer of the round is deeply indented, the round is
defective and must be discarded.
(b) If the primer is not indented or only slightly indented, the
firing pin or firing pin spring may be worn or broken, or the bolt may
not have been fully home. Check for dirt or any other obstruction
on the bolt and receiver, and in breech end of barrel. Check for a
ruptured case in the chamber. Remove all obstructions.
41
ТМ Е9-206А
15
GERMAN 7.9-MM DUAL PURPOSE MACHINE GUN MG34
(c) If driving spring is too weak to drive the bolt fully home, turn
the gun over to ordnance personnel. If firing pin or firing pin spring
is worn or broken, turn the bolt over to ordnance personnel,
d. Failure to Feed.
(I) Causes. Failure to feed may be caused by:
(a) Defective magazine or defective belt.
(b) Insufficient recoil of bolt to pick up a new round.
(c) Broken feed piece on top of bolt.
(2) Remedies.
(a) If the magazine does not feed cartridges into gun because of
defective spring, follower, or mouth, it should be replaced.
(b) If belt does not feed cartridges into gun because it is deformed
or broken, it should be discarded.
(c) If cartridges are not fed into gun because feed piece is broken,
turn the bolt over to ordnance personnel.
(d) Insufficient recoil may be due to reduced blast boosting or to
obstruction in receiver. Adjust the blast booster the required number
of notches until sufficient recoil is obtained. Remove the receiver
from gun and eliminate the obstruction.
c. f'ciilul'c tO ExtrSCi*
(1) CAUSES. Failure to extract is generally caused by:
(a) Dirty chamber.
(b) Dirty ammunition.
(c) Broken extractor.
(2) Action.
(a) When failure to extract occurs, the bolt may be found fully
home with a spent case in the chamber. Generally, most failures to
extract can be remedied by pulling the cocking handle smartly to the
rear. If this does not remove the case, use a cleaning rod.
(b) Sometimes the empty case will be left in the chamber, the
extractor ripping through the base of the cartridge. When this occurs,
the bolt generally will attempt to feed a fresh cartridge into the
chamber. It will then be necessary to remove this round before the
spent case can be removed.
(c) Where a dirty chamber or dirty ammunition is indicated, clean
the chamber and discard or clean the dirty ammunition. The presence
of even invisible particles of dust or sand in the chamber or on ammu-
nition will cause failure to extract. It is advisable to oil the belt with
paraffin wax if cartridges are to be left in it for more than a short
period. A belt once oiled can be used 10 times before oiling again.
f. Gun Fires Double or Triple Shots When Semiautomatic Trig-
ger Is Pulled. The principal cause of this trouble is a recoil of the
bolt sufficient to feed the succeeding round, but not enough to engage
the sear. Adjust the blast booster the required number of notches to
give the proper recoil.
42
ТМ Е9-206А
16
Section V
DISASSEMBLY AND ASSEMBLY
Paragraph
General ................................................ 16
Disassembly .......................................... 17
Assembly................................................ 18
16. GENERAL.
a. Before performing the following operations, make certain that
the gun has been unloaded and removed from the mount. The using
arms is permitted to perform only such disassembly and assembly
operations as are given below. All other disassembly and assembly
operations must be performed by ordnance maintenance personnel.
Figure 46 — German 7.9-mm Dual Purpote Machine Gun MG34 —
Removal of Butt
Figure 47 — Unlocking Buffer
43
ТМ Е9-206А
16-17
GERMAN 7.9-ММ DUAL PURPOSE MACHINE GUN MG34
Figure 49 — Removal of Bolt
17. DISASSEMBLY.
a. Butt Stock. Press the butt catch below the butt, rotate the butt
one quarter of a turn and remove it (fig. 46).
b. Feed Cover and Feed Block. Before proceeding, make certain
the bolt is forward and fully home. Then press the feed cover catch
forward and raise the cover (fig. 18). Press the feed cover axis pin
to the left and remove the feed cover (fig. 25). Raise the feed block
and remove it (fig. 26).
44
DISASSEMBLY AND ASSEMBLY
TM E9-206A
17
Figure 50 — Removal of Corking Handle
Figure 51 — Removal of Barrel
45
ТМ Е9-206А
17
GERMAN 7.9-MM DUAL PURPOSE MACHINE GUN MG34
RA 1*0 S4JJ7
Figure 52 — Removal of Barrel Casing From Receiver
Figure 53 — Removal of Blast Trap and Flash Eliminator
c. Buffer Housing. Press the buffer housing catch beneath the
rear end of the receiver, rotate the buffer housing one quarter turn
counterclockwise (fig. 47) and remove the housing (fig. 48), taking
care not to let the spring fly out.
<1. Bolt and Cocking Handle.
(1) Pull the cocking handle to the rear and remove the bolt from
the receiver (fig. 49).
(2) Press the buffer housing catch and remove the cocking handle
(fig. 50).
e. Removal of Barrel. Depress the receiver catch (fig. 39), rotate
the body about 180 degrees, and remove the barrel (fig. 51).
46
ТМ Е9-206А
17 18
DISASSEMBLY AND ASSEMBLY
Figure 54 — Removal of Trigger Housing Group
f. Removal of Barrel Casing. Depress the receiver locking pin
catch and remove the barrel casing from the receiver (fig. 52).
g. Flash Eliminator and Blast Trap. Raise the front end of the
flash eliminator catch and with an open wrench (or by hand) and
unscrew the flash eliminator together with blast trap (fig. 53). The
threads are right-hand.
h. Trigger Housing. With a drift or any suitable tool, drive out
the split pins (fig. 54) and then, the split pin retainers. Remove the
trigger housing from the receiver. The trigger housing should not be
removed unless absolutely necessary.
i. The chief components of the machine gun are shown in figure 55.
18. ASSEMBLY.
a. Prior to assembly, all groups must be free of dirt, rust, and other
extraneous matter. Metal parts in contact must be covered with a
light film of OIL, lubricating, preservative, light. Assembly is in the
reverse order of disassembly. However, the following instructions
pertaining to certain assembly operations should be noted:
(1) See that there is no round in the barrel.
(2) When inserting the bolt into the body, push the ejector fully
forward and pull the trigger to allow bolt to be moved forward.
47
,.EEED COVER
Figure 55 — Chief Components of the Machine Gun
GERMAN 7.9-MM DUAL PURPOSE MACHINE GUN MG34
ТМ Е9-206А
19-21
Section VI
CARE AND PRESERVATION
Paragraph
General................................................... 19
Cleaning of machine gun received from storage............. 20
Care in garrison and camp............................... 21
Care preparatory to firing................................ 22
Care on the range and in the field........................ 23
Care after firing......................................... 24
Preparation for storage................................... 25
19. GENERAL.
a. Proper functioning and accuracy of firing depend largely on
care, cleaning, and oiling. The weapon should be checked daily for
cleanliness and lubrication in garrison or camp, on the range, and in
the field. The following instructions should be carefully observed.
20. CLEANING OF MACHINE GUN RECEIVED FROM STOR-
AGE.
a. Machine guns and mounts which have been stored in accordance
with instructions given in paragraph 25, will be coated with either
OIL, lubricating, preservative, light, or COMPOUND, rust-preventive,
light. Machine guns received from storage will usually be coated
with a heavy, rust-preventive compound. Use SOLVENT, dry-
cleaning, to remove all traces of the compound. Apply the solvent
with rag swabs to large parts, and as a bath for small parts. Take care
to remove the compound from all recesses in which springs or plungers
operate. After removing all traces of the compound, allow the parts
to dry, and then wipe with a clean, dry rag.
b. Persons handling parts after such cleaning should wear gloves
to avoid leaving finger marks which are acid and usually start corro-
sion. SOLVENT, dry-cleaning, will attack and discolor rubber gloves.
21. CARE IN GARRISON AND CAMP.
a. Care and cleaning in garrison and camp include care of the
machine gun necessary to preserve its appearance and condition dur-
ing periods when no firing is being done. Machine guns in the hands
of troops should be inspected daily for proper condition and
cleanliness.
b. Bore.
(1) Remove the barrel.
(2) Assemble a cloth patch to a cleaning rod and insert the rod
into the bore through the breech end. Run the patch back and forth
several times through the entire length of the bore and chamber.
Repeat with several patches until the patch comes out clean.
(3) Impregnate a patch with OIL, lubricating, preservative, light.
Run the patch through the bore several times.
49
ТМ Е9-206А
21-23
GERMAN 7.9-ММ DUAL PURPOSE MACHINE GUN MG34
c. Wood and Metal Surface». • Use a small cleaning brush to
clean screwheads and crevices. With a clean dry cloth, remove all
moisture, perspiration, and dirt from metal surfaces, and then wipe
with a cloth slightly oiled with OIL, lubricating, preservative, light.
This protective oil film should be maintained at all times. To clean
the outer wood surfaces, wipe with a cloth lightly oiled with OIL,
lubricating, preservative, light. Then clean with a soft dry cloth.
d. After cleaning and protecting the machine gun as described
above, place it in the gun rack. Muzzle covers, gun covers, plugs, and
rack covers should not be used because they collect moisture and
promote rusting. However, when the squad rooms are being swept,
it is permissible to cover the gun racks in order to protect the machine
gun from dust. As soon as the rooms have been swept, the rack covers
must be removed.
22. CARE PREPARATORY TO FIRING.
a. Before firing, the following instructions should be carefully
observed in order to assure proper functioning of the machine gun.
b. Disassemble the gun into its main groups (fig. 55).
c. Run clean patches through the bore and chamber to remove all
dirt and oil.
d. Thoroughly clean all metal parts and lightly oil with OIL,
lubricating, preservative, light.
CAUTION: Do not oil the bore and chamber before firing because
dangerous pressures may develop.
e. Lubricate the following with a drop of oil from an oiler.
(1) Ejector groove on bolt.
(2) Plunger at rear of extractor.
(3) Underside of firing pin catch on bolt.
(4) Firing pin locking nut at rear of bolt.
(5) Crevices around feed piece.
(6) Underside of the 3 belt feed pawls.
(7) Safety lever.
(8) Groove for cocking handle on receiver.
f. Lubricant should be applied lightly because oil has a tendency
to collect dirt which may act as an abrasive on the operating parts.
g. After the machine gun groups have been cleaned and oiled as
described above, assemble the gun and wipe all outer surfaces with a
lightly oiled rag.
23. CARE ON THE RANGE AND IN THE FIELD.
a. The machine gun must be kept free from dirt and well lubricated
to obtain proper efficiency during firing. The following instructions
should be carefully observed.
50
ТМ Е9-206А
23-25
CARE AND PRESERVATION
b. Before Firing.
(1) See that the bore is free from dust, dirt, mud, or snow.
(2) See that the chamber is clean and free from oil.
(3) Test the trigger mechanisms at SAFE and FIRE.
(4) Work the bolt back and forth to see that it is clean and well
oiled, and that it works freely.
(5) Examine the belts and magazines to see that they are free from
dirt and properly loaded. Discard defective belts and magazines.
c. During Firing. In general, it should not be necessary to dis-
assemble the machine gun in the field for cleaning. However, if the
mechanism becomes very dirty or functions sluggishly, disassemble
the gun into its groups (fig. 55), and clean as instructed in para-
graph 22.
24. CARE AFTER FIRING.
a. The weapon should be cleaned after each session of firing and
not later than the evening of the day on which it was fired.
b. Immediately after firing or as soon as possible, remove the
barrel and run several wet patches impregnated with CLEANER,
rifle bore, through the bore. If CLEANER, rifle bore, is not available,
use warm soapy water or warm water alone or in the absence of these,
cold water. Remove the patch from the cleaning rod and attach a
cleaning brush. Run the brush through the bore several times. Make
certain the brush goes all the way through the bore before reversing
the direction. Remove the brush and run several patches wet with
clean water through the bore and chamber again. Follow this with
dry patches until they come out clean and dry. Finally, run a patch
impregnated with OIL, lubricating, preservative, light, through the
bore and chamber.
c. After the bore and chamber have been cleaned, disassemble the
gun (fig. 55). Clean all the metal parts with a clean dry rag, then
wipe with a lightly oiled rag before assembling. After assembling,
wipe the exterior surface with a rag lightly oiled with OIL, lubricating,
preservative, light.
25. PREPARATION FOR STORAGE.
a. OIL, lubricating, preservative, light, is the most satisfactory oil
for preserving the mechanism of machine guns. This oil is satisfac-
tory for preserving the polished surfaces, bore, and chamber for from
2 to 6 weeks, depending on climatic and storage conditions. Machine
guns in short term storage should be inspected every 5 days. If nec-
essary, the preservative film should be renewed.
b. COMPOUND, rust-preventive, light, is satisfactory for preserv-
ing polished surfaces, bore, and chamber for a period of up to one year,
depending on climatic and storage conditions.
51
ТМ Е9-206А
25
GERMAN 7.9-MM DUAL PURPOSE MACHINE GUN MG34
c. Thoroughly clean ail parts of the mechanism and the exterior of
the weapon with SOLVENT, dry-cleaning. Dry with clean rags.
After drying a metal part, do not touch with the bare hands. Then
coat all metal parts with either OIL, lubricating, preservative, light,
or COMPOUND, rust-preventive, light, depending on the probable
length of storage. The bore is best coated with rust-preventive com-
pound by dipping a cleaning brush in the compound and then running
the brush through the bore two or three times. Then see that the bolt
is fully home, and, handling the weapon by the butt and siing loop
only, place it in the packing chest.
Section VII
AMMUNITION
Paragraph
General........................................................ 26
Classification ................................................ 27
Identification ................................................ 28
Authorized cartridges ........................................ 29
Tropical ammunition ....................................... . 30
Interchangeability of ammunition............................... 31
Precautions in handling captured ammunition.................... 32
Care, handling, and preservation............................. 33
Field report of accidents...................................... 34
---------3 1 APPROX.-----------------
7.9-MM ARMOR-PIERCING CARTRIDGE 'GERMAN:
CARTRIDGE. BALL CAL .30. М2 (U.S.)
RA RD 6)187
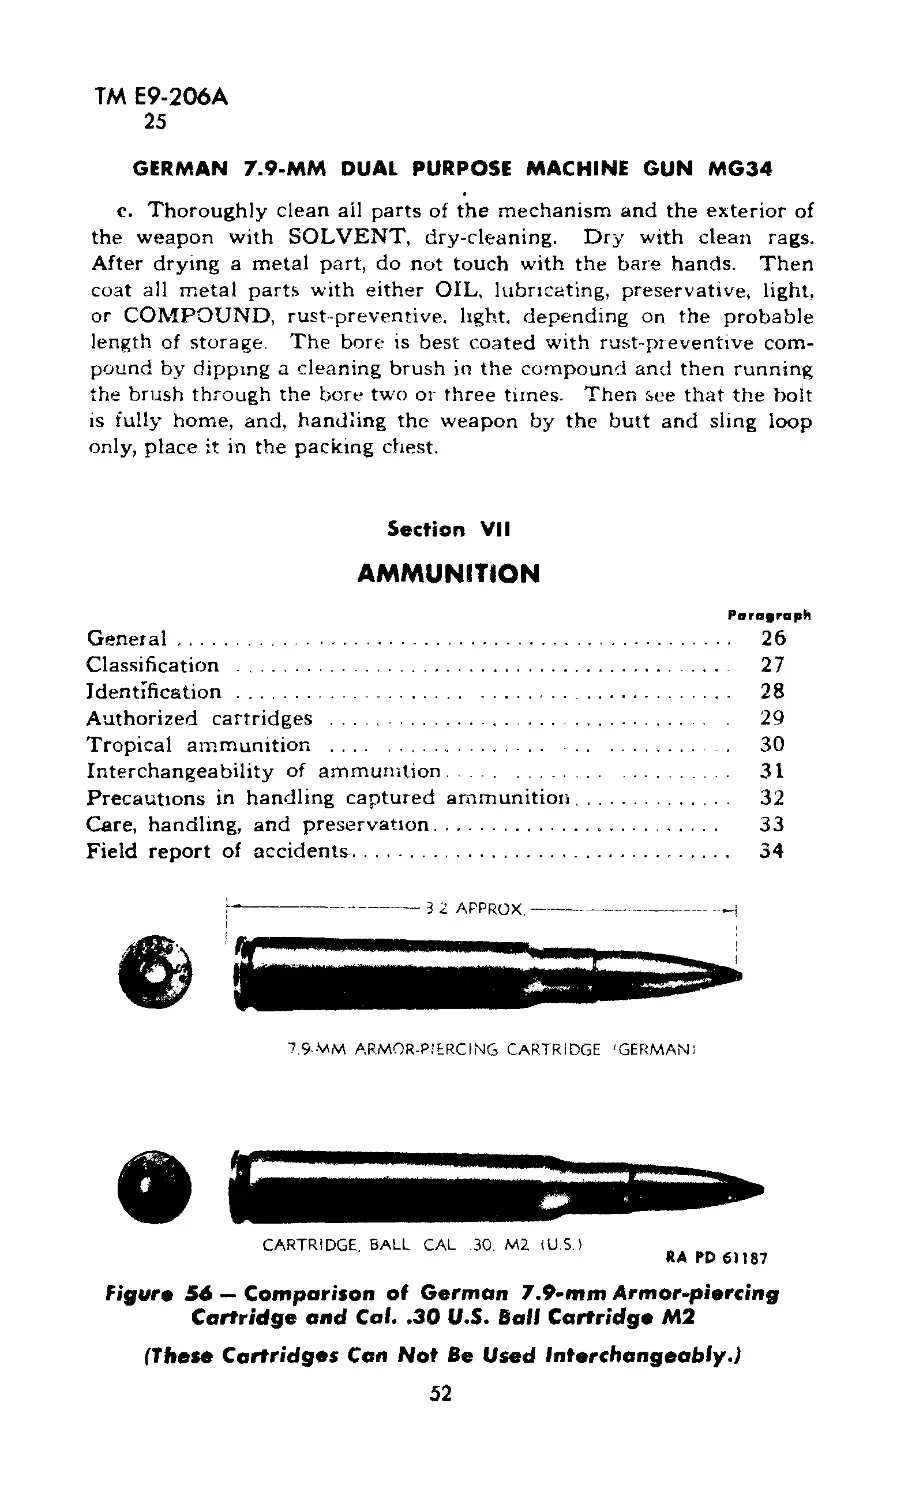
Figure 56 — Comparison of German 7.9-mm Armor-piercing
Cartridge and Cal. .30 U.S. Ball Cartridge М2
(These Cartridges Can Not Be Used Interchangeably.)
52
ТМ Е9-206А
26-28
AMMUNITION
26. GENERAL.
a. The standard small-arms ammunition for use in German rifles,
carbines, and machine guns is known as Patrone s.S. (Patr. s.S.). This
is usually referred to as 7.9-mm caliber ammunition but is more
accurately 7.92-mm caliber. The 7.9-mm German ammunition is
similar in appearance to, but is not interchangeable with, U.S. cal. .30
ammunition, as shown in figure 56. As encountered in the* field,
7.9-mm ammunition may be packed in cartons, in magazine clips, and
in machine gun belts in ammunition carriers and boxes (figs. 57, 58,
and 59). Cartridges primarily for use in machine guns are packed in
cartons and loaded into machine gun belts (equipment with the
weapon) in the field.
27. CLASSIFICATION.
a. General. Patrone s.S. (Patrone schweres Spitzgeschoss) is the
standard 7.9-mm service cartridge, whereas Patrone l.S. (Patrone
leichtes Spitzgeschoss) is reported to be reserved for practice firing
against air targets.
b. Service Ammunition. The main types of 7.9-mm service am-
munition are as follows:
Type German Abbreviated Designation
Armor-piercing .................Patr. S.m.K.
Armor-piercing-tracer ..........Patr. S.mJC.L’spur
Armor-piercing-incendiary ......Patr. P.m.K.
Ball ...........................Patr. s.S.
Semi-armor-piercing ............Patr. S.m.E.
Super-armor-piercing ...........Patr. S.m.K.H.
c. Practice ammunition may be classified as follows:
Type German Abbreviated Designation
Ball ...........................Patr. l.S.
Ball tracer ....................Patr. l.S.L’spur
Observation (or H.E. incendiary) . . B-Patr.
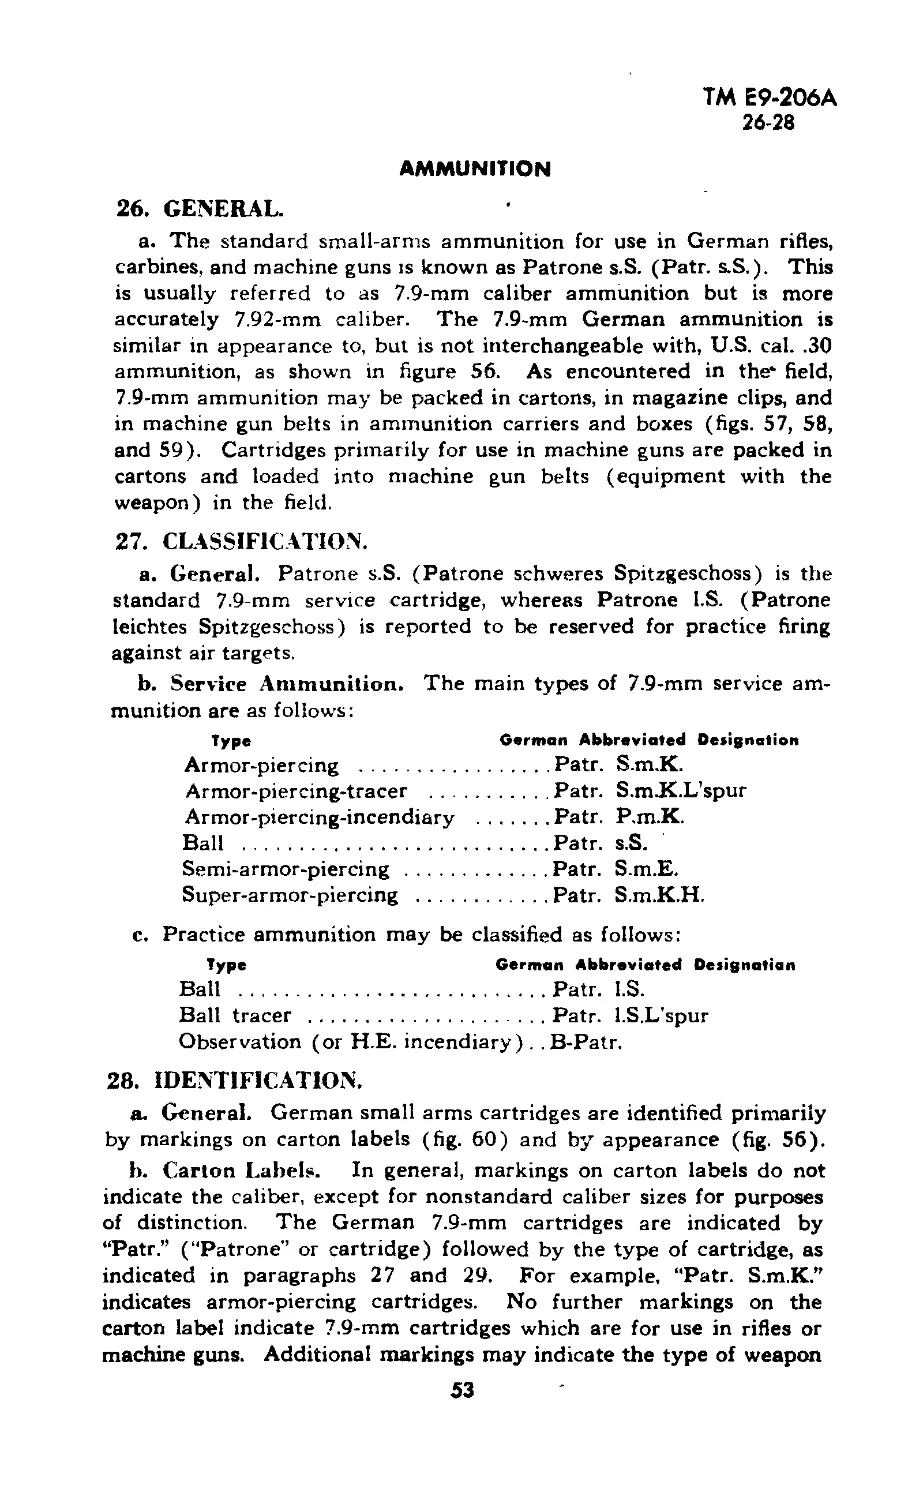
28. IDENTIFICATION.
a. General. German small arms cartridges are identified primarily
by markings on carton labels (fig. 60) and by appearance (fig. 56).
b. Carton Labels. In general, markings on carton labels do not
indicate the caliber, except for nonstandard caliber sizes for purposes
of distinction. The German 7.9-mm cartridges are indicated by
“Patr.” (“Patrone” or cartridge) followed by the type of cartridge, as
indicated in paragraphs 27 and 29. For example, “Patr. S.m.K.”
indicates armor-piercing cartridges. No further markings on the
carton label indicate 7.9-mm cartridges which are for use in rifles or
machine guns. Additional markings may indicate the type of weapon
53
ТМ Е9-206А
28
GERMAN 7.9-MM DUAL PURPOSE MACHINE GUN MG34
Figure 57 — Ammunition Carrier Showing Ammunition and Belt
54
AMMUNITION
TM E9-206A
28
Figure 58 — Ammunition Carrier and Ammunition Box
55
ТМ Е9-206А
28
GERMAN 7.9-ММ DUAL PURPOSE MACHINE GUN MG34
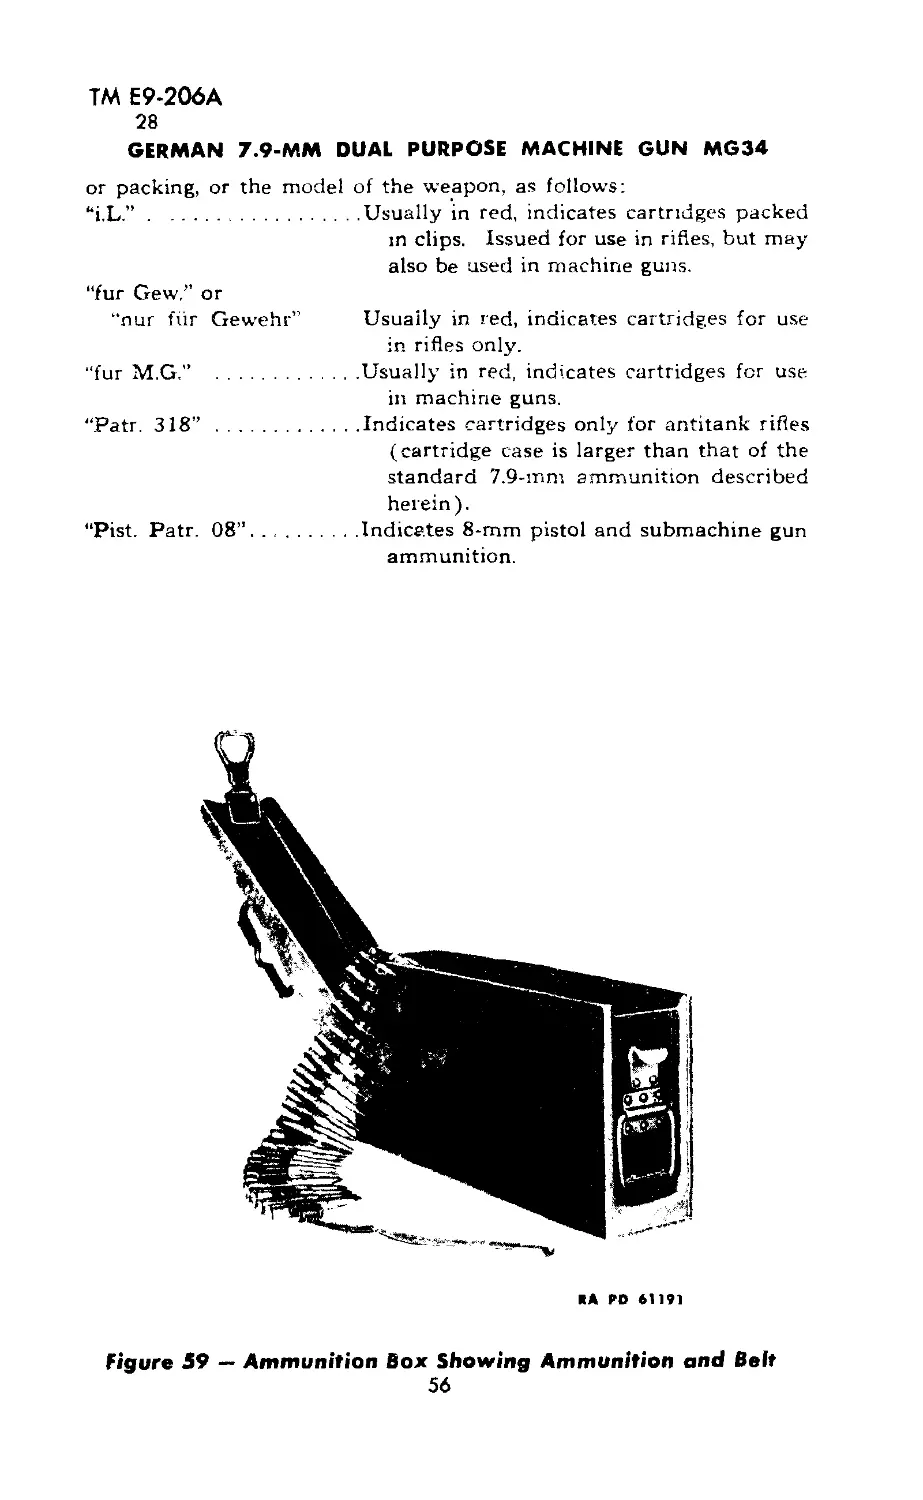
or packing, or the model of the weapon, as follows:
“i.L.”.................Usually in red, indicates cartridges packed
in clips. Issued for use in rifles, but may
also be used in machine guns.
“fur Gew.’’ or
“nur fiir Gewehr” Usually in red, indicates cartridges for use
in rifles only.
“fur M.G.” .................Usually in red, indicates cartridges for use
in machine guns.
"Patr. 318” ..............Indicates cartridges only for antitank rifles
(cartridge case is larger than that of the
standard 7.9-mm ammunition described
herein).
“Pist. Patr. 08”..........Indicates 8-mm pistol and submachine gun
ammunition.
RA PD «1191
Figure 59 - Ammunition Box Showing Ammunition and Belt
56
ТМ Е9-206А
28
AMMUNITION
BOX LABEL
DIMENSIONS: 10J X 7S co».
Label color: White, with black border and
printing.
1500 rounds Patronen schweres Spitzgeschoss.
(1500 CARTRIDGES with heavy pointed bullets) 411*2
figure 60 — Label on Packing Containers of German 7.9- mm
Cartridges
c. Typical Carton Label Marking. Typical markings and their
English equivalents are shown in Table I.
TABU I
TYPICAL LABEL MARKING ON CARTONS OP
GERMAN CARTRIDGES
Gorman Marking Engtiih Equivalent
1500 Patronen S.mJC L’spur
(gelb)
P. 69. 10.L. 39.
Nz. Gew. Bl. P. (2. 2. 0,45)
Rdf. 47. L. 1935
Patrh: S* P. 69 13L. 39
Gesch: P. 69 13.L. 39-Geschoss-
teile: P. 69
Satz: P. 69-zdh. 88: D.W.M.
774a. L. 39
Troken aufbewahren. Gegen
Stoss u. Fall zu schutze.
NOTE: S* indicates alloy of 72
“S” would indicate steel.
1500 cartridges, A.P. tracer (yel-
low)
Lot number, 10th delivery, 1939
Rifle powder, NC flaked (size of
grains)
Place of manufacture, 47th de-
livery, 1935
Brass cartridge case, S*, lot Na,
13th delivery 1939 Polte Mfg.
Bullet: lot No., 13th delivery,
1939
Composition (tracer): Lot No.
Cap 88: ?? delivery, 1939
Keep dry. Protect from blows.
% copper and 28% zinc. “St” or
57
ТМЕ9-206А
28
GERMAN 7.9-MM DUAL PURPOSE MACHINE GUN MG34
d. Markings on Cartridges. Cartridges removed from their pack-
ings may be identified by appearance and markings. Typical mark-
ings on the base (fig. 56) are listed in Table II. Identifying color
markings indicating type of cartridge are listed in Table III. For
marking to indicate tropical ammunition, see paragraph 30.
TABU II
TYPICAL MASKINGS ON BAM OF GERMAN CARTRIDGES
Garman Marking Englitli Equivalent
P 249 .............................Manufacturer’s initial (Polte) and
identification.
S*, S or St........................S* (alloy of 72% copper and
28% zinc), S or St (steel)
46................................Delivery, 46th
35................................Year of manufacture, 1935
TABU III
COLOR MARKINGS INDICATING TYPE Of GERMAN CARTRIDGES
Color of Primer Beat
or Bow Band Color on Ballot Type
Green base band........None.............Light practice ball (Patr.
LS.)
Green..................None.............Heavy ball (Patr. s.S.)
Red ...................None.............Armor-piercing (Patr.
S.m.K.)
Red ...................Black tip.....Armor-piercing-tracer
(Patr. S.mJL L’spur)
Black or red or
red base band..........None.............Armor-piercing-incendiary
(Patr. P.m.K.)
Black..................Chromium-
plated tip or
all black ex-
cept tip......Observation (B-Patr.),
HE-incendiary
Red annulus............Black ..........)_
l ог ! Super-armor-piercing
Red primer.............None............i (Patr.S.mJCH.)
58
ТМ Е9-206А
28
AMMUNITION
е. Abbreviations,
ТАШ tv
GERMAN ABBREVIATIONS
В...................Beobachtung ...........Observation
В...................Buchse ................Shotgun, gun» rifle
Bd. G...............Brandgeschoss .........Incendiary bullet
Beob................Beobachtung ...........Observation
Bl. P...............Blattchanpulver .......Flaked gunpowder
B-Patr..............Beobachtungsgeschoss
Patrone.............Observation cartridge
Ex. Patr............Exerzierpatrone .......Dummy cartridge
f. .................fur.................For
Fib................ Flugbahn ..............Trajectory
fiir Gew............fiir Gewehr ...........For rifle
fiir M.G............fiir Maschinegewehr .. . For machine gun
G.............. ... Geschutz ............Gun
G...................Gewehr ................Rifle
Gesch...............Geschoss ..............Projectile, bullet
Gew.................Gewehr . ..............Rifle
H.................... . Gehartet ..........Hardened
i.L.................in Ladestreifen .......In rifle clip
К...................Kern; Stahlkern .......Core; steel core
Kai.................Kaliber ...............Caliber, gage
Karab...............Karabiner .............Carbine
1...................leicht ................Light
L...................Ladestreifen ..........Rifle clip
L...................Lieferung .............Delivery
L...................Lieferungsnummer .... Delivery number
l.M.G...............leichtes Maschinegewehr Light machine gun
L’spur .............Leuchtspur ............Tracer
m...................mit ...................With
m.E.................mit Eisenkern .........With iron core (or soft steel core)
M.G.................Maschinegewehr Machine gun
Mun.................Munition................Ammunition
Nz..................Nitrozellulose......Nitrocellulose
P...................Phosphor .............. Phosphorus
Patrh...............Patronenhiilse......Cartridge case
Patr. l.S...........Patrone leichte.....Spitzge-
schoss ................................. Cartridge with light, pointed bullet
Patr. l.S.L’spur ...Patrone leichte Spitzge-
schoss mit Leuchtspur Cartridge with light, pointed bullet
with tracer
Patr. P.m.K.........Patrone Phosphor mit
Stahlkern ........ Cartridge with phosphorus with
steel core
Patr. S.m.E.........Patrone Spitzgeschoss mit
Eisenkern ...........Cartridge with pointed bullet with
iron core
Patr. S.m.K.........Patrone Spitzgeschoss mit
Stahlkern ...........Cartridge with pointed bullet with
steel core
59
ТМ Е9-206А
28-29
GERMAN 7.9-MM DUAL PURPOSE MACHINE GUN MG34
Patr. S.m.K.H.......Patrone Spitzgeschoss mit
Stahlkern Gehartet . Cartridge with pointed bullet with
hardened steel core
Patr. Sun.K.L’spur .. Patrone Spitzgeschoss mit
Stahlkern und Leucht-
spur ......................................Cartridge with painted bullet with
steel core and tracer
Patr. s.S...........Patrone schwer Spitzge-
schoss..............Cartridge with heavy pointed bullet
Patr. T.............Patronentasche ........Cartridge pouch
Ph..................Phosphor ..............Phosphorus
Pist. Patr..........Pistolen Patrone ......Pistol cartridge
P.K.................Pulverkasten ..........Ammunition box
Pl. Patr............Platzpatrone ..........Blank cartridge
Pr..................Phosphor ..............Phosphorus
Pr-Geschoss ........Phosphorgeschoss ......Phosphorus bullet
P.T.................Pulvertemperatur ......Ammunition temperature
S...................Spitzgeschoss .........Pointed bullet
S. or s.............schwer ................Heavy
schw................schwer ................Heavy
S-Gesch.............Spitzgeschoss .........Pointed bullet
S.m.K...............Spitzgeschoss mit Stahl-
kern ................Pointed bulet with steel core
S.m.K.H.............Spitzgeschoss mit......Stahl-
kern Gehartet ............................. Pointed bullet with hardened steel
core
Sun.K.L’spur .......Spitzgeschoss mit Stahl-
kern und Leuchtspur Pointed bullet with steel core and
tracer
St. ................Stahl .................Steel
Tp..................Tropen ................Tropics
Ub..................Ubung .................Practice
29. AUTHORIZED CARTRIDGES.
a. The only cartridges which may be authorized for use in the
German 7.9-mm Dual Purpose Machine Gun MG34 are listed in
Table V. For precautions in handling captured ammunition, see
paragraph 33. For other ammunition interchangeable with the Ger-
man ammunition, see paragraph 31.
TABU V
AUTHORIZED AMMUNITION FOR USI IN GERMAN 7.9-MM DUAL FURROW
MACHINE GUN MG341
German Abbreviated Type
DesigMtlen Service Ammunition Description
Patr. s.S...........Ball......................Average instrumental velo-
city, 2,380 ft. per sec.
Bullet core is of hard
lead.
1 Maximum range of machine gun, on antiaircraft tripod is 2,200 yards. Using
the telescopic sight it is 3,800 yard*.
60
ТМ Е9-206А
29-30
AMMUNITION
German Abbreviated
Designation fur M.G. i.L. . Service Ammunition—Cont'd Description Ball For machine guns only. Ball Packed in clips for use in rifles, but may be used in machine guns, if other types are not available.
Patr. S.m.K? . . Armor-piercing2 Bullet, which is longer than that of Patr. s.S., has steel
core and lead jacket2.
Patr. S.m.K.H......Super-armor-piercing. Bullet is similar to that of
Patr. S.m.K. except that
bullet core is of tungsten
carbide.
Patr. S.m.E........Semi-armor-piercing. .Bullet is similar to that of
Patr. S.m.K. except that
bullet core is of iron or
soft steel.
Patr. S.m.K.L’spur. . Armor-piercing-tracer Germans indicate for use
against aircraft only.
Patr. P.m.K. . . Armor-piercing-
incendiary ..............................Germans indicate for use
against aircraft only.
Contains phosphorus.
Practice Ammunition
Patr. I S..........Ball...................Similar to Patr. s.S. except
that bullet core is of light
metal. Has a short range.
Patr. l.S.L’spur .... Ball-tracer......... Similar to Patr. I.S., but has
a tracer element.
B-Patr.............Observation or H.E. Germans indicate that this
incendiary is only used in peacetime
for checking ranges. An
observation bullet con-
taining a smoke produ-
cer of phosphorus and
percussion fuze.
30. TROPICAL AMMUNITION.
a. Small arms ammunition for use in the tropics is readily identified
by the painted ring, 2 millimeters wide, at the junction of the bullet
2 When fired from a rifle will penetrate 0.33-inch steel plate at 440 yards, and
0.39-inch steel plate at 110 yards.
61
ТМ Е9-206А
30-32
GERMAN 7.9-MM DUAL PURPOSE MACHINE GUN MG34
and cartridge case. The color of the ring is the same as that used
on the primer to indicate the type of cartridge.
b. Containers for tropical ammunition may have the following
label printed in red on white:
Fur Tropen
Normale Pulvertempatur
+ 25: C.
c. Tropical ammunition has a reduced weight of propellant and
gives normal performance at 4-25 C. (77? F.). The temperature
taken as normal for standard ammunition is 10C. (50: F.).
31. INTERCHANGEABILITY OF AMMUNITION.
a. The 7.9-mm German cartridges, Patr. s.S., Patr. I.S., and Patr.
S.m.K. types and the British 7.92-mm Besa ammunition are inter-
changeable for use in the German 7.9-mm Dual Purpose Machine
Gun MG34. CARTRIDGE, ball, 7.92-mm (Chinese), can be used
with this gun. No U. S. ammunition is authorized.
32. PRECAUTIONS IN HANDLING CAPTURED AMMUNITION.
a. All captured ammunition should be examined by qualified per-
sonnel as soon as practicable. Loose ammunition may be dangerous
and is rarely worth the trouble of collection.
b. Ammunition may be dangerous because of:
(1) Deliberate “booby traps” laid by the enemy.
(2) Having been subject to fire or shelling.
(3) Removal of safety devices from fuzes, etc. (either deliberate
or accidental).
(4) Exposure rendering explosive elements supersensitive.
(5) Being “life-expired.”
c. Ammunition known or suspected of being dangerous will not be
moved or touched, but destroyed in accordance with TM 9-1900
(chapter 4).
d. Destroyed ammunition should be salvaged for brass parts. In
addition, all enemy airtight containers should be returned to the base.
This also applies to timber and wooden boxes for use as dunnage or
for remaking ammunition boxes.
e. Personnel handling captured ammunition should keep in mind
the fact that although two types of ammunition appear to have iden-
tical measurements, they are not necessarily interchangeable. Experi-
ments to ascertain interchangeability are forbidden except by special
authority.
f. No unauthorized modifications or experimentation will be carried
out on any ammunition.
62
ТМ Е9-206А
33-36
INSPECTION
33. CARE, HANDLING, AND PRESERVATION.
a. In addition to the precautions and care in handling given in
TM 9-1900 for U. S. small arms ammunition, the following applies
particularly to the German 7.9-mm ammunition.
b. The German 7.9-mm Dual Purpose Machine Gun MG34 is sus-
ceptible to malfunctioning should any foreign matter get into its
mechanism. Therefore, the German ammunition must be kept
clean, and in particular must be free from fine sand.
34. FIELD REPORT OF ACCIDENTS.
a. Any malfunctions of ammunition must be promptly reported by
the ordnance officer under whose supervision the material is main-
tained or issued (sec. VII, AR 750-10).
Section VIII
KlCDC^TiniU
vi'M
Paragraph
General ............................................. 35
Machine gun as a unit................................. 36
Barrel casing and barrel.............................. 37
Bolt and spring....................................... 38
Belts and magazines................................... 39
Mounts ............................................... 40
35. GENERAL.
a. Inspect the machine gun at intervals for operation and function-
ing. In all such inspections, use dummy ammunition. The use of
live ammunition is prohibited.
36. MACHINE GUN AS A UNIT.
a. Check the gun for general appearance, metal parts for scratches,
rust, or wear, and the wood butt for cracks and nicks.
b. Note if the butt is firmly secured.
c. Retract the bolt and note any sluggish movement or binding.
Remove the feed cover and feed block and see that the chamber is
clear. Grasp the bolt handle in the retracted position and pull the
trigger, allowing the bolt to go slowly forward on an empty chamber.
Note any binding or sluggish movement.
d. Check the functioning of the belt feed pawls, using dummy
rounds in a belt.
e. Retract the bolt and set the safety at SAFE and pull the trigger.
The bolt should remain cocked.
f. Turn the safety to FIRE and pull the trigger. The bolt should
move forward. Load a dummy round in the chamber and fire it.
Retract the bolt and note any difficulty or failure to extract or eject.
63
ТМ Е9-206А
37-40
GERMAN 7.9-MM DUAL PURPOSE MACHINE GUN MG34
37. BARREL CASING AND BARREL.
a. Note whether front sight is properly secured. Check whether
the bipod catch springs at the front and rear of barrel casing are set
or broken.
b. Note if recoil booster is properly secured to the casing. If loose,
tighten (the threads are right-hand).
c. Remove the barrel, hold it up to the light, and inspect the cham-
ber and bore for wear, pits, or bulges. To facilitate inspection, place
a piece of white paper in the breech end of the barrel in order to reflect
light into the bore; then rotate the barrel slowly so that the light fol-
lows the circumference of the bore. If the barrel has pits or bulges, it
should be turned over to ordnance maintenance personnel.
38. BOLT AND SPRING.
a. Examine the bolt surface for rust, roughness, or foreign matter.
Inspect all notches, edges, corners, and grooves for burs and wear.
b. Inspect firing pin point for wear and deformation.
c. Inspect the extractor and ejector for deformation or breakage.
<1 . Check the driving spring for kinks, fracture, and lost tension.
39. BELTS AND MAGAZINES.
a. Belts. Examine the belts for deformation or torn links. Note
whether the belts are clean and free from rust.
b. Belt Feed Drum Magazines. Examine the 50-round belt feed
drum magazines for deformation and for malfunction of the slide and
cover. Deformed magazines should be turned over to ordnance
maintenance personnel.
c. Spring-operated Drum Magazines. Examine the 75-round
spring-operated drum magazines for deformation of the sides and
mouth. Test the functioning of the magazine springs. Magazines
with defective springs or deformed mouths should be turned over to
ordnance maintenance personnel.
40. MOUNTS.
a. Bipod. Examine the bipod for rigidity of connections. Check
the functioning of the thumbscrew nut between the bipod legs.
b. Antiaircraft Tripod. Check the elevation adjustment of the
tripod by means of the leg clamps and wing nuts. Check functioning
of adjustable support at the top of the tripod. Test rigidity of con-
nections with tripod in any firing position.
c. Tripod Mount.
(1) Examine the erected tripod mount for rigidity of connections
in any given firing position. Check functioning of the elevation
64
ТМ Е9-206А
40-42
MAINTENANCE UNDER UNUSUAL CONDITIONS
mechanism and elevation stops. Check functioning of the traversing
mechanism and traverse stops.
(2) Push the cradle to the rear several times to simulate recoiling,
and note whether this alternately elevates and depresses the cradle,
step by step.
Section IX
MAINTENANCE UNDER UNUSUAL CONDITIONS
Paragraph
General......................................................... 41
Care in arctic climates ........................................ 42
Care in tropical climates ...................................... 43
41. GENERAL.
a. When operating under unusual conditions such as tropical or
arctic climates, severe dust or sand conditions, and near salt water,
the precautions listed below should be scrupulously observed.
42. CARE IN ARCTIC CLIMATES.
a. In temperatures below freezing, and particularly in arctic cli-
mates, it is essential that all moving parts be kept absolutely free from
moisture. It has also been found that excess oil on the working parts
may solidify to such an extent as to cause sluggish operation or even
complete failure.
b. The machine gun should be disassembled and the chief com-
ponents (fig. 55) cleaned with SOLVENT, dry-cleaning, before use
in temperatures below zero F. The working surfaces of parts which
show signs of wear may be lubricated by rubbing with a cloth that has
been lightly oiled with OIL, lubricating, preservative, light, and wrung
out. At temperatures above zero F, the machine gun may be oiled
lightly after cleaning by wiping with a lightly oiled cloth, using OIL,
lubricating, preservative, light.
c. The machine gun should be left exposed to the cold whenever
possible because, upon bringing it into a warm room, moisture will
condense on the cold metal and cause rusting. Immediately upon
bringing indoors, the machine gun should be thoroughly oiled "with
OIL, lubricating, preservative, light. After the machine gun has
reached room temperature, it should be wiped off to remove the
condensed water vapor and oiled again.
d. If the machine gun has been fired, it should be thoroughly
cleaned and oiled. The bore may be swabbed with an oiled patch
and, when the weapon reaches room temperature, thoroughly cleaned
and oiled as prescribed in paragraph 24.
e. Before firing, the machine gun should be cleaned and oil removed
as prescribed in paragraph 22. The bore and chamber should be
entirely free from oil before firing.
65
ТМ Е9-206А
43-45
GERMAN 7.9-ММ DUAL PURPOSE MACHINE GUN MG34
43. CARE IN TROPICAL CLIMATES.
a. Tropical Climates.
(1) In tropical climates where the temperature and humidity are
high, or where salt air is present, and during rainy seasons, the machine
gun should be thoroughly inspected at frequent intervals and kept
lightly oiled when not in use. The gun should be disassembled at
regular intervals to enable the drying and oiling of parts.
(2) Care should be taken to see that the unexposed parts and
surfaces are kept clean and oiled.
(3) In hot climates, use OIL, lubricating, preservative, light.
b. Hot, Dry Climates.
(1) In hot, dry climates where sand and dust are apt to get into
the mechanism and bore, the machine gun should be wiped clean
daily, or more often, if necessary. The gun should be disassembled
as far as necessary to facilitate thorough cleaning.
(2) Oiling and lubrication should be kept at a minimum, as oil
collects dust which acts as an abrasive on the working parts and may
foul the bore and chamber. OIL, lubricating, preservative, light, is
best for lubrication where temperatures are high, and should be lightly
applied only to the surfaces or working parts showing signs of wear.
(3) Perspiration from the hands is usually acid and causes rust.
Metal parts should therefore be wiped dry frequently.
(4) During sand or dust storms the breech and muzzle should be
kept covered. The dust cover underneath the ejection opening should
always be kept closed when no firing is done.
Section X
GLOSSARY
Paragraph
General......................................................... 44
Abbreviations, symbols, and terms............................... 45
44. GENERAL.
a. The following abbreviations, symbols, and terms may be found
on labels, communications, and literature pertaining to the German
7.9-mm Dual Purpose Machine Gun MG34.
45. ABBREVIATIONS, SYMBOLS, AND TERMS.
Abzug ................................................. Trigger
Abzugsperre ............................ Full automatic trigger
В (Beobachtung) .................................. Observation
Bd. G (Brandgeschoss) .........................Incendiary bullet
Behalter ........................................... Container
66
TM E9-206A
45
GLOSSARY
Beob. (Beobachtung) .................
B-Patr. (Beobachtungsgeschoss Patrone)
Bodenstuck ...........................
Brandkerngeschoss ....................
D (Dauerfeuer) .......................
Dtise.................................
Dreibein 34...........................
Einfuhtstuck .........................
E (Einzelfeuer) ......................
Eisen ................................
Eisenkern.............................
Ex. Patr. (Exerzierpatrone)...........
F (Feuer) ............................
Feder ................................
Feuer dampfer.........................
Fliegervisier.........................
Gehause ..............................
G (Gewehr) ...........................
Gelb.......... .......................
Gesch. (Geschoss) ....................
Gew. (Gewehr) ........................
Griffstuck ...........................
Gurt .................................
Gurtfuller 34.........................
Gurttrommel 34........................
Hauptladung ..........................
Hohentrieb ...........................
Hulse ................................
K. (Kern; Stahlkern) .................
Kai. (Kaliber) .......................
Karab. (Karabiner)....................
Kartusche ..............
Kartuschhulse.........................
Kartuschkorb .........................
Kern .................................
Kolben ...............................
Korn .................................
Kugel ................................
Kugelpatrone..........................
Kupfer ...............................
1. (leicht) ..........................
l.M.G. (leichtes Maschinegewehr)......
L’spur (Leuchtspur) ..................
..... Observation
. . Observation cartridge
..... Base..plate
..... Incendiary bullet
. . . . Full automatic fire
..... Blast trap
.....A A Tripod 34
. .. . Short leading belt
..... Single fire
..... Iron
. Iron or soft steel core
Dummy cartridge
..... Fire
..... Spring
..... Flash.hider
..... Antiaircraft sight
..... Receiver
..... Rifle
..... Yellow
Projectile, shell, bullet
.....Rifle
..... Grip.stock
..... Belt
Belt filling machine 34
Beit drum magazine 34
..... Propellant
. Elevating mechanism
..... Cartridge case
.....Core; steel core
..... Caliber, gage
.....Carbine
Cartridge
........Cartridge case
. . Ammunition basket
........ Core
........ Butt stock
........ Front sight
........ Bullet
........Ball Cartridge
........ Copper
........ Light
.. . . Light machine gun
........Tracer
67
TM E9-2O6A
45
GERMAN 7.9-MM DUAL PURPOSE MACHINE GUN MG34
Lafette 34..............
Lafettenaufsatzstuck .
Lauf ...................
Laufbehalter 34.........
Leuchtpatrone ..........
Leutchtsatz.............
Leuchtspurpatrone.......
Leutchspurgeschoss......
Leutchspurmunition ....
Mantel .................
Messing ................
M.G. (Maschinegewehr)
Mun. (Munition) ........
P. (Phosphor) ...........
Panzergeschoss .........
Patch. (Patronenhulse) .
Patr. l.S. (Patrone leichte
Spitzgeschoss Cartridge with light, pointed bullet
Patr. l.S.L’spur (Patrone leichte
Spitzgeschoss mit Leuchtspur)
........Tripod mount 34
Tripod mount AA adapter
........ Barrel
......Barrel container 34
..........Tracer cartridge
......Tracer composition
...... Tracer cartridge
...... Tracer bullet
.... Tracer ammunition
.... Barrel casing; jacket
.... Brass
.... Machine gun
.... Ammunition
....Phosphorus
. . . . Armor-piercing bullet
.......... Cartridge case
Patr. T. (Patronentasche)....
Patronengurt .................
Patronenhulse ................
Patronentrommel 34...........
Patr. P.m.K. (Patrone Phosphor
mit Stahlkern)...............
Cartridge with light, pointed
bullet with tracer
............Cartridge pouch
............ Cartridge belt
............ Cartridge case
..............Magazine 34
Cartridge with phosphorus
with steel core
Patr. S.m.E. (Patrone Spitzgeschoss
mit Eisenkern)
Patr. S.m.K. (Patrone Spitzgeschoss
mit Stahlkern) .
Cartridge with pointed bullet
with iron core
Cartridge with pointed bullet
with steel core
Patr. S.m.K.H. (Patrone Spitzgeschoss
mit Stahlkern Gehartet)
Cartridge with pointed bullet
with hardened steel core
Patr. S.ml.K.L’spur (Patrone Spitzgeschoss
mit Stahlkern und Leuchtspur)...........Cartridge with pointed
with steel core and
bullet
tracer
Patr. S.S. (Patrone schwer
Spitzgeschoss)
Patr. T. (Patronentasche)
Ph. (Phosphor) ..........
bullet
Cartridge pouch
.... Phosphorus
Cartridge with heavy pointed
68
ТМ E9-2O6A
45
GLOSSARY
Pist. Patr. (Pistolen Patrone) .
P.K (Pulverkasten)
Pl. Patr. (Platzpatrone) ........
Pr. (Phosphor) ..................
Pr-Geschoss (Phosphorgeschoss) . .
P.T. (Pulvertemperatur) .........
Puffer ..........................
Pulver ..........................
Pulverkasten ....................
Pulverladung.....................
Pulvertreibladung ...............
Rauchloses Pulver................
Rauchschwaches Pulver ...........
Richtvorrichtung ................
Rot .............................
Ruckstossverstarker..............
S (Sicherung, Sicher) ...........
S. (Spitzgeschoss) ..............
s. or S. (schwer) ...............
S.M.G. (schweres maschinegewehr)
Schlagbolzen.....................
Schliessfeder....................
Schutzdeckel.....................
......Pistol cartridge
...... Powder box
...... Blank cartridge
...... Phosphorus
......Phosphorus bullet
Ammunition temperature
...... Buffer
...... Powder
...... Powder box
.....Powder.charge
..... Propelling charge
.....Smokeless powder
..... Smokeless powder
..... Laying mechanism
..... Red
.....Recoil booster
..... Safety
.....Pointed bullet
..... Heavy
.... Heavy machine gun
.....Firing pin
.....Driving.spring
.....Dust cover
Schw. (schwer) ............................................. Heavy
Seitenhebel ...................................... Traversing lever
S-Gesch. (Spitzgeschoss) ............................ Pointed bullet
S.m.K. (Spitzgeschoss mit Stahlkern). .Pointed bullet with steel core
S.m.K.H. ( Spitzgeschoss
mit Stahlkern Gehartet) Pointed bullet with hardened steel core
S.mK.L'spur (Spitzgeschoss mit
Stahlkern und Leuchtspur)
Spannschieber.........
Spitze................
St. or S (Stahl)......
Stahlgeschoss.........
Stahlkern.............
Stahlkerngeschoss . . ..
Stahlmantel ..........
Teile ................
Tiefenfeuereiurichtung
Trager................
Tragriemen ...........
Treibladung...........
.............Pointed bullet with steel
core and tracer
...............Cocking..handle
............... Point
............... Steel
................ Steel bullet
.................Steel core
Steel-core bullet; armor-piercing bullet
................ Steel...jacket
.......... Components
............ Searching fire mechanism
............. Carrier
............... Sling
............Propelling..charge
69
ТМ Е9-206А
45-47
GERMAN 7.9-MM DUAL PURPOSE MACHINE GUN MG34
Trommelfuller 34...............!......Magazine filling machine 34
Trommelhalter...................................... Magazine holder
Versager ............................................... Misfire
Verschluss ................................... Breech mechanism
Visier.......................................................Sight
Zieleiurichtung .............................. Sighting mechanism
Zufiihrer...............................................Belt pawl
Zufiihrerdeckel ........................................Feed cover
Zweibein.................................................. Bipod
Zwischenstuck .................................... Extension belt
Section XI
REFERENCES
Standard nomenclature lists.................................. 46
Explanatory publications .................................... 47
46. STANDARD NOMENCLATURE LISTS.
a. Maintenance.
Cleaning, preserving, and lubricating materials;
recoil fluids, special oils, and miscellaneous
related items ............................ SNL K-l
Soldering, brazing, and welding material, gases
and related items.......................... SNL K-2
Current Standard Nomenclature Lists are as tabu-
lated here. An up-to-date list of SNL’s is main-
tained as the “Ordnance Publications for Supply
Index,” now published in...................... OFSB 1-1
47. EXPLANATORY PUBLICATIONS.
a. Ammunition, general ....................... TM 9-1900
b. Maintenance.
Chemical decontamination materials and equip-
ment ....................................... TM 3-220
Cleaning, preserving, lubricating, and welding
materials and similar items issued by the
Ordnance Department ........................ TM 9-850
Decontamination ............................ TC 38, 1941
Defense against chemical attack............. FM 21-40
Military chemistry and chemical agents...... TM 3-215
c. Miscellaneous.
Range regulations for firing ammunition for
training and target practice................ AR 750-10
Qualifications in arms and ammunition train-
ing allowances.............................. AR 775-10
70
ТМ Е9-206А
INDEX
А Га«е No.
Abbreviations, symbols, and
terms ...................59-60,66-70
Ammunition
authorized cartridges 60-61
care and preservation ........... 63
classification 53
interchangeability 62
field report of accidents . 63
identification ............... 53-60
precautions in handling captured
ammunition . 62
tropical ammunition 61-62
Antiaircraft tripod, inspection ... 64
Arctic climates, care of materiel in 65
Assembly of dual purpose machine
gun ............................. 47
Authorized cartridges...........60-61
Automatic fire . . . ..... 24,26
В
Barrel
inspection ...... 64
removal ............. 46
Barrel casing
disassembly 47
inspection....................... 64
Belt drum magazine, 50-round,
filling .......................... 13
Belt feed drum magazine, inspec-
tion ............................. 64
Belts and magazines, inspection . 64
Bolt and cocking handle, disas-
sembly ........................... 46
Bolt and spring, inspection...... 64
Bore, care and preservation...... 49
Buffer housing, disassembly .... 46
Butt stock, disassembly........... 44
c
Care and preservation
ammunition ...................... 63
care after firing............... 51
care in garrison and ctynp . 49-50
care on range and in the field 50-51
care preparatory to firing...... 50
cleaning machine gun received
from storage................ 49
preparation for storage . . . 51-52
No.
Changing barrels 35-36
Characteristics of dual purpose
machine gun ...................... 4
Classification of ammunition ... 53
Cleaning machine gun received
from storage..................... 49
Color markings on ammunition . 58
D
Data on machine gun .... 4
Disassembly of dual purpose ma-
chine gun .....................44-47
E
Elevation and traverse .........26-31
F
Feed cover and feed block, dis-
assembly ........................ 44
Field report of ammunition acci-
dents ........................... 63
Firing the machine gun
on bipod, antiaircraft tripod, or
tripod mount attachment . 24
on tripod mount.................24-31
metric and English units . . . 31
Flash eliminator and blast trap,
disassembly ..................... 47
G
Gun, machine, dual purpose, Ger-
man, 7.9-mm, MG34
ammunition .................. 52-63
care and preservation ....... 49-52
characteristics ................. 4
data............................. 4
disassembly and assembly 43-47
inspection .................. 63-65
maintenance under unusual con-
ditions ................ 65-66
malfunctions and corrections 40-42
operation.................... 10-36
sighting equipment .......... 37-40
I
Identification of ammunition
abbreviation ................ 59-60
carton labels................ 53-56
marking on cartridges........... 58
71
ТМ Е9-206А
GERMAN 7.9-ММ DUAL PURPOSE MACHINE GUN MG34
I—Conf'll Page No.
Inspection
barrel casing and barrel....... 63
belts and magazine........... 64
bolt and spring.............. 64
machine gun as a unit........ 63
mounts.................... 64-65
Pogo No.
loading the machine gun . 15-23
mounting the machine gun 10-13
unloading ...................32-34
Interchangeability of ammunition 62
L
Loading the machine gun:
with 50-round belt drum maga-
P
Precautions in handling captured
ammunition ..................... 62
zine ................... 21-23
with 7 5-round spring-operated
drum magazine.............. 23
with the belt............... 15-21
s
Service ammunition ............... 53
Single fire....................... 24
Spring-operated 75-round drum
magazine
filling......................... 15
inspection ..................... 64
M
Maintenance under unusual con-
ditions
care in arctic climates......... 65
care in tropical climates .66
Malfunctions and corrections
immediate action............. 40-41
malfunctions..................41-42
Metal surfaces, care and preserva-
tion ............................ 50
Metric and English units 31
Mounting machine gun:
on antiaircraft edapter of tripod
mount ............................ 13
on antiaircraft tripod ......... 12
on bipod......................10-12
on tripod mount ............. 12-13
О
Operation
changing barrel...............35-36
dismounting the machine gun . 13
filling the belts and magazine 13-15
firing the machine gun....... 23-31
Telescopic sight for 7.9-mm dual
purpose machine gun
MG34
operation
direct fire.....................39-40
indirect fire........ . 40
Trigger housing, disassembly . 47
Tripod mount, inspection . . 64-65
Tropical ammunition............61-62
Tropical climates, care of materiel
in .............................. 66
u
Unloading the machine gun, re-
moval
belt ............................. 32
50-round belt drum magazine . 32
75-round spring-operated drum
magazine ....................... 34
w
Wood surfaces, care and preserva-
tion ........................... 50
T
RAP024AUG44-
72
PUe<-fCAT*OA40 DePARTMENT . RARITAN AREKNAL