/


Текст
OPERATING MANUAL
PC-9335
CE@®
oco3
ono21
/-l4)d~~
ft..B-,
klw~~,,.e
II ~
Unpaeking and Installation
Although it is neither complicated to install nor difficult to operate your double cassette deck,
a few minutes of your time is required to read this manual for a properly wired installation
and becoming familiar with its many features and how to use them. Please take a great care
in unpacking your set and do not discard the carton and other packing materials. They may
be needed when moving your set and are required if it ever becomes necessary to return your
set for service. Never place the unit near raditor, in front of heating vents, to direct sun light,
in excessive humid or dusty location to avoid early damage and for your years of quality use.
Connect your complementary components as illustrated in the following page.
Features
•FULL LOGIC AUTO-REVERSE DECK
For continuous playback of BGM, high reliable and full logic controlled auto reverse deck
mechanism is provided.
• SYNCHRO DUBBING OF NORMAL AND HI-SPEED
Synchro dubbing is available from Deck B to A with normal or high speed.
•FIXED AND VARIABLE OUTPUT
For the PA system use, fixed output and variable output which is controlled with level con. trol on the front panel are provided.
•RELAY PLAYBACK
This model has the function of not only autoreverse but also relay playback. When deck
Breach to the end, deck A start playback automatically.
• AMS AND BLANK SKIP FUNCTION
For the convenience use, Automatic Music Search and Blank Skip functions are provided.
•EMERGENCY BATTERY OPERATION
You can operate this cassette deck by using 24V emergency battery for unexpected AC
power failure.
~
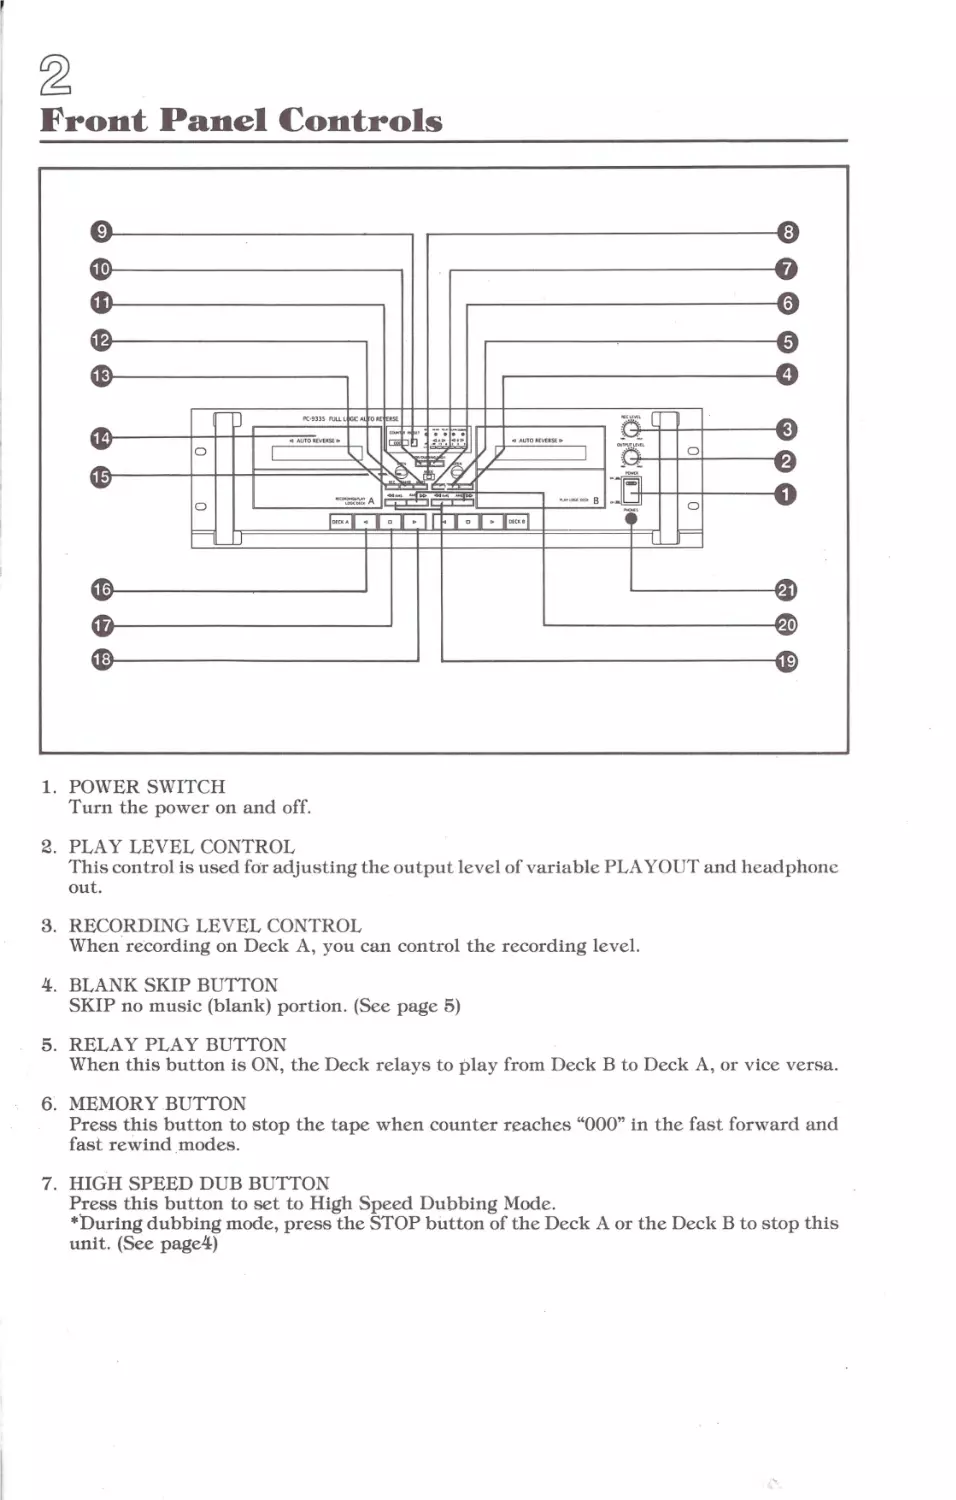
Front Panel Controls
0
0
..
~ ~••
B
1. POWER SWITCH
Turn the power on and off.
2. PLAY LEVEL CONTROL
This control is used for adjusting the output level of variable PLA YOUT and headphone
out.
3. RECORDING LEVEL CONTROL
When recording on Deck A, you can control the recording level.
4. BLANK SKIP BUTTON
SKIP no music (blank) portion. (See page 5)
5. RELAY PLAY BUTTON
When this button is ON, the Deck relays to play from Deck B to Deck A, or vice versa.
6. MEMORY BUTTON
Press this button to stop the tape when counter reaches "OOO" in the fast forward and
fast rewind modes.
7. HIGH SPEED DUB BUTTON
Press this button to set to High Speed Dubbing Mode.
*During dubbing mode, press the STOP button of the Deck A or the Deck B to stop this
unit. (See page4)
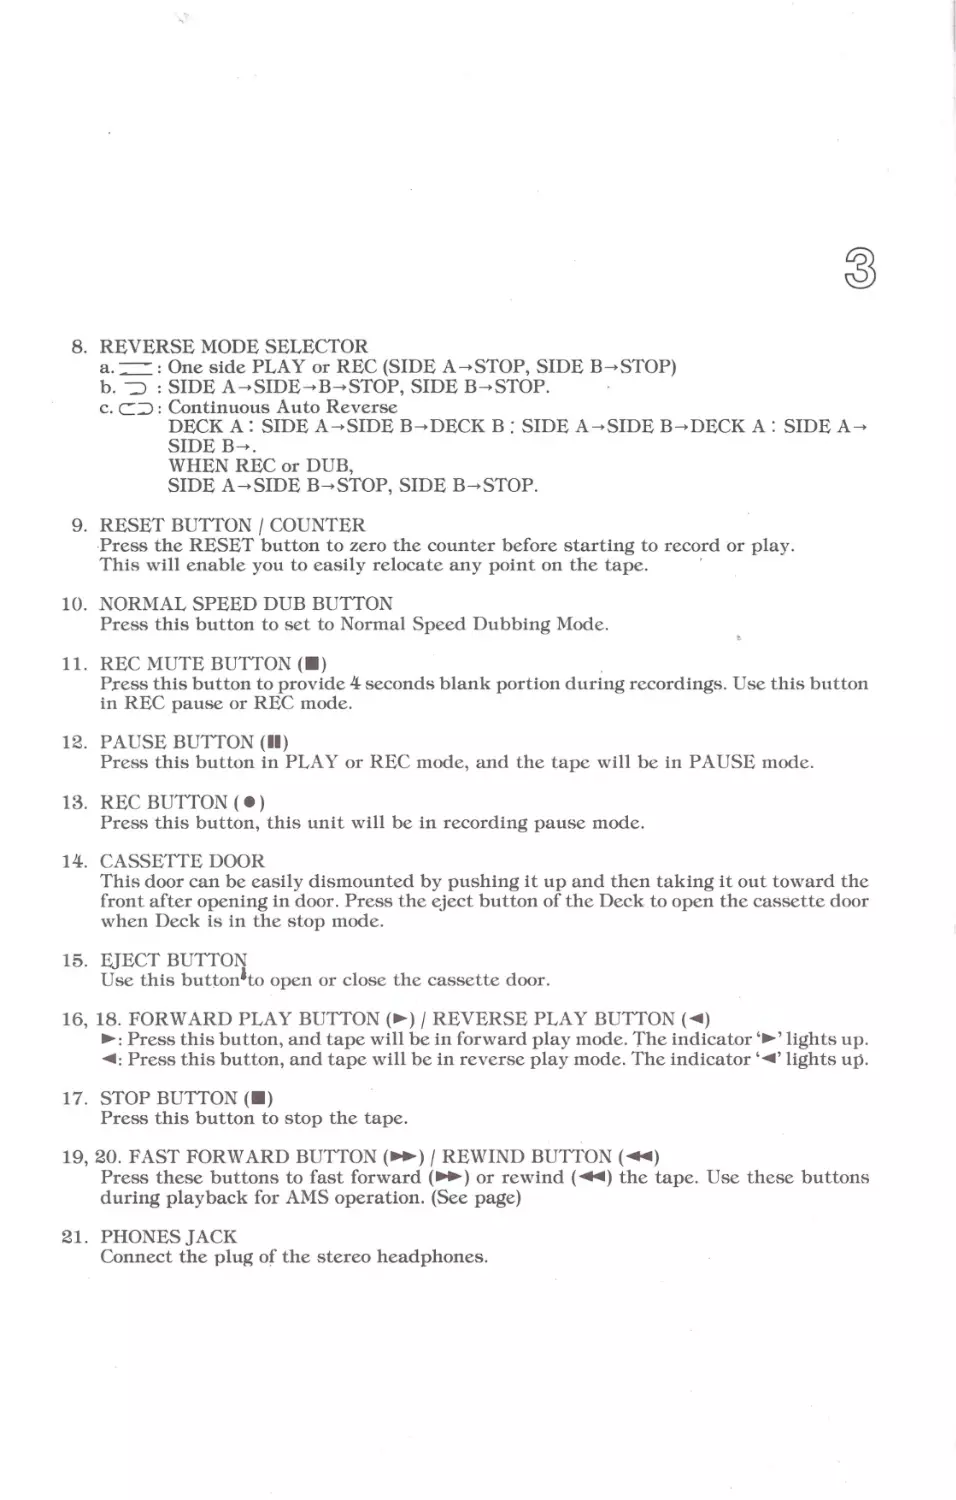
8. REVERSE MODE SELECTOR
a. == : One side PLAY or REC (SIDE A-+STOP, SIDE B-+STOP)
b. ~ : SIDE A -+ SIDE -+B -+ STOP, SIDE B-+STOP.
c. c~ : Con tinuous Auto Reverse
DECK A: SIDE A -+ SIDE B-+DECK B : SIDE A-+SIDE B-+DECK A: SIDE A-+
SIDE B-+.
WHEN REC or DUB,
SIDE A -+ SIDE B-+STOP, SIDE B-+STOP.
9 . RESET BUTTON / COUNTER
Press the RESET button to zero the counter before starting to record or play.
This will enable you to easily relocate any point on the tape.
'
10. NORMAL SPEED DUB BUTTON
Press this button to set to Normal Speed Dubbing Mode.
11. REC MUTE BUTTON(•)
Press this button to provide 4 seconds blank portion during recordings. Use this button
in REC pause or REC mode.
12. PAUSE BUTTON (II)
Press this button in PLAY or REC mode, and the tape will be in PA USE mode.
13. REC BUTTON ( •)
Press this button, this unit will be in recording pause mode.
14. CASSETTE DOOR
This door can be easily dismounted by pushing it up and then taking it out toward the
front after opening in door. Press the eject button of the Deck to open the cassette door
when Deck is in the stop mode.
15. EJECT BUTTON
Use this button•to open or close the cassette door.
16, 18. FORWARD PLAY BUTTON(..,.) / REVERSE PLAY BUTTON("""')
..,.: Press this button, and tape will be in forward play mode. The indicator,..,., lights up.
"""'=Press this button, and tape will be in reverse play mode. The indicator ' """'' lights up.
17. STOP BUTTON(•)
Press this button to stop the tape.
19, 20. FAST FORWARD BUTTON( ....... ) / REWIND BUTTON(~)
Press these buttons to fast forward (....... ) or rewind ( ~) the tape. Use these buttons
during playback for AMS operation. (See page)
21. PHONESJACK
Connect the plug of the stereo headphones.
Playback
1.
2.
3.
4.
Set REVERSE MODE switch to desired position.
Turn the power on.
Press the EJECT button.
Load recorded cassette tape into the cassette holder with the tape side to be played facing in front.
5. Press the PLAY button. The tape will now start playing. Adjust the volume, tone, etc. on
your amplifier to suit to your listening preference.
6. To stop playing, press the stop button. To open the door for removal of the cassette tape,
press the EJECT button in stop mode. When the tape reaches the end, the Tape stops or
plays automatically. (See No. @ (Reverse mode selector) of page@).
AMS Playback
This AMS (Automatic Music Search) playback is provided for easy portion of music you want
to hear from a cassette tape. During playback, press the fast forward or rewind button, and
the tape will skip one music.
Synehro Dubbing from Beek B to Beek A
1.
2.
3.
4.
Set REVERSE MODE switch to desired position.
Turn the power on.
Load a pre-recorded. cassette into the cassette holder on Deck B.
Load blank cassette (or pre-recorded cassette to replace with new recording) into the
dlssette holder on Deck A . Check to make sure that the cassette erasure tab on the upper
edge has not been removed.
5. Press the dubbing button (DUB or HI DUB).
6. To stop dubbing, press the STOP button.
*NOTE
• During dubbing, the REC LEVEL control is bypassed and REC LEVEL is copied the same
level of original tape.
•Sometimes your cassette Deck will copy the dubbing REC LEVEL a little higher or lower
as the different brand names of tapes.
• HIGH SPEED dubbing copies 1.5 times faster than NORMAL SPEED, but we recommend
to copy (dub) at NORMAL SPEED if a good sound quality is required.
Recording
1.
2.
3.
4.
Set REVERSE MODE switch to desired position.
Turn the power on.
Press EJECT button.
Set the function selector on the amplifier to the program source you wish to record; PHONO,
TUNER, COMPACT DISC, etc.
5. With the tape side to recorded facing in front, load the cassette into the cassette holder.
* Make sure that the cassette erasure tab on the upper edge has not been removed.
6 . To control recording level adjustment, press REC button the first, then the red 'REC'
indicator will flicker (this indicates that the Deck is in recording pause mode.)
7. Adjust the recording level with the REC LEVEL CONTROL knob so that the LED PEAK
LEVEL (LED METERS) display indicates about - 3dB at the peak reading of program
selected. Refer to the RECORDING LEVEL ADJUSTMENT section for details.
.
8 . Press the PLAY button ( ~ or ..,.. ), then Deck will start recording.
9. When the recording is finished, press the STOP button. When the tape reaches the end
while recording. Deck will stop or record automatically.
NOTE:
• If the cassette erasure tab on the upper edge has been removed, recording will not function.
•To erase a tape without adding new recording set REC LEVEL control to zero and press
the RECORD and PLAY buttons sequentially.
•To review the just recorded selection, use the tape counter. Press button® to set the tape
counter to "OOO" at the beginning of every recording and rewind to "OOO" after recording
for review.
• When you use to metal tape, low sensitivity from the Deck.
Blank Skip
With the BLANK SKIP function, after detecting blank portion for about 10 seconds, the
cassette Deck rewinds or fast forwards and automatically will play at the beginning of the
next music.
* This function operates only during playback.
Timer Operation
TIMER-PLAYBACK (WAKE-UP PLAYBACK)
1. Turn the power on.
2. Insert the tape to be played back.
3. Set the TIMER mode selector to PLAY.
4. Set the audio timer.
5. This Deck will play at the time that you set.
TIMER-RECORDING (UNATTENDED RECORDING)
1. Turn the power on.
2. Insert the tape to be recorded.
3. Set the TIMER mode selector to REC.
4 . Set the audio timer.
5 . This Deck will record at the time that you set.
Maintenanee
CLEANING OF HEADS AND TAPE PATH
Generally, it is sufficient to clean heads after every 10 hours .of operation. However, all
surfaces over which tape travels should be cleaned before making high quality recordings.
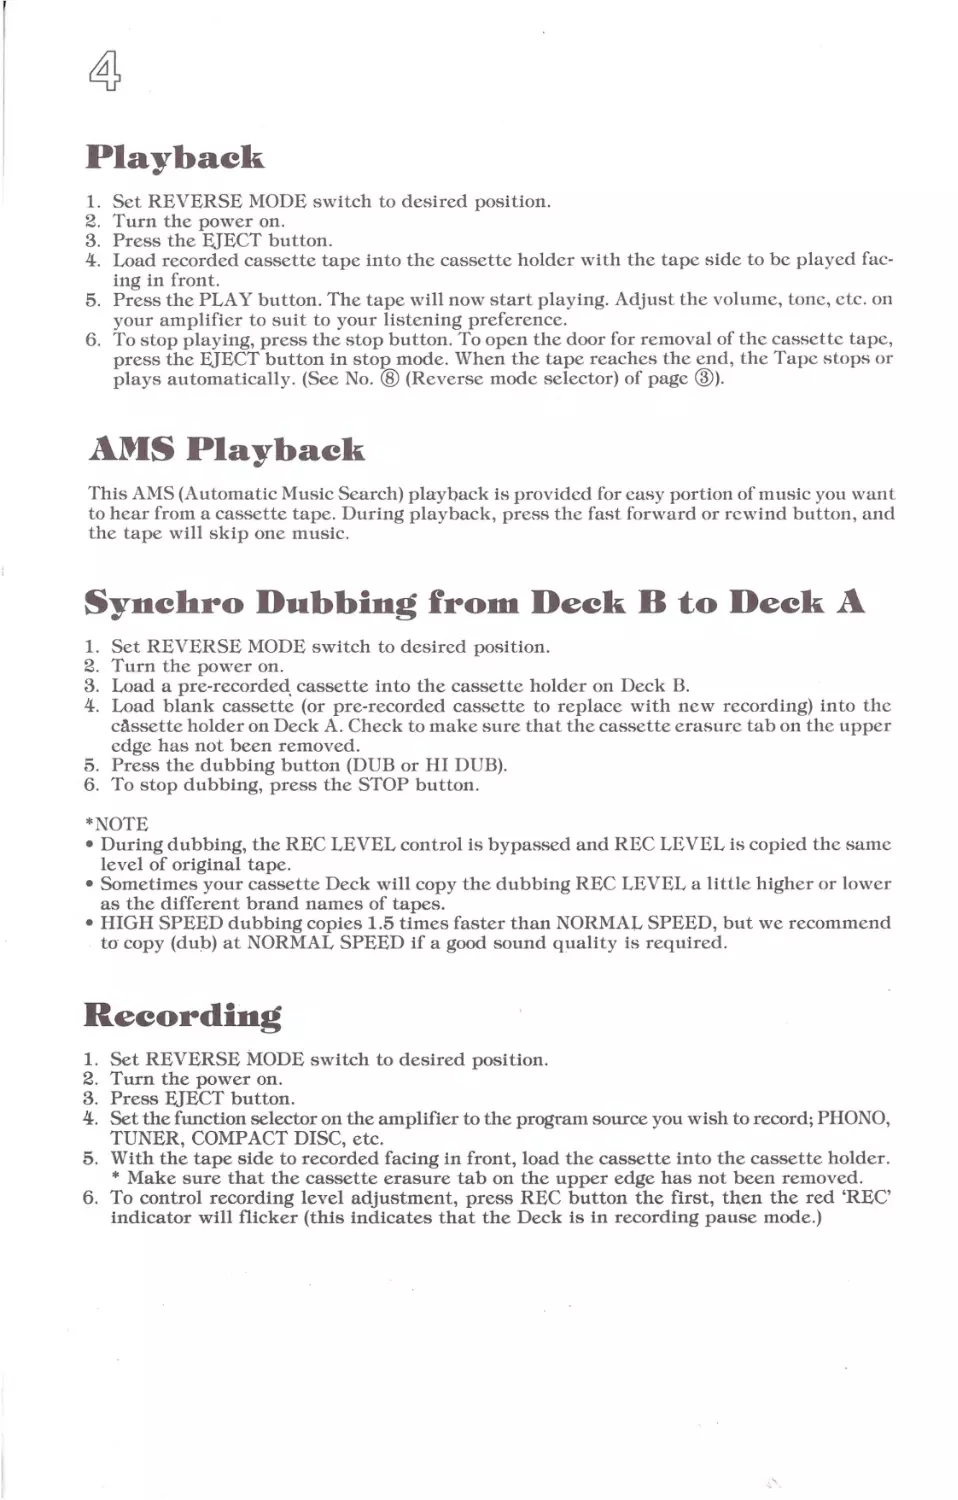
1. Set the POWER switch to OFF and remove cassette door lid by pushing it up and then
taking it out toward the front side after opening the door.
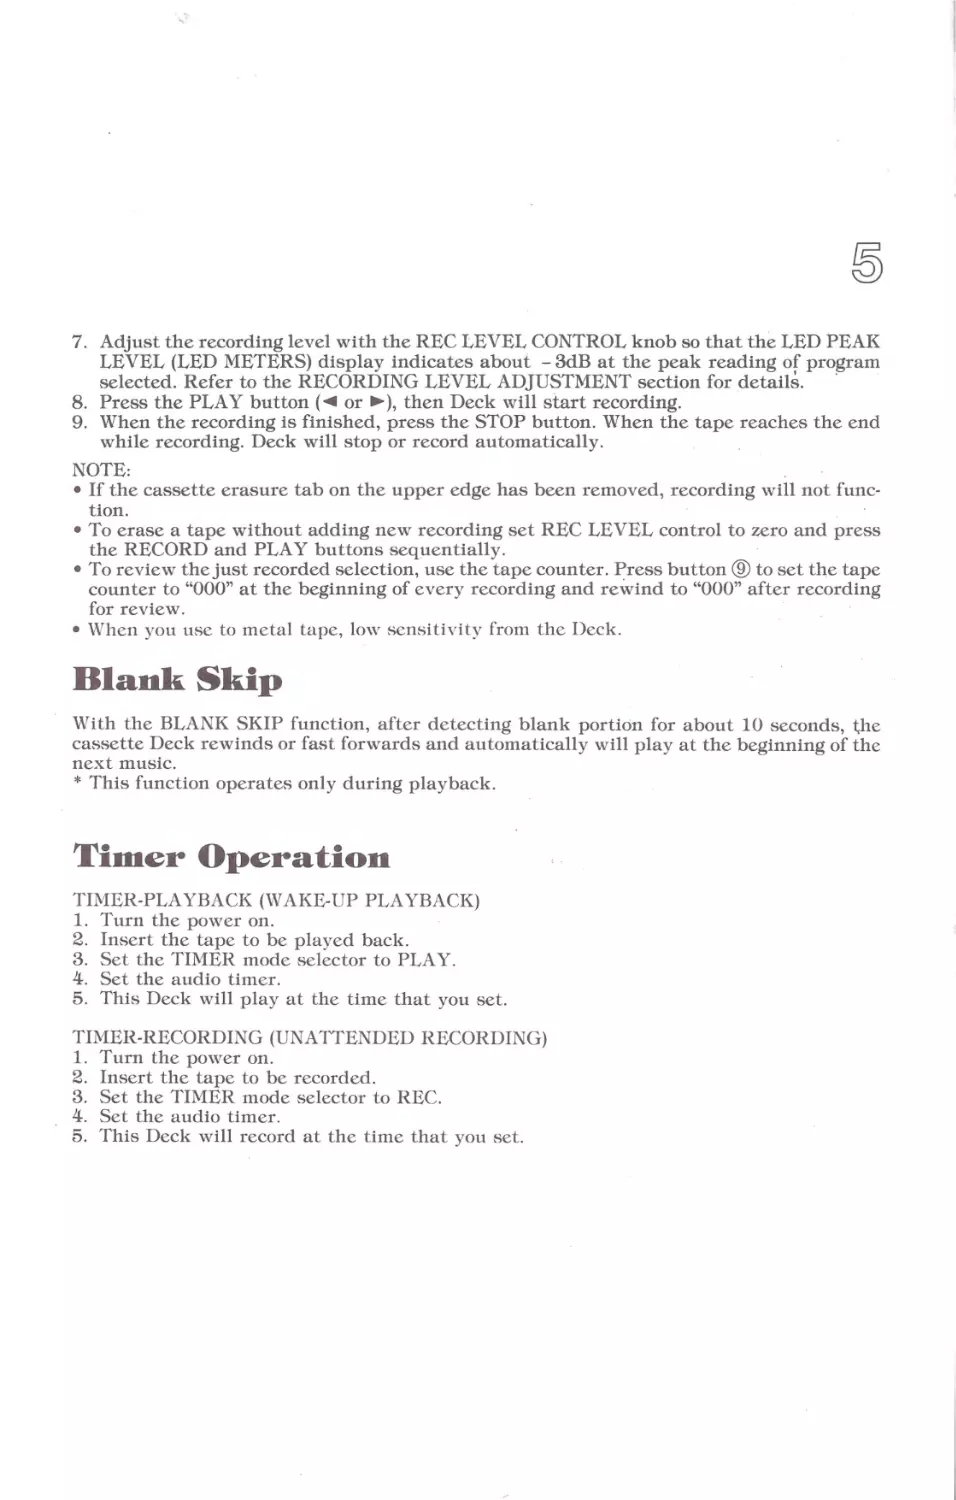
2. Wipe the heads using a cleaning tip slightly moistened with commercially available head
cleaner.
Playback Head
REC/PBHEAD
ERASE
HEAD
,
DECKB
DECK A
3 . Wipe the capstan and pinch roller using another cleaning tip slightly moistened with the
commercial.ly available rubber cleaner.
Pinch roller
4 . Replace the door lid.
• Do not insert cassette until the cleaner dries out.
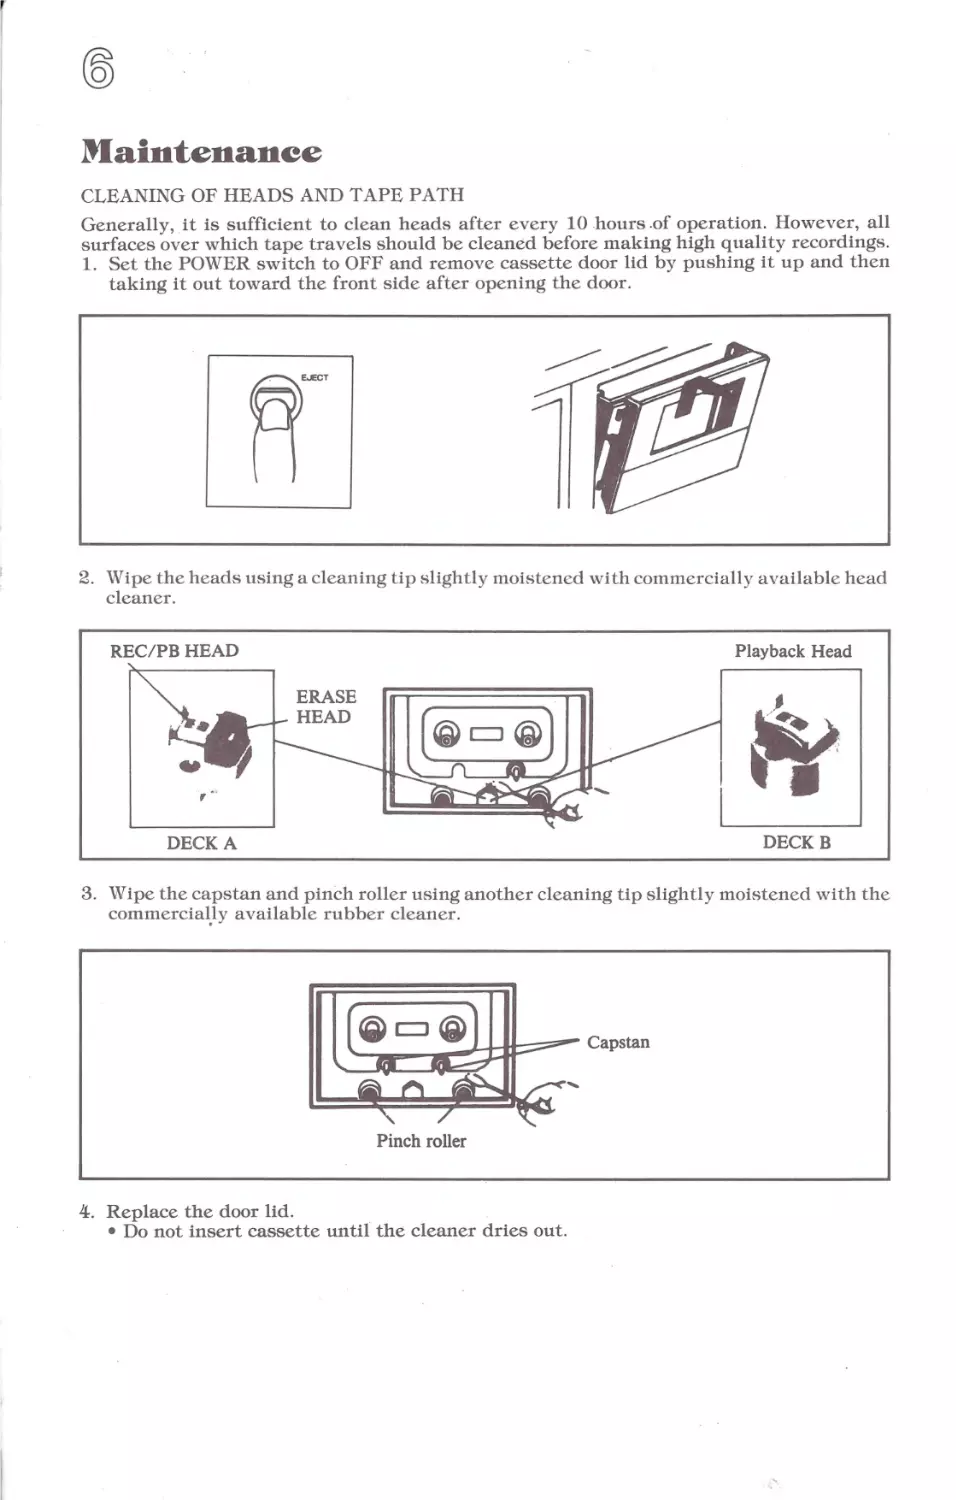
DEMAGNETIZING HEADS
Residual magnetism will gradually build up on the heads through continuous use and cause
erasure of high frequencies and hiss. The heads and metallic parts of the tape path should
be demagnetized after 20-30 hours of operation with a commercially available head demagnetizer. Be sure the cassette deck is turned off.
CLEANING CABINET
Clean the cabinet, panel and controls with a soft cloth lightly moistened with mild soap
solution. Do not use any type of sourcing powder or solvent such as alcohol or benzine.
Note on Cassette
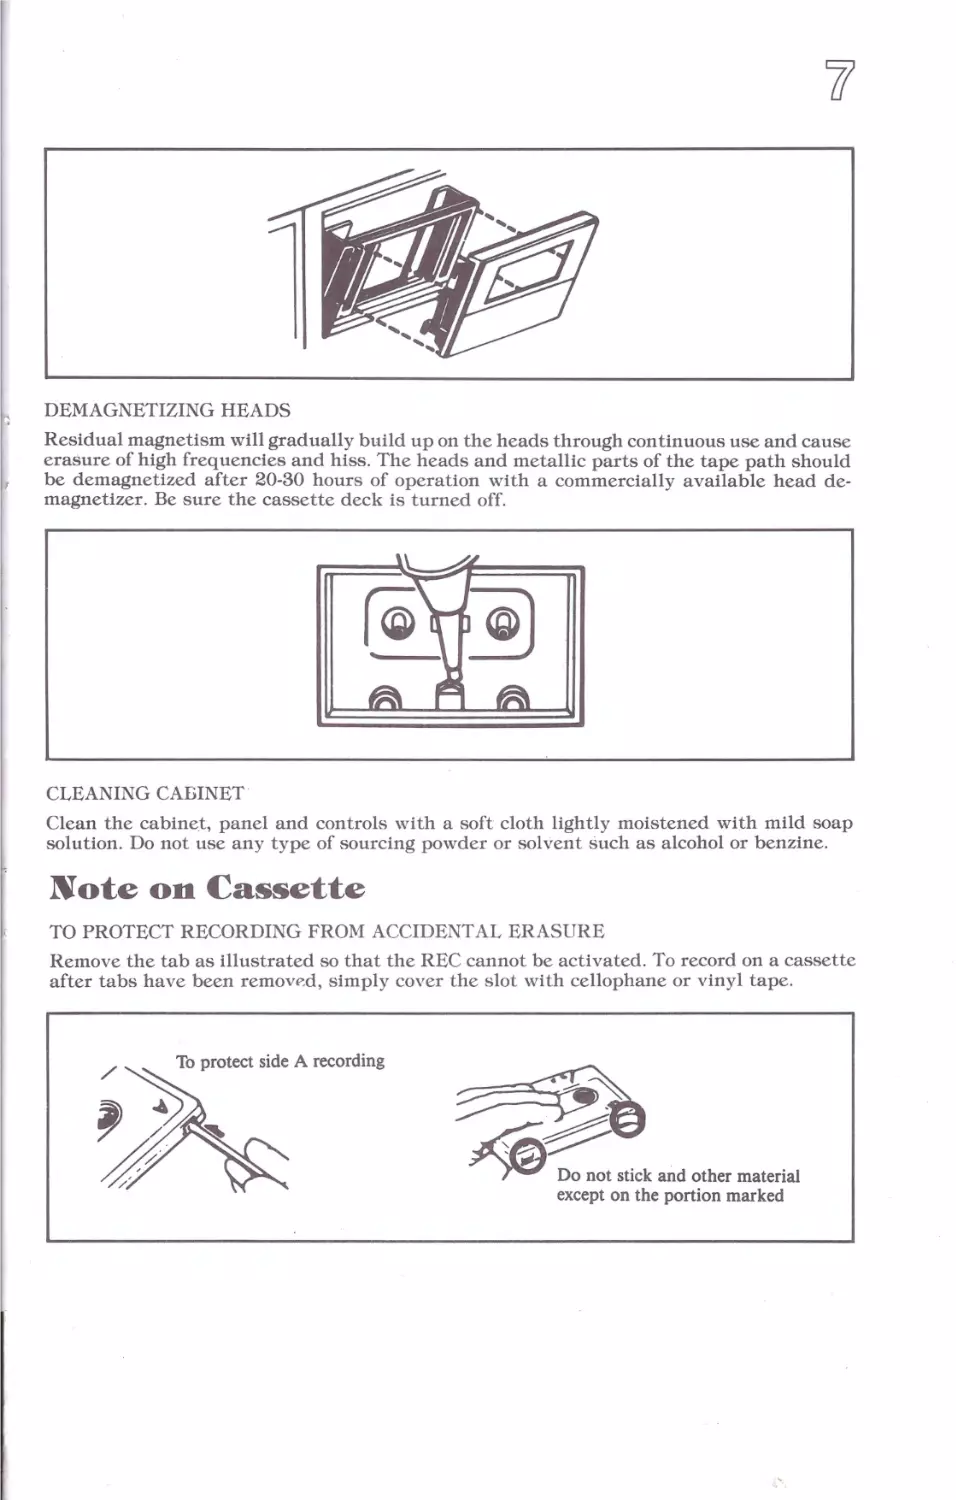
TO PROTECT RECORDING FROM ACCIDENTAL ERASURE
Remove the tab as illustrated so that the REC cannot be activated. To record on a cassette
after tabs have been removf':d, simply cover the slot with cellophane or vinyl tape.
,
~o protect side A recording
. -
$'
/.
.~~
~
Do not stick and other material
except on the portion marked
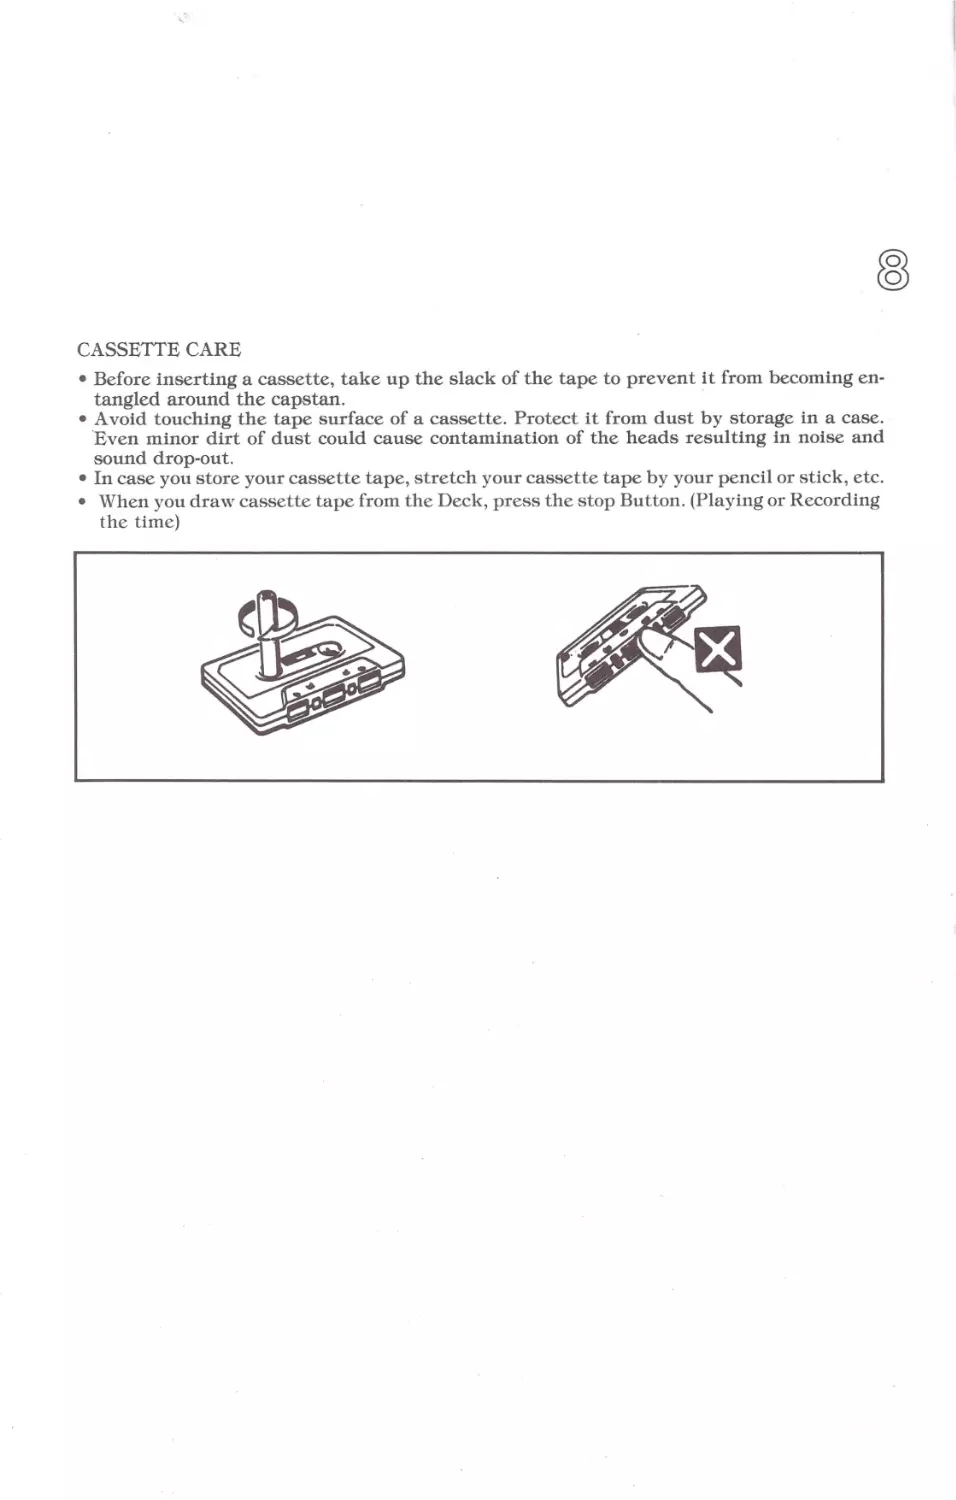
CASSETTE CARE
• Before inserting a cassette, take up the slack of the tape to prevent it from becoming entangled around the capstan.
• A void touching the tape surface of a cassette. Protect it from dust by storage in a case.
Even minor dirt of dust could cause contamination of the heads resulting in noise and
sound drop-out.
• In case you store your cassette tape, stretch your cassette tape by your pencil or stick, etc.
• When you draw cassette tape from the Deck, press the stop Button. (Playing or Recording
the time)
Rear Panel Controls
....... ..,,. ..-......
~""""'"'" '~"~
AYOS;-.<O<O«l" <U•l
-AC_,.11~121-0V ~1.UW
f\15l: O.SA!Z!4Vll1S)
O.ZSAIUoY!UoYl
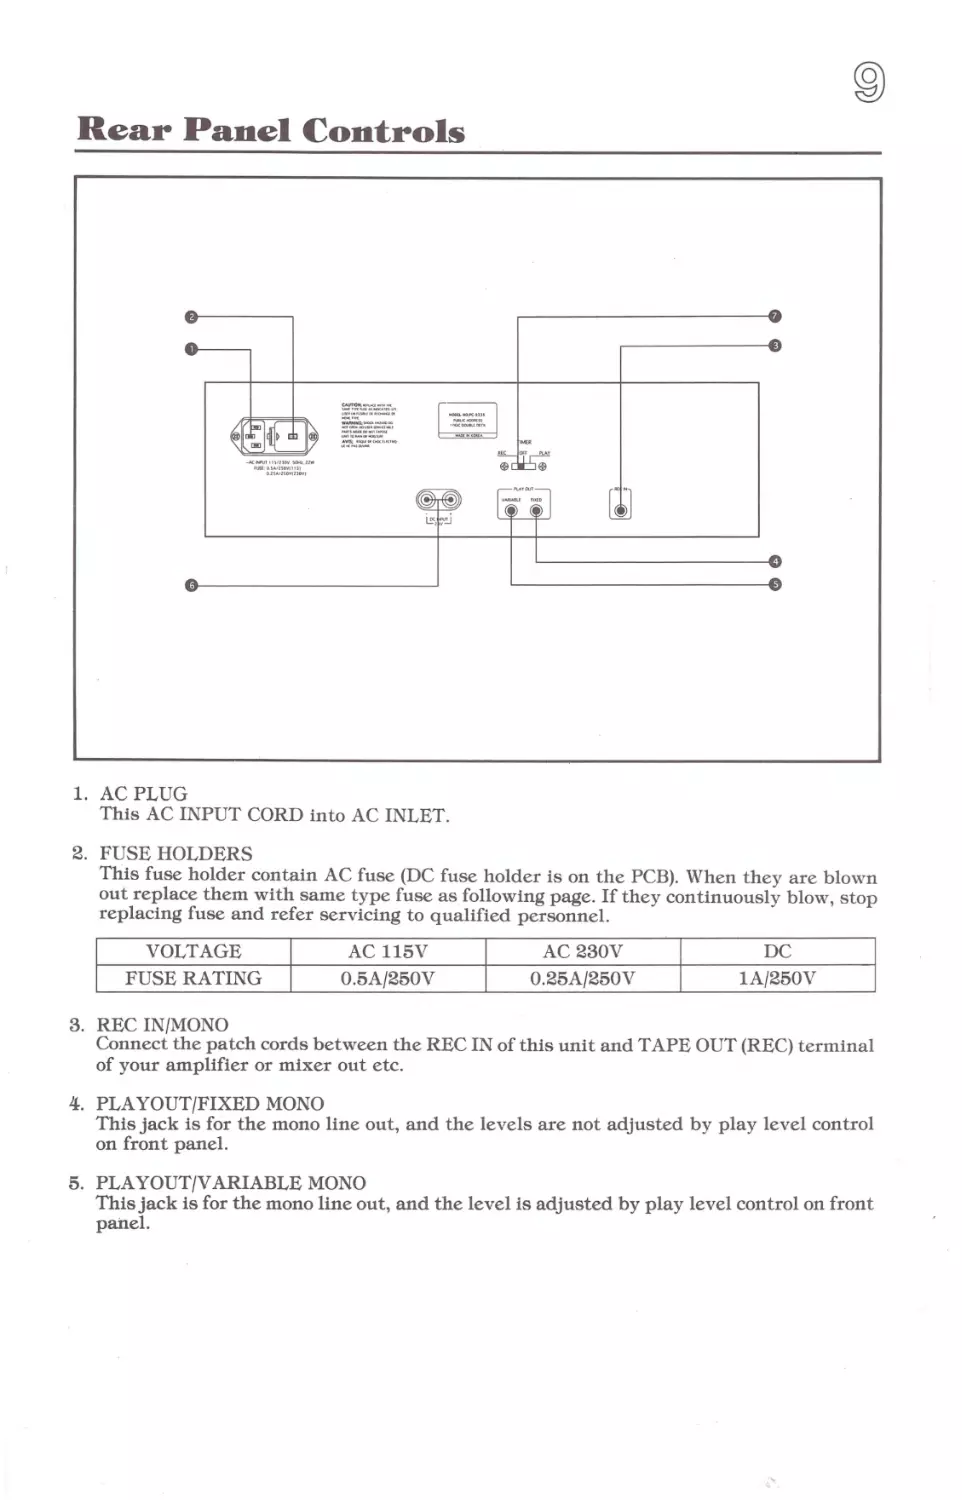
1. AC PLUG
This AC INPUT CORD into AC INLET.
2. FUSE HOLDERS
This fuse holder contain AC fuse (DC fuse holder is on the PCB). When they are blown
out replace them with same type fuse as following page. If they continuously blow, stop
replacing fuse and refer servicing to qualified personnel.
VOLTAGE
FUSE RATING
AC 115V
0.5A/250V
AC 230V
0.25A/250V
DC
1A/250V
3. REC IN/MONO
Connect the patch cords between the REC IN of this unit and TAPE OUT (REC) terminal
of your amplifier or mixer out etc.
4. PLAYOUT/FIXED MONO
This jack is for the mono line out, and the levels are not adjusted by play level control
on front panel.
5. PLAYOUT/V ARIABLE MONO
This jack is for the mono line out, and the level is adjusted by play level control on front
panel.
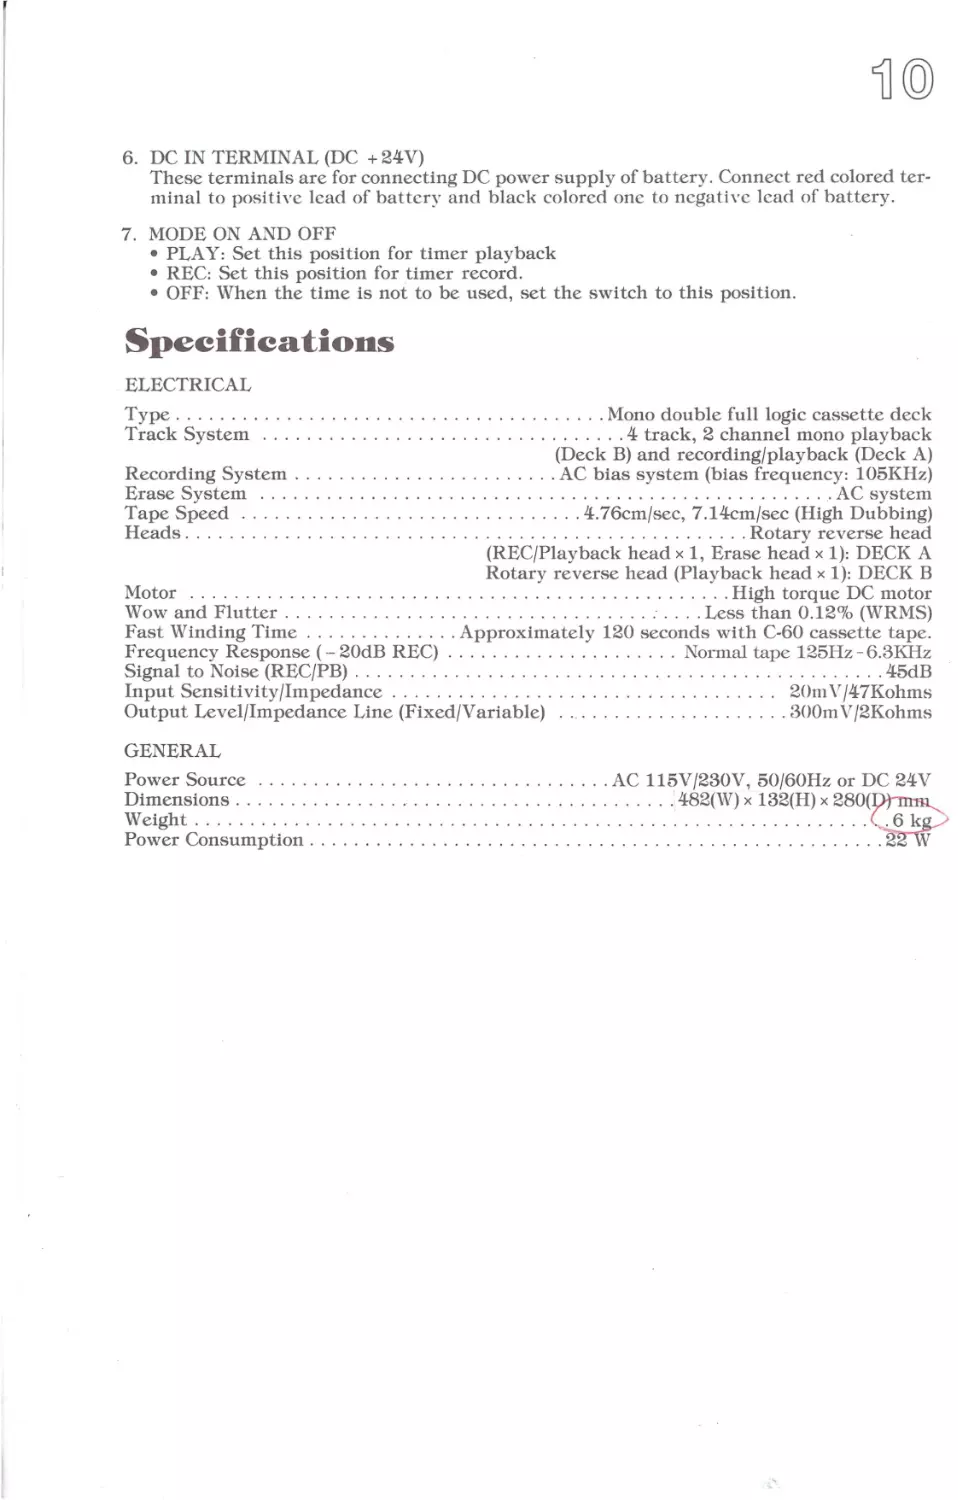
6. DC IN TERMINAL (DC + 24V)
These terminals are for connecting DC power supply of battery. Connect red colored ter minal to positive lead of battery and black colored one to negative lead of battery .
7. MODE ON AND OFF
• PLAY: Set this position for timer playback
• REC: Set this position for timer record.
• OFF: When the time is not to be used, set the switch to this position.
Speeifieations
ELECTRICAL
Type ...... . ... ... .... . .......... . .......... Mono double full logic cassette deck
Track System ... . . .. . .. . .. . ..... . . . . . ......... 4 track, 2 channel mono playback
(Deck B) and recording/playback (Deck A)
Recording System . . ..... .. .. .. . .. .... .... AC bias system (bias frequency: 105KH z)
Erase System .. ... ...... . .... . .. . . . . ..... ... .. . ...... . ...... . ... . AC system
Tape Speed .. .. ... . ...... . .. .. ........ . ... 4.76cm/sec, 7.14cm/sec (High Dubbing)
Heads . . . . . . . . . . . . . . . . . . . . . . . . . . . . . . . . . . . . . . . . . . . . . . . . . . . Rotary reverse head
(REC/Playback head x 1, Erase head x 1): DECK A
Rotary reverse head (Playback head x 1): DECK B
Motor . . ....... .. ........ . .. .. . . . . . ... . . .. . . ... . ... .... High torque DC motor
Wow and Flutter . ... . . . .. . . . ..... .... . . .. .. .. .. . . . .. .. Less than 0.12% (WR MS)
Fast Winding Time . .... .. . ... . . . Approximately 120 seconds with C-60 cassette t ape.
Frequency Response ( - 20dB REC) . . ... . .. . .. .... ... . .. Normal tape 125Hz - 6 .3KHz
Signal to Noise (RECJPB) . .. ... . .. . . . . .. .. ... . ...... . . .. ... ...... .. . .. .. . 45dB
Input Sensitivity/Impedance . . . . . . . . . . . . . . . . . . . . . . . . . . . . . . . . . . . 20111 V/47Kohms
Output Level/Impedance Line (Fixed/Variable) . ... . .. ... .. .... . . . . . 300m V /2Kohms
GENERAL
Power Source . ... . . . ...... .. .. . . ...... . .. . . .. AC 115V/230V, 50/60Hz or DC 24V
~i::~ts~~~s.
.': ~~~(~)·x·~~~(~) ·x·~~~(~
'.'.'. '. '. '. '. '. '. '. '. '. '. '. '. .. '. '. '. '. '. '.'. '. '. '. '. '. '. '. '. '. '. '. '. '.'. '.'.
Power Consumption ... . . ............. . ........ . ........... .. .. ... .... .~
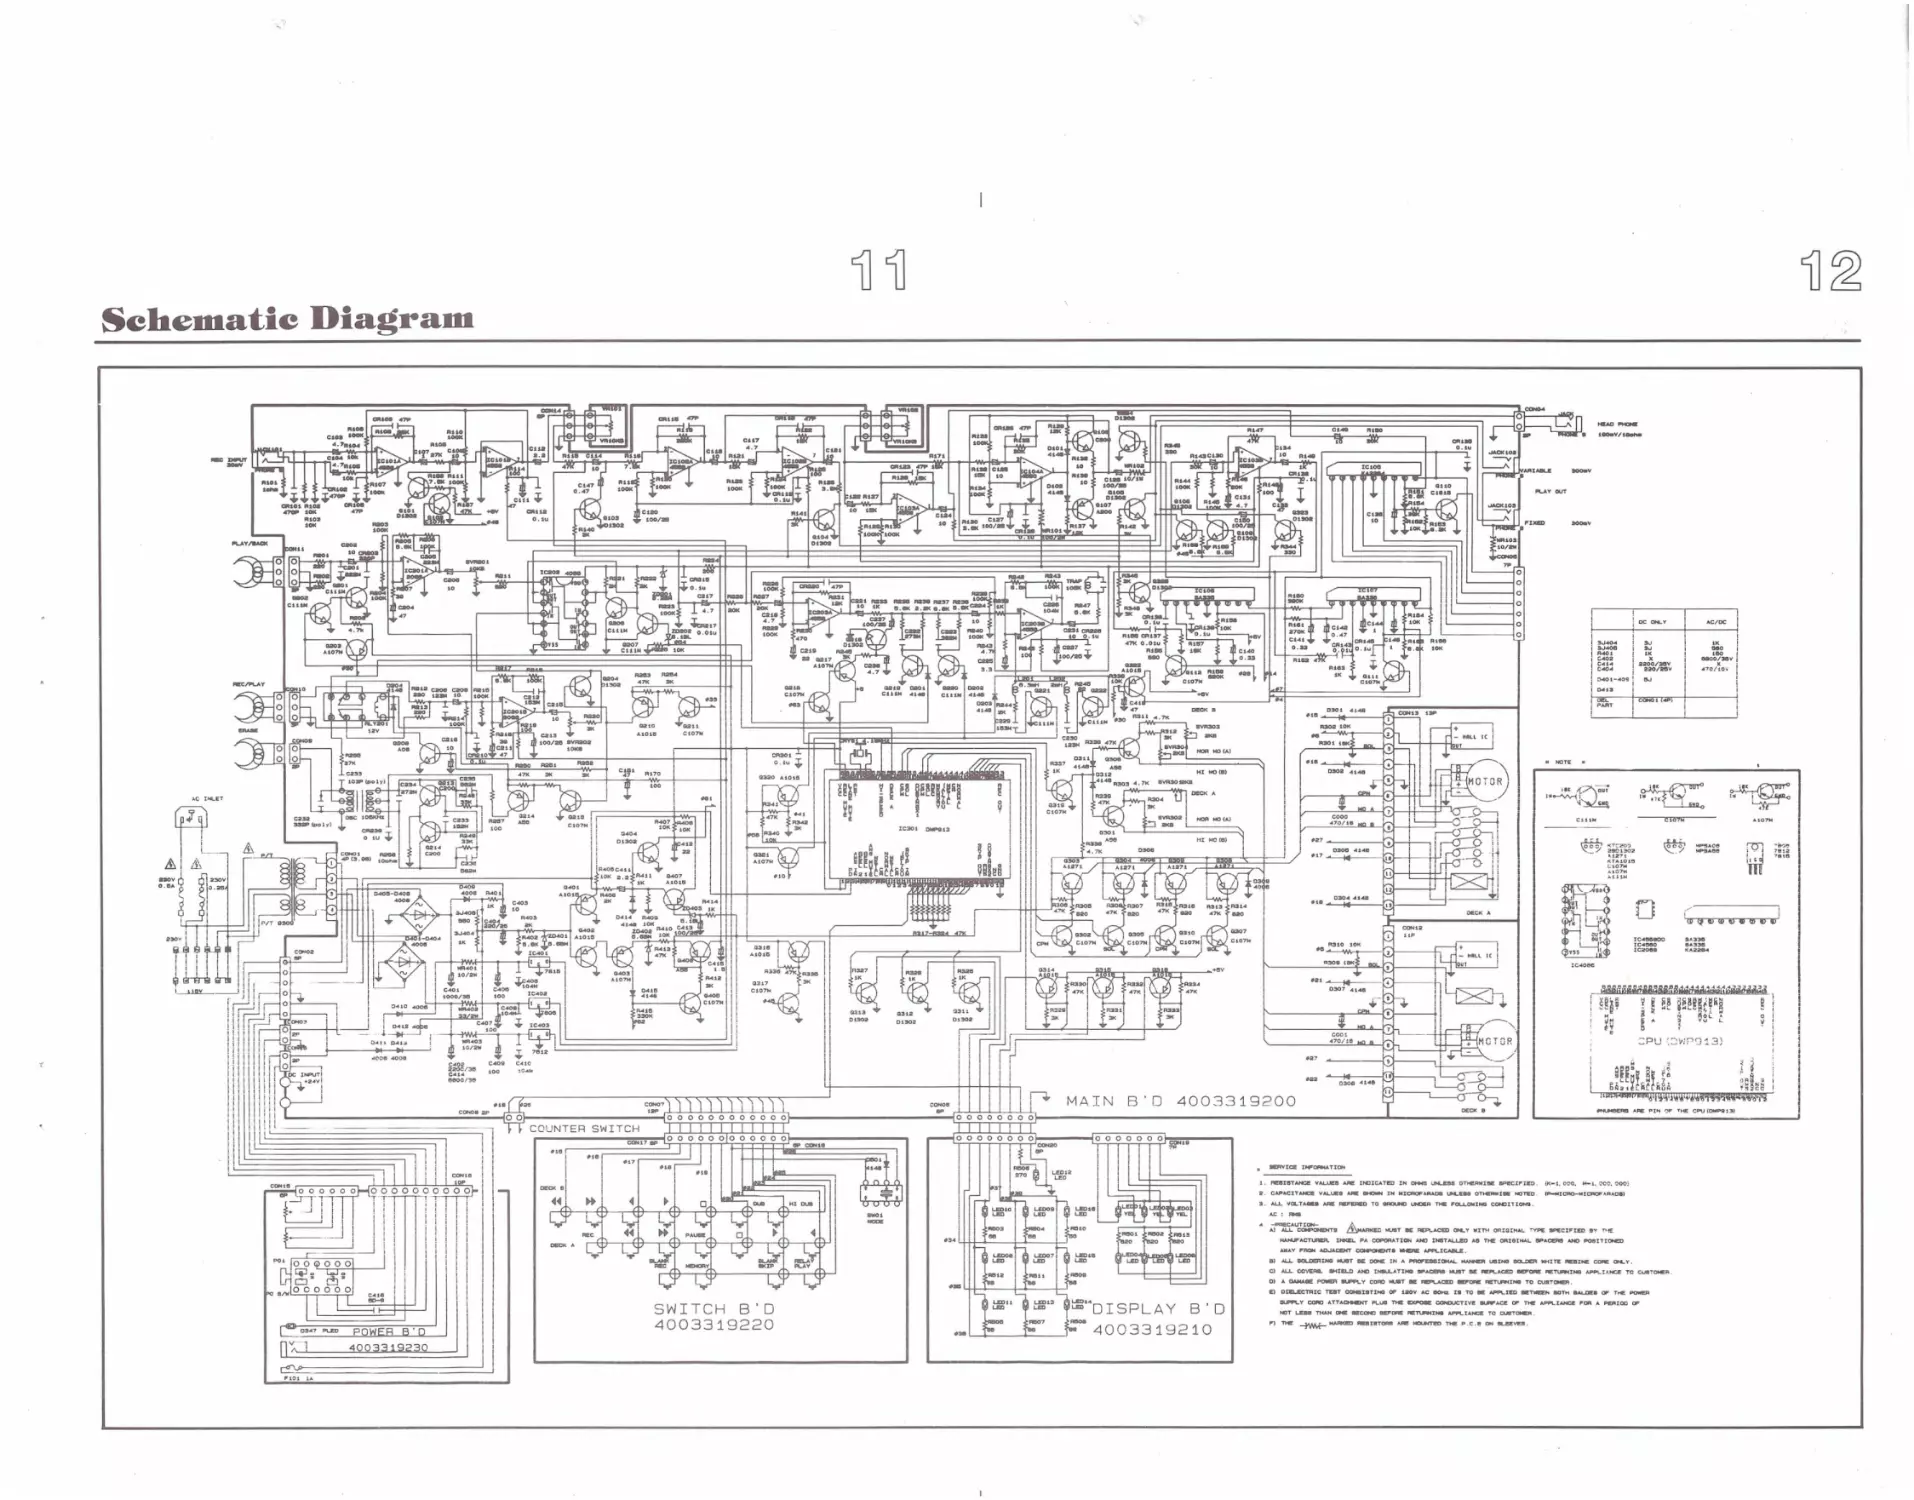
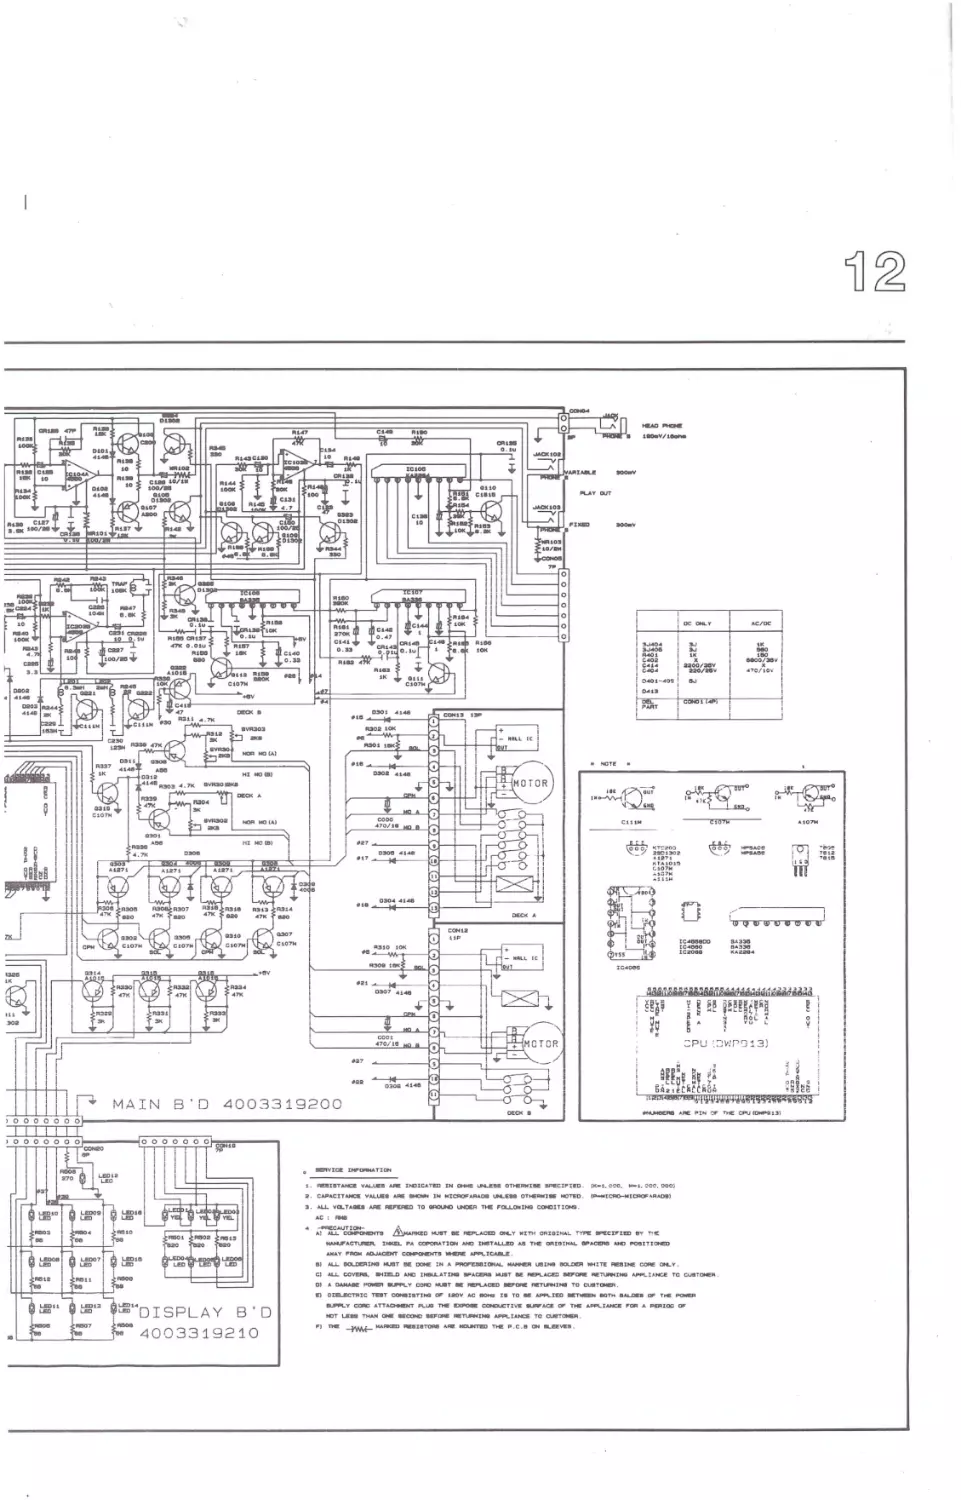
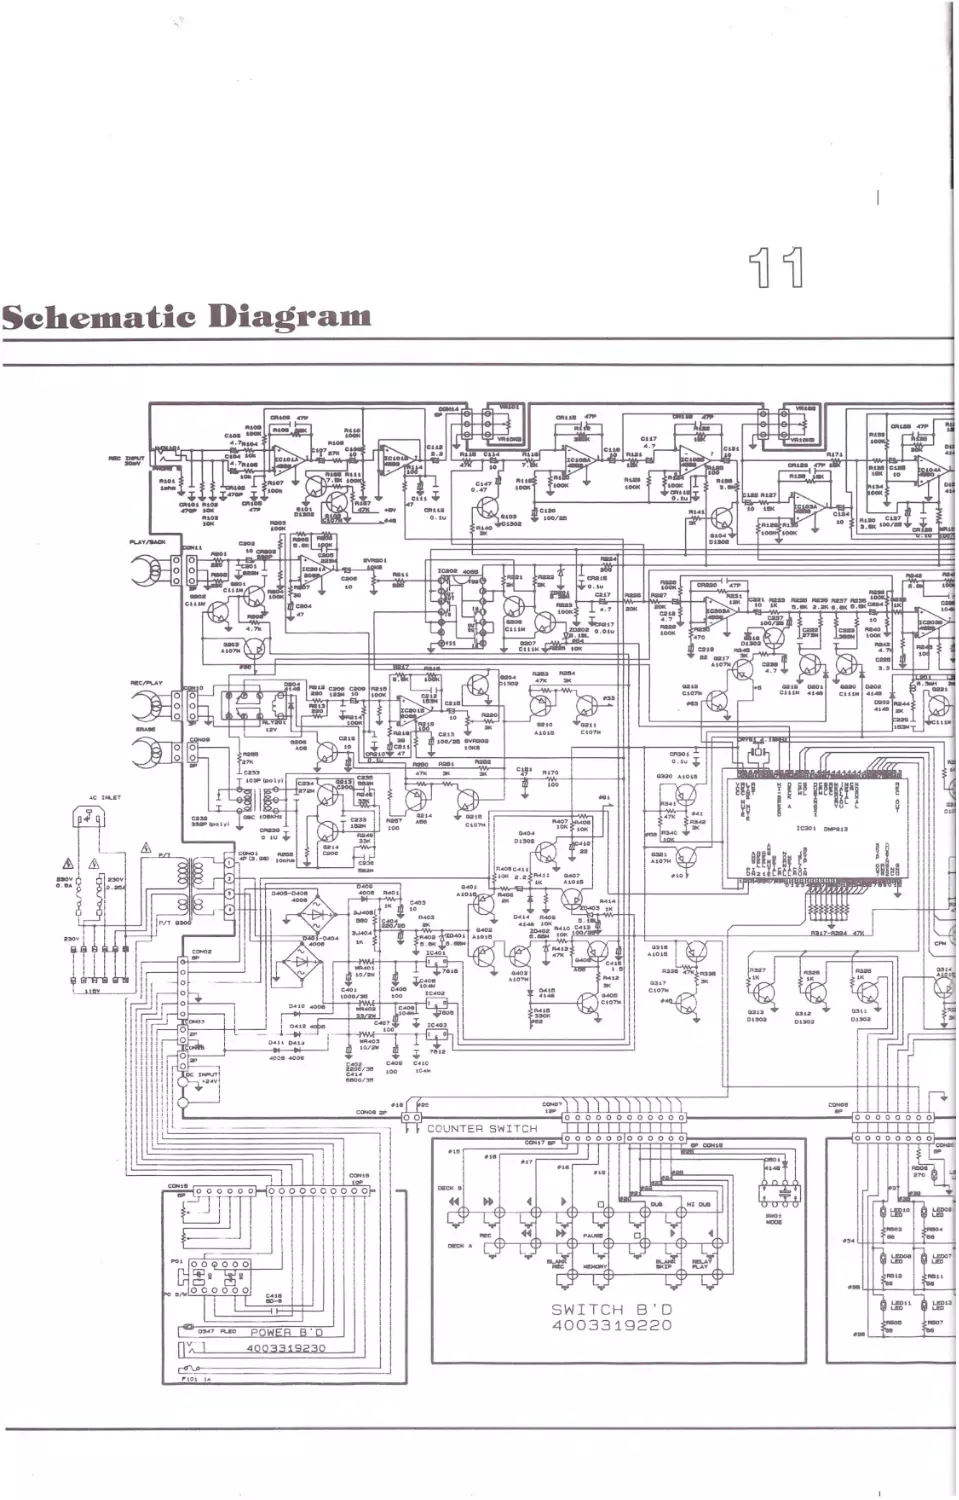
Sehematie Diagram
-...
..,..,
"
"'
0900/IOV
aaoo/mv
'
470/tO Y
220/21SY
i
..
COHCUl""'l
PART
,~-;;;
1•~1
' "
/
'
B'O 4003319200
AL.J.... 'llJLTA-.
= = 4: : 0 '.: :3~3~19~2~30= ='._JII
unv:::.
A-=l
C0"
_
I
4003319220
11
------'
AL.J.... 90UlERIHll - T M DONE !NA PACF~:OHAI... ~ Ul!IINO aa...!2R
ALL CQV£AL
A. DAIU.CllE ~ ......._ Y COAD - T -
... IE.D AHD
n•.
1.ATl- . . ~ - T M
Oill!L.ECTIUC TUT COH9IllTIHGI Of' 1aov AC -
THI!
-tn:
REIIME CCA! OllLY.
......_ACCI IM!Jl"QflR lllE,,_....INQ ...-i...!>.!GE TC CUllTot«l'I .
AEl"\..ACED Kl"C:W. AETI,.AUNCil TO CUSTOMER ,
I• TO -
.u>P\..1£0 •'f'lllEEN 9QTH ~·
CORO ATTAa..Hf PLUG T)C ~ Cl>ICUCTIVI: ..... ACE 01' Tl4!: APPLIAHCll!
NOT US11 THAN ~ •COICI 9£l'"OflE AE""--1N9 -..u.NCll TO CU8T°"4EFI.
I')
C'CC. 000)
lol.l9T BE REPLACED ON..T WITH ORIO:!-IAL TYPIE: -Cil'IIED 8Y '! "'!£
Ill
.-_y
cec........
PA COPOAATtC»( AND INllTM..L.ECI All THE OAIGIKAL tlPACOIS AHD l"OSITIOHU>
C)
B'D
4003319210
~
I~
Dl
E
SWITCH B'D
!K~i.
f-ICAO-WlCf'IOl'ARAOll)
I.SW. AEl"U'IED TO - - . . c ) \.tCJER T... l"Ol.l...l*INQ COHDlTI°"'9.
--ACT!."'°'-
I I i
I!
ItCJICATm IN Ot..e ut.l...l!Sll OTHl!Fl'llll!ll!: llPl!:Cil"l:ll!:O.
AE!llllT.VCZ VAl...UE!I
C.UOl.CITAHCI! VAl..\.e8 AN 9HOlllH IN MICl.c>l'"AFUOS UN...l!'.U OTHE""'1• NDT1!:0.
~AU~
I
~
L
a.
3.
~ Mo\AKm Ab!IllT~ ARE NCllMTU) TIC P.C.lt OH llU!l!Vl!!8.
"°"'
°'
Tl'<E POolUI
A PVIIOC: OI'
to"
'
i)
w i)
Cl
Q)
i)" '
;
!~
i ::..oa
! g~:
~
~
'"'
aaoot:mv
2ao1aev
1 tMOl-•09
!
().<Ill!
!~T
CtiiSi t4P)
(])"' i)
MAIN B'D 4003319200
1. Aa!UITAHCI!
2. CA.PACITAHCI!:
S.
Y"1...~
AAI! INJICATED IN <»*41!1 UN...1!88 OTHl!:RMI!ll!: llPl!CI .. I~.
Y.t.l.~S
AU. VQL TJt,. . ,__
A.Al: ........ I .... MICAOl"ARADa
~
TO
~LAU~ ~c
...
--ACT~
DJ
M...J.... 90l.tt:l'll-
C)
AU.. COVU.,
D)
A DAMA• ~
l[J
B'D
4003319210
I~
-T
~
O T _ I _ NOTED.
{K-~. c~.
-1. ':'CC, ooo;
C-IC'AO-Ml~/l.FIAOlll)
NJ9T -
AEPl...ACE> CIM..Y WITH oi:;:aINAL TYPE -Cil'"IED 1!1Y
PA, COPOR.t.TION AND lNllTAU..£0 A8 T111! ORIGINAL lllPACZRB AND
r·~
PO!JlTI~
!Ill!. 00te !NA PROl'"~!ONN. ~ Ul!!IINO SOl..DER -.1n. REeINE CCIRE
9'lln.D AHCI lN91.A...ATINll
......._y
CORO - T -
•.u::.N
-T K
REl'LACEl
911!7~
°"-"'·
N!:n.ININQ APPL!.lNCE TC CU9TONEA
FID'!..ACIEO 9EPOl"I! REl'l..AollNll TO CUSTOMER.
otm..acnuc TUT CONaI8TIMll " ' taov AC I• TO AJ>P\..IEO -~ 90Tl'I •A1...1m:• "' THE PO«R
--._y C0AG ATTAOeCWT PL<JG TI-.: ECl"09E COl«lUCTIVI: .__.ACE OI' THE 41"P\...I.t.NCI! ..OR A PE'IIOC 17
NOT L.£88 Ttu.N ONE .:CONl BEFCIJE ,.,.,__INll
"I
~EU
UNDER THE l'"Ol..LOlllINQ CONlll lOWS .
T1*
--tYlo..f-~
AEl!IIl!ITOA! .....:
~
~IANCE
TC
CIAIT~.
T1* P.C.11 ON Bt.l!l!:Vl!:ll.
w"
I>
ij) (j i)
Sehematie Diagram
SWITCH B'D
4003319220
MADE IN KOREA
NO : 9007970411