/


Текст
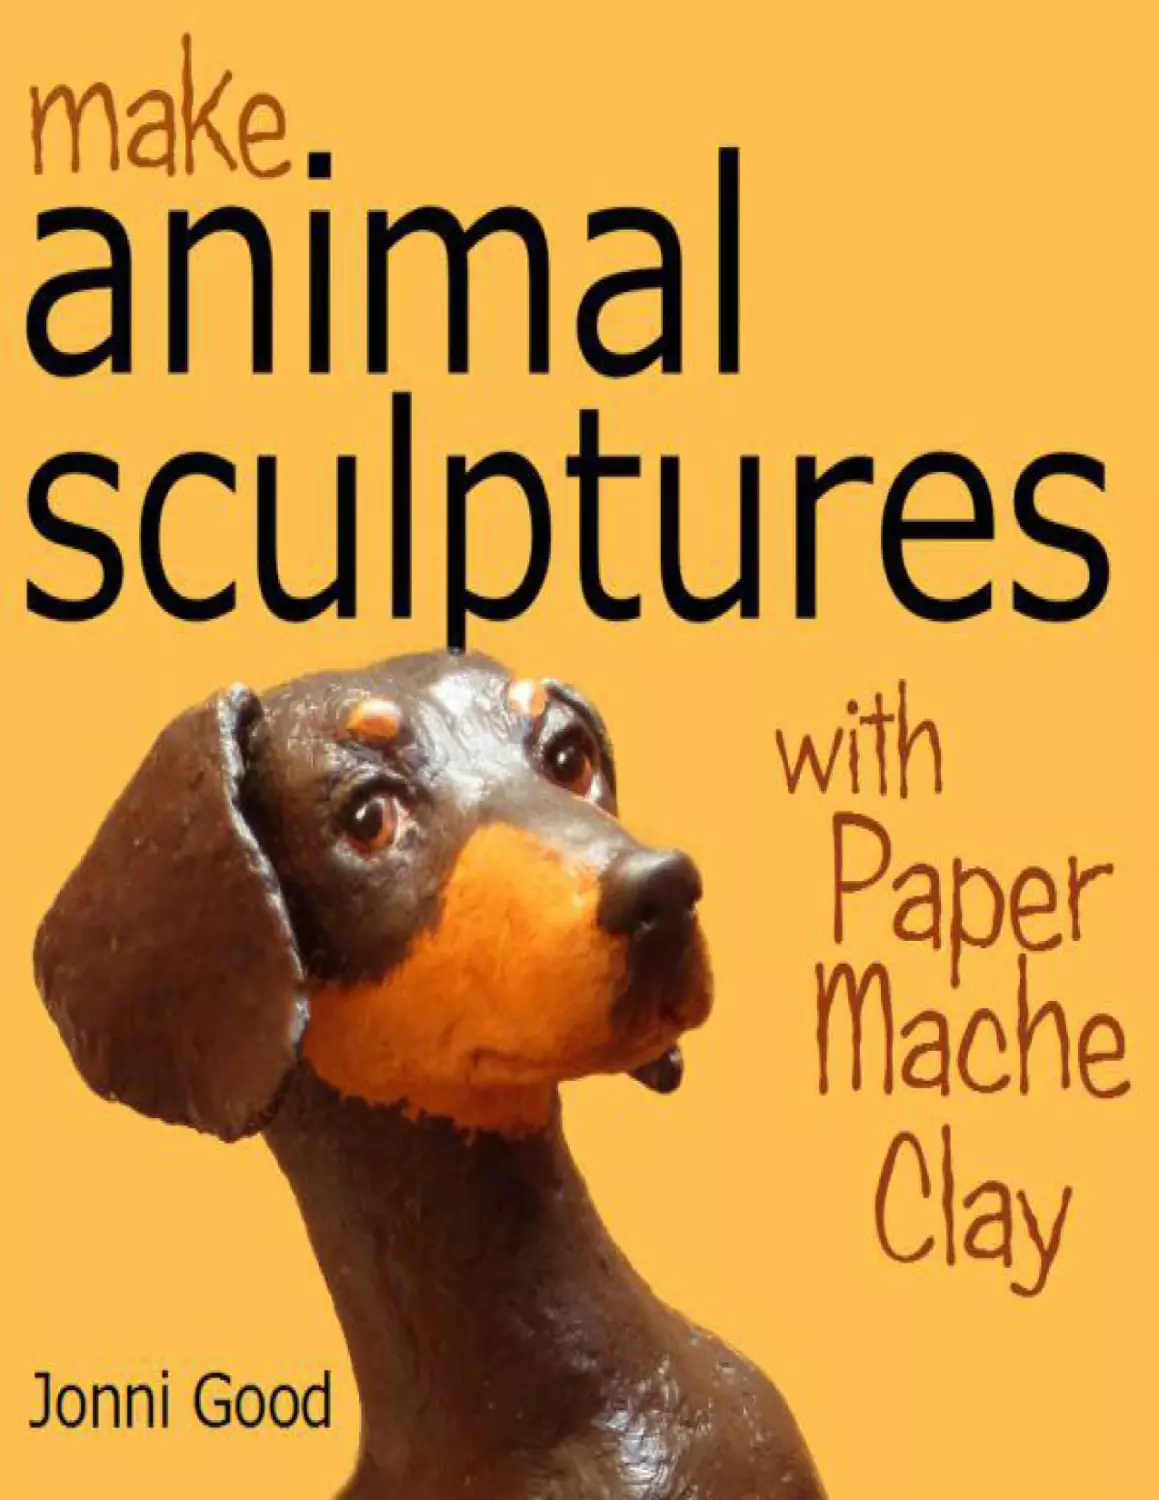
                    Make Animal Sculptures with Paper Mache Clay: How to Create
Stunning Wildlife Art Using Patterns and My Easy-to-Make, NoMess Paper
Mache Recipe
By Jonni Good
Published by Wet Cat Books
1311 V Ave.
La Grande, OR 97850
WetCatBooks.com
©2010 Jonni Good.
ISBN 978-0-9741065-1-9
Visit the author online at
UltimatePaperMache.com

INTRODUCTION:
The all-new recipes and methods in this book will help you master the
art of creating life-like animal sculptures with inexpensive materials in the
easiest and most enjoyable way possible. These are the same materials and
techniques that I developed to use in my own work.

How you’ll make your animal sculptures:

1. Transfer a pattern onto cardboard.
Patterns for each project are included, and I’ll also show you how to
make patterns of your own, using your own sketch or photo.

2. Assemble the pattern pieces into an armature, so your sculptures have
a natural, life-like posture.

3. Pad the armature with newspaper and masking tape to form a solid
base for your paper mache clay.

4. Cover the armature with a thin layer of home-made paper mache clay.

5. Paint your sculpture with acrylic paints after the clay is dry and hard.

I’m sure you’re familiar with the traditional methods of building
sculptures with paper mache, (or papier-mâché, if you prefer to spell it in
French). It usually involves sticking strips of newspaper onto a form with a
paste made from flour and water. As you can see from the previous photos,
there are no paper strips or paste used in the projects you’ll be making in
this book. I used paper strips and paste for many years to make my own
sculptures, mostly because the materials were affordable. I accepted the
drips of paste on my counters and floor, on my hands, (and sometimes the
dog), because they were a part of the creative process. In fact, many of the
tutorials on my popular paper mache website show projects using
traditional methods.
However, as soon as I developed the recipe for paper mache clay, I
stopped tearing up newspapers and mixing up paste. From this sculptor’s
point of view, the new clay has a number of important advantages over
traditional methods.
The most obvious advantage is the mess— there isn’t any. However,
that’s not why I worked so hard to develop these new methods. I spent
many months experimenting with new recipes and techniques for just one
reason: I wanted to find an easier way to create life-like animal sculptures
with realistic details. The new methods make sculpting easier, and that
makes sculpting more fun.

My first priority was to find a method that would allow me to draw my
intended sculpture on paper (or look at a photo) and be confident that my
finished sculpture would actually turn out the way I wanted it to with the
least amount of effort. That’s when the cardboard patterns were developed.
They don’t do the sculpting for you (this is not “sculpt-by-number“ by any
means), but it simplifies the process and it increases your chances of
creating a successful sculpture. That’s not to say that you can’t make
beautiful animal sculptures without making a pattern first, (many people
do), but I use them because it gives me more predictable results. Once you
try them, I think you’ll agree.
Next, I worked to find a solution to two of the problems that have
plagued every sculptor who has ever made a crumpled paper and masking
tape armature and covered it with traditional paper strips and paste:
1. How do you make the “skin” of your sculpture as smooth as you want
it, without fighting with the bumps and crannies that are formed when you
wad up a few pieces of paper and cover them with tape?
2. And how do you create fine details, like the eyes and nose?
The solution I eventually developed combines a few inexpensive
products to create a material that can be spread over a form the way you

would frost a cake (eliminating the bumpiness and the many layers of paper
and paste). This material can also be modeled into fine details, and takes
only a few minutes to make. It dries remarkably hard and strong, even when
applied thinly - 1/8” or so.
I call this material Paper Mache Clay, but you could call it “home-made
air-dried cellulose-reinforced polymer clay” (I don’t know how to spell that
in French). The home-made paper mache clay is easy to use, it isn’t messy,
and it lets you get to your goal (a magnificent animal sculpture) in less time
—and in a way that I think you’ll find is much more enjoyable than
messing around with paper strips and paste.
My instructions are not meant to show you how animals “should” be
sculpted. Instead, what I’ve tried to do is create a system of steps that move
you towards the successful creation of life-like animal sculptures in the
easiest way possible, so you can concentrate on the fun parts instead of
struggling to figure out how to put the materials together. Once you find out
how enjoyable it is to create sculptures using these methods and materials, I
know you’ll go on to invent new techniques that reflect your own character
and style.
Please visit my blog to ask questions about this book, share your own
ideas and methods, and show off your sculptures. Thousands of people visit
my blog every week, and the conversation gets quite interesting at times. I
do try to answer every comment I receive on the blog. Please join us at
http://UltimatePaperMache.com

MATERIALS YOU’LL NEED FOR PAPER
MACHE CLAY
Cheap Toilet Paper - The toilet paper completely “dissolves” into the
clay in just a few minutes when you mix the ingredients together with an
electric mixer. Since the resulting pieces of paper in the clay are so tiny,
your clay can be formed into much finer details than you could get if you
used another type of paper.
White Glue (Elmer’s Glue-All®) - I’ve found that the Elmer’s GlueAll® brand works the best. If this product is not available in your area, ask
your hardware store for a “PVA” glue. PVA stands for Polyvinyl Acetate, a
rubbery synthetic polymer. If at all possible, use the Elmer’s Glue-All,
because we already know it works. However, if you must use a glue other
than Elmer’s Glue-All®, buy a small container so you can make up just one
recipe as an experiment. (Note: Elmer’s School Glue will not work).
A 7 oz bottle is enough to make about a quart of clay. Many of the
sculptures in this book can be made with one quart of clay or less. If you
would like to make larger sculptures, (or more of them), you should be able
to find the glue in gallon containers at the hardware store.
Drywall Joint Compound - Joint compound is normally used in the
construction industry to smooth out the joints between pieces of
plasterboard on new walls. The primary ingredient is either calcium
carbonate or gypsum. Joint compound is called joint filler in the UK,
Fugenmasse in Germany and joint finish in Australia. If you aren't quite
sure what to ask for at the hardware store, I recommend that you go to
YouTube.com and do a search for "joint compound." You'll see videos of
some construction guys using the product for it's original purpose. That will
help when you're talking to the clerk.

My favorite joint compound is made by Sheetrock. Note: Since this
book was first written, the Dap brand changed their formula, and now their
joint compound doesn’t work. All other brands seem to work just fine.
A gallon container of joint compound costs about $6.00 at the time of
this writing, and it will give you enough material to make many quarts of
paper mache clay. If you keep the lid tightly closed, the joint compound will
stay usable in the plastic tub for months. Buy the regular joint compound
that is already mixed and ready to use. It comes in a handy plastic tub.
Don‘t get dry powder or fast-setting joint compound—they will not work.
Boiled Linseed Oil - The linseed oil improves the clay’s ability to take
fine details. You can usually find it at the hardware store or paint store. If
you can’t find linseed oil, you can leave it out of your clay recipe—your
clay will still work. Since there are chemicals in linseed oil that help it dry

faster, you will probably want to leave it out if you’re working with small
children.
White Flour - The white flour is used as a filler. Buy the cheapest flour
you can find at the store, if you don’t already have some on hand. You don’t
need much.

A FEW MORE THINGS YOU’LL NEED:
Some of the projects in this book have ears made from expanded
aluminum that is sold in hardware stores. This product is designed to keep
leaves out of gutters. If your local store doesn’t carry this product, you can
make your ears out of light cardboard instead, (you’ll see how to do this
when you make your piglet), or you can buy metal grids that are specially
designed for sculptors at an art store or online art supply website.
A box cutter or craft knife for cutting your cardboard patterns.

Masking tape (the cheapest brands are best for this work.) You’ll use a
lot of masking tape, so pick up several rolls in different widths.
Some sandpaper—and a face mask designed to be used while sanding.

If you don’t already have a few scraps of bendable wire (for things like
piglet and elephant tails), pick up a small roll of wire and some inexpensive
wire cutters.
An inexpensive glue gun, glue sticks and sheets of Styrofoam from a
craft store. These are used when you put your pattern pieces together. For
the pig and the horse, you will also need four long finishing nails or pins to
temporarily hold the legs in place before they’re glued.
A small portable mixer. (The mixer chops up the toilet paper into very
fine pieces. Mixing by hand doesn’t work as well.) You can usually find a
used hand mixer for a few dollars at a thrift store.
Old newspapers and some aluminum foil. Scraps of corrugated
cardboard or foam board, and some light cardboard, like the kind used for
cereal boxes. Poster board or heavy paper can be substituted for the light
cardboard.

To paint your sculptures you’ll need some acrylic paint and brushes. I’ll
give you the names of the colors I used for each project. Very few colors

were needed for all the animals in this book.
I also recommend that you purchase some Golden Acrylic Glazing
Liquid. If your local art store doesn’t carry this product, you can find it
online. I use this material extensively in my work because it makes it easier
to get a realistic look when I paint my animal sculptures.
For the final protective finish you’ll need some matte acrylic varnish or
a protective coating of your choice.

HOW TO GET THE MOST OUT OF THIS
BOOK
Some of the projects in this book are much easier than others, and some
may appeal to you more—but I do hope you will try them all because you’ll
learn new skills in each chapter. My goal is to show you a system of steps
that move you towards the successful creation of life-like animal sculptures
in the easiest way possible. If you complete all the projects in order, you
should then be confident about taking what you learned in this book and use
the same techniques to create original designs of your own.
In the first few chapters you’ll learn basic techniques, like creating
simple armatures out of crumpled newspaper and masking tape, and then
applying the paper mache clay to your form and creating interesting
textures. I think you’ll enjoy learning these skills while making your first
projects—the vintage chicken and the clown fish.
Then, as the difficulty level increases, you’ll add to your skills while
following a set routine for creating the armatures. The bodies and faces of
each animal are unique, but the steps you use to create them will stay the
same from one project to the next. You’ll find instructions for making your
own patterns from original drawings or photos at the end of the clown fish
and piglet chapters. Want to make a giraffe or rhino? No problem—soon
you’ll know how to sculpt any animal you like.
The paper mache clay recipe was developed to replace the traditional
paper strips and paste that many students and artists now use. Your
sculptures should last just as long and remain just as beautiful when you
make them with the clay instead of traditional paper mache materials.
However, the recipe has not been tested in a laboratory, so it should not be
considered “archival.”

SAFETY ISSUES
As with many other artists’ materials, the paper mache clay and acrylic
paints used in these sculptures should be used with care. Several of the
ingredients in paper mache clay are made for the construction and

remodeling industry. Please read the labels carefully before using these
products if you are not already familiar with them. If you're supervising a
younger artist, please make sure the child is old enough to understand how
to use the products safely.
Paper mache clay is not edible, either while wet or after your sculptures
have dried. The finished sculptures should not be used as toys for small
children—especially teething babies.
Several of the projects in this book were painted with acrylic paints that
contain pigments that need to be treated with respect, such as Cadmium Red
and Cadmium Yellow. If you supervise younger children, I suggest you use
craft paints with non-toxic ratings on the label, instead.
Always wear a mask when you sand paper mache clay (and any other
material). Sanding causes fine dust to be thrown up into the air. If you don't
use a mask, the dust will enter your lungs. Once it’s in there, it may never
come out, and that’s not a good thing. Be smart and use a face mask when
you sand.
Craft knives and box cutters are basically razor blades on a stick. Be
extra cautious when using these tools. I still have a scar to remind me that I
cut my thumb with a box cutter almost 40 years ago, so I speak from
experience. Use knives carefully.
Glue guns and melted glue ar hot. Yes, I know that’s obvious, but you'd
be amazed at how often I manage to stick my finger in hot glue. You, of
course, will be more careful.>/p>
I recommend that you air dry your sculptures near a radiator or heat
vent instead of drying them in the oven, because white glue contains a form
of plastic that doesn't smell good when it gets hot. In the summertime you
can put your sculptures outside in the shade to dry naturally. If you're
impatient, you can keep yourself busy by starting another project while
your first one is drying.
Now let's move on to the next chapter, for an overview of the skills
you’ll be learning in this book.

THE BASICS
In this chapter you’ll learn how to make your paper mache clay, how to
use the patterns in this book, how to create your armatures, and how to
apply your clay.

Every project in the book has a “skin” made from paper mache clay. We
went over the ingredients in the previous chapter, so flip back a few pages if
you skipped right past the introduction or if some of the materials are
unfamiliar to you.
The paper mache clay spreads easily with a knife, and can be molded
into fine details. The recipe and mixing instructions begin on the next page.
Right after the recipe and mixing instructions you’ll find a short
troubleshooting section.
If your clay doesn’t come out smooth and easy to spread with a knife,
read that section for help. And remember to come to my blog at
UltimatePaperMache.com if you need any additional help.

PAPER MACHE CLAY RECIPE
Ingredients:
1 roll of cheap toilet paper (see step 3, below)
3/4 cup (170 mL) of white glue (Elmer's Glue-All®)
1 cup (285 mL) of pre-mixed drywall joint compound (see previous
chapter, page 10, if you aren’t sure what this is)
1/2 cup (63 gm) white flour
2 tablespoons boiled linseed oil, more or less (I don’t actually measure
mine —that way I don’t have to wash out the spoon...)

Tools and Utensils
You’ll also need a large bowl, an electric mixer, a measuring cup, and an
air-tight container. And a tablespoon if you’re not as lazy as I am. The
recipe makes approximately 1 quart (about 1 litre) of paper mache clay.

MIXING YOUR PAPER MACHE CLAY

1. Fill a high-sided bowl with warm water. Remove the toilet paper
from the roll and throw it into the water. Push down on the paper to make
sure all of it gets wet.
2. Then pick up the paper and squeeze out as much water as you can.
Your paper should be damp, but not drippy.

3. (This step only needs to be done the first time you make a batch of
clay.) Take your damp paper and press it into a large measuring cup. The
recipe in this book works well with a roll that contains approximately 1-¼
to 1-½ cups (296 to 355 mL) of wet paper pulp.
If your roll contains more than this amount, your clay will come out too
dry and lumpy. Either buy a different brand with smaller rolls, or measure
each roll before using it so you’ll use the correct amount of paper with each
recipe.

4. Put the paper back in the bowl and break it into chunks about 1"
across. This will allow your mixer to move around the pieces and break
them apart.
5. Add the other ingredients and mix them together, using a hand-held
electric mixer. The mixer will pull the fibers of the toilet paper apart and
turn it into pulp. Continue to mix for at least 3 minutes to make sure the
paper has been mixed in with the other ingredients.
Your paper mache clay is now ready to use. If you won’t be using it
right away, keep it in a tightly covered plastic container. The clay should
stay usable for at least a week if you keep it covered.

TROUBLESHOOTING AND CUSTOMIZING
THE RECIPE

If your clay seems too dry or if it makes clumps instead of a nice
workable clay, check to make sure you didn’t use too much paper. (See Step
3, above). Also check the brand of joint compound you’re using—the Dap
brand does not work. (All other brands seem to work just fine).
If your clay feels sticky, use less flour next time. And if you can’t find
linseed oil, you can leave it out. The clay will feel a bit different, but it will
still work just fine.

HOME-MADE GESSO RECIPE
1 tablespoon joint compound
1 teaspoon white glue
A dab of white acrylic paint
Mix the ingredients until smooth. If you find that your gesso tends
to crack, use a little more glue, or a little more paint.

SIMPLE ARMATURES WITHOUT
PATTERNS:
Most of the projects in this book have patterns, but you can also
make armatures without patterns, as shown below. The photos here
show a simple ball-shaped form, but in coming chapters you’ll also
make long thin twists of paper (for the chicken’s tail and the elephant‘s
trunk) and a flat fishshaped form for your clown fish. Crumpled paper
can be made into almost any shape you can imagine, and several
shapes can be taped together to create more complicated forms.

1. Gather up some newspaper and crumple it into the basic shape
you need for your sculpture. Then start squishing, poking, prodding
and taping until you have the shape you want.

2. Completely cover your crumpled paper shape with masking
tape. You should have a firm, compacted form that will provide
support for the clay. There will be bumps and ridges, but don’t worry
—the paper mache clay will even them out.

ARMATURES MADE WITH PATTERNS:
For most of the projects in this book you will be using a pattern.
I’ll use the baby penguin pattern here to show you how to pad the
patterns with crumpled paper and masking tape. In the next section I’ll
show you how to transfer the pattern itself onto cardboard so you can
make a sculpture in any size you prefer.

1. After you cut out your pattern from cardboard or foam board,
crumple up a piece of newspaper into a shape that will fit a specific
area—the head, for instance. You will be filling out the shape on one
side at a time, and the edges of the pattern will determine the final
profile of your padded form.

2. Tape the crumpled paper to the pattern. The tape should go over
the edge of the pattern so the paper is firmly attached to the armature
—but you don’t want any extra paper to cover the edges. The pattern
should be allowed to determine the final shape of the animal, as seen
from the side.

3. When your first bit of paper is covered with tape, continue to
cover the pattern with more paper until you have the final shape you

need. Some areas will need to be fatter than others. After the first side
is done, flip the pattern over and cover the other side.

In the step-by-by-step instructions in each chapter you’ll see how
much each pattern piece will need to be padded, and which areas, like
the baby penguin‘s beak and wings, don’t need to be padded at all. The
padding should be well-taped, and the legs and wings should be very
firmly attached so the completed form or armature can stand on it’s
own. Animals with legs are attached with foam blocks and a hot glue
gun (I'll show you how in just a minute).

TRANSFERRING PATTERNS TO
CARDBOARD
In this section you’ll learn how to transfer the patterns from the
book onto cardboard, so you can use the cardboard pieces to help
shape your armatures.
You’ll need a ruler, a pencil, and something with a square corner. A
carpenter’s square is very helpful, but you can also use a piece of paper
or even the edges of a book.

1. Draw a grid on your cardboard. Your grid should have the same
number of squares as the pattern in the book. However, you determine
the size of your squares, because that’s how you control size of your
finished sculpture.

2. Transfer the pattern to your cardboard by drawing just one
square at a time. If you ignore everything else, it will be easy to
reproduce the fairly simple shapes inside each square.

3. When you have all the pieces drawn on your cardboard, cut
them out carefully with a craft knife. To make two identical legs or
ears, use the first piece as a pattern and trace around it.

ATTACHING THE LEGS WITH
STYROFOAM BLOCKS
Beginning with the family of Emperor Penguins, you’ll be
attaching legs to your armatures using Styrofoam blocks and a hot glue
gun. You can find Styrofoam at craft stores, and it’s easy to cut and
measure. I use a serrated bread knife to cut my foam blocks.
The foam blocks are used as separators so you can position your
legs a precise distance from the inner body pattern. The measurements
are based on the size of the squares you use when you transfer the
original pattern onto cardboard. That way, I can tell you how large to
make the separating blocks for the legs, even though you’re free to
make your animal sculpture as big or as small as you like by changing
the size of the squares you use for your pattern.

The outer edges of your foam blocks should fit inside the outside
edges of your leg pattern at it’s widest end (the hips and shoulders). If
a corner of the block sticks out beyond the leg pattern, just cut it off
with a serrated knife.
Front Legs:
The separator blocks are a different size for each project. The
important measurement is the depth of the block, because this
determines how far the leg pattern will be separated from the body.

The example shown above is for the dachshund’s front legs. The
instructions call for a block that is two squares thick. I glued two
pieces of foam together to make my block the right size.

In the example above, for the piglet’s front legs, the instructions
call for a block that is ½ as deep as the size of the squares on your grid.
Hind Legs:

The foam blocks for the hind legs need to be cut at an angle. As
you can see from the photo above, (of the dachshund just after the legs
have been attached to the body pattern), the foam blocks on the hind
legs are much deeper at the front than at the back. This puts the legs at
the correct angle so the dog can sit up nice and straight. The African
elephant’s hind legs are made the same way.

Even when animals are standing up, like the horse and the piglet in
this book, the blocks for the hind legs are cut at an angle so the legs are
closer together at the back, towards the tail. In the photo above you can
see me holding the hind legs of the horse armature as the hot glue
cools.

This foam block is cut according to the instructions for the hind
legs of the dachshund. The block is one square thick at the back, and
two squares thick on the front. Although the measurements for each
type of animal are different, all measurements will be based on the size
of the squares you used for your pattern grid.
After the blocks are cut, they’re first glued to the leg patterns with
a hot glue gun, and then they’re attached to the body pattern. The legs
shown in the previous photo are for the piglet.
In the chapters for the standing animal sculptures I’ll show you an
easy way to make sure your finished sculpture will stand up without
wobbling—an especially important trick to know for the horse, who
has only three feet on the ground.

APPLYING YOUR CLAY

When the legs are attached, and the form is padded and taped,
you’re ready to apply the clay. Use a knife to spread the clay onto the
form, and smooth it as you go along. As you can see, any irregularities
in your armature will be smoothed out as you apply the clay.
The first layer of clay should be ⅛ to ¼ inch (3 to 6 mm) thick.
You can use your fingers if you prefer, but the clay will stick to
your hands and it will be much more difficult to get a nice smooth
surface. A knife is really easier. You will only be able to apply clay to
about one half of a sculpture at a time. As soon as you no longer have
a dry spot to hold on to, put the sculpture aside to dry in a warm place.
When the clay is dry enough to handle, continue adding clay until the
entire piece is covered.
When the first smooth layer is dry, you can add more clay to the
areas where you’ll be sculpting details, like eyes and noses. For fine
details you can use clay modeling tools, found objects, or a table knife,
as shown. Experiment with different tools until you find the ones you
enjoy using.
Textures:

You can apply a texture at the same time that you apply your first
layer of clay, but it is almost always easier to apply a thin, smooth
layer first and let it dry, then add your details and textures with a
second layer.

That way, you don’t have to worry about finding a dry spot to hold
on to while you work on your textures and details.
You can make realistic-looking fur with the edge of your knife, or
you can use found objects to press a texture into the clay. You may be
surprised by how many common objects you can find to create realistic
or fanciful textures in your future paper mache clay sculptures. In fact,
you probably have lots of “modeling tools” in your junk drawer.

How these textures were made:
1. The edge of a knife was pressed into the clay to form tight
ridges, which could be used for fish fins or shells.
2. The clay was applied roughly with the flat side of a knife.
3. The edge of a knife was pressed into the clay to form rough
“fur.”
4. The rounded tip of a table knife was pushed into the clay to
make “feathers.”
5. A sheet of plastic wrap was placed on the clay and the flat side
of a knife was pulled across it to smooth the clay.
6. An old piece of burlap was pressed into the clay.
7. This texture was made by pressing a wooden craft stick into the
clay in a random manner.

8. A ball of crumpled aluminum foil was lightly pressed into the
wet clay. This texture could be used to represent rough fur.
9. Window screening was pressed into the clay. I used this material
to make the dry, cracked skin of the elephant.
10. Expanded aluminum gutter screen was pressed into the clay to
form “scales.” (You’ll be making ears with this material, if you can
find it at your local hardware store.)

VINTAGE CHICKEN

In this chapter you’ll make a small chicken in vintage colors. Since
there are no legs or extended tails to worry about and the details are
fairly simple, no pattern is needed. This is a good project to start with.
In coming chapters, the difficulty level will increase.

MAKING A PAPER AND MASKING TAPE
FORM
In This Section:
You’ll learn how to use crumpled newspaper and masking tape to
create an inner form for your sculpture.
Materials Needed:
Gather together a few pages of newspaper and some masking tape.
You’ll also need a few small scraps of cardboard for the chicken’s
comb, beak and wattles, and an old pair of scissors or a craft knife to
cut the cardboard.
Note: This is a whimsical chicken, so feel free to play around with
it—your chicken doesn’t have to end up looking exactly like mine. In
fact, you could get lots of practice by making two or three chickens—
they make nice gifts.

1. Take one to three sheets of newspaper and crumple it into a ball.
Then start taping the paper with masking tape. The size of this ball will
determine the size of your finished chicken.

2. Your ball should be egg- shaped—see photo. If necessary, add
small bits of crumpled newspaper to fill out any large dips and to
round the shape. Cover the ball completely with masking tape.

3. Push your paper ball down on the table to flatten the bottom. Cut
an oval shape from your cardboard with a craft knife or old scissors
and tape it to the bottom of your paper ball. This will give you a solid,
flat base that will keep your chicken from wobbling.

4. Take a square of newspaper, about ¼ page, and twist into a long
roll. Tape the roll to the chicken’s pointy end to form the tail. You will
probably need to cut off the ends of your twist to make it fit. The twist
of paper will create an upside-down U shape.

5. Now make a small teardrop- shaped ball for the head. You may
need to tear your tape into narrow pieces. Use lots of tape to make the
head as smooth as possible. Squish it to make it flat on the bottom and
rounded on top.

6. Tape the head to your chicken. Play around with the placement
until you get a posture you like. The masking tape is easy to remove
and reposition, so you can try out different placements until you find
exactly the right spot for the head.

Adding the Beak, Wattles and Comb

1. Draw a small triangle on a piece of cardboard like the one in the
drawing. The wide end is cut into tabs that will be folded back and
taped to the front of the chicken‘s head. Cut out the beak with a craft
knife or old pair of scissors. Fold the beak down the middle to create a
ridge (where you see the dotted lines on the drawing), and tape the tabs
to your chicken’s head.

2. Cut out the chicken’s wattle from another scrap of cardboard in
the shape shown in the drawing. Using narrow bits of tape, attach the
top of the wattle to the head just below the beak. The bottom part of
the wattle should hang loose, with no tape.

3. Put a scrap of cardboard behind your chicken’s head and draw
the curve of the head on the cardboard. This will make the curve on the
bottom of the comb fit snugly against the head.

4. Then draw the scallops at the top of the comb and cut it out
using a pair of old scissors or a craft knife. Use narrow pieces of tape
to attach the comb to the head, as shown.
Your inner form is now finished. Look over your chicken and press
down any masking tape ends that may be sticking up. You may need to
snip off a few ends if they won’t behave, or cover them with new
pieces of tape. Also check the form from all sides to make sure it’s as
round and symmetrical as you want it to be.
If necessary, add a few more bits of paper to fill in low spots, but
don’t worry if it’s a little lumpy. Now you’re ready to start adding your
paper mache clay.

APPLYING PAPER MACHE CLAY TO
YOUR FORM
In This Section:
You’ll learn how to apply paper mache clay to your form and add
textures to the clay. The clay will dry to a hard, durable “skin” that can
be painted any way you like.
Materials and Tools:
You’ll need some paper mache clay and a knife to spread it with.
You’ll find the recipe and instructions in a previous chapter.
Note: The amount of clay you need depends on the size of your
form. My chicken, which is only about 6 inches long, was made with
less than a cup of paper mache clay. The recipe makes about 1 quart of
clay, so you’ll have lots of clay left over if you make a chicken the
same size as mine. Be sure to keep left-over clay in an airtight
container so it won’t dry out. (If mold is a problem, keep it in the
refrigerator). You can use it later for another project in this book.

1. Use a table knife to put a glob of paper mache clay onto your
armature. Smooth the clay onto the form with the flat side of the knife.
If at any time your knife seems to be sticking to the clay, you can

dampen it slightly, but try to not get the clay too wet. Continue to add
clay until you no longer have a dry spot to hang on to. Then put the
chicken aside and allow the clay to dry overnight. When the clay is
hard, continue covering the sculpture with clay. Feather the wet clay
over the dry clay to make a nice smooth transition. Don’t put any clay
on the bottom of the chicken yet—you’ll do that part last.

2. Carefully cover the cardboard comb, wattle and beak. Smooth
the clay with your knife.

3. Use the edge of your knife to create the line where the top and
bottom of her beak meet. Use the tip of the knife to form her nostrils
and use a round-ended tool to make a depression for her eyes .
Note: In the photos above, you can see that I made the polka-dots
(with the cap from a felt-tip pen) in my first layer of clay. You may
find it easier to put on one smooth layer first, and then add a second
layer for your texture. Or, if you prefer, you can sculpt “feathers” into
the clay, or make spots with the end of a brush, (see images below). Or
you can just leave your chicken smooth. See the previous chapter for
texture ideas.

Making the Bottom Flat:
When all the clay has been added to the upper portion of your
chicken, it’s time to add clay to the bottom of your sculpture. If you do
it as shown below, the bottom of your finished sculpture will be nice
and flat.

1. Put a piece of plastic wrap on a flat surface. Then put a thick
layer (about ¼″ or 6 cm) of paper mache clay on the bottom of your
chicken. Place the chicken, bottom down, on the plastic wrap and push
down to flatten the clay against the plastic.

2. Then carefully pull the plastic away from the clay. Use your
knife to smooth out the transition between the sides and bottom. Lay
the chicken on her side and put her in a warm place to dry. When your

chicken is completely covered with paper mache clay she needs to dry
in a warm place until the clay is hard and no moisture is left in it.
If you place your chicken outside in the shade during the summer,
or over a heat register or radiator, she will dry in one or two days. You
know your chicken is completely dry when you can push on any part
of her “skin” and you don’t feel any movement at all. Since you added
a thicker layer of paper mache to the bottom, be especially careful to
check that area to make sure it’s dry all the way through.

FINISHING WITH ACRYLIC PAINT AND
GLAZE
In This Section:
You’ll learn how to finish your sculpture with tinted home-made
gesso, paint and matte acrylic varnish.
Materials and Tools:
To make your chicken look like the one in the photo you will need
acrylic paint and some glazing liquid to bring out the sculpted details.
You will also need one large flat brush and one narrow brush for
details, and a sheet of fine sandpaper.

If needed, use your sandpaper to smooth any jagged or bumpy
areas. You may find a small ridge where new clay was feathered over
dry clay, and this should be sanded smooth. Remember to use a mask
when you sand.
Cover your chicken with home-made gesso, (recipe in a previous
chapter), using a wide soft brush. The gesso will help smooth out the
surface of your chicken. If the gesso is too thick and details are being
lost, add a little bit of water to thin the gesso. If you have store-bought
gesso on hand, you can use that, instead. When the gesso is dry, you
can sand it, if needed.

Mixing Your Colors
You can paint your chicken in any colors that appeal to you. To
match my chicken, mix acrylic artist’s paints in the colors as listed

below. You can also use pre-mixed acrylic craft paints, if you prefer. If
you made your chicken with a more realistic feather texture, you might
like to paint her to look like your favorite breed. To see the many
different colors and patterns that chickens come in, do a Google image
search online, or look for a book in your local library.

1. Give your chicken an undercoat of warm white acrylic paint.

2. When the white is dry, paint your chicken’s comb and wattles
with the terracotta color. Use the orange, green and yellow for the

polka-dots, distributing the three colors evenly among the spots. The
beak is yellow.

To match my chicken, mix:
Warm White: Titanium White mixed with a dab of Raw Sienna.
Terra Cotta: Cadmium Red Light, Burnt Sienna and Cadmium
Yellow Light.
Orange: Terra Cotta mixture (above) mixed with Titanium White.
Sage Green: Ultramarine Blue and Cadmium Yellow Light.
Yellow: Cadmium Yellow Light and Burnt Sienna.
Final Glaze: Glazing Liquid mixed with a small amount of Burnt
Umber.
Remember that acrylic paint dries quickly, so mix up only as much
as you need, and only one color at a time.

3. Spread the glaze onto a small area of the chicken. Immediately
wipe off the glaze with a paper towel, allowing it to stay in the
recessed details of your design. If you want to remove more of the
brown glaze to let the original colors show through, use a lightly damp
towel. The glaze retards the drying time of the acrylic paint, so you
will have time to experiment. Allow the glaze to dry overnight.

4. Paint the eye with a fine-tipped permanent marker or a fine
brush and black paint. When the eye is dry, dip the sharp point of a pin
or wooden toothpick into white acrylic paint and dab a tiny white dot
into the eye. This will make a spot of reflecting light, and makes the
eye come alive.

5. When all the paint is completely dry, give the chicken a
protective coat of matte acrylic varnish. Allow your sculpture to dry
completely.

Congratulations! You’ve just completed your first sculpture with
paper mache clay. In the next chapter you’ll learn how to use a pattern
to make a fish, and you’ll learn how to create original patterns of your
own.

CLOWN FISH

You’ll use a pattern for the first time when you build the colorful
clown fish in this chapter. The fish will probably look familiar to you,
because this species was used as a model for the animated movie
character called Nemo.

MAKING YOUR CLOWN FISH
In This Section:
You’ll learn how a pattern can help you make a more realistic
sculpture. The patternmaking skills you’ll learn in this chapter will be
useful when you move on to making more complicated four-legged
sculptures.
Materials Needed:
In addition to the materials you used to make your chicken, you
will also need a sheet or two of old newspaper, some masking tape,
and some very light cardboard, (like the kind used for cereal boxes).

TRANSFERRING THE PATTERN ONTO
CARDBOARD

Draw a grid with ½” (1.25 cm) squares onto a piece of light
cardboard, like the kind used for cereal boxes, or onto a piece of poster
board or card stock. Transfer the pattern (on the top of the next page)
onto your
cardboard grid.

Pay attention to just one small square at a time. In this manner, you
can transfer even highly detailed patterns, like this one. It will be
easier to transfer the pattern if you draw the outline of the fish’s body
first (the dark gray line). Then add the fins and tabs.

Note: Cut only the fins out of light
cardboard. The body is shown to help you place the fins on your
sculpture.

MAKING YOUR SCULPTURE

1. Make a body from crumpled paper, the way you did when you
made your chicken, only a lot flatter. Use your pattern to determine the
shape and size. You can give the body a sideways curve or two, (so the
fish will look like it’s swimming), by squishing it and bending it until
you get a shape you like.

2. Now cut out the fins you drew onto your cardboard. Cut tabs
along the edges that attach to the body as shown in the drawing. Tape
the fins to the body by alternating the tabs on either side of the body,
so the fins stand up straight. You’ll need two of the large fins that go
on the fish’s side, (the pectoral fins), and two of the lower front fins,
(called the pelvic fins), on the fish’s belly.

APPLYING THE PAPER MACHE CLAY

1. Cover the body (but not the fins) with a thin smooth layer of
paper mache clay. Apply the clay to just one side at a time, allow that
side to harden, and then cover the other side.

2. Now apply a very thin layer of clay to each fin and use the side
of your knife to press lines in the clay to form the spines. Don’t worry
about the extra bit of clay that extends over the edges of the fins—you
can easily remove it later with sandpaper or a craft knife.

3. If you would like a texture on your fish that indicates scales, you
can do it now by covering the body with another very thin layer of clay
and then pressing a metal grid or other found-object with geometric
scalelike patterns into the clay, or you can draw the scales with a knife.
See the section on textures in the Basics chapter for more ideas.

4. Now add the lips and eyes, using small dabs of clay. If you want
your fish to look like Nemo, make really big eyes.

FINISHING YOUR FISH
When the clay is completely dry, sand your fish, paying special
attention to the edges of the fins where extra clay needs to be removed.
Large lumps can be cut away with a craft knife. Your fins will be very
thin, but they are surprisingly strong.
To finish your fish, first give the sculpture a coat of home-made
gesso, (recipe given previously), or use some gesso from the art store.
The white gesso’s surface beneath your colors will help the acrylic
paint look brighter. When the gesso is dry, you can sand it if needed.
To match my clown fish, mix:
Cadmium Red Light mixed with a small amount of Cadmium
Yellow Light for the red stripes.
Titanium White for the white stripes.
A thin wash of Ultramarine Blue mixed with water over the top
1/3rd of the red stripes after they were dry.
A thin wash of Cadmium Yellow Light mixed with water over
bottom 1/3rd of the red stripes.

Black made from Ultramarine Blue and Burnt Sienna for the black
stripes and the eyes.
Mix the colors as they’re needed, so they won’t dry out before
you’re ready to use them.

After the acrylic paint is dry, finish it with a protective coat of
acrylic varnish. Your new fish may stand up on it’s own on the three
bottom fins, or you can drill a small hole in the top fin and hang it
from a string.
On the next page I’ll show you how to make a pattern for any type
of fish, using photos or drawings. There are a number of wood carvers
who make beautiful fish sculptures especially for sportsmen (and
women) who would like an artistic way to remember the exciting day
when they caught a prize salmon or trout. If you would like to surprise
someone with a sculptured trophy of their favorite fish, you can use the
following instructions to reproduce the fish’s shape, using photos taken
on the day of the catch. It would make a lovely gift.

MAKE YOUR OWN FISH PATTERNS
In This Section:
You will learn how easy it is to make patterns of your own. This
technique works for any type of fish, from the smallest goldfish to the
biggest shark.
Materials Needed:
To make your own fish pattern, find a nice photo of any type of
tropical or fresh-water fish you like. Be sure your photo shows the fish
from the side. The fish I used for the example is a Powder Blue
Surgeonfish. You can use a sketch instead of a photo, if you like.

1. Print out your photo or draw a fish on a piece of paper. Then
draw the outline of the fish over the photo or sketch and add the tabs.

2. Draw a grid over your fish so you can transfer the outline onto a
piece of light cardboard.

3. Now draw another grid on a piece of light cardboard. The size of
the squares on your grid will determine the size of your sculpture.
Transfer the pattern as you did when you made your clown fish, and
then complete your sculpture using the instructions in this chapter. A
hanging mobile with 5 or six colorful fish would be very nice - but do
keep your sculptures out of reach of teething babies.

Note: Whales and dolphins are shaped almost like fish, so you can
use these instructions to make a sculpture of your favorite marine
mammal, too. The biggest challenge would be turning the tail so the
flukes are horizontal.

EMPEROR PENGUINS

Now we’ll make a family group of Emperor penguins. You can
make all three, or just make one or two. If you know someone who
loves watching the March of the Penguins movie, this group would
make a very special gift.
USING A PATTERN WITH LEGS
In This Chapter:
This is the first project in this book that uses a full pattern,
including both body and legs. You’ll learn how to attach the legs to the
body pattern in the correct place using Styrofoam and a hot glue gun.
Materials Needed:
In addition to the materials you used for your fish and chicken,
you’ll also need some blocks of Styrofoam from a craft store, and an
inexpensive hot glue gun. The patterns are on the following two pages.

TRANSFERRING THE PATTERNS

An adult emperor penguin is about 48” (122 cm) high, but you
don’t have to make your birds that big. I used a grid with 1½″ (3.8 cm)
squares, so my tallest adult penguin sculpture is about 15 ½ inches
(39.4 cm) tall. You can make your own penguins in any size you want
by changing the size of the squares on the grid you draw for the
patterns.
The dotted gray lines on the adult penguin patterns show how the
wings and legs are positioned on the body.

1. Transfer the patterns onto cardboard or foam board. There are no
separate leg pieces for the baby .
2. Use the leg and wing pieces as templates, and draw around them
so you have four of each. Cut the baby’s wings out of light cardboard.

PREPARING THE LEGS

1. Tape the adult penguins’ feet to the bottom of the legs, as shown.

2. Pad the inside of the legs about half-way up, and pad the entire
outside of the legs. Pad the toes with three rolls of paper and masking
tape, as shown. Leave a deep indentation between the toes.

3. Cut blocks of Styrofoam that fit inside the wide portion of the
legs. Your Styrofoam blocks need to be as deep as one square on your
pattern grid. For instance, the squares I used for my grid
were 1½″ high, so I made my Styrofoam blocks 1½″ deep. If you made
your penguins larger or smaller than I did, use the measurements from
your own pattern grid. If necessary, glue several pieces of foam
together to make the Styrofoam blocks thick enough.

4. Glue one block to the inside of each leg with a hot glue gun, and
then glue the legs to the body, using the dotted grey lines on the pattern
to help you find the correct position. Make sure the tail sits flat on the
table—you need the tail to help your penguin stand up.

PADDING THE BODIES

1. Firmly tape crumpled paper to the lower tummy and tail,
beneath the legs. Then continue to pad the body and head, covering the
paper completely with tape. The penguins’ bodies will look a bit like
footballs with heads after you’ve added all the padding. When you
attach the wings, use tape only on the shoulder area at the top, leaving
most of the wing free. Do not add paper padding to the wings or beak.
Cover the cardboard edges of the wings and beak with masking tape so
the clay will stick.

2. Pad the body and head of the baby penguin, as shown. Attach
the light cardboard wings at the shoulders. Cut a round piece of
cardboard and tape it to the bottom of the baby penguin to give it a flat
surface, like you did when you made your vintage chicken.

APPLYING THE CLAY

Cover the birds with a thin, smooth layer of paper mache clay.
Remember to cover the inside surface of the wings, too, and make the
bottoms flat like you did when you made your chicken.

The beaks are quite pointed—add enough clay to the end of each
beak for the point, but don’t worry if you can’t get the wet clay to hold
the pointed shape just yet. You can shape the clay with sandpaper or a
craft knife after it’s hard. Use your clay to give your baby penguin
some toes peaking out from under his belly, as shown in the photo.
When the clay is dry, sand if needed. You can now use your craft knife
and sandpaper to give the beaks a nice smooth surface and a sharper
point.

PAINTING YOUR ADULT PENGUINS

1. Cover your penguins with home- made gesso (page 19) or storebought gesso. If you like, you can use a fairly stiff brush to create a
“feather” texture with the gesso.

2. Use a sharp wooden tool to draw the eyes in the wet gesso.
Since both the eyes and the surrounding feathers are black, they will be
difficult to see when the sculptures are finished.
3. Allow the gesso to dry completely. Sand lightly, if needed. Then
use a pencil to draw the edges of the color patterns on each penguin
(see photo at the beginning of this chapter).
4. Use Titanium White acrylic paint to cover all the areas that will
not be black or dark gray.

5. When the white is dry, make up a very dark stain using Burnt
Sienna, Burnt Umber and Ultramarine Blue. The color should be a
dark slate gray.
Dilute the color with water and a little bit of Acrylic Glazing
Liquid to keep the stain from drying too quickly. Brush the stain onto
all the dark areas of the adult birds, including the feet, and then rub
some of it off with a dry paper towel. This initial stain will show
through after the final dark glaze is applied, and I think it makes the
large expanse of gray a bit more interesting. However, if you prefer
you can paint the dark parts of your adult penguins with one coat of
undiluted gray paint, instead.

6. When the gray wash is dry, use Cadmium Red Light mixed with
a little Cadmium Yellow Light to paint the orange crescent shape on
the head. Mix Cadmium Yellow Light with Titanium White and fill in
the yellow portions of the penguin’s head and upper chest.

7. Paint a black stripe down the edge of the dark gray area on the
chest and legs, and around the edges of each gray wing. Look at the
large photo at the beginning of the chapter to see how this stripe

should look. Paint the head black. When the black paint is dry, paint
the thin pink line on the beaks.

8. Mix up a glaze using the same colors you used in step 5, but
dilute it with Acrylic Glazing Liquid only, without water. Use this
transparent glaze to completely cover the gray stain you used on the
penguins‘ backs and wings. This will even out the color somewhat, but
you will still see an bit of variation and texture showing through. This
makes the gray look more interesting than a large amount of one flat
color.
Use Titanium White to retouch the white area, if needed. Allow all
the paint to dry, and then finish your sculptures with a matte acrylic
varnish.

PAINTING YOUR BABY PENGUIN

Draw the color patterns on the dry gesso with a pencil, and then
paint the white area of the face. Use the final dark gray glaze you used
for your adult penguins (step 8) to darken your baby’s toes. Then add
Titanium White to this gray paint to lighten it, and paint the baby’s
body (including the back) with this new color. Paint the beak, the back
of the head, the thin line around the chin, and the eyes with black
paint. Add a tiny white spot in each eye for a reflection.
When all the paint is dry, finish with matte acrylic varnish.
NOTE: Most penguin species have basically the same shape as the
Emperor Penguin (although most of them are not as big). Other species
can be identified by the colors and patterns of their feathers. Some
penguins also have interesting feather topknots on their heads. You can

use the directions given here, with slight variations, to make other
species of these cold-loving birds.
Now you’re ready for the next project, which has some interesting
new challenges. Your piglet will have four legs instead of two, he has
floppy ears and an interesting nose, and you’ll have much more
opportunity to give him a “personality” by modeling his eyes and
smile. Yes, he’s a bit more difficult, but I know you’re ready for the
challenge. On to the next project: a happy spotted pig!

PIGLET
In this chapter you’ll make a loveable little piglet, with spots
modeled after a KuneKune pig, a rare miniature breed.

MAKING YOUR PIGLET
In This Chapter:
You’ll learn how to use a pattern to make a four-legged sculpture,
and you'll sculpt the fine details, like eyes and feet.
Materials Needed:
You will use the same materials you used for your previous
projects, plus a short piece of wire for the tail and a tool for cutting the
wire. You’ll also need some aluminum foil and four finishing nails or
long pins.

TRANSFERRING THE PATTERN ONTO
CARDBOARD

Transfer your pattern onto corrugated cardboard or foam board.
For the pig in the photo, I used a grid with 2” squares, so my piglet is

about 12” long from nose to tail. You can make your own pig in any
size you want. Cut out the pieces with a craft knife.

Then trace around the front and back legs on another piece of
cardboard so you will have four leg pieces in all. Use the cardboard ear
as a pattern and trace around it on a piece of light cardboard or poster
board to make two ears.
Cut the tabs on the ears, like you did when you made the fins on your
fish.

PREPARING THE BODY PATTERN

1. Mark the divisions on the head, as shown on the pattern. Then
tape the nose to the end of the snout.
Note: You can use crumpled paper for the next steps on this page,
but the foil is easier.

2. Crumple a bit of aluminum foil into a flattened cylinder that
conforms to the shape of the snout, as shown. Tape it to one side of the
snout, then make another one and tape it to the other side.

3. Form some foil into a triangular shaped ball that will fit the
lower jaw. Tape it to the pattern piece, and then repeat this step for the
other side. The upper jaw sticks out farther than the lower jaw.

4. Form a large ball that fits the cheek area, and tape it on.

5. Now make the forehead piece in the shape of a flattened
cylinder. The forehead, or “eyebrow bone,” should be thicker than the
padding on the snout.

6. Check the overall shape of the head, and add more aluminum
foil, if needed. The cheek should stick out farther than the forehead,
and it should be nice and round, as shown.

PREPARING THE LEG PATTERNS

1. Pad the lower legs on both sides, but don’t pad the feet just yet.
Leave the hips and shoulder areas free of padding, as shown.

2. Pigs have cloven hooves, meaning that they’re split in the
middle between the two toes. To make the feet, crumple two

triangular-shaped aluminum balls. Tape the first ball to one side of the
cardboard pattern.

3. Cover the other ball with masking tape, and then tape the top
and back of the ball to the foot, as shown. This will leave the two toes
separated.

4. Cut four Styrofoam blocks. The two blocks for the front legs
need to be as thick as one-half of a square on the grid that you used to
make your pig pattern. For instance, I used a grid with 2” squares, so

my foam cubes are 1” thick. Make the cubes wide enough so they fit
inside the shoulder area of the pattern, without sticking out over the
edges.

The blocks for the back legs need to be angled, to give the pig a
natural posture. Make two blocks that are ½ of one square thick on one
side. The other side should be 1-½ squares thick.
Since I used a grid with 2” squares, my cubes are 1” thick on the
tail side, and 1 ½” thick on the front side. Your measurements will be
different if you made your pig in a different size than mine. Use a hot
glue gun to attach your cubes to the legs, as shown.

ATTACHING THE LEGS

1. To position the legs temporarily, use four long finishing nails or
pins. Push one nail through each cardboard leg pattern, and then
through the Styrofoam cube.

2. Press the sharp ends of the nails into the body pattern, as shown.
Reposition the legs until your pig is standing up straight, and his legs
are in the positions shown.

3. When the pig is standing the way you want him to, use a pen to
draw the outline of the foam blocks onto the body pattern. Then
remove the legs from the body and take out the nails.

4. Use your hot glue gun to add glue inside the marked areas on the
body pattern. Do just one leg at a time.

5. Glue the leg to the body pattern, using the drawn lines as guides.
Do the same for each leg. Check to make sure the legs are all still in
the correct position while the glue is still slightly warm, so you can
make adjustments if needed.

6. When the glue is cool, your armature should stand up on it’s
own, as shown.

PADDING THE BODY

1. Put crumpled paper beneath the hips and shoulders, as shown.
Also fill in the neck area between the cheek and the front shoulders.
You can now bend the pig at the neck if you want him to be looking
slightly to one side.

2. Add padding to the body. Fill in the tummy so it comes up to the
level of the shoulder and hip patterns, as shown.

3. Fill out the shoulders and hips with more padding. Use lots of
masking tape. The newspaper should be completely covered.

4. Pad the insides of the hind legs so they form buttocks. Also fill
in the insides of the front legs. When seen from underneath, you piglet
should look like the photo.

ADDING THE EARS AND TAIL

1. Cut the tabs on the light cardboard ears and bend them back.
Curve the ear into a “C” shape and tape the tabs to the pig’s head, just
behind the “forehead” or eyebrow bone.

2. Cut a piece of light wire long enough for the tail plus a few
inches more. Completely cover the wire you use for the tail with
masking tape to keep it from rusting, which would ruin the painted
finish on your pig.

3. Tape the extra portion of the tail to the pig’s backbone, as
shown.

Your armature is now finished, and it should look like this.

APPLYING THE PAPER MACHE CLAY

1. Begin applying the clay to the pig’s tummy and the insides of
the legs. Don’t put any clay on the bottom of the feet just yet. If you’re
making a boy pig, this is a good time to add a little bump.

2. Continue to add clay to the outsides of the legs and beneath the
pig’s chin. You can now turn your pig right-side up on the table, and
continue covering the sides and top.

3. Cover the head, including the nose, with clay. Use your knife to
define the mouth, as shown. Don’t cover the ears yet, but do cover the
ear tabs that you taped to the head.

4. Use the rounded end of a paintbrush or similar tool to form the
nostrils.

5. Cover the tail with a thin layer of clay. Don’t worry if you can’t
make it smooth— you can correct this with sandpaper when the clay is
dry.
At this point you should allow your pig to dry before continuing.
Once the clay is hard, you will finish the ears and feet.

6. When the clay on the head is dry and hard, cover the insides of
the ears with a thin layer of clay, like you did when you made the fins
on your fish.

7. Then cover the outsides of the ears. Don’t worry about the extra
clay on the edges of the ears. You will shape the ears with a craft knife
and sand them smooth when the clay is dry.

8. Add some clay to the pig’s head so you can sculpt the eyes. Use
a pointed tool to shape the eye, and smooth the edges of the new clay
over the old clay, to form a smooth surface on the face.

9. You can now add clay to the bottoms of the feet. Shape the
hooves, making sure the cleft between the toes is well defined. Place
the pig feet down on a piece of plastic wrap to make the bottoms of the
feet nice and flat. If you allowed the body clay to dry before covering

the feet, you can now place your pig upside down (a bread pan helps to
hold it up) to allow the feet and ears to dry.

FINISHING YOUR PIGLET
The piglet in the photo at the beginning of the chapter has a warm
pink skin and spots borrowed from a KuneKune pig, a miniature breed.
Pigs come in a wide variety of colors and patterns, and there are even
wooly pigs. You can use the instructions below to make a pig that
looks like mine.

1. Sand the edges of the ears, and trim the hooves, if needed.

2. Cover your pig with gesso, and allow it to dry. When the gesso
is dry, sand your piglet to make a fairly smooth surface.

3. To give your pig a nice pink glow, make up a stain using Burnt
Sienna, water and a small amount of Glazing Liquid Using a wide
brush, cover a small area of the pig and then wipe the color off with a
paper towel.

4. When the stain has dried completely, make up a warm white
glaze using Titanium White and a small dab of Raw Sienna. Thin this
paint with Glazing Liquid to make it transparent. Apply this glaze over
the pig, as shown.

5. When the white glaze is completely dry, draw spots on your pig
with a pencil, and then fill in the spots using black, made from Burnt
Sienna and Ultramarine Blue.

6. Use the same black to paint the pupil of the eyes.

7. To make the halo around the spots, thin some of your black with
Glazing Liquid and paint this glaze around the spots.

8. When the black is dry, mix up a small amount of light brown,
using Raw Sienna, Burnt Sienna, and a little water. Paint this on the
eye, then use a cotton swab or the corner of a paper towel to rub off a
small amount of this brown from the lower front quarter of the iris.

9. Mix up a very transparent glaze using Burnt Umber and Acrylic
Glazing Liquid. Paint this glaze over the eye, the mouth, the nostrils
and the insides of the ears. Use a damp paper towel to remove almost
all of the glaze - you want it to define the details, but it should not be

allowed to color the skin. Then use a very fine brush to add a small dot
of white over the black pupil for a reflection.
Your piglet is now ready for a final finish of matte acrylic glaze.
Pigs are very social creatures, so make sure you display your
sculpture where he can have lots of company, and be admired by all
your family and friends.

MAKING PATTERNS FOR FOURLEGGED
SCULPTURES
After you finished making your Clown Fish, I showed you how to
make a pattern for any kind of fish using a photo or drawing. On the
next page I’ll show you how the same techniques can be used when
making patterns for four-legged sculptures.
I’ll also show you how I use a drawing as the basis for most of the
patterns I use for my own sculptures. For instance, the piglet’s pattern
that you just completed was made from a drawing that emphasized the
piglet’s happy nature. When using patterns that you make yourself,
you can put your own personality into your sculptures.
MAKING A PATTERN FROM A PHOTO
First, let’s see what happens when we trace around this photo of a
pig. The process is the same as the one we used to make the fish
pattern, but you do need to add legs, ears, noses, and tails when you
make patterns for four-legged critters. Even when you use a photo, you
will need to get creative for things like ears and the legs that are on the
hidden side.

1. Print your photo, and then draw around the outline of the body.
Then draw the legs— including the hip and shoulder. The legs in this
photo are very similar on both sides, so we only need to draw one front
leg and one back leg.

2. Draw the grid over the drawing, so you can transfer the pattern
pieces onto a piece of cardboard.

3. Create a grid on a piece of cardboard or foam board, and transfer
the outline of the pig’s body and legs to the new grid. Some guesswork
is needed when drawing the nose and ears, so these pieces may need to
be changed when the sculpture is put together.

After the pieces have been cut out of cardboard, you can get a good
feel for how your finished sculpture will look even before you add the
paper and masking tape padding.
CREATING A PATTERN FROM A SKETCH OR DRAWING

Now I’ll show you the same process, but using a drawing instead
of a photo. This is how the pattern for the piglet in this chapter was
made. I used the photo on the previous page as one of the references
for my drawing, but I wanted the finished piglet sculpture to seem
younger and happier. I made the head rounder, the ears a bit bigger,
and put a smile on his face. The piglet in the sketch is also a bit fatter
than the real pig I used as a model.

1. Once you have a drawing you like, you’ll need to outline the
body and legs, including the shoulders and hips, just as you would if
you were using a photo.

2. Then you transfer the pattern onto cardboard or foam board.
Again, some guesswork is needed for the ears, since they’re folded. If
your drawing doesn’t show your animal from the side, you may have
to do a lot of guesswork. In fact, you may need to make several
patterns until you find exactly the right proportions and shapes.

For instance, the dachshund in the next chapter started out as a fast
sketch, shown here. Changing my scribbles into a finished sculpture
did take a bit of experimentation and a lot of guesswork. I found many
reference photos of dachshunds so I could get the proportions right,
and I used more photos for the details, like the eyes and nose.
Then I continued to make changes during the process of putting the
armature together. The result is the pattern you’ll find in the next
chapter. I suggest that you start making many sketches of your favorite

animals, and then practice turning those sketches into patterns. At this
stage, a good book on drawing animals and a sketchbook can be two of
your most valuable resources.

BEGGING DACHSHUND

In this chapter you’ll create a delightful begging dachshund
looking loveable and hoping for a treat. This dog sculpture would
make a wonderful gift for anyone who loves this breed.
MAKING YOUR DACHSHUND
In This Chapter:
You’ll learn how to give tails and bodies a twist to imply
movement and give your sculptures a more dynamic pose; you’ll get
more practice sculpting eyes, noses and paws; and you’ll learn how to
create realistic fur texture with the paper mache clay.

Materials Needed:
In addition to the materials you used in previous chapters, you will
also need some aluminum grid, which is sold at the hardware store as a
product to keep leaves out of gutters. If you can’t find any, you can use
light cardboard for the ears.

PREPARING THE BODY PATTERN

Transfer the pattern to cardboard or foam board and cut out the
pattern pieces. As usual, you can make your sculpture any size you
like by changing the size of the squares on your grid. Cut one ear out
of the cardboard and set it aside. You’ll use it as a pattern to cut two
ears from expanded aluminum or light cardboard.

1. Pad the muzzle with aluminum foil, as shown. Tape the padding
to the pattern.

2. Roll up a triangular ball slightly thicker than the muzzle
padding. (You’ll add clay over this area when you sculpt the eyes. )

3. Make a larger ball for the cheek and back of head. A dog’s head
is almost square when seen from the top.

4. Pad the neck with aluminum foil. The foil will help when you
bend the neck. Tape all the foil firmly to the pattern, and repeat these
steps on the other side of the head.

5. If you want your dog’s head to cocked slightly to the side, like
the dachshund in the photo, grasp the head and neck and twist them
until the head is in the position you want. If you made your pattern on
foam board it may tear, but that’s OK. Just use plenty of tape to repair
any tear or cut in the pattern. (See photo on next page).

6. Make two long, thin twists of aluminum foil for the tail. Tape
the twists to the sides of the tail pattern.

Then bend and curve the tail until it looks natural. The foil will
help hold the curves in place.

PREPARING THE LEG PATTERNS

1. Three of the paws need to be turned. For the left front leg and
both back legs, make a cut towards the middle of the leg where it
meets the paw, but leave a small tab in the middle. Then twist the paws
and tape them in place, as shown. The right “arm” is bent in at the
elbow and at the wrist.

2. Add padding on both sides of the lower legs, as shown.

3. The paws are held close to the dog’s chest, so it would be hard to
add clay to the underside of the paws after the pattern pieces are
attached and padded. It’s easier to add the clay now.
Put clay over the paw, building it up to the same level as the
padding on the legs. Put extra clay over the ends of the paws so you’ll
be able to make four toes on each foot. Put the legs aside and allow the
clay to dry.

ATTACHING THE LEGS TO THE BODY
PATTERN

Cut four Styrofoam blocks, like you did for the pig. The cubes for
the front legs should be as deep as two squares on the grid you used for
your pattern. For instance, I used 1” squares on my pattern, so the
cubes for the “arms” on my dachshund are 2 inches deep.
The hind legs are attached at an angle. (See photo on next page).
The Styrofoam cubes should be 2 squares deep at the front, and one
square deep at the back. Glue the legs to the body as shown with your
hot glue gun.

PADDING THE ARMATURE

1. Begin by filling out the insides of the legs, and tape the legs and
padding firmly to the Styrofoam blocks.

2. Turn the dog over and fill in the buttocks area.

3. Fill in the sides of the tummy and chest. The body should have a
nice sausage shape.

4. Fill in the hips and shoulders and use small bits of padding to
round out the upper legs in the chest area.

EARS

1. To make ears with expanded aluminum, use your cardboard ear
pattern and use it to cut two ears out of the metal grid. You can use an
old pair of scissors to cut the aluminum. The grid will stretch, so you
don’t need to cut into the tabs, as you did when you made the pig’s ear
out of light cardboard.

2. Curve the ear into a “C” shape. Bend and stretch the tab area so
it will lie flat on the head. Tape the ear to the head.

You may want to cover the edges of the ear with masking tape, as
shown, to make it easier to get a smooth edge when you add the clay. It
also keeps the cut aluminum wires from scratching you. If you don’t
have the aluminum grid, make the ears the way you did when you
made your pig.

APPLYING THE CLAY

1. Completely cover the armature with a thin layer of paper mache
clay. As you can see from the photo, the muzzle is still quite narrow,
because the details like lips and eyes will be added later with more
clay. Leave the ears bare for now, because it’s easier to model the eyes
and other facial features first.

2. Put extra clay on the back of the “arms,“ the back of the hind
legs, and the tail.

Use the edge of your knife to press in some “feathers,” or deep fur
texture, as shown. You may find it easier to allow the first layer of
smooth clay to dry, and then add the textures with a second layer.

3. Add a bit of clay at the top of the legs to indicate the narrow
muscle that connects the leg to the side, just above the knee. You‘ll
also notice that a female dog‘s lower belly fat tends to divide along the
center line. You can indicate this line, as shown. If you’re making a
male dachshund, you’ll need to add a bump between the legs on the
lower belly.

SCULPTING THE DETAILS
When the clay on the body is hard enough to handle, you can begin
adding the details.

A dog’s forward-looking eyes tend to make the skull somewhat
square when seen from the top. Check your head from above to make
sure you’re getting the right shape to the head.

Also note that the dog has a valley down the center line between
the ears, so add a bit of clay to each side of her head, as shown. Don’t
cover the ears just yet.

When the general shape of the head is correct, add enough clay to
form the eye and eyebrow bone. Try to form the shape of the eye, as
seen from the front, top and side. Remember to add a bump for the
eyebrow, too. Dogs have very expressive eyebrows.

Note: You can use the photos shown here as models, but you
should get into the habit of looking closely at photos of real animals—
or, if you have a dog in your own home, ask her to model for you.
However, you should be very conscious of the fact that dogs consider a
direct stare to be a sign of aggression. Try to look at your dog’s eyes
without causing her distress, because she may feel threatened if you
get too close or stare at her too long.

The overall shape of the muzzle as seen from the front is a rounded
triangle, with the wide part of the triangle on the bottom. Add
additional clay to the muzzle to form the general shape, as you did for
the wider part of the head.
Then add clay to the front end of your dachshund’s muzzle and
model the nose as shown here, (or use a photo or your own dog for a
model, as suggested for the eyes). Notice the slight crease in the
bottom half of the nose, which extends down to the mouth. The top lip
is made from a layer of fatty skin that hangs over the lower jaw. When
the eyes, nose and mouth are finished, put the sculpture in a warm
place to dry.

When the details of the head have been added and the clay is dry,
it’s time to finish the ears.

To make a firm connection between the top and bottom layers of
clay, firmly press some clay onto the underside of the ear with your
knife so some of it bulges through the holes of the aluminum grid.
Then add a bit more clay to the outside of the ear and spread it so it’s
smooth. Completely cover the ear, including the edges of the wire. You
will trim the outside edge of the ear after the clay is dry. When the clay
dries it may shrink and create a slightly bumpy surface. If so, just add
another very thin, smooth layer of clay to the ear and let it dry a
second time.

FINISHING YOUR SCULPTURE
When the clay on the ears and the rest of the body is completely
hard, sand if needed, paying special attention to the edges of the ears.
Make the nose as smooth as possible.
Then apply a layer of gesso with an old, stiff brush. The brush
marks will look like smooth fur. Begin adding your gesso at the tailend of the dog, and move up towards the head, overlapping the fur
marks in a natural way. Once the gesso has dried, you can lightly sand
it, if needed, and then paint your dachshund.

1. Begin by staining the entire sculpture with a thin wash made
from Raw Sienna and Burnt Sienna thinned with water and a little bit
of Glazing Liquid. Paint the wash onto the sculpture, and then wipe
much of it off with a paper towel. This will bring out the texture of the
fur.

2. Allow the base coat to completely dry. Then paint the black
portions of your dog. Make the black by mixing Burnt Sienna with
Ultramarine Blue. Add a mustache below the nose with a fairly dry
brush, and smudge the black under the nose with your finger or paper
towel.

3. After the black parts are dry, mix up Raw Sienna, Burnt Sienna,
and a touch of Ultramarine Blue. Thin this paint with water and a
small amount of Glazing Liquid to make a transparent reddish wash
for the paws, eyebrows and muzzle.

PAINTING THE EYES

1. Use a pencil to draw the edges of the dog’s iris. Then paint the
white part of the eye with a warm mixture of Titanium White, Burnt
Sienna and a small amount of Ultramarine Blue. For a small pink spot
in the corner of the eye, add a bit more Burnt Sienna. When the white
is dry, paint the edges of the irises with a thin black line.

2. Paint the pupils black and allow the paint to dry. Then add a
wash of warm reddish brown, made from Burnt Sienna, Burnt Umber
and a bit of Glazing Liquid. Use a cotton swab or the corner of a paper

towel to remove a patch of this paint in one side of the iris, to allow the
lighter brown beneath it to show through.

3. Then place a tiny spot of white for a reflection, on the side of the
pupil opposite the light spot on the iris, as shown here.
When the paint on the eyes is completely dry, mix up a very small
amount of Burnt Umber with Acrylic Glazing Liquid. Use this
transparent glaze along the edges of the black stripe on the top of the
dog’s muzzle, and to blend in the black mustache below the nose. Also
use this color to bring out the line of the mouth by painting it onto this
area and then wiping off almost all of it. This will help define the
mouth in a natural way.
When the glaze is dry, finish your dachshund with a coat of matte
acrylic varnish.

Note: Why mix your own black instead of using black acrylic paint
straight from a tube?
Black fur almost always shows a strong hint of red in the black
areas, (which can be seen when you look at a red and black dachshund
in just the right light), or a hint of blue if the animal is exceptionally
black (like a raven, for instance). However, the black paint that comes
from a tube has a slightly green tint. Even though we don’t consciously
notice this, black paint doesn’t “feel” quite natural.
Mixing your own black from Burnt Sienna and Ultramarine Blue
will create a warm, natural black that is much richer and more
interesting than plain black paint from the tube.

AFRICAN ELEPHANT
In this chapter you’ll make a very realistic African elephant. This
is a rather advanced project, but you should now be ready to take on
the challenge.

MAKING YOUR ELEPHANT
In This Chapter:
You’ll play with the posture of your elephant until you get it just
the way you want it, and you’ll create a textured surface on your
sculpture that looks very much like real elephant skin.
Materials Needed:

This project uses the same materials you used to make your
dachshund, plus a bit of wire for the tail.
When elephants sit on the ground in this position they are usually
taking a dust bath, which they seem to enjoy. When you make your
elephant sculpture you can curve the trunk in any way that you find
particularly captivating, and you can move the head around until your
elephant’s “body
language” is saying just what you want it to.

In the illustration shown here, you can easily see the relationship
between the eye, the “eyebrow bone” above the eye, and the tusk.
These three features make up a long bony ridge that sits just behind the
beginning of the trunk. Keep these columns in mind as you add
padding to the head pattern.

PREPARING THE BODY PATTERN

Transfer the pattern onto cardboard or foam board, as usual. The
trunk on the pattern has been cut short because you’ll make the rest of
the trunk with aluminum foil. That way, you’ll be able to twist and
curve it any way you like. Use the cardboard ear you cut out as a
pattern, and use it to cut two ears from expanded aluminum, as you did
when you made your dachshund.

1. Take two pieces of aluminum foil and fold them into long twists.
Tape them to each side of the elephant’s snout. The trunk pieces should
be almost as long as the body

2. Twist the two pieces together to form the slightly tapered trunk.
Tape the trunk in a few places to keep the pieces together.

3. Form a large ball from aluminum foil to fit the top half of the
head. Tape it to the pattern.

4. Make a ball for the cheek area that is just slightly deeper than
the forehead. When you look at your elephant’s head from the front, it
will look almost square.

5. Make a small teardrop shape for the eyebrow bone. Tape it to the
forehead, as shown.

6. Add aluminum foil to the beginning of the trunk to fill it out.
The trunk has a rounded triangle shape, and it’s flat on the bottom.

7. Twist some aluminum foil in the shape of the tusk. The tusk
goes on the head starting just below the eyebrow bone.

8. Use a small ball of aluminum foil below the tusk to push the
tusk slightly away from the bottom of the face, as shown. This will
help give the tusk the correct curve. Tape the tusk to the head and
completely cover the tusk itself with masking tape.

9. The upper tusk has a thick layer of skin covering it. Make this
layer of skin with a folded sheet of aluminum foil. Cover it with tape.
Then repeat all steps for the other side.

PREPARING THE LEG PATTERNS

1. Pad the bottom portion of each leg with crumpled newspaper
and masking tape. The bottom of each foot is flat.
2. Cut four blocks of Styrofoam. The size of the blocks depends on
the size of the squares you used for your pattern grid. The blocks for
the hind legs should be as deep as one square on your grid at the back,
and as deep as two squares on the front.
The blocks for the front legs should be as deep as one square on
the grid you used when you transferred the pattern to your cardboard.

3. Use your hot glue gun to attach the foam blocks to the hip and
shoulder portion of the leg patterns, as shown. The thickest part of the
blocks on the hind legs should be towards the feet.

PUTTING THE ARMATURE TOGETHER

1. Use thin finishing nails or pins to temporarily hold the legs onto
the body pattern. Play with the position of the front legs until you find
a posture you like. Then draw around the foam cubes to mark the body
pattern where the legs will go.

2. Remove the pins and use your hot glue gun to attach the legs to
the body. Note You don’t have to change the position of the head, but
it’s good to know how to do this in case you want to. Often, a slight

change in the direction an animal is looking can make a sculpture more
interesting.

ADJUSTING THE POSITION OF THE
HEAD
Note: You don’t have to change the position of the head, but it’s
good to know how to do this in case you want to. Often, a slight
change in the direction an animal is looking can make a sculpture more
interesting.

1. If you used foam board, a serrated bread knife works quite well
for cutting off the head. If you used cardboard for your pattern, use a
craft knife.

2. Raise the head or turn it until you get the look you want. Then
fill in any gap you’ve created between the head and neck with a ball of
aluminum foil or crumpled newspaper. Tape the “wound” securely.

PADDING THE ARMATURE

1. Use crumpled paper and masking tape to pad the body.

2. Pad the shoulder and hip area, and round out the elephant’s
buttocks.

3. Now add additional padding to the body where gravity pulls the
great bulk of the elephant downwards while he sits on his tail. The
body will look somewhat pear- shaped, and you may need to add
additional padding over the edges of the inner pattern to get the look
you want. In these photos, you can also see that I am still playing with
the position of the head and trunk.

4. Attach the expanded aluminum ear to the head, as shown.

5. Cut a piece of wire long enough for the tail, plus enough to go
up the elephant’s backbone. Put a twist of masking tape on the end of
the tail, and thicken the other end of the tail with foil. See photo on
next page.
6. Completely cover the wire with masking tape so it won’t rust
through the clay and ruin the finish on your sculpture. Then tape the
wire so it follows the curve of the backbone, all the way to the neck.

APPLYING THE PAPER MACHE CLAY

1. Completely cover your elephant with a thin layer of clay. The
ear tabs should be completely dry before you add clay to the ears, so
the weight of the clay won’t pull them off the sculpture. When the first
layer of clay is dry, apply another thin layer of clay. You will sculpt the
eye detail in this second layer, and apply wrinkles and texture to the
skin.

2. Sculpt the eyes with an extra bit of clay just below the eyebrow
bone. Remember that the eyebrow bone, the eye, and the top end of the
tusk all fall on one continuous ridge. Also note the dip that goes down
the middle on top of the head.

3. Use the edge of your knife to create wrinkles in the top of the
trunk. The bottom of the trunk is flat. Use the tip of your knife to make

two nostrils in the end of the trunk.

4. To make the dry, cracked texture of the skin, press a bit of
expanded aluminum into the clay while it’s still damp. Do this in a
somewhat random pattern, leaving some of the skin smooth.

5. Then go back over the entire body (except the tusks, of course),
with a small square of aluminum window screening. If you don’t have
these items handy, look for other things to use instead. Get creative!

FINISHING YOUR ELEPHANT
When the clay is completely dry and hard, sand your elephant—
paying special attention to the edges of the ears and the surface of the
tusks. Since the skin texture would be covered by gesso, we won’t use
it this time. The following instructions show you how to apply several
glazes in various shades of gray to make an all-gray animal look more
interesting.

1. Paint on a very thin wash of warm gray directly over the dry
clay, covering everything except the tusks. This results in an uneven
base coat, with some areas darker than others. To make your gray, mix
Burnt Sienna, Raw Sienna and Ultramarine Blue, and thin it with
enough water and Acrylic Glazing Liquid so most of the natural color
of the clay shows through. If the wash runs, wipe it off with a dry
paper towel.

2. When the base coat is completely dry, mix up a cooler gray with
more blue in the mix, and add Titanium White to make the mix more
opaque. This color should be thinned with Glazing Liquid and washed
over the warm gray. Wipe some of the cool gray off with a paper towel
to let the warm base coat show through.

3. When the previous glaze is dry, mix a small amount of Burnt
Umber and Glazing Liquid. Paint this color around the eye area and
then rub it off with a paper towel, leaving the darker color only in the
details around the eye. You can use this color in other places, too, to
define wrinkles or the texture of the skin.

4. When this dries, the eye can be completed with brown and black
fine-tipped permanent markers or a small brush. Be sure to add a tiny
spot of white paint for a reflection.
Note: Elephants have very unusual eyes. If you made a larger
sculpture that allows for more detail than mine, be sure to find a
photographic model to use. You can find photos online using Google’s
image search.
When all the paint is dry on the elephant’s skin, sand the tusks to
remove all the unwanted color that may have accidentally splashed on
them. You might want to leave a tiny bit of gray at the very top of the
tusk where they emerge from the head, for a realistic look. The white
color of the clay makes very convincing ivory. Complete your elephant
by giving it a protective finish of matte acrylic varnish.
Then, congratulate yourself for having completed a very advanced
project. You’ve now earned the right to call yourself a sculptor!

HORSE
Our last project is this beautiful horse sculpture. The horse in the
photo is a bay mare, but you can paint your own sculpture in the colors
you like best.

MAKING YOUR HORSE
In This Chapter:
You’ll learn how to reinforce the delicate leg patterns with wire,
and you’ll use pins or finishing nails to temporarily position the legs so
your horse will balance correctly, even though she only has three
hooves on the ground.
Materials Needed:
You’ll be using all the materials you used in previous chapters,
plus some light wire for reinforcing the legs, and a wire-cutting tool.

PREPARING THE BODY PATTERN

Transfer the horse pattern onto cardboard or foam board. Cut out
all the pieces carefully the legs are very narrow, and the cardboard will
tend to bend or tear. Use the ear you cut out as a pattern, and trace
around it to make two ears out of heavy paper or light card stock.

1. Crumple a ball of aluminum foil for the horse’s cheek. Tape it to
the area indicated on the pattern.

2. Form a flat piece with aluminum foil for the muzzle and above
the cheek. Tape it to the head.

3. Make a small ball of aluminum foil for the eyebrow bone and
tape it to the area above the cheek as indicated on the pattern.

4. Create a larger form out of crumpled aluminum foil for the neck.
Tape it down. Now repeat all steps for the other side of the pattern.

5. Twist two pieces of newspaper for the tail. Tape the twists on
each side of the body, then tape the two twists together.

6. Cut a piece of your wire to reinforce the tail. Tape part of the
wire to the body pattern, and bend it so it follows the curve of the tail.
Tape it securely, and completely cover the tail with tape.

PREPARING THE LEG PATTERNS

1. Lay the leg pieces on the pattern out on a table so you can see
where the legs will go. Mark the outside of each leg.

2. Cut lengths of wire and bend them to fit the leg patterns. Tape
them securely to the outside of each leg. The masking tape should
completely wrap the lower legs, and all of the wire should be covered
to keep rust from ruining the final finish of your sculpture.

3. Pad the lower legs with crumpled aluminum foil and tape the
pieces on securely. The tape, foil and wire will all act together to
strengthen your horse’s legs. Remember that the clay will make the
legs thicker, so don’t pad the pieces too much.

PUTTING THE ARMATURE TOGETHER
Note: If you want your horse to be looking off to the side instead
of straight ahead, bend her neck before attaching the legs. The foil
inside the neck will hold it in the new position. The position of the
neck and head will affect the balance of your horse, so it’s important to
do this before the legs are attached.

1. Cut four blocks of Styrofoam for spacers. The thickness of the
blocks is determined by the size of the squares you used when you
transferred your pattern to the cardboard. The blocks for the front legs
should be as deep as one square on your pattern grid.
The cubes for the back legs need to be angled—one side of the
block should be as deep as one square on your pattern, and the other
side of the block should be one and one-quarter times the size of your
grid squares.
As an example, if your grid used squares 1 inch wide, the cubes for the
horse’s back legs should be 1 inch deep at the back, and 1-¼ inch deep
at the front.

2. Use your hot glue gun to attach the cubes to the upper portion of
the legs. Remember to put the thickest part of the cubes on the hind
legs towards the front of the horse, as shown.

3. Use pins or small nails to hold the legs into position temporarily,
like you did when you made your pig. Push the pins through the leg
pattern and the Styrofoam block, and into the body pattern. You may
need to use more than one pin to hold them steady.

4. Keep moving the legs until your horse is holding the correct
position and the horse is balanced. Then use a pen to trace the shape of
the Styrofoam cubes on to the body pattern.

5. Put hot glue on the area inside one of the traced rectangles. Then
press the foam block into the glue. Attach all four legs, and then test
the balance of your sculpture before the glue completely cools, so you
can make minor adjustments if needed. Your horse pattern should now
stand on it’s own. (See photo on next page).

PADDING THE BODY

1. Begin by adding crumpled paper beneath each leg pattern at the
hips and shoulders.

2. Fill in the main body area, and add the chest muscles below the
neck. Turn the horse over and fill out the area between the legs and the
body, and form the buttocks area below the tail.

3. Now fill out the shoulder and hips. Check your sculpture and
make any final adjustments that may be needed.

4. Curl up the ears you cut out of heavy paper, and hold the curl
with a small bit of masking tape at the bottom of the ear, just above the
tabs, as shown.

5. Tape the tabs to the horse’s head. The ear sits just at the back of
the eyebrow bone you made when you added aluminum foil to the
head. The ears will be the most delicate part of your finished sculpture.

APPLYING THE PAPER MACHE CLAY

1. Apply a smooth, thin layer of paper mache clay to your horse,
but leave the bottoms of the hooves for last. Use the edge of your knife
to texture the clay on the tail. Use your knife or a smaller tool to form
the nostrils and the line between the upper and lower jaw. Cover the
ears, both inside and out, with a thin layer of clay.

2. Add additional clay to round out the cheek, if needed, and add
more clay to the eyebrow bone so the final shape of the head looks as
shown.

3. Add more clay to the head, just in front of the eyebrow bone,
and use it to sculpt the eyes.

4. Add more clay to one side of the neck for the mane, and a bit
between the ears for the forelock. Use the edge of your knife to texture
the clay to look like hair. At this point, put your horse in a warm place
and allow it to dry.

5. When the clay is hard enough to handle, add a bit of clay to the
bottom of each hoof, blending it into the hardened clay on the sides.
Place the horse, feet down, on a sheet of plastic wrap like you did
when you made your pig. Carefully pull off the plastic and allow your
horse to dry upside down until she’s completely dry and hard.

FINISHING YOUR HORSE

Sand your horse, paying special attention to the ears, legs and
hooves. Use your craft knife to define the ridge just above the hoof.
Use the sandpaper to remove extra clay that might be making the
legs too thick, but be careful to not break into the masking tape or
aluminum foil beneath the clay.
Apply a layer of gesso, allow it to dry, and sand it if needed.
I applied a series of glazes to build up the warm brown coat of my
bay mare. If you’re particularly fond of another breed or color pattern,
go ahead and paint your horse in any way you like. The following
instructions will show you how to paint a horse that looks like the one
at the beginning of this chapter.

1. Start with a base coat using Yellow Ochre with a small amount
of Ultramarine Blue added to bring down the tone just a bit. When the
base coat is dry, paint the white socks and the star on the mare’s
forehead.

2. Make a transparent glaze using Burnt Sienna and Raw Sienna,
mixed with Acrylic Glazing Liquid. Apply the glaze over the yellow
base coat. Some of the yellow will show through.

3. When the first glaze is completely dry, add another glaze using
Burnt Sienna, Burnt Umber, a bit of Raw Sienna, and Ultramarine
Blue. The color should be reddish brown. Use the same glaze on the
hooves, but wipe most of it off so the color on the hooves is lighter.

4. The final glaze is made from Raw Sienna, Titanium White, and
a touch of Ultramarine Blue. This glaze is slightly lighter and warmer
than the previous glaze. Apply this glaze to the dark brown areas.

Wipe off most of this glaze, so the darker color shows through. Leave
the eyes dark brown, with no lighter glaze added.
5. Mix up a very dark brown or black using Burnt Sienna and
Ultramarine Blue, plus a little bit of Acrylic Glazing Liquid to make it
easy to blend the edges of the black parts into the brown. Paint the
points, (mane, tail and lower legs above the socks), blending the dark
paint into the brown at the top of the legs. I used my finger to smudge
the paint at the top of the black area on the legs, creating a naturallooking transition between the black and brown. (See detail photo on
next page).
6. Use the black glaze you used for the mane, tail and lower legs to
darken the insides of the ears, to darken the muzzle, and to bring out
the detail around the eyes. In these three areas, most of the glaze
should be rubbed off with a paper towel.

7. Paint the iris of the eye black. When all the other paint is dry,
touch up the star on the mare’s forehead with white paint, and add a
small spot of white to the eye.
Finish your horse with matte acrylic varnish.
Now that you’ve completed all the projects in this book, you can
see how helpful a pattern can be when sculpting an animal—
especially one like your horse, with her long, thin legs. Many artists
are afraid to even try sculpting a horse, because they think it will be
too difficult—so you have a right to be proud of your accomplishment.
If you love horses, I hope you’ll go on to create many more
sculptures of this elegant beast. You can use the pattern from this
chapter to make horses in different sizes and colors, or use the

instructions at the end of the Piglet chapter to make your own pattern
of your favorite horse.

WHAT’S NEXT?
Congratulations! If you completed all the projects in this book,
you’re now ready to sculpt original life-like animal sculptures based
on your own designs, drawings and photos. You now know the
“system” for creating life-like animal sculptures with paper mache
clay. If you follow the same steps you used to make the projects in this
book, you can now produce new sculptures from your own original
designs, based on photographs or drawings. Your work will steadily
improve as you practice, practice, and practice some more.
As you become more and more comfortable with the steps, you’ll
begin to develop techniques of your own, and your sculptures will
reflect your own personality and your own relationship with the
animals you choose to sculpt. It doesn’t matter what kind of animal—
aardvark, donkey, Tasmanian devil, or ???
If you follow the system, you can make a sculpture of any animal you
want.
To recap:

THE BASIC SYSTEM FOR CREATING
YOUR OWN ORIGINAL SCULPTURES:
1. Create a drawing or find a good photo, showing your chosen
animal from the side.
2. Turn the drawing or photo into a pattern, using the grid system.
3. Transfer the pattern to cardboard or foam board, and carefully
cut out all the pieces. Determine if the legs will require reinforcing
wire, and decide if you should make the ears from light card stock or
expanded
aluminum.
4. Prepare the leg pieces of the pattern.
5. Prepare the body piece, paying special attention to the shapes on
the head. Break down the basic shapes of muzzle, cheek, eyebrow

bone and lower jaw, and pad the head with crumpled paper or foil
covered with masking tape.
6. Assemble the leg and body pieces with foam spacers and a hot
glue gun. You’ll need to look at photos or drawings of your animal
from the front and back to determine how thick your spacers should
be, and what angle you need to cut the foam blocks for the hind legs.
7. Pad the body, shoulder and hips on the armature with crumpled
paper and masking tape. Twist and turn the critter’s head, neck and
back to give your sculpture a more dynamic posture.
8. Apply the paper mache clay and model the details like eyes,
nose and mouth with a knife or modeling tool.
9. Allow your sculpture to dry completely. Then finish with a coat
of gesso, acrylic paint and a protective finish or matte acrylic varnish.

JOIN OUR ONLINE COMMUNITY
Remember - I want to see the sculptures you’ve created, and I’d
love to meet you online. Thousands of people visit my website every
week to learn new techniques for making paper mache sculptures. I do
hope you’ll drop by to show off your sculptures and join the
conversation. We have a lively community of artists who would love to
see your work, answer your questions, and receive your suggestions
and help.
If you have questions about any technique in this book or if you
have suggestions that would help your fellow sculptors, please visit my
blog and leave a comment. I try to answer every comment I receive so
we can all learn from each other. I hope to see you, (and your new
sculptures), soon.
UltimatePaperMache.com