/


Текст
i
Cea» yee
Se ne
THs. S42
eae
a
AES
goad te'
i
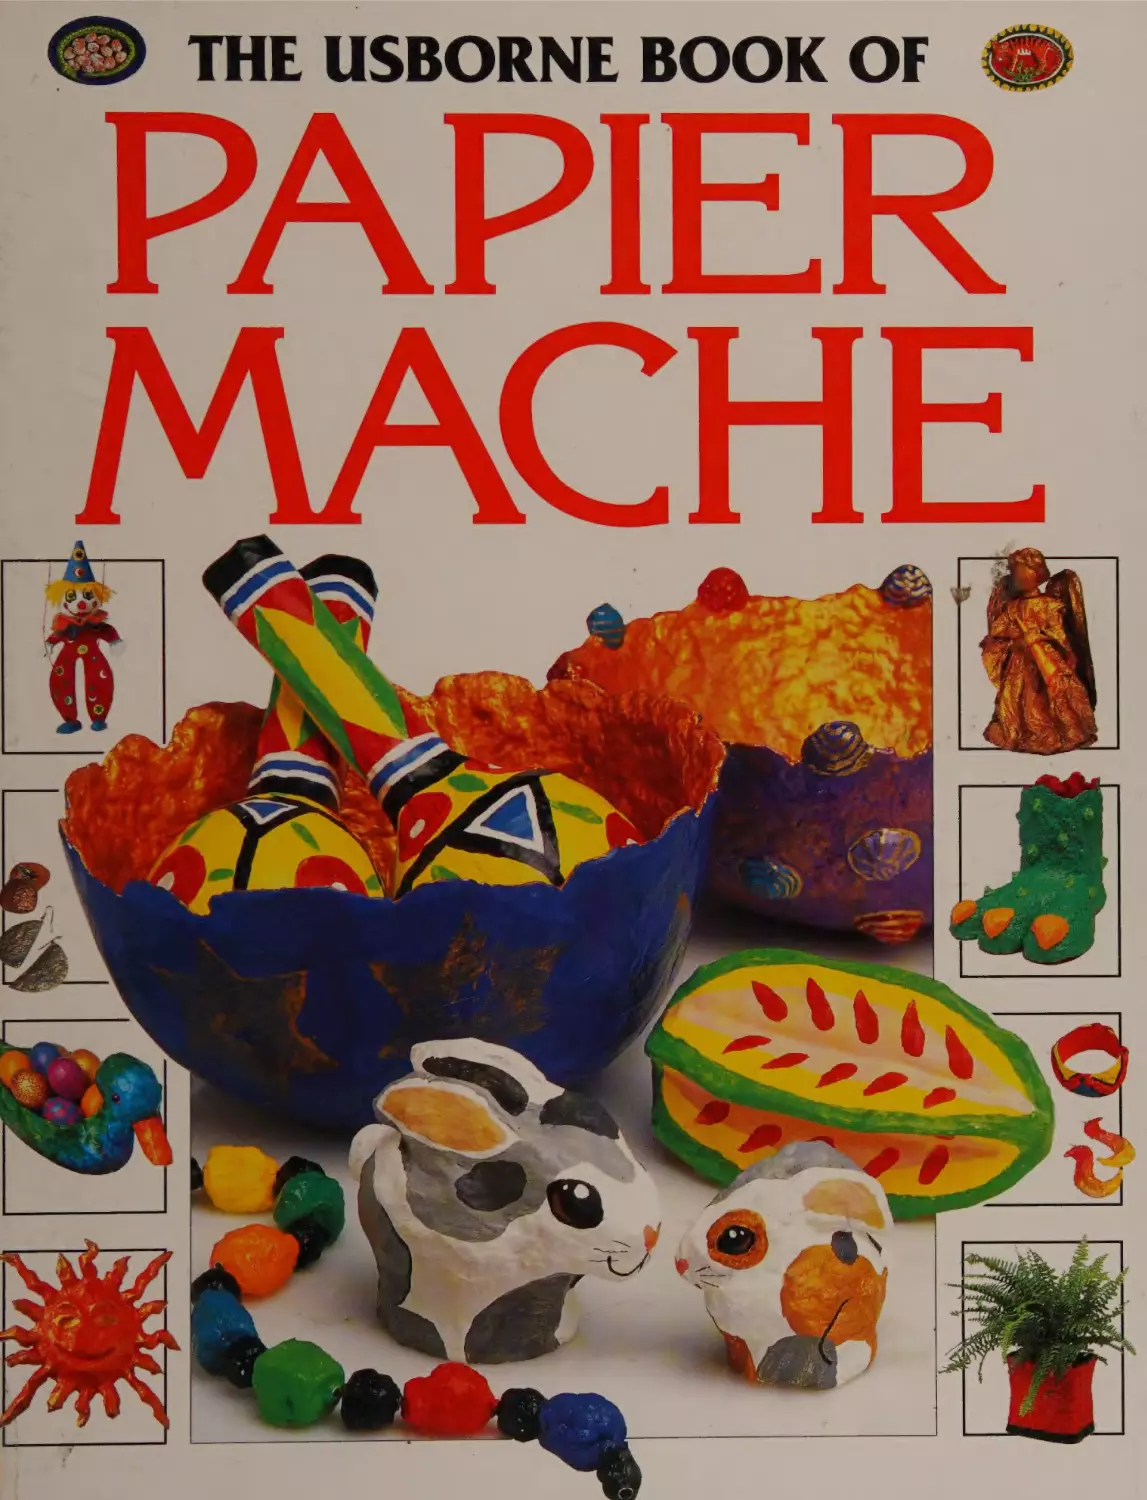
THE USBORNE BOOK OF
APIER
MACHE
|
Co
A
c
>
~
Ray Gibson
Edited by Cheryl Evans with Fiona Watt
Designed by Robert Walster and Jane Felstead
Photographs by Amanda Heywood ¢ Illustrated by Prue Greener
Series editor: Cheryl Evans
Contents
Before you start
Surprise fruit
Bangles and beads
Starry bowl
Mirror frames
Tiger plate
Rabbit family
Monster's foot pencil holder
2
4
6
8
10
12
14
16
Tray
Egg holder duck
Monster mask
Christmas angel
Puppets
Lizard planter
Recipes
18
20
22
24
27
30
32
First published in 1995. Usborne Publishing Ltd., Usborne House, 83-85 Saffron Hill,London ECIN 8RT, England.
Copyright ©1995 Usborne Publishing Ltd. First published in America August 1995.
The name Usborne and the device @ are Trade Marks of Usborne Publishing Ltd. All rights reserved. No part of
this publication may be reproduced, stored in a retrieval system or transmitted in any form or by any means,
mechanical, photocopying, recording or otherwise, without the prior permission of the publisher.
Printed in Portugal. UE.
Before you start
Papier maché, pronounced pap-ee-yay mashay,
is a French phrase, meaning "chewed paper".
You make it from old newspapers and paste. °
Layering
Use small
piecesof
4%
coke he
parts.
There are two main ways to use papier
maché: pasted in layers or as a pulp mixed
with paste. There are recipes for the paste
Use paper
and how to mix the pulp on page 32. Which
strips on
method to use is explained for each project.
~—
flat areas.
|
Most papier maché projects are not hard,
Layering means pasting layers of small pieces of
but they can take a while to finish, as you
paper over a base shape. When it is dry, you
must allow lots of time for the layersor wet _ usually remove the base, although sometimes
pulp to dry. It's best to make things in stages __ it is left in place. What you get is a strong, light
over several days.
papier maché shell, the shape of the base.
Tips on layering
into strips. Torn
edges give a
smoother finish.
3. Smooth overlapping 4. Complete one
of pieces at once ona_pieces of pasted paper layer at a time. You
tray, with a big
onto the base shape __ will be told how many
paintbrush.
with your fingers.
layers to do each time.
Pulp
Tips on using pulp
Pulp is wet newspaper
mashed with paste
and glue until it feels
like soft clay. You can
use it to create solid
shapes and model it
with your fingers or
tools. It is used in thin
Petroleum jelly makes
it easy
layers, dried each
to pull the shell off the base.
time. Thick layers
may dry on the
|. If youare usinga
—2. Roll and flatten
outside, but seal in
base shape, smear it
small balls of pulpin
moisture which can
with petroleum jelly
your hands. Press all
make it rot.
first.
over the surface.
2
3. Make sure there
are no gaps. Smooth
the places where balls
join with your fingers.
Drying
Let projects dry
:
Papier
naturally in an even
never looks
maché
heat.lf you put them _ exciting
next to direct heat,
before it is
decorated.
they can dry unevenly
and warp. Place them
70 a
on plastic foodwrap
on a flat surface.
finish
duck.)
You can try different kinds of
paper, but not shiny magazine
paper (the paste won't soak in).
Priming
Priming means to prepare for
decorating. You prime with white
emulsion paint under pale shades,
or a mix of two parts PVA
These shapes are primed
(household) glue to one part
with water and glue mixed.
water under dark shades.
aia
Painting
This box is primed
with white Eni a
Use acrylic or poster paints. If you use poster
paints, mix a little PVA (household) glue in
with them. If you don't, they may smear
when you varnish (see below).
a
Small
Polyurethane
:
_—
decorator’s brush
varnish
Paintbrush
Varnishing
Varnish gives a shiny top
layer that makes things look
rich and glowing. You can
make a simple varnish to use
(see page 8) or buy
polyurethane varnish. Ask an
adult to help you use this, as it
has poisonous fumes.
pees
Acrylic paints
These things have been fully
painted and varnished.
Surprise fruit
You will need: fruit
or vegetables as base
shapes; one quantity
of paste (page 32);
old newspapers;
petroleum jelly; craft
knife; white emulsion
paint; decorator's
brush; rice, pasta or
dried lentils; poster
paints mixed with
PVA (household)
glue, or acrylic paints;
paintbrush.
Keep smoothing the pasted
paper with your fingers.
|. Use any firm fruit
or vegetables such as
apples, pears, lemons,
red peppers. Rub
them all over with
petroleum jelly.
Tips
Paint the
background first
and allow to dry
before you
decorate. It is
easier to put dark
shades on top of
pale ones.
You can see how to
make bowls like these
on pages 8-9.
You could paint
the fruit to
look real, like
the peppers
and chillies in the
picture. Look
closely at the real
thing and copy it.
For a fruit that
jingles, put ina
toy bell at step 4.
You can buy bells
from craft or
department
stores.
Maracas are
musical
instruments.
Shake them
rhythmically to
make a rattling
noise in time to
MUSIC.
2. Cut or tear 2cm
(lin) squares of
newspaper and paste
over the fruit. If they
will not lie flat, tear
them a little smaller.
3. Allow it to dry. Do
three more layers,
drying completely
between each one.
Dry naturally ina
warm, airy place.
Stand to dry on
umpainted part.
4. Ask someone to
help you cut around
the middle of the
shape with a craft
knife. Ease the paper
shape off the fruit.
5. In one half of your
"paper shape, put a few
grains of rice, some —
pasta shapes or lentils.
Replace the other half
to match exactly.
6. Paste paper strips
7. When it is
in all directions over
completely dry, paint
where the halves join. any designs you like
Leave to dry. Paint
on it. Look at the
with white emulsion, |photograph below for
one side at a time.
some ideas.
Maracas
Make two orange shapes, as
in the steps above. Before
you paint them, add long
handles, like this.
You need: two slim
cardboard rolls; scissors;
clear tape; newspaper.
Cut two rolls
to about 10cm
(4in) long. You
could cut both
from a long
kitchen roll
tube.
Stuff newspaper
in one end. Tape
other end to
the orange
shape and
cover with
paper strips.
Bangles and beads
You will need: one
quantity of paper pulp
Pati:
Us
(page 32); thin
fy
cardboard, such as a
cereal box; silver foil;
acrylic or poster
paints; paintbrush;
7
‘a
}
°
7
For a jewel box,
sandpaper a small
box, cover with paper
layers then create a
vy
we
PVA (household) glue; Ga?
soft cloth; scissors;
W
fastenings (see right).
These steps show
|. Cutashape from
thin cardboard. Press
v
ear
2. Leave to dry
naturally (up to a
Brooches
made
how to make base
a small ball of pulp,
day). Add more pulp = “8/8
shapes. See how to
onto the middle of it
on top, squeezing and
turn them into things
to wear on the right.
and ease outtothe
edges ina thin layer.
pressing it into a
rounded-out shape.
i
pain a
You can simply prime your
shape, then paint tt,
Jf you like
_svss-<sail
J
3. Leave to dry again.
Add more layers if
you want it bigger, or
4. When dry, tear a
piece of silver foil
twice the size of
These
decorate with small
beads or rolls of pulp
your shape. Spread
glue all over the
beads are
brightly
for raised patterns.
shape.
aa
5. Press the shiny
6. Turn the shape
side of the foil onto —_over and trim the foil
the glue. Smooth it all to 0.5cm (‘4in). Glue
over with a soft
the back, then press
cloth, starting from
the foil edge down
the middle.
onto it neatly.
6
7. Paint over the foil front.
Wait a moment, then wipe
most of the paint off with a
damp cloth. Repeat until you
like the effect. For other
effects, see the photograph.
All these things are
very light to wear.
Choker
with
silver
foil
Clip earrings
For pierced earrings, make a
hole with a needle to slip hooks
_ through (buy hooks
Sa
from craft stores).
Making things to wear:
Earrings
To make earrings match, turn a
shape over, draw around it and
cut out again before adding
pulp. Glue on earring clips
(from craft stores).
Choker
a
<2 j
Cut a short length of
drinking straw. Tape it to
the back of your shape.
Thread a shoelace through
it to tie around your neck.
Brooch
Attach a safety pin to the
=?) back with strong tape.
a
:
These earrings are brushed
with gold acrylic paint.
s
Make bangles any width you
like. Add pulp shapes to make
them more interesting.
“Se
Slip beads
onto strong
thread and
tie fora
necklace.
‘
More ways to make
things: Beads
Flatten a small lump of
pulp, fold it around a
short length of drinking
straw and shape into a
bead. Make sure the
straw doesn't show. Slip the
straw onto a paintbrush to
finish shaping, if you like.
Paint when dry.
Bracelet
Overlap and tape a thin
cardboard strip into a
circle that will slide
onto your wrist. Slip it
) over a bottle to hold
|while you add a layer of
¢ pulp and extra shapes.
Decorate brightly.
You will need:
|'/% -2 quantities of
pulp and extra paste
(page 32); bowl;
petroleum jelly; paper
a
Le
\ ay
/
\»
towels; a big potato;
sharp knife; blunt
knife; gold and blue
paint (poster paint
with glue, or acrylic);
blue tissue paper; PVA
(household) glue;
scissors; paintbrush;
felt tip pen; saucer.
|. Choose a bowl to
use as a base (a big
one's best for this
design). Smear the
inside with a layer of
Detroleum jelly.
se,
2. Take walnut-sized
dollops of pulp, roll
them in your palms,
then flatten between
your hands to about
4mm ('in) thick.
3. Press flattened pulp
all over the bowl.
Start from the bottom
and work up the sides.
Smooth it as you go
with your fingers.
The small bowl
has a droopy
—
Varnishing
rim made
f
from pulp.
Varnish is a clear
coating to protect
the surface and
make it shiny.
To varnish,
4. Keep smoothing
pote all eee
SUES
omeencls)
Bi siPsSa
nee ‘3 © |
over the joins. At the
end, dip your fingers
in paste and smooth
all over. Leave the
top edge wavy.
an
looks cloudy
but dries
\
5. Leave the bowl to
dry naturally in an
even heat. This may
take up to four days
You can invent all kinds of
so be patient. You can designs
for bowls.
feel when it is dry.
re
YQ
clear.
Allow to dry.
Do more
layers for a
7 harder,
Rrinier
Fey atl
can wipe it
clean with a |
damp cloth.
iia
6. When completely
dry, run an old, blunt
knife between the
Original bowl and the
pulp. Ease the pulp
bowl out.
7. Carefully wipe all
the petroleum jelly off
the pulp bowl with a
paper towel,
otherwise the paint
will not stick to it.
8. To prime it, paint
all over with | part
water to 2 parts PVA
(household) glue.
Now it is ready to
decorate (see right).
%
For this bowl, add pulp lumps
once it is dry. Then paint.
_
wy
CP's
BAN
(
+
a
Ma,
”
*
asi
-
as
‘
:
.
ating the bowl
a
Be very
*
careful with
QO” knives.
dX,
Don't worry tf
star prints look
patchy.
. Smooth stars on by
\ brushing with more
y glue mix.
Wag
|. Paint the inside
gold. When dry, paint
the outside blue.
Take care not to go
over the rim, where
the paints meet.
2. Cut the potato in
half. Draw on a star
with felt-tip pen. Cut
away a layer of potato
around the star. Dry
on a paper towel.
3. Put gold paint onto
a saucer and press the
potato star into it.
Print several times
onto the tissue. Allow
to dry.
4. Cut the stars out
roughly. Spread glue
and water mixed onto
the outside of the
bowl and glue stars
on. Varnish (see left).
9
Mirror frames
You will need: a
small mirror; strong
cardboard; pencil;
ruler; craft knife;
newspaper; one
quantity runny paste
(page 32); plastic tray;
small decorator's
brush; masking tape;
strong string; tissue
paper; white emulsion
paint; poster or
acrylic paints; PVA
(household) glue.
“<>
|. Place your mirror
2. Cut out the inside
in the middle of the
cardboard and draw
around it. Draw a
second line 0.5cm
shape, using a craft
knife and a ruler. You
can draw and cut out
other inner shapes, if
you want (see below).
(‘Ain) inside the first.
3. Draw a frame of any
size and shape you like
around the hole. Draw
around cups, plates or
food cans for curves.
Cut out the shape.
Dry each
layer.
4. Lay newspaper
strips about 4 x 7cm
(1% x 2¥%in) on the
tray and brush them
all with paste. Use the
decorator's brush.
Other ideas
5. Paste strips,
overlapping, all over
one side of the frame.
This will be the front.
Paste strips over the
edge, all around. Dry.
Oval inside
shape.
aa
6. Do three more
layers. For a smooth
finish, add a layer of
tissue paper. Do one
layer of paper strips
on the frame's back.
7. When dry, paint the
front white. Dry again,
then do the back.
When dry, decorate it.
Put the mirror in the
frame (see right).
Tape the shapes together,
then join with pasted
strips over the edges.
Tape mirror to show through hole.
Draw around a cup,
saucer or plate to
make a round hole
and cut it out. Or do
a freehand shape.
10
Cut the outside frame
into a fish, dinosaur
or other animal. Paint
it brightly, or do
realistic markings.
Cut two hand mirror
shapes, with a hole in one.
Cover both with strips.
Tape mirror between and
join the shapes. Decorate.
Pasting strips
around corners
You can use
To cover
bright ribbons
to hang your
mirrors instead
corners
of string.
neatly, paste
a strip across
the corner,
to hang over
the edge.
ribbons
Tear the
;
overhanging
with lots of
strong tape.
P
longways up
Attach
ie ie
art in half
as far as the
edge of the
frame.
Bend and
stick each
half down
separately
onto the
back of the
frame.
You can hold this
dinosaur by its tail as
oe Framing
a hand mirror.
Turn frame
face-down.
Tape the
mirror facedown over
ja!
the hole with
«-
masking tape.
Paint a pretty
hand mirror pink
and gold.
fy
Knot the
ends of a
short piece of
string and
attach to the
back with lots
more tape.
Tiger plate
You will need: a flat,
oval plate as a base;
one quantity of paste
and one of pulp (see
page 32); newspaper
| "4
strips; PVA
(household) glue;
white emulsion paint;
small decorating
paintbrush; petroleum
|. Smear the plate
jelly; scissors; poster —_with a thin layer of
or acrylic paints; feltpetroleum jelly on
tip pen; white tissue —_-your fingers. Don't
paper; kitchen paper.
leave any bare parts.
This dish has
a pulp snake
protecting its
oe.
;
Let strips stick
over the
| edge. ..
2. Paste a layer of
3. Smooth paste on the
strips across the plate first layer with your
:
(see page 2 for tips on fingers and paste a
Paint the back
this). Use shorter
_°f tHe plate, too.
second layer the other
ARATE
F
&
4. Repeat steps 2 and 3. When the plate is
5. Roll and flatten
dry again, do the same twice more (eight
balls of pulp within
layers in all). Draw a tiger's body and a
the outline to make a__
tropical plant like this with felt-tip pen. Use —_ raised shape (see page
the curve of the plate for the tiger's back.
3 for help with pulp).
[2
6. When dry (2 days)
build up a head. Do a
round pulp shape and
adda small lump for a
chin and round ears.
Use a round plate
for a cat with an
arched back.
This plate has a
checked tablecloth
background with a
lobster on it.
A plate takes 9 or 10 days to
finish as it needs time to dry
at each stage.
Don't take the paper off
too soon, it will buckle.
7.When completely
dry (about 2 more
days), ease the paper
off the dish. Trim the
edge with scissors.
Tissue paper makes it
smoother.
A j
fs
9. Paste on two layers 10. Paint the main
8. Wipe off all the
of torn tissue paper. _ blocks, dry, then add
petroleum jelly with
kitchen paper. Glue = When dry (anhour _ patterns. Do two coats
of PVA (household)
strips over the edges. or two) paint white,
varnish (page 8).
glue
time.
a
at
side
one
Dry (a few hours).
13
Rabbit family
egg per rabbit; darning
needle; saucer; pulp,
not too wet - one
quantity makes about
four rabbits; PVA
(household) glue;
white emulsion paint;
paints; white tissue
paper; plastic food
wrap; masking tape;
plate; paintbrush;
pencil. They take
about four days.
Blowing
§
Pierce a hole in
the blunt end
with the needle.
'
“
re ee
Smooth
the join.
ox
‘lop
'
»
Shape and paint
carrots and
lettuce leaves for
your rabbits
from pulp.
~~
Wiggle the
needle around to
enlarge the hole.
2. Hold the end
with the hole in it
over the saucer.
Pierce the other
end. Wiggle the
needle vigorously
to break up the
egg yolk.
3. Blow very hard
through the top
hole until
everything inside
is pushed out. It
is really hard to
start with, but it
gets easier.
14
|
a)
ner
2. Press marble-sized
|. Blow one egg (see
balls of pulp into a
below) for each
thin coat all over the
rabbit body. If you
find it too hard, ask —_egg. Roll and smooth
the egg in your palms,
an adult to help.
then press it, on its
Rinse the shell in
water and dry it.
side, onto food wrap.
an e 8S
|. Gently wash
and dry an egg.
Base
Making the body
You will need: one
Put tape on before making the
hole to prevent cracking.
<5
Base added to
flattened side of egg.
3. Roll and flatten a
slightly bigger ball of
pulp. Press it onto the
body and shape into a
flat base, as shown.
Allow it to dry (one
or two days).
— Tape the
SN
sides.
Smooth
the
joins.
4. Attach the base to
5. Shape the head
6. Roll two fat pulp
an overturned plate
—into a heart like this: |sausage shapes for
with tape. Roll and
press a dip inthe top
ears. Lay them side
flatten a walnut-sized
with a finger; pinch
by side along the
rabbit's back. Join
ball of pulp. Press to =‘the bottom into a
the pointed end of the point. The sides taper each to one of the
bumps on the head.
down in a curve.
body for a head.
These rabbits
Decoration
are painted
Tail
quite
realistically;
family
with bright
patterns on.
Cover a
Features
Mark where
the eyes will go
in pencil first
to make sure
they are level.
but you could
doa
7. Pinch a ridge along
the top edges of the
ears. Keep shaping
the head and ears
until they look right.
Add a round tail. Let
__it dry (one day).
—
2. Add a second layer
walnut inthe |, Glue the rabbit,
same wayfor then press tiny pieces when dry (an hour or
less). The tissue layers
ababy rabbit. oF white tissue paper
a smoother finish.
give
paper
Push
it.
all over
into nooks and folds _ Prime it (see page 3).
Now paint as you like.
with a paintbrush.
| Paint the eyes
| brown and
| black as shown.
| Add white dots
for glints.
Do a heart-
shaped nose, a
mouth, and
streaks for
whiskers.
Show where
the back legs
are with a thin
black streak on
the side.
Monster's foot pencil holder
You need: a clean,
empty food can (400g/
140z); pencil; thin
cardboard; newspaper;
scissors; masking tape;
PVA (household) glue;
tissue paper; acrylic
paints and brush; paste
and I|'/-2 quantities of
pulp (page 32); old,
blunt knife. Tip: make
the foot ona tray, so
you can move it
without disturbing it.
|. Cut several are
of newspaper about
2 x 4cm (74x |*%in).
Paste them around
the open edge of the
food can, overlapping.
2. Place the can on
3. Draw around the
the cardboard, near __ heel and out in front
one edge, and draw __ of the can to make a
around it. This will be big foot shape with
theheel partofthe
three toes, spaced
monster's foot.
well apart. Cut it out.
4. Tape the tin onto
5. Make newspaper
6. Smooth the pulp
7. Roll and pinch balls
its circle with
rolls to fit inside each with your fingers - do of pulp and place them
masking tape. Folda
toe shape. Tape them between the toes
up the heel as spines.
newspaper package ___ on. Press flattened
with the knife. Add a Press and pinch small
to fit on the front of
balls of pulp allover _—_second layer, leaving __balls on all over for
the foot. Tape it on.
the can and foot.
a ragged top edge.
bumpy skin.
Toenail
8. Press and shape
9. When the nails are
rough triangles for
dry, paste on three
toenails and press
layers of tissue paper
onto the toes. Add — for a smoother finish.
more layers to make
Leave to dry properly
them thicker.
(up to 4 days).
16
10. Make more pulp if
you need to. Press a
thin layer all over the
sole. Leave to dry.
Prime, then paint
inside and out.
Make monster pencil
ends by shaping lumps
of pulp around the
pencil. Stand in a pot
to dry, then paint.
Gruesome hand
Use the same
technique for this
gruesome hand.
Paste strips
around the
top of the can,
as shown in
step | of the
monster foot.
Varnish the foot
(page 8)if you
want it to be
shiny.
Do contrasting
bumps.
Red and black
make a strong
combination.
~ You may need
to paint two
layers inside.
Cover the can
with pulp and
build up a hand
with three
fingers around
the side.
Add long nails
to the fingers,
as in steps 8
and 9 of the
monster foot.
Paint brightly.
Tray
You will need: a
small, round tray;
newspapers; runny
paste (page 32 make one quantity,
then more if
needed); small
=
decorator's
|. Lay plastic food
ona table. Turn
wrap
wrap;
gift
paintbrush;
the tray over onto it.
scissors; PVA
Cover the tray with
(household) glue;
more food wrap.
plastic food wrap.
3. Use this as a guide
2. Cut a piece of
to cut |7 more sheets.
newspaper big
enough to cover the — Protect a surface to
work on. Lay one of
whole tray and down’
its sides completely. | the cut sheets on top.
Varnish (see page 8) for a
shiny, wipeable surface.
This project is quite quick to make, but
needs a few days to dry and finish, so
allow for this ifmaking a present.
To decorate
|. Cut some big
motifs from the gift
wrap. Cut the
background into
4. Paste over it and
lay a second piece on
top. Smooth flat with
your hands. Repeat
with all the cut sheets.
5. Lift all 18 layers of
paper and lay them
over the tray. With
paste on your fingers,
smooth it down well.
6. Press the paper
over the edges and
down the sides.
Smooth down any
folds as flat as you can.
7. Press and smooth
until satisfied. Allow
to dry a little. When
edges are bendy, like
leather, trim to shape.
small pieces. Don't
tear it or white
edges will show.
2. Dip background
pieces in paste and
glue all over the
tray, overlapping.
Dry. Arrange the
big motifs, then
glue on with as
little paste as
possible.
Personalized tray
Make a very special present by
personalizing a tray. Paste on a
picture of the person and surround
it by images of things she likes.
Cut out and
glue on letters
froma
magazine for
her name.
Paste strips over top edge.
8. Once the paper is
very hard and dry (up
to three days), lift off.
Unpeel the food wrap.
It will be damp below.
9. Leave to dry. If the
tray starts to bend,
keep it flat with food
cans. Neaten the edge
with paper strips.
Nina likes
animals, food,
music and
parties with her
friends.
Ege holder duck
You will need: two
Basic shape
cardboard rolls;
kitchen roll; one
quantity of paste (page
32); newspaper;
masking tape; box || x
16cm (4 x 6'in) and
8cm (3in) deep*; ruler;
pencil; two plastic toy
eyes (from craft
stores); scissors; white
emulsion paint; paints;
decorator's brush;
PVA (household) glue.
Look at photograph
to judge sizeof
head.
2 iat
Flat end
|. Flatten one end of
a |5cm (6in) length of
cardboard roll. Tape
it firmly to the middle
of one end of the box.
LB
Awe
1 \br
\
“es
2. Crumple up a sheet 3. Shape the parcel
of newspaper 40 x
into an oval head.
Torn issue paper
60cm (15'% x 22in).
Squeeze it tighter if it strips were added to
Wrap in the sheet of looks too big. Tape to this duck, for extra,
kitchen roll and tape. the top of the neck.
glowing depth.
Fe
eS
.
a
Vo”
>» &
2cm (34in)
{ “Round off
(like
this,
..
a 3
4. For a beak, lightly
flatten a 7cm (2%/in)
length of cardboard
roll. Cut along it. Cut
again S5cm (2in) from
the first cut.
20
5. Round off one end.
Mark a point 2cm
(in) in from the
middle of the other
end. Cut from each
corner to this point.
*A 1kg rectangular margarine tub, if available, is the ideal size.
6. Flatten the beak
and trim rounded end
to a neat shape. Bend
back into a curve. Pad
with crumpled paper.
Tape to hold in place.
7. Press the V-shape
onto the front of the
head and tape it
securely. Don't worry
if it looks a little bit
messy at this stage.
_» tt
:
»
tify)
Finishing the shape
Add tape
across here.
Fold long sides
together.
|. Fold a pie
newspaper 38 x
28cm (15 x I lin).
Fold again and twist.
Trim to 30cm (12in).
Make 6 altogether.
2. Tape one twist
around the rim of the
box, starting at the
neck. Tape one on
the other side and
join them into a tail.
3. Tape on the other
twists. Bend them up
at the tail and tape to
the top twist. Crumple
newspaper to fill the
gap. Tape to hold.
Paste paper
inside and
Pes
4. Crumple a sheet of
newspaper into a
pad. Tape it to the
box, over the neck
roll. Flatten the pad's
edges against the box.
shapes together.
6. Leavesin a warm,
airy place to dry out
completely (1-2 days).
Paint:all over with
white: emulsion and
leave: to dry.
Eyes
To decorate
5. Using the layering
method (see page 2)
paste on four layers
of newspaper. Paste
over gaps to smooth
Decorate your duck
| as you like. Paint it
|. with poster paints and
| glue, or acrylics; you
- can then paste on
You can keep eggs to eat
in the duck or decorate
blown (see page 14) or
hard boiled eggs for an
attractive display.
| layers of overlapping
These eggs were painted white first,
pasted with tissue squares, then
decorated with gold acrylic paint
and 3-D pen (from art suppliers).
Varnish (page 8) eggs to
make them shine.
|. Mark a dot for
each eye. Poke ina
pencil to make a hole.
Glue the prong on
each toy eye and
press into the holes.
green, blue, yellow
and mauve tissue
paper for a richer
look, as in the
photograph, if you
like. Varnish (page 8)
for a shiny finish.
2\
Monster mask
You will need: plain
flour, salt, cooking oil
for saltdough (see
below); silver foil; big
tray; saucer; plastic
food wrap; newspaper;
white tissue paper;
|'A-2 quantities paste
(page 32); paintbrush;
pencil; petroleum jelly;
craft knife; blunt knife;
scissors; poster or
acrylic paints; pencil;
thin hat elastic.
The dough shape
_
|
|. To get a pattern for 2. Now press the foil 3. Place the saucer
upside down on the
the basic shape, press firmly all over your
tray. Cover both with
foil lightly onto your _ face, right to the
plastic food wrap.
face. Quickly scratch _ edges. Lift off and
holes for your nostrils. trim the face shape. | Make the saltdough.
To make
saltdough
|. Mix together
4. Roll and flatten a
5. Place the foil onto
four mugs of plain
big ball of dough over the dough. Press
flour, two mugs of | the saucer to roughly where your eyes are
salt, one tablespoon | the size and shape of _ on the foil to make
of cooking oil.
your foil pattern.
dents in the dough.
oO)
Big rolls above and below eyes.
6. Add the monster's
features in dough as
shown below. The
shapes to add are
shown dark green.
@
Cheekbones
Press red
areas with a
2. Add enough
water to make it
will fit
cling together as a | side)
stiff
dough. Knead
| , umps
;
i
finger to mark
for
it thoroughly with | yyper lip
your fingers.
and chin
22
nostrils, ears
and upper lip.
Pointed fangs
Lower lip
.
Making the mask
Paste on small
squares
a,
+
<2
|. After aboutaday
2. When dry (allowa
and a half, the dough's day), ease the mask
surface will be hard. — off the dough shape.
Smear with petroleum Run a blunt knife
jelly and paste on five under the edges to
layers of newspaper.
loosen. Dry again.
Slipahand under
4
mask to pull dough
<—
,
f\\ Adda tissue
Ne
SJ
Lory
out of hollows.
15 paper layer
27 =fora smooth
finish.
4. When dry, poke
holes in the ears with
a pencil. Tie on elastic
from ear to ear, long
enough to stretch
around your head.
3. Trim the edge of
the mask to neaten.
Cut out the nostrils
and eye shapes. Paste
overlapping paper
strips over all edges.
Paint the mask as you like. This one is dark green with
lighter green markings and fiery orange touches.
More shapes
Use the saltdough
to make other
shapes for papier
maché objects.
This sun wall
plaque was also
shaped around an
upturned saucer.
To age the mask,
brush all over
with watery
black paint.
%
ag
Lia
jena?
th
i:
S y
Bs
if
Pe
‘
Biv
f dj
.
g
yd
-
=
i
‘
ei
y
‘]
yy
[
’
ee”
Shape long, wobbly
"rays" and press in
eye and mouth dents.
23
Christmas angel
You need: a flattish
Press ends
Head
plastic bottle 20cm
(8in) tall; decorator's
brush; kitchen roll; one
quantity paste (page
32); glue stick; pencil;
scissors; ruler; gold
spray paint; masking
tape; two drawing pins
(thumb tacks);
microwave food
wrap”; thin cardboard
20 x 18cm (8 x 7'Ain);
five pipe cleaners; a
blown egg (page |4);
6
together at
S\N
the back.
,
\__
m"
:\
“<<,
~\)
.
J)
:
“
i)
:
Wind in
\S
spirals to cover
Pointed end
\ \\\\»
blunt end.
3. Paste three 7.5 x
|. Fold a pipe cleaner 2. Paste 2cm (*/in)
in half and tape to the wide strips of kitchen 20cm (3 x 8in) strips.
egg. Paste |.5cm (‘in) roll. Pinch each one __ Braid them and wrap
into a rope, then wind around the edge of
squares of kitchen
the hair. Leave to dry.
around egg for hair.
roll all over. Dry.
Arms
=
>,
>
a
4cm(1%in)
tin
>.
Elbow
SOPRA
Teavea
space.
Te : The
5,
Lf
SS
Wrap from
this end.
Se
=
Thumb
|. For each arm, twist
two pipe cleaners
together. Bend out
the end of one to
make a thumb.
2. Wrap pasted strips
of kitchen roll to
make a hand and an
elbow. Leave last 4cm
(I Ain) bare.
Body
Skirt
|. For wings, fold the
cardboard in half.
Draw dots and join
with lines, as shown.
Cut and open out.
2. Glue one side of
the wings. Press on
50cm (20in) of food
wrap and pinch into
folds. Trim edges.
Arms
S
together to istryaps
Remove the top of
the plastic bottle.
Paste strips of kitchen
roll all over the
bottle. Leave to dry.
24
|. Paste two joined
pieces of kitchen roll.
Fold together along
perforation. Paste the
top layer again.
*You can use ordinary foodwrap but it's not so firm.
=
2. Gather the folded
3. Stand the body on
edge. Press onto the
food wrap. Turn lower
front of the body.
edge of skirt under so
Add two more pieces _ it balloons out. Dry.
around the body.
Tape arms to the back.
Sleeves
Folded edge
Press point over
the neck. dom
Cut off these
ees triangles. ss
-
}
7
:
P ‘
Pinch ————
together.
|. Paste a 20 x 20cm
(8 x 8in) square of
kitchen roll. Fold it
diagonally. Turn over
1.5cm (‘Ain) at fold.
Bodice
Sa
2.Drapeitover
{|
one arm. Open = ivi
out the wide end. By
Repeat on the
other arm.
For her trumpet,
or other ideas,
see next page
|. Paste two joined
pieces of kitchen roll.
Fold at perforation,
then in half. Turn the
sides under neatly.
2. Pinch one side into
gathers and press onto
the waist. Drape the
rest over the neck and
gather onto the back.
This angel is
probably the
hardest projectin
‘ese
the book, but it
f
makes a beautiful
Christmas
decoration.
ae
Allow plenty of
time for drying at
different stages.
You may need
five or six
days to
finish it.
THE ANGEL CONTINUES ON THE NEXT PAGE
The sash
Other ideas
To make a trumpet,
cut an I lcm (4'/in)
square from white
paper. Roll it up,
making one end tight.
Glue and spray gold
|. Paste an 8 xI5cm
(3 x 6in) strip of
kitchen roll. Pinch it
in so it pleats. Wrap
around the waist to
cover the edges.
2. Trim sash, overlap
and press to fasten at
the back. Bend arms
forward at the elbows
and rearrange the
sleeves. Leave to dry.
Make a sheet of music
with a folded piece of
white paper. Dip it
into cold tea to make
it look old. Add some
music with a black pen.
Finishing off
For a scroll, cuta
|. Wrap a pasted
2cm (in) strip of
kitchen roll around
the pipe cleaners to
pad the neck.
2. Poke a hole in the
bottle's neck with a
pencil point. Press in
the pipe cleaners up
to the padding. Dry.
strip of white paper.
Dip in cold tea. Cur
by wrapping ends
around a pencil in
opposite directions.
You could add
braid around
the neck and
brightly
painted
touches.
Nt
ene
3. Take the angel
outside and place the
body and the wings
on lots of newspaper.
Spray gold and dry.
26
——
4. Attach the wings to
the angel's back with
drawing pins (thumb
tacks). Add accessoriesgam
(see right).
Puppets
You need: an apple; a carrot; newspaper; paste
(page 32); craft knife; scissors; thin string;
hairbrush; paints; two 23cm (Yin) green felt
squares; scraps of brown, black felt; cardboard;
red yarn; big needle; tracing paper;
kitchen paper; pencil; two toy eyes; glue
stick; two small pebbles; paper clips;
sewing pins; clear tape; ruler; two thin
17cm (6in) sticks; craft knife.
Head
ASX
|. Make a papier maché apple (see |\\ ;: 5
pages 10-11). Split open from top
\\
to bottom to remove the apple.
i)
String
[Pte
S ey
eae: A
VS.
Felt
X \. Ne ee.
strip
:
,
ee
{
eg
H
ke
(Se
ace
——
"
face
19h
ane LSA ‘ AL
brown.
ies
2. Knot one end of
32cm (12'Ain) of
Sy
Ay t
sa
You can
3. Crumple and rolla
scrap of pasted kitchen
make this
troll
puppet
s!amp his
string. Cut a felt strip paper for anose. Glue
2 x 2.5cm (7/4 x 13/in). it on. Paste paper strips aie,
Glue into one half as __—_over it. Paint when dry. hed
Put in eyes (page 21).
shown. Rejoin apple.
Arrange hair around
Thread yarn through with
a needle and
a.
a
tie here.
central string.
4
a
[ __—_
SS
-
Brushing
makes yarn fuzz out.
5. Hold where the yarn
4. Cut cardboard 8x
is tied and brush both
10cm (3 x 4in). Wind
———
gently. Glue to top
ends
long
the
around
yarn
buckle onto his belt
small
a
Slip
—
from
fuzz
sides. Tie the loops at of head. Pull
it on (see next
glue
you
before
as_
on
glue
one edge. Cut loops _ the brush to
at the other edge.
brows and moustache.
P48), ifyou like.
27
PUPPETS CONTINUE ON THE NEXT PAGE.
Oval
|. Fold the tracing
paper. Place the fold
along the flat far edge
of the troll pattern on
the left. Trace the
green body shape.
en
a0 ew
id
2. Turn tracing over
and go over the lines
you can see through it
(don't forget the dots
for holes). Open out
to see whole shape.
Troll's
layers
clothes oer
cu
Troll's
clothes
of felt.
MY
pel
~ Keep this tracing.
=
3. Pin tracing to both
green felt squares and
cut out. Trace the
4. Glue a clothes top
and bottom to each
body shape. Glue on
clothes pieces in the —_narrow black felt
same way. Cut two of strips at the waist on
each from brown felt. both sides as a belt.
Match
edges
top
(cut 2)
5. Trace the black
6. Glue the cardboard
oval pattern on the
oval to the wrong side
left in the same way. _ of one body. Glue the
Attach it to
tab from the head to
cardboard with paper the same piece. Glue
clips and cut it out.
on second body piece.
28
Jerk the ends of
the stick up
and down to
make the
puppet walk.
The flat end
is the heel.
|. Paste three layers
of paper onto 6cm
(2'Ain) of the pointed
end of a carrot. Dry.
Slice lengthways to
remove carrot.
2. Glue a pebble into
each heel. Pad the
shapes with paper and
paste three layers of
strips on top as a sole.
Dry, then paint black.
Putting
together
Use a pencil.
|. Cut slits on the
2. Replace pattern over
shoes 2cm (%/in) from
troll and poke holes in
legs, as marked. Knot
one end of two 46cm
(18in) pieces of string.
Thread through holes.
Clown
the heel. Glue the
ends of the felt legs
and push into the slits
with a scissor blade.
Pull head upright and tie
to middle of stick.
;
To make this clown,
follow the same steps
as for the troll,
only trace the
red clown
pattern for the
body and don't make
3. Wind leg strings
around the stick, 2cm the troll's clothes.
(?/in) from each end. See how to decorate
it on the right. Paint
Make both 4lcm
(16in) long, then tie. |the head white with a
Tie the head string on. clown's face.
Paint
This hair is
yellow yarn,
not fuzzed.
Make a coneshaped hat from
felt glued to
cardboard. (see
angel's trumpet,
page 26).
Sew a
running
stitch along
one long
edge of
strips offelt
and net
about 4cm
(134in) wide.
Gather, and
sew around
the neck for
a ruff.
Trace the
hands again
and cut from
white felt.
Glue on.
Glue on bright
felt shapes,
buttons and
sequins.
Paint the shoes
brightly.
string,
ifyou
like.
Lizard planter
You will need: large
Stem
pp
Se
(} ape
newspapers; six egg
cartons; masking tape;
scissors; plastic or
cardboard box about
20 x I5cm (8 x 6in)
and |5cm (6in) deep*
(box A); plastic or
cardboard box about
17cm (7in) square and_
9cm (4in) deep** (box
B); thin cardboard; felttip pen; two-three
quantities paper pulp
and one of paste (page
32); white emulsion
paint; paints; small
decorating brush;
PVA (household)
glue; craft knife; strong
tape; cocktail stick.
|. Tape the egg
cartons firmly into
three pairs, bumpy
sides together. Pile
them into a tower
and tape it strongly.
008 men
2. Lay the tower ona
whole open newspaper.
Trim paper to fit, roll
the tower up in it and
tape. Repeat until paper
—_is Icm (‘Ain) thick.
3. This is the stem.
4. Paste 10 x 30cm (4
x |2in) strips of
cardboard.
on
it
The planter takes four Stand
or five days to make
Draw around it, cut = newspaper around
but is well worth it. | out the shape and tape the stem and over
You may needhelp
ittooneendofthe
thetop.Addanother
with some steps.
stem. Stand stem on it. layer up and down.
Top and base
Cut hole slightly
UE
HE
|
30
alternate directions.
This is
the base.
iE E
|. Spread glue on the
top of the stem, set _
box A (see list above)
centrally on it and
add tape to hold very
firmly in place.
makes six layers in all,
drying completely
after every two layers.
Do layers in
bigger than drawn.
es
5. When it is dry (a
few hours), repeat
step 4 twice. That
2. Turn box B (see
list above) upside
down and standthe
tower on it. Draw
around it, then cut
out the shape.
3. Push the stem into
the hole to touch the
floor and tape firmly.
Draw around the
base onto cardboard,
cut out and tape on.
* A 2kg margarine tub is ideal, if available. ** Use a 4 litre plastic ice-cream tub, where available.
!
4. Cover the boxes
with three layers of
strips. Dry. Cover the
whole planter with a
thin layer of pulp. Dry
completely (4-5 days).
Lizard and
leaves
Paint three layers of varnish
(see page 8) inside and line with
two layers of silver foil to
waterproof. Varnish outside if
you want it to be shiny.
iy,
Paint black and red
striped lizards and
Turn pattern
over for a
eens
Copy this lizard, bigger,
Paneer Dee,
onto thin cardboard.
greenish-brown leaves..
Do the blue lines first,
red next, then green.
Cut out. Draw around
it onto the stem.
The blue planter
is dry-brushed
green (see below).
Its stem 1s two
egg cartons and
its top is a papier
maché bowl.
Add leaf shapes. Build
up all the shapes with
pulp. Mark leaves with
a cocktail stick. When
completely dry, paint
white emulsion all over.
Paint inside too.
eS
RE
at
Se
wie
Ciel
Petree
»
ov
The red planter is just ~
two boxes back to back.
Paint it yellow. Put
orange on the brush,
wipe most of it off on
paper, then brush
over the yellow. This
is called dry-brushing.
3|
Recipes
Paste recipe
This recipe makes
about |'/2 cups of
paste. If you want a
different amount, use
| part of flour to 3
parts of water. Use a
little extra water for
runny paste. Ask for
help to use the stove.
You will need:
whisk; cup; flour;
bowl; saucepan;
wooden spoon.
Don't overcook the
mixture as it will
become toothick.;
/i{
. Ina bowl, whisk a
cup of flour with a
cup of water. Add
two more cups of
water and mix well to
get rid of any lumps.
1|‘
2. Put the mixture
into a saucepan and
bring it to the boil,
stirring constantly.
Allow to cool
completely.
3. To store, cover
tightly with plastic
food wrap and keep
it in a refrigerator.
It will last for
several days.
You can use two parts PVA (household) glue and one part water or buy non-toxic paste
from toy or craft stores instead. Don't use wallpaper paste as it contains toxic fungicides.
Papier maché pulp
This is one quantity
of pulp. You will be
told if you need
more.
You will need:
blender (optional);
newspaper; large
bowl; one tablespoon
PVA (household) glue
mixed with one
tablespoon paste
(see above);
8
|. Cut or tear several
layers of newpaper
into |.5cm (Ain)
squares. Pack lightly
into a mug to fill it.
2. Either: put the
paper into a blender.
Cover it with water
and blend with lots
of short bursts.
ae
Or: Soak the paper
in hot water for 3
hours. Then knead
with your fingers to
make a pulp.
Tips
a mug; a sieve.
If stored pulp gets
This pulp is made with
glue and paste. Pasteonly pulp is not as
strong. Glue-only pulp
is harder to model.
For extra-strong pulp
add fillers - sawdust
(from pet shops) or
decorators' filler.
too wet, squeeze it
cy!
out and add glue.
3. Squeeze water from
the pulp ina sieve. Put
the pulp into the bowl.
Add a tablespoon of
glue/paste mix.
4. Knead it together
well. Add more glue
mix until it feels like
squashy clay. Store in
a bag in a refrigerator.
Always protect
work areas with lots
of old newspapers.
Keep a damp rag
handy for cleaning up.
"EVESHAM COLLEGE
nyseermsa eT
:
'
TEL
ESSE nieces
f
c
|
q
i
h
esrer’
A
pa
A
Bs
Bia
.
a
;
‘
?
THE USBORNE BOOK OF
APIER
This book shows you how to transform old newspapers into wonderful
gifts and decorative things. With the help of other cheap materials, such as
egg cartons, shoe boxes and cardboard rolls, you can make glowing
ornaments; ; puppets; bowls; big, bold earrings, necklaces and bracelets;
trays; planters and even a monster’s foot pencil holder. Gorgeous
photographs of the finished things will inspire you to try them for yourself,
while straightforward, step-by-step instructions show you the basic ways to
use papier maché and take you carefully through each project. You'll find it
hard to believe that papier maché means “chewed paper
Made with paper from a sustainable forest
52
£5.99
ISBN 0 7460 2074 0
JFMA
JJASOND/95
ISBN O-?4b0-2074-0
| Hil |
|
|
780746
0207
2
0‘nz
$2
n=