/


Автор: Currell D.
Теги: art handicrafts handicrafts and creativity dolls puppet theater
ISBN: 1-86126-663-4
Год: 2004


Текст
Making and
Manipulating
Marionettes
David Currell
Making and Manipulating
Marionettes
David Current
he Crowood Press
First published in 2004 by
The Crowood Press Ltd
Ramsbury, Marlborough
Wiltshire SN8 2IIR
w ww. crowood. com
(D David Currell 2004
All rights reserved - No part of this publication may be reproduced or
transmitted in any form or by any means, electronic or mechanical,
including photocopy, recording, or any information storage and
retrieval system, without permission in writing from the publishers.
British Library Cataloguing-in-Publication Data
A catalogue record for this book is available from (he British Library.
ISBN 1 861266634
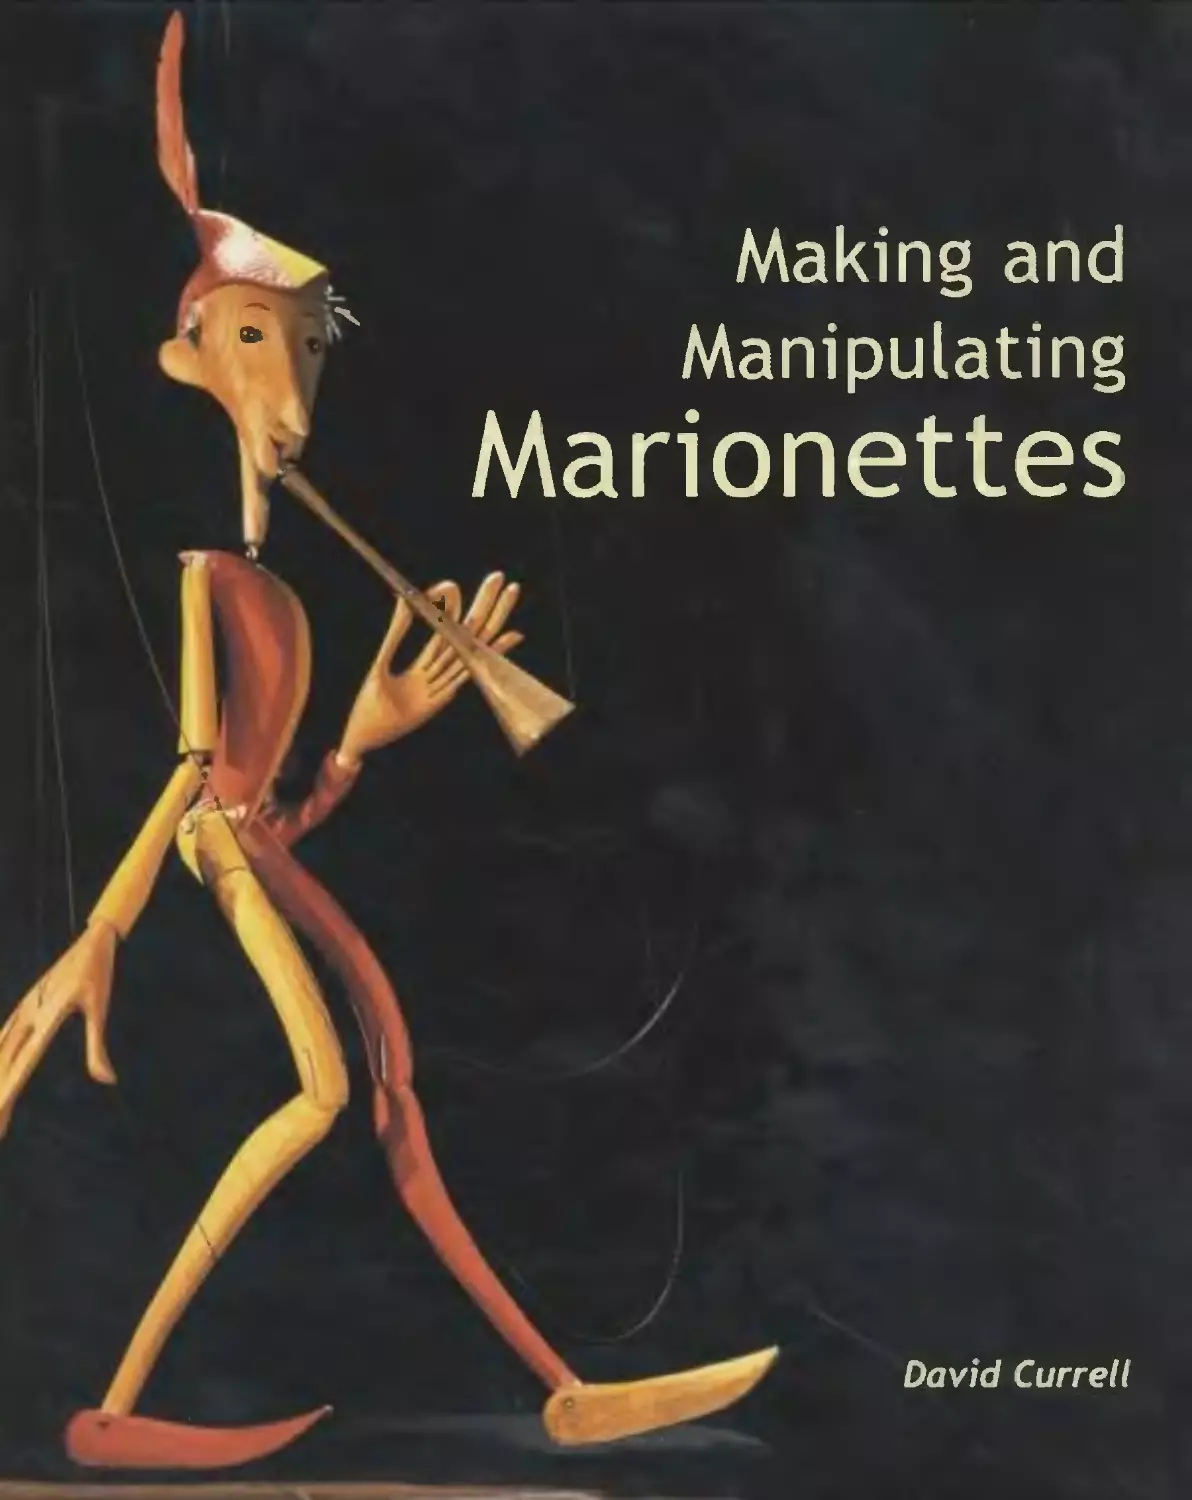
Frontispiece: ‘Bubbles’ by Paul Doran. Shadowstring Theatre
To the memory of my lather. 1 jconard Currell. whose encouragement
and support in my childhood fostered my interest in crafts and design.
We worked together on my first marionette before his early death.
Designed and edited by Focus Publishing,
1 la St Botolph's Road.
Sevenoaks
Kent TN 13 3AJ
Printed and bound in Malaysia by Times Offset (M) Sdn Bhd
Contents
Acknowledgements................................6
1 The Marionette Tradition........................9
2 Marionette Design..............................13
3 Heads-Materials and Methods....................20
-I Construction and Costume.......................42
5 Control and Manipulation.......................73
6 Animal Marionettes ............................97
7 Specialized Stringing ........................117
S Specialized Designs...........................152
Useful Addresses .............................187
Index.........................................189
Acknowledgements
Puppeteers are renowned for tiicir wi lingness tjq share
techniques and the secrets of their creations, none more
so than those who have contributed to this book and to
whom I am particularly grateful. Gordon Staight
introduced me to the magic of marionettes, spent
countless hours over many years teaching me his
techniques, and shared the clever, but often simple, ways
in which he surprised and amazed his audiences. Paul
Don n welcomed me to his theatre and allowed me to
delve into all aspects of his marionettes construction and
performance. Gren Middleton and John Roberts have
supplied photographs of their beautnul marionettes and
freely shared technical information Lyndlc Wright has
allowed inc use of photos ol the work of the late John
Wright. OBE. whose work I always admixed. rl he Puppet
Centre has also allowed me to photograph items in its
splendid and important collection. Further details about
those contributors arc included iu the Appendices.
friends and colleagues at Rochampton I nicer sits. David
Rose and Robert Watts, David for photographs oi figures
in my troupe and the Puppet Centre Collection. and
Robert for assistance with the numerous illiisiraiions.
Over the years I have also been involved closely with
V w
major puppet theatre organisations, especially the Puppet
Centre in London, the British Section of I'NIMA (I nion
Internationale de la Mariomiotte). and the British Puppci
and Model I heal re Guild, through which 1 have been
entertained, learned a host of techniques, and made
many friends, loo numerous to mention here.
I am extremely grateful also to lan Howes for
photograplis of some of my work in progress, and to my
Specialized puppetry techniques like conjuring
tricks, generailv come down to a set of a lew basic
principles. Methods and materials nrght develop but
the principles themselves are Vimele^. So the reader
will find in this book many techniques that I learned
with Gordon Staight. both of us depending heavily on a
few classics of puppet lierature. all published tn Wells
Gardner. Darlon & Co Ltd. In particular, we found
inspiration in Evcnjbodij’.s’ Макчтеии Book il94S).
Animal Pupprtrij (194 b»). A Btiuli Book of Puppctrif
(19 57) and A Second Bench Book ol Piqjpeirif 11 9 5 “ I. all
by H.W. VJianslaw. and Specialised Puppetry (194S*i by
H.U. Whanslaw’ and Victor Hotchkiss. Later I ako
found useful ideas m Puppet Cions (1971) by Peter
Fraser t'B.T. Batsfbrd I.tdi. those familiar with these
works will recognise that a few of nn •llustrations.
sketched for my own puppets, are based upon drawings
in these books. I gratefully acknowledge these sources
of inlormation and inspiration.
f ast but not least, my thanks arc extended to the team
at The Crowood Press for their support, patience and
helpful suggestions, shaping this into a clear, colourful
and attractive book that 1 trust the reader will enjoy as
much Iasi have wntinE it.
ACKNOWLEDGEMENTS
Photo Credits
г ". cos (if Movingstage Marionettes* Gren Middleton.
- - ; ? -1 PuppetCraft: john Roberts, except pages 20
*- x these arc courtesy of John Roberts and Graham
- х.-'П.
s of Shadowstring Theatre/Paul Doran: David
courtesy Paul Doran, except; page 13 (right),
orPaul Doran: page 101. Steve Guscott courtesy
- r_. Doran.
- Ъ «: - of Gordon Staight’s marionettes: David Currell
г > collection).
- : < :rom Puppet Centre Collection, pages 9. 19 (left).
_ - 98 Dav d Rose courtesy Puppet Centre Ltd.
• ' from Puppet Centre Collection, pages 11, 18, 34
(left), 48, 65, 78, 160: David Currell, courtesy Puppet
Centre Ltd.
Image page 17 (left): courtesy Puppet Centre Ltd (Crafts
Council Collection).
Image page 19 (right): courtesy ]ohn Blandall.
Image pages 55 and 69: courtesy Lvndie Wright.
Image page 57: courtesy Albrecht Roser, Stuttgart;
Germany.
Photos of author at work, pages 24. 25,40 Ian Howes.
All other photos (author's collection): David Currell,
except pages 33, 47, 93: David Rose; 89. 92: Emre
Currell: 180,183:Emily Currell.
1 The Marionette Tradition
'ne term ' marionette’ is u^ed in English specifically lor
ring puppets, to be distinguished тот the l 'rench
irioiuietic. which is a generic term Гог all types of
puppet. M bile it is widely agreed that ’puppet is derived
- ni pupa. the Italian fur doll, the origin of ’marionette’ is
uncertain. Soiue writers suggest that it derives from 'little
Mary ’ referring to the use of puppets in chart lies.
Marionettes have a long. soiTietimes distinguished
• i story. It is quite possible that early types of marionette
nd tided figures used in fertility rites: others, operated
remotely by strings, were used in ancient temples to
nspirc the congregation with wonder. In some cultures,
marionettes were m use before human actors because of
religious taboos on impersonation. In Indian Sanskrit
play s. for example, the leading player is called sulnidliauj
г the holder of strings’ because he was originally' a
naiToncttc op crafor. Early marionette pet lorn unices in
’ndia took the ir themes from the Mahabharata and the
\ ininpauu, the great Sanskrit epics, the contents of which
ire well suited to puppet theatre.
We know that marionettes were in use in China by the
ghth cei Cary but the Greeks might have used puppets as
.arly as St Mine. References to marionettes appear in
Roman literature by 400bc. by which lime it was
.ertainly a common form of entertainment in Greece.
There appears lo be no documentary cv-dencc of the
puppet show between the lali ol Rome and the seventh
cenrury but it seems reasonable to assume that vestiges of
ttis dramatic tradition siir\ ived. for between the seventh
md ninth centuries we find puppets being used for
religious purposes.
We can trace the use of puppets in Br tain back to the
mrteenth century; possibly introduced by French
niertainers in the previous century and we know also
:hcit marionette^ were in use i u Eli/abct han I ngland.
The puppet theatre was patronized by Charles II and
Ms сопи and. on his return to Britain in 166(J.
iPF'osinOrhunlo Гurioxo. a Sicilian rod-inurioucuc,
carved in wood with beaten arnumr.
1 iradilional Burmese nnirionette in the Puppet
Centre collection
puppeteers among his entourage introduced Poltchinelle
to Britain. 1 ormerly Pulcinella. a puppet version of one of
the zannr. or buffoons, in the Italian Cammedia dell' Arte.
the 1 rench version in Britain soon byc.ime Punch nello.
subsequently shortened to Punch. When Samuel Pepys
noted this character’s first recorded appearance in
9
THE MARIONETTE TRADITION
England, in Covent Garden in 1662. the puppet is
believed to have been a marionette.
Although we have no specific details of the puppets
themselves. George Speaight , cites convincing evidence
in support of the view that these were indeed
marionettes. The size of the booth erected for a
performance before Charles II at Whitehall Palace was of
such dimensions that it is inconceivable that it was
intended lor glove puppets. There are references to
puppets that ‘fly through clouds' and perform other feats
that arc most naturally accomplished by marionettes,
and allusions to political ‘wire-pulling' also associated
with marionettes. According to Speaight. the popularity
of glove puppets in the first half of the seventeenth
century was surpassed in the second half by the
attractions of the marionette performances and the
widespread popularity of Punch among all levels of
society - John Milton. for example, certainly frequented
the puppet theatre: he attributed the inspiration for
Paradise Lost, which first appeared in 1667. to a puppet
version of the story of Adam and Eve.
In early eighteenth-century England, puppetry was a
fashionable entertainment, the puppet show being one of
the places al which to be ‘seen . and many of the
continental aristocracy had their own private puppet
theatres. In France, the live actors felt so threatened by
the popularity of the marionette operas that in 1 720 a
special parliament was called to consider demands to
have the puppet performances restricted, but it found in
favour of the puppeteers.
In 1738 we find the first record in the USA of an
English-style marionette show. The Adventures of
Harlequin and Scaramouch? by a puppeteer named Holt.
The USA also provides evidence that, in some cultures,
the marionette might have developed from the mask.
Among the north-west coast Native Americans, for
example, there was the use of masks which then acquired
articulated jaws. Next they were held in the hands rather
than worn on the head and later were suspended on
strings.
As Kapellmeister at the Eisenstadt palace of Prince
Estcrhazy between 1761 and 1 790. Haydn composed the
music for five marionette operettas, and Philemon and
Baucis was composed for a marionette performance for
the Empress Maria Theresa. Gluck, too. composed
marionette operas to entertain patrons such as Queen
1. Speaight. Cj.. Punch & Judy, d Histoiy (Studio Vista. 1970).
Marie Antoinette and later as Kapellmeister io Maria
Theresa. Haydn and Goethe both acknowledged the
influence of puppet theatre in their formative years.
Goet he was presented with a puppet theatre at six years of
age, for which he subsequently wrote many plays: this is
said to have given him inspiration many years later for
Faust, which also became a significant work for puppet
theatre.
In the second hall of the eighteenth century, Mozart
composed works such as Do?i Giovanni, Die riedennaus. Il
Seraglio and Die Zimberjlot? which. though not written for
puppet theatre, have become classics of puppet theatre,
especially at the renowned Salzburg Marionette Theatre.
In Britain, interest in puppetry was flagging in the later
part of the eighteenth century. Fortunately, (he Italian
fantoccini marionettes arrived on the scene and raised the
popularity of puppets with performances full of tricks and
transformations, a marionette tradition that survives to
this day.
By 182U the puppeteers in England were catering for
children and the popularity of the marionettes had given
way to Mr Punch, now presented as a glove puppet. The
permanent puppet theatres closed and the marionettes,
like the glove puppets, took Erst to the streets and then to
the pleasure gardens. The travelling marionette
companies now took up the melodramas of the live
theatre as well as presenting the old tricks and
transformations in pantomime-style shows. Towards the
end of the nineteenth century. England’s marionette
troupes were considered to be the best in the world These
companies toured the globe with wagons carrying large
theatres for elaborate productions.
Despite the impact of the arrival of the cinema and
then television, throughout the past century there has
been a revival of puppet theatre in general and even today
there remain examples of the influence of the marionette
on the human dance-drama.
Marionette productions, created and developed by U
Thaw, a minister of royal entertainment in the
eighteenth century, have had such an influence on the
live dance-drama that in Burma the dancer’s skill is
measured by the ability to re-create convincingly the
movements of the marionette.
In a performance ] saw by the Burmese National
Dancers and Puppets, two stages were in view with two
sets of marionettes of different sizes at rest. The
puppeteers first operated the puppets on the smaller
stage, and then moved on to the large stage. The larger
Uli Ч \HI(LM2TTE TRADITION
niiirionctlcs came to lite and gradually il became dear
i • anb^ec were dancers, nol pijjipctx.
The cxMODpeiratlvc eompkxUy of cnnstnicwn.
шин pulalinn andslag'ir.'ril nr.itumeklcslidsjhulcd
to a greater take up of other lypes cf pr.ppd mil
maiiuneties retain a Jgmficant position in puppet
i Игл In*. 1 lirv lire rrgardkxl with. .1 tni liutc of reMccul and
allection 1 I.«ng-Ma tradition tn p pnlar cuhurc
with a ‘ Liiial. я11п*с1кч1 Ju. pci'forniers and llirii
audl dices.
1 farLia rau-.sii/Jr \ н нч чш j/rtu lunritc, brlumi 1й 1чг
]npij tiwClmvii. Fmm dFe/nmniis
Zn the Co.’hc ljom ert 1 he Pupp^ C« шге,
II
2 Marionette Design
diaractrrs from Kesop’s Fables(left) and The I’empest
above), (arved btf Gren ’ liddltiLOn, cosiumt s bif Juliet
Roger#, Mfn'hHjNlntjc Marionettes. rhe heads. hands and
t i arc carved :u limewood niul lire bodies and limbs of
In lartjrr charactersare tarvctljroni jelutong- Smaller
htjuresarr lime wood throughout. The wood is finished
a ith stains or left plain, rather than painted.
Pki.xcipi.es OF M ARIONII 1 I I- DrSIG.X'
hi order Lo undersiand and design marionette^. one
should appreciate something ol the nature of puppet
theatre in цепсга1 and nianonclies in particular. I hevare
not actors in miiHiduie and gencrdllx they Tail as puppets
il they are made loo lifelike lor that is lo misunderstand
what il is about puppets lha.t has captivated human
audit nces lor thousands of rears.
An actor acts but a puppet is. I lie manoncllc is
sometimes referred Lo as the complete mask, the mask
Irom which the human actor has withdrawn. 11 ua? this
tiled appealed to IЙ ward Gordan Craig v hen he proposed
I iery Jack by Paul Duran, Shadowstring I heatre.
I 3
MARIONETTE DESIGN
the Ubcr-marionelie and George Bernard Shaw argued
the case for a puppet ihcatre to he altar hc-d to every
drama school to teach the qualitv of ‘псД acting .
All puppets, including mark)net les. need to be an
essence and an empliajis of whatever they represent,
whether human, animal or an abstract concept They
hint at or suggest qualities. movements or emotions and
they arc most effective when they interpret rather than
ropy the human form.'I he power of the puppet resides in
large part in the fact (hat il is a simptificaiion ol form: it
invites the audience to participate in a rather special way
- to supplement those dimensions of character and
movement that arc merely suggested by the fuppcl
through ils design and by skilful mancpulal'oii.
Prospero and Ariel; ctiri'to! by Greii AlrdcHcto.ii, costume’
bi/ Juliet Rogers, Movmfjstciffe Marionettes. Ariel was
aval rd in qlriss by a professional (fluss blower to designs
by (.яти MiddR’ton; die use oj glass was inspired by tJir
straw direction, ‘I nirr Artel. invisible'.
A marionette built to human proportions tends to
look loo long and thin, so it is usual to exaggerate
the head, hands and It el slightly. Finely detailed
modelling or carving will he lost to an audience
more than a few led away, so keep the modelling bold.
V. hen designing or creating the head, think of the
modelling and painting as akin to stage make-up
compared with everyday cosmetics. Despite the ways
in which the puppet departs from human proportion. it
is useful for characterization to study books on human
anatomy for artists. and basic ‘tern to draw’ books of the
human form.
\A ilb puppets, one Ls liberated to create characters that
can defy natural laws; they can i \ through the air. turn
inside out and transform in all maimer о ways. Their
design is not limited by the human form, lor one creates
not only the costumes of, the actors, but also their heads,
faces, body shapes, and soon, t f course, the puppet needs
to look Like, and move as. the intended character and this
is conveyed in part by the shape, sjze and modelling of
every part of the puppet The way in which it moves is
influenced by its structure. the met hod of control and the
skill of the manipulator. So il is important Lo be clear
about what the marionette is lo be aid to do. and |x>
design Л accordingly.
Marionettes Ccin be as simple or as complex as you wish
but their apparent complexity and remoteness from their
operator distinguish them from other forms of puppet.
( и like a hand or rud-puppet. which you position just
n here you want il. the marionette. which is controlled via
strings, has more independence of movement so it bus
even more of a Ide of its ov. n. Therefore a marionette with
good balance, appropriate distribution of weight and
suitable joints will have intrinsic movement Ihal assists
the manipulator. When one operates a well-consiructcd
puppet the puppet docs a good deal of the wea k but it can
also resist intended gestures or other movements, so
flc.xibdiiv or restriction of movement is an important
consideration
Materials should be selected with a view to both the
joints required and the rclcitlve weight of die different
parts. If the pelvis is too light in relation io the legs, lor
example, the puppet will not walk well» In fact, any part
dial is too light will not facilitate good control and
movement .Marionettes that are entirely carted ac lieve a
unity of design and good distribution of weight iliat
promotes a quality of movement other puppets du not
always achieve.
1-t
MARIONETTE DESIGN
$ always a good idea lo plan the puppet, drawing it to
jal <:ze hoi h from lhe front and in profile You may find
jraw ing on lightly squared paper cases the transition
г т. the plan to the puppet, If so, work with lair-sized
ol around 2.Scm (Tin) so that the figure is
Jed into manageable segments. When drawing your
gn. have regard for ihe notes on proportion and
"... lure that follow.
M \kioxette Proportion
" «ncltes can be any size or shape and the variations of
portion can contribute significantly to charac-
; nation, so effectively there are no rules. However, some
dance may be useful ;n order lc achieve relative
portions within a puppet.
Head between
4th and %th of
height of puppet.
ELOovvs level
wifi waist.
Fingertips
halfway down
thigh
Hands reach from chin to
middle of forehead.
Feet about size of nead.
Typical proportions for a head: the ears align with the
eyes and nose, and the eyes are approximately one eye's
width apart.
1 piirfe to proportions for a marionette.
A puppet’s head is approximately a fifth of its height,
or just a little less. As with humans, the hand measures
the same as from the chin to the middle of the forehead
and covers most of the face. The hand is also about the
same length as the forearm and the upper arm. Feet are a
little longer, approximately equal to the height of the
head. Elbows arc level with the waist, the wrist with
the bottom of the body, and the fingertips half-way
down the thigh. The body is usually a little shorter than
the legs.
The way in which the face is framed by the addition of
hair can have a strong influence on the puppet s
appearance, and the age of a character affects the
proportions of the head. As a general guide,' the face has
three approximately equal divisions: chin lo nose: nose lo
evebrows; cvcbrows to brow-line. The bulk of the hair will
often add to the height of the head and can make the
proportions appear somewhat different. When designing
the head, do not make the pro01e too flat, particularly the
back of the head.
Eyes are a little above (he mid-point between the
chin and ihe lop of lhe skull and are usually one eye’s
width apart, depending on the width of lhe nose. The
.op and bottom of Lhe ears normally align with the top
and bottom of the nose. The mouth is a little above the
mid-point between lhe chin and the nose, and the
corners of the mouth align with the centre of the
eves. The neck is set a Little way back from the centre of
15
MARIONETTE DESIGN
The angle at which the head sits in relation to the body
contiUnites xiijf lit irnntly to cha racier hat ion.
the skull and. lor characterization, may be slightly
angled by the positioning of joints between the head,
neck and body
Common mistakes arc to make the eyes loo high or too
close together and foreheads too low. Ears are sometimes
too high or too small and need to be examined from ail
angles as they also contribute to characterization.
Consider proportion not only in terms ol height but
also in terms of the bulk of the body and iimbs. Ensure
dial the neck, arms and legs have sufficient bulk: if they
are too thin this w iil affect the way the costume hangs
and moves and the lack of bulk will often become
apparent Check I he profile of the entire puppet; if you
hoid the puppet in a strong beam of light, docs il cast a
strong, interesting shadow?
Marionette Stri cture
Generally, a marionette head moves most effectively if the
neck is separate from both the head and the body, though
the head and neck may be made in one piece. I made most
of my early marionettes with head and neck as a single
unit and was perfectly satisfied with the result. However,
'three, types of n^ck. Top: the neck made as part of the
head. Middle: the neck made as part of the body and
joined inside the head. Bottom: a separate nerk joined
inside both the head and the body.
16
MARIONETTE DESIGN
later made them separately, I discovered the
гг variety ol movement that I could achieve. For
purposes the neck may be made as part of the body
‘led inside the head.
• marionette body is normally jointed al the waist but
rent may be restricted as necessary. Some puppet
* _ -> favour a three-part body with the upper body and
'Cparaied by a large ball around which then move,
can be most effective. Some app (cations wit]
с a one-piece body with no waist joint, though this
- -.• mes affects the way the puppct walks.
unity of design and weigh!, hands and feet are
. intruded in the same material as the head. When
',-ni materials arc used, ensure that the finished
. rance has a coherence of style and texture.
Examples of carved marionettes.
Left: a marionette carved by the late John П right for the
Puppet Centre collection. 1 he wooden ball at the wriisi
fac ilitates smooth movement,
.Above: a marionette carved by a student on a course
tutored by John Roberts, Puppet Craft. Working from
rare fully drawn full-size patterns, this large puppet
(about 28in tall) has been carvedfrom lime and softer
jelutong woods.
\\ rist joints are usually designed to allow a good deal
of flexibility' hut ankle joints lend to be more restricted to
ensure a good walking action.
Where necessary, puppet parts may be weighted with
sheet lead (available from builders' merchants) or lead
curtain weights, glued or nailed on. Puppet parts cast in
rubber may be weighted by pouring a little liquid piaster
into the hollow part.
Animal Marionettes
Most quadrupeds have the same basic structure (xcc
illustration, page 18). The animal parts arc made from
the same materials described for human puppets but
size and weight may be factors hi selecting the material
and construction method to be used. Legs are usually
I \ КГ OVE TTI. JJKSIGX
1 he all iK fu:c (it iiitfSl ifimrti uf.t tls fo/luwx the чшне prjarfplf 5 as dir* tkaj I//»>*( mird {llhcittjJi (lirlr^ iriNiiivn.'ih1;/
hr jiiiiih J, и Irqrtirveti rKn|ir pirn* Js n rii trflrf(ivi‘for this рглпн м/wz ,’Mippri. <шvrrl1м/ ftfim Thi/lb wirihe Гищмч
C r'j.rr'sz/riii* ичгиглш n>/Jr< llniL
carved nr constructed ividh laminated layeix ul
plywood. It 1 ec<?ssary. additional shflpinj! uiin bv
achieved u Jh >1 mcilclkng ntaicriiiE. < г hi padding to
shape iviiJi foam nibbcr if lhe leg Is to be ом г чч! ’* 1 1
fabric, beet are cun i*d or made from the smr.c material
as the head.
Rod-M \rionbttes
A rod-marioncttc Is ; \cry 0И slyltf of pupixl
< perated <cm abuse iisu&lk hs a mixture of rods wxl
blringh. Hie traditional Sicilian puppeis. whitli
perform ih cs «if Orlando I'tirin-wxMiind s 1111 IfflB i>
ALA К I ON ETTE DESIGN
1 rod-marionette bi/ the late Harry Smith. The headand
body hit supported bij a single central rod while the
muds arc controlled bi/sti imfs.
high. are carved throughout in wood, and have brass
armour (see illustration on page X). t he puppets have
не same basic structure as other marionettes but the
style of control and method of manipulation are
very different,
Another type of rod-marionette. sometimes called
.1 rod-mar ionrtte or body puppet by John Blundall. This
technique, which is common in southern India, has
strings from the puppeteer's head and пес к to the
puppet’s head and shoulders. and rods to lhe hands.
a ‘body puppet' is found in southern India. This
puppet is suspended on strings hung from the
puppeteer’s head and rods are used to manipulate the
puppet’s hands. Such a figure might have a flowing
rube rather than legs and feel but, if it does have feet,
they may be attached to the puppeteer's shoes.
7 9
3 Heads - Materials
and Methods
Before embarking U|XffJ creating a lead, refer to llir
rnfui maiirm i и m-irkjtietlc design. in Chapter 2 and plan
ilie head in rehiiion in 1 he uhok* puppet, к he neck lo be
separate from tlse head nr created with the head as a
single a nit* Al what angle should the head sit in re la I ion
hi (he neck and < «mi!.кт*/ Does die puppet need a
moving mouth or moving eyes? JLqw will its personal
disinu hiHi ii'-> anti H*shs£C тЯьепсе I lie design."
I hr Pied Piprr brj Juini Pi‘ipp*Ml ra.fi. Hr fid flitd.
ri‘r run r r! hi /hurwwdfri’t dird withfuii
jMiim nUil u’jhi j/ibx kc th «fir :..
1 modrllr/iluwi iviiii r’xxrrruinibff f’r.* ui.^icn.
HEADS - MATERIALS AND METHODS
There are three basic methods for creating heads; these
are carving, modelling and casting (or moulding),
raditionally. marionettes were mostly carved in wood
and this remains a popular method though it requires
more skill than modelling or casting. Older puppetry texts
often refer to the use of plastic wood and Celastic for
modelling and casting. However, the formulation of
plastic wood has been changed and it no longer has
suitable properties for modelling, and Celastic. an
impregnated woven material used with a solvent, is no
longer available. The following pages outline a variety of
naterials that are suitable for each construction method,
including some long-standing methods and the latest
materials available.
V)U will discover a personal preference for particular
techniques, so do experiment and always be on the
lookout for new materials that appear in craft
>hops. decorating and DIY outlets, or in theatrical
chandlers/suppliers. In theatrical suppliers in particular
you will find all manner of materials and hardware of
jsc for puppet construction and finishing, staging and
scenery, including many of the modelling and casting
materials described in this chapter.
Tools
he beginner could probably manage with the basic
•ools that one might find in a household toolbox, unless
•ne is to carve puppets in wood. However, a slightly
enhanced selection of tools, detailed below, is desirable,
md there may be occasions when you add to the
collection for a particular purpose - brazing equipment.
tr example, may be needed for some types of metal
work. Keep all tools clean and well maintained, sharp
»y here appropriate, and use them only for their intended
purpose.
A vice with wooden jaws is essential for making most
lypcs of puppet and their controls. This may be
permanently attached to a workbench or the type that
can be clamped to any suitable surface.
You will certainly need a few craft knives and a
ariety of scissors. You will maintain the sharpness of
your scissors by keeping each pair for particular
materials and not using your fabric scissors for cutting
paper or cardboard. A tenon saw, coping saw and a
-jnior hacksaw cover most other cutting, though you
ill need a hand saw for easier cutting of large blocks
: wood.
A power drill is useful, though delicate drilling is best
done with a hand drill and occasionally you might need
a carpenter's brace. The brace will need augers for
drilling larger holes while the other drills need a variety
of twist drills, spade drills lor points! up to 5mm (Kin)
diameter, and a countersink bit. It is also useful to have
an awl. a bradawl and a gimlet.
Shaping and smoothing is facilitated with rasps, files
and various grades of glasspaper. Flat and round
Surform rasps and a small hand tool are particularly
helpful. Chisels with different width blades, mainly fiat
back and the odd bevelled back, will be needed for
general-purpose work, together with a mallet. Carving
tools arc detailed in the following section.
You also need: screwdrivers, for example ratchet.
Phillips and Pozidriv. slub and electrician's: large and
small pliers, pincers, wire cutters and tin snips: claw.
Warrington and tack hammers; a selection of brushes;
measuring implements and a try square.
Carving a Head
Woodcarving Tools
A woodworking vice fixed to a rigid bench is essential to
hold the wood firmly and safely while carving. A
powered band saw. tenon saw and coping saw are
useful for cutting basic shapes. Rasps are also handy.
While proper woodcarving rasps are recommended,
even a Surform rasp can be helpful for general shaping,
Some woods can also be shaped considerably with
glasspaper.
From my early days in puppetry Г always admired lhe
carving style of (the now late) John Wright from the
Little Angel Theatre in London, and followed closely his
recommendations, though with nothing like the same
degree of skill. He recommended for the beginner a basic
set of tools consisting of a 16mm (Ain) and a 25mm (lin)
flat chisel, a 6mm (Kin) fishtail flat, a 6mm (Kin) deep
gouge and a 13mm (Kin) shallow gouge plus a
woodcarving mallet and a pair of callipers for comparing
measurements. A sharpening stone and oil arc also
essential to maintain the tools in good condition and
minimize the risk of accidents caused by using
blunt tools.
Woods to Use
Well-seasoned limewood, a close-grained hardwood, is
recommended for carving a marionette head. It is easily
21
1 he main stages
in can ing a head.
sufficient wood for the front to back dimension. though
you can join two pieces with woodworking adhesive if
necessan.
The out 1. ne
shapes «redrawn
on the block of
wood.
Caning lechniquc
The beginner will find it helpful lo practise on spare pieces
of I he type of wood to be used before attempting to cane
the actual pnppel. Il is al sb a good idea I о carve the
simpler parts first so start with the body, then the limbs,
next the feel and hands, and finally carve the head.
Plan to use the wood with the grain running vertically
down through the whole puppet, except the feet, which
the grain will run along. Draw ihc outline shapes on to
The major waste
is removed with a
saw and chisel.
'1 hr face is shaped
with chisels and
smith d before
shapint/ the back
of the head.
worked, docs not tend io splinter too readily and il is fa rlv
lieht in weight. However, von might need to find a
specialist limber merchant lo obtaiin il. A second cholcc-
uouid be American while wood. Jelutong is suitable for
large puppet parts and simple heat! shapes but it is not
recommended for thin or delicate parts.
V, hen selecting the wood, avoid pieces with cracks,
stains or knots and look or a straight grain. Remember
that the head is much deeper than it is wide, so allow
River Girl and Poet, carved by (h en Middleton, costumes
by Juliet iioyers, Movaujsuiqe Marionettes, fora
commissioned piece, River Girl by VVendi/ Cope.
HEADS - MATERIALS AND METHODS
ilie blocks in thick pencil. As the wood is cut away these
outlines will be lost: when this happens, lightly sand the
wood lo study progress and redraw the outlines as
necessary.
Some people screw a block of wood securely lo the
bottom of the head in order lo hold it in the vice for
carving and then remove it when the carving is complete.
Others carve the ears last, leaving them as blocks for
securing in the vice, as described below.
Secure the rear of the block firmly in a vice and carve
the face and front half of the head, back almost to the
ears. First, cut away any major waste with a saw and a
chisel or rasp. Then embark upon the carving proper
with chisels. Make the chisel cuts in the same direction
as the grain or the wood will split and more than
intended will be cut away, ruining the head. For larger
cuts, hold the chisel and tap it firmly and sharply but not
too heavily, with the mallet. For fine paring, rest the end
of the chisel in the palm of one hand, against the heel,
and place the other hand over the shaft and blade,
helping to guide it. Always keep both hands behind the
direction of the cutting edge. Take care to shape the head
fully: a common mistake is to leave the head too angular,
reflecting the shape of the block from which it has
been carved.
Next, sand the face smooth, first with coarse
glasspaper on rough parts, working down in stages to a
very fine one. When the face is complete, work towards
the back of the head and finally shape the ears, which
must be done with care.
If the neck is separate from the head, hollow out the
socket for the neck and through this hole cut away as
much of the head as possible to reduce its weight.
Modelling a Head
General Principles
Modelling is a very flexible method for creating heads.
Starting with either a base shape or a model in
Plasticine (plastilene). you can build the required shape
in the chosen material and work on the head until you
achieve the desired result. Some materials are fairly
flexible, which allows you to cut back or sand the head
Modelling on a
Plasticine base.
The Plasticine
model with
cardboard or thin
plywood ears.
The Plasticine is
coated with a
release agent and
covered with a
mode Hint]
material.
A modelling
stand.
When dry, the
head is cut open
and the Plasticine
removed.
HEADS - MATERIALS AM) METHODS
Removing the Plasticine from a modelled head.
Top: Cut open the head with п suitable tool: alwatfs cut
awaif from the hand hohliiKj the head.
Middle: The cut is made with «‘ V' shape at the t op of the
head to assist alignment when rejoining the head shells.
Bottom: The Plasticine in the centre is scooped out and
that hi contact with the shell is rolled into the space
created. Leverage against the shell would cause il
to break.
when dry. Most modelling materials are strong and
reasonably lightweight when used in an appropriate
thickness.
Modelling on Plasticine
Make a modelling stand by screwing together a
substantial dowel and a block of wood. Ensure the base is
sufficiently large not to topple over, as the Plasticine
model will be quite heavy. Model the basic head shape
around the duwcL Alternatives to Plasticine may be used
but select one that remains pliable or it may be difficult to
remove from the head at a later stage. I If the puppet is to
have moving eyes see pages 3 5-6 for details of how* to
prepare this stage of the model.)
Avoid fine detail al this stage, as this will disappear as
the modelling progresses. In fact, with some materials,
hollows will become significantly shallower as layers are
added, so make the modelling holder than you wish the
final shape to be.
Cui out ear shapes in cardboard or thin plywood.. It is
important lo have a strong base lo build on, as the cars
will often take much of the weight of the puppet when
head strings are attached. Make them a little smaller than
the required final size and leave extensions to insert into
the Plasticine. Where necessary, apply a coating of
release agent or separator to the head (but not the ears),
and then cover it with a modelling material that dries to
form a hard shell.
Some materials have adhesive properties, but if you are
using one that does not. coat the ear shapes in adhesive to
ensure the modelling material sticks firmly to them. Pay
attention to the thickness of the modelling around the
eyes, nose and mouth as beginners often find these areas
l.o be loo thin when the base material is removed.
When the head has set hard, cut it open following a
line behind the ears and over the top of the head in a *Vr
shape to aid alignment when rejoining it. Some modellers
24
HEADS - MATERIALS AND METHODS
паке a preliminary an with a fine blade before Lhe
noddling' is dry. which is helpful with materials that tire
difficult lo cut when sei.
Next, separate lhe head shells and remove the
jxticine very careful h. Jl the head docs not separate
Heaidy slice through Lhe Plasticine with strong, line
eread or wire to separate the front and back sections.
Carefully scoop 0111 some of lhe Plasticine from the centre
t the head with a spoon, and roll a little of Lhe
urronnding Plasticine into the space cieated. Scoop it
ui again and repeat the process until you arc able to roll
of the Plasticine awav from the shell and remove it: Do
•*
lot try to remove a large quant it у at once and never apply
v’.eragc with the spoon against the head shgll or the head
1 ill break.
Hold lhe shells i.p to lhe light lo lest for weak points
nat need Strengthening, If you need to strengthen the
lead shell from the inside, remove any trace of a
eparator before applying more modelling material. You
night scrape the inside of the shell clean with a craft knife
г use a cloth soaked in methylated spirit (wood alcohol)
r another suitable cleaner.
\t this stage, complete any internal mechanisms for
lining lhe mouth or eyes and for aliac king the neck,
ten rejoin the shells, Conceal and strengthen the joint
vilh a little more of the modelling material.
tn
Modelling on a Base Shape
Some puppet makers first create a basic head form, such
.i? an egg shape, in the chosen modelling material as
described above. Having removed lhe Plasl'cmc or oilier
.nternal material and rejoined the shells. they then add all
he detail with more modelling materia I.
However. you may model upon any suitably shaped
':ect. which may remain inside or be removed from the
nardeiied shell. This is a useful method for any size of
'Lippct. bul is particularly helpful for making larger
-tires. It is a good idea lo fix the shape on lo a modelling
'land, but if you work on it hand-held, ensure that vou
<m either stand it or have some means to hang it up
10 dry
\n egg-shaped piece of polystyrene is often a good base
v modelling human figures, or a block of polystyrene
mm be shaped with a hacksaw blade and a sma 1 Surform
rasp. II necessary, the polystyrene may be, scooped out of
e inished head or dissolved with a Lcv\ drops of acetone,
ather than model directly on to the polystyrene, some
material^ are better applied if the polj’styrenc is first
covered with brown wrapping paper or similar applied
with PVA (white woodworker’s glue).
A cardboard base shape makes a very robust
alternative. Lo polystyrene. Draw the profile shape on
strong cardboard or a thin shed of plywood and cul it
out. If a strong fixture is required, such as а Ькч к of wood
or dowel ling lor securing the neck, glue il in place then
build the head around it. Establish the basic head shape
by gluing on cardboard 'ribs’ a short distance apart. To
give strength to the structure, glue further cardboard
shapes between the ribs. 1I‘ the puppet is to have moving
A polystyrene
base for
modelling.
Left: A block of
pohfstifrene is
shaped with a
rasp.
Below: The
pali/sLjrrjie is
coated with
brown paper
and PI 1 glue
ready for die
application of a
modelling
material.
25
HEADS - \1A I I К I ALS AND METHODS
\ cardboard base
shape for
modelling.
I cardboard
profile shape
with ribsgfrii’don
to il.
Braces arc pined
bet ween the ribs.
The shape is
covered with
strips of thin
cardboard.
eyes or a moving month, cut away the cardboard to
accommodat e these before proceeding.
Next, cover the structure with layers of thin
cardboard. For human characters, cover the cardboard
with a thin layer of modelling material, having first
smeared il with a suitable adhesive if necessary. Add
detail to lhe modelling as required. Animal heads may be
covered in the same way or. instead of a modelling
material, lhe cardboard can be covered with cloth or fur
fabric.
Paste and Paper
Create a Plasticine model and insert the cardboard or
plywood ear shapes. To prevent the modelled head
sticking, cover the Plasticine (hut not the cars) with
overlapping 2.5cm (1 in,) squares of damp tissue paper.
Build up the head shell with small squares of
newspaper using PVA glue or a cellular paste, lor
strength, at least four layers of paper arc required. Il is
often difficult to sec which areas have been covered and
which have not. so il is a good idea to alternate lhe colour
of the newsprint to ensure lull coverage. With cellular
paste it is necessary to let each layer dry thoroughly
before applying the next, whereas with PVA you can
proceed immediately. Remember to keep the modelling
bold. To highlight features, work in detail with tissue
paper, which can be scrunched up or manipulated as
necessary, and continue covering il и ilh newspaper.
When the modelled head is thoroughly dry. cut it open
and remove the Plasticine, insert any internal structures
required and rejoin the shells with paste and paper.
Paper Pulp
Create the pulp by soaking small pieces of newspaper in
waler. You may use a food processor to speed up the
Heads created by lhe late Barry Smith iisim* paper pulp
mixed with Jmr smvdiist.
26
HEADS -MATERIALS AND METHODS
'A lien the paper is thoroughly pulped drain о IT
" waler, lo prepare (he pulp Гаг modelling, add
r paste and water to produce a consistency like
rki-g. lhe addition of very line saw dint to the pulp
< i strong and very good finish lo lhe head.
. reate the Plasticine Ease sha >c on a modelling stand
j inscrl 'lie ear shapes: cover the Plasticine with
res of damp tissue paper as a separator. .Model the
ner the tissue paper. \\ hen lhe head is thoroughly
cui il open and remove the Plasticine. Secure any
\rnal lixlurcs. glue die shells together and
•j;Tgihcii ihc joint with pu p. Sand lhe head lightly
dd enough pulp to fill any cracks and achieve the
- ,'h desired.
ocl-I or in
’d-Ferm. described by lhe m <111 и factor er as ‘air-
ing wood clay', is obtainable from craft shops and
- aiional suppliers. It 1кг the appearance of dav
is similar to clav to manipulate. Once dry. il
•ssesscs many characteristics ol wood, and can be
Jed. hied and carved. Il dries reasonably quickly
.n allowed to dry naturally but wanning can speed
г lhe process. In fact, under pressure of lime, I have
d a head on a metal skewer in the heal from a gas hob
pul inn loo closely - and the head nis dried very7
:ckly without cracking, though this i not a
jco m in ended ice h n i ц u c!
<e Wood-Form to model upon Plasticine or on a base
• ;ape as described previously. I apply-' a little c lear glue to
basic car shapeg to ensure good adhesion of lhe
'•r„ierial. When modelling upon Plasticine, use
.’rolcuin jcllv as a release agent, but if you want il lo
jnere io a base, a polystyrene shape works well.
.1 ricn y our fingers lo prevent lhe Wood-Form sticking
them, \lter applying it to lhe base, moisten it just a
:ule With your lingers to blv id the pieces together and
>mooth the surface.
You can model lhe detail from the outset but
-cnerally I prefer with this material to establish the
verall shape and lo allow il to dry before shaping it
..rihei. Additional Wood-Form, can be applied without
’ e need for an adhesive but woi ks best il y'ou moisten il.
hich helps to blend il in. Using small pieces and
31 iking il quite wet will enable von to smooth il over the.
head like a thin paste and achieve an even sui lace.
When lhe modelling is dry. cut open lhe head to
"г-move the base shape, if appropriate, and rejoin the
A basic s/iapr < rerrted in ood-l опн. Иhciidnj. ills
sniim dsinoiXh ready for more dclaiicd uiodeffnirf of the
features.
head shells u it h a clear contact adhesive. Cover the joint
with a little more Wood-Form and lightly sand the
whole head smt olh.’.'he bead can then be painted with
the usual variety of paints.
Plaster and Muslin
Layers oi muslin, dipped in plaster filler, are modelled in
lhe same way as paste am1 paper but. because this
material i* much thicker, the initial Plasticine modelling
must he bolder or lhe detail w 11 be eroded as successive
HEADS - MATERIALS AND METHODS
layers arc* applied. Ready-mixed filler is too thick and
dry lor the purpose; use the type that comes in powder
form and mix it by adding lhe powder to the water until
it is a creamy consistency. A commercia. у produced
alternative is a cotton handage r.mpiegnaled with
plaster - till yon need to do is dip it into water and it is
ready to apply. Ц sets within live minutes and is hard in
half an hour. It can be purchased in rolls as plaster
bandage or in pre-cut form as Mod Roc.
Cover the modelled head with damp tissue paper
and apply at least three Ewers of overlapping squares of
lhe muslin and plaster filler. Colour alternate layers
with paint to ensure full coverage. Press each layer
firmly into the previous one. new layers can be added
without WciFting for existing ones to dry. To model detail,
use finely teased cotton wool saturated in plaster filler.
When dry it may be shaped with a craft knife or
glasspaper.
When the head is thoroughly dry. cut il open, remove
the Plasticine arid strengthen the shell if necessary: the
nostrils, eyes and mouth are often weak points, Insert
any internal fixtures then rejoin and cover the head with
another layer of muslin/Го achieve a very smooth finish,
apply to the surface iust enough filler to Id lhe weave of
the muslin: too much plaster will tend to chip if knocked.
Smooth It with a wet finger. When it has dried, sand,
lightly with line giasspapcr if necessary.
Milliput
MilEput is an epoxy putty that sets extremely hard
without shrinking and can be cut, drilled, filed and
sanded. There are di Terent grades of lhe substance:
Standard Yellow/( -rey is satisfactory for puppets but finer
grades are available. Each pack contains two sticks of
d’ffcrcnt colour. They arc like Plasticine to handle and
must be mixed together until a uniform colour with no
streaks is achieved. At this point it acquires very adhesive
properties and at room temperature sets rock hard in
about two or three hours, though setting time can be
reduced to a few minutes by heating.
Mflliput, requires a curing period equivalent to the
setting time. After Curing it can be worked immediately1
and detail may be added with modelling tools or other
appropriate implements without the use of an adhesive.
Keep fingers and tools moist to prevent sticking. Water
helps with manipulation and smoothing while the
substance is still soft. Either use wet fingers or smooth it
under a running tap. Clean the tools immediately after
use with a wet rag or paper: once hardened MilLpul is
almost impossible to remove.
Milliput may be modelled directly upon a shape such
as polystyrene, which may be Id t in the head or dissolved
out. IT a Plasticine model is used, a separator is not
normally needed: the Plasticine should peel away from
the Milliput but it is wise to try a test piece first. If
necessary, apply a release agent, which шау be Ambersil
DP 100/2 (a silicone spray I or petroleum jelly, depending
on the base shape used.
When the shell is dry. saw il open and remove the
Plasticine. Complete any internal mechan-sms. rc’oin
the two shells and cover the joint vv jih more Milliput.
Alternatively. use Milliput to create a basic head
shape like a hollow egg or spheroid, as described
previously. Then model all the features solidly on to the
hollow shed.
Rhenoflex 3000
Rhenoflex comes in sheet form and consists of a core
of woven polyester fabric sandwiched between
thermoplastic polyester layers with adhesive
characteristics. No solvent is needed as modelling or
casting requires only heat and pressure, tt is available
in various thicknesses, the range being RX312O/
И4(V 3 1 70/ 3292-RX 3 1 20 is Hie thinnest and results in
a fairly light finish after processing that resembles a thin
cardboard mask while RX32O2 results in a very strong
finish that could be used on the live stage to replicate
armour. Additional layers can be bonded to a previous
one if necessary and the shaped material cart be sanded,
idled and painted with acrylic paints.
To model the material, soften it In hot water or with a
hot air blower and model il to shape. You need tc work
quickly7 as it remains malleable for less than five minutes
and is fully haidened in three hours. If you need to add
another layer or more modelling detail, greater heEit and
more pressure will be required to achieve the necessary
bonding.
A release agent should not be needed unless the
general shaping has been done at a high tempc-ature but
a layer of damp tissue paper could be applied to the base
prior to modelling as a precaution.
As soon as the shell has cooled it will be rigid. Cut it
open (if the base shape is to be removed), secure any7
internal fixtures, then glue the shells together and cover
the joint with more Rhenoflex. Sand and fill the surface as
required to achieve the desired finish.
HEADS - MATERIALS AND METHODS
A a reform
-aldrin is a natural cotton mesh impregnated with a
r.ermoplastic resin. There are three types: gauze, light
...J heavy meshes. The heavy mesh has an open-weave
' r.iciure and sets the most rigid: lhe llghi mesh is open-
eave. semi-flexible and suitable for more intricate work:
gauze is a thin fabric, best for details and finishing
'iiches.
Varaform will adhere to itself and can be heated and
oled several times for remodelling. The rigidity of the
ructurc depends on the number of layers: up lo three
dyers al a time can be dipped in hot water then pressed
gether with a rolling-pin before modelling or moulding.
--inforcing or additional modelling strips can be added
-at you need to warm the part to which they arc lo be
-.ppi led as well as heating the additional material.
i'over the base shape with damp muslin. Immerse the
Varaform in hot water for a couple of minutes. As you
remove it (always use tongs), let the water drain off and
’hen apply the material over the muslin. Guide it into the
Hiape with your lingers or with a modelling tool. As the
working time is less than three minutes. you will need to
reheat it to adjust the modelling.
If you have a base shape that is not affected by higher
temperatures, you can use a hot air gun for dry
modelling. Place the Varaform on to the base shape and
then apply the heat. As the material softens it will take the
shape of lhe model but take care not to apply too much
heat or lhe material will take on adhesive properties and
attach itself to lhe base. Retouch or add detail as required.
Cut open the shell and remove the base shape, as
required. Attend to any interned fixtures and rejoin the
shells with more Varaform. All types of paint can be used
on the finished product. Where an adhesive is required for
use with this material, a mastic glue without solvent is
recommended. If 5'0u wish, lhe shell can be coated with
latex, silicone or epox}' products.
Jesmonite
Jesmonite is an acrylic composite, a water-based glass
fibre s^’slem that is supplied in two-part form, liquid and
powder. The)/ are mixed using a high shear mixing blade
in an electric drill in lhe ratio 1 part liquid to 2.5 parts
water by weight. Although it is a low-hazard product it is
recommended by the manufacturer that you wear eye-
protection, a dust mask and rubber gloves. There are
different grades but AC 300 Multicast should be
satisfactory for most puppet construction.
After mixing it is workable for between eight and
fifteen minutes at 15-18°C but this period can be
extended by the addition of the Jesmonite retarder. There
is also a ‘Thixotrope’ that can be added a drop at a time to
achieve the required viscosity so that it does not run or
slump if j'ou are applying il vertically. It can be used as a
laminate with glass fibre cloth or poured into moulds.
Used in theatre and television for sets and props as well
as for architectural details and sculpture, Jesmonite holds
fine detail but can be fairly heavy and. like fibreglass, is
harder to cut when dry: a rotary disc cutler will facilitate
cutting. A coaling of petroleum jelly or soil wax should
suffice as a release agent but I prefer lo apply a layer of
damp tissue paper to the base model.
Appfo pieces of stitched glass fabric to the model either
by dipping it first in the Jesmonite mix or by adding the
Jesmonite with a brush, which should be cleaned with
water after use. If you arc covering a polystyrene base,
use 3 mm Fiber mesh (polypropylene fibre) instead of glass
fabric.
Run a sharp blade around the intended dividing line of
the shells before lhe head has fully set. This will facilitate
separation when the head has set hard. After removing
the base shape, attend lo any' internal fixtures and rejoin
the head using more Jesmonite with the stitched glass
fabric. Apply Jesmonite Clear Top Coat to seal the surface
for painting.
Fibreglass
Fibreglass heads are created by the application of
fibreglass matting saturated in polyester liquid resin lo
the base model. The matting is available in several grades
- select the one most suitable for the task. If the puppet is
to have moving eyes or a moving mouth, use finishing
malt’ for the first layer to ensure a smooth internal
surface. Build up the head and features in coarse malt,
then apply a final layer of fine quality matt. The use of
rubber gloves is recommended.
Cover the base model with damp tissue paper before
applying the fibreglass. Soak pieces of lhe matting in the
liquid resin, press out all bubbles and then press lhe
matting on to the model with the pieces overlapping.
Before the head is completely dry. cul through the shell
with a sharp knife so that the Plasticine core can be
removed easily when the shells are dry. If this is not done,
a saw wifi be needed to cut it open when the fibreglass has
hardened. Rejoin the shells with saturated malting. It
may then be i 1 led or sanded.
29
HEADS - MATERIALS AND METHODS
Casting Methods
General Principles
Casting involves creating a piaster cast of a Plasticine
model and using that cast lo make copies in the chosen
material, lhe benefits ol this method include the
opportunity to get the final design exactly right in the
initial model, lhe possibility to renew heads easily or to
make identical heads for a character in different
costumes. It is also possible to make different finishing
touches to the same heads for family members.
Heads can be created using a range of materials, but
undercutting is not possible when using materials that
dry rigid, unless you are prepared to smash the plaster
cast to remove the head. The use of latex rubber does
permit undercutting provided it is not allowed to become
too thick or used with a hardener.
Some latex mixes and fibreglass can shrink by as much
as 10 per cent compared with the original model, so you
need to allow for this. It is not at all easy to judge how
much to increase lhe size but one does develop a feel for it.
Alternatively, create the basic shape in polystyrene, then
finish the modelling with a covering of Plasticine up to
1 cm (Йп) thick, depending on the size of the head. A little
experimentation with the size of the model in relation to
the material to be used lor the head is worthwhile. If there
L ndercutling: the face on lhe left has no undercutting
bin the one on the right is undercut. which would be
problematic if casting a head using a material that
seis hard.
is any undercutting with a polystyrene model, when the
plaster cast is complete, dissolve the polystyrene with
acetone, then remove the Plasticine and proceed as usual.
Making a Plaster Cast
Plaster of Paris may be used for creating the cast but
quick-setting 'stonehard' dental plaster is far superior. Il
sets much faster than plaster of Paris so you must work
quickly once it is ready to use. It also dries out ready for
moulding in a very short time and is remarkably strong.
When mixing the plaster, ensure that you have sufficient
for covering the section of head that, you are working on.
and in a suitable thickness. The finished plaster cast
should be about 3-5cm (П-2in I thick.
Whichever plaster is used, when mixing it add the
powder to the water, fairly thinly at first. It will start to
thicken and feel warm lo the touch when it is ready to use.
The two most suitable techniques for making the cast are
the hand-held method for moderate-sized heads and the
box method for larger heads.
Hand-Held Method
Prepare lhe Plasticine model for casting by inserting thin
strips of tin or a similar metal to divide it into two
sections. Overlap the strips by Mmm (Knin.) to create a
sound division between the front and back of the head. If
lhe head is to be made from a rigid material, make the
division overtire top of the head and down the sides along
the line of the ears.
For a flexible latex head, the same line can be followed.
Alternatively, the strips may be placed behind the cars or
in a large ring around the back of the head under the
hairline. With the latter method, which avoids an
unsightly flash down the ears and neck, a flexible head
can be manoeuvred out of the cast, but if you allow the
latex lo become too thick in the cast, it will be impossible
to remove it intact.
Prior to casting, smear lhe Plasticine and the metal
strips with petroleum jelly to act as a release agent.
Ensure there are no lumps of grease anywhere.
Follow the manufacturer's instructions for mixing the
plaster. Holding the back of the head in one hand, work
on the front half first. As soon as the plaster starts to
thicken, scoop it up with a spoon and carefully fill in all
the hollows: avoid trapping air bubbles, as this will spoil
the head. Some of the plaster will run off but disregard
this and keep applying it. As the consistency of the
plaster becomes creamy, pour it all over this half of the
HEAPS - MATERIALS AND METHODS
wp ua\sof
rearing the metal
:~r>for raking a
г» ixitr < ast of a
P aricine model.
v-'м/ dividers
ni the side e>f
lead in икс the
X5i *> nimble Ibr
•. with till
ultimo rind
it I ling
ди* rials.
? iridaitj lhe head
M'aiiin the
:irfhic avoids
possibiliiq of
: visible liftsli’ nt
e join bitt is
' liiixibk’ ortllf for
rearing 'airhf
’ xiblc heads so
’h it lhe и can be
manoeuvred oul
the jilnster
osi.
overlapping metal str-ps
-ead. It any plaster fal s away scoop it up and reapply
<’ re it sets.
Allow the cast to harden for about thirty minutes then
.^retully remove the metal strips with tweezers. Smooth
marks made in the Plasticine when removing the
'* • ps. Maks a lew shallow holes in the clean edge left
nerc the metal strips have been and smear the edge of
cast including (he shallow holes, with petroleum
f. y. Next, take a cast of the back of lhe head and, before
me plaster sets, carefully scrape away any excess that
erlapS lhe first cast.
U hen the cast has set, prise the two sections apart and
remove the Plasticine, The back section will have knobs
jLiound lhe edge to fit into the holes in the front secPon.
idling the cast to be aligned accurately for casting a
rubber head. When using this casting method for smaller
s.-rts. there may not be space for alignment knobs, but
-mailer casts will align fairly easily il the metal strips
l‘ow rhe undulations of lhe body parts.
Making a plaster
cast: the hand-
held method.
Clean the inside of the cast carefully with a rag soaked
in methylated spirit. Clean lhe ears, nose and other
awkward cracks with loops of fine wire. If aie bubbles
have created any liny holes in the inside surface they will
cause small lumps on the puppet so fill them with a little
fresh plaster and smooth careful’y
Leave the cast to dry out until it no longer eels cold and
heavy.
Bor Method
Create the Plasticine model on a modelling stand with a
large base, which will form part of the box for casting.
Ensure the head is held securely and does not wobble. Use
a rolling-pin to flatten out a long strip of Plasticine,
approximately 5 cm (2in) wide and 1.2cm (JKin) thick.
Trim one long side to give a neat, clean edge. Use this strip
to divide the head in two, Ensure that it is firmly in place
and in contact with the head all the way round but take
care not to damage the modelling. Add more Plasticine to
the top of (he curve to establish corners and trim this
divider into a rectangular shape. Smear the back o' he
head and the divider with petroleum jelly.
Make two folds in a strong piece of cardboard to create
31
HEADS - MATERIALS AND METHODS
Making a plaster
cast: the box
method.
Divia nu] lhe head
with Plasticine.
The divider
trimmed io a
rrctanyle.
Л box tv contain lhe
I) I aster.
Hie first half of the
cast with holes
scooped out to aid
later alupinirnt.
Another box created
around the plaster
block for cnsilng lhe
front of the head,
three sides of a box lo enclose the back of the head; the
Plasticine divider becomes lhe fourth side. Where the
cardboaid meets (he baseboard and the divider, seal all
the edges with substantial strips of Plasticine so that the
plasier cannot leak out. and lhe box. which is going to
retain a significant amount of liquid plaster, docs not
collapse.
Mix I he plaster and. as soon as it starts to thicken, pour
it steadily into the box. Shake the baseboard gently with
your free hand to release any trapped air bubbles.
When the plaster has set. carefully remove lhe
cardboard and lhe Plasticine divider, making good any
marks left on the head by the divider. Scoop a few shallow
holes in the inside edge of the plaster block lo facilitate
accurate joining of the cast when finished Smear the
front oi the head and lhe inside edge of the block,
including the shallow holes, with petroleum jelly. Ensure
there are no lumps of grease on any of the surfaces.
Place the block so that the head is face upwards and
fold another piece of cardboard around it to box in the
front of the head. Secure the cardboard with Plasticine
and pour in the plaster, gWlW shaking the model, as
before.
When the second hall’ of lhe cast is set. remove the
cardboard and scrape away any surplus plasier covering
the join Try io do this tie fore the plaster sets rock hard
but take, care not to remove the cardboard loo soon.
When both sections of the cast are completely sei. prise
the two blocks apart very carefully. Remove lhe
Plasticine, clean the cast and allowit to dry
Casting a Rigid I lead
The modelling materials described previously can be used
to create, heads in plaster casts but remember that if there
is any undercutting, you may not be abie to release the
shell without breaking the cast. With most materials a
very thorough coaling of release agent is needed to
prevent ihe model sticking to the cast. If petroleum jelly is
used ensure that every trace is removed rom the head
with methylated sp.nt before painting and finishing
Petroleum Jelly may be used for paste and paper or
paper pulp, but damp tissue paper is recommended.
Milliput requires petroleum jelly or a silicone spray such
as Ambersil DP 100/2. Because Milliput adheres
strongly, as a precaution you should coat the edges as well
as lhe lining of the cast. Cliiigtilm. pressed firmly into the
surface, is useful for lining the cast when muslin ard
plaster filler Eire used. Rhenoflex should not adhere to the
32
HEADS - ЛМ) methods
: Aver temperatures bin always lest it on a sample
.nM iiiijLviiil fast tn bu sure there is no reaction
wne psirltciihir type <aJ* cast will are using. Sjiiukirly.
rr; should not ail here in km er lempcnmirc-cbui ns
Liiniik 1 anuld .ilu ivs line the ilniikl with а piece
: *nip muslin ivhich must be used и highei
futures. After ciisiing, the muslin may Lip pcelcil
nrn the shell or allowed Ilf rciiLtiin on the head as
Mr coating. For railing viih |c<inmiit\ plaster
_ s must be sealed with shellac or pob uret lane
• >h I ibrri’l.jss ahi1 needs a luithkvi i hilly produced
ГйЬ Г.
rrh tin* rhiiscn moildliiig material in accordance
j ;?.е directions lor use given pres inudy. Pros il finnh
each section of I he nisi Ц 'hen tin bin shells are dry
.e them Iilti the casts. insert any inicriud It* lures.
n them In the sfliijy? as a iiiudr li d hrucL
sk*x j Libber can be mixed with, a hardener to create a
^s.Jbnl inav Ivi.ilhci brittle il iLMithil Ha« 10U.SC
< below :i«нПсмЫс m.x hcfid
< i l a I aicx-RuLibiT I .cad
• l;nex nrbher is available in я сиги*.у ol tTihiui>
Hies iiud Ivpgtuf iifis. L!tM.’a Itjirly strong, win coy mix
>r n!e iur hard rnbfcqr coys: while provides itio
“ii'is for cotiiTi I iiig. CM" puii) I 111 if. In iii'dw In ru-lltk’.we
,:c r.yht cor msIlikv yon can mix iMTerent grades .of
n uin ing proportions. S ипе puppet makers report
-* in using ehi>ipL*i types tr liilcx livni builders
r.Tanis and ridding a dikkenbig HgnaK I иг чнпг
wu might colour lhe la* ex before use (xd page
My i»iii |ji v!ltci1lc Is Lu piiilil the ttfiftd uRlT il IliiS
: v‘. .ft iltd
ie cast has been used previously lor making a rigid
: is cssenthil lo rlcau il ihui iMiglih lo гетите н
l . ui any ivleiiseagcm before using il nidi latex
.".erii ly. inniwiK'ik- heads are quite >nii.ill. II you
d’g.i г head. uni must citlurirnikc it inucn thiikci
..h uifl make li sigpirnmily Ihsivilt. or pren ide ксние
internal support to iiiaiiU'ain the sha|4. To
ihb, fill ст gliit a Id’.cr of Гонт riibbei in lhe
'I llic head or un the latex head as a mask and
it to a dud! ^icipe crenlcd in foitn rubber or
?• , - yrene.
i ins к c lhe head, join the livri purls d’ the Last and
them with sirong rubber bands «cord, i *cn seal
41 u iih Ida^lJL iik'. I arelLitly pour Lite latex irilo the
111J1 the neck. Iwjlding lhe container dmi In [be
cast .Ins 11Ш reduce Jhe risk id’ ai; bubhles. 'l ilt L lecasl
as you pour iti lhai t lie kiicx runs nil lo [III- insideslh Face,
rather than dropping into the centre.
'l l Ilt’lH h 1$ iipproM'.in lcIv a quarter FuU rolflhe cast hl
voi r Iviiid aiki Lap । gently tofil.l thc liolkms arid icnupi-
any air bubbles continue to coll lhe cast Ircqurnlly аь it r
I’ting il rd. V. hen d is lull, leave the i t«I !• si anil I ic
level ol ruleber will drop somewhat so iu|i it up
рстк л In .-al Is.
The lata for nr a <ktn uri lhe lining of Lhe ctisi find lhe
longer ft is Icli in the Ciisi i he thicker !i becomes. Friny-UtT
nannies hi an hour s* ih alien bt sufficient bill И depends
ni (he .xiniCLtlar rubber mia mid I te ihiekncsj- required
of lhe I’.cad Some experimen Lal ion may be necessary hl
First.
When suPic'eid time Iws ekipsed and the head hsis
Lhir’kciitsd. there will bvu substantial quajiLUy o( liquid
latex rcmairmng in the riiiln ol the cast. This is not
ini>1ed: рош‘ft back liu»' the container In usr loi auuilicr
Figure. To <illuw ilhe rubber IQ dry. lei the cast stand for al
least hAienty-four hours; hlhih ihc tietual i me needed
depends nn the thickness of ihc ruhber and the mix. The1
lujigti you leave the сам lull uf liquid latex the lunger 11 l
n il! L.-ikf |ij dry evil proijcrly''. I lesiting docs nol ‘«cciii
tn niaU* -.hi’, мил |Г1л’яп1 Lliliercncc lu thiy. II upt'i Ihv
I /ir«d rusr in ftfi < г гп Ыдег hy wttlian пшг dir
.xhidriFiV hoh’s iii.ih.’Liif hiu<j |Hr>iHisji9i к ond’C jriiJiimf
jicrx t>f dir ntvl t<»i ;id n irixljridi'N.
HEADS - MATERIALS AND METHODS
cast loo soon, you u ill have a squidgy mess rather than a
beautiful head soil is belter to err on the side of caution.
When you are ready to open the cast, first pour some
talcum powder into lhe head through lhe neck. Shake the
cast and blow the powder around inside, which will
prevent the inner surfaces ol lhe rubber sticking together,
lo ensure lull coverage you should use a generous
amount ol powder and then pour out am surplus lor
future use.
Prise lhe plaster cast apart: usually it will come away
from lhe back of the head. Iea\ ing the front section still in
the cast. Remove the front section carefully, with a little
manoeuvring if necessary. II the head has been allowed
to become too thick it could lock in the cast as firmly as a
rigid head. И there is a 'Hash . or ridge, around the head
from lhe join in lhe cast, trim it off with sharp scissors, a
sharp craft knife or a razor blade, taking care not to slice
mto lhe head itself.
Leave the head to dry for al least a further twcnly-four
hours before painting it.
r.s
Carved and Modelled Eyes
Eyes arc often carved, modelled, or cast w ill) lhe head and
then painted at lhe same time as the head. Alternatives lo
nai ural-looking eyes can sometimes be very el teclive.
• The entire eyeball may be painted a deep colour such as
I curved niarioneitr b/y the late John Wright. t he
ei/cbafls (he painted rntirrhj in a rich blur colour.
I follow egr sockets maij be painted a dark c olour or
covered with a reflective material. Skeleton modelled bij
Gordon Staighl.
Nl ADS - MATERIALS A\D METHOD'S
darkgr<vn, purple <m blueandpuxjribly varir sited
• H 'll nv eye S'xkeis may L<? pidmed a dark colei lit.
remaining iiiatt ar viimLshrd. er they mm fac cint'reil
n itli a rdlccliHT тал rial.
• Deep slhs сил be made In the eye snrkeis In produce
к nv % sliiidon s
• ftiiiitcd and v.ir:n slu’d ’.viicmIl ii Mis or Ik-hlIs mm be
£lued imp slutted eye sockets.
Glfl» ill ills HD Gill br UhClI. End ПГе IНС JidlUI'ill Jbr
nu: -i puppets.
• Torch hcilbs ч rouil iiiiu bulb -Meters and Mired tip in
?i xilkcry mid switch lune been used .’llrn behind u
я ••.-.ill piece of coloured ighiing tjel so iliai the eyes
glcm in н lienee. micurcomiciil luslxtan.
\Linhfit. । о rm’in fbiir«rood. u’hhdr। pshia_/m dierr/c.v,
Fill (.ген Wl/Мк'пял Uwiiifr-rftfo/’ Ikirni’HVXfv /«i
fnm»n spurlh dnmni'iil liirxoiifr "jin
' i 4 li’iiji" fhi% fwfio IhOI U (fA h >n ।, ffr'ii /( (fib
Iii?ir joii/п'г ike .-vnirrror io itirklc ч. m dr/errniiw*/илиio
fr< If.hrrrd.ipi /г,loijippjirt im rinr г1пгГ5олн1Х1гчггИ'.-
/мшиОгл timida pn fr.4 iiiti.ii'ir <чпf/nijj lo M-nMh ion
Moving IA es
Vlts'i ir?g eves caul be cl r, c’xpR’hSL’.T liuL йГ cixirse.. onk I
\ isible to the cudh Hue und they lend hi heичсI Гог in us i?r
vuriciy pLipix*i.s rtiiliii iliitn ehiinu'lers ui pkys. Ensure char
[lien.' is ^nl .L’lrn! spurt* inside lhe Juad Im tuc or
tncdKinism and ъ к-1 яички lari _v di l* iiHcnial spticc needed
if the ।>ti|ipei is tohiiw movingck'soi id a m<n itu moudi.
S/ji* ikirkrr. fhr
niiUior's /7 m
ГШ1’рЛ«?Л»ГНГ, hn*. O!
Hindi SJrrt lii iitl
with JHi’vinf/ejo’.’»
mid nricrih.
HEADS - MATERIALS AND METHODS
hi side the head: screws in (he hack of lhe wooden
eyeballs are weighted with lend and a piece of t ardboard
has been used as a spacer between (hem. Thin dowels are
used io restrict ctje. movement.
lhe techniques described below cover the main
possibilities, though the straightforward closing eye is by
far the most common. However, you may like to invent
your own variations, like the performer who mounted the
eyes on galvanized wire and designed the mechanism so
that they could pop out of the head and then spring hack
ini о place!
I Vbodeij balIs built into a Plasticine base in preparation
for modelling.
to give the necessary spacing between (he eyes.
Sometimes, larger balls in a modesHsizcd head will need
very little spacing and you may need to improvise
accordingly.
Place lhe wooden balls and spacer on the wires, coat
them with release cigent and build them into the
Plasticine model. Model the head as described previously,
leaving a suitable amount of eyeball uncovered. Let the
ends of the wire project through the sides of the head.
When the head is dry, cut it open and take out lhe
Plasticine. I hen remove and thoroughly clean the balls.
7 he method for
opening and
closing the eyes.
< losing and Bliiikiiiti luics
Moving eyes arc achieved most easily with a modelled
head, lor which the mechanism is built in at an early
stage of I lie head-making process. Make the eyes from
two wooden balls: their size depends on the size of the
head. If they arc not pre-drilled. carefully drill a hole
through the centre ol each hall: if lhe hole is off-centre, it
may adversely affect eye movement. Pivot the bails on a
piece of 12 or 14 gauge galvanized wire, and use 12mm
i in) diameter dowelling. also drilled through the centre.
string
hole tor wire
screw with lead counterweight
dowel across
head!
36
HEADS - MATERIALS AND METHODS
i ihe back of each ball fix a screw weigh led with lead
r.eep the eyes open. Some puppet makers use a spring
-<:ead of a weight but the weighted screw works
ztA^tlv well for most purposes. Replace lhe balls in the
~ cul lhe wire to the required length and fasten it in
:; cad by covering the ends with the modelling
r. erial. You might add a little more material to the
- <;ce of the head around the wire for extra security.
stop the eyes opening too far, fix a thin dowel rod
- - the head for the screws to rest on. Ensure that the
es can be fully closed from this position. If the dowel is
ю high, some of the eyeball might remain visible
-r. the screw is fully raised by the control string,
-.ch a string to the end of each screw. Raising lhe
<r; closes the eyes: they will resume the open position
- m the siring is released.
'he eye strings pass through two holes drilled in the top
r.e head. To prevent fraying, wax the strings thoroughly
: Ives wax. Some puppet makers also glue a small piece
-_rber tubing into the hole, but 1 find waxing sufficient
zr ded the hole is finished cleanly and lhe string runs
~r. Jit up to the control. If it runs up to the hole at an
If the eyes arc for a carved head, you will need to cut
open the hack of the head and hollow out the inside to
allow the eyes to be fitted. When cutting lhe eye cavity
and hollowing out the inside of the eye socket, take great
care. You need smooth surfaces and a good, clean fit so
that the eyeball sits securely in the socket without
jamming. The actual eye mechanism is the same as lor a
modelled head.
Swivelling Eijes
In order for eyes lo swivel, the wooden balls must be mounted
on vertical rather than horizontal, wires with short dowels
or other supports below them to maintain the correct
position. Fasten screws into the back of the balls and attach a
control string horizontally, securing it to each of the screws.
Fix screw-eyes or other suitable fastenings in each side of the
head. Thread the ends of the control string up through the
screw-eyes and the holes drilled in the head, then attach
them Loa control bar that is pivoted on the main control.
Rocking lhe control bar will cause the eyes to swivel. The
bar needs elastic attached between it and the main control in
order to return the bar and the eyes to the resting position
e before going vertically to the control, then it will rub
when released.
-e edge of the hole and is more likely to fray over time.
.- _ gh waxing does delay the deterioration.
Separate eye strings enable the eyes to be operated
•’.r together or independently but sometimes the
- in the balls are replaced by a single piece of
i, mized wire, appropriately weighted and bent into a
'hape. A single string is then used to control them.
the modelling material shrinks and the eyes jam in the
z: л_- ihis can usually be put right by running a sharp craft
around the inside of the eye sockets. Otherwise you
_ need io open up the head to gain access to the eyes.
galvanised
wire
nuintj die eyes together rather than singly.
screw-eye
Swivelling eyes.
37
HE \PS - MATERI ALS A\D METHODS
C rpSS-i l/t'5
\lthough il is possible lo amend the swivelling
mechanism described above lo make the eves move in
«
opposite directions, an effective alternative is to paint one
pair ol eyes on the eyeballs when in lhe open position and
to paint a second, cross-eyed set on lhe eyeballs when in
the closed position. Го make the eyes cross, just pull the
string to close’ them.
Men I.XC VI OU I IIS
Marionettes often do not need lo have a moving mouth,
even for plays where they haxe a good deal to say. In fact.
trying to keep a marionette’s mouth moving in
synchronization with speech can look unconvincing and
max distract lhe puppeteer from the general
manipulation of the puppet.
1 do have a few variety puppets for whom a moving
mouth seemed appropriate: a compere и ho has a little,
but not a great ileal, lo say: a lew animals, such as a dog
that barks and needs to pick up items with, its mouth: a
strong man who groans and puffs when trying to lilt the
weights t his eyes also roll) and one or two characters who
actuallx sax' comparatively little hut perhaps give a gasp of
surprise or ТаГ something..
И illie the clown by the author. Cross-eyes ore achieved by huviny a second set of eyes painted on the eyeballs instead о
eyelids. Vote the run-throuyh string used to raise a hand to the mouth.
HEADS - MATERIALS AND METHODS
Access to Internal Mechanisms
When a head has any internal mechanism there is a risk
:hat you may have to cut it open at some point. To
^ciliiate future access. during construction you can cut
г-д ay a section at the back of the head under I he hairline
and glue this back in place. If you need access, run a
sharp knife around lhe join and remove the panel.
Replace it when the repair is accomplished.
If the head has a hat secured to it, you could leave the
pof the head open and remove the hat to gain access to
the mechanism.
* Moving Month for a Modelled Head
cel lhe head over a Plasticine base (see pages 2 3-5),
t-п dry; cut it open and remove the Plasticine.
±refully cut out the lower lip and chin in an ‘L’ shape and
:.Highly clean the inside surface. Cut a wooden block
rhe required size and glue it inside the chin. Fill any
with the modelling material.
Replace the chin in the head and drill a hole through
le aw into the side of the block. The holt should be
t. - Toned so that lhe majority of lhe weight of lhe block
:he rear of the hole, not near the chin. If the drill does
not reach through the opposite jaw. remove the chin and
finish drilling the hole. Replace lhe chin and insert a piece
of galvanized wire right across the head. Use this it to
mark the inside ol the opposite jaw, which will enable you
to align the matching hole accurately.
Pivot the chin in the head on 12 or 14 gauge
galvanized wire. If it does not move freely or displays any
possibility of dislodging, you may need to add dowel ling
spacers (drilled through the centre lengthways) on either
side of the block to keep it in place. Cut the wire to size and
seal the holes in the jaw with the modelling material.
Attach a string to the back of the block for opening the
mouth. The string passes through the top of the head up
to the control. The weight of the block acts as a
counterbalance to close the mouth. A screw weighted
with lead may be attached to the back of the block to
increase the weight if necessary. Rub the siring with
beeswax to prevent fraying.
Carving a Moving Mouth
The head must be cut open and the inside hollowed out to
accommodate a moving mouth. It may be possible
sometimes to saw and chisel out the mouth section and
replace this section inside the head, appropriately pivoted,
but in most cases it is necessary to cut away the mouth
and to construct the replacement block separately.
The block is pivoted in the head and controlled in the
same way as described above for a modelled head.
nit meting a moving mouth.
"h month shape is cntj'roni the chin.
A wooden block used for pivoting the
chin and as a counter weight to close
the mouth.
A screw weighted with lead used
as a counterweight.
39
HEADS MATERIALS AND METHODS
P И X TI XG A X D FI X' I Sh 1N G
General Principles
In order to march skin tones, pamt the head and all areas
of exposed skin after the. puppet is assembled but before it
is costumed, hi order to enhance the in о deli mg, laces
should be considered in terms ol stage make-up and
lighting, rather than natural colours, but paint in good
natural light so that the true colours are clear.
Generally receding areas are darker and frontal areas
or highlights arc lighter; to paint them the opposite wav
Lends to neutralize the modelling and there ore the
characterization. Il is a good idea lo mix a fairly lieht
shade of lhe basic skin colour or an overall applicabon
and then develop this with lighter and darker shades or
oilier colours.
One can purchase ready-mixed flesh colours but they
usually need some modification to suit individual
requirements. Varying quantities of white, yellow. red
and brown help to achieve, appropriate skin tones.
Eyeballs can be any colour but mostly they will be
white. Гиге white can make the eye appear to be staring,
so a slightly cream colour may be preferable lips can
remain matt or bi-given a satin sheen, and occasionally a
darker lip-lining colour maybe used
Materials and Methods
To prepare the surface tor painting, wood will need
priming and papier-mache can be scaled with a coat of
TVA glue. Apply an undercoat of white emulsion paint,
hiking care not to leave brush strokes. When dry, lightly
sand and apply' a second coat lo achieve a very
smooth surface.
For the actual colouring, avoid using any paints v. itn a
gloss or shiny finish as they look unnatural and will glare
under stage lighting. If a surface should appear too shiny,
dust it lightly with talcum power before it is completely
dry. Shake and blow the surplus away and dust off any
remaining powder with a very soft, large paintbrush but
lake great care not to smudge lhe paint. Continue to add
and remove the powder until the desired effect
is achieved.
My own preference is for acrylic paints. Although they
can be diluted with waler, for best results they should be
thinned with a matt polymer medium, vvlv.ch produces a
good linish., When mixing shades that require large
quantit os of white, emulsion is a cheap and satisfactory
substitute lb г ас ry I ic pain t.
Painting on fibre-glass requires polyurctlunie paints.
When painting on latex rubber ii is necessary to mix
acrylic paint with the acrylic meat medium, or a mixture
Pnrntinq the
head: note th/'
(’Iran, .simple
lines.
40
_r <m riiL'LiiiiiiL VIiti ujilih’Iv них 1 wilh liquid
- e juiil proportions. nr wlih PVA glgc using ODc
* гч..п! in three । .iHsyluc По iu»l ppk Ihv pmnl ton
il trill trnr к v.livii div rtihlvrlli xim. Clean I hr
- *ch acfeuнсhnni ’diakK after rise
r
•; pji bcdJi .ilso he given а base uili.'urby Hilding
«in rubber dvi'\. duck emulsion paiml. .iiiil'ru*
-i i Juki axryilc paliii io lhe liquid kiivx bcl'niv il is
casting; Test il li:>l и 111 a small qriaiitily anil
\ hl!y lhe pmparlionx ii’Cu L bearing in mind thai
appear a si gEnh darker shadt when dry .Mix the
. 'id ihccrilutijrifig сагеГи1 \ in iTi inLi u rzxa ин bubbles.
•. v. ill spoil I In' l;nv\ рлг1 when casting. Iavwc die
stand In a settled count n г for at k*,isr я day before
lovi । il’i remaining jjrbubhlfslo й&рптчг.
• any peiriN i.hai might need varnishing such as
J? or ips acryllp vEirnhh is recuminviiJed Uheii
i* ft uiiJkii appetii iricvbk.lL it d<ic\ilrvrk”;ir.
iy lie nioi'vl rd. гагич!. or credits] with ina erials
_ i-rvni icxuiivs. Glue such inateiials dtreclly in Un-
iiialiE a skulk up lr«n a Lilrk siiiГ m dt rk J and
s itch llic iTi<Hc~rik.il 1.0 iL
h vb l’ "Ins г vtdrijufj, il ihe hw *1 |Jn sky JI sand
jpvsjrd.5 и rid i n^viirds lov.urdN I he crown. Therv jfr <i
jy of suiiabk maleriiils ranging from siring lo
me xHUiing ’лишк. cmhrr: drry silks. i rikahci i ircad
.uc liir kihHr. rireven ostrich leathers but not real
. Jf,
. ’lay he used И hx n iiursil sr.iii* or dyed io auv
7 b.ji4Jhig ivjtik m;-i lie used ag they arc. bm R is
mo hclpiid to cm lengths mui fluff them up wilh a
ТГ »” "comb.
c materials can also be ir cd f >r eyebrows Inn II Is
piiiin iIjlin. Even il' the lr<nr is Liu. chic uslmJI
к ’ he eyebrows darker or I hey will uni show on
-rm u./r <i/ ^iriarnry. лис? {i(iht waBed |r>»m
ru z.;‘ivii' f.
rJI-,Л !>,s - м VI I R I A I s \\l) METHODS
41
4 Construction and Costume
Il is important in design lhe whole puppet and be cicar
about joints required before you commence
construction of the body. You need to know the neck,
waist shoulder and hip joints before you start on ’he
body; and the shoulder, elbow, wrist. hip. knee and
ankle joints before you embark ti$on making the limbs.
When determining joints, aim for smoothness and
flexibility, with restricted movement where appropriate
and try lo avoid joints । licit rattle Sometimes a small
piece ol elcctr-cal tape or sticking-plaster wound
around an о fl ending metal pin or loop will stop the
rat tic but this should not be at the expense ol
move in ci it
Heads, Necks and
\ec к Joints
Head** and Necks
A carved head created with the neck attached provides a
fixing point for the Joint w il ft the bodv.
The methods lor creating holknv heads with attached
necks necessitate plugging the neck with a don cl to
Dowels inserted i n
the head to make
secure fixtures for
neck joints and head
strings,
screw-eye
4 do welling cross
built into a head
with the neck
attached.
Smail boy by John Roberts. I’uppetCnifi. An unclothed
figure, except for shoes which arc carml and pai filed.
he marionette 1$ jcrijitcd io f/ive standard ntoveinents,
with the addition oj a moving mouth. The puppet is и
caricature of the young boy for whom il was made.
42
CONSTRUCTION AND COSTUME
provide a means of effecting the joint with lhe body.
Shape the dowel to ensure a good fit and glue it in place.
Fill any remaining gaps with more of lhe head material,
which may he extended under the neck plug for extra
<ecuritv.
II the head has any internal mechanism, the plug
hoiild be the same length as the neck. If it has no such
mechanism , the dowel may extend to the top of the head
: required and can be used to support lhe horizontal
dowel described below.
II the cars are not sufficiently strong to support the
weight of the puppet or if they arc not in a suitable
position for the bead strings to be attached, secure a
iowel across the head and fix screw-eyes into the ends.
;h rough the head shell. If a vertical dowel extends the
mil length of the head, glue the horizontal dowel into a
nole drilled in it.
A head with a separate neck may also require a
horizontal dowel secured widthwise to effect the neck
oint or for attaching screw-eyes for head strings if the
ears are not suitable for this.
For the neck joints and the positioning of the head
'[rings you need lo identify the point of balance for the
head. To do this, hold the head lightly but securely
between the tips of your index fingers near its ears, so
ihat it can turn but not fall. Adjust the position of your
fingers until you find the point of balance where the
head does not dip forwards or backwards. For more
precision you might use the points of nails or dividers
but take care not to damage the head. Mark the position
for future reference.
Neck Joints
A hen the Neck is Built on to the Head
loin the neck to the body in one of the following ways,
as appropriate to the body construction.
• Thread a loop of cord through a hole in the body
and through a screw-eye in the base of the neck:
knot and glue the ends of the cord. This method is
suitable for laminated or latex bodies with a
central wooden core.
• Drill two holes in the body, one to each side from
the neck to the underarms. Countersink the holes
underneath the arms. Thread a loop of cord
through a screw-eye in the base of the neck and
carefully thread the ends down through the holes,
Knot and glue the ends of the cord, pressing them
Neck joints.
A screw-eye and cord
joint with a padded
plywood body.
A screw-eye and cord
joint with a rigid body.
A screw-eye and
galvanized wire joint.
The looped ends of the
wire can be used for
attaching the arms.
43
COXSTRl CTIOX AND COSTUME
Neck joints.
A wire through
the neck,
secured in the
he nd, restricts
head movement
to nodding only.
Wire through a
screw-eye in the
top of the neck
permits nodding
and some
turning.
A neck that is
separate from
head and body,
tut ached by
cord, is
re con in i ended as
il allows very
flexible
movement.
firmly into the countersunk holes. This method is
suitable for solid bodies.
• Secure the neck in the top of the body with a piece
of strong galvanized wire, the ends of which can
be looped for attaching the arms. To permit
turning, pass the wire through a screw-eye in the
base of the neck; if you wish to restrict it from
turning, pass the wire through the neck. This
method is suitable for solid and hollow bodies.
With solid wooden bodies it is possible to have screw-
eyes in the base of the neck and the top of the body
joined by cord. However, it is not recommended and
interlocked screw'-eyes arc strongly discouraged
because of their potential rattling and the possibility of
the head becoming locked in an awkward position.
When the Neck is Built on to lhe Body
When constructing the body ensure that the neck is
sufficiently strong and secure for the joint with the
head. This joint is probably best used when the body is
carved or modelled on a central core that remains inside
the body,
Fasten a screw-eye in the top of the neck if the head is
to turn, or drill a hole from side to side through the neck
for a restricted neck joint that allows nodding but not
turning. Drill a hole in either side of the head at the
point of balance.
Insert a length of strong galvanized wire through
these holes and through the screw-eye or the hole in the
neck. If spacers are needed to hold the neck in position,
drill holes through two short dowels and slip these on to
the wire on either side of the neck. Cut the wire to
length and secure it in the head with glue and more of
the head material or filler as appropriate.
IV/icn lhe Neck is Separate from the Head and Body
Carve the neck in wood or use a large diameter dowel
shaped with tools or built up with a modelling material.
The top and bottom of the neck can be joined inside the
head and body using any of the methods described
above but the most flexible method, which gives very
satisfactory movement, utilizes a cord running through
a hole drilled vertically through the neck. Attach the
ends of the cord to a dowel inside the head: pass them
through a hole in the body, then knot and glue.
Alternatively, the cord may be looped with both ends
threaded through holes drilled in a solid body, as
described above.
CONSTRUCTION AND COSTUME
Bodies and Waist Joints
Bodies
-. Fabric Body
Chile il is possible to construct an entire marionette from
.;bric. this is not a common technique. However,
casionaily it may be appropriate to fashion the body in
it- same way as the old-time marionettes, which were
nainh carved bin with the upper arms and central body
r.xide of fabric. Use a strong linen, calico or canvas lor lhe
?<xiv Lube. Pad it with fabric or small pieces of foam
ubber and tack it to wooden shoulder and hip blocks. If
An ‘old-time* marionette with « strong linen otedtivas
body and linen upper arms.
required, run a drawstring through holes around the
body and gat her it up a little to form a waist.
A C li ved Bodu
Carve the body using the lechit’ques desciibed lor caned
heads i see page 21-3.). Follow the shapes detai led for bodies
throughout this section. You might need to hollow the
thorax from underneath in. order to reduce its weight but
have regard for the waist juii.it before embarking upon this.
A wood and foam
rubber body. Note
that balsa wood is
a good
alternative lo
foam rubber,
Foam rubber is
glued to a
plywood centre
piece and
trimmed to
shape.
The shaded pans
are rut from the
wooden blockto
form the pelvis.
7 wo pieces of
shaped wood are
joined and
podded with
foam rubber for
the pelvis.
45
CONSTRUCTION AND COSTUME
Normally one would use a wood such cis lime or
Jelutong but it is possible also to make the body from balsa
wood, which is very easy to cut and to shape with rasps.
I lav mg achiev cd the basic shape, complete the detail with
glasspaper. finishing with a fine quality grade.
А Laminated itody
Make the thorax in layers over a firm central cure of
plywood that is cut to shape before applying the
additional layers. You will often find it uselul at the outset
to drill four holes in the core near lhe neck, waist and
shoulders and to secure- cords to these for effecting joints
later.
Build up lhe body shape by gluing blocks of foam
rubber or balsa wood to the Iron! and back of the
plywood. Shape foam rubber with scissors: small snips are
butler than trying to cul large chunks. Shape balsa wood
with rasps and glasspaper
Make the pelvis in a “1 shape, hither saw two sections
from a block of wood to form the shape and round off the
sharp corners, or glue and screw together two pieces of
wood in the 1 shape. Glue foam rubber or balsa wood to
this base and shape it as required.
A Modelled Bod?)
Model the body using one of die techniques described for
heads (see pages 2 3-9). For extra strength, apply the
modelling material lo a basic shape ol balsa wood or
polyslv renc. which remains inside the body.
A Cast Bocbj
Model the two parts of the body in Plasticine on dowels
and take a plaster cast (see pages 30-2). It is a good idea to
build out the upper dowel a little with Plasticine on both
the thorax and the pelvis lo create a slightly wider hole.
When the Plasticine is remand from the cast, the dowels
will leave holes in the plaster through which latex rubber
can be poured and also holes in the body parts that can be
used for joining them.
Cast the body in one of the materials described for
casting heads (see pages 32-3). For latex rubber.
Plasticine should be used to seal Lhe joints around the cast
and to plug lite lower hule in each section. This will retain
the latex in the cast and when you wish to drain off the
surplus, removal of the plug will facilitate the flow of
latex. For lhe body parts, allow the latex to form a fairly
thick layer so that it will maintain its shape when the
puppet is assembled.
dowel ling
Placing the me tai dividing
strips for casting a body
in plaster.
Dowels with screw-eyes are
used as secure fixings for
dowels
screw-eye
46
CONSrl RUCTION AND COSTUME
A Ifiafionetir made entiiehj fmi]] latex rubber and the
aster casts resed to create the separate parts.
cxing Points ior Str.ngs
11 bodies need secure fastening points Гог attaching the
j mtrol strings. Small screw-eyes, which should be glued
as well cis screwed in place, are suitable lor some
atCrials, Others veil! require additional measures..
The solid core of a laminated body may be drilled to
accept the siring if the pos?tion is suitable.
Padded bodies such as foam rubber or balsa wood may
have dowel ling inserts with screw-eyes in the ends. Driil
a hole in I he balsa wood or through the wooden core о a
foam rubber body and glue the dowels in
the holes. Angle the holes upwards from the outside so
that the control strings cannot pull out the dowels. Use
the same technique for bodies modelled on top of a core
4 /
COXSTRl'CTI ()\ A\D COSTUME
This mnrimieHe, carved bij (he late John U right for lhe
Puppet Centre collection, has wedtje-shaped segments al
the waist with cords rinirrhuj through front dir thorax Lo
the pc I vis.
thorax, one close to the front and the other near the back:
angle lhe holes downwards. Drill I wo more holes down
through each side of lhe pelvis and countersink the lower
end of lhe holes. On each side of the body, insert the ends
of a loop of cord through lhe holes in lhe thorax and the
pelvis, and knot the ends.
Alternatively, suspend the pehis in the same way but
insert wedge-shaped segments between the thorax and
lhe pelvis. Arrange them so that the thick end of lhe
wedge is al the back and the thin end at the front.
Pull Joints
Marionettes often move more effectively if a wooden ball
T*
is built into the waist to give a little more flexibility
between thorax and peh is. Always allow for lhe size of
the ball to be used when determining lhe size of the
I horax and pelvis. I sc a pre-drilled ba 11 or carefully drill a
hole through the centre of the ball. Thread cord through
the ball and through holes or a screw-eye in the body
sections. Knot the cord and seal wit h glue. This method is
suitable for laminated bodies.
To join latex-rubber body parts, thread two small
wooden balls or large beads on to a length of cord, one on
either side of a larger wooden ball, Knot and glue the ends
of the cord. Glue one bead into the based the thorax and
that will not retain screw-eyes such as polystyrene or
balsa wood.
For latex-rubber bodies, an. inner plywood shape may
provide a fixing point or screw-eyes can be attached lo a
strip of wood glued inside the shoulders. Alternatively,
attach the string to a small button and use a needle lo pull
lhe siring and button through lhe hole where the neck
joins. Push the needle out through lhe body al the rear of
lhe shoulders. leaving the button inside as a fixture. If
this is not possible, or to replace a string, insert the string
and button through a slit cut into the back and reseal the
l. r
slit u ith glue afterwards.
Waist Joints
There are several methods for making waist joints, hut
the one method that is not recommended is interlocked
another into the lop of lhe pelvis.
Ball joint at the waist.
A ball joint for latex-
rubber bodies.
screw -eves.
Cord Joints
two versions of a simple cord joint work very well,
especially with carved or modelled bodies. One uses cord,
in effect, lo suspend the pelvis from the thorax (See the
‘small box ’ on page 42 I. Drill two holes in each side of the
For carved and modelled bodies, make the body with
holes or indentations in the pelvis and thorax lo
accommodate a large wooden ball. Drill two parallel holes
down through the ball with the distance between them
roughly equivalent to the radius of lhe ball. Drill
matching holes up through the pelvis, emerging at the
sides, and down through the pelvis, emerging near the
CONSTRUCTION ANO COSTUME
cs ihe legs. Countersink the holes. On each side,
: j a cord through the body sections and the ball: knot
ends of the cords where they emerge Irom the body
2*1 the knots in the body and seal them with glue. Fill
etc n des if the body is to be unclothed.
At Joints
'her. real or synthetic, produces <1 smoothly moving
_r.t for bodies that do not require any twisting
ement at the waist. Use with solid bodies or bodies
_-ai have a firm central core of plywood.
For solid bodies, cut matching slots in the two sections
lo be joined. C ut a strip of leather to the required size. The
length should be exactly the comb-ned depth of the two
slots plus the intended space between thorax and pelvis. It
should be a little wider than the body so that you have
something to hold when making the joint. Apply glue to
the front and back of the part of the leather that is to fit
inside the thorax. Holding the edges of the leather, slide it
into the slot in the thorax: it should be a snug Hl. Repeat
the process for the pelvis with the other end of the leather.
Secure the leather further with nails and trim away the
waste leather at the sides with a sharp blade.
For a more restricted joint, permitting only forward
bending, use lhe above method with the following
differences. Cut away a wedge shape from the front of
the thorax and pelvis. Cut lhe leather the combined
depth of the two slots so that when it is glued and nailed
in place, the rear of the thorax and pelvis arc in contact
with each other.
A variation of the leather joint can be used to make
waist and hip joints with a single piece. Cul a strip of
leather long enough to run the entire length of the body
and. if required, to extend beyond this to make lhe joints
with the legs. Glue the front and back of the thorax and
pelvis to the leather and slit the leather below the pelvis to
create two strips for attaching the legs.
rather waist joints. Left: A leather joint that permits forward and backward movement hut not turning. Middle: A
siricted joint that allows only forward movement. Right: A central strip of leather used for both waist and hip joints.
49
CONSTRUCTION AND COSTUME
/1 Body in Three Parts
This joint, which allows only sideways movement, is most
often used for humorous effect in a novelty act. Make the
body in three sections: chest, pelvis, and a larger central
section incorporating the waist. Leave the chest and
pelvis hollow and shape the top and bottom of the centre
section to lit into the other two parts. Insert the ends of
the centrepiece into the chest and pelvis and join the
three sections with two long nails so that the body is free
lo pivot sideways.
A plasticine
model with
metal dividers
inserted for
making a
plaster cast.
angles at the shoulders. Remember to make one shoulder
dowel turn to the left and the other to the right. To
facilitate bending, make a 'V’-shaped groove in the
Plasticine model across the back of the elbow. To divide
the model for casting, follow a line along the inside and
outside of the arm when positioned as if the palms were
forward facing.
Having cast the rubber arm, use a sharp blade to make
a slit in the groove across the back of the elbow joint in
order to allow the arm to bend. Take care not to cut the
rubber at the front of the joint. Provided the latex is
reasonably thick (quite firm but still somewhat flexible),
the joint will last for many years. I have cast rubber limbs
that are good after twenty years, though quite thin
puppet pans have perished or become brittle and cracked
over this period.
1 body in three sections.
Arms, Elbows and Shoulder Joints
Arms
Arms can be made from stuffed tubes of cloth, and have
even been made from very thick rope that remained
visible to the audience. However, they are generally made
by one of the methods described below.
Latex-Rubber Anns
Cast the arms in latex rubber as described for heads (see
pages 30-4). When you make the plaster cast, insert
dowels into lhe Plasticine models at the wrist and at right
Wooden Arms
Arms are best carved from the
same type of wood as used
for carving the head and body
(see pages 21-2) but they
may also be made from
dowelling, which is shaped by
paring away or by adding a
modelling material. Do not use
A solid forearm sometimes has
a leather or fabric upperarm.
Here a strip of leather is glued
and bound to the forearm.
50
CONSTRUCTION AND COSTUME
jewels of small diameter, as they will not have sufficient
?ulk.
For a very flexible alternative to a full wooden arm. use
a wooden forearm with either a leather or a fabric upper
arm. Glue and bind a loop of leather to the forearm or
make a lube using a strong fabric such as calico or canvas
Lind tack it to the forearm (see illustration of the old-time
narionettc on page 45).
Elbow Joints
The recommended elbow joints for wooden arms are an
ipen mortise and tenon joint or a leather joint. In all
cases, it is important to leave sufficient wood at the back
?f the elbow on both forearm and upper arm to prevent
he joint bending in the wrong direction. Latex-rubber
trms arc cast with a built-in elbow joint (see page 50).
In Open Mortise and Tenon joint
This joint comprises a protrusion or ’tongue' on the
?rearm that is pivoted in a deep groove in the upper arm.
f the arm is carved, shape the tongue as part of the
hrearm. Ensure that the top is rounded and that it will
\tend far enough into the upper arm to be secured. Saw
and chisel out the groove in the lipper arm. It should be
ust wide enough to permit the lower arm to move freely
ent without wobbling.
When both parts are carved and sanded smooth, insert
• he tongue in the groove. Holding the parts in place very
securely, drill a small hole across the joint. Remove the
ower arm and enlarge very slightly the hole made in the
tongue so that it will turn freely on the nail that will
complete the joint. Sand lightly the inside surfaces of the
groove and the sides of the tongue to remove any burrs
caused by the drilling. Replace the tongue in the groove,
nserl a nail to act as the pivot and add a spot of glue to
• he head of the nail to secure it.
The tongue may be cut from a strip of aluminium; this
s more appropriate with arms shaped from dowelling.
cut lhe aluminium to shape with tin-snips: it may be
square at one end but lhe top of the longue should be
c-Hinded and lhe sides cut to lhe profile shape of the
irearm. bile the edges smooth. Place lhe forearm in a
.ice and saw down into it. cutting a slot into which the
aluminium will fit snugly. If it is difficult to achieve a
efficiently wide slot with a saw alone, slice a little more
wood away with a craft knife. Glue and insert the
aluminium into lhe slot and secure it with small nails,
hav ing first drilled guide holes.
Open mortise and tenon
elbow joints.
The elbow joint is carved
as part of the arm.
nail
A shaped strip of
aluminium is used to form nails
the tongue for tFie joint.
Cul a narrow slot in the upper arm to accommodate
the tongue. The slot should be just wide enough for the
tongue to turn freely bat not wobble. Assemble the parts
and drill a hole across the elbow for the pivot, as described
above. Remove any burrs with glasspapcr and a file,
reassemble the joint, insert the pivot nail and add a spot of
glue to its head.
Leather Joints
Leather elbow joints are the same in principle as the
restricted leather waist joint. Use a saw to cut matching
vertical slots in the upper arm and forearm at the elbow.
In each arm section, cut or file away a wedge shape at the
front of the elbow; the angle of the wedge determines the
degree of movement at the elbow. Lor each arm. cut a
strip of leather a little wider than the arm and no longer
51
CONSTRUCTION AND COSTUME
than the combined depth of the slots. Glue lhe leather
and slide it into the slots; ensure that lhe backs of the
elbow are in contact and that the arm is accurately
aligned. Allow the giue to dry. then secure the leather
further with small nails and finally trim the waste leather
with a sharp blade.
An alternative leather joint, often favoured by
professionals who carve their figures, involves 'stapling’
lo the upper arm a loop of leather i hat Its into a slot m the
lop of the forearm. To cut the slot in the forearm, drill a
hue of small holes very close together and clean out the
waste with a sharp craft knife. Glue the ends of the
leather loop into the hole: it should be a close fit with just
a little of the loop protruding, so you will probably need to
ease it in with a small tool. Secure the leather further with
liny nails.
A leather «nd staple joint.
Bend a piece of galvanized wire into a square-cornered
staple and drill small holes in the upper arm to
accommodate the wire. Insert the wire through the
leather loon and glue the staple inio the holes in the upper
arm The arm should move freely without bending tn the
wrong direction.
Shoulder Joints
The nature of the shoulder jpiint Will be determined in
large part by the material and method of construction of
the body and the arms. Select the appropriate joint from
the following possibilities.
Coid Joints
A range of simple but effective shoulder joints can be
achieved With strong cord Knot one end of the cord
thread [he other' end through a countersunk hole in lhe
top of the arm then proceed in one of the following ways.
• Thrcad the cord through a hole in the body and tie it
securely, either in lhe neck cavity or to a plywood
insert in the centre of the body.
hollcnu body.
A cord joint jor a
solid bad if.
CONSTRUCTION A .ND COSTUME
• Thread die cord through a hole right across the
body, through the opposite arm. and knot it.
* If (he body is not suitable for attaching the cord,
insert a piece of galvanized wire across the body and
loop the ends for attaching the cord.
-- Leather Joint
r leather loop and staple joint described for elbows (see
52 J is also suitable for the shoulder joints of wooden
> and bodies, provided the loop of leather is
f.cienlly loose to permit a full range of movement.
ppet parts.
Make the slot for the leather in the top of the arm. then
glue and insert the linked galvanized wire staple into
holes drilled in the shoulder.
A Cord and Bead Joint
Wooden beads linked by cord make a useful shoulder joint
for latex- rubber parts. Thread two beads on to lhe cord
and knot each end. The distance between the beads
determines the degree of arm movement. Make a slit in
each part to be joined, insert the threaded bead and resea!
the slit with glue.
A Concealed Joint
When lhe body or limbs are to be unclothed you do not
necessarily have to conceal the joint, but there may be
Л concealed shoulder joint. A strip of meliil pivoted in a
slot in the arm and inserted in a metal tube.
A concealed shoulder joint. The end of the metal strip is
bent to prevent it coining out of lhe Lube and it is secured
into a larger sleeve for insertion in the shoulder.
53
CONSTRUCTION AND COSTUME
A concealed shuuldt
joint.
The shin tider hfis i
deep hale if) setnrt
lhe tubing without
reslricthuj iiiovemeiii
of the inctul strip.
The assembled
shoulder joint allows
movement in al.1
direct ions.
54
CONSTRUCTION AND COS I I .ME
--ions when you wish Lo do so. A concealed shoulder
is rat her more complex than a similar joint for a
because (he shoulder joint requires movement in
directions.
ne join! is made using a narrow metal strip with one
nded end. This end fits into a slot in the lop of t he arm
: rotates on a nail through the arm. Cut the slot across
p of the arm. insert the metal strip and drill a hole
-- ugh the arm and the strip. Separate lhe joint,
ее slightly the hole in the metal and use a file to
a_ К iw
.e any burrs. Replace the strip in the arm and
- . are it with a nail.
.sert lhe other end of lhe strip into a short metal tube
' an internal diameter just large enough to let it turn
: у Bend lhe end of the metal strip to prevent it coming
f lhe lube, hi order to ensure that the metal strip can
freely without’ the bent tag on the end snagging, glue
metal tube into a piece of dowelling with a hole drilled
- ugh ils length, or in I о an improvised plug. Glue this
: io a suitable hole at the shoulder.
The slut allows the arm to be raised away from the
body while the tube allows forward and backward
movement.
Hands and Wrist Joints
Hands
Hands help to establish character and puppet hands
should be expressive. Look at your own hands as you
gesture or when relaxed: they arc not stiff and tlai but
form interesting and sometimes animated positions.
Notice that your fingers are not held in the same plane
and that the thumb is set in a different plane from the
fingers. Detailed modelling will not show, except to an
intimate audience or on video, so they arc- often simply
shaped or stylized. Like cartoon characters, puppets
sometimes have only three fingers and a i humb.
Some puppet makers, concerned at the prospect of
snagging a siring, do not separate the lingers but cut
deep grooves instead. However. most puppeteers find a
John II right
carving a hand.
Note how the
chisel is held
against the heel
of one hand
while the other
hand guides the
blade.
5э
CONSTRUCTION AND COSTUME
way of resolving any problems that may arise. Foi
example. where a hand with thin-, knobbly fingers might
catch on a string, it is possible to run a piece of very line
wire between the tips of the fingers to prevent snagging,
Before making the hand, determine tile wrist joint you
intend to use because some methods for making this
joint have fixtures that are built into lhe hand white it is
be*ng made.
Qu mf Hands
Carve the hands following the same principles described
for carving a head (see pages 21—3). The block of wood
needs to be long enough to allow spare at the wrist tor
securing in the vice.
On the block of wood, mark the hand shape and make
saw cuts to establish the separate fingers. Carefully shape
the .ndividual fingers and hollow out the palm of the
The main
cuts when
carving the
hands.
hand. When the carving is complete, gently cut away any
waste at the wrist and smooth the hand with increasingly
fine pieces of glasspaper.
A Modelled Hands
b model the hand, first establish a basic shape by
intertwining pipe-cleaners and bending them into
position. Build upon this base using one of the modelling
A pipe-cleaner
base for
modcHing
д huncL
materials previously described (see pages 27-9). Those
w'lh good adhesive properties will stick directly; for others
you need to cover the pipe-cleaners with an all-purpose
adhesive.
You will find that some materials are best applied to
individual fingers. Others work better if used in fairly
large pieces: apply these across lhe fingers, snip between
the fingers with a pair of scissors, and finally mode lhe
shape of the fingers. Sometimes one approach works
better than another, not because of inherent differences
in the materials but because it suits the individual
modeller.
When the hand is thoroughly dry, complete any
additional shaping required and smooth the hands readj
for jointing and painting.
For some wrist joints,, preparatory work prior to
modelling can make jointing much easier later, for
example, you might build a dowel in with lhe p-pe-cleaner
base so that there is a good fixing point for a screw-eve.
Dowellmg may be
built into a
modelled hand to
help a irevea
secure wrist joint.
56
CONSTRUCTION AND COSTUME
J sir/hied
fabric hand of
Clown Gustaf
by Albrecht
Roser.
^tentative positions for the metal dividers when
costing a hand in plaster.
Inserting a strip ol aluminium, a. leather strip or a loop at
the start can save yon a more fiddly job of securing these
in a Finished hand. Take care not to damage any leather
inserts when working an the hand.
Latex-Rubber Hands
La lev-rubber hands are moulded in i lie same way as latex
heads (see pages 30-4). V\ hen inserting tin dividers in the
Plasticine model to prepare for making lhe plaster cast,
you can either follow a line up the sides of the hand and
•ver the tips of the fingers or make a division across the
hack of the hand and the palm. You would he wise to
паке this division al the widest pan of lhe hand so that
on can remove any part that becomes Loo thick and
Therefore less flexible.
If you arc making a rigid hand, it is best to make the
ision between die from and the back or you will not be
able to remove the shaped fingers without breaking the
plaster cast.
Ckuh Hunds
Cloth hands arc not common on marionettes but they are
sometimes used for a particular effect. Albrecht Roser of
>tuiigart, for example, has Clown Gustaf whose hands are
made of tightly padded fabric with one row of stitches at the
main knuckles. This not only gives some amusing flexibility
hen playing the piano, but a string raises an index finger
•nd waggles it at the audience when they begin to applaud
>o soon. This is so simple yet so effective. The fingers arc not
rven rounded: they arc cut square at the lips.
To make the hands, use a template lo cut out lhe
matching shapes, leaving sufficient waste. Stitch around
the edges, trim the waste as close to lhe stitching as is safe
and turn the fabric the right way. To prevent puckering,
you might need lo snip into any tight corners before
turning. Leave a strip of fabric at the wrist to glue into a
slot in the arm for the wrist joint.
Wrist Joints
'rhe wrist is an important joint of a marionette. There will
be occasions when the movement of the wrist is
deliberately restricted to facilitate a particular movement
hut usually it will require a flexible, smooth action, if you
hold an arm horizontally and then turn and tilt it in
various directions, the hand should move or drop
smoothly and without hesitation.
The following joints arc suitable for lhe wrist. The
choice will depend on the degree of restriction required
and the materials used for the hand and arm.
/1 Rcrpe Joint
A rope arm and
wrist joint.
CONSTRUCTION AND COSTUME
In the exceptional case of an arm being made from rope,
glue it into a hole in the heel of the hand. Assuming It is
sufficiently thick, you might secure it further with a
couple of tiny nails inserted through the palm.
Leather Jomts
To restrict movement somewhat, glue and nail a strip of
leather into a slot cut in the arm and in the hand. The
A strip о
lent her, glued
and nailed
into slots cut
in the hand
mid Jorennn.
smooth and flexible joint often used by professionals for
carved puppets.
•1 Toihjae and Ci fr)W Joint
This is a good joint for restricting; movement in one plane,
for example for a pianist. The tongue is a sti ip of
aluminium that is secured in the hand and pivots in a slot
in lhe foiearm. Build the aluminium into the hand when
it is constructed, or cut a slot in the hand and glue lhe
aluminium into a.
Saw a slot in the forearm just a little wider than the
thickness of the aluminium. Yon might need make two
saw cuts and trim away I he waste with a sharp craft knife.
Normally you will want lhe hand to have a little upward
but much more downward movement. To achieve this,
angle the saw cut(s) in the forearm so that the slot
reaches just a little way back at the top but much further
back on the underside.
Position the aluminium tongue in the slot and drill a
small hole across the slot and through the aluminium.
Remove the tongue from the slot, enlarge the hole very
degree of movement permitted depends upon the
thickness and the vwdth of the leather.
To achieve a more flexible leather joint. cut a slot
in the hand. Glue and pin into the hand the ends of a
loop of leather, approximately 6mm (Kin) wide. Drill a
6-8mm (Xin) hole upwards into the forearm, insert the
leather loop into the hole and secure it with a nail. rnhe
hand should be close to the end of the forearm hut not so
close that it interferes with movement. This is a very
A strip oj aluminium secured in the hand and pivoted in
a slot in the forearm.
slightly and remove any burrs with a file. Replace lhe
tongue in the forearm and secure it with a nail through
the hole. Put a spoi of glue on the head of the nail.
Screw-Eye Joints
Screw-eye joints are not recommended but there are
times when they may be useful or provide a solution to a
problem. Interlocked sgrew-eyes are best avoided al all
times, not only do they rattle but they can also catch in
58
CONSTRUCTION AND COSTUME
awkward positions. On the rare occasions when this
method might be necessary, I would embed them deeply
into both of the parts to be joined and build around them
with a modelling material so that the parts near the
threaded shaft are covered, as this is where they are most
likely to snag. The following joints are less problematic.
• Screw and glue a screw-eye into the heel of the
hand. Attach it to the forearm with cord threaded
through a small hole drilled across the arm.
• Attach the screw-eye to the hand and drill a fairly
.4 screw-eye pivoted in a hole or о slot in the forearm.
1 dowelling insert provides a secure fixing that is useful
for niodelk’d «nd moulded latex-rubber hands. It also
offers a fixing point for the control string fora latex
rubber hand.
large hole upwards into the forearm. Insert the
screw-eye into the hole and secure it with a nail
across the forearm: pre-drill a guide hole for the nail
so that the arm does not split.
• If the hand is made from latex rubber, insert t nd
glue a dowel into it as an attachment for the screw-
eye. The dowel can also provide a helpful fixing point
later for a control string for the hand.
A Cord find Bead Joint
Hollow rubber hands and arms may be joined with cord
and wooden beads. Knot one end of the cord and seal the
knot with glue. Thread two beads on to the cord and knot
the other end, allowing the required amount of space
between the two balls. Insert one bead into the hand and
the other into the forearm through the holes left from the
casting of these parts.
If the rubber is not too thick, it should flex enough for
you to push the beads in through somewhat smaller
holes. Tug the hands a little to see if the beads will be
released: if they are not sufficiently secure, squeeze a little
glue into the holes to fasten them. If you cannot insert the
beads through the holes, slit the rubber a little, insert the
beads and glue the slit together again,
As an aid to flexibility, you may want to thread an
additional bead on the cord to fit between the hand and
the forearm. You must plan to do this from the outset so
that you can adjust the length of the forearms
accordingly or the puppet’s arms will look more like those
of an ape.
A cord and bead wrist joint for latex-rubber parts.
59
CO \ S TRI*< ’ТГОХ AND TCSTIMI-
I i.s. K\i i ind Hip Joints
J.-PgS
You must decide on line hip and untde joints lo Ik used
beftiru lipiking llie legs.
Jiinvtf uml Dcwr/iirfif * i'cr
pgsmay hccarvcf! ctr niiwk rum llial h Ji «i pc J
down »ir built up with ci inodclDing mjtrrinl sorb as
Vk ud-l-f H 111.
i’frpwtn.e-js
«nnlnnCcd plywood siEiti|K\ make strong. freely moving
kgs, pnu iilcd l!il plywood used Is not (no ihin. There arc
IwuOptions ijvaikible: milking the leg entirdy in plywood,
or using Ei core of plywood. lln.t padded "ill liititn
rubber cir balsawund. which Is helpful il there is a need to
reduce 1 te weight
Lm -Jkihfrcr I ед 5
l<U.hhcT legs: are lels! in one piece using I In* procedure
<.1ечт11.кч1 tor heads her pa^cs 3O-4J. Wliwirreiiiaigdre
Plasticine nio<id tor making die pktsicr еа< чкпреН wiih
V.L‘L[^L-vlliLpL-S vLil Го ?IH illl Ь Ilk ’ Г tllC к ICC Slid Й UU
-shaped groove across die 1гш»1 t? lh< кист Iih^iujiI
bending. Гаке care 10 ensure that sulfident FMdne
rem liiishi ilir ccitire of the косе Joint lo «• j ciite a jwp ibr
ihe kiiex rubber lo 11m uhi ilwnihcr ha II ol llirlrg.
’.Vhv i inserting lhe tin dividers rca.dy for casiing.
a nr up liic Mdcs and ai nund the lop i<r.d bewm
of the leg. When lhe cast has been credcil and tfte
rubber legs have been made, use a sharp kiille lu шике
a slii across the ^ггослт in ihr Iront of ilie knee jioinl
lu j I low II to bend. Такс саде по I to cut the rubber .il die
bad: of i.lic knee us this forms lhe hinge. Provided the
kgs arc cast fairly lhawkh thi hinge л ill last fiu ашпу
years.
The kite*- jinti! far iuftii/iati d pji/wwtf f./js.
•mi
CONSTRUCTION AND COSTUME
plasticine
A Phistn ine model with nietfll divide rs inserted ready
r making ft plaster east of the kgs, Note the ‘V’-shaped
r, »ovc at the knee to permit bending.
oints
*e best joints for carved, and dowelling legs are a
ndard open mortise and tenon joint сш into the legs, a
mil ar joint that uses an aluminium tongue, or a leather
m. For plywood logs, a mortise and tenon or a leather
nt are the most suitable. Latex-rubber legs are cast with
ruili-in knee joint (as desiT’bed above).
-л Open lionise niid Tenon Joint
?.. table for carved and dowelling legs, this joint is cut into
не leg, not added later, so you need to allow for the
'erlap of wood at the knee when determining the length
each piece of wood
Cut an angled slot in the lower leg, at the knee. Shape
~.e wood on each side of the slot: first use a saw to remove
i >mall rectangular block at the front of the knee to create
x ridge. The ridge Will but! against the corresponding
-.cge чл (he upper leg lo prevent the leg bending the
ng n<iy, Round the remaining wood at the top of this
:;g action.
he thigh section has a protruding Longue that fits into
_re slot. Cul away a small block al the front of the knee to
’respond to that cul from the lower leg. Make angled
cuts on each side of the intended tongue and then saw
wn to these cuts from the sides of the logs to remove the
-ste. Round the end of the remaining tongue.
Place the tongue into the slot with the knee in the locked
r« s 'ion. Holding it securely in place drill a small guide hole
ss the leg and through the joint The hole should be
gned with the two ridges. Separate the parts and enlarge
rhily the hole in the tongue so that it will turn freely on
e nail used as a pivot. Smooth lhe sides of the tongue and
•_ce groove with glasspaper, removing any'’ burrs.
?<eassemblc the leg and insert a nail lo secure the joint.
'he knee joint does not move smoothly and freely trim
' sand any offending part, then replace the nail and
с are its head with a spot of glue.
Al? opni mortise and tenon joint jor wooden legs.
Ahiininiiin; Mortise and Tenon Joint
In this alternative form of the open morl’se and tenon
joint, the wooden tongue is replaced with a strip of
aluminium, which is also used for a concealed joint for a
bare leg. If the joint is not to be seen, the additional
shaping described to conceal it is unnecessary. The joint is
essentially the same as that described previously for an.
open mortise and tenon elbow joint (sec page 51). When
carving or modelling the leg, shape it at the knee so that a
balT on the top of the lower leg fits into a ‘socket' in the
thigh section
Shape a strip of aluminium to round off one end, then
glue the other end into a slot cut in the lower leg. Drill
guide holes through the leg and insert two small nails to
secure the aluminium. In the thigh section, cut a slot to
accommodate the aluminium tongue. Do not let die slot
pierce the front of the knee: the wood that remains at the
front blocks the movement of the aluminium, preventing
the knee from bending in the wrong direction.
Assemble the leg with the knee in the locked position
and drill a guide hole across the knee and through the
61
CONSTRUCTION AND COSTUME
/1 concealed knee joint usiiifl an ahtrniniiun tongue pivoted in я slot in the lower leg.
aluminium. Remove the aluminium and enlarge lhe hole
in it. File oil any burrs and sand the inside ol lhe slot.
Reassemble lhe knee and insert a nail Гог lhe pivot. Seal
die nail with a spol of glue. If any further shaping is
required, it can be completed with a modelling material.
Pigwood Mortise mid Tenon joints
'l he joint is made from six plywood shapes. Make the
centrepiece of lhe lower leg long enough to insert into lhe
foot for the ankle joint For the lower centrepiece, either
use very slightly thinner plywood than the centrepiece in
the thigh or sand down lhe top of the tongue it creates, so
that the finished knee moves freely.
With a coping saw or a band saw. cut out rhe six leg
shapes (see A and B*. shown right). Glue together the three
thigh sections and the three sections ol the lower leg.
creating a longue and a groove. Insert the tongue into the
Pl if wood leg shapes.
Constructing laminated plywood legs.
62
CONSTRUCTION AND COSTUME
groove and, holding the leg with the knee in lhe locked
position, drill through lhe joint at the centre of the
overlapping parts (sec illustration below). Enlarge the hole
in the tongue, smooth the tongue and groove, with
glasspaper, and reassemble t he joint using a nail as the pivot.
When it is moving freely, seal the head of the nail with glue.
Shape the plywood to round the leg. If necessary, add
a modelling material, or glue on foam rubber or
balsawood and trim it to shape. Ensure that any
additional modelling or padding does not restrict the leg
movement.
The alternative method uses three plywood shapes A
lor the thigh and only the one centre shape ‘A for lhe
lower leg. AH of the plywood may be thinner than that
used for lhe leg made entirely in plywood. The bulk of the
eg. including the outer two sections of lhe lower leg. is
created in loam rubber or balsawood that is glued on.
then shaped.
Leather Joints
Leather makes a very good hinge for a knee joint and is
suitable lor plywood, carved and dowelling legs. Cut
matching slots in each leg section at the knee: the slots
should be just thick enough for the leather lo lit snugly.
Remove a wedge shape behind the knee with a saw. a
chisel or a rasp. The angle of the wedge determines the
degree of movement of lhe leg.
Use a strip of leather that is a little wider than the legs and
no longer (han the combined depth of lhe two slots. Glue
both sides of the leather, avoiding the centre strip w here the
legs arc to bend. I lold the leather by the spare at the sides
and slide it into the slots. Check that the legs arc aligned and
meet properly at the knees. If the leather is too short and
pulled too far into lhe slots, it will not straighten fully. If it is
too long, the legs wil I bend in the wrong direct ion.
Leave lhe glue to dry before proceeding in case you
displace the alignment. When the glue is dry. drill small
guide holes into lhe leg, through the leather. Secure it
further with small nails, finally, trim off the waste leather
with a sharp craft knife.
чво\ г i itt: The position of the hole for jointing.
чво\ e right: The leg assembled, showing foam rubber
padding used as an alternative to the plywood outer
sections of lhe lower ley.
A leather knee joint.
above left: Slots arc cut for the leather, and the rear of
lhe ley sections are cut away to permit bending.
ABOVE right: The ley assembled with the leather glued
and pinned in place.
63
COXSl IU CTION AND COSTI MF.
An alternative leather joint lor plywood legs is
sometimes used to reduce the ue-ght of large puppets.
Design and cut out the ph wood shapes fml on. not in
profile Clue the leather hinge to the back of the leg with
the plywood sections touching at the knee. \\ hen the glue
is dry, stick blocks oi foam rjbber or balsa wood lo the
front and hack of the ph wood. Cut aua\ v. edge shapes
behind the knee and trim the remainder of the blocks to
shape. 11 you arc also effecting lhe hip joint with Leather,
you should do this before .you add the padding to the legs.
plywood shape
leather strip
balsa wood or foam rubber
padding on front and back
Plywood sliuprs. joined with в strip of leather and
podded withJbam rubber.
This puppet has a wooden knee joint butjbrthe ankle. a
strip of aluminium is used instead of a wooden toiK/ue.
Hip Joints
I he hip joint selected depends on the materials used for he
legs and the pel cis as well as what the puppet is to do and
how it is required to move. Some puppets have a good deal
of movement both backwards and forwards while others
need io be more restricted. Sideways movement is
generally quite limited or the legs will be more difficult lo
control, but. of course, there wil always be exceptions. For
sculpted legs, all of lhe follow mg methods are possible: for
other legs the leather methods arc not suitable, with the
exception of the ph wood leg with a leather knee joint.
64
.|?}чл|р liJpiqr ptiHtf/Zq .rf/r Jl'SiJi/i
ftp /jjirui^.<vsHi.r Ji't/J з t»hpWiCSUCNf» OH JW.’ppK w
’spiprf .и/г Ju |фкл 7 лр.ippiq/h/ippiri* ’дг/.н p^ttod?
•jii/G j dit/ <IOOJ Jk’ipt’.'j pun Д' i li i
I’.K'.I ph dr.'l .1||; КЧ<Ц.Л? .7<кЦ 1! [|Uf] illL| L[ 1[ .k |HI t
jnptvp Г->| Эф L’o11CLIL|; ;»"dO \lliv ,ll]| му 5Й1[<51| -13 11)1 П!’Р
HU J H|i tn djjavpzini л| 1Й53t>. jjJ :n <x^id « ш 'juf.tpiq1
pii.KJsii^* '.9|i?udojildH эд i! э_п>1| н *iuiiit [WJjguil Xm si siq |
.; rr pjj.rirj.JAjjr]
CONSTRUCTION AND COSTUME
thigh and insert them on to the wire on each side of the
leg-divider. Use pliers to bend each end of the wire up at a
sharp right angle. If the wire is curved, the legs might jam
in an awkward position. Bond the tips of the wire inwards
to fit into the holes in the hips. Secure the wire with glue
and add staples if necessary. If you use thick wire to
suspend the legs, it may not bend sharply, so use two
lengths of ware. Pass one horizontally through the legs and
pelvis. Bend the other (which may be thinner) into a loop
with the sides pressed close together. Attach it vertically
down the outside of the pelvis or concealed within the
socket for the leg. the top curing into the pelvis. Solder the
horizontal wire securely to the end of the vertical
wire loop (see illustration on page 65).
Alternatively, glue and pin a loop of leather into a
slot in the top of the thigh and suspend the loop from the
galvanized wire. This is useful when you cannot
drill a hole across the leg but are able lo make a slot
or to build the leather loop into the construction process.
However, in order to prevent the leg rotating too far
sidew-ays on the wire, the loop itself needs to be fairly small.
A Cord Joint
Drill a hole across the top of each thigh and up through
the pelvis. Thread strong cord through the legs and pelvis,
then knot and glue the ends.
Leather hip joints.
Leather Joints
Glue and nail one end of a strip of leather into a slot cut in
the leg and the other end into another slot cut in the
Cord hip joints.
66
CONSTRUCTION AND COSTUME
relvis. An alternative method uses a strip of leather
hroughout the entire body and into the top ol lhe thigh,
he end of the leather is split lor lhe separate legs and is
secured with glue and small nails.
Feet and Ankle Joints
Feet
scale carved, modelled or cast feet using lhe materials
nd methods described In Chapter 3. When modelling a
4't it is often preferable to build upon a base of balsa
.\ood or polystyrene that does not need lo be i emoved
ater. If Plasticine is used, cut off lhe sole lo remove the
.usticinc and then glue the sole back on to the foot,
г, sure that the fool has sufficient weight for good
" ivemcnL but without being too heavy.
Have regard for the ankle joint when making the foot
< this will often be built in rather than added later. For
.sample. you might build into lhe foot a slot, or a tongue
ade from plywood or aluminium, ready for the joint.
lo facilitate a. good walking action, it is recommended
.at ankle joints are cut with lhe feet pointing very
ghily outwards to avoid the feet catching each other.
::c that lhe degree of vertical movement at the ankle is
railed to prevent the toes dragging. If the leet make too
uch noise on the stage floor, glue a piece of felt or,
eierably. chamois leather to the soles.
:.:r-Rubber Feel
jbber feet are cast in the same way as a rubber head (see
overlapping strips inserted
above sole of shoe
• tkincj a plaster cast from a Plast iciuc model.
pages 30-4). \\ hen dividing lhePlasticine model to make
the plaster cast. insert lhe metal strips around the sole.
You can cast lhe foot and the bottom of the leg in one
piece so that the lower log fits into I his 'lube’ If it is a tight
fit. you can glue it in place but this will prevent any
flexibility at the ankle. If the lube on lhe foot is larger
than the leg. use a nail across the assembled parts to form
a pivot and allow ankle movement.
Alternatively, make a fairly thick strip ol rubber by
pouring a quantity of latex into ti small container such as
a tin or a mirror surrounded by a retaining barrier made
from Plasticine. When it has set, peel oil the rubber strip
and trim it to the required size. Glue the strip into a slot
cul in the leg and insert the other end of the strip into the
foot. Pour liquid plaster of Paris into the heel and lhe
bottom of the leg to secure the strip. Make a small slit in
the call to pour the plaster in and keep the fool tilled
backwards so that the plaster remains in the heel and
does not fill lhe entire fool.
An ankle joint for latex-rubber puppets.
Ankle Joints
La tex-rubber feel arc cast with built-in ankles (see abo\ e).
The open mortise and tenon joint is recommended for
carved, modelled and cast feet.
Open Mortise anil Tenon Joints
This joint has a tongue built on to the bottom of the leg
that fits into a slot m the foot. To make the slot, cither build
it into the foot during construction or di ill a series of holes
in a straight line and clean out the waste with a craft knife
or a chisel. The length of the slot determines the degree of
67
CONS'I EtlJCTfON AND COSTUME
Tongue and
groove ankle
joints: the
recommended
joml has (Ik*
slot in the J out
andthe longue
on the leg.
Sir IbolsQuest hgJohn Roberts. Puppet( raft. Large
string puppets Jara modern version of lhe b iug Arthur
legend. Puppets designed and t arved bg John Roberts.
( oslinnes bg Л arm Liljejors: it took three attempts to get
the making of lhe leggings ( orrect to allow knee and
ankle movement.
Costi me
mincmcnl яг the ankle hiscri the longue into lhe slot and
drill a guide hole through the foot across lhe joint.
Remove i hr tongue and enlarge "he hole slight Iv. Clean the
longue and lhe groove, reassemble the joint, and secure it
with a nail. Glue lhe head of the nail to retain il.
If you need the groove to be in the leg and the longue
to be on lhe fool, il is best to build this in during
constrm lurn. In order to restrict movement a1 lhe ankle,
cut the groove at an angle so that it is higher in lhe front
and lower al lhe back of the leg. This will prevent the toes
dipping loo far.
An alternative lo lhe wooden tongue uses a ship of
aluminium. glued and pinned into one section and
pivoted in the other section on a nail.
Selecting fabrics
Just as puppet design focuses upon lhe essence of ihc
character, so lhe costume should capture lhe theme or
period and reflect this without becoming too lossy. Select
materials that widl stand up to wear but are fairly soli and
lightweight Fabrics thal drape well, such as jersey fabric
cut on lhe cross, make good, flowing robes. Avoid those
that restrict movement or that let liglu shine though.
Using only one type ol fabric can lead to a rather dull
appearance; mixtures of colour and texlures generaih
prove more successful. Consider how lhe costumes look
from a distance and hovi they appear under stage
lighting. Coloured lighting can enhance or kill the
appearance <»i a costume, so take swatches of the fabrics
Opposite: Bullfighter bg John И right.
CONSTRUCTION AND COSTUME
COXS I Rl CTlQb к4' и CDS ГI IM 1
Pied Piper Aiji /<drn Hi►Arifs, /'irpjiriCniH. C eu vi d hl
hili' nrCM?dand 5 0cjh iJfJni .• I* l/l, Illis f»«rrrn/nii!r isrnboul
мл thin us is iwsslbh* luru nHin<4)rih • I dfissiie. 1 h
rlnthcMinsihij Hj p thucci oillf* till wood. Isatin . iitniii
ЬчгП» T FdfpJ itjr/hr htii.
hi test under stage lighting before von purchase them.
P.lack Ic-mls la look flat a> J сочите so you might
mi bilinite ii dark sIkm1 liI blue green or br nvn I splor1
dillcrcni shades ol’ one colour an. coiHmsting colours
use one colour io accentuate another пн I пт than usinj.
COlltt st Ing colours in equal purls.
You cun dyv Librk' to the rcquied colour befor
making II пр iritu lhe COMiimc bid alv.nys dye h|ji rr
materkd и al ।m lorerroi >in making or Ibr modlftcaUrjiTs
as you proceed. Avot large prints as (hi-st; are unsuliable
for puppets* \tjii niigjil ad<l uiur imn de. ii. with textile
painl or dilutf d itcrylic paint, Ih.ppvUvr. also keep
adlectwns of trimmings - lek. hr nil lunging, lacv.
r hbons. leathers ЬгнЛч. icivelh’ry, ombroideiy
s ks. knitting va> )ls - in fcirt, all nninncrol oddsand егчГ
dial might conic in useful In a rnsiunie.
Making up iheCosiiiinr
Уоц nerd hi dress the ptappet before :iiLtteI-.iLih lire
strings. Sometimes j mi might nerd to sicurc lhe lands
rind fctl niter dressing the puppet, depending how you
about niaking the custuft’c- You can stiteli the
com nine together as Lf Пи a tloll -i id then dress the
puppet, but тяну people, esrcciuily beginners end up
Ji.’ mnin
ict fipo.s I d’
CtAir/IJh
CiJJMr^rrlrMT.
Glae or stitch e Jgei toeciher
with Lsstuino that are too light arid restrict
movemeiTt. \ good alternative is to stitch or glue thr
volumedlreciivon tn the puppet.
J)
CONSTRUCTION AND COSTUME
Gluing is usually quicker and avoids having seam
edges inside the costume as these can hinder movement,
but parts that arc subject to strain might need a few
stitches for security. The choice of glue depends on the
fabric: fabric adhesive is usually best but clear, multi-
purpose contact adhesive is possible for many materials.
To create a hem. smear the glue sparingly and evenly
along the edge, then turn it up and press down firmly, or
smear glue along the fabric and trim it clean when the
glue is dry. The use of glue for a turned-up hem may be
unsuitable for fabrics that are to flow loosely in folds as
the glue may stiffen them too much.
Trousers are created from two tubes of fabric joined
at the top. First establish the hems, and then make
each tube by gluing one edge of the fabric over the
other. Lay the fabric Hat and fold the inside edge
towards the centre: smear glue along the overlapping
edge, up as far as the crotch, then place this over the
inner edge and press down firmly. Snip a little into
both edges at the crotch so that the fabric can be
opened out at the top to meet the matching fabric
from the other leg. With the trouser legs on the
puppet, glue together the two pieces of fabric down
the fly front, under the crotch and up the back of the
trousers. A stitch in the crotch may be helpful. To
make a waistband, glue a strip of material into a
narrow7 tube shape. Press it flat with the join inside
and glue it on to the trousers.
The front and back panels of shirts and jackets are
glued to each other: collars and lapels arc glued on
separately. The sleeves are made from two tubes of
material cut at an angle at the top and glued or stitched
on to the shirt or jacket. The ends of the sleeves may be
hemmed or you can add separate cuffs.
Dresses usually require front and back panels for
the bodice and separate sleeves. The skirt can be cut in
one piece or in separate panels. However you can
achieve very effective costumes by draping lhe fabric
and stitching or gluing it in place, rather than making
up an actual dress. You can also add further layers of
fabric of different colour, texture, or transparency to
achieve the desired effect
5 Control and Manipulation
\l \Rioi\LTi ]•: COntrol
< rings allached to the puppet are formally joined to a.
л luden control, soinetnnes called a ‘crutch* or a ‘pcich',
iat is constructed and manipulated so as to move the
г uppel in lhe desired fashion. 1 he essence of marionette
. ntrol, more than for any oilier three-dimensional
-jppel. is lo let the puppet do the work: use lhe natural
Aunienis. and lhe moment inn of these movements, to
4 you. । herefore you should design your controls to
_mc\c lhe required movements or effects is simply as
-• ssible.
The Katbputli marionettes o. Rajasthan arc often
’.u oiled with just a loop of string, the ends of u hi ch are
ichcd Lo the top of I he head and lhe hack of the waist,
netimes with another loop lo the hands
mbi nation ol lhe intrinsic movements of the
Репс and the dexterity of the puppeteer produce an
zing degree of control and variety of movements. A
.cal .hi rm esc control has only a few strings attached
•cih to it: instead there are loops of string that sd in
res in the control when not in use. Phis type ol
-trol also depends on the puppeteer’s ability lo deal
the various loops simultaneously,
•ле'.er. some, of yon mav remember having betn given,
drum marionettes that were Irustraungly difficult to
ipulate. despite die simple con I mis. Often lhe figures had
ieitf structure or weight io move well, lhe costumes
Times proved a further limitation, and. paradoxically the
’Is were too simple. They were no! only simple but in a
they were inefficient because they did not do the work
... mostly they supported the puppet and you had to
- _ indiv idual striiigs to make something happen. A good
may appear more complicated but il will be much
c pen11c l he ma i ionci te vvit h less direct s tri ig pu 11in g.
ugh there arc a number of good basic designs, these
xc io be adapted or supplemented with individual
ares io suit the particular puppet and what it is required to
entire collet I ion of markinellex. including those I
myself. I do not have two controls that are exactly
the same. Controls for puppets that are characters in plays
have a greater degree of similarity than those that perform
varieiv-six le acts with tricks and transformations. which mav
— «Г •
require a good deal of inventiveness when the control is
designed.
Pkin lhe control al the same lime as planning the
marionette, but be prepared to adapt ynir plans even a< you
siring the puppet (see pages 84-6) in lhe light of how
effect i\ ciy il moves1 see pages 88-9 5i 'rhe n i< i ric incite mu st be
dressed before you start lushing it
aROVE.* This apparcnlh| s i r»plr control fora Burmese
тш ionetic takes a good deal of skill to operate. The front
crossbar carries the head strings and lhe rear crossbar
carries the body strings, whic h are attached close
together just behind the neck, 1 he three looped strings
sitting in the front groove operate the upper arms, hands
and legs; the loop of string in the rear groove operates
the heels.
LETT: Paul Doran, operating open-stage style. Normally
hr wears black c otton gloves to pet for in but omitted
these for the photograph.
CONTROl \\u MANIFt LATfON
HLI1 icmrjc CUTH mis ГСЧ’кИГГ ГЛ'П-||ЧГС1с
npcrathm. ibe ro,osi cbekig he upright чип.
tin'id the hui nuTird: thcdalltc is somcliiM QtLIftl
die '.unipIrHir1 - it p iddlt*" cr-nlnil lFiili-чч the puppr s
actions reqi;.re«ilbui wist', rhe*endeiiq-in ihel К isioux’
the upright central Г01 liuiniin dinractera. find die
linnztinl 11 C'Cintf rol lor • 11! 11! ILL 13 puppets. 1 IlFTLi'VtT, HJ ShIUi
f*iimhch, [lie 'or >чor;d control is used • tUJiHxdy fvr
both. Stime cun tn -Is uf each serf have Lhe walkingaction,
bull Milo lhe main ciMitnil n liilsl dsIilta li»Hieitstpiraic
leg bar ь I Ис 11 i< generally prelcnhle for h Liman figures
The use ul scicw-exes is nol геситтехЫ for
nirnrhiiii’ |he Mjirgs tn lhe «untroh they ten I inutch in
Hu- strings ,ii otfier puppets. especially when removing
the igLiLcs from a hanging rack. In L ie гпикЯс of E
nerfomt<пс«я i his c;i n bring t lie ol li er pu ppets crashing id
the gr Hind. л is better to drill small holes through (he
appropriate part and use lhe edge u tr triangular ftk Eo
make a line groovis around s I parts ol the control ••.herea
string i.s lobe attached, [jglith saad the coni rolto remove
iri roughness. sm'igtf. or sharp edges, lhen ilirciui iEl
stringy ihrourh liie link's, wine them aufoumliLhegroiires
nd LicthvO.
The d]niviisir'"is for tlie eoiilt4>L> described Lxluw are
I iiiL'iidrd pinch is .-a raniuji ituiih-. Ilic- 11 i>f г л h md
«г bar will he d'elerm ned kirgely by lhe size rind
pro|XM*ihms tn the puppet; lhe width, ihlckness or
ditimcltT u ill be delermtntxJ by tvhal feels amforLahfie
anil more p.irlieiihirly by thi Нгтн’н^опс ги.(U1*. liHUkl
any joims rcquirtxl wlihoui weakening lhe CWtrtL
FqaAcileiil metrk *itr. impeiidl measure; are
apprexvuuilHiiih In iJirnearest uimmiui яки
in- L’i’rigi i Conikoi
The basis of cite upright control b an linvtcd сгоя
shape, lhe upright is L ic nujin bai and theciusspktr die
lirai h.ir. In lhe main bar are Fitifschcd и ilcHvdlfag
sb HilJ r bfir ai i ic rear, н deiachanle eg bar til the Irani
iitsii the top. and Hires jusl below lhe leg biirtonperu e
lhe hands, hirllicraHachmcrils arc madras rpqtrirtd.
t h main bar h nuide 1гс«т a -2,5cni i;9tol length of
dlJiriin (3!ni|i square* section Limber 01 a dinwl ul 2ll>iiijn
didiiieh i. । he head liar is FirhiT Ithiun square млНпп
timber or JQmni (dr) dlanuicr d--welling, eruh a little
longer than lhe width ol the puppelX heud. .Attach
ш-i: The Вппнс.кс nHiiiorwitviFirtf (ion.
74
CONTROL AMD MANIPULATION
Пи
hand strings
The basic upright coiftrol.
dowelling head bar by drilling a hole across lhe control
and gluing the head bar into it. Secure it with a nail
through the upright. Attach the square section liinucr
with a cross-haking joint. Make tn о saw cuts half-way
through each piece of wood and theft chisel out the waste
so that the two pieces can be glued, interlocked and
screwed together.
The length of the shoulder bar is determined by
whatever is necessary to hold the shoulder strings clear of
the head. Approximately 12 5cm t 5in) should suit a
6()cui {24-in) marionette, but you might leave the bar
longer than required and cut it to length later v hen you
are sure where the strings need to go. ft will operate belter
if the bar is angled 30-40 degrees downwards. To aftach
the shoulder bar. drill a hole in the rear 01 the control
below the head bar and glue die dowel into the hole so
that it sticks out at the back. This dowel must be a tight fit.
It will carry a good deal of the marionette's weight so
secure it further with a small naih
As an alternative to a dowelling shoulder bar. it can be
made of galvanized wire, which enables it to be folded up
for packing. Dull a hole across the mam bar just below
the head bar. Pass the wirdi through the hole, bend each
end backwards to form a loop of the part through the
control, and bind together the two halves of the wire
with strong thread. Bend the ends of the wire into a
small loop for attaching the shoulder strings, ft
saw cuts
Ifikmg a cross^halving joint ‘or hiug
the head bar.
CONTROL AND MANIPULATION
necessary. to keep the shoulder strings well dear of the
head, attach them to lhe ends of a separate dowel and
suspend the dowel by a curtain ring 01 screw-eye from
the loop in the end of the wire.
To attach the leg bar. t;e a curtain ring or twist a screw-
eye into the centre of a 20cm (8m) dowel and suspend
this from the top of the control by a small hook. I prefer to
use the curtain ring as it is slightly larger and the
attaching thread whibh must be strong, lets it flex. This
helps when you are trying to replace it qu ckly on the
hook. To ensure the ring does not slip, drill a small hole
through the centre of the dowel for attaching the thread.
Heel strings are not normally required but, if they
should be needed, either attach them to a second log bar
on -he rear of the contro. or attach them to the shoulder
bar. If you have a number of such attachments on Lhe
shoulder bar. or elsewhere for that matter, you need ways
io identify them quickly while performing. For example,
tie a small coloured bead on to the string just below the
control, or attach a short white thread between the
control string and the control.
The hand wires are made from galvanized wire and
attached to the main control far enough below the leg bar
so as not to interfere fftith it when you raise the hand
A dowel «(inched to the shoulder bar to hold the strings
dear of the head.
wires. How you hold the control will be a factor when,
determining the position for the hand wires My preferred
method is to hold ihe control with my little finger under
the head bar and my other fingers above it. bu1 some
puppeteers place all their fingers above the head bar. Hold
the control as you would to operate it and mark the
position for the holes. I find a convenient position for lhe
lower hole to be 1cm (Xin) above mv index finger and rhe
upper hole 8mm (Йпп) above that; with the hook for the
leg bar at least 3cm (1 Йп) higher again.
Bend one end of each wire into a fairly sharp right angle
using pliers. Insert the long straight pieces ol wire through
the holes m opposite directions; caiefully bend the long
ends downwards. The}' should nut be too tight to the
upright or they will not move freely but you need quite
sharp corners, as wide curves will let the wires wobble
about. They also need to be angled outwards slightly, not
pointing straight down. To obtain a sharp angle, hold the
wire with phers and. as you bend the wire down, keep firm
pressure upwards on the piece of the wire that is across the
control. This takes a little practice to achieve.
76
CONTROL AND MANIPULATION
Cut lhe wires to lhe same length, loop the ends Гог
T-1ticking hand strings and seal the closures of the loops
ith glue. The hand wires usually reach al least lo the
uofri of the control and a little beyond. Dm puppets of
'-75cm (.2-4—30in) in height. 1 find that hand wires ol
The hand wires inserted in
the nitfiii control.
Marking the position of the hand wires.
A strong galvanized wire
loop used instead of a large
screw-hook.
16-1/cm I6&n) in length when finished arc usually
sufficient to achieve the degree of hand movement
required.
If the puppet has a back string and/or a chest string,
leave them a little slack so that they da not interfere with
normal movement. Attach the back string to some part of
the shoulder bar. and 1he chest string somewhere along
the head bar. or to a dowelling insert on the control, Lo
help to guide the string away from Lhe front of the face.
Add ci large screw-hook for hanging up the control.
Alternatively, make lhe hook from strong galvanized wire;
insert it through a hole drilled across the control, bend ihe
ends upwards along the control and bind it securely
with cord.
77
CONTROL AND M W’lPULATlOX
Alon th and Eye Strings
If fixtures are required for mouth and eye strings, attach
lo the control short dowels of about hmm (‘Jin i diameter.
Drill tun holes in the front of the control above, the head
bar and glue the dowels into die holes. Space the dowels
so your second finger can hl. under one dowel and your
third linger under the oilier.
Rocking Bars
\ rocking bar enables you to walk Inc puppet with the
hand holding lhe mam control. It is ич*с1 most often when
you need lo free your other hand for sonic particular
purpose, such as operating a specialized feature. ot the
puppet. However, the leg action is not usually as good as
when a separate !cg bar is used. Hierc are two common
types of rocking bar for an upright control: one made of
shaped wood, the other comprising a straight и oocicn bar
with a wire thumb loop.
1 varinfion on me basic npriqlit стнго!biplie Imc John Wright. The head brtris ijroovc’djor lhe Hide • ntierof the
siipporu’jiq hand and a sprintf clip is usedlo hold the lea bur.
CONTROL ANU MANIPULATION
A shaped
wooden
rocking bar.
Cut the shaped wooden leg bar from strong plywood
.-.th two large notches for your thumb or finger to fit into,
ill a hole through the centre of the bar and screw it to
main control bar at a position where you can reach il
mibriably with your thumb and index finger. Screw il
efficiently tight to permit a smooth and free rocking
rciion without wobbling- If you find it makes
manipulation more comfortable, you can insert a short
J wel between the rocking bar and the main control.
For the alternative control, drill two holes up through a
<raight leg bar and push the ends of a loop of wire
-.rough the holes. Bend the ends of the wire along the
p of the bar. then glue and bind them with strong
read. Drill a hole through the centre of the leg bar and
screw it to the main control where you would normally
- -ng the leg bar. with a dowelling spacer if required. Hold
control and slip your thumb or index finger into the
• _re loop to move the bar.
The Horizontal Control
This type of horizontal control is used for human figures:
the animal control is described in the following chapter
(see pages 109-12). The control consists of a wooden
main bar 20cm (Sin) in length and 2 5 x 25mm (1 in x
1 in) in width, to which arc attached lhe dowelling head,
shoulder and leg bars and a removable hand bar. The
dowels Eire approximately 7-10mm I X-Xin) in diameter.
The head and shoulder dowels are a little wider than
the respective parts of the puppet. They are suspended
from the main control so that you can walk lhe puppet
without rocking the head and body from side to side. Drill
two holes down I lirough the main bar. one approximately
in lhe middle for the head, the other near the back for the
shoulders. Drill a hole through the centre point of each
dowel rod. Thread a strong cord through each hole and
the corresponding dowel and knot the ends.
* wooden rocking bar with a wire thumb loop.
The standard horizontal control and st ringing.
79
CONTROL AND MANIPULATION
To assist manipulation of the head, you can glue into
the top of the head bar long nails that can be gripped with
your thumb and forefinger of lhe hand supporting the
control. Ensure that the string by which the bar is
suspended is not too long or you will be unable lo reach
the head bar.
Attach the leg bar near the front of the control by one
of the following methods.
• Glue the dowel into a hole drilled across the main
bar. Drill a small hole down through lhe main bar
and lhe dowel, and insert a small nail for added
security I sec illustration on page 79).
• Use a round file to make a groove across the top of
the main bar. Make lhe width of the groove the
same as the diameter of lhe dowel and the depth the
same as the radius, so that the dowel will fit snugly
inside. Glue and screw lhe dowel into lhe groove.
An alternative niectns of attaching the leg bar is to glue
and screw it into « groove in the control.
• Instead of dowelling, square section wood can be
used for the leg bar, glued and screwed to the lop ol
the main bar. If this method is used, the main bar
should have a section chiselled away for the bar to
sit in. which prevents il coming loose and turning
during use.
lo attach the hand bar to the main control, drill a
small hole through the mid-point and lie a small curtain
ring to the dowel with strong thread through the hole.
Screw a small hook into the front end of the main bar and
hang the hand bar from il.
Alternatively, use a screw-on spring clip (lorry clip) to
hold the bar. The width of the hand bar depends upon
what the puppet is to do, whether the hands are simply to
gesture or to perform a particular task.
To attach a back string, drill a hole down through the
rear end of the control.
A spring clip used to hold the hand bar.
Some puppets need heel strings. Attach these directly tc
the control or to a removable heel bar or a lever. The hee
bar is a dowel rod that sits on a smaller dowelling peg gluec
into the top of the control near the rear end. Drill a hole ir
the heel bar so that it fits snugly, bul not loo Lightly on tc
the peg. For a lever mechanism, pivot a strip of wood at the
back of the control, so that it can be raised by pressing ii
with the heel of the hand holding the control.
Add a large hook for hanging up the puppel. Use £
large screw-hook or shape the hook from strong
galvanized wire and attach it with knotted cord, or bind i'
securely in place.
80
CONTROL AND MANIPULATION
A large screw-hook
or strong wire
hooks for banging
up the control.
Mouth and Eye Controls
If lhe puppet is to have a movmg mouth lor eyesi. the
control string is fixed to у wire lever attached to the main
control. Make the lever from a piece of 12 or 14 gauge
galvanized wire with each end bent into a loop. Cut a slot
•n lhe control just behind lhe head bar - an eas\ \\ ay is to
drill a senes of touching holes in a straight line and
carefully trim out the waste with a chisel oi a sharp craft
knife. Fix the lever tn the siol bv a nail through one of lhe
» fc.
loops. The mouth or eye string(s) is bed lo ihe ether loop
and operated with the thumb or middle Unger of the hand
holding the controL
If the marionette has both moving eves and a moving
mouth vou can have two of these wire levers. one
*
operated by your thumb and the other by your middle
finger. However. this is tricky to operate and in
inexperienced hands can increase the risk of dropping the
whole controL
A control lever for die or month movements.
An alternative is to have one wire lever and to use
the hand bar to control the other moving feature. A
string from the mouth or the dyes runs up through a
small screw-cye that is fixed into the front of the control
The string is attached to the hand bar with suffie’ent
slack to perm’d the hands to be operated without pulling
thjSexti a string taut. By pulling the hand bar a liftle wav
from the main controL the attached feature is nitved.
CONTROL AND MAX’I PUL ATI ON
Although the hand bar used to control the eyes or month
has limited applications, it is useful for a puppet such us
a weighlliftcr.
Another possibility, if mouth and eyes move, is lo
attach both control strings to the hand bar. Drill a
hole in the hand bar to accommodate a dowel of
smaller diameter. Glue it in place to form a T’ shape. It
should face downwards and slightly rearwards when
the hand bar is hanging cm the main control. Attach
cither the mouth or the eye strings directly to the hand
bar as described previously and attach the other
string! s) to the end of the additional dowel. Rotating
the hand bar a little causes the extra dowel to operate
the feature attached: pulling the hand bar away
from the control operates the other feature. Rotating
and pulling simultaneously operates the mouth and
lhe eyes.
Before finally securing the strings, experiment with
the optimal amount of slack in the mouth and eye
strings to permit the required hand and arm movements
with and without moving these features.
Rocking Bar
A rocking bar is sometimes helpful for a horizontal
control, although it is more useful for the upright
control. Screw the rocking bar on to the front end of lhe
control and move it with your thumb and index finger
whilstholding the control with your other fingers. Of
course, you will have to place elsewhere any other
controls that would have been attached at this point.
An arrangement for the hand harlo control the mouth
and the eyes.
A rocking bar for a horizontal control.
82
CONTROL AND MANIPULATION
Rotating Controls
i rotating control allows the puppet lo be spun round.
Screw to the lop ol' lhe control a cotton reel or a similar
sized dowel with a hole drilled through lhe centre. Use
washers on top of and underneath the cotton reel and
ensure that the screw is secure, or il will unscrew when
you turn the control. Hold the reel with one hand whilst
turning the control with the other.
An Alternative Head Control
Instead of the normal head bar. it is possible to attach the
head strings to the corners of a triangular plywood plate.
It is suspended from lhe control by a hook and a screw-eye
so that il can be operated independently of the main
control. One string attaches at the back or the from of (he
head (preferably not the nosel and the other two at lhe
sides. This will give control of lhe head in many
directions.
screw arid washer
An alternative head control with three strings attached
to a triangular plywood plate.
Strings or Control Bars Attached to Elastic
It is sometimes useful to attach certain strings to the
control with a strip of thin elastic to allow a degree of
built-in movement. For example, a tightrope walker's
hands, which may be held raised away from the body,
would be able to move naturally without direct control
from the hand wires.
Strong elastic is occasionally used to suspend the
head bar from a horizontal control. The marionette's
head is tilted forward by slight downward pressure on
(he head bar.
head strings
rocking
bar
An old style of control that has a *T-shaped, three-point
hand control, a head bar suspended on elastic, and n
form of rocking bar to operate the legs.
CONTROL AND MANIPULATION
Alternative Hand and Leg Controls
A variation of the horizontal control exchanges the
position of lhe hand and leg controls. A detachable leg
bar hangs from the front of the control, and the hands are
controlled by a single loop of string that runs through a
hole drilled across lhe main bar. near the front, where the
leg bar would otherwise be. The limitation of this method
is the difficulty of manipulating the hands whilst walking
lhe puppet.
It is possible also to have a ‘I’-shaped hand control
with three strings to each hand. This is an old style that
would now tend only to be used lor a specific purpose
rather than as a standard met hod.
Stringing the Marionette
In the West there is the tendency to minimize the
visibility of lhe strings: most performers tend to
siring their puppets with dark green or black thread.
However, many Asian marionettes have fairly
substantial strings, often white, and it is interesting that
this does not seem to interfere with the enjoyment of the
performance or the suspension of disbelief. Similarly,
many marionette performers work in an open-stage
style in lull view of the audience, which is also accepted.
1 his suggests that one should not worry unduly about
whether one colour of string is going to show7 more
than another
In the past many puppeteers strung their
marionettes with dark green No.IS carpet thread, but
nowadays this can be difficult to find. I use black
Dacron braided nylon fishing line (strength 4.5kg/l (Jib
or higher!. You can use an appropriate substitute but
avoid clear, shiny nylon thread because it may stretch,
retains crinkles after being wound up. and glistens
distract in gly under stage lighting.
Wo always used to rub the carpet thread with
beeswax before use and from time to time thereafter to
prolong its life. I. do not really know if this makes much
difference to the Dacron thread but I continue to use
it anyway, just in case. Place the thread over the
beeswax block, hold lhe thread down with your thumb
and draw lhe thread through the wax with the other
hand. Repeat this two or three times to ensure all-round
coverage, but do not press too hard, nor draw the thread
loo quickly, or your thumb will suffer. When the puppet
is in use. rub lhe wax block up and down against lhe
taut strings: pull slack strings taut to wax them.
String the puppet so that you can hold it
comfortably to operate it, which will usually be
with the bottom of the control at about elbow height.
The length of the strings depends upon whether you
arc to stand on the same level as the puppet or to
operate from a raised platform or a bridge over the
stage. You will find that operating from a bridge with
2 4m (12ft) strings is very different from working at
floor level with 75cm (30inJ strings.
The strings of any removable control bars, such as a
leg bar. must be just long enough to allow7 the bar to be
unhooked without moving the puppet.
String the puppet when it is supported in a standing
position. In practice, you can use any means ol
hanging lhe control with a chain or a loop of cord
while the puppet is standing on a firm surface but it is
usually more convenient to stand the puppet on a table
or a workbench and suspend it from a gallows’.
Constructing a Gallows
A gallows is helpful for stringing puppets with
moderate-length strings. It consists of a work surface
to which is attached a vertical post, preferably
adjustable in height, and a top horizontal bar from
which a length of chain is suspended.
Use a substantial piece of wood approximately
50 x 25mm (2 x lin). Attach an upright of 1.5-1.8m
(5-6ft) to lhe work surface with three shelf brackets,
Alternatively, use two overlapping pieces of timber for
the upright. Drill a scries of equally spaced holes in
each piece and join them using bolts with wing nuts so
that you can adjust the height.
Screw a 30cm (12in) length of wood to t he top of the
upright at right angles and use a shelf bracket to
support it. Screw a hook into the end of this horizontal
bar and hang a chain from the hook,
If the strings are to be very long for working from a
bridge, make a similar arrangement from the bridge
with the puppet standing on lhe stage floor or make a
temporary rig elsewhere.
Attaching the Strings
Attach strings directly to lhe puppet or to fixtures on
the puppet designed for this purpose, not to the
costume or body padding. When attaching the
strings to the control, thread them through lhe pre-
drilled holes, wind them in the filed grooves and
knot them, loosely at first, so that adjustments can
84
CONTROL AND MANIPULATION
A gullfjws for stringing nktrioneltes.
'nade. The of the strings seems to help
:r.em grip in the grooves during this procedure.
S’.ri.ng lhe puppet in the following sequence.
With the control suspended hi the required height
ir un the work surface, connect the head strings (with
an animal, the back strings) so that the puppet stands
without floating or sagging at the knees Attach each
head string to a hole drilled in the ear. If the ear is not
strong enough or in an unsuitable position, use a
small screw-eye fastened in a dowel that is built into
the head at a position lor appropriate balance (.see
pages 42-4 3).
2. Attach the shoulder strings (with an animal, the
head strings l, using a needle to thread each one
through the costume. Suitable fixing points include
holes drilled in a solid body or in the plywood core
of a padded body?, and small screw-eyes in a solid
body. Alternatively, tie lhe string to a button inside
the body.
3. Attach the other ends of the shoulder strings lo the
end of the shoulder bar. Adjust the tension so that
when at rest, the head sits at the required position in
relation to the body7.
4. Drill a hole in each hand for the hand strings. The
position of the hole depends on how you want lhe
hands lo be held and how the weight is distributed.
You will not normally uant hands to be fully palm-
downwards unless they are to play the piano, nor
looking as though they are about to clap. Look at
your own hands when they7 hang loosely by your
side; they are usually angled with the knuckle of
your index finger the most forward point of lhe
hand. This is a good general position for a marionette
hand, for which vou would at ach the string between
the knuckles of the thumb and index finger or on the
line of the metacarpal bone of the index finger,
which runs from the knuckle down the back of the
hand. Sometimes you will attach the string to the
thumb, centrally on the back of the hand or even
with the palm facing upwards, as appropriate to the
required action.
Countersink the hole in the hand to hide the knot,
thread the string through the hole and knot the
end. Tie the other end of the hand suing to the
looped end of the corresponding hand wire or Lo a
hand bar. as appropriate. Ensure that the hand
strings are not slack, bui long enough for the hands
to hang by lhe puppet's sides when you are not
holding the control.
5. Attach the leg strings. Drill a hole in each leg just
above lhe knee, from front to back. Il necessary,
countersink the hole so that the knotted thread will
not .mpede movement at the knee. Use a needle to
85
CONTROL AND MANIPULATION
insert the thread through the costume and through
the hole in lhe leg, and then knot the thread. To
ensure that the fabric does not pull or pucker when
tension is applied, insert the needle through lhe
costume just a little above the hole in the leg. You
sometimes have to make more than one attempt to
gel the position just right. Attach the other end lo
the leg bar with the string just long enough lor the
bar to be unhooked without moving the leg.
6. Marionettes do not naturally look upwards just by
tilting the main control so a chest string is necessary if
this action is required. Attach it to the torso; the point
at which it is attached determines how far back the
puppet can bend. For the upright control, attach the
other end of the thread somewhere along lhe head bar
lo help to guide the string away from the front of the
face. If the puppet needs a back string, attach it to the
base ol the torso or the top of the pelvis. Attach the
other end to some part of the shoulder bar. Leave the
chest and back strings a little slack so that they do not
interfere with head movement. For the horizontal
control, attach these strings at convenient points near
the back and front of the main bar.
7. Attach any additional strings required. Make the
final adjustments to the tension of the strings.r ic all
the knots securely and seal them with a clear contact
adhesive. Trim all the loose ends of Lhe threads close
to the knots.
Marionette Manipulation
. he difference between puppet theatre and “dolly-
waggling' is akin to the difference between a concert
pianist and someone who simply presses the right notes
in the right order, or perhaps the right notes but in the
\\ rong order.
This section outlines general principles to enhance
movement, together with practical advice about the
handling of marionettes, and then explains the
mechanical aspects of marionette manipulation.
Principles and Practicalities
The puppeteer is an actor who acts through the puppet,
so concentration is essential: locus on your puppet and
look where your puppet is looking. Aspire to achieve
clean, precise movements and do not slur them together,
Sh
Develop a variety of gestures rather than jiggling lhe
puppet, and do not jerk or jiggle lhe puppet to every
syllable of speech.
I make no apology for repeating in all my books
invaluable advice given by the late John Wright. ’Every
line should have an action and every action should have
a meaning. Never put in unnecessary movement.’ He
also advised. ’New moves on new thoughts’. The puppet
may appear lo think, move and deliver a line almost
simultaneously, but the three elements actually follow
in sequence so that the movement anticipates the word
rather than following it.
Marionettes should make their entrances and exits in
character, like a live actor, so start manipulating them
before the audience can see them and do not swing or
float them on and off the stage. Give listening figures
subdued, watchful movements to focus attention on the
puppet that is speaking.
Rehearse thoroughly. You might use a mirror
occasionally to see how the puppet looks and moves
but avoid over-dependence on it, because you will not
have it to rely on when you perforin. You will begin
to know instinctively when lhe puppet is moving well;
you will feel when its weight is just transferred to the
floor, or when it is floating or sagging. Use video to
record and review your manipulation, and invite
someone to watch your live performance and give
constructive feedback.
Il is important not only to practise manipulation but
also to ensure that you have rehearsed under
performance conditions. Many years ago I had prepared
a number of cabaret acts with Im (3ft) high marionettes
and ultraviolet lighting. Having performed with
marionettes for many years and used UV with other
types of puppet, I was confident that 1 knew what I
was doing and not concerned that I had been unable
lo rehearse the items in total blackout. The controls
were painted black, the strings were black and 1 wore
black, including black gloves. Everything was going
smoothly until a string became caught in an awkward
position as I brought a puppet on stage, lhe kind of hitch
that would have been sorted in a second or two normally.
1 looked down to deal with it and suddenly realized that
opposite: Mr Herbert, by Gordon Staight, loses his
glasses, which are on top of his head. When he looks up,
with the aid of a string to (lie torso, they fall into
position on his face.
СОХ ГКО! \M) MANIPULATION
I pirjivo J u ?.ih rnml
ru prnwrt llU.,fJ,i'i'KJ
U'flr VI ! 6i7r\.l/«^hnTf
mnrinwurx.
I cmild not sec what ivas wrung. hl Lili 1 could гж
nothing except the puppii I could not even see пл
hands in from ol my Ja I urtunnlcly. I was aililc lofeel
<11 ihe pMibietn wa? :md retrieve the s'il uni ion. bill it
i-iiuld Iieivc heen di (Ten hi. So always imderkikc ;i ceri;ii|r.
5.И111c?11111 и!' iclicarsal under pen ki in«nee cnrdilion^
«uni prptiise until uni can deal u th lhe contiul -ith
yon г evesd«»*k d
I Ullanv arc also a source ‘I snugging ol strr.jgs.su
<жч ci v.+iai у u ’.war lo pert nil. 4 iges ar<l sccncn
ran have nil manner uf polculin! snagging iiinSkut
lr- Г0 di hU'V and a raid tlirsc. Howrvei turcLil uui .ire.
emergencies will arise - keep calm, hr prepared to
Improvise. Hud earn a nippe! Hirst aid box’ explaining,a
fc*H basic items imch as vdssors мни I screw drivers.
ч1иркт. needles, thieail. tape. glue, beeswax, and soon.
Yon du no! ni rd a lol bill 1 cai i \ ft biscuit’ tin lull'd odds
a end?-|u$i incase!
If von diup the mariorcuc llh the c<u:ln hnol lhe
|>iij pci» gently; keeping th strings £ lilt v jlnek. undo
any k)O<e tangles If the mr hi lakes hr нeight iC the
puppet, the tangles will be pulled i ghfer. h llicrc ore
i hrre k sji iiir, is rrqitiif* ' |<)i Ixiwhigor briidfiif/ ^rirrnK
UTt s/rr: n/'i ^itrnn Un xrzuid.iiHrr/jr.ijht i tmfivl ^jt,
the- sTjiiifcj di ur.1** m jhioohjifsififhiXfsii i/.г Ьииг!wj'its:
u hit nisFir j.s jistd ifrpi ods uii *'j{fivii!iho' рг- |r гоил
Til (lit 'ulOfi aprrnllhn ll'jl- irtf »«r is It ujM ill
tr ititj uhirr hhiiv'^ iil ln!tuHirhK(\.
CONTROL AND MANIPULATION
any difficult tangles, for example if the control has
tumbled over, trace the strings up from the puppet in a
systematic manner, twisting or turning the control as
necessary.
To avoid tangling the strings when storing or
transporting marionettes, wind the strings round
’winders , pieces of plywood or hardboard in which two
slots have been cut lo take the strings. Smooth the slots
and edges of the winders thoroughly before use.
When marionettes are not in use, protect them from
dust and damage by keeping them in bags made of calico
or a similar strong fabric. Make the bag long enough for
the puppet to remain upright and secure it with a draw
cord in the top hem.
Finally, when you are not manipulating the
marionettes, you will need some form of hanging rack,
sometimes called a ‘perchery'. You can construct this
yourself with timber uprights that support horizontal
metal tubing, but a much simpler method is 10 use a
garment rail designed for use in the home, not the
commercial sort because the rails of these arc generally
too large.
The L'pright Control
Hold the main control in one hand. Take the weight of the
control with your little finger under the head bar and
your second and third fingers above it if this is
comfortable. Alternatively, you can place your little finger
above the head bar but the former method is
recommended as more secure and supportive.
Use your index linger and thumb to manipulate the
hand wires for general control of the hands. With your
free hand, unhook and operate the leg bar. Use this hand
also to manipulate the hand strings when you want to
achieve movements not possible with the hand wires
alone: with the leg bar resting in your palm and held
securely by your thumb, third and fourth lingers, use
your index and second fingers to operate the individual
hand wires.
To nod or bow the head, or to lilt the head sideways,
angle the control in the appropriate direction, lb turn the
head, lilt the control very slightly forward, just enough to
take the weight on the shoulder strings, while
simultaneously turning the control.
To bow the bodv. pull the back string taut lo take the
weight, till and lower the control. If you keep lhe control
vertical while lowering it. the head will remain upright as
the body bows.
90
To nocl or bow the head,
tilt the control forwards.
To turn the head
without moving the
shoulders, tilt the
control very slightly
and turn it.
This string pulls
the head around
To walk the puppet, use your tree hand to unhook the leg
bar and meinipulate it with a forward moving, see-saw
action. Do not drag the legs ahead of the puppet, nor let it
COM KO I AND MANIPULATION
To incline the head,
tilt the control sideways.
To bow the body, tilt the
con irol and take the
tension on the back string.
To bow the body but keep
the head upright, pull the
back string arid lower the
control slightly.
To seat the puppet, till the control slightly and take the tension on the back str ing; bend the knees and lower
he puppet to the sent; then finally straighten it up.
91
imM'HOl \Xh M AXI PL'LATI0X
•J/jrrfidfNj щсш/г Nlid cijf sirflhf’i u-i/h flic [hujtrh irf lilt 1шпJ hi ltiititf flit* t tHifr* if.
’walk in a silting position иг llouting in lhe air. Keep the
puppet upright and the morcinents of ihr main ciintml
and I lif leg bar in har niun <, 1 'ry LO achieve * rhythm Ln lhe
walking acti'in: ilie riivilini nf the legs is reflected in the
rhythm ol Jlie main loiHioI X »ie ynur own walking
rhythm in a mirror: our bodies ik not glide a king ai a
cnnsiant It vi'lsisniii-Irgsminv There is a slight rise and fall
its we li\Jndcr lhe weight from one leg i<> nnciilk-г: it is not
nit LAC Lssm* Ixmiur. jusl d t LTy slight spring in the step. I ry
10 build this lulu tlicinmvriirnl and lei the nntitiul swing of
the legs assfcl угон In walking the inarimiel te.
\crticr idsu Inwv humans maintain their balance and
control their mnvinirni ns eIili sit down rind stand up
again. Try ь copy tlie movement willi the rnariundlc
rsn her than 11 tipping it on loachair. T It ibccoiuro dlgluly
fbrwsird u ii h n lull? lenskin пи the buck string il it has cnic
ASiihe I’hkIv leans forwards. l»cnd the knivsli'V.rf lilt, ?-C;
to the chair, and thru return ilie OHiln: In the wrlital
Ulten ।lie nniriidiLiic is it» stand up lei the body lean
hir.c^rd and raise tin ciintml. Appmpriak1 poshkunng
die leet find lifiiidshel|p io make ilic’ niownniilLxniviiiLius.
Тоорсга<с moulh urcyc strings. Cither Lt!>elhchwwliha
h-lds the leg bur. or Пк’к inii nncol the llisp.^dijkllngihe
cc hi I rnl. I ргект to u se I lie кilie r md hod ivbnicrcr ix^ibk
so the posiiiumng of the anachmcnis for ilwsiring tm
the cnntn.il is ’.c'"r signiin ani. but ensurethcoinitolishdt
Гп mh by other fingers.
I he Ihinimilal I ihiiIilfI
I |p|J Lhc main coiitrnl bar in out hand midu-r Ik head
bar ki tinn the hriid. Sometimes you need alsu ir>tili ik
control very slightly innvni J tn take lhe weight on the
CONTROL AND MANIPLLAIION
Opruninq dir btisic
horizoiiuil control.
.•vhouldcr strings while turning the bead bai You might be
able to turn the head with vonr index linger and thumb of
the same hand, especially if you have attached hails to ilie
head bar to assist you (see page SO). Otherwise. operate
the head bar with your other hand.
lb hid. no the head lo one side, tilt (he head bar
accordingly. To nod or bow the head, till the shoulder bar
to take I he weight ol’l the head bar Trv to do this лайtli one
of the • hi gers holding the control: move one linger and
place lhe tip on lhe centre of the shoulder bar, drawing il
Up towards the control. 1 f you < annul reach the shoulder
bar it might be suffic.ien.-t to raise the siring by which it is
suspended Alternatively. use your other hand but this
prevents you performing an1,' other operation with it. As
you raise lhe shoulder bar. lower the control vei:у slighllv
to keep the puppet standing irmly op lhe floor, lb avoid
bowing the hotly as well, keep ihe mam conlnd level.
To bow (lie body and (he head, till the control
43
CONTROL AND MANIPULATION
forwards. To bow Lhe body while keeping the head
upright, tilt the control and lilt the head bar.
To move the hands, either operate the hand bar with
your free hand or use this hand to operate individual
strings, as required by the actions to be performed.
To walk the puppet, rock the main control from side to
side in a paddling motion. To lower it on to one knee, lift
one leg string and draw it forward slightly while lowering
the main control, also with a slight forward motion.
To make the puppet sit. tilt the control so that it leans
forward, bend the knees, lower the puppet to the chair
and straighten up.
To inclint' the head, rock
the head bar sideways.
To bow the head and
body, tilt the control.
To nod or bow the head,
raise the shoulder bar.
To bow the body but
not the head, lift the
head bar while tilting
the control.
94
CONTROL AND MANIPULATION
i Operating the hands.
Paddle the control to
walkthi puppet.
Ъ»seal the puppet, tilt the control, bend the knees and
'wer lhe control, then straighten up the puppt L
95
6 Animal Marionettes
General Principles
\niinal marionettes may be made in a natural form or in
2 comic manner. The former may be created, like human
gures. with some small modifications to proportion and
ill move in ways that suggest lhe natural movements of
ieir live counterparts. Comic animals may be a
. iricalure in both form and action or they may appear
airly natural but perform in unexpected ways.
When creating variety or circus-style acts with
jiiimals. consider whether, and how. a live act might
ranslate effectively into a puppet act. We accept the idea
' a puppet that counts or spells its name even though we
- now it is really the puppeteer who does lhe counting or
-celling. Indeed, our suspension of disbelief and the
special relationship between audience and performer
applies to all of puppet theatre.
However, some people question whether an act such as
a lion and lion lamer could twrk as it depends upon an
element of real danger that simply does not exist with
puppets. Nonetheless, puppets have performed such acts
very successfully when the act has been well designed and
executed. Its success may depend upon a clever piece of
action, or elements such as danger may be replaced b\
humour, surprise, or perhaps the charm or elegance with
which the essence of the live act has been captured.
While the creation of fantastic creatures such as
dragons, unicorns and centaurs, and lo some extent
comic animals, allow lhe puppet maker freedom lo depart
from natural form; it is more difficult to achieve
gut: .4 Burmese
horse: noir the
utilized struct шт
t [fie legs with the
imatural front
<nee joints.
pposiTi: An
It pliant that
performs tricks,
’u hiding sucking
p water from a
uc ker and
prog rug the
и die nee, by Paul
ri-iron.
'hadowsirinrj
he at re. The body
» lad in fabric
nd the end of the
rnnk needs
plat imj evri у
AS Oil.
97
ANIMAL MARIONETTES
I Burmese (itjir.
ft Iso with stylized
icy joints.
'onvincing animals than human figures. My first attempt
it an animal marionette appeared more like a large dog
vith horns than the goat it was intended to be. This is
argely because we arc much more familiar with the
nimtin form and need to study animals in greater detail
in order to achieve the appropriate shape, proportion and
movement.
In many respects, movement has priority over
accuracy of anatomical detail: if the marionette's design
compromises its niovemciH, it will not be very successful
as a puppet. The Burmese animal marionettes illustrate
how a stylized figure with stylized movement and a very
basic control can provide as convincing a performance as
any complex, natural figure.
Design
The general design features for various animals arc sei
out below but the detail depends upon what the animal is
lо do. so il is wise to work out at least the broad outline of
an act in order to create a design til for die intended
purpose, t stTul additional information may be found in
Chapters 7 and 8.
Animals that appear in plays are usually fairly
straightforward in their design whilst those that appear in
representations ol circus or variety acts tend lo perform
many routines for which particular design features are
required. In addition to the traditional circus animals-
horses, elephants, bears, seals or sea lions, hig cats, dogs,
and members of the ape family - one may find storks,
ostriches, flamingos, giraffes and camels. Variety acts that
comprise all manner of amusing items may also include
spiders, grasshoppers, bumble-bees, crocodiles and
snakes-the possibilities arc endless.
Animal marionettes may be made from a variety of
materials and then covered with painted, dyed or fur
fabric, provided the covering does not restrict movement
However, il is common for animal marionettes lo be
carved from wood or modelled over a base shape and then
painted. Figures made in this way can be as convincing
as, and sometimes more elegant than, those covered in
fabric or fur.
Size and weight may be significant considerations
affecting design and construction and there may be
variations in relative scale between different animals or
between animals and humans. If, for example, a horse, a
Scorpion. carved hi jelutong by Gren Mitldh’ion,
Wovii/gsiagr Marionettes. Bused on detailed drawings
d' a scorpion and with sonic abstraction required for the
puppet, it is finished with a stained varnish. The figure
5 a character front The Butterfly’s (Evil) Spell by
Frederica Garcia Lorca, who was himself inspired
у puppets.
: 2 and a human figure were to appear together, it is
<eh that the size of lhe horse would be scaled down and
eai (?f the dog scaled up somewhat, and this would not
appear unnatural on the puppet stage.
While larger animals should not be too heavy smaller
.r.irmds should not be too light; either extreme will make
stipulation difficult. The bodies of larger figures
..efore Lend to be created over a light framework of
rd board, or on a base of balsa-wood or polystyrene. If
oden. they are hollowed out. Smaller figures need a
'..dtively heavier weight to the body, legs and feel to
r.chor them firmly to the ground, prevent them
’. nging as they move, and generally facilitate
~ amputation.
\ hatever the method of construction, ensure that
-ere are strong fastenings for securing lhe head, neck
d limbs io the body and for attaching lhe control
strings. Blocks of wood and dowels glued in place provide
good fixture points. Depending on lhe construction
method, supporting strings may be attached direct to a
body by drilling small holes at suitable points, by securing
the siring to a button inside or underneath a body, or b\
looping the end of lhe string and passing a length of
galvanized wire through the body and the loop.
Occasion ally screw-eyes are glued and screw ed in very
securely if lhe body is capable of taking them. They
should be sunk into holes so they arc not \ isible.
Loop of thread fits
in hole in body.
Securing a string to the body with galvanized wire.
Quadrupeds
The design lor a horse provides a general structural
framework lor most quadrupeds. In the case of the horse,
the outline around the body and legs tends to form a
square, though these proportions will vary with different
animals.
The limbs are restricted to moving forwards or
backwards, unless it is a comic figure where they might
splay in all directions. The leg joints are normally
restricted to bend only as the animal would naturally,
although the Burmese horse, with its front legs bending
the wrong way. illustrates that exceptions arc always
99
ANIMAL MARIONETTES
The structure of a marionette horse serves as a guide to
most quadrupeds.
possible. The joint between hoof and leg requires some
movement but with sufficient restriction lor it to fall
naturally into position as the horse walks.
Most neck movement of the horse is forward and, of
course, the head will turn. Some puppet makers restrict
the neck movement to one plane and pivot the head on
the end of the neck. Others structure the horse and most
other animals so that there is flexibility from the point
that the neck joins the body as well as rotation between
neck and head The former method would normally be
used lor a carved marionette: either method could be used
for a figure t hat is to be covered in fabric.
A horizontal control would be used for quadrupeds. If
a human figure is to ndc a horse, make its strings
shorter than those of the horse so that when il is on
horseback, thr main control o! each puppet can be held
with one hand You might even design the controls to
clip together.
Apes and Monkeys
Apart from the shape of the head, apes differ from human
figures in that they have little neck and the head is set
close lo the shoulders. The shoulders and back are
somewhat rounded and the btfdy may be made with
without a waist joint. The forearms are long but the legs
are short, so when the figure is upright, the hands alm
reach the ground. The legs remain partially bent most
the time and I lie feel have large great-toes (hat are rathe г
like thumbs.
Such puppets arc used to perform many ol the acts also
done by humans, so the upright or horizontal coni г
previously described (sec pages 74-84) may be used,
depending on the needs of the act
1 hr basic
structure
oj a
marionrit.-
monkey.
Fish
Tish may be carved in low relief, modelled on a profile
shape or on a framework of chicken wire, moulded in
latex rubber, created with a fabric covering over a
framework of chicken wire, or cut as flat shapes from
either a rigid or a flexible material. They arc painted or
decorated as required.
A single, large fish may have1 a mouth or eyes that move
like other animals. Fish in a shoal are usually very basic
shapes suspended from a common control.
Other sea creatures can be constructed using the
methods described later in this chapter (.w pages 104.-9).
100
ANIMAL MARIONETTES
А monkey, fm merit/ in the Ihirlcgnin Theatre troupe, is
now in lhe repertoire $f (he Shndowstifi»<j Theatre.
S^als and Sea Lions
These puppets arc designed typically io ‘juggle bails,
balance on see-saws. manoeuvre over gently inclined
dders. and play Lunes on burns or a keyboard vvdh
heir noses.
.hey are usul ly quiie simple in structure,
comprising a covering, of black, silky or velvet fabric
led with foam rubber, wadding and lead pellets, or
suitable altcrnabvcs. Tlic head covering may be given a
stiff lining to help maintain its shape. Make the flippers
Design rind control of a performing seal or sea lion.
from a flexible but reasonably arm material such as
latex rubber or leather. H'nge them io the body by loops
ol galvanized wire shaped as square-cornered staples.
Snakes
Snakes are often constructed with a modelled or carved
head and a bexh that is made from shaped wooden
segments.
They may also be made bom balls or beads of varying
d ameter threaded on a strong central cord. If extra
weight is required, include a few lead beads al selected
intervals. The central cord is fixed securely lo the head
and the tail bead. Do mil thread lhe beads 100 tightly:
allow sufficient flexibility to permit lhe snake to coil and
perform its other manoeuvres. Sometimes it is helpful to
insert a very small bead between the segments or lhe
larger beads to improve I'lexibi 1 ily.
The body may he painted or covered with fabric,
though any covering will almost certainly limit
movement.
101
XXIM XL М XRIOXETTES
A marionette snfike ninth’from wooden segments or
beads threaded on a central cord.
Insects
Insects need to be proportionally much larger than their
live counterparts and techniques such as illumination
from Hour-mounted spotlights to cast large, dramatic
shadows on a backcloth can create a menacing cl ect.
The head and body’ can be carved, modelled or cast in
latex rubber. The legs are constructed from a core of
twisted wire that is covered with fabric or a modelling
material Alternatively, they can be dipped in latex rubber.
Wings are usually made from a slightly flexible,
transparent material such as clear or coloured acetate,
Colouring can be added to plain wings with translucent
adhesive film or glass-painting colours. Markings such as
veins can be painted on or drawn with permanent felt tip
markers.
Butterflies can be made in several wavs, ranging from a
very simple design to that described above. They also can
be large, elegant puppets using any of the techniques
described in this book.
Birds
Small birds normally have a very simple structure. The
head, body and tail may be carved, modelled or cast all in
one piece with the wings hinged to permit them lo flap.
Many figures do not have legs; if they do, they usually
dangle loosely from the body. This design is suitable for
any bird that is required only to fly.
/1 bird with hinged wings operated by a lever on the
control.
Articulated necks may be limited to simple up and
down movement but they usually have two joints (head to
neck, neck to body) with that to the body restricted to up
and down movement and the head free Lo turn, as
desc ri b ed for q uad ru peds.
Larger birds are more complex in both structure and
control even though they are usually walking rather than
flying as puppets. Heads arc made by any of the usual
methods. Some bird puppets have jointed wooden necks
while those With long necks, based on a centra) cord or
rope covered with foam rubber tubing, have great
flexibility.
102
ANIMAL \l \R1()X ETTES
Bird puppets frequently have a moving beak with the
lower half ol sufficient weight lor it to open readily. If
the beak were to be operated in the same manner as the
mouth of a human figure. the size and weiaht ol the
moving part would probably require a lair amount of
counterbalance for which the head ргоч ides little space.
Therefore it is preferable to adopt an alternative design
in which the lower pari of the beak is not
counterbalanced but is held closed by a control siring
I see page 115,.
l egs arc usually carved, modelled upon dowels, or
possibly laminated in ph wood, pro\ ided they are sturdy
enough for strong joints to be effected. Fine joints
effected with a strip of metal, such as aluminium, are
very satisfactory. Comical figures sometimes have rope
legs w ith the ends glued irmly into the feet.
Wings can be carved, modelled, or cast in rubber, and
attached to the body with linen or leather hinges. The
leathering of the wings can be carved in low relief
or incorporated in the modelling, then painted.
Altcrnalivel.v. small feathers can be added or simulated
from small, shaped pieces ol fabric. If the wings are lo
open and the bird is to fly. the wings are made in two
parts and pivoted (asillustrated below).
Г/lis ostrich by (airdon Staighl is tijpiral oj the
угасшее oj 'larger birds.
Hinged and pivoted wingsJorn large bird that is to fly.
103
XX I.MA I. MARIONETTES
Construction Techniques
Many of the methods and materials used in constructing
animal heads and bodies arc the same as those described
previously lor other marionettes. Significant features
relating lo animal marionettes are detailed below.
Heads and Necks
Animal heads may be carved, modelled or cast by any of
l те methods described lor other marionettes- and it is
quite common lor the head lo have a moving mouth
and/or eyes. Necks lor animals may take a variety of
forms, depending on the animal and the type ol'
movement I licit is required, ft may be painted or covered
with iabric as appropriate. When a body is covered with
fabric, ’t is common for (his covering to be continued up
the neck to I be point where it meets the head, which
would then be painted.
Necks may be made using any of the following
methods,
• Model the neck and head together with articulation
only where the neck joins the body.
• Carve the neck from wood, cast it in latex rubber or
model il upon a length of dowelling.
• Cut bevelled discs of wood and thread them on to a
strong central cord, lo improve flexibility, use small
An animal net к nmdejrojn bevelled segments of wood
on (neutralcord.
Орел mortis# and tenon joints with the tongues cut
alternately horizontally and vcilh nil j allowsfor very
flexible neck nioverncul.
beads as spacers between the discs. Alternatively,
use wooden balls throughout instead of lhe wooden
discs.
• ,din wooden segments with open mortise and tenon
joints. Cut the joints lo allow complete flexibility or
to restrict movemen- as required; Cut the joints in
line to restrict movement to one plane, or cut them
horizontally at one end of a segment and vertically
at the other tc allow movement in i wo planes.
• A piece of suit able tubing or a spring may be used to
form the neck.
• Cover strong cord with foam rubber tubing. Either
leave the tubing intact or сш it into bevelled
segments for increased flexibility.
• For an extending neck, use wooden discs joined at
intervals by' thread, as described for an extending
puppet (sec pages 1 54-5). The neck retracts into a
hollow body (which I build around a large tin can)
by means of a string that runs from tne head-neck
joint, down through the ent?re length of the neck,
through to the end of me body and up lо the
control. Insert a piece of soft tubing into the b$dy to
carry the string and prevent fraying.
Most necks are joined to the head with cord to permit
104
ANIMAL MARIONETTES
he head to turn freely To restrict movement, carve the plywood. Make a hole in the neck for a cord for the neck
'lead with a tongue protruding where it meets the neck or reate the tongue from a piece of plywood or strip of iietal built into the head. Tse a nail to pivot the tongue in slot cut into the top of the neck. Either of these methods s suitable for attaching the neck to the body. Jodies n (he descriptions that follow, the body has a single entral profile shape when the neck is secured to the body villi cord. When the' neck is restricted to up and down novemenL there is a three-section profile core of dy wood. The outer sections are identical in shape but the •entre section is cut away to accommodate the wooden or heial tongue that protrudes from the base of the neck. he tongue pivots on a nail that is inserted through the wo outer profile shapes. The head of the nail is secured . ilh a spot of glue, [f the three layers of plywood make he body too heavy, cut away some of the centre of the hapes with a jigsaw or a coping saw. The dowelling attachments for legs may be replaced by alvanizcd wire or cord for alternative joints as described >r 1 egs (see p a ges 107-8). ж / \ hmiinated body shape with the centre section cut way to accommodate a plywood tongue at the base of Ik’ neck. The tongue pivots on a nail across the body. i Cardboard Body cardboard body is made in the same way as a cardboard =ad. cither as a base for modelling or for a direct •vering of fabric (see pages 2 5-6). Cui a profile shape from strong cardboard or thin joint. Make holes in the profile shape to accommodate 18mm 1 Xin) dowels for attaching the legs. Glue lhe dowels into the holes. Glue 'ribs' and strengthening cross-struts to the profile shape then cover it with cardboard! or skips of linen glued to the framework, (due a circle cut from smooth cardboard over the end of each dowel to ensure free movement of the legs. Cover the body with a modelling material, fabric, fur fabric, nylon 'hair’ or fluffed up knitting wool. Sometimes the profile and ribs arc all cut from plywood, slotted and glued together. For large animals the weight is reduced by cutting away the centres of the rib sections. hole for cord for ribsand neck joint bracing struts .,rdhn_ n /^^7 .s''' cardboard / covering / *3/> \ . / fit "" V X dowel V-f—C AZ cardboard disc - S' .. a strut between ribs a rib A cardboard body for an animal. An alternative structure has solid blocks at each end of the body with strong cardboard strips joining them. Layers of strips are added crossways until a sufficiently strong body is achieved (sec page 106). /1 Modelled Body Modelled like a head, over Plasticine, this body might well need a central profile shape of plywood, and perhaps also ribs and dowelling. to increase rigidity and facilitate the
105
AXIMAL MARIONETTES
Plywood ribs slot on to
the body profile shape.
Profile and rib shapes гиг in plywood.
perfect fit is achieved. Small nails tapped partially into the
ends ol the dowels will leave holes in the modelled body to
mark the position for the later attachment of the legs.
Before modelling, cover the frame and the Plasticine
with a separator to prevent the body shell sticking when
you cut il open to remove the Plasticine. Glue the two
hollow body shells back together over the plywood, noting
the position of the internal dowels. Cover the joint with a
little modelling material and finish with paint or fabric.
A Sculpted Body
Cut out a plywood body shape in profile with a coping saw
or band saw. Drill a hole for attaching a cord to the neck.
Glue blocks of balsa-wood, polystyrene or foam rubber to
the plywood and shape the blocks appropriately. Drill
holes through the body and glue dowels into them lor
attaching the legs (see page 107). Cover the body with
material such as wool or fur fabric.
A body sculpted entirely in balsa-wot id without the
central plywood shape needs dowelling inserts glued
securely in place to facilitate the attachment of the other
parts of the animal. Supporting strings pass right
through the body and are lied to buttons, or the looped
ends of a length of galvanized wire, which arc sunk into
the underside of the body.
block of wood
plywood centre
A body sculpted
in balsa-wood,
foam rubber or
polystyrene on a
ply wood profile
shape. Dowels
are secured
across the body
for attaching the
legs.
Solid wooden blocks at each end of the body joined by
strips of strong cardboard. Further strips are added
crossways to form a strong, hollow body.
attachment ol the strings, neck and legs (see a cardboard
body, page 105), Making a well-fitting insert after
modelling is possible but you may find it easier to build the
internal structure into the Plasticine model so that a
A Carved Body
Animal bodies may be carved in wood in the same way as
heads. Use a lightweight wood and, to reduce weight
further, cut the body open lengthwise, hollow it out and
then rejoin it.
A Latex-Rubber Body
Bodies may be modelled in Plasticine, cast in plaster, am
1 (
ANIMAL MARIONETTES
Carved mtinial
bodies me
usually cut open
and hollowed
out to reduce the
weight.
created in latex rubber, as described for heads
pages 30-4). Larger bodies will need a plywood
-. file shape and some form of stuffing to help to retain
shape. The plywood also provides fixing points for
:.trol strings and fastenings for dowels if required for
aching the legs.
_egs
.maj be carved from wood, modelled over lengths of
welling (sec illustration on page 64) or created from
mnated plywood shapes, depending on the most
„ table method for the size and style of the particular
mat's leg. in most cases, they are given open mortise
’ tenon joints (see pages 60-3). The tongue and the
groove for the joint may be carved, built into lhe design of
laminated plywood shapes, or formed using a strip of
metal such as aluminium for the tongue. The metal joint
is both strong and neat lor slim legs such as those of a
large bird. The procedure is the same as that described for
human legs (see pages 61-2 h
It is not so common to create animal legs in latex-
rubber. though this may be suitable for comical figures or
for long-legged birds.
There are several common methods for joining lhe kgs
to the body. In each case holes are drilled through the tops
of the legs and the fastenings arc countersunk to provide
a flush finish.
• Screw the legs to the body or into the internal dowels,
as appropriate. Ensure that the legs rotate freely on
the screws.
• Thread cord through holes across the body and logs,
then knot and glue the ends. To assist threading the
cord through (he body, make a large ‘needle’ of
galvanized wire with one end looped, ff these joints
tire made too loosely or loo close to the bottom of the
body, the legs may tend to swing in underneath it.
• Insert a length of galvanized wire through (he front
and rear of the body and suspend the legs on the wire.
Place a small washer outside of each leg and bend the
ends of the wire to form loops Hush with the kgs.
Animal kgs made fro nt
laminated plywood shapes.
Joining the legs to an animal body.
Legs screwed to dowels inside the body.
107
ANIMAL MARIONETTES
• Suspend the legs on metal rods inserted through the
body and secure them by soldering or brazing small
metal discs to the ends of the rods.
beet and Ankle Joints
For animal feet, follow the instructions for the feet of
other puppets (see pages 67-8) or for hands modelled on a
wire framework (see page 56). The joints described above
for logs are also suitable for ankles, especially a metal or
wooden tongue pivoted in a slot in the leg. As w ith human
ligurcs, some flexibility at the ankle is desirable but
ensure that movement is sufficiently restricted to preven
the feet dragging as the animal walks.
Joining the legs to an animal body.
Legs attached with cord,
Joining the legs to an animal body.
Legs secured with galvanized wire.
108
Joining the legs to an animal body.
Legs suspended on a metal rod with discs soldered to
the ends.
An open mortise and tenon joint
for on fliiinud's ankle.
AM.UAL VAR JON ETTES
Tails
lilscan bemiade from artificial hairpieces, cut and bound
igJhth at one end. I \e cord, st i jug. strips of Ге t or leather.
»r any other material suitable lor the t\pe and Style of
animal. Glue lhe lad into a hole made in the rear of lhe
animal. If a siring is to be attached to lhe tail, if is a good
. Jea lo glue and pin thetail in place lor extra seenntv.
Coxtroi and Manipulation
i the past, annnal controls have ranged from loops ol
4<ripg hung from t he. hand and forearm ol the operator io
complex structures that required considerable skill to
peratc
today. a horizontal control similar to that used for
me human figures is the most common method,
.;d ipled as necessary for particular animals or for the acts
they arc to perform. Although anic@al manoneUes do not
have the range of bod'у movement or gestures of the
human figure, they can be surprisingly effective even
u ilh a fairly simple control. Just a till of lhe head, or a icg
raised and paused in the air or capping the ground., can
suggest various emotions or intentions to an audience
(sec Chapter 5 or general advice about stringing and care
ol lhestrings).
V1 lorizomal Control for Animals
The control is constructed from a main wooden bar about
the seme length ax the puppet, and ol 2 5 mm I 1 in) square
section, with dowel rods attached directly or suspended
cross-wise.
Drill small holes down through the main bar lor
attaching the main support mg strings: these are secured
lo the body al I hr shoulder and rump.
Ditfbi/, />.’/ Gordon S/aitfht, perfornis various iriLks such its spellituj hi.s runite and simple numerical
alt nlations with the help of the < hildri'ii'n the audience. It has a biiili~mr st i hifj-operated bark taken from
.1 laij and its furry coat is cut from a f luffy dusthiq mop.
AM M AL MARIONETTES
1 nt ’9r 1 front left
and Ьаск anc| ьас^
The basic control and stringing.
of these actions together to move mouth and eyes
simultaneously.
A more satisfactory method, which does not require
moving the head away from the body, uses a variation or
the head control. The head control has a central bar that
fits into a holder on the main control. The bolder is made
from a strip of aluminium, bent into a square-corncrcd.
inverted ’U' shape, then glued and nailed io the control. A
head
head
mouth
A ‘T'-shaped head bar, a liitle wider than die animal's
head, hangs from the front of the conlrol by means of a
hook in the control and a curtain ring tied to the head bar.
To make the head bar, drill a hole in the centre of a
12-1 3mm (Hin) diameter dowel and glue into it a 5-femm
0tin) diameter dowel. Attach the main head strings to the
ends of the larger dowel. A string to the nose or a string
for a moving mouth or moving eyes is attached I о the end
of the smaller dowel.
If the animal has a moving mouth and moving eyes, a
simple solution is to attach one control string to the end of
the smaller dowel of the head bar. Arrange the other to
rim through a screw-eye in the end of the control and
attach it to the centre of the larger head bar dowel. Rotate
the head bar upwards to operate one feature; pul! it away
Tom the main control to operate the other. Pei form both
Mouth and eye strings attached to the head bar.
Strings for the ears run through a hole across the main
control bar.
dowelling crossbar carries the head str ings: it is glued and
screwed into a groove Cut in the head control. A small
dowel is glued into a hole in the front of the control for the
mouth string. The eye string is attached to a wire iever
with looped ends. The upper loop pivots on a nail in a slot
cut in the head control. Rotate the control a little to move
the mouth. Move the eye control wire with the fingers of
the hand holding the control.
For the leg bar. glue a 10mm (XmJ diameter doWel into
a hole drilled across the main bar. near the front. For
most quadrupeds, the opposing front and rear legs are
attached to the same side of lhe leg bar so that front right
and back left legs are raised together, and front left with
back right. Connecting same-side legs to the control
produces a rolling gait. Do check how a particular
1 1C)
ANIMAL MARIONETTES
In alternative head bar with month and eye controls.
animal normally moves. Sometimes the leg strings might
need to run through a small screw-eye or loop of wire in
each side of the body to achieve the desired leg
Movement or to guide (hem without catching.
An additional leg bar may be added to raise the rear
.egs together for acrobatics or Гог a kicking action. Drill a
hole through the centre of the leg bar; it sits on a vertical
dowel peg glued into a hole drilled near tne back of the
In additional leg bar for kicking1 rearwards and a tail
spring.
main bar. The strings are attached to the back of the rear
I—
legs just above the feet/hooves.
To control a tail, glue a spring such as a piece of
curtain wire, into a hole drilled into the rear of the
control. Attach the tail string to the end of the spring.
Add car strings if required. Either attach them to rhe
head bar or have a single ‘run-through string threaded
through a screw-eye in the head bar or through a hole
drilled across the front ol the main control bar. If the
strings arc attached to the main bar. the ears will be
raised whenever the head bar is unhooked and Lowered.
This same arrangement is possible with mouth or eye
strings but is not generally very satisfactory.
Hold the control with one hand. To move the head,
unhook the head bar and move it with your free hand. To
effect movements of the body tilt and turn the main control.
To wall: the puppet. rock the control from side to side.
A Control for One-Handed Operation
This control allows you, with practice, to manipulate the
head, body and legs with a single hand. Although the
range of movement of the head is somewhat limited, it is
nevertheless quite effective. The basic control for
supporting the body and operating the legs remains as a
main bar with a dowel ling leg bar securely attached. The
111
AX IM AL MARI OX ETTES
To lower die head, unhook and lower the head bar, To
turn the head, turn the head Irar.
Tn walk the puppet, paddle the control,
head bar is very similar bu 1 wiih a shorter cross-dowel for
attaching head strings. Suspend the head bar from lhe
nia-n bar with two lengths ol’ cord threaded through
vertical holes in each bar and knotted at lhe ends. Hold
the main control in one hand using your thumb and
index finger to operate the head bar.
Fish
Single fish with moving mouths or moving eyes have a
simple, horizontal control, usually with two supporting
strings plus other control strings as necessary.
Suspend Csti in a shoal liom a common control by one or
two strings each: two strings, keep them facing in the same
direction while single strings allow them to turn. Alternativek.
join groups of fish tail to head with loose fine thread, to permit
movement but resist spinning To avoid the fish hanging in a
straight line, suspend them at different heights from horizontal
dowels of different lengt hs joined to a mam control bar.
112
ANIMAL MARIONETTES
A simple control for n single fish.
Seals and Sea Lions
Strings to the head, “shoulders* and tail are usually
sufficient for general movement so only a very basic
horizontal control bar is required. It has a main bar with
a single, horizontal dowel glued into a hole drilled across
the main bar (see illustration on page 101). Strings to the
flippers may not be needed to assist the waddling action; if
these are required, attach another horizontal dowel and
attach the strings to the ends of it.
To juggle a single belli, thread it on a string to the nose. For
a pair of seals to pass a ball between them, screw their
controls to each end of a wooden bar so 1 hat they can be held
and moved with one hand or rotated on the bar to face one
another. Arrange the juggling strings in the same way as for
a human figure juggling from hand to hand (see page 131).
Snakes
The control for a snake need be no more than a straight
bar with strings fixed at appropriate points. Some
performers use a length of fairly stiff but still flexible rope
instead of a wooden bar, which assists in twisting and
coiling movements. The head and tail strings on a
wooden bar may be of the run-through type, attached to
a curtain ring so that a pull on one of the rings can raise
the head or the tail. A moving mouth would require an
A control for a shoal offish: the strings are of varied
lengths and the fish on each side are joined loosely/гот
tail to head to prevent them spinning.
extra control string; raising only the head string would
slacken the mouth string and automatically open the
mouth if the mouth string were used to keep it closed
rather than to open it (see pages 114-5).
One difficulty that sometimes arises is slopping lhe
head swinging from side to side if it is heavy and there is
only a single head string. Positioning the head string as
far forward as balance permits and having another str-ng
on the body close to the head will help to prevent this.
Alternatively, two strings, one to each side of the head,
may be a helpful measure.
Bees and Insects
The method of control can vary from a single string or
wire to the main horizontal control described above,
modified as appropriate lo the particular animal and
what it is to do.
• Use a single string for puppets that are simply to
flutter about. When a group is suspended from a
single control, join the figures loosely with fine thread
113
\\l\l \i iIAKlONE'l ITS
Cunt mis for a snake.
i/airhj stiff lenytJr of rope is sometimes used.
Conirols for a snake.
.4 .strip of wood with i'un-throuijh strings attachedto die
head nod the tnil.
to prevent the strings tangling
• I’sc a length of wire to control a single puppet for
which direct control is necessary, for example if a bee
is required to sting somebody or Lo burst a balloon
I with a pin built into its tail ).
• Adopt a more complex, horizontal control lor figures
liiat are themselves: larger and more complex.
Birds
A simple bird control consists of a horizontal bar to which
arc attached either head and body strings, ol a single
string or wire attached to the body al a surtab.e ; iot
balance A wooden bar is attached as a lever to flap
wings (see illustration on page 102). An alternative ii
lever is lo attach three strings directly lo the main bar
to the body and one to each wing, jdijsing and low
.won' i \D opposir.': Gordon Smiylu’s ostrich has
control sti ini/ that holds the b< uk closed, hi contrast i
most puppets where the control string is nsmiHij titlec »
open (he month, relaxing the sirhiy allows if lo open.
Note п/so how the eye movements coin!) hie with beak
ioovi'tncnts tn a very expressive numner.
ANIMAL M AR ION ETTES
he central body string creates a smooth, graceful fiction
f lhe w ings as t he bird hies.
The control Ibr birds with articulated necks will
’.-quire a separate head bar that may be detachable or
suspended on strong clastic.
When the bird has an opening beak, one possibility is
arrange lhe stringing so lhe beak is normally open
nd the beak siring is used to close rather than lo open
J he beak siring is attached to a ‘T'-shaped head bar
hat may be held in a position that leaves the beak open
and closes il by upward rotation ol lhe head bar.
Alternatively, il may be held in a position thai keeps lhe
beak closed and opens it by downward rotation о the
head bar. These methods work surprisingly u ell.
A variation has a lever on a more substantial head
control; (he beak string is attached lo lhe lever which
has clastic or a strong rubber band to keep it closed.
Pressure on lhe lever lowers the string to open lhe
mouth.
If the bird has moving eyes and a moving beak, cither
use a run-through string lo control the additional
moving feature (see illustration on page 1 10» or adopt
lhe alternative control I see illuslral.ion on page 1111.
Large, walking birds require a horizontal control
much like other animals. The control has three strings
1.0 support the body; Ax о lo the ‘shoulders' and one lo
lhe tail, and a fixed horizontal crossbar lor lhe legs.
<s_ ~
A lever iiK'chriiiisHT for an opruinff mouth.
115
ANIMAL MARIONETTES
shoulders
Strings to the wings arc attached at a suitable point on
the horizontal bar so that they can be manipulated with
the fingers of lhe hand that holds Lhecontrol.
Some puppet makers add wire levers to move the
wings but they arc complicated to make and operate
They also require Lhe use of your free hand, which you
need to operate the head, so they are best avoided unless
they are needed for a specific purpose.
A hook and a small ring are used lo suspend a
detachable head bar of dowelling from the front of the
control. If the bird has an articulated beak, the string is
attached to a ‘T’-shaped head bar, as described above.
A horizontal control for large, walking birds.
7 Specialized Stringing
Giixekai Principles
Special ynutiiinc* beat hicvcd just by aiBding a
ru- ciirrlclly pinioned sirin-»ч Hmvever in some
cirtui-istances- a more complex .ippruuch may bt*
required. This clluplui describes SLi'inglng arniri^rmc nl>
both ftir pan cniar purpose* ш J l.ir (he spc&n( cJkuis
lhill ипау be achieved with puppul ь constructed hi LIjlb
Strujdarcl ivais uidiouL uny spcd^il design (calling. Hie
prim- п1гч iHji'uicd may be used for a variety ol
applications and puppet makers need lo be creative in
devising ways loiichicuea nciv inmeiticitl or trick (nr the
piipiK’l
lor the best results, keep the stringing as simple as
possible and uezi tier lit»» you will rt-pi lc и string when
iht* i:ec d arises I he major supporting -irings and those n
Ihv limbs .ire Lisjrilh casi to lepkr.u bill this is nui
access arih the chisc with oijictr sis’ings. which Г№и be
circd ci rily during V- |v.4rUcLbHi but no! uhen !hv
puppet isctmipieLed.
Stiniu uuisropdiiiK’ a number cf specialized lechnbques
such <i« juggling or playing an tastrutnm while- riding a
iinicvdu or uijlhirig a liglili ape arid the niiirinnutles u ill
IlflVC it kll liolLX 41ГП1 IILLL‘111 [’111 1И .SlrillJ'S Hl tl fCt iht*
diflcrcni iic'iiofis. Addiiinnal siring-: ahvuys ix.44! lo Lx*
cnrdulh p i>ilK4 ed я» thnl ihuv сил bu Inund and
operated qiiii kiy and c asiSv during я iiertnrmanr. oliur’i
In lew light conditions. II ivu-icr. d lh practice. lh< \ cill
ollcti be iicce«sibk_ дiikoijt even n ujattce pruvidul ihey
ши sailalih poMlioiHsL
Raising Hand to ihe Moi th
Il l*. p« ^it. и io Гн su si hand in ihv mouth with nu special
stringtng. HoW'tvcr, v bun very direct, and prmsc action is
I !!(ir < bftilit*/i.fj (йзпй?п S-,rdf|ihl. Л p пи tdruiH/h stum;
S fb-'J&>nlj&U|fc hill. ||. .4| it HJtfrpiCL if'Hjlt .’Ntcidli’ llj/n1
if*s 'тбКагхр?и|гп ivinovrs а1нвГ н/ imlik’rhj iiemx гогл
pimin ititirrhs fafrnrpis о phrif ih
1 17
SPECIA JZEIJ STH I X Gift I.
Hold Nip Kun-Through Strings in Place
When h i4Hi-ihn:u^h ,«nlr ng s 1.1 scd and needt io be
secured hi this piisiLujia. uh ci I her u sin till и ng Lu litjtiik it
nil in tlir mu nd nr cut а мп.ill 5I111 in n suitable port иГ
ii'x t'^iKiriihiiid krni ihi siring xti th in угшсап < ip ii кип
lhe slot with lhe kiwi |qdrilling il from drC[ЗДнПд
Fn.siircdiui the ringiiriht kind v.ill mi bv M' ii< ( к
dj"iu aEIcntirh 1 £1 г II«к III
-it|iirr<vL addiunmil stringing ищу be песеччнгу I ihc
iiniiiJi lines not iipeii drill a small hole between lhe I p-.
Ultrt 1 ii string Co ilh hanfl rr к» нп obied held in lhe
band: ihrcii] ilie siring 1 тип Ji the mouth and «nil
through al uk drilled in 5 he Lap ol I Lie head, I irLi.uknh
V liL'ti the iikhiIIi ts Itxt-d. cl is Jit lplul Ln glue и siiiLiL^l*
piece ol Lubin" ига plastic drinklug,straw in the head lor
Lhe string Ii run through and Г0 fadlilftk rcpl.iLumiul
bill ensure that there иге no sharp edges lo frjy lhe
lhrei.nl PliI th« -егтц Lu rinse* rIt 1 timid nr object to tin
hiuuiIl
Ku г through strings can be used in Several wa >s - Id
hniu» lhe handsUwcdier, hrou^h theUcjsr for sjikIIli?^,1
hiiLicIi и II r.ier> ihnnuh ihc bndy Гог chudilng ihf
clwsl. nr anywhere yiiu need. As this is addiliuna] In the
standard iuuid Ч1П111Ц., l’ikiiit Uial и "чо; 1 hr irmly long lit
permit iheiiiinnal ranyc d hand inuvemcnls
Eating
Ecititig is a simple extension «Г uising m li.md II» iht
mouth, using a run-lbrauyh string with ei inaving
mouth and a head sullLienily !i<4lnu ь accommodate
ulmCivei is in be eaten. FnsLeaxl of nlladiuig the run-
Ihmue, 1 strung in 1 lie h ind, it is aiijirlii d 10 the rhjcci hi
lx* слеп, и lilch iiniNi he hrid talrly sccwcly in 1be h.ind
so tliLil Lite hand contiiniej hi hold the Ilm d v.lien lhe
ritn-ihrouyh siriiit* is raised.
Gorden SteiighCs (roupc Gurdon's Puppets'. Featured
a rollcr-skaliug pup pci. which al <*ne Lime peeled arid
U «'He. mu vh “idim//mp/jr? rheI n/tr-
liM4ir//l (MUfj '.Ч Г!Лг4ШН'МГ thr c7u«i пл /iririJit JfA
SPECIALIZED STRINGING
S. ringing Jbr raising a hand to the mouth.
and string hand string
String runs through
right hand
run-through string
fastened here
An extra nm-through siring used to bring the hands
together.
A puppet thar ‘eats’ by means of a run-through Stung.
The banana is attached by a press-stiid.
ate a banana: a later version ate an ice-cream The
banana was modelled and fixed securely in the hand b\
means of a press-stud, The strips of banana skin were
hinged at the base with fabric and held in place,
unpeeled, by a string from the base, which was wound
around the top of the strips and held in a small slot in
one piece. Raising the other hand to 1he banana and
ptdling this string to release the skin. created the effect
of peeling it. A run-through string to the top of the
edible part raised the banana to the mouth and a quick
jerk of this string separated the press-stud and allowed
the banana to disappear inside the head.
The ice-cream and cone were cast in fairly soft
latex rubber and the cone was secured in the hand
with a very small piece of Velcro. A run-through siring,
this time from the top of the cone, raised it to the mouth
and a clean jerk on the string made it disappear inside
the head. An additional touch was a topping of Crazy
119
SPECIALIZED STRINGING
A puppet Chat cats' by means of a run-through string.
"he ice-cream is moulded in latex rubber.
Foam (a fun loam that wipes away cleanly), which
made the ice-cream appear more realistic and some
of which remained smeared ah around the puppet’s
mouth.
R aising a H at
Drill holes in the brim of the hat for the head strings to
pass through. Ensure that the holes are spaced exactly
the. same distance apart as the head strings, which
should be parallel, so that the hat has smooth vertical
movement. Attach an extra string to one hand and
thread il through another hole drilled in the brim where
it meets the crown: drill the hole at an angle so that the
thread passes inside the Lal and out through another
hole in the top. Pull the string to raise lhe hand to the
hat: continue to pull it to lift the hat.
Kttising a luil with a run-throuqh string.
To adjust a hat. as opposed to raising it make slots
instead ol holes in the brim so that it can move to and fro
on the head. A run-through siring can still be used but 1
prefer to use the puppet's thumb, or a small metal pin
sticking out from the thumb. You need to ensure that the
arm movement permits this action with ease.
Lifting an Object
Attach a string lo the object. Thread lhe string through a
hole in the hand and then attach it to lhe control. To pick
up the object, rest the hand on it and pull the string taut.
The hand will be lilted with the object. In replace the object,
lower the run-through string and. when the object is in
place, lift lhe hand string to remove lhe hand. To ensure
that the hand remains firmly in contact with the object,
particularly when putting it down, the hand should be a
reasonable weight and you should bend the puppet as
necessary for the hand to reach lhe required position.
120
SPECIALIZED STRINGING
run-through string
Using an
extra string
to pick upon
object.
Alternative
wags of
picking up
objects when a
run-through
string is not
feasible: a
hook (top), a
button magnet
(middle) ora
strip of Velcro
in the palm of
the hand
(bottom).
Alternative Ways to Lift an Object
If the puppet needs lo move about Lhe stage when not
holding the object, any extra stringing would need to be
very long and loose, which is not always practical,
liter natively, a small wire hook or a button-magnet may
be built into the hand. If a magnet is used, a strip of tin
needs to be glued to the surface of any non-attractcd
object to be picked up. If the object is to be put down on
stage, a stronger magnet will be required on the surface
on to which it is to be placed.
Velcro, glued to the hand and to the object is a
possibility'’ for objects that are not too heavy. They cling
together when the hand is placed on the object, especially
if the hand is of a suitable weight, but a good jerk of the
hand string can separate the two. This can be problematic
if unintended, or a helpful way to cast the object aside but
it is certainly not a graceful way to replace an object.
Removing and Replacing an Object
There may be occasions when a puppet is required to remove
an object from its pocket and then replace it, or to perform a
similar operation. The compere and cowboy demonstrate
two means by which such movements are effected.
The compere, with a handkerchief inside its jacket,
illustrates how this is accomplished with run-through
strings. Two run-through strings are attached to the
121
urj\ I on r u;r I 2 3: Mr Herbert by (ierdqn S freight, Run-through sit iugs enable him to remove a handkcri hief.
f rom an inside pocket mid to replace if after Idowhiq his nose mid polishing his spt dm les. Ш of Gordon s acts hove
nice touches of luuiumr and, with Gordon in view of the тпИепсе, Mr Herbert attempts to demonstrate to the audirnci
that hr controls the puppeteer rather than the other way round. He shows how, when he raises his hand, the puppeteer
rtns-’s his; when he lowers it, the puppeteer lowers his. Then he lijts both leys off the yroitnd - and falls flat on Ins
boltoin! Time to rcajipraise In’s thwrrj.
122
SPEC I Л l.l/l-D STRINGING
handkerclTef: one runs ihroi.uh the bodv. oui of the back
and up to the control The other passes in front ol lhebody
lo the left hand, runs through a hole in the thumb and
continues up lo thecon'roL Pulling, this latter siring taut
draws the hand across the body to lhe edge of the jacket.
Го ensure the hand is jekawn lo the hand vcrrhief and noi
vice versa, lhe handkerchief is lodged firmly in place
between the jacket and lhe bods Continuing lo pull lhe
String lilts the handkerchief oqI rind the puppet can blow its
nose and polish its glasses. I о replace the handkerchief, the
hand is positioner! |by lhe edge of the jacket and pulling t ic
other string through the back draws the handkerchief
inside the jacket.
l he con bo\ illustrates how objects in the hand may be
12 3
SPI-CI ALIZED STRINGING
Sliin 1 im Tex by Gordon Staight. a/kh : ijtt \\d richt: The cowboy draws hisyun.
Sl'IX’lAUZKU STRINGING
the gnu provides the confraf required to draw and
repine e the gun in the holster. A tiny spike profnidinq
front the left ilnnnbeitiibles the cowboy io adjust the
angle of his hat.
Че shoots various items from a target. Л smoking ban c/
effect is at hieved with talciun powder in a bellows inside
the body.
12 5
Sl’f't'IA IZI’D S IK I'UilKG
uinhokd lx inciiiis nF the ftluljee liifriittb ci livu
strings. iirnnmil liiiiu! ronirnl wire Is used fur all I he
ma i npirai mitt til the ginn hand I IneMrmg. akl.idud hi
lhe ii 1.4 secured Lc> I l ie gun u Ik re (he btnnvl joins lhe
Indict chamber, I hi* hand wire г1гадиг$ ihi vun from
lis JudsLer, An adLlhioir.il string is needed In order to
replan1 ll iv ц li 11. Illi* nnr Irum lhe cnnliul dixvn. to I Ik1
ri’airtil Ihr arm pisi above 11 it* lIIww, ft яиыъ thi< ugh a
hole In lhe irm and ifUiched io the thumb where ii
Lundies Lhe bull ad lhe gun. I.illiiig ih’> string while
keep ng tension on lhe main Itaiul wire raises ilk elbow
.iiilI p jyilions! I lie. gun ah'-nr die htieler.'l hr dbmv string
srioii luu'crec ind (he guru gu'ili’dinlh the niliei 4ihl
issirrfOsMhly tephKcd in lhe loh n".
When i lc gnn ь lii rd. sniind lFTclis ol gimdmts яге
,i rm m pan Led by ‘smokr Irnui lhe barrel,, u ijlJi i
hHi uh l.ilcnm powder bion ii Ггс-m a bcllc/л - or nihln
01з1Ь.ыЬ"ц.*:11чх1 in ihrl |'кгл ingi ha pier > < page I 54 •.
Opening Obji-cts Without Special
Stri \ging
VV'li.eD mie nerds в iikniu icHc I о open a huuk. lilt lhe
lid । ! a piano or vrforni rin equivahiit iniikiiiuii.K
is often Sttllidem lo build а мпаГ pi okeruit on r । the
pari hi i;i* lifted and in guide I lie limid umlvr lhe
prr cciiun mid raise ii Ilowevcr, a htrr i xtn a^isiHnrf
i?cn L.!XDfl«;iiT;AfrWrrfe*ri H Gtmbn 4/«irjfii. A p/rrr
ел"iriJiwnird ivirr ILvrrfftrnvecn die i/iniuhfmd iiid.-v
iihp i* Jhdps io nri’ie (u’s fdii.ssrs in гггЛча. jiiiA’emmt
iiHcf 11 jr/hiul JCirb.uj
12h
SPECIALIZED STRINGING
is sometimes required. The compere, for example, has
a fine nail secured across the gap between the tips of
the thumb and forefinger in order to help to raise the
glasses in a clean movement. The cowboy has a small
spike that protrudes from one of its thumbs: this is used
to catch the brim oi the hat and adjust its position on
the head.
A Pole Balancer
The structure and most of the stringing ol this
traditional figure are standard. Strings from the hands
and feet pass through holes drilled in a horizontal,
brightly coloured pole. Moving the tension from one set
of strings to the other allows the pole to be transferred
between the hands and feet.
For the act lo be convincing, the pole is thrown or
bounced up and down by recoiling the relevant set of
strings. You need to consider the position of the puppet for
each transfer. It can enter carrying the pole, which it can
Stringhigfor apole balancer, a traditional
marionette act.
A simple version of a
still walker.
128
SPKCI A1JZLD STRINGING
throw and catch while standing. However. it cannot, Гог
example, transfer the pole con\ioc.in.gly from the eel to
the hands while upright: the puppet should he lying on
the floor vi ith its feet raised in the air.
A Stilt Walker
The still walker is a standard puppei. a simple version
of which does not require the usual control Movement
is effected through the stills, which are sufficiently long
for the operator to hold. Secure l he puppet s hands and
led to the stills and support the head by strings
attached high on the stilts. Hold the tup of the stills to
vvaik the puppet. If the puppeteer is performing in sight
of the audience. :l is helpful to paint the top of die slihs
a dark colour so that they do not draw attention to
themselves.
Paul Doran of the Shadowsiring theatre (see page
188) has a more complex stilt walker that has shorter,
hollow, metal stills and a proper control. 1 he figure walks
on lo the stage then leaps up on to the stilts and the ad
proceeds. In order to achieve this, the puppet has an extra
string attached to each foot that runs through a hole a
few inches above the ground in the still and continues up
through io the control. These strings arc jerked taut to
make the puppei leap on lo the stilts and arc secured on
the control in the raised position so that they remain in
place until the ptippeieer w ishes lo release them.
A Simple Juggling Puppet
It is not essential to have elaborale stringing for a
juggler. Skilfully done, the mere suggestion of juggling
can be as effective as the real thing, huhan puppeteers
have perfected such techniques to an amazing degree: a
single Loop of string is used with one end attached to
each of the puppet's hands. A ball threaded on to each
end of the siring is bounced up and down by jerking he
siring. The balls can be thrown up alternately or
together. When boi i balls arc in the air. a sideways
wiggling of the strings causes the balls to cross over and
creates 1 he illusion of juggling
Instead of a loop of string there can be separate
strings to each hand, hesc sitings are attached lo
a detach able hand bar. like a norma, leg bar (see page
76), V\ ith this arrangement you might find it a little
easier to throw the balls i. p but il w ill be more difficult to
achieve the cross-over illusion.
1 still walkei bij Pun? Doran, SFuidowslrmn Thc(Ure. The
marionette walks mi stage mid jumps on lolhr stills
before proceeding vvidi the act. This is achieved Inf usiiii|
nni-through striiujs from Jhefeet £0 the hoiloit stilts.
129
SPECIALIZED STRINCINC
One of the most effective methods of ‘juggling' uses only
a loop of string, on to which are threaded two bails.
Bouncing the balls «nd jiggling the strings can create a
convincing appearance of higgling.
When the operator is hidden, n nice touch is to
have the ball thrown in the air but the operator catches
it and there is a long pause before it is released.
Meanwhile some humorous business takes place with
the bewildered puppet wondering what has happened to
the ball.
Separate strings attached to a hand bar used to juggle
bails threaded on the strings.
130
A string is used to raise and lower this single ball.
Transferring the tension from one side of the hand bar to
the other allows the ball lo drop on to a different hand.
SPECIALIZED STRINGING
Throwing and Catching a Single
B\i I.
me performers juggle with just one ball. The hand
- Tgs pass through a hole drilled in the ball and are
.ched to a hand bar as described above. An additional
— ng is attached to raise and lower the ball. It passes
•ugh a screw-eye in the main control and is then
jbed to the centre of the hand bar.
Pulling the hand bar forwards raises the ball. Tilting
. hand bar to transfer the tension from one hand lo the
r.er allows the ball to drop back on to a different hand
“en the hand bar is moved back towards the control.
j the puppet is to walk while juggling, you will need a
«_ viu bar to control the legs, leaving one of your hands
rer tor the actual juggling.
More Complex Juggling
' juggling method requires an extra crossbar, the
-gJing bar. on the main control. Attach a string to each
ггг: of the bodv to be involved. I hread these strings
- ugh a hole in the ball or other object to be juggled and
- '-.Ii them to the juggling bar.
Take the tension on one string whilst leaving all the
r.ers slack, Now release this siring and pull a different one
• io transfer the ball to another part of the body. Each of
12c strings must be long enough to let the ball bounce to
part of the puppet. You may find it works belter if the
zurpet throws the ball up between the transfers. To do this.
> me performers attach a separate string directly to the ball
- le others simply bounce the ball on the hand or body
> on which it is resting. It is essential to practise
iT.'terring the ball from one limb to another until the
- e process is smooth rather than jerky.
An Acrobat on a Horizontal Bar
7l-,- horizontal bar offers a somewhat easier alternative to
rrapeze. Two upright posts attached to a baseboard
>_?pori the bar. The base should be secured to prevent
?r?ling over: «1 simple method is to extend the base
rt ards and stand on it during the act.
The puppet and control are of standard construction,
ugh It may be helpful to have a hand bar rather than
^ег-лгаге hand wires. Additions or amendments lo the
. r.:rol may be made to achieve particular actions: a back
- ~ g and heel strings are very useful. The puppet's hands
More complex juggling requires strings through the ball
to different parts of the body. Boimcing the ball in the
air, while puHing one string taut and leaving the others
slack, transfers the ball from the nose ora limb to
another part of the body,
arc made with the fingers looped to enable them to grasp the
horizontal bar.
You may invent your own act but some possibilities arc as
follows. The puppet enters and jumps up to grasp the bar: a
back string helps it swing to and fro and it can raise itself with
great effort to balance with its hips resting on Lhe bai. By
raising the heel strings, the puppet can do a handstand on
the bar and then lower itself so that the head and body are on
the other side of the bar. still with the hands gripping the bar.
131
SPECIMJ7ED STRINGING
iRQt i Л\d page 133: Л juggler performing wiih cups and saucers on a pole by Paul Doran, SJiadowslniif/ Theatre.
132
SPECIALIZED STRINGING
Having returned Lo the original hanging position, the
puppei raises its knees between its hands and hooks its
legs over the bar to achieve a silting position. Slackening
the hand strings releases the bar from the hands and the
puppei can now hang backwards and swing Irani its
knees. 11 there is a protruding heel or a small hook there,
the puppet can slip further backwards and hang by its
heels, again recovering lo a hand-held position with
co ns i d era h 1 c e fl or t.
Am acrobat on a horizontal bur.
A Trapeze Artist
The trapeze artist is sometimes attached lo the trapeze so
that it enters already swinging or it may be completely
separate and actually jump on to the trapeze. These
arrangements have different implications for stringing
and for what the puppei can do. in each case the puppet is
of a standard construction with the hands curved to fit
over the bar. Some puppei makers use joints that restrict
the limbs and waist lo movement in one plane, rather
than have them moving in all directions.
13 3
S 1 ’ В СIЛ LIZ E D STRING.! N G
I'hi CxaCt positioning ol Strings on the body iUlci the
design of 'hi1 control depends on what you want to
achieve and some experimentation might be necessary.
Performers with suitable staging may have a
traditional form of trapeze with a crossbar suspended by
ropes lived high on the stage or suspended from a form of
gallows1 attached to the stage.
An alternative trapeze consists of two horizontal dowel
rods joined by two vertical dowels or rigid metal rods vi ith
the upper bar tunning part of the control, as described
below tor the puppet permanently attached to the trapeze.
A Puppet Sena rated from the Trapeze
The mat fonel le will have the normal stringing but may be
assisted by a hand bar and additional strings to the toes or
the front of the ankle. Many of its actions will be like
those performed on the horizontal bar. The trapeze itself
is suspended iroi n a gailows attached to the stage.
The puppet can leap on to the trapeze ant hook its
hands over the bar. Il can also hang from the trapeze and
swing using only one hand, monkey-fashion. Swing the
legs to build up the momentum ready lb г the acrobatics.
A trapcre artist by Paul Dorttu. Shadowslrhitj Theatre, The puppet, septiratr j'rom the irupcr.c. performs a succession of
dcfiih-dcfijinq movements, inchtdiur/ hanffinq by its tiintcil-np toes.
SPECIALIZED STRINGING
Haise the knees between the amis and allow7 the foot to
pass between the hands and over the horizontal bar so
tiled the puppet is siiii-ing and swinging on the crossbar
Loosen, the hand strings to release the hands from the
trapeze and let lhe puppet lean backwards until it is
hanging upside down and swingmg with its knees hooked
over the bar, A smtill protrusion from the top of Lhe heels
would allow the puppet to slide back further and hung by
its heels.
Instead of sitting on the crossbar, the puppet could
raise its Leet on to the bar, release its hards and swing in a
standing position.
If the puppet is lo hang bv its toes, it will be achieved
best if the toe' strings pass under the crossbar and then
back over ii to lhe control. The puppeteer needs to skilfully
manipulate a toe bar into this position without dropping
it. As the puppet swings by its hands, the toe strings are
raised to hook the feet over the crossbar. The hands are
then released and the puppet is allowed to hang upside
down. Turned-up toes assist in this.
A Puppet Permanently Attached to the Trapeze
This marionette is rather different in scope. It makes its
entrance already swinging and can hang and swing from
its hands or toes, raise itself waist high to tre bar.
alternately raising and lowering itself by the arms. It can
also swing with its hands and feet on the bar and the
whole trapeze can be spun around.
l he control for this version of the acrobat is different
from usual. To the ends of a main, vertical, central dowel
are attached two horizontal dowel rods, the lotver rod
be’ug the upper horizontal bar ol the trapeze so that the
puppeteer carries the puppet and trapeze together. The
distance between the horizontal dowels is half the height
of the puppet from toes to fingertips with its arms raised.
Hand strings are threaded through holes in the lower
crossbar of the trapeze, a fair distance apart Strings from
the front of the feet near tlie loes are threaded through
additional holes in the crossbar, between the hand strings.
1 hese hand and foot strings should be of euual length. The
hand strings pass behiiid the upper ciossbar of the trapeze
and the fool strings pass in front of it. Both sets of strings
arc attached to the upper crossbar of the control.
Head strings are required but shoulder strings are not
needed. The head strings pass behind the lower and upper
crossbars of the trapeze and are attached to the upper
crossbar of the control They must be sufficiently long to
permit the puppet to hang upside down from its toes.
hand foot head head foot hand
metai rod
hard
hand
foot
foot
head
strings
half the height cf
tne puppet win
arms raised
Head strings
pats behind
the bar.. Hand
and foot strings
pass through
holes in the
bar
Head and hand
strings pass
behind the bar.
Foot strings
pass in front of
the bar
А ~1 - -
metal rod ,r —
j J
loop
of
curd
1 1
i S.
String! ntj and control for a puppet that is permanently
attached to the trapeze.
Because the head strmgs will be slack at some points in
the acrobatics, it might help to use a neck joint thal
provides some restriction rather than having the head
flop aoout.
A loop of cord attached Lo the control enables the
whole trapeze and the puppet lo be spun. Attaching the
loop to the base of the control permits the trapeze to spin
with the puppet hanging from either its hands or its toes.
When the control is held vertically, the hands and feet
135
SPECIALIZED STRINGING
Head strings omitted for clarity
Till the control forward to raise
the hands and release the feet.
Raise and lower the control slightly
to swing the legs.
With the control upright, the hands
and feet are on the trapeze.
136
SPECIALIZED STRINGING
Tilt the control backward to raise
the feet mid lower the hands.
iIt the control hackwards to extend
the arms fully.
Ti It the control forward tn id
raise the head string to raise
the puppet to waist or hip
height on the tr apeze.
137
SPECIALIZED STRINGING
head bar
Strings lo
the hips
give good
control
without the
need fora
metal rod.
will be on the trapeze- Tilt the control forwards to lower
the feet and hang by the hands: till il backwards to lower
the hands and hang by the toes. Tilt the control and raise
it repeatedly to build up momentum as the puppet sv ings.
Tilt the control forwards and lift the head strings to raise
the puppet lo waist height on the trapeze. Continue to
raise the head strings and slacken the ankle strings for the
puppet to stand on the trapeze.
The act revolves around sequencing these actions
smoothly and in a convincing way.
A Unicyclist
The unicyclist is a standard puppet but it is usually
secured to the saddle of the cycle, and the feel are
attached to the pedals on the wheel. Strings alone may
control the puppet but, for more direct control, fast
stopping and turning, many performers use a metal rod
painted black io control the unicycle. The rod may run
down through the puppet to the saddle but this restricts
the puppet's movements, It is preferable to attach it to the
saddle and run it up behind the puppet lo the control.
Strings to the control, allowing a little wobbly
movement, can support the puppet’s head and
shoulders. The hands have a running string through the
control. By contrast. Paul Doran achieves excellent
control without the use of a metal rod by the addition of
strings to the puppet’s hips.
A Weightlifter
The weightlifter is made by a standard method, though
joints have to be chosen carefully if the limbs are lo be
bare. This puppet often benefits from moving eyes and
mouth so that appropriate grunts and gasps or rolling
eyes can accompany the effort to lift the weights.
The hands are in a hooked position for lifting the
weights. They’ may be attached with palms facing
upwards or downwards, depending on the act. Hand
strings are attached near the knuckles for the over-grip
and at the heel of the hand, near the wrists, for the under-
grip. The exact positioning depends on the weight of the
hands and the length and curve of the fingers. You need
to achieve a position that will look as natural as possible
but will hold the weights securely when they arc lifted.
Remember that, in order for the hands to be hooked and
unhooked, the thumbs will not curl around the bar as
they would for a human: they will remain in line with the
138
S P ISC I A L IZ К D S T R [ N G IN G
Pau? Dortm's Shad&wstring troupe inrhcdes a puppet on a 'brcak-away bicycle (made by Steve arid Cfiriv Clarke
of the ll'ychwood Puppris) that comics apart io become a unicycle.
fingers so they will not help to hold the weights in the
hands.: If the palms are facing upwards, lhe hand strings
can help tn control the weights if they start to roll out of
the puppet's hands
Usually the Heights are placed on the floor in advance
of the puppet's entrance. Some per ormers use a smaller
puppet (of a child, for example) to enter and remove them
with east at the end of the act. after die wcightlifter has
apparently struggled to lift them
1! the weights are round I hey? will need chocks to slop
them rolling away or a suitable stand to hold them.
There is no trick to this puppet: the act revoh es around
a series of attempts to lift the weights or dumb-bells with
eventual success. The weight lifter kneels behind the
horizontal bar, nooks its hands over or under the bar and
adopts a range of techniques to lift the weights - kneeling,
standing, bending even silling or hying on the floor,
Gordon Staigl.it/s weight lifter st rains so hard that al first
its legs rise up into the air instead of the weights! \ly owe
children's version concludes with the puppet achieving
its goal but then falling through the stage floor by means
of a trap door. This device has a catch released by a cord to
a fool-opera led lever.
A variation ol the vve’ghtbfler uses strings that run
through the horizontal bar of the weights to lhe hands,
his enables the puppet to lift the weights securely but
prevents it from moving far from the we-ghts. Some
people therefore have the puppet carry the weights on to
the stage, hut this rather defeats the point of the act1 The
HCighllliter may also be arranged with the loot strings
SPECIALIZED STRINGING
дней 7 akd О1тслт:: Gorzlonia. by Gordon. Staiylit. struyyles to h 7 the writjlds. At first his feel rise rip instead о/ fhc
weights bin cvi'iiiitiillij he succeeds with nuu h (fnott:ny. paniing. and barinq of teeth.
1 Ю
SPECIALIZED STRINGING
141
SPECIALIZED STRIMjI NG
Detailoj the author's weightlifter: the upward-facing
paints help io hold the weights securely
when they are raised.
through the horizontal bar ol the weights, so that the
weights can be transferred from hands lo feet, like the
pole balancer.
A horizontal control is helpful as it allows the puppet
to be walked simply by rocking the main control, leaving
the puppeteer with a free hand to control the puppet's
hands. The basic control follows the normal design with
suspended head and shoulder bars, a back string
attached directly lo the control, and a leg bar attached
near the front of the Control. A horizontal hand bar that
hangs from a hook on the front on the control operates
the hands. The bar should be a little wider than the
distance between the centres of the hands when ifting
the weights.
It may also have heel strings and mouth and eye
controls. An additional bar will be required if strings
through the weights io the feet are to be included.
kiciit: A weightlifter with run-through strings
to lift the weights.
142
SPECIALIZED STR1XCIXC
Ml SI Cl ANS
Fhe following examples demonstrate the general
principles that may be applied lo puppets with a v aricty of
musical instrumcnis.
\ Pianist or Percussionist
Fasten a siring to ihe back of each hand and another al
the mid-point ol each lurearm. Make, tlic hand control
7’lic control and Mnnfjruj for (i piai list 'shai ids mid
lore (i nus.
i j Гт: 1 oski the pitnrisi, an etn lj/ puppet by the
author, raises the piano I’d, which causes the
candelabra to illuminate. Etc raises the lidof the
keyboard arid proceeds io play, soon to be interrupted
in various ways. The hands and the keyboard are
moulded in Mtr.v rubber to prevent them clattering
ns be plays. I he body of the piano hns л pjywood base
and hd, with shaped aluminium h)r the sides
and keyboard lid.
141
SPECIALIZED STRINGING
from three pieces of dowelling fixed in an ‘IГ shape.
Attach the sti mgs lo the corners of the ‘IT .
Rock and till the bar lo produce a simulation of a
pianist's hand action. Tie a small curtain ring to the
centre of this control and hang it from a hook screwed
into the main control
The same arrangement would be appropriate for a
percussionist but you might need to attach two of the
strings to parts of lhe instruments instead of the hands,
depending on lhe distribution of weight A puppet with
cymbals has run-through strings for bringing the hands
together (see pages 118-9).
A Violinist
Although the puppet is standard, you will have to make a
miniature version of a violin and a bow. Two strings
support the violin: one runs from the main body of the
violin, through a small screw-eyc or loop of wire on the
shoulder, and up to the main control. A small ring near
the top of the string hooks onto the control and enables
the violin to be raised and lowered. The other string runs
from the puppet's left hand, on lhe neck of the violin, lo a
hand wire on the main control.
The bow is held against the strings by a small ring or a
strong jewellery clasp ( which allows the bow and violin lo
be separated for packing). A more complex arrangement
has this ring or clasp attached to a string that runs
through a loop on the violin. Allowing the string lo
slacken releases lhe bow from the violin, pulling it taut
raises it to lhe violin for playing.
The bowing action is achieved by two strings attached
to a separate dowel bar that hooks on to the main control.
One string is attached to the bow-hand and the other to
the end of the bow. The dowel bar is rocked to effect the
playing movements.
The puppet’s left hand may be fixed to the neck of the
violin or closed around the neck but with freedom to
move, which enhances the effect. Some performers have
even hinged the fingers and devised ways of raising and
lowering them on the neck of the violin, but this is visible
only with a fairly intimate audience.
A Harpist
This puppet is included as an example of the use of a
control that requires both hands to be free to manipulate
specific strings. The figure may be of standard
construction, though it is common for puppets that
remain seated to have the part from hip to toe made in
The control tmd stringing for a violinist.
144
SPECIALIZED STRINGING
small screw-eye
nr loop of wire
small ring
one ur.jo'nlcd piece and to be fixed permanently to a seat.
The seat and the instrument would be attached securely
to a baseboard.
The hand strings run through small screw-eyes or fine
wire loops fixed to the harp. he ends of the strings are
attached lo dowel rods that are operated with a sce-saw
action. In order for a sole puppeteer to control the slight
body movements and operate both hands, the main
control may be hung from the puppeteer s wrist using a
loop of webbing that is attached to the control. Hanging
the control from a gallon s on the stage is also possible but
does not allow the puppet as much head or body7
movement
A Trumpeter
Any wind instrument requires a run-through siring to lift
the object to the mouth and a further string placed on the
instrument in order to support it. 1 he supporting string is
alien attached to one of the hand wires, yvhklh is used to
raise and lower the instrument as h is played.
shoulder bars
StringingJbrdual control.
Stringing for Dual Control
Dual control is used when two or more maiionettes
perform i he same actions side by side.
(ilue and nail the shoulder bar into a hole drilled in the
head bar: this allows the heads to be tilted forward.
Alternatively, attach the shoulder strings to the head bar
on cither s de of the head strings, join the head and leg
bars with a length of string tied to the centre of each bar.
Fix the right hand and right leg strings of both puppets
145
S PEC! ALIZED STR 1NGI NG
together on the right-hand side of the leg bar and Ihe left
hand and left leg strings on to the left of the bar. Now the
puppets will move or dance together.
Stringing for Tandem Control
Tandem controk when the puppets move one behind the
other, is best effected with a long horizontal control that is
really like two or more controls joined together. The range
of movement is quite limited and such devices tend to be
used lor marching bands, soldiers, performing animals
and ihe like.
For human figures, each puppet has a head bar and a
shoulder bar suspended from the main control. What
would normally be the leg bar is used to attach strings to
the hands and knees: left leg and right hand on one side,
right leg and left hand on the other, or same-side hands
and legs, as required. The normal rocking action
produces both log movement and arm swinging.
It should he appreciated that such a control will not
permit the heads to be nodded, as tilting the control
will lower the front puppet. Further refinement will be
necessary to achieve more complex movement.
For animals in tandem, the main control is once again
an elongated horizontal bar that supports the rump and
shoulder strings, and leg bars alternately lift opposing
front and rear legs.
The head bars are not suspended in the usual way: they
are pivoted on another long horizontal bar or rod that is
itself suspended from the main control with strong clastic.
The head bars arc joined al the ends by string or
galvanized wire so that turning either bar effects turning
of both heads. The use of elastic to suspend (he long bar
permits a degree of natural head movement as the animal
walks or trots and downward pressure on the bar lowers
both heads together.
Paul Doran has a number of puppets that have tandem
controls. Гог a set of four horses he has devised a control
that leads them in single file and, as each section of the
control may be swivelled and separated, the Figures can
perform both side by side and individually. This is a
splendid example of the ingenuity of the puppeteer in
devising ways to achieve variations on a familiar act.
For a pair of acrobats, he adopts the tandem control
with the addition of strings that run from the feet of the
rear character through small loops on the shoulders of
the front character. This arrangement permits a number
of acrobatic feats to be effected.
rear puppet
hand arid leg
(same side or opposing)
shoulders
head
(same side or opposing)
shoulders
head
146
SPECIALIZED STRINGING
front left and back
right legs
front left and back
right legs
t вся 77 A tandem
"oiitroljoraiii итак.
ЫШТ: /1 variMonон the mijnial
tindrm control lo al low .for
4oddiii£j heads.
li i t: A tandem control for htinian
figures. The control ni'tif be
detachable - sec geutotnime horse
and reversible puppet.
147
SPECIALIZED STRINGING
]4S
SPECIALIZED STRINGING
OPPOSI ГЕА\п TIPS PAGE: Paul Doran opera1' iff a pair of
acrobats with a tandem control. Additional run-through
strings Jrointhcjeci of the puppet al die rein through
loops oi1l he shoulders of the front puppet, fat iiiuilr
vniJous acrobat ic manoeuvres.
149
SPECIALIZED STRINGING
A Puppet Puppeteer
The two puppets are made by any of the methods
described earlier. Attach the head and shoulder strings
of the large puppet lo the upright control as usual and
use a rocking bar for the leg control. This control has
only one hand wire. The string attached to it is used to
raise and lower the small control, held in the puppet's
left hand.
In one end of the head bar fix a small hook and from
it hang another dowel rod. This rod controls the small
puppet's hand/Ieg bar that is held in the large puppet's
right hand. Join the same-side hands and knees of the
small puppet by a short cord, so that when a hand is
raised the corresponding leg js raised too.
An interesting version of this act uses a puppet
looking like the puppeteer to manipulate a scaled-down
version of one of the main puppet characters.
Of course, the point is apparent to the audience only
If the puppeteer is performing open-stage and is
therefore visible.
left: A puppet puppeteer by Gordon Staight.
Exceptionally, the main figure is modelled in a
naturalistic manner as it is a likeness of Gordon Staight
operating a miniature version of Mr Herbert,
his puppet compere. A velcro patch on his jumper is used
to attach a back-cloth when required.
The control and stringing for a puppei puppeteer.
151
8 Specialized Designs
For many traditional marionette. acts, specialized designs
arc just as important as the stringing arrangements bin
as with stringing, the best results will be achieved il' you
keep the mechanisms and structure as simple as possible
and allow for access to such mechanisms for adjustments
or repairs.
Consider aSso whether an action by the puppet should
be repeated. Sometimes repetition is unavoidable because,
il is in the nature of the act. but a clever piece ol’ action
that amuses or surprises the audience is often more
effective if it is only performed once just like a magician's
trick. Although this means that “trick puppets will have
comparativclv brief acts, it does help to keep up the pace
of the periormanec. Never draw out an act just to till a
certain period of lime: if you have music, tailor the music
to the act not the act to the music.
П illie the clown, br/ the author, be conics cross-ciK'rf
ns hr blows up a but loon.
Blowing, Bellons and Smoke
Some acts require the puppet to blow bubbles, to
appear lo blow tip a balloon, or perform some equivalent
action such as the elephant that squirts water over
the audience All arc dependent upim rubber tubing
that leads either to a mouthpiece through which
the puppeteer blows, or to some form ol pump or bellows
that may be cither a rubber bulb of the type used when
measuring blood pressure or a specially constructed
pin ip.
rhe bubble blower has a rubber lube running from its
mouth, through the head, to a plastic mouthpiece (such
as lor a smoker's pipe I attached lo the control.
The clown lias a specially made holder lor lhe balloon
that tits inside its hand. I he baud is madeof latex rubber
so that it can bo manipulated over ihe nozzle when lhe
balloon is attached, lhe balloon holder coma ns a small
metal pipe Lo v hich is attached the rubber tubing that
runs up the arm. down lhe body inside the costume then
trails along the floor to a foot pump behind lhe
backcloth. In this case, as the puppet blows up the
balloon it grows taller and becomes cross-eyed.
Make the foot pump from latex rubber (sec pages
>0—fj. It is wedge-shaped with a small hole in lhe
deeper edge and a larger hole :n lhe top. Into the smaller
hole insert a piece of meial tubing for attaching lhe
rubber tube; il should he a tight fit and may be further
secured with adhesive, tutu ihe larger hole glue a non-
return valve. Го make the valve, drill a substantial hole
down through lhe centre of a short piece ol' dowelling
and cover the base of the dowelling with a circular piece
of thin and fairly flexible rubber. Partially glue this
rubber flap to the dowel but leave between half and two-
thirds of the circumference unallached. When the
pump is depressed the pressure of air inside closes the
Пар and prevents air escaping so lhal it is forced doc; n
।he rubber tubing io the puppet. When the loot is
гешолed ihe flap allows air to enter the pump through
the hole in the dowel. The narrow1 gauge of the rubber
SPH’IA1.1Z3-I) DESIGNS
Bubbles by Paul Doratn Shadowstriiuj 7 hrture. 1 rubber tube to a tiioitilipicee titlached io lhe roniroJ enables this
puppet to blew bubbles through a pipe, it also creates babbles with lhe ringed end of lhe wand held hi its left hand.
153
SPECIALIZED DESIGNS
talcum powder held in a small bellows inside die body or m
a rubber bulb attached lo the control. \ line rubber tube
runs through the arm and hand into the gun and along the
barrel. The bellows is operated by a string attached to a
lever on (he control, while the bulb is simply squeezed by
the puppei ccr
1 purpose-built foot pump moulded in latex rubber and
with an improvised поп-return valve.
The balloon is attached tn a metal holder to which is
fixed a Luigili oj rubber uibiiup The tubing is threaded
through the arm and bodg find along the stage to a
loot pump.
tubing and metal pipe helps to prevent the air drifting
back into (he pump from the balloon. I here might be
slight seepage but this will be countered by further
pumping or by keeping the pump depressed when the
desired size of balloon has been achieved.
The cowboy described in the previous chapter
(seepages 124—6) has a gun that smokes when it is fired. In
the distant past, the smoke would have been produced by
the puppeteer smoking and blowing the smoke down a lube
to the gun. Nowaday s, the smoke is generally replaced by
A Coli apsible or Extending Pippet
The burly consists of three pieces of plywood or hardboard
joined al the front, rear and sides by strong thread. such as
that used lor stringing the puppet. Shape the top of the
shoulders with balsa-wood or foam rubber glued on to the top
section. Make (he legs from a scries of wooden discs cut from
plywood or a large dowel rod. Join them in the same way as
the body.
Drill small, aligned holes on each side of the legs and body
pieces. I he strings (hat raise and lower the legs and body pass
through these holes. The strings run freely' through the whole
puppet, being attached only' to the feet and to the control.
SPECIALIZED DESIGNS
The stringing arrangements for an exlending or a
collapsible puppet are illustrated below right]. Гог an
extending puppet, the legs and body art contracted when
normal: to lower them, tilt lhe control forwards. For a
collapsible puppet, when the control is held upright., the
legs and body are al their maximum length; to raise them,
tilt the control upwards, raising the bottom section and
therefore the strings that i un through to the feet.
The
structure
of rm
extending
or
collapsible
puppet.
A string is also fixed
to the back and front
of each leg section
The leg see* inns.
Four strings join
the leg sectons.
The control for an extending
puppet.
The control fora
collapsible puppet.
1 5 э
SPECTAEI7ED DESIGNS
П ilhe the. ehnvti is alsv tm (’.virnding puppet.
Scar a moi co
There are several versions of this traditional puppet,
i Jnc has a num her of heads hidden in a hollow body that
emerge one above the, oilier Another lias hollow heads
that f.l inside each other.
I he act itself is very simple but can be most effective
when performed with careful timing. With tile former
version, the neck Marts to grow. the head weaves from
side to side, forwards and backwards in a humorous
fashion, and then the. second head appears. And so it
continues with another head, then another until the
puppet is fully extended. The version with the hollow
heads can proceed in a similar fashion hut also enables
you to replace a head inside the body and lo raise
instead a larger head in which it sits. A good deal of
business can proceed around re-msertmg and revealing
the nested heads.
SPECIAL IZED DESIGNS
Tw o versions of the traditional Scaramouch. One has heads inside the body while the other has heads nested
inside each other.
A Tumbli.k Puppet
This is a traditional transformation but lhe principle
can be applied io a vat icly of purposes. The puppet has
two heads and two bodies joined together at the waist.
Each body has arms and hands but no legs The lower
body is hidden by a voluminous skirt, which may need
lo be weighted around lhe hem. Make the skirt from a
reversible material that looks attractive when turned
inside out or use two pieces of material joined al waist
and hem.
Raising the strings attached to the lower head whilst
releasing the tension of the upper head strings will make
the puppet 'tumble', or turn over, and reveal lhe hidden
puppet. The skirt drops to cover the other puppet.
U’hc two heads must face in opposite directions, so that
when it tumbles, the hidden puppet will rise lacing the
Same wav as the other.
15?
SPEC 1 A LIZ Id) DESIGNS
weights
Л iraddanad innibh’r puppet.
A Reversible, Two-Headed Puppet
wo-hea,ded. reversible puppets are sometimes required
and there arc three basic versions.
The first, which is more* ol a comic figure, has a single
body w th two fronts and a Single sei о Г limbs but a two-
laced Bead. 7 he limbs normally have sideways movement
so the figure lends to be used for sung and danvi
purposes. An nprigiiL control With just a lead bur and a
rocking bar attached to the bmbs would be adequate lor
this puppet. 1 he strings to the hands arc secured and then
continue down to the legs so that the same-side hand and
leg mo\e together. Sometimes a single wire is Used to the
bead instead of two strings so that the puppet can be spur,
around.
I he act sometimes has a pair ol such puppets
identically dressed with, costumes of contrasting colour:
(especially black and white) on each ’.ide ol the puppet. Al
one moment they аге both showing b ack costumes, ther
they both show white, then one slums black and the
other shows white, all of which is based around a simple
dance, routine.
turn j i\i) отшA reversible, split-headed puppet by
rhe author, lhe wizard and his apprentice arc backio
bat к and t annul Jind each other.
SPECJAf LZED DESIGNS
A second, more versatile. version is made with two
ccs and a. body with two fronts and two seis of I nibs,
such a figure, needs to he kept fail I у square to the
nidience if the figure on the reverse is not lo show
'elorcyou in lend it io. It could be used, lor example for
. transformation or for luo aspects ol a characters
personality. A rcvei sible horizontal control with limb
-iiimis at each end is used here. The hand strinns are
e run-through type and the leg bars arc suspended
n in each end ol the control by cord. If they were fixed
• the control m the usual way. both puppets legs would
r-eu alked when ether one were manipulated
1/rrr (/gooddeal oj ctfitiisiriij buxiiicss, tiieij are
'Срппшч! nnd t on npprftrsidr by side.
The third version is like the ргел ions one but the head
and body tire split down lhe centre, dividing the two
figures completely. so that they have hall heads and
bodies but. whole limbs. Once split apart, they can
appear together on stage. Obey are held together by a
simple incchamsm. A small strip of metal. bent into an
L-shapr and with a hole in it. is fixed in lhe back of one
head, the strip with lhe hole protruding. The other
figure has a corresponding slot m lhe back pf lhe head,
inside, which is secured a slotted block ol wood A
galvanized v. re pin runs down through this head and
through a hole drilled in the wooden block. The metal
plate fils into the slot and is secured by the pin through
the hole in the plate. The top of the galvanized wire is
looped for attaching the release-string and a small
note’h is soldered on lo prevent it coming too far out of
the head.
slotted
wooden
block
I he Securing and leiease 'iji'eehanismfdra
split-hi ruledpuppet.
The control consists of two separate horizontal
controls attached back Lo back: two screws in the fop of
one fit into kevhole slots in lhe other. Ensure that lhe
slots bl cleanly and fairly tightly on lhe screws so ihai
I hey do not separate unintentionally. The string for the
release pin is al I ached to the control of the puppet w .th
the pin in its 1 lead.
159
SPB‘G:I MJ'/l-n DLSIGNS
7 hr nvo hriuls Jorked zngt titer.
leg bar
keyhole slots
screws
head bar
head v>r
release string
run-through
hands string
leg strings
run-th rough
hands string
'rhe conn ols ore joined by ьгп’П’х in keyhole slots.
A Chinese Beli Dancer
JThi,s is и traditional act for whi$h the puppet may be
constructed in the usual way. The illuslral'on on page 16
de in on st rates the original method and shows the angle at
which the arms and legs are joined to the body to product
the characteristic ‘dancing’ indvemenfe as the bells are
rung. i he legs arc alt ached lo a rocking bar on the contr
lo leave lhe puppeteer s hand free lo operate a hand bar ic
which swings from lhe bells tire attached
Alternatively. lhe leg siiings can be all ached to the
puppet's wrists so that the legs and arms move together.
While this may appear quite comical, it does lima i ie
puppet's movements more than one might uish. With
practice it is possible lo produce a recognizable tunc with
ihe bells.
Л (hincxr br/f-danerr. a traditional, fantoccini-sly/e
Jiqnrc frotn lhe turn oj the last cciiltinj. perJon tied by
Dtde in lhe 1920s in (he Gordens oj >hr Palais de Jusurt .
Marseilles. \<nv in the lloqarlh Collection of the Puppet
Cent re collection.
160
SPECIALIZED DESIGNS
L wing an Egg
Another old favourite is a bird that lays- an egg: sometimes
the egg also opens to reveal a smaller bird inside. Part of
[he bird's body is hollow to accommodate lhe egg. which
has a small loop ol string or line wire that is secured in lhe
body by a release pin
Make the pm from galvanized wire and loop one end to
attach the release string. Thread the string up through a
si nail hole in lhe body and attach the end lo lhe control al
a point where it can easily be found in low light.
An alternative method used by Gordon Slaight for the
ostrich secures the egg in lhe body by a shallow, curved
’cup’ the shape of the cud of the egg. fhe cup is sprung to
hold it firmly against the egg. A release string runs
through lhe body and is attached, to the cup; pulling the
si ring retracts I he cup and allows the* egg to drop.
Flaps made of I abric-covered latex rubber cover the
hole in the base of the body, which hold in shape but flex
open under the weight of lhe egg. from which a newly
hatched ostrich emerges. The egg is in two sections with
.An egg secured with a galvanized wirepin through a
loop of strong th rend or fine wi re.
overlapping edges; they press together securely but come
apart when bounced on the floor by the string to reveal
the puppet inside.
A । ightrope Walker
The struct и re о/ « be 11-din ice r.
This puppet has only one special feature, a slot cut along
each fool to fit ox er the tightrope. Do ensure that the legs,
particularly the hip joints, have sufficient flexibility lo
allow the legs to cross over one another. Occasionally the
feet might slide a little along the rope but tills is
acceptable, humans do this too. Sometimes the puppet
just seems to find the tope and slot on to it; sometimes it
lakes a little longer to get it right but you can make this
part of the act with the puppet shaking, appearing to
nimble, regaining its balance, losing confidence half-way
along, perhaps having exchanges with the audience - ’Is
it further to go on or further to go back?’ he asks. ‘Come
on, you can do it!' the audience shout, and so on.
1G1
SPECIALIZED DESIGNS
The tightrope walker 'sfeet are grooved to grip the rope.
To make a simple tightrope, screw two pieces of wood
at right angles lo the bottom of two uprights, such as
dowelling. to make bases. Cut a slot in the top of each
upright to accommodate the tightrope.
Either attach the bases to a long board that is wide
enough to prevent lhe prop from toppling over or fasten
meta] angle brackets to the bases and fit them into slots in
the stage. To help to hold lhe brackets securely, screw
blocks of wood under the stage on each side of the slots.
Fasten the tightrope between the upright posts. Secure
Lhe ends to scrcw-cycs in the bases. To maintain lhe
tension of the cord, attach a strong rubber band between
one end of the cord and the screw-eye.
A tightrope walker by Paul Doran, Shallowstring
Theatre. The marionette has a removable mask that
reveals a different expression; the mask is held in place
by run-through strings.
A simple structure for supporting a tightrope.
If you wish to make a more complex tightrope
structure, you should first consider how you will
dismantle it for packing, transport it and set it up in a
short space of time.
162
SPECIALIZED DESIGNS
A Pantomime Horse
I his comic, pantomime horse attempts all manner of
feats before coming apart on stage, revealing the two
characters inside. One version of the act starts with a
finely made horse performing, followed by the pantomime
horse mimicking its act with hilarious results.
lhe pantomime horse consists of two puppets with
separate, horizontal controls joined together using screws
and keyhole slots. Both characters inside the horse are
made as figures bending from the waist, the one at the
rear bending rather more than the one at the front. The
head, shoulders and hands of each character are made
protruding through the front of their costumes.
The front character is hidden by the false horse’s head
and neck, which is secured by a small, galvanized wire pin
through a wire loop on the horse’s shoulders. The seat of
its trousers is visible through lhe front half of the horse’s
body when the puppei comes apart.
lhe head of the character at the rear fits inside the
‘rout half of the horse and is secured in place by a
galvanized wire pin through a small wire loop in the top
of its head and another in the rear of the front section,
l he body covering of the rear section fits just inside that
1 pantomime horse.
Screw-eye secured
The internal structure of the pantomime horse.
keyhole slots
The control of the pantomime horse and the
characters revealed.
of the front section so it should be of slightly smaller
diameter. The joint between the two bodies is covered by a
horse blanket.
The controls each have suspended dowel rods for the
head and shoulder/rump strings and fixed dowel rods for
the leg bars so that rocking the controls produces the
walking action. If the leg strings are fixed to the same side
163
SPECIALIZED DESIGNS
of each control, when the controls arc joined and walked
together, the same-side legs will be raised with a comic,
rolling gait rather than the normal opposing front and
rear legs.
The wire pins that hold the pantomime horse together
arc looped at the lop Гог securing release strings that
arc attached to each control between the head and
shoulder/rump strings. When the other comic business
is complete and the revelation is due. one ol lhe release
strings is pulled, dropping lhe horse’s head. Then the
second release string is pulled and the controls arc
separated, completing the revelation, and the two
characters chase one another off the stage.
A Trick Rocking Horse
This is an example of the use of a standard puppet with
a trick figure that some might consider a puppet but
others would regard as a prop. The clown is a standard
marionette but the rocking horse is double headed. It
appears lo be a normal rocking horse but, when lhe
clown has gone through the business of working out
how to mount it and which way to face, and started
rocking, the head drops to form a tail and the Lail at the
other end rises to form the head. Confusion ensues and
when the clown manages to reposition itself lhe correct
way round, the heads and tails switch again.
Before proceeding to make the horse, it is a good idea to
work out in cardhoard the head and body shapes and the
positions of the pivots, slots and nails.
The head mechanism of the two-headed roc king horse.
IM
The horse s body is made of two plywood shapes with
blocks between to separate them. The heads arc cut from
plywood and pivoted between the body shapes on a nail.
The head shapes and the position of the pivot are
arranged so that the head drops down into the space in
the body leaving only the mane visible to form a tail.
In order to hold the raised head in place, the base of lhe
head is slotted and lhe slot clicks over a second, carefully
positioned nail. Another groove is cut slightly below the
slot so that Lhe head does not snag on the nail when it
drops down. Each head is attached in this way and a small
screw-eye is inserted under each jaw. A fine thread that
runs through the centre of the body joins the screw-eyes;
the thread should be taut when one head is fully down
and the other is fully raised.
Two strings, one to the top of each head, control the
horse. They arc attached to opposite ends of a horizontal
dowel rod. When a head is to be raised from the tail
position, the head string is pulled up. As the head rises, it
pulls the thread attached to lhe opposing horse’s jaw. This
releases the other head from the raised position by
uncoupling the slot from the retaining nail and lhe head
drops to form a tail.
A Contortionist
This marionette, another traditional figure, is both a
contortionist and a hand-balancer. The figure is
constructed with a body in three sections that were
traditionally joined by strips of leather or webbing lo
provide greater flexibility. All major joints are restricted to
prevent too much sideways movement The feet and
hands might need to be weighted with lead, depending on
the construction materials used. Ensure that the costume
is sufficiently soft and loose to facilitate the intended
movements.
Usually the puppet has strings to the head. back, and
soles or insteps of the feet. Some versions have strings to
the hands while others have them I о the arms instead.
Knee strings enable the puppet to walk on to the stage but
arc not used thereafter so some performers dispense with
these and the puppet enters with a series of leaps.
The control has a main vertical dowel rod with
opposite: Spotty the clown and Rocky by Gordon Staighl.
The rocking horse is part-puppet and part-prop with two
heads which ensure that, whatever the clown docs, he is
always facing the wrong way.
SPECIALIZED DESIUMS
crossbars near the top and bottom. 1’he top crossbar is
fixed while the lower one. which is wider, hooks on to the
rear of the control.
The head strings arc attached to the lop crossbar, If
control of the knees is required, they have a single string,
one end attached to each knee, which runs through
screw-eyes inserted in the Lop crossbar. Moving lhe string
from side to side effects the knee movements.
1 he strings to the feet are attached to the lower
crossbar (Lhe loot bar); the back string, on the lowest
section of lhe body, is tied to a screw-еус in the base of the
control. An additional string to the chest may be attached
to the front of the central body section to enable lhe
puppet to bend backwards too. Attach it to any
convenient point on the control, a short horizontal dowel
glued into a hole drilled in lhe control is a useful method.
Ensure that the string is sufficiently slack to permit all the
requ i red movements.
Cut a slot in ihe control to accommodate a single hand
wire that is looped at each end. Insert one loop in the
slot and pivot it on a nail through the dowelling. The loop
at the other end carries a run-through string, the ends
of which are attached I о the backs of the hands or
the forearms.
The structure of the puppet.
The control.
166
SPECIALIZED DESIGNS
Tilt the control forwards to bow the puppet. Tilt it
further and move the hand wire forwards with your index
Linger to place its hands on the floor. Unhook and raise the
leg bar to its full extent for a handstand. Manipulate the
band string for the puppet to walk on its hands. Bring the
foot bar over the top of the control and lower it in front of
the control for the puppet to lower its feet on either side of
its head. Depending on its dimensions and flexibility, the
puppet should be able lo reach the ground with its feet and
move around lhe stage in this position.
A sequence of those main elements can be interspersed
with such movements as raising and lowering the control
to achieve press-ups with the legs in the air, kicking the
legs and bouncing on the hands, swinging the feet
alternately over the head, raising and lowering lhe knees
wrhile handstanding, and single-hand balancing.
Hand- ba km c i ng.
Lowering the legs intrant of the hands.
167
SPECIALIZED DESIGNS
The Grand Turk
Often used as the grand finale of a puppei variety show,
this is a single puppet that transforms into six different
characters. However, the means by which this is achieved
is comparatively simple, despite lhe length of the
description that follows.
The characters may vary of course; it need not be the
Turk but the very lull, baggy costume and turban is ideal
for containing the six puppets. This particular Turk
transforms into the four wives, which emerge from his
limbs: a mother-in-law. which is inside the body; and a
Grand Wizard hidden in lhe turban.
The puppet consists of three full-sized heads, four
somewhat smaller heads tor the wives, a wooden
shoulder block and the Turk's own hands and feet, made
by any of the standard methods.
Г cast all the parts in latex rubber, creating the heads
with necks attached Three different casts were used for
the three larger heads but only one for lhe wives. The
casts used for the large heads were used also for other
puppets: significant variations in painting and finishing
altered their appearance and the resemblance has never
been noticed.
Two of the wives' heads are attached a little above the
wrists of the Turk's hands and two just above the ankles.
There needs to be some flexibility at the ankles so that
the feet dip and allow the costume io hang down when
lhe wives are revealed.
The head of the mother-in-law is attached securely
to the underside of lhe shoulder block: a dowel is
secured in lhe head and neck, and a screw-eye in the
base of the dowel is attached lo the shoulder block with
strong cord.
The head of the wizard is attached directly above the
Turk's head. A single dowel rod the same diameter as the
neck runs from the base of the Turk's neck, out through
the top of lhe head and then up through the wizard's
neck to the top of his head.
The Turk’s head is attached to the shoulder block in
one ol three ways. The first is the most secure and is the
method used for my own Grand Turk. The other methods
require little or no metalworking.
* A specially constructed mechanism is used. It
consists of a strip of metal, bent Lo form a square-
cornered. inverted IT shape with two flanges with
holes drilled to screw it to the shoulder block. A
Sides of costume
split to accommodate
leg strings.
The Turk with six concealed puppets.
second strip of metal, soldered half-way up the
inverted T ". acts as a guide to keep the release pin
appropriately aligned. A hole is drilled through the
centre of both horizontal plates to carry this pin.
which has a looped top for attaching the string, and
a knobble on the shaft to prevent it coming out of
the mechanism.
A keyhole-shaped metal plate with two holes drilled
in it is screwed to lhe base of the neck with the
rectangular part facing rearwards to fit into the
mechanism, I he pin is depressed to engage the hole
in the plate and lock the head to lhe shoulder block.
A slight pull on the release string raises the pin and
separates the head from the body.
168
SPECIALIZED DESIG\S
Three types of release mechanism lor the head.
Top: A keyhole-shapedplale held in a purpose built
mechanism.
M»ddlc: A keyhole-shaped piate secured by a release pin.
Bottom: A strong, looped wire secured by a release pin.
* Л keyhole-shaped piece of metal is screwed to the
base ol lhe neck. Ihe rectangular pari, which
extends rearwards, is slotted. A wire loop fixed in the
shoulder block protrudes through the slot and a
piece of galvanized wire is inserted to lock the head
lo the shoulders. One end of this wire pin is looped
to al tach a string; pulling I his string allows the head
and body to be separated but take care not lo puli it
by mistake and release il too soon.
• Strong galvanized wire is secured in the shoulder
block with a looped end protruding. The loop fits
into a hole in the base ol the neck and is secured bv a
release pin inserted ih rough a hole in lhe back of
the neck.
A small ’spice’ of galvanized wire is glued into a hole
drilled in each end of the shoulder block for attaching the
arms and another piece of galvanized wire is inserted
across the mothcr-in-km’s head with the ends bent over
locreate spikes behind her ears. These spikes should point
downwards on her head upwards when the head is
inverted inside ihe Turk's body. A further, galvanized wire
splice is glued into a hole drilled through the lop of the
wizard's head, down into the dowelling inside it. You need
to leave enough of lhe spike protruding to hold the
turban; at this stage, leave it Jong and cut it to the
required length later..
The wizard, tile moiher-in-law and the wives each
have a single supporting siring, from lhe top of the head to
the control. Attach the string to .he head with a small
screw-eye that can be covered by hair. This may make
them liable to spin around once they have been revealed
but the costumes touching the floor help to control this.
These characters have no bodies but full gowns that
are gathered at lhe neck and hang freely. You can add
arms and hands to each igure but I hey should not be
bulky and could be made of fabric. Just inside the hems of
lhe gowns arc sewn a senes of small loops or curtain
rings These are gathered up so that lhe gown encloses ine
head. The rings arc slipped over the spikes on the shoulder
block and on the mother-in-law’s head, as appropriate
this has now created the Turk's arms and legs.
The moiher-in-law has a string from the top of her
head to ihe control. Her gou n is attached to the shoulder
block and hangs over the tops of the legs when she is
inverted. Ensure that both sides of the shoulder block are
covered so that the costume, not lhe wooden block, is
169
SPECIALIZED DESIGNS
visible both before and after the transformai on. 11 her
costume is reversible, il will serve as the costume for the
Turk as well. Alternatively, two different fabrics may be
used, preferably joined at the hem.
head inside arm
thread looped
to fit on spike
shoulder
block
rings around
hem of costume
sprke for
attaching arm
head irs.de turban
Securing the turban: first. the turban release string
goes around the spike, fol lowed by the rings inside the
wizard's co st tune.
thread looped
head insioe leg
head inside
boay
spike for
attaching leg
rings around hem
of costume
Attaching lhe
arms and legs
to the body:
if used, the
looped betid
string must go
over the spike
before the rings
around the
hem of the
costume.
' lie turban iabnc is glued to ike lurk’s head and must
be long enough to form a robe lor the wizard when they
transform. Small rings are sewn ins.de lhe gown at a
suitable point and the fabric is gathered up. covering the
и izard’s head A good deal of fabric will need to be turned
in when the rings arc placed over the spike on top of the
head.
I iie wizard lias two sitings attached to the top of Lis
head - the supporting string and another to release the
turban lor the final reveal. The release string is knotted co
form a small loop a short distance above lhe head. rl his
loop is slipped over the spike before the rings so that, when
it is pulled, it will lift the rings off the spike and allow the
costume to drop down. Once released, this string hangs to
the back of the wizard’s head so that the loop is hidden.
Two Variations
Some puppeteers knot the head string of each wife to
form a small loop like that described for the wizard. This
loop is slipped over the spike before the rings to take the
weight of the figure rathcr than having the weight taken
170
SPECIALIZED DESIGNS
by the rings on the costume. The position of the loop on
the string should allow for the length of the arms and
legs. The idea of this is to help keep the fullness in lhe
baggy pants and sleeves, but the loop may not come off as
cleanly as the rings and, once the figure is revealed, it can
draw undue attention to itself, appearing like a little fly
above each head.
The second variation is lo attach the legs to the Turk’s
costume rather than to the mother-in-law's head. A ring
of galvanized wire is inserted into the hem ol the costume
with two spikes protruding upwards lo accommodate the
leg rings. Although a loose flap made from additional
costume material can hide the attachment, it spreads the
legs quite lar apart and the wire loop can interfere with
ihe smooth dropping of the costume when the mother-in-
law is revealed.
The Control
The puppet has a simple horizontal control that consists
of a main bar with two dowel rods glued into holes drilled
across it. Small screw-eyes are fixed to the ends of the
dowels for attaching the arm and leg strings (lhe wives),
fhree more small scrcw-cyes are attached directly to the
main ban one at (he back bar for the mother-in-law’s
support string, one on the side for the body/mother-in-
law's release string, and one on the front for the turban
release string.
A hook is screwed into the front ol' the main bar to hold
a ring on the end of the wizard's support string, which
supports the entire puppet. All strings other than this one
are slack and are tied on to small galvanized wire hooks
lor attaching to the screw-eyes. This allows them to be
unhooked and the character danced around the stage as
it is revealed, then hooked back on the control ready for
the next transformation. The string to the mother-in-law
should be sufficiently long to allow the Turk's costume to
hang unhindered.
The Grand Turk is now ready for action. Clearly he will
be able only to shuffle along but gentle swaying of the
control with a little rhythm in the action can make it
more convincing. After some little business the
transformation takes place. Raising each of the wives'
head strings in turn lifts the rings off the spikes and
allows them to float away from the body, the costumes
falling to cover the hands and feet.
With the head and body floating in the air. a pull on the
wives from inside arms and legs
Г/ic puppets inside the Grand Tttrk are revealed.
These two have the hands. These two have the legs.
171
SPECIALIZED DESIGNS
neck pin separates the head from the body find al'ows the
costume to fall, revealing the mother-in-law now that her
head string takes lhe weight.
Now only the head and turban are floating; Finally the
string on top of the turban is raised, lifting the turban
rings. Che costume falls to hide the Turk’s head and reveal
the Grand Wizard. The transformation is complete.
Sometimes the release strings for the mother-!n-hiw
and the turban are pulled simultaneously so that both
transformations happen in one grand operation. 11 you
have ar. assistant, instead of replacing the strings on ihe
control after each transformation, you might pass them
across to be hooked on to a separate bar and danced
separately from the Turk.
A Dissf.ctimg Puppet
This is a marionette that comes apart ar.d goes back
together again with very simple manipulation of the
control. The act is most often performed with a skeleton,
sometimes coated in fluorescent pa.nl and used with
uLra-violet lighting. Other versions uf the act exist, a
traditional one being a come-apart clown that also
juggles halls and finally appears to juggle its own limbs.
Whichever version of the act is adopted, the principle
is the same: the puppet’s head, body and limbs are made
cis usual but with no fixed joints at the neck, shoulders
or hips. Instead, run-through strings are used to hold
the elements together and permit them to come apart
when these strings arc slackened. A description of the
skeleton follows as its construction is unusual but
the stringing arrangements apply to any dissecting
puppet
। he head is modelled or carved as normal. Fasten a
dowel across the head with strong glue. Insert a screw-
cye into each end of the dowel, through ihe sides of the
head.
Make the ribs, breastbone, shoulder blades and pelvis
from plywood or a modelling material over a cardboard
shape, If necessary to help adhesion, sniear the
cardboard with LJfllJ glue or an equivalent clear
adhesive. You may find that it is best to have only eight
ribs to avoid the body appearing too long and «him The
first five ribs arc made as a closed loop and the bottom
three open tn the front to join on to the breastbone which
Is glued on to the top five ribs. File, or carve, grooves in
Small pieces of dowelling for the vertebrae.
The body is assembled on a length of strong galvanized
/1 come-apart, juggling down.
wire that is glued lo ihe pelvis and runs through the
whole backbone. When al! the parts are glued together,
cover and strengthen the joints with a modelling
material.
Carve lhe hands and feet or model them on pipe-
cleaners ( see page 56 >. C arve the arms and legs or create a
general shape with dowelling and bu Id up details with a
modelling material.
The wrist, dhow. knee and ankle joints are open
mortise and tenon joints (see pages 58-64). The tongue is
a strip of alummmm, glued and naled in one part, and
pivoted on a nail "n the other part.
The head, arms and legs are Joined I о the body by
strings that form pari of the method of control (see
page 174). To attach the string to an arm or leg. drill a
small hole down through the knobbly protrusion and
make a small countersunk hole in the undciside.
Thread the string down through the hole and knot it.
172
SPECIALIZED DESIGNS
A dowel inserted
in lhe head with
screw-eyes
/{isiened into
each end.
} { vertebra
The components
of the rb~eaqe.
Fire ribs this shape,
increasing in siz:Rr
Three ribs
this shape.
screw-eyes
1 *ir control tmdstriiKjiiHj.
The assembled body.
173
SP i:cJ Л LIZED DESIGNS
Press lhe knot into the countersunk hole and smear it
with clear glue.
The control consists of a vertical dowel with two
narrower, horizontal dowels glued into holes near the top
and bottom. Another, the arm-and-Jcg bar, is suspended
from a hook on lhe control.
String the puppet so that when the control is held
upright with the leg bar hooked on to it, the parts arc all
close together and not dissected,
1'he puppet is supported by the body strings, and VI.
and lhe centre string J. Attach strings L and M to each side
of the top pair ol ribs; they run through the scrcw-eyes in
lhe head to the control’s lower cross bar and must be
parallel. Attach J to the top of the neck: thread the other
end through a hole in the dowel fixed in the head, and
through the top of the skull to a screw-eye in the bottom
of I he control.
To restrict the
joint, build up the
front of leg
nail
AhiHiiiiiiiin
used for the
elbow, wrist,
knee and ankle
Strip of aluminium
glued and nailed
in leg.
fasten another string. K. to the dowel in the head: this
runs through a screw-eyc m the centre of the control to
the centre of the arm-and-kg bar. Pall this bar forward lo
raise lhe bead. fl he head returns to its normal position
when the bar is replaced.
Attach the hand strings. E and G. to lhe arm-and-leg
bar. F and 11 join the wrists to the knees. By paddling lhe
bar the arms and legs are moved together.
Fasten the strings. A and C. which support the arms,
and В and D. wInch support the legs, to the top crossbar of
the control. Л aijd C run through the shoulder blades: В
and 1) run through screw-eyes on each side of the pelvis,
up through die rib cage and through a hole in the top rib.
The arms and legs are detached from the body by tilling
the control forwards.
Skeleton in Disguise
Gordon Staight created an amusing ad around the
dissecting skeleton that is contained within a costume
with an alt ached mask. The skeleton enters the stage in
the guise of a football supporter but, when he hears that
his team has won the cup. he. is so surprised that he jumps
out of his skin and dances around the stage, coming apart
and rejoining as he does so.
The costume has weighted feet attached but no hands:
the ends of the sleeves are fixed in lhe pockets of a coat.
The outer head is really two masks, one for the face and
one for lhe back of 1 he head: they close over the skeleton’s
skull and arc held in place by a hat that is atiached loosrh
to lhe skulk The costume, which is open at the top to
insert the skeleton. is gathered and held together by the
collar, which is split al the back of lhe neck. The collar is
fastened by a small galvanized wire pin through a small
loop of wire: a pull-string from this pin opens the
costume, allowing it t*o fall to the ground, causing me
mask to open as it dues so.
171
1В(Л 1 1 /’ uj s’ 176-7: Jantter Oyyie, a football. supporter, by Gordon Suiiqhl. The puppet jumps out ot his skin when
he hears that. Thyiioiiih Argyle hnve won the cup. Л mask itlku hed to lhe cuiieeuls du dissediny skeleton.
My version oinils the horizontal thread joining the tops of the leys so they can spread further npart.
I'h
SPHClAi IZIID DESIGNS
Native American Puppet
This is another version of ihe dissecting puppet,
lhe puppet (illustrated on pages 1 7<S-9) does a rain
dance but causes snow to full (a shower of polystyrene
chippings or theatrical snoul. The entire body and neck
are modelled .in one piece Without any joints. The elbow,
knee and ankle jointsari3 made with aluminium, like the
skeleton, but the puppet has no wrist joints.
Rod-Marionettes
A Bodj’ Puppet
A body puppet is made in lhe same wav as other
marionettes, It is suspended on strings that are attached
to a cloth-bound ring that fits on lo ihe puppeteer's head.
Shoulder strings arc attached lo a strap that hangs
around the puppeteer's neck Movement ol ihe
puppeteer's bend brings about movement of the puppet.
S.rong rods are used to operate the hands; lor case of
manipulation. the ends of the rods are glued into short
dowel handles. Some figures have flowing robes but no
release string
ga'vamzed wi-e pin
slot
wire loop
lhe srciiriiu] and release mechanism forlimner Oijyie's
costume.
178
7 wonk?/ rcnthei s, bij
Cordon St night, is f
variation on Lhe. dissect inq
puppet. His rain dance
onhf succeeds in
producing snow.
SPECIALIZED' DESIGNS
legs 01 led. others have legs and feet that move freely,
while some feel arc attached to the puppeteer’s shoes.
There are a number of ways ol doing this: one of the most
satisfactory is to haw long, .shaped, plywood strips io
which are attached the puppet's feet and the soles ol
slippers for the puppi-tecr.
There are two main traditions of these figures that
differ in certain respects. One has wooden upper arms
and forearms and unjoin!cd legs. The other has knee
joints and wooden forearms but tubes of fabric for tne
upper arms.
hose marionettes differ moM significant ly from others
in their means of control. There are many styles of
Sici lian-Sh le Rod- Man.oncites
The basic wooden construction is very much like other
marionettes. 1 he head and neck are carved in one piece
and the body oil on has no waist joint, though some
figures have a separate pelvis held in place by strong cords
that are released when lhe puppet is cut in half in battle.
Wooden legs are suspended from the pelvis on strong
wires here are no wrist or ankle jo inis.
hand rod
cloth-bound nag to fit
puppeteer's head
Feet may be attached
to puppeteer s shoes
shoulder strings
attached :c neck strap
Controlling ti body p«*ppcl .vtijk' of rod -rrnn ioiictte.
If neccssanj, the feci тцу be attached to the
puppeteer ’s shoes.
TIr Sicihari i od-niarionclte Orlando 1 hrjoso has a main
control rod with a looped top, a rod to the sword hand
and a string to lhe shield пгт.
ISO
SPECIALIZED DESHINS
.'•ntrol for rod^manoncttes in different countries, a
'election of winch is illustrated (see pages 181-2). The
Sicilian figures have strong metal rods to both the head
ind sword arm, the shield arm is controlled by a cord, and
.1 rar (her cord lifts or lowers the visor. Some have a cord to
sword that is not permanently attached to the hand.
'he rods vary in thickness from 4-6mm depending on
:he tradition.
red to head
THIS PAGE А\П PAGE 182:
/1 variety of traditional
controls for rod-marionettes.
1S1
SPECIALIZED DESIGNS
hand wire - one to each hand
head rod
ABOVE. LETT, BELOW
AND TOP right:
More I rndit ioiinl
controls for
rod-mar incites.
head rod
string to visor on
helmet
A Sicilian control in the Palermo tradition.
SPECIALIZED DESIGNS
Operating a Sieilran
knight: a wooden handle
assists control and I hr
hand rod hooks into the
dandling loop of string
when not in use.
1S3
SPECIALIZED DESIGNS
The main rad passes down through the head and
neck and ci looped end hooks into a strong piece of wire
fastened securely in the body, bridging the neck groove.
During a performance the puppet may be beheaded by
firm downward pressure and a quick twist of lhe rod to
uncouple the head rod from the body.
The figures that do not have a sword fixed
permanently in the right hand carry the sword in a
metal sheath on the left hip. A cord attached to the
top of the hand rod runs through a hole in the clenched
right hand to the hilt of the sword. The rod is used
to place the hand on the sword and the run-through
string is pulled taut for the puppet to grasp the hilt
and draw the sword from its sheath. With practice it
is possible to replace the sword in the sheath and free
the hand.
Some rod-marionettes have leg strings but this
style has none. Very slight sideways movement of
the control, while twisting the head rod. transfers
weight to one leg and creates a momentum that
causes the other leg to swing. Despite lhe apparently
limited means of control and the weight of the
Sicilian figures (approximately 4kg/91bh the
performances are exciting affairs, full of vitality. The
puppets battle each other, slay witches and dragons,
and many scenes end with the stage piled high with
puppei bodies - a grand puppet tradition built upon
stories that are great puppet fare.
Useful Addresses
Organizations and Centres
here are nal.onal and regional groups throughout the
world, and also UNIMA IL’Union Internationale de la
Marionneltcj, the international puppetry organization.
Somi* arc membership organizations wbicib haw events
.or their members but have no permanent base you can
i4i: others have centres with libraries, workshops,
Ahibhs and performances. Some of the centres will have
restricted opening times, so alway s make contact before
filing. Many7 now have websites and the following
rgamzalions will have contact informalion about other
rganizat'ons nationally and internationally.
British Puppet and Model Theatre Guild
l w w puppetg uild org.uk
Meiri ber sh ip S ccr et a ry: Ji t d i I h S h uh
Lt tie Holme
Church Lanc-
hciiiics Ditton
Surrey KT7 ONL
Membership organization, one of the oldest existing
puppet ry organizations in the world
Scottish Mask and Puppet Centre
>-1 (1 Balcarres Avenue
<civjndaie
Glasgow G ] 1 OQF
Tel: 0141 339 Ы85
•j-1 n a 11: info @ Scottish ma skar d puppet c en 1 re, co. u к
л \ w. sco ttis hma skand pu ppet ce litre, с о: u к
Amtact: Malcolm Knight
_ hriving centre with a full programme of events
The Puppet Centre Ltd
(formerly the Puppet Centre Trust)
Battersea Arts Centre (BAL)
Lavender Hill
London SW.11 5TN
Tel 02(1/228 53 35
Fax: 020 72288863
e-mail: pctpuppci centre demon.uo.uk
w ww.puppctccn Lrc.com
National charitable trust, reference centre lor all aspects
of puppet theatre: open to all
Websites
Puppeteersi 'K; Puppets Online
www. P и p pel eer s к ’ К. com
A one-stop source of information about many aspects of
puppet theatre, events and performers
Puppetry Home Page
www.stigecraft .com/puppetry/orgamzations/index. him 1
Contains lists ol organizations worldwide (rot
comprehensive I
Publications
Ray DaSilva. Puppetry Bookseller
6 3 Kennedy Road
Bicester
Oxfordshire 0X26 2BE
Tel/Fax: 01869 24579 3
e-mail: dasilva@puppetbooks.couk
I XI MA British Centre
ww. u nima.org
Membership Secretary: Martin MacGilp
1 »Cullcrnic Gardens
Ba I loch
Inverness IV 2 7JP
International. non-governmental, membership organization
187
Professional Contributors
The following are contributors to this book who have
permanent or louring companies.
MovingStage Marionettes
(Iren and Juliet Middleton
78 Middleton Road
London E8 4BP
MovingStagc Marionettes is not a theatre but a major
puppet company that creates the shows* Its performance
venue is:
The Puppet Theatre Barge
В lorn field Road
Little Venice
London W9
Nearest underground station: Warwick Avenue
Bov office: 020 7249 687Й
e-mail: puppets movingstage co.uk
tvw w.puppetbar ge.c< )nt
w w tv. movt ngs t age .с о. u к
Moors at Little Venice from autumn through spring:- tours
the River Thames in the summer season. Specializes in
marionettes.
PuppetCrah
John Roberts. Artistic Oil ector
1 t enter. Oak Cottages
Dartington
Tonies
Devon TO 9 6DW
Tel/Fax: 01803 8g7778
e-mail: johnfepuppclcraft.co.uk
w w w.puppctcraft. co. u к
Major toui ing puppet company
Shadowstrirg Thcalie
Contact: Paul Doran, resident solo puppeteer, specialising
in marionettes, with permanent theatre and touring
show based at:
Tropfquana Wildlife Park
Washlord Cross
Watehet
Somerset
(On the A 39 between Williton and AlmeheadJ
Tel: 01184 64068.8
e-.n aikshad о wstf. ng (h1 ft ceneLco.uk
w w w. geocitics.com/puppet ville/shadowst ring.html
ww w. I ropiq uar; a. co.uk
Lyndie Wright
Puppeteer, designer and maker: contributed photographs
of the late John Wright’s work. John and Lyndie Wright
founded the Lillie Angel Theatre listed below. Enquiries
about John's work should be addressed to Lyndie (not lhe
theatre I at:
10 Dagmar Passage
Cross Street
London
N.I 2l)N
lei: 020 7226 9612
Little Angel Theatre
14 Dagmar Passage
Cross Street
London
.XI 2DX
Xearesl underground station:. Angel
Tel: 020 7226 1787
l ax: 020 7359 7565
e-mail: iiifofelittlcangeitlieatrc.com
www. Lt 11 ean gel t h eatrc.com
Major British company with permanent theatre: resident
company also tours
Amateur Contributor
Gordon Straight
Now retired. Cordon Straight is an excellent example of
lhe long tradition of skilful and inventive amateur
puppeteers, performing largely for pleasure and for
charity. A long-tirrie mentor to the author, who maintains
his collection. Enquiries aboul his work should be
addressed to:
David Clirrell
University Academic Advisor
Roehampt on University
Grove House
Roehampton Lane
London SW15 5PJ
Tel:0208392 3385
e-mail: d. cu r rel 1. @ roe h a ni p ton. ас. u к
188
Index
04I0internal mechanisms 36, 39
acrobats 148—9
acrobirfon horizon lai bar 131-3
duШiniuni joints 58. 61-2, 62. 64. 68, K)3
I о;, 172-4, 176-7,178-9
\ niencan wl lite wood 2 2
ан tin al marionettes 1 2, 96-116, 96, 97. 98,
99 101. 103. 109. 114, 115
bodies 105-7
body covering 96.9b. 99.101.102.103,
104,105.109.114-5
constru ci ion 1 ()4—У
Cf nit rol and manipu la t ion 1 ()9-16.
146=7
design 1 7-1 *8. 18.97. 98.98-103
feet cind ankle joints 108
heads 18.25-6 114,115
legs 17.18.64.97.107-8
materials 1 7—1 8,96
tails 109. Ill
ankle joints 17.64,67-8.108,174.177
apes and monkey? 100.101
arnu. elbows and sh udder joints 15,1 7, 34,
42, 50-5. 70, 161.176-9
arms 45,47. 50-1. 57
elbowjoints ] 7. 34 42, 5 1-2.142.1 72,
174.176-9
shoulder joints 17. 34,42.45. 52-5,
5 3-э4
balance, marionette 14
ha IL or bead joints 17 46.48-9, 5 3. 59
balloon blower 118. ] 52.1 52-4.154
balsa wood body 46. 106
base shape for ca st i ng 3 0
base shape lor modelling 2 3-6. 2 5,27, 46
bellows 12 5. 1 52, 15$.
bicycle, breakaway 1 39
birds 102-3, ЮЗ, 1 ]4-6.114.115
blowing, bellows and smoke 125.152-4
Blundall, John, puppets by 19
body construction 45-50
animal 105-7
cardboard 105
carved/sculpted 45—6.48,49.106, 107
cast 46-7 47. 106-7
contortionist 164-6
extend dig or collapsibie puppet I 54— 5
fabric 45
laminated 45-6.47.48 49.105
modelled 46 48 ] 05-6.178-9
three-part 50
body proportion and shape 15
body puppet (rod-marionette I 19.177-80
bookseller 187
Britain puppets in 9,10.11
British Puppet and Model Theatre Guild 187
bubble blower 152 153
bullfighter 69
Burmese marionette 9. 73, 74,97.98
Burmese puppei theatre ] 0
cardboard base for head and b< idy 25
carved marionettes 8.9.11.12.1 3.14. 17.
20.22. 35 42.48.68,69. 70. 74,97.
98. 180.18 3-5
carving/sculpling 21-23
be dies 18.42,45-6
handsand feet 17,19.20. 34.42. 55, "6.
67-8
heads 17.18.19. 20, 21. 3 3 34.42
limbs 18.42, 50-1.60.61
mo vt ng eyes lor carded heads 3 7
moving mouth for carved heads 9. 11, 39.
42
technique 22-3
tools 21
woods 21
casting 21, 30—4, 47
bodies 46
hands and fee t 57.67
heads 30-4 33
limbs 50. 60-1
methods and materials 30—4. 33
principles 30
Cclastic 21
charactenzation 14 15.16. 55
China,; puppets in 9
thinese bell dancer 160.160-1
Clowns I i. 1 3. 38. 40. 72.118.129.132^,
1 39, .148-9,1 52-4.1 56. 1 62,165,1 72
collapsible or extending puppet 118 154-6,
156
Com media del Г Arte 9
concealed shoulder and knee joints 5 3-4
5 3-5.61-2.62. 178-9
construction techniques
animal marionettes 104-9
human marionettes 42—68
contortionist 164-7
contributors 188
control, bo dy puppet 19
control and manipulation 72-95
aeroplane or paddle con trol see horizonta I
control
animal 100, 101. IU2.109-16,114.1 15.
146-7
Burmese 73
chest string 86, 87
dimensions 74
clastic and control str ings 8 3
horizontal control 74. 79-84.92-5.93,
142
horizontal control for aiiimcils 109-1 1
human figures 72. 73. 73-95. 78. 89.92.
93
manipulation 86-95.89 92, 93
mouth and eye control 78 81—2.92,
110-11,114.115, 115-16
one-handed for animals 111-12
rocking bar 78-9
rotating 83
stringing 84—6
tangles and snags 86-90
upright control 74 9,89.90-2.92
winder 88-90
control, specialized
body puppet 1 77, 180
dua I control 14 5-6
extending or collapsibicpuppel 155
Grand Tu rk 168.17 1-2
Juggler 129-31
189
IND I-X
pantomime horse 16 3-4
pianist 14 3-4
puppet puppeteer 1 50. 1 5 1
rod-marionette 180-6.180,183-5
skeleton 173—4
split-headed puppet 160
tandem control 146-9. 148-9
trapeze artist 135-8
unicyclist 138, 138
violinist 144-5
weightlifter 142
control, rod-marionette 19,177. 180-6.
180. 18 3-5
coni joints 43.44. 48.49, 52-3. 57. 59. 66.
104.108
costume 1 3 19. 34. 41. 68. 69. 70. 68-71.
74.87.88
and stringing a marionette 70, 85.86
cowboy 12 3-6.124-6
Craig Edward Gordon 1 3-14
cross-eyes 38,156
Currell. David 188
Currell. David, puppets bv 20.24,25.27. 3 3.
35.36. 38.40,41.47.60.89.9 3, I 18.
142,143.152.154.156.158-9
dance-drama. Burmese 10
DaSilva. Ray 187
design, marionette 12-19
animal marionettes 98-103
plans 15.42
principles of 1 3-]4
dissecting puppets 172-9, 175-7.178-9
dogs 18. 109
dual control 145-6
ears 15.16,23,24.26, 27.111
eating I 18-20
elastic and control strings 8 3
elbows 15. 17. 34.42. 50. 51-2,142, 172.
174,176-9. 177
elephant 96
England, puppets in 9,10.11
entrances and exits 8 6
epoxy putty see Millipul
extending neck 104
extending orcollapsible puppet 118,154-6.
156
eyes 15,35
bead 20
construction 34—8, 36
control 78.81-2.92. 110-11
cross-eyes 38.156
moving 20.24.25.25 6,29. 35-38, 35,
36. 1 14.115. 1 18. 123. 127
painting 17. 34.40.48
swivelling 37
fabric hands 57
lace, proportion 15
fantoccini 10.11.16(1
feet and ankle joints
animal 18.64.97. 10 3. 107. 108
human 67-8.87. 88.161-2,172-4.
178-9
fibreglass
heads and bodies 29
painting on 40
release agent 33
shrinkage 30
fish 100. 112-1 3
foam-rubber and plywood body 45-6.48. 52
fool pump 152-4
France, puppets in 9.10
gallows Гог stringing marionettes 84-5
glass marionette 14
Goethe a n d Faust 10
Gluck and marionette operas 10
Grand Turk 168-72
Greece, puppets in ancient 9
hair 17.22. 34. 38.41.48.117.118. 122.
129. 139. 148-9. 150,159.162
hand functions, assistance with 121. 125,
126-8,126-7
hands (set*also wrist joints)
carved 14.17.19. 20. 34.42. 55.69. 70
cast 47. 57.118. 14 3.152.154
construction 55-7
fabric 57
modelled 41.56-7, 87.88.126-7
proportion 15
hanging rack or percherv 90
harpist 145
H ayd n a nd marionette operettas 10
head construction (.ver also modelled heads)
20-41
animal 96.97.101.104.109.114. 115
cardboard base shape 2 5-6
carved/sculptcd 8,9, 18. 19. 20. 34,69.
70
cast 3 3. 31M-
modelled 20.2 3-9.24.25.27, 34, 35. 36.
87.88.117, 118. 122-6.140-1.143.
1 78-9
painting and finishing 13,20, 34. 38,
39-41.40.4]
proportion 15
hip joints J 7.42 48.65-7.65
history sec tradition
horizontal control for human figures 79—84.
92-5.9 3. 142
horizontal control for animal
marionettes 100. 109-11
horse 97.99-100. 109-11
India, puppets in 9.19 73. 1 29
insects 102 113-14
internal mechimisms. access to 36. 39
intrinsic movement .14.73
I talian nuirfonet tes 10
Italy, Commedia dell* Arte 9
jelutong wood 17.22.99
Jesmonite 29, 33
joints see neck joints, elbow join Is. etc.
juggling 11 3,129-31. 1 32-3
Kathputli marionettes 7 3
knee joints 17.42.45. 47,48. 60. 61-4,62.
64, 7(1. 172-4. 176-9
laminated plywood legs 17-18. 60. 62—3.
107
latex rubber puppets (sec also casting) 47
arms and legs 50,61 -2
bodies and waist joints 46.48
feet and ankle joints 67
hands and wrist joints 57. 59.143
hardener 30. 33
heads, materials and methods 33.3 3—4
internal support 3 3
legs 60-1,107
mask 33.175-7
painting on 40-1
shoulder joints 5 3
shrinkage 30
undercutting 30
weighting 17
laying an egg 161
leather joints 1 7. 34.42
elbow joint 51-52
hip joint 45.65,66-7
knee Joint 63—4.
shoulder joint 5 3
190
INDEX
.'.Gist joint 49
wrist joint 58.
egs and knee joints 60-4. 68.15 5.172—4.
1 76-9
.нити! 97.98. 103. 107-8
carved 17. IS. 42.45.48. 60. 61. 70
concealed joint 61-2, 62
laminated 1 7. 60, 64,107
latex rubber 47, 60-1
modelled 64.178-9
mug an object 120-1
: me wood ] 3.17,20. 70
m synchronization 38
L<’ re a. F red erico Garcia 99
magnet 117.121
m an ipu lat ion S6-9 5. 109-16
rhe horizontal control Гог animal figures
109-16
the horizontal control lor human figures
92-5.9 3
ihc upright control 89.96-2.92
masks 10. ] 3. 3 3.162.174.175-7
materials, selecting 14
head 21-2.23-4.26-9. 30, 32-3
hands and feet 17
Milliputt epoxy putty) 28, 32
Mil ton. John and Paradise Lost 11
modelled heads 20.24. 2 5.26. 2 7, 34, 3 5. 36,
38.117.118.122-7.140-1.143.117,
1 56-7.1 58-9.165.176-7.178-9
modelling 21
base shape Гог 2 3
bodies 46.48, 178-9
hands and feet 4 J. 56-7. 140-1. 178—9
heads, materials and methods 23-9. 27.
36.140-1
limbs 60.64. 107.178-9
moving mouths 3 5.39
on Plasticine 24-5. 39
removing the base shape 24. 24-5
shrinkage 37
modelling stand 23.24 31,
Mod-rock 28
movement, intrinsic 14.73
Movingstage Marionettes 12.13,14,22. 35.
99.188
Mozart 10
moulding sec’casting
mouth, moving 9,1 1.25,25-6. 29. 3 5.
38-9,42,103,104.109. J17.118»
122-3.127.140-1
control 78.81-2.92,110-11.1 14.115.
I 15-16
musicians puppet 143-5. 143
native American character 20,177.178-9
nature of the puppet 1 3
necks and neck joints 16. 17.25,42—4,
104-5
old-time marionettes 1 1.45.160.161.172
open mortise and tenon joints 17,51.58.
61-3.64.67-8.104. 142
opening objects 126.127. 126-8
open-stage performing 72.84. 148-9. 153.
162
operas, marionette 10
organisations and centres 187
Orlando Furioso 8.18-19.180.18 3-5
ostrich 64.103.114. 115
painting and finishing puppets 13. 38. 39—41
animal bodies 96,98, 99.101, ] 02.103.
Ю4.105,109.114-15
hair 17. 22, 34. 38,41.48,117.118,
] 22. 129,139.148-9,150,1 59. 162
head, hands and feet 13.20, 34. 38.
39-40.40.41.69.118.148-9.15 3.
162
materials and methods 40-1
painted costume 70
principles 39-40
pantoni'mc horse 163-4
paper pulp heads 26, 26-7, 32
paste and paper heads 26, 32
Pepys, Samuel 9
perchery sec hanging rack
pianist or percussionist 143,143-4
pilaster and muslin heads 27-8, 32
plaster casts see casting
plastic wood 21
Plasticine, modelling on 23-5,24, 26, 27.
27-8.36
plywood
and foam rubber body 45-6, 107
legs 17-18.60,62-3.107
polebalancer 128-129
Polichinelle 9
polystyrene
as a base for modelling 2 5. 25—6, 27,46
as a base for casting 30
head support 33
sculpted body 106
proportion 14,15-16
Prospero and Ariel J 4
Pulcinella 9
Punchinello 9
Punch. Mr 9-10
Puppet Centre Ltd 187
Puppet Centre Collection, puppets in 9.11.
17. 18. 19. 34.48. 78.160
PuppetCralt 1 7. 20. 42. 68, 70.188
puppet puppeteer 150. 151
Puppet Theatre Barge 188
Puppeteers! IK/PuppetsOnline 187
quadrupeds (sec also animal marionettes 117
18.99-100
raising a hand to the mouth 38.117-18.
119
raising a hat 117,120
Rajasthani marionettes 73
rattling joints 42
release agent 23, 24.2 5, 27. 28, 29. 30
casting rigid heads 32-3.36
removing and replacing an object 121 -6»
122-6
reversible, two-headed puppet 158-60, 15 8
159
Rhenoflex 3000 28-9. 32
rocking bar 78-9,82
rod-marionette 8.18-19,19.1 77-86.180.
183-5
Rome, puppets in ancient 9
rotating control 8 3
run-through strings 38.117. 118.118-20.
121.122-6,128,129.1 39.142,
148-9,162.183-5
Salzburg Marionette Theatre 10
Sanskrit plays 9
Scaramouche 156-7
scorpion 99
Scottish Mask and Puppet Centre 187
screw-eye wrist joints 58
sculpt in g see carving /scu I pti ng
seals and sea lions 101.113
separater see release age nt
shoulder joints 17. 34,42, 53, 54, 52-5
Shadowsiring Theatre Frontispiece. 13. 72,
96,101.129.132-3.134. 139.146.
148-9. 153,162, 188
Sicilian rod—marionettes 8,18-19,180,
180-6,183-5
191
INDEX
skeleton 34.172—1
skeleton in disguise 171-6.17 5-7
Smith Barry, puppets by IУ 26
<moke 125 154
stakes 101-2.113.114
spciiiglit. George 10
specialized designs 152 86
balloon blower 152.1 52-4.154
blou ing. bellows and smoke 12 5, 1 52-4
body puppei I rod-mar lunette) 177-80
bubble blower 1 52. 1 5 J
Chinese bell dancer 160. 160-1
collapsible or ext ending puppet 118.
154-6,156
contortionist 164- 7
dissecting puppets 172 9. 175-7. 178-9
foul pump 152-4
Grand Turk 168-72
laying an egg 161
native American puppei 20. J 77.178-9
pantomime horse 16 3-4
reversible, two-headed puppei 1 58-60.
1 58. 1 59
rod-marionettes 8. 18-19,19.177-86.
180. 183-5
Scaramouche 156-7
Sicilian-slyle rod mark) licit es 8.18-19.
180 6, 180. 18 3-5
skeleton 34.172-4
skeleton in disguise 174-6.175-7
smoke 125.154
split-headed puppet 1 58. 159.159-60
tightrope walker 161-2,162
trick rocking horse 164. 16 5
tumbler puppei 157-8
specia I ized st ringing 117-51
acrobats 148-9
acrobat on horizontal bar 131-3
dual control J 45-6
eating 118-20
harpist 145
juggling 1 1 3.129-3 1.1 32-3
lilting an object 120-1
pole balancer 128-9
principles 11 7
puppet puppeteer 1 50.1 51
raising a hand lo the mouth 38.117-18.
119
raising ah al 117.120
removing and replacing an object 121 -6.
122-6
run-through strings 38.117. 118.
11 8 -2 1. 122-6.128.1 29.1 39. 142.
148-9.162.183-5
stilt walker 128-9.129
tandem control 146-7.148-9
trapeze artist 1 33-8. 1 34
trumpeter 145
unicyclist 138.139
violinist 144—5
wcightlilier 1 38-42. 140-1.142
split-headed puppei 1 58. 1 59.1 59-60
Staight. Gordon, puppets by 34. 5 3-4. 62.
64.87.88.92. 103.109.114.115.
117.122-7, 140-1.150.161,165.
174.175-7.178-9.188
still walker 128-9.129
stringing the marionette 84-6
a gallows 84-5
attachment points 4 3,46-8. 84-6.99
strings.
and elastic 83
attaching 84-6 99
eye J 7. 78.110-11
head 43
mouth 39.78,110-1 I 1 14. 115
run-through 38. 117. 1 18.118-20, 121.
122-6.128.129.1 39.142.148-9.
162, 1S3-5
tangles and snags 86-90
visibility of 9. 73. 74. 84
structure, marionette 16-19. 17.18. 34.97.
98
Styrofoam. see polyst} rene
tails 109. I 1 1
tandem control 146-7, 148-9
tangles and snags 86-90
Tempest. The 13
Thirlle. John, puppei by 18
tightrope walker 161-2.162
tools 21
tongue and groove wrist joint 5cS
tradition, the marionette S-l 1
trapeze artist 13 3-8. 1 34
trick rocking horse 164. 165
trumpeter 145
I u inbler puppei 157-8
undercutting 30, 32
unicyclist I 38. I 39
Union Internationale de la Marionnette 187
United Stales of America, marionettes in 10
upright control 74-9. 89.90-2
Vara brm 29. 33
Victorian marionette 11
violinist 144-5
wtiisl joints 1 7.42.48.48-50
cord joints 48
ball joints 48-9
leather joints 49
websites 187
weight and balance 14.17
weightliltcr 1 38-12. 140-1. 142
winder for marionettes 88. 90
wood-carving sec carving
Wood-Form 27
woods lor carving 21-2
Wright. John 21.86. 188
Wright. John, puppets by 17. 34.48 55.65.
69, 78
wrist joints 17. 34, 56, 57-9.172—4,176-9,
177
192
MAKING ANO MANIPULATING MARIONETTES h a
guide to the design, construction and control of string puppe:
a craft and m rformance irt that has fascinated aud*encei I
over two thousand years. Timeless pnnc.ples combined with tradlti n
and modem materials and techniques, are exp’atncd with pn ls o ' ar
clarity, accompanied by colour photographs and detailed line drawings.
• An introduction to the
marionette tradition and thj
principles and practicalities of
mwionett? d.s*[n
• Advice on materials end
methods for carving, modelling
and casting puppet parts
• Detailed explanations for
marionette control, stringing
red manipulation
For details of our other books
visit www. crowood com
• Step-by-step Instructions
for th*. cot structC_n and
jointing of human and
animal marionettes using
traditional techniques and
the latest materials
• Secrets for achieving a wide
range of special effects and
traditional acts, tricks and
transformations
9