/


![Securing the [homes] section](https://djvu.online/jpg2/I/8/A/I8AKAvjR7SfBX/497.webp)


Автор: Negus Ch.
Теги: information technology computer technology operating systems linux operating system
ISBN: 9781394317462
Год: 2026


Текст
Eleventh Edition
Downloaded from https://onlinelibrary.wiley.com/doi/ by alex jounh - Oregon Health & Science Univer , Wiley Online Library on [05/12/2025]. See the Terms and Conditions (https://onlinelibrary.wiley.com/terms-and-conditions) on Wiley Online Library for rules of use; OA articles are governed by the applicable Creative Commons License
BIBLE
Linux®
BIBLE
Eleventh Edition
Christopher Negus
Downloaded from https://onlinelibrary.wiley.com/doi/ by alex jounh - Oregon Health & Science Univer , Wiley Online Library on [05/12/2025]. See the Terms and Conditions (https://onlinelibrary.wiley.com/terms-and-conditions) on Wiley Online Library for rules of use; OA articles are governed by the applicable Creative Commons License
Linux®
Published by John Wiley & Sons, Inc., Hoboken, New Jersey.
ISBNs: 9781394317462 (paperback), 9781394317486 (ePDF), 9781394317479 (ePub)
No part of this publication may be reproduced, stored in a retrieval system, or transmitted in any form or by any
means, electronic, mechanical, photocopying, recording, scanning, or otherwise, except as permitted under Section 107
or 108 of the 1976 United States Copyright Act, without either the prior written permission of the Publisher, or
authorization through payment of the appropriate per-copy fee to the Copyright Clearance Center, Inc., 222 Rosewood
Drive, Danvers, MA 01923, (978) 750-8400, fax (978) 750-4470, or on the web at www.copyright.com. Requests to
the Publisher for permission should be addressed to the Permissions Department, John Wiley & Sons, Inc., 111 River
Street, Hoboken, NJ 07030, (201) 748-6011, fax (201) 748-6008, or online at http://www.wiley.com/go/
permission.
The manufacturer’s authorized representative according to the EU General Product Safety Regulation is Wiley-VCH
GmbH, Boschstr. 12, 69469 Weinheim, Germany, e-mail: Product_Safety@wiley.com.
Trademarks: Wiley and the Wiley logo are trademarks or registered trademarks of John Wiley & Sons, Inc. and/or
its affiliates in the United States and other countries and may not be used without written permission. Linux is a
registered trademark of Linus Torvalds. All other trademarks are the property of their respective owners. John Wiley &
Sons, Inc. is not associated with any product or vendor mentioned in this book.
Limit of Liability/Disclaimer of Warranty: While the publisher and author have used their best efforts in preparing
this book, they make no representations or warranties with respect to the accuracy or completeness of the contents
of this book and specifically disclaim any implied warranties of merchantability or fitness for a particular purpose.
No warranty may be created or extended by sales representatives or written sales materials. The advice and strategies
contained herein may not be suitable for your situation. You should consult with a professional where appropriate.
Further, readers should be aware that websites listed in this work may have changed or disappeared between when
this work was written and when it is read. Neither the publisher nor author shall be liable for any loss of profit or any
other commercial damages, including but not limited to special, incidental, consequential, or other damages.
For general information on our other products and services or for technical support, please contact our Customer Care
Department within the United States at (800) 762-2974, outside the United States at (317) 572-3993 or fax (317) 572-
4002. For product technical support, you can find answers to frequently asked questions or reach us via live chat at
https://support.wiley.com.
Wiley also publishes its books in a variety of electronic formats. Some content that appears in print may not be
available in electronic formats. For more information about Wiley products, visit our web site at www.wiley.com.
Library of Congress Cataloging in Publication data available on request.
Cover image: © aleksandarvelasevic/Getty Images
Downloaded from https://onlinelibrary.wiley.com/doi/ by alex jounh - Oregon Health & Science Univer , Wiley Online Library on [05/12/2025]. See the Terms and Conditions (https://onlinelibrary.wiley.com/terms-and-conditions) on Wiley Online Library for rules of use; OA articles are governed by the applicable Creative Commons License
Copyright © 2026 by John Wiley & Sons, Inc. All rights reserved, including rights for text and data mining and training
of artificial intelligence technologies or similar technologies.
Downloaded from https://onlinelibrary.wiley.com/doi/ by alex jounh - Oregon Health & Science Univer , Wiley Online Library on [05/12/2025]. See the Terms and Conditions (https://onlinelibrary.wiley.com/terms-and-conditions) on Wiley Online Library for rules of use; OA articles are governed by the applicable Creative Commons License
As always, I dedicate this book to my wife, Sheree.
Chris Negus is a senior technical writer for Amazon Web Services (AWS). During his first few
years with AWS, Chris worked on Linux container-related open source software projects. He
wrote the Production Environment page for the Kubernetes project, while serving on Kubernetes documentation release teams for versions 1.22, 1.23, and 1.24. For internal AWS open
source projects, Chris wrote documentation for EKS Anywhere, EKS Distro, and Karpenter
autoscaler.
More recently, Chris has worked on the AWS Elastic Kubernetes Service (EKS) documentation,
where he has contributed to documentation for the EKS getting started experience, running
AI/ML workloads on EKS, and EKS Auto Mode. He has also worked on docs for the Elastic Container Registry (ECR) and EKS Best Practices.
Before joining AWS, Chris was a Linux principal technical writer, instructor, and examiner for
Red Hat, Inc. In more than a decade with Red Hat, Chris taught hundreds of IT professionals to
become Red Hat Certified Engineers (RHCEs), and he wrote scores of documents on everything
from Linux to virtualization to cloud computing and containerization.
Before joining Red Hat, Chris spent about a decade writing dozens of books on Linux and
UNIX, including the Red Hat Linux Bible (all editions), Docker Containers, CentOS Bible, Fedora
Bible, Linux Troubleshooting Bible, Linux Toys, Linux Toys II, and 10 editions of this Linux Bible.
Chris also co-authored several books for the Linux Toolbox series for power users: Fedora Linux
Toolbox, SUSE Linux Toolbox, Ubuntu Linux Toolbox, Mac OS X Toolbox, and BSD UNIX Toolbox.
Before becoming an independent author, Chris worked for eight years with the organization
at AT&T that developed the UNIX operating system before moving to Utah to help contribute
to Novell’s UnixWare project in the 1990s. When not writing about Linux, Chris enjoys playing
soccer; hanging out with his wife, Sheree; and spending what time he can with his sons, Seth
and Caleb, when he can find where they are.
vii
Downloaded from https://onlinelibrary.wiley.com/doi/ by alex jounh - Oregon Health & Science Univer , Wiley Online Library on [05/12/2025]. See the Terms and Conditions (https://onlinelibrary.wiley.com/terms-and-conditions) on Wiley Online Library for rules of use; OA articles are governed by the applicable Creative Commons License
About the Author
David Clinton is a Linux server admin, AWS Solutions Architect, and data analyst who has
worked with IT infrastructure in both academic and enterprise environments. He’s administrated
physical systems, containers, and networks using many Ubuntu flavors for nearly two decades.
He has authored technology books—including AWS Certified Solutions Architect Study Guide:
Associate SAA-C03 Exam (Sybex, 2022)—and created nearly 100 video courses for Pluralsight that
teach Linux administration, server virtualization, generative AI tools, and IT security.
In a previous life, David spent 20 years as a high school teacher. He currently lives in
Toronto, Canada, with his wife and family and can be reached through his website:
www.bootstrap-it.com.
ix
Downloaded from https://onlinelibrary.wiley.com/doi/ by alex jounh - Oregon Health & Science Univer , Wiley Online Library on [05/12/2025]. See the Terms and Conditions (https://onlinelibrary.wiley.com/terms-and-conditions) on Wiley Online Library for rules of use; OA articles are governed by the applicable Creative Commons License
About the Technical Editor
F
irst I want to acknowledge the people I work with every day at Amazon Web Services.
I was lured away from my happy position at Red Hat with the promise of writing for open
source containerization projects (mostly related to Kubernetes). While I have done a lot
of work with those projects, lately I have focused on EKS and learning everything I can about
running Kubernetes clusters at massive scale on the AWS cloud (where more Kubernetes clusters run than anywhere else in the world).
I couldn’t ask for a better team to work with at AWS. My teammates Donovan Finch, Geoffrey
Cline, and Paul Gasca have driven innovation to improve and extend the tools and processes
needed for our work. Donovan’s support background has made him a go-to guy when I need
a deep, technical understanding of a technology. Paul has created incredible tooling to make
our jobs easier, including leading the charge into gathering our department’s efforts into integrating AI in our work. Geoffrey has shown creative leadership in moving our work to be more
open, helping to greatly extend the contributions to that work. Finally, our team is led by
Samantha Lindsey-Ahmed. Sam has been brave in personally and professionally supporting our
team as we look for ways to break through boundaries, instead of waiting for others to solve
our challenges.
As for the people at Wiley, thanks for letting me continue to develop and improve this book
over the years. Thanks to Satish Gowrishankar for shepherding the long and arduous process
of getting a writer to deliver an approximately 900-page book from the writer’s hands into
production. Thanks to Danielle Shaw for a careful and thorough review of the text, and Kim
Wimpsett for a nice final pass before the book entered production. Thanks to Saravanan
Dakshinamurthy for keeping the page proofs on track. Thanks to David Clinton for his awesome
technical review of the book (including making sure I cover Ubuntu properly). And thanks to
Pete Gaughan and Kenyon Brown for overseeing the whole process.
Thanks also to Margot Maley Hutchison from Waterside Productions for contracting the book
for me with Wiley and always looking out for my best interests for these many years. And
special thanks to Jay Kipfmiller for mowing my lawn so I could finish this book.
Finally, thanks to my wife, Sheree, for sharing her life with me and doing such a great job
raising Seth and Caleb.
—Christopher Negus
xi
Downloaded from https://onlinelibrary.wiley.com/doi/ by alex jounh - Oregon Health & Science Univer , Wiley Online Library on [05/12/2025]. See the Terms and Conditions (https://onlinelibrary.wiley.com/terms-and-conditions) on Wiley Online Library for rules of use; OA articles are governed by the applicable Creative Commons License
Acknowledgments
Introduction.............................................................................................................. xxxv
Part I: Getting Started. . . . . . . . . . . . . . . . . . . . . . . . . . . . . . . . . . . . . . . . . . 1
Chapter 1: Starting with Linux......................................................................................... 3
Chapter 2: Creating the Perfect Linux Desktop...................................................................27
Part II: Becoming a Linux Power User. . . . . . . . . . . . . . . . . . . . . . . . . . . . . . 57
Chapter 3: Using the Shell...............................................................................................59
Chapter 4: Moving Around the Filesystem..........................................................................91
Chapter 5: Working with Text Files................................................................................. 111
Chapter 6: Managing Running Processes.......................................................................... 129
Chapter 7: Writing Simple Shell Scripts........................................................................... 145
Part III: Becoming a Linux System Administrator . . . . . . . . . . . . . . . . . . . . 163
Chapter 8: Learning System Administration..................................................................... 165
Chapter 9: Installing Linux............................................................................................ 191
Chapter 10: Getting and Managing Software.................................................................... 217
Chapter 11: Managing User Accounts.............................................................................. 247
Chapter 12: Managing Disks and Filesystems.................................................................... 271
Part IV: Becoming a Linux Server Administrator. . . . . . . . . . . . . . . . . . . . . 303
Chapter 13: Understanding Server Administration............................................................ 305
Chapter 14: Administering Networking........................................................................... 339
Chapter 15: Starting and Stopping Services..................................................................... 367
Chapter 16: Configuring a Print Server............................................................................ 387
Chapter 17: Configuring a Web Server............................................................................. 409
Chapter 18: Configuring an FTP Server............................................................................ 439
Chapter 19: Configuring a Windows File Sharing (Samba) Server........................................ 459
Chapter 20: Configuring an NFS File Server...................................................................... 483
Chapter 21: Troubleshooting Linux................................................................................. 505
Chapter 22: Configuring an Artificial Intelligence Chatbot................................................. 535
Part V: Learning Linux Security Techniques. . . . . . . . . . . . . . . . . . . . . . . . . 545
Chapter 23: Understanding Basic Linux Security.............................................................. 547
Chapter 24: Understanding Advanced Linux Security........................................................ 579
xiii
Downloaded from https://onlinelibrary.wiley.com/doi/ by alex jounh - Oregon Health & Science Univer , Wiley Online Library on [05/12/2025]. See the Terms and Conditions (https://onlinelibrary.wiley.com/terms-and-conditions) on Wiley Online Library for rules of use; OA articles are governed by the applicable Creative Commons License
Contents at a Glance
Chapter 25: Enhancing Linux Security with SELinux......................................................... 613
Chapter 26: Securing Linux on a Network........................................................................ 641
Part VI: Engaging with Cloud Computing . . . . . . . . . . . . . . . . . . . . . . . . . . 661
Chapter 27: Shifting to Clouds and Containers................................................................. 663
Chapter 28: Using Linux for Cloud Computing.................................................................. 679
Chapter 29: Deploying Linux to the Cloud....................................................................... 699
Chapter 30: Automating Apps and Infrastructure with Ansible........................................... 713
Chapter 31: Deploying Applications as Containers with Kubernetes.................................... 729
Appendix A: Media....................................................................................................... 749
Appendix B: Exercise Answers........................................................................................ 759
Index.......................................................................................................................... 821
xiv
Downloaded from https://onlinelibrary.wiley.com/doi/ by alex jounh - Oregon Health & Science Univer , Wiley Online Library on [05/12/2025]. See the Terms and Conditions (https://onlinelibrary.wiley.com/terms-and-conditions) on Wiley Online Library for rules of use; OA articles are governed by the applicable Creative Commons License
Contents at a Glance
Introduction . . . . . . . . . . . . . . . . . . . . . . . . . . . . . . . . . . . . . . . . . . . . . . . . . . . . . . . . . . xxxv
Part I: Getting Started
1
Chapter 1: Starting with Linux. . . . . . . . . . . . . . . . . . . . . . . . . . . . . . . . . . . . . . . . . . . . . . . 3
Understanding What Linux Is................................................................................... 4
Understanding How Linux Differs from Other Operating Systems................................... 6
Exploring Linux History........................................................................................... 7
Free-flowing UNIX culture at Bell Labs.............................................................. 8
Commercial UNIX........................................................................................... 9
Berkeley Software Distribution arrives.....................................................10
UNIX Laboratory and commercialization..................................................10
GNU transitions UNIX to freedom....................................................................11
BSD loses some steam....................................................................................12
Linus builds the missing piece........................................................................13
OSI open source definition.............................................................................14
Understanding How Linux Distributions Emerged.......................................................16
Choosing a Red Hat distribution.....................................................................16
Using Red Hat Enterprise Linux..............................................................17
Using Fedora........................................................................................18
Choosing Ubuntu or another Debian distribution..............................................19
Finding Professional Opportunities with Linux Today.................................................19
Understanding how companies make money with Linux.....................................20
Becoming Red Hat certified............................................................................21
RHCSA topics.......................................................................................22
RHCE topics.........................................................................................23
Summary..............................................................................................................25
Chapter 2: Creating the Perfect Linux Desktop. . . . . . . . . . . . . . . . . . . . . . . . . . . . . . . . . .27
Understanding Linux Desktop Technology.................................................................28
Starting with the Fedora GNOME Desktop Live Image..................................................30
Using the GNOME Desktop.......................................................................................31
After the computer boots up..........................................................................31
Navigating with the mouse....................................................................32
Navigating with the keyboard................................................................36
Setting up the GNOME desktop.......................................................................38
Extending the GNOME desktop........................................................................39
xv
Downloaded from https://onlinelibrary.wiley.com/doi/ by alex jounh - Oregon Health & Science Univer , Wiley Online Library on [05/12/2025]. See the Terms and Conditions (https://onlinelibrary.wiley.com/terms-and-conditions) on Wiley Online Library for rules of use; OA articles are governed by the applicable Creative Commons License
Contents
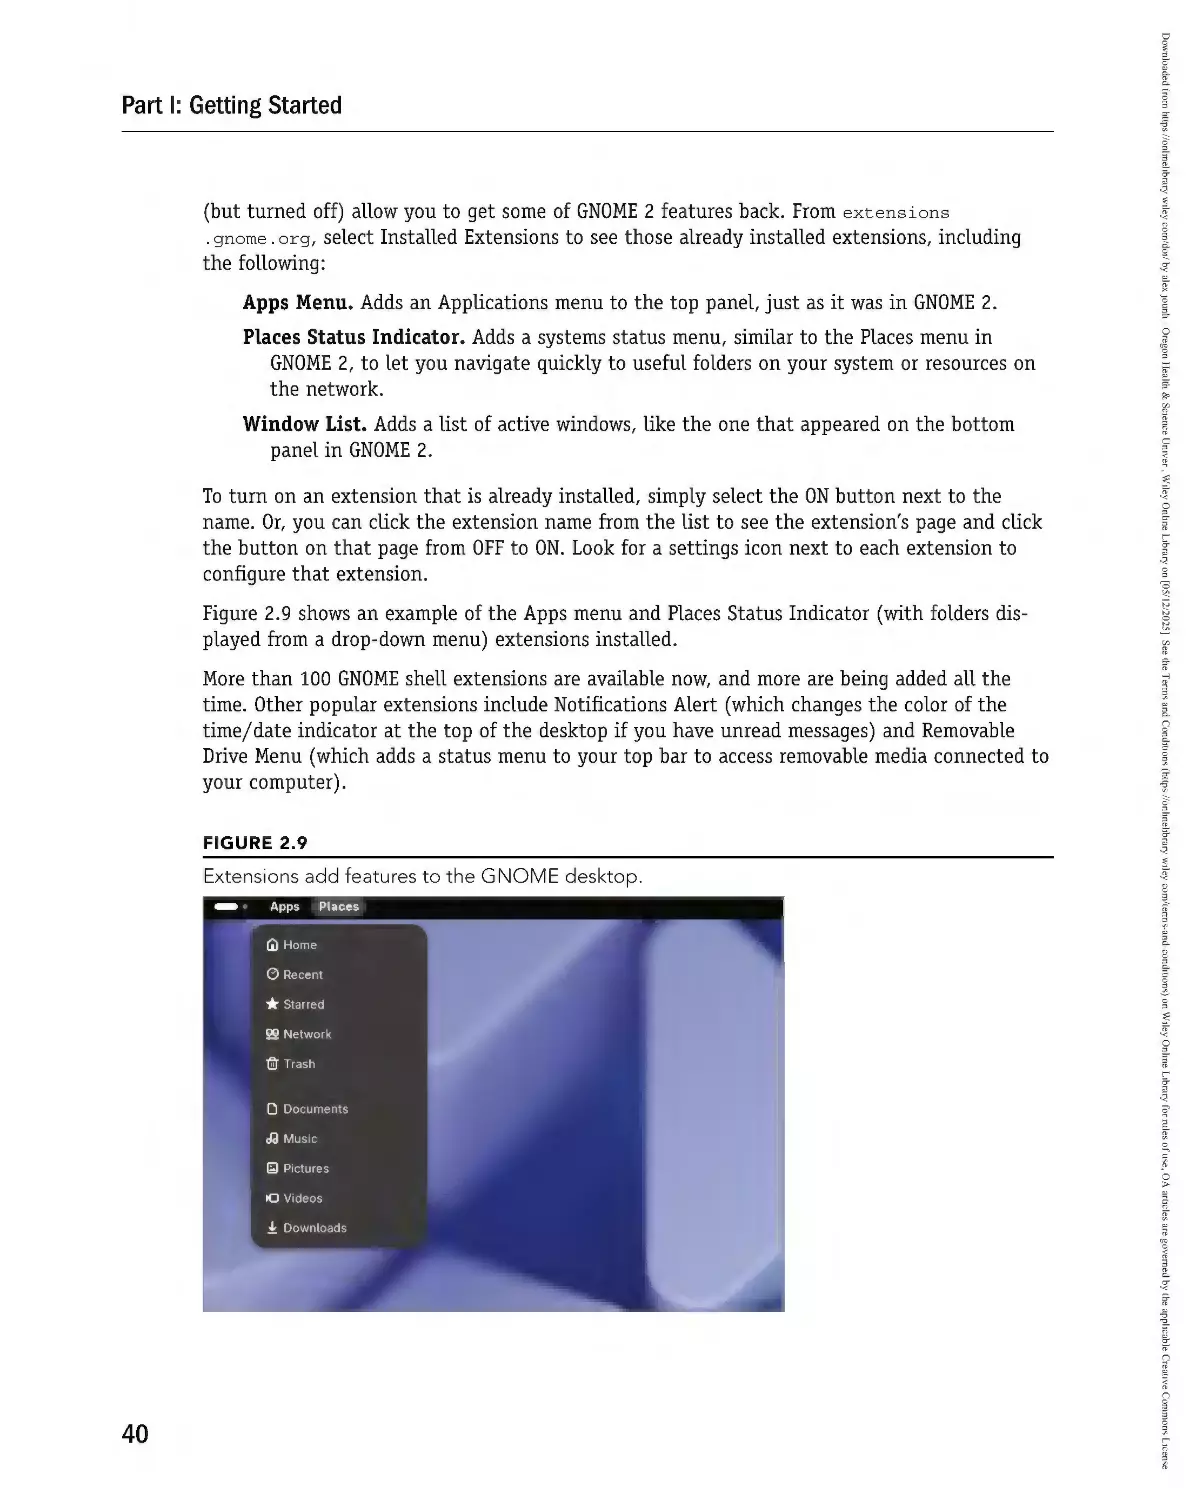
Using GNOME shell extensions................................................................39
Using the GNOME Tweak tool..................................................................41
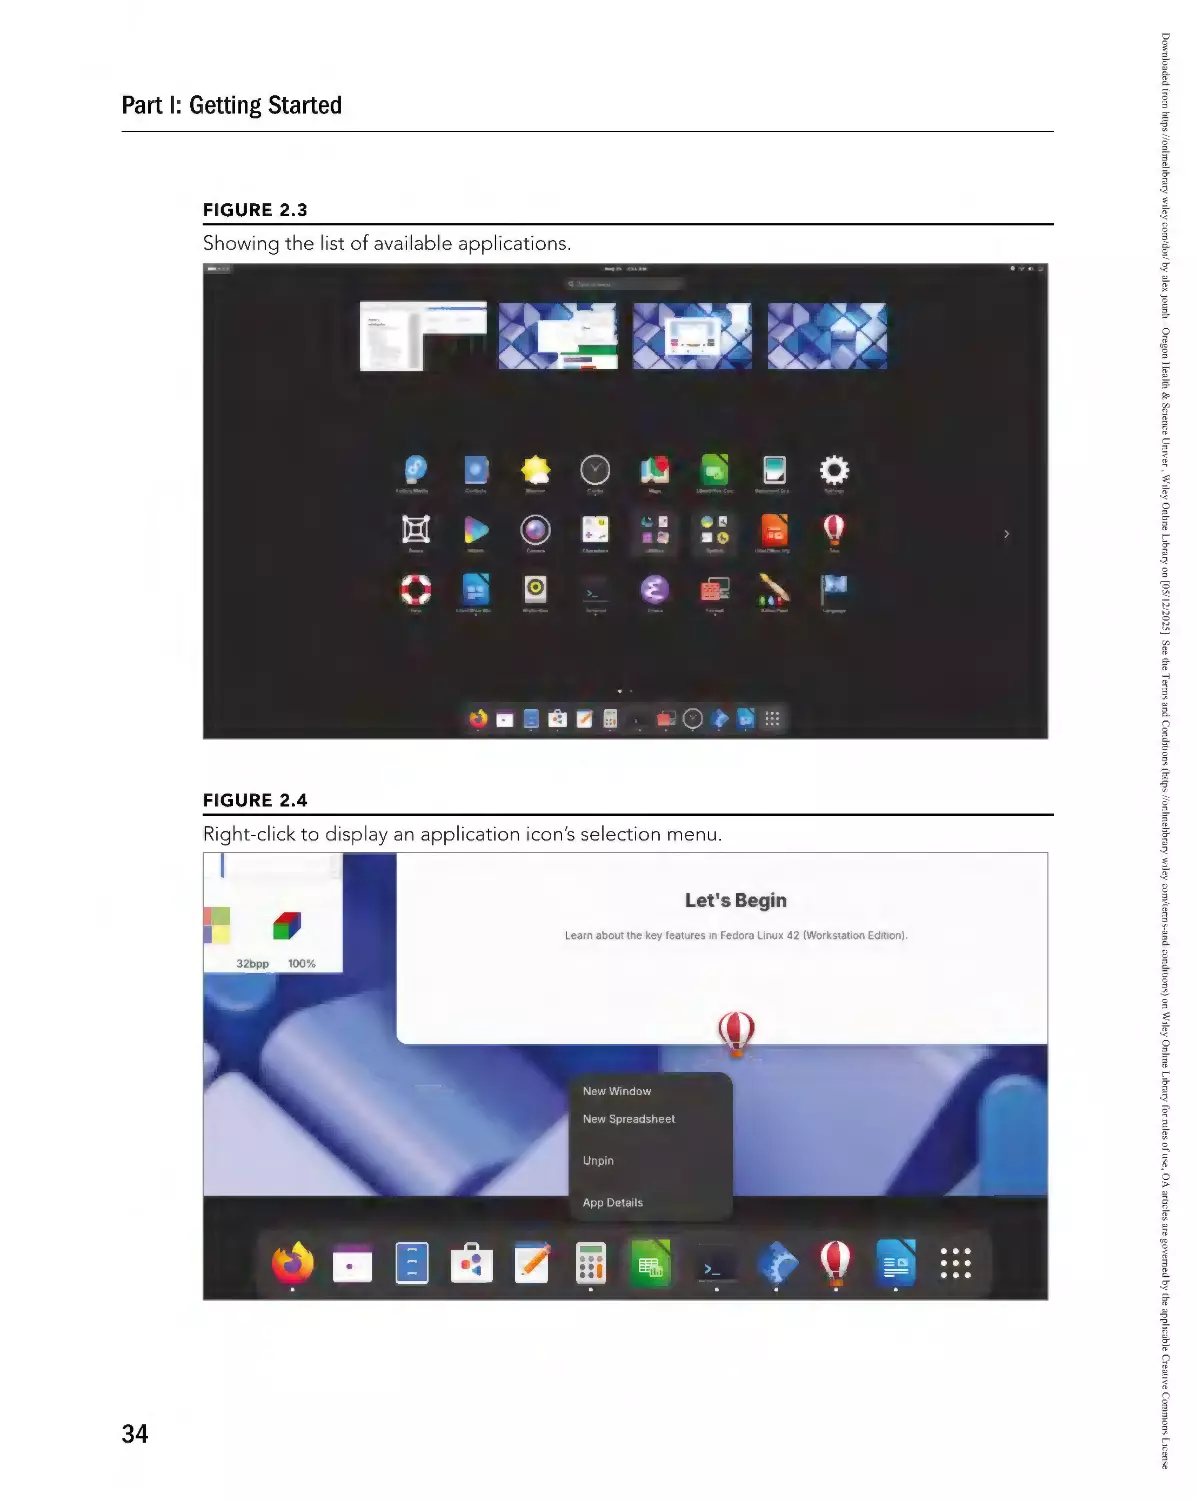
Starting with desktop applications..................................................................42
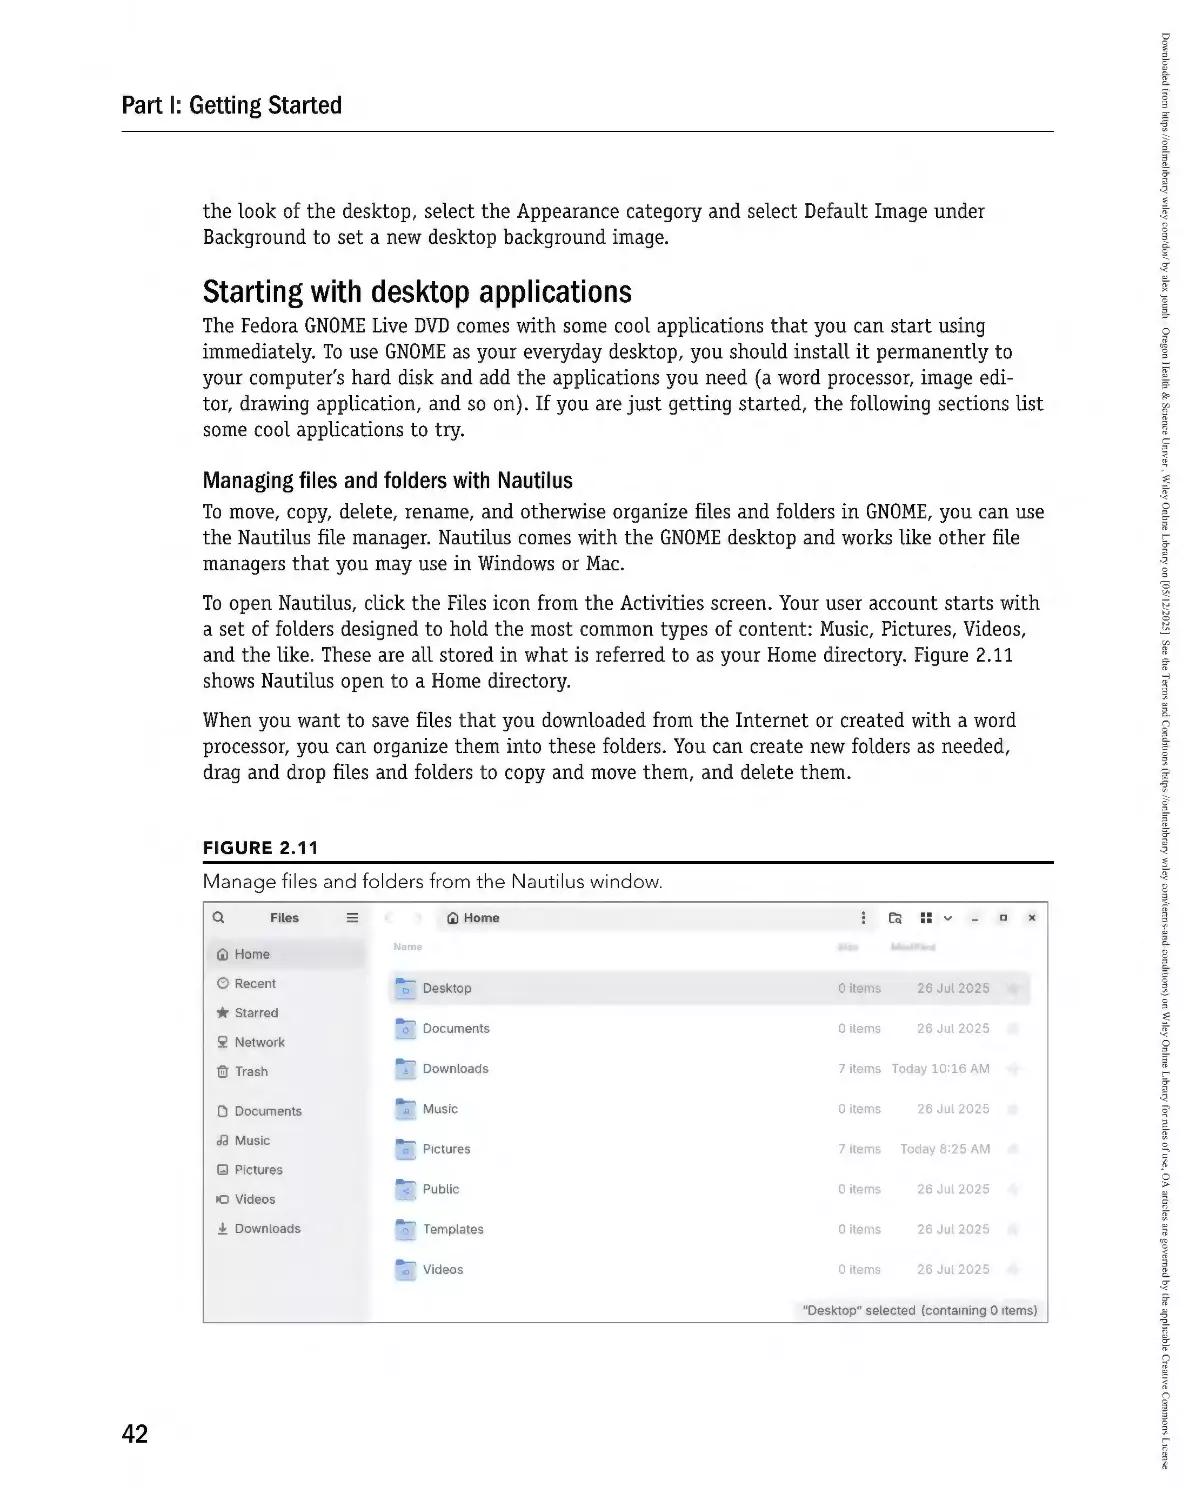
Managing files and folders with Nautilus.................................................42
Installing and managing additional software............................................43
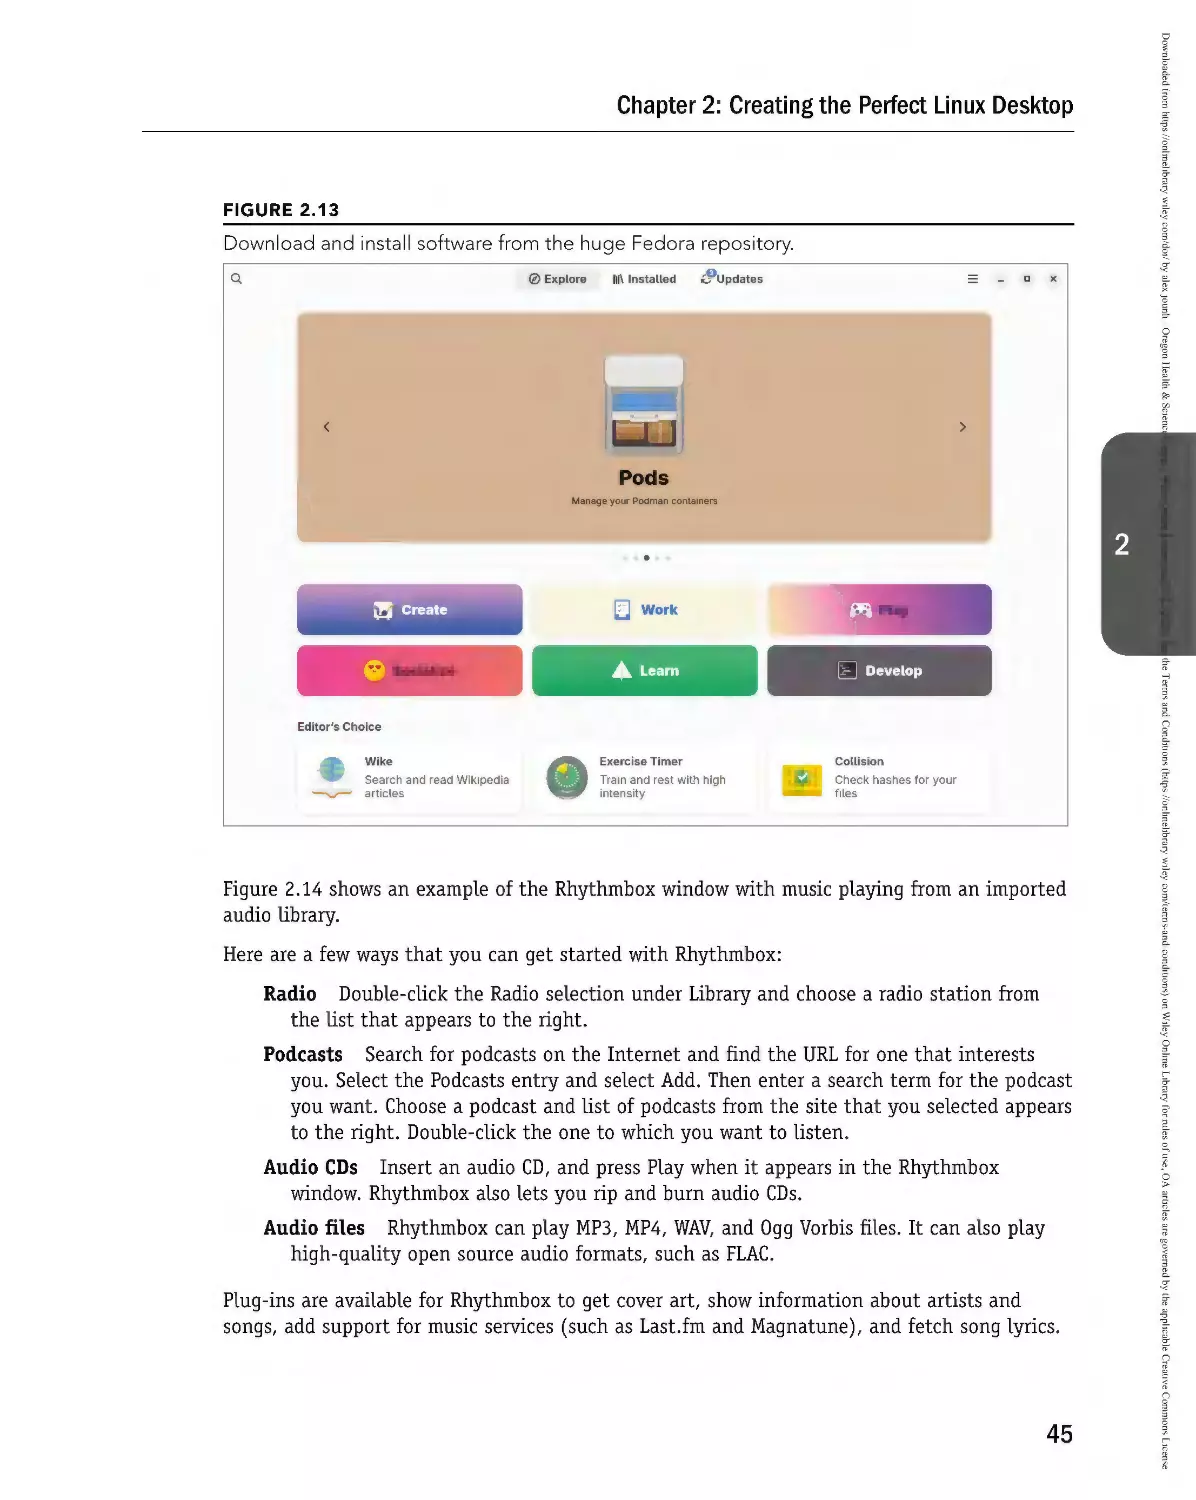
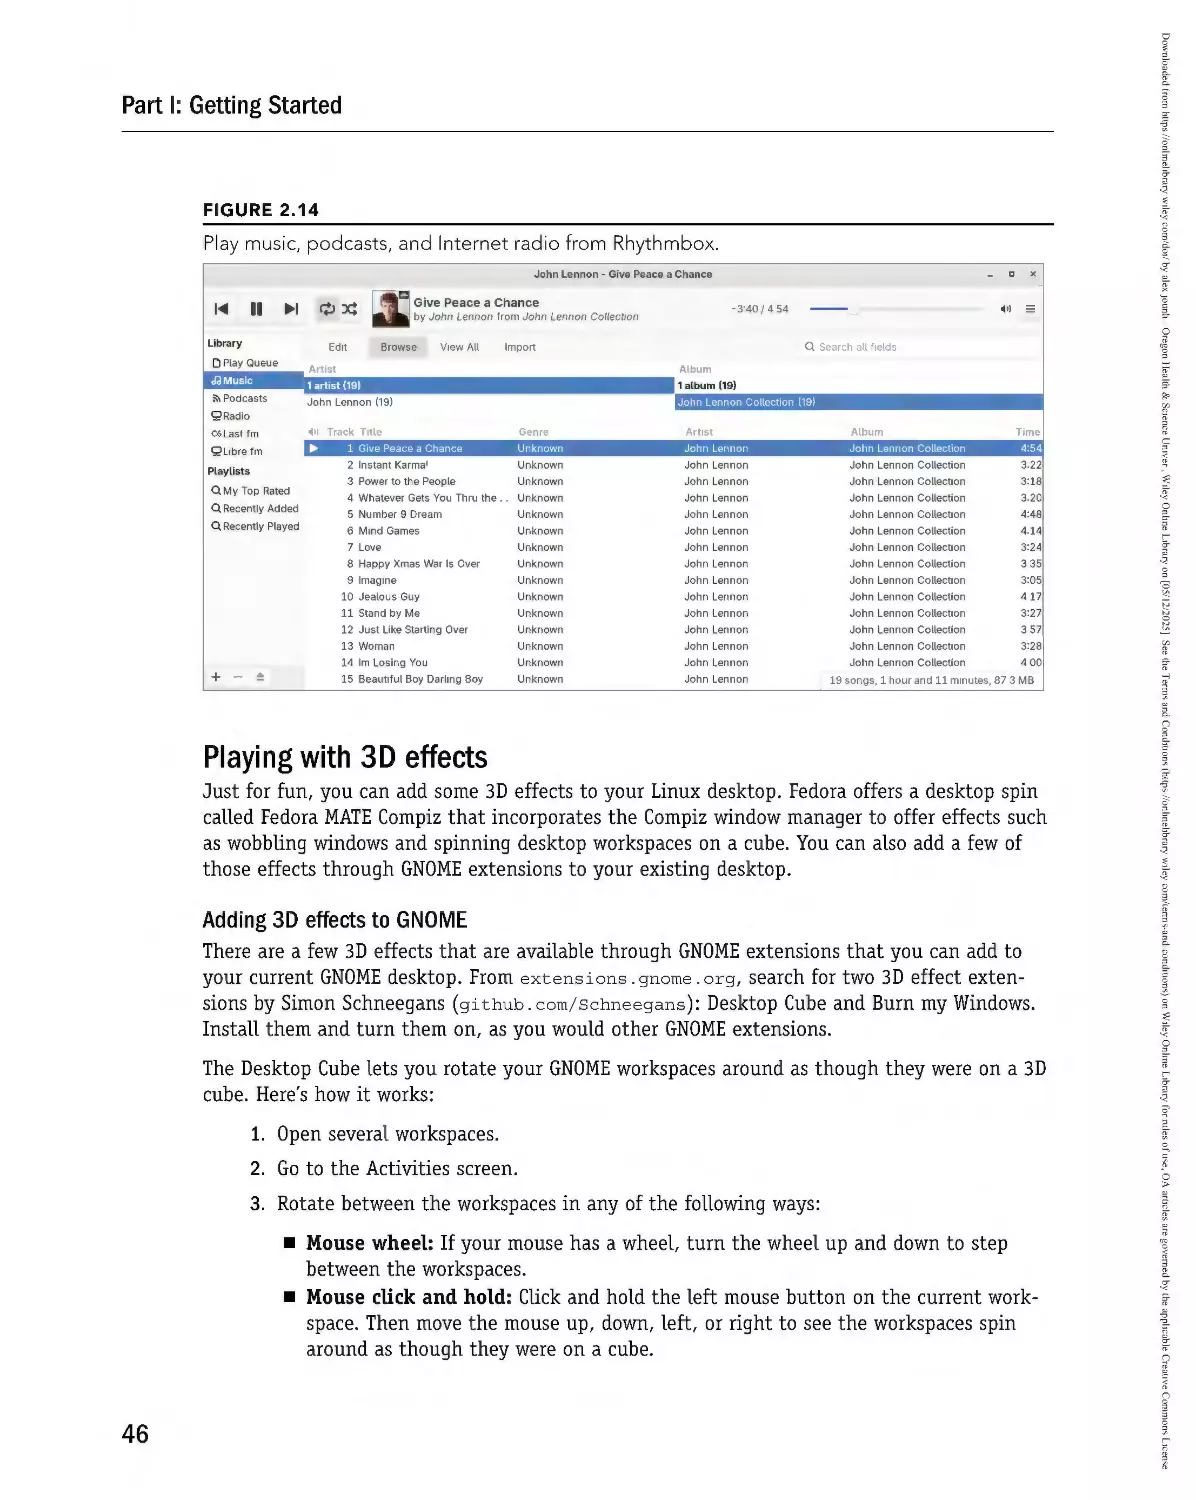
Playing music with Rhythmbox..............................................................44
Playing with 3D effects..................................................................................46
Adding 3D effects to GNOME...................................................................46
Running a MATE+Compiz desktop....................................................................47
Configuring a Developer Desktop.............................................................................49
Getting a Git account....................................................................................50
Choosing an IDE or code editor.......................................................................50
Using Visual Studio Code................................................................................51
Installing Visual Studio Code..................................................................51
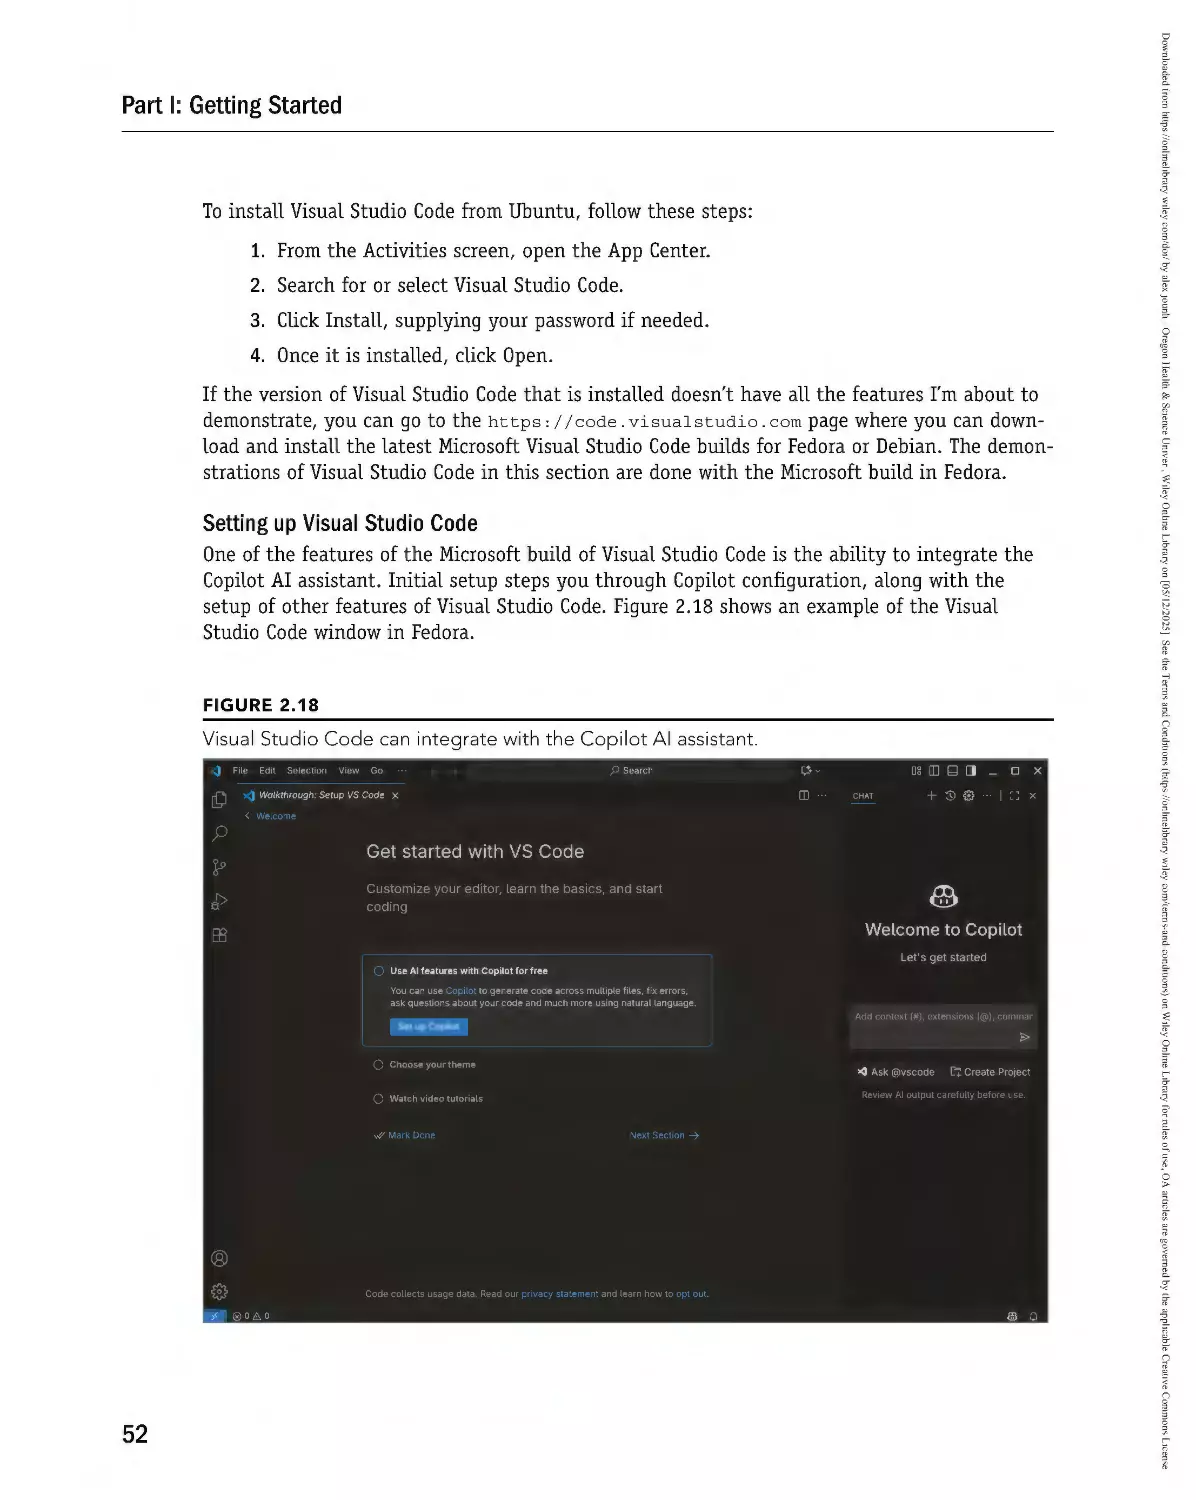
Setting up Visual Studio Code................................................................52
Summary..............................................................................................................55
Exercises..............................................................................................................55
Part II: Becoming a Linux Power User
57
Chapter 3: Using the Shell. . . . . . . . . . . . . . . . . . . . . . . . . . . . . . . . . . . . . . . . . . . . . . . . .59
About Shells and Terminal Windows.........................................................................60
Using the shell prompt..................................................................................61
Using a Terminal window...............................................................................62
Using virtual consoles....................................................................................63
Choosing Your Shell...............................................................................................63
Running Commands...............................................................................................64
Understanding command syntax.....................................................................65
Locating commands.......................................................................................68
Recalling Commands Using Command History............................................................70
Command-line editing...................................................................................71
Command-line completion..............................................................................73
Command-line recall......................................................................................74
Connecting and Expanding Commands......................................................................76
Piping between commands.............................................................................76
Sequential commands....................................................................................77
Background commands..................................................................................77
Expanding commands....................................................................................77
Expanding arithmetic expressions...................................................................78
Expanding variables.......................................................................................78
Using Shell Variables..............................................................................................79
Creating and using aliases..............................................................................81
Exiting the shell...........................................................................................81
xvi
Downloaded from https://onlinelibrary.wiley.com/doi/ by alex jounh - Oregon Health & Science Univer , Wiley Online Library on [05/12/2025]. See the Terms and Conditions (https://onlinelibrary.wiley.com/terms-and-conditions) on Wiley Online Library for rules of use; OA articles are governed by the applicable Creative Commons License
Contents
Creating Your Shell Environment.............................................................................82
Configuring your shell...................................................................................82
Setting your prompt......................................................................................83
Adding environment variables........................................................................85
Getting Information about Commands......................................................................86
Summary..............................................................................................................88
Exercises..............................................................................................................88
Chapter 4: Moving Around the Filesystem . . . . . . . . . . . . . . . . . . . . . . . . . . . . . . . . . . . . .91
Using Basic Filesystem Commands............................................................................94
Using Metacharacters and Operators.........................................................................96
Using file-matching metacharacters.................................................................96
Using file-redirection metacharacters...............................................................97
Using brace expansion characters....................................................................99
Listing Files and Directories....................................................................................99
Understanding File Permissions and Ownership........................................................ 103
Changing permissions with chmod (numbers)................................................ 105
Changing permissions with chmod (letters)................................................... 105
Setting default file permission with umask................................................... 106
Changing file ownership............................................................................... 107
Moving, Copying, and Removing Files..................................................................... 107
Summary............................................................................................................ 109
Exercises............................................................................................................ 109
Chapter 5: Working with Text Files. . . . . . . . . . . . . . . . . . . . . . . . . . . . . . . . . . . . . . . . . .111
Editing Files with vim and vi.............................................................................. 111
Starting with vi......................................................................................... 113
Adding text....................................................................................... 113
Moving around in the text................................................................... 114
Deleting, copying, and changing text.................................................... 115
Pasting (putting) text......................................................................... 116
Repeating commands.......................................................................... 116
Exiting vi......................................................................................... 116
Skipping around in the file.......................................................................... 117
Searching for text....................................................................................... 118
Using ex mode............................................................................................ 118
Learning more about vi and vim................................................................. 118
Finding Files....................................................................................................... 119
Using locate to find files by name................................................................. 119
Searching for files with find....................................................................... 121
Finding files by name.......................................................................... 121
Finding files by size............................................................................ 122
Finding files by user........................................................................... 122
Finding files by permission.................................................................. 123
xvii
Downloaded from https://onlinelibrary.wiley.com/doi/ by alex jounh - Oregon Health & Science Univer , Wiley Online Library on [05/12/2025]. See the Terms and Conditions (https://onlinelibrary.wiley.com/terms-and-conditions) on Wiley Online Library for rules of use; OA articles are governed by the applicable Creative Commons License
Contents
Finding files by date and time.............................................................. 124
Using -not and -or when finding files................................................ 124
Finding files and executing commands.................................................. 125
Searching in files with grep........................................................................ 126
Summary............................................................................................................ 127
Exercises............................................................................................................ 127
Chapter 6: Managing Running Processes. . . . . . . . . . . . . . . . . . . . . . . . . . . . . . . . . . . . .129
Understanding Processes....................................................................................... 129
Listing Processes................................................................................................. 130
Listing processes with ps............................................................................ 130
Listing processes with procs...................................................................... 132
Listing and changing processes with top...................................................... 133
Listing processes with System Monitor........................................................... 135
Managing Background and Foreground Processes..................................................... 137
Starting background processes...................................................................... 137
Using foreground and background commands................................................. 138
Killing and Renicing Processes............................................................................... 139
Killing processes with kill and killall................................................... 139
Using kill to signal processes by PID................................................ 140
Using killall to signal processes by name......................................... 141
Setting processor priority with nice and renice......................................... 141
Limiting Processes with cgroups............................................................................ 142
Summary............................................................................................................ 143
Exercises............................................................................................................ 144
Chapter 7: Writing Simple Shell Scripts. . . . . . . . . . . . . . . . . . . . . . . . . . . . . . . . . . . . . .145
Understanding Shell Scripts.................................................................................. 146
Executing and debugging shell scripts........................................................... 146
Understanding shell variables....................................................................... 147
Special shell positional parameters....................................................... 148
Reading in parameters......................................................................... 149
Parameter expansion in Bash............................................................... 149
Performing arithmetic in shell scripts............................................................ 151
Using programming constructs in shell scripts................................................ 151
The if. . .then statements.................................................................... 152
The case command.............................................................................. 154
The for...do loop........................................................................... 155
The while...do and until...do loops.......................................... 156
Trying some useful text manipulation programs.............................................. 157
The general regular expression parser (grep)...................................... 157
Remove sections of lines of text (cut)................................................... 157
Translate or delete characters (tr)..................................................... 158
The stream editor (sed)...................................................................... 158
xviii
Downloaded from https://onlinelibrary.wiley.com/doi/ by alex jounh - Oregon Health & Science Univer , Wiley Online Library on [05/12/2025]. See the Terms and Conditions (https://onlinelibrary.wiley.com/terms-and-conditions) on Wiley Online Library for rules of use; OA articles are governed by the applicable Creative Commons License
Contents
Using simple shell scripts............................................................................. 159
Telephone list.................................................................................... 159
Backup script..................................................................................... 160
Summary............................................................................................................ 161
Exercises............................................................................................................ 161
Part III: Becoming a Linux System Administrator
163
Chapter 8: Learning System Administration. . . . . . . . . . . . . . . . . . . . . . . . . . . . . . . . . . .165
Understanding System Administration.................................................................... 165
Using Graphical Administration Tools..................................................................... 167
Using Cockpit browser-based administration................................................... 167
Using system-config-* tools.......................................................................... 169
Using other browser-based admin tools.......................................................... 171
Using the root User Account................................................................................. 172
Becoming root from the shell (su command)................................................. 173
Allowing administrative access via the GUI..................................................... 174
Gaining administrative access with sudo....................................................... 174
Exploring Administrative Commands, Configuration Files, and Log Files...................... 176
Administrative commands............................................................................ 176
Administrative configuration files................................................................. 177
Administrative log files and systemd journal.......................................... 181
Using journalctl to view the systemd journal.......................................... 181
Managing log messages with rsyslogd.................................................... 182
Using Other Administrative Accounts..................................................................... 182
Checking and Configuring Hardware....................................................................... 183
Checking your hardware............................................................................... 184
Managing removable hardware...................................................................... 187
Working with loadable modules..................................................................... 187
Listing loaded modules........................................................................ 188
Loading modules................................................................................ 188
Removing modules.............................................................................. 189
Summary............................................................................................................ 189
Exercises............................................................................................................ 189
Chapter 9: Installing Linux. . . . . . . . . . . . . . . . . . . . . . . . . . . . . . . . . . . . . . . . . . . . . . . .191
Quick Starting Linux Installation........................................................................... 192
Choosing a Computer........................................................................................... 195
Installing Red Hat Enterprise Linux from Installation Media..................................... 198
Understanding Cloud-Based Installations................................................................ 201
Installing Linux in the Enterprise.......................................................................... 202
Exploring Common Installation Topics.................................................................... 203
Upgrading or installing from scratch.............................................................. 203
Dual booting.............................................................................................. 205
xix
Downloaded from https://onlinelibrary.wiley.com/doi/ by alex jounh - Oregon Health & Science Univer , Wiley Online Library on [05/12/2025]. See the Terms and Conditions (https://onlinelibrary.wiley.com/terms-and-conditions) on Wiley Online Library for rules of use; OA articles are governed by the applicable Creative Commons License
Contents
Installing Linux to run virtually................................................................... 206
Using installation boot options..................................................................... 206
Boot options for disabling features....................................................... 207
Boot options for video problems........................................................... 208
Boot options for special installation types............................................. 208
Boot options for kickstarts and remote repositories................................ 208
Miscellaneous boot options.................................................................. 209
Using specialized storage............................................................................. 209
Partitioning hard drives............................................................................... 210
Understanding different partition types................................................ 211
Tips for creating partitions.................................................................. 212
Using the GRUB boot loader......................................................................... 213
Summary............................................................................................................ 215
Exercises............................................................................................................ 216
Chapter 10: Getting and Managing Software. . . . . . . . . . . . . . . . . . . . . . . . . . . . . . . . . .217
Managing Software on the Desktop........................................................................ 218
Going Beyond the Software Window....................................................................... 219
Understanding Linux RPM and DEB Software Packaging............................................ 220
Understanding DEB packaging...................................................................... 221
Understanding RPM packaging...................................................................... 222
What is in an RPM?............................................................................. 222
Where do RPMs come from?................................................................. 223
Installing RPMs.................................................................................. 224
Managing RPM Packages with dnf and yum............................................................ 224
Transitioning from yum to dnf.................................................................... 225
Understanding how dnf works..................................................................... 225
Using YUM with third-party software repositories........................................... 228
Managing software with the dnf command.................................................... 229
Searching for packages........................................................................ 229
Installing and removing packages......................................................... 231
Updating packages.............................................................................. 233
Updating groups of packages............................................................... 234
Maintaining your RPM package database and cache................................. 235
Downloading RPMs from a YUM repository............................................. 236
Installing, Querying, and Verifying Software with the rpm Command......................... 237
Installing and removing packages with rpm................................................... 237
Querying rpm information........................................................................... 238
Verifying RPM packages............................................................................... 240
Personal installs with Snap, Homebrew, and Flatpak........................................ 241
Using Snap........................................................................................ 242
Using Homebrew................................................................................. 243
Using Flatpak..................................................................................... 244
Managing Software in the Enterprise...................................................................... 244
Summary............................................................................................................ 245
Exercises............................................................................................................ 246
xx
Downloaded from https://onlinelibrary.wiley.com/doi/ by alex jounh - Oregon Health & Science Univer , Wiley Online Library on [05/12/2025]. See the Terms and Conditions (https://onlinelibrary.wiley.com/terms-and-conditions) on Wiley Online Library for rules of use; OA articles are governed by the applicable Creative Commons License
Contents
Chapter 11: Managing User Accounts. . . . . . . . . . . . . . . . . . . . . . . . . . . . . . . . . . . . . . .247
Creating User Accounts......................................................................................... 247
Adding users with useradd........................................................................ 250
Setting user defaults................................................................................... 253
Modifying users with usermod.................................................................... 255
Deleting users with userdel...................................................................... 256
Understanding Group Accounts.............................................................................. 257
Using group accounts.................................................................................. 257
Creating group accounts............................................................................... 258
Managing Users in the Enterprise........................................................................... 259
Setting permissions with Access Control Lists................................................. 260
Setting ACLs with setfacl................................................................ 260
Setting default ACLs........................................................................... 262
Enabling ACLs.................................................................................... 263
Adding directories for users to collaborate............................................. 264
Creating group collaboration directories (set GID bit).............................. 265
Creating restricted deletion directories (sticky bit)................................. 266
Centralizing User Accounts................................................................................... 267
Summary............................................................................................................ 268
Exercises............................................................................................................ 268
Chapter 12: Managing Disks and Filesystems . . . . . . . . . . . . . . . . . . . . . . . . . . . . . . . . .271
Understanding Disk Storage.................................................................................. 271
Partitioning Hard Disks........................................................................................ 273
Understanding partition tables..................................................................... 274
Viewing disk partitions................................................................................ 274
Creating a single-partition disk..................................................................... 276
Creating a multiple-partition disk................................................................. 279
Using Logical Volume Manager Partitions................................................................ 284
Checking an existing LVM............................................................................. 284
Creating LVM logical volumes........................................................................ 287
Growing LVM logical volumes........................................................................ 288
Mounting Filesystems........................................................................................... 289
Supported filesystems.................................................................................. 290
Enabling swap areas.................................................................................... 292
Disabling swap area..................................................................................... 293
Using the fstab file to define mountable filesystems..................................... 293
Using the mount command to mount filesystems........................................... 296
Mounting a disk image in loopback............................................................... 297
Using the umount command......................................................................... 297
Using the mkfs Command to Create a Filesystem.................................................... 298
Managing Storage with Cockpit............................................................................. 299
Summary............................................................................................................ 301
Exercises............................................................................................................ 301
xxi
Downloaded from https://onlinelibrary.wiley.com/doi/ by alex jounh - Oregon Health & Science Univer , Wiley Online Library on [05/12/2025]. See the Terms and Conditions (https://onlinelibrary.wiley.com/terms-and-conditions) on Wiley Online Library for rules of use; OA articles are governed by the applicable Creative Commons License
Contents
Part IV: Becoming a Linux Server Administrator
303
Chapter 13: Understanding Server Administration. . . . . . . . . . . . . . . . . . . . . . . . . . . . . .305
Starting with Server Administration....................................................................... 306
Step 1: Install the server.............................................................................. 306
Step 2: Configure the server......................................................................... 308
Using configuration files..................................................................... 308
Checking the default configuration....................................................... 309
Step 3: Start the server................................................................................ 309
Step 4: Secure the server............................................................................. 311
Password protection............................................................................ 311
Firewalls............................................................................................ 311
SELinux............................................................................................. 312
Security settings in configuration files.................................................. 312
Step 5: Monitor the server............................................................................ 312
Configure logging............................................................................... 312
Run system activity reports................................................................. 313
Watch activity live with Cockpit........................................................... 313
Keep system software up-to-date.......................................................... 314
Check the filesystem for signs of crackers.............................................. 314
Checking and Setting Servers................................................................................ 314
Managing Remote Access with the Secure Shell Service............................................ 314
Starting the openssh-server service............................................................... 315
Using SSH client tools.................................................................................. 316
Using ssh for remote login................................................................... 316
Using ssh for remote execution........................................................... 318
Copying files between systems with scp and rsync.............................. 319
Interactive copying with sftp............................................................... 322
Using key-based (passwordless) authentication............................................... 322
Configuring System Logging.................................................................................. 324
Enabling system logging with rsyslog............................................................ 324
Understanding the rsyslog.conf file....................................................... 325
Understanding the messages log file..................................................... 327
Setting up and using a loghost with rsyslogd.................................... 328
Watching logs with logwatch.................................................................... 330
Checking System Resources with sar.................................................................... 331
Checking System Space........................................................................................ 333
Displaying system space with df.................................................................. 333
Checking disk usage with du........................................................................ 334
Finding disk consumption with find............................................................ 334
Managing Servers in the Enterprise........................................................................ 335
Summary............................................................................................................ 336
Exercises............................................................................................................ 336
xxii
Downloaded from https://onlinelibrary.wiley.com/doi/ by alex jounh - Oregon Health & Science Univer , Wiley Online Library on [05/12/2025]. See the Terms and Conditions (https://onlinelibrary.wiley.com/terms-and-conditions) on Wiley Online Library for rules of use; OA articles are governed by the applicable Creative Commons License
Contents
Chapter 14: Administering Networking. . . . . . . . . . . . . . . . . . . . . . . . . . . . . . . . . . . . . . .339
Configuring Networking for Desktops..................................................................... 340
Checking your network interfaces................................................................. 342
Checking your network from GNOME Settings window............................. 342
Checking your network from Cockpit..................................................... 343
Checking your network from the command line...................................... 345
Configuring network interfaces..................................................................... 349
Setting IP addresses manually.............................................................. 349
Setting IP address aliases.................................................................... 350
Setting routes.................................................................................... 351
Configuring a network proxy connection........................................................ 352
Configuring Networking from the Command Line..................................................... 354
Configure networking with nmtui................................................................ 354
Editing a NetworkManager TUI connection..................................................... 355
Understanding networking configuration files................................................ 356
NetworkManager connection files......................................................... 356
/etc/hosts file.................................................................................... 357
/etc/resolv.conf file.................................................................. 358
/etc/nsswitch.conf................................................................... 358
Setting alias network interfaces.................................................................... 360
Setting up Ethernet channel bonding............................................................ 361
Configuring Networking in the Enterprise............................................................... 362
Configuring Linux as a router....................................................................... 362
Configuring Linux as a DHCP server............................................................... 363
Configuring Linux as a DNS server................................................................. 364
Configuring Linux as a proxy server............................................................... 364
Summary............................................................................................................ 365
Exercises............................................................................................................ 365
Chapter 15: Starting and Stopping Services . . . . . . . . . . . . . . . . . . . . . . . . . . . . . . . . . .367
Understanding the Initialization Daemon............................................................... 368
Understanding systemd initialization............................................................. 369
Learning systemd basics...................................................................... 369
Learning systemd’s backward compatibility to SysVinit............................ 374
Stopping and Starting Services.............................................................................. 375
Stopping and starting SysVinit services......................................................... 376
Stopping and starting systemd services.......................................................... 377
Stopping a service with systemd........................................................... 377
Starting a service with systemd............................................................ 377
Restarting a service with systemd......................................................... 378
Reloading services with systemd........................................................... 378
Enabling Persistent Services.................................................................................. 379
Enabling a service with systemd........................................................... 379
Disabling a service with systemd.......................................................... 380
xxiii
Downloaded from https://onlinelibrary.wiley.com/doi/ by alex jounh - Oregon Health & Science Univer , Wiley Online Library on [05/12/2025]. See the Terms and Conditions (https://onlinelibrary.wiley.com/terms-and-conditions) on Wiley Online Library for rules of use; OA articles are governed by the applicable Creative Commons License
Contents
Configuring a Default Runlevel or Target Unit......................................................... 382
Adding New or Customized Services....................................................................... 383
Adding new services to systemd.................................................................... 383
Step 1: Create a new or customized service configuration unit file............ 383
Step 2: Move the service configuration unit file..................................... 384
Step 3: Add the service to the Wants directory....................................... 384
Summary............................................................................................................ 386
Exercises............................................................................................................ 386
Chapter 16: Configuring a Print Server. . . . . . . . . . . . . . . . . . . . . . . . . . . . . . . . . . . . . . 387
Common UNIX Printing System.............................................................................. 388
Setting Up Printers.............................................................................................. 389
Adding a printer automatically..................................................................... 390
Using web-based CUPS administration............................................................ 390
Allow remote printing administration................................................... 391
Add a printer not automatically detected.............................................. 391
Using the Print Settings window................................................................... 393
Configuring local printers with the Print Settings window....................... 393
Configuring remote printers................................................................. 396
Adding a remote CUPS printer.............................................................. 397
Adding a remote UNIX (LDP/LPR) printer.............................................. 397
Adding a Windows (SMB) printer.......................................................... 398
Working with CUPS Printing.................................................................................. 399
Configuring the CUPS server (cupsd.conf)...................................................... 399
Starting the CUPS server.............................................................................. 401
Configuring CUPS printer options manually.................................................... 401
Using Printing Commands..................................................................................... 402
Printing with lp.......................................................................................... 402
Listing status with lpstat -t.......................................................................... 403
Removing print jobs with lprm...................................................................... 403
Configuring Print Servers...................................................................................... 404
Configuring a shared CUPS printer................................................................. 404
Configuring a shared Samba printer............................................................... 406
Understanding smb.conf for printing..................................................... 406
Setting up SMB clients........................................................................ 407
Summary............................................................................................................ 407
Exercises............................................................................................................ 408
Chapter 17: Configuring a Web Server. . . . . . . . . . . . . . . . . . . . . . . . . . . . . . . . . . . . . . .409
Understanding the Apache Web Server................................................................... 409
Getting and Installing Your Web Server.................................................................. 410
Understanding the httpd-core package..................................................... 410
Installing Apache........................................................................................ 413
Starting Apache.................................................................................................. 414
Securing Apache......................................................................................... 415
xxiv
Downloaded from https://onlinelibrary.wiley.com/doi/ by alex jounh - Oregon Health & Science Univer , Wiley Online Library on [05/12/2025]. See the Terms and Conditions (https://onlinelibrary.wiley.com/terms-and-conditions) on Wiley Online Library for rules of use; OA articles are governed by the applicable Creative Commons License
Contents
Apache file permissions and ownership................................................. 415
Apache and firewalls........................................................................... 416
Apache and SELinux........................................................................... 416
Understanding the Apache configuration files................................................. 417
Using directives.................................................................................. 418
Understanding default settings............................................................. 420
Adding a virtual host to Apache.................................................................... 422
Allowing users to publish their own web content............................................ 424
Securing your web traffic with SSL/TLS......................................................... 425
Understanding how SSL is configured.................................................... 427
Generating an SSL key and self-signed certificate................................... 429
Generating a certificate signing request................................................ 430
Troubleshooting Your Web Server........................................................................... 431
Checking for configuration errors.................................................................. 431
Accessing forbidden and server internal errors................................................ 433
Exploring web server deployment........................................................................... 435
Summary............................................................................................................ 435
Exercises............................................................................................................ 436
Chapter 18: Configuring an FTP Server . . . . . . . . . . . . . . . . . . . . . . . . . . . . . . . . . . . . . .439
Understanding FTP............................................................................................... 439
Installing the vsftpd FTP Server............................................................................. 441
Starting the vsftpd Service................................................................................... 442
Securing Your FTP Server...................................................................................... 445
Opening your firewall for FTP....................................................................... 445
Open firewall for FTP on recent RHEL or Fedora system............................ 446
Open firewall for FTP on older RHEL or Fedora system............................. 446
Configuring SELinux for your FTP server........................................................ 448
Relating Linux file permissions to vsftpd....................................................... 449
Configuring Your FTP Server.................................................................................. 450
Setting up user access................................................................................. 450
Allowing uploading..................................................................................... 451
Setting up vsftpd for the Internet................................................................. 452
Using FTP Clients to Connect to Your Server............................................................ 454
Accessing an FTP server with the lftp command.............................................. 454
Using the gFTP client................................................................................... 456
Summary............................................................................................................ 457
Exercises............................................................................................................ 457
Chapter 19: Configuring a Windows File Sharing (Samba) Server. . . . . . . . . . . . . . . . . . .459
Understanding Samba........................................................................................... 459
Installing Samba.................................................................................................. 460
Starting and Stopping Samba................................................................................ 461
Starting the Samba (smb) service.................................................................. 461
Starting the NetBIOS (nmbd) name server...................................................... 463
xxv
Downloaded from https://onlinelibrary.wiley.com/doi/ by alex jounh - Oregon Health & Science Univer , Wiley Online Library on [05/12/2025]. See the Terms and Conditions (https://onlinelibrary.wiley.com/terms-and-conditions) on Wiley Online Library for rules of use; OA articles are governed by the applicable Creative Commons License
Contents
Stopping the Samba (smb) and NetBIOS (nmb) services................................... 464
Securing Samba................................................................................................... 464
Configuring firewalls for Samba..................................................................... 465
Configuring SELinux for Samba..................................................................... 466
Setting SELinux Booleans for Samba..................................................... 466
Setting SELinux file contexts for Samba................................................ 467
Configuring Samba host/user permissions...................................................... 468
Configuring Samba............................................................................................... 468
Configuring the [global] section................................................................... 469
Configuring the [homes] section................................................................... 470
Securing the [homes] section............................................................... 470
Configuring the [printers] section................................................................. 471
Creating a Samba shared folder..................................................................... 472
Adding the shared folder to Samba....................................................... 472
Checking the Samba share................................................................... 472
Accessing Samba Shares....................................................................................... 475
Accessing Samba shares in Linux.................................................................. 476
Accessing Samba shares from a Linux file manager................................. 476
Mounting a Samba share from a Linux command line.............................. 478
Accessing Samba shares in Windows.............................................................. 479
Using Samba in the Enterprise............................................................................... 479
Summary............................................................................................................ 480
Exercises............................................................................................................ 480
Chapter 20: Configuring an NFS File Server. . . . . . . . . . . . . . . . . . . . . . . . . . . . . . . . . . .483
Installing an NFS Server....................................................................................... 484
Starting the NFS service....................................................................................... 485
Sharing NFS Filesystems....................................................................................... 486
Configuring the /etc/exports file............................................................ 486
Hostnames in /etc/exports............................................................ 487
Access options in /etc/exports............................................................. 488
User mapping options in /etc/exports................................................... 488
Exporting the shared filesystems................................................................... 489
Securing Your NFS Server...................................................................................... 490
Opening up your firewall for NFS................................................................... 491
Configuring SELinux for your NFS server........................................................ 492
Using NFS Filesystems.......................................................................................... 492
Viewing NFS shares...................................................................................... 493
Manually mounting an NFS filesystem............................................................ 493
Mounting an NFS filesystem at boot time....................................................... 494
Mounting noauto filesystems................................................................ 495
Using mount options........................................................................... 496
Using autofs to mount NFS filesystems on demand.......................................... 498
xxvi
Downloaded from https://onlinelibrary.wiley.com/doi/ by alex jounh - Oregon Health & Science Univer , Wiley Online Library on [05/12/2025]. See the Terms and Conditions (https://onlinelibrary.wiley.com/terms-and-conditions) on Wiley Online Library for rules of use; OA articles are governed by the applicable Creative Commons License
Contents
Automounting to the /net directory..................................................... 498
Automounting home directories........................................................... 499
Unmounting NFS filesystems................................................................................. 501
Using NFS with Cockpit................................................................................ 502
Summary............................................................................................................ 503
Exercises............................................................................................................ 504
Chapter 21: Troubleshooting Linux. . . . . . . . . . . . . . . . . . . . . . . . . . . . . . . . . . . . . . . . . .505
Boot-Up Troubleshooting...................................................................................... 505
Understanding Startup Methods.................................................................... 506
Starting with systemd......................................................................... 506
Starting from the firmware (UEFI)................................................................. 507
Troubleshooting hardware setup........................................................... 508
Troubleshooting boot order.................................................................. 509
Troubleshooting the GRUB boot loader........................................................... 510
Starting the kernel...................................................................................... 511
Troubleshooting the initialization system.............................................. 512
Troubleshooting systemd initialization.................................................. 512
Troubleshooting Software Packages........................................................................ 516
Troubleshooting Networking................................................................................. 520
Troubleshooting outgoing connections........................................................... 520
View network interfaces...................................................................... 520
Check physical connections.................................................................. 521
Check routes...................................................................................... 521
Check hostname resolution.................................................................. 522
Troubleshooting incoming connections.......................................................... 523
Check if the client can reach your system at all...................................... 523
Check if the service is available to the client......................................... 524
Check the service on the server............................................................ 525
Troubleshooting Memory...................................................................................... 525
Uncovering memory issues........................................................................... 526
Checking for memory problems............................................................. 528
Dealing with memory problems............................................................ 529
Troubleshooting in Rescue Mode............................................................................ 531
Summary............................................................................................................ 533
Exercises............................................................................................................ 533
Chapter 22: Configuring an Artificial Intelligence Chatbot . . . . . . . . . . . . . . . . . . . . . . . .535
Choosing Language Models.................................................................................... 535
Evaluating Your AI Requirements........................................................................... 536
Getting Ollama to Serve Language Models............................................................... 537
Running a language model from the command line......................................... 539
Customizing a model with Ollama.................................................................. 542
Summary............................................................................................................ 542
Exercises............................................................................................................ 542
xxvii
Downloaded from https://onlinelibrary.wiley.com/doi/ by alex jounh - Oregon Health & Science Univer , Wiley Online Library on [05/12/2025]. See the Terms and Conditions (https://onlinelibrary.wiley.com/terms-and-conditions) on Wiley Online Library for rules of use; OA articles are governed by the applicable Creative Commons License
Contents
Part V: Learning Linux Security Techniques
545
Chapter 23: Understanding Basic Linux Security . . . . . . . . . . . . . . . . . . . . . . . . . . . . . . .547
Implementing Physical Security............................................................................. 547
Implementing disaster recovery.................................................................... 548
Securing user accounts................................................................................ 549
One user per user account.................................................................... 549
Limiting access to the root user account................................................ 549
Setting expiration dates on temporary accounts..................................... 550
Removing unused user accounts........................................................... 550
Securing passwords..................................................................................... 551
Choosing good passwords..................................................................... 552
Setting and changing passwords........................................................... 553
Enforcing best password practices......................................................... 554
Understanding the password files and password hashes........................... 556
Securing the filesystem................................................................................ 558
Managing dangerous filesystem permissions........................................... 558
Securing the password files.................................................................. 559
Locking down the filesystem................................................................ 561
Managing software and services.................................................................... 562
Updating software packages................................................................. 562
Keeping up with security advisories...................................................... 562
Advanced implementation............................................................................ 563
Monitoring Your Systems...................................................................................... 563
Monitoring log files..................................................................................... 563
Monitoring the filesystem............................................................................ 567
Verifying software packages................................................................. 567
Scanning the filesystem...................................................................... 568
Detecting viruses and rootkits.............................................................. 570
Auditing and Reviewing Linux............................................................................... 575
Conducting compliance reviews..................................................................... 575
Conducting security reviews......................................................................... 575
Summary............................................................................................................ 576
Exercises............................................................................................................ 576
Chapter 24: Understanding Advanced Linux Security. . . . . . . . . . . . . . . . . . . . . . . . . . . .579
Implementing Linux Security with Cryptography..................................................... 579
Understanding hashing................................................................................ 580
Understanding encryption/decryption........................................................... 581
Understanding cryptographic ciphers.................................................... 581
Understanding cryptographic cipher keys.............................................. 583
Understanding digital signatures.......................................................... 587
Implementing Linux cryptography................................................................. 589
Ensuring file integrity......................................................................... 589
xxviii
Downloaded from https://onlinelibrary.wiley.com/doi/ by alex jounh - Oregon Health & Science Univer , Wiley Online Library on [05/12/2025]. See the Terms and Conditions (https://onlinelibrary.wiley.com/terms-and-conditions) on Wiley Online Library for rules of use; OA articles are governed by the applicable Creative Commons License
Contents
Encrypting a Linux filesystem at installation......................................... 590
Encrypting a Linux file........................................................................ 592
Encrypting Linux with miscellaneous tools............................................ 593
Using Encryption from the Desktop....................................................... 593
Implementing Linux Security with PAM.................................................................. 594
Understanding the PAM authentication process.............................................. 595
Understanding PAM contexts................................................................ 596
Understanding PAM control flags.......................................................... 596
Understanding PAM modules................................................................ 597
Understanding PAM configuration files.................................................. 598
Administering PAM on your Linux system...................................................... 598
Managing PAM configuration with authselect......................................... 599
Managing individual PAM configuration files.......................................... 601
Managing PAM system event configuration files...................................... 602
Implementing resources limits with PAM............................................... 603
Implementing time restrictions with PAM.............................................. 605
Enforcing good passwords with PAM...................................................... 606
Encouraging sudo use with PAM........................................................... 610
Obtaining more information on PAM.............................................................. 611
Summary............................................................................................................ 611
Exercises............................................................................................................ 612
Chapter 25: Enhancing Linux Security with SELinux. . . . . . . . . . . . . . . . . . . . . . . . . . . . .613
Understanding SELinux Benefits............................................................................ 613
Understanding How SELinux Works........................................................................ 615
Understanding Type Enforcement.................................................................. 616
Understanding Multi-Level Security............................................................... 617
Implementing SELinux security models.......................................................... 617
Understanding SELinux operational modes............................................. 618
Understanding SELinux security contexts.............................................. 619
Understanding SELinux Policy types...................................................... 621
Understanding SELinux policy rule packages.......................................... 623
Configuring SELinux............................................................................................. 623
Setting the SELinux mode............................................................................ 624
Setting the SELinux policy type.................................................................... 626
Managing SELinux security contexts.............................................................. 626
Managing the user security context...................................................... 627
Managing the file security context........................................................ 628
Managing the process security context.................................................. 628
Managing SELinux policy rule packages.......................................................... 629
Managing SELinux via Booleans.................................................................... 631
Monitoring and Troubleshooting SELinux................................................................ 632
Understanding SELinux logging.................................................................... 632
Reviewing SELinux messages in the audit log......................................... 632
Reviewing SELinux messages in the messages log.................................... 633
xxix
Downloaded from https://onlinelibrary.wiley.com/doi/ by alex jounh - Oregon Health & Science Univer , Wiley Online Library on [05/12/2025]. See the Terms and Conditions (https://onlinelibrary.wiley.com/terms-and-conditions) on Wiley Online Library for rules of use; OA articles are governed by the applicable Creative Commons License
Contents
Troubleshooting SELinux logging.................................................................. 634
Troubleshooting common SELinux problems................................................... 634
Using a nonstandard directory for a service........................................... 635
Using a nonstandard port for a service.................................................. 635
Moving files and losing security context labels....................................... 636
Booleans set incorrectly...................................................................... 636
Putting It All Together......................................................................................... 636
Obtaining More Information on SELinux................................................................. 637
Summary............................................................................................................ 638
Exercises............................................................................................................ 638
Chapter 26: Securing Linux on a Network . . . . . . . . . . . . . . . . . . . . . . . . . . . . . . . . . . . .641
Auditing Network Services.................................................................................... 641
Evaluating access to network services with nmap............................................ 642
Using nmap to audit your network services advertisements.............................. 646
Working with Firewalls......................................................................................... 649
Understanding firewalls............................................................................... 650
Implementing firewalls................................................................................ 651
Ubuntu UFW firewalls.......................................................................... 651
Fedora and RHEL firewalld firewalls....................................................... 653
Changing firewall rules with Cockpit..................................................... 656
Understanding the firewall-config utility............................................... 657
Summary............................................................................................................ 658
Exercises............................................................................................................ 658
Part VI: Engaging with Cloud Computing
661
Chapter 27: Shifting to Clouds and Containers . . . . . . . . . . . . . . . . . . . . . . . . . . . . . . . .663
Understanding Linux Containers............................................................................ 664
Namespaces................................................................................................ 665
Container registries..................................................................................... 666
Base images and layers................................................................................ 666
Starting with Linux Containers.............................................................................. 667
Pulling and running containers..................................................................... 667
Pulling a container............................................................................. 667
Running a shell from a container.......................................................... 668
Running an FTP server from a container................................................ 669
Starting and stopping containers.................................................................. 671
Building a container image........................................................................... 672
Build a simple container image............................................................. 672
Build an FTP container from GitHub...................................................... 673
Tagging and pushing an image to a registry.................................................... 675
Using containers in the enterprise................................................................. 677
Summary............................................................................................................ 677
Exercises............................................................................................................ 677
xxx
Downloaded from https://onlinelibrary.wiley.com/doi/ by alex jounh - Oregon Health & Science Univer , Wiley Online Library on [05/12/2025]. See the Terms and Conditions (https://onlinelibrary.wiley.com/terms-and-conditions) on Wiley Online Library for rules of use; OA articles are governed by the applicable Creative Commons License
Contents
Chapter 28: Using Linux for Cloud Computing. . . . . . . . . . . . . . . . . . . . . . . . . . . . . . . . .679
Overview of Linux and Cloud Computing................................................................. 680
Cloud hypervisors........................................................................................ 680
Cloud controllers......................................................................................... 681
Cloud storage.............................................................................................. 681
Cloud authentication................................................................................... 682
Cloud deployment and configuration............................................................. 682
Cloud platforms.......................................................................................... 682
Trying Basic Cloud Technology.............................................................................. 683
Setting Up a Small Cloud...................................................................................... 684
Configuring hypervisors............................................................................... 685
Step 1: Get Linux software................................................................... 685
Step 2: Check your computers.............................................................. 685
Step 3: Install Linux on hypervisors...................................................... 686
Step 4: Start services on the hypervisors............................................... 687
Step 5: Edit /etc/hosts, or set up DNS................................................... 688
Configuring storage..................................................................................... 688
Step 1: Install Linux software.............................................................. 688
Step 2: Configure NFS share................................................................. 689
Step 3: Start the NFS service................................................................ 689
Step 4: Mount the NFS share on the hypervisors..................................... 689
Creating virtual machines............................................................................. 690
Step 1: Get images to make virtual machines......................................... 690
Step 2: Check the network bridge......................................................... 691
Step 3: Start Virtual Machine Manager (virt-manager)............................. 691
Step 4: Check the connection details.................................................... 692
Step 5: Create a new virtual machine.................................................... 692
Managing virtual machines........................................................................... 693
Migrating virtual machines........................................................................... 694
Step 1: Identify other hypervisors........................................................ 695
Step 2: Migrate running VM to another hypervisor.................................. 695
Summary............................................................................................................ 697
Exercises............................................................................................................ 697
Chapter 29: Deploying Linux to the Cloud . . . . . . . . . . . . . . . . . . . . . . . . . . . . . . . . . . . .699
Getting Linux to Run in a Cloud............................................................................ 699
Creating Linux Images for Clouds........................................................................... 701
Configuring and running a cloud-init cloud instance....................................... 701
Investigating the cloud instance................................................................... 703
Cloning the cloud instance........................................................................... 704
Expanding your cloud-init configuration............................................... 704
Adding ssh keys with cloud-init........................................................... 705
Adding software with cloud-init........................................................... 706
Using cloud-init in enterprise computing....................................................... 707
xxxi
Downloaded from https://onlinelibrary.wiley.com/doi/ by alex jounh - Oregon Health & Science Univer , Wiley Online Library on [05/12/2025]. See the Terms and Conditions (https://onlinelibrary.wiley.com/terms-and-conditions) on Wiley Online Library for rules of use; OA articles are governed by the applicable Creative Commons License
Contents
Using Amazon EC2 to Deploy Cloud Images............................................................. 708
Summary............................................................................................................ 711
Exercises............................................................................................................ 711
Chapter 30: Automating Apps and Infrastructure with Ansible . . . . . . . . . . . . . . . . . . . . .713
Understanding Ansible......................................................................................... 714
Exploring Ansible Components.............................................................................. 715
Inventories................................................................................................. 715
Playbooks.................................................................................................. 716
Plays................................................................................................. 716
Tasks................................................................................................. 716
Modules............................................................................................. 716
Roles, imports, and includes................................................................. 717
Stepping Through an Ansible Deployment............................................................... 717
Prerequisites............................................................................................... 718
Setting up SSH keys to each node................................................................. 718
Installing Ansible................................................................................................ 720
Creating an inventory.................................................................................. 720
Authenticating to the hosts......................................................................... 721
Creating a playbook..................................................................................... 721
Run the playbook........................................................................................ 722
Running Ad Hoc Ansible Commands....................................................................... 724
Trying ad hoc commands.............................................................................. 725
Automating Tasks with Ansible Tower Automation Framework................................... 726
Summary............................................................................................................ 727
Exercises............................................................................................................ 727
Chapter 31: Deploying Applications as Containers with Kubernetes. . . . . . . . . . . . . . . . .729
Understanding Kubernetes.................................................................................... 730
Kubernetes control plane............................................................................. 731
Kubernetes data plane................................................................................. 731
Kubernetes applications............................................................................... 731
Kubernetes interfaces.................................................................................. 732
Trying Kubernetes............................................................................................... 732
Getting Kubernetes..................................................................................... 733
Starting the Kubernetes Basics Tutorial................................................. 733
Starting Minikube............................................................................... 734
Running the Kubernetes Basics tutorial......................................................... 735
Get information about your cluster....................................................... 735
Deploy a Kubernetes application........................................................... 736
Get information on the deployment’s pods............................................. 737
Expose applications with services......................................................... 740
Label a service................................................................................... 741
Delete a service.................................................................................. 742
Scale up an application....................................................................... 742
xxxii
Downloaded from https://onlinelibrary.wiley.com/doi/ by alex jounh - Oregon Health & Science Univer , Wiley Online Library on [05/12/2025]. See the Terms and Conditions (https://onlinelibrary.wiley.com/terms-and-conditions) on Wiley Online Library for rules of use; OA articles are governed by the applicable Creative Commons License
Contents
Check the load balancer...................................................................... 744
Scale down an application................................................................... 744
Enterprise-Quality Kubernetes with EKS................................................................. 745
Summary............................................................................................................ 746
Exercises............................................................................................................ 747
Appendix A: Media . . . . . . . . . . . . . . . . . . . . . . . . . . . . . . . . . . . . . . . . . . . . . . . . . . . . .749
Getting Fedora.................................................................................................... 750
Getting Red Hat Enterprise Linux.......................................................................... 752
Getting Ubuntu................................................................................................... 752
Booting Linux from a USB Drive............................................................................ 754
Creating Linux CDs and DVDs................................................................................. 754
Burning CDs/DVDs in Windows...................................................................... 755
Burning CDs/DVDs on a macOS system........................................................... 755
Burning CDs/DVDs in Linux.......................................................................... 755
Burning CDs or DVDs from a Linux desktop............................................ 756
Burning CDs or DVDs from a Linux command line................................... 757
Appendix B: Exercise Answers. . . . . . . . . . . . . . . . . . . . . . . . . . . . . . . . . . . . . . . . . . . . .759
Chapter 1: Starting with Linux.............................................................................. 759
Chapter 2: Creating the Perfect Linux Desktop........................................................ 759
Chapter 3: Using the Shell.................................................................................... 761
Chapter 4: Moving Around the Filesystem............................................................... 763
Chapter 5: Working with Text Files......................................................................... 764
Chapter 6: Managing Running Processes................................................................. 766
Chapter 7: Writing Simple Shell Scripts.................................................................. 767
Chapter 8: Learning System Administration............................................................ 770
Chapter 9: Installing Linux................................................................................... 772
Chapter 10: Getting and Managing Software............................................................ 774
Chapter 11: Managing User Accounts...................................................................... 775
Chapter 12: Managing Disks and Filesystems........................................................... 779
Chapter 13: Understanding Server Administration.................................................... 781
Chapter 14: Administering Networking................................................................... 785
Chapter 15: Starting and Stopping Services............................................................. 786
Chapter 16: Configuring a Print Server................................................................... 788
Chapter 17: Configuring a Web Server..................................................................... 790
Chapter 18: Configuring an FTP Server................................................................... 794
Chapter 19: Configuring a Windows File Sharing (Samba) Server................................ 796
Chapter 20: Configuring an NFS File Server............................................................. 798
Chapter 21: Troubleshooting Linux........................................................................ 800
Chapter 22: Configuring an Artificial Intelligence Chat Bot....................................... 802
Chapter 23: Understanding Basic Linux Security...................................................... 804
Chapter 24: Understanding Advanced Linux Security............................................... 805
xxxiii
Downloaded from https://onlinelibrary.wiley.com/doi/ by alex jounh - Oregon Health & Science Univer , Wiley Online Library on [05/12/2025]. See the Terms and Conditions (https://onlinelibrary.wiley.com/terms-and-conditions) on Wiley Online Library for rules of use; OA articles are governed by the applicable Creative Commons License
Contents
Chapter 25: Enhancing Linux Security with SELinux................................................ 807
Chapter 26: Securing Linux on a Network............................................................... 809
Chapter 27: Shifting to Clouds and Containers......................................................... 810
Chapter 28: Using Linux for Cloud Computing......................................................... 812
Chapter 29: Deploying Linux to the Cloud............................................................... 814
Chapter 30: Automating Apps and Infrastructure with Ansible.................................. 815
Chapter 31: Deploying Applications as Containers with Kubernetes............................ 817
Index . . . . . . . . . . . . . . . . . . . . . . . . . . . . . . . . . . . . . . . . . . . . . . . . . . . . . . . . . . . . . . .821
xxxiv
Downloaded from https://onlinelibrary.wiley.com/doi/ by alex jounh - Oregon Health & Science Univer , Wiley Online Library on [05/12/2025]. See the Terms and Conditions (https://onlinelibrary.wiley.com/terms-and-conditions) on Wiley Online Library for rules of use; OA articles are governed by the applicable Creative Commons License
Contents
Y
ou can’t learn Linux without using it.
I’ve come to that conclusion after more than 25 years of teaching people how to use
Linux. You can’t just read a book; you can’t just listen to a lecture. You need someone to
guide you, and you need to jump in and do it yourself.
In 1999, I wrote my first Linux book, Red Hat Linux Bible. The book’s huge success gave me
the opportunity to become a full-time, independent Linux author. For about a decade, I wrote
dozens of Linux books and explored the best ways to explain Linux from the quiet of my
small home office.
In 2008, I hit the road. I was hired by Red Hat, Inc., as a full-time instructor, teaching Linux
to professional system administrators seeking Red Hat Certified Engineer (RHCE) certification.
In my three years as a Linux instructor, I honed my teaching skills in front of a live audience
whose Linux experience ranged from none to experienced professionals. Over time, I was able
to broaden my own knowledge of Linux by acquiring about 10 certifications, including the
Red Hat Certified Architect (RHCA) certification.
When I moved on to work for Amazon Web Services in 2020, I used my foundational
knowledge of Linux to become a contributor to open source projects, primarily in the venue
of containerization. Every day, I lean on my knowledge of Linux, both in the subject matter I
cover and with the developer desktop I use to get my work done.
In previous editions of the Linux Bible, I turned my teaching experience into text to take a
reader from someone who has never used Linux to someone with a wide range of skills needed
to become a Linux professional. The skills you could acquire from previous editions remain in
effect in this edition as well. They include the following:
Beginner to certified professional: As long as you have used a computer, mouse, and
keyboard, you can start with this book. I tell you how to get Linux, begin using it,
step through critical topics, and ultimately excel at administering and securing it.
System administrator focused: When you are finished with this book, you will know how
to use Linux and how to modify and maintain it. Almost all of the topics needed to
become a Red Hat Certified Engineer are introduced in this book. That said, many software developers have also used this book to understand how to work on a Linux system
as a development platform or target for their applications.
Emphasis on command-line tools: Although point-and-click windows for managing
Linux have improved greatly in recent years, many advanced features can be utilized
only by entering commands and editing configuration files manually. I teach you how
xxxv
Downloaded from https://onlinelibrary.wiley.com/doi/ by alex jounh - Oregon Health & Science Univer , Wiley Online Library on [05/12/2025]. See the Terms and Conditions (https://onlinelibrary.wiley.com/terms-and-conditions) on Wiley Online Library for rules of use; OA articles are governed by the applicable Creative Commons License
Introduction
to become proficient with the Linux command-line shell, and I occasionally compare
shell features with graphical tools for accomplishing the same tasks.
Aimed at fewer Linux distributions: In past editions, I described about 18 different Linux distributions. With only a few notable exceptions, most popular Linux
distributions are either Red Hat based (Red Hat Enterprise Linux, Fedora, Oracle Linux,
Amazon Linux, and so on) or Debian based (Ubuntu, Linux Mint, Kali Linux, and
so forth). Although this book most thoroughly covers Red Hat distributions, I have
continued to increase the coverage of Ubuntu throughout the book, because that’s
where many of the biggest Linux fans begin.
Many, many demos and exercises: Instead of just telling you what Linux does, I actually show you what it does. Then, to make sure you got it, you have the opportunity to
try Linux exercises yourself. Every procedure and exercise has been tested to work in
Fedora or Red Hat Enterprise Linux. Most work in Ubuntu as well.
For this eleventh edition, major enhancements include a focus on developer desktop tools,
using cloud consoles, updated firewall features, running AI workloads, and personal software
installation tools:
Setting up a developer desktop: Like many others, I like to use Linux as my developer
desktop. To help you get started with that, I added a section describing developer tools
that come with Linux. I also provided a brief introduction to Git, since it is the primary
tool for storing, updating, and otherwise managing software in the open source world.
Using a cloud console: On a local Linux system, you open a terminal window or access
a virtual terminal to access a shell. For cloud-based Linux systems, there are ways of
accessing a Linux system shell from a cloud console. I describe how to do that for AWS.
Alternative software install tools: While system-wide software package installation has
traditionally been handled by RPM and Deb tools for RHEL and Ubuntu, respectively,
other tools have emerged for installing software for personal use. Descriptions of these
tools, like Snap, Homebrew, and Flatpak, are added to this edition.
Improved firewall coverage: With iptables firewalls becoming less common on
Linux systems, I dropped most iptables coverage. Instead, I beefed up descriptions of firewalld (for RHEL and Fedora systems) and introduced UFW firewalls (for
Ubuntu systems).
Setting up an AI chatbot: With the availability of AI large language models (LLMs) and
tools for managing those LLMs, it is possible to run your own AI chatbot. While this
software is challenging to run on low-powered hardware, I introduce you to how an AI
chatbot can be run in Linux.
procs for listing processes: I added a brief description of the procs utility for listing
Linux processes.
Quick install: I added a quick install section to the installation chapter for this edition.
It should help someone starting with an old Windows laptop to get and install Fedora
and overwrite their old operating system.
xxxvi
Downloaded from https://onlinelibrary.wiley.com/doi/ by alex jounh - Oregon Health & Science Univer , Wiley Online Library on [05/12/2025]. See the Terms and Conditions (https://onlinelibrary.wiley.com/terms-and-conditions) on Wiley Online Library for rules of use; OA articles are governed by the applicable Creative Commons License
Introduction
Web server deployment: I added a short section on different ways to deploy a web server.
Using authselect to manage PAM: In recent years, authselect has become the preferred
way of managing pluggable authentication modules (PAM). So I enhanced descriptions
of authselect.
Out with the old: If there were a couple of popular ways to implement a particular feature, I would typically try to address both as long as they both were relevant. However,
some features that I covered previously just became too outdated to include in this
edition, so I just cut them. These include GNOME 2, iptables, and SystemV init. Cutting
SystemV init was particularly sad for me because I was the first person to document it
when it was created in the 1980s.
How This Book Is Organized
The book is organized to enable you to start off at the beginning with Linux and grow to
become a professional Linux system administrator and power user.
Part I, “Getting Started,” includes two chapters designed to help you understand what Linux is
and get you started with a Linux desktop:
■
■
Chapter 1, “Starting with Linux,” covers topics such as what the Linux operating
system is, where it comes from, and how to get started using it.
Chapter 2, “Creating the Perfect Linux Desktop,” provides information on how you can
create a desktop system and use some of the most popular desktop features.
Part II, “Becoming a Linux Power User,” provides in-depth details on how to use the Linux
shell, work with filesystems, manipulate text files, manage processes, and use shell scripts:
■
■
■
■
■
Chapter 3, “Using the Shell,” includes information on how to access a shell, run commands, recall commands (using history), and do tab completion. The chapter also
describes how to use variables, aliases, and man pages (traditional Linux command
reference pages).
Chapter 4, “Moving Around the Filesystem,” includes commands for listing, creating,
copying, and moving files and directories. More advanced topics in this chapter include
filesystem security, such as file ownership, permissions, and access control lists.
Chapter 5, “Working with Text Files,” includes everything from basic text editors to
tools for finding files and searching for text within files.
Chapter 6, “Managing Running Processes,” describes how to see what processes are
running on your system and change them. Ways of changing processes include killing,
pausing, and sending other types of signals.
Chapter 7, “Writing Simple Shell Scripts,” includes shell commands and functions that
you can gather together into a file to run as a command itself.
xxxvii
Downloaded from https://onlinelibrary.wiley.com/doi/ by alex jounh - Oregon Health & Science Univer , Wiley Online Library on [05/12/2025]. See the Terms and Conditions (https://onlinelibrary.wiley.com/terms-and-conditions) on Wiley Online Library for rules of use; OA articles are governed by the applicable Creative Commons License
Introduction
In Part III, “Becoming a Linux System Administrator,” you learn how to administer
Linux systems:
■
■
■
■
■
Chapter 8, “Learning System Administration,” provides information on basic graphical
tools, commands, and configuration files for administering Linux systems. It introduces the Cockpit web UI for simplified, centralized Linux administration.
Chapter 9, “Installing Linux,” covers common installation tasks, such as disk partitioning and initial software package selection, as well as more advanced installation
tools, such as installing from kickstart files.
Chapter 10, “Getting and Managing Software,” provides an understanding of how software packages work and how to get and manage software packages.
Chapter 11, “Managing User Accounts,” discusses tools for adding and deleting users
and groups as well as how to centralize user account management.
Chapter 12, “Managing Disks and Filesystems,” provides information on adding partitions, creating filesystems, and mounting filesystems, as well as working with logical
volume management.
In Part IV, “Becoming a Linux Server Administrator,” you learn to create powerful network
servers and the tools needed to manage them:
■
■
■
■
■
■
■
■
■
■
xxxviii
Chapter 13, “Understanding Server Administration,” covers remote logging, monitoring
tools, and the Linux boot process.
Chapter 14, “Administering Networking,” discusses how to configure networking.
Chapter 15, “Starting and Stopping Services,” provides information on starting and
stopping services.
Chapter 16, “Configuring a Print Server,” describes how to configure printers to use
locally on your Linux system or over the network from other computers.
Chapter 17, “Configuring a Web Server,” describes how to configure an Apache web server.
Chapter 18, “Configuring an FTP Server,” covers procedures for setting up a vsftpd
FTP server that can be used to enable others to download files from your Linux system
over the network.
Chapter 19, “Configuring a Windows File Sharing (Samba) Server,” covers Windows file
server configuration with Samba.
Chapter 20, “Configuring an NFS File Server,” describes how to use Network File System
features to share folders of files among systems over a network.
Chapter 21, “Troubleshooting Linux,” covers popular tools for troubleshooting your
Linux system.
Chapter 22, “Configuring an Artificial Intelligence Chatbot,” describes how to set up
an AI chatbot using Ollama and language models of your choice.
Downloaded from https://onlinelibrary.wiley.com/doi/ by alex jounh - Oregon Health & Science Univer , Wiley Online Library on [05/12/2025]. See the Terms and Conditions (https://onlinelibrary.wiley.com/terms-and-conditions) on Wiley Online Library for rules of use; OA articles are governed by the applicable Creative Commons License
Introduction
In Part V, “Learning Linux Security Techniques,” you learn how to secure your Linux systems
and services:
■
■
■
■
Chapter 23, “Understanding Basic Linux Security,” covers basic security concepts and
techniques.
Chapter 24, “Understanding Advanced Linux Security,” provides information on using
PAM and cryptology tools to tighten system security and authentication.
Chapter 25, “Enhancing Linux Security with SELinux,” shows you how to enable Security Enhanced Linux (SELinux) to secure system services.
Chapter 26, “Securing Linux on a Network,” covers network security features, such as
firewalld and ufw firewalls, to secure system services.
In Part VI, “Engaging with Cloud Computing,” the book pivots from a single-system focus
toward containerization, cloud computing, and automation:
■
■
■
■
■
Chapter 27, “Shifting to Clouds and Containers,” describes how to pull, push, start,
stop, tag, and build container images.
Chapter 28, “Using Linux for Cloud Computing,” introduces concepts of cloud computing in Linux by describing how to set up hypervisors, build virtual machines, and
share resources across networks.
Chapter 29, “Deploying Linux to the Cloud,” describes how to deploy Linux images to
different cloud environments, including Amazon EC2 or a local Linux system that is
configured for virtualization.
Chapter 30, “Automating Apps and Infrastructure with Ansible,” tells you how to
create Ansible playbooks and run ad hoc Ansible commands to automate the
configuration of Linux systems and other devices.
Chapter 31, “Deploying Applications as Containers with Kubernetes,” describes the
Kubernetes project and how it is used to orchestrate container images, with the potential to massively scale up for large data centers.
Part VII contains two appendices to help you get the most from your exploration of Linux.
Appendix A, “Media,” provides guidance on downloading Linux distributions. Appendix B,
“Exercise Answers,” provides sample solutions to the exercises included in Chapters 2
through 31.
Conventions Used in This Book
Throughout the book, special typography indicates code and commands. Commands and code
are shown in a monospaced font:
This is how code looks.
xxxix
Downloaded from https://onlinelibrary.wiley.com/doi/ by alex jounh - Oregon Health & Science Univer , Wiley Online Library on [05/12/2025]. See the Terms and Conditions (https://onlinelibrary.wiley.com/terms-and-conditions) on Wiley Online Library for rules of use; OA articles are governed by the applicable Creative Commons License
Introduction
In the event that an example includes both input and output, the monospaced font is still
used, but input is presented in bold type to distinguish the two. Here’s an example:
$ ftp ftp.handsonhistory.com
Name (home:jake): jake
Password: ******
As for styles in the text:
■
■
■
New terms and important words appear in italic when introduced.
Keyboard strokes appear like this: Ctrl+A. This convention indicates to hold the Ctrl
key as you also press the “a” key.
Filenames, URLs, and code within the text appear as follows: persistence
.properties.
The following items call your attention to points that are particularly important.
Note
A Note box provides extra information to which you need to pay special attention.
Tip
A Tip box shows a special way of performing a particular task.
Caution
A Caution box alerts you to take special care when executing a procedure or damage to your computer hardware or software could result.
Jumping into Linux
If you are new to Linux, you might have vague ideas about what it is and where it came from.
You may have heard something about it being free (as in cost) or free (as in freedom to use it
as you please). Before you start putting your hands on Linux (which we will do soon enough),
Chapter 1 seeks to answer some of your questions about the origins and features of Linux.
Take your time and work through this book to get up to speed on Linux and how you can
make it work to meet your needs. This is your invitation to jump in and take the first step
toward becoming a Linux expert!
xl
Downloaded from https://onlinelibrary.wiley.com/doi/ by alex jounh - Oregon Health & Science Univer , Wiley Online Library on [05/12/2025]. See the Terms and Conditions (https://onlinelibrary.wiley.com/terms-and-conditions) on Wiley Online Library for rules of use; OA articles are governed by the applicable Creative Commons License
Introduction
Visit the Linux Bible website
To find links to various Linux distributions, tips on gaining Linux certification, and corrections to the book
as they become available, go to www.wiley.com/go/linuxbible11e.
How to Contact Wiley or the Author
You can contact Christopher Negus at striker57@gmail.com.
If you believe you have found a mistake in this book, please bring it to our attention. At John
Wiley & Sons, we understand how important it is to provide our customers with accurate content, but even with our best efforts an error may occur.
To submit your possible errata, please email it to our Customer Service Team at wiley
support@wiley.com with the subject line “Possible Book Errata Submission.”
xli
Downloaded from https://onlinelibrary.wiley.com/doi/ by alex jounh - Oregon Health & Science Univer , Wiley Online Library on [05/12/2025]. See the Terms and Conditions (https://onlinelibrary.wiley.com/terms-and-conditions) on Wiley Online Library for rules of use; OA articles are governed by the applicable Creative Commons License
Introduction
Getting Started
IN THIS PART
Chapter 1
Starting with Linux
Chapter 2
Creating the Perfect Linux Desktop
Linux Bible, Eleventh Edition. Christopher Negus.
© 2026 John Wiley & Sons, Inc. All rights reserved, including rights for text and data mining and training of artificial intelligence technologies or similar
technologies. Published 2026 by John Wiley & Sons, Inc.
Downloaded from https://onlinelibrary.wiley.com/doi/ by alex jounh - Oregon Health & Science Univer , Wiley Online Library on [05/12/2025]. See the Terms and Conditions (https://onlinelibrary.wiley.com/terms-and-conditions) on Wiley Online Library for rules of use; OA articles are governed by the applicable Creative Commons License
Part I
Starting with Linux
1
IN THIS CHAPTER
Learning what Linux is
Learning where Linux came from
Choosing Linux distributions
Exploring professional opportunities with Linux
Becoming certified in Linux
T
he operating systems war is over, and Linux has won. Proprietary operating systems simply cannot
keep up with the pace of improvements and quality that Linux can achieve with its culture of
sharing and innovation. Even Microsoft, whose former CEO Steve Ballmer once referred to Linux as
“a cancer,” now says that Linux’s use on its Microsoft’s Azure cloud computing service has surpassed
the use of Windows.
Linux is one of the most important technological advancements of the twenty-first century. Beyond its
impact on the growth of the Internet and its place as an enabling technology for a range of computer-
driven devices, Linux development has become a model for how collaborative projects can surpass what
single individuals and companies can do alone.
Google runs thousands upon thousands of Linux servers to power its search technology. Its Android
phones are based on Linux. Likewise, when you download and run Google’s Chrome OS, you get a browser
that is backed by a Linux operating system.
Facebook builds and deploys its site using what is referred to as a LAMP stack (Linux, Apache web server,
MySQL database, and PHP web scripting language)—all open source projects. In fact, Facebook itself uses
an open source development model, making source code for the applications and tools that drive Facebook available to the public. This model has helped Facebook shake out bugs quickly, get contributions
from around the world, and fuel its exponential growth.
Financial organizations that have trillions of dollars riding on the speed and security of their operating
systems also rely heavily on Linux. These include the New York Stock Exchange, Chicago Mercantile
Exchange, and Tokyo Stock Exchange.
3
Linux Bible, Eleventh Edition. Christopher Negus.
© 2026 John Wiley & Sons, Inc. All rights reserved, including rights for text and data mining and training of artificial intelligence technologies or similar
technologies. Published 2026 by John Wiley & Sons, Inc.
Downloaded from https://onlinelibrary.wiley.com/doi/ by alex jounh - Oregon Health & Science Univer , Wiley Online Library on [05/12/2025]. See the Terms and Conditions (https://onlinelibrary.wiley.com/terms-and-conditions) on Wiley Online Library for rules of use; OA articles are governed by the applicable Creative Commons License
CHAPTER
As cloud continues to be one of the hottest buzzwords today, a part of the cloud groundswell that
isn’t hype is that Linux and other open source technologies continue to be the foundation on which
today’s greatest cloud innovations are being built. Every software component that you need to
build a private or public cloud (such as hypervisors, cloud controllers, network storage, virtual networking, and authentication) is freely available for you to start using from the open source world.
Today, the world’s largest tech companies have gone all-in on artificial intelligence (AI). Massive data center build-outs are in progress to create and run new AI models, train and fine-tune
existing models, and add external data (with things like retrieval-augmented generation).
Cloud providers and others are making those services available to their customers at huge scale,
while encouraging customers to engage with cloud AI services, such as ChatGPT, Google Gemini,
Anthropic Claude, Microsoft Copilot, and Amazon Bedrock. Most operating systems running those
huge AI workloads, by far, are Linux systems.
The widespread adoption of Linux around the world has created huge demand for Linux expertise.
This chapter starts you down a path to becoming a Linux expert by helping you understand what
Linux is, where it came from, and what your opportunities are for becoming proficient in it.
The rest of this book provides you with hands-on activities to help you gain that expertise.
Finally, I show you how to apply that expertise to cloud technologies, including automation
tools, such as Ansible, and containerization orchestration technologies, such as Kubernetes and
OpenShift.
Understanding What Linux Is
Linux is a computer operating system. An operating system consists of the software that manages your computer and lets you run applications on it. The features that make up Linux and
similar computer operating systems include the following:
Detecting and preparing hardware: When the Linux system boots up (when you turn on
your computer), it looks at the components on your computer (processors, hard drive,
network cards, and so on) and loads the software (drivers and modules) needed to
access those particular hardware devices.
Managing processes: The operating system must keep track of multiple processes running
at the same time and decide which have access to the central processing units (CPUs)
and when. The system also must offer ways of starting, stopping, and changing the
status of processes.
Managing memory: Random access memory (RAM) and swap space (extended memory)
must be allocated to applications as they need memory. The operating system decides
how requests for memory are handled.
Providing user interfaces: An operating system must provide ways of accessing the
system. The first Linux systems were accessed from a command-line interpreter called a
shell. Today, graphical desktop interfaces are commonly available as well.
4
Downloaded from https://onlinelibrary.wiley.com/doi/ by alex jounh - Oregon Health & Science Univer , Wiley Online Library on [05/12/2025]. See the Terms and Conditions (https://onlinelibrary.wiley.com/terms-and-conditions) on Wiley Online Library for rules of use; OA articles are governed by the applicable Creative Commons License
Part I: Getting Started
Controlling filesystems: Filesystem structures are built into the operating system (or
loaded as modules). The operating system controls ownership and access to the files
and directories (folders) that the filesystems contain.
Providing user access and authentication: Creating user accounts and allowing boundaries to be set between users is a basic feature of Linux. Separate user and group
accounts enable users to control their own files and processes.
1
Offering administrative utilities: In Linux, hundreds (perhaps thousands) of commands
and graphical windows are available to do such things as add users, manage disks, monitor
the network, install software, and generally secure and manage your computer. Web UI
tools, such as Cockpit, have lowered the bar for doing complex administrative tasks.
Starting up services: To use printers, handle log messages, and provide a variety of
system and network services, processes called daemon processes run in the background,
waiting for requests to come in. Many types of services run in Linux. Linux provides
different ways of starting and stopping these services. In other words, while Linux
includes web browsers to view web pages, it can also be the computer that serves up
web pages to others. Popular server features include web, mail, database, printer, file,
DNS, and DHCP servers.
Programming tools: A wide variety of programming utilities for creating applications and
libraries for implementing specialty interfaces are available with Linux.
As someone managing Linux systems, you need to learn how to work with those features just
described. While many features can be managed using graphical interfaces, an understanding
of the shell command line is critical for someone administering Linux systems.
Modern Linux systems now go way beyond what the first UNIX systems (on which Linux was
based) could do. Advanced features in Linux, often used in large enterprises, include the
following:
Clustering: Linux can be configured to work in clusters so that multiple systems can
appear as one larger set of compute resources to the outside world. Customer requests
for services from the cluster can be distributed between instances of those services
running on multiple nodes, making access to those services continue seamlessly, even
if any single service or node becomes unavailable.
Virtualization: To manage computing resources more efficiently, Linux can run as a virtualization host. On that host, you could run other Linux systems, Microsoft Windows,
BSD, or other operating systems as virtual guests. To the outside world, each of those
virtual guests appears as a separate computer. KVM and Xen are two technologies in
Linux for creating virtual hosts.
Cloud computing: To manage large-scale virtualization environments, you can use full-
blown cloud computing platforms based primarily on Linux. Clouds such as Amazon
Web Services (AWS), Google Cloud Platform (GCP), and Microsoft Azure can simultaneously manage many virtualization hosts, virtual networks, user and system authentication methods, virtual guests, and networked storage. Clouds even allow you to create
5
Downloaded from https://onlinelibrary.wiley.com/doi/ by alex jounh - Oregon Health & Science Univer , Wiley Online Library on [05/12/2025]. See the Terms and Conditions (https://onlinelibrary.wiley.com/terms-and-conditions) on Wiley Online Library for rules of use; OA articles are governed by the applicable Creative Commons License
Chapter 1: Starting with Linux
your own virtual private clouds (VPCs) so you can fully control the security policies
and performance of the environment in which your workloads run. Projects such as
Kubernetes, which manages containerized applications, are made to scale your compute
resources up and down as the demands of your workloads change.
Real-time computing: Linux can be configured for real-time computing, where high-
priority processes can expect fast, predictable attention.
Specialized storage: Instead of just storing data on the computer’s hard disk, you can
store it on many specialized local and networked storage interfaces that are available in
Linux. Popular file-level storage choices in Linux include Network File System (NFS) and
Samba. Supported block-level network storage in Linux includes iSCSI, Fibre Channel,
and Infiniband. Entire open source storage platforms include projects such as Ceph
(https://ceph.io) and GlusterFS (https://www.gluster.org).
Some of these advanced topics are not covered in this book. However, the features covered
here for using the shell, working with disks, starting and stopping services, and configuring a
variety of servers should serve as a foundation for working with those advanced features.
Understanding How Linux Differs from Other
Operating Systems
If you are new to Linux, chances are good that you have used a Microsoft Windows or macOS
operating system. Although macOS had its roots in a free software operating system, referred to
as the Berkeley Software Distribution (more on that later), operating systems from both Microsoft
and Apple are considered proprietary operating systems. What that means is the following:
■
■
■
You cannot see the code used to create the operating system, and therefore, you
cannot change the operating system at its most basic levels if it doesn’t suit your
needs. Also, you can’t use the operating system to build your own operating system
from source code.
You cannot check the code to find bugs, explore security vulnerabilities, or simply
learn what that code is doing.
You may not be able to plug your own software easily into the operating system if the
creators of that system don’t want to expose the programming interfaces you need to
the outside world.
You might look at those statements about proprietary software and say, “What do I care? I’m
not a software developer. I don’t want to see or change how my operating system is built.”
That may be true. However, the fact that others can take free and open source software and
use it as they please has driven the explosive growth of the Internet (think Google), mobile
phones (think Android), special computing devices (think automotive infotainment systems
and software-defined vehicles), and hundreds of technology companies. Free software has
driven down computing costs and allowed for an explosion of innovation.
6
Downloaded from https://onlinelibrary.wiley.com/doi/ by alex jounh - Oregon Health & Science Univer , Wiley Online Library on [05/12/2025]. See the Terms and Conditions (https://onlinelibrary.wiley.com/terms-and-conditions) on Wiley Online Library for rules of use; OA articles are governed by the applicable Creative Commons License
Part I: Getting Started
Maybe you don’t want to use Linux—as Google, Facebook, and other companies have done—to
build the foundation for a multibillion-dollar company. Nonetheless, those companies and
others who now rely on Linux to drive their computer infrastructures need more and more
people with the skills to run those systems and deploy workloads on them.
You may wonder how a computer system that is so powerful and flexible has come to be free
as well. To understand how that could be, you need to see where Linux came from. The next
sections of this chapter describe the strange and winding path of the free software movement
that led to Linux.
Exploring Linux History
Some histories of Linux begin with the following message entitled “What would you like to
see most in minix?” posted by Linus Torvalds to the comp.os.minix newsgroup on August
25, 1991, at
https://groups.google.com/forum/#!msg/comp.os.minix/dlNtH7RRrGA/SwRavCzVE7gJ
Linus Benedict Torvalds
Hello everybody out there using minix -
I’m doing a (free) operating system (just a hobby, won’t be big and professional like gnu) for 386(486)
AT clones. This has been brewing since april, and is starting to get ready. I’d like any feedback on things
people like/dislike in minix, as my OS resembles it somewhat (same physical layout of the file-system
(due to practical reasons, among other things). . .Any suggestions are welcome, but I won’t promise I’ll
implement them :-)
Linus (torvalds@kruuna.helsinki.fi)
PS. Yes —it’s free of any minix code, and it has a multi-threaded fs. It is NOT protable[sic] (uses 386
task switching etc), and it probably never will support anything other than AT-harddisks, as that’s all I
have :-(.
Minix was a UNIX-like operating system that ran on PCs in the early 1990s. Like Minix, Linux
was also a clone of the UNIX operating system. With few exceptions, such as Microsoft Windows, most modern computer systems (including macOS and Linux itself) were derived from
UNIX operating systems, created originally by AT&T.
To truly appreciate how a free operating system could have been modeled after a proprietary
system from AT&T Bell Laboratories, it helps to understand the culture in which UNIX was created and the chain of events that made the essence of UNIX possible to reproduce freely.
Note
To learn more about how Linux was created, pick up the book Just for Fun: The Story of an Accidental Revolutionary by
Linus Torvalds (Harper Collins Publishing, 2001).
7
1
Downloaded from https://onlinelibrary.wiley.com/doi/ by alex jounh - Oregon Health & Science Univer , Wiley Online Library on [05/12/2025]. See the Terms and Conditions (https://onlinelibrary.wiley.com/terms-and-conditions) on Wiley Online Library for rules of use; OA articles are governed by the applicable Creative Commons License
Chapter 1: Starting with Linux
Free-flowing UNIX culture at Bell Labs
From the beginning, the UNIX operating system was created and nurtured in a communal environment. Its creation was not driven by market needs but by a desire to overcome impediments
to producing programs. AT&T, which owned the UNIX trademark originally, eventually made
UNIX into a commercial product. By that time, however, many of the concepts (and even much
of the early code) that made UNIX special had fallen into the public domain.
If you are not old enough to remember when AT&T split up in 1984, you may not remember a
time when AT&T was the phone company. Up until the early 1980s, AT&T didn’t have to think
much about competition because if you wanted a phone in the United States, you had to go to
AT&T. It had the luxury of funding pure research projects. The mecca for such projects was the
Bell Laboratories site in Murray Hill, New Jersey.
After a project called Multics failed around 1969, Bell Labs employees Ken Thompson and Dennis Ritchie set off on their own to create an operating system that would offer an improved
environment for developing software. Up to that time, most programs were written on paper
punch cards that had to be fed in batches to mainframe computers. In a 1980 lecture on
“The Evolution of the UNIX Time-sharing System,” Dennis Ritchie summed up the spirit that
started UNIX:
What we wanted to preserve was not just a good environment in which to do programming, but a system
around which a fellowship could form. We knew from experience that the essence of communal computing as supplied by remote-access, time-shared machines is not just to type programs into a terminal
instead of a keypunch, but to encourage close communication.
The simplicity and power of the UNIX design began breaking down barriers that, until
this point, had impeded software developers. The foundation of UNIX was set with several
key elements:
The UNIX filesystem: Because it included a structure that allowed levels of subdirectories (which, for today’s desktop users, look like folders inside of folders), UNIX could
be used to organize the files and directories in intuitive ways. Furthermore, complex
methods of accessing disks, tapes, and other devices were greatly simplified by representing those devices as individual device files that you could also access as items in a
directory.
Input/output redirection: Early UNIX systems also included input redirection and pipes.
From a command line, UNIX users could direct the output of a command to a file using
a right-arrow key (>). Later, the concept of pipes (|) was added where the output of
one command could be directed to the input of another command. For example, the
following command line concatenates (cat) file1 and file2, sorts (sort) the lines in
those files alphabetically, paginates the sorted text for printing (pr), and directs the
output to the computer’s default printer (lpr):
$ cat file1 file2 | sort | pr | lpr
This method of directing input and output enabled developers to create their own specialized utilities that could be joined with existing utilities. This modularity made it
8
Downloaded from https://onlinelibrary.wiley.com/doi/ by alex jounh - Oregon Health & Science Univer , Wiley Online Library on [05/12/2025]. See the Terms and Conditions (https://onlinelibrary.wiley.com/terms-and-conditions) on Wiley Online Library for rules of use; OA articles are governed by the applicable Creative Commons License
Part I: Getting Started
possible for a lot of code to be developed by lots of different people. A user could just
put together the pieces they needed.
Portability: Simplifying the experience of using UNIX also led to it becoming extraordinarily portable to run on different computer hardware. By having device drivers (represented by files in the filesystem tree), UNIX could present an interface to applications
in such a way that the programs didn’t have to know about the details of the underlying hardware. To port UNIX later to another system, developers had only to change the
drivers. The application programs didn’t have to change for different hardware!
To make portability a reality, however, a high-level programming language was needed to
implement the software. To that end, Brian Kernighan and Dennis Ritchie created the C programming language. In 1973, UNIX was rewritten in C. Today, C is still the primary language
used to create the UNIX (and Linux) operating system kernels.
As Ritchie went on to say in a 1979 lecture (https://www.nokia.com/bell-labs/about/
dennis-m-ritchie/hist.html):
Today, the only important UNIX program still written in assembler is the assembler itself; virtually all the
utility programs are in C, and so are most of the application’s programs, although there are sites with
many in Fortran, Pascal, and Algol 68 as well. It seems certain that much of the success of UNIX follows
from the readability, modifiability, and portability of its software that in turn follows from its expression
in high-level languages.
If you are a Linux enthusiast and are interested in what features from the early days of Linux
have survived, an interesting read is Dennis Ritchie’s reprint of the first UNIX programmer’s
manual (dated November 3, 1971). You can find it at Dennis Ritchie’s website: https://
www.nokia.com/bell-labs/about/dennis-m-ritchie/1stEdman.html. The form of this documentation is UNIX man pages, which is still the primary format for documenting UNIX and
Linux operating system commands and programming tools today.
What’s clear as you read through the early documentation and accounts of the UNIX system is
that the development was a free-flowing process, it lacked ego, and it was dedicated to making UNIX excellent. This process led to a sharing of code (both inside and outside of Bell Labs),
which allowed rapid development of a high-quality UNIX operating system. It also led to an
operating system that AT&T would find difficult to reel back in later.
Commercial UNIX
Before the AT&T divestiture in 1984, when it was split up into AT&T and seven “Baby Bell”
companies, AT&T was forbidden to sell computer systems. Companies that would later become
Verizon, Qwest (now part of CenturyLink), Nokia, and Alcatel-Lucent (now part of Nokia) were
all part of AT&T. As a result of AT&T’s monopoly of the telephone system, the U.S. government
was concerned that an unrestricted AT&T might dominate the fledgling computer industry.
Because AT&T was restricted from selling computers directly to customers before its divestiture,
UNIX source code was licensed to universities for a nominal fee. This allowed UNIX installations to grow in size and mindshare among top universities. However, there was still no UNIX
operating system for sale from AT&T that you didn’t have to compile yourself.
9
1
Downloaded from https://onlinelibrary.wiley.com/doi/ by alex jounh - Oregon Health & Science Univer , Wiley Online Library on [05/12/2025]. See the Terms and Conditions (https://onlinelibrary.wiley.com/terms-and-conditions) on Wiley Online Library for rules of use; OA articles are governed by the applicable Creative Commons License
Chapter 1: Starting with Linux
Berkeley Software Distribution arrives
In 1975, UNIX V6 became the first version of UNIX available for widespread use outside of Bell
Laboratories. From this early UNIX source code, the first major variant of UNIX was created at
University of California –Berkeley. It was named the Berkeley Software Distribution (BSD).
For most of the next decade, the BSD and Bell Labs versions of UNIX headed off in separate
directions. BSD continued forward in the free-flowing, share-the-code manner that was the
hallmark of the early Bell Labs UNIX, whereas AT&T started steering UNIX toward commercialization. With the formation of a separate UNIX Laboratory, which moved out of Murray Hill
and down the road to Summit, New Jersey, AT&T began its attempts to commercialize UNIX. By
1984, divestiture was behind AT&T and it was really ready to start selling UNIX.
UNIX Laboratory and commercialization
The UNIX Laboratory was considered a jewel that couldn’t quite find a home or a way to make
a profit. As it moved between Bell Laboratories and other areas of AT&T, its name changed
several times. It is probably best remembered by the name it had as it began its spin-off from
AT&T: UNIX System Laboratories (USL).
The UNIX source code that came out of USL, the legacy of which was sold in part to Santa Cruz
Operation (SCO), was used for a time as the basis for ever-dwindling lawsuits by SCO against
major Linux vendors (such as IBM and Red Hat, Inc.). Because of that, I think the efforts from
USL that have contributed to the success of Linux are lost on most people.
During the 1980s, of course, many computer companies were afraid that a newly divested AT&T
would pose more of a threat to controlling the computer industry than would an upstart company in Redmond, Washington. To calm the fears of IBM, Intel, Digital Equipment Corporation,
and other computer companies, the UNIX Lab made the following commitments to ensure a
level playing field:
Source code only: Instead of producing its own boxed set of UNIX, AT&T continued to
sell source code only and to make it available equally to all licensees. Each company
would then port UNIX to its own equipment. It wasn’t until about 1992, when the lab
was spun off as a joint venture with Novell (called Univel), and then eventually sold to
Novell, that a commercial boxed set of UNIX (called UnixWare) was produced directly
from that source code.
Published interfaces: To create an environment of fairness and community to its original equipment manufacturers (OEMs), AT&T began standardizing what different ports
of UNIX had to be able to do to still be called UNIX. To that end, Portable Operating
System Interface (POSIX) standards and the AT&T UNIX System V Interface Definition
(SVID) were specifications UNIX vendors could use to create compliant UNIX systems.
Those same documents also served as road maps for the creation of Linux.
Note
In an early email newsgroup post, Linus Torvalds made a request for a copy, preferably online, of the POSIX standard. I
think that no one from AT&T expected someone actually to be able to write their own clone of UNIX from those interfaces
without using any of its UNIX source code.
10
Downloaded from https://onlinelibrary.wiley.com/doi/ by alex jounh - Oregon Health & Science Univer , Wiley Online Library on [05/12/2025]. See the Terms and Conditions (https://onlinelibrary.wiley.com/terms-and-conditions) on Wiley Online Library for rules of use; OA articles are governed by the applicable Creative Commons License
Part I: Getting Started
Technical approach: Again, until the very end of USL, most decisions on the direction
of UNIX were made based on technical considerations. Management was promoted
up through the technical ranks, and to my knowledge there was never any talk of
writing software to break other companies’ software or otherwise restrict the success of
USL’s partners.
When USL eventually started taking on marketing experts and creating a desktop UNIX product for end users, Microsoft Windows already had a firm grasp on the desktop market. Also,
because the direction of UNIX had always been toward source-code licensing destined for large
computing systems, USL had pricing difficulties for its products. For example, on software that
it was including with UNIX, USL found itself having to pay out per-computer licensing fees
that were based on $100,000 mainframes instead of $2,000 PCs. Add to that the fact that no
application programs were available with UnixWare and you can see why the endeavor failed.
Successful marketing of UNIX systems at the time, however, was happening with other computer companies. SCO had found a niche market, primarily selling PC versions of UNIX running
dumb terminals in small offices. Sun Microsystems was selling lots of UNIX workstations (originally based on BSD but merged with UNIX in SVR4) for programmers and high-end technology
applications (such as stock trading).
Other commercial UNIX systems were also emerging by the 1980s. This new ownership assertion
of UNIX was beginning to take its toll on the spirit of open contributions. Lawsuits were being
initiated to protect UNIX source code and trademarks. In 1984, this new, restrictive UNIX gave
rise to an organization that eventually led the path to Linux: the Free Software Foundation.
GNU transitions UNIX to freedom
In 1984, Richard M. Stallman started the GNU project (https://gnu.org), recursively named
by the phrase GNU is Not UNIX. As a project of the Free Software Foundation (FSF), GNU
was intended to become a recoding of the entire UNIX operating system that could be freely
distributed.
The GNU Project page (https://gnu.org/gnu/thegnuproject.html) tells the story of how
the project came about in Stallman’s own words. It also lays out the problems that proprietary
software companies were imposing on those software developers who wanted to share, create,
and innovate.
Although rewriting millions of lines of code might seem daunting for one or two people,
spreading the effort across dozens or even hundreds of programmers made the project possible.
Remember that UNIX was designed to be built in separate pieces that could be piped together.
Because they were reproducing commands and utilities with well-known, published interfaces,
that effort could easily be split among many developers.
It turned out that not only could the same results be gained by all new code, but in some
cases that code was better than the original UNIX versions. Because everyone could see the
code being produced for the project, poorly written code could be corrected quickly or replaced
over time.
11
1
Downloaded from https://onlinelibrary.wiley.com/doi/ by alex jounh - Oregon Health & Science Univer , Wiley Online Library on [05/12/2025]. See the Terms and Conditions (https://onlinelibrary.wiley.com/terms-and-conditions) on Wiley Online Library for rules of use; OA articles are governed by the applicable Creative Commons License
Chapter 1: Starting with Linux
If you are familiar with UNIX, try searching the hundreds of GNU software packages, which
contain thousands of commands, for your favorite UNIX command from the Free Software
Directory (https://directory.fsf.org/wiki/GNU). Chances are good that you will find it
there, along with many, many other available software projects.
Over time, the term free software has been mostly replaced by the term open source software.
The term free software is preferred by the Free Software Foundation, while open source software
is promoted by the Open Source Initiative (https://opensource.org).
To accommodate both camps, some people use the term free and open source software (FOSS)
instead. An underlying principle of FOSS, however, is that although you are free to use the
software as you like, you have some responsibility to make the improvements that you make to
the code available to others. This way, everyone in the community can benefit from your work,
as you have benefited from the work of others.
To define clearly how open source software should be handled, the GNU software project created the GNU Public License (GPL). Although many other software licenses cover slightly
different approaches to protecting free software, the GPL is the most well known—and it’s
the one that covers the Linux kernel itself. The GNU Public License includes the following
basic features:
Author rights: The original author retains the rights to their software.
Free distribution: People can use the GNU software in their own software, changing and
redistributing it as they please. They do, however, have to include the source code with
their distribution (or make it easily available).
Copyright maintained: Even if you were to repackage and resell the software, the
original GNU agreement must be maintained with the software, which means that all
future recipients of the software have the opportunity to change the source code, just
as you did.
There is no warranty on GNU software. If something goes wrong, the original developer of the
software has no obligation to fix the problem. However, many organizations, large and small,
offer paid support (often in subscription form) for the software when it is included in their
Linux or other open source software distribution. (See the section “OSI open source definition”
later in this chapter for a more detailed definition of open source software.)
Despite its success in producing thousands of UNIX utilities, the GNU project itself failed to
produce one critical piece of code: the kernel. Its attempts to build an open source kernel with
the GNU Hurd project (https://gnu.org/software/hurd/) were unsuccessful at first, so it
failed to become the premier open source kernel.
BSD loses some steam
The one software project that had a chance of beating out Linux to be the premier open source
kernel was the venerable BSD project. By the late 1980s, BSD developers at the University of
California (UC), Berkeley, realized that they had already rewritten most of the UNIX source
code they had received a decade earlier.
12
Downloaded from https://onlinelibrary.wiley.com/doi/ by alex jounh - Oregon Health & Science Univer , Wiley Online Library on [05/12/2025]. See the Terms and Conditions (https://onlinelibrary.wiley.com/terms-and-conditions) on Wiley Online Library for rules of use; OA articles are governed by the applicable Creative Commons License
Part I: Getting Started
In 1989, UC Berkeley distributed its own UNIX-like code as Net/1 and later (in 1991) as Net/2.
Just as UC Berkeley was preparing a complete, UNIX-like operating system that was free from
all AT&T code, AT&T hit them with a lawsuit in 1992. The suit claimed that the software was
written using trade secrets taken from AT&T’s UNIX system.
It’s important to note here that BSD developers had completely rewritten the copyright-
protected code from AT&T. Copyright was the primary means AT&T used to protect its rights
to the UNIX code. Some believe that if AT&T had patented the concepts covered in that code,
there might not be a Linux (or any UNIX clone) operating system today.
The lawsuit was dropped when Novell bought UNIX System Laboratories from AT&T in 1994.
Nevertheless, during that critical period there was enough fear and doubt about the legality
of the BSD code that the momentum that BSD had gained to that point in the fledgling open
source community was lost. Many people started looking for another open source alternative.
The time was ripe for a college student from Finland who was working on his own kernel.
Note
Today, BSD versions are available from the following major projects: FreeBSD, NetBSD, OpenBSD and DragonFly BSD.
People generally characterize FreeBSD as the easiest to use, NetBSD as available on the most computer hardware
platforms, and OpenBSD as fanatically secure. DragonFly BSD came along a bit later, offering high-performance and
advanced storage offerings. Many security-minded individuals still prefer BSD to Linux. Also, because of its licensing,
BSD code can be used by proprietary software vendors, such as Microsoft and Apple, who don’t want to share their
operating system code with others. macOS is built on a BSD derivative.
Linus builds the missing piece
Linus Torvalds started work on Linux in 1991, while he was a student at the University of Helsinki, Finland. He wanted to create a UNIX-like kernel so that he could use the same kind of
operating system on his home PC that he used at school. At the time, Linus was using Minix,
but he wanted to go beyond what the Minix standards permitted.
As noted earlier, Linus announced the first public version of the Linux kernel to the comp
.os.minix newsgroup on August 25, 1991, although Torvalds guesses that the first version
didn’t actually come out until mid-September of that year.
Although Torvalds stated that Linux was written for the 386 processor and probably wasn’t
portable, others persisted in encouraging (and contributing to) a more portable approach in
the early versions of Linux. By October 5, 1991, Linux 0.02 was released with much of the
original assembly code rewritten in the C programming language, which made it possible to
start porting it to other machines.
The Linux kernel was the last—and the most important—piece of code that was needed to
complete a whole UNIX-like operating system under the GPL. So when people started putting
together distributions, the name Linux and not GNU is what stuck. Some distributions, such
as Debian, however, refer to themselves as GNU/Linux distributions. (Not including GNU in the
13
1
Downloaded from https://onlinelibrary.wiley.com/doi/ by alex jounh - Oregon Health & Science Univer , Wiley Online Library on [05/12/2025]. See the Terms and Conditions (https://onlinelibrary.wiley.com/terms-and-conditions) on Wiley Online Library for rules of use; OA articles are governed by the applicable Creative Commons License
Chapter 1: Starting with Linux
title or subtitle of a Linux operating system was also a matter of much public grumbling by
some members of the GNU project. See https://www.gnu.org/gnu/gnu-linux-faq.html.)
Today, Linux can be described as an open source UNIX-like operating system that reflects a
combination of SVID, POSIX, and BSD compliance. Linux continues to aim toward compliance
with POSIX as well as with standards set by the owner of the UNIX trademark, The Open Group
(https://www.opengroup.org/membership/forums/platform/unix).
The nonprofit Open Source Development Labs, renamed the Linux Foundation after merging with the Free Standards Group (https://linuxfoundation.org), which employs Linus
Torvalds, manages the direction today of Linux development efforts. Its sponsors list is like
a Who’s Who of commercial Linux system and application vendors, including IBM/Red Hat,
Amazon Web Services, Microsoft, Meta, Google, Oracle, HP, Dell, Intel, Cisco Systems, and about
1,800 others. The Linux Foundation’s primary charter is to protect and accelerate the growth of
Linux by providing legal protection and software development standards for Linux developers.
Although much of the thrust of corporate Linux efforts is on enterprise computing, huge
improvements are continuing in the desktop arena as well. The KDE and GNOME desktop environments continuously improve the Linux experience for casual users. Newer lightweight
desktop environments such as Chrome OS, Xfce, and LXDE/LXQt now offer efficient alternatives
that today bring Linux to thousands of netbook owners.
Linus Torvalds continues to maintain and improve the Linux kernel.
Note
For a more detailed history of Linux, see the book Open Sources: Voices from the Open Source Revolution (O’Reilly,
1999). The entire first edition is available online at
https://oreilly.com/openbook/opensources/book
OSI open source definition
Linux provides a platform that lets software developers change the operating system as they
like and get a wide range of help creating the applications they need. One of the watchdogs of
the open source movement is the Open Source Initiative (OSI) (https://opensource.org).
Although the primary goal of open source software is to make source code available, other
goals of open source software are also defined by OSI in its open source definition. Most of the
following rules for acceptable open source licenses serve to protect the freedom and integrity
of the open source code:
Free distribution: An open source license can’t require a fee from anyone who resells
the software.
Source code: The source code must be included with the software, and there can be no
restrictions on redistribution.
14
Downloaded from https://onlinelibrary.wiley.com/doi/ by alex jounh - Oregon Health & Science Univer , Wiley Online Library on [05/12/2025]. See the Terms and Conditions (https://onlinelibrary.wiley.com/terms-and-conditions) on Wiley Online Library for rules of use; OA articles are governed by the applicable Creative Commons License
Part I: Getting Started
Derived works: The license must allow modification and redistribution of the code under
the same terms.
Integrity of the author’s source code: The license may require that those who use
the source code remove the original project’s name or version if they change the
source code.
1
No discrimination against persons or groups: The license must allow all people to be
equally eligible to use the source code.
No discrimination against fields of endeavor: The license can’t restrict a project from
using the source code because it is commercial, or because it is associated with a field
of endeavor that the software provider doesn’t like.
Distribution of license: No additional license should be needed to use and redistribute
the software.
License must not be specific to a product: The license can’t restrict the source code to a
particular software distribution.
License must not restrict other software: The license can’t prevent someone from
including the open source software on the same medium as non-open source software.
License must be technology neutral: The license can’t restrict methods in which the
source code can be redistributed.
Open source licenses used by software development projects must meet these criteria to be
accepted as open source software by OSI. More than 100 different licenses are accepted by OSI
to be used to label software as “OSI Certified Open Source Software.” In addition to the GPL,
other popular OSI-approved licenses include the following:
Apache: The popular Apache Web Server project, along with other Apache.org projects,
is covered by Apache licenses. Corporate open source contributors use Apache licenses
because it provides for patent protections, while being otherwise rather permissive.
LGPL: The GNU Lesser General Public License (LGPL) is often used for distributing libraries
that other application programs depend upon.
BSD: The Berkeley Software Distribution License allows redistribution of source code, with
the requirement that the source code keep the BSD copyright notice and not use the
names of contributors to endorse or promote derived software without written permission. A major difference from GPL, however, is that BSD does not require people
modifying the code to pass those changes on to the community. As a result, proprietary software vendors such as Apple and Microsoft have used BSD code in their own
operating systems.
MIT: The MIT license is like the BSD license, except that it doesn’t include the endorsement and promotion requirement.
Mozilla: The Mozilla license covers the use and redistribution of source code associated with the Firefox web browser and other software related to the Mozilla project
15
Downloaded from https://onlinelibrary.wiley.com/doi/ by alex jounh - Oregon Health & Science Univer , Wiley Online Library on [05/12/2025]. See the Terms and Conditions (https://onlinelibrary.wiley.com/terms-and-conditions) on Wiley Online Library for rules of use; OA articles are governed by the applicable Creative Commons License
Chapter 1: Starting with Linux
(https://www.mozilla.org/en-US/). It is a much longer license than the others just
mentioned because it contains more definitions of how contributors and those reusing the source code should behave. This includes submitting a file of changes when
submitting modifications and that those making their own additions to the code for
redistribution should be aware of patent issues or other restrictions associated with
their code.
The end result of open source code is software that has more flexibility to grow and fewer
boundaries in how it can be used. Many believe that the fact that numerous people look over
the source code for a project results in higher-quality software for everyone. As open source
advocate Eric S. Raymond says in an often-quoted line, “Given enough eyeballs, all bugs
are shallow.”
Understanding How Linux Distributions Emerged
Having bundles of source code floating around the Internet that could be compiled and packaged into a Linux system worked well for geeks. More casual Linux users, however, needed a
simpler way to put together a Linux system. To respond to that need, some of the best geeks
began building their own Linux distributions.
A Linux distribution consists of the components needed to create a working Linux system and
the procedures needed to get those components installed and running. Technically, Linux is
really just what is referred to as the kernel. Before the kernel can be useful, you must have
other software, such as basic commands (GNU utilities), services that you want to offer (such
as remote login or web servers), and possibly a desktop interface and graphical applications.
Then you must be able to gather all that together and install it on your computer’s hard disk.
Slackware (http://www.slackware.com) is one of the oldest Linux distributions still supported today. It made Linux friendly for less technical users by distributing software already
compiled and grouped into packages. (Those packages of software components were in a format
called tarballs.) Then you would use basic Linux commands to do things like format your disk,
enable swap, and create user accounts.
Before long, many other Linux distributions were created. Some Linux distributions were created to meet special needs, such as Kali Linux (a bootable Linux for computer forensics and
cybersecurity), Gentoo (a cool source-based, customizable Linux), and Linux Mint (one of several desktop Linux distributions). But two major distributions rose to become the foundation
for many other distributions: Red Hat Linux and Debian.
Choosing a Red Hat distribution
When Red Hat Linux appeared in the late 1990s, it quickly became the most popular Linux distribution for several reasons:
RPM package management: Tarballs are fine for dropping software on your computer, but
they don’t work as well when you want to update, remove, or even find out about that
16
Downloaded from https://onlinelibrary.wiley.com/doi/ by alex jounh - Oregon Health & Science Univer , Wiley Online Library on [05/12/2025]. See the Terms and Conditions (https://onlinelibrary.wiley.com/terms-and-conditions) on Wiley Online Library for rules of use; OA articles are governed by the applicable Creative Commons License
Part I: Getting Started
software. Red Hat created the RPM packaging format so that a software package could
contain not only the files to be shared but also information about the package version,
who created it, which files were documentation or configuration files, and when it was
created. By installing software packaged in RPM format, you could store that information about each software package in a local RPM database. It became easy to find what
was installed, update it, or remove it.
Simple installation: The Anaconda installer made it much simpler to install Linux. As a
user, you could step through some simple questions, in most cases accepting defaults,
to install Red Hat Linux.
Graphical administration: Red Hat added simple graphical tools to configure printers,
add users, set time and date, and do other basic administrative tasks. As a result, desktop users could use a Linux system without even having to run commands.
For years, Red Hat Linux was the preferred Linux distribution for both Linux professionals
and enthusiasts. Red Hat, Inc., gave away the source code, as well as the compiled, ready-
to-run versions of Red Hat Linux (referred to as the binaries). But as the needs of its Linux
community users and big-ticket customers began to move further apart, Red Hat abandoned
Red Hat Linux and began developing two operating systems instead: Red Hat Enterprise Linux
and Fedora.
Using Red Hat Enterprise Linux
In March 2012, Red Hat, Inc., became the first open source software company to bring in more
than $1 billion in yearly revenue. It achieved that goal by building a set of products around
Red Hat Enterprise Linux (RHEL) that would suit the needs of the most demanding enterprise
computing environments. After expanding its product line to include many components of
hybrid cloud computing, Red Hat was purchased by IBM in July 2019 for $34 billion.
While other Linux distributions focused on desktop systems or small business computing, RHEL
worked on those features needed to handle mission-critical applications for big business and
government. It built systems that could speed transactions for the world’s largest financial
exchanges and be deployed as clusters and virtual hosts.
Instead of just selling RHEL, Red Hat offers an ecosystem of benefits upon which Linux customers could draw. To use RHEL, customers buy subscriptions that they can use to deploy any
version of RHEL that they desire. If they decommission a RHEL system, they can use the subscription to deploy another system.
Different levels of support are available for RHEL, depending on customer needs. Customers can
be assured that, along with support, they can get hardware and third-party software that is
certified to work with RHEL. They can get Red Hat consultants and engineers to help them put
together the computing environments they need. They can also get training and certification
exams for their employees (see the discussion of RHCE certification later in this chapter).
Red Hat has also added other products as natural extensions to Red Hat Enterprise Linux.
JBoss is a middleware product for deploying Java-based applications to the Internet or
17
1
Downloaded from https://onlinelibrary.wiley.com/doi/ by alex jounh - Oregon Health & Science Univer , Wiley Online Library on [05/12/2025]. See the Terms and Conditions (https://onlinelibrary.wiley.com/terms-and-conditions) on Wiley Online Library for rules of use; OA articles are governed by the applicable Creative Commons License
Chapter 1: Starting with Linux
company intranets. Red Hat Virtualization comprises the virtualization hosts, managers, and
guest computers that allow you to install, run, manage, migrate, and decommission huge virtual computing environments.
There are those who have tried to clone RHEL, using the freely available RHEL source code,
rebuilding and rebranding it. Oracle Linux is built from source code for RHEL but currently
offers an incompatible kernel. Amazon Linux 2023 (AL2023) primarily bases its distribution on
the Fedora Linux distribution.
I’ve chosen to use Red Hat Enterprise Linux for many of the examples in this book because, if
you want a career working on Linux systems, there is a huge demand for those who can administer RHEL systems. If you are starting out with Linux, however, Fedora can provide an excellent entry point to the same skills that you need to use and administer RHEL systems. Ubuntu
is used in this book as the primary alternative to those distributions.
Using Fedora
While RHEL is the commercial, stable, supported Linux distribution, Fedora is the free, cutting-
edge Linux distribution that is sponsored by Red Hat, Inc. Fedora is the Linux system that Red
Hat uses to engage the Linux development community and encourage those who want a free
Linux for personal use and rapid development.
Fedora includes tens of thousands of software packages, many of which keep up with the latest
available open source technology. As a user, you can try the latest Linux desktop, server, and
administrative interfaces in Fedora for free. As a software developer, you can create and test
your applications using the latest Linux kernel and development tools.
Because the focus of Fedora is on the latest technology, it focuses less on stability. So, expect
that you might need to do some extra work to get everything working and that not all the
software will be fully baked.
I recommend you use Fedora or RHEL for most of the examples in this book for the following reasons:
■
■
■
Fedora is used as a proving ground for Red Hat Enterprise Linux. Red Hat tests many
new applications in Fedora before committing them to RHEL. By using Fedora, you will
learn the skills you need to work with features as they are being developed for Red
Hat Enterprise Linux.
For learning, Fedora is more convenient than RHEL, yet still includes many of the more
advanced, enterprise-ready tools that are in RHEL.
Fedora is free, not only as in “freedom,” but also as in “you don’t have to pay for it.”
It also includes more fun applications, such as music players and games.
Fedora is extremely popular with those who develop open source software. However, in the
past few years, another Linux distribution has captured the attention of many people starting
out with Linux: Ubuntu.
18
Downloaded from https://onlinelibrary.wiley.com/doi/ by alex jounh - Oregon Health & Science Univer , Wiley Online Library on [05/12/2025]. See the Terms and Conditions (https://onlinelibrary.wiley.com/terms-and-conditions) on Wiley Online Library for rules of use; OA articles are governed by the applicable Creative Commons License
Part I: Getting Started
Choosing Ubuntu or another Debian distribution
Like Red Hat Linux, the Debian GNU/Linux distribution was an early Linux distribution that
excelled at packaging and managing software. Debian uses the deb packaging format and
tools to manage all of the software packages on its systems. Debian also has a reputation for
stability.
Many Linux distributions can trace their roots back to Debian. If you search DistroWatch
(https://distrowatch.com), more than 150 active Linux distributions can be traced back to
Debian, although there are probably hundreds of Debian-based distros. Popular Debian-based
distributions include Linux Mint, elementary OS, Zorin OS, Kali Linux, and many others. However,
the Debian derivative that has achieved the most success is Ubuntu (https://ubuntu.com).
By relying on stable Debian software development and packaging, the Ubuntu Linux distribution (sponsored by Canonical Ltd.) was able to come along and add those features that Debian
lacked. In pursuit of bringing new users to Linux, the Ubuntu project added a simple graphical
installer and easy-to-use graphical tools. It also focused on full-featured desktop systems while
still offering popular server packages.
Ubuntu was also an innovator in creating new ways to run Linux. Using live CDs or live USB
drives offered by Ubuntu, you could have Ubuntu up and running in just a few minutes. Often
included on live CDs were open source applications, such as web browsers and word processors, that actually ran in Windows. This made the transition to Linux from Windows easier for
some people.
If you are using Ubuntu, don’t fear. Most of the subject matter covered in this book will work
as well in Ubuntu as it does in Fedora or RHEL.
Finding Professional Opportunities with Linux Today
If you want to develop an idea for a computer-related research project or technology company,
where do you begin? You begin with an idea. After that, you look for the tools that you need
to explore and eventually create your vision. Then you look for others to help you during that
creation process.
Today, the hard costs of starting a company like Google or Facebook include just a computer,
a connection to the Internet, and enough caffeinated beverage of your choice to keep you up
all night writing code. If you have your own world-changing idea, Linux and thousands of software packages are available to help you build your dreams. The open source world also comes
with communities of developers, administrators, and users who are available to help you.
If you want to get involved with an existing open source project, projects are always looking
for people to write code, test software, or write documentation. In those projects, you will
find people who use the software, work on that software, and are usually willing to share their
expertise to help you as well.
19
1
Downloaded from https://onlinelibrary.wiley.com/doi/ by alex jounh - Oregon Health & Science Univer , Wiley Online Library on [05/12/2025]. See the Terms and Conditions (https://onlinelibrary.wiley.com/terms-and-conditions) on Wiley Online Library for rules of use; OA articles are governed by the applicable Creative Commons License
Chapter 1: Starting with Linux
Whether you seek to develop the next great open source software project or you simply want
to gain the skills needed to compete for the thousands of well-paying Linux administrator or
development jobs, it will help you to know how to install, secure, and maintain Linux systems.
In August 2025, tens of thousands of jobs requiring Linux skills were listed at Indeed.com.
Many offered pay of $100,000 per year or more. Sites such as Fossjobs.net provide a venue for
posting and finding jobs associated with Linux and other free and open source software skills.
Taking a casual look at what Linux-related skills are in demand for employers today, you will
see things like system administration, configuration management, cloud computing, cybersecurity, and networking. Those are all topics that are covered to some extent in this book.
The message to take from these job sites is that Linux continues to grow and create demands
for Linux expertise. Companies that have begun using Linux have continued to move forward
with it. Those using Linux continue to expand its use and find that cost savings, security, and
the flexibility it offers continue to make Linux a good investment.
Understanding how companies make money with Linux
Open source enthusiasts believe that better software can result from an open source software
development model than from proprietary development models. So, in theory, any company
creating software for its own use can save money by adding its software contributions to those
of others to gain a much better end product for themselves.
Companies that want to make money by selling software need to be more creative than they
were in the old days. Although you can sell the software you create, which includes GPL software, you must pass the source code of that software forward. Of course, others can then
recompile that product, basically using and even reselling your product without charge. Here
are a few ways that companies are dealing with that issue:
Software subscriptions: Red Hat, Inc., sells its Red Hat Enterprise Linux products on a
subscription basis. For a certain amount of money per year, you get binary code to run
Linux (so you don’t have to compile it yourself), guaranteed support, tools for tracking
the hardware and software on your computer, access to the company’s knowledge base,
and other assets.
Although Red Hat’s Fedora project includes much of the same software and is also
available in binary form, there are no guarantees associated with the software or
future updates of that software. A small office or personal user might take a risk on
using Fedora (which is itself an excellent operating system), but a big company that’s
running mission-critical applications will probably put down a few dollars for RHEL.
Training and certification: With Linux system use growing in government and big
business, professionals are needed to support those systems. Red Hat offers training
courses and certification exams to help system administrators become proficient using
Red Hat Enterprise Linux systems. In particular, the Red Hat Certified Engineer (RHCE)
and Red Hat Certified System Administrator (RHCSA) certifications have become
20
Downloaded from https://onlinelibrary.wiley.com/doi/ by alex jounh - Oregon Health & Science Univer , Wiley Online Library on [05/12/2025]. See the Terms and Conditions (https://onlinelibrary.wiley.com/terms-and-conditions) on Wiley Online Library for rules of use; OA articles are governed by the applicable Creative Commons License
Part I: Getting Started
popular (https://www.redhat.com/en/services/certifications). More on RHCE/
RHCSA certifications later in this chapter.
Other certification programs are offered by Linux Professional Institute (https://www
.lpi.org), Linux Foundation (https://training.linuxfoundation.org/
certification-catalog) and CompTIA (wwww.comptia.org). LPI, Linux Foundation, and CompTIA are professional computer industry associations.
Bounties: Software bounties are a fascinating way for open source software companies
to make money. Suppose you are using XYZ software package and you need a new feature right away. By paying a software bounty to the project itself or to other software
developers, you can have your required improvements moved to the head of the queue.
The software you pay for will remain covered by its open source license, but you will
have the features you need—probably at a fraction of the cost of building the project
from scratch.
Donations: Many open source projects accept donations from individuals or open source
companies that use code from their projects. Amazingly, many open source projects
support one or two developers and run exclusively on donations.
Boxed sets, mugs, and T-shirts: Some open source projects have online stores where you
can buy boxed sets (some people still like physical DVDs or USB drives and hard copies
of documentation) and a variety of mugs, T-shirts, mouse pads, and other items. If you
really love a project, for goodness sake, buy a T-shirt!
This is in no way an exhaustive list, because more creative ways are being invented every day
to support those who create open source software. Remember that many people have become
contributors to and maintainers of open source software because they needed or wanted the
software themselves. The contributions they make for free are worth the return they get from
others who do the same.
Becoming Red Hat certified
Although this book is not focused on becoming certified in Linux, it touches on the activities
that you need to be able to master to pass popular Linux certification exams. In particular,
most of what is covered in the Red Hat Certified Engineer (RHCE) and Red Hat Certified System
Administrator (RHCSA) exams for Red Hat Enterprise Linux 8 is described in this book.
If you are looking for a job as a Linux IT professional, RHCSA or RHCE certification is often
listed as a requirement, or at least a preference, for employment. The RHCSA exam (EX200)
provides basic certification, covering such topics as configuring disks and filesystems, adding
users, setting up a simple web and FTP server, and adding swap space. The RHCE exam (EX300)
tests for more advanced server configuration as well an advanced knowledge of security features, such as SELinux and firewalls.
Those of us who have taught RHCE/RHCSA courses and given exams (as I did for three years)
are not allowed to tell you exactly what is on the exam. However, Red Hat gives an overview of
21
1
Downloaded from https://onlinelibrary.wiley.com/doi/ by alex jounh - Oregon Health & Science Univer , Wiley Online Library on [05/12/2025]. See the Terms and Conditions (https://onlinelibrary.wiley.com/terms-and-conditions) on Wiley Online Library for rules of use; OA articles are governed by the applicable Creative Commons License
Chapter 1: Starting with Linux
how the exams work as well as a list of topics that you can expect to see covered in the exam.
You can find those exam objectives on the following sites:
RHCSA
https://redhat.com/en/services/training/ex200-red-hat-certified-system-
administrator-rhcsa-exam
RHCE
https://www.redhat.com/en/services/training/ex294-red-hat-certifiedengineer-rhce-exam-red-hat-enterprise-linux-9
As the exam objectives state, the RHCSA and RHCE exams are performance based, which means
you are given tasks to do and you must perform those tasks on an actual Red Hat Enterprise
Linux system, as you would on the job. You are graded on how well you obtained the results of
those tasks.
If you plan to take the exams, check back to the exam objectives pages often because they
change from time to time. Also keep in mind that the RHCSA is a stand-alone certification;
however, you must pass the RHCSA and the RHCE exams to get an RHCE certification. Often,
the two exams are given on the same day.
You can sign up for RHCSA and RHCE training and exams at https://redhat.com/en/
services/training-and-certification. Training and exams are given at major cities all
over the United States and around the world. The skills you need to complete these exams are
described in the following sections.
RHCSA topics
As noted earlier, RHCSA exam topics cover basic system administration skills. These are the
current topics listed for Red Hat Enterprise Linux 9 at the RHCSA exam objectives site (again,
check the exam objectives site in case they change) and where in this book you can learn
about them:
Understand essential tools: You are expected to have a working knowledge of the
command shell (bash), including how to use proper command syntax and do input/
output redirection (< > >>). You need to know how to log in to remote and local
systems. Expect to have to create, edit, move, copy, link, delete, and change permission and ownership on files. Likewise, you should know how to look up information on
man pages and /usr/share/doc. Most of these topics are covered in Chapter 3 and
Chapter 4 in this book. Chapter 5 describes how to edit and find files.
Operate running systems: In this category, you must understand the Linux boot process
and how to shut down, reboot, and change to different targets (previously called runlevels). You need to identify processes and kill processes as requested. You must be able
to find and interpret log files. Chapter 15 describes how to change targets and manage
system services. See Chapter 6 for information on managing and changing processes.
Logging is described in Chapter 13.
22
Downloaded from https://onlinelibrary.wiley.com/doi/ by alex jounh - Oregon Health & Science Univer , Wiley Online Library on [05/12/2025]. See the Terms and Conditions (https://onlinelibrary.wiley.com/terms-and-conditions) on Wiley Online Library for rules of use; OA articles are governed by the applicable Creative Commons License
Part I: Getting Started
Configure local storage: Setting up disk partitions includes creating physical volumes
and configuring them to be used for Logical Volume Management (LVM) or encryption
(LUKS). You should also be able to set up those partitions as filesystems or swap space
that can be mounted or enabled at boot time. Disk partitioning and LVM are covered
in Chapter 12. LUKS and other encryption topics are described in Chapter 23, “Understanding Advanced Linux Security.”
Create and configure filesystems: Create and automatically mount different kinds of
filesystems, including regular Linux filesystems (ext2, ext3, or ext4) and network filesystems (NFS). Create collaborative directories using the set group ID bit feature. You
must also be able to use LVM to extend the size of a logical volume. Filesystem topics
are covered in Chapter 12. See Chapter 20 for NFS coverage.
Deploy, configure, and maintain systems: This covers a range of topics, including configuring networking and creating cron tasks. For software packages, you must be able
to install packages from Red Hat Content Delivery Network (CDN), a remote repository,
or the local filesystem. The cron facility is described in Chapter 13.
Manage users and groups: You must know how to add, delete, and change user and
group accounts. Another topic that you should know is password aging, using the
chage command. See Chapter 11 for information on configuring users and groups.
Manage security: You must have a basic understanding of how to set up a firewall
(firewalld, system-config-firewall, or iptables) and how to use
SELinux. You must be able to set up SSH to do key-based authentication. Learn about
SELinux in Chapter 25. Firewalls are covered in Chapter 26. Chapter 13 includes a
description of key-based authentication.
Most of these topics are covered in this book. Refer to Red Hat documentation (https://
access.redhat.com/documentation) under the Red Hat Enterprise Linux heading for descriptions of features not found in this book. In particular, the system administration guides contain descriptions of many of the RHCSA-related topics.
RHCE topics
RHCE exam topics cover more advanced server configuration, along with a variety of security features for securing those servers in Red Hat Enterprise Linux. Again, check the RHCE
exam objectives site for the most up-to-date information on topics that you should study
for the exam.
System configuration and management
The system configuration and management requirement for the RHCE exam covers a range of
topics, including the following:
Firewalls: Block or allow traffic to selected ports on your system that offer services such
as web, FTP, and NFS, as well as block or allow access to services based on the originator’s IP address. Firewalls are covered in Chapter 26, “Securing Linux on a Network.”
Kerberos authentication: Use Kerberos to authenticate users on a RHEL system.
23
1
Downloaded from https://onlinelibrary.wiley.com/doi/ by alex jounh - Oregon Health & Science Univer , Wiley Online Library on [05/12/2025]. See the Terms and Conditions (https://onlinelibrary.wiley.com/terms-and-conditions) on Wiley Online Library for rules of use; OA articles are governed by the applicable Creative Commons License
Chapter 1: Starting with Linux
System reports: Use features such as sar to report on system use of memory, disk
access, network traffic, and processor utilization. Chapter 13 describes how to use the
sar command.
Shell scripting: Create a simple shell script to take input and produce output in various
ways. Shell scripting is described in Chapter 7.
SELinux: With Security Enhanced Linux in Enforcing mode, make sure that all server configurations described in the next section are properly secured with SELinux. SELinux is
described in Chapter 25.
Ansible: Understand core Ansible components (inventories, modules, playbooks, and so
on). Be able to install and configure an Ansible control node. Work with Ansible roles
and use advanced Ansible features. See Chapter 30 for information on using Ansible
playbooks to install and manage Linux systems.
Installing and configuring network services
For each of the network services in the list that follows, make sure you can go through the
steps to install packages required by the service, set up SELinux to allow access to the service, set the service to start at boot time, secure the service by host or by user (using iptables
or features provided by the service itself), and configure it for basic operation. These are
the services:
Web server: Configure an Apache (HTTP/HTTPS) server. You must be able to set up a
virtual host, deploy a CGI script, use private directories, and allow a particular Linux
group to manage the content. Chapter 17 describes how to configure a web server.
DNS server: Set up a DNS server (bind package) to act as a caching-only name server that
can forward DNS queries to another DNS server. No need to configure master or slave
zones. DNS is described from the client side in Chapter 14. For information on configuring a DNS server with Bind, see the RHEL Networking Guide at
https://docs.redhat.com/en/documentation/red_hat_enterprise_linux/9/
html/managing_networking_infrastructure_services/assembly_setting-up-
and-configuring-a-bind-dns-server_networking-infrastructure-services
NFS server: Configure an NFS server to share specific directories to specific client systems
so they can be used for group collaboration. Chapter 20 covers NFS.
Windows file sharing server: Set up Linux (Samba) to provide SMB shares to specific
hosts and users. Configure the shares for group collaboration. See Chapter 19 to learn
about configuring Samba.
Mail server: Configure postfix or sendmail to accept incoming mail from outside of the
local host. Relay mail to a smart host. Mail server configuration is not covered in this
book (and should not be done lightly). See the RHEL System Administrator’s Guide for
information on configuring mail servers at:
https://docs.redhat.com/en/documentation/red_hat_enterprise_linux/9/
html/deploying_mail_servers/assembly_mail-transport-agent_deploying-
mail-servers
24
Downloaded from https://onlinelibrary.wiley.com/doi/ by alex jounh - Oregon Health & Science Univer , Wiley Online Library on [05/12/2025]. See the Terms and Conditions (https://onlinelibrary.wiley.com/terms-and-conditions) on Wiley Online Library for rules of use; OA articles are governed by the applicable Creative Commons License
Part I: Getting Started
Secure Shell server: Set up the SSH service (sshd) to allow remote login to your local
system as well as key-based authentication. Otherwise, configure the sshd.conf file
as needed. Chapter 13 describes how to configure the sshd service.
Network Time server: Configure a Network Time Protocol server (ntpd) to synchronize
time with other NTP peers.
1
Database server: Configure the MariaDB database and manage it in various ways.
Learn how to configure the MariaDB from the MariaDB site (https://
mariadb.com/docs).
Although there are other tasks in the RHCE exam, as just noted, keep in mind that most of the
tasks have you configure servers and then secure those servers using any technique that you
need. Those can include firewall rules, SELinux, or any features built into configuration files
for the particular service.
Summary
Linux is an operating system that is built by a community of software developers around
the world, which is led by its creator, Linus Torvalds. It is derived originally from the UNIX
operating system but has grown beyond UNIX in popularity and power over the years.
The history of the Linux operating system can be tracked from early UNIX systems that were
distributed free to colleges and improved upon by initiatives such as the Berkeley Software
Distribution (BSD). The Free Software Foundation helped make many of the components
needed to create a fully free UNIX-like operating system. The Linux kernel itself was the last
major component needed to complete the job.
Most Linux software projects are protected by one of a set of licenses that fall under the Open
Source Initiative umbrella. The most prominent of these is the GNU Public License (GPL). Standards such as the Linux Standard Base and world-class Linux organizations and companies
(such as Canonical Ltd. and Red Hat, Inc.) make it possible for Linux to continue to be a
stable, productive operating system into the future.
Learning the basics of how to use and administer a Linux system will serve you well in any
aspect of working with Linux. The remaining chapters provide a series of exercises with which
you can test your understanding. That’s why, for the rest of the book, you will learn best with
a Linux system in front of you so that you can work through the examples in each chapter and
complete the exercises successfully.
The next chapter explains how to get started with Linux by describing how to get and use a
Linux desktop system.
25
Downloaded from https://onlinelibrary.wiley.com/doi/ by alex jounh - Oregon Health & Science Univer , Wiley Online Library on [05/12/2025]. See the Terms and Conditions (https://onlinelibrary.wiley.com/terms-and-conditions) on Wiley Online Library for rules of use; OA articles are governed by the applicable Creative Commons License
Chapter 1: Starting with Linux
Creating the Perfect
Linux Desktop
2
IN THIS CHAPTER
Understanding Linux desktop environments
Running Linux from a Live image
Navigating the GNOME desktop
Adding extensions to GNOME
Using Nautilus to manage files in GNOME
Enabling 3D effects
Configuring a developer desktop
U
sing Linux as your everyday desktop system is becoming easier to do all the time. As with
everything in Linux, you have choices. There are fully featured GNOME or KDE desktop environments or lightweight desktops such as LXDE or Xfce. There are even simpler stand-alone
window managers.
After you have chosen a desktop, you will find that almost every major type of desktop application you
have on a Windows or Mac system has equivalent applications in Linux. For applications that are not
available in Linux, you can often run a Windows application in Linux using Windows compatibility software or browser versions of the applications.
The goal of this chapter is to familiarize you with the concepts related to Linux desktop systems and to
give you tips for working with a Linux desktop. In this chapter, you do the following:
■
■
■
■
■
Step through the desktop features and technologies that are available in Linux
Tour the major features of the GNOME desktop environment
Learn tips and tricks for getting the most out of your GNOME desktop experience
Try some fun 3D desktop effects with MATE+Compiz
Set up your Linux desktop for software development
27
Linux Bible, Eleventh Edition. Christopher Negus.
© 2026 John Wiley & Sons, Inc. All rights reserved, including rights for text and data mining and training of artificial intelligence technologies or similar
technologies. Published 2026 by John Wiley & Sons, Inc.
Downloaded from https://onlinelibrary.wiley.com/doi/ by alex jounh - Oregon Health & Science Univer , Wiley Online Library on [05/12/2025]. See the Terms and Conditions (https://onlinelibrary.wiley.com/terms-and-conditions) on Wiley Online Library for rules of use; OA articles are governed by the applicable Creative Commons License
CHAPTER
To use the instructions in this chapter, I recommend you have a Fedora system running in front
of you. You can get Fedora in lots of ways, including the following:
Running Fedora from a live medium Refer to Appendix A, “Media,” for information on
downloading and burning a Fedora Live image to a USB drive or DVD so that you can
boot it live to use with this chapter.
Installing Fedora permanently Install Fedora to your hard disk and boot it from there
(as described in Chapter 9, “Installing Linux”).
Because the current release of Fedora uses the GNOME interface, most of the procedures described
in this chapter work with other Linux distributions that have GNOME available.
Understanding Linux Desktop Technology
Modern computer desktop systems offer graphical windows, icons, and menus that are operated
from a mouse and keyboard. If you are younger than 40, you might think that there’s nothing
special about that. However, the first Linux systems did not have graphical interfaces available.
Also, many Linux servers today that are tuned for special tasks (for example, functioning as a
web server or file server) don’t have desktop software installed.
Nearly every major Linux distribution that offers desktop interfaces can trace its roots back
to the X Window System originally from the X.Org Foundation (http://www.x.org). The
X Window System provided a framework on which types of desktop environments or simple
window managers could be built. A replacement for X.Org called Wayland (http://wayland
.freedesktop.org) has been developed and is now used by default for Ubuntu, Fedora, RHEL,
and other major Linux distributions.
The X Window System (sometimes simply called X) was created before Linux existed, and
it even predates Microsoft Windows. It was built to be a lightweight, networked desktop
framework.
X works in sort of a backward client/server model. The X server runs on the local system, providing an interface to your screen, mouse, and keyboard. X clients (such as word processors,
music players, and image viewers) can be launched from the local system or from any system
on your network to which the X server gives permission to do so.
X was created at a time when graphical terminals (thin clients) simply managed the keyboard,
mouse, and display. Applications, disk storage, and processing power were all on larger centralized computers. So, applications ran on larger machines but were displayed and managed
over the network on the thin client. Later, thin clients were replaced by desktop personal
computers. Most client applications on PCs ran locally using local processing power, disk space,
memory, and other hardware features, while applications that did not start from the local
system were not allowed.
X itself provides a plain gray background and a simple “X” mouse cursor. There are no menus,
panels, or icons on a plain X screen. If you were to launch an X client (such as a terminal
28
Downloaded from https://onlinelibrary.wiley.com/doi/ by alex jounh - Oregon Health & Science Univer , Wiley Online Library on [05/12/2025]. See the Terms and Conditions (https://onlinelibrary.wiley.com/terms-and-conditions) on Wiley Online Library for rules of use; OA articles are governed by the applicable Creative Commons License
Part I: Getting Started
window or word processor), it would appear on the X display with no border around it to move,
minimize, or close the window. Those features are added by a window manager.
A window manager adds the capability to manage the windows on your desktop and often provides menus for launching applications and otherwise working with the desktop. A full-blown
desktop environment includes a window manager, but it also adds menus, panels, and usually an
application programming interface that is used to create applications that play well together.
So how does an understanding of how desktop interfaces work in Linux help you when it
comes to using Linux? Here are some of the ways:
■
■
■
■
Because Linux desktop environments are not required to run a Linux system, a Linux
system may have been installed without a desktop. It might offer only a plain-text,
command-line interface. You can choose to add a desktop later. After it is installed,
you can choose whether to start up the desktop when your computer boots or start it
as needed.
For a lightweight Linux system, such as one meant to run on less powerful computers,
you can choose an efficient, though less feature-rich, window manager (such as
fluxbox) or a lightweight desktop environment (such as LXDE or Xfce).
For more robust computers, you can choose more powerful desktop environments
(such as GNOME and KDE Plasma) that can do things such as watch for events to happen (such as inserting a USB flash drive) and respond to those events (such as opening a window to view the contents of the drive).
You can have multiple desktop environments installed, and you can choose which one
to launch when you log in. In this way, different users on the same computer can use
different desktop environments.
Many different desktop environments are available to choose from in Linux. Here are
some examples:
GNOME GNOME is the default desktop environment for Ubuntu, Fedora, Red Hat Enterprise Linux, and many others. Think of it as a professional desktop environment
focusing on stability more than fancy effects.
KDE Plasma KDE Plasma is probably the second most popular desktop environment for
Linux. It has more bells and whistles than GNOME and offers more integrated applications. KDE Plasma is also available with Fedora, Ubuntu, and many other Linux systems.
For RHEL 8, KDE was dropped from the distribution.
Xfce The Xfce desktop was one of the first lightweight desktop environments. It is good
to use on older or less powerful computers. It is available with Fedora, Ubuntu, and
other Linux distributions.
LXDE The Lightweight X11 Desktop Environment (LXDE) was designed to be a fast-
performing, energy-saving desktop environment. Often, LXDE is used on less-expensive
devices (such as netbook computers) and on live media (such as a live CD or live USB
stick). It is the default desktop for the KNOPPIX live Linux distribution. Although LXDE
is not included with RHEL, you can try it with Fedora or Ubuntu.
29
2
Downloaded from https://onlinelibrary.wiley.com/doi/ by alex jounh - Oregon Health & Science Univer , Wiley Online Library on [05/12/2025]. See the Terms and Conditions (https://onlinelibrary.wiley.com/terms-and-conditions) on Wiley Online Library for rules of use; OA articles are governed by the applicable Creative Commons License
Chapter 2: Creating the Perfect Linux Desktop
GNOME was originally designed to resemble the macOS desktop, while KDE was meant to emulate the Windows desktop environment. Because it is the most popular desktop environment
and the one most often used in business Linux systems, most desktop procedures and exercises
in this book use the GNOME desktop. Using GNOME, however, still gives you the choice of several different Linux distributions.
Starting with the Fedora GNOME Desktop Live Image
A live Linux ISO image is the quickest way to get a Linux system up and running so that you
can begin trying it. Depending on its size, the image can be burned to a USB drive, CD, or
DVD and booted on your computer. With a Linux live image, you can have Linux take over the
operation of your computer temporarily without harming the contents of your hard drive.
If you have Windows installed, Linux just ignores it and takes control of your computer itself.
When you are finished with the Linux live image, you can reboot the computer; pop out the
USB drive, CD, or DVD; and go back to running whatever operating system was installed on the
hard disk.
To try a GNOME desktop along with the descriptions in this section, I suggest you get a Fedora
Workstation Live ISO (as described in Appendix A). Because a live ISO does all its work from
that operating system image and in memory, it runs slower than an installed Linux system.
Also, although you can change files, add software, and otherwise configure your system, by
default the work you do disappears when you reboot unless you explicitly save that data to
your hard drive or external storage.
The fact that changes you make to the live environment go away on reboot is very good for
trying Linux but not that great if you want an ongoing desktop or server system. For that
reason, I recommend that if you have a spare computer, you install Linux permanently on that
computer’s hard disk to use with the rest of this book (as described in Chapter 9).
After you have a live Linux image in hand, do the following to get started:
1. Get a computer. To have a good “getting started” experience, if you have a standard PC
(64-bit) with a USB, CD, or DVD drive, at least 4GB of memory (RAM), and at least a 2GHz
processor, you are ready to start. Just make sure the image you download matches your
computer’s architecture—a 64-bit medium does not run on a 32-bit computer. Fedora and
RHEL dropped 32-bit support, so you would need older versions of those distributions to
run on those older machines. If you only have a 32-bit or otherwise less powerful computer, consider using Slackware, Debian, or Gentoo, which still offer 32-bit versions.
2. Start the live image. Insert the live CD/DVD or USB drive into your computer and
reboot your computer. Depending on the boot order set on your computer, the live
image might start up directly from the BIOS (the code that controls the computer
before the operating system starts).
30
Downloaded from https://onlinelibrary.wiley.com/doi/ by alex jounh - Oregon Health & Science Univer , Wiley Online Library on [05/12/2025]. See the Terms and Conditions (https://onlinelibrary.wiley.com/terms-and-conditions) on Wiley Online Library for rules of use; OA articles are governed by the applicable Creative Commons License
Part I: Getting Started
Note
If, instead of the live medium booting, your installed operating system starts up, you need to perform an additional step
to start the live CD/DVD. Reboot again, and when you see the BIOS screen, look for some words that say something like
“Boot Order.” The on-screen instructions may say to press the F12 or F1 key. Press that key immediately from the BIOS
screen to interrupt the boot process. Next, you should see a screen that shows available selections. Highlight the entry
for CD/DVD or USB drive, and press Enter to boot the live image. If you don’t see the drive there, you may need to go
into BIOS setup and enable the CD/DVD or USB drive there.
3. Start Fedora. If the selected drive is able to boot, you see a boot screen. For Fedora,
with Start Fedora highlighted, press Enter to start the live medium.
4. Begin using the desktop. For Fedora, the live medium should start up directly to a
GNOME desktop.
You can now proceed to the next section, “Using the GNOME Desktop” (which includes information on using GNOME in Fedora, Red Hat Enterprise Linux, and other operating systems).
Using the GNOME Desktop
GNOME is the gold standard for Linux desktop environments. It was designed to provide a
simple, friendly, and uncluttered interface. It is the most popular desktop on full-featured
Linux distributions.
The latest GNOME interface was designed to be used with multiple workspaces. Instead of minimizing applications you want to set aside for the moment, you can go to the Activities screen
and drag a window to another workspace. After that, it’s easy to click or scroll between workspaces to access different sets of application windows.
A bar across the top provides access to the Activities screen, the time and date (leading to a
calendar), and some settings. Otherwise, the screen is clear for you to begin running applications. The Activities screen also lets you see what applications are running and displays a
Show Apps button to let you see, search for, and select the apps available on your system.
The following section steps you through the features of the most recent GNOME desktop.
After the computer boots up
If you booted up a live Fedora image, when you reach the desktop, you are assigned as the
Live System User for your username. For an installed system, you see the login screen, with
user accounts on the system ready for you to select and enter a password. Log in with the
username and password that you have defined for your system.
31
2
Downloaded from https://onlinelibrary.wiley.com/doi/ by alex jounh - Oregon Health & Science Univer , Wiley Online Library on [05/12/2025]. See the Terms and Conditions (https://onlinelibrary.wiley.com/terms-and-conditions) on Wiley Online Library for rules of use; OA articles are governed by the applicable Creative Commons License
Chapter 2: Creating the Perfect Linux Desktop
FIGURE 2.1
Starting with the GNOME desktop in Fedora.
Figure 2.1 is an example of the GNOME desktop screen that appears in Fedora. Press the Windows key (or move the mouse cursor to the upper-left corner of the desktop) to toggle between
a blank desktop and the Activities screen.
By design, there is very little on the GNOME desktop when you start out. There is no task bar
at the bottom of the screen and no application icons for you to select. The top bar has the
Activities icon on the left, a clock in the middle, and some icons on the right for such things
as adjusting audio volume, checking your network connection, and restarting the system. The
Activities screen is where you can select to open applications, view active applications, or use
different workspaces.
Navigating with the mouse
To get started, try navigating the GNOME desktop with your mouse:
1. Toggle activities and windows. Move your mouse cursor to the upper-left corner of
the screen near the Activities button. Each time you move there, your screen changes
between showing you the windows that you are actively using on the current workspace and a set of available Activities. (This has the same effect as pressing the
Windows key.) In some version of GNOME, you need to select the Activities button.
2. Open applications from Activities screen. From the Activities screen, click to open
some applications from the set of icons on the bottom of the screen (Firefox, Calendar,
Files, Software, Text Editor, or others) to open them or select Show Apps to choose
32
Downloaded from https://onlinelibrary.wiley.com/doi/ by alex jounh - Oregon Health & Science Univer , Wiley Online Library on [05/12/2025]. See the Terms and Conditions (https://onlinelibrary.wiley.com/terms-and-conditions) on Wiley Online Library for rules of use; OA articles are governed by the applicable Creative Commons License
Part I: Getting Started
from a larger list of applications. Move the mouse to the upper-left corner again, and
toggle between showing active applications on the current workspace and showing the
Activities screen with selectable workspaces and active applications. Figure 2.2 shows
an example of the Activities screen.
3. Open applications from Applications list. From the Activities screen, select the
Application button from the bottom of the left column (the button has nine dots in
a box). The view changes to a set of icons representing the applications installed on
your system, as shown in Figure 2.3.
4. View additional applications. From the Applications screen, you can change the view
of your applications in several ways, as well as launch them in different ways:
a. Page through. To see icons representing applications that are not onscreen, use
the mouse to click dots on the right to page through applications. If you have a
wheel mouse, you can use that instead to scroll the icons.
b. Launching an application. To start the application you want, left-click its icon
to open the application in the current workspace. Right-click to open a menu that
lets you choose to open a new window, open a particular type of content (such
as a new spreadsheet), pin to dash (so the application’s icon appears on the Dash
bar), or show details about the application. Figure 2.4 shows an example of the
menu for an application that creates spreadsheets.
FIGURE 2.2
Showing active apps, available apps, and workspaces on the Activities screen.
33
2
Downloaded from https://onlinelibrary.wiley.com/doi/ by alex jounh - Oregon Health & Science Univer , Wiley Online Library on [05/12/2025]. See the Terms and Conditions (https://onlinelibrary.wiley.com/terms-and-conditions) on Wiley Online Library for rules of use; OA articles are governed by the applicable Creative Commons License
Chapter 2: Creating the Perfect Linux Desktop
FIGURE 2.3
Showing the list of available applications.
FIGURE 2.4
Right-click to display an application icon’s selection menu.
34
Downloaded from https://onlinelibrary.wiley.com/doi/ by alex jounh - Oregon Health & Science Univer , Wiley Online Library on [05/12/2025]. See the Terms and Conditions (https://onlinelibrary.wiley.com/terms-and-conditions) on Wiley Online Library for rules of use; OA articles are governed by the applicable Creative Commons License
Part I: Getting Started
5. Open additional applications. Start up additional applications. Notice that as you
open a new application, an icon representing that application appears in the Dash bar
on the bottom of the Activities screen.
6. Use multiple workspaces. GNOME’s design encourages the use of workspaces. Instead
of minimizing applications, GNOME designers made it easy for you to drag applications
to other workspaces when you want to set them aside but not close them. Notice that
the former Minimize button is now called Hide.
Move the mouse to the upper-left corner (click if needed) again to show the current
workspaces at the top of the Activities screen. Drag and drop a few of the windows to
an empty desktop space. Figure 2.5 shows what the small workspaces look like. Notice
that an additional empty workspace is created each time the last empty one is used.
You can drag and drop the miniature windows to any workspace and then select the
workspace to view it.
FIGURE 2.5
As new desktops are used, additional ones appear on the right.
35
2
Downloaded from https://onlinelibrary.wiley.com/doi/ by alex jounh - Oregon Health & Science Univer , Wiley Online Library on [05/12/2025]. See the Terms and Conditions (https://onlinelibrary.wiley.com/terms-and-conditions) on Wiley Online Library for rules of use; OA articles are governed by the applicable Creative Commons License
Chapter 2: Creating the Perfect Linux Desktop
7. Use the window menu. Move the mouse to the upper-left corner of the screen to
return to the active workspace (large window view). Right-click the title bar on a
window to view the window menu. Here is what is on that menu for Fedora:
a. Take Screenshot. Take a screenshot of the current screen. An image of the current
window is saved to the Pictures/Screenshots directory in your home directory.
b. Hide. Set aside the window in the current workspace. Go to the Activity screen
and select it to get it back.
c. Maximize. Expand the window to its maximum size.
d. Move. Change the window to moving mode. Moving your mouse moves the window.
Click to fix the window to a spot.
e. Resize. Change the window to resize mode. Moving your mouse resizes the
window. Click to keep the size.
f. Workspace selections. Several selections let you use workspaces in different ways.
Select Always on Top to make the current window always on top of other windows
in the workspace. Select Always on Visible Workspace to always show the window
on the workspace that is visible, or select Move to Workspace Left or Move to Workspace Right to move the window to the workspace to the left or right, respectively.
If you don’t feel comfortable navigating GNOME with your mouse or if you don’t have a mouse,
the next section helps you navigate the desktop from the keyboard.
Navigating with the keyboard
If you prefer to keep your hands on the keyboard, you can work with the GNOME desktop
directly from the keyboard in a number of ways, including the following:
Windows key. Press the Windows key on the keyboard. On most PC keyboards, this is the
key with the Microsoft Windows logo on it next to the Alt key. This toggles the mini-
window (Activities) and active-window (current workspace) views. Many people use this
key often, instead of moving the mouse pointer to the upper-left corner of the screen.
Select different views. From the Windows or Activities view, hold Ctrl+Alt+Tab to see a
menu of the different views (see Figure 2.6 for the menu from the Activities screen).
FIGURE 2.6
Press Ctrl+Alt+Tab to display desktop areas to select.
36
Downloaded from https://onlinelibrary.wiley.com/doi/ by alex jounh - Oregon Health & Science Univer , Wiley Online Library on [05/12/2025]. See the Terms and Conditions (https://onlinelibrary.wiley.com/terms-and-conditions) on Wiley Online Library for rules of use; OA articles are governed by the applicable Creative Commons License
Part I: Getting Started
Still holding the Ctrl+Alt keys, press Tab again to highlight one of the following icons
from the menu and release to select it:
Top Bar. Highlights the top bar. After it is selected, you can tab between items on that
bar (Activities, Calendar, and the Top Bar menu).
Dash. Highlights the first application in the application bar on the left. Use arrow
keys to move up and down that menu, and press Enter to open the highlighted
application.
Apps. Selects the Applications view.
Windows. Selects the Windows view.
Search. Highlights the search box. Type a few letters to show only icons for applications that contain the letters you type. When you have typed enough letters to
uniquely identify the application you want, press Enter to launch the application.
Select an active window. Return to any of your workspaces (press the Windows key if
you are not already on an active workspace). Press Alt+Tab to see a list of all active
windows (Figure 2.7). Continue to hold the Alt key as you press the Tab key (or right
or left arrow keys) to highlight the application that you want from the list of active
desktop application windows. If an application has multiple windows open, press Alt+`
(backtick, located above the Tab key) to choose among those subwindows. Release the
Alt key to select it.
Launch a command or application. From any active workspace, you can launch a Linux
command or a graphical application. Here are some examples:
Apps. From the Activities screen, press Ctrl+Alt+Tab and continue to press Tab until
the Apps icon is highlighted; then release Ctrl+Alt. The Applications view appears,
with the first icon highlighted. Use the Tab key or arrow keys (up, down, right, and
left) to highlight the application icon you want, and press Enter.
FIGURE 2.7
Press Alt+Tab to select which running application to go to.
37
2
Downloaded from https://onlinelibrary.wiley.com/doi/ by alex jounh - Oregon Health & Science Univer , Wiley Online Library on [05/12/2025]. See the Terms and Conditions (https://onlinelibrary.wiley.com/terms-and-conditions) on Wiley Online Library for rules of use; OA articles are governed by the applicable Creative Commons License
Chapter 2: Creating the Perfect Linux Desktop
Command box. If you know the name (or part of a name) of a command you want
to run, press Alt+F2 to display a command box. Type the name of the command
that you want to run into the box (try Calculator to open a calculator application,
for example).
Search box. From the Activities screen, press Ctrl+Alt+Tab and continue to press Tab
until the magnifying glass (Search) icon is highlighted; then release Ctrl+Alt. In the
search box now highlighted, type a few letters in an application’s name or description (type scr to see what you get). Keep typing until the application you want is
highlighted (in this case, Screenshot), and press Enter to launch it.
Dash. From the Activities screen, press Ctrl+Alt+Tab and continue to press Tab until
the star (Dash) icon is highlighted; then release Ctrl+Alt. From the Dash, move
the up and down arrows to highlight an application that you want to launch and
press Enter.
Escape. When you are stuck in an action that you don’t want to complete, try pressing
the Esc key. For example, after pressing Alt+F2 (to enter a command), opening an icon
from the top bar, or going to an overview page, pressing Esc returns you to the active
window on the active workspace.
I hope you now feel comfortable navigating the GNOME desktop. Next, you can try running
some useful and fun desktop applications from GNOME.
Setting up the GNOME desktop
Much of what you need GNOME to do for you is set up automatically. However, you need to
make a few tweaks to get the desktop the way you want. Most of these setup activities are
available from the System Settings window (Figure 2.8). Open the Settings icon from the
Applications list.
Here are some suggestions for configuring a GNOME desktop:
Configure Wi-Fi. If you didn’t do so during installation, your GNOME desktop Wi-Fi settings let you configure a Wi-Fi connection. The Wi-Fi settings let you choose from
available wireless networks or connect to hidden networks. If you have a wired Internet
connection, you can configure your wireless connection to serve as a Wi-Fi hotspot for
other devices in your location.
Configure networking. If your computer has a wired network connection, it is often configured automatically when you boot up your Fedora system. Alternatively, you can
set up Network Proxy to have your system communicate outside of your local network
through a proxy server for HTTP(S), FTP, and/or SOCKS services. Likewise, you can set
up to allow VPN connections. Refer to Chapter 14, “Administering Networking,” for further information on configuring networking.
Bluetooth. If your computer has Bluetooth hardware, you can enable that device to communicate with other Bluetooth devices (such as a Bluetooth headset or printer). These
settings let you connect to Bluetooth devices your computer finds in the vicinity.
38
Downloaded from https://onlinelibrary.wiley.com/doi/ by alex jounh - Oregon Health & Science Univer , Wiley Online Library on [05/12/2025]. See the Terms and Conditions (https://onlinelibrary.wiley.com/terms-and-conditions) on Wiley Online Library for rules of use; OA articles are governed by the applicable Creative Commons License
Part I: Getting Started
FIGURE 2.8
Change desktop settings from the System Settings window.
2
Displays. From the Displays screen, you can configure your screen orientation, screen resolution, refresh rate, and scale.
Sound. Click the Sound settings button to adjust sound input and output devices on
your system.
Extending the GNOME desktop
If the GNOME shell doesn’t do everything you’d like, don’t despair. You can add extensions to
provide additional functionality to GNOME. Also, a tool called GNOME Tweaks lets you change
advanced settings in GNOME.
Using GNOME shell extensions
GNOME shell extensions are available to change the way your GNOME desktop looks and
behaves. Visit the GNOME Shell Extensions site (http://extensions.gnome.org) from your
Firefox browser on your GNOME desktop. The page asks if you want to allow extensions. If you
agree, you will share data with extensions.gnome.org and extensions-next.gnome.org
sites. Those sites will have access to your browser tabs and will display notifications to you. If
you agree to those requests and others they may add, you can continue with this section.
In previous editions of this book, I described GNOME 2, which was the previous major
update to GNOME. If you liked GNOME 2, some of the extensions included with GNOME 3
39
Downloaded from https://onlinelibrary.wiley.com/doi/ by alex jounh - Oregon Health & Science Univer , Wiley Online Library on [05/12/2025]. See the Terms and Conditions (https://onlinelibrary.wiley.com/terms-and-conditions) on Wiley Online Library for rules of use; OA articles are governed by the applicable Creative Commons License
Chapter 2: Creating the Perfect Linux Desktop
(but turned off) allow you to get some of GNOME 2 features back. From extensions
.gnome.org, select Installed Extensions to see those already installed extensions, including
the following:
Apps Menu. Adds an Applications menu to the top panel, just as it was in GNOME 2.
Places Status Indicator. Adds a systems status menu, similar to the Places menu in
GNOME 2, to let you navigate quickly to useful folders on your system or resources on
the network.
Window List. Adds a list of active windows, like the one that appeared on the bottom
panel in GNOME 2.
To turn on an extension that is already installed, simply select the ON button next to the
name. Or, you can click the extension name from the list to see the extension’s page and click
the button on that page from OFF to ON. Look for a settings icon next to each extension to
configure that extension.
Figure 2.9 shows an example of the Apps menu and Places Status Indicator (with folders displayed from a drop-down menu) extensions installed.
More than 100 GNOME shell extensions are available now, and more are being added all the
time. Other popular extensions include Notifications Alert (which changes the color of the
time/date indicator at the top of the desktop if you have unread messages) and Removable
Drive Menu (which adds a status menu to your top bar to access removable media connected to
your computer).
FIGURE 2.9
Extensions add features to the GNOME desktop.
40
Downloaded from https://onlinelibrary.wiley.com/doi/ by alex jounh - Oregon Health & Science Univer , Wiley Online Library on [05/12/2025]. See the Terms and Conditions (https://onlinelibrary.wiley.com/terms-and-conditions) on Wiley Online Library for rules of use; OA articles are governed by the applicable Creative Commons License
Part I: Getting Started
You can click the Installed Extensions button at the top of the page and see the installed
extensions. You can turn the extensions off and on from there and even delete them
permanently.
Using the GNOME Tweak tool
If you don’t like the way some of the built-in features of GNOME behave, you can change many
of them with the GNOME Tweak tool. This tool is not installed by default with the Fedora
GNOME Live CD, but you can add it by installing the gnome-tweaks package. (See
Chapter 10, “Getting and Managing Software,” for information on how to install software packages in Fedora.) After installation, the GNOME Tweak tool is available by launching the Tweaks
app from your Activities screen. Start with the Windows category to consider what you might
want to change in GNOME. Figure 2.10 shows the Tweak tool displaying Windows settings.
2
If the fonts are too small for you, select the Fonts category and click the plus sign next to
the Scaling Factor box to increase the font size, or change fonts individually for documents,
window titles, or monospace fonts.
Under Windows settings, you can select Maximize or Minimize under Titlebar Buttons to add
those buttons to the top bar in each window (as they were on GNOME 2 desktops). To change
FIGURE 2.10
Change the Windows settings using the GNOME Tweak tool (Appearance settings).
41
Downloaded from https://onlinelibrary.wiley.com/doi/ by alex jounh - Oregon Health & Science Univer , Wiley Online Library on [05/12/2025]. See the Terms and Conditions (https://onlinelibrary.wiley.com/terms-and-conditions) on Wiley Online Library for rules of use; OA articles are governed by the applicable Creative Commons License
Chapter 2: Creating the Perfect Linux Desktop
the look of the desktop, select the Appearance category and select Default Image under
Background to set a new desktop background image.
Starting with desktop applications
The Fedora GNOME Live DVD comes with some cool applications that you can start using
immediately. To use GNOME as your everyday desktop, you should install it permanently to
your computer’s hard disk and add the applications you need (a word processor, image editor, drawing application, and so on). If you are just getting started, the following sections list
some cool applications to try.
Managing files and folders with Nautilus
To move, copy, delete, rename, and otherwise organize files and folders in GNOME, you can use
the Nautilus file manager. Nautilus comes with the GNOME desktop and works like other file
managers that you may use in Windows or Mac.
To open Nautilus, click the Files icon from the Activities screen. Your user account starts with
a set of folders designed to hold the most common types of content: Music, Pictures, Videos,
and the like. These are all stored in what is referred to as your Home directory. Figure 2.11
shows Nautilus open to a Home directory.
When you want to save files that you downloaded from the Internet or created with a word
processor, you can organize them into these folders. You can create new folders as needed,
drag and drop files and folders to copy and move them, and delete them.
FIGURE 2.11
Manage files and folders from the Nautilus window.
42
Downloaded from https://onlinelibrary.wiley.com/doi/ by alex jounh - Oregon Health & Science Univer , Wiley Online Library on [05/12/2025]. See the Terms and Conditions (https://onlinelibrary.wiley.com/terms-and-conditions) on Wiley Online Library for rules of use; OA articles are governed by the applicable Creative Commons License
Part I: Getting Started
Because Nautilus is not much different from most file managers that you have used on other
computer systems, this chapter does not go into detail about how to use drag-and-drop and
traverse folders to find your content. However, I do want to make a few observations that may
not be obvious about how to use Nautilus:
Home folder You have complete control over the files and folders that you create in
your Home folder. Most other parts of the filesystem are not accessible to you as a
regular user.
Filesystem organization Although it appears under the name Home, your Home folder
is actually located in the filesystem under the /home folder in a folder named after
your username: for example, /home/liveuser or /home/chris. In the next few
chapters, you learn how the filesystem is organized (especially in relation to the Linux
command shell).
Working with files and folders Right-click a file or folder icon to see how you can
act on it. For example, you can copy, cut, move to trash (delete), or open any file or
folder icon.
Creating folders To create a new folder, right-click in a folder window and select New
Folder. Type the new folder name in the New Folder window, and press Enter to name
the folder.
Accessing remote content Nautilus can display content from remote servers as well as
the local filesystem. In Nautilus, select Other Locations from the file menu. From the
Connect To Server box that appears, you can connect to a remote server via SSH (secure
shell), FTP with login, Public FTP, Windows share, WebDav (HTTP), or Secure WebDav
(HTTPS). Add appropriate user and password information as needed, and the content of
the remote server appears in the Nautilus window. Figure 2.12 shows an example of a
Nautilus window that is ready to connect to a remote server over SSH
protocol (ssh://chris@192.168.122.18).
Installing and managing additional software
The Fedora Live Desktop comes with a web browser (Firefox), a file manager (Nautilus), and a few
other common applications. However, there are many other useful applications that, because of
their size, just wouldn’t fit on a live CD. If you install the live Fedora Workstation to your hard
disk (as described in Chapter 9), you almost certainly will want to add some more software.
Note
You can try installing software if you are running the live medium. However, keep in mind that because writeable space
on a live medium uses virtual memory (RAM), that space is limited and can easily run out. Also, when you reboot your
system, anything that you install disappears.
When Fedora is installed, it is automatically configured to connect your system to the huge
Fedora software repository that is available on the Internet. As long as you have an Internet
connection, you can run the Add/Remove software tool to download and install any of thousands of Fedora packages.
43
2
Downloaded from https://onlinelibrary.wiley.com/doi/ by alex jounh - Oregon Health & Science Univer , Wiley Online Library on [05/12/2025]. See the Terms and Conditions (https://onlinelibrary.wiley.com/terms-and-conditions) on Wiley Online Library for rules of use; OA articles are governed by the applicable Creative Commons License
Chapter 2: Creating the Perfect Linux Desktop
FIGURE 2.12
Access remote folders using the Nautilus Connect To Server feature.
Although the entire facility for managing software in Fedora (the dnf and rpm features) is
described in detail in Chapter 10, you can start installing some software packages without
knowing much about how the feature works. Begin by going to the Activities screen and opening the Software window. Figure 2.13 shows an example of the Software window.
With the Software window open, you can select the applications that you want to install by
searching (type the name into the Find box) or choosing a category. Each category offers
packages sorted by subcategories and featured packages in that category. Select the spyglass
icon in the upper-left corner, and then type a word associated with the software package that
you want to install. You can read a description of each package that comes up in your search.
When you are ready, click Install to install the package and any dependent packages needed to
make it work.
By searching for and installing some common desktop applications, you should be able to start
using your desktop effectively. Refer to Chapter 10 for details on how to add software repositories and use dnf, yum, and rpm commands to manage software in Fedora and Red Hat
Enterprise Linux.
Playing music with Rhythmbox
Rhythmbox is the music player that comes on the Fedora GNOME Live Desktop. You can launch
Rhythmbox from the GNOME Apps list and immediately play music files, podcasts, or Internet
radio shows. You can import audio files in WAV and Ogg Vorbis formats or add plug-ins for MP3
or other audio formats.
44
Downloaded from https://onlinelibrary.wiley.com/doi/ by alex jounh - Oregon Health & Science Univer , Wiley Online Library on [05/12/2025]. See the Terms and Conditions (https://onlinelibrary.wiley.com/terms-and-conditions) on Wiley Online Library for rules of use; OA articles are governed by the applicable Creative Commons License
Part I: Getting Started
FIGURE 2.13
Download and install software from the huge Fedora repository.
2
Figure 2.14 shows an example of the Rhythmbox window with music playing from an imported
audio library.
Here are a few ways that you can get started with Rhythmbox:
Radio Double-click the Radio selection under Library and choose a radio station from
the list that appears to the right.
Podcasts Search for podcasts on the Internet and find the URL for one that interests
you. Select the Podcasts entry and select Add. Then enter a search term for the podcast
you want. Choose a podcast and list of podcasts from the site that you selected appears
to the right. Double-click the one to which you want to listen.
Audio CDs Insert an audio CD, and press Play when it appears in the Rhythmbox
window. Rhythmbox also lets you rip and burn audio CDs.
Audio files Rhythmbox can play MP3, MP4, WAV, and Ogg Vorbis files. It can also play
high-quality open source audio formats, such as FLAC.
Plug-ins are available for Rhythmbox to get cover art, show information about artists and
songs, add support for music services (such as Last.fm and Magnatune), and fetch song lyrics.
45
Downloaded from https://onlinelibrary.wiley.com/doi/ by alex jounh - Oregon Health & Science Univer , Wiley Online Library on [05/12/2025]. See the Terms and Conditions (https://onlinelibrary.wiley.com/terms-and-conditions) on Wiley Online Library for rules of use; OA articles are governed by the applicable Creative Commons License
Chapter 2: Creating the Perfect Linux Desktop
FIGURE 2.14
Play music, podcasts, and Internet radio from Rhythmbox.
Playing with 3D effects
Just for fun, you can add some 3D effects to your Linux desktop. Fedora offers a desktop spin
called Fedora MATE Compiz that incorporates the Compiz window manager to offer effects such
as wobbling windows and spinning desktop workspaces on a cube. You can also add a few of
those effects through GNOME extensions to your existing desktop.
Adding 3D effects to GNOME
There are a few 3D effects that are available through GNOME extensions that you can add to
your current GNOME desktop. From extensions.gnome.org, search for two 3D effect extensions by Simon Schneegans (github.com/Schneegans): Desktop Cube and Burn my Windows.
Install them and turn them on, as you would other GNOME extensions.
The Desktop Cube lets you rotate your GNOME workspaces around as though they were on a 3D
cube. Here’s how it works:
1. Open several workspaces.
2. Go to the Activities screen.
3. Rotate between the workspaces in any of the following ways:
■
■
46
Mouse wheel: If your mouse has a wheel, turn the wheel up and down to step
between the workspaces.
Mouse click and hold: Click and hold the left mouse button on the current workspace. Then move the mouse up, down, left, or right to see the workspaces spin
around as though they were on a cube.
Downloaded from https://onlinelibrary.wiley.com/doi/ by alex jounh - Oregon Health & Science Univer , Wiley Online Library on [05/12/2025]. See the Terms and Conditions (https://onlinelibrary.wiley.com/terms-and-conditions) on Wiley Online Library for rules of use; OA articles are governed by the applicable Creative Commons License
Part I: Getting Started
FIGURE 2.15
Rotate workspaces on a cube with the Desktop Cube extension.
2
Figure 2.15 shows an example of a rotating desktop cube.
The Burn my Windows extension adds effects to windows as they open and close on the GNOME
desktop. By default, Burn my Windows opens and closes windows in flames. To enable different
effects instead, open the Settings icon next to the ON/OFF switch when you enabled it. It will
let you choose from more than 20 different effects, like Broken Glass, Matrix, and T-Rex Attack.
If you thought those effects were fun, you can try a whole Fedora spin of effects that includes
the light-weight MATE desktop with Compiz Fusion special effects.
Running a MATE+Compiz desktop
The Fedora project offers a full MATE+Compiz desktop spin (fedoraproject.org/spins/
mate). To try it, you can download the ISO image from that site and run it live or install it, as
described in Chapter 9 or Appendix A.
Once you have the MATE+Compiz desktop running, start using Compiz by selecting System ➢
Preferences ➢ Look And Feel ➢ CompizConfig Settings Manager. Figure 2.16 shows an example
of the Effects page of the Compiz Setting Manager.
Here are some effects you can try (you can always turn them off by unselecting the effect):
■
■
Enable Water Effect, and then select Shift+F9 to have the desktop filled with moving
water rings. Select Shift+F8 to toggle a wiper.
Enable Motion Blur, and then select Ctrl+F12 to blur windows as you move them.
47
Downloaded from https://onlinelibrary.wiley.com/doi/ by alex jounh - Oregon Health & Science Univer , Wiley Online Library on [05/12/2025]. See the Terms and Conditions (https://onlinelibrary.wiley.com/terms-and-conditions) on Wiley Online Library for rules of use; OA articles are governed by the applicable Creative Commons License
Chapter 2: Creating the Perfect Linux Desktop
FIGURE 2.16
Configure desktop effects in Compiz Settings Manager.
■
■
Enable Paint fire on the screen, and then hold Windows+Shift as you hold and drag the
left mouse button to show fire across the screen.
Enable Wobbly Windows to cause any window that you move to wobble.
Figure 2.17 shows an example of a window being moved while wobble
is enabled.
While playing with desktop effects can be fun, Linux desktops are also built to do serious
work. If you are a software developer, and especially if you are developing applications to ultimately run on Linux systems, using a Linux desktop as a developer workstation can be very
useful. The next section should help get started with that.
48
Downloaded from https://onlinelibrary.wiley.com/doi/ by alex jounh - Oregon Health & Science Univer , Wiley Online Library on [05/12/2025]. See the Terms and Conditions (https://onlinelibrary.wiley.com/terms-and-conditions) on Wiley Online Library for rules of use; OA articles are governed by the applicable Creative Commons License
Part I: Getting Started
FIGURE 2.17
The wobble effect.
2
Configuring a Developer Desktop
The Linux operating system was always a favorite for software developers and remains so
today. It is no surprise that there are many tools available with Linux to let you configure it as
a fully functioning developer desktop.
A Linux developer desktop is particularly popular with those developing software for Linux
servers, especially in large enterprises. Today, that can include containerized software, software for embedded Linux systems, and artificial intelligence and machine learning software. On
your Linux developer’s desktop, you can build and run that software in an environment that is
essentially the same as where it is destined to run.
While there are many different developer tools to choose from, you will almost certainly want
to consider the following in the tools that you choose:
■
■
Code editors/IDEs: While it is possible to use a plain-text editor to edit code, special
features for editing code are available from many command-line and graphical code
editing tools. Features can range from code highlighting to auto completion to full
artificial intelligence integration. Complete IDEs offer a more comprehensive set of
tools for building, debugging, and deploying software.
Git integration: For storing, sharing, and managing code, Git is the industry standard. Git was created by Linus Torvalds (who invented Linux) and is open source. With
Git, you can use a variety of command-line tools and code editors to integrate with
49
Downloaded from https://onlinelibrary.wiley.com/doi/ by alex jounh - Oregon Health & Science Univer , Wiley Online Library on [05/12/2025]. See the Terms and Conditions (https://onlinelibrary.wiley.com/terms-and-conditions) on Wiley Online Library for rules of use; OA articles are governed by the applicable Creative Commons License
Chapter 2: Creating the Perfect Linux Desktop
your Git tools. Build code from scratch or “fork” code from an open source project to
begin working with software using Git tools for managing software version control on
large or small software projects.
Command-line tools will be an integral part of your Linux developer desktop experience. But
because I haven’t described the shell and command-line tools yet, this section will primarily
describe developer tools you can add and use from your Linux desktop. I will describe how to
choose and set up a code editor that can be enhanced to manage and edit your documents and
code. Then I’ll describe how to integrate the code you use with your Git account so you can
store and share your work.
Getting a Git account
If you want to share your code publicly and participate in other public software projects,
you should get a Git account. Although you can copy (clone) many public Git repositories
without an account, you will need an account if you want to submit change suggestions (pull
requests) to a Git repository. Depending on the repository, you might need additional permissions as well.
To start, you can get a free Git account at GitHub.com, GitLab.com, or Bitbucket.org,
depending on which repositories you want to contribute to and where you want to save your
own code. To start with GitHub, go to Github.com and click Sign Up. It will step you through
the process of getting your GitHub credentials.
To set up your GitHub credentials to be stored permanently on your Linux system, you can
follow instructions such as those from Geeksforgeeks (https://www.geeksforgeeks.org/
git/how-to-add-git-credentials-in-linux). However, for our purposes, I will demonstrate
how to get a GitHub project on to your computer to begin using a code editor (which does not
require credentials).
If you want to learn how to use Git to contribute other software projects or create projects yourself, there are a lot of good resources for learning Git. I recommend GitHub Skills
(skills.github.com), Git Immersion (gitimmersion.com), and Learn Git Branching (learn
gitbranching.js.org).
Choosing an IDE or code editor
Sometimes the IDE or code editor you use will be determined by what your employer
chooses. Your company might have an integrated set of tools and workflows that are simply
required of you.
If you are choosing your own tools for editing code, you might do that based on a combination
of things, such as the languages you are programming in and how devoted you are to using
purely open source solutions. Here are some of your choices in Linux:
■
50
Eclipse IDE: Eclipse has been around for more than two decades and has been a popular IDE, particularly for Java development. Created originally by IBM, it is an open
source project. By adding plugins, you can develop applications in Eclipse for dozens
of programming languages.
Downloaded from https://onlinelibrary.wiley.com/doi/ by alex jounh - Oregon Health & Science Univer , Wiley Online Library on [05/12/2025]. See the Terms and Conditions (https://onlinelibrary.wiley.com/terms-and-conditions) on Wiley Online Library for rules of use; OA articles are governed by the applicable Creative Commons License
Part I: Getting Started
■
■
■
IntelliJ IDEA: This is one of several IDEs available from JetBrains. It has surpassed
Eclipse IDE in popularity among Java developers. There is a free, open source community version of IntelliJ IDEA available, but many developers will upgrade to the paid
Ultimate version to get extra tools for web development, database tools, and remote
development.
Apache NetBeans: Like other IDEs, Apache NetBeans is particularly suited for Java
development, although it also supports PHP, HTML5, CSS, and C and C++. It is a top-
level Apache Software Foundation project and is offered on multiple platforms besides
Linux, such as macOS, Windows, and Berkeley Software Distribution.
Visual Studio Code: Developed by Microsoft, Visual Studio Code is a source code editor for languages such as C languages (C, C++, and C#), Node.js, Python, Java, and
JavaScript, among others. While it is not a full-blown IDE, with extensions you can
add the components needed to match most IDEs, such as profilers, debuggers, and
compilers. Open source versions are available of Visual Studio Code to run in Linux.
To demonstrate some of what you can do with a code editor with added IDE-type features, I’m
going to use Visual Studio Code.
Using Visual Studio Code
While not a complete IDE, Visual Studio Code offers many useful features to create code and,
with extensions, can offer a free way to begin using IDE-like features. It is released as open
source under a standard MIT open source license for its code on GitHub. However, keep in mind
that the Microsoft build contains proprietary content, such as logos and some proprietary
Microsoft features. If you prefer, there is a more pure, open source version called VSCodium
that you can try.
Given those caveats, if you are working in a Linux development environment, it’s likely that
you will run into Visual Studio Code or the paid Visual Studio versions from Microsoft that
are more full-featured IDEs. For our purposes, however, we will install the free Visual Studio
Code and add a few extensions to give you the idea of what you can do with a developer desktop in Linux.
Installing Visual Studio Code
There are different ways to install the free Visual Studio Code software. Besides using the App
Center window (Ubuntu) and Software window (Fedora), you can install the Microsoft build
from instructions on https://code.visualstudio.com/docs/setup/linux. To install Visual
Studio Code from Fedora, follow these steps:
1. From the Activities screen, open the Software window.
2. From the search box, type Visual Studio Code and click the Visual Studio Code icon
when it appears.
3. Click Install, supplying your password if needed.
4. Once it is installed, click Open.
51
2
Downloaded from https://onlinelibrary.wiley.com/doi/ by alex jounh - Oregon Health & Science Univer , Wiley Online Library on [05/12/2025]. See the Terms and Conditions (https://onlinelibrary.wiley.com/terms-and-conditions) on Wiley Online Library for rules of use; OA articles are governed by the applicable Creative Commons License
Chapter 2: Creating the Perfect Linux Desktop
To install Visual Studio Code from Ubuntu, follow these steps:
1. From the Activities screen, open the App Center.
2. Search for or select Visual Studio Code.
3. Click Install, supplying your password if needed.
4. Once it is installed, click Open.
If the version of Visual Studio Code that is installed doesn’t have all the features I’m about to
demonstrate, you can go to the https://code.visualstudio.com page where you can download and install the latest Microsoft Visual Studio Code builds for Fedora or Debian. The demonstrations of Visual Studio Code in this section are done with the Microsoft build in Fedora.
Setting up Visual Studio Code
One of the features of the Microsoft build of Visual Studio Code is the ability to integrate the
Copilot AI assistant. Initial setup steps you through Copilot configuration, along with the
setup of other features of Visual Studio Code. Figure 2.18 shows an example of the Visual
Studio Code window in Fedora.
FIGURE 2.18
Visual Studio Code can integrate with the Copilot AI assistant.
52
Downloaded from https://onlinelibrary.wiley.com/doi/ by alex jounh - Oregon Health & Science Univer , Wiley Online Library on [05/12/2025]. See the Terms and Conditions (https://onlinelibrary.wiley.com/terms-and-conditions) on Wiley Online Library for rules of use; OA articles are governed by the applicable Creative Commons License
Part I: Getting Started
You can begin by stepping through the Visual Studio Code setup:
■
■
■
■
■
■
■
Use AI features with Copilot for free: If you want to try Copilot, you can enable it
by providing your GitHub account or other credentials. Before doing so, read the Terms
and Privacy Statement and know that you are leaving the realm of privacy and open
source. That said, enabling Copilot is an easy way to get a sense of what AI can do for
you in helping you write code.
Choose your theme: Dark Mode is chosen for you by default, but there are more than
a dozen Light, Dark, and High Contrast themes you can choose from.
Watch video tutorials: Follow the link to a video tutorial on how to use Visual Studio
Code. The video associated with the version I installed provided a tutorial on how to
code in JavaScript, Python, and HTML.
Tune your settings: Review and change common settings, such as fonts, auto save (off
by default), and default formatter (such as CSS, HTML, or JSON language features).
Code with extensions: Adding extensions is the way to turn Visual Studio Code into
much more than just a code editor. This is where you can choose different AI extensions, Git version control extensions, and productivity extensions, to name a few.
Built-in terminal: Selecting this opens a terminal (shell command line) interface to
your system in the bottom of your Visual Studio Code window. If you are not yet familiar with the Linux shell, I suggest you will want this once you become more familiar.
Track your code with Git: Select this to add a Git repository to Visual Studio Code.
When you choose to add a Git repository, you are prompted to enter the URL to that repository. For example, I’m going to step you through the process to download (clone) a GitHub
repository and start editing files from that repository in Visual Studio Code:
1. Choose a GitHub project you want to use. I entered https://github.com/StartBoot
strap/startbootstrap-grayscale. Grayscale is an HTML theme that can be copied
and repurposed to use as you please. I’m going to use Visual Studio Code to edit the
HTML content and replace some images.
2. You are prompted to select a folder to copy the repository into. I selected my home
directory (/home/chris).
3. Open a web browser to see the web page we are about to edit. In my case, I typed this
into the browser location box: file:///home/chris/startbootstrap-
grayscale/dist/index.html.
4. Now that you know what file we are about to edit, go to the Activities screen and type
Visual Studio Code to open the application.
5. Select Open Folder, and then choose the folder you just cloned to your system. In my
case, it was /home/chris/startbootstrap-grayscale/dist. The contents
of that folder appear in the Visual Studio Code left navigation bar.
6. Select the index.html file and modify it as you like. I changed Grayscale to Holidays and put a holiday image in as a background. Figure 2.19 shows Visual Studio
Code showing the index.html file.
53
2
Downloaded from https://onlinelibrary.wiley.com/doi/ by alex jounh - Oregon Health & Science Univer , Wiley Online Library on [05/12/2025]. See the Terms and Conditions (https://onlinelibrary.wiley.com/terms-and-conditions) on Wiley Online Library for rules of use; OA articles are governed by the applicable Creative Commons License
Chapter 2: Creating the Perfect Linux Desktop
FIGURE 2.19
Different elements in HTML content are highlighted in Visual Studio Code.
FIGURE 2.20
Display updated HTML content in your browser window.
7. Save your changes (Ctrl+S).
8. Reload your browser to see your updates to the index.html page. Figure 2.20 shows
an example of that page.
54
Downloaded from https://onlinelibrary.wiley.com/doi/ by alex jounh - Oregon Health & Science Univer , Wiley Online Library on [05/12/2025]. See the Terms and Conditions (https://onlinelibrary.wiley.com/terms-and-conditions) on Wiley Online Library for rules of use; OA articles are governed by the applicable Creative Commons License
Part I: Getting Started
This brief introduction to Visual Studio Code is just the tip of the iceberg of what you can do
with it. Using the Remote Explorer feature, you can work with code on other systems over SSH
connections. Using the Run and Debug feature to test the code you are writing, and add a variety of extensions to support various programming languages and AI chatbot integrations.
Summary
The GNOME desktop environment is the default desktop environment for many Linux systems,
including Fedora and Ubuntu. Besides GNOME desktops, you can try other popular and useful
desktop environments. The K Desktop Environment (KDE) offers many more bells and whistles
than GNOME. Netbooks and live CD distributions sometimes use the LXDE or Xfce desktops.
Now that you have a grasp of how to get and use a Linux desktop, it’s time to start digging
into the more professional administrative interfaces. Chapter 3, “Using the Shell,” introduces
you to the Linux command-line shell interface.
Exercises
Use these exercises to test your skill in using a GNOME desktop. If you are stuck, solutions to
the tasks are shown in Appendix B.
1. Obtain a Linux system with a GNOME desktop installed by default. Start the system
and log in to the GNOME desktop.
2. Launch the Firefox web browser and go to the GNOME home page (http://
gnome.org).
3. Pick a background you like from the GNOME art site (http://gnome-look.org), download it to your Pictures folder, and select it as your current background.
4. Start a Nautilus File Manager window and move it to the second workspace on
your desktop.
5. Find the image that you downloaded to use as your desktop background and open it in
any image viewer.
6. Move back and forth between the workspace with Firefox on it and the one with the
Nautilus file manager.
7. Open a list of applications installed on your system and select an image viewer to
open from that list. Use as few clicks or keystrokes as possible.
8. Change the view of the windows on your current workspace to smaller views you can
step through. Select any window you’d like to make it your current window.
9. From your desktop, using only the keyboard, launch a music player.
10. Take a picture of your desktop using only keystrokes.
55
2
Downloaded from https://onlinelibrary.wiley.com/doi/ by alex jounh - Oregon Health & Science Univer , Wiley Online Library on [05/12/2025]. See the Terms and Conditions (https://onlinelibrary.wiley.com/terms-and-conditions) on Wiley Online Library for rules of use; OA articles are governed by the applicable Creative Commons License
Chapter 2: Creating the Perfect Linux Desktop
Becoming a Linux
Power User
IN THIS PART
Chapter 3
Using the Shell
Chapter 4
Moving Around the Filesystem
Chapter 5
Working with Text Files
Chapter 6
Managing Running Processes
Chapter 7
Writing Simple Shell Scripts
Linux Bible, Eleventh Edition. Christopher Negus.
© 2026 John Wiley & Sons, Inc. All rights reserved, including rights for text and data mining and training of artificial intelligence technologies or similar
technologies. Published 2026 by John Wiley & Sons, Inc.
Downloaded from https://onlinelibrary.wiley.com/doi/ by alex jounh - Oregon Health & Science Univer , Wiley Online Library on [05/12/2025]. See the Terms and Conditions (https://onlinelibrary.wiley.com/terms-and-conditions) on Wiley Online Library for rules of use; OA articles are governed by the applicable Creative Commons License
Part II
Using the Shell
3
IN THIS CHAPTER
Understanding the Linux shell
Using the shell from consoles or Terminals
Using commands
Using command history and tab completion
Connecting and expanding commands
Understanding variables and aliases
Making shell settings permanent
Using man pages and other documentation
B
efore icons and windows took over computer screens, you typed commands to interact with most
computers. On UNIX systems, from which Linux was derived, the program used to interpret and
manage commands was referred to as the shell.
No matter which Linux distribution you are using, you can always count on the fact that the shell is
available to you. It provides a way to create executable script files, run programs, work with filesystems,
compile computer code, and manage the computer. Although the shell is less intuitive than common
graphical user interfaces (GUIs), most Linux experts consider the shell to be much more powerful than
GUIs. Shells have been around a long time, and many advanced features that aren’t available from the
desktop can be accessed by running shell commands.
The Linux shell illustrated in this chapter is called the Bash shell, which stands for Bourne Again Shell.
The name is derived from the fact that Bash is compatible with the one of the earliest UNIX shells: the
Bourne shell (named after its creator, Stephen Bourne, and represented by the sh command).
Although Bash is included with most distributions and considered a standard, other shells are available,
including the C shell (csh), which is popular among BSD UNIX users, and the Korn shell (ksh), which
is popular among UNIX System V users. Ubuntu uses the dash shell by default at boot time, which is
designed to perform faster than the Bash shell but uses bash as the default login shell. Linux also has a
tcsh shell (an improved C shell) and an ash shell (another Bourne shell look-alike).
59
Linux Bible, Eleventh Edition. Christopher Negus.
© 2026 John Wiley & Sons, Inc. All rights reserved, including rights for text and data mining and training of artificial intelligence technologies or similar
technologies. Published 2026 by John Wiley & Sons, Inc.
Downloaded from https://onlinelibrary.wiley.com/doi/ by alex jounh - Oregon Health & Science Univer , Wiley Online Library on [05/12/2025]. See the Terms and Conditions (https://onlinelibrary.wiley.com/terms-and-conditions) on Wiley Online Library for rules of use; OA articles are governed by the applicable Creative Commons License
CHAPTER
The odds are strong that the Linux distribution you are using has more than one shell available
for your use. This chapter, however, focuses primarily on the Bash shell. That is because the
Linux distributions featured in this book, Fedora, Ubuntu, and Red Hat Enterprise Linux, all use
the Bash shell by default when you open a Terminal window.
The following are a few major reasons to learn how to use the shell:
■
■
■
You will learn to get around any Linux or other UNIX-like system. For example, I can log
in to my Red Hat Enterprise Linux web server, my home multimedia server, my home
router, or my wife’s Mac and explore and use any of those computer systems from a
shell. I can even log in and run commands on my Android phone. They all run Linux
or similar systems on the inside.
Special shell features enable you to gather data input and direct data output between
commands and Linux filesystems. To save on typing, you can find, edit, and repeat
commands from your shell history. Many power users hardly touch a graphical interface, doing most of their work from a shell.
You can gather commands into a file using programming constructs such as conditional
tests, loops, and case statements to perform complex operations quickly, which would be
difficult to retype over and over. Programs consisting of commands that are stored and
run from a file are referred to as shell scripts. Many Linux system administrators use
shell scripts to automate tasks such as backing up data and monitoring log files.
The shell is a command language interpreter. If you have used Microsoft operating systems,
you’ll see that using a shell in Linux is similar to, but generally much more powerful than,
the PowerShell interpreter used to run commands. However, if you like the Bash shell, you can
install the git Bash application to use a Bash shell in Windows.
You can happily use Linux from a graphical desktop interface, but as you grow into Linux, you will
surely need to use the shell at some point to track down a problem or administer some features.
How to use the shell isn’t obvious at first, but with the right help you can quickly learn many of
the most important shell features. This chapter is your guide to working with the Linux system
commands, processes, and filesystem from the shell. It describes the shell environment and helps
you tailor it to your needs.
About Shells and Terminal Windows
There are several ways to get to a shell interface in Linux. Some of the most common are the
shell prompt, Terminal window, virtual console, and cloud console, which you learn more about
in the following sections.
To start, boot up your Linux system. On your screen, you should see either a graphical login
screen or a plain-text login prompt similar to the following:
Fedora Linux 42 (Workstation Edition)
Kernel 6.15.7-
200.fc42.x86_64 on an x86_64 (tty3)
fedora login:
60
Downloaded from https://onlinelibrary.wiley.com/doi/ by alex jounh - Oregon Health & Science Univer , Wiley Online Library on [05/12/2025]. See the Terms and Conditions (https://onlinelibrary.wiley.com/terms-and-conditions) on Wiley Online Library for rules of use; OA articles are governed by the applicable Creative Commons License
Part II: Becoming a Linux Power User
In either case, you should log in with a regular user account. If you have a plain-text login
prompt, continue to the next section, “Using the shell prompt.” If you log in through a
graphical screen, go to the section “Using a Terminal window” to see how to access a shell
from the desktop. In either case, you can access more shells as described in the sections “Using
virtual consoles” and “Using cloud consoles,” which appear later in this chapter.
Using the shell prompt
If your Linux system has no graphical user interface (or one that isn’t working at the
moment), you will most likely see a shell prompt after you log in. Typing commands from the
shell will probably be your primary means of using the Linux system.
The default prompt for a regular user is simply a dollar sign:
$
The default prompt for the root user is a pound sign (also called a number sign or a hash tag):
#
In most Linux systems, the $ and # prompts are preceded by your username, system name, and
current directory name. For example, a login prompt for the user named jake on a computer
named pine with /usr/share/ as the current working directory might appear as follows:
[jake@pine share]$
or
jake@pine:/usr/share$
3
You can change the prompt to display any characters you like and even read in pieces of
information about your system. For example, you can use the current working directory, the
date, the local computer name, or any string of characters as your prompt. To configure your
prompt, see the section “Setting your prompt” later in this chapter.
Although a tremendous number of features are available with the shell, it’s easy to begin by
just entering a few commands. Try some of the commands shown in the remaining sections to
become familiar with your current shell environment.
In the examples that follow, the dollar ($) and pound (#) symbols indicate a prompt. A $ indicates that the command can be run by any user, but a # typically means that you should run
the command as the root user; that is, many administrative tools require root permission to
be able to run them. The prompt is followed by the command that you type (and then press
Enter). The lines that follow show the output resulting from the command.
Note
Although we use # to indicate that a command be run as the root user, you do not need to log in as the root user to run
a command as root. In fact, the most common way to run a command as a root user is to use the sudo command. See
Chapter 8, “Learning System Administration,” for further information about the sudo command.
61
Downloaded from https://onlinelibrary.wiley.com/doi/ by alex jounh - Oregon Health & Science Univer , Wiley Online Library on [05/12/2025]. See the Terms and Conditions (https://onlinelibrary.wiley.com/terms-and-conditions) on Wiley Online Library for rules of use; OA articles are governed by the applicable Creative Commons License
Chapter 3: Using the Shell
Using a Terminal window
With the desktop GUI running, you can open a Terminal emulator program (sometimes referred
to as a Terminal window) to start a shell. Most Linux distributions make it easy for you to
get to a shell from the GUI. Here are two common ways to launch a Terminal window from a
Linux desktop:
Right-click the desktop. In the context menu that appears, if you see Open in Terminal, Shells, New Terminal, Terminal Window, Xterm, or some similar item, select it to
start a Terminal window. (Some distributions have disabled this feature.)
Click the panel menu. Many Linux desktops include a panel at the top or bottom of
the screen from which you can launch applications. For example, in GNOME, click the
Activities menu, type Terminal, and press Enter.
In all cases, you should be able to type a command as you would from a shell with no GUI.
Different Terminal emulators are available with Linux. In Fedora, Red Hat Enterprise Linux
(RHEL), and other Linux distributions that use the GNOME desktop, the default Terminal emulator window is the GNOME Terminal (started by the gnome-terminal command).
GNOME Terminal supports many features beyond the basic shell. For example, you can cut and
paste text to or from a GNOME Terminal window, change fonts, set a title, choose colors or
images to use as background, and set how much text to save when text scrolls off the screen.
To try some GNOME Terminal features, start up a Fedora or RHEL system and log in to the desktop. Then follow this procedure:
1. Click the Activities menu and type Terminal. A Terminal window should open on
your desktop.
2. Select the three-bar icon at the top of the window, and then select Preferences.
3. On the General tab, select Unnamed under the Profiles heading. Then check the
“Custom font” box.
4. Select the Font field, try a different font and size, and then click Select. The new font
appears in the Terminal window.
5. Unselect the Custom Font box. This takes you back to the original font.
6. On the Colors tab, clear the Use Colors From System Theme check box. From here, you
can try some different fonts and background colors.
7. Re-select the Use Colors From System Theme box to go back to the default colors.
8. Go to your Profile window. There are other features with which you may want to
experiment, such as setting how much scrolled data is kept.
9. Close the Profile window when you are finished. You are now ready to use your Terminal window.
If you are using Linux from a graphical desktop, you will probably most often access the shell
from a Terminal window.
62
Downloaded from https://onlinelibrary.wiley.com/doi/ by alex jounh - Oregon Health & Science Univer , Wiley Online Library on [05/12/2025]. See the Terms and Conditions (https://onlinelibrary.wiley.com/terms-and-conditions) on Wiley Online Library for rules of use; OA articles are governed by the applicable Creative Commons License
Part II: Becoming a Linux Power User
Using virtual consoles
Most Linux systems that include a desktop interface start multiple virtual consoles running
on the computer. Virtual consoles are a way to have multiple shell sessions open at once in
addition to the graphical interface you are using.
You can switch between virtual consoles by holding the Ctrl and Alt keys and pressing a
function key between F1 and F6. For example, in Fedora, press Ctrl+Alt+F1 (or F2, F3, F4, and
so on up to F6 on most Linux systems) to display one of six virtual consoles.
You can return to the GUI (if one is running) by pressing Ctrl+Alt+F2. Pressing Ctrl+Alt+F1
brings you to the gdm screen (the login screen) persistently running on tty1 to allow multiple
simultaneous GUI sessions: the gdm is on tty1; the first desktop is started on tty2; if there
were a second desktop, it would be started on tty3; and so on.
1. Try it right now. Hold down the Ctrl+Alt keys and press F3. You should see a plain-text
login prompt. Log in using your username and password. Try a few commands. When
you are finished, type exit to exit the shell and then press Ctrl+Alt+F1 or Ctrl+Alt+F2
to return to your graphical desktop interface. You can go back and forth between
these consoles as much as you like.
2. Select Session Manager ➪ Connect. Provided that the instance allows connections from
Session Manager and you have permissions to use that feature, you should see a shell
prompt, logged in as sam-user. This user has sudo privileges to the machine.
3. At this point, you can use shell commands to look around the system. You can also
use sudo to become another user on the system (such as ec2-user) and run commands as that user.
Choosing Your Shell
In most Linux systems, your default shell is the Bash shell. To find out what is your default
login shell, enter the following commands:
$ whoami
chris
$ grep chris /etc/passwd
chris:x:13597:13597:Chris Negus:/home/chris:/bin/bash
Notice that the command-line examples shown here and throughout the book show the
command followed by output from that command. When the command completes, you are presented with the command prompt again.
The whoami command shows your username. The grep command (replacing chris with
your username) shows the definition of your user account in the /etc/passwd file. The last
field in that entry shows that the Bash shell (/bin/bash) is your default shell (the one that
starts up when you log in or open a Terminal window).
It’s possible, although not likely, that you might have a different default shell set. To try a
different shell, simply type the name of that shell (examples include ksh, tcsh, csh, sh,
63
3
Downloaded from https://onlinelibrary.wiley.com/doi/ by alex jounh - Oregon Health & Science Univer , Wiley Online Library on [05/12/2025]. See the Terms and Conditions (https://onlinelibrary.wiley.com/terms-and-conditions) on Wiley Online Library for rules of use; OA articles are governed by the applicable Creative Commons License
Chapter 3: Using the Shell
dash, and others, assuming that they are installed). You can try a few commands in that shell
and type exit when you are finished to return to the Bash shell.
You might choose to use different shells for the following reasons:
■
■
■
You are used to using UNIX System V systems (often ksh by default) or Sun Microsystems and other Berkeley UNIX-based distributions (frequently csh by default), and
you are more comfortable using default shells from those environments.
You want to run shell scripts that were created for a particular shell environment, and
you need to run the shell for which they were made so that you can test or use those
scripts from your current shell.
You simply prefer features in one shell over those in another. For example, a member
of my Linux Users Group prefers ksh over bash because he doesn’t like the way
aliases are used with bash.
Although most Linux users have a preference for one shell or another, when you know how to
use one shell, you can quickly learn any of the others by occasionally referring to the shell’s
man page (for example, type man bash). The man pages (described later in the section “Getting Information about Commands”) provide documentation for commands, file formats, and
other components in Linux. Most people use Bash just because they don’t have a particular
reason for using a different shell. The rest of this chapter describes the Bash shell.
Bash includes features originally developed for sh and ksh shells in early UNIX systems, as
well as some csh features. Expect Bash to be the default login shell in most Linux systems
that you are using, with the exception of some specialized Linux systems (such as some
that run on embedded devices) that may require a smaller shell that needs less memory and
requires fewer features. Most of the examples in this chapter are based on the Bash shell.
Tip
The Bash shell is worth knowing not only because it is the default in most installations, but because it is the one you will
use with most Linux certification exams.
Running Commands
The simplest way to run a command is just to type the name of the command from a shell.
From your desktop, open a Terminal window. Then enter the following command:
$ date
Fri Jun 13 08:14:53 EDT 2025
Entering the date command, with no options or arguments, causes the current day, month,
date, time, time zone, and year to be displayed as just shown.
64
Downloaded from https://onlinelibrary.wiley.com/doi/ by alex jounh - Oregon Health & Science Univer , Wiley Online Library on [05/12/2025]. See the Terms and Conditions (https://onlinelibrary.wiley.com/terms-and-conditions) on Wiley Online Library for rules of use; OA articles are governed by the applicable Creative Commons License
Part II: Becoming a Linux Power User
Here are a few other commands you can try:
$ pwd
/home/chris
$ hostname
mydesktop
$ ls
Desktop
Downloads
Documents Music
Pictures
Public
Templates
Videos
The pwd command shows your current working directory. Entering hostname shows your
computer’s hostname. The ls command lists the files and directories in your current directory.
Although many commands can be run by just entering command names, it’s more common to
type other characters after the command to modify its behavior. The characters and words that
you can type after a command are called options and arguments.
Understanding command syntax
Most commands have one or more options that you can add to change the command’s behavior.
Options typically consist of a single letter preceded by a hyphen. However, you can group
single-letter options together or precede each with a hyphen to use more than one option at a
time. For example, the following two uses of options for the ls command are the same:
$ ls -l -a -t
$ ls -lat
In both cases, the ls command is run with the -l (long listing), -a (show hidden dot files),
and -t options (list by time).
Some commands include options that are represented by a whole word. To tell a command
to use a whole word as an option, you typically precede it with a double hyphen (--). For
example, to use the help option on many commands, you enter --help on the command
line. Without the double hyphen, the letters h, e, l, and p would be interpreted as separate
options. There are some commands that don’t follow the double hyphen convention, using a
single hyphen before a word, but most commands use double hyphens for word options.
Note
You can use the --help option with most commands to see the options and arguments that they support. For example, try typing hostname --help.
Many commands also accept arguments after certain options are entered or at the end of the
entire command line. An argument is an extra piece of information, such as a filename, directory,
username, device, or other item, that tells the command what to act on. For example, cat
/etc/passwd displays the contents of the /etc/passwd file on your screen. In this case,
65
3
Downloaded from https://onlinelibrary.wiley.com/doi/ by alex jounh - Oregon Health & Science Univer , Wiley Online Library on [05/12/2025]. See the Terms and Conditions (https://onlinelibrary.wiley.com/terms-and-conditions) on Wiley Online Library for rules of use; OA articles are governed by the applicable Creative Commons License
Chapter 3: Using the Shell
/etc/passwd is the argument. Usually, you can have as many arguments as you want on the
command line, limited only by the total number of characters allowed on a command line. Sometimes, an argument is associated with an option. In that case, the argument must immediately
follow the option. With single-letter options, the argument typically follows after a space. For full-
word options, the argument often follows an equal sign (=). Here are some examples:
$ ls --hide=Desktop
Documents Music
Downloads Pictures
Public
Videos
Templates
In the previous example, the --hide option tells the ls command not to display the file or
directory named Desktop when listing the contents of the directory. Notice that the equal
sign immediately follows the option (no space) and then the argument (again, no space).
Here’s an example of a single-letter option that is followed by an argument:
$ tar -
cvf backup.tar /home/chris
In the tar example just shown, the options say to create (c) a file (f) named backup.tar
that includes all of the contents of the /home/chris directory and its subdirectories and
show verbose (v) messages as the backup is created. Because backup.tar is an argument to
the f option, backup.tar must immediately follow the option.
Here are a few commands that you can try. See how they behave differently with different options:
$ ls
Desktop Documents Downloads Music Pictures Public Templates
Videos
$ ls -a
.
Desktop
.gnome2_private .lesshst
Public
..
Documents
.gnote
.local
Templates
.bash_history Downloads
.gnupg
.mozilla
Videos
.bash_logout
.emacs
.gstreamer-
0.10 Music
.xsession-
errors
.bash_profile .esd_auth
.gtk-
bookmarks
Pictures
.zshrc
.bashrc
.fsync.log .gvfs
Pictures
$ uname
Linux
$ uname -a
Linux fedora 6.15.7-
200.fc42.x86_64 #1 SMP PREEMPT_DYNAMIC
Thu Jul 17 17:57:16 UTC 2025 x86_64 GNU/Linux
$ date
Sat Jul 26 07:44:39 PM EDT 2025
$ date +'%d/%m/%y'
26/07/25
$ date +'%A, %B %d, %Y'
Saturday, July 26, 2025
66
Downloaded from https://onlinelibrary.wiley.com/doi/ by alex jounh - Oregon Health & Science Univer , Wiley Online Library on [05/12/2025]. See the Terms and Conditions (https://onlinelibrary.wiley.com/terms-and-conditions) on Wiley Online Library for rules of use; OA articles are governed by the applicable Creative Commons License
Part II: Becoming a Linux Power User
The ls command, by itself, shows all regular files and directories in the current directory. By
adding the -a, you can also see the hidden files in the directory (those beginning with a dot).
The uname command shows the type of system you are running (Linux). When you add -a,
you also can see the hostname, kernel release, and kernel version.
The date command has some special types of options. By itself, date simply prints the
current day, date, and time as shown earlier. But the date command supports a special +
format option, which lets you display the date in different formats. Enter date --help to
see different format indicators you can use.
Try the id and who commands to get a feel for your current Linux environment, as described
in the following paragraphs.
When you log in to a Linux system, Linux views you as having a particular identity, which
includes your username, group name, user ID, and group ID. Linux also keeps track of your
login session: it knows when you logged in, how long you have been idle, and where you
logged in from.
To find out information about your identity, use the id command as follows:
$ id
uid=1000(chris) gid=1000(chris) groups=10(wheel)
In this example, the username is chris, which is represented by the numeric user ID (uid)
1000. The primary group for chris also is called chris, which has a group ID (gid) of 1000.
It is normal for Ubuntu, Fedora, and Red Hat Enterprise Linux users to have the same primary
group name as their username. The user chris also belongs to another group called wheel
(gid 10), which gives the user sudo privilege. These names and numbers represent the permissions that chris has to access computer resources.
Note
Linux distributions that have Security Enhanced Linux (SELinux) enabled, such as Fedora and RHEL, show additional
information at the end of the id output. That output might look something like the following:
context=unconfined_u:unconfined_r:unconfined_t:s0-
s0:c0.c1023
SELinux provides a means of tightly locking down the security of a Linux system. See Chapter 24, “Enhancing Linux
Security with SELinux,” if you want to learn about SELinux.
You can see information about your current login session by using the who command. In the
following example, the -u option says to add information about idle time and the process ID
and -H asks that a header be printed:
$ who -uH
NAME
LINE
chris
seat0
chris
tty2
chris
tty3
TIME
IDLE
2025-
01-
13 20:57
?
2025-
01-
13 20:57 old
2025-
01-
26 18:41
.
PID COMMENT
3778 (login screen)
3778 (tty2)
1258085
67
3
Downloaded from https://onlinelibrary.wiley.com/doi/ by alex jounh - Oregon Health & Science Univer , Wiley Online Library on [05/12/2025]. See the Terms and Conditions (https://onlinelibrary.wiley.com/terms-and-conditions) on Wiley Online Library for rules of use; OA articles are governed by the applicable Creative Commons License
Chapter 3: Using the Shell
The output from this who command shows that the user chris is logged in on seat0 (which
represents the login screen running in the first virtual console on the monitor connected to the
computer) and his login session began at the time and date shown. The only active login shell
is in tty3, where the IDLE time shows how long the shell has been open without any command
being typed (the dot indicates that it is currently active). PID shows the process ID of the user’s
login shell. COMMENT would show the name of the remote computer from which the user had
logged in, if that user had logged in from another computer on the network, or, in this case,
where the login screen is running (seat0) or where the desktop is running (tty2).
Locating commands
Now that you have typed a few commands, you may wonder where those commands are
located and how the shell finds the commands you type. To find commands you type, the shell
looks in what is referred to as your path. For commands that are not in your path, you can
type the complete identity of the location of the command.
If you know the directory that contains the command that you want to run, one way to run
it is to type the full, or absolute, path to that command. For example, you run the date
command from the /bin directory by entering the following:
$ /bin/date
Of course, this can be inconvenient, especially if the command resides in a directory with a
long pathname. The better way is to have commands stored in well-known directories and then
add those directories to your shell’s PATH environment variable. The path consists of a list
of directories that are checked sequentially for the commands you enter. To see your current
path, enter the following:
$ echo $PATH
/usr/local/bin:/usr/bin:/bin:/usr/local/sbin:/usr/sbin:/sbin:
/home/chris/bin
The results show a common default path for a regular Linux user. Directories in the path
list are separated by colons. Most user commands that come with Linux are stored in the
/usr/bin or /usr/local/bin directory (the old /bin directory now contains the same
content as /usr/bin). The /sbin and /usr/sbin directories contain administrative commands (some Linux systems don’t put those directories in regular users’ paths). The last directory shown is the bin directory in the user’s home directory (/home/chris/bin).
Tip
If you want to add your own commands or shell scripts, place them in the bin directory in your home directory (such as
/home/chris/bin for the user named chris). This directory is automatically added to your path in some Linux
systems, although you may need to create that directory or add it to your PATH on other Linux systems. So, as long as
you add the command to your bin with execute permission, you can begin using it by simply typing the command name
at your shell prompt. To make commands available to all users on your system, add them to /usr/local/bin.
68
Downloaded from https://onlinelibrary.wiley.com/doi/ by alex jounh - Oregon Health & Science Univer , Wiley Online Library on [05/12/2025]. See the Terms and Conditions (https://onlinelibrary.wiley.com/terms-and-conditions) on Wiley Online Library for rules of use; OA articles are governed by the applicable Creative Commons License
Part II: Becoming a Linux Power User
Unlike some other operating systems, Linux does not, by default, check the current directory
for an executable before searching the path. It immediately begins searching the path, and
executables in the current directory are run only if they are in the PATH variable or you give
their absolute (such as /home/chris/scriptx.sh) or relative (for example,
./scriptx.sh) location.
The path directory order is important. Directories are checked from left to right. So, in this
example, if there is a command called foo located in both the /usr/bin and /sbin directories, the one in /usr/bin is executed. To have the other foo command run, you either
type the full path to the command or change your PATH variable. (Changing your PATH and
adding directories to it are described later in this chapter.)
Not all of the commands you run are located in directories in your PATH variable. Some commands are built into the shell. Other commands can be overridden by creating aliases that
define any commands and options that you want the command to run. There are also ways of
defining a function that consists of a stored series of commands. Here is the order in which
the shell checks for the commands you type:
1. Aliases. These are names set by the alias command that represent a particular
command and a set of options. Type alias to see what aliases are set. Often, aliases
enable you to define a short name for a long, complicated command. (I describe how
to create your own aliases later in this chapter.)
2. Shell reserved word. These are words reserved by the shell for special use. Many
of these are words that you would use in programming-type functions, such as
do, while, case, and else. (I cover some of these reserved words in Chapter 7,
“Writing Simple Shell Scripts.”)
3
3. Function. This is a set of commands that is executed together within the
current shell.
4. Built-in command. This is a command built into the shell. As a result, there is no
representation of the command in the filesystem. Some of the most common commands that you will use are shell built-in commands, such as cd (to change directories), echo (to output text to the screen), exit (to exit from a shell), fg (to bring
a command running in the background to the foreground), history (to see a list of
commands that were previously run), pwd (to list the present working directory), set
(to set shell options), and type (to show the location of a command).
5. Filesystem command. This command is stored in and executed from the computer’s
filesystem. (These are the commands that are indicated by the value of the PATH
variable.)
To determine the location of a particular command, you can use the type command. (If you
are using a shell other than bash, use the which command instead.) For example, to find out
where the Bash shell command is located, enter the following:
$ type bash
bash is /bin/bash
69
Downloaded from https://onlinelibrary.wiley.com/doi/ by alex jounh - Oregon Health & Science Univer , Wiley Online Library on [05/12/2025]. See the Terms and Conditions (https://onlinelibrary.wiley.com/terms-and-conditions) on Wiley Online Library for rules of use; OA articles are governed by the applicable Creative Commons License
Chapter 3: Using the Shell
Try these few words with the type command to see other locations of commands: which,
case, and return. If a command resides in several locations, you can add the -a option to
have all of the known locations of the command printed. For example, the command type -a
ls should show an aliased and filesystem location for the ls command.
Tip
Sometimes, you run a command and receive an error message that the command was not found or that permission to
run the command was denied. If the command was not found, check that you spelled the command correctly and that
it is located in your PATH variable. If permission to run the command was denied, the command may be in the PATH
variable but may not be executable. Also remember that case is important, so typing CAT or Cat will not find the cat
command.
If a command is not in your PATH variable, you can use the plocate command to try to find
it. Using plocate, you can search any part of the system that is accessible to you. (Some
files are accessible only to the root user.) For example, if you wanted to find the location of
the chage command, you could enter the following:
$ plocate chage
/usr/bin/chage
/usr/sbin/lchage
/usr/share/man/fr/man1/chage.1.gz
/usr/share/man/it/man1/chage.1.gz
/usr/share/man/ja/man1/chage.1.gz
/usr/share/man/man1/chage.1.gz
/usr/share/man/man1/lchage.1.gz
/usr/share/man/pl/man1/chage.1.gz
/usr/share/man/ru/man1/chage.1.gz
/usr/share/man/sv/man1/chage.1.gz
/usr/share/man/tr/man1/chage.1.gz
Notice that plocate (formerly called locate) not only found the chage command, but
also found the lchage command and a variety of man pages associated with chage for different languages. The plocate command looks all over your filesystem, not just in directories
that contain commands. (If plocate does not find files recently added to your system, run
updatedb as root to update the locate database.)
In the coming chapters, you learn to use additional commands. For now, I want you to become
more familiar with how the shell itself works. So next I discuss features for recalling commands, completing commands, using variables, and creating aliases.
Recalling Commands Using Command History
Being able to repeat a command you ran earlier in a shell session can be convenient. Recalling
a long and complex command line that you mistyped can save you some trouble. Fortunately,
some shell features enable you to recall previous command lines, edit those lines, or complete
a partially typed command line.
70
Downloaded from https://onlinelibrary.wiley.com/doi/ by alex jounh - Oregon Health & Science Univer , Wiley Online Library on [05/12/2025]. See the Terms and Conditions (https://onlinelibrary.wiley.com/terms-and-conditions) on Wiley Online Library for rules of use; OA articles are governed by the applicable Creative Commons License
Part II: Becoming a Linux Power User
The shell history is a list of the commands that you have entered before. Using the history
command in a Bash shell, you can view your previous commands. Then using various shell
features, you can recall individual command lines from that list and change them however
you please.
The rest of this section describes how to do command-line editing, how to complete parts of
command lines, and how to recall and work with the history list.
Command-line editing
If you type something wrong on a command line, the Bash shell ensures that you don’t have
to delete the entire line and start over. Likewise, you can recall a previous command line and
change the elements to make a new command.
By default, the Bash shell uses command-line editing that is based on the emacs text editor.
(Type man emacs to read about it, if you care to do so.) If you are familiar with emacs, you
probably already know most of the keystrokes described here.
Tip
If you prefer the vi command for editing shell command lines, you can easily make that happen. Add the following line
to the .bashrc file in your home directory:
set -
o vi
The next time you open a bash shell, you can use vi commands to edit your command lines.
3
To do the editing, you can use a combination of control keys, meta keys, and arrow keys. For
example, Ctrl+F means to hold down the Ctrl key and type f. Alt+F means to hold down the Alt
key and type f. (Instead of the Alt key, your keyboard may use a Meta key or the Esc key. On a
Windows keyboard, you can use the Windows key.)
To try a bit of command-line editing, enter the following:
$ ls /usr/bin | sort -
f | less
This command lists the contents of the /usr/bin directory, sorts the contents in alphabetical order (regardless of case), and pipes the output to less. The less command displays the
first page of output, after which you can go through the rest of the output a line (press Enter)
or a page (press spacebar) at a time. Simply press q when you are finished. Now, suppose
that you want to change /usr/bin to /sbin. You can use the following steps to change
the command:
1. Press the up arrow (↑) key. This displays the most recent command from your
shell history.
2. Press Ctrl+A. This moves the cursor to the beginning of the command line.
71
Downloaded from https://onlinelibrary.wiley.com/doi/ by alex jounh - Oregon Health & Science Univer , Wiley Online Library on [05/12/2025]. See the Terms and Conditions (https://onlinelibrary.wiley.com/terms-and-conditions) on Wiley Online Library for rules of use; OA articles are governed by the applicable Creative Commons License
Chapter 3: Using the Shell
3. Press Ctrl+F or the right arrow (→) key. Repeat this command a few times to position the cursor under the first slash (/).
4. Press Ctrl+D. Type this command four times to delete /usr from the line. Then type
s to change it to /sbin.
5. Press Enter. This executes the command line.
As you edit a command line, at any point you can type regular characters to add those characters
to the command line. The characters appear at the location of your text cursor. You can use right
→ and left ← arrows to move the cursor from one end to the other on the command line. You can
also press the up ↑ and down ↓ arrow keys to step through previous commands in the history list
to select a command line for editing. (See the section “Command-line recall” for details on how
to recall commands from the history list.) You can use many keystrokes to edit your command
lines. Table 3.1 lists the keystrokes that you can use to move around the command line.
TABLE 3.1
Keystrokes for Navigating Command Lines
Keystroke
Full Name
Meaning
Ctrl+F
Character forward
Go forward one character.
Ctrl+B
Character backward
Go backward one character.
Alt+F
Word forward
Go forward one word.
Alt+B
Word backward
Go backward one word.
Ctrl+A
Beginning of line
Go to the beginning of the current line.
Ctrl+E
End of line
Go to the end of the line.
Ctrl+L
Clear screen
Clear screen and leave line at the top of the screen.
The keystrokes in Table 3.2 can be used to edit command lines.
TABLE 3.2
72
Keystrokes for Editing Command Lines
Keystroke
Full Name
Meaning
Ctrl+D
Delete current
Delete the current character.
Backspace
Delete previous
Delete the previous character.
Ctrl+T
Transpose character
Switch positions of current and previous characters.
Alt+T
Transpose words
Switch positions of current and previous words.
Alt+U
Uppercase word
Change the current word to uppercase.
Alt+L
Lowercase word
Change the current word to lowercase.
Alt+C
Capitalize word
Change the current word to an initial capital.
Ctrl+V
Insert special
character
Add a special character. For example, to add a Tab character, press Ctrl+V+Tab.
Downloaded from https://onlinelibrary.wiley.com/doi/ by alex jounh - Oregon Health & Science Univer , Wiley Online Library on [05/12/2025]. See the Terms and Conditions (https://onlinelibrary.wiley.com/terms-and-conditions) on Wiley Online Library for rules of use; OA articles are governed by the applicable Creative Commons License
Part II: Becoming a Linux Power User
Use the keystrokes in Table 3.3 to cut and paste text on a command line.
TABLE 3.3 Keystrokes for Cutting and Pasting Text from within
Command Lines
Keystroke
Full Name
Meaning
Ctrl+K
Cut end of line
Cut text to the end of the line.
Ctrl+U
Cut beginning of line
Cut text to the beginning of the line.
Ctrl+W
Cut previous word
Cut the word located behind the cursor.
Alt+D
Cut next word
Cut the word following the cursor.
Ctrl+Y
Paste recent text
Paste most recently cut text.
Alt+Y
Paste earlier text
Rotate back to previously cut text and paste it.
Ctrl+C
Delete whole line
Delete the entire line.
Command-line completion
To save you a few keystrokes, the Bash shell offers several different ways of completing
partially typed values. To attempt to complete a value, type the first few characters and press
Tab. Here are some of the values you can type partially from a Bash shell:
Command, alias, or function If the text you type begins with regular characters, the
shell tries to complete the text with a command, alias, or function name.
Variable If the text you type begins with a dollar sign ($), the shell completes the text
with a variable from the current shell.
Username If the text you type begins with a tilde (~), the shell completes the text with
a username. As a result, ~username indicates the home directory of the named user.
Here are a few examples of command completion. (When you see <Tab>, it means to press the
Tab key on your keyboard.) Enter the following:
$ echo $OS<Tab>
$ cd ~ro<Tab>
$ userm<Tab>
The first example causes $OS to expand to the $OSTYPE variable. In the next example,
~ro expands to the root user’s home directory (~root/). Next, userm expands to the
usermod command.
Pressing Tab twice offers some wonderful possibilities. Sometimes, several possible completions
for the string of characters you have entered are available. In those cases, you can check the
possible ways that text can be expanded by pressing Tab twice at the point where you want to
do completion.
73
3
Downloaded from https://onlinelibrary.wiley.com/doi/ by alex jounh - Oregon Health & Science Univer , Wiley Online Library on [05/12/2025]. See the Terms and Conditions (https://onlinelibrary.wiley.com/terms-and-conditions) on Wiley Online Library for rules of use; OA articles are governed by the applicable Creative Commons License
Chapter 3: Using the Shell
The following shows the result you would get if you checked for possible completions on $P:
$ echo $P<Tab><Tab>
$PATH $PPID $PS1 $PS2 $PS4 $PWD
$ echo $P
In this case, there are six possible variables that begin with $P. After possibilities are displayed, the original command line returns, ready for you to complete it as you choose. For
example, if you typed another P and hit Tab again, the command line would be completed with
$PPID (the only unique possibility).
Command-line recall
After you type a command, the entire command line is saved in your shell’s history list. The
list is stored in the current shell until you exit the shell. After that, it is written to a history
file, from which any command can be recalled to be run again in your next session. After a
command is recalled, you can modify the command line, as described earlier.
To view your history list, use the history command. Enter the command without options or
followed by a number to list that many of the most recent commands. For example:
$ history 8
382 date
383 ls /usr/bin | sort -
a | more
384 man sort
385 cd /usr/local/bin
386 man more
387 useradd -
m /home/chris -
u 101 chris
388 passwd chris
389 history 8
A number precedes each command line in the list. You can recall one of those commands
using an exclamation point (!). Keep in mind that when an exclamation point is used, the
command runs blind without presenting an opportunity to confirm the command you’re
referencing. There are several ways to run a command immediately from this list, including
the following:
!n Run command number. Replace the n with the number of the command line and that
line is run. For example, here’s how to repeat the date command shown as command
number 382 in the preceding history listing:
$!382
date
Fri Jun 27 15:47:57 EDT 2025
!! Run previous command. Runs the previous command line. Here’s how you would immediately run that same date command:
$ !!
74
Downloaded from https://onlinelibrary.wiley.com/doi/ by alex jounh - Oregon Health & Science Univer , Wiley Online Library on [05/12/2025]. See the Terms and Conditions (https://onlinelibrary.wiley.com/terms-and-conditions) on Wiley Online Library for rules of use; OA articles are governed by the applicable Creative Commons License
Part II: Becoming a Linux Power User
date
Fri Jun 27 15:53:27 EDT 2025
!?string? Run command containing string. This runs the most recent command that contains a particular string of characters. For example, you can run the date command
again by just searching for part of that command line as follows:
$ !?dat?
date
Fri Jun 27 16:04:18 EDT 2025
Instead of just running a history command line immediately, you can recall a particular
line and edit it. You can use the following keys or key combinations to do that, as shown in
Table 3.4.
TABLE 3.4
Keystrokes for Using Command History
Key(s)
Function Name
Description
Arrow
keys (↑ and ↓)
Step
Press the up and down arrow keys to step through
each command line in your history list to arrive at
the one you want. (Ctrl+P and Ctrl+N do the same
functions, respectively.)
Ctrl+R
Reverse
incremental search
After you press these keys, you enter a search string to
do a reverse search. As you type the string, a matching
command line appears that you can run or edit.
Ctrl+S
Forward
incremental search
This is the same as the preceding function but for forward search. (It may not work in all instances.)
Alt+P
Reverse search
After you press these keys, you enter a string to do a
reverse search. Type a string and press Enter to see the
most recent command line that includes that string.
Alt+N
Forward search
This is the same as the preceding function but for forward search. (It may not work in all instances.)
Another way to work with your history list is to use the fc command. Type fc followed by
a history line number, and that command line is opened in a text editor. The text editor, by
default, is either nano (type Ctrl-o to save and Ctrl-x to exit) or vi (type :wq to save
and exit or :q! to just exit if you are stuck in vi). Make the changes that you want. When
you exit the editor, the command runs. You can also give a range of line numbers (for example,
fc 100 105). All of the commands open in your text editor and then run one after the
other when you exit the editor.
After you close your shell, the history list is stored in the .bash_history file in your home
directory. Up to 1,000 history commands are stored for you by default.
75
3
Downloaded from https://onlinelibrary.wiley.com/doi/ by alex jounh - Oregon Health & Science Univer , Wiley Online Library on [05/12/2025]. See the Terms and Conditions (https://onlinelibrary.wiley.com/terms-and-conditions) on Wiley Online Library for rules of use; OA articles are governed by the applicable Creative Commons License
Chapter 3: Using the Shell
Note
Some people disable the history feature for the root user by setting the HISTFILE shell variable to /dev/null
or simply leaving HISTSIZE blank. This prevents information about the root user’s activities from potentially being
exploited. If you are an administrative user with root privileges, you may want to consider emptying your file upon exiting as well for the same reasons. Also, because shell history is stored permanently when the shell exits properly, you
can prevent storing a shell’s history by killing a shell. For example, to kill a shell with process ID 1234, type kill -9
1234 from any shell.
Connecting and Expanding Commands
A truly powerful feature of the shell is the capability to redirect the input and output of commands to and from other commands and files. To allow commands to be strung together, the
shell uses metacharacters. A metacharacter is a typed character that has special meaning to
the shell for connecting commands or requesting expansion.
Metacharacters include the pipe character (|), ampersand (&), semicolon (;), right parenthesis ()), left parenthesis ((), less than sign (<), and greater than sign (>). The next sections
describe how to use metacharacters on the command line to change how commands behave.
Piping between commands
The pipe (|) metacharacter connects the output from one command to the input of another
command. This lets you have one command work on some data and then have the next
command deal with the results. Here is an example of a command line that includes pipes:
$ cat /etc/passwd | sort | less
This command lists the contents of the /etc/passwd file and pipes the output to the
sort command. The sort command takes the usernames that begin each line of the
/etc/passwd file, sorts them alphabetically, and pipes the output to the less command
(to page through the output).
Pipes are an excellent illustration of how UNIX, the predecessor of Linux, was created as an
operating system made up of building blocks. A standard practice in UNIX was to connect utilities in different ways to get different jobs done. For example, before the days of graphical
word processors, users created plain-text files that included macros to indicate formatting. To
see how the document really appeared, they would use a command such as the following:
$ gunzip < /usr/share/man/man1/grep.1.gz | nroff -
c -
man | less
In this example, the contents of the grep man page (grep.1.gz) are directed to the
gunzip command to be unzipped. The output from gunzip is piped to the nroff command
to format the man page using the manual macro (-man). To display the output, it is piped
to the less command. Because the file being displayed is in plain text, you could have substituted any number of options to work with the text before displaying it. You could sort the
76
Downloaded from https://onlinelibrary.wiley.com/doi/ by alex jounh - Oregon Health & Science Univer , Wiley Online Library on [05/12/2025]. See the Terms and Conditions (https://onlinelibrary.wiley.com/terms-and-conditions) on Wiley Online Library for rules of use; OA articles are governed by the applicable Creative Commons License
Part II: Becoming a Linux Power User
contents, change or delete some of the content, or bring in text from other documents. The
key is that, instead of all of those features being in one program, you get results from piping
and redirecting input and output between multiple commands.
Sequential commands
Sometimes, you may want a sequence of commands to run, with one command completing
before the next command begins. You can do this by typing several commands on the same
command line and separating them with semicolons (;):
$ date ; troff -
me verylargedocument | lpr ; date
In this example, I was formatting a huge document and wanted to know how long it would
take. The first command (date) showed the date and time before the formatting started. The
troff command formatted the document and then piped the output to the printer. When the
formatting was finished, the date and time were printed again (so I knew how long the troff
command took to complete).
Another useful command to add to the end of a long command line is mail. You could add the
following to the end of a command line:
; mail -
s "Finished the long command" chris@example.com
Then, for example, a mail message is sent to the user you choose after the command
completes.
3
Background commands
Some commands can take a while to complete. Sometimes, you may not want to tie up your
shell waiting for a command to finish. In those cases, you can have the commands run in the
background by using the ampersand (&).
Text formatting commands (such as nroff and troff, described earlier) are examples of
commands that can be run in the background to format a large document. You also might want
to create your own shell scripts that run in the background to check continuously for certain
events to occur, such as the hard disk filling up or particular users logging in.
The following is an example of a command being run in the background:
$ troff -
me verylargedocument | lpr &
Don’t close the shell until the process is completed or that kills the process. Other ways to manage
background and foreground processes are described in Chapter 6, “Managing Running Processes.”
Expanding commands
With command substitution, you can have the output of a command interpreted by the
shell instead of by the command itself. In this way, you can have the standard output of a
command become an argument for another command. The two forms of command substitution
are $(command) and `command` (backticks, not single quotes).
77
Downloaded from https://onlinelibrary.wiley.com/doi/ by alex jounh - Oregon Health & Science Univer , Wiley Online Library on [05/12/2025]. See the Terms and Conditions (https://onlinelibrary.wiley.com/terms-and-conditions) on Wiley Online Library for rules of use; OA articles are governed by the applicable Creative Commons License
Chapter 3: Using the Shell
The command in this case can include options, metacharacters, and arguments. The following
is an example of using command substitution:
$ vi $(find /home | grep xyzzy)
In this example, the command substitution is done before the vi command is run. First, the
find command starts at the /home directory and prints out all of the files and directories
below that point in the filesystem. The output is piped to the grep command, which filters
out all files except for those that include the string xyzzy in the filename. Finally, the vi
command opens all filenames for editing (one at a time) that include xyzzy. (If you run this
and are not familiar with vi, you can type :q! to exit the file.)
This particular example is useful if you want to edit a file for which you know the name but
not the location. As long as the string is uncommon, you can find and open every instance of
a filename existing beneath a point you choose in the filesystem. (In other words, don’t use
grep from the root filesystem or you’ll match and try to edit several thousand files.)
Expanding arithmetic expressions
Sometimes, you want to pass arithmetic results to a command. There are two forms that
you can use to expand an arithmetic expression and pass it to the shell: $[expression] or
$(expression). The following is an example:
$ echo "I am $[2025 -1957] years old."
I am 68 years old.
The shell interprets the arithmetic expression first (2025 - 1957) and then passes that
information to the echo command. The echo command displays the text with the results of
the arithmetic (68) inserted.
Here’s an example of the other form:
$ echo "There are $(ls | wc -
w) files in this directory."
There are 14 files in this directory.
This lists the contents of the current directory (ls) and runs the word count command to
count the number of files found (wc -w). The resulting number (14, in this case) is echoed
back with the rest of the sentence shown.
Expanding variables
Variables that store information within the shell can be expanded using the dollar sign ($)
metacharacter. When you expand an environment variable on a command line, the value of the
variable is printed instead of the variable name itself, as follows:
$ ls -
l $BASH
-
rwxr-
xr-
x. 1 root root 1219248 Oct 12 17:59 /usr/bin/bash
Using $BASH as an argument to ls -l causes a long listing of information on the bash
command to be printed.
78
Downloaded from https://onlinelibrary.wiley.com/doi/ by alex jounh - Oregon Health & Science Univer , Wiley Online Library on [05/12/2025]. See the Terms and Conditions (https://onlinelibrary.wiley.com/terms-and-conditions) on Wiley Online Library for rules of use; OA articles are governed by the applicable Creative Commons License
Part II: Becoming a Linux Power User
Using Shell Variables
The shell itself stores information that may be useful to the user’s shell session in what are
called variables. Examples of variables include $SHELL (which identifies the shell you are
using), $PS1 (which defines your shell prompt), and $MAIL (which identifies the location of
your user’s local Linux mailbox).
You can see all variables set for your current shell by typing the set command. A subset of your
local variables is referred to as environment variables. Environment variables are variables that are
exported to any new shells opened from the current shell. Type env to see environment variables.
You can type echo $VALUE, where VALUE is replaced by the name of a particular environment variable you want to list. And because there are always multiple ways to do anything in
Linux, you can also type declare to get a list of the current environment variables and their
values along with a list of shell functions.
Besides those that you set yourself, some software packages set variables that store things
such as locations of configuration files, mailboxes, and path directories. Variables can also
store values for your shell prompts, the size of your history list, and the type of operating
system. You can refer to the value of any of those variables by preceding it with a dollar sign
($) and placing it anywhere on a command line. For example:
$ echo $USER
chris
3
This command prints the value of the USER variable, which holds your username (chris).
Substitute any other value for USER to print its value instead.
When you start a shell (by logging in via a virtual console or opening a Terminal window),
many environment variables are already set. Table 3.5 shows some variables either that are set
when you use a Bash shell or that can be set by you to use with different features.
TABLE 3.5
Common Shell Environment Variables
Variable
Description
BASH
This contains the full pathname of the bash command. This is usually
/bin/bash.
BASH_VERSION
This is a number representing the current version of the bash command.
EUID
This is the effective user ID number of the current user. It is assigned when
the shell starts, based on the user’s entry in the /etc/passwd file.
FCEDIT
If set, this variable indicates the text editor used by the fc command
to edit history commands. If this variable isn’t set, the vi
command is used.
HISTFILE
This is the location of your history file. It is typically located at
$HOME/.bash_history.
Continues
79
Downloaded from https://onlinelibrary.wiley.com/doi/ by alex jounh - Oregon Health & Science Univer , Wiley Online Library on [05/12/2025]. See the Terms and Conditions (https://onlinelibrary.wiley.com/terms-and-conditions) on Wiley Online Library for rules of use; OA articles are governed by the applicable Creative Commons License
Chapter 3: Using the Shell
TABLE 3.5 (continued)
80
Variable
Description
HISTFILESIZE
This is the number of history entries that can be stored. After this number
is reached, the oldest commands are discarded. The default value is 1000.
HISTCMD
This returns the number of the current command in the history list.
HOME
This is your home directory. It is your current working directory each time
you log in or type the cd command without any options.
HOSTTYPE
This is a value that describes the computer architecture on which the Linux
system is running. For Intel-compatible PCs, the value is i386, i486, i586,
i686, or something like i386-linux. For AMD 64-bit machines, the value
is x86_64.
MAIL
This is the location of your local mailbox file. The file is typically your username in the /var/spool/mail or /var/mail directory.
OLDPWD
This is the directory that was the working directory before you changed to
the current working directory.
OSTYPE
This name identifies the current operating system. For Fedora and Ubuntu
Linux, the OSTYPE value is either linux or linux-gnu, depending on
the type of shell you are using. (Bash can run on other operating systems as well.)
PATH
This is the colon-separated list of directories used to find commands
that you type. The default value for regular users varies for different
distributions but typically includes the following: /usr/bin:/
usr/local/bin. You need to type the full path or a relative path to a
command that you want to run, which is not in your PATH. For the root
user, the value also includes /sbin, /usr/sbin, and /usr/
local/sbin, although these are often added to the PATH for a regular
user as well.
PPID
This is the process ID of the command that started the current shell (for
example, the Terminal window containing the shell).
PROMPT_COMMAND
This can be set to a command name that is run each time before your shell
prompt is displayed. Setting PROMPT_COMMAND=date lists the current
date/time before the prompt appears.
PS1
This sets the value of your shell prompt. There are many items that you
can read into your prompt (date, time, username, hostname, and so on).
Sometimes a command requires additional prompts, which you can set
with the variables PS2, PS3, and so on.
PWD
This is the directory that is assigned as your current directory. This value
changes each time you change directories using the cd command.
Downloaded from https://onlinelibrary.wiley.com/doi/ by alex jounh - Oregon Health & Science Univer , Wiley Online Library on [05/12/2025]. See the Terms and Conditions (https://onlinelibrary.wiley.com/terms-and-conditions) on Wiley Online Library for rules of use; OA articles are governed by the applicable Creative Commons License
Part II: Becoming a Linux Power User
TABLE 3.5 (continued)
Variable
Description
RANDOM
Accessing this variable causes a random number to be generated. The
number is between 0 and 99999.
SECONDS
This is the number of seconds since the time the shell was started.
SHLVL
This is the number of shell levels associated with the current shell session.
When you log in to the shell, the SHLVL is 1. Each time you start a new
bash command (by, for example, using su to become a new user, or by
simply typing bash), this number is incremented.
TMOUT
This can be set to a number representing the number of seconds the
shell can be idle without receiving input. After the number of seconds is
reached, the shell exits. This security feature makes it less likely for unattended shells to be accessed by unauthorized people. (This must be set in
the login shell for it actually to cause the shell to log out the user.)
Creating and using aliases
Using the alias command, you can effectively create a shortcut to any command and options
that you want to run later. You can add and list aliases with the alias command. Consider
the following examples of using alias from a Bash shell:
3
$ alias p='pwd ; ls –
CF'
$ alias rm='rm -
i'
In the first example, the letter p is assigned to run the command pwd and then to run
ls -CF to print the current working directory and list its contents in column form. The second example runs the rm command with the -i option each time you type rm. (This is an
alias that is often set automatically for the root user. Instead of just removing files, you are
prompted for each individual file removal. This prevents you from automatically removing all
of the files in a directory by mistakenly typing something such as rm *.)
While you are in the shell, you can check which aliases are set by typing the alias
command. If you want to remove an alias, use unalias. (Remember that if the alias is set
in a configuration file, it will be set again when you open another shell.)
Exiting the shell
To exit the shell when you are finished, type exit or press Ctrl+D. If you go to the shell from
a Terminal window and you are using the original shell from that window, exiting causes the
Terminal window to close. If you are at a virtual console, the shell exits and returns you to a
login prompt.
If you have multiple shells open from the same shell session, exiting a shell simply returns you
to the shell that launched the current shell. For example, the su command opens a shell as a
new user. Exiting from that shell simply returns you to the original shell.
81
Downloaded from https://onlinelibrary.wiley.com/doi/ by alex jounh - Oregon Health & Science Univer , Wiley Online Library on [05/12/2025]. See the Terms and Conditions (https://onlinelibrary.wiley.com/terms-and-conditions) on Wiley Online Library for rules of use; OA articles are governed by the applicable Creative Commons License
Chapter 3: Using the Shell
Creating Your Shell Environment
You can tune your shell to help you work more efficiently. You can set aliases to create shortcuts to your favorite command lines and environment variables to store bits of information.
By adding those settings to shell configuration files, you can have the settings available every
time you open a shell.
Configuring your shell
Several configuration files support how your shell behaves. Some of the files are executed for
every user and every shell, whereas others are specific to the user who creates the configuration
file. Table 3.6 shows the files that are of interest to anyone using the Bash shell in Linux. (Notice
the use of ~ in the filenames to indicate that the file is located in each user’s home directory.)
TABLE 3.6
Bash Configuration Files
File
Description
/etc/profile
This sets up user environment information for every user. It is executed
when you first log in. This file provides values for your path in addition
to setting environment variables for such things as the location of
your mailbox and the size of your history files. Finally, /etc/profile
gathers shell settings from configuration files in the /etc/profile.d
directory.
/etc/bashrc
This executes for every user who runs the Bash shell each time a Bash
shell is opened. It sets the default prompt and may add one or more
aliases. Values in this file can be overridden by information in each user’s
~/.bashrc file.
~/.bash_profile
This is used by each user to enter information that is specific to their use
of the shell. It is executed only once—when the user logs in. By default,
it sets a few environment variables and executes the user’s .bashrc file.
This is a good place to add environment variables because, once set,
they are inherited by future shells.
~/.bashrc
This contains the information that is specific to your Bash shells. It is read
when you log in and also each time you open a new Bash shell. This is
the best location to add aliases so that your shell picks them up.
~/.bash_logout
This executes each time you log out (exit the last Bash shell).
To change the /etc/profile or /etc/bashrc files, you must be the root user. It is better to
create an /etc/profile.d/custom.sh file to add system-wide settings instead of editing
those files directly, however. Users can change the information in the $HOME/.bash_profile,
$HOME/.bashrc, and $HOME/.bash_logout files in their own home directories.
82
Downloaded from https://onlinelibrary.wiley.com/doi/ by alex jounh - Oregon Health & Science Univer , Wiley Online Library on [05/12/2025]. See the Terms and Conditions (https://onlinelibrary.wiley.com/terms-and-conditions) on Wiley Online Library for rules of use; OA articles are governed by the applicable Creative Commons License
Part II: Becoming a Linux Power User
Until you learn to use the vi editor, described in Chapter 5, “Working with Text Files,” you
can use a simple editor called nano to edit plain-text files. For example, enter the following to
edit and add stuff to your $HOME/.bashrc file:
$ nano $HOME/.bashrc
With the file open in nano, move the cursor down to the bottom of the file (using the down
arrow key). Type the line you want (for example, you could type alias d='date +%D').
To save the file, press Ctrl+O (the letter O); to quit, press Ctrl+X. The next time you log in or
open a new shell, you can use the new alias (in this case, just type d). To have the new information you just added to the file available from the current shell, type the following:
$ source $HOME/.bashrc
$ d
06/29/25
The following sections provide ideas about items to add to your shell configuration files. In
most cases, you add these values to the .bashrc file in your home directory. However, if you
administer a system, you may want to set some of these values as defaults for all your Linux
system’s users.
Setting your prompt
Your prompt consists of a set of characters that appear each time the shell is ready to accept a
command. The PS1 environment variable sets what the prompt contains and is what you will
interact with most of the time. If your shell requires additional input, it uses the values of
PS2, PS3, and PS4.
When your Linux system is installed, often a prompt is set to contain more than just a dollar
sign or pound sign. For example, in Ubuntu, Fedora, or Red Hat Enterprise Linux, your prompt
is set to include the following information: your username, your hostname, and the base name
of your current working directory. That information is surrounded by brackets and followed by
a dollar sign (for regular users) or a pound sign (for the root user). The following is an example of that prompt:
[chris@myhost:~/bin]$
If you change directories, the ~/bin name would change to the name of the new directory.
Likewise, if you were to log in as a different user or to a different host, that information
would change.
You can use several special characters (indicated by adding a backslash to a variety of letters)
to include different information in your prompt. Special characters can be used to output your
Terminal number, the date, and the time as well as other pieces of information. Table 3.7 provides some examples (you can find more on the Bash man page).
83
3
Downloaded from https://onlinelibrary.wiley.com/doi/ by alex jounh - Oregon Health & Science Univer , Wiley Online Library on [05/12/2025]. See the Terms and Conditions (https://onlinelibrary.wiley.com/terms-and-conditions) on Wiley Online Library for rules of use; OA articles are governed by the applicable Creative Commons License
Chapter 3: Using the Shell
TABLE 3.7
Characters to Add Information to Bash Prompt
Special Character
Description
\!
This shows the current command history number. This includes all previous
commands stored for your username.
\#
This shows the command number of the current command. This includes only
the commands for the active shell.
\$
This shows the user prompt ($) or root prompt (#), depending on which type of
user you are.
\W
This shows only the current working directory base name. For example, if
the current working directory was /var/spool/mail, this value simply
appears as mail.
\[
This precedes a sequence of nonprinting characters. This can be used to add a
Terminal control sequence into the prompt for such things as changing colors,
adding blink effects, or making characters bold. (Your Terminal determines the
exact sequences available.)
\]
This follows a sequence of nonprinting characters.
\\
This shows a backslash.
\d
This displays the day name, month, and day number of the current date, for
example, Sat Jan 25.
\h
This shows the hostname of the computer running the shell.
\n
This causes a newline to occur.
\nnn
This shows the character that relates to the octal number replacing nnn.
\s
This displays the current shell name. For the Bash shell, the value
would be bash.
\t
This prints the current time in hours, minutes, and seconds, for example,
10:14:39.
\u
This prints your current username.
\w
This displays the full path to the current working directory.
Tip
If you are setting your prompt temporarily by typing at the shell, you should put the value of PS1 in quotes. For example,
you could type export PS1="[\t \w]\$ " to see a prompt that looks like this:
[20:26:32 /var/spool]$.
To make a change to your prompt permanent, add the value of PS1 to your .bashrc file in
your home directory (assuming that you are using the Bash shell). There may already be
a PS1 value in that file, which you can modify. Refer to the Bash Prompt HOWTO
(http://www.tldp.org/HOWTO/Bash-Prompt-HOWTO) for information on changing colors,
commands, and other features of your Bash shell prompt.
84
Downloaded from https://onlinelibrary.wiley.com/doi/ by alex jounh - Oregon Health & Science Univer , Wiley Online Library on [05/12/2025]. See the Terms and Conditions (https://onlinelibrary.wiley.com/terms-and-conditions) on Wiley Online Library for rules of use; OA articles are governed by the applicable Creative Commons License
Part II: Becoming a Linux Power User
Adding environment variables
You might want to consider adding a few environment variables to your .bashrc file. These
can help make working with the shell more efficient and effective:
TMOUT This sets how long the shell can be inactive before Bash automatically exits.
The value is the number of seconds for which the shell has not received input. This
can be a nice security feature, in case you leave your desk while you are still logged
in to Linux. To prevent being logged off while you are working, you may want to set
the value to something like TMOUT=1800 (to allow 30 minutes of idle time). You can
use any Terminal session to close the current shell after a set number of seconds, for
example, TMOUT=30.
PATH As described earlier, the PATH variable sets the directories that are searched for
the commands that you use. If you often use directories of commands that are not in
your path, you can permanently add them. To do this, add a PATH variable to your
.bashrc file. For example, to add a directory called /getstuff/bin, add the
following:
PATH=$PATH:/getstuff/bin ; export PATH
This example first reads all of the current path directories into the new PATH ($PATH),
adds the /getstuff/bin directory, and then exports the new PATH.
3
Caution
Some people add the current directory to their PATH by adding a directory identified simply as a dot (.), as follows:
PATH=.:$PATH ; export PATH
This enables you to run commands in your current directory before evaluating any other command in the path (which
people may be used to if they have used DOS). However, the security risk with this procedure is that you could be in a
directory that contains a command that you don’t intend to run from that directory. For example, a malicious person
could put an ls command in a directory that, instead of listing the content of your directory, does something devious.
Because of this, the practice of adding the dot to your path is highly discouraged.
WHATEVER You can create your own environment variables to provide shortcuts in
your work. Choose any name that is not being used and assign a useful value to it. For
example, if you do a lot of work with files in the /work/time/files/info/
memos directory, you could set the following variable:
M=/work/time/files/info/memos ; export M
You could make that your current directory by typing cd $M. You could run a program
from that directory called hotdog by typing $M/hotdog. You could edit a file from
there called bun by typing vi $M/bun.
85
Downloaded from https://onlinelibrary.wiley.com/doi/ by alex jounh - Oregon Health & Science Univer , Wiley Online Library on [05/12/2025]. See the Terms and Conditions (https://onlinelibrary.wiley.com/terms-and-conditions) on Wiley Online Library for rules of use; OA articles are governed by the applicable Creative Commons License
Chapter 3: Using the Shell
Getting Information about Commands
When you first start using the shell, it can be intimidating. All that you see is a prompt. How
do you know which commands are available, which options they use, or how to use advanced
features? Fortunately, a lot of help is available. Here are some places that you can look to supplement what you learn in this chapter:
■
Check the PATH. Type echo $PATH. You see a list of the directories containing commands that are immediately accessible to you. Listing the contents of those directories
displays most standard Linux commands. For example:
$ ls /usr/bin
arch
dd
awk
df
basename dmesg
bash
dnsdomainname
cat
domainname
chgrp
echo
chmod
ed
chown
egrep
cp
env
cpio
ex
csh
false
cut
fgrep
dash
find
date
findmnt
■
■
■
■
fusermount
gawk
gettext
grep
gtar
gunzip
gzip
hostname
ipcalc
kbd_mode
keyctl
kill
link
ln
loadkeys
login
ls
lsblk
lscgroup
lssubsys
mail
mailx
mkdir
mknod
mktemp
more
mount
mountpoint
mv
nano
netstat
nice
nisdomainname
ping
ping6
ps
pwd
readlink
red
redhat_lsb:init
rm
rmdir
Use the help command. Some commands are built into the shell, so they do not
appear in a directory. The help command lists those commands and shows options
available with each of them. (Enter help | less to page through the list.) For help
with a particular built-in command, enter help command, replacing command with
the name that interests you. The help command works with the Bash shell only.
Use --help with the command. Many commands include a --help option that you
can use to get information about how the command is used. For example, if you enter
date -
-
help | less, the output shows not only options but also time formats
that you can use with the date command. Other commands simply use a –h option,
like fdisk -h.
Use the info command. The info command is another tool for displaying information about commands from the shell. The info command can move among a hierarchy
of nodes to find information about commands and other items. Not all commands have
information available in the info database, but sometimes more information can be
found there than on a man page.
Use the man command. To learn more about a particular command, enter man
command. (Replace command with the command name you want.) A description of
the command and its options appears on the screen.
Man pages are the most common means of getting information about commands as well as
other basic components of a Linux system. Each man page falls into one of the categories
86
Downloaded from https://onlinelibrary.wiley.com/doi/ by alex jounh - Oregon Health & Science Univer , Wiley Online Library on [05/12/2025]. See the Terms and Conditions (https://onlinelibrary.wiley.com/terms-and-conditions) on Wiley Online Library for rules of use; OA articles are governed by the applicable Creative Commons License
Part II: Becoming a Linux Power User
listed in Table 3.8. As a regular user, you will be most interested in man pages in section 1. As
a system administrator, you will also be interested in sections 5 and 8, and occasionally section 4. Programmers will be interested in sections 2 and 3 man pages.
TABLE 3.8
Manual Page Sections
Section Number
Section Name
Description
1
User Commands
Commands that can be run from the shell by a regular
user (typically no administrative privilege is needed)
2
System Calls
Programming functions used within an application to
make calls to the kernel
3
C Library Functions
Programming functions that provide interfaces to specific programming libraries (such as those for certain
graphical interfaces or other libraries that operate in
user space)
4
Devices and
Special Files
Filesystem nodes that represent hardware devices
(such as Terminals or CD drives) or software devices
(such as random number generators)
5
File Formats and
Conventions
Types of files (such as a graphics or word processing
file) or specific configuration files (such as the passwd
or group file)
6
Games
Games available on the system
7
Miscellaneous
Overviews of topics such as protocols, filesystems,
character set standards, and so on
8
System Administration
Tools and Daemons
Commands that require root or other administrative
privileges to use
Options to the man command enable you to search the man page database or display man
pages on the screen. Here are some examples of man commands and options:
$ man -
k passwd
…
passwd
passwd
$ man passwd
$ man 5 passwd
(1)
(5)
-update user's authentication tokens
-password file
Using the -k option, you can search the name and summary sections of all man pages
installed on the system. There are about a dozen man pages that include “passwd” in the
name or description of a command.
Note
If man -k displays no output, it may be that the man page database has not been initialized. Type mandb as root to
initialize the man page database.
87
3
Downloaded from https://onlinelibrary.wiley.com/doi/ by alex jounh - Oregon Health & Science Univer , Wiley Online Library on [05/12/2025]. See the Terms and Conditions (https://onlinelibrary.wiley.com/terms-and-conditions) on Wiley Online Library for rules of use; OA articles are governed by the applicable Creative Commons License
Chapter 3: Using the Shell
Let’s say that the two man pages in which I am interested are the passwd command (in section 1 of the man pages) and the passwd file (in section 5) man pages. Because just typing
man passwd displays the section 1 page, I need to request explicitly the section 5 man page
if I want to see that instead (man 5 passwd).
While you are displaying a man page, you can view different parts of the file using Page Down and
Page Up keys (to move a page at a time). Use the Enter key or up and down arrows to move a line
at a time. Press a forward slash (/) and type a term to search the document for that term. Press n
to repeat the search forward or N to repeat the search backward. To quit the man page, type q.
Summary
To become an expert Linux user, you must be able to use the shell to type commands. This
chapter focuses on the Bash shell, which is the one that is most commonly used with Linux
systems. You learned how commands are structured and how many special features, such as
variables, command completion, and aliases, are used.
The next chapter describes how to move around the Linux filesystem from the shell command
line.
Exercises
Use these exercises to test your knowledge of using the shell. These tasks assume you are
running a Fedora or Red Hat Enterprise Linux system (although some tasks work on other
Linux systems as well). If you are stuck, solutions to the tasks are shown in Appendix B
(although in Linux, there are often multiple ways to complete a task).
1. From your desktop, switch to the third virtual console and log in to your user account.
Run a few commands. Then exit the shell and return to the desktop.
2. Open a Terminal window and change the font colors as you please.
3. Find the location of the mount command and the tracepath man page.
4. Type the following three commands, and then recall and change those commands as
described:
$ cat /etc/passwd
$ ls $HOME
$ date
a. Use the command-line recall feature to recall the cat command and change
/etc/passwd to /etc/group.
88
Downloaded from https://onlinelibrary.wiley.com/doi/ by alex jounh - Oregon Health & Science Univer , Wiley Online Library on [05/12/2025]. See the Terms and Conditions (https://onlinelibrary.wiley.com/terms-and-conditions) on Wiley Online Library for rules of use; OA articles are governed by the applicable Creative Commons License
Part II: Becoming a Linux Power User
b. Recall the ls command, determine how to list files by time (using the man page),
and add that option to the ls $HOME command line.
c. Add format indicators to the date command to display the date output as
month/day/year.
5. Run the following command, typing as few characters as possible (using tab
completion):
basename /usr/share/doc/
6. Use the cat command to list the contents of the /etc/services file and pipe
those contents to the less command so that you can page through it (press q to quit
when you are finished).
7. Run the date command in such a way that the output from that command produces
the current day, month, date, and year. Have that read into another command line,
resulting in text that appears like the following (your date, of course, will be different): Today is Thursday, July 31, 2025.
8. Using variables, find out what your hostname, username, shell, and home directories
are currently set to.
9. Create an alias called mypass that displays the contents of the /etc/passwd file
on your screen in such a way that it is available every time you log in or open a new
shell from your user account.
3
10. Display the man page for the mount system call.
89
Downloaded from https://onlinelibrary.wiley.com/doi/ by alex jounh - Oregon Health & Science Univer , Wiley Online Library on [05/12/2025]. See the Terms and Conditions (https://onlinelibrary.wiley.com/terms-and-conditions) on Wiley Online Library for rules of use; OA articles are governed by the applicable Creative Commons License
Chapter 3: Using the Shell
4
Moving Around the Filesystem
IN THIS CHAPTER
Learning about the Linux filesystem
Listing file and directory attributes
Making files and directories
Listing and changing permission and ownership
Making copies and moving files
T
he Linux filesystem is the structure in which all of the information on your computer is stored.
In fact, one of the defining properties of the UNIX systems on which Linux is based is that nearly
everything you need to identify on your system (data, commands, symbolic links, devices, and
directories) is represented by items in the filesystems. Knowing where things are and understanding
how to get around the filesystem from the shell are critical skills in Linux.
In Linux, files are organized within a hierarchy of directories. Each directory can contain files as
well as other directories. You can refer to any file or directory using either a full path (for example,
/home/joe/myfile.txt) or a relative path (for example, if /home/joe were your current directory, you could simply refer to the file as myfile.txt).
If you were to map out the files and directories in Linux, it would look like an upside-down tree. At the
top is the root directory (not to be confused with the root user), which is represented by a single slash
(/). Below that is a set of common directories in the Linux system, such as bin, dev, home, lib, and
tmp, to name a few. Each of those directories, as well as directories added to the root directory, can contain subdirectories.
Figure 4.1 illustrates how the Linux filesystem is organized as a hierarchy. To demonstrate how directories are connected, the figure shows a /home directory that contains a subdirectory for the user joe.
Within the joe directory are Desktop, Documents, and other subdirectories. To refer to a file called
memo1.doc in the memos directory, you can type the full path of /home/joe/Documents/memos/
memo1.doc. If your current directory is /home/joe/, refer to the file as Documents/memos/
memo1.doc.
91
Linux Bible, Eleventh Edition. Christopher Negus.
© 2026 John Wiley & Sons, Inc. All rights reserved, including rights for text and data mining and training of artificial intelligence technologies or similar
technologies. Published 2026 by John Wiley & Sons, Inc.
Downloaded from https://onlinelibrary.wiley.com/doi/ by alex jounh - Oregon Health & Science Univer , Wiley Online Library on [05/12/2025]. See the Terms and Conditions (https://onlinelibrary.wiley.com/terms-and-conditions) on Wiley Online Library for rules of use; OA articles are governed by the applicable Creative Commons License
CHAPTER
FIGURE 4.1
The Linux filesystem is organized as a hierarchy of directories.
/
bin
dev
boot
etc
lib
misc
home media mnt
opt
proc
root
sbin
usr
tmp
var
joe
Desktop
Documents Downloads Music Pictures
memos
plans
projects
memol.doc
Some of these Linux directories may interest you:
92
/bin
Contains common Linux user commands, such as ls, sort, date,
and chmod.
/boot
Has the bootable Linux kernel, initial RAM disk, and boot loader configuration
files (GRUB).
/dev
Contains files representing access points to devices on your systems. These include
terminal devices (tty*), virtual terminals (pts*), hard disks (hd* or sd*), RAM
(ram*), and CD-ROM (cd*). Users can access these devices directly through these
device files; however, applications often hide the actual device names to end users.
For example, if you open a Terminal window, you don’t need to know that the device
it opens is /dev/pts/0.
/etc
Contains administrative configuration files. Most of these files are plain-text files that,
given the user has proper permission, can be edited with any text editor.
/home
Contains directories assigned to each regular user with a login account. (The root user
is an exception, using /root as his or her home directory.)
/media
Provides a standard location for automounting devices (removable media in particular). If the medium has a volume name, that name is typically used as the mount point.
For example, if I were logged in on a GNOME desktop as joe, a USB drive with a
volume name of myusb would be mounted on /media/joe/myusb. (Not all Linux
distributions and desktops use the /media directory in this way.)
/lib
Contains shared libraries needed by applications in /bin and /sbin to boot the
system. For Linux systems that support binaries in those directories that are for different architectures, you may see directories such as /lib32 or /lib64.
/mnt
A common mount point for many devices before it was supplanted by the standard
/media directory. Some bootable Linux systems still use this directory to mount hard
disk partitions and remote filesystems. Many people still use this directory to temporarily mount local or remote filesystems, which might come and go as removable
media are disconnected or remote filesystems go offline.
Downloaded from https://onlinelibrary.wiley.com/doi/ by alex jounh - Oregon Health & Science Univer , Wiley Online Library on [05/12/2025]. See the Terms and Conditions (https://onlinelibrary.wiley.com/terms-and-conditions) on Wiley Online Library for rules of use; OA articles are governed by the applicable Creative Commons License
Part II: Becoming a Linux Power User
/misc
A directory sometimes used to automount filesystems upon request.
/opt
Directory structure available to store add-on application software.
/proc
Contains information about system resources.
/root
Represents the root user’s home directory. The home directory for root does not
reside beneath /home for security reasons.
/sbin
Contains administrative commands and daemon processes.
/sys
Contains parameters for such things as tuning block storage and managing cgroups.
/tmp
Contains temporary files used by applications.
/usr
Contains user documentation, games, graphical files (X11), libraries (lib), and a variety of other commands and files that are not needed during the boot process. The
/usr directory is meant for files that don’t change after installation (in theory,
/usr could be mounted read-only).
/var
Contains directories of data used by various applications. In particular, this is where
you would place files that you share as an FTP server (/var/ftp) or a web server
(/var/www), by default. It also contains all system log files (/var/log) and spool files
in /var/spool (such as mail, cups, and news). The /var directory contains directories and files that are meant to change often. On server computers, it is common to
create the /var directory as a separate filesystem, using a filesystem type that can be
easily expanded.
Linux Filesystems vs. Windows-Based Filesystems
Although similar in many ways, the Linux filesystem has some striking differences when compared to
filesystems used in MS-DOS and Windows operating systems. Here are a few of these differences:
■
In MS-DOS and Windows filesystems, drive letters represent different storage devices. In
Linux, all storage devices are connected to the filesystem hierarchy. So, the fact that all of
/usr may be on a separate hard disk or that /mnt/remote1 is a filesystem from another
computer is invisible to the user.
■
Slashes, rather than backslashes, are used to separate directory names in Linux. So,
C:\home\joe in a Microsoft system is /home/joe in a Linux system.
■
Filenames almost always have suffixes in DOS (such as .txt for text files or .docx for word-
processing files). Although at times you can use that convention in Linux, three-character suffixes
have no required meaning in Linux. They can be useful for identifying a file type. Many Linux
applications and desktop environments use file suffixes to determine the contents of a file. In
Linux, however, DOS command extensions such as .com, .exe, and .bat don’t necessarily
signify an executable. (Permission flags make Linux files executable.)
■
Every file and directory in a Linux system has permissions and ownership associated with it.
Security varies among Microsoft systems. Because DOS and Microsoft Windows began as
single-user systems, file ownership was not built into those systems when they were designed.
Later releases added features such as file and folder attributes to address this problem.
4
93
Downloaded from https://onlinelibrary.wiley.com/doi/ by alex jounh - Oregon Health & Science Univer , Wiley Online Library on [05/12/2025]. See the Terms and Conditions (https://onlinelibrary.wiley.com/terms-and-conditions) on Wiley Online Library for rules of use; OA articles are governed by the applicable Creative Commons License
Chapter 4: Moving Around the Filesystem
The filesystems in the DOS or Microsoft Windows operating systems differ from Linux’s file structure, as the sidebar “Linux Filesystems vs. Windows-Based Filesystems” explains.
Using Basic Filesystem Commands
I want to introduce you to a few simple commands for getting around the filesystem. If you
want to follow along, log in and open a shell. When you log in to a Linux system and open a
shell, you are placed in your home directory. As a Linux user, most of the files you save and
work with will probably be in that directory or in subdirectories that you create. Table 4.1
shows commands to create and use files and directories.
TABLE 4.1
Commands to Create and Use Files
Command
Result
cd
Changes to another directory
pwd
Prints the name of the current (or present) working directory
mkdir
Creates a directory
chmod
Changes the permission on a file or directory
ls
Lists the contents of a directory
One of the most basic commands that you use from the shell is cd. The cd command can be
used with no options (to take you to your home directory) or with full or relative paths.
Consider the following commands:
$ cd /usr/share/
$ pwd
/usr/share
$ cd doc
$ pwd
/usr/share/doc
$ cd
$ pwd
/home/chris
The /usr/share option represents the absolute path to a directory on the system. Because
it begins with a slash (/), this path tells the shell to start at the root of the filesystem and
take you to the share directory that exists in the usr directory. The doc option to the cd
command looks for a directory called doc that is relative to the current directory. So, that
command made /usr/share/doc your current directory.
After that, by typing cd alone, you are returned to your home directory. If you ever wonder
where you are in the filesystem, the pwd command can help you. Here are a few other interesting cd command options:
$ cd ~
$ pwd
94
Downloaded from https://onlinelibrary.wiley.com/doi/ by alex jounh - Oregon Health & Science Univer , Wiley Online Library on [05/12/2025]. See the Terms and Conditions (https://onlinelibrary.wiley.com/terms-and-conditions) on Wiley Online Library for rules of use; OA articles are governed by the applicable Creative Commons License
Part II: Becoming a Linux Power User
/home/chris
$ cd ~/Music
$ pwd
/home/chris/Music
$ cd ../../../usr
$ pwd
/usr
The tilde (~) represents your home directory. So cd ~ takes you there. You can use the tilde
to refer to directories relative to your home directory as well, such as /home/chris/Music
with ~/Music. Typing a name as an option takes you to a directory below the current directory, but you can use two dots (..) to go to a directory above the current directory. The example shown takes you up three directory levels (to /) and then takes you into the
/usr directory.
The following steps lead you through the process of creating directories within your home
directory and moving among your directories, with a mention of setting appropriate file
permissions:
1. Go to your home directory. To do this, simply type cd in a shell and press Enter.
(For other ways of referring to your home directory, see the sidebar “Identifying
Directories.”)
2. To make sure that you’re in your home directory, type pwd. When I do this, I get the
following response (yours will reflect your home directory):
$ pwd
/home/joe
3. Create a new directory called test in your home directory, as follows:
$ mkdir test
4. Check the permissions of the directory:
$ ls -
ld test
drwxr-
xr-
x 2 joe sales 1024 Jan 24 12:17 test
This listing shows that test is a directory (d). The d is followed by the permissions
(rwxr-xr-x), which are explained later in the section “Understanding File Permissions and Ownership.” The rest of the information indicates the owner (joe), the
user’s primary group (sales), and the date that the files in the directory were most
recently modified (Jan 24 at 12:17 p.m.).
Note
When you add a new user in Ubuntu, Fedora and Red Hat Enterprise Linux and most other Linux systems, the user is
assigned to a group of the same name by default. For example, in the preceding text, the user joe would be assigned
to the group joe. This approach to assigning groups is referred to as the user private group scheme.
95
4
Downloaded from https://onlinelibrary.wiley.com/doi/ by alex jounh - Oregon Health & Science Univer , Wiley Online Library on [05/12/2025]. See the Terms and Conditions (https://onlinelibrary.wiley.com/terms-and-conditions) on Wiley Online Library for rules of use; OA articles are governed by the applicable Creative Commons License
Chapter 4: Moving Around the Filesystem
For now, enter the following:
$ chmod 700 test
This step changes the permissions of the directory to give you complete access and
everyone else no access at all. (The new permissions should read rwx------.)
5. Make the test directory your current directory as follows:
$ cd test
$ pwd
/home/joe/test
If you followed along, at this point a subdirectory of your home directory called test is your
current working directory. You can create files and directories in the test directory along
with the descriptions in the rest of this chapter.
Using Metacharacters and Operators
Whether you are listing, moving, copying, removing, or otherwise acting on files in your
Linux system, certain special characters, referred to as metacharacters and operators, help
you to work with files more efficiently. Metacharacters can help you match one or more files
without completely typing each filename. Operators enable you to direct information from one
command or file to another command or file.
Using file-matching metacharacters
To save you some keystrokes and enable you to refer easily to a group of files, the Bash shell
lets you use metacharacters. Anytime you need to refer to a file or directory, such as to list,
open, or remove it, you can use metacharacters to match the files you want. Here are some
useful metacharacters for matching filenames:
*
Matches any number of characters
?
Matches any one character
[...]
Matches any one of the characters between the brackets, which can include a hyphen-
separated range of letters or numbers
Try some of these file-matching metacharacters by first going to an empty directory (such as
the test directory described in the previous section) and then creating some empty files:
$ touch apple banana grape grapefruit watermelon
The touch command creates empty files (or updates the modification date on existing files).
The commands that follow show you how to use shell metacharacters with the ls command to
match filenames. Try the following commands to see whether you get the same responses:
$ ls a*
apple
$ ls g*
96
Downloaded from https://onlinelibrary.wiley.com/doi/ by alex jounh - Oregon Health & Science Univer , Wiley Online Library on [05/12/2025]. See the Terms and Conditions (https://onlinelibrary.wiley.com/terms-and-conditions) on Wiley Online Library for rules of use; OA articles are governed by the applicable Creative Commons License
Part II: Becoming a Linux Power User
grape grapefruit
$ ls g*t
grapefruit
$ ls *e*
apple grape grapefruit watermelon
$ ls *n*
banana watermelon
The first example matches any file that begins with a (apple). The next example matches any
files that begin with g (grape, grapefruit). Next, files beginning with g and ending in
t are matched (grapefruit). Next, any file that contains e in the name is matched
(apple, grape, grapefruit, watermelon). Finally, any file that contains n is matched
(banana, watermelon).
Here are a few examples of pattern matching with the question mark (?):
$ ls ????e
apple grape
$ ls g???e*
grape grapefruit
The first example matches any five-character file that ends in e (apple, grape). The second
matches any file that begins with g and has e as its fifth character (grape, grapefruit).
The following examples use braces to do pattern matching:
$ ls [abw]*
apple banana watermelon
$ ls [agw]*[ne]
apple grape watermelon
In the first example, any file beginning with a, b, or w is matched. In the second, any file
that begins with a, g, or w and also ends with either n or e is matched. You can also include
ranges within brackets. For example:
$ ls [a-g]*
apple banana grape grapefruit
4
Here, any filenames beginning with a letter from a through g are matched.
Using file-redirection metacharacters
Commands receive data from standard input and send it to standard output. Using pipes
(described earlier), you can direct standard output from one command to the standard input of
another. With files, you can use less than (<) and greater than (>) signs to direct data to and
from files. Here are the file-redirection characters:
<
Directs the contents of a file to the command. In most cases, this is the default action
expected by the command and the use of the character is optional; using less bigfile
is the same as less < bigfile.
>
Directs the standard output of a command to a file. If the file exists, the content of that file
is overwritten.
97
Downloaded from https://onlinelibrary.wiley.com/doi/ by alex jounh - Oregon Health & Science Univer , Wiley Online Library on [05/12/2025]. See the Terms and Conditions (https://onlinelibrary.wiley.com/terms-and-conditions) on Wiley Online Library for rules of use; OA articles are governed by the applicable Creative Commons License
Chapter 4: Moving Around the Filesystem
2>
Directs standard error (error messages resulting from running the command) to the file.
&>
Directs both standard output and standard error to the file.
>>
Directs the output of a command to a file, adding the output to the end of the existing file.
The following are some examples of command lines where information is directed to and
from files:
$ mail root < ~/.bashrc
$ man chmod | col -
b > /tmp/chmod
$ echo "I finished the project on $(date)" >> ~/projects
In the first example, the content of the .bashrc file in the home directory is sent in a mail
message to the computer’s root user. The second command line formats the chmod man page
(using the man command), removes extra backspaces (col -b), and sends the output to the
file /tmp/chmod (erasing the previous /tmp/chmod file, if it exists). The final command
results in the following text being added to the user’s project file:
I finished the project on Sat Jul 26 13:46:49 EDT 2025
Another type of redirection, referred to as here text (also called here document), enables you to
type text that can be used as standard input for a command. Here documents involve entering
two less-than characters (<<) after a command, followed by a word. All typing following that
word is taken as user input until the word is repeated on a line by itself. Here is an example:
$
>
>
>
>
>
$
mail root cnegus rjones bdecker << thetext
I want to tell everyone that there will be a 10 a.m.
meeting in conference room B. Everyone should attend.
-- James
thetext
This example sends a mail message to root, cnegus, rjones, and bdecker usernames on the local
system. The text entered between <<thetext and thetext becomes the content of the
message. A common use of here text is to use it with a text editor to create or add to a file
from within a script:
/bin/ed /etc/resolv.conf <<resendit
a
nameserver 100.100.100.100
.
w
q
resendit
With these lines added to a script run by the root user, the ed text editor adds the IP address
of a DNS server to the /etc/resolv.conf file.
98
Downloaded from https://onlinelibrary.wiley.com/doi/ by alex jounh - Oregon Health & Science Univer , Wiley Online Library on [05/12/2025]. See the Terms and Conditions (https://onlinelibrary.wiley.com/terms-and-conditions) on Wiley Online Library for rules of use; OA articles are governed by the applicable Creative Commons License
Part II: Becoming a Linux Power User
Using brace expansion characters
By using curly braces ({}), you can expand a set of characters across filenames, directory
names, or other arguments to which you give commands. For example, if you want to create a
set of files such as memo1 through memo5, you can do that as follows:
$ touch memo{1,2,3,4,5}
$ ls
memo1 memo2 memo3 memo4 memo5
The items that are expanded don’t have to be numbers or even single digits. For example, you
could use ranges of numbers or digits. You could also use any string of characters, as long as
you separate them with commas. Here are some examples:
$ touch {John,Bill,Sally}-{Breakfast,Lunch,Dinner}
$ ls
Bill-Breakfast Bill-Lunch John-Dinner Sally-Breakfast Sally-Lunch
Bill-Dinner John-Breakfast John-Lunch Sally-Dinner
$ rm {John,Bill,Sally}-{Breakfast,Lunch,Dinner}
$ touch {a..f}{1..5}
$ ls
a1 a3 a5 b2 b4 c1 c3 c5 d2 d4 e1 e3 e5 f2 f4
a2 a4 b1 b3 b5 c2 c4 d1 d3 d5 e2 e4 f1 f3 f5
In the first example, the use of two sets of braces means John, Bill, and Sally each have filenames associated with Breakfast, Lunch, and Dinner. If I had made a mistake, I could easily
recall the command and change touch to rm to delete all of the files. In the next example,
the use of two dots between letters a and f and numbers 1 and 5 specifies the ranges to be
used. Note the files that were created from those few characters.
Listing Files and Directories
The ls command is the most common command used to list information about files and directories. Many options available with the ls command allow you to gather different sets of files
and directories as well as to view different kinds of information about them.
By default, when you type the ls command, the output shows you all non-hidden files and
directories contained in the current directory. When you type ls, however, many Linux systems (including Fedora, Ubuntu and RHEL) assign an alias ls to add options. (An alias is a
way that you can change the behavior of any command by adding an alias to your own shell
config file, such as ~/.bashrc.) To see if ls is aliased, enter the following:
$ alias ls
alias ls='ls --color=auto'
99
4
Downloaded from https://onlinelibrary.wiley.com/doi/ by alex jounh - Oregon Health & Science Univer , Wiley Online Library on [05/12/2025]. See the Terms and Conditions (https://onlinelibrary.wiley.com/terms-and-conditions) on Wiley Online Library for rules of use; OA articles are governed by the applicable Creative Commons License
Chapter 4: Moving Around the Filesystem
The --color=auto option causes different types of files and directories to be displayed in
different colors. So, return to the $HOME/test directory created earlier in the chapter, add a
couple of different types of files, and then see what they look like with the ls command.
$ cd $HOME/test
$ touch scriptx.sh apple
$ chmod 755 scriptx.sh
$ mkdir Stuff
$ ln -
s apple pointer_to_apple
$ ls
apple pointer_to_apple scriptx.sh Stuff
Although you can’t see it in the preceding code example, the directory Stuff shows up in
blue, pointer_to_apple (a symbolic link) appears as red, and scriptx.sh (which is an
executable file) appears in green. All other regular files show up in black (or whatever your
default Terminal color is). Typing ls -l to see a long listing of those files can make these
different types of files clearer still:
$ ls -l
total 4
-
rw-
rw-
r-
-
.
lrwxrwxrwx.
-
rwxr-
xr-
x.
drwxrwxr-
x.
1
1
1
2
joe
joe
joe
joe
joe
0
joe
5
joe
0
joe 4096
Dec
Dec
Dec
Dec
18
18
18
18
13:38
13:46
13:37
13:38
apple
pointer_to_apple -
> apple
scriptx.sh
Stuff
As you look at the long listing, notice that the first character of each line shows the type of
file. A hyphen (-
) indicates a regular file, d indicates a directory, and l (lowercase L) indicates
a symbolic link. An executable file (a script or binary file that runs as a command) has execute
bits turned on (x). A directory (Stuff) must have execute permissions on as well to be able
to change to that directory. See more on execute bits in the upcoming section “Understanding
File Permissions and Ownership.”
You should become familiar with the contents of your home directory next. Use the -l and -a
options to ls.
$ ls -
la /home/joe
total 158
drwxrwxrwx 2
joe
drwxr-
xr-
x 3
root
-
rw-
-
-
-
-
-
-1
joe
-
rw-
r-
-
r-
-1
joe
-
rw-
r-
-
r-
-1
joe
-
rw-
r-
-
r-
-1
joe
drw-
r-
-
r-
-1
joe
-
rw-
rw-
r-
-1
joe
^
col 1
sales
4096
root
4096
sales
2204
sales
24
sales
230
sales
124
sales
4096
sales 149872
^
^
^
^
col 2 col 3 col 4 col 5 col
May
May
May
May
May
May
May
May
^
6
12
10
18
10
10
10
10
11
13:55
01:49
21:30
01:50
01:50
01:50
01:50
22:49
.
..
.bash_history
.bash_logout
.bash_profile
.bashrc
.kde
letter
^
col 7
Displaying a long list (-l option) of the contents of your home directory shows you more
about file sizes and directories. The total line shows the total amount of disk space used by
100
Downloaded from https://onlinelibrary.wiley.com/doi/ by alex jounh - Oregon Health & Science Univer , Wiley Online Library on [05/12/2025]. See the Terms and Conditions (https://onlinelibrary.wiley.com/terms-and-conditions) on Wiley Online Library for rules of use; OA articles are governed by the applicable Creative Commons License
Part II: Becoming a Linux Power User
the files in the list (158 kilobytes in this example). Adding the all files option (-a) displays
files that begin with a dot (.). Directories such as the current directory (.) and the parent
directory (..)—the directory above the current directory—are noted as directories by the
letter d at the beginning of each entry. Each directory begins with a d and each file begins
with a dash (-
).
The file and directory names are shown in column 7. In this example, a dot (.) represents
/home/joe, and two dots (..) represent /home—the parent directory of /joe. Most of the
files in this example are dot (.) files that are used to store GUI properties (.kde directory)
or shell properties (.bash files). The only nondot file in this list is the one named letter.
Column 3 shows the directory or file owner. The /home directory is owned by root, and
everything else is owned by the user joe, who belongs to the sales group (groups are listed in
column 4).
In addition to the d or -
, column 1 on each line contains the permissions set for that file
or directory. Other information in the listing includes the number of hard links to the item
(column 2), the size of each file in bytes (column 5), and the date and time each file was most
recently modified (column 6).
Here are a few other facts about file and directory listings:
■
■
■
■
The number of characters shown for a directory (4096 bytes in these examples) reflects
the size of the file containing information about the directory. Although this number
can grow above 4096 bytes for a directory that contains lots of files, this number
doesn’t reflect the size of files contained in that directory. For example, type ls -l
/usr to list subdirectories such as /usr/bin/ and /usr/share that contain
enough files to show values about 4096.
The format of the time and date column can vary. Instead of displaying “May 12,” the
date might be displayed as “2025-05-12,” depending upon the distribution and the
language setting (LANG variable).
On occasion, instead of seeing the execute bit (x) set on an executable file, you
may see an s in that spot instead. With an s appearing within either the owner
(-rwsr-xr-x) or group (-rwxr-sr-x) permissions, or both (-rwsr-sr-x), the
application can be run by any user, but ownership of the running process is assigned
to the application’s user/group instead of that of the user launching the command.
This is referred to as a set UID or set GID program, respectively. For example, the
mount command has permissions set as -rwsr-xr-x. This allows any user to run
mount to list mounted filesystems (although you still have to be root to use mount
to actually mount filesystems from the command line, in most cases). Type ls -
l /
usr/bin | grep rws to see other set GID commands.
If a t appears at the end of a directory, it indicates that the sticky bit is set for that
directory (for example, drwxrwxr-t). By setting the sticky bit on a directory,
the directory’s owner can allow other users and groups to add files to the directory
but prevent users from deleting each other’s files in that directory. With a set GID
assigned to a directory, any files created in that directory are assigned the same group
as the directory’s group. (If you see a capital S or T instead of the execute bits on a
101
4
Downloaded from https://onlinelibrary.wiley.com/doi/ by alex jounh - Oregon Health & Science Univer , Wiley Online Library on [05/12/2025]. See the Terms and Conditions (https://onlinelibrary.wiley.com/terms-and-conditions) on Wiley Online Library for rules of use; OA articles are governed by the applicable Creative Commons License
Chapter 4: Moving Around the Filesystem
■
directory, it means that the set GID or sticky bit permission, respectively, was set, but
for some reason the execute bit was not also turned on.)
If you see a plus sign at the end of the permission bits (for example, -rw-rw-r--+),
it means that extended attributes (+), such as access control lists (ACLs), are set on
the file. A dot at the end (.) indicates that SELinux is set on the file.
As I mentioned earlier, there are many useful options for the ls command. Return to the
$HOME/test directory in which you’ve been working. Here are some examples of ls options.
Don’t worry if the output doesn’t exactly match what is in your directory at this point.
Any file or directory beginning with a dot (.) is considered hidden and is not displayed by
default with ls. These dot files are typically configuration files or directories that need to
be in your home directory but don’t need to be seen in your daily work. The -a lets you see
those files.
The -t option displays files in the order in which they were most recently modified. With the
-F option, a backslash (/) appears at the end of directory names, an asterisk (*) is added to
executable files, and an at sign (@) is shown next to symbolic links.
Identifying Directories
When you need to identify your home directory on a shell command line, you can use the following:
$HOME
This environment variable stores your home directory name.
~
The tilde (~) represents your home directory on the command line.
You can also use the tilde to identify someone else’s home directory. For example, ~joe would be
expanded to the joe home directory (probably /home/joe). So, if I wanted to go to the directory
/home/joe/test, I could enter cd ~joe/test to get there.
Other special ways of identifying directories in the shell include the following:
.
A single dot (.) refers to the current directory.
..
Two dots (..) refer to a directory directly above the current directory.
$PWD
This environment variable refers to the current working directory.
$OLDPWD
This environment variable refers to the previous working directory before you
changed to the current one. (Entering cd –returns you to the directory represented
by $OLDPWD.)
To show hidden and non-hidden files:
$ ls -a
. apple docs grapefruit pointer_to_apple .stuff watermelon
.. banana grape .hiddendir script.sh .tmpfile
102
Downloaded from https://onlinelibrary.wiley.com/doi/ by alex jounh - Oregon Health & Science Univer , Wiley Online Library on [05/12/2025]. See the Terms and Conditions (https://onlinelibrary.wiley.com/terms-and-conditions) on Wiley Online Library for rules of use; OA articles are governed by the applicable Creative Commons License
Part II: Becoming a Linux Power User
To list all files by time most recently modified:
$ ls -at
.tmpfile .hiddendir .. docs watermelon banana script.sh
. .stuff pointer_to_apple grapefruit apple grape
To list files and append file-type indicators:
$ ls -F
apple banana docs/ grape grapefruit pointer_to_apple@ script.sh*
watermelon
To avoid displaying certain files or directories when you use ls, use the --hide= option. In
the next set of examples, any file beginning with g does not appear in the output. Using a -d
option on a directory shows information about that directory instead of showing the files and
directories the directory contains. The -R option lists all files in the current directory as well
as any files or directories that are associated with the original directory. The -S option lists
files by size.
To exclude any files beginning with the letter g in the list:
$ ls --hide=g*
apple banana docs pointer_to_apple script.sh watermelon
To list info about a directory instead of the files it contains:
$ ls -
ld $HOME/test/
drwxrwxr-
x. 4 joe joe 4096 Dec 18 22:00 /home/joe/test/
To create multiple directory layers at the same time (-p is needed):
$ mkdir -
p $HOME/test/documents/memos/
To list all files and directories recursively from current directory down:
$ ls -R
To list files by size:
4
$ ls -S
Understanding File Permissions and Ownership
After you’ve worked with Linux for a while, you are almost sure to get a Permission
denied message. Permissions associated with files and directories in Linux were designed to
keep users from accessing other users’ private files and to protect important system files.
The nine bits assigned to each file for permissions define the access that you and others have
to your file. Permission bits for a regular file appear as -rwxrwxrwx. Those bits are used to
define who can read, write, or execute the file.
103
Downloaded from https://onlinelibrary.wiley.com/doi/ by alex jounh - Oregon Health & Science Univer , Wiley Online Library on [05/12/2025]. See the Terms and Conditions (https://onlinelibrary.wiley.com/terms-and-conditions) on Wiley Online Library for rules of use; OA articles are governed by the applicable Creative Commons License
Chapter 4: Moving Around the Filesystem
Note
For a regular file, a dash appears in front of the nine-bit permissions indicator. Instead of a dash, you might see a d
(for a directory), l (for a symbolic link), b (for a block device), c (for a character device), s (for a socket), or p (for a
named pipe).
Of the nine-bit permissions, the first three bits apply to the owner’s permission, the next three
apply to the group assigned to the file, and the last three apply to all others. The r stands
for read, the w stands for write, and the x stands for execute permissions. If a dash appears
instead of the letter, it means that permission is turned off for that associated read, write, or
execute bit.
Because files and directories are different types of elements, read, write, and execute permissions on files and directories mean different things. Table 4.2 explains what you can do with
each of them.
TABLE 4.2
Setting Read, Write, and Execute Permissions
Permission
File
Directory
Read
View what’s
in the file.
See what files and subdirectories it contains but not necessarily see the contents of those files.
Write
Change the file’s
content, rename it,
or delete it.
Add files or subdirectories to the directory. Remove files
or directories from the directory.
Execute
Run the file as
a program.
Change to the directory as the current directory, search
through the directory, or execute a program from the
directory. Access file metadata (file size, time stamps, and
so on) of files in that directory.
As noted earlier, you can see the permission for any file or directory by typing the ls -ld
command. The named file or directory appears as those shown in this example:
$ ls -
ld ch3 test
-
rw-
rw-
r-
-1 joe sales 4983 Jan 18 22:13 ch3
drwxr-
xr-
x 2 joe sales 1024 Jan 24 13:47 test
The first line shows that the ch3 file has read and write permission for the owner and the
group. All other users have read permission, which means that they can view the file but
cannot change its contents or remove it. The second line shows the test directory (indicated
by the letter d before the permission bits). The owner has read, write, and execute permissions while the group and other users have only read and execute permissions. As a result, the
owner can add, change, or delete files in that directory, and everyone else can only read the
contents, change to that directory, and list the contents of the directory. (If you had not used
104
Downloaded from https://onlinelibrary.wiley.com/doi/ by alex jounh - Oregon Health & Science Univer , Wiley Online Library on [05/12/2025]. See the Terms and Conditions (https://onlinelibrary.wiley.com/terms-and-conditions) on Wiley Online Library for rules of use; OA articles are governed by the applicable Creative Commons License
Part II: Becoming a Linux Power User
the -d options to ls, you would have listed files in the test directory instead of permissions
of that directory.)
Changing permissions with chmod (numbers)
If you own a file, you can use the chmod command to change the permission on it as you
please. In one method of doing this, each permission (read, write, and execute) is assigned a
number—r=4, w=2, and x=1—and you use each set’s total number to establish the permission.
For example, to make permissions wide open for yourself as owner, you would set the first
number to 7 (4+2+1), and then you would give the group and others read-only permission by
setting both the second and third numbers to 4 (4+0+0) so that the final number is 744. Any
combination of permissions can result from 0 (no permission) through 7 (full permission).
Here are some examples of how to change permission on a file (named file) and what the
resulting permission would be.
The following chmod command results in this permission: rwxrwxrwx
# chmod 777 file
The following chmod command results in this permission: rwxr-xr-x
# chmod 755 file
The following chmod command results in this permission: rw-r--r--
# chmod 644 file
The following chmod command results in this permission: ---------
# chmod 000 file
The chmod command also can be used recursively. For example, suppose that you wanted to
give an entire directory structure 755 permission (rwxr-xr-x), starting at the $HOME/
myapps directory. To do that, you could use the -R option, as follows:
$ chmod -
R 755 $HOME/myapps
All files and directories below and including the myapps directory in your home directory will
have 755 permissions set. Because the numbers approach to setting permission changes all
permission bits at once, it’s more common to use letters to change permission bits recursively
over a large set of files.
Changing permissions with chmod (letters)
You can also turn file permissions on and off using plus (+) and minus (–
) signs, respectively,
along with letters to indicate what changes and for whom. Using letters, for each file you can
change permission for the user (u), group (g), other (o), and all users (a). What you would
change includes the read (r), write (w), and execute (x) bits. For example, start with a file
that has all permissions open (rwxrwxrwx). Run the following chmod commands using
minus sign options. The resulting permissions are shown to the right of each command.
105
4
Downloaded from https://onlinelibrary.wiley.com/doi/ by alex jounh - Oregon Health & Science Univer , Wiley Online Library on [05/12/2025]. See the Terms and Conditions (https://onlinelibrary.wiley.com/terms-and-conditions) on Wiley Online Library for rules of use; OA articles are governed by the applicable Creative Commons License
Chapter 4: Moving Around the Filesystem
The following chmod command results in this permission: r-xr-xr-x
$ chmod a-
w file
The following chmod command results in this permission: rwxrwxrw-
$ chmod o-
x file
The following chmod command results in this permission: rwx------
$ chmod go-
rwx file
Likewise, the following examples start with all permissions closed (---------). The plus
sign is used with chmod to turn permissions on.
The following chmod command results in this permission: rw-------
$ chmod u+rw files
The following chmod command results in this permission: --x--x--x
$ chmod a+x files
The following chmod command results in this permission: r-xr-x---
$ chmod ug+rx files
Using letters to change permission recursively with chmod generally works better than
using numbers because you can change bits selectively instead of changing all permission
bits at once. For example, suppose that you want to remove write permission for “other”
without changing any other permission bits on a set of files and directories. You could do the
following:
$ chmod -
R o-
w $HOME/myapps
This example recursively removes write permissions for “other” on any files and directories
below the myapps directory. If you had used numbers such as 644, execute permission would
be turned off for directories; using 755, execute permission would be turned on for regular
files. Using o-w, only one bit is turned off and all other bits are left alone.
Setting default file permission with umask
When you create a file as a regular user, it’s given permission rw-rw-r-- by default. A directory is given the permission rwxrwxr-x. For the root user, file and directory permission are
rw-r--r-- and rwxr-xr-x, respectively. These default values are determined by the value
of umask. Enter umask to see what your umask value is. For example:
$ umask
0002
If you ignore the leading zero for the moment, the umask value masks what is considered to
be fully opened permissions for a file 666 or a directory 777. The umask value of 002 results
in permission for a directory of 775 (rwxrwxr-x). That same umask results in a file permission of 644 (rw-rw-r--). (Execute permissions are off by default for regular files.)
106
Downloaded from https://onlinelibrary.wiley.com/doi/ by alex jounh - Oregon Health & Science Univer , Wiley Online Library on [05/12/2025]. See the Terms and Conditions (https://onlinelibrary.wiley.com/terms-and-conditions) on Wiley Online Library for rules of use; OA articles are governed by the applicable Creative Commons License
Part II: Becoming a Linux Power User
To change your umask value temporarily, run the umask command. Then try creating some
files and directories to see how the umask value affects how permissions are set. For example:
$ umask 777
d---------.
----------.
$ umask 000
drwxrwxrwx.
-
rw-
rw-
rw-
.
$ umask 022
drwxr-
xr-
x.
-
rw-
r-
-
r-
-
.
;
2
1
;
2
1
;
2
1
touch file01 ; mkdir dir01 ; ls -
ld file01 dir01
joe joe 6 Dec 19 11:03 dir01
joe joe 0 Dec 19 11:02 file01
touch file02 ; mkdir dir02 ; ls -
ld file02 dir02
joe joe 6 Dec 19 11:00 dir02/
joe joe 0 Dec 19 10:59 file02
touch file03 ; mkdir dir03 ; ls -
ld file03 dir03
joe joe 6 Dec 19 11:07 dir03
joe joe 0 Dec 19 11:07 file03
If you want to change your umask value permanently, add a umask command to the
.bashrc file in your home directory (near the end of that file). The next time you open a
shell, your umask is set to whatever value you chose.
Changing file ownership
As a regular user, you cannot change ownership of files or directories to have them belong to
another user. You can change ownership as the root user. For example, suppose that you created a file called memo.txt in the user joe’s home directory while you were root user. Here’s
how you could change it to be owned by joe:
# chown joe /home/joe/memo.txt
# ls -
l /home/joe/memo.txt
-
rw-
r-
-
r-
-
. 1 joe root 0 Dec 19 11:23 /home/joe/memo.txt
Notice that the chown command changed the user to joe but left the group as root. To
change both user and group to joe, you could enter the following instead:
# chown joe:joe /home/joe/memo.txt
# ls -
l /home/joe/memo.txt
-
rw-
r-
-
r-
-
. 1 joe joe 0 Dec 19 11:23 /home/joe/memo.txt
The chown command can be use recursively as well. Using the recursive option (-R) is helpful
if you need to change a whole directory structure to ownership by a particular user. For example, if you mounted disk partition to the /mnt/mystuff directory and you wanted to give
full ownership of the contents of that drive to the user joe, you could enter the following:
# chown -
R joe:joe /mnt/mystuff
Moving, Copying, and Removing Files
Commands for moving, copying, and deleting files are fairly straightforward. To change the
location of a file, use the mv command. To copy a file from one location to another, use the
cp command. To remove a file, use the rm command. These commands can be used to act on
107
4
Downloaded from https://onlinelibrary.wiley.com/doi/ by alex jounh - Oregon Health & Science Univer , Wiley Online Library on [05/12/2025]. See the Terms and Conditions (https://onlinelibrary.wiley.com/terms-and-conditions) on Wiley Online Library for rules of use; OA articles are governed by the applicable Creative Commons License
Chapter 4: Moving Around the Filesystem
individual files and directories or recursively to act on many files and directories at once. Here
are some examples:
$ mv abc def
$ mv abc ~
$ mv /home/joe/mymemos/ /home/joe/Documents/
The first mv command moves the file abc to the file def in the same directory (essentially
renaming it), whereas the second mv command moves the file abc to your home directory (~).
The next mv command moves the mymemos directory (and all its contents) to the
/home/joe/Documents directory.
By default, the mv command overwrites any existing files if the file to which you are moving
exists. However, many Linux systems alias the mv command (especially for the root user) so
that it uses the -i option (which causes mv to prompt you before overwriting existing files).
Here’s how to check if that is true on your system:
# alias mv
alias mv='mv -
i'
Here are some examples of using the cp command to copy files from one location to another:
$
$
$
$
cp
cp
cp
cp
abc def
abc ~
-
r /usr/share/doc/bash-
completion* /tmp/a/
-
ra /usr/share/doc/bash-
completion* /tmp/b/
The first copy command (cp) copies abc to the new name def in the same directory, whereas
the second copies abc to your home directory (~), keeping the name abc. The two recursive
(-r) copies copy the bash-completion directory and all of the files it contains, first to
new /tmp/a/ and /tmp/b/ directories. If you run ls -l on those two directories, you see
that for the cp command run with the archive (-a) option, the original date/time stamps and
permissions are maintained by the copy. Without the -a, current date/time stamps replace
existing ones, and permissions are determined by your umask.
The cp command typically also is aliased with the -i option in order to prevent you from
inadvertently overwriting files.
As with the cp and mv commands, rm is also usually aliased to include the -i option. This
can prevent the damage that can come from an inadvertent recursive remove (-r) option. Here
are some examples of the rm command:
$ rm abc
$ rm *
The first rm command deletes the abc file; the second removes all of the files in the current
directory (except that it doesn’t remove directories and/or any files that start with a dot). If
you want to remove a directory, you need to use the recursive (-r) option to rm or, for an
empty directory, you can use the rmdir command. Consider the following examples:
$ rmdir /home/joe/nothing/
108
Downloaded from https://onlinelibrary.wiley.com/doi/ by alex jounh - Oregon Health & Science Univer , Wiley Online Library on [05/12/2025]. See the Terms and Conditions (https://onlinelibrary.wiley.com/terms-and-conditions) on Wiley Online Library for rules of use; OA articles are governed by the applicable Creative Commons License
Part II: Becoming a Linux Power User
$ rm -
ri /home/joe/bigdir/
$ rm -
rf /home/joe/hugedir/
The rmdir command in the preceding code only removes the directory (nothing) if it is
empty. The rm -ri example removes the directory bigdir and all of its contents (files
and multiple levels of subdirectories), but it prompts you before each is removed. When you
use the force option (-f), the hugedir directory and all of its contents are immediately
removed, without prompting.
Caution
When you don’t use the -i option on the mv, cp, and rm commands, you risk removing some (or lots) of files by mistake. Using wildcards (such as *) and no -i makes mistakes even more likely. That said, sometimes you don’t want to
be bothered to step through each file you delete. You have other options as follows:
■
■
As noted with the -f option, you can force rm to delete without prompting. An alternative is to run rm, cp,
or mv with a backslash in front of it (\rm bigdir). The backslash causes any command to run unaliased.
Another alternative with mv or cp is to use the -b option. With -b, if a file of the same name exists at the
destination, a backup copy of the old file is made before the new file is moved there.
Summary
Commands for moving around the filesystem, copying files, moving files, and removing files
are among the most basic commands that you need to work from the shell. This chapter covers
lots of commands for moving around and manipulating files as well as commands for changing
ownership and permission.
The next chapter describes commands for editing and searching for files. These commands
include the vim/vi text editors, the find command, and the grep command.
4
Exercises
Use these exercises to test your knowledge of efficient ways to get around the Linux
filesystem and work with files and directories. When possible, try to use shortcuts to type as
little as possible to get the desired results. These tasks assume you are running a Fedora or
Red Hat Enterprise Linux system (although some tasks work on other Linux systems as well).
If you are stuck, solutions to the tasks are shown in Appendix B (although in Linux, there are
often multiple ways to complete a task).
1. Create a directory in your home directory called projects. In the projects directory, create nine empty files that are named house1, house2, house3, and so on,
up to house9. Assuming that there are lots of other files in that directory, come up
with a single argument to ls that would list just those nine files.
109
Downloaded from https://onlinelibrary.wiley.com/doi/ by alex jounh - Oregon Health & Science Univer , Wiley Online Library on [05/12/2025]. See the Terms and Conditions (https://onlinelibrary.wiley.com/terms-and-conditions) on Wiley Online Library for rules of use; OA articles are governed by the applicable Creative Commons License
Chapter 4: Moving Around the Filesystem
2. Make the $HOME/projects/houses/doors/ directory path. Create the following
empty files within this directory path (try using absolute and relative paths from your
home directory):
$HOME/projects/houses/bungalow.txt
$HOME/projects/houses/doors/bifold.txt
$HOME/projects/outdoors/vegetation/landscape.txt
3. Copy the files house1 and house5 to the $HOME/projects/houses/ directory.
4. Recursively copy the /usr/share/doc/initscripts* directory to the
$HOME/projects/ directory. Maintain the current date/time stamps and
permissions.
5. Recursively list the contents of the $HOME/projects/ directory. Pipe the output to
the less command so that you can page through the output.
6. Remove the files house6, house7, and house8 without being prompted.
7. Move house3 and house4 to the $HOME/projects/houses/doors directory.
8. Remove the $HOME/projects/houses/doors directory and its contents.
9. Change the permissions on the $HOME/projects/house2 file so that it can be
read by and written to by the user who owns the file, only read by the group, and
have no permission for others.
10. Recursively change permissions of the $HOME/projects/ directory so that nobody
has write permission to any files or directory beneath that point in the filesystem.
110
Downloaded from https://onlinelibrary.wiley.com/doi/ by alex jounh - Oregon Health & Science Univer , Wiley Online Library on [05/12/2025]. See the Terms and Conditions (https://onlinelibrary.wiley.com/terms-and-conditions) on Wiley Online Library for rules of use; OA articles are governed by the applicable Creative Commons License
Part II: Becoming a Linux Power User
Working with Text Files
5
IN THIS CHAPTER
Using vim and vi to edit text files
Searching for files
Searching in files
W
hen the UNIX system, on which Linux was based, was created, most information was managed
on the system in plain-text files. Thus, it was critical for users to know how to use tools for
searching for and within plain-text files and to be able to change and configure those files.
Today, the configuration of Linux systems can still be done by editing plain-text files. Whether you are
modifying files in the /etc directory to configure a local service or editing Ansible inventory files to
configure sets of host computers, plain-text files are still in common use for those tasks.
Before you can become a full-fledged system administrator, you need to be able to use a plain-text editor.
The fact that most professional Linux servers don’t even have a graphical interface available makes the
need for editing of plain-text configuration files with a non-graphical text editor necessary.
After you know how to edit text files, you still might find it tough to figure out where the files are
located that you need to edit. With commands such as find, you can search for files based on various
attributes (filename, size, modification date, and ownership to name a few). With the grep command,
you can search within text files to find specific search terms.
Editing Files with vim and vi
It’s almost impossible to use Linux for any period of time and not need a text editor because, as noted
earlier, most Linux configuration files are plain-text files that you will almost certainly need to change
manually at some point.
If you are using a GNOME desktop, you can run gedit (type gedit into the Search box and press
Enter, or select Applications ➪ Accessories ➪ gedit), which is fairly intuitive for editing text. (For
Ubuntu, type sudo apt install gedit to install it.) You can also run a simple text editor called
111
Linux Bible, Eleventh Edition. Christopher Negus.
© 2026 John Wiley & Sons, Inc. All rights reserved, including rights for text and data mining and training of artificial intelligence technologies or similar
technologies. Published 2026 by John Wiley & Sons, Inc.
Downloaded from https://onlinelibrary.wiley.com/doi/ by alex jounh - Oregon Health & Science Univer , Wiley Online Library on [05/12/2025]. See the Terms and Conditions (https://onlinelibrary.wiley.com/terms-and-conditions) on Wiley Online Library for rules of use; OA articles are governed by the applicable Creative Commons License
CHAPTER
nano from the shell. However, most Linux shell users use either the vi or emacs command
to edit text files.
The advantage of vi or emacs over a graphical editor is that you can use the command from
any shell, character terminal, or character-based connection over a network (using ssh, for
example)—no graphical interface is required. They each also contain tons of features, so you
can continue to grow with them.
The following sections provide a brief tutorial on the vi text editor, which you can use
to manually edit a text file from any shell. It also describes the improved versions of vi
called vim. (If vi doesn’t suit you, see the sidebar “Exploring Other Text Editors” for further options.)
The vi editor is difficult to learn at first, but after you know it, you never have to use a
mouse or a function key—you can edit and move around quickly and efficiently within files
just by using the keyboard.
Exploring Other Text Editors
Dozens of text editors are available for use with Linux. Some alternatives might be in your Linux distribution. You can try them out if you find vi to be too taxing. Here are some of the options:
nano: This popular, streamlined text editor is used with many bootable Linux systems and other
limited-space Linux environments. For example, nano is available to edit text files during a
Gentoo Linux install process.
gedit: The GNOME text editor runs on the desktop.
jed: This screen-oriented editor was made for programmers. Using colors, jed can highlight
code that you create so that you can easily read the code and spot syntax errors. Use the Alt
key to select menus to manipulate your text.
joe: The joe editor is similar to many PC text editors. Use Ctrl and the arrow keys to move
around. Press Ctrl+C to exit with no save or Ctrl+X to save and exit.
kate: This nice-looking editor comes in the kdebase package. It has lots of bells and whistles,
such as highlighting for different types of programming languages and controls for managing
word wrap.
kedit: This GUI-based text editor comes with the KDE desktop.
mcedit: In this editor, function keys help you get around, save, copy, move, and delete text. Like
jed and joe, mcedit is screen oriented. It comes in the mc package in RHEL and Fedora.
nedit: This is an excellent programmer’s editor. You need to install the optional nedit package
to get this editor.
If you use ssh to log in to other Linux computers on your network, you can use any available text editor to
edit files. If you use ssh -X to connect to the remote system, a GUI-based editor pops up on your local
screen. When no GUI is available, you need a text editor that runs in the shell, such as vi, jed, or joe.
112
Downloaded from https://onlinelibrary.wiley.com/doi/ by alex jounh - Oregon Health & Science Univer , Wiley Online Library on [05/12/2025]. See the Terms and Conditions (https://onlinelibrary.wiley.com/terms-and-conditions) on Wiley Online Library for rules of use; OA articles are governed by the applicable Creative Commons License
Part II: Becoming a Linux Power User
Starting with vi
Most often, you start vi to open a particular file. For example, to open a file called /tmp/
test, enter the following command:
$ vi /tmp/test
If this is a new file, you should see something similar to the following:
□
~
~
~
~
~
"/tmp/test" [New File]
A blinking box at the top represents where your cursor is located. The bottom line keeps you
informed about what is going on with your editing (here, you just opened a new file). In
between, there are tildes (~) as filler because there is no text in the file yet. Now here’s the
intimidating part: there are no hints, menus, or icons to tell you what to do. To make it worse,
you can’t just start typing. If you do, the computer is likely to beep at you. (And some people
complain that Linux isn’t friendly.)
First, you need to know the two main operating modes: command and input. The vi editor
always starts in command mode. Before you can add or change text in the file, you have to type
a command (one or two letters, sometimes preceded by an optional number) to tell vi what you
want to do. Case is important, so use uppercase and lowercase exactly as shown in the examples!
Note
On Red Hat Enterprise Linux, Fedora, and other Linux distributions, for regular users the vi command is aliased to run
vim. If you type alias vi, you should see alias vi='vim'. The first obvious difference between vi and
vim is that any known text file type, such as HTML, C code, or a common configuration file, appears in color. The colors
indicate the structure of the file. Other features of vim that are not in vi include features such as visual highlighting
and split-screen mode. By default, the root user doesn’t have vi aliased to vim. If vim is not on your system, try
installing either the vim or vim-enhanced package.
Adding text
To get into input mode, type an input command letter. To begin, type any of the following
letters. When you are finished inputting text, press the Esc key (sometimes twice) to return to
command mode. Remember the Esc key!
a: The add command. With this command, you can input text that starts to the right of
the cursor.
A: The add at end command. With this command, you can input text starting at the end
of the current line.
113
5
Downloaded from https://onlinelibrary.wiley.com/doi/ by alex jounh - Oregon Health & Science Univer , Wiley Online Library on [05/12/2025]. See the Terms and Conditions (https://onlinelibrary.wiley.com/terms-and-conditions) on Wiley Online Library for rules of use; OA articles are governed by the applicable Creative Commons License
Chapter 5: Working with Text Files
i: The insert command. With this command, you can input text that starts to the left of
the cursor.
I: The insert at beginning command. With this command, you can input text that starts at
the beginning of the current line.
o: The open below command. This command opens a line below the current line and puts
you in insert mode.
O: The open above command. This command opens a line above the current line and puts
you in insert mode.
Tip
When you are in insert mode, -- INSERT -- appears at the bottom of the screen.
Type a few words, and press Enter. Repeat that a few times until you have a few lines of text.
When you’re finished typing, press Esc to return to command mode. Now that you have a file
with some text in it, try moving around in your text with the keys or letters described in the
next section.
Tip
Remember the Esc key! It always places you back into command mode. Remember that sometimes you must press Esc
twice. For example, if you type a colon (:) to go into ex mode, you must press Esc twice to return to command mode.
Moving around in the text
To move around in the text, you can use the up, down, right, and left arrows. However,
many of the keys for moving around are right under your fingertips when they are in typing position:
Arrow keys: Move the cursor up, down, left, or right in the file one character at a time. To
move left and right, you can also use Backspace and the spacebar, respectively. If you
prefer to keep your fingers on the keyboard, move the cursor with h (left), l (right), j
(down), or k (up).
w: Moves the cursor to the beginning of the next word (delimited by spaces, tabs, or
punctuation).
W: Moves the cursor to the beginning of the next word (delimited by spaces or tabs).
b: Moves the cursor to the beginning of the previous word (delimited by spaces, tabs, or
punctuation).
B: Moves the cursor to the beginning of the previous word (delimited by
spaces or tabs).
0 (zero): Moves the cursor to the beginning of the current line.
114
Downloaded from https://onlinelibrary.wiley.com/doi/ by alex jounh - Oregon Health & Science Univer , Wiley Online Library on [05/12/2025]. See the Terms and Conditions (https://onlinelibrary.wiley.com/terms-and-conditions) on Wiley Online Library for rules of use; OA articles are governed by the applicable Creative Commons License
Part II: Becoming a Linux Power User
$: Moves the cursor to the end of the current line.
H: Moves the cursor to the upper-left corner of the screen (first line on the screen).
M: Moves the cursor to the first character of the middle line on the screen.
L: Moves the cursor to the lower-left corner of the screen (last line on the screen).
Deleting, copying, and changing text
The only other editing that you need to know is how to delete, copy, or change text. The x,
d, y, and c commands can be used to delete and change text. These can be used along with
movement keys (arrows, PgUp, PgDn, letters, and special keys) and numbers to indicate exactly
what you are deleting, copying, or changing. Consider the following examples:
x: Deletes the character under the cursor.
X: Deletes the character directly before the cursor.
d<?>: Deletes some text.
c<?>: Changes some text.
y<?>: Yanks (copies) some text.
The <?> after each letter in the preceding list identifies the place where you can use a
movement command to choose what you are deleting, changing, or yanking. For example:
dw: Deletes (d) a word (w) after the current cursor position.
db: Deletes (d) a word (b) before the current cursor position.
dd: Deletes (d) the entire current line (d).
c$: Changes (c) the characters (actually erases them) from the current character to the
end of the current line ($) and goes into input mode.
c0: Changes (c) (again, erases) characters from the previous character to the beginning of
the current line (0) and goes into input mode.
cl: Erases (c) the current letter (l) and goes into input mode.
cc: Erases (c) the line (c) and goes into input mode.
yy: Copies (y) the current line (y) into the buffer.
y): Copies (y) the current sentence ( ) ), to the right of the cursor, into the buffer.
y}: Copies (y) the current paragraph ( } ), to the right of the cursor, into the buffer.
Any of the commands just shown can be further modified using numbers, as you can see in the
following examples:
3dd: Deletes (d) three (3) lines (d), beginning at the current line.
3dw: Deletes (d) the next three (3) words (w).
5cl: Changes (c) the next five (5) letters (l) (that is, removes the letters and enters
input mode).
115
5
Downloaded from https://onlinelibrary.wiley.com/doi/ by alex jounh - Oregon Health & Science Univer , Wiley Online Library on [05/12/2025]. See the Terms and Conditions (https://onlinelibrary.wiley.com/terms-and-conditions) on Wiley Online Library for rules of use; OA articles are governed by the applicable Creative Commons License
Chapter 5: Working with Text Files
12j: Moves down (j) 12 lines (12).
5cw: Erases (c) the next five (5) words (w) and goes into input mode.
4y): Copies (y) the next four (4) sentences ( ) ).
Pasting (putting) text
After text has been copied to the buffer (by deleting, changing, or yanking it), you can place that
text back in your file using the letter p or P. With both commands, the text most recently stored
in the buffer is put into the file in different ways.
P: Puts the copied text to the left of the cursor if the text consists of letters or words; puts
the copied text above the current line if the copied text contains lines of text.
p: Puts the buffered text to the right of the cursor if the text consists of letters or
words; puts the buffered text below the current line if the buffered text contains
lines of text.
Repeating commands
After you delete, change, or paste text, you can repeat that action by typing a period (.). For
example, with the cursor on the beginning of the name Joe, you type cw and then type Jim
to change Joe to Jim. You search for the next occurrence of Joe in the file, position the cursor at the beginning of that name, and press a period. The word changes to Jim, and you can
search for the next occurrence. You can go through a file this way, pressing n to go to the next
occurrence and period (.) to change the word.
Exiting vi
To wrap things up, use the following commands to save or quit the file:
ZZ: Saves the current changes to the file and exits from vi.
:w: Saves the current file, but you can continue editing.
:wq: Works the same as ZZ.
:q: Quits the current file. This works only if you don’t have any unsaved changes.
:q!: Quits the current file and doesn’t save the changes you just made to the file.
Tip
If you’ve really trashed the file by mistake, the :q! command is the best way to exit and abandon your changes. The file
reverts to the most recently saved version. So, if you just saved with :w, you are stuck with the changes up to that point.
However, despite having saved the file, you can type u to back out of changes (all the way back to the beginning of the
editing session if you like) and then save again.
116
Downloaded from https://onlinelibrary.wiley.com/doi/ by alex jounh - Oregon Health & Science Univer , Wiley Online Library on [05/12/2025]. See the Terms and Conditions (https://onlinelibrary.wiley.com/terms-and-conditions) on Wiley Online Library for rules of use; OA articles are governed by the applicable Creative Commons License
Part II: Becoming a Linux Power User
You have learned a few vi editing commands. I describe more commands in the following sections. First, however, consider the following tips to smooth out your first trials with vi:
Esc: Remember that Esc gets you back to command mode. (I’ve watched people press every
key on the keyboard trying to get out of a file.) Esc followed by ZZ gets you out of
command mode, saves the file, and exits.
u: Press u to undo the previous change you made. Continue to press u to undo the change
before that and the one before that.
Ctrl+R: If you decide that you didn’t want to undo the previous undo command, use
Ctrl+R for Redo. Essentially, this command undoes your undo.
Caps Lock: Beware of hitting Caps Lock by mistake. Everything that you type in vi has
a different meaning when the letters are capitalized. You don’t get a warning that you
are typing capitals; things just start acting weird.
:!command: You can run a shell command while you are in vi using :! followed by a
shell command name. For example, type :!date to see the current date and time,
type :!pwd to see what your current directory is, or type :!jobs to see whether you
have any jobs running in the background. When the command completes, press Enter
and you are back to editing the file. You could even use this technique to launch a
shell (:!bash) from vi, run a few commands from that shell and then type exit to
return to vi. (I recommend doing a save before escaping to the shell, just in case you
forget to go back to vi.)
Ctrl+g: If you forget what you are editing, pressing these keys displays the name of the
file that you are editing and the current line that you are on at the bottom of the
screen. It also displays the total number of lines in the file, the percentage of how far
you are through the file, and the column number the cursor is on. This just helps you
get your bearings after you’ve stopped for a cup of coffee at 3 a.m.
Skipping around in the file
Besides the few movement commands described earlier, there are other ways of moving
around a vi file. To try them, open a large file that you can’t damage too much. (Try copying
/etc/services to /tmp and opening it by typing vi /tmp/services.) Here are some
movement commands that you can use:
Ctrl+f: Pages ahead one page at a time
Ctrl+b: Pages back one page at a time
Ctrl+d: Pages ahead one-half page at a time
Ctrl+u: Pages back one-half page at a time
5
G: Goes to the last line of the file
1G: Goes to the first line of the file
35G: Goes to any line number (35, in this case)
117
Downloaded from https://onlinelibrary.wiley.com/doi/ by alex jounh - Oregon Health & Science Univer , Wiley Online Library on [05/12/2025]. See the Terms and Conditions (https://onlinelibrary.wiley.com/terms-and-conditions) on Wiley Online Library for rules of use; OA articles are governed by the applicable Creative Commons License
Chapter 5: Working with Text Files
Searching for text
To search for the next or previous occurrence of text in the file, use either the slash (/) or the
question mark (?) character. Follow the slash or question mark with a pattern (string of text)
to search forward or backward, respectively, for that pattern. Within the search, you can also
use metacharacters. Here are some examples:
/hello: Searches forward for the word hello.
?goodbye: Searches backward for the word goodbye.
/The.*foot: Searches forward for a line that has the word The in it and also, after that
at some point, the word foot.
?[pP]rint: Searches backward for either print or Print. Remember that case matters in Linux, so make use of brackets to search for words that could have different
capitalization.
After you have entered a search term, simply type n or N to search again in the same direction
(n) or the opposite direction (N) for the term.
Using ex mode
The vi editor was originally based on the ex editor, which didn’t let you work in full-screen
mode. However, it did enable you to run commands that let you find and change text on
one or more lines at a time. When you type a colon and the cursor goes to the bottom of the
screen, you are essentially in ex mode. The following are examples of some of those ex commands for searching for and changing text. (I chose the words Local and Remote to search
for, but you can use any appropriate words.)
:g/Local: Searches for the word Local and prints every occurrence of that
line from the file. (If there is more than a screenful, the output is piped to the
more command.)
:s/Local/Remote: Substitutes Remote for the first occurrence of the word Local on
the current line.
:g/Local/s//Remote: Substitutes the first occurrence of the word Local on every
line of the file with the word Remote.
:g/Local/s//Remote/g: Substitutes every occurrence of the word Local with the
word Remote in the entire file.
:g/Local/s//Remote/gp: Substitutes every occurrence of the word Local with
the word Remote in the entire file and then prints each line so that you can see the
changes (piping it through less if output fills more than one page).
Learning more about vi and vim
To learn more about the vi editor, try typing vimtutor. The vimtutor command opens
a tutorial in the vim editor that steps you through common commands and features you can
use in vim. To use vimtutor, install the vim-enhanced package.
118
Downloaded from https://onlinelibrary.wiley.com/doi/ by alex jounh - Oregon Health & Science Univer , Wiley Online Library on [05/12/2025]. See the Terms and Conditions (https://onlinelibrary.wiley.com/terms-and-conditions) on Wiley Online Library for rules of use; OA articles are governed by the applicable Creative Commons License
Part II: Becoming a Linux Power User
Finding Files
Even a basic Linux installation can have thousands of files installed on it. To help you find
files on your system, you can use commands such as locate or plocate (to find commands
by name), find (to find files based on lots of different attributes), and grep (to search
within text files to find lines in files that contain search text).
Using locate to find files by name
On most Linux systems (Ubuntu, Fedora, and RHEL included), the updatedb command runs
once per day to gather the names of files throughout your Linux system into a database. By
running the locate command, you can search that database to find the location of files stored
in it. (Note that locate has been replaced by the plocate package in some Linux distributions,
although you can still use the locate command as it is symbolically linked to plocate.)
Here are a few things you should know about searching for files using the locate command:
■
■
There are advantages and disadvantages to using locate to find filenames instead of
the find command. A locate command finds files faster because it searches a database instead of having to search the whole filesystem live. A disadvantage is that the
locate command cannot find any files added to the system since the previous time
the database was updated.
Not every file in your filesystem is stored in the database. The contents of the /etc/
updatedb.conf file limit which filenames are collected by pruning out select
mount types, filesystem types, file types, and mount points. For example, filenames
are not gathered from remotely mounted filesystems (cifs, nfs, and so on) or
locally mounted CDs or DVDs (iso9660). Paths containing temporary files (/tmp)
and spool files (/var/spool/cups) are also pruned. You can add items to prune (or
remove some items that you don’t want pruned) the locate database to your needs. In
Fedora 42, the updatedb.conf file contains the following:
# https://bugzilla.redhat.com/show_bug.cgi?id=2033216
PRUNEFS = "9p afs autofs binfmt_misc ceph cgroup cgroup2 cifs coda
configfs curlftpfs debugfs devfs devpts devtmpfs ecryptfs ftpfs
fuse.ceph fuse.cryfs fuse.encfs fuse.glusterfs fuse.gvfsd-
fuse
fuse.mfs fuse.rclone fuse.rozofs fuse.sshfs fusec fusesmb gfs gfs2
gpfs hugetlbfs iso9660 lustre lustre_lite mfs mqueue ncpfs nfs nfs4
ocfs ocfs2 proc pstore ramfs pstorefs rootfs rpc_pipefs securityfs
smbfs sysfs tmpfs tracefs udev udf usbfs"
# https://bugzilla.redhat.com/show_bug.cgi?id=2097889
PRUNEPATHS = "/tmp /media /dev /sys /proc /run /var/cache /
var/spool"
As a regular user, you can’t see any files from the locate database that you can’t see in the
filesystem normally. For example, if you can’t type ls to view files in the /root directory, you
can’t locate files stored in that directory.
119
5
Downloaded from https://onlinelibrary.wiley.com/doi/ by alex jounh - Oregon Health & Science Univer , Wiley Online Library on [05/12/2025]. See the Terms and Conditions (https://onlinelibrary.wiley.com/terms-and-conditions) on Wiley Online Library for rules of use; OA articles are governed by the applicable Creative Commons License
Chapter 5: Working with Text Files
■
■
When you search for a string, the string can appear anywhere in a file’s path.
For example, if you search for passwd, you could turn up /etc/passwd,
/usr/bin/passwd, /home/chris/passwd/pwdfiles.txt, and many other
files with passwd in the path.
If you add files to your system after updatedb runs, you can’t locate those files until
updatedb runs again (probably that night). To get the database to contain all files
up to the current moment, you can simply run updatedb from the shell as root.
Here are some examples of using the locate command to search for files:
$ locate .bashrc
/etc/skel/.bashrc
/home/cnegus/.bashrc
# locate .bashrc
/etc/skel/.bashrc
/home/bill/.bashrc
/home/cnegus/.bashrc
/home/joe/.bashrc
/root/.bashrc
When run as a regular user, locate only finds .bashrc in /etc/skel and the user’s own
home directory. Run as root, the same command locates .bashrc files in everyone’s home
directory.
$ locate dir_color
/usr/share/man/man5/dir_colors.5.gz
…
$ locate -
i dir_color
/etc/DIR_COLORS
/etc/DIR_COLORS.256color
/etc/DIR_COLORS.lightbgcolor
/usr/share/man/man5/dir_colors.5.gz
Using locate -i, filenames are found regardless of case. So in the previous Fedora example,
DIR_COLORS was found with -i, whereas it wasn’t found without the -i option.
$ locate bzip2
/usr/bin/bzip2
/usr/bin/bzip2recover
/usr/share/bash-completion/completions/bzip2
/var/lib/dpkg/info/bzip2.list
/var/lib/dpkg/info/bzip2.md5sums
Unlike the find command, which uses the -name option to find filenames, the locate
command locates the string you enter if it exists in any part of the file’s path. In this example,
searching for bzip2 using the locate command finds files and directories containing the
bzip2 text string.
120
Downloaded from https://onlinelibrary.wiley.com/doi/ by alex jounh - Oregon Health & Science Univer , Wiley Online Library on [05/12/2025]. See the Terms and Conditions (https://onlinelibrary.wiley.com/terms-and-conditions) on Wiley Online Library for rules of use; OA articles are governed by the applicable Creative Commons License
Part II: Becoming a Linux Power User
Searching for files with find
The find command is the best one for searching your filesystem for files based on a variety of
attributes. After files are found, you can act on those files as well (using the -exec or -okay
option) by running any commands you want on them.
When you run find, it searches your filesystem live, which causes it to run slower than
locate, but it gives you an up-to-the-moment view of the files on your Linux system. However, you can also tell find to start at a particular point in the filesystem so that the search
can go faster by limiting the area of the filesystem being searched.
Nearly any file attribute that you can think of can be used as a search option. You can search for
filenames, ownership, permission, size, modification times, and other attributes. You can even use
combinations of attributes. Here are some basic examples of using the find command:
$
$
#
$
find
find /etc
find /etc
find $HOME -
ls
Run on a line by itself, the find command finds all files and directories below the current
directory. If you want to search from a particular point in the directory tree, just add the name
of the directory you want to search (such as /etc). As a regular user, find does not give
you special permission to find files or search directories that have permissions that make them
readable only by the root user. So, find produces a bunch of error messages. Run as the root
user, find /etc finds all files under /etc.
A special option to the find command is -ls. A long listing (ownership, permission, size,
and so on) is printed with each file when you add -ls to the find command (similar to
output of the ls -l command). This option helps you in later examples when you want to
verify that you have found files that contain the ownership, size, modification times, or other
attributes that you are trying to find.
Note
If, as a regular user, you are searching an area of the filesystem where you don’t have full permission to access all of the
files it contains (such as the /etc directory), you might receive lots of error messages when you search with find.
To get rid of those messages, direct standard errors to /dev/null. To do that, add the following to the end of the
command line: 2> /dev/null. The 2> redirects standard error to the next option (in this case /dev/null,
where the output is discarded).
Finding files by name
To find files by name, you can use the -name and -iname options. The search is done by
base name of the file; the directory names are not searched by default. To make the search
121
5
Downloaded from https://onlinelibrary.wiley.com/doi/ by alex jounh - Oregon Health & Science Univer , Wiley Online Library on [05/12/2025]. See the Terms and Conditions (https://onlinelibrary.wiley.com/terms-and-conditions) on Wiley Online Library for rules of use; OA articles are governed by the applicable Creative Commons License
Chapter 5: Working with Text Files
more flexible, you can use file-matching characters, such as asterisks (*) and question marks
(?), as in the following examples:
# find /etc -
name passwd
/etc/pam.d/passwd
/etc/logcheck/ignore.d.server/passwd
/etc/passwd
# find /etc -
iname '*passwd*'
/etc/security/opasswd
/etc/pam.d/chpasswd
/etc/pam.d/passwd
/etc/logcheck/ignore.d.server/passwd
/etc/passwd
Using the -name option and no asterisks, the first example lists any files in the /etc directory that are named passwd exactly. By using -iname instead, you can match any combination of uppercase and lowercase. Using asterisks, you can match any filename that includes the
word passwd.
Finding files by size
If your disk is filling up and you want to find out where your biggest files are located, you
can search your system by file size. The -size option enables you to search for files that are
exactly, smaller than, or larger than a selected size, as you can see in the following examples:
$ find
$ find
$ find
4.1G
2.2G
560M
/usr/share/ -
size +10M
/mostlybig -
size -
1M
/bigdata -
size +500M -
size -
5G -
exec du -
sh {} \;
/bigdata/images/rhel10.img
/bigdata/Fedora-Workstation-Live-x86_64-40-1.14.iso
/bigdata/dance2.avi
The first example in the preceding code finds files larger than 10MB. The second finds files less
than 1MB. In the third example, I’m searching for files that are between 500MB and 5GB. This
includes an example of the -exec option (which I describe later) to run the du command on
each file to see its size.
Finding files by user
You can search for a particular owner (-user) or group (-group) when you try to find files.
By using -not and -or, you can refine your search for files associated with specific users and
groups, as you can see in the following examples:
$ find /home -
user chris -
ls
131077
4
-
rw-
r-
-
r-
- 1 chris
chris 379 Jun 29 2014 ./.bashrc
# find /home \( -
user chris -
or -
user joe \) -
ls
131077
4
-
rw-
r-
-
r-
- 1 chris
chris 379 Jun 29 2014 ./.bashrc
181022
4
-
rw-
r-
-
r-
- 1 joe
joe
379 Jun 15 2014 ./.bashrc
122
Downloaded from https://onlinelibrary.wiley.com/doi/ by alex jounh - Oregon Health & Science Univer , Wiley Online Library on [05/12/2025]. See the Terms and Conditions (https://onlinelibrary.wiley.com/terms-and-conditions) on Wiley Online Library for rules of use; OA articles are governed by the applicable Creative Commons License
Part II: Becoming a Linux Power User
# find /etc -
group lp -
ls
12320800
4 drwxr-
xr-
x
5 root
lp 4096
12322043
4 drwx-
-
-
-
-
- 2 root
lp 4096
ssl
# find /var/spool -
not -
user root -
ls
10355350 4 drwx-
-
-
-
-
-2 syslog adm 4096 Dec
rsyslog
10748662 4 drwx-
wx-
-
T 2 postfix root 4096 Jul
postfix/defer
Sep 15 13:24 /etc/cups
Jun 13 2023 /etc/cups/
30 2021 /var/spool/
30 10:05 /var/spool/
The first example outputs a long listing of all of the files under the /home directory that are
owned by the user chris. The next lists files owned by chris or joe. The find command
of /etc turns up all files that have lp as their primary group assignment. The last example
shows all files under /var/spool that are not owned by root. You can see files owned by
other users in the sample output.
Finding files by permission
Searching for files by permission is an excellent way to turn up security issues on your system
or uncover access issues. Just as you changed permissions on files using numbers or letters
(with the chmod command), you can likewise find files based on number or letter permissions
along with the -perm options. (Refer to Chapter 4, “Moving Around the Filesystem,” to see
how to use numbers and letters with chmod to reflect file permissions.)
If you use numbers for permission, as I do below, remember that the three numbers represent permissions for the user, group, and other. Each of those three numbers varies from no permission
(0) to full read/write/execute permission (7) by adding read (4), write (2), and execute (1) bits
together. With a hyphen (-
) in front of the number, all three of the bits indicated must match;
with a forward slash (/) in front of it, any of the numbers can match for the search to find a file.
The full, exact numbers must match if neither a hyphen nor a forward slash is used.
Consider the following examples:
$ find /usr/bin -
perm 755 -
ls
788884
28 -
rwxr-
xr-
x
1 root
bin/echo
root
28176 Mar 10
$ find /home/chris/ -
perm -
222 -
type d -
ls
144503
4 drwxrwxrwx
8 chris chris 4096 Jun 23
chris/OPENDIR
2014 /
2014 /home/
By searching for -perm 755, any files or directories with exactly rwxr-xr-x permission are
matched. By using -perm -222, only files that have write permission for user, group, and
other are matched. Notice that, in this case, the -type d is added to match only directories.
$ find /myreadonly -
perm /222 -
type f
685035
0 -
rw-
rw-
r-
- 1 chris
chris
myreadonly/abc
$ find . -
perm -
002 -
type f -
ls
266230
0 -
rw-
rw-
rw- 1 chris
chris
LINUX_BIBLE/abc
5
0 Dec 30 16:34 /
0 Dec 30 16:28 ./
123
Downloaded from https://onlinelibrary.wiley.com/doi/ by alex jounh - Oregon Health & Science Univer , Wiley Online Library on [05/12/2025]. See the Terms and Conditions (https://onlinelibrary.wiley.com/terms-and-conditions) on Wiley Online Library for rules of use; OA articles are governed by the applicable Creative Commons License
Chapter 5: Working with Text Files
Using -perm /222, you can find any file (-type f) that has write permission turned on
for the user, group, or other. You might do that to make sure that all files are read-only in a
particular part of the filesystem (in this case, beneath the /myreadonly directory). The last
example, -perm /002, is very useful for finding files that have open write permission for
“other,” regardless of how the other permission bits are set.
Finding files by date and time
Date and time stamps are stored for each file when it is created, when it is accessed, when its
content is modified, and when its metadata is changed. Metadata includes owner, group, time
stamp, file size, permissions, and other information stored in the file’s inode. You might want
to search for file data or metadata changes for any of the following reasons:
■
You just changed the contents of a configuration file, and you can’t remember which
one. So, you search /etc to see what has changed in the past 10 minutes:
$ find /etc/ -
mmin -
10
■
You suspect that someone hacked your system three days ago. So, you search the
system to see if any commands have had their ownership or permissions changed in
the past three days:
$ find /bin /usr/bin /sbin /usr/sbin -
ctime -
3
■
You want to find files in your FTP server (/var/ftp) and web server (/var/www)
that have not been accessed in more than 300 days so that you can see if any need to
be deleted:
$ find /var/ftp /var/www -
atime +300
As you can glean from the examples, you can search for content or metadata changes over
a certain number of days or minutes. The time options (-atime, -ctime, and -mtime)
enable you to search based on the number of days since each file was accessed, was changed,
or had its metadata changed. The min options (-amin, -cmin, and -mmin) do the same
in minutes.
Numbers that you give as arguments to the min and time options are preceded by a hyphen
(to indicate a time from the current time to that number of minutes or days ago) or a plus (to
indicate time from the number of minutes or days ago and older). With no hyphen or plus, the
exact number is matched.
Using -not and -or when finding files
With the -not and -or options, you can further refine your searches. There may be times
when you want to find files owned by a particular user but not assigned to a particular group.
You may want files larger than a certain size but smaller than another size. Or you might want
to find files owned by any of several users. The -not and -or options can help you do that.
Consider the following examples:
■
124
There is a shared directory called /var/allusers. This command line enables you
to find files that are owned by either joe or chris.
Downloaded from https://onlinelibrary.wiley.com/doi/ by alex jounh - Oregon Health & Science Univer , Wiley Online Library on [05/12/2025]. See the Terms and Conditions (https://onlinelibrary.wiley.com/terms-and-conditions) on Wiley Online Library for rules of use; OA articles are governed by the applicable Creative Commons License
Part II: Becoming a Linux Power User
$ find /var/allusers \( -
user joe -
o -
user chris \) -
ls
679967
0 -
rw-
r-
-
r-
-1 chris chris
0 Dec 31 12:57
/var/allusers/myjoe
■
679977 1812 -
rw-
r-
-
r-
-1 joe
/var/allusers/dict.dat
joe
679972
0 -
rw-
r-
-
r-
-1 joe
/var/allusers/one
sales
4379 Dec 31 13:09
0 Dec 31 13:02
This command line searches for files owned by the user joe, but only those that are
not assigned to the group joe:
$ find /var/allusers/ -
user joe -
not -
group joe -
ls
679972 0 -
rw-
r-
-
r-
-1 joe sales 0 Dec 31 13:02 /var/allusers/one
■
You can also add multiple requirements on your searches. Here, a file must be owned
by the user joe and must also be more than 1MB in size:
$ find /var/allusers/ -
user joe -
and -
size +1M -
ls
679977 1812 -
rw-
r-
-
r-
-1 joe root 1854379 Dec 31 13:09
/var/allusers/dict.dat
Finding files and executing commands
One of the most powerful features of the find command is the capability to execute commands on any files that you find. With the -exec option, the command you use is executed
on every file found, without stopping to ask if that’s okay. The -ok option stops at each
matched file and asks whether you want to run the command on it.
The advantage of using -ok is that, if you are doing something destructive, you can make sure
that you okay each file individually before the command is run on it. The syntax for using
-exec and -ok is the same:
$ find [options] -exec command {} \;
$ find [options] -ok command {} \;
With -exec or -ok, you run find with any options you like in order to find the files you are
seeking. Then you enter the -exec or -ok option followed by the command you want to run
on each file. The set of curly braces indicates where on the command line to read in each file
that is found. Each file can be included in the command line multiple times if you like. To end
the line, you need to add a backslash and semicolon (\;). Here are some examples:
■
This command finds any file named passwd under the /etc directory and includes
that name in the output of an echo command:
5
$ find /etc -
iname passwd -
exec echo "I found {}" \;
I found /etc/pam.d/passwd
I found /etc/passwd
■
The following command finds every file under the /usr/share directory that is
more than 5MB in size. Then it lists the size of each file with the du command.
125
Downloaded from https://onlinelibrary.wiley.com/doi/ by alex jounh - Oregon Health & Science Univer , Wiley Online Library on [05/12/2025]. See the Terms and Conditions (https://onlinelibrary.wiley.com/terms-and-conditions) on Wiley Online Library for rules of use; OA articles are governed by the applicable Creative Commons License
Chapter 5: Working with Text Files
The output of find is then sorted by size, from largest to smallest. With -exec
entered, all entries found are processed, without prompting:
$ find /usr/share -
size +5M -
exec du {} \; | sort -
nr
26656 /usr/share/fonts/opentype/noto/NotoSerifCJK-
Bold.ttc
26480 /usr/share/pocketsphinx/model/en-
us/en-
us.lm.bin
25672 /usr/share/fonts/opentype/noto/NotoSerifCJK-
Regular.ttc
■
The -ok option enables you to choose, one at a time, whether each file found is acted
upon by the command you enter. For example, you want to find all files that belong to
joe in the /var/allusers directory (and its subdirectories) and move them to the
/tmp/joe directory:
#
#
<
<
mkdir /tmp/joe
find /var/allusers/ -
user joe -
ok mv {} /tmp/joe/ \;
mv … /var/allusers/dict.dat> ? y
mv … /var/allusers/five> ? y
Notice in the preceding code that you are prompted for each file that is found before it is
moved to the /tmp/joe directory. You would simply type y and press Enter at each line to
move the file, or just press Enter to skip it.
For more information on the find command, enter man find.
Searching in files with grep
If you want to search for files that contain a certain search term, you can use the grep
command. With grep, you can search a single file, multiple files, or search a whole directory
structure of files recursively.
When you search, you can have every line containing the term printed on your screen (standard output) or just list the names of the files that contain the search term. By default, grep
searches text in a case-sensitive way, although you can do case-insensitive searches as well.
Instead of just searching files, you can also use grep to search standard output. So, if a
command turns out lots of text and you want to find only lines that contain certain text, you
can use grep to filter just what you want.
Here are some examples of grep command lines used to find text strings in one or more files:
$ grep dns /etc/services
mdns
353/udp
# Multicast DNS
$ grep -
i dns /etc/services
domain-
s
853/tcp
# DNS over TLS [RFC7858]
domain-
s
853/udp
# DNS over DTLS [RFC8094]
mdns
353/udp
# Multicast DNS
…
In the first example, a grep for the word dns in the /etc/services file turned up one
line. Searching again, using the -i to be case-insensitive (as in the second example), there
were three lines of text produced.
126
Downloaded from https://onlinelibrary.wiley.com/doi/ by alex jounh - Oregon Health & Science Univer , Wiley Online Library on [05/12/2025]. See the Terms and Conditions (https://onlinelibrary.wiley.com/terms-and-conditions) on Wiley Online Library for rules of use; OA articles are governed by the applicable Creative Commons License
Part II: Becoming a Linux Power User
To search for lines that don’t contain a selected text string, use the -v option. In the following example, all lines from the /etc/services file are displayed except those containing
the text tcp (case-insensitive). In this example, you will see a lot of udp services:
$ grep -
vi udp /etc/services
To do recursive searches, use the -r option and a directory as an argument. The following
example includes the -l option, which just lists files that include the search text, without
showing the actual lines of text. That search turns up files that contain the text peerdns
(case-insensitive).
$ grep -
rli peerdns /usr/share/doc/
/usr/share/doc/dnsmasq-2.66/setup.html
/usr/share/doc/initscripts-9.49.17/sysconfig.txt
…
The next example recursively searches the /etc/systemd directory for the term root. It
lists every line in every file beneath the directory that contains that text. To make it easier
to have the term root stand out on each line, the --color option is added. By default, the
matched term appears in red.
$ grep -
ri -
-
color root /etc/systemd/
/etc/systemd/logind.conf:#KillExcludeUsers=root
/etc/systemd/timesyncd.conf:#RootDistanceMaxSec=5
To search the output of a command for a term, you can pipe the output to the grep
command. In this example, I know that IP addresses are listed on output lines from the ip
command that include the string inet, so I use grep to display just those lines:
$ ip addr show | grep inet
inet 127.0.0.1/8 scope host lo
inet 192.168.1.231/24 brd 192.168.1.255 scope global wlan0
Summary
Being able to work with plain-text files is a critical skill for using Linux. Because so many
configuration files and document files are in plain-text format, you need to become proficient
with a text editor to use Linux effectively. Finding filenames and content in files are also critical skills. In this chapter, you learned to use the locate and find commands for finding
files and grep for searching files.
The next chapter covers a variety of ways to work with processes. There, you learn how to
see what processes are running, run processes in the foreground and background, and change
processes (using signals).
Exercises
Use these exercises to test your knowledge of using the vi (or vim) text editor, commands
for finding files (locate and find), and commands for searching files (grep). These tasks
127
5
Downloaded from https://onlinelibrary.wiley.com/doi/ by alex jounh - Oregon Health & Science Univer , Wiley Online Library on [05/12/2025]. See the Terms and Conditions (https://onlinelibrary.wiley.com/terms-and-conditions) on Wiley Online Library for rules of use; OA articles are governed by the applicable Creative Commons License
Chapter 5: Working with Text Files
assume you are running a Fedora or Red Hat Enterprise Linux system (although some tasks
work on other Linux systems as well). If you are stuck, solutions to the tasks are shown in
Appendix B (although in Linux, there are often multiple ways to complete a task).
1. Copy the /etc/services file to the /tmp directory. Open the /tmp/services
file in vim, and search for the term WorldWideWeb. Change that to read
World Wide Web.
2. Find the following paragraph in your /tmp/services file (in Ubuntu, choose a different paragraph) and move it to the end of that file.
# Note that it is presently the policy of IANA to assign a single
well-known
# port number for both TCP and UDP; hence, most entries here have
two entries
# even if the protocol doesn't support UDP operations.
# Updated from RFC 1700, "Assigned Numbers" (October 1994). Not all
ports
# are included, only the more common ones.
3. Using ex mode, search for every occurrence of the term tcp (case-sensitive) in your
/tmp/services file and change it to WHATEVER.
4. As a regular user, search the /etc directory for every file named passwd. Redirect
error messages from your search to /dev/null.
5. Create a directory in your home directory called TEST. Create files in that directory
named one, two, and three that have full read/write/execute permissions on for
everyone (user, group, and other). Construct a find command to find those files and
any other files that have write permission open to “others” from your home directory
and below.
6. Find files under the /usr/share/cups directory that have not been modified in
more than 300 days.
7. Create a /tmp/FILES directory. Find all files under the /usr/share directory that
are more than 5MB and less than 10MB and copy them to the /tmp/FILES directory.
8. Find every file in the /tmp/FILES directory, and make a backup copy of each file in
the same directory. Use each file’s existing name, and just append .mybackup to create each backup file.
9. Install the kernel-doc package in Fedora or Red Hat Enterprise Linux. Using grep,
search inside the files contained in the /usr/share/doc/kernel-doc* directory for the term e1000 (case-insensitive) and list the names of the files that contain
that term.
10. Search for the e1000 term again in the same location, but this time list every line
that contains the term and highlight the term in color.
128
Downloaded from https://onlinelibrary.wiley.com/doi/ by alex jounh - Oregon Health & Science Univer , Wiley Online Library on [05/12/2025]. See the Terms and Conditions (https://onlinelibrary.wiley.com/terms-and-conditions) on Wiley Online Library for rules of use; OA articles are governed by the applicable Creative Commons License
Part II: Becoming a Linux Power User
6
Managing Running Processes
IN THIS CHAPTER
Displaying processes
Running processes in the foreground and background
Killing and renicing processes
I
n addition to being a multiuser operating system, Linux is a multitasking system. Multitasking
means that many programs can be running at the same time. An instance of a running program is
referred to as a process. Linux provides tools for listing running processes, monitoring system usage,
and stopping (or killing) processes when necessary.
From a shell, you can launch processes and then pause, stop, or kill them. You can also put them in the
background and bring them to the foreground. This chapter describes tools such as ps, procs, top,
kill, jobs, and other commands for listing and managing processes.
Understanding Processes
A process is a running instance of a command. For example, there may be one vi command on the
system. But if vi is currently being run by 15 different users, that command is represented by 15 different running processes.
A process is identified on the system by what is referred to as a process ID (PID). That PID is unique
for the current system. In other words, no other process can use that number as its process ID while
that first process is still running. However, after a process has ended, another process can reuse
that number.
Along with a process ID number, other attributes are associated with a process. Each process, when it
is run, is associated with a particular user account and group account. That account information helps
determine what system resources the process can access. For example, a process run as the root user
has much more access to system files and resources than a process running as a regular user.
129
Linux Bible, Eleventh Edition. Christopher Negus.
© 2026 John Wiley & Sons, Inc. All rights reserved, including rights for text and data mining and training of artificial intelligence technologies or similar
technologies. Published 2026 by John Wiley & Sons, Inc.
Downloaded from https://onlinelibrary.wiley.com/doi/ by alex jounh - Oregon Health & Science Univer , Wiley Online Library on [05/12/2025]. See the Terms and Conditions (https://onlinelibrary.wiley.com/terms-and-conditions) on Wiley Online Library for rules of use; OA articles are governed by the applicable Creative Commons License
CHAPTER
The ability to monitor and manage processes on your system is critical for a Linux system
administrator. Sometimes, runaway processes may be killing your system’s performance.
Finding and dealing with processes, based on attributes such as memory and CPU usage, are
covered in this chapter.
Note
Commands that display information about running processes get most of that information from raw data stored in the
/proc filesystem. Each process stores its information in a subdirectory of /proc, named after the process ID of that
process. You can view some of that raw data by displaying the contents of files in one of those directories (using cat or
less commands).
Listing Processes
From the command line, the ps command is the oldest and most common command for listing processes currently running on your system. The Linux version of ps contains a variety
of options from old UNIX and BSD systems, some of which are conflicting and implemented in
nonstandard ways. See the ps man page for descriptions of those different options. A more
modern replacement to ps is the procs command.
The top command provides a more screen-oriented approach to listing processes, and it can
also be used to change the status of processes. If you are using the GNOME desktop, you can
use the System Monitor tool (gnome-system-monitor) to provide a graphical means of
working with processes. These commands are described in the following sections.
Listing processes with ps
The most common utility for checking running processes is the ps command. Use it to see
which programs are running, the resources they are using, and who is running them. The following is an example of the ps command:
$ ps u
USER
PID %CPU %MEM VSZ
RSS TTY
STAT
jake 1982 0.0 0.0 453632 6040 tty2 Ssl+
jake 1995 0.0 0.1 556148 14448 tty2 Sl+
jake 22903 0.0 0.0 229980 5416 pts/2 Ss
jake 24356 100 0.0 231120 4312 pts/2 R+
START
11:14
11:14
15:43
16:05
TIME
0:00
0:00
0:00
0:00
COMMAND
gdm...
gnome...
bash
ps -
u
In this example, the u option (equivalent to -u) asks that usernames be shown, as well
as other information such as the time the process started and memory and CPU usage for
processes associated with the current user. Because this was run while the user was logged
into a GNOME desktop, the gdm (login screen) and gnome (desktop) processes shown are associated with a login terminal (tty2). The other processes are from a virtual terminal (pts/2)
that represents the shell (Bash) the user is working from.
130
Downloaded from https://onlinelibrary.wiley.com/doi/ by alex jounh - Oregon Health & Science Univer , Wiley Online Library on [05/12/2025]. See the Terms and Conditions (https://onlinelibrary.wiley.com/terms-and-conditions) on Wiley Online Library for rules of use; OA articles are governed by the applicable Creative Commons License
Part II: Becoming a Linux Power User
The concept of a terminal comes from the old days when people worked exclusively from character terminals, so a terminal typically represented a single person at a single screen. Nowadays, you can have many “terminals” on one screen by opening multiple virtual terminals or
Terminal windows on the desktop.
In this shell session, not much is happening. The first process shows that the user named
jake opened a Bash shell after logging in. The next process shows that jake has run the
ps u command. The terminal device (pts/2) is being used for the current session. The STAT
column represents the state of the process, with R indicating a currently running process
and S representing a sleeping process. The s indicates a session leader, and l shows a multithreaded process.
Note
Several other values can appear under the STAT column. For example, a plus sign (+) indicates that the process is
associated with the foreground operations.
The USER column shows the name of the user who started the process. Each process is represented by a unique PID, which you can use if you ever need to kill a runaway process or send
another kind of signal to a process. The %CPU and %MEM columns show the percentages of the
processor and random access memory, respectively, that the process is consuming.
VSZ (virtual set size) shows the size of the image process (in kilobytes), and RSS (resident set
size) shows the size of the program in memory. The VSZ and RSS sizes may be different because
VSZ is the amount of memory allocated for the process, whereas RSS is the amount that is
actually being used. RSS memory represents physical memory that cannot be swapped.
START shows the time the process began running, and TIME shows the cumulative system
time used. (Many commands consume very little CPU time, as reflected by 0:00 for processes
that haven’t even used a whole second of CPU time.)
Many processes running on a computer are not associated with a terminal. A normal Linux
system has many processes running in the background. Background system processes perform such tasks as logging system activity or listening for data coming in from the network.
They are often started when Linux boots up, and they run continuously until the system
shuts down. Likewise, logging into a Linux desktop causes many background processes to kick
off, such as processes for managing audio, desktop panels, authentication, and other desktop features.
To page through all of the processes running on your Linux system for the current user, add
the pipe (|) and the less command to ps ux:
$ ps ux | less
To page through all processes running for all users on your system, use the ps aux command
as follows:
$ ps aux | less
131
6
Downloaded from https://onlinelibrary.wiley.com/doi/ by alex jounh - Oregon Health & Science Univer , Wiley Online Library on [05/12/2025]. See the Terms and Conditions (https://onlinelibrary.wiley.com/terms-and-conditions) on Wiley Online Library for rules of use; OA articles are governed by the applicable Creative Commons License
Chapter 6: Managing Running Processes
A pipe (located above the backslash character on the keyboard) enables you to direct the
output of one command to be the input of the next command. In this example, the output of
the ps command (a list of processes) is directed to the less command, which enables you to
page through that information. Use the spacebar to page through and type q to end the list.
You can also use the arrow keys to move one line at a time through the output.
The ps command can be customized to display selected columns of information and to sort
information by one of those columns. Using the -o option, you can use keywords to indicate
the columns you want to list with ps. For example, the next example lists every running process (-e) and then follows the -o option with every column of information I want to display,
including the process ID (pid), username (user), user ID (uid), group name (group),
group ID (gid), virtual memory allocated (vsz), resident memory used (rss), and the full
command line that was run (comm). By default, output is sorted by process ID number.
$ ps -
eo pid,user,uid,group,gid,vsz,rss,comm | less
PID USER
UID GROUP
GID
VSZ
RSS COMMAND
1
root
0 root
0 187660 13296 systemd
2
root
0 root
0
0
0 kthreadd
If you want to sort by a specific column, you can use the sort= option. For example, to see
which processes are using the most memory, I sort by the vsz field. That sorts from lowest
memory use to highest. Because I want to see the highest ones first, I put a hyphen in front of
that option to sort (sort=-vsz).
$ ps -
eo pid,user,group,gid,vsz,rss,comm -
-
sort=-
vsz | head
PID USER
GROUP
GID
VSZ
RSS COMMAND
5219 chris
chris
1000 12763828 572024 firefox
3841 chris
chris
1000 4768392 298668 gnome-
shell
5695 chris
chris
1000 4007920 1461360 Isolated Web Co
8376 chris
chris
1000 3081560
66044 gjs
Refer to the ps man page for information on other columns of information by which you can
display and sort.
Listing processes with procs
A more modern tool than ps for listing processes is procs. While you can always expect ps
to be available on standard Linux systems, procs is available to easily install. The procs
package can be installed with snap on Ubuntu systems and with dnf on Fedora systems.
Here’s an example of default procs output from a Fedora system:
$ procs
PID:▲ User
1
2
3
4
...
132
root
root
root
root
│ TTY
│
│
│
│
│
CPU
[%]
0.0
0.0
0.0
0.0
MEM
[%]
0.2
0.0
0.0
0.0
CPU Time │
│
00:00:02 │
00:00:00 │
00:00:00 │
00:00:00 │
Command
/usr/lib/system/systemd
[kthreadd]
[pool_workqueue_release]
[kworker/R-rcu_gp]
Downloaded from https://onlinelibrary.wiley.com/doi/ by alex jounh - Oregon Health & Science Univer , Wiley Online Library on [05/12/2025]. See the Terms and Conditions (https://onlinelibrary.wiley.com/terms-and-conditions) on Wiley Online Library for rules of use; OA articles are governed by the applicable Creative Commons License
Part II: Becoming a Linux Power User
The default procs output displays fields in color, shows eight columns of information, and
gives you all running processes on the system. As with ps, you can add fields to the output.
However, procs offers fields like TcpPort to let you see ports associated with a process
(ports aren’t exposed to all users, so try this as root). Here’s an example of a system that has
an nginx server running and listening on port 80:
# procs -
-
insert TcpPort -
-
insert Processor nginx
PID:▲ User │ TTY CPU MEM CPU Time
│
[%] [%]
13992 root │ 0.0 0.0 00:00:00
process /usr/sbin/nginx
13993 nginx │ 0.0 0.1 00:00:00
process
13994 nginx │ 0.0 0.1 00:00:00
process
13995 nginx │ 0.0 0.1 00:00:00
process
13996 nginx │ 0.0 0.1 00:00:00
process
13997 nginx │ 0.0 0.1 00:00:00
process
13998 nginx │ 0.0 0.1 00:00:00
process
TCP Processor│ Command
│
[80]
0 │ nginx: master
[80]
5 │ nginx: worker
[80]
2 │ nginx: worker
[80]
3 │ nginx: worker
[80]
1 │ nginx: worker
[80]
5 │ nginx: worker
[80]
0 │ nginx: worker
A built-in watch process (-w) lets you watch your output update over time (refreshing every
1000ms, by default). The following command would allow you to list the output in ascending
(a) or descending (d) usage as it refreshes:
# procs -
w -
-
insert TcpPort -
-
insert Processor nginx Interval:
1000ms, Last Updated: 2025/10/19 15:58:21 ( Next: n, Prev: p,
Ascending: a,
Descending: d, Quit: q or Ctrl-
C )
...
Listing and changing processes with top
The top command provides a screen-oriented means of displaying processes running on your
system. With top, the default is to display processes based on how much CPU time they are
currently consuming. However, you can sort by other columns as well. After you identify a
misbehaving process, you can also use top to kill (completely end) or renice (reprioritize)
that process.
If you want to be able to kill or renice any processes, you need to run top as the root user. If
you just want to display processes and possibly kill or change your own processes, you can do
that as a regular user. Figure 6.1 shows an example of the top window.
General information about your system appears at the top of the top output, followed by
information about each running process (or at least as many as will fit on your screen).
133
6
Downloaded from https://onlinelibrary.wiley.com/doi/ by alex jounh - Oregon Health & Science Univer , Wiley Online Library on [05/12/2025]. See the Terms and Conditions (https://onlinelibrary.wiley.com/terms-and-conditions) on Wiley Online Library for rules of use; OA articles are governed by the applicable Creative Commons License
Chapter 6: Managing Running Processes
At the top, you can see how long the system has been up, how many users are currently
logged in to the system, and how much demand there has been on the system for the past 1,
5, and 10 minutes.
FIGURE 6.1
Displaying running processes with top
Other general information includes how many processes (tasks) are currently running, how
much CPU is being used, and how much RAM and swap are available and being used. Following
the general information are listings of each process, sorted by what percent of the CPU is being
used by each process. All of this information is redisplayed every 5 seconds, by default.
The following list includes actions that you can do with top to display information in different ways and modify running processes:
■
■
■
■
■
Press h to see help options, and then press any key to return to the top display.
Press M to sort by memory usage instead of CPU, and then press P to return to sorting by CPU.
Press the number 1 to toggle showing CPU usage of all your CPUs if you have more
than one CPU on your system.
Press R to reverse sort your output.
Press u and enter a username to display processes only for a particular user.
A common practice is to use top to find processes that are consuming too much memory or
processing power and then act on those processes in some way. A process consuming too much
CPU can be reniced to give it less priority to the processors. A process consuming too much
memory can be killed. With top running, here’s how to renice or kill a process:
Renicing a process Note the process ID of the process you want to renice and press r.
When the PID to renice message appears, type the process ID of the process you
want to renice. When prompted to Renice PID to value, type in a number from
–20 to 19. (See “Setting processor priority with nice and renice” later in this chapter
for information on the meanings of different renice values.)
134
Downloaded from https://onlinelibrary.wiley.com/doi/ by alex jounh - Oregon Health & Science Univer , Wiley Online Library on [05/12/2025]. See the Terms and Conditions (https://onlinelibrary.wiley.com/terms-and-conditions) on Wiley Online Library for rules of use; OA articles are governed by the applicable Creative Commons License
Part II: Becoming a Linux Power User
Killing a process Note the process ID of the process you want to kill and press k. Type
15 to terminate cleanly or 9 to just kill the process outright. (See “Killing processes
with kill and killall” later in this chapter for more information on using different signals you can send to processes.)
Listing processes with System Monitor
If you have GNOME desktop available on your Linux system, System Monitor (gnome-
system-monitor) is available to provide a more graphical way of displaying processes on
your system. You sort processes by clicking columns. You can right-click processes to stop, kill,
or renice them.
To start System Monitor from the GNOME desktop, press the Windows key and then type
System Monitor and press Enter. Then select the Processes tab. Figure 6.2 shows an example of the System Monitor window, displaying processes for the current user in order by
memory use.
FIGURE 6.2
Use the System Monitor window to view and change running processes.
By default, only running processes associated with your user account are displayed. Those
processes are listed alphabetically at first. You can resort the processes by clicking any of
the field headings (forward and reverse). For example, click the %CPU heading to see which
processes are consuming the most processing power. Click the Memory heading to see which
processes consume the most memory.
You can change your processes in various ways by right-clicking a process name and selecting
from the menu that appears (see Figure 6.3 for an example).
135
6
Downloaded from https://onlinelibrary.wiley.com/doi/ by alex jounh - Oregon Health & Science Univer , Wiley Online Library on [05/12/2025]. See the Terms and Conditions (https://onlinelibrary.wiley.com/terms-and-conditions) on Wiley Online Library for rules of use; OA articles are governed by the applicable Creative Commons License
Chapter 6: Managing Running Processes
FIGURE 6.3
Renice, kill, or pause a process from the System Monitor window.
Here are some of the things you can do to a process from the menu you clicked:
Stop: Pauses the process so that no processing occurs until you select Continue Process.
(This is the same as pressing Ctrl+Z on a process from the shell.)
Continue: Continues running a paused process.
Terminate: Sends a Terminate signal (15) to a process. In most cases, this terminates the
process cleanly.
Kill: Sends a Kill signal (9) to a process. This should kill a process immediately, regardless
of whether it can be done cleanly.
Change Priority: Presents a list of priorities from Very Low to Very High. Select Custom
to see a slider bar from which you can renice a process. Normal priority is 0. To get
better processor priority, use a negative number from –1 to –20. To have a lower processor priority, use a positive number (0 to 19). Only the root user can assign negative
priorities, so when prompted you need to provide the root password to set a negative
nice value.
Set Affinity: By setting Affinity, you can choose which processor(s) can be used to run a
particular process. Select a process and then choose Set Affinity to choose which
processors the process can run on.
Memory Maps: Lets you view the system memory map to see which libraries and other
components are being held in memory for the process.
Open Files: Lets you view which files are currently being held open by the process.
Properties: Lets you see other settings associated with the process (such as security
context, memory usage, and CPU use percentages).
You can display running processes associated with users other than yourself. To do that, highlight any process in the display (just click it). Then, from the menu button (the button with
three bars on it), select All Processes. You can modify processes you don’t own only if you are
136
Downloaded from https://onlinelibrary.wiley.com/doi/ by alex jounh - Oregon Health & Science Univer , Wiley Online Library on [05/12/2025]. See the Terms and Conditions (https://onlinelibrary.wiley.com/terms-and-conditions) on Wiley Online Library for rules of use; OA articles are governed by the applicable Creative Commons License
Part II: Becoming a Linux Power User
the root user or if you can provide the root password when prompted after you try to change
a process.
Sometimes, you won’t have the luxury of working with a graphical interface. To change
processes without a graphical interface, you can use a set of commands and keystrokes to
change, pause, or kill running processes. Some of those are described next.
6
Managing Background and Foreground Processes
If you are using Linux over a network or from a dumb terminal (a monitor that allows only
text input with no GUI support), your shell may be all that you have. You may be used to a
graphical environment in which you have lots of programs active at the same time so that you
can switch among them as needed. This shell thing can seem pretty limited.
Although the Bash shell doesn’t include a GUI for running many programs at once, it does let
you move active programs between the background and foreground. In this way, you can have
lots of stuff running and selectively choose the one you want to deal with at the moment.
You can place an active program in the background in several ways. One is to add an ampersand (&) to the end of a command line when you first run the command. You can also use the
at command to run commands in such a way that they are not connected to the shell.
To stop a running command and put it in the background, press Ctrl+Z. After the command is
stopped, you can either bring it back into the foreground to run (the fg command) or start
it running in the background (the bg command). Keep in mind that any command running
in the background might spew output during commands that you run subsequently from that
shell. For example, if output appears from a command running in the background during a vi
session, simply press Ctrl+L to redraw the screen to get rid of the output.
Tip
To avoid having the output appear, you should have any process running in the background send its output to a file or to
null (add 2> /dev/null to the end of the command line).
Starting background processes
If you have programs that you want to run while you continue to work in the shell, you can
place the programs in the background. To place a program in the background at the time you
run the program, type an ampersand (&) at the end of the command line, like this:
$ find /usr> /tmp/allusrfiles &
[3] 15971
This example command finds all files on your Linux system (starting from /usr), prints
those filenames, and puts those names in the file /tmp/allusrfiles. The ampersand (&)
runs that command line in the background. Notice that the job number, [3], and process ID
137
Downloaded from https://onlinelibrary.wiley.com/doi/ by alex jounh - Oregon Health & Science Univer , Wiley Online Library on [05/12/2025]. See the Terms and Conditions (https://onlinelibrary.wiley.com/terms-and-conditions) on Wiley Online Library for rules of use; OA articles are governed by the applicable Creative Commons License
Chapter 6: Managing Running Processes
number, 15971, are displayed when the command is launched. To check which commands you
have running in the background, use the jobs command, as follows:
$ jobs
[1] Stopped (tty output) vi /tmp/myfile
[2] Running
find /usr -
print> /tmp/allusrfiles &
[3] Running
nroff -
man /usr/man2/*>/tmp/man2 &
[4]-Running
nroff -
man /usr/man3/*>/tmp/man3 &
[5]+ Stopped
nroff -
man /usr/man4/*>/tmp/man4
The first job shows a text-editing command (vi) that I placed in the background and stopped
by pressing Ctrl+Z while I was editing. Job 2 shows the find command I just ran. Jobs 3 and
4 show nroff commands currently running in the background. Job 5 had been running in the
shell (foreground) until I decided too many processes were running and pressed Ctrl+Z to stop
job 5 until a few processes had completed.
The plus sign (+) next to number 5 shows that it was most recently placed in the background. The
minus sign (-
) next to number 4 shows that it was placed in the background just before the most
recent background job. Because job 1 requires terminal input, it cannot run in the background. As
a result, it is Stopped until it is brought to the foreground again.
Tip
To see the process ID for the background job, add a -l (the lowercase letter L) option to the jobs command. If you
type ps, you can use the process ID to figure out which command is for a particular background job.
Using foreground and background commands
Continuing with the example, you can bring any of the commands on the jobs list to the foreground. For example, to edit myfile again, enter the following:
$ fg %1
As a result, the vi command opens again. All text is as it was when you stopped the vi job.
Caution
Before you put a text processor, word processor, or similar program in the background, make sure that you save your file.
It’s easy to forget that you have a program in the background, and you will lose your data if you log out or the computer
reboots.
To refer to a background job (to cancel or bring it to the foreground), use a percent sign (%)
followed by the job number. You can also use the following to refer to a background job:
%
138
Refers to the most recent command put into the background (indicated by the plus
sign when you type the jobs command). This action brings the command to the
foreground.
Downloaded from https://onlinelibrary.wiley.com/doi/ by alex jounh - Oregon Health & Science Univer , Wiley Online Library on [05/12/2025]. See the Terms and Conditions (https://onlinelibrary.wiley.com/terms-and-conditions) on Wiley Online Library for rules of use; OA articles are governed by the applicable Creative Commons License
Part II: Becoming a Linux Power User
%string
Refers to a job where the command begins with a particular string of characters.
The string must be unambiguous. (In other words, typing %vi when there are two
vi commands in the background results in an error message.)
%?string
Refers to a job where the command line contains a string at any point. The string
must be unambiguous or the match fails.
%--
Refers to the job stopped before the one most recently stopped.
If a command is stopped, you can start it running again in the background using the bg
command. For example, refer to job 5 from the jobs list in a previous example:
[5]+ Stopped nroff -
man /usr/man4/*>/tmp/man4
Enter the following:
$ bg %5
After that, the job runs in the background. Its jobs entry appears as follows:
[5] Running nroff -
man /usr/man4/*>/tmp/man4 &
Killing and Renicing Processes
Just as you can change the behavior of a process using graphical tools such as System Monitor (described earlier in this chapter), you can also use command-line tools to kill a process
or change its CPU priority. The kill command can send a kill signal to any process to end it,
assuming you have permission to do so. It can also send different signals to a process to otherwise change its behavior. The nice and renice commands can be used to set or change the
processor priority of a process.
Killing processes with kill and killall
Although usually used for ending a running process, the kill and killall commands can
actually be used to send any valid signal to a running process. Besides telling a process to end,
a signal might tell a process to reread configuration files, pause (stop), or continue after being
paused, just to name a few possibilities.
Signals are represented by both numbers and names. Signals that you might send most commonly from a command include SIGKILL (9), SIGTERM (15), and SIGHUP (1). The default
signal is SIGTERM, which tries to terminate a process cleanly. To kill a process immediately,
you can use SIGKILL. The SIGHUP signal can, depending on the program, tell a process
to reread its configuration files. SIGSTOP pauses a process, while SIGCONT continues a
stopped process.
Different processes respond to different signals. Processes cannot block SIGKILL and
SIGSTOP signals, however. Table 6.1 shows examples of some signals (enter man 7 signal
to read about other available signals).
139
6
Downloaded from https://onlinelibrary.wiley.com/doi/ by alex jounh - Oregon Health & Science Univer , Wiley Online Library on [05/12/2025]. See the Terms and Conditions (https://onlinelibrary.wiley.com/terms-and-conditions) on Wiley Online Library for rules of use; OA articles are governed by the applicable Creative Commons License
Chapter 6: Managing Running Processes
TABLE 6.1
Signals Available in Linux
Signal
Number
Description
SIGHUP
1
Hang-up detected on controlling terminal or death of controlling
process.
SIGINT
2
Interrupt from keyboard.
SIGQUIT
3
Quit from keyboard.
SIGABRT
6
Abort signal from abort(3).
SIGKILL
9
Kill signal.
SIGTERM
15
Termination signal.
SIGCONT
19,18,25
Continue if stopped.
SIGSTOP
17,19,23
Stop process.
Notice that there are multiple possible signal numbers for SIGCONT and SIGSTOP because
different numbers are used in different computer architectures. For most x86 and Power architectures, use the middle value. The first value usually works for Alpha and SPARC, while the
last one is for MIPS architecture.
Using kill to signal processes by PID
Using commands such as ps and top, you can find processes to which you want to send a
signal. Then you can use the process ID of that process as an option to the kill command,
along with the signal you want to send.
For example, you run the top command and see that the bigcommand process is consuming
most of your processing power:
PID
USER
10432 chris
PR
20
NI
0
VIRT RES SHR S %CPU %MEM
471m 121m 18m S 99.9 3.2
TIME+
77:01.76
COMMAND
bigcommand
Here, the bigcommand process is consuming 99.9 percent of the CPU. You decide that you
want to kill it so that other processes have a shot at the CPU. If you use the process ID of the
running bigcommand process, here are some examples of the kill command that you can
use to kill that process:
$ kill 10432
$ kill -
15 10432
$ kill -
SIGKILL 10432
The default signal sent by kill is 15 (SIGTERM), so the first two examples have the same
results. On occasion, a SIGTERM doesn’t kill a process, so you may need a SIGKILL to kill it.
Instead of SIGKILL, you can use –9 to get the same result.
Another useful signal is SIGHUP. If, for example, something on your GNOME desktop were corrupted, you could send the gnome-shell a SIGHUP signal to reread its configuration files
140
Downloaded from https://onlinelibrary.wiley.com/doi/ by alex jounh - Oregon Health & Science Univer , Wiley Online Library on [05/12/2025]. See the Terms and Conditions (https://onlinelibrary.wiley.com/terms-and-conditions) on Wiley Online Library for rules of use; OA articles are governed by the applicable Creative Commons License
Part II: Becoming a Linux Power User
and restart the desktop. If the process ID for gnome-shell were 1833, here are two ways
you could send it a SIGHUP signal:
# kill -
1 1833
# killall -HUP gnome-shell
6
Using killall to signal processes by name
With the killall command, you can signal processes by name instead of by process ID. The
advantage is that you don’t have to look up the process ID of the process that you want to
kill. The potential downside is that you can kill more processes than you mean to if you are
not careful. (For example, typing killall bash may kill a bunch of shells that you don’t
mean to kill.)
Like the kill command, killall uses SIGTERM (signal 15) if you don’t explicitly enter a
signal number. Also as with kill, you can send any signal you like to the process you name
with killall. For example, if you see a process called testme running on your system and
you want to kill it, you can simply enter the following:
$ killall -
9 testme
The killall command can be particularly useful if you want to kill a bunch of commands of
the same name.
Setting processor priority with nice and renice
When the Linux kernel tries to decide which running processes get access to the CPUs on your
system, one of the things it takes into account is the nice value set on the process. Every process running on your system has a nice value between –20 and 19. By default, the nice value
is set to 0. Here are a few facts about nice values:
■
■
■
■
■
The lower the nice value, the more access to the CPUs the process has. In other words,
the nicer a process is, the less CPU attention it gets. So, a –20 nice value gets more
attention than a process with a 19 nice value.
A regular user can set nice values only from 0 to 19. No negative values are allowed.
So a regular user can’t ask for a value that gives a process more attention than most
processes get by default.
A regular user can set the nice value higher, not lower. So, for example, if a user sets
the nice value on a process to 10 and then later wants to set it back to 5, that action
will fail. Likewise, any attempt to set a negative value will fail.
A regular user can set the nice value only on the user’s own processes.
The root user can set the nice value on any process to any valid value, up or down.
You can use the nice command to run a command with a particular nice value. When a process is running, you can change the nice value using the renice command, along with the
process ID of the process, as in the example that follows:
# nice -
n +5 updatedb &
141
Downloaded from https://onlinelibrary.wiley.com/doi/ by alex jounh - Oregon Health & Science Univer , Wiley Online Library on [05/12/2025]. See the Terms and Conditions (https://onlinelibrary.wiley.com/terms-and-conditions) on Wiley Online Library for rules of use; OA articles are governed by the applicable Creative Commons License
Chapter 6: Managing Running Processes
The updatedb command is used to generate the locate database manually by gathering
names of files throughout the filesystem. In this case, I just wanted updatedb to run in the
background (&) and not interrupt work being done by other processes on the system. I ran the
top command to make sure that the nice value was set properly:
PID USER
20284 root
PR
25
NI VIRT
5 98.7m
RES
932
SHR S %CPU %MEM
644 D 2.7 0.0
TIME+
0:00.96
COMMAND
updatedb
Notice that under the NI column, the nice value is set to 5. Because the command was run
as the root user, the root user can lower the nice value later by using the renice command.
(Remember that a regular user can’t reduce the nice value or ever set it to a negative number.)
Here’s how you would change the nice value for the updatedb command just run to –5:
# renice -
n -
5 20284
If you ran the top command again, you might notice that the updatedb command is now at
or near the top of the list of processes consuming CPU time because you gave it priority to get
more CPU attention.
Limiting Processes with cgroups
You can use a feature like “nice” to give a single process more or less access to CPU time.
Setting the nice value for one process, however, doesn’t apply to child processes that a process
might start up or any other related processes that are part of a larger service. In other words,
“nice” doesn’t limit the total amount of resources a particular user or application can consume
from a Linux system.
In cloud computing, most Linux systems running directly on computer hardware are used as
hypervisors, with users’ Linux systems running as virtual machines on that hardware. Their
memory, processing power, and access to storage have become commodities to be shared by
many users. In that model, more needs to be done to control the amount of system resources
to which a particular user, application, container, or virtual machine running on a Linux
system has access.
That’s where cgroups come in.
Cgroups can be used to identify a process as a task, belonging to a particular control group.
Tasks can be set up in a hierarchy where, for example, there may be a task called daemons that
sets default limitations for all daemon server processes and then subtasks that may set specific
limits on a web server daemon (httpd) or an FTP service daemon (vsftpd).
As a task launches a process, other processes that the initial process launches (called child
processes) inherit the limitations set for the parent process. Those limitations might say that
all the processes in a control group only have access to particular processors and certain sets
of RAM. Or they may only allow access to up to 30 percent of the total processing power of
a machine.
142
Downloaded from https://onlinelibrary.wiley.com/doi/ by alex jounh - Oregon Health & Science Univer , Wiley Online Library on [05/12/2025]. See the Terms and Conditions (https://onlinelibrary.wiley.com/terms-and-conditions) on Wiley Online Library for rules of use; OA articles are governed by the applicable Creative Commons License
Part II: Becoming a Linux Power User
Cgroups v2 (docs.kernel.org/admin-guide/cgroup-v2.html) has become the default
cgroups version for Ubuntu, Fedora, and RHEL in recent years. It represents a major update to
the service, providing a more cohesive hierarchy of features and improved security. Likewise,
performance and management of cgroups are better with cgroups v2. Cgroups v2 has unified
cgroup features under a set of controllers, including:
Memory: This controller allows you to limit how memory is distributed and track how that
memory is used.
CPU: This controller controls how CPU cycles are distributed.
IO: This controller controls the access to block devices (storage).
Cpuset: This controller lets you confine a set of processes so that they run on a particular
group of memory and CPU hardware. This is useful for separating important tasks from
other parts of your Linux system.
PID: This controller lets cgroups prevent new tasks from being created (forked or cloned)
after a set limit has been reached.
RDMA: The Remote Direct Memory Access (RDMA) controller allows a computer to directly
access memory on another computer. This can speed the transfer of data from one
system to another.
At its most basic level, creating and managing cgroups is generally not a job for new Linux
system administrators. Setting up cgroups can be tricky and, if done improperly, can make
your system unstable or even unbootable.
The reason I bring up the concept of cgroups here is to help you understand some of the
underlying features in Linux that can be used to limit and monitor resource usage. In cloud
computing, you may run into cgroup types of features that you choose from a console or configure as sets of policies. You may be able to set rules like “Allow the Marketing department’s
virtual machines to consume up to 40 percent of the available memory” or “Pin the database
application to a particular CPU and memory set.”
Knowing how Linux can limit and contain the resource usage by the set of processes assigned
to a task will ultimately help you manage your computing resources better. If you are interested in learning more about cgroups v2, you can refer to the official Control Group v2 documentation (https://docs.kernel.org/admin-guide/cgroup-v2.html).
Summary
Even on a Linux system where there isn’t much activity, typically dozens or even hundreds of
processes are running in the background. Using the tools described in this chapter, you can
view and manage the processes running on your system.
143
6
Downloaded from https://onlinelibrary.wiley.com/doi/ by alex jounh - Oregon Health & Science Univer , Wiley Online Library on [05/12/2025]. See the Terms and Conditions (https://onlinelibrary.wiley.com/terms-and-conditions) on Wiley Online Library for rules of use; OA articles are governed by the applicable Creative Commons License
Chapter 6: Managing Running Processes
Managing processes includes viewing processes in different ways, running them in the foreground or background, and killing or renicing them. More advanced features for limiting
resource usage by selected processes are available using the cgroups feature.
In the next chapter, you learn how to combine commands and programming functions into
files that can be run as shell scripts.
Exercises
Use these exercises to test your knowledge of viewing running processes and then changing
them later by killing them or changing processor priority (nice value). These tasks assume
you are running a Fedora or Red Hat Enterprise Linux system (although some tasks work on
other Linux systems as well). If you are stuck, solutions to the tasks are shown in Appendix B
(although in Linux, you can often use multiple ways to complete a task).
1. List all processes running on your system, showing a full set of columns. Pipe that
output to the less command so that you can page through the list of processes.
2. List all processes running on the system and sort those processes by the name of the
user running each process.
3. List all processes running on the system, and display the following columns of information: process ID, username, group name, virtual memory size, resident memory size,
and the command.
4. Run the top command to view processes running on your system. Go back and forth
between sorting by CPU usage and memory consumption.
5. Start the gedit process from your desktop. Make sure you run it as the user you are
logged in as. Use the System Monitor window to kill that process.
6. Run the gedit process again. This time, using the kill command, send a signal to the
gedit process that causes it to pause (stop). Try typing some text into the gedit
window and make sure that no text appears yet.
7. Use the killall command to tell the gedit command that you paused in the previous exercise to continue working. Make sure that the text you type in after gedit
was paused now appears on the window.
8. Install the xeyes command (in Fedora, it is in the xeyes package). Run the xeyes
command about 20 times in the background so that 20 xeyes windows appear on the
screen. Move the mouse around and watch the eyes watch your mouse pointer. When
you have had enough fun, kill all xeyes processes in one command using killall.
9. As a regular user, run the gedit command so that it starts with a nice value of 5.
10. Using the renice command, change the nice value of the gedit command you just
started to 7. Use any command you like to verify that the current nice value for the
gedit command is now set to 7.
144
Downloaded from https://onlinelibrary.wiley.com/doi/ by alex jounh - Oregon Health & Science Univer , Wiley Online Library on [05/12/2025]. See the Terms and Conditions (https://onlinelibrary.wiley.com/terms-and-conditions) on Wiley Online Library for rules of use; OA articles are governed by the applicable Creative Commons License
Part II: Becoming a Linux Power User
Writing Simple Shell Scripts
7
IN THIS CHAPTER
Working with shell scripts
Doing arithmetic in shell scripts
Running loops and cases in shell scripts
Creating simple shell scripts
Y
ou’d never get any work done if you typed every command that needs to be run on your Linux
system when it starts. Likewise, you could work more efficiently if you grouped together sets of
commands that you run all the time. Shell scripts can handle these tasks.
A shell script is a group of commands, functions, variables, or just about anything else you can use from
a shell. These items are typed into a plain-text file. That file can then be run as a command. Linux systems have traditionally used system initialization shell scripts during system startup to run commands
needed to get services going. You can create your own shell scripts to automate the tasks that you need
to do regularly.
For decades, building shell scripts was the primary skill needed to join together sets of tasks in UNIX and
Linux systems. As demands for configuring Linux systems grew beyond single-system setups to complex,
automated cluster configurations, more structured methods have arisen. These methods include Ansible
playbooks and Kubernetes YAML files, described later in cloud-related chapters. That said, writing shell
scripts is still the best next step from running individual commands to building repeatable tasks in
Linux systems.
This chapter provides a rudimentary overview of the inner workings of shell scripts and how they can
be used. You learn how simple scripts can be harnessed to a scheduling facility (such as cron or at) to
simplify administrative tasks or just run on demand as they are needed.
145
Linux Bible, Eleventh Edition. Christopher Negus.
© 2026 John Wiley & Sons, Inc. All rights reserved, including rights for text and data mining and training of artificial intelligence technologies or similar
technologies. Published 2026 by John Wiley & Sons, Inc.
Downloaded from https://onlinelibrary.wiley.com/doi/ by alex jounh - Oregon Health & Science Univer , Wiley Online Library on [05/12/2025]. See the Terms and Conditions (https://onlinelibrary.wiley.com/terms-and-conditions) on Wiley Online Library for rules of use; OA articles are governed by the applicable Creative Commons License
CHAPTER
Understanding Shell Scripts
Have you ever had a task that you needed to do over and over that took lots of typing on the
command line? Do you ever think to yourself, “Wow, I wish I could just type one command to
do all this”? Maybe a shell script is what you’re after.
Shell scripts are the equivalent of batch files in Windows and can contain long lists of commands, complex flow control, arithmetic evaluations, user-defined variables, user-defined
functions, and sophisticated condition testing. Shell scripts are capable of handling everything from simple one-line commands to something as complex as starting up a Linux system.
Although dozens of different shells are available in Linux, the default shell for most Linux
systems is called Bash, the Bourne Again SHell.
Executing and debugging shell scripts
One of the primary advantages of shell scripts is that they can be opened in any text editor to
see what they do. A big disadvantage is that large or complex shell scripts often execute more
slowly than compiled programs. You can execute a shell script in two basic ways:
■
■
The filename is used as an argument to the shell (as in bash myscript). In this
method, the file does not need to be executable; it just contains a list of shell commands. The shell specified on the command line is used to interpret the commands in
the script file. This is most common for quick, simple tasks.
The shell script may also have the name of the interpreter placed in the first line of
the script preceded by #! (as in #!/bin/bash) and have the execute bit of the
file containing the script set (using chmod +x filename). You can then run your
script just as you would any other program in your path simply by typing the name of
the script on the command line.
When scripts are executed in either manner, options for the program may be specified on
the command line. Anything following the name of the script is referred to as a command-
line argument.
As with writing any software, there is no substitute for clear and thoughtful design and lots of
comments. The pound sign (#) prefaces comments and can take up an entire line or exist on
the same line after script code. It is best to implement more complex shell scripts in stages,
making sure that the logic is sound at each step before continuing. Here are a few good, concise tips to make sure that things are working as expected during testing:
■
■
146
In some cases, you can place an echo statement at the beginning of lines within
the body of a loop and surround the command with quotes. That way, rather than
executing the code, you can see what will be executed without making any permanent changes.
To achieve the same goal, you can place dummy echo statements throughout the
code. If these lines get printed, you know the correct logic branch is being taken.
Downloaded from https://onlinelibrary.wiley.com/doi/ by alex jounh - Oregon Health & Science Univer , Wiley Online Library on [05/12/2025]. See the Terms and Conditions (https://onlinelibrary.wiley.com/terms-and-conditions) on Wiley Online Library for rules of use; OA articles are governed by the applicable Creative Commons License
Part II: Becoming a Linux Power User
■
You can use set -x near the beginning of the script to display each command that is
executed or launch your scripts using
$ bash -
x myscript
■
Because useful scripts have a tendency to grow over time, keeping your code readable
as you go along is extremely important. Do what you can to keep the logic of your
code clean and easy to follow.
Understanding shell variables
Often within a shell script, you want to reuse certain items of information. During the course
of processing the shell script, the name or number representing this information may change.
To store information used by a shell script in such a way that it can be easily reused, you can
set variables. Variable names within shell scripts are case sensitive and can be defined in the
following manner:
NAME=value
The first part of a variable is the variable name, and the second part is the value set for that
name. Be sure that the NAME and value touch the equal sign, without any spaces. Variables
can be assigned from constants, such as text, numbers, and underscores. This is useful for initializing values or saving lots of typing for long constants. The following examples show variables set to a string of characters (CITY) and a numeric value (PI):
CITY="Springfield"
PI=3.14159265
Variables can contain the output of a command or command sequence. You can accomplish this
by preceding the command with a dollar sign and open parenthesis, following it with a closing
parenthesis. For example, MYDATE=$(date)assigns the output from the date command to
the MYDATE variable. Enclosing the command in backticks (`) can have the same effect. In this
case, the date command is run when the variable is set and not each time the variable is read.
Escaping Special Shell Characters
Keep in mind that characters such as the dollar sign ($), backtick (`), asterisk (*), exclamation point (!),
and others have special meaning to the shell, which you will see as you proceed through this chapter.
On some occasions, you want the shell to use these characters’ special meaning and other times you
don’t. For example, if you typed echo $HOME, the shell would think you meant to display the name of
your home directory (stored in the $HOME variable) to the screen (such as /home/chris) because a $
indicates a variable name follows that character.
If you wanted literally to show $HOME, you would need to escape the $. Typing echo ’$HOME' or echo
\$HOME would literally show $HOME on the screen. So, if you want to have the shell interpret a single
Continues
147
7
Downloaded from https://onlinelibrary.wiley.com/doi/ by alex jounh - Oregon Health & Science Univer , Wiley Online Library on [05/12/2025]. See the Terms and Conditions (https://onlinelibrary.wiley.com/terms-and-conditions) on Wiley Online Library for rules of use; OA articles are governed by the applicable Creative Commons License
Chapter 7: Writing Simple Shell Scripts
continued
character literally, precede it with a backslash (\). To have a whole set of characters interpreted literally,
surround those characters with single quotes (').
Using double quotes is a bit trickier. Surround a set of text with double quotes if you want all but a few
characters used literally. For example, with text surrounded with double quotes, dollar signs ($), back-
ticks (`), and exclamation points (!) are interpreted specially, but other characters (such as an asterisk)
are not. Type these three lines to see the different output (shown on the right):
echo '$HOME * `date`'
echo "$HOME * `date`"
echo $HOME * `date`
$HOME * `date`
/home/chris * Jul 27 11:20:26 AM EDT 2025
/home/chris file1 file2 Jul 27 11:21:19 AM EDT 2025
Using variables is a great way to get information that can change from computer to computer
or from day to day. The following example sets the output of the uname -n command to
the MACHINE variable. Then I use parentheses to set NUM_FILES to the number of files
in the current directory by piping (|) the output of the ls command to the word count
command (wc -l):
MACHINE=`uname -n`
NUM_FILES=$(/bin/ls | wc -
l)
Variables can also contain the value of other variables. This is useful when you have to preserve a value that will change so that you can use it later in the script. Here, BALANCE is set
to the value of the CurBalance variable:
BALANCE="$CurBalance"
Note
When assigning variables, use only the variable name (for example, BALANCE). When you reference a variable,
meaning that you want the value of the variable, precede it with a dollar sign (as in $CurBalance). The result of
the latter is that you get the value of the variable, not the variable name itself.
Special shell positional parameters
There are special variables that the shell assigns for you. One set of commonly used variables
is called positional parameters or command-line arguments, and it is referenced as $0, $1, $2,
$3. . .$n. $0 is special, and it is assigned the name used to invoke your script; the others are
assigned the values of the parameters passed on the command line in the order they appeared. For
instance, let’s say that you had a shell script named myscript that contained the following:
#!/bin/bash
# Script to echo out command-
line arguments
echo "The first argument is $1, the second is $2."
echo "The command itself is called $0."
148
Downloaded from https://onlinelibrary.wiley.com/doi/ by alex jounh - Oregon Health & Science Univer , Wiley Online Library on [05/12/2025]. See the Terms and Conditions (https://onlinelibrary.wiley.com/terms-and-conditions) on Wiley Online Library for rules of use; OA articles are governed by the applicable Creative Commons License
Part II: Becoming a Linux Power User
echo "There are $# parameters on your command line"
echo "Here are all the arguments: $@"
Assuming that the script is executable and located in a directory in your $PATH, the following
shows what would happen if you ran that command with foo and bar as arguments:
$ chmod 755 /home/chris/bin/myscript
$ myscript foo bar
The first argument is foo, the second is bar.
The command itself is called /home/chris/bin/myscript.
There are 2 parameters on your command line
Here are all the arguments: foo bar
As you can see, the positional parameter $0 is the full path or relative path to myscript,
$1 is foo, and $2 is bar.
Another variable, $#, tells you how many parameters your script was given. In the example,
$# would be 2. The $@ variable holds all of the arguments entered at the command line.
Another particularly useful special shell variable is $?, which receives the exit status of the
last command executed. Typically, a value of zero means that the command exited successfully, and anything other than zero indicates an error of some kind. For a complete list of special shell variables, refer to the bash man page and search for shell variables.
Reading in parameters
Using the read command, you can prompt the user for information and store that information to use later in your script. Here’s an example of a script that uses the read command:
#!/bin/bash
read -
p "Type in an adjective, noun and verb (past tense): " adj1
noun1 verb1
echo "He sighed and $verb1 to the elixir. Then he ate the
$adj1 $noun1."
In this script, after the script prompts for an adjective, noun, and verb, the user is expected
to enter words that are then assigned to the adj1, noun1, and verb1 variables. Those three
variables are then included in a silly sentence, which is displayed on the screen. If the script
were called sillyscript, here’s an example of how it might run:
$ chmod 755 /home/chris/bin/sillyscript
$ sillyscript
Type in an adjective, noun and verb (past tense): hairy football
danced
He sighed and danced to the elixir. Then he ate the hairy football.
Parameter expansion in Bash
As mentioned earlier, if you want the value of a variable, you precede it with a $ (for example,
$CITY). This is really just shorthand for the notation ${CITY}; curly braces are used when
the value of the parameter needs to be placed next to other text without a space. Bash has
special rules that allow you to expand the value of a variable in different ways. Going into all
149
7
Downloaded from https://onlinelibrary.wiley.com/doi/ by alex jounh - Oregon Health & Science Univer , Wiley Online Library on [05/12/2025]. See the Terms and Conditions (https://onlinelibrary.wiley.com/terms-and-conditions) on Wiley Online Library for rules of use; OA articles are governed by the applicable Creative Commons License
Chapter 7: Writing Simple Shell Scripts
of the rules is probably overkill for a quick introduction to shell scripts, but the following list
presents some common constructs you’re likely to see in Bash scripts that you find on your
Linux system:
${var:-
value}: If variable is unset or empty, expand this to value.
${var#pattern}: Chop the shortest match for pattern from the front of var’s value.
${var##pattern}: Chop the longest match for pattern from the front of var’s value.
${var%pattern}: Chop the shortest match for pattern from the end of var’s value.
${var%%pattern}: Chop the longest match for pattern from the end of var’s value.
Try typing the following commands from a shell to test how parameter expansion works:
$ THIS="Example"
$ THIS=${THIS:-"Not Set"}
$ THAT=${THAT:-"Not Set"}
$ echo $THIS
Example
$ echo $THAT
Not Set
In the examples here, the THIS variable is initially set to the word Example. In the next two
lines, the THIS and THAT variables are set to their current values or to Not Set, if they are
not currently set. Notice that because I just set THIS to the string Example, when I echo
the value of THIS it appears as Example. However, because THAT was not set, it appears
as Not Set.
Note
For the rest of this section, I show how variables and commands may appear in a shell script. To try any of those examples, however, you can simply type them into a shell, as shown in the previous example.
In the following example, MYFILENAME is set to /home/digby/myfile.txt. Next, the
FILE variable is set to myfile.txt, and DIR is set to /home/digby. In the NAME variable, the filename is cut down simply to myfile; then, in the EXTENSION variable, the file
extension is set to txt. (To try these, you can type them at a shell prompt as in the previous
example and echo the value of each variable to see how it is set.) Type the code on the left.
The material on the right side describes the action.
MYFILENAME=/home/digby/myfile.txt # Sets the value of MYFILENAME.
FILE=${MYFILENAME##*/} # FILE becomes myfile.txt.
DIR=${MYFILENAME%/*} # DIR becomes /home/digby.
NAME=${FILE%.*} # NAME becomes myfile.
EXTENSION=${FILE##*.} # EXTENSION becomes txt.
150
Downloaded from https://onlinelibrary.wiley.com/doi/ by alex jounh - Oregon Health & Science Univer , Wiley Online Library on [05/12/2025]. See the Terms and Conditions (https://onlinelibrary.wiley.com/terms-and-conditions) on Wiley Online Library for rules of use; OA articles are governed by the applicable Creative Commons License
Part II: Becoming a Linux Power User
Performing arithmetic in shell scripts
Bash uses untyped variables, meaning you are not required to specify whether a variable is text
or numbers. It normally treats variables as strings of text, so unless you tell it otherwise with
declare, your variables are just a bunch of letters to Bash. However, when you start trying
to do arithmetic with them, Bash converts them to integers if it can. This makes it possible to
do some fairly complex arithmetic in Bash.
Integer arithmetic can be performed using the built-in let command or through the external
expr or bc commands. After setting the variable BIGNUM value to 1024, the three commands that follow would all store the value 64 in the RESULT variable. The bc command is
a calculator application that is available in most Linux distributions. The last command gets a
random number between 0 and 10 and echoes the results back to you.
BIGNUM=1024
let RESULT=$BIGNUM/16
RESULT=`expr $BIGNUM / 16`
RESULT=`echo "$BIGNUM / 16" | bc`
let foo=$RANDOM; echo $foo
7
Another way to grow a variable incrementally is to use $(()) notation with ++I added to
increment the value of I. Try typing the following:
$ I=0
$ echo "The value of I after increment is $((++I))"
The value of I after increment is 1
$ echo "The value of I before and after increment is $((I++)) and
$I"
The value of I before and after increment is 1 and 2
Repeat either of those commands to continue to increment the value of $I.
Note
Although most elements of shell scripts are relatively freeform (where white space, such as spaces or tabs, is insignificant), both let and expr are particular about spacing. The let command insists on no spaces between each
operand and the mathematical operator, whereas the syntax of the expr command requires white space between each
operand and its operator. In contrast to those, bc isn’t picky about spaces, but it can be trickier to use because it does
floating-point arithmetic.
To see a complete list of the kinds of arithmetic you can perform using the let command,
type help let at the Bash prompt.
Using programming constructs in shell scripts
One of the features that makes shell scripts so powerful is that their implementation of looping and conditional execution constructs is similar to those found in more complex scripting and programming languages. You can use several different types of loops, depending on
your needs.
151
Downloaded from https://onlinelibrary.wiley.com/doi/ by alex jounh - Oregon Health & Science Univer , Wiley Online Library on [05/12/2025]. See the Terms and Conditions (https://onlinelibrary.wiley.com/terms-and-conditions) on Wiley Online Library for rules of use; OA articles are governed by the applicable Creative Commons License
Chapter 7: Writing Simple Shell Scripts
The if. . .then statements
The most commonly used programming construct is conditional execution, or the if statement. It is used to perform actions only under certain conditions. There are several variations
of if statements for testing various types of conditions.
The first if...then example tests if VARIABLE is set to the number 1. If it is, then the
echo command is used to say that it is set to 1. The fi statement then indicates that the if
statement is complete, and processing can continue.
VARIABLE=1
if [ $VARIABLE -
eq 1 ] ; then
echo "The variable is 1"
fi
Instead of using -eq, you can use the equal sign (=), as shown in the following example. The =
works best for comparing string values, while -eq is often better for comparing numbers. Using
the else statement, different words can be echoed if the criterion of the if statement isn’t met
($STRING = ″Friday″). Keep in mind that it’s good practice to put strings in double quotes.
STRING="Friday"
if [ $STRING = "Friday" ] ; then
echo "WhooHoo. Friday."
else
echo "Will Friday ever get here?"
fi
You can also reverse tests with an exclamation mark (!). In the following example, if STRING
is not Monday, then ″At least it's not Monday″ is echoed.
STRING="FRIDAY"
if [ "$STRING" != "Monday" ] ; then
echo "At least it's not Monday"
fi
In the following example, elif (which stands for “else if”) is used to test for an additional
condition (for example, whether filename is a file or a directory).
filename="$HOME"
if [ -
f "$filename" ] ;
echo "$filename is a
elif [ -
d "$filename" ]
echo "$filename is a
else
echo "I have no idea
fi
then
regular file"
; then
directory"
what $filename is"
As you can see from the preceding examples, the condition you are testing is placed between
square brackets [ ]. When a test expression is evaluated, it returns either a value of 0,
meaning that it is true, or a 1, meaning that it is false. Notice that the echo lines are
indented. The indentation is optional and done only to make the script more readable.
152
Downloaded from https://onlinelibrary.wiley.com/doi/ by alex jounh - Oregon Health & Science Univer , Wiley Online Library on [05/12/2025]. See the Terms and Conditions (https://onlinelibrary.wiley.com/terms-and-conditions) on Wiley Online Library for rules of use; OA articles are governed by the applicable Creative Commons License
Part II: Becoming a Linux Power User
Table 7.1 lists the conditions that are testable and is quite a handy reference. (If you’re in a
hurry, you can type help test on the command line to get the same information.)
TABLE 7.1
Operators for Test Expressions
Operator
What Is Being Tested?
-a file
Does the file exist? (same as -e).
-b file
Is the file a block special device?
-c file
Is the file a character special device (for example, /dev/console)? Used
to identify serial lines and terminal devices.
-d file
Is the file a directory?
-e file
Does the file exist? (same as -a).
-f file
Does the file exist, and is it a regular file (for example, not a directory,
socket, pipe, link, or device file)?
-g file
Does the file have the set group id (SGID) bit set?
-h file
Is the file a symbolic link? (same as -L).
-k file
Does the file have the sticky bit set?
-L file
Is the file a symbolic link?
-n string
Is the length of the string greater than 0 bytes?
-O file
Do you own the file?
-p file
Is the file a named pipe?
-r file
Is the file readable by you?
-s file
Does the file exist, and is it larger than 0 bytes?
-S file
Does the file exist, and is it a socket?
-t fd
Is the file descriptor connected to a terminal?
-u file
Does the file have the set user id (SUID) bit set?
-w file
Is the file writable by you?
-x file
Is the file executable by you?
-z string
Is the length of the string 0 (zero) bytes?
expr1 -a expr2
Are both the first expression and the second expression true?
expr1 -o expr2
Is either of the two expressions true?
file1 -nt file2
Is the first file newer than the second file (using the modification
time stamp)?
file1 -ot file2
Is the first file older than the second file (using the modification
time stamp)?
file1 -ef file2
Are the two files associated by a link (a hard link or a symbolic link)?
var1 = var2
Is the first variable equal to the second variable?
7
Continues
153
Downloaded from https://onlinelibrary.wiley.com/doi/ by alex jounh - Oregon Health & Science Univer , Wiley Online Library on [05/12/2025]. See the Terms and Conditions (https://onlinelibrary.wiley.com/terms-and-conditions) on Wiley Online Library for rules of use; OA articles are governed by the applicable Creative Commons License
Chapter 7: Writing Simple Shell Scripts
TABLE 7.1 (continued)
Operator
What Is Being Tested?
var1 -eq var2
Is the first variable equal to the second variable?
var1 -ge var2
Is the first variable greater than or equal to the second variable?
var1 -gt var2
Is the first variable greater than the second variable?
var1 -le var2
Is the first variable less than or equal to the second variable?
var1 -lt var2
Is the first variable less than the second variable?
var1 != var2
Is the first variable not equal to the second variable?
var1 -ne var2
Is the first variable not equal to the second variable?
There is also a special shorthand method of performing tests that can be useful for simple one-
command actions. In the following example, the two pipes (||) indicate that if the directory
being tested for doesn’t exist (-d dirname), then make the directory (mkdir $dirname):
# [ test ] || action
# Perform simple single command if test is false
dirname="/tmp/testdir"
[ -
d "$dirname" ] || mkdir "$dirname"
Instead of pipes, you can use two ampersands to test if something is true. In the following example, a command is being tested to see if it includes at least three command-line
arguments:
# [ test ] && {action}
# Perform simple single action if test is true
[ $# -
ge 3 ] && echo "There are at least 3 command line arguments."
You can combine the && and || operators to make a quick, one-line if...then...else. The
following example tests that the directory represented by $dirname already exists. If it does, a
message says the directory already exists. If it doesn’t, the statement creates the directory:
# dirname=mydirectory
[ -
e $dirname ] && echo $dirname already exists || mkdir $dirname
The case command
Another frequently used construct is the case command. Similar to a switch statement in
programming languages, this can take the place of several nested if statements. The following
is the general form of the case statement:
case "VAR" in
Result1)
{ body };;
Result2)
{ body };;
*)
154
Downloaded from https://onlinelibrary.wiley.com/doi/ by alex jounh - Oregon Health & Science Univer , Wiley Online Library on [05/12/2025]. See the Terms and Conditions (https://onlinelibrary.wiley.com/terms-and-conditions) on Wiley Online Library for rules of use; OA articles are governed by the applicable Creative Commons License
Part II: Becoming a Linux Power User
{ body } ;;
esac
Among other things, you can use the case command to help with your backups. The following
case statement tests for the first three letters of the current day (case 'date +%a' in).
Then, depending on the day, a particular backup directory (BACKUP) and tape drive (TAPE)
are set. Although tape devices are rarely used these days, the example shows how case statements can have different actions take place on different days:
# Our VAR doesn't have to be a variable,
# it can be the output of a command as well
# Perform action based on day of week
case `date +%a` in
"Mon")
BACKUP=/home/myproject/data0
TAPE=/dev/rft0
# Note the use of the double semi-
colon to end each option
;;
# Note the use of the "|" to mean "or"
"Tue" | "Thu")
BACKUP=/home/myproject/data1
TAPE=/dev/rft1
;;
"Wed" | "Fri")
BACKUP=/home/myproject/data2
TAPE=/dev/rft2
;;
# Don't do backups on the weekend.
*)
7
BACKUP="none"
TAPE=/dev/null
;;
esac
The asterisk (*) is used as a catchall, similar to the default keyword in the C programming
language. In this example, if none of the other entries is matched on the way down the loop,
the asterisk is matched, and the value of BACKUP becomes none. Note the use of esac, or
case spelled backward, to end the case statement.
The for...do loop
Loops are used to perform actions over and over again until a condition is met or until all data
has been processed. One of the most commonly used loops is the for...do loop. It iterates through a list of values, executing the body of the loop for each element in the list. The
syntax and a few examples are presented here:
for VAR in LIST
do
{ body }
done
155
Downloaded from https://onlinelibrary.wiley.com/doi/ by alex jounh - Oregon Health & Science Univer , Wiley Online Library on [05/12/2025]. See the Terms and Conditions (https://onlinelibrary.wiley.com/terms-and-conditions) on Wiley Online Library for rules of use; OA articles are governed by the applicable Creative Commons License
Chapter 7: Writing Simple Shell Scripts
The for loop assigns the values in LIST to VAR one at a time. Then, for each value, the
body in braces between do and done is executed. VAR can be any variable name, and LIST
can be composed of pretty much any list of values or anything that generates a list.
for NUMBER in 0 1 2 3 4 5 6 7 8 9
do
echo The number is $NUMBER
done
for FILE in `ls`
do
echo $FILE
done
You can also write it this way, which is somewhat cleaner:
for NAME in John Paul Ringo George ; do
echo $NAME is my favorite Beatle
done
Each element in the LIST is separated from the next by white space. This can cause trouble
if you’re not careful because some commands, such as ls -l, output multiple fields per line,
each separated by white space. The string done ends the for statement.
If you’re a die-hard C programmer, Bash allows you to use C syntax to control your loops:
LIMIT=10
# Double parentheses, and no $ on LIMIT even though it's a variable!
for ((a=1; a <= LIMIT ; a++)) ; do
echo "$a"
done
The while...do and until...do loops
Two other possible looping constructs are the while...do loop and the until...do loop.
The structure of each is presented here:
while condition
do
{ body }
done
until condition
do
{ body }
done
The while statement executes while the condition is true. The until statement executes
until the condition is true—in other words, while the condition is false.
Here is an example of a while loop that outputs the number 0123456789:
N=0
while [ $N -
lt 10 ] ; do
echo -
n $N
let N=$N+1
done
156
Downloaded from https://onlinelibrary.wiley.com/doi/ by alex jounh - Oregon Health & Science Univer , Wiley Online Library on [05/12/2025]. See the Terms and Conditions (https://onlinelibrary.wiley.com/terms-and-conditions) on Wiley Online Library for rules of use; OA articles are governed by the applicable Creative Commons License
Part II: Becoming a Linux Power User
Another way to output the number 0123456789 is to use an until loop as follows:
N=0
until [ $N -
eq 10 ] ; do
echo -
n $N
let N=$N+1
done
Trying some useful text manipulation programs
Bash is great and has lots of built-in commands, but it usually needs some help to do anything
really useful. Some of the most common useful programs you’ll see used are grep, cut, tr, awk,
and sed. As with all of the best UNIX tools, most of these programs are designed to work with
standard input and standard output, so you can easily use them with pipes and shell scripts.
7
The general regular expression parser (grep)
The name general regular expression print (grep) sounds intimidating, but grep is just a way
to find patterns in files or text. Think of it as a useful search tool. Gaining expertise with regular expressions is quite a challenge, but after you master it, you can accomplish many useful
things with just the simplest forms.
For example, you can display a list of all regular user accounts by using grep to search for all
lines that contain the text /home in the /etc/passwd file as follows:
$ grep /home /etc/passwd
Or you could find all environment variables that begin with HO using the following command:
$ env | grep ^HO
Note
The ^ in the preceding code is the actual caret character, ^, not what you’ll commonly see for a backspace, ^H. Type ^,
H, and O (the uppercase letter) to see what items start with the uppercase characters HO.
To find a list of options to use with the grep command, type man grep.
Remove sections of lines of text (cut)
The cut command can extract fields from a line of text or from files. It is useful for parsing
system configuration files into easy-to-digest chunks. You can specify the field separator you
want to use and the fields you want, or you can break up a line based on bytes.
The following example lists all home directories of users on your system. This grep command
line pipes a list of regular users from the /etc/passwd file and displays the sixth field
(-f6) as delimited by a colon (-d':'). The hyphen at the end tells cut to read from standard input (from the pipe).
$ grep /home /etc/passwd | cut
/home/chris
/home/joe
-
d':' -
f6 -
157
Downloaded from https://onlinelibrary.wiley.com/doi/ by alex jounh - Oregon Health & Science Univer , Wiley Online Library on [05/12/2025]. See the Terms and Conditions (https://onlinelibrary.wiley.com/terms-and-conditions) on Wiley Online Library for rules of use; OA articles are governed by the applicable Creative Commons License
Chapter 7: Writing Simple Shell Scripts
Translate or delete characters (tr)
The tr command is a character-based translator that can be used to replace one character or
set of characters with another or to remove a character from a line of text.
The following example translates all uppercase letters to lowercase letters and displays the
words mixed upper and lower case as a result:
$ FOO="Mixed UPpEr aNd LoWeR cAsE"
$ echo $FOO | tr [A-
Z] [a-
z]
mixed upper and lower case
In the next example, the tr command is used on a list of filenames to rename any files in that
list so that any tabs or spaces (as indicated by the [:blank:] option) contained in a filename are translated into underscores. Try running the following code in a test directory:
$ mkdir /tmp/test; cd /tmp/test
$ touch "Hello There"
$ touch "hi there"
for file in * ; do
f=$(echo "$file" | tr '[:blank:]' '_')
[ "$file" = "$f" ] || mv -
i -
-"$file" "$f"
done
$ ls
Hello_There hi_there
The stream editor (sed)
The sed command is a simple scriptable editor, so it can perform only simple edits, such as
removing lines that have text matching a certain pattern, replacing one pattern of characters
with another, and so on. To get a better idea of how sed scripts work, there’s no substitute for
the online documentation, but here are some examples of common uses.
You can use the sed command essentially to do what I did earlier with the grep example: search
the /etc/passwd file for the word home. Here the sed command searches the entire /etc/
passwd file, searches for the word home, and prints any line containing the word home:
$ sed -
n '/home/p' /etc/passwd
chris:x:1000:1000:Chris Negus:/home/chris:/bin/bash
joe:x:1001:1001:Joe Smith:/home/joe:/bin/bash
In this next example, sed searches the file /tmp/somefile.txt and replaces every instance of the string Mac with Linux. Notice that the letter g is needed at the end of the substitution command to cause every occurrence of Mac on each line to be changed to Linux.
(Otherwise, only the first instance of Mac on each line is changed.) The output is then sent to
the /tmp/fixed_file.txt file. The output from sed goes to stdout, so this command
redirects the output to a file for safekeeping.
$ cat /tmp/somefile.txt
My Mac system is the best Mac system that there is.
158
Downloaded from https://onlinelibrary.wiley.com/doi/ by alex jounh - Oregon Health & Science Univer , Wiley Online Library on [05/12/2025]. See the Terms and Conditions (https://onlinelibrary.wiley.com/terms-and-conditions) on Wiley Online Library for rules of use; OA articles are governed by the applicable Creative Commons License
Part II: Becoming a Linux Power User
Your Mac system is not as good as my Mac.
$ sed 's/Mac/Linux/g' /tmp/somefile.txt > \ /tmp/fixed_file.txt
$ cat /tmp/fixed_file.txt
My Linux system is the best Linux system that there is.
Your Linux system is not as good as my Linux.
You can get the same result using a pipe:
$ cat /tmp/somefile.txt | sed 's/Mac/Linux/g' > /tmp/fixed_file.txt
By searching for a pattern and replacing it with a null pattern, you delete the original pattern.
This example searches the contents of the somefile.txt file and replaces extra blank spaces at
the end of each line (s/ *$) with nothing (//). Results go to the fixed_file.txt file.
$ cat /tmp/somefile.txt | sed 's/ *$//' > /tmp/fixed_file.txt
7
Using simple shell scripts
Sometimes, the simplest of scripts can be the most useful. If you type the same sequence of
commands repetitively, it makes sense to store those commands (once!) in a file. The following
sections offer a couple of simple, but useful, shell scripts.
Telephone list
This idea has been handed down from generation to generation of old UNIX hacks. It’s really
quite simple, but it employs several of the concepts just introduced.
#!/bin/bash
# (@)/ph
# A very simple telephone list
# Type "ph new name number" to add to the list, or
# just type "ph name" to get a phone number
PHONELIST=~/.phonelist.txt
# If no command line parameters ($#), there
# is a problem, so ask what they're talking about.
if [ $# -
lt 1 ] ; then
echo "Whose phone number did you want? "
exit 1
fi
# Did you
if [ $1 =
shift
echo $*
echo $*
exit 0
fi
want to add a new phone number?
"new" ] ; then
>> $PHONELIST
added to database
# Nope. But does the file have anything in it yet?
159
Downloaded from https://onlinelibrary.wiley.com/doi/ by alex jounh - Oregon Health & Science Univer , Wiley Online Library on [05/12/2025]. See the Terms and Conditions (https://onlinelibrary.wiley.com/terms-and-conditions) on Wiley Online Library for rules of use; OA articles are governed by the applicable Creative Commons License
Chapter 7: Writing Simple Shell Scripts
# This might be our first time using it, after all.
if [ ! -
s $PHONELIST ] ; then
echo "No names in the phone list yet! "
exit 1
else
grep -
i -
q "$*" $PHONELIST
# Quietly search the file
if [ $? -
ne 0 ] ; then
# Did we find anything?
echo "Sorry, that name was not found in the phone list"
exit 1
else
grep -
i "$*" $PHONELIST
fi
fi
exit 0
So, if you created the telephone list file as ph in your current directory, you could type the
following from the shell to try your ph script:
$ chmod 755 ph
$ ./ph new "Mary Jones" 608-
555-
1212
Mary Jones 608-
555-
1212 added to database
$ ./ph Mary
Mary Jones 608-555-1212
The chmod command makes the ph script executable. The ./ph command runs the ph
command from the current directory with the new option. This adds Mary Jones as the name
and 608-555-1212 as the phone number to the database ($HOME/.phonelist.txt). The
next ph command searches the database for the name Mary and displays the phone entry for
Mary. If the script works, add it to a directory in your path (such as $HOME/bin).
Backup script
Because nothing works forever and mistakes happen, backups are just a fact of life when
dealing with computer data. This simple script backs up all of the data in the home directories
of all of the users on your Fedora or RHEL system.
#!/bin/bash
# (@)/my_backup
# A very simple backup script
#
# Change the TAPE device to match your system.
# Check /var/log/messages to determine your tape device.
TAPE=/dev/rft0
# Rewind the tape device $TAPE
mt $TAPE rew
# Get a list of home directories
HOMES=`grep /home /etc/passwd | cut -
f6 -
d':'`
160
Downloaded from https://onlinelibrary.wiley.com/doi/ by alex jounh - Oregon Health & Science Univer , Wiley Online Library on [05/12/2025]. See the Terms and Conditions (https://onlinelibrary.wiley.com/terms-and-conditions) on Wiley Online Library for rules of use; OA articles are governed by the applicable Creative Commons License
Part II: Becoming a Linux Power User
# Back up the data in those directories
tar cvf $TAPE $HOMES
# Rewind and eject the tape.
mt $TAPE rewoffl
Summary
Writing shell scripts gives you the opportunity to automate many of your most common
system administration tasks. This chapter covered common commands and functions that you
can use in scripting with the Bash shell. It also provided some concrete examples of scripts for
doing backups and other procedures.
In the next chapter, you transition from learning about user features into examining system
administration topics. Specifically, Chapter 8, “Learning System Administration,” covers how
to become the root user, as well as how to use administrative commands, monitor log files, and
work with configuration files.
Exercises
Use these exercises to test your knowledge of writing simple shell scripts. These tasks assume
you are running a Fedora or Red Hat Enterprise Linux system (although some tasks work on
other Linux systems as well). If you are stuck, solutions to the tasks are shown in Appendix B
(although in Linux, there are often multiple ways to complete a task).
1. Create a script in your $HOME/bin directory called myownscript. When the script
runs, it should output information that appears similar to the following:
Today is Sat Jul 26 15:45:04 EST 2025.
You are in /home/joe and your host is abc.example.com.
Of course, you need to read in your current date/time, current working directory, and
hostname. Also, include comments about what the script does and indicate that the
script should run with the /bin/bash shell.
2. Create a script that reads in three positional parameters from the command line,
assigns those parameters to variables named ONE, TWO, and THREE, respectively, and
outputs that information in the following format:
There are X parameters that include Y.
The first is A, the second is B, the third is C.
Replace X with the number of parameters and Y with all parameters entered. Then
replace A with the contents of variable ONE, B with variable TWO, and C with variable THREE.
161
7
Downloaded from https://onlinelibrary.wiley.com/doi/ by alex jounh - Oregon Health & Science Univer , Wiley Online Library on [05/12/2025]. See the Terms and Conditions (https://onlinelibrary.wiley.com/terms-and-conditions) on Wiley Online Library for rules of use; OA articles are governed by the applicable Creative Commons License
Chapter 7: Writing Simple Shell Scripts
3. Create a script that prompts users for the name of the street and town where they
grew up. Assign town and street to variables called mytown and mystreet, and
output them with a sentence that reads as shown below (of course, $mystreet and
$mytown will appear with the actual town and street the user enters):
The street I grew up on was $mystreet and the town was $mytown
4. Create a script called myos that asks the user, “What is your favorite operating
system?” Output an insulting sentence if the user types “Windows” or “Mac.” Respond
“Great choice!” if the user types “Linux.” For anything else, say “Is <what is typed in>
an operating system?”
5. Create a script that runs through the words moose, cow, goose, and sow through a for
loop. Have each of those words appended to the end of the line “I have a. . . .”
162
Downloaded from https://onlinelibrary.wiley.com/doi/ by alex jounh - Oregon Health & Science Univer , Wiley Online Library on [05/12/2025]. See the Terms and Conditions (https://onlinelibrary.wiley.com/terms-and-conditions) on Wiley Online Library for rules of use; OA articles are governed by the applicable Creative Commons License
Part II: Becoming a Linux Power User
Becoming a Linux System
Administrator
IN THIS PART
Chapter 8
Learning System Administration
Chapter 9
Installing Linux
Chapter 10
Getting and Managing Software
Chapter 11
Managing User Accounts
Chapter 12
Managing Disks and Filesystems
Linux Bible, Eleventh Edition. Christopher Negus.
© 2026 John Wiley & Sons, Inc. All rights reserved, including rights for text and data mining and training of artificial intelligence technologies or similar
technologies. Published 2026 by John Wiley & Sons, Inc.
Downloaded from https://onlinelibrary.wiley.com/doi/ by alex jounh - Oregon Health & Science Univer , Wiley Online Library on [05/12/2025]. See the Terms and Conditions (https://onlinelibrary.wiley.com/terms-and-conditions) on Wiley Online Library for rules of use; OA articles are governed by the applicable Creative Commons License
Part III
8
Learning System Administration
IN THIS CHAPTER
Doing graphical administration
Using the root login
Understanding administrative commands, config files, and log files
Working with devices and filesystems
L
inux, like other UNIX-based systems, was intended for use by more than one person at a time.
Multiuser features enable many people to have accounts on a single Linux system with their
data kept secure from others. Multitasking enables many people to run many programs on the
computer at the same time, with each person able to run more than one program. Sophisticated networking protocols and applications make it possible for a Linux system to extend its capabilities to
network users and computers around the world. The person assigned to manage all of a Linux system’s
resources is called the system administrator.
Even if you are the only person using a Linux system, system administration is still set up to be separate
from other computer use. To do most administrative tasks, you need to be logged in as the root user (also
called the superuser) or to get root permission temporarily (usually using the sudo command). Regular
users who don’t have root permission cannot change, or in some cases cannot even see, some of the configuration information for a Linux system. In particular, security features such as stored passwords are
protected from general view.
Because Linux system administration is such a huge topic, this chapter focuses on the general principles
of Linux system administration. In particular, it examines some of the basic tools that you need to administer a Linux system for a personal desktop or on a small server. Beyond the basics, this chapter also
teaches you how to work with filesystems and monitor the setup and performance of your Linux system.
Understanding System Administration
Separating the role of system administrator from that of other users has several effects. For a system
that has many people using it, limiting who can manage it enables you to keep it more secure. A separate administrative role also prevents others from casually harming your system when they are just
using it to write a document or browse the Internet.
165
Linux Bible, Eleventh Edition. Christopher Negus.
© 2026 John Wiley & Sons, Inc. All rights reserved, including rights for text and data mining and training of artificial intelligence technologies or similar
technologies. Published 2026 by John Wiley & Sons, Inc.
Downloaded from https://onlinelibrary.wiley.com/doi/ by alex jounh - Oregon Health & Science Univer , Wiley Online Library on [05/12/2025]. See the Terms and Conditions (https://onlinelibrary.wiley.com/terms-and-conditions) on Wiley Online Library for rules of use; OA articles are governed by the applicable Creative Commons License
CHAPTER
If you are the system administrator of a Linux system, you generally log in as a regular user
account and then ask for administrative privileges when you need them. This is often done
with one of the following:
su command: Often, su is used to open a shell as root user. After the shell is open,
the administrator can run multiple commands and then exit to return to a shell as a
regular user.
sudo command: With sudo, a regular user is given root privileges, but only when
that user runs the sudo command to run another command. After running that one
command with sudo, the user is immediately returned to a shell and acts as the
regular user again. Ubuntu and Fedora by default assign sudo privilege to the first
user account when those systems are installed. This is not done by default in RHEL,
although during RHEL installation, you can choose for your first user to have sudo
privilege if you’d like (select the Make This User Administrator option).
Cockpit browser-based administration: RHEL, Fedora, and other Linux distributions
have committed to Cockpit as their primary browser-based system administration facility. With Cockpit enabled, you can monitor and change your system’s general activities,
storage, networking, accounts, services, and other features.
Graphical windows: Before Cockpit was widely available, RHEL, Fedora, and other Linux
distributions offered individual graphical administration tools that were launched by
commands beginning with system-config-*. Although most of these administration tools are not being offered in the latest release of RHEL and Fedora, they are
noted here because they are still available in older Linux releases and a few are still
available in current releases.
Tasks that can be done only by the root user tend to be those that affect the system as a
whole or impact the security or health of the system. The following is a list of common features that a system administrator is expected to manage:
Filesystems: When you first install Linux, the directory structure is set up to make the
system usable. However, if users later want to add extra storage or change the filesystem layout outside of their home directory, they generally need administrative privileges to do that. Also, the root user has permission to access files owned by any user.
As a result, the root user can copy, move, or change any other user’s files—a privilege
needed to make backup copies of the filesystem for safekeeping.
Software installation: Because malicious software can harm your system or make it insecure, you need root privilege to install software so that it is available to all users on
your system. Regular users can still install some software in their own directories and
can list information about installed system software.
User accounts: Only the root user can add and remove user accounts and group accounts.
Network interfaces: In the past, the root user had to configure network interfaces
and start and stop those interfaces. Now, many Linux desktops allow regular users to
start and stop network interfaces from their desktop using Network Manager. This is
166
Downloaded from https://onlinelibrary.wiley.com/doi/ by alex jounh - Oregon Health & Science Univer , Wiley Online Library on [05/12/2025]. See the Terms and Conditions (https://onlinelibrary.wiley.com/terms-and-conditions) on Wiley Online Library for rules of use; OA articles are governed by the applicable Creative Commons License
Part III: Becoming a Linux System Administrator
particularly true for wireless network interfaces, which can come and go by location as
you move your Linux laptop or handheld device around.
Servers: Configuring web servers, file servers, domain name servers, mail servers, and dozens
of other servers requires root privilege, as does starting and stopping those services. Content, such as web pages, can be added to servers by nonroot users if you configure your
system to allow that. Services are often run as special administrative user accounts, such
as apache (for the httpd service) and rpc (for the rpcbind service). So, if someone
cracks a service, they can’t get root privilege to other services or system resources.
Security features: Setting up security features, such as firewalls and user access lists, is usually done with root privilege. It’s also up to the root user to monitor how the services are
being used and to make sure that server resources are not exhausted or abused.
The easiest way to begin system administration is to use some graphical administration tools.
Using Graphical Administration Tools
Most system administration for the first Linux systems was done from the command line. As
Linux became more popular, however, both graphical and command-line interfaces began to be
offered for most common Linux administrative tasks.
The following sections describe some of the point-and-click types of interfaces that are available for doing system administration in Linux.
Using Cockpit browser-based administration
Cockpit is the best browser-based Linux system administration tool that I have ever seen. It brings
together a range of Linux administrative activities into one interface and taps into a diverse set of
Linux APIs using cockpit-bridge. As someone doing Linux administration, however, you just need
to know that you will get a consistent and stable way of administering your systems with Cockpit.
Getting started with Cockpit is as simple as enabling the cockpit socket and pointing a web
browser at the Cockpit service. Because of Cockpit’s plug-in design, there are new tools being
created all the time that you can add to your system’s Cockpit interface.
If you are starting with the latest RHEL or Fedora systems, performing the following procedure
lets you enable and start using Cockpit on your system.
Note
No configuration is required to start this procedure. However, you can configure Cockpit to use your own OpenSSL certificate instead of the self-signed one used by default. This lets you avoid having to accept the unverified self-signed certificate when you open the Cockpit interface from your browser.
1. If Cockpit is not already installed, do the following:
# dnf install cockpit
167
8
Downloaded from https://onlinelibrary.wiley.com/doi/ by alex jounh - Oregon Health & Science Univer , Wiley Online Library on [05/12/2025]. See the Terms and Conditions (https://onlinelibrary.wiley.com/terms-and-conditions) on Wiley Online Library for rules of use; OA articles are governed by the applicable Creative Commons License
Chapter 8: Learning System Administration
or
# apt-
get install cockpit
2. Log in as root user, and enable the Cockpit socket:
# systemctl enable -
-
now cockpit.socket
Created symlink /etc/systemd/system/sockets.target.wants/cockpit.socket
→ /usr/lib/systemd/system/cockpit.socket.
3. Open your web browser to port 9090 on the system where you just enabled Cockpit.
You can use the hostname, localhost, or IP address. Port 9090 is configured for
HTTPS by default, although you can reconfigure that if you like to use HTTP. Here are
examples of addresses to type into your browser’s address bar:
https://localhost:9090/
https://host1.example.com:9090/
https://192.168.122.114:9090/
4. Assuming you didn’t replace the self-signed certificate for Cockpit, you are warned
that the connection is not safe. To accept it anyway, and depending on your browser,
you must select Advanced and agree to an exception to allow the browser to use the
Cockpit service.
5. Enter your username and password. Use the root user or a user with sudo privileges if
you want to change your system configuration. A regular user can see but not change
most settings. Figure 8.1 shows an example of this window for Fedora.
FIGURE 8.1
Logging in to Cockpit.
168
Downloaded from https://onlinelibrary.wiley.com/doi/ by alex jounh - Oregon Health & Science Univer , Wiley Online Library on [05/12/2025]. See the Terms and Conditions (https://onlinelibrary.wiley.com/terms-and-conditions) on Wiley Online Library for rules of use; OA articles are governed by the applicable Creative Commons License
Part III: Becoming a Linux System Administrator
6. Begin using Cockpit. The Cockpit dashboard contains a good set of features by default
(you can add more later) on Ubuntu, RHEL, and Fedora systems. Figure 8.2 shows an
example of the Overview area of the Cockpit dashboard.
FIGURE 8.2
View system activity and other topics from the Cockpit dashboard.
8
Immediately after logging in to Cockpit, you begin seeing system activity related to system
health, usage (CPU usage and memory), system information, and configuration. Selections in
the left navigation pane let you begin working with logs, storage, networking, user and group
accounts, services, and other features on your system.
As you proceed through the rest of this book, you will see descriptions of how to use the different features of Cockpit in the appropriate section. To dive deeper into any of the topics
that you encounter with Cockpit, I recommend checking out the Cockpit project website:
https://cockpit-project.org.
Using system-config-* tools
On Fedora and RHEL systems prior to the release of Cockpit, a set of graphical tools was
available from the Activities screen (GNOME) or from the command line. On older Fedora
and RHEL systems, you could operate these tools from the command line by running a set
of commands that began with the system-config* string (such as system-
config-network).
169
Downloaded from https://onlinelibrary.wiley.com/doi/ by alex jounh - Oregon Health & Science Univer , Wiley Online Library on [05/12/2025]. See the Terms and Conditions (https://onlinelibrary.wiley.com/terms-and-conditions) on Wiley Online Library for rules of use; OA articles are governed by the applicable Creative Commons License
Chapter 8: Learning System Administration
These system-config* tools require root permission. If you are logged in as a regular
user, you must enter the root password before the graphical user interface (GUI) application’s
window opens or, in some cases, when you request to do some special activity.
The following list describes many of the graphical tools available in earlier Fedora or RHEL
systems. (Some were only in Fedora, and many are not installed by default.) The command
that you would launch to get the feature is shown in parentheses (often, it is the same as the
package name). The following graphical tools were available in Fedora:
Domain Name System (system-config-bind): Create and configure zones if your
computer is acting as a DNS server.
HTTP (system-config-httpd): Configure your computer as an Apache web server.
NFS (system-config-nfs): Set up directories from your system to be shared with
other computers on your network using the NFS service.
Root Password (system-config-rootpassword): Change the root password.
Samba NFS (system-config-samba): Configure Windows (SMB) file sharing. (To configure other Samba features, you can use the SWAT window.)
The following graphical tools were available in both Fedora and RHEL systems prior
to RHEL 8:
Services (system-config-services): Display and change which services are
running on your Fedora system at different runlevels from the Service Configuration window.
Authentication (system-config-authentication): Change how users are authenticated on your system. Typically, shadow passwords and MD5 passwords are selected.
However, if your network supports LDAP, Kerberos, SMB, NIS, or Hesiod authentication,
you can select to use any of those authentication types.
Date & Time (system-config-date): Set the date and time or choose to have an NTP
server keep system time in sync.
Firewall (system-config-firewall): Configure your firewall to allow or deny services to computers from the network.
Language (system-config-language): Select the default language used for
the system.
Printing (system-config-printer): Configure local and network printers.
SELinux Management (system-config-selinux): Set SELinux enforcing modes and
default policy.
Users & Groups (system-config-users): Add, display, and change user and group
accounts for your Fedora system.
170
Downloaded from https://onlinelibrary.wiley.com/doi/ by alex jounh - Oregon Health & Science Univer , Wiley Online Library on [05/12/2025]. See the Terms and Conditions (https://onlinelibrary.wiley.com/terms-and-conditions) on Wiley Online Library for rules of use; OA articles are governed by the applicable Creative Commons License
Part III: Becoming a Linux System Administrator
Other administrative utilities were available from the Applications menu on the top panel.
Select the Activities screen (in GNOME) to choose some of the following tools (if installed):
Configuration Editor (gconf-editor): Directly edit the GNOME configuration
database.
Disk Usage Analyzer (gnome-utils): Display detailed information about your hard
disks and removable storage devices.
Disk Utility (gnome-disks): Manage disk partitions and add filesystems (gnome-
disk-utility package).
Kickstart (system-config-kickstart): Create a kickstart configuration file that
can be used to install multiple Linux systems without user interaction.
Descriptions from previous editions of this book of most of these tools have been replaced by
procedures using Cockpit instead.
Using other browser-based admin tools
To simplify the management of many enterprise-quality open source projects, those projects
have begun offering browser-based graphical management tools. In most cases, command-line
tools are offered for managing these projects as well.
For example, if you are using Red Hat Enterprise Linux, there are browser-based interfaces for
managing the following projects:
Red Hat OpenShift: OpenShift, based on the Kubernetes project, offers a browser-based
interface for deploying and managing a cluster of control plane and worker nodes as
well as features for deploying and managing containers in what are referred to as pods.
See the Red Hat OpenShift site at www.openshift.com or the upstream OKD site at
www.okd.io for details.
Red Hat Enterprise Linux OpenStack Platform (RHELOSP): The OpenStack platform-
as-a-service project lets you manage your own private, hybrid cloud through your
browser. This includes the OpenStack dashboard from the OpenStack Horizon project
(http://horizondocs.openstack.org/horizon/latest). That interface lets you
launch and manage virtual machines and all of the resources around them: storage,
networking, authentication, processing allocations, and so on. Refer to Chapter 27,
“Using Linux for Cloud Computing,” for a description of how to use the OpenStack
Dashboard.
Red Hat Virtualization (RHV): With RHEV, the RHV manager provides the browser-based
interface for managing virtual machines, including allocating storage and user access
to resources. Many other examples of browser-based graphical administration tools
are available with open source projects. If you are new to Linux, it can be easier to
get started with these interfaces. However, keep in mind that often you need to use
command-line tools if you need to troubleshoot problems because graphical tools are
often limited in that area.
171
8
Downloaded from https://onlinelibrary.wiley.com/doi/ by alex jounh - Oregon Health & Science Univer , Wiley Online Library on [05/12/2025]. See the Terms and Conditions (https://onlinelibrary.wiley.com/terms-and-conditions) on Wiley Online Library for rules of use; OA articles are governed by the applicable Creative Commons License
Chapter 8: Learning System Administration
Using the root User Account
Every Linux system starts out with at least one administrative user account (the root user) and
possibly one or more regular user accounts (given a name that you choose, or a name assigned
by your Linux distribution). In most cases, you log in as a regular user and become the root
user to do an administrative task.
The root user has complete control of the operation of your Linux system. That user can open
any file or run any program. The root user also installs software packages and adds accounts
for other people who use the system.
Tip
Think of the root user in Linux as similar to the Administrator user in Windows.
When you first install many Linux systems (although not all systems), you add a password for
the root user. You must remember and protect this password; you need it to log in as root or
maybe to obtain root permission while you are logged in as some other user.
To become familiar with the root user account, you can simply log in as the root user. I recommend trying this from a virtual console. To do so, press Ctrl+Alt+F3. When you see the login
prompt, type root (press Enter) and enter the password. A login session for root opens. When
you are finished, type exit, and then press Ctrl+Alt+F1 or possibly Ctrl+Alt+F2 to return to
the regular desktop login.
After you have logged in as root, the home directory for the root user is typically /root. The
home directory and other information associated with the root user account are located in the
/etc/passwd file. Here’s what the root entry looks like in the /etc/passwd file:
root:x:0:0:root:/root:/bin/bash
This shows that for the user named root, the user ID is set to 0 (root user), the group ID is
set to 0 (root group), the home directory is /root, and the shell for that user is /bin/
bash. (Linux uses the /etc/shadow file to store encrypted password data, so the password
field here contains an x.) You can change the home directory or the shell used by editing the
values in this file. A better way to change these values, however, is to use the usermod
command (see the section “Modifying Users with usermod” in Chapter 11 for further
information).
At this point, any command that you run from your shell is run with root privilege. So be
careful. You have much more power to change (and damage) the system than you did as a regular user. Again, type exit when you are finished. If you are on a virtual console and have
a desktop interface running on another console, press Ctrl+Alt+F1 to return to the graphical
login screen if you are using a Linux desktop system.
172
Downloaded from https://onlinelibrary.wiley.com/doi/ by alex jounh - Oregon Health & Science Univer , Wiley Online Library on [05/12/2025]. See the Terms and Conditions (https://onlinelibrary.wiley.com/terms-and-conditions) on Wiley Online Library for rules of use; OA articles are governed by the applicable Creative Commons License
Part III: Becoming a Linux System Administrator
Note
By default, the root account has no password set in Ubuntu. This means that even though the account exists, you cannot
log in using it or use su to become the root user. This adds an additional level of security to Ubuntu and requires you to
use sudo before each command that you want to execute as the root user.
Becoming root from the shell (su command)
Although you can become the superuser by logging in as root, sometimes that is not
convenient.
For example, you may be logged in to a regular user account and just want to make a quick
administrative change to your system without having to log out and log back in. You may
need to log in over the network to make a change to a Linux system but find that the system
doesn’t allow root users in from over the network (a common practice for secure Linux systems). One solution is to use the su command. From any Terminal window or shell, you can
simply type the following:
$ su
Password: ******
#
When you are prompted, type the root user’s password. The prompt for the regular user ($)
changes to the superuser prompt (#). At this point, you have full permission to run any
command and use any file on the system. However, one thing that the su command doesn’t
do when used this way is read in the root user’s environment. As a result, you may type a
command that you know is available and get the message Command Not Found. To fix this
problem, use the su command with the dash (-
) option instead like this:
$ su -
Password: ******
#
You still need to type the password, but after that everything that normally happens at login
for the root user happens after the su command is completed. Your current directory will be
root’s home directory (probably /root), and things such as the root user’s PATH variable
are used. If you become the root user by just typing su, rather than su -
, you don’t change
directories or the environment of the current login session.
You can also use the su command to become a user other than root. This is useful for troubleshooting a problem that is being experienced by a particular user but not by others on the
computer (such as an inability to print or send email). For example, to have the permissions of
a user named jsmith, you’d type the following:
$ su -jsmith
173
8
Downloaded from https://onlinelibrary.wiley.com/doi/ by alex jounh - Oregon Health & Science Univer , Wiley Online Library on [05/12/2025]. See the Terms and Conditions (https://onlinelibrary.wiley.com/terms-and-conditions) on Wiley Online Library for rules of use; OA articles are governed by the applicable Creative Commons License
Chapter 8: Learning System Administration
Even if you were root user before you typed this command, afterward you would have only the
permissions to open files and run programs that are available to jsmith. As root user, however,
after you type the su command to become another user, you don’t need a password to continue. If you type that command as a regular user, you must type the new user’s password.
When you are finished using superuser permissions, return to the previous shell by exiting
the current shell. Do this by pressing Ctrl+D or by typing exit. If you are the administrator
for a computer that is accessible to multiple users, don’t leave a root shell open on someone
else’s screen unless you want to give that person freedom to do anything they want to
the computer!
Allowing administrative access via the GUI
As mentioned earlier, when you run GUI tools as a regular user (from Fedora, Red Hat Enterprise Linux, or some other Linux systems), you are prompted for the root password before you
are able to access the tool. By entering the root password, you are given root privilege for
that task.
For Linux systems using GNOME desktops, you must enter the root password each time you
start any of the system-config or other GUI tools that require root privilege (such as a GUI
application to install software packages).
Gaining administrative access with sudo
Particular users can also be given administrative permissions for particular tasks or any task by
typing sudo followed by the command they want to run, without being given the root
password. The sudoers facility is the most common way to provide such privilege. Using
sudoers for any users or groups on the system, you can do the following:
■
■
■
■
■
Assign root privilege for any command they run with sudo.
Assign root privilege for a select set of commands.
Give users root privilege without telling them the root password because they only
have to provide their own user password to gain root privilege.
Allow users, if you choose, to run sudo without entering a password at all.
Track which users have run administrative commands on your system. (Using su,
all you know is that someone with the root password logged in, whereas the sudo
command logs which user runs an administrative command.)
With the sudoers facility, giving full or limited root privileges to any user simply entails
adding the user to /etc/sudoers and defining what privilege you want that user to have.
Then the user can run any command they are privileged to use by preceding that command
with the sudo command.
Here’s an example of how to use the sudo facility to cause the user named joe to have full
root privilege.
174
Downloaded from https://onlinelibrary.wiley.com/doi/ by alex jounh - Oregon Health & Science Univer , Wiley Online Library on [05/12/2025]. See the Terms and Conditions (https://onlinelibrary.wiley.com/terms-and-conditions) on Wiley Online Library for rules of use; OA articles are governed by the applicable Creative Commons License
Part III: Becoming a Linux System Administrator
Tip
If you look at the sudoers file in Ubuntu, you see that the initial user on the system already has privilege, by default,
for the sudo group members. To give any other user the same privilege, you could simply add the additional user to the
admin group when you run visudo.
1. As the root user, edit the /etc/sudoers file by running the visudo command:
# /usr/sbin/visudo
By default, the file opens in vi, unless your EDITOR variable happens to be set to
some other editor acceptable to visudo (for example, export EDITOR=gedit).
The reason for using visudo is that the command locks the /etc/sudoers file and
does some basic sanity checking of the file to ensure that it has been edited correctly.
Note
If you are stuck here, try running the vimtutor command for a quick tutorial on using vi and vim.
2. Add the following line to allow joe to have full root privileges on the computer:
joe
ALL=(ALL)
ALL
This line causes joe to provide a password (his own password, not the root password)
in order to use administrative commands. To allow joe to have that privilege without
using a password, type the following line instead:
joe
ALL=(ALL)
NOPASSWD: ALL
3. Save the changes to the /etc/sudoers file (in vi, type Esc and then :wq). The
following is an example of a session by the user joe just after he has been assigned
sudo privileges:
[joe]$ sudo touch /mnt/testfile.txt
We trust you have received the usual lecture
from the local System Administrator. It usually
boils down to these two things:
#1) Respect the privacy of others.
#2) Think before you type.
Password: *********
[joe]$ ls -
l /mnt/testfile.txt
-
rw-
r-
-
r-
-
. 1 root root 0 Jan 7 08:42 /mnt/testfile.txt
[joe]$ rm /mnt/testfile.txt
rm: cannot remove ‘/mnt/testfile.txt': Permission denied
[joe]$ sudo rm /mnt/textfile.txt
[joe]$
175
8
Downloaded from https://onlinelibrary.wiley.com/doi/ by alex jounh - Oregon Health & Science Univer , Wiley Online Library on [05/12/2025]. See the Terms and Conditions (https://onlinelibrary.wiley.com/terms-and-conditions) on Wiley Online Library for rules of use; OA articles are governed by the applicable Creative Commons License
Chapter 8: Learning System Administration
In this session, the user joe runs the sudo command to create a file (/mnt/textfile
.txt) in a directory for which he doesn’t have write permission. He is given a warning and
asked to provide his password (this is joe’s password, not the root password).
Even after joe has entered the password, he must still use the sudo command to run subsequent administrative commands as root (the rm fails, but the sudo rm succeeds). Notice
that he is not prompted for a password for the second sudo. That’s because after entering
his password successfully, he can enter as many sudo commands as he wants for the next five
minutes, on RHEL and Fedora systems, without having to enter it again. For Ubuntu,
this is set to zero, for no time-out. (You can change the time-out value from five minutes to
any length of time you want by setting the passwd_timeout value in the /etc/
sudoers file.)
The preceding example grants a simple all-or-nothing administrative privilege to joe. However,
the /etc/sudoers file gives you an incredible amount of flexibility in permitting individual
users and groups to use individual applications or groups of applications. Refer to the
sudoers and sudo man pages for information about how to tune your sudo facility.
Exploring Administrative Commands, Configuration
Files, and Log Files
You can expect to find many commands, configuration files, and log files in the same places
in the filesystem, regardless of which Linux distribution you are using. The following sections
give you some pointers on where to look for these important elements.
Note
If GUI administrative tools for Linux have become so good, why do you need to know about administrative files? For one
thing, while GUI tools differ among Linux versions, many underlying configuration files are the same. So if you learn to
work with them, you can work with almost any Linux system. Also, if a feature is broken or if you need to do something
that’s not supported by the GUI, when you ask for help, Linux experts almost always tell you how to run commands or
change the configuration file directly.
Administrative commands
Only the root user is intended to use many administrative commands. When you log in as
root (or use su -from the shell to become root), your $PATH variable is set to include some
directories that contain commands for the root user. In the past, these have included the
following:
/sbin: Originally contained commands needed to boot your system, including commands
for checking filesystems (fsck) and turning on swap devices (swapon).
/usr/sbin: Originally contained commands for such things as managing user accounts
(such as useradd) and checking processes that are holding files open (such as
176
Downloaded from https://onlinelibrary.wiley.com/doi/ by alex jounh - Oregon Health & Science Univer , Wiley Online Library on [05/12/2025]. See the Terms and Conditions (https://onlinelibrary.wiley.com/terms-and-conditions) on Wiley Online Library for rules of use; OA articles are governed by the applicable Creative Commons License
Part III: Becoming a Linux System Administrator
lsof). Commands that run as daemon processes are also contained in this directory. Daemon processes are processes that run in the background, waiting for service
requests such as those to access a printer or a web page. (Look for commands that end
in d, such as sshd, pppd, and cupsd.)
For the latest Ubuntu, RHEL, and Fedora releases, all administrative commands from the
two directories are stored in the /usr/sbin directory (which is symbolically linked from
/sbin). Also, /usr/sbin is added to the PATH of both the root user and all regular users.
Some administrative commands are contained in regular user directories (such as /bin and
/usr/bin). This is especially true of commands that have some options available to everyone. An example is the /bin/mount command, which anyone can use to list mounted filesystems but only root can use to mount filesystems. (Some desktops, however, are configured to
let regular users use mount to mount CDs, DVDs, or other removable media.)
Note
See the section ″Mounting Filesystems″ in Chapter 12 for instructions on how to mount a filesystem.
To find commands intended primarily for the system administrator, check out the section 8 manual pages (usually in /usr/share/man/man8). They contain descriptions and
options for most Linux administrative commands. If you want to add commands to your
system, consider adding them to /usr/local/bin or /usr/local/sbin. Some Linux
distributions automatically add those directories to your PATH, usually before your standard
bin and sbin directories. In that way, commands installed to those directories are not only
accessible but can also override commands of the same name in other directories. Some third-
party applications that are not included with Linux distributions are sometimes placed in the
/usr/local/bin, /opt/bin, or /usr/local/sbin directory.
Administrative configuration files
Configuration files are another mainstay of Linux administration. Almost everything that you set
up for your particular computer—user accounts, network addresses, or GUI preferences—results in
settings being stored in plain-text files. This has some advantages and some disadvantages.
The advantage of plain-text files is that it’s easy to read and change them. Any text editor
will do. The downside, however, is that as you edit configuration files, traditionally no error
checking is done. You sometimes have to run the program that reads these files (such as a network daemon or the X desktop) to find out whether you set up the files correctly.
While some configuration files use standard structures, such as XML for storing information,
many do not. So, you need to learn the specific structure rules for each configuration file. A
comma or a quote in the wrong place can sometimes cause an entire interface to fail. You can
check in many ways that the structure of many configuration files is correct.
Some software packages offer a command to test the sanity of the configuration file tied to a
package before you start a service. For example, the testparm command is used with Samba
177
8
Downloaded from https://onlinelibrary.wiley.com/doi/ by alex jounh - Oregon Health & Science Univer , Wiley Online Library on [05/12/2025]. See the Terms and Conditions (https://onlinelibrary.wiley.com/terms-and-conditions) on Wiley Online Library for rules of use; OA articles are governed by the applicable Creative Commons License
Chapter 8: Learning System Administration
to check the sanity of your smb.conf file. Other times, the daemon process providing a service offers an option for checking your config file. For example, run httpd -t to check your
Apache web server configuration before starting your web server.
Note
Some text editors, such as the vim command (not vi), understand the structure of some types of configuration files.
If you open such a configuration file in vim, notice that different elements of the file are shown in different colors. In
particular, you can see comment lines in a different color than data.
Throughout this book, you’ll find descriptions of the configuration files that you need to set
up the different features that make up Linux systems. The two major locations of configuration files are your home directory (where your personal configuration files are kept) and the
/etc directory (which holds system-wide configuration files).
Following are descriptions of directories (and subdirectories) that contain useful configuration
files. The descriptions are followed by some individual configuration files in /etc that are of
particular interest. Viewing the contents of Linux configuration files can teach you a lot about
administering Linux systems.
$HOME: All users store in their home directories information that directs how their login
accounts behave. Many configuration files are stored directly in each user’s home directory (such as /home/joe) and begin with a dot (.), so they don’t appear in a user’s
directory when you use a standard ls command (you need to type ls -a to see
them). Likewise, dot files and directories won’t show up in most file manager windows
by default. There are dot files that define the behavior of each user’s shell, the desktop look-and-feel, and options used with your text editor. There are even files such
as those in each user’s $HOME/.ssh directory that configure permissions for logging
into remote systems. (To see the name of your home directory, type echo $HOME
from a shell.)
/etc: This directory contains most of the basic Linux system configuration files.
/etc/cron*: Directories in this set contain files that define how the crond utility runs
applications on a daily (cron.daily), hourly (cron.hourly), monthly
(cron.monthly), or weekly (cron.weekly) schedule.
/etc/cups: Contains files used to configure the CUPS printing service.
/etc/default: Contains files that set default values for various utilities. For example,
the file for the useradd command defines the default group number, home directory,
password expiration date, shell, and skeleton directory (/etc/skel) used when creating a new user account.
/etc/httpd: Contains a variety of files used to configure the behavior of your Apache
web server (specifically, the httpd daemon process). (On Ubuntu and other Linux systems, /etc/apache or /etc/apache2 is used instead.)
/etc/mail: Contains files used to configure your sendmail mail transport agent.
178
Downloaded from https://onlinelibrary.wiley.com/doi/ by alex jounh - Oregon Health & Science Univer , Wiley Online Library on [05/12/2025]. See the Terms and Conditions (https://onlinelibrary.wiley.com/terms-and-conditions) on Wiley Online Library for rules of use; OA articles are governed by the applicable Creative Commons License
Part III: Becoming a Linux System Administrator
/etc/postfix: Contains configuration files for the postfix mail transport agent.
/etc/rc?.d: There is a separate rc?.d directory for each valid system state: rc0.d
(shutdown state), rc1.d (single-user state), rc2.d (multiuser state), rc3.d
(multiuser plus networking state), rc4.d (user-defined state), rc5.d (multiuser,
networking, plus GUI login state), and rc6.d (reboot state). These directories are
maintained for compatibility with old UNIX SystemV init services.
/etc/security: Contains files that set a variety of default security conditions for your
computer, basically defining how authentication is done. These files are part of the
pam (pluggable authentication modules) package.
/etc/skel: Any files contained in this directory are automatically copied to a user’s
home directory when that user is added to the system. By default, most of these files
are dot (.) files, such as .kde (a directory for setting KDE desktop defaults) and
.bashrc (for setting default values used with the bash shell).
/etc/sysconfig: Contains important system configuration files that are created and
maintained by various services (including firewalld, samba, and most networking
services). These files are critical for Linux distributions, such as Fedora and RHEL, that
use GUI administration tools but are not used on other Linux systems at all.
/etc/systemd: Contains files associated with the systemd facility, for managing the
boot process and system services. In particular, when you run systemctl commands
to enable and disable services, files that make that happen are stored in subdirectories
of the /etc/systemd system directory.
/etc/xinetd.d: Contains a set of files, each of which defines an on-demand network
service that the xinetd daemon listens for on a particular port. When the xinetd
daemon process receives a request for a service, it uses the information in these files to
determine which daemon processes to start to handle the request.
The following are some interesting configuration files in /etc:
aliases: Can contain distribution lists used by the Linux mail services. (This file is
located in /etc/mail in Ubuntu when you install the sendmail package.)
bashrc: Sets system-wide defaults for bash shell users. (This may be called bash
.bashrc on some Linux distributions.)
crontab: Sets times for running automated tasks and variables associated with the
cron facility (such as the SHELL and PATH associated with cron).
csh.cshrc (or cshrc): Sets system-wide defaults for csh (C shell) users.
exports: Contains a list of local directories that are available to be shared by remote
computers using the Network File System (NFS).
fstab: Identifies the devices for common storage media (hard disk, DVD, CD-ROM, and so
on) and locations where they are mounted in the Linux system. This is used by the mount
command to choose which filesystems to mount when the system first boots. Likewise,
when you run mount manually, it will add options from fstab as command-line options.
179
8
Downloaded from https://onlinelibrary.wiley.com/doi/ by alex jounh - Oregon Health & Science Univer , Wiley Online Library on [05/12/2025]. See the Terms and Conditions (https://onlinelibrary.wiley.com/terms-and-conditions) on Wiley Online Library for rules of use; OA articles are governed by the applicable Creative Commons License
Chapter 8: Learning System Administration
group: Identifies group names and group IDs (GIDs) that are defined on the system.
Group permissions in Linux are defined by the second of three sets of rwx (read, write,
execute) bits associated with each file and directory.
gshadow: Contains shadow passwords for groups.
hostname: Contains the hostname for the local system (beginning in RHEL 7 and recent
Fedora and Ubuntu systems).
hosts: Contains IP addresses and hostnames that you can reach from your computer.
(Usually this file is used just to store names and addresses of computers on your LAN or
small private network.)
inittab: On earlier Linux systems, contained information that defined which programs
start and stop when Linux boots, shuts down, or goes into different states in between.
This configuration file was the first one read when Linux started the init process.
This file is no longer used on Linux systems that support systemd.
mtab: Contains a list of filesystems that are currently mounted.
mtools.conf: Contains settings used by DOS commands in Linux that are part of the
mtools package.
named.conf: Contains DNS settings if you are running your own DNS server (bind or
bind9 package).
nsswitch.conf: Contains name service switch settings, for identifying where critical
system information (user accounts, hostname-to-address mappings, and so on) comes
from (local host or via network services).
ntp.conf: Includes information needed to run the Network Time Protocol (NTP).
passwd: Stores account information for all valid users on the local system. Also includes
other information, such as the home directory and default shell. (Rarely includes the
user passwords themselves, which are typically stored in the /etc/shadow file.)
printcap: Contains definitions for the printers configured for your computer. (If
the printcap file doesn’t exist, look for printer information in the
/etc/cups directory.)
profile: Sets system-wide environment and startup programs for all users. This file is
read when the user logs in.
protocols: Sets protocol numbers and names for a variety of Internet services.
rpc: Defines remote procedure call names and numbers.
services: Defines TCP/IP and UDP service names and their port assignments.
shadow: Contains encrypted passwords for users who are defined in the passwd file.
(This is viewed as a more secure way to store passwords than the original encrypted
password in the passwd file. The passwd file needs to be publicly readable, whereas
the shadow file can be unreadable by all but the root user.)
180
Downloaded from https://onlinelibrary.wiley.com/doi/ by alex jounh - Oregon Health & Science Univer , Wiley Online Library on [05/12/2025]. See the Terms and Conditions (https://onlinelibrary.wiley.com/terms-and-conditions) on Wiley Online Library for rules of use; OA articles are governed by the applicable Creative Commons License
Part III: Becoming a Linux System Administrator
shells: Lists the shell command-line interpreters (bash, sh, csh, and so on) that are
available on the system as well as their locations.
sudoers: Sets commands that can be run by users, who may not otherwise have permission to run the command, using the sudo command. In particular, this file is used to
provide selected users with root permission.
rsyslog.conf: Defines what logging messages are gathered by the rsyslogd daemon
and in which files they are stored. (Typically, log messages are stored in files contained
in the /var/log directory.)
xinetd.conf: Contains simple configuration information used by the xinetd daemon
process. This file mostly points to the /etc/xinetd.d directory for information
about individual services.
Another directory, /etc/X11, includes subdirectories that each contain system-wide configuration files used by X and different X window managers available for Linux. The xorg.conf
file (configures your computer and monitor to make it usable with X) and configuration directories containing files used by xdm and xinit to start X are in here.
Directories relating to window managers contain files that include the default values that
a user will get if that user starts one of these window managers on your system. The twm
window manager may have system-wide configuration files in these directories.
Administrative log files and systemd journal
One of the things that Linux does well is keep track of itself. This is a good thing when you
consider how much is going on in a complex operating system.
Sometimes you are trying to get a new facility to work and it fails without giving you the foggiest reason why. Other times, you want to monitor your system to see whether people are
trying to access your computer illegally. In any of those cases, you want to be able to refer to
messages coming from the kernel and services running on the system.
For Linux systems that don’t use the systemd facility, the main utility for logging
error and debugging messages is the rsyslogd daemon. (Some older Linux systems use the
syslogd daemon.) Although you can still use rsyslogd with systemd systems,
systemd has its own method of gathering and displaying messages called the systemd
journal (journalctl command).
Using journalctl to view the systemd journal
The primary command for viewing messages from the systemd journal is the journalctl
command. The boot process, the kernel, and all systemd-managed services direct their status
and error messages to the systemd journal.
Using the journalctl command, you can display journal messages in many different ways.
Here are some examples:
# journalctl
# journalctl --list-boots | head
181
8
Downloaded from https://onlinelibrary.wiley.com/doi/ by alex jounh - Oregon Health & Science Univer , Wiley Online Library on [05/12/2025]. See the Terms and Conditions (https://onlinelibrary.wiley.com/terms-and-conditions) on Wiley Online Library for rules of use; OA articles are governed by the applicable Creative Commons License
Chapter 8: Learning System Administration
-
2 93bdb6164… Sat 2025-
01-
04 21:07:28 EST—
Sat 2025-
01-
04 21:19:37 EST
-
1 7336cb823… Sun 2025-
01-
05 10:38:27 EST—
Mon 2025-
01-
06 09:29:09 EST
0 eaebac25f… Sat 2025-
01-
18 14:11:41 EST—
Sat 2025-
01-
18 16:03:37 EST
# journalctl -
b 488e152a3e2b4f6bb86be366c55264e7
# journalctl -k
In these examples, the journalctl command with no options lets you page through all
messages in the systemd journal. To list the boot IDs for each time the system was booted,
use the –list-boots option. To view messages associated with a particular boot instance,
use the -b option with one of the boot instances. To see only kernel messages, use the
-k option. Here are some more examples:
# journalctl _SYSTEMD_UNIT=sshd.service
# journalctl PRIORITY=0
# journalctl -a -f
Use the _SYSTEMD_UNIT= options to show messages for specific services (here, the sshd
service) or for any other systemd unit file (such as other services or mounts). To see messages associated with a particular syslog log level, set PRIORITY= to a value from 0 to 7. In
this case, only emergency (0) messages are shown. To follow messages as they come in, use the
-f option; to show all fields, use the -a option.
Managing log messages with rsyslogd
The rsyslogd facility, and its predecessor syslogd, gather log messages and direct them to
log files or remote log hosts. Logging is done according to information in the /etc/rsyslog
.conf file. Messages are typically directed to log files that are usually in the /var/log directory, but they can also be directed to log hosts for additional security. Here are a few common
log files:
boot.log: Contains boot messages about services as they start up
messages: Contains many general informational messages about the system
secure: Contains security-related messages, such as login activity or any other act that
authenticates users
Refer to Chapter 13, “Understanding Server Administration,” for information on configuring
the rsyslogd facility.
Using Other Administrative Accounts
You don’t hear much about logging in with other administrative user accounts (besides root)
on Linux systems. It was a fairly common practice in UNIX systems to have several different
administrative logins that allowed administrative tasks to be split among several users. For
example, people sitting near a printer could have lp permissions to move print jobs to another
printer if they knew a printer wasn’t working.
182
Downloaded from https://onlinelibrary.wiley.com/doi/ by alex jounh - Oregon Health & Science Univer , Wiley Online Library on [05/12/2025]. See the Terms and Conditions (https://onlinelibrary.wiley.com/terms-and-conditions) on Wiley Online Library for rules of use; OA articles are governed by the applicable Creative Commons License
Part III: Becoming a Linux System Administrator
In any case, administrative logins are available with Linux; however, logging in directly as those
users is disabled by default. The accounts are maintained primarily to provide ownership for files
and processes associated with particular services. When daemon processes are run under separate
administrative logins, having one of those processes cracked does not give the cracker root permission and the ability to access other processes and files. Consider the following examples:
lp: The user owns such things as the /var/log/cups printing log file and various
printing cache and spool files. The home directory for lp is /var/spool/lpd.
apache: The user can set up content files and directories on an Apache web server. It is
primarily used to run the web server processes (httpd) in RHEL and Fedora systems,
while the www-data user runs the Apache service (apache2) on Ubuntu systems.
avahi: The user runs the avahi daemon process to provide zeroconf services on
your network.
chrony: The user runs the chronyd daemon, which is used to maintain accurate computer clocks.
postfix: The user owns various mail server spool directories and files. The user runs the
daemon processes used to provide the postfix service (master).
bin: The user owns many commands in /bin in traditional UNIX systems. This is not the
case in some Linux systems (such as Ubuntu, Fedora, and Gentoo) because root owns
most executable files. The home directory of bin is /bin.
news: The user could do administration of Internet news services, depending on how you
set permission for /var/spool/news and other news-related resources. The home
directory for news is /etc/news.
rpc: The user runs the remote procedure calls daemon (rpcbind), which is used to
receive calls for services on the host system. The NFS service uses the RPC service.
By default, the administrative logins in the preceding list are disabled. You would need to
change the default shell from its current setting (usually /sbin/nologin or /bin/false)
to a real shell (typically /bin/bash) to be able to log in as these users. As mentioned earlier,
however, they are really not intended for interactive logins.
Checking and Configuring Hardware
In a perfect world, after installing and booting Linux, all of your hardware is detected and
available for access. Although Linux systems have become quite good at detecting hardware,
sometimes you must take special steps to get your computer hardware working. Also, the
growing use of removable USB devices (CDs, DVDs, flash drives, digital cameras, and removable
hard drives) has made it important for Linux to do the following:
■
■
Efficiently manage hardware that comes and goes.
Look at the same piece of hardware in different ways. (For example, it should be able
to see a printer as a fax machine, scanner, and storage device as well as a printer.)
183
8
Downloaded from https://onlinelibrary.wiley.com/doi/ by alex jounh - Oregon Health & Science Univer , Wiley Online Library on [05/12/2025]. See the Terms and Conditions (https://onlinelibrary.wiley.com/terms-and-conditions) on Wiley Online Library for rules of use; OA articles are governed by the applicable Creative Commons License
Chapter 8: Learning System Administration
Linux kernel features added in the past few years have made it possible to change drastically
the way that hardware devices are detected and managed. The Udev subsystem dynamically
names and creates devices as hardware comes and goes.
If this sounds confusing, don’t worry. It’s designed to make your life as a Linux user much
easier. The result of features built on the kernel is that device handling in Linux has become
more automatic and more flexible:
More automatic For most common hardware, when a hardware device is connected
or disconnected, it is automatically detected and identified. Interfaces to access the
hardware are added so it is accessible to Linux. Then the fact that the hardware is present (or removed) is passed to the user level, where applications listening for hardware
changes are ready to mount the hardware and/or launch an application (such as an
image viewer or music player).
More flexible If you don’t like what happens automatically when a hardware item is
connected or disconnected, you can change it. For example, features built into GNOME
and KDE desktops let you choose what happens when a music CD or data DVD is
inserted or when a digital camera is connected. If you prefer that a different program
be launched to handle it, you can easily make that change.
The following sections cover several issues related to getting your hardware working properly in Linux. First, it describes how to check information about the hardware components of
your system. It then covers how to configure Linux to deal with removable media. Finally, it
describes how to use tools for manually loading and working with drivers for hardware that is
not detected and loaded properly.
Checking your hardware
When your system boots, the kernel detects your hardware and loads drivers that allow Linux
to work with that hardware. Because messages about hardware detection scroll quickly off the
screen when you boot, to view potential problem messages you have to redisplay those messages after the system comes up.
There are a few ways to view kernel boot messages after Linux comes up. The root user can
run the dmesg command to see what hardware was detected and which drivers were loaded by
the kernel at boot time. As new messages are generated by the kernel, those messages are also
made available to the dmesg command.
A second way to see boot messages is the journalctl command to show the messages associated with a particular boot instance (as shown earlier in this chapter).
Note
After your system is running, if you have the syslogd service running, many kernel messages are sent to the /var/
log/syslog file. So, for example, if you want to see what happens when you plug in a USB drive, you can type
tail -
f /var/log/syslog and watch as devices and mount points are created. Likewise, you could use the
journalctl -f command to follow messages as they come into the systemd journal.
184
Downloaded from https://onlinelibrary.wiley.com/doi/ by alex jounh - Oregon Health & Science Univer , Wiley Online Library on [05/12/2025]. See the Terms and Conditions (https://onlinelibrary.wiley.com/terms-and-conditions) on Wiley Online Library for rules of use; OA articles are governed by the applicable Creative Commons License
Part III: Becoming a Linux System Administrator
The following is an example of some output from the dmesg command that was trimmed down
to show some interesting information:
# dmesg | less
[
0.000000] Linux version 6.15.7-
200.fc42.x86_64
(mockbuild@5da7262c50a0401890423524c10adde0)
(gcc (GCC) 15.1.1 20250521 (Red Hat 15.1.1-
2), GNU ld version
2.44-3.fc42)
#1 SMP PREEMPT_DYNAMIC Thu Jul 17 17:57:16 UTC 2025
[
0.000000] Command line:
BOOT_IMAGE=(hd0,gpt2)/vmlinuz-
6.15.7-
200.fc42.x86_64
root=UUID=2a9dafa6-
4e21-
4f38-
a9f5-
94cac9528f13
ro rootflags=subvol=root rhgb quiet
[
0.000000] BIOS-
provided physical RAM map:
[
0.000000] BIOS-
e820: [mem 0x0000000000000000-
0x000000000005bfff]
usable
...
[
1.791996] nvme0n1: p1 p2 p3
[
1.802122] input: Logitech USB Receiver as /devices/pci0000:00/
0000:00:14.0/usb1/1-
8/1-
8.2/1-
8.2:1.0/0003:046D:C534.0002/input/
input3
[
1.888385] hid-
generic 0003:046D:C534.0002: input,hidraw0: USB HID
v1.11
Keyboard [Logitech USB Receiver] on usb-
0000:00:14.0-
8.2/input0
[
1.900416] input: Logitech USB Receiver Mouse as /devices/pci0000:00/
0000:00:14.0/usb1/1-
8/1-
8.2/1-
8.2:1.1/0003:046D:C534.0003/input/
input4
[
1.900647] input: Logitech USB Receiver Consumer Control as /
devices/
pci0000:00/0000:00:14.0/usb1/1-
8/1-
8.2/1-
8.2:1.1/0003:046D:C534
.0003/
input/input5
[
1.965788] input: Logitech USB Receiver System Control as /devices/
pci0000:00/0000:00:14.0/usb1/1-
8/1-
8.2/1-
8.2:1.1/0003:046D:C534
.0003/
input/input6
...
From this output, you first see the Linux kernel version, followed by kernel command-line
options. The last few lines reflect a USB drive being detected with a Logitech USB Receiver
System Control, which communicates with my USB mouse and keyboard.
If something goes wrong detecting your hardware or loading drivers, you can refer to this
information to see the name and model number of hardware that’s not working. Then you can
search Linux forums or documentation to try to solve the problem. After your system is up and
running, some other commands let you look at detailed information about your computer’s
185
8
Downloaded from https://onlinelibrary.wiley.com/doi/ by alex jounh - Oregon Health & Science Univer , Wiley Online Library on [05/12/2025]. See the Terms and Conditions (https://onlinelibrary.wiley.com/terms-and-conditions) on Wiley Online Library for rules of use; OA articles are governed by the applicable Creative Commons License
Chapter 8: Learning System Administration
hardware. The lspci command lists PCI buses on your computer and devices connected to
them. Here’s a snippet of output:
$ lspci
00:00.0 Host bridge: Intel Corporation 8th Gen Core Processor
Host Bridge/DRAM Registers (rev 07)
00:02.0 VGA compatible controller: Intel Corporation CoffeeLake-
S
GT2 [UHD Graphics 630]
00:12.0 Signal processing controller: Intel Corporation Cannon Lake
PCH Thermal Controller (rev 10)
00:14.0 USB controller: Intel Corporation Cannon Lake PCH USB 3.1
xHCI Host Controller (rev 10)
00:14.2 RAM memory: Intel Corporation Cannon Lake PCH
Shared SRAM (rev 10)
00:14.3 Network controller: Intel Corporation Cannon Lake PCH
CNVi WiFi (rev 10)
00:16.0 Communication controller: Intel Corporation Cannon Lake
PCH HECI Controller (rev 10)
The host bridge connects the local bus to the other components on the PCI bridge. I cut down
the output to show information about the different devices on the system that handle various features. If you are having trouble getting any of these devices to work, noting the model
names and numbers gives you something to search for.
To get more verbose output from lspci, add one or more -v options. For example, using
lspci -vvv, I received information about my Ethernet controller, including latency, capabilities of the controller, and the Linux driver (e1000) being used for the device.
If you are specifically interested in USB devices, try the lsusb command. By default, lsusb
lists information about the computer’s USB hubs along with any USB devices connected to the
computer’s USB ports:
$ lsusb
Bus 001 Device
Bus 001 Device
Bus 001 Device
Jefferson Peak
Bus 001 Device
Bus 001 Device
Bus 001 Device
Bus 002 Device
001: ID
002: ID
005: ID
(JfP)
039: ID
040: ID
041: ID
001: ID
1d6b:0002 Linux Foundation 2.0 root hub
03f0:3454 HP, Inc ENVY 6000 series
8087:0aaa Intel Corp. Bluetooth 9460/9560
1a40:0101 Terminus Technology Inc. Hub
0000:3825
USB OPTICAL MOUSE
c0f4:01b0 USB usb keyboard
1d6b:0003 Linux Foundation 3.0 root hub
From the preceding output, you can see information about the keyboard, mouse, and
Bluetooth device connected to the computer. As with lspci, you can add one or more -v
options to see more details.
To see details about your processor, run the lscpu command. That command gives basic
information about your computer’s processors.
186
Downloaded from https://onlinelibrary.wiley.com/doi/ by alex jounh - Oregon Health & Science Univer , Wiley Online Library on [05/12/2025]. See the Terms and Conditions (https://onlinelibrary.wiley.com/terms-and-conditions) on Wiley Online Library for rules of use; OA articles are governed by the applicable Creative Commons License
Part III: Becoming a Linux System Administrator
$ lscpu
Architecture:
CPU op-
mode(s):
Address sizes:
Byte Order:
CPU(s):
On-
line CPU(s) list:
…
x86_64
32-
bit, 64-
bit
39 bits physical, 48 bits virtual
Little Endian
6
0-
5
From the sampling of output of lscpu, you can see that this is a 64-bit system (x86_64), it
can operate in 32-bit or 64-bit modes, and there are six CPUs.
Managing removable hardware
Linux systems such as Red Hat Enterprise Linux, Fedora, and others, which support full GNOME
desktop environments, include simple graphical tools for configuring what happens when you
attach popular removable devices to the computer. So, with a GNOME desktop running, you simply
plug in a USB device or insert a CD or DVD, and a window may pop up to deal with that device.
Although different desktop environments share many of the same underlying mechanisms (in
particular, Udev) to detect and name removable hardware, they offer different tools for configuring how they are mounted or used. Udev (using the systemd-udevd daemon) creates and
removes devices (/dev directory) as hardware is added and removed from the computer.
The options to connect regular USB flash drives or hard drives are not listed on this window.
If you connect USB flash drives to your computer, devices are automatically created when you
plug them in (named /dev/sda, /dev/sdb, and so on). Any filesystems found on those
devices are automatically mounted on /run/media/username, and you are prompted if
you want to open a Nautilus window to view files on those devices. This is done automatically,
so you don’t have to do any special configuration to make this happen.
When you are finished with a USB drive, right-click the device’s name in the Nautilus file manager window and select Safely Remove Drive. This action unmounts the drive and removes the
mount point in the /run/media/username directory. After that, you can safely unplug the
USB drive from your computer.
Working with loadable modules
If you have added hardware to your computer that isn’t properly detected, you might need to
load a module manually for that hardware. Linux comes with a set of commands for loading,
unloading, and getting information about hardware modules.
Kernel modules are installed in /lib/modules/ subdirectories. The name of each subdirectory is based on the release number of the kernel. For example, if the kernel were 6.15.9-
201.fc42.x86_64, the /lib/modules/6.15.9-201.fc42.x86_64 directory would
contain drivers for that kernel. Modules in those directories can then be loaded and unloaded
as they are needed.
187
8
Downloaded from https://onlinelibrary.wiley.com/doi/ by alex jounh - Oregon Health & Science Univer , Wiley Online Library on [05/12/2025]. See the Terms and Conditions (https://onlinelibrary.wiley.com/terms-and-conditions) on Wiley Online Library for rules of use; OA articles are governed by the applicable Creative Commons License
Chapter 8: Learning System Administration
Commands for listing, loading, unloading, and getting information about modules are available
with Linux. The following sections describe how to use those commands.
Listing loaded modules
To see which modules are currently loaded into the running kernel on your computer, use the
lsmod command. Consider the following example:
# lsmod
Module
hid_logitech_hidpp
hid_logitech_dj
xt_nat
xt_tcpudp
veth
xt_conntrack
nft_chain_nat
xt_MASQUERADE
nf_nat
nf_conntrack_netlink
e1000e
Size
65536
36864
12288
16384
45056
12288
12288
16384
61440
57344
356352
Used by
0
0
1
0
0
1
3
2
3 xt_nat,nft_chain_nat,xt_MASQUERADE
0
0
This output shows a variety of modules that have been loaded on a Linux system, including
one for a network interface device (e1000).
To find information about any of the loaded modules, use the modinfo command. For example, you can enter the following:
# /sbin/modinfo -
d e1000
Intel(R) PRO/1000 Network Driver
Not all modules have descriptions available, and if nothing is available, no data is returned.
In this case, however, the e1000 module is described as an Intel(R) PRO/1000 Network Driver
module. You can also use the -a option to see the author of the module or -n to see the
object file representing the module. The author information often has the email address of the
driver’s creator, so you can contact the author if you have problems or questions about it.
Loading modules
You can load any module (as root user) that has been compiled and installed (to a /lib/
modules subdirectory) into your running kernel using the modprobe command. A common
reason for loading a module is to use a feature temporarily (such as loading a module to
support a special filesystem on some removable media you want to access). Another reason to
load a module is to identify that module as one that will be used by a particular piece of hardware that could not be autodetected.
Here is an example of the modprobe command being used to load the parport module,
which provides the core functions to share parallel ports with multiple devices:
# modprobe parport
188
Downloaded from https://onlinelibrary.wiley.com/doi/ by alex jounh - Oregon Health & Science Univer , Wiley Online Library on [05/12/2025]. See the Terms and Conditions (https://onlinelibrary.wiley.com/terms-and-conditions) on Wiley Online Library for rules of use; OA articles are governed by the applicable Creative Commons License
Part III: Becoming a Linux System Administrator
After parport is loaded, you can load the parport_pc module to define the PC-style ports
available through the interface. The parport_pc module lets you optionally define the
addresses and IRQ numbers associated with each device sharing the parallel port, as in the following example:
# modprobe parport_pc io=0x3bc irq=auto
In this example, a device is identified as having an address of 0x3bc, and the IRQ for the
device is autodetected.
The modprobe command loads modules temporarily—they disappear at the next reboot. To
add the module to your system permanently, add the modprobe command line to one of the
startup scripts run at boot time.
Removing modules
Use the rmmod command to remove a module from a running kernel. For example, to remove
the module parport_pc from the current kernel, type the following:
# rmmod parport_pc
If it is not currently busy, the parport_pc module is removed from the running kernel. If it
is busy, try killing any process that might be using the device. Then run rmmod again. Sometimes, the module you are trying to remove depends on other modules that may be loaded. For
instance, the usbcore module cannot be unloaded because it is a built-in module:
8
# rmmod usbcore
rmmod: ERROR: Module usbcore is builtin.
Instead of using rmmod to remove modules, you could use the modprobe -r command. With
modprobe -r, instead of just removing the module you request, you can also remove dependent modules that are not being used by other modules.
Summary
Many features of Linux, especially those that can potentially damage the system or impact
other users, require that you gain root privilege. This chapter describes different ways of
obtaining root privilege: direct login, su command, or sudo command. It also covers some
of the key responsibilities of a system administrator and components (configuration files,
browser-based tools, and so on) that are critical to a system administrator’s work.
The next chapter describes how to install a Linux system. Approaches to installing Linux that
are covered in that chapter include how to install from live media and from installation media.
Exercises
Use these exercises to test your knowledge of system administration and to explore information about your system hardware. These tasks assume that you are running a Fedora or Red
189
Downloaded from https://onlinelibrary.wiley.com/doi/ by alex jounh - Oregon Health & Science Univer , Wiley Online Library on [05/12/2025]. See the Terms and Conditions (https://onlinelibrary.wiley.com/terms-and-conditions) on Wiley Online Library for rules of use; OA articles are governed by the applicable Creative Commons License
Chapter 8: Learning System Administration
Hat Enterprise Linux system (although some tasks work on other Linux systems as well). If
you are stuck, solutions to the tasks are shown in Appendix B (although in Linux, there are
often multiple ways to complete a task).
1. From a shell as root user (or using sudo), enable Cockpit (cockpit.socket) using
the systemctl command.
2. Open your web browser to the Cockpit interface (9090) on your system.
3. Find all files under the /var/spool directory that are owned by users other than
root and display a long listing of them.
4. Become the root user using the su -command. To prove that you have root privilege,
create an empty or plain-text file named /mnt/test.txt. Exit the shell when you
are finished. If you are using Ubuntu, you must set your root password first (sudo
passwd root).
5. Log in as a regular user and become root using su -
. Edit the /etc/sudoers file
to allow your regular user account to have full root privilege via the sudo command.
6. As the user to whom you just gave sudoers privilege, use the sudo command to
create a file called /mnt/test2.txt. Verify that the file is there and owned by the
root user.
7. Run the journalctl -f command and plug a USB drive into a USB port on your
computer. If it doesn’t mount automatically, mount it on /mnt/test. In a second
terminal, unmount the device and remove it, continuing to watch the output from
journalctl -f.
8. Run a command to see what USB devices are connected to your computer.
9. Pretend that you added a TV card to your computer, but the module needed to use it
(bttv) was not properly detected and loaded. Load the bttv module yourself, and
then look to see that it was loaded. Were other modules loaded with it?
10. Remove the bttv module along with any other modules that were loaded with it. List
your modules to make sure that this was done.
190
Downloaded from https://onlinelibrary.wiley.com/doi/ by alex jounh - Oregon Health & Science Univer , Wiley Online Library on [05/12/2025]. See the Terms and Conditions (https://onlinelibrary.wiley.com/terms-and-conditions) on Wiley Online Library for rules of use; OA articles are governed by the applicable Creative Commons License
Part III: Becoming a Linux System Administrator
Installing Linux
9
IN THIS CHAPTER
Quick starting a Linux installation
Choosing an installation method
Installing a single-or multi-boot system
Performing a Live media installation of Fedora
Installing Red Hat Enterprise Linux
Understanding cloud-based installations
Partitioning the disk for installation
Understanding the GRUB boot loader
I
nstalling Linux has become a fairly easy thing to do—if you are starting with a computer that is
up to spec (hard disk, RAM, CPU, and so on) and you don’t mind totally erasing your hard drive.
With cloud computing and virtualization, installation can be even simpler. It allows you to bypass
traditional installation and spin a Linux system up or down within a few minutes by adding metadata
to prebuilt images.
This chapter starts off with a simple installation on a physical computer from Live media and progresses
to more complex installation topics.
To ease you into the subject of installing Linux, I cover three different ways of installing Linux and step
you through each process:
Installing from Live media A Linux Live media ISO is a single, read-only image that contains
everything you need to start a Linux operating system. That image can be burned to a DVD
or USB drive and booted from that medium. With the Live media, you can totally ignore your
computer’s hard disk; in fact, you can run Live media on a system with no hard disk. After you
are running the Live Linux system, some Live media ISOs allow you to launch an application
that permanently installs the contents of the Live medium to your hard disk. The first installation procedure in this chapter shows you how to install Linux permanently from a Fedora Live
media ISO.
191
Linux Bible, Eleventh Edition. Christopher Negus.
© 2026 John Wiley & Sons, Inc. All rights reserved, including rights for text and data mining and training of artificial intelligence technologies or similar
technologies. Published 2026 by John Wiley & Sons, Inc.
Downloaded from https://onlinelibrary.wiley.com/doi/ by alex jounh - Oregon Health & Science Univer , Wiley Online Library on [05/12/2025]. See the Terms and Conditions (https://onlinelibrary.wiley.com/terms-and-conditions) on Wiley Online Library for rules of use; OA articles are governed by the applicable Creative Commons License
CHAPTER
Installing from an installation DVD An installation DVD, available with Fedora, RHEL,
Ubuntu, and other Linux distributions, offers more flexible ways of installing Linux.
In particular, instead of just copying the whole Live media contents to your computer,
with an installation DVD you can choose exactly which software package you want. The
second installation procedure I show in this chapter steps you through an installation
process from a Red Hat Enterprise Linux installation DVD.
Installing in the enterprise Sitting in front of a computer and clicking through installation questions isn’t inconvenient if you are installing a single system. But what if
you need to install dozens or hundreds of Linux systems? What if you want to install
those systems in particular ways that need to be repeated over multiple installations?
Later in this chapter, I describe efficient ways of installing multiple Linux systems
using network installation features and kickstart files.
A fourth method of installation not covered in this chapter is to install Linux to a cloud environment (such as Amazon Web Services) or virtual machine on a virtualization host, such as Virtual
Box or a VMware system. Chapter 27 and Chapter 28 describe ways of installing or deploying a
virtual machine on a Linux KVM host or in a cloud environment.
To try the procedures in this chapter along with me, you should have a computer in front of you
that you don’t mind totally erasing. As an alternative, you can use a computer that has another
operating system installed (such as Windows), as long as there is enough unused disk space
available outside of that operating system. I describe the procedure, and risk of data loss, if you
decide to set up one of these “dual-boot” (Linux and Windows) arrangements.
Quick Starting Linux Installation
Everything in this book makes more sense if you have a Linux system up and running in front
of you. So before I launch into all your choices for installing Linux, I’m starting you with a
quick installation setup that assumes that you have:
■
■
■
A PC that has some version of Windows installed that you are comfortable completely
erasing to run Linux
A USB drive that can be completely erased and has at least 3GB capacity
An Internet connection
If that works for you, you can follow along here to obtain a Fedora Workstation distribution
and install it on that computer (Fedora 42 was used here). See “Choosing a Computer” later in
this chapter for other considerations related to making choices about your Linux installation.
Here are the steps:
1. Boot up your old Windows computer and log in.
2. Back up any data you want to save from this computer (you are about to erase it all).
3. Open a web browser to https://fedoraproject.org, scroll down to the Fedora Workstation box, and select Download Now.
192
Downloaded from https://onlinelibrary.wiley.com/doi/ by alex jounh - Oregon Health & Science Univer , Wiley Online Library on [05/12/2025]. See the Terms and Conditions (https://onlinelibrary.wiley.com/terms-and-conditions) on Wiley Online Library for rules of use; OA articles are governed by the applicable Creative Commons License
Part III: Becoming a Linux System Administrator
4. Find the Live ISO that matches your computer’s architecture and click the download
button. Unless it is a very old computer (possibly a 386), you will probably pick Intel
and AMD x86_64. The ISO image will probably take a few minutes to download.
Note
To do the next steps, you need software to burn the ISO image to USB drive. I chose the Fedora Media Writer to do this,
which should work on most Windows systems. However, for my Windows 11 system, I needed to add the Microsoft Visual
C++ Redistributable for Visual Studio package to get the MSVCP140.dll file for Fedora Media Writer to work. You
could use other image burning software if you have trouble getting Fedora Media Writer to work.
5. Scroll down the https://fedoraproject.org/workstation/download page and click
the Fedora Media Writer download button (for Windows and Mac).
6. From the MediaWriter page that appears, choose the version to match your computer.
For me, this was called FedoraMediaWriter-win64-x.x.x.exe.
7. Click the download button at the top of your browser and select the FedoraMediaWriter
executable. A window opens, asking if you want to allow this app to make changes to
your device.
8. Click Yes. Then step through the Fedora Media Writer prompts to install it. In the last
step, you will click Finish, with the check box Run Fedora Media Writer selected.
9. With Fedora Media Writer displayed, click the Select .iso File button. Figure 9.1 shows
an example of this window.
10. Click Next to see the Write Options window. Click the Select button and choose the
Fedora ISO you downloaded earlier from the Downloads folder. Insert your USB drive
into your computer and select it from the USB Drive drop-down.
11. Click the Write button. The Erase confirmation window appears. If you are ready to
overwrite the entire USB drive, click Write. It will take a few minutes for the ISO
image to be burned to the USB drive and checked. Click Finish when it is done. You
are now ready to install.
12. With the USB drive still inserted, reboot to the Live image. When the BIOS screen
appears, quickly look for a message that tells you to press a particular function key
(such as F12 or Esc) to interrupt the boot process and press that key. You have to
be quick to catch it before the computer boots to hard drive. Choose to see the boot
menu, and then select the USB drive. Fedora should come up on the boot screen.
When you see the boot screen, select Start Fedora-Workstation-Live.
13. Start the installation. When the Welcome to Fedora screen appears, click Install
Fedora. You should see the Installation screen, as shown in Figure 9.2.
14. Select the language (such as U.S. English) and select Next.
193
9
Downloaded from https://onlinelibrary.wiley.com/doi/ by alex jounh - Oregon Health & Science Univer , Wiley Online Library on [05/12/2025]. See the Terms and Conditions (https://onlinelibrary.wiley.com/terms-and-conditions) on Wiley Online Library for rules of use; OA articles are governed by the applicable Creative Commons License
Chapter 9: Installing Linux
FIGURE 9.1
Use Fedora Media Writer to make a bootable Linux on USB.
15. Select the installation destination. Available storage devices (such as your hard drive)
are displayed, with your hard drive selected as the installation destination. To have
the installer overwrite everything, select Use Entire Disk and click Next. The Storage
Configuration window appears.
16. If you want your data encrypted on disk for any new partitions, select the Encrypt My
Data box. Or just click Next. The Review and Install screen appears.
17. Review the installation screen. You can still back out at this point. If you are ready,
select the I Understand That All Existing Data Will Be Erased box. Then click the Erase
Data And Install button. Your disk will now be erased, and Fedora will be installed.
18. When installation is complete, remove the USB drive, shut down the computer, remove
the USB drive, and then turn the computer back on.
194
Downloaded from https://onlinelibrary.wiley.com/doi/ by alex jounh - Oregon Health & Science Univer , Wiley Online Library on [05/12/2025]. See the Terms and Conditions (https://onlinelibrary.wiley.com/terms-and-conditions) on Wiley Online Library for rules of use; OA articles are governed by the applicable Creative Commons License
Part III: Becoming a Linux System Administrator
FIGURE 9.2
Step through the Fedora installation screen.
19. Begin using Fedora. A first boot screen appears at this point, allowing you to create a
user account and configure the system. You are automatically logged in as that user
account when configuration is done. That account has sudo privileges, so you can
immediately begin doing administrative tasks as that user.
If for some reason this procedure didn’t work for you, continue on for a more detailed look at
the Linux installation process.
Choosing a Computer
You can get a Linux distribution that runs on handheld devices or an old PC in your closet
with as little as 24MB of RAM and a 486 processor. To have a good desktop PC experience with
Linux, however, you should consider what you want to be able to do with Linux when you are
choosing your computer.
Be sure to consider the basic specifications that you need for a PC-type computer to run the
Fedora and Red Hat Enterprise Linux distributions. Because Fedora is used as the basis for Red
Hat Enterprise Linux releases, hardware requirements are similar for basic desktop and server
hardware for those two distributions.
195
9
Downloaded from https://onlinelibrary.wiley.com/doi/ by alex jounh - Oregon Health & Science Univer , Wiley Online Library on [05/12/2025]. See the Terms and Conditions (https://onlinelibrary.wiley.com/terms-and-conditions) on Wiley Online Library for rules of use; OA articles are governed by the applicable Creative Commons License
Chapter 9: Installing Linux
Processor A 1GHz Pentium processor is the minimum for a GUI installation. For most
applications, an old 32-bit processor will work (x86). However, if you want to set up
the system to do virtualization, you need a 64-bit processor (x86_64). You also have
the choice of using an ARM processor (aarch64).
Note
If you have a less powerful computer than the minimum described here, consider using a lightweight Linux distribution.
Lightweight Ubuntu distributions include Peppermint OS (peppermintos.com) and Lubuntu (lubuntu.net). For a
lightweight Fedora-based distribution, try the LXDE desktop (https://fedoraproject.org/spins/lxde).
For a Linux distribution requiring a miniscule amount of resources, you could try Tiny Core Linux (http://tiny
corelinux.net).
RAM Fedora recommends at least 4GB of RAM for a good workstation experience. On my
Fedora workstation, I’m running a web browser, word processor, and a couple of terminal windows, and I’m consuming more than 3GB of RAM.
DVD or USB drive You need to be able to boot up the installation process from a DVD or
USB drive. In recent releases, the full Fedora Live media ISO has become too big to fit
on a CD, so you need to burn it to a DVD or USB drive. If you can’t boot from a DVD or
USB drive, there are ways to start the installation from a hard disk or by using a PXE
install. After the installation process is started, more software can be retrieved from
different locations (over the network or from hard disk, for example).
Note
PXE (pronounced “pixie”) stands for Preboot eXecution Environment (PXE). You can boot a client computer from a network interface card (NIC) that is PXE-enabled. If a PXE boot server is available on the network, it can provide everything
a client computer needs to boot. What it boots can be an installer. So, with a PXE boot, it is possible to do a complete
Linux installation without a CD, DVD, or any other physical medium.
Network card You need wired or wireless networking hardware to be able to add more
software or get software updates. Fedora and Ubuntu, like most Linux distribution,
offer free software repositories if you can connect to the Internet. For RHEL, updates
are available as part of the subscription price.
Disk space Fedora recommends at least 40GB of disk space for an average workstation installation, although installations can range (depending on which packages you
choose to install) from 600MB (for a minimal server with no GUI install) to 7GB (to
install all packages from the full installation ISO). Consider the amount of data that
you need to store. Although documents can consume very little space, videos can consume massive amounts of space. (By comparison, you can install Tiny Core Linux to
disk with only about 16MB of disk space, which includes a GUI.)
196
Downloaded from https://onlinelibrary.wiley.com/doi/ by alex jounh - Oregon Health & Science Univer , Wiley Online Library on [05/12/2025]. See the Terms and Conditions (https://onlinelibrary.wiley.com/terms-and-conditions) on Wiley Online Library for rules of use; OA articles are governed by the applicable Creative Commons License
Part III: Becoming a Linux System Administrator
Special hardware features Some Linux features require special hardware features. For
example, to use Fedora or RHEL as a virtualization host using KVM, the computer must
have a processor that supports virtualization. These include AMD-V or Intel-VT chips.
Most recent computers will have this feature.
If you’re not sure about your computer hardware, there are a few ways to check what you
have. If you are running Windows, the System Properties window can show you the processor
you have as well as the amount of RAM that’s installed. As an alternative, with the Fedora Live
CD booted, open a shell and type lshw | less to see a listing of hardware as it is detected
on your system.
Simplicity is the main advantage of installing from Live media. Essentially, you are just copying the kernel, applications, and settings from the ISO image to the hard disk. There are
fewer decisions that you have to make to do this kind of installation, but you also don’t get
to choose exactly which software packages to install. After the installation, you can add and
remove packages as you please.
The first decisions you must make about your Live media installation include where you want
to install the system and whether you want to keep existing operating systems around when
your installation is done:
Single-boot computer The easiest way to install Linux is to not have to worry about
other operating systems or data on the computer and have Linux replace everything.
When you are done, the computer boots up directly to Fedora.
Multi-boot computer If you already have Windows installed on a computer and you
don’t want to erase it, you can install Fedora along with Windows on that system.
Then, at boot time, you can choose which operating system to start up. To be able to
install Fedora on a system with another operating system installed, you must either
have extra disk space available (outside the Windows partition) or be able to shrink
the Windows system to gain enough free space to install Fedora. Because multi-boot
computers are tedious to set up and risk damaging your installed system, I recommend
installing Linux on a separate computer, even an old used one, or on a virtual machine,
as opposed to multi-booting.
Bare-metal or virtual system The resulting Fedora installation can be installed to boot
up directly from the computer hardware or from within an existing operating system
on the computer. If you have a computer that is running as a virtual host, you can
install Fedora on that system as a virtual guest. Virtualization host software includes
KVM, Xen, and VirtualBox (for Linux and UNIX systems as well as Windows and macOS),
Hyper-V (for Microsoft systems), and VMware (for Linux, Windows, and macOS). You
can use the Fedora Live ISO image from disk or burned to a USB driver or DVD to start
an installation from your chosen hypervisor host. (Chapter 28, “Using Linux for Cloud
Computing,” describes how to set up a KVM virtualization host.)
With your hardware in place, you can choose to install Linux from a Live ISO image (described
earlier) or from installation media, as described in the following sections.
197
9
Downloaded from https://onlinelibrary.wiley.com/doi/ by alex jounh - Oregon Health & Science Univer , Wiley Online Library on [05/12/2025]. See the Terms and Conditions (https://onlinelibrary.wiley.com/terms-and-conditions) on Wiley Online Library for rules of use; OA articles are governed by the applicable Creative Commons License
Chapter 9: Installing Linux
Installing Red Hat Enterprise Linux
from Installation Media
In addition to offering a live ISO image, most Linux distributions offer a single image or set of
images that can be used to install the distribution. For this type of installation media, instead
of copying the entire contents of the medium to disk, software is split up into packages that
you can select to meet your exact needs. A full installation DVD ISO, for example, can allow
you to install anything from a minimal system to a fully featured desktop to a full-blown
server that offers multiple services.
In this chapter, I use a Red Hat Enterprise Linux 10 installation DVD ISO as the installation
medium. Review the hardware information and descriptions of dual booting in the previous
section before beginning your RHEL installation.
Follow this procedure to install Red Hat Enterprise Linux from an installation DVD ISO from a
USB drive.
1. Get the installation media. The process of downloading RHEL install ISO images is
described on the Red Hat Enterprise Linux product page. If you are not yet a Red Hat
customer, you can apply for an evaluation copy here: https://www.redhat.com/en/
products/trials.
This requires that you create a Red Hat account. If that is not possible, you can try
Linux distributions that are similar to RHEL, such as AlmaLinux and Rocky Linux.
For this example, I used the 7.9G RHEL 10 DVD ISO rhel-10.0-x86_64-dvd.iso.
After you have the DVD ISO, you can burn it to a physical USB drive or dual-layer DVD,
as described in Appendix A.
2. Boot the installation media. Insert the USB drive or DVD into your computer and
reboot. (Interrupt the boot prompt to select to boot from the selected USB or DVD.)
The Welcome screen appears.
3. Select Install Or Test Media. Select the Install or the Test This Media & Install entry to
do a new installation of RHEL. The media test verifies that the DVD has not been corrupted during the download or burning process. If you need to modify the installation
process, you can add boot options by pressing the Tab key with a boot entry highlighted and typing in the options you want. See the section “Using installation boot
options” later in this chapter.
4. Select a language. Select your language and click Continue. The Installation Summary
screen appears. From that screen, you can select to change any of the available Localization, Software, and System features, as shown in Figure 9.3.
5. On the Keyboard screen, choose from different types of keyboards available with the
languages you selected earlier. Type some text to see how the keys are laid out.
6. On the Language Support screen, you have a chance to add support for additional
languages (beyond what you set by default earlier). Click Done when you are finished.
198
Downloaded from https://onlinelibrary.wiley.com/doi/ by alex jounh - Oregon Health & Science Univer , Wiley Online Library on [05/12/2025]. See the Terms and Conditions (https://onlinelibrary.wiley.com/terms-and-conditions) on Wiley Online Library for rules of use; OA articles are governed by the applicable Creative Commons License
Part III: Becoming a Linux System Administrator
7. On the Time & Date screen, choose a time zone for your machine by region and city.
Either set the time manually with up/down arrows or select Network Time to have
your system try to connect to networked time servers automatically to sync system
time. Automatic Date & Time is preferred for keeping accurate time. Click Done when
you are finished.
8. On the Connect to Red Hat screen, if you have a Red Hat account and plan to use the
system as a production system, click Connect To Red Hat and use your user name and
password or activation key to register this system with Red Hat Network. This allows
you to get updates and use Red Hat Insights to manage your RHEL system. Options
let you choose a proxy, satellite server, or custom base URL to get software packages
instead of directly connecting to Red Hat Network.
9. On the Installation Source screen, the installation medium you booted from is
used, by default, to provide the RPM packages that are used during installation.
Autodetected installation source should already be selected. You have the option of
selecting On The network and choosing a web URL (http, https, or ftp) to identify
where the Red Hat Enterprise Linux software repository is located or of selecting Red
Hat CDN to have the installer use the Red Hat Content Delivery Network to grab the
packages needed for installation. Click Done when you are finished.
10. On the Software Selection screen, the default Server With GUI selection provides a
GNOME 3 desktop system on top of a basic server install. Other choices include Server
(which has no GUI), Minimal Install (which starts with a basic package set), Workstation (geared for end users), Custom Operating System (a basic RHEL system), and Virtualization Host (set up to run virtual machines). You can select to add other services
or other base environments to include. Select Done when you are ready to continue.
11. On the Installation Destination screen, the new RHEL system is installed, by default,
on the local hard drive using automatic partitioning. You also have the option of
attaching network storage or special storage, such as Firmware RAID. (See the section
“Partitioning hard drives” later in this chapter for details on configuring storage.)
Click Done when you are finished. You may be asked to verify that it’s okay to delete
existing storage.
12. On the Kdump screen, enabling kdump sets aside RAM to be used to capture the
resulting kernel dump, in the event that your kernel crashes. Without kdump, there
would be no way to diagnose a crashed kernel. By default, enabling kdump sets aside
160MB plus 2 bits for every 4KB of RAM for saving kernel crashes.
13. On the Network & Host Name screen, any network interface cards that are discovered
can be configured at this point. If a DHCP service is available on the network, network
address information is assigned to the interface after you select ON. Click Configure if
you prefer to configure the network interface manually. Fill in the Host Name box if
you want to set the system’s hostname. Setting up your network and hostname during installation can make it easier to begin using your system after installation. Click
Done to continue.
199
9
Downloaded from https://onlinelibrary.wiley.com/doi/ by alex jounh - Oregon Health & Science Univer , Wiley Online Library on [05/12/2025]. See the Terms and Conditions (https://onlinelibrary.wiley.com/terms-and-conditions) on Wiley Online Library for rules of use; OA articles are governed by the applicable Creative Commons License
Chapter 9: Installing Linux
14. On the Root Account screen, the root user account is disabled by default (meaning
that you cannot login directly as root). If you leave Disable Root Account selected,
this also disables remote access to the root account through tools like SSH. In that
case, you need to use a regular user account with sudo privilege to obtain root
access. If you select Enable Root Account, direct root access is allowed on the system,
you can immediately set the root password and allow remote SSH login. Set the password for the root user and verify it (type it again). Click Done to accept it. If the
password is too short or too weak, you stay on the page (where you can set a new
password). If you decide to keep the weak password instead, click Done again to
accept the weak password.
15. On the Create User page, it is good practice to log into a Linux system with a non-
root-user account and request root privilege as needed. You can set up a user account,
including a username, full name, and password. You can select Add Administrative
Privileges. . . to give that user sudo privileges (allowing the account to act as the
root user as needed). Advanced settings are optional, if you want to set the user to a
particular primary user and group ID or add the user to additional accounts. Leave the
wheel account to provide sudo access. Click Done when you are finished. If the password you enter is too short or otherwise weak, you must change it or click Done again
if you still want to use the weak password.
16. Click the Begin Installation button to start the install process. A progress bar marks
the progress of the installation. As the system is installing, you can set the root password and create a new user account for your new system.
17. When installation is finished, click Reboot. Pop out the USB drive or DVD when the
system restarts and Red Hat Enterprise Linux starts up from the hard disk.
18. Run firstboot. If you installed a desktop interface, the firstboot screen appears the
first time you boot the system. Here’s what you do:
a. License Information: Read and click the check box to accept the license information; then click Done.
b. Subscription Manager: When prompted, you can leave the default subscription
management system in place (subscription.rhn.redhat.com) or enter the location of a Red Hat Satellite server to register your system. Click Next. Enter your
Red Hat account and password, and then click Register to register and entitle your
system to updates. If the subscription found is acceptable, click Attach to enable
the subscription.
19. Click Reboot when you are done.
You should now be able to log in to your Red Hat Enterprise Linux system. If your RHEL system
is registered, one of the first things you should do is to get software updates for the new
system. Do this by logging into the system and running sudo dnf upgrade from a Terminal window. If your system is not registered, you can still use it to try RHEL.
200
Downloaded from https://onlinelibrary.wiley.com/doi/ by alex jounh - Oregon Health & Science Univer , Wiley Online Library on [05/12/2025]. See the Terms and Conditions (https://onlinelibrary.wiley.com/terms-and-conditions) on Wiley Online Library for rules of use; OA articles are governed by the applicable Creative Commons License
Part III: Becoming a Linux System Administrator
FIGURE 9.3
Choose from the Localization, Software, and System topics on the Installation Summary screen.
Understanding Cloud-Based Installations
When you install a Linux system on a physical computer, the installer can see the computer’s
hard drive, network interfaces, CPUs, and other hardware components. When you install Linux
in a cloud environment, those physical components are abstracted into a pool of resources. So,
to install a Linux distribution in an Amazon EC2, Google Compute Engine, or OpenStack cloud
platform, you need to go about things differently.
The common way of installing Linux in a cloud is to start with a file that is an image of
an installed Linux system. Typically, that image includes all of the files needed by a basic,
running Linux system. Metadata is combined with that image from a configuration file,
by choosing an instance type (which defines things like the type and number of CPUs and
assigned memory amount) or by filling out a form from a cloud controller that creates and
launches the operating system as a virtual machine (or, if you request it, it could also run
directly on selected computer hardware).
9
The kind of information added to the image might include a particular hostname, root password, and new user account. You might also want to choose to have a specific amount of disk
space, a particular network configuration, and a certain number of CPU processors and RAM.
Methods for installing Linux in a local cloud-like KVM environment are discussed in Chapter 28, “Deploying Linux to the Cloud.” That chapter covers how to run a Linux system as a
virtual machine image on a KVM environment, Amazon EC2 cloud, or OpenStack environment.
201
Downloaded from https://onlinelibrary.wiley.com/doi/ by alex jounh - Oregon Health & Science Univer , Wiley Online Library on [05/12/2025]. See the Terms and Conditions (https://onlinelibrary.wiley.com/terms-and-conditions) on Wiley Online Library for rules of use; OA articles are governed by the applicable Creative Commons License
Chapter 9: Installing Linux
Installing Linux in the Enterprise
If you were managing dozens, hundreds, even thousands of Linux systems in a large enterprise,
it would be terribly inefficient to have to go to each computer to type and click through each
installation. Fortunately, with Red Hat Enterprise Linux and other distributions (such as
Amazon Linux 2023), you can automate the installation in such a way that all you need to
do is to turn on a computer and boot from the computer’s network interface card to get your
desired Linux installation.
Although we have focused on installing Linux from a DVD or USB media, there are many other
ways to launch a Linux installation and many ways to complete an installation. The following
descriptions step through the installation process and describe ways of changing that process
along the way:
Launch the installation medium. You can launch an installation from any medium
that you can boot from a computer: CD, DVD, USB drive, hard disk, or network interface card with PXE support. The computer goes through its boot order and looks at the
master boot record on the physical medium or looks for a PXE server on the network.
Start the anaconda kernel. The job of the bootloader is to point to the special kernel
(and possibly an initial RAM disk) that starts the Linux installer (called anaconda).
So, any of the media types just described simply needs to point to the location of
the kernel and initial RAM disk to start the installation. If the software packages
are not on the same medium, the installation process prompts you for where to get
those packages.
Add kickstart or other boot options. Boot options (described later in this chapter) can
be passed to the anaconda kernel to configure how it starts up. One option supported
by Fedora and RHEL allows you to pass the location of a kickstart file to the installer.
That kickstart can contain all of the information needed to complete the installation:
root password, partitioning, time zone, and so on to configure the installed system
further. After the installer starts, it either prompts for needed information or uses the
answers provided in the kickstart file.
Find software packages. Software packages don’t have to be on the installation
medium. This allows you to launch an installation from a boot medium that contains
only a kernel and initial RAM disk. From the kickstart file or from an option you enter
manually to the installer, you can identify the location of the repository holding the
RPM software packages. That location can be a local CD (cdrom), website (http), FTP
site (ftp), NFS share (nfs), NFS ISO (nfsiso), or local disk (hd).
Modify installation with kickstart scripts. Scripts included in a kickstart can run
commands you choose before or after the installation to further configure the Linux
system. Those commands can add users, change permissions, create files and directories, grab files over the network, or otherwise configure the installed system exactly
as you specify.
202
Downloaded from https://onlinelibrary.wiley.com/doi/ by alex jounh - Oregon Health & Science Univer , Wiley Online Library on [05/12/2025]. See the Terms and Conditions (https://onlinelibrary.wiley.com/terms-and-conditions) on Wiley Online Library for rules of use; OA articles are governed by the applicable Creative Commons License
Part III: Becoming a Linux System Administrator
Although installing Linux in enterprise environments is beyond the scope of this book, I want
you to understand the technologies that are available when you want to automate the Linux
installation process. Here are some of those technologies available to use with Red Hat Enterprise Linux, along with links to where you can find more information about them:
Install server If you set up an installation server, you don’t have to carry the software
packages around to each machine where you install RHEL. Essentially, you copy all of
the software packages from the RHEL installation medium to a web server (http), FTP
server (ftp), or NFS server (nfs) and then point to the location of that server when
you boot the installer. The RHEL 10 Installation Guide describes how to set up a local
or network installation source: https://docs.redhat.com/en/documentation/
red_hat_enterprise_linux/10/html/interactively_installing_rhel_over_
the_network/preparing-network-based-repositories.
PXE server If you have a computer with a network interface card that supports PXE
booting (as most do), you can set your computer’s BIOS to boot from that NIC. If you
have set up a PXE server on that network, that server can present a menu to the computer containing entries to launch an installation process. Chapter 22, “Configuring
a PXE Server,” describes how to set up a PXE server to use for installation. The RHEL
Installation Guide also provides information on how to set up PXE servers for
installation: https://docs.redhat.com/en/documentation/red_hat_enterprise_
linux/10/html/automatically_installing_rhel/preparing-a-pxeinstallation-source.
Kickstart files To automate an installation completely, you create what is called a
kickstart file. By passing a kickstart file as a boot option to a Linux installer, you can
provide answers to all of the installation questions that you would normally have to
click through.
When you install RHEL, a kickstart file containing answers to all installation questions
for the installation you just did is contained in the /root/anaconda-ks.cfg file.
You can present that file to your next installation to repeat the installation configuration or use that file as a model for different installations.
See the RHEL Installation Guide for information on performing a kickstart installation:
https://docs.redhat.com/en/documentation/red_hat_enterprise_linux/10/
html/automatically_installing_rhel/creating-kickstart-files.
Exploring Common Installation Topics
Some of the installation topics touched upon earlier in this chapter require further explanation for you to be able to implement them fully. Read the following sections to get a greater
understanding of specific installation topics.
Upgrading or installing from scratch
If you have an earlier version of Linux already installed on your computer, Fedora, Ubuntu,
and other Linux distributions offer an upgrade option.
203
9
Downloaded from https://onlinelibrary.wiley.com/doi/ by alex jounh - Oregon Health & Science Univer , Wiley Online Library on [05/12/2025]. See the Terms and Conditions (https://onlinelibrary.wiley.com/terms-and-conditions) on Wiley Online Library for rules of use; OA articles are governed by the applicable Creative Commons License
Chapter 9: Installing Linux
Upgrading lets you move a Linux system from one release to the next. Between minor releases,
you can simply update packages as needed. Before beginning an upgrade, make sure that you
have backed up all critical data on your system. Here are a few general rules before performing
an upgrade:
Refresh current packages. Make sure you are on the latest versions of your packages
for the current release before upgrading to a new one. For Fedora, you can type dnf
upgrade --refresh.
Remove extra packages. If you have software packages that you don’t need, remove
them before you do an upgrade. Upgrade processes typically upgrade only those packages that are on your system. Upgrades generally do more checking and comparing
than clean installs do, so any package that you can remove saves time during the
upgrade process.
Check configuration files. A Linux upgrade procedure often leaves copies of old configuration files. You should check that the new configuration files still work for you.
Tip
Installing Linux from scratch goes faster than an upgrade. It also results in a cleaner Linux system. So, if you don’t need
the data on your system (or if you have a backup of your data), I recommend you do a fresh installation. Then you can
restore your data to a freshly installed system.
Add system upgrade tools, if available. You can get the Fedora upgrade tool by typing
dnf install dnf-plugin-system-upgrade.
Download packages for the new release. To do the system upgrade, you first download the packages needed for the new release. For example, if you were upgrading
from Fedora 41 to Fedora 42, you could type dnf system-
upgrade download
--refresh --releasever=42.
Fix conflicts. If there are conflicts between existing packages and the new versions
of those packages, you should address those conflicts. It may mean that you need to
delete some packages (add the --allowerasing option).
Perform the upgrade. After you have downloaded packages for the new version and
fixed any conflicts, you can start the upgrade process. For Fedora, you can run dnf
system-upgrade reboot. Don’t do anything to interrupt this process once it is
started, or it could result in a broken system. The system will reboot when it is done.
Check the /etc/os-release file to make sure that it reflects the new release.
Some Linux distributions, most notably Gentoo, have taken the approach of providing ongoing updates. Instead of taking a new release every few months, you simply continuously grab
updated packages as they become available and install them on your system.
204
Downloaded from https://onlinelibrary.wiley.com/doi/ by alex jounh - Oregon Health & Science Univer , Wiley Online Library on [05/12/2025]. See the Terms and Conditions (https://onlinelibrary.wiley.com/terms-and-conditions) on Wiley Online Library for rules of use; OA articles are governed by the applicable Creative Commons License
Part III: Becoming a Linux System Administrator
Dual booting
It is possible to have multiple operating systems installed on the same computer. One way to
do this is by having multiple partitions on a hard disk and/or multiple hard disks and then
installing different operating systems on different partitions. As long as the boot loader contains boot information for each of the installed operating systems, you can choose which one
to run at boot time.
Caution
Although tools for resizing Windows partitions and setting up multi-boot systems have improved in recent years, there
is still some risk of losing data on Windows/Linux dual-boot systems. Different operating systems often have different
views of partition tables and master boot records that can cause your machine to become unbootable (at least temporarily) or lose data permanently. Always back up your data before you try to resize a Windows filesystem to make space
for Linux.
If the computer you are using already has a Windows system on it, quite possibly the entire
hard disk is devoted to Windows. Although you can run a bootable Linux, such as Linux
Mint or Fedora Live Media, without touching the hard disk, to do a more permanent installation, you’ll want to find disk space outside of the Windows installation. There are a few ways
to do this:
Add a hard disk. Instead of messing with your Windows partition, you can simply add a
hard disk and devote it to Linux.
Resize your Windows partition. If you have available space on a Windows partition,
you can shrink that partition so that free space is available on the disk to devote to
Linux. Some Linux distributions (particularly bootable Linux distributions used as rescue media) include a tool called GParted (which includes software from the Linux-NTFS
project for resizing Windows NTFS partitions).
Note
Type dnf install gparted (in Fedora) or apt-
get install gparted (in Ubuntu) to install GParted.
Run gparted as root to start it.
Before you try to resize your Windows partition, you might need to defragment it. To defragment a disk on Windows 11, select Defragment and Optimize and then select Optimize. To
defragment on some older Windows systems, open My Computer, right-click your hard disk icon
(typically C:), select Properties, click Tools, and select Defragment Now.
205
9
Downloaded from https://onlinelibrary.wiley.com/doi/ by alex jounh - Oregon Health & Science Univer , Wiley Online Library on [05/12/2025]. See the Terms and Conditions (https://onlinelibrary.wiley.com/terms-and-conditions) on Wiley Online Library for rules of use; OA articles are governed by the applicable Creative Commons License
Chapter 9: Installing Linux
Defragmenting your disk can be a fairly long process. The result of defragmentation is that all
of the data on your disk are contiguous, creating a lot of contiguous free space at the end of
the partition. Sometimes, you have to complete the following special tasks to make this true:
■
■
If the Windows swap file is not moved during defragmentation, you must remove it.
Then, after you defragment your disk again and resize it, you need to restore the swap
file. To remove the swap file, open the Control Panel, open the System icon, click the
Performance tab, and select Virtual Memory. To disable the swap file, click Disable
Virtual Memory.
If your DOS partition has hidden files that are on the space you are trying to free up,
you need to find them. In some cases, you can’t delete them. In other cases, such as
swap files created by a program, you can safely delete those files. This is a bit tricky
because some files should not be deleted, such as DOS system files. You can use the
attrib -s -h command from the root directory to deal with hidden files.
After your disk is defragmented, you can use GParted to create a new partition from the available space.
After you have cleared enough disk space to install Linux (see the disk space requirements
described earlier in this chapter), you can install Ubuntu, Fedora, RHEL, or another Linux distribution. As you set up your boot loader during installation, you can identify Windows, Linux,
and any other bootable partitions so that you can select which one to boot when you start
your computer.
Installing Linux to run virtually
Using virtualization technology, such as KVM, VMware, VirtualBox, or Xen, you can configure
your computer to run multiple operating systems simultaneously. Typically, you have a host
operating system running (such as your Linux or Windows desktop), and then you configure
guest operating systems to run within that environment.
If you have a Windows system, you can use commercial VMware products to run Linux on your
Windows desktop. Get a trial of VMware Workstation (https://www.vmware.com/resources/
hands-on-labs) to see if you like it. Then run your installed virtual guests with the free
VMware Player. With a full-blown version of VMware Workstation, you can run multiple
distributions at the same time.
Open source virtualization products that are available with Linux systems include VirtualBox
(https://www.virtualbox.org), Xen (https://xenproject.org), and KVM (https://
linux-kvm.org). For Windows, consider Windows Subsystem. Some Linux distributions still
use Xen. However, all Red Hat systems currently use KVM as the basis for Red Hat’s hypervisor
features in RHEL, Red Hat Virtualization, and other cloud projects. See Chapter 28 for information on installing Linux as a virtual machine on a Linux KVM host.
Using installation boot options
When the anaconda kernel launches at boot time for RHEL or Fedora, boot options provided on
the kernel command line modify the behavior of the installation process. By interrupting the
206
Downloaded from https://onlinelibrary.wiley.com/doi/ by alex jounh - Oregon Health & Science Univer , Wiley Online Library on [05/12/2025]. See the Terms and Conditions (https://onlinelibrary.wiley.com/terms-and-conditions) on Wiley Online Library for rules of use; OA articles are governed by the applicable Creative Commons License
Part III: Becoming a Linux System Administrator
boot loader before the installation kernel boots, you can add your own boot options to direct
how the installation behaves.
When you see the installation boot screen, depending on the boot loader, press Tab or some
other key to pause the boot process on the GRUB screen. With the bootable entry highlighted,
press e to be able to edit the anaconda kernel command line and initial RAM disk line. The
lines for a RHEL boot screen might look something like the following:
linux ($root/vmlinuz-6.12.0-55.9.1.el10_10.x86_64 ...
initrd ($root/initramfs-6.12.0-55.9.1.el10.0.x86_64.img ...
The vmlinuz line represents the compressed kernel, and initrd represents the initial RAM
disk (containing modules and other tools needed to start the installer). To add more options,
just type them at the end of that line and press Enter.
So, for example, if you have a kickstart file available from /root/ks.cfg on a CD, the information you add to your anaconda boot prompt to start the installation using the kickstart file
could look like the following:
ks=cdrom:/root/ks.cfg
Boot options for disabling features
Sometimes, a Linux installation fails because the computer has some nonfunctioning or nonsupported hardware. Often, you can get around those issues by passing options to the installer
that do such things as disable selected hardware when you need to select your own driver.
Table 9.1 provides some examples.
TABLE 9.1
Boot Options for Disabling Features
Installer Option
Tells System
nofirewire
Not to load support for firewire devices
nodma
Not to load DMA support for hard disks
noide
Not to load support for IDE devices
nompath
Not to enable support for multipath devices
noparport
Not to load support for parallel ports
nopcmcia
Not to load support for PCMCIA controllers
noprobe
Not to probe hardware; instead prompt user for drivers
noscsi
Not to load support for SCSI devices
nousb
Not to load support for USB devices
noipv6
Not to enable IPV6 networking
nonet
Not to probe for network devices
numa-off
To disable the Non-Uniform Memory Access (NUMA) for AMD64 architecture
acpi=off
To disable the Advanced Configuration and Power Interface (ACPI)
9
207
Downloaded from https://onlinelibrary.wiley.com/doi/ by alex jounh - Oregon Health & Science Univer , Wiley Online Library on [05/12/2025]. See the Terms and Conditions (https://onlinelibrary.wiley.com/terms-and-conditions) on Wiley Online Library for rules of use; OA articles are governed by the applicable Creative Commons License
Chapter 9: Installing Linux
Boot options for video problems
If you are having trouble with your video display, you can specify video settings as noted in
Table 9.2.
TABLE 9.2
Boot Options for Video Problems
Boot Option
Tells System
xdriver=vesa
Use standard vesa video driver
resolution=1024x768
Choose exact resolution to use
nofb
Don’t use the VGA 16 framebuffer driver
skipddc
Don’t probe DDC of the monitor (the probe can hang the installer)
graphical
Force a graphical installation
Boot options for special installation types
By default, installation runs in graphical mode when you’re sitting at the console answering
questions. If you have a text-only console or if the GUI isn’t working properly, you can run
an installation in plain-text mode: by typing text, you cause the installation to run in
text mode.
If you want to start installation on one computer but you want to answer the installation
questions from another computer, you can enable a VNC (virtual network computing) installation. After you start this type of installation, you can go to another system and open a vnc
viewer, giving the viewer the address of the installation machine (such as 192.168.0.99:1).
Table 9.3 provides the necessary commands, along with what to tell the system to do.
TABLE 9.3
Boot Options for VNC Installations
Boot Option
Tells System
vnc
Run installation as a VNC server
vncconnect=hostname[:port]
Connect to VNC client hostname and optional port
vncpassword=password
Client uses password (at least eight characters) to connect
to installer
Boot options for kickstarts and remote repositories
You can boot the installation process from an installation medium that contains little more
than the kernel and initial RAM disk. If that is the case, you need to identify the repository
where the software packages exist. You can do that by providing a kickstart file or by identifying the location of the repositories in some way. To force the installer to prompt for the
repository location (CD/DVD, hard drive, NFS, FTP, or HTTP), add askmethod to the installation boot options.
208
Downloaded from https://onlinelibrary.wiley.com/doi/ by alex jounh - Oregon Health & Science Univer , Wiley Online Library on [05/12/2025]. See the Terms and Conditions (https://onlinelibrary.wiley.com/terms-and-conditions) on Wiley Online Library for rules of use; OA articles are governed by the applicable Creative Commons License
Part III: Becoming a Linux System Administrator
Using repo= options, you can identify software repository locations. The following examples
show the syntax to use for creating repo= entries:
repo=hd:/dev/sda1:/myrepo
Repository in /myrepo on disk 1 first partition
repo=http://abc.example.com/myrepo
Repository available from /myrepo on web server
repo=ftp://ftp.example.com/myrepo
Repository available from /myrepo on FTP server
repo=cdrom
Repository available from local CD or DVD
repo=nfs::mynfs.example.com:/myrepo/
Repository available from /myrepo on NFS share
repo=nfsiso::nfs.example.com:/mydir/rhel10.iso
Installation ISO image available from NFS server
Instead of identifying the repository directly, you can specify it within a kickstart file. The following are examples of some ways to identify the location of a kickstart file:
ks=cdrom:/stuff/ks.cfg
Get kickstart from CD/DVD.
ks=hd:sda2:/test/ks.cfg
Get kickstart from test directory on hard disk(
sda2).
ks=http://www.example.com/ksfiles/ks.cfg
Get kickstart from a web server.
ks=ftp://ftp.example.com/allks/ks.cfg
Get kickstart from a FTP server.
ks=nfs:mynfs.example.com:/someks/ks.cfg
Get kickstart from an NFS server.
Miscellaneous boot options
Here are a few other options that you can pass to the installer that don’t fit in a category.
rescue
Instead of installing, run the kernel to open Linux rescue mode.
9
mediacheck
Check the installation medium for checksum errors.
For further information on using the anaconda installer in rescue mode (to rescue a broken
Linux system), see Chapter 21, “Troubleshooting Linux.” For information on the latest boot
options used in RHEL 10, refer to the RHEL 10 Installation Guide: https://docs.redhat.com/
en/documentation/red_hat_enterprise_linux/10/html/interactively_installing_
rhel_from_installation_media/optional-customizing-boot-options.
Using specialized storage
In large enterprise computing environments, it is common to store the operating system and
data outside of the local computer. Instead, some special storage device beyond the local hard
209
Downloaded from https://onlinelibrary.wiley.com/doi/ by alex jounh - Oregon Health & Science Univer , Wiley Online Library on [05/12/2025]. See the Terms and Conditions (https://onlinelibrary.wiley.com/terms-and-conditions) on Wiley Online Library for rules of use; OA articles are governed by the applicable Creative Commons License
Chapter 9: Installing Linux
disk is identified to the installer, and that storage device (or devices) can be used during
installation.
Once identified, the storage devices that you indicate during installation can be used the same
way that local disks are used. You can partition them and assign a structure (filesystem, swap
space, and so on) or leave them alone and simply mount them where you want the data to be
available.
The following types of specialized storage devices can be selected from the Specialized Storage
Devices screen when you install Red Hat Enterprise Linux, Fedora, or other Linux distributions:
Firmware RAID A firmware RAID device is a type of device that has hooks in the BIOS,
allowing it to be used to boot the operating system, if you choose.
Multipath devices As the name implies, multipath devices provide multiple paths
between the computer and its storage devices. These paths are aggregated, so these
devices look like a single device to the system using them, while the underlying technology provides improved performance, redundancy, or both. Connections can be provided by iSCSI or Fibre Channel over Ethernet (FCoE) devices.
Other SAN devices Any device representing a Storage Area Network (SAN).
While configuring these specialized storage devices is beyond the scope of this book, know
that if you are working in an enterprise where iSCSI and FCoE devices are available, you can
configure your Linux system to use them at installation time. You need the following types of
information to do this:
iSCSI devices Have your storage administrator provide you with the target IP address of
the iSCSI device and the type of discovery authentication needed to use the device. The
iSCSI device may require credentials.
Fibre Channel over Ethernet Devices (FCoE) For FCoE, you need to know the network
interface that is connected to your FCoE switch. You can search that interface for available FCoE devices.
Partitioning hard drives
The hard disk (or disks) on your computer provide the permanent storage area for your data
files, applications, and the operating system itself. Partitioning is the act of dividing a disk
into logical areas that can be worked with separately. In Windows, you are probably aware of
the main partition (C:) that appears to consume the whole hard disk (although, depending on
the version, your Windows system may also have a system partition, a recovery partition, and
possibly a boot partition). However, with Linux there are several reasons you may want to have
multiple partitions:
Multiple operating systems If you install Linux on a PC that already has a Windows
operating system, you may want to keep both operating systems on the computer. For
all practical purposes, each operating system must exist on a completely separate partition. When your computer boots, you can choose which system to run.
Multiple partitions within an operating system To protect their entire operating
system from running out of disk space, people often assign separate partitions to
210
Downloaded from https://onlinelibrary.wiley.com/doi/ by alex jounh - Oregon Health & Science Univer , Wiley Online Library on [05/12/2025]. See the Terms and Conditions (https://onlinelibrary.wiley.com/terms-and-conditions) on Wiley Online Library for rules of use; OA articles are governed by the applicable Creative Commons License
Part III: Becoming a Linux System Administrator
different areas of the Linux filesystem. For example, if /home and /var were assigned
to separate partitions, then a gluttonous user who fills up the /home partition
wouldn’t prevent logging daemons from continuing to write to log files in the /var/
log directory.
Multiple partitions also make doing certain kinds of backups (such as an image backup)
easier. For example, an image backup of /home would be much faster (and probably
more useful) than an image backup of the root filesystem (/).
Different filesystem types Different kinds of filesystems have different structures.
Filesystems of different types must be on their own partitions. Also, you might need
different filesystems to have different mount options for special features (such as read-
only or user quotas). In most Linux systems, you need at least one filesystem type for
the root of the filesystem (/) and one for your swap area. Filesystems on CD-ROM use
the iso9660 filesystem type.
Tip
When you create partitions for Linux, you usually assign the filesystem type as Linux native (using the ext2, ext3, ext4,
btrfs, or xfs type on most Linux systems). If the applications that you are running require particularly long filenames,
large file sizes, or many inodes (each file consumes an inode), you may want to choose a different filesystem type.
Coming from Windows
If you have used only Windows operating systems before, you are probably used to seeing C: as holding
all of the data on your local hard disk and never thought about partitions. With many Linux systems, you
have the opportunity to view and change the default partitioning based on how you want to use the system.
During installation, systems such as Fedora and RHEL let you partition your hard disk using
graphical partitioning tools. The following sections describe how to partition your disk during
a Fedora installation. See the section “Tips for creating partitions” for some ideas for creating
disk partitions.
Understanding different partition types
Many Linux distributions give you the option of selecting different partition types when you
partition your hard disk during installation. Partition types include the following:
Linux partitions Use this option to create a partition for a btrfs, xfs, ext2, ext3, or
ext4 filesystem type that is added directly to a partition on your hard disk (or other
storage medium).
LVM partitions Create an LVM partition if you plan to create or add to an LVM volume
group. LVMs give you more flexibility in growing, shrinking, and moving partitions
later than regular partitions do.
RAID partitions Create two or more RAID partitions to create a RAID array. These partitions should be on separate disks to create an effective RAID array. RAID arrays can
211
9
Downloaded from https://onlinelibrary.wiley.com/doi/ by alex jounh - Oregon Health & Science Univer , Wiley Online Library on [05/12/2025]. See the Terms and Conditions (https://onlinelibrary.wiley.com/terms-and-conditions) on Wiley Online Library for rules of use; OA articles are governed by the applicable Creative Commons License
Chapter 9: Installing Linux
help improve performance, reliability, or both as those features relate to reading,
writing, and storing your data.
Swap partitions Create a swap partition to extend the amount of virtual memory available on your system.
The following sections contain information about creating partitions. If you are still not sure
when you should use these different partition types, refer to Chapter 12, “Managing Disks and
Filesystems,” for further information on configuring disk partitions.
Tips for creating partitions
Changing your disk partitions to handle multiple operating systems can be tricky, in part
because each operating system has its own ideas about how partitioning information should be
handled as well as different tools for doing it. Here are some tips to help you get it right:
■
■
■
If you are creating a dual-boot system, particularly for a Windows system, try to
install the Windows operating system first after partitioning your disk. Otherwise, the
Windows installation may make the Linux partitions inaccessible.
The fdisk man page recommends that you use partitioning tools that come with
an operating system to create partitions for that operating system. For example, the
Windows fdisk knows how to create partitions that Windows will like, and the Linux
fdisk will happily make your Linux partitions. After your hard disk is set up for dual
boot, however, you should probably not go back to Windows-only partitioning tools.
Use Linux fdisk or parted commands.
A master boot record (MBR) partition table can contain four primary partitions, one
of which can be marked to contain 184 logical drives. On a GPT partition table, you
can have a maximum of 128 primary partitions on most operating systems, including
Linux. You typically won’t need nearly that many partitions. If you need more partitions, use LVM and create as many logical volumes as you like.
If you are using Linux as a desktop system, you probably don’t need lots of different partitions. However, some good reasons exist for having multiple partitions for Linux systems that
are shared by lots of users or are public web servers or file servers. Having multiple partitions
within your Linux system offers the following advantages:
Protection from attacks Denial-of-service attacks sometimes take actions that try to fill
up your hard disk. If public areas, such as /var, are on separate partitions, a successful attack can fill up a partition without shutting down the whole computer. Because
/var is the default location for web and FTP servers and is expected to hold lots of
data, entire hard disks often are assigned to the /var filesystem alone.
Protection from corrupted filesystems If you have only one filesystem (/), its
corruption can cause the whole Linux system to be damaged. Corruption of a smaller
partition can be easier to fix and often allows the computer to stay in service while the
correction is made.
212
Downloaded from https://onlinelibrary.wiley.com/doi/ by alex jounh - Oregon Health & Science Univer , Wiley Online Library on [05/12/2025]. See the Terms and Conditions (https://onlinelibrary.wiley.com/terms-and-conditions) on Wiley Online Library for rules of use; OA articles are governed by the applicable Creative Commons License
Part III: Becoming a Linux System Administrator
Table 9.4 lists some directories that you may want to consider making into separate filesystem
partitions.
TABLE 9.4
Assigning Partitions to Particular Directories
Directory
Explanation
/boot
Sometimes, the BIOS in older PCs can access only the first 1,024 cylinders of your
hard disk. To make sure that the information in your /boot directory is accessible to
the BIOS, create a separate disk partition (by default, RHEL 10 sets this partition to
1024 MiB) for /boot. Even with several kernels installed, there is rarely a reason for
/boot to be larger than 1024 MiB.
/usr
This directory structure contains most of the applications and utilities available to Linux
users. The original theory was that if /usr were on a separate partition, you could
mount that filesystem as read-only after the operating system had been installed. This
would prevent attackers from replacing or removing important system applications
with their own versions that may cause security problems. A separate /usr partition is
also useful if you have diskless workstations on your local network. Using NFS, you can
share /usr over the network with those workstations.
/var
Your FTP (/var/ftp) and web server (/var/www) directories are, by default in many
Linux systems, stored under /var. Having a separate /var partition can prevent an
attack on those facilities from corrupting or filling up your entire hard disk.
/home
Because your user account directories are located in this directory, having a separate
/home account can prevent a reckless user from filling up the entire hard disk. It also
conveniently separates user data from your operating system (for easy backups or new
installs). Often, /home is created as an LVM logical volume, so it can grow in size as
user demands increase. It may also be assigned user quotas to limit disk use.
/tmp
Protecting /tmp from the rest of the hard disk by placing it on a separate partition can
ensure that applications that need to write to temporary files in /tmp can complete
their processing, even if the rest of the disk fills up.
Although people who use Linux systems rarely see a need for lots of partitions, those who
maintain and occasionally have to recover large systems are thankful when the system they
need to fix has several partitions. Multiple partitions can limit the effects of deliberate damage
(such as denial-of-service attacks), problems from errant users, and accidental filesystem
corruption.
Using the GRUB boot loader
A boot loader lets you choose when and how to boot the operating systems installed on your
computer’s hard disks. The GRand Unified Bootloader (GRUB) is the most popular boot loader
used for installed Linux systems. There are two major versions of GRUB available today:
GRUB Legacy (version 1). This version of GRUB was used with earlier versions of RHEL,
Fedora, and Ubuntu.
GRUB 2. The current versions of Red Hat Enterprise Linux, Ubuntu, and Fedora use GRUB 2
as the default boot loader.
213
9
Downloaded from https://onlinelibrary.wiley.com/doi/ by alex jounh - Oregon Health & Science Univer , Wiley Online Library on [05/12/2025]. See the Terms and Conditions (https://onlinelibrary.wiley.com/terms-and-conditions) on Wiley Online Library for rules of use; OA articles are governed by the applicable Creative Commons License
Chapter 9: Installing Linux
Note
SYSLINUX is another boot loader that you might have encounter with Linux systems a few years ago. The SYSLINUX boot
loaders were not typically used for installed Linux systems. However, SYSLINUX was commonly used as the boot loader
for bootable Linux CDs and DVDs. SYSLINUX was particularly good for booting ISO9660 CD images (isolinux) and USB
sticks (syslinux) and for working on older hardware or for PXE booting (pxelinux) a system over the network.
If you want to boot to a particular run level, you can add the run level you want to the end
of the kernel line. For example, to have RHEL boot to run level 3 (multiuser plus networking
mode), add 3 to the end of the kernel line. You can also boot to single-user mode (1), multiuser mode (2), or X GUI mode (5). Level 3 is a good choice if your GUI is temporarily broken.
Level 1 is good if you have forgotten your root password.
By default, you will see a splash screen as Linux boots. If you want to see messages showing
activities happening as the system boots up, you can remove the option rhgb quiet from
the kernel line. This lets you see messages as they scroll by. Pressing Esc during boot-up gets
the same result.
GRUB 2 represents a major rewrite of the GRUB Legacy project. It was adopted as the default
boot loader for the latest Red Hat Enterprise Linux, Fedora, and Ubuntu releases. The major
function of the GRUB 2 boot loader is still to find and start the operating system you want,
but now much more power and flexibility is built into the tools and configuration files that
get you there.
In GRUB 2, the configuration file is named /boot/grub/grub.cfg, /etc/grub2/grub
.cfg or /etc/grub2-efi.cfg (for systems booted with EFI). Here are some things you
should know about the grub.cfg file:
■
■
■
■
214
Instead of editing grub.cfg by hand or having kernel RPM packages add to it,
grub.cfg is generated automatically from the /etc/default/grub file and the
/etc/grub.d/ directory. You should modify or add to those files to configure GRUB
2 yourself.
The grub.cfg file can contain scripting syntax, including such things as functions,
loops, and variables.
Device names needed to identify the location of kernels and initial RAM disks can be
more reliably identified using labels or universally unique identifiers (UUIDs). This
prevents the possibility of a disk device such as /dev/sda being changed to /dev/
sdb when you add a new disk (which would result in the kernel not being found).
For Fedora and RHEL systems, *conf files in the /boot/loader/entries directory are used to create entries that are displayed on the GRUB menu that appears at
boot time.
Downloaded from https://onlinelibrary.wiley.com/doi/ by alex jounh - Oregon Health & Science Univer , Wiley Online Library on [05/12/2025]. See the Terms and Conditions (https://onlinelibrary.wiley.com/terms-and-conditions) on Wiley Online Library for rules of use; OA articles are governed by the applicable Creative Commons License
Part III: Becoming a Linux System Administrator
You could create your own entry for the GRUB boot menu by following the format of an existing entry. The following file in the /boot/loader/entries directory creates a menu entry
for booting a Fedora 41 kernel and initrd:
title Fedora Linux (6.15.6-
100.fc41.x86_64) 41 (Workstation Edition)
version 6.15.6-100.fc41.x86_64
linux /root/boot/vmlinuz-6.15.6-100.fc41.x86_64
initrd /root/boot/initramfs-6.15.6-100.fc41.x86_64.img $tuned_initrd
options root=UUID=bb87f14d-b36e-4e50-9ec1-de5d56a2fb56 ro rootflags
=subvol=root rhgb quiet $tuned_params
grub_users $grub_users
grub_arg --unrestricted
grub_class fedora
The menu entry for this selection appears as Fedora Linux (6.15.6-
100.fc41
.x86_64) 41 (Workstation Edition) on the GRUB 2 boot menu.
The linux line identifies the location of the kernel (/root/boot/vmlinuz-6.15.6-100
.fc41.x86_64), followed by the location of the initrd (/root/boot/
initramfs-6.15.6-100.fc41.x86_64.img).
There are many, many more features of GRUB 2 that you can learn about if you want to dig
deeper into your system’s boot loader. The best documentation for GRUB 2 is available by typing info grub2 at the shell. The info entry for GRUB 2 provides a lot of information for
booting different operating systems, writing your own configuration files, working with GRUB
image files, setting GRUB environment variables, and working with other GRUB features.
Summary
Although every Linux distribution includes a different installation method, you need to do
many common activities, regardless of which Linux system you install. For every Linux system,
you need to deal with issues of disk partitioning, user setup, and other configuration options.
In this chapter, you stepped through installation procedures for a Fedora Workstation (using
a live media installation) and Red Hat Enterprise Linux (from installation media). You learned
how deploying Linux in cloud environments can differ from traditional installation methods by
combining metadata with prebuilt base operating system image files to run on large pools of
compute resources.
The chapter also covered special installation topics, including using boot options and disk
partitioning. With your Linux system now installed, Chapter 10, “Getting and Managing
Software,” describes how to begin managing the software on your Linux system.
215
9
Downloaded from https://onlinelibrary.wiley.com/doi/ by alex jounh - Oregon Health & Science Univer , Wiley Online Library on [05/12/2025]. See the Terms and Conditions (https://onlinelibrary.wiley.com/terms-and-conditions) on Wiley Online Library for rules of use; OA articles are governed by the applicable Creative Commons License
Chapter 9: Installing Linux
Exercises
Use these exercises to test your knowledge of installing Linux. I recommend you do these exercises on a computer that has no operating system or data on it that you would fear losing (in
other words, one you don’t mind erasing). If you have a computer that allows you to install
virtual systems, that is a safe way to do these exercises as well. These exercises were tested
using Fedora 42 Workstation Live media and a RHEL 10 Installation DVD.
1. Start installing from Fedora Live media, using as many of the default options
as possible.
2. After you have completely installed Fedora, update all of the packages on the system.
3. Start installing from an RHEL installation DVD but make it so that the installation
runs in text mode. Complete the installation in any way you choose.
4. Start installing from a RHEL installation DVD and set the disk partitioning as
follows: a 1024MB /boot, / (6G), /var (2G), and /home (2G). Leave the rest as
unused space.
Caution
Completing Exercise 4 ultimately deletes all content on your hard disk. If you just want to use this exercise to practice
partitioning, you can reboot your computer before clicking Accept Changes at the end of this procedure without harming
your hard disk. If you go forward and partition your disk, assume that all data you have not explicitly changed has been
deleted.
216
Downloaded from https://onlinelibrary.wiley.com/doi/ by alex jounh - Oregon Health & Science Univer , Wiley Online Library on [05/12/2025]. See the Terms and Conditions (https://onlinelibrary.wiley.com/terms-and-conditions) on Wiley Online Library for rules of use; OA articles are governed by the applicable Creative Commons License
Part III: Becoming a Linux System Administrator
10
Getting and Managing Software
IN THIS CHAPTER
Installing software from the desktop
Working with RPM and Deb packages
Using dnf and yum to manage packages
Using rpm to work with packages
Installing personal software with Snap, Flatpak, and Homebrew
Installing software in the enterprise
I
n Linux distributions such as Fedora and Ubuntu, you don’t need to know much about how software
is packaged and managed to get the software you want. Those distributions have excellent software
installation tools that automatically point to huge software repositories. Just a few clicks and you’re
using the software in little more time than it takes to download it.
The fact that Linux software management is so easy these days is a credit to the Linux community, which
has worked diligently to create packaging formats, complex installation tools, and high-quality software packages. Not only is it easy to get the software, but after it’s installed, it’s easy to manage, query,
update, and remove it.
This chapter begins by describing how to install software in Fedora using the Software graphical installation tool. If you are just installing a few desktop applications on your own desktop system, you may not
need much more than that and ongoing security updates.
To dig deeper into managing Linux software, next I describe what makes up Linux software packages
(comparing deb and rpm formatted packaging), underlying software management components, and commands (dnf, yum, and rpm) for managing software in Fedora and Red Hat Enterprise Linux.
For per-user software installation, I show how to use tools such as Snap, Flatpak, and Homebrew to add
software for a particular user, as opposed to adding it system wide. That’s followed by a description of
how to manage software packages in enterprise computing.
217
Linux Bible, Eleventh Edition. Christopher Negus.
© 2026 John Wiley & Sons, Inc. All rights reserved, including rights for text and data mining and training of artificial intelligence technologies or similar
technologies. Published 2026 by John Wiley & Sons, Inc.
Downloaded from https://onlinelibrary.wiley.com/doi/ by alex jounh - Oregon Health & Science Univer , Wiley Online Library on [05/12/2025]. See the Terms and Conditions (https://onlinelibrary.wiley.com/terms-and-conditions) on Wiley Online Library for rules of use; OA articles are governed by the applicable Creative Commons License
CHAPTER
Managing Software on the Desktop
The Fedora Software window offers an intuitive way of choosing and installing desktop applications that does not align with typical Linux installation practices. With the Software window,
the smallest software component you install is an application, which can contain multiple
software packages.
Figure 10.1 shows an example of the Fedora Software window.
FIGURE 10.1
Install and manage software packages from the Fedora Software window.
To get to the Software window in Fedora, move your mouse to the upper-left corner of the
screen, then type Software, and press Enter. The first time you open this window, you can
select Enable to allow third-party software repositories that are not part of the official redistributable Fedora repositories. Using the Software window is the best way to install desktop-oriented
applications, such as word processors, games, graphics editors, and educational applications.
From the Software window, you can select the applications that you want to install from the
Editor’s Picks group (a handful of popular applications), choose from categories of applications
(Audio & Video, Games, Graphics & Photography, and so on), or search by application name or
218
Downloaded from https://onlinelibrary.wiley.com/doi/ by alex jounh - Oregon Health & Science Univer , Wiley Online Library on [05/12/2025]. See the Terms and Conditions (https://onlinelibrary.wiley.com/terms-and-conditions) on Wiley Online Library for rules of use; OA articles are governed by the applicable Creative Commons License
Part III: Becoming a Linux System Administrator
description. Select the Install button to have the Software window download and install all of
the software packages needed to make the application work.
Other features of this window let you see all installed applications (Installed tab) or view a list of
applications that have updated packages available for you to install (Updates tab). If you want
to remove an installed application, simply click the Remove button next to the package name.
If you are using Linux purely as a desktop system, where you want to write documents, play
music, and do other common desktop tasks, the Software window might be all you need to get the
basic software you want. By default, your system connects to the main Fedora software repository
and gives you access to hundreds of software applications. As noted earlier, you also have the
option of accessing third-party applications that are still free for you to use but not redistribute.
Although the Software window lets you download and install hundreds of applications from
the Fedora software repository, that repository actually contains tens of thousands of software
packages. What packages can you not see from that repository, when might you want those
other packages, and how can you gain access to those packages (as well as packages from other
software repositories)?
Going Beyond the Software Window
If you are managing a single desktop system, you might be quite satisfied with the hundreds
of packages that you can find through the Software window. Open source versions of most
common types of desktop applications are available to you through the Software window.
However, the following are some examples of why you might want to go beyond what you can
do with the Software window:
More repositories Fedora and Red Hat Enterprise Linux distribute only open source,
freely distributable software. You may want to install some commercial software (such
as commercial codecs for playing special media types) or nonfree software (available
from repositories such as rpmfusion.org).
Beyond desktop applications Tens of thousands of software packages in the Fedora
repository are not available through the Software window. Most of these packages are
not associated with graphical applications at all. For example, some packages contain
pure command-line tools, system services, programming tools, or documentation that
doesn’t show up in the Software window.
Flexibility Although you may not know it, when you install an application through
the Software window, you may actually be installing multiple RPM packages. This set
of packages may just be a default package set that includes documentation, extra
fonts, additional software plug-ins, or multiple language packs that you may or may
not want. With dnf, yum, and rpm commands, you have more flexibility on exactly
which packages related to an application or other software feature is installed on
your system.
219
10
Downloaded from https://onlinelibrary.wiley.com/doi/ by alex jounh - Oregon Health & Science Univer , Wiley Online Library on [05/12/2025]. See the Terms and Conditions (https://onlinelibrary.wiley.com/terms-and-conditions) on Wiley Online Library for rules of use; OA articles are governed by the applicable Creative Commons License
Chapter 10: Getting and Managing Software
More complex queries Using commands such as dnf, yum, and rpm, you can get
detailed information about packages, package groups, and repositories.
Software validation Using rpm and other tools, you can check whether a signed
package has been modified before you installed it or whether any of the components of
a package have been tampered with since the package was installed.
Managing software installation Although the Software window works well if you
are installing desktop software on a single system, it doesn’t scale well for managing
software on multiple systems. Other tools are built on top of the rpm facility for
doing that.
Before I launch into some of the command-line tools for installing and managing software in
Linux, the next section describes how the underlying packaging and package management
systems in Linux work. In particular, I focus on RPM packaging as it is used in Fedora, Red Hat
Enterprise Linux, and related distributions as well as Deb packages, which are associated with
Debian, Ubuntu, Linux Mint, and related distributions.
Understanding Linux RPM and DEB
Software Packaging
On the first Linux systems, if you wanted to add software, you would grab the source code from a
project that produced it, compile it into runnable binaries, and drop it onto your computer. If you
were lucky, someone would have already compiled it in a form that would run on your computer.
The form of the package could be a tarball containing executable files (commands), documentation, configuration files, and libraries. (A tarball is a single file in which multiple files are
gathered together for convenient storage or distribution.) When you install software from a
tarball, the files from that tarball might be spread across your Linux system in appropriate
directories (/usr/share/man, /etc, /bin, and /lib, to name just a few). Although it is
easy to create a tarball and just drop a set of software onto your Linux system, this method of
installing software makes it difficult to do these things:
Get dependent software You would need to know if the software you were installing
depended on other software being installed for your software to work. Then you would
have to track down that software and install that too (which might itself have some
dependencies).
List the software Even if you knew the name of the command, you might not know
where its documentation or configuration files were located when you looked
for it later.
Remove the software Unless you kept the original tarball, or a list of files, you
wouldn’t know where all of the files were when it came time to remove them. Even if
you knew, you would have to remove each one individually.
220
Downloaded from https://onlinelibrary.wiley.com/doi/ by alex jounh - Oregon Health & Science Univer , Wiley Online Library on [05/12/2025]. See the Terms and Conditions (https://onlinelibrary.wiley.com/terms-and-conditions) on Wiley Online Library for rules of use; OA articles are governed by the applicable Creative Commons License
Part III: Becoming a Linux System Administrator
Update the software Tarballs are not designed to hold metadata about the contents
that they contain. After the contents of a tarball are installed, you may not have a way
to tell what version of the software you are using, making it difficult to track down
bugs and get new versions of your software.
To deal with these problems, packages progressed from simple tarballs to more complex packaging. With only a few notable exceptions (such as Gentoo, Slackware, and a few others), the
majority of Linux distributions went to one of two packaging formats—DEB and RPM:
DEB (.deb) packaging The Debian GNU/Linux project created .deb packaging, which
is used by Debian and other distributions based on Debian (Ubuntu, Linux Mint, MX
Linux, and so on). Using tools such as apt-get, apt, and dpkg, Linux distributions
could install, manage, upgrade, and remove software.
RPM (.rpm) packaging Originally named Red Hat Package Manager, but later recursively renamed RPM Package Manager, RPM is the preferred package format for SUSE,
Red Hat distributions (RHEL and Fedora), and those based on Red Hat distributions
(Amazon Linux, CentOS, Oracle Linux, and so on). The rpm command was the first tool
to manage RPMs. Later, yum was added to enhance the RPM facility, and now dnf has
replaced yum, while still maintaining compatibility with many yum commands.
For managing software on individual systems, there are proponents on both sides of the RPM
versus DEB debate with valid points. Although RPM is the preferred format for managing
enterprise-quality software installation, updates, and maintenance, DEB is popular among
many Linux enthusiasts. This chapter covers both RPM (Fedora and Red Hat Enterprise Linux)
and (to some extent) DEB packaging and software management.
Understanding DEB packaging
Debian software packages hold multiple files and metadata related to some set of software
in the format of an ar archive file. The files can be executables (commands), configuration
files, documentation, and other software items. The metadata includes such things as dependencies, licensing, package sizes, descriptions, and other information. Multiple command-line
and graphical tools are available for working with DEB files in Ubuntu, Debian, and other Linux
distributions. Some of these include the following:
Ubuntu Software Center Select the Ubuntu App Center application from the GNOME
Show Apps button. The window that appears lets you search for applications and packages that you want by searching for keywords or navigating categories.
aptitude The aptitude command is a package installation tool that provides a
screen-oriented menu that runs in the shell. After you run the command, use arrow
keys to highlight the selection you want, and press Enter to select it. You can upgrade
packages, get new packages, or view installed packages.
apt* There is a set of apt* commands (apt-get, apt, apt-config, apt-cache,
and so on) that can be used to manage package installation.
221
10
Downloaded from https://onlinelibrary.wiley.com/doi/ by alex jounh - Oregon Health & Science Univer , Wiley Online Library on [05/12/2025]. See the Terms and Conditions (https://onlinelibrary.wiley.com/terms-and-conditions) on Wiley Online Library for rules of use; OA articles are governed by the applicable Creative Commons License
Chapter 10: Getting and Managing Software
The Ubuntu App Center is fairly intuitive for finding and installing packages. However, here are
a few examples of commands that can help you install and manage packages with apt* commands. In this case, I’m looking for and installing the vsftpd package.
Note
Notice that the apt* commands are preceded by the sudo command in these examples. That’s because it is common
practice for an Ubuntu administrator to run administrative commands as a regular user with sudo privilege.
$ sudo apt-
get update
Get the latest package versions
$ sudo apt-
cache search vsftpd Find package by key word (such as vsftpd)
$ sudo apt-
cache show vsftpd
Display information about a package
$ sudo apt-
get install vsftpd
Install the vsftpd package
$ sudo apt-
get upgrade
Update installed packages if upgrade ready
$ sudo apt-
cache pkgnames
List all packages that are installed
There are many other uses of apt* commands that you can try. If you have an Ubuntu system
installed, I recommend you run man apt to get an understanding of what the apt and
related commands can do.
Understanding RPM packaging
An RPM package is a consolidation of files needed to provide all or part of a feature, such as
a word processor, a photo viewer, or a file server. The commands, configuration files, and documentation that make up the software feature can be inside an RPM. However, an RPM file
also contains metadata that stores information about the contents of that package, where the
package came from, what it needs to run, and other information.
What is in an RPM?
Before you even look inside an RPM, you can tell much about it by the name of the RPM
package itself. To find out the name of an RPM package currently installed on your system (in
this example the Firefox web browser), you could type the following from the shell in Fedora
or Red Hat Enterprise Linux:
# rpm -
q firefox
firefox-141.0-2.fc42.x86_64
From this, you can tell that the base name of the package is firefox. The version number
is 141.0 (assigned by the upstream producer of Firefox, the Mozilla Project). The release
(assigned by the packager, Fedora, each time the package is rebuilt at the same release
number) is 2. The firefox package was built for Fedora 42 (fc42) and is compiled for the x86
64-bit architecture (x86_64).
When the firefox package was installed, it was probably copied from the installation
medium (such as a USB drive or DVD) or downloaded from a YUM repository (more on that
later). If you had been given the RPM file and it was sitting in a local directory, the name
would appear as firefox-141.0-2.fc42.x86_64.rpm, and you could install it
222
Downloaded from https://onlinelibrary.wiley.com/doi/ by alex jounh - Oregon Health & Science Univer , Wiley Online Library on [05/12/2025]. See the Terms and Conditions (https://onlinelibrary.wiley.com/terms-and-conditions) on Wiley Online Library for rules of use; OA articles are governed by the applicable Creative Commons License
Part III: Becoming a Linux System Administrator
from there. Regardless of where it came from, once the package is installed, the name and
other information about it are stored in an RPM database on the local machine.
To find out more about what is inside an RPM package, you can use options other than the
rpm command to query that local RPM database, as in this example:
# rpm -
qi firefox
Name
: firefox
Version
: 141.0
Release
: 2.fc42
Architecture: x86_64
Install Date: Sat 26 Jul 2025 07:12:12 PM EDT
Group
: Unspecified
Size
: 258717681
License
: LicenseRef-
Callaway-
MPLv1.1 OR GPL-
2.0-
or-
later OR
LicenseRef-Callaway-LGPLv2+
Signature
: RSA/SHA256, Tue 22 Jul 2025 04:44:16 AM EDT, Key ID
c8ac4916105ef944
Source RPM : firefox-
141.0-
2.fc42.src.rpm
Build Date : Fri 18 Jul 2025 07:28:57 AM EDT
Build Host : buildvm-
x86-
10.rdu3.fedoraproject.org
Packager
: Fedora Project
Vendor
: Fedora Project
URL
: https://www.mozilla.org/firefox/
Bug URL
: https://bugz.fedoraproject.org/firefox
Summary
: Mozilla Firefox Web browser
Description :
Mozilla Firefox is an open-
source web browser, designed for standards
compliance, performance and portability.
Besides the information you got from the package name itself, the -qi (query information) option lets you see who built the package (Fedora Project), when it was built, and
when it was installed. The group the package is in (Unspecified), its size, and the licensing
are listed. To enable you to find out more about the package, the URL points to the project
page on the Internet, and the Summary and Description lines tell you what the package
is used for.
Where do RPMs come from?
The software included with Linux distributions, or built to work with those distributions,
comes from thousands of open source projects all over the world. These projects, referred to
as upstream software providers, usually make the software available to anyone who wants it,
under certain licensing conditions.
A Linux distribution takes the source code and builds it into binaries. Then it gathers those
binaries together with documentation, configuration files, scripts, and other components available from the upstream provider.
After all of those components are gathered into the RPM, the RPM package is signed (so that
users can test the package for validity) and placed in a repository of RPMs for the specific
223
10
Downloaded from https://onlinelibrary.wiley.com/doi/ by alex jounh - Oregon Health & Science Univer , Wiley Online Library on [05/12/2025]. See the Terms and Conditions (https://onlinelibrary.wiley.com/terms-and-conditions) on Wiley Online Library for rules of use; OA articles are governed by the applicable Creative Commons License
Chapter 10: Getting and Managing Software
distribution and architecture (32-bit x86, 64-bit x86, and so on). The repository is placed on
an installation USB drive, CD, or DVD or in a directory that is made available as an FTP, web, or
NFS server.
Installing RPMs
When you initially install a Fedora or Red Hat Enterprise Linux system, many individual RPM
packages make up that installation. After Linux is installed, you can add more packages using
the Software window (as described earlier). Refer to Chapter 9, “Installing Linux,” for information on initially installing Linux.
The first tool to be developed for installing RPM packages, however, was the rpm command.
Using rpm, you can install, update, query, validate, and remove RPM packages. The command,
however, has some major drawbacks:
Dependencies For most RPM packages to work, some other software (library, executables, and so on) must be installed on the system. When you try to install a package
with rpm, if a dependent package is not installed, the package installation fails, telling
you which components were needed. At that point, you have to dig around to find
what package contained that component. When you go to install it, that dependent
package might itself have dependencies that you need to install to get it to work.
This situation is lovingly referred to as “dependency hell” and is often used as an
example of why DEB packages were better than RPMs. DEB packaging tools were made
to resolve package dependencies automatically, well before RPM-related packaging tools
could do that.
Location of RPMs The rpm command expects you to provide the exact location of the
RPM file when you try to install it. In other words, you would have to give firefox-
141.0-2.fc42.x86_64.rpm as an option if the RPM were in the current directory
or http://example.com/firefox-141.0-2.fc42.x86_64.rpm if it were on a server.
As Red Hat Linux and other RPM-based applications grew in popularity, it became apparent
that something had to be done to make package installation more convenient. The answer was
the YUM facility.
Managing RPM Packages with dnf and yum
The YellowDog Updater Modified (YUM) project set out to solve the headache of managing
dependencies with RPM packages. Its major contribution was to stop thinking about RPM packages as individual components and think of them as parts of larger software repositories.
With repositories, the problem of dealing with dependencies fell not to the person who
installed the software but to the Linux distribution or third-party software distributor that
makes the software available. So, for example, it would be up to the Fedora Project to make
sure that every component needed by every package in its Linux distribution could be resolved
by some other package in the repository.
224
Downloaded from https://onlinelibrary.wiley.com/doi/ by alex jounh - Oregon Health & Science Univer , Wiley Online Library on [05/12/2025]. See the Terms and Conditions (https://onlinelibrary.wiley.com/terms-and-conditions) on Wiley Online Library for rules of use; OA articles are governed by the applicable Creative Commons License
Part III: Becoming a Linux System Administrator
Repositories could also build on each other. So, for example, the rpmfusion.org repository
could assume that a user already had access to the main Fedora repository. If a package being
installed from rpmfusion.org needed a library or command from the main Fedora repository,
the Fedora package could be downloaded and installed at the same time that you install the
rpmfusion.org package.
The YUM repositories could be put in a directory on a web server (http://); on an FTP server
(ftp://); on local media such as a USB, CD, or DVD; or in a local directory (file://). The
locations of these repositories would then be stored on the user’s system in the /etc/dnf/
dnf.conf file or, more typically, in separate configuration files in the /etc/yum.repos.d
directory.
Transitioning from yum to dnf
The dnf command-line interface represents the next generation of YUM. DNF, which refers to
itself as Dandified YUM (https://github.com/rpm-software-management/dnf5/), has been
part of Fedora since version 18 and has just been added as the default RPM package manager
for RHEL 8. Like yum, dnf is a tool for finding, installing, querying, and generally managing
RPM packages from remote software repositories to your local Linux system.
While dnf maintains a basic command-line compatibility with yum, one of its main differences is that it adheres to a strict API. That API encourages the development of extensions and
plug-ins to dnf.
For our purposes, almost all of the yum commands described in this chapter can be replaced
by dnf or used as they are. The yum command is a symbolic link to dnf in Fedora and RHEL,
so typing either command has the same result. For more information on DNF, refer to the DNF
page at https://dnf.readthedocs.io/.
Understanding how dnf works
This is the basic syntax of the dnf command:
# dnf [options] command
Using that syntax, you can find packages, see package information, find out about package
groups, update packages, or delete packages, to name a few features. With the YUM repository
and configuration in place, a user can install a package by simply typing something like the
following:
# dnf install firefox
The user only needs to know the package name (which could be queried in different ways,
as described in the section “Searching for packages” later in this chapter). The YUM facility
finds the latest version of that package available from the repository, downloads it to the local
system, and installs it.
225
10
Downloaded from https://onlinelibrary.wiley.com/doi/ by alex jounh - Oregon Health & Science Univer , Wiley Online Library on [05/12/2025]. See the Terms and Conditions (https://onlinelibrary.wiley.com/terms-and-conditions) on Wiley Online Library for rules of use; OA articles are governed by the applicable Creative Commons License
Chapter 10: Getting and Managing Software
To gain more experience with the YUM facility and to see where there are opportunities for
you to customize how YUM works on your system, follow the descriptions of each phase of the
YUM install process described next.
Note
In earlier Fedora and RHEL systems, YUM was configured in the /etc/yum.conf file. Now, the main dnf configuration file is /etc/dnf/dnf.conf, with the /etc/dnf directory containing modules and plug-ins that add to your
ability to manage RPM packages.
1. Checking /etc/dnf/dnf.conf:
When any dnf or yum command starts, it checks the file /etc/dnf/dnf.conf for
default settings, along with other configuration files in subdirectories of /etc/dnf/.
The /etc/dnf/dnf.conf file is a place to set defaults for YUM repositories. If you
like, you can change locations of log or cache directories or set installation limits or
whether to do gpgchecks on packages. Type man dnf.conf for details. You can also
identify the location and settings for repositories here, although the /etc/yum
.repos.d directory is the more typical location for identifying repositories in individual files. This file is empty by default, but here are some things you could set:
[main]
gpgcheck=1
installonly_limit=3
The gpgcheck is used to validate each package against a key that you receive from
those who built the RPM. It is on by default (gpgcheck=1). For packages in Fedora
or RHEL, the key comes with the distribution to check all packages. To install packages that are not from your distribution, you need either to import the key to verify
those packages or to turn off that feature (gpgcheck=0).
The install_onlylimit=3 setting allows up to three versions of the same
package to be kept on the system (don’t set this to less than 2, to ensure that you
always have at least two kernel packages).
2. Checking /etc/yum.repos.d/*.repo files:
Software repositories can be enabled by dropping files ending in .repo into the
/etc/yum.repos.d/ directory that point to the location of one or more repositories. In Fedora, even your basic Fedora repositories are enabled from .repo files
in this directory. Here’s an example of a simple yum configuration file named
/etc/yum.repos.d/myrepo.repo:
[myrepo]
name=My repository of software packages
baseurl=http://myrepo.example.com/pub/myrepo
enabled=1
gpgcheck=1
gpgkey=file:///etc/pki/rpm-
gpg/MYOWNKEY
226
Downloaded from https://onlinelibrary.wiley.com/doi/ by alex jounh - Oregon Health & Science Univer , Wiley Online Library on [05/12/2025]. See the Terms and Conditions (https://onlinelibrary.wiley.com/terms-and-conditions) on Wiley Online Library for rules of use; OA articles are governed by the applicable Creative Commons License
Part III: Becoming a Linux System Administrator
Each repository entry begins with the name of the repository enclosed in square
brackets. The name line contains a human-readable description of the repository.
The baseurl line identifies the directory containing the RPM files, which can be an
httpd://, ftp://, or file:// entry.
The enabled line indicates whether the entry is active. A 1 is active; 0 is inactive.
If there is no enabled line, the entry is active. The last two lines in the preceding
code indicate whether to check the signatures on packages in this repository. The
gpgkey line shows the location of the key that is used to check the packages in this
repository.
You can have as many repositories enabled as you like. However, keep in mind that
when you use yum or dnf commands, every repository is checked, and metadata
about all packages is downloaded to the local system running the yum command. So,
to be more efficient, don’t enable repositories that you don’t need.
3. Downloading RPM packages and metadata from a YUM repository:
After dnf knows the locations of the repositories, metadata from the repodata
directory of each repository is downloaded to the local system. In fact, it is the existence of a repodata directory in a directory of RPMs that indicates that it is a YUM
repository.
Metadata information is stored on the local system in the /var/cache/libdnf5
directory. Any further queries about packages, package groups, or other information
from the repository are gathered from the cached metadata until a time-out period
is reached.
After the timeout period is reached, fresh metadata is retrieved if the dnf or yum
command is run. By default, the time-out is 6 hours for yum and 48 hours for dnf.
You can change that period by setting metadata_expire in the
/etc/dnf/dnf.conf file.
Next, dnf looks at the packages that you requested to install and checks if any
dependent packages are needed by those packages. With the package list gathered,
dnf asks you if it is okay to download all of those packages. If you choose yes, the
packages are downloaded to the cache directories and installed.
4. Installing RPM packages to Linux filesystem:
After all of the necessary packages are downloaded to the cache directories, dnf runs
rpm commands to install each package. If a package contains preinstall scripts (which
might create a special user account or make directories), those scripts are run. The
contents of the packages (commands, config files, docs, and so on) are copied to the
filesystem at locations specified in the RPM metadata. Then any post-install scripts
are run. (Post-install scripts run additional commands needed to configure the system
after each package is installed.)
5. Storing YUM repository metadata to local RPM database.
The metadata contained in each RPM package that is installed is ultimately copied
into the local RPM database. The RPM database is contained in files that are stored
227
10
Downloaded from https://onlinelibrary.wiley.com/doi/ by alex jounh - Oregon Health & Science Univer , Wiley Online Library on [05/12/2025]. See the Terms and Conditions (https://onlinelibrary.wiley.com/terms-and-conditions) on Wiley Online Library for rules of use; OA articles are governed by the applicable Creative Commons License
Chapter 10: Getting and Managing Software
in the /var/lib/dnf or /var/lib/rpm directory, depending on your RHEL or
Fedora release. After information about installed packages is in the local database, you
can do all sorts of queries of that database. You can see what packages are installed,
list components of those packages, and see scripts or change logs associated with each
package. You can even validate installed packages against the RPM database to see if
anyone has tampered with installed components.
The rpm command (described in the section “Installing, Querying, and Verifying Software with the rpm Command” later in this chapter) is the best tool for querying the
RPM database. You can run individual queries with rpm or use it in scripts to produce
reports or run common queries over and over again.
Now that you understand the basic functioning of the dnf command, your Fedora system
should be automatically configured to connect to the main Fedora repository and the Fedora
Updates repository. You can try some dnf command lines to install packages right now. Or,
you can enable other third-party YUM repositories to draw software from.
Using YUM with third-party software repositories
The Fedora and Red Hat Enterprise Linux software repositories have been screened to contain
only software that meets criteria that make it open and redistributable. In some instances,
however, you may want to go beyond those repositories. Before you do, you should understand
that some third-party repositories have these limitations:
■
■
■
■
They may have less stringent requirements for redistribution and freedom from patent
constraints than the Fedora and RHEL repositories have.
They may introduce some software conflicts.
They may include software that is not open source and, although it may be free for
personal use, may not be redistributable.
They may slow down the process of installing all of your packages (because metadata
is downloaded for every repository you have enabled).
For those reasons, I recommend that you either (1) don’t enable any extra software repositories, or (2) enable only the RPM Fusion repository (http://rpmfusion.org) at first for
Fedora and the EPEL repository (http://fedoraproject.org/wiki/EPEL) for Red Hat Enterprise Linux. RPM Fusion represents a fusion of several popular third-party Fedora repositories
(Freshrpms, Livna.org, and Dribble). See the FAQ for details (http://rpmfusion.org/FAQ).
To enable the Free RPM Fusion repository in Fedora, do the following:
1. Open a Terminal window.
2. Type su and enter the root password when prompted.
3. Type the following command on one line with no space in between the slash and
rpmfusion (if that doesn’t work, go to the fedora directory and choose the RPM
appropriate for your version of Fedora):
# rpm -
Uvh \
http://download1.rpmfusion.org/free/fedora/rpmfusion-free-release-
stable.noarch.rpm
228
Downloaded from https://onlinelibrary.wiley.com/doi/ by alex jounh - Oregon Health & Science Univer , Wiley Online Library on [05/12/2025]. See the Terms and Conditions (https://onlinelibrary.wiley.com/terms-and-conditions) on Wiley Online Library for rules of use; OA articles are governed by the applicable Creative Commons License
Part III: Becoming a Linux System Administrator
The RPM Fusion Nonfree repository contains such things as codecs needed to play many popular multimedia formats. To enable the Nonfree repository in Fedora, type the following (again,
type the following two lines on a single line, with no space between the two):
# rpm -
Uhv \
http://download1.rpmfusion.org/nonfree/fedora/rpmfusion-nonfree-release-
stable.noarch.rpm
Most of the other third-party repositories that might interest you contain software that is not
open source. For example, if you want to install the Adobe Flash plug-in for Linux, download the
YUM repository package from Adobe, and you can use the yum command to install the Flash plugin and get updates later by running the yum update command when updates are available.
Managing software with the dnf command
The yum and dnf commands have dozens of subcommands that you can use to work with
RPM packages on your system. The following sections provide some examples of useful dnf
command lines to search for, install, query, and update packages associated with your YUM
repositories. The section “Installing and removing packages” describes how to install and
remove installed packages with the dnf command.
Note
Metadata, describing the contents of YUM repositories, is downloaded from each of your enabled YUM repositories the
first time you run a dnf command. Metadata is downloaded again after the metadata_expire time is reached.
The more YUM repositories that you enable and the larger they are, the longer this download can take. You can reduce
this download time by increasing the expire time (in the /etc/dnf/dnf.conf file) or by not enabling repositories
you don’t need.
Searching for packages
Using different searching subcommands, you can find packages based on key words, package
contents, or other attributes.
Let’s say you want to try a different text editor but you can’t remember the name of the one
you wanted. You could start by using the search subcommand to look for the term editor in
the name or description:
# dnf search editor
...
emacs.x86_64: GNU Emacs text editor
emacs-
gtk+x11.x86_64: GNU Emacs text editor with GTK toolkit X support
emacs-
lucid.x86_64: GNU Emacs text editor with Lucid toolkit X support
emacs-
nw.x86_64: GNU Emacs text editor with no window system support
enki.noarch: Text editor for programmers
equalx.x86_64: A graphical editor for writing LaTeX equations
eureka.x86_64: A cross-
platform map editor for the classic DOOM
games
...
229
10
Downloaded from https://onlinelibrary.wiley.com/doi/ by alex jounh - Oregon Health & Science Univer , Wiley Online Library on [05/12/2025]. See the Terms and Conditions (https://onlinelibrary.wiley.com/terms-and-conditions) on Wiley Online Library for rules of use; OA articles are governed by the applicable Creative Commons License
Chapter 10: Getting and Managing Software
The search uncovered a long list of packages containing editor in the name or summary. The
one I was looking for is named emacs. To get information about that package, I can use the
info subcommand:
# dnf info emacs
Name
:
Epoch
:
Version
:
Release
:
Architecture
:
Download size :
Installed size :
Source
:
Repository
:
Summary
:
URL
:
License
:
Description
:
documenting,
emacs
1
30.1
13.fc42
x86_64
32.5 MiB
171.5 MiB
emacs-
30.1-
13.fc42.src.rpm
updates
GNU Emacs text editor
https://www.gnu.org/software/emacs/
GPL-
3.0-
or-
later AND CC0-
1.0
GNU Emacs is a powerful, customizable, self-
modeless text editor...
If you know the command, configuration file, or library name you want but don’t know what
package it is in, use the provides subcommand to search for the package. Here you can see
that the dvdrecord command is part of the wodim package:
# dnf provides dvdrecord
wodim-
1.1.11-
59.fc42.x86_64 : A command line CD/DVD recording program
Repo
: fedora
Matched from:
Filename
: /usr/bin/dvdrecord
The list subcommand can be used to list package names in different ways. Use it with a
package base name to find the version and repository for a package. You can list all packages
that are available (--available) or installed (--installed).
# dnf list emacs
emacs.x86_64 1:30.1-
13.fc42 updates
# dnf list --available
Available packages
0ad.x86_64
0ad-
data.noarch
0xFFFF.x86_64
2048-
cli.x86_64
2048-
cli-
nocurses.x86_64
2048-
cli-
sdl.x86_64
...
230
0.27.1-
1.fc42
0.27.1-
1.fc42
0.10-
13.fc42
0.9.1-
23.fc42
0.9.1-
23.fc42
0.9.1-
23.fc42
updates
updates
fedora
fedora
fedora
fedora
Downloaded from https://onlinelibrary.wiley.com/doi/ by alex jounh - Oregon Health & Science Univer , Wiley Online Library on [05/12/2025]. See the Terms and Conditions (https://onlinelibrary.wiley.com/terms-and-conditions) on Wiley Online Library for rules of use; OA articles are governed by the applicable Creative Commons License
Part III: Becoming a Linux System Administrator
# dnf list --installed
Installed Packages
Box2D.x86_64
9abde4f8
ImageMagick.x86_64
ImageMagick-
libs.x86_64
LibRaw.x86_64
ModemManager.x86_64
9abde4f8
2.4.2-
3.fc42
624cbc92582d4ecfae4c5874
1:7.1.1.47-
1.fc42
1:7.1.1.47-
1.fc42
0.21.4-
1.fc42
1.22.0-
5.fc42
updates
updates
updates
624cbc92582d4ecfae4c5874
Installing and removing packages
The install subcommand lets you install one or more packages, along with any dependent
packages needed. With dnf install, multiple repositories can be searched to fulfill needed
dependencies. Consider the following example of dnf install:
# dnf install emacs
Updating and loading repositories:
Repositories loaded.
Package
Arch
Upgrading:
glibc
x86_64
replacing glibc
x86_64
glibc-
all-
langpacks
x86_64
replacing glibc-
all-
langpacks x86_64
glibc-
common
x86_64
...
Installing:
emacs
x86_64
Installing dependencies:
emacs-
common
x86_64
...
Transaction Summary:
Installing:
15 packages
Upgrading:
4 packages
Replacing:
4 packages
Version
Repository
2.41-
9.fc42
2.41-
8.fc42
2.41-
9.fc42
2.41-
8.fc42
2.41-
9.fc42
updates
updates
updates
updates
updates
Size
6.6
6.6
226.9
226.9
1.0
MiB
MiB
MiB
MiB
MiB
1:30.1-
13.fc42 updates
171.5 MiB
1:30.1-
13.fc42 updates
103.8 MiB
Total size of inbound packages is 153 MiB. Need to download 153 MiB.
After this operation, 440 MiB extra will be used
(install 681 MiB, remove 242 MiB).
Is this ok [y/N]: y
You can see here that emacs requires that emacs-common and several other packages be
installed so all are queued up for installation. The six packages together are 132MB to download, but they consume 531MB after installation. Pressing y installs them. You can put a -y on
the command line (at the end of the dnf command) to avoid having to press y to install the
packages. Personally, however, I usually want to see all of the packages about to be installed
before I agree to the installation.
231
10
Downloaded from https://onlinelibrary.wiley.com/doi/ by alex jounh - Oregon Health & Science Univer , Wiley Online Library on [05/12/2025]. See the Terms and Conditions (https://onlinelibrary.wiley.com/terms-and-conditions) on Wiley Online Library for rules of use; OA articles are governed by the applicable Creative Commons License
Chapter 10: Getting and Managing Software
You can reinstall a package if you mistakenly delete components of an installed package. If
you attempt a regular install, the system responds with “nothing to do.” You must instead use
the reinstall subcommand. For example, suppose that you installed the zsh package and
then deleted /bin/zsh by mistake. You could restore the missing components by typing the
following:
# rpm -
V zsh
missing
/usr/bin/zsh
# dnf reinstall zsh
# type zsh
zsh is /usr/bin/zsh
You can remove a single package, along with its dependencies that aren’t required by other
packages, with the remove subcommand. For example, to remove the tito package and
dependencies, you could type the following:
# dnf remove tito
Package
Arch
Version
Repository
Removing:
tito
noarch
0.6.27-
2.fc42 updates
Removing unused dependencies:
add-
determinism
x86_64
0.6.0-
1.fc42
updates
...
Transaction Summary:
Removing:
186 packages
Size
662.0 KiB
2.4 MiB
After this operation, 132 MiB will be freed (install 0 B, remove 132 MiB).
Is this ok [y/N]: y
Notice that the space shown for each package is the actual space consumed by the package in
the filesystem and not the download size (which is considerably smaller).
An alternative method to remove a set of packages that you have installed is to use the
history subcommand. Using history, you can see your dnf activities (history list
and history info) and undo an entire transaction (history undo). In other words, all
of the packages that you installed can be uninstalled using the undo option of the history
subcommand, as in the following example:
# dnf history list | head
ID Command line
Date and time
7 dnf remove tito
2025-
07-
27 21:26:26
6 dnf install tito
2025-
07-
27 21:02:31
5 yum install libcgroup-
tools 2025-
07-
27 11:52:02
# dnf history info 5
Transaction ID : 5
Begin time
: 2025-
07-
27 11:52:02
232
Action(s) Altered
186
187
2
Downloaded from https://onlinelibrary.wiley.com/doi/ by alex jounh - Oregon Health & Science Univer , Wiley Online Library on [05/12/2025]. See the Terms and Conditions (https://onlinelibrary.wiley.com/terms-and-conditions) on Wiley Online Library for rules of use; OA articles are governed by the applicable Creative Commons License
Part III: Becoming a Linux System Administrator
Begin rpmdb
:
bb0fd34f84804ca11e1e3c13accad5014bebbc1f5cc3b89198593f74783da96f
End time
: 2025-
07-
27 11:52:03
End rpmdb
:
3ffd9991cc45cac82dd2b7fbfe926ec2a4cbf44c157c28637d7ebce3680e972b
User
: 1000 Chris Negus <chris>
Status
: Ok
Releasever
: 42
Description
: yum install libcgroup-
tools
Comment
:
Packages altered:
Action Package
Reason
Repository
Install libcgroup-
tools-
0:3.0-
8.fc42.x86_64 User
fedora
Install libcgroup-
0:3.0-
8.fc42.x86_64
Dependency fedora
# dnf history undo 5
Updating and loading repositories:
Repositories loaded.
Package
Arch
Removing
libcgroup-
tools
x86_64
Removing unused dependencies:
libcgroup
x86_64
Version
Repository
Size
3.0-
8.fc42 fedora
298.4 KiB
3.0-
8.fc42 fedora
157.7 KiB
Transaction Summary:
Removing:
2 packages
After this operation, 456 KiB will be freed (install 0 B, remove 456 KiB).
Is this ok [y/N]: y
Notice that before undoing the transaction we displayed exactly which packages were involved.
Viewing the transaction can save you from mistakenly deleting packages that you want to
keep. By undoing transaction 5, you can remove all packages that were installed during that
transaction. If you are trying to undo an install that included dozens or even hundreds of
packages, undo can be a very useful option.
Updating packages
As new releases of a package become available, they are sometimes put into separate update
repositories or simply added to the original repository. If multiple versions of a package are
available (whether in the same repository or in another enabled repository), dnf provides
the latest version when you install a package. For some packages, such as the Linux kernel
package, you can keep multiple versions of the same package.
If a new version of a package shows up later, you can download and install the new version of
the package by using the update subcommand.
233
10
Downloaded from https://onlinelibrary.wiley.com/doi/ by alex jounh - Oregon Health & Science Univer , Wiley Online Library on [05/12/2025]. See the Terms and Conditions (https://onlinelibrary.wiley.com/terms-and-conditions) on Wiley Online Library for rules of use; OA articles are governed by the applicable Creative Commons License
Chapter 10: Getting and Managing Software
The check-update subcommand can check for updates. The update subcommand can be
used to update a single package or to get updates to all packages that are currently installed
and have an update available. Or, you can simply update a single package (such as the cups
package), as in this example:
# dnf check-update
…
open-vm-tools-desktop.x86_64 13.0.0-1.fc42
opensc.x86_64
0.26.1-
3.fc42
opensc-
libs.x86_64
0.26.1-
3.fc42
python3-
boto3.noarch
1.39.13-
1.fc42
python3-
botocore.noarch
1.39.13-
1.fc42
…
# dnf update
Updating and loading repositories:
Repositories loaded.
Package
Arch
Upgrading:
open-
vm-
tools
x86_64
replacing open-
vm-
tools
x86_64
open-
vm-
tools-
desktop
x86_64
replacing open-
vm-
tools-
desktop x86_64
opensc
x86_64
replacing opensc
x86_64
…
Transaction Summary:
Upgrading:
14 packages
Replacing:
14 packages
updates
updates
updates
updates
updates
Versio
Repository
Size
13.0.0-
1.fc42
12.5.2-
1.fc42
13.0.0-
1.fc42
12.5.2-
1.fc42
0.26.1-
3.fc42
0.26.1-
2.fc42
updates
3.0 MiB
updates
3.1 MiB
updates
446.4 KiB
updates
446.4 KiB
updates
1.2 MiB
624cbc9... 1.2 MiB
Total size of inbound packages is 35 MiB. Need to download 35 MiB.
After this operation, 27 KiB extra will be used
(install 365 MiB, remove 365 MiB).
Is this ok [y/N]: y
# dnf update cups
The preceding command requested to update the cups package. If other dependent packages need to be updated to update cups, those packages would be downloaded and
installed as well.
Updating groups of packages
To make it easier to manage a whole set of packages at once, YUM supports package groups.
For example, you could install GNOME desktop environment (to get a whole desktop) or Virtualization (to get packages needed to set up the computer as a virtualization host). You can
start by running the group list subcommands to see a list of group names:
# dnf group list | grep kde
ID
Name
kde-
office
KDE Office
234
Installed
no
Downloaded from https://onlinelibrary.wiley.com/doi/ by alex jounh - Oregon Health & Science Univer , Wiley Online Library on [05/12/2025]. See the Terms and Conditions (https://onlinelibrary.wiley.com/terms-and-conditions) on Wiley Online Library for rules of use; OA articles are governed by the applicable Creative Commons License
Part III: Becoming a Linux System Administrator
kde-
pim
kde-
software-
development
kde-
desktop
…
KDE PIM
KDE Software Development
KDE
no
no
no
Let’s say that you wanted to try out a different desktop environment. You see that we
searched the list for kde and found kde-desktop. To find out what comes with that group, use
the group info subcommand:
# dnf group info kde-
desktop
Id
: kde-
desktop
Name
: KDE
Description
: The KDE Plasma Workspaces, a highly-
configurable
graphical user interface which includes a
panel,
desktop, system icons and desktop widgets, and
many powerful KDE applications.
Installed
: no
Order
:
Langonly
:
Uservisible
: yes
Repositories
: fedora, updates
Mandatory packages
: plasma-
desktop
: plasma-
workspace
: plasma-
workspace-
wallpapers ...
In addition to showing a description of the group, group info shows Mandatory Packages
(those that are always installed with the group), Default Packages (those that are installed by
default but can be excluded), and Optional Packages (which are part of the group but not installed
by default). When you use some graphical tools to install package groups, you can uncheck
default packages or check optional packages to change whether they are installed with the group.
If you decide that you want to install a package group, use the groupinstall subcommand:
# dnf group install kde-
desktop
This groupinstall resulted in 101 packages from the group being installed and 5 existing packages being updated. If you decide that you don’t like the group of packages, you can
remove the entire group at once using the groupremove subcommand:
# dnf group remove kde-
desktop
Maintaining your RPM package database and cache
Several subcommands to yum can help you do maintenance tasks, such as checking for problems with your RPM database or clearing out the cache. The YUM facility has tools for maintaining your RPM packages and keeping your system’s software efficient and secure.
Clearing out the cache is something that you want to do from time to time. If you decide to
keep downloaded packages after they are installed (they are removed by default, based on the
235
10
Downloaded from https://onlinelibrary.wiley.com/doi/ by alex jounh - Oregon Health & Science Univer , Wiley Online Library on [05/12/2025]. See the Terms and Conditions (https://onlinelibrary.wiley.com/terms-and-conditions) on Wiley Online Library for rules of use; OA articles are governed by the applicable Creative Commons License
Chapter 10: Getting and Managing Software
keepcache=0 setting in the /etc/dnf/dnf.conf file), your cache directories (under
/var/cache/dnf) can fill up. Metadata stored in cache directories can be cleared, causing
fresh metadata to be downloaded from all enabled YUM repositories the next time yum is run.
Here are ways to clear that information:
# dnf clean packages
Removed 206 files, 2 directories (total of 933 MiB). 0 errors
occurred.
# dnf clean metadata
Removed 79 files, 22 directories (total of 263 MiB). 0 errors
occurred.
# dnf clean all
Removed 0 files, 13 directories (total of 0 B). 0 errors occurred.
Although unlikely, it’s possible that the RPM database can become corrupted. This can happen if something unexpected occurs, such as pulling out the power cord when a package is
partially installed. You can check the RPM database to look for errors (dnf check) or just
rebuild the RPM database files. Here’s an example of a corrupt RPM database and the rpm
command that you can use to fix it:
# dnf check
# rpm --rebuilddb
The yum clean examples in the preceding command lines remove cached data from the
/var/cache/dnf subdirectories. The rpm --rebuilddb example rebuilds the database.
The yum check example can check for problems with the local RPM cache and database but
notice that we used the rpm command to fix the problem.
In general, the command best suited for working with the local RPM database is the
rpm command.
Downloading RPMs from a YUM repository
If you just want to examine a package without actually installing it, you can download that
package with the dnf command or, in earlier releases, use the yumdownloader command.
Either case causes the package that you name to be downloaded from the YUM repository and
copied to your current directory.
For example, to download the latest version of the Firefox web browser package with
yumdownloader from the YUM repository to your current directory, type the following:
# yumdownloader firefox
firefox-
141.0-
2.fc42.x86_64.rpm
236
9.8 MB/s |
77 MB
00:07
Downloaded from https://onlinelibrary.wiley.com/doi/ by alex jounh - Oregon Health & Science Univer , Wiley Online Library on [05/12/2025]. See the Terms and Conditions (https://onlinelibrary.wiley.com/terms-and-conditions) on Wiley Online Library for rules of use; OA articles are governed by the applicable Creative Commons License
Part III: Becoming a Linux System Administrator
To use the dnf command, type this:
# dnf download firefox
Downloading Packages:
firefox-
0:141.0-
2.fc42.x86_64
00m05s
100% |
16.0 MiB/s |
77.0 MiB |
With any downloaded RPM package now sitting in your current directory, you can use a variety of rpm commands to query or use that package in different ways (as described in the
next section).
Installing, Querying, and Verifying Software with the
rpm Command
There is a wealth of information about installed packages in the local RPM database. The rpm
command contains dozens of options to enable you to find information about each package, such
as the files it contains, who created it, when it was installed, how large it is, and many other
attributes. Because the database contains fingerprints (md5sums) of every file in every package, it
can be queried with RPM to find out if files from any package have been tampered with.
The rpm command can still do basic install and upgrade activities, although most people only use
rpm in that way when there is a package sitting in the local directory, ready to be installed. So,
let’s get one in our local directory to work with. Type the following to download the latest version
of the zsh package:
# dnf download zsh
zsh-
0:5.9-
16.fc42.x86_64
00m01s
100% |
3.2 MiB/s |
3.3 MiB |
With the zsh package downloaded to your current directory, try some rpm commands on it.
Installing and removing packages with rpm
To install a package with the rpm command, type the following:
# rpm -i zsh-0:5.9-16.fc42.x86_64.rpm
Notice that the entire package name is given to install with rpm, not just the package base name.
If an earlier version of zsh were installed, you could upgrade the package using -U. Often, people
use -h and -v options to get hash signs printed and more verbose output during the upgrade:
10
# rpm -Uhv zsh-5.9-16.fc42.x86_64.rpm
Verifying…
######################### [100%]
Preparing…
######################### [100%]
Updating / installing...
1:zsh-
5.9-
16.fc42
######################### [100%]
237
Downloaded from https://onlinelibrary.wiley.com/doi/ by alex jounh - Oregon Health & Science Univer , Wiley Online Library on [05/12/2025]. See the Terms and Conditions (https://onlinelibrary.wiley.com/terms-and-conditions) on Wiley Online Library for rules of use; OA articles are governed by the applicable Creative Commons License
Chapter 10: Getting and Managing Software
Although an install (-i) only installs a package if the package is not already installed, an
upgrade (-U) installs the package even if it is already installed. A third type of install, called
freshen (-F), installs a package only if an existing, earlier version of a package is installed on
the computer, as in this example:
# rpm -
Fhv *.rpm
You could use the previous freshen command if you were in a directory containing thousands
of RPMs but only wanted to update those that were already installed (in an earlier version) on
your system and skip those that were not yet installed.
You can add a few interesting options to any of your install options. The --replacepkgs
option enables you to reinstall an existing version of a package (if, for example, you had mistakenly deleted some components), and the --oldpackage enables you to replace a newer
package with an earlier version.
# rpm -Uhv --replacepkgs emacs-30.1-13.fc42.x86_64.rpm
# rpm -Uhv --oldpackage zsh-5.0.2-25.el7_3.1.x86_64.rpm
You can remove a package with the -e option. You only need the base name of a package to
remove it. Here’s an example:
# rpm -
e emacs
The rpm -
e emacs command would be successful because no other packages are dependent
on emacs. However, it would leave behind emacs-common, which was installed as a dependency to emacs. If you had tried to remove emacs-common first, that command would fail
with a “Failed dependencies” message.
Querying rpm information
After the package is installed, you can query for information about it. Using the -q option,
you can see information about the package including a description (-qi), list of files (-ql),
documentation (-qd), and configuration files (-qc).
# rpm -
qi zsh
Name
: zsh
Version
: 5.9
Release
: 16.fc42
…
# rpm -
ql zsh
/etc/skel/.zprofile
/etc/skel/.zshrc
/etc/zlogin
/etc/zlogout
…
# rpm -
qd zsh
/usr/share/doc/zsh/BUGS
/usr/share/doc/zsh/CONTRIBUTORS
/usr/share/doc/zsh/FAQ
238
Downloaded from https://onlinelibrary.wiley.com/doi/ by alex jounh - Oregon Health & Science Univer , Wiley Online Library on [05/12/2025]. See the Terms and Conditions (https://onlinelibrary.wiley.com/terms-and-conditions) on Wiley Online Library for rules of use; OA articles are governed by the applicable Creative Commons License
Part III: Becoming a Linux System Administrator
…
# rpm -
qc zsh
/etc/skel/.zprofile
/etc/skel/.zshrc
/etc/zlogin
/etc/zlogout
…
You can use options to query any piece of information contained in an RPM. You can find what
an RPM needs for it to be installed (--requires), what version of software a package provides (--provides), what scripts are run before and after an RPM is installed or removed
(--scripts), and what changes have been made to an RPM (--changelog).
# rpm -q --requires emacs-common
/bin/sh
/usr/bin/pkg-config
/usr/bin/readlink
/usr/bin/sh
/usr/sbin/alternatives
…
# rpm -q --provides emacs-common
application()
application(emacs-mail.desktop)
application(emacs.desktop)
config(emacs-common) = 1:30.1-13.fc42
emacs-common = 1:30.1-13.fc42
emacs-common(x86-64) = 1:30.1-13.fc42
…
# rpm -q --scripts httpd
postinstall scriptlet (using /bin/sh):
if [ $1 -
eq 1 ] && [ -
x "/usr/lib/systemd/systemd-
update-
helper" ];
then
# Initial installation
/usr/lib/systemd/systemd-
update-
helper install-
system-
units
httpd.service
htcacheclean.service httpd.socket || :
fi
preuninstall scriptlet (using /bin/sh):
# rpm -
q -
-
changelog httpd | less
Thu Jul 17 2025 Luboš Uhliarik <luhliari@redhat.com> -2.4.64-
2
-Fix RewriteRule with inverted pattern and RewriteCond regression
* Fri Jul 11 2025 Luboš Uhliarik <luhliari@redhat.com> -2.4.64-
1
-new version 2.4.64
…
239
10
Downloaded from https://onlinelibrary.wiley.com/doi/ by alex jounh - Oregon Health & Science Univer , Wiley Online Library on [05/12/2025]. See the Terms and Conditions (https://onlinelibrary.wiley.com/terms-and-conditions) on Wiley Online Library for rules of use; OA articles are governed by the applicable Creative Commons License
Chapter 10: Getting and Managing Software
In the previous two examples, you can see that scripts inside the httpd have postinstall and
preinstall scriptlets and that the --changelog option enables you to see why changes have
been made to each version of the package.
Using a feature called --queryformat, you can query different tags of information and
output them in any form you like. Run the --querytags option to be able to see all of the
tags that are available:
# rpm -
-
querytags | less
ARCH
ARCHIVESIZE
ARCHSUFFIX
BASENAMES
BUGURL
…
# rpm -
q binutils -
-
queryformat "The package is %{NAME} \
and the release is %{RELEASE}\n"
The package is binutils and the release is 5.fc42
All of the queries that you have done so far have been to the local RPM database. By adding a
-p to those query options, you can query an RPM file sitting in your local directory instead.
The -p option is a great way to look inside a package that someone gives you to investigate
what it is before you install it on your system.
If you haven’t already, get the zsh package and put it in your local directory (dnf
download zsh). Then run some query commands on the RPM file.
# rpm -qip zsh-5.9-16.fc42.x86_64.rpm
# rpm -qlp zsh-5.9-16.fc42.x86_64.rpm
# rpm -qdp zsh-5.9-16.fc42.x86_64.rpm
# rpm -qcp zsh-5.9-16.fc42.x86_64.rpm
# View info about the RPM
file
# List all files in the RPM
file
# Show docs in the RPM file
# List config files in the
RPM file
Verifying RPM packages
Using the -V option, you can check the packages installed on your system to see if the components have been changed since the packages were first installed. Although it is normal for
configuration files to change over time, it is not normal for binaries (the commands in /bin,
/sbin, and so on) to change after installation. Binaries that are changed are probably an
indication that your system has been cracked.
In this example, I’m going to install the zsh package and mess it up. If you want to try along
with the examples, be sure to remove or reinstall the package when you are finished.
#
#
#
#
240
rpm -i zsh-5.9-15.fc41.x86_64.rpm
echo hello> /bin/zsh
rm /etc/zshrc
rpm -
V zsh
Downloaded from https://onlinelibrary.wiley.com/doi/ by alex jounh - Oregon Health & Science Univer , Wiley Online Library on [05/12/2025]. See the Terms and Conditions (https://onlinelibrary.wiley.com/terms-and-conditions) on Wiley Online Library for rules of use; OA articles are governed by the applicable Creative Commons License
Part III: Becoming a Linux System Administrator
missing
S.5….T.
c
/etc/zshrc
/bin/zsh
In this output, you can see that the /bin/zsh file has been tampered with and /etc/
zshrc has been removed. Each time that you see a letter or a number instead of a dot from
the rpm -V output, it is an indication of what has changed. Letters that can replace the dots
(in order) include the following:
S
M
5
D
L
U
G
T
P
file Size differs
Mode differs (includes permissions and file type)
MD5 sum differs
Device major/minor number mismatch
readLink(2) path mismatch
User ownership differs
Group ownership differs
mTime differs
caPabilities differ
Those indicators are from the “Verify” section of the rpm man page. In my example, you
can see the file size has changed (S), the md5sum checked against the file’s fingerprint has
changed (5), and the modification time (T) on the file differs.
To restore the package to its original state, use rpm with the --replacepkgs option, as
shown next. (The yum reinstall zsh command would work as well.) Then check it with
-V again. No output from -V means that every file is back to its original state.
# rpm -i --replacepkgs zsh-5.9-16.fc42.x86_64.rpm
# rpm -
V zsh
It is good practice to back up your RPM database (from /var/lib/rpm) and copy it to
some read-only medium (such as a CD). Then, when you go to verify packages that you suspect were cracked, you know that you aren’t checking it against a database that has also
been cracked.
Personal installs with Snap, Homebrew, and Flatpak
Traditional software packaging formats, such as Deb and RPM, were designed to be installed
system-wide and be available to everyone on the system. In recent years, personal software
installation packaging and tools such as Snap, Homebrew, and Flatpak have been developed for
Linux and other operating systems to offer different advantages, including:
Running in a sandboxed environment With tools like Homebrew and Flatpak, you
can install software within a user’s environment. This lets you keep that software from
conflicting with system software. Multiple users on the same system can have different
versions of the same software without conflicting with others. Snap lets a user install
Snap packages on some distributions without sudo privileges (on Ubuntu, sudo is
required), but that software is installed so that any user can run that software.
Built-in dependencies Instead of requiring software dependencies to be installed from
multiple packages, all libraries and runtime software needed by the installed software
241
10
Downloaded from https://onlinelibrary.wiley.com/doi/ by alex jounh - Oregon Health & Science Univer , Wiley Online Library on [05/12/2025]. See the Terms and Conditions (https://onlinelibrary.wiley.com/terms-and-conditions) on Wiley Online Library for rules of use; OA articles are governed by the applicable Creative Commons License
Chapter 10: Getting and Managing Software
is included in its package. This greatly reduces the kinds of compatibility problems that
can occur when required software comes from different, system-wide packages.
Compatible with multiple systems Because one of these packages can contain everything you need to run the software you want in a contained environment, the same
package can often be installed and run on multiple Linux distributions. In fact, Snaps
can be built to run on macOS and Microsoft Windows as well Linux systems. Homebrew,
on the other hand, is built for macOS, but runs on Linux systems as well.
To install and use these software installation tools, you don’t always need root privileges. As
long as you choose software that is from reliable sources, the fact that the software runs in a
sandbox helps protect the host system from exploits.
Using Snap
Snap lets you install software packages that are referred to as Snaps. There are command line
tools and GUI tools for installing and managing Snaps. Because Snap was developed by Canonical, the company that maintains Ubuntu, Snaps are well integrated into the Ubuntu ecosystem, although they can work on other Linux systems as well.
Snap comes installed on Ubuntu system but must be installed on most Fedora systems. To
install it in Fedora, type:
$ sudo dnf install snapd
If you are running Ubuntu, open the App Center GUI tools to see the Snaps available.
Figure 10.2 shows an example of the App Center window for installing Snaps:
FIGURE 10.2
Install and manage snaps and other software from the Ubuntu App Center.
242
Downloaded from https://onlinelibrary.wiley.com/doi/ by alex jounh - Oregon Health & Science Univer , Wiley Online Library on [05/12/2025]. See the Terms and Conditions (https://onlinelibrary.wiley.com/terms-and-conditions) on Wiley Online Library for rules of use; OA articles are governed by the applicable Creative Commons License
Part III: Becoming a Linux System Administrator
To install Snaps from the command line, you use the snap CLI. For example, to install the
Kolourpaint application, type:
$ snap install kolourpaint
kolourpaint 25.04.3 from KDE✓ installed
To see which Snaps are installed on your local system, type:
$ snap list
Name
bare
core24
kolourpaint
Version
1.0
20250618
25.04.3
Rev
5
1055
122
Tracking
latest/stable
latest/stable
latest/stable
Publisher
canonical✓
canonical✓
kde✓
Notes
base
base
-
Typically, you can then run the application from the command line (in this case, type kolourpaint) or for GUI apps select the Show Apps icon in the lower left of your screen and type the
application name (Kolourpaint in this case).
Using Homebrew
Homebrew (https://brew.sh/) is a software package manager that was created for macOS but
is also available for Linux systems. It is popular with software developers for installing software
that is outside of the Linux system’s primary package manager. This can be helpful if you want
to use software that is a different version than what is installed on your Linux system or that
is not available in Deb or RPM packages.
To install Homebrew, as a user with sudo privileges, run the following command from the
Homebrew home page (brew.sh) and then follow the instructions that come next:
$ /bin/bash -
c "$(curl -
fsSL \
https://raw.githubusercontent.com/Homebrew/install/HEAD/install.sh)"
https://raw.githubusercontent.com/Homebrew/install/HEAD/install.sh)"
==> Checking for `sudo` access (which may request your password)...
==> This script will install:
/home/linuxbrew/.linuxbrew/bin/brew
...
==> The following new directories will be created:
/home/linuxbrew/.linuxbrew/var/homebrew/linked
Press RETURN/ENTER to continue or any other key to abort: <ENTER>
...
Next, perform the steps that are listed to install those software packages that are needed
to use Homebrew. With Homebrew installed, you can look for a software package. Let’s say
that you want to try some tool like top to see processes running on your system. You could
type this:
$ brew search top
==> Formulae
apachetop
argocd-
autopilot
git-
open
gnu-
getopt
nvtop
pg_top
243
10
Downloaded from https://onlinelibrary.wiley.com/doi/ by alex jounh - Oregon Health & Science Univer , Wiley Online Library on [05/12/2025]. See the Terms and Conditions (https://onlinelibrary.wiley.com/terms-and-conditions) on Wiley Online Library for rules of use; OA articles are governed by the applicable Creative Commons License
Chapter 10: Getting and Managing Software
atop
autopep8
autopsy
bdftopcf
gotop
gsettings-
desktop-
schemas
gtop
htop
sntop
sqtop
tokyo-
dystopia
topfew
To find out more information about the htop package, type the following:
$ brew info htop
==> htop: stable 3.4.1 (bottled), HEAD
Improved top (interactive process viewer)
https://htop.dev/
If you have decided that you want to install this package, type this:
$ brew install htop
After that, you could run htop to see a screen-oriented display of processes running on your
system and other information about your system.
Using Flatpak
Flatpak has become a popular tool for installing software on Linux systems. One of its greatest
assets is its ability to run in a sandboxed environment, preventing installed Flatpak software
from conflicting with other software running on the same system.
To begin using Flatpak, go to https://flatpak.org/setup and choose your Linux distribution. For example, with Ubuntu, type this:
$ sudo apt install flatpak
To see what applications are available to install with Flatpak, go to the flathub.org and
select an application that interests you to see instructions for installing it. For example, to
install the Foliate ebook reader, type this:
$ flatpak install flathub com.github.johnfactotum.Foliate
Answer the questions as prompted. To run that application, type this:
$ flatpak run com.github.johnfactotum.Foliate
Managing Software in the Enterprise
At this point, you should have a good working knowledge of how to install, query, remove, and
otherwise manipulate packages with graphical tools, the yum command, and the rpm command.
When you start working with RPM files in a large enterprise, you need to extend that knowledge.
Features used to manage RPM packages in the enterprise with Red Hat Enterprise Linux offer
a bit more complexity and much more power. Instead of having one big software repository, as
Fedora does, RHEL provides software using Red Hat Subscription Management, requiring paid
subscriptions/entitlements that allow access to a variety of software channels and products
(RHEL, Red Hat Virtualization, Red Hat Software Collections, and so on).
244
Downloaded from https://onlinelibrary.wiley.com/doi/ by alex jounh - Oregon Health & Science Univer , Wiley Online Library on [05/12/2025]. See the Terms and Conditions (https://onlinelibrary.wiley.com/terms-and-conditions) on Wiley Online Library for rules of use; OA articles are governed by the applicable Creative Commons License
Part III: Becoming a Linux System Administrator
In terms of enterprise computing, one of the great benefits of the design of RPM packages is
that their management can be automated. Other Linux packaging schemes allow packages to
stop and prompt you for information when they are being installed (such as asking for a directory location or a username). RPM packages install without interruption, offering some of the
following advantages:
Kickstart files All of the questions that you answer during a manual install, and all of
the packages that you select, can be added into a file called a kickstart file. When you
start a Fedora or Red Hat Enterprise Linux installer, you can provide a kickstart file at
the boot prompt. From that point on, the entire installation process completes on
its own. Any modifications to the default package installs can be made by running
pre- and postscripts from the kickstart file to do such things as add user accounts or
modify configuration files.
PXE boot You can configure a PXE server to allow client computers to boot an anaconda
(installer) kernel and a select kickstart file. A completely blank computer with a network interface card (NIC) that supports PXE booting can simply boot from its NIC to
launch a fresh installation. In other words, turn on the computer, and if it hits the NIC
in its boot order, a few minutes later you can have a freshly installed system, configured to your exact specifications without intervention. See Chapter 22, “Configuring a
PXE Boot Server,” for instructions on setting up and installing with PXE boot.
Satellite server (Spacewalk) Red Hat Enterprise Linux systems can be deployed using
what is referred to as Satellite Server. Built into Satellite Server are the same features
that you have from Red Hat CDN to manage and deploy new systems and updates. RHEL
systems can be configured to get automatic software updates at times set from the satellite server. Sets of packages called Errata that fix specific problems can be quickly and
automatically deployed to the systems that need them.
Container Images Instead of installing individual RPMs on a system, you can package
up a few or a few hundred RPMs into a container image. The container image is like an
RPM in that it holds a set of software, but unlike an RPM in that it is more easily added
to a system, run directly, and deleted from a system than an RPM is.
Descriptions of how to use kickstart files, Satellite Servers, containers, and other enterprise-
ready installation features are beyond the scope of this book. But the understanding you have
gained from learning about YUM and RPM remain critical components of all of the features just
mentioned.
Summary
Software packaging in Fedora, Red Hat Enterprise Linux, and related systems is provided
using software packages based on the RPM Package Manager (RPM) tools. Debian, Ubuntu,
and related systems package software into DEB files. You can try easy-to-use graphical tools
such as the Software window for finding and installing packages. The primary command-line
tools include the yum, dnf, and rpm commands for Red Hat–related systems and aptitude,
245
10
Downloaded from https://onlinelibrary.wiley.com/doi/ by alex jounh - Oregon Health & Science Univer , Wiley Online Library on [05/12/2025]. See the Terms and Conditions (https://onlinelibrary.wiley.com/terms-and-conditions) on Wiley Online Library for rules of use; OA articles are governed by the applicable Creative Commons License
Chapter 10: Getting and Managing Software
apt* and dpkg for Debian-related systems. Personal, sometimes sandboxed installs, can be
done with tools such as Snap, Flatpak, and Homebrew.
Using these software management tools, you can install, query, verify, update, and remove
packages. You can also do maintenance tasks, such as clean out cache files. This chapter
describes many of the features of the Software window, as well as yum, dnf, and rpm commands.
With your system installed and the software packages that you need added, it’s time to configure your Fedora, RHEL, Debian, or Ubuntu system further. If you expect to have multiple
people using your system, your next task could be to add and otherwise manage user accounts
on your system. Chapter 11, “Managing User Accounts,” describes user management in Fedora,
RHEL, and other Linux systems.
Exercises
These exercises test your knowledge of working with RPM software packages in Fedora or Red
Hat Enterprise Linux. To do the exercises, I recommend you have a Fedora system in front of
you that has an Internet connection. (Most of the procedures work equally well on a registered
RHEL system.)
You need to be able to reach the Fedora repositories (which should be set up automatically).
If you are stuck, solutions to the tasks are shown in Appendix B (although in Linux, there are
often multiple ways to complete a task).
1. Search the YUM repository for the package that provides the mogrify command.
2. Display information about the package that provides the mogrify command, and
determine what is that package’s home page (URL).
3. Install the package containing the mogrify command.
4. List all the documentation files contained in the package that provides the
mogrify command.
5. Look through the changelog of the package that provides the mogrify command.
6. Delete the mogrify command from your system and verify its package against the
RPM database to see that the command is indeed missing.
7. Reinstall the package that provides the mogrify command, and make sure that the
entire package is intact again.
8. Download the package that provides the mogrify command to your current directory.
9. Display general information about the package you just downloaded by querying the
package’s RPM file in the current directory.
10. Remove the package containing the mogrify command from your system.
246
Downloaded from https://onlinelibrary.wiley.com/doi/ by alex jounh - Oregon Health & Science Univer , Wiley Online Library on [05/12/2025]. See the Terms and Conditions (https://onlinelibrary.wiley.com/terms-and-conditions) on Wiley Online Library for rules of use; OA articles are governed by the applicable Creative Commons License
Part III: Becoming a Linux System Administrator
Managing User Accounts
11
IN THIS CHAPTER
Working with user accounts
Working with group accounts
Configuring centralized user accounts
A
dding and managing users are common tasks for Linux system administrators. User accounts keep
boundaries between the people and roles that use your systems and between the processes that
run on your systems. Groups are a way of assigning rights to your system that can be assigned to
multiple users at once.
This chapter describes not only how to create a new user but also how to create predefined settings
and files to configure the user’s environment. Using tools such as the useradd and usermod commands, you can assign settings such as the location of a home directory, a default shell, a default
group, and specific user ID and group ID values. With Cockpit, you can add and manage user accounts
through a web UI.
To expand beyond user accounts on individual systems, organizations typically centrally managed user
databases to store user names and credentials. This chapter describes protocols such as NIS, LDAP,
and Windows Active Directory for centralizing authentication and authorization of users of
networked systems.
Creating User Accounts
Every person who uses your Linux system should have a separate user account. Having a user account
provides you with an area in which to store files securely as well as a means of tailoring your user
interface (GUI, path, environment variables, and so on) to suit the way that you use the computer.
You can add user accounts to most Linux systems in several ways. Fedora, Ubuntu, and Red Hat Enterprise Linux systems offer Cockpit, which includes an Account selection for creating and managing user
accounts. If Cockpit is not yet installed and enabled, do that as follows on a RHEL or Fedora system:
# dnf install cockpit -
y
# systemctl enable -
-
now cockpit.socket
247
Linux Bible, Eleventh Edition. Christopher Negus.
© 2026 John Wiley & Sons, Inc. All rights reserved, including rights for text and data mining and training of artificial intelligence technologies or similar
technologies. Published 2026 by John Wiley & Sons, Inc.
Downloaded from https://onlinelibrary.wiley.com/doi/ by alex jounh - Oregon Health & Science Univer , Wiley Online Library on [05/12/2025]. See the Terms and Conditions (https://onlinelibrary.wiley.com/terms-and-conditions) on Wiley Online Library for rules of use; OA articles are governed by the applicable Creative Commons License
CHAPTER
On an Ubuntu system, when you install Cockpit, it is started and enabled automatically. Type:
$ sudo apt-
get install cockpit
To create a user account through Cockpit, do the following:
1. Open the Cockpit interface from your web browser (localhost:9090).
2. Log in as a user with root privilege, click the Turn On Administrative Access button,
type your password when prompted, and select Accounts.
3. Click Create New Account.
Figure 11.1 shows an example of the Create New Account pop-up window.
FIGURE 11.1
Add and modify user accounts from Cockpit.
4. Begin adding a new user account to your Linux system. Here are the fields you need
to fill in:
Full name: Use the user’s real name, typically used with uppercase and lowercase
letters, as the user would write it in real life. Technically, this information is stored
in the comment field of the passwd file, but by convention, most Linux and UNIX
systems expect this field to hold each user’s full name. As you fill in the full name,
Cockpit suggests a username. For example, jsmith would be the user name suggested
for Joe Smith.
248
Downloaded from https://onlinelibrary.wiley.com/doi/ by alex jounh - Oregon Health & Science Univer , Wiley Online Library on [05/12/2025]. See the Terms and Conditions (https://onlinelibrary.wiley.com/terms-and-conditions) on Wiley Online Library for rules of use; OA articles are governed by the applicable Creative Commons License
Part III: Becoming a Linux System Administrator
User name: This is the name used to log in as this user. When you choose a username,
don’t begin with a number (for example, 26jsmith). Also, it’s best to use all lowercase
letters, no control characters or spaces, and a maximum of eight characters, by convention. The useradd command allows up to 32 characters, but some applications
can’t deal with usernames that long. Tools such as ps display user IDs (UIDs) instead
of names if names are too long. Having users named Jsmith and jsmith can cause confusion with programs (such as sendmail) that don’t distinguish case.
Home directory: By default, Cockpit will choose the home directory where you will
store your files. For example, with a user name of jsmith, it would choose
/home/jsmith and create the home directory with permissions set for jsmith
begin using it. You can choose a different directory if you like.
Shell: When the user logs in or opens a Terminal window, the shell identified here is
used as the default shell. The bash shell (/bin/bash) is used by default. You can use
a different shell, but you need to check that the shell you want is installed already.
User ID: The first available user ID assigned by default is presented for you to use.
Typically, the user created during installation is given UID 1000, so if this is the next
one, Cockpit will suggest UID 1001.
Authentication: To use traditional password authentication, select Use Password and
then fill in the password fields. Selecting the Require Password Change On First Login
box ensures that the user is forced to create their own password the first time they log
in. If you select Disallow Password Authentication, you can require that the user use
some other authentication mechanism. For example, you could require that SSH keys
be used for the user to log in. Cockpit still asks you to enter a password, but a username and password cannot be used for initial login.
Password, Confirm password: Enter the password you want the user to have in both
fields. The password should be at least eight characters long and contain a mixture of
uppercase and lowercase letters, numbers, and punctuation. It should not contain real
words, repeated letters, or letters in a row on the keyboard. Through this interface,
you must set a password that meets the previous criteria. (If you want to add a password that doesn’t meet this criteria, you can use the useradd command, described
later in this chapter.)Bars underneath the password fields turn from red to green as
you improve the strength of your password.
5. Click Create to add the user to the system. An entry for the new user account is
added to the /etc/passwd file and the new group account to the /etc/group
file. (I will describe those later in this chapter.)
The Cockpit Accounts screen lets you modify a small set of information about a regular user
after it has been created. To modify user information later, do the following:
1. From the Accounts page, select the user account that you want to change. A screen
appears with available selections for that user account.
2. You can delete but not modify the username, but you can change the following
information:
249
11
Downloaded from https://onlinelibrary.wiley.com/doi/ by alex jounh - Oregon Health & Science Univer , Wiley Online Library on [05/12/2025]. See the Terms and Conditions (https://onlinelibrary.wiley.com/terms-and-conditions) on Wiley Online Library for rules of use; OA articles are governed by the applicable Creative Commons License
Chapter 11: Managing User Accounts
Full name: Because the user’s full name is just a comment, you can change that as
you please.
Groups: By default, each user is given a group name that is the same as the username.
From the drop-down box, you can add access to another existing group to the
selected user.
Password: You can choose Set Password to set a new password for that user or choose
Force Change to force the user to change their password the next time they log
in. By default, passwords never expire. You can change that to have the password
expire every set number of days.
Shell: Click Change if you want to change the current shell (/bin/sh, by default) to
a different shell. Consider changing this to /bin/bash, or some other shell if you
have a different preference.
Authorized Public SSH Keys: If you have a public SSH key for the user, you can click
the + Add Key button, paste that key into the text box, and click Add. With that
key in place, the user with the associated private key is allowed to log into that
user account via SSH without needing to enter a password.
3. The changes take effect immediately, so you can simply leave the window when you
are done modifying the user account.
The Accounts area of the Cockpit web UI was designed to simplify the process of creating and
modifying user accounts. More features associated with user accounts can be added or modified
from the command line. The next part of this chapter describes how to add user accounts from
the command line with useradd and change them with the usermod command.
Adding users with useradd
Sometimes, a Linux system doesn’t have a desktop tool or web UI available for adding users.
Other times, you might find it more convenient to add lots of users at once with a shell script
or change user account features that are not available from Cockpit. For those cases, commands are available to enable you to add and modify user accounts from the command line.
The most straightforward method for creating a new user from the shell is the useradd
command. After opening a Terminal window with root permission or using a regular user with
sudo privileges, you simply invoke useradd at the command prompt, with details of the
new account as parameters.
The only required parameter is the login name of the user, but you probably want to include
some additional information ahead of it. Each item of account information is preceded by
a single-letter option code with a dash in front of it. The following options are available
with useradd:
-c "comment": Provide a description of the new user account. Typically, this is the person’s full name. Replace comment with the name of the user account (-c Jake). Use
quotes to enter multiple words (for example,-c "Jake Jackson").
250
Downloaded from https://onlinelibrary.wiley.com/doi/ by alex jounh - Oregon Health & Science Univer , Wiley Online Library on [05/12/2025]. See the Terms and Conditions (https://onlinelibrary.wiley.com/terms-and-conditions) on Wiley Online Library for rules of use; OA articles are governed by the applicable Creative Commons License
Part III: Becoming a Linux System Administrator
-d home_dir: Set the home directory to use for the account. The default is to name it
the same as the login name and to place it in /home. Replace home_dir with the
directory name to use (for example, -d /mnt/homes/jake).
-D: Rather than create a new account, save the supplied information as the new default
settings for any new accounts that are created.
-e expire_date: Assign the expiration date for the account in YYYY-MM-DD format.
Replace expire_date with a date that you want to use. (For example, to expire an
account on May 5, 2029, use -e 2029-05-05.)
-f -1: Set the number of days after a password expires until the account is permanently
disabled. The default, -1, disables the option. Setting this to 0 disables the account
immediately after the password has expired. Replace -1 (that’s minus one) with the
number to use.
-g group: Set the primary group (it must already exist in the /etc/group file) the
new user will be in. Replace group with the group name (for example, -g wheel).
Without this option, a new group is created that is the same as the username and is
used as that user’s primary group.
-G grouplist: Add the new user to the supplied comma-separated list of supplementary groups (for example, -G wheel,sales,tech,lunch). (If you use -G later
with usermod, be sure to use -aG to add groups and not just -G to replace groups. If
you don’t, existing supplementary groups are removed and the groups you provide here
are the only ones assigned.)
-k skel_dir: Set the skeleton directory containing initial configuration files and login
scripts that should be copied to a new user’s home directory. This parameter can be
used only in conjunction with the -m option. Replace skel_dir with the directory
name to use. (Without this option, the /etc/skel directory is used.)
-m: Automatically create the user’s home directory and copy the files in the skeleton
directory (/etc/skel) to it. (This is the default action for Fedora and RHEL, so it’s
not required. It is not the default for Ubuntu.)
-M: Do not create the new user’s home directory, even if the default behavior is set to
create it.
-n: Turn off the default behavior of creating a new group that matches the name and user
ID of the new user. This option is available with Fedora and RHEL systems. Other Linux
systems often assign a new user to the group named users instead.
-o: Use with -u uid to create a user account that has the same UID as another username. This effectively lets you have two different usernames with authority over the
same set of files and directories. For example, useradd -
o -
u 1002 tim would
create a user account for the username tim and assign time UID 1002, which is presumably already also being used by another user.
-p passwd: Enter a password for the account you are adding. This must be an encrypted
password. Instead of adding an encrypted password here, you can simply use the
251
11
Downloaded from https://onlinelibrary.wiley.com/doi/ by alex jounh - Oregon Health & Science Univer , Wiley Online Library on [05/12/2025]. See the Terms and Conditions (https://onlinelibrary.wiley.com/terms-and-conditions) on Wiley Online Library for rules of use; OA articles are governed by the applicable Creative Commons License
Chapter 11: Managing User Accounts
passwd user command later to add a password for user. (To generate an encrypted
MD5 password, type openssl passwd.)
-s shell: Specify the command shell to use for this account. Replace shell with the
command shell (for example, -s /bin/csh).
-u user_id: Specify the user ID number for the account (for example, -u 1793).
Without the -u option, the default behavior is to assign the next available number
automatically. Replace user_id with the ID number. User IDs that are automatically
assigned to regular users begin at 1000 on some distributions and 500 on others, so
you should use IDs for regular users that are above those numbers in a way that doesn’t
collide with the automatic assignments.
Let’s create an account for a new user. The user’s full name is Sara Green, with a login name of
sara. To begin, become root user and type the following command:
# useradd -
c "Sara Green" sara
Next, set the initial password for sara using the passwd command. You’re prompted to type
the password twice:
# passwd sara
Changing password for user sara.
New password: **********
Retype new password: **********
Note
Asterisks in this example represent the password you type. Nothing is actually displayed when you type the password.
Also, keep in mind that running passwd as root user lets you add short or blank passwords that regular users cannot
add themselves.
In creating the account for sara, the useradd command performs several actions:
■
■
■
■
■
■
252
Reads the /etc/login.defs and /etc/default/useradd files to get default
values to use when creating accounts.
Checks command-line parameters to find out which default values to override.
Creates a new user entry in the /etc/passwd and /etc/shadow files based on the
default values and command-line parameters.
Creates any new group entries in the /etc/group file. (Fedora, Ubuntu, and others
create a group using the new user’s name.)
Creates a home directory based on the user’s name in the /home directory.
Copies any files located within the /etc/skel directory to the new home directory.
This usually includes login and application startup scripts.
Downloaded from https://onlinelibrary.wiley.com/doi/ by alex jounh - Oregon Health & Science Univer , Wiley Online Library on [05/12/2025]. See the Terms and Conditions (https://onlinelibrary.wiley.com/terms-and-conditions) on Wiley Online Library for rules of use; OA articles are governed by the applicable Creative Commons License
Part III: Becoming a Linux System Administrator
The preceding example uses only a few of the available useradd options. Most account settings are assigned using default values. You can set more values explicitly if you want to.
Here’s an example that uses a few more options to do so:
# useradd -
g users -
G wheel,apache -
s /bin/tcsh -
c "Sara Green" sara
In this case, useradd is told to make users the primary group sara belongs to (-g), add
her to the wheel and apache groups, and assign tcsh as her primary command shell (-s). A
home directory in /home under the user’s name (/home/sara) is created by default. This
command line results in a line similar to the following being added to the /etc/passwd file:
sara:x:1002:1007:Sara Green:/home/sara:/bin/tcsh
Each line in the /etc/passwd file represents a single user account record. Each field is
separated from the next by a colon (:) character. The field’s position in the sequence determines what it is. As you can see, the login name is first. The password field contains an x
because, in this example, the shadow password file is used to store encrypted password data
(in /etc/shadow).
The user ID selected by useradd is 1002. The primary group ID is 1007, which corresponds to
a private sara group in the /etc/group file. The comment field was correctly set to Sara
Green, the home directory was automatically assigned as /home/sara, and the command
shell was assigned as /bin/tcsh, exactly as specified with the useradd options.
By leaving out many of the options (as I did in the first useradd example), defaults are
assigned in most cases. For example, by not using -g sales or -G wheel,apache, the
group name sara was assigned to the new user. Some Linux systems (other than Fedora and
RHEL) assign users as the group name by default. Likewise, excluding -s /bin/tcsh
causes /bin/bash to be assigned as the default shell.
The /etc/group file holds information about the different groups on your Linux system
and the users who belong to them. Groups are useful for enabling multiple users to share
access to the same files while denying access to others. Here is the /etc/group entry created for sara:
sara:x:1007:
Each line in the group file contains the name of a group, a group password (usually filled
with an x), the group ID number associated with it, and a list of users in that group. By
default, each user is added to their own group, beginning with the next available GID, starting
with 1000.
Setting user defaults
The useradd command determines the default values for new accounts by reading the
/etc/login.defs and /etc/default/useradd files. You can modify those defaults by
editing the files manually with a standard text editor. Although login.defs is different on
253
11
Downloaded from https://onlinelibrary.wiley.com/doi/ by alex jounh - Oregon Health & Science Univer , Wiley Online Library on [05/12/2025]. See the Terms and Conditions (https://onlinelibrary.wiley.com/terms-and-conditions) on Wiley Online Library for rules of use; OA articles are governed by the applicable Creative Commons License
Chapter 11: Managing User Accounts
different Linux systems, the following is an example containing many of the settings that you
might find in a login.defs file:
PASS_MAX_DAYS
PASS_MIN_DAYS
PASS_MIN_LEN
PASS_WARN_AGE
UID_MIN
UID_MAX
SYS_UID_MIN
SYS_UID_MAX
GID_MIN
GID_MAX
SYS_GID_MIN
SYS_GID_MAX
CREATE_HOME
99999
0
5
7
1000
60000
200
999
1000
60000
201
999
yes
All uncommented lines contain keyword/value pairs. For example, the keyword PASS_MIN_
LEN is followed by some white space and the value 5. This tells useradd that the user password must be at least five characters. Other lines enable you to customize the valid range of
automatically assigned user ID numbers or group ID numbers. (Fedora starts at UID 1000; earlier systems started with UID 100.) Permanent administrative user and group account numbers
are reserved for up to 199 and 200, respectively. So, you can assign your own administrative
user and group accounts starting at 200 and 201, respectively, up to ID number 999.
A comment section that explains the keyword’s purpose precedes each keyword (which I edited
out here to save space). Altering a default value is as simple as editing the value associated
with a keyword and saving the file before running the useradd command.
If you want to view other default settings, find them in the /etc/default/useradd
file. You can also see default settings by typing the useradd command with the -D option,
as follows:
# useradd -D
GROUP=100
HOME=/home
INACTIVE=-1
EXPIRE=
SHELL=/bin/bash
SKEL=/etc/skel
CREATE_MAIL_SPOOL=yes
You can also use the -D option to change defaults. When run with this flag, useradd refrains
from actually creating a new user account; instead, it saves any additionally supplied options
as the new default values in /etc/default/useradd. Not all useradd options can be
used in conjunction with the -D option. You can use only the five options listed here:
-b default_home: Set the default directory in which user home directories are created.
Replace default_home with the directory name to use (for example, -b /garage).
Usually, this is /home.
254
Downloaded from https://onlinelibrary.wiley.com/doi/ by alex jounh - Oregon Health & Science Univer , Wiley Online Library on [05/12/2025]. See the Terms and Conditions (https://onlinelibrary.wiley.com/terms-and-conditions) on Wiley Online Library for rules of use; OA articles are governed by the applicable Creative Commons License
Part III: Becoming a Linux System Administrator
-e default_expire_date: Set the default expiration date on which the user account
is disabled. The default_expire_date value should be replaced with a date in the
form YYYY-MM-DD (for example, -e 2029-10-17).
-f default_inactive: Set the number of days after a password has expired before
the account is disabled. Replace default_inactive with a number representing
the number of days (for example, -f 7).
-g default_group: Set the default group in which new users will be placed. Normally,
useradd creates a new group with the same name and ID number as the user. Replace
default_group with the group name to use (for example, -g bears).
-s default_shell: Set the default shell for new users. This is /bin/bash or /bin/
sh, typically. Replace default_shell with the full path to the shell that you want
as the default for new users (for example, -s /bin/sh).
To set any of the defaults, give the -D option first and add the defaults that you want to set.
For example, to set the default home directory location to /home/everyone and the default
shell to /bin/tcsh, enter the following:
# useradd -
D -
b /home/everyone -
s /bin/tcsh
In addition to setting up user defaults, an administrator can create default files that are
copied to each user’s home directory for use. These files can include login scripts and shell
configuration files (such as .bashrc). Keep in mind that setting up these kinds of files is the
purpose of the default /etc/skel directory.
Other commands that are useful for working with user accounts include usermod (to modify
settings for an existing account) and userdel (to delete an existing user account).
Modifying users with usermod
The usermod command provides a simple and straightforward method for changing account
parameters. Many of the options available with it mirror those found in useradd. The options
that can be used with this command include the following:
-c username: Change the description associated with the user account. Replace
username with the name of the user account (-c jake). Use quotes to enter multiple words (for example, -c "Jake Jackson").
-d home_dir: Change the home directory to use for the account. The default is to name
it the same as the login name and to place it in /home. Replace home_dir with the
directory name to use (for example, -d /mnt/homes/jake).
-e expire_date: Assign a new expiration date for the account in YYYY-MM-DD
format. Replace expire_date with a date you want to use. (For October 15, 2029,
use -e 2029-10-15.)
-f -1: Change the number of days after a password expires until the account is permanently disabled. The default, -1, disables the option. Setting this to 0 disables
255
11
Downloaded from https://onlinelibrary.wiley.com/doi/ by alex jounh - Oregon Health & Science Univer , Wiley Online Library on [05/12/2025]. See the Terms and Conditions (https://onlinelibrary.wiley.com/terms-and-conditions) on Wiley Online Library for rules of use; OA articles are governed by the applicable Creative Commons License
Chapter 11: Managing User Accounts
the account immediately after the password has expired. Replace -1 with the
number to use.
-g group: Change the primary group (as listed in the /etc/group file) the user will be
in. Replace group with the group name (for example, -g wheel).
-G grouplist: Set the user’s secondary groups to the supplied comma-separated list of
groups. If the user is already in at least one group besides the user’s private group, you
must add the -a option as well (-Ga). If not, the user belongs to only the new set of
groups and loses membership to any previous groups.
-l login_name: Change the login name of the account.
-L: Lock the account by putting an exclamation point at the beginning of the encrypted
password in /etc/shadow. This locks the account while still allowing you to leave
the password intact (the -U option unlocks it).
-m: Available only when –d is used. This causes the contents of the user’s home directory
to be copied to the new directory.
-o: Use only with -u uid to remove the restriction that UIDs must be unique.
-s shell: Specify a different command shell to use for this account. Replace shell
with the command shell (for example, -s /bin/bash).
-u user_id: Change the user ID number for the account. Replace user_id with the ID
number (for example, -u 1474).
-U: Unlocks the user account (by removing the exclamation mark at the beginning of the
encrypted password).
The following are examples of the usermod command:
# usermod -
s /bin/csh chris
# usermod -
Ga sales,marketing, chris
The first example changes the shell to the csh shell for the user named chris. In the second
example, supplementary groups are added for the user chris. The -a option (-Ga) makes
sure that the supplementary groups are added to any existing groups for the user chris. If
the -a is not used, existing supplementary groups for chris are erased and the new list of
groups includes the only supplementary groups assigned to that user.
Deleting users with userdel
Just as usermod is used to modify user settings and useradd is used to create users,
userdel is used to remove users. The following command removes the user chris:
# userdel -
r chris
Here, the user chris is removed from the /etc/password file. The –r option removes the
user’s home directory as well. If you choose not to use –r, as follows, the home directory for
chris is not removed:
# userdel chris
256
Downloaded from https://onlinelibrary.wiley.com/doi/ by alex jounh - Oregon Health & Science Univer , Wiley Online Library on [05/12/2025]. See the Terms and Conditions (https://onlinelibrary.wiley.com/terms-and-conditions) on Wiley Online Library for rules of use; OA articles are governed by the applicable Creative Commons License
Part III: Becoming a Linux System Administrator
Keep in mind that simply removing the user account does not change anything about the files
that user leaves around the system (except those that are deleted when you use -r). However,
ownership of files left behind appears as belonging to the previous owner’s user ID number
when you run ls -l on the files.
Before you delete the user, you may want to run a find command to find all files that would
be left behind by the user. After you delete the user, you could search on user ID to find files
left behind. Here are two find commands to do those things:
# find / -
user chris -
ls
# find / -
uid 504 -
ls
Because files that are not assigned to any username are considered to be a security risk, it is
a good idea to find those files and assign them to a real user account. Here’s an example of a
find command that finds all files in the filesystem that are not associated with any user (the
files are listed by UID):
# find / -
nouser -
ls
Understanding Group Accounts
Group accounts are useful if you want to share a set of files with multiple users. You can create
a group and change the set of files to be associated with that group. The root user can assign
users to that group so they can have access to files based on that group’s permission. Consider
the following file and directory:
$ ls -
ld /var/salesdocs /var/salesdocs/file.txt
drwxrwxr-
x. 2 root sales 4096 Jan 14 09:32 /var/salesstuff/
-
rw-
rw-
r-
-
. 1 root sales
0 Jan 14 09:32 /var/salesstuff/file.txt
Looking at permissions on the directory /var/salesstuff (rwxrwxr-x), you see the second set of rwx shows that any member of the group (sales) has permission to read files in
that directory (r is read), create and delete files from that directory (w is write), and change
to that directory (x is execute). The file named file.txt can be read and changed by members of the sales group (based on the second rw-
).
Using group accounts
Every user is assigned to a primary group. In Ubuntu, Fedora, and RHEL, by default, that group
is a new group with the same name as the user. So, if the user were named sara, the group
assigned to her would also be sara. The primary group is indicated by the number in the
third field of each entry in the /etc/passwd file; for example, the group ID 1007 here:
sara:x:1002:1007:Sara Green:/home/sara:/bin/tcsh
That entry points to an entry in the /etc/group file:
sara:x:1007:
257
11
Downloaded from https://onlinelibrary.wiley.com/doi/ by alex jounh - Oregon Health & Science Univer , Wiley Online Library on [05/12/2025]. See the Terms and Conditions (https://onlinelibrary.wiley.com/terms-and-conditions) on Wiley Online Library for rules of use; OA articles are governed by the applicable Creative Commons License
Chapter 11: Managing User Accounts
Let’s turn to the sara user and group accounts for examples. Here are a few facts about
using groups:
■
■
When sara creates a file or directory, by default, that file or directory is assigned to
sara’s primary group (also called sara).
The user sara can belong to zero or more supplementary groups. If sara were a
member of groups named sales and marketing, those entries could look like the
following in the /etc/group file:
sales:x:1302:joe,bill,sally,sara
marketing:x:1303:mike,terry,sara
■
■
The user sara can’t add herself to a supplementary group. She can’t even add another
user to her sara group. Only someone with root privilege can assign users to groups.
Any file assigned to the sales or marketing group is accessible to sara with
group and other permissions (whichever provides the most access). If sara wants
to create a file with the sales or marketing groups assigned to it, she could use
the newgrp command. In this example, sara uses the newgrp command to have
sales become her primary group temporarily and creates a file:
[sara]$ touch file1
[sara]$ newgrp sales
[sara]$ touch file2
[sara]$ ls -
l file*
-
rw-
rw-
r-
-
. 1 sara sara 0 Jan 18 22:22 file1
-
rw-
rw-
r-
-
. 1 sara sales 0 Jan 18 22:23 file2
[sara]$ exit
It is also possible to allow users to become a member of a group temporarily with the newgrp
command without actually being a member of that group. To do that, someone with root permission can use gpasswd to set a group password (such as gpasswd sales). After that,
any user can type newgrp sales into a shell and temporarily use sales as their primary
group by simply entering the group password when prompted.
Creating group accounts
As the root user, you can create new groups from the command line with the groupadd
command. Also, as noted earlier, groups are created automatically when a user account
is created.
Group ID numbers from 0 through 999 are assigned to special administrative groups. For example, the root group is associated with GID 0. Regular groups begin at 1000 for Ubuntu, Red Hat
Enterprise Linux, and Fedora. On the first UNIX systems, GIDs went from 0 to 99. Other Linux
systems reserve GIDs between 0 and 500 for administrative groups. A relatively new feature,
described earlier, reserves administrative user and group accounts up to 199 and 200, respectively, and lets you create your own administrative accounts between those numbers and 999.
258
Downloaded from https://onlinelibrary.wiley.com/doi/ by alex jounh - Oregon Health & Science Univer , Wiley Online Library on [05/12/2025]. See the Terms and Conditions (https://onlinelibrary.wiley.com/terms-and-conditions) on Wiley Online Library for rules of use; OA articles are governed by the applicable Creative Commons License
Part III: Becoming a Linux System Administrator
Here are some examples of creating a group account with the groupadd command:
# groupadd kings
# groupadd -
g 1325 jokers
In the examples just shown, the group named kings is created with the next available group
ID. After that, the group jokers is created using the 1325 group ID. Some administrators
like using an undefined group number above 200 and under 1000 so that the group they create
doesn’t intrude on the group designations above 1000 (so UID and GID numbers can go along
in parallel).
To change a group later, use the groupmod command, as in the following example:
# groupmod -
g 330 jokers
# groupmod -
n jacks jokers
In the first example, the group ID for jokers is changed to 330. In the second, the name
jokers is changed to jacks. If you then wanted to assign any of the groups as supplementary groups to a user, you can use the usermod command (as described earlier in
this chapter).
Managing Users in the Enterprise
The basic Linux method of handling user and group accounts has not changed since the first
UNIX systems were developed decades ago. However, as Linux systems have become used in
more complex ways, features for managing users, groups, and the permissions associated with
them have been added on to the basic user/group model so that it could be more flexible and
more centralized:
More flexible In the basic model, only one user and one group can be assigned to each
file. Also, regular users have no ability to assign specific permissions to different users
or groups and very little flexibility setting up collaborative files/directories. Enhancements to this model allow regular users to set up special collaborative directories
(using features such as sticky bit and set GID bit directories). Using access control lists
(ACLs), any user can also assign specific permissions to files and directories to any
users and groups they like.
More centralized When you have only one computer, storing user information for all
users in the /etc/passwd file is probably not a hardship. However, if you need to
authenticate the same set of users across thousands of Linux systems, centralizing that
information can save lots of time and heartache. Red Hat Enterprise Linux includes
features that enable you to authenticate users from LDAP servers or Microsoft Active
Directories servers.
The following sections describe how to use features such as Access Control Lists (ACLs) and
shared directories (sticky bit and set GID bit directories) to provide powerful ways to share
files and directories selectively.
259
11
Downloaded from https://onlinelibrary.wiley.com/doi/ by alex jounh - Oregon Health & Science Univer , Wiley Online Library on [05/12/2025]. See the Terms and Conditions (https://onlinelibrary.wiley.com/terms-and-conditions) on Wiley Online Library for rules of use; OA articles are governed by the applicable Creative Commons License
Chapter 11: Managing User Accounts
Setting permissions with Access Control Lists
The access control list (ACL) feature was created so that regular users could share their files
and directories selectively with other users and groups. With ACLs, a user can allow others to
read, write, and execute files and directories without leaving those filesystem elements wide
open or requiring the root user to change the user or group assigned to them.
Here are a few things to know about ACLs:
■
■
■
■
■
■
For ACLs to be used, they must be enabled on a filesystem when that filesystem
is mounted.
In some Linux systems, ACLs are automatically enabled on any filesystem created
when the system is installed.
If you create a filesystem after installation (such as when you add a hard disk), you
need to make sure that the acl mount option is used when the filesystem is mounted
(more on that later).
To add ACLs to a file, you use the setfacl command; to view ACLs set on a file, you
use the getfacl command.
To set ACLs on any file or directory, you must be the actual owner (user) assigned to
it. In other words, being assigned user or group permissions with setfacl does not
give you permission to change ACLs on those files yourself.
Because multiple users and groups can be assigned to a file/directory, the actual permission a user has is based on a union of all user/group designations to which they
belong. For example, if a file had read-only permission (r--) for the sales group and
read/write/execute (rwx) for the market group, and mary belonged to both, mary
would have rwx permission.
Note
If ACLs are not enabled on the filesystem you are trying to use with setfacl, see the section “Enabling ACLs” later in
this chapter for information on how to mount a filesystem with ACLs enabled.
Setting ACLs with setfacl
Using the setfacl command, you can modify permissions (-m) or remove ACL permissions
(-x). The following is an example of the syntax of the setfacl command:
setfacl -
m u:username:rwx filename
In the example just shown, the modify option (-m) is followed by the letter u, indicating
that you are setting ACL permissions for a user. After a colon (:), you indicate the username,
followed by another colon and the permissions that you want to assign. As with the chmod
command, you can assign read (r), write (w), and/or execute (x) permissions to the user or
group (in the example, full rwx permission is given). The last argument is replaced by the
actual filename you are modifying.
260
Downloaded from https://onlinelibrary.wiley.com/doi/ by alex jounh - Oregon Health & Science Univer , Wiley Online Library on [05/12/2025]. See the Terms and Conditions (https://onlinelibrary.wiley.com/terms-and-conditions) on Wiley Online Library for rules of use; OA articles are governed by the applicable Creative Commons License
Part III: Becoming a Linux System Administrator
The following are some examples of the user mary using the setfacl command to add permission for other users and groups on a file:
[mary]$ touch /tmp/memo.txt
[mary]$ ls -
l /tmp/memo.txt
-
rw-
rw-
r-
-
. 1 mary mary 0 Jan 21 09:27 /tmp/memo.txt
[mary]$ setfacl -
m u:bill:rw /tmp/memo.txt
[mary]$ setfacl -
m g:sales:rw /tmp/memo.txt
11
In the preceding example, mary created a file named /tmp/memo.txt. Using the setfacl
command, she modified (-m) permissions for the user named bill so that he now has read/
write (rw) permissions to that file. Then she modified permissions for the group sales so
that anyone belonging to that group would also have read/write permissions. Look at ls -l
and getfacl output on that file now:
[mary]$ ls -
l /tmp/memo.txt
-
rw-
rw-
r-
-
+ 1 mary mary 0 Jan 21 09:27 /tmp/memo.txt
[mary]$ getfacl /tmp/memo.txt
# file: tmp/memo.txt
# owner: mary
# group: mary
user::rw-
user:bill:rw-
group::rw-
group:sales:rw-
mask::rw-
other::r--
From the ls -l output, notice the plus sign (+) in the rw-rw-r--+ output. The plus sign
indicates that ACLs are set on the file, so you know to run the getfacl command to see
how ACLs are set. The output shows mary as owner and group (same as what you see with
ls -l), the regular user permissions (rw-
), and permissions for ACL user bill (rw-
).
The same is true for group permissions and permissions for the group sales. Other permissions are r--.
The mask line (near the end of the previous getfacl example) requires some special discussion. As soon as you set ACLs on a file, the regular group permission on the file sets a mask of
the maximum permission an ACL user or group can have on a file. So, even if you provide an
individual with more ACL permissions than the group permissions allow, the individual’s effective permissions do not exceed the group permissions as in the following example:
[mary]$ chmod 644 /tmp/memo.txt
[mary]$ getfacl /tmp/memo.txt
# file: tmp/memo.txt
# owner: mary
# group: mary
user::rw-
user:bill:rw- #effective:r-
-
group::rw-
#effective:r-
-
261
Downloaded from https://onlinelibrary.wiley.com/doi/ by alex jounh - Oregon Health & Science Univer , Wiley Online Library on [05/12/2025]. See the Terms and Conditions (https://onlinelibrary.wiley.com/terms-and-conditions) on Wiley Online Library for rules of use; OA articles are governed by the applicable Creative Commons License
Chapter 11: Managing User Accounts
group:sales:rw- #effective:r--
mask::r--
other::r--
Notice in the preceding example that even though the user bill and group sales have
rw-permissions, their effective permissions are r--. So, bill or anyone in sales would
not be able to change the file unless mary were to open permissions again (for example, by
typing chmod 664 /tmp/memo.txt).
Setting default ACLs
Setting default ACLs on a directory enables your ACLs to be inherited. This means that when
new files and directories are created in that directory, they are assigned the same ACLs. To set
a user or group ACL permission as the default, you add a d: to the user or group designation.
Consider the following example:
[mary]$ mkdir /tmp/mary
[mary]$ setfacl -
m d:g:market:rwx /tmp/mary/
[mary]$ getfacl /tmp/mary/
# file: tmp/mary/
# owner: mary
# group: mary
user::rwx
group::rwx
other::r-x
default:user::rwx
default:group::rwx
default:group:sales:rwx
default:group:market:rwx
default:mask::rwx
default:other::r-x
To make sure that the default ACL worked, create a subdirectory. Then run getfacl again.
You will see that default lines are added for user, group, mask, and other, which are inherited
from the directory’s ACLs:
[mary]$ mkdir /tmp/mary/test
[mary]$ getfacl /tmp/mary/test
# file: tmp/mary/test
# owner: mary
# group: mary
user::rwx
group::rwx
group:sales:rwx
group:market:rwx
mask::rwx
other::r-x
default:user::rwx
default:group::rwx
default:group:sales:rwx
262
Downloaded from https://onlinelibrary.wiley.com/doi/ by alex jounh - Oregon Health & Science Univer , Wiley Online Library on [05/12/2025]. See the Terms and Conditions (https://onlinelibrary.wiley.com/terms-and-conditions) on Wiley Online Library for rules of use; OA articles are governed by the applicable Creative Commons License
Part III: Becoming a Linux System Administrator
default:group:market:rwx
default:mask::rwx
default:other::r-x
Notice that when you create a file in that directory, the inherited permissions are different. Because a regular file is created without execute permission, the effective permission is
reduced to rw-
:
[mary@cnegus ~]$ touch /tmp/mary/file.txt
[mary@cnegus ~]$ getfacl /tmp/mary/file.txt
# file: tmp/mary/file.txt
# owner: mary
# group: mary
user::rw-
group::rwx
#effective:rw-
group:sales:rwx
#effective:rw-
group:market:rwx
#effective:rw-
mask::rw-
other::r--
Enabling ACLs
In recent Ubuntu, Fedora, and RHEL systems, xfs and ext filesystem types (ext2, ext3, and
ext4) are automatically created with ACL support. On other Linux systems, or on filesystems
created on other Linux systems, you can add the acl mount option in several ways:
■
■
■
Add the acl option to the fifth field in the line in the /etc/fstab file that automatically mounts the filesystem when the system boots up.
Implant the acl line in the Default mount options field in the filesystem’s
super block, so that the acl option is used whether the filesystem is mounted automatically or manually.
Add the acl option to the mount command line when you mount the filesystem
manually with the mount command.
Keep in mind that in Fedora and Red Hat Enterprise Linux systems, you have to add the acl
mount option only to those filesystems that were created elsewhere. The anaconda installer
automatically adds ACL support to every filesystem it creates during install time and mkfs
adds acl to every filesystem you create with that tool. To check that the acl option has
been added to an ext filesystem, determine the device name associated with the filesystem,
and run the tune2fs -l command to view the implanted mount options, as in this example:
# mount | grep ”/ “
/dev/nvme0n1p2 on / type ext4 (rw,relatime,errors=remount-
ro)
# tune2fs -
l /dev/nvme0n1p2 | grep "mount options"
Default mount options:
user_xattr acl
First, I typed the mount command to see a list of all filesystems that are currently mounted,
limiting the output by grepping for just the root filesystem “/ “ (because I was looking for
the filesystem mounted on /). After I saw the filesystem’s device name, I used it as an option
263
11
Downloaded from https://onlinelibrary.wiley.com/doi/ by alex jounh - Oregon Health & Science Univer , Wiley Online Library on [05/12/2025]. See the Terms and Conditions (https://onlinelibrary.wiley.com/terms-and-conditions) on Wiley Online Library for rules of use; OA articles are governed by the applicable Creative Commons License
Chapter 11: Managing User Accounts
to tune2fs -l to find the default mount options line. There, I could see that mount options
user_xattr (for extended attributes such as SELinux) and acl were both implanted in the
filesystem super block so that they would be used when the filesystem was mounted.
If the Default mount options field is blank (such as when you have just created a
new filesystem), you can add the acl mount option using the tune2fs -o command. For
example, on a different Linux system, I created a filesystem on a removable USB drive that was
assigned as the /dev/sdc1 device. To implant the acl mount option and check that it is
there, I ran the following commands:
# tune2fs -
o acl /dev/sdc1
# tune2fs -
l /dev/sdc1 | grep "mount options"
Default mount options:
acl
You can test that this worked by remounting the filesystem and trying to use the setfacl
command on a file in that filesystem.
A second way to add acl support to a filesystem is to add the acl option to the line in the
/etc/fstab file that automatically mounts the filesystem at boot time. The following is an
example of what a line would look like that mounts the ext4 filesystem located on the /dev/
sdc1 device to the /var/stuff directory:
/dev/sdc1
/var/stuff
ext4
acl
1 2
Instead of the defaults entry in the fourth field, I added acl. If there were already options
set in that field, add a comma after the last option and add acl. The next time the filesystem
is mounted, ACLs are enabled. If the filesystem were already mounted, I could type the following mount command as root to remount the filesystem using acl or any other values added
to the /etc/fstab file:
# mount -
o remount /dev/sdc1
A third way that you can add ACL support to a filesystem is to mount the filesystem by hand
and specifically request the acl mount option. So, if there were no entry for the filesystem
in the /etc/fstab file, after creating the mount point (/var/stuff), type the following
command to mount the filesystem and include ACL support:
# mount -
o acl /dev/sdc1 /var/stuff
Keep in mind that the mount command only mounts the filesystem temporarily. When the
system reboots, the filesystem is not mounted again, unless you add an entry to the /etc/
fstab file.
Adding directories for users to collaborate
A special set of three permission bits is typically ignored when you use the chmod command
to change permissions on the filesystem. These bits can set special permissions on commands
and directories. The focus of this section is setting the bits that help you create directories to
use for collaboration.
264
Downloaded from https://onlinelibrary.wiley.com/doi/ by alex jounh - Oregon Health & Science Univer , Wiley Online Library on [05/12/2025]. See the Terms and Conditions (https://onlinelibrary.wiley.com/terms-and-conditions) on Wiley Online Library for rules of use; OA articles are governed by the applicable Creative Commons License
Part III: Becoming a Linux System Administrator
As with read, write, and execute bits for user, group, and other, these special
file permission bits can be set with the chmod command. If, for example, you run
chmod 775 /mnt/xyz, the implied permission is actually 0775. To change permissions,
you can replace the number 0 with any combination of those three bits (4, 2, and 1), or you
can use letter values instead. (Refer to Chapter 4, “Moving Around the Filesystem,” if you need
to be reminded about how permissions work.) Table 11.1 shows the letters and numbers.
TABLE 11.1
Commands to Create and Use Files
Name
Numeric value
Letter value
Set user ID bit
4
u+s
Set group ID bit
2
g+s
Sticky bit
1
o+t
The bits in which you are interested in for creating collaborative directories are the set group
ID bit (2) and sticky bit (1). If you are interested in other uses of the set user ID and set group
ID bits, refer to the sidebar “Using Set UID and Set GID Bit Commands.”
Creating group collaboration directories (set GID bit)
When you create a set GID directory, any files created in that directory are assigned to the
group assigned to the directory itself. The idea is to have a directory where all members of a
group can share files but still protect them from other users. Here’s a set of steps for creating a
collaborative directory for all users in the group I created called sales:
1. Create a group to use for collaboration:
# groupadd -
g 301 sales
2. Add to the group some users with which you want to be able to share files
(I used mary):
# usermod -
aG sales mary
3. Create the collaborative directory:
# mkdir /mnt/salestools
Using Set UID and Set GID Bit Commands
The set UID and set GID bits are used on special executable files that allow commands set to be run
differently than most. Normally, when a user runs a command, that command runs with that user’s permissions. In other words, if I run the vi command as chris, that instance of the vi command would
have the permissions to read and write files that the user chris could read and write.
Continues
265
11
Downloaded from https://onlinelibrary.wiley.com/doi/ by alex jounh - Oregon Health & Science Univer , Wiley Online Library on [05/12/2025]. See the Terms and Conditions (https://onlinelibrary.wiley.com/terms-and-conditions) on Wiley Online Library for rules of use; OA articles are governed by the applicable Creative Commons License
Chapter 11: Managing User Accounts
continued
Commands with the set UID or set GID bits set are different. It is the owner and group assigned to the
command, respectively, that determines the permissions the command has to access resources on the
computer. So, a set UID command owned by root would run with root permissions; a set GID command
owned by apache would have apache group permissions.
Examples of applications that have set UID bits turned on are the su and newgrp commands. In both
of those cases, the commands must be able to act as the root user to do their jobs. However, to actually
get root permissions, a user must provide a password. You can tell su is a set UID bit command because
of the s where the first execute bit (x) usually goes:
$ ls /bin/su
-
rwsr-
xr-
x. 1 root root
30092 Jan 30 07:11 su
4. Assign the group sales to the directory:
# chgrp sales /mnt/salestools
5. Change the directory permission to 2775. This turns on the set group ID bit (2), full
rwx for the user (7), rwx for group (7), and r-x (5) for other:
# chmod 2775 /mnt/salestools
6. Become mary (run su - mary). As mary, create a file in the shared directory and
look at the permissions. When you list permissions, you can see that the directory is
a set GID directory because a lowercase s appears where the group execute permission
should be (rwxrwsr-x):
# su -mary
[mary]$ touch /mnt/salestools/test.txt
[mary]$ ls -
ld /mnt/salestools/ /mnt/salestools/test.txt
drwxrwsr-
x. 2 root sales 4096 Jan 22 14:32 /mnt/salestools/
-
rw-
rw-
r-
-
. 1 mary sales
0 Jan 22 14:32 /mnt/salestools/test.txt
Typically, a file created by mary would have the group mary assigned to it. But because
test.txt was created in a set group ID bit directory, the file is assigned to the sales
group. Now, anyone who belongs to the sales group can read from or write to that file, based
on group permissions.
Creating restricted deletion directories (sticky bit)
A restricted deletion directory is created by turning on a directory’s sticky bit. What makes a
restricted deletion directory different than other directories? Normally, if write permission is
open to a user on a file or directory, that user can delete that file or directory. However, in a
restricted deletion directory, unless you are the root user or the owner of the directory, you
can never delete another user’s files.
266
Downloaded from https://onlinelibrary.wiley.com/doi/ by alex jounh - Oregon Health & Science Univer , Wiley Online Library on [05/12/2025]. See the Terms and Conditions (https://onlinelibrary.wiley.com/terms-and-conditions) on Wiley Online Library for rules of use; OA articles are governed by the applicable Creative Commons License
Part III: Becoming a Linux System Administrator
Typically, a restricted deletion directory is used as a place where lots of different users can create files. For example, the /tmp directory is a restricted deletion directory:
$ ls -
ld /tmp
drwxrwxrwt. 116 root root 36864 Jan 22 14:18 /tmp
You can see that the permissions are wide open, but instead of an x for the execute bit for
other, the t indicates that the sticky bit is set. The following is an example of creating a
restricted deletion directory with a file that is wide open for writing by anyone:
[mary]$ mkdir /tmp/mystuff
[mary]$ chmod 1777 /tmp/mystuff
[mary]$ cp /etc/services /tmp/mystuff/
[mary]$ chmod 666 /tmp/mystuff/services
[mary]$ ls -
ld /tmp/mystuff /tmp/mystuff/services
drwxrwxrwt. 2 mary mary
4096 Jan 22 15:28 /tmp/mystuff/
-
rw-
rw-
rw-
. 1 mary mary 640999 Jan 22 15:28 /tmp/mystuff/services
With permissions set to 1777 on the /tmp/mystuff directory, you can see that all
permissions are wide open, but a t appears instead of the last execute bit. With the
/tmp/mystuff/services file open for writing, any user could open it and change its
contents. However, because the file is in a sticky bit directory, only root and mary can delete
that file.
Centralizing User Accounts
Although the default way of authenticating users in Linux is to check user information against
the /etc/passwd file and passwords from the /etc/shadow file, you can authenticate in
other ways as well. In most large enterprises, user account information is stored in a centralized authentication server, so each time you install a new Linux system, instead of adding user
accounts to that system, you have the Linux system query the authentication server when
someone tries to log in.
As with local passwd/shadow authentication, configuring centralized authentication
requires that you provide two types of information: account information (username, user/
group IDs, home directory, default shell, and so on) and authentication method (different
types of encrypted passwords, smart cards, retinal scans, and so on). Linux provides ways of
configuring those types of information.
Authentication domains that are supported via the authconfig command include LDAP, NIS,
and Windows Active Directory.
Supported centralized database types include the following:
LDAP The Lightweight Directory Access Protocol (LDAP) is a popular protocol for providing directory services (such as phone books, addresses, and user accounts). It is an
open standard that is configured in many types of computing environments.
Kerberos Kerberos offers secure client/server communications, using a Key Distribution
Center consisting of an Authentication Server and a Ticket-granting Server. Because
267
11
Downloaded from https://onlinelibrary.wiley.com/doi/ by alex jounh - Oregon Health & Science Univer , Wiley Online Library on [05/12/2025]. See the Terms and Conditions (https://onlinelibrary.wiley.com/terms-and-conditions) on Wiley Online Library for rules of use; OA articles are governed by the applicable Creative Commons License
Chapter 11: Managing User Accounts
Kerberos has been around for a long time, it is well integrated into different operating
systems including Linux and Windows systems. Kerberized services include ssh,
ftp, and rcp.
Winbind Selecting Winbind from the Authentication Configuration window enables you
to authenticate your users against a Microsoft Active Directory (AD) server. Many large
companies extend their desktop authentication setup to do server configuration as well
as using an AD server.
If you are looking into setting up your own centralized authentication services and you want
to use an open source project, I recommend looking into the 389 Directory Server (https://
directory.fedoraproject.org). Fedora and other Linux systems offer this enterprise-quality
LDAP server.
Summary
Having separate user accounts is the primary method of setting secure boundaries between the
people who use your Linux system. Regular users typically can control the files and directories
within their own home directories but very little outside of those directories.
In this chapter, you learned how to add user and group accounts, how to modify them,
and even how to extend user and group accounts beyond the boundaries of the local
/etc/passwd file. You also learned that authentication can be done by accessing centralized
LDAP servers.
The next chapter introduces another basic topic needed by Linux system administrators: how
to manage disks. In that chapter, you learn how to partition disks, add filesystems, and mount
them so the contents of the disk partitions are accessible to those using your system.
Exercises
Use these exercises to test your knowledge of adding and managing user and group accounts
in Linux. These tasks assume you are running a Fedora or Red Hat Enterprise Linux system
(although some tasks work on other Linux systems as well). If you are stuck, solutions to
the tasks are shown in Appendix B (although in Linux, you often have multiple ways to complete a task).
1. Add a local user account to your Linux system that has a username of jbaxter and
a full name of John Baxter and that uses /bin/sh as its default shell. Let the UID be
assigned by default. Set the password for jbaxter to: My1N1te0ut!.
2. Create a group account named testing that uses group ID 315.
3. Add jbaxter to the testing group and the bin group.
268
Downloaded from https://onlinelibrary.wiley.com/doi/ by alex jounh - Oregon Health & Science Univer , Wiley Online Library on [05/12/2025]. See the Terms and Conditions (https://onlinelibrary.wiley.com/terms-and-conditions) on Wiley Online Library for rules of use; OA articles are governed by the applicable Creative Commons License
Part III: Becoming a Linux System Administrator
4. Open a shell as jbaxter (either a new login session or using a current shell) and
temporarily have the testing group be your default group so that when you type
touch /home/jbaxter/file.txt, the testing group is assigned as the
file’s group.
5. Note what user ID has been assigned to jbaxter, and delete the user account
without deleting the home directory assigned to jbaxter.
6. Find any files in the /home directory (and any subdirectories) that are assigned to
the user ID that recently belonged to the user named jbaxter.
7. Copy the /etc/services file to the default skeleton directory so that it
shows up in the home directory of any new user. Then add a new user to the system
named mjones, with a full name of Mary Jones and a home directory of
/home/maryjones.
8. Find all files under the /home directory that belong to mjones. Are there any files
owned by mjones that you didn’t expect to see?
9. Log in as mjones, and create a file called /tmp/maryfile.txt. Using ACLs,
assign the bin user read/write permission to that file. Then assign the lp group
read/write permission to that file.
10. Still as mjones, create a directory named /tmp/mydir. Using ACLs, assign default
permissions to that directory so that the adm user has read/write/execute
permission to that directory and any files or directories created in it. Create the
/tmp/mydir/testing/ directory and /tmp/mydir/newfile.txt file, and
make sure that the adm user was also assigned full read/write/execute permissions.
(Note that despite rwx permission being assigned to the adm user, the effective permission on newfile.txt is only rw. What could you do to make sure that adm gets
execute permission as well?)
269
11
Downloaded from https://onlinelibrary.wiley.com/doi/ by alex jounh - Oregon Health & Science Univer , Wiley Online Library on [05/12/2025]. See the Terms and Conditions (https://onlinelibrary.wiley.com/terms-and-conditions) on Wiley Online Library for rules of use; OA articles are governed by the applicable Creative Commons License
Chapter 11: Managing User Accounts
12
Managing Disks and Filesystems
IN THIS CHAPTER
Working with shell scripts
Creating logical volumes with LVM
Adding filesystems
Mounting filesystems
Unmounting filesystems
Y
our operating system, applications, and data all need to be kept on some kind of permanent
storage so that when you turn your computer off and then on again, it is all still there. Traditionally, that storage has been provided by a hard disk in your computer. To organize the information
on that disk, the disk is usually divided into partitions, with most partitions given a structure referred
to as a filesystem.
This chapter describes how to work with hard drives. Hard drive tasks include partitioning, adding
filesystems, and managing those filesystems in various ways. Storage devices that are attached to the
systems such as removable devices, including hard disk drives (HDDs) and solid-state drives (SSDs), and
network devices can be partitioned and managed in the same ways.
After covering basic partitions, I describe how Logical Volume Manager (LVM) can be used to make it
easier to grow, shrink, and otherwise manage filesystems more efficiently.
Understanding Disk Storage
The basics of how data storage works are the same in most modern operating systems. When you install
the operating system, the disk is divided into one or more partitions. Most partitions are formatted
with filesystems. In the case of Linux, some of the partitions may be specially formatted for elements
such as swap area or LVM physical volumes. Disks are used for permanent storage; random access
memory (RAM) and swap are used for temporary storage. For example, when you run a command, that
command is copied from the hard disk into RAM so that your computer processor (CPU) can access it
more quickly.
271
Linux Bible, Eleventh Edition. Christopher Negus.
© 2026 John Wiley & Sons, Inc. All rights reserved, including rights for text and data mining and training of artificial intelligence technologies or similar
technologies. Published 2026 by John Wiley & Sons, Inc.
Downloaded from https://onlinelibrary.wiley.com/doi/ by alex jounh - Oregon Health & Science Univer , Wiley Online Library on [05/12/2025]. See the Terms and Conditions (https://onlinelibrary.wiley.com/terms-and-conditions) on Wiley Online Library for rules of use; OA articles are governed by the applicable Creative Commons License
CHAPTER
Your CPU can access data much faster from RAM than it can from a hard disk, although SSDs
are more like RAM than HDDs. However, a disk is usually much larger than RAM, RAM is much
more expensive, and RAM is erased when the computer reboots. Think of your office as a metaphor for RAM and disk. A disk is like a file cabinet where you store folders of information you
need. RAM is like the top of your desk, where you put the folder of papers while you are using
it but put it back in the file cabinet when you are not.
If RAM fills up by running too many processes or a process with a memory leak, new processes
fail if your system doesn’t have a way to extend system memory. That’s where a swap area
comes in. A swap space is a hard disk swap partition or a swap file where your computer can
“swap out” data from RAM that isn’t being used at the moment and then “swap in” the data
back to RAM when it is again needed. However, because of more memory availability and more
efficient use of memory, swap is used less often than it once was. If you do assign a swap area,
it is still better never to exceed your RAM (performance takes a hit when you swap), though
swapping out is better than having processes just fail.
Another special partition is a Logical Volume Manager (LVM) physical volume. LVM physical
volumes enable you to create pools of storage space called volume groups. From those volume
groups, you have much more flexibility for growing and shrinking logical volumes than you
have resizing disk partitions directly.
For Linux, at least one disk partition is required, assigned to the root (/) of the entire Linux
filesystem. However, it is more common to have separate partitions that are assigned to particular directories, such as /home, /var, and/or /tmp. Each of the partitions is connected
to the larger Linux filesystem by mounting it to a point in the filesystem where you want that
partition to be used. Any file added to the mount point directory of a partition, or a subdirectory, is stored on that partition.
Note
The word mount refers to the action of connecting a filesystem from a hard disk, USB drive, or network storage device
to a particular point in the filesystem. This action is done using the mount command, along with options to tell the
command where the storage device is located and to which directory in the filesystem to connect it.
The business of connecting permanent disk partitions to the Linux filesystem is done automatically and invisibly to the end user. How does this happen? Each regular disk partition created
when you install Linux is associated with a device name. An entry in the /etc/fstab file
tells Linux each partition’s device name and where to mount it (as well as other bits of information). The mounting is done when the system boots.
Most of this chapter focuses on understanding how your computer’s disk is partitioned and
connected to form your Linux filesystem as well as how to partition disks, format filesystems
and swap space, and have those items made available when the system boots. The chapter then
covers how to do partitioning and filesystem creation manually.
272
Downloaded from https://onlinelibrary.wiley.com/doi/ by alex jounh - Oregon Health & Science Univer , Wiley Online Library on [05/12/2025]. See the Terms and Conditions (https://onlinelibrary.wiley.com/terms-and-conditions) on Wiley Online Library for rules of use; OA articles are governed by the applicable Creative Commons License
Part III: Becoming a Linux System Administrator
Coming from Windows
Filesystems are organized differently in Linux than they are in Microsoft Windows operating systems.
Instead of drive letters (for example, A:, B:, C:) for each local disk, network filesystem, CD-ROM, or
other type of storage medium, everything fits neatly into the Linux directory structure.
Some drives are connected (mounted) automatically into the filesystem when you insert removable media.
For example, a USB drive might be mounted on /media/<user>/<drive_label>. If the drive isn’t
mounted automatically, it is up to an administrator to create a mount point in the filesystem and then
connect the disk to that point.
Linux can understand VFAT and exFAT filesystems, which are often the default format when you buy a
USB flash drive. A VFAT and exFAT USB flash drive provides a good way to share data between Linux
and Windows systems. Linux kernel support is available for NTFS filesystems, which are usually used with
Windows these days. However, NTFS, and sometimes exFAT, often require that you install additional
kernel drivers in Linux.
VFAT filesystems are often used when files need to be exchanged between different types of operating
systems. Because VFAT was used in MS-DOS and early Windows operating systems, it offers a good
lowest common denominator for sharing files with many types of systems (including Linux). NTFS is the
filesystem type most commonly used with modern Microsoft Windows systems.
Partitioning Hard Disks
Linux provides several tools for managing your hard disk partitions. You need to know how to
partition your disk if you want to add a disk to your system or change your existing disk
configuration.
The following sections demonstrate disk partitioning using a removable USB flash drive and a
fixed hard disk. To be safe, I use a USB flash drive that doesn’t contain any data that I want to
keep in order to practice partitioning.
Changing partitioning can make a system
unbootable!
I don’t recommend using your system’s primary hard disk to practice changing partitioning because a
mistake can make your system unbootable. Even if you use a separate USB flash drive to practice, a bad
entry in /etc/fstab can hang your system on reboot. If after changing partitions your system fails to
boot, refer to Chapter 21, “Troubleshooting Linux,” for information on how to fix the problem.
273
12
Downloaded from https://onlinelibrary.wiley.com/doi/ by alex jounh - Oregon Health & Science Univer , Wiley Online Library on [05/12/2025]. See the Terms and Conditions (https://onlinelibrary.wiley.com/terms-and-conditions) on Wiley Online Library for rules of use; OA articles are governed by the applicable Creative Commons License
Chapter 12: Managing Disks and Filesystems
Understanding partition tables
PC architecture computers have traditionally used master boot record (MBR) partition tables to
store information about the sizes and layouts of the hard disk partitions. There are many tools
for managing MBR partitions that are quite stable and well known. A few years ago, however,
a new standard called globally unique identifier (GUID) partition tables began being used on
systems as part of the UEFI computer architecture to replace the older BIOS method of booting
the system.
Many Linux partitioning tools have been updated to handle GUID partition tables (gpts).
Other tools for handling GUID partition tables have been added. Because the popular fdisk
command does not support gpt partitions, the parted command is used to illustrate partitioning in this chapter.
Limitations imposed by the MBR specification brought about the need for GUID partitions. In
particular, MBR partitions are limited to 2TB in size. GUID partitions can create partitions up
to 9.4 zettabytes (ZB).
Viewing disk partitions
To view disk partitions, use the parted command with the -l option. The following is an
example of partitioning on a 240GB fixed hard drive on an Ubuntu system:
# parted -l
Model: SK hynix BC711 HFM256GD3JX013N (nvme)
Disk /dev/nvme0n1: 256GB
Sector size (logical/physical): 512B/512B
Partition Table: gpt
Disk Flags:
Number
1
esp
2
Start
1049kB
End
538MB
Size
537MB
File system
fat32
538MB
256GB
256GB
ext4
Name
EFI System Partition
Flags
boot,
In this example, the Linux system uses a Non-Volatile Memory Express (NVMe) SSD, represented by the /dev/nvme0n1 device. The partition table is gpt, with the boot partition
holding a fat32 filesystem type and the root filesystem being an ext4 filesystem type. Using
fdisk, you can see more details. In particular, it shows the two partitions from that drive as
nvme0n1p1 and nvme0n1p2:
# fdisk -
l /dev/nvme0n1
Disk /dev/nvme0n1: 238.47 GiB, 256060514304 bytes, 500118192 sectors
Disk model: SK hynix BC711 HFM256GD3JX013N
Units: sectors of 1 * 512 = 512 bytes
Sector size (logical/physical): 512 bytes / 512 bytes
I/O size (minimum/optimal): 512 bytes / 512 bytes
Disklabel type: gpt
Disk identifier: 3CCE6231-1AEF-420E-8F7C-4915EFEEB412
274
Downloaded from https://onlinelibrary.wiley.com/doi/ by alex jounh - Oregon Health & Science Univer , Wiley Online Library on [05/12/2025]. See the Terms and Conditions (https://onlinelibrary.wiley.com/terms-and-conditions) on Wiley Online Library for rules of use; OA articles are governed by the applicable Creative Commons License
Part III: Becoming a Linux System Administrator
Device
Start
End
Sectors
/dev/nvme0n1p1
2048
1050623
1048576
/dev/nvme0n1p2 1050624 500117503 499066880
Size Type
512M EFI System
238G Linux filesystem
When a USB flash drive is inserted, it is assigned to the first available sd device. The following
example shows a USB drive from an Ubuntu 24.04 system, where /dev/sda is assigned as the
USB device name (the first sd disk on the system). This USB drive is a 60GB USB flash drive:
# fdisk -
l /dev/sda
Disk /dev/sda: 57.77 GiB, 62026416128 bytes, 121145344 sectors
Disk model: USB DISK 3.0
Units: sectors of 1 * 512 = 512 bytes
Sector size (logical/physical): 512 bytes / 512 bytes
I/O size (minimum/optimal): 512 bytes / 512 bytes
Disklabel type: dos
Disk identifier: 0x988df2aa
Device
/dev/sda1
12
Boot Start
End
Sectors Size Id Type
2048 121145343 121143296 57.8G c W95 FAT32 (LBA)
Although this drive was assigned to/dev/sda, your drive might be assigned to a different
device name. Here are some things to look for:
■
■
■
A SCSI or USB storage device, represented by an sd? device (such as sda, sdb, sdc,
and so on) can have up to 16 minor devices (for example, the main /dev/sdc device
and /dev/sdc1 through /dev/sdc15). So, there can be 15 partitions total. An
NVMe SSD storage device, represented by a nvme device (such as nvme0, nvme1,
nvme2, and so on), can be divided into one or more namespaces (most devices just
use the first namespace) and partitions. For example, /dev/nvme0n1p1 represents
the first partition in the first namespace on the first NVMe SSD.
For x86 computers, disks can have up to four primary partitions. So, to have more
than four total partitions, one must be an extended partition. Any partitions beyond
the four primary partitions are logical partitions that use space from the extended
partition.
The id field indicates the type of partition. The USB drive uses c, which is W95
FAT32 (LBA). This type is useful for moving files between Linux and Windows
systems that are not network connected.
In this example, the first primary hard disk appears as /dev/nvme0n1. With RHEL and
Fedora installations, for default partitioning, there is usually at least one LVM partition created
by the installer, out of which other partitions can be assigned. To see more human-readable
information on your disk, type:
# df -
h /dev/nvme0n1p?
Filesystem
Size Used Avail Use% Mounted on
/dev/nvme0n1p1 511M 6.2M 505M
2% /boot/efi
/dev/nvme0n1p2 234G
50G 172G 23% /
275
Downloaded from https://onlinelibrary.wiley.com/doi/ by alex jounh - Oregon Health & Science Univer , Wiley Online Library on [05/12/2025]. See the Terms and Conditions (https://onlinelibrary.wiley.com/terms-and-conditions) on Wiley Online Library for rules of use; OA articles are governed by the applicable Creative Commons License
Chapter 12: Managing Disks and Filesystems
The first partition is roughly 511MB and is mounted on the /boot/efi directory. The second
partition (50GB) is mounted on the root (/) of the filesystem.
For the moment, I recommend you leave the hard disk alone and find a USB flash drive that
you do not mind erasing. You can try the commands I demonstrate on that drive.
Creating a single-partition disk
To add a new storage medium (hard disk, USB flash drive, or similar device) to your computer
so that it can be used by Linux, you first need to connect the disk device to your computer
and then partition the disk. Here’s the general procedure:
1. Install the new hard drive or insert the new USB flash drive.
2. Partition the new disk.
3. Create the filesystems on the new disk.
4. Mount the filesystems.
The easiest way to add a disk or flash drive to Linux is to have the entire disk devoted to a
single Linux partition. You can have multiple partitions, however, and assign them each to
different types of filesystems and different mount points if you like.
The following process takes you through partitioning a USB flash drive to be used for Linux,
where the whole USB drive is assigned to one partition. If you have a USB flash drive (any
size) that you don’t mind erasing, you can work through this procedure as you read. The
section following this describes how to partition a disk with multiple partitions.
Warning
If you make a mistake partitioning your disk with parted, make sure that you correct that change. Unlike fdisk,
where you could just type q to exit without saving your changes, parted makes your changes immediately, so you are
not able just to quit to abandon changes.
1. For a USB flash drive, just plug it into an available USB port. Going forward, I use a
60GB USB flash drive, but you can get a USB flash drive of any size.
2. Determine the device name for the USB drive. As root user from a shell, type the following journalctl command, and then insert the USB flash drive. Messages appear,
indicating the device name of the drive you just plugged in (press Ctrl+C to exit the
tail command when you are finished).
# journalctl -f
kernel: usb 2-
2:
kernel: usb 2-
2:
=6300...
kernel: usb 2-
2:
SerialNumber=3
kernel: usb 2-
2:
kernel: usb 2-
2:
276
new SuperSpeed USB device number 7 using xhci_hcd
New USB device found, idVendor=13fe, idProduct
New USB device strings: Mfr=1, Product=2,
Product: USB DISK 3.0
Manufacturer:
Downloaded from https://onlinelibrary.wiley.com/doi/ by alex jounh - Oregon Health & Science Univer , Wiley Online Library on [05/12/2025]. See the Terms and Conditions (https://onlinelibrary.wiley.com/terms-and-conditions) on Wiley Online Library for rules of use; OA articles are governed by the applicable Creative Commons License
Part III: Becoming a Linux System Administrator
kernel:
kernel:
kernel:
kernel:
ANSI: 6
kernel:
kernel:
GB/57.8
kernel:
kernel:
kernel:
usb 2-
2: SerialNumber: 900024068F523776
usb-
storage 2-
2:1.0: USB Mass Storage device detected
scsi host2: usb-
storage 2-
2:1.0
scsi 2:0:0:0: Direct-
Access
USB DISK 3.0
PMAP PQ: 0
sd 2:0:0:0:
sd 2:0:0:0:
GiB)
sd 2:0:0:0:
sd 2:0:0:0:
sda: sda1
Attached scsi generic sg0 type 0
[sda] 121145344 512-
byte logical blocks: (62.0
[sda] Write Protect is off
[sda] Mode Sense: 45 00 00 00
3. From the output, you can see that the USB flash drive was found and assigned to
/dev/sda. (Your device name may be different.) It also contains a single formatted
partition: sda1. Be sure you identify the correct disk or you could lose all data from
disks you may want to keep!
4. If the USB flash drive mounts automatically, unmount it. Here is how to find the USB
partitions in this example and unmount them:
# mount | grep sda
/dev/sda1 on /run/media…
# umount /dev/sda1
5. Use the parted command to create partitions on the USB drive. For example, if you
are formatting the first USB, SATA, or SCSI disk (sda), you can type the following:
# parted /dev/sda
GNU Parted 3.2
Using /dev/sda
Welcome to GNU Parted! Type 'help' to view a list of commands.
(parted)
Now you are in parted command mode, where you can use the parted single-letter
command set to work with your partitions.
6. If you start with a new USB flash drive, it may have one partition that is entirely
devoted to a Windows-compatible filesystem (such as VFAT or fat32). Use p to view all
partitions and rm to delete the partition. Here’s what it looked like when I did that:
(parted) p
Model: USB DISK 3.0 (scsi)
Disk /dev/sda: 62.0GB
Sector size (logical/physical): 512B/512B
Partition Table: msdos
Disk Flags:
Number Start
End
Size
Type
1
1049kB 62.0GB 62.0GB primary
(parted) rm
Partition number? 1
File system
Flags
lba
277
12
Downloaded from https://onlinelibrary.wiley.com/doi/ by alex jounh - Oregon Health & Science Univer , Wiley Online Library on [05/12/2025]. See the Terms and Conditions (https://onlinelibrary.wiley.com/terms-and-conditions) on Wiley Online Library for rules of use; OA articles are governed by the applicable Creative Commons License
Chapter 12: Managing Disks and Filesystems
7. Relabel the disk as having a gpt partition table instead of msdos.
(parted) mklabel gpt
Warning: The existing disk label on /dev/sda will be
destroyed and all data on this disk will be lost. Do you want to
continue?
Yes/No? Yes
(parted)
8. To create a new partition, type mkpart. You are prompted for the filesystem type,
then the start and end of the partition. This example names the partition alldisk,
uses ext4 as the filesystem type, starts the partition at 1M, and ends at 123GB:
(parted) mkpart
Partition name? []? alldisk
File system type? [ext2]? ext4
Start? 1
End? 62GB
9. Double-check that the drive is partitioned the way you want by pressing p, and then
type q to exit. (Your output will differ, depending on the size of your drive.)
(parted) p
Model: USB DISK 3.0 (scsi)
Disk /dev/sda: 62.0GB
Sector size (logical/physical): 512B/512B
Partition Table: gpt
Disk Flags:
Number Start
1
1049kB
End
62.0GB
Size
62.0GB
File system
xfs
Name
alldisk
Flags
10. Although the partitioning is done, the new partition is not yet ready to use. For that,
you have to create a filesystem on the new partition. To create a filesystem on the
new disk partition, use the mkfs command. By default, this command creates an
ext2 filesystem, which is usable by Linux. However, in most cases you want to use a
journaling filesystem (such as ext3, ext4, or xfs). To create an xfs filesystem on the
first partition of the second hard disk, type the following:
# mkfs -
t xfs /dev/sda1
Tip
You can use different commands, or options to this command, to create other filesystem types. For example, use mkfs
.exfat to create a VFAT filesystem, mkfs.msdos for DOS, or mkfs.xfs for the xfs filesystem type. You may
want a VFAT or exFAT (available with Ubuntu) filesystem if you want to share files among Linux, Windows, and Mac
systems.
278
Downloaded from https://onlinelibrary.wiley.com/doi/ by alex jounh - Oregon Health & Science Univer , Wiley Online Library on [05/12/2025]. See the Terms and Conditions (https://onlinelibrary.wiley.com/terms-and-conditions) on Wiley Online Library for rules of use; OA articles are governed by the applicable Creative Commons License
Part III: Becoming a Linux System Administrator
11. To be able to use the new filesystem, you need to create a mount point and mount it
to the partition. Here is an example of how to do that. You then check to make sure
that the mount succeeded.
# mkdir /mnt/test
# mount /dev/sda1 /mnt/test
# df -
h /dev/sda1
Filesystem
Size Used Avail Use% Mounted on
/dev/sda1
57G
24K
54G
1% /mnt/test
The df command shows that /dev/sda1 is mounted on /mnt/test and that it
offers about 54GB of disk space. The mount command shows all mounted filesystems,
but here I just list sda1 to show that it is mounted.
Any files or directories that you create later in the /mnt/test directory, and any of
its subdirectories, are stored on the /dev/sda1 device.
12. When you are finished using the drive, you can unmount it with the umount
command, after which you can safely remove the drive (see the description of the
umount command later if this command fails):
# umount /dev/sda1
13. You don’t usually set up a USB flash drive to mount automatically every time the
system boots because it mounts automatically when you plug it in. But if you decide
that you want to do that, edit /etc/fstab and add a line describing what and
where to mount. Here is an example of a line you might add:
/dev/sda1
/mnt/test
ext4
defaults
0 1
In this example, the partition (/dev/sda1) is mounted on the /mnt/test directory as an ext4 filesystem. The defaults keyword causes the partition to be
mounted at boot time. The number 0 tells the system not to back up files automatically from this filesystem with the dump command (dump is rarely used anymore, but
the field is here). The 1 in the last column tells the system to check the partition for
errors after a certain number of mounts.
At this point, you have a working, permanently mounted disk partition. The next section
describes how to partition a disk that has multiple partitions.
Creating a multiple-partition disk
Now that you understand the basic process of partitioning a disk, adding a filesystem, and
making that filesystem available (temporarily and permanently), it is time to try a more complex example. Taking that same 128GB USB flash drive, I ran the procedure described later in
this section to create multiple partitions on one disk.
In this procedure, I configure an MBR partition to illustrate how extended partitions work
and to use the older fdisk command. I create two partitions of 5GB (sda1 and sda2), two
3GB (sda3 and sda5), and 4GB (sda6). The sda4 device is an extended partition, which
279
12
Downloaded from https://onlinelibrary.wiley.com/doi/ by alex jounh - Oregon Health & Science Univer , Wiley Online Library on [05/12/2025]. See the Terms and Conditions (https://onlinelibrary.wiley.com/terms-and-conditions) on Wiley Online Library for rules of use; OA articles are governed by the applicable Creative Commons License
Chapter 12: Managing Disks and Filesystems
consumes all remaining disk space. Space from the sda5 and sda6 partitions is taken from
the extended partition. This leaves plenty of space to create new partitions.
As before, insert the USB flash drive and determine the device name (in my case, /dev/sda).
Also, be sure to unmount any partitions that mount automatically when you insert the USB
flash drive.
Tip
When you indicate the size of each partition, type the plus sign and the number of megabytes or gigabytes you want to
assign to the partition. For example, use +1024M to create a 1,024MB partition or +10G for a 10GB partition. Be
sure to remember the plus sign (+) and the M or G! If you forget the M or G, fdisk thinks you mean sectors and you
get unexpected results.
1. I started this procedure by overwriting the USB drive with the dd command.
This allowed me to start with a fresh master boot record. Please be careful to use the
right drive number, or you could erase your operating system!
dd if=/dev/zero of=/dev/sd<number> bs=1M count=100).
2. Create six new partitions as follows:
# fdisk /dev/sda
Welcome to fdisk (util-
linux 2.39.3).
Changes will remain in memory only, until you decide to write them.
Be careful before using the write command.
Device does not contain a recognized partition table.
Created a new DOS disklabel with disk identifier 0x8933f665.
Command (m for help): n
Partition type
p
primary (0 primary, 0 extended, 4 free)
e
extended (container for logical partitions)
Select (default p): p
Partition number (1-
4, default 1): 1
First sector (2048-
240254975, default 2048):
Last sector, +/-
sectors or +/-
size{K,M,G,T,P} (2048-
240254975, default
240254975): +5G
Created a new partition 1 of type 'Linux' and of size 5 GiB.
Command (m for help): n
Partition type
p
primary (1 primary, 0 extended, 3 free)
e
extended (container for logical partitions)
Select (default p): p
Partition number (2-
4, default 2): 2
280
Downloaded from https://onlinelibrary.wiley.com/doi/ by alex jounh - Oregon Health & Science Univer , Wiley Online Library on [05/12/2025]. See the Terms and Conditions (https://onlinelibrary.wiley.com/terms-and-conditions) on Wiley Online Library for rules of use; OA articles are governed by the applicable Creative Commons License
Part III: Becoming a Linux System Administrator
First sector (10487808-
240254975, default 10487808):
Last sector, +/-
sectors or +/-
size{K,M,G,T,P} (10487808-
240254975,
default 240254975): +5G
Created a new partition 2 of type 'Linux' and of size 5 GiB.
Command (m for help): n
Partition type
p
primary (2 primary, 0 extended, 2 free)
e
extended (container for logical partitions)
Select (default p): p
Partition number (3,4, default 3): 3
First sector (20973568-
240254975, default 20973568): <ENTER>
Last sector, +/-
sectors or +/-
size{K,M,G,T,P} (20973568-
240254975,
default 240254975): +3G
12
Created a new partition 3 of type 'Linux' and of size 3 GiB.
Command (m for help): n
Partition type
p
primary (3 primary, 0 extended, 1 free)
e
extended (container for logical partitions)
Select (default e): e
Selected partition 4
First sector (27265024-
240254975, default 27265024): <ENTER>
Last sector, +/-
sectors or +/-
size{K,M,G,T,P} (27265024-
240254975, default 240254975): <ENTER>
Created a new partition 4 of type 'Extended' and of size 101.6 GiB.
Command (m for help): n
All primary partitions are in use.
Adding logical partition 5
First sector (27267072-
240254975, default 27267072): <ENTER>
Last sector, +/-
sectors or +/-
size{K,M,G,T,P} (27267072-
240254975, default 240254975): +3G
Created a new partition 5 of type 'Linux' and of size 3 GiB.
Command (m for help): n
All primary partitions are in use.
Adding logical partition 6
First sector (33560576-
240254975, default 33560576): <ENTER>
Last sector, +/-
sectors or +/-
size{K,M,G,T,P} (33560576-
240254975,
default 240254975): +4G
Created a new partition 6 of type 'Linux' and of size 4 GiB.
281
Downloaded from https://onlinelibrary.wiley.com/doi/ by alex jounh - Oregon Health & Science Univer , Wiley Online Library on [05/12/2025]. See the Terms and Conditions (https://onlinelibrary.wiley.com/terms-and-conditions) on Wiley Online Library for rules of use; OA articles are governed by the applicable Creative Commons License
Chapter 12: Managing Disks and Filesystems
3. Check the partitioning before saving by typing p. Notice that there are five usable
partitions (sdc1, sdc2, sdc3, sdc5, and sdc6) and that the sectors between the
Start and End for sdc4 are being consumed by sdc5 and sdc6.
Command (m for help): p
…
Device
Boot
Start
End
Sectors
Size Id Type
/dev/sda1
2048 10487807 10485760
5G 83 Linux
/dev/sda2
10487808 20973567 10485760
5G 82 Linux
/dev/sda3
20973568 27265023
6291456
3G 83 Linux
/dev/sda4
27265024 240254975 212989952 101.6G 5 Extended
/dev/sda5
27267072 33558527
6291456
3G 83 Linux
/dev/sda6
33560576 41949183
8388608
4G 83 Linux
4. The default partition type is Linux. I decided that I wanted to use some of the partitions for swap space (type 82), FAT32 (type c), and Linux LVM (type 8e). To do
that, I type t and indicate which partition type to use. Type L to see a list of partition types.
Command (m for help): t
Partition number (1-
6): 2
Hex code (type L to list codes): 82
Changed type of partition 'Linux' to 'Linux swap / Solaris'.
Command (m for help): t
Partition number (1-
6): 5
Hex code (type L to list codes): c
Changed type of partition 'Linux' to 'W95 FAT32 (LBA)'.
Command (m for help): t
Partition number (1-
6): 6
Hex code (type L to list codes): 8e
Changed type of partition 'Linux' to 'Linux LVM'.
5. I check that the partition table is the way I want it and then write the changes:
Command (m for help): p
…
Device
Boot
Start
End
Sectors Size Id Type
/dev/sda1
2048 10487807 10485760
5G 83 Linux
/dev/sda2
10487808 20973567 10485760
5G 82 Linux swap /
Solaris
/dev/sda3
20973568 27265023
6291456
3G 83 Linux
/dev/sda4
27265024 240254975 212989952 101.6G 5 Extended
/dev/sda5
27267072 33558527
6291456
3G c W95 FAT32 (LBA)
/dev/sda6
33560576 41949183
8388608
4G 8e Linux LVM
282
Downloaded from https://onlinelibrary.wiley.com/doi/ by alex jounh - Oregon Health & Science Univer , Wiley Online Library on [05/12/2025]. See the Terms and Conditions (https://onlinelibrary.wiley.com/terms-and-conditions) on Wiley Online Library for rules of use; OA articles are governed by the applicable Creative Commons License
Part III: Becoming a Linux System Administrator
Command (m for help): w
The partition table has been altered!
The kernel still uses the old partitions. The new table will be used
at the next reboot.
Syncing disks
6. After the write is completed, check that the kernel knows about the changes to the
partition table. To do that, search the /proc/partitions for sda. If the new
devices are not there, run the partprobe /dev/sda command on the drive or
reboot your computer.
# grep sda /proc/partitions
8
16 120127488 sda
8
17 120125440 sda1
# partprobe /dev/sda
# grep sda /proc/partitions
8
16 120127488 sda
8
17
5242880 sda1
8
18
5242880 sda2
8
19
3145728 sda3
8
20
1 sda4
8
21
3145728 sda5
8
22
4194304 sda6
12
7. While the partitions are now set for different types of content, other commands are
needed to structure the partitions into filesystems or swap areas. Here’s how to do that
for the partitions just created:
sda1: To make this into a regular Linux ext4 filesystem, type the following:
# mkfs -
t ext4 /dev/sda1
sda2: To format this as a swap area, type the following:
# mkswap /dev/sda2
sda3: To make this into an ext2 filesystem (the default), type the following:
# mkfs /dev/sda3
sda5: To make this into a VFAT filesystem (the default), type the following:
# mkfs -
t vfat /dev/sda5
sda6: To make this into a LVM physical volume, type the following (for Ubuntu, if
LVM is not yet installed, type sudo apt-
get install lvm2):
# pvcreate /dev/sda6
These partitions are now ready to be mounted, used as swap areas, or added to an LVM volume
group. See the next section, “Using Logical Volume Manager Partitions,” to see how LVM
physical volumes are used to ultimately create LVM logical volumes from volume groups. See
the section “Mounting Filesystems” for descriptions of how to mount filesystems and enable
swap areas.
283
Downloaded from https://onlinelibrary.wiley.com/doi/ by alex jounh - Oregon Health & Science Univer , Wiley Online Library on [05/12/2025]. See the Terms and Conditions (https://onlinelibrary.wiley.com/terms-and-conditions) on Wiley Online Library for rules of use; OA articles are governed by the applicable Creative Commons License
Chapter 12: Managing Disks and Filesystems
Using Logical Volume Manager Partitions
Basic disk partitioning in Linux has its shortcomings. What happens if you run out of disk
space? In the old days, a common solution was to copy data to a bigger disk, restart the
system with the new disk, and hope that you didn’t run out of space again anytime soon. This
process meant downtime and inefficiency.
Logical Volume Manager offers lots of flexibility and efficiency in dealing with constantly
changing storage needs. With LVM, physical disk partitions are added to pools of space called
volume groups. Logical volumes are assigned space from volume groups as needed. This gives
you these abilities:
■
■
■
Add more space to a logical volume from the volume group while the volume is
still in use.
Add more physical volumes to a volume group if the volume group begins to run out
of space. The physical volumes can be from disks.
Move data from one physical volume to another so you can remove smaller disks
and replace them with larger ones while the filesystems are still in use—again,
without downtime.
With LVM, it is also easier to shrink filesystems to reclaim disk space, although shrinking does
require that you unmount the logical volume (but no reboot is needed). LVM also supports
advanced features, such as mirroring and working in clusters.
Checking an existing LVM
Let’s start by looking at an existing LVM example on a Red Hat Enterprise Linux system. The
following command displays the partitions on my first hard disk:
# fdisk -
l /dev/sda | grep /dev/sda
Disk /dev/sda: 160.0 GB, 160000000000 bytes
/dev/sda1
*
2048
1026047
512000
/dev/sda2
*
1026048
312498175
155736064
83
8e
Linux
Linux LVM
On this RHEL system, the 160GB hard drive is divided into one 500MB Linux partition (sda1)
and a second (Linux LVM) partition that consumes the rest of the disk (sda2). Next, I use the
pvdisplay command to see if that partition is being used in an LVM group:
# pvdisplay /dev/sda2
--- Physical volume ---
PV Name
/dev/sda2
VG Name
vg_abc
PV Size
148.52 GiB / not usable 2.00 MiB
Allocatable
yes (but full)
PE Size
4.00 MiB
Total PE
38021
Free PE
0
Allocated PE
38021
PV UUID
wlvuIv-
UiI2-
pNND-
f39j-
oH0X-
9too-
AOII7R
284
Downloaded from https://onlinelibrary.wiley.com/doi/ by alex jounh - Oregon Health & Science Univer , Wiley Online Library on [05/12/2025]. See the Terms and Conditions (https://onlinelibrary.wiley.com/terms-and-conditions) on Wiley Online Library for rules of use; OA articles are governed by the applicable Creative Commons License
Part III: Becoming a Linux System Administrator
You can see that the LVM physical volume represented by /dev/sda2 has 148.52GiB of space,
all of which has been totally allocated to a volume group named vg_abc. The smallest unit of
storage that can be used from this physical volume is 4.0MiB, which is referred to as a physical
extent (PE).
Note
Notice that LVM tools show disk space in MiB and GiB. One MB is 1,000,000 bytes (106), while a MiB is 1,048,576
bytes (220). A MiB is a more accurate way to reflect how data are stored on a computer. But marketing people tend to
use MB because it makes the hard disks, CDs, and DVDs they sell look like they have more capacity than they do. Keep
in mind that most tools in Linux display storage data in MiB and GiB, although some can display MB and GB as well.
Next, you want to see information about the volume group:
# vgdisplay vg_abc
--- Volume group ---
VG Name
System ID
Format
Metadata Areas
Metadata Sequence No
VG Access
VG Status
MAX LV
Cur LV
Open LV
Max PV
Cur PV
Act PV
VG Size
PE Size
Total PE
Alloc PE / Size
Free PE / Size
VG UUID
12
vg_abc
lvm2
1
4
read/write
resizable
0
3
3
0
1
1
148.52 GiB
4.00 MiB
38021
38021 / 148.52 GiB
0 / 0
c2SGHM-
KU9H-
wbXM-
sgca-
EtBr-
UXAq-
UnnSTh
You can see that all of the 38,021 PEs have been allocated. Using lvdisplay as follows, you
can see where they have been allocated (I have snipped some of the output):
# lvdisplay vg_abc
--- Logical volume ---
LV Name
VG Name
LV UUID
LV Write Access
LV Status
# open
LV Size
/dev/vg_abc/lv_root
vg_abc
33VeDc-
jd0l-
hlCc-
RMuB-
tkcw-
QvFi-
cKCZqa
read/write
available
1
50.00 GiB
285
Downloaded from https://onlinelibrary.wiley.com/doi/ by alex jounh - Oregon Health & Science Univer , Wiley Online Library on [05/12/2025]. See the Terms and Conditions (https://onlinelibrary.wiley.com/terms-and-conditions) on Wiley Online Library for rules of use; OA articles are governed by the applicable Creative Commons License
Chapter 12: Managing Disks and Filesystems
Current LE
Segments
Allocation
Read ahead sectors
-currently set to
Block device
--- Logical volume ---
LV Name
VG Name
…
LV Size
--- Logical volume ---
LV Name
VG Name
…
LV Size
12800
1
inherit
auto
256
253:0
/dev/vg_abc/lv_home
vg_abc
92.64 GiB
/dev/vg_abc/lv_swap
vg_abc
5.88 GiB
There are three logical volumes drawing space from vg_abc. Each logical volume is associated with a device name that includes the volume group name and the logical volume name:
/dev/vg_abc/lv_root (50GB), /dev/vg_abc/lv_home (92.64GB), and /dev/vg_
abc/lv_swap (5.88GB). Other devices linked to these names are located in the /dev/
mapper directory: vg_abc-lv_home, vg_abc-lv_root, and vg_abc-lv_swap. Either
set of names can be used to refer to these logical volumes.
The root and home logical volumes are formatted as ext4 filesystems, whereas the swap
logical volume is formatted as swap space. Let’s look in the /etc/fstab file to see how
these logical volumes are used:
# grep vg_ /etc/fstab
/dev/mapper/vg_abc-
lv_root /
/dev/mapper/vg_abc-
lv_home /home
/dev/mapper/vg_abc-
lv_swap swap
ext4
ext4
swap
defaults
defaults
defaults
1 1
1 2
0 0
Figure 12.1 illustrates how the different partitions, volume groups, and logical volumes relate
to the complete Linux filesystem. The sda1 device is formatted as a filesystem and mounted
on the /boot directory. The sda2 device provides space for the vg_abc volume group.
Then logical volumes lv_home and lv_root are mounted on the /home and / directories,
respectively.
If you run out of space on any of the logical volumes, you can assign more space from the
volume group. If the volume group is out of space, you can add another hard drive or network
storage drive and add space from that drive to the volume group so more is available.
Now that you know how LVM works, the next section shows you how to create LVM logical
volumes from scratch.
286
Downloaded from https://onlinelibrary.wiley.com/doi/ by alex jounh - Oregon Health & Science Univer , Wiley Online Library on [05/12/2025]. See the Terms and Conditions (https://onlinelibrary.wiley.com/terms-and-conditions) on Wiley Online Library for rules of use; OA articles are governed by the applicable Creative Commons License
Part III: Becoming a Linux System Administrator
FIGURE 12.1
LVM logical volumes can be mounted like regular partitions on a Linux filesystem.
/
/bin
/boot
/etc
/home ...
Logical
volumes
(Iv)
/dev/mapper/vg_abc-Iv_root
/dev/mapper/vg_abc-Iv_home
/dev/mapper/vg_abc-Iv_swap
Volume group
(vg)
/dev/sda1
Physical
volume
(pv)
12
vg_abc
/dev/sda2
Creating LVM logical volumes
LVM logical volumes are used from the top down, but they are created from the bottom up.
As illustrated in Figure 12.1, first you create one or more physical volumes (pv), use the
physical volumes to create volume groups (vg), and then create logical volumes from
the volume groups (lv).
Commands for working with each LVM component begin with the letters pv, vg, and lv.
For example, pvdisplay shows physical volumes, vgdisplay shows volume groups, and
lvdisplay shows logical volumes.
The following procedure takes you through the steps of creating LVM volumes from scratch.
To do this procedure, you could use the USB flash drive and partitions that I described earlier
in this chapter.
1. Obtain a disk with some spare space on it and create a disk partition on it of the
LVM type (8e). Then use the pvcreate command to identify this partition as an
LVM physical volume. The process of doing this is described in the section “Creating a
multiple-partition disk” using the /dev/sda6 device in that example.
2. To add that physical volume to a new volume group, use the vgcreate command.
The following command shows you how to create a volume group called myvg0 using
the /dev/sda6 device:
# vgcreate myvg0 /dev/sda6
Volume group "myvg0" successfully created
287
Downloaded from https://onlinelibrary.wiley.com/doi/ by alex jounh - Oregon Health & Science Univer , Wiley Online Library on [05/12/2025]. See the Terms and Conditions (https://onlinelibrary.wiley.com/terms-and-conditions) on Wiley Online Library for rules of use; OA articles are governed by the applicable Creative Commons License
Chapter 12: Managing Disks and Filesystems
3. To see the new volume group, type the following:
# vgdisplay myvg0
--- Volume group ---
VG Name
…
VG Size
PE Size
Total PE
Alloc PE / Size
Free PE / Size
myvg0
<4.00 GiB
4.00 MiB
1023
0 / 0
1023 / <4.00 MiB
4. All of the 1023 physical extents (PEs, 4MiB each) are available. Here’s how to create a
logical volume from some of the space in that volume group and then check that the
device for that logical volume exists:
# lvcreate -
n music -
L 1G myvg0
Logical volume "music" created
# ls /dev/mapper/myvg0*
/dev/mapper/myvg0-music
5. As you can see, the procedure created a device named /dev/mapper/myvg0-
music. That device can now be used to put a filesystem on and mount, just as you
did with regular partitions in the first part of this chapter. For example:
# mkfs -
t ext4 /dev/mapper/myvg0-
music
# mkdir /mnt/mymusic
# mount /dev/mapper/myvg0-
music /mnt/mymusic
# df -
h /mnt/mymusic
Filesystem
Size Used Avail Use%
/dev/mapper/myvg0-
music 974M
24K
907M
1%
Mounted on
/mnt/mymusic
6. As with regular partitions, logical volumes can be mounted permanently by adding an
entry to the /etc/fstab file, such as:
/dev/mapper/myvg0-
music /mnt/mymusic
ext4 defaults 1 2
The next time you reboot, the logical volume is automatically mounted on /mnt/mymusic.
(Be sure to unmount the logical volume and remove this line if you want to remove the USB
flash drive from your computer.)
Growing LVM logical volumes
If you run out of space on a logical volume, you can add space to it without even unmounting
it. To do that, you must have space available in the volume group, grow the logical volume,
and grow the filesystem to fill it. Building on the procedure in the previous section, here’s how
to grow a logical volume:
1. Note how much space is currently on the logical volume, and then check that space is
available in the logical volume’s volume group:
# vgdisplay myvg0
…
VG Size
288
<4.00 MiB
Downloaded from https://onlinelibrary.wiley.com/doi/ by alex jounh - Oregon Health & Science Univer , Wiley Online Library on [05/12/2025]. See the Terms and Conditions (https://onlinelibrary.wiley.com/terms-and-conditions) on Wiley Online Library for rules of use; OA articles are governed by the applicable Creative Commons License
Part III: Becoming a Linux System Administrator
PE Size
Total PE
Alloc PE / Size
Free PE / Size
# df -
h /mnt/mymusic/
Filesystem
/dev/mapper/myvg0-
music
4.00 MiB
1023
256 / 1.00 GiB
767 / <3.00 GiB
Size
974M
Used Avail Use% Mounted on
24K
907M
1% /mnt/mymusic
2. Expand the logical volume using the lvextend command:
# lvextend -
L +1G /dev/mapper/myvg0-
music
Size of logical volume myvg0/music changed
from 1.00GiB to 2.00 GiB (512 extents).
Logical volume myvg0/music successfully resized
3. Resize the filesystem to fit the new logical volume size:
12
# resize2fs -p /dev/mapper/myvg0-music
4. Check to see that the filesystem is now resized to include the additional disk space:
# df -
h /mnt/mymusic/
Filesystem
/dev/mapper/myvg0-
music
Size
2.0G
Used Avail Use% Mounted on
24K
1.9G
1% /mnt/mymusic
You can see that the filesystem is now about 1GB larger.
Mounting Filesystems
Now that you have had a chance to play with disk partitioning and filesystems, I’m going
to step back and talk about how filesystems are set up to connect permanently to your
Linux system.
Most of the hard disk partitions created when you install Linux are mounted automatically for
you when the system boots. When you install Fedora, Ubuntu, Red Hat Enterprise Linux, and
other Linux systems, you have the option to let the installer automatically configure your hard
disk or create partitions yourself and indicate the mount points for those partitions.
When you boot Linux, usually all of the Linux partitions on your hard disk are listed in your
/etc/fstab file and are mounted. For that reason, the following sections describe what you
might expect to find in that file. It also describes how you can mount other partitions so that
they become part of your Linux filesystem.
The mount command is used not only to mount local storage devices but also to mount other
kinds of filesystems on your Linux system. For example, mount can be used to mount directories (folders) over the network from NFS or Samba servers. It can be used to mount filesystems from a new hard drive or USB flash drive that is not configured to automount. It can also
mount filesystem image files using loop devices.
289
Downloaded from https://onlinelibrary.wiley.com/doi/ by alex jounh - Oregon Health & Science Univer , Wiley Online Library on [05/12/2025]. See the Terms and Conditions (https://onlinelibrary.wiley.com/terms-and-conditions) on Wiley Online Library for rules of use; OA articles are governed by the applicable Creative Commons License
Chapter 12: Managing Disks and Filesystems
Note
With the addition of automatic mounting features and changes in how removable media are identified with the Linux
2.6 kernel (using features such as Udev and Hardware Abstraction Layer), you no longer need to mount removable
media manually for many Linux desktop systems. Understanding how to mount and unmount filesystems manually on a
Linux server, however, can be a useful skill if you want to mount remote filesystems or temporarily mount partitions in
particular locations.
Supported filesystems
To see filesystem types that are currently loaded in your kernel, type cat /proc/file
systems. The list that follows shows a sample of filesystem types that are currently supported in Linux, although they may not be in use at the moment or even available on the
Linux distribution you are using.
befs: Filesystem used by the BeOS operating system.
btrfs: A copy-on-write filesystem that implements advanced filesystem features. It offers
fault tolerance and easy administration. The btrfs filesystem has recently grown in popularity for enterprise applications. The latest Fedora release uses btrfs as the default
root filesystem.
cifs: Common Internet Filesystem (CIFS), the virtual filesystem used to access servers that
comply with the SNIA CIFS specification. CIFS is an attempt to refine and standardize
the SMB protocol used by Samba and Windows file sharing.
ext4: Successor to the popular ext3 filesystem. It includes many improvements over ext3,
such as support for volumes up to 1 exbibyte and file sizes up to 16 tebibytes. (This
replaced ext3 as the default filesystem used in Fedora and RHEL. It has since been
supplanted by xfs as the default for RHEL.)
ext3: Ext filesystems are the most common in most Linux systems. Compared ext2, the
ext3 filesystem, also called the third extended filesystem, includes journaling features
that, compared to ext2, improve a filesystem’s capability to recover from crashes.
ext2: The default filesystem type for earlier Linux systems. Features are the same as ext3,
except that ext2 doesn’t include journaling features.
ext: This is the first version of ext4. It is not used very often anymore.
zfs: Popular for enterprise-quality applications. The zfs filesystem is popular for
use with network-attached storage (NAS) devices and is designed to handle large
amounts of data.
iso9660: Evolved from the High Sierra filesystem (the original standard for CD-ROMs).
Extensions to the High Sierra standard (called Rock Ridge extensions) allow iso9660
filesystems to support long filenames and UNIX-style information (such as file permissions, ownership, and links). Data CD-ROMs typically use this filesystem type.
290
Downloaded from https://onlinelibrary.wiley.com/doi/ by alex jounh - Oregon Health & Science Univer , Wiley Online Library on [05/12/2025]. See the Terms and Conditions (https://onlinelibrary.wiley.com/terms-and-conditions) on Wiley Online Library for rules of use; OA articles are governed by the applicable Creative Commons License
Part III: Becoming a Linux System Administrator
kafs: AFS client filesystem. Used in distributed computing environments to share files
with Linux, Windows, and Macintosh clients.
minix: Minix filesystem type, used originally with the Minix version of UNIX. It supports
filenames of up to only 30 characters.
msdos: An MS-DOS filesystem. You can use this type to mount media that comes from old
Microsoft operating systems.
vfat: Microsoft extended FAT (VFAT) filesystem.
exfat: Extended FAT (exFAT) filesystem that has been optimized for SD cards, USB drives,
and other flash memory.
umsdos: An MS-DOS filesystem with extensions to allow features that are similar to UNIX
(including long filenames).
proc: Not a real filesystem, but rather a filesystem interface to the Linux kernel. You probably won’t do anything special to set up a proc filesystem. However, the /proc mount
point should be a proc filesystem. Many utilities rely on /proc to gain access to Linux
kernel information.
reiserfs: ReiserFS journaled filesystem. ReiserFS was once a common default filesystem
type for several Linux distributions. However, ext and xfs filesystems are by far more
common filesystem types used with Linux today.
swap: Used for swap partitions. Swap areas are used to hold data temporarily when RAM
is used up. Data is swapped to the swap area and then returned to RAM when it is
needed again.
squashfs: Compressed, read-only filesystem type. Squashfs is popular on live CDs, where
there is limited space and a read-only medium (such as a CD or DVD).
nfs: Network Filesystem (NFS) type of filesystem. NFS is used to mount filesystems on
other Linux or UNIX computers.
hpfs: Filesystem is used to do read-only mounts of an OS/2 HPFS filesystem.
ncpfs: A filesystem used with Novell NetWare. NetWare filesystems can be mounted over
a network.
ntfs: Windows NT filesystem. Depending upon the distribution you have, it may be
supported as a read-only filesystem (so that you can mount and copy files from it).
ufs: Filesystem once popular on Sun Microsystems operating systems (that is, Solaris
and SunOS).
jfs: A 64-bit journaling filesystem by IBM that is relatively lightweight for the many
features it has.
xfs: A high-performance filesystem originally developed by Silicon Graphics that works
extremely well with large files. This is the default root filesystem type for RHEL.
gfs2: A shared disk filesystem that allows multiple machines to all use the same shared
disk without going through a network filesystem layer such as CIFS, NFS, and so on.
291
12
Downloaded from https://onlinelibrary.wiley.com/doi/ by alex jounh - Oregon Health & Science Univer , Wiley Online Library on [05/12/2025]. See the Terms and Conditions (https://onlinelibrary.wiley.com/terms-and-conditions) on Wiley Online Library for rules of use; OA articles are governed by the applicable Creative Commons License
Chapter 12: Managing Disks and Filesystems
To see the list of filesystems that come with the kernel you are using, type cat /proc/
filesystems. Mounting a filesystem of a supported type causes the filesystem module to be
loaded, if it is not already loaded.
Type man fs to see descriptions of Linux filesystems.
Enabling swap areas
A swap area is an area of the disk that is made available to Linux if the system runs out of
memory (RAM). If your RAM is full and you try to start another application without a swap
area, that application will fail.
With a swap area, Linux can temporarily swap out data from RAM to the swap area and
then get it back when needed. You take a performance hit, but it is better than having
processes fail.
To create a swap area from a partition or a file, use the mkswap command. To enable that
swap area temporarily, you can use the swapon command. For example, here’s how to check
your available swap space, create a swap file, enable the swap file, and then check that the
space is available on your system:
# free -m
total
used
Mem:
1955
663
-
/+ buffers/cache:
Swap:
819
0
#
#
#
#
#
free
1291
337
819
shared
0
1617
buffers
42
cached
283
dd if=/dev/zero of=/var/opt/myswap bs=1M count=1024
chmod 600 /var/opt/myswap
mkswap /var/opt/myswap
swapon /var/opt/myswap
free -m
total
used
Mem:
1955
1720
-
/+ buffers/cache:
Swap:
1843
0
free
235
367
1843
shared
0
1588
buffers
42
cached
1310
The free command shows the amount of swap before and after creating, making, and
enabling the swap area with the swapon command. That amount of swap is available immediately and temporarily to your system. To make that swap area permanent, you need to add it
to your /etc/fstab file. Here is an example:
/var/opt/myswap
swap
swap
defaults
0 0
This entry indicates that the swap file named /var/opt/myswap should be enabled at boot
time. Because there is no mount point for swap area, the second field is just set to swap, as is
292
Downloaded from https://onlinelibrary.wiley.com/doi/ by alex jounh - Oregon Health & Science Univer , Wiley Online Library on [05/12/2025]. See the Terms and Conditions (https://onlinelibrary.wiley.com/terms-and-conditions) on Wiley Online Library for rules of use; OA articles are governed by the applicable Creative Commons License
Part III: Becoming a Linux System Administrator
the partition type. To test that the swap file works before rebooting, you can enable it immediately (swapon -a) and check that the additional swap area appears:
# swapon -a
Disabling swap area
If at any point you want to disable a swap area, you can do so using the swapoff command.
You might do this, in particular, if the swap area is no longer needed and you want to reclaim
the space being consumed by a swap file or remove a USB drive that is providing a swap
partition.
First, make sure that no space is being used on the swap device (using the free command),
and then use swapoff to turn off the swap area so that you can reuse the space. Here is
an example:
# free -m
total
used
Mem:
1955
1720
-
/+ buffers/cache: 367
Swap:
1843
0
# swapoff /var/opt/myswap
# free -m
Mem:
1955
1720
-
/+ buffers/cache: 367
Swap:
819
0
free
235
1588
1843
shared
0
buffers
42
cached
1310
235
1588
819
0
42
1310
Notice that the amount of available swap was reduced after running the swapoff command.
Using the fstab file to define mountable filesystems
The hard disk partitions on your local computer and the remote filesystems that you use every
day are probably set up to mount automatically when you boot Linux. The /etc/fstab file
contains definitions for each partition, along with options describing how the partition is
mounted. Here’s an example of an /etc/fstab file:
# /etc/fstab
/dev/mapper/vg_abc-
lv_root
UUID=78bdae46-
9389-
438d-
bfee-
06dd934fae28
/dev/mapper/vg_abc-
lv_home
/home
/dev/mapper/vg_abc-
lv_swap
swap
# Mount entries added later
/dev/sdb1
/win
192.168.0.27:/nfsstuff
/remote
//192.168.0.28/myshare
/share
# special Linux filesystems
tmpfs
/dev/shm
devpts
/dev/pts
sysfs
/sys
proc
/proc
/
ext4 defaults
/boot ext4 defaults
ext4
defaults
swap
defaults
1
1
1
0
vfat
nfs
cifs
1 2
0 0
0 0
ro
users,_netdev
guest,_netdev
1
2
2
0
tmpfs
defaults
0 0
devpts gid=5,mode=620 0 0
sysfs defaults
0 0
proc
defaults
0 0
293
12
Downloaded from https://onlinelibrary.wiley.com/doi/ by alex jounh - Oregon Health & Science Univer , Wiley Online Library on [05/12/2025]. See the Terms and Conditions (https://onlinelibrary.wiley.com/terms-and-conditions) on Wiley Online Library for rules of use; OA articles are governed by the applicable Creative Commons License
Chapter 12: Managing Disks and Filesystems
The /etc/fstab file just shown is from a default Red Hat Enterprise Linux server install,
with a few lines added.
For now, you can ignore the tmpfs, devpts, sysfs, and proc entries. Those are special
devices associated with shared memory, terminal windows, device information, and kernel
parameters, respectively.
In general, the first column of /etc/fstab shows the device or share (what is mounted),
while the second column shows the mount point (where it is mounted). That is followed by the
type of filesystem, any mount options (or defaults), and two numbers (used to tell commands
such as dump and fsck what to do with the filesystem).
The first three entries represent the disk partitions assigned to the root of the filesystem (/),
the /boot directory, and the /home directory. All three are ext4 filesystems. The fourth line
is a swap device (used to store data when RAM overflows). Notice that the device names for /,
/home, and swap all start with /dev/mapper. That’s because they are LVM logical volumes
that are assigned space from a pool of space called an LVM volume group (more on LVM in the
section “Using Logical Volume Manager Partitions” earlier in this chapter).
The /boot partition is on its own physical partition, /dev/sda1. Instead of using
/dev/sda1, however, a unique identifier (UUID) identifies the device. Why use a UUID
instead of /dev/sda1 to identify the device? Suppose you plugged another disk into your
computer and booted up. Depending on how your computer iterates through connected
devices on boot, it is possible that the new disk might be identified as /dev/sda, causing
the system to look for the contents of /boot on the first partition of that disk.
To see all of the UUIDs assigned to storage devices on your system, type the blkid command,
as follows (I added a grep command to filter out loopback devices):
# blkid | grep -
v loop
/dev/sda1:
UUID="78bdae46-9389-438d-bfee-06dd934fae28" TYPE="ext4"
/dev/sda2:
UUID="wlvuIv-UiI2-pNND-f39j-oH0X-9too-AOII7R" TYPE="LVM2_member"
/dev/mapper/vg_abc-lv_root:
UUID="3e6f49a6-8fec-45e1-90a9-38431284b689" TYPE="ext4"
/dev/mapper/vg_abc-lv_swap:
UUID="77662950-2cc2-4bd9-a860-34669535619d" TYPE="swap"
/dev/mapper/vg_abc-lv_home:
UUID="7ffbcff3-36b9-4cbb-871d-091efb179790" TYPE="ext4"
/dev/sdb1:
SEC_TYPE="msdos" UUID="75E0-
96AA" TYPE="vfat"
Any of the device names can be replaced by the UUID designation in the left column of an
/etc/fstab entry.
I added the next three entries in /etc/fstab to illustrate some different kinds of entries. I
connected a hard drive from an old Microsoft Windows system and had it mounted on the
/win directory. I added the ro option so it would mount read-only.
294
Downloaded from https://onlinelibrary.wiley.com/doi/ by alex jounh - Oregon Health & Science Univer , Wiley Online Library on [05/12/2025]. See the Terms and Conditions (https://onlinelibrary.wiley.com/terms-and-conditions) on Wiley Online Library for rules of use; OA articles are governed by the applicable Creative Commons License
Part III: Becoming a Linux System Administrator
The next two entries represent remote filesystems. On the /remote directory, the
/nfsstuff directory is mounted read/write (rw) from the host at address 192.168.0.27 as
an NFS share. On the /share directory, the Windows share named myshare is mounted
from the host at 192.168.0.28. In both cases, I added the _netdev option, which tells Linux
to wait for the network to come up before trying to mount the shares. For more information
on mounting CIFS and NFS shares, refer to Chapter 19, “Configuring a Windows File Sharing
(Samba) Server,” and Chapter 20, “Configuring an NFS File Server,” respectively.
Coming from Windows
The section “Using the fstab file to define mountable filesystems” shows mounting a hard disk partition from an old VFAT filesystem being used in Windows. Most Windows systems today use the NTFS
filesystem. Support for this system, however, is not delivered with every Linux system. NTFS is available
from Fedora and Ubuntu in the ntfs-3g package.
To help you understand the contents of the /etc/fstab file, here is what is in each field of
that file:
Field 1: Name of the device representing the filesystem. This field can include the LABEL
or UUID option with which you can indicate a volume label or universally unique identifier (UUID) instead of a device name. The advantage to this approach is that because
the partition is identified by volume name, you can move a volume to a different
device name and not have to change the fstab file. (See the description of the mkfs
command in the section “Using the mkfs Command to Create a Filesystem” later in
this chapter for information on creating and using labels.)
Field 2: Mount point in the filesystem. The filesystem contains all data from the mount
point down the directory tree structure unless another filesystem is mounted at some
point beneath it.
Field 3: Filesystem type. Valid filesystem types are described in the section “Supported
filesystems” earlier in this chapter (although you can only use filesystem types for
which drivers are included for your kernel).
Field 4: Use defaults or a comma-separated list of options (no spaces) that you want
to use when the entry is mounted. See the mount command manual page (under the
-o option) for information on other supported options.
Tip
Typically, only the root user is allowed to mount a filesystem using the mount command. However, to allow any user to
mount a filesystem (such as a filesystem on a CD), you could add the user option to Field 4 of /etc/fstab.
Field 5: The number in this field indicates whether the filesystem needs to be dumped
(that is, have its data backed up). A 1 means that the filesystem needs to be dumped,
295
12
Downloaded from https://onlinelibrary.wiley.com/doi/ by alex jounh - Oregon Health & Science Univer , Wiley Online Library on [05/12/2025]. See the Terms and Conditions (https://onlinelibrary.wiley.com/terms-and-conditions) on Wiley Online Library for rules of use; OA articles are governed by the applicable Creative Commons License
Chapter 12: Managing Disks and Filesystems
and a 0 means that it doesn’t. (This field is no longer particularly useful because most
Linux administrators use more sophisticated backup options than the dump command.
Most often, a 0 is used.)
Field 6: The number in this field indicates whether the indicated filesystem should be
checked with fsck when the time comes for it to be checked: 1 means it needs to
be checked first, 2 means to check after all those indicated by 1 have already been
checked, and 0 means don’t check it.
If you want to find out more about mount options as well as other features of the /etc/
fstab file, there are several man pages to which you can refer, including man 5 nfs and
man 8 mount.
Using the mount command to mount filesystems
Linux systems automatically run mount -a (mount all filesystems from the /etc/fstab
file) each time you boot. For that reason, you generally use the mount command only for
special situations. In particular, the average user or administrator uses mount in two ways:
■
■
To display the disks, partitions, and remote filesystems currently mounted
To mount a filesystem temporarily
Any user can type mount (with no options) to see what filesystems are currently mounted on
the local Linux system. The following is an example of the mount command. It shows a single
hard disk partition (/dev/sda1) containing the root (/) filesystem and proc and devpts
filesystem types mounted on /proc and /dev, respectively.
$ mount
/dev/sda3 on / type ext4 (rw)
/dev/sda2 on /boot type ext4 (rw)
/dev/sda1 on /mnt/win type vfat (rw)
/dev/proc on /proc type proc (rw)
/dev/sys on /sys type sysfs (rw)
/dev/devpts on /dev/pts type devpts (rw,gid=5,mode=620)
/dev/shm on /dev/shm type tmpfs (rw)
none on /proc/sys/fs/binfmt_misc type binfmt_misc (rw)
/dev/cdrom on /media/MyOwnDVD type iso9660 (ro,nosuid,nodev)
Traditionally, the most common devices to mount by hand are removable media, such as
DVDs or CDs. However, depending on the type of desktop you are using, CDs and DVDs may
be mounted for you automatically when you insert them. (In some cases, applications are
launched as well when media is inserted. For example, a music player or photo editor may be
launched when your inserted USB medium has music or digital images on it.)
Occasionally, however, you may find it useful to mount a filesystem manually. For example,
you want to look at the contents of an old hard disk, so you install it as a second disk on your
computer. If the partitions on the disk did not automount, you could mount partitions from
296
Downloaded from https://onlinelibrary.wiley.com/doi/ by alex jounh - Oregon Health & Science Univer , Wiley Online Library on [05/12/2025]. See the Terms and Conditions (https://onlinelibrary.wiley.com/terms-and-conditions) on Wiley Online Library for rules of use; OA articles are governed by the applicable Creative Commons License
Part III: Becoming a Linux System Administrator
that disk manually. For example, to mount a read-only disk partition sdb1 that has an older
ext3 filesystem, you could type this:
# mkdir /mnt/temp
# mount -
t ext3 -
o ro /dev/sdb1 /mnt/tmp
Another reason to use the mount command is to remount a partition to change its mount
options. Suppose you want to remount /dev/sdb1 as read/write, but you do not want to
unmount it (maybe someone is using it). You could use the remount option as follows:
# mount -
t ext3 -
o remount,rw /dev/sdb1
Mounting a disk image in loopback
Another valuable way to use the mount command has to do with disk images. If you download
an SD card or DVD ISO image file from the Internet and you want to see what it contains, you
can do so without burning it to DVD or other medium. With the image on your hard disk,
create a mount point and use the -o loop option to mount it locally. Here’s an example:
# mkdir /mnt/mydvdimage
# mount -
o loop whatever-
i686-
disc1.iso /mnt/mydvdimage
In this example, the /mnt/mydvdimage directory is created, and then the disk image file
(whatever-i686-disc1.iso) residing in the current directory is mounted on it. You can
now cd to that directory, view the contents of it, and copy or use any of its contents. This is
useful for downloaded DVD images from which you want to install software without having to
burn the image to DVD. You could also share that mount point over NFS, so you could install
the software from another computer. When you are done, to unmount the image, type umount
/mnt/mydvdimage.
Other options to mount are available only for specific filesystem types. See the mount manual page for those and other useful options.
Using the umount command
When you are finished using a temporary filesystem, or you want to unmount a permanent
filesystem temporarily, use the umount command. This command detaches the filesystem from
its mount point in your Linux filesystem. To use umount, you can give it either a directory
name or a device name, as shown in this example:
# umount /mnt/test
This unmounts the device from the mount point /mnt/test. You can also unmount using
this form:
# umount /dev/sdb1
In general, it’s better to use the directory name (/mnt/test) because the umount
command will fail if the device is mounted in more than one location. (Device names all begin
with /dev.)
297
12
Downloaded from https://onlinelibrary.wiley.com/doi/ by alex jounh - Oregon Health & Science Univer , Wiley Online Library on [05/12/2025]. See the Terms and Conditions (https://onlinelibrary.wiley.com/terms-and-conditions) on Wiley Online Library for rules of use; OA articles are governed by the applicable Creative Commons License
Chapter 12: Managing Disks and Filesystems
If you get the message device is busy, the umount request has failed because either
an application has a file open on the device or you have a shell open with a directory on the
device as a current directory. Stop the processes or change to a directory outside the device
you are trying to unmount for the umount request to succeed.
An alternative for unmounting a busy device is the -l option. With umount -l (a lazy
unmount), the unmount happens as soon as the device is no longer busy. To unmount a
remote NFS filesystem that’s no longer available (for example, the server went down), you can
use the umount -f option to forcibly unmount the NFS filesystem.
Tip
A really useful tool for discovering what’s holding open a device you want to unmount is the lsof command. Type
lsof with the name of the partition that you want to unmount (such as lsof /mnt/test). The output shows you
what commands are holding files open on that partition. The fuser-v /mnt/test command can be used in the
same way.
Using the mkfs Command to Create a Filesystem
You can create a filesystem for any supported filesystem type on a disk or partition that you
choose. You do so with the mkfs command. Although this is most useful for creating filesystems on hard-disk partitions, you can create filesystems on USB flash drives, network drives,
or rewritable DVDs as well.
Before you create a new filesystem, make sure of the following:
■
■
■
You have partitioned the disk as you want (using the fdisk command).
You get the device name correct, or you may end up overwriting your hard disk by
mistake. For example, the first partition on the second SCSI or USB flash drive on your
system is /dev/sdb1 and the third disk is /dev/sdc1.
To unmount the partition if it’s mounted before creating the filesystem.
The following are two examples of using mkfs to create a filesystem on two partitions on a
USB flash drive located as the first and second partitions on the third SCSI disk (/dev/sdc1
and /dev/sdc2). The first creates an xfs partition (if it is not installed on Ubuntu, type
sudo apt-
get install xfsprogs), while the second creates an ext4 partition.
# mkfs -
t xfs /dev/sdc1
mke2fs 1.47.0 (5-Feb-2023)
Creating filesystem with 786432 4k blocks and 196608 inodes
Filesystem UUID: ec65df7a-6157-4e1a-b9d6-37f047330f90
Superblock backups stored on blocks:
32768, 98304, 163840, 229376, 294912
Allocating group tables: done
Writing inode tables: done
298
Downloaded from https://onlinelibrary.wiley.com/doi/ by alex jounh - Oregon Health & Science Univer , Wiley Online Library on [05/12/2025]. See the Terms and Conditions (https://onlinelibrary.wiley.com/terms-and-conditions) on Wiley Online Library for rules of use; OA articles are governed by the applicable Creative Commons License
Part III: Becoming a Linux System Administrator
Creating journal (16384 blocks): done
Writing superblocks and filesystem accounting information: done
# mkfs -
t ext4 /dev/sdc2
mke2fs 1.47.0 (5-Feb-2023)
Creating filesystem with 786432 4k blocks and 196608 inodes
Filesystem UUID: d8645fe2-d44e-4c89-8495-c32433d5238c
Superblock backups stored on blocks:
32768, 98304, 163840, 229376, 294912
Allocating group tables: done
Writing inode tables: done
Creating journal (16384 blocks): done
Writing superblocks and filesystem accounting information: done
12
You can now mount either of these filesystems (for example, mkdir /mnt/myusb ;
mount /dev/sdc1 /mnt/myusb), change to /mnt/myusb as your current directory
(cd /mnt/myusb), and create files on it as you please.
Managing Storage with Cockpit
Most of the features described in this chapter for working with disk partitions and filesystems
using command-line tools can be accomplished using the Cockpit web user interface. With
Cockpit running on your system, open the web UI (hostname:9090) and select the Storage
tab. Figure 12.2 shows an example of the Cockpit Storage tab on a Fedora system.
FIGURE 12.2
View storage devices, filesystems, and activities from the Cockpit Storage page.
The Storage tab provides a solid overview of your system’s storage. It charts read and write
activity of your storage devices every minute. It displays the local filesystems and storage
299
Downloaded from https://onlinelibrary.wiley.com/doi/ by alex jounh - Oregon Health & Science Univer , Wiley Online Library on [05/12/2025]. See the Terms and Conditions (https://onlinelibrary.wiley.com/terms-and-conditions) on Wiley Online Library for rules of use; OA articles are governed by the applicable Creative Commons License
Chapter 12: Managing Disks and Filesystems
(including RAID devices and LVM volume groups) as well as remotely mounted NFS shares and
iSCSI targets. Each hard disk, DVD, and other physical storage device is also displayed on the
Storage tab.
You can change partitions for a selected drive with Cockpit. I inserted an unformatted USB
flash drive and selected it in the Cockpit Storage screen. It appears as shown in Figure 12.3.
FIGURE 12.3
View and change disk partitions for a select storage device.
With the storage device information displayed, you could reformat the entire storage device
(Create Partition Table) or, assuming that space is available on the device, add a new partition (Create Partition). Figure 12.4 shows an example of the window that appears when you
Format drive.
FIGURE 12.4
Format the new storage device.
300
Downloaded from https://onlinelibrary.wiley.com/doi/ by alex jounh - Oregon Health & Science Univer , Wiley Online Library on [05/12/2025]. See the Terms and Conditions (https://onlinelibrary.wiley.com/terms-and-conditions) on Wiley Online Library for rules of use; OA articles are governed by the applicable Creative Commons License
Part III: Becoming a Linux System Administrator
Because this is a USB flash drive, I would probably just format the disk. However, I filled out
the page as though it were a permanent disk that I wanted to format and mount to the
filesystem. The name (mydata) is the label assigned to the partition. The mountpoint is
/mnt/mydata. I chose the EXT4 filesystem. Selecting Mount without waiting,
ignore failure is a good idea for a noncritical partition. If I did do this on a USB flash
drive, and removed it at some point, the system would still be able to reboot.
After I select Format and mount, the disk is formatted and mounted on /mnt/mydata.
Keep in mind that this information is added to the /etc/fstab file, so it will be mounted
each time the system comes up.
Summary
Managing filesystems is a critical part of administering a Linux system. Using commands
such as parted and fdisk, you can view and change disk partitions. Filesystems can be
added to partitions using the mkfs command. Once created, filesystems can be mounted and
unmounted using the mount and umount commands, respectively.
Logical Volume Manager offers a more powerful and flexible way of managing disk partitions.
With LVM, you create pools of storage, called volume groups, which can allow you to grow and
shrink logical volumes as well as extend the size of your volume groups by adding more physical volumes.
For a more intuitive way of working with storage devices, Cockpit offers a web-based interface
for viewing and configuring storage on your Linux system. Using the web UI, you can see both
local and networked storage as well as reformat disks and modify disk partitions.
With most of the basics needed to become a system administrator covered at this point in the
book, Chapter 13, “Understanding Server Administration,” introduces concepts for extending
those skills to manage network servers. Topics in that chapter include information on how to
install, manage, and secure servers.
Exercises
Use these exercises to test your knowledge of creating disk partitions, Logical Volume Manager,
and working with filesystems. You need a USB flash drive that is at least 1GB, which you can
erase for these exercises.
These tasks assume you are running a Fedora or Red Hat Enterprise Linux system (although
some tasks work on other Linux systems as well). If you are stuck, solutions to the tasks are
shown in Appendix B (although in Linux, there are often multiple ways to complete a task).
1. Run a command as root to watch the system journal in a Terminal as fresh data comes
in and insert your USB flash drive. Determine the device name of the USB flash drive.
2. Run a command to list the partition table for the USB flash drive.
301
12
Downloaded from https://onlinelibrary.wiley.com/doi/ by alex jounh - Oregon Health & Science Univer , Wiley Online Library on [05/12/2025]. See the Terms and Conditions (https://onlinelibrary.wiley.com/terms-and-conditions) on Wiley Online Library for rules of use; OA articles are governed by the applicable Creative Commons License
Chapter 12: Managing Disks and Filesystems
3. Delete all the partitions on your USB flash drive, save the changes, and make sure the
changes were made both on the disk’s partition table and in the Linux kernel.
4. Add three partitions to the USB flash drive: 100MB Linux partition, 200MB swap partition, and 500MB LVM partition. Save the changes.
5. Put an ext4 filesystem on the Linux partition.
6. Create a mount point called /mnt/mypart and mount the Linux partition on it.
7. Enable the swap partition and turn it on so that additional swap space is immediately
available.
8. Create a volume group called abc from the LVM partition, create a 200MB logical
volume from that group called data, add a VFAT partition, and then temporarily
mount the logical volume on a new directory named /mnt/test. Check that it was
successfully mounted.
9. Grow the logical volume from 200MB to 300MB.
10. Do what you need to do to remove the USB flash drive safely from the computer:
unmount the Linux partition, turn off the swap partition, unmount the logical
volume, and delete the volume group from the USB flash drive.
302
Downloaded from https://onlinelibrary.wiley.com/doi/ by alex jounh - Oregon Health & Science Univer , Wiley Online Library on [05/12/2025]. See the Terms and Conditions (https://onlinelibrary.wiley.com/terms-and-conditions) on Wiley Online Library for rules of use; OA articles are governed by the applicable Creative Commons License
Part III: Becoming a Linux System Administrator
Becoming a Linux Server
Administrator
IN THIS PART
Chapter 13
Understanding Server Administration
Chapter 14
Administering Networking
Chapter 15
Starting and Stopping Services
Chapter 16
Configuring a Print Server
Chapter 17
Configuring a Web Server
Chapter 18
Configuring an FTP Server
Chapter 19
Configuring a Windows File Sharing (Samba) Server
Chapter 20
Configuring an NFS File Server
Chapter 21
Troubleshooting Linux
Chapter 22
Configuring a PXE server
Linux Bible, Eleventh Edition. Christopher Negus.
© 2026 John Wiley & Sons, Inc. All rights reserved, including rights for text and data mining and training of artificial intelligence technologies or similar
technologies. Published 2026 by John Wiley & Sons, Inc.
Downloaded from https://onlinelibrary.wiley.com/doi/ by alex jounh - Oregon Health & Science Univer , Wiley Online Library on [05/12/2025]. See the Terms and Conditions (https://onlinelibrary.wiley.com/terms-and-conditions) on Wiley Online Library for rules of use; OA articles are governed by the applicable Creative Commons License
Part IV
Understanding Server
Administration
13
IN THIS CHAPTER
Administering Linux servers
Communicating with servers over networks
Setting up logging locally and remotely
Monitoring server systems
Managing servers in the enterprise
A
lthough some system administration tasks are needed even on a desktop system (installing software, setting up printers, and so on), many new tasks appear when you set up a Linux system to
act as a server. That’s especially true if the server that you configure is made public to anyone
on the Internet, where you can be overloaded with requests from good guys while needing to be constantly on guard against attacks from bad guys.
Dozens of different kinds of servers are available for Linux systems. Most servers serve up data to remote
clients, but others serve the local system (such as those that gather logging messages or kick off maintenance tasks at set times using the cron facility). Many servers are represented by processes that run
continuously in the background and respond to requests that come to them. These processes are referred
to as daemon processes.
As the name implies, servers exist to serve. The data they serve can include web pages, files, database
information, email, and lots of other types of content. As a server administrator, some of the additional
challenges to your system administration skills include the following:
Remote access To use a desktop system, you typically sit at its console. Server systems, by
contrast, tend to be housed in racks in climate-controlled environments under lock and key.
More often than not, after the physical computers are in place, most administration of those
machines is done using remote access tools. Often, no graphical interface is available, so you
must rely on command-line tools or browser-based interfaces to do things such as remote login,
remote copying, and remote execution. The most common of these tools are built on the Secure
Shell (SSH) facility.
305
Linux Bible, Eleventh Edition. Christopher Negus.
© 2026 John Wiley & Sons, Inc. All rights reserved, including rights for text and data mining and training of artificial intelligence technologies or similar
technologies. Published 2026 by John Wiley & Sons, Inc.
Downloaded from https://onlinelibrary.wiley.com/doi/ by alex jounh - Oregon Health & Science Univer , Wiley Online Library on [05/12/2025]. See the Terms and Conditions (https://onlinelibrary.wiley.com/terms-and-conditions) on Wiley Online Library for rules of use; OA articles are governed by the applicable Creative Commons License
CHAPTER
Diligent security To be useful, a server must be able to accept requests for content
from remote users and systems. Unlike desktop systems, which can simply close down
all network ports that allow incoming requests for access, a server must make itself
vulnerable by allowing some access to its ports. That’s why as a server administrator,
it is important to open ports to services that are needed and lock down ports that are
not needed. You can secure services using tools such as iptables and firewalld
(firewall tools) and Security Enhanced Linux (to limit the resources a service can access
from the local system).
Continuous monitoring Although you typically turn off your laptop or desktop system
when you are not using it, servers usually stay on 24×7, 365 days a year. Because you
don’t want to sit next to each server and continuously monitor it personally, you can
configure tools to monitor each server, gather log messages, and even forward suspicious messages to an email account or have it show up as an alert on the service’s console. You can enable system activity reporters to gather data around the clock on CPU
usage, memory usage, network activity, and disk access.
In this chapter, I lay out some of the basic tools and techniques that you need to know to
administer remote Linux servers. You learn to use SSH tools to access your server securely,
transfer data back and forth, and even launch remote desktops or graphical applications and
have them appear on your local system. You learn to use remote logging and system activity
reports to monitor system activities continuously.
Starting with Server Administration
Whether you are installing a file server, web server, or any of the other server facilities available with Linux systems, many of the steps required for getting the server up
and running are the same. Where server setup diverges is in the areas of configuration
and tuning.
In later chapters, I describe specific servers and how they differ. In each of the server-related
chapters that follow, you’ll go through the same basic steps for getting that server started and
available to be used by your clients.
Step 1: Install the server
Although most server software is not preinstalled on the typical Linux system, any general-
purpose Linux system offers the software packages needed to supply every major type of server
available.
Sometimes, multiple software packages associated with a particular type of server are gathered together in package groups (Fedora and RHEL) or tasks (Ubuntu and Debian). At other
times, you just need to install the server packages you want individually. Here are some server
package groups in Fedora and some of the packages available in each group:
Print server The Common UNIX Printing Service (cups package) is used most often
to provide print server features on Linux systems. Packages that provide graphical
306
Downloaded from https://onlinelibrary.wiley.com/doi/ by alex jounh - Oregon Health & Science Univer , Wiley Online Library on [05/12/2025]. See the Terms and Conditions (https://onlinelibrary.wiley.com/terms-and-conditions) on Wiley Online Library for rules of use; OA articles are governed by the applicable Creative Commons License
Part IV: Becoming a Linux Server Administrator
administration of CUPS (system-config-printer) and printer drivers
(foomatic, hpijs, and others) are also available when you install the printing
group. (See Chapter 16, “Configuring a Print Server.”)
Web server The Apache (httpd or apache2 package) web server is the software used
most often to serve web pages (HTTP content). Related packages include modules to
help serve particular types of content (Perl, Python, PHP, and SSL connections). Likewise, there are packages of related documentation (httpd-manual), tools for monitoring web data (webalizer), and tools for providing web proxy services (squid). You
can get those packages by installing the web-server group on a Fedora or RHEL
system. (See Chapter 17, “Configuring a Web Server.”)
FTP server The Very Secure FTP daemon (vsftpd package) is the default FTP server
used in Fedora and RHEL. Other FTP server packages include proftpd and pure-
ftpd. You can install the ftp-server group to get those packages. (See Chapter 18,
“Configuring an FTP Server.”)
Windows file server Samba (samba package) allows a Linux system to act as a Windows
file and print server. Install the smb-server group to get those packages. (See
Chapter 19, “Configuring a Windows File Sharing [Samba] Server.”)
NFS file server Network File System (NFS) is the standard Linux and UNIX feature for
providing shared directories to other systems over a network. The nfs-utils package
provides NFS services and related commands. There is no group to install for NFS. (See
Chapter 20, “Configuring an NFS File Server.”)
Mail server These types of packages enable you to configure email servers, sometimes
referred to as a Mail Transport Agent (MTA) server. You have several choices of email
servers, including sendmail, postfix (default in Fedora and RHEL), and exim.
Related packages, such as dovecot, allow the mail server to deliver email to clients.
Install the mail-server group for mail server–related packages.
Directory server Packages in this category provide remote and local authentication services. These include Kerberos (krb5-server), LDAP (openldap-servers), and
NIS (ypserv). Install those packages with the directory-server group.
DNS server The Berkeley Internet Name Domain service (bind and bind-chroot)
provides the software needed to configure a server to resolve hostnames into IP
addresses. Optional packages include dnsperf (for benchmarking) and nsd (to
install the NLnet Labs Name Server Daemon). The dnf-server group can install
those packages.
Network Time Protocol server The ntpd or chronyd package provides a service that
you can enable to sync up your system clock with clocks from public or private NTP
servers. There is no group for installing NTP servers.
SQL server The PostgreSQL (postgresql and postgresql-server packages) service is an object-relational database management system. Related packages provide
PostgreSQL documentation and related tools. The MySQL (mysql and mysql-
server packages) service is another popular open source SQL database server.
307
13
Downloaded from https://onlinelibrary.wiley.com/doi/ by alex jounh - Oregon Health & Science Univer , Wiley Online Library on [05/12/2025]. See the Terms and Conditions (https://onlinelibrary.wiley.com/terms-and-conditions) on Wiley Online Library for rules of use; OA articles are governed by the applicable Creative Commons License
Chapter 13: Understanding Server Administration
A community-developed branch of MySQL called MariaDB has supplanted MySQL on
many Linux distributions. PostgreSQL and MariaDB databases can be installed with the
sql-server and mysql groups, respectively.
To find and install a server package group in Fedora or RHEL, you can use the dnf command.
For example:
$ sudo dnf group list -
-
hidden | grep -
i server
mail-
server
Mail Server
network-
server
Network Servers
...
smb-
server
Windows File Server
sql-
server
PostgreSQL Database
...
directory-
server
Directory Server
dns-
server
DNS Name Server
ftp-
server
FTP Server
$ sudo dnf group install web-
server
...
Package
Arch
Version
Repository
Installing group/module packages:
php
x86_64
8.3.21-
1.fc41
updates
Installing weak dependencies:
php-
cli
x86_64
8.3.21-
1.fc41
updates
php-
fpm
x86_64
8.3.21-
1.fc41
updates
...
Installing groups:
Basic Web Server
no
no
no
no
yes
no
yes
Size
0.0
B
16.2 MiB
8.2 MiB
This will install the required and dependent packages for the web-server group. To install the
optional packages for the group, add the --with-optional option.
Step 2: Configure the server
Most server software packages are installed with a default configuration that leans more
toward security than immediate full use. The following are some things to think about when
you set out to configure a server.
Using configuration files
Traditionally, Linux servers have been configured by editing plain-text files in the /etc directory (or subdirectories). Often, there is a primary configuration file; sometimes, there is a
related configuration directory in which files ending in .conf can be pulled into the main
configuration file.
The httpd package (Apache web server) is an example of a server package that has a primary
configuration file and a directory where other configuration files can be dropped in and be
included with the service. The main configuration file in Fedora and RHEL is /etc/httpd/
conf/httpd.conf. The configuration directory is /etc/httpd/conf.d/.
308
Downloaded from https://onlinelibrary.wiley.com/doi/ by alex jounh - Oregon Health & Science Univer , Wiley Online Library on [05/12/2025]. See the Terms and Conditions (https://onlinelibrary.wiley.com/terms-and-conditions) on Wiley Online Library for rules of use; OA articles are governed by the applicable Creative Commons License
Part IV: Becoming a Linux Server Administrator
After installing httpd and related packages, you will see files in the /etc/httpd/
conf.d/ directory that were placed there by different packages: mod_ssl, mod_perl, and
so on. This is a way that add-on packages to a service can have their configuration information enabled in the httpd server, without the package trying to run a script to edit the main
httpd.conf file.
The one downside to plain-text configuration files is that you don’t get the kind of immediate
error checking you get when you use graphical administration tools. You either have to run a
test command (if the service includes one) or actually try to start the service to see if there is
any problem with your configuration file.
Tip
Instead of using vi to edit configuration files, use vim. Using the vim command can help you catch configuration file
errors as you are editing.
The vim command knows about the formats of many configuration files (passwd, httpd.conf, fstab, and
others). If you make a mistake and type an invalid term or option in one of those files, or break the format somehow,
the color of the text changes. For example, in /etc/fstab, if you change the option defaults to default, the
word’s color changes.
Checking the default configuration
Most server software packages in Ubuntu, Fedora, and RHEL are installed with minimal configuration and lean more toward being secure than totally useful out of the box. While installing
a software package, some Linux distributions ask you things such as the directory in which
you want to install it or the user account with which you want to manage it.
Because RPM packages are designed to be installed unattended, the person installing the
package has no choice on how it is installed. The files are installed in set locations, specific
user accounts are enabled to manage it, and when you start the service, it might well offer
limited accessibility. You are expected to configure the software after the package is installed
to make the server fully functional.
Two examples of servers that are installed with limited functionality are mail servers
(sendmail or postfix packages) and DNS servers (bind package). Both of these servers
are installed with default configurations and start up on reboot. However, both also only listen
for requests on your localhost. So, until you configure those servers, people who are not
logged in to your local server cannot send mail to the mail server or use your computer as a
public DNS server, respectively.
Step 3: Start the server
Most services that you install in Linux are configured to start up when the system boots and
then run continuously, listening for requests, until the system is shut down. There are two
major facilities for managing services: systemd (used now by RHEL, Ubuntu, and Fedora)
309
13
Downloaded from https://onlinelibrary.wiley.com/doi/ by alex jounh - Oregon Health & Science Univer , Wiley Online Library on [05/12/2025]. See the Terms and Conditions (https://onlinelibrary.wiley.com/terms-and-conditions) on Wiley Online Library for rules of use; OA articles are governed by the applicable Creative Commons License
Chapter 13: Understanding Server Administration
and SystemVinit scripts (used by Red Hat Enterprise Linux through RHEL 6.x and rarely
used anymore).
Regardless of which facility is used on your Linux system, it is your job to do things such as
set whether you want the service to come up when the system boots and to start, stop, and
reload the service as needed (possibly to load new configuration files or temporarily stop
access to the service). Commands for doing these tasks are described in Chapter 15, “Starting
and Stopping Services.”
Most, but not all, services are implemented as daemon processes. Here are a few things that
you should know about those processes:
User and group permissions Daemon processes often run as users and groups other
than root. For example, httpd runs as apache and ntpd runs as the ntp user. The
reason for this is that if someone cracks these daemons, they would not have permissions to access files beyond what the services can access.
Daemon configuration files Often, a service has a configuration file for the daemon
stored in the /etc/sysconfig directory. This is different than the service configuration file in that its job is often just to pass arguments to the server process itself
rather than configure the service. For example, options you set in the /etc/
sysconfig/rsyslogd file are passed to the rsyslogd daemon when it starts up.
You can tell the daemon, for example, to output additional debugging information or
accept remote logging messages. See the man page for the service (for example, man
rsyslogd) to see what options are supported.
Port numbers Packets of data go to and from your system over network interfaces
through ports for each supported protocol (usually UDP or TCP). Most standard services have specific port numbers to which daemons listen and to which clients connect. Unless you are trying to hide the location of a service, you typically don’t change
the ports on which a daemon process listens. When you go to secure a service, you
must make sure that the port to the service is open on the firewall (see Chapter 25,
“Securing Linux on a Network,” for information on iptables and firewalld
firewalls). Also, if you change a port on which the service is listening and SELinux
is in enforcing mode, SELinux may prevent the daemon from listening on that port
(see Chapter 24, “Enhancing Linux Security with SELinux,” for more information
on SELinux).
Note
One reason for changing port numbers on a service is “security by obscurity.” For example, the sshd service is a well-
known target for people trying to break into a system by guessing logins and passwords on TCP port 22.
I have heard about people changing their Internet-facing sshd service to listen on some other port number (perhaps
some unused, very high port number). Then they tell their friends or colleagues to log in to their machine from SSH by
pointing to this other port. The idea is that port scanners looking to break into a system might be less likely to scan the
normally unused port.
310
Downloaded from https://onlinelibrary.wiley.com/doi/ by alex jounh - Oregon Health & Science Univer , Wiley Online Library on [05/12/2025]. See the Terms and Conditions (https://onlinelibrary.wiley.com/terms-and-conditions) on Wiley Online Library for rules of use; OA articles are governed by the applicable Creative Commons License
Part IV: Becoming a Linux Server Administrator
Not all services run continuously as daemon processes. Some older UNIX services ran on
demand using the xinetd super server. Other services just run once on startup and exit. Still
others run only a set number of times, being launched when the crond daemon sees that the
service was configured to run at the particular time.
In recent years, previous xinetd services in RHEL and Fedora, such as telnet and tftp,
have been converted to systemd services. A number of services, including cockpit, use
systemd sockets to achieve the same results. The xinetd package was dropped from Fedora
in release 34 but is currently still available in Ubuntu.
Step 4: Secure the server
Opening your system to allow remote users to access it over the network is not a decision
to be taken lightly. Crackers all over the world run programs to scan for vulnerable servers
that they can take over for their data or their processing power. Luckily, there are measures
that you can put in place on Linux systems to protect your servers and services from attacks
and abuse.
Some common security techniques are described in the following sections. These and other
topics are covered in more depth in Part V, “Learning Linux Security Techniques.”
Password protection
Good passwords and password policies are the first line of defense in protecting a Linux
system. If someone can log in to your server via ssh as the root user with a password of
foobar, expect to be cracked. A good technique is to disallow direct login by root and require
every user to log in as a regular user and then use su or sudo to become root.
You can also use the Pluggable Authentication Module (PAM) facility to adjust the number
of times that someone can have failed login attempts before blocking access to that person.
PAM also includes other features for locking down authentication to your Linux server. For a
description of PAM, see Chapter 23, “Understanding Advanced Linux Security.”
Of course, you can bypass passwords altogether by requiring public key authentication. To use
that type of authentication, you must make sure that any user you want to have access to
your server has their public key copied to the server (such as through ssh-copy-id). Then
they can use ssh, scp, or related commands to access that server without typing their password. See the section “Using key-based (passwordless) authentication” later in this chapter for
further information.
Firewalls
The legacy iptables firewall service can track and respond to every packet coming from
and going to network interfaces on your computer. Using iptables, you can drop or reject
every packet making requests for services on your system except for those few that you have
enabled. Further, you can tell iptables to allow service requests only from certain IP
addresses (good guys) or not allow requests from other addresses (bad guys).
311
13
Downloaded from https://onlinelibrary.wiley.com/doi/ by alex jounh - Oregon Health & Science Univer , Wiley Online Library on [05/12/2025]. See the Terms and Conditions (https://onlinelibrary.wiley.com/terms-and-conditions) on Wiley Online Library for rules of use; OA articles are governed by the applicable Creative Commons License
Chapter 13: Understanding Server Administration
The firewalld (Fedora and RHEL) and ufw (Ubuntu) features, which have supplanted
iptables, each adds a layer of functionality to Linux firewall rules. With firewalld, you
not only can insert firewall rules into the kernel, but you can also organize firewall rules
by dividing them up into zones and changing firewall rules on the fly to react to different events. For Ubuntu, ufw provides a simple interface for allowing and denying access to
ports on the local system.
In each of the server chapters coming up, I describe what ports need to be open to allow
access to services. Descriptions of how iptables and firewalld work are included in
Chapter 25, “Securing Linux on a Network.”
SELinux
Fedora, Red Hat Enterprise Linux, and other Linux distributions come with the Security
Enhanced Linux (SELinux) feature included and in Enforcing mode. Although the default targeted mode doesn’t have much impact on most applications that you run in a Linux desktop,
it has a major impact on most major services.
A major function of SELinux is to protect the contents of your Linux system from the processes
running on the system. In other words, SELinux makes sure a web server, FTP server, Samba
server, or DNS server can access only a restricted set of files on the system (as defined by
file contexts) and allows only a restricted set of features (as defined by Booleans and limited
port access).
Details about how to use SELinux are contained in Chapter 24, “Enhancing Linux Security
with SELinux.”
Security settings in configuration files
Within the configuration files of most services are values that you can set to secure the service
further. For example, for file servers and web servers, you can restrict access to certain files or
data based on username, hostname, IP address of the client, or other attributes.
Step 5: Monitor the server
Because you can’t be there to monitor every service every minute, you need to put monitoring tools in place to watch your servers for you and make it easy for you to find out when
something needs attention. Some of the tools that you can use to monitor your servers are
described in the sections that follow.
Configure logging
Using the rsyslog service (rsyslogd daemon), you can gather critical information and
error conditions into log files about many different services. By default in Ubuntu, RHEL, and
Fedora, log messages from various services are directed into log files in the /var/log directory. For added security and convenience, log messages can also be directed to a centralized
server, providing a single location to view and manage logging for a group of systems but also
to secure those messages from someone cracking your system.
312
Downloaded from https://onlinelibrary.wiley.com/doi/ by alex jounh - Oregon Health & Science Univer , Wiley Online Library on [05/12/2025]. See the Terms and Conditions (https://onlinelibrary.wiley.com/terms-and-conditions) on Wiley Online Library for rules of use; OA articles are governed by the applicable Creative Commons License
Part IV: Becoming a Linux Server Administrator
Several different software packages are available to work with rsyslog and manage log messages. The logwatch feature scans your log files each night and sends critical information
gathered from those files to an email account of your choice. The logrotate feature backs
up log files into compressed archives when the logs reach a certain size or pass a set amount
of time since the previous backup.
The features for configuring and managing system logging are described in the section “Configuring System Logging” later in this chapter.
Run system activity reports
The sar facility (which is enabled by the sysstat package) can be configured to watch
activities on your system such as memory usage, CPU usage, disk latency, network activities,
and other resource drains. By default, the sar facility launches the sadc program every few
minutes, day and night, to gather data. Viewing that data later can help you go back and
figure out where and when demand is spiking on your system or when an attack happened.
The sar facility is described in the section “Checking System Resources with sar” later in
this chapter.
Watch activity live with Cockpit
With Cockpit running on your system, you can watch system activity in real time. Open your
web browser to display the Cockpit console (https://localhost:9090). In real time,
you can watch percentage of CPU use, memory and swap consumption, how much data is written to and from disk (disk i/o), and network traffic as it is gathered and displayed across the
screen. Figure 13.1 shows an example of the System area of the Cockpit console, displaying
activity data.
FIGURE 13.1
Log in to Cockpit.
313
13
Downloaded from https://onlinelibrary.wiley.com/doi/ by alex jounh - Oregon Health & Science Univer , Wiley Online Library on [05/12/2025]. See the Terms and Conditions (https://onlinelibrary.wiley.com/terms-and-conditions) on Wiley Online Library for rules of use; OA articles are governed by the applicable Creative Commons License
Chapter 13: Understanding Server Administration
Keep system software up-to-date
As security holes are discovered and patched, you must make sure that the updated software
packages containing those patches are installed on your servers. Again, with mission-critical
servers, the safest and most efficient way is to use subscribed Red Hat Enterprise Linux systems for your servers and then deploy security-related package updates to your system as soon
as they are released and tested.
To keep your personal server and desktop systems up-to-date, there are various graphical tools
to add software and to check for updates. You can also use the dnf command to check for and
install all packages that are available for your RHEL or Fedora systems (enter dnf update). For
your Ubuntu systems, run sudo apt update; sudo apt dist-
upgrade.
Check the filesystem for signs of crackers
To check your filesystem for possible intrusion, you can run commands such as rpm -V to
check to see if any commands, document files, or configuration files have been tampered with
on your system. For more information on rpm -V, refer to the description of rpm -V in
Chapter 10, “Getting and Managing Software.”
Now that you have an overview of how Linux server configuration is done, the next sections
of this chapter focus on the tools that you need to access, secure, and maintain your Linux
server systems.
Checking and Setting Servers
If you are tasked with managing a Linux server, the following sections include a bunch of
items that you can check. Keep in mind that nowadays many servers in large data centers are
deployed and managed by larger platforms. So, know how the server is managed before you
make any changes to it. Your changes might be overwritten automatically if you changed the
defined state of that system.
Managing Remote Access with the Secure
Shell Service
The Secure Shell tools are a set of client and server applications that allow you to do basic communications between client computers and your Linux server. The tools include ssh, scp,
sftp, and other tools for managing those commands. Because communication is encrypted
between the server and the clients, these tools are more secure than similar, older tools. For
example, instead of using older remote login commands such as telnet or rlogin, you
could use ssh. The ssh command can also replace older remote execution commands, such
as rsh. Remote copy commands, such as rcp, can be replaced with secure commands such as
scp and rsync.
314
Downloaded from https://onlinelibrary.wiley.com/doi/ by alex jounh - Oregon Health & Science Univer , Wiley Online Library on [05/12/2025]. See the Terms and Conditions (https://onlinelibrary.wiley.com/terms-and-conditions) on Wiley Online Library for rules of use; OA articles are governed by the applicable Creative Commons License
Part IV: Becoming a Linux Server Administrator
With Secure Shell tools, both the authentication process and all communications that follow
are encrypted. Communications from telnet and the older “r” commands expose passwords
and all data to someone sniffing the network. Today, telnet and similar commands should be
used only for testing access to remote ports, providing public services such as PXE booting, or
doing other tasks that don’t expose your private data.
Note
For a deeper discussion of encryption techniques, refer to Chapter 23, “Understanding Advanced Linux Security.”
Most Linux systems include secure shell clients, and many include the secure shell server
as well. If you are using Ubuntu, Fedora, or RHEL distributions, for example, the client and
server software packages that contain the ssh tools are openssh, openssh-clients, and
openssh-server packages. List them in Fedora or RHEL as follows:
# dnf list -
-
installed | grep openssh
openssh.x86_64
9.9p1-
4.fc41
openssh-
clients.x86_64 9.9p1-
4.fc41
openssh-
server.x86_64
9.9p1-
4.fc41
updates
updates
updates
On Ubuntu, only the openssh-clients package is installed by default. It includes the
functionality of the openssh package. If you need the server installed, use the sudo
apt-get install openssh-server command.
13
$ sudo dpkg -
-l
ist | grep openssh
ii openssh-
client
1:9.6p1-
3ubuntu13.11 amd64 secure shell (SSH)
client, for secure access to remote machines
ii openssh-
server
1:9.6p1-
3ubuntu13.11 amd64 secure shell (SSH)
server, for secure access from remote machines
ii openssh-
sftp-
server 1:9.6p1-
3ubuntu13.11 amd64 secure shell (SSH)
sftp server module, for SFTP access from remote machines
$ sudo apt-
get install openssh-
server
Starting the openssh-server service
Linux systems that come with the openssh-server package already installed sometimes are
not configured for it to start automatically. To check the status of your openssh-server,
type the following for Ubuntu and RHEL and Fedora, respectively:
$ sudo systemctl status sshd.service
$ sudo systemctl status ssh.service
To start and enable the service for RHEL or Fedora, type:
$ sudo systemctl start sshd.service
$ sudo systemctl enable sshd.service
315
Downloaded from https://onlinelibrary.wiley.com/doi/ by alex jounh - Oregon Health & Science Univer , Wiley Online Library on [05/12/2025]. See the Terms and Conditions (https://onlinelibrary.wiley.com/terms-and-conditions) on Wiley Online Library for rules of use; OA articles are governed by the applicable Creative Commons License
Chapter 13: Understanding Server Administration
To start and enable the service for Ubuntu, type:
$ sudo systemctl start ssh.service
$ sudo systemctl enable ssh.service
Modify your firewall settings to allow the openssh-client to access port 22 (firewalls are
covered in Chapter 25, “Securing Linux on a Network”). After the service is up and running
and the firewall is properly configured, you should be able to use ssh client commands to
access your system via the ssh server.
Any further configurations for what the sshd daemon is allowed to do are handled in the
/etc/ssh/sshd_config file. At a minimum, check that the PermitRootLogin setting
is prohibit-password (the default) or no. The first prevents someone from logging in as
root remotely using a password (but allows key-based authentication) the second stops anyone
from remotely logging in as root at all.
After you have changed the sshd_config file, restart the sshd service. If you set
PermitRootLogin no and you use ssh to log in to that system from a remote client, you
must do so as a regular user and then use su or sudo to become the root user.
Using SSH client tools
Many tools for accessing remote Linux systems have been created to make use of the SSH service. The most frequently used of those tools is the ssh command, which can be used for
remote login, remote execution, and other tasks. Commands such as scp and rsync can
copy one or more files at a time between SSH client and server systems. The sftp command
provides an FTP-like interface for traversing a remote filesystem and getting and putting files
between the systems interactively.
By default, all of the SSH-related tools authenticate using standard Linux usernames and passwords, all done over encrypted connections. However, SSH also supports key-based authentication, which can be used to configure key-based and possibly passwordless authentication
between clients and SSH servers, as described in the section “Using key-based (passwordless)
authentication” later in this chapter.
Using ssh for remote login
Use the ssh command from another Linux computer to test that you can log in to the Linux
system running your sshd service. The ssh command is one that you will use often to access
a shell on the servers you are configuring.
Try logging in to your Linux server from another Linux system using the ssh command. (If
you don’t have another Linux system, you can simulate this by typing localhost instead of
the IP address and logging in as a local user.) The following is an example of remotely logging
in to johndoe’s account on 10.140.67.23:
$ ssh johndoe@10.140.67.23
The authenticity of host '10.140.67.23 (10.140.67.23)'
can't be established.
316
Downloaded from https://onlinelibrary.wiley.com/doi/ by alex jounh - Oregon Health & Science Univer , Wiley Online Library on [05/12/2025]. See the Terms and Conditions (https://onlinelibrary.wiley.com/terms-and-conditions) on Wiley Online Library for rules of use; OA articles are governed by the applicable Creative Commons License
Part IV: Becoming a Linux Server Administrator
RSA key fingerprint is
a4:28:03:85:89:6d:08:fa:99:15:ed:fb:b0:67:55:89.
Are you sure you want to continue connecting (yes/no)? yes
Warning: Permanently added '10.140.67.23' (RSA) to the
list of known hosts.
johndoe@10.140.67.23's password: *********
If this is the very first time that you have logged in to that remote system using the ssh
command, the system asks you to confirm that you want to connect. Type yes, and press
Enter. When prompted, enter the user’s password.
When you type yes to continue, you accept the remote host’s public key. At that point, the
remote host’s public key is downloaded to the client in the client’s ~/.ssh/known_hosts
file. Now data exchanged between these two systems can be encrypted and decrypted using
RSA asymmetric encryption (see Chapter 23, “Understanding Advanced Linux Security”). After
you are logged in to the remote system, you can begin typing shell commands. The connection
functions like a normal login. The only difference is that the data is encrypted as it travels
over the network.
When you are finished, type exit to end the remote connection. The connection is closed,
and you are returned to the command prompt on your local system. (If the local shell doesn’t
return after you exit the remote shell, typing ~. usually closes the connection.)
$ exit
logout
Connection to 10.140.67.23 closed
13
After you have remotely connected to a system, a file in your local system subdirectory,
~.ssh/known_hosts, will exist. This file contains the public key of the remote host
along with its IP address. Your server’s public and private keys are stored in the /etc/ssh
directory.
$ ls .ssh
known_hosts
$ cat .ssh/known_hosts
10.140.67.23 ssh-rsa
AAAAB3NzaC1yc2EAAAABIwAAAQEAoyfJK1YwZhNmpHE4yLPZAZ9ZNE...
Tip
Any later attempts by this user to contact the server at 10.140.67.23 are authenticated using this stored key. If the
server should change its key (which happens if the operating system is reinstalled or if keys are rotated), attempts
to ssh to that system result in a refused connection and dire warnings that you may be under attack. If the key has
indeed changed, in order to be able to ssh to that address again, just remove the host’s key (the whole line) from your
known_hosts file and you can copy over the new key or reconnect to the host and accept the new key.
317
Downloaded from https://onlinelibrary.wiley.com/doi/ by alex jounh - Oregon Health & Science Univer , Wiley Online Library on [05/12/2025]. See the Terms and Conditions (https://onlinelibrary.wiley.com/terms-and-conditions) on Wiley Online Library for rules of use; OA articles are governed by the applicable Creative Commons License
Chapter 13: Understanding Server Administration
Using ssh for remote execution
Besides logging into a remote shell, the ssh command can be used to execute a command
on the remote system and have the output returned to the local system. Here is an example:
$ ssh johndoe@10.140.67.23 hostname
johndoe@10.140.67.23's password: **********
host01.example.com
In the example just shown, the hostname command runs as the user johndoe on the
Linux system located at IP address 10.140.67.23. The output of the command is the
name of the remote host (in this case, host01.example.com), which appears on the
local screen.
If you run a remote execution command with ssh that includes options or arguments, be sure
to surround the whole remote command line in quotes. Keep in mind that if you refer to files
or directories in your remote commands, relative paths are interpreted in relation to the user’s
home directory, as shown here:
$ ssh johndoe@10.140.67.23 "cat myfile"
johndoe@10.140.67.23's password: **********
Contents of the myfile file located in johndoe's home directory.
The ssh command just shown goes to the remote host located at 10.140.67.23 and runs
the cat myfile command as the user johndoe. This causes the contents of the myfile
file from that system to be displayed on the local screen.
Another type of remote execution that you can do with ssh is X11 forwarding. If X11 forwarding is enabled on the server (X11Forwarding yes is set in the /etc/sshd/sshd_
config file), you can run graphical applications from the server securely over the SSH connection using ssh -Y.
For this example, install the xterm package on the remote host (sudo dnf install
xterm). Then from your local system, run the following command:
$ ssh -
Y johndoe@10.140.67.23 xterm
johndoe@10.140.67.23's password: **********
This should result in the xterm terminal window utility running from the remote system but
displaying on your local desktop. You can now run commands on that remote system from that
window as you would if you were running it on that system’s desktop. Just close the window
when you are finished, and the local prompt returns. You can do this for any graphical administration tool or just regular X applications.
If you want to run several X commands and don’t want to have to reconnect each time, you
can use X11 forwarding directly from a remote shell as well. Put them in the background and
you can have several remote X applications running on your local desktop at once. Here’s
an example:
$ ssh -
Y johndoe@10.140.67.23
johndoe@10.140.67.23's password: **********
318
Downloaded from https://onlinelibrary.wiley.com/doi/ by alex jounh - Oregon Health & Science Univer , Wiley Online Library on [05/12/2025]. See the Terms and Conditions (https://onlinelibrary.wiley.com/terms-and-conditions) on Wiley Online Library for rules of use; OA articles are governed by the applicable Creative Commons License
Part IV: Becoming a Linux Server Administrator
$ xterm &
$ xeyes &
$ exit
^C
After you have finished using the graphical applications, close them as you would normally.
Then type exit (and possibly Ctrl-C), as shown in the preceding example, to leave the
remote shell and return to your local shell.
Copying files between systems with scp and rsync
The scp command is similar to the old UNIX rcp command for copying files to and from
Linux systems, except that all communications are encrypted. Files can be copied from the
remote system to the local system or local to remote. You can also copy files recursively
through a whole directory structure if you choose.
The following is an example of using the scp command to copy the /etc/services file the
local system to the /tmp directory on a remote computer as the user johndoe:
$ scp /etc/services johndoe@10.140.67.23:/tmp
johndoe@10.140.67.23's password: ***************
memo
100%|****************| 153
0:00
Here I entered the password for johndoe. After the password is accepted, the file is copied to
the remote system successfully.
You can do recursive copies with scp using the -r option. Instead of a file, pass a directory
name to the scp command, and all files and directories below that point in the filesystem are
copied to the other system.
$ scp -
r johndoe@10.140.67.23:/usr/share/man/man1/ /tmp/
johndoe@10.140.67.23's password: ***************
volname.1.gz
100% 543
0.5KB/s
mtools.1.gz
100% 6788
6.6KB/s
roqet.1.gz
100% 2496
2.4KB/s
…
00:00
00:00
00:00
As long as the user johndoe has access to the files and directories on the remote system
and the local user can write to the target directory (both are true in this case), the directory structure from /usr/share/man/man1 down is copied to the local /tmp directory.
The scp command can be used to back up files and directories over a network. However, if you
compare scp to the rsync command, you see that rsync (which also works over SSH connections) is a better backup tool. Try running the scp command shown previously to copy the
man1 directory (you can simulate the command using localhost instead of the IP address
if you only have one accessible Linux system). Now enter the following on the system to which
you copied the files:
$ ls -
l /usr/share/man/man1/awk.1* /tmp/man1/awk.1*
-
rw-
r-
-
r-
-1 chris chris 19611 May 26 13:48 /tmp/man1/awk.1.gz
319
13
Downloaded from https://onlinelibrary.wiley.com/doi/ by alex jounh - Oregon Health & Science Univer , Wiley Online Library on [05/12/2025]. See the Terms and Conditions (https://onlinelibrary.wiley.com/terms-and-conditions) on Wiley Online Library for rules of use; OA articles are governed by the applicable Creative Commons License
Chapter 13: Understanding Server Administration
lrwxrwxrwx 1 root root
26 Aug 23
awk.1.gz ->
/etc/alternatives/awk.1.gz
2023 /usr/share/man/man1/
Next, run the scp command again and list the files once more:
$ scp -
r johndoe@10.140.67.23:/usr/share/man/man1/ /tmp/
johndoe@10.140.67.23's password: ***************
$ ls -
l /usr/share/man/man1/awk.1* /tmp/man1/awk.1*
-
rw-
r-
-
r-
-1 chris chris 19611 May 26 14:01 /tmp/man1/awk.1.gz
lrwxrwxrwx 1 root root
26 Aug 23 2023 /usr/share/man/man1/
awk.1.gz ->
/etc/alternatives/awk.1.gz
The output of those commands tells you a few things about how scp works:
Attributes lost Permissions or date/time stamp attributes were not retained when the
files were copied. If you were using scp as a backup tool, you would probably want to
keep permissions and time stamps on the files if you needed to restore the files later.
Symbolic links lost The awk.1.gz file is actually a symbolic link to the /etc/
alternatives/awk.1.gz file. Instead of copying the link, scp follows the link
and actually copies the file. Again, if you were to restore this directory, awk.1.gz
would be replaced by the actual at.1.gz file instead of a link to it.
Copy repeated unnecessarily If you watched the second scp output, you would
notice that all files were copied again, even though the exact files being copied were
already on the target. The updated modification date confirms this. By contrast, the
rsync command can determine that a file has already been copied and not copy the
file again.
The rsync command is a better network backup tool because it can overcome some of the
shortcomings of scp just listed. Try running an rsync command to do the same action that
scp just did, but with a few added options:
$ rm -
rf /tmp/man1/
$ rsync -
avl johndoe@10.140.67.23:/usr/share/man/man1/ /tmp/
johndoe@10.140.67.23's password: ***************
receiving incremental file list
man1/
man1/ImageMagick.1.gz
man1/Mail.1.gz -> /usr/share/man/man1/s-nail.1.gz
…
$ rsync -
avl johndoe@10.140.67.23:/usr/share/man/man1/ /tmp/
johndoe@10.140.67.23's password: ***************
receiving incremental file list
sent 25 bytes received 63,502 bytes 127,054.00 bytes/sec
total size is 11,544,110 speedup is 181.72
$ ls -
l /usr/share/man/man1/awk.1* /tmp/man1/awk.1*
320
Downloaded from https://onlinelibrary.wiley.com/doi/ by alex jounh - Oregon Health & Science Univer , Wiley Online Library on [05/12/2025]. See the Terms and Conditions (https://onlinelibrary.wiley.com/terms-and-conditions) on Wiley Online Library for rules of use; OA articles are governed by the applicable Creative Commons License
Part IV: Becoming a Linux Server Administrator
lrwxrwxrwx.1 johndoe johndoe 9 Jul 17 2024 /tmp/man1/awk.1.gz
-
> /etc/alternatives/awk.1.gz
lrwxrwxrwx.1 root
root
26 Aug 23 2023 /usr/share/man/man1/
awk.1.gz
-
> /etc/alternatives/awk.1.gz
After removing the /tmp/man1 directory, you run an rsync command to copy all of the files
to the /tmp/man1 directory, using -a (recursive archive), -v (verbose), and -l (copy symbolic links). Then run the command immediately again and notice that nothing is copied. The
rsync command knows that all of the files are there already, so it doesn’t copy them again.
This can be a tremendous savings of network bandwidth for directories with gigabytes of files
where only a few megabytes change.
Also notice from the output of ls -l that the symbolic links have been preserved on the
awk.1.gz file and so has the date/time stamp on the file. If you need to restore those files
later, you can put them back exactly as they were.
This use of rsync is good for backups. But what if you wanted to mirror two directories, making the contents of two directory structures exactly the same on two machines? The following
commands illustrate how to create an exact mirror of the directory structure on both machines
using the directories shown with the previous rsync commands.
First, on the remote system, copy a new file into the directory being copied:
# cp /etc/services /usr/share/man/man1
Next, on the local system, run rsync to copy across any new files (in this case, just the directory and the new file, services):
$ rsync -
avl johndoe@10.140.67.23:/usr/share/man/man1 /tmp
johndoe@10.140.67.23's password:
***************
receiving incremental file list
man1/
man1/services
After that, go back to the remote system and remove the new file:
$ sudo rm /usr/share/man/man1/services
Now, on the local system, run rsync again and notice that nothing happens. At this point,
the remote and local directories are different because the local system has the services file and
the remote doesn’t. That is correct behavior for a backup directory. (You want to have files
on the backup in case something was removed by mistake.) However, if you want the remote
and local directories to be mirrored, you would have to add the --delete option. The result
is that the services file is deleted on the local system, making the remote and local directory
structures in sync.
$ rsync -
avl /usr/share/man/man1 localhost:/tmp
johndoe@10.140.67.23's password: ***************
receiving incremental file list
man1/
321
13
Downloaded from https://onlinelibrary.wiley.com/doi/ by alex jounh - Oregon Health & Science Univer , Wiley Online Library on [05/12/2025]. See the Terms and Conditions (https://onlinelibrary.wiley.com/terms-and-conditions) on Wiley Online Library for rules of use; OA articles are governed by the applicable Creative Commons License
Chapter 13: Understanding Server Administration
$ rsync -
avl -
-
delete johndoe@10.140.67.23:/usr/share/man/man1 /tmp
johndoe@10.140.67.23's password: ***************
receiving incremental file list
deleting man1/services
Interactive copying with sftp
If you don’t know exactly what you want to copy to or from a remote system, you can use the
sftp command to create an interactive FTP-style session over the SSH service. Using sftp,
you can connect to a remote system over SSH, change directories, list directory contents, and
then (given proper permission) get files from and put files on the server. Keep in mind that,
despite its name, sftp has nothing to do with the FTP protocol and doesn’t use FTP servers. It
simply uses an FTP style of interaction between a client and a sshd server.
The following example shows the user johndoe connecting to jd.example.com:
$ sftp johndoe@jd.example.com
Connecting to jd.example.com
johndoe@jd.example.com's password: ***************
sftp>
At this point, you can begin an interactive FTP session. You can use get and put commands
on files as you would with any FTP client, but with the comfort of knowing you are working on
an encrypted and secure connection. Because the FTP protocol passes usernames, passwords,
and data in clear text, using sftp over SSH, if possible, is a much better alternative for allowing your users to copy files interactively from the system.
Using key-based (passwordless) authentication
If you are using SSH tools to connect to the same systems throughout the day, you might find
it inconvenient to be entering your password over and over again. Instead of using password-
based authentication, SSH allows you to set up key-based authentication to use instead. Here’s
how it works:
■
■
■
You create a public key and a private key.
You guard the private key but copy the public key across to the user account on the
remote host to which you want to do key-based authentication.
With your key copied to the proper location, you use any SSH tools to connect to the
user account on the remote host, but instead of asking you for a password, the remote
SSH service compares the public key and the private key and allows you access if the
two keys match.
When you create the keys, you are given the option to add a passphrase to your private key. If
you decide to add a passphrase, even though you don’t need to enter a password to authenticate to the remote system, you still need to enter your passphrase to unlock your private key.
If you don’t add a passphrase, you can communicate using your public/private key pairs in a
way that is completely passwordless. However, if someone should get ahold of your private key,
they could act as you in any communication that required that key.
322
Downloaded from https://onlinelibrary.wiley.com/doi/ by alex jounh - Oregon Health & Science Univer , Wiley Online Library on [05/12/2025]. See the Terms and Conditions (https://onlinelibrary.wiley.com/terms-and-conditions) on Wiley Online Library for rules of use; OA articles are governed by the applicable Creative Commons License
Part IV: Becoming a Linux Server Administrator
The following procedure demonstrates how a local user named chris can set up key-based
authentication to a remote user named johndoe at IP address 10.140.67.23. If you
don’t have two Linux systems, you can simulate this by using two user accounts on your local
system. I start by logging in as the local user named chris and typing the following to generate my local public/private key pair:
$ ssh-keygen
Generating public/private ed25519 key pair.
Enter file in which to save the key (/home/chris/.ssh/id_ed25519)
: ENTER
Enter passphrase for "/home/chris/.ssh/id_ed25519" (empty for no
passphrase): ENTER
Enter same passphrase again: ENTER
Your identification has been saved in /home/chris/.ssh/id_ed25519
Your public key has been saved in /home/chris/.ssh/id_ed25519.pub
The key fingerprint is:
SHA256:OSkAmMOS1kWFna80hC66olebA4eyQu33WQN823h6hgo chris@ansible
The key's randomart image is:
+--[ED25519 256]--+
...
I accepted the default ed25519 key (rsa and ecdsa keys are also allowed) and pressed Enter
twice to have a blank passphrase associated with the key. As a result, my private key
(id_ed25519) and public key (id_ed25519.pub) are copied to the .ssh directory in my
local home directory. The next step is to copy that key over to a remote user so that I can use
key-based authentication each time I connect to that user account with ssh tools:
$ ssh-copy-id -i ~/.ssh/id_ed25519.pub johndoe@10.140.67.23
johndoe@10.140.67.23's password: ***************
When prompted, I entered johndoe’s password. With that accepted, the public key belonging
to chris is copied to the authorized_keys file in johndoe’s .ssh directory on the
remote system. Now, the next time chris tries to connect to johndoe’s account, the SSH
connection is authenticated using those keys. Because no passphrase is put on the private key,
no passphrase is required to unlock that key when it is used.
Log into the machine with ssh johndoe@10.140.67.23, and check in the $HOME/
.ssh/authorized_keys to make sure you haven’t added extra keys that you weren’t
expecting.
[chris]$ ssh johndoe@10.140.67.23
Last login: Sun Jul 27 10:12:22 2025 from
[johndoe]$
10.140.67.22
With the keys in place, chris could now use ssh, scp, rsync, or any other SSH-enabled
command to do key-based authentication. Using these keys, for example, an rsync
command could go into a cron script and automatically back up johndoe’s home directory
every night.
323
13
Downloaded from https://onlinelibrary.wiley.com/doi/ by alex jounh - Oregon Health & Science Univer , Wiley Online Library on [05/12/2025]. See the Terms and Conditions (https://onlinelibrary.wiley.com/terms-and-conditions) on Wiley Online Library for rules of use; OA articles are governed by the applicable Creative Commons License
Chapter 13: Understanding Server Administration
Want to secure your remote system further? After you have the keys in place on your remote
system for everyone you want to allow to log in to that system, you can set the sshd
service on the remote system to not allow password authentication by changing the
PasswordAuthentication setting in the /etc/ssh/sshd_config file to no so that
it appears as follows:
PasswordAuthentication no
Then restart the sshd service (systemctl restart sshd). After that, anyone with a
valid key is still accepted. Anyone who tries to log in without a key gets the following failure
message and doesn’t even get a chance to enter a username and password:
Permission denied (publickey,gssapi-keyex,gssapi-with-mic).
Configuring System Logging
With the knowledge of how to access your remote server using SSH tools, you can log in to the
server and set up some of the services needed to make sure that it’s running smoothly. System
logging is one of the basic services configured for Linux to keep track of what is happening on
the system.
The rsyslog service (rsyslogd daemon) provides the features to gather log messages from
software running on the Linux system and direct those messages to local log files, devices, or
remote logging hosts. Configuration of rsyslog is similar to the configuration of its predecessor, syslog. However, rsyslog allows you to add modules to manage and direct log messages more specifically.
In recent years, the rsyslog facility began leveraging messages that are gathered
and stored in the systemd journal. To display journal log messages directly from the
systemd journal, instead of viewing them from files in the /var/log directory, use the
journalctl command.
Enabling system logging with rsyslog
Most of the files in the /var/log directory are populated with log messages directed to them
from the rsyslog service. The rsyslogd daemon is the system logging daemon. It accepts
log messages from a variety of other programs and writes them to the appropriate log files.
This is better than having every program write directly to its own log file because it enables
you to manage centrally how log files are handled.
Configuring rsyslogd to record varying levels of detail in the log files is possible. It can be
told to ignore all but the most critical messages, or it can record every detail.
The rsyslogd daemon can even accept messages from other computers on your network.
This remote logging feature is particularly handy because it enables you to centralize the management and review of the log files from many systems on your network. There is also a major
security benefit to this practice.
324
Downloaded from https://onlinelibrary.wiley.com/doi/ by alex jounh - Oregon Health & Science Univer , Wiley Online Library on [05/12/2025]. See the Terms and Conditions (https://onlinelibrary.wiley.com/terms-and-conditions) on Wiley Online Library for rules of use; OA articles are governed by the applicable Creative Commons License
Part IV: Becoming a Linux Server Administrator
With remote logging, if a system on your network is broken into, the cracker cannot delete or
modify the log files because those files are stored on a separate computer. It is important to
remember, however, that those log messages are not, by default, encrypted (though encryption
can be enabled). Anyone tapping into your local network can eavesdrop on those messages as
they pass from one machine to another. Also, although crackers may not be able to change old
log entries, they can affect the system such that any new log messages should not be trusted.
Running a dedicated loghost, a computer that serves no purpose other than to record log messages from other computers on the network, is not uncommon. Because this system runs no
other services, it is unlikely that it will be broken into. This makes it nearly impossible for
crackers to erase their tracks completely.
Understanding the rsyslog.conf file
The /etc/rsyslog.conf file is the primary configuration file for the rsyslog service. In
the /etc/rsyslog.conf file, a modules section lets you include or not include specific features in your rsyslog service. The following is an example of the modules section of /etc/
rsyslog.conf in Fedora 42:
# Use default timestamp format
module(load="builtin:omfile" Template="RSYSLOG_TraditionalFile
Format")
module(load="imuxsock"
# provides support for local system logging (e.g. via logger
command)
SysSock.Use="off") # Turn off message reception via local log
socket;
# local messages are retrieved through
imjournal now.
module(load="imjournal"
# provides access to the systemd journal
FileCreateMode="0600"
# Quiet warning and ensure privacy
StateFile="imjournal.state") # File to store the position in the
journal
# Include all config files in /etc/rsyslog.d/
include(file="/etc/rsyslog.d/*.conf" mode="optional")
#module(load="imklog")
# reads kernel messages (the same are read from journald)
#module(load="immark")
# provides -
-
MARK-
-message capability
# Provides UDP syslog reception
# for parameters see http://www.rsyslog.com/doc/imudp.html
#module(load="imudp") # needs to be done just once
#input(type="imudp" port="514")
325
13
Downloaded from https://onlinelibrary.wiley.com/doi/ by alex jounh - Oregon Health & Science Univer , Wiley Online Library on [05/12/2025]. See the Terms and Conditions (https://onlinelibrary.wiley.com/terms-and-conditions) on Wiley Online Library for rules of use; OA articles are governed by the applicable Creative Commons License
Chapter 13: Understanding Server Administration
# Provides TCP syslog reception
# for parameters see http://www.rsyslog.com/doc/imtcp.html
#module(load="imtcp") # needs to be done just once
#input(type="imtcp" port="514")
Entries beginning with module(load= load the modules that follow. Modules that are currently disabled are preceded by a pound sign (#). The imjournal module lets rsyslog
access the systemd journal. The imuxsock module is needed to accept messages from the
local system. (It should not be commented out—preceded by a pound sign—unless you have a
specific reason to do so.) The imklog module logs kernel messages.
Modules not enabled by default include the immark module, which allows --MARK-- messages to be logged (used to indicate that a service is alive). The imudp and imtcp modules
and related port number entries are used to allow the rsyslog service to accept remote logging messages and are discussed in more detail in the section “Setting up and using a loghost
with rsyslogd” later in this chapter.
Most of the work done in the /etc/rsyslog.conf configuration file involves modifying
the RULES section. The following is an example of some of the rules in the RULES section of
the /etc/rsyslog.conf file. Note that in Ubuntu, you need to look in the /etc/
rsyslog.d directory for this configuration information. Each package puts its own logging
configuration information in that directory, including the rsyslog package.
#### RULES ####
# Log all kernel messages to the console.
# Logging much else clutters up the screen.
#kern.*
/dev/console
# Log anything (except mail) of level info or higher.
# Don't log private authentication messages!
*.info;mail.none;authpriv.none;cron.none
/var/log/messages
# The authpriv file has restricted access.
authpriv.*
/var/log/secure
# Log all the mail messages in one place.
mail.*
-
/var/log/maillog
# Log cron stuff
cron.*
/var/log/cron
# Everybody gets emergency messages
*.emerg
:omusrmsg:*
# Save news errors of level crit and higher in a special file.
uucp,news.crit
/var/log/spooler
# Save boot messages also to boot.log
local7.*
/var/log/boot.log
Rules entries come in two columns. In the left column are designations of what messages are
matched; the right column shows where matched messages go. Messages are matched based
on facility (mail, cron, kern, and so on) and priority (starting at debug, info, notice,
and up to crit, alert, and emerg), separated by a dot (.). So mail.info would match all
messages from the mail service that are info level and above.
326
Downloaded from https://onlinelibrary.wiley.com/doi/ by alex jounh - Oregon Health & Science Univer , Wiley Online Library on [05/12/2025]. See the Terms and Conditions (https://onlinelibrary.wiley.com/terms-and-conditions) on Wiley Online Library for rules of use; OA articles are governed by the applicable Creative Commons License
Part IV: Becoming a Linux Server Administrator
As for where the messages go, most messages are directed to files in the /var/log directory.
You can, however, direct messages to a device (such as /dev/console) or a remote loghost
(such as @loghost.example.com). The at sign (@) indicates that the name that follows is the
name of the loghost.
By default, logging is done only to local files in the /var/log directory. However, if you
uncomment the kern.* entry, you can easily direct kernel messages of all levels to your computer’s console screen.
The first working entry in the preceding example shows that info-level messages from all
services (*) are matched by that rule, with the exception of messages from mail, authpriv,
and cron services (which are excluded with the word none). All of the matched messages are
directed to the /var/log/messages file.
The mail, authpriv (authentication messages), and cron (cron facility messages) services each has its own log files, as listed in the columns to their right. Also, notice that
the mail log is indicated as -/var/log/maillog, with the minus sign indicating
not to sync the log file after each write (which is actually the default). To understand
the format of those and other log files, the format of the /var/log/messages file is
described next.
Understanding the messages log file
Because of the many programs and services that record information to the messages log file,
understanding the format of this file is important. You can get a good early warning of problems developing on your system by examining this file. Each line in the file is a single message recorded by some program or service. Here is a snippet of an actual messages log file
in Fedora:
May 29 16:35:58 host01 systemd[1]: Started firewalld.service -
firewalld -dynamic firewall daemon.
May 29 16:35:58 host01 audit[1]: SERVICE_START pid=1 uid=0
auid=4294967295
ses=4294967295 subj=system_u:system_r:init_t:s0 msg='unit=firewalld
comm="systemd" exe="/usr/lib/systemd/systemd" hostname=? addr=?
terminal=?
res=success'
May 29 16:35:58 host01 systemd[1]: Reached target network-
pre.target -
Preparation for Network.
May 29 16:35:58 host01 systemd[1]: Starting NetworkManager.service -
Network Manager...
...
May 31 11:16:49 host01 audit[3287]: USER_AUTH pid=3287 uid=1000
auid=1000
ses=4 subj=unconfined_u:unconfined_r:unconfined_t:s0-
s0:c0.c1023
msg='op=PAM:authentication grantors=? acct="chris" exe="/usr/bin/
sudo"
hostname=? addr=? terminal=/dev/pts/0 res=failed'
May 31 11:16:51 host01 audit[3287]: USER_CMD pid=3287 uid=1000 auid=1000
327
13
Downloaded from https://onlinelibrary.wiley.com/doi/ by alex jounh - Oregon Health & Science Univer , Wiley Online Library on [05/12/2025]. See the Terms and Conditions (https://onlinelibrary.wiley.com/terms-and-conditions) on Wiley Online Library for rules of use; OA articles are governed by the applicable Creative Commons License
Chapter 13: Understanding Server Administration
ses=4 subj=unconfined_u:unconfined_r:unconfined_t:s0-
s0:c0.c1023
msg='cwd="/home/chris" cmd=7375202D exe="/usr/bin/sudo"
terminal=pts/0 res=failed'
The default message format in the /var/log/messages file is divided into five main parts.
This format is determined by the following entry in the /etc/rsyslog.conf file:
module(load="builtin:omfile" Template="RSYSLOG_Traditional
FileFormat")
When you view messages in files from the /var/log directory, from left to right, message
parts are as follows:
■
■
■
■
■
The date and time that the message was logged
The name of the computer from which the message came
The program or service name to which the message pertains
The process number (enclosed in square brackets) of the program sending
the message
The actual text message
Take another look at the preceding file snippet. This shows the firewall service (firewalld)
starting up, as well as the network service (NetworkManager). The last two messages show
failed attempts to use sudo for the user with UID 1000 (chris) to log in as the root user.
By occasionally reviewing the messages and secure files, you could catch a cracking
attempt before it is successful. If you see an excessive number of connection attempts for a
particular service, especially if they are coming from systems on the Internet, you may be
under attack.
Setting up and using a loghost with rsyslogd
To redirect your computer’s log files to another computer’s rsyslogd, you must make
changes to both the local and remote rsyslog configuration file, /etc/rsyslog.conf.
As root user, open the /etc/rsyslog.conf file in a text editor (such as vi).
On the client side
To send the messages to another computer (the loghost) instead of a file, start by replacing the
log filename with the @ character followed by the name of the loghost. For example, to log all
messages of all levels to loghost via UDP protocol, add this line:
*.*
@loghost
Restart the rsyslog service: systemctl restart rsyslog
The messages are now sent using UDP protocol to the rsyslogd service running on the computer named loghost. If you prefer, you can simply duplicate each line in the file that indicates which log messages to store and direct that information to @loghost.
328
Downloaded from https://onlinelibrary.wiley.com/doi/ by alex jounh - Oregon Health & Science Univer , Wiley Online Library on [05/12/2025]. See the Terms and Conditions (https://onlinelibrary.wiley.com/terms-and-conditions) on Wiley Online Library for rules of use; OA articles are governed by the applicable Creative Commons License
Part IV: Becoming a Linux Server Administrator
The name loghost was not an arbitrary choice. Creating such a hostname and making it an
alias to the actual system acting as the loghost is customary. That way, if you ever need to
switch the loghost duties to a different machine, you need to change only the loghost alias;
you do not need to re-edit the rsyslog.conf file on every computer.
On the loghost side
The loghost that is set to accept the messages must listen for those messages on standard
ports (514 UDP, although it can be configured to accept messages on 514 TCP as well). Here is
how you would configure the Linux loghost that is also running the rsyslog service:
1. Edit the /etc/rsyslog.conf file on the loghost system and uncomment the lines
that enable the rsyslogd daemon to listen for remote log messages. Then add a
line to define the template for storing the remote logs and a second line to accept the
remote logs:
module(load="imudp") # needs to be done just once
input(type="imudp" port="514")
module(load="imtcp") # needs to be done just once
input(type="imtcp" port="514")
$template RemoteLogs,"/var/log/remotelogs/%HOSTNAME%/%PROGR
AMNAME%.log"
*.* ?RemoteLogs
2. Open your firewall for port 514, to allow new messages to be directed to your loghost.
(See Chapter 25, “Securing Linux on a Network,” for a description of how to open specific ports to allow access to your system.)
3. Restart the rsyslog service (systemctl restart rsyslog.service).
4. If the service is running, you should be able to see that the service is listening on the
ports that you enabled (UDP and/or TCP ports 514). Run the ss command as follows
to see that the rsyslogd daemon is listening on IPv4 and IPv6 ports 514 for both
UDP and TCP services:
# ss -
tupln | grep 514
udp UNCONN 0 0 0.0.0.0:514 0.0.0.0:* users:(("rsyslogd",pid=1684
7,fd=4))
udp UNCONN 0
7,fd=5))
0
[::]:514
tcp LISTEN 0
7,fd=6))
25 0.0.0.0:514 0.0.0.0:* users:(("rsyslogd",pid=1684
tcp LISTEN 0
7,fd=7))
25
[::]:514
[::]:* users:(("rsyslogd",pid=1684
[::]:* users:(("rsyslogd",pid=1684
329
13
Downloaded from https://onlinelibrary.wiley.com/doi/ by alex jounh - Oregon Health & Science Univer , Wiley Online Library on [05/12/2025]. See the Terms and Conditions (https://onlinelibrary.wiley.com/terms-and-conditions) on Wiley Online Library for rules of use; OA articles are governed by the applicable Creative Commons License
Chapter 13: Understanding Server Administration
5. Once the client host begins sending log messages, the new directory you set in the
template is created, a subdirectory for each client host is created, and log files for
each host is added to its directory. To see them, type:
# ls -
ld /var/log/remotelogs/ /var/log/remotelogs/*/*
drwx-
-
-
-
-
-
. 1 root root 14 Jun 1 08:27 /var/log/remotelogs/
-rw-------. 1 root root 459 Jun 1 08:27 /var/log/remotelogs/host1/
audit.log
-rw-------. 1 root root 460 Jun 1 08:27 /var/log/remotelogs/host1/
rsyslogd.log
-rw-------. 1 root root 526 Jun 1 08:27 /var/log/remotelogs/host1/
systemd.log
Watching logs with logwatch
The logwatch service runs in most Linux systems that do system logging with rsyslog.
Because logs on busy systems can become very large over time, it doesn’t take long for there
to be too many messages for a system administrator to watch every message in every log. To
install the logwatch facility, enter the following:
# dnf install logwatch
# apt-
get install logwatch
# Fedora or RHEL
# Ubuntu
What logwatch does is gather messages once each night that look like they might represent a problem, put them in an email message, and send it to any email address the administrator chooses. To enable logwatch, all you have to do is install the logwatch
package.
The logwatch service runs from a cron job (0logwatch or 00logwatch) placed in
/etc/cron.daily. You can use the /etc/logwatch/conf/logwatch.conf file to
add local settings. The default options used to gather log messages are set (or indicated in
comments) in the /usr/share/logwatch/default.conf/logwatch.conf file.
Some of the default settings define the location of log files (/var/log), location of the temporary directory (/var/cache/logwatch), and the recipient of the daily logwatch email
(the local root user). Unless you expect to log in to the server to read logwatch messages,
you probably want to change the MailTo setting in the /etc/logwatch/conf/
logwatch.conf file:
MailTo = chris@example.com
Look in /usr/share/logwatch/default.conf/logwatch.conf for other settings to
change (such as detail level or the time range for each report). Then make your additions to
/etc/logwatch/conf/logwatch.conf as mentioned.
330
Downloaded from https://onlinelibrary.wiley.com/doi/ by alex jounh - Oregon Health & Science Univer , Wiley Online Library on [05/12/2025]. See the Terms and Conditions (https://onlinelibrary.wiley.com/terms-and-conditions) on Wiley Online Library for rules of use; OA articles are governed by the applicable Creative Commons License
Part IV: Becoming a Linux Server Administrator
When the service is enabled (which it is just by installing the logwatch package), you will
see a message each night in the root user’s mailbox. When you are logged in as root, you can
use the old mail command to view the root user’s mailbox:
# mail
Heirloom Mail version 12.5 7/5/10. Type ? for help.
"/var/spool/mail/root": 2 messages 2 new
>N 1 logwatch@abc.ex Sun Jun 1 04:02 45/664
"Logwatch for abc"
2 logwatch@abc.ex Mon Jun 2 04:02 45/664
"Logwatch for abc"
& 1
& x
In mail, you should see email messages from logwatch run each day (here at 4:02 a.m.).
Type the number of the message you want to view and page through it with the spacebar or
line by line by pressing Enter. Type x to exit when you are finished.
The kind of information you see includes kernel errors, installed packages, authentication
failures, and malfunctioning services. Disk space usage is reported, so you can see if your
storage is filling up. Just by glancing through this logwatch message, you should get an idea
whether sustained attacks are under way or if some repeated failures are taking place.
Checking System Resources with sar
The System Activity Reporter (sar) is one of the oldest system monitoring facilities created
for early UNIX systems—predating Linux by a few decades. The sar command itself can display system activity continuously, at set intervals (every second or two), and display it on the
screen. It can also display system activity data that was gathered earlier.
The sar command is part of the sysstat package (install the package if it’s not on your
system). When you install sysstat and enable the sysstat service, your system immediately begins gathering system activity data that can be reviewed later using certain options to
the sar command.
# systemclt enable sysstat
# systemctl start sysstat
To read the data in the /var/log/sa/sa?? files, you can use some of the following
sar commands:
# sar -
u | less
Linux 6.15.7-
200.fc42.x86_64 (host01)
(6 CPU)
23:27:46
06/01/2025
_x86_64_
LINUX RESTART (1 CPU)
331
13
Downloaded from https://onlinelibrary.wiley.com/doi/ by alex jounh - Oregon Health & Science Univer , Wiley Online Library on [05/12/2025]. See the Terms and Conditions (https://onlinelibrary.wiley.com/terms-and-conditions) on Wiley Online Library for rules of use; OA articles are governed by the applicable Creative Commons License
Chapter 13: Understanding Server Administration
11:30:05 PM
11:40:06 PM
Average:
CPU
all
all
%user
0.90
0.90
%nice %system
0.00
1.81
0.00
1.81
%iowait
1.44
1.44
%steal
0.28
0.28
%idle
95.57
95.57
The -u option shows CPU usage. By default, the output starts at midnight on the current day
and then shows how much processing time is being consumed by different parts of the system.
The output continues to show the activity every 10 minutes until the current time is reached.
To see disk activity output, run the sar -d command. Again, output comes in 10-minute
intervals starting at midnight.
# sar -
d | less
Linux 6.15.7-
200.fc42.x86_64 (ansible)
(6 CPU)
23:27:46
11:30:05
11:40:06
11:40:06
11:40:06
Average:
Average:
Average:
PM
PM
PM
PM
LINUX RESTART
(1 CPU)
DEV
dev8-
0
dev253-
0
dev253-
1
dev8-
0
dev253-
0
dev253-
1
rkB/s
5663.94
5664.09
0.01
5663.94
5664.09
0.01
tps
49.31
48.99
10.84
49.31
48.99
10.84
06/01/2025
wkB/s
50.38
7.38
43.34
50.38
7.38
43.34
areq-
sz
115.89
115.78
4.00
115.89
115.78
4.00
_x86_64_
aqu-
sz
0.03
0.05
0.04
0.03
0.05
0.04
await…
1.00
0.98
3.29
1.00
0.98
3.29
If you want to run sar activity reports live, you can do that by adding counts and time intervals to the command line, as shown here:
# sar -
n DEV 5 2
Linux 6.15.7-
200.fc42.x86_64 (ansible)
06/01/2025
_x86_64_
(6 CPU)
11:19:36 PM IFACE rxpck/s txpck/s rxkB/s txkB/s rxcmp/s txcmp/s…
11:19:41 PM
lo
5.42
5.42
1.06
1.06
0.00
0.00…
11:19:41 PM eno1
0.00
0.00
0.00
0.00
0.00
0.00…
…
Average: IFACE
rxpck/s txpck/s rxkB/s txkB/ rxcmp/s txcmp/s rxmcst/s
Average:
lo
7.21
7.21
1.42 1.42
0.00
0.00
0.00
Average: eno1
0.00
0.00
0.00 0.00
0.00
0.00
0.00
Average: wlp0s20f3
4.70
4.00
4.81 0.63
0.00
0.00
0.00
With the -n Dev example just shown, you can see how much activity came across the different network interfaces on your system. You can see how many packets were transmitted and
received and how many KB of data were transmitted and received. In that example, samplings
of data were taken every five seconds and repeated twice.
Refer to the sar, sadc, sa1, and sa2 man pages for more information on how sar data can
be gathered and displayed.
332
Downloaded from https://onlinelibrary.wiley.com/doi/ by alex jounh - Oregon Health & Science Univer , Wiley Online Library on [05/12/2025]. See the Terms and Conditions (https://onlinelibrary.wiley.com/terms-and-conditions) on Wiley Online Library for rules of use; OA articles are governed by the applicable Creative Commons License
Part IV: Becoming a Linux Server Administrator
Checking System Space
Although logwatch can give you a daily snapshot of space consumption on your system
disks, the df and du commands can help you immediately see how much disk space is available. The following sections show examples of those commands.
Displaying system space with df
You can display the space available in your filesystems using the df command. To see the
amount of space available on all of the mounted filesystems on your Linux computer, type df
with no options:
$ df
Filesystem
/dev/sda3
/dev/sda2
…
1k-
blocks
30645460
46668
Used
2958356
8340
Available
26130408
35919
Use%
11%
19%
Mounted on
/
/boot
This example output shows the space available on the hard disk partition mounted on the
/ (root) directory (/dev/sda1) and /boot partition (/dev/sda2). Disk space is shown in
1KB blocks. To produce output in a more human-readable form, use the -h option:
$ df -h
Filesystem
/dev/sda3
/dev/sda2
…
Size
29G
46M
Used
2.9G
8.2M
Avail
24G
25M
Use%
11%
19%
Mounted on
/
/boot
13
With the df -h option, output appears in a friendlier megabyte or gigabyte listing. Other
options with df enable you to do the following:
■
■
■
■
■
Print only filesystems of a particular type (-t type).
Exclude filesystems of a particular type (-x type). For example, type df -x
tmpfs -
x devtmpfs to exclude temporary filesystem types (limiting output to
filesystems that represent real storage areas).
Include filesystems that have no space, such as /proc and /dev/pts (-a).
List only available and used inodes (-i).
Display disk space in certain block sizes (--block-size=#).
To filter out temp, overlay and other filesystems that are not associated with your permanent
storage, you can either explicitly ask for particular filesystem types or ask to not display the
nonpermanent filesystems, as shown in the following two examples:
$ df -
h -
t ext4 -
t vfat -
t btrfs -
t xfs
$ df -
h -
x squashfs -
x tmpfs -
x devtmpfs -
x overlay -
x efivarfs
333
Downloaded from https://onlinelibrary.wiley.com/doi/ by alex jounh - Oregon Health & Science Univer , Wiley Online Library on [05/12/2025]. See the Terms and Conditions (https://onlinelibrary.wiley.com/terms-and-conditions) on Wiley Online Library for rules of use; OA articles are governed by the applicable Creative Commons License
Chapter 13: Understanding Server Administration
Checking disk usage with du
To find out how much space is being consumed by a particular directory (and its subdirectories), use the du command. With no options, du lists all directories below the current directory, along with the space consumed by each directory. At the end, du produces total disk
space used within that directory structure.
The du command is a good way to check how much space is being used by a particular user
(du /home/jake) or in a particular filesystem partition (du /var). By default, disk space
is displayed in 1KB block sizes. To make the output friendlier (in kilobytes, megabytes, and
gigabytes), use the -h option as follows:
$ du -
h /home/jake
114k
/home/jake/httpd/stuff
234k
/home/jake/httpd
137k
/home/jake/uucp/data
701k
/home/jake/uucp
1.0M
/home/jake
The output shows the disk space used in each directory under the home directory of the user
named jake (/home/jake). Disk space consumed is shown in kilobytes (K), megabytes
(M), and gigabytes (G). The total space consumed by /home/jake is shown on the last line.
Add the –s option to see total disk space used for a directory and its immediate files and subdirectories.
Finding disk consumption with find
The find command is a great way to find file consumption of your hard disk using a variety
of criteria. You can get a good idea of where disk space can be recovered by finding files that
are over a certain size or were created by a particular person.
Note
You must be the root user to run this command effectively, unless you are just checking your personal files. If you are not
the root user, there are many places in the filesystem for which you do not have permission to check. Regular users can
usually check their own home directories but not those of others.
In the following example, the find command recursively searches for all files in the
Downloads directory of my home directory (~/Downloads) and outputs each file’s size
in bytes (%s) and filename (%p). It then sorts the output by file size and displays the first
10 lines (head -
n 10). Here is the command line:
# find ~/Downloads/ -
xdev -
type f -
printf '%s\t%p\n' | sort -
rn | \
head -
n 10
11085742080
Downloads/rhel-9.4-x86_64-dvd.iso
2295853056
Downloads/Fedora-Workstation-Live-x86_64-40-1.14.iso
1039138816
Downloads/rhel-
9.4-
x86_64-
boot.iso
239449343
Downloads/Photos-
001.zip
35782656
Downloads/c03.indd
334
Downloaded from https://onlinelibrary.wiley.com/doi/ by alex jounh - Oregon Health & Science Univer , Wiley Online Library on [05/12/2025]. See the Terms and Conditions (https://onlinelibrary.wiley.com/terms-and-conditions) on Wiley Online Library for rules of use; OA articles are governed by the applicable Creative Commons License
Part IV: Becoming a Linux Server Administrator
34758656
13406857
11292895
Downloads/c07.indd
Downloads/9781119578888_Art_and_Word_Files.zip
Downloads/digisign-
documents-
07-
10-
2025.zip
This command line is useful for showing me the 10 largest files I have downloaded to my
Downloads directory, so I can save some disk space by deleting the ones I no longer need.
Tip
The -xdev option prevents filesystems other than the selected filesystem from being searched. This is a good way to
cut out a lot of junk that may be output from the /proc filesystem. It can also keep large, remotely mounted filesystems from being searched.
Here’s another example, except that instead of just sorting all files and listing the top 10,
we’re looking for any files in the entire filesystem (/) that are larger than 100 kilobytes
(-size +100M):
# find / -xdev -size +100M -type f -printf \
'%s\t%p\n' | sort -rn > /tmp/size
You can save yourself lots of disk space just by removing some of the largest files that are no
longer needed. In this example, you can see that large files are sorted by size in the /tmp/
size file.
13
Managing Servers in the Enterprise
Most of the server configuration covered in this book describes how to install systems manually and work directly on host computers. Having to set up each host individually would be
far too inefficient for modern data centers consisting of dozens, hundreds, or even thousands
of computers. To make the process of setting up Linux servers in a large data center more efficient, some of the following are employed:
Automated deployments One way to install systems without having to step through a
manual install process is with PXE booting. By setting up a PXE server and booting a
computer on that network from a PXE-enabled network interface card, you can start a
full install of that system simply by booting the system. Once the install is done, the
system can reboot to run from the installed system. See Chapter 22, “Configuring a PXE
Server,” for further information.
Generic host systems By making your host systems as generic as possible, individual
installation, configuration, and upgrades can be greatly simplified. This can be
automated in layers, where the base system is installed by PXE booting, configuration
is done through features such as cloud-int, and applications can bring along their own
dependencies when they run. On the application level, this can be done by running an
application from inside a virtual machine or container. When the application is done
running, it can be discarded without leaving its dependent software on the host.
335
Downloaded from https://onlinelibrary.wiley.com/doi/ by alex jounh - Oregon Health & Science Univer , Wiley Online Library on [05/12/2025]. See the Terms and Conditions (https://onlinelibrary.wiley.com/terms-and-conditions) on Wiley Online Library for rules of use; OA articles are governed by the applicable Creative Commons License
Chapter 13: Understanding Server Administration
Separation of management and worker systems Instead of individually managing
host systems, a separate platform can offer a way to manage large sets of systems. To
do this, a platform such as Kubernetes or VMWare vCenter can have management nodes
(in some cases called control plane nodes) that manage the machines where the workload actually runs (sometimes called workers or just nodes). This separation of tasks by
host type makes it possible to have applications deployed on any available worker that
meets the needs of the application (such as available memory or CPU).
Keep in mind that understanding how individual applications are configured and services are
run is still the foundation for these more advanced ways of managing data center resources.
Although in-depth coverage of enterprise deployment and monitoring tools is outside the
scope of this book, refer to Part VI, “Engaging with Cloud Computing,” for an introduction to
how different Linux-based cloud platforms manage these issues.
Summary
Although many different types of servers are available with Linux systems, the basic procedure for
installing and configuring a server is often similar. The normal course of events is to install, configure, start, secure, and monitor your servers. Basic tasks that apply to all servers include using
networking tools (particularly SSH tools) to log in, copy files, or execute remote commands.
Because an administrator can’t be logged in watching servers all the time, tools for gathering
data and reviewing the log data later are very important when administering Linux servers.
The rsyslog facility can be used for local and remote logging. The sar facility gathers live
data or plays back data gathered earlier at 10-minute intervals. Cockpit lets you watch CPU,
memory, disk, and networking activity live from a web user interface. To watch disk space, you
can run df and du commands.
The skills described in this chapter are designed to help you build a foundation to do
enterprise-quality system administration in the future. Although these skills are useful, to
manage many Linux systems at the same time, you need to extend your skills by using automating deployment and monitoring tools, as described in the cloud computing section of this
book.
Although it is easy to set up networking to reach your servers in simple, default cases, more
complex network configuration requires a knowledge of networking configuration files and
related tools. The next chapter describes how to set up and administer networking in Linux.
Exercises
The exercises in this section cover some of the basic tools for connecting to and watching over
your Linux servers. As usual, you can accomplish the tasks here in several ways. So, don’t worry if
you don’t go about the exercises in the same way as shown in the answers, as long as you get the
same results. If you are stuck, solutions to the tasks are shown in Appendix B.
336
Downloaded from https://onlinelibrary.wiley.com/doi/ by alex jounh - Oregon Health & Science Univer , Wiley Online Library on [05/12/2025]. See the Terms and Conditions (https://onlinelibrary.wiley.com/terms-and-conditions) on Wiley Online Library for rules of use; OA articles are governed by the applicable Creative Commons License
Part IV: Becoming a Linux Server Administrator
Some of the exercises assume you have a second Linux system available that you can log in
to and try different commands. On that second system, you need to make sure that the sshd
service is running, that the firewall is open, and that ssh is allowed for the user account that
you are trying to log in to (root is often blocked by sshd).
If you have only one Linux system, you can create an additional user account and simply simulate communications with another system by connecting to the name localhost instead,
as shown in this example:
# useradd joe
# passwd joe
# ssh joe@localhost
1. Using the ssh command, log in to another computer (or the local computer) using
any account to which you have access. Enter the password when prompted.
2. Using remote execution with the ssh command, display the contents of a remote
/etc/system-release file and have its contents displayed on the local system.
3. Use the ssh command to use X11 forwarding to display an xterm window on your
local system; then touch a file in the current directory and list it to make sure
it exists.
4. Recursively copy all of the files from the /usr/share/help/es directory on a
remote system to the /tmp directory on your local system in such a way that all of
the modification times on the files are updated to the time on the local system when
they are copied.
5. Recursively copy all of the files from the /usr/share/zsh directory on a remote
system to the /tmp directory on your local system in such a way that all of the modification times on the files from the remote system are maintained on the local system.
6. Create a public/private key pair to use for SSH communications (no passphrase on the
key), copy the public key file to a remote user’s account with ssh-copy-id, and
use key-based authentication to log in to that user account without having to enter
a password.
7. Create an entry in /etc/rsyslog.conf that stores all authentication messages
(authpriv) info level and higher into a file named /var/log/myauth. From one
terminal, watch the file as data comes into it, and in another terminal, try to ssh
into your local machine as any valid user with a bad password.
8. Use the du command to determine the largest directory structures under /usr/
share, sort them from largest to smallest, and list the top ten of those directories in
terms of size.
9. Use the df command to show the space that is used and available from all of the filesystems currently attached to the local system but exclude any tmpfs or devtmpfs
filesystems.
10. Find any files in the /usr directory that are more than 10MB in size.
337
13
Downloaded from https://onlinelibrary.wiley.com/doi/ by alex jounh - Oregon Health & Science Univer , Wiley Online Library on [05/12/2025]. See the Terms and Conditions (https://onlinelibrary.wiley.com/terms-and-conditions) on Wiley Online Library for rules of use; OA articles are governed by the applicable Creative Commons License
Chapter 13: Understanding Server Administration
Administering Networking
14
IN THIS CHAPTER
Automatically connecting Linux to a network
Using NetworkManager for simple network connectivity
Configuring networking from the command line
Working with network configuration files
Configuring routing, DHCP, DNS, and other networking infrastructure features for the enterprise
C
onnecting a single desktop system or laptop to a network, particularly one that connects to the
Internet, has become so easy that I have put off writing a full chapter on Linux networking for a
while. If you are trying to connect your Fedora, RHEL, Ubuntu, or another Linux desktop system
to the Internet, here’s what you can try given an available wired or wireless network interface:
Wired network If your home or office has a wired Ethernet port that provides a path to the
Internet and your computer has an Ethernet port, use an Ethernet cable to connect the two
ports. After you turn on your computer, boot up Linux and log in. Clicking the Network icon on
the desktop should show you that you are connected to the Internet or allow you to connect
with a single click.
Wireless network For a wireless computer running Linux, log in and click the Network icon
on the desktop. The first time you connect to a local wireless network, select from the list of
wireless networks that appear. When prompted, enter the required password, if it’s needed.
Each time that computer boots up from the same location, it automatically connects to that
wireless network.
If either of those types of network connections works for you and you are not otherwise curious about
how networking works in Linux, that may be all you need to know. However, what if your Linux system
doesn’t automatically connect to the Internet? What if you want to configure your desktop to talk to a
private network at work (such as a VPN)? What if you want to lock down network settings on your server
or configure your Linux system to work as a router?
339
Linux Bible, Eleventh Edition. Christopher Negus.
© 2026 John Wiley & Sons, Inc. All rights reserved, including rights for text and data mining and training of artificial intelligence technologies or similar
technologies. Published 2026 by John Wiley & Sons, Inc.
Downloaded from https://onlinelibrary.wiley.com/doi/ by alex jounh - Oregon Health & Science Univer , Wiley Online Library on [05/12/2025]. See the Terms and Conditions (https://onlinelibrary.wiley.com/terms-and-conditions) on Wiley Online Library for rules of use; OA articles are governed by the applicable Creative Commons License
CHAPTER
In this chapter, topics related to networking are divided into networks for desktops, servers, and
enterprise computing. The general approach to configuring networking in these three types of
Linux systems is as follows:
Desktop/laptop networking On desktop or laptop systems, NetworkManager runs by
default to manage network interfaces. With NetworkManager, you can automatically
accept the address and server information that you need to connect to the Internet.
However, you can also set address information manually. You can configure things such
as proxy servers or virtual private network connections to allow your desktop to work
from behind an organization’s firewall or to connect through a firewall, respectively.
Server networking Although NetworkManager originally worked best on desktop and
laptop network configurations, it now works extremely well on servers. Today, features
that are useful for configuring servers, such as Ethernet channel bonding and configuring aliases, can be found in NetworkManager.
Enterprise networking Explaining how to configure networking in a large enterprise
can fill several volumes itself. However, to give you a head start using Linux in an
enterprise environment, I discuss basic networking technologies, such as DHCP and DNS
servers, which make it possible for desktop systems to connect to the Internet automatically and find systems based on names and not just IP addresses.
Configuring Networking for Desktops
Whether you connect to the Internet from Linux, Windows, a smartphone, or any other kind of
network-enabled device, certain things must be in place for that connection to work. The computer must have a network interface (wired or wireless), an IP address, an assigned DNS server,
and a route to the Internet (identified by a gateway device).
Before I discuss how to change your networking configuration in Linux, let’s look at the
general activities that occur when Linux is set to connect to the Internet automatically with
NetworkManager:
Activate network interfaces NetworkManager looks to see what network interfaces (wired or wireless) are set to start. By default, external interfaces are usually
set to start automatically using DHCP, although static names and addresses can be
set instead.
Request DHCP service The Linux system acts as a DHCP client to send out a request for
DHCP service on each enabled interface. It uses the MAC address of the network interface to identify itself in the request.
Get response from DHCP server A DHCP server, possibly running on a wireless router,
cable modem, or other device providing a route to the Internet from your location,
responds to the DHCP request. It can provide lots of different types of information to
the DHCP client. That information probably contains at least the following:
340
Downloaded from https://onlinelibrary.wiley.com/doi/ by alex jounh - Oregon Health & Science Univer , Wiley Online Library on [05/12/2025]. See the Terms and Conditions (https://onlinelibrary.wiley.com/terms-and-conditions) on Wiley Online Library for rules of use; OA articles are governed by the applicable Creative Commons License
Part IV: Becoming a Linux Server Administrator
IP address The DHCP server typically has a range of Internet Protocol (IP) addresses
that it can hand out to any system on the network that requests an address. In
more secure environments, or one in which you want to be sure that specific
machines get specific addresses, the DHCP server provides a specific IP address to
requests from specific MAC addresses. (MAC addresses are made to be unique among
all network interface cards and are assigned by the manufacturer of each card.)
Subnet mask When the DHCP client is assigned an IP address, the accompanying subnet mask tells that client which part of the IP address identifies the subnetwork and
which identifies the host. For example, an IP address of 192.168.0.100 and subnet
mask of 255.255.255.0 tell the client that the network is 192.168.0 and the host
part is 100.
Lease time When an IP address is dynamically allocated to the DHCP client (such as
a Linux system), that client is assigned a lease time. The client doesn’t own that
address but must lease it again when the time expires and request it once again
when the network interface restarts. Usually, the DHCP server remembers the client
and assigns the same address when the system starts up again or asks to renew
the lease. The default lease time is typically 86,400 seconds (24 hours) for IPV4
addresses. The more plentiful IPV6 addresses are assigned for 2,592,000 seconds
(30 days) by default.
Domain name server Because computers like to think in numbers (such as IP
addresses like 192.168.0.100) and people tend to think in names (such as the hostname www.example.com), computers need a way to translate hostnames into IP
addresses and sometimes the opposite as well. The Domain Name System (DNS) was
designed to handle that problem by providing a hierarchy of servers to do name-to-
address mapping on the Internet. The location of one or more DNS servers (usually
two or three) is usually assigned to the DHCP client from the DHCP host.
Default gateway Although the Internet has one unique namespace, it is actually
organized as a series of interconnected physical subnetworks. For a network request
to leave your local network, it must know what node on your network provides a
route to addresses outside of your local network. The DHCP server usually provides
the “default gateway” IP address. By having network interfaces on both your subnetwork and the next network on the way to the ultimate destination of your communication, a gateway can route your packets to their destination.
Other information A DHCP server can be configured to provide all kinds of information to help the DHCP client. For example, it can provide the location of an NTP
server (to sync time between clients), font server (to get fonts for your X display),
IRC server (for online chats), or print server (to designate available printers).
Update local network settings After the settings are received from the DHCP server,
they are implemented as appropriate on the local Linux system. For example, the IP
address is set on the network interface, the DNS server entries are added to the local
/etc/resolv.conf file (by NetworkManager), and the lease time is stored by the
local system so it knows when to request that the lease be renewed.
341
14
Downloaded from https://onlinelibrary.wiley.com/doi/ by alex jounh - Oregon Health & Science Univer , Wiley Online Library on [05/12/2025]. See the Terms and Conditions (https://onlinelibrary.wiley.com/terms-and-conditions) on Wiley Online Library for rules of use; OA articles are governed by the applicable Creative Commons License
Chapter 14: Administering Networking
All of the steps just described typically happen without your having to do anything but turn
on your Linux system and log in. Now suppose that you want to be able to verify your network
interfaces or change some of those settings. You can do that using the tools described in the
next sections.
Checking your network interfaces
There are both graphical and command-line tools for viewing information about your network
interfaces in Linux. From the desktop, NetworkManager tools and the Cockpit web user interface are good places to start.
Checking your network from GNOME Settings window
The easiest way to check the basic setting for a network interface is to open the pull-down
menu at the upper-right corner of your desktop, select the arrow next to the WIFI button, and
then select All Networks. Figure 14.1 shows the Wi-Fi settings for an active network on an
Ubuntu GNOME desktop.
FIGURE 14.1
Checking WIFI interfaces with GNOME Settings.
As you can see in Figure 14.1, both IPv4 and IPv6 addresses are assigned to the interface. The IP address 192.168.1.1 offers both a DNS service and the default route to external networks.
To see more about how your Linux system is configured, click one of the tabs at the top of
the window. For example, Figure 14.2 shows the Security tab, where you can select the type of
security connection to the network and set the password needed to connect to that network.
342
Downloaded from https://onlinelibrary.wiley.com/doi/ by alex jounh - Oregon Health & Science Univer , Wiley Online Library on [05/12/2025]. See the Terms and Conditions (https://onlinelibrary.wiley.com/terms-and-conditions) on Wiley Online Library for rules of use; OA articles are governed by the applicable Creative Commons License
Part IV: Becoming a Linux Server Administrator
FIGURE 14.2
Viewing network security settings with the GNOME settings window.
Checking your network from Cockpit
Provided you have enabled Cockpit, you can see and change information about your network
interfaces through your web browser. On your local system, you open https://localhost:
9090/network to go directly to the Cockpit Networking page for your local system.
Figure 14.3 shows an example of this.
FIGURE 14.3
Viewing and changing network settings from Cockpit.
14
343
Downloaded from https://onlinelibrary.wiley.com/doi/ by alex jounh - Oregon Health & Science Univer , Wiley Online Library on [05/12/2025]. See the Terms and Conditions (https://onlinelibrary.wiley.com/terms-and-conditions) on Wiley Online Library for rules of use; OA articles are governed by the applicable Creative Commons License
Chapter 14: Administering Networking
From the Cockpit Networking page, you can see information about all of your network interfaces at once. In this case, the active network interfaces are docker0 (the network bridge
that allows containers to communicate with the local computer and beyond) and wlp0s20f3
(the active wireless interface). The other interface of interest is eno1, which is an inactive
wired interface.
At the top of the Cockpit Networking page, you can see data being sent from and received on
the local system. Select a network interface to see a page displaying activities for that particular interface.
Click the Firewall Edit Rules And Zones button to see the list of services that are allowed
into your system. For example, Figure 14.4 shows that UDP ports are open for four services
(DHCPv6 client, Samba Client, Multicast DNS, and RPC Bind). DHCPv6 lets the system acquire
an IPv6 address from the network. Multicast DNS and Samba Client services can allow the
autodetection of printers, share file systems, and a variety of devices and shared resources.
RPC Bind allows you to share NFS network file systems, as well as provide access to other
network services.
FIGURE 14.4
View services that are accessible through the firewall from Cockpit.
Ports open to TCP services include ports for accessing Secure Shell (port 22), web server
(ports 80 and 443), FTP server (port 21), NFS (2049, and RCP Bind (port 111). With the ssh
344
Downloaded from https://onlinelibrary.wiley.com/doi/ by alex jounh - Oregon Health & Science Univer , Wiley Online Library on [05/12/2025]. See the Terms and Conditions (https://onlinelibrary.wiley.com/terms-and-conditions) on Wiley Online Library for rules of use; OA articles are governed by the applicable Creative Commons License
Part IV: Becoming a Linux Server Administrator
service (TCP port 22) open, the sshd service running on your local system is available for
remote users to log into your local system. The other ports allow access to those other services
running on your local system.
The fact that those ports are open doesn’t necessarily mean that the services are running.
However, if they are running, the computer’s firewall will allow access to them.
More advanced features available from the Cockpit Networking page allow you to add VPNs,
bonds, teams, bridges, and VLANs to your local network interfaces.
Checking your network from the command line
To get more detailed information about your network interfaces, try running some commands.
There are commands that can show you information about your network interfaces, routes,
hosts, and traffic on the network.
Viewing network interfaces
To see information about each network interface on your local Linux system, enter the
following:
# ip addr show
1: lo: <LOOPBACK,UP,LOWER_UP> mtu 65536 qdisc noqueue state UNKNOWN group
default qlen 1000
link/loopback 00:00:00:00:00:00 brd 00:00:00:00:00:00
inet 127.0.0.1/8 scope host lo
valid_lft forever preferred_lft forever
inet6 ::1/128 scope host noprefixroute
valid_lft forever preferred_lft forever
2: eno1: <NO-
CARRIER,BROADCAST,MULTICAST,UP> mtu 1500 qdisc fq_codel state
DOWN group default qlen 1000
link/ether f8:b4:6a:a6:93:96 brd ff:ff:ff:ff:ff:ff
altname enp0s31f6
3: wlp0s20f3: <BROADCAST,MULTICAST,UP,LOWER_UP> mtu 1500 qdisc noqueue
state
UP group default qlen 1000
link/ether 06:58:63:3e:af:87 brd ff:ff:ff:ff:ff:ff permaddr
54:8d:5a:a2:f3:c3
inet 192.168.1.24/24 brd 192.168.1.255 scope global dynamic
noprefixroute wlp0s20f3
valid_lft 65744sec preferred_lft 65744sec
inet6 fe80::4a9f:8805:d22a:4296/64 scope link noprefixroute
valid_lft forever preferred_lft forever
4: docker0: <NO-
CARRIER,BROADCAST,MULTICAST,UP> mtu 1500 qdisc noqueue
state
DOWN group default
link/ether 02:42:d6:9b:d9:a9 brd ff:ff:ff:ff:ff:ff
inet 172.17.0.1/16 brd 172.17.255.255 scope global docker0
valid_lft forever preferred_lft forever
345
14
Downloaded from https://onlinelibrary.wiley.com/doi/ by alex jounh - Oregon Health & Science Univer , Wiley Online Library on [05/12/2025]. See the Terms and Conditions (https://onlinelibrary.wiley.com/terms-and-conditions) on Wiley Online Library for rules of use; OA articles are governed by the applicable Creative Commons License
Chapter 14: Administering Networking
The ip addr show output displays information about your network interfaces, in this case
from a laptop running Fedora 42. The lo entry in the first line of the output shows the loopback
interface, which is used to allow network commands run on the local system to connect to the local
system. The IP address for localhost is 127.0.0.1/8 (the /8 is CIDR notation, indicating that 127.0 is
the network number and 0.1 is the host number). Add an -s option (ip -
s addr show) to see
statistics of packet transmissions and errors associated with each interface.
In this case, the wired Ethernet interface (en01) is down (no cable), but the wireless
interface is up (wlp0s20f3). The MAC address on the wireless interface (wlp2s0) is
06:58:63:3e:af:87, and the Internet (IPv4) address is 192.168.1.24. An IPv6 address is
also enabled.
Older versions of Linux are used to assign more generic network interface names, such as eth0
and wlan0. Now interfaces are named by their locations on the computer’s bus. For example,
the first port on the network card seated in the third PCI bus for a Fedora system is named
p3p1. The first embedded Ethernet port would be em1. Wireless interfaces sometimes appear
using the name of the wireless network as the device name.
A formerly popular command (now deprecated in Ubuntu) for seeing network interface information is the ifconfig command. By default, ifconfig shows similar information to that
of ip addr, but ifconfig also shows the number of packets received (RX) and transmitted
(TX) by default, as well as the amount of data and any errors or dropped packets:
# ifconfig wlp2s0
wlp2s0: flags=4163<UP,BROADCAST,RUNNING,MULTICAST> mtu 1500
inet 192.168.1.83 netmask 255.255.255.0
broadcast 192.168.1.255
inet6 2600:1700:722:a10:b55a:fca6:790d:6aa6
prefixlen 64 scopeid 0x0<global>
inet6 fe80::25ff:8129:751b:23e3
prefixlen 64 scopeid 0x20<link>
inet6 2600:1700:722:a10::489
prefixlen 128 scopeid 0x0<global>
ether e0:06:e6:83:ac:c7 txqueuelen 1000 (Ethernet)
RX packets 208402 bytes 250962570 (239.3 MiB)
RX errors 0 dropped 4 overruns 0 frame 0
TX packets 113589 bytes 13240384 (12.6 MiB)
TX errors 0 dropped 0 overruns 0 carrier 0 collisions 0
Checking connectivity to remote systems
To make sure that you can reach systems that are available on the network, you can use the ping
command. As long as the computer responds to ping requests (not all do), you can use ping to
send packets to that system in a way that asks them to respond. Here is an example:
$ ping host1
PING host1 (192.168.1.15 ) 56(84) bytes of data.
64 bytes from host1 (192.168.1.15 ): icmp_seq=1 ttl=64 time=0.062 ms
64 bytes from host1 (192.168.1.15 ): icmp_seq=2 ttl=64 time=0.044 ms
^C
346
Downloaded from https://onlinelibrary.wiley.com/doi/ by alex jounh - Oregon Health & Science Univer , Wiley Online Library on [05/12/2025]. See the Terms and Conditions (https://onlinelibrary.wiley.com/terms-and-conditions) on Wiley Online Library for rules of use; OA articles are governed by the applicable Creative Commons License
Part IV: Becoming a Linux Server Administrator
--- host1 ping statistics ---
2 packets transmitted, 2 received, 0% packet loss, time 1822ms
rtt min/avg/max/mdev = 0.044/0.053/0.062/0.009 ms
The ping command shown here continuously pings the host named host1. After a few pings,
press Ctrl+C to end the pings, and the last few lines show you how many of the ping requests
succeeded.
You could have used the IP address (192.168.1.15, in this case) to see that you could reach
the system. However, using the hostname gives you the additional advantage of knowing
that your name-to-IP-address translation (being done by your DNS server or local hosts file)
is working properly as well. In this case, however, host1 appeared in the local /etc/
hosts file.
Checking routing information
Routing is the next thing that you can check with respect to your network interfaces. The following snippets show you how to use the ip and route commands to do that:
# ip route show
default via 192.168.1.1 dev wlp0s20f3 proto dhcp src 192.168.1.24
metric 600
172.17.0.0/16 dev docker0 proto kernel scope link src 172.17.0.1
linkdown
192.168.1.0/24 dev wlp0s20f3 proto kernel scope link src 192.168.1.24
metric 600
The ip route show command example illustrates that the 192.168.1.1 address provides the
route to the host over the wlp0s20f3 network interface. Containers running in Docker on
the 172.17.0.0/16 network get direct communication to the local system via the 172.17.0.1 IP
address. The route command can provide similar information:
# route
Kernel IP routing table
Destination Gateway
Genmask
default
_gateway 0.0.0.0
172.17.0.0
0.0.0.0
255.255.0.0
192.168.1.0 0.0.0.0
255.255.255.0
Flags
UG
U
U
Metric
600
0
600
Ref
0
0
0
Use
0
0
0
Iface
wlp0s20f3
docker0
wlp0s20f3
The output from the kernel routing table is from a system with a single active external network interface. Any packets destined for outside of the 192.168.1 network are forwarded to
the gateway system at 192.168.1.1. That system represents my router to the Internet. Here’s a
more complex routing table from a different network:
# route
Kernel IP routing table
Destination
Gateway
default
gateway
10.0.0.0
vpn.example.
10.10.135.0
0.0.0.0
Genmask
0.0.0.0
255.0.0.0
255.255.217.0
Flags
UG
U
U
Metric
600
50
50
Ref Use Iface
0
0 wlp3s0
0
0 tun0
0
0 tun0
347
14
Downloaded from https://onlinelibrary.wiley.com/doi/ by alex jounh - Oregon Health & Science Univer , Wiley Online Library on [05/12/2025]. See the Terms and Conditions (https://onlinelibrary.wiley.com/terms-and-conditions) on Wiley Online Library for rules of use; OA articles are governed by the applicable Creative Commons License
Chapter 14: Administering Networking
vpn.example.
172.17.0.0
192.168.1.0
gateway
0.0.0.0
*
255.255.255.255 UGH
255.255.0.0
U
255.255.255.0
U
600
0
600
0
0
0
0 wlp3s0
0 docker0
0 wlp3s0
In the route example just shown, there is a wireless interface (wlp3s0) as well as an interface
representing a virtual private network (VPN) tunnel. A VPN provides a way to have encrypted,
private communications between a client and a remote network over an insecure network
(such as the Internet). Here the tunnel goes from the local system over the wlan0 interface
to a host named vpn.example.com (some of the name is truncated).
All communication to the 192.168.1.0/24 network still goes directly over the wireless LAN.
However, packets destined for the 10.10.135.0/24 and 10.0.0.0/8 networks are routed directly
to vpn.example.com for communication with hosts on the other side of the VPN connection
over the tunneled interface (tun0).
A special route is set up for communications to containers (docker0) running on the local
system on network 172.17.0.0. All other packets go to the default route via the address
192.168.1.0. As for the flags shown in the output, a U says the route is up, a G identifies
the interface as a gateway, and an H says the target is a host (as is the case with the VPN
connection).
So far, I have shown you the routes to leave the local system. If you want to follow the
entire route to a host from beginning to end, you can use the traceroute command
(dnf install traceroute or sudo apt install inetutils-
traceroute). For
example, to trace the route a packet takes from your local system to the google.com site, type
the following traceroute command:
# traceroute google.com
traceroute to google.com (74.125.235.136), 30 hops max, 60 byte pkts
…
7 rrcs-
70-
62-
95-
197.midsouth.biz.rr.com (70.62.95.197) …
8 ge-
2-
1-
0.rlghncpop-
rtr1.southeast.rr.com (24.93.73.62) …
9 ae-
3-
0.cr0.dca10.tbone.rr.com (66.109.6.80) …
10 107.14.19.133 (107.14.19.133) 13.662 ms …
11 74.125.49.181 (74.125.49.181) 13.912 ms …
12 209.85.252.80 (209.85.252.80) 61.265 ms …
13 66.249.95.149 (66.249.95.149) 18.308 ms …
14 66.249.94.22 (66.249.94.22) 18.344 ms …
15 72.14.239.83 (72.14.239.83) 85.342 ms …
16 64.233.174.177 (64.233.174.177) 167.827 ms …
17 209.85.255.35 (209.85.255.35) 169.995 ms …
18 209.85.241.129 (209.85.241.129) 170.322 ms …
19 nrt19s11-
in-
f8.1e100.net (74.125.235.136) 169.360 ms …
I truncated some of the output to drop off some of the initial routes and the amount
of time (in milliseconds) that the packets were taking to traverse each route. Using
traceroute, you can see where the bottlenecks are along the way if your network communication is stalling.
348
Downloaded from https://onlinelibrary.wiley.com/doi/ by alex jounh - Oregon Health & Science Univer , Wiley Online Library on [05/12/2025]. See the Terms and Conditions (https://onlinelibrary.wiley.com/terms-and-conditions) on Wiley Online Library for rules of use; OA articles are governed by the applicable Creative Commons License
Part IV: Becoming a Linux Server Administrator
Viewing the host and domain names
To see the hostname assigned to the local system, type hostname. To just see the domain
portion of that name, use the dnsdomainname command:
# hostname
spike.example.com
# dnsdomainname
example.com
Configuring network interfaces
If you don’t want to have your network interfaces assigned automatically from a DHCP server
(or if there is no DHCP server), you can configure network interfaces manually. This can
include assigning IP addresses, the locations of DNS servers and gateway machines, and routes.
This basic information can be set up using NetworkManager.
Setting IP addresses manually
To change the network configuration for your wired network interface through GNOME
Settings, do the following:
1. Select the Settings icon from the drop-down menu in the upper-right corner of the
desktop and select Network.
2. Assuming you have a wired NIC that is not yet in use, select the settings button
(small gear icon) next to the interface that you want to change (mine was just
called wired).
3. Choose IPv4 and change the IPv4 Method setting from Automatic (DHCP) to Manual.
4. Fill in the following information (only Address and Netmask are required):
a. Address: The IP address you want to assign to your local network interface. For
example, 192.168.100.100.
b. Netmask: The subnetwork mask that defines which part of the IP address represents the network and which part identifies the host. For example, a netmask
of 255.255.255.0 would identify the network portion of the previous address as
192.168.100 and the host portion as 100.
c. Gateway: The IP address of the computer or device on the network that acts as the
default route. The default route will route packets from the local network to any
address that is not available on the local network or via some other custom route.
d. DNS servers: Fill in the IP addresses for the system providing DNS service to
your computer. If there is more than one DNS server, add the others in a comma-
separated list of servers.
5. Click the Apply button. The new information is saved, and the network is restarted
using the new information. Figure 14.5 shows an example of those network settings.
349
14
Downloaded from https://onlinelibrary.wiley.com/doi/ by alex jounh - Oregon Health & Science Univer , Wiley Online Library on [05/12/2025]. See the Terms and Conditions (https://onlinelibrary.wiley.com/terms-and-conditions) on Wiley Online Library for rules of use; OA articles are governed by the applicable Creative Commons License
Chapter 14: Administering Networking
FIGURE 14.5
Changing network settings with GNOME Settings.
Setting IP address aliases
You can attach multiple IP addresses to a single network interface. In the same screen previously used to configure a manual wired network interface, this is done by simply filling in a
subsequent Addresses box and adding the new IP address information. Here are a few things
you should know about adding address aliases:
■
■
■
A netmask is required for each address, but a gateway is not required.
The Apply button stays grayed out until you include valid information in
the fields.
The new address does not have to be on the same subnetwork as the original address,
although it is listening for traffic on the same physical network.
After adding the address 192.168.100.103 to my wired interface, running ip addr show
eno1 displays the following indication of the two IP addresses on the interface:
2: eno1: <BROADCAST,MULTICAST,UP,LOWER_UP> mtu 1500 qdisc fq_codel
state UP group default qlen 1000
link/ether 30:85:a9:04:9b:f9 brd ff:ff:ff:ff:ff:ff
inet 192.168.100.100/24 brd 192.168.100.255 scope
350
Downloaded from https://onlinelibrary.wiley.com/doi/ by alex jounh - Oregon Health & Science Univer , Wiley Online Library on [05/12/2025]. See the Terms and Conditions (https://onlinelibrary.wiley.com/terms-and-conditions) on Wiley Online Library for rules of use; OA articles are governed by the applicable Creative Commons License
Part IV: Becoming a Linux Server Administrator
global noprefixroute enp4s0
valid_lft forever preferred_lft forever
inet 192.168.100.103/24 brd 192.168.100.255 scope
global secondary noprefixroute enp4s0
valid_lft forever preferred_lft forever
For information on setting up aliases directly in configuration files, refer to the section
“Setting alias network interfaces” later in this chapter.
Setting routes
When you request a connection to an IP address, your system looks through your routing table
to determine the path on which to connect to that address. Information is sent in the form of
packets. A packet is routed in the following different ways, depending on its destination:
■
■
■
The local system is sent to the lo interface.
A system on your local network is directed through your NIC directly to the intended
recipient system’s NIC through the local network.
Any other system is sent to the gateway (router) that directs the packet on to its
intended address on the Internet.
Of course, what I have just described here is one of the simplest cases. You may, in fact, have
multiple NICs with multiple interfaces to different networks. You may also have multiple routers
on your local network that provide access to other private networks. For example, suppose you
have a router (or other system acting as a router) on your local network; you can add a custom
route to that router via the Network, Wired page. Using the NetworkManager example shown
previously, scroll down the page to view the Routes section. Then add the following information:
Address The network address of the subnetwork you route to. For example, if the router
(gateway) will provide you access to all systems on the 192.168.200 network, add the
address 192.168.200.0.
Netmask Add the netmask needed to identify the subnetwork. For example, if the
router provides access to the Class C address 192.168.200, you could use the netmask
255.255.255.0.
Gateway Add the IP address for the router (gateway) that provides access to the new
route. For example, if the router has an IP address on your 192.168.1 network of
192.168.1.199, add that address in this field.
Click Apply to apply the new routing information. You may have to restart the interface for
this to take effect (for example, ifup enp4s0). Enter route -n to make sure the new
routing information has been applied.
# route -n
Kernel IP routing table
Destination
Gateway
0.0.0.0
192.168.100.1
192.168.100.0
0.0.0.0
192.168.200.0
192.168.1.199
Genmask
0.0.0.0
255.255.255.0
255.255.255.0
Flags
UG
U
UG
Metric
1024
0
1
Ref Use Iface
0
0 p4p1
0
0 p4p1
0
0 p4p1
351
14
Downloaded from https://onlinelibrary.wiley.com/doi/ by alex jounh - Oregon Health & Science Univer , Wiley Online Library on [05/12/2025]. See the Terms and Conditions (https://onlinelibrary.wiley.com/terms-and-conditions) on Wiley Online Library for rules of use; OA articles are governed by the applicable Creative Commons License
Chapter 14: Administering Networking
In the example just shown, you can see that the default gateway is 192.168.100.1. However, any packets destined for the 192.168.200 network are routed through the gateway host
at IP address 192.168.1.199. Presumably that host has a network interface that faces the
192.168.200 network, and it is set up to allow other hosts to route through it to that network.
See the section “Setting custom routes” later in this chapter for information on how to set
routes directly in configuration files.
Configuring a network proxy connection
If your desktop system is running behind a corporate firewall, you might not have direct
access to the Internet. Instead, you might have to reach the Internet via a proxy server.
Instead of allowing you full access to the Internet, a proxy server lets you make requests only
for certain services outside of the local network. The proxy server then passes those requests
on to the Internet or another network.
Proxy servers typically provide access to web servers (http:// and https://) and FTP
servers (ftp://). However, a proxy server that supports SOCKS can provide a proxy service
for different protocols outside of the local network. (SOCKS is a network protocol made to allow
client computers to access the Internet through a firewall.) You can identify a proxy server in
the GNOME Settings Network page and have communications for selected protocols go through
that server (from the Settings window, select Network and then select Proxy).
Instead of identifying a proxy server to your network interfaces (via the Network page), you
can configure your browser to use a proxy server directly by changing your Firefox Settings to
use a proxy server. Here’s how to define a proxy server from the Firefox window:
1. From Firefox, type about:preference into the location bar. The Firefox Settings
window appears.
2. From the Firefox Settings window, scroll down to Network Settings and select Settings.
3. From the Connection Settings window that appears, you can try to autodetect the
proxy settings or, if you set the proxy in the Network page, you can choose to use
system proxy settings. You can also select Manual Proxy Configuration, fill in the following information, and click OK.
a. HTTP Proxy: The IP address of the computer providing the proxy service. This
causes all requests for web pages (http:// protocol) to be forwarded to the
proxy server.
b. Port: The port associated with the proxy service. By default, the port number is
3128, but it can differ.
c. Use this proxy server for all HTTPS: Select this box to use the same proxy server
and port associated with the HTTP proxy for HTTPS service requests. This causes
the HTTPS Proxy box to be grayed out. (Instead of selecting this box, you can set
HTTPS proxy services separately.)
352
Downloaded from https://onlinelibrary.wiley.com/doi/ by alex jounh - Oregon Health & Science Univer , Wiley Online Library on [05/12/2025]. See the Terms and Conditions (https://onlinelibrary.wiley.com/terms-and-conditions) on Wiley Online Library for rules of use; OA articles are governed by the applicable Creative Commons License
Part IV: Becoming a Linux Server Administrator
d. SOCKS Host: Using a SOCKS Host can help you get around firewall restrictions to
request restricted service. It can also protect remote systems from seeing your
IP address.
e. No Proxy for: Add the hostname or IP address for any system that you want to be
able to contact with Firefox directly without going through the proxy server. You
don’t need to add localhost and the local IP address (127.0.0.1) in this box, since
those addresses are already set not to redirect.
Figure 14.6 shows an example of the Configure Proxy Access to the Internet window filled in to
configure a connection to a proxy server located at IP address 192.168.1.1 for all protocols. After
you click OK, all requests from the Firefox browser to locations outside of the local system are
directed to the proxy server, which forwards those requests on to the appropriate server.
FIGURE 14.6
Setting up Firefox to use a proxy server.
14
353
Downloaded from https://onlinelibrary.wiley.com/doi/ by alex jounh - Oregon Health & Science Univer , Wiley Online Library on [05/12/2025]. See the Terms and Conditions (https://onlinelibrary.wiley.com/terms-and-conditions) on Wiley Online Library for rules of use; OA articles are governed by the applicable Creative Commons License
Chapter 14: Administering Networking
Configuring Networking from the Command Line
While NetworkManager does a great job of autodetecting wired networks or presenting you
with lists of wireless networks, sometimes you need to abandon the NetworkManager GUI and
commands or Cockpit to configure the features that you need. These are some of the networking features in Linux described in the coming sections:
Basic configuration: See how to use nmtui to configure basic networking with a menu-
based interface from a shell. This tool provides an intuitive interface for configuring
networking on servers that have no graphical interface for running GUI-based tools.
Configuration files: Understand configuration files associated with Linux networking and
how to configure them directly.
Ethernet channel bonding: Set up Ethernet channel bonding (multiple network cards
listening on the same IP address).
Configure networking with nmtui
Many servers don’t have graphical interfaces available. So, if you want to configure networking, you must be able to do so from the shell. One way to do that is to edit networking
configuration files directly. Another method is to use menu-based commands that let you press
arrow and Tab keys to navigate and forms you fill in to configure your network interface.
The nmtui command (for Fedora or RHEL: dnf install NetworkManager-
tui; for
Ubuntu, it should already be installed) provides a menu-based interface that runs in the shell.
As root, enter nmtui to see a screen similar to the one presented in Figure 14.7.
FIGURE 14.7
Configuring networking with NetworkManager TUI.
Use arrow keys and the Tab key to move around the interface. With the item you want to
select highlighted, press Enter to select it. The interface is limited to modifying the following
354
Downloaded from https://onlinelibrary.wiley.com/doi/ by alex jounh - Oregon Health & Science Univer , Wiley Online Library on [05/12/2025]. See the Terms and Conditions (https://onlinelibrary.wiley.com/terms-and-conditions) on Wiley Online Library for rules of use; OA articles are governed by the applicable Creative Commons License
Part IV: Becoming a Linux Server Administrator
kinds of information: edit or activate a connection (network interface cards), set system
hostname (hostname and DNS configuration), and turn the network interfaces on or off using
radio switches.
Editing a NetworkManager TUI connection
From the NetworkManager TUI screen displayed, here is how to edit an existing connection:
1. Edit a connection: With “Edit a connection” highlighted, press Enter. A list of network devices (usually wired or wireless Ethernet cards) is displayed, along with any
wireless networks to which you have connected in the past.
2. Network devices: Highlight one of the network devices (in my case, I chose a wired
Ethernet interface) and press Enter.
3. IPv4 Configuration: Move to the IPv4 Configuration show button and press Enter.
The Edit Connection window that appears lets you change information relating to the
selected network device.
4. Change to Manual: You can leave the Profile Name and Device fields as they are. By
default, Automatic is enabled. Automatic is what allows the network interface to come
up automatically on the network if a DHCP service is available. To enter address and
other information yourself, use the Tab key to highlight the Automatic field and press
the spacebar; then use the arrow keys to highlight Manual and press Enter.
5. Addresses: Now fill in the address information (IPv4 address). For example,
192.168.100.100.
6. Gateway: Type in the IP address for the computer or router that is supplying the
route to the Internet.
7. DNS servers: Type in the IP addresses of either one or two DNS servers to tell the
system where to go to translate hostnames you request into IP addresses.
8. Search domains: The Search Domains entries are used when you request a host from
an application without using a fully qualified domain name. For example, if you type
ping host1 with an example.com search path, the command would try to send
ping packets to host1.example.com.
9. Routing: You can set custom routes by highlighting Edit in the Routing field and
pressing Enter. Fill in the Destination/Prefix and Next Hop fields and click OK to save
the new custom route.
10. Other selections: Of the other selections on the screen, consider setting Never Use
This Network For Default Route if the network doesn’t connect to wider networks
and Ignore Automatically Obtained Routes if you don’t want those features to be set
automatically from the network. Figure 14.8 shows the screen after Manual has been
selected and the address information has been filled in.
Tab to the OK button and press the spacebar. Then click Quit to exit.
355
14
Downloaded from https://onlinelibrary.wiley.com/doi/ by alex jounh - Oregon Health & Science Univer , Wiley Online Library on [05/12/2025]. See the Terms and Conditions (https://onlinelibrary.wiley.com/terms-and-conditions) on Wiley Online Library for rules of use; OA articles are governed by the applicable Creative Commons License
Chapter 14: Administering Networking
FIGURE 14.8
Set static IP addresses by selecting Manual from the Edit Connection screen.
Understanding networking configuration files
As of Fedora 36, the /etc/sysconfig/network-scripts directory is no longer used by
NetworkManager to store network configuration files by default. Instead, Fedora, Ubuntu, and
most other Linux systems that use NetworkManager store wired and wireless network interfaces in keystore files in either the /etc/netplan or /etc/NetworkManager/
system-connections directory.
The following sections describe the format of NetworkManager connection files, as well as
other files that contain networking information for Linux systems.
NetworkManager connection files
Whether configured through a WIFI connection or by manually configuring a wired network
interface, NetworkManager stores that information in key/value pairs in files in either the
/etc/NetworkManager/system-connections directory or the /etc/netplan
directory.
Here is an example of a wireless connection file from the system-connections directory
on a Fedora system in .ini-style formatting:
[connection]
id=joenet-5G
uuid=645980f3-166d-446d-8516-1abe9e4c76e5
type=wifi
interface-name=wlp0s20f3
[wifi]
mode=infrastructure
ssid=joenet-5G
356
Downloaded from https://onlinelibrary.wiley.com/doi/ by alex jounh - Oregon Health & Science Univer , Wiley Online Library on [05/12/2025]. See the Terms and Conditions (https://onlinelibrary.wiley.com/terms-and-conditions) on Wiley Online Library for rules of use; OA articles are governed by the applicable Creative Commons License
Part IV: Becoming a Linux Server Administrator
[wifi-security]
auth-alg=open
key-mgmt=wpa-psk
psk=MyQoolPa$$word
[ipv4]
method=auto
[ipv6]
addr-gen-mode=default
method=auto
[proxy]
Here is an example of a wired connection file from the /etc/netplans directory on an
Ubuntu system in .yaml-style formatting:
network:
version: 2
ethernets:
NM-eb28103d-af3b-37fc-96a9-a8cb63475805:
renderer: NetworkManager
match:
name: "eno1"
addresses:
-"192.168.100.100/24"
nameservers:
addresses:
-192.168.100.101
dhcp6: true
ipv6-
address-
generation: "stable-
privacy"
wakeonlan: true
networkmanager:
uuid: "eb28103d-
af3b-
37fc-
96a9-
a8cb63475805"
name: "Wired connection 1"
passthrough:
connection.autoconnect-
priority: "-
999"
connection.timestamp: "1697324723"
ethernet._: ""
ipv4.address1: "192.168.100.100/24,192.168.1.21"
ipv4.method: "manual"
ipv6.ip6-
privacy: "-
1"
proxy._: ""
14
/etc/hosts file
Before DNS was created, translating hostnames to IP addresses was done by passing around
a single hosts file. While there were only a few dozen and then a few hundred hosts on the
357
Downloaded from https://onlinelibrary.wiley.com/doi/ by alex jounh - Oregon Health & Science Univer , Wiley Online Library on [05/12/2025]. See the Terms and Conditions (https://onlinelibrary.wiley.com/terms-and-conditions) on Wiley Online Library for rules of use; OA articles are governed by the applicable Creative Commons License
Chapter 14: Administering Networking
Internet, this approach worked pretty well. But as the Internet grew, the single hosts file
became unscalable and DNS was invented.
The /etc/hosts file still exists on Linux systems. It can still be used to map IP addresses
to hostnames. The /etc/hosts file is a way to set up names and addresses for a small
local network or just create aliases to make it easier to access the systems that you use
all the time.
Here’s an example of an /etc/hosts file:
127.0.0.1 localhost localhost.localdomain
::1
localhost localhost.localdomain
192.168.0.201 node1.example.com node1 joe
192.168.0.202 node2.example.com node2 sally
The first two lines (127.0.0.1 and ::1) set addresses for the local system. The IPv4 address
for the local host is 127.0.0.1; the IPv6 address for the local host is ::1. There are also
entries for two IP addresses. You could reach the first IP address (192.168.0.201) by the names
node1.example.com, node1, or joe. For example, typing ping joe results in packets being
sent to 192.168.0.201.
/etc/resolv.conf file
DNS servers and search domains are set in the /etc/resolv.conf file. If NetworkManager is enabled and running, you should not edit this file directly. Using DNS?= entries from
ifcfg-* files, NetworkManager overwrites the /etc/resolv.conf file so that you would
lose any entries you add to that file. Here’s an example of the /etc/resolv.conf file that
was modified by NetworkManager:
# Generated by NetworkManager
nameserver 192.168.0.2
nameserver 192.168.0.3
Each nameserver entry identifies the IP address of a DNS server. The order defines the order
in which the DNS servers are checked. It’s normal to have two or three nameserver entries,
in case the first is not available. More than that and it can take too long for an unresolvable
hostname to get checked for each server.
Another type of entry that you can add to this file is a search entry. A search entry lets you
indicate domains to be searched when a hostname is requested by its base name instead of its
entire fully qualified domain name. You can have multiple search entries by identifying one or
more domain names after the search keyword, as in this example:
search example.com example.org example.net
The search options are separated by spaces or tabs.
/etc/nsswitch.conf
Settings in the /etc/nsswitch.conf file determine how the system looks for different
pieces of information in different kinds of files and databases. This includes hosts, networks,
358
Downloaded from https://onlinelibrary.wiley.com/doi/ by alex jounh - Oregon Health & Science Univer , Wiley Online Library on [05/12/2025]. See the Terms and Conditions (https://onlinelibrary.wiley.com/terms-and-conditions) on Wiley Online Library for rules of use; OA articles are governed by the applicable Creative Commons License
Part IV: Becoming a Linux Server Administrator
protocols, services, and other types of information. For example, this is how the hosts entry in
the /etc/nsswitch.conf file appears in Fedora:
hosts: files myhostname mdns4_minimal [NOTFOUND=return]
resolve [!UNAVAIL=return] dns
For example, hostname resolution is done first by searching the local /etc/hosts file
(files) and then by resolving its full-qualified domain name (myhostname). Next,
it tries to find the hostname (mdns4_minimal). If the hostname is not found
( [NOTFOUND=return]), the lookup fails and returns an error, which prevents it from doing
a DNS lookup. It then tries to find DNS resolvers listed in the /etc/resolv.conf file and
fails if they are unavailable ([UNAVAIL=return]). Finally, if the hostname resolution can
find the remote DNS servers, it will check those servers for the hostname.
You can add other locations, such as Network Information Service (nis or nisplus) databases, for querying hostname-to-IP-address resolution. You can also change the order in which
the different services are queried. You can check that hostname-to-IP-address resolution is
working properly using different commands.
If you want to check that your DNS servers are being queried properly, you can use the host
or dig commands, as in, for example:
$ host redhat.com
redhat.com has address 34.235.198.240
redhat.com has address 52.200.142.250
redhat.com mail is handled by 10 us-
smtp-
inbound-
2.mimecast.com.
redhat.com mail is handled by 10 us-
smtp-
inbound-
1.mimecast.com.
$ dig redhat.com
<<>> DiG 9.18.30-
0ubuntu0.24.04.2-
Ubuntu <<>> redhat.com
;; global options: +cmd
;; Got answer:
;; -
>>HEADER<<-opcode: QUERY, status: NOERROR, id: 17631
;; flags: qr rd ra; QUERY: 1, ANSWER: 2, AUTHORITY: 0, ADDITIONAL: 1
14
;; OPT PSEUDOSECTION:
; EDNS: version: 0, flags:; udp: 65494
;; QUESTION SECTION:
;redhat.com.
IN
A
;; ANSWER SECTION:
redhat.com.
redhat.com.
;;
;;
;;
;;
3331
3331
IN
IN
A
A
52.200.142.250
34.235.198.240
Query time: 0 msec
SERVER: 127.0.0.53#53(127.0.0.53) (UDP)
WHEN: Sat Jun 07 18:09:07 EDT 2025
MSG SIZE rcvd: 71
359
Downloaded from https://onlinelibrary.wiley.com/doi/ by alex jounh - Oregon Health & Science Univer , Wiley Online Library on [05/12/2025]. See the Terms and Conditions (https://onlinelibrary.wiley.com/terms-and-conditions) on Wiley Online Library for rules of use; OA articles are governed by the applicable Creative Commons License
Chapter 14: Administering Networking
By default, the host command produces simpler output for DNS queries. It shows the IP
address for redhat.com and the names of the mail servers (MX records) that serve redhat
.com. The dig command shows information similar to what appears in the files that hold
DNS records. The QUESTION SECTION part of the output shows that the address section
asked for the address of redhat.com and the ANSWER SECTION part showed the answer
(52.200.142.250 and 34.235.198.240). You can also see the address of the DNS
server that was queried.
The host and dig commands are used only to query DNS servers. They don’t check the
nsswitch.conf file to find other places to query, such as the local hosts file. For that, you
would have to use the getent command:
# getent hosts node1
192.168.0.201 node1
This getent example finds a host named node1 that was entered into my local /etc/hosts
file. The getent command can be used to query any information set up in the
nsswitch.conf file. For example, typing getent passwd root shows the entry for
the root user account in the local file, but it can also query a remote LDAP database for user
information if you have configured that feature, as described in Chapter 11, “Managing User
Accounts.”
Setting alias network interfaces
Sometimes you might want your network interface card listening on multiple IP addresses. For
example, if you were setting up a web server that was serving secure content (https) for multiple domains (example.com, example.org, and so on), each domain would require a separate
IP address (associated with a separate certificate). In that case, instead of adding multiple network interface cards to the computer, you could simply create multiple aliases on a single NIC.
If, for example, you wanted to have three IPv4 addresses for your first wired NIC card in
Fedora, look in the /etc/NetworkManager/system-connections directory for a file
named something like Wired connection 1.nmconnection. Then add address1,
address2, and address3 entries similar to the following (depending on the IPv4 addresses
you wanted to add):
[connection]
id=Wired connection 1
uuid=7b0eb73e-61fe-38a9-aaeb-ef19010fdb75
type=ethernet
autoconnect-priority=-999
interface-name=eno1
[ethernet]
[ipv4]
address1=192.168.1.195/24
address2=192.168.1.196/24
360
Downloaded from https://onlinelibrary.wiley.com/doi/ by alex jounh - Oregon Health & Science Univer , Wiley Online Library on [05/12/2025]. See the Terms and Conditions (https://onlinelibrary.wiley.com/terms-and-conditions) on Wiley Online Library for rules of use; OA articles are governed by the applicable Creative Commons License
Part IV: Becoming a Linux Server Administrator
address3=192.168.1.197/24
...
In Ubuntu, find the file with the “Wired connection 1” name in the /etc/netplan
directory:
$ sudo grep "Wired" /etc/netplan/*
/etc/netplan/90-
NM-
eb28103d-
af3b-
*.yaml:
name: "Wired connection 1"
Then edit that file so that the following three IPv4 addresses appear under the addresses line:
network:
version: 2
ethernets:
NM-eb28103d-af3b-37fc-96a9-a8cb63475805:
renderer: NetworkManager
match:
name: "eno1"
addresses:
-"192.168.1.195/24
-"192.168.1.196/24
-"192.168.1.197/24
...
name: "Wired connection 1"
...
After you have changed the connection files, restart NetworkManager as follows for those
changes to take effect:
# systemctl restart NetworkManager
Setting up Ethernet channel bonding
Ethernet channel bonding allows you to have more than one network interface card on a computer associated with a single IP address. There are several reasons you might want to do this:
High availability Multiple NICs on the same IP address can ensure that if one subnet
goes down or one NIC breaks, the address can still be reached on a NIC connected to
another subnet.
Performance If there is too much network traffic to be handled by one NIC, you can
spread that traffic across multiple NICs.
Depending on the type of bonding that you want to do, you can set your bonding interface to
different modes. Here we set the mode to balance-rr, which is a round-robin policy that
enables fault tolerance and load balancing between the interfaces we later add to that bond.
The name of the bond is bond0.
$ sudo nmcli con add type bond con-
name bond0 \
ifname bond0 mode balance-
rr
361
14
Downloaded from https://onlinelibrary.wiley.com/doi/ by alex jounh - Oregon Health & Science Univer , Wiley Online Library on [05/12/2025]. See the Terms and Conditions (https://onlinelibrary.wiley.com/terms-and-conditions) on Wiley Online Library for rules of use; OA articles are governed by the applicable Creative Commons License
Chapter 14: Administering Networking
Next, add the IP address that you want to bond to listen for. For example, to set the IPv4
address to 192.168.100.10 on bond0, type:
$ nmcli con mod bond0 ipv4.method manual ipv4.addr 192.168.
100.10/24
After that, you need to configure the network interface cards that you want to use with the
bond0 bond. For example, if you have two wired Ethernet cards on your computer, you configure them as you would normally, with the exception that you don’t want to add IP addresses
directly to those interfaces. Instead, add both wired interfaces to the bond. Here are examples
of adding the eno1 and eno2 interfaces to the bond0 bond:
$ nmcli con add type ethernet
slave-
type bond master
$ nmcli con add type ethernet
slave-
type bond master
con-
name eno1-
bond \
bond0 ifname eno1
con-
name eno2-
bond \
bond0 ifname eno2
The last thing that you want to do is to make sure that the bond0 interface is set to use the
bonding module. To do that, create an /etc/modprobe.d/bonding.conf file that contains the following entry:
alias bond0 bonding
To have the new interfaces take effect, restart NetworkManager:
$ sudo systemctl restart NetworkManager
Configuring Networking in the Enterprise
So far, the network configuration described in this chapter has centered on setting up single
systems to connect to a network. Features available in Linux can go well beyond that by providing software that supports the actual network infrastructure needed by host computers to
communicate.
The following sections introduce you to a few of the network infrastructure types of services available in Linux. Full implementation of these features is beyond the scope of
this book, but know that if you find yourself needing to manage network infrastructure
features, the following sections will give you a sense of how those features are implemented in Linux.
Configuring Linux as a router
If you have more than one network interface on a computer (typically two or more NICs),
you can configure Linux as a router. To make this happen, all that is needed is a change to
one kernel parameter that allows packet forwarding. To turn on the ip_forward parameter
immediately and temporarily, enter the following as root:
# cat /proc/sys/net/ipv4/ip_forward
0
# echo 1> /proc/sys/net/ipv4/ip_forward
362
Downloaded from https://onlinelibrary.wiley.com/doi/ by alex jounh - Oregon Health & Science Univer , Wiley Online Library on [05/12/2025]. See the Terms and Conditions (https://onlinelibrary.wiley.com/terms-and-conditions) on Wiley Online Library for rules of use; OA articles are governed by the applicable Creative Commons License
Part IV: Becoming a Linux Server Administrator
# cat /proc/sys/net/ipv4/ip_forward
1
Packet forwarding (routing) is disabled on many Linux systems by default, with the value of
ip_forward set to 0. By setting it to 1, packet forwarding is immediately enabled. To make
this change permanent, you must add that value to the /etc/sysctl.conf file so that it
appears as follows:
net.ipv4.ip_forward = 1
With that file modified as shown, each time the system reboots, the value for ip_forward
is reset to 1. (Notice that net.ipv4.ip_forward reflects the actual location of the
ip_forward file, minus /proc/sys, and with dots replacing slashes. You can change any
kernel parameters set in the /proc/sys directory structure in this way.)
When a Linux system is used as a router, it is often used as a firewall between a private
network and a public network, such as the Internet. If that is the case, you might also
want to use that same system as a firewall that does network address translation (NAT)
and provides DHCP service, so the systems on the private network can route through the
Linux system using private IP addresses. (See Chapter 26, “Securing Linux on a Network,”
for information on working with Linux firewall rules using the firewalld and ufw
facility.)
Configuring Linux as a DHCP server
Not only can a Linux system use a DHCP server to get its IP address and other information,
it can also be configured to act as a DHCP server. In its most basic form, a DHCP server can
hand out IP addresses from a pool of addresses to any system that requests an IP address.
Usually, however, the DHCP server also distributes the locations of DNS servers and the
default gateway.
Configuring a DHCP server is not something that should be done without some thought. Don’t
add a DHCP server on a network that is not under your control and that already has a working
DHCP server. Many clients are set up to get address information from any DHCP server that will
hand it out.
The DHCP service is provided by the dhcp-server package in Fedora and RHEL or
isc-dhcp-server in Ubuntu. The service is named dhcpd or isc-dhcp-server, respectively. The primary configuration file is /etc/dhcp/dhcpd.conf for IPv4 networks (there
is a dhcpd6.conf file in the same directory to provide DHCP service for IPv6 networks). By
default, the dhcpd daemon listens on UDP port 67, so remember to keep that port open on
your firewall.
To configure a DHCP server in Fedora, you could copy the dhcpd.conf.example file from the
/usr/share/doc/dhcp-server directory and replace the /etc/dhcp/dhcpd.conf
file. Then modify it as you like. Before using that file, however, you want to change the
domain-name options to reflect your domain and IP address ranges to suit those you are using.
The comments in the file will help you do this.
363
14
Downloaded from https://onlinelibrary.wiley.com/doi/ by alex jounh - Oregon Health & Science Univer , Wiley Online Library on [05/12/2025]. See the Terms and Conditions (https://onlinelibrary.wiley.com/terms-and-conditions) on Wiley Online Library for rules of use; OA articles are governed by the applicable Creative Commons License
Chapter 14: Administering Networking
When you install some virtualization and cloud services on a Linux system, a DHCP server is
set up by default for you within that system. For example, when you install KVM and start
the libvirtd service in RHEL or Fedora, it automatically configures a default private network in the 192.168.122.0/24 address range. When you launch virtual machines, they are
given IP addresses in that range. When you install and start the Docker service on those Linux
distributions, it likewise sets up a private network and hands out IP addresses to Docker containers launched on that system.
Configuring Linux as a DNS server
In Linux, most professional Domain Name System (DNS) servers are implemented using the
Berkeley Internet Name Domain (BIND) service. This is implemented in Fedora and RHEL by
installing the bind, bind-utils, and bind-libs packages. For added security, some
people install the bind-chroot package. In Ubuntu, you can install the bind9 package.
By default, bind is configured by editing the /etc/named.conf (Fedora or RHEL) or
/etc/bind/named.conf (Ubuntu) file. Hostname-to-IP-address mapping is done in zone
files located in the /var/named (Fedora or RHEL) or /etc/bind/ directory. If you install
the bind-chroot package in Fedora or RHEL, bind configuration files are moved under the
/var/named/chroot directory, which attempts to replicate the files from /etc and /var
that are needed to configure bind so that the named daemon (which provides the service) is
confined to the /etc/named/chroot directory structure.
If you are interested in trying out bind, I recommend you first try it out by configuring
DNS for a small home network behind a firewall as a way to make it easier for the people in
your household to communicate with each other. You can lock down the IP addresses of the
machines in your home by attaching MAC addresses of each computer’s network interface card
to specific IP addresses on a DHCP server and then mapping those names to addresses in a DNS
server. You can also use a DNS server to just do caching, which can speed up DNS lookups for
the clients that use it.
Caution
Before you create a public DNS server, keep in mind that it is important to secure your DNS server properly. A cracked
public DNS server can be used to redirect traffic to any server the bad guys choose. So, if you are using that server, you
are in danger of being presented with sites that are not the sites you think they are.
Configuring Linux as a proxy server
A proxy server provides a means of restricting network traffic from a private network to a
public one, such as the Internet. Such servers provide an excellent way to lock down a computer lab at a school or restrict websites that employees can visit from work.
By physically setting up Linux as a router but configuring it as a proxy server, all of the systems on your home or business network can be configured to access the Internet using only
certain protocols and only after you filter the traffic.
364
Downloaded from https://onlinelibrary.wiley.com/doi/ by alex jounh - Oregon Health & Science Univer , Wiley Online Library on [05/12/2025]. See the Terms and Conditions (https://onlinelibrary.wiley.com/terms-and-conditions) on Wiley Online Library for rules of use; OA articles are governed by the applicable Creative Commons License
Part IV: Becoming a Linux Server Administrator
Using the Squid Proxy Server, which comes with most Linux systems (squid package in
Ubuntu, Fedora, and RHEL), you can enable the system to accept requests to web servers (HTTP
and HTTPS), file servers (FTP), and other protocols. You can restrict which systems can use
your proxy server (by hostname or IP address) and even limit which sites they can visit (by
specific address, range of addresses, hostname, or domain names).
Configuring a squid proxy server can be as simple as installing the squid package, editing
the /etc/squid/squid.conf file, and starting the squid service. The file comes with a
recommended minimal configuration. However, you might want to define the hosts (based on
IP address or name) that you want to allow to use the service. There are blacklists available
with squid that allow you to deny access to whole sets of sites that might be inappropriate
for children to visit.
Summary
Most network connections from a Linux desktop or laptop system can be made with little or
no user intervention. If you use NetworkManager over a wired or wireless Ethernet connection, address and server information needed to start up can be automatically obtained from a
DHCP server.
With NetworkManager’s graphical interface, you can do some network configuration, if you
like. You can set static IP addresses and select the name server and gateway computers to use.
To do more manual and complex network configuration, consider working more directly with
network configuration files.
Network configuration files in Linux can be used to set up more advanced features such as Ethernet channel bonding.
Beyond the basics of network connectivity in Linux, features are available that enable you to
provide network infrastructure types of services. This chapter introduced services and features
such as routing, DHCP, and DNS that you need to know when working with more advanced networking features in Linux.
With your networking configured, you can now begin configuring services to run over your
networks. Chapter 15, “Starting and Stopping Services,” describes the tools that you need to
enable, disable, start, stop, and check the status of the services that are configured for your
Linux system.
Exercises
The exercises in this section help you to examine and change the network interfaces on your
Linux system as well as understand how to configure more advanced networking features. Start
these exercises on a Linux system that has an active network connection but that is not in the
middle of some critical network activity.
365
14
Downloaded from https://onlinelibrary.wiley.com/doi/ by alex jounh - Oregon Health & Science Univer , Wiley Online Library on [05/12/2025]. See the Terms and Conditions (https://onlinelibrary.wiley.com/terms-and-conditions) on Wiley Online Library for rules of use; OA articles are governed by the applicable Creative Commons License
Chapter 14: Administering Networking
I recommend that you do these exercises directly from your computer console (in other words,
don’t ssh into the computer to do them). Some of the commands that you run may interrupt
your network connectivity, and some of the configuration you do, if you make a mistake, can
result in your computer being temporarily unavailable from the network.
There are often multiple ways to complete the tasks described in these exercises. If you are
stuck, refer to the task solutions that are provided in Appendix B.
1. Use the desktop to check that NetworkManager has successfully started your network
interface (wired or wireless) to the network. If it has not, then try to start your network interface.
2. Run a command to check the active network interfaces available on your computer.
3. Try to contact google.com from the command line in a way that ensures that DNS is
working properly.
4. Run a command to check the routes being used to communicate outside of your
local network.
5. Trace the route being taken to connect to google.com.
6. View the network activity of your Linux system from the Cockpit web user interface.
7. Create a host entry that allows you to communicate with your local host system using
the name myownhost.
8. Determine the addresses of the DNS name servers that are being used to resolve hostnames to IP addresses on your system, then check which is queried from your system
to find the IP address for google.com.
9. Create a custom route that directs traffic destined for the 192.168.99.0/24 network
to some IP address on your local network, such as 192.168.0.5 (first ensuring that the
192.168.99 network is not being used at your location).
10. Check to see if your system has been configured to allow IPv4 packets to be routed
between network interfaces on your system.
366
Downloaded from https://onlinelibrary.wiley.com/doi/ by alex jounh - Oregon Health & Science Univer , Wiley Online Library on [05/12/2025]. See the Terms and Conditions (https://onlinelibrary.wiley.com/terms-and-conditions) on Wiley Online Library for rules of use; OA articles are governed by the applicable Creative Commons License
Part IV: Becoming a Linux Server Administrator
15
Starting and Stopping Services
IN THIS CHAPTER
Understanding the various Linux init services
Auditing Linux daemon-controlled services
Stopping and starting services
Changing the Linux server’s default runlevel
Removing services
T
he primary job of a Linux server system is to offer services to local or remote users. A server can
provide access to web pages, files, database information, streaming music, or other types of content. Name servers can provide access to lists of host computer or usernames. Hundreds of these
and other types of services can be configured on your Linux systems.
Ongoing services offered by a Linux system, such as access to a printer service or login service, are typically implemented by what is referred to as a daemon process. Most Linux systems have a method of
managing each daemon process as a service using one of several popular initialization systems (also
referred to as init systems). Advantages of using init systems include the ability to do the following:
Identify runlevels: Put together sets of services in what are referred to as runlevels or targets.
Establish dependencies: Set service dependencies, so, for example, a service that requires
network interfaces won’t start until all network startup services have started successfully.
Set the default runlevel: Select which runlevel or target starts up when the system boots
(a default runlevel).
Manage services: Run commands that tell individual services to start, stop, pause, restart, or
even reload configuration files.
While there are several different init systems are in use with Linux systems today, the predominant
one is Systemd. Systemd is used in Fedora, Red Hat Enterprise Linux, Ubuntu, and many other Linux
367
Linux Bible, Eleventh Edition. Christopher Negus.
© 2026 John Wiley & Sons, Inc. All rights reserved, including rights for text and data mining and training of artificial intelligence technologies or similar
technologies. Published 2026 by John Wiley & Sons, Inc.
Downloaded from https://onlinelibrary.wiley.com/doi/ by alex jounh - Oregon Health & Science Univer , Wiley Online Library on [05/12/2025]. See the Terms and Conditions (https://onlinelibrary.wiley.com/terms-and-conditions) on Wiley Online Library for rules of use; OA articles are governed by the applicable Creative Commons License
CHAPTER
distributions. Its most popular predecessor was SysVinit. Here’s a brief introduction to those two
init system:
SysVinit: This traditional init system was created for UNIX System V systems in the early
1980s. It offers an easy-to-understand method of starting and stopping services based
on runlevel. Most UNIX and Linux systems up until a decade or two ago used SysVinit.
Systemd: Fedora, RHEL, and Ubuntu adopted the systemd init system more than a decade ago. It is the most complex of the init systems, but it also offers much more flexibility. Systemd offers not only features for starting and working with services but
also lets you manage sockets, devices, mount points, swap areas, and other unit types.
This chapter primarily describes the systemd init system. However, because some features
of SysVinit are still supported in systemd, SysVinit is covered to some extent as well.
In the process of using the systemd init system, you learn how the boot process works to
start services, how you can start and stop services individually, and how you enable and disable services.
Understanding the Initialization Daemon
To understand service management, you need to understand the initialization daemon. The
initialization daemon can be thought of as the “mother of all processes.” This daemon is the
first process to be started by the kernel on the Linux server. For Linux distributions that
use SysVinit, the init daemon is literally named init. For systemd, the init daemon is
named systemd.
The Linux kernel has a process ID (PID) of 0. Thus, the initialization process (init or
systemd) daemon has a parent process ID (PPID) of 0, and a PID of 1. Once started, init is
responsible for spawning (launching) processes configured to be started at the server’s boot
time, such as the login shell. It is also responsible for managing services.
The classic SysVinit init daemons worked without problems for many years. However, these
daemons were created to work within a static environment. As new hardware, such as USB
devices, came along, the classic init daemons had trouble dealing with these and other hot-
plug devices. Computer hardware had changed from static to event based. New init daemons
were needed to deal with these fluid environments.
In addition, as new services came along, the classic init daemons had to deal with starting
more and more services. Thus, the entire system initialization process was less efficient and
ultimately slower. Because starting services was done in a static order, all subsequent services
had to wait to start if any prior service stalled.
The modern initialization daemons have tried to solve the problems of inefficient system boots
and non-static environments. The most popular of the new initialization daemons is systemd.
Ubuntu, RHEL, and Fedora distributions have made the move to the systemd daemon while
maintaining backward compatibility to the classic SysVinit, Upstart, or BSD init daemons.
368
Downloaded from https://onlinelibrary.wiley.com/doi/ by alex jounh - Oregon Health & Science Univer , Wiley Online Library on [05/12/2025]. See the Terms and Conditions (https://onlinelibrary.wiley.com/terms-and-conditions) on Wiley Online Library for rules of use; OA articles are governed by the applicable Creative Commons License
Part IV: Becoming a Linux Server Administrator
The systemd daemon, explained at http://docs.fedoraproject.org/en-US/quick-docs/
understanding-and-administering-systemd, was written primarily by Lennart Poettering, a
Red Hat developer. It is currently used by all of the latest versions of Fedora, RHEL, OpenSUSE,
and Ubuntu. Running ps -e can immediately tell you if yours is a systemd system:
# ps -
e | head
PID TTY
TIME CMD
1 ?
00:04:36 /usr/lib/systemd/system…
2 ?
00:00:03 [kthreadd]
3 ?
00:00:15 [pool_workqueue_release]
It is possible that PID 1 will appear as the init process. For example:
# ps -
ef | head
UID
PID PPID
root
1
0
root
2
0
root
3
2
C
0
0
0
STIME
08:13
08:13
08:13
TTY
?
?
?
TIME
00:00:02
00:00:00
00:00:00
CMD
/sbin/init splash
[kthreadd]
[pool_workqueue_release]
In this case, you can check and see that the init process might actually just be a symbolic link
to systemd:
# ls -
ls /sbin/init
0 lrwxrwxrwx 1 root root 22 Aug
systemd/systemd
8 10:51 /sbin/init -
> ../lib/
Understanding systemd initialization
The systemd initialization daemon is the newer replacement for the SysVinit and the Upstart
init daemons. This modern initialization daemon was introduced in Ubuntu 14.10, Fedora
15, and RHEL 7, and it is still in use today. It is backward compatible with both SysVinit and
Upstart. System initialization time is reduced by systemd because it can start services in a
parallel manner. With SysVinit, services were run in a fixed order, so if one service got stuck,
subsequent services would have to wait to start up (even if they had no dependencies on the
service that was stuck).
Learning systemd basics
With the SysVinit daemon, services are stopped and started based upon runlevels. The
systemd service is concerned with runlevels, but it implements them in a different way with
what are called target units. Although the main job of systemd is to start and stop services,
it can manage other types of things referred to as units. A unit is a group consisting of a
name, type, and configuration file, and it is focused on a particular service or action. There are
12 systemd unit types:
■
■
■
15
automount
device
mount
369
Downloaded from https://onlinelibrary.wiley.com/doi/ by alex jounh - Oregon Health & Science Univer , Wiley Online Library on [05/12/2025]. See the Terms and Conditions (https://onlinelibrary.wiley.com/terms-and-conditions) on Wiley Online Library for rules of use; OA articles are governed by the applicable Creative Commons License
Chapter 15: Starting and Stopping Services
■
■
■
■
■
■
■
■
■
path
service
snapshot
socket
target
timer
swap
slice
scope
The two primary systemd units with which you need to be concerned for dealing with services are service units and target units. A service unit is for managing daemons on your Linux
server. A target unit is simply a group of other units.
The example that follows shows several systemd service units and target units. The service
units have familiar daemon names, such as cups and sshd. Note that each service unit name
ends with .service. The target units shown have names like sysinit. (sysinit is used
for starting up services at system initialization.) The target unit names end with .target.
# systemctl list-
units | grep .service
…
alsa-
restore.service loaded active exited
State
apparmor.service
loaded active exited
bluetooth.service
loaded active running
...
cups.service
loaded active running
dbus.service
loaded active running
docker.service
loaded active running
...
ufw.service
loaded active exited
...
Save/Restore Sound Card
Load AppArmor profiles
Bluetooth service
CUPS Scheduler
D-
Bus System Message Bus
Docker Container Engine
Uncomplicated firewall
The Linux system unit configuration files are located in the /lib/systemd/system and
/etc/systemd/system directories. You could use the ls command to look through those
directories, but the preferred method is to use an option on the systemctl command. It
shows how the service is set when the service is installed (PRESET) and how it is set currently (STATE):
# systemctl list-unit-files --type=service
UNIT FILE
accounts-
daemon.service
alsa-
restore.service
alsa-
state.service
alsa-
utils.service
anacron.service
apparmor.service
apport-
autoreport.service
370
STATE
enabled
static
static
masked
enabled
enabled
static
PRESET
enabled
-
-
enabled
enabled
enabled
-
Downloaded from https://onlinelibrary.wiley.com/doi/ by alex jounh - Oregon Health & Science Univer , Wiley Online Library on [05/12/2025]. See the Terms and Conditions (https://onlinelibrary.wiley.com/terms-and-conditions) on Wiley Online Library for rules of use; OA articles are governed by the applicable Creative Commons License
Part IV: Becoming a Linux Server Administrator
apport-
coredump-
hook@.service
apport-
forward@.service
apport.service
apt-
daily-
upgrade.service
apt-
daily.service
apt-
news.service
autovt@.service
avahi-
daemon.service
blk-
availability.service
bluetooth.service
…
287 unit files listed.
static
static
enabled
static
static
static
alias
enabled
enabled
enabled
-
-
enabled
-
-
-
-
enabled
enabled
enabled
The unit configuration files shown in the preceding code are all associated with a service unit.
Configuration files for target units can be displayed via the following method:
# systemctl list-unit-files --type=target
UNIT FILE
STATE
PRESET
basic.target
static
-
blockdev@.target
static
-
bluetooth.target
static
-
boot-
complete.target
static
-
cloud-
config.target
static
-
cloud-
init.target
static
-
cryptsetup-
pre.target
static
-
cryptsetup.target
static
-
ctrl-
alt-
del.target
alias
-
default.target
alias
-
emergency.target
static
-
exit.target
disabled disabled
factory-
reset.target
static
-
final.target
static
-
first-
boot-
complete.target
static
-
friendly-
recovery.target
static
-
getty-
pre.target
static
-
getty.target
static
-
graphical.target
static
-
halt.target
disabled disabled
remote-
fs.target
enabled enabled
...
81 unit files listed.
Notice that both of the configuration units’ file examples display units with a status of static,
enabled, disabled, or alias. The enabled status means that the unit is currently enabled. The
disabled status means that the unit is currently disabled. The next status, static, is slightly
confusing. It stands for “statically enabled,” and it means that the unit is enabled by default
and cannot be disabled, even by root (although it could still be started manually). As for
alias, it means that the service name is an alias (symbolic link) to another name. For example,
ctrl-alt-del.target is an alias for reboot.target.
371
15
Downloaded from https://onlinelibrary.wiley.com/doi/ by alex jounh - Oregon Health & Science Univer , Wiley Online Library on [05/12/2025]. See the Terms and Conditions (https://onlinelibrary.wiley.com/terms-and-conditions) on Wiley Online Library for rules of use; OA articles are governed by the applicable Creative Commons License
Chapter 15: Starting and Stopping Services
The service unit configuration files contain lots of information, such as what other services must
be started, when this service can be started, which environmental file to use, and so on. The following example shows the ssh service for the sshd daemon’s unit configuration file in Fedora:
# cat /lib/systemd/system/sshd.service
[Unit]
Description=OpenSSH server daemon
Documentation=man:sshd(8) man:sshd_config(5)
After=network.target sshd-keygen.target
Wants=sshd-keygen.target
# Migration for Fedora 38 change to remove group ownership for host
keys
# See https://fedoraproject.org/wiki/Changes/SSHKeySignSuidBit
Wants=ssh-host-keys-migration.service
[Service]
Type=notify
# Set option as empty variable to suppress warnings upon expanding
the
# command line when the config file under /etc does not exist or is
empty.
Environment=OPTIONS=
EnvironmentFile=-/etc/sysconfig/sshd
ExecStart=/usr/sbin/sshd -
D $OPTIONS
ExecReload=/bin/kill -
HUP $MAINPID
KillMode=process
Restart=on-failure
RestartSec=42s
[Install]
WantedBy=multi-user.target
This basic service unit configuration file includes the following options:
Description: A free-form description (comment line) of the service.
Documentation: Lists man pages for the sshd daemon and configuration file.
After: Configures ordering. In other words, it lists which units should be activated
before this service is started.
Environment File: The service’s configuration files.
ExecStart: The command used to start this service.
ExecReload: The command used to reload this service.
WantedBy: The target unit to which this service belongs.
Notice that the target unit, multi-user.target, is used in the ssh service unit configuration file. The ssh service unit is wanted by the multi-user.target. In other words,
when the multi-user.target unit is activated, the ssh service unit is started.
372
Downloaded from https://onlinelibrary.wiley.com/doi/ by alex jounh - Oregon Health & Science Univer , Wiley Online Library on [05/12/2025]. See the Terms and Conditions (https://onlinelibrary.wiley.com/terms-and-conditions) on Wiley Online Library for rules of use; OA articles are governed by the applicable Creative Commons License
Part IV: Becoming a Linux Server Administrator
You can view the various units that a target unit will activate by using the following command:
# systemctl show -
-
property "Wants" multi-
user.target
Wants=systemd-user-sessions.service thermald.service sssd.service
ssh.service mcelog.service abrt-
xorg.service vboxservice.service
vmtoolsd.service…
(END) q
Unfortunately, the systemctl command does not format the output for this well. It literally
runs off the right edge of the screen so you cannot see the full results. Also, you must enter q
to return to the command prompt. To fix this problem, pipe the output through less, as shown
in the example that follows:
# systemctl show -
-
property "Wants" multi-
user.target | less
Wants=systemd-user-sessions.service thermald.service sssd.service
ssh.service mcelog.service abrt-
xorg.service vboxservice.service
vmtoolsd.service cups.path systemd-
oomd.service docker.service getty
.target plymouth-
quit.service virtqemud.service avahi-
daemon.service
remote-fs.target firewalld.service...
This display shows all of the services and other units that will be activated (started), including
ssh, when the multi-user.target unit is activated. Remember that a target unit is simply a grouping of other units, as shown in the preceding example. Also notice that the units in
this group are not all service units. There are path units and other target units as well.
A target unit has both Wants and requirements, called Requires. A Wants means that all the
units listed are triggered to activate (start). If they fail or cannot be started, no problem—the
target unit continues on its merry way. The preceding example is a display of Wants only.
A Requires is much more stringent than a Wants and potentially catastrophic. A Requires
means that all of the units listed are triggered to activate (start). If they fail or cannot be
started, the entire unit (group of units) is deactivated.
You can view the various units a target unit Requires (must activate or the unit will fail), using
the command in the example that follows. Notice that the Requires output is much shorter than
the Wants for the multi-user.target. Thus, no special formatting of the output is needed.
# systemctl show -
-
property "Requires" multi-
user.target
Requires=basic.target
The target units also have configuration files, as do the service units. The following example
shows the contents of the multi-user.target configuration file.
# cat /lib/systemd/system/multi-
user.target
# This file is part of systemd.
#
…
15
[Unit]
Description=Multi-User
373
Downloaded from https://onlinelibrary.wiley.com/doi/ by alex jounh - Oregon Health & Science Univer , Wiley Online Library on [05/12/2025]. See the Terms and Conditions (https://onlinelibrary.wiley.com/terms-and-conditions) on Wiley Online Library for rules of use; OA articles are governed by the applicable Creative Commons License
Chapter 15: Starting and Stopping Services
Documentation=man:systemd.special(7)
Requires=basic.target
Conflicts=rescue.service rescue.target
After=basic.target rescue.service rescue.target
AllowIsolate=yes
This basic target unit configuration file has the following options:
Description: This is just a free-form description of the target.
Documentation: Lists the appropriate systemd man page.
Requires: If this multi-user.target gets activated, the listed target unit is also
activated. If the listed target unit is deactivated or fails, then multi-user.target is
deactivated. If there are no After and Before options, then both multi-user.target
and the listed target unit activate simultaneously.
Conflicts: This setting avoids conflicts in services. Starting multi-user.target stops
the listed targets and services, and vice versa.
After: This setting configures ordering. In other words, it determines which units should be
activated before starting this service.
AllowIsolate: This option is a Boolean setting of yes or no. If this option is set to yes,
then this target unit, multi-user.target, is activated along with its dependencies
and all others are deactivated.
To get more information on these configuration files and their options, enter man systemd
.service, man systemd.target, and man systemd.unit at the command line.
For the Linux server using systemd, the boot process is easier to follow now that you understand
systemd target units. At boot, systemd activates the default.target unit. This unit is
aliased either to multi-user.target or graphical.target. Thus, depending upon the
alias set, the services targeted by the target unit are started.
If you need more help understanding the systemd daemon, you can enter man -
k systemd
at the command line to get a listing of the various systemd utilities’ documentation in the
man pages.
Learning systemd’s backward compatibility to SysVinit
The systemd daemon has maintained backward compatibility to the SysVinit daemon. This
allowed Linux distributions time to migrate slowly to systemd.
While runlevels are not truly part of systemd, the systemd infrastructure has been created to
provide compatibility with the concept of runlevels. There are seven target unit configuration files
specifically created for backward compatibility to SysVinit:
■
■
374
runlevel0.target
runlevel1.target
Downloaded from https://onlinelibrary.wiley.com/doi/ by alex jounh - Oregon Health & Science Univer , Wiley Online Library on [05/12/2025]. See the Terms and Conditions (https://onlinelibrary.wiley.com/terms-and-conditions) on Wiley Online Library for rules of use; OA articles are governed by the applicable Creative Commons License
Part IV: Becoming a Linux Server Administrator
■
■
■
■
■
runlevel2.target
runlevel3.target
runlevel4.target
runlevel5.target
runlevel6.target
There is a target unit configuration file for each of the seven classic SysVinit runlevels. Type
man runlevel to see information about those runlevels. These target unit configuration
files are symbolically linked to target unit configuration files that most closely match the idea
of the original runlevel. In the example that follows, the symbolic links are shown for runlevel
target units. Notice that the runlevel target units for runlevel 2, 3, and 4 are all symbolically
linked to multi-user.target. The multi-user.target unit is similar to the legacy
extended multi-user mode.
# ls -
l /lib/systemd/system/runlevel*.target
# /usr/lib/ in Ubuntu
lrwxrwxrwx. 1 root root 15 Apr 9 04:25 /lib/systemd/system/runlevel0
.target
-
> poweroff.target
lrwxrwxrwx. 1 root root 13 Apr 9 04:25 /lib/systemd/system/runlevel1
.target
-
> rescue.target
lrwxrwxrwx. 1 root root 17 Apr 9 04:25 /lib/systemd/system/runlevel2
.target
-
> multi-
user.target
lrwxrwxrwx. 1 root root 17 Apr 9 04:25 /lib/systemd/system/runlevel3
.target
-
> multi-
user.target
lrwxrwxrwx. 1 root root 17 Apr 9 04:25 /lib/systemd/system/runlevel4
.target
-
> multi-
user.target
lrwxrwxrwx. 1 root root 16 Apr 9 04:25 /lib/systemd/system/runlevel5
.target
-
> graphical.target
lrwxrwxrwx. 1 root root 13 Apr 9 04:25 /lib/systemd/system/runlevel6
.target
-
> reboot.target
Stopping and Starting Services
The tasks of starting, stopping, and restarting services typically refer to immediate needs—in
other words, managing services without a server reboot. For example, if you want to stop a
service temporarily, then you are in the right place. However, if you want to stop a service and
not allow it to be restarted at server reboot, then you need to disable the service, which is
covered in the section “Enabling Persistent Services” later in this chapter.
375
15
Downloaded from https://onlinelibrary.wiley.com/doi/ by alex jounh - Oregon Health & Science Univer , Wiley Online Library on [05/12/2025]. See the Terms and Conditions (https://onlinelibrary.wiley.com/terms-and-conditions) on Wiley Online Library for rules of use; OA articles are governed by the applicable Creative Commons License
Chapter 15: Starting and Stopping Services
Stopping and starting SysVinit services
The primary command for stopping and starting SysVinit services is the service command. This
command is maintained in systemd systems for backward compatibility. With the service
command, the name of the service that you want to control comes second in the command line.
The last option is what you want to do to the service: stop, start, restart, and so on. The
following example shows how to stop the cups service and see the status:
# service cups stop
# service cups status
○ cups.service -CUPS Scheduler
Loaded: loaded (/usr/lib/systemd/system/cups.service; enabled;
preset: enabled)
Active: inactive (dead) since Thu 2025-
01-
09 22:59:54 EST; 3s
ago
Duration: 42.022s
TriggeredBy: ○ cups.path
○ cups.socket
Docs: man:cupsd(8)
Process: 428848 ExecStart=/usr/sbin/cupsd -
l (code=exited,
status=0/SUCCESS)
Main PID: 428848 (code=exited, status=0/SUCCESS)
Status: "Scheduler is running..."
CPU: 22ms
Jan 09 22:59:54 Admin-
ubuntu-
20 systemd[1]: Stopped cups.service -
CUPS Scheduler.
To start a service, you simply use a start option instead of a stop option on the end of the
service command, as follows:
# service cups start
# service cups status
● cups.service -CUPS Scheduler
Loaded: loaded (/usr/lib/systemd/system/cups.service; enabled;
preset: enabled)
Active: active (running) since Thu 2025-
01-
09 23:06:10 EST; 3s
ago
TriggeredBy: ○ cups.path
● cups.socket
Docs: man:cupsd(8)
Main PID: 430494 (cupsd)
Status: "Scheduler is running..."
Tasks: 1 (limit: 9171)
Memory: 2.7M (peak: 3.0M)
CPU: 16ms
CGroup: /system.slice/cups.service
└─430494 /usr/sbin/cupsd -
l
376
Downloaded from https://onlinelibrary.wiley.com/doi/ by alex jounh - Oregon Health & Science Univer , Wiley Online Library on [05/12/2025]. See the Terms and Conditions (https://onlinelibrary.wiley.com/terms-and-conditions) on Wiley Online Library for rules of use; OA articles are governed by the applicable Creative Commons License
Part IV: Becoming a Linux Server Administrator
Jan 09 23:06:10 systemd[1]: Starting cups.service -CUPS Scheduler...
Jan 09 23:06:10 systemd[1]: Started cups.service-
CUPS Scheduler.
Stopping and starting systemd services
The systemd service uses the systemctl command to start, stop, and otherwise work with
systemd services.
Stopping a service with systemd
In the example that follows, the status of the cups daemon is checked and then stopped
using the systemctl stop cups.service command:
# systemctl status cups.service
○ cups.service -CUPS Scheduler
Loaded: loaded (/usr/lib/systemd/system/cups.service; enabled;
preset: enabled)
Active: inactive (dead) since Thu 2025-
01-
09 23:09:36 EST; 3s
ago
Duration: 3min 25.908s
TriggeredBy: ○ cups.path
○ cups.socket
Docs: man:cupsd(8)
Process: 430494 ExecStart=/usr/sbin/cupsd -
l (code=exited,
status=0/SUCCESS)
Main PID: 430494 (code=exited, status=0/SUCCESS)
Status: "Scheduler is running..."
CPU: 18ms
Jan
Jan
Jan
Jan
Jan
09
09
09
09
09
23:06:10
23:06:10
23:09:36
23:09:36
23:09:36
systemd[1]:
systemd[1]:
systemd[1]:
systemd[1]:
systemd[1]:
Starting cups.service -CUPS Scheduler...
Started cups.service -CUPS Scheduler.
Stopping cups.service -CUPS Scheduler...
cups.service: Deactivated successfully.
Stopped cups.service -CUPS Scheduler.
Notice that when the status is taken, after stopping the cups
daemon, the service is inactive (dead) but still considered enabled.
This means that the cups daemon is still started upon server boot.
Starting a service with systemd
Starting the cups daemon is just as easy as stopping it. The example that follows demonstrates this ease:
# systemctl start cups.service
# systemctl status cups.service
● cups.service -CUPS Scheduler
15
377
Downloaded from https://onlinelibrary.wiley.com/doi/ by alex jounh - Oregon Health & Science Univer , Wiley Online Library on [05/12/2025]. See the Terms and Conditions (https://onlinelibrary.wiley.com/terms-and-conditions) on Wiley Online Library for rules of use; OA articles are governed by the applicable Creative Commons License
Chapter 15: Starting and Stopping Services
Loaded: loaded (/usr/lib/systemd/system/cups.service; enabled;
preset: enabled)
Active: active (running) since Thu 2025-
01-
09 23:11:10 EST; 3s
ago
TriggeredBy: ○ cups.path
● cups.socket
Docs: man:cupsd(8)
Main PID: 430868 (cupsd)
Status: "Scheduler is running..."
Tasks: 1 (limit: 9171)
Memory: 2.7M (peak: 3.2M)
CPU: 16ms
CGroup: /system.slice/cups.service
└─430868 /usr/sbin/cupsd -
l
After the cups daemon is started, using systemctl with the status option shows the service is active (running). Also, its process ID (PID) number, 430868, is shown.
Restarting a service with systemd
Restarting a service means that a service is stopped and then started again. If the service was
not currently running, restarting it simply starts the service.
# systemctl restart cups.service
Reloading services with systemd
Reloading services is different from restarting services. When you reload services, the service itself is not stopped. Only the service’s configuration files are loaded again. Note that not
all services are implemented to use the reload feature, but daemon-reload will reload all
appropriate services if you have changed any systemd configuration files.
# systemctl daemon-reload
# systemctl status sshd.service
● ssh.service -OpenBSD Secure Shell server
Loaded: loaded (/usr/lib/systemd/system/ssh.service; disabled;
preset: enabled)
Active: active (running) since Mon 2025-
01-
06 15:00:29 EST; 3
days ago
TriggeredBy: ● ssh.socket
Docs: man:sshd(8)
man:sshd_config(5)
Main PID: 90152 (sshd)
Tasks: 1 (limit: 9171)
Memory: 3.2M (peak: 20.4M swap: 972.0K swap peak: 1.1M)
CPU: 322ms
CGroup: /system.slice/ssh.service
└─90152 "sshd: /usr/sbin/sshd -
D [listener] 0 of 10-
100
startups"
378
Downloaded from https://onlinelibrary.wiley.com/doi/ by alex jounh - Oregon Health & Science Univer , Wiley Online Library on [05/12/2025]. See the Terms and Conditions (https://onlinelibrary.wiley.com/terms-and-conditions) on Wiley Online Library for rules of use; OA articles are governed by the applicable Creative Commons License
Part IV: Becoming a Linux Server Administrator
Jan 06 15:02:00 sshd[90436]: pam_unix(sshd:session): session opened
for user chris(uid=1000) by c>
Jan 06 15:02:00 sshd[90436]: pam_unix(sshd:session): session closed
for user chris
Jan 09 23:19:59 systemd[1]: Reloaded ssh.service -OpenBSD Secure
Shell server.
…
Doing a reload of services, instead of a restart, prevents any pending service operations
from being aborted. A reload is a better method for a busy Linux server.
Now that you know how to stop and start services for troubleshooting and emergency purposes, you can learn how to enable and disable services.
Enabling Persistent Services
You use stop and start for immediate needs, not for services that need to be persistent. A
persistent service is one that is started at server boot time or at a particular runlevel. Services
that need to be set as persistent are typically new services that the Linux server is offering.
Enabling a service with systemd
Using the enable option on the systemctl command sets a service to always start at boot
(be persistent). The following shows exactly how to accomplish this:
# systemctl status cups.service
systemctl status cups.service
○ cups.service -CUPS Scheduler
Loaded: loaded (/usr/lib/systemd/system/cups.service; disabled;
preset: enabled)
Active: inactive (dead) since Thu 2025-
01-
09 23:23:29 EST; 2s
ago
Duration: 11min 13.891s
TriggeredBy: ○ cups.socket
Docs: man:cupsd(8)
Process: 430954 ExecStart=/usr/sbin/cupsd -
l (code=exited,
status=0/SUCCESS)
Main PID: 430954 (code=exited, status=0/SUCCESS)
Status: "Scheduler is running..."
CPU: 20ms
Jan 09 23:23:29 systemd[1]: cups.service: Deactivated successfully.
Jan 09 23:23:29 systemd[1]: Stopped cups.service -CUPS Scheduler.
15
# systemctl enable cups.service
Synchronizing state of cups.service with SysV service script with
/usr/lib/systemd/systemd-sysv-install.
379
Downloaded from https://onlinelibrary.wiley.com/doi/ by alex jounh - Oregon Health & Science Univer , Wiley Online Library on [05/12/2025]. See the Terms and Conditions (https://onlinelibrary.wiley.com/terms-and-conditions) on Wiley Online Library for rules of use; OA articles are governed by the applicable Creative Commons License
Chapter 15: Starting and Stopping Services
Executing: /usr/lib/systemd/systemd-
sysv-
install enable cups
Created symlink /etc/systemd/system/printer.target.wants/cups.service
→ /usr/lib/systemd/system/cups.service.
Created symlink /etc/systemd/system/multi-
user.target.wants/cups
.service → /usr/lib/systemd/system/cups.service.
Created symlink /etc/systemd/system/sockets.target.wants/cups.socket
→ /usr/lib/systemd/system/cups.socket.
Created symlink /etc/systemd/system/multi-
user.target.wants/cups.path
→ /usr/lib/systemd/system/cups.path.
# systemctl start cups.service
# systemctl status cups.service
● cups.service -CUPS Scheduler
Loaded: loaded (/usr/lib/systemd/system/cups.service; enabled;
preset: enabled)
Active: active (running) since Thu 2025-
01-
09 23:25:26 EST; 1min
8s ago
TriggeredBy: ○ cups.path
● cups.socket
Docs: man:cupsd(8)
Main PID: 433177 (cupsd)
Status: "Scheduler is running..."
Tasks: 1 (limit: 9171)
Memory: 3.6M (peak: 3.9M)
CPU: 18ms
CGroup: /system.slice/cups.service
└─433177 /usr/sbin/cupsd -
l
Jan 09 23:25:26 systemd[1]: Starting cups.service -CUPS Scheduler...
Jan 09 23:25:26 systemd[1]: Started cups.service -CUPS Scheduler.
Because the service was both stopped and disabled, I both started and enabled the service.
Notice that the status of cups.service changes from disabled to enabled after using the
enable option on systemctl. Also, notice that the enable option simply creates a few
symbolic links. You may be tempted to create these links yourself. However, the preferred
method is to use the systemctl command to accomplish this.
Disabling a service with systemd
You can use the disable option on the systemctl command to keep a service from
starting at boot. However, it does not immediately stop the service. You need to use the stop
option discussed in the section “Stopping a service with systemd.” The following example
shows how to disable a currently enabled service:
# systemctl disable cups.service
Synchronizing state of cups.service with SysV service script with
/usr/lib/systemd/systemd-sysv-install.
380
Downloaded from https://onlinelibrary.wiley.com/doi/ by alex jounh - Oregon Health & Science Univer , Wiley Online Library on [05/12/2025]. See the Terms and Conditions (https://onlinelibrary.wiley.com/terms-and-conditions) on Wiley Online Library for rules of use; OA articles are governed by the applicable Creative Commons License
Part IV: Becoming a Linux Server Administrator
Executing: /usr/lib/systemd/systemd-
sysv-
install disable cups
Removed "/etc/systemd/system/sockets.target.wants/cups.socket".
Removed "/etc/systemd/system/multi-user.target.wants/cups.service".
Removed "/etc/systemd/system/multi-user.target.wants/cups.path".
Removed "/etc/systemd/system/printer.target.wants/cups.service".
Disabling 'cups.service', but its triggering units are still active:
cups.socket
The disable option simply removes a few files via the preferred method of the system
ctl command. Notice also in the preceding example that although the cups service is now
disabled, the cups.socket is still active (running) and needs to be stopped manually. With
systemd, some services cannot be disabled. These services are static services. Consider the
following service, dbus.service:
# systemctl status dbus.service
● dbus.service -D-
Bus System Message Bus
Loaded: loaded (/usr/lib/systemd/system/dbus.service; static)
Active: active (running) since Sun 2025-
01-
05 12:04:13 EST;
4 days ago
TriggeredBy: ● dbus.socket
Docs: man:dbus-
daemon(1)
Main PID: 1249 (dbus-
daemon)
Tasks: 1 (limit: 9171)
Memory: 14.4M (peak: 240.2M swap: 896.0K swap peak: 3.6M)
CPU: 53.692s
CGroup: /system.slice/dbus.service
└─1249 @dbus-daemon --system --address=systemd:
--nofork --nopidfile --systemd-activation --syslog-o>
Jan 09 18:21:10 dbus-
daemon[1249]: [system] Activating via systemd:
service name='net.reactivated>
…
When the systemctl disable command is issued on dbus.service, it is ignored.
Remember that static means that the service is enabled by default and cannot be disabled,
even by root. Sometimes, disabling a service is not enough to make sure that it does not run.
For example, you might want network.service to replace NetworkManager.service
for starting network interfaces on your system. Disabling NetworkManager would keep the
service from starting on its own. However, if some other service listed NetworkManager as a
dependency, that service would try to start NetworkManager when it started.
To disable a service in a way that prevents it from ever running on your system, you can use
the mask option. For example, to set the fictitious MyExample service so that it never runs,
type the following:
# systemctl mask MyExample.service
This will link the service to /dev/null. So even if someone tried to run that service,
nothing would happen. To be able to use the service again, you could type systemctl
unmask MyExample.service.
381
15
Downloaded from https://onlinelibrary.wiley.com/doi/ by alex jounh - Oregon Health & Science Univer , Wiley Online Library on [05/12/2025]. See the Terms and Conditions (https://onlinelibrary.wiley.com/terms-and-conditions) on Wiley Online Library for rules of use; OA articles are governed by the applicable Creative Commons License
Chapter 15: Starting and Stopping Services
Now that you understand how to enable individual services to be persistent (and how to disable or mask individual services), you need to look at service groups as a whole. Next, I cover
how to start groups of services at boot time.
Configuring a Default Runlevel or Target Unit
Whereas a persistent service is one that is started at server boot time, a persistent (default) runlevel or target unit is a group of services that are started at boot time. Both classic SysVinit and
Upstart defined these groups of services as runlevels, while systemd calls them target units.
For systemd, the term target units refers to groups of services to be started. The following
shows the various target units that you can configure to be persistent and their equivalent
backward-compatible, runlevel-specific target units:
■
■
multi-user.target=
■ runlevel2.target
■ runlevel3.target
■ runlevel4.target
graphical.target =
■ runlevel5.target
The persistent target unit is set via a symbolic link to the default.target unit file.
Consider the following:
# ls -
l /etc/systemd/system/default.target
lrwxrwxrwx. 1 root root 36 Mar 13 17:27
/etc/systemd/system/default.target -
>
/lib/systemd/system/runlevel5.target
# ls -
l /lib/systemd/system/runlevel5.target
lrwxrwxrwx. 1 root root 16 Mar 27 15:39
/lib/systemd/system/runlevel5.target -
> graphical.target
The example shows that the current persistent target unit on this server is runlevel5
.target because default.target is a symbolic link to the runlevel5.target
unit file. However, notice that runlevel5.target is also a symbolic link and it points
to graphical.target. Thus, this server’s current persistent target unit is graphical
.target. To set a different target unit to be persistent, you simply need to change the
symbolic link for default.target. To be consistent, stick with the runlevel target units
if they are used on your server.
The following systemctl example changes the server’s persistent target unit from
multi-user.target to graphical.target:
# systemctl get-default
multi-user.target
# systemctl set-
default graphical.target
Removed "/etc/systemd/system/default.target".
382
Downloaded from https://onlinelibrary.wiley.com/doi/ by alex jounh - Oregon Health & Science Univer , Wiley Online Library on [05/12/2025]. See the Terms and Conditions (https://onlinelibrary.wiley.com/terms-and-conditions) on Wiley Online Library for rules of use; OA articles are governed by the applicable Creative Commons License
Part IV: Becoming a Linux Server Administrator
Created symlink /etc/systemd/system/default.target →
/usr/lib/systemd/system/graphical.target.
# systemctl get-default
graphical.target
When the server is rebooted, the graphical.target is the persistent target unit. Any services in the graphical.target unit are started (activated) at that time.
If you are used to the old SysVinit runlevels, you can use the runlevels to see how the current
Systemd target maps into those runlevels:
# runlevel
3 5
This shows that the current runlevel is 5 (graphical.target) and the previous runlevel
was 3 (multi-user.target).
Adding New or Customized Services
Occasionally, you need to add a new service to your Linux server. Also, you may have to customize a particular service. When these needs arise, you must follow specific steps for your
Linux server’s initialization daemon to either take over the management of the service or recognize the customization of it.
Adding new services to systemd
When adding a new or customized service to a Linux systemd server, you have to complete
three steps in order to have the service managed by systemd:
1. Create a new or customized service configuration unit file for the new or customized service.
2. Move the new or customized service configuration unit file to the proper location for
systemd management.
3. Add the service to a specific target unit’s Wants directory to have the new or customized service start automatically with other services.
Step 1: Create a new or customized service configuration unit file
If you are customizing a service configuration unit file, simply make a copy of the original
unit file from /lib/systemd/system and add any desired customizations.
For new files, obviously, you are creating a service unit configuration file from scratch.
Consider the following basic service unit file template. At bare minimum, you need
Description and ExecStart options for a service unit configuration file:
15
# cat My_New_Service.service
[Unit]
Description=My New Service
383
Downloaded from https://onlinelibrary.wiley.com/doi/ by alex jounh - Oregon Health & Science Univer , Wiley Online Library on [05/12/2025]. See the Terms and Conditions (https://onlinelibrary.wiley.com/terms-and-conditions) on Wiley Online Library for rules of use; OA articles are governed by the applicable Creative Commons License
Chapter 15: Starting and Stopping Services
[Service]
ExecStart=/usr/bin/My_New_Service
For additional help on customizing or creating a new configuration unit file and the various
needed options, you can use the man pages. At the command line, type man systemd
.service to find out more about the various service unit file options.
Step 2: Move the service configuration unit file
Before you move the new or customized service configuration unit file, you need to be aware
that there are two potential locations to store service configuration unit files. The one you
choose determines whether the customizations take effect and if they remain persistent
through software upgrades.
You can place your system service configuration unit file in one of the following two locations:
■
/etc/systemd/system
■ This location is used to store customized local service configuration unit files.
■ Files in this location are not overwritten by software installations or upgrades.
Files here are used by the system even if there is a file of the same name in the /lib/
systemd/system directory.
■
/lib/systemd/system
■ This location is used to store system service configuration unit files.
■ Files in this location are overwritten by software installations and upgrades.
Files here are used by the system only if there is no file of the same name in the /etc/
systemd/system directory.
Thus, the best place to store your new or customized service configuration unit file is in
/etc/systemd/system.
Tip
When you create a new or customized service, for the change to take effect without a server reboot, you need to issue a
special command. At the command line, type systemctl daemon-reload.
Step 3: Add the service to the Wants directory
This final step is optional. It needs to be done only if you want your new service to start with
a particular systemd target unit. For a service to be activated (started) by a particular target
unit, it must be in that target unit’s Wants directory.
First, add the line WantedBy=desired.target to the bottom of your service configuration unit file. The following example shows that the desired target unit for this new service is
multi-user.target:
# cat /etc/systemd/system/My_New_Service.service
[Unit]
Description=My New Fake Service
384
Downloaded from https://onlinelibrary.wiley.com/doi/ by alex jounh - Oregon Health & Science Univer , Wiley Online Library on [05/12/2025]. See the Terms and Conditions (https://onlinelibrary.wiley.com/terms-and-conditions) on Wiley Online Library for rules of use; OA articles are governed by the applicable Creative Commons License
Part IV: Becoming a Linux Server Administrator
[Service]
ExecStart=/usr/bin/My_New_Service
[Install]
WantedBy=multi-user.target
To add a new service unit to a target unit, you need to create a symbolic link. The following
example shows the files located in the multi-user.target unit’s Wants directory. Previously, in the section “Understanding systemd initialization,” the systemctl command was
used to list Wants, and it is still the preferred method. Notice that in this directory, the files
are symbolic links pointing to service unit configuration files in the /lib/systemd/
system directory.
# ls /etc/systemd/system/multi-user.target.wants
abrt-
ccpp.service
cups.path
remote-
fs.target
abrtd.service
fcoe.service
rsyslog.service
abrt-
oops.service
irqbalance.service sendmail.service
abrt-
vmcore.service
lldpad.service
sm-
client.service
atd.service
mcelog.service
sshd-
keygen.service
auditd.service
mdmonitor.service
sshd.service
…
# ls -l /etc/systemd/system/multi-user.target.wants
total 0
lrwxrwxrwx. 1 root root 37 Nov 2 22:29 abrt-
ccpp.service -
>
/lib/systemd/system/abrt-
ccpp.service
lrwxrwxrwx. 1 root root 33 Nov 2 22:29 abrtd.service -
>
/lib/systemd/system/abrtd.service
…
lrwxrwxrwx. 1 root root 32 Apr 26 20:05 sshd.service -
>
/lib/systemd/system/sshd.service
The following illustrates the process of adding a symbolic link file for My_New_Service:
# ln -
s /etc/systemd/system/My_New_Service.service
/etc/systemd/system/multi-user.target.wants/My_New_Service.service
A symbolic link is created in the multi-user.target.wants directory. Now the new
service, My_New_Service, is activated (started) when the multi-user.target unit is
activated.
Tip
If you want to change the systemd target unit for a service, you need to change the symbol link to point to a new
target Wants directory location. Use the ln -sf command to force any current symbolic link to be broken and the
new designated symbolic link to be enforced.
15
Together, the three steps get your new or customized service added to a Linux systemd
server. Remember that at this point, a new service is not running until a server reboot. To
start the new service before a reboot, review the commands in the section “Stopping and
Starting Services.”
385
Downloaded from https://onlinelibrary.wiley.com/doi/ by alex jounh - Oregon Health & Science Univer , Wiley Online Library on [05/12/2025]. See the Terms and Conditions (https://onlinelibrary.wiley.com/terms-and-conditions) on Wiley Online Library for rules of use; OA articles are governed by the applicable Creative Commons License
Chapter 15: Starting and Stopping Services
Summary
How you start and stop services is dependent upon what initialization daemon is used by your
Linux server: SysVinit, Upstart, or Systemd. Because, by far, Systemd is the most prevalent init
system on Linux systems today, the chapter focuses on working with Systemd.
The concepts of starting and stopping services go along with other service management concepts, such as making a service persistent, starting certain services at server boot time, reloading a service, and restarting a service. Understanding these concepts is very helpful as you
learn about configuring and managing a Linux print server in the next chapter.
Exercises
Refer to the material in this chapter to complete the tasks that follow. If you are stuck, solutions to the tasks are shown in Appendix B (although in Linux, there are often multiple ways
to complete a task). Try each of the exercises before referring to the answers. These tasks
assume that you are running an Ubuntu, Fedora, or Red Hat Enterprise Linux system (although
some tasks work on other Linux systems as well). For that reason, the tasks will be done using
the Systemd service, which they all use by default.
1. Determine which initialization daemon your server is currently using.
2. What command can you use to check the status of the sshd daemon?
3. Determine your server’s previous and current runlevel and default target.
4. How can you change the defaulttarget unit on your Linux server?
5. For Systemd initialization daemon, what command lists services running (or active) on
your server?
6. List the running (or active) services on your Linux server.
7. For Systemd initialization daemon, what commands show a particular service’s
current status?
8. Show the status of the cups daemon on your Linux server.
9. Attempt to restart the cups daemon on your Linux server.
10. Attempt to reload all of the Systemd services on your Linux server, as you would after
creating a new service or changing the configuration for an existing service, to get
your services to pick up new settings.
386
Downloaded from https://onlinelibrary.wiley.com/doi/ by alex jounh - Oregon Health & Science Univer , Wiley Online Library on [05/12/2025]. See the Terms and Conditions (https://onlinelibrary.wiley.com/terms-and-conditions) on Wiley Online Library for rules of use; OA articles are governed by the applicable Creative Commons License
Part IV: Becoming a Linux Server Administrator
Configuring a Print Server
16
IN THIS CHAPTER
Understanding printing in Linux
Setting up printers
Using printing commands
Managing document printing
Sharing printers
Y
ou can configure your Linux system to use printers that are connected directly to it (via a USB
port) or that are available for printing over the network. Likewise, any printer that you configure
on your local system can be shared with users on other Linux, Windows, or Mac systems by opening your printer as a print server.
You configure a printer as a native Linux printer in Fedora, RHEL, Ubuntu, and other Linux systems with
the Common UNIX Printing System (CUPS). To configure a printer to work as a Microsoft Windows style of
print server, you can use the Samba service in Linux.
This chapter focuses on CUPS. In particular, it shows you the graphical front end to CUPS, called the
Print Settings window, which comes with Fedora, Red Hat Enterprise Linux, and other Linux distributions.
Using Print Settings, you can also configure your printers as print servers so that people can print to
your printer from their own computers.
If you don’t have a desktop or you want to print from within a shell script, this chapter shows you
how to use printing commands. From the command line, print commands such as lp are available for
carrying out printing. Commands also exist for querying print queues (lpq), manipulating print queues
(cupsenable, cupsdisable, and cupsreject), and removing print queues (lprm).
387
Linux Bible, Eleventh Edition. Christopher Negus.
© 2026 John Wiley & Sons, Inc. All rights reserved, including rights for text and data mining and training of artificial intelligence technologies or similar
technologies. Published 2026 by John Wiley & Sons, Inc.
Downloaded from https://onlinelibrary.wiley.com/doi/ by alex jounh - Oregon Health & Science Univer , Wiley Online Library on [05/12/2025]. See the Terms and Conditions (https://onlinelibrary.wiley.com/terms-and-conditions) on Wiley Online Library for rules of use; OA articles are governed by the applicable Creative Commons License
CHAPTER
Common UNIX Printing System
CUPS has become the standard for printing from Linux and other UNIX-like operating systems. It
was designed to meet today’s needs for standardized printer definitions and sharing on Internet
Protocol–based networks (as most computer networks are today). Nearly every Linux distribution
today comes with CUPS as its printing service. Here are some of the service’s features:
IPP CUPS is based on the Internet Printing Protocol (http://www.pwg.org/ipp), a
standard that was created to simplify how printers can be shared over IP networks. In
the IPP model, printer servers and clients who want to print can exchange information
about the model and features of a printer using the HTTP (that is, web content) protocol. A server can also broadcast the availability of a printer so that a printing client
can easily find a list of locally available printers without configuration.
Drivers CUPS also standardized how printer drivers are created. The idea was to have
a common format that could be used by printer manufacturers so that a driver could
work across all different types of UNIX systems. That way, a manufacturer had to create
the driver only once to work for Linux, macOS, and a variety of UNIX derivatives.
Printer classes You can use printer classes to create multiple print server entries that
point to the same printer or one print server entry that points to multiple printers. In
the first case, multiple entries can each allow different options (such as pointing to a
particular paper tray or printing with certain character sizes or margins). In the second
case, you can have a pool of printers so that printing is distributed. In this instance,
a malfunctioning printer, or a printer that is dealing with very large documents, won’t
bring all printing to a halt. CUPS also supports implicit classes, which are print classes
that form by merging identical network printers automatically.
Printer browsing With printer browsing, client computers can see any CUPS printers
on your local network with browsing enabled. As a result, clients can simply select
the printers that they want to use from the printer names broadcast on the network,
without needing to know in advance what the printers are named and where they are
connected. You can turn off the feature to prevent others on the local network from
seeing a printer.
UNIX print commands To integrate into Linux and other UNIX environments, CUPS
offers versions of standard commands for printing and managing printers that have
been traditionally offered with UNIX systems.
Instead of using the Print Settings window, you can configure CUPS printing in other
ways as well:
Configuring CUPS from a browser The CUPS project itself offers a web-based
interface for adding and managing printers. With the cupsd service running, type
localhost:631 from a web browser on the computer running the CUPS service to
manage printing. (See the section “Using web-based CUPS administration” later in
this chapter.)
Configuring CUPS manually You also can configure CUPS manually (that is, edit
the configuration files and start the cupsd daemon from the command line).
388
Downloaded from https://onlinelibrary.wiley.com/doi/ by alex jounh - Oregon Health & Science Univer , Wiley Online Library on [05/12/2025]. See the Terms and Conditions (https://onlinelibrary.wiley.com/terms-and-conditions) on Wiley Online Library for rules of use; OA articles are governed by the applicable Creative Commons License
Part IV: Becoming a Linux Server Administrator
Configuration files for CUPS are contained in the /etc/cups directory. In particular, you might be interested in the cupsd.conf file, which identifies permissions,
authentication, and other information for the printer daemon, and printers.conf,
which identifies addresses and options for configured printers. Use the classes
.conf file to define local printer classes.
Printing Directly from Windows to CUPS
You can print to CUPS from non-UNIX systems as well. For example, you can use a PostScript printer driver
to print directly from a Windows system to your CUPS server. You can use CUPS without modification by
configuring the Windows computer with a PostScript driver that uses http://printservername:631/
printers/targetPrinter as its printing port.
You may also be able to use the native Windows printer drivers for the printer instead of the PostScript
driver. If the native Windows driver does not work right out of the box on your CUPS print queue, you
can create a Raw Print Queue under CUPS and use that instead. The Raw Print Queue directly passes
through the data from the Windows native print driver to the printer.
To use CUPS, you must have the cups package installed in Fedora or RHEL. Most desktop
Linux distributions include CUPS during the initial system install. If it is not installed in a
Fedora or RHEL install, install it by typing the following:
# dnf install cups cups-
client
For Ubuntu, type:
$ sudo apt install cups cups-
client
Setting Up Printers
Although using the printer administration tools specifically built for your distribution is
usually best, many Linux systems simply rely on the tools that come with the CUPS software package.
The following sections explore how to use CUPS web-based administration tools that come with
every Linux distribution. Then it examines the Print Settings tool system-config-
printer, which is available with Fedora systems to enable you to set up printers. In some
cases, no configuration is necessary, because connected printers can be automatically detected
and configured. To install the Print Settings tool in Fedora, as root, enter the following dnf
(or yum) command:
# dnf install system-config-printer
For Ubuntu, type:
$ sudo apt install system-
config-
printer
389
16
Downloaded from https://onlinelibrary.wiley.com/doi/ by alex jounh - Oregon Health & Science Univer , Wiley Online Library on [05/12/2025]. See the Terms and Conditions (https://onlinelibrary.wiley.com/terms-and-conditions) on Wiley Online Library for rules of use; OA articles are governed by the applicable Creative Commons License
Chapter 16: Configuring a Print Server
Adding a printer automatically
CUPS printers can be configured to broadcast their availability on the network automatically
so that a client system can detect and use them without configuration. Connect a USB printer
to your computer, and the printer can be automatically detected and made available. In fact, if
you attach a local printer in Fedora and the print driver is not yet installed, you are prompted
to install the software packages needed to use the printer.
The first time that you go to print a document or view your Print Settings tool, the printers
are ready to use. Further configuration can be done using the web-based CUPS administration
tool or the Print Settings window.
Using web-based CUPS administration
CUPS offers its own web-based administrative tool for adding, deleting, and modifying printer
configurations on your computer. The CUPS print service (using the cupsd daemon) listens on
port 631 to provide access to the CUPS web-based administrative interface and share printers.
If CUPS is already running on your computer, you can immediately use CUPS web-based
administration from your web browser. To see whether CUPS is running and to start setting up
your printers, open a web browser on the local computer and type this into its location box:
http://localhost:631/.
A prompt for a valid login name and password may appear when you request functions that
require it. If so, type the root login name and the root user’s password and click OK. A screen
similar to the one shown in Figure 16.1 appears.
FIGURE 16.1
CUPS provides a web-based administration tool.
390
Downloaded from https://onlinelibrary.wiley.com/doi/ by alex jounh - Oregon Health & Science Univer , Wiley Online Library on [05/12/2025]. See the Terms and Conditions (https://onlinelibrary.wiley.com/terms-and-conditions) on Wiley Online Library for rules of use; OA articles are governed by the applicable Creative Commons License
Part IV: Becoming a Linux Server Administrator
Allow remote printing administration
By default, web-based CUPS administration is available only from the local host. To access web-
based CUPS administration from another computer, from the main CUPS page:
1. Select the Administration tab.
2. Select the Allow Remote Administration check box.
3. Click the Change Settings button.
Then open your computer’s firewall to allow connections to TCP port 631 to allow access to the
service. After that, from any browser that has access to your local network, you can access the
CUPS Administration page by going to port 631 on the CUPS server (for example, http://
host.example.com:631).
You may need to restart CUPS for the change to take effect: systemctl restart cups.
If you are not already running the browser as the root user, you must also enter the username
and password of root or an administrative user.
Add a printer not automatically detected
To configure a printer that is not automatically detected, you can add a printer from the
Administration screen. With the Administration screen displayed, you can add a printer
as follows:
1. Click the Add Printer button. The Add New Printer screen appears.
2. Select the device to which the printer is connected. The printer can be connected
locally to a parallel, SCSI, serial, or USB port directly on the computer. Alternatively,
you can select a network connection type for Apple printers (AppSocket or HP
JetDirect), Internet Printing Protocol (http, https, ipps, or ipp), or a Windows
printer (using Samba or SMB). If a connected printer appears in that list, you can just
select that printer instead.
3. If prompted for more information, you may need to describe the connection to the
printer further. For example, you might be asked for the network address for an IPP or
Samba printer.
4. Type a name, location, and description for the printer; select if you want to share this
printer and click Continue.
5. Select the make of the print driver. If you don’t see the manufacturer of your printer
listed, choose PostScript for a PostScript printer or HP for a PCL printer. For the manufacturer you choose, you can select a specific model.
6. Set options. If you are asked to set options for your printer, you may do so. Then
select Set Printer Options to continue.
7. Your printer should be available. If the printer is added successfully, click the name
of your printer to have the new printer page appear; from the printer page, you can
select Maintenance or Administration to print a test page or modify the printer configuration.
391
16
Downloaded from https://onlinelibrary.wiley.com/doi/ by alex jounh - Oregon Health & Science Univer , Wiley Online Library on [05/12/2025]. See the Terms and Conditions (https://onlinelibrary.wiley.com/terms-and-conditions) on Wiley Online Library for rules of use; OA articles are governed by the applicable Creative Commons License
Chapter 16: Configuring a Print Server
With the basic printer configuration done, you can now do further work with your printers.
Here are a few examples of what you can do:
List print jobs Click Show All Jobs to see what print jobs are currently active from any
of the printers configured for this server. Click Show Completed Jobs to see information
about jobs that are already printed.
Create a printer class Click the Administration tab, choose Add Class, and identify a
name, description, and location for a printer class. From the list of Printers (Members)
configured on your server, select the ones to go into this class.
Cancel or move a print job If you print a 100-page job by mistake or if the printer is
spewing out junk, the Cancel feature can be handy. Likewise, if you sent a print job to
the wrong printer, the Move Job selection can be useful. From the Administration tab,
click Manage Jobs; then click Show Active Jobs to see what print jobs are currently in
the queue for the printer. Select the Cancel Job button next to the print job that you
want to cancel or select Move Job to move the print job to a different printer.
View printers You can click the Printers tab from the top of any of the CUPS web-based
administration pages to view the printers that you have configured. For each printer
that appears, you can select Maintenance or Administrative tasks. Under Maintenance,
click Pause Printer (to stop the printer from printing but still accept print jobs for the
queue), Reject Jobs (to not accept any further print jobs for the moment), Move All
Jobs (to move them to another printer), Cancel All Jobs (to delete all print jobs), or
Print Test Page (to print a page). Figure 16.2 shows the information on the Printers tab
for a specific printer.
FIGURE 16.2
You can do administration tasks from the Printers tab.
392
Downloaded from https://onlinelibrary.wiley.com/doi/ by alex jounh - Oregon Health & Science Univer , Wiley Online Library on [05/12/2025]. See the Terms and Conditions (https://onlinelibrary.wiley.com/terms-and-conditions) on Wiley Online Library for rules of use; OA articles are governed by the applicable Creative Commons License
Part IV: Becoming a Linux Server Administrator
Using the Print Settings window
If you are using Fedora or Ubuntu, you can use the Print Settings window to set up your
printers. In fact, I recommend you use it instead of CUPS web administration because the
resulting printer configuration files are tailored to work with the way the CUPS service is
started on those systems. After the package is installed (dnf install system-
config-
printer), to install a printer from your GNOME desktop, start the Print Settings window by
typing Print Settings from the Activity screen or by typing system-config-printer
from the shell. This tool enables you to add and delete printers and edit printer properties. It also enables you to send test pages to those printers to make sure that they are
working properly.
The key here is that you are configuring printers that are managed by your print daemon
(cupsd for the CUPS service). After a printer is configured, users on your local system can
use it. You can refer to the section “Configuring Print Servers” to learn how to make the server
available to users from other computers on your network.
The printers that you set up can be connected directly to your computer (as on a USB port)
or to another computer on the network (for example, from another Linux system or
Windows system).
Configuring local printers with the Print Settings window
Add a local printer (in other words, a printer connected directly to your computer) with the
Printers window using the procedure that follows.
Adding a local printer
To add a local printer from a GNOME desktop in the latest version of Fedora, follow these steps:
1. Type the following to open the Print Settings window:
$ system-config-printer &
The Printing window appears.
2. Click Add. (If asked, click the Adjust Firewall button to allow access to the printer
port 631.) A New Printer window appears.
3. If the printer that you want to configure is detected, simply select it and click
Forward. If it is not detected, choose the device to which the printer is connected
(LPT #1 and Serial Port #1 are the first parallel and serial ports, respectively) and click
Forward. (Type lpinfo -
v | less in a shell to see printer connection types.) You
are asked to identify the printer’s driver.
4. To use an installed driver for your printer, choose Select Printer From Database,
and then choose the manufacturer of your printer. As an alternative, you could
select Provide PPD File and supply your own PPD file (for example, if you have a
printer that is not supported in Linux and you have a driver that was supplied with
the printer). (PPD stands for PostScript Printer Description.) Click Forward to see a list
of printer models from which you can choose.
393
16
Downloaded from https://onlinelibrary.wiley.com/doi/ by alex jounh - Oregon Health & Science Univer , Wiley Online Library on [05/12/2025]. See the Terms and Conditions (https://onlinelibrary.wiley.com/terms-and-conditions) on Wiley Online Library for rules of use; OA articles are governed by the applicable Creative Commons License
Chapter 16: Configuring a Print Server
Tip
If your printer doesn’t appear on the list but supports PCL (HP’s Printer Control Language), try selecting one of the HP
printers (such as HP LaserJet). If your printer supports PostScript, select PostScript printer from the list. Selecting Raw
Print Queue enables you to send documents that are already formatted for a particular printer type to a specific printer.
5. With your printer model selected, click the driver you want to use with it and
then click Forward to continue.
6. Add the following information, and click Forward:
a. Printer Name: Add the name you want to give to identify the printer. The name
must begin with a letter, but after the initial letter, it can contain a combination
of letters, numbers, dashes (-
), and underscores (_). For example, an HP printer
on a computer named maple could be named hp-maple.
b. Description: Add a few words describing the printer, such as its features (for
example, an HP LaserJet 2100M with PCL and PS support).
c. Location: Add some words that describe the printer’s location (for example, “In
Room 205 under the coffee maker”).
7. When the printer is added, click No or Yes if you’re prompted to print a test
page. The new printer entry appears in the Print Settings window. Double-click the
printer to see the Properties window for that printer, as shown in Figure 16.3.
FIGURE 16.3
The Printer Properties window after adding a printer.
394
Downloaded from https://onlinelibrary.wiley.com/doi/ by alex jounh - Oregon Health & Science Univer , Wiley Online Library on [05/12/2025]. See the Terms and Conditions (https://onlinelibrary.wiley.com/terms-and-conditions) on Wiley Online Library for rules of use; OA articles are governed by the applicable Creative Commons License
Part IV: Becoming a Linux Server Administrator
8. If you want the printer to be your default printer, right-click the printer from
the Printer Settings window and select Set As Default. A pop-up lets you choose
whether to set the printer as default system-wide or for your account personally. As
you add other printers, you can change the default printer by selecting the one you
want and selecting Set As Default again.
9. Make sure that the printing is working. Open a Terminal window and use the lp
command to print a file (such as lp /etc/hosts). (If you want to share this
printer with other computers on your network, refer to the section “Configuring Print
Servers” later in this chapter.)
Editing a local printer
After double-clicking the printer that you want to configure, choose from the following menu
options to change its configuration:
Settings: The Description, Location, Device URI, and Make and Model information you created earlier is displayed in this dialog box.
Policies: Click Policies to set the following items:
State: Select check boxes to indicate whether the printer will print jobs that are in
the queue (Enabled), accept new jobs for printing (Accepting Jobs), and be available to be shared with other computers that can communicate with your computer
(Shared). You also must select Server Settings and click the Share Published Printers
Connected To This System check box before the printer will accept print jobs from
other computers.
Policies: In case of error, the stop-printer selection causes all printing to that printer
to stop. You can also select to have the job discarded (abort-job) or retried (retry-
job) in the event of an error condition.
Banner: There are no starting or ending banner pages by default for the printer.
Choose starting or ending banner pages that include text such as Classified, Confidential, Secret, and so on.
Access Control: If your printer is a shared printer, you can select this window to create
a list that either allows users access to the printer (with all others denied) or denies
users access to the printer (with all others allowed).
Printer Options: Click Printer Options to set defaults for options related to the printer
driver. The available options are different for different printers. Many of these options
can be overridden when someone prints a document. Here are examples of a few of the
options that you might (or might not) have available:
Watermark: Several Watermark settings are available to enable you to add and change
watermarks on your printed pages. By default, Watermark and Overlay are off
(None). By selecting Watermark (behind the text) or Overlay (over the text), you
can set the other Watermark settings to determine how watermarks and overlays
are done. Watermarks can go on every page (All) or only the first page (First Only).
Select Watermark Text to choose what words are used for the watermark or overlay
395
16
Downloaded from https://onlinelibrary.wiley.com/doi/ by alex jounh - Oregon Health & Science Univer , Wiley Online Library on [05/12/2025]. See the Terms and Conditions (https://onlinelibrary.wiley.com/terms-and-conditions) on Wiley Online Library for rules of use; OA articles are governed by the applicable Creative Commons License
Chapter 16: Configuring a Print Server
(Draft, Copy, Confidential, Final, and so on). You can then select the font type, size,
style, and intensity of the watermark or overlay.
Resolution Enhancement: You can use the printer’s current settings or choose to turn
resolution enhancement on or off.
Page Size: The default is U.S. letter size, but you can also ask the printer to print legal
size, envelopes, ISO A4 standard, or several other page sizes.
Media Source: Choose which tray to print from. Select Tray 1 to insert pages manually.
Levels of Gray: Choose to use the printer’s current levels of gray or have enhanced or
standard gray levels turned on.
Resolution: Select the default printing resolution (such as 300, 600, or 1,200 dots per
inch). Higher resolutions result in better quality but take longer to print.
EconoMode: Either use the printer’s current setting or choose a mode where you save
toner or one where you have the highest possible quality.
Job Options: Click Job Options to set common default options that will be used for this
printer if the application printing the job doesn’t already set them. These include
Common Options (number of copies, orientation, scale to fit, and pages per side),
Image Options (scaling, saturation, hue, and gamma), and Text Options (characters/
inch, lines/inch, and margin settings).
Ink/Toner Levels: Click Ink/Toner Levels to see information on how much ink or toner
your printer has left. (Not all printers report these values.)
Click Apply when you are satisfied with the changes you made to the local printer.
Configuring remote printers
To use a printer that is available on your network, you must identify that printer to your
Linux system. Supported remote printer connections include Networked CUPS (IPP) printers,
Networked UNIX (LPD) printers, Networked Windows (Samba) printers, and JetDirect printers.
(Of course, both CUPS and UNIX print servers can be run from Linux systems as well as other
UNIX systems.)
In each case, you need a network connection from your Linux system to the servers to which
those printers are connected. Using a remote printer requires that someone set up that printer
on the remote server computer. See the section “Configuring Print Servers” later in this chapter for information on how to do that on your Linux server.
Use the Print Settings window (system-config-printer) to configure each of the remote
printer types. This is how it is done:
1. From the GNOME Activities screen, type Print Settings (or Printers in Ubuntu) and
press Enter.
2. Click Add. The New Printer window appears.
396
Downloaded from https://onlinelibrary.wiley.com/doi/ by alex jounh - Oregon Health & Science Univer , Wiley Online Library on [05/12/2025]. See the Terms and Conditions (https://onlinelibrary.wiley.com/terms-and-conditions) on Wiley Online Library for rules of use; OA articles are governed by the applicable Creative Commons License
Part IV: Becoming a Linux Server Administrator
3. Depending on the type of ports that you have on your computer, select one of
the following:
a. LPT #1: Use this for a printer connected to your parallel port.
b. Serial Port #1: Use this for a printer connected to your serial port.
c. Network Printer: Under this heading, you can search for network printers (by
hostname or IP address) or type in the URI for several different printer types:
i. Find Network Printer: Instead of entering a printer URI, you can provide a
hostname or IP address for the system that has the printer to which you want
to print. Select Find. Any printers found on that host appear on the window,
ready for you to add. Select Forward. Fill in descriptive information and
select Apply.
ii. AppleSocket/HP JetDirect: Use this for a JetDirect printer.
iii. Internet Printing Protocol (IPP): Use this for a CUPS or other IPP printer.
Most Linux and macOS printers fall into this category.
iv. Internet Printing Protocol (HTTPS): Use this for a CUPS or other IPP printer
being shared over a secure connection (valid certificates required).
v. LPD/LPR Host or Printer: Use this for a UNIX printer.
vi. Windows Printer via SAMBA: Use this for a Windows system printer.
Continue with the steps in whichever of the following sections is appropriate.
Adding a remote CUPS printer
If you chose to add a CUPS (Internet Printing Protocol) printer that is accessible over your
local network from the Print Settings window, you must add the device URI for that printer.
For example, an HP Envy 6000 printer might have the following URI:
ipp://192.168.1.21:631/printers/HP_ENVY_6000_series
Complete the rest of the procedure as you would for a local printer (see the section “Adding a
local printer” earlier in this chapter).
Adding a remote UNIX (LDP/LPR) printer
If you chose to add a UNIX printer (LPD/LPR) from the Print Settings window, you must add
the following information to the window that appears:
Host This is the hostname of the computer to which the printer is attached (or otherwise accessible). This is the IP address or hostname for the computer (the hostname
is accessible from your /etc/hosts file or through a DNS name server). Select the
Probe button to search for the host.
Queue
This is the printer name on the remote UNIX computer.
Complete the rest of the procedure as you would for a local printer (see the section “Adding a
local printer” earlier in this chapter).
397
16
Downloaded from https://onlinelibrary.wiley.com/doi/ by alex jounh - Oregon Health & Science Univer , Wiley Online Library on [05/12/2025]. See the Terms and Conditions (https://onlinelibrary.wiley.com/terms-and-conditions) on Wiley Online Library for rules of use; OA articles are governed by the applicable Creative Commons License
Chapter 16: Configuring a Print Server
Tip
If the print job you send to test the printer is rejected, the print server computer may not have allowed you access to
the printer. Ask the remote computer’s administrator to add your hostname to the /etc/lpd.perms file. (Enter
lpstat -d printer to see the status of your print job.)
Adding a Windows (SMB) printer
Enabling your computer to access an SMB printer (the Windows printing service) involves adding an entry for the printer in the Select Connection window.
When you choose to add a Windows printer to the Print Settings window (Windows Printer via
Samba), click Browse to see a list of computers on your network that have been detected as
offering SMB services (file and/or printing service). You can configure the printer from this
window as follows:
1. Type the URI of the printer, excluding the leading smb://. For example, you
might type /host1/myprinter or /mygroup/host1/myprinter.
2. Select either “Prompt user if authentication is required” or “Set authentication
details now.”
3. If you chose “Set authentication details now,” fill in the username and password needed to access the SMB printer; then click Verify to check that you can
authenticate to the server.
4. Click Forward to continue.
Alternatively, you can identify a server that does not appear on the list of servers. Type the
information needed to create an SMB URI that contains the following information:
Workgroup This is the workgroup name assigned to the SMB server. Using the workgroup name isn’t necessary in all cases.
Server This is the NetBIOS name or IP address for the computer, which may or may not
be the same as its TCP/IP name. To translate this name into the address needed to
reach the SMB host, Samba checks several places where the name may be assigned to
an IP address. Samba checks the following (in the order shown) until it finds a match:
the local /etc/hosts file, the local /etc/lmhosts file, a WINS server on the network, and responses to broadcasts on each local network interface to resolve the name.
Share This is the name under which the printer is shared with the remote computer.
It may be different from the name by which local users of the SMB printer know
the printer.
User A username is required by the SMB server system to give you access to the SMB
printer. A username is not necessary if you are authenticating the printer based on
share-level rather than user-level access control. With share-level access, you can add a
password for each shared printer or filesystem.
398
Downloaded from https://onlinelibrary.wiley.com/doi/ by alex jounh - Oregon Health & Science Univer , Wiley Online Library on [05/12/2025]. See the Terms and Conditions (https://onlinelibrary.wiley.com/terms-and-conditions) on Wiley Online Library for rules of use; OA articles are governed by the applicable Creative Commons License
Part IV: Becoming a Linux Server Administrator
Password Use the password associated with the SMB username or the shared resource,
depending on the kind of access control being used.
Caution
When you enter a username and password for SMB, the information is stored unencrypted in the /etc/cups/
printers.conf file. Be sure that the file remains readable only by root.
The following is an example of the SMB URI that you could add to the SMB:// box:
jjones:my9passswd@FSTREET/NS1/hp
The URI shown here identifies the username (jjones), the user’s password (my9passswd),
the workgroup (FSTREET), the server (NS1), and the printer queue name (hp).
Complete the rest of the procedure as you would for a local printer (see the section “Adding a
local printer” earlier in this chapter).
If everything is set up properly, you can use the standard lp command to print the file to the
printer. Using this example, employ the following form for printing:
$ cat file1.ps | lp -
P NS1-
PS
Tip
If you are receiving failure messages, make sure that the computer to which you are printing is accessible. For
the Printer NS1 hp example, you can type smbclient -
L NS1 -
U jjones. Then type the password
(my9passswd, in this case). The –L asks for information about the server; the –U jjones says to log in the user
jjones. If you get a positive name query response after you enter a password, you should see a list of shared printers
and files from that server. Check the names and try printing again.
Working with CUPS Printing
Tools such as CUPS web-based administration and the Print Settings window effectively hide
the underlying CUPS facility. Sometimes, however, you want to work directly with the tools
and configuration files that come with CUPS. The following sections describe how to use some
special CUPS features.
Configuring the CUPS server (cupsd.conf)
The cupsd daemon process listens for requests to your CUPS print server and responds to
those requests based on settings in the /etc/cups/cupsd.conf file. The configuration
variables in the cupsd.conf file are in the same form as those in the Apache configuration
file (httpd.conf or apache2.conf). Type man cupsd.conf to see details on any of
the settings.
399
16
Downloaded from https://onlinelibrary.wiley.com/doi/ by alex jounh - Oregon Health & Science Univer , Wiley Online Library on [05/12/2025]. See the Terms and Conditions (https://onlinelibrary.wiley.com/terms-and-conditions) on Wiley Online Library for rules of use; OA articles are governed by the applicable Creative Commons License
Chapter 16: Configuring a Print Server
The Print Settings window adds access information to the cupsd.conf file. For other Linux
systems or if you don’t have a desktop on your server, you may need to configure the cupsd
.conf file manually. You can step through the cupsd.conf file to tune your CUPS server
further. Most of the settings are optional or can just be left as the default. Let’s look at some
of the settings that you can use in the cupsd.conf file.
No classification is set by default. With the classification set to topsecret, you can have
Top Secret displayed on all pages that go through the print server:
Classification topsecret
Other classifications you can substitute for topsecret include classified,
confidential, secret, and unclassified.
The term browsing refers to the act of broadcasting information about your printer on your
local network and listening for other print servers’ information. CUPS works with a service
called DNS-SD, which broadcasts printer availability on your local network. The Avahi daemon
actually implements this feature.
In Fedora, browsing is on by default (Browsing Yes), while in Ubuntu, it is off by default
(Browsing No).
Browsing Yes
Listen *:631
To enable web-based CUPS administration and to share printers with others on the network,
the cupsd daemon can be set to listen on port 631 for all network interfaces to your computer based on this entry: Listen *:631. By default, it listens on the local interface only
on Ubuntu and other Linux systems (Listen localhost:631). For Fedora, CUPS listens
on all interfaces by default.
This is a good way to enable users on several connected LANs to discover and use printers on
other nearby LANs.
You can allow or deny access to different features of the CUPS server. An access definition for a
CUPS printer (created from the Print Settings window) might appear as follows:
<Location /printers/ns1-hp1>
Order Deny,Allow
Deny From All
Allow From 127.0.0.1
AuthType None
</Location>
Here, printing to the ns1-hp1 printer is allowed only for users on the local host
(127.0.0.1). No password is needed (AuthType None). To allow access to the administration tool, CUPS must be configured to prompt for a password (AuthType Basic).
400
Downloaded from https://onlinelibrary.wiley.com/doi/ by alex jounh - Oregon Health & Science Univer , Wiley Online Library on [05/12/2025]. See the Terms and Conditions (https://onlinelibrary.wiley.com/terms-and-conditions) on Wiley Online Library for rules of use; OA articles are governed by the applicable Creative Commons License
Part IV: Becoming a Linux Server Administrator
Starting the CUPS server
In the latest Ubuntu, Fedora and RHEL systems, you use the systemctl command instead of
service to start and stop services:
# systemctl status cups.service
* cups.service -CUPS Printing Service
Loaded: loaded (/usr/lib/systemd/system/cups.service; enabled;
preset: disabled)
Drop-
In: /usr/lib/systemd/system/service.d
└─10-timeout-abort.conf
Active: active (running) since Sun 2025-
01-
19 11:03:04 EST; 1h
7min ago
TriggeredBy: ● cups.socket
● cups.path
Docs: man:cupsd(8)
Main PID: 9942 (cupsd)
Status: "Scheduler is running..."
Tasks: 2 (limit: 8881)
Memory: 19.0M (peak: 80.7M)
CPU: 4.000s
CGroup: /system.slice/system-
cups.slice/cups.service
└─9942 /usr/sbin/cupsd -
l
16
You can tell the CUPS service is running because the status shows the cupsd daemon active
with PID 9942. If that service were not running, you could start the CUPS service as follows:
# systemctl start cups.service
See Chapter 15, “Starting and Stopping Services,” for more information on the systemctl
and service commands for working with services.
Configuring CUPS printer options manually
If your Linux distribution doesn’t have a graphical means of configuring CUPS, you can edit
configuration files directly. For example, when a new printer is created from the Print Settings
window, it is defined in the /etc/cups/printers.conf file. This is what a printer entry
looks like:
<DefaultPrinter printer>
Info HP LaserJet 2100M
Location HP LaserJet 2100M in hall closet
DeviceURI parallel:/dev/lp0
State Idle
Accepting Yes
Shared No
JobSheets none none
QuotaPeriod 0
401
Downloaded from https://onlinelibrary.wiley.com/doi/ by alex jounh - Oregon Health & Science Univer , Wiley Online Library on [05/12/2025]. See the Terms and Conditions (https://onlinelibrary.wiley.com/terms-and-conditions) on Wiley Online Library for rules of use; OA articles are governed by the applicable Creative Commons License
Chapter 16: Configuring a Print Server
PageLimit 0
KLimit 0
</Printer>
This is an example of a local printer that serves as the default printer for the local system. The
Shared No value is set because the printer is currently available only on the local system.
The most interesting information relates to DeviceURI, which shows that the printer is connected to parallel port /dev/lp0. The state is Idle (ready to accept printer jobs), and the
Accepting value is Yes (the printer is accepting print jobs by default).
The DeviceURI has several ways to identify the device name of a printer, reflecting where
the printer is connected. Here are some examples listed in the printers.conf file:
DeviceURI
DeviceURI
DeviceURI
DeviceURI
DeviceURI
DeviceURI
DeviceURI
DeviceURI
DeviceURI
DeviceURI
parallel:/dev/plp
serial:/dev/ttyd1?baud=38400+size=8+parity=none+flow=soft
scsi:/dev/scsi/sc1d6l0
usb://hostname:port
socket://hostname:port
tftp://hostname/path
ftp://hostname/path
http://hostname[:port]/path
ipp://hostname/path
smb://hostname/printer
The first four examples show the form for local printers (parallel, serial, scsi, and
usb). The other examples are for remote hosts. In each case, hostname can be the host’s name
or IP address. Port numbers or paths identify the locations of each printer on the host. For
example, hostname could be myhost.example.com:631 and path could be replaced by
any name you like, such as printers/myprinter.
Using Printing Commands
To remain backward compatible with older UNIX and Linux printing facilities, CUPS supports
many of the old commands for working with printing. Most command-line printing with CUPS
can be performed with the lp command. Word processing applications such as LibreOffice,
OpenOffice, and AbiWord are set up to use this facility for printing.
You can use the Print Settings window to define the filters needed for each printer so that the
text can be formatted properly. Options to the lp command can add filters to process the text
properly. Other commands for managing printed documents include lpq (for viewing the contents of print queues), lprm (for removing print jobs from the queue), and lpstat -t (for
controlling printers).
Printing with lp
You can use the lp command to print documents to both local and remote printers (provided
the printers are configured locally). Document files can be either added to the end of the lp
402
Downloaded from https://onlinelibrary.wiley.com/doi/ by alex jounh - Oregon Health & Science Univer , Wiley Online Library on [05/12/2025]. See the Terms and Conditions (https://onlinelibrary.wiley.com/terms-and-conditions) on Wiley Online Library for rules of use; OA articles are governed by the applicable Creative Commons License
Part IV: Becoming a Linux Server Administrator
command line or directed to the lp command using a pipe (|). Here’s an example of a simple
lp command:
$ lp doc1.ps
When you specify just a document file with lp, output is directed to the default printer. As an
individual user, you can change the default printer by setting the value of the PRINTER variable. Typically, you add the PRINTER variable to one of your startup files, such as $HOME/
.bashrc. Adding the following line to your .bashrc file, for example, sets your default
printer to lp3:
export PRINTER=lp3
To override the default printer, specify a particular printer on the lp command line. The following example uses the -P option to select a different printer:
$ lp -
P canyonps doc1.ps
The lp command has a variety of options that enable lp to interpret and format several different types of documents. These include -# num, where num is replaced by the number of
copies to print (from 1 to 100) and -l (which causes a document to be sent in raw mode,
presuming that the document has already been formatted). To learn more options to lp,
type man lp.
Listing status with lpstat -t
Use the lpstat -t command to list the status of your printers. Here is an example:
$ /usr/sbin/lpstat -t
printer hp disabled since Wed 29 Jan 2025 10:53:34 AM EDT
printer deskjet-
555 is idle. enabled since Wed 29 Jan 2025
10:53:34 AM EDT
This output shows two active printers. The hp printer is currently disabled (offline). The
deskjet-555 printer is enabled.
Removing print jobs with lprm
Users can remove their own print jobs from the queue with the lprm command. Used alone
on the command line, lprm removes all of the user’s print jobs from the default printer. To
remove jobs from a specific printer, use the -P option, as follows:
$ lprm -
P lp0
To remove all print jobs for the current user, type the following:
$ lprm -
The root user can remove all of the print jobs for a specific user by indicating that user on the
lprm command line. For example, to remove all print jobs for the user named mike, the root
user types the following:
# lprm –
U mike
403
16
Downloaded from https://onlinelibrary.wiley.com/doi/ by alex jounh - Oregon Health & Science Univer , Wiley Online Library on [05/12/2025]. See the Terms and Conditions (https://onlinelibrary.wiley.com/terms-and-conditions) on Wiley Online Library for rules of use; OA articles are governed by the applicable Creative Commons License
Chapter 16: Configuring a Print Server
To remove an individual print job from the queue, indicate its job number on the lprm
command line. To find the job number, type the lpq command. Here’s what the output of that
command may look like:
# lpq
printer is ready and printing
Rank
Owner
Job Files
active root
133 /home/jake/pr1
2
root
197 /home/jake/mydoc
Total Size Time
467
23948
The output shows two printable jobs waiting in the queue. (The printer is ready and printing
the job listed as active.) Under the Job column, you can see the job number associated with
each document. To remove the first print job, type the following:
# lprm 133
Configuring Print Servers
You’ve configured a printer so that you and the other users on your computer can print to it.
Now you want to share that printer with other people in your home, school, or office. Basically, that means configuring the printer as a print server.
The printers configured on your Linux system can be shared in different ways with other
computers on your network. Not only can your computer act as a Linux print server (by configuring CUPS), but it can also appear as an SMB (Windows) print server to client computers.
After a local printer is attached to your Linux system and your computer is connected to your
local network, you can use the procedures in the following sections to share the printer with
client computers using a Linux (UNIX) or SMB interface.
Configuring a shared CUPS printer
Making the local printer added to your Linux computer available to other computers on your
network is fairly easy. If a TCP/IP network connection exists between the computers sharing
the printer, you simply grant permission to all hosts, individual hosts, or users from remote
hosts to access your computer’s printing service.
To configure a printer entry manually in the /etc/cups/printers.conf file to accept
print jobs from all other computers, make sure that the Shared Yes line is set. The following example from a printers.conf entry earlier in this chapter demonstrates what the
new entry would look like:
<DefaultPrinter printer>
Info HP LaserJet 2100M
Location HP LaserJet 2100M in hall closet
DeviceURI parallel:/dev/lp0
State Idle
Accepting Yes
Shared Yes
JobSheets none none
404
Downloaded from https://onlinelibrary.wiley.com/doi/ by alex jounh - Oregon Health & Science Univer , Wiley Online Library on [05/12/2025]. See the Terms and Conditions (https://onlinelibrary.wiley.com/terms-and-conditions) on Wiley Online Library for rules of use; OA articles are governed by the applicable Creative Commons License
Part IV: Becoming a Linux Server Administrator
QuotaPeriod 0
PageLimit 0
KLimit 0
</Printer>
On Linux systems that use the Print Settings window described earlier in this chapter, it’s best
to set up your printer as a shared printer using that window. Here’s how to do that using the
latest Fedora release:
1. From the Activities screen on a GNOME 3 desktop in Fedora, type Print Settings
and press Enter. The Print Settings window appears.
2. To allow all of your printers to be shared, select Server ➪ Settings. If you are not
the root user, you are prompted for the root password. The Basic Server Settings popup appears.
3. Select the check box Publish Shared Printers Connected To This System and click
OK. You may be asked to modify your firewall to open the necessary ports for remote
systems to access your printers.
4. To allow or restrict printing for a particular printer further, double-click the
name of the printer that you want to share. (If the printer is not yet configured,
refer to the section “Setting Up Printers” earlier in this chapter.)
5. Choose the Policies heading and select Shared so that a check mark appears
in the box.
6. If you want to restrict access to the printer to selected users, select the Access
Control heading and choose one of the following options:
a. Allow Printing for Everyone Except These Users. With this selected, all users are
allowed access to the printer. By typing usernames into the Users box and clicking
Add, you exclude selected users.
b. Deny Printing for Everyone Except These Users. With this selected, all users are
excluded from using the printer. Type usernames into the Users box, and click Add
to allow access to the printer for only those names that you enter.
Now you can configure other computers to use your printer, as described in the section
“Setting Up Printers” of this chapter. If you try to print from another computer and it doesn’t
work, try these troubleshooting tips:
Open your firewall. If you have a restrictive firewall, it may not permit printing. You
must enable access to TCP port 631 to allow access to printing on your computer.
Check names and addresses. Make sure you entered your computer’s name and print
queue properly when you configured it on the other computer. Try using the IP address
instead of the hostname. (If that works, it indicates a DNS name resolution problem.)
Running a tool such as tcpdump enables you to see where the transaction fails.
Check which addresses cupsd is listening on. The cupsd daemon must be listening
outside of the localhost for remote systems to print to it. Use the ss command
405
16
Downloaded from https://onlinelibrary.wiley.com/doi/ by alex jounh - Oregon Health & Science Univer , Wiley Online Library on [05/12/2025]. See the Terms and Conditions (https://onlinelibrary.wiley.com/terms-and-conditions) on Wiley Online Library for rules of use; OA articles are governed by the applicable Creative Commons License
Chapter 16: Configuring a Print Server
(as the root user) as follows to check this. The first example shows cupsd only listening on local host (127.0.0.1:631); the second shows cupsd listening on all network interfaces (0 0.0.0.0:631):
# ss -
tupln | grep 631
tcp
0
0 127.0.0.1:631
# ss -
tupln | grep 631
tcp
0
0 0.0.0.0:631
0.0.0.0:*
LISTEN
6492/cupsd
0.0.0.0:*
LISTEN
6492/cupsd
Access changes to your shared printer are made in the cupsd.conf and printers.conf
files in your /etc/cups directory.
Configuring a shared Samba printer
Your Linux printers can be configured as shared SMB printers so that they appear to be available from Windows systems. To share your printer as if it were a Samba (SMB) printer, simply
configure basic Samba server settings as described in Chapter 19, “Configuring a Windows File
Sharing (Samba) Server.” All your printers should be shared on your local network by default.
The next section shows what the resulting settings look like and how you might want to
change them.
Understanding smb.conf for printing
When you configure Samba, the /etc/samba/smb.conf file is constructed to enable all of
your configured printers to be shared. Here are a few lines from the smb.conf file that relate
to printer sharing:
[global]
…
printing = cups
printcap name = cups
load printers = yes
cups options = raw
…
[printers]
comment = All Printers
path = /var/tmp
printable = Yes
create mask = 0600
browseable = No
With cups options set to raw, Samba assumes that print files have already been formatted
by the time they reach your print server. This allows the Linux or Windows clients to provide
their own print drivers.
The last few lines are the actual printers’ definition. By changing the browseable option
from No to Yes, you give users the ability to print to all printers (printable = Yes).
You can also store Windows native print drivers on your Samba server. When a Windows client
uses your printer, the driver automatically becomes available. You do not need to download a
406
Downloaded from https://onlinelibrary.wiley.com/doi/ by alex jounh - Oregon Health & Science Univer , Wiley Online Library on [05/12/2025]. See the Terms and Conditions (https://onlinelibrary.wiley.com/terms-and-conditions) on Wiley Online Library for rules of use; OA articles are governed by the applicable Creative Commons License
Part IV: Becoming a Linux Server Administrator
driver from the vendor’s website. To enable the printer driver share, add a Samba share called
print$ that looks like the following:
[print$]
comment = Printer Drivers
path = /var/lib/samba/drivers
guest ok = no
read only = yes
write list = chris, david
After you have the share available, you can start copying Windows print drivers to the
/var/lib/samba/drivers directory.
Setting up SMB clients
Chances are good that if you are configuring a Samba printer on your Linux computer, you
want to share it with Windows clients. If Samba is set up properly on your computer and the
client computers can reach you over the network, users should have no trouble finding and
using your printer.
For many Windows systems, click Start ➪ Printers and Scanners. Select Add a printer or
scanner, and select the printer from the list that appears to configure it. Select Add device to
make it available.
After your shared printer appears in the window, configure a pointer to that printer by
opening (double-clicking) the printer icon. A message tells you that you must set up the
printer before you can use it. Click Yes to proceed to configure the printer for local use. The
Add Printer Wizard appears. Answer the questions that ask you how you intend to use the
printer and add the appropriate drivers. When you are finished, the printer appears in your
printer window.
Summary
Providing networked printing services is essential on today’s business networks. With the use
of a few network-attached devices, you can focus your printer spending on a few high-quality
devices that multiple users can share instead of numerous lower-cost devices. In addition, a
centrally located printer can make it easier to maintain the printer while still enabling everyone to get their printing jobs done.
The default printing service in nearly every major Linux distribution today is the Common
UNIX Printing System (CUPS). Any Linux system that includes CUPS offers the CUPS web-based
administrative interface for configuring CUPS printing. It also offers configuration files in the
/etc/cups directory for configuring printers and the CUPS service (cupsd daemon).
In RHEL, Fedora, Ubuntu, and other Linux systems, you can configure your printer with the
printing configuration windows. A variety of drivers makes it possible to print to different
kinds of printers as well as to printers that are connected to computers on the network.
407
16
Downloaded from https://onlinelibrary.wiley.com/doi/ by alex jounh - Oregon Health & Science Univer , Wiley Online Library on [05/12/2025]. See the Terms and Conditions (https://onlinelibrary.wiley.com/terms-and-conditions) on Wiley Online Library for rules of use; OA articles are governed by the applicable Creative Commons License
Chapter 16: Configuring a Print Server
You can set up your computer as a Linux print server, and you can also have your computer
emulate an SMB (Windows) print server. After your network is configured properly and a local
printer is installed, sharing that printer over the network as a UNIX or SMB print server is not
very complicated.
Exercises
Use these exercises to test your knowledge of configuring printers in Linux. These tasks
assume you are running a Fedora, Red Hat Enterprise Linux, or Ubuntu system (although some
tasks work on other Linux systems as well). If you are stuck, solutions to the tasks are shown
in Appendix B (although in Linux, you can often complete a task in multiple ways).
1. Use the Print Settings window (system-config-printer package) to add a new
printer called myprinter to your system. (The printer does not have to be connected to set up a print queue for the new printer.) Make it a generic PostScript
printer connected to a local serial, LPT, or other port.
2. Use the lpstat -t command to see the status of all of your printers.
3. Use the lp command to print the /etc/hosts file to that printer.
4. Check the print queue for that printer to see that the print job is there.
5. Remove the print job from the queue (cancel it).
6. Using the Printing window, set the basic server setting that publishes your printers so
that other systems on your local network can print to your printers.
7. Allow remote administration of your system from a web browser.
8. Demonstrate that you can do remote administration of your system by opening a
web browser to port 631 from another system to the Linux system running your
print server.
9. Use the ss command to see on which addresses the cupsd daemon is listening (the
printing port is 631).
10. Delete the myprinter printer entry from your system.
408
Downloaded from https://onlinelibrary.wiley.com/doi/ by alex jounh - Oregon Health & Science Univer , Wiley Online Library on [05/12/2025]. See the Terms and Conditions (https://onlinelibrary.wiley.com/terms-and-conditions) on Wiley Online Library for rules of use; OA articles are governed by the applicable Creative Commons License
Part IV: Becoming a Linux Server Administrator
Configuring a Web Server
17
IN THIS CHAPTER
Installing an Apache web server
Configuring Apache
Securing Apache with iptables and SELinux
Creating virtual hosts
Building a secure (HTTPS) website
Checking Apache for errors
W
eb servers are responsible for serving up the content you view on the Internet every day. By
far, the most popular web server is the Apache (HTTPD) web server, which is sponsored by the
Apache Software Foundation (http://apache.org). Because Apache is an open source project,
it is available with every major Linux distribution, including Fedora, RHEL, and Ubuntu.
You can configure a basic web server to run in Linux in just a few minutes. However, you can configure
your Apache web server in a tremendous number of ways. You can configure an Apache web server to
serve content for multiple domains (virtual hosting), provide encrypted communications (HTTPS), and
secure some or all of a website using different kinds of authentication.
This chapter takes you through the steps to install and configure an Apache web server. These steps
include procedures for securing your server as well as using a variety of modules so that you can incorporate different authentication methods and scripting languages into your web server. Then I describe how
to generate certificates to create an HTTPS Secure Sockets Layer (SSL) website.
While most of this chapter shows you the features of a simple Apache web server, there are other considerations for running a production-quality web server. I describe a few of those considerations at the end
of this chapter.
Understanding the Apache Web Server
Apache HTTPD (also known as the Apache HTTPD Server) provides the service with which the client web
browsers communicate. The daemon process (httpd) runs in the background on your server and waits
409
Linux Bible, Eleventh Edition. Christopher Negus.
© 2026 John Wiley & Sons, Inc. All rights reserved, including rights for text and data mining and training of artificial intelligence technologies or similar
technologies. Published 2026 by John Wiley & Sons, Inc.
Downloaded from https://onlinelibrary.wiley.com/doi/ by alex jounh - Oregon Health & Science Univer , Wiley Online Library on [05/12/2025]. See the Terms and Conditions (https://onlinelibrary.wiley.com/terms-and-conditions) on Wiley Online Library for rules of use; OA articles are governed by the applicable Creative Commons License
CHAPTER
for requests from web clients. Web browsers provide those connections to the HTTP daemon
and send requests, which the daemon interprets, sending back the appropriate data (such as a
web page or other content).
Apache HTTPD includes an interface that allows modules to tie into the process to handle specific portions of a request. Among other things, modules are available to handle the processing
of scripting languages, such as Perl, Ruby, Python, and PHP, within web documents and to add
encryption to connections between clients and the server.
Apache began as a collection of patches and improvements from the National Center for
Supercomputing Applications (NCSA), University of Illinois, Urbana-Champaign, to the HTTP
daemon. The NCSA HTTP daemon was the most popular HTTP server at the time, but it had
started to show its age after its author, Rob McCool, left NCSA in mid-1994.
Note
Another project that came from NCSA is Mosaic. Most modern web browsers can trace their origins to Mosaic.
In early 1995, a group of developers formed the Apache Group and began making extensive
modifications to the NCSA HTTPD code base. Apache soon replaced NCSA HTTPD as the most
popular web server. Today there are other competitors for that prize, with nginx perhaps in
the lead for that.
The Apache Group later formed the Apache Software Foundation (ASF) to promote the development of Apache and other free software. With the start of new projects at ASF, the Apache
server became known as Apache HTTPD, although the two terms are still used interchangeably.
Currently, ASF has more than 350 open source initiatives, including Tomcat (which includes
open source Java Servlet and JavaServer Pages technologies), Hadoop (a project providing highly available, distributed computing), Kafka (a distributed streaming platform), and
SpamAssassin (an email filtering program).
Getting and Installing Your Web Server
Although Apache is available with every major Linux distribution, it is often packaged in different ways. In most cases, all you need to start a simple Apache web server is the package
containing the Apache daemon itself (/usr/sbin/httpd) and its related files. In Fedora,
RHEL, and others, the Apache web server comes in the httpd package.
Understanding the httpd-core package
To examine the httpd-core package in Fedora or RHEL before you install it, download the
package using the yumdownloader command (from the dnf-utils package) and run a
few rpm commands on it to view its contents:
# yumdownloader httpd-core
# rpm -qpi httpd-core*rpm
410
Downloaded from https://onlinelibrary.wiley.com/doi/ by alex jounh - Oregon Health & Science Univer , Wiley Online Library on [05/12/2025]. See the Terms and Conditions (https://onlinelibrary.wiley.com/terms-and-conditions) on Wiley Online Library for rules of use; OA articles are governed by the applicable Creative Commons License
Part IV: Becoming a Linux Server Administrator
Name
: httpd-
core
Version
: 2.4.64
Release
: 2.fc42
Architecture: x86_64
Install Date: (not installed)
Group
: Unspecified
Size
: 4701807
License
: Apache-
2.0 AND (BSD-
3-
Clause AND metamail AND
HPND-
sell-
variant AND Spencer-
94)
Signature
: RSA/SHA256, Thu 17 Jul 2025 09:47:36 AM EDT,
Key ID c8ac4916105ef944
Source RPM : httpd-
2.4.64-
2.fc42.src.rpm
Build Date : Thu 17 Jul 2025 09:35:22 AM EDT
Build Host : Thu 17 Jul 2025 09:35:22 AM EDT
Packager
: Fedora Project
Vendor
: Fedora Project
URL
: https://httpd.apache.org/
Bug URL
: https://bugzilla.redhat.com/
Summary
: httpd minimal core
Description :
The httpd-
core package contains essential httpd binaries.
17
The yumdownloader command downloads the latest version of the httpd-core package
to the current directory. The rpm -qpi command queries the httpd-core RPM package
you just downloaded for information. You can see that the package was created by the Fedora
project and that it is indeed the Apache HTTP Server package. Next, look inside the package to
see the configuration files (-qpc):
# rpm -qpc httpd-core*rpm
/etc/httpd/conf.d/autoindex.conf
/etc/httpd/conf.d/userdir.conf
/etc/httpd/conf.d/welcome.conf
/etc/httpd/conf.modules.d/00-base.conf
/etc/httpd/conf.modules.d/00-dav.conf
…
/etc/httpd/conf/httpd.conf
/etc/httpd/conf/magic
/etc/logrotate.d/httpd
/etc/sysconfig/htcacheclean
The main configuration file is /etc/httpd/conf/httpd.conf for Apache. The
welcome.conf file defines the default home page for your website, until you add some content. The magic file defines rules that the server can use to figure out a file’s type when the
server tries to open it.
The /etc/logrotate.d/httpd file defines how log files produced by Apache are rotated.
The /usr/lib/tmpfiles.d/httpd.conf file defines a directory that contains temporary runtime files (no need to change that file).
411
Downloaded from https://onlinelibrary.wiley.com/doi/ by alex jounh - Oregon Health & Science Univer , Wiley Online Library on [05/12/2025]. See the Terms and Conditions (https://onlinelibrary.wiley.com/terms-and-conditions) on Wiley Online Library for rules of use; OA articles are governed by the applicable Creative Commons License
Chapter 17: Configuring a Web Server
Some Apache modules drop configuration files (*.conf) into the /etc/httpd/conf
modules.d/ directory. Any file in that directory that ends in .conf is pulled into the main
httpd.conf file and used to configure Apache. Most module packages that come with configuration files put those configuration files in the /etc/httpd/conf.d directory. For
example, the mod_ssl (for secure web servers) and mod_python (for interpreting Python
code) modules have related configuration files in the /etc/httpd/conf.d directory named
ssl.conf and python.conf, respectively.
You can just install the httpd-core package to begin setting up your web server. However, you might prefer to add some other packages that are often associated with the httpd
package. One way to do that is to install the entire Web Server (in Fedora) or Basic Web Server
group (in RHEL), as in the following example:
# dnf groupinstall "Web Server"
Besides installing some packages that are peripheral to httpd-core (such as rsyslogd,
irqbalance, and others), here are other packages in the Web Server group in Fedora that
you get by default along with httpd-core:
httpd-manual Fills the /var/www/manual directory with the Apache documentation manuals. After you start the httpd service (as shown in later steps), you
can access this set of manuals from a web browser on the local machine by typing
http://localhost/manual into the location box.
Externally, instead of localhost, you could use the fully qualified domain name or IP
address of the system. The Apache Documentation screen then appears, as shown in
Figure 17.1.
mod_ssl Contains the module and configuration file needed for the web server to provide secure connections to clients using SSL and Transport Layer Security (TLS) protocols. These features are necessary if you need encrypted communications for online
shopping or other data you want to keep private. The configuration file is located at
/etc/httpd/conf.d/ssl.conf.
crypto-utils Contains commands for generating keys and certificates needed to do
secure communications with the Apache web server.
mod_perl Contains the Perl module (mod_perl), configuration file, and associated
files needed to allow the Apache web server to execute any Perl code directly.
php Contains the PHP module and configuration file needed to run PHP scripts
directly in Apache. Related packages include php-ldap (for running PHP code that
needs to access LDAP databases) and php-mysql (to add database support to the
Apache server).
php-ldap Adds support for Lightweight Directory Access Protocol (LDAP) to the PHP
module, allowing directory service access over networks.
412
Downloaded from https://onlinelibrary.wiley.com/doi/ by alex jounh - Oregon Health & Science Univer , Wiley Online Library on [05/12/2025]. See the Terms and Conditions (https://onlinelibrary.wiley.com/terms-and-conditions) on Wiley Online Library for rules of use; OA articles are governed by the applicable Creative Commons License
Part IV: Becoming a Linux Server Administrator
FIGURE 17.1
Access Apache documentation directly from the local Apache server.
17
squid Provides proxy services for specific protocols (such as HTTP), as mentioned in
Chapter 14, “Administering Networking.” Although it doesn’t provide HTTP content
itself, a Squid proxy server typically forwards requests from proxy clients to the Internet or other network providing web content. This provides a means of controlling or
filtering content that clients can reach from a home, school, or place of business.
webalizer
Contains tools for analyzing web server data.
Optional packages in the Web Server group come from the “web-server” subgroup. Run dnf
groupinfo web-server to display those packages. Some of those packages offer special
ways of providing content, such as wikis (mediawiki), content management systems
(drupal7), and blogs (wordpress). Others include tools for graphing web statistics
(awstats) or offer lightweight web server alternatives to Apache (lighttpd).
Installing Apache
Although you need only httpd-core to get started with an Apache web server, if you are
just learning about Apache, you should install the manuals (httpd-manual) as well. If you
413
Downloaded from https://onlinelibrary.wiley.com/doi/ by alex jounh - Oregon Health & Science Univer , Wiley Online Library on [05/12/2025]. See the Terms and Conditions (https://onlinelibrary.wiley.com/terms-and-conditions) on Wiley Online Library for rules of use; OA articles are governed by the applicable Creative Commons License
Chapter 17: Configuring a Web Server
plan on creating a secure (SSL) site and possibly generating some statistics about your website, you can just install the entire group in Fedora:
# dnf groupinstall "Web Server"
Assuming that you have an Internet connection to the Fedora repository (or RHEL repository, if you are using RHEL), all of the mandatory and default packages from that group
are installed. You have all of the software that you need to do the procedures and exercises
described in this chapter.
Starting Apache
To get the Apache web server going, you want to enable the service to start on every reboot,
and you want to start it immediately. In Red Hat Enterprise Linux (up to RHEL 6) and in older
Fedora distributions, you could type the following as root:
# chkconfig httpd on
# service httpd start
Starting httpd:
[
OK
]
In the latest Fedora and RHEL systems, you enable and start the httpd service using the
systemctl command:
#
#
#
●
systemctl enable httpd.service
systemctl start httpd.service
systemctl status httpd.service
httpd.service -The Apache HTTP Server
Loaded: loaded (/usr/lib/systemd/system/httpd.service; enabled;
preset: disabled)
Drop-
In: /usr/lib/systemd/system/service.d
└─10-timeout-abort.conf
/etc/systemd/system/httpd.service.d
└─php-fpm.conf
Active: active (running) since 2025-
07-
28 18:58:36 EDT; 3s ago
Docs: man:httpd.service(8)
Main PID: 6058 (/usr/sbin/httpd)
Status: "Total requests: 10; Idle/Busy workers 100/0;Requests/
sec: 0.00917; Bytes ser>
Tasks: 231 (limit: 9200)
Memory: 34.5M (peak: 35.3M)
CPU: 1.682s
CGroup: /system.slice/httpd.service
├─6058 /usr/sbin/httpd -
DFOREGROUND
├─6060 /usr/sbin/httpd -
DFOREGROUND
…
When the httpd service starts, five or six httpd daemon processes are launched by default
(depending on your Linux system) to respond to requests for the web server. You can configure
414
Downloaded from https://onlinelibrary.wiley.com/doi/ by alex jounh - Oregon Health & Science Univer , Wiley Online Library on [05/12/2025]. See the Terms and Conditions (https://onlinelibrary.wiley.com/terms-and-conditions) on Wiley Online Library for rules of use; OA articles are governed by the applicable Creative Commons License
Part IV: Becoming a Linux Server Administrator
more or fewer httpd daemons to be started based on settings in the httpd.conf file
(described in the section “Understanding the Apache configuration files” later in this chapter).
To change the behavior of the httpd daemon, you can edit the httpd service by running
systemctl edit httpd.
Because there are different versions of httpd around, check the man page (man httpd) to
see what options can be passed to the httpd daemon. For example, run systemctl edit
httpd and add an entry as follows:
[Service]
Environment=OPTIONS=‘-e debug’
Save the changes (Ctrl+O, Ctrl+X). Adding -e debug increases the log level so that the
maximum number of Apache messages are sent to log files. Restart the httpd service for the
changes to take effect. Type the ps command to make sure that the options took effect:
$ ps -
ef | grep httpd
root
14575 1
0 08:49 ? 00:00:01 /usr/sbin/httpd -
e debug
-DFOREGROUND
apache 14582 14575 0 08:49 ? 00:00:00 /usr/sbin/httpd -
e debug
-DFOREGROUND
If you added a debug option (-e debug), remember to remove that option by running
systemctl edit httpd again and removing the entry when you are done debugging
Apache, and restart the service. Leaving debugging on will quickly fill up your log files.
Securing Apache
To secure Apache, you need to be aware of standard Linux security features (permissions, ownership, firewalls, and Security Enhanced Linux) as well as security features that are specific to
Apache. The following sections describe security features that relate to Apache.
Apache file permissions and ownership
The httpd daemon process runs as the user apache and group apache. By default,
HTML content is stored in the /var/www/html directory (as determined by the value of
DocumentRoot in the httpd.conf file).
For the httpd daemon to be able to access that content, standard Linux permissions apply:
If read permission is not on for “other” users, it must be on for the apache user or group
for the files to be read and served to clients. Likewise, any directory the httpd daemon must
traverse to get to the content must have execute permission on for the apache user, apache
group, or other user.
Although you cannot log in as the apache user (/sbin/nologin is the default shell), you
can create content as root and change its ownership (chown command) or permission (chmod
command). Often, however, separate user or group accounts are added to create content that is
readable by everyone (other) but writable only by that special user or group.
415
17
Downloaded from https://onlinelibrary.wiley.com/doi/ by alex jounh - Oregon Health & Science Univer , Wiley Online Library on [05/12/2025]. See the Terms and Conditions (https://onlinelibrary.wiley.com/terms-and-conditions) on Wiley Online Library for rules of use; OA articles are governed by the applicable Creative Commons License
Chapter 17: Configuring a Web Server
Apache and firewalls
If you have locked down your firewall in Linux, you need to open several ports for clients to be
able to talk to Apache through the firewall. Standard web service (HTTP) is accessible over TCP
port 80; secure web service (HTTPS) is accessible via TCP port 443. (Port 443 appears only if
you have installed the mod_ssl package, as described later.)
To verify which ports are being used by the httpd server, use the ss command:
# ss -
tupln | grep httpd
tcp6 0
0 :::80
tcp6 0
0 :::443
:::*
:::*
LISTEN
LISTEN
29169/httpd
29169/httpd
The output shows that the httpd daemon (process ID 29169) is listening on all addresses for
port 80 (:::80) and port 443 (:::443). Both ports are associated with the TCP protocol
(tcp6). To open those ports in Fedora or Red Hat Enterprise Linux, you need to add some firewall rules.
On a current Fedora or RHEL system, open the Firewall window. You need the firewalld
package installed and the firewalld service started. Type Firewall and press Enter from the
Activities screen on the GNOME desktop. From there, select Permanent as the configuration.
Then, with the public zone selected, click the check boxes next to the http and https service
boxes. Those ports immediately become open. (As an alternative, you could use Cockpit to
open ports from the Networking tab.)
For RHEL 6 or older Fedora releases, add rules to the /etc/sysconfig/iptables file
(somewhere before a final DROP or REJECT) such as the following:
-
A INPUT -
m state -
-
state NEW -
m tcp -
p tcp -
-
dport 80 -
j ACCEPT
-
A INPUT -
m state -
-
state NEW -
m tcp -
p tcp -
-
dport 443 -
j ACCEPT
Restart iptables (service iptables restart) for the new rules to take effect.
Once the firewall ports are open, you should be able to access your new web server from
outside of the localhost. From another computer on your network, type the hostname or IP
address of your web server, such as https://192.168.1.10, to see the Apache test page.
Apache and SELinux
If Security Enhanced Linux (SELinux) is set to enforcing (as it is by default in Fedora and Red
Hat Enterprise Linux), SELinux adds another layer of security over your httpd service. In
essence, SELinux actually sets out to protect the system from being damaged by someone
who may have cracked the httpd daemon. SELinux does this by creating policies that do the
following:
■
416
Deny access to files that are not set to the right file contexts. For httpd in SELinux,
there are different file contexts for content, configuration files, log files, scripts, and
other httpd-related files. Any file that is not set to the proper context is not accessible to the httpd daemon.
Downloaded from https://onlinelibrary.wiley.com/doi/ by alex jounh - Oregon Health & Science Univer , Wiley Online Library on [05/12/2025]. See the Terms and Conditions (https://onlinelibrary.wiley.com/terms-and-conditions) on Wiley Online Library for rules of use; OA articles are governed by the applicable Creative Commons License
Part IV: Becoming a Linux Server Administrator
■
■
Prevent insecure features from being used, such as file uploading and clear-text
authentication, by setting Booleans for such features to the off position. You
can selectively turn on Booleans as they are needed—if they meet your security
requirements.
Keep the httpd daemon from accessing nonstandard features, such as a port outside
of the default ports the service would expect to use.
A full description of SELinux is contained in Chapter 25, “Enhancing Linux Security with
SELinux.” However, here are a few specifics you should know about using SELinux with the
Apache httpd service:
Turn off SELinux You don’t have to use SELinux. You can set SELinux to permissive
mode if you feel that it is too difficult and unnecessary to create the SELinux policies
needed to get your web server to work with SELinux in enforcing mode. You can change
the mode to permissive by editing the /etc/sysconfig/selinux file so that the
SELINUX value is set as follows. With this set, the next time you reboot the system,
it is in permissive mode. This means that if you break SELinux policies, that event is
logged but not prevented (as it would be in enforcing mode).
SELINUX=permissive
Read the httpd_selinux man page Type man httpd_selinux from the shell. This
man page shows you the proper file contexts and available Booleans. (If the man page
is not there, install it with dnf install selinux-policy-doc.)
Use standard locations for files When you create new files, those files inherit the file
contexts of the directories in which they are stored. Because /etc/httpd is set to
the right file context for configuration files, /var/www/html is right for content
files, and so on. Simply copying files to or creating new files in those locations causes
the file contexts to be set properly.
Modify SELinux to allow nonstandard features You may want to serve web content
from the /mystuff directory or put configuration files in the /etc/whatever
directory. Likewise, you may want to allow users of your server to upload files, run
scripts, or enable other features that are disabled by SELinux by default. In those
cases, you can use SELinux commands to set the file contexts and Booleans that you
need to get SELinux working the way you want.
Be sure to read Chapter 25, “Enhancing Linux Security with SELinux,” to learn more
about SELinux.
Understanding the Apache configuration files
The configuration files for Apache HTTPD are incredibly flexible, meaning you can configure
the server to behave in almost any manner you want. This flexibility comes at the cost of
increased complexity in the form of a large number of configuration options (called directives).
In practice, however, you need to be familiar with only a few directives in most cases.
417
17
Downloaded from https://onlinelibrary.wiley.com/doi/ by alex jounh - Oregon Health & Science Univer , Wiley Online Library on [05/12/2025]. See the Terms and Conditions (https://onlinelibrary.wiley.com/terms-and-conditions) on Wiley Online Library for rules of use; OA articles are governed by the applicable Creative Commons License
Chapter 17: Configuring a Web Server
Note
See http://httpd.apache.org/docs/current/mod/directives.html for a complete list of directives
supported by Apache. If you have httpd-manual installed, you can reach descriptions of these directives and other
Apache features by opening the manual from the server you have running Apache: http://localhost/manual.
In Fedora and RHEL, the basic Apache server’s primary configuration file is in /etc/httpd/
conf/httpd.conf. Besides this file, any file ending in .conf in the /etc/httpd/
conf.d directory is also used for Apache configuration (based on an Include line in the
httpd.conf file). In Ubuntu, the Apache configuration is stored in text files read by the
Apache server, beginning with /etc/apache2/apache2.conf. Configuration is read from
start to finish, with most directives being processed in the order in which they are read.
Using directives
The scope of many configuration directives can be altered based on context. In other words,
some parameters may be set on a global level and then changed for a specific file, directory, or
virtual host. Other directives are always global in nature, such as those specifying on which IP
addresses the server listens. Still others are valid only when applied to a specific location.
Locations are configured in the form of a start tag containing the location type and a resource
location, followed by the configuration options for that location, and finishing with an end
tag. This form is often called a configuration block, and it looks similar to HTML code. A special
type of configuration block, known as a location block, is used to limit the scope of directives
to specific files or directories. These blocks take the following form:
<locationtag specifier>
(options specific to objects matching the specifier go within this
block)
</locationtag>
Different types of location tags exist and are selected based on the type of resource location
that is being specified. The specifier included in the start tag is handled based on the type of
location tag. The location tags that you generally use and encounter are Directory, Files,
and Location, which limit the scope of the directives to specific directories, files, or locations, respectively.
■
■
418
Directory tags are used to specify a path based on the location on the filesystem.
For instance, <Directory /> refers to the root directory on the computer.
Directories inherit settings from directories above them, with the most specific
Directory block overriding less-specific ones, regardless of the order in which they
appear in the configuration files.
Files tags are used to specify files by name. Files tags can be contained within
a Directory block to limit them to files under that directory. Settings within a
Files block override the ones in Directory blocks.
Downloaded from https://onlinelibrary.wiley.com/doi/ by alex jounh - Oregon Health & Science Univer , Wiley Online Library on [05/12/2025]. See the Terms and Conditions (https://onlinelibrary.wiley.com/terms-and-conditions) on Wiley Online Library for rules of use; OA articles are governed by the applicable Creative Commons License
Part IV: Becoming a Linux Server Administrator
■
Location tags are used to specify the URI used to access a file or directory. This
is different from Directory in that it relates to the address contained within the
request and not to the real location of the file on the drive. Location tags are processed last and override the settings in Directory and Files blocks.
Match versions of these tags—DirectoryMatch, FilesMatch, and LocationMatch—
have the same function but can contain regular expressions in the resource specification.
FilesMatch and LocationMatch blocks are processed at the same time as Files and
Location, respectively. DirectoryMatch blocks are processed after Directory blocks.
Apache can also be configured to process configuration options contained within files with the
name specified in the AccessFileName directive (which is generally set to .htaccess).
Directives in access configuration files are applied to all objects under the directory they contain, including subdirectories and their contents. Access configuration files are processed at
the same time as Directory blocks, using a similar “most specific match” order.
Note
Access control files are useful for allowing users to change specific settings without having access to the server
configuration files. The configuration directives permitted within an access configuration file are determined by the
AllowOverride setting on the directory in which they are contained. Some directives do not make sense at that
level and generally result in a “server internal error” message when trying to access the URI. The AllowOverride
option is covered in detail at http://httpd.apache.org/docs/mod/core.html#allowoverride.
Three directives commonly found in location blocks and access control files are
DirectoryIndex, Options, and ErrorDocument:
■
■
■
DirectoryIndex tells Apache which file to load when the URI contains a directory
but not a filename. This directive doesn’t work in Files blocks.
Options is used to adjust how Apache handles files within a directory. The
ExecCGI option tells Apache that files in that directory can be run as CGI scripts,
and the Includes option tells Apache that server-side includes (SSIs) are permitted.
Another common option is the Indexes option, which tells Apache to generate a list
of files if one of the filenames found in the DirectoryIndex setting is missing. An
absolute list of options can be specified, or the list of options can be modified by
adding + or -in front of an option name. See http://httpd.apache.org/docs/mod/
core.html#options for more information.
ErrorDocument directives can be used to specify a file containing messages to
send to web clients when a particular error occurs. The location of the file is relative
to the /var/www directory. The directive must specify an error code and the full URI
for the error document. Possible error codes include 403 (access denied), 404 (file
not found), and 500 (server internal error). You can find more information about the
ErrorDocument directive at http://httpd.apache.org/docs/mod/core.html#
errordocument. As an example, when a client requests a URL from the server that is
419
17
Downloaded from https://onlinelibrary.wiley.com/doi/ by alex jounh - Oregon Health & Science Univer , Wiley Online Library on [05/12/2025]. See the Terms and Conditions (https://onlinelibrary.wiley.com/terms-and-conditions) on Wiley Online Library for rules of use; OA articles are governed by the applicable Creative Commons License
Chapter 17: Configuring a Web Server
not found, the following ErrorDocument line causes the 404 error code to send
the client an error message that is listed in the /var/www/error/HTTP_NOT_
FOUND.html.var file.
ErrorDocument 404 /error/HTTP_NOT_FOUND.html.var
Another common use for location blocks and access control files is to limit or expand access
to a resource. The Allow directive can be used to permit access to matching hosts, and the
Deny directive can be used to forbid it. Both of these options can occur more than once
within a block and are handled based on the Order setting. Setting Order to Deny,
Allow permits access to any host that is not listed in a Deny directive. A setting of Allow,
Deny denies access to any host not allowed in an Allow directive.
As with most other options, the most specific Allow or Deny option for a host is used,
meaning you can Deny access to a range and Allow access to subsets of that range. By adding the Satisfy option and some additional parameters, you can add password authentication. For more information on Allow or Deny, Satisfy, or other directives, refer to the
Apache Directive Index: http://httpd.apache.org/docs/current/mod/directives.html.
Understanding default settings
The reason you can start using your Apache web server as soon as you install it is that the
httpd.conf file includes default settings that tell the server where to find web content,
scripts, log files, and other items that the server needs to operate. It also includes settings
that tell the server how many server processes to run at a time and how directory contents are
displayed.
If you want to host a single website (such as for the example.com domain), you can simply
add content to the /var/www/html directory and add the address of your website to a DNS
server so that others can browse to it. You can then change directives, such as those described
in the previous section, as needed.
To help you understand the settings that come in the default httpd.conf file, I’ve displayed
some of those settings with descriptions below. I have removed comments and rearranged some
of the settings for clarity.
The following settings show locations where the httpd server is getting and putting content
by default:
ServerRoot "/etc/httpd"
Include conf.d/*.conf
ErrorLog logs/error_log
CustomLog "logs/access_log" combined
DocumentRoot "/var/www/html"
ScriptAlias /cgi-bin/ "/var/www/cgi-bin/"
The ServerRoot directive identifies /etc/httpd as the location where configuration files
are stored.
420
Downloaded from https://onlinelibrary.wiley.com/doi/ by alex jounh - Oregon Health & Science Univer , Wiley Online Library on [05/12/2025]. See the Terms and Conditions (https://onlinelibrary.wiley.com/terms-and-conditions) on Wiley Online Library for rules of use; OA articles are governed by the applicable Creative Commons License
Part IV: Becoming a Linux Server Administrator
At the point in the file where the Include line appears, any files ending in .conf from the
/etc/httpd/conf.d directory are included in the httpd.conf file. Configuration files
are often associated with Apache modules (and are often included in the software package
with a module) or with virtual host blocks (which you might add yourself to virtual host
configurations in separate files). See the section “Adding a virtual host to Apache” later in
this chapter.
As errors are encountered and content is served, messages about those activities are placed
in files indicated by the ErrorLog and CustomLog entries. From the entries shown here,
those logs are stored in the /etc/httpd/logs/error_log and /etc/httpd/logs/
access_log directories, respectively. Those logs are hard linked to the /var/log/httpd
directory, so you can access the same file from there as well.
The DocumentRoot and ScriptAlias directives determine where content that is served
by your httpd server is stored. Traditionally, you would place an index.html file in the
DocumentRoot directory (/var/www/html, by default) as the home page and add other
content as needed. The ScriptAlias directive tells the httpd daemon that any scripts
requested from the cgi-bin directory should be found in the /var/www/cgi-bin
directory. For example, a client could access a script located in /var/www/cgi-bin/
script.cgi by entering a URL such as http://example.com/cgi-bin/script.cgi.
In addition to file locations, you can find other information in the httpd.conf file. Here are
some examples:
Listen 80
User apache
Group apache
ServerAdmin root@localhost
DirectoryIndex index.html index.php
AccessFileName .htaccess
The Listen 80 directive tells httpd to listen for incoming requests on port 80 (the
default port for the HTTP web server protocol). By default, it listens on all network
interfaces, although you could restrict it to selected interfaces by IP address (for example,
Listen 192.168.0.1:80).
The User and Group directives tell httpd to run as apache for both the user and group.
The value of ServerAdmin (root@localhost, by default) is published on some web pages
to tell users where to email if they have problems with the server.
The DirectoryIndex lists files that httpd will serve if a directory is requested. For example, if a web browser requested http://host/whatever/, httpd would see whether
/var/www/html/whatever/index.html existed and serve it if so. If it didn’t exist, in
this example, httpd would look for index.php. If that file couldn’t be found, the contents
of the directory would be displayed. An AccessFileName directive can be added to tell
httpd to use the contents of the .htaccess file if it exists in a directory to read in settings
that apply to access to that directory. For example, the file could be used to require password
421
17
Downloaded from https://onlinelibrary.wiley.com/doi/ by alex jounh - Oregon Health & Science Univer , Wiley Online Library on [05/12/2025]. See the Terms and Conditions (https://onlinelibrary.wiley.com/terms-and-conditions) on Wiley Online Library for rules of use; OA articles are governed by the applicable Creative Commons License
Chapter 17: Configuring a Web Server
protection for the directory or to indicate that the contents of the directory should be displayed in certain ways. For this file to work, however, a Directory container (described
next) would have to have AllowOverride opened. (By default, the AllowOverride
None setting prevents the .htaccess file from being used for any directives.)
The following Directory containers define behavior when the root directory (/), /var/
www, and /var/www/html directories are accessed:
<Directory/>
AllowOverride none
Require all denied
</Directory>
<Directory "/var/www">
AllowOverride None
# Allow open access:
Require all granted
</Directory>
<Directory "/var/www/html">
Options Indexes FollowSymLinks
AllowOverride None
Require all granted
</Directory>
The first Directory container (/) indicates that if httpd tries to access any files in the
Linux filesystem, access is denied. The AllowOverride none directive prevents
.htaccess files from overriding settings for that directory. Those settings apply to any subdirectories that are not defined in other Directory containers.
Content access is relaxed within the /var/www directory. Access is granted to content added
under that directory, but overriding settings is not allowed.
The /var/www/html Directory container follows symbolic links and does not allow overrides. With Require all granted set, httpd doesn’t prevent any access to the server.
If all of the settings just described work for you, you can begin adding the content that you
want to the /var/www/html and /var/www/cgi-bin directories. One reason you might
not be satisfied with the default setting is that you might want to serve content for multiple
domains (such as example.com, example.org, and example.net). To do that, you need to
configure virtual hosts. Virtual hosts, which are described in greater detail in the next section,
are a convenient (and almost essential) tool for serving different content to clients based on
the server address or name to which a request is directed. Most global configuration options
are applied to virtual hosts, but they can be overridden by directives within the
VirtualHost block.
Adding a virtual host to Apache
Apache supports the creation of separate websites within a single server to keep content separate. Individual sites are configured on the same server in what are referred to as virtual hosts.
422
Downloaded from https://onlinelibrary.wiley.com/doi/ by alex jounh - Oregon Health & Science Univer , Wiley Online Library on [05/12/2025]. See the Terms and Conditions (https://onlinelibrary.wiley.com/terms-and-conditions) on Wiley Online Library for rules of use; OA articles are governed by the applicable Creative Commons License
Part IV: Becoming a Linux Server Administrator
Virtual hosts are really just a way to have the content for multiple domain names available from the same Apache server. Instead of needing to have one operating system to
serve content for each domain, you can serve content for multiple domains from the same
operating system.
An Apache server that is doing virtual hosting may have multiple domain names that resolve
to the IP address of the server. The content that is served to a web client is based on the name
used to access the server.
For example, if a client got to the server by requesting the name www.example.com, the client
would be directed to a virtual host container that had its ServerName set to respond to
www.example.com. The container would provide the location of the content and possibly different error logs or Directory directives from the global settings. This way, each virtual
host could be managed as if it were on a separate machine.
To use name-based virtual hosting, add as many VirtualHost containers as you like. Here’s
how to configure a virtual host:
Note
After you enable your first VirtualHost, your default DocumentRoot (/var/www/html) is no longer used if
someone accesses the server by IP address or some name that is not set in a VirtualHost container. Instead, the
first VirtualHost container is used as the default location for the server.
1. In Fedora or RHEL, create a file named /etc/httpd/conf.d/example.org
.conf using this template:
<VirtualHost *:80>
ServerAdmin
webmaster@example.org
ServerName
www.example.org
ServerAlias
web.example.org
DocumentRoot
/var/www/html/example.org/
DirectoryIndex index.php index.html index.htm
</VirtualHost>
This example includes the following settings:
■
■
The *:80 specification in the VirtualHost block indicates to what address
and port this virtual host applies. With multiple IP addresses associated with your
Linux system, the * can be replaced by a specific IP address. The port is optional
for VirtualHost specifications but should always be used to prevent interference with SSL virtual hosts (which use port 443 by default).
The ServerName and ServerAlias lines tell Apache which names this virtual
host should be recognized as, so replace them with names appropriate to your site.
You can leave out the ServerAlias line if you do not have any alternate names
for the server, and you can specify more than one name per ServerAlias line or
have multiple ServerAlias lines if you have several alternate names.
423
17
Downloaded from https://onlinelibrary.wiley.com/doi/ by alex jounh - Oregon Health & Science Univer , Wiley Online Library on [05/12/2025]. See the Terms and Conditions (https://onlinelibrary.wiley.com/terms-and-conditions) on Wiley Online Library for rules of use; OA articles are governed by the applicable Creative Commons License
Chapter 17: Configuring a Web Server
■
The DocumentRoot specifies where the web documents (content served for
this site) are stored. Although shown as a subdirectory that you create under the
default DocumentRoot (/var/www/html), often sites are attached to the home
directories of specific users (such as /home/chris/public_html) so that each
site can be managed by a different user.
2. With the host enabled, use apachectl to check the configuration, and then do
a graceful restart:
# apachectl configtest
Syntax OK
# apachectl graceful
Provided that you have registered the system with a DNS server, a web browser should be able
to access this website using either www.example.org or web.example.org. If that works, you
can start adding other virtual hosts to the system as well.
Another way to extend the use of your website is to allow multiple users to share their own
content on your server. You can enable users to add content that they want to share via your
web server in a subdirectory of their home directories, as described in the next section.
Note
Keeping individual virtual hosts in separate files is a convenient way to manage virtual hosts. However, you should
be careful to keep your primary virtual host in a file that will be read before the others because the first virtual host
receives requests for site names that don’t match any in your configuration. In a commercial web-hosting environment,
it is common to create a special default virtual host that contains an error message indicating that no site by that name
has been configured.
Allowing users to publish their own web content
In situations where you do not have the ability to set up a virtual host for every user for
whom you want to provide web space, you can easily make use of the mod_userdir module
in Apache. With this module enabled (which it is not by default), the public_html directory under every user’s home directory is available to the web at http://servername/~
username/.
For example, a user named wtucker on www.example.org stores web content in /home/
wtucker/public_html. That content would be available from http://www
.example.org/~wtucker.
Make these changes to the /etc/httpd/conf/httpd.conf file to allow users to publish
web content from their own home directories. Not all versions of Apache have these blocks in
their httpd.conf file, so you might have to create them from scratch:
1. Create a <IfModule mod_userdir.c> block. Change chris to any username
you want to allow users to create their own public_html directory. You can add
multiple usernames.
424
Downloaded from https://onlinelibrary.wiley.com/doi/ by alex jounh - Oregon Health & Science Univer , Wiley Online Library on [05/12/2025]. See the Terms and Conditions (https://onlinelibrary.wiley.com/terms-and-conditions) on Wiley Online Library for rules of use; OA articles are governed by the applicable Creative Commons License
Part IV: Becoming a Linux Server Administrator
<IfModule mod_userdir.c>
UserDir enabled chris
UserDir public_html
</IfModule>
2. Create a <Directory /home/*/public_html> directive block and change
any settings you like. This is how the block will look:
<Directory "/home/*/public_html">
Options Indexes Includes FollowSymLinks
Require all granted
</Directory>
3. Have your users create their own public_html directories in their own home
directories.
$ mkdir $HOME/public_html
4. Set the execute permission (as root user) to allow the httpd daemon to access
the home directory:
# chmod +x /home /home/*
5. If SELinux is in enforcing mode (which it is by default in Fedora and RHEL),
a proper SELinux file context (httpd_user_content_t) should already be
set on the following directories so that SELinux allows the httpd daemon
to access the content automatically: /home/*/www, /home/*/web, and
/home/*/public_html. If for some reason the context is not set, you can set
it as follows:
# chcon -R --reference=/var/www/html/ /home/*/public_html
6. Set the SELinux Boolean to allow users to share HTML content from their home
directories:
# setsebool –
P httpd_enable_homedirs true
7. Restart or reload the httpd service.
At this point, you should be able to access content placed in a user’s public_html
directory by pointing a web browser to http://hostname/~user.
Securing your web traffic with SSL/TLS
Any data that you share from your website using standard HTTP protocol is sent in clear text.
This means anyone who can watch the traffic on a network between your server and your
client can view your unprotected data. To secure that information, you can add certificates to
your site (so a client can validate who you are) and encrypt your data (so nobody can sniff
your network and see your data).
425
17
Downloaded from https://onlinelibrary.wiley.com/doi/ by alex jounh - Oregon Health & Science Univer , Wiley Online Library on [05/12/2025]. See the Terms and Conditions (https://onlinelibrary.wiley.com/terms-and-conditions) on Wiley Online Library for rules of use; OA articles are governed by the applicable Creative Commons License
Chapter 17: Configuring a Web Server
Electronic commerce applications, such as online shopping and banking, should always be
encrypted using either the SSL or TLS specification. TLS is based on version 3.0 of the SSL
specifications, so they are very similar in nature. Because of this similarity—and because SSL
is older—the SSL acronym is often used to refer to either variety. For web connections, the SSL
connection is established first, and then normal HTTP communication is “tunneled” through it.
Note
Because SSL negotiation takes place before any HTTP communication, name-based virtual hosting (which occurs at the
HTTP layer) does not work easily with SSL. As a consequence, every SSL virtual host you configure should have a unique
IP address. (See the Apache site for more information: httpd.apache.org/docs/vhosts/name-based.html.)
While you are establishing a connection between an SSL client and an SSL server, asymmetric
(public key) cryptography is used to verify identities and establish the session parameters and
the session key. A symmetric encryption algorithm is then used with the negotiated key to
encrypt the data that are transmitted during the session. The use of asymmetric encryption
during the handshaking phase allows safe communication without the use of a preshared key,
and the symmetric encryption is faster and more practical for use on the session data.
For the client to verify the identity of the server, the server must have a previously generated
private key as well as a certificate containing the public key and information about the server.
This certificate must be verifiable using a public key that is known to the client.
Certificates are generally digitally signed by a third-party certificate authority (CA) that has
verified the identity of the requester and the validity of the request to have the certificate
signed. In most cases, the CA is a company that has made arrangements with the web browser
vendor to have its own certificate installed and trusted by default client installations. The CA
then charges the server operator for its services.
Commercial certificate authorities vary in price, features, and browser support, but remember
that price is not always an indication of quality. Some popular CAs are GoDaddy (https://
www.godaddy.com/web-security/ssl-certificate) and DigiCert (https://www.digicert
.com).
You also have the option of creating self-signed certificates, although these should be used
only for testing or when a very small number of people will be accessing your server and you
do not plan to have certificates on multiple machines. Directions for generating a self-signed
certificate are included in the section “Generating an SSL key and self-signed certificate” later
in this chapter.
The last option is to run your own certificate authority. This is probably practical only if you
have a small number of expected users and the means to distribute your CA certificate to them
(including assisting them with installing it in their browsers). The process for creating a CA is
too elaborate to cover in this book, but it is a worthwhile alternative to generating self-signed
certificates.
426
Downloaded from https://onlinelibrary.wiley.com/doi/ by alex jounh - Oregon Health & Science Univer , Wiley Online Library on [05/12/2025]. See the Terms and Conditions (https://onlinelibrary.wiley.com/terms-and-conditions) on Wiley Online Library for rules of use; OA articles are governed by the applicable Creative Commons License
Part IV: Becoming a Linux Server Administrator
The following sections describe how HTTPS communications are configured by default in Fedora
and RHEL when you install the mod_ssl package. After that, I describe how to configure SSL
communications better by generating your own SSL keys and certificates to use with the web
server (running on a Fedora or RHEL system) configured in this chapter.
Understanding how SSL is configured
If you have installed the mod_ssl package in Fedora or RHEL (which is done by default if
you installed the Basic Web Server group), a self-signed certificate and private key are created
when the package is installed. This allows you to use HTTPS protocol immediately to communicate with the web server.
Although the default configuration of mod_ssl allows you to have encrypted communications
between your web server and clients, because the certificate is self-signed, a client accessing
your site is warned that the certificate is untrusted. To begin exploring the SSL configuration
for your Apache web server, make sure that the mod_ssl package is installed on the server
running your Apache (httpd) service:
# dnf install mod_ssl
The mod_ssl package includes the module needed to implement SSL on your web server
(mod_ssl.so) and a configuration file for your SSL hosts: /etc/httpd/conf.d/ssl
.conf. There are many comments in this file to help you understand what to change. Those
lines that are not commented out define some initial settings and a default virtual host. Here
are some of those lines:
Listen 443 https
...
<VirtualHost _default_:443>
ErrorLog logs/ssl_error_log
TransferLog logs/ssl_access_log
LogLevel warn
SSLEngine on
...
SSLCertificateFile /etc/pki/tls/certs/localhost.crt
SSLCertificateKeyFile /etc/pki/tls/private/localhost.key
...
</VirtualHost>
The SSL service is set to listen on standard SSL port 443 on all the system’s network interfaces.
A VirtualHost block is created that causes error messages and access messages to be logged
to log files that are separate from the standard logs used by the server (ssl_error_log and
ssl_access_log in the /var/log/httpd/ directory). The level of log messages is set to
warn and the SSLEngine is turned on.
In the preceding sample code, two entries associated with SSL Certificates in the Virtual
Host block identify the key and certificate information. As mentioned previously, a key is
427
17
Downloaded from https://onlinelibrary.wiley.com/doi/ by alex jounh - Oregon Health & Science Univer , Wiley Online Library on [05/12/2025]. See the Terms and Conditions (https://onlinelibrary.wiley.com/terms-and-conditions) on Wiley Online Library for rules of use; OA articles are governed by the applicable Creative Commons License
Chapter 17: Configuring a Web Server
generated when mod_ssl is installed and placed in the file /etc/pki/tls/private/
localhost.key. A self-signed certificate, /etc/pki/tls/certs/localhost.crt,
is created using that key. When you create your own key and certificate later, you need to
replace the values of SSLCertificateFile and SSLCertificateKeyFile in this file.
After installing the mod_ssl package and reloading the configuration file, you can test that
the default certificate is working by following these steps:
1. Open a connection to the website from a web browser, using the HTTPS protocol. For example, if you are running Firefox on the system where the web server
is running, type https://localhost into the location box and press Enter.
Figure 17.2 shows an example of the page that appears.
FIGURE 17.2
Accessing an SSL website with a default certificate.
2. This page warns you that there is no way of verifying the authenticity of this
site. That is because there is no way to know who created the certificate that you are
accepting.
3. Because you are accessing the site via a browser on the local host, click Advanced
and then View Certificate to see the certificate that was generated. It includes
your hostname, information on when the certificate was issued and when it expires,
and lots of other organization information.
428
Downloaded from https://onlinelibrary.wiley.com/doi/ by alex jounh - Oregon Health & Science Univer , Wiley Online Library on [05/12/2025]. See the Terms and Conditions (https://onlinelibrary.wiley.com/terms-and-conditions) on Wiley Online Library for rules of use; OA articles are governed by the applicable Creative Commons License
Part IV: Becoming a Linux Server Administrator
4. Close that window, and then select Accept the Risk and Continue to accept the
connection. You should now see your default web page using HTTPS protocol. From
now on, your browser will accept HTTPS connections to the web server using that certificate and encrypt all communications between the server and browser.
Because you don’t want your website to scare off users, the best thing to do is to get a valid
certificate to use with your site. The next best thing to do is to create a self-signed certificate
that at least includes better information about your site and organization. The following section describes how to do that.
Generating an SSL key and self-signed certificate
Today, you can use your cloud provider or a service called CertBot (certbot.eff.org) to
create your SSL certificates. Besides offering a friendly interface for creating SSL certificates,
these services can also help you update your certificates as needed.
For this example, however, I’m going to show you how to use software that comes with most
Linux systems to create SSL certificates. To begin setting up SSL, use the openssl command,
which is part of the openssl package, to generate your public and private keys. After that,
you can generate your own self-signed certificate to test the site or to use internally.
1. If the openssl package is not already installed, install it as follows:
# dnf install openssl
2. Generate a 2048-bit RSA private key and save it to a file:
# cd /etc/pki/tls/private
# openssl genrsa -
out server.key 2048
# chmod 600 server.key
NOTE
You can use a filename other than server.key and should do so if you plan to have more than one SSL host on
your machine (which requires more than one IP address). Just make sure you specify the correct filename in the Apache
configuration later.
Or, in higher-security environments, encrypting the key by adding the -des3 argument after the genrsa argument on the openssl command line is a good idea.
When prompted for a passphrase, press Enter:
# openssl genrsa -
des3 -
out server.key 1024
3. If you don’t plan to have your certificate signed, or if you want to test your
configuration, generate a self-signed certificate and save it in a file named
server.crt in the /etc/pki/tls/certs directory:
# cd /etc/pki/tls/certs
# openssl req -
new -
x509 -
nodes -
sha1 -
days 365 \
429
17
Downloaded from https://onlinelibrary.wiley.com/doi/ by alex jounh - Oregon Health & Science Univer , Wiley Online Library on [05/12/2025]. See the Terms and Conditions (https://onlinelibrary.wiley.com/terms-and-conditions) on Wiley Online Library for rules of use; OA articles are governed by the applicable Creative Commons License
Chapter 17: Configuring a Web Server
-
key /etc/pki/tls/private/server.key \
-out server.crt
Country Name (2 letter code) [XX]: US
State or Province Name (full name) []: NJ
Locality Name (eg, city) [Default City]: Princeton
Organization Name (eg, company) [Default Company Ltd]:TEST USE ONLY
Organizational Unit Name (eg, company) [Default Company Ltd]:TEST
USE ONLY
Common Name (eg, YOUR name) []:secure.example.org
Email Address []:dom@example.org
4. Edit the /etc/httpd/conf.d/ssl.conf file to change the key and certificate
locations to use the ones that you just created. For example:
SSLCertificateFile /etc/pki/tls/certs/server.crt
SSLCertificateKeyFile /etc/pki/tls/private/server.key
5. Restart or reload the httpd server.
6. Open https://localhost from a local browser again, repeat the procedure to
review, and accept the new certificate.
For internal use or testing, a self-signed certificate might work for you. However, for public
websites, you should use a certificate that is validated by a certificate authority (CA). The procedure for doing that is covered next.
Generating a certificate signing request
If you plan to have your certificate signed by a CA (including one that you run yourself), you
can use your private key to generate a certificate signing request (CSR):
1. Create a directory for storing your CSR.
# mkdir /etc/pki/tls/ssl.csr
# cd /etc/pki/tls/ssl.csr/
2. Use the openssl command to generate the CSR. The result is a CSR file in the
current directory named server.csr. When you enter the information, the Common
Name entry should match the name that clients will use to access your server. Be sure
to get the other details right so that it can be validated by a third-party CA. Also,
if you had entered a passphrase for your key, you are prompted to enter it here to
use the key.
# openssl req -
new -
key ../private/server.key -
out server.csr
Country Name (2 letter code) [AU]:US
State or Province Name (full name) []:Washington
Locality Name (eg, city) []:Bellingham
Organization Name (eg, company) [Default Company
Ltd]:Example Company, LTD.
Organizational Unit Name (eg, section) []:Network
Operations
430
Downloaded from https://onlinelibrary.wiley.com/doi/ by alex jounh - Oregon Health & Science Univer , Wiley Online Library on [05/12/2025]. See the Terms and Conditions (https://onlinelibrary.wiley.com/terms-and-conditions) on Wiley Online Library for rules of use; OA articles are governed by the applicable Creative Commons License
Part IV: Becoming a Linux Server Administrator
Common Name (eg, your name or your server’s hostname) []:secure
.example.org
Email Address []:dom@example.org
Please enter the following ‘extra’ attributes
to be sent with your certificate request
A challenge password []:
An optional company name []:
3. Visit the website of the certificate signing authority that you choose and request
a signed certificate. At some point, the CA site will probably ask you to copy and
paste the contents of your CSR (server.csr file in this example) into a form
needed to make the request.
4. When the CA sends you the certificate (probably via email), save it in the /etc/
pki/tls/certs/ directory using a name based on the site you are hosting —
for example, example.org.crt.
5. Change the value of SSLCertificateFile in the /etc/httpd/conf.d/
ssl.conf file to point to your new CRT file. Or, if you have multiple SSL hosts,
you might want to create a separate entry (possibly in a separate .conf file) that
looks like the following:
Listen 192.168.0.56:443
<VirtualHost *:443>
ServerName
secure.example.org
ServerAlias
web.example.org
DocumentRoot
/home/username/public_html/
DirectoryIndex index.php index.html index.htm
SSLEngine
On
SSLCertificateKeyFile /etc/pki/tls/private/server.key
SSLCertificateFile /etc/pki/tls/certs/example.org.crt
</VirtualHost>
The IP address shown in the Listen directive should be replaced by the public IP address
representing the SSL host you are serving. Remember that each SSL host must have its own
IP address.
Troubleshooting Your Web Server
In any complex environment, you occasionally run into problems. The following sections
include tips for isolating and resolving the most common errors that you may encounter.
Checking for configuration errors
You may occasionally run into configuration errors or script problems that prevent Apache
from starting or that prevent specific files from being accessible. Most of these problems can
be isolated and resolved using two Apache-provided tools: the apachectl program and the
system error log.
431
17
Downloaded from https://onlinelibrary.wiley.com/doi/ by alex jounh - Oregon Health & Science Univer , Wiley Online Library on [05/12/2025]. See the Terms and Conditions (https://onlinelibrary.wiley.com/terms-and-conditions) on Wiley Online Library for rules of use; OA articles are governed by the applicable Creative Commons License
Chapter 17: Configuring a Web Server
When encountering a problem, first use the apachectl program with the configtest
parameter to test the configuration. In fact, it’s a good idea to develop the habit of running
this every time you make a configuration change:
# apachectl configtest
Syntax OK
# apachectl graceful
In the event of a syntax error, apachectl indicates where the error occurs and also does its
best to give a hint about the nature of the problem. You can then use the graceful restart
option (apachectl graceful) to instruct Apache to reload its configuration without disconnecting any active clients.
Note
The graceful restart option in apachectl automatically tests the configuration before sending the reload signal
to apache, but getting in the habit of running the manual configuration test after making any configuration changes is
still a good idea.
Some configuration problems pass the syntax tests performed by apachectl but cause the
HTTP daemon to exit immediately after reloading its configuration. If this happens, use the
tail command to check Apache’s error log for useful information. On Fedora and RHEL systems, the error log is in /var/log/httpd/error.log. On other systems, you can find the
location by looking for the ErrorLog directive in your Apache configuration.
You might encounter an error message that looks something like this:
[crit] (98)Address already in use: make_sock: could not bind
to port 80
This error often indicates that something else is bound to port 80, that another Apache process is already running (apachectl usually catches this), or that you have told Apache to
bind the same IP address and port combination in more than one place.
You can use the ss command to view the list of programs (including Apache) with TCP ports in
the LISTEN state:
# ss -nltp
Active Internet connections (only servers)
Proto Local Address Foreign Address State
tcp6
:::80
:::*
LISTEN
PID/Program name
2105/httpd
The output from ss (which was shortened to fit here) indicates that an instance of the httpd
process with a process ID of 2105 is listening (as indicated by the LISTEN state) for connections to any local IP address (indicated by :::80) on port 80 (the standard HTTP port). If a
different program is listening to port 80, it is shown there. You can use the kill command to
terminate the process, but if it is something other than httpd, you should also find out why
it is running.
432
Downloaded from https://onlinelibrary.wiley.com/doi/ by alex jounh - Oregon Health & Science Univer , Wiley Online Library on [05/12/2025]. See the Terms and Conditions (https://onlinelibrary.wiley.com/terms-and-conditions) on Wiley Online Library for rules of use; OA articles are governed by the applicable Creative Commons License
Part IV: Becoming a Linux Server Administrator
If you don’t see any other processes listening on port 80, it could be that you have accidentally told Apache to listen on the same IP address and port combination in more than
one place. Three configuration directives can be used for this: BindAddress, Port,
and Listen:
■
■
■
BindAddress enables you to specify a single IP address on which to listen, or you
can specify all IP addresses using the * wildcard. You should never have more than
one BindAddress statement in your configuration file.
Port specifies on which TCP port to listen, but it does not enable you to specify the
IP address. Port is generally not used more than once in the configuration.
Listen enables you to specify both an IP address and a port to bind to. The IP
address can be in the form of a wildcard, and you can have multiple Listen statements in your configuration file.
To avoid confusion, it is generally a good idea to use only one of these directive types. Of
the three, Listen is the most flexible, so it is probably the one you want to use the most.
A common error when using Listen is to specify a port on all IP addresses (*:80) as well
as that same port on a specific IP address (1.2.3.4:80), which results in the error from
make_sock.
Configuration errors relating to SSL commonly result in Apache starting improperly. Make sure
that all key and certificate files exist and that they are in the proper format (use openssl to
examine them).
For other error messages, try doing a web search to see whether somebody else has encountered the problem. In most cases, you can find a solution within the first few matches.
If you aren’t getting enough information in the ErrorLog, you can configure it to log
more information using the LogLevel directive. The options available for this directive, in
increasing order of verbosity, are emerg, alert, crit, error, warn, notice, info, and
debug. Select only one of these.
Any message that is at least as important as the LogLevel that you select is stored in the
ErrorLog. On a typical server, LogLevel is set to warn. You should not set it to any value
lower than crit, and you should avoid leaving it set to debug because that can slow down
the server and result in a very large ErrorLog.
As a last resort, you can also try running httpd -X manually to check for crashes or
other error messages. The -X runs httpd so that it displays debug and higher messages on
the screen.
Accessing forbidden and server internal errors
The two common types of errors you may encounter when attempting to view specific pages on
your server are permission errors and server internal errors. Both types of errors can usually be
isolated using the information in the error log. After making any of the changes described in
the following list to attempt to solve one of these problems, try the request again and check
433
17
Downloaded from https://onlinelibrary.wiley.com/doi/ by alex jounh - Oregon Health & Science Univer , Wiley Online Library on [05/12/2025]. See the Terms and Conditions (https://onlinelibrary.wiley.com/terms-and-conditions) on Wiley Online Library for rules of use; OA articles are governed by the applicable Creative Commons License
Chapter 17: Configuring a Web Server
the error log to see whether the message has changed (for example, to show that the operation
completed successfully).
Note
“File not found” errors can be checked in the same way as “access forbidden” and “server internal errors.” You may
sometimes find that Apache is not looking where you think it is for a specific file. Generally, the entire path to the file
shows up in the error log. Make sure you are accessing the correct virtual host, and check for any Alias settings that
might be directing your location to a place you don’t expect.
File permissions A “File permissions prevent access” error indicates that the apache
process is running as a user that is unable to open the requested file. By default,
httpd is run by the Apache user and group. Make sure the account has execute permissions on the directory, and every directory above it, as well as read permissions on
the files themselves. Read permissions on a directory are also necessary if you want
Apache to generate an index of files. See the manual page for chmod for more information about how to view and change permissions.
Note
Read permissions are not necessary for compiled binaries, such as those written in C or C++, but they can be safely
added unless a need exists to keep the contents of the program secret.
Access denied A “Client denied by server configuration” error indicates that Apache was
configured to deny access to the object. Check the configuration files for Location
and Directory sections that might affect the file that you are trying to access.
Remember that settings applied to a path are also applied to any paths below it. You
can override these by changing the permissions only for the more specific path to
which you want to allow access.
Index not found The “Directory index forbidden by rule” error indicates that Apache
could not find an index file with a name specified in the DirectoryIndex directive
and was configured not to create an index containing a list of files in a directory. Make
sure that your index page, if you have one, has one of the names specified in the relevant DirectoryIndex directive, or add an Options Indexes line to the appropriate Directory or Location section for that object.
Script crashed “Premature end of script headers” errors can indicate that a script is
crashing before it finishes. On occasion, the errors that caused this also show up in the
error log. When using suexec or suPHP, this error may also be caused by a file ownership or permissions error. These errors appear in log files in the /var/log/httpd
directory.
SELinux errors If file permissions are open but messages denying permission appear in
log files, SELinux could be causing the problem. Set SELinux to permissive mode temporarily (setenforce 0) and try to access the file again. If the file is now accessible,
434
Downloaded from https://onlinelibrary.wiley.com/doi/ by alex jounh - Oregon Health & Science Univer , Wiley Online Library on [05/12/2025]. See the Terms and Conditions (https://onlinelibrary.wiley.com/terms-and-conditions) on Wiley Online Library for rules of use; OA articles are governed by the applicable Creative Commons License
Part IV: Becoming a Linux Server Administrator
set SELinux to enforcing mode again (setenforce 1) and check file contexts and
Booleans. File contexts must be correct for httpd to be able to access a file. A Boolean
might prevent a file being served from a remotely mounted directory or prevent a page
from sending an email or uploading a file. Type man httpd_selinux for details
about SELinux configuration settings associated with the httpd services. (Install the
selinux-policy-devel package to have that man page added to your system.)
Exploring web server deployment
While this chapter is aimed at understanding the basics of installing and running an Apache
web server, there is a lot more to consider before you put a web server into production. Here
are some considerations:
■
■
■
■
Content you are serving: If your goal is to create an ecommerce site or set up a content management system (for example, to publish blogs or wikis), the one you choose
will impact how you set up the web server that serves that content.
Web server project: While Apache has been the most popular web server project,
others have come along that offer their own advantages. They include nginx,
(https://nginx.org/) designed for running large websites, lighttpd (http://
www.lighttpd.net/), optimized for low resource demand, and Node.js (https://
nodejs.org/), tuned for JavaScript applications. By some accounts, nginx has surpassed Apache in popularity in recent years.
Deployment methods: Besides installing packages directly on a Linux system, you
can web servers from prepackaged solutions from cloud providers or run containerized
web servers in Docker or Kubernetes.
Add-on software: To fully manage your production quality web server, there are software add-ons you want to consider as well. To improve performance of busy servers,
consider adding caching software and load balancers. To keep track of activity, look for
observability software.
Summary
The open source Apache project is one of the world’s most popular web server projects.
Although Apache offers tremendous flexibility, security, and complexity, a basic Apache
web server can be configured in just a few minutes in Fedora, RHEL, and most other Linux
distributions.
The chapter described the steps for installing, configuring, securing, and troubleshooting a
basic Apache web server. You learned how to configure virtual hosting and secure SSL hosts.
You also learned how to configure Apache to allow any user account on the system to publish
content from their own public_html directory.
Continuing on the topic of server configuration, in Chapter 18, “Configuring an FTP Server,”
you will learn how to set up an FTP server in Linux. The examples illustrate how to configure
an FTP server using the vsftpd package.
435
17
Downloaded from https://onlinelibrary.wiley.com/doi/ by alex jounh - Oregon Health & Science Univer , Wiley Online Library on [05/12/2025]. See the Terms and Conditions (https://onlinelibrary.wiley.com/terms-and-conditions) on Wiley Online Library for rules of use; OA articles are governed by the applicable Creative Commons License
Chapter 17: Configuring a Web Server
Exercises
The exercises in this section cover topics related to installing and configuring an Apache web
server. As usual, I recommend you use a spare Fedora or Red Hat Enterprise Linux system to do
the exercises. Don’t do these exercises on a production machine because these exercises modify
the Apache configuration files and service, and they could damage services that you have currently configured. Try to use a virtual machine or find a computer where it will do no harm to
interrupt services on the system.
These exercises assume you are starting with a Fedora or RHEL installation on which the
Apache server (httpd-core package) is not yet installed.
If you are stuck, solutions to the tasks are shown in Appendix B. These show you one approach
to each task, although Linux may offer multiple ways to complete a task.
1. From a Fedora system, install the httpd-core package.
2. Create a file called index.html in the directory assigned to DocumentRoot in
the main Apache configuration file. The file should have the words “My Own Web
Server” inside.
3. Start the Apache web server and set it to start up automatically at boot time. Check
that it is available from a web browser on your local host. (You should see the words
“My Own Web Server” displayed if it is working properly.)
4. Use the ss command to see on which ports the httpd server is listening.
5. Try to connect to your Apache web server from a web browser that is outside of the
local system. If it fails, correct any problems that you encounter by investigating the
firewall, SELinux, and other security features.
6. Using the openssl or similar command, create your own private RSA key and self-
signed SSL certificate.
7. Configure your Apache web server to use your key and self-signed certificate to serve
secure (HTTPS) content.
8. Use a web browser to create an HTTPS connection to your web server and view the
contents of the certificate that you created.
9. Create a file named /etc/httpd/conf.d/example.org.conf, which turns on
name-based virtual hosting and creates a virtual host that does these things:
■
■
■
436
Listens on port 80 on all interfaces
Has a server administrator of joe@example.org
Has a server name of joe.example.org
Downloaded from https://onlinelibrary.wiley.com/doi/ by alex jounh - Oregon Health & Science Univer , Wiley Online Library on [05/12/2025]. See the Terms and Conditions (https://onlinelibrary.wiley.com/terms-and-conditions) on Wiley Online Library for rules of use; OA articles are governed by the applicable Creative Commons License
Part IV: Becoming a Linux Server Administrator
■
■
Has a DocumentRoot of /var/www/html/example.org
Has a DirectoryIndex that includes at least index.html
Create an index.html file in DocumentRoot that contains the words “Welcome to
the House of Joe” inside.
10. Add the text joe.example.org to the end of the localhost entry in your /etc/
hosts file on the machine that is running the web server. Then type http://
joe.example.org into the location box of your web browser. You should see “Welcome
to the House of Joe” when the page is displayed.
17
437
Downloaded from https://onlinelibrary.wiley.com/doi/ by alex jounh - Oregon Health & Science Univer , Wiley Online Library on [05/12/2025]. See the Terms and Conditions (https://onlinelibrary.wiley.com/terms-and-conditions) on Wiley Online Library for rules of use; OA articles are governed by the applicable Creative Commons License
Chapter 17: Configuring a Web Server
Configuring an F TP Server
18
IN THIS CHAPTER
Learning how FTP works
Getting a vsftpd server installed
■ Choosing security settings for vsftpd
■ Setting up vsftpd configuration files
■ Running FTP clients
■
■
T
he File Transfer Protocol (FTP) is one of the oldest protocols in existence for sharing files over networks. Although there are more secure protocols for network file sharing, FTP is still used quite
often for making files freely available on the Internet.
Several FTP server projects are available with Linux today. However, the one often used with Fedora,
Red Hat Enterprise Linux, CentOS, Ubuntu, and other Linux distributions is the Very Secure FTP Daemon
(vsftpd package). This chapter describes how to install, configure, use, and secure an FTP server using
the vsftpd package.
Understanding FTP
FTP operates in a client/server model. An FTP server daemon listens for incoming requests (on TCP port
21) from FTP clients. The client presents a login and password. If the server accepts the login information, the client can interactively traverse the filesystem, list files and directories, and then download
(and sometimes upload) files.
What makes FTP insecure is that everything sent between the FTP client and server is done in clear
text. The FTP protocol was created at a time when most computer communication was done on private
lines or over dial-up, where encryption was not thought to be critical. If you use FTP over a public network, someone sniffing the line anywhere between the client and server would be able to see not only
the data being transferred but also the authentication process (login and password information).
So, FTP is not good for sharing files privately (use SSH commands such as sftp, scp, or rsync if
you need private, encrypted file transfers). However, if you are sharing public documents, open source
software repositories, or other openly available data, FTP is a good choice. Regardless of the operating
439
Linux Bible, Eleventh Edition. Christopher Negus.
© 2026 John Wiley & Sons, Inc. All rights reserved, including rights for text and data mining and training of artificial intelligence technologies or similar
technologies. Published 2026 by John Wiley & Sons, Inc.
Downloaded from https://onlinelibrary.wiley.com/doi/ by alex jounh - Oregon Health & Science Univer , Wiley Online Library on [05/12/2025]. See the Terms and Conditions (https://onlinelibrary.wiley.com/terms-and-conditions) on Wiley Online Library for rules of use; OA articles are governed by the applicable Creative Commons License
CHAPTER
system people use, they surely have an FTP file transfer application available to get files that
you offer from your FTP server.
When users authenticate to an FTP server in Linux, their usernames and passwords are authenticated against the standard Linux user accounts and passwords. There is also a special, nonauthenticated account used by the FTP server called anonymous. The anonymous account can be
accessed by anyone because it does not require a valid password. In fact, the term anonymous
FTP server is often used to describe a public FTP server that does not require (or even allow)
authentication of a legitimate user account.
Note
Although the ability to log in to the vsftpd server using a regular Linux user account is enabled by default in Fedora
and Red Hat Enterprise Linux, if SELinux is set to enforcing mode, it prevents the logins and file transfers from succeeding. If you want to keep SELinux in enforcing mode yet still allow Linux logins, you can change a Boolean (see the section “Configuring SELinux for your FTP server” later in this chapter) to allow regular user logins to succeed.
After the authentication phase (on the control port, TCP port 21), a second connection is
made between the client and server. FTP supports both active and passive connection types.
With an active FTP connection, the server sends data from its TCP port 20 to some random port
the server chooses above port 1023 on the client. With a passive FTP connection, the client
requests the passive connection and requests a random port from the server.
Many browsers support passive FTP mode so that if the client has a firewall, it doesn’t block
the data port that the FTP server might use in active mode. Supporting passive mode requires
some extra work on the server’s firewall to allow random connections to ports above 1023 on
the server. The section “Opening up your firewall for FTP,” later in this chapter, describes what
you need to do to your Linux firewall to make both passive and active FTP connections work.
After the connection is established between the client and server, the client’s current directory is established. For the anonymous user, the /var/ftp directory is the home directory
for Fedora or RHEL, and it’s /srv/ftp for Ubuntu and most Debian-based distributions. The
anonymous user cannot go outside of the /var/ftp directory structure. If a regular user, let’s
say joe, logs in to the FTP server, /home/joe is joe’s current directory, but joe can change to
any part of the filesystem for which he has permission.
Command-oriented FTP clients (such as lftp and ftp commands) go into an interactive mode
after connecting to the server. From the prompt you see, you can run many commands that
are similar to those that you would use from the shell. You could use pwd to see your current
directory, ls to list directory contents, and cd to change directories. When you see a file that
you want, you use the get and put commands to download files from or upload them to the
server, respectively.
With graphical tools for accessing FTP servers (such as a web browser), you type the URL of the
site that you want to visit (such as ftp://docs.example.com) into the location box of the
browser. If you don’t add a username or password, an anonymous connection is made, and the
440
Downloaded from https://onlinelibrary.wiley.com/doi/ by alex jounh - Oregon Health & Science Univer , Wiley Online Library on [05/12/2025]. See the Terms and Conditions (https://onlinelibrary.wiley.com/terms-and-conditions) on Wiley Online Library for rules of use; OA articles are governed by the applicable Creative Commons License
Part IV: Becoming a Linux Server Administrator
contents of the home directory of the site are displayed. Click links to directories to change to
those directories. Click links to files to display or download those files to your local system.
Armed with some understanding of how FTP works, you are now ready to install an FTP server
(vsftpd package) on your Linux system.
Installing the vsftpd F TP Server
Setting up the Very Secure FTP server requires only one package in Fedora, RHEL, and other
Linux distributions: vsftpd. Assuming you have a connection to your software repository,
just type the following as root for Fedora or RHEL to install vsftpd:
# dnf install vsftpd
If you are using Ubuntu (or another Linux distribution based on Debian packaging), type the
following to install vsftpd:
$ sudo apt-
get install vsftpd
Here are some commands that you can run after the vsftpd package is installed to familiarize yourself with the contents of that package. From Fedora or RHEL, run this command to get
some general information about the package:
# rpm -
qi vsftpd
…
Packager
: Fedora Project
Vendor
: Fedora Project
URL
: https://security.appspot.com/vsftpd.html
Bug URL
: https://bugz.fedoraproject.org/vsftpd
Summary
: Very Secure Ftp Daemon
Description : vsftpd is a Very Secure FTP daemon. It was written
completely from scratch.
18
If you want to get more information about vsftpd, follow the URL listed to the related website (https://security.appspot.com/vsftpd.html). You can get additional documentation
and information about the latest revisions of vsftpd.
You can view the full contents of the vsftpd package (rpm -
ql vsftpd), or you can view
just the documentation (-qd) or configuration (-qc) files. To see the documentation files in
the vsftpd package, use the following:
# rpm -
qd vsftpd
/usr/share/doc/vsftpd/EXAMPLE/INTERNET_SITE/README
…
/usr/share/doc/vsftpd/EXAMPLE/PER_IP_CONFIG/README
…
/usr/share/doc/vsftpd/EXAMPLE/VIRTUAL_HOSTS/README
/usr/share/doc/vsftpd/EXAMPLE/VIRTUAL_USERS/README
…
/usr/share/doc/vsftpd/FAQ
441
Downloaded from https://onlinelibrary.wiley.com/doi/ by alex jounh - Oregon Health & Science Univer , Wiley Online Library on [05/12/2025]. See the Terms and Conditions (https://onlinelibrary.wiley.com/terms-and-conditions) on Wiley Online Library for rules of use; OA articles are governed by the applicable Creative Commons License
Chapter 18: Configuring an F TP Server
…
/usr/share/doc/vsftpd/vsftpd.xinetd
/usr/share/man/man5/vsftpd.conf.5.gz
/usr/share/man/man8/vsftpd.8.gz
In the /usr/share/doc/vsftpd/EXAMPLE directory structure, there are sample configuration files included to help you configure vsftpd in ways that are appropriate for an
Internet site, multiple IP address site, and virtual hosts. The main /usr/share/doc/
vsftpd directory contains an FAQ (frequently asked questions), installation tips, and version
information.
The man pages might have the most useful information when you set out to configure the
vsftpd server. Type man vsftpd.conf to read about the configuration file and man
vsftpd to read about the daemon process and how to manage it as a systemd service.
To list the configuration files, type the following:
# rpm -
qc vsftpd
/etc/logrotate.d/vsftpd
/etc/pam.d/vsftpd
/etc/vsftpd/ftpusers
/etc/vsftpd/user_list
/etc/vsftpd/vsftpd.conf
The main configuration file is /etc/vsftpd/vsftpd.conf (in RHEL and Fedora) or
/etc/vsftpd.conf (in Ubuntu). The ftpusers and user_list (Fedora and RHEL,
but not Ubuntu) files in the same directory store information about user accounts that are
restricted from accessing the server. The /etc/pam.d/vsftpd file sets how authentication
is done to the FTP server. The /etc/logrotate.d/vsftpd file configures how log files are
rotated over time.
Now you have vsftpd installed and have taken a quick look at its contents. The next step is
to start up and test the vsftpd service.
Starting the vsftpd Service
No configuration is required to launch the vsftpd service if you just want to use the default
settings. If you start vsftpd as it is delivered with Fedora, the following is what you get:
■
■
442
The vsftpd service starts the vsftpd daemon, which runs in the background.
The standard port on which the vsftpd daemon listens is TCP port 21. By default,
data is transferred to the user, after the connection is made, on TCP port 20. TCP port
21 must be open in the firewall to allow new connections to access the service. Both
IPv4 and IPv6 connections are available by default. This procedure changes to the
TCP IPv4 service. (See the section “Securing Your FTP Server” later in this chapter for
details on opening ports, enabling connection tracking needed for passive FTP, and
setting other firewall rules related to FTP.)
Downloaded from https://onlinelibrary.wiley.com/doi/ by alex jounh - Oregon Health & Science Univer , Wiley Online Library on [05/12/2025]. See the Terms and Conditions (https://onlinelibrary.wiley.com/terms-and-conditions) on Wiley Online Library for rules of use; OA articles are governed by the applicable Creative Commons License
Part IV: Becoming a Linux Server Administrator
■
■
■
■
■
The vsftpd daemon reads vsftpd.conf to determine what features the service
allows.
Linux user accounts (excluding administrative users) can access the FTP server. The
anonymous user account (no password required) can be enabled. (If SELinux is in
enforcing mode, you need to set a Boolean to allow regular users to log in to the FTP
server. See the section “Securing Your FTP Server” for details.)
The anonymous user has access only to the /var/ftp directory and its subdirectories. A regular user starts with their home directory as the current directory but can
access any directory to which the user would be able to gain access via a regular login
or SSH session. Lists of users in the /etc/vsftpd/user_list and /etc/
vsftpd/ftpusers files define some administrative and special users who do not
have access to the FTP server (root, bin, daemon, and others).
By default, the anonymous user can download files from the server but not upload
them. A regular user can upload or download files, based on regular Linux permissions.
Log messages detailing file uploads or downloads are written in the /var/log/
xferlogs file. Those log messages are stored in a standard xferlog format.
If you are ready to start your server using the defaults just described, the following examples
show you how to do that. If you want to change some additional settings first, go to the section “Configuring Your FTP Server” later in this chapter, finalize your settings, and then come
back here for instructions on how to enable and start your server.
1. Check the vsftpd service. Before you start the vsftpd service, you can check out
whether it is running already. In the latest Fedora or Red Hat Enterprise Linux, you do
the following:
# systemctl status vsftpd.service
vsftpd.service -Vsftpd ftp daemon
Loaded: loaded (/usr/lib/systemd/system/vsftpd.service;
disabled; preset:disabled)
Drop-
in /usr/lib/systemd/system/service.d
└─10-timeout-abort.conf
Active: inactive (dead)
In the earlier Fedora and RHEL example, the systemctl commands show the status
as stopped. You can also see that it is disabled in Fedora and RHEL.
2. To start and enable vsftpd in Fedora or RHEL (and then check the status), type the
following:
# systemctl start vsftpd.service
# systemctl enable vsftpd.service
Created symlink
/etc/systemd/system/multi-
user.target.wants/vsftpd.service -
>
/usr/lib/systemd/system/vsftpd.service
# systemctl status vsftpd.service
443
18
Downloaded from https://onlinelibrary.wiley.com/doi/ by alex jounh - Oregon Health & Science Univer , Wiley Online Library on [05/12/2025]. See the Terms and Conditions (https://onlinelibrary.wiley.com/terms-and-conditions) on Wiley Online Library for rules of use; OA articles are governed by the applicable Creative Commons License
Chapter 18: Configuring an F TP Server
● vsftpd.service -Vsftpd ftp daemon
Loaded: loaded (/usr/lib/systemd/system/vsftpd
.service;
enabled; preset: disabled)
Drop-
In: /usr/lib/systemd/system/service.d
└─10-timeout-abort.conf
Active: active (running) since Wed 2025-
01-
15 22:40:19 EST;
2min 40s ago
Main PID: 19260 (vsftpd)
Tasks: 1 (limit: 9200)
Memory: 752.0K (peak: 1.3M)
CPU: 3ms
CGroup: /system.slice/vsftpd.service
└─19260 /usr/sbin/vsftpd /etc/vsftpd/vsftpd.conf
Jan 15 22:40:19 fedora systemd[1]: Starting vsftpd.service-
Vsftpd
ftp daemon...
Jan 15 22:40:19 fedora systemd[1]: Started vsftpd.service -Vsftpd
ftp daemon.
3. Now, on either system, you could check that the service is running using the
ss command:
# ss -
tupln | grep vsftpd
tcp6 0
:::21 :::* LISTEN
19260/vsftpd
From the ss output, you can see that the vsftpd process (process ID of 19260) is
listening (LISTEN) on all IP addresses for incoming connections on port 21 (:::21) for
the TCP 6 (tcp6) protocol.
4. Because vsftp, by default, allows you to log in to the FTP server using a local user
account, to test the new server, log in to the shell as that user and type the following
command to create a file you can use:
$ echo "Hello From Your FTP Server" > /tmp/hello.txt
5. Popular web browsers, such as Firefox and Chrome, stopped supporting the FTP
protocol in recent years. So you need to use a different FTP client to test that your
vsftp server is working. Install the ftp client to do this (curl and wget are
also options):
# dnf install ftp
6. Log in as a regular user to the system running your FTP server. Then use the ftp
command to log in to the server, change directory to /tmp, pull the hello.txt file
to your local directory, and then display its contents:
$ ftp localhost
Trying ::1...
Connected to localhost (::1).
444
Downloaded from https://onlinelibrary.wiley.com/doi/ by alex jounh - Oregon Health & Science Univer , Wiley Online Library on [05/12/2025]. See the Terms and Conditions (https://onlinelibrary.wiley.com/terms-and-conditions) on Wiley Online Library for rules of use; OA articles are governed by the applicable Creative Commons License
Part IV: Becoming a Linux Server Administrator
220 (vsFTPd 3.0.5)
Name (localhost:chris): chris
331 Please specify the password.
Password: <your password>
230 Login successful.
Remote system type is UNIX.
Using binary mode to transfer files.
ftp> cd /tmp
250 Directory successfully changed.
ftp> get hello.txt
local: hello.txt remote: hello.txt
229 Entering Extended Passive Mode (|||59605|)
150 Opening BINARY mode data connection for hello.txt (27 bytes).
226 Transfer complete.
27 bytes received in 0.000106 secs (254.72 Kbytes/sec)
ftp> exit
221 Goodbye.
$ cat hello.txt
Hello From Your FTP Server
7. Next, try this again by installing ftp on another system, replacing localhost with
your host’s IP address or fully qualified host name, and getting hello.txt from
your user’s home directory. If that works, the vsftpd server is publicly accessible to
other systems on your local network. If it doesn’t, which it quite possibly may not,
see the next section, “Securing Your FTP Server.” That section tells you how to open
firewalls and modify other security features to allow access and otherwise secure your
FTP server.
Securing Your F TP Server
Even though it is easy to get a vsftpd FTP server started, that doesn’t mean it is immediately fully accessible. If you have a firewall in place on your Linux system, it is probably blocking access to all services on your system except for those that you have explicitly allowed.
If you decide that the default vsftpd configuration works for you as described in the previous section, you can set to work allowing the appropriate access and providing security for
your vsftpd service. To help you secure your vsftpd server, the next sections describe how
to configure your firewall and SELinux (Booleans and file contexts).
Opening your firewall for F TP
If you have a firewall implemented on your system, you need to add firewall rules that allow
incoming requests to your FTP site and allow packets to return to your system on established
connections. Firewalls are implemented using iptables rules and managed with the
iptables service or firewalld service (see Chapter 25, “Securing Linux on a Network,”
for details about firewall services).
445
18
Downloaded from https://onlinelibrary.wiley.com/doi/ by alex jounh - Oregon Health & Science Univer , Wiley Online Library on [05/12/2025]. See the Terms and Conditions (https://onlinelibrary.wiley.com/terms-and-conditions) on Wiley Online Library for rules of use; OA articles are governed by the applicable Creative Commons License
Chapter 18: Configuring an F TP Server
Open firewall for FTP on recent RHEL or Fedora system
In Fedora and Red Hat Enterprise Linux, firewall rules have traditionally been stored in the
/etc/sysconfig/iptables file, and the underlying service was iptables (RHEL 6) or
iptables.service (Fedora). Modules were loaded into your firewall from the /etc/
sysconfig/iptables-config file. In RHEL 7 and Fedora 21 or later, the new
firewalld service manages those rules and rules are stored in the /etc/firewalld/
zones directory.
Note
It is best to work on your firewall directly from a system console, if possible, instead of over a remote login (such as
ssh) because a small error can immediately lock you out of your server. After that, you must go over to the console to
get back into the server and fix the problem.
You need to add a few things to your firewall to allow access to your FTP server without opening access to other services. First, you need to allow your system to accept requests on TCP
port 21; then you need to make sure the connection tracking module is loaded.
In the most recent RHEL and Fedora systems, you can use the Firewall Configuration window
to enable your firewall and open access to your FTP service. Install the firewall-config
package and either open the Firewall window from your desktop or run firewall-config
to start the Firewall Configuration window, as shown in Figure 18.1.
Next, to open access permanently to your FTP service, click the Configuration box and select
Permanent. Select FedoraWorkstation. Then select the check box next to ftp under the Services
tab. This automatically opens TCP port 21 (FTP) on your firewall and loads kernel modules
needed to allow access to passive FTP service. Select Options ➪ Reload Firewalld to apply the
firewall rule permanently.
Open firewall for FTP on older RHEL or Fedora system
For RHEL 6 and earlier systems, add rules directly to the /etc/sysconfig/iptables
file. If you are using a default firewall, rules in the beginning open access to requests for any
services coming from the local host and allow packets to come in that are associated with, or
related to, established connections. In the middle are rules that open ports for service requests
that you have already allowed, such as the secure shell service (sshd on TCP port 22). At the
end of the rules, a final rule usually DROPs or REJECTs any request that has not explicitly
been allowed.
To allow public access to someone requesting your FTP server, you want to allow new requests
to TCP port 21. You typically want to add the rule somewhere before the final DROP or
REJECT rule. The following output shows partial contents of the /etc/sysconfig/
iptables file with the rule allowing access to your FTP server in bold:
*filter
:INPUT ACCEPT [0:0]
:FORWARD ACCEPT [0:0]
446
Downloaded from https://onlinelibrary.wiley.com/doi/ by alex jounh - Oregon Health & Science Univer , Wiley Online Library on [05/12/2025]. See the Terms and Conditions (https://onlinelibrary.wiley.com/terms-and-conditions) on Wiley Online Library for rules of use; OA articles are governed by the applicable Creative Commons License
Part IV: Becoming a Linux Server Administrator
:OUTPUT ACCEPT [0:0]
-
A INPUT -
m state -
-
state ESTABLISHED,RELATED -
j ACCEPT
-
A INPUT -
i lo -
j ACCEPT
-
A INPUT -
m state -
-
state NEW -
m tcp -
p tcp -
-
dport 22 -
j ACCEPT
-
A INPUT -
m state -
-
state NEW -
m tcp -
p tcp -
-
dport 21 -
j ACCEPT
…
-A INPUT -j REJECT --reject-with icmp-host-prohibited
COMMIT
FIGURE 18.1
Open access to your FTP service from the Firewall Configuration window.
18
This example shows that, for the filter table, the firewall accepts packets from established connections, connections from local hosts, and any new requests on TCP port 22 (SSH service).
The line we just added (--dport 21) allows any packets on new connections to TCP port 21
to be accepted.
Note
It is important to have the ESTABLISHED, RELATED line in your iptables firewall rules. Without that line,
users would be able to connect to your SSH (port 22) and FTP (port 21) services, but they would not be able to communicate after that. So, a user could get authenticated but not be able to transfer data.
447
Downloaded from https://onlinelibrary.wiley.com/doi/ by alex jounh - Oregon Health & Science Univer , Wiley Online Library on [05/12/2025]. See the Terms and Conditions (https://onlinelibrary.wiley.com/terms-and-conditions) on Wiley Online Library for rules of use; OA articles are governed by the applicable Creative Commons License
Chapter 18: Configuring an F TP Server
The next thing you must do on RHEL 6 and earlier systems is set up the FTP connection
tracking module to be loaded each time the firewall starts up. Edit this line at the beginning of
the /etc/sysconfig/iptables-config file to appear as follows:
IPTABLES_MODULES="nf_conntrack_ftp"
At this point, you can restart your firewall (keeping in mind that a mistake could lock you out
if you are logged in remotely). Use one of the following two commands to restart your
firewall, depending on whether your system is using the older iptables service or the newer
firewalld service:
# service iptables restart
or
# systemctl restart firewalld.service
Try again to access your FTP server from a remote system (using a web browser or some other
FTP client).
Configuring SELinux for your F TP server
If SELinux is set to permissive or disabled, it does not block access to the vsftpd service
in any way. However, if SELinux is in enforcing mode, a few SELinux issues could cause your
vsftpd server not to behave as you would like. Use the following commands to check the
state of SELinux on your system:
# getenforce
Enforcing
# grep ^SELINUX= /etc/sysconfig/selinux
SELINUX=enforcing
The getenforce command shows how SELinux is currently set. (Here, it’s in enforcing
mode.) The SELINUX= variable in /etc/sysconfig/selinux shows how SELinux is set
when the system comes up. If it is in enforcing mode, as it is here, check the ftpd_selinux
man page for information about SELinux settings that can impact the operation of your
vsftpd service. Install the selinux-policy-doc package to get the ftpd_selinux
man page as well as man pages for other services with SELinux policies.
Here are some examples of file contexts that must be set for SELinux to allow files and directories to be accessed by vsftpd:
■
■
448
To share content so that it can be downloaded to FTP clients, that content must be
marked with a public_content_t file context. Files created in the /var/ftp
directory or its subdirectories inherit public_content_t file context automatically. (Be sure to create new content or copy existing content to the /var/ftp directories. Moving the files there may not change the file context properly.)
To allow files to be uploaded by anonymous users, the file context on the directory
to which you upload must be set to public_content_rw_t. (Other permissions, SELinux Booleans, and vsftpd.conf settings must be in place for this to
work as well.)
Downloaded from https://onlinelibrary.wiley.com/doi/ by alex jounh - Oregon Health & Science Univer , Wiley Online Library on [05/12/2025]. See the Terms and Conditions (https://onlinelibrary.wiley.com/terms-and-conditions) on Wiley Online Library for rules of use; OA articles are governed by the applicable Creative Commons License
Part IV: Becoming a Linux Server Administrator
If you have files in the /var/ftp directory structure that have the wrong file contexts
(which can happen if you move files there from other directories instead of copying them),
you can change or restore the file context on those files so that they can be shared. For example, to recursively change the file context of the /var/ftp/pub/stuff directory so that
the content can be readable from the FTP server through SELinux, enter the following:
# semanage fcontext -
a -
t public_content_t "/var/ftp/pub/stuff(/.*)?"
# restorecon -
F -
R -
v /var/ftp/pub/stuff
If you wanted to allow users to write to a directory as well as to read from it, you would need
to assign the public_content_rw_t file context to the directory to which you want to
allow uploads. This example tells SELinux to allow uploading of files to the /var/ftp/pub/
uploads directory:
# semanage fcontext -
a -
t public_content_rw_t \
"/var/ftp/pub/uploads(/.*)?"
# restorecon -
F -
R -
v /var/ftp/pub/uploads
FTP server features that are considered insecure by SELinux have Booleans that let you allow
or disallow those features. Here are some examples:
■
For SELinux to allow anonymous users to read and write files and directories, you need
to turn on the allow_ftpd_anon_write (RHEL 6) or ftpd_anon_write (RHEL
7 or later) Boolean:
# setsebool -
P ftpd_anon_write on
■
18
To be able to mount remote NFS or CIFS (Windows) shared filesystems and share
them from your vsftpd server, you need to turn on the following two Booleans,
respectively:
# setsebool -
P allow_ftpd_use_nfs on
# setsebool -
P allow_ftpd_use_cifs on
If you ever find that you cannot access files or directories from your FTP server that you
believe should be accessible, try turning off SELinux temporarily:
# setenforce 0
If you can access the files or directories with SELinux now in permissive mode, put the system
back in enforcing mode (setenforce 1). Now you know you have to go back through your
SELinux settings and find out what is preventing access. (See Chapter 25, “Enhancing Linux
Security with SELinux,” for more information on SELinux.)
Relating Linux file permissions to vsftpd
The vsftpd server relies on standard Linux file permissions to allow or deny access to files
and directories. As you would expect, for an anonymous user to view or download a file, at
least read permission must be open for other (------r--). To access a directory, at least execute permission must be on for other (--------x).
449
Downloaded from https://onlinelibrary.wiley.com/doi/ by alex jounh - Oregon Health & Science Univer , Wiley Online Library on [05/12/2025]. See the Terms and Conditions (https://onlinelibrary.wiley.com/terms-and-conditions) on Wiley Online Library for rules of use; OA articles are governed by the applicable Creative Commons License
Chapter 18: Configuring an F TP Server
For regular user accounts, the general rule is that if a user can access a file from the shell, that
user can access the same file from an FTP server. So, typically, regular users should at least
be able to get (download) and put (upload) files to and from their own home directories,
respectively. After permissions and other security provisions are in place for your FTP server,
you may want to consider other configuration settings for your FTP server.
Configuring Your F TP Server
Most of the configuration for the vsftpd service is done in the /etc/vsftpd/vsftpd
.conf file (for Ubuntu, it is the /etc/vsftpd.conf file). Examples of vsftpd.conf for
different types of sites are included in the /usr/share/doc/vsftpd directory. Depending
on how you want to use your FTP site, the following sections discuss a few ways to configure
your FTP server.
Remember to restart the vsftpd service after making any configuration changes.
Setting up user access
The vsftpd server comes with all local Linux users (those listed in the /etc/passwd file)
configured to access the server and the anonymous user prevented. This is based on the following vsftpd.conf settings:
anonymous_enable=NO
local_enable=YES
Some web server companies have let users use FTP to upload the content for their own web
servers, although this is not as common a practice as it used to be. In some cases, the users
would have FTP-only accounts, meaning that they could not log in to a shell, but they could
log in via FTP to manage their content. Creating a user account that has no default shell (actually, /sbin/nologin) is how you can keep a user from logging into a shell but still allow
FTP access. For example, the /etc/passwd entry for the FTP-only user account bill might
look something like the following:
bill:x:1000:1000:Bill Jones:/home/bill:/sbin/nologin
With the user account set with /sbin/nologin as the default shell, any attempts to log in
from a console or via ssh as the user bill are denied. However, as long as bill has a password and local account access to the FTP server is enabled, bill should be able to log in to
the FTP server via an FTP client.
Not every user with an account on the Linux system has access to the FTP server. The setting
userlist_enable=YES in vsftpd.conf says to deny access to the FTP server to all
accounts listed in the /etc/vsftpd/user_list file. That list includes administrative
users root, bin, daemon, adm, lp, and others. You can add to that list other users to whom
you would like to deny access.
If you change userlist_enable to NO, the user_list file becomes a list of only those
users who do have access to the server. In other words, setting userlist_enable=NO,
450
Downloaded from https://onlinelibrary.wiley.com/doi/ by alex jounh - Oregon Health & Science Univer , Wiley Online Library on [05/12/2025]. See the Terms and Conditions (https://onlinelibrary.wiley.com/terms-and-conditions) on Wiley Online Library for rules of use; OA articles are governed by the applicable Creative Commons License
Part IV: Becoming a Linux Server Administrator
removing all usernames from the user_list file, and adding the usernames chris, joe,
and mary to that file cause the server to allow only those three users to log in to the server.
No matter how the value of userlist_enable is set, the /etc/vsftpd/ftpusers file
always includes users who are denied access to the server. Like the userlist_enable file,
the ftpusers file includes a list of administrative users. You can add more users to that file
if you want them to be denied FTP access.
One way to limit access to users with regular user accounts on your system is to use chroot
settings. Here are examples of some chroot settings:
chroot_local_user=YES
chroot_list_enable=YES
chroot_list_file=/etc/vsftpd/chroot_list
With the settings just shown uncommented, you could create a list of local users and add them
to the /etc/vsftpd/chroot_list file. After one of those users logged in, that user
would be prevented from going to places in the system that were outside of that user’s home
directory structure.
If uploads to your FTP server are allowed, the directories a user tries to upload to must be
writeable by that user. However, uploads can be stored under a username other than that
of the user who uploaded the file. This is one of the features discussed next, in the section
“Allowing uploading.”
18
Allowing uploading
To allow any form of writing to the vsftpd server, you must have write_enable=YES
set in the vsftpd.conf file (which it is, by default). Because of that, if local accounts are
enabled, users can log in and immediately begin uploading files to their own home directories.
However, anonymous users are denied the ability to upload files by default.
To allow anonymous uploads with vsftpd, you must have the first option in the following code example, and you may want the second line of code as well (both can be enabled
by uncommenting them from the vsftpd.conf file). The first allows anonymous users to
upload files; the second allows them to create directories:
anon_upload_enable=YES
anon_mkdir_write_enable=YES
The next step is to create a directory where anonymous users can write. Any directory under
the /var/ftp directory that has write permissions for the user ftp, the ftp group, or
other can be written to by an anonymous user. A common thing is to create an uploads
directory with permission open for writing. The following are examples of commands to run on
the server:
# mkdir /var/ftp/uploads
# chown ftp:ftp /var/ftp/uploads
# chmod 775 /var/ftp/uploads
451
Downloaded from https://onlinelibrary.wiley.com/doi/ by alex jounh - Oregon Health & Science Univer , Wiley Online Library on [05/12/2025]. See the Terms and Conditions (https://onlinelibrary.wiley.com/terms-and-conditions) on Wiley Online Library for rules of use; OA articles are governed by the applicable Creative Commons License
Chapter 18: Configuring an F TP Server
As long as the firewall is open and SELinux Booleans are set properly, an anonymous user can
cd to the uploads directory and put a file from the user’s local system into the uploads directory. On the server, the file would be owned by the ftp user and ftp group. The permissions
set on the directory (775) would allow you to see the files that were uploaded but not change
or overwrite them.
One reason for allowing anonymous FTP, and then enabling it for anonymous uploads, is to
allow people you don’t know to drop files into your uploads folder. Because anyone who can
find the server can write to this directory, some form of security needs to be in place. You
want to prevent an anonymous user from seeing files uploaded by other users, taking files, or
deleting files uploaded by other anonymous FTP users. One form of security is the chown
feature of FTP.
By setting the following two values, you can allow anonymous uploads. The result of these
settings is that when an anonymous user uploads a file, that file is immediately assigned ownership of a different user. The following is an example of some chown settings that you could
put in your vsftpd.conf file to use with your anonymous upload directory:
chown_uploads=YES
chown_username=joe
If an anonymous user were to upload a file after vsftpd was restarted with these settings,
the uploaded file would be owned by the user joe and the ftp group. Permissions would be
read/write for the owner and nothing for anyone else (rw-------).
So far, you have seen configuration options for individual features on your vsftpd server.
Some sets of vsftp.conf variables can work together in ways that are appropriate for certain kinds of FTP sites. The next section contains one of these examples, represented by a
sample vsftpd.conf configuration file that comes with the vsftpd package. That file can
be copied from a directory of sample files to the /etc/vsftpd/vsftpd.conf file to use
for an FTP server that is available on the Internet.
Setting up vsftpd for the Internet
To share files from your FTP server safely to the Internet, you can lock down your server by
limiting it to only allow downloads and only from anonymous users. To start with a configuration that is designed to share vsftpd files safely over the Internet, back up your current
/etc/vsftpd/vsftpd.conf file and copy this file to overwrite your vsftpd.conf (the
file is in different locations for Ubuntu or Fedora and RHEL):
/usr/share/doc/vsftpd/EXAMPLE/INTERNET_SITE/vsftpd.conf
/usr/share/doc/vsftpd/examples/INTERNET_SITE
# Fedora/RHEL
# Ubuntu
The following paragraphs describe the contents of that vsftpd.conf. Settings in the first
section set the access rights for the server:
# Access rights
anonymous_enable=YES
452
Downloaded from https://onlinelibrary.wiley.com/doi/ by alex jounh - Oregon Health & Science Univer , Wiley Online Library on [05/12/2025]. See the Terms and Conditions (https://onlinelibrary.wiley.com/terms-and-conditions) on Wiley Online Library for rules of use; OA articles are governed by the applicable Creative Commons License
Part IV: Becoming a Linux Server Administrator
local_enable=NO
write_enable=NO
anon_upload_enable=NO
anon_mkdir_write_enable=NO
anon_other_write_enable=NO
Turning on anonymous_enable (YES) and turning off local_enable (NO) ensures
that no one can log in to the FTP server using a regular Linux user account. Everyone must
come in through the anonymous account. No one can upload files (write_enable=NO).
Then, the anonymous user cannot upload files (anon_upload_enable=NO), create directories (anon_mkdir_write_enable=NO), or otherwise write to the server (anon_
other_write_enable=NO). Here are the Security settings:
# Security
anon_world_readable_only=YES
connect_from_port_20=YES
hide_ids=YES
pasv_min_port=50000
pasv_max_port=60000
Because the vsftpd daemon can read files assigned to the ftp user and group, setting
anon_world_readable_only=YES ensures that anonymous users can see files where
the read permission bit is turned on for other (------r--), but not write files. The
connect_from_port_20=YES setting gives the vsftpd daemon slightly more permission
to send data the way a client might request by allowing PORT-style data communications.
Using hide_ids=YES hides the real permissions set on files, so to the user accessing the
FTP site, everything appears to be owned by the ftp user. The two pasv settings restrict the
range of ports that can be used with passive FTP (where the server picks a higher number port
on which to send data) to between 50000 and 60000.
The next section contains features of the vsftpd server:
# Features
xferlog_enable=YES
ls_recurse_enable=NO
ascii_download_enable=NO
async_abor_enable=YES
With xferlog_enable=YES, all file transfers to and from the server are logged to the
/var/log/xferlog file. Setting ls_recurse_enable=NO prevents users from recursively listing the contents of an FTP directory (in other words, it prevents the type of listing that you could get with the ls -R command) because on a large site, that could drain
resources. Disabling ASCII downloads forces all downloads to be in binary mode (preventing
files from being translated in ASCII, which is inappropriate for binary files). The async_
abor_enable=YES setting ensures that some FTP clients, which might hang when aborting
a transfer, will not hang.
453
18
Downloaded from https://onlinelibrary.wiley.com/doi/ by alex jounh - Oregon Health & Science Univer , Wiley Online Library on [05/12/2025]. See the Terms and Conditions (https://onlinelibrary.wiley.com/terms-and-conditions) on Wiley Online Library for rules of use; OA articles are governed by the applicable Creative Commons License
Chapter 18: Configuring an F TP Server
The following settings have an impact on performance:
# Performance
one_process_model=YES
idle_session_timeout=120
data_connection_timeout=300
accept_timeout=60
connect_timeout=60
anon_max_rate=50000
With one_process_model=YES set, performance can improve because vsftpd launches
one process per connection. Reducing the idle_session_timeout from the default
300 seconds to 120 seconds causes FTP clients that are idle more than 2 minutes to be disconnected. Thus, less time is spent managing FTP sessions that are no longer in use. If a data
transfer stalls for more than data_connection_timeout seconds (300 seconds here), the
connection to the client is dropped.
The accept_timeout setting of 60 seconds allows 1 minute for a PASV connection to be
accepted by the remote client. The connect_timeout sets how long a remote client has
to respond to a request to establish a PORT-style data connection. Limiting the transfer rate
to 50000 (bytes per second) with anon_max_rate can improve overall performance of the
server by limiting how much bandwidth each client can consume.
Using F TP Clients to Connect to Your Server
Many client programs come with Linux, which you can use to connect to your FTP server.
Because Firefox and Chrome web browsers no longer support the FTP protocol, this chapter will
step you through other FTP clients that are available in Linux.
Accessing an F TP server with the lftp command
To test your FTP server from the command line, you can use the lftp command. To install the
lftp command in Fedora or RHEL, enter the following from the command line:
# dnf install lftp
If you use the lftp command with just the name of the FTP server you are trying to access,
the command tries to connect to the FTP server as the anonymous user. By adding the -u
username, you can enter the user’s password when prompted and gain access to the FTP
server as the user you logged in as.
After you have added your user and password information, you get an lftp prompt, ready for
you to start typing commands. The connection is made to the server when you type your first
command. You can use the commands to move around the FTP server and then use the get
and put commands to download and upload files.
454
Downloaded from https://onlinelibrary.wiley.com/doi/ by alex jounh - Oregon Health & Science Univer , Wiley Online Library on [05/12/2025]. See the Terms and Conditions (https://onlinelibrary.wiley.com/terms-and-conditions) on Wiley Online Library for rules of use; OA articles are governed by the applicable Creative Commons License
Part IV: Becoming a Linux Server Administrator
The following example shows how to use commands as just described. It assumes that the FTP
server (and associated security measures) has been configured to allow local users to connect
and to read and write files:
# lftp -
u chris localhost
Password: ********
lftp chris@localhost:~> pwd
ftp://chris@localhost
lftp chris@localhost:~> cd Documents
cd ok, cwd=/home/chris/Documents
lftp chris@localhost:~/Documents> ls
-
rw-
r-
-
r-
-
1 13597
13597
1394 Jan 28 2024 enrolled20250128
-
rw-
r-
-
r-
-
1 13597
13597
514 Feb 15 2024 enrolled-
20250215
lftp chris@localhost:~/Documents> !pwd
/root
lftp chris@localhost:~/Documents> get enrolled-20250128
3108 bytes transferred
lftp chris@localhost:~/Documents> put /etc/hosts
201 bytes transferred
lftp chris@localhost:~/Documents> ls
-
rw-
r-
-
r-
-
1 13597
13597
1394 Jan 28 2024 enrolled-
20250128
-
rw-
r-
-
r-
-
1 13597
13597
514 Feb 15 2024 enrolled-
20250215
-
rw-
r-
-
r-
-
1 13597
13597
201 Mar 03 20:22 hosts
lftp chris@localhost:~/Documents> !ls
anaconda-
ks.cfg
enrolled-
20250128
install.log
dog
Pictures
sent
Documents
Public
survey-
20141023.txt
lftp chris@localhost:~/Documents> quit
After providing the username (-u chris), lftp prompts for chris’s Linux user password.
Typing pwd shows that chris is logged in to the local host and that /home/chris is the
current directory. Just as you would from a regular Linux command-line shell, you can use cd
to change to another directory and ls to list that directory’s contents.
To have the commands you run interpreted by the client system, you can simply put an exclamation mark (!) in front of a command. For example, running !pwd shows that the current
directory on the system that initiated the lftp is /root. This is good to know because if
you get a file from the server without specifying its destination, it goes to the client’s current
directory (in this case, /root). Other commands you might run so that they are interpreted
by the client system include !cd (to change directories) and !ls (to list files).
Assuming you have read permission for a file on the server and write permission from the
current directory on the initiating system, you can use the get command to download a file
from the server (get enrolled-20250128). If you have write and upload permission on
the current directory on the server, you can use put to copy a file to the server
(put /etc/hosts).
455
18
Downloaded from https://onlinelibrary.wiley.com/doi/ by alex jounh - Oregon Health & Science Univer , Wiley Online Library on [05/12/2025]. See the Terms and Conditions (https://onlinelibrary.wiley.com/terms-and-conditions) on Wiley Online Library for rules of use; OA articles are governed by the applicable Creative Commons License
Chapter 18: Configuring an F TP Server
Running an ls command shows that the /etc/hosts file was uploaded to the server.
Running the !ls command lets you see that the enrolled-20250128 file was transferred
from the server to the initiating system.
Using the gFTP client
Many other FTP clients are available with Linux as well. Another FTP client that you could
try is gFTP. The gFTP client provides an interface that lets you see both the local and remote
sides of your FTP session. To install gFTP in Fedora, run the following command to install the
gftp package:
# dnf install gftp
To start gFTP, launch it from the applications menu or run gftp & from the shell. To use it,
type the URL of the FTP server to which you wish to connect, enter the username you want to
use (such as anonymous), and press Enter. Figure 18.2 shows an example of gFTP being used to
connect to the site: ftp.gnu.org.
FIGURE 18.2
The gFTP FTP client lets you see both sides of an FTP session.
456
Downloaded from https://onlinelibrary.wiley.com/doi/ by alex jounh - Oregon Health & Science Univer , Wiley Online Library on [05/12/2025]. See the Terms and Conditions (https://onlinelibrary.wiley.com/terms-and-conditions) on Wiley Online Library for rules of use; OA articles are governed by the applicable Creative Commons License
Part IV: Becoming a Linux Server Administrator
To traverse the FTP site from gFTP, just double-click folders (just as you would from a file manager window). The full paths to the local directory (on the left) and remote directory (on the
right) are shown above the listings of files and folders below.
To transfer a file from the remote side to the local side, select the file that you want from the
right and click the arrow in the middle of the screen pointing to the left. Watch the progress
of the file transfer from messages on the bottom of the screen. When the transfer completes,
the file appears in the left pane.
You can bookmark the address information that you need to connect to an FTP site. That
address is added to a set of bookmarks already stored under the Bookmarks menu. You can
select sites from the list to try the gFTP. Most of the sites are for Linux distributions and other
open source software sites.
Summary
Setting up an FTP server is an easy way to share files over a TCP network. The Very Secure FTP
Daemon (vsftpd package) is available for Fedora, Red Hat Enterprise Linux, Ubuntu, and
other Linux systems.
A default vsftpd server allows anonymous users to download files from the server and regular
Linux users to upload or download files (provided the correct security settings are applied).
Moving around on an FTP server is similar to moving around a Linux filesystem. You move up
and down the directory structure to find the content that you want.
There are both graphical and text-based FTP clients. A popular text-based client for Linux is
lftp. As for graphical FTP clients, you can use dedicated FTP clients, such as gFTP.
FTP servers are not the only way to share files over a network from Linux. The Samba service
provides a way to share files over a network so that the shared Linux directory looks like a
shared directory from a Windows system. Chapter 19, “Configuring a Windows File Sharing
(Samba) Server,” describes how to use Samba to offer Windows-style file sharing.
Exercises
The exercises in this section describe tasks related to setting up an FTP server in RHEL or
Fedora and connecting to that server using an FTP client. If you are stuck, solutions to the
tasks are shown in Appendix B. Keep in mind that the solutions shown in Appendix B are usually just one of multiple ways to complete a task.
Don’t do these exercises on a Linux system running a public FTP server because they almost
certainly will interfere with that server.
1. Determine which package provides the Very Secure FTP Daemon service.
2. Install the Very Secure FTP Daemon package on your system, and search for the
configuration files in that package.
457
18
Downloaded from https://onlinelibrary.wiley.com/doi/ by alex jounh - Oregon Health & Science Univer , Wiley Online Library on [05/12/2025]. See the Terms and Conditions (https://onlinelibrary.wiley.com/terms-and-conditions) on Wiley Online Library for rules of use; OA articles are governed by the applicable Creative Commons License
Chapter 18: Configuring an F TP Server
3. Enable anonymous FTP and disable local user login for the Very Secure FTP
Daemon service.
4. Start the Very Secure FTP Daemon service and set it to start when the system boots.
5. On the system running your FTP server, create a file named test in the anonymous
FTP directory that contains the words “Welcome to your vsftpd server.”
6. Install the ftp package on the system running your FTP server and use ftp to get
the test file from the anonymous FTP home directory. Be sure you can see that a
copy of the file is in the local directory.
7. From an ftp command outside of the system that is running the FTP server, try to
access the test file in the anonymous FTP home directory. If you cannot access the
file, check that your firewall and SELinux are configured to allow access to that file.
8. Configure your vsftpd server to allow file uploads by anonymous users to a directory named in.
9. Install the lftp FTP client (if you don’t have a second Linux system, install lftp on
the same host running the FTP server). If you cannot upload files to the in directory,
check that your firewall and SELinux are configured to allow access to that file.
10. Using any FTP client you choose, visit the ftp://ftp.gnu.org site and list the contents of the directory you land in.
458
Downloaded from https://onlinelibrary.wiley.com/doi/ by alex jounh - Oregon Health & Science Univer , Wiley Online Library on [05/12/2025]. See the Terms and Conditions (https://onlinelibrary.wiley.com/terms-and-conditions) on Wiley Online Library for rules of use; OA articles are governed by the applicable Creative Commons License
Part IV: Becoming a Linux Server Administrator
19
Configuring a Windows File
Sharing (Samba) Server
IN THIS CHAPTER
Getting and installing Samba
Using Samba security features
Editing the smb.conf configuration file
Accessing Samba from Linux and Windows clients
Using Samba in the enterprise
S
amba is the project that implements open source versions of protocols used to share files and
printers among Windows systems as well as authenticate users and restrict hosts. Samba offers
a number of ways to share files among Windows, Linux, and macOS systems that are well known
and readily available to users of those systems.
This chapter steps you through the process of installing and configuring a Samba server. It describes the
security features that you need to know to share your file and printer resources and describes how to
access those resources from Linux and Windows systems.
Understanding Samba
Samba (https://samba.org) is a suite of programs that allows Linux, UNIX, and other systems to
interoperate with Microsoft Windows file and printer sharing protocols. Windows, macOS, and other
client systems can access Samba servers to share files and printers in the same ways that they would
from Windows file and print servers.
With Samba, you can use standard TCP/IP networking to communicate with clients. For name service,
Samba supports regular TCP/IP hostnames as well as NetBIOS names. File sharing is done using Server
Message Block (SMB) protocol.
The Samba project has gone to great lengths to make its software secure and robust. In fact, many
people prefer using Samba servers over Windows file servers because of the added security that is
inherent in running Windows-style file sharing services on Linux or other UNIX-like operating systems.
459
Linux Bible, Eleventh Edition. Christopher Negus.
© 2026 John Wiley & Sons, Inc. All rights reserved, including rights for text and data mining and training of artificial intelligence technologies or similar
technologies. Published 2026 by John Wiley & Sons, Inc.
Downloaded from https://onlinelibrary.wiley.com/doi/ by alex jounh - Oregon Health & Science Univer , Wiley Online Library on [05/12/2025]. See the Terms and Conditions (https://onlinelibrary.wiley.com/terms-and-conditions) on Wiley Online Library for rules of use; OA articles are governed by the applicable Creative Commons License
CHAPTER
Beyond all of the technical mumbo-jumbo, however, the end result is that Samba makes it easy
to share files and printers between Linux servers and Windows desktop systems. For the server,
only a few configuration files and tools are needed to manage Samba. For the clients, shared
resources just show up under Network selection in the File Explorer application.
To configure the Samba service, you directly edit Samba configuration files (particularly smb
.conf) and run a few commands. To begin using Samba on your Linux system, you need to
install a few software packages, as described in the next section.
Installing Samba
In Red Hat Enterprise Linux and Fedora, to configure a Samba file and print server, installing
the samba package gets you everything you need to start. Among other components, the
samba package includes the Samba service daemon (/usr/sbin/smbd) and NetBIOS name
server daemon (/usr/sbin/nmbd). Installing the samba package pulls in the samba-
common package, which contains server configuration files (smb.conf, lmhosts, and
others) and commands for adding passwords and testing configuration files, along with other
Samba features.
To install the packages needed to use Samba, enter the following as root from the command
line in Ubuntu, or in Fedora or RHEL, respectively:
# apt install samba smbclient
or
# dnf install samba samba-
client samba-
winbind
Continuing with RHEL or Fedora as an example, after you have installed the Samba packages,
look at the configuration files in the samba-common package:
# rpm -qc samba-common
/etc/logrotate.d/samba
/etc/samba/lmhosts
/etc/samba/smb.conf
/etc/sysconfig/samba
The /etc/logrotate.d/samba and /etc/sysconfig/samba files are usually not
modified. The first sets how files in /var/log/samba log files are rotated (copied to other
files and removed) over time. (Type man logrotate to learn more.) The second is a file
where you could put options that are passed to the smbd, nmbd, or winbindd daemon, so
you could turn off features such as debugging.
Most configuration files that you would modify for Samba are in the /etc/samba directory.
The smb.conf file is the primary configuration file where you put global settings for the
Samba server as well as individual file and printer share information (more on that later). The
lmhosts file enables the Samba NetBIOS hostname to be mapped into IP addresses.
Although it doesn’t exist by default, you can create a file named /etc/samba/smbusers
to map Linux usernames into Windows usernames. As you configure your Samba server, you
460
Downloaded from https://onlinelibrary.wiley.com/doi/ by alex jounh - Oregon Health & Science Univer , Wiley Online Library on [05/12/2025]. See the Terms and Conditions (https://onlinelibrary.wiley.com/terms-and-conditions) on Wiley Online Library for rules of use; OA articles are governed by the applicable Creative Commons License
Part IV: Becoming a Linux Server Administrator
can refer to the smb.conf man page (man smb.conf). There are also man pages for Samba
commands, such as smbpasswd (to change passwords), smbclient (to connect to a Samba
server), and nmblookup (to look up NetBIOS information).
After you have installed Samba packages and completed a quick survey of what they contain, try starting up the Samba service and see what you get in a default configuration. For
Ubuntu and some other versions of Linux, some additional configuration might be needed to
bring up samba.
Starting and Stopping Samba
With samba and samba-common installed, you can start the server and investigate how it
runs in the default configuration. Two main services are associated with a Samba server, each
of which has its own service daemon:
smb: This service controls the smbd daemon process, which provides the file and print
sharing services that can be accessed by Windows clients.
nmb: This service controls the nmbd daemon. By providing name-to-address mapping via
the NetBIOS name service, nmbd can map requests from Windows clients for NetBIOS
names so that they can be resolved into IP addresses.
To share files and printers with other Linux systems with Samba, only the smb service is
required. The next section describes how to start and enable the smb service.
Starting the Samba (smb) service
The smb service is what starts the smbd server and makes files and printers available from
your local system to other computers on the network. As usual, services are enabled and
started differently on different Linux systems. For different Linux systems, you need to find
the name of the service and the correct tool to start the smbd daemon.
In Fedora and RHEL, to enable Samba to start immediately when the system boots, enter the
following from the command line as root:
# systemctl enable smb.service
# systemctl start smb.service
# systemctl status smb.service
smb.service -Samba SMB Daemon
Loaded: loaded (/usr/lib/systemd/system/smb.service; enabled;
preset: disabled)
Drop-
In: /usr/lib/systemd/system/service.d
└─10-timeout-abort.conf, 50-keep-warm.conf
Active: active (running) since SSun 2025-
06-
29 16:54:18 EDT; 5s ago
Invocation: 4868431907c74f48a6823658189d98f6
Docs: man:smbd(8)
461
19
Downloaded from https://onlinelibrary.wiley.com/doi/ by alex jounh - Oregon Health & Science Univer , Wiley Online Library on [05/12/2025]. See the Terms and Conditions (https://onlinelibrary.wiley.com/terms-and-conditions) on Wiley Online Library for rules of use; OA articles are governed by the applicable Creative Commons License
Chapter 19: Configuring a Windows File Sharing (Samba) Server
Main PID:
Status:
Tasks:
Memory:
CPU:
CGroup:
man:samba(7)
man:smb.conf(5)
7947 (smbd)
"smbd: ready to serve connections..."
3 (limit: 8919)
10.0M (peak: 10.3M)
77ms
/system.slice/smb.service
├─7947 /usr/sbin/smbd --foreground --no-process-group
├─7950 /usr/sbin/smbd --foreground --no-process-group
└─7951 /usr/sbin/smbd --foreground --no-process-group
Jun 29 16:54:18 fedora systemd[1]: Starting smb.service -Samba
SMB Daemon...
The first systemctl command enables the service, the second starts it immediately, and the
third shows the status. To investigate further, notice that the service file is located at /usr/
lib/systemd/system/smb.service. Look at the contents of that file:
# cat /usr/lib/systemd/system/smb.service
[Unit]
Description=Samba SMB Daemon
Documentation=man:smbd(8) man:samba(7) man:smb.conf(5)
Wants=network-online.target
After=network.target network-
online.target nmb.service winbind
.service
[Service]
Type=notify
PIDFile=/run/smbd.pid
LimitNOFILE=16384
EnvironmentFile=-/etc/sysconfig/samba
ExecStart=/usr/sbin/smbd --foreground --no-process-group $SMBDOPTIONS
ExecReload=/bin/kill -
HUP $MAINPID
LimitCORE=infinity
Environment=KRB5CCNAME=FILE:/run/samba/krb5cc_samba
[Install]
WantedBy=multi-user.target
The Samba daemon process (smbd) starts up after the network, network-online, nmb,
and winbind targets. The /etc/sysconfig/samba file contains variables that are passed
as arguments to the smbd, nmbd, and winbindd daemons when they start. No options are set
by default for any of those daemons. The WantedBy line indicates that smb.service should
start when the system boots up into multi-user mode (multi-user.target), which it does
by default.
Whether you are running your Samba server on RHEL, Fedora, or another Linux system,
you can check access to the Samba server using the smbclient command (from the
462
Downloaded from https://onlinelibrary.wiley.com/doi/ by alex jounh - Oregon Health & Science Univer , Wiley Online Library on [05/12/2025]. See the Terms and Conditions (https://onlinelibrary.wiley.com/terms-and-conditions) on Wiley Online Library for rules of use; OA articles are governed by the applicable Creative Commons License
Part IV: Becoming a Linux Server Administrator
samba-client package). You can get basic information from a Samba server using the
following command (you can use an empty password here):
# smbclient -
L localhost
Password for [FEDORAGROUP\root]: <ENTER>
Anonymous login successful
Sharename
---------
IPC$
Type
----
IPC
Comment
-------
IPC Service (Samba Server Version 4.22.3)
The smbclient output allows you to see what services are available from the server. By default,
anonymous login is allowed when querying the server (so I just pressed Enter when prompted for
a password).
You can discern a number of things about the default Samba server setup from
this output:
■
■
No directories are shared yet from the server.
There is no NetBIOS name service running yet from the Samba server.
Next, you can decide whether you want to run the NetBIOS name service on your Samba server.
Starting the NetBIOS (nmbd) name server
If no Windows domain server is running on the network, as is the case here, you can start the
nmb service on the Samba host to provide that service.
To start the nmb service (nmbd daemon) in Fedora or RHEL, type the following:
# systemctl enable nmb.service
# systemctl start nmb.service
# systemctl status nmb.service
Created symlink /etc/systemd/system/multi-
user.target.wants/nmb
.service → /usr/lib/systemd/system/nmb.service.
# systemctl status nmb
● nmb.service -Samba NMB Daemon
Loaded: loaded (/usr/lib/systemd/system/nmb.service; enabled;
preset:
disabled)
Drop-
In: /usr/lib/systemd/system/service.d
└─10-timeout-abort.conf, 50-keep-warm.conf
Active: active (running) since Sun 2025-
07-
06 18:38:27 EDT; 12s
ago
Docs: man:nmbd(8)
man:samba(7)
man:smb.conf(5)
Main PID: 7962 (nmbd)
Status: "nmbd: ready to serve connections..."
463
19
Downloaded from https://onlinelibrary.wiley.com/doi/ by alex jounh - Oregon Health & Science Univer , Wiley Online Library on [05/12/2025]. See the Terms and Conditions (https://onlinelibrary.wiley.com/terms-and-conditions) on Wiley Online Library for rules of use; OA articles are governed by the applicable Creative Commons License
Chapter 19: Configuring a Windows File Sharing (Samba) Server
Tasks:
Memory:
CPU:
CGroup:
1 (limit: 8919)
3.1M (peak: 3.5M)
35ms
/system.slice/nmb.service
└─7962 /usr/sbin/nmbd --foreground --no-process-group
Jul 06 18:38:27 fedora systemd[1]: Started nmb.service -Samba
NMB Daemon.
By default, the NetBIOS name is set to SAMBA in the smb.conf file (check the value of
workgroup in smb.conf to see if your NetBIOS name is different). To query the nmbd
server for the IP address of SAMBA, you would enter the following:
# nmblookup -
U 127.0.0.1 FEDORA40
querying SAMBA on 127.0.0.1
192.168.1.19 SAMBA<00>
You should be able to see your Samba server running from the local system now. The hostname
assigned to the system (in this case SAMBA) is assigned by default.
However, if you have a firewall configured or SELinux enabled, you may not be able to access
the Samba server fully from a remote system yet. The next section should help you to open
Samba to systems outside of the local system as well as to allow some Samba features that may
be turned off by SELinux.
Stopping the Samba (smb) and NetBIOS (nmb) services
To stop the smb and nmb services in Fedora or RHEL, you can use the same systemctl
command you used to start them. You can use the same command to disable the services as
well so that they do not start up again when the system boots. Here are examples of how to
stop the smb and nmb services immediately:
# systemctl stop smb.service
# systemctl stop nmb.service
To prevent the smb and nmb services from starting the next time the system reboots, enter
the following commands in Fedora or RHEL:
# systemctl disable smb.service
# systemctl disable nmb.service
Of course, you only want to stop or disable the smb and nmb services if you no longer want
to use the Samba service. If you are ready to continue to configure your Samba service, enable
and restart the services so begin to configure your Linux security features to allow the Samba
service. to become available to others on your network.
Securing Samba
If you cannot access your Samba server from another host immediately after starting the
server, you probably have some security work to do. Because many default installations of
464
Downloaded from https://onlinelibrary.wiley.com/doi/ by alex jounh - Oregon Health & Science Univer , Wiley Online Library on [05/12/2025]. See the Terms and Conditions (https://onlinelibrary.wiley.com/terms-and-conditions) on Wiley Online Library for rules of use; OA articles are governed by the applicable Creative Commons License
Part IV: Becoming a Linux Server Administrator
Linux prevent, rather than allow, access to the system, dealing with security for a service such
as Samba usually has more to do with making it available than making it secure.
Here are the security features that you should be aware of when configuring your
Samba system:
Firewalls The default firewall for Fedora, RHEL, and other Linux systems prevents any
access to local services from outside systems. So, to allow users from other computers
to access your Samba service, you must create firewall rules that open one or more
ports for selected protocols (TCP in particular).
SELinux Many features of Samba are designated as potentially insecure by SELinux.
Because the default SELinux Booleans (on/off switches for certain features) are set to
provide the least access required, you need to turn Booleans on for features such as
allowing users to access their own home directories with Samba. In other words, you
can configure Samba to share user home directories, but SELinux prohibits someone
from trying to use that feature unless you explicitly configure SELinux to allow
that feature.
Host and user restrictions Within the Samba configuration files themselves, you can
indicate which hosts and users can have access to the Samba server as a whole or to
particular shared directories.
The next sections describe how to set up the security features just mentioned for Samba.
Configuring firewalls for Samba
If a firewall is configured for your Linux system when you first install it, the firewall typically allows any requests for services from local users but none by outside users. That’s why,
at the end of the installation section of this chapter, you should have been able to test
that Samba was working using the smbclient command from the local system. However,
if the request originated from another system, it would have been rejected.
Configuring firewall rules for Samba mainly consists of opening up incoming ports on which
the smbd and nmbd daemons are listening. These are the ports that you should open to
get a working Samba service on your Linux system:
TCP port 445: This is the primary port on which the Samba smbd daemon listens. Your
firewall must support incoming packet requests on this port for Samba to work.
TCP port 139: The smbd daemon also listens on TCP port 139 in order to handle
sessions associated with NetBIOS hostnames. This is used for legacy SMB1 compatibility, so it is possible to use Samba over TCP without opening this port.
UDP ports 137 and 138: The nmbd daemon uses these two ports for incoming NetBIOS
requests. If you are using the nmbd daemon, these two ports must be open for new
packet requests for NetBIOS name resolution.
For Fedora and RHEL, allowing incoming access to those four ports is easy. Simply open the Firewall Configuration window, and on the Services tab select the check boxes next to the samba
465
19
Downloaded from https://onlinelibrary.wiley.com/doi/ by alex jounh - Oregon Health & Science Univer , Wiley Online Library on [05/12/2025]. See the Terms and Conditions (https://onlinelibrary.wiley.com/terms-and-conditions) on Wiley Online Library for rules of use; OA articles are governed by the applicable Creative Commons License
Chapter 19: Configuring a Windows File Sharing (Samba) Server
and samba-client entries on the public zone. Those ports become immediately accessible (no
restart of the firewalld service is required).
Configuring SELinux for Samba
There are both file context and Boolean considerations related to using Samba with SELinux
in enforcing mode. File contexts must be properly set on a directory that is shared by Samba.
Booleans allow you to override the secure-by-default approach to certain Samba features.
You can find information on how SELinux confines Samba on the samba_selinux man page
(man samba_selinux). You must install the selinux-policy-doc package to get that
man page. For a deeper understanding of SELinux, refer to Chapter 25, “Enhancing Linux Security
with SELinux.”
Setting SELinux Booleans for Samba
An easy way to list and change SELinux Booleans for Samba is from the command line. To use the
semanage command to list Samba-related Booleans, enter the following:
# semanage boolean -
l | egrep "smb|samba"
The following is a list of some of the SELinux Booleans that apply to Samba and their descriptions. Most of the Booleans let you set which files and directories the Samba server can read
and write on behalf of Samba users. Others let you allow potentially insecure features:
samba_run_unconfined: Allows samba to run unconfined scripts from Samba shares.
smbd_anon_write: Allows Samba to let anonymous users modify public files used
for public file transfer services. Files and directories must be labeled public_
content_rw_t.
samba_enable_home_dirs: Allows Samba to share users’ home directories.
samba_export_all_ro: Allows Samba to share any file and directory read-only.
use_samba_home_dirs: Allows a remote Samba server to access home directories on the
local machine.
samba_create_home_dirs: Allows Samba to create new home directories (for example, via PAM).
samba_export_all_rw: Allows Samba to share any file or directory read/write.
The following Booleans affect Samba’s ability to share directories that are themselves
mounted from other remote services (such as NFS) or to act as a Windows domain controller:
samba_share_fusefs: Allows Samba to export ntfs/fusefs volumes.
samba_share_nfs: Allows Samba to export NFS volumes.
samba_domain_controller: Allows Samba to act as the domain controller, add users
and groups, and change passwords.
466
Downloaded from https://onlinelibrary.wiley.com/doi/ by alex jounh - Oregon Health & Science Univer , Wiley Online Library on [05/12/2025]. See the Terms and Conditions (https://onlinelibrary.wiley.com/terms-and-conditions) on Wiley Online Library for rules of use; OA articles are governed by the applicable Creative Commons License
Part IV: Becoming a Linux Server Administrator
The setsebool command is used to turn the SELinux Booleans on or off. Used with the -P
option, setsebool sets the Boolean you indicate permanently. For example, to allow Samba to
share any file or directory with read-only permission from the server, you could type the following
from a shell as root user:
# setsebool -
P samba_export_all_ro on
# getsebool samba_export_all_ro
samba_export_all_ro --> on
The setsebool command sets the Boolean in this case to on. The getsebool lets you see the
value of the Boolean.
Setting SELinux file contexts for Samba
SELinux confines the files that the Samba service can access. Instead of allowing any file with
the proper read and write permission to be shared by the Samba server, SELinux (when in enforcing mode) requires that files and directories have the correct file contexts set on them before the
Samba service can even see that the files exist.
For the Samba service to function with SELinux immediately, some files and directories come
preset with the proper file contexts. For example, Samba configuration files (/etc/samba/*),
log files (/var/log/samba/*), and libraries (/var/lib/samba/*) have rules assigned to
ensure that they get the proper file contexts. To find files and directories associated with the
Samba service and smbd daemon that have file contexts preset, run the following:
# semanage fcontext -
l | grep -
i samba
# semanage fcontext -
l | grep -
i smb
The file context portion in which you are interested ends with _t: for example, samba_etc_t,
samba_log_t, and samba_var_t for the /etc/samba, /var/log/samba, and /var/
lib/samba directories, respectively.
You may find that you need to change file contexts—for example, when you put files in nonstandard locations (such as moving the smb.conf file to /root/smb.conf) or when you want
to share a directory (other than home directories, which can be turned on by setting a Boolean).
Unlike the vsftpd (FTP) and httpd (web) servers that come with Linux, Samba has no default
shared content directories (those just mentioned used /var/ftp and /var/www/html).
You can change a file context permanently by creating a new file context rule and then applying
that rule to the file or directory for which it is intended. You can do that with the semanage
command (to make the rule) and restorecon command (to apply the rule). For example, if you
wanted to share a directory, /var/mystuff, you would create that directory and run the following commands to make it available for read/write access from Samba:
# mkdir /var/mystuff
# ls -
Zd /var/mystuff
unconfined_u:object_r:var_t:s0 /var/mystuff
# semanage fcontext -
a -
t samba_share_t "/var/mystuff(/.*)?"
467
19
Downloaded from https://onlinelibrary.wiley.com/doi/ by alex jounh - Oregon Health & Science Univer , Wiley Online Library on [05/12/2025]. See the Terms and Conditions (https://onlinelibrary.wiley.com/terms-and-conditions) on Wiley Online Library for rules of use; OA articles are governed by the applicable Creative Commons License
Chapter 19: Configuring a Windows File Sharing (Samba) Server
# restorecon -
v /var/mystuff
Relabeled /var/mystuff from unconfined_u:object_r:var_t:s0
to unconfined_u:object_r:samba_share_t:s0
# ls -
Zd /var/mystuff/
unconfined_u:object_r:samba_share_t:s0 /var/mystuff/
After those commands are run, the /mystuff directory, along with any files and directories
below that point, has the file context of samba_share_t. It is then up to you to assign the
correct Linux ownership and file permissions to allow access to the users you choose. The upcoming section “Configuring Samba” provides an example of creating a share, and it shows you how
to add permissions and ownership to a shared directory using standard Linux commands.
Configuring Samba host/user permissions
Within the smb.conf file itself, you can allow or restrict access to the entire Samba server or to
specific shares based on the hosts or users trying to gain access. You can also restrict access to the
Samba server by providing the service only on particular interfaces.
For example, if you have one network interface card connected to the Internet and another connected to the local network, you can tell Samba to serve requests only on the local network interface. The next section describes how to configure Samba, including how to identify which hosts,
users, or network interfaces can access your Samba server.
Configuring Samba
Inside the /etc/samba/smb.conf file are settings for configuring your Samba server, defining
shared printers, configuring how authentication is done, and creating shared directories. The file
consists of the following predefined sections:
[global]: Settings that apply to the Samba server as a whole are placed in this section.
This is where you set the server’s description, its workgroup (domain), the location of log
files, the default type of security, and other settings.
[homes]: This section determines whether users with accounts on the Samba server can see
their home directories (browseable) or write to them.
[printers]: In this section, settings tell Samba whether to make printers available
through Samba that are configured for Linux printing (CUPS).
[print$]: This section configures a directory as a shared printer drivers folder.
Inside the smb.conf file, lines beginning with pound signs (#) or semicolons (;) are comments. Removing the semicolons enables you to set up different kinds of shared information
quickly. The # sign can also be used to comment out a line.
When you begin editing your smb.conf file, make a backup that you can go back to if something goes wrong. You can start by copying the smb.conf.example file to smb.conf, if
you want to start with some examples. In some cases, however, it will not contain much more
than is already in the smb.conf file.
468
Downloaded from https://onlinelibrary.wiley.com/doi/ by alex jounh - Oregon Health & Science Univer , Wiley Online Library on [05/12/2025]. See the Terms and Conditions (https://onlinelibrary.wiley.com/terms-and-conditions) on Wiley Online Library for rules of use; OA articles are governed by the applicable Creative Commons License
Part IV: Becoming a Linux Server Administrator
Configuring the [global] section
Here is an example of a [global] section of the smb.conf file:
[global]
workgroup = SAMBA
security = user
passdb backend = tdbsam
printing = cups
printcap name = cups
load printers = yes
cups options = raw
netbios name = FEDORA42
log file = /var/log/samba/log.%m
max log size = 50
domain master = yes
;
;
interfaces = lo eth0 192.168.12.2/24 192.168.13.2/24
hosts allow = 127. 192.168.12. 192.168.13.
# To display workgroups, enable SMB1 by uncommenting the following:
;
client min protocol = NT1
;
server min protocol = NT1
;
ntlm auth = ntlmv1-
permitted
The workgroup (also used as the domain name) is set to SAMBA in this example. When a
client communicates with the Samba server, this name tells the client which workgroup the
Samba server is in.
The default security type is set to user (Samba usernames and passwords).
The passdb backend = tdbsam specifies to use a Samba backend database to hold passwords. You can use the smbpasswd command to set each user’s password (as described later).
Setting printing = cups and printcap name = cups indicates to use the
printcap created by the CUPS printing service. When you set load printers = yes,
Samba knows to share any printers configured by your local CUPS printing service from Samba.
The cups options lets you pass any options that you like to the CUPS printers served by
your Samba server. By default, only raw is set, which allows Windows clients to use their own
print drivers. Printers on your Samba server print the pages they are presented in raw form.
You can set a NetBIOS name by uncommenting the netbios name line and adding the server
name you want. For example, netbios name = FEDORA42.
If you want to restrict access to the Samba server so that it responds only on certain interfaces, you can uncomment the interfaces line and add either the IP address or name
(lo, eth0, eth1, and so on) of the network interfaces you want.
469
19
Downloaded from https://onlinelibrary.wiley.com/doi/ by alex jounh - Oregon Health & Science Univer , Wiley Online Library on [05/12/2025]. See the Terms and Conditions (https://onlinelibrary.wiley.com/terms-and-conditions) on Wiley Online Library for rules of use; OA articles are governed by the applicable Creative Commons License
Chapter 19: Configuring a Windows File Sharing (Samba) Server
You can restrict access to the Samba server to specific hosts as well. Uncomment the hosts
allow line (remove the semicolon) and insert the IP addresses of the hosts that you want to
allow. To enter a range of addresses, simply end the subnetwork portion of the address, followed by a dot. For example, 127. is associated with IP addresses that point to the local host.
The 192.168.12. entry matches all IP addresses from 192.168.12.1 to 192.168.12.254.
Configuring the [homes] section
The [homes] section is configured, by default, to allow any Samba user account to be able
to access its own home directory via the Samba server. Here is what the default homes entry
looks like:
[homes]
comment = Home Directories
valid users = %S, %D%w%S
browseable = No
read only = No
inherit acls = Yes
Setting valid users to %S substitutes the current service name, which allows any valid
users of the service to access their home directories. The valid users are also identified by
domain or workgroup (%D), winbind separator (%w), and name of current service (%S).
The browseable = No setting prevents the Samba server from displaying the availability of
the shared home directories. Users who can provide their own Samba usernames and passwords
can read and write in their own home directories (read only = no). With inherit
acls set to Yes, access control lists can be inherited to add another layer of security on the
shared files.
Securing the [homes] section
If after starting the smb service you cannot log in using a valid user account, you may need
to change some security features on your system. On Fedora and RHEL systems, in particular,
SELinux features need to be changed to allow users to access their home directories if you are
in SELinux enforcing mode.
For example, if you tried to use smbclient to log in to your home directory, the login would
succeed, but when you tried to list the contents of the home directory, you might see the following message:
NT_STATUS_ACCESS_DENIED listing \*
To tell SELinux to allow Samba users to access their home directories as Samba shares, turn on
the samba_enable_home_dirs Boolean by entering the following as root from a shell:
# setsebool -
P samba_enable_home_dirs on
The setsebool command turns on the capability of Samba to share home directories (which
is off by default). First create a password for the user with smbpasswd and then log in with
smbclient. The form for using the smbclient command to check access to the user’s
470
Downloaded from https://onlinelibrary.wiley.com/doi/ by alex jounh - Oregon Health & Science Univer , Wiley Online Library on [05/12/2025]. See the Terms and Conditions (https://onlinelibrary.wiley.com/terms-and-conditions) on Wiley Online Library for rules of use; OA articles are governed by the applicable Creative Commons License
Part IV: Becoming a Linux Server Administrator
home directory, again for the user chris, would be the following (replacing the IP address
with the name or address of your Samba server):
$ smbpasswd -
a chris
New SMB password: *********
Retype new SMB password: *********
Added user chris.
$ smbclient -
U chris //192.168.0.119/chris
Password for [FEDORAGROUP\chris]:
Try "help" to get a list of possible commands.
smb: \> ls file.txt
file.txt 149946368 Sun Jul 27 09:28:53 2025
39941 blocks of size 524288. 28191 blocks available
smb:\> quit
The main point to remember is that even though the share is not browseable, you can request
it by giving the Samba server’s hostname or IP address, followed by the user’s name (here,
chris), to access the user’s home directory.
Configuring the [printers] section
Any printer that you configure for CUPS printing on your Linux system is automatically shared
to others over Samba, based on the [printers] section that is added by default. The global
cups options = raw setting makes all printers raw printers (meaning that the Windows
client needs to provide the proper printer driver for each shared printer).
Here’s what the default printers section looks like in the smb.conf file:
[printers]
comment = All Printers
path = /var/tmp
browseable = no
guest ok = no
writeable = yes
printable = yes
create mask = 0600
19
The path tells Samba to store temporary print files in /var/tmp. The printable = yes
line causes all of your CUPS printers on the local system to be shared by Samba. Printers are
writeable and allow guest printing in this example. The create mask = 0600 setting used
here has the effect of removing write and execute bits for group and other, within the ACL,
when files are created in the path directory.
To see that local printers are available, you could run the smbclient -L command from a
Linux system, as shown earlier. On a Windows system, you can select Network from the File
Explorer window and select the icon representing your Samba server. All shared printers and
folders appear in that window. (See the section “Accessing Samba Shares” later in this chapter
for details on viewing and using shared printers.)
471
Downloaded from https://onlinelibrary.wiley.com/doi/ by alex jounh - Oregon Health & Science Univer , Wiley Online Library on [05/12/2025]. See the Terms and Conditions (https://onlinelibrary.wiley.com/terms-and-conditions) on Wiley Online Library for rules of use; OA articles are governed by the applicable Creative Commons License
Chapter 19: Configuring a Windows File Sharing (Samba) Server
Creating a Samba shared folder
Before you can create a shared folder, that folder (directory) must exist and have the proper
permissions set. In this example, the /var/salesdata directory is shared. You want the
data to be writeable by the user named chris but visible to anyone on your network. To create that directory and set the proper permissions and SELinux file contexts, type the following
as root user:
# mkdir /var/salesdata
# chmod 775 /var/salesdata
# chown chris:chris /var/salesdata
# semanage fcontext -
a -
t samba_share_t /var/salesdata
# restorecon -
v /var/salesdata
# touch /var/salesdata/test
# ls -
lZ /var/salesdata/test
-rw-r--r--. 1 root root
unconfined_u:object_r:samba_share_t:s0 0 Dec 24 14:35
/var/salesdata/test
Adding the shared folder to Samba
With the /var/salesdata directory created and properly configured to be shared by
Samba, here is what the shared folder (called salesdata) might look like in the smb
.conf file:
[salesdata]
comment = Sales data for current year
path = /var/salesdata
read only = no
;
browseable = yes
valid users = chris
Before this share was created, the /var/salesdata directory was created, with chris
assigned as the user and group, and the directory was set to be readable and writeable by
chris. (The SELinux file context must also be set if SELinux is in enforcing mode.) The Samba
username chris must be presented along with the associated password to access the share.
After chris is connected to the share, chris has read and write access to it (read
only = no).
Now that you have seen the default settings for Samba and an example of a simple shared
directory (folder), read the next few sections to see how to configure shares even further. In
particular, the examples demonstrate how to make shares available to particular users, hosts,
and network interfaces.
Checking the Samba share
For the changes to your Samba configuration to take effect, you need to restart the smb service. After that is done, check that the Samba share you created is available and that any user
472
Downloaded from https://onlinelibrary.wiley.com/doi/ by alex jounh - Oregon Health & Science Univer , Wiley Online Library on [05/12/2025]. See the Terms and Conditions (https://onlinelibrary.wiley.com/terms-and-conditions) on Wiley Online Library for rules of use; OA articles are governed by the applicable Creative Commons License
Part IV: Becoming a Linux Server Administrator
you assigned to the share can access it. To do those things, enter the following as root user
from a shell on the Samba server:
# systemctl restart smb.service
# smbclient -
L localhost -
U chris
Enter SAMBA\chris's password: *******
Sharename
Type
Comment
---------
----
-------
salesdata
Disk
Sales data for current year
print$
Disk
Printer Drivers
IPC$
IPC
IPC Service (Samba 4.22.3)
chris
Disk
Home Directories
…
Here you can see the share name (salesdata), the domain set to the workgroup name
SAMBA, and the description entered earlier (Sales data for current year). Next,
a quick way to test access to the share is to use the smbclient command. You can use
the hostname or IP address with smbclient to access the share. Because I am on the local
system in this example, I just use the name localhost and the user I added (chris):
# smbclient -
U chris //localhost/salesdata
Password for [FEDORAGROUP\chris]: ********
Try "help" to get a list of possible commands.
smb: \> lcd /etc
smb: \> put hosts
putting file hosts as \hosts (43.5 kb/s) (average 43.5 kb/s)
smb: \> ls
.
D
0 Mon Jul 27 05:28:19 2025
..
D
0 Mon Jul 27 05:28:19 2025
test
N
0 Mon Jul 27 05:20:17 2025
hosts
A
89 Mon Jul 27 05:28:19 2025
248394752 blocks of size 1024. 138013196 blocks available
smb: \> quit
A Samba share is in the form //host/share or \\host\share. However, when you
identify a Samba share from a Linux shell in the latter case, the backslashes need to be
escaped. So, as an argument, the first example of the share would have to appear as
\\\\localhost\\salesdata. Thus, the first form is easier to use.
19
Note
Escaping a character that you type from the shell is done by putting a backslash (\) in front of that character. It tells the
shell to use the character following the backslash literally, instead of giving the character a special meaning to the shell.
(The * and ? characters are examples of characters with special meaning.) Because the backslash itself has special
meaning to the shell, if you want to use a backslash literally, you need to precede it with a backslash. That is why when
you want to type a Samba address that includes two backslashes, you actually have to enter four backslashes.
473
Downloaded from https://onlinelibrary.wiley.com/doi/ by alex jounh - Oregon Health & Science Univer , Wiley Online Library on [05/12/2025]. See the Terms and Conditions (https://onlinelibrary.wiley.com/terms-and-conditions) on Wiley Online Library for rules of use; OA articles are governed by the applicable Creative Commons License
Chapter 19: Configuring a Windows File Sharing (Samba) Server
When prompted, enter the Samba password for that user (it may be different from the Linux
user’s password). The Samba user’s password was set earlier with smbpasswd in this example.
You see the smb: \> prompt after that.
At this point, you have a session open to the Samba host that is similar to an ftp session for
traversing an FTP server. The lcd /etc command makes /etc the current directory on the
local system. The put hosts command uploads the hosts file from the local system to the
shared directory. Typing ls shows that the file exists on the server. The quit command ends
the session.
Restricting Samba access by network interface
To restrict access to all of your shares, you can set the global interfaces setting in the smb
.conf file. Samba is designed more for local file sharing than for sharing over wide area
networks. If your computer has a network interface connected to a local network and one
connected to the Internet, consider allowing access only to the local network.
To set which interfaces Samba listens on, uncomment the interfaces line shown in an earlier example in the [global] section of the smb.conf file. Then add the interface names or
IP address ranges of those computers that you want to allow access to your computer. Here is
an example:
interfaces = lo eth0 192.168.12.2/24 192.168.13.2/24
This interfaces entry allows access to the Samba service to all users on the local system (lo)
and the external NIC (eth0). It also allows access to any systems on the 192.168.12 and
192.168.13 networks. See the smb.conf man page’s description of different ways of identifying hosts and network interfaces.
Restricting Samba access by host
Host access to the Samba server can be set for the entire service or for single shares.
Here are some examples of hosts allow and hosts deny entries:
hosts
hosts
hosts
hosts
allow = 192.168.22. EXCEPT 192.168.22.99
allow = 192.168.5.0/255.255.255.0
allow = .example.com market.example.net
deny = evil.example.org 192.168.99.
These entries can be put in the [global] section or in any shared directory section. The
first example allows access to any host in the 192.168.22. network except for 192.168.22.99,
which is denied. Note that a dot is required at the end of the network number. The
192.168.5.0/255.255.255.0 example uses netmask notation to identify 192.168.5 as the set of
addresses that are allowed.
In the third line of the sample code, any host from the .example.com network is allowed, as
is the individual host market.example.net. The hosts deny example shows that you can
use the same form to identify names and IP addresses to prevent access from certain hosts.
474
Downloaded from https://onlinelibrary.wiley.com/doi/ by alex jounh - Oregon Health & Science Univer , Wiley Online Library on [05/12/2025]. See the Terms and Conditions (https://onlinelibrary.wiley.com/terms-and-conditions) on Wiley Online Library for rules of use; OA articles are governed by the applicable Creative Commons License
Part IV: Becoming a Linux Server Administrator
Restricting Samba access by user
Particular Samba users and groups can be allowed access to specific Samba shares by identifying those users and groups within a share in the smb.conf file. Aside from guest users,
which you may or may not allow, the default user authentication for Samba requires you to
add a Samba (Windows) user account that maps into a local Linux user account.
To allow a user to access the Samba server, you need to create a password for the user. Here is
an example of how to add a Samba password for the user jim:
# smbpasswd -
a jim
New SMB password: *******
Retype new SMB password: *******
After running that smbpasswd command, jim can use that username and password to access
the Samba server. The /var/lib/samba/private/passdb.tdb file holds the password
just entered for jim. After that, the user jim can change the password by simply typing
smbpasswd when he is logged in. The root user can change the password by rerunning the
command shown in the example but dropping the -a option.
If you wanted to give jim access to a share, you could add a valid users line to that
shared block in the smb.conf file. For example, to provide both chris and jim access to a
share, you could add the following line:
valid users = jim, chris
If the read only option is set to no for the share, both users could potentially write files to
the share (depending on file permissions). If read only is set to yes, you could still allow
access to jim and chris to write files by adding a write list line as follows:
write list = jim, chris
The write list can contain groups (that is, Linux groups contained in the /etc/group file) to
allow write permission to any Linux user that belongs to a particular Linux group. You can add
write permission for a group by putting a plus (+) character in front of a name. For example,
the following adds write access for the market group to the share with which this line is
associated:
write list = jim, chris, +market
There are many ways to change and extend the features of your shared Samba resources.
For further information on configuring Samba, be sure to examine the smb.conf file itself
(which includes many useful comments) and the smb.conf man page.
Accessing Samba Shares
After you have created some shared directories in Samba, many client tools are available in
both Linux and Windows for accessing those shares. Command-line tools in Linux include
the smbclient command, demonstrated earlier in this chapter. For a graphical means of
475
19
Downloaded from https://onlinelibrary.wiley.com/doi/ by alex jounh - Oregon Health & Science Univer , Wiley Online Library on [05/12/2025]. See the Terms and Conditions (https://onlinelibrary.wiley.com/terms-and-conditions) on Wiley Online Library for rules of use; OA articles are governed by the applicable Creative Commons License
Chapter 19: Configuring a Windows File Sharing (Samba) Server
accessing shares, you can use the file managers available in both Windows (File Explorer) and
Linux (Nautilus, with the GNOME desktop).
Accessing Samba shares in Linux
Once a Samba share is available, it can be accessed from remote Linux and Windows systems
using file managers or remote mount commands.
Accessing Samba shares from a Linux file manager
Opening a file manager in Linux can provide you with access to the shared directories from
Linux (Samba) and Windows (SMB). How you access the file manager is different on different Linux desktops. In GNOME 3, you can click the Files icon. In other desktops, open the
Home folder.
With the Nautilus window manager displayed, select Other Location in the left navigation bar.
Available networks (such as FEDORA40) should appear. Look to the box at the bottom of the
window next to the Connect button and then enter the location of an available Samba share.
Given the previous examples, you would be able to use either of these shares:
smb://192.168.1.24/chris
smb://192.168.1.24/salesdata
The window should appear similar to Figure 19.1.
FIGURE 19.1
Identify a Samba share from the Nautilus Connect.
Click Connect. From the window that appears, you can select to connect as a registered user.
If you do that, you can enter your username, the Samba domain name, and the password for
your user. You can also select whether to save that password. Figure 19.2 shows an example of
that window.
476
Downloaded from https://onlinelibrary.wiley.com/doi/ by alex jounh - Oregon Health & Science Univer , Wiley Online Library on [05/12/2025]. See the Terms and Conditions (https://onlinelibrary.wiley.com/terms-and-conditions) on Wiley Online Library for rules of use; OA articles are governed by the applicable Creative Commons License
Part IV: Becoming a Linux Server Administrator
FIGURE 19.2
Add your Samba credentials.
Click Connect.
If the user and password are accepted, you should see the contents of the remote directory. If
you have write access to the share, you can open another Nautilus window and drag and drop
files between the two systems. Figure 19.3 shows an example of the Nautilus window after I
have connected to the salesdata share.
FIGURE 19.3
Displaying a Samba share from Connect in Nautilus.
19
477
Downloaded from https://onlinelibrary.wiley.com/doi/ by alex jounh - Oregon Health & Science Univer , Wiley Online Library on [05/12/2025]. See the Terms and Conditions (https://onlinelibrary.wiley.com/terms-and-conditions) on Wiley Online Library for rules of use; OA articles are governed by the applicable Creative Commons License
Chapter 19: Configuring a Windows File Sharing (Samba) Server
Mounting a Samba share from a Linux command line
Because a Samba shared directory can be viewed as a remote filesystem, you can use common
Linux tools to connect a Samba share (temporarily or permanently) to your Linux system.
Using the standard mount command (with cifs-utils installed), you can mount a remote
Samba share as a CIFS filesystem in Linux. This example mounts the salesdata share from
the host at IP address 192.168.0.119 on the local directory /mnt/sales:
# dnf install cifs-
utils -
y
# mkdir /mnt/sales
# mount -
t cifs -
o user=chris \
//192.168.1.24/salesdata /mnt/sales
Password for chris@//192.168.1.24/salesdata: *******
# ls /mnt/sales
hosts
memos test whitepapers
When prompted, enter the Samba password for chris. Given that the user chris in this
example has read-write permission to the shared directory, users on your system should be
able to read and write to the mounted directory. Regardless of who saves files on the shared
directory, on the server those files are owned by the user chris. This mount lasts until the
system is rebooted or you run the umount command on the directory. If you want the share
to be mounted permanently (that is, every time the system boots up) in the same location,
you can do some additional configuration. First, open the /etc/fstab file and add an entry
similar to the following:
//192.168.1.24/salesdata /mnt/sales cifs credentials=/root/cif.txt 0 0
Next, create a credentials file (in this example, /root/cif.txt). In that file, put the name
of the user and the user’s password that you want to present when the system tries to mount
the filesystem. Here is an example of the contents of that file:
user=chris
pass=mypass
Before you reboot to check that the entry is correct, try mounting it from the command line.
A mount -a command tries to mount any filesystem listed in the /etc/fstab file that is
not already mounted. The df command shows information about disk space for the mounted
directory, as in the following example:
# mount -a
# df -
h /mnt/sales
Filesystem
//192.168.1.24/salesdata
Size
237G
Used Avail Use%
106G 132G 45%
Mounted on
/mnt/sales
You should now be able to use the shared Samba directory as you do any directory on the
local system.
478
Downloaded from https://onlinelibrary.wiley.com/doi/ by alex jounh - Oregon Health & Science Univer , Wiley Online Library on [05/12/2025]. See the Terms and Conditions (https://onlinelibrary.wiley.com/terms-and-conditions) on Wiley Online Library for rules of use; OA articles are governed by the applicable Creative Commons License
Part IV: Becoming a Linux Server Administrator
Accessing Samba shares in Windows
As with Linux, you can access Samba shares from the file manager window, in this case Windows File Explorer. To do this, open any folder in Windows, right-click This PC from the left
panel, and select Map Network Drive. Type the name of the share in the Folders box (this
example uses \\192.168.1.24\salesdata), select Connect using different credentials,
and select Finish. Enter the network credentials when prompted and click OK (Figure 19.4).
FIGURE 19.4
Accessing Samba shares from Windows.
In Figure 19.4, you can see the salesdata share. You can now use this shared folder as
you would any other folder in Windows. You can drag and drop files into the share, double-
click to open a file, or save files from Windows on to the share.
Using Samba in the Enterprise
Although it’s beyond the scope of this book, Windows file and printer sharing via Samba
servers used to be a popular application in large enterprises. Despite that Linux has begun to
dominate the enterprise-quality server market, Microsoft Windows systems are still the predominant systems used on the desktop.
The major features needed to integrate Samba servers into a large enterprise with many Microsoft Windows desktops are related to authentication. Most large enterprises use Microsoft
Active Directory Services (ADS) servers for authentication. On the Linux side, that means configuring Kerberos on the Linux system and using ADS (instead of user) for the type of security
in the smb.conf file.
479
19
Downloaded from https://onlinelibrary.wiley.com/doi/ by alex jounh - Oregon Health & Science Univer , Wiley Online Library on [05/12/2025]. See the Terms and Conditions (https://onlinelibrary.wiley.com/terms-and-conditions) on Wiley Online Library for rules of use; OA articles are governed by the applicable Creative Commons License
Chapter 19: Configuring a Windows File Sharing (Samba) Server
The advantage of central authentication is that users have to remember only one set of credentials throughout the enterprise and system administrators need to manage fewer user accounts
and passwords.
Summary
Because of the popularity of Windows desktops, Samba servers are useful tools for sharing files
and printers among Windows and Linux systems. Samba provides a way to interoperate with
Windows systems by implementing the Server Message Block (SMB) or Common Internet File
(CIFS) protocol for sharing resources over a network.
This chapter stepped through the process of installing, starting, securing, configuring, and
accessing Samba servers on a Linux system. Using command-line tools, I demonstrated how
to set up a Samba server. I showed you both command-line and desktop tools for getting to
Samba shares from Linux and Windows systems.
The next chapter describes the Network File System (NFS) facility. NFS is the native Linux facility for sharing and mounting filesystems over networks with other Linux and UNIX systems.
Exercises
The exercises in this section describe tasks related to setting up a Samba server in Linux and
accessing that server using a Samba client. As usual, there are often several ways to accomplish some of the tasks here. So don’t worry if you don’t go about the exercises in the same
way as shown in the answers, as long as you get the same results. See Appendix B for suggested solutions.
Don’t do these exercises on a Linux system running a Samba server because they will almost
certainly interfere with that server. These exercises were tested on a Fedora system. Some of
the steps might be slightly different on another Linux system.
1. Install the samba and samba-client packages.
2. Start and enable the smb and nmb services.
3. Set the Samba server’s workgroup to TESTGROUP, the netbios name to MYTEST,
and the server string to Samba Test System.
4. Add a Linux user named phil to your system, and add a Linux password and Samba
password for phil.
5. Set the [homes] section so that home directories are browseable (yes) and writeable
(yes), and phil is the only valid user.
6. Set any SELinux Boolean that is necessary to make it so that phil can access his
home directory via a Samba client, then restart the smb and nmb services.
7. From the local system, use the smbclient command to list that the homes share is
available.
480
Downloaded from https://onlinelibrary.wiley.com/doi/ by alex jounh - Oregon Health & Science Univer , Wiley Online Library on [05/12/2025]. See the Terms and Conditions (https://onlinelibrary.wiley.com/terms-and-conditions) on Wiley Online Library for rules of use; OA articles are governed by the applicable Creative Commons License
Part IV: Becoming a Linux Server Administrator
8. From a Nautilus (file manager) window on the local system, connect to the homes
share for the user phil on the local Samba server in a way that allows you to drag
and drop files to that folder.
9. Open up the firewall so that anyone who has access to the server can access the Samba
service (smbd and nmbd daemons).
10. From another system on your network (Windows or Linux), try to open the homes
share again as the user phil, and again make sure you can drag and drop files to it.
19
481
Downloaded from https://onlinelibrary.wiley.com/doi/ by alex jounh - Oregon Health & Science Univer , Wiley Online Library on [05/12/2025]. See the Terms and Conditions (https://onlinelibrary.wiley.com/terms-and-conditions) on Wiley Online Library for rules of use; OA articles are governed by the applicable Creative Commons License
Chapter 19: Configuring a Windows File Sharing (Samba) Server
20
Configuring an NFS File Server
IN THIS CHAPTER
Getting NFS server software
Enabling and starting NFS
Exporting NFS directories
Setting security features for NFS
Mounting remote NFS shared directories
I
nstead of representing storage devices as drive letters (A, B, C, and so on), as they are in Microsoft
operating systems, Linux systems invisibly connect filesystems from multiple hard disks, USB drives,
CD-ROMs, and other local devices to form a single Linux filesystem. The Network File System (NFS)
facility enables you to extend your Linux filesystem to connect filesystems on other computers to your
local directory structure.
An NFS file server provides an easy way to share large amounts of data among the users and computers in
an organization. An administrator of a Linux system that is configured to share its filesystems using NFS
has to perform the following tasks to set up NFS:
1. Set up the network. NFS is typically used on private networks as opposed to public networks,
such as the Internet.
2. Install NFS. Install the nfs-server package, if it is not already installed.
3. Start the NFS service. Several service daemons need to start up and run to have a fully operational NFS service. In Ubuntu, Fedora, and Red Hat Enterprise Linux, you can start up the
nfs-server service.
4. Choose what to share from the server. Decide which directories (folders) on your Linux NFS
server to make available to other computers. You can choose any point in the filesystem and
make all files and directories below that point accessible to other computers.
5. Set up security on the server. You can use several different security features to apply the
level of security with which you are comfortable. Mount-level security enables you to restrict
the computers that can mount a resource and, for those allowed to mount it, enables you
to specify whether it can be mounted read/write or read-only. In NFS, user-level security is
483
Linux Bible, Eleventh Edition. Christopher Negus.
© 2026 John Wiley & Sons, Inc. All rights reserved, including rights for text and data mining and training of artificial intelligence technologies or similar
technologies. Published 2026 by John Wiley & Sons, Inc.
Downloaded from https://onlinelibrary.wiley.com/doi/ by alex jounh - Oregon Health & Science Univer , Wiley Online Library on [05/12/2025]. See the Terms and Conditions (https://onlinelibrary.wiley.com/terms-and-conditions) on Wiley Online Library for rules of use; OA articles are governed by the applicable Creative Commons License
CHAPTER
implemented by mapping users from the client systems to users on the NFS server
(based on UID and not username) so that they can rely on standard Linux read/write/
execute permissions, file ownership, and group permissions to access and protect files.
6. Mount the filesystem on the client. Each client computer that is allowed access
to the server’s NFS shared filesystem can mount it anywhere the client chooses. For
example, you may mount a filesystem from a computer called oak on the /mnt/oak
directory in your local filesystem. After it is mounted, you can view the contents of
that directory by typing ls /mnt/oak.
Although it is often used as a file server (or other type of server), Linux is a general-purpose
operating system, so any Linux system can share, or export, filesystems as a server or use
another computer’s filesystems (mount) as a client.
Note
A filesystem is usually a structure of files and directories that exists on a single device (such as a hard disk partition
or USB drive). The term Linux filesystem refers to the entire directory structure (which may include filesystems from
several disk partitions, NFS, or a variety of network resources), beginning from root (/) on a single computer. A shared
directory in NFS may represent all or part of a computer’s filesystem, which can be attached (from the shared directory
down the directory tree) to another computer’s filesystem.
Installing an NFS Server
To run an NFS server, you need a set of kernel modules (which are delivered with the kernel
itself) plus some user-level tools to configure the service, run daemon processes, and query the
service in various ways.
For Fedora and RHEL, the components you need that are not already in the kernel can be
added by installing the nfs-utils package. For Ubuntu, you install the nfs-kernel-
server package. For the latest RHEL and Fedora releases, type the following to install
nfs-utils:
# dnf install nfs-
utils
For Ubuntu, type:
# apt install nfs-kernel-server
Besides a few documents in the /usr/share/doc/nfs-utils directory, most documentation in the nfs-utils package includes man pages for its various components. To see the
list of documentation in Fedora and RHEL, type the following:
# rpm -
qd nfs-
utils | less
There are tools and man pages for both the NFS server side (for sharing a directory with
others) and the client side (for mounting a remote NFS directory locally). To configure a server,
you can refer to the exports man page (to set up the /etc/exports file to share your
484
Downloaded from https://onlinelibrary.wiley.com/doi/ by alex jounh - Oregon Health & Science Univer , Wiley Online Library on [05/12/2025]. See the Terms and Conditions (https://onlinelibrary.wiley.com/terms-and-conditions) on Wiley Online Library for rules of use; OA articles are governed by the applicable Creative Commons License
Part IV: Becoming a Linux Server Administrator
directories). The man page for the exportfs command describes how to share and view the
list of directories that you share from the /etc/exports file. The nfsd man page describes
the options that you can pass to the rpc.nfsd server daemon, which lets you do such things
as run the server in debugging mode.
Man pages on the client side include the mount.nfs man page (to see what mount options
you can use when mounting remote NFS directories on your local system). There is also an
nfsmount.conf man page, which describes how to use the /etc/nfsmount.conf file
to configure how your system behaves when you mount remote resources locally. The
showmount man page describes how to use the showmount command to see what shared
directories are available from NFS servers.
To find out more about the nfs-utils package, you can run the following commands to see
information about the package, configuration files, and commands, respectively:
# rpm -qi nfs-utils
# rpm -qc nfs-utils
# rpm -
ql nfs-
utils | grep bin
Starting the NFS service
Starting the NFS server involves launching several service daemons. The basic NFS service in
Ubuntu, Fedora, and RHEL is called nfs-server. To start that service, enable it (so it starts
each time your system boots) and check the status by running the following three commands:
#
#
#
•
systemctl start nfs-
server
systemctl enable nfs-
server
systemctl status nfs-
server
nfs-
server.service -NFS server and services
Loaded: loaded (/lib/systemd/system/nfs-
server.service; enabled
preset: disabled)
Drop-
In: /usr/lib/systemd/system/service.d
└─10-timeout-abort.conf
Active: active (exited) since Mon 2025-
03-
09 15:15:11 EDT; 24s
ago
Main PID: 7767 (code=exited, status=0/SUCCESS)
CPU: 50ms
You can see from the status that the nfs-server service is enabled and active. Some
versions of the NFS service also require that the RPC service be running (rpcbind). The
nfs-server service automatically starts the rpcbind service, if it is needed and not
already running.
After the service is running, the commands (mount, exportfs, and so on) and files
(/etc/exports, /etc/fstab, and so on) for actually configuring NFS are basically the
same on every Linux system. So, after you have NFS installed and running, just follow the
instructions in this chapter to start using NFS.
485
20
Downloaded from https://onlinelibrary.wiley.com/doi/ by alex jounh - Oregon Health & Science Univer , Wiley Online Library on [05/12/2025]. See the Terms and Conditions (https://onlinelibrary.wiley.com/terms-and-conditions) on Wiley Online Library for rules of use; OA articles are governed by the applicable Creative Commons License
Chapter 20: Configuring an NFS File Server
Sharing NFS Filesystems
To share an NFS filesystem from your Linux system, you need to export it from the server
system. Exporting is done in Linux by adding entries into the /etc/exports file. Each entry
identifies a directory in your local filesystem that you want to share with other computers. The
entry also identifies the other computers that can access the resource (or opens it to all computers) and includes other options that reflect permissions associated with the directory.
Remember that when you share a directory, you are sharing all files and subdirectories below
that directory as well (by default). You need to be sure that you want to share everything in
that directory structure. You can still restrict access within that directory structure in many
ways; those are discussed later in this chapter.
Configuring the /etc/exports file
To make a directory from your Linux system available to other systems, you need to export
that directory. Exporting is done on a permanent basis by adding information about an
exported directory to the /etc/exports file.
Here’s the format of the /etc/exports file:
Directory
Host(Options…)
Host(Options…)
# Comments
In this example, Directory is the name of the directory that you want to share, and Host
indicates the client computer to which the sharing of this directory is restricted. Options
can include a variety of options to define the security measures attached to the shared directory for the host. (You can repeat Host and Option pairs.) Comments are any optional
comments that you want to add (following the # sign).
The exports man page (man exports) contains details about the syntax of the /etc/
exports file. In particular, you can see the options that you can use to limit access and
secure each shared directory.
As root user, you can use any text editor to configure /etc/exports to modify shared
directory entries or add new ones. Here’s an example of an /etc/exports file:
/cal
/pub
/home
*.linuxtoys.net(rw)
# Company events
*(ro,insecure,all_squash)
# Public dir
maple(rw,root_squash) spruce(rw,root_squash)
The /cal entry represents a directory that contains information about events related to
the company. Any computer in the company’s domain (*.linuxtoys.net) can mount that
NFS share. Users can write files to the directory as well as read them (indicated by the rw
option). The comment (# Company events) simply serves to remind you of what the
directory contains.
The /pub entry represents a public directory. It allows any computer and user to read files
from the directory (indicated by the ro option) but not to write files. The insecure option
enables any computer, even one that doesn’t use a secure NFS port, to access the directory.
486
Downloaded from https://onlinelibrary.wiley.com/doi/ by alex jounh - Oregon Health & Science Univer , Wiley Online Library on [05/12/2025]. See the Terms and Conditions (https://onlinelibrary.wiley.com/terms-and-conditions) on Wiley Online Library for rules of use; OA articles are governed by the applicable Creative Commons License
Part IV: Becoming a Linux Server Administrator
The all_squash option causes all users (UIDs) and groups (GIDs) to be mapped to the
nobody user (UID 65534), giving them minimal permission to files and directories.
The /home entry enables a set of users to have the same /home directory on different computers. Suppose, for example, that you are sharing /home from a computer named oak. The
computers named maple and spruce could each mount that directory on their own /home
directories. If you gave all users the same username/UID on all machines, you could have the
same /home/user directory available for each user, regardless of which computer they are
logged into. The root_squash is used to exclude the root user from another computer from
having root privilege to the shared directory.
These are just examples; you can share any directories that you choose, including the entire
filesystem (/). Of course, there are security implications of sharing the whole filesystem
or sensitive parts of it (such as /etc). Security options that you can add to your
/etc/exports file are described throughout the sections that follow.
Hostnames in /etc/exports
You can indicate in the /etc/exports file which host computers can have access to your
shared directory. If you want to associate multiple hostnames or IP addresses with a particular shared directory, be sure to leave a space before each hostname. However, add no spaces
between a hostname and its options. Here’s an example:
/usr/local maple(rw) spruce(ro,root_squash)
Notice that there is a space after (rw) but none after maple. You can identify hosts in
several ways:
Individual host Enter one or more TCP/IP hostnames or IP addresses. If the host is
in your local domain, you can simply indicate the hostname. Otherwise, use the full
host.domain format. These are valid ways to indicate individual host computers:
maple
maple.handsonhistory.com
10.0.0.11
IP network Allow access to all hosts from a particular network address by indicating
a network number and its netmask, separated by a slash (/). Here are valid ways to
designate network numbers:
10.0.0.0/255.0.0.0 172.16.0.0/255.255.0.0
192.168.18.0/255.255.255.0
192.168.18.0/24
TCP/IP domain Using wildcards, you can include all or some host computers from a
particular domain level. Here are some valid uses of the asterisk and question mark
wildcards:
*.handsonhistory.com
*craft.handsonhistory.com
???.handsonhistory.com
487
20
Downloaded from https://onlinelibrary.wiley.com/doi/ by alex jounh - Oregon Health & Science Univer , Wiley Online Library on [05/12/2025]. See the Terms and Conditions (https://onlinelibrary.wiley.com/terms-and-conditions) on Wiley Online Library for rules of use; OA articles are governed by the applicable Creative Commons License
Chapter 20: Configuring an NFS File Server
The first example matches all hosts in the handsonhistory.com domain. The second
example matches woodcraft, basketcraft, or any other hostnames ending in
craft in the handsonhistory.com domain. The final example matches any three-
letter hostnames in the domain.
NIS groups You can allow access to hosts contained in an NIS group. To indicate an NIS
group, precede the group name with an at (@) sign (for example, @group).
Access options in /etc/exports
You don’t have to just give away your files and directories when you export a directory with
NFS. In the options part of each entry in /etc/exports, you can add options that allow
or limit access by setting read/write permission. These options, which are passed to NFS, are
as follows:
ro: Client can mount this exported filesystem read-only. The default is to mount the filesystem read/write.
rw: Explicitly asks that a shared directory be shared with read/write permissions. (If the
client chooses, it can still mount the directory as read-only.)
User mapping options in /etc/exports
In addition to options that define how permissions are handled generally, you can use options
to set the permissions that specific users have to NFS shared filesystems.
One method that simplifies this process is to have each user with multiple user accounts have
the same username and UID on each machine. This makes it easier to map users so they have
the same permissions on a mounted filesystem as they do on files stored on their local hard
disks. If that method is not convenient, user IDs can be mapped in many other ways. Here are
some methods of setting user permissions and the /etc/exports option that you use for
each method:
root user The client’s root user is mapped by default into the nobody username (UID
65534). This prevents a client computer’s root user from being able to change all files
and directories in the shared filesystem. If you want the client’s root user to have root
permission on the server, use the no_root_squash option.
Tip
Keep in mind that even though root is squashed, the root user from the client can still become any other user account
and access files for those user accounts on the server. So, be sure that you trust root with all of your user data before
you share it read/write with a client.
nfsnobody or nobody user/group By using the 65534 user ID and group ID, you
essentially create a user/group with permissions that do not allow access to files that
belong to any real users on the server, unless those users open permission to everyone.
However, files created by the 65534 user or group are available to anyone assigned as
488
Downloaded from https://onlinelibrary.wiley.com/doi/ by alex jounh - Oregon Health & Science Univer , Wiley Online Library on [05/12/2025]. See the Terms and Conditions (https://onlinelibrary.wiley.com/terms-and-conditions) on Wiley Online Library for rules of use; OA articles are governed by the applicable Creative Commons License
Part IV: Becoming a Linux Server Administrator
the 65534 user or group. To set all remote users to the 65534 user/group, use the
all_squash option.
The 65534 UIDs and GIDs are used to prevent the ID from running into a valid user or
group ID. Using anonuid or anongid options, you can change the 65534 user or
group, respectively. For example, anonuid=175 sets all anonymous users to UID 175,
and anongid=300 sets the GID to 300. (Only the number is displayed when you list
file permission unless you add entries with names to /etc/passwd and /etc/group
for the new UIDs and GIDs.)
User mapping If a user has login accounts for a set of computers (and has the same
ID), NFS, by default, maps that ID. This means that if the user named mike (UID 110)
on maple has an account on pine (mike, UID 110), he can use his own remotely
mounted files on either computer from either computer.
If a client user who is not set up on the server creates a file on the mounted NFS directory, the file is assigned to the remote client’s UID and GID. (An ls -l on the server
shows the UID of the owner.)
Exporting the shared filesystems
After you have added entries to your /etc/exports file, run the exportfs command to
have those directories exported (made available to other computers on the network). Reboot
your computer or restart the NFS service, and the exportfs command runs automatically
to export your directories. If you want to export them immediately, run exportfs from the
command line (as root).
Tip
Running the exportfs command after you change the exports file is a good idea. If any errors are in the file,
exportfs identifies them for you.
Here’s an example of the exportfs command:
# /usr/sbin/exportfs -a -r -v
exporting maple:/pub
exporting spruce:/pub
exporting maple:/home
exporting spruce:/home
exporting *:/mnt/win
The -a option indicates that all directories listed in /etc/exports should be exported.
The -r resyncs all exports with the current /etc/exports file (disabling those exports no
longer listed in the file). The -v option says to print verbose output. In this example, the
/pub and /home directories from the local server are immediately available for mounting by
those client computers that are named (maple and spruce). The /mnt/win directory is
available to all client computers.
489
20
Downloaded from https://onlinelibrary.wiley.com/doi/ by alex jounh - Oregon Health & Science Univer , Wiley Online Library on [05/12/2025]. See the Terms and Conditions (https://onlinelibrary.wiley.com/terms-and-conditions) on Wiley Online Library for rules of use; OA articles are governed by the applicable Creative Commons License
Chapter 20: Configuring an NFS File Server
Securing Your NFS Server
The NFS facility was created at a time when encryption and other security measures were not
routinely built into network services (such as remote login, file sharing, and remote execution). Therefore, NFS (even up through version 3) suffered from some rather glaring security
issues. NFS addressed some of these issues by adding Kerberos authentication in NFS version 4,
allowing it to be used on insecure networks.
In general, however, NFS is not typically used over public networks. These are some of
the issues:
Remote root users Even with the default root_squash (which prevents root users
from having root access to remote shares), the root user on any machine to which you
share NFS directories can gain access to any other user account. Therefore, if you are
doing something like sharing home directories with read/write permission, the root
user on any box to which you are sharing has complete access to the contents of those
home directories.
Unencrypted communications Because NFS traffic is unencrypted, by default, anyone
sniffing your network can see the data that is being transferred.
User mapping Default permissions to NFS shares are mapped by user ID. So, for example, a user with UID 1000 on an NFS client has access to files owned by UID 1000 on
the NFS server. This is regardless of the usernames used.
Filesystem structure exposed Up to NFSv3, if you shared a directory over NFS, you
exposed the location of that directory on the server’s filesystem. (In other words, if
you shared the /var/stuff directory, clients would know that /var/stuff was its
exact location on your server.)
That’s the bad news. The good news is that most of these issues are addressed in NFSv4 but
require some extra configuration. By integrating Kerberos support, NFSv4 lets you configure
user access based on each user obtaining a Kerberos ticket. For you, the extra work is configuring a Kerberos server. As for exposing NFS share locations, with NFSv4 you can bind shared
directories to an /exports directory, so when they are shared, the exact location of those
directories is not exposed.
Visit https://help.ubuntu.com/community/NFSv4Howto for details on NFSv4 features
in Ubuntu.
As for standard Linux security features associated with NFS, firewalls and SELinux can play a
role in securing and providing access to your NFS server from remote clients. In particular, getting firewall features working with NFS can be particularly challenging. These security features
are described in the sections that follow.
490
Downloaded from https://onlinelibrary.wiley.com/doi/ by alex jounh - Oregon Health & Science Univer , Wiley Online Library on [05/12/2025]. See the Terms and Conditions (https://onlinelibrary.wiley.com/terms-and-conditions) on Wiley Online Library for rules of use; OA articles are governed by the applicable Creative Commons License
Part IV: Becoming a Linux Server Administrator
Opening up your firewall for NFS
The NFS service relies on several different service daemons for normal operation, with most of
these daemons listening on different ports for access. For the default NFSv4 used in Fedora,
TCP and UDP ports 2049 (nfs) and 111 (rpcbind) must be open for an NFS server to perform
properly. The server must also open TCP and UDP ports 20048 for the showmount command to
be able to query available NFS shared directories from rpc.mountd on the server.
For RHEL, Fedora, and other systems that use the firewalld service, you can use the Firewall Configuration window (dnf install firewall-
config) to open the firewall for
your NFS service. Type firewall-config, and then make sure that mountd, nfs, and rpc-
bind are checked in the window to open the appropriate ports to allow access to your NFS service. Figure 20.1 shows an example of this window.
With those ports set, I restarted the nfs-server service (systemctl restart nfs-
server).
FIGURE 20.1
Use the Firewall Configuration window to open your firewall to allow access to the NFS service.
20
491
Downloaded from https://onlinelibrary.wiley.com/doi/ by alex jounh - Oregon Health & Science Univer , Wiley Online Library on [05/12/2025]. See the Terms and Conditions (https://onlinelibrary.wiley.com/terms-and-conditions) on Wiley Online Library for rules of use; OA articles are governed by the applicable Creative Commons License
Chapter 20: Configuring an NFS File Server
Configuring SELinux for your NFS server
With SELinux set to permissive or disabled, it does not block access to the NFS service. In
enforcing mode, however, you should understand a few SELinux Booleans. To check the state of
SELinux on your system, enter the following:
# getenforce
Enforcing
# grep ^SELINUX= /etc/sysconfig/selinux
SELINUX=enforcing
SELINUXTYPE=targeted
If your system is in enforcing mode, as it is here, check the nfsd_selinux man page for
information about SELinux settings that can impact the operation of your NFS service. Here
are a few SELinux file contexts associated with NFS that you might need to know about:
nfs_export_all_ro: With this Boolean set to on, SELinux allows you to share files
with read-only permission using NFS. NFS read-only file sharing is allowed with this on
regardless of the SELinux file context set on the shared files and directories.
nfs_export_all_rw: With this Boolean set to on, SELinux allows you to share files
with read/write permission using NFS. As with the previous Boolean, this works regardless of the file context set on the shared files and directories.
use_nfs_home_dirs: To allow the NFS server to share your home directories via NFS,
set this Boolean to on.
Of the Booleans just described, the first two are on by default. The use_nfs_home_dirs
Boolean is off. To turn on the use_nfs_home_dirs directory, you could type the following:
# setsebool -
P use_nfs_home_dirs on
You can ignore all of the Booleans related to NFS file sharing, however, by changing the file
contexts on the files and directories you want to share via NFS. The public_content_t
and public_content_rw_t file contexts can be set on any directory that you want to
share via NFS (or other file share protocols, such as HTTP, FTP, and others, for that matter). For
example, to set the rule to allow the /whatever directory and its subdirectories to be shared
read/write via NFS and then to apply that rule, enter the following:
# semanage fcontext -
a -
t public_content_rw_t "/whatever(/.*)?"
# restorecon -
F -
R -
v /whatever
If you wanted to allow users just to be able to read files from a directory but not write to it,
you could assign the public_content_t file context to the directory instead.
Using NFS Filesystems
After a server exports a directory over the network using NFS, a client computer connects that
directory to its own filesystem using the mount command. That’s the same command used
492
Downloaded from https://onlinelibrary.wiley.com/doi/ by alex jounh - Oregon Health & Science Univer , Wiley Online Library on [05/12/2025]. See the Terms and Conditions (https://onlinelibrary.wiley.com/terms-and-conditions) on Wiley Online Library for rules of use; OA articles are governed by the applicable Creative Commons License
Part IV: Becoming a Linux Server Administrator
to mount filesystems from local hard disks, DVDs, and USB drives, but with slightly different options.
The mount command enables a client to mount NFS directories added to the /etc/fstab
file automatically, just as it does with local disks. NFS directories can also be added to the
/etc/fstab file in such a way that they are not automatically mounted (so you can mount
them manually when you choose). With a noauto option, an NFS directory listed in
/etc/fstab is inactive until the mount command is used, after the system is up and
running, to mount the filesystem.
In addition to the /etc/fstab file, you can set mount options using the
/etc/nfsmount.conf file. Within that file, you can set mount options that apply to any
NFS directory you mount or only those associated with specific mount points or NFS servers.
Before you set about mounting NFS shared directories, however, you probably want to check
out what shared directories are available via NFS using the showmount command.
Viewing NFS shares
From a client Linux system, you can use the showmount command to see what shared directories are available from a selected computer. From a computer named ubuntu I listed all the
NFS shared directories from my system named fedora.example.com:
$ showmount -e fedora.example.com
Export list for fedora.example.com:
/pub *
/cal *
/home ubuntu
The showmount output shows that the shared directory named /home is available only to
the host ubuntu. The /pub and /cal directories, however, are available to anyone.
Manually mounting an NFS filesystem
After you know that the directory from a computer on your network has been exported (that
is, made available for mounting), you can mount that directory manually using the mount
command. This is a good way to make sure that it is available and working before you set it up
to mount permanently. The following is an example of mounting the /stuff directory from a
computer named maple on your local computer:
# mkdir /mnt/maple
# mount maple:/stuff /mnt/maple
The first command (mkdir) creates the mount point directory. (/mnt is a common place
to put temporarily mounted disks and NFS filesystems.) The mount command identifies the
remote computer and shared filesystem, separated by a colon (maple:/stuff), and the local
mount point directory (/mnt/maple) follows.
493
20
Downloaded from https://onlinelibrary.wiley.com/doi/ by alex jounh - Oregon Health & Science Univer , Wiley Online Library on [05/12/2025]. See the Terms and Conditions (https://onlinelibrary.wiley.com/terms-and-conditions) on Wiley Online Library for rules of use; OA articles are governed by the applicable Creative Commons License
Chapter 20: Configuring an NFS File Server
Note
If the mount fails, make sure the NFS service is running on the server and that the server’s firewall rules don’t deny
access to the service. From the server, type ps ax | grep nfsd to see a list of nfsd server processes. If you
don’t see the list, try to start your NFS daemons as described earlier in this chapter. By default, the nfsd daemon listens for NFS requests on port number 2049. Your firewall must accept udp requests on ports 2049 (nfs) and 111
(rpc). In Red Hat Enterprise Linux 6 and earlier versions of Fedora, you may need to set static ports for related services and then open ports for those services in the firewall. Refer to “Securing Your NFS Server” earlier in this chapter to
review how to overcome these security issues.
To ensure that the NFS mount occurred, type mount -
t nfs4. This command lists all
mounted NFS filesystems. Here is an example of the mount command and its output (with
filesystems not pertinent to this discussion edited out):
# mount -
t nfs4
192.168.122.240:/mnt on /mnt/fed type nfs4 (rw,relatime,vers=4.2,
rsize=262144,wsize=262144,namlen=255,hard,
proto=tcp,timeo=600,retrans=2,sec=sys,clientaddr=192.168.122.63,
local_lock=none,addr=192.168.122.240)
The output from the mount -
t nfs4 command shows only those filesystems mounted
from NFS file servers. The NFS filesystem is the /mnt directory from 192.168.122.240
(192.168.122.240:/mnt). It is mounted on /mnt/fed, and its mount type is nfs4. The filesystem was mounted read/write (rw), and the IP address of maple is 192.168.122.240
(addr=192.168.122.240). Many other settings related to the mount are shown as well,
such as the read and write sizes of packets and the NFS version number.
The mount operation just shown temporarily mounts an NFS filesystem on the local system.
The next section describes how to make the mount more permanent (using the /etc/fstab
file) and how to select various options for NFS mounts.
Mounting an NFS filesystem at boot time
To set up an NFS filesystem to mount automatically on a specified mount point each time you
start your Linux system, you need to add an entry for that NFS filesystem to the /etc/
fstab file. That file contains information about all different kinds of mounted (and available
to be mounted) filesystems for your system.
Here’s the format for adding an NFS filesystem to your local system:
host:directory
mountpoint
nfs
options
0
0
The first item (host:directory) identifies the NFS server computer and shared directory.
mountpoint is the local mount point on which the NFS directory is mounted. It is followed
by the filesystem type (nfs). Any options related to the mount appear next in a comma-
separated list. (The last two zeros configure the system not to dump the contents of the filesystem and not to run fsck on the filesystem.)
494
Downloaded from https://onlinelibrary.wiley.com/doi/ by alex jounh - Oregon Health & Science Univer , Wiley Online Library on [05/12/2025]. See the Terms and Conditions (https://onlinelibrary.wiley.com/terms-and-conditions) on Wiley Online Library for rules of use; OA articles are governed by the applicable Creative Commons License
Part IV: Becoming a Linux Server Administrator
The following are examples of NFS entries in /etc/fstab:
maple:/stuff
oak:/apps
/mnt/maple nfs
/oak/apps nfs
bg,rsize=8192,wsize=8192
noauto,ro
0 0
0 0
After you have modified the /etc/fstab file, run the following command so that systemd
uses the latest version of that file:
# systemctl daemon-reload
In the first example, the remote directory /stuff from the computer named maple
(maple:/stuff) is mounted on the local directory /mnt/maple (the local directory must
already exist). If the mount fails because the share is unavailable, the bg causes the mount
attempt to go into the background and retry again later.
The filesystem type is nfs, and read (rsize) and write (wsize) buffer sizes (discussed
in the section “Using mount options,” later in this chapter) are set at 8192 to speed data
transfer associated with this connection. In the second example, the remote directory is
/apps on the computer named oak. It is set up as an NFS filesystem (nfs) that can be
mounted on the /oak/apps directory locally. This filesystem is not mounted automatically
(noauto), however, and it can be mounted only as read-only (ro) using the mount command
after the system is already running.
Tip
The default is to mount an NFS filesystem as read/write. However, the default for exporting a filesystem is read-only. If
you are unable to write to an NFS filesystem, check that it was exported as read/write from the server.
Mounting noauto filesystems
Your /etc/fstab file may also contain devices for other filesystems that are not mounted
automatically. For example, you might have multiple disk partitions on your hard disk or an
NFS shared filesystem that you want to mount only occasionally. A noauto filesystem can be
mounted manually. The advantage is that when you type the mount command, you can type
less information and have the rest filled in by the contents of the /etc/fstab file. So, for
example, you could type
# mount /oak/apps
With this command, mount knows to check the /etc/fstab file to get the filesystem to
mount (oak:/apps), the filesystem type (nfs), and the options to use with the mount (in
this case ro, for read-only). Instead of typing the local mount point (/oak/apps), you could
have typed the remote filesystem name (oak:/apps) and had other information filled in.
20
495
Downloaded from https://onlinelibrary.wiley.com/doi/ by alex jounh - Oregon Health & Science Univer , Wiley Online Library on [05/12/2025]. See the Terms and Conditions (https://onlinelibrary.wiley.com/terms-and-conditions) on Wiley Online Library for rules of use; OA articles are governed by the applicable Creative Commons License
Chapter 20: Configuring an NFS File Server
Tip
When naming mount points, including the name of the remote NFS server in that name can help you remember where
the files are actually being stored. This may not be possible if you are sharing home directories (/home) or mail directories (/var/spool/mail). For example, you might mount a filesystem from a machine called duck on the directory /mnt/duck.
Using mount options
You can add several mount options to the /etc/fstab file (or to a mount command line
itself) to influence how the filesystem is mounted. When you add options to /etc/fstab,
they must be separated by commas. For example, here the noauto, ro, and hard options are
used when oak:/apps is mounted:
oak:/apps
/oak/apps
nfs
noauto,ro,hard
0 0
The following are some options that are valuable for mounting NFS filesystems. You can read
about these and other NFS mount options you can put in the /etc/fstab file from the nfs
man page (man 5 nfs):
hard If this option is used and the NFS server disconnects or goes down while a process
is waiting to access it, the process hangs until the server comes back up. This is helpful if it is critical that the data with which you are working stay in sync with the programs that are accessing it. (This is the default behavior.)
soft If the NFS server disconnects or goes down, a process trying to access data from
the server times out after a set period when this option is on. An input/output error is
delivered to the process trying to access the NFS server.
rsize This is the size of the blocks of data (in bytes) that the NFS client will request
be used when it is reading data from an NFS server. The default is 1024. Using a larger
number (such as 8192) gets you better performance on a network that is fast (such
as a LAN) and is relatively error-free (that is, one that doesn’t have lots of noise or
collisions).
wsize This is the size of the blocks of data (in bytes) that the NFS client will request
to be used when it is writing data to an NFS server. The default is 1024. Performance
issues are the same as with the rsize option.
timeo=# This sets the time after an RPC timeout occurs that a second transmission is
made, where # represents a number in tenths of a second. The default value is seven-
tenths of a second. Each successive timeout causes the timeout value to be doubled (up
to 60 seconds maximum). Increase this value if you believe that timeouts are occurring
because of slow response from the server or a slow network.
retrans=# This sets the number of minor timeouts and retransmissions that need to
happen before a major timeout occurs.
496
Downloaded from https://onlinelibrary.wiley.com/doi/ by alex jounh - Oregon Health & Science Univer , Wiley Online Library on [05/12/2025]. See the Terms and Conditions (https://onlinelibrary.wiley.com/terms-and-conditions) on Wiley Online Library for rules of use; OA articles are governed by the applicable Creative Commons License
Part IV: Becoming a Linux Server Administrator
retry=# This sets how many minutes to continue to retry failed mount requests, where
# is replaced by the number of minutes to retry. The default is 10,000 minutes (which
is about one week).
bg
If the first mount attempt times out, try all subsequent mounts in the background.
This option is valuable if you are mounting a slow or sporadically available NFS filesystem. When you place mount requests in the background, your system can continue to
mount other filesystems instead of waiting for the current one to complete.
Note
If a nested mount point is missing, a timeout to allow for the needed mount point to be added occurs. For example, if
you mount /usr/trip and /usr/trip/extra as NFS filesystems and /usr/trip is not yet mounted when
/usr/trip/extra tries to mount, /usr/trip/extra times out. If you’re lucky, /usr/trip comes up and
/usr/trip/extra mounts on the next retry.
fg
If the first mount attempt times out, try subsequent mounts in the foreground. This
is the default behavior. Use this option if it is imperative that the mount be successful
before continuing (for example, if you were mounting /usr).
Not all NFS mount options need to go into the /etc/fstab file. On the client side, the
/etc/nfsmount.conf file can be configured for Mount, Server, and Global sections. In
the Mount section, you can indicate which mount options are used when an NFS filesystem is
mounted to a particular mount point. The Server section lets you add options to any NFS filesystem mounted from a particular NFS server. Global options apply to all NFS mounts from this
client. (Note that /etc/nfsmount.conf exists in Fedora and RHEL systems, but you need
to create it on Ubuntu systems if you want to use it.)
The following entry in the /etc/nfsmount.conf file sets a 32KB read and write block size
for any NFS directories mounted from the system named thunder.example.com:
[ Server "thunder.example.com" ]
rsize=32k
wsize=32k
To set default options for all NFS mounts for your systems, you can uncomment the
NFSMount_Global_Options block. In that block, you can set such things as protocols
and NFS versions as well as transmission rates and retry settings. Here is an example of an
NFSMount_Global_Options block:
[ NFSMount_Global_Options ]
# This sets the default version to NFS 4
Defaultvers=4
# Sets the number of times a request will be retried before
# generating a timeout
Retrans=2
20
497
Downloaded from https://onlinelibrary.wiley.com/doi/ by alex jounh - Oregon Health & Science Univer , Wiley Online Library on [05/12/2025]. See the Terms and Conditions (https://onlinelibrary.wiley.com/terms-and-conditions) on Wiley Online Library for rules of use; OA articles are governed by the applicable Creative Commons License
Chapter 20: Configuring an NFS File Server
# Sets the number of minutes before retrying a failed
# mount to 2 minutes
Retry=2
In the example just shown, the default NFS version is 4. Data is retransmitted twice (2) before
generating a timeout. The wait time is 2 minutes before retrying a failed transmission. You can
override any of these default values by adding mount options to the /etc/fstab or to the
mount command line when the NFS directory is mounted.
Using autofs to mount NFS filesystems on demand
Improvements to autodetecting and mounting removable devices have meant that you can simply insert or plug in those devices to have them detected, mounted, and displayed. However,
to make the process of detecting and mounting remote NFS filesystems more automatic, you
still need to use a facility such as autofs (short for automatically mounted filesystems).
The autofs facility mounts network filesystems on demand when someone tries to use the
filesystems. With the autofs facility configured and turned on, you can cause any available NFS shared directories to mount on demand. To use the autofs facility, you need to
have the autofs package installed. (For Fedora and RHEL, you can type dnf install
autofs or for Ubuntu or Debian apt-
get install autofs to install the package from
the network.)
Automounting to the /net directory
With autofs enabled, if you know the hostname and directory being shared by another host
computer, simply change (cd) to the autofs mount directory (/net or /var/autofs
by default). This causes the shared resource to be automatically mounted and made accessible to you.
The following steps explain how to turn on the autofs facility in Fedora or RHEL:
1. In Fedora or RHEL, as root user from a Terminal window, open the /etc/auto
.master file and look for the following line (in Ubuntu, you need to uncomment
that line):
/net
-
hosts
This causes the /net directory to act as the mount point for the NFS shared directories that you want to access on the network. (If there is a comment character at the
beginning of that line, remove it.)
2. To start the autofs service in a Fedora or RHEL system, type the following as
root user:
# systemctl start autofs.service
3. To set up the autofs service to restart every time you boot your system, type:
# systemctl enable autofs
498
Downloaded from https://onlinelibrary.wiley.com/doi/ by alex jounh - Oregon Health & Science Univer , Wiley Online Library on [05/12/2025]. See the Terms and Conditions (https://onlinelibrary.wiley.com/terms-and-conditions) on Wiley Online Library for rules of use; OA articles are governed by the applicable Creative Commons License
Part IV: Becoming a Linux Server Administrator
Believe it or not, that’s all you have to do. If you have a network connection to the NFS
servers from which you want to share directories, try to access a shared NFS directory. For
example, if you know that the /usr/local/share directory is being shared from the computer on your network named shuttle, you can do the following:
$ cd /net/shuttle/
If that computer has any shared directories that are available to you, you can successfully
change to that directory.
You also can type the following:
$ ls
usr
You should be able to see that the usr directory is part of the path to a shared directory. If
there were shared directories from other top-level directories (such as /var or /tmp), you
would see those. Of course, seeing any of those directories depends on how security is set up
on the server.
Try going straight to the shared directory, as shown in this example:
$ cd /net/shuttle/usr/local/share
$ ls
info man music television
At this point, the ls should reveal the contents of the /usr/local/share directory on
the computer named shuttle. What you can do with that content depends on how it was
configured for sharing by the server.
This can be a bit disconcerting because you don’t see any files or directories until you actually try to use them, such as changing to a network-mounted directory. The ls command,
for example, doesn’t show anything under a network-mounted directory until the directory is
mounted, which may lead to a sometimes-it’s-there-and-sometimes-it’s-not impression. Just
change to a network-mounted directory, or access a file on such a directory, and autofs
takes care of the rest.
In the example shown, the hostname shuttle is used. However, you can use any name or IP
address that identifies the location of the NFS server computer. For example, instead of
shuttle, you might have used shuttle.example.com or an IP address such as
192.168.0.122.
Automounting home directories
Instead of just mounting an NFS filesystem under the /net directory, you might want to configure autofs to mount a specific NFS directory in a specific location. For example, you could
configure a user’s home directory from a centralized server that could be automounted from a
different machine when a user logs in. Likewise, you could use a central authentication mechanism, such as LDAP (as described in Chapter 11, “Managing User Accounts”), to offer centralized user accounts.
499
20
Downloaded from https://onlinelibrary.wiley.com/doi/ by alex jounh - Oregon Health & Science Univer , Wiley Online Library on [05/12/2025]. See the Terms and Conditions (https://onlinelibrary.wiley.com/terms-and-conditions) on Wiley Online Library for rules of use; OA articles are governed by the applicable Creative Commons License
Chapter 20: Configuring an NFS File Server
The following procedure illustrates how to set up a user account on an NFS server and share
the home directory of a user named joe from that server so that it can be automounted when
joe logs into a different computer. In this example, instead of using a central authentication
server, matching accounts are created on each system.
1. On the NFS server (mynfs.example.com) that provides a centralized user home directory for the user named joe, create a user account for joe with a home directory of
/home/shared/joe as its name. Also find joe’s user ID number from the /etc/
passwd file (third field) so that you can match it when you set up a user account for
joe on another system.
# mkdir /home/shared
# useradd -
c "Joe Smith" -
d /home/shared/joe joe
# grep joe /etc/passwd
joe:x:1000:1000:Joe Smith:/home/shared/joe:/bin/bash
2. On the NFS server, export the /home/shared/ directory to any system on your local
network (I use 192.168.0.* here) so that you can share the home directory for joe
and any other users you create by adding this line to the /etc/exports file:
/home/shared 192.168.0.*(rw,insecure)
Note
In the exports file example, the insecure option allows clients to use ports above port 1024 to make mount
requests. Some NFS clients require this because they do not have access to NFS-reserved ports.
3. On the NFS server, restart the nfs-server service, or if it is already running, you
can simply export the shared directory as follows:
# exportfs -a -r -v
4. On the NFS server, make sure that the appropriate ports are open on the firewall. See
the section “Securing Your NFS Server” earlier in this chapter for details.
5. On the NFS client system, add an entry to the /etc/auto.master file that identifies the mount point where you want the remote NFS directory to be mounted and
a file (of your choosing) where you will identify the location of the remote NFS directory. I added this entry to the auto.master file:
/home/remote /etc/auto.joe
6. On the NFS client system, add an entry to the file you just noted (/etc/auto.joe
is what I used) that contains an entry like the following:
joe
-
rw
mynfs.example.com:/home/shared/joe
7. On the NFS client system, restart the autofs service:
# systemctl restart autofs.service
500
Downloaded from https://onlinelibrary.wiley.com/doi/ by alex jounh - Oregon Health & Science Univer , Wiley Online Library on [05/12/2025]. See the Terms and Conditions (https://onlinelibrary.wiley.com/terms-and-conditions) on Wiley Online Library for rules of use; OA articles are governed by the applicable Creative Commons License
Part IV: Becoming a Linux Server Administrator
8. On the NFS client system, create a user named joe using the useradd command. For
that command line, you need to get the UID for joe on the server (507 in this example) so that joe on the client system owns the files from joe’s NFS home directory.
When you run the following command, the joe user account is created, but you will
see an error message stating that the home directory already exists (which is correct):
# useradd -
u 507 -
c "Joe Smith" -
d /home/remote/joe joe
# passwd joe
Changing password for user joe.
New password: ********
Retype new password: ********
9. On the NFS client system, log in as joe. If everything is working properly, when joe
logs in and tries to access his home directory (/home/remote/joe), the directory
/home/share/joe should be mounted from the mynfs.example.com server. The
NFS directory was both shared and mounted as read/write with ownership to UID 507
(joe on both systems), so the user joe on the local system should be able to add,
delete, change, and view files in that directory.
After joe logs off (actually, when he stops accessing the directory) for a timeout period
(10 minutes, by default), the directory is unmounted.
Unmounting NFS filesystems
After an NFS filesystem is mounted, unmounting it is simple. You use the umount command
with either the local mount point or the remote filesystem name. For example, here are two
ways that you could unmount maple:/stuff from the local directory /mnt/maple:
# umount maple:/stuff
# umount /mnt/maple
Either form works. If maple:/stuff is mounted automatically (from a listing in
/etc/fstab), the directory is remounted the next time you boot Linux. If it was a
temporary mount (or listed as noauto in /etc/fstab), it isn’t remounted at boot time.
Tip
The command is umount, not unmount. This is easy to get wrong.
If you get the message device is busy when you try to unmount a filesystem, it means
that the unmount failed because the filesystem is being accessed. Most likely, one of the directories in the NFS filesystem is the current directory for your shell (or the shell of someone else
on your system). The other possibility is that a command is holding a file open in the NFS filesystem (such as a text editor). Check your Terminal windows and other shells, and then cd out
of the directory if you are in it, or just close the Terminal windows.
501
20
Downloaded from https://onlinelibrary.wiley.com/doi/ by alex jounh - Oregon Health & Science Univer , Wiley Online Library on [05/12/2025]. See the Terms and Conditions (https://onlinelibrary.wiley.com/terms-and-conditions) on Wiley Online Library for rules of use; OA articles are governed by the applicable Creative Commons License
Chapter 20: Configuring an NFS File Server
If an NFS filesystem doesn’t unmount, you can force unmount it (umount -
f /mnt/
maple) or unmount and clean it up later (umount -
l /mnt/maple). The -l option is usually the better choice because a forced unmount can disrupt a file modification that is in progress. Another alternative is to run fuser -v mountpoint to see what users are holding your
mounted NFS share open and then fuser -k mountpoint to kill all of those processes.
Using NFS with Cockpit
Once the NFS and Cockpit services are running on your system, you can mount NFS shares and
view mounted shares from the Cockpit web UI. Here’s how to do that:
1. Log in to your Cockpit interface (port 9090) through your web browser and select
Storage. The URL to get to storage in the Cockpit service on your local system should
be something like https://host1.example.com:9090/storage.
2. If there are mounted NFS shares on your system, they should appear under the NFS
Mounts section. Figure 20.2 shows an example containing an Ubuntu system with a
mounted NFS share of the /home directory from a system named fedora.
FIGURE 20.2
View NFS shares mounted locally using the Cockpit web UI.
3. To mount a remote NFS share, select the three-bar icon in the storage box, and then
select New NFS mount. Fill in the address or hostname of the NFS server, the shared
directory on the NFS share, and the point on the local filesystem where you will
mount that share. Then select Add, as shown in Figure 20.3.
502
Downloaded from https://onlinelibrary.wiley.com/doi/ by alex jounh - Oregon Health & Science Univer , Wiley Online Library on [05/12/2025]. See the Terms and Conditions (https://onlinelibrary.wiley.com/terms-and-conditions) on Wiley Online Library for rules of use; OA articles are governed by the applicable Creative Commons License
Part IV: Becoming a Linux Server Administrator
FIGURE 20.3
Add a new NFS mount using the Cockpit seb UI.
At this point, you should be able to access the content from the remote NFS share from the
mount point on your local filesystem. By default, the NFS mount information is added to the
/etc/fstab file (notice the Mount at boot box selected by default), so the NFS share will be
made available each time the system reboots.
Summary
Network File System (NFS) is one of the oldest computer file sharing products in existence
today. It is still popular for sharing directories of files between UNIX and Linux systems. NFS
allows servers to designate specific directories to make available to designated hosts and then
allows client systems to connect to those directories by mounting them locally.
NFS can be secured using firewall (iptables) rules and SELinux (to confine how file sharing
protocols can share NFS resources). Although NFS was inherently insecure when it was created
(data is shared unencrypted and user access is fairly open), features in NFS version 4 have
helped improve the overall security of NFS.
This NFS chapter is the last of the book’s server chapters. Chapter 21, “Troubleshooting Linux,”
covers a wide range of desktop and server topics as it helps you understand techniques for
troubleshooting your Linux system.
503
20
Downloaded from https://onlinelibrary.wiley.com/doi/ by alex jounh - Oregon Health & Science Univer , Wiley Online Library on [05/12/2025]. See the Terms and Conditions (https://onlinelibrary.wiley.com/terms-and-conditions) on Wiley Online Library for rules of use; OA articles are governed by the applicable Creative Commons License
Chapter 20: Configuring an NFS File Server
Exercises
Exercises in this section take you through tasks related to configuring and using an NFS server
in Linux. If possible, have two Linux systems available that are connected on a local network.
One of those Linux systems will act as an NFS server while the other will be an NFS client.
To get the most from these exercises, I recommend you don’t use a Linux server that has NFS
already up and running. You can’t do all of the exercises here without disrupting an NFS service that is already running and sharing resources.
See Appendix B for suggested solutions.
1. On the Linux system you want to use as an NFS server, install the packages needed to
configure an NFS service.
2. On the NFS server, list the documentation files that come in the package that provides
the NFS server software.
3. On the NFS server, determine the name of the NFS service and start it.
4. On the NFS server, check the status of the NFS service you just started.
5. On the NFS server, create the /var/mystuff directory and share it from your NFS
server with the following attributes: available to everyone, read-only, and the root
user on the client has root access to the share.
6. On the NFS server, make sure that the share you created is accessible to all hosts by
opening appropriate firewall ports and SELinux.
7. On a second Linux system (NFS client), view the shares available from the NFS server.
(If you don’t have a second system, you can do this from the same system.) If you do
not see the shared NFS directory, go back to the previous question and try again.
8. On the NFS client, create a directory called /var/remote and temporarily mount the
/var/mystuff directory from the NFS server on that mount point.
9. On the NFS client, unmount /var/remote, add an entry so that the same mount
is done automatically when you reboot (with a bg mount option), and test that the
entry you created is working properly.
10. From the NFS server, copy some files to the /var/mystuff directory. From the NFS
client, make sure that you can see the files just added to that directory and make sure
that you can’t write files to that directory from the client.
504
Downloaded from https://onlinelibrary.wiley.com/doi/ by alex jounh - Oregon Health & Science Univer , Wiley Online Library on [05/12/2025]. See the Terms and Conditions (https://onlinelibrary.wiley.com/terms-and-conditions) on Wiley Online Library for rules of use; OA articles are governed by the applicable Creative Commons License
Part IV: Becoming a Linux Server Administrator
Troubleshooting Linux
21
IN THIS CHAPTER
Troubleshooting bootloaders
Troubleshooting system initialization
Fixing software packaging problems
Checking network interface issues
Dealing with memory problems
Using rescue mode
I
n any complex operating system, lots of things can go wrong. You can fail to save a file because you
are out of disk space. An application can crash because the system is out of memory. The system
can fail to boot up properly for, well, lots of different reasons.
In Linux, the dedication to openness, and the focus on making the software run with maximum efficiency, has led to an amazing number of tools that you can use to troubleshoot every imaginable
problem. In fact, if the operating system isn’t working as you would like, you even have the ultimate
opportunity to rewrite the code yourself (although I don’t cover how to do that here).
This chapter takes on some of the most common problems that you can run into on a Linux system, and
it describes the tools and procedures that you can use to overcome those problems. Topics are broken
down by areas of troubleshooting, such as the boot process, software packages, networking, memory
issues, and rescue mode.
Boot-Up Troubleshooting
Before you can begin troubleshooting a running Linux system itself, that system needs to boot up. For
a Linux system to boot up, a series of things has to happen. A Linux system installed directly on a PC
architecture computer goes through the following steps to boot up:
■
■
Turning on the power
Starting the hardware (from BIOS or UEFI firmware)
505
Linux Bible, Eleventh Edition. Christopher Negus.
© 2026 John Wiley & Sons, Inc. All rights reserved, including rights for text and data mining and training of artificial intelligence technologies or similar
technologies. Published 2026 by John Wiley & Sons, Inc.
Downloaded from https://onlinelibrary.wiley.com/doi/ by alex jounh - Oregon Health & Science Univer , Wiley Online Library on [05/12/2025]. See the Terms and Conditions (https://onlinelibrary.wiley.com/terms-and-conditions) on Wiley Online Library for rules of use; OA articles are governed by the applicable Creative Commons License
CHAPTER
■
■
■
■
■
Finding the location of the boot loader and starting it
Choosing an operating system from the boot loader
Starting the kernel and initial RAM disk for the selected operating system
Starting the initialization process (init, upstart, or systemd)
Starting all of the services associated with the selected level of activity (runlevel or
default target)
The exact activities that occur at each of these points underwent a transformation more than
a decade ago. The boot loader was changed to accommodate new kinds of hardware. The initialization process was changed so that services could start more efficiently, based on dependencies and in reaction to the state of the system (such as what hardware is plugged in or
what files exist) rather than a static boot order.
Troubleshooting the Linux boot process begins when you turn on your computer, and it ends
when all of the services are up and running. At that point, typically a graphical or text-based
login prompt is available from the console, ready for you to log in.
After reading the short descriptions of startup methods, go to the section “Starting from the
firmware (UEFI)” to understand what happens at each stage of the boot process and where you
might need to troubleshoot. Because the general structure of the Linux boot process is the
same for the three Linux systems featured here (Fedora, RHEL, and Ubuntu), I will go through
the boot process only once, but I will describe the differences among them as I go.
Understanding Startup Methods
It’s up to the individual Linux distribution how the services associated with the running
Linux system are started. After the boot loader starts the kernel, how the rest of the activities (mounting filesystems, setting kernel options, running services, and so on) are done is all
managed by the initialization process.
As I describe the boot process, I focus on the primary initialization system used with Linux
today: systemd.
Starting with systemd
The systemd facility has become the present and future of the initialization process for most
Linux systems. It was adopted in Fedora 15 and in RHEL 7 and replaced Upstart in Debian and
Ubuntu 15.04. Although systemd is more complex than its predecessor, System V init, it
also offers many more features, such as these:
Targets Instead of runlevels, systemd focuses on targets. A target can start a set
of services as well as create or start other types of units (such as directory mounts,
sockets, swap areas, and timers).
System V compatibility There are targets that align with System V runlevels, if you
are used to dealing with runlevels. For example, graphical.target aligns with
runlevel 5, while multi-user.target is essentially runlevel 3. However, there are
506
Downloaded from https://onlinelibrary.wiley.com/doi/ by alex jounh - Oregon Health & Science Univer , Wiley Online Library on [05/12/2025]. See the Terms and Conditions (https://onlinelibrary.wiley.com/terms-and-conditions) on Wiley Online Library for rules of use; OA articles are governed by the applicable Creative Commons License
Part IV: Becoming a Linux Server Administrator
many more targets than runlevels, giving you the opportunity to manage sets of units
more finely. Likewise, systemd supports System V init scripts and commands, such
as chkconfig and service for manipulating those services if System V init services happen to be installed.
Dependency-based startup When the system starts up, any service in the default target
(graphical.target for desktops and multi-user.target for most servers)
that has had its dependencies met can start. This feature can speed up the boot process by ensuring that a single stalled service doesn’t make other services wait before
they can start, if they don’t need the stalled service.
Resource usage With systemd, you can use cgroups to limit how much of your system’s resources are consumed by a service. For example, you can limit the amount of
memory, CPU, or other resources an entire service can consume, so a runaway process
or a service that spins off an unreasonable number of child processes cannot consume
more than the entire service is allowed.
When a systemd-enabled Linux system starts up, the first running process (PID 1) is the
systemd daemon in RHEL and Fedora. For Ubuntu, that process appears as /sbin/init,
but that process is actually a symbolic to the systemd daemon as well. Later, the primary
command for managing systemd services is the systemctl command. Managing systemd
journal (log) messages is done with the journalctl command. You also have the ability to
use old-style System V init commands such as init, poweroff, reboot, runlevel,
and shutdown to manage services.
Starting from the firmware (UEFI)
When you physically turn on a computer, firmware is loaded to initialize the hardware and find
an operating system to boot. On PC architectures, that firmware was previously referred to as
BIOS (Basic Input Output System). In recent years, a new type of firmware called UEFI (Unified
Extensible Firmware Interface) has replaced BIOS on almost all computers. The two are mutually
exclusive.
UEFI was designed to allow a secure boot feature, which can be used to ensure that only
operating systems whose components have been signed can be used during the boot process.
UEFI can still be used with nonsigned operating systems by disabling the secure boot feature.
For Ubuntu, secure boot was first supported in 12.04.2. RHEL 7 and later versions also officially support secure boot. The main job of UEFI firmware is to initialize the hardware and then
hand off control of the boot process to a boot loader. The boot loader then finds and starts the
operating system. After an operating system is installed, you should typically just let the firmware do its work and not interrupt it.
There are, however, occasions when you want to interrupt the firmware. For this discussion, we
focus on how UEFI generally works. Right after you turn on the power, you can interrupt the boot
process to see a UEFI screen that usually includes a few words noting how to go into Setup mode
507
21
Downloaded from https://onlinelibrary.wiley.com/doi/ by alex jounh - Oregon Health & Science Univer , Wiley Online Library on [05/12/2025]. See the Terms and Conditions (https://onlinelibrary.wiley.com/terms-and-conditions) on Wiley Online Library for rules of use; OA articles are governed by the applicable Creative Commons License
Chapter 21: Troubleshooting Linux
and change the boot order. If you press the function key noted (often F1, F2, or F12) to choose
one of those items, here’s what you can do:
Setup utility The setup utility lets you change settings in the hardware. These settings can be used to enable or disable certain hardware components or turn on or off
selected hardware features.
Boot order Computers are capable of starting an operating system, or more specifically, a boot loader that can start an operating system, from several different devices
attached to the computer. Those devices can include a CD drive, DVD drive, hard disk,
USB drive, or network interface card. The boot order defines the order in which those
devices are checked. By modifying the boot order, you can tell the computer to ignore
the default boot order temporarily and try to boot from the device that you select.
For my HP workstation, after the boot process begins, I immediately press the F2 function key
to go into Setup or F12 to change the boot order temporarily. The next sections explore what
you can troubleshoot from the Setup and Boot Order screens.
Troubleshooting hardware setup
As I already noted, you can usually let the hardware start without interruption and have the
system boot up to the default boot device (probably the hard drive). However, here are some
instances when you may want to go into Setup mode and change something in the UEFI setup:
To see an overview of your hardware If your troubleshooting problem is hardware
related, the hardware setup is a great place to start examining your system. The Setup
screen tells you the type of system, its version, its processors, its memory slots and
types, whether it is 32-bit or 64-bit, which devices are in each slot, and many details
about the types of devices attached to the system.
If you can’t get an operating system booted at all, the Setup screen may be the only
way to determine the system model, processor type, and other information you’ll need
to search for help or call for support.
To disable/enable a device Most devices connected to your computer are enabled and
made available for use by the operating system. To troubleshoot a problem, you may
need to disable a device.
For example, let’s say that your computer has two network interface cards (NICs). You
want to use the second NIC to install Linux over a network, but the installer keeps trying to use the first NIC to connect to the network. You can disable the first NIC so that
the installer doesn’t even see it when it tries to connect to the network. Or, you can
keep the NIC visible to the computer but simply disable the NIC’s ability to PXE boot.
Maybe you have an audio card, and you want to disable the integrated audio on the
motherboard. That can be done on the hardware setup screen as well.
Conversely, sometimes you want to enable a device that has been disabled. Perhaps you
were given a computer that had a device disabled in the firmware. From the operating
system, for example, it may look like you don’t have front USB ports or a CD drive.
508
Downloaded from https://onlinelibrary.wiley.com/doi/ by alex jounh - Oregon Health & Science Univer , Wiley Online Library on [05/12/2025]. See the Terms and Conditions (https://onlinelibrary.wiley.com/terms-and-conditions) on Wiley Online Library for rules of use; OA articles are governed by the applicable Creative Commons License
Part IV: Becoming a Linux Server Administrator
Looking at these setup screens tells you whether those devices are not available simply
because they have been disabled in the firmware.
To change a device setting Sometimes, the default settings that come in your firmware don’t work for your situation. You might want to change the following settings in
the firmware:
NIC PXE boot settings Most modern NICs are capable of booting from servers found
on the network. If you need to do that and you find that the NIC doesn’t come up
as a bootable device on your Boot Order screen, you may have to enable that feature
in the firmware.
Virtualization settings If you want to run a Linux system as a virtual host, the computer’s CPU must include Intel Virtual Technology or AMD Secure Virtual Machine
(SVM) support. It is possible, however, that even if your CPU comes with this
support, it may not be enabled in the firmware. To enable it, go to the firmware
Setup screen and look for a Virtualization selection (possibly under the Performance
category). Make sure that it is set to On.
Troubleshooting boot order
Depending on the hardware attached to your computer, a typical boot order might boot a
USB drive first, then the hard drive, then a CD/DVD device (if available), and finally the
network interface card. The firmware would go to each device, looking for a boot loader in
the device’s master boot record. If it finds a boot loader, it starts it. If no boot loader is
located, it moves on to the next device until all are tried. If no boot loader is found, the
computer fails to boot.
One problem that could occur with the boot order is that the device you want to boot may not
appear in the boot order at all. In that case, going to the Setup screen, as described in the
previous section, either to enable the device or change a setting to make it bootable, may be
the thing to do.
If the device from which you want to boot does appear in the boot order, typically you just
have to move the arrow key to highlight the device you want and press Enter. The following
are reasons for selecting your own device to boot:
Rescue mode If Linux does not boot from the hard disk, selecting a USB drive allows
you to boot to a rescue mode (described later in this chapter) that can help you repair
the hard disk on an unbootable system. See the section “Troubleshooting in Rescue
Mode” later in this chapter for further information.
Fresh install Sometimes, the boot order has the hard disk listed first. If you decide that
you need to do a fresh install of the operating system, you need to select the boot
device that is holding your installation medium (USB, CD, DVD drive, or NIC).
Assuming that you get past any problems you have with the firmware, the next step is for the
computer to start the boot loader.
509
21
Downloaded from https://onlinelibrary.wiley.com/doi/ by alex jounh - Oregon Health & Science Univer , Wiley Online Library on [05/12/2025]. See the Terms and Conditions (https://onlinelibrary.wiley.com/terms-and-conditions) on Wiley Online Library for rules of use; OA articles are governed by the applicable Creative Commons License
Chapter 21: Troubleshooting Linux
Troubleshooting the GRUB boot loader
Typically, the firmware finds the master boot record on the first hard disk and begins loading
that boot loader in stages. Chapter 9, “Installing Linux,” describes the GRUB boot loader that
is used with most modern Linux systems, including RHEL, Fedora, and Ubuntu. The GRUB boot
loader described here is referred to as GRUB 2.
In this discussion, I am interested in the boot loader from the perspective of what to do if
the boot loader fails or what ways you might want to interrupt the boot loader to change the
behavior of the boot process.
Techniques for troubleshooting Linux from the GRUB 2 boot prompt are similar to those in the
legacy GRUB boot prompt. Follow these instructions for interrupting the GRUB boot prompt for
the most recent Fedora, RHEL, and Ubuntu systems:
1. After you turn on your computer and just after you see the BIOS screen, press any key
(such as the up arrow). You should see several menu items representing different kernels to boot.
2. From the available entries, the default is to boot the latest available kernel, which
should be highlighted and ready to boot. However, you can choose a different entry if
any of the following applies:
■ The current kernel is broken, and you want to choose an older kernel that you
know is working.
■ You want to run an entry that represents a totally different operating system that
is installed on your disk.
■ You want to run a rescue kernel.
3. Assuming you want to run a Linux kernel, highlight the kernel you want (using up
and down arrows) and type e. You will see commands that are run to start the system,
as shown in Figure 21.1.
FIGURE 21.1
Interrupt the GRUB bootloader to modify the boot process.
510
Downloaded from https://onlinelibrary.wiley.com/doi/ by alex jounh - Oregon Health & Science Univer , Wiley Online Library on [05/12/2025]. See the Terms and Conditions (https://onlinelibrary.wiley.com/terms-and-conditions) on Wiley Online Library for rules of use; OA articles are governed by the applicable Creative Commons License
Part IV: Becoming a Linux Server Administrator
4. To add arguments to the kernel, move your cursor to the end of the line beginning
with linux and type the arguments you want. See https://www.kernel.org/doc/
Documentation/admin-guide/kernel-parameters.txt for a list of kernel parameters. Here are two examples:
■
selinux: If there is a problem with SELinux that makes your system unusable, you
can disable it as follows:
selinux=0
■
smt: Simultaneous Multithreading (smt) allows a single CPU core to execute multiple threads. To fix some microprocessor flaws, you need to turn off that feature.
You can do that at boot time by passing the smt=1 or nosmt argument on the
kernel command line.
5. Once you are done adding arguments, press Ctrl+X to boot the system with the kernel
arguments you added.
Starting the kernel
After the kernel starts, there isn’t much to do except to watch out for potential problems. For
RHEL, you see a Red Hat Enterprise Linux screen with a slow-spinning icon. If you want to
watch messages detailing the boot process scroll by, press the Esc key.
At this point, the kernel tries to load the drivers and modules needed to use the hardware on
the computer. The main things to look for at this point (although they may scroll by quickly)
are hardware failures that may prevent some features from working properly. Although much
rarer than it used to be, there may be no driver available for a piece of hardware, or the wrong
driver may get loaded and cause errors.
In addition to scrolling past on the screen, messages produced when the kernel boots are
copied to the kernel ring buffer. As its name implies, the kernel ring buffer stores kernel messages in a buffer, throwing out older messages after that buffer is full. After the computer
boots up completely, you can log into the system and enter the following command to capture
these kernel messages in a file (then view them with the less command):
# dmesg > /tmp/kernel_msg.txt
# less /tmp/kernel_msg.txt
I like to direct the kernel messages into a file (choose any name you like) so that the messages
can be examined later or sent to someone who can help debug any problems. The messages
appear as components are detected, such as your CPU, memory, network cards, hard drives,
and so on.
In Linux systems that support systemd, kernel messages are stored in the systemd journal. So,
besides the dmesg command, you can also run journalctl to see kernel messages from boot
time to the present. For example, here are kernel messages output from a Fedora 42 system:
# journalctl -k
Jul 28 08:58:58 fedora kernel: Linux version 6.15.7-
200.fc42.x86_64
511
21
Downloaded from https://onlinelibrary.wiley.com/doi/ by alex jounh - Oregon Health & Science Univer , Wiley Online Library on [05/12/2025]. See the Terms and Conditions (https://onlinelibrary.wiley.com/terms-and-conditions) on Wiley Online Library for rules of use; OA articles are governed by the applicable Creative Commons License
Chapter 21: Troubleshooting Linux
(mockbuild@5da7262c50a0401890423524c10adde0) (gcc (GCC) 15.1.1
20250521
(Red Hat 15.1.1-
2), GNU ld version 2.44-
3.fc42) #1 SMP PREEMPT_
DYNAMIC
Thu Jul 17 17:57:16 UTC 2025
Jul 28 08:58:58 fedora kernel: Command line:
BOOT_IMAGE=(hd0,gpt2)/vmlinuz-
6.15.7-
200.fc42.x86_64 root=UUID=
2a9dafa6-
4e21-
4f38-
a9f5-
94cac9528f13 ro rootflags=subvol=root rhgb quiet
Jul 28 08:58:58 fedora kernel: BIOS-
provided physical RAM map:
Jul 28 08:58:58 fedora kernel: BIOS-
e820:
[mem 0x0000000000000000-
0x000000000005bfff] usable
...
Jul 28 08:58:58 fedora kernel: BIOS-
e820:
[mem 0x000000000005c000-
0x000000000005cfff] reserved
What you want to look for are drivers that fail to load or messages that show certain features
of the hardware failing to be enabled. For example, I once had a TV tuner card (for watching television on my computer screen) that set the wrong tuner type for the card that was
detected. Using information about the TV card’s model number and the type of failure, I found
that passing an option to the card’s driver allowed me to try different settings until I found
the one that matched my tuner card.
In describing how to view kernel startup messages, I have gotten ahead of myself a bit.
Before you can log in and see the kernel messages, the kernel needs to finish bringing up
the system. As soon as the kernel is done initially detecting hardware and loading drivers, it
passes off control of everything else that needs to be done to boot the system to the initialization system.
Troubleshooting the initialization system
The first process to run on a system where the kernel has just started depends on the initialization facility that system is using. For System V init, the first process to run is the init
process. For systemd, the first process is systemd (although, with the latest Ubuntu, the
first process is called /sbin/init, but it is a symbolic link to systemd). Depending on
which is running on your system (type ps -
ef | head to check), follow the systemd
descriptions in the following sections.
Troubleshooting systemd initialization
The latest versions of Fedora, RHEL, and Ubuntu use systemd as their initialization system.
Although systemd is more complex than the previous System V init, systemd also offers
more ways to analyze what is happening during initialization.
Understanding the systemd boot process
When the systemd daemon (/usr/lib/systemd/systemd) is started after the kernel
starts up, it sets in motion all of the other services that are set to start up. In particular, for
512
Downloaded from https://onlinelibrary.wiley.com/doi/ by alex jounh - Oregon Health & Science Univer , Wiley Online Library on [05/12/2025]. See the Terms and Conditions (https://onlinelibrary.wiley.com/terms-and-conditions) on Wiley Online Library for rules of use; OA articles are governed by the applicable Creative Commons License
Part IV: Becoming a Linux Server Administrator
Fedora and RHEL systems, it keys off of the contents of the /etc/systemd/system/
default.target file, as in this example:
# cat /etc/systemd/system/default.target
…
[Unit]
Description=Graphical Interface
Documentation=man:systemd.special(7)
Requires=multi-user.target
Wants=display-manager.service
Conflicts=rescue.service rescue.target
After=multi-
user.target rescue.service rescue.target display-
manager
.service
AllowIsolate=yes
The default.target file is actually a symbolic link to a file in the /usr/lib/systemd/
system directory. For a server, it may be linked to the multi-user.target file; for a
desktop, it is linked to the graphical.target file (as is shown here).
Unlike with the System V init facility, which just runs service scripts in alphanumeric order,
the systemd service needs to work backward from the default.target to determine which
services and other targets are run. In this example, default.target is a symbolic link to the
graphical.target file. When you list the contents of that file, you can see the following:
■
■
The multi-user.target is required to start first.
The display-manager.service is started after that.
By continuing to discover what those two units require, you can find what else is required. For
example, multi-user.target requires basic.target (which starts a variety of basic
services) and display-manager.service (which starts up the display manager, gdm) to
launch a graphical login screen.
To see services the multi-user.target starts, list contents of the /etc/systemd/
system/multi-user.target.wants directory, as in this example:
# ls /etc/systemd/system/multi-user.target.wants/
abrtd.service
cups.service
rsyslog.service
abrt-
journal-
core.service docker.service
smartd.service
abrt-
oops.service
firewalld.service
smb.service
abrt-
vmcore.service
flatpak-
add-
fedora-
repos.service sshd.service
abrt-
xorg.service
irqbalance.service
sssd.service
atd.service
mcelog.service
systemd-
oomd.service
auditd.service
mdmonitor.service
thermald.service
audit-
rules.service
ModemManager.service
vboxservice.service
autofs.service
NetworkManager.service
virtqemud.service
avahi-
daemon.service
nfs-
client.target
vmtoolsd.service
chronyd.service
nfs-
server.service
vsftpd.service
crond.service
nmb.service
cups.path
remote-
fs.target
513
21
Downloaded from https://onlinelibrary.wiley.com/doi/ by alex jounh - Oregon Health & Science Univer , Wiley Online Library on [05/12/2025]. See the Terms and Conditions (https://onlinelibrary.wiley.com/terms-and-conditions) on Wiley Online Library for rules of use; OA articles are governed by the applicable Creative Commons License
Chapter 21: Troubleshooting Linux
These files are symbolic links to files that define what starts for each of those services. On
your system, these may include remote shell (sshd), printing (cups), auditing (auditd),
networking (NetworkManager), and others. Those links were added to that directory
either when the package for a service was installed or when the service was enabled from a
systemctl enable command.
Keep in mind that, unlike System V init, systemd can start, stop, and otherwise manage
unit files that represent more than just services. It can manage devices, automounts, paths,
sockets, and other things. After systemd has started everything, you can log into the system
to investigate and troubleshoot any potential problems.
After you log in, running the systemctl command lets you see every unit file that
systemd tried to start up. Here is an example:
# systemctl
UNIT
LOAD
DESCRIPTION
proc-
sys-
fs-
binfmt_misc.automount
loaded
Arbitrary Executable File Formats File System
sys-
devices-
pc…:00:1b.0-
sound-
card0.device loaded
631xESB/632xESB High Definition Audio Control
sys-
devices-
pc…:00:1d.2-
usb4-
4\x2d2.device loaded
DeskJet 5550
…
-
.mount
Mount
boot-
efi.mount
boot.mount
…
autofs.service
Automounts filesystems on demand
cups.service
CUPS Scheduler
httpd.service
The Apache HTTP Server
ACTIVE SUB
active waiting
active plugged
active plugged
loaded active mounted
Root
loaded active mounted
loaded active mounted
/boot/efi
/boot
loaded active running
loaded active running
loaded failed failed
From the systemctl output, you can see whether any unit file failed. In this case, you can
see that the httpd.service (your web server) failed to start. To investigate further, you
can run journalctl -u for that service to see whether any error messages were reported:
# journalctl -
u httpd.service
…
Dec 08 09:30:36 linux-
bible systemd[1]: Starting The Apache HTTP
Server…
Dec 08 09:30:36 linux-
bible httpd[16208]: httpd: Syntax error
514
Downloaded from https://onlinelibrary.wiley.com/doi/ by alex jounh - Oregon Health & Science Univer , Wiley Online Library on [05/12/2025]. See the Terms and Conditions (https://onlinelibrary.wiley.com/terms-and-conditions) on Wiley Online Library for rules of use; OA articles are governed by the applicable Creative Commons License
Part IV: Becoming a Linux Server Administrator
on line 105 of /etc/httpd/conf/httpd.conf:
/etc/httpd/conf/httpd.conf:105: <Directory> was not closed.
Dec 08 09:30:36 linux-
bible systemd[1]: httpd.service: Main process
exited,
code=exited, status=1/FAILURE
Dec 08 09:30:36 linux-
bible systemd[1]: httpd.service:
Failed with result ‘exit-
code’.
Dec 08 09:30:36 linux-
bible systemd[1]:
Failed to start The Apache HTTP Server.
From the output, you can see that there was a mismatch of the directives in the httpd
.conf file (I failed to close a Directory section). After that was corrected, I could start the
service (systemctl start httpd). If more unit files appear as failed, you can run the
journalctl -u command again, using those unit filenames as arguments.
Analyzing the systemd boot process
To see exactly what happened during the boot process for a system using the systemd service, systemd provides the systemd-analyze tool. If you want to see if there are services
that are stalling or you want to look for a place to put in your own systemcd service, you
can use this command to analyze the entire startup process. Here are some examples:
# systemd-analyze time
Startup finished in 5.646s (firmware) + 3.702s (loader) + 2.609s
(kernel)
+ 1min 51.585s (userspace) = 2min 3.544s
graphical.target reached after 1min 51.559s in userspace.
The time option lets you see how long each phase of the startup process took, from the start
of the firmware to the end of the default target. You can use plot to create an SVG graphic of
each component of the startup process (I show eog here to display the output).
# systemd-
analyze plot > /tmp/systemd-
plot.svg
# eog /tmp/systemd-
plot.svg
Figure 21.2 shows a small snippet of output from the much larger graphic for the systemd service on an Ubuntu system.
From this snippet, you can see services that start after the NetworkManager.service
starts up. Parts in dark red show the time in which the service or target takes to start. If the
service continues to run, that is shown in light red. In this example, the httpd.service
failed after trying to start for 4.456 seconds. You can tell this because the bar to the right is
white, showing that the service is not running. At this point, you could use the journalctl
command, as described earlier, to debug the problem.
The next section describes how to troubleshoot issues that can arise with your software packages.
515
21
Downloaded from https://onlinelibrary.wiley.com/doi/ by alex jounh - Oregon Health & Science Univer , Wiley Online Library on [05/12/2025]. See the Terms and Conditions (https://onlinelibrary.wiley.com/terms-and-conditions) on Wiley Online Library for rules of use; OA articles are governed by the applicable Creative Commons License
Chapter 21: Troubleshooting Linux
FIGURE 21.2
Snippet from systemd-analyze startup plot.
Troubleshooting Software Packages
Software packaging facilities (such as dnf for RPM and apt for DEB packages) are designed
to make it easier for you to manage your system software. (See Chapter 10, “Getting and
Managing Software,” for the basics on how to manage software packages.) Despite efforts to
make it all work, however, sometimes software packaging can break.
Note
The dnf facility has replaced dnf in Fedora and RHEL systems. This section sometimes uses the yum command since
it will work on both older and newer Fedora and RHEL systems in most cases, because yum is aliased to dnf. The dnf
command is always shown when it is explicitly required.
The following sections describe some common problems that you can encounter with RPM
packages on a RHEL or Fedora system and how you can overcome those problems.
Sometimes, when you try to install or upgrade a package using the dnf command, error messages tell you that the dependent packages that you need to do the installation you want are
not available. This can happen on a small scale (when you try to install one package) or on a
grand scale (where you are trying to update or upgrade your entire system).
Because of the short release cycles and larger repositories of Fedora and Ubuntu, inconsistencies in package dependencies are more likely to occur than they do in more stable, selective
516
Downloaded from https://onlinelibrary.wiley.com/doi/ by alex jounh - Oregon Health & Science Univer , Wiley Online Library on [05/12/2025]. See the Terms and Conditions (https://onlinelibrary.wiley.com/terms-and-conditions) on Wiley Online Library for rules of use; OA articles are governed by the applicable Creative Commons License
Part IV: Becoming a Linux Server Administrator
repositories (such as those offered by Red Hat Enterprise Linux). To avoid dependency failures,
here are a few good practices that you can follow:
Use recent, well-tested repositories. There are thousands of software packages in
Fedora. If you use the main Fedora repositories to install software from the current
release, it is rare to have dependency problems.
21
When packages are added to the repository, as long as the repository maintainers run
the right commands to set up the repository (and you don’t use outside repositories),
everything you need to install a selected package should be available. However, when
you start using third-party repositories, those repositories may have dependencies on
repositories that they can’t control. For example, if a repository creates a new version
of its own software that requires later versions of basic software (such as libraries), the
versions that they need might not be available from the Fedora repository.
Consistently update your system. Running dnf update every night (or yum
update on older systems) makes it less likely that you will encounter major dependency problems than if you update your system only every few months. In systems
with a GNOME desktop, the Software window lets you check for and apply updates to
installed software packages. On recent Fedora and RHEL systems, you can add Auto
Updates (https://fedoraproject.org/wiki/AutoUpdates). AutoUpdates automatically downloads updated packages when they are available and, if configured,
can install them as well. Another approach is to build a cron job to check for or run
nightly updates. See the sidebar “Using cron for Software Updates” for details on how
to do that.
Occasionally upgrade your system. Fedora and Ubuntu have new releases every six
months. Fedora stops supplying updated packages for each version, 13 months after
it is released. So, although you don’t have to upgrade to the new release every six
months, you should upgrade once a year or face possible dependency and security problems when Fedora stops supplying updates.
To get a whole new version of those distributions (such as Fedora 40 to Fedora 41), do the
following:
1. Upgrade to the latest software for your current release:
# dnf upgrade --refresh -y
2. Install the dnf-plugin-system-upgrade plug-in:
# dnf install dnf-plugin-system-upgrade -y
3. Start upgrading to the new release:
# dnf system-upgrade download --releasever=41
4. Reboot to the upgrade process:
# dnf system-
upgrade reboot
517
Downloaded from https://onlinelibrary.wiley.com/doi/ by alex jounh - Oregon Health & Science Univer , Wiley Online Library on [05/12/2025]. See the Terms and Conditions (https://onlinelibrary.wiley.com/terms-and-conditions) on Wiley Online Library for rules of use; OA articles are governed by the applicable Creative Commons License
Chapter 21: Troubleshooting Linux
5. When the system comes back up, you can remove cached metadata and transaction
as follows:
# dnf system-
upgrade clean
If you are looking for a stable system, Red Hat Enterprise Linux is a better bet because it provides updates for each major release for seven years or more.
Note
If you use the apt-get command in Ubuntu to update your packages, keep in mind that there are different meanings
to the update and upgrade options in Ubuntu with apt-get than with the dnf or yum command (Fedora and
RHEL).
In Ubuntu, apt-get update causes the latest packaging metadata (package names, version numbers, and so on)
to be downloaded to the local system. Running apt-get upgrade causes the system to upgrade any installed
packages that have new versions available, based on the latest downloaded metadata.
In contrast, every time that you run a dnf or yum command in Fedora or RHEL, the latest metadata about new packages for the current release is downloaded. When you then run dnf update, you get the latest packages available
for the current release of Fedora or RHEL. To go to the next release, you must run dnf system-upgrade, as
described earlier.
If you encounter a dependency problem, here are a few things that you can do to try to resolve
the problem:
Use stable repositories. For recent releases of well-known distributions (RHEL, Fedora,
or Ubuntu, for example), dependency problems are rare and often fixed quickly. However, if you are relying on repositories for older releases or development-oriented
repositories (such as Fedora’s Rawhide repository), expect to find more dependency
problems. Reinstalling or upgrading can often fix dependency problems.
Only use third-party apps and repositories when necessary. The further you are from
the core of a Linux distribution, the more likely you are to have dependency problems
someday. Always look in the main repositories for your distribution before you look
elsewhere for a package or try to build one yourself.
Even if it works when you first install it, a package someone just handed to you might
not have a way to be upgraded. A package from a third-party repository may break if
the creators don’t provide a new version when dependent packages change.
Solve kernel-related dependencies. If you get third-party RPM packages for such
things as video cards or wireless network cards that contain kernel drivers and you
install a later kernel, those drivers no longer work. The result might be that the
graphical login screen doesn’t start when the system boots or your network card fails
to load, so you have no wireless networking.
Because most Linux systems keep the two most recent kernels, you can reboot, interrupt GRUB, and select the previous (still working) kernel from which you can boot.
That gets your system up and running, with the old kernel and working drivers, while
you look for a more permanent fix.
518
Downloaded from https://onlinelibrary.wiley.com/doi/ by alex jounh - Oregon Health & Science Univer , Wiley Online Library on [05/12/2025]. See the Terms and Conditions (https://onlinelibrary.wiley.com/terms-and-conditions) on Wiley Online Library for rules of use; OA articles are governed by the applicable Creative Commons License
Part IV: Becoming a Linux Server Administrator
The longer-term solution is to get a new driver that has been rebuilt for your current
kernel. Sites such as rpmfusion.org build third-party, non–open source driver
packages and upgrade those drivers when a new kernel is available. With the
rpmfusion.org repository enabled, your system should pick up the new drivers when
the new kernel is added.
As an alternative to sites such as rpmfusion.org, you can go straight to the website
for the manufacturer and try to download its Linux drivers (Nvidia offers Linux drivers
for its video cards), or if source code is available for the driver, you can try to build it
yourself.
Exclude some packages from update. If you are updating lots of packages at once, you
can exclude the packages that fail to get the others to work as you pursue the problem
with the broken ones. Here’s how to update all packages needing an upgrade, except
for a package named somepackage (replace somepackage with the name of the
package that you want to exclude):
# dnf -y --exclude=somepackage update
Using cron for Software Updates
The cron facility provides a means of running commands at predetermined times and intervals. You can
set the exact minute, hour, day, or month that a command runs. You can configure a command to run
every five minutes, every third hour, or at a particular time on Friday afternoon.
If you want to use cron to set up nightly software updates, you can do that as the root user by editing
the /etc/crontab file. Here’s an example of what the crontab file you create might look like:
#
min
59
hour
23
day/month
*
month
*
day/week
*
user
root
command
dnf -
y update >> /tmp/cron.txt
The /etc/crontab file consists of five fields designating day and time, a user field, and a seventh field,
containing the command line to run. I added the comment line to indicate the fields. (Note that each user
can have their own crontab file, which excludes the user field.) Here, the dnf -
y update command
is run, with its output directed to the /tmp/cron.txt file. The command is run at 59 minutes after hour
23 (11:59 p.m.) as the root user. The asterisks (*) are required as placeholders, instructing cron to run
the command on every day of the month, month, and day of the week.
When you create a cron entry, make sure that you either direct the output to a file or pipe the output
to a command that can deal with the output. If you don’t, any output is sent to the user that created the
cron job (in this case, root).
In a crontab file, you can have a range of numbers or a list of numbers, or you can skip numbers. For
example, 1, 5, or 17 in the first field causes the command to be run 1, 5, and 17 minutes after the hour.
An */3 in the second field causes the command to run every three hours (midnight, 3 a.m., 6 a.m., and
so on). A 1-3 in the fourth field tells cron to run the command in January, February, and March. Days
of the week and months can be entered as numbers or words.
For more information on the format of a crontab file, type man 5 crontab. To read about the crontab
command, type man 1 crontab.
519
21
Downloaded from https://onlinelibrary.wiley.com/doi/ by alex jounh - Oregon Health & Science Univer , Wiley Online Library on [05/12/2025]. See the Terms and Conditions (https://onlinelibrary.wiley.com/terms-and-conditions) on Wiley Online Library for rules of use; OA articles are governed by the applicable Creative Commons License
Chapter 21: Troubleshooting Linux
Troubleshooting Networking
With more and more of the information, images, video, and other content that we use every
day now available outside of our local computers, a working network connection is required
on almost every computer system. So, if you drop your network connection or can’t reach the
systems with which you want to communicate, it’s good to know that there are many tools in
Linux for looking at the problem.
For client computers (laptops, desktops, and handheld devices), you want to connect to the
network to reach other computer systems. On a server, you want your clients to be able to
reach you. The following sections describe different tools for troubleshooting network connectivity for Linux client and server systems.
Troubleshooting outgoing connections
Let’s say you open your web browser but are unable to get to any website. You suspect that
you are not connected to the network. Maybe the problem is with name resolution, but it may
be with the connection outside of your local network.
To check whether your outgoing network connections are working, you can use many of
the commands described in Chapter 14, “Administering Networking.” You can test connectivity using a simple ping command. To see if name-to-address resolution is working, use
host and dig.
The following sections cover problems that you can encounter with network connectivity for
outgoing connections and what tools to use to uncover the problems.
View network interfaces
To see the status of your network interfaces, use the ip command. The following output
shows that the loopback interface (lo) is up (so you can run network commands on your local
system), but eth0 (your first wired network card) is down (state DOWN). If the interface
had been up, an inet line would show the IP address of the interface. Here, only the loopback
interface has an inet address (127.0.0.1).
# ip addr show
1: lo: <LOOPBACK,UP,LOWER_UP> mtu 16436 qdisc noqueue state UNKNOWN
link/loopback 00:00:00:00:00:00 brd 00:00:00:00:00:00
inet 127.0.0.1/8 scope host lo
inet6 ::1/128 scope host
valid_lft forever preferred_lft forever
2: eth0: <NO-
CARRIER,BROADCAST,MULTICAST,UP> mtu 1500 state DOWN qlen
1000
link/ether f0:de:f1:28:46:d9 brd ff:ff:ff:ff:ff:ff
By default in Ubuntu, RHEL, and Fedora, network interfaces are named based on how they are
connected to the physical hardware. For example, in RHEL, you might see a network interface of enp11s0. That would indicate that the NIC is a wired Ethernet card (en) on PCI board
11 (p11) and slot 0 (s0). A wireless card would start with wl instead of en (for example,
520
Downloaded from https://onlinelibrary.wiley.com/doi/ by alex jounh - Oregon Health & Science Univer , Wiley Online Library on [05/12/2025]. See the Terms and Conditions (https://onlinelibrary.wiley.com/terms-and-conditions) on Wiley Online Library for rules of use; OA articles are governed by the applicable Creative Commons License
Part IV: Becoming a Linux Server Administrator
wlp0s20f3). The intention is to make the NIC names more predictable, because when the
system is rebooted, it is not guaranteed which interfaces would be named eth0, eth1, and so
on by the operating system.
Check physical connections
For a wired connection, make sure your computer is plugged into the port on your network
switch. If you have multiple NICs, make sure that the cable is plugged into the correct one. If
you know the name of a network interface (eth0, p4p1, or other), to find which NIC is associated with the interface, enter ethtool -
p eth0 at the command line and look behind
your computer to see which NIC is blinking (Ctrl+C stops the blinking). Plug the cable into the
correct port.
If instead of seeing an interface that is down, the ip command shows no interface at all,
check that the hardware isn’t disabled. For a wired NIC, the card may not be fully seated in its
slot or the NIC may have been disabled in the BIOS.
On a wireless connection, you may click the NetworkManager icon and not see an available
wireless interface. Again, it could be disabled in the BIOS. However, on a laptop, check to see
if there is a tiny switch that disables the NIC. I’ve seen several people shred their networking
configurations only to find out that this tiny switch on the front or side of their laptops had
been switched to the off position.
Check routes
If your network interface is up but you still can’t reach the host you want to reach, try
checking the route to that host. Start by checking your default route. Then try to reach the
local network’s gateway device to the next network. Finally, try to ping a system somewhere
on the Internet:
# ip route show
default via 192.168.1.1 dev wlp0s20f3 proto dhcp src 192.168.1.21
metric 600
192.168.1.0/24 dev wlp0s20f3 proto kernel scope link src 192.168.1.21
metric 600
The default line shows that the default gateway is at address 192.168.1.1 and that the address
can be reached over the wlp0s20f3 wireless card. Because there is only the wlp0s20f3
interface here and only a route to the 192.168.1.0/24 network is shown, all communication
not addressed to a host on the 192.168.1.0/24 network is sent through the default gateway
(192.168.1.1). The default gateway is more properly referred to as a router.
To make sure that you can reach your router, try to ping it, as in this example:
# ping -
c 2 192.168.1.1
PING 192.168.1.1 (192.168.1.1) 56(84) bytes of data.
64 bytes from 192.168.1.1: icmp_seq=1 ttl=64 time=0.757 ms
64 bytes from 192.168.1.1: icmp_seq=2 ttl=64 time=0.538 ms
521
21
Downloaded from https://onlinelibrary.wiley.com/doi/ by alex jounh - Oregon Health & Science Univer , Wiley Online Library on [05/12/2025]. See the Terms and Conditions (https://onlinelibrary.wiley.com/terms-and-conditions) on Wiley Online Library for rules of use; OA articles are governed by the applicable Creative Commons License
Chapter 21: Troubleshooting Linux
--- 192.168.1.1 ping statistics ---
2 packets transmitted, 2 received, 0% packet loss, time 65ms
rtt min/avg/max/mdev = 0.538/0.647/0.757/0.112 ms
A “Destination Host Unreachable” message tells you that the router is either turned off or, for
a wired network, not physically connected to you (maybe the router isn’t connected to the
switch you share). If the ping succeeds and you can reach the router, the next step is to try an
address beyond your router.
Try to ping a widely accessible IP address. For example, the IP address for the Google public
DNS server is 8.8.8.8. Try to ping that (ping -
c2 8.8.8.8). If that ping succeeds, your
network is probably fine, and it is most likely your hostname-to-address resolution that is not
working properly.
If you can reach a remote system but the connection is very slow, you can use the
traceroute command to follow the route to the remote host. For example, this command
shows each hop taken en route to http://www.google.com:
# traceroute www.google.com
The output shows the time taken to make each hop along the way to the Google site. Instead
of traceroute, you can use the mtr command (dnf install mtr) to watch the route
taken to a host. With mtr, the route is queried continuously, so you can watch the performance of each leg of the journey over time.
Check hostname resolution
If you cannot reach remote hosts by name, but you can reach them by pinging IP addresses,
your system is having a problem with hostname resolution. Systems connected to the Internet
do name-to-address resolution by communicating to a domain name system (DNS) server that
can provide them with the IP addresses of the requested hosts.
The DNS server your system uses can be entered manually or picked up automatically from
a DHCP server when you start your network interfaces. In either case, the names and IP
addresses of one or more DNS servers end up in your /etc/resolv.conf file. Here is an
example of that file:
search example.com
nameserver 192.168.0.254
nameserver 192.168.0.253
When you ask to connect to a hostname in Fedora or Red Hat Enterprise Linux, the /etc/
hosts file is searched; then the name server entries in resolv.conf are queried in the
order that they appear. Here are some ways of debugging name-to-address resolution:
Check if DNS server can be reached. Knowing the name server addresses, you can try
to ping each name server’s IP address to see if it is accessible, for example, ping -c
2 192.168.0.254. If the IP address can be reached, it could be that either you
were assigned the wrong address for the DNS server or it is currently down.
Check if DNS server is working. You specifically try to use each DNS server with the
host or dig command. For example, either of these two commands can be used to
522
Downloaded from https://onlinelibrary.wiley.com/doi/ by alex jounh - Oregon Health & Science Univer , Wiley Online Library on [05/12/2025]. See the Terms and Conditions (https://onlinelibrary.wiley.com/terms-and-conditions) on Wiley Online Library for rules of use; OA articles are governed by the applicable Creative Commons License
Part IV: Becoming a Linux Server Administrator
see if the DNS server at 192.168.0.254 can resolve the hostname www.google.com
into an IP address. Repeat this for each name server’s IP address until you find which
ones work:
# host www.google.com 192.168.0.254
Using domain server:
Name: 192.168.0.254
Address: 192.168.0.254#53
Aliases:
21
www.google.com has address 192.178.50.68
www.google.com has IPv6 address 2607:f8b0:4008:814::2004
# dig @192.168.0.254 www.google.com
…
;; QUESTION SECTION:
;www.google.com.
IN A
;; ANSWER SECTION:
www.google.com.
…
294
IN
A
142.250.217.228
Correct your DNS servers. If you determine that you have the wrong IP addresses
set for your DNS servers, changing them can be a bit tricky. Search /var/log/
messages or the output of journalctl for your DNS servers’ IP addresses. If
NetworkManager is used to start your networking and connect to a DHCP server, you
should see name server lines with the IP addresses being assigned.
The procedures just described for checking your outgoing network connectivity apply to any
type of system, whether it is a laptop, desktop, or server. For the most part, incoming connections are severely limited with laptops or desktops because most requests are simply denied.
However, for servers, the next section describes ways of making your server accessible if clients
are having trouble reaching the services you provide from that server.
Troubleshooting incoming connections
If you are troubleshooting network interfaces on a server, there are different considerations
than on a desktop system. Because most Linux systems are configured as servers, you should
know how to troubleshoot problems encountered by those who are trying to reach your
Linux servers.
I’ll start with the idea of having an Apache web server (httpd) running on your Linux
system, but no web clients can reach it. The following sections describe things that you can
try to locate the problem.
Check if the client can reach your system at all
To be a public server, your system’s hostname should be resolvable so that any client on the
Internet can reach it. That means locking down your system to a particular public IP address
and registering that address with a public DNS server. You can use a domain registrar (such as
http://www.networksolutions.com) to do that.
523
Downloaded from https://onlinelibrary.wiley.com/doi/ by alex jounh - Oregon Health & Science Univer , Wiley Online Library on [05/12/2025]. See the Terms and Conditions (https://onlinelibrary.wiley.com/terms-and-conditions) on Wiley Online Library for rules of use; OA articles are governed by the applicable Creative Commons License
Chapter 21: Troubleshooting Linux
When clients cannot reach your website by name from their web browsers, if the client is
a Linux system, you can go through ping, host, traceroute, and other commands
described in the previous section to track down the connectivity problem. Windows systems
have their own version of ping that you can use from those systems.
If the name-to-address resolution is working to reach your system and you can ping your
server from the outside, the next thing to try is the availability of the service.
Check if the service is available to the client
From a Linux client, you can check if the service you are looking for (in this case httpd) is
available from the server. One way to do that is using the nmap command.
The nmap command is a favorite tool for system administrators checking for various kinds
of information on networks. However, it is a favorite cracker tool as well because it can scan
servers, looking for potential vulnerabilities. So, it is fine to use nmap to scan your own systems to check for problems, but know that using nmap on another system is like checking the
doors and windows on someone’s house to see if you can get in. You look like an intruder.
Checking your own system to see what ports to your server are open to the outside world
(essentially, checking what services are running) is perfectly legitimate and easy to do. After
nmap is installed (dnf install nmap), use your system hostname or IP address to use
nmap to scan your system to see what is running on common ports:
# nmap 192.168.0.119
Starting Nmap 7.94SVN ( https://nmap.org ) at 2025-
03-
29 18:50 EDT
Nmap scan report for fedora (192.168.1.21)
Host is up (0.0037s latency).
Not shown: 995 filtered ports
PORT
STATE SERVICE
21/tcp open
ftp
22/tcp open
ssh
80/tcp open
http
443/tcp open
https
631/tcp open
ipp
MAC Address: 00:1B:21:0A:E8:5E (Intel Corporate)
Nmap done: 1 IP address (1 host up) scanned in 4.77 seconds
The preceding output shows that TCP ports are open to the regular (http) and secure
(https) web services. When you see that the state is open, it indicates that a service is listening on the port as well. If you get to this point, it means that your network connection is
fine, and you should direct your troubleshooting efforts to how the service itself is configured
(for example, you might look in /etc/httpd/conf/httpd.conf to see if specific hosts
are allowed or denied access).
If TCP ports 80 and/or 443 are not shown, it means that they are being filtered. You need to
check whether your firewall is blocking (not accepting packets to) those ports. If the port is
524
Downloaded from https://onlinelibrary.wiley.com/doi/ by alex jounh - Oregon Health & Science Univer , Wiley Online Library on [05/12/2025]. See the Terms and Conditions (https://onlinelibrary.wiley.com/terms-and-conditions) on Wiley Online Library for rules of use; OA articles are governed by the applicable Creative Commons License
Part IV: Becoming a Linux Server Administrator
not filtered but the state is closed, it means that the httpd service either isn’t running or
isn’t listening on those ports. The next step is to log in to the server and check those issues.
Check the service on the server
If there seems to be nothing blocking client access to your server through the actual ports providing the service that you want to share, it is time to check the service itself. Assuming that
the service is running (systemctl status httpd.service to check), the next thing to
check is that it is listening on the proper ports and network interfaces.
The ss command is a great general-purpose tool for checking network services. The following
command lists the names and process IDs (p) for all processes that are listening (l) for TCP
(t) and UDP (u) services, along with the port number (n) on which they are listening. The
command line filters out all lines except those associated with the httpd process:
# ss -
tupln | grep httpd
tcp
0 0 :::80
:::*
tcp
0 0 :::443
:::*
LISTEN
LISTEN
2567/httpd
2567/httpd
The previous example shows that the httpd process is listening on port 80 and 443 for all
interfaces. It is possible that the httpd process might be listening on selected interfaces. For
example, if the httpd process were only listening on the local interface (127.0.0.1) for HTTP
requests (port 80), the entry would appear as follows:
tcp
0
0 127.0.0.1:80 :::*
LISTEN
2567/httpd
For httpd, as well as for other network services that listen for requests on network interfaces, you can edit the service’s main configuration file (in this case,
/etc/httpd/conf/httpd.conf) to tell it to listen on port 80 for all addresses (Listen
80) or a specific address (Listen 192.168.0.100:80).
Troubleshooting Memory
Troubleshooting performance problems on your computer is one of the most important,
although often elusive, tasks you need to complete. Maybe you have a system that was
working fine, but it begins to slow down to a point where it is practically unusable. Maybe
applications just begin to crash for no apparent reason. Finding and fixing the problem may
take some detective work.
Linux comes with many tools for watching activities on your system and figuring out what
is happening. Using a variety of Linux utilities, you can do things such as finding out which
processes are consuming large amounts of memory or placing high demands on your processors, disks, or network bandwidth. Solutions can include the following:
Adding capacity Your computer may be trying to do what you ask of it, but failures
might occur because you don’t have enough memory, processing power, disk space,
or network capacity to get reasonable performance. Even nearing the boundaries of
525
21
Downloaded from https://onlinelibrary.wiley.com/doi/ by alex jounh - Oregon Health & Science Univer , Wiley Online Library on [05/12/2025]. See the Terms and Conditions (https://onlinelibrary.wiley.com/terms-and-conditions) on Wiley Online Library for rules of use; OA articles are governed by the applicable Creative Commons License
Chapter 21: Troubleshooting Linux
resource exhaustion can cause performance problems. Improving your computer hardware capacity is often the easiest way of solving performance problems.
Tuning the system Linux comes with default settings that define how it internally
saves data, moves data around, and protects data. System tunable parameters can be
changed if the default settings don’t work well for the types of applications you have
on your system.
Uncovering problem applications or users Sometimes, a system performs poorly
because a user or an application is doing something wrong. Misconfigured or broken applications can hang or gobble up all of the resources they can find. An inexperienced user might mistakenly start multiple instances of a program that drain
system resources. As a system administrator, you want to know how to find and fix
these problems.
To troubleshoot performance problems in Linux, you use some of the basic tools for watching
and manipulating processes running on your system. Refer to Chapter 6, “Managing Running
Processes,” if you need details on commands such as ps, top, kill, and killall. In
the following sections, I add commands such as memstat to dig a little deeper into what
processes are doing and where things are going wrong.
The most complex area of troubleshooting in Linux relates to managing virtual memory. The
next sections describe how to view and manage virtual memory.
Uncovering memory issues
Computers have ways of storing data permanently (hard disks) and temporarily (random access
memory [RAM] and swap space). Think of yourself as a CPU, working at a desk trying to get
your work finished. You would put data that you want to keep permanently in a filing cabinet
across the room (that’s like hard disk storage). You would put information that you are currently using on your desk (that’s like RAM memory on a computer).
Swap space is a way of extending RAM. It is really just a place to put temporary data
that doesn’t fit in RAM but is expected to be needed by the CPU at some point. Although
swap space is on the hard disk, it is not a regular Linux filesystem in which data is stored
permanently.
Compared to disk storage, random access memory has the following attributes:
Nearer the processor Like the desk being near to you as you work, memory is physically near the CPU on the computer’s motherboard. So, any data the CPU needs, it can
just grab immediately if the data is in RAM.
Faster Its proximity to the CPU and the way that it is accessed (solid state versus
mechanical hard disks) makes it much faster for the CPU to get information from RAM
than it can from a hard disk. It’s quicker to look at a piece of paper on your desk (a
small, close space) than to walk to a row of file cabinets and to start searching for
what you want.
526
Downloaded from https://onlinelibrary.wiley.com/doi/ by alex jounh - Oregon Health & Science Univer , Wiley Online Library on [05/12/2025]. See the Terms and Conditions (https://onlinelibrary.wiley.com/terms-and-conditions) on Wiley Online Library for rules of use; OA articles are governed by the applicable Creative Commons License
Part IV: Becoming a Linux Server Administrator
Less capacity A new computer might have a 1TB or larger hard drive but 8GB or 16GB of
RAM. Although it would make the computer run faster to put every file and every piece
of data that the processor may need into RAM, in most cases there just wouldn’t be
enough room. Also, both the physical memory slots on the computer and the computer
system itself (64-bit computers can address more RAM than 32-bit computers) can limit
how much RAM a computer is capable of having.
More expensive Although RAM is tremendously more affordable than it was a decade or
two ago, it is still much more expensive (per GB) than hard disks.
Temporary RAM holds data and metadata that the CPU is using now for the work it is
doing (plus some content the Linux kernel is keeping around because it suspects a process will need it before long). When you turn off the computer, however, everything in
RAM is lost. When the CPU is done with data, that data is discarded if it is no longer
needed, left in RAM for possible later use, or marked to be written to disk for permanent storage if it needs to be saved.
It is important to understand the difference between temporary (RAM) and permanent (hard
disk) storage, but that doesn’t tell the whole story. If the demand for memory exceeds the
supply of RAM, the kernel can temporarily move data out of RAM to an area called swap space.
If we revisit the desk analogy, this would be like saying, “There is no room left on my desk,
yet I have to add more papers to it for the projects I’m currently working on. Instead of storing
papers I’ll need soon in a permanent file cabinet, I’ll have one special file cabinet (like a desk
drawer) to hold those papers that I’m still working with but that I’m not ready to store permanently or throw away.”
Refer to Chapter 12, “Managing Disks and Filesystems,” for more information on swap files and
partitions and how to create them. For the moment, however, there are a few things that you
should know about these kinds of swap areas and when they are used:
■
■
■
■
When data is swapped from RAM to a swap area (swapped out), you get a performance
hit. Remember, writing to disk is much slower than writing to RAM.
When data is returned from swap to RAM because it is needed again (swapped in), you
get another performance hit.
When Linux runs out of space in RAM, swapping is like losing a high gear on a car.
The car might have to run in a lower gear, but it would not stop altogether. In other
words, all your processes stay active, and they don’t lose any data or fail completely,
but the system performance can significantly slow down.
If both RAM and swap are full and no data can be discarded or written to disk, your
system can reach an out-of-memory (OOM) condition. When that happens, the kernel
OOM killer kicks in and begins killing off processes, one by one, to regain as much
memory as the kernel needs to begin functioning properly again.
The general rule has always been that swapping is bad and should be avoided. However,
some would argue that, in certain cases, more aggressive swapping can actually improve
performance.
527
21
Downloaded from https://onlinelibrary.wiley.com/doi/ by alex jounh - Oregon Health & Science Univer , Wiley Online Library on [05/12/2025]. See the Terms and Conditions (https://onlinelibrary.wiley.com/terms-and-conditions) on Wiley Online Library for rules of use; OA articles are governed by the applicable Creative Commons License
Chapter 21: Troubleshooting Linux
Think of the case where you open a document in a text editor and then minimize it on your
desktop for several days as you work on different tasks. If data from that document were
swapped out to disk, more RAM would be available for more active applications that could put
that space to better use. The performance hit would come the next time you needed to access
the data from the edited document and the data was swapped in from disk to RAM. The settings that relate to how aggressively a system swaps are referred to as swappiness.
As much as possible, Linux wants to make everything that an open application needs immediately available. So, using the desk analogy, if I am working on nine active projects and there is
space on the desk to hold the information I need for all nine projects, why not leave them all
within reach on the desk? Following that same way of thinking, the kernel sometimes keeps
libraries and other content in RAM that it thinks you might eventually need—even if a process
is not looking for it immediately.
The fact that the kernel is inclined to store information in RAM that it expects may be needed
soon (even if it is not needed now) can cause an inexperienced system administrator to think
that the system is almost out of RAM and that processes are about to start failing. That is why
it is important to know the different kinds of information being held in memory—so that you
can tell when real out-of-memory situations can occur. The problem is not just running out of
RAM; it is running out of RAM when only non-swappable data are left.
Keep this general overview of virtual memory (RAM and swap) in mind, as the next section
describes ways to go about troubleshooting issues related to virtual memory.
Checking for memory problems
Let’s say you are logged in to a Linux desktop, with lots of applications running, and everything begins to slow down. To find out if the performance problems have occurred because
you have run out of memory, you can try commands such as top and ps to begin looking for
memory consumption on your system.
To run the top command to watch for memory consumption, type top and then type a capital M. Here is an example:
# top
top -19:22:48 up 2 days, 12:03, 1 user, load average: 0.26, 0.32, 0.34
Tasks: 323 total,
1 running, 321 sleeping,
0 stopped,
1 zombie
%Cpu(s): 1.6 us, 0.9 sy, 0.0 ni, 97.6 id, 0.0 wa, 0.0 hi, 0.0 si,
0.0 st
MiB Mem :
7717.2 total,
427.8 free,
4830.8 used,
3473.8 buff/cache
MiB Swap:
3072.0 total,
2227.5 free,
844.5 used.
2886.4 avail Mem
PID USER
PR NI
VIRT
RES
SHR S %CPU %MEM
TIME+ COMMAND
4142 chris 20
0 5260168 234684 83624 S
6.0
3.0 89:17.02 gnome-
shell 156061 chris 20
0 4283940 661852 270176 S
4.0
8.4 14:31.88
firefox
528
Downloaded from https://onlinelibrary.wiley.com/doi/ by alex jounh - Oregon Health & Science Univer , Wiley Online Library on [05/12/2025]. See the Terms and Conditions (https://onlinelibrary.wiley.com/terms-and-conditions) on Wiley Online Library for rules of use; OA articles are governed by the applicable Creative Commons License
Part IV: Becoming a Linux Server Administrator
18337 chris 20
term
156780 chris 20
Web
...
0 720036 49728 29236 S
1.0
0.6
1:33.24 gnome-
0 2442464 93392 75244 S
1.0
1.2
0:27.24 Isolated
There are two lines (MiB Mem and MiB Swap) and four columns of information (VIRT, RES,
SHR, and %MEM) relating to memory in the top output. In this example of a busy desktop
system, you can see that RAM is not exhausted, but a lot is being used. From the MiB Mem
line 4830.8MiB of 717.2MiB is used and that some data are being swapped to disk from the
MiB Swap line (844.5MiB used).
However, if you were to add up the output in the VIRT column, you would see that the memory allocated for all processes, would exceed the total RAM that is available. That’s because the
VIRT column shows only the amount of memory that has been promised to the application.
The RES line shows the amount of non-swappable memory that is actually being used.
Notice that, when you ask to sort by memory usage by typing a capital M, top knows to sort
on that RES column. The SHR column shows memory that could potentially be shared by
other applications (such as libraries), and %MEM shows the percentage of total memory consumed by each application.
If you think that the system is reaching an out-of-memory state, here are a few things
to look for:
■
■
■
■
The free space shown on the MiB Mem line would be at or near zero.
The used space shown on the MiB Swap line would be nonzero and would continue
to grow. That should be accompanied with a slowdown of system performance.
As the top screen redraws every few seconds, if there is a process with a memory leak
(continuously asking for and using more memory, but not giving any memory back),
the amount of VIRT memory grows, but more important, the RES memory continues
to grow for that process.
If the Swap space actually runs out, the kernel starts to kill off processes to deal with
this out-of-memory condition.
If you have Cockpit installed and enabled, you can watch memory usage live from your web
browser. Open Cockpit and then select Overview ➪ View Metrics And History (from the Usage
box). Then I hovered the mouse pointer over a time where there was high memory usage and
swap activity. Figure 21.3 shows a system where the memory is all being consumed by opening
multiple tabs in my web browser. The result is excessive swapping.
Dealing with memory problems
In the short term, you can do several things to deal with an out-of-memory condition:
Kill a process If the memory problem is due to one errant process, you can simply kill
that process. Assuming that you are logged in as root or as the user who owns the
529
21
Downloaded from https://onlinelibrary.wiley.com/doi/ by alex jounh - Oregon Health & Science Univer , Wiley Online Library on [05/12/2025]. See the Terms and Conditions (https://onlinelibrary.wiley.com/terms-and-conditions) on Wiley Online Library for rules of use; OA articles are governed by the applicable Creative Commons License
Chapter 21: Troubleshooting Linux
runaway process, type k from the top window, then enter the PID of the process that
you want to kill, and choose 15 or 9 as the signal to send.
Drop page caches If you just want to clear up some memory right now as you otherwise
deal with the problem, you can tell the system to drop inactive page caches. When you
do this, some memory pages are written to disk; others are just discarded (because they
are stored permanently and can be gotten again from disk when they are needed).
This action is the equivalent of cleaning your desk and putting all but the most critical
information into the trash or into a file cabinet. You may need to retrieve information
again shortly from a file cabinet, but you almost surely don’t need it all immediately.
Keep top running in one Terminal window to see the MiB Mem line change as you
type the following (as root) into another Terminal window:
# echo 3> /proc/sys/vm/drop_caches
Kill an out-of-memory process Sometimes, memory exhaustion has made the system
so unusable that you may not be able to get a response from a shell or GUI. In those
cases, you might be able to use Alt+SysRq keystrokes to kill an out-of-memory process.
The reason you can use Alt+SysRq keystrokes on an otherwise unresponsive system is
that the kernel processes Alt+SysRq requests ahead of other requests.
FIGURE 21.3
Monitor RAM and Swap usage in real time with Cockpit.
Ubuntu 24.04.3 LTS Admin-ubuntu-20 (Linux 6.8.0-79-generic #79-Ubuntu SMP PREEMPT_DYNAMIC Tue Aug 12 14:42:46 UTC 2025) x86-64
Startup finished in 10.045s (firmware) + 3.994s (loader) + 3.754s (kernel) + 2min 40.966s (userspace) = 2min 58.761s graphical.target reached
after 2min 40.942s in userspace.
–14.0s
–4.0s
0.0s
1.0s
4.0s
5.0s
6.0s
7.0s
firmware
loader
kernel
systemd
530
-.slice
system.slice
y
init.scope
p
-.mount
dev-nvme0n1p2.device
(458ms)
p
(
)
machine.slice
system-modprobe.slice
y
system-postfix.slice
system-systemd\x2dfsck.slice
user.slice
systemd-ask-password-wall.path
proc-sys-fs-binfmt_misc.automount
integritysetup.target
nss-user-lookup.target
slices.target
snapd.mounts-pre.target
veritysetup.target
8.0s
Downloaded from https://onlinelibrary.wiley.com/doi/ by alex jounh - Oregon Health & Science Univer , Wiley Online Library on [05/12/2025]. See the Terms and Conditions (https://onlinelibrary.wiley.com/terms-and-conditions) on Wiley Online Library for rules of use; OA articles are governed by the applicable Creative Commons License
Part IV: Becoming a Linux Server Administrator
To enable Alt+SysRq keystrokes, the system must have already set /proc/sys/
kernel/sysrq to 1. An easy way to do this is to add kernel.sysrq = 1 to the
/etc/sysctl.conf file. Also, you must run the Alt+SysRq keystrokes from a text-
based interface (such as the virtual console you see when you press Ctrl+Alt+F2).
With kernel.sysrq set to 1, you can kill the process on your system with the
highest OOM score by pressing Alt+SysRq+f from a text-based interface. A listing of all
processes running on your system appears on the screen with the name of the process
that was killed listed at the end. You can repeat those keystrokes until you have killed
enough processes to be able to access the system normally from the shell again.
Note
There are many other Alt+SysRq keystrokes that you can use to deal with an unresponsive system. For example,
Alt+SysRq+e terminates all processes except for the init process. Alt+SysRq+t dumps a list of all current tasks and
information about those tasks to the console. To reboot the system, press Alt+SysRq+b. See www.kernel.org/doc/
html/latest/admin-guide/sysrq.html for more information about Alt+SysRq keystrokes.
Troubleshooting in Rescue Mode
If your Linux system becomes unbootable, your best option for fixing it is probably to go into
rescue mode. To go into rescue mode, you bypass the Linux system installed on your hard disk
and boot some rescue medium (such as a bootable USB drive or boot CD). After the rescue
medium boots, it tries to mount any filesystems that it can find from your Linux system so
that you can repair any problems.
For many Linux distributions, the installation USB drive or DVD can serve as boot media for
going into rescue mode. Here’s an example of how to use a RHEL installation DVD to go into
rescue mode to fix a broken Linux system (burn the image to a USB drive if your computer
doesn’t have a DVD drive):
1. Get the installation CD or DVD image that you want to use and burn it to the appropriate medium (USB, CD, or DVD). See Appendix A, “Media,” for information on burning
CDs and DVDs. (For my example, I used a Red Hat Enterprise Linux installation DVD.)
2. Insert the USB, CD, or DVD into the drive on the computer that has the broken Linux
system installed and reboot.
3. The moment you see the BIOS screen, press the function key noted on that screen for
selecting the boot device (possibly the F12 or F2 function key).
4. Choose the drive (USB, CD, or DVD) from the list of bootable devices, and press Enter.
5. When the RHEL boot menu appears, use the arrow keys to highlight the word Troubleshooting and press Enter. In other Linux boot media, the selection could say Rescue
Mode or something similar. On the next screen that appears, select Rescue a Red Hat
Enterprise Linux system and press Enter.
531
21
Downloaded from https://onlinelibrary.wiley.com/doi/ by alex jounh - Oregon Health & Science Univer , Wiley Online Library on [05/12/2025]. See the Terms and Conditions (https://onlinelibrary.wiley.com/terms-and-conditions) on Wiley Online Library for rules of use; OA articles are governed by the applicable Creative Commons License
Chapter 21: Troubleshooting Linux
6. After a few moments, the Linux system on the rescue medium boots up. When
prompted, select your language and keyboard. You are asked if you want to start network interfaces on the system.
7. If you think that you might need to get something from another system on your network (such as RPM packages or debugging tools), click Yes and try to configure your
network interfaces. You are then asked if you want to try to mount filesystems from
your installed Linux system under /mnt/sysimage.
8. Select Continue to have your filesystems mounted (if possible) under the /mnt/
sysimage directory. If this is successful, a Rescue message appears, telling you that
your filesystems have been mounted under /mnt/sysimage.
9. Select OK to continue. You should see a shell prompt for the root user (#). You are
ready to begin troubleshooting from rescue mode. After you are in rescue mode, the
portion of your filesystem that is not damaged is mounted under the /mnt/
sysimage directory. Type ls /mnt/sysimage to check that the files and directories from the hard disk are there.
Right now, the root of the filesystem (/) is from the filesystem that comes on the rescue
medium. To troubleshoot your installed Linux system, however, you can type the following command:
# chroot /mnt/sysimage
Now the /mnt/sysimage directory becomes the root of your filesystem (/) so that it looks
like the filesystem installed on your hard disk. Here are some things that you can do to repair
your system while you are in rescue mode:
Fix /etc/fstab. If your filesystems couldn’t mount because of an error in your
/etc/fstab file, you could try to correct any entries that might have problems (such
as wrong device names or a mount point directory that doesn’t exist). After you have
fixed the file, type mount -a to make sure that all of the filesystems mount.
Reinstall missing components. It might be that the filesystems are fine, but the
system failed to boot because some critical command or configuration file is missing.
You might be able to fix the problem by reinstalling the package with the missing components. For example, if someone had deleted /bin/mount by mistake, the system
would have no command to mount filesystems. Reinstalling the util-linux package
would replace the missing mount command.
Check the filesystems. If your booting problems stem from corrupt filesystems, you can
try running the fsck command (filesystem check) to see if there is any corruption on
the disk partition. If there is, fsck attempts to correct problems it encounters.
If you are finished, type reboot to restart your system. If that doesn’t work, you might need
to restart the system by powering down and back up again. Be sure to pop out the medium
before the system restarts.
532
Downloaded from https://onlinelibrary.wiley.com/doi/ by alex jounh - Oregon Health & Science Univer , Wiley Online Library on [05/12/2025]. See the Terms and Conditions (https://onlinelibrary.wiley.com/terms-and-conditions) on Wiley Online Library for rules of use; OA articles are governed by the applicable Creative Commons License
Part IV: Becoming a Linux Server Administrator
Summary
Troubleshooting problems in Linux can start from the moment you turn on your computer.
Problems can occur with your computer BIOS, boot loader, or other parts of the boot process
that you can correct by intercepting them at different stages of the boot process.
After the system has started, you can troubleshoot problems with software packages, network
interfaces, or memory exhaustion. Linux comes with many tools for finding and correcting any
part of the Linux system that might break down and need fixing.
Exercises
The exercises in this section enable you to try out useful troubleshooting techniques in Linux.
Because some of the techniques described here can potentially damage your system, I recommend that you do not use a production system that you cannot risk damaging. See Appendix B
for suggested solutions.
These exercises relate to troubleshooting topics in Linux. They assume that you are booting a
PC with UEFI. To do these exercises, you need to be able to reboot your computer and interrupt
any work it may be doing.
1. Boot your computer, and as soon as you see the UEFI boot screen, go into Setup mode
as instructed on the screen.
2. From the UEFI Setup screen, determine if your computer is 32-bit or 64-bit, if it
includes virtualization support, and if your network interface card is capable of
PXE booting.
3. Reboot, and just after the BIOS screen disappears, when you see the countdown to
booting the Linux system, press any key to get to the GRUB boot loader.
4. From the GRUB boot loader, add an option to boot up to runlevel 1 so that you can do
some system maintenance.
5. After the system boots up, look at the messages that were produced in the kernel ring
buffer that show the activity of the kernel as it booted up.
6. In Fedora or RHEL, run a trial dnf update and exclude any kernel package that is
available.
7. Check to see what processes are listening for incoming connections on your system.
8. Check to see what ports are open on your external network interface.
9. Run the top command in a Terminal window. Open a second Terminal window, clear
your page cache, and note on the top screen if more RES memory is now available.
10. With Cockpit enabled on your system, access Cockpit to view details on the system’s
ongoing memory and swap usage.
533
21
Downloaded from https://onlinelibrary.wiley.com/doi/ by alex jounh - Oregon Health & Science Univer , Wiley Online Library on [05/12/2025]. See the Terms and Conditions (https://onlinelibrary.wiley.com/terms-and-conditions) on Wiley Online Library for rules of use; OA articles are governed by the applicable Creative Commons License
Chapter 21: Troubleshooting Linux
Downloaded from https://onlinelibrary.wiley.com/doi/ by alex jounh - Oregon Health & Science Univer , Wiley Online Library on [05/12/2025]. See the Terms and Conditions (https://onlinelibrary.wiley.com/terms-and-conditions) on Wiley Online Library for rules of use; OA articles are governed by the applicable Creative Commons License
Configuring an Artificial
Intelligence Chatbot
22
IN THIS CHAPTER
Choosing an AI language model
Evaluating your computer hardware for AI
Running language models with Ollama
Trying Phi-3, Llama-3.1, and Mistral language models
L
ike most emerging computing technologies in recent years, artificial intelligence (AI) is particularly suited to Linux as both a development platform and a destination for deployment. While a
lot of AI development is going on behind closed doors in large tech companies, the open source
development of tools and language models has helped to accelerate the growth of AI in an astonishing way.
You can expect that, over time, more AI features will be built into computer operating systems. Likewise, more tools will become available for integrating AI into common computing workflows. For example,
Red Hat has recently released Lightspeed AI into RHEL 10. Lightspeed lets you interact with it from the
command line to make queries in plain English. It also connects to Red Hat’s knowledge base to provide
direct access to Red Hat documentation.
Although you have almost certainly already used AI through search engines and by clicking AI icons that
appear on web pages and in apps, my goal here is to help you deploy an AI workload in Linux. This consists of stepping you through the different choices for AI language models and then having you run and
use one or more of those AI language models in Linux.
Choosing Language Models
While setting up a simple service like a web server or a file server can be done on a Linux system with
minimal resources, serving even a small AI chatbot is much more demanding. Choosing between the
available large language models (LLMs) and small language models (SLMs) to use for your chatbot will
have a major impact on the results and performance that you get.
535
Linux Bible, Eleventh Edition. Christopher Negus.
© 2026 John Wiley & Sons, Inc. All rights reserved, including rights for text and data mining and training of artificial intelligence technologies or similar
technologies. Published 2026 by John Wiley & Sons, Inc.
Downloaded from https://onlinelibrary.wiley.com/doi/ by alex jounh - Oregon Health & Science Univer , Wiley Online Library on [05/12/2025]. See the Terms and Conditions (https://onlinelibrary.wiley.com/terms-and-conditions) on Wiley Online Library for rules of use; OA articles are governed by the applicable Creative Commons License
CHAPTER
In general, the following can help you understand the differences between LLMs and SLMs:
■
■
■
■
■
Parameters: SLMs generally have between 1 billion and 7 billion parameters, while
LLMs can have more than 30 billion parameters (with some LLMs over 70 billion).
Fewer parameters means that SLMs can’t do problem solving that is as deep or complex as LLMs. Note that there are some smaller models that are still referred to as
LLMs because they are based on models that were architected as LLMs but were just
reduced in size.
Lower resource requirements: SLMs can run on less powerful and less expensive
hardware than LLMs. For example, an SLM might be able to run with less memory
(between 4–8 GB) compared to LLMs (which might need 40 GB or more). Likewise,
some SLMs can run on CPUs while LLMs might require GPUs to run effectively.
Task requirements: SLMs are generally good at performing simple tasks that need
to be done quickly, but without much complexity. LLMs tend to have much broader
knowledge and can work on tasks that have multiple, complex steps. The LLM can also
come up with more complex solutions and produce better output (such as in-depth
reports or creative writing).
Knowledge: Answers from SLMs may be less informed and even factually incorrect
since they work from a smaller knowledge base than LLMs.
Biases: Unless the SLM is very carefully curated when it is created, an SLM is much
more likely to have biased results than an LLM. That’s because there is much less
information to use to obtain answers, so small amounts of biased or false data in the
SLM can have a greater possibility of providing skewed results.
Taking all of that into account, the type and exact language model that you use should come
down to a balance of the task you need it to do, the resources you are willing to devote to it,
and the money you have to apply to the job you hope to accomplish. Also, keep in mind that
language models described will probably become obsolete in a short period of time, so you
should probably look for newer models as well.
Evaluating Your AI Requirements
Small language models (SLMs) or small versions of large language models can be best to use
when you have limitations. Those limitations might be compute resources (limited processing
power, storage, and memory) or a limited amount of money to spend. However, if the task you
want to do is also limited, an SLM might just suit your needs. For example, an SLM might be
appropriate if the issues are as follows:
■
■
536
Computer hardware is limited: For our purposes, I want you to see how you can
run a chatbot in Linux on a computer with a decent amount of power, but not a huge
amount. If you then want to try an LLM that might not work as well on your hardware, you could consider getting a cloud account or upgrading to better hardware.
Simple tasks: If you want to do tasks that are simple and have well-defined boundaries, such as a bot that does basic question-and-answer tasks, an SLM can be
Downloaded from https://onlinelibrary.wiley.com/doi/ by alex jounh - Oregon Health & Science Univer , Wiley Online Library on [05/12/2025]. See the Terms and Conditions (https://onlinelibrary.wiley.com/terms-and-conditions) on Wiley Online Library for rules of use; OA articles are governed by the applicable Creative Commons License
Part IV: Becoming a Linux Server Administrator
■
■
■
effective. Questions outside of its realm can be directed to an outside document or
other contact information.
Speed: With the limited size and scope of an SLM, if speed of response is important,
then an SLM can be useful for providing quick, if not always accurate, results. The
smaller size and reduced complexity of its knowledge can make an SLM bring up an
answer quicker.
Privacy: The world’s largest and most complex LLMs are far too big (and expensive)
to run on your home hardware. Using those LLMs effectively requires that you upload
your data to the servers running those LLMs. This exposes your data to outside sources
that you might want to keep private. Running language models on your own hardware
makes it so you don’t have to expose your data to outside companies.
Disconnected: Most SLMs and many LLMs can run disconnected. Besides the privacy
issues previously described, there may be times when you simply don’t have or can’t
rely on an Internet connection. For example, some remote locations or edge computing devices might need to run disconnected.
I tried a few SLMs with my moderate hardware (8GB memory, six CPU cores, and AVX2
support). Some SLMs that perform well on my hardware include the following:
■
■
■
Phi-3: This family of models from Microsoft is available in mini, small, and medium
versions. It easily wrote some shell scripts I asked it to create. It tends to give long-
winded answers to common questions (who is the major league baseball all-time home
run leader?). The phi3:mini is the only version that runs well on my hardware, but
it did run quite well.
Llama-3.1: This is one of the first reduced-size LLMs to run well on limited hardware. Llama-3.1 is an open source language model developed by Meta. I installed
llama3.1:8b, which performed well on my hardware.
Mistral: The Mistral language model is developed by the French start-up company
Mistral AI. While some language models focus on English, Mistral was trained in
English, French, Spanish, German, and Italian. When I asked for a list of birds
common to Michigan, USA, it gave me a list of 10 birds with basic characteristics,
without too much verbiage.
Because we are using Ollama for this example, you can check for models that are available to
use with Ollama on the Ollama search page (ollama.com/search). If you are interested in
running models that are too demanding for your hardware, consider renting online compute
resources from major cloud providers or services like RunPod (runpod.io), where you can
run some AI jobs for pennies per hour.
Getting Ollama to Serve Language Models
To try LLMs or SLMs on your local Linux system, you can use the Ollama. Ollama is designed to
run AI language models on your local computer. To get started, your Linux system should meet
the latest requirements, keeping in mind that these are minimums and that more is better.
(For other ways to install Ollama in Linux, see docs.ollama.com/linux.)
537
22
Downloaded from https://onlinelibrary.wiley.com/doi/ by alex jounh - Oregon Health & Science Univer , Wiley Online Library on [05/12/2025]. See the Terms and Conditions (https://onlinelibrary.wiley.com/terms-and-conditions) on Wiley Online Library for rules of use; OA articles are governed by the applicable Creative Commons License
Chapter 22: Configuring an Artificial Intelligence Chatbot
■
■
■
Linux: You should be running Fedora 42, Ubuntu 22.04 LTS, or other recent
Linux systems.
Memory: The amount of memory needed to run Ollama depends on the model you
are using:
■ For 13B models, you need at least 32 GB of RAM.
■ For 7B models, you need at least 16 GB of RAM.
■ For 3B models, you need at least 8 GB of RAM.
Processors: SLMs will work on CPUs, but graphics processor units (GPUs) are better if
you have them available. Here are the minimums:
■
CPUs: Eight cores are recommended, but you can get by with four cores with
smaller SLMs. I ran several models successfully with six cores. If possible, choose
CPUs with AVX-512 or AVX support. Those features allow the CPUs to do parallel
processing of data in large amounts. To see if your CPUs support AVX or AVX-512,
type the following:
$ cat /proc/cpuinfo | grep -
i avx
flags : fpu vme de pse tsc msr pae mce cx8 apic sep mtrr pge
mca cmov pat pse36 clflush dts acpi mmx fxsr sse sse2 ss ht tm
pbe syscall nx pdpe1gb rdtscp lm constant_tsc art arch_perfmon
pebs bts rep_good nopl xtopology nonstop_tsc cpuid aperfmperf
pni pclmulqdq dtes64 monitor ds_cpl vmx smx est tm2 ssse3 sdbg
fma cx16 xtpr pdcm pcid sse4_1 sse4_2 x2apic movbe popcnt tsc_
deadline_timer aes xsave avx f16c rdrand ...
■
■
GPUs: Although Ollama does not require GPUs, performance is significantly better
with GPUs. Check the amount of VRAM associated with your GPUs. About 4 GB of
VRAM is recommended for 7B models (with 4-bit quantization); for a 13B model,
8 GB minimum of VRAM is recommended. Models with larger parameter counts
require more VRAM.
Disk space: To start with Ollama, you should have at least 12 GB of available disk
space, plus you will need to allow more for each SLM or LLM you install.
Consider downloading and reviewing the install.sh script before you run it, as a security
best practice. Assuming your computer meets the requirements just described and assuming
your computer has an X86_64 processor, do the following to install and run the Ollama server:
1. Download Ollama. Run this command and you will be prompted for your password
(to get sudo privilege). Next, the Ollama Linux bundle is downloaded, and the
ollama service is installed and enabled as a systemd service. Because I had no
GPUs on my computer, Ollama tells me that it will run in CPU-only mode:
$ curl -
fsSL https://ollama.com/install.sh | sh
>>> Enabling and starting ollama service...
...
>>> The Ollama API is now available at 127.0.0.1:11434.
>>> Install complete. Run "ollama" from the command line.
WARNING: No NVIDIA/AMD GPU detected. Ollama will run CPU-
only mode.
538
Downloaded from https://onlinelibrary.wiley.com/doi/ by alex jounh - Oregon Health & Science Univer , Wiley Online Library on [05/12/2025]. See the Terms and Conditions (https://onlinelibrary.wiley.com/terms-and-conditions) on Wiley Online Library for rules of use; OA articles are governed by the applicable Creative Commons License
Part IV: Becoming a Linux Server Administrator
2. Make sure the Ollama service is running:
$ sudo systemctl status ollama
● ollama.service -Ollama Service
Loaded: loaded (/etc/systemd/system/ollama.service; enabled;
preset: disabled)
Drop-
In: /usr/lib/systemd/system/service.d
└─10-timeout-abort.conf
Active: active (running) since Sun 2025-
09-
21 19:09:49 EDT;
12min ago
3. Check the Ollama version:
$ ollama -v
ollama version is 0.12.0
22
You are ready to start using language models.
Running a language model from the command line
With Ollama installed, you can run an LLM from the shell with the ollama command. The
first example is a Llama 3.1 LLM, which has been open sourced by Meta. Although there are
versions of Llama 3.1 that have up to 405 billion parameters, there is also one that has a few
as 8 billion parameters: llama3.1:8b. Although it is as small as some SLMs, it is considered
an LLM because its architecture is shared with the large Llama 3.1 LLMs.
The first time you run a language model, if it is not yet downloaded to your system, ollama
will download it. Then, if the model supports the generate feature, it will present a prompt for
you to query the model. To run Llama 3.1 8B (llama3.1:8b) from the command line with
Ollama, type the following. The model will take a bit of time to download:
$ ollama run llama3.1:8b
pulling manifest
pulling 667b0c1932bc: 100%
pulling 948af2743fc7: 100%
pulling 0ba8f0e314b4: 100%
pulling 56bb8bd477a5: 100%
pulling 455f34728c9b: 100%
verifying sha256 digest
writing manifest
success
>>>
..... 4.9 GB
..... 1.5 KB
..... 12 KB
.....
96 B
..... 487 B
With the prompt ready, you can run commands to query the model itself:
■
■
/show license: Lets you read the license for the model. It’s a good idea to read the
license to address privacy concerns and explain any constraints on commercial use.
/show info: Gives you information about the current model. For example:
>>> /show info
Model
539
Downloaded from https://onlinelibrary.wiley.com/doi/ by alex jounh - Oregon Health & Science Univer , Wiley Online Library on [05/12/2025]. See the Terms and Conditions (https://onlinelibrary.wiley.com/terms-and-conditions) on Wiley Online Library for rules of use; OA articles are governed by the applicable Creative Commons License
Chapter 22: Configuring an Artificial Intelligence Chatbot
architecture
parameters
context length
embedding length
quantization
...
llama
8.0B
131072
4096
Q4_K_M
If you want to save the work you have done so you can go back to it later, you can use
/save <model> and /load <model> commands. For example, this sequence saves your
current model and session, leaves the current session, and then restarts the session where
you left off:
>>> /save mysession
Created new model 'mysession'
>>> /bye
$ ollama run mysession
At this point you are running the new model named mysession, which includes the
Llama3.1 8B plus the content you added during your previous session.
Next, ask it a question. If you ask Llama 3.1 what it is good at, it will tell you it is good at
conversational dialogue, generating text for articles, stories, and entire documents, creative
writing, dialogue role-playing, and language semantics and structure. It does admit, however,
that it can make mistakes and be biased. So, I gave it a simple question:
>>> Create a pithy catch phrase for the Linux Bible, by Christopher
Negus
Here are some options:
1.
2.
3.
4.
5.
"Chris Negus guides you through Linux".
"Linux made simple, by Chris Negus".
"The Linux expert's trusted companion".
"Unlocking Linux with Chris Negus".
"Your Linux journey, led by Chris".
Or, if you'd like something even more concise:
1. "Negus' Linux Navigator"
2. "Linux with Chris"
3. "Chris Negus: Your Linux Guide"
Try a couple of other models. Here’s an example of Mistral:
$ ollama run mistral
>>> Translate the first verse of Emily Dickenson's "Hope is a thing
of feathers" into French
La présente strophe de "Espérance, c'est une chose d'plumes", de
Emily Dickinson, est traduite en français comme suit :
1. Espérance -c'est un oiseau petit,
Qui a son nid dans mon cœur,
540
Downloaded from https://onlinelibrary.wiley.com/doi/ by alex jounh - Oregon Health & Science Univer , Wiley Online Library on [05/12/2025]. See the Terms and Conditions (https://onlinelibrary.wiley.com/terms-and-conditions) on Wiley Online Library for rules of use; OA articles are governed by the applicable Creative Commons License
Part IV: Becoming a Linux Server Administrator
Et il ne sait pas toujours que je suis là,
Mais qu'importe, car je le sens toujours !
Dans cette traduction, nous avons tenté de préserver le rythme et la
rhyme originaux de l'œuvre de Dickinson.
As the results show, it finds the poem and, in its translation, tries to preserve the original
rhyme and rhythm of the poem.
Next, try Phi 3 mini. Be specific with Phi 3 because it can produce a lot of results:
$ ollama run phi3:mini
>>> Write a terse bash script to copy all .png files from my /home/
chris directory and any subdirectories, then put them in a /tmp/
images directory.
```bash
#!/bin/bash
mkdir -
p /tmp/images
find /home/chris -
name '*.png' -
type f | xargs cp -
t /tmp/images/
echo "All PNG files copied to TMP_IMAGES"
```
This script uses the `find` command combined with `xargs` and `cp`.
First, it creates a `/tmp/images` directory if necessary. Then, using
`find`,
we search for all `.png` files within Chris's home folder recursively
(`-name '*.png'`)...
I trimmed down the text because, despite asking for a terse script, Phi 3 went on for a while
describing what it had done. For more complex queries, when you expect more in-depth
results, you will probably want larger models and better hardware than what I was using.
I had mixed results when it came to the accuracy of my answers, but the models I tried did
well when it came to writing code.
To remind yourself which language models you have downloaded and run with Ollama, you can
run the list command:
$ ollama list
NAME
phi3:mini
mistral:latest
mysession:latest
llama3.1:8b
ID
4f2222927938
6577803aa9a0
89d3d23af648
46e0c10c039e
SIZE
2.2 GB
4.4 GB
4.9 GB
4.9 GB
MODIFIED
About an hour ago
30 hours ago
2 days ago
2 days ago
You can see the storage space consumed by each language model and when you most recently
used the model.
While trying the boundaries of a few AI language models can be interesting, there are other
interesting things you can do with those models.
541
22
Downloaded from https://onlinelibrary.wiley.com/doi/ by alex jounh - Oregon Health & Science Univer , Wiley Online Library on [05/12/2025]. See the Terms and Conditions (https://onlinelibrary.wiley.com/terms-and-conditions) on Wiley Online Library for rules of use; OA articles are governed by the applicable Creative Commons License
Chapter 22: Configuring an Artificial Intelligence Chatbot
Customizing a model with Ollama
If you are interested in creating your own AI models, you can either train your own model
from scratch or tune an existing model. Because training can take a lot of time and money to
do effectively from scratch, many people take existing models and fine-tune them to use their
own or their company’s data to adapt the existing model.
One place to start is with the Hugging Face Transformers library (huggingface.co/docs/
transformers). This library provides pretrained models that can be used with deep learning
frameworks, such as PyTorch and TensorFlow, to build and train existing models on your own
data. You can then serve the models you create to your customers, friends, or organization.
Summary
While running your own AI chatbot can be expensive and time-consuming, it is possible to use
smaller language models and have a fairly good experience on computer hardware with a moderate amount of power. In this chapter, I showed you how to use Ollama server to run language
models on your local computer and compare and contrast them with other models.
This chapter is the last of the book’s server chapters. Chapter 23, “Understanding Basic Linux
Security,” will introduce you to important Linux security concepts, while providing you with
hands-on ways to secure your Linux systems.
Exercises
Exercises in this section give you tasks for using Ollama to run AI models on your local Linux
system. See Appendix B for suggested solutions.
1. Using specifications described in this chapter, check your Linux computer to see if it
has the number of CPU cores and amount of memory to run the smaller AI language
models described here.
2. Go to the Ollama search page and look for smaller language models that you think
might run well on your current hardware.
3. Download and install the Ollama server to your Linux system.
4. Run the llama3.1:8b language model with Ollama and ask it to write a short poem for
you about an adventure at sea.
5. Run the Mistral language model with Ollama and ask it what the five most common
birds in Michigan, USA, are.
6. Run the phi3:mini language model and have it suggest five flowers to plant in a
garden in central Florida, USA.
7. Save your Phi-3 session to a new model named myflowers.
542
Downloaded from https://onlinelibrary.wiley.com/doi/ by alex jounh - Oregon Health & Science Univer , Wiley Online Library on [05/12/2025]. See the Terms and Conditions (https://onlinelibrary.wiley.com/terms-and-conditions) on Wiley Online Library for rules of use; OA articles are governed by the applicable Creative Commons License
Part IV: Becoming a Linux Server Administrator
8. List all the language models that are now available through Ollama on your
local system.
9. Using the ollama command, display the license for the language model you are
currently running.
10. Using the ollama command, show information about the model you are
currently running.
22
543
Downloaded from https://onlinelibrary.wiley.com/doi/ by alex jounh - Oregon Health & Science Univer , Wiley Online Library on [05/12/2025]. See the Terms and Conditions (https://onlinelibrary.wiley.com/terms-and-conditions) on Wiley Online Library for rules of use; OA articles are governed by the applicable Creative Commons License
Chapter 22: Configuring an Artificial Intelligence Chatbot
Learning Linux Security
Techniques
IN THIS PART
Chapter 23
Understanding Basic Linux Security
Chapter 24
Understanding Advanced Linux Security
Chapter 25
Enhancing Linux Security with SELinux
Chapter 26
Securing Linux on a Network
Linux Bible, Eleventh Edition. Christopher Negus.
© 2026 John Wiley & Sons, Inc. All rights reserved, including rights for text and data mining and training of artificial intelligence technologies or similar
technologies. Published 2026 by John Wiley & Sons, Inc.
Downloaded from https://onlinelibrary.wiley.com/doi/ by alex jounh - Oregon Health & Science Univer , Wiley Online Library on [05/12/2025]. See the Terms and Conditions (https://onlinelibrary.wiley.com/terms-and-conditions) on Wiley Online Library for rules of use; OA articles are governed by the applicable Creative Commons License
Part V
Understanding Basic
Linux Security
23
IN THIS CHAPTER
Implementing basic security
Monitoring security
Auditing and reviewing security
A
t its most basic level, securing a Linux system starts with physical security, data security, user
accounts protection, and software security. Over time, you need to monitor that system to make
sure it remains safe.
Some of the questions that you need to ask yourself include the following:
■
■
■
■
■
Who can get to the system physically?
Are backup copies of data being made in case of disaster?
How well are user accounts secured?
Does the software come from a secure Linux distribution, and are security patches up–to date?
Have you been monitoring the system to make sure that it has not been cracked or corrupted?
This chapter starts by covering basic Linux security topics. Subsequent chapters go deeper into more
advanced security mechanisms.
Implementing Physical Security
A lock on the computer server room door is the first line of defense. Although a very simple concept, it
is often ignored. Access to the physical server means access to all of the data that it contains. No security software can fully protect your systems if someone with malicious intent has physical access to the
Linux server.
Basic server room physical security includes items such as these:
■
■
A lock or security alarm on the server room door
Access controls that allow only authorized access and that identify who accessed the room and
when the access occurred, such as a card key entry system
547
Linux Bible, Eleventh Edition. Christopher Negus.
© 2026 John Wiley & Sons, Inc. All rights reserved, including rights for text and data mining and training of artificial intelligence technologies or similar
technologies. Published 2026 by John Wiley & Sons, Inc.
Downloaded from https://onlinelibrary.wiley.com/doi/ by alex jounh - Oregon Health & Science Univer , Wiley Online Library on [05/12/2025]. See the Terms and Conditions (https://onlinelibrary.wiley.com/terms-and-conditions) on Wiley Online Library for rules of use; OA articles are governed by the applicable Creative Commons License
CHAPTER
■
■
A sign stating “no unauthorized access allowed” on the door
Policies on who can access the room and when that access may occur for groups such
as the cleaning crew, server administrators, and others
Physical security includes environmental controls. Appropriate fire suppression systems and
proper ventilation for your server room must be implemented. These are just a few basic considerations for physical security of your servers. Consult a data center security expert for more
advanced methods of securing your servers.
Implementing disaster recovery
Disaster recovery plans should include these things:
■
■
■
■
What data is to be included in backups
Where backups are to be stored
How long backups are maintained
How backup media is rotated through storage
Backup data, media, and software should be included in your Access Control Matrix checklist.
Caution
It is important to determine how many backup copies of each object should be maintained. While you may need only
three backup copies of one particular object, another object may be important enough to require maintaining more
copies.
Backup utilities on a Linux system include the following:
■
■
■
■
■
amanda (Advanced Maryland Automatic Network Disk Archiver)
cpio
dump/restore
tar
rsync
The cpio, dump/restore, and tar utilities are typically pre-installed on a Linux distribution. A simple yet effective tool for backing up data over networks is the rsync utility. With
rsync, you can set up a cron job to keep copies of all data in selected directories or mirror
exact copies of directories on remote machines.
Of the tools just mentioned, dump/restore (dump package) and amanda (amanda-
common in Ubuntu and amanda in Fedora) are not typically installed by default. However,
amanda is extremely popular because it comes with a great deal of flexibility and can even
back up a Windows system. If you need more information on the amanda backup utility, see
amanda.org. Ultimately, the utility you select must meet your organization’s particular security needs for backup.
548
Downloaded from https://onlinelibrary.wiley.com/doi/ by alex jounh - Oregon Health & Science Univer , Wiley Online Library on [05/12/2025]. See the Terms and Conditions (https://onlinelibrary.wiley.com/terms-and-conditions) on Wiley Online Library for rules of use; OA articles are governed by the applicable Creative Commons License
Part V: Learning Linux Security Techniques
Securing user accounts
User accounts are part of the authentication process allowing users into the Linux system.
Proper user account management enhances a system’s security. Setting up user accounts was
covered in Chapter 11, “Managing User Accounts.” However, a few additional rules are necessary to increase security through user account management:
■
■
■
■
Assign only one user per user account.
Limit access to the root user account.
Set expiration dates on temporary accounts.
Remove unused user accounts.
One user per user account
Accounts should enforce accountability. Thus, multiple people should not be logging in to one
account. When multiple people share an account, there is no way to prove a particular individual completed a particular action.
Limiting access to the root user account
If multiple people can log in to the root account, you have another repudiation situation.
You cannot track individual use of the root account. To allow tracking of the root account use
by individuals, a policy for using sudo (see Chapter 8, “Learning System Administration”)
instead of logging into root should be instituted. You should even consider requiring that all
administrative work be done using sudo.
Instead of giving multiple people root permission on a Linux system, you can grant root access
on a per-command basis with the sudo command. Using sudo provides the following security benefits:
■
■
■
■
The root password does not have to be given out; in fact, a root password may not
even be set.
You can fine-tune command access.
All sudo use (who, what, when) for Fedora and RHEL is recorded in /var/log/
secure, including any failed sudo access attempts. Recent Linux systems store all
sudo access in the systemd journal (type journalctl -f to watch live sudo
access attempts, along with other system messages).
After you grant someone sudo permission, you can try to restrict root access to certain commands in the /etc/sudoers file (with the visudo command). However,
after you grant root permission to a user, even in a limited way, it is difficult to be
sure that a determined user can’t find ways to gain full root access to your system and
do what they want to it.
One way to keep a misbehaving administrator in check is to have security messages intended
for the /var/log/secure file sent to a remote log server to which none of the local administrators have access. In that way, any misuse of root privilege is attached to a particular user
and is logged in a way that the user can’t cover their tracks.
549
23
Downloaded from https://onlinelibrary.wiley.com/doi/ by alex jounh - Oregon Health & Science Univer , Wiley Online Library on [05/12/2025]. See the Terms and Conditions (https://onlinelibrary.wiley.com/terms-and-conditions) on Wiley Online Library for rules of use; OA articles are governed by the applicable Creative Commons License
Chapter 23: Understanding Basic Linux Security
Setting expiration dates on temporary accounts
If you have consultants, interns, or temporary employees who need access to your Linux systems, it is important to set up their user accounts with expiration dates. The expiration date
is a safeguard, in case you forget to remove their accounts when they no longer need access to
your organization’s systems.
To set a user account with an expiration date, use the usermod command. The format is
usermod -e yyyy-mm-dd user_name. In the following code, the account tim has been
set to expire on January 1, 2027:
# usermod -e 2027-01-01 tim
To verify that the account has been properly set to expire, double-check yourself by using the
chage command. The chage command is primarily used to view and change a user account’s
password aging information. However, it also can access account expiration information. The
-l option allows you to list various information to which chage has access. To keep it simple,
pipe the output from the chage command into grep and search for the word Account. This
produces only the user account’s expiration date.
# chage -
l tim | grep Account
Account expires
:
Jan
01,
2025
As you can see, the account expiration date was successfully changed for tim to January 1,
2025.
Tip
If you do not use the /etc/shadow file for storing your account passwords, the chage utility doesn’t work. In most
cases, this is not a problem because the /etc/shadow file is configured to store password information by default on
most Linux systems.
Set account expiration dates for all transitory employees. In addition, consider reviewing all
user account expiration dates as part of your security monitoring activities. These activities
help to eliminate any potential backdoors to your Linux system.
Removing unused user accounts
Keeping old expired accounts around is asking for trouble. After a user has left an organization, it is best to perform a series of steps to remove their account along with data:
1. Find files on the system owned by the account, using the find / -
user
username command.
2. Expire or disable the account.
3. Back up the files.
4. Remove the files or reassign them to a new owner.
5. Delete the account from the system.
550
Downloaded from https://onlinelibrary.wiley.com/doi/ by alex jounh - Oregon Health & Science Univer , Wiley Online Library on [05/12/2025]. See the Terms and Conditions (https://onlinelibrary.wiley.com/terms-and-conditions) on Wiley Online Library for rules of use; OA articles are governed by the applicable Creative Commons License
Part V: Learning Linux Security Techniques
Problems occur when step 5 is forgotten and expired or disabled accounts are still on the
system. A malicious user gaining access to your system could renew the account and then masquerade as a legitimate user.
To find these accounts, search through the /etc/shadow file. The account’s expiration
date is in the eighth field of each record. It would be convenient if a date format were used.
Instead, this field shows the account’s expiration date as the number of days since January 1,
1970.
You can use a two-step process to find expired accounts in the /etc/shadow file automatically. First, set up a shell variable (see Chapter 7, “Writing Simple Shell Scripts”) with today’s
date in “days since January 1, 1970” format. Then, using the gawk command, you can obtain
and format the information needed from the /etc/shadow file.
Setting up a shell variable with the current date converted to the number of days since
January 1, 1970, is not particularly difficult. The date command can produce the number
of seconds since January 1, 1970. To get what you need, divide the result from the date
command by the number of seconds in a day: 86,400. The following demonstrates how to set
up the shell variable TODAY:
$ TODAY=$(( $(date -
-
utc +%s) / 86400 ))
$ echo $TODAY
20202
In the next example, the accounts and their expiration dates are pulled from the /etc/
shadow file using gawk. The $1 and $8 in the gawk command represent the username and
expiration date fields in the /etc/shadow file records. To check the expiration dates for
accounts that have the expiration date set (greater than 0) and see if they are expired, try the
following:
# gawk -
F: ‘{if (($8 > 0) && ($TODAY > $8)) print $1,$8}’ /etc/shadow
mary 21550
consultant 19005
intern 19005
$ echo $TODAY
20202
That is all you need to do. Set up and check your TODAY variable and execute the awk
command. All of the accounts with expiration dates in the /etc/shadow file are listed for
you. Notice that mary’s account doesn’t expire until after the current date, but consultant and
intern expired before the current date. To remove those accounts, use the userdel command.
User accounts are only a portion of the authentication process allowing users into the Linux
system. User account passwords also play an important role in the process.
Securing passwords
Passwords are the most basic security tool of any modern operating system and, consequently,
the most commonly attacked security feature. It is natural for users to want to choose a
password that is easy to remember, but often this means they choose a password that is also
easy to guess.
551
23
Downloaded from https://onlinelibrary.wiley.com/doi/ by alex jounh - Oregon Health & Science Univer , Wiley Online Library on [05/12/2025]. See the Terms and Conditions (https://onlinelibrary.wiley.com/terms-and-conditions) on Wiley Online Library for rules of use; OA articles are governed by the applicable Creative Commons License
Chapter 23: Understanding Basic Linux Security
Brute-force methods are commonly employed to gain access to a computer system. Trying the
popular passwords often yields results. Some of the most common passwords are as follows:
■
■
■
■
■
123456
Password
princess
rockyou
abc123
Just use your favorite Internet search engine and look for “common passwords.” If you can
find these lists, then malicious attackers can too. Obviously, choosing good passwords is critical to having a secure system.
Choosing good passwords
In general, a password must not be easy to guess, be common or popular, or be linked to you
in any way. Here are some rules to follow when choosing a password:
■
■
■
■
■
■
■
Do not use any variation of your login name or your full name.
Do not use a dictionary word.
Do not use proper names of any kind.
Do not use your phone number, address, family, or pet names.
Do not use website names.
Do not use any contiguous line of letters or numbers on the keyboard (such as
“qwerty” or “asdfg”).
Do not use any of the previous rules with added numbers or punctuation at the front
or end or typed backward.
So now that you know what not to do, look at the two primary items that make a
strong password:
■
■
A password should be at least 8 characters in length (complexity is more important
than length).
A password should contain all of the following:
■
■
■
■
Lowercase letters
Uppercase letters
Numbers
Special characters, such as : ! $ % * ( ) -+ = , < > : : ″ ’
Twenty-five characters is a long password. However, the longer the password, the more secure
it is. What your organization chooses as the minimum password length depends on its security needs.
552
Downloaded from https://onlinelibrary.wiley.com/doi/ by alex jounh - Oregon Health & Science Univer , Wiley Online Library on [05/12/2025]. See the Terms and Conditions (https://onlinelibrary.wiley.com/terms-and-conditions) on Wiley Online Library for rules of use; OA articles are governed by the applicable Creative Commons License
Part V: Learning Linux Security Techniques
Tip
Gibson Research Center has some excellent material on strong passwords, including an article called “How big is your
haystack. . .and how well hidden is your needle?” at grc.com/haystack.htm.
Choosing a good password can be difficult. It has to be hard enough not to be guessed and
easy enough for you to remember. A good way to choose a strong password is to take the first
letter from each word of an easily remembered sentence. Be sure to add numbers, special characters, and varied case. The sentence you choose should have meaning only to you and should
not be publicly available. Table 23.1 lists examples of strong passwords and the tricks used to
remember them.
TABLE 23.1
Ideas for Good Passwords
Password
How to Remember It
Mrci7yo!
My rusty car is 7 years old!
2emBp1ib
2 elephants make BAD pets, 1 is better
ItMc?Gib
Is that MY coat? Give it back
The passwords look like nonsense but are actually rather easy to remember. Of course, be sure
not to use the passwords listed here. Now that they are public, they will be added to malicious
attackers’ dictionaries.
Setting and changing passwords
You set your own password using the passwd command. Type the passwd command, and
it allows you to change your password. First, it prompts you to enter your old password. To
protect against someone shoulder surfing and learning your password, the password is not displayed as you type.
Assuming you type your old password correctly, the passwd command prompts you for the
new password. When you type your new password, it is checked using a utility called
cracklib to determine whether it is a good or bad password. Nonroot users are required to
try a different password if the one they have chosen is not a good password.
The root user is the only user who is permitted to assign bad passwords. After the password
has been accepted by cracklib, the passwd command asks you to enter the new password
a second time to make sure that there are no typos (which are hard to detect when you can’t
see what you are typing).
553
23
Downloaded from https://onlinelibrary.wiley.com/doi/ by alex jounh - Oregon Health & Science Univer , Wiley Online Library on [05/12/2025]. See the Terms and Conditions (https://onlinelibrary.wiley.com/terms-and-conditions) on Wiley Online Library for rules of use; OA articles are governed by the applicable Creative Commons License
Chapter 23: Understanding Basic Linux Security
When running as root, changing a user’s password is possible by supplying that user’s login
name as a parameter of the passwd command, as in this example:
# passwd joe
New password:
Retype new password:
passwd: password updated successfully
Here, the passwd command prompts you twice to enter a new password for joe. It does not
prompt for his old password in this case.
Enforcing best password practices
Now you know what a good password looks like and how to change a password, but how do
you enforce it on your Linux system? One place to start is with the libpwquality project. With
libpwquality, you can define exact requirements that passwords must meet. For example,
to ensure that passwords must be 12 characters long (minlen), have at least 2 numbers
(dcredit), 3 uppercase letters (ucredit), and 2 lowercase letters (lcredit), and ensure
4 characters are different than the previous passwords (difork), you can add the following
lines to the /etc/security/pwquality.conf file:
minlen=12
dcredit=2
ucredit=3
lcredit=2
difok=4
The next question is, How can you make people change passwords? It can become tiresome to
come up with new, strong passwords every 30 days! That is why some enforcing techniques are
often necessary.
Tip
If users are having a difficult time creating secure and unique passwords, consider installing the pwgen utility on your
Linux system. This open source password-generating utility creates passwords that are made to be pronounceable and
memorable. You can use these generated words as a starting point for creating account passwords.
Default values in the /etc/login.defs file for new accounts were covered in Chapter 11.
Within the login.defs file are some settings affecting password aging and length:
PASS_MAX_DAYS
PASS_MIN_DAYS
PASS_WARN_AGE
30
5
7
In this example, the maximum number of days, PASS_MAX_DAYS, until the password must
be changed is 30. The number you set here is dependent upon your particular account setup.
For organizations that practice one person to one account, this number can be much larger
than 30. If you do have shared accounts or multiple people know the root password, it is
554
Downloaded from https://onlinelibrary.wiley.com/doi/ by alex jounh - Oregon Health & Science Univer , Wiley Online Library on [05/12/2025]. See the Terms and Conditions (https://onlinelibrary.wiley.com/terms-and-conditions) on Wiley Online Library for rules of use; OA articles are governed by the applicable Creative Commons License
Part V: Learning Linux Security Techniques
imperative that you change the password often. This practice effectively refreshes the list of
those who know the password.
To keep users from changing their password to a new password and then immediately changing
it right back, you need to set the PASS_MIN_DAYS to a number larger than zero. In the preceding example, the soonest a user could change their password again is five days.
The PASS_WARN_AGE setting is the number of days a user is warned before being forced to
change their password. People tend to need lots of warnings and prodding, so the preceding
example sets the warning time to seven days.
Earlier in the chapter, I mentioned that a strong password is between 15 and 25 characters
long. With the PASS_MIN_LEN setting, you can force users to use a certain minimum number
of characters in their passwords. The setting you choose should be based upon your organization’s security lifecycle plans.
Note
Ubuntu does not have the PASS_MIN_LEN setting in its login.defs file. Instead, this setting is handled by the
PAM utility. PAM is covered in Chapter 23, “Understanding Advanced Linux Security.”
For accounts that have already been created, you need to control password aging via the
chage command. The options needed to control password aging with chage are listed in
Table 23.2. Notice that there is not a password length setting in the chage utility.
TABLE 23.2
23
chage Options
Option
Description
-M
Sets the maximum number of days before a password needs to be changed. Equivalent
to PASS_MAX_DAYS in /etc/login.defs.
-m
Sets the minimum number of days before a password can be changed again. Equivalent
to PASS_MIN_DAYS in /etc/login.defs.
-W
Sets the number of days a user is warned before being forced to change the account
password. Equivalent to PASS_WARN_AGE in /etc/login.defs.
The example that follows uses the chage command to set password aging parameters for the
tim account. All three options are used at once.
# chage -
l tim | grep days
Minimum number of days between password change
Maximum number of days between password change
Number of days of warning before password expires
# chage -
M 30 -
m 5 -
W 7 tim
# chage -
l tim | grep days
Minimum number of days between password change
: 0
: 99999
: 7
: 5
555
Downloaded from https://onlinelibrary.wiley.com/doi/ by alex jounh - Oregon Health & Science Univer , Wiley Online Library on [05/12/2025]. See the Terms and Conditions (https://onlinelibrary.wiley.com/terms-and-conditions) on Wiley Online Library for rules of use; OA articles are governed by the applicable Creative Commons License
Chapter 23: Understanding Basic Linux Security
Maximum number of days between password change
Number of days of warning before password expires
: 30
: 7
You can also use the chage command as another method of account expiration, which is
based upon the account’s password expiring. Earlier, the usermod utility was used for account
expiration. Use the chage command with the -M and the -I options to lock the account. In
the code that follows, the tim account is viewed using chage -l. Only the information for
tim’s password settings is extracted.
# chage -
l tim | grep Password
Password expires
Password inactive
: never
: never
You can see that there are no settings for password expiration (Password expires) or
password inactivity (Password inactive). In the following code, the account is set to be
locked five days after tim’s password expires by using only the -I option.
# chage -
I 5 tim
# chage -
l tim | grep Password
Password expires
Password inactive
: never
: never
Notice that no settings changed! Without a password expiration set, the -I option has no
effect. Thus, using the -M option, the maximum number of days is set before the password
expires and the setting for the password inactivity time should take hold.
# chage -
M 30 -
I 5 tim
# chage -
l tim | grep Password
Password expires
Password inactive
: Mar 03, 2028
: Mar 08, 2028
Now, tim’s account will be locked five days after his password expires. This is helpful in situations where an employee has left the company but their user account has not yet been
removed. Depending upon your organization’s security needs, consider setting all accounts to
lock a certain number of days after passwords have expired.
Understanding the password files and password hashes
Early Linux systems stored their passwords in the /etc/passwd file. The passwords were
hashed. A hashed password is created using a one-way mathematical process. After you create
the hash, you cannot re-create the original characters from the hash. Here’s how it works.
When a user enters the account password, the Linux system rehashes the password and then
compares the hash result to the original hash in /etc/passwd. If they match, the user is
authenticated and allowed into the system.
The problem with storing these password hashes in the /etc/passwd file has to do with the
filesystem security settings (see Chapter 4, “Moving Around the Filesystem”). The filesystem
security settings for the /etc/passwd file are listed here:
# ls -
l /etc/passwd
-
rw-
r-
-
r-
-
. 1 root root 1644 Feb
556
2 02:30 /etc/passwd
Downloaded from https://onlinelibrary.wiley.com/doi/ by alex jounh - Oregon Health & Science Univer , Wiley Online Library on [05/12/2025]. See the Terms and Conditions (https://onlinelibrary.wiley.com/terms-and-conditions) on Wiley Online Library for rules of use; OA articles are governed by the applicable Creative Commons License
Part V: Learning Linux Security Techniques
As you can see, everyone can read the password file. You might think that this is not a
problem because the passwords are all hashed. However, individuals with malicious intent have
created files called rainbow tables. A rainbow table is simply a dictionary of potential passwords that have been hashed. For instance, the rainbow table would contain the hash for the
popular password “Password,” which is as follows:
$6$dhN5ZMUj$CNghjYIteau5xl8yX.f6PTOpendJwTOcXjlTDQUQZhhy
V8hKzQ6Hxx6Egj8P3VsHJ8Qrkv.VSR5dxcK3QhyMc.
Because of the ease of access to the password hashes in the /etc/passwd file, it is only
a matter of time before a hashed password is matched in a rainbow table and the plain-text
password is uncovered.
Note
Security experts will tell you that the passwords are not just hashed but also salted. Salting a hash means that a randomly generated value is added to the original password before it is hashed. This makes it even more difficult for the
hashed password to be matched to its original password. However, in Linux, the hash salt is also stored with the hashed
passwords. Thus, read access to the /etc/passwd file means you have the hash value and its salt.
Thus, the hashed passwords were moved to a new configuration file, /etc/shadow, many
years ago. This file has the following security settings:
# ls -
l /etc/shadow
----------. 1 root root 1049 Feb
23
2 09:45 /etc/shadow
Despite having no permissions open, root, but no other user, can view this file. Thus, the
hashed passwords are protected. Here is the tail end of a /etc/shadow file. You can see
that there are long, nonsensical character strings in each user’s record. Those are the hashed
passwords.
# tail -
2 /etc/shadow
johndoe:$6$jJjdRN9/qELmb8xWM1LgOYGhEIxc/:15364:0:99999:7:::
Tim:$6$z760AJ42$QXdhFyndpbVPVM5oVtNHs4B/:15372:5:30:7:16436::
Caution
You may inherit a Linux system that still uses the old method of keeping the hashed passwords in the /etc/passwd
file. It is easy to fix. Just use the pwconv command, and the /etc/shadow file is created and hashed passwords
moved to it.
The following are also stored in the /etc/shadow file, in addition to the account name and
hashed password:
■
■
■
Number of days (since January 1, 1970) since the password was changed
Number of days before the password can be changed
Number of days before a password must be changed
557
Downloaded from https://onlinelibrary.wiley.com/doi/ by alex jounh - Oregon Health & Science Univer , Wiley Online Library on [05/12/2025]. See the Terms and Conditions (https://onlinelibrary.wiley.com/terms-and-conditions) on Wiley Online Library for rules of use; OA articles are governed by the applicable Creative Commons License
Chapter 23: Understanding Basic Linux Security
■
■
■
Number of days to warn a user before a password must be changed
Number of days after a password expires that an account is disabled
Number of days (since January 1, 1970) that an account has been disabled
This should sound familiar, as they are the settings for password aging covered earlier in the
chapter. Remember that the chage command does not work if you do not have an /etc/
shadow file set up or if the /etc/login.defs file is not available.
Obviously, filesystem security settings are important for keeping your Linux system secure.
This is especially true with all Linux systems’ configuration files and others.
Securing the filesystem
Another important part of securing your Linux system is setting proper filesystem security.
The basics for security settings were covered in Chapter 4 and for access control lists (ACLs)
in Chapter 11. However, there are a few additional points that need to be added to your
knowledge base.
Managing dangerous filesystem permissions
If you gave full rwxrwxrwx (777) access to every file on the Linux system, you can imagine
the chaos that would follow. In many ways, similar chaos can occur by not closely managing
the set UID (SUID) and the set GID (SGID) permissions (see Chapter 4 and Chapter 11).
Files with the SUID permission in the Owner category and execute permission in the Other
category allow anyone to become the file’s owner temporarily while the file is being executed
in memory. The riskiest case is if the file’s owner is root.
Similarly, files with the SGID permission in the Group category and execute permission in
the Other category allow anyone temporarily to become a group member of the file’s group
while the file is being executed in memory. SGID can also be set on directories. This sets the
group ID of any files created in the directory to the group ID of the directory.
Executable files with SUID or SGID are favorites of malicious users. Thus, it is best to use
them sparingly. However, some files do need to keep these settings. Two examples are the
passwd and the sudo commands that follow. Each of these files should maintain their SUID
permissions.
$ ls -
l /usr/bin/passwd
-
rwsr-
xr-
x. 1 root root 28804 Aug 17 20:50 /usr/bin/passwd
$ ls -
l /usr/bin/sudo
-
-
-
s-
-
x-
-
x. 2 root root 77364 Nov 3 08:10 /usr/bin/sudo
Commands such as passwd and sudo are designed to be used as SUID programs. Even
though those commands run as root user, as a regular user you can change only your own
password with passwd and can escalate to root permission with sudo only if you were given
permission in the /etc/sudoers file. A more dangerous situation would be if a hacker created a SUID bash command; anyone running that command could effectively change everything on the system that had root access.
558
Downloaded from https://onlinelibrary.wiley.com/doi/ by alex jounh - Oregon Health & Science Univer , Wiley Online Library on [05/12/2025]. See the Terms and Conditions (https://onlinelibrary.wiley.com/terms-and-conditions) on Wiley Online Library for rules of use; OA articles are governed by the applicable Creative Commons License
Part V: Learning Linux Security Techniques
Using the find command, you can search your system to see if there are any hidden or otherwise inappropriate SUID and SGID commands on your system. Here is an example:
# find / -
perm /6000 -
ls
2394782 24 -
rwxr-
sr-
x 1 root
2541159 60 -
rwsr-
xr-
x 1 root
2408894 60 -
rwsr-
xr-
x 1 root
2394771 56 -
rwsr-
xr-
x 1 root
…
5767487 85 -
rwsrwsr-
x 1 root
…
tty
root
root
root
22976
57352
57688
55736
Jan 14 19:00 /usr/bin/write
Aug 7 2025 /usr/bin/at
Jul 16 2025 /usr/bin/crontab
Jan 14 19:00 /usr/bin/su
root 68928 Sep 13 11:52 /var/.bin/myvi
Notice that find uncovers SUID and SGID commands that regular users can run to escalate
their permission for particular reasons. In this example, there is also a file that a user tried to
hide (myvi). This is a copy of the vi command that, because of permission and ownership,
can change files owned by root. This is obviously a user doing something that they should
not be doing.
Securing the password files
The /etc/passwd file is the file the Linux system uses to check user account information
and was covered earlier in the chapter. The /etc/passwd file should have the following permission settings:
■
■
■
Owner: root
Group: root
Permissions: (644)
■ Owner: rw-
■ Group: r--
■ Other: r--
23
The example that follows shows that the /etc/passwd file has the appropriate settings:
# ls -
l /etc/passwd
-
rw-
r-
-
r-
-
. 1 root root 1644 Feb
2 02:30 /etc/passwd
These settings are needed so that users can log in to the system and see usernames associated
with user ID and group ID numbers. However, users should not be able to modify the /etc/
passwd directly. For example, a malicious user could add a new account to the file if write
access were granted to Other.
The next file is the /etc/shadow file. Of course, it is closely related to the /etc/passwd
file because it is also used during the login authentication process. This /etc/shadow file
should have the following permissions settings:
■
■
■
Owner: root
Group: root
Permissions: (000)
559
Downloaded from https://onlinelibrary.wiley.com/doi/ by alex jounh - Oregon Health & Science Univer , Wiley Online Library on [05/12/2025]. See the Terms and Conditions (https://onlinelibrary.wiley.com/terms-and-conditions) on Wiley Online Library for rules of use; OA articles are governed by the applicable Creative Commons License
Chapter 23: Understanding Basic Linux Security
■
■
■
Owner: ---
Group: ---
Other: ---
The code that follows shows that the /etc/shadow file has the appropriate settings.
# ls -
l /etc/shadow
----------. 1 root root 1049 Feb
2 09:45 /etc/shadow
The /etc/passwd file has read access for the owner, group, and other. Notice how much
more the /etc/shadow file is restricted than the /etc/passwd file. For the /etc/
shadow file, there is no access permission on, although the root user can still access the file.
So, if only root can view this file, how can users change their passwords, which are stored in
/etc/shadow? The passwd utility, /usr/bin/passwd, uses the special permission
SUID. This permission setting is shown here:
# ls -
l /usr/bin/passwd
-
rwsr-
xr-
x. 1 root root 28804 Aug 17 20:50 /usr/bin/passwd
Thus, the user running the passwd command temporarily becomes root while the command
is executing in memory and can then write to the /etc/shadow file, but only to change the
user’s own password-related information.
Note
The root user does not have write access to the /etc/shadow permissions, so how does root write to the /etc/
shadow file? The root user is all-powerful and has complete access to all files, whether the permissions are listed
or not.
The /etc/group file (see Chapter 11) contains all the groups on the Linux system. Its file
permissions should be set exactly as the /etc/passwd file:
■
■
■
Owner: root
Group: root
Permissions: (644)
■ Owner: rw-
■ Group: r--
■ Other: r--
Also, the group password file, /etc/gshadow, needs to be properly secured. As you would
expect, the file permission should be set exactly as the /etc/shadow file:
■
■
■
560
Owner: root
Group: root
Permissions: (000)
Downloaded from https://onlinelibrary.wiley.com/doi/ by alex jounh - Oregon Health & Science Univer , Wiley Online Library on [05/12/2025]. See the Terms and Conditions (https://onlinelibrary.wiley.com/terms-and-conditions) on Wiley Online Library for rules of use; OA articles are governed by the applicable Creative Commons License
Part V: Learning Linux Security Techniques
■
■
■
Owner: ---
Group: ---
Other: ---
Locking down the filesystem
The filesystem table (see Chapter 12, “Managing Disks and Filesystems”), /etc/fstab, needs
some special attention too. The /etc/fstab file is used at boot time to mount storage
devices on filesystems. It is also used by the mount command, the dump command, and the
fsck command. The /etc/fstab file should have the following permission settings:
■
■
■
Owner: root
Group: root
Permissions: (644)
■ Owner: rw-
■ Group: r--
■ Other: r--
Within the filesystem table, there are some important security settings that need to be
reviewed. Besides your root, boot, and swap partitions, filesystem options are fairly secure by
default. However, you may want to also consider the following:
■
■
■
■
Typically, you put the /home subdirectory, where user directories are located, on its
own partition. When you add mount options to mount that directory in /etc/
fstab, you can set the nosuid option to prevent SUID and SGID permission-
enabled executable programs from running from there. Programs that need SUID and
SGID permissions should not be stored in /home and are most likely malicious. You
can set the nodev option so that no device file located there will be recognized.
Device files should be stored in /dev and not in /home. You can set the noexec
option so that no executable programs, which are stored in /home, can be run.
You can put the /tmp subdirectory, where temporary files are located, on its own partition and use the same options settings as for /home:
■ nosuid
■ nodev
■ noexec
You can put the /usr subdirectory, where user programs and data are located, on its
own partition and set the nodev option so that no device file located there is recognized. After software is installed, the /usr directory often has little or no change
(sometimes, it is even mounted read-only for security reasons). One area of /usr that
is typically writeable is /usr/local, which is where local commands, configuration
files, and other shared resources are often added.
If the system is configured as a server, you probably want to put the /var directory on its own partition. The /var directory is meant to grow, as log messages
561
23
Downloaded from https://onlinelibrary.wiley.com/doi/ by alex jounh - Oregon Health & Science Univer , Wiley Online Library on [05/12/2025]. See the Terms and Conditions (https://onlinelibrary.wiley.com/terms-and-conditions) on Wiley Online Library for rules of use; OA articles are governed by the applicable Creative Commons License
Chapter 23: Understanding Basic Linux Security
and content for web, FTP, and other servers are added. You can use the same mount
options with the /var partition as you do for /home:
nosuid
nodev
■ noexec
Putting the preceding mount options into your /etc/fstab would look similar to the
following:
■
■
/dev/sdb1
/dev/sdc1
/dev/sdb2
/dev/sdb3
/home
/tmp
/usr
/var
ext4
ext4
ext4
ext4
defaults,nodev,noexec,nosuid
defaults,nodev,noexec,nosuid
defaults,nodev
defaults,nodev,noexec,nosuid
1
1
1
1
2
1
2
2
These mount options will help to lock down your filesystem further and add another layer
of protection from those with malicious intent. Again, managing the various file permissions
and fstab options should be part of your security policy. The items you choose to implement
must be determined by your organization’s security needs.
Managing software and services
Often, the administrator’s focus is on making sure that the needed software and services are
on a Linux system. From a security standpoint, you need to take the opposite viewpoint and
make sure that the unneeded software and services are not on a Linux system.
Updating software packages
In addition to removing unnecessary services and software, keeping current software up to
date is critical for security. The latest bug fixes and security patches are obtained via software
updates. Software package updates were covered in Chapter 9, “Installing Linux,” and Chapter 10, “Getting and Managing Software.”
Software updates need to be done on a regular basis. How often and when you do it, of course,
depends upon your organization’s security needs.
You can easily automate software updates, but like removing services and software, it would
be wise to test the updates in a test environment first. When updated software shows no problems, you can then update the software on your production Linux systems.
Keeping up with security advisories
As security flaws are found in Linux software, the Common Vulnerabilities and Exposures (CVE)
project tracks them and helps to quickly get fixes for those flaws worked on by the Linux
community.
Companies such as Red Hat provide updated packages to fix the security flaws and deliver
them in what is referred to as errata. Errata may consist of a single updated package or multiple updated packages. If you are running Red Hat Enterprise Linux, you search for, identify,
562
Downloaded from https://onlinelibrary.wiley.com/doi/ by alex jounh - Oregon Health & Science Univer , Wiley Online Library on [05/12/2025]. See the Terms and Conditions (https://onlinelibrary.wiley.com/terms-and-conditions) on Wiley Online Library for rules of use; OA articles are governed by the applicable Creative Commons License
Part V: Learning Linux Security Techniques
and install the RPM (RPM Package Manager) packages associated with a particular CVE and
delivered in errata.
As new forms of software packaging become available, make sure that the software in those
packages is being checked for vulnerabilities. For example, containers available from the Red
Hat Ecosystem Catalog (https://catalog.redhat.com/search?searchType=containers)
include Red Hat–supported container images along with security information for each image.
For more information on how security updates are handled in Red Hat Enterprise Linux, refer
to the Security Updates page on the Red Hat customer portal (https://access.redhat.com/
security). The site contains a wealth of knowledge related to security vulnerabilities and how
they are being handled. Being able to get timely security updates is one of the primary reasons
companies subscribe critical systems to Red Hat Enterprise Linux.
Advanced implementation
You should be aware of several other important security topics as you are planning your
deployments. They include cryptography, Pluggable Authentication Modules (PAM), and
SELinux. These advanced and detailed topics have been put into separate chapters—Chapter 24
and Chapter 25.
Monitoring Your Systems
If you do a good job of planning and implementing your system’s security, most malicious
attacks will be stopped. However, if an attack should occur, you need to be able to recognize
it. Monitoring is an activity that needs to be going on continuously.
Monitoring your system includes watching over log files, user accounts, and the filesystem
itself. In addition, you need some tools to help you detect intrusions and other types
of malware.
Monitoring log files
Understanding how message logging is done is critical to maintaining and troubleshooting a
Linux system. Before the systemd facility was used to gather messages in what is referred to
as the systemd journal, messages generated by the kernel and system services were directed
to file in the /var/log directory. While that is still true to a great extent with systemd,
you can now also view log messages directly from the systemd journal using the
journalctl command.
The log files for your Linux system are primarily located in the /var/log directory. Some of
the log files have dates appended (for example, error_log-20250329) to keep them to
manageable sizes and help you find what you are looking for. For many Linux systems, most
of the files in the /var/log directory are directed there from the systemd journal through
the rsyslogd service (see Chapter 13, “Understanding Server Administration”). Table 23.3
describes the /var/log files.
563
23
Downloaded from https://onlinelibrary.wiley.com/doi/ by alex jounh - Oregon Health & Science Univer , Wiley Online Library on [05/12/2025]. See the Terms and Conditions (https://onlinelibrary.wiley.com/terms-and-conditions) on Wiley Online Library for rules of use; OA articles are governed by the applicable Creative Commons License
Chapter 23: Understanding Basic Linux Security
TABLE 23.3
564
Log Files in the /var/log Directory
System Log Name
Filename
Description
Apache
Access Log
/var/log/httpd/
access_log
Logs requests for information from your
Apache web server.
Apache Error Log
/var/log/httpd/
error_log
Logs errors encountered from clients trying
to access data on your Apache web server.
Bad Logins Log
btmp
Logs bad login attempts.
Boot Log
boot.log
Contains messages indicating which system
services have started and shut down successfully and which (if any) have failed to start or
stop. The most recent bootup messages are
listed near the end of the file.
Kernel Log
dmesg
Records messages printed by the kernel
when the system boots. (RHEL and Fedora
no longer use this file, but instead store that
information with the journalctl service.)
Cron Log
cron
Contains status messages from the
crond daemon.
dpkg Log
dpkg.log
Contains information concerning installed
Debian packages.
FTP Log
vsftpd.log
Contains messages relating to transfers
made using the vsftpd daemon (FTP server).
FTP Transfer Log
xferlog
Contains information about files transferred
using the FTP service.
GNOME Display
Manager Log
/var/log/gdm/:0.log
Holds messages related to the login screen
(GNOME display manager). Yes, there really
is a colon in the filename.
LastLog
lastlog
Records the last time an account logs in to
the system.
Login/out Log
wtmp
Contains a history of logins and logouts on
the system.
Mail Log
maillog
Contains information about addresses to
which and from which email was sent. Useful
for detecting spamming.
MySQL Server Log
mysqld.log
Includes information related to activities of
the MySQL database server (mysqld).
News Log
spooler
Provides a directory containing logs of messages from the Usenet News server if you are
running one.
Downloaded from https://onlinelibrary.wiley.com/doi/ by alex jounh - Oregon Health & Science Univer , Wiley Online Library on [05/12/2025]. See the Terms and Conditions (https://onlinelibrary.wiley.com/terms-and-conditions) on Wiley Online Library for rules of use; OA articles are governed by the applicable Creative Commons License
Part V: Learning Linux Security Techniques
System Log Name
Filename
Description
Samba Log
/var/log/samba/
smbd.log/
var/log/samba/
nmbd.log
Shows messages from the Samba
SMB file service daemon and related
NetBIOS service.
Security Log
secure
Records the date, time, and duration of login
attempts and sessions.
Sendmail Log
sendmail
Shows error messages recorded by the sendmail daemon.
Squid Log
/var/log/squid/
access.log
Contains messages related to the squid
proxy/caching server.
System Log
messages
Provides a general-purpose log file where
many programs record messages.
UUCP Log
uucp
Shows status messages from the UNIX to
UNIX Copy Protocol daemon.
DNF Log
dnf.log
Shows messages related to RPM software packages. Previously, the log file
was yum.log.
X.Org X11 Log
Xorg.0.log
Includes messages output by the X.Org X
server. Wayland has largely replaced X.Org in
Ubuntu, Fedora, and RHEL, with its log messages managed by journalctl.
The log files that are in your system’s /var/log directory depend upon what services you are
running. Also, some log files are distribution dependent. For example, if you use Fedora, you
would not have the dpkg log file.
Most of the log files are displayed using the commands cat, head, tail, more, or less.
However, a few of them have special commands for viewing (see Table 23.4).
TABLE 23.4
Viewing Log Files That Need Special Commands
Filename
View Command
btmp
dump-utmp btmp
dmesg
dmesg
lastlog
lastlog
wtmp
dump-utmp wtmp
With the change in Fedora, RHEL, Ubuntu, and other Linux distributions to systemd (which
manages the boot process and services), as noted earlier, the mechanism for gathering and
displaying log messages associated with the kernel and system services has changed as well.
565
23
Downloaded from https://onlinelibrary.wiley.com/doi/ by alex jounh - Oregon Health & Science Univer , Wiley Online Library on [05/12/2025]. See the Terms and Conditions (https://onlinelibrary.wiley.com/terms-and-conditions) on Wiley Online Library for rules of use; OA articles are governed by the applicable Creative Commons License
Chapter 23: Understanding Basic Linux Security
Those messages are directed to the systemd journal and can be displayed with the
journalctl command.
You can view journal messages directly from the systemd journal instead of simply listing
the contents of /var/log files. Instead, you can use the journalctl command to display
log messages in various ways.
To page through kernel messages, type the following command:
# journalctl -k
May 04 11:07:24 fedora kernel: Linux version 6.14.4-
200.fc41.x86_64
(mockbuild@5e8b303f7a684c54a3682c261f6ffc3d)
(gcc (GCC) 14.2.1 20250110 (Red Hat 14.2.1-
7), GNU ld version
2.43.1-5.fc41)
#1 SMP PREEMPT_DYNAMIC Fri Apr 25 15:45:16 UTC 2025
May 04 11:07:24 fedora kernel: Command line: BOOT_IMAGE=(hd0,gpt2)
/vmlinuz-6.14.4-200.fc41.x86_64 root=UUID=bb87f14d-b36e-4e50-
9ec1-
de5d56a2fb56 ro rootflags=subvol=root rhgb quiet
May 04 11:07:24 fedora kernel: BIOS-
provided physical RAM map:
May 04 11:07:24 fedora kernel: BIOS-
e820: [mem 0x000000...
...
May 04 11:07:24 fedora kernel: Kernel command line:
BOOT_IMAGE=(hd0,gpt2)/vmlinuz-
6.14.4-
200.fc41.x86_64
root=UUID=bb8UUID=bb87f14d-b36e-4e50-9ec1-de5d56a2fb56
ro rootflags=subvol=root rhgb quiet
May 04 11:07:24 fedora kernel: Unknown kernel command line parameters
"rhgb BOOT_IMAGE=(hd0,gpt2)/vmlinuz-
6.14.4-
200.fc41.x86_64", will be
passed to user space.
...
May 04 11:07:26 fedora kernel: BTRFS: device label fedora_localhost-
live devid 1 transid 22019 /dev/nvme0n1p3 (259:3) scanned by mount
(498)
May 04 11:07:26 fedora kernel: BTRFS info (device nvme0n1p3):
first mount of filesystem bb87f14d-
b36e-
4e50-
9ec1-
de5d56a2fb56
May 04 11:07:26 fedora kernel: BTRFS info (device nvme0n1p3):
using crc32c (crc32c-
x86_64) checksum algorithm
May 04 11:07:26 fedora kernel: BTRFS info (device nvme0n1p3):
using free-
space-
tree
To view messages associated with a particular service, use the -u option followed by the service name to see log messages for any service, as in this example:
# journalctl -
u NetworkManager.service
# journalctl -
u httpd.service
# journalctl -u avahi-daemon.service
566
Downloaded from https://onlinelibrary.wiley.com/doi/ by alex jounh - Oregon Health & Science Univer , Wiley Online Library on [05/12/2025]. See the Terms and Conditions (https://onlinelibrary.wiley.com/terms-and-conditions) on Wiley Online Library for rules of use; OA articles are governed by the applicable Creative Commons License
Part V: Learning Linux Security Techniques
If you think that a security breach is in progress, you can watch all or selected messages as
they come in by following messages. For example, to follow kernel messages or httpd messages as they come in, add the -f option (press Ctrl+C when you are finished):
# journalctl -k -f
# journalctl -
f -
u NetworkManager.service
To check just boot messages, you can list the boot IDs for all system boots and then boot the
particular boot instance that interests you. The following examples display boot IDs and then
show boot messages for a selected boot ID:
# journalctl --list-boots
-
3 58f8f1ca9... Sat 2025-
03-
29
-
2 b85aa94bf... Wed 2025-
04-
09
-
1 0606ac5b1... Sat 2025-
04-
12
0 281514a27... Sun 2025-
05-
04
21:59:13
03:03:09
22:06:12
11:07:24
EDT
EDT
EDT
EDT
Sun
Sat
Tue
Sun
2025-
03-
30
2025-
04-
12
2025-
04-
29
2025-
05-
04
20:23:33
22:05:58
12:17:21
16:12:56
EDT
EDT
EDT
EDT
# journalctl -
b 281514a27efa4b66a30c07d92eb2f4d2
May 04 11:07:24 fedora kernel: Linux version 6.14.4-
200.fc41.x86_64
(mockbuild@5e8b303f7a684c54a3682c261f6ffc3d)
(gcc (GCC) 14.2.1 20250110 (Red Hat 14.2.1-
7), GNU ld version 2.43
.1-5.fc41)
#1 SMP PREEMPT_DYNAMIC Fri Apr 25 15:45:16 UTC 2025
May 04 11:07:24 fedora kernel: Command line: BOOT_IMAGE=(hd0,gpt2)
/vmlinuz-6.14.4-200.fc41.x86_64 root=UUID=bb87f14d-b36e-4e50-
9ec1-
de5d56a2fb56 ro rootflags=subvol=root rhgb quiet
23
Monitoring the filesystem
Malicious programs often modify files. They also can try to cover their tracks by posing as ordinary files and programs. However, there are ways to uncover them through the various monitoring tactics covered in the following sections.
Verifying software packages
Typically, if you install a software package from a standard repository or download a reputable site’s package, you won’t have any problems. But it is always good to double-check your
installed software packages to see if they have been compromised. The command to accomplish
this is rpm -V package_name.
When you verify the software, information from the installed package files is compared against
the package metadata (see Chapter 10, “Getting and Managing Software”) in the rpm database. If no problems are found, the rpm -V command returns nothing. However, if there are
discrepancies, you get a coded listing. Table 23.5 shows the codes used and a description of
the discrepancy.
567
Downloaded from https://onlinelibrary.wiley.com/doi/ by alex jounh - Oregon Health & Science Univer , Wiley Online Library on [05/12/2025]. See the Terms and Conditions (https://onlinelibrary.wiley.com/terms-and-conditions) on Wiley Online Library for rules of use; OA articles are governed by the applicable Creative Commons License
Chapter 23: Understanding Basic Linux Security
TABLE 23.5
Package Verification Discrepancies
Code
Discrepancy
S
File size
M
File permissions and type
5
MD5 check sum
D
Device file’s major and minor numbers
L
Symbolic links
U
User ownership
G
Group ownership
T
File modified times (mtime)
P
Other installed packages this package is dependent upon (aka capabilities)
In the partial list that follows, all the installed packages are given a verification check. You
can see that the codes 5, S, and T were returned, indicating some potential problems.
# rpm -qaV
S.5....T. c /etc/httpd/conf/httpd.conf
…
S.5....T.
S.5....T.
c /etc/ansible/hosts
c /etc/samba/smb.conf
You do not have to verify all of your packages at once. You can verify just one package at a
time. For example, if you want to verify your nmap package, you simply enter rpm -
V nmap.
Note
To verify packages on Ubuntu, you need the debsums utility. It is not installed by default. To install debsums, use
the command sudo apt-
get install debsums. To check all installed packages, use the debsums -a
command. To check one package, type debsums packagename.
Scanning the filesystem
Unless you have recently updated your system, binary files should not have been modified for
any reason. Commands such as find and rpm -V can help you determine if a binary file has
been tampered with.
To check for binary file modification, find can use the file’s modify time, or mtime. The file
mtime is the time when the contents of a file were last modified. Also, find can monitor the
file’s create/change time, or ctime.
If you suspect malicious activity, you can quickly scan your filesystem to see if any binaries
were modified or changed today (or yesterday, depending upon when you think the intrusion
took place). To do this scan, use the find command.
568
Downloaded from https://onlinelibrary.wiley.com/doi/ by alex jounh - Oregon Health & Science Univer , Wiley Online Library on [05/12/2025]. See the Terms and Conditions (https://onlinelibrary.wiley.com/terms-and-conditions) on Wiley Online Library for rules of use; OA articles are governed by the applicable Creative Commons License
Part V: Learning Linux Security Techniques
In the example that follows, a scan is made of the /sbin directory. To see if any binary files
were modified less than 24 hours ago, the command find /sbin -
mtime -
1 is used. In
the example, a shell script called tricks was created in this directory in the past 24 hours. This
indicates that malicious activity is taking place on the system. To investigate further, check
the file’s modification times, using the stat filename command, as shown here:
# find /sbin/ -
mtime -
1
/sbin
/sbin/tricks
# stat /sbin/tricks
File: /sbin/tricks
Size: 11
Blocks: 8
IO Block: 4096
regular file
Device: 0,41
Inode: 3263457
Links: 1
Access: (0755/-
rwxr-
xr-
x) Uid: (
0/
root)
Gid: (
0/
root)
Context: unconfined_u:object_r:bin_t:s0
Access: 2025-05-04 17:15:15.280023908 -0400
Modify: 2025-05-04 17:15:15.280023908 -0400
Change: 2025-05-04 17:15:15.280023908 -0400
Birth: 2025-
05-
04 17:15:15.280023908 -
0400
You could create a database of all of the binary’s original mtimes and ctimes and then run
a script to find current mtimes and ctimes, compare them against the database, and note
any discrepancies. However, this type of program has already been created and works well. It’s
called an intrusion detection system, and it is covered later in this chapter.
You need to perform several other filesystem scans on a regular basis. Favorite files or file
settings of malicious attackers are listed in Table 23.6. The table also lists the commands to
perform the scans and why the file or file setting is potentially problematic.
TABLE 23.6
Additional Filesystem Scans
File or Setting
Scan Command
Problem with File or Setting
SUID
permission
find / -
perm
-4000
Allows anyone to become the file’s owner temporarily while the file is being executed in memory
SGID
permission
find / -
perm
-2000
Allows anyone to become a group member of the
file’s group temporarily while the file is being executed in memory
rhost files
find /home -
name
.rhosts
Allows a system to trust another system completely.
It should not be in /home directories
Ownerless files
find / -
nouser
Indicates files that are not associated with
any username
Groupless files
find / -
nogroup
Indicates files that are not associated with any
group name
569
23
Downloaded from https://onlinelibrary.wiley.com/doi/ by alex jounh - Oregon Health & Science Univer , Wiley Online Library on [05/12/2025]. See the Terms and Conditions (https://onlinelibrary.wiley.com/terms-and-conditions) on Wiley Online Library for rules of use; OA articles are governed by the applicable Creative Commons License
Chapter 23: Understanding Basic Linux Security
The rpm -V package command can tell you information about changes that have occurred
to a file after it has been installed from an RPM package. For each file that has changed from
the selected package since it was installed, you can see the following information:
S
M
5
D
L
U
G
T
P
Size of the file differs
Permissions or file type (Mode) of the file differs
Digest differs (formerly MD5 sum)
Device major/minor number is mismatched
The readLink(2) path is mismatch
User ownership differs
Group ownership differs
mTime differs
caPabilities differ
By default, only changed files appear. Add -v (verbose) to also show files that have not
changed. Here is an example:
# rpm -
V samba
S.5….T.
/usr/sbin/eventlogadm
In this example, I echoed a few characters into the eventlogadm binary. The S shows the
size of the file changes, 5 shows the digest no longer matches the original digest, and T says
the modification time on the file has changed.
These filesystem scans help monitor what is going on in your system and help detect malicious
attacks. However, other types of attacks can occur to your files, including viruses and rootkits.
Detecting viruses and rootkits
Two popular malicious attack tools are viruses and rootkits because they stay hidden while
performing their malicious activities. Linux systems need to be monitored for both such
intrusions.
Monitoring for viruses
A computer virus is malicious software that can attach itself to already installed system software, and it has the ability to spread through media or networks. It is a misconception that
there are no Linux viruses. The malicious creators of viruses do often focus on popular desktop
operating systems, such as Windows. However, that does not mean that viruses are not created
for Linux systems.
Even more important, Linux systems are often used to handle services, such as mail servers, for
Windows desktop systems. Therefore, Linux systems used for such purposes need to be scanned
for Windows viruses as well.
Antivirus software scans files using virus signatures. A virus signature is a hash created from
a virus’s binary code. The hash will positively identify that virus. Antivirus programs have a
virus signature database that is used to compare against files to see if there is a signature
match. Depending upon the number of new threats, a virus signature database can be updated
often to provide protection from these new threats.
570
Downloaded from https://onlinelibrary.wiley.com/doi/ by alex jounh - Oregon Health & Science Univer , Wiley Online Library on [05/12/2025]. See the Terms and Conditions (https://onlinelibrary.wiley.com/terms-and-conditions) on Wiley Online Library for rules of use; OA articles are governed by the applicable Creative Commons License
Part V: Learning Linux Security Techniques
A good antivirus software choice for your Linux system, which is open source and free, is
ClamAV. To install ClamAV on a Fedora or RHEL system, type the command dnf install
clamav. You can find out more about ClamAV at clamav.net, where there is documentation
on how to set up and run the antivirus software.
Tip
You can review the packages available for Ubuntu installation by entering the command apt-cache search
clamav. A couple of different packages are available for Ubuntu, so review the ClamAV website information before you
choose a package.
Monitoring for rootkits
A rootkit is a little more insidious than a virus. A rootkit is a malicious program that does the
following:
■
■
■
Hides itself, often by replacing system commands or programs
Maintains high-level access to a system
Is able to circumvent software created to locate it
The purpose of a rootkit is to get and maintain root-level access to a system. The term was created by putting together root, which means that it has to have administrator access, and kit,
which means it is usually several programs that operate in concert.
A rootkit detector that can be used on a Linux system is chkrootkit. To install
chkrootkit on a Fedora or RHEL system, issue the command dnf install
chkrootkit. To install chkrookit on an Ubuntu system, use the command sudo
apt-
get install chkrootkit.
Tip
It is best to use a Live CD or flash drive to run chkrootkit so that the results are not circumvented by a rootkit.
Ubuntu, Kali Linux, and Fedora Security Lab have chkrootkit on their Live Linux distributions. You can get the
Fedora distribution at fedoraproject.org/labs/security.
Finding a rootkit with chkrootkit is simple. After installing the package or booting up the
Live image, type in chkrootkit at the command line. It searches the entire file structure
denoting any infected files.
The code that follows shows a run of chkrootkit on an infected system. The grep
command was used to search for the keyword INFECTED. Notice that many of the files listed
as “infected” are Bash shell command files. This is typical of a rootkit.
# chkrootkit | grep INFECTED
Checking 'du'… INFECTED
Checking 'find'… INFECTED
Checking 'ls'… INFECTED
571
23
Downloaded from https://onlinelibrary.wiley.com/doi/ by alex jounh - Oregon Health & Science Univer , Wiley Online Library on [05/12/2025]. See the Terms and Conditions (https://onlinelibrary.wiley.com/terms-and-conditions) on Wiley Online Library for rules of use; OA articles are governed by the applicable Creative Commons License
Chapter 23: Understanding Basic Linux Security
Checking 'lsof'… INFECTED
Checking 'pstree'… INFECTED
Searching for Suckit rootkit… Warning: /sbin/init INFECTED
In the last line of the preceding chkrootkit code is an indication that the system has been
infected with the Suckit rootkit. It actually is not infected with this rootkit. When running
utilities, such as antivirus and rootkit-detecting software, you often get a number of false positives. A false positive is an indication of a virus, rootkit, or other malicious activity that does
not really exist. In this particular case, this false positive is caused by a known bug.
The chkrootkit utility should have regularly scheduled runs and, of course, should be run
whenever a rootkit infection is suspected. To find more information on chkrootkit, go to
chkrootkit.org.
Tip
Another rootkit detector that might interest you is called Rootkit Hunter (rkhunter). Run the rkhunter script to
check your system for malware and known rootkits. Configure rkhunter in the /etc/rkhunter.conf file. For
a simple example, run rkhunter -c to check the filesystem for a variety of rootkits and vulnerabilities. To get Rootkit Hunter, install the rkhunter package for Ubuntu, Fedora, or RHEL.
Detecting an intrusion
Intrusion detection system (IDS) software—a software package that monitors a system’s activities (or its network) for potential malicious activities and reports these activities—can help
you monitor your system for potential intrusions. Closely related to intrusion detection system
software is a software package that prevents an intrusion, called intrusion prevention system
software. Some of these packages are bundled together to provide intrusion detection and
prevention.
Several intrusion detection system software packages are available for a Linux system. A few of
the more popular utilities are listed in Table 23.7. You should know that the open source version of tripwire is no longer supported by tripwire.org. However, the original tripwire
code is still available, but not actively maintained, at https://github.com/Tripwire/
tripwire-open-source.
TABLE 23.7
572
Popular Linux Intrusion Detection Systems
IDS
Name
Installation
Website
aide
dnf install aide
apt-
get install aide
https://sourceforge.net/
projects/aide/
Snort
rpm or tarball packages from website
http://snort.org
tripwire
See instructions at https://github.com/
https://github.com/Tripwire/
tripwire-open-source
Tripwire/tripwire-open-source
Downloaded from https://onlinelibrary.wiley.com/doi/ by alex jounh - Oregon Health & Science Univer , Wiley Online Library on [05/12/2025]. See the Terms and Conditions (https://onlinelibrary.wiley.com/terms-and-conditions) on Wiley Online Library for rules of use; OA articles are governed by the applicable Creative Commons License
Part V: Learning Linux Security Techniques
The Advanced Intrusion Detection Environment (aide) IDS uses a method of comparison
to detect intrusions. When you were a child, you may have played the game of comparing
two pictures and finding what was different between them. The aide utility uses a similar
method. A “first picture” database is created. At some time later, another database “second
picture” is created, and aide compares the two databases and reports what is different.
To begin, you need to take that “first picture.” The best time to create this picture is when the
system has been freshly installed. The command to create the initial database is aide -i,
and it takes a long time to run. Some of its output follows. Notice that aide tells you where
it is creating its initial “first picture” database.
# aide -i
Start timestamp: 2025-
08-
05 18:01:33 -
0400 (AIDE 0.18.8)
AIDE successfully initialized database.
New AIDE database written to /var/lib/aide/aide.db.new.gz
Number of entries:
...
279512
The next step is to move the initial “first picture” database to a new location. This protects the
original database from being overwritten. Plus, the comparison does not work unless the database is moved. The command to move the database to its new location and give it a new name
is as follows:
# cp /var/lib/aide/aide.db.new.gz /var/lib/aide/aide.db.gz
When you are ready to check whether your files have been tampered with, you need to create
a new database (second picture) and compare it to the original database (first picture). The
check option on the aide command, -c, creates a new database and runs a comparison against
the old database. The output shown next illustrates this comparison being done, and the aide
command reporting that the du and find commands had been hacked:
# aide -C
# cat /etc/aide.conf
Start timestamp: 2025-
05-
04 18:14:59 -
0400 (AIDE 0.18.8)
AIDE found differences between database and filesystem!!
Summary:
Total number of entries: 279514
Added entries:
0
Removed entries:
0
Changed entries:
3
---------------------------------------------------
Changed entries:
---------------------------------------------------
d > ... mc.. ... : /usr/bin
f < ... mci.H.XS : /usr/bin/du
573
23
Downloaded from https://onlinelibrary.wiley.com/doi/ by alex jounh - Oregon Health & Science Univer , Wiley Online Library on [05/12/2025]. See the Terms and Conditions (https://onlinelibrary.wiley.com/terms-and-conditions) on Wiley Online Library for rules of use; OA articles are governed by the applicable Creative Commons License
Chapter 23: Understanding Basic Linux Security
f > ... mc..H... : /usr/bin/find
---------------------------------------------------
Detailed information about changes:
---------------------------------------------------
Directory:
Size
Mtime
Ctime
/usr/bin
: 43818
: 2025-
05-
04 17:46:15 -
0400
: 2025-
05-
04 17:46:15 -
0400
File: /usr/bin/du
Size
: 103360
Mtime
: 2024-
11-
12 19:00:00 -
0500
Ctime
: 2025-
03-
29 09:36:47 -
0400
Inode
: 2393239
SHA256
: 94ibADeDDp26fcj88mp0QLlVvT73oojY
uo/1NJ
ByxLoEhaBEI=
SHA512
: 8aQq3lMwGtyUdsAFFRLHZQw3...
File: /usr/bin/find
Size
: 205240
Mtime
: 2025-
07-
16 20:00:00 -
0400
Ctime
: 2025-
03-
29 09:36:01 -
0400
SHA256
: X5qDAIr3L3KBFg/K7au/qzRZNPNJQ87c
82diST
WqwJZfhxJe4=
SHA512
: zCZJfpkKIjO1Oz8L4g...
| 43834
| 2025-
05-
04 18:14:44 -
0400
| 2025-
05-
04 18:14:44 -
0400
|
|
|
|
|
11
2025-
05-
04 18:13:54 -
0400
2025-
05-
04 18:13:59 -
0400
3263819
XbrX3QubEi3NmVaIQ5D0qsRzjK
| inq2cYsXbDA=
|
|
|
|
205244
2025-
05-
04 18:14:53 -
0400
2025-
05-
04 18:14:53 -
0400
Yg3q9+7e27U9NefeGLGOOXuEbt
| hq2G2ldd0JI=
The files listed by the aide check in this example are infected. However, aide can also
display many false positives.
Where aide databases are created, what comparisons are made, and several other configuration settings are handled in the /etc/aide.conf file. The following is a partial display of
the file. You can see the names of the database file and the log file directories set here:
# cat /etc/aide.conf
# Example configuration file for AIDE.
@@define DBDIR /var/lib/aide
@@define LOGDIR /var/log/aide
# The location of the database to be read.
database=file:@@{DBDIR}/aide.db.gz
# The location of the database to be written.
#database_out=sql:host:port:database:login_name:passwd:table
574
Downloaded from https://onlinelibrary.wiley.com/doi/ by alex jounh - Oregon Health & Science Univer , Wiley Online Library on [05/12/2025]. See the Terms and Conditions (https://onlinelibrary.wiley.com/terms-and-conditions) on Wiley Online Library for rules of use; OA articles are governed by the applicable Creative Commons License
Part V: Learning Linux Security Techniques
#database_out=file:aide.db.new
database_out=file:@@{DBDIR}/aide.db.new.gz
…
An intrusion detection system can be a big help in monitoring the system. When potential
intrusions are detected, comparing the output to information from other commands (such as
rpm -V) and log files can help you better understand and correct any attacks on your system.
Auditing and Reviewing Linux
You must understand two important terms when you are auditing the health of your Linux
system. A compliance review is an audit of the overall computer system environment to ensure
that the policies and procedures you have set for the system are being carried out correctly.
A security review is an audit of current policies and procedures to ensure that they follow
accepted best security practices.
Conducting compliance reviews
Similar to audits in other fields, such as accounting, audits can be conducted internally or by
external personnel. These reviews can be as simple as someone sitting down and comparing
implemented security to your company’s stated policies. However, more popular is conducting
audits using penetration testing.
Penetration testing is an evaluation method used to test a computer system’s security by simulating malicious attacks. It is also called pen testing and ethical hacking. No longer do you
have to gather tools and the local neighborhood hacker to help you conduct these tests.
Kali Linux (https://www.kali.org) is a distribution created specifically for penetration testing. It can be used from a live DVD or a flash drive. Training on the use of Kali Linux is offered
by Offensive Security (https://www.offsec.com/courses-and-certifications).
While penetration testing is lots of fun, for a thorough compliance review, a little more is
needed. You should also use checklists from industry security sites.
Conducting security reviews
Conducting a security review requires that you know current best security practices. There
are several ways to stay informed about best security practices. The following is a brief list of
organizations that can help you:
■
■
■
■
National Institute of Standards and Technology (NIST), Computer Security
Resource Center
URL: https://csrc.nist.gov/projects/security-content-automation-protocol
Offers Security Content Automation protocol to assess configuration compliance and
detect vulnerable software versions
United States Cybersecurity and Infrastructure Security Agency (CISA)
575
23
Downloaded from https://onlinelibrary.wiley.com/doi/ by alex jounh - Oregon Health & Science Univer , Wiley Online Library on [05/12/2025]. See the Terms and Conditions (https://onlinelibrary.wiley.com/terms-and-conditions) on Wiley Online Library for rules of use; OA articles are governed by the applicable Creative Commons License
Chapter 23: Understanding Basic Linux Security
URL: www.us-cert.gov
Offers the National Cyber Alert System
■ Offers RSS feeds on the latest security threats
The SANS Institute
■ URL: www.sans.org/security-resources
■ Offers Computer Security Research newsletters
■ Offers RSS feeds on the latest security threats
Gibson Research Corporation
■ URL: www.grc.com
■ Offers the Security Now! security netcast
■
■
■
■
Information from these sites will assist you in creating stronger policies and procedures. Given
how fast the best security practices change, it would be wise to conduct security reviews often,
depending upon your organization’s security needs.
Now you understand a lot more about basic Linux security. The hard part is actually putting all
of these concepts into practice.
Summary
Basic Linux security practices, such as managing user accounts, securing passwords, and
managing software and services, form the foundation for all other security on your Linux
system. With that foundation in place, ongoing monitoring of your system includes watching
over system log files, checking for malicious intrusions, and monitoring the filesystem.
Reviews of your security policies are also important to keep up on a regular basis. Audits assist
in ensuring that your Linux system is secured and the proper security policies and practices
are in place.
You have completed your first step of gathering basic security procedures and principles
knowledge. It is not enough just to know the basics. You need to add advanced Linux security
tools to your security toolbox. In the next chapter, advanced security topics of cryptography
and authentication modules are covered.
Exercises
Refer to the material in this chapter to complete the tasks that follow. If you are stuck, solutions to the tasks are shown in Appendix B (although in Linux, there are often multiple ways
to complete a task). Try each of the exercises before referring to the answers. These tasks
assume you are running a Fedora or Red Hat Enterprise Linux system (although some tasks will
work on other Linux systems as well).
1. Check log messages from the systemd journal for the following services:
NetworkManager.service, sshd.service, and auditd.service.
576
Downloaded from https://onlinelibrary.wiley.com/doi/ by alex jounh - Oregon Health & Science Univer , Wiley Online Library on [05/12/2025]. See the Terms and Conditions (https://onlinelibrary.wiley.com/terms-and-conditions) on Wiley Online Library for rules of use; OA articles are governed by the applicable Creative Commons License
Part V: Learning Linux Security Techniques
2. List the permissions of the file containing your system’s user passwords and determine
if they are appropriate.
3. Determine your account’s password aging and if it will expire using a single command.
4. Install the lemon package (assuming this is a package you do not have installed),
damage the /usr/bin/lemon file (perhaps copy /etc/services there), verify
that the file has been tampered with, and remove the lemon package.
5. You suspect you have had a malicious attack on your system today and important
binary files have been modified. What command should you use to find these modified files?
6. Install and run chkrootkit to see if the malicious attack from the previous exercise
installed a rootkit.
7. Find files with the SUID or SGID permission set.
8. Install the aide package.
9. Run the aide command to initialize the aide database and copy the database to the
correct location.
10. Run the aide command to check if any important files on your system have
been modified.
23
577
Downloaded from https://onlinelibrary.wiley.com/doi/ by alex jounh - Oregon Health & Science Univer , Wiley Online Library on [05/12/2025]. See the Terms and Conditions (https://onlinelibrary.wiley.com/terms-and-conditions) on Wiley Online Library for rules of use; OA articles are governed by the applicable Creative Commons License
Chapter 23: Understanding Basic Linux Security
Understanding Advanced
Linux Security
24
IN THIS CHAPTER
Understanding hashing and encryption
Checking file integrity
Encrypting files, directories, and filesystems
Understanding pluggable authentication modules
Managing Linux security with Authselect and PAM
D
ue to ever-changing and growing threats, implementing basic computer security is no longer
enough. As malicious users gain access to and knowledge of advanced tools, so must a Linux
system administrator. Understanding advanced computer security topics and tools must be part
of your preparation.
In this chapter, you will learn about cryptography basics, such as ciphers and encryption. You will also learn
how Authselect profiles and Pluggable Authentication Modules (PAM) can be used to safely manage Linux
system authentication features.
Implementing Linux Security with Cryptography
Using cryptography enhances the security of your Linux system and its network communications. Cryptography is the science of concealing information. It has a long and rich history that goes back far before
computers were around. Because of its heavy use of mathematical algorithms, cryptography has easily
transitioned to computers. Linux comes with many cryptographic tools ready for you to use.
To understand cryptographic concepts and the various Linux tools, you should know a few cryptography terms:
Plain text: Text that a human or machine can read and comprehend
Ciphertext: Text that a human or machine cannot read and comprehend
Encryption: The process of converting plain text into ciphertext using an algorithm
Decryption: The process of converting ciphertext into plain text using an algorithm
579
Linux Bible, Eleventh Edition. Christopher Negus.
© 2026 John Wiley & Sons, Inc. All rights reserved, including rights for text and data mining and training of artificial intelligence technologies or similar
technologies. Published 2026 by John Wiley & Sons, Inc.
Downloaded from https://onlinelibrary.wiley.com/doi/ by alex jounh - Oregon Health & Science Univer , Wiley Online Library on [05/12/2025]. See the Terms and Conditions (https://onlinelibrary.wiley.com/terms-and-conditions) on Wiley Online Library for rules of use; OA articles are governed by the applicable Creative Commons License
CHAPTER
Cipher: The algorithm used to encrypt plain text into ciphertext and decrypt ciphertext
into plain text
Block cipher: A cipher that breaks data into blocks before encrypting
Stream cipher: A cipher that encrypts the data without breaking it up
Key: A piece of data required by the cipher to encrypt or decrypt data successfully
Parents of young children often use a form of cryptography. They spell words instead of
speaking them. A parent may take the plain-text word candy and turn it into ciphertext by
saying to the other parent “C-A-N-D-Y.” The other parent decrypts the word by using the same
spelling cipher and recognizes that the word is “candy.” Unfortunately, it does not take children long to learn how to decrypt via the spelling cipher.
You may have noticed that hashing was not included in the preceding cryptography definition
list. Hashing needs some special attention because it is often confused with encryption.
Understanding hashing
Hashing is not encryption, but it is a form of cryptography. Remember from Chapter 23,
“Understanding Basic Linux Security,” that hashing is a one-way mathematical process used to
create ciphertext. However, unlike encryption, after you create a hash, you cannot de-hash it
back to its original plain text.
For a hashing algorithm to be used in computer security, it needs to be collision-free, which
means that the hashing algorithm does not output the same hash for two totally different
inputs. Each input must have a unique hashed output. Thus, cryptographic hashing is a one-
way mathematical process that is collision-free.
By default, cryptography is already in use on a Linux system. For example, the /etc/shadow
file contains hashed passwords. Hashing is used on Linux systems for the following:
■
■
■
■
Passwords (Chapter 23)
Verifying files
Digital signatures
Virus signatures (Chapter 23)
A hash is also called a message digest, checksum, fingerprint, or signature. One Linux utility that produces message digests is the sha256sum utility. In Chapter 10, “Getting and
Managing Software,” you learned about getting software for your Linux system. When you
download a software file, you can make sure that the file was not corrupted on download.
Figure 24.1 shows the website for downloading the latest Fedora Workstation distribution software (stored as a file in the form that is referred to as an ISO image). Along with the download
ISO file, select the verify button for instruction to verify the ISO.
With the ISO and the CHECKSUM file in the same directory, the following example verifies the
contents of the Fedora 42 Workstation ISO:
$ sha256sum --ignore-missing -c Fedora-Workstation-42-1.1-x86_
64-CHECKSUM
Fedora-Workstation-Live-42-1.1.x86_64.iso: OK
580
Downloaded from https://onlinelibrary.wiley.com/doi/ by alex jounh - Oregon Health & Science Univer , Wiley Online Library on [05/12/2025]. See the Terms and Conditions (https://onlinelibrary.wiley.com/terms-and-conditions) on Wiley Online Library for rules of use; OA articles are governed by the applicable Creative Commons License
Part V: Learning Linux Security Techniques
FIGURE 24.1
The Fedora ISO security page tells how to get and check with sha256sum.
You can implement even more cryptography besides hashing on your Linux system. The Linux
utilities to do so are easy to use. However, first you need to understand a few more underlying
cryptography concepts.
Understanding encryption/decryption
The primary use of cryptography on a Linux system is to encode data to hide it (encryption)
from unauthorized eyes and then decode the data (decryption) for authorized eyes. On a Linux
system, you can encrypt the following:
■
■
■
■
■
■
Individual files
Partitions and volumes
Web page connections
Network connections
Backups
Zip files
24
These encryption/decryption processes use special math algorithms to accomplish their task.
The algorithms are called cryptographic ciphers.
Understanding cryptographic ciphers
One of the original ciphers, called the Caesar Cipher, was created and used by Julius Caesar. It
was terribly easy to crack, however. Today, many more secure ciphers are available. Understanding how each cipher works is important because the strength of the cipher you choose should
directly relate to the security needs of your data. Table 24.1 describes a few modern ciphers.
581
Downloaded from https://onlinelibrary.wiley.com/doi/ by alex jounh - Oregon Health & Science Univer , Wiley Online Library on [05/12/2025]. See the Terms and Conditions (https://onlinelibrary.wiley.com/terms-and-conditions) on Wiley Online Library for rules of use; OA articles are governed by the applicable Creative Commons License
Chapter 24: Understanding Advanced Linux Security
TABLE 24.1
582
Cryptography Ciphers
Method
Description
AES (Advanced
Encryption Standard),
also called Rijndael
Symmetric cryptography.
Block cipher, encrypting data in 128-, 192-, or 256-bit blocks using a
128-, 192-, or 256-bit key for encrypting/decrypting.
Blowfish
Symmetric cryptography.
Block cipher, encrypting data in 64-bit blocks using the same 32-bit to
448-bit keys for encrypting/decrypting.
CAST5
Symmetric cryptography.
Block cipher, encrypting data in 64-bit blocks using the same up to 128-
bit key for encrypting/decrypting.
DES (Data Encryption Standard)
No longer considered secure.
Symmetric cryptography.
Block cipher, encrypting data in 64-bit blocks using the same 56-bit key
for encrypting/decrypting.
3DES
Improved DES cipher.
Symmetric cryptography.
Data is encrypted up to 48 times with three different 56-bit keys before
the encryption process is completed.
El Gamal
Asymmetric cryptography.
Uses two keys derived from a logarithm algorithm.
Elliptic Curve
Cryptosystems
Asymmetric cryptography.
Uses two keys derived from an algorithm containing two randomly
chosen points on an elliptic curve.
IDEA
Symmetric cryptography.
Block cipher, encrypting data in 64-bit blocks using the same 128-bit key
for encrypting/decrypting.
RC4 also called ArcFour or ARC4
Stream cipher, encrypting data in 64-bit blocks using a variable key size
for encrypting/decrypting.
RC5
Symmetric cryptography.
Block cipher, encrypting data in 32-, 64-, or 128-bit blocks using the
same up to 2,048-bit keys for encrypting/decrypting.
RC6
Symmetric cryptography.
Same as RC5, but slightly faster.
Rijndael also
called AES
Symmetric cryptography.
Block cipher, encrypting data in 128-, 192-, 256-, blocks using a 128-,
192-, or 256-bit key for encrypting/decrypting.
RSA
Most popular
asymmetric cryptography.
Uses two keys derived from an algorithm containing a multiple of two
randomly generated prime numbers.
Downloaded from https://onlinelibrary.wiley.com/doi/ by alex jounh - Oregon Health & Science Univer , Wiley Online Library on [05/12/2025]. See the Terms and Conditions (https://onlinelibrary.wiley.com/terms-and-conditions) on Wiley Online Library for rules of use; OA articles are governed by the applicable Creative Commons License
Part V: Learning Linux Security Techniques
Understanding cryptographic cipher keys
Cryptographic ciphers require a piece of data, called a key, to complete their mathematical process
of encryption/decryption. The key can be either a single key or a pair of keys.
Notice the different cipher key sizes listed in Table 24.1. The key size is directly related to how
easily the cipher is cracked. The bigger the key size, the less the chance of cracking the cipher. For
example, DES is no longer considered secure because of its small 56-bit key size. However, a cipher
with a key size of 256 bits or 512 bits is considered secure because it would take trillions of years
to brute-force crack such a keyed cipher.
Symmetric key cryptography
Symmetric cryptography, also called secret key or private key cryptography, encrypts plain text
using a single-keyed cipher. The same key is needed in order to decrypt the data. The advantage of
symmetric key cryptography is speed. The disadvantage is the need to share the single key if the
encrypted data is to be decrypted by another person.
An example of symmetric key cryptography on a Linux system is accomplished using the OpenPGP
utility, GNU Privacy Guard, gpg. The gnupg2 package is installed by default in Fedora and RHEL.
For Ubuntu, you need to install the gnupg package to get the gpg command.
Encrypting and decrypting a tar archive file
The example that follows shows the tar command used to create a compressed tar archive
(backup.tar.gz) and the gpg2 utility used to encrypt the file. With the -c option, gpg2
encrypts the file with a symmetric key. The original file is kept, and a new encrypted file,
backup.tar.gz.gpg, is created.
# tar -
cvzf /tmp/backup.tar.gz /etc
# gpg2 -c --force-mdc \
-
o /tmp/backup.tar.gz.gpg /tmp/backup.tar.gz
Enter passphrase: **********
Repeat passphrase: **********
# cd /tmp ; file backup*
backup.tar.gz:
gzip compressed data, from Unix, original size
modulo 2^32 33740800
backup.tar.gz.gpg: PGP symmetric key encrypted data -AES with 256-
bit key
salted & iterated -SHA256 .
The single key used to encrypt the file is protected by a passphrase. This passphrase is simply
a password or phrase chosen by the user at the time of encryption. It should be at least eight
characters in length and have at least one digit or special character.
To decrypt the file, use the gpg2 utility again. For example, if you were to hand the file to
another user, that user could run gpg2 with the -d option and provide the passphrase for the
secret key.
$ gpg2 -
d -
-
force-
mdc /tmp/backup.tar.gz.gpg > /tmp/backup.tar.gz
<A pop-
up window asks for your passphrase>
583
24
Downloaded from https://onlinelibrary.wiley.com/doi/ by alex jounh - Oregon Health & Science Univer , Wiley Online Library on [05/12/2025]. See the Terms and Conditions (https://onlinelibrary.wiley.com/terms-and-conditions) on Wiley Online Library for rules of use; OA articles are governed by the applicable Creative Commons License
Chapter 24: Understanding Advanced Linux Security
gpg: AES256.CFB encrypted data
gpg: encrypted with 1 passphrase
…
The result here is that the original tar file is decrypted and copied to /tmp/backup.tar
.gz. If the gpg-agent daemon is running on the system, that passphrase is cached so that
file could be decrypted again without entering the passphrase again (provided the cache timeout has not expired).
Symmetric key cryptography is rather simple and easy to understand. Asymmetric cryptography is much more complicated and often is a point of confusion in cryptography.
Asymmetric key cryptography
Asymmetric cryptography, also called private/public key cryptography, uses two keys, called
a key pair. A key pair consists of a public key and a private key. The public key is just that—
public. There is no need to keep it secret. The private key needs to be kept secret.
The general idea of asymmetric key cryptography is shown in Figure 24.2. A plain-text file is
encrypted using a public key of a key pair. The encrypted file then can be securely transmitted
to another person. To decrypt the file, the private key is used. This private key must be from
the public/private key pair. Thus, data that has been encrypted with the public key can be
decrypted only with its private key. The advantage of asymmetric cryptography is heightened
security. The disadvantage is speed and key management.
FIGURE 24.2
Basic asymmetric key cryptography.
Public Key
Unencrypted
file
584
Private Key
Encrypted
file
Encrypted
file
Unencrypted
file
Downloaded from https://onlinelibrary.wiley.com/doi/ by alex jounh - Oregon Health & Science Univer , Wiley Online Library on [05/12/2025]. See the Terms and Conditions (https://onlinelibrary.wiley.com/terms-and-conditions) on Wiley Online Library for rules of use; OA articles are governed by the applicable Creative Commons License
Part V: Learning Linux Security Techniques
Generating a key pair
You can perform asymmetric encryption on your Linux system using gpg2. Before you can
encrypt a file, you must first create your key pair and a “key ring.” In the example that
follows, the gpg2 --gen-key command was used. This command creates a public/private
key pair for the user johndoe, according to his desired specifications. It also generates a key
ring to store his keys.
$ gpg2 --gen-key
gpg (GnuPG) 2.4.4; Copyright (C) 2024 g10 Code GmbH
…
GnuPG needs to construct a user ID to identify your key.
Real name: John Doe
Email address: johndoe@example.com
You selected this USER-
ID:
"John Doe <johndoe@example.com>"
Change (N)ame, (E)mail or (O)kay/(Q)uit? O
You need a Passphrase to protect your secret key.
<A pop-
up window prompts you for a passphrase>
Enter passphrase: **********
Repeat passphrase: **********
…
gpg: /home/johndoe/.gnupg/trustdb.gpg: trustdb created
gpg: directory '/home/johndoe/.gnupg/openpgp-
revocs.d' created
gpg: revocation certificate stored as '/home/johndoe/.gnupg/openpgp-
revocs.d/8432C5004E6ACF5388F7F206F1CBFDAF4DD13075.rev'
public and secret key created and signed.
pub
uid
sub
ed25519 2025-
06-
29 [SC] [expires: 2028-
06-
28]
8432C5004E6ACF5388F7F206F1CBFDAF4DD13075
John Doe <johndoe@example.com>
cv25519 2025-
06-
29 [E] [expires: 2028-
06-
28]
In the preceding example, the gpg2 utility asks for several specifications to generate the
desired public/private keys:
24
User ID: This identifies the public key portion of the public/private key pair.
Email Address: This is the email address associated with the key.
Passphrase: This is used to identify and protect the private key portion of the public/
private key pair.
The user johndoe can check his key ring by using the gpg2 --list-keys command, as
shown in the code that follows. Notice the user ID (UID) of the public key is displayed just as
it was created, containing johndoe’s real name, comment, and email address.
$ gpg --list-secret-keys --keyid-format=long
/root/.gnupg/pubring.kbx
------------------------
sec
ed25519/F1CBFDAF4DD13075 2025-
06-
29 [SC] [expires: 2028-
06-
28]
585
Downloaded from https://onlinelibrary.wiley.com/doi/ by alex jounh - Oregon Health & Science Univer , Wiley Online Library on [05/12/2025]. See the Terms and Conditions (https://onlinelibrary.wiley.com/terms-and-conditions) on Wiley Online Library for rules of use; OA articles are governed by the applicable Creative Commons License
Chapter 24: Understanding Advanced Linux Security
uid
ssb
8432C5004E6ACF5388F7F206F1CBFDAF4DD13075
[ultimate] John Doe <johndoe@example.com>
cv25519/963B491AA3798773 2025-
06-
29 [E] [expires: 2028-
06-
28]
After the key pair and key ring are generated, files can be encrypted and decrypted. First, the
public key must be extracted from the key ring so that it can be shared. In the example that
follows, the gpg2 utility is used to extract the public key from johndoe’s key ring using the
hexadecimal string from the previous output. The extracted key is put into a file to be shared.
In this case, the user johndoe chose the filename JohnDoe.pub.
$ gpg2 --armor --export 8432C5004E6ACF5388F7F206F1CBFDAF4DD13075 >
JohnDoe.pub
$ file JohnDoe.pub
JohnDoe.pub: PGP public key block Public-
Key
Sharing a public key
The file containing the public key can be shared in any number of ways. It can be sent as an
attachment via email or even posted on a web page. The public key is considered public, so
there is no need to hide it. In the example that follows, johndoe has given the file containing his public key to the user jill. She adds johndoe’s public key to her key ring using
the gpg2 --import command. The user jill verifies that johndoe’s public key is added
using the gpg2 --list-keys command to view her key ring.
$ ls *.pub
JohnDoe.pub
$ gpg2 --import JohnDoe.pub
gpg: directory '/home/jill/.gnupg' created
gpg: /home/jill/.gnupg/trustdb.gpg: trustdb created
gpg: key F1CBFDAF4DD13075: public key "John Doe <johndoe@example
.com>" imported
gpg: Total number processed: 1
gpg:
imported: 1
$ gpg2 --list-keys
[keyboxd]
---------
pub
ed25519 2025-
06-
29 [SC] [expires: 2028-
06-
28]
8432C5004E6ACF5388F7F206F1CBFDAF4DD13075
uid
[ unknown] John Doe <johndoe@example.com>
sub
cv25519 2025-
06-
29 [E] [expires: 2028-
06-
28]
Encrypting an email message
After the key is added to the key ring, that public key can be used to encrypt data for the
public key’s original owner. In the example code that follows, note that jill has created a
text file, MessageForJohn.txt, for user johndoe.
■
■
586
She encrypts the file using his public key.
The encrypted file, MessageForJohn, is created by the --out option.
Downloaded from https://onlinelibrary.wiley.com/doi/ by alex jounh - Oregon Health & Science Univer , Wiley Online Library on [05/12/2025]. See the Terms and Conditions (https://onlinelibrary.wiley.com/terms-and-conditions) on Wiley Online Library for rules of use; OA articles are governed by the applicable Creative Commons License
Part V: Learning Linux Security Techniques
■
The option --recipient identifies johndoe’s public key using only the real name
portion of his public key’s UID in quotation marks, ″John Doe″.
$ gpg2 -
-
out MessageForJohn -
-
recipient "John Doe" \
--encrypt MessageForJohn.txt
…
$ ls
JohnDoe.pub MessageForJohn MessageForJohn.txt
The encrypted message file, MessageForJohn, created from the plain-text file,
MessageForJohn.txt, can be securely sent to the user johndoe. To decrypt this message, johndoe uses his private key, identified and protected by the secret passphrase used to
create the key originally. After johndoe provides the proper passphrase, gpg2 decrypts the
message file and puts it into the file JillsMessage, designated by the --out option. Once
it’s decrypted, he can read the plaintext message.
$ ls MessageForJohn
MessageForJohn
$ gpg2 --out JillsMessage --decrypt MessageForJohn
<A pop-
up window prompts you for a passphrase>
gpg: encrypted with cv25519 key, ID 963B491AA3798773, created
2025-06-29
"John Doe <johndoe@example.com>"
$ cat JillsMessage
I know you are not the real John Doe.
To review, the steps needed for encryption/decryption of files using asymmetric keys include
the following:
1. Generate the key pair and the key ring.
2. Export a copy of your public key to a file.
3. Share the public key file.
4. Individuals who want to send you encrypted files add your public key to
their key ring.
24
5. A file is encrypted using your public key.
6. The encrypted file is sent to you.
7. You decrypt the file using your private key.
Remember that in asymmetric cryptography, each public and private key is a paired set that
works together.
Understanding digital signatures
A digital signature is an electronic originator used for authentication and data verification. A
digital signature is not a scan of your physical signature. Instead, it is a cryptographic token
sent with a file, so the file’s receiver can be assured that the file came from you and has not
been modified in any way.
587
Downloaded from https://onlinelibrary.wiley.com/doi/ by alex jounh - Oregon Health & Science Univer , Wiley Online Library on [05/12/2025]. See the Terms and Conditions (https://onlinelibrary.wiley.com/terms-and-conditions) on Wiley Online Library for rules of use; OA articles are governed by the applicable Creative Commons License
Chapter 24: Understanding Advanced Linux Security
When you create a digital signature, the following steps occur:
1. You create a file or message.
2. Using the gpg2 utility, you create a hash or message digest of the file.
3. The gpg2 utility then encrypts the hash and the file, using an asymmetric key cipher.
For the encryption, the private key of the public/private key pair is used. This is now
a digitally signed encrypted file.
4. You send the encrypted hash (aka digital signature) and file to the receiver.
5. The receiver re-creates the hash or message digest of the received encrypted file.
6. Using the gpg2 utility, the receiver decrypts the received digital signature using the
public key, to obtain the original hash or message digest.
7. The gpg2 utility compares the original hash to the re-created hash to see if they
match. If they match, the receiver is told the digital signature is good.
8. The receiver can now read the decrypted file.
Notice in step 3 that the private key is used first. In the description of asymmetric key cryptography, the public key was used first. Asymmetric key cryptography is flexible enough
to allow you to use your private key to encrypt and the receiver to use your public key
to decrypt.
Note
Digital signatures have their own special ciphers. While several ciphers can handle both encryption and creating signatures, there are a few whose only job is to create digital signatures. Previously, the most popular cryptographic ciphers
to use in creating signatures were RSA and Digital Signature Algorithm (DSA). The RSA algorithm can be used for both
encryption and creating signatures, while DSA can be used only for creating digital signatures. Today, Ed25519 is considered to be more secure and faster than RSA, and ECDSA provides better protection than DSA.
As you can see, a digital signature contains both cryptographic hashing and asymmetric key
cryptography. This complicated process is often handled by an application that has been configured to do so, instead of being directly handled by Linux system users. However, you can
manually add your own digital signatures to documents.
Signing a file with a digital signature
Let’s say that user johndoe is going to send a message to the user christineb, along with
his digital signature. He has created a file containing the plain-text message to send. He uses
the gpg2 utility to create the signature file and encrypt the message file. The --sign option
tells the gpg2 utility that MessageForChristine.txt is the file to encrypt and use to
create the digital signature. In response, the gpg2 utility does the following:
■
■
588
Creates a message digest (aka hash) of the message file
Encrypts the message digest, which creates the digital signature
Downloaded from https://onlinelibrary.wiley.com/doi/ by alex jounh - Oregon Health & Science Univer , Wiley Online Library on [05/12/2025]. See the Terms and Conditions (https://onlinelibrary.wiley.com/terms-and-conditions) on Wiley Online Library for rules of use; OA articles are governed by the applicable Creative Commons License
Part V: Learning Linux Security Techniques
■
■
Encrypts the message file
Places the encrypted contents into the file specified by the --output option,
JohnDoe.DS
The file JohnDoe.DS now contains an encrypted and digitally signed message. The following
code demonstrates this process:
$ gpg2 --output JohnDoe.DS --sign MessageForJill.txt
After the user jill receives the signed and encrypted file, she can use the gpg2 utility
to check the digital signature and decrypt the file in one step. In the code that follows, the
--decrypt option is used along with the name of the digitally signed file, JohnDoe.DS.
The file’s message is decrypted and shown. The digital signature of the file is checked and
found to be valid.
$ gpg2 --decrypt JohnDoe.DS
I am the real John Doe!
gpg: Signature made Sun 29 Jun 2025 06:20:08 PM EDT
gpg:
using EDDSA key
8432C5004E6ACF5388F7F206F1CBFDAF4DD13075
gpg: Good signature from "John Doe <johndoe@example.com>" [ultimate]
Without johndoe’s public key on her key ring, jill would not be able to decrypt this message and check the digital signature.
Tip
The previous example of digitally signing a document allows anyone with the public key the ability to decrypt the document. To keep it truly private, use the public key of the recipient to encrypt with the gpg2 options: --sign and
--encrypt. The recipient can decrypt with their private key.
Understanding a few cryptography basics will help you get started on securing your Linux
system with encryption. Keep in mind that we’ve covered just the basics in this chapter. There
are many more cryptography topics, such as digital certificates and public key infrastructure,
that would be worth your time to learn.
Implementing Linux cryptography
Many cryptography tools are available on your Linux system. Which ones you choose to use
depend upon your organization’s security requirements. The following is a brief review of some
of the Linux cryptography tools available.
Ensuring file integrity
Earlier in this chapter, an ISO’s file integrity was checked using the message digest utility
sha256sum.
589
24
Downloaded from https://onlinelibrary.wiley.com/doi/ by alex jounh - Oregon Health & Science Univer , Wiley Online Library on [05/12/2025]. See the Terms and Conditions (https://onlinelibrary.wiley.com/terms-and-conditions) on Wiley Online Library for rules of use; OA articles are governed by the applicable Creative Commons License
Chapter 24: Understanding Advanced Linux Security
Related message digest utilities include the following:
■
■
■
■
sha224sum
sha256sum
sha384sum
sha512sum
These tools work just like the sha1sum command, except, of course, they use the SHA-2
cryptographic hash standard. The only difference between the various SHA-2 tools is the key
length they use. The sha224sum command uses a key length of 224 bits, the sha256sum
command uses a key length of 256 bits, and so on. Remember that the longer the key length,
the less the chance of cracking the cipher.
The SHA-2 cryptographic hash standard was created by the National Security Agency (NSA).
SHA-3 is another cryptographic hash standard, which was released by NIST in August 2015.
Encrypting a Linux filesystem at installation
You may need to encrypt an entire filesystem on your Linux server. This can be done in a
number of different ways, including using a Free and Open Source Software (FOSS)
third-party tool such as Linux Unified Key Setup (LUKS) (https://gitlab.com/cryptsetup/
cryptsetup).
One of your options in Linux is to encrypt your root partition upon installation (see Chapter 9,
“Installing Linux”). Many Linux distributions include an encryption option during their installation process. Figure 24.3 shows the encryption option during a Red Hat Enterprise Linux
installation.
FIGURE 24.3
Red Hat Enterprise Linux installation encryption option.
After you select this option during installation, you are asked for a password. This is
symmetric key cryptography with a password protecting the single key. Figure 24.4 shows the
installation asking for the key’s password. The password must be at least eight characters long.
If you select this encryption option, whenever you boot the system, you are asked for the
symmetric key password. Figure 24.5 shows what this looks like. This protects the root partition, should the disk it resides on be stolen.
590
Downloaded from https://onlinelibrary.wiley.com/doi/ by alex jounh - Oregon Health & Science Univer , Wiley Online Library on [05/12/2025]. See the Terms and Conditions (https://onlinelibrary.wiley.com/terms-and-conditions) on Wiley Online Library for rules of use; OA articles are governed by the applicable Creative Commons License
Part V: Learning Linux Security Techniques
FIGURE 24.4
Linux Fedora encryption symmetric key password.
FIGURE 24.5
Asking for the encryption symmetric key password at boot.
If you inherit a system with an encrypted disk, using root privileges, you can use the lvs and
cryptsetup commands and the /etc/crypttab file to help. In the following example,
the lvs command shows all the logical volumes currently on the system and their underlying device names. See Chapter 12, “Managing Disks and Filesystems,” for a review of different
LVM commands.
# lvs -
o devices
Devices
/dev/mapper/luks-b099fbbe-0e56-425f-91a6-44f129db9f4b(56)
/dev/mapper/luks-b099fbbe-0e56-425f-91a6-44f129db9f4b(0)
24
On this system, notice that the underlying device names start with luks. This indicates that
the Linux Unified Key Setup (LUKS) standard for hard disk encryption has been used.
Note
Ubuntu does not have the lvs command installed by default. To install it in Ubuntu, type sudo apt-get
install lvm2 at the command line.
The encrypted logical volumes are mounted at boot time using the information from the
/etc/fstab file. However, contents of the /etc/crypttab file, which are used to trigger
the capture of the password at boot time, will decrypt the /etc/fstab entries as they are
591
Downloaded from https://onlinelibrary.wiley.com/doi/ by alex jounh - Oregon Health & Science Univer , Wiley Online Library on [05/12/2025]. See the Terms and Conditions (https://onlinelibrary.wiley.com/terms-and-conditions) on Wiley Online Library for rules of use; OA articles are governed by the applicable Creative Commons License
Chapter 24: Understanding Advanced Linux Security
mounted. This is shown in the following code. Notice that the luks names are the same as
those listed by the lvs command in the previous example.
# cat /etc/crypttab
luks-b099fbbe-0e56-425f-91a6-44f129db9f4b
UUID=b099fbbe-
0e56-
425f-
91a6-
44f129db9f4b none
You can also use the cryptsetup command to help you uncover more information about
your Linux system’s encrypted volumes. In the example that follows, the status option is
used along with the luks device name to determine further information.
# cryptsetup status luks-b099fbbe-0e56-425f-91a6-44f129db9f4b
/dev/mapper/luks-b099fbbe-0e56-425f-91a6-44f129db9f4b
is active and is in use.
type:
LUKS1
cipher: aes-
xts-
plain64
keysize: 512 bits
device: /dev/sda3
offset: 4096 sectors
size:
493819904 sectors
mode:
read/write
Encrypting a Linux file
The most popular tool for file encryption on a Linux system is the OpenPGP utility GNU Privacy
Guard, gpg. Its flexibility and variety of options, along with the fact that it is installed by
default on most Linux distributions, add to its appeal.
Caution
If your organization uses a third-party cloud storage company, you need to know that some of these companies, such as
Dropbox, do not encrypt the files until they are received. This means the company has the keys required to decrypt your
files and can leave your organization’s data vulnerable. Encrypting files on your Linux system before they are sent to the
cloud adds the extra layer of protection needed.
However, you can use several other cryptography tools on a Linux system to encrypt files. Just
like gpg, many of these tools allow you to do much more than merely file encryption. The following are some of the popular Linux cryptography tools that you can use to encrypt files:
aescrypt: It uses the symmetric key cipher Rijndael, also called AES. This third-party
FOSS tool is available for download from www.aescrypt.com.
gpg: This utility can use either asymmetric key pairs or a symmetric key. It is installed
by default, and it is the cryptography tool of choice for Linux servers. The default
cipher to use is set in the gpg.conf file. There are man pages available as well as
info gnupg.
592
Downloaded from https://onlinelibrary.wiley.com/doi/ by alex jounh - Oregon Health & Science Univer , Wiley Online Library on [05/12/2025]. See the Terms and Conditions (https://onlinelibrary.wiley.com/terms-and-conditions) on Wiley Online Library for rules of use; OA articles are governed by the applicable Creative Commons License
Part V: Learning Linux Security Techniques
Encrypting Linux with miscellaneous tools
You can apply cryptography, defined as the act of writing or generating codes meant to keep
secrets, to just about everything in Linux. Besides filesystems, directories, and files, you can
also encrypt backups, Zip files, network connections, and more.
Table 24.2 lists some of the miscellaneous Linux cryptography tools and what they do. If you
want to see a full list of installed cryptography tools on your current Linux distribution, type
man -
k crypt at the command line.
TABLE 24.2
Linux Miscellaneous Cryptography Tools
Tool
Description
duplicity
Encrypts backups. To install on Fedora, type dnf install duplicity. To install
on Ubuntu, type sudo apt install duplicity at the command line.
openssl
A toolkit that implements Secure Sockets Layer (SSL) and Transport Layer Security
(TLS) protocols. These protocols require encryption. Installed by default.
seahorse
A GNU Privacy Guard encryption key manager. Installed by default on Ubuntu. To
install on Fedora and RHEL, type dnf install seahorse at the command line.
For Ubuntu, type sudo apt install seahorse.
ssh
Encrypts remote access across a network. Installed by default.
zipcloak
Encrypts entries in a Zip file. Installed by default.
Like many other items on a Linux system, the available cryptography tools are rich and plentiful. This gives you the flexibility and variety that you need to implement the cryptography
standards your particular organization requires.
Using Encryption from the Desktop
The Passwords and Keys window provides a means of viewing and managing keys and passwords
from the GNOME desktop. This window can be launched by selecting the Passwords and Keys
icon from the Activities screen or by running the seahorse command. With the window that
appears, you can work with the following:
Passwords: When you access a website, from a Chromium or Chrome web browser, and
enter a username and password (and you select to save that password), it is stored
on your system for the next time you visit that site. Select the Login entry under the
Passwords heading to see each of these saved usernames and passwords.
Certificates: You can view certificates associated with the Gnome2 Key Storage, User Key
Storage, System Trust, and Default Trust.
593
24
Downloaded from https://onlinelibrary.wiley.com/doi/ by alex jounh - Oregon Health & Science Univer , Wiley Online Library on [05/12/2025]. See the Terms and Conditions (https://onlinelibrary.wiley.com/terms-and-conditions) on Wiley Online Library for rules of use; OA articles are governed by the applicable Creative Commons License
Chapter 24: Understanding Advanced Linux Security
PGP keys: You can view the GPG keys that you create by selecting the GnuPG keys entry.
Secure Shell: You can create public and private OpenSSH keys that let you log in to
remote systems using those keys instead of passwords for authentication with ssh,
scp, rsync, sftp, and related commands. Select OpenSSH keys to view any keys
that you have created for this purpose. (See the section “Using key-based passwordless
authentication” in Chapter 13 for information on creating these types of keys.)
Another extremely powerful security tool available on Linux is PAM and associated authentication features. The next sections in this chapter cover basic PAM concepts and how you can use
this tool to enhance even further your Linux system’s security.
Implementing Linux Security with PAM
Pluggable Authentication Modules (PAM) simplifies the authentication management process.
Remember that authentication (see Chapter 23, “Understanding Basic Linux Security”) is the
process of determining that a subject (a user or process) is who they say they are. This process
is sometimes called identification and authentication. PAM is a centralized method of providing
authentication for the Linux system and applications.
Applications can be written to use PAM; such applications are called PAM-aware. A PAM-aware
application does not have to be rewritten and recompiled to have its authentication settings
changed. Any required changes are made within a PAM configuration file for the PAM-aware
applications. Thus, authentication management for these applications is centralized and
simplified.
You can see whether a particular Linux application or utility is PAM-aware by checking
whether it is compiled with the PAM library, libpam.so. In the example that follows, the
crontab application is being checked for PAM awareness. The ldd command checks a file’s
shared library dependencies and shows here that crontab on this particular Linux system is
PAM-aware.
# ldd /usr/bin/crontab | grep pam
libpam.so.0 => /lib64/libpam.so.0 (0x00007fbee19ce000)
The benefits of using PAM on your Linux system include the following:
■
■
■
Simplified and centralized authentication management from the administrator viewpoint
Simplified application development, because developers can write applications using
the documented PAM library instead of writing their own authentication routines
Flexibility in authentication:
■
■
■
594
Allow or deny access to resources based on traditional criteria, such as
identification
Allow or deny access based on additional criteria, such as time-of-day restrictions
Set subject limitations, such as resource usage
Downloaded from https://onlinelibrary.wiley.com/doi/ by alex jounh - Oregon Health & Science Univer , Wiley Online Library on [05/12/2025]. See the Terms and Conditions (https://onlinelibrary.wiley.com/terms-and-conditions) on Wiley Online Library for rules of use; OA articles are governed by the applicable Creative Commons License
Part V: Learning Linux Security Techniques
While PAM helped to centralize authentication configuration in Linux, there have been drawbacks to managing PAM as it was first implemented. In recent years, Authselect has replaced
Authconfig for managing PAM, providing a simpler and more stable means of managing
authentication through authentication profiles.
Understanding the PAM authentication process
When a subject (user or process) requests access to a PAM-aware application or utility, these
components are used to complete the subject authentication process:
■
■
■
The PAM-aware application’s module configuration file (in /etc/pam.d)
Additional PAM configuration files for some modules (in /etc/security)
The PAM modules the configuration file uses stored (in /usr/lib64/security for
Fedora and RHEL on 64-bit systems; /usr/lib/x86_64-linux-gnu/security/
for Ubuntu)
Each PAM-aware application configuration file is at the center of the process. The PAM module
configuration files call upon particular PAM modules to perform the needed authentication.
PAM modules authenticate subjects from system authorization data, such as a centralized user
account using LDAP (see Chapter 11, “Managing User Accounts”).
Linux comes with many applications that are PAM-aware, with their needed configuration files
and PAM modules already installed. If you have any special authentication needs, you can
most likely find a PAM module that has already been written for that need. However, before
you start tweaking PAM, you need to understand more about how PAM operates and how to
change it without breaking your system’s authentication.
A series of steps is taken by PAM using the modules and configuration files to ensure that
proper application authentication occurs:
1. A subject (user or process) requests access to an application.
2. The application’s PAM module configuration file, which contains an access policy, is
open and read.
The access policy is set via a list of all the PAM modules to be used in the authentication process. This PAM module(s) list is called a stack.
3. The PAM modules in the stack are invoked in the order in which they are listed.
4. Each PAM module returns either a success or failure status.
5. The stack continues to be read in order, and it is not necessarily stopped by a single
returned failure status.
6. The status results of all the PAM modules are combined into a single overall result of
authentication success or failure.
Typically, if a single PAM module returns a failure status, access to the application is denied.
However, this is dependent upon the configuration file settings. Most PAM module configuration files are located /etc/pam.d. The general format of a PAM configuration file is
context
control flag
PAM module [module options]
595
24
Downloaded from https://onlinelibrary.wiley.com/doi/ by alex jounh - Oregon Health & Science Univer , Wiley Online Library on [05/12/2025]. See the Terms and Conditions (https://onlinelibrary.wiley.com/terms-and-conditions) on Wiley Online Library for rules of use; OA articles are governed by the applicable Creative Commons License
Chapter 24: Understanding Advanced Linux Security
Understanding PAM contexts
PAM modules have standard functions that provide different authentication services. These
standard functions within a PAM module can be divided into function types called contexts.
Contexts can also be called module interfaces or types. In Table 24.3, the different PAM contexts are listed along with what type of authentication service they provide.
TABLE 24.3
PAM Contexts
Context
Service Description
auth
Provides authentication management services, such as verifying
account passwords
account
Provides account validation services, such as time-of-day access restrictions
password
Manages account passwords, such as password length restrictions
session
Allows actions for the user before and after gaining access to a service
Understanding PAM control flags
In a PAM configuration file, control flags are used to determine the overall status, which are
returned to the application. A control flag is either of the following:
Simple keyword: The only concern here is if the corresponding PAM module returns
a response of either “failed” or “success.” See Table 24.4 for how these statuses
are handled.
Series of actions: The returned module status is handled through the series of actions
listed in the file.
TABLE 24.4
596
PAM Configuration Control Flags and Response Handling
required
If failed, returns a failure status to the application, after the rest of the contexts
have been run in the stack.
For example, a requisite control might cause a login to fail if someone types in
an invalid user. But the user might not be told of the failure until after entering a
password, hiding the fact that it was the bad username that caused the failure.
requisite
If failed, returns a failure status to the application immediately without running
the rest of the stack. (Be careful where you place this control in the stack.)
For example, a requisite control might require key-based authentication and fail
immediately when a valid key is not provided. In that case, it could fail before
even prompting for a username/password.
sufficient
If failed, the module status is ignored. If successful, then a success status is
immediately returned to the application without running the rest of the stack.
(Be careful where you place this control in the stack.)
Downloaded from https://onlinelibrary.wiley.com/doi/ by alex jounh - Oregon Health & Science Univer , Wiley Online Library on [05/12/2025]. See the Terms and Conditions (https://onlinelibrary.wiley.com/terms-and-conditions) on Wiley Online Library for rules of use; OA articles are governed by the applicable Creative Commons License
Part V: Learning Linux Security Techniques
optional
This control flag is important only for the final overall return status of success or
failure. Think of it as a tiebreaker. When the other modules in the configuration
file stack return statuses that are neither clear-cut failure nor success statuses,
this optional module’s status is used to determine the final status or break the
tie. In cases where the other modules in the stack are returning a clear-cut path
of failure or success, this status is ignored.
include
Get all the return statuses from this particular PAM configuration file’s stack
to include in this stack’s overall return status. It’s as if the entire stack from the
named configuration file is now in this configuration file.
substack
Similar to the include control flag, except for how certain errors and evaluations
affect the main stack. This forces the included configuration file stack to act as a
substack to the main stack. Thus, certain errors and evaluations affect only the
substack and not the main stack.
Table 24.4 shows the various keyword control flags and their responses to the returned module
status. Notice that a few of the control flags need to be carefully placed within the configuration file’s stack. Some control flags cause the authentication process to stop immediately,
and the rest of the PAM modules are not called. The control flags simply control how the PAM
module status results are combined into a single overall result. Table 24.4 demonstrates how
the status results are combined.
You should know that the PAM modules return many more status result codes than just success
or failure. For example, a module may return the status code of PAM_ACCT_EXPIRED, which
means the user account has expired. This would be deemed a failure.
Understanding PAM modules
A PAM module is actually a suite of shared library modules (DLL files) stored in /usr/
lib64/security for 64-bit Fedora or RHEL systems. Type ls /usr/lib64/security/
pam*.so to see those modules. On Ubuntu, to find your PAM modules, type the command
sudo find /usr/lib -
name pam*.so at the command line.
Your Linux system comes with many of the PAM modules needed already installed. If you do
need a module not already installed, most likely someone else has already written it. Check
out sources such as these:
■ http://www.openwall.com/pam
■ https://www.gnu.org.ua/software/pam-modules/download.html
597
24
Downloaded from https://onlinelibrary.wiley.com/doi/ by alex jounh - Oregon Health & Science Univer , Wiley Online Library on [05/12/2025]. See the Terms and Conditions (https://onlinelibrary.wiley.com/terms-and-conditions) on Wiley Online Library for rules of use; OA articles are governed by the applicable Creative Commons License
Chapter 24: Understanding Advanced Linux Security
Understanding PAM configuration files
Most PAM files for configuring modules are contained in the /etc/pam.d directory. Before
we get to how to configure these PAM configuration files, there are a few things you should
know about them:
■
■
Modifying or deleting PAM system event configuration files incorrectly can lock you
out of your own system. If possible, make changes to these files using Authselect to
update profiles, rather than editing these files directly. In any case, make sure you
test any changes in a virtual or test environment before modifying your production
Linux servers.
Many of the PAM configuration files have a man page associated with them. For example, to find out more information on the pam_unix module, type man pam_unix at
the command line of your Ubuntu, Fedora, or RHEL distribution.
Even though Linux comes with many PAM-aware applications, various configuration files, and
PAM modules already installed, you cannot just hope that PAM will take care of itself. Certain
administrative steps are needed to manage PAM.
Administering PAM on your Linux system
Authselect has become the preferred tool for managing PAM on Fedora, RHEL, and other
Linux systems. By focusing on PAM profiles, Authselect lets you choose to implement a set of
tested, proven basic identity and authentication settings, then lets you manage how to update
those profiles.
Selecting an authselect profile for your system creates a stack of PAM modules and an
nsswitch.conf that defines the sources and settings for your Linux system’s authentication mechanism. You can see files that are directly managed by authselect in /etc/pam.d by
listing those that are symbolically linked to the /etc/authselect directory:
# ls -
l /etc/pam.d/ | grep lrw
lrwxrwxrwx. 1 root root 32 Jun 7 17:58
/etc/authselect/fingerprint-
auth
lrwxrwxrwx. 1 root root 29 Jun 7 17:58
/etc/authselect/password-
auth
lrwxrwxrwx. 1 root root 25 Jun 7 17:58
/etc/authselect/postlogin
lrwxrwxrwx. 1 root root 30 Jun 7 17:58
/etc/authselect/smartcard-
auth
lrwxrwxrwx. 1 root root 27 Jun 7 17:58
/etc/authselect/system-
auth
fingerprint-
auth -
>
password-
auth -
>
postlogin -
>
smartcard-
auth -
>
system-
auth -
>
To change any of the authselect files, you should use the authselect command and not edit
them directly. Most of the pam.d files that are not directly managed by authselect are copied
from and maintained by the packages that own those files. For example, the samba file comes
from the samba package, and the cockpit file comes from the cockpit package. Most of
those other files will draw on the authselect-managed files, since authselect files provide foundational authentication setup used on your system.
598
Downloaded from https://onlinelibrary.wiley.com/doi/ by alex jounh - Oregon Health & Science Univer , Wiley Online Library on [05/12/2025]. See the Terms and Conditions (https://onlinelibrary.wiley.com/terms-and-conditions) on Wiley Online Library for rules of use; OA articles are governed by the applicable Creative Commons License
Part V: Learning Linux Security Techniques
The next sections both the authselect and direct editing methods of changing PAM configuration files in the /etc/pam.d directory. These examples were done on a Fedora system.
Managing PAM configuration with authselect
Use the authselect command to examine your PAM authselect setup and begin working
with your PAM configuration. To begin, check that authselect is enabled on your system. This
shows that your authselect is installed and valid:
# authselect check
Current configuration is valid.
Display a list of current authselect profiles. The following shows that there are four available profiles:
# authselect list
-local
Local users only
-nis
Enable NIS for system authentication
-sssd
Enable SSSD for system authentication (also for local
users only)
-winbind
Enable winbind for system authentication
Display the current authselect profile. The following shows that the sssd profile is current.
With sssd, your Linux system is configured to allow authentication both locally (including
passwd and group files) and remotely (allowing authentication against remote servers, such
as LDAP and Kerberos).
# authselect current
Profile ID: sssd
Enabled features:
- with-silent-lastlog
- with-fingerprint
- with-mdns4
For a full description of available settings for a selected profile (for example, sssd), type the
following:
# authselect show sssd
Enable SSSD for system authentication (also for local users only)
=================================================================
Selecting this profile will enable SSSD as the source of identity
and authentication providers.
...
AVAILABLE OPTIONAL FEATURES
---------------------------
with-faillock::
Enable account locking in case of too many consecutive
authentication failures.
599
24
Downloaded from https://onlinelibrary.wiley.com/doi/ by alex jounh - Oregon Health & Science Univer , Wiley Online Library on [05/12/2025]. See the Terms and Conditions (https://onlinelibrary.wiley.com/terms-and-conditions) on Wiley Online Library for rules of use; OA articles are governed by the applicable Creative Commons License
Chapter 24: Understanding Advanced Linux Security
with-mkhomedir::
Enable automatic creation of home directories for users on their
first login.
...
Note
Before you make changes to your PAM setup on a production system with authselect, try some of the following on a test
system. Also, be sure to back up your current setup so that you can restore it if necessary.
Say you want to add with-mkhomedir to your current sssd profile, to have a home directory
created for a user on their first login. The following command backs up the current authselect
setup and adds with-mkhomedir to the existing sssd options:
# authselect select sssd -
b with-
mkhomedir with-
silent-
lastlog \
with-fingerprint with-mdns4
Backup stored at /var/lib/authselect/backups/2025-07-06-11-16-49
.drbcIq
Profile "sssd" was selected.
...
# authselect current
Profile ID: sssd
Enabled features:
- with-mkhomedir
- with-silent-lastlog
- with-fingerprint
- with-mdns4
You can see that current sssd profile has been backed up and the with-mkhomedir has been
added to the new sssd profile. The output also recommends you can do further inspection to
make sure the SSSD service is configured and enabled.
If you decide you don’t like your changes, you can restore from your backup settings by listing
available backups and then by using backup-restore to restore those settings:
# authselect backup-list
2025-
07-
06-
11-
16-
49.drbcIq (created at Sun 06 Jul 2025 07:16:49 AM
EDT)
# authselect backup-restore 2025-07-06-11-16-49.drbcIq
# authselect current
Profile ID: sssd
Enabled features:
- with-silent-lastlog
- with-fingerprint
- with-mdns4
A better way to make a lot of changes with authselect is to create a custom profile. With a
custom profile, you get copies of the whole set of authselect-managed files. You can change
them as you like and then set you profile as the current profile. If something goes wrong,
600
Downloaded from https://onlinelibrary.wiley.com/doi/ by alex jounh - Oregon Health & Science Univer , Wiley Online Library on [05/12/2025]. See the Terms and Conditions (https://onlinelibrary.wiley.com/terms-and-conditions) on Wiley Online Library for rules of use; OA articles are governed by the applicable Creative Commons License
Part V: Learning Linux Security Techniques
you can always switch back to a known, working profile. To create a profile called myprofile,
type the following:
# authselect create-
profile myprofile -
b sssd
Select the new profile as your current profile, add a few settings that you choose, and check
that the profile is current:
# authselect select custom/myprofile/ -
b
Backup stored at /var/lib/authselect/backups/2025-07-06-14-17-53
.QTrVPn
Profile "custom/myprofile/" was selected.
Make sure that SSSD service is configured and enabled. See SSSD
documentation for more information.
# authselect select custom/myprofile/ with-
silent-
lastlog \
with-fingerprint with-mdns4
# authselect current
Profile ID: custom/myprofile/
Enabled features:
- with-silent-lastlog
- with-fingerprint
- with-mdns4
Make any further changes you want to the files in the new profiles directory (/etc/
authselect/custom/myprofile/), using some of the examples in the next section or
using authselect to further configure the profile. One other change I made was to change the
top line of README in my new profile directory to say “My sssd authentication (also for local
users only).” So when I listed all of the profiles, it showed this:
# authselect list
-local
Local users only
-nis
Enable NIS for system authentication
-sssd
Enable SSSD for system authentication (also for local
users only)
-winbind
Enable winbind for system authentication
-custom/mysssd My sssd authentication (also for local users only)
To learn more about using authselect to manage PAM authentication, see the authselect man
page (man authselect).
Managing individual PAM configuration files
You should review PAM configuration files for your PAM-aware applications and utilities to
ensure that their authentication process matches your organization’s desired authentication
process. Your Access Control Matrix (see Chapter 23, “Understanding Basic Linux Security”)
and the information on understanding PAM provided in this chapter should help you conduct
an audit of the PAM configuration files.
601
24
Downloaded from https://onlinelibrary.wiley.com/doi/ by alex jounh - Oregon Health & Science Univer , Wiley Online Library on [05/12/2025]. See the Terms and Conditions (https://onlinelibrary.wiley.com/terms-and-conditions) on Wiley Online Library for rules of use; OA articles are governed by the applicable Creative Commons License
Chapter 24: Understanding Advanced Linux Security
Each PAM-aware application should have its very own PAM configuration file. Each configuration file defines what particular PAM modules are used for that application. If no configuration
file exists, a security hole may be created for that application. This hole could be used for
malicious intent. As a safety precaution, PAM comes with the “other” configuration file. If a
PAM-aware application does not have a PAM configuration file, it defaults to using the “other”
PAM configuration file.
You can verify whether your Linux system has the /etc/pam.d/other configuration file by
using the ls command. The example that follows shows that the /etc/pam.d/other PAM
configuration file does exist on this system.
$ ls /etc/pam.d/other
/etc/pam.d/other
The PAM /etc/pam.d/other configuration file should deny all access, which in terms of
security is referred to as Implicit Deny. In computer security access control, Implicit Deny
means that if certain criteria are not clearly met, access must be denied. In this case, if no
configuration file exists for a PAM-aware application, all access to it is denied. The following
shows an /etc/pam.d/other file’s contents:
$ cat /etc/pam.d/other
#%PAM-1.0
auth
required
account required
password required
session required
pam_deny.so
pam_deny.so
pam_deny.so
pam_deny.so
Notice that all four PAM contexts—auth, account, password, and session—are
listed. Each context uses the required control flag and the pam_deny.so module. The
pam_deny.so PAM module is used to deny access.
Even with the “other” configuration file in place, if a PAM configuration file for a PAM-aware
application is not there, it must be created. Add this item to your PAM audit checklist. You
should also review your PAM “other” configuration file on your Linux system to ensure that it
enforces Implicit Deny.
Managing PAM system event configuration files
Similar to PAM-aware application and utility configuration files, your PAM system event configuration files need to be audited with your organization’s Access Control Matrix. However, for
any needed modifications to these files, there are extra steps that must be taken.
In the material that follows, you will learn how to set up special security requirements via PAM
on your Linux system, such as account login time restrictions. Many of the special requirements require you to make a change to PAM system event configuration files, such as /etc/
pam.d/system-auth.
Keep in mind that for the several files that authselect maintains directly it may rewrite
these files and remove any locally made changes. Fortunately, each PAM configuration file that
602
Downloaded from https://onlinelibrary.wiley.com/doi/ by alex jounh - Oregon Health & Science Univer , Wiley Online Library on [05/12/2025]. See the Terms and Conditions (https://onlinelibrary.wiley.com/terms-and-conditions) on Wiley Online Library for rules of use; OA articles are governed by the applicable Creative Commons License
Part V: Learning Linux Security Techniques
runs this risk has it documented in a comment line within. Using grep, you can quickly find
which PAM configuration files have this potential problem.
# grep "Generated by authselect" /etc/pam.d/*
fingerprint-
auth:# Generated by authselect
password-
auth:# Generated by authselect
postlogin:# Generated by authselect
smartcard-
auth:# Generated by authselect
system-
auth:# Generated by authselect
To make changes to the authselect-managed files, use the authselect command described earlier, when possible. Although not recommended, you can also opt-out of authselect’s management of any of those files. See the authselect man page for details.
Implementing resources limits with PAM
Managing resources is not just a system administrative task. It is also a security administrative task. Setting resource limitations helps you avoid many problems on your Linux system.
Problems such as fork bombs can be averted by limiting the number of processes a single user
can create. A fork bomb occurs when a process spawns one process after another in a recursive
manner until system resources are consumed.
The PAM module pam-limits uses a special configuration file to set these resources limits:
/etc/security/limits.conf. By default, this file has no resource limits set within it.
Therefore, you need to review the file and set resources limits to match your organization’s
security needs.
Note
PAM configuration files are in the /etc/pam.d directory and the /etc/security directory.
The following snippet shows the /etc/security/limits.conf file. The file is well documented. You should read through the contents of that file for a thorough format description
and examples of limits that can be set.
$ cat /etc/security/limits.conf
# /etc/security/limits.conf
#
#This file sets the resource limits for the users logged in via PAM.
#It does not affect resource limits of the system services.
#
#Also note that configuration files in /etc/security/limits.d
directory,which are read in alphabetical order, override the settings
in this
#file in case the domain is the same or more specific.
…
603
24
Downloaded from https://onlinelibrary.wiley.com/doi/ by alex jounh - Oregon Health & Science Univer , Wiley Online Library on [05/12/2025]. See the Terms and Conditions (https://onlinelibrary.wiley.com/terms-and-conditions) on Wiley Online Library for rules of use; OA articles are governed by the applicable Creative Commons License
Chapter 24: Understanding Advanced Linux Security
#Each line describes a limit for a user in the form:
#
#<domain>
<type> <item> <value>
…
#*
soft
core
0
#*
hard
rss
10000
#@student
hard
nproc
20
#@faculty
soft
nproc
20
#@faculty
hard
nproc
50
#ftp
hard
nproc
0
#@student
-
maxlogins
4
# End of file
The format items domain and type need some further explanation:
domain: The limit applies to the listed user or group. If the domain is *, it applies to
all users.
type: A hard limit cannot be exceeded. A soft limit can be exceeded, but only
temporarily.
Look at the limits.conf file setting example that follows. The group faculty is listed,
but what you should notice is nproc. The nproc limit sets the maximum number of
processes a user can start. This setting is what prevents a fork bomb. Notice that the type
selected is hard; thus, the limit of 50 processes cannot be exceeded. Of course, this limit is
not enforced because the line is commented out with a # symbol.
#@faculty
hard
nproc
50
Limit settings are set per login and last only for the duration of the login session. A malicious
user could log in several times to create a fork bomb. Thus, setting the maximum number of
logins for these user accounts is a good idea too.
Limiting the maximum number of logins may have to be done on a per-user basis. For example,
johndoe needs to log in to the Linux system only once. To prevent others from using
johndoe’s account, set his account’s maxlogins to 1.
johndoe
hard
maxlogins
1
To override any settings in the limits.conf file, add files named *.conf to the /etc/
security/limits.d directory. This is a convenient way to have an RPM file or other
method to add and remove limits without needing to edit the limits.conf file directly.
The final step in limiting this resource is to ensure that the PAM module using limits
.conf is included in one of the PAM system event configuration files. The PAM module using
limits.conf is pam_limits. In the partial listing that follows, grep is used to verify
that the PAM module is used within the system event configuration files.
# grep "pam_limits" /etc/pam.d/*
/etc/pam.d/fingerprint-
auth:session required
/etc/pam.d/password-
auth:session
required
604
pam_limits.so
pam_limits.so
Downloaded from https://onlinelibrary.wiley.com/doi/ by alex jounh - Oregon Health & Science Univer , Wiley Online Library on [05/12/2025]. See the Terms and Conditions (https://onlinelibrary.wiley.com/terms-and-conditions) on Wiley Online Library for rules of use; OA articles are governed by the applicable Creative Commons License
Part V: Learning Linux Security Techniques
/etc/pam.d/runuser:session
/etc/pam.d/sudo:session
/etc/pam.d/system-
auth:session
required
required
required
pam_limits.so
pam_limits.so
pam_limits.so
Time limits for access to services and accounts are not handled by the PAM /etc/
security/limits.conf configuration file. Instead, it is handled by the time.conf file.
Implementing time restrictions with PAM
PAM can make your entire Linux system operate on “PAM time.” Time restrictions such as
access to particular applications during certain times of the day, or allowing logins only during
specified days of the week, are all handled by PAM.
The PAM configuration file that handles these restrictions is located in the /etc/security
directory. The following code shows the well-documented /etc/security/time.conf
PAM configuration file.
$ cat /etc/security/time.conf
# this is an example configuration file for the pam_time module. Its
syntax was initially based heavily on that of the shadow package
(shadow-960129).
#
# the syntax of the lines is as follows:
#
#
services;ttys;users;times
…
I recommend that you read through the contents of the time.conf file. Note that the format
for each valid entry follows this syntax: services;ttys;users;times. Fields are separated
by semicolons. The valid field values are documented in the time.conf configuration file.
While time.conf is well-documented, an example is always helpful. For instance, you have
decided that regular users should be allowed to log in on terminals on weekdays only (Monday
through Friday). They can log in from 7 a.m. to 7 p.m. on these weekdays. The following list
describes what elements need to be set:
services: Login
ttys—*: Indicates that all terminals are to be included
users: Everyone but root (!root)
times: Allowed on weekdays (Wd) from 7 a.m. (0700) to 7 p.m. (1900)
The entry in time.conf would look like the following:
login; * ; !root ; Wd0700-
1900
The final step in implementing this example time restriction is to ensure that the PAM module
using time.conf is included in one of the PAM system event configuration files. The PAM
605
24
Downloaded from https://onlinelibrary.wiley.com/doi/ by alex jounh - Oregon Health & Science Univer , Wiley Online Library on [05/12/2025]. See the Terms and Conditions (https://onlinelibrary.wiley.com/terms-and-conditions) on Wiley Online Library for rules of use; OA articles are governed by the applicable Creative Commons License
Chapter 24: Understanding Advanced Linux Security
module using time.conf is pam_time. In the partial listing that follows, grep shows the
PAM module; pam_time is not used within any of the system event configuration files.
# grep "pam_time" /etc/pam.d/*
chkrootkit:auth
sufficient
chkrootkit:session
optional
config-
util:auth
sufficient
config-
util:session
optional
pam_timestamp.so
pam_timestamp.so
pam_timestamp.so
pam_timestamp.so
Because pam_time is not listed, you must modify the /etc/pam.d/system-auth file for
PAM to enforce the time restrictions. The PAM configuration file system-auth is used by
PAM at system login and during password modifications. This configuration file checks many
items, such as time restrictions.
Add the following near the top of the “account” section of the configuration file. Now the
pam_time module checks the login restrictions you set within the /etc/security/
time.conf file.
account
required
pam_time.so
Note
On Ubuntu, you need to modify the /etc/pam.d/common-auth file instead of the system-auth configuration file.
Remember that system-auth is an authselect-managed file. If you modify this file, you
must take extra steps to preserve the modifications from the authselect utility. You can
employ additional PAM modules and configuration files to set even more restrictions on subjects. One important security module is pam_cracklib.
Enforcing good passwords with PAM
When a password is modified, the PAM module pam_cracklib is involved in the process. The
module prompts the user for a password and checks its strength against a system dictionary
and a set of rules for identifying poor choices.
Using pam_cracklib, you can check a newly chosen password for the following:
■
■
■
■
■
■
■
■
606
Is it a dictionary word?
Is it a palindrome?
Is it the old password with the case changed?
Is it too much like the old password?
Is it too short?
Is it a rotated version of the old password?
Does it use the same consecutive characters?
Does it contain the username in some form?
Downloaded from https://onlinelibrary.wiley.com/doi/ by alex jounh - Oregon Health & Science Univer , Wiley Online Library on [05/12/2025]. See the Terms and Conditions (https://onlinelibrary.wiley.com/terms-and-conditions) on Wiley Online Library for rules of use; OA articles are governed by the applicable Creative Commons License
Part V: Learning Linux Security Techniques
You can change the rules pam_cracklib uses for checking new passwords by making modifications to the /etc/pam.d/system-auth file. You may think that the changes should be
made in the PAM-aware passwd configuration file. However, /etc/pam.d/passwd includes
the system-auth file in its stack.
# cat /etc/pam.d/passwd
#%PAM-1.0
# This tool only uses the password stack.
password
substack
system-
auth
-
password
optional pam_gnome_keyring.so use_authtok
password
substack
postlogin
Note
On Ubuntu, you need to modify the /etc/pam.d/common-password file instead of the system-auth configuration file.
The current settings of the system-auth file are shown here. Currently, one entry calls the
pam_cracklib PAM module.
# cat /etc/pam.d/system-auth
# Generated by authselect
# Do not modify this file manually, use authselect instead.
# Any user changes will be overwritten.
auth
required
pam_env.so
auth
required
pam_faildelay.so delay=2000000
auth
sufficient
pam_fprintd.so
...
auth
required
pam_deny.so
account
account
account
account
account
password
…
required
pam_unix.so
sufficient
pam_localuser.so
sufficient
pam_usertype.so issystem
[default=bad success=ok user_unknown=ignore] pam_sss.so
required
pam_permit.so
requisite
pam_cracklib.so try_first_pass retry=3
The pam_cracklib entry added in the preceding listing uses the keyword retry. The
following keywords are available for cracklib:
debug
Causes module to write information to syslog.
authtok_type=XXX
■
■
Defaults to using New UNIX password: and Retype UNIX password: to
request passwords.
Replace XXX with a word to use instead of UNIX.
607
24
Downloaded from https://onlinelibrary.wiley.com/doi/ by alex jounh - Oregon Health & Science Univer , Wiley Online Library on [05/12/2025]. See the Terms and Conditions (https://onlinelibrary.wiley.com/terms-and-conditions) on Wiley Online Library for rules of use; OA articles are governed by the applicable Creative Commons License
Chapter 24: Understanding Advanced Linux Security
retry=N
■
■
Default = 1
Prompt user at most N times before returning with an error.
difok=N
■
■
■
■
Default = 5
The number of characters in the new password that must not be present in the
old password.
Exception 1: If half of the characters in the new password are different, then the new
password is accepted.
Exception 2: See difignore.
difignore=N
■
■
Default = 23
The number of characters that the password has before the difok setting is ignored.
minlen=N
■
■
■
Default = 9
The minimum acceptable size for the new password.
See dcredit, ucredit, lcredit, and ocredit for how their settings
affect minlen.
dcredit=N
■
■
■
Default =1
If (N >= 0): The maximum credit for having digits in the new password. If you
have fewer than or N digits, each digit counts +1 toward meeting the current
minlen value.
If (N < 0): The minimum number of digits that must be met for a new password.
ucredit=N
■
■
■
Default = 1
If (N >= 0): The maximum credit for having uppercase letters in the new password. If
you have fewer than or N uppercase letters, each letter counts +1 toward meeting the
current minlen value.
If (N < 0): The minimum number of uppercase letters that must be met for a
new password.
lcredit=N
■
■
608
Default = 1
If (N >= 0): The maximum credit for having lowercase letters in the new password. If
you have fewer than or N lowercase letters, each letter counts +1 toward meeting the
current minlen value.
Downloaded from https://onlinelibrary.wiley.com/doi/ by alex jounh - Oregon Health & Science Univer , Wiley Online Library on [05/12/2025]. See the Terms and Conditions (https://onlinelibrary.wiley.com/terms-and-conditions) on Wiley Online Library for rules of use; OA articles are governed by the applicable Creative Commons License
Part V: Learning Linux Security Techniques
■
If (N < 0): The minimum number of lowercase letters that must be met for a
new password.
ocredit=N
■
■
■
Default = 1
If (N >= 0): The maximum credit for having other characters in the new password. If
you have fewer than or N other characters, each character counts +1 toward meeting
the current minlen value.
If (N < 0): The minimum number of other characters that must be met for a
new password.
minclass=N
■
■
Default = 0
N out of four character classes is required for the new password. The four classes are
digits, uppercase letters, lowercase letters, and other characters.
maxrepeat=N
■
■
Default = 0
Reject passwords that contain more than N same consecutive characters.
reject_username
Check whether the name of the user in straight or reversed form is contained in the
new password. If it is found, the new password is rejected.
try_first_pass
Try to get the password from a previous PAM module. If that does not work, prompt the
user for the password.
use_authtok
This argument is used to force the module not to prompt the user for a new password.
Instead, the new password is provided by the previously stacked password module.
dictpath=/path
Path to the cracklib dictionaries.
maxsequence=N
■
■
Default = 0 (meaning this check is disabled)
N set to any number other than 0 causes passwords with monotonic characters longer
than that number to be rejected.
maxclassrepeat=N
■
■
Default = 0 (meaning this check is disabled)
N set to any number other than 0 causes passwords with consecutive characters in the
same class that are longer than that number to be rejected.
609
24
Downloaded from https://onlinelibrary.wiley.com/doi/ by alex jounh - Oregon Health & Science Univer , Wiley Online Library on [05/12/2025]. See the Terms and Conditions (https://onlinelibrary.wiley.com/terms-and-conditions) on Wiley Online Library for rules of use; OA articles are governed by the applicable Creative Commons License
Chapter 24: Understanding Advanced Linux Security
gecoscheck=N
Causes passwords with more than three straight characters from the user’s GECOS field,
typically containing the user’s real name, to be rejected.
enforce_for_root=N
■
■
Default = 0 (meaning this check is disabled)
N set to any number other than 0 causes passwords with consecutive characters in the
same class that are longer than that number to be rejected.
enforce_for_root
Enforce failed password checks for the root user. This option is off by default.
For example, if your organization requires passwords to be 10 characters long and they must
contain two digits, you would add a line similar to the following to the /etc/pam.d/
system-auth file:
password required pam_cracklib.so minlen=10 dcredit=-
2
The keywords used in this example with pam_cracklib are as follows:
■
■
minlen=10: The new password must be at least 10 characters.
dcredit=-2: The new password must contain two numbers.
Note
The pam_cracklib restrictions do not apply to the root user unless you apply the enforce_for_root option.
Encouraging sudo use with PAM
To allow tracking of root-account use by individuals and avoid a repudiation situation (see
Chapter 23, “Understanding Basic Linux Security”), you should restrict the use of the su
command and encourage the use of sudo. If your organization has such a policy, you can
accomplish this with PAM in just a few steps.
The su command is PAM-aware, which greatly simplifies things. It uses the PAM module
pam_wheel to check for users in the wheel group. The /etc/pam.d/su configuration file
is shown here:
# cat /etc/pam.d/su
#%PAM-1.0
auth
sufficient
pam_rootok.so
# Uncomment the following line to implicitly trust users
# in the "wheel" group.
#auth
sufficient pam_wheel.so trust use_uid
# Uncomment the following line to require a user to be
# in the "wheel" group.
#auth
required
pam_wheel.so use_uid
auth
substack
system-
auth
610
Downloaded from https://onlinelibrary.wiley.com/doi/ by alex jounh - Oregon Health & Science Univer , Wiley Online Library on [05/12/2025]. See the Terms and Conditions (https://onlinelibrary.wiley.com/terms-and-conditions) on Wiley Online Library for rules of use; OA articles are governed by the applicable Creative Commons License
Part V: Learning Linux Security Techniques
auth
account
account
password
session
session
session
include
sufficient
include
include
include
include
optional
postlogin
pam_succeed_if.so uid = 0 use_uid quiet
system-
auth
system-
auth
system-
auth
postlogin
pam_xauth.so
First, to restrict the use of su, if you are using the wheel group as your administrative group,
you need to reassign your administrative group to a new group (see Chapter 11, “Managing
User Accounts”). If you are not using the wheel group, just be sure not to assign anyone in
the future to this group.
Next, you need to edit the /etc/pam.d/su configuration file. Remove the comment mark,
#, from the following line:
#auth
required
pam_wheel.so use_uid
With these modifications, PAM disables the use of the su command. Administrative users now
must use sudo, which the system tracks and provides a desired nonrepudiation environment
(see Chapter 23).
Obtaining more information on PAM
PAM is another rich and versatile security tool available to you on your Linux system. In your
own Linux system’s man pages, you can read about managing the PAM configuration files and
about the modules in your /usr/lib64/security (64-bit) directory.
■
■
To get more information on PAM configuration files, use the command
man pam.conf.
You can see all of the PAM modules available on your system by entering ls /usr/
lib64/security/pam*.so at the command line. To get more information on each
PAM module, enter man pam_module_name. Be sure to leave off the file extension
of so for the pam_module_name. For example, enter man pam_lastlog to learn
more about the pam_lastlog.so module. For additional information on PAM, see
https://github.com/linux-pam/linux-pam.
Summary
Cryptography tools offer ways of protecting and verifying the validity of the data you use on
your Linux system. The PAM facility provides a means of creating policies to secure the tools
that are used to authenticate users on your system.
Both the cryptography tools and PAM should be handled with care as you learn about Linux.
Be sure to test any modifications that you make on a test Linux system or a virtualized Linux
system before you implement them on a production machine.
The next chapter covers SELinux. While cryptography and PAM are tools that you can use on
your Linux system, SELinux is an entire security enhancement layer.
611
24
Downloaded from https://onlinelibrary.wiley.com/doi/ by alex jounh - Oregon Health & Science Univer , Wiley Online Library on [05/12/2025]. See the Terms and Conditions (https://onlinelibrary.wiley.com/terms-and-conditions) on Wiley Online Library for rules of use; OA articles are governed by the applicable Creative Commons License
Chapter 24: Understanding Advanced Linux Security
Exercises
Use these exercises to test your knowledge of using cryptography tools and PAM. These tasks
assume you are running a Fedora or Red Hat Enterprise Linux system (although some tasks
work on other Linux systems as well). If you are stuck, solutions to the tasks are shown in
Appendix B (although in Linux, there are often multiple ways to complete a task).
1. Encrypt a file using the gpg utility and a symmetric key.
2. Generate a public key ring using the gpg utility.
3. List out the key ring you generated.
4. Encrypt a file and add your digital signature using the gpg utility.
5. Go to the Fedora download page: https://fedoraproject.org. Select one of the
Fedora distributions to download. When the download is complete, verify your image.
6. Does the su command have a PAM configuration file? If so, display the configuration
file on the screen and list what PAM contexts it uses.
7. List out the various PAM modules on your system to your screen.
8. Find the PAM “other” configuration file on your system. Does it exist? Does it enforce
Implicit Deny?
9. Find the PAM limits configuration file. Does it have a setting to keep a fork bomb from
occurring on your system?
10. Use the authselect command to check that authselect is enabled on your system, to
list available profiles, and see which profile is current.
612
Downloaded from https://onlinelibrary.wiley.com/doi/ by alex jounh - Oregon Health & Science Univer , Wiley Online Library on [05/12/2025]. See the Terms and Conditions (https://onlinelibrary.wiley.com/terms-and-conditions) on Wiley Online Library for rules of use; OA articles are governed by the applicable Creative Commons License
Part V: Learning Linux Security Techniques
Enhancing Linux Security
with SELinux
25
IN THIS CHAPTER
Learning about SELinux benefits
Learning how SELinux works
Setting up SELinux
Fixing problems with SELinux
Getting additional information on SELinux
F
or servers that require the highest levels of security, basic Linux security is not enough. By
default, a process running on a Linux system uses standard permissions on files and directories
to allow or deny access to those items. A more secure approach would be to allow access to the
specific files, directories, ports, system calls, processes, and network sockets that the service needs and
deny access to everything else. That is what Security Enhanced Linux (SELinux) does.
SELinux was developed by the National Security Agency (NSA) along with other security research organizations, such as the Secure Computing Corporation (SCC). SELinux was released to the open source community in 2000, and it became popular when Red Hat included SELinux in its Linux distributions. Now,
SELinux is used by many organizations and is widely available.
Understanding SELinux Benefits
SELinux is a security enhancement module deployed on top of Linux. It provides additional security
measures, is included by default, and is set to be in enforcing mode in Red Hat Enterprise Linux (RHEL)
and Fedora. SELinux is available for Ubuntu systems, but not installed by default. For Ubuntu, App
Armor is more commonly used for mandatory access control than SELinux.
SELinux provides improved security on the Linux system via role-based access controls (RBACs) on subjects and objects (aka processes and resources). “Traditional” Linux security uses discretionary access
controls (DACs).
613
Linux Bible, Eleventh Edition. Christopher Negus.
© 2026 John Wiley & Sons, Inc. All rights reserved, including rights for text and data mining and training of artificial intelligence technologies or similar
technologies. Published 2026 by John Wiley & Sons, Inc.
Downloaded from https://onlinelibrary.wiley.com/doi/ by alex jounh - Oregon Health & Science Univer , Wiley Online Library on [05/12/2025]. See the Terms and Conditions (https://onlinelibrary.wiley.com/terms-and-conditions) on Wiley Online Library for rules of use; OA articles are governed by the applicable Creative Commons License
CHAPTER
With DAC, a process can access any file, directory, device, or other resource that leaves itself
open to access. With RBAC, a process only has access to resources that it is explicitly allowed
to access, based on the assigned role. The way that SELinux implements RBAC is to assign an
SELinux policy to a process. That policy restricts access as follows:
■
■
Only letting the process access resources that carry explicit labels
Making potentially insecure features, such as write access to a directory, available as
Booleans, which can be turned on or off
A service, such as a web server, that includes an SELinux policy will often get installed with
SELinux labels set on specific directories and files. This can make it so that the running server
process can only read and write files from specific directories. If you want to change that, you
need to add the correct SELinux labels on the files and directories that you want the process
to access.
SELinux is not a replacement for DAC. Instead, it is an additional security layer.
■
■
■
DAC rules are still used when using SELinux.
DAC rules are checked first, and if access is allowed, then SELinux policies are checked.
If DAC rules deny access, SELinux policies are not reviewed.
If a user tries to execute a file for which they do not have execute access to (rw-
), the “traditional” Linux DAC controls deny access. Thus, the SELinux policies are not even checked.
Note
SELinux is the default security enhancement of Red Hat distributions, whereas AppArmor is the default security enhancement for Ubuntu. You can still install SELinux on Ubuntu by using the command sudo apt-
get install
selinux and then reboot. However, as of this writing, the Ubuntu wiki page for SELinux suggests that you do not use
Ubuntu’s SELinux package (https://wiki.ubuntu.com/SELinux). If you want to learn more about AppArmor,
go to https://help.ubuntu.com/community/AppArmor.
Even though “traditional” Linux security controls still work, there are several benefits to using
SELinux. The following are a few of SELinux’s benefits:
It implements the RBAC access control model.
control model.
This is considered the strongest access
It uses least privilege access for subjects (for example, users and processes). The
term least privilege means that every subject is given a limited set of privileges that
are only enough to allow the subject to be functional in its tasks. With least privilege
implemented, a user or process is limited on the accidental (or on-purpose) damage to
objects it can cause.
It allows process sandboxing. The term process sandboxing means that each process
runs in its own area (sandbox). It cannot access other processes or their files unless
special permissions are granted. These areas where processes run are called domains.
614
Downloaded from https://onlinelibrary.wiley.com/doi/ by alex jounh - Oregon Health & Science Univer , Wiley Online Library on [05/12/2025]. See the Terms and Conditions (https://onlinelibrary.wiley.com/terms-and-conditions) on Wiley Online Library for rules of use; OA articles are governed by the applicable Creative Commons License
Part V: Learning Linux Security Techniques
It allows a test of its functionality before implementation. SELinux has a permissive mode, which allows you to see the effect of enforcing SELinux on your system.
In permissive mode, SELinux still logs what it considers security breaches (called AVC
denials), but it doesn’t prevent them.
Another way to look at SELinux benefits is to examine what can happen if SELinux is not
enabled on your Linux system. For example, getting back to the web server example, your web
server daemon (httpd) is listening on a port for something to happen. A simple request from
a web browser comes in to view a home page. Going through its normal routine, the httpd
daemon hears the request and only “traditional” Linux security is applied. Being unconstrained by SELinux, httpd can do these things:
■
■
■
Access any file or directory, based on read/write/execute permissions for the associated owner and group.
Perform potentially insecure activities, such as allowing a file upload or changing
system limits.
Listen on any port it likes for incoming requests.
On a system constrained by SELinux, the httpd daemon is much more tightly controlled.
Using the preceding example, httpd can listen only on the port on which SELinux allows it to
listen. SELinux prevents httpd from accessing any file that doesn’t have the proper security
context set and denies potentially insecure activities that are not explicitly enabled with Booleans in SELinux. In essence, SELinux severely limits what malicious code might gain access to
and generally limits activity on your Linux system.
Understanding How SELinux Works
SELinux can be compared to a guard at a door. In this comparison, the subject (the user)
wants to access the object (the file) inside the room. To gain access to this object, the following has to happen:
1. The subject must present an ID badge to the guard.
2. The guard reviews the ID badge and access rules kept in a large manual.
a. If the access rules allow this particular ID badge inside the door, the subject may
enter the room to access the object.
b. If the access rules do not allow this particular ID badge access to the object, then
the guard refuses entry.
SELinux provides a combination of role-based access control (RBAC) and either type enforcement (TE) or Multi-Level Security (MLS). In role-based access control, access to an object is
based on a subject’s assigned role in the organization. Therefore, it is not based on the subject’s username or process ID. Each role is granted access rights.
615
25
Downloaded from https://onlinelibrary.wiley.com/doi/ by alex jounh - Oregon Health & Science Univer , Wiley Online Library on [05/12/2025]. See the Terms and Conditions (https://onlinelibrary.wiley.com/terms-and-conditions) on Wiley Online Library for rules of use; OA articles are governed by the applicable Creative Commons License
Chapter 25: Enhancing Linux Security with SELinux
Understanding Type Enforcement
Type enforcement (TE) is necessary to implement the RBAC model. Type enforcement secures a
system through these methods:
■
■
■
Labeling objects as certain security types
Assigning subjects to particular domains and roles
Providing rules allowing certain domains and roles to access certain object types
The example that follows uses the ls -l command to show the DAC controls on the file
my_stuff. The output shows the file’s owner (johndoe) and group (johndoe) as well as its
assignments for permissions.
If you need a review of file permissions, see Chapter 4, “Moving Around the Filesystem.”
$ ls -
l my_stuff
-
rw-
rw-
r-
-
. 1 johndoe johndoe 0 Feb 12 06:57 my_stuff
The example that follows includes ls -lZ and the same file, my_stuff, but instead of just
the DAC controls, the -Z option displays the SELinux security RBAC controls too.
$ ls -
lZ my_stuff
-rw-rw-r--. johndoe johndoe unconfined_u:object_r:user_home_t:s0
… my_stuff
The ls -Z example displays four items associated with the file that are specific to SELinux:
user (unconfined_u)
role (object_r)
type (user_home_t)
level (s0)
These four RBAC items (user, role, type, and level) are used in the SELinux access control to
determine appropriate access levels. Together, the items are called the SELinux security context.
A security context (ID badge) is sometimes called a security label.
These security context assignments are given to subjects (processes and users). Each security
context has a specific name. The name given depends upon what object or subject it has been
assigned: files have a file context, users have a user context, and processes have a process context, also called a domain.
The rules allowing access are called allow rules or policy rules. A policy rule is the process
SELinux follows to grant or deny access to a particular system security type. Returning to the
comparison of SELinux with the guard, SELinux serves as the guard who must see the subject’s
security context (ID badge) and review the policy rules (access rules manual) before allowing
or denying access to an object. Thus, type enforcement ensures that only certain “types” of
subjects can access certain “types” of objects.
616
Downloaded from https://onlinelibrary.wiley.com/doi/ by alex jounh - Oregon Health & Science Univer , Wiley Online Library on [05/12/2025]. See the Terms and Conditions (https://onlinelibrary.wiley.com/terms-and-conditions) on Wiley Online Library for rules of use; OA articles are governed by the applicable Creative Commons License
Part V: Learning Linux Security Techniques
Understanding Multi-Level Security
With SELinux, the default policy type is called a targeted policy, which primarily controls how
network services (such as web servers and file servers) can be accessed on a Linux system. The
targeted policy places fewer restrictions on what valid user accounts can do on the system. For
a more restricted policy, you can choose Multi-Level Security (MLS). MLS uses type enforcement
along with the additional feature of security clearances. It also offers Multi-Category Security,
which gives classification levels to objects.
Tip
The Multi-Level Security names can cause confusion. Multi-Category Security (MCS) is sometimes called Multi-
Clearance Security. Because MLS offers MCS, it is sometimes called MLS/MCS.
Multi-Level Security enforces the Bell-LaPadula Mandatory Access security model. The Bell-
LaPadula model was developed by the U.S. government to impose information confidentiality.
Enforcing this model is accomplished by granting object access based on a role’s security
clearance and an object’s classification level.
Security clearance is an attribute granted to roles allowing access to classified objects. Classification level is an attribute granted to an object, providing protection from subjects who have
a security clearance attribute that is too low. You most likely have heard of the classification
level top secret. The fictional book and movie character James Bond had a top-secret security
clearance, which granted him access to top-secret classified information. This is a classic example of the Bell-LaPadula model.
The combination of RBAC along with either type enforcement or Multi-Level Security enables
SELinux to provide such a strong security enhancement. SELinux also offers different operational modes for its use.
Implementing SELinux security models
The role-based access control model, type enforcement, Multi-Level Security, and Bell-LaPadula
models are all interesting topics. SELinux implements these models through a combination of
four primary SELinux pieces:
■
■
■
■
Operational modes
Security contexts
Policy types
Policy rule packages
Although we’ve touched upon some of these design elements, the following will give you an
in-depth understanding of them. This understanding is needed before you can begin modifying
the SELinux configuration on your system.
617
25
Downloaded from https://onlinelibrary.wiley.com/doi/ by alex jounh - Oregon Health & Science Univer , Wiley Online Library on [05/12/2025]. See the Terms and Conditions (https://onlinelibrary.wiley.com/terms-and-conditions) on Wiley Online Library for rules of use; OA articles are governed by the applicable Creative Commons License
Chapter 25: Enhancing Linux Security with SELinux
Understanding SELinux operational modes
SELinux comes with three operational modes: disabled, permissive, and enforcing. Each of
these modes offers different benefits for Linux system security.
Using the disabled mode
In the disabled mode, SELinux is turned off. The default method of access control, Discretionary Access Control (DAC), is used instead. This mode is useful for circumstances in which
enhanced security is not required.
If at all possible, Red Hat recommends setting SELinux to permissive mode rather than disabling it. However, there are occasions where disabling SELinux is appropriate.
If you are running applications that are working properly (from your perspective) but are generating massive amounts of SELinux AVC denial messages (even in permissive mode), you may
end up filling up log files to the point of making your systems unusable. The better approach
is to set the proper security context on the files your applications need to access. Nevertheless, disabling SELinux is the quicker fix.
Before you disable SELinux, however, think about whether you may ever want to enable it
on that system again. If you decide to set it to enforcing or permissive at a later date, the
next time you reboot your system, it will go through an automatic SELinux file relabel before
it comes up.
Tip
If all you care about is turning SELinux off, you have found the answer. Just edit the configuration file /etc/
selinux/config and change the text SELINUX= to SELINUX=disabled. SELinux will be disabled after a
system reboot. You can now skip the rest of this chapter.
Using the permissive mode
In permissive mode, SELinux is turned on, but the security policy rules are not enforced. When
a security policy rule should deny admission, access is still allowed. However, a message is sent
to a log file denoting that access should have been denied.
SELinux permissive mode is used for the following:
■
■
■
■
Auditing the current SELinux policy rules
Testing new applications to see what effect SELinux policy rules will have on them
Testing new SELinux policy rules to see what effect the new rules will have on current
services and applications
Troubleshooting why a particular service or application is no longer working properly
under SELinux
In some cases, you can use the audit2allow command to read the SELinux audit logs and
generate new SELinux rules to allow the denied actions selectively. This can be a quick way to
get your applications working on your Linux system without disabling SELinux.
618
Downloaded from https://onlinelibrary.wiley.com/doi/ by alex jounh - Oregon Health & Science Univer , Wiley Online Library on [05/12/2025]. See the Terms and Conditions (https://onlinelibrary.wiley.com/terms-and-conditions) on Wiley Online Library for rules of use; OA articles are governed by the applicable Creative Commons License
Part V: Learning Linux Security Techniques
Using the Enforcing mode
The name says it all. In enforcing mode, SELinux is turned on, and all of the security policy
rules are enforced.
Understanding SELinux security contexts
As mentioned earlier, an SELinux security context is the method used to classify objects
(such as files) and subjects (such as users and programs). The defined security context allows
SELinux to enforce policy rules for subjects accessing objects. A security context consists of
four attributes: user, role, type, and level.
User The user attribute is a mapping of a Linux username to an SELinux name. This
is not the same as a user’s login name, and it is referred to specifically as the SELinux
user. The SELinux username ends with a u, making it easier to identify in the output.
Regular unconfined users have an unconfined_u user attribute in the default targeted policy.
Role A designated role in the company is mapped to an SELinux role name. The role
attribute is then assigned to various subjects and objects. Each role is granted access
to other subjects and objects based on the role’s security clearance and the object’s
classification level. More specifically, for SELinux, users are assigned a role and roles
are authorized for particular types or domains. Using roles can force accounts, such as
root, into a less privileged position. The SELinux role name has an r at the end. On a
targeted SELinux system, processes run by the root user have a system_r role, while
regular users run under the unconfined_r role.
Type This type attribute defines a domain type for processes, a user type for users,
and a file type for files. This attribute is also called security type. Most policy rules are
concerned with the security type of a process and what files, ports, devices, and other
elements of the system that process has access to (based on their security types). The
SELinux type name ends with a t.
Level The level is an attribute of Multi-Level Security, and it enforces the
Bell-LaPadula model. It is optional in TE but is required if you are using MLS.
The MLS level is a combination of the sensitivity and category values that together
form the security level. A level is written as sensitivity : category.
sensitivity
■
■
■
■
Represents the security or sensitivity level of an object, such as confidential or
top secret.
Is hierarchical, with s0 (unclassified) typically being the lowest.
Is listed as a pair of sensitivity levels (lowlevel-highlevel) if the
levels differ.
Is listed as a single sensitivity level (s0) if there are no low and high levels. In
some cases, however, even if there are no low and high levels, the range is still
shown (s0-s0).
25
619
Downloaded from https://onlinelibrary.wiley.com/doi/ by alex jounh - Oregon Health & Science Univer , Wiley Online Library on [05/12/2025]. See the Terms and Conditions (https://onlinelibrary.wiley.com/terms-and-conditions) on Wiley Online Library for rules of use; OA articles are governed by the applicable Creative Commons License
Chapter 25: Enhancing Linux Security with SELinux
category
■
■
■
■
Represents the category of an object, such as No Clearance, Top Clearance,
and so on.
Traditionally, the values are between c0 and c255.
Is listed as a pair of category levels (lowlevel.highlevel) if the levels differ.
Is listed as a single category (level) if there are no low and high levels.
Users have security contexts
To see your SELinux user context, enter the id command at the shell prompt. The following is
an example of the security context for user johndoe:
$ id
uid=1000(johndoe) gid=1000(johndoe) groups=1000(johndoe)
context=unconfined_u:unconfined_r:unconfined_t:s0-s0:c0.c1023
The user’s security context list shows the following:
user: The Linux user, johndoe, is mapped to the SELinux unconfined_u user.
role: The SELinux user, unconfined_u, is mapped to the role of the unconfined_r.
type: The user has been given the type of unconfined_t.
level:
sensitivity: The user has only one sensitivity level, and it is the lowest
level of s0.
categories: The user has access to c0.c1023, which is all categories (c0 through
to c1023).
Files have security contexts
A file also has a security context. To see an individual file’s context, use the -Z option on the
ls command. The following is a security context for the file my_stuff:
$ ls -
Z my_stuff
-rw-rw-r--. johndoe johndoe
unconfined_u:object_r:user_home_t:s0 my_stuff
The file context list shows the following:
user: The file is mapped to the SELinux unconfined_u user.
role: The file is mapped to the role of object_r.
type: The file is considered to be part of the user_home_t domain.
level:
sensitivity: The user has only one sensitivity level, and it is the lowest
level of s0.
categories: MCS is not set for this file.
620
Downloaded from https://onlinelibrary.wiley.com/doi/ by alex jounh - Oregon Health & Science Univer , Wiley Online Library on [05/12/2025]. See the Terms and Conditions (https://onlinelibrary.wiley.com/terms-and-conditions) on Wiley Online Library for rules of use; OA articles are governed by the applicable Creative Commons License
Part V: Learning Linux Security Techniques
Processes have security contexts
A process’s security context has the same four attributes as a user’s and a file’s context. To see
process information on a Linux system, you typically use a variant of the ps command. In the
following code, the ps -el command was used:
# ps -
el | grep bash
0 S 1000 1589 1583
bash
0 S 1000 5289 1583
bash
4 S
0 5350 5342
00:00:00 bash
0
80
0 - 1653 n_tty_ pts/0
00:00:00
0
80
0 - 1653 wait
pts/1
00:00:00
0
80
0 - 1684 wait
pts/1
To see a process’s security context, you need to use the -Z option on the ps command. In the
example that follows, the ps -eZ command was used and then piped into grep to search
only for processes running the Bash shell.
# ps -
eZ | grep bash
unconfined_u:unconfined_r:unconfined_t:s0-
s0:c0.c1023 1589 pts/0
00:00:00 bash
unconfined_u:unconfined_r:unconfined_t:s0-
s0:c0.c1023 5289 pts/1
00:00:00 bash
unconfined_u:unconfined_r:unconfined_t:s0-
s0:c0.c1023 5350 pts/1
00:00:00 bash
The process context list shows the following:
user: The process is mapped to the SELinux unconfined_u user.
role: The process is running as the unconfined_r role.
type: The process is running in the unconfined_t domain.
level:
sensitivity: The process has only level s0.
categories: The process has access to c0.c1023, which is all categories
(c0 through to c1023).
These security contexts can all be changed to meet your organization’s particular security
needs. However, before you learn how to change the settings of these security contexts, you
need to understand another piece of the SELinux puzzle, SELinux policy types.
Understanding SELinux Policy types
The policy type chosen directly determines what sets of policy rules are used to dictate what
an object can access. The policy type also determines what specific security context attributes
are needed. This is where you start to see the fine level of access control that can be implemented via SELinux.
621
25
Downloaded from https://onlinelibrary.wiley.com/doi/ by alex jounh - Oregon Health & Science Univer , Wiley Online Library on [05/12/2025]. See the Terms and Conditions (https://onlinelibrary.wiley.com/terms-and-conditions) on Wiley Online Library for rules of use; OA articles are governed by the applicable Creative Commons License
Chapter 25: Enhancing Linux Security with SELinux
Note
The policy types available on your distribution may not match the ones listed here. For instance, on older Linux
distributions, the strict policy is still available. On newer distributions, the strict policy has been merged into the
Targeted policy, with Targeted used by default.
SELinux has different policies among which you can choose:
■
■
■
Targeted
MLS
Minimum
Each policy implements different access controls to match your organization’s needs. It is critical to understand these policy types in order to select the correct one for your particular security requirements.
Targeted policy
The Targeted policy’s primary purpose is to restrict “targeted” daemons. However, it can also
restrict other processes and users. Targeted daemons are sandboxed. A sandbox is an environment where programs can run but their access to other objects is tightly controlled.
A process running in such an environment is said to be “sandboxed.” Thus, a targeted daemon
is restricted so that no malicious attacks launched through them can affect other services
or the Linux system as a whole. Targeted daemons make it safer for you to share your print
server, file server, web server, or other services while limiting the risks that access to those
services pose to other assets on your system.
All subjects and objects not targeted are run in the unconfined_t domain. The
unconfined_t domain has no SELinux policy restrictions and thus only uses the “traditional” Linux security.
SELinux comes with the Targeted policy set as the default. Thus, by default, SELinux targets
only a few daemons.
MLS (Multi-Level Security) policy
The MLS policy’s primary purpose is to enforce the Bell-LaPadula model. It grants access to
other subjects and objects based upon a role’s security clearance and the object’s classification level.
In the MLS policy, a security context’s MLS attribute is critical. Otherwise, the policy rules will
not know how to enforce access restrictions.
Minimum policy
This policy is just as it sounds—minimal. It was originally created for low-memory machines or
devices such as smartphones.
622
Downloaded from https://onlinelibrary.wiley.com/doi/ by alex jounh - Oregon Health & Science Univer , Wiley Online Library on [05/12/2025]. See the Terms and Conditions (https://onlinelibrary.wiley.com/terms-and-conditions) on Wiley Online Library for rules of use; OA articles are governed by the applicable Creative Commons License
Part V: Learning Linux Security Techniques
The Minimum policy is essentially the same as the Targeted policy, but only the base policy
rule package is used. This “bare-bones” policy can be used to test out the effects of SELinux on
a single designated daemon. For low-memory devices, the Minimum policy allows SELinux to
run without consuming a great deal of resources.
Understanding SELinux policy rule packages
Policy rules, also called allow rules, are the rules used by SELinux to determine if a subject has
access to an object. Policy rules are installed with SELinux and are grouped into packages, also
called modules.
On your Linux system, there is user documentation on these various policy modules in the
form of HTML files. To view this documentation on Fedora or RHEL, open your system’s browser
and type in the following URL: file:///usr/share/doc/selinux-policy/html/
index.html. If you do not have the policy documentation on your system, you can install
it on a Fedora or RHEL system by typing dnf install selinux-policy-doc at the
command line.
You can review this policy documentation to see how policy rules are created and packaged.
The policy rule packages, along with the SELinux operational modes, policy type, and various security contexts, work together to secure your Linux system via SELinux. The following
sections cover how to begin configuring SELinux to meet your particular organization’s security needs.
Configuring SELinux
SELinux comes preconfigured. You can use the SELinux features without any configuration
work. However, rarely do the preconfigured settings meet all of your Linux system’s security needs.
SELinux configurations can be set and modified only by the root user. Configuration and
policy files are located in the /etc/selinux directory. The primary configuration file is the
/etc/selinux/config file, and it appears as follows:
# cat /etc/selinux/config
# This file controls the state of SELinux on the system.
# SELINUX= can take one of these three values:
#
enforcing -SELinux security policy is enforced.
#
permissive -SELinux prints warnings instead of enforcing.
#
disabled -SELinux is fully disabled.
...
SELINUX=enforcing
# SELINUXTYPE= can take one of these three values:
#
targeted -Targeted processes are protected,
#
minimum -Modification of targeted policy.
#
Only selected processes are protected.
25
623
Downloaded from https://onlinelibrary.wiley.com/doi/ by alex jounh - Oregon Health & Science Univer , Wiley Online Library on [05/12/2025]. See the Terms and Conditions (https://onlinelibrary.wiley.com/terms-and-conditions) on Wiley Online Library for rules of use; OA articles are governed by the applicable Creative Commons License
Chapter 25: Enhancing Linux Security with SELinux
#
mls -Multi Level Security protection.
SELINUXTYPE=targeted
This main SELinux configuration file allows you to set the mode and the policy type.
Setting the SELinux mode
To see SELinux’s current mode on your system, use the getenforce command. To see both
the current mode and the mode set in the configuration file, use the sestatus command.
Both commands are shown in the code that follows:
# getenforce
Enforcing
# sestatus
SELinux status:
SELinuxfs mount:
SELinux root directory:
Loaded policy name:
Current mode:
Mode from config file:
Policy MLS status:
Policy deny_unknown status:
Memory protection checking:
Max kernel policy version:
enabled
/sys/fs/selinux
/etc/selinux
targeted
enforcing
enforcing
enabled
allowed
actual (secure)
34
To change the mode setting, you can use the setenforce command with one of the following options:
■
■
enforcing or 1
permissive or 0
Notice that you cannot use the setenforce command to change SELinux to disabled mode.
The example that follows shows the SELinux mode being changed immediately to permissive
mode via the setenforce command. The sestatus command shows the current operational mode and the mode in the configuration file, which has not been modified. When the
system is rebooted, it determines the SELinux operational mode from the configuration file.
Thus, the permissive mode set in the example that follows is temporary because the enforcing
mode is set via the configuration file when the system is rebooted.
# setenforce 0
# getenforce
Permissive
# sestatus
SELinux status:
SELinuxfs mount:
SELinux root directory:
Loaded policy name:
Current mode:
Mode from config file:
…
624
enabled
/sys/fs/selinux
/etc/selinux
targeted
permissive
enforcing
Downloaded from https://onlinelibrary.wiley.com/doi/ by alex jounh - Oregon Health & Science Univer , Wiley Online Library on [05/12/2025]. See the Terms and Conditions (https://onlinelibrary.wiley.com/terms-and-conditions) on Wiley Online Library for rules of use; OA articles are governed by the applicable Creative Commons License
Part V: Learning Linux Security Techniques
Caution
It is best to switch from the disabled to the enforcing mode by modifying the configuration file and rebooting. Switching
from disabled to enforcing via the setenforce command may hang your system as a result of incorrect file labels.
Keep in mind that, when rebooting after changing from disabled mode, there could be a long wait for your filesystem to be relabeled after the system comes back up in permissive or enforcing mode.
To disable SELinux, you must edit the SELinux configuration file. Rebooting the system always
changes the mode back to what is set in that configuration file. The preferred method of
changing the SELinux mode is to modify the configuration file and then reboot the system.
When switching from disabled to either enforcing or permissive mode, SELinux automatically
relabels the filesystem after a reboot. This means that SELinux checks and changes the security contexts of any files with incorrect security contexts (for example, mislabeled files) that
can cause problems in the new mode. Also, any files not labeled are labeled with contexts.
This relabeling process can take a long time because each file’s context is checked. The following is the message that you’ll receive when a system is going through a relabeling process
after a reboot:
*** Warning -
-SELinux targeted policy relabel is required.
*** Relabeling could take a very long time, depending on file
*** system size and speed of hard drives.
To modify the mode in the /etc/selinux/config file, change the line SELINUX= to one
of the following:
■
■
■
SELINUX=disabled
SELINUX=enforcing
SELINUX=permissive
The SELinux configuration file example that follows shows that the mode has been set to permissive. Now, when a system reboot occurs, the mode is changed.
# cat /etc/selinux/config
# This file controls the state of SELinux on the system.
# SELINUX= can take one of these three values:
#
targeted -Targeted processes are protected,
#
minimum -Modification of targeted policy.
#
Only selected processes are protected.
#
mls -Multi Level Security protection
SELINUX=permissive
…
The primary SELinux configuration file does not just contain the mode setting. It also specifies
the policy type, which will be enforced.
625
25
Downloaded from https://onlinelibrary.wiley.com/doi/ by alex jounh - Oregon Health & Science Univer , Wiley Online Library on [05/12/2025]. See the Terms and Conditions (https://onlinelibrary.wiley.com/terms-and-conditions) on Wiley Online Library for rules of use; OA articles are governed by the applicable Creative Commons License
Chapter 25: Enhancing Linux Security with SELinux
Setting the SELinux policy type
The policy type you choose determines whether SELinux enforces TE, MLS, or a base package.
This type setting directly determines the sets of policy rules used to dictate what an object
can access.
By default, the policy type is set to targeted. To change the default policy type, edit the
/etc/selinux/config file. Change the line SELINUXTYPE= to one of the following:
■
■
■
SELINUX=targeted
SELINUX=mls
SELINUX=minimum
If you set the SELinux type to mls or minimum, you need to make sure you have their policy
package installed first. Check by typing the following:
dnf list selinux-policy-mls
dnf list selinux-policy-minimum
or
The example of the SELinux configuration file that follows shows that the type has been set to
mls. Now when a system reboot occurs, the policy type is changed.
# cat /etc/selinux/config
# This file controls the state of SELinux on the system.
…
# SELINUXTYPE= type of policy in use. Possible values are:
#
targeted -Targeted processes are protected,
#
minimum -Modification of targeted policy.
#
Only selected processes are protected.
#
mls -Multi Level Security protection.
SELINUXTYPE=mls
Managing SELinux security contexts
SELinux security contexts allow SELinux to enforce policy rules for subjects accessing objects.
Your Linux system comes with security contexts already assigned.
To view current SELinux file and process security contexts, use the secon command.
Table 25.1 lists available options on the secon command.
TABLE 25.1
626
secon Command Options
Option
Description
-u
Use this option to show the user of the security context.
-r
Use this option to show the role of the security context.
-t
Use this option to show the type of the security context.
-s
Use this option to show the sensitivity level of the security context.
Downloaded from https://onlinelibrary.wiley.com/doi/ by alex jounh - Oregon Health & Science Univer , Wiley Online Library on [05/12/2025]. See the Terms and Conditions (https://onlinelibrary.wiley.com/terms-and-conditions) on Wiley Online Library for rules of use; OA articles are governed by the applicable Creative Commons License
Part V: Learning Linux Security Techniques
Option
Description
-c
Use this option to show the clearance level of the security context.
-m
Use this option to show the sensitivity and clearance level of the security context as an
MLS range.
If you use the secon command with no designation, it shows you the current process’s security context. To see another process’s security context, use the -p option. The example that
follows shows you how to use secon to view the current and the systemd process’s security context.
# secon -urt
user: unconfined_u
role: unconfined_r
type: unconfined_t
# secon -
urt -
p 1
user: system_u
role: system_r
type: init_t
To view a file’s security context, you use the -f option, as shown here:
# secon -
urt -
f /etc/passwd
user: system_u
role: object_r
type: passwd_file_t
The secon command doesn’t show your security context. To see your security context, use
the id command.
Managing the user security context
Remember that every system user login ID is mapped to a particular SELinux user ID. To see
a mapping list on your system, enter the semanage login -
l command. The semanage
command and its output are shown in the code that follows. If a user login ID is not listed,
then it uses the “default” login mapping, which is the Login Name of _default_. Notice
that the associated MLS/MCS settings for each SELinux user are shown as well.
# semanage login -
l
Login Name
__default__
root
SELinux User
unconfined_u
unconfined_u
MLS/MCS Range
s0-
s0:c0.c1023
s0-
s0:c0.c1023
Service
*
*
To see a current display of the SELinux users and their associated roles, use the command
semanage user -
l. The partial display that follows shows roles mapped to SELinux
usernames:
25
# semanage user -
l
Labeling MLS/
MLS/
SELinux User Prefix
MCS Level MCS Range
SELinux Roles
627
Downloaded from https://onlinelibrary.wiley.com/doi/ by alex jounh - Oregon Health & Science Univer , Wiley Online Library on [05/12/2025]. See the Terms and Conditions (https://onlinelibrary.wiley.com/terms-and-conditions) on Wiley Online Library for rules of use; OA articles are governed by the applicable Creative Commons License
Chapter 25: Enhancing Linux Security with SELinux
guest_u
…
user_u
xguest_u
user
s0
s0
guest_r
user
user
s0
s0
s0
s0
user_r
xguest_r
If you need to add a new SELinux username, the semanage utility is used again. This time,
the command is semanage user -
a selinux_username. To map a login ID to the newly
added SELinux username, the command is semanage login -
a -
s selinux_username
loginID. The semanage utility is a powerful tool in managing your SELinux configuration.
For more information on the semanage utility, see the man pages.
Managing the file security context
Labeling files is critical to maintaining proper access control to each file’s data. SELinux does
set file security labels upon installation and upon system reboot when the SELinux mode is
switched from disabled. To see a file’s current label (aka security context), use the ls -Z
command, as shown here:
# ls -
Z /etc/passwd
system_u:object_r:passwd_file_t:s0 /etc/passwd
You can use several commands to manage file security context labels, as shown in Table 25.2.
TABLE 25.2
File Security Context Label Management Commands
Utility
Description
chcat
Use this to change a file’s security context label’s category.
chcon
Use this to change a file’s security context label.
fixfiles
This calls the restorecon/setfiles utility.
restorecon
This does the exact same thing as setfiles utility, but it has a different interface than setfiles.
setfiles
Use this to verify and/or correct security context labels. It can be run for file label
verification and/or relabeling files when adding a new policy module to the
system. Does exactly the same thing as the restorecon utility but has a different interface than restorecon.
The chcat and chcon commands, shown in Table 25.2, allow you to change a file’s security context. The fixfiles, restorecon, and setfiles commands are essentially the
same utility. However, restorecon is the popular choice to use when fixing file labels. The
command restorecon filename changes a file back to its default security context.
Managing the process security context
The definition of a process is a running program. When you run programs or start services on
a Linux system, each one is given a process ID (see Chapter 6, “Managing Running Processes”).
On a system with SELinux, a process is also given a security context.
628
Downloaded from https://onlinelibrary.wiley.com/doi/ by alex jounh - Oregon Health & Science Univer , Wiley Online Library on [05/12/2025]. See the Terms and Conditions (https://onlinelibrary.wiley.com/terms-and-conditions) on Wiley Online Library for rules of use; OA articles are governed by the applicable Creative Commons License
Part V: Learning Linux Security Techniques
How a process gets its security context depends upon which process started it. Remember
that systemd (previously init) is the “mother” of all processes (see Chapter 15, “Starting
and Stopping Services”). Thus, many daemons and processes are started by systemd. The
processes systemd starts are given new security contexts. For instance, when the apache
daemon is started by systemd, it is assigned the type httpd_t. The context assigned is
handled by the SELinux policy written specifically for that daemon. If no policy exists for a
process, then it is assigned a default type, unconfined_t.
For a program or application run by a user (parent process), the new process (child process)
inherits the user’s security context. Of course, this occurs only if the user is allowed to run the
program. A process can also run a program. The child process in this case also inherits its parent process’s security context. Thus, the child process runs in the same domain.
So, a process’s security context is set before the program is run and depends upon who started
it. You can use a couple of commands to change the security contexts under which a program
is run:
runcon: Run the program using options to determine the user, role, and type
(aka domain).
sandbox: Run the program within a tightly controlled domain (aka sandbox).
You can cause several problems by using runcon, so use it with caution. However, sandbox
offers a great deal of protection. It allows flexibility in testing out new programs on your
Linux system.
Managing SELinux policy rule packages
Policy rules are the rules used by SELinux to determine whether a subject has access to an
object. They are grouped into packages, also called modules, and are installed with SELinux.
An easy way to view the modules on your system is to use the semodule -l command. It
lists all of the policy modules along with their current version number. An example of the
semodule -l command is shown here:
# semodule -l
abrt
accountsd
acct
…
xserver
zabbix
zarafa
zebra
zoneminder
zosremote
25
Several tools can help you manage and even create your own policy modules. Table 25.3 shows
the various policy rule package tools available on a Fedora system.
629
Downloaded from https://onlinelibrary.wiley.com/doi/ by alex jounh - Oregon Health & Science Univer , Wiley Online Library on [05/12/2025]. See the Terms and Conditions (https://onlinelibrary.wiley.com/terms-and-conditions) on Wiley Online Library for rules of use; OA articles are governed by the applicable Creative Commons License
Chapter 25: Enhancing Linux Security with SELinux
TABLE 25.3
SELinux Policy Package Tools
Policy Tool
Description
audit2allow
Generates policy allow/dontaudit rules from logs of denied
operations
audit2why
Generates a description of why the access was denied from logs of
denied operations
checkmodule
Compiles policy modules
checkpolicy
Compiles SELinux policies
load_policy
Loads new policies into the kernel
semodule_expand
Expands a policy module package
semodule_link
Links policy module packages together
semodule_package
Creates a policy module package
The following is an example policy typically used as a framework to create local policy rules.
The example policy is rather long, so only a portion of it is shown.
# cat /usr/share/doc/selinux-policy/example.te
policy_module(myapp,1.0.0)
########################################
#
# Declarations
#
type myapp_t;
type myapp_exec_t;
domain_type(myapp_t)
domain_entry_file(myapp_t, myapp_exec_t)
type myapp_log_t;
logging_log_file(myapp_log_t)
type myapp_tmp_t;
files_tmp_file(myapp_tmp_t)
…
allow myapp_t myapp_tmp_t:file manage_file_perms;
files_tmp_filetrans(myapp_t,myapp_tmp_t,file)
#
You can see from the preceding example code that a special syntax is used in policy code. To
create and modify policy rules, you need to learn this policy rule language syntax, learn how
630
Downloaded from https://onlinelibrary.wiley.com/doi/ by alex jounh - Oregon Health & Science Univer , Wiley Online Library on [05/12/2025]. See the Terms and Conditions (https://onlinelibrary.wiley.com/terms-and-conditions) on Wiley Online Library for rules of use; OA articles are governed by the applicable Creative Commons License
Part V: Learning Linux Security Techniques
to use the SELinux policy compilers, and learn how to link policy rule files together to form
modules; you probably need to take a couple of daylong classes to accomplish this. You may
be tempted to give up on SELinux at this point. However, it is much easier to use Booleans to
modify policies.
Managing SELinux via Booleans
SELinux policy rule writing and module creation is a rather complicated and time-consuming
activity. Creating incorrect policy rules could potentially compromise your Linux system’s security. Thankfully, SELinux provides Booleans.
A Boolean is a toggle switch that toggles a setting on or off. A Boolean switch allows you to
change parts of SELinux policy rules without any knowledge of policy writing. These policy
changes can be done without a system reboot too!
To see a list of all of the current Booleans used in SELinux, use the getsebool -a
command. The following is an example of the SELinux policy rules with Booleans on a Fedora
Linux system:
# getsebool -a
abrt_anon_write --> off
abrt_handle_event --> on
…
zebra_write_config --> off
zoneminder_anon_write --> off
zoneminder_run_sudo --> off
To see a specific policy that can be modified by a Boolean, the getsebool command is used
again. This time, the policy name is passed to it, as shown in the following example:
# getsebool httpd_can_connect_ftp
httpd_can_connect_ftp --> off
To toggle a policy, you can use the setsebool command. This command changes the policy
rule temporarily. When the system is rebooted, the Boolean returns to its original setting. If
you need this setting to be permanent, you can use setsebool with the -P option.
The setsebool command has six settings: three for turning a policy on (on, 1, or true),
and three for turning a policy off (off, 0, or false).
One example where you might want to use setsebool relates to restricting the use of executable files. In some situations, it is not good security to allow users to execute programs
from their /home directory. To prevent this from happening, the allow_user_exec_
content policy rule needs to be turned off. The example that follows shows the setsebool
command being used to do just that. Notice that the -P option is used to make this setting
permanent.
# setsebool -
P allow_user_exec_content off
631
25
Downloaded from https://onlinelibrary.wiley.com/doi/ by alex jounh - Oregon Health & Science Univer , Wiley Online Library on [05/12/2025]. See the Terms and Conditions (https://onlinelibrary.wiley.com/terms-and-conditions) on Wiley Online Library for rules of use; OA articles are governed by the applicable Creative Commons License
Chapter 25: Enhancing Linux Security with SELinux
The getsebool command verifies that the Boolean setting has been correctly made:
# getsebool allow_user_exec_content
allow_user_exec_content --> off
Booleans make modifying current SELinux policy rules much easier. Overall, the SELinux
command line configuration utilities, such as getsebool, are easy to use. However, if you
want a GUI configuration tool, SELinux has one. For Fedora and RHEL, it is installed via the
command dnf install policycoreutils-
gui. To use this configuration tool, simply
type in the command system-config-selinux and a GUI interface appears.
Monitoring and Troubleshooting SELinux
SELinux provides lots of information to tools that monitor and log system activities. It logs
all access denials, which can help you determine whether an attack is being attempted. These
same SELinux log files are also useful in troubleshooting SELinux problems.
Understanding SELinux logging
SELinux uses a cache called the Access Vector Cache (AVC) when reviewing policy rules for particular security contexts. When access is denied, called an AVC denial, a denial message is put
into a log file.
These logged denial messages can help you diagnose and address routine SELinux policy violations. Where these denial messages are logged depends upon the status of the auditd and
rsyslogd daemons:
■
■
If the auditd daemon is running, the denial messages are logged to /var/log/
audit/audit.log.
If auditd is not running, but the rsyslogd daemon is running, the denial messages are logged to /var/log/messages.
Note
If both auditd and rsyslogd are running and you have the setroubleshootd daemon on your system,
denial messages are sent to both the audit.log and messages log files. However, denial information in the
messages log file is put into a more understandable format by the setroubleshootd daemon.
Reviewing SELinux messages in the audit log
If you have the auditd daemon running, you can quickly see if any AVC denials have
been logged by using the aureport command. The example that follows shows the use of
aureport and grep to search for AVC denials. At least one denial has been logged to
/var/log/audit/audit.log:
# aureport | grep AVC
Number of AVC's: 1
632
Downloaded from https://onlinelibrary.wiley.com/doi/ by alex jounh - Oregon Health & Science Univer , Wiley Online Library on [05/12/2025]. See the Terms and Conditions (https://onlinelibrary.wiley.com/terms-and-conditions) on Wiley Online Library for rules of use; OA articles are governed by the applicable Creative Commons License
Part V: Learning Linux Security Techniques
After you discover that an AVC denial has been logged in audit.log, you can use
ausearch to review the denial message(s). The example that follows shows the ausearch
command being used to review the logged AVC denial message:
# ausearch -
m avc
type=AVC msg=audit(1580397837.344:274): avc: denied { getattr } for
pid=1067
comm="httpd" path="/var/myserver/services" dev="dm-
0" ino=655836
scontext=system_u:system_r:httpd_t:s0
tcontext=unconfined_u:object_r:var_t:s0 tclass=file permissive=0
The display provides information on who was attempting access, along with their security context when attempting it. Look for these keywords in an AVC denial message:
■
■
■
■
type=AVC
avc: denied
com="httpd"
path="/var/myserver/services"
This can give you enough data either to begin fixing a problem or to track down malicious
activity. Here, the /var/myserver/services directory has the wrong SELinux file context to be read by the httpd service.
Reviewing SELinux messages in the messages log
If you have the auditd service running, you can find AVC denial messages by searching
through the /var/log/audit/audit.log file using grep. For the latest RHEL and
Fedora systems or any Linux system using systemd, you can run the journalctl command
to check for AVC denial log messages as well. Within each log message is an AVC message that
you can view to get information about that AVC denial, as in the following example:
# journalctl | grep AVC
type=AVC msg=audit(1580397837.346:275): avc: denied { getattr }for
pid=1067
comm="httpd" path="/var/myserver/services" dev="dm-
0" ino=655836
scontext=system_u:system_r:httpd_t:s0
tcontext=unconfined_u:object_r:var_t:s0 tclass=file permissive=0
Since you know that there are AVC denials, you can pass the entire /var/log/audit/
audit.log file to sealert to step through the issues:
# sealert -
a /var/log/audit/audit.log
SELinux is preventing httpd from getattr access on the file
/var/myserver/services.
*****
Plugin catchall (100. confidence) suggests
25
*************
If you believe that httpd should be allowed getattr access on the
services file by default.
Then you should report this as a bug.
633
Downloaded from https://onlinelibrary.wiley.com/doi/ by alex jounh - Oregon Health & Science Univer , Wiley Online Library on [05/12/2025]. See the Terms and Conditions (https://onlinelibrary.wiley.com/terms-and-conditions) on Wiley Online Library for rules of use; OA articles are governed by the applicable Creative Commons License
Chapter 25: Enhancing Linux Security with SELinux
You can generate a local policy module to allow this access.
Do
allow this access for now by executing:
# ausearch -
c ‘httpd’ -
-
raw | audit2allow -
M my-
httpd
# semodule -
X 300 -
i my-
httpd.pp
Additional Information:
Source Context
system_u:system_r:httpd_t:s0
Target Context
unconfined_u:object_r:var_t:s0
Target Objects
/var/myserver/services [ file ]
…
Raw Audit Messages
type=AVC msg=audit(1580397837.346:275): avc: denied { getattr }
for pid=1067 comm="httpd" path="/var/myserver/services" dev="dm-
0"
ino=655836 scontext=system_u:system_r:httpd_t:s0
tcontext=unconfined_u:object_r:var_t:s0 tclass=file permissive=0
Hash: httpd,httpd_t,var_t,file,getattr
In this case, if you want to allow access by the httpd service to the content in the directory
being denied, you can run the ausearch and semodule commands shown in the output.
This creates and applies a new SELinux policy to allow access to the content. Provided there
are no other permission problems, httpd should be able to access that content.
Troubleshooting SELinux logging
Obviously, the log files are extremely important for diagnosing and addressing SELinux policy
violations. The log files, or directly querying the systemd journal (journalctl command),
are your first steps in troubleshooting SELinux. Thus, it is important to make sure your Linux
system is logging messages in the first place.
A quick way to determine if the logging is taking place is to check if the proper daemons are
running: auditd, rsyslogd, and/or setroubleshootd. Use an appropriate command,
such as systemctl status auditd.service. Of course, the command you use depends
on your Linux distribution and its version. See Chapter 15 for more details. If the daemon is
not running, start it so that logging may begin to occur.
Caution
Sometimes AVC denials are not logged because of dontaudit policy rules. Although the dontaudit rules help
reduce false positives in the logs, they can cause problems when troubleshooting. To fix this, temporarily disable all
dontaudit policy rules using the command semodule -DB.
Troubleshooting common SELinux problems
When you begin working with SELinux, it is easy to overlook the obvious. Whenever access is
denied, you should first check the “traditional” Linux DAC permissions. For example, use the
ls -l command and double-check that a file’s owner; group; and read, write, and execute
assignments are correct.
634
Downloaded from https://onlinelibrary.wiley.com/doi/ by alex jounh - Oregon Health & Science Univer , Wiley Online Library on [05/12/2025]. See the Terms and Conditions (https://onlinelibrary.wiley.com/terms-and-conditions) on Wiley Online Library for rules of use; OA articles are governed by the applicable Creative Commons License
Part V: Learning Linux Security Techniques
With SELinux, several regular items can cause problems:
■
■
■
■
Using a nonstandard directory for a service
Using a nonstandard port for a service
Moving files that result in losing their security context labels
Having Booleans set incorrectly
Each one of these problems can be solved fairly quickly.
Using a nonstandard directory for a service
For various reasons, you may decide to store a service’s files in a nonstandard directory. When
you do this, SELinux needs to know that this nonstandard behavior has occurred. Otherwise, it
denies access to legitimate service access requests.
For example, you decided to keep your HTML files in a different location from the standard
/var/www/html. You put the files in /abc/www/html. You must let SELinux know that
you want the http service to be able to access the files within /abc/www/html. The commands to accomplish this are semanage and restorecon. In the following code snippet,
the commands are used to add the proper security context type on the /abc/www/html
directory and all it contains:
# semanage fcontext -
a -
t httpd_sys_content_t
"/abc/www/html(/.*)?"
To actually set the new security context type to the files within the directory, you need to use
the restorecon -R command. This is accomplished in the following code:
# restorecon -
R -
v /abc/www/html
# ls -
Zd /abc/www/html
unconfined_u:object_r:httpd_syscontent_t:s0 /abc/www/html
Now the httpd daemon has permission to access your HTML files in their nonstandard directory location. Any files you create in that directory will inherit that context as well, so they
also can be accessible to the httpd daemon.
Using a nonstandard port for a service
Similar to the problem just described, you may decide to have a service listening on a nonstandard port. When you make this port change, the service often fails to start.
For example, you decide for security purposes to move sshd from port 22 to a nonstandard
port, 47347. SELinux does not know about this port, and the service fails to start. To fix this
problem, you must first find the security context type for sshd. This is accomplished using
the code that follows by issuing the semanage port -
l command and piping the results
into grep to search for ssh.
# semanage port -
l | grep ssh
ssh_port_t
tcp
22
635
25
Downloaded from https://onlinelibrary.wiley.com/doi/ by alex jounh - Oregon Health & Science Univer , Wiley Online Library on [05/12/2025]. See the Terms and Conditions (https://onlinelibrary.wiley.com/terms-and-conditions) on Wiley Online Library for rules of use; OA articles are governed by the applicable Creative Commons License
Chapter 25: Enhancing Linux Security with SELinux
In the preceding example, you can see that the context type needed is ssh_port_t. Now,
using the semanage command again, you add that type to port 47347, as shown here:
# semanage port -
a -
t ssh_port_t -
p tcp 47347
# semanage port -
l | grep ssh
ssh_port_t
tcp
47347, 22
At this point, edit the /etc/ssh/sshd_config file to add a Port 47347 line to the file.
Then restart the sshd service so that the service listens on the nonstandard port 47347.
Moving files and losing security context labels
You used the cp command to move a file from /etc temporarily to the /tmp directory. Then
you used the mv command to put it back. Now the file has the security context of the temporary directory instead of its original security context, and your system is getting AVC denial
messages when the service using that file tries to start up.
There is an easy fix, thanks to the restorecon command. Simply type in restore
con file, and the file has its permanent security context restored. If you want to restore
an entire directory structure, you could use that command recursively. For example, use
restorecon -
R /etc/myconfigs.
Booleans set incorrectly
Another common problem is simply setting a Boolean incorrectly. This can give you several
AVC denials.
For example, if your system’s scripts are no longer able to connect out to the network and
you are getting AVC denials in your logs, you need to check the httpd Booleans. Use the
getsebool -a command, and pipe it into grep to search for any Booleans that affect
httpd. The example here shows these commands being used:
# getsebool -
a | grep http
…
httpd_can_network_connect --> off
…
The getsebool command shows the Boolean httpd_can_network_connect is set to
off. To change this Boolean, use the following command: setsebool -
P httpd_can_
network_connect on. Notice the -P option was used to make the setting permanent. Now
your scripts should be able to connect out to the network.
Putting It All Together
Obviously, SELinux is a rather complicated and rich tool. You now have a good, solid foundation on the SELinux basics. Here are some recommendations as you get started implementing
SELinux on your system.
636
Downloaded from https://onlinelibrary.wiley.com/doi/ by alex jounh - Oregon Health & Science Univer , Wiley Online Library on [05/12/2025]. See the Terms and Conditions (https://onlinelibrary.wiley.com/terms-and-conditions) on Wiley Online Library for rules of use; OA articles are governed by the applicable Creative Commons License
Part V: Learning Linux Security Techniques
The default targeted SELinux mode can be used to secure most basic network services
(httpd, vsftpd, Samba, and so on) without you needing to assign special user roles or otherwise lock down your system. In this case, the main things you need to do are to put files in
standard locations (or run commands to assign the proper file contexts to nonstandard locations), make sure that Booleans are turned on for less secure features that you want on anyway, and watch AVC denials for problems.
■
■
■
Start with the permissive operational mode. This allows requests to succeed that
SELinux sees as insecure, while still logging those insecurities.
Run your current system for a significant amount of time in permissive mode. Review
the logs and see what problems may occur with the default SELinux settings. You
can then change Booleans or file contexts so that features improperly denied can be
allowed. After the problems are worked out, turn on enforcing mode.
Overall, implement SELinux configuration changes one at a time in a test environment or using permissive mode. See what kind of effect each configuration change has
before moving on to the next one. You can then use the audit2allow command to
allow actions that were stopped by AVC denials to be selectively allowed in the policy
for a service.
Obtaining More Information on SELinux
Several additional sources of information can help you with SELinux on your Linux system:
Your System’s man Pages Issue the command man -
k selinux to find all of the
various man pages that you can review for the SELinux utilities currently installed on
your system. If you are debugging SELinux problems for a well-known service (such as
httpd, vsftpd, Samba, and so on), there is probably a man page associated with
how specifically to fix SELinux problems with that service. For example:
$ man -
k selinux | grep vsftpd
systemd_vsftpd_generator_selinux (8) -SELinux for systemd_vsftpd_
generator
The Red Hat Enterprise Linux Manuals Located at https://docs.redhat.com, this
site contains an entire manual on SELinux.
The Fedora Project SELinux Guide Located at https://docs.fedoraproject.org,
this site has a Security-Enhanced Linux Guide. However, the guide is not updated for
every Fedora version, so you may need to look in older versions to find it. Also, the
SELinux Guide is not located within the Security manual, but the Security manual is a
good manual to review as well.
SELinux Project Wiki This is the official SELinux project page. Several resources are
available at this site, which is located at https://github.com/selinuxproject.
25
637
Downloaded from https://onlinelibrary.wiley.com/doi/ by alex jounh - Oregon Health & Science Univer , Wiley Online Library on [05/12/2025]. See the Terms and Conditions (https://onlinelibrary.wiley.com/terms-and-conditions) on Wiley Online Library for rules of use; OA articles are governed by the applicable Creative Commons License
Chapter 25: Enhancing Linux Security with SELinux
Summary
SELinux provides a security enhancement to Linux. It is installed by default on many Linux
distributions. In this chapter, you learned the benefits of SELinux, how it works, how to set
it up, how to fix various problems with SELinux, and how to get more information about this
important security enhancement.
At first glance, SELinux appears rather complicated. However, after it’s broken down into
its various components—operational modes, security contexts, policy types, and policy
packages—you can see how the various pieces work together. Each component plays an important role for enforcing and testing the chosen security requirements for your organization.
You learned about the various steps available to configure SELinux. Even though SELinux
comes preconfigured, you may need to make some modifications to meet your organization’s
security needs. Each component has its own configuration steps and settings to choose.
Though policy rule creation was not covered, you did learn how to modify the supplied policies
via Booleans.
SELinux provides another tool for monitoring your Linux system’s security. Because SELinux
logs all access denials, it can help you determine if an attack has been or is being attempted.
Even the best-laid plans can go badly. Therefore, in this chapter, you learned how to fix
common SELinux configuration problems.
In the next chapter, you’ll learn how to protect your Linux system on a network. You’ll learn
about controlling access, managing firewalls, and securing remote access.
Exercises
Use these exercises to test your knowledge of using SELinux. These tasks assume you are
running a Fedora or Red Hat Enterprise Linux system (although some tasks work on other
Linux systems as well). If you are stuck, solutions to the tasks are shown in Appendix B
(although in Linux, there are often multiple ways to complete a task).
1. Making no changes to the SELinux primary configuration file, write down the
command to temporarily set your system into the permissive operating mode
for SELinux.
2. Making no changes to the SELinux primary configuration file, write down the
command to temporarily set your system into the enforcing mode for SELinux.
3. What current and permanent SELinux policy types are set on your system and how did
you find them?
4. List the security context for the /etc/hosts file and identify its different security
context attributes.
638
Downloaded from https://onlinelibrary.wiley.com/doi/ by alex jounh - Oregon Health & Science Univer , Wiley Online Library on [05/12/2025]. See the Terms and Conditions (https://onlinelibrary.wiley.com/terms-and-conditions) on Wiley Online Library for rules of use; OA articles are governed by the applicable Creative Commons License
Part V: Learning Linux Security Techniques
5. Create a file called test.html in your home directory, and assign its type to
httpd_sys_content_t. (This is something that you might do to make content
available to be shared by your web server outside of the common /var/www/html
directory.)
6. List the security context for the running crond process and identify its security context attributes.
7. Create a file called /etc/test.txt, change its file context to user_tmp_t,
restore it to its proper content (the default context for the /etc directory), and
remove the file. Use the ls -
Z /etc/test.txt command to check the file at each
point in the process.
8. You have a tftp server on your private network, and you want to allow anonymous
writes and access to the tftp service’s home directory (while SELinux is in enforcing
mode). Determine what Booleans allow anonymous writes and access to the tftp service’s home directory and turn those Booleans on.
9. What command would list out all of the SELinux policy modules on your system along
with their version number?
10. Tell SELinux to allow access to the sshd service through TCP Port 54903.
25
639
Downloaded from https://onlinelibrary.wiley.com/doi/ by alex jounh - Oregon Health & Science Univer , Wiley Online Library on [05/12/2025]. See the Terms and Conditions (https://onlinelibrary.wiley.com/terms-and-conditions) on Wiley Online Library for rules of use; OA articles are governed by the applicable Creative Commons License
Chapter 25: Enhancing Linux Security with SELinux
26
Securing Linux on a Network
IN THIS CHAPTER
Managing network services
Controlling access to network services
Implementing firewalls
S
etting up your Linux system on a network, especially a public network, creates a whole new set
of challenges when it comes to security. The best way to secure your Linux system is to keep it
off all networks. However, that is rarely a feasible option.
Entire books have been filled with information on how to secure a computer system on a network. Many
organizations hire full-time computer security administrators to watch over their network-attached Linux
systems. Therefore, think of this chapter as a brief introduction to securing Linux on a network.
Auditing Network Services
Most Linux systems used for large enterprises are configured as servers that, as the name implies, offer services to remote clients over a network. A network service is any task that the computer performs requiring
it to send and receive information over the network using some predefined set of rules. Routing email is a
network service, as is serving web pages.
A Linux server has the potential to provide thousands of services. Many of them are listed in the
/etc/services file. Consider the following snippets from the /etc/services file:
$
#
#
#
#
#
#
#
#
#
cat /etc/services
/etc/services:
$Id: services,v 1.49 2017/08/18 12:43:23 ovasik Exp $
Network services, Internet style
IANA services version: last updated 2021-
01-
19
Note that it is presently the policy of IANA to assign …
Each line describes one service, and is of the form:
641
Linux Bible, Eleventh Edition. Christopher Negus.
© 2026 John Wiley & Sons, Inc. All rights reserved, including rights for text and data mining and training of artificial intelligence technologies or similar
technologies. Published 2026 by John Wiley & Sons, Inc.
Downloaded from https://onlinelibrary.wiley.com/doi/ by alex jounh - Oregon Health & Science Univer , Wiley Online Library on [05/12/2025]. See the Terms and Conditions (https://onlinelibrary.wiley.com/terms-and-conditions) on Wiley Online Library for rules of use; OA articles are governed by the applicable Creative Commons License
CHAPTER
# service-
name port/protocol [aliases …]
[# comment]
…
echo
7/tcp
echo
7/udp
discard
9/tcp
sink null
discard
9/udp
sink null
systat
11/tcp
users
systat
11/udp
users
daytime
13/tcp
daytime
13/udp
qotd
17/tcp
quote
qotd
17/udp
quote
chargen
19/tcp
ttytst source
chargen
19/udp
ttytst source
ftp-
data
20/tcp
ftp-
data
20/udp
# 21 is registered to ftp, but also used by fsp
ftp
21/tcp
…
http
80/tcp
www www-
http
# WorldWideWeb HTTP
http
80/udp
www www-
http
# HyperText Transfer
Protocol
http
80/sctp
# HyperText Transfer
Protocol
kerberos
88/tcp
kerberos5 krb5 # Kerberos v5
kerberos
88/udp
kerberos5 krb5 # Kerberos v5
…
After the comment lines, notice three columns of information. The left column contains the
name of each service. The middle column defines the port number and protocol type used for
that service. The right column contains an optional alias or list of aliases for the service.
Some Linux distributions come with unneeded network services running, although “secure
by default” has become more of a guiding principle over the years. An unnecessary service
exposes your Linux system to malicious attacks. For example, if your Linux server is a print
server, serving only people inside your home or office, then you would not want that service
exposed outside of your local network. In fact, you would probably not even want that server
directly exposed to the Internet.
Originally, restricting services on Linux systems meant setting up individual physical Linux
servers with only a few services running on each. Later, running multiple Linux virtual
machines on a physical host lets you lock down small sets of services on virtual machines.
More recently, containerized applications can allow many more separate and secured services
to run on each physical host.
Evaluating access to network services with nmap
A wonderful tool to help you review your network services from a network standpoint is the
nmap security scanner. The nmap utility is available in most Linux distribution repositories
and has a web page full of information at http://nmap.org.
642
Downloaded from https://onlinelibrary.wiley.com/doi/ by alex jounh - Oregon Health & Science Univer , Wiley Online Library on [05/12/2025]. See the Terms and Conditions (https://onlinelibrary.wiley.com/terms-and-conditions) on Wiley Online Library for rules of use; OA articles are governed by the applicable Creative Commons License
Part V: Learning Linux Security Techniques
To install nmap on a Fedora or RHEL distribution, use the yum or dnf command (using root
privileges), as shown in the example that follows:
# dnf install nmap -
y
Updating Subscription Management repositories.
Last metadata expiration check: 0:03:41 ago on Sun 12 Oct 2025
11:24:07 PM EDT.
Dependencies resolved.
=====================================================================
Package
Arch
Version
Repository
Size
=====================================================================
Installing:
nmap
x86_64 4:7.92-
3.fc41 fedora
23.7 MiB
...
To install the nmap utility on an Ubuntu distribution, type sudo apt-
get install
nmap at the command line.
The nmap utility’s full name is Network Mapper. It has a variety of uses for security audits
and network exploration. Using nmap to do various port scans allows you to see what services
are running on all of the servers on your local network and whether they are advertising their
availability.
Note
What is a port? Ports, or more correctly network ports, are numeric values used by the TCP and UDP network protocols
as access points to services on a system. Standard port numbers are assigned to services so that a service knows to
listen on a particular port number and a client knows to request the service on that port number.
For example, port 80 is the standard network port for unencrypted (HTTP) traffic to the Apache web service. So, if you
ask for www.example.com from your web browser, the browser assumes you mean to use TCP port 80 on the server
that offers that web content. Think of a network port as a door to your Linux server. Each door is numbered. And behind
every door is a particular service waiting to help whoever knocks on that door.
To audit your server’s ports, the nmap utility offers several useful scan types. The nmap site
has an entire manual on all of the port scanning techniques that you can use at http://
nmap.org/book/man-port-scanning-techniques.html. Here are two basic port scans to get
you started on your service auditing:
TCP Connect port scan For this scan, nmap attempts to connect to ports using the
Transmission Control Protocol (TCP) on the server. If a port is listening, the connection
attempt succeeds.
TCP is a network protocol used in the TCP/IP network protocol suite. TCP is a
connection-oriented protocol. Its primary purpose is to negotiate and initiate a connection using what is called a three-way handshake. TCP sends a synchronize packet
(SYN) to a remote server specifying a specific port number in the packet. The remote
server receives the SYN and replies with an acknowledgment packet (SYN-ACK) to the
643
26
Downloaded from https://onlinelibrary.wiley.com/doi/ by alex jounh - Oregon Health & Science Univer , Wiley Online Library on [05/12/2025]. See the Terms and Conditions (https://onlinelibrary.wiley.com/terms-and-conditions) on Wiley Online Library for rules of use; OA articles are governed by the applicable Creative Commons License
Chapter 26: Securing Linux on a Network
originating computer. The original server then acknowledges (ACK) the response, and
a TCP connection is officially established. This three-way handshake is often called a
SYN-SYN-ACK or SYN, SYN-ACK, ACK.
If you select a TCP Connect port scan, the nmap utility uses this three-way handshake
to do a little investigative activity on a remote server. Any services that use the TCP
protocol will respond to the scan.
UDP port scan For this scan, nmap sends a UDP packet to every port on the system
being scanned. UDP is another popular protocol in the TCP/IP network protocol suite.
Unlike TCP, however, UDP is a connectionless protocol. If the port is listening and has a
service that uses the UDP protocol, it responds to the scan.
Tip
Keep in mind that free and open source software (FOSS) utilities are also available to those with malicious intent. While
you are doing these nmap scans, realize that the remote scan results that you see for your Linux server are the same
scan results that others will see. This will help you evaluate your system’s security settings in terms of how much information is being given out to port scans. You should use tools like nmap only on your own systems, because scanning
ports on other people’s computers might be illegal and can at least give the impression that you are trying to break in.
When you run the nmap utility, it provides a handy little report with information on the
system you are scanning and the ports it sees. The ports are given a “state” status. nmap
reports six possible port states:
open: This is the most dangerous state an nmap scan can report for a port. An open
port indicates that a server has a service handling requests on this port. Think of it
as a sign on the door, “Come on in! We are here to help you.” Of course, if you are
offering a public service, you want the port to be open.
closed: A closed port is accessible, but there is no service waiting on the other side
of this door. However, the scan status still indicates that there is a Linux server at this
particular IP address.
filtered: This is the best state to secure a port that you don’t want anyone to access.
It cannot be determined if a Linux server is actually at the scanned IP address. It is
possible that a service could be listening on a particular port, but the firewall is blocking access to that port, effectively preventing any access to the service through the
particular network interface.
unfiltered: The nmap scan sees the port but cannot determine if the port is open
or closed.
open|filtered: The nmap scan sees the port but cannot determine if the port is
open or filtered.
closed|filtered: The nmap scan sees the port but cannot determine if the port is
closed or filtered.
644
Downloaded from https://onlinelibrary.wiley.com/doi/ by alex jounh - Oregon Health & Science Univer , Wiley Online Library on [05/12/2025]. See the Terms and Conditions (https://onlinelibrary.wiley.com/terms-and-conditions) on Wiley Online Library for rules of use; OA articles are governed by the applicable Creative Commons License
Part V: Learning Linux Security Techniques
To help you better understand how to use the nmap utility, review the following example. For
the purposes of building a network services list, the example nmap scans are conducted on a
Fedora system. The first scan is a TCP Connect scan from the command line using the loopback
address 127.0.0.1.
# nmap -
sT 127.0.0.1
Starting Nmap 7.94SVN ( https://nmap.org ) at 2025-
06-
21 10:19 EDT
Nmap scan report for localhost (127.0.0.1)
Host is up (0.00024s latency).
Not shown: 991 closed ports
PORT
STATE SERVICE
22/tcp open ssh
111/tcp open rpcbind
Nmap done: 1 IP address (1 host up) scanned in 1.34 seconds
The TCP Connect nmap scan reports that two TCP ports are open and have services listening on
the localhost (127.0.0.1) for requests to these ports:
■
■
The ssh service is listening at TCP port 22.
The Remote Procedure Call (rpcbind) service is listening at TCP port 111.
The next nmap scan is a UDP scan on the Fedora system’s loopback address:
# nmap -
sU 127.0.0.1
Starting Nmap 7.92 ( https://nmap.org ) at 2025-
06-
21 10:23 EDT
Nmap scan report for localhost (127.0.0.1)
Host is up (0.0000080s latency).
Not shown: 994 closed ports
PORT
111/udp
514/udp
STATE
SERVICE
open
rpcbind
open|filtered syslog
Nmap done: 1 IP address (1 host up) scanned in 2.24 seconds
The UDP nmap scan reports that two UDP ports are open and have services listening on
those ports:
■
■
Remote Procedure Call (rpcbind) service is listening at UDP port 111.
Syslog (syslog) is listening at UDP port 514.
Notice that port 111’s rpcbind is listed under both nmap’s TCP Connect scan and the UDP scan
because the rpcbind service can communicate over both the TCP and the UDP protocols and
thus is listed in both scans.
645
26
Downloaded from https://onlinelibrary.wiley.com/doi/ by alex jounh - Oregon Health & Science Univer , Wiley Online Library on [05/12/2025]. See the Terms and Conditions (https://onlinelibrary.wiley.com/terms-and-conditions) on Wiley Online Library for rules of use; OA articles are governed by the applicable Creative Commons License
Chapter 26: Securing Linux on a Network
Using these two simple nmap scans, TCP Connect and UDP on your loopback address, you can
build a list of the network services offered by your Linux server. Keep in mind that port numbers are associated with a particular protocol (TCP or UDP) and a particular network interface.
For example, if you have one network interface card (NIC) on a computer that faces the Internet and another that faces a private network, you may want to offer a private service (like the
CUPS service for printing) to the NIC on your private network. But you may want to filter that
port (631) on the NIC that faces the Internet.
Using nmap to audit your network services advertisements
You probably want lots of people to visit your website (httpd service). You probably don’t
want everyone on the Internet to be capable of accessing your SMB file shares (smb service).
To make sure you are properly separating access to those two types of services, you want to be
able to check what a malicious scanner can see of the services available on your public-facing
network interfaces.
The idea here is to compare what your Linux server looks like from the inside versus what
it looks like from the outside. If you determine that some network services are accessible
that you intended to keep private, you can take steps to block access to them from external
interfaces.
Tip
You may be tempted to skip the scans from inside your organization’s internal network. Don’t. Malicious activity often
occurs by a company’s own employees or by someone who has already penetrated external defenses. Again, the nmap
utility is a great help here. To get a proper view of how your Linux server’s ports are seen, you need to conduct scans
from several locations. For example, a simple audit would set up scans in these places:
■
On the Linux server itself
From another server on the organization’s same network
■
From outside the organization’s network
■
In the following examples, part of a simple audit is conducted. The nmap utility is run on a
Fedora system, designated as Host-A. Host-A is the Linux server whose network services are to
be protected. Host-B is a Linux server using the Ubuntu distribution and is on the same network as Host-A.
Tip
Security settings on various network components, such as the server’s firewall and the company’s routers, should all be
considered when conducting audit scans.
For this audit example, a scan is run from Host-A, using not the loopback address but the
actual IP address. First, the IP address for Host-B is determined from that host using the ip
addr show command. The IP address is 192.168.1.18.
646
Downloaded from https://onlinelibrary.wiley.com/doi/ by alex jounh - Oregon Health & Science Univer , Wiley Online Library on [05/12/2025]. See the Terms and Conditions (https://onlinelibrary.wiley.com/terms-and-conditions) on Wiley Online Library for rules of use; OA articles are governed by the applicable Creative Commons License
Part V: Learning Linux Security Techniques
# ip addr show
1: lo: <LOOPBACK,UP,LOWER_UP> mtu 65536 qdisc noqueue state UNKNOWN
group
default qlen 1000
link/loopback 00:00:00:00:00:00 brd 00:00:00:00:00:00
inet 127.0.0.1/8 scope host lo
valid_lft forever preferred_lft forever
inet6 ::1/128 scope host noprefixroute
valid_lft forever preferred_lft forever
2: wlp0s20f3: <BROADCAST,MULTICAST,UP,LOWER_UP> mtu 1500 qdisc
noqueue state
UP group default qlen 1000
link/ether 54:8d:5a:aa:9f:88 brd ff:ff:ff:ff:ff:ff
inet 192.168.1.18/24 brd 192.168.1.255 scope global dynamic
noprefixroute wlp0s20f3
valid_lft 65489sec preferred_lft 65489sec
inet6 fe80::1e02:b4fe:eb6c:10e2/64 scope link noprefixroute
valid_lft forever preferred_lft forever
Now, using the Host-B IP address, an nmap TCP Connect scan is issued from Host-A. The nmap
scan goes out to the network to conduct the scan. All ports are reported as having a status
of closed.
$ nmap -
sT 10.140.67.23
Starting Nmap 7.92 ( https://nmap.org ) at 2025-
06-
21 11:03 EDT
Note: Host seems down. If it is really up,
but blocking our ping probes, try -
PN
Nmap done: 1 IP address (0 hosts up) scanned in 0.11 seconds
Here, nmap gives a helpful hint. Host-B appears to be down, or it could just be blocking the
probes. So, another nmap scan is attempted from Host-A, using nmap’s advice of disabling the
scan’s ping probes via the -PN option.
$ nmap -
sT -
PN 192.168.1.18
Starting Nmap 7.92 ( https://nmap.org ) at 2025-
06-
21 11:12 EDT
Nmap scan report for ubuntu (192.168.1.18)
Host is up (0.0015s latency).
All 1000 scanned ports on 10.140.67.23 are filtered
Nmap done: 1 IP address (1 host up) scanned in 5.54 seconds
You can see that Host-B (192.168.1.18) is up and running and all of its ports have a status
of filtered. This means that no network ports are being exposed from Host-A. These scans
from Host-A give you a better idea of what a malicious scanner may see when scanning your
Linux server. In this example, the malicious scanner would not see much.
647
26
Downloaded from https://onlinelibrary.wiley.com/doi/ by alex jounh - Oregon Health & Science Univer , Wiley Online Library on [05/12/2025]. See the Terms and Conditions (https://onlinelibrary.wiley.com/terms-and-conditions) on Wiley Online Library for rules of use; OA articles are governed by the applicable Creative Commons License
Chapter 26: Securing Linux on a Network
Note
If you are familiar with nmap, you know that the TCP SYN scan is the default scan nmap uses. The TCP SYN scan does
an excellent job of probing a remote system in a stealth manner. Because you are probing your own system for security
auditing purposes, it makes sense to use the more “heavy-duty” nmap utility scans. If you still want to use the TCP SYN
scan, the command is nmap -
sS ip_address.
The services currently running on Host-A are not that “juicy.” In the example that follows,
other services, sshd and http, is started on Host-B using the systemctl command (see
Chapter 15, “Starting and Stopping Services”). This should give the nmap utility a more interesting target to search for.
# systemctl start sshd.service
# systemctl start apache2.service
Also, because Host-B’s firewall is blocking the nmap scans from Host-A, it would be interesting to see what an nmap scan can report when the firewall is down. Please don’t try this
on a system exposed to the Internet. The example that follows shows the firewall being disabled on Host-B for another Linux system (for other systems, you might need to disable the
ufw service):
# systemctl stop firewalld.service
# systemctl status firewalld.service
With a new service running and Host-A’s firewall lowered, the nmap scans should find something. In the following, nmap scans are run again from Host-B. This time the nmap utility
shows the ssh service running on open port 22. Notice that with the firewall down on Host-A,
both nmap scans pick up much more information. This really demonstrates the importance of
your Linux server’s firewall.
# nmap -
sT -
PN 192.168.1.18
Starting Nmap 7.92 ( https://nmap.org ) at 2025-
06-
21 11:24 EDT
Nmap scan report for ubuntu (192.168.1.18)
Host is up (0.0065s latency).
Not shown: 990 closed tcp ports (conn-
refused)
PORT
STATE SERVICE
22/tcp
open ssh
80/tcp
open http
Nmap done: 1 IP address (1 host up) scanned in 0.13 seconds
The UDP scan was taking a long time to complete, so I reduced the maximum round-trip time
for each port (--max-rtt-timeout 15ms), assuming that a slow response meant that a
port was probably not open and reduced the ports scanned (-F). As the command notes, a short
round-trip time can harm accuracy, but in my case the results were accurate.
# nmap -sU -F --max-rtt-timeout 15ms 192.168.1.18
WARNING: You specified a round-
trip time timeout (10 ms) that is
EXTRAORDINARILY SMALL. Accuracy may suffer.
648
Downloaded from https://onlinelibrary.wiley.com/doi/ by alex jounh - Oregon Health & Science Univer , Wiley Online Library on [05/12/2025]. See the Terms and Conditions (https://onlinelibrary.wiley.com/terms-and-conditions) on Wiley Online Library for rules of use; OA articles are governed by the applicable Creative Commons License
Part V: Learning Linux Security Techniques
Starting Nmap 7.94SVN ( https://nmap.org ) at 2025-
06-
21 11:57 EDT
Nmap scan report for ubuntu (192.168.1.18)
Host is up (0.048s latency).
Not shown: 57 closed udp ports (port-
unreach), 39 filtered udp ports
(admin-prohibited)
PORT
STATE
SERVICE
111/udp open
rpcbind
5353/udp open
zeroconf
MAC Address: 06:58:63:3E:AF:87 (Unknown)
Nmap done: 1 IP address (1 host up) scanned in 101.43 seconds
To conduct a thorough audit, be sure to include the UDP scan. Also, there are additional nmap
scans that may be beneficial to your organization. Look at the nmap utility’s website for additional suggestions.
Caution
If you have been following along and lowered your server’s firewall to conduct these nmap scans, be sure to raise it
again. Enter systemctl start firewalld.service.
You still need to implement controls for those services that your Linux server should offer. One
way to accomplish this is via firewall rules.
Early versions of Linux use TCP wrappers to allow or deny access to Linux services. It did this
by offering /etc/hosts.allow and /etc/hosts.deny files where you could specifically
indicate which services are available and which are blocked to particular outside system names
and/or IP addresses. TCP wrappers has been dropped from most recent Linux distributions.
However, some features, such as vsftpd, still honor those configuration files, using similar
access control features.
Working with Firewalls
A firewall in a building is a fireproof wall that prevents the spread of fire throughout the
building. A computer firewall blocks the transmission of malicious or unwanted data into and
out of a computer system or network. For example, a firewall can block malicious scans from
your Linux server ports. A firewall can also change network packets flowing through your
system and redirect or change packets in various ways.
In Linux, iptables was the kernel-level firewall feature for a long time. In recent years, however, it has been replaced by other firewall services such as ufw (used by Ubuntu systems)
and firewalld (used by Fedora and RHEL systems). Personal firewall services are most commonly used to allow or block access from outside systems to the services running on your local
system. They work by allowing you to create rules that can be applied to every packet that
tries to enter (INPUT), leave (OUTPUT), or route through your system (FORWARD).
649
26
Downloaded from https://onlinelibrary.wiley.com/doi/ by alex jounh - Oregon Health & Science Univer , Wiley Online Library on [05/12/2025]. See the Terms and Conditions (https://onlinelibrary.wiley.com/terms-and-conditions) on Wiley Online Library for rules of use; OA articles are governed by the applicable Creative Commons License
Chapter 26: Securing Linux on a Network
Although allowing or blocking packets trying to enter your system is the primary feature of
firewalls, you can also create rules that let you do the following:
■
■
■
■
■
Block packets leaving your system, effectively to prevent a process on your system
from reaching a remote host, range of addresses, or selected services.
Forward packets from one network interface on your system to another, effectively
allowing your computer to act as a router between two networks.
Port forward a packet intended for a selected port to be rerouted to another port
on your local system, or to a remote system, so that other locations can handle the
request from the packet.
Change information in a packet header (called mangling) to redirect the packet or
somehow mark it for more processing.
Allow multiple computers on a private network (such as the computers, televisions, or
other devices on your home network) to communicate with the Internet over a single
public IP address. (This is referred to as IP masquerading.)
In the following sections, I describe many of these features but focus mostly on the rules to
block or allow access to the services running on your Linux system.
Understanding firewalls
Although you may tend to think of a firewall as a complete barrier, a Linux firewall is really
just a filter that checks each network packet or application request coming into or out of a
computer system or network.
Note
What is a network packet? A network packet is data that has been broken up into transmittable chunks. The chunks,
or packets, have additional data added to them as they traverse down the OSI model. It’s like putting a letter inside an
envelope at each stage as it moves down the protocol stack. One of the purposes of this additional data is to ensure the
packet’s safe and intact arrival at its destination. The additional data is stripped off of the packet as it traverses back up
the OSI model at its destination (like taking off the outer envelope and handing the letter to the layer above).
Firewalls can be placed into different categories, depending upon their function. Each category
has an important place in securing your server and network.
A firewall is either network-based or host-based. A network-based firewall is one that
is protecting the entire network or subnet. For example, a network firewall would be
used in your workplace, where the network should be protected by a screening router’s
firewall. A firewall on your router can prevent an intruder from even seeing that the
laptop behind that firewall in your home exists.
A host-based firewall is one that is running on and protecting an individual host or
server. You most likely have a firewall on your PC at home. This is a host-based firewall.
A firewall is either a hardware or a software firewall. Firewalls can be located on
network devices, such as routers. Their filters are configured in the router’s firmware.
650
Downloaded from https://onlinelibrary.wiley.com/doi/ by alex jounh - Oregon Health & Science Univer , Wiley Online Library on [05/12/2025]. See the Terms and Conditions (https://onlinelibrary.wiley.com/terms-and-conditions) on Wiley Online Library for rules of use; OA articles are governed by the applicable Creative Commons License
Part V: Learning Linux Security Techniques
In your home, your Internet service provider (ISP) may provide a router to let you gain
access to the Internet. The router contains firewall firmware, and it is considered a
hardware firewall.
Firewalls can be located on a computer system as an application. The application allows
filtering rules to be set that filter the incoming traffic. This is an example of a software
firewall. A software firewall is also called a rule-based firewall.
A firewall is either a network-layer filter or an application-layer filter. A firewall
that examines individual network packets is also called a packet filter. A network-layer
firewall allows only certain packets into and out of the system. It operates on the lower
layers of the OSI reference model.
An application-layer firewall filters at the higher layers of the OSI reference model. This
firewall allows only certain applications access to and from the system.
You can see how these firewall categories overlap. The best firewall setup is a combination of
all of the categories. As with many security practices, the more layers you have, the harder it
is for malicious activity to penetrate.
Implementing firewalls
On a Linux system, the firewall is a host-based, network-layer, software firewall. With firewalls,
you can create a series of rules for every network packet coming through your Linux server.
You can fine-tune the rules to allow network traffic from one location but not from another.
These rules essentially make up a network access control list for your Linux server.
There are a few different sets of firewall services, commands, and related GUIs that you can
use with different Linux distributions, including ufw (for Ubuntu systems) and firewalld (for
Fedora and RHEL systems).
Ubuntu UFW firewalls
For Ubuntu, the Uncomplicated Firewall (UFW) is a popular tool for working with firewall rules
for personal systems. The graphical front end for that service is the Firewall (gufw) GUI.
From there, you can set different profiles for Public, Office, and Home. For each, you can add
Allow, Deny, Reject, or Limit access to ports in different directions for TCP and UDP protocols.
Figure 26.1 shows an example of the Firewall window adding access to the Syslog service for
your Home profile.
Here are a few examples of ufw commands you can use to work with your UFW firewall. Type
the following to start, enable, and check the status of the ufw service:
#
#
#
●
systemctl start ufw
systemctl enable ufw
systemctl status ufw
ufw.service -Uncomplicated firewall
Loaded: loaded (/usr/lib/systemd/system/ufw.service; enabled;
preset: enabled)
651
26
Downloaded from https://onlinelibrary.wiley.com/doi/ by alex jounh - Oregon Health & Science Univer , Wiley Online Library on [05/12/2025]. See the Terms and Conditions (https://onlinelibrary.wiley.com/terms-and-conditions) on Wiley Online Library for rules of use; OA articles are governed by the applicable Creative Commons License
Chapter 26: Securing Linux on a Network
Active: active (exited) since Sat 2025-
06-
28 15:38:18 EDT; 4h
23min ago
Docs: man:ufw(8)
Main PID: 846 (code=exited, status=0/SUCCESS)
CPU: 51ms
Jun 28 15:38:18 Admin-
ubuntu-
20 systemd[1]: Starting ufw.service
- ...
FIGURE 26.1
gufw Firewall Configuration window.
The following shows a list of ufw firewall rules that are active, including which port/protocol is allowed or denied through the firewall. Here only the ssh service (port 22/tcp) is
allowed in:
# ufw status numbered
Status: active
To
-
-
[ 1] 22/tcp
[ 3] 22/tcp (v6)
Action
-
-
-
-
-
-
ALLOW IN
ALLOW IN
From
-
-
-
-
Anywhere
Anywhere (v6)
With ufw, you can also manage firewall rules by application name (as stored in files in the
/etc/ufw/appplications.d directory). To see a list of apps for which you can open
ports by add name, type the following:
# ufw app list
652
Downloaded from https://onlinelibrary.wiley.com/doi/ by alex jounh - Oregon Health & Science Univer , Wiley Online Library on [05/12/2025]. See the Terms and Conditions (https://onlinelibrary.wiley.com/terms-and-conditions) on Wiley Online Library for rules of use; OA articles are governed by the applicable Creative Commons License
Part V: Learning Linux Security Techniques
Available applications:
Apache
Apache Full
...
Samba
26
The samba file defines ports open for the Samba service (ports=137,138/udp|139,
445/tcp). To see details about ports needed to expose that service, type the following:
# ufw app info Samba
Profile: Samba
Title: LanManager-
like file and printer server for Unix
Description: The Samba software suite is a collection of programs that
implements the SMB/CIFS protocol for unix systems, allowing you to serve
files and printers to Windows, NT, OS/2 and DOS clients. This protocol is
sometimes also referred to as the LanManager or NetBIOS protocol.
Ports:
137,138/udp
139,445/tcp
To open ports so you can expose the Samba service outside of your local computer, for IPv4
and IPv6 ports, type the following:
# sudo ufw allow Samba
# ufw status numbered
Status: active
[
[
[
[
1]
3]
4]
6]
To
-
-
22/tcp
Samba
22/tcp (v6)
Samba (v6)
Action
-
-
-
-
-
-
ALLOW IN
ALLOW IN
ALLOW IN
ALLOW IN
From
-
-
-
-
Anywhere
Anywhere
Anywhere (v6)
Anywhere (v6)
You can also use the ufw Firewall window to see that those Samba ports are exposed as well.
Fedora and RHEL firewalld firewalls
Fedora, RHEL, and other Linux distributions have added the firewalld service to provide
a more dynamic way of managing firewall rules. For recent RHEL and Fedora releases, the
firewalld service and related command (firewalld-cmd) and GUI (firewalld-
config) are used to manage your Linux system firewall.
The Firewall Configuration window provides an easy way to open ports on your firewall and
do masquerading (routing private addresses to a public network) or port forwarding. The
firewalld service can react to changes in conditions, which the static iptables service can’t
653
Downloaded from https://onlinelibrary.wiley.com/doi/ by alex jounh - Oregon Health & Science Univer , Wiley Online Library on [05/12/2025]. See the Terms and Conditions (https://onlinelibrary.wiley.com/terms-and-conditions) on Wiley Online Library for rules of use; OA articles are governed by the applicable Creative Commons License
Chapter 26: Securing Linux on a Network
do as well on its own. By enabling access to a service, firewalld can also do things like
load modules needed to allow access to a service.
The firewalld service may already be installed on your Linux system. To check this, type
the following:
# systemctl status firewalld
• firewalld.service -firewalld -dynamic firewall daemon
Loaded: loaded (/usr/lib/systemd/system/firewalld.service;
enabled
preset: enabled)
Drop-
In: /usr/lib/systemd/system/service.d
└─10-timeout-abort.conf, 50-keep-warm.conf
Active: active (running) since Sun 2025-
06-
22 06:18:24 EDT;
14min ago
Invocation: 7b4121c509ab4b95b3e409650cd1f84c
Docs: man:firewalld(1)
Main PID: 1045 (firewalld)
Tasks: 2 (limit: 8923)
Memory: 51.5M (peak: 52.8M)
CPU: 1.034s
CGroup: /system.slice/firewalld.service
└─1045 /usr/bin/python3 -
sP /usr/sbin/firewalld
--nofork --nopid
If it’s not installed, you can still install the service and the associated graphical user interface
and then start the firewalld service as follows:
# dnf install firewalld firewall-
config
# systemctl start firewalld.service
# systemctl enable firewalld.service
To manage the firewalld service, you can start the Firewall Configuration window. Do this
by selecting Activities from GNOME and typing Firewall or by entering the following:
# firewall-config &
Figure 26.2 shows an example of the Firewall Configuration window.
With firewalld, you can select from a set of firewall zones, depending on which services
you want to share and the level of protection you want for your system. The default set of
Fedora Workstation rules selected in this example is appropriate for a Linux workstation
operating on a home network. For example, it allows the following:
DHCPv6 Client: To enable automatic assignment of addresses on IPv6 networks.
Multicast DNS (mDNS): To allow domain name system interfaces on small network interfaces, without requiring a regular DNS server.
Network printing client and server (IPP): To allow printer sharing on your local system
and network.
654
Downloaded from https://onlinelibrary.wiley.com/doi/ by alex jounh - Oregon Health & Science Univer , Wiley Online Library on [05/12/2025]. See the Terms and Conditions (https://onlinelibrary.wiley.com/terms-and-conditions) on Wiley Online Library for rules of use; OA articles are governed by the applicable Creative Commons License
Part V: Learning Linux Security Techniques
Samba client: To allow file sharing with Windows systems and other systems on your
local network.
SSH: To allow others to try to log into your system from the network.
Cockpit: To allow access to Cockpit web-based administration from the network. Cockpit
comes installed in some RHEL and Fedora systems, but not others. Cockpit won’t appear
in the Firewall Configuration window until you install the cockpit package.
FIGURE 26.2
Firewall Configuration window.
If you connect your computer to networks on which you have different levels of trust (such
as a wireless network at an airport), you can adjust your firewall rules by selecting a different
zone. For example, to change to the public zone from the Firewall Configuration window, do
the following:
1. Under the Active Bindings column, select your active connection (in this example,
wireless-5G).
2. Select Change Zone.
3. Select a new zone (for example, public).
655
26
Downloaded from https://onlinelibrary.wiley.com/doi/ by alex jounh - Oregon Health & Science Univer , Wiley Online Library on [05/12/2025]. See the Terms and Conditions (https://onlinelibrary.wiley.com/terms-and-conditions) on Wiley Online Library for rules of use; OA articles are governed by the applicable Creative Commons License
Chapter 26: Securing Linux on a Network
The public zone, while still allowing IPv6 connections, remote login (SSH), and mDNS service, does not allow access to more potentially vulnerable services, such as printing, Windows
file sharing (Samba), and Cockpit services. Consider disallowing the SSH service as well.
Besides changing zones, another common task that you might want to do is just open some
firewall ports to allow access to selected services. From the Firewall Configuration window, with
the Fedora Workstation zone set as the current zone, just click each service that you want to
open. The port allowing access to each service is opened immediately (when you select the
Runtime configuration) and opened permanently (when you select the Permanent configuration) from the top of that window.
One nice feature of the Firewall Configuration window is that when you choose to allow access
to a service, you might do more than just open a port. For example, enabling the FTP service also causes connection tracking modules to be loaded that allow nonstandard ports to be
accessed through the firewall when needed.
Changing firewall rules with Cockpit
Cockpit offers another intuitive way of working with your system’s firewall. To view and modify
your firewall with Cockpit, do the following:
1. Open your web browser to the Cockpit interface (https://yourhost:9090) and
log in with root privilege.
2. Select Networking ➪ Firewall to see the Firewall screen, as shown in Figure 26.3.
FIGURE 26.3
Firewall configuration.
656
Downloaded from https://onlinelibrary.wiley.com/doi/ by alex jounh - Oregon Health & Science Univer , Wiley Online Library on [05/12/2025]. See the Terms and Conditions (https://onlinelibrary.wiley.com/terms-and-conditions) on Wiley Online Library for rules of use; OA articles are governed by the applicable Creative Commons License
Part V: Learning Linux Security Techniques
3. Select Add Services. The Add Service pop-up appears.
4. Click the check box next to the service that you want to enable in the current zone
and select Add Services.
Access to the selected port is enabled. Assuming you have a service running on that port,
someone requesting the service (such as access to your web server on ports 80 and 443) will
be allowed.
As mentioned earlier, underlying the Cockpit and firewalld services in Fedora and RHEL is
the nft framework. If you have a Linux system without the Cockpit or firewalld services
(or with firewalld disabled), you can sometimes use the iptables service instead. The
next sections describe how you can set firewall rules for the firewalld service from the
command line with firewall-cmd.
Understanding the firewall-config utility
If you are using the firewalld service on your Linux system, you can use the
firewall-cmd command to manage firewall rules. To see the firewall zones, type the
following:
# firewall-cmd --get-zones
FedoraServer FedoraWorkstation block dmz docker drop external home
internal libvirt libvirt-
routed nm-
shared public trusted work
Then to see the default firewall zone, type the following:
# firewall-cmd --get-default-zone
FedoraWorkstation
To see a list of information about a particular zone (in this case, FedoraWorkstation), type the
following:
# firewall-cmd --permanent --info-zone=FedoraWorkstation
FedoraWorkstation (default)
target: default
ingress-
priority: 0
egress-
priority: 0
icmp-
block-
inversion: no
interfaces:
sources:
services: afp dhcpv6-
client ftp http https mdns rpc-
bind samba-
client ssh
ports: 1025-
65535/udp 1025-
65535/tcp 631/tcp
protocols:
forward: yes
masquerade: no
forward-
ports:
source-
ports:
icmp-
blocks:
rich rules:
657
26
Downloaded from https://onlinelibrary.wiley.com/doi/ by alex jounh - Oregon Health & Science Univer , Wiley Online Library on [05/12/2025]. See the Terms and Conditions (https://onlinelibrary.wiley.com/terms-and-conditions) on Wiley Online Library for rules of use; OA articles are governed by the applicable Creative Commons License
Chapter 26: Securing Linux on a Network
To list the services for which ports are open on the firewall, type the following:
# firewall-cmd --list-services
afp dhcpv6-
client ftp http https mdns rpc-
bind samba-
client smtp ssh
# firewall-cmd --permanent --list-services
afp dhcpv6-
client ftp http https mdns rpc-
bind samba-
client ssh
The previous command shows that the smtp service is open on the running system, but is not
set to be open permanently. To set all the current open ports to be open permanently, type
the following:
# firewall-cmd --runtime-to-permanent
success
# firewall-cmd --permanent --list-services
afp dhcpv6-
client ftp http https mdns rpc-
bind samba-
client smtp ssh
To add a new service permanently to your default zone, use the --add-service option. For
example, to add the NFS service, type the following:
# firewall-cmd --permanent --add-service=nfs
# firewall-cmd --permanent --list-services
afp dhcpv6-
client ftp http https mdns nfs rpc-
bind samba-
client
smtp ssh
Summary
Securing your Linux server is critical on a network. Inherently, a majority of the malicious
attacks originate from a network, especially the Internet. This chapter covered some of the
basics that you need in order to get started on this process on your own Linux system.
Protecting your network services can be simplified after you determine and remove any
unneeded network services. The nmap utility helps you here. Also, you can use nmap to audit
your Linux server’s advertising of network services. These audits assist in determining what
firewall modifications are needed.
Recent versions of Fedora and RHEL have added the firewalld service as a front end to the
firewall facility that is built into the Linux kernel. By using the firewall configuration tool and
Cockpit web UI, you can easily open ports in your firewall to allow access to selected services.
Ubuntu uses the ufw firewall by default.
At this point in this book, you should have a good grasp of what goes into setting up and
securing Linux desktop and server systems. In the next two chapters, I’m going to help you
extend that knowledge into cloud computing and virtualization.
Exercises
Refer to the material in this chapter to complete the tasks that follow. If you are stuck, solutions to the tasks are shown in Appendix B (although in Linux, you can often complete a task
in multiple ways). Try each of the exercises before referring to the answers. These tasks assume
658
Downloaded from https://onlinelibrary.wiley.com/doi/ by alex jounh - Oregon Health & Science Univer , Wiley Online Library on [05/12/2025]. See the Terms and Conditions (https://onlinelibrary.wiley.com/terms-and-conditions) on Wiley Online Library for rules of use; OA articles are governed by the applicable Creative Commons License
Part V: Learning Linux Security Techniques
you are running a Fedora or Red Hat Enterprise Linux system (although some tasks work on
other Linux systems as well). Please don’t use a production system to try the commands in
these exercises. Although the commands shown here do not permanently change your firewall
(the old rules will return when the firewall service restarts), improperly modifying your firewall can result in unwanted access.
1. Install the Network Mapper utility on your local Linux system.
2. Run a TCP Connect scan on your local loopback address. What ports have a service
running on them?
3. Run a UDP port scan on your Linux system from a remote system.
4. Check to see if your system is running the firewalld service. If not, install
firewalld and firewall-config and then start and enable that service.
5. Use the Firewall Configuration window to open access to secure (TCP port 443) and
insecure (TCP port 80) ports for a web service.
6. Determine your Linux system’s current firewall rules.
7. Use firewall-cmd to list the default firewall zone.
8. Use firewall-cmd to list all services to see which ports are permanently opened in
your firewall’s default zone.
659
26
Downloaded from https://onlinelibrary.wiley.com/doi/ by alex jounh - Oregon Health & Science Univer , Wiley Online Library on [05/12/2025]. See the Terms and Conditions (https://onlinelibrary.wiley.com/terms-and-conditions) on Wiley Online Library for rules of use; OA articles are governed by the applicable Creative Commons License
Chapter 26: Securing Linux on a Network
Engaging
with Cloud Computing
IN THIS PART
Chapter 27
Shifting to Clouds and Containers
Chapter 28
Using Linux for Cloud Computing
Chapter 29
Deploying Linux to the Cloud
Chapter 30
Automating Apps and Infrastructure with Ansible
Chapter 31
Deploying Applications as Containers with Kubernetes
Linux Bible, Eleventh Edition. Christopher Negus.
© 2026 John Wiley & Sons, Inc. All rights reserved, including rights for text and data mining and training of artificial intelligence technologies or similar
technologies. Published 2026 by John Wiley & Sons, Inc.
Downloaded from https://onlinelibrary.wiley.com/doi/ by alex jounh - Oregon Health & Science Univer , Wiley Online Library on [05/12/2025]. See the Terms and Conditions (https://onlinelibrary.wiley.com/terms-and-conditions) on Wiley Online Library for rules of use; OA articles are governed by the applicable Creative Commons License
Part VI
Shifting to Clouds and
Containers
27
IN THIS CHAPTER
Understanding key technologies for cloud computing
Learning how Linux containers work
Installing and starting container software
Pulling and running container images
Restarting a stopped container
Building a container image
Tagging and pushing container images to a registry
W
hile most of this book focuses on installing and managing individual computers, services, and
applications, this part takes you into the technologies needed to bring Linux into large data
centers. For a data center to operate efficiently, its computers must become as generic as possible and running components must become more automated. The chapters in this part focus on technologies that make those two things happen.
Computers become more generic by separating the applications from the operating systems. This means not
just packaging applications into things you install on an operating system (like RPM or Deb packages), but
also putting together sets of software into packages that themselves can run once they are delivered in ways
that keep them separate from the operating system. Virtual machines (VMs) and containers are two ways of
packaging sets of software and their dependencies in ways that are ready to run and can be easily moved
around a data center.
From a high level, a virtual machine is a complete operating system that runs on another operating system,
allowing you to have many VMs active at a time on one physical computer. Everything an application or a
service needs to run can be stored within that VM or in attached storage.
A VM has its own kernel, filesystem, process table, network interfaces, and other operating system features
separate from the host, while sharing the CPU and RAM with the host system. You can deploy that VM to
a physical system in a way that makes it easy to run the application and then discard the VM when you
are done. You can run multiple instances of the VM on the same computer or clone and run the VM across
663
Downloaded from https://onlinelibrary.wiley.com/doi/ by alex jounh - Oregon Health & Science Univer , Wiley Online Library on [05/12/2025]. See the Terms and Conditions (https://onlinelibrary.wiley.com/terms-and-conditions) on Wiley Online Library for rules of use; OA articles are governed by the applicable Creative Commons License
CHAPTER
multiple computers. The term virtual machine comes from the fact that each VM sees an emulation
of computer hardware and not the hardware itself directly.
A container is like a VM, with the major difference being that a container doesn’t have its
own kernel. In most other ways, it is like a VM in that its name spaces are separate from
the host operating system and you can move it from host to host to run wherever it is
convenient.
The chapters in this part introduce you to the concepts, tools, and technologies that you
need to know to engage with cloud computing. You can try virtual machines on a single
Linux host using KVM. You can also deploy virtual machines to cloud technologies, such as
Google Cloud Platform (GCP) and Amazon Web Services (AWS).
To deploy sets of hosts, either on bare metal or the cloud, you will learn how to use Ansible.
With Ansible playbooks, you can also define the software that is installed and run on each
host system.
As for containers, the Kubernetes project has grabbed the spotlight as the premier technology for orchestrating massive numbers of containers across large data centers. Major cloud
providers offer managed Kubernetes platforms for large enterprises.
The technology that started the rush to containers a few years ago was the Docker project.
The docker command and daemon offered simplified ways to build and run containers on
Linux systems. Today, standardized container formats (such as the Open Container Initiative) and other container tools, such as podman, LXC (Linux Containers), and LXD (Linux
Container Daemon), offer ways of working with containers that align more tightly with the
Kubernetes ecosystem.
The remainder of this chapter is devoted to getting started with containers. It covers the
docker and podman commands, along with other popular tools for working with individual
containers.
Understanding Linux Containers
Containers make it simple to get and run applications and then discard them when you are
done. There are a few things you should know about containers before you get started.
In working with containers, people refer to the entity that you move around as a container
image (or simply an image). When you run that image or when it is paused or stopped, it is
referred to as a container.
A container remains separate from the host system by using its own set of namespaces. You
typically would build your own container images by getting a secure base image and then
adding your own layers of software on top of that image to create a new image. To share
your images, you push them to shared container registries and allow others to pull them.
664
Downloaded from https://onlinelibrary.wiley.com/doi/ by alex jounh - Oregon Health & Science Univer , Wiley Online Library on [05/12/2025]. See the Terms and Conditions (https://onlinelibrary.wiley.com/terms-and-conditions) on Wiley Online Library for rules of use; OA articles are governed by the applicable Creative Commons License
Part VI: Engaging with Cloud Computing
Namespaces
Linux support for namespaces is what allows containers to be contained. With namespaces,
the Linux kernel can associate one or more processes with a set of resources. Normal
processes, not those run in a container, all use the same host namespaces. By default,
processes in a container see only the container’s namespaces and not those of the host.
Namespaces include the following:
Process table A container has its own set of process IDs and, by default, can see only
the processes running inside the container. While PID 1 on the host is the init process (systemd), in a container PID 1 is the first process run inside the container. Typically, that is just the process of the application running inside of that container (like
a web server or database executable).
Network interfaces By default, a container has a single network interface (eth0) and
is assigned an IP address when the container runs. By default, a service run inside a
container (such as a web server listening on ports 80 and 443) is not exposed outside
of the host system. The upside of this is that you could have hundreds of web servers
running on the same host without conflict. The downside is that you need to manage
how those ports are exposed outside of the host.
Mount table By default, a container can’t see the host’s root filesystem, or any other
mounted filesystem listed in the host’s mount table. The container brings its own filesystem, consisting of the application and any dependencies it needs to run. Files or
directories needed from the host can be selectively bind-mounted inside the container.
User IDs Although containerized processes run as some UID within the host’s
namespace, another set of UIDs is nested within the container. This can, for example,
let a process run as root within a container but not have any special privileges to the
host system.
UTS A UTS namespace allows a containerized process to have a different host and
domain name from the host.
Control group (cgroup) In some Linux systems (such as Fedora and RHEL), a containerized process runs within a selected control group and cannot see the other cgroups
available on the host system. Likewise, it cannot see the identity of its own cgroup
to the host.
Interprocess communications (IPC)
namespace from the host.
A containerized process cannot see the IPC
Although access to any host namespace is restricted by default, privileges to host namespaces
can be opened selectively. In that way, you can do things like mount configuration files or
data inside the container from the host and map container ports to host ports to expose them
outside of the host.
665
27
Downloaded from https://onlinelibrary.wiley.com/doi/ by alex jounh - Oregon Health & Science Univer , Wiley Online Library on [05/12/2025]. See the Terms and Conditions (https://onlinelibrary.wiley.com/terms-and-conditions) on Wiley Online Library for rules of use; OA articles are governed by the applicable Creative Commons License
Chapter 27: Shifting to Clouds and Containers
Container registries
Permanent storage for containers is done in what is referred to as a container registry. When
you create a container image that you want to share, you can push that image to a public
registry or a private registry that you maintain yourself (such as a Red Hat Quay registry).
Someone who wants to use the image will pull it from the registry.
There are large, public container image registries, such as the Docker Hub (docker.io) and Quay
Registry (Quay.io). Some cloud container registries, such as Amazon Elastic Container Registry
(ECR), offer both public (https://gallery.ecr.aws/) and private, per-user registries. Most
registries offer free accounts to get started. If you want access to more features, such as the
ability to keep your registry private, premium accounts are available as well.
Base images and layers
Although you can create containers from scratch, most often a container is built by starting
with a well-known base image and adding software to it. That base image typically aligns with
the operating system from which you are installing software into your container.
You can get official base images from Ubuntu (https://hub.docker.com/_/ubuntu), CentOS
(https://hub.docker.com/_/centos), Fedora (https://hub.docker.com/_/fedora), and
many other Linux distributions. Those Linux distributions may offer base images in different
forms, such as standard and minimal versions. In fact, there are base images you can build on
that offer runtimes for PHP, Perl, Java, and other development environments.
Although Red Hat offers a subscription model for its software, if you want to use Red Hat software as the foundation for your container images, Red Hat offers freely available Universal
Base Images (UBIs) for standard, minimal, and a variety of runtime containers. You can find
those images by searching the Red Hat Container Catalog for UBI images (https://catalog
.redhat.com/search?).
You can add software to a base image using commands such as docker build or podman. By
using a Dockerfile to define the build, you can add yum or apt-get commands to install software from software repositories into your new container.
When you add software to an image, it creates a new layer to become part of the new image. Reusing the same base images for the containers that you build offers several advantages. One advantage is that when you run the container image, only one copy of the base image is needed on the
host. So, if you were running 10 different containers based on the same base image, you only
need to pull and store the base image once, then possibly only add a few megabytes of extra data
for each new image.
If you look at the contents of a base image, it would look like a little Linux filesystem. You
see configuration files in /etc, executables in /bin and /sbin, and libraries in /lib. In
other words, it would have the basic components that an application would need from a Linux
host system.
666
Downloaded from https://onlinelibrary.wiley.com/doi/ by alex jounh - Oregon Health & Science Univer , Wiley Online Library on [05/12/2025]. See the Terms and Conditions (https://onlinelibrary.wiley.com/terms-and-conditions) on Wiley Online Library for rules of use; OA articles are governed by the applicable Creative Commons License
Part VI: Engaging with Cloud Computing
Keep in mind that the container images you run don’t necessarily need to match the host
Linux system. So, for example, you could run a Fedora base image on an Ubuntu system, as
long as there are no specific kernel requirements or libraries built into the container image.
Starting with Linux Containers
Very little preparation is needed to start running containers on your own Linux system. The
following procedures describe how to prepare your Linux system to start using containers.
Docker Inc. makes free versions of Docker available via the Install Docker Engine page
(https://docs.docker.com/engine/install/). To try an older version of the docker
package, you can run the following on a RHEL or Fedora system to install the docker package
and then start and enable the docker service:
27
# dnf install docker -
y
# systemctl start docker
# systemctl enable docker
The podman command supports most of the docker command-line options for working
with containers, so you can use it instead of docker. Keep in mind that podman represents
a different code base from docker, even though it supports similar management command
options. With podman, you don’t need to have a service running, as you do with docker.
To install podman on Fedora or RHEL, do the following:
# dnf install podman -
y
You can now start using the podman or docker commands to work with containers and container images for the examples in this chapter.
Pulling and running containers
With the docker or podman packages installed and ready to use, you can try running a container. To start, you can pull a container to your local system and then run it. If you like, you
can skip the pull command since running the container will pull it if the requested image is
not already on your system.
Pulling a container
Choose a reliable container image to try, as in one that comes from an official project, is up-
to-date, and preferably has been scanned for vulnerabilities. Here is an example of pulling a
Fedora base image with the docker command (you can replace docker with podman in
these examples):
# docker pull public.ecr.aws/docker/library/fedora:40
40: Pulling from docker/library/fedora
fc4518b6c5f9: Pull complete
Digest: sha256:3c86d25fef9d2001712bc3d9b091fc40cf04be4767e48f1aa3b78
5bf58d300ed
667
Downloaded from https://onlinelibrary.wiley.com/doi/ by alex jounh - Oregon Health & Science Univer , Wiley Online Library on [05/12/2025]. See the Terms and Conditions (https://onlinelibrary.wiley.com/terms-and-conditions) on Wiley Online Library for rules of use; OA articles are governed by the applicable Creative Commons License
Chapter 27: Shifting to Clouds and Containers
Status: Downloaded newer image for public.ecr.aws/docker/library/
fedora:40
public.ecr.aws/docker/library/fedora:40
To see that the image is on your system, run the following:
# docker images
REPOSITORY
SIZE
public.ecr.aws/docker/library/fedora
ago 226MB
TAG
IMAGE ID
CREATED
40
b368d29df3b5
2 months
Running a shell from a container
Use docker or podman to run a shell within a container. You can identify the image
either by the image ID (b368d29df3b5) or by the name (public.ecr.aws/docker/
library/fedora). Use the -i (interactive) and -t (terminal) options so that you can have
an interactive session within the container from the Bash shell:
# docker run -
it b368d29df3b5 bash
[root@50bec06ad25f /]#
With the shell running, commands that you type will operate within the container. For example, you list the container’s filesystem or check out the os-release file to see the operating
system on which the container is based:
[root@50bec06ad25f /]# ls /
afs boot etc
lib
media opt
root sbin sys usr
bin dev
home lib64 mnt
proc run
srv
tmp var
[root@50bec06ad25f /]# cat /etc/os-
release | grep ^NAME
NAME="Fedora Linux"
Because containers are meant to have the minimal amount of content needed to run the
intended application, many standard tools may not be inside the container. You can install
software inside a running container. However, keep in mind that containers are meant to be
discarded. So, if you want to add software permanently, you should build a new image to
include the software you want.
Here’s an example of adding software to a running container:
[root@e9086da6ed70 /]# dnf install procps iproute -
y
Now you can run commands such as ps and ip inside the container:
[root@e9086da6ed70 /]# ps -ef
UID
PID PPID C STIME
root
1
0 0 17:44
root
40
1 0 17:45
[root@e9086da6ed70 /]# ip a
1: lo: <LOOPBACK,UP,LOWER_UP>
668
TTY
pts/0
pts/0
TIME CMD
00:00:00 bash
00:00:00 ps -
ef
mtu 65536 …
Downloaded from https://onlinelibrary.wiley.com/doi/ by alex jounh - Oregon Health & Science Univer , Wiley Online Library on [05/12/2025]. See the Terms and Conditions (https://onlinelibrary.wiley.com/terms-and-conditions) on Wiley Online Library for rules of use; OA articles are governed by the applicable Creative Commons License
Part VI: Engaging with Cloud Computing
inet 127.0.0.1/8 scope host lo
…
3: eth0@if11: <BROADCAST,MULTICAST,UP,LOWER_UP> mtu 1500 …
inet 172.17.0.2/16 brd 172.17.255.255 scope global eth0
…
Notice that from within the container, you see only two running processes (the shell and the
ps command). PID 1 is the Bash shell. The trimmed output from ip a shows that there is
only one external network interface from the container (eth0@if11) and that interface is
assigned the IP address of 172.17.0.2/16.
When you are done, you can type exit to quit the shell and stop the container:
[root@e9086da6ed70 /]# exit
Although the shell and the container are no longer running, the container is still available on
your system in a stopped state. Notice that podman ps alone doesn’t show the container. You
need to add --all:
[root@e9086da6ed70 /]# podman ps
CONTAINER ID IMAGE COMMAND CREATED STATUS PORTS NAMES
[root@e9086da6ed70 /]# podman ps --all
CONTAINER ID IMAGE
COMMAND CREATED
STATUS
PORTS
50bec0..
b368d29df3b5 "bash" 1 hour ago Exited (0) ...
Later you can see how to delete and restart a stopped container.
Running an FTP server from a container
Because you want to be able to throw away a container when you are done, in general you
want any changeable data to be stored outside of the container. The following is a simple
example of an FTP server (vsftpd) being run from a container. If you want to try this example
yourself, I recommend you skip to the section “Building a container image” later in this chapter for instructions on how to build the vsftpd container image yourself.
For this procedure, you need a configuration file (vsftpd.conf) and an FTP directory that
contains a file or two to share (/var/ftp/pub) on the host system. When the vsftpd container starts, it bind mounts those items into the container as volumes.
1. Create a vsftpd.conf file: Create the vsftpd.conf file in the default location,
/etc/vsftpd/vsftpd.conf. See the vsftpd.conf man page for details. Here
is an example:
anonymous_enable=YES
local_enable=YES
write_enable=YES
local_umask=022
669
27
Downloaded from https://onlinelibrary.wiley.com/doi/ by alex jounh - Oregon Health & Science Univer , Wiley Online Library on [05/12/2025]. See the Terms and Conditions (https://onlinelibrary.wiley.com/terms-and-conditions) on Wiley Online Library for rules of use; OA articles are governed by the applicable Creative Commons License
Chapter 27: Shifting to Clouds and Containers
dirmessage_enable=YES
xferlog_enable=NO
connect_from_port_20=YES
listen=NO
listen_ipv6=YES
pam_service_name=vsftpd
userlist_enable=YES
tcp_wrappers=NO
vsftpd_log_file=/dev/stdout
syslog_enable=NO
background=NO
pasv_enable=Yes
pasv_max_port=21100
pasv_min_port=21110
2. Create an ftp directory: Create an anonymous FTP directory for vsftpd to share in
the standard location on the host (/var/ftp/pub) and copy a few files to that
directory:
# mkdir -
p /var/ftp/pub
# cp /etc/services /etc/login.defs /var/ftp/pub/
3. Get the vsftpd container image: Build the vsftpd image as described in “Building a
container image” later in this chapter. To check that it is available to run, enter the
following:
# docker images
REPOSITORY TAG
IMAGE ID
CREATED
vsftpd
latest 487d0db26098 5 seconds ago
SIZE
208 MB
4. Run the vsftpd container image: When you run the vsftpd container, you need to
expose ports and mount files from the host to the container. Here’s an example (you
can use podman instead of docker ):
# docker run -
d -
p 20:20 -
p 21:21 \
-p 21100-21110:21100-21110 \
-
v /etc/vsftpd/:/etc/vsftpd/ \
-
v /var/ftp/pub:/var/ftp/pub \
--name vsftpd vsftpd
# podman ps
CONTAINER ID IMAGE
COMMAND
CREATED
STATUS
PORTS
NAMES
3a5d094dd4b5 vsftpd:latest /usr/local/s2… 9 seconds ago
Up 10 seconds ago 0.0.0.0:20-
21-
>20-
21/tcp vsftpd
This example uses the following options:
-d: Runs the container in detached mode, so the vsftpd service runs in the background.
-p: Standard FTP ports (TCP 20 and TCP 21) are mapped to the same port numbers on
the host network interfaces, so the service can be accessed outside of the local host.
670
Downloaded from https://onlinelibrary.wiley.com/doi/ by alex jounh - Oregon Health & Science Univer , Wiley Online Library on [05/12/2025]. See the Terms and Conditions (https://onlinelibrary.wiley.com/terms-and-conditions) on Wiley Online Library for rules of use; OA articles are governed by the applicable Creative Commons License
Part VI: Engaging with Cloud Computing
A range of ports needed for passive FTP are opened to their counterparts on the host as
well (21100-21110).
--rm: Although not included in this example, adding --rm to the command line will
remove the container when it exits.
-v: To use the configuration files (/etc/vsftpd directory) and content that you want
to share (/var/ftp directory) from the host system, those directories are bind-
mounted to the same locations on the container with the -v option.
--name: Set the name of the container to vsftpd (or any name you like).
Keep in mind that you can bind container content and ports to other locations on the host.
In that way, you can have multiple versions of the same software running on the same host
without conflicting with each other.
To make your vsftpd service accessible outside of the local system, be sure to open the FTP
ports and passive FTP ports that you just assigned as follows:
# firewall-cmd --zone=public --add-service=ftp
# firewall-cmd --zone=public \
--permanent --add-service=ftp
# firewall-cmd --zone=public \
--add-port=21100-21110/tcp
# firewall-cmd --zone=public \
--permanent --add-port=21100-21110/tcp
# firewall-cmd reload
You can now use any FTP client to access the FTP service via the anonymous user. To configure
your vsftpd service further and check that it is working, refer to Chapter 18, “Configuring an
FTP Server.”
Starting and stopping containers
Unless you specifically set a container to be removed when it stops (--rm option), if the container is stopped, paused, or just fails, the container is still on your system. You can see the
status of all containers on your system (currently running or not) using the ps option:
# docker ps
CONTAINER ID IMAGE
COMMAND
CREATED
STATUS
PORTS
NAMES
4d6be3e63fe3 localhost/vsftpd:latest /usr/local/s2… About an hour ago
Up About an hour ago 0.0.0.0:20-
21-
>20-
21/tcp vsftpd
# docker ps -
a
CONTAINER ID IMAGE
COMMAND
CREATED
STATUS
PORTS
NAMES
7da88bd62667 ubi8/ubi:latest
bash
2 minutes ago
Exited 7 seconds ago
silly_wozniak
671
27
Downloaded from https://onlinelibrary.wiley.com/doi/ by alex jounh - Oregon Health & Science Univer , Wiley Online Library on [05/12/2025]. See the Terms and Conditions (https://onlinelibrary.wiley.com/terms-and-conditions) on Wiley Online Library for rules of use; OA articles are governed by the applicable Creative Commons License
Chapter 27: Shifting to Clouds and Containers
4d6be3e63fe3 localhost/vsftpd:latest /usr/local/s2i/ru… About an hour
ago
Up About an hour ago 0.0.0.0:20-
21-
>20-
21/tcp vsftpd
Only running containers are shown with podman ps. By adding -a, you can see all containers, including those that are no longer running but have not yet been removed. You can
restart an existing container that is no longer running using the start option:
# docker start -
a 7da88bd62667
[root@7da88bd62667 /]#
The restarted container was running a Bash shell. Because the container’s terminal session
already existed, I didn’t need to start a new one (-it). I just needed to attach (-a) to the
existing session. For a container that was just running in detached mode, I can simply start
and stop it as required:
# docker stop 4d6be3e63fe3
4d6be3e63fe3…
# docker start 4d6be3e63fe3
4d6be3e63fe3
Note that if the container had been started with the --rm option, the container would be
removed as soon as you stopped it. So, you would have to run a new container instead of
just restarting the old one. Because the configuration files and data are stored outside of
the container, running a new container is easy and painless. Upgrading the application in
the future is as easy as removing the old container and starting up one from the updated
container image.
Building a container image
To build a container image, all you need is a Dockerfile describing how to build the image
and any other content that you want to include with the image. The following procedures describe how to create a simple container from your own Dockerfile and how to get
the software you need to build a vsftpd service into a container from software available
on GitHub.
Build a simple container image
This procedure creates a simple container from a Dockerfile. In this process, you create a Dockerfile and a simple script, then build that content into a new container image.
1. Create a directory to hold your container project and then enter that directory:
# mkdir myproject
# cd myproject
2. Create a script called cworks.sh in the current directory that contains the following text:
#!/bin/bash
set -
o errexit
672
Downloaded from https://onlinelibrary.wiley.com/doi/ by alex jounh - Oregon Health & Science Univer , Wiley Online Library on [05/12/2025]. See the Terms and Conditions (https://onlinelibrary.wiley.com/terms-and-conditions) on Wiley Online Library for rules of use; OA articles are governed by the applicable Creative Commons License
Part VI: Engaging with Cloud Computing
set -
o nounset
set -
o pipefail
echo "This Container Works!"
3. Make the script executable:
# chmod 755 cworks.sh
4. Create a file named Dockerfile in the current directory that contains the following content:
FROM public.ecr.aws/docker/library/fedora
COPY ./cworks.sh /usr/local/bin/
CMD ["/usr/local/bin/cworks.sh"]
5. Build a container image called myproject from the Dockerfile in the current
directory (.):
# docker build -
t myproject .
=> [internal] load build definition from Dockerfile
=> => transferring dockerfile: 205B
=> [internal] load metadata for ...fedora:latest
=> [internal] load .dockerignore
...
=> [1/2] FROM public.ecr.aws/docker/library/fedora:latest...
...
=> [2/2] COPY ./cworks.sh /usr/local/bin/
=> exporting to image
=> => exporting layers
=> => writing image sha256:0fc6fac6810ef40b5168551ff51...
=> => naming to docker.io/library/myproject
27
0.0s
0.0s
1.5s
0.0s
8.8s
0.3s
0.1s
0.0s
0.0s
6. Run the container to make sure it works. To do that, you can use either the container
name (myproject) or its image ID (0fc6fac6810e):
# docker run 0fc6fac6810e
The Container Works!
Build an FTP container from GitHub
The following procedure describes how to get the software you need to build a vsftpd service
into a container from software available on GitHub. (You will need to sign into a GitHub account
to clone the vsftpd repository.) It then shows you how to build and run that container.
1. If you don’t already have it, install git on your local system:
# dnf install git -
y
2. For this example, we are starting with the vsftpd container-images project on GitHub.
Clone a copy of that software to a local directory as follows:
# git clone https://github.com/container-images/vsftpd.git
# cd vsftpd
# ls
673
Downloaded from https://onlinelibrary.wiley.com/doi/ by alex jounh - Oregon Health & Science Univer , Wiley Online Library on [05/12/2025]. See the Terms and Conditions (https://onlinelibrary.wiley.com/terms-and-conditions) on Wiley Online Library for rules of use; OA articles are governed by the applicable Creative Commons License
Chapter 27: Shifting to Clouds and Containers
default-
conf/
root/
Dockerfile
s2i/
LICENSE
tests/
Makefile
README.md
3. Modify the files as needed. For example, go through the default default-conf/
vsftpd.conf file to see if you want to change the vsftpd configuration. Also, go
through the Dockerfile and use the latest Fedora image available. For example, modify
the FROM line at the beginning so that it appears as follows:
FROM registry.fedoraproject.org/fedora:latest
4. From the vsftpd directory, use either the docker or podman command to build the
container image. For example:
# docker build -
t vsftpd .
=> [internal] load build definition from Dockerfile
0.0s
=> => transferring dockerfile: 1.47kB
0.0s
=> [internal] load metadata for ...fedoraproject.org/fedora:latest 0.6s
=> [internal] load .dockerignore
0.0s
=> => transferring context: 2B
0.0s
=> [1/6] FROM ...fedoraproject.org/fedora:latest@sha256:85ec2d... 7.8s
=> => resolve ...fedoraproject.org/fedora:latest@sha256:85ec2d... 0.0s
=> => sha256:41750641d2071dde7fd937551057ab0... 61.08MB / 61.08MB 5.5s
=> => sha256:85ec2d23d28d7272129023dbe6ebbc1... 1.41kB / 1.41kB
0.0s
=> => sha256:b46b7a3fe2850b05ee5081c16c6ffaa7dffc... 504B / 504B
0.0s
=> => sha256:73edd27af7a2206b2249f3ddf939e4403361... 860B / 860B
0.0s
=> => extracting sha256:41750641d2071dde7fd937551057ab0edf802d166 2.1s
=> [internal] load build context
0.0s
=> => transferring context: 548B
0.0s
=> [2/6] RUN dnf install -
y vsftpd && dnf clean all &&
mkdir /home/vsftpd
21.6s
=> [3/6] RUN mkdir -
p /opt/app-
root/src
0.2s
=> [4/6] WORKDIR /opt/app-
root/src
0.1s
=> [5/6] COPY ./s2i/bin/ /usr/local/s2i
0.1s
=> [6/6] COPY default-
conf/vsftpd.conf /etc/vsftpd/vsftpd.conf
0.1s
=> exporting to image
0.8s
=> => exporting layers
0.7s
=> => writing image sha256:6070ec7fca9ff9f5cd768d3a2e1dcdc90cf... 0.0s
=> => naming to docker.io/library/vsftpd
0.0s
5. Check that the new image was created:
# docker images
REPOSITORY
TAG
vsftpd
latest
IMAGE ID
6070ec7fca9f
CREATED
21 minutes ago
SIZE
227MB
This build process consisted of six steps. The FROM line in the first step pulls the fedora
image from the registry.fedoraproject.org container registry. Each subsequent step runs
a command. If content is added during the command, a new layer is created for the image.
Step 2 runs the dnf command to install the vsfptd package and creates the /home/
vsftpd directory. Notice that the instruction has both dnf install and dnf clean in
674
Downloaded from https://onlinelibrary.wiley.com/doi/ by alex jounh - Oregon Health & Science Univer , Wiley Online Library on [05/12/2025]. See the Terms and Conditions (https://onlinelibrary.wiley.com/terms-and-conditions) on Wiley Online Library for rules of use; OA articles are governed by the applicable Creative Commons License
Part VI: Engaging with Cloud Computing
the same instruction. This is good practice since it prevents an additional layer of cached dnf
data from being included with the image.
Steps 3 and 4 create the /opt/app-root/src directory and set it as the working directory
(WORKDIR). Step 5 copies the s2i/bin/ directory to the container’s /usr/local/s2i
directory. Step 6 copies a default vsftpd.conf configuration file into the container.
For more information on creating and using a Dockerfile to build container images, refer to the
Dockerfile Reference (https://docs.docker.com/engine/reference/builder/). To learn more
about options for building container images, refer to the podman man pages (man podman
build).
Tagging and pushing an image to a registry
So far, I have shown an example of building a container image and running it on your local
system. To make your image available to other people on other systems, you typically add that
image to a container registry. Follow these instructions to tag an image on your local system and
push it to a remote container registry.
To try a simple registry on your local system, install the docker-distribution package on a
Fedora or RHEL system. For a more permanent solution, you can get accounts on public container
registries such as Quay.io and Docker Hub. Both free trials and subscriptions. For Quay.io, see
https://quay.io/plans/. You can also set up and run your own supported container registry,
such as Red Hat Quay (https://www.openshift.com/products/quay).
To get you started, the following procedure has you install the docker-distribution
package on the local system and then tag and push an image to it:
1. Install docker-distribution: On a RHEL or recent Fedora system, install and start the
docker-distribution:
#
#
#
#
•
dnf install docker-
distribution -
y
systemctl start docker-
distribution
systemctl enable docker-
distribution
systemctl status docker-
distribution
docker-
distribution.service -v2 Registry server for Docker
Loaded: loaded
(/usr/lib/systemd/system/docker-
distribution.service;
enabled; preset: disabled
...
Active: active (running) since Sun 2025-
04-
13 14:41:39 EDT;
1min 7s ago
2. Open the registry port: To be able to push and pull container images from other host
systems, you need to open TCP port 5000 on the firewall:
# firewall-cmd --zone=public --add-port=5000/tcp --permanent
3. Allow insecure registries: To push to a docker-distribution registry, you need
to tell docker to allow insecure registries. This is okay since we are just using this for
675
27
Downloaded from https://onlinelibrary.wiley.com/doi/ by alex jounh - Oregon Health & Science Univer , Wiley Online Library on [05/12/2025]. See the Terms and Conditions (https://onlinelibrary.wiley.com/terms-and-conditions) on Wiley Online Library for rules of use; OA articles are governed by the applicable Creative Commons License
Chapter 27: Shifting to Clouds and Containers
testing. Create the /etc/docker/daemon.json file with the following content
(using your hostname):
{
"insecure-
registries" : [ "host01.example.com:5000" ]
}
Then restart the docker service:
# systemctl daemon-reload
# systemctl restart docker
4. Tag the image: By tagging a local image, you identify the location of the registry
where the image will be stored. Replace the image ID and host.example.com with
your image ID and hostname or IP address to tag the image:
# docker images | grep vsftpd
vsftpd
latest 6070ec7fca9f 31 minutes ago 227MB
# docker tag 6070ec7fca9f host01.example.com:5000/myvsftpd:v1.0
# docker images | grep myvsftpd
host01.example.com:5000/myvsftpd v1.0 6070ec7fca9f 33 minutes ago
227MB
5. Push the image: Push the image to the local registry (substitute your hostname or
IP address):
# docker push host01.example.com:5000/myvsftpd:v1.0
The push refers to repository [host01.example.com:5000/myvsftpd]
22a97d289055: Pushed
...
v1.0: digest: sha256:bfab407b138afa2d03099a38a741f1d00a3902...
size: 1569
6. Pull the image: To make sure that the image is available from your registry, try to
pull the image. Either delete the image from your local system or go to another host
to try this:
# docker pull host01.example.com:5000/myvsftpd:v1.0
v1.0: Pulling from myvsftpd
Digest: sha256:bfab407b138afa2d03099a38a741f1d00a3902796ce4ca6
0fc6...
Status: Image is up-
to-
date for host01.example.com:5000/
myvsftpd:v1.0
host01.example.com:5000/myvsftpd:v1.0
At this point, you should be able to share your images.
If you were using a public registry, which is a better solution for sharing images with a wider
audience, the procedure for pushing and pulling images would look like the following.
# docker login quay.io
Username: myownusername
Password: ***************
676
Downloaded from https://onlinelibrary.wiley.com/doi/ by alex jounh - Oregon Health & Science Univer , Wiley Online Library on [05/12/2025]. See the Terms and Conditions (https://onlinelibrary.wiley.com/terms-and-conditions) on Wiley Online Library for rules of use; OA articles are governed by the applicable Creative Commons License
Part VI: Engaging with Cloud Computing
# podman tag aa0274872f23 \
quay.io/myownusername/myvsftpd:v1.0
# podman push quay.io/myownusername/myvsftpd:v1.0
Using containers in the enterprise
Although the Docker project made huge strides in simplifying how individual containers can be
used, it was the Kubernetes project that helped propel Linux containers into the enterprise. While
command-line tools like docker and podman are good for managing individual containers,
Kubernetes offers a platform for deploying large, complex applications across huge data centers.
Refer to Chapter 31, “Deploying Applications as Containers with Kubernetes,” for information on
how to use Kubernetes to deploy and manage containerized applications in the enterprise.
27
Summary
Containerizing applications has seen widespread adoption for many years now. The Docker
project was a huge contributor to the simplification of containerizing individual applications
and running them on single systems. Tools such as podman also became available to deploy
and manage individual containers on Linux systems.
This chapter described how to pull, run, build, and otherwise manage containers using
command-line tools like docker and podman. You can use this knowledge as a foundation
for understanding how containerization works and how those concepts are applied later in
Chapter 31, as it describes how Kubernetes can manage containerized applications across an
entire enterprise.
Exercises
The exercises in this section describe tasks related to working with containers. If you are stuck,
solutions to the tasks are shown in Appendix B. Keep in mind that the solutions shown in Appendix B are usually just one of multiple ways to complete a task.
1. Choose either podman or docker, install the software package containing the tool of
your choice, and start any necessary services to use those commands.
2. Using either docker or podman, pull this image to your host: public.ecr.aws/
docker/library/fedora.
3. Run the fedora image to open a Bash shell.
4. With the Bash shell open within a container, run a few commands to see the operating
system on which the container is based, install the proc-ps package, run a
command to see the processes running inside the container, and then exit.
5. Restart the container again and connect to it using an interactive shell. Exit the shell
when you are finished.
677
Downloaded from https://onlinelibrary.wiley.com/doi/ by alex jounh - Oregon Health & Science Univer , Wiley Online Library on [05/12/2025]. See the Terms and Conditions (https://onlinelibrary.wiley.com/terms-and-conditions) on Wiley Online Library for rules of use; OA articles are governed by the applicable Creative Commons License
Chapter 27: Shifting to Clouds and Containers
6. Create a simple Dockerfile from a fedora base image, include a script named
cworks.sh that uses echo to output the string “The Container Works!” and add
that script to the image so that it runs as the default command.
7. Use docker or podman to build an image named containerworks from the Dockerfile you just created.
8. Gain access to a container registry, either by installing the docker-distribution package
or by getting an account on Quay.io or Docker Hub.
9. Tag and push your new image to your chosen container registry.
678
Downloaded from https://onlinelibrary.wiley.com/doi/ by alex jounh - Oregon Health & Science Univer , Wiley Online Library on [05/12/2025]. See the Terms and Conditions (https://onlinelibrary.wiley.com/terms-and-conditions) on Wiley Online Library for rules of use; OA articles are governed by the applicable Creative Commons License
Part VI: Engaging with Cloud Computing
28
Using Linux for Cloud Computing
IN THIS CHAPTER
How Linux is used in clouds
Understanding basic cloud technology
Setting up a hypervisor
Creating virtual machines
C
omputer operating systems were originally designed to be installed directly on computer hardware. When it needed memory, storage, processing power, or network interfaces, a computer
operating system looked for physical RAM, hard disks, CPUs, and network interface cards. When
it needed more of those things than were physically installed, you turned the machine off and physically added them to the computer. Nowadays, virtualizing these items is what makes cloud computing possible.
Virtualization, as it relates to computers, is the act of making computing resources that were originally
designed as physical objects to be represented by virtual ones. For example, a virtual operating system
(referred to as a virtual machine) doesn’t communicate directly with the hardware. Instead, a virtual
machine (VM) interacts with a specially configured host computer referred to as a hypervisor. So, instead
of being able to run one operating system on a physical computer, you could potentially run dozens or
even hundreds of VMs on a single physical computer.
The advantages gained from running VMs are massive. Not only can you have multiple operating systems
running on the same computer, but those systems can be different ones—Linux, BSD, Windows, or any
other system made to run on the computer’s hardware. If you need to shut down the host computer
for maintenance, you can migrate the running VMs to another hypervisor with an often imperceptible
amount of downtime.
To support virtual machines across multiple hypervisors, you can virtualize the features they rely upon as
well. For example, virtual networks and virtual storage can span multiple hypervisors, so if a VM needed
to move to another hypervisor, the same virtual networks and storage would be available to a newly
migrated virtual machine.
679
Downloaded from https://onlinelibrary.wiley.com/doi/ by alex jounh - Oregon Health & Science Univer , Wiley Online Library on [05/12/2025]. See the Terms and Conditions (https://onlinelibrary.wiley.com/terms-and-conditions) on Wiley Online Library for rules of use; OA articles are governed by the applicable Creative Commons License
CHAPTER
You don’t need to build a whole data center to begin understanding virtualization and to use some
of the underlying technologies that make cloud computing possible. This chapter starts you off by
helping you to set up a host computer to run as a hypervisor, start running VMs on that hypervisor,
and then learn how to migrate VMs to other hypervisors (in order to prevent downtime or just to
grow your capacity).
Overview of Linux and Cloud Computing
Cloud computing moves us into an arena where everything you learned previously in this
book is abstracted and automated. In a cloud environment, when you install a system, you
are probably not booting from a physical USB, erasing the local hard drive, and installing
Linux directly on a computer sitting in front of you. You are also probably not logging into
the installed system and manually configuring the software and features you want to run on
that system.
Instead, you are installing a VM or having a VM launched for you from a request to a public
cloud, such as Amazon AWS. The network interfaces that you see may not be represented
by a physical switch; rather, they may be virtual networks that exist on a single computer
or span multiple hypervisors. Today, every software aspect of cloud computing can be fulfilled using open source technology running on Linux systems. To get a feel for how some
of the basic technologies in cloud computing work, this chapter explains some of those
technologies and then describes how to set up a hypervisor and start using VMs on that
hypervisor.
Cloud hypervisors
In cloud computing, the operating systems serving cloud users are usually not running directly
on computer hardware. Instead, hypervisors are configured to run many operating systems as
what are referred to as virtual machines (VMs).
Depending on your cloud environment, you may hear a hypervisor referred to as a
compute node, a worker node, or simply a host. Because hypervisors tend to be commodity
items (dozens or hundreds of hypervisors may be set up for a location), Linux is the logical
choice as the operating system running as hypervisors directly on hardware.
Kernel-based Virtual Machine (KVM) is the basic virtualization technology implemented in most
Linux distributions to make a Linux system into a hypervisor. KVM is supported on Ubuntu,
Red Hat Enterprise Linux, Fedora, CentOS, and many other Linux systems.
Another major technology that can be used instead of KVM to make a Linux system into a
hypervisor is Xen (www.xenproject.org). Xen has been around longer than KVM, and it is
supported in products from Citrix Systems and Oracle, as well as being offered as an alternative
to KVM in many popular Linux systems.
Later in this chapter, I describe how to check to see if a computer has the required hardware
features to be used as a hypervisor and how to configure it to be used with KVM.
680
Downloaded from https://onlinelibrary.wiley.com/doi/ by alex jounh - Oregon Health & Science Univer , Wiley Online Library on [05/12/2025]. See the Terms and Conditions (https://onlinelibrary.wiley.com/terms-and-conditions) on Wiley Online Library for rules of use; OA articles are governed by the applicable Creative Commons License
Part VI: Engaging with Cloud Computing
Cloud controllers
Because a cloud configuration can include multiple hypervisors, pools of storage, multiple
virtual networks, and many virtual machines, you need centralized tools to manage and monitor those features. You can use both graphical and command-based tools for controlling cloud
environments.
Although not considered a full cloud controller, the Virtual Machine Manager
(virt-manager) GUI and virsh command can be used to manage a small cloud-like environment. Using virt-manager, you can get a feel for managing multiple virtual machines
across several hypervisors, and you can learn how to deal with virtual networks and shared
storage pools.
Full-blown cloud platforms have their own controllers for offering much more complex interactions between cloud components. For example, the Red Hat OpenStack platform (https://
access.redhat.com/products/red-hat-openstack-platform) and its upstream RDO project
(https://www.rdoproject.org) provide flexible and expandable cloud environments for
managing VMs and all associated supporting features. For Red Hat Virtualization (RHV), the
RHV Manager provides many of the same features.
If you want to start out more simply, however, you can start by using virt-manager, the
VM Desktop tool, to manage your first mini cloud-like environment.
Cloud storage
New demands on data storage arise when you move your operating systems and applications into a
cloud environment. To be able to move a virtual machine to run on another hypervisor, its storage
must be available from that new hypervisor. Storage needs for clouds include back-end storage for
your VMs, images for launching VMs, and databases for storing information about the cloud itself.
Shared storage between hypervisors can be done as simply as creating an NFS share (see
Chapter 20, “Configuring an NFS File Server”) and mounting it on the same mount point
between multiple hypervisors. NFS is one of the easiest ways to implement shared storage.
More robust shared storage that can handle disk failures and provide better performance works
better for clouds providing critical services. Shared block storage, where you mount a whole
disk or disk partition, can be accomplished using technologies such as iSCSI or Fibre Channel.
Ceph (http://ceph.com) is an open source project for managing both block and object storage
that is popular for managing storage in cloud environments. GlusterFS (www.gluster.org) is a
scale-out filesystem that is often used in cloud environments.
For the simple mini-cloud example in this chapter, I used NFS to provide shared storage between
the hypervisors. Ceph and GlusterFS are more appropriate for enterprise-quality installations.
However, major cloud providers tend to have their own storage facilities. For example, AWS offers
S3 (object storage), EBS (block storage), and EFS (file storage). Azure has Blob Storage (object
storage), Azure Disks (block storage), and Azure Files (file storage). Google Cloud has Cloud
Storage (object storage), Persistent Disks (block storage), and Cloud Filestore (file storage).
681
28
Downloaded from https://onlinelibrary.wiley.com/doi/ by alex jounh - Oregon Health & Science Univer , Wiley Online Library on [05/12/2025]. See the Terms and Conditions (https://onlinelibrary.wiley.com/terms-and-conditions) on Wiley Online Library for rules of use; OA articles are governed by the applicable Creative Commons License
Chapter 28: Using Linux for Cloud Computing
Cloud authentication
To be able to limit the cloud resources a user can consume, and possibly track and charge for
that use, you need authentication mechanisms. Authentication is necessary for those who are
using cloud features as well as for those who are allowed to administer cloud features.
Cloud platform projects sometimes let you connect centralized authentication mechanisms to
validate and authorize cloud users. These can include Kerberos, Microsoft Active Directory, and
others. In Linux, Identity, Policy, and Audit (IPA) software (see www.freeipa.org) offers a full
set of authentication features that can be used across an enterprise cloud platform.
Most commercial cloud providers offer multiple authentication and authorization mechanisms.
For AWS, Identity and Access Management (IAM) is commonly used. Microsoft Azure uses Entra
ID (formerly Azure Active Directory) and Google Cloud uses IAM and service accounts.
Cloud deployment and configuration
If you are managing a large cloud infrastructure, you don’t want to have to walk over to each
machine and click through a graphical installation every time you want to add a hypervisor
or other node on your network. Today, many tools can deploy and configure Linux systems as
simply as rebooting the computer and having it boot up to a preconfigured installer.
In Chapter 9, “Installing Linux,” I talked about how to use a PXE server (to boot a Linux
installer automatically over the network from your network interface card) and Kickstart files
(to identify all of the answers you need to complete an installation). With that setup in place,
you can simply boot a computer from a network interface and come back a short time later to
find a fully installed Linux system.
After a computer is deployed, systems can be configured and possibly monitored and updated
using tools such as Puppet (http://puppetlabs.com) and Chef (www.chef.io). Whole work
environments can be deployed in virtual machines using Vagrant (www.vagrantup.com). Ansible (www.ansible.com) is another tool for automating IT infrastructures and the applications
that run on them.
Cloud platforms
If you want to implement a small private cloud within your organization, the open source
OpenStack platform is one possibility. It offers a huge amount of flexibility and power in how
you configure and use it.
Red Hat Virtualization (RHV) is another popular cloud platform. RHV makes it easy to start
with a simple RHV Manager and one or two hypervisors to run the VMs it manages and then
grow your own cloud platform by adding more hypervisors, storage pools, and other features.
If you want to use public clouds based on open source technology to run the operating systems that you need, you can use any of several different cloud providers. Public cloud providers that you can use to run Linux VMs include Amazon Web Services (www.amazon.com/
aws), Google Cloud Platform (https://cloud.google.com), and Microsoft Azure (https://
portal.azure.com). Chapter 28, “Deploying Linux to the Cloud,” covers how to deploy Linux
to some of these cloud providers.
682
Downloaded from https://onlinelibrary.wiley.com/doi/ by alex jounh - Oregon Health & Science Univer , Wiley Online Library on [05/12/2025]. See the Terms and Conditions (https://onlinelibrary.wiley.com/terms-and-conditions) on Wiley Online Library for rules of use; OA articles are governed by the applicable Creative Commons License
Part VI: Engaging with Cloud Computing
Trying Basic Cloud Technology
To help you understand cloud technology from the ground up, this section illustrates some of
the basic building blocks of a modern cloud infrastructure. Using three computers, I’ll help you
create a setup that includes the following:
Hypervisors A hypervisor is a software component that that runs directly on computer hardware and allows you to run other, multiple computer systems on it. Those
other systems are referred to as virtual machines (VMs). A cloud infrastructure may
have dozens or hundreds of hypervisors running, possibly running thousands of virtual machines.
Virtual machines The virtual machines that you run on a Linux hypervisor can be the
same type of Linux system, a different Linux system, a Windows system, or any other
type of system that is compatible with the hardware on which the hypervisor runs.
Thus, the virtual machines that run on the hypervisors that we will build here could
include Fedora, Ubuntu, RHEL, CentOS, Microsoft Windows, and others.
Shared storage To offer the greatest flexibility, the storage that hypervisors make
available to virtual machines is often shared among a pool of hypervisors. This allows
a set of hypervisors to share a set of images that they use to install or start virtual
machines. It also lets the same set of virtual machines run on any hypervisor in that
group and even move to a different hypervisor without shutting down the VM. Moving
running VMs can be useful if a hypervisor becomes overloaded or if it needs to be shut
down for maintenance.
The setup we build in the following procedure allows you to work with VMs in these ways:
■
■
■
■
Installing a new VM on a hypervisor
Setting features on your VMs
Logging in to and using a VM running on a hypervisor
Migrating running VMs to another hypervisor
We will explore the following technologies:
Kernel-based Virtual Machine (KVM) KVM is the basic kernel technology that allows
virtual machines to interact with the Linux kernel.
QEMU Processor Emulator One qemu process runs for each active virtual machine on
the system. QEMU provides features that make it appear to each virtual machine as
though it is running on physical hardware.
Libvirt Service Daemon (libvirtd) A single libvirtd service runs on each hypervisor. The libvirtd daemon listens for requests to start, stop, pause, and otherwise
manage virtual machines on a hypervisor. Those requests can come from an application
designed to manage virtual machines (such as virt-manager or OpenStack Dashboard) or from an application that you create to talk directly to the libvirt application programming interface.
683
28
Downloaded from https://onlinelibrary.wiley.com/doi/ by alex jounh - Oregon Health & Science Univer , Wiley Online Library on [05/12/2025]. See the Terms and Conditions (https://onlinelibrary.wiley.com/terms-and-conditions) on Wiley Online Library for rules of use; OA articles are governed by the applicable Creative Commons License
Chapter 28: Using Linux for Cloud Computing
Virtual Machine Manager The Virtual Machine Manager (virt-manager command) is
a GUI tool for managing virtual machines. Besides letting you request to start and stop
virtual machines, virt-manager lets you install, configure, and manage VMs in different ways. You can use the virsh command to pass options to the command line to
work with virtual machines instead of clicking in a GUI window.
Virtualization Viewer The virt-viewer command launches a virtual machine console window on your Desktop. The window that appears allows you to work from a
console window to a Desktop or command-line interface to the selected virtual machine
(depending on what that VM has to offer). What this means is that someone consuming your virtualization platform could bundle together their own operating system,
application, configuration files, and data and deploy them. They would rely on your
hypervisors to provide the compute power, storage, memory, network interfaces, and
management features needed to run the virtual machines containing their applications.
The next section gives you your first taste of some of the foundational technologies of Linux
clouds. It describes how to set up a small cloud by configuring your own hypervisors, virtual
machines, and virtual storage.
Setting Up a Small Cloud
With three physical machines connected together on a network, you can illustrate some of the
basic concepts you need in order to understand how to build your own cloud. The three computers running Fedora 42 and the network connecting them are configured as follows:
Networking A high-speed, wired network was set up to connect the three computers.
Fast network connections are critical to successful VM migration. In this example, each
hypervisor also has a network bridge configured so that each virtual machine can pick
up an IP address directly from a DHCP service on the network.
Hypervisors Two of the computers are configured as hypervisors. A hypervisor (sometimes referred to as a host or a compute node) allows you to run virtual machines.
In Fedora 42, the most common hypervisor technology is called Kernel-based
Virtual Machine (KVM), while the actual virtual machines are managed by the
libvirtd service.
Storage One computer is configured to offer shared storage between the two hypervisors. For simplicity, NFS is used to create the shared storage, although in a production
environment, iSCSI or Fibre Channel would be better solutions.
Note
For test purposes, you could use one of the two hypervisors to provide the shared storage. However, one of the main purposes of configuring two hypervisors and separate shared storage is that you want to be able to shut down any hypervisor and still have all of your virtual machines operate normally. If you have shared storage available from one of the
hypervisors, you could never bring that hypervisor down without shutting down all of the VMs using that storage.
684
Downloaded from https://onlinelibrary.wiley.com/doi/ by alex jounh - Oregon Health & Science Univer , Wiley Online Library on [05/12/2025]. See the Terms and Conditions (https://onlinelibrary.wiley.com/terms-and-conditions) on Wiley Online Library for rules of use; OA articles are governed by the applicable Creative Commons License
Part VI: Engaging with Cloud Computing
Configuring hypervisors
In the following procedure, I installed Fedora 42 Server (including a GNOME desktop) on two
physical computers and configured them as KVM hosts running the libvirtd service. Follow
these steps to accomplish this for yourself.
Step 1: Get Linux software
Go to the Fedora Project page (https://fedoraproject.org) and download the latest Fedora
Server. I chose to download the Fedora 42, 64-bit Server edition DVD ISO. If a later version of
Fedora is available, you could likely use that instead.
Burn the image to a USB drive using an application such as the Fedora Media Writer (also available from https://fedoraproject.org).
Step 2: Check your computers
The computers you use as hypervisors in Fedora 42 need to meet a few requirements. You
should check the following on your computer before you start installing:
Supports virtualization. You can check for virtualization support by looking at the flags
set in the CPU.
Memory. The computer must have enough RAM not only to run the host operating
system, but also for each virtual machine that you expect to run on the system.
Processing power. Keep in mind that each virtual machine consumes processing power
for itself and any application running inside the virtual machine.
Storage is another consideration. However, because we intend to configure storage from a separate node on the network, we will address that issue later.
To check that the available features of your computers meet the requirements, boot a Linux
Live CD or DVD, open a Terminal window, and type the following commands:
# cat /proc/cpuinfo | grep -
-
color -
E "vmx|svm|lm"
flags : fpu vme de pse tsc msr pae mce cx8 apic sep mtrr pge mca
cmov pat pse36 clflush dts acpi mmx fxsr sse sse2 ss ht tm pbe
syscall nx pdpe1gb rdtscp lm constant_tsc arch_perfmon pebs bts
rep_good xtopology nonstop_tsc aperfmperf pni pclmulqdq dtes64
monitor ds_cpl vmx smx es…
…
Running the previous command shows that this computer is a 64-bit computer (lm) and that
an Intel chip supports virtualization features (vmx). If the CPU were an AMD chip that supported virtualization, instead of vmx, you would see svm highlighted. Those settings show
that this computer can be used as a hypervisor.
When you start running VMs on a host, memory is often the bottleneck. For memory requirements, you must add what is needed by the host to whatever you need for each VM. You can
lower memory requirements by not having Desktop software installed, as most hypervisors do.
685
28
Downloaded from https://onlinelibrary.wiley.com/doi/ by alex jounh - Oregon Health & Science Univer , Wiley Online Library on [05/12/2025]. See the Terms and Conditions (https://onlinelibrary.wiley.com/terms-and-conditions) on Wiley Online Library for rules of use; OA articles are governed by the applicable Creative Commons License
Chapter 28: Using Linux for Cloud Computing
In this case, however, I performed a Fedora Server install, then added a GNOME Desktop. To
check the memory and swap on the computer, I entered the following:
# free -
m
Mem:
Swap:
total
15318
7743
used
4182
0
free
6331
7743
shared buff/cache
1047
4805
available
9678
This system has about 16Gb of RAM and 8Gb of swap. I estimate that 4Gb is good for the host
system, including the added GNOME desktop. If I allow 1Gb or 2Gb for each VM, this system
should be able to run 6–12 VMs along with the Desktop. Check the memory requirements for
the operating systems and the applications that you plan to run to determine your particular
memory needs.
To check the number and types of processors on your computer, enter the following:
# grep processor /proc/cpuinfo
processor : 0
…
processor : 4
processor : 5
# head /proc/cpuinfo
processor : 0
vendor_id : GenuineIntel
cpu family : 6
model
: 158
model name : Intel(R) Core(TM) i5-
8500T CPU @ 2.10GHz
stepping
: 10
…
The first command in the preceding code shows that there are six (0 through 5) processors on
the computer. The second command for the first processor shows that it is GenuineIntel, the
model number, model name, CPU family, and other information.
To do live VM migration between the two hypervisors, the CPUs must be in the same family. If
they don’t have compatible CPUs, you could migrate a VM by shutting it down on one hypervisor and starting it up from shared storage on the other.
After you have sized up the two hypervisor computers, start installing Fedora on them.
Step 3: Install Linux on hypervisors
Using the Fedora 42 installation media, begin installing the two hypervisors. Follow descriptions in Chapter 9, “Installing Linux,” for installing Fedora. You should know the following
things, which are specific to the installation for this procedure:
Name the hypervisors I set the hostnames on the hypervisors to host1.example.com
and host2.example.com.
686
Downloaded from https://onlinelibrary.wiley.com/doi/ by alex jounh - Oregon Health & Science Univer , Wiley Online Library on [05/12/2025]. See the Terms and Conditions (https://onlinelibrary.wiley.com/terms-and-conditions) on Wiley Online Library for rules of use; OA articles are governed by the applicable Creative Commons License
Part VI: Engaging with Cloud Computing
Partitioning When partitioning, I erase the entire hard disk. Then I create a 500MiB
/boot partition and a 12GiB swap partition, and I assign the rest of the disk space to
the root partition (/). The /var/lib/libvirt/images directory holds most of
the data on this system, but that is a shared directory, available from another system
on the network and shared between the two hypervisors. (More on that later.)
Networking If given the option, turn on wired network interfaces for each hypervisor. The hypervisors and storage should all be on the same local network, because the
speed of your network connection among those machines is critical to getting good
performance.
Software packages During installation, I install only the default Fedora Server packages. After installation is complete and the system is rebooted, I installed the GNOME
desktop, and later I install more of the software that’s needed for each hypervisor.
Reboot the computer when installation is finished (removing the USB drive and starting up on
the hard drive). After the system is rebooted, update the Fedora software, add new packages,
and reboot the system again as follows:
# dnf update -
y
# dnf install virt-manager libvirt-daemon-config-network
# reboot
The virt-manager package contains the GUI tool for managing your virtual machines. The
libvirt-daemon-config-network package creates the default network interface that
lets the virtual machines access external networks (through the host) using Network Address
Translation (NAT). The default address range assigned to the virtual machines is 192.168.122.2
through 192.168.122.254.
Other packages that you will need should already be included with the Fedora install. If you
did a different install type, make sure you have the following packages also added:
■
■
libvirt-client (for the virsh command)
libvirt-daemon (to get the libvirtd service)
Step 4: Start services on the hypervisors
You need to make sure that the libvirtd service is running on both hypervisors. Start the
sshd service as well. They may already be running, but just to make sure, do the following as
root on both hypervisors:
#
#
#
#
systemctl
systemctl
systemctl
systemctl
start sshd.service
enable sshd.service
start libvirtd.service
enable libvirtd.service
The sshd service allows you to log into the hypervisors over the network, if necessary. The
libvirtd service is the one with which you may be unfamiliar. It is listening for requests to
manage your virtual machines on each host.
687
28
Downloaded from https://onlinelibrary.wiley.com/doi/ by alex jounh - Oregon Health & Science Univer , Wiley Online Library on [05/12/2025]. See the Terms and Conditions (https://onlinelibrary.wiley.com/terms-and-conditions) on Wiley Online Library for rules of use; OA articles are governed by the applicable Creative Commons License
Chapter 28: Using Linux for Cloud Computing
Step 5: Edit /etc/hosts, or set up DNS
To make it convenient to communicate between the hypervisors and storage system, you
should assign hostnames to each system and map those names to IP addresses. Setting up a
DNS server to which all the systems point is probably the best way to do that. However, for our
simple example, you can just edit the /etc/hosts file on each system and add entries for
each host.
Here is an example of what additional entries to your /etc/hosts file might look like for
the three systems used in this procedure:
192.168.0.138
192.168.0.139
192.168.0.1
host1.example.com host1
host2.example.com host2
storage.example.com storage
Next you need to configure the storage.
Configuring storage
You can provide networked storage to the hypervisors for this procedure in many ways. I chose
to set up a separate Fedora system on the same local network as the hypervisors and use NFS
to attach the shared storage to both hypervisors.
NFS is not the most efficient method of sharing storage among hypervisors, but it is one of the
easiest and most common to set up. In this procedure, I use the Virtualization Manager GUI
tool (virt-manager) to configure the NFS storage pool.
For consistency’s sake, the NFS share set up from the storage system is the /var/lib/
libvirt/images directory. It is mounted in the same place on each of the hypervisors. (For
testing, if you have only two machines available, you can configure storage from one of the
hypervisors. Keep in mind, however, that this means you can’t turn off that hypervisor without
shutting down all of your VMs.)
Step 1: Install Linux software
To set up your storage on an NFS server, you can use pretty much any Linux system that has
an NFS service available. Consider these things when you install Linux:
Disk space. Make sure that you have enough storage space available on the partition that
contains the shared directory. For this example, /var/lib/libvirt/images is the
shared directory.
Performance. For best performance, you want to have a disk that has fast access times
and data transfer rates.
For Fedora and RHEL, NFS server software is available from the nfs-utils package. For
Ubuntu, you need the nfs-kernel-server package. After initial installation is finished,
check that the NFS server software is installed. If it isn’t, you can install it on Fedora or RHEL
with this command:
# dnf install nfs-
utils
688
Downloaded from https://onlinelibrary.wiley.com/doi/ by alex jounh - Oregon Health & Science Univer , Wiley Online Library on [05/12/2025]. See the Terms and Conditions (https://onlinelibrary.wiley.com/terms-and-conditions) on Wiley Online Library for rules of use; OA articles are governed by the applicable Creative Commons License
Part VI: Engaging with Cloud Computing
For Ubuntu and similar systems, type this:
# apt-get install nfs-kernel-server
Step 2: Configure NFS share
To create an NFS share, you need to identify the directory to share and add information about
it to the /etc/exports file. Follow these steps:
1. Create a directory. You can share any directory containing the space that you want to
share. Consider making a new directory and mounting a whole disk or partition on it.
For this example, I create a directory named /var/storage as follows:
# mkdir -
p /var/storage
2. Allow exporting. On your storage system, create an entry in the /etc/exports file
to share the directory with selected systems (by name or IP address). For this example,
I allowed read-write access (rw) to all systems (this is for testing purposes and would
be insecure to do permanently):
/var/storage *(no_root_squash,rw,sync)
3. Export the directory. On the storage system, export the shared directory:
# exportfs -a
Step 3: Start the NFS service
Start the NFS service and open the firewall on the storage system to allow access to that service. Here’s how:
1. Start and enable NFS. On the latest Fedora and RHEL systems, enter the following to
start the NFS server:
# systemctl start nfs-
server.service
# systemctl enable nfs-
server.service
2. Open the firewall. To open the firewall ports so that those outside the local system
can use your NFS share, do the following on Fedora 42:
# firewall-cmd --permanent --add-service=rpc-bind
# firewall-cmd --permanent --add-service=nfs
# systemctl restart firewalld
Step 4: Mount the NFS share on the hypervisors
Log in to each hypervisor and follow these steps to make the share available locally. Note that
the location of the mount point directory on each hypervisor must be the same. Here’s how:
1. Check the NFS share availability. From each of the two hypervisors, make sure that
you can see the available share by entering the following:
# showmount -
e storage.example.com
Export list for storage.example.com:
/var/storage *
689
28
Downloaded from https://onlinelibrary.wiley.com/doi/ by alex jounh - Oregon Health & Science Univer , Wiley Online Library on [05/12/2025]. See the Terms and Conditions (https://onlinelibrary.wiley.com/terms-and-conditions) on Wiley Online Library for rules of use; OA articles are governed by the applicable Creative Commons License
Chapter 28: Using Linux for Cloud Computing
2. Mount the NFS share. Add information about the share to the /etc/fstab file. For
our example, to allow the directory from the storae.example.com to be mounted on
the same directory locally each time the system boots, the entry in the /etc/fstab
file could look like this:
storage.example.com:/var/storage /var/lib/libvirt/images nfs
defaults 0 0
3. Set SELInux boolean. If SELinux is in enforcing mode, set the following Boolean to
allow qemu-kvm to use the NFS share:
# setsebool -
P virt_use_nfs 1
4. Test the NFS mount. To check that you got the mount entry correct, run the following command to mount all entries in the /etc/fstab that have not already been
mounted, and check that the NFS share was mounted:
# mount -
a
# mount | grep libvirt
storage.example.com:/var/storage on /var/lib/libvirt/images type
nfs4
(rw,relatime,vers=4.0,rsize=1048576,wsize=1048576,namlen=255,hard,
proto=tcp,
port=0,timeo=600,retrans=2,sec=sys,clientaddr=192.168.0.1,local_
lock=none,
addr=192.168.0.138)
With your hypervisors and storage now in place, you can begin creating your virtual machines.
Creating virtual machines
The Virtual Machine Manager (virt-manager) is a good tool to use to create your first virtual machines. It steps you through the installation and setup of virtual machines, and it provides a way to view and change the status of your existing virtual machines.
Later, when you understand the kinds of features that go into creating virtual machines, you
can use the virt-install command to create virtual machines instead. The advantage of
virt-install is that you can script or easily copy and paste a command line to create a
virtual machine instead of having to click through a GUI window.
I chose to download a Fedora 42 Workstation DVD ISO to use to install the operating system for
my VMs. However, if you prefer, you can install many different versions of Linux or Windows as
your virtual machine.
Step 1: Get images to make virtual machines
You can create a virtual machine in many ways. In general, you start with either a prebuilt
image (basically a copy of a working virtual machine) or just install from an installation ISO
690
Downloaded from https://onlinelibrary.wiley.com/doi/ by alex jounh - Oregon Health & Science Univer , Wiley Online Library on [05/12/2025]. See the Terms and Conditions (https://onlinelibrary.wiley.com/terms-and-conditions) on Wiley Online Library for rules of use; OA articles are governed by the applicable Creative Commons License
Part VI: Engaging with Cloud Computing
image into a fresh storage area. Here we are going to do the latter and create a VM from the
Fedora 42 Workstation installation ISO image.
Assuming you are logged in to one of the hypervisors as root and the ISO image is in the
current directory, copy the ISO to the default directory used by virt-manager for storage
(/var/lib/libvirt/images):
# cp Fedora-Workstation-Live-42-1.1.x86_64.iso /var/lib/libvirt/
images/
Because that directory is shared by both hypervisors, you can go to either hypervisor to use
that image.
Step 2: Check the network bridge
On each hypervisor, there should be a default network bridge named virbr0. All virtual
machines will be added to this network interface and automatically assigned an IP address.
This default bridge exists due to libvirtd’s default virtual network. By default, the hypervisor uses the address range of 192.168.122.2 through 192.168.122.254 to assign to the virtual
machines. Using Network Address Translation (NAT), the host can route packets from the virtual machines using these private addresses to external network interfaces.
Do the following on each hypervisor to check the bridge for each:
# brctl show virbr0
bridge name bridge id
virbr0
8000.5254005eeceb
# ip addr show virbr0
STP enabled
yes
28
interfaces
vnet0
5: virbr0: <BROADCAST,MULTICAST,UP,LOWER_UP> mtu 1500 qdisc noqueue
state UP group default
link/ether fe:54:00:57:71:67 brd ff:ff:ff:ff:ff:ff
inet 192.168.122.1 brd 192.168.122.255 scope global dynamic
virbr0
Step 3: Start Virtual Machine Manager (virt-manager)
From the Desktop on either hypervisor, do the following to open Virtual Machine Manager and
connect it to the hypervisor:
1. Start virt-manager. Go to the Activities screen, type Virtual Machine Manager
into the search box, and press Enter, or type virt-manager from the shell. Type
the root password or your sudo user’s password when prompted. You should see the
Virtual Machine Manager window.
2. Check the connection to the hypervisor. Select File ➪ Add Connection. From the
Add Connection pop-up, the hypervisor (QEMU/KVM) should already be set and the
Autoconnect check box should be checked. Click Connect to connect to the local
hypervisor if it has not already been done.
691
Downloaded from https://onlinelibrary.wiley.com/doi/ by alex jounh - Oregon Health & Science Univer , Wiley Online Library on [05/12/2025]. See the Terms and Conditions (https://onlinelibrary.wiley.com/terms-and-conditions) on Wiley Online Library for rules of use; OA articles are governed by the applicable Creative Commons License
Chapter 28: Using Linux for Cloud Computing
Step 4: Check the connection details
After connecting to the hypervisor, set up some connection details. To do that, from the Virtual Machine Manager window, do the following:
1. View the connection details. Select Edit ➪ Connection Details to see the Connection
Details window. Select the Overview, Virtual Networks, and Storage tabs to familiarize
yourself with connection information for your hypervisor. For example, the Storage
tab appears in Figure 28.1, showing that there are 166.90Gb of free space in the location used by default for storage by this hypervisor (/var/lib/libvirt/images
directory).
FIGURE 28.1
Start Virtual Machine Manager and check connection details.
2. Check that the network bridge is available. Select the Virtual Networks tab, and
make sure that the bridge (virbr0) is in the list of available network interfaces.
Step 5: Create a new virtual machine
To create a new virtual machine from the Virtual Machine Manager window, do the following:
1. Start the wizard. To start the Create a New Virtual Machine Wizard, select File ➪ New
Virtual Machine. The Create a New Virtual Machine window appears.
692
Downloaded from https://onlinelibrary.wiley.com/doi/ by alex jounh - Oregon Health & Science Univer , Wiley Online Library on [05/12/2025]. See the Terms and Conditions (https://onlinelibrary.wiley.com/terms-and-conditions) on Wiley Online Library for rules of use; OA articles are governed by the applicable Creative Commons License
Part VI: Engaging with Cloud Computing
2. Choose the installation method. Four ways of creating the virtual machine are presented. The first three are ways to identify the location of installation media. The
fourth lets you import an existing disk image. For our example, choose the first selection (Local install media) and click Forward.
3. Choose the ISO. Select the Use ISO Image button and choose Browse. In the window
that appears, select or browse to the Fedora ISO, select Choose Volume, and click Forward to continue.
4. Choose the memory and CPU. Choose the amount of RAM and number of processors
available to the VM and click Forward. I suggest at least 1024Mb of RAM and at least
one processor. Using 2048Mb of RAM, if it is available, is better.
5. Enable storage. Choose the amount of disk space that you want the VM to consume.
I suggest at least 10Gb for a Fedora Workstation, but you could probably get by with
less. The qcow2 image that is created grows to the size you actually consume (up to
the amount allocated), so over-allocating space causes no problem until you actually
try to use that space. Click Forward.
6. Review the settings before the installation starts. Choose the name for the virtual
machine and review the other settings for your installation. Select Customize Configuration Before Install to further review settings. Leave other settings at the default for
now and click Finish.
7. Review the hardware settings. If you selected Customize on the previous screen,
you can review the settings in more detail. Under the VirtIO Disk, make sure the
cache mode is set to none or directsync. Under Memory, you might want to select
Enable Shared Memory. When you are satisfied, select Begin Installation.
8. Install the virtual machine. You are prompted to install the system just as you would
be if you were installing directly to hardware. Complete the installation, and reboot
the virtual machine. If the VM window isn’t open, double-click the VM entry (in this
case, Fedora40ws) in the virt-manager window and log in. Figure 28.2 shows an
example of the virt-manager window with the Fedora Workstation virtual machine
displayed.
Managing virtual machines
After you have one or more virtual machines installed on a hypervisor, you can manage each
VM in much the same way that you manage a computer system installed directly on hardware.
You can do the following:
■
View the system from a console. Double-click a running VM in the virt-manager
window. A console window opens to the VM, allowing you to use the VM just as you
would from a physical console to access an operating system installed directly on the
hardware. You can bypass virt-manager to display a VM’s console directly with
virt-viewer. For example, for a VM named fedora42ws, type virt-viewer
fedora42ws.
693
28
Downloaded from https://onlinelibrary.wiley.com/doi/ by alex jounh - Oregon Health & Science Univer , Wiley Online Library on [05/12/2025]. See the Terms and Conditions (https://onlinelibrary.wiley.com/terms-and-conditions) on Wiley Online Library for rules of use; OA articles are governed by the applicable Creative Commons License
Chapter 28: Using Linux for Cloud Computing
■
■
■
Shut down the VM. Right-click the VM entry and select Shut Down. Then select either
Shut Down (to shut down properly) or Force Off (effectively pulling the plug). Or, you
can select Reboot.
Start the VM. If the VM is currently shut down, right-click the entry and select Run
to start the VM running.
Delete the VM. If you are totally finished using the VM, select Delete. You are asked
if you want to delete the storage as well. Uncheck the box if you want to keep the
storage associated with the VM.
FIGURE 28.2
Open the virtual machine and begin using it.
Now that you are comfortable using your virtual machines, you can try migrating a VM to
another hypervisor.
Migrating virtual machines
Being able to migrate your virtual machines between different hypervisors gives you tremendous flexibility in managing your computer workloads. Here are some of the advantages:
■
694
Improve performance by moving VMs from hypervisors that are overloaded to ones that
have more available memory and CPU capacity.
Downloaded from https://onlinelibrary.wiley.com/doi/ by alex jounh - Oregon Health & Science Univer , Wiley Online Library on [05/12/2025]. See the Terms and Conditions (https://onlinelibrary.wiley.com/terms-and-conditions) on Wiley Online Library for rules of use; OA articles are governed by the applicable Creative Commons License
Part VI: Engaging with Cloud Computing
■
■
■
Do routine maintenance on a hypervisor while keeping your VMs running.
Move VMs off underutilized hypervisors so that you can shut them off to save energy
until they are needed again.
Move VMs off site if you are expecting to shut down a data center or you are expecting
a hurricane or other catastrophe to hit your data center.
Live migration, in particular, is valuable if you need processes to keep running on the VMs
without interruption. The key to getting live VM migration to work is setting up your environment properly. Make sure the following things are in place:
■
■
■
■
■
Shared networked storage among the hypervisors.
The same network interfaces configured on each hypervisor.
Compatible CPUs between hypervisors. (Often, a set of hypervisors has the exact same
hardware.)
A fast network connection between the hypervisors and storage.
The same or similar versions of virtualization software on the hypervisors. (In our
case, we used Fedora 42 on both and installed them similarly.)
With all that in place, live migration requires only a few steps to get going.
Step 1: Identify other hypervisors
Assuming the Virtual Machine Manager window is still up and running on one of your hypervisors, go to that window and do the following to connect to the other hypervisor:
a. Connect to the hypervisor. Select File ➪ Add Connection. The Add Connection
window should appear.
b. Add the connection. Select the Connect to Remote Host check box, choose SSH
as the method, use a valid user name (like chris or joe), and type the hostname
of the other hypervisor (for example, host1). When you click Connect, you may
be prompted to enter a password for the remote hypervisor’s user and enter other
information. Note that you might need to install the openssh-askpass package
to be prompted for the password.
An entry for the new hypervisor should appear on the Virtual Machine Manager window.
Step 2: Migrate running VM to another hypervisor
Before you can migrate the VM to another hypervisor, you might need to adjust your firewall
rules. With the default firewall rules in place, direct libvirt migration will fail. A random TCP
port needs to be opened to allow the migration. The default is 49152, but any available, nonprivileged port can be chosen. Tunneled migration requires SSH key authentication.
With the Virtual Machine Manager open, right-click any VM that is currently running and
select Migrate. The Migrate the Virtual Machine window appears, as shown in Figure 28.3.
695
28
Downloaded from https://onlinelibrary.wiley.com/doi/ by alex jounh - Oregon Health & Science Univer , Wiley Online Library on [05/12/2025]. See the Terms and Conditions (https://onlinelibrary.wiley.com/terms-and-conditions) on Wiley Online Library for rules of use; OA articles are governed by the applicable Creative Commons License
Chapter 28: Using Linux for Cloud Computing
FIGURE 28.3
Choose which hypervisor to migrate the VM to.
Select the new host. In my example, the VM is currently running on host01, so I want to
select ansible as the new host. After a bit of time for the memory image of the VM to copy
over to the other host, the VM should appear as running on that host.
If for some reason your migration fails (incompatible CPUs or other problems), you can always
shut down the VM on one host and start it again on the other host. Doing that only requires
that your shared storage is in place. On the second host, simply run the Create a New Virtual
Machine Wizard, but select to run an existing image instead of an installation ISO.
The hypervisor configuration I just demonstrated might suit you well for your home workstation or even for a small business. Although it is beyond the scope of this book to help you
develop an entire cloud computing platform, it is within my charter to help you use different
cloud platforms to run your Linux systems. The next chapter helps you do just that.
696
Downloaded from https://onlinelibrary.wiley.com/doi/ by alex jounh - Oregon Health & Science Univer , Wiley Online Library on [05/12/2025]. See the Terms and Conditions (https://onlinelibrary.wiley.com/terms-and-conditions) on Wiley Online Library for rules of use; OA articles are governed by the applicable Creative Commons License
Part VI: Engaging with Cloud Computing
Summary
Linux is the foundation on which most of today’s emerging cloud technologies are being built.
This chapter describes many of the basic components that go into building a cloud based on
Linux and other open source technologies. It then helps you to learn about some of those
basic technologies by setting up a couple of hypervisors and launching virtual machines.
Exercises
The exercises in this section describe tasks related to setting up a hypervisor (KVM host computer) and using it to run virtual machines. If you are stuck, solutions to the tasks are shown
in Appendix B. Keep in mind that the solutions shown in Appendix B are usually just one of
many ways to complete a task.
Although the example shown in this chapter for setting up hypervisors uses three physical
machines, these exercises can be done on a single physical machine.
1. Check your computer to see if it can support KVM virtualization.
2. Install a Linux system along with the packages needed to use it as a KVM host and to
run the Virtual Machine Manager application.
3. Make sure that the sshd and libvirtd services are running on the system.
4. Get a Linux installation ISO image that is compatible with your hypervisor and copy it
to the default directory used by Virtual Machine Manager to store images.
5. Check that the default network bridge (virbr0) is currently active.
6. Install a virtual machine using the ISO image you copied earlier.
7. Make sure you can log into and use the virtual machine.
8. Check that your virtual machine can connect to the Internet or other networks
outside of the hypervisor.
9. Stop the virtual machine so that it is no longer running.
10. Start the virtual machine again so that it is running and available.
697
28
Downloaded from https://onlinelibrary.wiley.com/doi/ by alex jounh - Oregon Health & Science Univer , Wiley Online Library on [05/12/2025]. See the Terms and Conditions (https://onlinelibrary.wiley.com/terms-and-conditions) on Wiley Online Library for rules of use; OA articles are governed by the applicable Creative Commons License
Chapter 28: Using Linux for Cloud Computing
29
Deploying Linux to the Cloud
IN THIS CHAPTER
Creating Linux cloud images
Deploying a cloud image with virsh or virt-manager (libvirtd)
Deploying an EC2 image to the AWS cloud
T
o get a new Linux system to use, instead of just running a standard installation program from a
physical USB drive or DVD, you can get a Linux image and deploy it to a cloud. One way to do that
is to take a generic Linux image (one that is bootable but not personalized) and provide information to configure it to suit your needs. Another way is to go to a cloud provider, choose an image, click
through selections to configure it, and launch it.
The point is that cloud computing is offering up new ways to start up and use Linux systems. In Chapter 28, I had you do a standard Linux installation to create a virtual machine that runs on a Linux hypervisor. In this chapter, I will show you how to use cloud images to start up a fresh Linux system.
First, I describe how to use cloud-init to combine a Linux cloud image manually with configuration
information to allow it to run in a variety of environments. Next, I tell you how to do a similar process
on the AWS public cloud (using Amazon EC2 images by clicking through easy-to-use cloud controls).
Getting Linux to Run in a Cloud
Cloud platforms are great for spinning up new virtual machines quickly and efficiently. They can do so
because a fresh install is not required each time you want a new instance of an operating system.
Public clouds, such as Amazon EC2 (http://aws.amazon.com/ec2), offer instances of different Linux
distributions for you to start and use. You choose a Linux instance, such as Amazon 2023, Ubuntu,
Red Hat Enterprise Linux (RHEL), or SUSE Linux Enterprise Server (SLES), which is tuned for specific
purposes. For example, there are instances that are optimized for high-performance processing, for
memory-intensive applications, or to run as nodes for specific environments (such as the AWS Elastic
Kubernetes Service [EKS]).
699
Downloaded from https://onlinelibrary.wiley.com/doi/ by alex jounh - Oregon Health & Science Univer , Wiley Online Library on [05/12/2025]. See the Terms and Conditions (https://onlinelibrary.wiley.com/terms-and-conditions) on Wiley Online Library for rules of use; OA articles are governed by the applicable Creative Commons License
CHAPTER
The content of a cloud instance tends to be generic in nature. It is expected that more information is attached to the image by the cloud user or the cloud provider using a service such as
cloud-init. For cloud-init information falls into two general categories: meta-data
and user-data:
meta-data Included with meta-data is information that is needed before the image
boots. This is data that is outside of the contents of the image and is typically
managed by the cloud provider. Some of this data comes from the fact that things such
as storage, memory, and processing power are drawn from a pool of resources rather
than from the physical machine on which you are installing. So, the meta-data tells
the cloud provider the amounts of those resources, and possibly others, to allocate
early in the process of starting up the instance.
user-data The user-data information is inserted into the operating system that
exists on the image. This is data that the person using the virtual machine provides.
This might include a user account and password, configuration files, commands to run
on first boot, the identities of software repositories, or anything else that you might
want to run or change within the operating system itself.
When you go to run a Linux instance in a cloud environment, you typically enter the meta-
data and user-data information by clicking check boxes and filling in forms from a web-
based cloud controller (such as the Red Hat Virtualization Manager). The information may not
be identified as meta-data and user-data when you configure the instance through the
cloud controller.
The cloud you use to run your Linux virtual machines may be a public cloud, a private cloud,
or a hybrid cloud. The type of cloud you choose may depend on your needs and your budget:
Public cloud Amazon EC2, Microsoft Azure, and Google Compute Engine are examples
of cloud platforms that let you launch and use Linux virtual machines (sometimes
called instances) from a web-based interface. You pay for the time that the instance is
running. The amount of memory, storage, and virtual CPUs you use to run the instances
also add to the costs. The advantage of public clouds is that you don’t have to purchase
and maintain your own cloud infrastructure.
Private cloud With a private cloud, you put your own computing infrastructure in place
(hypervisors, controllers, storage, network configuration, and so on). Setting up your
own private cloud means taking on more up-front costs to own and maintain infrastructure. But it gives you added security and control of your computing resources.
Because you control the infrastructure, you can create the images to which users have
access in your own infrastructure and account for user usage of that infrastructure in
your own way.
Hybrid cloud Many companies are looking toward hybrid cloud solutions. A hybrid cloud
can allow multiple compute assets to be managed by a central facility. For example, a
public cloud customer can combine a container platform such as EKS, which has management features running in the AWS cloud, and leverage the server machines in its
own data centers to run its EKS workloads.
700
Downloaded from https://onlinelibrary.wiley.com/doi/ by alex jounh - Oregon Health & Science Univer , Wiley Online Library on [05/12/2025]. See the Terms and Conditions (https://onlinelibrary.wiley.com/terms-and-conditions) on Wiley Online Library for rules of use; OA articles are governed by the applicable Creative Commons License
Part VI: Engaging with Cloud Computing
To help you get a better feel for configuring Linux cloud instances, in the next sections I’ll
describe how cloud-init works to configure Linux cloud instances. I’ll then help you create
your own meta-data and user-data files and apply them to your cloud instance so the
information can be used when the cloud image boots.
Creating Linux Images for Clouds
Think about what you did when you installed a Linux system in Chapter 9, “Installing Linux.”
During the manual installation process, you set a root password, created a regular user account
and password, possibly defined your network interfaces, and did other tasks. The information
you entered became a permanent part of the operating system that remained each time you
booted the system.
When you start with a prebuilt cloud image as your Linux system, you can use cloud-init to
get a Linux system ready to run. The cloud-init facility (https://docs.cloud-init.io) sets
up a generic virtual machine instance to run in the way that you want it to run without going
through an install process. The next section describes some ways of using cloud-init.
Configuring and running a cloud-init cloud instance
In the next procedure, I show you how to create data manually; the data can be combined
with a bootable Linux cloud image so that when that image boots, it is configured based on
your data. Combining data with the image at runtime allows you to change the data each time
before the image is run instead of installing it permanently in the image.
I suggest that you run this procedure on one of the hypervisors you configured in Chapter 28,
“Using Linux for Cloud Computing.” This not only allows you to create the customized data
for your Linux cloud image but also lets you run that image as a virtual machine on that
hypervisor.
You can use any Linux distribution you want for this procedure and then run it on any
hypervisor. For this example, the hypervisor could be Ubuntu, Fedora, or RHEL, but I chose a
Fedora image.
To add data and run an existing cloud image, this procedure requires you to obtain a cloud
image, create data files, and generate a new image that combines those elements. This procedure is meant to be very simple to get a cloud image booted. Later, I will tell you how to add
more features to these data files. To configure and run a cloud image, follow these steps:
1. Create cloud-init meta-data file. Create a file named meta-data to hold
data that identifies information about the cloud instance from the outside. For
example, you can add a name to identify the instance (instance-id), a hostname
(local-hostname), and other information. To keep your first try simple, I assign
only two fields. (You can set them to any names you like.)
instance-id: FedoraWS01
local-hostname: fedora01
701
29
Downloaded from https://onlinelibrary.wiley.com/doi/ by alex jounh - Oregon Health & Science Univer , Wiley Online Library on [05/12/2025]. See the Terms and Conditions (https://onlinelibrary.wiley.com/terms-and-conditions) on Wiley Online Library for rules of use; OA articles are governed by the applicable Creative Commons License
Chapter 29: Deploying Linux to the Cloud
2. Create cloud-init user-data file. Create a file named user-data to hold
data that configures inside the operating system on the image itself. For this simple
case, I just set a password for the default user (fedora) to cloudpass and ensured
that cloud-init does not expire the password:
#cloud-config
password: cloudpass
chpasswd: {expire: False}
3. Combine data into a separate image. With the meta-data and user-data files
in the current directory, create an ISO image that contains that data. Later, we present
this image as a CD-ROM to the Linux image so cloud-init knows how to configure
the Linux image. (Install the genisoimage and cloud-init packages first, if you
haven’t already. The cloud-init package isn’t required on the hypervisor.)
# dnf install genisoimage cloud-
init qemu-
img virt-
install # In Fedora
or
# apt install genisoimage cloud-
init qemu-
utils virtinst # In Ubuntu
# genisoimage -
output fedora42-
data.iso -
volid cidata \
-joliet -rock user-data meta-data
4. Get a base cloud image. Cloud images for Ubuntu, Fedora, and RHEL are configured for use with cloud-init. Get an official Fedora cloud image (images for other
distributions are described later), and do the following:
a. Go to the Fedora cloud image download page. Open a web browser and go to
https://fedoraproject.org/cloud/download.
b. Click the image. Click the Download button that appears for the Fedora Cloud
Base QEMU image to get a qcow2 image that can be used with Virtual Machine
Manager. The image name is something like Fedora-Cloud-Base-Generic-
42.-1.1.x86_64.qcow2.
5. Snapshot the image. You probably need to run this procedure a few times before
you get the exact image that you want. So, instead of using the downloaded image
directly, make a snapshot of it. To keep track of my versions, I added 01 to the new
snapshot name:
# qemu-
img create -
f qcow2 \
-o backing_file=Fedora-Cloud-Base-Generic-42-1.1.x86_64.qcow2 \
-F qcow2 Fedora-Cloud-Base-01.qcow2
6. Copy files to the images directory. It’s good practice to copy images to the /var/
lib/libvirt/images/ directory when you are using them on a hypervisor
(libvirtd service). For example, to copy the cloud image and data image to that
directory, type the following:
# cp Fedora-Cloud-Base-Generic-42-1.1.x86_64.qcow2 \
Fedora-Cloud-Base-01.qcow2 \
702
Downloaded from https://onlinelibrary.wiley.com/doi/ by alex jounh - Oregon Health & Science Univer , Wiley Online Library on [05/12/2025]. See the Terms and Conditions (https://onlinelibrary.wiley.com/terms-and-conditions) on Wiley Online Library for rules of use; OA articles are governed by the applicable Creative Commons License
Part VI: Engaging with Cloud Computing
fedora42-
data.iso
/var/lib/libvirt/images/
\
7. Start the cloud instance. With the files in place, run the following commands to start
an instance of your cloud image:
# cd /var/lib/libvirt/images
# virt-install --import --name fedora42-01 --ram 4096 --vcpus 2 \
--disk path=Fedora-Cloud-Base-01.qcow2,format=qcow2,bus=virtio \
--disk path=fedora42-data.iso,device=cdrom \
--os-variant fedora42 --network network=default &
The previous virt-install example shows that the virtual machine is assigned to consume
4Gib of RAM (--ram 4096) and two virtual CPUs (--vcpus 2). The RAM and VCPU values on
your system may be different, depending on your computer’s resources. This was run on Fedora.
Your options might be different for other Linux systems.
At this point, a virtual machine named fedora42-01 is running on your hypervisor. As the
virtual machine boots up, a console window should open allowing you to log into the new cloud
virtual machine.
Investigating the cloud instance
To investigate the cloud image that we created, you can open the running instance and look
inside. One way to do that, if it is not already open, is to open the virtual machine with
virt-viewer:
# virt-viewer fedora42-01
From the console window that appears, use the data that we added to the image in order to log in.
Use fedora as the user and cloudpass as the password to log in. The fedora user has sudo
privileges, so you can use that account to investigate the instance by entering some commands.
Here you can see where the user-data was copied into the instance:
$ sudo cat /var/lib/cloud/instances/nocloud/user-
data.txt
#cloud-config
password: cloudpass
chpasswd: {expire: False}
29
The basic cloud configuration is done in the /etc/cloud/cloud.cfg file. You can see here
that the root user account is disabled by default. At the bottom of the file, you can see that the
user named fedora is the default user and has sudo privileges without requiring a password.
$ sudo cat /etc/cloud/cloud.cfg
users:
-default
disable_root: true
…
system_info:
default_user:
name: fedora
703
Downloaded from https://onlinelibrary.wiley.com/doi/ by alex jounh - Oregon Health & Science Univer , Wiley Online Library on [05/12/2025]. See the Terms and Conditions (https://onlinelibrary.wiley.com/terms-and-conditions) on Wiley Online Library for rules of use; OA articles are governed by the applicable Creative Commons License
Chapter 29: Deploying Linux to the Cloud
lock_paswd: True
gecos: fedora Cloud User
groups: [wheel, adm, systemd-
journal]
sudo: ["ALL=(ALL) NOPASSWD:ALL"]
shell: /bin/bash
paths:
cloud_dir: /var/lib/cloud
templates_dir: /etc/cloud/templates
ssh_svcname: sshd
You can see other things in the cloud.cfg file as well. You can see which cloud_init_
modules run during initialization (such as those that set the hostname or start rsyslog
logging). You can see cloud_config_modules that set the locale and the time zone and
run further configuration tools (such as Chef and Puppet).
Because yum repositories are enabled, provided you have an available network connection
(DHCP should have assigned addresses to the virtual machine by default), you can install any
packages available from the Fedora repositories.
Cloning the cloud instance
If you decide you like the cloud instance you created, you can save a copy of it to run later by
making a clone of the two images (cloud and data image) that make up the cloud instance. To
create a clone of the running cloud instance, using virt-manager, do the following:
1. Launch virt-manager. On the host system running the virtual machine, run the
virt-manager command or start Virtual Machine Manager from the Activities
screen on your desktop.
2. Pause the virtual machine. Right-click the virtual machine instance entry in the
virt-manager window and select Shut Down.
3. Clone the virtual machine. Right-click the virtual machine instance entry
again and select Clone. The Clone Virtual Machine window appears, as shown in
Figure 29.1
4. Choose clone settings. For the cloud-based image and the data image, you can
choose either to make new copies or to share them with the existing virtual
machine. After you do, select Clone.
The cloned cloud instance is now available to start, stop, and otherwise manage as you like
from the Virtual Machine Manager window or the virsh command. A great advantage of
making clones is that you can make any changes that you like to them, without having to
change the originals. Just delete the clone when you are done, and you can quickly generate a new one when you need it.
Expanding your cloud-init configuration
You can add much more information to your meta-data and user-data files to
configure your cloud instances. Examples of cloud-init settings can be found on the
Cloud-Init Config Examples page (https://docs.cloud-init.io/en/latest/reference/
704
Downloaded from https://onlinelibrary.wiley.com/doi/ by alex jounh - Oregon Health & Science Univer , Wiley Online Library on [05/12/2025]. See the Terms and Conditions (https://onlinelibrary.wiley.com/terms-and-conditions) on Wiley Online Library for rules of use; OA articles are governed by the applicable Creative Commons License
Part VI: Engaging with Cloud Computing
examples.html). The following sections show examples of settings that you can add to your
user-data files.
FIGURE 29.1
Cloning lets you save a permanent copy of a cloud instance.
Note
The user-data and meta-data files are in YAML format. The YAML format uses indents and well-known delimiters. Items in a list are preceded by a hyphen and a space. Keys and values are separated by a colon and a space. If
you are not familiar with YAML, I recommend digging around the YAML project site (https://github.com/yaml).
Adding ssh keys with cloud-init
Instead of using passwords to log into your cloud instances, you can use key-based authentication along with the ssh command to log in over the network. This is commonly used
by cloud providers to allow user access to cloud images.
If you have already generated public and private ssh keys for the user account that you
plan to use to ssh into the cloud instance, you can use that public key for this procedure.
If you had generated an RSA key pair, the public key is located in the id_rsa.pub file
by default:
# cat $HOME/.ssh/id_rsa.pub
705
29
Downloaded from https://onlinelibrary.wiley.com/doi/ by alex jounh - Oregon Health & Science Univer , Wiley Online Library on [05/12/2025]. See the Terms and Conditions (https://onlinelibrary.wiley.com/terms-and-conditions) on Wiley Online Library for rules of use; OA articles are governed by the applicable Creative Commons License
Chapter 29: Deploying Linux to the Cloud
ssh-rsa AAAAB3NzaC1yc2EAAAADAQABAAABAQDMzdq6hqDUhueWzl7rIUwjxB/rrJY4
oZpoWINzeGVf6m8wXlHmmqd9C7LtnZg2P24/ZBb3S1j7vK2WymOcwEoWekhbZHBAyYeqX
KYQQjUB2E2Mr6qMkmrjQBx6ypxbz+VwADNC
wegY5RCUoNjrN43GVu6nSOxhFf7hv6dtCjvosOvtt0979YS3UcEyrobpNzreGSJ8FMPM
RFMWWg68Jz5hOMCIE1IldhpODvQVbTNsn/STxO7ZwSYV6kfDj0szvdoDDCyh8mPNC1kI
Dhf/qu/Zn1kxQ9xfecQ+SUi+2IwN69o1fNpexJPFr+Bwjkwcrk58C6uowG5eNSgnuu7G
MUkT root@host2.example.com
The public key from that file is typically copied to the $HOME/.ssh/authorized_keys
file for the user on the remote system to which you wish to log in. We can have the key added
to that file on our cloud instance using entries in the user-data file that looks like the
following:
users:
-default
-name: wsmith
gecos: William B. Smith
primary-
group: wsmith
sudo: ALL=(ALL) NOPASSWD:ALL
lock-
passwd: true
ssh-
authorized-
keys:
-ssh-
rsa AAAAB3NzaC1yc2EAAAADAQABAAABAQDMzdq6hqDUhueWzl7rIUwj
xB/rrJY4oZpoWINzeGVf6m8wXlHmmqd9C7LtnZg2P24/
ZBb3S1j7vK2WymOcwEoWekhbZHBAyYeqXKYQQjUB2E2Mr6qMkmrjQBx6ypxbz+V
wADNCwegY5RCUoNjrN43GVu6nSOxhFf7hv6dtCjvosOvtt0979YS3UcEyrobpNz
reGSJ8FMPMRFMWWg68Jz5hOMCIE1IldhpODvQVbTNsn/
STxO7ZwSYV6kfDj0szvdoDDCyh8mPNC1kIDhf/qu/
Zn1kxQ9xfecQ+SUi+2IwN69o1fNpexJPFr+Bwjkwcrk58C6uowG5eNS
gnuu7GMUkT root@host2.example.com
From the previous information, you can see that wsmith is the default user. The gecos
entry is typically the user’s full name, used in the fifth field of the /etc/passwd file. The
password is locked for this user. However, because the ssh-rsa entry from my root account
on host2.example.com is provided here under ssh-authorized-keys for the user, I can
log into the cloud instance as wsmith over ssh without entering a password (provided my
private key is associated with that public key).
Adding software with cloud-init
You aren’t limited to the software already on your cloud image. Inside your user-data file, you
can define YUM repositories (in Fedora and RHEL) or apt repositories (in Ubuntu or Debian) and
then identify any packages that you want to have installed when the cloud instance starts.
The following example shows what entries in a user-data file might look like to add a YUM
repository (for Fedora or RHEL) to your cloud instance and then install packages from that
repository or any other enabled repository:
myownrepo:
baseurl: http://myrepo.example.com/pub/myrepo/
enabled: true
706
Downloaded from https://onlinelibrary.wiley.com/doi/ by alex jounh - Oregon Health & Science Univer , Wiley Online Library on [05/12/2025]. See the Terms and Conditions (https://onlinelibrary.wiley.com/terms-and-conditions) on Wiley Online Library for rules of use; OA articles are governed by the applicable Creative Commons License
Part VI: Engaging with Cloud Computing
gpgcheck: true
gpgkey: file:///etc/pki/rpm-
gpg/RPM-
GPG-
KEY-
MYREPO
name: My personal software repository
packages:
-nmap
-mycoolcmd
-[libmystuff, 3.10.1-
2.fc21.noarch]
In the example just shown, a new yum repository is created in the file /etc/yum.repos.d/
myownrepo.repo. A gpgkey is provided to check the validity of installed packages, and
GPG checking is turned on. After that, the nmap package is installed (that’s in the standard
Fedora yum repository), the mycoolcmd package is installed (from my private repository),
and a specific version of the libmystuff package is installed.
Configuring apt software repositories for Ubuntu is done a bit differently. Failsafe primary and
security apt package mirrors are configured by default (in the cloud.cfg file in the image),
along with settings to cause the instance, if run in an Amazon EC2 cloud, to search the closest
region for packages. To add more repositories, entries in your user-data file could look like
the following:
apt_mirror: http://us.archive.ubuntu.com/ubuntu/
apt_mirror_search:
- http://myownmirror.example.com
- http://archive.ubuntu.com
packages:
-nmap
-mycoolcmd
-[libmystuff, 3.16.0-
25]
The myownmirror.example.com entry tells apt to use your own private apt repository to
search for packages. Note that packages you want to install can be entered in basically the
same format as you did with Fedora, although specific version information (if entered) might
look different in some cases.
You can add many other settings to your user-data and meta-data files. Again, refer to
the Cloud-Init Cloud Config Examples page (https://docs.cloud-init.io/en/latest/
reference/examples.html) for details.
Using cloud-init in enterprise computing
So far, the cloud-init examples in this chapter have focused on taking a cloud image,
manually adding configuration data, and running it as a virtual machine temporarily
on your local hypervisor. This approach is useful if you want to understand how cloud-
init works and the opportunities you have for tuning cloud images to your specifications. This approach doesn’t scale well, however, if you are managing large enterprises of
virtual machines.
Cloud-init supports the concept of datasources. By placing user-data and meta-data
in a datasource, you don’t have to inject that information manually into a cloud instance, as
707
29
Downloaded from https://onlinelibrary.wiley.com/doi/ by alex jounh - Oregon Health & Science Univer , Wiley Online Library on [05/12/2025]. See the Terms and Conditions (https://onlinelibrary.wiley.com/terms-and-conditions) on Wiley Online Library for rules of use; OA articles are governed by the applicable Creative Commons License
Chapter 29: Deploying Linux to the Cloud
we did earlier in this chapter. Instead, when the cloud-init service starts running on the
instance, it knows to not only look on the local system for data sources, but also outside of it.
For Amazon EC2 clouds, cloud-init queries a particular IP address
(http://169.254.169.254) for data. For example, it may check
http://169.254.169.254/2009-04-04/meta-data for meta-data and
http://169.254.169.254/2009-04-04/user-data for user-data. This allows the
configuration data to be stored and accessed from a central location. Note that EC2 has begun
transitioning to token-based access through IMDSv2.
As for what might be inside the meta-data and user-data, far more complex configuration
schemes can be developed for deployment of your cloud instances. Cloud-init supports
configuration tools, such as Puppet (https://www.puppet.com/community/open-source/open-
source-puppet) and Chef (https://community.chef.io/downloads). These tools let you apply
scripts of configuration information to your cloud instances, even doing such things as replacing
components or restarting services as needed to return the system to a desired state.
At this point, however, my job is not to make you into full-blown cloud administrators (a few hundred pages ago, you could have been a Linux novice). Instead, I want you to understand what you
will be dealing with if you eventually land in a cloud data center ... because many people believe
that most data centers will be managed as cloud infrastructures in the not-too-distant future.
So far in this chapter, you have looked at the inside of configuring Linux for cloud computing.
Next, let’s step back and look at how you can use Amazon Linux 2 to run your own Linux-
based virtual machines.
Using Amazon EC2 to Deploy Cloud Images
Amazon Elastic Computer Cloud (Amazon EC2) is a foundational service offered by the Amazon
Web Services (AWS) cloud platform. It is particularly suited for pay-as-you-go cloud computing.
EC2 makes it easy to get started by letting you choose from preconfigured virtual machine
images and configuring them to suit your needs.
To start using Amazon EC2 to launch virtual machines, go to the Getting Started with Amazon
Web Services page and follow links to create a new account (https://aws.amazon.com/
getting-started/). After you log in, the full range of AWS services is displayed. Select Sign
In to the Console (https://console.aws.amazon.com), then choose EC2, and you will
see the EC2 AWS Management Console, as shown in Figure 29.2:
To start your first Linux virtual machine instance, do the following:
1. Select Launch Instance. The Launch an Instance page appears, and you are given
a choice of Linux (Amazon Linux, Red Hat, SUSE Linux, Ubuntu, and Debian) and
Windows AMIs to start up.
2. Find the image you want, and click the Select button. I chose Amazon Linux 2023,
which is an RPM-based Linux distribution.
708
Downloaded from https://onlinelibrary.wiley.com/doi/ by alex jounh - Oregon Health & Science Univer , Wiley Online Library on [05/12/2025]. See the Terms and Conditions (https://onlinelibrary.wiley.com/terms-and-conditions) on Wiley Online Library for rules of use; OA articles are governed by the applicable Creative Commons License
Part VI: Engaging with Cloud Computing
3. Choose an instance type. Scroll down to the Instance Type box and make that selection based on the number of vCPUs, Architecture, amount of memory, amount of
storage, type of storage, and network performance.
4. Key pair (login). Select Create new key pair to create a public and private key pair
that you can use to log into your system with ssh. Name the key pair, select a type
(ED25519 is stronger than RSA), and choose a format (use .pem for OpenSSH and
.ppk for PuTTY from a Windows machine). Then click Create Key Pair. Your new private key is downloaded to your local system.
5. Network settings. If you leave the defaults, it chooses a irtual private cloud (VPC),
which essentially creates an isolated environment to act like your own private data
center. It uses your default subnet, assigns public IP addresses, and sets up a firewall and security. By default, it will allow SSH traffic, so you can remotely log in to
the instance.
6. Configure storage. Choose the amount of storage (in GiB) and the type of Elastic
Block Storage to use.
7. Advanced details. You can probably leave the Advanced details settings as they are,
but you can select Info buttons next to each setting to read more about it.
FIGURE 29.2
Launch cloud instances using the Amazon EC2 Management Console.
29
709
Downloaded from https://onlinelibrary.wiley.com/doi/ by alex jounh - Oregon Health & Science Univer , Wiley Online Library on [05/12/2025]. See the Terms and Conditions (https://onlinelibrary.wiley.com/terms-and-conditions) on Wiley Online Library for rules of use; OA articles are governed by the applicable Creative Commons License
Chapter 29: Deploying Linux to the Cloud
8. Review the instance settings and select Launch Instance to start the instance.
Figure 29.3 shows an example of an Amazon Linux 2023 instance ready to launch.
FIGURE 29.3
Configure and launch an Amazon Linux 2023 instance on AWS.
9. Select the instance. If all goes well, the name of the new instance appears on the
screen. Select the instance name in the Success box. From the Instances page, select
the instance.
10. Select your instance and then click the Connect button. From the page for your
instance, click the Connect button to see different ways to connect to the instance.
Click EC2 Instance Connect and then Connect; a shell opens in your browser, and you
can begin using that instance.
To log in to the instance from your Linux system, follow the SSH client instructions
to use ssh to log into the public IP address you created. Replace ec2-user with
ubuntu (for Ubuntu) and fedora (for Fedora) instances. For example, the command
to log in to the AWS instance would look similar to the following:
$ ssh -i "youraws.pem" ec2-user@ec2-w-xx-yyy-zz.us-east-2.compute
.amazonaws.com
710
Downloaded from https://onlinelibrary.wiley.com/doi/ by alex jounh - Oregon Health & Science Univer , Wiley Online Library on [05/12/2025]. See the Terms and Conditions (https://onlinelibrary.wiley.com/terms-and-conditions) on Wiley Online Library for rules of use; OA articles are governed by the applicable Creative Commons License
Part VI: Engaging with Cloud Computing
11. Terminate the instance. When you are done with the instance, you can terminate it
by selecting the check box for the instance from the Instances page and then selecting
Instance State ➪ Terminate (delete). You are warned that the storage for the instance
will be deleted when you delete the instance. Select Terminate to remove the instance
and its associated storage.
It is important to remember to get rid of the instance when you are done or you will continue
to be charged for it.
Summary
Understanding how cloud computing differs from simply installing an operating system
directly on computer hardware will help you to adapt as more and more data centers move
toward cloud computing. In the beginning of this chapter, I encouraged you to get your hands
on some cloud images, combine them with data, and launch them on a local Linux hypervisor
to understand how cloud images work.
After that, I introduced the Amazon Elastic Compute Cloud service, where you can pay to use
cloud storage and processing time if you don’t have enough computing resources of your own.
The next chapter describes how to use Ansible to automate the deployment of host systems
and applications to your data center.
Exercises
The exercises in this section assume you have already set up a host system as a hypervisor (KVM
host computer). You need to use that hypervisor to run the virtual machine created in the exercises. If you are stuck, solutions to the tasks are shown in Appendix B. Keep in mind that the
solutions shown in Appendix B are usually just one of multiple ways to complete a task.
1. To be able to create a custom virtual machine image, install the genisoimage,
cloud-init, qemu-img, and virt-manager, virt-viewer packages.
29
2. Obtain a cloud image from the Fedora project.
3. Use qemu-img to create a snapshot of that image in qcow2 format called myvm
.qcow2, which you can use later to combine with your own data.
4. Create a cloud-init metadata file named meta-data that sets the instanceid to myvm and local-hostname to myvm.example.com.
5. Create a cloud-init user data file called user-data that sets the default user’s
password to test and sets chpasswd never to expire with {expire: False}.
711
Downloaded from https://onlinelibrary.wiley.com/doi/ by alex jounh - Oregon Health & Science Univer , Wiley Online Library on [05/12/2025]. See the Terms and Conditions (https://onlinelibrary.wiley.com/terms-and-conditions) on Wiley Online Library for rules of use; OA articles are governed by the applicable Creative Commons License
Chapter 29: Deploying Linux to the Cloud
6. Run the genisoimage command to combine the meta-data and user-data
files to create a mydata.iso file that you can combine with a virtual machine
image later.
7. Use the virt-install command to combine the myvm.qcow2 virtual machine
image with the mydata.iso image to create a new virtual machine image named
newvm that starts running on your hypervisor.
8. Use virt-viewer to open a console to the newvm virtual machine.
9. Log into the newvm virtual machine, using the fedora user and test password that
you set earlier.
712
Downloaded from https://onlinelibrary.wiley.com/doi/ by alex jounh - Oregon Health & Science Univer , Wiley Online Library on [05/12/2025]. See the Terms and Conditions (https://onlinelibrary.wiley.com/terms-and-conditions) on Wiley Online Library for rules of use; OA articles are governed by the applicable Creative Commons License
Part VI: Engaging with Cloud Computing
Automating Apps and
Infrastructure with Ansible
30
IN THIS CHAPTER
Understanding Ansible
Installing Ansible
Stepping through a deployment
Running ad hoc commands
T
o this point in the book, we have mostly focused on manually configuring individual Linux systems. You have learned how to install software, edit configuration files, and start services directly
on the machines where they run. While knowing how to work on individual Linux hosts is foundational to managing Linux systems, by itself it doesn’t scale well. That’s where Ansible can help.
Ansible is one of many automation features available today that changes the job of Linux administration
from a focus on single systems to groups of systems. It moves the configuration of those systems from
each individual machine to a control node. It replaces the user interface of a shell on each machine with
Ansible playbooks that run tasks on other machines over a network.
Although our focus here is on managing Linux systems, Ansible can manage many things around those
Linux systems as well. There are Ansible modules for making sure that machines are powered on, that
network devices are properly configured, and that remote storage is accessible.
In all but the smallest data centers, knowing how to deploy and manage Linux systems and surrounding infrastructure automatically is becoming a requirement for many IT jobs these days. For fully containerized data centers, Kubernetes-based application platforms are becoming the industry standard for
container orchestration and automation (see Chapter 31, “Deploying Applications as Containers with
Kubernetes”). For infrastructure and more traditional application deployments, Ansible offers rich set of
features for administrators with a Linux mindset.
This chapter takes you through what you should know about Ansible to get started. It then steps you
through deploying an application across a set of Linux systems with Ansible and shows you how to work
with those systems later by redeploying playbooks and running ad hoc commands.
713
Downloaded from https://onlinelibrary.wiley.com/doi/ by alex jounh - Oregon Health & Science Univer , Wiley Online Library on [05/12/2025]. See the Terms and Conditions (https://onlinelibrary.wiley.com/terms-and-conditions) on Wiley Online Library for rules of use; OA articles are governed by the applicable Creative Commons License
CHAPTER
Understanding Ansible
Ansible extends, rather than replaces, what you have already learned about Linux. At its most
basic level, Ansible comprises the following:
■
■
■
An automation language that describes the tasks that you want to perform to reach a
particular state. These are gathered into playbooks.
The automation engine that is used to run the playbooks.
Interfaces you can use to manage and secure playbooks and other automation components, implemented with commands and RESTful APIs.
Using inventories (that define sets of hosts) and playbooks (that define sets of actions to take
on those hosts), Ansible configures host systems in the following ways:
Simple feature configuration: You create inventories and playbooks as plain-text files,
where you identify Linux components that are acted upon by modules. No coding experience is required.
Setting the results that you want: What you describe here are resources that define
the state you want a feature to be in on a node. That state can be a systemd service running, a network interface with particular addresses set, or a disk partition of a
certain size created. If, for some reason, the state changes for a feature, you can run a
playbook again to have Ansible return a node to the intended state.
SSH connections: By default, each host node must be running an SSH service that is configured to allow Ansible to communicate to it from the control node. Key-based authentication to regular user accounts allows this to happen, with sudo available when root
privilege escalation is needed. Because you are using an SSH service that is probably
already running on the host, you don’t need to run additional agents or configure special firewall rules for this to work.
Once you learn the basics about how Ansible works, you can do a wide range of advanced,
complex activities, such as the following:
Provisioning infrastructure: Using Ansible, you can provision the infrastructure that
your applications need, whether that is installing operating systems on bare metal or
as hypervisors (along with their virtual machines), setting up storage devices, or configuring network devices. In each of those cases, Ansible can leverage your existing
provisioning tools so that they can all be managed in one place.
Deploying applications: By describing the desired state of your applications, Ansible not
only can use tasks to deploy sets of applications across multiple nodes and devices, but
it can also replay those playbooks to return an application to its desired state when a
feature may have broken or have been changed unintentionally.
Managing containers and operators: Recent additions to Ansible allow it to deploy containerized applications to a Kubernetes infrastructure such as OpenShift. Operators in
OpenShift, which can be managed by an Ansible Operator, not only can define the state
714
Downloaded from https://onlinelibrary.wiley.com/doi/ by alex jounh - Oregon Health & Science Univer , Wiley Online Library on [05/12/2025]. See the Terms and Conditions (https://onlinelibrary.wiley.com/terms-and-conditions) on Wiley Online Library for rules of use; OA articles are governed by the applicable Creative Commons License
Part VI: Engaging with Cloud Computing
of containerized applications, but they can also respond to changes in real time and
make upgrades easier. See the description of the Ansible Operator for details (https://
www.ansible.com/blog/ansible-operator).
Managing networking: Tasks that are often done manually to configure, test,
validate, and enhance your networking infrastructure can be automated with Ansible. See the Ansible Network Getting Started guide for details
(https://docs.ansible.com/ansible/latest/network/getting_started/
index.html#network-getting-started).
Managing cloud environments: Just as you can deploy infrastructures to bare metal,
Ansible offers tools for provisioning infrastructure and applications to cloud environments. For Amazon Web Services (AWS) alone, there are hundreds of Ansible modules
available for managing infrastructure and applications. Modules for Alibaba, Azure,
Google, and a few dozen other cloud environments are also available.
Exploring Ansible Components
When a playbook is run, it acts on one or more target host systems (represented by inventories) and executes items referred to as plays. Each play contains one or more tasks that are
set to be achieved by that play. To carry out a task, the task calls modules, which are executed
in the order that they appear. Before you start using Ansible, it helps to understand a little
more about these components.
Inventories
By gathering host systems (nodes) that you want to manage in what are referred to as inventories, you can manage machines that are similar in groups. Similarities could include the
following:
■
■
■
Located in a similar location
Provide the same kind of service
Assigned to a particular stage in a process, such as sets of machines for development,
testing, staging, and production
Joining hosts together into more than one group allows them to be acted on based on different kinds of attributes. For example, host01 might be both in a group called newyork
(for its location) and a group called ftp (for the application it provides). Tasks run on those
inventory groups might allow each host to get network settings based on its location and the
applications it runs based on its purpose, respectively.
There are multiple ways of creating inventories. You can set a line of static servers or create a
range of systems. You can also use dynamic lists of servers from cloud providers, such as Azure,
AWS, and GCP.
Using variables, you can assign attributes to a set of hosts in an inventory. Those variables
can configure such things as the port from which a service is available from a host, a timeout
715
30
Downloaded from https://onlinelibrary.wiley.com/doi/ by alex jounh - Oregon Health & Science Univer , Wiley Online Library on [05/12/2025]. See the Terms and Conditions (https://onlinelibrary.wiley.com/terms-and-conditions) on Wiley Online Library for rules of use; OA articles are governed by the applicable Creative Commons License
Chapter 30: Automating Apps and Infrastructure with Ansible
value for a service, or the location of a service used by a host (such as a database for a
Network Time Protocol server).
Like playbooks, inventories can be simple text files. They can also be implemented from an
inventory script.
Playbooks
Playbooks are created as YAML-formatted files that describe the end state of something.
That something can cause software to be installed, applications to be configured, or services to be launched. It can focus on the application alone, or it can include the entire
environment (networking, storage, authentication, or other feature) surrounding that
application.
Playbooks are meant to be reusable—to deploy the same components later, to be adapted for
other components, or to be replayed to reestablish the original intent of a specific instance
of the playbook. Because playbooks are intended for reuse, many people keep their playbooks
under source control. In that way, you can track changes over time and make the playbooks
easily available.
Plays
Inside a playbook is one or more plays. Each play has a target, such as a hosts identifier
that tells the playbook which host systems to act on. That can be followed by a remote_
user that tells the playbook which user to authenticate to on the host. The play can also
indicate that it needs to escalate privileges with sudo before it starts executing the tasks.
After that, there can be one or more tasks to define the actual activity that is carried out on
the hosts.
Tasks
At the most basic level, each task runs one or more modules. A task provides a way to associate the module being run with the parameters and return values associated with that module.
Modules
Hundreds of Ansible modules are available today, with more being created all the time. When
run, a module makes sure that a requested state is achieved by checking that intended state,
as indicated by parameters that are provided, and if the target is not in that state, then doing
what needs to be done to get there. The Module Index organizes those modules by category
(https://docs.ansible.com/ansible/latest/modules/modules_by_category.html).
Examples of modules include yum, mysql_db, and ipmi_power. The yum module can
install, remove, or otherwise manage software packages and repositories from the YUM facility.
A mysql_db module lets you add or remove a MySQL database from a host. The ipmi_
power module lets you check the state of computers with IPMI interfaces and make sure they
get to the requested state (on or off).
716
Downloaded from https://onlinelibrary.wiley.com/doi/ by alex jounh - Oregon Health & Science Univer , Wiley Online Library on [05/12/2025]. See the Terms and Conditions (https://onlinelibrary.wiley.com/terms-and-conditions) on Wiley Online Library for rules of use; OA articles are governed by the applicable Creative Commons License
Part VI: Engaging with Cloud Computing
Conditionals can be applied to each task. For example, with the yum module, you can condition whether to install a package by its state. You could say that if the state of the package is
installed, then don’t install the package (even if a newer version is available). However, if
you use latest, then a newer version of the package will be installed if the current package
is not the latest.
Parameters let you add information to modify the task. For example, with the user module, when
you add a user to a system, you can identify the user’s name, password, UID, and shell.
Besides setting up modules to be executed from playbooks, you can also run modules directly
from the command line. This is useful if you want to act on a host immediately, without running
an entire playbook. For example, you can ping a set of hosts to make sure that they are running
or check the status of a service. (See the section “Running Ad Hoc Ansible Commands” later in
this chapter for further information.)
To learn more about a particular module, go to the Ansible documentation website (select Modules
from the https://docs.ansible.com page) or use the ansible-doc command. For example,
to learn more about how to use the copy module to copy files to a remote location, enter the
following:
# ansible-doc copy
> COPY
(/usr/lib/python3.7/site-
packages/ansible/modules/files/
copy.py)
The 'copy' module copies a file from the local or
remote machine to a location on the remote machine…
Most modules have return values to provide information about the results of that module’s action.
Common return values include Booleans, indicating whether the task was successful (failed),
whether the task was skipped (skipped), or whether the task had to make changes (changed).
Roles, imports, and includes
As your collection of playbooks grows, you may find that you want to break up those playbooks
into smaller pieces that you can include in multiple playbooks. You can separate parts of a large
playbook into separate, reusable files and then call those files into the main playbook using
includes and imports. Roles are similar, but they can encompass more things than tasks, such as
modules, variables, and handlers.
For information on using includes, imports, and roles, see “Creating Reusable Playbooks” at
https://docs.ansible.com/ansible/latest/user_guide/playbooks_reuse.html.
Stepping Through an Ansible Deployment
30
To get you started using Ansible, we are going to step through a procedure to deploy a web
service to a set of hosts. After installing Ansible, the procedure shows you how to create
the inventory and playbook that you need to deploy the service. Then it shows how to use
ansible-playbook to actually deploy the playbook.
717
Downloaded from https://onlinelibrary.wiley.com/doi/ by alex jounh - Oregon Health & Science Univer , Wiley Online Library on [05/12/2025]. See the Terms and Conditions (https://onlinelibrary.wiley.com/terms-and-conditions) on Wiley Online Library for rules of use; OA articles are governed by the applicable Creative Commons License
Chapter 30: Automating Apps and Infrastructure with Ansible
Prerequisites
To get started, I used four computers (you can use virtual machines) with the following names:
ansible
host01
host02
host03
Used as the Ansible control node
First target node
Second target node
Third target node
Then I ran the following steps to prepare to use those hosts with Ansible:
1. Installed Fedora on each of the computers or virtual machines (RHEL should
work as well).
2. For each of the three target nodes (host01, host02, and host03), I made sure
to do the following:
a. Have the SSH service running and available (opening TCP port 22 if necessary) to
the Ansible control node.
b. Create a nonroot user account. Later, when you use the playbook, add the
--ask-become-pass option to be prompted for the password that you’ll
need to escalate privileges.
c. Set a password for that user.
When running Ansible, I use the regular user account that has sudo privileges to connect
to each system, and then I escalate to root privilege using sudo.
Setting up SSH keys to each node
Log in to the control node (ansible) and ensure that it can reach the three other nodes
that you are configuring. Either make sure you can reach the hosts through a DNS server or
add them to the /etc/hosts file on the control node. Then set up keys to access those
nodes. For example:
1. As root user, add the IP address and name for each node to which you want to
deploy your Ansible playbooks to the /etc/hosts file:
192.168.122.154
192.168.122.94
192.168.122.189
host01
host02
host03
2. Still on the ansible system, generate ssh keys so that you can have passwordless
communications with each host. You can run this and the later Ansible commands as a
regular user on the ansible host system:
$ ssh-keygen
Generating public/private ed25519 key pair.
Enter file in which to save the key (/home/joe/.ssh/id_ed25519):
<ENTER>
Created directory '/home/joe/.ssh'.
718
Downloaded from https://onlinelibrary.wiley.com/doi/ by alex jounh - Oregon Health & Science Univer , Wiley Online Library on [05/12/2025]. See the Terms and Conditions (https://onlinelibrary.wiley.com/terms-and-conditions) on Wiley Online Library for rules of use; OA articles are governed by the applicable Creative Commons License
Part VI: Engaging with Cloud Computing
Enter passphrase for "/home/chris/.ssh/id_ed25519"(empty for no
passphrase): <ENTER>
Enter same passphrase again: <ENTER>
Your identification has been saved in /home/joe/.ssh/id_ed25519
Your public key has been saved in /home/joe/.ssh/id_rsa.pub.
The key fingerprint is:
SHA256:UexjkySUSqi1XpyJKu9fmNB2rwYJERi7ka8IpPYdV5c chris@ansible
The key's randomart image is:
+--[ED25519 256]--+
|.o.. . ..o.
|
|.o. o . o.o .
|
|+. + = +.= E
|
|o+o.o * ..B
|
|+.o+o+..S. o
|
|=.oo=+o.
|
|oo .oo. .
|
| . ...
|
| ......
|
+----[SHA256]-----+
3. Using ssh-copy-id, copy your public key to the user account with sudo privilege
on each host. The following for loop steps through copying the user’s password to all
three hosts for the user joe:
$ for i in 1 2 3; do ssh-
copy-
id joe@host0$i; done
/usr/bin/ssh-
copy-
id: INFO: Source of key(s) to be installed:
"/home/joe/.ssh/id_ed25519.pub"
/usr/bin/ssh-
copy-
id: INFO: attempting to log in with the
new key(s), to filter out any that are already installed
/usr/bin/ssh-
copy-
id: INFO: 1 key(s) remain to be installed
-
-if you are prompted now it is to install the new keys
joe@host01's password: <password>
Number of key(s) added: 1
Now try logging into the machine, with:
"ssh 'joe@host01'"
and check to make sure that only the key(s) you wanted were added.
/usr/bin/ssh-
copy-
id: INFO: Source of key(s) to be installed:
"/home/joe/.ssh/id_ed25519.pub"
/usr/bin/ssh-
copy-
id: INFO: attempting to log in with the
new key(s), to filter out any that are already installed
/usr/bin/ssh-
copy-
id: INFO: 1 key(s) remain to be installed
-
-if you are prompted now it is to install the new keys
joe@host02's password: <password> ...
The next step is to install the ansible package on the control node (ansible). From
that point on, all that work is done from the control node.
719
30
Downloaded from https://onlinelibrary.wiley.com/doi/ by alex jounh - Oregon Health & Science Univer , Wiley Online Library on [05/12/2025]. See the Terms and Conditions (https://onlinelibrary.wiley.com/terms-and-conditions) on Wiley Online Library for rules of use; OA articles are governed by the applicable Creative Commons License
Chapter 30: Automating Apps and Infrastructure with Ansible
Installing Ansible
Ansible software packages are available for RHEL, Fedora, Ubuntu, and other Linux
distributions. Because Ansible playbooks are run from a control node, there is no need to
install Ansible software on any of the nodes that it targets.
So, start by installing the ansible package on the RHEL, Fedora, Ubuntu, or other Linux
system that you want to use as your control node. That control node must simply be able to
connect to the SSH service running on the host nodes to which you want to deploy.
Install the ansible package (or ansible-core for a lighter install) in one of the following
ways:
RHEL
# dnf install ansible -
y
Fedora
# dnf install ansible -
y
Ubuntu
$ sudo apt install ansible
With Ansible installed, you can start to build the inventory that provides the targets for the playbooks that you will run.
Creating an inventory
A simple inventory can consist of the name representing the target for a playbook and the host
systems associated with that name. To get started, here is an inventory example that contains
three groups of static hosts:
[ws]
host01
host02
host03
[newyork]
host01
[houston]
host02
host03
Adding these entries to the /etc/ansible/hosts file makes them available when you run
Ansible commands and playbooks.
720
Downloaded from https://onlinelibrary.wiley.com/doi/ by alex jounh - Oregon Health & Science Univer , Wiley Online Library on [05/12/2025]. See the Terms and Conditions (https://onlinelibrary.wiley.com/terms-and-conditions) on Wiley Online Library for rules of use; OA articles are governed by the applicable Creative Commons License
Part VI: Engaging with Cloud Computing
Although this procedure just deploys to the set of hosts in the ws group, the other two groups
illustrate how you might want to set up playbooks for separate tasks based on the location of the
machines (newyork and houston).
Authenticating to the hosts
Just to make sure you can access each host from the Ansible system, ssh to each host. You
should not have to enter a password:
$ ssh -
i id_ed25519 joe@host01
Last login: Sun Mar 30 19:13:53 2025 from 192.168.122.208
$ exit
Repeat for each host.
Creating a playbook
This playbook results in web server software being installed and started on the hosts defined
earlier in the ws group. Likewise, the playbook checks that firewall software is installed and
running and that port 80 (http port) is open in the firewall to access the web server. I added
the following content to a file called simple_web.yaml:
---
-name: Create web server
hosts: ws
remote_user: joe
become_method: sudo
become: yes
become_user: root
tasks:
-name: Install httpd
yum:
name: httpd
state: present
-name: Check that httpd has started
service:
name: httpd
state: started
-name: Install firewalld
yum:
name: firewalld
state: present
-name: Firewall access to https
firewalld:
service: http
permanent: yes
state: enabled
30
721
Downloaded from https://onlinelibrary.wiley.com/doi/ by alex jounh - Oregon Health & Science Univer , Wiley Online Library on [05/12/2025]. See the Terms and Conditions (https://onlinelibrary.wiley.com/terms-and-conditions) on Wiley Online Library for rules of use; OA articles are governed by the applicable Creative Commons License
Chapter 30: Automating Apps and Infrastructure with Ansible
-name: Restart the firewalld service to load in the firewall
changes
service:
name: firewalld
state: restarted
The three hyphens at the beginning of the simple_web.yaml playbook indicate the start of
the YAML content in the file. Here’s a breakdown of the rest of the file:
name: The play is identified as “Create web server.”
hosts: Apply this inventory to the hosts in the ws group.
remote_user: The regular user that is used to authenticate to each remote system.
This is done because it is a good security practice not to allow direct root login to a
remote system.
become: Enabling this feature (yes) tells Ansible to become a different user than the
remote_user to run the modules in the task.
become_method: What feature to use to escalate privilege (sudo).
become_user: Which user to authenticate to (root).
tasks: Starts the section containing the tasks.
name: The name is a title given to the task. In the first case, “Install httpd,” then
“Check that httpd has started,” and so on. The next line starts with the name of a
module (yum, service, firewalld, and so on).
For yum, it says to check if the httpd package is present, and if it is not, then
install it.
For service, it checks whether the httpd daemon is running (started). If httpd is
not running, Ansible starts it.
For yum, it says to check if the firewalld package is present, and if it is not, then
install it.
For firewalld, make the port for the http service (TCP 80) available immediately
(enabled) and permanently (permanent: yes) through the firewall.
For service, restart the firewalld service (restarted) to enable access to the new
http service firewall port.
Run the playbook
Use the ansible-playbook command to run the playbook. (As an alternative, you
could also use ansible-navigator.) To test the playbook before running it live, use
the -C option. To see more details (at least until you are sure that it’s working), add the
-v option to see verbose output.
Keep in mind that if you run a playbook with -C, it cannot fully test the playbook to make
sure that it is correct. The reason is that a later step might require that an earlier step be
722
Downloaded from https://onlinelibrary.wiley.com/doi/ by alex jounh - Oregon Health & Science Univer , Wiley Online Library on [05/12/2025]. See the Terms and Conditions (https://onlinelibrary.wiley.com/terms-and-conditions) on Wiley Online Library for rules of use; OA articles are governed by the applicable Creative Commons License
Part VI: Engaging with Cloud Computing
completed before it can be done. In this example, the httpd package would need to be
installed before the httpd service can be running.
Here’s an example of running the Ansible playbook in verbose mode:
$ ansible-playbook -v simple_web.yaml -kK
Using /etc/ansible/ansible.cfg as config file
SSH password: <ssh password>
BECOME password[defaults to SSH password]: <Enter>
PLAY [Create web server] ***************************************
TASK [Gathering Facts] *****************************************
ok: [host03]
ok: [host02]
ok: [host01]
TASK [Install httpd]
****************************************************************
changed: [host01] => {"changed": true, "msg": "", "rc": 0,
"results": ["Installed: httpd", …
changed: [host02] => {"changed": true, "msg": "", "rc": 0,
"results": ["Installed: httpd", …
changed: [host03] => {"changed": true, "msg": "", "rc": 0,
"results": ["Installed: httpd", …
TASK [Check that httpd has started]
****************************************************************
changed: [host03] => {"changed": true, "name": "httpd",
"state": "started", "status":
changed: [host02] => {"changed": true, "name": "httpd",
"state": "started", "status": …
changed: [host01] => {"changed": true, "name": "httpd",
"state": "started", "status": …
…
TASK [Install firewalld]****************************************
changed: [host03] => {"changed": true, "msg": "", "rc": 0, "results":
["Installed: firewalld", "Installed: python3-
decorator…
changed: [host02] => {"changed": true, "msg": "", "rc": 0, "results":
["Installed: firewalld", "Installed: python3-
decorator…
changed: [host01] => {"changed": true, "msg": "", "rc": 0, "results":
["Installed: firewalld"…
TASK [Firewall access to https]*************************************
ok: [host03] => {"changed": false, "msg": "Permanent operation,
(offline operation: only on-
disk configs were altered)"}
ok: [host02] => {"changed": false, "msg": "Permanent operation,
(offline operation: only on-
disk configs were altered)"}
723
30
Downloaded from https://onlinelibrary.wiley.com/doi/ by alex jounh - Oregon Health & Science Univer , Wiley Online Library on [05/12/2025]. See the Terms and Conditions (https://onlinelibrary.wiley.com/terms-and-conditions) on Wiley Online Library for rules of use; OA articles are governed by the applicable Creative Commons License
Chapter 30: Automating Apps and Infrastructure with Ansible
ok: [host01] => {"changed": false, "msg": "Permanent operation,
(offline operation: only on-
disk configs were altered)"}
PLAY RECAP *****************************************************
host01: ok=6 changed=4 unreachable=0 failed=0 skipped=0 rescued=0
ignored=0
host02: ok=6 changed=4 unreachable=0 failed=0 skipped=0 rescued=0
ignored=0
host03: ok=6 changed=4 unreachable=0 failed=0 skipped=0
rescued=0 ignored=0
The output from ansible-playbook steps through each task. The first task (Gathering
Facts) shows that all three host systems in the ws inventory are accessible. What you can’t
see is that it is using the credentials to connect to each system and then escalating that user
to root privilege before completing each subsequent task.
The “Install httpd” task checks to see if the httpd package is yet installed on each host. If it is
not, Ansible asks to install the package, along with any dependent packages. Next, Ansible checks
the status of the httpd service on each host and, if it is not running, then starts it.
After that, each host is checked to see if the firewalld package is installed and installs it
if it is not there. Then Ansible adds a firewall rule to each host to allow access to the http
service (TCP port 80) and makes that setting permanent.
The PLAY RECAP then shows you the results of all of the tasks. Here you can see that all
six tasks on all hosts were ok. If there had been any failed, skipped, rescued, or ignored
tasks, they would be listed.
You can rerun this playbook if you think that something may have gotten out of place or if
you made a modification to it. You could also use it later to deploy the playbook on different systems.
Although you have seen how Ansible is good at deploying multiple tasks in playbooks, it
can also be used for one-off actions. In the next section, I show how to run some ad hoc
Ansible commands to query and further modify the hosts that we just deployed.
Running Ad Hoc Ansible Commands
There may be times when you want to do one-off tasks on your Ansible-managed nodes.
You can do those tasks using ad hoc commands. With an ad hoc command, you can directly
call a module from the Ansible command line and have it act on an inventory. Some of
those tasks could include the following:
■
■
■
724
Installing RPM software packages
Managing user accounts
Copying files to and from nodes
Downloaded from https://onlinelibrary.wiley.com/doi/ by alex jounh - Oregon Health & Science Univer , Wiley Online Library on [05/12/2025]. See the Terms and Conditions (https://onlinelibrary.wiley.com/terms-and-conditions) on Wiley Online Library for rules of use; OA articles are governed by the applicable Creative Commons License
Part VI: Engaging with Cloud Computing
■
■
Changing permissions on a file or directory
Rebooting a node
Just as when you run playbooks, running ad hoc commands focuses on reaching a desired
state. The ad hoc command takes a declarative statement, figures out what is being
requested, and does what it needs to do to reach the requested state.
To try these examples of ad hoc Ansible commands, you can use the ws inventory created
earlier.
Trying ad hoc commands
When you run an ad hoc Ansible command, you take some action using an Ansible module.
The command module is used by default if no other module is indicated. Using the module,
you indicate which command and options you want to run on a group of nodes as a one-
time activity.
Check that an inventory is up and running. Here, you see that hosts are all running in the
ws inventory:
$ ansible ws -
u joe -
m ping -
kK
SSH password: <ssh password>
BECOME password[defaults to SSH password]: <Enter>
host03 | SUCCESS => {
"ansible_facts": {
"discovered_interpreter_python": "/usr/bin/python"
},
"changed": false,
"ping": "pong"
}
host02 | SUCCESS => { …
host01 | SUCCESS => { …
You can find out if the httpd service is running on the hosts in the ws inventory by
checking the state of that service with this ansible command as follows:
$ ansible ws -
u joe -
m service \
-a "name=httpd state=started" --check -kK
SSH password: <ssh password>
BECOME password[defaults to SSH password]: <Enter>
host02 | SUCCESS => {
"ansible_facts": {
"discovered_interpreter_python": "/usr/bin/python"
},
"changed": false,
"name": "httpd",
"state": "started",
"status": { …
host 01 | SUCCESS => { …
30
725
Downloaded from https://onlinelibrary.wiley.com/doi/ by alex jounh - Oregon Health & Science Univer , Wiley Online Library on [05/12/2025]. See the Terms and Conditions (https://onlinelibrary.wiley.com/terms-and-conditions) on Wiley Online Library for rules of use; OA articles are governed by the applicable Creative Commons License
Chapter 30: Automating Apps and Infrastructure with Ansible
At the moment, there is no content on the web servers. To add an index.html file (containing the text “Hello from your web server!”) to all of the hosts in the ws inventory, you
could run this command (type the root password when prompted):
$ echo "Hello from your web server!"> index.html
$ ansible ws -
m copy -
a \
"src=./index.html dest=/var/www/html/ \
owner=apache group=apache mode=0644" \
-b --user joe --become --ask-become-pass -kK
SSH password: <ssh password>
BECOME password[defaults to SSH password]: <Enter>
host01 | CHANGED => {
"ansible_facts": {
"discovered_interpreter_python": "/usr/bin/python"
},
"changed": true,
"checksum": "213ae4bb07e9b1e96fbc7fe94de372945a202bee",
"dest": "/var/www/html/index.html",
"gid": 48,
"group": "apache",
"md5sum": "495feb8ad508648cfafcf69681d94f97",
"mode": "0644",
"owner": "apache",
"secontext": "system_u:object_r:httpd_sys_content_t:s0",
"size": 52,
"src": "/home/joe/.ansible/tmp/ansible-
tmp-
1581027374.649223-
29961128730253/source",
"state": "file",
"uid": 48
host02 | CHANGED => { …
host03 | CHANGED => { …
You can see that the index.html file is created with the apache owner (UID 48) and
apache group (GID 48) in the /var/www/html directory on host01. The copy was then
repeated to host02 and host03. You can check that everything is working by trying to
access that file from the ansible host through the web server using the curl command:
$ curl host01
Hello from your web server!
Automating Tasks with Ansible Tower
Automation Framework
Although running Ansible playbooks and commands are great for automating and later modifying sets of hosts, for a fully managed enterprise, you can go even further with Ansible. Using
Ansible Tower, you can add a larger framework to your Ansible deployments.
726
Downloaded from https://onlinelibrary.wiley.com/doi/ by alex jounh - Oregon Health & Science Univer , Wiley Online Library on [05/12/2025]. See the Terms and Conditions (https://onlinelibrary.wiley.com/terms-and-conditions) on Wiley Online Library for rules of use; OA articles are governed by the applicable Creative Commons License
Part VI: Engaging with Cloud Computing
Ansible Tower provides a web-based interface for managing your entire IT infrastructure with
Ansible playbooks and other components. By centralizing your Ansible assets in one place,
you have a single place to receive notifications. You can manage different administrative roles
across your enterprise.
The Ansible Tower interface makes it easy to update your provisioned assets continuously.
Instead of having to remember command-line options, you can just click to configure and
launch your Ansible tasks. Inventory management is graphical and job scheduling can be done
in intuitive, visual ways.
A REST API is available with Ansible Tower that can help you embed your existing infrastructure tools into Ansible. So, you can usually just continue the processes that you already have
in place but manage them with Ansible instead.
You can learn more about Ansible Tower from the Ansible Tower site (https://www
.ansible.com/products/tower).
Summary
Ansible provides a unique formatting language and set of tools to automate many of the tasks
that you have learned in other parts of this book. Once you know how to build an Ansible
playbook, you can identify the exact configuration that you want on a system and then easily
deploy that configuration to one or more host systems.
With Ansible playbooks, you define the exact state of an application and surrounding components and then apply that state to Linux host systems, network devices, or other targets. You
can save those playbooks and reuse them to produce similar results on other systems or adapt
them to create new and different results.
Ansible can also use ad hoc commands to update systems. From the ansible command line,
you can add users, copy files, install software, or do almost anything else you can do with
playbooks. With those commands, you can quickly apply a set of changes across multiple hosts
or respond to a problem that requires a quick fix that needs to be made immediately to a set
of hosts.
In this chapter, you learned about the different components that make up an Ansible toolset.
You created your own playbook for deploying a simple web server. Then you ran some ad hoc
commands to modify the systems to which you deployed your playbook.
Exercises
These exercises test your ability to get Ansible installed on your system, create your first Ansible
playbook, and run a few ad hoc Ansible commands. These tasks assume you are running a Fedora
or Red Hat Enterprise Linux system (although some tasks work on Ubuntu and other Linux
systems as well).
727
30
Downloaded from https://onlinelibrary.wiley.com/doi/ by alex jounh - Oregon Health & Science Univer , Wiley Online Library on [05/12/2025]. See the Terms and Conditions (https://onlinelibrary.wiley.com/terms-and-conditions) on Wiley Online Library for rules of use; OA articles are governed by the applicable Creative Commons License
Chapter 30: Automating Apps and Infrastructure with Ansible
Although Ansible is meant to deploy tasks to remote systems, the exercises here will just let you
try a playbook and a few commands on a single system. If you are stuck, solutions to the tasks
are shown in Appendix B (although in Linux, you can often complete a task in multiple ways).
1. Install Ansible on your Fedora or Ubuntu system.
2. Add sudo privilege for the user that you want to use to do these exercises.
3. Create a start to an Ansible playbook (call it my_playbook.yaml) that includes the
following content:
---
-name: Create web server
hosts: localhost
tasks:
-name: Install httpd
yum:
name: httpd
state: present
4. Run ansible-playbook on the my_playbook.yaml in check mode to see if
there is a problem completing the playbook (hint: there is).
5. Modify my_playbook.yaml to escalate privileges so that the tasks are run as the
root user.
6. Run ansible-playbook again until the httpd package successfully installs on
your system.
7. Modify my_playbook.yaml again to start the httpd service, and set it so that it
will start every time the system boots.
8. Run an ansible command that checks whether the httpd service is up on
localhost.
9. Create an index.html file that contains the text “Web server is up,” and use
the ansible command to copy that file to the /var/www/html directory on
localhost.
10. Use the curl command to view the contents of the file that you just copied to the
web server.
728
Downloaded from https://onlinelibrary.wiley.com/doi/ by alex jounh - Oregon Health & Science Univer , Wiley Online Library on [05/12/2025]. See the Terms and Conditions (https://onlinelibrary.wiley.com/terms-and-conditions) on Wiley Online Library for rules of use; OA articles are governed by the applicable Creative Commons License
Part VI: Engaging with Cloud Computing
31
Deploying Applications
as Containers with Kubernetes
IN THIS CHAPTER
Understanding Kubernetes
Trying Kubernetes
Running the Kubernetes Basics Tutorials
Enterprise-quality Kubernetes with EKS
L
inux containers separate the applications they contain from the operating systems on which they
run. Built properly, a container will hold a discrete set of software that can be transported and
run efficiently. But the story doesn’t end there. Once you have some containers, the next step is
to engage them with a platform like Kubernetes that allows you to do the following:
■
■
■
■
■
■
Group sets of containers together to form a larger application. For example, deploy a web
server, a database, and monitoring tools together.
Scale up your containers as the demand requires. In fact, you want to be able to scale each
component of the larger application individually, without having to scale up everything.
Set the state of your application and not just run it. What this means is that, instead of saying
run a container, you want to be able to say something like “run three copies of container X,
and if one goes down, be sure to start another one to replace it.”
Recover from host computers going down or becoming overloaded. If the host running a container fails, you want the container to recover quickly and start up on another host computer.
Not be concerned about the infrastructure. You want your application to connect to the services that it needs without having to know the hostnames, IP addresses, or port numbers associated with those services.
Upgrade your containerized applications without downtime.
Kubernetes offers all of those features and more. While at first there were others competing to be the
platform of choice for orchestrating containers, such as Mesos and Docker Swarm, Kubernetes has
become the undisputed leader in orchestrating, deploying, and managing containerized applications.
Kubernetes is also becoming the choice for running artificial intelligence and machine learning applications that can run as massive scale.
729
Downloaded from https://onlinelibrary.wiley.com/doi/ by alex jounh - Oregon Health & Science Univer , Wiley Online Library on [05/12/2025]. See the Terms and Conditions (https://onlinelibrary.wiley.com/terms-and-conditions) on Wiley Online Library for rules of use; OA articles are governed by the applicable Creative Commons License
CHAPTER
This chapter introduces you to Kubernetes and the enterprise-quality Kubernetes platform
from Amazon called Elastic Kubernetes Service (EKS). The best way to learn Kubernetes is to
start up a Kubernetes cluster and run commands to explore Kubernetes and deploy a containerized application. Before you do that, you should understand a bit about what a Kubernetes
cluster is and what components you need to deploy an application to a cluster.
Understanding Kubernetes
A Kubernetes cluster consists of nodes that form a control plane (for managing the cluster) and
data plane (for running workloads). You can run all control plane and data plane services on
the same system for personal use. For example, with Minikube, as described later in this
chapter, you can run a Kubernetes cluster from a virtual machine on your laptop (https://
minikube.sigs.k8s.io/docs/start).
In a production environment, the control plane runs continuously, while data plane nodes
can be brought up and down as the demands of your workloads change. Here are the different components you need to consider if you were to set up a production-quality Kubernetes
infrastructure:
Control plane: The control plane manages the components running in the Kubernetes
cluster. It manages communications between components, schedules applications to
run on the data plane nodes, scales up the applications as needed, and makes sure that
the proper number of containers (distributed in pods) are running. The control plane
can run on one node, but you would typically have three or more available to make
sure that control plane services are always available.
Data plane: The data plane is where the deployed containers actually run. The number
of nodes that you need depends on your workload. For an on-premises cluster, you
might want the maximum number of nodes available that you might need during peak
demand, with nodes being brought up as they are needed and decommissioned as they
are not. For cloud environments, the cloud provider typically has enough systems on
hand to meet your data plane needs, so you can just pay for those nodes as you need
them. Although if you require special types of systems that are particularly in demand,
such as GPUs, you might need to reserve them.
Storage: Persistent networked storage allows containers to access the same storage,
regardless of the node that runs them.
Other services: To integrate a Kubernetes environment into an existing data center, you
might want to integrate it with other services. For example, you can set up application
and network load balancers to spread requests for services across multiple nodes. You
might also want to integrate with the local data center’s or cloud’s identity and access
management services.
In Kubernetes, the smallest unit with which you can deploy a container is referred to as a
pod. A pod can hold one or more containers, along with metadata describing its containers.
Although a pod can hold only one container, it is sometimes appropriate for a pod to have
730
Downloaded from https://onlinelibrary.wiley.com/doi/ by alex jounh - Oregon Health & Science Univer , Wiley Online Library on [05/12/2025]. See the Terms and Conditions (https://onlinelibrary.wiley.com/terms-and-conditions) on Wiley Online Library for rules of use; OA articles are governed by the applicable Creative Commons License
Part VI: Engaging with Cloud Computing
more than one. For example, a pod might contain a sidecar container, which is meant to monitor the service running in the primary container in the pod. Putting multiple containers in
the same pod means that containers in that pod will scale up together.
31
Kubernetes control plane
A Kubernetes control plane directs the activities of a Kubernetes cluster. The control plane
oversees all of the activities of the cluster through a set of services. The centerpiece of a
Kubernetes control plane is the API server (kube-apiserver), which receives object
requests. Communications between all of the nodes in the cluster pass through the API server.
When the API server is presented with an object, such as a request that a certain number of
pods be running, the Kubernetes scheduler (kube-scheduler) finds available nodes to run
each pod and schedules them to run on those nodes. To make sure that each object remains in
the prescribed state, Kubernetes controllers (kube-controller-manager) run continuously to do things such as to make sure that namespaces exist, that defined service accounts
are available, that the right number of replicas are running, and that defined endpoints are
active. If any of that is out of sync, requests are made to return those objects to the requested
states, by doing such things as bringing up more pods or re-creating a missing endpoint.
Kubernetes data plane
At the heart of each node in the Kubernetes data plane is the kubelet service. A kubelet registers its node with the API server. The API server then directs the kubelet to do things like
run a container that is requested from the API server through a PodSpec and make sure that it
continues to run in a healthy state.
Another service that runs on each node is a container engine (often referred to as a runtime).
Originally, the docker service was by far the most popular container engine used to launch,
manage, and delete containers as required by the PodSpec. However, in Kubernetes v1.23 the
use of Docker in Kubernetes was deprecated, and Docker was replaced by containerd as the
default container runtime for Kubernetes.
Originally, nodes were meant to be as generic as possible so that you could simply spin up a
new node when additional capacity was needed and it would be configured to handle most
requests to run containers. Over time, Kubernetes evolved to let you specify the types of processors (x86_64, Arm, GPUs, and so on), the amount of memory, and other attributes of the
nodes required to run your applications. Likewise, you can also run custom operating systems
that run the features for that node to work in your data center.
Kubernetes applications
In Kubernetes, applications are managed by defining API objects that set the state of resources
on the cluster. For example, you can create a Deployment object in a YAML file that defines
pods that each run one or more containers, along with the namespace in which it runs and
the number of replicas of each pod it runs. That object could also define the ports that
are open and any volumes that are mounted for each container. Kubernetes control plane
731
Downloaded from https://onlinelibrary.wiley.com/doi/ by alex jounh - Oregon Health & Science Univer , Wiley Online Library on [05/12/2025]. See the Terms and Conditions (https://onlinelibrary.wiley.com/terms-and-conditions) on Wiley Online Library for rules of use; OA articles are governed by the applicable Creative Commons License
Chapter 31: Deploying Applications as Containers with Kubernetes
responds to those kinds of requests and makes sure that the requests are carried out on the
Kubernetes data plane nodes.
Kubernetes uses the concept of services to separate the location of an application from its
actual IP address and port number. By assigning a service name to the set of pods that provide
that service, the exact location of each pod does not need to be known outside of the cluster.
Instead, it is up to Kubernetes to direct a request for that service to an available pod.
IP addresses associated with active pods are not directly addressable from outside the cluster by
default. It is up to you to define how you want to expose a service associated with a set of pods
outside of the cluster. Using a Service object, you can expose services in different ways.
By default, exposing a service via a ClusterIP service type makes it available only to
other components within the cluster. To expose the service outside of the cluster, you can
use NodePort, which makes the pod providing the service accessible through the same
Kubernetes-assigned port on an external IP address from each node on which the pod
is running.
A third method is to use LoadBalancer to assign an external, fixed IP address that acts as a
load balancer to the pods providing the service. With LoadBalancer, a cloud’s external
load balancer directs traffic to the backend pods. Finally, you can expose the service with
ExternalName, which associates the service with a particular DNS CNAME record.
Regardless of how you expose a Kubernetes service, when there is a request for that service,
Kubernetes acts to route communications to the set of pods that provide that service. In that
way, pods can come up and down without disrupting the clients using the service.
Kubernetes interfaces
Kubernetes has both command-line and web console interfaces for accessing a Kubernetes cluster. The examples in this chapter focus on command-line tools. Commands include minikube,
which is used to manage the Kubernetes virtual machine and bring the cluster up and down,
and kubectl, which is the general-purpose tool for managing the Kubernetes cluster.
Trying Kubernetes
Because setting up your own production-quality Kubernetes cluster requires some forethought,
this chapter will focus on a couple of easy ways to get a personal Kubernetes cluster running
and accessible quickly. In particular, here are a few different ways that you can gain access to
a Kubernetes cluster:
Kubernetes Tutorials: The official Kubernetes site offers interactive, web UI tutorials,
where you can start up your own cluster and try out Kubernetes. From Kubernetes
732
Downloaded from https://onlinelibrary.wiley.com/doi/ by alex jounh - Oregon Health & Science Univer , Wiley Online Library on [05/12/2025]. See the Terms and Conditions (https://onlinelibrary.wiley.com/terms-and-conditions) on Wiley Online Library for rules of use; OA articles are governed by the applicable Creative Commons License
Part VI: Engaging with Cloud Computing
Tutorials (https://kubernetes.io/docs/tutorials), you can choose from basic,
configuration, stateless applications, and other tutorial topics.
Minikube: With Minikube, you can run Kubernetes on your own computer. A Linux,
macOS, or Windows system that can run virtual machines can get the Minikube VM and
have a Kubernetes cluster running on a laptop or desktop system within a few minutes. Hello Minikube (https://kubernetes.io/docs/tutorials/hello-minikube)
includes instructions to set up Minikube.
K3s: K3s (https://k3s.io) is a Kubernetes distribution that is made to run in IoT
appliances and in remote locations. It works well for configurations that need to run
unattended.
MicroK8s: For developers who want a pure Kubernetes experience, MicroK8s (https://
microk8s.io/) is a good choice. MicroK8s offers a simple installation and builds that
keep up with the latest Kubernetes releases.
Docker Desktop: Another option (not detailed here) is Docker Desktop, which lets you
enable a preconfigured Kubernetes cluster that runs a control plane and node on your
workstation. (https://docs.docker.com/desktop/features/kubernetes).
To get you started, I’ll step you through some of the Kubernetes tutorials and explain the
concepts behind what they are doing. You can follow along in the tutorial or run the same
commands on your own Minikube setup. I describe how to get Kubernetes in one of these two
ways next.
Note
If you have an Amazon EKS environment up and running, you can follow most of these steps in EKS as well. In most
case, you can use the kubectl command to get the same results you would on minikube.
Getting Kubernetes
The following descriptions tell you how to work with a Kubernetes cluster either through the
Kubernetes Basics Tutorial or by installing and starting Minikube.
Starting the Kubernetes Basics Tutorial
To start up the Kubernetes project basic interactive tutorial, visit the following URL from your
web browser:
https://kubernetes.io/docs/tutorials/kubernetes-basics
Figure 31.1 shows the start of the Kubernetes Basics Tutorial.
At this point, you can follow the prompts through the tutorial. Because the tutorial starts a
live cluster, you can use that interface to try other commands as well.
733
31
Downloaded from https://onlinelibrary.wiley.com/doi/ by alex jounh - Oregon Health & Science Univer , Wiley Online Library on [05/12/2025]. See the Terms and Conditions (https://onlinelibrary.wiley.com/terms-and-conditions) on Wiley Online Library for rules of use; OA articles are governed by the applicable Creative Commons License
Chapter 31: Deploying Applications as Containers with Kubernetes
FIGURE 31.1
Step through the Kubernetes project tutorials.
Starting Minikube
Getting Minikube running on your personal computer requires a few things. This includes the
following:
■
■
■
■
Logging in as a user with sudo privileges.
Using a computer that is configured as a hypervisor so it can run the Minikube virtual
machines. You can set up Virtual Machine Manager, as described in the “Setting up a
hypervisor” section of Chapter 28.
Having resources recommended by Minikube (two or more CPUs, 2GB or more of free
memory, 20GB or more of free disk space, and a connection to the Internet).
Container or virtual machine manager.
For Linux, macOS, and Windows systems, go here to find the latest instructions:
https://minikube.sigs.k8s.io/docs/start/
These are the basic steps for installing and starting minikube:
1. Installation: Choose the operating system, architecture, release type, and installer
type. For example, on a Linux, x86-64 system with a stable release type and binary
download, you might run the following commands to download and install minikube:
$ curl -LO \
https://github.com/kubernetes/minikube/releases/latest/
download/minikube-linux-amd64
$ sudo install minikube-linux-amd64 \
/usr/local/bin/minikube \
&& rm minikube-linux-amd64
734
Downloaded from https://onlinelibrary.wiley.com/doi/ by alex jounh - Oregon Health & Science Univer , Wiley Online Library on [05/12/2025]. See the Terms and Conditions (https://onlinelibrary.wiley.com/terms-and-conditions) on Wiley Online Library for rules of use; OA articles are governed by the applicable Creative Commons License
Part VI: Engaging with Cloud Computing
2. Start your cluster: Run minikube start as the user with sudo privileges. If all
goes well, minikube should find your hypervisor and create the minikube control
plane. At this point, you can try some kubectl commands on your cluster and try
running some containerized applications.
3. Install the kubectl command: Get a version of the kubectl command that is
within one version of Kubernetes in your Minikube. Installing the latest versions of
kubectl and minikube should take care of that. Enter the following:
$ sudo curl -
LO \
https://storage.googleapis.com/kubernetes-release/
release/'curl -s
https://storage.googleapis.com/kubernetes-release/release/
stable.txt
'/bin/linux/amd64/kubectl
$ sudo mv kubectl /usr/local/bin/
$ sudo chmod 755 /usr/local/bin/kubectl
Strickly speaking, you don’t need to get a separate kubectl binary since minikube has
kubectl built in. For example, you could just run minikube kubectl get node. But
in most other environments, you will use kubectl as a separate command.
Running the Kubernetes Basics tutorial
The Kubernetes Basics Tutorial takes you through a good set of commands to start familiarizing yourself with Kubernetes:
https://kubernetes.io/docs/tutorials/kubernetes-basics/
The following text walks you through the first five modules of the Kubernetes Basics Tutorial.
If you are running through this procedure directly from the Kubernetes tutorials page, go
ahead and start Minikube (minikube start). If you are using Minikube from a VM already
running on your laptop, you can still follow this procedure. The steps are the same since both
use Minikube.
Get information about your cluster
Run these commands to get basic information about your cluster:
1. List Minikube version: To see the version of minikube you are using, enter the
following:
$ minikube version
minikube version: v1.35.0
commit: dd5d320e41b5451cdf3c01891bc4e13d189586ed-dirty
2. List cluster information: To see the URL from which the Kubernetes master and DNS
services are available, enter the following:
$ kubectl cluster-info
Kubernetes control plane is running at https://localhost:36355
CoreDNS is running at https://localhost:36355/api/v1/namespaces/
kube-system/services/kube-dns:dns/proxy
735
31
Downloaded from https://onlinelibrary.wiley.com/doi/ by alex jounh - Oregon Health & Science Univer , Wiley Online Library on [05/12/2025]. See the Terms and Conditions (https://onlinelibrary.wiley.com/terms-and-conditions) on Wiley Online Library for rules of use; OA articles are governed by the applicable Creative Commons License
Chapter 31: Deploying Applications as Containers with Kubernetes
To further debug and diagnose cluster problems, use 'kubectl
cluster-info dump'.
3. List node information: To see the number of nodes running (just one master node
for Minikube) and their status, enter the following:
$ kubectl get nodes
NAME
STATUS
ROLES
AGE
minikube Ready
control-
plane 23m
VERSION
v1.32.0
4. List cluster and client versions: To list the versions of the kubectl client and
Kubernetes cluster (to make sure they are within one version of each other), enter the
following:
$ kubectl version
Client Version: v1.31.0
Kustomize Version: v5.4.2
Server Version: v1.32.0
Deploy a Kubernetes application
Request to run and manage containerized applications (in the form of pods) on a Kubernetes cluster is known as a deployment. Once a deployment is created, it is up to the Kubernetes cluster to make sure the requested pods are always running. It does this by doing the
following:
■
■
■
■
Accepting the deployment creation through the API server
Asking the scheduler to run the requested containers from each pod on
available nodes
Watching the pods to make sure they continue to run as requested
Starting a new instance of a pod (on the same or different node) if the pod fails (for
example, if the container stops running)
The tutorial shows an example of how to create a simple deployment from a container image.
In this example, you just give it a name and identify the container image to use. The rest of
the deployment settings are filled in from defaults.
1. Create a deployment: To start the deployment that pulls the kubernetes-
bootcamp container with a deployment name of kubernetes bootcamp, enter
the following:
$ kubectl create deployment kubernetes-
bootcamp \
--image=gcr.io/google-samples/kubernetes-bootcamp:v1
deployment.apps/kubernetes-bootcamp created
2. List deployments: To see that the deployment exists (and has one instance requested
and one running), enter the following:
$ kubectl get deployments
NAME
READY
kubernetes-
bootcamp
1/1
736
UP-
TO-
DATE
1
AVAILABLE
1
AGE
4m38s
Downloaded from https://onlinelibrary.wiley.com/doi/ by alex jounh - Oregon Health & Science Univer , Wiley Online Library on [05/12/2025]. See the Terms and Conditions (https://onlinelibrary.wiley.com/terms-and-conditions) on Wiley Online Library for rules of use; OA articles are governed by the applicable Creative Commons License
Part VI: Engaging with Cloud Computing
3. Describe the deployment: To see details about the deployment, enter the following:
$ kubectl describe deployments kubernetes-
bootcamp
Name:
kubernetes-
bootcamp
Namespace:
default
…
Replicas:
1 desired | 1 updated | 1 total | 1 available |
0 unavailable
…
Pod Template:
Labels: app=kubernetes-
bootcamp
Containers:
kubernetes-
bootcamp:
Image:
gcr.io/google-
samples/kubernetes-
bootcamp:v1
Port:
<none>
Host Port:
<none>
Environment: <none>
Mounts:
<none>
Volumes:
<none>
…
31
In the kubernetes-bootcamp deployment, notice that it just sets one instance (replica)
of the pod associated with the deployment to be available. The deployment runs in the current
namespace, which by default is called default. Notice also that there are no ports open or
volumes mounted by default for the pods.
Get information on the deployment’s pods
With the deployment created, you can ask for information about the pod created from that
deployment and expose the Kubernetes API from the VM to your local system, via a proxy service, to connect to the pod directly.
1. Expose the Kubernetes API to the local system: To open a proxy from your system
to the Kubernetes API running in Minikube (kubectl proxy), enter the following:
$ kubectl proxy
Starting to serve on 127.0.0.1:8001
2. Query the Kubernetes API: Open a second terminal, and query the Kubernetes API
running on Minikube by entering the following:
$ curl http://localhost:8001/version
{
"major": "1",
"minor": "32",
"gitVersion": "v1.32.0",
"gitCommit": "70d3cc986aa8221cd1dfb1121852688902d3bf53",
"gitTreeState": "clean",
"buildDate": "2024-
12-
11T17:59:15Z",
"goVersion": "go1.23.3",
737
Downloaded from https://onlinelibrary.wiley.com/doi/ by alex jounh - Oregon Health & Science Univer , Wiley Online Library on [05/12/2025]. See the Terms and Conditions (https://onlinelibrary.wiley.com/terms-and-conditions) on Wiley Online Library for rules of use; OA articles are governed by the applicable Creative Commons License
Chapter 31: Deploying Applications as Containers with Kubernetes
"compiler": "gc",
"platform": "linux/amd64"
3. Get pod information: The name of the pod used in this deployment is
kubernetes-bootcamp, followed by a unique string of characters. Enter these
commands to output the name of the pod and then list a description of that pod:
$ kubectl get pods
NAME
READY
STATUS
RESTARTS
AGE
kubernetes-
bootcamp-
9bc58d867-
7g6dr
1/1
Running
0
12m
$ kubectl describe pod kubernetes-bootcamp-9bc58d867-7g6dr
Name:
kubernetes-
bootcamp-
9bc58d867-
7g6dr
Namespace:
default
Priority:
0
Node:
minikube/10.0.2.15
…
Containers:
kubernetes-
bootcamp:
Container ID:
docker://5b75b05b7f9aca00ae99abc9b997ae8e708eed906f…
Image:
gcr.io/google-
samples/kubernetes-
bootcamp:v1
Image ID:
docker-
pullable://gcr.io/google-
samples…
…
Events:
Type
Reason
Age
From
Message
-
-
-
-
-
-
-
-
-
-
-
-
-
- -
-
-
-
-
-
-
-
Normal Scheduled 14m
default-
scheduler Successfully assigned
default/kubernetes-bootcamp-9bc58d867-7g6dr to minikube
Normal Pulled
14m
kubelet
Successfully pulled
image...
"gcr.io/google-samples/kubernetes-bootcamp:v1"
already present on machine
Normal Created
14m
kubelet, minikube Created container
kubernetes-bootcamp
Normal Started
14m
kubelet, minikube Started container
kubernetes-bootcamp
From the trimmed output, you can see the name of the pod, the namespace it is
in (default), and the node on which it is running (minikube/10.0.2.15).
Under Containers, you can see the name of the running container
(docker://5b75b05b7f9a . . .), the image it came from (. . . kubernetes-
bootcamp:v1), and the image ID for that image. Under Events, starting from the
bottom, you can see the kubelet on the node minikube, starting and creating the
container. It successfully pulls the container image. Then it assigns the pod to run on
that node.
4. Connect to the pod: Use the curl command to contact the pod and get it to
respond to your request for information:
$ export POD_NAME=$(kubectl get pods -
o go-
template -
-
template \
'{{range .items}}{{.metadata.name}}{{"\n"}}{{end}}') ; \
738
Downloaded from https://onlinelibrary.wiley.com/doi/ by alex jounh - Oregon Health & Science Univer , Wiley Online Library on [05/12/2025]. See the Terms and Conditions (https://onlinelibrary.wiley.com/terms-and-conditions) on Wiley Online Library for rules of use; OA articles are governed by the applicable Creative Commons License
Part VI: Engaging with Cloud Computing
echo Name of the Pod: $POD_NAME
Name of the Pod: kubernetes-
bootcamp-
9bc58d867-
7g6dr
$ curl http://localhost:8001/api/v1/namespaces/default/pods/
$POD_NAME:8080/proxy/
Hello Kubernetes bootcamp!|Running on:kubernetes-
bootcamp-
9bc58d867-7g6dr|v=1
31
5. View the logs: To see the logs for any container that is running inside the selected
pod, run the following command:
$ kubectl logs $POD_NAME
Kubernetes Bootcamp App Started At: 2025-
04-
12T07:40:02.787Z |
Running On: kubernetes-bootcamp-9bc58d867-7g6dr
Running On: kubernetes-
bootcamp-
9bc58d867-
7g6dr | Total Requests: 1
| App Uptime: 841.737 seconds | Log Time: 2025-
04-
12T07:54:04.524Z
6. Execute commands on the pod: Use kubectl exec to run commands inside the
pod. The first command runs env in order to view shell environment variables from
inside of the pod, and the second opens a shell inside the pod so you can run the
following commands:
$ kubectl exec $POD_NAME -
-env
PATH=/usr/local/sbin:/usr/local/bin:/usr/sbin:/usr/bin:/sbin:/bin
HOSTNAME=kubernetes-bootcamp-9bc58d867-7g6dr
KUBERNETES_SERVICE_HOST=10.96.0.1
KUBERNETES_SERVICE_PORT=443
…
$ kubectl exec -
ti $POD_NAME -
-bash
root@kubernetes-bootcamp-9bc58d867-7g6dr:/# date
Sat Apr 12 07:58:00 UTC 2025
kubernetes-bootcamp-5b48cfdcbd-lf9t2:/# ps -ef
UID
PID
PPID C STIME TTY
TIME CMD
root
1
0 0 07:40 ?
00:00:00 /bin/sh -
c node
server.js
root
6
1 0 07:40 ?
00:00:00 node server.js
root
18
0 0 07:57 pts/0
00:00:00 bash
root
25
18 0 07:58 pts/0
00:00:00 ps -
ef
root@kubernetes-bootcamp-5b48cfdcbd-lf9t2:/# curl localhost:8080
Hello Kubernetes bootcamp!|Running on:kubernetes-
bootcamp-
9bc58d
867-7g6dr|v=1
root@kubernetes-bootcamp-5b48cfdcbd-lf9t2:/# exit
After starting a shell, you can see output from the date and ps commands. From ps, you can
see that the first process run in the container (PID 1) is the server.js script. After that,
the curl command is able to communicate successfully with the container on localhost
port 8080.
739
Downloaded from https://onlinelibrary.wiley.com/doi/ by alex jounh - Oregon Health & Science Univer , Wiley Online Library on [05/12/2025]. See the Terms and Conditions (https://onlinelibrary.wiley.com/terms-and-conditions) on Wiley Online Library for rules of use; OA articles are governed by the applicable Creative Commons License
Chapter 31: Deploying Applications as Containers with Kubernetes
Expose applications with services
To expose the kubernetes-bootcamp pod described in these procedures so that it is accessible from an external IP address from the worker node on which it is running, you can create
a NodePort object. Here is one way to do that:
1. Check that the pod is running: Enter the following to see that the kubernetes-
bootcamp pod is running:
$ kubectl get pods
NAME
kubernetes-
bootcamp-
9bc58d867-
7g6dr
READY
1/1
STATUS
Running
RESTARTS
0
AGE
26m
2. Check the services: Enter the following to see the services running in the default
namespace. Notice that only the kubernetes service is available and that there is
no service exposing the kubernetes-bootcamp pod outside of the cluster:
$ kubectl get services
NAME
TYPE
kubernetes
ClusterIP
CLUSTER-
IP
10.96.0.1
EXTERNAL-
IP
<none>
PORT(S)
443/TCP
AGE
31m
3. Create a service: Create a service that uses NodePort to make the pod available from
an IP address on the host at a specific port number (8080). For example, enter the
following:
$ kubectl expose deployment/kubernetes-
bootcamp \
--type="NodePort" --port 8080
service/kubernetes-bootcamp exposed
4. View the new service: Type the following to see the IP address (10.96.66.230) and
port number (8080) from which the service is made available on the host:
$ kubectl get services
NAME
TYPE
CLUSTER-
IP EXTERNAL-
IP PORT(S)
AGE
kubernetes
ClusterIP 10.96.0.1
<none>
443/TCP
33m
kubernetes-
bootcamp NodePort 10.96.66.230 <none>
8080:30128/TCP 5s
$ kubectl describe services/kubernetes-
bootcamp
Name:
kubernetes-
bootcamp
Namespace:
default
Labels:
app=kubernetes-
bootcamp
Annotations:
<none>
Selector:
app=kubernetes-
bootcamp
Type:
NodePort
IP Family Policy:
SingleStack
IP Families:
IPv4
IP:
10.106.58.189
IPs:
10.106.58.189
Port:
<unset> 8080/TCP
TargetPort:
8080/TCP
NodePort:
<unset> 30128/TCP
740
Downloaded from https://onlinelibrary.wiley.com/doi/ by alex jounh - Oregon Health & Science Univer , Wiley Online Library on [05/12/2025]. See the Terms and Conditions (https://onlinelibrary.wiley.com/terms-and-conditions) on Wiley Online Library for rules of use; OA articles are governed by the applicable Creative Commons License
Part VI: Engaging with Cloud Computing
Endpoints:
Session Affinity:
External Traffic Policy:
Internal Traffic Policy:
Events:
10.244.0.4:8080
None
Cluster
Cluster
<none>
31
5. Get the assigned node port: To get the port assigned to the service and set the
$NODE_PORT variable to that value, enter the following:
$ export NODE_PORT=$(kubectl get services/kubernetes-
bootcamp \
-
o go-
template='{{(index .spec.ports 0).nodePort}}')
$ echo NODE_PORT=$NODE_PORT
NODE_PORT=30000
6. Access the service: To check that the service is available from the NodePort, use the
following curl command (using the IP address for your Minikube instance):
$ curl $(minikube ip):$NODE_PORT
Hello Kubernetes bootcamp!|Running on:kubernetes-
bootcamp-
9bc58
d867|v=1
Label a service
Labels provide the means to group pods, nodes, or other objects in Kubernetes. Using labels,
you do things like make sure that only pods with certain labels run on selected nodes. You can
also use them to identify certain pods by their labels so you can find them and act on them.
Labels are set as key/value pairs. Use this procedure to add a label to an existing service.
1. Check the pod’s label: So far, kubernetes-bootcamp is the only label assigned to
the pod. To make sure, enter the following:
$ kubectl describe deployment
Name:
kubernetes-
bootcamp
Namespace:
default
CreationTimestamp:
Sat, 12 Apr 2025 03:39:50 -
0400
Labels:
app=kubernetes-
bootcamp
Annotations:
deployment.kubernetes.io/revision: 1
…
2. Add another label: To add an additional label (v1) to the pod, get the name of the
pod and add the new label as follows:
$ export POD_NAME=$(kubectl get pods -
o go-
template -
-
template \
'{{range .items}}{{.metadata.name}}{{"\n"}}{{end}}') ; \
echo Name of the Pod: $POD_NAME
Name of the Pod: kubernetes-
bootcamp-
9bc58d867-
7g6dr
$ kubectl label pod $POD_NAME version=v1
pod/kubernetes-bootcamp-9bc58d867-7g6dr labeled
741
Downloaded from https://onlinelibrary.wiley.com/doi/ by alex jounh - Oregon Health & Science Univer , Wiley Online Library on [05/12/2025]. See the Terms and Conditions (https://onlinelibrary.wiley.com/terms-and-conditions) on Wiley Online Library for rules of use; OA articles are governed by the applicable Creative Commons License
Chapter 31: Deploying Applications as Containers with Kubernetes
3. Check and use the label: Check that the version=v1 label has been assigned to
the pod, and then use that label to list information about the pod:
$ kubectl describe pods $POD_NAME
Name:
kubernetes-
bootcamp-
9bc58d867-
7g6dr
Namespace:
default
Priority:
0
Service Account: default
Node:
minikube/10.0.2.15
Start Time:
Sat, 12 Apr 2025 03:39:50 -
0400
Labels:
app=kubernetes-
bootcamp
pod-
template-
hash=9bc58d867
version=v1
$ kubectl get pods -
l version=v1
NAME
READY
STATUS
RESTARTS
AGE
kubernetes-
bootcamp-
9bc58d867-
7g6dr
1/1
Running
0
60m
Delete a service
If you are done using the service, you can delete it. This removes access to the service from
the NodePort, but it does not delete the deployment itself.
1. Check the service: Make sure that the kubernetes-bootcamp service still exists:
$ kubectl get services
NAME
TYPE
CLUSTER-
IP
EXTERNAL-
IP PORT(S)
AGE
kubernetes
ClusterIP 10.96.0.1
<none>
443/TCP
97m
kubernetes-
bootcamp NodePort 10.106.58.189 <none>
8080:30128/TCP 30m
2. Delete the service: Using the label name, delete the service:
$ kubectl delete service -
l app=kubernetes-
bootcamp
service "kubernetes-
bootcamp" deleted
3. Check the service and deployment: Make sure the service has been deleted but the
deployment still exists:
$ kubectl get services
NAME
TYPE
CLUSTER-
IP
EXTERNAL-
IP PORT(S)
kubernetes
ClusterIP 10.96.0.1
<none>
443/TCP
$ kubectl get deployment
NAME
READY
UP-
TO-
DATE
AVAILABLE
AGE
kubernetes-
bootcamp 1/1
1
1
65m
AGE
64m
Scale up an application
One of the most powerful features of Kubernetes is its ability to scale up an application as the
demand requires it. This procedure starts with the kubernetes-bootcamp deployment,
which is running one pod and scales it up to have additional pods running using the ReplicaSet
feature and a different means of exposing the application to outside access.
742
Downloaded from https://onlinelibrary.wiley.com/doi/ by alex jounh - Oregon Health & Science Univer , Wiley Online Library on [05/12/2025]. See the Terms and Conditions (https://onlinelibrary.wiley.com/terms-and-conditions) on Wiley Online Library for rules of use; OA articles are governed by the applicable Creative Commons License
Part VI: Engaging with Cloud Computing
1. Get the deployment: List information about the kubernetes-bootcamp deployment, and note that it is set to have only one replica set (rs) active:
$ kubectl get deployments
NAME
READY
UP-
TO-
DATE
kubernetes-
bootcamp
1/1
1
$ kubectl get rs
NAME
DESIRED
kubernetes-
bootcamp-
5b48cfdcbd
1
AVAILABLE
1
CURRENT
1
AGE
107s
READY
1
31
AGE
3m4s
2. Scale up the replicas: To scale the deployment up to four replica sets, enter the
following:
$ kubectl scale deployments/kubernetes-bootcamp --replicas=4
deployment.extensions/kubernetes-bootcamp scaled
3. Check the new replicas: List the deployments to make sure that there are now four
replicas ready and available:
$ kubectl get deployments
NAME
READY
kubernetes-
bootcamp
4/4
UP-
TO-
DATE
4
AVAILABLE
4
AGE
8m44s
4. Check the pods: There should now also be four kubernetes-bootcamp pods
running, each with its own IP address inside the cluster. To make sure, enter the
following:
$ kubectl get pods -
o wide
NAME
READY
STATUS
RESTARTS AGE
NODE
NOMINATED NODE
READINESS GATES
kubernetes-
bootcamp-
9bc… 1/1
Running
0
8m43s
minikube <none>
<none>
kubernetes-
bootcamp-
9bc… 1/1
Running
0
12s
minikube <none>
<none>
kubernetes-
bootcamp-
9bc… 1/1
Running
0
12s
minikube <none>
<none>
kubernetes-
bootcamp-
9bc… 1/1
Running
0
12s
minikube <none>
<none>
IP
10.244.0.6
10.244.0.4
10.244.0.5
10.244.0.7
5. View deployment details: To see details of the increased replicas in the deployment,
enter the following:
$ kubectl describe deployments/kubernetes-
bootcamp
Name:
kubernetes-
bootcamp
Namespace:
default
…
NewReplicaSet:
kubernetes-
bootcamp-
9bc58d867 (4/4 replicas
created)
Events:
Type
Reason
Age
From
Message
-
-
-
-
-
-
-
-
-
-
-
-
-
- -
-
-
-
-
-
-
-
-
-
-
Normal ScalingReplicaSet 59m
deployment-
controller Scaled
up replica set kubernetes-
bootcamp-
9bc58d867 from 0 to 1
743
Downloaded from https://onlinelibrary.wiley.com/doi/ by alex jounh - Oregon Health & Science Univer , Wiley Online Library on [05/12/2025]. See the Terms and Conditions (https://onlinelibrary.wiley.com/terms-and-conditions) on Wiley Online Library for rules of use; OA articles are governed by the applicable Creative Commons License
Chapter 31: Deploying Applications as Containers with Kubernetes
Normal ScalingReplicaSet 2m57s deployment-
controller
up replica set kubernetes-
bootcamp-
9bc58d867 from 1 to 4
Scaled
Check the load balancer
To check that traffic is being distributed across all four replicated pods, you can get the NodePort and then use the curl command to make sure that multiple connections to the NodePort
result in different pods being accessed:
1. List details about the service: To see details about the kubernetes-bootcamp
service, enter the following:
$ kubectl expose \
deployment/kubernetes-bootcamp \
--type="NodePort" --port 8080
$ kubectl describe services/kubernetes-
bootcamp
Name:
kubernetes-
bootcamp
Namespace:
default
Labels:
app=kubernetes-
bootcamp
Annotations:
<none>
Selector:
app=kubernetes-
bootcamp
Type:
NodePort
...
Endpoints:
10.244.0.4:8080,10.244.0.7:8080,10.244.0.5:8080 +
1 more...
Session Affinity:
None
External Traffic Policy: Cluster
Internal Traffic Policy: Cluster
Events:
<none>
Notice that each pod has its own IP address and port, with each comma-separated IP
address and port representing a unique pod (10.244.0.4:8080,10.244.0.7:
8080, and so on).
2. Get the NodePort: Enter the following to set $NODE_PORT to the value of the port
number assigned to the service:
$ export NODE_PORT=$(kubectl get services/kubernetes-
bootcamp \
-
o go-
template='{{(index .spec.ports 0).nodePort}}')
$ echo NODE_PORT=$NODE_PORT
NODE_PORT=31915
3. Run curl: Run the curl command a few times to query the service. If you run it a
few times, you should see that it is accessing different pods. That is how you know
that the load balancer is working:
$ curl $(minikube ip):$NODE_PORT
Hello Kubernetes bootcamp!|Running on:kubernetes-
bootcamp-
9bc58d
867-6n257|v=1
Scale down an application
To scale the number of ReplicaSets defined in your deployment, simply change the number of
replicas to a lower number.
744
Downloaded from https://onlinelibrary.wiley.com/doi/ by alex jounh - Oregon Health & Science Univer , Wiley Online Library on [05/12/2025]. See the Terms and Conditions (https://onlinelibrary.wiley.com/terms-and-conditions) on Wiley Online Library for rules of use; OA articles are governed by the applicable Creative Commons License
Part VI: Engaging with Cloud Computing
1. Scale down replicas: Enter the following to change the number of replicas for the
deployment to 2:
$ kubectl scale deployments/kubernetes-bootcamp –-replicas=2
deployment.extensions/kubernetes-bootcamp scaled
2. Check the deployment: To see that the deployment is set to 2, and that only two
pods are running, enter the following:
$ kubectl get deployments
NAME
READY
UP-
TO-
DATE
AVAILABLE
AGE
kubernetes-
bootcamp
2/2
2
2
52m
$ kubectl get pods -
o wide
NAME
READY
STATUS
RESTARTS AGE
IP
NODE
NOMINATED NODE
READINESS GATES
kubernetes-
bootcamp-
9bc… 1/1
Running
0
8m43s 10.244.0.6
minikube <none>
<none>
kubernetes-
bootcamp-
9bc… 1/1
Running
0
12s
10.244.0.4
At this point, you should feel comfortable manually querying your Kubernetes cluster in various ways and starting up and working with deployments, pods, and replicas. To continue with
more advanced Kubernetes tutorials, return to the main Kubernetes Tutorials page (https://
kubernetes.io/docs/tutorials/).
Enterprise-Quality Kubernetes with EKS
While anyone can run Kubernetes on a single machine to test some Kubernetes features, as we
have in this book, its real value comes when you need to run Kubernetes in production and at
scale. When you are building enterprise-quality Kubernetes clusters to run your most critical
business workloads, you should take into account:
■
■
■
■
Scalability: If your applications are overloaded, Kubernetes can add more pods. If your
nodes have reached capacity, Kubernetes can add more nodes. Likewise, as demand
reduces, those items can be shut down.
Self-healing: Kubernetes can do health checks of containers, pods, nodes, services,
and other objects and replace them if they have failed or are degraded.
High availability: Using features like scalability and self-healing, Kubernetes can
ensure that applications remain available to your customers and do not appear to be
unavailable as Kubernetes is responding to failures and increased demands. Kubernetes
clusters can also be spread across multiple locations so that an outage of a set of computers or even an entire data center can cause work to be diverted to systems in other
locations.
Efficiency: Because Kubernetes gives you the ability to run as many workloads and
nodes as the moment requires, you can achieve maximum efficient use of your compute resources. To that end, Kubernetes can do things such as consolidate workloads
745
31
Downloaded from https://onlinelibrary.wiley.com/doi/ by alex jounh - Oregon Health & Science Univer , Wiley Online Library on [05/12/2025]. See the Terms and Conditions (https://onlinelibrary.wiley.com/terms-and-conditions) on Wiley Online Library for rules of use; OA articles are governed by the applicable Creative Commons License
Chapter 31: Deploying Applications as Containers with Kubernetes
■
■
on to a single, more efficiently sized computer or move workloads to a less expensive system.
Open source Kubernetes ecosystem: Because Kubernetes is an open source project
and not owned or maintained by a single company, many companies and organizations
have adopted it and extended it. This means you can choose from a wide range of
built-in features, as well as third-party software, that you can use to make it work for
you as you need.
Portability: Kubernetes has the ability to run in different places (such as on-premises,
edge computing, and data centers) and with support from different vendors (such
as AWS, Microsoft, Google, and Red Hat). This allows you to develop your company’s applications once and then deploy to anywhere that is most appropriate for
your needs.
Most cloud service providers offer a managed Kubernetes service that can help you in several
ways. They can save you the cost of creating your own data centers while you develop your
products and then allow you to grow your Kubernetes use as needs arise. Popular cloud service
providers that offer Kubernetes services include Amazon Web Services’ (AWS) Elastic Kubernetes Service (EKS), Microsoft Azure’s Azure Kubernetes Service (AKS), and Google Cloud’s
Google Kubernetes Engine (GKE).
These cloud Kubernetes services can also help you by simplifying your entry into Kubernetes.
For example, they can offer simple ways to start clusters that manage the control plane for
you, select a useful set of add-on software that they prepackage for you, and even set up autoscaling to launch and scale the nodes used to run your workloads.
As you become more comfortable using Kubernetes, you have the flexibility to tune your
clusters and enhance the software used with your clusters. Features such as monitoring and
observability can help make your Kubernetes use more efficient and cost-effective.
Summary
Kubernetes has become the platform of choice for deploying containerized applications across
large data centers. A Kubernetes cluster consists of a control plane (that directs the activities
of a cluster) and nodes (that actually run the containerized payloads).
As someone using Kubernetes to run containerized applications, you can create deployments
that define the state of the application you are running. For example, you can deploy an application that is configured to run multiple replicas of the pods representing that application.
You can identify the application as a service and set up the application to be available with
mounted storage available and from defined ports on the nodes from which they are run.
Products based on Kubernetes are available when you need to run mission-critical applications
in environments that are stable and supported. Most major cloud providers offer managed
Kubernetes services that can both provide easy, inexpensive entry points into production-
quality Kubernetes clusters and let you easily grow your Kubernetes workloads as your
needs grow.
746
Downloaded from https://onlinelibrary.wiley.com/doi/ by alex jounh - Oregon Health & Science Univer , Wiley Online Library on [05/12/2025]. See the Terms and Conditions (https://onlinelibrary.wiley.com/terms-and-conditions) on Wiley Online Library for rules of use; OA articles are governed by the applicable Creative Commons License
Part VI: Engaging with Cloud Computing
Exercises
The exercises in this section describe tasks related to trying Kubernetes, either online or
by setting up Minikube on a computer. If you are stuck, solutions to the tasks are shown in
Appendix B. Keep in mind that the solutions shown in Appendix B are usually just one of
many ways to complete a task.
1. Install Minikube and the kubectl command on a local computer.
2. View your version of Minikube, as well as the versions of your kubectl client and
Kubernetes service.
3. Create a deployment that manages a pod running the hello-node container image
(gcr.io/hello-minikube-zero-install/hello-node).
4. Use the appropriate kubectl commands to view the hello-node deployment and
describe the deployment in detail.
5. View the current replica set associated with your hello-node deployment.
6. Scale up the hello-node deployment to three replicas.
7. Expose the hello-node deployment outside of the Kubernetes cluster using
LoadBalancer.
8. Get the IP address of your Minikube instance and the port number of the exposed
hello-node service.
9. Use the curl command to query the hello-node service using the IP address and
port number from the previous step.
10. Use the kubectl commands to delete the hello-node service and deployment,
and then use the minikube command to stop the Minikube virtual machine.
747
31
Downloaded from https://onlinelibrary.wiley.com/doi/ by alex jounh - Oregon Health & Science Univer , Wiley Online Library on [05/12/2025]. See the Terms and Conditions (https://onlinelibrary.wiley.com/terms-and-conditions) on Wiley Online Library for rules of use; OA articles are governed by the applicable Creative Commons License
Chapter 31: Deploying Applications as Containers with Kubernetes
Shifting to Clouds and
Containers
27
IN THIS CHAPTER
Understanding key technologies for cloud computing
Learning how Linux containers work
Installing and starting container software
Pulling and running container images
Restarting a stopped container
Building a container image
Tagging and pushing container images to a registry
W
hile most of this book focuses on installing and managing individual computers, services, and
applications, this part takes you into the technologies needed to bring Linux into large data
centers. For a data center to operate efficiently, its computers must become as generic as possible and running components must become more automated. The chapters in this part focus on technologies that make those two things happen.
Computers become more generic by separating the applications from the operating systems. This means not
just packaging applications into things you install on an operating system (like RPM or Deb packages), but
also putting together sets of software into packages that themselves can run once they are delivered in ways
that keep them separate from the operating system. Virtual machines (VMs) and containers are two ways of
packaging sets of software and their dependencies in ways that are ready to run and can be easily moved
around a data center.
From a high level, a virtual machine is a complete operating system that runs on another operating system,
allowing you to have many VMs active at a time on one physical computer. Everything an application or a
service needs to run can be stored within that VM or in attached storage.
A VM has its own kernel, filesystem, process table, network interfaces, and other operating system features
separate from the host, while sharing the CPU and RAM with the host system. You can deploy that VM to
a physical system in a way that makes it easy to run the application and then discard the VM when you
are done. You can run multiple instances of the VM on the same computer or clone and run the VM across
663
Linux Bible, Eleventh Edition. Christopher Negus.
© 2026 John Wiley & Sons, Inc. All rights reserved, including rights for text and data mining and training of artificial intelligence technologies or similar
technologies. Published 2026 by John Wiley & Sons, Inc.
Downloaded from https://onlinelibrary.wiley.com/doi/ by alex jounh - Oregon Health & Science Univer , Wiley Online Library on [05/12/2025]. See the Terms and Conditions (https://onlinelibrary.wiley.com/terms-and-conditions) on Wiley Online Library for rules of use; OA articles are governed by the applicable Creative Commons License
CHAPTER
multiple computers. The term virtual machine comes from the fact that each VM sees an emulation
of computer hardware and not the hardware itself directly.
A container is like a VM, with the major difference being that a container doesn’t have its
own kernel. In most other ways, it is like a VM in that its name spaces are separate from
the host operating system and you can move it from host to host to run wherever it is
convenient.
The chapters in this part introduce you to the concepts, tools, and technologies that you
need to know to engage with cloud computing. You can try virtual machines on a single
Linux host using KVM. You can also deploy virtual machines to cloud technologies, such as
Google Cloud Platform (GCP) and Amazon Web Services (AWS).
To deploy sets of hosts, either on bare metal or the cloud, you will learn how to use Ansible.
With Ansible playbooks, you can also define the software that is installed and run on each
host system.
As for containers, the Kubernetes project has grabbed the spotlight as the premier technology for orchestrating massive numbers of containers across large data centers. Major cloud
providers offer managed Kubernetes platforms for large enterprises.
The technology that started the rush to containers a few years ago was the Docker project.
The docker command and daemon offered simplified ways to build and run containers on
Linux systems. Today, standardized container formats (such as the Open Container Initiative) and other container tools, such as podman, LXC (Linux Containers), and LXD (Linux
Container Daemon), offer ways of working with containers that align more tightly with the
Kubernetes ecosystem.
The remainder of this chapter is devoted to getting started with containers. It covers the
docker and podman commands, along with other popular tools for working with individual
containers.
Understanding Linux Containers
Containers make it simple to get and run applications and then discard them when you are
done. There are a few things you should know about containers before you get started.
In working with containers, people refer to the entity that you move around as a container
image (or simply an image). When you run that image or when it is paused or stopped, it is
referred to as a container.
A container remains separate from the host system by using its own set of namespaces. You
typically would build your own container images by getting a secure base image and then
adding your own layers of software on top of that image to create a new image. To share
your images, you push them to shared container registries and allow others to pull them.
664
Downloaded from https://onlinelibrary.wiley.com/doi/ by alex jounh - Oregon Health & Science Univer , Wiley Online Library on [05/12/2025]. See the Terms and Conditions (https://onlinelibrary.wiley.com/terms-and-conditions) on Wiley Online Library for rules of use; OA articles are governed by the applicable Creative Commons License
Part VI: Engaging with Cloud Computing
Namespaces
Linux support for namespaces is what allows containers to be contained. With namespaces,
the Linux kernel can associate one or more processes with a set of resources. Normal
processes, not those run in a container, all use the same host namespaces. By default,
processes in a container see only the container’s namespaces and not those of the host.
Namespaces include the following:
Process table A container has its own set of process IDs and, by default, can see only
the processes running inside the container. While PID 1 on the host is the init process (systemd), in a container PID 1 is the first process run inside the container. Typically, that is just the process of the application running inside of that container (like
a web server or database executable).
Network interfaces By default, a container has a single network interface (eth0) and
is assigned an IP address when the container runs. By default, a service run inside a
container (such as a web server listening on ports 80 and 443) is not exposed outside
of the host system. The upside of this is that you could have hundreds of web servers
running on the same host without conflict. The downside is that you need to manage
how those ports are exposed outside of the host.
Mount table By default, a container can’t see the host’s root filesystem, or any other
mounted filesystem listed in the host’s mount table. The container brings its own filesystem, consisting of the application and any dependencies it needs to run. Files or
directories needed from the host can be selectively bind-mounted inside the container.
User IDs Although containerized processes run as some UID within the host’s
namespace, another set of UIDs is nested within the container. This can, for example,
let a process run as root within a container but not have any special privileges to the
host system.
UTS A UTS namespace allows a containerized process to have a different host and
domain name from the host.
Control group (cgroup) In some Linux systems (such as Fedora and RHEL), a containerized process runs within a selected control group and cannot see the other cgroups
available on the host system. Likewise, it cannot see the identity of its own cgroup
to the host.
Interprocess communications (IPC)
namespace from the host.
A containerized process cannot see the IPC
Although access to any host namespace is restricted by default, privileges to host namespaces
can be opened selectively. In that way, you can do things like mount configuration files or
data inside the container from the host and map container ports to host ports to expose them
outside of the host.
665
27
Downloaded from https://onlinelibrary.wiley.com/doi/ by alex jounh - Oregon Health & Science Univer , Wiley Online Library on [05/12/2025]. See the Terms and Conditions (https://onlinelibrary.wiley.com/terms-and-conditions) on Wiley Online Library for rules of use; OA articles are governed by the applicable Creative Commons License
Chapter 27: Shifting to Clouds and Containers
Container registries
Permanent storage for containers is done in what is referred to as a container registry. When
you create a container image that you want to share, you can push that image to a public
registry or a private registry that you maintain yourself (such as a Red Hat Quay registry).
Someone who wants to use the image will pull it from the registry.
There are large, public container image registries, such as the Docker Hub (docker.io) and Quay
Registry (Quay.io). Some cloud container registries, such as Amazon Elastic Container Registry
(ECR), offer both public (https://gallery.ecr.aws/) and private, per-user registries. Most
registries offer free accounts to get started. If you want access to more features, such as the
ability to keep your registry private, premium accounts are available as well.
Base images and layers
Although you can create containers from scratch, most often a container is built by starting
with a well-known base image and adding software to it. That base image typically aligns with
the operating system from which you are installing software into your container.
You can get official base images from Ubuntu (https://hub.docker.com/_/ubuntu), CentOS
(https://hub.docker.com/_/centos), Fedora (https://hub.docker.com/_/fedora), and
many other Linux distributions. Those Linux distributions may offer base images in different
forms, such as standard and minimal versions. In fact, there are base images you can build on
that offer runtimes for PHP, Perl, Java, and other development environments.
Although Red Hat offers a subscription model for its software, if you want to use Red Hat software as the foundation for your container images, Red Hat offers freely available Universal
Base Images (UBIs) for standard, minimal, and a variety of runtime containers. You can find
those images by searching the Red Hat Container Catalog for UBI images (https://catalog
.redhat.com/search?).
You can add software to a base image using commands such as docker build or podman. By
using a Dockerfile to define the build, you can add yum or apt-get commands to install software from software repositories into your new container.
When you add software to an image, it creates a new layer to become part of the new image. Reusing the same base images for the containers that you build offers several advantages. One advantage is that when you run the container image, only one copy of the base image is needed on the
host. So, if you were running 10 different containers based on the same base image, you only
need to pull and store the base image once, then possibly only add a few megabytes of extra data
for each new image.
If you look at the contents of a base image, it would look like a little Linux filesystem. You
see configuration files in /etc, executables in /bin and /sbin, and libraries in /lib. In
other words, it would have the basic components that an application would need from a Linux
host system.
666
Downloaded from https://onlinelibrary.wiley.com/doi/ by alex jounh - Oregon Health & Science Univer , Wiley Online Library on [05/12/2025]. See the Terms and Conditions (https://onlinelibrary.wiley.com/terms-and-conditions) on Wiley Online Library for rules of use; OA articles are governed by the applicable Creative Commons License
Part VI: Engaging with Cloud Computing
Keep in mind that the container images you run don’t necessarily need to match the host
Linux system. So, for example, you could run a Fedora base image on an Ubuntu system, as
long as there are no specific kernel requirements or libraries built into the container image.
Starting with Linux Containers
Very little preparation is needed to start running containers on your own Linux system. The
following procedures describe how to prepare your Linux system to start using containers.
Docker Inc. makes free versions of Docker available via the Install Docker Engine page
(https://docs.docker.com/engine/install/). To try an older version of the docker
package, you can run the following on a RHEL or Fedora system to install the docker package
and then start and enable the docker service:
27
# dnf install docker -
y
# systemctl start docker
# systemctl enable docker
The podman command supports most of the docker command-line options for working
with containers, so you can use it instead of docker. Keep in mind that podman represents
a different code base from docker, even though it supports similar management command
options. With podman, you don’t need to have a service running, as you do with docker.
To install podman on Fedora or RHEL, do the following:
# dnf install podman -
y
You can now start using the podman or docker commands to work with containers and container images for the examples in this chapter.
Pulling and running containers
With the docker or podman packages installed and ready to use, you can try running a container. To start, you can pull a container to your local system and then run it. If you like, you
can skip the pull command since running the container will pull it if the requested image is
not already on your system.
Pulling a container
Choose a reliable container image to try, as in one that comes from an official project, is up-
to-date, and preferably has been scanned for vulnerabilities. Here is an example of pulling a
Fedora base image with the docker command (you can replace docker with podman in
these examples):
# docker pull public.ecr.aws/docker/library/fedora:40
40: Pulling from docker/library/fedora
fc4518b6c5f9: Pull complete
Digest: sha256:3c86d25fef9d2001712bc3d9b091fc40cf04be4767e48f1aa3b78
5bf58d300ed
667
Downloaded from https://onlinelibrary.wiley.com/doi/ by alex jounh - Oregon Health & Science Univer , Wiley Online Library on [05/12/2025]. See the Terms and Conditions (https://onlinelibrary.wiley.com/terms-and-conditions) on Wiley Online Library for rules of use; OA articles are governed by the applicable Creative Commons License
Chapter 27: Shifting to Clouds and Containers
Status: Downloaded newer image for public.ecr.aws/docker/library/
fedora:40
public.ecr.aws/docker/library/fedora:40
To see that the image is on your system, run the following:
# docker images
REPOSITORY
SIZE
public.ecr.aws/docker/library/fedora
ago 226MB
TAG
IMAGE ID
CREATED
40
b368d29df3b5
2 months
Running a shell from a container
Use docker or podman to run a shell within a container. You can identify the image
either by the image ID (b368d29df3b5) or by the name (public.ecr.aws/docker/
library/fedora). Use the -i (interactive) and -t (terminal) options so that you can have
an interactive session within the container from the Bash shell:
# docker run -
it b368d29df3b5 bash
[root@50bec06ad25f /]#
With the shell running, commands that you type will operate within the container. For example, you list the container’s filesystem or check out the os-release file to see the operating
system on which the container is based:
[root@50bec06ad25f /]# ls /
afs boot etc
lib
media opt
root sbin sys usr
bin dev
home lib64 mnt
proc run
srv
tmp var
[root@50bec06ad25f /]# cat /etc/os-
release | grep ^NAME
NAME="Fedora Linux"
Because containers are meant to have the minimal amount of content needed to run the
intended application, many standard tools may not be inside the container. You can install
software inside a running container. However, keep in mind that containers are meant to be
discarded. So, if you want to add software permanently, you should build a new image to
include the software you want.
Here’s an example of adding software to a running container:
[root@e9086da6ed70 /]# dnf install procps iproute -
y
Now you can run commands such as ps and ip inside the container:
[root@e9086da6ed70 /]# ps -ef
UID
PID PPID C STIME
root
1
0 0 17:44
root
40
1 0 17:45
[root@e9086da6ed70 /]# ip a
1: lo: <LOOPBACK,UP,LOWER_UP>
668
TTY
pts/0
pts/0
TIME CMD
00:00:00 bash
00:00:00 ps -
ef
mtu 65536 …
Downloaded from https://onlinelibrary.wiley.com/doi/ by alex jounh - Oregon Health & Science Univer , Wiley Online Library on [05/12/2025]. See the Terms and Conditions (https://onlinelibrary.wiley.com/terms-and-conditions) on Wiley Online Library for rules of use; OA articles are governed by the applicable Creative Commons License
Part VI: Engaging with Cloud Computing
inet 127.0.0.1/8 scope host lo
…
3: eth0@if11: <BROADCAST,MULTICAST,UP,LOWER_UP> mtu 1500 …
inet 172.17.0.2/16 brd 172.17.255.255 scope global eth0
…
Notice that from within the container, you see only two running processes (the shell and the
ps command). PID 1 is the Bash shell. The trimmed output from ip a shows that there is
only one external network interface from the container (eth0@if11) and that interface is
assigned the IP address of 172.17.0.2/16.
When you are done, you can type exit to quit the shell and stop the container:
[root@e9086da6ed70 /]# exit
Although the shell and the container are no longer running, the container is still available on
your system in a stopped state. Notice that podman ps alone doesn’t show the container. You
need to add --all:
[root@e9086da6ed70 /]# podman ps
CONTAINER ID IMAGE COMMAND CREATED STATUS PORTS NAMES
[root@e9086da6ed70 /]# podman ps --all
CONTAINER ID IMAGE
COMMAND CREATED
STATUS
PORTS
50bec0..
b368d29df3b5 "bash" 1 hour ago Exited (0) ...
Later you can see how to delete and restart a stopped container.
Running an FTP server from a container
Because you want to be able to throw away a container when you are done, in general you
want any changeable data to be stored outside of the container. The following is a simple
example of an FTP server (vsftpd) being run from a container. If you want to try this example
yourself, I recommend you skip to the section “Building a container image” later in this chapter for instructions on how to build the vsftpd container image yourself.
For this procedure, you need a configuration file (vsftpd.conf) and an FTP directory that
contains a file or two to share (/var/ftp/pub) on the host system. When the vsftpd container starts, it bind mounts those items into the container as volumes.
1. Create a vsftpd.conf file: Create the vsftpd.conf file in the default location,
/etc/vsftpd/vsftpd.conf. See the vsftpd.conf man page for details. Here
is an example:
anonymous_enable=YES
local_enable=YES
write_enable=YES
local_umask=022
669
27
Downloaded from https://onlinelibrary.wiley.com/doi/ by alex jounh - Oregon Health & Science Univer , Wiley Online Library on [05/12/2025]. See the Terms and Conditions (https://onlinelibrary.wiley.com/terms-and-conditions) on Wiley Online Library for rules of use; OA articles are governed by the applicable Creative Commons License
Chapter 27: Shifting to Clouds and Containers
dirmessage_enable=YES
xferlog_enable=NO
connect_from_port_20=YES
listen=NO
listen_ipv6=YES
pam_service_name=vsftpd
userlist_enable=YES
tcp_wrappers=NO
vsftpd_log_file=/dev/stdout
syslog_enable=NO
background=NO
pasv_enable=Yes
pasv_max_port=21100
pasv_min_port=21110
2. Create an ftp directory: Create an anonymous FTP directory for vsftpd to share in
the standard location on the host (/var/ftp/pub) and copy a few files to that
directory:
# mkdir -
p /var/ftp/pub
# cp /etc/services /etc/login.defs /var/ftp/pub/
3. Get the vsftpd container image: Build the vsftpd image as described in “Building a
container image” later in this chapter. To check that it is available to run, enter the
following:
# docker images
REPOSITORY TAG
IMAGE ID
CREATED
vsftpd
latest 487d0db26098 5 seconds ago
SIZE
208 MB
4. Run the vsftpd container image: When you run the vsftpd container, you need to
expose ports and mount files from the host to the container. Here’s an example (you
can use podman instead of docker ):
# docker run -
d -
p 20:20 -
p 21:21 \
-p 21100-21110:21100-21110 \
-
v /etc/vsftpd/:/etc/vsftpd/ \
-
v /var/ftp/pub:/var/ftp/pub \
--name vsftpd vsftpd
# podman ps
CONTAINER ID IMAGE
COMMAND
CREATED
STATUS
PORTS
NAMES
3a5d094dd4b5 vsftpd:latest /usr/local/s2… 9 seconds ago
Up 10 seconds ago 0.0.0.0:20-
21-
>20-
21/tcp vsftpd
This example uses the following options:
-d: Runs the container in detached mode, so the vsftpd service runs in the background.
-p: Standard FTP ports (TCP 20 and TCP 21) are mapped to the same port numbers on
the host network interfaces, so the service can be accessed outside of the local host.
670
Downloaded from https://onlinelibrary.wiley.com/doi/ by alex jounh - Oregon Health & Science Univer , Wiley Online Library on [05/12/2025]. See the Terms and Conditions (https://onlinelibrary.wiley.com/terms-and-conditions) on Wiley Online Library for rules of use; OA articles are governed by the applicable Creative Commons License
Part VI: Engaging with Cloud Computing
A range of ports needed for passive FTP are opened to their counterparts on the host as
well (21100-21110).
--rm: Although not included in this example, adding --rm to the command line will
remove the container when it exits.
-v: To use the configuration files (/etc/vsftpd directory) and content that you want
to share (/var/ftp directory) from the host system, those directories are bind-
mounted to the same locations on the container with the -v option.
--name: Set the name of the container to vsftpd (or any name you like).
Keep in mind that you can bind container content and ports to other locations on the host.
In that way, you can have multiple versions of the same software running on the same host
without conflicting with each other.
To make your vsftpd service accessible outside of the local system, be sure to open the FTP
ports and passive FTP ports that you just assigned as follows:
# firewall-cmd --zone=public --add-service=ftp
# firewall-cmd --zone=public \
--permanent --add-service=ftp
# firewall-cmd --zone=public \
--add-port=21100-21110/tcp
# firewall-cmd --zone=public \
--permanent --add-port=21100-21110/tcp
# firewall-cmd reload
You can now use any FTP client to access the FTP service via the anonymous user. To configure
your vsftpd service further and check that it is working, refer to Chapter 18, “Configuring an
FTP Server.”
Starting and stopping containers
Unless you specifically set a container to be removed when it stops (--rm option), if the container is stopped, paused, or just fails, the container is still on your system. You can see the
status of all containers on your system (currently running or not) using the ps option:
# docker ps
CONTAINER ID IMAGE
COMMAND
CREATED
STATUS
PORTS
NAMES
4d6be3e63fe3 localhost/vsftpd:latest /usr/local/s2… About an hour ago
Up About an hour ago 0.0.0.0:20-
21-
>20-
21/tcp vsftpd
# docker ps -
a
CONTAINER ID IMAGE
COMMAND
CREATED
STATUS
PORTS
NAMES
7da88bd62667 ubi8/ubi:latest
bash
2 minutes ago
Exited 7 seconds ago
silly_wozniak
671
27
Downloaded from https://onlinelibrary.wiley.com/doi/ by alex jounh - Oregon Health & Science Univer , Wiley Online Library on [05/12/2025]. See the Terms and Conditions (https://onlinelibrary.wiley.com/terms-and-conditions) on Wiley Online Library for rules of use; OA articles are governed by the applicable Creative Commons License
Chapter 27: Shifting to Clouds and Containers
4d6be3e63fe3 localhost/vsftpd:latest /usr/local/s2i/ru… About an hour
ago
Up About an hour ago 0.0.0.0:20-
21-
>20-
21/tcp vsftpd
Only running containers are shown with podman ps. By adding -a, you can see all containers, including those that are no longer running but have not yet been removed. You can
restart an existing container that is no longer running using the start option:
# docker start -
a 7da88bd62667
[root@7da88bd62667 /]#
The restarted container was running a Bash shell. Because the container’s terminal session
already existed, I didn’t need to start a new one (-it). I just needed to attach (-a) to the
existing session. For a container that was just running in detached mode, I can simply start
and stop it as required:
# docker stop 4d6be3e63fe3
4d6be3e63fe3…
# docker start 4d6be3e63fe3
4d6be3e63fe3
Note that if the container had been started with the --rm option, the container would be
removed as soon as you stopped it. So, you would have to run a new container instead of
just restarting the old one. Because the configuration files and data are stored outside of
the container, running a new container is easy and painless. Upgrading the application in
the future is as easy as removing the old container and starting up one from the updated
container image.
Building a container image
To build a container image, all you need is a Dockerfile describing how to build the image
and any other content that you want to include with the image. The following procedures describe how to create a simple container from your own Dockerfile and how to get
the software you need to build a vsftpd service into a container from software available
on GitHub.
Build a simple container image
This procedure creates a simple container from a Dockerfile. In this process, you create a Dockerfile and a simple script, then build that content into a new container image.
1. Create a directory to hold your container project and then enter that directory:
# mkdir myproject
# cd myproject
2. Create a script called cworks.sh in the current directory that contains the following text:
#!/bin/bash
set -
o errexit
672
Downloaded from https://onlinelibrary.wiley.com/doi/ by alex jounh - Oregon Health & Science Univer , Wiley Online Library on [05/12/2025]. See the Terms and Conditions (https://onlinelibrary.wiley.com/terms-and-conditions) on Wiley Online Library for rules of use; OA articles are governed by the applicable Creative Commons License
Part VI: Engaging with Cloud Computing
set -
o nounset
set -
o pipefail
echo "This Container Works!"
3. Make the script executable:
# chmod 755 cworks.sh
4. Create a file named Dockerfile in the current directory that contains the following content:
FROM public.ecr.aws/docker/library/fedora
COPY ./cworks.sh /usr/local/bin/
CMD ["/usr/local/bin/cworks.sh"]
5. Build a container image called myproject from the Dockerfile in the current
directory (.):
# docker build -
t myproject .
=> [internal] load build definition from Dockerfile
=> => transferring dockerfile: 205B
=> [internal] load metadata for ...fedora:latest
=> [internal] load .dockerignore
...
=> [1/2] FROM public.ecr.aws/docker/library/fedora:latest...
...
=> [2/2] COPY ./cworks.sh /usr/local/bin/
=> exporting to image
=> => exporting layers
=> => writing image sha256:0fc6fac6810ef40b5168551ff51...
=> => naming to docker.io/library/myproject
27
0.0s
0.0s
1.5s
0.0s
8.8s
0.3s
0.1s
0.0s
0.0s
6. Run the container to make sure it works. To do that, you can use either the container
name (myproject) or its image ID (0fc6fac6810e):
# docker run 0fc6fac6810e
The Container Works!
Build an FTP container from GitHub
The following procedure describes how to get the software you need to build a vsftpd service
into a container from software available on GitHub. (You will need to sign into a GitHub account
to clone the vsftpd repository.) It then shows you how to build and run that container.
1. If you don’t already have it, install git on your local system:
# dnf install git -
y
2. For this example, we are starting with the vsftpd container-images project on GitHub.
Clone a copy of that software to a local directory as follows:
# git clone https://github.com/container-images/vsftpd.git
# cd vsftpd
# ls
673
Downloaded from https://onlinelibrary.wiley.com/doi/ by alex jounh - Oregon Health & Science Univer , Wiley Online Library on [05/12/2025]. See the Terms and Conditions (https://onlinelibrary.wiley.com/terms-and-conditions) on Wiley Online Library for rules of use; OA articles are governed by the applicable Creative Commons License
Chapter 27: Shifting to Clouds and Containers
default-
conf/
root/
Dockerfile
s2i/
LICENSE
tests/
Makefile
README.md
3. Modify the files as needed. For example, go through the default default-conf/
vsftpd.conf file to see if you want to change the vsftpd configuration. Also, go
through the Dockerfile and use the latest Fedora image available. For example, modify
the FROM line at the beginning so that it appears as follows:
FROM registry.fedoraproject.org/fedora:latest
4. From the vsftpd directory, use either the docker or podman command to build the
container image. For example:
# docker build -
t vsftpd .
=> [internal] load build definition from Dockerfile
0.0s
=> => transferring dockerfile: 1.47kB
0.0s
=> [internal] load metadata for ...fedoraproject.org/fedora:latest 0.6s
=> [internal] load .dockerignore
0.0s
=> => transferring context: 2B
0.0s
=> [1/6] FROM ...fedoraproject.org/fedora:latest@sha256:85ec2d... 7.8s
=> => resolve ...fedoraproject.org/fedora:latest@sha256:85ec2d... 0.0s
=> => sha256:41750641d2071dde7fd937551057ab0... 61.08MB / 61.08MB 5.5s
=> => sha256:85ec2d23d28d7272129023dbe6ebbc1... 1.41kB / 1.41kB
0.0s
=> => sha256:b46b7a3fe2850b05ee5081c16c6ffaa7dffc... 504B / 504B
0.0s
=> => sha256:73edd27af7a2206b2249f3ddf939e4403361... 860B / 860B
0.0s
=> => extracting sha256:41750641d2071dde7fd937551057ab0edf802d166 2.1s
=> [internal] load build context
0.0s
=> => transferring context: 548B
0.0s
=> [2/6] RUN dnf install -
y vsftpd && dnf clean all &&
mkdir /home/vsftpd
21.6s
=> [3/6] RUN mkdir -
p /opt/app-
root/src
0.2s
=> [4/6] WORKDIR /opt/app-
root/src
0.1s
=> [5/6] COPY ./s2i/bin/ /usr/local/s2i
0.1s
=> [6/6] COPY default-
conf/vsftpd.conf /etc/vsftpd/vsftpd.conf
0.1s
=> exporting to image
0.8s
=> => exporting layers
0.7s
=> => writing image sha256:6070ec7fca9ff9f5cd768d3a2e1dcdc90cf... 0.0s
=> => naming to docker.io/library/vsftpd
0.0s
5. Check that the new image was created:
# docker images
REPOSITORY
TAG
vsftpd
latest
IMAGE ID
6070ec7fca9f
CREATED
21 minutes ago
SIZE
227MB
This build process consisted of six steps. The FROM line in the first step pulls the fedora
image from the registry.fedoraproject.org container registry. Each subsequent step runs
a command. If content is added during the command, a new layer is created for the image.
Step 2 runs the dnf command to install the vsfptd package and creates the /home/
vsftpd directory. Notice that the instruction has both dnf install and dnf clean in
674
Downloaded from https://onlinelibrary.wiley.com/doi/ by alex jounh - Oregon Health & Science Univer , Wiley Online Library on [05/12/2025]. See the Terms and Conditions (https://onlinelibrary.wiley.com/terms-and-conditions) on Wiley Online Library for rules of use; OA articles are governed by the applicable Creative Commons License
Part VI: Engaging with Cloud Computing
the same instruction. This is good practice since it prevents an additional layer of cached dnf
data from being included with the image.
Steps 3 and 4 create the /opt/app-root/src directory and set it as the working directory
(WORKDIR). Step 5 copies the s2i/bin/ directory to the container’s /usr/local/s2i
directory. Step 6 copies a default vsftpd.conf configuration file into the container.
For more information on creating and using a Dockerfile to build container images, refer to the
Dockerfile Reference (https://docs.docker.com/engine/reference/builder/). To learn more
about options for building container images, refer to the podman man pages (man podman
build).
Tagging and pushing an image to a registry
So far, I have shown an example of building a container image and running it on your local
system. To make your image available to other people on other systems, you typically add that
image to a container registry. Follow these instructions to tag an image on your local system and
push it to a remote container registry.
To try a simple registry on your local system, install the docker-distribution package on a
Fedora or RHEL system. For a more permanent solution, you can get accounts on public container
registries such as Quay.io and Docker Hub. Both free trials and subscriptions. For Quay.io, see
https://quay.io/plans/. You can also set up and run your own supported container registry,
such as Red Hat Quay (https://www.openshift.com/products/quay).
To get you started, the following procedure has you install the docker-distribution
package on the local system and then tag and push an image to it:
1. Install docker-distribution: On a RHEL or recent Fedora system, install and start the
docker-distribution:
#
#
#
#
•
dnf install docker-
distribution -
y
systemctl start docker-
distribution
systemctl enable docker-
distribution
systemctl status docker-
distribution
docker-
distribution.service -v2 Registry server for Docker
Loaded: loaded
(/usr/lib/systemd/system/docker-
distribution.service;
enabled; preset: disabled
...
Active: active (running) since Sun 2025-
04-
13 14:41:39 EDT;
1min 7s ago
2. Open the registry port: To be able to push and pull container images from other host
systems, you need to open TCP port 5000 on the firewall:
# firewall-cmd --zone=public --add-port=5000/tcp --permanent
3. Allow insecure registries: To push to a docker-distribution registry, you need
to tell docker to allow insecure registries. This is okay since we are just using this for
675
27
Downloaded from https://onlinelibrary.wiley.com/doi/ by alex jounh - Oregon Health & Science Univer , Wiley Online Library on [05/12/2025]. See the Terms and Conditions (https://onlinelibrary.wiley.com/terms-and-conditions) on Wiley Online Library for rules of use; OA articles are governed by the applicable Creative Commons License
Chapter 27: Shifting to Clouds and Containers
testing. Create the /etc/docker/daemon.json file with the following content
(using your hostname):
{
"insecure-
registries" : [ "host01.example.com:5000" ]
}
Then restart the docker service:
# systemctl daemon-reload
# systemctl restart docker
4. Tag the image: By tagging a local image, you identify the location of the registry
where the image will be stored. Replace the image ID and host.example.com with
your image ID and hostname or IP address to tag the image:
# docker images | grep vsftpd
vsftpd
latest 6070ec7fca9f 31 minutes ago 227MB
# docker tag 6070ec7fca9f host01.example.com:5000/myvsftpd:v1.0
# docker images | grep myvsftpd
host01.example.com:5000/myvsftpd v1.0 6070ec7fca9f 33 minutes ago
227MB
5. Push the image: Push the image to the local registry (substitute your hostname or
IP address):
# docker push host01.example.com:5000/myvsftpd:v1.0
The push refers to repository [host01.example.com:5000/myvsftpd]
22a97d289055: Pushed
...
v1.0: digest: sha256:bfab407b138afa2d03099a38a741f1d00a3902...
size: 1569
6. Pull the image: To make sure that the image is available from your registry, try to
pull the image. Either delete the image from your local system or go to another host
to try this:
# docker pull host01.example.com:5000/myvsftpd:v1.0
v1.0: Pulling from myvsftpd
Digest: sha256:bfab407b138afa2d03099a38a741f1d00a3902796ce4ca6
0fc6...
Status: Image is up-
to-
date for host01.example.com:5000/
myvsftpd:v1.0
host01.example.com:5000/myvsftpd:v1.0
At this point, you should be able to share your images.
If you were using a public registry, which is a better solution for sharing images with a wider
audience, the procedure for pushing and pulling images would look like the following.
# docker login quay.io
Username: myownusername
Password: ***************
676
Downloaded from https://onlinelibrary.wiley.com/doi/ by alex jounh - Oregon Health & Science Univer , Wiley Online Library on [05/12/2025]. See the Terms and Conditions (https://onlinelibrary.wiley.com/terms-and-conditions) on Wiley Online Library for rules of use; OA articles are governed by the applicable Creative Commons License
Part VI: Engaging with Cloud Computing
# podman tag aa0274872f23 \
quay.io/myownusername/myvsftpd:v1.0
# podman push quay.io/myownusername/myvsftpd:v1.0
Using containers in the enterprise
Although the Docker project made huge strides in simplifying how individual containers can be
used, it was the Kubernetes project that helped propel Linux containers into the enterprise. While
command-line tools like docker and podman are good for managing individual containers,
Kubernetes offers a platform for deploying large, complex applications across huge data centers.
Refer to Chapter 31, “Deploying Applications as Containers with Kubernetes,” for information on
how to use Kubernetes to deploy and manage containerized applications in the enterprise.
27
Summary
Containerizing applications has seen widespread adoption for many years now. The Docker
project was a huge contributor to the simplification of containerizing individual applications
and running them on single systems. Tools such as podman also became available to deploy
and manage individual containers on Linux systems.
This chapter described how to pull, run, build, and otherwise manage containers using
command-line tools like docker and podman. You can use this knowledge as a foundation
for understanding how containerization works and how those concepts are applied later in
Chapter 31, as it describes how Kubernetes can manage containerized applications across an
entire enterprise.
Exercises
The exercises in this section describe tasks related to working with containers. If you are stuck,
solutions to the tasks are shown in Appendix B. Keep in mind that the solutions shown in Appendix B are usually just one of multiple ways to complete a task.
1. Choose either podman or docker, install the software package containing the tool of
your choice, and start any necessary services to use those commands.
2. Using either docker or podman, pull this image to your host: public.ecr.aws/
docker/library/fedora.
3. Run the fedora image to open a Bash shell.
4. With the Bash shell open within a container, run a few commands to see the operating
system on which the container is based, install the proc-ps package, run a
command to see the processes running inside the container, and then exit.
5. Restart the container again and connect to it using an interactive shell. Exit the shell
when you are finished.
677
Downloaded from https://onlinelibrary.wiley.com/doi/ by alex jounh - Oregon Health & Science Univer , Wiley Online Library on [05/12/2025]. See the Terms and Conditions (https://onlinelibrary.wiley.com/terms-and-conditions) on Wiley Online Library for rules of use; OA articles are governed by the applicable Creative Commons License
Chapter 27: Shifting to Clouds and Containers
6. Create a simple Dockerfile from a fedora base image, include a script named
cworks.sh that uses echo to output the string “The Container Works!” and add
that script to the image so that it runs as the default command.
7. Use docker or podman to build an image named containerworks from the Dockerfile you just created.
8. Gain access to a container registry, either by installing the docker-distribution package
or by getting an account on Quay.io or Docker Hub.
9. Tag and push your new image to your chosen container registry.
678
Downloaded from https://onlinelibrary.wiley.com/doi/ by alex jounh - Oregon Health & Science Univer , Wiley Online Library on [05/12/2025]. See the Terms and Conditions (https://onlinelibrary.wiley.com/terms-and-conditions) on Wiley Online Library for rules of use; OA articles are governed by the applicable Creative Commons License
Part VI: Engaging with Cloud Computing
28
Using Linux for Cloud Computing
IN THIS CHAPTER
How Linux is used in clouds
Understanding basic cloud technology
Setting up a hypervisor
Creating virtual machines
C
omputer operating systems were originally designed to be installed directly on computer hardware. When it needed memory, storage, processing power, or network interfaces, a computer
operating system looked for physical RAM, hard disks, CPUs, and network interface cards. When
it needed more of those things than were physically installed, you turned the machine off and physically added them to the computer. Nowadays, virtualizing these items is what makes cloud computing possible.
Virtualization, as it relates to computers, is the act of making computing resources that were originally
designed as physical objects to be represented by virtual ones. For example, a virtual operating system
(referred to as a virtual machine) doesn’t communicate directly with the hardware. Instead, a virtual
machine (VM) interacts with a specially configured host computer referred to as a hypervisor. So, instead
of being able to run one operating system on a physical computer, you could potentially run dozens or
even hundreds of VMs on a single physical computer.
The advantages gained from running VMs are massive. Not only can you have multiple operating systems
running on the same computer, but those systems can be different ones—Linux, BSD, Windows, or any
other system made to run on the computer’s hardware. If you need to shut down the host computer
for maintenance, you can migrate the running VMs to another hypervisor with an often imperceptible
amount of downtime.
To support virtual machines across multiple hypervisors, you can virtualize the features they rely upon as
well. For example, virtual networks and virtual storage can span multiple hypervisors, so if a VM needed
to move to another hypervisor, the same virtual networks and storage would be available to a newly
migrated virtual machine.
679
Linux Bible, Eleventh Edition. Christopher Negus.
© 2026 John Wiley & Sons, Inc. All rights reserved, including rights for text and data mining and training of artificial intelligence technologies or similar
technologies. Published 2026 by John Wiley & Sons, Inc.
Downloaded from https://onlinelibrary.wiley.com/doi/ by alex jounh - Oregon Health & Science Univer , Wiley Online Library on [05/12/2025]. See the Terms and Conditions (https://onlinelibrary.wiley.com/terms-and-conditions) on Wiley Online Library for rules of use; OA articles are governed by the applicable Creative Commons License
CHAPTER
You don’t need to build a whole data center to begin understanding virtualization and to use some
of the underlying technologies that make cloud computing possible. This chapter starts you off by
helping you to set up a host computer to run as a hypervisor, start running VMs on that hypervisor,
and then learn how to migrate VMs to other hypervisors (in order to prevent downtime or just to
grow your capacity).
Overview of Linux and Cloud Computing
Cloud computing moves us into an arena where everything you learned previously in this
book is abstracted and automated. In a cloud environment, when you install a system, you
are probably not booting from a physical USB, erasing the local hard drive, and installing
Linux directly on a computer sitting in front of you. You are also probably not logging into
the installed system and manually configuring the software and features you want to run on
that system.
Instead, you are installing a VM or having a VM launched for you from a request to a public
cloud, such as Amazon AWS. The network interfaces that you see may not be represented
by a physical switch; rather, they may be virtual networks that exist on a single computer
or span multiple hypervisors. Today, every software aspect of cloud computing can be fulfilled using open source technology running on Linux systems. To get a feel for how some
of the basic technologies in cloud computing work, this chapter explains some of those
technologies and then describes how to set up a hypervisor and start using VMs on that
hypervisor.
Cloud hypervisors
In cloud computing, the operating systems serving cloud users are usually not running directly
on computer hardware. Instead, hypervisors are configured to run many operating systems as
what are referred to as virtual machines (VMs).
Depending on your cloud environment, you may hear a hypervisor referred to as a
compute node, a worker node, or simply a host. Because hypervisors tend to be commodity
items (dozens or hundreds of hypervisors may be set up for a location), Linux is the logical
choice as the operating system running as hypervisors directly on hardware.
Kernel-based Virtual Machine (KVM) is the basic virtualization technology implemented in most
Linux distributions to make a Linux system into a hypervisor. KVM is supported on Ubuntu,
Red Hat Enterprise Linux, Fedora, CentOS, and many other Linux systems.
Another major technology that can be used instead of KVM to make a Linux system into a
hypervisor is Xen (www.xenproject.org). Xen has been around longer than KVM, and it is
supported in products from Citrix Systems and Oracle, as well as being offered as an alternative
to KVM in many popular Linux systems.
Later in this chapter, I describe how to check to see if a computer has the required hardware
features to be used as a hypervisor and how to configure it to be used with KVM.
680
Downloaded from https://onlinelibrary.wiley.com/doi/ by alex jounh - Oregon Health & Science Univer , Wiley Online Library on [05/12/2025]. See the Terms and Conditions (https://onlinelibrary.wiley.com/terms-and-conditions) on Wiley Online Library for rules of use; OA articles are governed by the applicable Creative Commons License
Part VI: Engaging with Cloud Computing
Cloud controllers
Because a cloud configuration can include multiple hypervisors, pools of storage, multiple
virtual networks, and many virtual machines, you need centralized tools to manage and monitor those features. You can use both graphical and command-based tools for controlling cloud
environments.
Although not considered a full cloud controller, the Virtual Machine Manager
(virt-manager) GUI and virsh command can be used to manage a small cloud-like environment. Using virt-manager, you can get a feel for managing multiple virtual machines
across several hypervisors, and you can learn how to deal with virtual networks and shared
storage pools.
Full-blown cloud platforms have their own controllers for offering much more complex interactions between cloud components. For example, the Red Hat OpenStack platform (https://
access.redhat.com/products/red-hat-openstack-platform) and its upstream RDO project
(https://www.rdoproject.org) provide flexible and expandable cloud environments for
managing VMs and all associated supporting features. For Red Hat Virtualization (RHV), the
RHV Manager provides many of the same features.
If you want to start out more simply, however, you can start by using virt-manager, the
VM Desktop tool, to manage your first mini cloud-like environment.
Cloud storage
New demands on data storage arise when you move your operating systems and applications into a
cloud environment. To be able to move a virtual machine to run on another hypervisor, its storage
must be available from that new hypervisor. Storage needs for clouds include back-end storage for
your VMs, images for launching VMs, and databases for storing information about the cloud itself.
Shared storage between hypervisors can be done as simply as creating an NFS share (see
Chapter 20, “Configuring an NFS File Server”) and mounting it on the same mount point
between multiple hypervisors. NFS is one of the easiest ways to implement shared storage.
More robust shared storage that can handle disk failures and provide better performance works
better for clouds providing critical services. Shared block storage, where you mount a whole
disk or disk partition, can be accomplished using technologies such as iSCSI or Fibre Channel.
Ceph (http://ceph.com) is an open source project for managing both block and object storage
that is popular for managing storage in cloud environments. GlusterFS (www.gluster.org) is a
scale-out filesystem that is often used in cloud environments.
For the simple mini-cloud example in this chapter, I used NFS to provide shared storage between
the hypervisors. Ceph and GlusterFS are more appropriate for enterprise-quality installations.
However, major cloud providers tend to have their own storage facilities. For example, AWS offers
S3 (object storage), EBS (block storage), and EFS (file storage). Azure has Blob Storage (object
storage), Azure Disks (block storage), and Azure Files (file storage). Google Cloud has Cloud
Storage (object storage), Persistent Disks (block storage), and Cloud Filestore (file storage).
681
28
Downloaded from https://onlinelibrary.wiley.com/doi/ by alex jounh - Oregon Health & Science Univer , Wiley Online Library on [05/12/2025]. See the Terms and Conditions (https://onlinelibrary.wiley.com/terms-and-conditions) on Wiley Online Library for rules of use; OA articles are governed by the applicable Creative Commons License
Chapter 28: Using Linux for Cloud Computing
Cloud authentication
To be able to limit the cloud resources a user can consume, and possibly track and charge for
that use, you need authentication mechanisms. Authentication is necessary for those who are
using cloud features as well as for those who are allowed to administer cloud features.
Cloud platform projects sometimes let you connect centralized authentication mechanisms to
validate and authorize cloud users. These can include Kerberos, Microsoft Active Directory, and
others. In Linux, Identity, Policy, and Audit (IPA) software (see www.freeipa.org) offers a full
set of authentication features that can be used across an enterprise cloud platform.
Most commercial cloud providers offer multiple authentication and authorization mechanisms.
For AWS, Identity and Access Management (IAM) is commonly used. Microsoft Azure uses Entra
ID (formerly Azure Active Directory) and Google Cloud uses IAM and service accounts.
Cloud deployment and configuration
If you are managing a large cloud infrastructure, you don’t want to have to walk over to each
machine and click through a graphical installation every time you want to add a hypervisor
or other node on your network. Today, many tools can deploy and configure Linux systems as
simply as rebooting the computer and having it boot up to a preconfigured installer.
In Chapter 9, “Installing Linux,” I talked about how to use a PXE server (to boot a Linux
installer automatically over the network from your network interface card) and Kickstart files
(to identify all of the answers you need to complete an installation). With that setup in place,
you can simply boot a computer from a network interface and come back a short time later to
find a fully installed Linux system.
After a computer is deployed, systems can be configured and possibly monitored and updated
using tools such as Puppet (http://puppetlabs.com) and Chef (www.chef.io). Whole work
environments can be deployed in virtual machines using Vagrant (www.vagrantup.com). Ansible (www.ansible.com) is another tool for automating IT infrastructures and the applications
that run on them.
Cloud platforms
If you want to implement a small private cloud within your organization, the open source
OpenStack platform is one possibility. It offers a huge amount of flexibility and power in how
you configure and use it.
Red Hat Virtualization (RHV) is another popular cloud platform. RHV makes it easy to start
with a simple RHV Manager and one or two hypervisors to run the VMs it manages and then
grow your own cloud platform by adding more hypervisors, storage pools, and other features.
If you want to use public clouds based on open source technology to run the operating systems that you need, you can use any of several different cloud providers. Public cloud providers that you can use to run Linux VMs include Amazon Web Services (www.amazon.com/
aws), Google Cloud Platform (https://cloud.google.com), and Microsoft Azure (https://
portal.azure.com). Chapter 28, “Deploying Linux to the Cloud,” covers how to deploy Linux
to some of these cloud providers.
682
Downloaded from https://onlinelibrary.wiley.com/doi/ by alex jounh - Oregon Health & Science Univer , Wiley Online Library on [05/12/2025]. See the Terms and Conditions (https://onlinelibrary.wiley.com/terms-and-conditions) on Wiley Online Library for rules of use; OA articles are governed by the applicable Creative Commons License
Part VI: Engaging with Cloud Computing
Trying Basic Cloud Technology
To help you understand cloud technology from the ground up, this section illustrates some of
the basic building blocks of a modern cloud infrastructure. Using three computers, I’ll help you
create a setup that includes the following:
Hypervisors A hypervisor is a software component that that runs directly on computer hardware and allows you to run other, multiple computer systems on it. Those
other systems are referred to as virtual machines (VMs). A cloud infrastructure may
have dozens or hundreds of hypervisors running, possibly running thousands of virtual machines.
Virtual machines The virtual machines that you run on a Linux hypervisor can be the
same type of Linux system, a different Linux system, a Windows system, or any other
type of system that is compatible with the hardware on which the hypervisor runs.
Thus, the virtual machines that run on the hypervisors that we will build here could
include Fedora, Ubuntu, RHEL, CentOS, Microsoft Windows, and others.
Shared storage To offer the greatest flexibility, the storage that hypervisors make
available to virtual machines is often shared among a pool of hypervisors. This allows
a set of hypervisors to share a set of images that they use to install or start virtual
machines. It also lets the same set of virtual machines run on any hypervisor in that
group and even move to a different hypervisor without shutting down the VM. Moving
running VMs can be useful if a hypervisor becomes overloaded or if it needs to be shut
down for maintenance.
The setup we build in the following procedure allows you to work with VMs in these ways:
■
■
■
■
Installing a new VM on a hypervisor
Setting features on your VMs
Logging in to and using a VM running on a hypervisor
Migrating running VMs to another hypervisor
We will explore the following technologies:
Kernel-based Virtual Machine (KVM) KVM is the basic kernel technology that allows
virtual machines to interact with the Linux kernel.
QEMU Processor Emulator One qemu process runs for each active virtual machine on
the system. QEMU provides features that make it appear to each virtual machine as
though it is running on physical hardware.
Libvirt Service Daemon (libvirtd) A single libvirtd service runs on each hypervisor. The libvirtd daemon listens for requests to start, stop, pause, and otherwise
manage virtual machines on a hypervisor. Those requests can come from an application
designed to manage virtual machines (such as virt-manager or OpenStack Dashboard) or from an application that you create to talk directly to the libvirt application programming interface.
683
28
Downloaded from https://onlinelibrary.wiley.com/doi/ by alex jounh - Oregon Health & Science Univer , Wiley Online Library on [05/12/2025]. See the Terms and Conditions (https://onlinelibrary.wiley.com/terms-and-conditions) on Wiley Online Library for rules of use; OA articles are governed by the applicable Creative Commons License
Chapter 28: Using Linux for Cloud Computing
Virtual Machine Manager The Virtual Machine Manager (virt-manager command) is
a GUI tool for managing virtual machines. Besides letting you request to start and stop
virtual machines, virt-manager lets you install, configure, and manage VMs in different ways. You can use the virsh command to pass options to the command line to
work with virtual machines instead of clicking in a GUI window.
Virtualization Viewer The virt-viewer command launches a virtual machine console window on your Desktop. The window that appears allows you to work from a
console window to a Desktop or command-line interface to the selected virtual machine
(depending on what that VM has to offer). What this means is that someone consuming your virtualization platform could bundle together their own operating system,
application, configuration files, and data and deploy them. They would rely on your
hypervisors to provide the compute power, storage, memory, network interfaces, and
management features needed to run the virtual machines containing their applications.
The next section gives you your first taste of some of the foundational technologies of Linux
clouds. It describes how to set up a small cloud by configuring your own hypervisors, virtual
machines, and virtual storage.
Setting Up a Small Cloud
With three physical machines connected together on a network, you can illustrate some of the
basic concepts you need in order to understand how to build your own cloud. The three computers running Fedora 42 and the network connecting them are configured as follows:
Networking A high-speed, wired network was set up to connect the three computers.
Fast network connections are critical to successful VM migration. In this example, each
hypervisor also has a network bridge configured so that each virtual machine can pick
up an IP address directly from a DHCP service on the network.
Hypervisors Two of the computers are configured as hypervisors. A hypervisor (sometimes referred to as a host or a compute node) allows you to run virtual machines.
In Fedora 42, the most common hypervisor technology is called Kernel-based
Virtual Machine (KVM), while the actual virtual machines are managed by the
libvirtd service.
Storage One computer is configured to offer shared storage between the two hypervisors. For simplicity, NFS is used to create the shared storage, although in a production
environment, iSCSI or Fibre Channel would be better solutions.
Note
For test purposes, you could use one of the two hypervisors to provide the shared storage. However, one of the main purposes of configuring two hypervisors and separate shared storage is that you want to be able to shut down any hypervisor and still have all of your virtual machines operate normally. If you have shared storage available from one of the
hypervisors, you could never bring that hypervisor down without shutting down all of the VMs using that storage.
684
Downloaded from https://onlinelibrary.wiley.com/doi/ by alex jounh - Oregon Health & Science Univer , Wiley Online Library on [05/12/2025]. See the Terms and Conditions (https://onlinelibrary.wiley.com/terms-and-conditions) on Wiley Online Library for rules of use; OA articles are governed by the applicable Creative Commons License
Part VI: Engaging with Cloud Computing
Configuring hypervisors
In the following procedure, I installed Fedora 42 Server (including a GNOME desktop) on two
physical computers and configured them as KVM hosts running the libvirtd service. Follow
these steps to accomplish this for yourself.
Step 1: Get Linux software
Go to the Fedora Project page (https://fedoraproject.org) and download the latest Fedora
Server. I chose to download the Fedora 42, 64-bit Server edition DVD ISO. If a later version of
Fedora is available, you could likely use that instead.
Burn the image to a USB drive using an application such as the Fedora Media Writer (also available from https://fedoraproject.org).
Step 2: Check your computers
The computers you use as hypervisors in Fedora 42 need to meet a few requirements. You
should check the following on your computer before you start installing:
Supports virtualization. You can check for virtualization support by looking at the flags
set in the CPU.
Memory. The computer must have enough RAM not only to run the host operating
system, but also for each virtual machine that you expect to run on the system.
Processing power. Keep in mind that each virtual machine consumes processing power
for itself and any application running inside the virtual machine.
Storage is another consideration. However, because we intend to configure storage from a separate node on the network, we will address that issue later.
To check that the available features of your computers meet the requirements, boot a Linux
Live CD or DVD, open a Terminal window, and type the following commands:
# cat /proc/cpuinfo | grep -
-
color -
E "vmx|svm|lm"
flags : fpu vme de pse tsc msr pae mce cx8 apic sep mtrr pge mca
cmov pat pse36 clflush dts acpi mmx fxsr sse sse2 ss ht tm pbe
syscall nx pdpe1gb rdtscp lm constant_tsc arch_perfmon pebs bts
rep_good xtopology nonstop_tsc aperfmperf pni pclmulqdq dtes64
monitor ds_cpl vmx smx es…
…
Running the previous command shows that this computer is a 64-bit computer (lm) and that
an Intel chip supports virtualization features (vmx). If the CPU were an AMD chip that supported virtualization, instead of vmx, you would see svm highlighted. Those settings show
that this computer can be used as a hypervisor.
When you start running VMs on a host, memory is often the bottleneck. For memory requirements, you must add what is needed by the host to whatever you need for each VM. You can
lower memory requirements by not having Desktop software installed, as most hypervisors do.
685
28
Downloaded from https://onlinelibrary.wiley.com/doi/ by alex jounh - Oregon Health & Science Univer , Wiley Online Library on [05/12/2025]. See the Terms and Conditions (https://onlinelibrary.wiley.com/terms-and-conditions) on Wiley Online Library for rules of use; OA articles are governed by the applicable Creative Commons License
Chapter 28: Using Linux for Cloud Computing
In this case, however, I performed a Fedora Server install, then added a GNOME Desktop. To
check the memory and swap on the computer, I entered the following:
# free -
m
Mem:
Swap:
total
15318
7743
used
4182
0
free
6331
7743
shared buff/cache
1047
4805
available
9678
This system has about 16Gb of RAM and 8Gb of swap. I estimate that 4Gb is good for the host
system, including the added GNOME desktop. If I allow 1Gb or 2Gb for each VM, this system
should be able to run 6–12 VMs along with the Desktop. Check the memory requirements for
the operating systems and the applications that you plan to run to determine your particular
memory needs.
To check the number and types of processors on your computer, enter the following:
# grep processor /proc/cpuinfo
processor : 0
…
processor : 4
processor : 5
# head /proc/cpuinfo
processor : 0
vendor_id : GenuineIntel
cpu family : 6
model
: 158
model name : Intel(R) Core(TM) i5-
8500T CPU @ 2.10GHz
stepping
: 10
…
The first command in the preceding code shows that there are six (0 through 5) processors on
the computer. The second command for the first processor shows that it is GenuineIntel, the
model number, model name, CPU family, and other information.
To do live VM migration between the two hypervisors, the CPUs must be in the same family. If
they don’t have compatible CPUs, you could migrate a VM by shutting it down on one hypervisor and starting it up from shared storage on the other.
After you have sized up the two hypervisor computers, start installing Fedora on them.
Step 3: Install Linux on hypervisors
Using the Fedora 42 installation media, begin installing the two hypervisors. Follow descriptions in Chapter 9, “Installing Linux,” for installing Fedora. You should know the following
things, which are specific to the installation for this procedure:
Name the hypervisors I set the hostnames on the hypervisors to host1.example.com
and host2.example.com.
686
Downloaded from https://onlinelibrary.wiley.com/doi/ by alex jounh - Oregon Health & Science Univer , Wiley Online Library on [05/12/2025]. See the Terms and Conditions (https://onlinelibrary.wiley.com/terms-and-conditions) on Wiley Online Library for rules of use; OA articles are governed by the applicable Creative Commons License
Part VI: Engaging with Cloud Computing
Partitioning When partitioning, I erase the entire hard disk. Then I create a 500MiB
/boot partition and a 12GiB swap partition, and I assign the rest of the disk space to
the root partition (/). The /var/lib/libvirt/images directory holds most of
the data on this system, but that is a shared directory, available from another system
on the network and shared between the two hypervisors. (More on that later.)
Networking If given the option, turn on wired network interfaces for each hypervisor. The hypervisors and storage should all be on the same local network, because the
speed of your network connection among those machines is critical to getting good
performance.
Software packages During installation, I install only the default Fedora Server packages. After installation is complete and the system is rebooted, I installed the GNOME
desktop, and later I install more of the software that’s needed for each hypervisor.
Reboot the computer when installation is finished (removing the USB drive and starting up on
the hard drive). After the system is rebooted, update the Fedora software, add new packages,
and reboot the system again as follows:
# dnf update -
y
# dnf install virt-manager libvirt-daemon-config-network
# reboot
The virt-manager package contains the GUI tool for managing your virtual machines. The
libvirt-daemon-config-network package creates the default network interface that
lets the virtual machines access external networks (through the host) using Network Address
Translation (NAT). The default address range assigned to the virtual machines is 192.168.122.2
through 192.168.122.254.
Other packages that you will need should already be included with the Fedora install. If you
did a different install type, make sure you have the following packages also added:
■
■
libvirt-client (for the virsh command)
libvirt-daemon (to get the libvirtd service)
Step 4: Start services on the hypervisors
You need to make sure that the libvirtd service is running on both hypervisors. Start the
sshd service as well. They may already be running, but just to make sure, do the following as
root on both hypervisors:
#
#
#
#
systemctl
systemctl
systemctl
systemctl
start sshd.service
enable sshd.service
start libvirtd.service
enable libvirtd.service
The sshd service allows you to log into the hypervisors over the network, if necessary. The
libvirtd service is the one with which you may be unfamiliar. It is listening for requests to
manage your virtual machines on each host.
687
28
Downloaded from https://onlinelibrary.wiley.com/doi/ by alex jounh - Oregon Health & Science Univer , Wiley Online Library on [05/12/2025]. See the Terms and Conditions (https://onlinelibrary.wiley.com/terms-and-conditions) on Wiley Online Library for rules of use; OA articles are governed by the applicable Creative Commons License
Chapter 28: Using Linux for Cloud Computing
Step 5: Edit /etc/hosts, or set up DNS
To make it convenient to communicate between the hypervisors and storage system, you
should assign hostnames to each system and map those names to IP addresses. Setting up a
DNS server to which all the systems point is probably the best way to do that. However, for our
simple example, you can just edit the /etc/hosts file on each system and add entries for
each host.
Here is an example of what additional entries to your /etc/hosts file might look like for
the three systems used in this procedure:
192.168.0.138
192.168.0.139
192.168.0.1
host1.example.com host1
host2.example.com host2
storage.example.com storage
Next you need to configure the storage.
Configuring storage
You can provide networked storage to the hypervisors for this procedure in many ways. I chose
to set up a separate Fedora system on the same local network as the hypervisors and use NFS
to attach the shared storage to both hypervisors.
NFS is not the most efficient method of sharing storage among hypervisors, but it is one of the
easiest and most common to set up. In this procedure, I use the Virtualization Manager GUI
tool (virt-manager) to configure the NFS storage pool.
For consistency’s sake, the NFS share set up from the storage system is the /var/lib/
libvirt/images directory. It is mounted in the same place on each of the hypervisors. (For
testing, if you have only two machines available, you can configure storage from one of the
hypervisors. Keep in mind, however, that this means you can’t turn off that hypervisor without
shutting down all of your VMs.)
Step 1: Install Linux software
To set up your storage on an NFS server, you can use pretty much any Linux system that has
an NFS service available. Consider these things when you install Linux:
Disk space. Make sure that you have enough storage space available on the partition that
contains the shared directory. For this example, /var/lib/libvirt/images is the
shared directory.
Performance. For best performance, you want to have a disk that has fast access times
and data transfer rates.
For Fedora and RHEL, NFS server software is available from the nfs-utils package. For
Ubuntu, you need the nfs-kernel-server package. After initial installation is finished,
check that the NFS server software is installed. If it isn’t, you can install it on Fedora or RHEL
with this command:
# dnf install nfs-
utils
688
Downloaded from https://onlinelibrary.wiley.com/doi/ by alex jounh - Oregon Health & Science Univer , Wiley Online Library on [05/12/2025]. See the Terms and Conditions (https://onlinelibrary.wiley.com/terms-and-conditions) on Wiley Online Library for rules of use; OA articles are governed by the applicable Creative Commons License
Part VI: Engaging with Cloud Computing
For Ubuntu and similar systems, type this:
# apt-get install nfs-kernel-server
Step 2: Configure NFS share
To create an NFS share, you need to identify the directory to share and add information about
it to the /etc/exports file. Follow these steps:
1. Create a directory. You can share any directory containing the space that you want to
share. Consider making a new directory and mounting a whole disk or partition on it.
For this example, I create a directory named /var/storage as follows:
# mkdir -
p /var/storage
2. Allow exporting. On your storage system, create an entry in the /etc/exports file
to share the directory with selected systems (by name or IP address). For this example,
I allowed read-write access (rw) to all systems (this is for testing purposes and would
be insecure to do permanently):
/var/storage *(no_root_squash,rw,sync)
3. Export the directory. On the storage system, export the shared directory:
# exportfs -a
Step 3: Start the NFS service
Start the NFS service and open the firewall on the storage system to allow access to that service. Here’s how:
1. Start and enable NFS. On the latest Fedora and RHEL systems, enter the following to
start the NFS server:
# systemctl start nfs-
server.service
# systemctl enable nfs-
server.service
2. Open the firewall. To open the firewall ports so that those outside the local system
can use your NFS share, do the following on Fedora 42:
# firewall-cmd --permanent --add-service=rpc-bind
# firewall-cmd --permanent --add-service=nfs
# systemctl restart firewalld
Step 4: Mount the NFS share on the hypervisors
Log in to each hypervisor and follow these steps to make the share available locally. Note that
the location of the mount point directory on each hypervisor must be the same. Here’s how:
1. Check the NFS share availability. From each of the two hypervisors, make sure that
you can see the available share by entering the following:
# showmount -
e storage.example.com
Export list for storage.example.com:
/var/storage *
689
28
Downloaded from https://onlinelibrary.wiley.com/doi/ by alex jounh - Oregon Health & Science Univer , Wiley Online Library on [05/12/2025]. See the Terms and Conditions (https://onlinelibrary.wiley.com/terms-and-conditions) on Wiley Online Library for rules of use; OA articles are governed by the applicable Creative Commons License
Chapter 28: Using Linux for Cloud Computing
2. Mount the NFS share. Add information about the share to the /etc/fstab file. For
our example, to allow the directory from the storae.example.com to be mounted on
the same directory locally each time the system boots, the entry in the /etc/fstab
file could look like this:
storage.example.com:/var/storage /var/lib/libvirt/images nfs
defaults 0 0
3. Set SELInux boolean. If SELinux is in enforcing mode, set the following Boolean to
allow qemu-kvm to use the NFS share:
# setsebool -
P virt_use_nfs 1
4. Test the NFS mount. To check that you got the mount entry correct, run the following command to mount all entries in the /etc/fstab that have not already been
mounted, and check that the NFS share was mounted:
# mount -
a
# mount | grep libvirt
storage.example.com:/var/storage on /var/lib/libvirt/images type
nfs4
(rw,relatime,vers=4.0,rsize=1048576,wsize=1048576,namlen=255,hard,
proto=tcp,
port=0,timeo=600,retrans=2,sec=sys,clientaddr=192.168.0.1,local_
lock=none,
addr=192.168.0.138)
With your hypervisors and storage now in place, you can begin creating your virtual machines.
Creating virtual machines
The Virtual Machine Manager (virt-manager) is a good tool to use to create your first virtual machines. It steps you through the installation and setup of virtual machines, and it provides a way to view and change the status of your existing virtual machines.
Later, when you understand the kinds of features that go into creating virtual machines, you
can use the virt-install command to create virtual machines instead. The advantage of
virt-install is that you can script or easily copy and paste a command line to create a
virtual machine instead of having to click through a GUI window.
I chose to download a Fedora 42 Workstation DVD ISO to use to install the operating system for
my VMs. However, if you prefer, you can install many different versions of Linux or Windows as
your virtual machine.
Step 1: Get images to make virtual machines
You can create a virtual machine in many ways. In general, you start with either a prebuilt
image (basically a copy of a working virtual machine) or just install from an installation ISO
690
Downloaded from https://onlinelibrary.wiley.com/doi/ by alex jounh - Oregon Health & Science Univer , Wiley Online Library on [05/12/2025]. See the Terms and Conditions (https://onlinelibrary.wiley.com/terms-and-conditions) on Wiley Online Library for rules of use; OA articles are governed by the applicable Creative Commons License
Part VI: Engaging with Cloud Computing
image into a fresh storage area. Here we are going to do the latter and create a VM from the
Fedora 42 Workstation installation ISO image.
Assuming you are logged in to one of the hypervisors as root and the ISO image is in the
current directory, copy the ISO to the default directory used by virt-manager for storage
(/var/lib/libvirt/images):
# cp Fedora-Workstation-Live-42-1.1.x86_64.iso /var/lib/libvirt/
images/
Because that directory is shared by both hypervisors, you can go to either hypervisor to use
that image.
Step 2: Check the network bridge
On each hypervisor, there should be a default network bridge named virbr0. All virtual
machines will be added to this network interface and automatically assigned an IP address.
This default bridge exists due to libvirtd’s default virtual network. By default, the hypervisor uses the address range of 192.168.122.2 through 192.168.122.254 to assign to the virtual
machines. Using Network Address Translation (NAT), the host can route packets from the virtual machines using these private addresses to external network interfaces.
Do the following on each hypervisor to check the bridge for each:
# brctl show virbr0
bridge name bridge id
virbr0
8000.5254005eeceb
# ip addr show virbr0
STP enabled
yes
28
interfaces
vnet0
5: virbr0: <BROADCAST,MULTICAST,UP,LOWER_UP> mtu 1500 qdisc noqueue
state UP group default
link/ether fe:54:00:57:71:67 brd ff:ff:ff:ff:ff:ff
inet 192.168.122.1 brd 192.168.122.255 scope global dynamic
virbr0
Step 3: Start Virtual Machine Manager (virt-manager)
From the Desktop on either hypervisor, do the following to open Virtual Machine Manager and
connect it to the hypervisor:
1. Start virt-manager. Go to the Activities screen, type Virtual Machine Manager
into the search box, and press Enter, or type virt-manager from the shell. Type
the root password or your sudo user’s password when prompted. You should see the
Virtual Machine Manager window.
2. Check the connection to the hypervisor. Select File ➪ Add Connection. From the
Add Connection pop-up, the hypervisor (QEMU/KVM) should already be set and the
Autoconnect check box should be checked. Click Connect to connect to the local
hypervisor if it has not already been done.
691
Downloaded from https://onlinelibrary.wiley.com/doi/ by alex jounh - Oregon Health & Science Univer , Wiley Online Library on [05/12/2025]. See the Terms and Conditions (https://onlinelibrary.wiley.com/terms-and-conditions) on Wiley Online Library for rules of use; OA articles are governed by the applicable Creative Commons License
Chapter 28: Using Linux for Cloud Computing
Step 4: Check the connection details
After connecting to the hypervisor, set up some connection details. To do that, from the Virtual Machine Manager window, do the following:
1. View the connection details. Select Edit ➪ Connection Details to see the Connection
Details window. Select the Overview, Virtual Networks, and Storage tabs to familiarize
yourself with connection information for your hypervisor. For example, the Storage
tab appears in Figure 28.1, showing that there are 166.90Gb of free space in the location used by default for storage by this hypervisor (/var/lib/libvirt/images
directory).
FIGURE 28.1
Start Virtual Machine Manager and check connection details.
2. Check that the network bridge is available. Select the Virtual Networks tab, and
make sure that the bridge (virbr0) is in the list of available network interfaces.
Step 5: Create a new virtual machine
To create a new virtual machine from the Virtual Machine Manager window, do the following:
1. Start the wizard. To start the Create a New Virtual Machine Wizard, select File ➪ New
Virtual Machine. The Create a New Virtual Machine window appears.
692
Downloaded from https://onlinelibrary.wiley.com/doi/ by alex jounh - Oregon Health & Science Univer , Wiley Online Library on [05/12/2025]. See the Terms and Conditions (https://onlinelibrary.wiley.com/terms-and-conditions) on Wiley Online Library for rules of use; OA articles are governed by the applicable Creative Commons License
Part VI: Engaging with Cloud Computing
2. Choose the installation method. Four ways of creating the virtual machine are presented. The first three are ways to identify the location of installation media. The
fourth lets you import an existing disk image. For our example, choose the first selection (Local install media) and click Forward.
3. Choose the ISO. Select the Use ISO Image button and choose Browse. In the window
that appears, select or browse to the Fedora ISO, select Choose Volume, and click Forward to continue.
4. Choose the memory and CPU. Choose the amount of RAM and number of processors
available to the VM and click Forward. I suggest at least 1024Mb of RAM and at least
one processor. Using 2048Mb of RAM, if it is available, is better.
5. Enable storage. Choose the amount of disk space that you want the VM to consume.
I suggest at least 10Gb for a Fedora Workstation, but you could probably get by with
less. The qcow2 image that is created grows to the size you actually consume (up to
the amount allocated), so over-allocating space causes no problem until you actually
try to use that space. Click Forward.
6. Review the settings before the installation starts. Choose the name for the virtual
machine and review the other settings for your installation. Select Customize Configuration Before Install to further review settings. Leave other settings at the default for
now and click Finish.
7. Review the hardware settings. If you selected Customize on the previous screen,
you can review the settings in more detail. Under the VirtIO Disk, make sure the
cache mode is set to none or directsync. Under Memory, you might want to select
Enable Shared Memory. When you are satisfied, select Begin Installation.
8. Install the virtual machine. You are prompted to install the system just as you would
be if you were installing directly to hardware. Complete the installation, and reboot
the virtual machine. If the VM window isn’t open, double-click the VM entry (in this
case, Fedora40ws) in the virt-manager window and log in. Figure 28.2 shows an
example of the virt-manager window with the Fedora Workstation virtual machine
displayed.
Managing virtual machines
After you have one or more virtual machines installed on a hypervisor, you can manage each
VM in much the same way that you manage a computer system installed directly on hardware.
You can do the following:
■
View the system from a console. Double-click a running VM in the virt-manager
window. A console window opens to the VM, allowing you to use the VM just as you
would from a physical console to access an operating system installed directly on the
hardware. You can bypass virt-manager to display a VM’s console directly with
virt-viewer. For example, for a VM named fedora42ws, type virt-viewer
fedora42ws.
693
28
Downloaded from https://onlinelibrary.wiley.com/doi/ by alex jounh - Oregon Health & Science Univer , Wiley Online Library on [05/12/2025]. See the Terms and Conditions (https://onlinelibrary.wiley.com/terms-and-conditions) on Wiley Online Library for rules of use; OA articles are governed by the applicable Creative Commons License
Chapter 28: Using Linux for Cloud Computing
■
■
■
Shut down the VM. Right-click the VM entry and select Shut Down. Then select either
Shut Down (to shut down properly) or Force Off (effectively pulling the plug). Or, you
can select Reboot.
Start the VM. If the VM is currently shut down, right-click the entry and select Run
to start the VM running.
Delete the VM. If you are totally finished using the VM, select Delete. You are asked
if you want to delete the storage as well. Uncheck the box if you want to keep the
storage associated with the VM.
FIGURE 28.2
Open the virtual machine and begin using it.
Now that you are comfortable using your virtual machines, you can try migrating a VM to
another hypervisor.
Migrating virtual machines
Being able to migrate your virtual machines between different hypervisors gives you tremendous flexibility in managing your computer workloads. Here are some of the advantages:
■
694
Improve performance by moving VMs from hypervisors that are overloaded to ones that
have more available memory and CPU capacity.
Downloaded from https://onlinelibrary.wiley.com/doi/ by alex jounh - Oregon Health & Science Univer , Wiley Online Library on [05/12/2025]. See the Terms and Conditions (https://onlinelibrary.wiley.com/terms-and-conditions) on Wiley Online Library for rules of use; OA articles are governed by the applicable Creative Commons License
Part VI: Engaging with Cloud Computing
■
■
■
Do routine maintenance on a hypervisor while keeping your VMs running.
Move VMs off underutilized hypervisors so that you can shut them off to save energy
until they are needed again.
Move VMs off site if you are expecting to shut down a data center or you are expecting
a hurricane or other catastrophe to hit your data center.
Live migration, in particular, is valuable if you need processes to keep running on the VMs
without interruption. The key to getting live VM migration to work is setting up your environment properly. Make sure the following things are in place:
■
■
■
■
■
Shared networked storage among the hypervisors.
The same network interfaces configured on each hypervisor.
Compatible CPUs between hypervisors. (Often, a set of hypervisors has the exact same
hardware.)
A fast network connection between the hypervisors and storage.
The same or similar versions of virtualization software on the hypervisors. (In our
case, we used Fedora 42 on both and installed them similarly.)
With all that in place, live migration requires only a few steps to get going.
Step 1: Identify other hypervisors
Assuming the Virtual Machine Manager window is still up and running on one of your hypervisors, go to that window and do the following to connect to the other hypervisor:
a. Connect to the hypervisor. Select File ➪ Add Connection. The Add Connection
window should appear.
b. Add the connection. Select the Connect to Remote Host check box, choose SSH
as the method, use a valid user name (like chris or joe), and type the hostname
of the other hypervisor (for example, host1). When you click Connect, you may
be prompted to enter a password for the remote hypervisor’s user and enter other
information. Note that you might need to install the openssh-askpass package
to be prompted for the password.
An entry for the new hypervisor should appear on the Virtual Machine Manager window.
Step 2: Migrate running VM to another hypervisor
Before you can migrate the VM to another hypervisor, you might need to adjust your firewall
rules. With the default firewall rules in place, direct libvirt migration will fail. A random TCP
port needs to be opened to allow the migration. The default is 49152, but any available, nonprivileged port can be chosen. Tunneled migration requires SSH key authentication.
With the Virtual Machine Manager open, right-click any VM that is currently running and
select Migrate. The Migrate the Virtual Machine window appears, as shown in Figure 28.3.
695
28
Downloaded from https://onlinelibrary.wiley.com/doi/ by alex jounh - Oregon Health & Science Univer , Wiley Online Library on [05/12/2025]. See the Terms and Conditions (https://onlinelibrary.wiley.com/terms-and-conditions) on Wiley Online Library for rules of use; OA articles are governed by the applicable Creative Commons License
Chapter 28: Using Linux for Cloud Computing
FIGURE 28.3
Choose which hypervisor to migrate the VM to.
Select the new host. In my example, the VM is currently running on host01, so I want to
select ansible as the new host. After a bit of time for the memory image of the VM to copy
over to the other host, the VM should appear as running on that host.
If for some reason your migration fails (incompatible CPUs or other problems), you can always
shut down the VM on one host and start it again on the other host. Doing that only requires
that your shared storage is in place. On the second host, simply run the Create a New Virtual
Machine Wizard, but select to run an existing image instead of an installation ISO.
The hypervisor configuration I just demonstrated might suit you well for your home workstation or even for a small business. Although it is beyond the scope of this book to help you
develop an entire cloud computing platform, it is within my charter to help you use different
cloud platforms to run your Linux systems. The next chapter helps you do just that.
696
Downloaded from https://onlinelibrary.wiley.com/doi/ by alex jounh - Oregon Health & Science Univer , Wiley Online Library on [05/12/2025]. See the Terms and Conditions (https://onlinelibrary.wiley.com/terms-and-conditions) on Wiley Online Library for rules of use; OA articles are governed by the applicable Creative Commons License
Part VI: Engaging with Cloud Computing
Summary
Linux is the foundation on which most of today’s emerging cloud technologies are being built.
This chapter describes many of the basic components that go into building a cloud based on
Linux and other open source technologies. It then helps you to learn about some of those
basic technologies by setting up a couple of hypervisors and launching virtual machines.
Exercises
The exercises in this section describe tasks related to setting up a hypervisor (KVM host computer) and using it to run virtual machines. If you are stuck, solutions to the tasks are shown
in Appendix B. Keep in mind that the solutions shown in Appendix B are usually just one of
many ways to complete a task.
Although the example shown in this chapter for setting up hypervisors uses three physical
machines, these exercises can be done on a single physical machine.
1. Check your computer to see if it can support KVM virtualization.
2. Install a Linux system along with the packages needed to use it as a KVM host and to
run the Virtual Machine Manager application.
3. Make sure that the sshd and libvirtd services are running on the system.
4. Get a Linux installation ISO image that is compatible with your hypervisor and copy it
to the default directory used by Virtual Machine Manager to store images.
5. Check that the default network bridge (virbr0) is currently active.
6. Install a virtual machine using the ISO image you copied earlier.
7. Make sure you can log into and use the virtual machine.
8. Check that your virtual machine can connect to the Internet or other networks
outside of the hypervisor.
9. Stop the virtual machine so that it is no longer running.
10. Start the virtual machine again so that it is running and available.
697
28
Downloaded from https://onlinelibrary.wiley.com/doi/ by alex jounh - Oregon Health & Science Univer , Wiley Online Library on [05/12/2025]. See the Terms and Conditions (https://onlinelibrary.wiley.com/terms-and-conditions) on Wiley Online Library for rules of use; OA articles are governed by the applicable Creative Commons License
Chapter 28: Using Linux for Cloud Computing
29
Deploying Linux to the Cloud
IN THIS CHAPTER
Creating Linux cloud images
Deploying a cloud image with virsh or virt-manager (libvirtd)
Deploying an EC2 image to the AWS cloud
T
o get a new Linux system to use, instead of just running a standard installation program from a
physical USB drive or DVD, you can get a Linux image and deploy it to a cloud. One way to do that
is to take a generic Linux image (one that is bootable but not personalized) and provide information to configure it to suit your needs. Another way is to go to a cloud provider, choose an image, click
through selections to configure it, and launch it.
The point is that cloud computing is offering up new ways to start up and use Linux systems. In Chapter 28, I had you do a standard Linux installation to create a virtual machine that runs on a Linux hypervisor. In this chapter, I will show you how to use cloud images to start up a fresh Linux system.
First, I describe how to use cloud-init to combine a Linux cloud image manually with configuration
information to allow it to run in a variety of environments. Next, I tell you how to do a similar process
on the AWS public cloud (using Amazon EC2 images by clicking through easy-to-use cloud controls).
Getting Linux to Run in a Cloud
Cloud platforms are great for spinning up new virtual machines quickly and efficiently. They can do so
because a fresh install is not required each time you want a new instance of an operating system.
Public clouds, such as Amazon EC2 (http://aws.amazon.com/ec2), offer instances of different Linux
distributions for you to start and use. You choose a Linux instance, such as Amazon 2023, Ubuntu,
Red Hat Enterprise Linux (RHEL), or SUSE Linux Enterprise Server (SLES), which is tuned for specific
purposes. For example, there are instances that are optimized for high-performance processing, for
memory-intensive applications, or to run as nodes for specific environments (such as the AWS Elastic
Kubernetes Service [EKS]).
699
Linux Bible, Eleventh Edition. Christopher Negus.
© 2026 John Wiley & Sons, Inc. All rights reserved, including rights for text and data mining and training of artificial intelligence technologies or similar
technologies. Published 2026 by John Wiley & Sons, Inc.
Downloaded from https://onlinelibrary.wiley.com/doi/ by alex jounh - Oregon Health & Science Univer , Wiley Online Library on [05/12/2025]. See the Terms and Conditions (https://onlinelibrary.wiley.com/terms-and-conditions) on Wiley Online Library for rules of use; OA articles are governed by the applicable Creative Commons License
CHAPTER
The content of a cloud instance tends to be generic in nature. It is expected that more information is attached to the image by the cloud user or the cloud provider using a service such as
cloud-init. For cloud-init information falls into two general categories: meta-data
and user-data:
meta-data Included with meta-data is information that is needed before the image
boots. This is data that is outside of the contents of the image and is typically
managed by the cloud provider. Some of this data comes from the fact that things such
as storage, memory, and processing power are drawn from a pool of resources rather
than from the physical machine on which you are installing. So, the meta-data tells
the cloud provider the amounts of those resources, and possibly others, to allocate
early in the process of starting up the instance.
user-data The user-data information is inserted into the operating system that
exists on the image. This is data that the person using the virtual machine provides.
This might include a user account and password, configuration files, commands to run
on first boot, the identities of software repositories, or anything else that you might
want to run or change within the operating system itself.
When you go to run a Linux instance in a cloud environment, you typically enter the meta-
data and user-data information by clicking check boxes and filling in forms from a web-
based cloud controller (such as the Red Hat Virtualization Manager). The information may not
be identified as meta-data and user-data when you configure the instance through the
cloud controller.
The cloud you use to run your Linux virtual machines may be a public cloud, a private cloud,
or a hybrid cloud. The type of cloud you choose may depend on your needs and your budget:
Public cloud Amazon EC2, Microsoft Azure, and Google Compute Engine are examples
of cloud platforms that let you launch and use Linux virtual machines (sometimes
called instances) from a web-based interface. You pay for the time that the instance is
running. The amount of memory, storage, and virtual CPUs you use to run the instances
also add to the costs. The advantage of public clouds is that you don’t have to purchase
and maintain your own cloud infrastructure.
Private cloud With a private cloud, you put your own computing infrastructure in place
(hypervisors, controllers, storage, network configuration, and so on). Setting up your
own private cloud means taking on more up-front costs to own and maintain infrastructure. But it gives you added security and control of your computing resources.
Because you control the infrastructure, you can create the images to which users have
access in your own infrastructure and account for user usage of that infrastructure in
your own way.
Hybrid cloud Many companies are looking toward hybrid cloud solutions. A hybrid cloud
can allow multiple compute assets to be managed by a central facility. For example, a
public cloud customer can combine a container platform such as EKS, which has management features running in the AWS cloud, and leverage the server machines in its
own data centers to run its EKS workloads.
700
Downloaded from https://onlinelibrary.wiley.com/doi/ by alex jounh - Oregon Health & Science Univer , Wiley Online Library on [05/12/2025]. See the Terms and Conditions (https://onlinelibrary.wiley.com/terms-and-conditions) on Wiley Online Library for rules of use; OA articles are governed by the applicable Creative Commons License
Part VI: Engaging with Cloud Computing
To help you get a better feel for configuring Linux cloud instances, in the next sections I’ll
describe how cloud-init works to configure Linux cloud instances. I’ll then help you create
your own meta-data and user-data files and apply them to your cloud instance so the
information can be used when the cloud image boots.
Creating Linux Images for Clouds
Think about what you did when you installed a Linux system in Chapter 9, “Installing Linux.”
During the manual installation process, you set a root password, created a regular user account
and password, possibly defined your network interfaces, and did other tasks. The information
you entered became a permanent part of the operating system that remained each time you
booted the system.
When you start with a prebuilt cloud image as your Linux system, you can use cloud-init to
get a Linux system ready to run. The cloud-init facility (https://docs.cloud-init.io) sets
up a generic virtual machine instance to run in the way that you want it to run without going
through an install process. The next section describes some ways of using cloud-init.
Configuring and running a cloud-init cloud instance
In the next procedure, I show you how to create data manually; the data can be combined
with a bootable Linux cloud image so that when that image boots, it is configured based on
your data. Combining data with the image at runtime allows you to change the data each time
before the image is run instead of installing it permanently in the image.
I suggest that you run this procedure on one of the hypervisors you configured in Chapter 28,
“Using Linux for Cloud Computing.” This not only allows you to create the customized data
for your Linux cloud image but also lets you run that image as a virtual machine on that
hypervisor.
You can use any Linux distribution you want for this procedure and then run it on any
hypervisor. For this example, the hypervisor could be Ubuntu, Fedora, or RHEL, but I chose a
Fedora image.
To add data and run an existing cloud image, this procedure requires you to obtain a cloud
image, create data files, and generate a new image that combines those elements. This procedure is meant to be very simple to get a cloud image booted. Later, I will tell you how to add
more features to these data files. To configure and run a cloud image, follow these steps:
1. Create cloud-init meta-data file. Create a file named meta-data to hold
data that identifies information about the cloud instance from the outside. For
example, you can add a name to identify the instance (instance-id), a hostname
(local-hostname), and other information. To keep your first try simple, I assign
only two fields. (You can set them to any names you like.)
instance-id: FedoraWS01
local-hostname: fedora01
701
29
Downloaded from https://onlinelibrary.wiley.com/doi/ by alex jounh - Oregon Health & Science Univer , Wiley Online Library on [05/12/2025]. See the Terms and Conditions (https://onlinelibrary.wiley.com/terms-and-conditions) on Wiley Online Library for rules of use; OA articles are governed by the applicable Creative Commons License
Chapter 29: Deploying Linux to the Cloud
2. Create cloud-init user-data file. Create a file named user-data to hold
data that configures inside the operating system on the image itself. For this simple
case, I just set a password for the default user (fedora) to cloudpass and ensured
that cloud-init does not expire the password:
#cloud-config
password: cloudpass
chpasswd: {expire: False}
3. Combine data into a separate image. With the meta-data and user-data files
in the current directory, create an ISO image that contains that data. Later, we present
this image as a CD-ROM to the Linux image so cloud-init knows how to configure
the Linux image. (Install the genisoimage and cloud-init packages first, if you
haven’t already. The cloud-init package isn’t required on the hypervisor.)
# dnf install genisoimage cloud-
init qemu-
img virt-
install # In Fedora
or
# apt install genisoimage cloud-
init qemu-
utils virtinst # In Ubuntu
# genisoimage -
output fedora42-
data.iso -
volid cidata \
-joliet -rock user-data meta-data
4. Get a base cloud image. Cloud images for Ubuntu, Fedora, and RHEL are configured for use with cloud-init. Get an official Fedora cloud image (images for other
distributions are described later), and do the following:
a. Go to the Fedora cloud image download page. Open a web browser and go to
https://fedoraproject.org/cloud/download.
b. Click the image. Click the Download button that appears for the Fedora Cloud
Base QEMU image to get a qcow2 image that can be used with Virtual Machine
Manager. The image name is something like Fedora-Cloud-Base-Generic-
42.-1.1.x86_64.qcow2.
5. Snapshot the image. You probably need to run this procedure a few times before
you get the exact image that you want. So, instead of using the downloaded image
directly, make a snapshot of it. To keep track of my versions, I added 01 to the new
snapshot name:
# qemu-
img create -
f qcow2 \
-o backing_file=Fedora-Cloud-Base-Generic-42-1.1.x86_64.qcow2 \
-F qcow2 Fedora-Cloud-Base-01.qcow2
6. Copy files to the images directory. It’s good practice to copy images to the /var/
lib/libvirt/images/ directory when you are using them on a hypervisor
(libvirtd service). For example, to copy the cloud image and data image to that
directory, type the following:
# cp Fedora-Cloud-Base-Generic-42-1.1.x86_64.qcow2 \
Fedora-Cloud-Base-01.qcow2 \
702
Downloaded from https://onlinelibrary.wiley.com/doi/ by alex jounh - Oregon Health & Science Univer , Wiley Online Library on [05/12/2025]. See the Terms and Conditions (https://onlinelibrary.wiley.com/terms-and-conditions) on Wiley Online Library for rules of use; OA articles are governed by the applicable Creative Commons License
Part VI: Engaging with Cloud Computing
fedora42-
data.iso
/var/lib/libvirt/images/
\
7. Start the cloud instance. With the files in place, run the following commands to start
an instance of your cloud image:
# cd /var/lib/libvirt/images
# virt-install --import --name fedora42-01 --ram 4096 --vcpus 2 \
--disk path=Fedora-Cloud-Base-01.qcow2,format=qcow2,bus=virtio \
--disk path=fedora42-data.iso,device=cdrom \
--os-variant fedora42 --network network=default &
The previous virt-install example shows that the virtual machine is assigned to consume
4Gib of RAM (--ram 4096) and two virtual CPUs (--vcpus 2). The RAM and VCPU values on
your system may be different, depending on your computer’s resources. This was run on Fedora.
Your options might be different for other Linux systems.
At this point, a virtual machine named fedora42-01 is running on your hypervisor. As the
virtual machine boots up, a console window should open allowing you to log into the new cloud
virtual machine.
Investigating the cloud instance
To investigate the cloud image that we created, you can open the running instance and look
inside. One way to do that, if it is not already open, is to open the virtual machine with
virt-viewer:
# virt-viewer fedora42-01
From the console window that appears, use the data that we added to the image in order to log in.
Use fedora as the user and cloudpass as the password to log in. The fedora user has sudo
privileges, so you can use that account to investigate the instance by entering some commands.
Here you can see where the user-data was copied into the instance:
$ sudo cat /var/lib/cloud/instances/nocloud/user-
data.txt
#cloud-config
password: cloudpass
chpasswd: {expire: False}
29
The basic cloud configuration is done in the /etc/cloud/cloud.cfg file. You can see here
that the root user account is disabled by default. At the bottom of the file, you can see that the
user named fedora is the default user and has sudo privileges without requiring a password.
$ sudo cat /etc/cloud/cloud.cfg
users:
-default
disable_root: true
…
system_info:
default_user:
name: fedora
703
Downloaded from https://onlinelibrary.wiley.com/doi/ by alex jounh - Oregon Health & Science Univer , Wiley Online Library on [05/12/2025]. See the Terms and Conditions (https://onlinelibrary.wiley.com/terms-and-conditions) on Wiley Online Library for rules of use; OA articles are governed by the applicable Creative Commons License
Chapter 29: Deploying Linux to the Cloud
lock_paswd: True
gecos: fedora Cloud User
groups: [wheel, adm, systemd-
journal]
sudo: ["ALL=(ALL) NOPASSWD:ALL"]
shell: /bin/bash
paths:
cloud_dir: /var/lib/cloud
templates_dir: /etc/cloud/templates
ssh_svcname: sshd
You can see other things in the cloud.cfg file as well. You can see which cloud_init_
modules run during initialization (such as those that set the hostname or start rsyslog
logging). You can see cloud_config_modules that set the locale and the time zone and
run further configuration tools (such as Chef and Puppet).
Because yum repositories are enabled, provided you have an available network connection
(DHCP should have assigned addresses to the virtual machine by default), you can install any
packages available from the Fedora repositories.
Cloning the cloud instance
If you decide you like the cloud instance you created, you can save a copy of it to run later by
making a clone of the two images (cloud and data image) that make up the cloud instance. To
create a clone of the running cloud instance, using virt-manager, do the following:
1. Launch virt-manager. On the host system running the virtual machine, run the
virt-manager command or start Virtual Machine Manager from the Activities
screen on your desktop.
2. Pause the virtual machine. Right-click the virtual machine instance entry in the
virt-manager window and select Shut Down.
3. Clone the virtual machine. Right-click the virtual machine instance entry
again and select Clone. The Clone Virtual Machine window appears, as shown in
Figure 29.1
4. Choose clone settings. For the cloud-based image and the data image, you can
choose either to make new copies or to share them with the existing virtual
machine. After you do, select Clone.
The cloned cloud instance is now available to start, stop, and otherwise manage as you like
from the Virtual Machine Manager window or the virsh command. A great advantage of
making clones is that you can make any changes that you like to them, without having to
change the originals. Just delete the clone when you are done, and you can quickly generate a new one when you need it.
Expanding your cloud-init configuration
You can add much more information to your meta-data and user-data files to
configure your cloud instances. Examples of cloud-init settings can be found on the
Cloud-Init Config Examples page (https://docs.cloud-init.io/en/latest/reference/
704
Downloaded from https://onlinelibrary.wiley.com/doi/ by alex jounh - Oregon Health & Science Univer , Wiley Online Library on [05/12/2025]. See the Terms and Conditions (https://onlinelibrary.wiley.com/terms-and-conditions) on Wiley Online Library for rules of use; OA articles are governed by the applicable Creative Commons License
Part VI: Engaging with Cloud Computing
examples.html). The following sections show examples of settings that you can add to your
user-data files.
FIGURE 29.1
Cloning lets you save a permanent copy of a cloud instance.
Note
The user-data and meta-data files are in YAML format. The YAML format uses indents and well-known delimiters. Items in a list are preceded by a hyphen and a space. Keys and values are separated by a colon and a space. If
you are not familiar with YAML, I recommend digging around the YAML project site (https://github.com/yaml).
Adding ssh keys with cloud-init
Instead of using passwords to log into your cloud instances, you can use key-based authentication along with the ssh command to log in over the network. This is commonly used
by cloud providers to allow user access to cloud images.
If you have already generated public and private ssh keys for the user account that you
plan to use to ssh into the cloud instance, you can use that public key for this procedure.
If you had generated an RSA key pair, the public key is located in the id_rsa.pub file
by default:
# cat $HOME/.ssh/id_rsa.pub
705
29
Downloaded from https://onlinelibrary.wiley.com/doi/ by alex jounh - Oregon Health & Science Univer , Wiley Online Library on [05/12/2025]. See the Terms and Conditions (https://onlinelibrary.wiley.com/terms-and-conditions) on Wiley Online Library for rules of use; OA articles are governed by the applicable Creative Commons License
Chapter 29: Deploying Linux to the Cloud
ssh-rsa AAAAB3NzaC1yc2EAAAADAQABAAABAQDMzdq6hqDUhueWzl7rIUwjxB/rrJY4
oZpoWINzeGVf6m8wXlHmmqd9C7LtnZg2P24/ZBb3S1j7vK2WymOcwEoWekhbZHBAyYeqX
KYQQjUB2E2Mr6qMkmrjQBx6ypxbz+VwADNC
wegY5RCUoNjrN43GVu6nSOxhFf7hv6dtCjvosOvtt0979YS3UcEyrobpNzreGSJ8FMPM
RFMWWg68Jz5hOMCIE1IldhpODvQVbTNsn/STxO7ZwSYV6kfDj0szvdoDDCyh8mPNC1kI
Dhf/qu/Zn1kxQ9xfecQ+SUi+2IwN69o1fNpexJPFr+Bwjkwcrk58C6uowG5eNSgnuu7G
MUkT root@host2.example.com
The public key from that file is typically copied to the $HOME/.ssh/authorized_keys
file for the user on the remote system to which you wish to log in. We can have the key added
to that file on our cloud instance using entries in the user-data file that looks like the
following:
users:
-default
-name: wsmith
gecos: William B. Smith
primary-
group: wsmith
sudo: ALL=(ALL) NOPASSWD:ALL
lock-
passwd: true
ssh-
authorized-
keys:
-ssh-
rsa AAAAB3NzaC1yc2EAAAADAQABAAABAQDMzdq6hqDUhueWzl7rIUwj
xB/rrJY4oZpoWINzeGVf6m8wXlHmmqd9C7LtnZg2P24/
ZBb3S1j7vK2WymOcwEoWekhbZHBAyYeqXKYQQjUB2E2Mr6qMkmrjQBx6ypxbz+V
wADNCwegY5RCUoNjrN43GVu6nSOxhFf7hv6dtCjvosOvtt0979YS3UcEyrobpNz
reGSJ8FMPMRFMWWg68Jz5hOMCIE1IldhpODvQVbTNsn/
STxO7ZwSYV6kfDj0szvdoDDCyh8mPNC1kIDhf/qu/
Zn1kxQ9xfecQ+SUi+2IwN69o1fNpexJPFr+Bwjkwcrk58C6uowG5eNS
gnuu7GMUkT root@host2.example.com
From the previous information, you can see that wsmith is the default user. The gecos
entry is typically the user’s full name, used in the fifth field of the /etc/passwd file. The
password is locked for this user. However, because the ssh-rsa entry from my root account
on host2.example.com is provided here under ssh-authorized-keys for the user, I can
log into the cloud instance as wsmith over ssh without entering a password (provided my
private key is associated with that public key).
Adding software with cloud-init
You aren’t limited to the software already on your cloud image. Inside your user-data file, you
can define YUM repositories (in Fedora and RHEL) or apt repositories (in Ubuntu or Debian) and
then identify any packages that you want to have installed when the cloud instance starts.
The following example shows what entries in a user-data file might look like to add a YUM
repository (for Fedora or RHEL) to your cloud instance and then install packages from that
repository or any other enabled repository:
myownrepo:
baseurl: http://myrepo.example.com/pub/myrepo/
enabled: true
706
Downloaded from https://onlinelibrary.wiley.com/doi/ by alex jounh - Oregon Health & Science Univer , Wiley Online Library on [05/12/2025]. See the Terms and Conditions (https://onlinelibrary.wiley.com/terms-and-conditions) on Wiley Online Library for rules of use; OA articles are governed by the applicable Creative Commons License
Part VI: Engaging with Cloud Computing
gpgcheck: true
gpgkey: file:///etc/pki/rpm-
gpg/RPM-
GPG-
KEY-
MYREPO
name: My personal software repository
packages:
-nmap
-mycoolcmd
-[libmystuff, 3.10.1-
2.fc21.noarch]
In the example just shown, a new yum repository is created in the file /etc/yum.repos.d/
myownrepo.repo. A gpgkey is provided to check the validity of installed packages, and
GPG checking is turned on. After that, the nmap package is installed (that’s in the standard
Fedora yum repository), the mycoolcmd package is installed (from my private repository),
and a specific version of the libmystuff package is installed.
Configuring apt software repositories for Ubuntu is done a bit differently. Failsafe primary and
security apt package mirrors are configured by default (in the cloud.cfg file in the image),
along with settings to cause the instance, if run in an Amazon EC2 cloud, to search the closest
region for packages. To add more repositories, entries in your user-data file could look like
the following:
apt_mirror: http://us.archive.ubuntu.com/ubuntu/
apt_mirror_search:
- http://myownmirror.example.com
- http://archive.ubuntu.com
packages:
-nmap
-mycoolcmd
-[libmystuff, 3.16.0-
25]
The myownmirror.example.com entry tells apt to use your own private apt repository to
search for packages. Note that packages you want to install can be entered in basically the
same format as you did with Fedora, although specific version information (if entered) might
look different in some cases.
You can add many other settings to your user-data and meta-data files. Again, refer to
the Cloud-Init Cloud Config Examples page (https://docs.cloud-init.io/en/latest/
reference/examples.html) for details.
Using cloud-init in enterprise computing
So far, the cloud-init examples in this chapter have focused on taking a cloud image,
manually adding configuration data, and running it as a virtual machine temporarily
on your local hypervisor. This approach is useful if you want to understand how cloud-
init works and the opportunities you have for tuning cloud images to your specifications. This approach doesn’t scale well, however, if you are managing large enterprises of
virtual machines.
Cloud-init supports the concept of datasources. By placing user-data and meta-data
in a datasource, you don’t have to inject that information manually into a cloud instance, as
707
29
Downloaded from https://onlinelibrary.wiley.com/doi/ by alex jounh - Oregon Health & Science Univer , Wiley Online Library on [05/12/2025]. See the Terms and Conditions (https://onlinelibrary.wiley.com/terms-and-conditions) on Wiley Online Library for rules of use; OA articles are governed by the applicable Creative Commons License
Chapter 29: Deploying Linux to the Cloud
we did earlier in this chapter. Instead, when the cloud-init service starts running on the
instance, it knows to not only look on the local system for data sources, but also outside of it.
For Amazon EC2 clouds, cloud-init queries a particular IP address
(http://169.254.169.254) for data. For example, it may check
http://169.254.169.254/2009-04-04/meta-data for meta-data and
http://169.254.169.254/2009-04-04/user-data for user-data. This allows the
configuration data to be stored and accessed from a central location. Note that EC2 has begun
transitioning to token-based access through IMDSv2.
As for what might be inside the meta-data and user-data, far more complex configuration
schemes can be developed for deployment of your cloud instances. Cloud-init supports
configuration tools, such as Puppet (https://www.puppet.com/community/open-source/open-
source-puppet) and Chef (https://community.chef.io/downloads). These tools let you apply
scripts of configuration information to your cloud instances, even doing such things as replacing
components or restarting services as needed to return the system to a desired state.
At this point, however, my job is not to make you into full-blown cloud administrators (a few hundred pages ago, you could have been a Linux novice). Instead, I want you to understand what you
will be dealing with if you eventually land in a cloud data center ... because many people believe
that most data centers will be managed as cloud infrastructures in the not-too-distant future.
So far in this chapter, you have looked at the inside of configuring Linux for cloud computing.
Next, let’s step back and look at how you can use Amazon Linux 2 to run your own Linux-
based virtual machines.
Using Amazon EC2 to Deploy Cloud Images
Amazon Elastic Computer Cloud (Amazon EC2) is a foundational service offered by the Amazon
Web Services (AWS) cloud platform. It is particularly suited for pay-as-you-go cloud computing.
EC2 makes it easy to get started by letting you choose from preconfigured virtual machine
images and configuring them to suit your needs.
To start using Amazon EC2 to launch virtual machines, go to the Getting Started with Amazon
Web Services page and follow links to create a new account (https://aws.amazon.com/
getting-started/). After you log in, the full range of AWS services is displayed. Select Sign
In to the Console (https://console.aws.amazon.com), then choose EC2, and you will
see the EC2 AWS Management Console, as shown in Figure 29.2:
To start your first Linux virtual machine instance, do the following:
1. Select Launch Instance. The Launch an Instance page appears, and you are given
a choice of Linux (Amazon Linux, Red Hat, SUSE Linux, Ubuntu, and Debian) and
Windows AMIs to start up.
2. Find the image you want, and click the Select button. I chose Amazon Linux 2023,
which is an RPM-based Linux distribution.
708
Downloaded from https://onlinelibrary.wiley.com/doi/ by alex jounh - Oregon Health & Science Univer , Wiley Online Library on [05/12/2025]. See the Terms and Conditions (https://onlinelibrary.wiley.com/terms-and-conditions) on Wiley Online Library for rules of use; OA articles are governed by the applicable Creative Commons License
Part VI: Engaging with Cloud Computing
3. Choose an instance type. Scroll down to the Instance Type box and make that selection based on the number of vCPUs, Architecture, amount of memory, amount of
storage, type of storage, and network performance.
4. Key pair (login). Select Create new key pair to create a public and private key pair
that you can use to log into your system with ssh. Name the key pair, select a type
(ED25519 is stronger than RSA), and choose a format (use .pem for OpenSSH and
.ppk for PuTTY from a Windows machine). Then click Create Key Pair. Your new private key is downloaded to your local system.
5. Network settings. If you leave the defaults, it chooses a irtual private cloud (VPC),
which essentially creates an isolated environment to act like your own private data
center. It uses your default subnet, assigns public IP addresses, and sets up a firewall and security. By default, it will allow SSH traffic, so you can remotely log in to
the instance.
6. Configure storage. Choose the amount of storage (in GiB) and the type of Elastic
Block Storage to use.
7. Advanced details. You can probably leave the Advanced details settings as they are,
but you can select Info buttons next to each setting to read more about it.
FIGURE 29.2
Launch cloud instances using the Amazon EC2 Management Console.
29
709
Downloaded from https://onlinelibrary.wiley.com/doi/ by alex jounh - Oregon Health & Science Univer , Wiley Online Library on [05/12/2025]. See the Terms and Conditions (https://onlinelibrary.wiley.com/terms-and-conditions) on Wiley Online Library for rules of use; OA articles are governed by the applicable Creative Commons License
Chapter 29: Deploying Linux to the Cloud
8. Review the instance settings and select Launch Instance to start the instance.
Figure 29.3 shows an example of an Amazon Linux 2023 instance ready to launch.
FIGURE 29.3
Configure and launch an Amazon Linux 2023 instance on AWS.
9. Select the instance. If all goes well, the name of the new instance appears on the
screen. Select the instance name in the Success box. From the Instances page, select
the instance.
10. Select your instance and then click the Connect button. From the page for your
instance, click the Connect button to see different ways to connect to the instance.
Click EC2 Instance Connect and then Connect; a shell opens in your browser, and you
can begin using that instance.
To log in to the instance from your Linux system, follow the SSH client instructions
to use ssh to log into the public IP address you created. Replace ec2-user with
ubuntu (for Ubuntu) and fedora (for Fedora) instances. For example, the command
to log in to the AWS instance would look similar to the following:
$ ssh -i "youraws.pem" ec2-user@ec2-w-xx-yyy-zz.us-east-2.compute
.amazonaws.com
710
Downloaded from https://onlinelibrary.wiley.com/doi/ by alex jounh - Oregon Health & Science Univer , Wiley Online Library on [05/12/2025]. See the Terms and Conditions (https://onlinelibrary.wiley.com/terms-and-conditions) on Wiley Online Library for rules of use; OA articles are governed by the applicable Creative Commons License
Part VI: Engaging with Cloud Computing
11. Terminate the instance. When you are done with the instance, you can terminate it
by selecting the check box for the instance from the Instances page and then selecting
Instance State ➪ Terminate (delete). You are warned that the storage for the instance
will be deleted when you delete the instance. Select Terminate to remove the instance
and its associated storage.
It is important to remember to get rid of the instance when you are done or you will continue
to be charged for it.
Summary
Understanding how cloud computing differs from simply installing an operating system
directly on computer hardware will help you to adapt as more and more data centers move
toward cloud computing. In the beginning of this chapter, I encouraged you to get your hands
on some cloud images, combine them with data, and launch them on a local Linux hypervisor
to understand how cloud images work.
After that, I introduced the Amazon Elastic Compute Cloud service, where you can pay to use
cloud storage and processing time if you don’t have enough computing resources of your own.
The next chapter describes how to use Ansible to automate the deployment of host systems
and applications to your data center.
Exercises
The exercises in this section assume you have already set up a host system as a hypervisor (KVM
host computer). You need to use that hypervisor to run the virtual machine created in the exercises. If you are stuck, solutions to the tasks are shown in Appendix B. Keep in mind that the
solutions shown in Appendix B are usually just one of multiple ways to complete a task.
1. To be able to create a custom virtual machine image, install the genisoimage,
cloud-init, qemu-img, and virt-manager, virt-viewer packages.
29
2. Obtain a cloud image from the Fedora project.
3. Use qemu-img to create a snapshot of that image in qcow2 format called myvm
.qcow2, which you can use later to combine with your own data.
4. Create a cloud-init metadata file named meta-data that sets the instanceid to myvm and local-hostname to myvm.example.com.
5. Create a cloud-init user data file called user-data that sets the default user’s
password to test and sets chpasswd never to expire with {expire: False}.
711
Downloaded from https://onlinelibrary.wiley.com/doi/ by alex jounh - Oregon Health & Science Univer , Wiley Online Library on [05/12/2025]. See the Terms and Conditions (https://onlinelibrary.wiley.com/terms-and-conditions) on Wiley Online Library for rules of use; OA articles are governed by the applicable Creative Commons License
Chapter 29: Deploying Linux to the Cloud
6. Run the genisoimage command to combine the meta-data and user-data
files to create a mydata.iso file that you can combine with a virtual machine
image later.
7. Use the virt-install command to combine the myvm.qcow2 virtual machine
image with the mydata.iso image to create a new virtual machine image named
newvm that starts running on your hypervisor.
8. Use virt-viewer to open a console to the newvm virtual machine.
9. Log into the newvm virtual machine, using the fedora user and test password that
you set earlier.
712
Downloaded from https://onlinelibrary.wiley.com/doi/ by alex jounh - Oregon Health & Science Univer , Wiley Online Library on [05/12/2025]. See the Terms and Conditions (https://onlinelibrary.wiley.com/terms-and-conditions) on Wiley Online Library for rules of use; OA articles are governed by the applicable Creative Commons License
Part VI: Engaging with Cloud Computing
Automating Apps and
Infrastructure with Ansible
30
IN THIS CHAPTER
Understanding Ansible
Installing Ansible
Stepping through a deployment
Running ad hoc commands
T
o this point in the book, we have mostly focused on manually configuring individual Linux systems. You have learned how to install software, edit configuration files, and start services directly
on the machines where they run. While knowing how to work on individual Linux hosts is foundational to managing Linux systems, by itself it doesn’t scale well. That’s where Ansible can help.
Ansible is one of many automation features available today that changes the job of Linux administration
from a focus on single systems to groups of systems. It moves the configuration of those systems from
each individual machine to a control node. It replaces the user interface of a shell on each machine with
Ansible playbooks that run tasks on other machines over a network.
Although our focus here is on managing Linux systems, Ansible can manage many things around those
Linux systems as well. There are Ansible modules for making sure that machines are powered on, that
network devices are properly configured, and that remote storage is accessible.
In all but the smallest data centers, knowing how to deploy and manage Linux systems and surrounding infrastructure automatically is becoming a requirement for many IT jobs these days. For fully containerized data centers, Kubernetes-based application platforms are becoming the industry standard for
container orchestration and automation (see Chapter 31, “Deploying Applications as Containers with
Kubernetes”). For infrastructure and more traditional application deployments, Ansible offers rich set of
features for administrators with a Linux mindset.
This chapter takes you through what you should know about Ansible to get started. It then steps you
through deploying an application across a set of Linux systems with Ansible and shows you how to work
with those systems later by redeploying playbooks and running ad hoc commands.
713
Linux Bible, Eleventh Edition. Christopher Negus.
© 2026 John Wiley & Sons, Inc. All rights reserved, including rights for text and data mining and training of artificial intelligence technologies or similar
technologies. Published 2026 by John Wiley & Sons, Inc.
Downloaded from https://onlinelibrary.wiley.com/doi/ by alex jounh - Oregon Health & Science Univer , Wiley Online Library on [05/12/2025]. See the Terms and Conditions (https://onlinelibrary.wiley.com/terms-and-conditions) on Wiley Online Library for rules of use; OA articles are governed by the applicable Creative Commons License
CHAPTER
Understanding Ansible
Ansible extends, rather than replaces, what you have already learned about Linux. At its most
basic level, Ansible comprises the following:
■
■
■
An automation language that describes the tasks that you want to perform to reach a
particular state. These are gathered into playbooks.
The automation engine that is used to run the playbooks.
Interfaces you can use to manage and secure playbooks and other automation components, implemented with commands and RESTful APIs.
Using inventories (that define sets of hosts) and playbooks (that define sets of actions to take
on those hosts), Ansible configures host systems in the following ways:
Simple feature configuration: You create inventories and playbooks as plain-text files,
where you identify Linux components that are acted upon by modules. No coding experience is required.
Setting the results that you want: What you describe here are resources that define
the state you want a feature to be in on a node. That state can be a systemd service running, a network interface with particular addresses set, or a disk partition of a
certain size created. If, for some reason, the state changes for a feature, you can run a
playbook again to have Ansible return a node to the intended state.
SSH connections: By default, each host node must be running an SSH service that is configured to allow Ansible to communicate to it from the control node. Key-based authentication to regular user accounts allows this to happen, with sudo available when root
privilege escalation is needed. Because you are using an SSH service that is probably
already running on the host, you don’t need to run additional agents or configure special firewall rules for this to work.
Once you learn the basics about how Ansible works, you can do a wide range of advanced,
complex activities, such as the following:
Provisioning infrastructure: Using Ansible, you can provision the infrastructure that
your applications need, whether that is installing operating systems on bare metal or
as hypervisors (along with their virtual machines), setting up storage devices, or configuring network devices. In each of those cases, Ansible can leverage your existing
provisioning tools so that they can all be managed in one place.
Deploying applications: By describing the desired state of your applications, Ansible not
only can use tasks to deploy sets of applications across multiple nodes and devices, but
it can also replay those playbooks to return an application to its desired state when a
feature may have broken or have been changed unintentionally.
Managing containers and operators: Recent additions to Ansible allow it to deploy containerized applications to a Kubernetes infrastructure such as OpenShift. Operators in
OpenShift, which can be managed by an Ansible Operator, not only can define the state
714
Downloaded from https://onlinelibrary.wiley.com/doi/ by alex jounh - Oregon Health & Science Univer , Wiley Online Library on [05/12/2025]. See the Terms and Conditions (https://onlinelibrary.wiley.com/terms-and-conditions) on Wiley Online Library for rules of use; OA articles are governed by the applicable Creative Commons License
Part VI: Engaging with Cloud Computing
of containerized applications, but they can also respond to changes in real time and
make upgrades easier. See the description of the Ansible Operator for details (https://
www.ansible.com/blog/ansible-operator).
Managing networking: Tasks that are often done manually to configure, test,
validate, and enhance your networking infrastructure can be automated with Ansible. See the Ansible Network Getting Started guide for details
(https://docs.ansible.com/ansible/latest/network/getting_started/
index.html#network-getting-started).
Managing cloud environments: Just as you can deploy infrastructures to bare metal,
Ansible offers tools for provisioning infrastructure and applications to cloud environments. For Amazon Web Services (AWS) alone, there are hundreds of Ansible modules
available for managing infrastructure and applications. Modules for Alibaba, Azure,
Google, and a few dozen other cloud environments are also available.
Exploring Ansible Components
When a playbook is run, it acts on one or more target host systems (represented by inventories) and executes items referred to as plays. Each play contains one or more tasks that are
set to be achieved by that play. To carry out a task, the task calls modules, which are executed
in the order that they appear. Before you start using Ansible, it helps to understand a little
more about these components.
Inventories
By gathering host systems (nodes) that you want to manage in what are referred to as inventories, you can manage machines that are similar in groups. Similarities could include the
following:
■
■
■
Located in a similar location
Provide the same kind of service
Assigned to a particular stage in a process, such as sets of machines for development,
testing, staging, and production
Joining hosts together into more than one group allows them to be acted on based on different kinds of attributes. For example, host01 might be both in a group called newyork
(for its location) and a group called ftp (for the application it provides). Tasks run on those
inventory groups might allow each host to get network settings based on its location and the
applications it runs based on its purpose, respectively.
There are multiple ways of creating inventories. You can set a line of static servers or create a
range of systems. You can also use dynamic lists of servers from cloud providers, such as Azure,
AWS, and GCP.
Using variables, you can assign attributes to a set of hosts in an inventory. Those variables
can configure such things as the port from which a service is available from a host, a timeout
715
30
Downloaded from https://onlinelibrary.wiley.com/doi/ by alex jounh - Oregon Health & Science Univer , Wiley Online Library on [05/12/2025]. See the Terms and Conditions (https://onlinelibrary.wiley.com/terms-and-conditions) on Wiley Online Library for rules of use; OA articles are governed by the applicable Creative Commons License
Chapter 30: Automating Apps and Infrastructure with Ansible
value for a service, or the location of a service used by a host (such as a database for a
Network Time Protocol server).
Like playbooks, inventories can be simple text files. They can also be implemented from an
inventory script.
Playbooks
Playbooks are created as YAML-formatted files that describe the end state of something.
That something can cause software to be installed, applications to be configured, or services to be launched. It can focus on the application alone, or it can include the entire
environment (networking, storage, authentication, or other feature) surrounding that
application.
Playbooks are meant to be reusable—to deploy the same components later, to be adapted for
other components, or to be replayed to reestablish the original intent of a specific instance
of the playbook. Because playbooks are intended for reuse, many people keep their playbooks
under source control. In that way, you can track changes over time and make the playbooks
easily available.
Plays
Inside a playbook is one or more plays. Each play has a target, such as a hosts identifier
that tells the playbook which host systems to act on. That can be followed by a remote_
user that tells the playbook which user to authenticate to on the host. The play can also
indicate that it needs to escalate privileges with sudo before it starts executing the tasks.
After that, there can be one or more tasks to define the actual activity that is carried out on
the hosts.
Tasks
At the most basic level, each task runs one or more modules. A task provides a way to associate the module being run with the parameters and return values associated with that module.
Modules
Hundreds of Ansible modules are available today, with more being created all the time. When
run, a module makes sure that a requested state is achieved by checking that intended state,
as indicated by parameters that are provided, and if the target is not in that state, then doing
what needs to be done to get there. The Module Index organizes those modules by category
(https://docs.ansible.com/ansible/latest/modules/modules_by_category.html).
Examples of modules include yum, mysql_db, and ipmi_power. The yum module can
install, remove, or otherwise manage software packages and repositories from the YUM facility.
A mysql_db module lets you add or remove a MySQL database from a host. The ipmi_
power module lets you check the state of computers with IPMI interfaces and make sure they
get to the requested state (on or off).
716
Downloaded from https://onlinelibrary.wiley.com/doi/ by alex jounh - Oregon Health & Science Univer , Wiley Online Library on [05/12/2025]. See the Terms and Conditions (https://onlinelibrary.wiley.com/terms-and-conditions) on Wiley Online Library for rules of use; OA articles are governed by the applicable Creative Commons License
Part VI: Engaging with Cloud Computing
Conditionals can be applied to each task. For example, with the yum module, you can condition whether to install a package by its state. You could say that if the state of the package is
installed, then don’t install the package (even if a newer version is available). However, if
you use latest, then a newer version of the package will be installed if the current package
is not the latest.
Parameters let you add information to modify the task. For example, with the user module, when
you add a user to a system, you can identify the user’s name, password, UID, and shell.
Besides setting up modules to be executed from playbooks, you can also run modules directly
from the command line. This is useful if you want to act on a host immediately, without running
an entire playbook. For example, you can ping a set of hosts to make sure that they are running
or check the status of a service. (See the section “Running Ad Hoc Ansible Commands” later in
this chapter for further information.)
To learn more about a particular module, go to the Ansible documentation website (select Modules
from the https://docs.ansible.com page) or use the ansible-doc command. For example,
to learn more about how to use the copy module to copy files to a remote location, enter the
following:
# ansible-doc copy
> COPY
(/usr/lib/python3.7/site-
packages/ansible/modules/files/
copy.py)
The 'copy' module copies a file from the local or
remote machine to a location on the remote machine…
Most modules have return values to provide information about the results of that module’s action.
Common return values include Booleans, indicating whether the task was successful (failed),
whether the task was skipped (skipped), or whether the task had to make changes (changed).
Roles, imports, and includes
As your collection of playbooks grows, you may find that you want to break up those playbooks
into smaller pieces that you can include in multiple playbooks. You can separate parts of a large
playbook into separate, reusable files and then call those files into the main playbook using
includes and imports. Roles are similar, but they can encompass more things than tasks, such as
modules, variables, and handlers.
For information on using includes, imports, and roles, see “Creating Reusable Playbooks” at
https://docs.ansible.com/ansible/latest/user_guide/playbooks_reuse.html.
Stepping Through an Ansible Deployment
30
To get you started using Ansible, we are going to step through a procedure to deploy a web
service to a set of hosts. After installing Ansible, the procedure shows you how to create
the inventory and playbook that you need to deploy the service. Then it shows how to use
ansible-playbook to actually deploy the playbook.
717
Downloaded from https://onlinelibrary.wiley.com/doi/ by alex jounh - Oregon Health & Science Univer , Wiley Online Library on [05/12/2025]. See the Terms and Conditions (https://onlinelibrary.wiley.com/terms-and-conditions) on Wiley Online Library for rules of use; OA articles are governed by the applicable Creative Commons License
Chapter 30: Automating Apps and Infrastructure with Ansible
Prerequisites
To get started, I used four computers (you can use virtual machines) with the following names:
ansible
host01
host02
host03
Used as the Ansible control node
First target node
Second target node
Third target node
Then I ran the following steps to prepare to use those hosts with Ansible:
1. Installed Fedora on each of the computers or virtual machines (RHEL should
work as well).
2. For each of the three target nodes (host01, host02, and host03), I made sure
to do the following:
a. Have the SSH service running and available (opening TCP port 22 if necessary) to
the Ansible control node.
b. Create a nonroot user account. Later, when you use the playbook, add the
--ask-become-pass option to be prompted for the password that you’ll
need to escalate privileges.
c. Set a password for that user.
When running Ansible, I use the regular user account that has sudo privileges to connect
to each system, and then I escalate to root privilege using sudo.
Setting up SSH keys to each node
Log in to the control node (ansible) and ensure that it can reach the three other nodes
that you are configuring. Either make sure you can reach the hosts through a DNS server or
add them to the /etc/hosts file on the control node. Then set up keys to access those
nodes. For example:
1. As root user, add the IP address and name for each node to which you want to
deploy your Ansible playbooks to the /etc/hosts file:
192.168.122.154
192.168.122.94
192.168.122.189
host01
host02
host03
2. Still on the ansible system, generate ssh keys so that you can have passwordless
communications with each host. You can run this and the later Ansible commands as a
regular user on the ansible host system:
$ ssh-keygen
Generating public/private ed25519 key pair.
Enter file in which to save the key (/home/joe/.ssh/id_ed25519):
<ENTER>
Created directory '/home/joe/.ssh'.
718
Downloaded from https://onlinelibrary.wiley.com/doi/ by alex jounh - Oregon Health & Science Univer , Wiley Online Library on [05/12/2025]. See the Terms and Conditions (https://onlinelibrary.wiley.com/terms-and-conditions) on Wiley Online Library for rules of use; OA articles are governed by the applicable Creative Commons License
Part VI: Engaging with Cloud Computing
Enter passphrase for "/home/chris/.ssh/id_ed25519"(empty for no
passphrase): <ENTER>
Enter same passphrase again: <ENTER>
Your identification has been saved in /home/joe/.ssh/id_ed25519
Your public key has been saved in /home/joe/.ssh/id_rsa.pub.
The key fingerprint is:
SHA256:UexjkySUSqi1XpyJKu9fmNB2rwYJERi7ka8IpPYdV5c chris@ansible
The key's randomart image is:
+--[ED25519 256]--+
|.o.. . ..o.
|
|.o. o . o.o .
|
|+. + = +.= E
|
|o+o.o * ..B
|
|+.o+o+..S. o
|
|=.oo=+o.
|
|oo .oo. .
|
| . ...
|
| ......
|
+----[SHA256]-----+
3. Using ssh-copy-id, copy your public key to the user account with sudo privilege
on each host. The following for loop steps through copying the user’s password to all
three hosts for the user joe:
$ for i in 1 2 3; do ssh-
copy-
id joe@host0$i; done
/usr/bin/ssh-
copy-
id: INFO: Source of key(s) to be installed:
"/home/joe/.ssh/id_ed25519.pub"
/usr/bin/ssh-
copy-
id: INFO: attempting to log in with the
new key(s), to filter out any that are already installed
/usr/bin/ssh-
copy-
id: INFO: 1 key(s) remain to be installed
-
-if you are prompted now it is to install the new keys
joe@host01's password: <password>
Number of key(s) added: 1
Now try logging into the machine, with:
"ssh 'joe@host01'"
and check to make sure that only the key(s) you wanted were added.
/usr/bin/ssh-
copy-
id: INFO: Source of key(s) to be installed:
"/home/joe/.ssh/id_ed25519.pub"
/usr/bin/ssh-
copy-
id: INFO: attempting to log in with the
new key(s), to filter out any that are already installed
/usr/bin/ssh-
copy-
id: INFO: 1 key(s) remain to be installed
-
-if you are prompted now it is to install the new keys
joe@host02's password: <password> ...
The next step is to install the ansible package on the control node (ansible). From
that point on, all that work is done from the control node.
719
30
Downloaded from https://onlinelibrary.wiley.com/doi/ by alex jounh - Oregon Health & Science Univer , Wiley Online Library on [05/12/2025]. See the Terms and Conditions (https://onlinelibrary.wiley.com/terms-and-conditions) on Wiley Online Library for rules of use; OA articles are governed by the applicable Creative Commons License
Chapter 30: Automating Apps and Infrastructure with Ansible
Installing Ansible
Ansible software packages are available for RHEL, Fedora, Ubuntu, and other Linux
distributions. Because Ansible playbooks are run from a control node, there is no need to
install Ansible software on any of the nodes that it targets.
So, start by installing the ansible package on the RHEL, Fedora, Ubuntu, or other Linux
system that you want to use as your control node. That control node must simply be able to
connect to the SSH service running on the host nodes to which you want to deploy.
Install the ansible package (or ansible-core for a lighter install) in one of the following
ways:
RHEL
# dnf install ansible -
y
Fedora
# dnf install ansible -
y
Ubuntu
$ sudo apt install ansible
With Ansible installed, you can start to build the inventory that provides the targets for the playbooks that you will run.
Creating an inventory
A simple inventory can consist of the name representing the target for a playbook and the host
systems associated with that name. To get started, here is an inventory example that contains
three groups of static hosts:
[ws]
host01
host02
host03
[newyork]
host01
[houston]
host02
host03
Adding these entries to the /etc/ansible/hosts file makes them available when you run
Ansible commands and playbooks.
720
Downloaded from https://onlinelibrary.wiley.com/doi/ by alex jounh - Oregon Health & Science Univer , Wiley Online Library on [05/12/2025]. See the Terms and Conditions (https://onlinelibrary.wiley.com/terms-and-conditions) on Wiley Online Library for rules of use; OA articles are governed by the applicable Creative Commons License
Part VI: Engaging with Cloud Computing
Although this procedure just deploys to the set of hosts in the ws group, the other two groups
illustrate how you might want to set up playbooks for separate tasks based on the location of the
machines (newyork and houston).
Authenticating to the hosts
Just to make sure you can access each host from the Ansible system, ssh to each host. You
should not have to enter a password:
$ ssh -
i id_ed25519 joe@host01
Last login: Sun Mar 30 19:13:53 2025 from 192.168.122.208
$ exit
Repeat for each host.
Creating a playbook
This playbook results in web server software being installed and started on the hosts defined
earlier in the ws group. Likewise, the playbook checks that firewall software is installed and
running and that port 80 (http port) is open in the firewall to access the web server. I added
the following content to a file called simple_web.yaml:
---
-name: Create web server
hosts: ws
remote_user: joe
become_method: sudo
become: yes
become_user: root
tasks:
-name: Install httpd
yum:
name: httpd
state: present
-name: Check that httpd has started
service:
name: httpd
state: started
-name: Install firewalld
yum:
name: firewalld
state: present
-name: Firewall access to https
firewalld:
service: http
permanent: yes
state: enabled
30
721
Downloaded from https://onlinelibrary.wiley.com/doi/ by alex jounh - Oregon Health & Science Univer , Wiley Online Library on [05/12/2025]. See the Terms and Conditions (https://onlinelibrary.wiley.com/terms-and-conditions) on Wiley Online Library for rules of use; OA articles are governed by the applicable Creative Commons License
Chapter 30: Automating Apps and Infrastructure with Ansible
-name: Restart the firewalld service to load in the firewall
changes
service:
name: firewalld
state: restarted
The three hyphens at the beginning of the simple_web.yaml playbook indicate the start of
the YAML content in the file. Here’s a breakdown of the rest of the file:
name: The play is identified as “Create web server.”
hosts: Apply this inventory to the hosts in the ws group.
remote_user: The regular user that is used to authenticate to each remote system.
This is done because it is a good security practice not to allow direct root login to a
remote system.
become: Enabling this feature (yes) tells Ansible to become a different user than the
remote_user to run the modules in the task.
become_method: What feature to use to escalate privilege (sudo).
become_user: Which user to authenticate to (root).
tasks: Starts the section containing the tasks.
name: The name is a title given to the task. In the first case, “Install httpd,” then
“Check that httpd has started,” and so on. The next line starts with the name of a
module (yum, service, firewalld, and so on).
For yum, it says to check if the httpd package is present, and if it is not, then
install it.
For service, it checks whether the httpd daemon is running (started). If httpd is
not running, Ansible starts it.
For yum, it says to check if the firewalld package is present, and if it is not, then
install it.
For firewalld, make the port for the http service (TCP 80) available immediately
(enabled) and permanently (permanent: yes) through the firewall.
For service, restart the firewalld service (restarted) to enable access to the new
http service firewall port.
Run the playbook
Use the ansible-playbook command to run the playbook. (As an alternative, you
could also use ansible-navigator.) To test the playbook before running it live, use
the -C option. To see more details (at least until you are sure that it’s working), add the
-v option to see verbose output.
Keep in mind that if you run a playbook with -C, it cannot fully test the playbook to make
sure that it is correct. The reason is that a later step might require that an earlier step be
722
Downloaded from https://onlinelibrary.wiley.com/doi/ by alex jounh - Oregon Health & Science Univer , Wiley Online Library on [05/12/2025]. See the Terms and Conditions (https://onlinelibrary.wiley.com/terms-and-conditions) on Wiley Online Library for rules of use; OA articles are governed by the applicable Creative Commons License
Part VI: Engaging with Cloud Computing
completed before it can be done. In this example, the httpd package would need to be
installed before the httpd service can be running.
Here’s an example of running the Ansible playbook in verbose mode:
$ ansible-playbook -v simple_web.yaml -kK
Using /etc/ansible/ansible.cfg as config file
SSH password: <ssh password>
BECOME password[defaults to SSH password]: <Enter>
PLAY [Create web server] ***************************************
TASK [Gathering Facts] *****************************************
ok: [host03]
ok: [host02]
ok: [host01]
TASK [Install httpd]
****************************************************************
changed: [host01] => {"changed": true, "msg": "", "rc": 0,
"results": ["Installed: httpd", …
changed: [host02] => {"changed": true, "msg": "", "rc": 0,
"results": ["Installed: httpd", …
changed: [host03] => {"changed": true, "msg": "", "rc": 0,
"results": ["Installed: httpd", …
TASK [Check that httpd has started]
****************************************************************
changed: [host03] => {"changed": true, "name": "httpd",
"state": "started", "status":
changed: [host02] => {"changed": true, "name": "httpd",
"state": "started", "status": …
changed: [host01] => {"changed": true, "name": "httpd",
"state": "started", "status": …
…
TASK [Install firewalld]****************************************
changed: [host03] => {"changed": true, "msg": "", "rc": 0, "results":
["Installed: firewalld", "Installed: python3-
decorator…
changed: [host02] => {"changed": true, "msg": "", "rc": 0, "results":
["Installed: firewalld", "Installed: python3-
decorator…
changed: [host01] => {"changed": true, "msg": "", "rc": 0, "results":
["Installed: firewalld"…
TASK [Firewall access to https]*************************************
ok: [host03] => {"changed": false, "msg": "Permanent operation,
(offline operation: only on-
disk configs were altered)"}
ok: [host02] => {"changed": false, "msg": "Permanent operation,
(offline operation: only on-
disk configs were altered)"}
723
30
Downloaded from https://onlinelibrary.wiley.com/doi/ by alex jounh - Oregon Health & Science Univer , Wiley Online Library on [05/12/2025]. See the Terms and Conditions (https://onlinelibrary.wiley.com/terms-and-conditions) on Wiley Online Library for rules of use; OA articles are governed by the applicable Creative Commons License
Chapter 30: Automating Apps and Infrastructure with Ansible
ok: [host01] => {"changed": false, "msg": "Permanent operation,
(offline operation: only on-
disk configs were altered)"}
PLAY RECAP *****************************************************
host01: ok=6 changed=4 unreachable=0 failed=0 skipped=0 rescued=0
ignored=0
host02: ok=6 changed=4 unreachable=0 failed=0 skipped=0 rescued=0
ignored=0
host03: ok=6 changed=4 unreachable=0 failed=0 skipped=0
rescued=0 ignored=0
The output from ansible-playbook steps through each task. The first task (Gathering
Facts) shows that all three host systems in the ws inventory are accessible. What you can’t
see is that it is using the credentials to connect to each system and then escalating that user
to root privilege before completing each subsequent task.
The “Install httpd” task checks to see if the httpd package is yet installed on each host. If it is
not, Ansible asks to install the package, along with any dependent packages. Next, Ansible checks
the status of the httpd service on each host and, if it is not running, then starts it.
After that, each host is checked to see if the firewalld package is installed and installs it
if it is not there. Then Ansible adds a firewall rule to each host to allow access to the http
service (TCP port 80) and makes that setting permanent.
The PLAY RECAP then shows you the results of all of the tasks. Here you can see that all
six tasks on all hosts were ok. If there had been any failed, skipped, rescued, or ignored
tasks, they would be listed.
You can rerun this playbook if you think that something may have gotten out of place or if
you made a modification to it. You could also use it later to deploy the playbook on different systems.
Although you have seen how Ansible is good at deploying multiple tasks in playbooks, it
can also be used for one-off actions. In the next section, I show how to run some ad hoc
Ansible commands to query and further modify the hosts that we just deployed.
Running Ad Hoc Ansible Commands
There may be times when you want to do one-off tasks on your Ansible-managed nodes.
You can do those tasks using ad hoc commands. With an ad hoc command, you can directly
call a module from the Ansible command line and have it act on an inventory. Some of
those tasks could include the following:
■
■
■
724
Installing RPM software packages
Managing user accounts
Copying files to and from nodes
Downloaded from https://onlinelibrary.wiley.com/doi/ by alex jounh - Oregon Health & Science Univer , Wiley Online Library on [05/12/2025]. See the Terms and Conditions (https://onlinelibrary.wiley.com/terms-and-conditions) on Wiley Online Library for rules of use; OA articles are governed by the applicable Creative Commons License
Part VI: Engaging with Cloud Computing
■
■
Changing permissions on a file or directory
Rebooting a node
Just as when you run playbooks, running ad hoc commands focuses on reaching a desired
state. The ad hoc command takes a declarative statement, figures out what is being
requested, and does what it needs to do to reach the requested state.
To try these examples of ad hoc Ansible commands, you can use the ws inventory created
earlier.
Trying ad hoc commands
When you run an ad hoc Ansible command, you take some action using an Ansible module.
The command module is used by default if no other module is indicated. Using the module,
you indicate which command and options you want to run on a group of nodes as a one-
time activity.
Check that an inventory is up and running. Here, you see that hosts are all running in the
ws inventory:
$ ansible ws -
u joe -
m ping -
kK
SSH password: <ssh password>
BECOME password[defaults to SSH password]: <Enter>
host03 | SUCCESS => {
"ansible_facts": {
"discovered_interpreter_python": "/usr/bin/python"
},
"changed": false,
"ping": "pong"
}
host02 | SUCCESS => { …
host01 | SUCCESS => { …
You can find out if the httpd service is running on the hosts in the ws inventory by
checking the state of that service with this ansible command as follows:
$ ansible ws -
u joe -
m service \
-a "name=httpd state=started" --check -kK
SSH password: <ssh password>
BECOME password[defaults to SSH password]: <Enter>
host02 | SUCCESS => {
"ansible_facts": {
"discovered_interpreter_python": "/usr/bin/python"
},
"changed": false,
"name": "httpd",
"state": "started",
"status": { …
host 01 | SUCCESS => { …
30
725
Downloaded from https://onlinelibrary.wiley.com/doi/ by alex jounh - Oregon Health & Science Univer , Wiley Online Library on [05/12/2025]. See the Terms and Conditions (https://onlinelibrary.wiley.com/terms-and-conditions) on Wiley Online Library for rules of use; OA articles are governed by the applicable Creative Commons License
Chapter 30: Automating Apps and Infrastructure with Ansible
At the moment, there is no content on the web servers. To add an index.html file (containing the text “Hello from your web server!”) to all of the hosts in the ws inventory, you
could run this command (type the root password when prompted):
$ echo "Hello from your web server!"> index.html
$ ansible ws -
m copy -
a \
"src=./index.html dest=/var/www/html/ \
owner=apache group=apache mode=0644" \
-b --user joe --become --ask-become-pass -kK
SSH password: <ssh password>
BECOME password[defaults to SSH password]: <Enter>
host01 | CHANGED => {
"ansible_facts": {
"discovered_interpreter_python": "/usr/bin/python"
},
"changed": true,
"checksum": "213ae4bb07e9b1e96fbc7fe94de372945a202bee",
"dest": "/var/www/html/index.html",
"gid": 48,
"group": "apache",
"md5sum": "495feb8ad508648cfafcf69681d94f97",
"mode": "0644",
"owner": "apache",
"secontext": "system_u:object_r:httpd_sys_content_t:s0",
"size": 52,
"src": "/home/joe/.ansible/tmp/ansible-
tmp-
1581027374.649223-
29961128730253/source",
"state": "file",
"uid": 48
host02 | CHANGED => { …
host03 | CHANGED => { …
You can see that the index.html file is created with the apache owner (UID 48) and
apache group (GID 48) in the /var/www/html directory on host01. The copy was then
repeated to host02 and host03. You can check that everything is working by trying to
access that file from the ansible host through the web server using the curl command:
$ curl host01
Hello from your web server!
Automating Tasks with Ansible Tower
Automation Framework
Although running Ansible playbooks and commands are great for automating and later modifying sets of hosts, for a fully managed enterprise, you can go even further with Ansible. Using
Ansible Tower, you can add a larger framework to your Ansible deployments.
726
Downloaded from https://onlinelibrary.wiley.com/doi/ by alex jounh - Oregon Health & Science Univer , Wiley Online Library on [05/12/2025]. See the Terms and Conditions (https://onlinelibrary.wiley.com/terms-and-conditions) on Wiley Online Library for rules of use; OA articles are governed by the applicable Creative Commons License
Part VI: Engaging with Cloud Computing
Ansible Tower provides a web-based interface for managing your entire IT infrastructure with
Ansible playbooks and other components. By centralizing your Ansible assets in one place,
you have a single place to receive notifications. You can manage different administrative roles
across your enterprise.
The Ansible Tower interface makes it easy to update your provisioned assets continuously.
Instead of having to remember command-line options, you can just click to configure and
launch your Ansible tasks. Inventory management is graphical and job scheduling can be done
in intuitive, visual ways.
A REST API is available with Ansible Tower that can help you embed your existing infrastructure tools into Ansible. So, you can usually just continue the processes that you already have
in place but manage them with Ansible instead.
You can learn more about Ansible Tower from the Ansible Tower site (https://www
.ansible.com/products/tower).
Summary
Ansible provides a unique formatting language and set of tools to automate many of the tasks
that you have learned in other parts of this book. Once you know how to build an Ansible
playbook, you can identify the exact configuration that you want on a system and then easily
deploy that configuration to one or more host systems.
With Ansible playbooks, you define the exact state of an application and surrounding components and then apply that state to Linux host systems, network devices, or other targets. You
can save those playbooks and reuse them to produce similar results on other systems or adapt
them to create new and different results.
Ansible can also use ad hoc commands to update systems. From the ansible command line,
you can add users, copy files, install software, or do almost anything else you can do with
playbooks. With those commands, you can quickly apply a set of changes across multiple hosts
or respond to a problem that requires a quick fix that needs to be made immediately to a set
of hosts.
In this chapter, you learned about the different components that make up an Ansible toolset.
You created your own playbook for deploying a simple web server. Then you ran some ad hoc
commands to modify the systems to which you deployed your playbook.
Exercises
These exercises test your ability to get Ansible installed on your system, create your first Ansible
playbook, and run a few ad hoc Ansible commands. These tasks assume you are running a Fedora
or Red Hat Enterprise Linux system (although some tasks work on Ubuntu and other Linux
systems as well).
727
30
Downloaded from https://onlinelibrary.wiley.com/doi/ by alex jounh - Oregon Health & Science Univer , Wiley Online Library on [05/12/2025]. See the Terms and Conditions (https://onlinelibrary.wiley.com/terms-and-conditions) on Wiley Online Library for rules of use; OA articles are governed by the applicable Creative Commons License
Chapter 30: Automating Apps and Infrastructure with Ansible
Although Ansible is meant to deploy tasks to remote systems, the exercises here will just let you
try a playbook and a few commands on a single system. If you are stuck, solutions to the tasks
are shown in Appendix B (although in Linux, you can often complete a task in multiple ways).
1. Install Ansible on your Fedora or Ubuntu system.
2. Add sudo privilege for the user that you want to use to do these exercises.
3. Create a start to an Ansible playbook (call it my_playbook.yaml) that includes the
following content:
---
-name: Create web server
hosts: localhost
tasks:
-name: Install httpd
yum:
name: httpd
state: present
4. Run ansible-playbook on the my_playbook.yaml in check mode to see if
there is a problem completing the playbook (hint: there is).
5. Modify my_playbook.yaml to escalate privileges so that the tasks are run as the
root user.
6. Run ansible-playbook again until the httpd package successfully installs on
your system.
7. Modify my_playbook.yaml again to start the httpd service, and set it so that it
will start every time the system boots.
8. Run an ansible command that checks whether the httpd service is up on
localhost.
9. Create an index.html file that contains the text “Web server is up,” and use
the ansible command to copy that file to the /var/www/html directory on
localhost.
10. Use the curl command to view the contents of the file that you just copied to the
web server.
728
Downloaded from https://onlinelibrary.wiley.com/doi/ by alex jounh - Oregon Health & Science Univer , Wiley Online Library on [05/12/2025]. See the Terms and Conditions (https://onlinelibrary.wiley.com/terms-and-conditions) on Wiley Online Library for rules of use; OA articles are governed by the applicable Creative Commons License
Part VI: Engaging with Cloud Computing
31
Deploying Applications
as Containers with Kubernetes
IN THIS CHAPTER
Understanding Kubernetes
Trying Kubernetes
Running the Kubernetes Basics Tutorials
Enterprise-quality Kubernetes with EKS
L
inux containers separate the applications they contain from the operating systems on which they
run. Built properly, a container will hold a discrete set of software that can be transported and
run efficiently. But the story doesn’t end there. Once you have some containers, the next step is
to engage them with a platform like Kubernetes that allows you to do the following:
■
■
■
■
■
■
Group sets of containers together to form a larger application. For example, deploy a web
server, a database, and monitoring tools together.
Scale up your containers as the demand requires. In fact, you want to be able to scale each
component of the larger application individually, without having to scale up everything.
Set the state of your application and not just run it. What this means is that, instead of saying
run a container, you want to be able to say something like “run three copies of container X,
and if one goes down, be sure to start another one to replace it.”
Recover from host computers going down or becoming overloaded. If the host running a container fails, you want the container to recover quickly and start up on another host computer.
Not be concerned about the infrastructure. You want your application to connect to the services that it needs without having to know the hostnames, IP addresses, or port numbers associated with those services.
Upgrade your containerized applications without downtime.
Kubernetes offers all of those features and more. While at first there were others competing to be the
platform of choice for orchestrating containers, such as Mesos and Docker Swarm, Kubernetes has
become the undisputed leader in orchestrating, deploying, and managing containerized applications.
Kubernetes is also becoming the choice for running artificial intelligence and machine learning applications that can run as massive scale.
729
Linux Bible, Eleventh Edition. Christopher Negus.
© 2026 John Wiley & Sons, Inc. All rights reserved, including rights for text and data mining and training of artificial intelligence technologies or similar
technologies. Published 2026 by John Wiley & Sons, Inc.
Downloaded from https://onlinelibrary.wiley.com/doi/ by alex jounh - Oregon Health & Science Univer , Wiley Online Library on [05/12/2025]. See the Terms and Conditions (https://onlinelibrary.wiley.com/terms-and-conditions) on Wiley Online Library for rules of use; OA articles are governed by the applicable Creative Commons License
CHAPTER
This chapter introduces you to Kubernetes and the enterprise-quality Kubernetes platform
from Amazon called Elastic Kubernetes Service (EKS). The best way to learn Kubernetes is to
start up a Kubernetes cluster and run commands to explore Kubernetes and deploy a containerized application. Before you do that, you should understand a bit about what a Kubernetes
cluster is and what components you need to deploy an application to a cluster.
Understanding Kubernetes
A Kubernetes cluster consists of nodes that form a control plane (for managing the cluster) and
data plane (for running workloads). You can run all control plane and data plane services on
the same system for personal use. For example, with Minikube, as described later in this
chapter, you can run a Kubernetes cluster from a virtual machine on your laptop (https://
minikube.sigs.k8s.io/docs/start).
In a production environment, the control plane runs continuously, while data plane nodes
can be brought up and down as the demands of your workloads change. Here are the different components you need to consider if you were to set up a production-quality Kubernetes
infrastructure:
Control plane: The control plane manages the components running in the Kubernetes
cluster. It manages communications between components, schedules applications to
run on the data plane nodes, scales up the applications as needed, and makes sure that
the proper number of containers (distributed in pods) are running. The control plane
can run on one node, but you would typically have three or more available to make
sure that control plane services are always available.
Data plane: The data plane is where the deployed containers actually run. The number
of nodes that you need depends on your workload. For an on-premises cluster, you
might want the maximum number of nodes available that you might need during peak
demand, with nodes being brought up as they are needed and decommissioned as they
are not. For cloud environments, the cloud provider typically has enough systems on
hand to meet your data plane needs, so you can just pay for those nodes as you need
them. Although if you require special types of systems that are particularly in demand,
such as GPUs, you might need to reserve them.
Storage: Persistent networked storage allows containers to access the same storage,
regardless of the node that runs them.
Other services: To integrate a Kubernetes environment into an existing data center, you
might want to integrate it with other services. For example, you can set up application
and network load balancers to spread requests for services across multiple nodes. You
might also want to integrate with the local data center’s or cloud’s identity and access
management services.
In Kubernetes, the smallest unit with which you can deploy a container is referred to as a
pod. A pod can hold one or more containers, along with metadata describing its containers.
Although a pod can hold only one container, it is sometimes appropriate for a pod to have
730
Downloaded from https://onlinelibrary.wiley.com/doi/ by alex jounh - Oregon Health & Science Univer , Wiley Online Library on [05/12/2025]. See the Terms and Conditions (https://onlinelibrary.wiley.com/terms-and-conditions) on Wiley Online Library for rules of use; OA articles are governed by the applicable Creative Commons License
Part VI: Engaging with Cloud Computing
more than one. For example, a pod might contain a sidecar container, which is meant to monitor the service running in the primary container in the pod. Putting multiple containers in
the same pod means that containers in that pod will scale up together.
31
Kubernetes control plane
A Kubernetes control plane directs the activities of a Kubernetes cluster. The control plane
oversees all of the activities of the cluster through a set of services. The centerpiece of a
Kubernetes control plane is the API server (kube-apiserver), which receives object
requests. Communications between all of the nodes in the cluster pass through the API server.
When the API server is presented with an object, such as a request that a certain number of
pods be running, the Kubernetes scheduler (kube-scheduler) finds available nodes to run
each pod and schedules them to run on those nodes. To make sure that each object remains in
the prescribed state, Kubernetes controllers (kube-controller-manager) run continuously to do things such as to make sure that namespaces exist, that defined service accounts
are available, that the right number of replicas are running, and that defined endpoints are
active. If any of that is out of sync, requests are made to return those objects to the requested
states, by doing such things as bringing up more pods or re-creating a missing endpoint.
Kubernetes data plane
At the heart of each node in the Kubernetes data plane is the kubelet service. A kubelet registers its node with the API server. The API server then directs the kubelet to do things like
run a container that is requested from the API server through a PodSpec and make sure that it
continues to run in a healthy state.
Another service that runs on each node is a container engine (often referred to as a runtime).
Originally, the docker service was by far the most popular container engine used to launch,
manage, and delete containers as required by the PodSpec. However, in Kubernetes v1.23 the
use of Docker in Kubernetes was deprecated, and Docker was replaced by containerd as the
default container runtime for Kubernetes.
Originally, nodes were meant to be as generic as possible so that you could simply spin up a
new node when additional capacity was needed and it would be configured to handle most
requests to run containers. Over time, Kubernetes evolved to let you specify the types of processors (x86_64, Arm, GPUs, and so on), the amount of memory, and other attributes of the
nodes required to run your applications. Likewise, you can also run custom operating systems
that run the features for that node to work in your data center.
Kubernetes applications
In Kubernetes, applications are managed by defining API objects that set the state of resources
on the cluster. For example, you can create a Deployment object in a YAML file that defines
pods that each run one or more containers, along with the namespace in which it runs and
the number of replicas of each pod it runs. That object could also define the ports that
are open and any volumes that are mounted for each container. Kubernetes control plane
731
Downloaded from https://onlinelibrary.wiley.com/doi/ by alex jounh - Oregon Health & Science Univer , Wiley Online Library on [05/12/2025]. See the Terms and Conditions (https://onlinelibrary.wiley.com/terms-and-conditions) on Wiley Online Library for rules of use; OA articles are governed by the applicable Creative Commons License
Chapter 31: Deploying Applications as Containers with Kubernetes
responds to those kinds of requests and makes sure that the requests are carried out on the
Kubernetes data plane nodes.
Kubernetes uses the concept of services to separate the location of an application from its
actual IP address and port number. By assigning a service name to the set of pods that provide
that service, the exact location of each pod does not need to be known outside of the cluster.
Instead, it is up to Kubernetes to direct a request for that service to an available pod.
IP addresses associated with active pods are not directly addressable from outside the cluster by
default. It is up to you to define how you want to expose a service associated with a set of pods
outside of the cluster. Using a Service object, you can expose services in different ways.
By default, exposing a service via a ClusterIP service type makes it available only to
other components within the cluster. To expose the service outside of the cluster, you can
use NodePort, which makes the pod providing the service accessible through the same
Kubernetes-assigned port on an external IP address from each node on which the pod
is running.
A third method is to use LoadBalancer to assign an external, fixed IP address that acts as a
load balancer to the pods providing the service. With LoadBalancer, a cloud’s external
load balancer directs traffic to the backend pods. Finally, you can expose the service with
ExternalName, which associates the service with a particular DNS CNAME record.
Regardless of how you expose a Kubernetes service, when there is a request for that service,
Kubernetes acts to route communications to the set of pods that provide that service. In that
way, pods can come up and down without disrupting the clients using the service.
Kubernetes interfaces
Kubernetes has both command-line and web console interfaces for accessing a Kubernetes cluster. The examples in this chapter focus on command-line tools. Commands include minikube,
which is used to manage the Kubernetes virtual machine and bring the cluster up and down,
and kubectl, which is the general-purpose tool for managing the Kubernetes cluster.
Trying Kubernetes
Because setting up your own production-quality Kubernetes cluster requires some forethought,
this chapter will focus on a couple of easy ways to get a personal Kubernetes cluster running
and accessible quickly. In particular, here are a few different ways that you can gain access to
a Kubernetes cluster:
Kubernetes Tutorials: The official Kubernetes site offers interactive, web UI tutorials,
where you can start up your own cluster and try out Kubernetes. From Kubernetes
732
Downloaded from https://onlinelibrary.wiley.com/doi/ by alex jounh - Oregon Health & Science Univer , Wiley Online Library on [05/12/2025]. See the Terms and Conditions (https://onlinelibrary.wiley.com/terms-and-conditions) on Wiley Online Library for rules of use; OA articles are governed by the applicable Creative Commons License
Part VI: Engaging with Cloud Computing
Tutorials (https://kubernetes.io/docs/tutorials), you can choose from basic,
configuration, stateless applications, and other tutorial topics.
Minikube: With Minikube, you can run Kubernetes on your own computer. A Linux,
macOS, or Windows system that can run virtual machines can get the Minikube VM and
have a Kubernetes cluster running on a laptop or desktop system within a few minutes. Hello Minikube (https://kubernetes.io/docs/tutorials/hello-minikube)
includes instructions to set up Minikube.
K3s: K3s (https://k3s.io) is a Kubernetes distribution that is made to run in IoT
appliances and in remote locations. It works well for configurations that need to run
unattended.
MicroK8s: For developers who want a pure Kubernetes experience, MicroK8s (https://
microk8s.io/) is a good choice. MicroK8s offers a simple installation and builds that
keep up with the latest Kubernetes releases.
Docker Desktop: Another option (not detailed here) is Docker Desktop, which lets you
enable a preconfigured Kubernetes cluster that runs a control plane and node on your
workstation. (https://docs.docker.com/desktop/features/kubernetes).
To get you started, I’ll step you through some of the Kubernetes tutorials and explain the
concepts behind what they are doing. You can follow along in the tutorial or run the same
commands on your own Minikube setup. I describe how to get Kubernetes in one of these two
ways next.
Note
If you have an Amazon EKS environment up and running, you can follow most of these steps in EKS as well. In most
case, you can use the kubectl command to get the same results you would on minikube.
Getting Kubernetes
The following descriptions tell you how to work with a Kubernetes cluster either through the
Kubernetes Basics Tutorial or by installing and starting Minikube.
Starting the Kubernetes Basics Tutorial
To start up the Kubernetes project basic interactive tutorial, visit the following URL from your
web browser:
https://kubernetes.io/docs/tutorials/kubernetes-basics
Figure 31.1 shows the start of the Kubernetes Basics Tutorial.
At this point, you can follow the prompts through the tutorial. Because the tutorial starts a
live cluster, you can use that interface to try other commands as well.
733
31
Downloaded from https://onlinelibrary.wiley.com/doi/ by alex jounh - Oregon Health & Science Univer , Wiley Online Library on [05/12/2025]. See the Terms and Conditions (https://onlinelibrary.wiley.com/terms-and-conditions) on Wiley Online Library for rules of use; OA articles are governed by the applicable Creative Commons License
Chapter 31: Deploying Applications as Containers with Kubernetes
FIGURE 31.1
Step through the Kubernetes project tutorials.
Starting Minikube
Getting Minikube running on your personal computer requires a few things. This includes the
following:
■
■
■
■
Logging in as a user with sudo privileges.
Using a computer that is configured as a hypervisor so it can run the Minikube virtual
machines. You can set up Virtual Machine Manager, as described in the “Setting up a
hypervisor” section of Chapter 28.
Having resources recommended by Minikube (two or more CPUs, 2GB or more of free
memory, 20GB or more of free disk space, and a connection to the Internet).
Container or virtual machine manager.
For Linux, macOS, and Windows systems, go here to find the latest instructions:
https://minikube.sigs.k8s.io/docs/start/
These are the basic steps for installing and starting minikube:
1. Installation: Choose the operating system, architecture, release type, and installer
type. For example, on a Linux, x86-64 system with a stable release type and binary
download, you might run the following commands to download and install minikube:
$ curl -LO \
https://github.com/kubernetes/minikube/releases/latest/
download/minikube-linux-amd64
$ sudo install minikube-linux-amd64 \
/usr/local/bin/minikube \
&& rm minikube-linux-amd64
734
Downloaded from https://onlinelibrary.wiley.com/doi/ by alex jounh - Oregon Health & Science Univer , Wiley Online Library on [05/12/2025]. See the Terms and Conditions (https://onlinelibrary.wiley.com/terms-and-conditions) on Wiley Online Library for rules of use; OA articles are governed by the applicable Creative Commons License
Part VI: Engaging with Cloud Computing
2. Start your cluster: Run minikube start as the user with sudo privileges. If all
goes well, minikube should find your hypervisor and create the minikube control
plane. At this point, you can try some kubectl commands on your cluster and try
running some containerized applications.
3. Install the kubectl command: Get a version of the kubectl command that is
within one version of Kubernetes in your Minikube. Installing the latest versions of
kubectl and minikube should take care of that. Enter the following:
$ sudo curl -
LO \
https://storage.googleapis.com/kubernetes-release/
release/'curl -s
https://storage.googleapis.com/kubernetes-release/release/
stable.txt
'/bin/linux/amd64/kubectl
$ sudo mv kubectl /usr/local/bin/
$ sudo chmod 755 /usr/local/bin/kubectl
Strickly speaking, you don’t need to get a separate kubectl binary since minikube has
kubectl built in. For example, you could just run minikube kubectl get node. But
in most other environments, you will use kubectl as a separate command.
Running the Kubernetes Basics tutorial
The Kubernetes Basics Tutorial takes you through a good set of commands to start familiarizing yourself with Kubernetes:
https://kubernetes.io/docs/tutorials/kubernetes-basics/
The following text walks you through the first five modules of the Kubernetes Basics Tutorial.
If you are running through this procedure directly from the Kubernetes tutorials page, go
ahead and start Minikube (minikube start). If you are using Minikube from a VM already
running on your laptop, you can still follow this procedure. The steps are the same since both
use Minikube.
Get information about your cluster
Run these commands to get basic information about your cluster:
1. List Minikube version: To see the version of minikube you are using, enter the
following:
$ minikube version
minikube version: v1.35.0
commit: dd5d320e41b5451cdf3c01891bc4e13d189586ed-dirty
2. List cluster information: To see the URL from which the Kubernetes master and DNS
services are available, enter the following:
$ kubectl cluster-info
Kubernetes control plane is running at https://localhost:36355
CoreDNS is running at https://localhost:36355/api/v1/namespaces/
kube-system/services/kube-dns:dns/proxy
735
31
Downloaded from https://onlinelibrary.wiley.com/doi/ by alex jounh - Oregon Health & Science Univer , Wiley Online Library on [05/12/2025]. See the Terms and Conditions (https://onlinelibrary.wiley.com/terms-and-conditions) on Wiley Online Library for rules of use; OA articles are governed by the applicable Creative Commons License
Chapter 31: Deploying Applications as Containers with Kubernetes
To further debug and diagnose cluster problems, use 'kubectl
cluster-info dump'.
3. List node information: To see the number of nodes running (just one master node
for Minikube) and their status, enter the following:
$ kubectl get nodes
NAME
STATUS
ROLES
AGE
minikube Ready
control-
plane 23m
VERSION
v1.32.0
4. List cluster and client versions: To list the versions of the kubectl client and
Kubernetes cluster (to make sure they are within one version of each other), enter the
following:
$ kubectl version
Client Version: v1.31.0
Kustomize Version: v5.4.2
Server Version: v1.32.0
Deploy a Kubernetes application
Request to run and manage containerized applications (in the form of pods) on a Kubernetes cluster is known as a deployment. Once a deployment is created, it is up to the Kubernetes cluster to make sure the requested pods are always running. It does this by doing the
following:
■
■
■
■
Accepting the deployment creation through the API server
Asking the scheduler to run the requested containers from each pod on
available nodes
Watching the pods to make sure they continue to run as requested
Starting a new instance of a pod (on the same or different node) if the pod fails (for
example, if the container stops running)
The tutorial shows an example of how to create a simple deployment from a container image.
In this example, you just give it a name and identify the container image to use. The rest of
the deployment settings are filled in from defaults.
1. Create a deployment: To start the deployment that pulls the kubernetes-
bootcamp container with a deployment name of kubernetes bootcamp, enter
the following:
$ kubectl create deployment kubernetes-
bootcamp \
--image=gcr.io/google-samples/kubernetes-bootcamp:v1
deployment.apps/kubernetes-bootcamp created
2. List deployments: To see that the deployment exists (and has one instance requested
and one running), enter the following:
$ kubectl get deployments
NAME
READY
kubernetes-
bootcamp
1/1
736
UP-
TO-
DATE
1
AVAILABLE
1
AGE
4m38s
Downloaded from https://onlinelibrary.wiley.com/doi/ by alex jounh - Oregon Health & Science Univer , Wiley Online Library on [05/12/2025]. See the Terms and Conditions (https://onlinelibrary.wiley.com/terms-and-conditions) on Wiley Online Library for rules of use; OA articles are governed by the applicable Creative Commons License
Part VI: Engaging with Cloud Computing
3. Describe the deployment: To see details about the deployment, enter the following:
$ kubectl describe deployments kubernetes-
bootcamp
Name:
kubernetes-
bootcamp
Namespace:
default
…
Replicas:
1 desired | 1 updated | 1 total | 1 available |
0 unavailable
…
Pod Template:
Labels: app=kubernetes-
bootcamp
Containers:
kubernetes-
bootcamp:
Image:
gcr.io/google-
samples/kubernetes-
bootcamp:v1
Port:
<none>
Host Port:
<none>
Environment: <none>
Mounts:
<none>
Volumes:
<none>
…
31
In the kubernetes-bootcamp deployment, notice that it just sets one instance (replica)
of the pod associated with the deployment to be available. The deployment runs in the current
namespace, which by default is called default. Notice also that there are no ports open or
volumes mounted by default for the pods.
Get information on the deployment’s pods
With the deployment created, you can ask for information about the pod created from that
deployment and expose the Kubernetes API from the VM to your local system, via a proxy service, to connect to the pod directly.
1. Expose the Kubernetes API to the local system: To open a proxy from your system
to the Kubernetes API running in Minikube (kubectl proxy), enter the following:
$ kubectl proxy
Starting to serve on 127.0.0.1:8001
2. Query the Kubernetes API: Open a second terminal, and query the Kubernetes API
running on Minikube by entering the following:
$ curl http://localhost:8001/version
{
"major": "1",
"minor": "32",
"gitVersion": "v1.32.0",
"gitCommit": "70d3cc986aa8221cd1dfb1121852688902d3bf53",
"gitTreeState": "clean",
"buildDate": "2024-
12-
11T17:59:15Z",
"goVersion": "go1.23.3",
737
Downloaded from https://onlinelibrary.wiley.com/doi/ by alex jounh - Oregon Health & Science Univer , Wiley Online Library on [05/12/2025]. See the Terms and Conditions (https://onlinelibrary.wiley.com/terms-and-conditions) on Wiley Online Library for rules of use; OA articles are governed by the applicable Creative Commons License
Chapter 31: Deploying Applications as Containers with Kubernetes
"compiler": "gc",
"platform": "linux/amd64"
3. Get pod information: The name of the pod used in this deployment is
kubernetes-bootcamp, followed by a unique string of characters. Enter these
commands to output the name of the pod and then list a description of that pod:
$ kubectl get pods
NAME
READY
STATUS
RESTARTS
AGE
kubernetes-
bootcamp-
9bc58d867-
7g6dr
1/1
Running
0
12m
$ kubectl describe pod kubernetes-bootcamp-9bc58d867-7g6dr
Name:
kubernetes-
bootcamp-
9bc58d867-
7g6dr
Namespace:
default
Priority:
0
Node:
minikube/10.0.2.15
…
Containers:
kubernetes-
bootcamp:
Container ID:
docker://5b75b05b7f9aca00ae99abc9b997ae8e708eed906f…
Image:
gcr.io/google-
samples/kubernetes-
bootcamp:v1
Image ID:
docker-
pullable://gcr.io/google-
samples…
…
Events:
Type
Reason
Age
From
Message
-
-
-
-
-
-
-
-
-
-
-
-
-
- -
-
-
-
-
-
-
-
Normal Scheduled 14m
default-
scheduler Successfully assigned
default/kubernetes-bootcamp-9bc58d867-7g6dr to minikube
Normal Pulled
14m
kubelet
Successfully pulled
image...
"gcr.io/google-samples/kubernetes-bootcamp:v1"
already present on machine
Normal Created
14m
kubelet, minikube Created container
kubernetes-bootcamp
Normal Started
14m
kubelet, minikube Started container
kubernetes-bootcamp
From the trimmed output, you can see the name of the pod, the namespace it is
in (default), and the node on which it is running (minikube/10.0.2.15).
Under Containers, you can see the name of the running container
(docker://5b75b05b7f9a . . .), the image it came from (. . . kubernetes-
bootcamp:v1), and the image ID for that image. Under Events, starting from the
bottom, you can see the kubelet on the node minikube, starting and creating the
container. It successfully pulls the container image. Then it assigns the pod to run on
that node.
4. Connect to the pod: Use the curl command to contact the pod and get it to
respond to your request for information:
$ export POD_NAME=$(kubectl get pods -
o go-
template -
-
template \
'{{range .items}}{{.metadata.name}}{{"\n"}}{{end}}') ; \
738
Downloaded from https://onlinelibrary.wiley.com/doi/ by alex jounh - Oregon Health & Science Univer , Wiley Online Library on [05/12/2025]. See the Terms and Conditions (https://onlinelibrary.wiley.com/terms-and-conditions) on Wiley Online Library for rules of use; OA articles are governed by the applicable Creative Commons License
Part VI: Engaging with Cloud Computing
echo Name of the Pod: $POD_NAME
Name of the Pod: kubernetes-
bootcamp-
9bc58d867-
7g6dr
$ curl http://localhost:8001/api/v1/namespaces/default/pods/
$POD_NAME:8080/proxy/
Hello Kubernetes bootcamp!|Running on:kubernetes-
bootcamp-
9bc58d867-7g6dr|v=1
31
5. View the logs: To see the logs for any container that is running inside the selected
pod, run the following command:
$ kubectl logs $POD_NAME
Kubernetes Bootcamp App Started At: 2025-
04-
12T07:40:02.787Z |
Running On: kubernetes-bootcamp-9bc58d867-7g6dr
Running On: kubernetes-
bootcamp-
9bc58d867-
7g6dr | Total Requests: 1
| App Uptime: 841.737 seconds | Log Time: 2025-
04-
12T07:54:04.524Z
6. Execute commands on the pod: Use kubectl exec to run commands inside the
pod. The first command runs env in order to view shell environment variables from
inside of the pod, and the second opens a shell inside the pod so you can run the
following commands:
$ kubectl exec $POD_NAME -
-env
PATH=/usr/local/sbin:/usr/local/bin:/usr/sbin:/usr/bin:/sbin:/bin
HOSTNAME=kubernetes-bootcamp-9bc58d867-7g6dr
KUBERNETES_SERVICE_HOST=10.96.0.1
KUBERNETES_SERVICE_PORT=443
…
$ kubectl exec -
ti $POD_NAME -
-bash
root@kubernetes-bootcamp-9bc58d867-7g6dr:/# date
Sat Apr 12 07:58:00 UTC 2025
kubernetes-bootcamp-5b48cfdcbd-lf9t2:/# ps -ef
UID
PID
PPID C STIME TTY
TIME CMD
root
1
0 0 07:40 ?
00:00:00 /bin/sh -
c node
server.js
root
6
1 0 07:40 ?
00:00:00 node server.js
root
18
0 0 07:57 pts/0
00:00:00 bash
root
25
18 0 07:58 pts/0
00:00:00 ps -
ef
root@kubernetes-bootcamp-5b48cfdcbd-lf9t2:/# curl localhost:8080
Hello Kubernetes bootcamp!|Running on:kubernetes-
bootcamp-
9bc58d
867-7g6dr|v=1
root@kubernetes-bootcamp-5b48cfdcbd-lf9t2:/# exit
After starting a shell, you can see output from the date and ps commands. From ps, you can
see that the first process run in the container (PID 1) is the server.js script. After that,
the curl command is able to communicate successfully with the container on localhost
port 8080.
739
Downloaded from https://onlinelibrary.wiley.com/doi/ by alex jounh - Oregon Health & Science Univer , Wiley Online Library on [05/12/2025]. See the Terms and Conditions (https://onlinelibrary.wiley.com/terms-and-conditions) on Wiley Online Library for rules of use; OA articles are governed by the applicable Creative Commons License
Chapter 31: Deploying Applications as Containers with Kubernetes
Expose applications with services
To expose the kubernetes-bootcamp pod described in these procedures so that it is accessible from an external IP address from the worker node on which it is running, you can create
a NodePort object. Here is one way to do that:
1. Check that the pod is running: Enter the following to see that the kubernetes-
bootcamp pod is running:
$ kubectl get pods
NAME
kubernetes-
bootcamp-
9bc58d867-
7g6dr
READY
1/1
STATUS
Running
RESTARTS
0
AGE
26m
2. Check the services: Enter the following to see the services running in the default
namespace. Notice that only the kubernetes service is available and that there is
no service exposing the kubernetes-bootcamp pod outside of the cluster:
$ kubectl get services
NAME
TYPE
kubernetes
ClusterIP
CLUSTER-
IP
10.96.0.1
EXTERNAL-
IP
<none>
PORT(S)
443/TCP
AGE
31m
3. Create a service: Create a service that uses NodePort to make the pod available from
an IP address on the host at a specific port number (8080). For example, enter the
following:
$ kubectl expose deployment/kubernetes-
bootcamp \
--type="NodePort" --port 8080
service/kubernetes-bootcamp exposed
4. View the new service: Type the following to see the IP address (10.96.66.230) and
port number (8080) from which the service is made available on the host:
$ kubectl get services
NAME
TYPE
CLUSTER-
IP EXTERNAL-
IP PORT(S)
AGE
kubernetes
ClusterIP 10.96.0.1
<none>
443/TCP
33m
kubernetes-
bootcamp NodePort 10.96.66.230 <none>
8080:30128/TCP 5s
$ kubectl describe services/kubernetes-
bootcamp
Name:
kubernetes-
bootcamp
Namespace:
default
Labels:
app=kubernetes-
bootcamp
Annotations:
<none>
Selector:
app=kubernetes-
bootcamp
Type:
NodePort
IP Family Policy:
SingleStack
IP Families:
IPv4
IP:
10.106.58.189
IPs:
10.106.58.189
Port:
<unset> 8080/TCP
TargetPort:
8080/TCP
NodePort:
<unset> 30128/TCP
740
Downloaded from https://onlinelibrary.wiley.com/doi/ by alex jounh - Oregon Health & Science Univer , Wiley Online Library on [05/12/2025]. See the Terms and Conditions (https://onlinelibrary.wiley.com/terms-and-conditions) on Wiley Online Library for rules of use; OA articles are governed by the applicable Creative Commons License
Part VI: Engaging with Cloud Computing
Endpoints:
Session Affinity:
External Traffic Policy:
Internal Traffic Policy:
Events:
10.244.0.4:8080
None
Cluster
Cluster
<none>
31
5. Get the assigned node port: To get the port assigned to the service and set the
$NODE_PORT variable to that value, enter the following:
$ export NODE_PORT=$(kubectl get services/kubernetes-
bootcamp \
-
o go-
template='{{(index .spec.ports 0).nodePort}}')
$ echo NODE_PORT=$NODE_PORT
NODE_PORT=30000
6. Access the service: To check that the service is available from the NodePort, use the
following curl command (using the IP address for your Minikube instance):
$ curl $(minikube ip):$NODE_PORT
Hello Kubernetes bootcamp!|Running on:kubernetes-
bootcamp-
9bc58
d867|v=1
Label a service
Labels provide the means to group pods, nodes, or other objects in Kubernetes. Using labels,
you do things like make sure that only pods with certain labels run on selected nodes. You can
also use them to identify certain pods by their labels so you can find them and act on them.
Labels are set as key/value pairs. Use this procedure to add a label to an existing service.
1. Check the pod’s label: So far, kubernetes-bootcamp is the only label assigned to
the pod. To make sure, enter the following:
$ kubectl describe deployment
Name:
kubernetes-
bootcamp
Namespace:
default
CreationTimestamp:
Sat, 12 Apr 2025 03:39:50 -
0400
Labels:
app=kubernetes-
bootcamp
Annotations:
deployment.kubernetes.io/revision: 1
…
2. Add another label: To add an additional label (v1) to the pod, get the name of the
pod and add the new label as follows:
$ export POD_NAME=$(kubectl get pods -
o go-
template -
-
template \
'{{range .items}}{{.metadata.name}}{{"\n"}}{{end}}') ; \
echo Name of the Pod: $POD_NAME
Name of the Pod: kubernetes-
bootcamp-
9bc58d867-
7g6dr
$ kubectl label pod $POD_NAME version=v1
pod/kubernetes-bootcamp-9bc58d867-7g6dr labeled
741
Downloaded from https://onlinelibrary.wiley.com/doi/ by alex jounh - Oregon Health & Science Univer , Wiley Online Library on [05/12/2025]. See the Terms and Conditions (https://onlinelibrary.wiley.com/terms-and-conditions) on Wiley Online Library for rules of use; OA articles are governed by the applicable Creative Commons License
Chapter 31: Deploying Applications as Containers with Kubernetes
3. Check and use the label: Check that the version=v1 label has been assigned to
the pod, and then use that label to list information about the pod:
$ kubectl describe pods $POD_NAME
Name:
kubernetes-
bootcamp-
9bc58d867-
7g6dr
Namespace:
default
Priority:
0
Service Account: default
Node:
minikube/10.0.2.15
Start Time:
Sat, 12 Apr 2025 03:39:50 -
0400
Labels:
app=kubernetes-
bootcamp
pod-
template-
hash=9bc58d867
version=v1
$ kubectl get pods -
l version=v1
NAME
READY
STATUS
RESTARTS
AGE
kubernetes-
bootcamp-
9bc58d867-
7g6dr
1/1
Running
0
60m
Delete a service
If you are done using the service, you can delete it. This removes access to the service from
the NodePort, but it does not delete the deployment itself.
1. Check the service: Make sure that the kubernetes-bootcamp service still exists:
$ kubectl get services
NAME
TYPE
CLUSTER-
IP
EXTERNAL-
IP PORT(S)
AGE
kubernetes
ClusterIP 10.96.0.1
<none>
443/TCP
97m
kubernetes-
bootcamp NodePort 10.106.58.189 <none>
8080:30128/TCP 30m
2. Delete the service: Using the label name, delete the service:
$ kubectl delete service -
l app=kubernetes-
bootcamp
service "kubernetes-
bootcamp" deleted
3. Check the service and deployment: Make sure the service has been deleted but the
deployment still exists:
$ kubectl get services
NAME
TYPE
CLUSTER-
IP
EXTERNAL-
IP PORT(S)
kubernetes
ClusterIP 10.96.0.1
<none>
443/TCP
$ kubectl get deployment
NAME
READY
UP-
TO-
DATE
AVAILABLE
AGE
kubernetes-
bootcamp 1/1
1
1
65m
AGE
64m
Scale up an application
One of the most powerful features of Kubernetes is its ability to scale up an application as the
demand requires it. This procedure starts with the kubernetes-bootcamp deployment,
which is running one pod and scales it up to have additional pods running using the ReplicaSet
feature and a different means of exposing the application to outside access.
742
Downloaded from https://onlinelibrary.wiley.com/doi/ by alex jounh - Oregon Health & Science Univer , Wiley Online Library on [05/12/2025]. See the Terms and Conditions (https://onlinelibrary.wiley.com/terms-and-conditions) on Wiley Online Library for rules of use; OA articles are governed by the applicable Creative Commons License
Part VI: Engaging with Cloud Computing
1. Get the deployment: List information about the kubernetes-bootcamp deployment, and note that it is set to have only one replica set (rs) active:
$ kubectl get deployments
NAME
READY
UP-
TO-
DATE
kubernetes-
bootcamp
1/1
1
$ kubectl get rs
NAME
DESIRED
kubernetes-
bootcamp-
5b48cfdcbd
1
AVAILABLE
1
CURRENT
1
AGE
107s
READY
1
31
AGE
3m4s
2. Scale up the replicas: To scale the deployment up to four replica sets, enter the
following:
$ kubectl scale deployments/kubernetes-bootcamp --replicas=4
deployment.extensions/kubernetes-bootcamp scaled
3. Check the new replicas: List the deployments to make sure that there are now four
replicas ready and available:
$ kubectl get deployments
NAME
READY
kubernetes-
bootcamp
4/4
UP-
TO-
DATE
4
AVAILABLE
4
AGE
8m44s
4. Check the pods: There should now also be four kubernetes-bootcamp pods
running, each with its own IP address inside the cluster. To make sure, enter the
following:
$ kubectl get pods -
o wide
NAME
READY
STATUS
RESTARTS AGE
NODE
NOMINATED NODE
READINESS GATES
kubernetes-
bootcamp-
9bc… 1/1
Running
0
8m43s
minikube <none>
<none>
kubernetes-
bootcamp-
9bc… 1/1
Running
0
12s
minikube <none>
<none>
kubernetes-
bootcamp-
9bc… 1/1
Running
0
12s
minikube <none>
<none>
kubernetes-
bootcamp-
9bc… 1/1
Running
0
12s
minikube <none>
<none>
IP
10.244.0.6
10.244.0.4
10.244.0.5
10.244.0.7
5. View deployment details: To see details of the increased replicas in the deployment,
enter the following:
$ kubectl describe deployments/kubernetes-
bootcamp
Name:
kubernetes-
bootcamp
Namespace:
default
…
NewReplicaSet:
kubernetes-
bootcamp-
9bc58d867 (4/4 replicas
created)
Events:
Type
Reason
Age
From
Message
-
-
-
-
-
-
-
-
-
-
-
-
-
- -
-
-
-
-
-
-
-
-
-
-
Normal ScalingReplicaSet 59m
deployment-
controller Scaled
up replica set kubernetes-
bootcamp-
9bc58d867 from 0 to 1
743
Downloaded from https://onlinelibrary.wiley.com/doi/ by alex jounh - Oregon Health & Science Univer , Wiley Online Library on [05/12/2025]. See the Terms and Conditions (https://onlinelibrary.wiley.com/terms-and-conditions) on Wiley Online Library for rules of use; OA articles are governed by the applicable Creative Commons License
Chapter 31: Deploying Applications as Containers with Kubernetes
Normal ScalingReplicaSet 2m57s deployment-
controller
up replica set kubernetes-
bootcamp-
9bc58d867 from 1 to 4
Scaled
Check the load balancer
To check that traffic is being distributed across all four replicated pods, you can get the NodePort and then use the curl command to make sure that multiple connections to the NodePort
result in different pods being accessed:
1. List details about the service: To see details about the kubernetes-bootcamp
service, enter the following:
$ kubectl expose \
deployment/kubernetes-bootcamp \
--type="NodePort" --port 8080
$ kubectl describe services/kubernetes-
bootcamp
Name:
kubernetes-
bootcamp
Namespace:
default
Labels:
app=kubernetes-
bootcamp
Annotations:
<none>
Selector:
app=kubernetes-
bootcamp
Type:
NodePort
...
Endpoints:
10.244.0.4:8080,10.244.0.7:8080,10.244.0.5:8080 +
1 more...
Session Affinity:
None
External Traffic Policy: Cluster
Internal Traffic Policy: Cluster
Events:
<none>
Notice that each pod has its own IP address and port, with each comma-separated IP
address and port representing a unique pod (10.244.0.4:8080,10.244.0.7:
8080, and so on).
2. Get the NodePort: Enter the following to set $NODE_PORT to the value of the port
number assigned to the service:
$ export NODE_PORT=$(kubectl get services/kubernetes-
bootcamp \
-
o go-
template='{{(index .spec.ports 0).nodePort}}')
$ echo NODE_PORT=$NODE_PORT
NODE_PORT=31915
3. Run curl: Run the curl command a few times to query the service. If you run it a
few times, you should see that it is accessing different pods. That is how you know
that the load balancer is working:
$ curl $(minikube ip):$NODE_PORT
Hello Kubernetes bootcamp!|Running on:kubernetes-
bootcamp-
9bc58d
867-6n257|v=1
Scale down an application
To scale the number of ReplicaSets defined in your deployment, simply change the number of
replicas to a lower number.
744
Downloaded from https://onlinelibrary.wiley.com/doi/ by alex jounh - Oregon Health & Science Univer , Wiley Online Library on [05/12/2025]. See the Terms and Conditions (https://onlinelibrary.wiley.com/terms-and-conditions) on Wiley Online Library for rules of use; OA articles are governed by the applicable Creative Commons License
Part VI: Engaging with Cloud Computing
1. Scale down replicas: Enter the following to change the number of replicas for the
deployment to 2:
$ kubectl scale deployments/kubernetes-bootcamp –-replicas=2
deployment.extensions/kubernetes-bootcamp scaled
2. Check the deployment: To see that the deployment is set to 2, and that only two
pods are running, enter the following:
$ kubectl get deployments
NAME
READY
UP-
TO-
DATE
AVAILABLE
AGE
kubernetes-
bootcamp
2/2
2
2
52m
$ kubectl get pods -
o wide
NAME
READY
STATUS
RESTARTS AGE
IP
NODE
NOMINATED NODE
READINESS GATES
kubernetes-
bootcamp-
9bc… 1/1
Running
0
8m43s 10.244.0.6
minikube <none>
<none>
kubernetes-
bootcamp-
9bc… 1/1
Running
0
12s
10.244.0.4
At this point, you should feel comfortable manually querying your Kubernetes cluster in various ways and starting up and working with deployments, pods, and replicas. To continue with
more advanced Kubernetes tutorials, return to the main Kubernetes Tutorials page (https://
kubernetes.io/docs/tutorials/).
Enterprise-Quality Kubernetes with EKS
While anyone can run Kubernetes on a single machine to test some Kubernetes features, as we
have in this book, its real value comes when you need to run Kubernetes in production and at
scale. When you are building enterprise-quality Kubernetes clusters to run your most critical
business workloads, you should take into account:
■
■
■
■
Scalability: If your applications are overloaded, Kubernetes can add more pods. If your
nodes have reached capacity, Kubernetes can add more nodes. Likewise, as demand
reduces, those items can be shut down.
Self-healing: Kubernetes can do health checks of containers, pods, nodes, services,
and other objects and replace them if they have failed or are degraded.
High availability: Using features like scalability and self-healing, Kubernetes can
ensure that applications remain available to your customers and do not appear to be
unavailable as Kubernetes is responding to failures and increased demands. Kubernetes
clusters can also be spread across multiple locations so that an outage of a set of computers or even an entire data center can cause work to be diverted to systems in other
locations.
Efficiency: Because Kubernetes gives you the ability to run as many workloads and
nodes as the moment requires, you can achieve maximum efficient use of your compute resources. To that end, Kubernetes can do things such as consolidate workloads
745
31
Downloaded from https://onlinelibrary.wiley.com/doi/ by alex jounh - Oregon Health & Science Univer , Wiley Online Library on [05/12/2025]. See the Terms and Conditions (https://onlinelibrary.wiley.com/terms-and-conditions) on Wiley Online Library for rules of use; OA articles are governed by the applicable Creative Commons License
Chapter 31: Deploying Applications as Containers with Kubernetes
■
■
on to a single, more efficiently sized computer or move workloads to a less expensive system.
Open source Kubernetes ecosystem: Because Kubernetes is an open source project
and not owned or maintained by a single company, many companies and organizations
have adopted it and extended it. This means you can choose from a wide range of
built-in features, as well as third-party software, that you can use to make it work for
you as you need.
Portability: Kubernetes has the ability to run in different places (such as on-premises,
edge computing, and data centers) and with support from different vendors (such
as AWS, Microsoft, Google, and Red Hat). This allows you to develop your company’s applications once and then deploy to anywhere that is most appropriate for
your needs.
Most cloud service providers offer a managed Kubernetes service that can help you in several
ways. They can save you the cost of creating your own data centers while you develop your
products and then allow you to grow your Kubernetes use as needs arise. Popular cloud service
providers that offer Kubernetes services include Amazon Web Services’ (AWS) Elastic Kubernetes Service (EKS), Microsoft Azure’s Azure Kubernetes Service (AKS), and Google Cloud’s
Google Kubernetes Engine (GKE).
These cloud Kubernetes services can also help you by simplifying your entry into Kubernetes.
For example, they can offer simple ways to start clusters that manage the control plane for
you, select a useful set of add-on software that they prepackage for you, and even set up autoscaling to launch and scale the nodes used to run your workloads.
As you become more comfortable using Kubernetes, you have the flexibility to tune your
clusters and enhance the software used with your clusters. Features such as monitoring and
observability can help make your Kubernetes use more efficient and cost-effective.
Summary
Kubernetes has become the platform of choice for deploying containerized applications across
large data centers. A Kubernetes cluster consists of a control plane (that directs the activities
of a cluster) and nodes (that actually run the containerized payloads).
As someone using Kubernetes to run containerized applications, you can create deployments
that define the state of the application you are running. For example, you can deploy an application that is configured to run multiple replicas of the pods representing that application.
You can identify the application as a service and set up the application to be available with
mounted storage available and from defined ports on the nodes from which they are run.
Products based on Kubernetes are available when you need to run mission-critical applications
in environments that are stable and supported. Most major cloud providers offer managed
Kubernetes services that can both provide easy, inexpensive entry points into production-
quality Kubernetes clusters and let you easily grow your Kubernetes workloads as your
needs grow.
746
Downloaded from https://onlinelibrary.wiley.com/doi/ by alex jounh - Oregon Health & Science Univer , Wiley Online Library on [05/12/2025]. See the Terms and Conditions (https://onlinelibrary.wiley.com/terms-and-conditions) on Wiley Online Library for rules of use; OA articles are governed by the applicable Creative Commons License
Part VI: Engaging with Cloud Computing
Exercises
The exercises in this section describe tasks related to trying Kubernetes, either online or
by setting up Minikube on a computer. If you are stuck, solutions to the tasks are shown in
Appendix B. Keep in mind that the solutions shown in Appendix B are usually just one of
many ways to complete a task.
1. Install Minikube and the kubectl command on a local computer.
2. View your version of Minikube, as well as the versions of your kubectl client and
Kubernetes service.
3. Create a deployment that manages a pod running the hello-node container image
(gcr.io/hello-minikube-zero-install/hello-node).
4. Use the appropriate kubectl commands to view the hello-node deployment and
describe the deployment in detail.
5. View the current replica set associated with your hello-node deployment.
6. Scale up the hello-node deployment to three replicas.
7. Expose the hello-node deployment outside of the Kubernetes cluster using
LoadBalancer.
8. Get the IP address of your Minikube instance and the port number of the exposed
hello-node service.
9. Use the curl command to query the hello-node service using the IP address and
port number from the previous step.
10. Use the kubectl commands to delete the hello-node service and deployment,
and then use the minikube command to stop the Minikube virtual machine.
747
31
Downloaded from https://onlinelibrary.wiley.com/doi/ by alex jounh - Oregon Health & Science Univer , Wiley Online Library on [05/12/2025]. See the Terms and Conditions (https://onlinelibrary.wiley.com/terms-and-conditions) on Wiley Online Library for rules of use; OA articles are governed by the applicable Creative Commons License
Chapter 31: Deploying Applications as Containers with Kubernetes
Media
A
IN THIS APPENDIX
Getting Linux distributions
Creating a bootable USB, CD, or DVD
U
nless you bought a computer with Linux preinstalled or had someone install it for you, you need
to find a way to get a Linux distribution and then either install or run it live on your computer.
Fortunately, Linux distributions are widely available and come in a variety of forms.
In this appendix, you learn how to do the following:
■
■
■
Get a few different Linux distributions.
Create a bootable disk to install your distribution.
Boot Linux from a USB drive.
To use this book effectively, you should have a Linux distribution in front of you to work on. It’s important to be able to experience Linux as you read. So, try the examples and do the exercises.
Linux distributions are commonly available from the websites of the organizations that produce them.
The following sections describe websites associated with Linux distributions that offer ISO images you
can download.
Note
An ISO is a disk image that is formatted in the ISO 9660 filesystem format, a format that is commonly used with USB,
CD, and DVD images. Because this is a well-known format, it is readable by Windows, Mac, and Linux systems.
An ISO image can be used to create a bootable USB flash drive, CD, or DVD medium, depending on the size of the
image. An ISO image in your filesystem can be mounted in Linux in loopback mode, so you can view or copy its contents.
When an ISO image contains a Linux Live image or installation image, the images are bootable. This means that instead
of starting up an operating system, such as Windows or Linux, from the computer’s hard drive, you can tell your computer
to boot from the CD or DVD instead. This enables you to run a totally different operating system than is installed on your
hard drive without changing or damaging the data on that drive.
749
Linux Bible, Eleventh Edition. Christopher Negus.
© 2026 John Wiley & Sons, Inc. All rights reserved, including rights for text and data mining and training of artificial intelligence technologies or similar
technologies. Published 2026 by John Wiley & Sons, Inc.
Downloaded from https://onlinelibrary.wiley.com/doi/ by alex jounh - Oregon Health & Science Univer , Wiley Online Library on [05/12/2025]. See the Terms and Conditions (https://onlinelibrary.wiley.com/terms-and-conditions) on Wiley Online Library for rules of use; OA articles are governed by the applicable Creative Commons License
APPENDIX
Getting Fedora
Note
I recommend downloading the Fedora Workstation Live Image to use along with this book because most of the book
works with that distribution. You can run it live without committing to overwriting your computer’s hard disk until you feel
comfortable enough to install it permanently.
To test the examples in this book, I primarily used Fedora 42, 64-bit Fedora Workstation
images, which you can get from GetFedora.org (https://fedoraproject.org/en/
workstation/download). If you have a 64-bit machine, you must use the 64-bit ISO. There are
also 64-bit ARM and PowerPC versions available.
Later versions of Fedora that come with a GNOME desktop should work as well. Here’s a link to
the exact ISO used for the Fedora 42 Workstation:
https://download.fedoraproject.org/pub/fedora/linux/releases/42/Workstation/
x86_64.iso/Fedora-Workstation-Live-42-1.1.x86_64.iso
Keep in mind that the latest Fedora Workstation ISO image does not fit on a CD, so you must
burn it to a DVD or USB drive. See the descriptions of CD/DVD burning tools available for
Windows, macOS, and Linux later in this appendix.
Figure A.1 shows an example of the Fedora Workstation Download page.
FIGURE A.1
Get Fedora ISO images from the Download Fedora Workstation page.
750
Downloaded from https://onlinelibrary.wiley.com/doi/ by alex jounh - Oregon Health & Science Univer , Wiley Online Library on [05/12/2025]. See the Terms and Conditions (https://onlinelibrary.wiley.com/terms-and-conditions) on Wiley Online Library for rules of use; OA articles are governed by the applicable Creative Commons License
Appendix A: Media
Follow these steps to choose and download the Fedora image to either run live or install to
your computer:
1. From FedoraProject.org, click Get Fedora, and then click Workstation or Server.
I recommend the Workstation image to follow along with this book.
2. Click the Download Now button to go to the Download Fedora Workstation page.
3. Choose the computer architecture that matches your computer (x86_64, aarch64, or
ppc64le). The most common is x86_64.
4. Click the Download icon next to Fedora Workstation to save the ISO to your local
system. Depending on your settings, either you are asked where you want to download
it or it simply begins downloading to a default folder (in Linux, it is probably a Downloads folder).
5. If you are prompted for where to put the ISO, select a folder that has enough space to
hold it. Remember where this folder is located, because you need to find the ISO when
you go to burn it later.
If you need more information about what to do with the downloaded image, there are links to
help you on that same Download Fedora Workstation page. At the time of this writing, they
recommend using Fedora Media Writer to burn the image to a bootable medium (I describe this
in detail in Chapter 9, “Installing Linux”). The exact instructions might change as the website
is updated.
You have other choices for downloading ISOs from Fedora. By selecting Get Fedora from the
FedoraProject.org page, you can choose Spins from the left navigation to see a list of specially configured Fedora ISO images called spins. Here are some special types of Fedora spins
that might interest you:
KDE Mobile Desktop spin: People who prefer the KDE desktop to the GNOME desktop can
download the KDE Plasma spin.
Lightweight Desktop spins: If you are trying Linux on a computer with less memory or
processing power, consider Xfce and LXQt spins (representing lightweight desktops of
the same name).
Desktop effects spin: The MATE+Compiz spin offers more of the other extreme to the
lightweight desktops, with desktop effects like wobbly windows and desktops that
rotate on a cube.
Child-friendly desktop spin: The SOAS desktop is a spin of the Sugar Learning Platform,
made to provide a simplified setup and a child-friendly graphical interface. SOAS can be
transported on a USB drive and run on any available computer.
Mouseless desktop: If you like to fully control your Linux system from the keyboard (no
pointing device, like a mouse or touchpad), the Sway spin provides that approach,
along with lightweight apps for browsing the Web, editing text, and playing music.
751
A
P
P
E
N
D
I
X
Downloaded from https://onlinelibrary.wiley.com/doi/ by alex jounh - Oregon Health & Science Univer , Wiley Online Library on [05/12/2025]. See the Terms and Conditions (https://onlinelibrary.wiley.com/terms-and-conditions) on Wiley Online Library for rules of use; OA articles are governed by the applicable Creative Commons License
Appendix A: Media
Getting Red Hat Enterprise Linux
Many large corporations, government agencies, and universities use Red Hat Enterprise Linux to
run their mission-critical applications. While most of the procedures in this book will run well on
Fedora, there are many references to how things are done differently in Red Hat Enterprise Linux
(RHEL) because when you go to get a job as a Linux system administrator, you will, in most cases,
be working with Red Hat Enterprise Linux systems or derivatives of RHEL systems.
Although the source code for Red Hat Enterprise Linux is freely available, the ISOs containing the packages you install (often referred to as the binaries) are available only to those who
have accounts on the Red Hat customer portal (https://access.redhat.com) or through
evaluation copies.
If you don’t have an account, you can try signing up for a 30-day trial. If either you or your
company has an account with Red Hat, you can download the ISOs that you need. Go to the
following site and follow the instructions to download a Red Hat Enterprise Linux server ISO or
sign up to get an evaluation copy:
https://access.redhat.com/downloads
Red Hat does not offer live versions of Red Hat Enterprise Linux. Instead, you can download
installation DVDs that you can install, as described in Chapter 9.
Note
If you are unable to obtain a Red Hat Enterprise Linux installation DVD, you can get a similar experience using popular
Linux distributions that are derived from the same Linux ecosystem. These include Amazon Linux 2023 (AL2023),
CentOS Stream, Rocky Linux, and Oracle Linux.
Getting Ubuntu
Many people new to Linux begin by downloading and installing Ubuntu. Ubuntu has a huge
fan base and many active contributors. If you have problems with Ubuntu, there are large,
active forums where many people are willing to help you overcome problems.
If you already have an Ubuntu system installed, you can follow along with most of this book.
You can get Ubuntu with a GNOME desktop or, like Fedora, choose from different spins (called
flavors) that include Kubuntu (KDE Plasma), Lubuntu (XFCE), Lubuntu (LXQt), and Ubuntu
MATE (with a classic GNOME 2 desktop). In the latest edition of this book, I have continued to
add references to Ubuntu to make the workflow easier for Ubuntu users.
To get the latest Ubuntu desktop, you can download an x86_64 Live ISO image by simply clicking the Download button on the Download Ubuntu Desktop page: http://www.ubuntu.com/
download/ubuntu.
Figure A.2 shows an example of the Download Ubuntu Desktop page.
752
Downloaded from https://onlinelibrary.wiley.com/doi/ by alex jounh - Oregon Health & Science Univer , Wiley Online Library on [05/12/2025]. See the Terms and Conditions (https://onlinelibrary.wiley.com/terms-and-conditions) on Wiley Online Library for rules of use; OA articles are governed by the applicable Creative Commons License
Appendix A: Media
FIGURE A.2
Get an Ubuntu ISO image from the Download Ubuntu Desktop page.
As with Fedora, the easiest way to download Ubuntu is to select the 64-bit Ubuntu Live image,
download it, and burn it. Here’s how to do that from the Download Ubuntu Desktop page:
1. Click the Download button. By default, this downloads the most recent 64-bit Ubuntu
desktop Live ISO image.
2. Either you are asked where you want to download the ISO image or it simply begins
downloading to a default folder.
3. If you are asked where to put the ISO, select a folder that has enough space to hold
the ISO. Remember where this folder is located because you need to find the ISO when
you go to burn it later.
There are typically two downloads to select from on this page. The first is the Long Term
Support (LTS) version, while the other is the most recent Ubuntu version. The LTS version is the stable, supported (for up to 12 years) version, while the other will have the latest updates but offer a shorter support timeline. This book was tested against the Ubuntu
24.04 LTS version.
After the download is complete, burn the ISO image to a USB drive or DVD using procedures
described in “Booting Linux from a USB Drive” or “Creating Linux CDs and DVDs.”
Other kinds of Ubuntu installation media are also available. To find other Ubuntu Flavors, go
to the Ubuntu Flavors page (https://ubuntu.com/desktop/flavors). From this site, you can
get media that contains a variety of specialized desktop and server installs.
753
A
P
P
E
N
D
I
X
Downloaded from https://onlinelibrary.wiley.com/doi/ by alex jounh - Oregon Health & Science Univer , Wiley Online Library on [05/12/2025]. See the Terms and Conditions (https://onlinelibrary.wiley.com/terms-and-conditions) on Wiley Online Library for rules of use; OA articles are governed by the applicable Creative Commons License
Appendix A: Media
Booting Linux from a USB Drive
Because personal computers rarely come with CD/DVD drives anymore, the most popular way
to create Linux boot media is with a USB drive. USB drives offer the advantage of being continuously writable as well as readable. Most modern computers can boot from a USB drive,
although you may have to interrupt the boot process to tell the BIOS to boot from a USB drive
instead of hard drive.
Chapter 9 includes steps for using the Fedora Media Writer to create a bootable USB drive to
install your Linux images. You can also find procedures for putting Fedora and Ubuntu on a
USB drive in the following locations:
Fedora on a USB drive: Using a tool called Live USB Creator, you can install a Fedora ISO
image to a USB drive in either Windows or Linux. To run Fedora from that drive, insert
it into a USB port on your computer, reboot the computer, interrupt the BIOS as it is
booting (possibly F12), and select to boot from a USB drive. The procedure for using
Live USB creator is located at https://docs.fedoraproject.org/en-US/quick-
docs/creating-and-using-a-live-installation-image/index.html.
Ubuntu on a USB drive: Ubuntu has procedures for creating a bootable USB drive with
Ubuntu on it that work from Windows, macOS, or Linux. To find out how to do this, go
to the Ubuntu Download page, and under “Easy ways to switch to Ubuntu,” look for the
appropriate “How to create a bootable USB stick. . .” procedure for Ubuntu, Windows,
or macOS: https://ubuntu.com/tutorials/tutorial-create-a-usb-stick-on-
ubuntu#1-overview.
Creating Linux CDs and DVDs
After you have downloaded a Linux CD or DVD image, you can use several tools to create bootable CDs or DVDs for either installing or just running Linux live from those media. Before you
begin, you must have the following:
DVD or CD ISO images: Download the ISO images to your computer that represent the
physical DVD or CD you will ultimately burn. Today, most default Linux ISO images are
too big to fit on a CD (including those for RHEL, Fedora, and Ubuntu).
Blank DVDs/CDs: You need blank DVDs or CDs to burn the images to. CDs hold up to
about 700MB; DVDs hold up to about 4.7GB (single layer).
CD/DVD burner: You need a drive that is capable of burning CDs or DVDs, depending on
which you are burning. Not all CD/DVD drives can burn DVDs (especially older ones).
So, you may need to find a computer with a drive that has that capability.
The following sections describe how to burn bootable CDs and DVDs from Windows, macOS, and
Linux systems.
754
Downloaded from https://onlinelibrary.wiley.com/doi/ by alex jounh - Oregon Health & Science Univer , Wiley Online Library on [05/12/2025]. See the Terms and Conditions (https://onlinelibrary.wiley.com/terms-and-conditions) on Wiley Online Library for rules of use; OA articles are governed by the applicable Creative Commons License
Appendix A: Media
Burning CDs/DVDs in Windows
If you have downloaded your Linux ISO image to a Windows system and your computer has a
writable CD/DVD drive, you can burn that image to a writable CD or DVD.
In the latest Windows releases, the function of burning ISO images to CD or DVD is built into
Windows File Explorer. After an ISO image is downloaded, simply insert the appropriate CD or
DVD into your computer’s drive (assuming the drive is writable), right-click the ISO image icon
from the folder to which you downloaded it, and click Burn Disc Image. When the Windows
Disc Image Burner window appears, click Burn to burn the image.
Burning CDs/DVDs on a macOS system
Like Windows, macOS has CD/DVD burning software built into the operating system. To burn an
ISO image to disk on a macOS system, follow these steps:
1. Download the ISO image you want on your macOS system. An icon representing the
ISO should appear on your desktop.
2. Insert a blank CD or DVD into your CD/DVD burner, as appropriate for the size of
the image.
3. Right-click the icon representing the Linux ISO that you just downloaded and click
Burn “Linux” to Disk. A pop-up window appears, asking if you are sure you want to
burn the image.
4. Fill in the name you want to give the ISO and the write speed and then click Burn.
The image begins burning to disk.
5. After the image has been burned, eject the disk; you are ready to boot the CD or DVD
on an appropriate computer.
Burning CDs/DVDs in Linux
Linux has both graphical and command-line tools for burning CD and DVD images to physical media. Examples in this section show how to use K3b from the desktop or cdrecord (or
wodim) to burn ISO images to CD or DVD. If they are not installed, you can install either one
as follows:
For Fedora or RHEL
# dnf install k3b
# dnf install wodim
A
P
P
E
N
D
I
X
For Debian or Ubuntu
# apt-
get install k3b
# apt-
get install wodim
755
Downloaded from https://onlinelibrary.wiley.com/doi/ by alex jounh - Oregon Health & Science Univer , Wiley Online Library on [05/12/2025]. See the Terms and Conditions (https://onlinelibrary.wiley.com/terms-and-conditions) on Wiley Online Library for rules of use; OA articles are governed by the applicable Creative Commons License
Appendix A: Media
Burning CDs or DVDs from a Linux desktop
Here’s how to create bootable Linux CDs or DVDs from a running Linux system (such as Fedora)
using K3b. K3b comes with the KDE desktop but runs on the GNOME desktop as well (dnf
install k3b).
1. Download the ISO images that you want to your computer’s hard drive. (A CD image is
less than 700MB in size. Single-layer DVD images are less than 4.7GB.)
2. Open a CD/DVD burning application. For this procedure, I recommend K3b CD and DVD
Kreator (http://www.k3b.org). In Fedora, select Activities and type K3b (or type
k3b from a Terminal window). The “K3b –The CD and DVD Kreator” window appears.
3. From the K3b window, select Tools ➪ Burn Image to burn a CD or DVD ISO Image. You
are asked to choose an image file.
4. Browse to the image you just downloaded or copied to your hard drive and select
it. After you select the image you want, the Burn Image window appears, as does a
checksum on the image. Figure A.3 shows the K3b window ready to select an image
of Fedora.
5. Insert a blank CD or DVD into the CD/DVD drive, which may be a combination CD/DVD
drive. (If a CD/DVD Creator window pops up, you can close it.)
FIGURE A.3
Use K3b to burn your Linux CDs or DVDs.
756
Downloaded from https://onlinelibrary.wiley.com/doi/ by alex jounh - Oregon Health & Science Univer , Wiley Online Library on [05/12/2025]. See the Terms and Conditions (https://onlinelibrary.wiley.com/terms-and-conditions) on Wiley Online Library for rules of use; OA articles are governed by the applicable Creative Commons License
Appendix A: Media
6. Check the settings in the Burn Image window (often, the defaults are fine, but you
may want to slow down the speed if you get some bad burns). You can also select the
Simulate check box to test the burn before actually writing to the CD/DVD. Click Start
to continue.
7. When the CD/DVD is finished burning, eject it (or it may eject automatically) and
mark it appropriately (information such as the distribution name, version number,
date, and name of the ISO image).
Now you’re ready to begin installing (or booting) the Linux distribution you just burned.
Burning CDs or DVDs from a Linux command line
If you have no GUI or you don’t mind working from the shell, you can use the cdrecord
command to burn the ISOs. With a blank CD or DVD inserted and the ISO image you want to
burn in the current directory, you can use the following simple command line for burning a CD
image to CD or DVD using cdrecord:
# cdrecord -
v whatever.iso
See the cdrecord man page (man cdrecord) for other options available with the
cdrecord command.
A
P
P
E
N
D
I
X
757
Downloaded from https://onlinelibrary.wiley.com/doi/ by alex jounh - Oregon Health & Science Univer , Wiley Online Library on [05/12/2025]. See the Terms and Conditions (https://onlinelibrary.wiley.com/terms-and-conditions) on Wiley Online Library for rules of use; OA articles are governed by the applicable Creative Commons License
Appendix A: Media
Exercise Answers
T
B
his appendix provides answers to each of the chapter exercises. There are many ways to accomplish tasks in Linux. Suggested answers are provided here.
Some of the exercises require that you modify system files that could change the basic functioning
of your system, or even make your system unbootable. Therefore, I recommend you do the exercises
on a Linux system that you are free to modify and erase if something should go wrong. Using virtual
machines, which you can discard when you are done, is an excellent option.
Chapter 1: Starting with Linux
There are no exercises in Chapter 1.
Chapter 2: Creating the Perfect Linux Desktop
This section details some ways that these tasks can be completed on a recent GNOME desktop.
1. To get started, you need a Linux system in front of you to do the procedures in this book. An
installed system is preferable, so you don’t lose your changes when you reboot. To start, you
can use a Fedora Live CD (or installed system), an Ubuntu installed system, or a Red Hat Enterprise Linux installed system. Here are your choices:
a. Fedora Workstation live image: Get a Fedora Workstation live image as described in
Appendix A. Run it live, as described in the section “Starting with the Fedora GNOME
Desktop Live image” in Chapter 2, or install it and run it from hard disk as described in
Chapter 9.
b. Ubuntu (GNOME 3): Install Ubuntu as described in “Getting Ubuntu” in Appendix A.
2. To launch the Firefox web browser and go to the GNOME home page (http://gnome.org),
there are some easy steps to take. If your network is not working, refer to Chapter 14, “Administering Networking,” for help on connecting to wired and wireless networks. Press the Windows key to get to the Activities screen. Then type Firefox to highlight just the Firefox
web browser icon. Press Enter to launch it. Type http://gnome.org in the location box, and
press Enter.
759
Linux Bible, Eleventh Edition. Christopher Negus.
© 2026 John Wiley & Sons, Inc. All rights reserved, including rights for text and data mining and training of artificial intelligence technologies or similar
technologies. Published 2026 by John Wiley & Sons, Inc.
Downloaded from https://onlinelibrary.wiley.com/doi/ by alex jounh - Oregon Health & Science Univer , Wiley Online Library on [05/12/2025]. See the Terms and Conditions (https://onlinelibrary.wiley.com/terms-and-conditions) on Wiley Online Library for rules of use; OA articles are governed by the applicable Creative Commons License
APPENDIX
3. To pick a background you like from the GNOME art site (http://gnome-look.org),
download it to your Pictures folder, and select it as your current background, as follows:
a. Type http://gnome-look.org/ in the Firefox location box and press Enter.
b. Find a background that you like and select it. Then click the Download button and
download it to your Pictures folder.
c. Open your Pictures folder, right-click the image, and select Set as Wallpaper.
The image is used as your desktop background.
4. To start a Nautilus File Manager window and move it to the second workspace on your
desktop, do the following:
a. Press the Windows key.
b. Click the Files icon from the Dash. A new instance of Nautilus starts in the current
workspace.
c. Right-click the title bar in the Files window and select Move To Workspace Right.
The Files window moves to the next workspace.
5. To find the image that you downloaded to use as your desktop background and open
it in any image viewer, first go to your Home folder, and then open the Pictures folder.
Double-click the image to open it in an image viewer.
6. To move back and forth between the workspace with Firefox on it and the one with
the Nautilus file manager, press the Windows key, and select the workspace. As an
alternative, you can use the middle wheel on your mouse to go between workspaces.
7. To open a list of applications installed on your system and select an image viewer to
open from that list using as few clicks or keystrokes as possible, do the following:
Move the mouse to the upper-left corner of the screen (click if required) to get to the
Activities screen. Select Show Apps, type Image Viewer, and press Enter.
8. To change the view of the windows on your current workspace to smaller views of
those windows that you can step through, do the following:
With multiple windows open on multiple workspaces, press the Alt+Tab keys. While
continuing to hold the Alt key, press Tab until you highlight the application that
you want. Release the Alt key to select it.
9. To launch a music player from your desktop using only the keyboard, do the following:
a. Press the Windows key to go to the Activities screen.
b. Type Rhyth (until the icon appears and is highlighted) and press Enter.
10. To take a picture of your desktop using only keystrokes, press the Print Screen key.
From the Take Screenshot app that appears, highlight a selection, the whole screen, or
a single window, and then click the Capture button.
760
Downloaded from https://onlinelibrary.wiley.com/doi/ by alex jounh - Oregon Health & Science Univer , Wiley Online Library on [05/12/2025]. See the Terms and Conditions (https://onlinelibrary.wiley.com/terms-and-conditions) on Wiley Online Library for rules of use; OA articles are governed by the applicable Creative Commons License
Appendix B: Exercise Answers
Chapter 3: Using the Shell
1. To switch virtual consoles and return to the desktop in Fedora or Ubuntu (this feature
is disabled in some RHEL systems), do the following:
a. Hold Ctrl+Alt and press F2 (Ctrl+Alt+F2). A text-based console should appear.
b. Type your username (press Enter) and password (press Enter).
c. Type a few commands, such as id, pwd, and ls.
d. Type exit to exit the shell and return to the login prompt.
e. Press Ctrl+Alt+F1 to return to the virtual console that holds your desktop. On different Linux systems, the desktop may be on different virtual consoles. Ctrl+Alt+F7
and Ctrl+Alt+F2 are other common places to find it. You may need to log in again.
2. For your Terminal window, to make the font red and the background yellow on some
older versions of GNOME, select the Main Menu (three lines) icon and choose Preferences. Choose your profile (it could be Unnamed), select the Colors tab, and unselect
Use Colors From System Theme. Select the Default Color Text color and change it to
Red. Select the Default Color Background and change it to yellow.
For some newer GNOME desktops, it’s not as easy to select individual color changes.
Select the Main Menu (three lines) icon, choose Preferences, and then simply
choose a palette that most closely matches the colors you want.
3. Find the mount command and tracepath man page.
a. Run type mount to see that the mount command’s location is either /usr/
bin/mount or /bin/mount.
b. Run locate tracepath | grep tracepath to see that the tracepath
man page is at /usr/share/man/man8/tracepath.8.gz.
4. Run, recall, and change these commands as described:
$ cat /etc/passwd
$ ls $HOME
$ date
a. Press the up arrow until you see the cat /etc/passwd command. If your cursor is not already at the end of the line, press Ctrl+E to get there. Backspace over
the word passwd, type the word group, and press Enter.
b. Type man ls, and find the option to list by time (-t). Press the up arrow until
you see the ls $HOME command. Use the left arrow key or Alt+B to position your
cursor to the left of $HOME. Type -t so that the line appears as ls -t $HOME.
Press Enter to run the command.
c. Type man date to view the date man page. Use the up arrow to recall the date
command and add the format indicator that you found. A single %D format indicator gets the results you need:
$ date +%D
04/27/20
761
A
P
P
E
N
D
I
X
Downloaded from https://onlinelibrary.wiley.com/doi/ by alex jounh - Oregon Health & Science Univer , Wiley Online Library on [05/12/2025]. See the Terms and Conditions (https://onlinelibrary.wiley.com/terms-and-conditions) on Wiley Online Library for rules of use; OA articles are governed by the applicable Creative Commons License
Appendix B: Exercise Answers
5. Use tab completion to type basename /usr/share/doc/. Type basena<Tab>
/u<Tab>sh<Tab>doc<Tab> to get basename /usr/share/doc/.
6. Pipe /etc/services to the less command:
$ cat /etc/services | less
7. Make output from the date command appear in this format: Today is Thursday, July
31, 2025 (yours will be the current date).
$ echo "Today is $(date +'%A, %B %d, %Y')"
8. View variables to find your current hostname, username, shell, and home directories.
$
$
$
$
echo
echo
echo
echo
$HOSTNAME
$USERNAME
$SHELL
$HOME
9. Add a permanent mypass alias that displays the contents of the /etc/passwd file.
a. Type nano $HOME/.bashrc.
b. Move the cursor to an open line at the bottom of the page. (Press Enter to open a
new line if needed.)
c. On its own line, type alias m="cat /etc/passwd".
d. Press Ctrl+O to save and Ctrl+X to exit the file.
e. Type source $HOME/.bashrc.
f. Type alias m to make sure the alias was set properly: alias m='cat
/etc/passwd'.
g. Type m. (The /etc/passwd file displays on the screen.)
10. To display the man page for the mount system call, use the man -k command to find
man pages that include the word mount. Then use the mount command with the
correct section number (8) to get the proper mount man page:
$ man -
k mount | grep ^mount
mount
(2) -mount filesystem
mount
(8) -mount a filesystem
…
mountpoint (1) -see if a directory is a mountpoint
mountstats (8) -Displays various NFS client per-
mount statistics
$ man 2 mount
MOUNT(2)
Linux Programmer's Manual
MOUNT(2)
NAME
mount -mount filesystem
SYNOPSIS
#include <sys/mount.h>
.
.
.
762
Downloaded from https://onlinelibrary.wiley.com/doi/ by alex jounh - Oregon Health & Science Univer , Wiley Online Library on [05/12/2025]. See the Terms and Conditions (https://onlinelibrary.wiley.com/terms-and-conditions) on Wiley Online Library for rules of use; OA articles are governed by the applicable Creative Commons License
Appendix B: Exercise Answers
Chapter 4: Moving Around the Filesystem
1. Create the projects directory, create nine empty files (house1 to house9), and
list just those files.
$ mkdir $HOME/projects/
$ touch $HOME/projects/house{1..9}
$ ls $HOME/projects/house{1..9}
2. Make the $HOME/projects/houses/doors/ directory path, and create some
empty files in that path.
$
$
$
$
$
$
$
cd
mkdir
touch
mkdir
touch
mkdir
touch
$HOME/projects/houses
$HOME/projects/houses/bungalow.txt
$HOME/projects/houses/doors/
$HOME/projects/houses/doors/bifold.txt
-
p $HOME/projects/outdoors/vegetation/
$HOME/projects/outdoors/vegetation/landscape.txt
3. Copy the files house1 and house5 to the $HOME/projects/houses/ directory.
$ cp $HOME/projects/house[15] $HOME/projects/houses
4. Recursively copy the /usr/share/doc/initscripts* directory to the $HOME/
projects/ directory.
$ cp -
ra /usr/share/doc/initscripts*/ $HOME/projects/
5. Recursively list the contents of the $HOME/projects/ directory. Pipe the output to
the less command so that you can page through the output.
$ ls -
lR $HOME/projects/ | less
6. Remove the files house6, house7, and house8 without being prompted.
$ rm -
f $HOME/projects/house[678]
7. Move house3 and house4 to the $HOME/projects/houses/doors directory.
$ mv $HOME/projects/house{3,4} $HOME/projects/houses/doors/
8. Remove the $HOME/projects/houses/doors directory and its contents.
$ rm -
rf $HOME/projects/houses/doors/
9. Change the permissions on the $HOME/projects/house2 file so that it can be
read and written to by the user who owns the file, only read by the group, and have
no permission for others.
$ chmod 640 $HOME/projects/house2
10. Recursively change the permissions of the $HOME/projects/ directory so that
nobody has write permission to any files or directories beneath that point in the
filesystem.
$ chmod -
R a-
w $HOME/projects/
$ ls -
lR $HOME/projects/
763
A
P
P
E
N
D
I
X
Downloaded from https://onlinelibrary.wiley.com/doi/ by alex jounh - Oregon Health & Science Univer , Wiley Online Library on [05/12/2025]. See the Terms and Conditions (https://onlinelibrary.wiley.com/terms-and-conditions) on Wiley Online Library for rules of use; OA articles are governed by the applicable Creative Commons License
Appendix B: Exercise Answers
/home/joe/projects/:
total 12
-
r-
-
r-
-
r-
-
. 1 joe joe
-
r-
-
r-
-
-
-
-
. 1 joe joe
-
r-
-
r-
-
r-
-
. 1 joe joe
-
r-
-
r-
-
r-
-
.
dr-
xr-
xr-
x.
dr-
xr-
xr-
x.
dr-
xr-
xr-
x.
…
1
2
2
3
joe
joe
joe
joe
0 Jan 16 06:49 house1
0 Jan 16 06:49 house2
0 Jan 16 06:49 house5
joe
0 Jan 16 06:49 house9
joe 4096 Jan 16 06:57 houses
joe 4096 Jul 1 2014 initscripts-
9.03.40
joe 4096 Jan 16 06:53 outdoors
Chapter 5: Working with Text Files
1. Follow these steps to create the /tmp/services file, and then edit it so that
WorldWideWeb appears as World Wide Web.
$ cp /etc/services /tmp
$ vi /tmp/services
/WorldWideWeb<Enter>
cwWorld Wide Web<Esc>
The next two lines show the before and after:
http
http
80/tcp
80/tcp
www www-
http
www www-
http
# WorldWideWeb HTTP
# World Wide Web HTTP
2. One way to move the paragraph in your /tmp/services file is to search for the first
line of the paragraph, delete five lines (5dd), go to the end of the file (G), and put in
the text (p):
$ vi /tmp/services
/Note that it is<Enter>
5dd
G
p
3. To use ex mode to search for every occurrence of the term tcp (case sensitive) in
your /tmp/services file and change it to WHATEVER, you can enter the following:
$ vi /tmp/services
:g/tcp/s//WHATEVER/g<Enter>
4. To search the /etc directory for every file named passwd and redirect errors from
your search to /dev/null, you can enter the following:
$ find /etc -
name passwd 2> /dev/null
764
Downloaded from https://onlinelibrary.wiley.com/doi/ by alex jounh - Oregon Health & Science Univer , Wiley Online Library on [05/12/2025]. See the Terms and Conditions (https://onlinelibrary.wiley.com/terms-and-conditions) on Wiley Online Library for rules of use; OA articles are governed by the applicable Creative Commons License
Appendix B: Exercise Answers
5. Create a directory in your home directory called TEST. Create files in that directory
named one, two, and three that have full read/write/execute permissions for
everyone (user, group, and other). Construct a find command that would find those
files and any other files that have write permission open to “others” from your home
directory and below.
$ mkdir $HOME/TEST
$ touch $HOME/TEST/{one,two,three}
$ chmod 777 $HOME/TEST/{one,two,three}
$ find $HOME -
perm -
002 -
type f -
ls
148120 0 -
rwxrwxrwx
1 chris chris 0 Jan
chris/TEST/two
148918 0 -
rwxrwxrwx
1 chris chris 0 Jan
chris/TEST/three
147306 0 -
rwxrwxrwx
1 chris chris 0 Jan
chris/TEST/one
1 08:56 /home/
1 08:56 home/
1 08:56 /home/
6. Find files under the /usr/share/doc directory that have not been modified in
more than 300 days.
$ find /usr/share/doc -
mtime +300
7. Create a /tmp/FILES directory. Find all files under the /usr/share directory
that are more than 5MB and less than 10MB, and copy them to the /tmp/FILES
directory.
$ mkdir /tmp/FILES
$ find /usr/share -
size +5M -
size -
10M -
exec cp {} /tmp/FILES \;
$ du -
sh /tmp/FILES/*
6.6M
/tmp/FILES/BidiCharacterTest.txt
7.6M
/tmp/FILES/BidiTest.txt
5.2M
/tmp/FILES/day.jpg
8. Find every file in the /tmp/FILES directory, and make a backup copy of each file in
the same directory. Use each file’s existing name and append .mybackup to create
each backup file.
$ find /tmp/FILES/ -
type f -
exec cp {} {}.mybackup \;
9. Install the kernel-doc package in Fedora or Red Hat Enterprise Linux. Using grep,
search inside the files contained in the /usr/share/doc/kernel-doc* directory
for the term e1000 (case insensitive), and list the names of the files that contain
that term.
# dnf install kernel-
doc
$ cd /usr/share/doc/kernel-doc*
$ grep -
rli e1000 .
./Documentation/powerpc/booting-
without-
of.txt
./Documentation/networking/e100.txt
…
765
A
P
P
E
N
D
I
X
Downloaded from https://onlinelibrary.wiley.com/doi/ by alex jounh - Oregon Health & Science Univer , Wiley Online Library on [05/12/2025]. See the Terms and Conditions (https://onlinelibrary.wiley.com/terms-and-conditions) on Wiley Online Library for rules of use; OA articles are governed by the applicable Creative Commons License
Appendix B: Exercise Answers
10. Search for the e1000 term again in the same location. However, this time list every
line that contains the term and highlight the term in color.
$ cd /usr/share/doc/kernel-doc-*
$ grep -
ri -
-
color e1000 .
Chapter 6: Managing Running Processes
1. To list all processes running on your system with a full set of columns, while piping
the output to less, enter the following:
$ ps -
ef | less
2. To list all processes running on the system and sort those processes by the name of
the user running each process, enter the following:
$ ps -
ef -
-
sort=user | less
3. To list all processes running on the system with the column names process ID,
username, group name, nice value, virtual memory size, resident memory size, and
command, enter the following:
$ ps -
eo 'pid,user,group,nice,vsz,rss,comm' | less
PID USER
GROUP
NI
VSZ
RSS COMMAND
1 root
root
0 19324 1236 init
2 root
root
0
0
0 kthreadd
3 root
root
-
0
0 migration/0
4 root
root
0
0
0 ksoftirqd/0
4. To run the top command and then go back and forth between sorting by CPU usage
and memory consumption, enter the following:
$ top
P
M
P
M
5. To start the gedit process from your desktop and use the System Monitor window to
kill that process, do the following:
$ gedit &
Next, from the Activities screen, type System Monitor and press Enter. Find the
gedit process on the Processes tab. (You can sort alphabetically to make it easier
by clicking the Process Name heading.) Right-click the gedit command, and then
select either End Process or Kill Process; the gedit window on your screen should
disappear.
6. To run the gedit process and use the kill command to send a signal to pause
(stop) that process, enter the following (taking note of the process ID shown):
$ gedit &
[1] 21532
$ kill -
SIGSTOP 21532
766
Downloaded from https://onlinelibrary.wiley.com/doi/ by alex jounh - Oregon Health & Science Univer , Wiley Online Library on [05/12/2025]. See the Terms and Conditions (https://onlinelibrary.wiley.com/terms-and-conditions) on Wiley Online Library for rules of use; OA articles are governed by the applicable Creative Commons License
Appendix B: Exercise Answers
7. To use the killall command to tell the gedit command (paused in the previous
exercise) to continue working, do the following:
$ killall -
SIGCONT gedit
Make sure that the text you typed after gedit was paused now appears in
the window.
8. To install the xeyes command, run it about 20 times in the background, and run
killall to kill all 20 xeyes processes at once, enter the following:
#
$
$
…
$
dnf install xorg-x11-apps
xeyes &
xeyes &
killall xeyes &
Remember, you need to be the root user to install the package. After that, remember
to repeat the xeyes command 20 times. Spread the windows around on your screen,
and move the mouse for fun to watch the eyes move. All the xeyes windows should
disappear at once when you type killall xeyes.
9. As a regular user, run the gedit command so that it starts with a nice value of 5.
# nice -
n 5 gedit &
[1] 21578
10. To use the renice command to change the nice value of the gedit command you
just started to 7, enter the following:
# renice -
n 7 21578
21578: old priority 0, new priority 7
Use any command you like to verify that the current nice value for the gedit
command is now set to 7. For example, you could type the following:
# ps -
eo 'pid,user,nice,comm' | grep gedit
21578 chris
7 gedit
Chapter 7: Writing Simple Shell Scripts
1. Here’s an example of how to create a script in your $HOME/bin directory called
myownscript. When the script runs, it should output information that appears
as follows:
A
P
P
E
N
D
I
X
Today is Sat Jul 26 15:45:04 EDT 2025.
You are in /home/joe and your host is abc.example.com.
The following steps show one way to create the script named myownscript:
a. If it doesn't already exist, create a bin directory:
$ mkdir $HOME/bin
767
Downloaded from https://onlinelibrary.wiley.com/doi/ by alex jounh - Oregon Health & Science Univer , Wiley Online Library on [05/12/2025]. See the Terms and Conditions (https://onlinelibrary.wiley.com/terms-and-conditions) on Wiley Online Library for rules of use; OA articles are governed by the applicable Creative Commons License
Appendix B: Exercise Answers
b. Using any text editor, create a script called $HOME/bin/myownscript that
contains the following:
#!/bin/bash
# myownscript
# List some information about your current system
echo "Today is $(date)."
echo "You are in $(pwd) and your host is $(hostname)."
c. Make the script executable:
$ chmod 755 $HOME/bin/myownscript
2. Create a script that reads in three positional parameters from the command line and
assigns those parameters to variables named ONE, TWO, and THREE, respectively.
Also, replace X with the number of parameters and Y with all of the parameters
entered. Then replace A with the contents of variable ONE, B with variable TWO, and C
with variable THREE, as shown here:
a. To create the script, open a file named $HOME/bin/myposition and add the
following contents:
#!/bin/bash
# myposition
ONE=$1
TWO=$2
THREE=$3
echo "There are $# parameters that include: $@"
echo "The first is $ONE, the second is $TWO, the third is
$THREE."
b. To make the script called $HOME/bin/myposition executable, enter the
following:
$ chmod 755 $HOME/bin/myposition
c. To test it, run it with some command-line arguments, as in the following:
$ myposition Where Is My Hat Buddy?
There are 5 parameters that include: Where Is My Hat Buddy?
The first is Where, the second is Is, the third is My.
3. To create the script described, do the following:
a. To create a file called $HOME/bin/myhome and make it executable, enter the
following:
$ touch $HOME/bin/myhome
$ chmod 755 $HOME/bin/myhome
b. Here's what the script myhome might look like:
#!/bin/bash
# myhome
read -
p "What street did you grow up on? " mystreet
768
Downloaded from https://onlinelibrary.wiley.com/doi/ by alex jounh - Oregon Health & Science Univer , Wiley Online Library on [05/12/2025]. See the Terms and Conditions (https://onlinelibrary.wiley.com/terms-and-conditions) on Wiley Online Library for rules of use; OA articles are governed by the applicable Creative Commons License
Appendix B: Exercise Answers
read -
p "What town did you grow up in? " mytown
echo "The street I grew up on was $mystreet and the town
was $mytown."
c. Run the script to check that it works. The following example shows what the input
and output for the script could look like:
$ myhome
What street did you grow up on? Harrison
What town did you grow up in? Princeton
The street I grew up on was Harrison and the town was Princeton.
4. To create the required script, do the following:
a. Using any text editor, create a script called $HOME/bin/myos and make the
script executable:
$ touch $HOME/bin/myos
$ chmod 755 $HOME/bin/myos
b. The script could contain the following:
#!/bin/bash
# myos
read -
p "What is your favorite operating system, Mac,
Windows or Linux? " opsys
if [ $opsys = Mac ] ; then
echo "Mac is nice, but not tough enough for me."
elif [ $opsys = Windows ] ; then
echo "I used Windows once. What is that blue screen for?"
elif [ $opsys = Linux ] ; then
echo "Great Choice!"
else
echo "Is $opsys an operating system?"
fi
5. To create a script named $HOME/bin/animals that runs through the words moose,
cow, goose, and sow through a for loop and have each of those words appended to
the end of the line “I have a. . .,” do the following:
a. Make the script executable:
$ touch $HOME/bin/animals
$ chmod 755 $HOME/bin/animals
A
P
P
E
N
D
I
X
b. The script could contain the following:
#!/bin/bash
# animals
for ANIMALS in moose cow goose sow ; do
echo "I have a $ANIMALS"
done
769
Downloaded from https://onlinelibrary.wiley.com/doi/ by alex jounh - Oregon Health & Science Univer , Wiley Online Library on [05/12/2025]. See the Terms and Conditions (https://onlinelibrary.wiley.com/terms-and-conditions) on Wiley Online Library for rules of use; OA articles are governed by the applicable Creative Commons License
Appendix B: Exercise Answers
c. When you run the script, the output should appear as follows:
$
I
I
I
I
animals
have a moose
have a cow
have a goose
have a sow
Chapter 8: Learning System Administration
1. To enable Cockpit on your system, enter the following:
# systemctl enable -
-
now cockpit.socket
Created symlink /etc/systemd/system/sockets.target.wants/
cockpit.socket
→ /usr/lib/systemd/system/cockpit.socket
2. To open the Cockpit interface in your web browser, enter the hostname or IP address
of the system holding your Cockpit service, followed by port number 9090. For example, enter this into the location box of your browser:
https://host1.example.com:9090/
3. To find all of the files under the /var/spool directory that are owned by users
other than root and do a long listing of them, enter the following. (I recommend
becoming root to find files that might be closed off to other users.)
$ su -
Password: *********
# find /var/spool -
not -
user root -
ls | less
4. To become root user and create an empty or plain-text file named /mnt/test.txt,
enter the following:
$ su -
Password: *********
# touch /mnt/test.txt
# ls -
l /mnt/test.txt
-
rw-
r-
-
r-
-
. 1 root root 0 Jan
9 21:51 /mnt/test.txt
5. To become root and edit the /etc/sudoers file to allow your regular user account
(for example, bill) to have full root privilege via the sudo command, do the
following:
$ su -
Password: *********
# visudo
o
bill
ALL=(ALL)
Esc
ZZ
770
ALL
Downloaded from https://onlinelibrary.wiley.com/doi/ by alex jounh - Oregon Health & Science Univer , Wiley Online Library on [05/12/2025]. See the Terms and Conditions (https://onlinelibrary.wiley.com/terms-and-conditions) on Wiley Online Library for rules of use; OA articles are governed by the applicable Creative Commons License
Appendix B: Exercise Answers
Because visudo opens the /etc/sudoers file in vi, the example types o to open
a line, and then it types in the line to allow bill to have full root privilege. After the
line is typed, press Esc to return to command mode and type ZZ to write and quit.
6. To use the sudo command to create a file called /mnt/test2.txt and verify that
the file is there and owned by the root user, enter the following:
[bill]$ sudo touch /mnt/test2.txt
We trust you have received the usual lecture from the local System
Administrator. It usually boils down to these three things:
#1) Respect the privacy of others.
#2) Think before you type.
#3) With great power comes great responsibility.
[sudo] password for bill: *********
[bill]$ ls -
l /mnt/text2.txt
-
rw-
r-
-
r-
-
. 1 root root 0 Jan 9 23:37 /mnt/text2.txt
7. Do the following to mount and unmount a USB drive and watch the system journal
during this process:
a. Run the journalctl -f command as root in a Terminal window and watch the
output from here for the next few steps.
# journalctl -f
Jan 25 16:07:59 host2 kernel: usb 1-
1.1: new high-
speed USB device
number 16 using ehci-
pci
Jan 25 16:07:59 host2 kernel: usb 1-
1.1: New USB device found,
idVendor=0ea0, idProduct=2168
Jan 25 16:07:59 host2 kernel: usb 1-
1.1: New USB device strings:
Mfr=1, Product=2, SerialNumber=3
Jan 25 16:07:59 host2 kernel: usb 1-
1.1: Product: Flash Disk
Jan 25 16:07:59 host2 kernel: usb 1-
1.1: Manufacturer: USB
…
Jan 25 16:08:01 host2 kernel: sd 18:0:0:0: [sdb] Write Protect is off
Jan 25 16:08:01 host2 kernel: sd 18:0:0:0: [sdb]
Assuming drive cache: write through
Jan 25 16:08:01 host2 kernel: sdb: sdb1
Jan 25 16:08:01 host2 kernel: sd 18:0:0:0: [sdb]
Attached SCSI removable disk
b. Plug in a USB storage drive that mounts a filesystem from that drive automatically.
If it does not, run the following commands in a second terminal (as root) to create
a mount point directory and mount the device:
$ mkdir /mnt/test
$ mount /dev/sdb1 /mnt/test
$ umount /dev/sdb1
771
A
P
P
E
N
D
I
X
Downloaded from https://onlinelibrary.wiley.com/doi/ by alex jounh - Oregon Health & Science Univer , Wiley Online Library on [05/12/2025]. See the Terms and Conditions (https://onlinelibrary.wiley.com/terms-and-conditions) on Wiley Online Library for rules of use; OA articles are governed by the applicable Creative Commons License
Appendix B: Exercise Answers
8. To see what USB devices are connected to your computer, enter the following:
$ lsusb
9. To load the bttv module, list the modules that were loaded, and unload it, enter the
following:
# modprobe -
a bttv
# lsmod | grep bttv
ttv
tea575x
tveeprom
videobuf_dma_sg
videobuf_core
v4l2_common
videodev
i2c_algo_bit
167936 0
16384 1 bttv
28672 1 bttv
24576 1 bttv
32768 2 videobuf_dma_sg,bttv
16384 1 bttv
233472 3 tea575x,v4l2_common,bttv
16384 1 bttv
Notice that other modules (v4l2_common, videodev, and others) were loaded
when you loaded bttv with modprobe -a.
10. Enter the following to remove the bttv module along with any other modules that
were loaded with it. Notice that they were all gone after running modprobe -r.
# modprobe -
r bttv
# lsmod | grep bttv
Chapter 9: Installing Linux
1. To install a Fedora system from Fedora Workstation Live media, follow the instructions
in the section “Quick Starting Linux Installation” in Chapter 9. In general, those steps
include the following:
a. Getting the live media burned to a USB drive or DVD.
b. Booting the Live media.
c. Selecting to install to the hard drive when the system boots up.
d. Adding information from the summary page needed to configure your system
initially.
e. Rebooting your computer and removing the Live medium so that the newly
installed system boots from the hard drive.
2. To update the packages, after the Fedora Workstation Live media installation is complete, do the following:
a. Reboot the computer and fill in the first boot questions as prompted.
b. Using a wired or wireless connection, make sure you have a connection to the
Internet. Refer to Chapter 14, “Administering Networking,” if you have trouble
772
Downloaded from https://onlinelibrary.wiley.com/doi/ by alex jounh - Oregon Health & Science Univer , Wiley Online Library on [05/12/2025]. See the Terms and Conditions (https://onlinelibrary.wiley.com/terms-and-conditions) on Wiley Online Library for rules of use; OA articles are governed by the applicable Creative Commons License
Appendix B: Exercise Answers
getting your networking connection to work properly. Open a shell as the root user
and type sudo dnf update.
c. When prompted, type y to accept the list of packages displayed. The system
begins downloading and installing the packages.
3. To run the RHEL installation in text mode, do the following:
a. Boot the RHEL DVD.
b. When you see the boot menu, highlight one of the installation boot entries and
press Tab. Move the cursor right to the end of the kernel line, and type the literal
option text at the end of that line. Press Enter to start the installer.
c. Try out the rest of the installation in text mode.
4. To set the disk partitioning as described in question 4 for a Red Hat Enterprise Linux
DVD installation, do the following:
Note
This procedure ultimately deletes all content on your hard disk. If you just want to use this exercise to practice partitioning, you can reboot your computer before starting the actual installation process without harming your hard disk. After
you go forward and partition your disk, assume that all data has been deleted.
a. On a computer that you can erase with at least 10GB of disk space, insert a RHEL
installation DVD, reboot, and begin stepping through the installation screens.
b. When you get to the Installation Summary screen, select Installation Destination.
c. From the Installation Destination screen, select the device to use for the installation (probably sda if you have a single hard disk that you can completely erase or
vda for a virtual install).
d. Select the Custom button.
e. Select Done to get to the Manual Partitioning screen.
f. If the existing disk space is already consumed, you need to delete the partitions
before proceeding.
g. Click the plus (+) button at the bottom of the screen. Then add each of the following mount points:
/boot - 400M
/ - 3G
/var - 2G
/home -2G
h. Select Done. You should see a summary of changes.
i. If the changes look acceptable, select Accept Changes. If you are just practicing
and don’t actually want to change your partitions, select Cancel & Return to
Custom Partitioning. Then simply exit the installer.
773
A
P
P
E
N
D
I
X
Downloaded from https://onlinelibrary.wiley.com/doi/ by alex jounh - Oregon Health & Science Univer , Wiley Online Library on [05/12/2025]. See the Terms and Conditions (https://onlinelibrary.wiley.com/terms-and-conditions) on Wiley Online Library for rules of use; OA articles are governed by the applicable Creative Commons License
Appendix B: Exercise Answers
Chapter 10: Getting and Managing Software
1. To search the YUM repository for the package that provides the mogrify command,
enter the following:
# dnf provides mogrify
2. To display information about the package that provides the mogrify command and
determine what is that package’s home page (URL), enter the following:
# dnf info ImageMagick
You see that the URL to the home page for ImageMagick is https://imagemagick.org.
3. To install the package containing the mogrify command, enter the following:
# dnf install ImageMagick
4. To list all of the documentation files contained in the package that provides the
mogrify command, enter the following:
# rpm -
qd ImageMagick
…
/usr/share/doc/ImageMagick/AUTHORS.txt
…
/usr/share/man/man1/identify.1.gz
/usr/share/man/man1/import.1.gz
/usr/share/man/man1/mogrify.1.gz
5. To look through the change log of the package that provides the mogrify command,
enter the following (type q to exit):
# rpm -
q -
-
changelog ImageMagick | less
6. To delete the mogrify command from your system and verify its package against the
RPM database to see that the command is indeed missing, enter the following:
# type mogrify
mogrify is /usr/sbin/mogrify
# rm /usr/sbin/mogrify
rm remove symbolic link '/usr/sbin/mogrify'? y
# rpm -
V ImageMagick
missing
/usr/bin/mogrify
7. To reinstall the package that provides the mogrify command and make sure that the
entire package is intact again, enter the following:
# dnf reinstall ImageMagick
# rpm -
V ImageMagick
8. To download the package that provides the mogrify command to your current directory, enter the following:
# dnf download ImageMagick
ImageMagick-
7.1.1.47-
1.fc42.x86_64.rpm
774
Downloaded from https://onlinelibrary.wiley.com/doi/ by alex jounh - Oregon Health & Science Univer , Wiley Online Library on [05/12/2025]. See the Terms and Conditions (https://onlinelibrary.wiley.com/terms-and-conditions) on Wiley Online Library for rules of use; OA articles are governed by the applicable Creative Commons License
Appendix B: Exercise Answers
9. To display general information about the package that you just downloaded by querying the package’s RPM file in the current directory, enter the following:
# rpm -qip ImageMagick-7.1.1.47-1.fc42.x86_64.rpm
Name
: ImageMagick
Epoch
: 1
Version
: 7.1.1.47
Release
: 1.fc42
…
10. To remove the package containing the mogrify command from your system, enter
the following:
# dnf remove ImageMagick
Chapter 11: Managing User Accounts
For questions that involve adding and removing user accounts, you can use the Users window,
the User Manager window, or command-line tools such as useradd and usermod. The point
is to make sure you get the correct results shown in the answers that follow, not necessarily to
do it exactly in the same way that I did.
There are multiple ways that you can achieve the same results. The answers here show how to
complete the exercises from the command line. (Become root user when you see a # prompt.)
1. To add a local user account to your Linux system that has a username of jbaxter
and a full name of John Baxter, which uses /bin/sh as its default shell and is the
next available UID (yours may differ from the one shown here), enter the following.
You can use the grep command to check the new user account. Then set the password for jbaxter to My1N1te0ut!.
# useradd -
c "John Baxter" -
s /bin/sh jbaxter
# grep jbaxter /etc/passwd
jbaxter:x:1001:1001:John Baxter:/home/jbaxter:/bin/sh
# passwd jbaxter
Changing password for user jbaxter
New password: My1N1te0ut!
Retype new password: My1N1te0ut!
passwd: all authentication tokens updated successfully
A
P
P
E
N
D
I
X
2. To create a group account named testing that uses group ID 315, enter the
following:
# groupadd -
g 315 testing
# grep testing /etc/group
testing:x:315:
775
Downloaded from https://onlinelibrary.wiley.com/doi/ by alex jounh - Oregon Health & Science Univer , Wiley Online Library on [05/12/2025]. See the Terms and Conditions (https://onlinelibrary.wiley.com/terms-and-conditions) on Wiley Online Library for rules of use; OA articles are governed by the applicable Creative Commons License
Appendix B: Exercise Answers
3. To add jbaxter to the testing group and the bin group, enter the following:
# usermod -
aG testing,bin jbaxter
# grep jbaxter /etc/group
bin:x:1:bin,daemon,jbaxter
jbaxter:x:1001:
testing:x:315:jbaxter
4. To become jbaxter and temporarily have the testing group be jbaxter’s
default group, run touch /home/jbaxter/file.txt so that the testing
group is assigned as the file’s group, and do the following:
$ su -jbaxter
Password: My1N1te0ut!
sh-
4.2$ newgrp testing
sh-
4.2$ touch /home/jbaxter/file.txt
sh-
4.2$ ls -
l /home/baxter/file.txt
-
rw-
rw-
r-
-
. 1 jbaxter testing 0 Jan 25 06:42 /home/jbaxter/
file.txt
sh-
4.2$ exit ; exit
5. Note what user ID has been assigned to jbaxter, and then delete the user account
without deleting the home directory assigned to jbaxter.
$ userdel jbaxter
6. Use the following command to find any files in the /home directory (and any subdirectories) that are assigned to the user ID that recently belonged to the user named
jbaxter. (When I did it, the UID/GID were both 1001; yours may differ.) Notice
that the username jbaxter is no longer assigned on the system, so any files that
the user created are listed as belonging to UID 1001 and GID 1001, except for a couple
of files that were assigned to the testing group because of the newgrp command
run earlier:
# find /home -
uid 1001 -
ls
262184 4 drwx-
-
-
-4 1001
1001
4096 Jan 25 08:00 /home/
jbaxter
262193 4 -
rw-
r-
-r
-
-1 1001 1001
176 Jan 27 2011 /home/
jbaxter/.bash_profile
262196 4 -
rw-
-
-
-
-1 13602 testing 93 Jan 25 08:00 /home/
jbaxter/.bash_history
262194 0 -
rw-
rw-
r-
-1 13602 testing 0 Jan 25 07:59 /home/
jbaxter/file.txt
…
7. Run these commands to copy the /etc/services file to the /etc/skel/ directory; then add a new user to the system named mjones, with a full name of Mary
Jones and a home directory of /home/maryjones. List her home directory to make
sure that the services file is there.
# cp /etc/services /etc/skel/
# useradd -
d /home/maryjones -
c "Mary Jones" mjones
776
Downloaded from https://onlinelibrary.wiley.com/doi/ by alex jounh - Oregon Health & Science Univer , Wiley Online Library on [05/12/2025]. See the Terms and Conditions (https://onlinelibrary.wiley.com/terms-and-conditions) on Wiley Online Library for rules of use; OA articles are governed by the applicable Creative Commons License
Appendix B: Exercise Answers
# ls -
l /home/maryjones
total 628
-
rw-
r-
-
r-
-
. 1 mjones mjones 640999 Jan 25 06:27 services
8. Run the following command to find all files under the /home directory that belong
to mjones. If you did the exercises in order, notice that after you deleted the user
with the highest user ID and group ID, those numbers were assigned to mjones.
As a result, any files left on the system by jbaxter now belong to mjones. (For
this reason, you should remove or change ownership of files left behind when you
delete a user.)
# find /home -
user mjones -
ls
262184 4 drwx-
-
-
-
-
-4 mjones mjones 4096 Jan 25 08:00
/home/jbaxter
262193 4 -
rw-
r-
-
r-
-1 mjones mjones 176 Jan 27 2011 /home/
jbaxter/.bash_profile
262189 4 -
rw-
r-
-
r-
-1 mjones mjones 18 Jan 27 2011 /home/
jbaxter/.bash_logout
262194 0 -
rw-
rw-
r-
-1 mjones testing 0 Jan 25 07:59 /home/
jbaxter/file.txt
262188 4 -
rw-
r-
-
r-
-1 mjones mjones 124 Jan 27 2011 /home/
jbaxter/.bashrc
262197 4 drwx-
-
-
-
-
-4 mjones mjones 4096 Jan 25 08:27
/home/maryjones
262207 4 -
rw-
r-
-
r-
-1 mjones mjones 176 Jan 27 2011 /home/
maryjones/.bash_profile
262202 4 -
rw-
r-
-
r-
-1 mjones mjones 18 Jan 27 2011 /home/
maryjones/.bash_logout
262206 628 -
rw-
r-
-
r-
-1 mjones mjones 640999 Jan 25 08:27
/home/maryjones/services
262201 4 -
rw-
r-
-
r-
-1 mjones mjones 124 Jan 27 2011 /home/
maryjones/.bashrc
9. As the user mjones, you can use the following to create a file called /tmp/
maryfile.txt and use ACLs to assign the bin user read/write permission and the
lp group read/write permission to that file.
[mjones]$ touch /tmp/maryfile.txt
[mjones]$ setfacl -
m u:bin:rw /tmp/maryfile.txt
[mjones]$ setfacl -
m g:lp:rw /tmp/maryfile.txt
[mjones]$ getfacl /tmp/maryfile.txt
# file: tmp/maryfile.txt
# owner: mjones
# group: mjones
user::rw-
user:bin:rw-
group::rw-
group:lp:rw-
mask::rw-
other::r& —
A
P
P
E
N
D
I
X
777
Downloaded from https://onlinelibrary.wiley.com/doi/ by alex jounh - Oregon Health & Science Univer , Wiley Online Library on [05/12/2025]. See the Terms and Conditions (https://onlinelibrary.wiley.com/terms-and-conditions) on Wiley Online Library for rules of use; OA articles are governed by the applicable Creative Commons License
Appendix B: Exercise Answers
10. Run this set of commands (as mjones) to create a directory named /tmp/mydir
and use ACLs to assign default permissions to it so that the adm user has read/write/
execute permission to that directory and any files or directories created in it. Test that
it worked by creating the /tmp/mydir/testing/ directory and /tmp/mydir/
newfile.txt.
[mary]$ mkdir /tmp/mydir
[mary]$ setfacl -
m d:u:adm:rwx /tmp/mydir
[mjones]$ getfacl /tmp/mydir
# file: tmp/mydir
# owner: mjones
# group: mjones
user::rwx
group::rwx
other::r-
x
default:user::rwx
default:user:adm:rwx
default:group::rwx
default:mask::rwx
default:other::r-
x
[mjones]$ mkdir /tmp/mydir/testing
[mjones]$ touch /tmp/mydir/newfile.txt
[mjones]$ getfacl /tmp/mydir/testing/
# file: tmp/mydir/testing/
# owner: mjones
# group: mjones
user::rwx
user:adm:rwx
group::rwx
mask::rwx
other::r-
x
default:user::rwx
default:user:adm:rwx
default:group::rwx
default:mask::rwx
default:other::r-
x
[mjones]$ getfacl /tmp/mydir/newfile.txt
# file: tmp/mydir/newfile.txt
# owner: mjones
# group: mjones
user::rw-
user:adm:rwx
#effective:rw-
group::rwx
#effective:rw-
mask::rw-
other::r-
-
Notice that the adm user effectively has only rw-permission. To remedy that, you
need to expand the permissions of the mask. One way to do that is with the chmod
command, as follows:
[mjones]$ chmod 775 /tmp/mydir/newfile.txt
[mjones]$ getfacl /tmp/mydir/newfile.txt
778
Downloaded from https://onlinelibrary.wiley.com/doi/ by alex jounh - Oregon Health & Science Univer , Wiley Online Library on [05/12/2025]. See the Terms and Conditions (https://onlinelibrary.wiley.com/terms-and-conditions) on Wiley Online Library for rules of use; OA articles are governed by the applicable Creative Commons License
Appendix B: Exercise Answers
# file: tmp/mydir/newfile.txt
# owner: mjones
# group: mjones
user::rwx
user:adm:rwx
group::rwx
mask::rwx
other::r-
x
Chapter 12: Managing Disks and Filesystems
1. To determine the device name of a USB flash drive that you want to insert into your
computer, enter the following and insert the USB flash drive. (Press Ctrl+C after you
have seen the appropriate messages.)
# journalctl -f
kernel: [sdb] 15667200 512-
byte logical blocks:
(8.02 GB/7.47 GiB)
Feb 11 21:55:59 cnegus kernel: sd 7:0:0:0:
[sdb] Write Protect is off
Feb 11 21:55:59 cnegus kernel: [sdb] Assuming
drive cache: write through
Feb 11 21:55:59 cnegus kernel: [sdb] Assuming
drive cache: write through
2. To list partitions on the USB flash drive on a RHEL 6 system, enter the following:
# fdisk -
c -
u -
l /dev/sdb
To list partitions on a RHEL 7, RHEL 8, or Fedora system, enter the following:
# fdisk -
l /dev/sdb
Keep in mind that, in either case, the device name might be other than /dev/sdb.
3. To delete partitions on the USB flash drive, assuming device /dev/sdb, do the
following:
# fdisk /dev/sdb
Command (m for help): d
Partition number (1-
6):
Command (m for help): d
Partition number (1-
5):
Command (m for help): d
Partition number (1-
5):
Command (m for help): d
Partition number (1-
4):
Command (m for help): d
Partition number (1-
4):
Command (m for help): d
Selected partition 1
Command (m for help): w
# partprobe /dev/sdb
6
5
A
P
P
E
N
D
I
X
4
3
2
779
Downloaded from https://onlinelibrary.wiley.com/doi/ by alex jounh - Oregon Health & Science Univer , Wiley Online Library on [05/12/2025]. See the Terms and Conditions (https://onlinelibrary.wiley.com/terms-and-conditions) on Wiley Online Library for rules of use; OA articles are governed by the applicable Creative Commons License
Appendix B: Exercise Answers
4. To add a 100MB Linux partition, 200MB swap partition, and 500MB LVM partition to
the USB flash drive, enter the following:
# fdisk /dev/sdb
Command (m for help): n
Command action
e
extended
p
primary partition (1-
4)
p
Partition number (1-
4): 1
First sector (2048-
15667199, default 2048): <ENTER>
Last sector, +sectors or +size{K,M,G} (default 15667199): +100M
Command (m for help): n
Command action
e
extended
p
primary partition (1-
4)
p
Partition number (1-
4): 2
First sector (616448-
8342527, default 616448): <ENTER>
Last sector, +sectors or +size{K,M,G} (default 15667199): +200M
Command (m for help): n
Command action
e
extended
p
primary partition (1-
4)
p
Partition number (1-
4): 3
First sector (616448-
15667199, default 616448): <ENTER>
Using default value 616448
Last sector, +sectors or +size{K,M,G} (default 15667199): +500M
Command (m for help): t
Partition number (1-
4): 2
Hex code (type L to list codes): 82
Changed system type of partition 2 to 82 (Linux swap / Solaris)
Command (m for help): t
Partition number (1-
4): 3
Hex code (type L to list codes): 8e
Changed system type of partition 3 to 8e (Linux LVM)
Command (m for help): w
# partprobe /dev/sdb
# grep sdb /proc/partitions
8
16
7833600 sdb
8
17
102400 sdb1
8
18
204800 sdb2
8
19
512000 sdb3
780
Downloaded from https://onlinelibrary.wiley.com/doi/ by alex jounh - Oregon Health & Science Univer , Wiley Online Library on [05/12/2025]. See the Terms and Conditions (https://onlinelibrary.wiley.com/terms-and-conditions) on Wiley Online Library for rules of use; OA articles are governed by the applicable Creative Commons License
Appendix B: Exercise Answers
5. To put an ext4 filesystem on the Linux partition, enter the following:
# mkfs -
t ext4 /dev/sdb1
6. To create a mount point called /mnt/mypart and mount the Linux partition on it,
do the following:
# mkdir /mnt/mypart
# mount -
t ext4 /dev/sdb1 /mnt/mypart
7. To enable the swap partition and turn it on so that additional swap space is immediately available, enter the following:
# mkswap /dev/sdb2
# swapon /dev/sdb2
8. To create a volume group called abc from the LVM partition, create a 200MB logical volume from that group called data, create a VFAT filesystem on it, temporarily
mount the logical volume on a new directory named /mnt/test, and then check
that it was successfully mounted, enter the following:
#
#
#
#
#
#
pvcreate /dev/sdb3
vgcreate abc /dev/sdb3
lvcreate -
n data -
L 200M abc
mkfs -
t vfat /dev/mapper/abc-
data
mkdir /mnt/test
mount /dev/mapper/abc-
data /mnt/test
9. To grow the logical volume from 200MB to 300MB, enter the following:
# lvextend -
L +100M /dev/mapper/abc-
data
# resize2fs -p /dev/mapper/abc-data
10. To remove the USB flash drive safely from the computer, do the following:
#
#
#
#
#
#
umount /dev/sdb1
swapoff /dev/sdb2
umount /mnt/test
lvremove /dev/mapper/abc-data
vgremove abc
pvremove /dev/sdb3
You can now safely remove the USB flash drive from the computer.
Chapter 13: Understanding Server Administration
1. To log in to any account on another computer using the ssh command, enter the following (replacing localhost with a remote machine for all these examples, if you
have one) and then enter the password when prompted:
$ ssh joe@localhost
joe@localhost's password: *********
[joe]$
781
A
P
P
E
N
D
I
X
Downloaded from https://onlinelibrary.wiley.com/doi/ by alex jounh - Oregon Health & Science Univer , Wiley Online Library on [05/12/2025]. See the Terms and Conditions (https://onlinelibrary.wiley.com/terms-and-conditions) on Wiley Online Library for rules of use; OA articles are governed by the applicable Creative Commons License
Appendix B: Exercise Answers
2. To display the contents of a remote /etc/system-release file and have its contents displayed on the local system using remote execution with the ssh command,
do the following:
$ ssh joe@localhost "cat /etc/system-
release"
joe@localhost's password: *******
Fedora release 42 (Adams)
3. To use X11 forwarding to display a gedit window on your local system and then save
a file on the remote home directory, do the following:
$ ssh -
X joe@localhost "xterm"
joe@localhost's password: ********
From the xterm window that appears, type the following:
$ touch hello
$ ls hello
hello
4. To copy all the files from the /usr/share/help/es directory recursively on a
remote system to the /tmp directory on your local system in such a way that all of
the modification times on the files are updated to the time on the local system when
they are copied, do the following:
$ scp -
r joe@localhost:/usr/share/help/es /tmp
joe@localhost's password: ********
org.gnome.baobab.svg
100% 6920
401.9KB/s
00:00
index.page
100% 2402
271.6KB/s
00:00
$ ls -
l /tmp/es | head
total 20
drwxr-
xr-
x 3 chris chris 4096 Sep 26 07:46 baobab
drwxr-
xr-
x 3 chris chris 4096 Sep 26 07:46 evince
Notice that the directory you create will be larger than the directory you copied.
That’s because the default for scp is to follow symbolic links and copy the files they
point to instead of just copying the symbolic link.
5. To copy all of the files from the /usr/share/zsh directory recursively on a remote
system to the /tmp directory on your local system in such a way that all of the modification times on the files from the remote system are maintained on the local system,
try the following:
$ rsync -
av joe@localhost:/usr/share/zsh /tmp
joe@localhost's password: ********
receiving incremental file list
zsh/
zsh/5.9/
zsh/5.9/functions/
zsh/5.9/functions/VCS_INFO_adjust
$ ls -
l /tmp/logwatch | head
total 8
drwxr-
xr-
x 5 chris chris 4096 Jul 27 17:53 5.9
drwxr-
xr-
x 2 chris chris 4096 Sep 14 16:11 site-
functions
782
Downloaded from https://onlinelibrary.wiley.com/doi/ by alex jounh - Oregon Health & Science Univer , Wiley Online Library on [05/12/2025]. See the Terms and Conditions (https://onlinelibrary.wiley.com/terms-and-conditions) on Wiley Online Library for rules of use; OA articles are governed by the applicable Creative Commons License
Appendix B: Exercise Answers
6. To create a public/private key pair to use for SSH communications (no passphrase on
the key), copy the public key file to a remote user’s account with ssh-copy-id and
use key-based authentication to log in to that user account without having to enter a
password, use the following code:
$ ssh-keygen
Generating public/private rsa key pair.
Enter file in which to save the key (/home/joe/.ssh/id_rsa): ENTER
/home/joe/.ssh/id_rsa already exists.
Enter passphrase (empty for no passphrase): ENTER
Enter same passphrase again: ENTER
Your identification has been saved in /home/joe/.ssh/id_rsa.
Your public key has been saved in /home/joe/.ssh/id_rsa.pub.
The key fingerprint is:
58:ab:c1:95:b6:10:7a:aa:7c:c5:ab:bd:f3:4f:89:1e joe@cnegus.csb
The key's randomart image is:
…
$ ssh-copy-id -i ~/.ssh/id_rsa.pub joe@localhost
joe@localhost's password: ********
Now try logging into the machine, with "ssh 'joe@localhost'", and check
in .ssh/authorized_keys to make sure we haven’t added extra keys that you
weren’t expecting.
$ ssh joe@localhost
$ cat .ssh/authorized_keys
ssh-
rsa AAAAB3NzaC1yc2EAAAABIwAAAQEAyN2Psp5/LRUC9E8BDCx53
yPUa0qoOPd
v6H4sF3vmn04V6E7D1iXpzwPzdo4rpvmR1ZiinHR2xGAEr2uZag7feKgLn
ww2KPcQ6S
iR7lzrOhQjV+SGb/a1dxrIeZqKMq1Tk07G4EvboIrq//9J47vI4l7iNu0xRmjI3TTxa
DdCTbpG6J3uSJm1BKzdUtwb413x35W2bRgMI75aIdeBsDgQBBiOdu+zuTM
rXJj2viCA
XeJ7gIwRvBaMQdOSvSdlkX353tmIjmJheWdgCccM/1jKdoELpaevg9anCe/
yUP3so31
tTo4I+qTfzAQD5+66oqW0LgMkWVvfZI7dUz3WUPmcMw== chris@abc
.example.com
7. To create an entry in /etc/rsyslog.conf that stores all authentication messages
at the info level and higher into a file named /var/log/myauth, do the following.
Watch from one terminal as the data comes in.
# vim /etc/rsyslog.conf
authpriv.info
# systemctl restart rsyslog.service
/var/log/myauth
783
A
P
P
E
N
D
I
X
Downloaded from https://onlinelibrary.wiley.com/doi/ by alex jounh - Oregon Health & Science Univer , Wiley Online Library on [05/12/2025]. See the Terms and Conditions (https://onlinelibrary.wiley.com/terms-and-conditions) on Wiley Online Library for rules of use; OA articles are governed by the applicable Creative Commons License
Appendix B: Exercise Answers
<Terminal 1>
<Terminal 2>
# tail -
f /var/log/myauth
$ ssh jim@localhost
Sep 26 08:16:31 fedora
jim@localhost's password:
sshd-
session[265664]: Invalid user
Permission denied,try again
jim from 192.168.1.18 port 37080
Sep 26 08:16:35 fedora
sshd-
session[265664]: pam_unix
(sshd:auth): check pass; user unknown
Sep 26 08:16:36 fedora
sshd-
session[265664]: Failed password
for invalid user jim from 192.168.1.18
port 37080 ssh2
Ctrl-C
8. To determine the largest directory structures under /usr/share, sort them from
largest to smallest, and list the top 10 of those directories in terms of size using the
du command, enter the following:
# du -
s /usr/share/* | sort -
rn | head
711408
/usr/share/locale
449320
/usr/share/code
209872
/usr/share/icons
196988
/usr/share/fonts
…
9. To show the space that is used and available from all the filesystems currently
attached to the local system, but exclude any tmpfs, devtmpfs, efivarfs, and
overlay filesystems by using the df command, enter the following:
$ df -
h -
x tmpfs -
x devtmpfs -
x efivarfs -
x overlay | grep -
v snapd
Filesystem
Size Used Avail Use% Mounted on
/dev/nvme0n1p3 237G
48G 187G 21% /
/dev/nvme0n1p3 237G
48G 187G 21% /home
/dev/nvme0n1p2 974M 449M 458M 50% /boot
/dev/nvme0n1p1 599M
20M 580M
4% /boot/efi
10. To find any files in the /usr directory that are more than 10MB in size, do the
following:
$ find /usr -
size +10M
/usr/bin/qemu-
system-
i386
/usr/bin/qemu-
system-
x86_64
/usr/bin/snap
/usr/bin/lto-
dump
/usr/bin/toolbox
/usr/bin/docker
...
784
Downloaded from https://onlinelibrary.wiley.com/doi/ by alex jounh - Oregon Health & Science Univer , Wiley Online Library on [05/12/2025]. See the Terms and Conditions (https://onlinelibrary.wiley.com/terms-and-conditions) on Wiley Online Library for rules of use; OA articles are governed by the applicable Creative Commons License
Appendix B: Exercise Answers
Chapter 14: Administering Networking
1. To use the desktop to check that NetworkManager has successfully started your network interface (wired or wireless), do the following:
a. Click the upper-right corner of your GNOME desktop to see the drop-down menu.
Any active wireless network connections should appear in the Wi-Fi button.
b. If it has not connected to the network, select the right arrow in the Wi-Fi button,
choose from the list of wireless networks available, and then enter the username
and password, if prompted, to start an active connection.
2. To run a command to check the active network interfaces available on your computer,
enter the following:
$ ifconfig
or
$ ip addr show
3. Try to contact google.com from the command line in a way that ensures that DNS is
working properly:
$ ping google.com
Ctrl-C
4. To run a command to check the routes being used to communicate outside of your
local network, enter the following:
$ route
5. To trace the route being taken to connect to google.com, use the traceroute
command:
$ traceroute google.com
6. To view the network interfaces and related network activities for your Linux system
through Cockpit, open a web browser to port 9090 using an IP address or hostname.
For example: https://localhost:9090/network. If the page is not found, try
starting Cockpit: sudo systemctl start cockpit.
7. To create a host entry that allows you to communicate with your local host system
using the name myownhost, edit the /etc/hosts file (vi /etc/hosts), and
add myownhost to the end of the localhost entry so that it appears as follows (then
ping myownhost to see if it worked):
127.0.0.1
localhost.localdomain localhost myownhost
# ping myownhost
Ctrl+C
8. To see the DNS name servers being used to resolve hostnames and IP addresses on your
system (yours will be different than those shown below), enter the following:
# cat /etc/resolv.conf
nameserver 10.83.14.9
# or try: resolvectl status
785
A
P
P
E
N
D
I
X
Downloaded from https://onlinelibrary.wiley.com/doi/ by alex jounh - Oregon Health & Science Univer , Wiley Online Library on [05/12/2025]. See the Terms and Conditions (https://onlinelibrary.wiley.com/terms-and-conditions) on Wiley Online Library for rules of use; OA articles are governed by the applicable Creative Commons License
Appendix B: Exercise Answers
nameserver 10.18.2.10
nameserver 192.168.1.254
# dig google.com
…
google.com.
91941
IN
NS
142.250.191.110
;; Query time: 38 msec
;; SERVER: 127.0.0.53#53(127.0.0.53) (UDP)
;; WHEN: Fri Sep 26 08:47:51 EDT 2025
;; MSG SIZE rcvd: 55
9. If you have an extra wired connection, to create a custom route that directs traffic
destined for the 192.168.99.0/24 network to some IP address on your local network,
such as 192.168.0.5 (first ensuring that the 192.168.99 network is not being used at
your location), do the following:
a. From GNOME, go to the Activities screen, type Settings, and press Enter.
b. Select Network, and then click the Settings icon on the Wired line.
c. Select IPv4, and then select Manual.
d. In the Addresses section, add the address, netmask, and gateway described earlier
and click Apply. The new route should take effect immediately.
e. Type the following from a terminal to see the route:
# route -n
Kernel IP routing table
Destination Gateway
0.0.0.0
192.168.1.1
0.0.0.0
192.168.0.5
192.168.0.5 0.0.0.0
192.168.99.0 0.0.0.0
Genmask
0.0.0.0
0.0.0.0
255.255.255.255
255.255.255.0
Flags
UG
UG
UH
U
Metric
600
20100
20100
100
Ref Use Iface
0
0 wlp0s20f3
0
0 eno1
0
0 eno1
0
0 eno1
10. To check to see whether your system has been configured to allow IPv4 packets to be
routed between network interfaces on your system, enter the following:
# cat /proc/sys/net/ipv4/ip_forward
0
A 0 shows that IPv4 packet forwarding is disabled; a 1 shows that it is enabled.
Chapter 15: Starting and Stopping Services
1. To determine which initialization daemon your server is currently using, consider the
following:
a. In most cases today, PID 1 appears as the systemd daemon:
# ps -
ef | head
UID
PID PPID
786
C STIME TTY
TIME CMD
Downloaded from https://onlinelibrary.wiley.com/doi/ by alex jounh - Oregon Health & Science Univer , Wiley Online Library on [05/12/2025]. See the Terms and Conditions (https://onlinelibrary.wiley.com/terms-and-conditions) on Wiley Online Library for rules of use; OA articles are governed by the applicable Creative Commons License
Appendix B: Exercise Answers
root
1
0 0 17:01 ?
00:00:04
/usr/lib/systemd/systemd -
-
system -
-
deserialize=165
splash
If you type ps -ef and PID 1 is init, it still might be the systemd daemon. Use
the strings command to see if systemd is in use:
# strings /sbin/init | grep -
i systemd
systemd_features
libsystemd-
core-
257.7-
1.fc42.so
libsystemd-
shared-
257.7-
1.fc42.so
/usr/lib64/systemd
rd.systemd.unit
…
b. Most likely, you have the Upstart, SysVinit, or BSD init daemon if your init
daemon is not systemd. But double-check at http://wikipedia.org/
wiki/Init.
2. Run the systemctl command to check the status of the sshd daemon:
# systemctl status sshd.service
• sshd.service -OpenSSH server daemon
Loaded: loaded (/usr/lib/systemd/system/sshd.service;
enabled; preset: disabled)
Drop-
In: /usr/lib/systemd/system/service.d
└─10-
timeout-
abort.conf
Active: active (running) since Tue 2025-
09-
23
22:57:51 EDT; 2 days ago
3. To determine your server’ previous and current runlevel, use the runlevel command:
$ runlevel
N 3
$ systemctl get-default
graphical.target
4. To change the default target unit on your Linux server to multi-user, you can do
the following:
# systemctl set-default multi-user.target
Removed /etc/systemd/system/default.target.
Created symlink /etc/systemd/system/default.target →
/usr/lib/systemd/system/multi-
user.target.
A
P
P
E
N
D
I
X
To set the default target back to graphical target:
# systemctl set-
default graphical.target
5. To list active services on your server, type the following:
# systemctl list-unit-files --type=service | grep -v
disabled
787
Downloaded from https://onlinelibrary.wiley.com/doi/ by alex jounh - Oregon Health & Science Univer , Wiley Online Library on [05/12/2025]. See the Terms and Conditions (https://onlinelibrary.wiley.com/terms-and-conditions) on Wiley Online Library for rules of use; OA articles are governed by the applicable Creative Commons License
Appendix B: Exercise Answers
UNIT FILE
abrt-
journal-
core.service
abrt-
oops.service
abrt-
vmcore.service
abrt-
xorg.service
abrtd.service
accounts-
daemon.service
…
STATE
enabled
enabled
enabled
enabled
enabled
enabled
PRESET
enabled
enabled
enabled
enabled
enabled
enabled
6. To list the running (or active) services on your Linux server, use the appropriate command(s) determined in answer 5 for the initialization daemon that your
server is using.
7. For each initialization daemon, the following command shows a particular service’s
current status:
$ systemctl status service_name
For example:
$ systemctl status crond.service
8. To show the status of the cups daemon on your Linux server, use the following:
$ systemctl status cups.service
• cups.service -CUPS Scheduler
Loaded: loaded (/usr/lib/systemd/system/cups.service;
disabled; preset: disabled)
Drop-
In: /usr/lib/systemd/system/service.d
└─10-
timeout-
abort.conf
Active: active (running) since Tue 2025-
09-
23 22:57:51 EDT;
2 days ago
9. To attempt to restart the cups daemon on your Linux server, use the following:
# systemctl restart cups.service
10. To attempt to reload configuration files that have changes so that they can be used by
all system daemon services on your Linux server, run the following:
# systemctl daemon-reload
Chapter 16: Configuring a Print Server
For questions that involve working with printers, you can use either graphical or command-
line tools in most cases. The point is to make sure that you get the correct results, shown in
the answers that follow. The answers here include a mix of graphical and command-line ways
of solving the exercises. (Become root user when you see a # prompt.)
1. To use the Print Settings window to add a new printer called myprinter to your
system (generic PostScript printer, connected to a port), do the following:
a. Install the system-config-printer package:
# dnf install system-config-printer
788
Downloaded from https://onlinelibrary.wiley.com/doi/ by alex jounh - Oregon Health & Science Univer , Wiley Online Library on [05/12/2025]. See the Terms and Conditions (https://onlinelibrary.wiley.com/terms-and-conditions) on Wiley Online Library for rules of use; OA articles are governed by the applicable Creative Commons License
Appendix B: Exercise Answers
b. From the GNOME desktop, select Print Settings from the Activities screen.
c. Unlock the interface and enter your password (assuming you have sudo privilege).
d. Select the Add button.
e. Select an attached printer, another device, or a Network Printer as the device and
click Forward.
f. For the driver, choose Generic and click Forward; then choose PostScript and
click Forward.
g. Click Forward to skip any installable options, if needed.
h. For the printer name, call it myprinter, give it any description and location you
like, and click Apply.
i. Click Cancel in order not to print a test page. The printer should appear in the
Print Settings window.
2. To use the lpstat -t command to see the status of all of your printers, enter the
following:
# lpstat -t
scheduler is running
system default destination: myprinter
device for myprinter: serial:/dev/ttyS4?baud=115200
myprinter accepting requests since Sat 27 Sep 2025
08:18:00 AM EDT
printer myprinter is idle. enabled since Sat 27 Sep 2025
08:18:00 AM EDT
3. To use the lp command to print the /etc/hosts file, enter the following:
$ lp /etc/hosts
request id is myprinter-
1 (1 file(s))
4. To check the print queue for that printer, enter the following:
# lpq -
P myprinter
myprinter is not ready
Rank
Owner
Job
1st
root
655
File(s)
hosts
Total Size
1024 bytes
5. To remove the print job from the queue (cancel it), enter the following:
# lprm -
P myprinter
6. To use the printing window to set the basic server setting that publishes your printers
so that other systems on your local network can print to your printers, do the
following:
a. On a GNOME desktop, from the Activities screen, type Print Settings and
press Enter.
b. Select Server ➪ Settings and type your password if prompted.
c. Click the Publish Shared Printers Connected To This System check box
and click OK.
789
A
P
P
E
N
D
I
X
Downloaded from https://onlinelibrary.wiley.com/doi/ by alex jounh - Oregon Health & Science Univer , Wiley Online Library on [05/12/2025]. See the Terms and Conditions (https://onlinelibrary.wiley.com/terms-and-conditions) on Wiley Online Library for rules of use; OA articles are governed by the applicable Creative Commons License
Appendix B: Exercise Answers
7. To allow remote administration of your system from a web browser, follow these steps:
a. On a GNOME desktop, from the Activities screen, type Print Settings, and
press Enter.
b. Select Server ➪ Settings and type your password if prompted.
c. Click the Allow Remote Administration check box and click OK.
8. To demonstrate that you can do remote administration of your system from a web
browser on another system, do the following:
a. In the location box from a browser window from another computer on your network, enter the following, replacing hostname with the name or IP address of
the system running your print service: https://hostname:631.
b. Type root (or a user with sudo privilege) as the user and the associated password, when prompted. The CUPS home page should appear from that system.
9. To use the netstat or ss command to see on which addresses the cupsd daemon is
listening, enter the following:
# ss -
tupln | grep cupsd
tcp LISTEN 0 4096 0.0.0.0:631 0.0.0.0:* users (("cupsd",pid=3714
43,fd=8))
tcp LISTEN 0 4096 [::]:631
[::]:*
users:(("cupsd",pid=3714
43,fd=9))
10. To delete the myprinter printer entry from your system, do the following:
a. From the Print Settings window, click the Unlock button and type your password
when prompted.
b. Right-click the myprinter icon and select Delete.
c. When prompted, select Delete again.
Chapter 17: Configuring a Web Server
1. To install the httpd package, along with dependent packages, on a Fedora system, do
the following:
# dnf install httpd mod_ssl
2. To create a file called index.html in the directory assigned to DocumentRoot in
the main Apache configuration file (with the words “My Own Web Server” inside), do
the following:
a. Determine the location of DocumentRoot:
# grep ^DocumentRoot /etc/httpd/conf/httpd.conf
DocumentRoot "/var/www/html"
b. Echo the words “My Own Web Server” into the index.html file located in
DocumentRoot:
# echo "My Own Web Server"> /var/www/html/index.html
790
Downloaded from https://onlinelibrary.wiley.com/doi/ by alex jounh - Oregon Health & Science Univer , Wiley Online Library on [05/12/2025]. See the Terms and Conditions (https://onlinelibrary.wiley.com/terms-and-conditions) on Wiley Online Library for rules of use; OA articles are governed by the applicable Creative Commons License
Appendix B: Exercise Answers
3. To start the Apache web server and set it to start up automatically at boot time, do
the following:
# systemctl start httpd.service
# systemctl enable httpd.service
To check that it is available from a web browser on your local host, type the following in the location box on your local host (your host name or IP address should
work as well):
http://localhost/
You should see the message “My Own Web Server” in the browser. (If you want to use
https://localhost, your server needs to listen on port 443.)
4. To use the ss command to see on which ports the httpd server is listening, enter
the following:
# ss -
tupln | grep httpd
Netid State
Recv-
Q Send-
Q
Local Address:Port Peer
Address:
PortProcess
tcp
LISTEN 0
511
*:443
*:*
users:(("httpd",pid=489504,fd=6),("httpd",pid=488153,fd=6),
("httpd",pid=488152,fd=6),("httpd",pid=488151,fd=6),
("httpd",pid=488149,fd=6))
tcp
LISTEN 0
511
*:80
*:*
users:(("httpd",pid=431843,fd=4),("httpd",pid=431842,fd=4),
("httpd",pid=431841,fd=4),("httpd",pid=1749,fd=4))
5. Try to connect to your Apache web server from a web browser that is outside of the
local system. If it fails, correct any problems that you encounter by investigating the
firewall, SELinux, and other security features.
If you don’t have DNS set up yet, use the IP address of the server to view your Apache
server from a remote web browser, such as http://192.168.0.1. If you are not
able to connect, retry connecting to the server from your browser after performing
each of the following steps on the system running the Apache server:
a. From the GNOME Activities screen, type Firewall config and press Enter.
b. If prompted, type your password to get sudo privilege.
c. From the Firewall Configuration window, with the default Zone selected (such as
FedoraWorkstation), click the Configuration box and select Permanent.
d. Scroll down through the services and turn on the check boxes for http , http3,
and https protocols.
e. Click the Configuration box again and select Runtime and choose the same protocols from the list again (to have the change take effect immediately).
The /var/www/html/index.html file should not be prevented by SELinux from
being served. Creating index.html in that directory should automatically assign it
the right context. However, if you are not able to see the file from your browser, you
791
A
P
P
E
N
D
I
X
Downloaded from https://onlinelibrary.wiley.com/doi/ by alex jounh - Oregon Health & Science Univer , Wiley Online Library on [05/12/2025]. See the Terms and Conditions (https://onlinelibrary.wiley.com/terms-and-conditions) on Wiley Online Library for rules of use; OA articles are governed by the applicable Creative Commons License
Appendix B: Exercise Answers
can make sure that the problem is not SELinux by trying a few things. The
setenforce 0 command puts SELinux in permissive mode temporarily. If
connecting to the web server succeeds after that, you need to correct SELinux file
context and/or Boolean issues (probably file context in this case). The following
should work:
# chcon --reference=/var/www/html /var/www/html/index.html
6. To use the openssl or similar command to create your own private RSA key and
self-signed SSL certificate, do the following (if you don’t have a fully qualified domain
name, you can use your server’s IP address, as shown here):
#
#
#
#
#
#
dnf install openssl
cd /etc/pki/tls/private
openssl genrsa -
out server.key 1024
chmod 600 server.key
cd /etc/pki/tls/certs
openssl req -
new -
x509 -
nodes -
sha256 -
days 365 \
-
keyout /etc/pki/tls/private/server.key \
-out server.crt
Country Name (2 letter code) [AU]: US
State or Province Name (full name) [Some-
State]: NJ
Locality Name (eg, city) []: Princeton
Organization Name (eg, company) [Internet Widgits Pty
Ltd]:TEST USE ONLY
Organizational Unit Name (eg, section) []:TEST USE ONLY
Common Name (eg, YOUR name) []: 192.168.1.19
Email Address []: dom@example.org
You should now have a /etc/pki/tls/private/server.key key file and a
/etc/pki/tls/certs/server.crt certificate file.
7. To configure your Apache web server to use your key and self-signed certificate to
serve secure (HTTPS) content, do the following:
a. Edit the /etc/httpd/conf.d/ssl.conf file to change the key and certificate locations to use the ones that you just created:
SSLCertificateFile /etc/pki/tls/certs/server.crt
SSLCertificateKeyFile /etc/pki/tls/private/server.key
b. Edit the /etc/httpd/conf/httpd.conf file and add the common name that
you assigned when you created the certificate (replace
192.168.1.19 in our example with your server's IP address):
ServerName 192.168.1.19
c. Restart the httpd service:
# systemctl restart httpd.service
8. To use a web browser to create an HTTPS connection to your web server and view the
contents of the certificate that you created, do the following:
From the system running the Apache server, type https://localhost in the
browser’s location box. You should see a message similar to “This Connection is
792
Downloaded from https://onlinelibrary.wiley.com/doi/ by alex jounh - Oregon Health & Science Univer , Wiley Online Library on [05/12/2025]. See the Terms and Conditions (https://onlinelibrary.wiley.com/terms-and-conditions) on Wiley Online Library for rules of use; OA articles are governed by the applicable Creative Commons License
Appendix B: Exercise Answers
Untrusted” or “Warning: Potential Security Risk Ahead.” To complete the connection
in Firefox, do the following:
a. Click Advanced.
b. Click View Certificate. You will see information from the certificate you created.
c. Go back to the Warning page and click Accept The Risk and Continue. You should
now see the contents of your web page.
9. To create a file named /etc/httpd/conf.d/example.org.conf, create an
index.html file for that site to serve, and restart the service, do the following:
a. Create an /etc/httpd/conf.d/example.org.conf file that looks like the
following:
NameVirtualHost *:80
<VirtualHost *:80>
ServerAdmin
joe@example.org
ServerName
joe.example.org
ServerAlias
web.example.org
DocumentRoot
/var/www/html/joe.example.org/
DirectoryIndex index.html
</VirtualHost>
b. Create the text to go into the index.html file:
# mkdir /var/www/html/joe.example.org/
# echo "Welcome to the House of Joe" > \
/var/www/html/joe.example.org/index.html
c. Restart the httpd service:
# systemctl restart httpd
10. Add the text example.org joe.example.org to the end of the localhost entry in
your /etc/hosts file on the machine that is running the web server, and check it
by typing http://joe.example.org into the location box of your web browser to see
“Welcome to the House of Joe” when the page is displayed, do the following:
a. Edit the /etc/hosts file with any text editor so the local host line appears
as follows:
127.0.0.1 localhost.localdomain localhost example.org joe
.example.org
b. From a browser on the local system where httpd is running, you should be able
to type http://joe.example.org into the location box to access the Apache web
server using name-based authentication.
793
A
P
P
E
N
D
I
X
Downloaded from https://onlinelibrary.wiley.com/doi/ by alex jounh - Oregon Health & Science Univer , Wiley Online Library on [05/12/2025]. See the Terms and Conditions (https://onlinelibrary.wiley.com/terms-and-conditions) on Wiley Online Library for rules of use; OA articles are governed by the applicable Creative Commons License
Appendix B: Exercise Answers
Chapter 18: Configuring an FTP Server
Caution
Don’t do the tasks described here on a working, public FTP server, because these tasks will interfere with its operations.
(You could, however, use these tasks to set up a new FTP server.)
1. To determine which package provides the Very Secure FTP Daemon service, enter the
following as root:
# dnf search "Very Secure FTP"
…
================ N/S Matched: Very Secure FTP ============
vsftpd.x86_64 : Very Secure Ftp Daemon
The search found the vsftpd package.
2. To install the Very Secure FTP Daemon package on your system and search for the configuration files in the vsftpd package, enter the following:
# dnf install vsftpd
# rpm -
qc vsftpd | less
/etc/logrotate.d/vsftpd
/etc/pam.d/vsftpd
/etc/vsftpd/ftpusers
/etc/vsftpd/user_list
/etc/vsftpd/vsftpd.conf
3. To enable anonymous FTP and disable local user login for the Very Secure FTP Daemon
service, set the following in the /etc/vsftpd/vsftpd.conf file:
anonymous_enable=YES
write_enable=YES
anon_upload_enable=YES
local_enable=NO
4. To start the Very Secure FTP Daemon service and set it to start when the system boots,
enter the following on a current Fedora or Red Hat Enterprise Linux system:
# systemctl start vsftpd.service
# systemctl enable vsftpd.service
5. On the system running your FTP server, enter the following to create a file named
test in the anonymous FTP directory that contains the words “Welcome to your
vsftpd server”:
# echo "Welcome to your vsftpd server"> /var/ftp/test
6. To install the ftp package on your FTP server system and use the ftp command to
pull the test file from the server to your local directory, do the following:
a. Install the ftp package on your FTP server system:
# dnf install ftp
794
Downloaded from https://onlinelibrary.wiley.com/doi/ by alex jounh - Oregon Health & Science Univer , Wiley Online Library on [05/12/2025]. See the Terms and Conditions (https://onlinelibrary.wiley.com/terms-and-conditions) on Wiley Online Library for rules of use; OA articles are governed by the applicable Creative Commons License
Appendix B: Exercise Answers
b. To use the ftp command to log in to the local FTP server as an anonymous user
and copy that file to your local directory, do the following:
$ ftp localhost
Trying ::1...
Connected to localhost (::1).
220 (vsFTPd 3.0.5)
Name (localhost:root): anonymous
331 Please specify the password.
Password: <Enter>
230 Login successful.
Remote system type is UNIX.
Using binary mode to transfer files.
ftp> ls
229 Entering Extended Passive Mode (|||16905|)
150 Here comes the directory listing.
drwxr-
xr-
x
1 0
0
0 Apr 15 00:00 pub
-
rw-
r-
-
r-
-
1 0
0
30 Sep 28 21:01 test
ftp> get test
local: test remote: test
229 Entering Extended Passive Mode (|||13267|)
150 Opening BINARY mode data connection for test (30 bytes).
226 Transfer complete.
30 bytes received in 6.4e-
05 secs (468.75 Kbytes/sec)
ftp> quit
221 Goodbye.
chris@fedora:~$ cat test
Welcome to your vsftpd server
The text “Welcome to your vsftpd server” should appear in your terminal.
7. Try to get the test file from another system as you did from the local system in the
previous exercise. If it does not work, go to the FTP server and make sure it is accessible in the following ways:
a. From the GNOME Activities screen, type Firewall config and press Enter.
b. If prompted, type your password to get sudo privilege.
c. From the Firewall Configuration window, with the default zone selected (such as
FedoraWorkstation), click the Configuration box and select Permanent.
d. Scroll down through the services and turn on the check box for the ftp protocol.
e. Click the Configuration box again and select Runtime and choose the same protocols from the list again (to have the change take effect immediately).
To disable SELinux temporarily, enter the following and then try to access the
site again:
# setenforce 0
795
A
P
P
E
N
D
I
X
Downloaded from https://onlinelibrary.wiley.com/doi/ by alex jounh - Oregon Health & Science Univer , Wiley Online Library on [05/12/2025]. See the Terms and Conditions (https://onlinelibrary.wiley.com/terms-and-conditions) on Wiley Online Library for rules of use; OA articles are governed by the applicable Creative Commons License
Appendix B: Exercise Answers
If setting SELinux to 0 (Passive) makes the file accessible, then try to fix the
problem permanently by making sure that the test file context is set to
public_content_t.
8. To configure your vsftpd server to allow file uploads by anonymous users to a directory
named in, do the following as root on your FTP server:
a. Create the in directory as follows:
# mkdir /var/ftp/in
# chown ftp:ftp /var/ftp/in
# chmod 777 /var/ftp/in
b. For SELinux to allow uploading to the directory, first set file contexts properly
from the FTP server:
# semanage fcontext -
a -
t public_content_rw_t "/var/ftp/
in(/.*)?"
# restorecon -
F -
R -
v /var/ftp/in
c. Next, set the SELinux Boolean to allow uploading:
# setsebool -
P allow_ftpd_anon_write on
d. Restart the vsftpd service (systemctl restart vsftpd.service).
9. To install the lftp FTP client (if you don’t have a second Linux system, install lftp
on the same host running the FTP server) and, optionally, try to upload the /etc/
resolv.conf file to the in directory on the server, run the following commands:
# dnf install lftp
# lftp localhost
lftp localhost:/> cd in
lftp localhost:/in> put /etc/resolv.conf
89 bytes transferred
lftp localhost:/in> quit
If this doesn’t work, review exercise 8 to see if you can make it work by fixing the
firewall or SELinux.
10. Using any FTP client you choose, visit the ftp://ftp.gnu.org site and list the
contents of the directory that you land in.
…
Chapter 19: Configuring a Windows File Sharing
(Samba) Server
1. To install the samba and samba-client packages, enter the following as root from
a shell on the local system:
# dnf install samba samba-
client
796
Downloaded from https://onlinelibrary.wiley.com/doi/ by alex jounh - Oregon Health & Science Univer , Wiley Online Library on [05/12/2025]. See the Terms and Conditions (https://onlinelibrary.wiley.com/terms-and-conditions) on Wiley Online Library for rules of use; OA articles are governed by the applicable Creative Commons License
Appendix B: Exercise Answers
2. To start and enable the smb and nmb services, enter the following as root from a shell
on the local system:
#
#
#
#
systemctl
systemctl
systemctl
systemctl
enable smb.service
start smb.service
enable nmb.service
start nmb.service
3. To set the Samba server’s workgroup to TESTGROUP, the NetBIOS name to MYTEST,
and the server string to Samba Test System, as root user in a text editor, open
the /etc/samba/smb.conf file, and change three lines so that they appear
as follows:
workgroup = TESTGROUP
netbios name = MYTEST
server string = Samba Test System
4. To add a Linux user named phil to your system and add a Linux password and Samba
password for phil, enter the following as root user from a shell. (Be sure to remember the passwords you set.)
# useradd phil
# passwd phil
New password: *******
Retype new password: *******
# smbpasswd -
a phil
New SMB password: *******
Retype new SMB password: *******
Added user phil.
5. To set the [homes] section so that home directories are browseable (yes) and writeable (yes) and that phil is the only valid user, open the /etc/samba/smb.conf
file as root and change the [homes] section so that it appears as follows:
[homes]
comment = Home Directories
browseable = Yes
read only = No
valid users = phil
6. To set SELinux Booleans that are necessary to make it so that phil can access his
home directory via a Samba client, enter the following as root from a shell, and restart
the smb and nmb services:
# setsebool -
P samba_enable_home_dirs on
# systemctl restart smb
# systemctl restart nmb
7. From the local system, use the smbclient command to list that the homes share is
available.
# smbclient -
L localhost
Enter TESTGROUP\root's password: <ENTER>
Anonymous login successful
797
A
P
P
E
N
D
I
X
Downloaded from https://onlinelibrary.wiley.com/doi/ by alex jounh - Oregon Health & Science Univer , Wiley Online Library on [05/12/2025]. See the Terms and Conditions (https://onlinelibrary.wiley.com/terms-and-conditions) on Wiley Online Library for rules of use; OA articles are governed by the applicable Creative Commons License
Appendix B: Exercise Answers
Sharename
-
-
-
-
-
-
-
-
-
homes
Type
-
-
-
-
Disk
Comment
-
-
-
-
-
-
-
Home Directories
…
8. To connect to the homes share from a Nautilus (file manager) window on the Samba
server’s local system for the user phil in a way that allows you to drag and drop files
to that folder, do the following:
a. Open the Nautilus window (select the files icon).
b. In the left pane, select Other Locations and then click in the Connect To
Server box.
c. Type the Server address. For example, smb://localhost/phil/.
d. When prompted, select Registered User, type phil as the username, enter the
domain (TESTGROUP), and enter phil’s password.
e. Open another Nautilus window and drop a file to phil’s homes folder.
9. To open up the firewall so that anyone who has access to the server can access the
Samba service (smbd and nmbd daemons), you can simply open the Firewall Configuration window and check the netbios-ns, samba, and samba-client check
boxes (for both Runtime and Permanent).
10. To open the homes share again as the user phil from another system on your network (Windows or Linux) and make sure that you can drag and drop files to it, do the
following:
a. This step is really just repeating the Nautilus example described previously or
accessing a Windows File Explorer window and opening the share (by selecting Network, and then the Samba server). The trick is to make sure that the service has
been made available through the Linux server security features.
b. If you cannot access the Samba share, go back to exercise 5 to set up SELinux and
go to exercise 9 to enable the firewall.
Chapter 20: Configuring an NFS File Server
1. To install the packages needed to configure the NFS service on your chosen Linux
system, enter the following as root user at a shell (Fedora or RHEL):
# dnf install nfs-
utils
2. To list the documentation files that come in the package that provides the NFS server
software, enter the following:
# rpm -qd nfs-utils
/usr/share/doc/nfs-
utils/ChangeLog
…
798
Downloaded from https://onlinelibrary.wiley.com/doi/ by alex jounh - Oregon Health & Science Univer , Wiley Online Library on [05/12/2025]. See the Terms and Conditions (https://onlinelibrary.wiley.com/terms-and-conditions) on Wiley Online Library for rules of use; OA articles are governed by the applicable Creative Commons License
Appendix B: Exercise Answers
/usr/share/man/man5/exports.5.gz
/usr/share/man/man5/nfs.5.gz
/usr/share/man/man5/nfsmount.conf.5.gz
/usr/share/man/man7/nfsd.7.gz
/usr/share/man/man8/blkmapd.8.gz
/usr/share/man/man8/exportfs.8.gz
…
3. To start and enable the NFS service, enter the following as root user on the NFS server:
# systemctl start nfs-
server.service
# systemctl enable nfs-
server.service
4. To check the status of the NFS service that you just started on the NFS server, enter
the following as root user:
# systemctl status nfs-
server.service
5. To share a directory /var/mystuff from your NFS server as available to everyone,
read-only, and with the root user on the client having root access to the share, first
create the mount directory as follows:
# mkdir /var/mystuff
Then create an entry in the /etc/exports file that is similar to the following:
/var/mystuff
*(ro,no_root_squash,insecure)
To make the share available, enter the following:
# exportfs -v -a
exporting *:/var/mystuff
6. To make sure the share you created is accessible to all hosts, do the following:
a. From the Firewall Configuration window, make sure nfs, mountd, and rpc-bind
are set to On for the Permanent and Runtime firewall settings.
b. SELinux should be able to share NFS filesystems while in enforcing mode without
any changes to file contexts or Booleans. To make sure the share you created can
be shared read-only, run the following command as root user on the NFS server:
# setsebool -
P nfs_export_all_ro on
7. To view the shares available from the NFS server, enter the following from the NFS
client, replacing nfsserver with the name of your server:
# showmount -
e nfsserver
Export list for nfsserver:
/var/mystuff *
8. To create a directory called /var/remote and temporarily mount the /var/
mystuff directory from the NFS server (named nfsserver in this example) on that
mount point, enter the following as root user from the NFS client:
# mkdir /var/remote
# mount -
t nfs nfsserver:/var/mystuff /var/remote
799
A
P
P
E
N
D
I
X
Downloaded from https://onlinelibrary.wiley.com/doi/ by alex jounh - Oregon Health & Science Univer , Wiley Online Library on [05/12/2025]. See the Terms and Conditions (https://onlinelibrary.wiley.com/terms-and-conditions) on Wiley Online Library for rules of use; OA articles are governed by the applicable Creative Commons License
Appendix B: Exercise Answers
9. To add an entry so that the same mount is done automatically when you reboot, first
unmount /var/remote as follows:
# umount /var/remote
Then add an entry like the following to the /etc/fstab on the client system
(replacing nfsserver with your server name):
nfsserver:/var/mystuff
/var/remote
nfs bg,ro 0 0
To test that the share is configured properly, enter the following on the NFS client as
the root user:
# mount -a
# mount -
t nfs4
nfsserver:/var/mystuff on /var/remote type nfs4
(ro,relatime,vers=4.2…
10. To copy some files to the /var/mystuff directory, enter the following on the
NFS server:
# cp /etc/hosts /etc/services /var/mystuff
From the NFS client, to make sure that you can see the files just added to that directory, and to make sure that you can’t write files to that directory from the client,
enter the following:
# ls /var/remote
hosts
services
# touch /var/remote/file1
touch: cannot touch '/var/remote/file1': Read-
only file system
Chapter 21: Troubleshooting Linux
1. To go into Setup mode from the boot screen on your computer, do the following:
a. Reboot your computer.
b. Within a few seconds, you should see the boot screen, with an indication of which
function key to press to go into Setup mode. (On my Dell workstation, it’s the F2
function key; it could be the Delete key or something else.)
c. The UEFI or BIOS screen should appear. (If the system starts booting Linux, you
didn’t press the function key fast enough.)
2. From the BIOS setup screen, do the following to determine whether your computer is
32-bit or 64-bit, whether it includes virtualization support, and whether your network
interface card is capable of PXE booting.
Your experience may be a bit different from mine, depending on your computer and
Linux system. The setup screen is different for different computers. In general, however, you can use arrow keys and tab keys to move between different columns, and
press Enter to select an entry.
800
Downloaded from https://onlinelibrary.wiley.com/doi/ by alex jounh - Oregon Health & Science Univer , Wiley Online Library on [05/12/2025]. See the Terms and Conditions (https://onlinelibrary.wiley.com/terms-and-conditions) on Wiley Online Library for rules of use; OA articles are governed by the applicable Creative Commons License
Appendix B: Exercise Answers
a. On my Dell workstation, under the System heading, I highlight Processor Info to
see the type of processor that I have.
b. On my Dell workstation, under the Advanced, Built-in Device Options headings,
I see an Integrated NIC that allows me to boot to network (if I intend to boot the
computer from a PXE server over the network).
3. To interrupt the boot process to get to the GRUB boot loader, do the following:
a. Reboot the computer.
b. Just after the BIOS screen disappears, when you see the countdown to booting the
Linux system, press any key (perhaps the spacebar).
c. The GRUB boot loader menu should appear, ready to allow you to select which
operating system kernel to boot.
4. To boot up your computer to runlevel 1 so that you can do some system maintenance and get to the GRUB boot screen (as described in the previous exercise), do the
following:
a. Use the arrow keys to highlight the operating system and kernel that you
want to boot.
b. Type e to see the entries needed to boot the operating system.
c. Move your cursor to the line that included the kernel. (It should include the word
vmlinuz somewhere on the line.)
d. Move the cursor to the end of that line, add a space, and then type init=bash.
e. Follow the instructions to boot the new entry. You will probably either press Ctrl+X
or press Enter; if there is another screen, type b.
If it worked, you should be able to type the root password and begin using the
system from the shell.
5. To look at the messages that were produced in the kernel ring buffer (which shows
the activity of the kernel as it booted up), enter the following from the shell after the
system finishes booting:
# dmesg | less
Or, on a system using systemd, enter the following:
# journalctl -k
6. Reboot your system back to RHEL or Fedora. To run a trial yum update and exclude
any kernel package that is available, enter the following (when prompted, type N to
not actually go through with the update, if updates are available):
# dnf update --exclude='kernel*'
7. To check to see what processes are listening for incoming connections on your system,
enter the following:
# ss -
tupln | less
801
A
P
P
E
N
D
I
X
Downloaded from https://onlinelibrary.wiley.com/doi/ by alex jounh - Oregon Health & Science Univer , Wiley Online Library on [05/12/2025]. See the Terms and Conditions (https://onlinelibrary.wiley.com/terms-and-conditions) on Wiley Online Library for rules of use; OA articles are governed by the applicable Creative Commons License
Appendix B: Exercise Answers
8. To check to see what ports are open on your external network interface, do the
following.
If possible, run the nmap command from another Linux system on your network,
replacing yourhost with the hostname or IP address of your system:
# nmap yourhost
9. To clear your system’s page cache and watch the effect it has on your memory usage,
do the following:
a. Open a Terminal from the Activities screen.
b. Run the top command (to watch processes currently running on your system),
and then type a capital M to sort processes by those consuming the most memory.
c. From the Terminal window, select New Window to open a second Terminal window.
d. From the second Terminal window, become root user (su -
).
e. While watching the Mem line (used column) in the first Terminal window, enter the
following from the second Terminal window:
# echo 3> /proc/sys/vm/drop_caches
f. The used RES memory should go down significantly on the Mem line. The numbers
in the RES column for each process should go down as well.
10. To view memory and swap usage from Cockpit through your web browser, open your
browser to Cockpit for your host (https://hostname:9090). Then select Overview ➪ View metrics and history in the Usage box.
Chapter 22: Configuring an Artificial
Intelligence Chat Bot
1. To check your Linux computer for the number of CPU cores and amount of memory,
type the following:
$ cat /proc/cpuinfo | grep processor
processor
: 0
processor
: 1
processor
: 2
processor
: 3
processor
: 4
processor
: 5
$ cat /proc/meminfo | grep MemTotal
MemTotal:
7889356 kB
2. Open your web browser to ollama.com/search and type the name of a model you
are interested in. Model descriptions that include the term you type appear below for
you to select.
802
Downloaded from https://onlinelibrary.wiley.com/doi/ by alex jounh - Oregon Health & Science Univer , Wiley Online Library on [05/12/2025]. See the Terms and Conditions (https://onlinelibrary.wiley.com/terms-and-conditions) on Wiley Online Library for rules of use; OA articles are governed by the applicable Creative Commons License
Appendix B: Exercise Answers
3. To download and install the Ollama server to your Linux system, type the following:
$ curl -
fsSL https://ollama.com/install.sh | sh
4. To run the llama3.1:8b language model with Ollama and ask it to write a short poem
type the following:
$ ollama run llama3.1:8b
>>> Write a short poem about the moon and the stars
Silver moon, a glowing sphere,
Dancing on the midnight air...
5. To run the mistral language model with Ollama and ask it what are the five most
common birds in Michigan, USA, type the following:
$ ollama run mistral
>>> What are the five most common birds in Michigan, USA
Michigan is home to a variety of bird species due to its diverse
geography...
6. Run the phi3:mini language model and have it suggest five flowers to plant in a
garden in central Florida, USA.
$ ollama run phi3:mini
>>> Suggest five flowers to plant in a garden in central Florida,
USA
1. Hibiscus -These large flowering plants with vibrant blooms...
7. Save your Phi-3 session to a new model named myflowers.
>>> /save myflowers
Created new model 'myflowers'
8. List all the language models that are now available through Ollama on your
local system.
$ ollama list
NAME
phi3:latest
mistral:latest
mysession:latest
llama3.1:8b
ID
4f2222927938
6577803aa9a0
89d3d23af648
46e0c10c039e
SIZE
2.2 GB
4.4 GB
4.9 GB
4.9 GB
MODIFIED
4 days ago
6 days ago
6 days ago
7 days ago
9. Using the ollama command, display the license for the language model you are
currently running.
A
P
P
E
N
D
I
X
>>> /show license
10. Using the ollama command, show information about the model you are
currently running.
>>> /show info
803
Downloaded from https://onlinelibrary.wiley.com/doi/ by alex jounh - Oregon Health & Science Univer , Wiley Online Library on [05/12/2025]. See the Terms and Conditions (https://onlinelibrary.wiley.com/terms-and-conditions) on Wiley Online Library for rules of use; OA articles are governed by the applicable Creative Commons License
Appendix B: Exercise Answers
Chapter 23: Understanding Basic Linux Security
1. To check log messages from the systemd journal for the NetworkManager
.service, sshd.service, and auditd.service services, enter the following:
# journalctl -
u NetworkManager.service
# journalctl -
u sshd.service
# journalctl -
u auditd.service
2. User passwords are stored in the /etc/shadow file. To see its permissions, type ls
-l /etc/shadow at the command line. (If no shadow file exists, then you need to
run pwconv.)
The following are the appropriate settings:
# ls -
l /etc/shadow
----------. 1 root root 1049 Feb
10 09:45 /etc/shadow
3. To determine your account’s password aging and whether it will expire using a single
command, type chage -l user_name. For example:
# chage -
l chris
4. To start auditing writes to the /etc/shadow with the auditd daemon, enter the
following at the command line:
# auditctl -
w /etc/shadow -
p w
To check your audit settings, type auditctl -l at the command line.
5. To create a report from the auditd daemon on the /etc/shadow file, enter
ausearch -
f /etc/shadow at the command line. To turn off the auditing on
that file, enter auditctl -
W /etc/shadow -
p w at the command line.
6. To install the lemon package, damage the /usr/bin/lemon executable, verify that
it has been tampered with, and remove the lemon package, enter the following:
# dnf install -
y lemon
# cp /etc/services /usr/bin/lemon
# rpm -
V lemon
S.5….T.
/usr/bin/lemon
# dnf erase lemon
From the original lemon file, the file size (S), the md4sum (5), and the modification
times (T) all differ. For Ubuntu, install the package with apt-
get install lemon
and enter debsums lemon to check it.
7. If you suspect you have had a malicious attack on your system today and important
binary files have been modified, you can check important bin directories by entering
the following at the command line:
# find /bin /sbin /usr/bin /usr/sbin -
mtime -
1
804
Downloaded from https://onlinelibrary.wiley.com/doi/ by alex jounh - Oregon Health & Science Univer , Wiley Online Library on [05/12/2025]. See the Terms and Conditions (https://onlinelibrary.wiley.com/terms-and-conditions) on Wiley Online Library for rules of use; OA articles are governed by the applicable Creative Commons License
Appendix B: Exercise Answers
8. To install and run chkrootkit to see if the malicious attack from the previous exercise installed a rootkit, do the following:
a. To install chkrootkit, type the following:
# dnf install chkrootkit
or
# apt install chkrootkit
# For Fedora or RHEL
# For Ubuntu
b. To run the check, enter the following and review the results.
# chkrootkit
9. To find files anywhere in the system with the SUID or SGID permission set, type the
following:
# find / -
perm /6000 -
ls
10. To install the aide package, run the aide command to initialize the aide database, copy the database to the correct location, and run the aide command to check
whether any important files on your system have been modified, enter the following:
#
#
#
#
dnf install aide
aide -i
cp /var/lib/aide/aide.db.new.gz /var/lib/aide/aide.db.gz
aide -C
To make the output more interesting, you could install the lemon package (described
in an earlier exercise) before you run aide -i and modify it before running
aide -C to see how a modified binary looks from aide.
Chapter 24: Understanding Advanced Linux Security
To do the first few exercises, you must have the gnupg2 package installed. This is not
installed by default in Ubuntu, although it is installed for the latest Fedora and RHEL releases.
1. To encrypt a file using the gpg utility and a symmetric key, enter the following
commands. This example creates an encrypted file called services.gpg. (The gpg
utility asks for a passphrase to protect the symmetric key.)
$ cp /etc/services .
$ gpg -
c services
If you were to copy the file to a different system, you could run this command
(providing the password when prompted) to decrypt it and copy the output to the
services.txt file.
A
P
P
E
N
D
I
X
$ gpg -
d services.gpg > services.txt
2. To generate a key pair using the gpg utility, enter the following:
$ gpg --gen-key
805
Downloaded from https://onlinelibrary.wiley.com/doi/ by alex jounh - Oregon Health & Science Univer , Wiley Online Library on [05/12/2025]. See the Terms and Conditions (https://onlinelibrary.wiley.com/terms-and-conditions) on Wiley Online Library for rules of use; OA articles are governed by the applicable Creative Commons License
Appendix B: Exercise Answers
You must provide the following information:
a. Your real name and email address
b. A passphrase for the private key
c. Type O (Okay) to accept it, and then type the password, when prompted.
3. To list the keys you generated, enter the following:
$ gpg --list-keys
4. To encrypt a file (copy of /etc/passwd) and add your digital signature using the
gpg utility, do the following:
a. You must have first generated a key ring (exercise 2).
b. After you have generated the key ring, enter the following:
$ cp /etc/passwd .
$ gpg --output passwd_signed --sign passwd
5. From the fedoraproject.org page, select one of the Fedora distributions to
download. When the download is complete, click Verify to see instructions for verifying your image. The instructions will something like the following:
$ curl https://<someURL>/Fedora-Workstation-42-1.1-x86_64-
CHECKSUM >
> Fedora-Workstation-42-1.1-x86_64-CHECKSUM
$ sha256sum -c --ignore-missing *-CHECKSUM
Fedora-
Workstation-
Live-
42-
1.1.x86_64.iso: OK
6. To determine if the su command has a PAM configuration file, type the following:
$ ls /etc/pam.d/su
/etc/pam.d/su
If the file exists, type the following at the command line to display its contents. The
PAM contexts it uses include any of the following: auth, account, password,
or session.
$ cat /etc/pam.d/su
7. To list the various PAM modules on your Fedora or RHEL system, enter the following:
$ ls /usr/lib64/security/pam*.so
To list the various PAM modules on your Ubuntu Linux system, enter the following:
# find / -
name pam*.so
8. To find the PAM “other” configuration file on your system, enter ls /etc/pam.d/
other at the command line. An “other” configuration file that enforces Implicit Deny
should look similar to the following code:
$ cat /etc/pam.d/other
#%PAM-
1.0
auth
required
account required
806
pam_deny.so
pam_deny.so
Downloaded from https://onlinelibrary.wiley.com/doi/ by alex jounh - Oregon Health & Science Univer , Wiley Online Library on [05/12/2025]. See the Terms and Conditions (https://onlinelibrary.wiley.com/terms-and-conditions) on Wiley Online Library for rules of use; OA articles are governed by the applicable Creative Commons License
Appendix B: Exercise Answers
password required
session required
pam_deny.so
pam_deny.so
9. To find the PAM limits configuration file, enter the following:
$ ls /etc/security/limits.conf
Display the file’s contents by entering the following:
$ cat /etc/security/limits.conf
Settings in this file to prevent a fork bomb look like the following:
@student
@student
hard
-
nproc
maxlogins
50
4
10. To use the authselect command to check that authselect is enabled on your system,
list available profiles, and see which profile is current, type the following:
$ authselect check
$ authselect list
$ authselect current
Chapter 25: Enhancing Linux Security with SELinux
Because SELinux can have a dramatic effect on the security of your Linux system, I recommend you only do these exercises on a practice system.
1. To set your system into the permissive mode for SELinux, type the following:
# setenforce permissive
2. To set your system into the enforcing mode for SELinux without changing the SELinux
primary configuration file, type the following:
# setenforce enforcing
3. To find and view the permanent SELinux policy type (set at boot time), type the
following:
# cat /etc/selinux/config | grep SELINUX=
SELINUX=enforcing
4. To list the /etc/hosts file security context and identify the different security context attributes, enter ls -
Z /etc/hosts at the command line:
$ ls -
lZ /etc/hosts
-rw-r--r--. root root system_u:object_r:net_conf_t:s0 Sep 28 16:42
/etc/hosts
a. The file’s user context is system_u, indicating a system file.
b. The file’s role is object_r, indicating an object in the filesystem (a text file, in
this case).
c. The file’s type is net_conf_t, because the file is a network configuration file.
807
A
P
P
E
N
D
I
X
Downloaded from https://onlinelibrary.wiley.com/doi/ by alex jounh - Oregon Health & Science Univer , Wiley Online Library on [05/12/2025]. See the Terms and Conditions (https://onlinelibrary.wiley.com/terms-and-conditions) on Wiley Online Library for rules of use; OA articles are governed by the applicable Creative Commons License
Appendix B: Exercise Answers
d. The file’s sensitivity level is s0, indicating the lowest security level. (This number
may be listed in a range of numbers from s0-s3.)
e. The file’s category level starts with a c and ends with a number. It may be listed
in a range of numbers, such as c0-c102. This is not required except in highly
secure environments and is not set here.
5. To create a file called test.html and assign its type as httpd_sys_content_t,
enter the following:
$ touch test.html
$ chcon -
t httpd_sys_content_t test.html
$ ls -
Z test.html
unconfined_u:object_r:httpd_sys_content_t:s0 test.html
6. To list the crond process’s security context and identify the different security context attributes, enter this at the command line:
$ ps -
efZ | grep crond
system_u:system_r:crond_t:s0-
s0:c0.c1023 root 1768
1 0 20:25 ?
00:00:00 /usr/sbin/crond -
n
a. The process’s user context is system_u, indicating a system process.
b. The process’s role is system_r, indicating a system role.
c. The process’s type or domain is crond_t.
d. The process’s sensitivity level starts at s0-s0, indicating that it is not highly sensitive. (It is secure by normal Linux standards, however, because the process is run
as the root user.)
e. The process’s category level is c0.c1023, with the c0, indicating that the category is also not highly secure from an SELinux standpoint.
7. To create an /etc/test.txt file, change its file context to user_tmp_t, restore
it to its proper content (the default context for the /etc directory), and remove the
file, enter the following:
# touch /etc/test.txt
# ls -
Z /etc/test.txt
unconfined_u:object_r:etc_t:s0 /etc/test.txt
# chcon -
t user_tmp_t /etc/test.txt
# ls -
Z /etc/test.txt
unconfined_u:object_r:user_tmp_t:s0 /etc/test.txt
# restorecon /etc/test.txt
# ls -
Z /etc/test.txt
unconfined_u:object_r:etc_t:s0
/etc/test.txt
# rm /etc/test.txt
rm: remove regular empty file `/etc/test.txt'? y
808
Downloaded from https://onlinelibrary.wiley.com/doi/ by alex jounh - Oregon Health & Science Univer , Wiley Online Library on [05/12/2025]. See the Terms and Conditions (https://onlinelibrary.wiley.com/terms-and-conditions) on Wiley Online Library for rules of use; OA articles are governed by the applicable Creative Commons License
Appendix B: Exercise Answers
8. To determine what Booleans allow anonymous writes and access to the tftp service’s
home directory and then turn those Booleans on permanently, enter the following commands:
# getsebool -
a | grep tftp
tftp_home_dir -
-
> off
tftpd_anon_write -
-
> off
# setsebool -
P tftp_home_dir=on
# setsebool -
P tftp_anon_write=on
# getsebool tftp_home_dir tftp_anon_write
tftp_home_dir -
-
> on
tftp_anon_write -
-
> on
9. To list all SELinux policy modules on your system, along with their version numbers,
enter the following:
# semodule –l
10. To tell SELinux to allow access to the sshd service through TCP Port 54903, enter the
following:
# semanage port -
a -
t ssh_port_t -
p tcp 54903
# semanage port -
l | grep ssh
ssh_port_t
tcp
54903, 22
Chapter 26: Securing Linux on a Network
1. To install the Network Mapper (aka nmap) utility on your local Linux system:
a. On Fedora or RHEL, enter dnf install nmap at the command line.
b. On Ubuntu, nmap may come pre-installed. If not, enter sudo apt-get
install nmap at the command line.
2. To run a TCP Connect scan on your local loopback address, enter nmap -sT
127.0.0.1 at the command line. The ports you have running on your Linux server
will vary. However, they may look similar to the following:
# nmap -
sT 127.0.0.1
…
PORT
STATE SERVICE
25/tcp open smtp
631/tcp open ipp
3. To run a UDP Connect scan on your Linux system from a remote system:
a. Determine your Linux server's IP address by entering ifconfig at the command
line. The output will look similar to the following, and your system's IP address
follows inet addr: in the ifconfig command's output.
# ifconfig
…
p2p1 Link encap:Ethernet HWaddr 08:00:27:E5:89:5A
inet addr:10.140.67.23
809
A
P
P
E
N
D
I
X
Downloaded from https://onlinelibrary.wiley.com/doi/ by alex jounh - Oregon Health & Science Univer , Wiley Online Library on [05/12/2025]. See the Terms and Conditions (https://onlinelibrary.wiley.com/terms-and-conditions) on Wiley Online Library for rules of use; OA articles are governed by the applicable Creative Commons License
Appendix B: Exercise Answers
b. From a remote Linux system, enter the command nmap -
sU IP address
at the command line, using the IP address you obtained from earlier.
For example:
# nmap -
sU 10.140.67.23
4. To check to see if your system is running the firewalld service and then install
and start it if it is not:
a. Enter systemctl status firewalld.service.
b. If the firewalld service is not running, on a Fedora or RHEL system, enter the
following:
# dnf install firewalld firewall-
config -
y
# systemctl start firewalld
# systemctl enable firewalld
5. To open ports in your firewall to allow remote access to your local web service, do the
following:
a. Start the Firewall Configuration window (firewalld-config).
b. Make sure that Configuration: Runtime is selected.
c. Select your current zone (for example, FedoraWorkstation).
d. Under Services, select the http and https check boxes.
e. Select Configuration: Permanent.
f. Under Services, select the http and https check boxes.
6. To determine your Linux system’s current firewall policies and rules, open the Firewall
Configuration window and select the current zone, select Runtime as the Configuration, and scroll through the services.
7. To use firewall-cmd to list the default firewall zone, type the following:
# firewall-cmd --get-default-zone
FedoraWorkstation
8. To use firewall-cmd to list all services to see which ports are permanently opened
in your firewall’s default port:
# firewall-cmd --permanent --info-zone=FedoraWorkstation
Chapter 27: Shifting to Clouds and Containers
1. Install and start either podman or docker:
# dnf install podman -
y
or
# dnf install docker -
y
# systemctl start docker
# systemctl enable docker
810
Downloaded from https://onlinelibrary.wiley.com/doi/ by alex jounh - Oregon Health & Science Univer , Wiley Online Library on [05/12/2025]. See the Terms and Conditions (https://onlinelibrary.wiley.com/terms-and-conditions) on Wiley Online Library for rules of use; OA articles are governed by the applicable Creative Commons License
Appendix B: Exercise Answers
2. Use either docker or podman to pull this image to your host, public.ecr.aws/
docker/library/fedora:
# podman pull public.ecr.aws/docker/library/fedora
or
# docker pull public.ecr.aws/docker/library/fedora
3. Run the fedora image to open a bash shell:
# podman run -
it fedora bash
or
# docker run -
it fedora bash
4. Run commands to see the operating system on which the container is based, install
the proc-ps package, and run a command to see the processes running inside the
container:
bash-
4.4# cat /etc/os-
release | grep ^NAME
NAME="Fedora Linux"
bash-
4.4# dnf install procps -
y
bash-
4.4# ps -ef
UID
PID PPID C STIME TTY
TIME CMD
root
1
0 0 03:37 pts/0
00:00:00 bash
root
20
1 0 03:43 pts/0
00:00:00 ps -
ef
bash-
4.4# exit
5. To restart and connect to the container that you just closed using an interactive shell,
enter the following:
# podman ps -
a
CONTAINER ID IMAGE
COMMAND CREATED
STATUS
PORTS NAMES
2a37d41fb734 …fedora:latest bash
7 minutes ago
Exited (0) 4 seconds ago
ecstatic_fermat
# podman start -
a 2a37d41fb734
bash-
4.4# exit
6. To create a simple Dockerfile from a fedora base image, include a script named
cworks.sh that echoes “The Container Works!” and add that script to the image so
that it runs, do the following:
a. Create and change to a new directory:
# mkdir project
# cd project
A
P
P
E
N
D
I
X
b. Create a file named Dockerfile with the following content:
FROM public.ecr.aws/docker/library/fedora
COPY ./cworks.sh /usr/local/bin/
CMD ["/usr/local/bin/cworks.sh"]
c. Create a file named cworks.sh with the following content:
#!/bin/bash
set -
o errexit
811
Downloaded from https://onlinelibrary.wiley.com/doi/ by alex jounh - Oregon Health & Science Univer , Wiley Online Library on [05/12/2025]. See the Terms and Conditions (https://onlinelibrary.wiley.com/terms-and-conditions) on Wiley Online Library for rules of use; OA articles are governed by the applicable Creative Commons License
Appendix B: Exercise Answers
set -
o nounset
set -
o pipefail
echo "The Container Works!"
7. Use docker or podman to build an image named containerworks from the Dockerfile you just created.
# podman build -
t myproject .
or
# docker build -
t myproject .
8. To gain access to a container registry, either by installing the docker-distribution
package from Fedora or getting an account on Quay.io or Docker Hub. Here’s how to
install it from Fedora:
# dnf install docker-
distribution -
y
# systemctl start docker-
distribution
# systemctl enable docker-
distribution
Or get an account from Quay.io (https://quay.io/plans/) or Docker Hub, and
then do this:
# podman login quay.io
Username: <username>
Password: *********
9. Tag and push a new image to a chosen container registry:
# docker images | grep myproject
myproject latest a23ca4c04a0a 15 minutes ago 169 MB
# podman tag a23ca4c04a0a localhost:5000/myproject:v1.0
# podman push localhost:5000/myproject:v1.0
Chapter 28: Using Linux for Cloud Computing
1. To check your computer to see if it can support KVM virtualization, enter the
following:
# cat /proc/cpuinfo | grep -
-
color -
E "vmx|svm|lm"
flags : fpu vme de pse tsc msr pae mce cx8 apic sep mtrr
pge mca cmov pat pse36 clflush dts acpi mmx fxsr sse sse2 ss ht tm
pbe syscall nx pdpe1gb rdtscp lm constant_tsc arch_perfmon pebs
bts rep_good xtopology nonstop_tsc aperfmperf pni pclmulqdq dtes64
monitor ds_cpl vmx smx es…
…
The CPU must support either vmx or svm. The lm indicates that it is a 64-bit
computer.
2. To install a Linux system along with the packages needed to use it as a KVM host and
to run the Virtual Machine Manager application, do the following:
a. Get a live or installation image from a Linux site (fedoraproject.org, for example),
and burn it to a USB drive or DVD (or otherwise make it available to install).
812
Downloaded from https://onlinelibrary.wiley.com/doi/ by alex jounh - Oregon Health & Science Univer , Wiley Online Library on [05/12/2025]. See the Terms and Conditions (https://onlinelibrary.wiley.com/terms-and-conditions) on Wiley Online Library for rules of use; OA articles are governed by the applicable Creative Commons License
Appendix B: Exercise Answers
b. Boot the installation image, and select to install it to a hard drive.
c. For a Fedora Workstation, after the install is complete and you have rebooted,
install the following package (for different Linux distributions, you might need to
install a package that provides libvirtd as well):
# dnf install virt-manager libvirt-daemon-config-network
3. To make sure that the sshd and libvirtd services are running on the system,
enter the following:
#
#
#
#
systemctl
systemctl
systemctl
systemctl
start sshd.service
enable sshd.service
start libvirtd.service
enable libvirtd.service
4. Get a Linux installation ISO image that is compatible with your hypervisor, and copy it
to the default directory used by Virtual Machine Manager to store images. For example,
if the Fedora Workstation DVD is in the current directory, you can enter the following:
# cp Fedora-Workstation-Live-42-1.1.x86_64.iso \
/var/lib/libvirt/images/
5. To check the settings on the default network bridge (virbr0), enter the following:
# ip addr show virbr0
4: virbr0: <NO-
CARRIER,BROADCAST,MULTICAST,UP> mtu 1500 qdisc
noqueue state UP group default
link/ether de:21:23:0e:2b:c1 brd ff:ff:ff:ff:ff:ff
inet 192.168.122.1/24 brd 192.168.122.255 scope global virbr0
valid_lft forever preferred_lft forever6.
6. To install a virtual machine using the ISO image you copied earlier, do the following.
a. Enter this command:
# virt-manager &
b. Select File and then select New Virtual Machine.
c. Select Local Install Media and click Forward.
d. Select Browse, choose the live or install ISO, click Choose Volume, and
click Forward.
e. Select memory and CPUs and click Forward.
f. Select the size of disk that you want to use and click Forward.
A
P
P
E
N
D
I
X
g. Select Virtual Network Default: NAT (it may already be selected).
h. If it all looks okay, click Finish.
i. Follow the installation process indicated by the installation ISO.
7. To make sure you can log in to and use the virtual machine, do the following:
a. Double-click the entry for the new virtual machine.
b. When the viewer window appears, log in as you would normally.
813
Downloaded from https://onlinelibrary.wiley.com/doi/ by alex jounh - Oregon Health & Science Univer , Wiley Online Library on [05/12/2025]. See the Terms and Conditions (https://onlinelibrary.wiley.com/terms-and-conditions) on Wiley Online Library for rules of use; OA articles are governed by the applicable Creative Commons License
Appendix B: Exercise Answers
8. To check that your virtual machine can connect to the Internet or other network outside of the hypervisor, do one of the following:
a. Open a web browser, and try to connect to a website on the Internet.
b. Open a Terminal window, enter ping redhat.com, and then press
Ctrl+C to exit.
9. To stop the virtual machine so that it is no longer running:
a. Right-click the entry for the VM in the virt-manager window.
b. Select Shut Down, and then select Shut Down again.
c. If the VM doesn’t shut down immediately, you can select Force Off instead, but
that is like pulling the plug out and risks data loss.
10. Start the virtual machine again so that it is running and available:
a. Right-click the entry for the VM in the virt-manager window.
b. Click Run.
Chapter 29: Deploying Linux to the Cloud
1. To install the genisoimage, cloud-init, qemu-img, virt-manager,
virt-install and virt-viewer packages, enter the following:
# dnf install genisoimage cloud-
init qemu-
img virt-
manager \
virt-install virt-viewer
2. To obtain a Fedora cloud image, go to https://fedoraproject.org/en/cloud/
download and download a qcow2 image.
3. To create a snapshot of that image in qcow2 format called myvm.qcow2, enter the
following:
# qemu-
img create -
f qcow2 \
-o backing_file=Fedora-Cloud-Base-Generic-42-1.1.x86_64.qcow2 \
myvm.qcow2
4. Create a cloud-init meta data file named meta-data that includes the following
content:
instance-
id: myvm
local-
hostname: myvm.example.com
5. Create a cloud-init user data file called user-data that includes the following
content:
#cloud-
config
password: test
chpasswd: {expire: False}
814
Downloaded from https://onlinelibrary.wiley.com/doi/ by alex jounh - Oregon Health & Science Univer , Wiley Online Library on [05/12/2025]. See the Terms and Conditions (https://onlinelibrary.wiley.com/terms-and-conditions) on Wiley Online Library for rules of use; OA articles are governed by the applicable Creative Commons License
Appendix B: Exercise Answers
6. Run the genisoimage command to combine the meta-data and user-data files
to create a mydata.iso file:
# genisoimage -
output mydata.iso -
volid cidata \
-joliet-long -rock user-data meta-data
7. Copy the files to /var/lib/libvirt/images and use the virt-install
command to combine the myvm.qcow2 virtual machine image with the mydata
.iso image to create a new virtual machine image named newvm that runs as a virtual machine on your hypervisor.
# cp mydata.iso myvm.qcow2 /var/lib/libvirt/images
# cd /var/lib/libvirt/images
# virt-install --import --name newvm \
--ram 4096 --vcpus 2 \
--disk path=myvm.qcow2,format=qcow2,bus=virtio \
--disk path=mydata.iso,device=cdrom \
--network network=default --os-variant fedora41 &
When the installation is done, the new virtual machine will start and open in a new
window. Close the window after it starts up.
8. To open the newvm virtual machine with virt-viewer, enter the following:
# virt-viewer newvm
9. Log into the newvm virtual machine using the fedora user and password test:
Login: fedora
Password: test
Chapter 30: Automating Apps and Infrastructure
with Ansible
1. To install the ansible package, do the following:
Fedora
# dnf install ansible -
y
Ubuntu
$
$
$
$
sudo
sudo
sudo
sudo
apt update
apt install software-
properties-
common
apt-add-repository --yes --update ppa:ansible/ansible
apt install ansible
2. To add sudo privileges for the user running Ansible commands, run visudo and
create an entry similar to the following (changing joe to your username):
joe
ALL=(ALL)
NOPASSWD: ALL
815
A
P
P
E
N
D
I
X
Downloaded from https://onlinelibrary.wiley.com/doi/ by alex jounh - Oregon Health & Science Univer , Wiley Online Library on [05/12/2025]. See the Terms and Conditions (https://onlinelibrary.wiley.com/terms-and-conditions) on Wiley Online Library for rules of use; OA articles are governed by the applicable Creative Commons License
Appendix B: Exercise Answers
3. Open a file named my_playbook.yaml, and add the following content:
---
-name: Create web server
hosts: localhost
tasks:
-name: Install httpd
yum:
name: httpd
state: present
4. To run the my_playbook.yaml playbook in check mode, do the following.
(It should fail because the user does not have privileges to install a package.)
$ ansible-playbook -C my_playbook.yaml
…
TASK [Install httpd] **************************************
fatal: [localhost]: FAILED! => {"changed": false, "msg": "This
command has to be run under the root user.", "results": []}
…
5. Make the following changes to the my_playbook.yaml file:
-
-
-
-name: Create web server
hosts: localhost
become: yes
become_method: sudo
become_user: root
tasks:
-name: Install httpd
yum:
name: httpd
state: present
6. To run the my_playbook.yaml file again to install the httpd package, enter the
following:
$ ansible-playbook my_playbook.yaml
…
TASK [Install httpd] **************************************
changed: [localhost]
PLAY RECAP ************************************************
localhost: ok=2 changed=1 unreachable=0 failed=0 skipped=0
rescued=0 ignored=0
7. Modify my_playbook.yaml as follows to start the httpd service, and set it so that
it will start every time the system boots:
-
-
-
-name: Create web server
hosts: localhost
816
Downloaded from https://onlinelibrary.wiley.com/doi/ by alex jounh - Oregon Health & Science Univer , Wiley Online Library on [05/12/2025]. See the Terms and Conditions (https://onlinelibrary.wiley.com/terms-and-conditions) on Wiley Online Library for rules of use; OA articles are governed by the applicable Creative Commons License
Appendix B: Exercise Answers
become: yes
become_method: sudo
become_user: root
tasks:
-name: Install httpd
yum:
name: httpd
state: present
-name: start httpd
service:
name: httpd
state: started
8. To run an ansible command so that it checks whether the httpd service is up on
localhost, enter the following:
$ ansible localhost -
m service \
-a "name=httpd state=started" --check
localhost | SUCCESS => {
"changed": false,
"name": "httpd",
"state": "started",
"status": { …
9. To create an index.html file in the current directory that contains the text “Web
server is up” and runs the ansible command to copy that file to the /var/www/
html directory on localhost, do the following (changing joe to your username):
$ echo "Web server is up"> index.html
$ export MYUSER=joe
$ ansible localhost \
-
m copy -
a \
"src=./index.html dest=/var/www/html/ \
owner=apache group=apache mode=0644" \
-b --user $MYUSER --become-user root --become-method sudo
localhost | CHANGED => { …
10. To use the curl command to view the contents of the file you just copied to the web
server, do the following:
$ curl localhost
Web server is up
Chapter 31: Deploying Applications as Containers
with Kubernetes
1. To gain access to a Minikube instance, install it as described here: minikube.sigs
.k8s.io. This includes starting minikube: minikube start.
2. To check the version of your Minikube installation, type the following:
$ minikube version
817
A
P
P
E
N
D
I
X
Downloaded from https://onlinelibrary.wiley.com/doi/ by alex jounh - Oregon Health & Science Univer , Wiley Online Library on [05/12/2025]. See the Terms and Conditions (https://onlinelibrary.wiley.com/terms-and-conditions) on Wiley Online Library for rules of use; OA articles are governed by the applicable Creative Commons License
Appendix B: Exercise Answers
For instructions for installing kubectl, see https://kubernetes.io/docs/
tasks/tools/install-kubectl-linux/. Here’s one example if you have a 64-bit
Linux system:
$ curl -
LO "https://dl.k8s.io/release/$(curl -
L -
s \
https://dl.k8s.io/release/stable.txt)/bin/linux/amd64/kubectl"
$ chmod 755 kubectl; sudo cp kubectl /usr/bin
$ kubectl version
3. To create a deployment that manages a pod running the hello-node container
image, enter the following:
$ kubectl create deployment hello-
node \
--image=gcr.io/hello-minikube-zero-install/hello-node
4. To view the hello-node deployment and describe the deployment in detail, enter
the following:
$ kubectl get deployment
NAME
READY
UP-
TO-
DATE
AVAILABLE
hello-
node
0/1
1
0
$ kubectl describe deployment hello-
node
AGE
13s
5. To view the current replica set associated with your hello-node deployment, enter
the following:
$ kubectl get rs
6. To scale up the hello-node deployment to three replicas, enter the following:
$ kubectl scale deployments/hello-node --replicas=3
7. To expose the hello-node deployment outside of the Kubernetes cluster using
LoadBalancer, enter the following:
$ kubectl expose deployment hello-
node \
--type=LoadBalancer --port=8080
8. To get the IP address of your Minikube instance and port number of the exposed
hello-node service, enter the following:
$ minikube ip
192.168.39.150
$ kubectl describe service hello-
node | grep NodePort
NodePort:
<unset> 31179/TCP
9. Use the curl command to query the hello-node service, using the IP address and
port number from the previous step. For example:
$ curl 192.168.39.105:31179
Hello World!
818
Downloaded from https://onlinelibrary.wiley.com/doi/ by alex jounh - Oregon Health & Science Univer , Wiley Online Library on [05/12/2025]. See the Terms and Conditions (https://onlinelibrary.wiley.com/terms-and-conditions) on Wiley Online Library for rules of use; OA articles are governed by the applicable Creative Commons License
Appendix B: Exercise Answers
10. To delete the hello-node service and deployment and then stop the Minikube
virtual machine, enter the following:
$ kubectl delete service hello-
node
$ kubectl delete deployment hello-
node
$ minikube stop
A
P
P
E
N
D
I
X
819
Downloaded from https://onlinelibrary.wiley.com/doi/ by alex jounh - Oregon Health & Science Univer , Wiley Online Library on [05/12/2025]. See the Terms and Conditions (https://onlinelibrary.wiley.com/terms-and-conditions) on Wiley Online Library for rules of use; OA articles are governed by the applicable Creative Commons License
Appendix B: Exercise Answers
Symbols and Numerics
:! command, 117
$ key, 115
? metacharacter, 96–97
[...] metacharacter, 96–97
* metacharacter, 96–97
< metacharacter, 97–98
> metacharacter, 97–98
&> metacharacter, 98
>> metacharacter, 98
0 key, 114
2> metacharacter, 98
& (ampersand), 76, 77, 137, 154
* (asterisk), 121–122, 147–148, 155, 252
@ (at sign), 102
/ (backslash), 102, 148, 473
` (backtick), 77–78, 147–148
^ (caret character), 157
: (colon), 253
{} (curly braces), 99, 149–150
$ (dollar sign), 61, 73, 77–78, 147–148
. (dot), 101, 102
--(double hyphen), 65
= (equal sign), 66, 152
! (exclamation point), 74, 147–148, 152, 455
/ (forward slash), 88, 91
-(hyphen/dash), 100, 104
( (left parenthesis), 76
< (less than sign), 76
-(minus sign), 138
% (percent sign), 138–139
. (period), 116
| (pipe character), 8, 76–77, 131–132, 148, 154, 403
+ (plus sign), 102, 138, 280
# (pound sign), 61, 146
? (question mark), 118, 121–122
) (right parenthesis), 76
> (right-arrow key), 8
; (semicolon), 76, 77
’ (single quote), 148
[] (square brackets), 152
~ (tilde), 73, 95, 102, 113
.. (two dots), 95, 102
A
absolute path, 94
Access Control Lists (ACLs)
enabling, 263–264
setting
permissions with, 260–267
with setfacl command, 260–262
access denied error, 434
access options, in /etc/exports file, 488
Access Vector Cache (AVC), 632–634
accessing
forbidden/server internal errors, 433–435
FTP server with lftp command, 454–456
remote content, 43
Samba shares
in Linux, 476–478
overview, 475
in Windows, 479
account (PAM), 596
ACLs. See Access Control Lists (ACLs)
acpi-off option, 207
Active Directory Services (ADS), 479
active FTP connection, 440
activities, toggling with mouse, 32
Activities screen, opening applications from, 32–33
ad hoc commands, 725–726
add at end command, 113
add command, 113
administrative accounts, 182–183
administrative commands, 176–177
administrative configuration files, 177–182
administrative log files, 181
administrative utilities, 5
ADS (Active Directory Services), 479
Advanced Encryption Standard (AES), 582
Advanced Maryland Automatic Network Disk Archiver
(amanda), 548
AES (Advanced Encryption Standard), 582
821
Linux Bible, Eleventh Edition. Christopher Negus.
© 2026 John Wiley & Sons, Inc. All rights reserved, including rights for text and data mining and training of artificial intelligence technologies or similar
technologies. Published 2026 by John Wiley & Sons, Inc.
Downloaded from https://onlinelibrary.wiley.com/doi/ by alex jounh - Oregon Health & Science Univer , Wiley Online Library on [05/12/2025]. See the Terms and Conditions (https://onlinelibrary.wiley.com/terms-and-conditions) on Wiley Online Library for rules of use; OA articles are governed by the applicable Creative Commons License
Index
aescrypt tool, 592
AI. See artificial intelligence (AI)
aide, 572
AKS (Azure Kubernetes Service), 746
alias command, 81
alias network interfaces, setting, 360–361
aliases
creating, 81
overview, 69, 73, 179
setting, 350–351
using, 81
allow rules, 616
Alt+SysRq keystrokes, 531
amanda, 548
Amazon EC2 (Amazon Elastic Computer Cloud),
699, 708–711
Amazon Elastic Computer Cloud (Amazon EC2),
699, 708–711
Amazon Elastic Container Registry (ERC), 666
Amazon Web Services (AWS), 681, 682, 746
ampersand (&), 76, 77, 137, 154
anaconda kernel, 202
anonymous FTP server, 440
Ansible
automating tasks with Ansible Tower Automation
Framework, 726–727
components
inventories, 715–716
overview, 715
playbooks, 716–717
deploying
prerequisites, 718
setting up SSH keys to nodes, 718–719
exercise answers, 816–818
exercises, 727–728
installing
authenticating hosts, 721
creating inventories, 720–721
creating playbooks, 721–722
overview, 720
running playbooks, 722–724
overview, 24, 682, 713–715
running ad hoc commands
overview, 724–725
trying ad hoc commands, 725–726
Ansible Network Getting Started guide, 715
Ansible Operator, 715
Ansible Tower, automating tasks with, 726–727
apache, 183
822
Apache
adding virtual hosts to, 422–424
configuration files, 417–422
HTTPD Server, 409–410
installing, 413–414
license, 15
securing, 415–417
starting, 414–431
web server, 307
Apache Access Log, 564
Apache Error Log, 564
Apache NetBeans, 51
Apache Software Foundation (ASF), 409–410
apache2 package, 307
apachectl program, 431–432
AppArmor, 614
application-layer firewall, 651
applications
automating (See Ansible)
deploying, 714 (See also Kubernetes)
Kubernetes, 731–732, 736–737, 740–745
launching using keyboard, 37–38
opening
from Activities screen, 32–33
from Applications list, 33
using mouse, 35
starting with desktop, 42–46
viewing using mouse, 33
Applications list, opening applications from, 33
apt* commands, 221–222
apt-get command, 518
aptitude command, 221
ArcFour (ARC4), 582
argument, 65
arithmetic, performing in shell scripts, 151
arithmetic expressions, expanding, 78
arrow keys, 114
artificial intelligence (AI)
chatbot
choosing language models, 535–536
evaluating AI requirements, 536–537
exercise answers, 803–804
exercises, 542–543
overview, 535
serving language models using Ollama, 537–542
overview, 4
ASF (Apache Software Foundation), 409–410
assigning partitions to directories, 213
asterisk (*), 121–122, 147–148, 155, 252
Downloaded from https://onlinelibrary.wiley.com/doi/ by alex jounh - Oregon Health & Science Univer , Wiley Online Library on [05/12/2025]. See the Terms and Conditions (https://onlinelibrary.wiley.com/terms-and-conditions) on Wiley Online Library for rules of use; OA articles are governed by the applicable Creative Commons License
Index
asymmetric key cryptography, 584
at sign (@), 102
AT&T, 8, 9, 13
attacks, protection from, 212
audio CDs (Rhythmbox), 45
audio files (Rhythmbox), 45
audit log, reviewing SELinux messages in, 632–633
audit2allow tool, 630
audit2why tool, 630
auditing
network services
with nmap utility, 642–649
overview, 641–642
network services advertisements using nmap, 646–649
aureport command, 632–633
ausearch command, 634
auth (PAM), 596
authentication
cloud, 682
as a graphical tool, 170
hosts, 721
key-based (passwordless), 322–324
PAM, 595–598
in user accounts, 249
author rights, 12
authselect command, managing PAM configuration
with, 599–601
Auto Updates, 517
autofs, mounting NFS filesystems on demand
using, 498–501
automating
apps (See Ansible)
deployments, 335
infrastructure (See Ansible)
tasks with Ansible Tower, 726–727
automounting
home directories, 499–501
to /net directory, 498–499
avahi, 183
AVC (Access Vector Cache), 632–634
AWS (Amazon Web Services), 681, 682, 746
Azure Kubernetes Service (AKS), 746
B
-b default_home option, 254
b key, 114
B key, 114
background commands, 77
background processes, managing, 137–139
backslash (/), 102, 148, 473
backtick (`), 77–78, 147–148
backup script, 160–161
backward compatibility, 374–375
Bad Logins Log, 564
Ballmer, Steve (CEO), 3
bare-metal system, 197
base images/layers, 666–667
Bash shell
choosing, 63–64
connecting commands, 76–77
creating environments, 82–85
exercise answers, 761–763
exercises, 88–89
expanding
commands, 77–78
parameters in, 149–150
information about commands, 86–88
overview, 59–60
recalling commands using command history, 70–76
running commands, 64–70
terminal windows and, 60–63
using variables, 79–81
BASH variable, 79
bashrc, 179
BASH_VERSION variable, 79
Basic Input Output System (BIOS). See Unified Extensible
Firmware Interface (UEFI)
befs filesystem, 290
Bell Labs, 8–9, 10
Berkeley Internet Name Domain (BIND) service, 307, 364
Berkeley Software Distribution (BSD), 6, 10, 12–13, 15
bg command, 137
bg option, 497
biases, LLMs compared with SLMs, 536
bin, 183
/bin directory, 92
binaries, 17
bind package, 307
BIND (Berkeley Internet Name Domain) service, 307, 364
BindAddress directive, 433
bind-chroot package, 307
BIOS. See Unified Extensible Firmware Interface (UEFI)
block cipher, 580
block packets, 650
Blowfish, 582
Bluetooth, 38
Booleans, 466–467, 631–632, 636
823
Downloaded from https://onlinelibrary.wiley.com/doi/ by alex jounh - Oregon Health & Science Univer , Wiley Online Library on [05/12/2025]. See the Terms and Conditions (https://onlinelibrary.wiley.com/terms-and-conditions) on Wiley Online Library for rules of use; OA articles are governed by the applicable Creative Commons License
Index
/boot directory, 92, 213
Boot Log, 564
boot options, 202, 206–209
boot order, 508, 509
boot time, mounting NFS filesystems at, 494–498
booting Linux from USB drives, 754
boot.log file, 564
boot-up troubleshooting
GRUB boot handler, 510–511
overview, 505–506
starting
from firmware (UEFI), 507–509
kernel, 511–516
startup methods, 506–507
bounties, 21
boxed sets, 21
brace expansion characters, 99
browser, configuring CUPS from, 388
browser-based admin tools, 171
brute-force methods, 552
BSD (Berkeley Software Distribution), 6, 10, 12–13, 15
btmp file, 564, 565
btrfs filesystem, 290
built-in commands, 69
built-in dependencies, 241–242
burning CDs/DVDs, 755–757
C
c$ command, 115
-c "comment", 250
-c username option, 255
c<?> command, 115
c0 command, 115
CA (certificate authority), 426
Caesar Cipher, 581
canceling print jobs, 392
capacity, adding to memory, 525–526
Caps Lock key, 117
caret character (^), 157
case command, 70, 154–155
CAST5, 582
cc command, 115
cd command, 94–95
CDs, creating, 754–757
CentOS, base images from, 666
centralizing user accounts, 267–268
Ceph, 6, 681
certificate authority (CA), 426
824
certificate signing requests, generating, 430–431
certificates, 20–21, 593
cgroups, limiting processes with, 142–143
chage command, 550, 555–556, 558
characters
deleting, 158
escaping, 473
translating, 158
chatbot
choosing language models, 535–536
evaluating AI requirements, 536–537
exercises, 542–543
overview, 535
serving language models using Ollama, 537–542
chcat command, 628
chcon command, 628
checkmodule tool, 630
checkpolicy tool, 630
checksum. See hash
check-update subcommand, 234
Chef, 682, 708
child processes, 142
chkrootkit utility, 571–572
chmod command, 105–106, 160, 265
chrony, 183
chronyd package, 307
CIFS (Common Internet Filesystem), 290
cifs filesystem, 290
cipher, 580
ciphertext, 579
CISA (United States Cybersecurity and Infrastructure
Security Agency), 575–576
cl command, 115
ClamAV, 571
classification level, 617
cloning cloud instances, 704–707
closed port state, 644
closed|filtered port state, 644
cloud authentication, 682
cloud computing. See also containers
cloud authentication, 682
cloud configuration, 682
cloud controllers, 681
cloud deployment, 682
cloud hypervisors, 680
cloud platforms, 682
cloud storage, 681
configuration, 682
exercise answers, 813–814
Downloaded from https://onlinelibrary.wiley.com/doi/ by alex jounh - Oregon Health & Science Univer , Wiley Online Library on [05/12/2025]. See the Terms and Conditions (https://onlinelibrary.wiley.com/terms-and-conditions) on Wiley Online Library for rules of use; OA articles are governed by the applicable Creative Commons License
Index
exercises, 697
overview, 5–6, 679–680
setting up small clouds
configuring hypervisors, 685–688
configuring storage, 688–690
creating virtual machines, 690–693
managing virtual machines, 693–694
migrating virtual machines, 694–696
overview, 684
technology, 683–684
cloud controllers, 681
cloud deployment
creating Linux images from clouds
cloning cloud instances, 704–707
configuring cloud-init cloud instance, 701–703
investigating cloud instances, 703–704
overview, 701
running cloud-init cloud instances, 701–703
using cloud-init in enterprise
computing, 707–708
exercise answers, 814–815
exercises, 711–712
overview, 682, 699
running Linux in cloud, 699–701
using Amazon Elastic Computer Cloud (Amazon EC2),
708–711
cloud environments, managing, 715
cloud instances
cloning, 704–707
investigating, 703–704
cloud platforms, 682
cloud storage, 681
cloud-based installations, 201
Cloud-Init Config Examples page, 704–705
cloud-init service
adding
software with, 706–707
ssh keys with, 705–706
configuring cloud instances, 701–703
expanding configuration, 704–705
overview, 700–701
running cloud instances, 701–703
using in enterprise computing, 707–708
clustering, 5
Cockpit
Accounts screen, 249–250
changing firewall rules with, 656–657
checking networks from, 343–345
creating user accounts through, 248–249
managing storage with, 299–301
overview, 247–248, 655
using NFS with, 502–503
watching live activity with, 313
Cockpit browser-based administration, 166, 167–169
code editors, 49, 50–51
collision-free, 580
colon (:), 253
command history, recalling commands using, 70–76
command language interpreter, 60
command line
checking networks from, 345–349
configuring networking from, 354–362
mounting Samba shares from Linux, 478
running language models from, 538–541
command-line argument, 146, 148–149
command-line completion, 73–74
command-line editing, 71–73
command-line recall, 74–76
commands. See also specific commands
ad hoc, 724–726
administrative, 176–177
background, 77
connecting, 76–77
for creating/using files, 94–96
executing, 125–126
expanding, 77–78
filesystem, 94–96
getting information on, 86–88
launching using keyboard, 37–38
locating, 68–70
piping between, 76–77
recalling using command history, 70–76
repeating, 116
running, 64–70
sequential, 77
syntax for, 65–68
commercial UNIX, 9–11
Common Internet Filesystem (CIFS), 290
Common UNIX Printing System (CUPS)
configuring
from browser, 388
manually, 388–389
server, 399–400
shared printers, 404–406
overview, 306–307, 388–389
printing directly from Windows to, 389
starting server, 401
working with printing, 399–402
825
Downloaded from https://onlinelibrary.wiley.com/doi/ by alex jounh - Oregon Health & Science Univer , Wiley Online Library on [05/12/2025]. See the Terms and Conditions (https://onlinelibrary.wiley.com/terms-and-conditions) on Wiley Online Library for rules of use; OA articles are governed by the applicable Creative Commons License
Index
Common Vulnerabilities and Exposures (CVE), 562
compliance reviews, conducting, 575
components
Ansible
inventories, 715–716
playbooks, 716–717
reinstalling, 532
CompTIA, 21
compute node. See hypervisors
computers, choosing, 195–197
conditionals (Ansible), 717
Configuration Editor, 171
configuration files
administrative, 177–182
Apache, 417–422
network, 356–360
overview, 204, 308–309
Pluggable Authentication Module (PAM), 598
security settings in, 312
configuring
checking for errors, 431–433
cloud, 682
cloud-init cloud instance, 701–703
CUPS
from browser, 388
manually, 388–389
printer options manually, 401–402
server, 399–400
default runlevel, 382–383
developer desktops, 49–55
/etc/exports file, 486–489
firewalls for Samba, 465–466
FTP servers, 450–454
[global] section, 469–470
hardware, 183–189
[homes] section (Samba), 470–471
hypervisors, 685–688
Linux
as a DHCP server, 363–364
as a DNS server, 364
as a proxy server, 364–365
as a router, 362–363
local printers, 393–396
logging, 312–313
network interfaces, 349–352
network proxy connections, 352–353
network services, 24–25
826
networking
from command line, 354–362
for desktops, 340–353
in enterprise, 362–365
with nmtui command, 354–355
networks, 38
NFS share, 689
print servers, 404–407
[printers] section (Samba), 471
remote printers, 396–397
Samba, 468–475
Samba host/user permissions, 468
SELinux
for FTP servers, 448–449
managing policy rule packages, 629–631
managing security contexts, 626–629
managing via Booleans, 631–632
for NFS server, 492
overview, 623–624
for Samba, 466–468
setting mode, 624–625
setting policy type, 626
servers, 308–309
shared CUPS printers, 404–406
shared SAMBA printers, 406–407
shells, 82–83
SSL, 427–429
storage, 688–690
system logging, 324–331
target units, 382–383
Wi-Fi, 38
consoles, viewing systems from, 693
container engine, 731
container images
building, 672–675
defined, 664
overview, 245
tagging to registries, 675–677
container registries, 664, 666, 675–677
containers
base images/layers, 666–667
building container images, 672–675
container registries, 666
deploying applications as (See Kubernetes)
exercise answers, 811–812
exercises, 677–678
managing, 714–715
Downloaded from https://onlinelibrary.wiley.com/doi/ by alex jounh - Oregon Health & Science Univer , Wiley Online Library on [05/12/2025]. See the Terms and Conditions (https://onlinelibrary.wiley.com/terms-and-conditions) on Wiley Online Library for rules of use; OA articles are governed by the applicable Creative Commons License
Index
namespaces, 665
overview, 663–664, 667
pulling, 667–668
running
FTP servers from, 669–671
shells from, 668–669
starting, 671–672
stopping, 671–672
tagging images to registries, 675–677
using in enterprise, 677
contexts, Pluggable Authentication Module (PAM), 596
continuous monitoring, server administration and, 306
control flags, Pluggable Authentication Module
(PAM), 596–597
control group, in namespaces, 665
control plane (Kubernetes), 730, 731
control plane nodes, 336
copying
files, 107–109
files between systems with scp and rsync, 319–322
text, 115–116
copyright maintained, 12
corrupted filesystems, protection from, 212–213
cp command, 108, 109
cpio utility, 548
CPU controller, 143
CPUs, Ollama and, 538
Cpuset controller, 143
cron file, 519, 564
Cron Log, 564
crontab, 179
cryptographic cipher keys, 583–587
cryptographic ciphers, 581–582
cryptographic hashing, 580
cryptography, implementing security with, 579–594
crypto-utils package, 412
cryptsetup command, 591
csh.cshrc, 179
Ctrl+b, 117
Ctrl+d, 117
Ctrl+f, 117
Ctrl+g, 117
Ctrl+R, 117
Ctrl+u, 117
CUPS. See Common UNIX Printing System (CUPS)
cups package, 306–307
cupsd.conf, 399–400
curly braces ({}), 99, 149–150
customizing language models with Ollama, 542
cut command, 157
CVE (Common Vulnerabilities and Exposures), 562
D
-D, 251
-d home_dir option, 251, 255
d<?> command, 115
DAC (Discretionary Access Control), 618
daemon configuration files, 310
daemon processes, 5, 142, 305
Dandified YUM, 225
dash (-), 104
Data Encryption Standard (DES), 582
data plane (Kubernetes), 730, 731–732
Database server, 25
datasources, 707–708
date, 124, 170
date command, 64, 67, 68, 551
db command, 115
dd command, 115, 280
DEB packaging, 220–224
Debian, 19
debsums utility, 568
debugging shell scripts, 146–147
decryption
cryptographic cipher keys, 583–587
cryptographic ciphers, 581–582
defined, 579
digital signatures, 587–589
overview, 581
tar archive files, 583–584
default gateway, 341
default runlevel, 367, 382–383
default settings, 420–422
defining mountable filesystems using fstab file, 293–296
deleting
characters, 158
services, 742
text, 115–116
users with userdel command, 256–257
virtual machines, 694
dependencies, 224, 241–242
dependency-based startup, 507
dependent software, 220
827
Downloaded from https://onlinelibrary.wiley.com/doi/ by alex jounh - Oregon Health & Science Univer , Wiley Online Library on [05/12/2025]. See the Terms and Conditions (https://onlinelibrary.wiley.com/terms-and-conditions) on Wiley Online Library for rules of use; OA articles are governed by the applicable Creative Commons License
Index
deployment. See also cloud deployment
Ansible, 717–719
applications, 714 (See also Kubernetes)
pods, 737–739
of web servers, 435
derived works, of open source, 15
DES (Data Encryption Standard), 582
desktop
configuring developer, 49–55
configuring networking for, 340–353
exercise answers, 759–760
exercises, 55
Fedora GNOME, 30–49
managing software on, 218–219
networking, 340
overview, 27–28
technology, 28–30
using encryption from, 593–594
Desktop Cube, 46–47
detecting
intrusions, 572–575
rootkits, 571–572
viruses, 570–571
/dev directory, 92
developer desktops, configuring, 49–55
devices
changing settings, 509
disabling, 508–509
enabling, 508–509
df command, 333, 478
DHCP server
configuring Linux as, 363–364
getting response from, 340–341
DHCP service, requesting, 340
DHCPv6 Client, 654
DigiCert, 426
Digital Signature Algorithm (DSA), 588
digital signatures
overview, 587–588
signing files with, 588–589
directives, 418–420
directories
adding for users to collaborate, 264–265
assigning partitions to, 213
hierarchy of, 91–93
identifying, 102
listing, 99–103
Directory server, 307
Directory tags, 418
DirectoryIndex directive, 419, 421–422
828
disabled mode (SELinux), 618
disabling
boot options for, 207
devices, 508–509
swap areas, 293
disaster recovery, 548
Discretionary Access Control (DAC), 618
disk space
for installation, 196
Ollama and, 538
Disk Usage Analyzer, 171
Disk Utility, 171
disks
checking
existing LVM, 284–287
usage with du command, 334
creating
LVM logical volumes, 287–288
multiple-partition, 279–283
single-partition, 276–279
disk storage, 271–273
exercise answers, 780–782
exercises, 301–302
finding consumption with find, 334–335
growing LVM logical volumes, 288–289
managing storage with Cockpit, 299–301
mounting images in loopbacks, 297
overview, 271
partition tables, 274
partitioning hard disks, 273–283
using Logical Volume Manager (LVM) partitions, 284–289
viewing partitions, 274–276
Displays screen, 39
distributions (Linux), 16–19
DistroWatch, 19
dmesg command, 184–185, 564, 565
dnf facility, 224–237, 516
DNF Log, 565
dnf.log file, 565
docker command, 664, 667, 677
Docker Desktop, 733
Docker Hub, 666, 675
DocumentRoot directive, 421
dollar sign ($), 61, 73, 77–78, 147–148
domain, 616
Domain Name System (DNS)
overview, 170, 341, 364
server, 24, 307, 364
setting up, 688
donations, 21
Downloaded from https://onlinelibrary.wiley.com/doi/ by alex jounh - Oregon Health & Science Univer , Wiley Online Library on [05/12/2025]. See the Terms and Conditions (https://onlinelibrary.wiley.com/terms-and-conditions) on Wiley Online Library for rules of use; OA articles are governed by the applicable Creative Commons License
Index
dot (.), 101, 102
double hyphen (--), 65
downloading RPMs from YUM repositories,
236–237
dpkg.log file, 564
DragonFly BSD, 13
drivers, CUPS and, 389
dropping page caches, 530
DSA (Digital Signature Algorithm), 588
du command, checking disk usage with, 334
dual booting, 205–206
dump/restore utility, 548
dump-utmp btmp command, 565
dump-utmp wtmp command, 565
duplicity tool, 593
DVD drive, for installation, 196
DVDs, creating, 754–757
dw command, 115
E
-e default_expire_date option, 255
-e expire_date option, 251, 255
echo command, 78, 146
Eclipse IDE, 50
editing
command-line, 71–73
/etc/hosts file, 688
files with vim and vi, 111–118
local printers, 395–396
NetworkManager TUI connections, 355–356
efficiency, of Elastic Kubernetes Service (EKS),
745–746
EKS (Elastic Kubernetes Service), 745–746
El Gamal, 582
Elastic Kubernetes Service (EKS), 745–746
Elliptic Curve Cryptosystems, 582
email messages, encrypting, 586–587
enabling
ACLs, 263–264
devices, 508–509
network interfaces, 340
persistent services, 379–382
swap areas, 292–293
system logging with rsyslog, 324–330
encryption
cryptographic cipher keys, 583–587
cryptographic ciphers, 581–582
defined, 579
digital signatures, 587–589
email messages, 586–587
filesystems at installation, 590–592
Linux files, 592
Linux with miscellaneous tools, 593
overview, 581
tar archive files, 583–584
using from the desktop, 593–594
enforcing mode (SELinux), 619
ensuring file integrity, 589–590
enterprise
configuring networking in, 362–365
installing in the, 192, 202–203
managing
servers in, 335–336
software in, 244–245
users in, 259–267
networking, 340
using cloud-init in, 707–708
using containers in, 677
using Samba in, 479–480
Entra ID, 682
environment variables, 79–81, 85
EPEL repository, 228
equal sign (=), 66, 152
ERC (Amazon Elastic Container Registry), 666
errata, 562–563
ErrorDocument directive, 419–420
Esc key, 38, 117
escaping
characters, 473
shell characters, 147–148
essential tools, RHCSA, 22
/etc directory, 92, 178–179
/etc/exports file, 486–489
/etc/fstab file, 532, 561–562
/etc/group file, 560
/etc/hosts file, 357–538, 688
/etc/nsswitch.conf file, 358–360
/etc/passwd file, 559
/etc/resolv.conf file, 358
/etc/shadow file, 550–551, 559–560, 580
Ethernet channel bonding, setting up, 361–362
EUID variable, 79
ex mode, 118
exclamation point (!), 74, 147–148, 152, 455
-exec option, 125–126
Execute permission, 104
executing
commands, 125–126
shell scripts, 146–147
829
Downloaded from https://onlinelibrary.wiley.com/doi/ by alex jounh - Oregon Health & Science Univer , Wiley Online Library on [05/12/2025]. See the Terms and Conditions (https://onlinelibrary.wiley.com/terms-and-conditions) on Wiley Online Library for rules of use; OA articles are governed by the applicable Creative Commons License
Index
exercise answers
Ansible, 816–818
artificial intelligence (AI) chatbot, 803–804
Bash shell, 761–763
cloud computing, 813–814
cloud deployment, 814–815
containers, 811–812
desktop, 759–760
disks, 780–782
filesystems, 763–764, 780–782
FTP servers, 794–797
installing, 773–774
Kubernetes, 818–819
network security, 809–811
networking, 786–787
NFS file server, 799–801
print servers, 789–791
processes, 766–768
Samba server, 797–799
security, 804–805, 806–807
SELinux, 807–809
server administration, 782–785
services, 787–789
shell scripts, 768–770
software, 774–776
system administration, 770–773
text files, 764–766
troubleshooting, 801–803
user accounts, 776–779
web servers, 791–794
exercises
Ansible, 727–728
artificial intelligence (AI) chatbot, 542–543
Bash shell, 88–89
cloud computing, 697
cloud deployment, 711–712
containers, 677–678
desktop, 55
disks, 301–302
filesystems, 109–110, 301–302
FTP servers, 457–458
installing, 216
Kubernetes, 747
network security, 658–659
networking, 365–366
NFS server, 504
print servers, 408
processes, 144
Samba server, 480–481
830
security, 576–577, 612
SELinux, 638–639
server administration, 336–337
services, 386
shell scripts, 161–162
software, 246
system administration, 189–190
text files, 127–128
troubleshooting, 533
user accounts, 268–269
web servers, 436–437
exfat filesystem, 273, 291
exiting
shells, 81
vi command, 116–117
expiration dates, setting on temporary accounts, 550
exportfs command, 485, 489
exporting shared filesystems, 489
exports, 179
expr command, 151
ext filesystem, 290
ext2 filesystem, 290
ext3 filesystem, 290
ext4 filesystem, 290
extending GNOME desktop, 39–42
F
-f default_inactive option, 255
-f option, 251, 255–256
Facebook, 3
fc command, 75
FCEDIT variable, 79
FCoE (Fibre Channel over Ethernet Devices), 210
fdisk command, 279–280
Fedora
adding users, 95
base images from, 666
firewalls, 653–656
getting, 750–751
GNOME desktop (See GNOME)
installing print Settings tool in, 389
opening firewall for FTP on, 446–448
overview, 18
Project page, 685
Project SELinux Guide, 637
on USB drives, 754
Fedora Media Writer, 193, 685
fg command, 137
Downloaded from https://onlinelibrary.wiley.com/doi/ by alex jounh - Oregon Health & Science Univer , Wiley Online Library on [05/12/2025]. See the Terms and Conditions (https://onlinelibrary.wiley.com/terms-and-conditions) on Wiley Online Library for rules of use; OA articles are governed by the applicable Creative Commons License
Index
fg option, 497
Fibre Channel over Ethernet Devices (FCoE), 210
"File not found" error, 434
file permissions
Apache, 415
errors and, 434
relating to vsftpd, 449–450
File Transfer Protocol (FTP). See also FTP servers
building containers from GitHub, 673–675
connecting to server using clients, 454–457
opening firewall for, 445–448
overview, 439–441
file-matching metacharacters, 96–97
file-redirection metacharacters, 97–98
files
administrative configuration, 177–182
administrative log, 181
configuration, 82, 204, 308–309
copying
overview, 107–109
between systems with scp and rsync, 319–322
ensuring integrity of, 589–590
kickstart, 203
listing, 99–103
managing
with Nautilus, 42–43
security context, 628
moving, 107–109, 636
password, 556–558
permissions/ownership of, 103–107
removing, 107–109
security contexts of, 620
signing with digital signatures, 588–589
Files tags, 418
filesystems
basic commands, 94–96
checking, 314, 532
commands for, 69
copying files, 107–109
disabling swap areas, 293
enabling swap areas, 292–293
encrypting at installation, 590–592
exercise answers, 763–764, 780–782
exercises, 109–110, 301–302
file permissions and ownership, 103–107
Linux compared with Windows-based, 93
listing files and directories, 99–103
locking down, 561–562
managing
permissions, 558–559
storage with Cockpit, 299–301
metacharacters, 96–99
monitoring, 567–575
mounting, 289–298
mounting disk images in loopback, 297
moving files, 107–109
NFS, 492–501
operators, 96–99
organization of, 43, 273
overview, 5, 91–94, 271, 484
protection from corrupted, 212–213
removing files, 107–109
RHCSA, 23
scanning, 568–570
securing, 558–562
structure of, 490
supported, 290–292
system administrators and, 166
types of, 211
using fstab files to define mountable, 293–296
using mkfs command to create, 298–299
using mount command to mount filesystems,
296–297
using umount command, 297–298
filtered port state, 644
find command, 121–126, 334–335, 568–569
firewall-config utility, 657–658
firewalld service, 312, 653–656
firewalls
Apache and, 416
changing rules with Cockpit, 656–657
configuring for Samba, 465–466
Fedora, 653–656
firewall-config utility, 657–658
as a graphical tool, 170
implementing, 651–658
opening
for FTP, 445–448
for NFS server, 491
overview, 23, 311–312, 649–651
RHEL, 653–656
Samba and, 465
Ubuntu UFW, 651–653
firmware (UEFI), starting from, 507–509
firmware RAID, 210
5cl command, 115
5cw command, 116
fixfiles command, 628
831
Downloaded from https://onlinelibrary.wiley.com/doi/ by alex jounh - Oregon Health & Science Univer , Wiley Online Library on [05/12/2025]. See the Terms and Conditions (https://onlinelibrary.wiley.com/terms-and-conditions) on Wiley Online Library for rules of use; OA articles are governed by the applicable Creative Commons License
Index
Flatpak, personal installs with, 241–244
folders
creating, 43
managing with Nautilus, 42–43
foo command, 69
forbidden/server internal errors, accessing, 433–435
for...do loop, 155–156
foreground processes, managing, 137–139
fork bomb, 603
forward packets, 650
forward slash (/), 88
FOSS (free and open software), 12, 644
4y) command, 116
free and open software (FOSS), 12, 644
free command, 292, 293
free distribution, 12, 14
free software, 12
Free Software Directory, 12
Free Standards Group, 14
FreeBSD, 13
fstab file, 179, 293–296
FTP. See File Transfer Protocol (FTP)
FTP Log, 564
FTP servers
accessing with lftp command, 454–456
allowing uploading, 451–452
configuring
overview, 450–454
SELinux for, 448–449
exercise answers, 794–797
exercises, 457–458
File Transfer Protocol (FTP), 439–441
installing vsftpd FTP server, 441–442
opening firewall for FTP, 445–448
overview, 307, 439
relating Linux file permissions to vsftpd,
449–450
running from containers, 669–671
securing, 445–450
setting up
user access, 450–451
vsftpd for Internet, 452–454
starting vsftpd service, 442–445
using FTP clients to connect to server, 454–457
using gFTP client, 456–457
FTP Transfer Log, 564
full name, in user accounts, 248
functions, 69, 73
832
G
-g default_group option, 255
-g group option, 251, 256
-G grouplist option, 251, 256
G key, 117
gawk command, 551
gedit, 112
Geeksforgeeks, 50
general regular expression parser, 157
generic host systems, 335
Gentoo, 16
get command, 455
getenforce command, 448, 624
getfacl command, 260–263
getsebool command, 631–632, 636
getting
gfs2 filesystem, 291
gFTP client, 456–457
Gibson Research Corporation, 553, 576
Git accounts, getting, 50
Git Immersion, 50
GIT integration, 49–50
GitHub, building FTP containers from, 673–675
GitHub Skills, 50
GKE (Google Cloud Kubernetes Engine), 746
[global] section (Samba), 468, 469–470
globally unique identifier (GUID) partition tables, 274
GlusterFS, 681
GNOME
checking networks from, 342–343
extending, 39–42
overview, 29, 30–31
post-computer boot-up, 31–38
running MATE+Compiz desktops, 47–49
setting up, 38–39
Shell Extensions, 39–41
starting with desktop applications, 42–46
3D effects, 46–47
Tweak tool, 41–42
using, 31–49
GNOME Display Manager Log, 564
GNU Hurd project, 12
GNU Lesser General Public License (LGPL), 15
GNU Privacy Guard (gpg), 583, 592
GNU Project, 11–12, 14
GNU Public License (GPL), 12
GoDaddy, 426
Downloaded from https://onlinelibrary.wiley.com/doi/ by alex jounh - Oregon Health & Science Univer , Wiley Online Library on [05/12/2025]. See the Terms and Conditions (https://onlinelibrary.wiley.com/terms-and-conditions) on Wiley Online Library for rules of use; OA articles are governed by the applicable Creative Commons License
Index
Google Cloud Kubernetes Engine (GKE), 746
Google Cloud Platform, 682
GParted, 205–206
gpg tool, 583, 592
GPL (GNU Public License), 12
GPUs (graphical processing units), Ollama and, 538
GRand Unified Bootloader (GRUB), 213–215, 510–511
graphical administration tools
Cockpit browser-based administration, 167–169
overview, 167
Red Hat, 17
using other browser-based admin tools, 171
using system-config* tools, 169–171
graphical option, 208
graphical processing units (GPUs), Ollama and, 538
graphical user interface (GUI), allowing administrative
access via, 174
graphical windows, 166
greater than sign (>), 76
grep command, 126–127, 157
group, 180
group accounts, 257–259
Group directive, 421
group management, RHCSA, 23
group permissions, 310
groupadd command, 258–259
groupless files, 569
growing LVM logical volumes, 288–289
GRUB (GRand Unified Bootloader), 213–215,
510–511
gshadow, 180
GUI (graphical user interface), allowing administrative
access via, 174
GUID (globally unique identifier) partition tables, 274
H
H key, 115
hard disks
adding, 205
partitioning, 273–283
hard drives, partitioning, 210–213
hard option, 496
hardware
checking, 183–189
configuring, 183–189
features for installation, 197
managing removable, 187
overview, 4
SLMs and, 536
troubleshooting setup, 508–509
viewing overview of, 508
Hardware Abstraction Layer, 290
hashes password, 556–558
hashing, 580–581
help command, 86
help option, 65
here text/document, 98
--hide option, 66
high availability, of Elastic Kubernetes
Service (EKS), 745
HISTCMD variable, 80
HISTFILE shell variable, 76, 79
HISTFILESIZE variable, 80
history, of Linux, 7–16
history command, 74, 232–233
$HOME, 102, 178
/home directory, 92, 213
Home directory, 249, 499–501
Home folder, 43
HOME variable, 80
Homebrew, personal installs with, 241–244
[homes] section (Samba), 468–471
Host-A, 646–649
Host-B, 646–649
host-based firewalls, 650
hostname, 180
hostnames
checking resolution, 522–523
in /etc/exports file, 487–488
hosts. See also hypervisors
authenticating, 721
configuring permissions for Samba, 468
overview, 680
restricting Samba access by, 474
Samba and restrictions, 465
hosts, 180
HOSTTYPE variable, 80
hpfs filesystem, 291
HP’s Printer Control Language (PCL), 394
HTTP, 170
httpd package, 307, 308–309
httpd-core package, 410–413
httpd-manual package, 412
Hugging Face Transformers library, 542
hybrid cloud, 700
833
Downloaded from https://onlinelibrary.wiley.com/doi/ by alex jounh - Oregon Health & Science Univer , Wiley Online Library on [05/12/2025]. See the Terms and Conditions (https://onlinelibrary.wiley.com/terms-and-conditions) on Wiley Online Library for rules of use; OA articles are governed by the applicable Creative Commons License
Index
hypervisors
configuring, 685–688
defined, 679
identifying, 695
installing Linux on, 686–687
migrating running virtual machines to other, 695–696
mounting NFS share on, 689–690
overview, 680, 683
for small clouds, 684
starting services on, 687
hyphen (-), 100
I
IAM (Identity and Access Management), 682
id command, 67
IDEA, 582
identification and authentication, 594
Identity, Policy, and Audit (IPA) software, 682
Identity and Access Management (IAM), 682
IDEs, 49, 50–51
IDS (intrusion detection system), 569, 572–575
ifconfig command, 346
if...then statements, 152–154
imports (Ansible), 717
include flag (PAM), 597
includes (Ansible), 717
incoming connections, troubleshooting, 523–525
index not found error, 434
info command, 86
infrastructure
automating (See Ansible)
provisioning, 714
init systems, 367
initialization daemon, 368–375
initialization system, troubleshooting, 512
inittab, 180
input/output redirection, 8–9
insert at beginning command, 114
insert command, 114
install subcommand, 231
installation DVD, installing from, 192
installation media, installing Red Hat Enterprise Linux
from, 198–201
installing
Ansible, 720–724
Apache, 413–414
boot options for, 206–209
choosing computers, 195–197
834
cloud-based, 201
dual booting, 205–206
in the Enterprise, 202–203
exercise answers, 773–774
exercises, 216
Linux
on hypervisors, 686–687
software, 688–689
network services, 24–25
NFS file server, 484–485
overview, 191–192
packages
overview, 231–233
with rpm command, 237–238
partitioning hard drives, 210–213
quick starting, 192–195
Red Hat, 17
Red Hat Enterprise Linux from installation
media, 198–201
RPMs, 224
to run virtually, 206
Samba, 460–461
from scratch, 203–204
servers, 306–308
software, 43–44
using GRUB boot loader, 213–215
using specialized storage, 209–210
Visual Studio Code, 51–52
vsftpd FTP server, 441–442
web servers, 410–414
IntelliJ IDEA, 51
interfaces (Kubernetes), 732. See also network interfaces
Internet, setting up vsftpd for, 452–454
Internet Printing Protocol (IPP), 389
Internet Protocol (IP) address
overview, 341
setting
aliases, 350–351
manually, 349–350
interprocess communications (IPC), in namespaces, 665
intrusion detection system (IDS), 569, 572–575
intrusion prevention system (IPS), 572
intrusions, detecting, 572–575
inventories (Ansible), 715–716, 720–721
investigating cloud instances, 703–704
IO controller, 143
IP. See Internet Protocol (IP) address
ip command, 346–347, 520
IPA (Identity, Policy, and Audit) software, 682
Downloaded from https://onlinelibrary.wiley.com/doi/ by alex jounh - Oregon Health & Science Univer , Wiley Online Library on [05/12/2025]. See the Terms and Conditions (https://onlinelibrary.wiley.com/terms-and-conditions) on Wiley Online Library for rules of use; OA articles are governed by the applicable Creative Commons License
Index
IPC (interprocess communications), in namespaces, 665
IPP (Internet Printing Protocol), 389
IPS (intrusion prevention system), 572
iptables, 311–312, 649
iSCI devices, 210
ISO image, 580, 749
iso9660 filesystem, 290
J
JBoss, 17–18
jed, 112
jfs filesystem, 291
jobs command, 138
joe, 112
journalctl command, 181–182, 184, 276, 507, 511–
512, 563, 566, 633–634
Just For Fun: The Story of an Accidental Revolutionary
(Torvalds), 7
K
-k skel_dir, 251
K3s, 733
kafs filesystem, 291
Kali Linux, 16, 575
kate, 112
KDE Plasma, 29, 30
kedit, 112
Kerberos, 23, 267–268
kernel, 16, 511–516
Kernel Log, 564
kernel ring buffer, 511
Kernel-based Virtual Machine (KVM), 206, 680, 683
Kernighan, Brian, 9
key, 580
key pairs, generating, 585–586
key-based (passwordless) authentication, 322–324
keyboards, navigating with, 36–38
keystrokes
for cutting and pasting text from within
command lines, 73
for editing command lines, 72
for navigating command lines, 72
for using command history, 75
Kickstart, 171
kickstarts
boot options for, 208–209
files, 203, 245
options, 202
kill command, 139–141
killall command, 139–141
killing
out-of-memory process, 530–531
processes, 139–142, 529–530
knowledge, LLMs compared with SLMs, 536
kubectl command, 733
Kubernetes
applications, 731–732
cluster, 730
control plane, 731
data plane, 731
Elastic Kubernetes Service (EKS), 745–746
exercise answers, 818–819
exercises, 747
getting, 733–735
interfaces, 732
overview, 729–731, 732–733
running Kubernetes Basic Tutorial, 735–745
Kubernetes Basics Tutorial
running, 735–745
starting, 733–734
KVM (Kernel-based Virtual Machine), 206, 680, 683
L
L key, 115
-l login_name option, 256
-l option, 274
-L option, 256
labeling services, 741–742
LAMP stack (Linux, Apache web server, MySQL database,
and PHP web scripting language), 3
language, as a graphical tool, 170
language models
choosing, 535–536
customizing with Ollama, 542
running from command line, 538–541
laptop networking, 340
large language models (LLMs), 535–536
lastlog command, 564, 565
LDAP (Lightweight Directory Access Protocol), 267, 412
Learn Git Branching, 50
lease time, 341
left parenthesis ((), 76
less command, 71
less than sign (<), 76
let command, 151
835
Downloaded from https://onlinelibrary.wiley.com/doi/ by alex jounh - Oregon Health & Science Univer , Wiley Online Library on [05/12/2025]. See the Terms and Conditions (https://onlinelibrary.wiley.com/terms-and-conditions) on Wiley Online Library for rules of use; OA articles are governed by the applicable Creative Commons License
Index
Level attribute, 619
lftp command, accessing FTP server with, 454–456
LGPL (GNU Lesser General Public License), 15
/lib directory, 92
Libvirt Service Daemon (libvirtd), 683
lighttpd, 435
Lightweight Directory Access Protocol (LDAP), 267, 412
Lightweight X11 Desktop Environment (LXDE), 29, 196
limiting processes with cgroups, 142–143
Linux
accessing Samba shares in, 476–478
booting from USB drives, 754
burning CDs/DVDs in, 755–757
comparisons with other operating systems, 6–7
distributions, 16–19
encrypting files, 592
history of, 7–16
installing software, 688–689
Ollama and, 538
overview, 3–6
partitions, 211
professional opportunities for, 19–25
Linux, Apache web server, MySQL database, and PHP web
scripting language (LAMP stack), 3
Linux Foundation, 21
Linux Mint, 16
Linux Professional Institute, 21
Linux Unified Key Setup (LUKS), 590
list subcommand, 230–231
Listen 80 directive, 421
Listen directive, 433
listing
directories, 99–103
files, 99–103
loaded modules, 188
print jobs, 392
processes, 130–137
software, 220
status with lpstat -t command, 403
live image, 30–31
Live media, installing from, 191
Llama-3.1, 537
LLMs (large language models), 535–536
load balancer, checking, 744
loadable modules, 187–189
loading modules, 188–189
load_policy tool, 630
local network settings, updating, 341
836
local printers
configuring, 393–396
editing, 395–396
local storage (RHCSA), 23
locate command, 119–120
location, of RPMs, 224
Location tags, 419
locking down filesystems, 561–562
log files, 563–567
logging
configuring, 312–313
SELinux, 632–634
loghost, setting up with rsyslogd, 328–330
Logical Volume Manager (LVM)
logical volumes
creating, 287–288
growing, 287
overview, 23, 272
partitions, 211
using partitions, 284–289
Login/out Log, 564
logwatch, watching logs with, 330–331
loopbacks, mounting disk images in, 297
lp command, 183, 402–403
lprm command, removing print jobs with, 403–404
lpstat -t command, listing status with, 403
ls command, 65, 67, 96–97, 99–103, 148, 455–456
lsof command, 298
lsusb command, 186
Lubuntu, 196
LUKS (Linux Unified Key Setup), 590
LVM. See Logical Volume Manager (LVM)
lvs command, 591
LXDE (Lightweight X11 Desktop Environment), 29, 196
M
-M, 251
M key, 115
-m option, 251, 256
macOS system, burning CDs/DVDs in, 755
Mail Log, 564
Mail server, 24, 307
Mail Transport Agent (MTA), 307
MAIL variable, 80
maillog file, 564
maintaining RPM package database/cache, 235–236
man command, 86–88, 98
Downloaded from https://onlinelibrary.wiley.com/doi/ by alex jounh - Oregon Health & Science Univer , Wiley Online Library on [05/12/2025]. See the Terms and Conditions (https://onlinelibrary.wiley.com/terms-and-conditions) on Wiley Online Library for rules of use; OA articles are governed by the applicable Creative Commons License
Index
management systems, separation from workers
systems of, 336
mapping options, in /etc/exports file, 488–489
MariaDB, 308
master boot record (MBR) partition tables, 274
MATE+Compiz desktop, 47–49
MBR (master boot record) partition tables, 274
mcedit, 112
MCS (Multi-Category Security), 617
mDNS (Multicast DNS), 654
/media directory, 92
memory
managing, 4
Ollama and, 538
troubleshooting, 525–531
Memory controller, 143
message digest. See hash
messages file, 565
messages log file, 327–328, 633–634
metacharacters
brace expansion, 99
file-matching, 96–97
file-redirection, 97–98
overview, 76
metadata, 229
meta-data, 700
MicroK8s, 733
Microsoft Azure, 682
migrating virtual machines, 694–696
Minikube, 733, 734–735
Minimum policy (SELinux), 622–623
Minix, 7
minix filesystem, 291
minus sign (-), 138
/misc directory, 93
Mistral, 537
MIT license, 15
mkdir command, 493
mkfs command, 278, 298–299
MLS (Multi-Level Security), 615, 617
MLS (Multi-Level Security) policy (SELinux), 622
/mnt directory, 92
mod_perl package, 412
modprobe command, 188–189
mod_ssl package, 412
modules
Ansible, 716–717
Pluggable Authentication Module (PAM), 597
monitoring
filesystem, 567–575
log files, 563–567
servers, 312–314
mount command, 272, 289, 295, 296–297, 485, 492–493,
495, 496
mount table, in namespaces, 665
mounting
filesystems, 289–298
NFS filesystems
at boot time, 494–498
on demand using autofs, 498–501
overview, 493–494
NFS share on hypervisors, 689–690
noauto filesystems, 495
Samba shares from Linux command line, 478
mount-level security, 483
mouse, navigating using, 32–36
moving
files, 107–109, 636
print jobs, 392
Mozilla license, 15–16
msdos filesystem, 291
MTA (Mail Transport Agent), 307
mtab, 180
mtools.conf, 180
mtr command, 522
mugs, 21
multi-boot computer, 197
Multicast DNS (mDNS), 654
Multi-Category Security (MCS), 617
Multi-Level Security (MLS), 615, 617
Multi-Level Security (MLS) policy (SELinux), 622
multipath devices, 210
multiple-partition disks, creating, 279–283
multitasking, 165
multiuser features, 165
music, playing with Rhythmbox, 44–46
mv command, 108, 109
MySQL Server Log, 564
mysqld.log file, 564
N
-n, 251
name
finding files by, 121–122
using killall to signal processes by, 141
837
Downloaded from https://onlinelibrary.wiley.com/doi/ by alex jounh - Oregon Health & Science Univer , Wiley Online Library on [05/12/2025]. See the Terms and Conditions (https://onlinelibrary.wiley.com/terms-and-conditions) on Wiley Online Library for rules of use; OA articles are governed by the applicable Creative Commons License
Index
named.conf, 180
namespaces, 665
nano, 112
National Center for Supercomputing Applications
(NCSA), 410
National Institute of Standards and Technology
(NIST), 575
National Security Agency (NSA), 590, 613
Nautilus, managing files/folders with, 42–43
navigating
with keyboards, 36–38
with mouse, 32–36
in text, 114–115
ncpfs filesystem, 291
NCSA (National Center for Supercomputing
Applications), 410
nedit, 112
/net directory, automounting to, 498–499
NetBIOS (nmbd) name server, starting, 463–464
NetBIOS (nmb) services, stopping, 464
NetBSD, 13
network bridge, checking, 691
network cards, for installation, 196
network configuration files, 356–360
Network File System (NFS), 170, 291, 307. See also NFS
filesystems; NFS server; NFS service, starting;
NFS shares
network interface cards (NICs), 508
network interfaces
activating, 340
checking, 342–349
configuring, 349–352
in namespaces, 665
restricting Samba access by, 474
system administrators and, 166–167
viewing, 345–346, 520–521
network printing client and server (IPP), 654
network proxy connections, configuring, 352–353
network security
auditing network services
with nmap utility, 642–649
overview, 641–642
exercise answers, 809–811
exercises, 658–659
firewalls
implementing, 651–658
overview, 649–651
overview, 641
network services, installing and configuring, 24–25
838
Network Time Protocol server, 307
Network Time server, 25
network-based firewalls, 650
networking
configuring
from command line, 354–362
for desktops, 340–353
as a DHCP server, 363–364
as a DNS server, 364
in enterprise, 362–365
network interfaces, 349–352
network proxy connections, 352–353
with nmtui command, 354–355
as a proxy server, 364–365
as a router, 362–363
editing NetworkManager TUI connection, 355–356
exercise answers, 786–787
exercises, 365–366
managing, 715
network configuration files, 356–360
overview, 339–340
setting alias network interfaces, 360–361
setting up Ethernet channel bonding, 361–362
for small clouds, 684
troubleshooting
incoming connections, 523–525
outgoing connections, 520–523
network-layer firewall, 651
NetworkManager TUI connections, editing, 355–356
networks, configuring, 38
news, 183
News Log, 564
NFS (Network File System), 170, 291, 307. See also NFS
filesystems; NFS server; NFS service, starting;
NFS shares
nfs filesystem, 291
NFS filesystems
manually mounting, 493–494
sharing, 486–489
unmounting, 501–503
NFS server
configuring
/etc/exports file, 486–489
SELinux for, 492
exercise answers, 799–801
exercises, 504
exporting shared filesystems, 489
installing, 484–485
manually mounting NFS filesystems, 493–494
Downloaded from https://onlinelibrary.wiley.com/doi/ by alex jounh - Oregon Health & Science Univer , Wiley Online Library on [05/12/2025]. See the Terms and Conditions (https://onlinelibrary.wiley.com/terms-and-conditions) on Wiley Online Library for rules of use; OA articles are governed by the applicable Creative Commons License
Index
mounting
NFS filesystems at boot time, 494–498
NFS filesystems on demand using autofs, 498–501
opening up firewall for, 491
overview, 24, 307, 483–484
securing, 490–492
sharing NFS filesystems, 486–489
starting, 485
unmounting filesystems, 501–503
using NFS filesystems, 492–501
viewing NFS shares, 493
NFS service, starting, 689
NFS shares
configuring, 689
mounting on hypervisors, 689–690
viewing, 493
nfsnobody, 488–489
nginx, 435
NIC PXE boot settings, 509
nice command, setting processor priority with, 141–142
NICs (network interface cards), 508
NIST (National Institute of Standards and Technology), 575
nmap utility, 642–649
nmb (NetBIOS) services, stopping, 464
nmbd (NetBIOS) name server, starting, 463–464
nmtui command, configuring networking with, 354–355
noauto filesystems, mounting, 495
nobody, 488–489
Node.js, 435
nodes, setting up SSH keys to, 718–719
nodma option, 207
nofb option, 208
nofirewire option, 207
noide option, 207
noipv6 option, 207
nompath option, 207
nonet option, 207
nonstandard directories, 635
nonstandard ports, for services, 635–636
Non-Volatile Memory Express (NVMe) SSD, 274–275
noparport option, 207
nopcmcia option, 207
noprobe option, 207
noscsi option, 207
-not option, 124–125
nousb option, 207
Novell, 13
NSA (National Security Agency), 590, 613
nsswitch.conf, 180
ntfs filesystem, 291
ntp.conf, 180
ntpd package, 307
numa-off option, 207
NVMe (Non-Volatile Memory Express) SSD, 274–275
O
-o option, 251, 256
OEMs (original equipment manufacturers), 10
Offensive Security, 575
OLDPWD variable, 80, 102
Ollama
customizing models with, 542
overview, 537–539
running language models from command line, 539–541
1G, 117
one-command actions, 154
open above command, 114
open below command, 114
Open Group, 14
open port state, 644
open source, 12, 746
Open Source Initiative (OSI), 12, 14–16
Open Sources: Voices from the Open Source Revolution, 14
OpenBSD, 13
open|filtered port state, 644
opening
applications
from Activities screen, 32–33
from Applications list, 33
using mouse, 35
firewall
for FTP, 445–448
for NFS server, 491
OpenPGP, 583, 592
openssh-server service, starting, 315–316
openssl tool, 593
OpenStack Horizon project, 171
operating systems
Linux compared with other, 6–7
multiple partitions within, 210–211
RHCSA, 22
operational modes, SELinux, 618–619
operators
managing, 714–715
for test expressions, 153–154
/opt directory, 93
option, 65
839
Downloaded from https://onlinelibrary.wiley.com/doi/ by alex jounh - Oregon Health & Science Univer , Wiley Online Library on [05/12/2025]. See the Terms and Conditions (https://onlinelibrary.wiley.com/terms-and-conditions) on Wiley Online Library for rules of use; OA articles are governed by the applicable Creative Commons License
Index
optional flag (PAM), 597
Options directive, 419
-or option, 124–125
Oracle Linux, 18
original equipment manufacturers (OEMs), 10
OSI (Open Source Initiative), 12, 14–16
OSTYPE variable, 80
outgoing connections, troubleshooting, 520–523
out-of-memory process, killing, 530–531
ownerless files, 569
ownership
Apache, 415
of files, 103–107
P
-p passwd, 251–252
packages
installing
overview, 231–233
with rpm command, 237–238
overview, 204
removing
overview, 231–233
with rpm command, 237–238
searching for, 229–231
updating
groups of, 234–235
overview, 233–234
packet filter, 651
packet forwarding, 363
page caches, dropping, 530
PAM. See Pluggable Authentication Module (PAM)
pam_cracklib module, 606–610
parameters
Ansible, 717
expanding in Bash, 149–150
LLMs compared with SLMs, 536
positional, 148–149
reading in, 149
parted command, 274, 276, 277
partition tables, 274
partitioning
hard disks, 273–283
hard drives, 210–213
partitions
assigning to directories, 213
LVM, 284–289
tips for creating, 212–213
840
types of, 211–212
PASS_MIN_LEN setting, 555
passwd command, 180, 553–554
password (PAM), 596
password files
overview, 556–558
securing, 559–561
password hashes, 556–558
password protection, for servers, 311
passwordless (key-based) authentication, 322–324
passwords
changing, 553–554
choosing, 552–553
encryption from the desktop and, 593
enforcing
best practices, 554–556
with PAM, 606–610
securing, 551–558
setting, 553–554
for SMB, 399
in user accounts, 249
pasting text, 116
path directory, 69
PATH variable, 80, 85, 86
PCL (HP’s Printer Control Language), 394
PE (physical extent), 285
Peppermint OS, 196
percent sign (%), 138–139
period (.), 116
Perl module, 412
permissions
changing with chmod command, 105–106
of files, 103–107
filesystem, 558–559
finding files by, 123–124
group, 310
setting
with Access Control Lists (ACLs), 260–267
default with unmask command, 106–107
user, 310
permissive mode (SELinux), 618
persistent services, enabling, 379–382
PGP keys, encryption from the desktop and, 594
Phi-3, 537
php package, 412
php-ldap package, 412
physical connections, checking, 521
physical extent (PE), 285
physical security
Downloaded from https://onlinelibrary.wiley.com/doi/ by alex jounh - Oregon Health & Science Univer , Wiley Online Library on [05/12/2025]. See the Terms and Conditions (https://onlinelibrary.wiley.com/terms-and-conditions) on Wiley Online Library for rules of use; OA articles are governed by the applicable Creative Commons License
Index
advanced implementation, 563
disaster recovery, 548
filesystem, 558–562
overview, 547–548
passwords, 551–558
services, 562–563
software, 562–563
user accounts, 549–551
PID (process ID), 129, 140–141
PID controller, 143
ping command, 520
pipe character (|), 8, 76–77, 131–132, 148, 154, 403
plain text, 579
platforms, cloud, 682
playbooks (Ansible)
creating, 721–722
overview, 716–717
running, 722–724
playing music with Rhythmbox, 44–46
plays (Ansible), 716
plocate command, 70
Pluggable Authentication Module (PAM)
administering on Linux system, 598–611
authentication process, 595–598
configuration files, 598
contexts, 596
control flags, 596–597
encouraging use of sudo with, 610–611
enforcing good passwords with, 606–610
implementing
resource limits with, 603–605
security with, 594–611
time restrictions with, 605–606
managing
configuration with authselect, 599–601
individual configuration files, 601–602
system event configuration files, 602–603
modules, 597
overview, 311, 563, 594–595
resources for, 611
plus sign (+), 102, 138, 280
podcasts (Rhythmbox), 45
podman command, 667, 677
pods, deployment, 737–739
policy rule, 616
policy rule packages (SELinux), 623, 629–631
policy types (SELinux), 621–623, 626
port 80, 643
Port directive, 433
port numbers, 310
portability, 9, 746
Portable Operating System Interface (POSIX), 10
ports, 643
positional parameters, 148–149
POSIX (Portable Operating System Interface), 10
postfix, 183
PostgreSQL service, 307
pound sign (#), 61, 146
PPID variable, 80
Preboot eXecution Environment (PXE), 196
prerequisites (Ansible), 718
print jobs
canceling, 392
listing, 392
moving, 392
removing with lprm command, 403–404
[print$] section (Samba), 468
print servers
adding printers automatically, 390
configuring
CUPS printer options manually, 401–402
CUPS server, 399–400
overview, 404–407
shared CUPS printers, 404–406
shared Samba printers, 406–407
exercise answers, 789–791
exercises, 408
listing status with lpstat -t command, 403
overview, 306–307, 387
printing
directly from Windows to CUPS, 389
with lp command, 402–403
removing print jobs with lprm command, 403–404
setting up printers, 389–399
starting CUPS server, 401
UNIX printing system, 388–389
using Print Settings window, 393–399
using printing commands, 402–404
using web-based CUPS administration, 390–392
working with CUPS printing, 399–402
Print Settings window
configuring
local printers with, 393–396
remote printers with, 396–397
overview, 387
using, 393–399
printcap, 180
printer browsing, 389
841
Downloaded from https://onlinelibrary.wiley.com/doi/ by alex jounh - Oregon Health & Science Univer , Wiley Online Library on [05/12/2025]. See the Terms and Conditions (https://onlinelibrary.wiley.com/terms-and-conditions) on Wiley Online Library for rules of use; OA articles are governed by the applicable Creative Commons License
Index
printer classes, 389, 392
printers
adding automatically, 390
setting up, 389–399
viewing, 392
[printers] section (Samba), 468, 471
printing
directly from Windows to CUPS, 389
as a graphical tool, 170
printing commands, 402–403
privacy, SLMs and, 537
private cloud, 700
private key cryptography, 583, 584
/proc directory, 93, 130
proc filesystem, 291
process ID (PID), 129, 140–141
process management, 4
process table, in namespaces, 665
processes
background, 137–139
exercise answers, 766–768
exercises, 144
foreground, 137–139
killing, 139–142, 529–530
limiting with cgroups, 142–143
listing, 130–137
managing security context, 628–629
overview, 129–130
renicing, 139–142
security contexts of, 621
processors
for installation, 196
Ollama and, 538
procs package, listing processes with, 132–133
professional opportunities, finding, 19–25
profile, 180
programming constructs, in shell scripts, 151–157
programming tools, 5
PROMPT_COMMAND variable, 80
prompts, setting, 83–84
protocols, 180
provisioning infrastructure, 714
proxy server, configuring Linux as a, 364–365
ps command, listing processes with, 130–132
PS1 variable, 80
public cloud, 700
public key cryptography, 584
public keys, sharing, 586
published interfaces, UNIX, 10
842
pulling containers, 667–671
Puppet, 682, 708
pwconv command, 557
pwd command, 65, 80, 102
pwgen utility, 554
PXE (Preboot eXecution Environment), 196
PXE boot/server, 203, 245
Q
:q! command, 116
QEMU Processor Emulator, 683
Quay Registry, 666, 675
querying rpm information, 238–240
question mark (?), 118, 121–122
quick starting installation, 192–195
R
Radio selection (Rhythmbox), 45
RAID, 210, 211–212
random access memory (RAM), 196, 271–272, 526–528
RANDOM variable, 81
Raymond, Eric S., 16
RBACs (role-based access controls), 613–614, 615
RC4, 582
RC5, 582
RC6, 582
RDMA (Remote Direct Memory Access) controller, 143
read command, 149
Read permission, 104
reading in parameters, 149
real-time computing, 6
recalling commands using command history, 70–76
Red Hat
certification, 21–25
choosing distributions, 16–18
customer portal, 563, 752
documentation, 23
Red Hat Certified Engineer (RHCE), 20–25
Red Hat Certified System Administrator
(RHCSA), 20–23
Red Hat Container Catalog, 666
Red Hat Ecosystem Catalog, 563
Red Hat Enterprise Linux (RHEL)
adding users, 95
firewalls, 653–656
getting, 752
installing from installation media, 198–201
Manuals, 637
Downloaded from https://onlinelibrary.wiley.com/doi/ by alex jounh - Oregon Health & Science Univer , Wiley Online Library on [05/12/2025]. See the Terms and Conditions (https://onlinelibrary.wiley.com/terms-and-conditions) on Wiley Online Library for rules of use; OA articles are governed by the applicable Creative Commons License
Index
opening firewall for FTP on, 446–448
overview, 17–18
Red Hat Enterprise Linux (RHEL) Networking Guide, 24
Red Hat Enterprise Linux OpenStack Platform
(RHELOSP), 171
Red Hat OpenShift, 171
Red Hat OpenStack platform, 681
Red Hat Package Manager. See RPM packages
Red Hat Virtualization (RHV), 18, 171, 682
regular user ($), 173
reinstall subcommand, 232
reinstalling components, 532
ReiserFS, 291
reiserfs filesystem, 291
relating Linux file permissions to vsftpd, 449–450
reloading services with systemd, 378–379
remote access, 305, 314–324
remote content, accessing, 43
remote CUPS printers, adding, 397
Remote Direct Memory Access (RDMA) controller, 143
remote printers, configuring, 396–397
remote printing administration, allowing, 391
remote repositories, boot options for, 208–209
remote systems, checking connectivity to, 346–347
remote UNIX (LDP/LPR) printers, adding, 397
removable hardware, managing, 187
removing
files, 107–109
modules, 189
packages
overview, 231–233
with rpm command, 237–238
print jobs with lprm command, 403–404
sections of lines of text, 157
software, 220
user accounts, 550–551
renice command, setting processor priority
with, 141–142
renicing processes, 139–142
repeating commands, 116
repositories, 219, 518
requesting DHCP service, 340
required flag (PAM), 596, 597
Requires, 373
requisite flag (PAM), 596
rescue mode, 509, 531–532
resident set size (RSS), 131
resizing Windows partitions, 205
resolution-1024x768 option, 208
resources
implementing limits with PAM, 603–605
LLMs compared with SLMs, 536
usage of, 507
restarting services with systemd, 378
restorecon command, 467, 628, 636
restricted deletion directories, creating, 266–267
retrans=# option, 496
retry=# option, 497
return command, 70
RHCE (Red Hat Certified Engineer), 20–25
RHCSA (Red Hat Certified System Administrator),
20–23
RHEL. See Red Hat Enterprise Linux (RHEL)
RHELOSP (Red Hat Enterprise Linux OpenStack
Platform), 171
rhost files, 569
RHV (Red Hat Virtualization), 18, 171, 682
Rhythmbox, playing music with, 44–46
right parenthesis ()), 76
right-arrow key (>), 8
Ritchie, Dennis, 8, 9
Rjindael. See Advanced Encryption Standard (AES)
rm command, 108, 109
rmdir command, 109
rmmod command, 189
Role attribute, 619
role-based access controls (RBACs), 613–614, 615
roles (Ansible), 717
/root directory, 91, 93
Root Password, 170
root user, 165, 488, 490
root user account, 172–176, 549
Rootkit Hunter, 572
rootkits, detecting, 571–572
route command, 346–347
router, 362–363, 521–522
routes, 351–352, 521–522
rpc, 180, 183
rpm command, 237–238, 568, 570
RPM Fusion, 228–229
RPM packages
managing with dnf and yum, 224–237
overview, 220–224
Red Hat, 16–17
verifying, 240–241
RSA, 582, 588
rsize option, 496
RSS (resident set size), 131
843
Downloaded from https://onlinelibrary.wiley.com/doi/ by alex jounh - Oregon Health & Science Univer , Wiley Online Library on [05/12/2025]. See the Terms and Conditions (https://onlinelibrary.wiley.com/terms-and-conditions) on Wiley Online Library for rules of use; OA articles are governed by the applicable Creative Commons License
Index
rsync command, copying files between systems
with, 319–322
rsync utility, 548
rsyslog service, 312–313, 324–330
rsyslog.conf, 181
rsyslogd
managing log messages with, 182
setting up loghost with, 328–330
runlevels, 22, 367
runtime, 731
S
-s default_shell option, 255
-s shell option, 252, 256
salting a hash, 557
Samba client, 655
Samba Log, 565
Samba NFS, 170
samba package, 307
SAMBA printers, configuring shared, 406–407
Samba server
accessing
Samba shares, 475–479
Samba shares in Linux, 476–478
Samba shares in Windows, 479
configuring
firewalls, 465–466
[global] section, 469–470
[homes] section, 470–471
overview, 468–475
[printers] section, 471
Samba host/user permissions, 468
SELinux for, 466–468
creating shared folders, 472–475
exercise answers, 797–799
exercises, 480–481
installing, 460–461
overview, 459–460
securing, 464–468
starting
NetBIOS (nmbd) server, 463–464
overview, 461–464
stopping
NetBIOS (nmb) services, 464
overview, 461–464
using in enterprise, 479–480
SAN devices, 210
sandboxed environments, 241
844
SANS Institute, 576
sar command, 313, 331–332
satellite server, 245
/sbin command, 93, 176
scalability, of Elastic Kubernetes Service (EKS), 745
scaling down applications, 744–745
scaling up applications, 742–744
scanning filesystems, 568–570
SCC (Secure Computing Corporation), 613
Schneegans, Simon, 46
scp command, copying files between systems
with, 319–322
screenshots, 36
script crashed error, 434
ScriptAlias directive, 421
SCSI storage device, 275
seahorse tool, 593
secon command, 626–627
SECONDS variable, 81
secret key cryptography, 583
Secure Computing Corporation (SCC), 613
secure file, 565
Secure Shell (SSH)
encryption from the desktop and, 594
managing remote access with tools, 314–324
overview, 655
server, 25
Secure Sockets Layer (SSL)
configuring, 427–429
generating keys, 429–430
securing web traffic with, 425–431
securing
Apache, 415–417
filesystem, 558–562
FTP server, 445–450
[homes] section, 470–471
NFS server, 490–492
password files, 559–561
passwords, 551–558
Samba, 464–468
servers, 311–312
user accounts, 549–551
web traffic with SSL/TLS, 425–431
security. See also network security; SELinux
conducting
compliance reviews, 575
security reviews, 575–576
exercise answers, 804–805, 806–807
exercises, 576–577, 612
Downloaded from https://onlinelibrary.wiley.com/doi/ by alex jounh - Oregon Health & Science Univer , Wiley Online Library on [05/12/2025]. See the Terms and Conditions (https://onlinelibrary.wiley.com/terms-and-conditions) on Wiley Online Library for rules of use; OA articles are governed by the applicable Creative Commons License
Index
implementing with cryptography
decryption, 581–589
encrypting filesystems at installation, 590–592
encrypting Linux files, 592
encrypting Linux with miscellaneous tools, 593
encryption, 581–589
ensuring file integrity, 589–590
hashing, 580–581
overview, 579–580
using encryption from desktop, 593–594
implementing with PAM
administering PAM, 598–611
authentication process, 595–598
encouraging sudo use with PAM, 610–611
enforcing good passwords with PAM, 606–610
implementing resources limits with PAM,
603–605
implementing time restrictions with PAM,
605–606
managing individual PAM configuration
files, 601–602
managing PAM configuration with authselect
command, 599–601
managing PAM system event configuration
files, 602–603
overview, 594–595
PAM configuration files, 598
PAM contexts, 596
PAM control flags, 596–597
PAM modules, 597
resources for PAM, 611
overview, 547, 579
physical
advanced implementation, 563
disaster recovery, 548
filesystem, 558–562
overview, 547–548
passwords, 551–558
services, 562–563
software, 562–563
user accounts, 549–551
server administration and, 306
system monitoring
filesystem, 567–575
log files, 563–567
overview, 563
security advisories, 562–563
security by obscurity, 310
security clearance, 617
security contexts
managing in SELinux, 626–629
SELinux, 619–621
Security Enhanced Linux (SELinux)
Apache and, 416–417
benefits of, 613–615
configuring
for FTP servers, 448–449
managing policy rule packages, 629–631
managing security contexts, 626–629
managing via Booleans, 631–632
for NFS server, 492
overview, 623–624
for Samba, 466–468
setting mode, 624–625
setting policy type, 626
errors, 434–435
exercise answers, 807–809
exercises, 638–639
how it works
implementing security models, 617–623
multi-level security, 617
overview, 615
type enforcement (TE), 616
logging, 632–634
operational modes, 618–619
overview, 24, 67, 312, 613, 636–637
policy rule packages, 623
policy types, 621–623
resources for, 637
Samba and, 465
security contexts, 619–621
setting file contexts for Samba, 467–468
troubleshooting
common problems, 634–636
logging, 634
security features, system administrators and, 167
security label, 616
Security Log, 565
security management, RHCSA, 23
security models, SELinux, 617–623
security reviews, conducting, 575–576
sed command, 158–159
self-healing, of Elastic Kubernetes Service (EKS), 745
self-signed certificates, generating, 429–430
SELinux. See Security Enhanced Linux (SELinux)
SELinux Management, as a graphical tool, 170
SELinux Project Wiki, 637
semicolon (;), 76, 77
845
Downloaded from https://onlinelibrary.wiley.com/doi/ by alex jounh - Oregon Health & Science Univer , Wiley Online Library on [05/12/2025]. See the Terms and Conditions (https://onlinelibrary.wiley.com/terms-and-conditions) on Wiley Online Library for rules of use; OA articles are governed by the applicable Creative Commons License
Index
semodule command, 634
semodule_expand tool, 630
semodule_link tool, 630
semodule_package tool, 630
sendmail file, 565
Sendmail Log, 565
sequential commands, 77
server administration
checking
servers, 314
system resources with sar, 331–332
system space, 333–335
configuring
servers, 308–309
system logging, 324–331
exercise answers, 782–785
exercises, 336–337
installing server, 306–308
logwatch service, 330–331
managing
remote access with secure Shell tools,
314–324
servers in enterprise, 335–336
monitoring servers, 312–314
overview, 305–306
securing servers, 311–312
setting servers, 314
starting
openssh-server package, 315–316
servers, 309–311
using key-based authentication, 322–324
using SSH client tools, 316–322
server networking, 340
ServerRoot directive, 420–421
servers
checking, 314
configuring, 308–309
installing, 306–308
monitoring, 312–314
securing, 311–312
setting, 314
starting, 309–311
system administrators and, 167
services
adding new to systemd, 383–385
configuring default runlevel/target unit, 382–383
deleting, 742
enabling persistent service, 379–382
exercise answers, 787–789
846
exercises, 386
exposing applications with, 740–741
as a graphical tool, 170
initialization daemon, 368–375
labeling, 741–742
managing, 562–563
nonstandard directories for, 635
nonstandard ports for, 635–636
overview, 367–368
starting, 375–379
stopping, 375–379
systemd, 377–379
systemd initialization, 369–375
SysVinit, 376–377
services, 180
session (PAM), 596
sestatus command, 624
set GID (SGID), 558–559
set GID bit, 265–266
set UID (SUID), 558–559
set UID bit, 265–266
setenforce command, 624–625
setfacl command, setting ACLs with, 260–262
setfiles command, 628
setsebool command, 467, 470–471, 631–632
setup
Ethernet channel bonding, 361–362
GNOME desktop, 38–39
loghost with rsyslogd, 328–330
printers, 389–399
small clouds
configuring hypervisors, 685–688
configuring storage, 688–690
creating virtual machines, 690–693
managing virtual machines, 693–694
migrating virtual machines, 694–696
overview, 684
SMB clients, 407
SSH keys to nodes, 718–719
user access, 450–451
Visual Studio Code, 52–55
vsftpd for Internet, 452–454
setup utility, 508
sftp command, 322
SGID permission, 569
SHA-2 cryptographic hash, 590
shadow, 180
shalsum command, 590
shared filesystems, exporting, 489
Downloaded from https://onlinelibrary.wiley.com/doi/ by alex jounh - Oregon Health & Science Univer , Wiley Online Library on [05/12/2025]. See the Terms and Conditions (https://onlinelibrary.wiley.com/terms-and-conditions) on Wiley Online Library for rules of use; OA articles are governed by the applicable Creative Commons License
Index
shared folders
adding to Samba, 472
creating in Samba, 472–475
shared storage, 683
sharing
NFS filesystems, 486–489
public keys, 586
shell characters, escaping, 147–148
shell environments, creating, 82–85
shell history, 70–76
shell prompt, 61
shell reserved words, 69
shell scripts
backup script, 160–161
case command, 154–155
debugging, 146–147
deleting characters, 158
escaping shell characters, 147–148
executing, 146–147
exercise answers, 768–770
exercises, 161–162
for...do loop, 155–156
general regular expression parser, 157
if...then statements, 152–154
overview, 24, 145–146
parameter expansion in Bash, 149–150
performing arithmetic in, 151
reading in parameters, 149
removing sections of lines of text, 157
shell positional parameters, 148–149
shell variables, 147–150
stream editor, 158–159
telephone list, 159–160
text manipulation programs, 157–159
translating characters, 158
until...do loop, 156–157
using programming constructs in, 151–157
while...do loop, 156–157
shell variables, 147–150
shells. See also Bash shell
configuring, 82–83
overview, 4
running from containers, 668–669
in user accounts, 249
shells, 181
SHLVL variable, 81
showmount command, 493
shutting down virtual machines, 694
sidecar container, 731
signature. See hash
signing files with digital signatures, 588–589
single quote (’), 148
single-boot computer, 197
single-partition disks, creating, 276–279
size, finding files by, 122
skipddc option, 208
skipping around files, 117
Slackware, 16
slash (/), 91, 118
SLMs (small language models), 535–536
small language models (SLMs), 535–536
smb service, 461. See also Samba server
smbclient command, 470–471, 475
smb.conf file, 406–407
Snap, personal installs with, 241–244
Snort, 572
soft option, 496
software
adding with cloud-init, 706–707
DEB packaging, 220–224
exercise answers, 774–776
exercises, 246
installing
overview, 43–44
with rpm command, 237–244
Linux RPM, 220–224
listing, 220
managing
on desktop, 218–219
in enterprise, 244–245
overview, 43–44, 562–563
RPM packages with dnf and yum, 224–237
overview, 217
querying with rpm command, 237–244
removing, 220
Software window, 219–220
subscriptions, 20
system administrators and installation of, 166
troubleshooting packages, 516–519
updating
overview, 221, 314
packages, 562
verifying
packages, 567–568
with rpm command, 237–244
software bounties, 21
software packages, 202, 567–568
Software window, 219–220
847
Downloaded from https://onlinelibrary.wiley.com/doi/ by alex jounh - Oregon Health & Science Univer , Wiley Online Library on [05/12/2025]. See the Terms and Conditions (https://onlinelibrary.wiley.com/terms-and-conditions) on Wiley Online Library for rules of use; OA articles are governed by the applicable Creative Commons License
Index
Sound settings, 39
source code, 10, 14, 15
Spacewalk, 245
special installation types, boot options for, 208
specialized storage, 6, 209–210
speed, SLMs and, 537
spins, 751
spooler file, 564
SQL server, 307
square brackets ([]), 152
squashfs filesystem, 291
Squid Log, 565
squid package, 413
squid proxy server, 365
ss command, 525
ssh command, 314, 316–319, 593
ssh keys
adding with cloud-init, 705–706
setting up to nodes, 718–719
SSH protocol, 43
SSL. See Secure Sockets Layer (SSL)
Stallman, Richard M., 11
starting
Apache, 414–431
background processes, 137–138
containers, 671–672
CUPS server, 401
with desktop applications, 42–46
from firmware (UEFI), 507–509
kernel, 511–516
Kubernetes Basics Tutorial, 733–734
Minikube, 734–735
NetBIOS (nmbd) name server, 463–464
NFS file server, 485
NFS service, 689
openssh-server service, 315–316
Samba, 461–464
servers, 309–311
services, 375–379
with systemd, 506–507
Virtual Machine Manager, 691
virtual machines, 694
vsftpd service, 442–445
startup methods, 506–507
startup services, 5
status, listing with lpstat -t command, 403
stopping
containers, 671–672
NetBIOS (nmb) services, 464
848
Samba, 461–464
services, 375–379
storage
configuring, 688–690
disk, 271–273
Kubernetes, 730
managing with Cockpit, 299–301
for small clouds, 684
stream cipher, 580
stream editor, 158–159
su command, 166, 173–174
subnet mask, 341
substack flag (PAM), 597
sudo command
encouraging use of with PAM, 610–611
gaining administrative access with, 174–176
overview, 61, 166, 549
sudoers, 181
sufficient flag (PAM), 596
SUID permission, 569
superuser, 165
superuser prompt (#), 173
supported filesystem, 290–292
swap areas, 292–293
swap filesystem, 291
swap partitions, 212
swap space, 272
switch statement, 154–155
symmetric key cryptography, 583
syntax, for commands, 65–68
/sys directory, 93
SYSLINUX, 214
system activity reports, running, 313
system administration
administrative commands, 176–177
administrative configuration files, 177–182
browser-based admin tools, 171
checking and configuring hardware, 183–189
Cockpit browser-based administration, 167–169
exercise answers, 770–773
exercises, 189–190
GUI, 174
loadable modules, 187–189
managing removable hardware, 187
overview, 165–167
su command, 173–174
sudo command, 174–176
system-config* tools, 169–171
using graphical administration tools, 167–171
Downloaded from https://onlinelibrary.wiley.com/doi/ by alex jounh - Oregon Health & Science Univer , Wiley Online Library on [05/12/2025]. See the Terms and Conditions (https://onlinelibrary.wiley.com/terms-and-conditions) on Wiley Online Library for rules of use; OA articles are governed by the applicable Creative Commons License
Index
using other administrative accounts, 182–183
using root user account, 172–176
system administrator, 165
system configuration/management, 23–24
system deployment, RHCSA, 23
System Log, 565
system logging, configuring, 324–331
system maintenance, RHCSA, 23
System Monitor, listing processes with, 135–137
system monitoring
filesystem, 567–575
log files, 563–567
overview, 563
system reports, 24
system resources, checking with sar, 331–332
system space, checking, 333–335
System V compatibility, 506–507
system-config* tools, 169–171
systemd journal, 181–182, 309–310
systemd service
adding new services to, 383–385
backward compatibility to SysVinit, 374–375
boot process, 512–516
disabling persistent services with, 380–382
enabling persistent services with, 379–380
initialization daemon for, 369–375
overview, 368
starting with, 506–507
stopping and starting, 377–379
troubleshooting initialization, 512–516
systemectl command, 373, 380–382, 401, 462
SystemVinit scripts, 309–310
SysVinit
initialization daemon for, 368
overview, 368
stopping and starting, 376–377
systemd backward compatibility to, 374–375
T
tagging container images to registries, 675–677
tail command, 276
tar archive files, 583–584
tar command, 548, 583–584
tarballs, 16
target units, 369–370, 382–383
Targeted policy (SELinux), 622
targets, 367, 506
tasks
Ansible, 716
LLMs compared with SLMs, 536
SLMs and simplicity of, 536–537
TCP Connect port scan, 643–644
TCP port 139, 465
TCP port 445, 465
TE (type enforcement), 615, 616
technical approach, UNIX, 11
technology
cloud, 683–684
Linux desktop, 28–30
telnet command, 315
terminal windows, Bash shell and, 60–63
text
adding, 113–114
changing, 115–116
copying, 115–116
deleting, 115–116
navigating in, 114–115
pasting, 116
removing sections of lines of, 157
searching for, 118
text editors, 112
text files
adding text, 113–114
changing text, 115–116
copying text, 115–116
deleting text, 115–116
editing with vim and vi, 111–118
exercise answers, 764–766
exercises, 127–128
find command, 121–126
finding, 119–127
grep command, 126–127
locate command, 119–120
navigating, 114–115
overview, 111
pasting text, 116
repeating commands, 116
searching for text, 118
skipping around in, 117
text editors, 112
using ex mode, 118
text manipulation programs, 157–159
third-party apps/repositories, 228–229, 518
35G, 117
Thompson, Ken, 8
3D effects, 46–47
3dd command, 115
849
Downloaded from https://onlinelibrary.wiley.com/doi/ by alex jounh - Oregon Health & Science Univer , Wiley Online Library on [05/12/2025]. See the Terms and Conditions (https://onlinelibrary.wiley.com/terms-and-conditions) on Wiley Online Library for rules of use; OA articles are governed by the applicable Creative Commons License
Index
3DES, 582
3dw command, 115
389 Directory Server, 268
three-way handshake, 643
tilde (~), 73, 95, 102, 113
time
finding files by, 124
as a graphical tool, 170
implementing restrictions with PAM, 605–606
timeo-# option, 496
TLS, securing web traffic with, 425–431
TMOUT variable, 81, 85
/tmp directory, 93, 213
toggling activities and windows using mouse, 32
top command, 133–135, 528–529
Torvalds, Linus, 7, 13–14
touch command, 96–97
tr command, 158
traceroute command, 348, 522
training, 20–21
transitioning, from yum to dnf, 225
translating characters, 158
tripwire, 572
troff command, 77
troubleshooting
Booleans, 636
boot order, 509
boot-up
GRUB boot handler, 510–511
overview, 505–506
starting from firmware (UEFI), 507–509
starting kernel, 511–516
startup methods, 506–507
common SELinux problems, 634–636
exercise answers, 801–803
exercises, 533
hardware setup, 508–509
initialization system, 512
memory
overview, 525–526
uncovering memory issues, 526–531
networking
incoming connections, 523–525
outgoing connections, 520–523
overview, 520
overview, 505
in rescue mode, 531–532
SELinux logging, 634
software packages, 516–519
850
systemd initialization, 512–516
web servers, 431–435
T-shirts, 21
turning off SELinux, 417
tutorials, Kubernetes, 732–733
12j command, 116
two dots (..), 95, 102
Type attribute, 619
type command, 70
type enforcement (TE), 615, 616
U
u key, 117
-U option, 256
-u user_id option, 252, 256
Ubuntu
adding users, 95
base images from, 666
getting, 752–753
installing print Settings tool in, 389
overview, 19
PASS_MIN_LEN setting, 555
on USB drives, 754
Ubuntu Flavors, 753
Ubuntu Software Center, 221
Ubuntu UFW firewalls, 651–653
Udev, 290
UDP port scan, 644
UDP ports 137 and 138, 465
UEFI (Unified Extensible Firmware Interface), starting
from, 507–509
ufs filesystem, 291
ufw, 312
UFW (Uncomplicated Firewall), 651–653
umount command, 297–298
umsdos filesystem, 291
Uncomplicated Firewall (UFW), 651–653
uncovering memory issues, 526–531
unencrypted communications, 490
unfiltered port state, 644
Unified Extensible Firmware Interface (UEFI), starting
from, 507–509
United States Cybersecurity and Infrastructure Security
Agency (CISA), 575–576
UNIX
commercial, 9–11
filesystem, 8
print commands, 389
Downloaded from https://onlinelibrary.wiley.com/doi/ by alex jounh - Oregon Health & Science Univer , Wiley Online Library on [05/12/2025]. See the Terms and Conditions (https://onlinelibrary.wiley.com/terms-and-conditions) on Wiley Online Library for rules of use; OA articles are governed by the applicable Creative Commons License
Index
UNIX Laboratory, 10
UNIX System Laboratories (USL), 10–11
unmask command, setting default file permissions
with, 106–107
unmount command, 501–502
unmounting NFS filesystems, 501–503
until...do loop, 156–157
untyped variables, 151
updatedb command, 119
updating
groups of packages, 234–235
local network settings, 341
packages, 233–234
software, 221, 314
software packages, 562
upgrading, from scratch, 203–204
uploading, allowing, 451–452
USB drives
booting Linux from, 754
for installation, 196
USB storage device, 275
user access and authentication, 5, 450–451
user accounts
adding with useradd command, 250–253
centralizing, 267–268
creating
group accounts, 258–259
overview, 247–257
deleting with userdel command, 256–257
exercise answers, 776–779
exercises, 268–269
group accounts, 257–259
managing in enterprise, 259–267
modifying with usermod command, 255–256
overview, 247
removing, 550–551
securing, 549–551
setting
expiration dates on temporary, 550
permissions with Access Control Lists,
260–267
user details, 253–255
system administrators and, 166
User attribute, 619
user defaults, setting, 253–255
User directive, 421
user IDs, 249, 665
user interfaces, 4
user management, RHCSA, 23
user mapping, 489, 490
user permissions, 310, 468
user restrictions, Samba and, 465
useradd command, adding users with, 250–253
user-data, 700
userdel command, 256–257, 551
usermod command, 255–256, 550
usernames, 73, 249, 399
users
adding in Ubuntu, Fedora, and Red Hat
Enterprise Linux, 95
allowing to publish own web content, 424–425
finding files by, 122–123
managing security context, 627–628
restricting Samba access by, 475
security contexts of, 620
Users & Groups, as a graphical tool, 170
USL (UNIX System Laboratories), 10–11
/usr directory, 93, 213
/usr/sbin command, 176–177
UTS namespace, 665
uucp file, 565
UUCP Log, 565
V
Vagrant, 682
/var directory, 93, 213
variables
environment, 79–81
expanding, 78
overview, 73
shell, 79–81, 147–150
/var/log directory, 563–567
/var/log/gdm/:0.log file, 564
/var/log/httpd/access_log file, 564
/var/log/httpd/error_log file, 564
/var/log/samba/smbd.log/var/log/samba/
nmbd.log file, 565
/var/log/squid/access.log file, 565
Very Secure FTP daemon (vsftpd package), 307
vfat filesystem, 273, 291
vi command, 71, 111–118
video problems, boot options for, 208
views, selecting using keyboard, 36–37
vim command, 111–118, 178, 309
virsh command, 681
virt-manager command, 681, 684, 690–693
virtual consoles, 63
851
Downloaded from https://onlinelibrary.wiley.com/doi/ by alex jounh - Oregon Health & Science Univer , Wiley Online Library on [05/12/2025]. See the Terms and Conditions (https://onlinelibrary.wiley.com/terms-and-conditions) on Wiley Online Library for rules of use; OA articles are governed by the applicable Creative Commons License
Index
virtual hosts, adding to Apache, 422–424
Virtual Machine Manager (virt-manager)
command, 684
overview, 681, 690–693
starting, 691
virtual machines (VMs)
creating, 690–693
defined, 679
deleting, 694
getting images to make, 690–691
managing, 693–694
migrating, 694–696
overview, 663, 680, 683
shutting down, 694
starting, 694
virtual private network (VPN), 347
virtual set size (VSZ), 131
virtual system, 197
VirtualBox, 206
virtualization
defined, 679
installing Linux to run virtually, 206
overview, 5
settings, 509
Virtualization Viewer (virt-viewer
command), 684
virt-viewer command, 684
virus signature, 570
viruses, detecting, 570–571
Visual Studio Code
installing, 51–52
overview, 51
setting up, 52–55
using, 51–55
websites, 52
VMs. See virtual machines (VMs)
VMware Workstation, 206
vnc option, 208
vncconnect-
hostname[:port] option, 208
vncpassword-
password option, 208
VPN (virtual private network), 347
vsftpd FTP server
installing, 441–442
relating Linux file permissions to, 449–450
setting up for Internet, 452–454
vsftpd service, 307, 442–445
vsftpd.log file, 564
VSZ (virtual set size), 131
852
W
w key, 114
W key, 114
Wants, 373
watching logs with logwatch, 330–331
Watermark settings, 395–396
Wayland, 28
web servers
accessing forbidden and server internal errors, 433–435
adding virtual hosts to Apache, 422–424
allowing users to publish own web content, 424–425
Apache configuration files, 417–422
Apache HTTPD, 409–410
checking for configuration errors, 431–433
deployment of, 435
exercise answers, 791–794
exercises, 436–437
httpd-core package, 410–413
installing
Apache, 413–414
overview, 410–413
overview, 24, 409
securing
Apache, 415–417
web traffic with SL/TLS, 425–431
starting Apache, 414–431
troubleshooting, 431–435
web traffic, securing with SSL/TLS, 425–431
webalizer package, 413
web-based CUPS administration, 390–392
WHATEVER variable, 85
which command, 69–70
while...do loop, 156–157
who command, 67–68
Wi-Fi, configuring, 38
wildcards, 109
Winbind, 268
window manager, 29
window menus, using mouse with, 36
windows
selecting using keyboard, 37
toggling with mouse, 32
Windows (operating system)
accessing Samba shares in, 479
burning CDs/DVDs in, 755
file server (samba package), 307
file sharing server, 24–25 (See also Samba server)
Downloaded from https://onlinelibrary.wiley.com/doi/ by alex jounh - Oregon Health & Science Univer , Wiley Online Library on [05/12/2025]. See the Terms and Conditions (https://onlinelibrary.wiley.com/terms-and-conditions) on Wiley Online Library for rules of use; OA articles are governed by the applicable Creative Commons License
Index
printing directly to CUPS from, 389
resizing partitions, 205
Windows key, 36
Windows (SMB) printers, adding, 398–399
Windows-based filesystems, 93
wired network, 339
wireless network, 339
worker node, 680
worker systems, separation from management
systems of, 336
workspaces, using with mouse, 35
Write permission, 104
wsize option, 496
wtmp file, 564, 565
X
x command, 115
X command, 115
X Window System, 28–29
-xdev option, 335
xdriver-vesa option, 208
Xen, 206, 680
Xfce, 29
xferlog file, 564
xfs filesystem, 291
xinetd.conf, 181
X.Org Foundation, 28
X.Org X11 Log, 565
Xorg.0.log file, 565
Y
y) command, 115
y} command, 115
Y<?> command, 115
YellowDog Updater Modified (YUM) project, 224–237
yum, managing RPM packages with, 224–237
yumdownloader command, 411
yy command, 115
Z
zfs filesystem, 290
zipcloak tool, 593
853
Downloaded from https://onlinelibrary.wiley.com/doi/ by alex jounh - Oregon Health & Science Univer , Wiley Online Library on [05/12/2025]. See the Terms and Conditions (https://onlinelibrary.wiley.com/terms-and-conditions) on Wiley Online Library for rules of use; OA articles are governed by the applicable Creative Commons License
Index