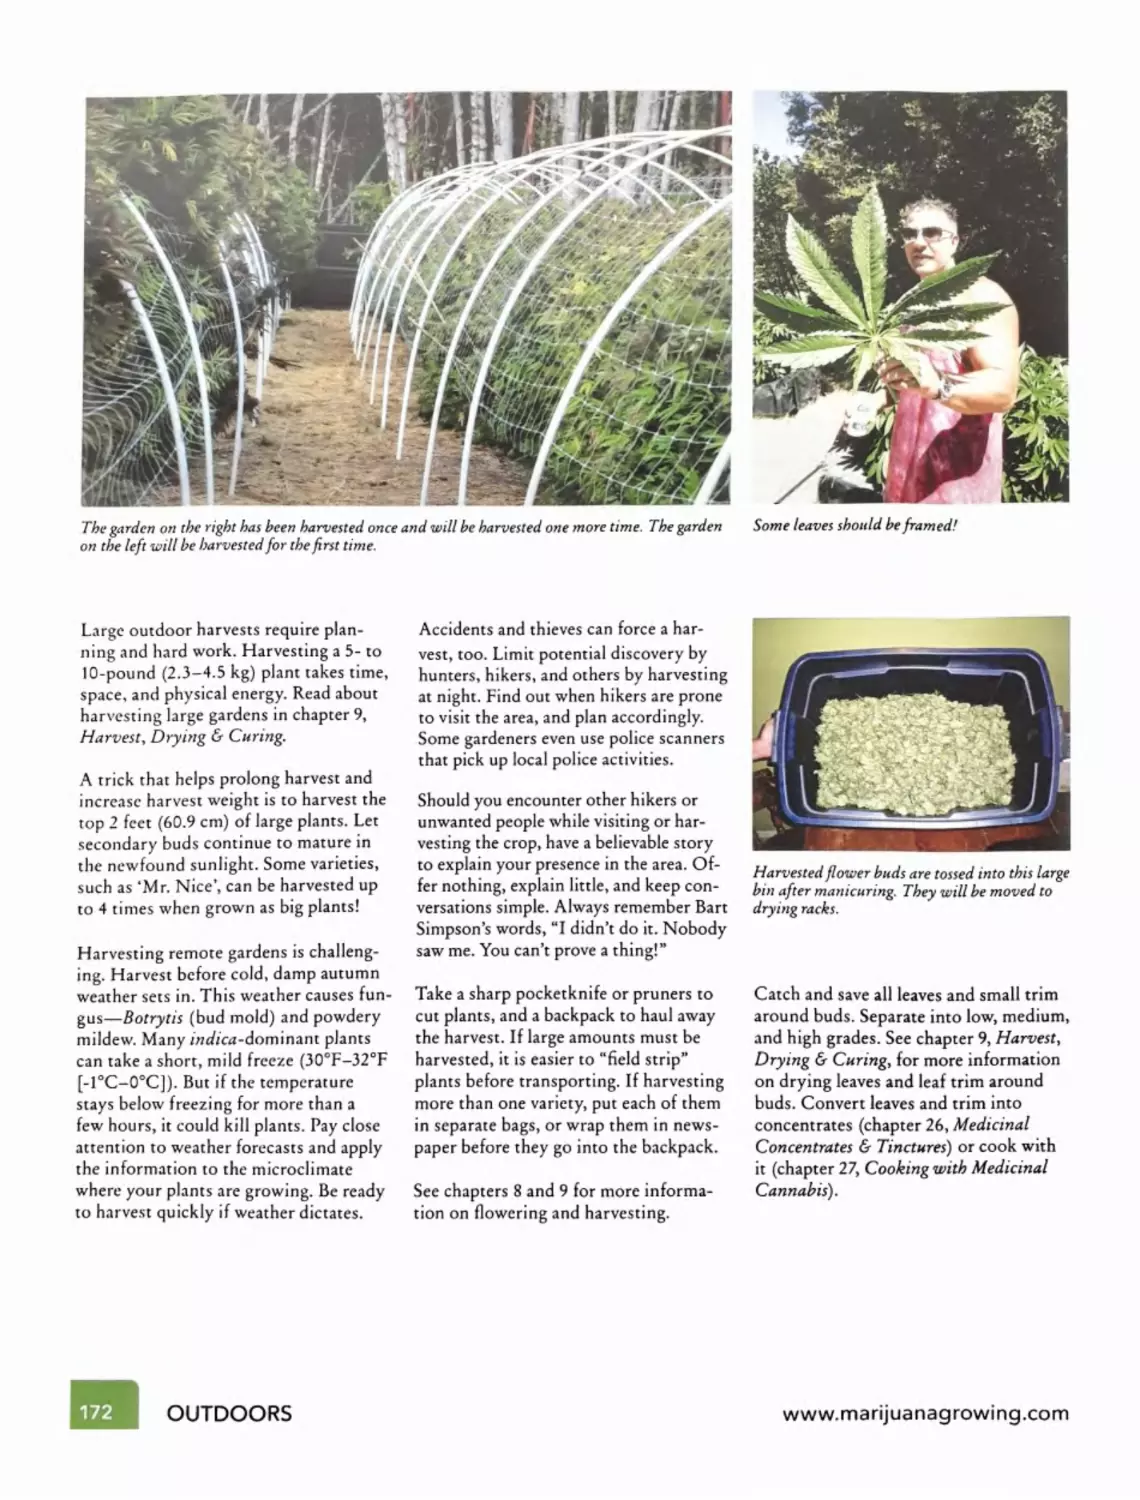
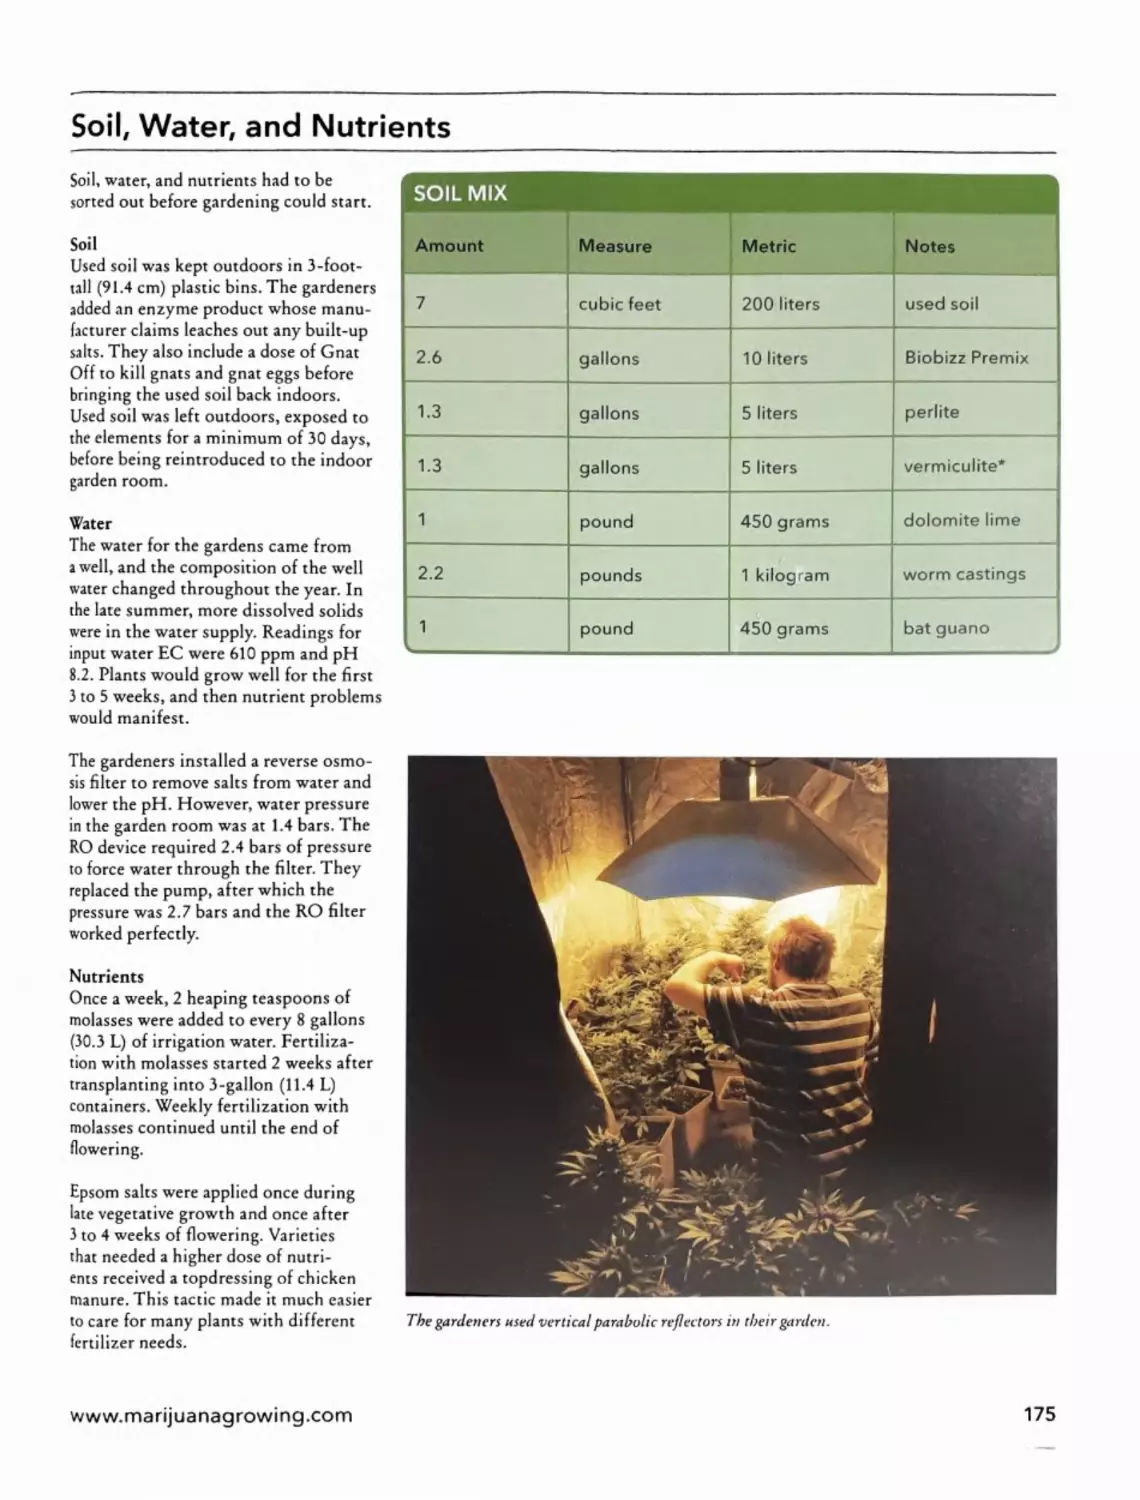
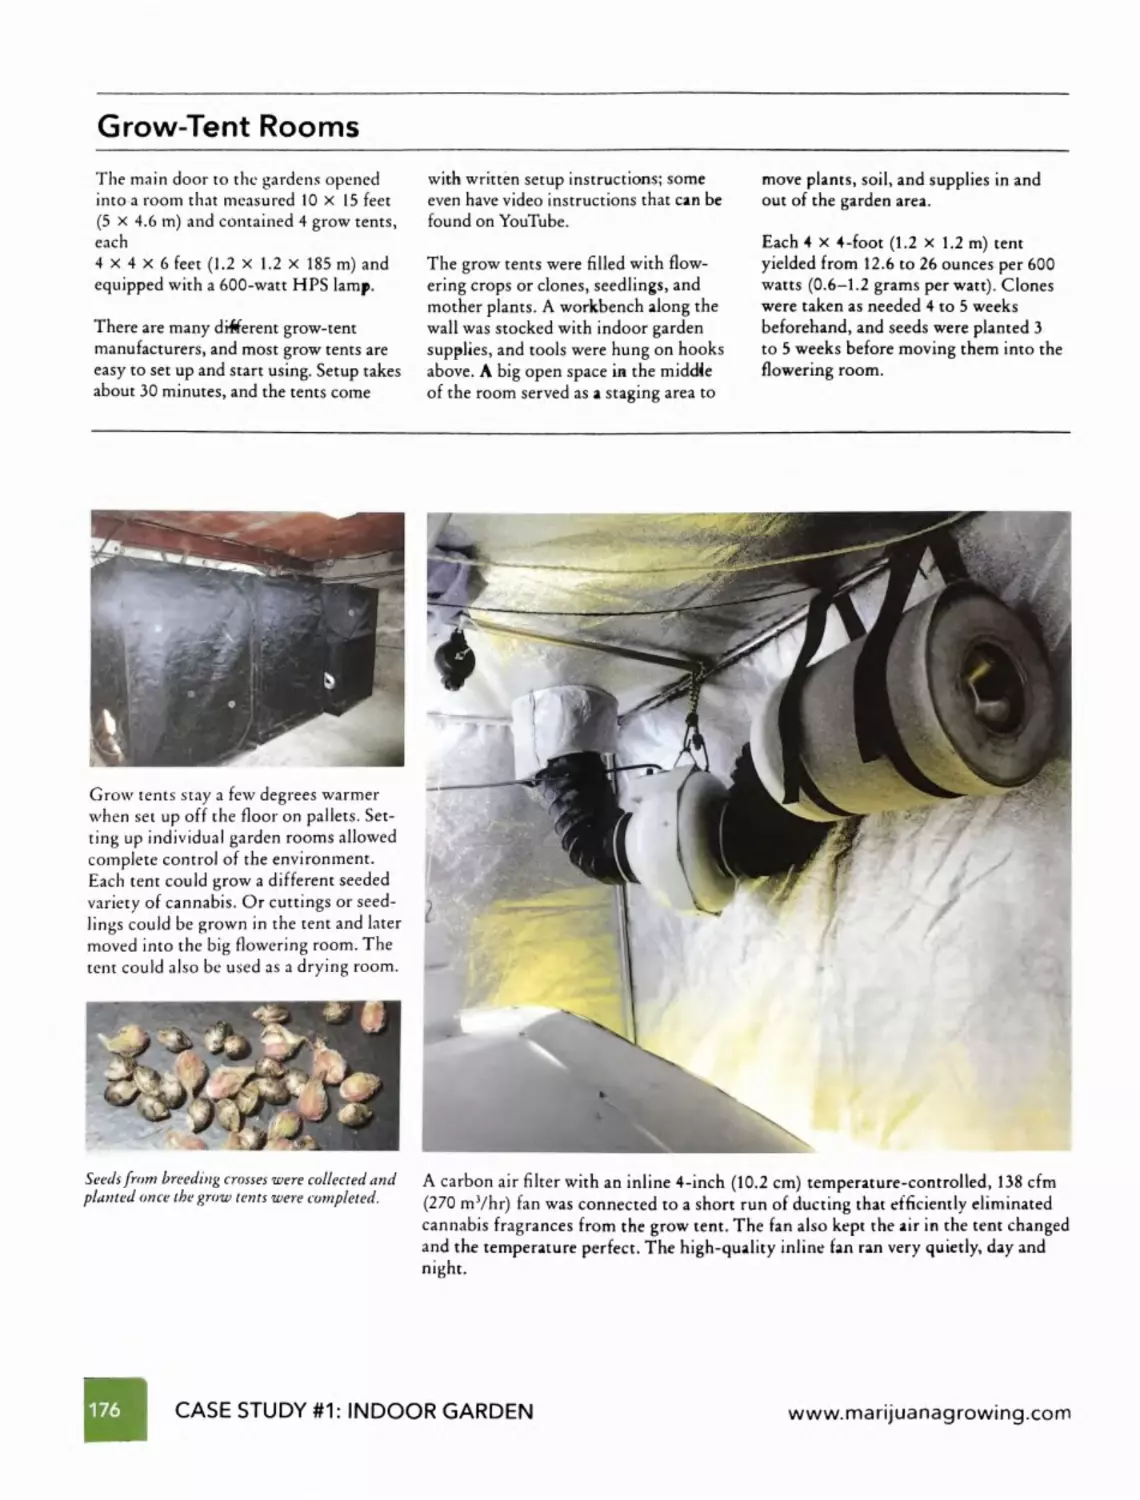
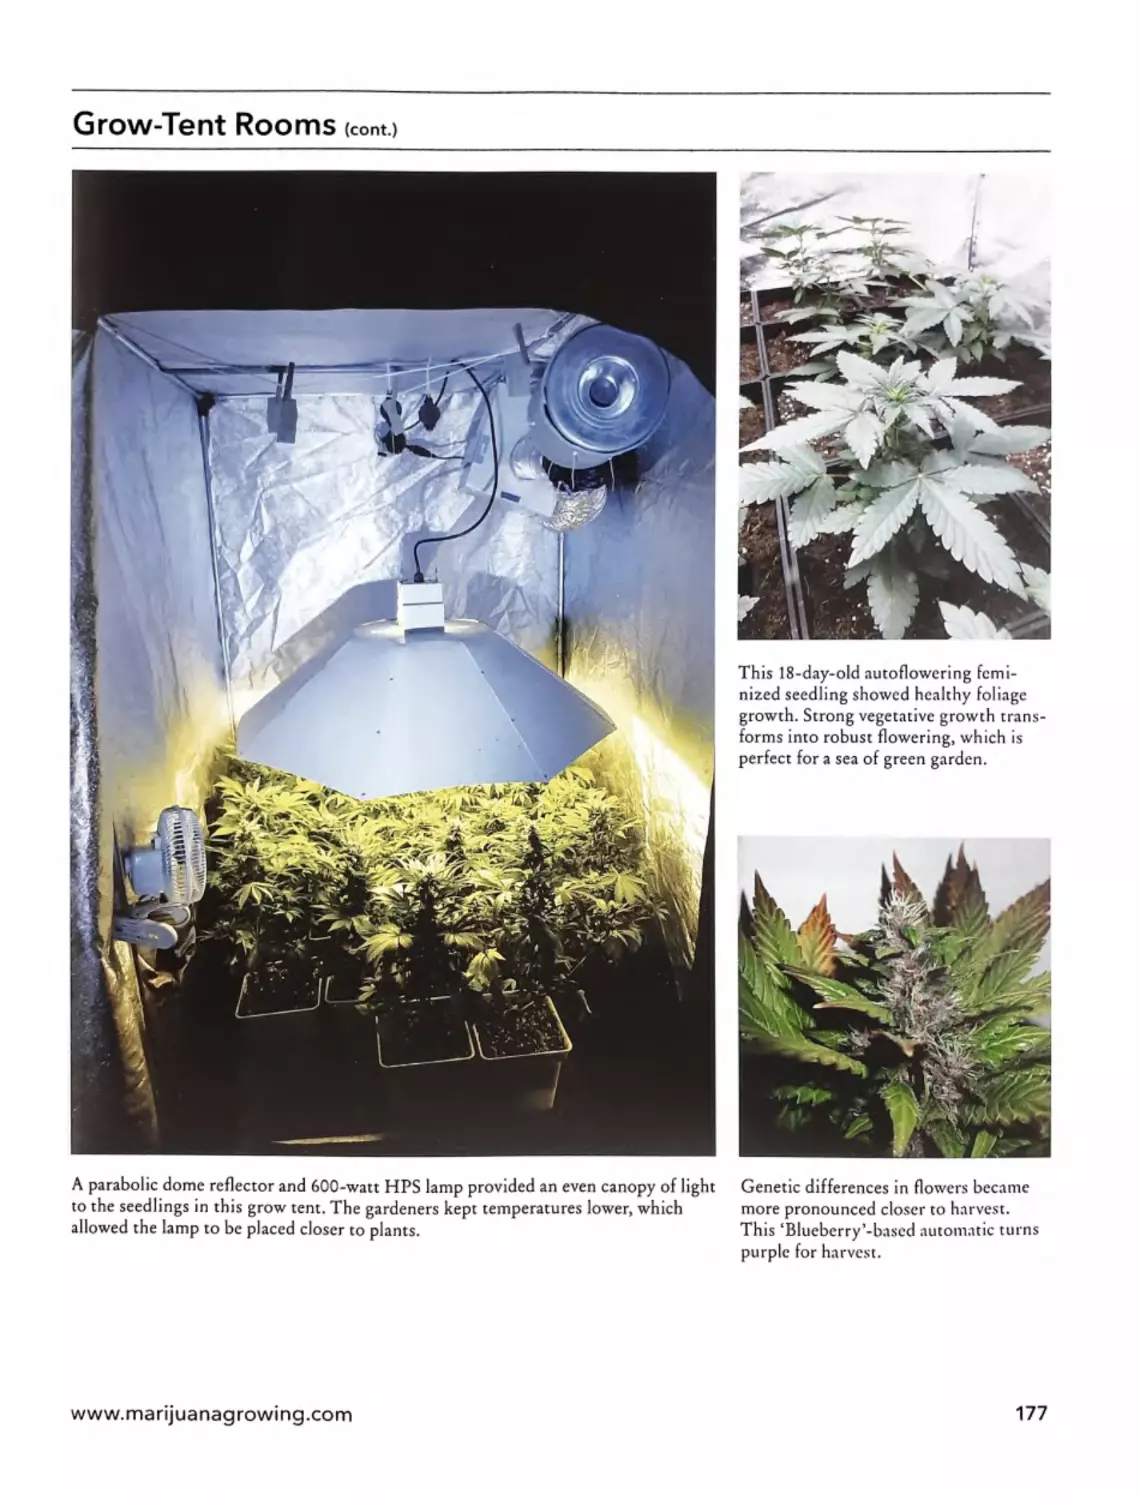
/


Автор: Patten George F. Van
Теги: medicine encyclopedia cannabis
ISBN: 978-1 -878823-39 -7
Год: 2015
Похожие


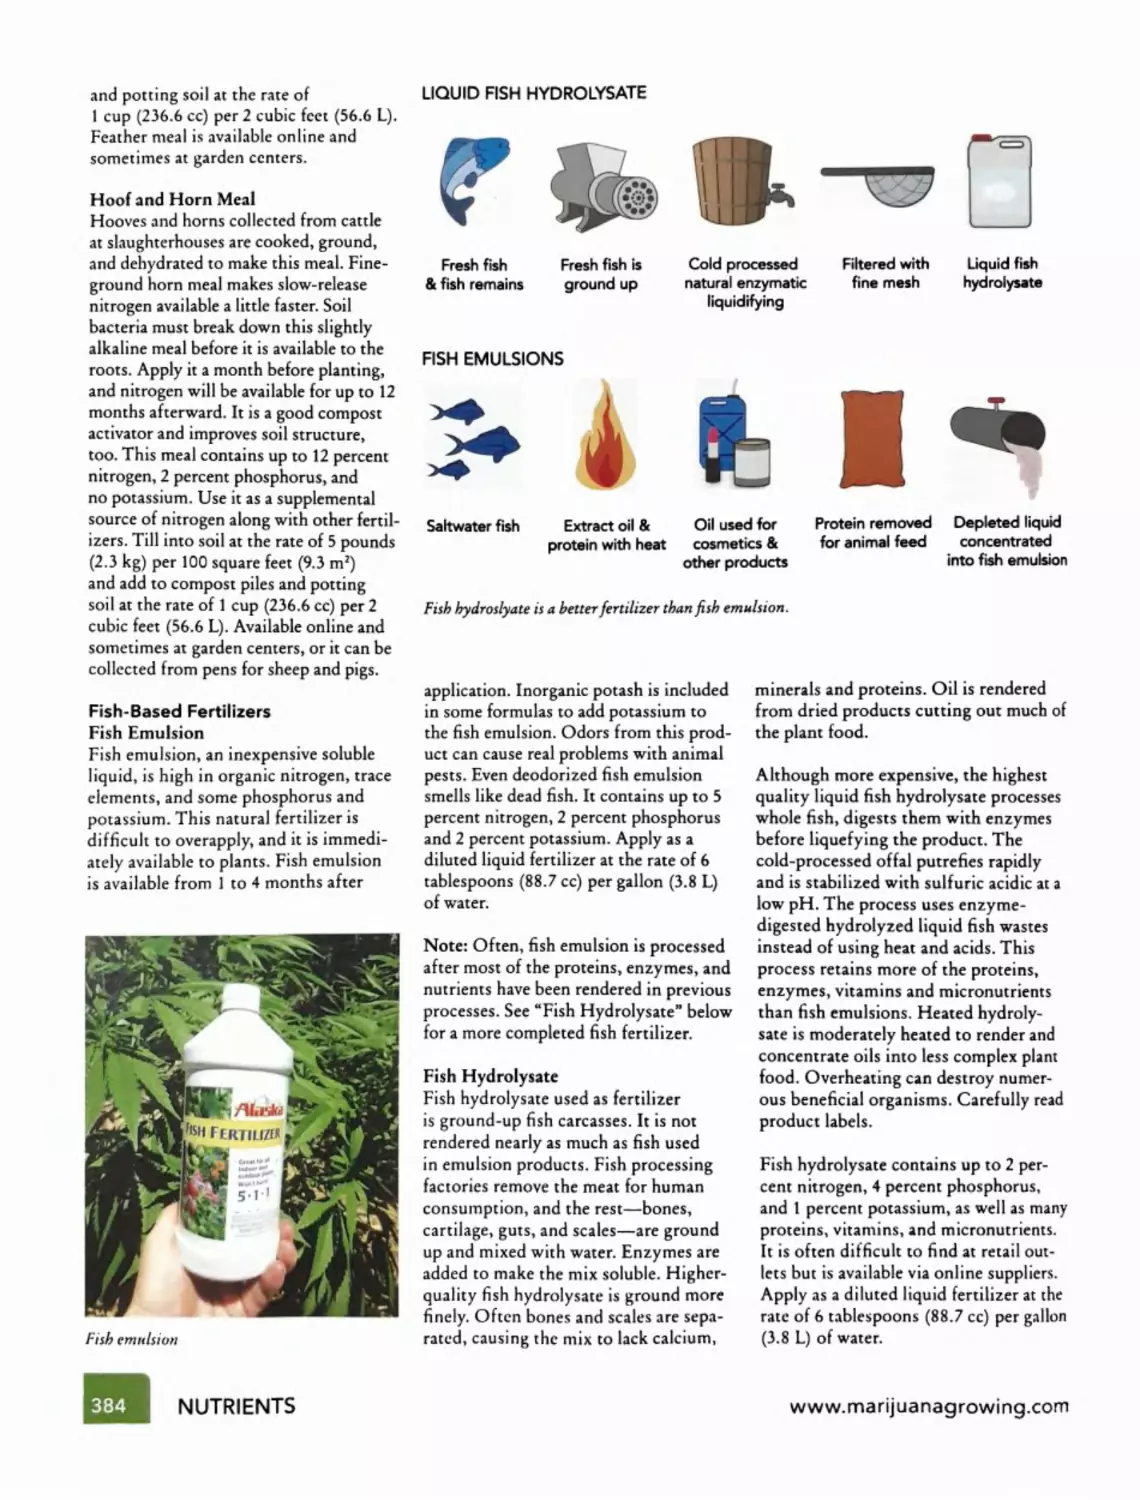
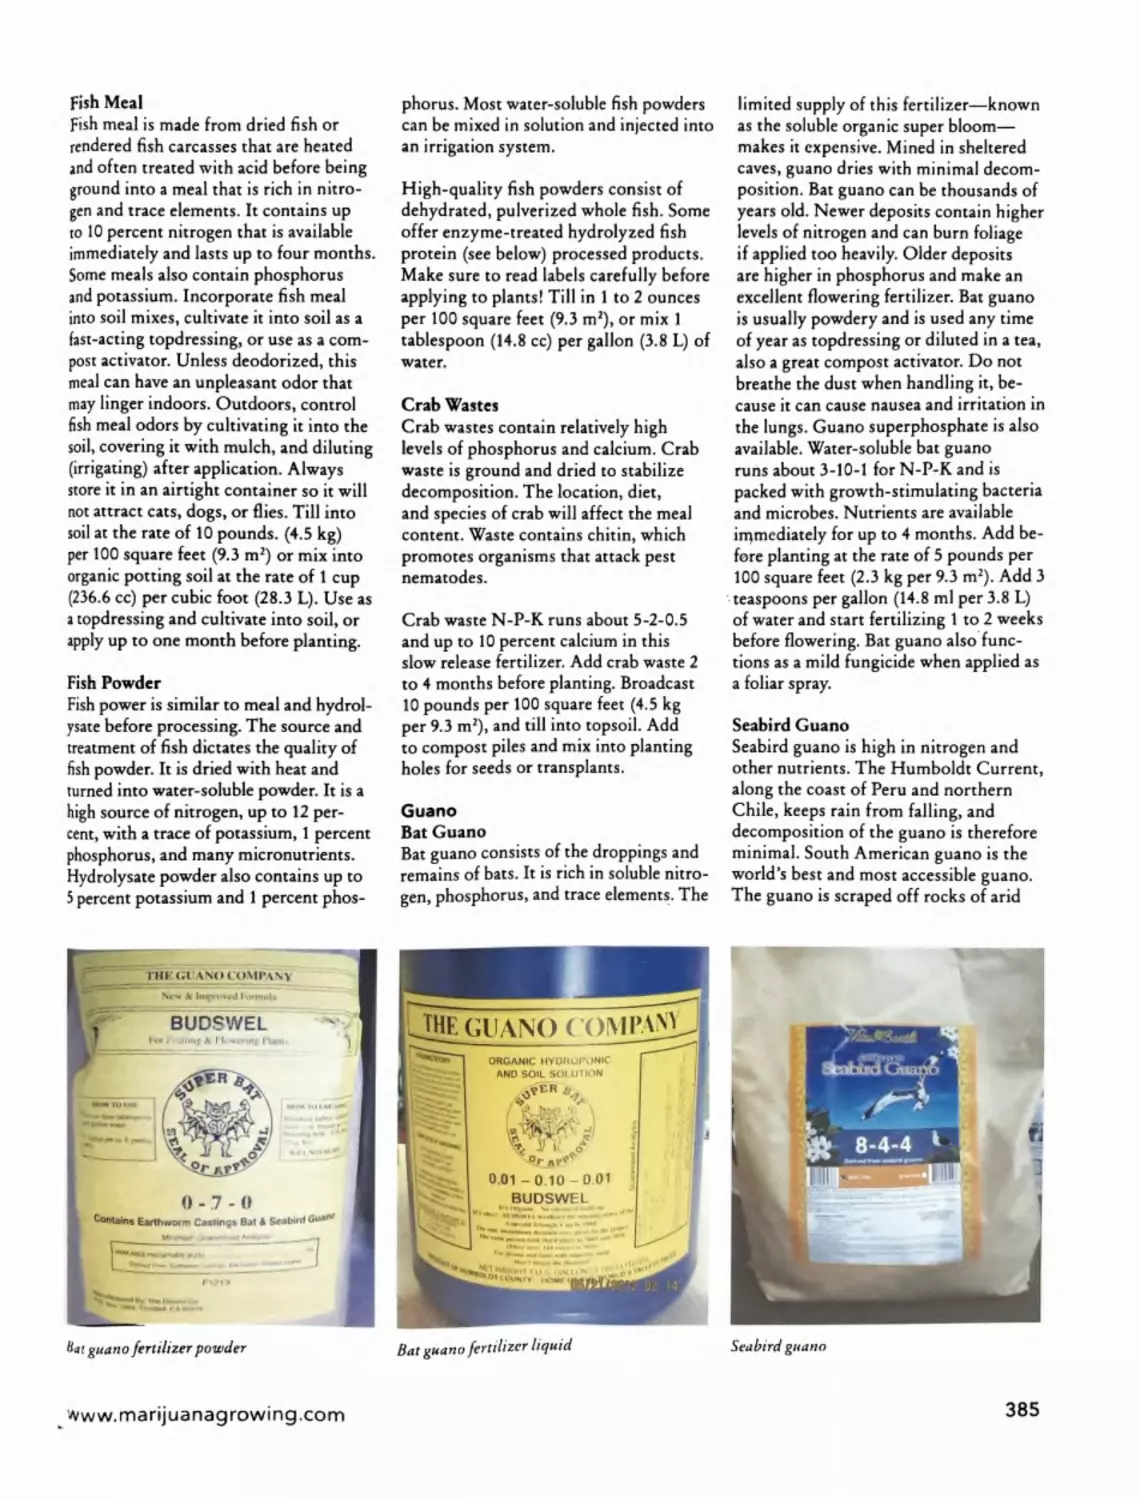
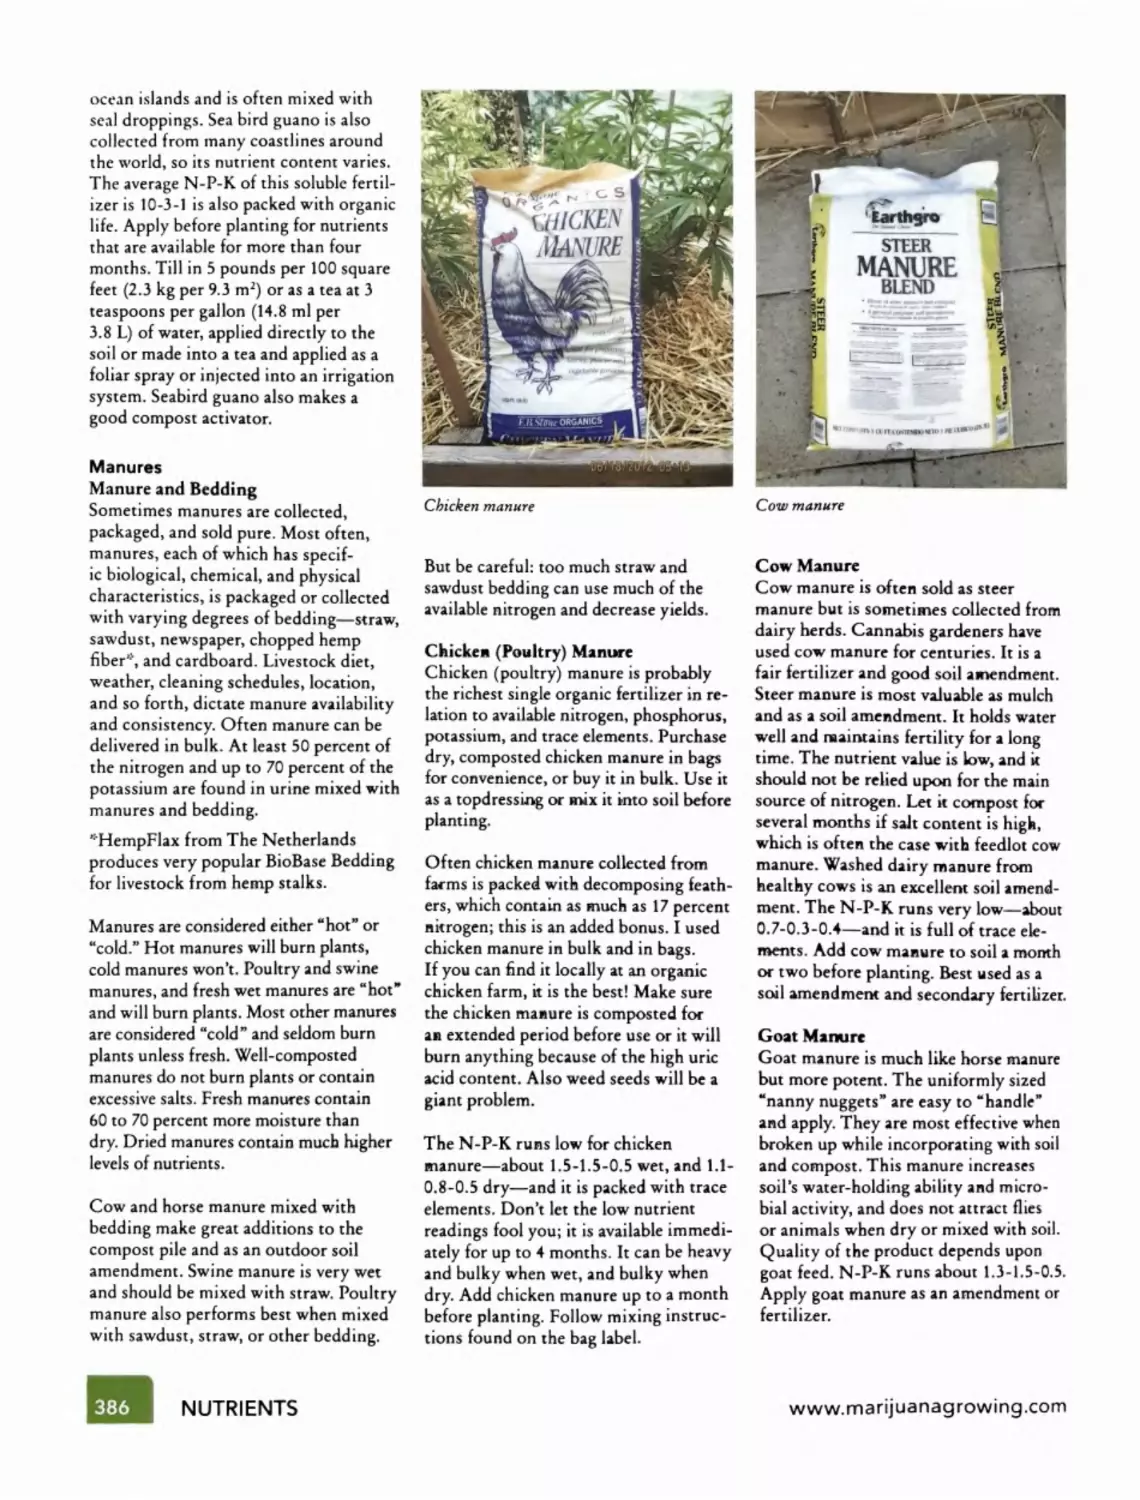
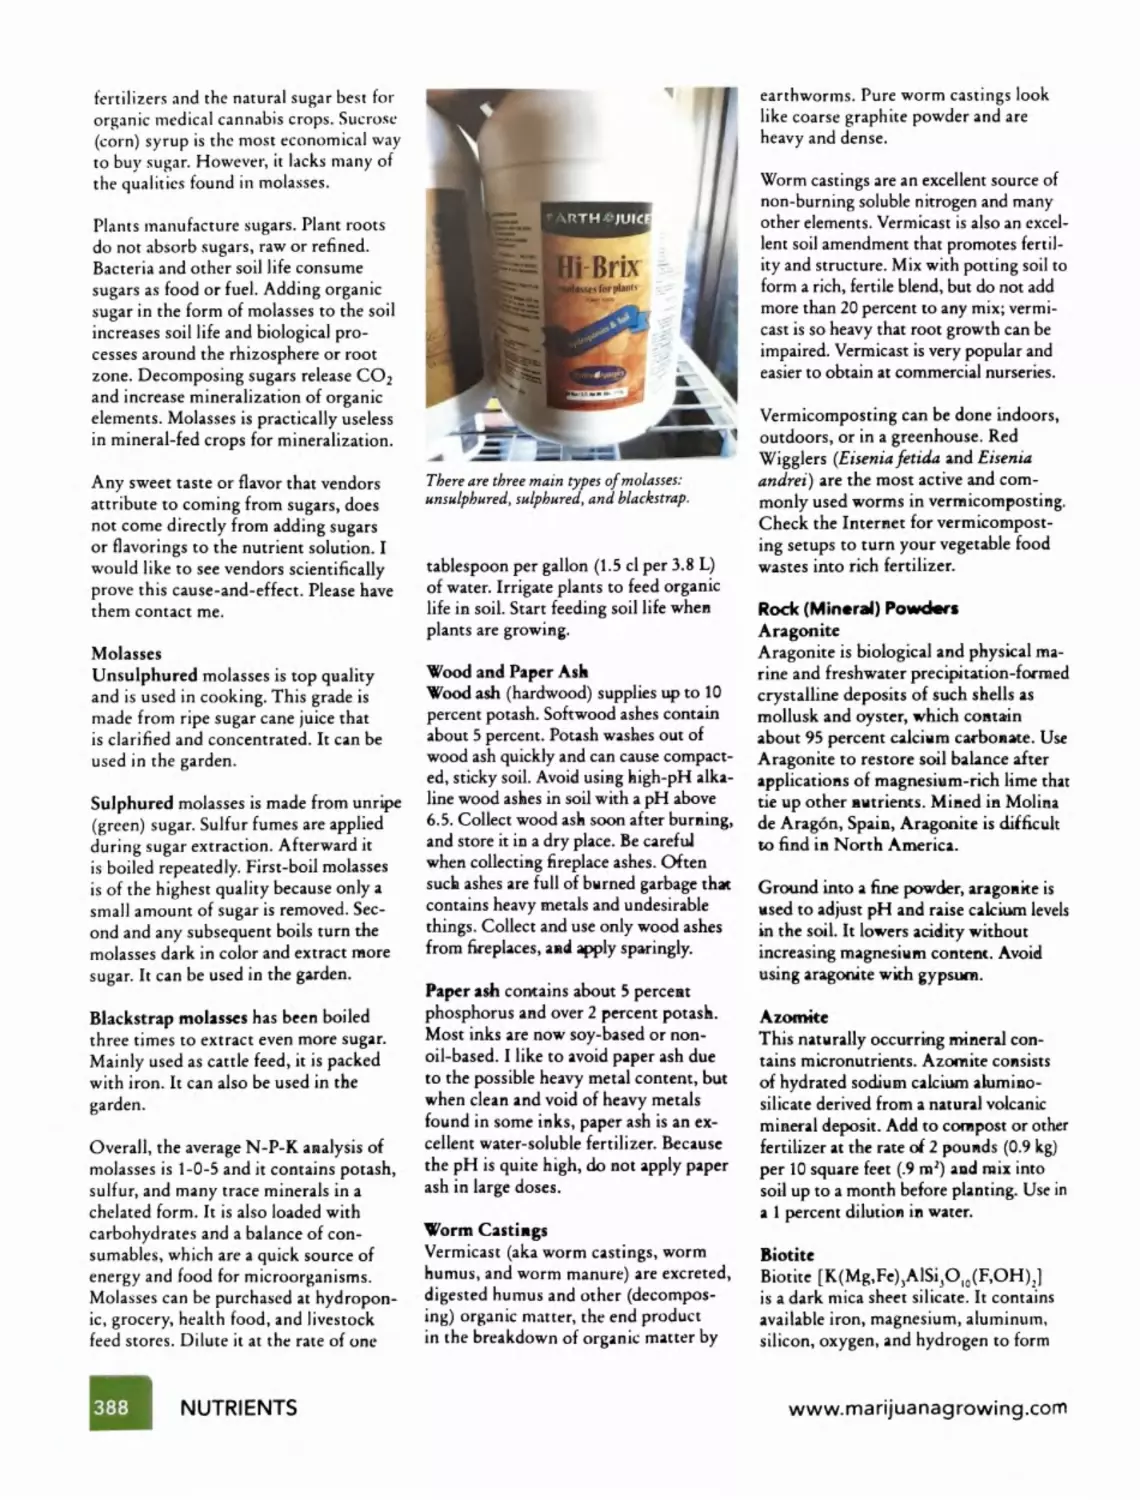
Текст
THE CANNABIS ENCYCLOPEDIA
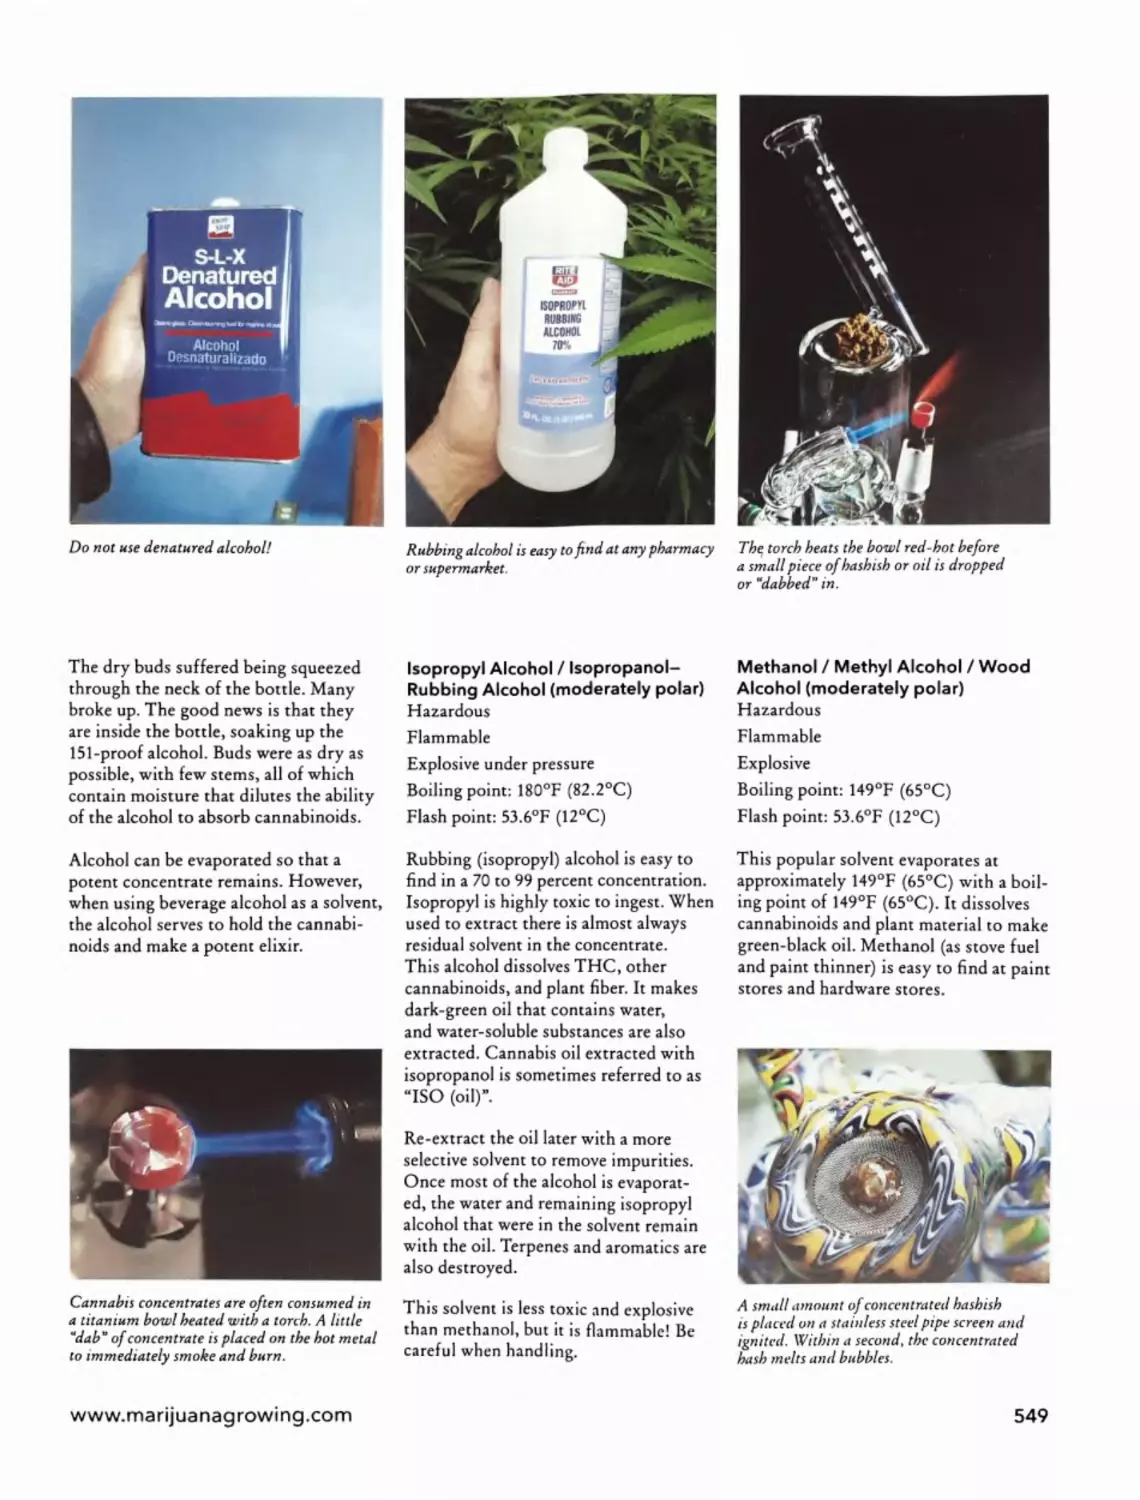
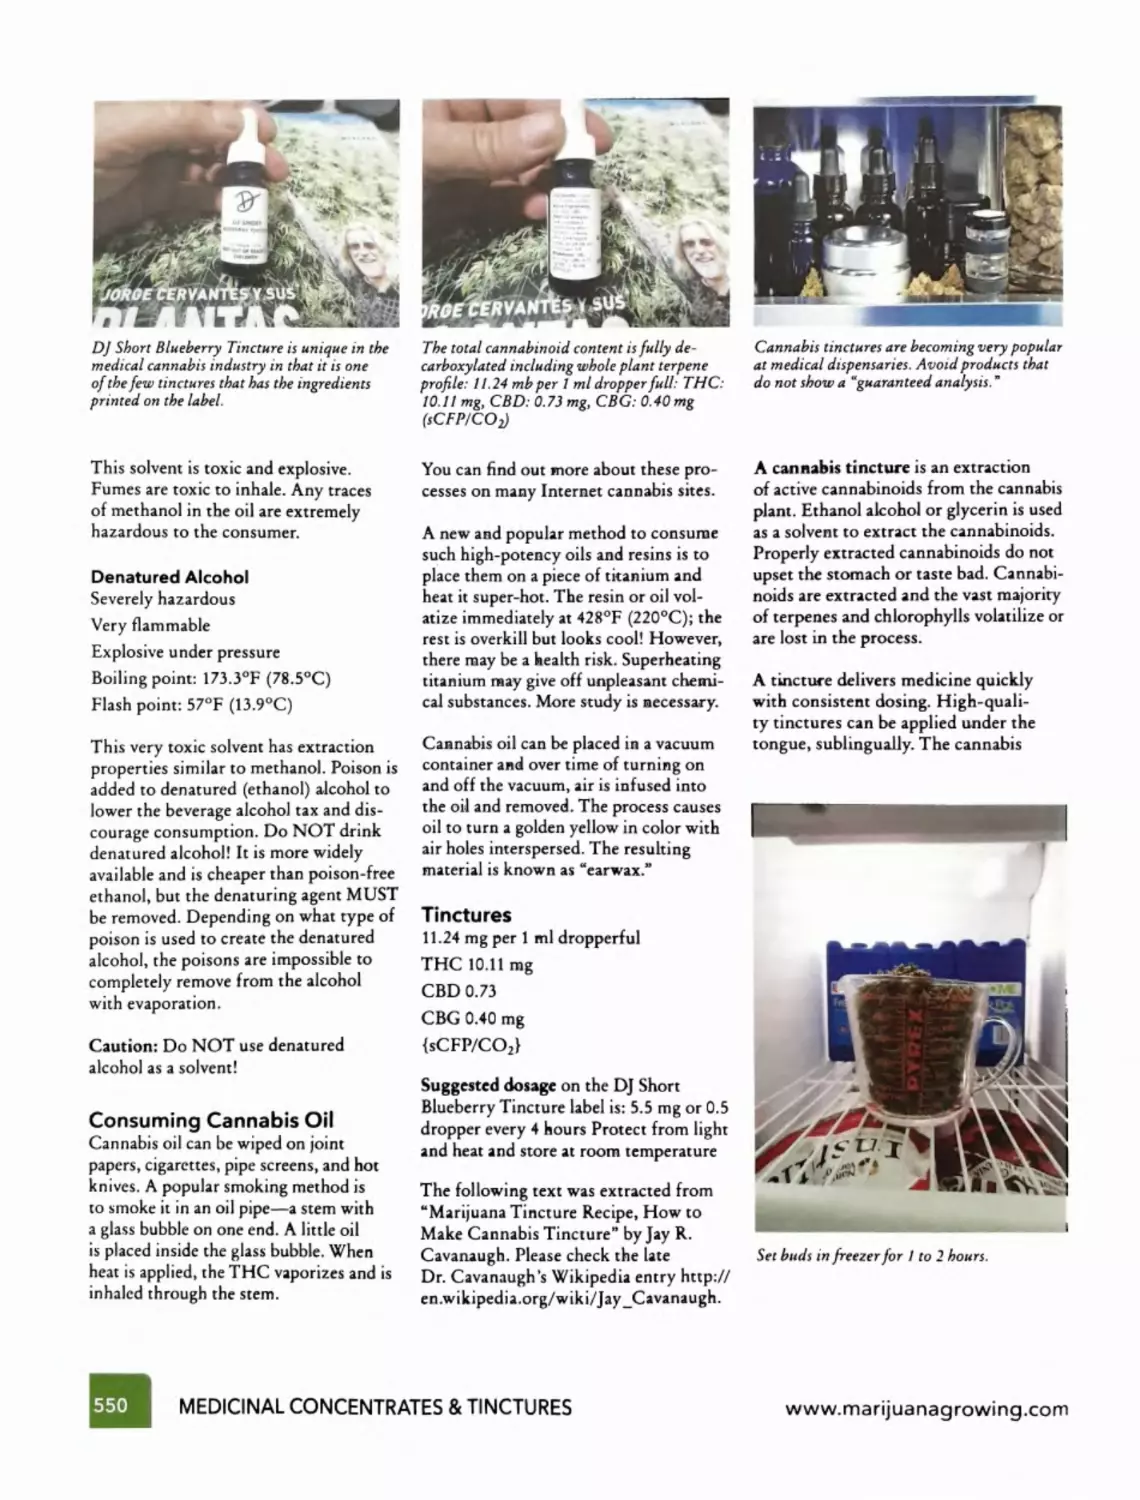
The Definitive Guide to Cultivation &
Consumption of Medical Marijuana
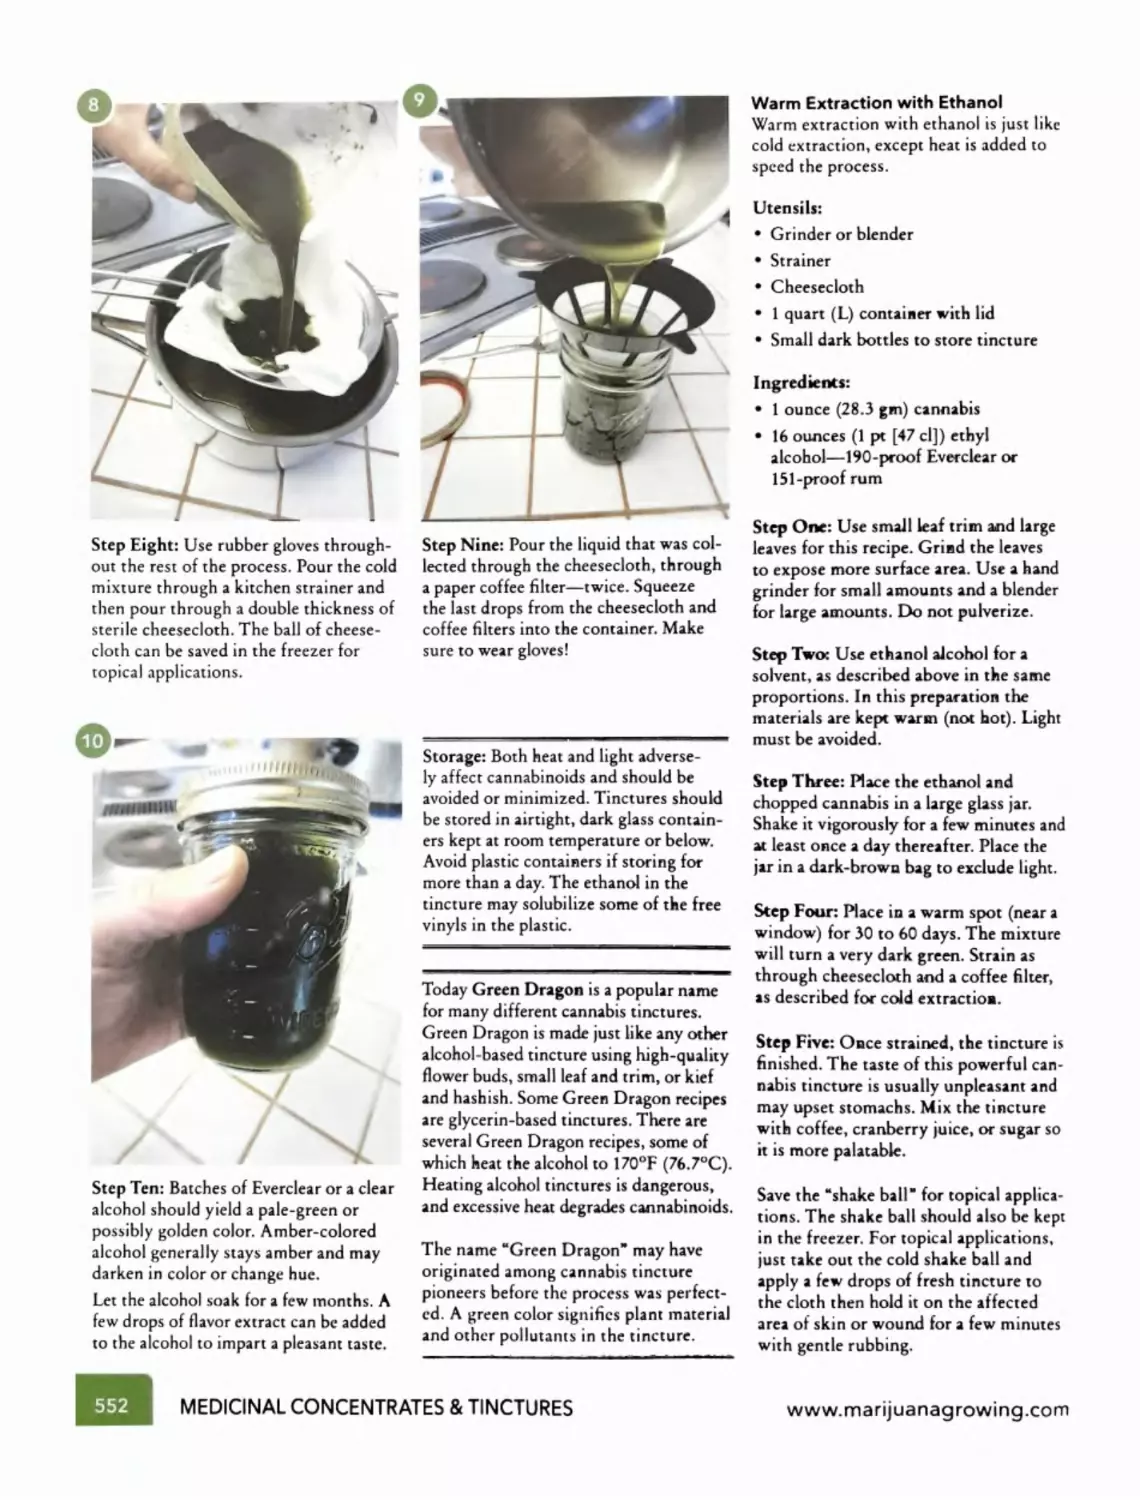
This book was written for the purpose of supplying information to the public. The publisher and the author, or anyone associated with
the production of this book, do not advocate breaking the law. This book provides no legal advice, health advice, or illegal gardening
advice, nor does it advise the misuse of products in any way.
Readers are encouraged to review text and videos of any and all available information about cannabis in order to develop a complete
background on the subject.
The author and the publisher have tried to the best of their ability to describe the most current methods for growing cannabis.
However, there may be mistakes in the text that the author and editors were unable to detect. This book contains current information
up to the date of publication.
Copyright © 2015, George F. Van Patten, aka Jorge Cervantes
All rights reserved. No part of this book may be reproduced in any way whatsoever without written permission from the publisher,
except by a reviewer who may quote brief passages or reproduce images in a review with appropriate credits; nor may any part of this
book be reproduced, stored in a retrieval system, or transmitted in any form or by any mechanical or electronic means, photocopied,
recorded, or other, without written permission from George F. Van Patten.
Published by Van Patten Publishing, USA
Cover design: Wendover Brown, Christopher Valdes, Ricki Jaeckel
Cover image by Tonil3: ‘Pakistan Chitral Kush’ from CannaBioGen
Back-cover images: Lochfoot (www.lochfootphoto.com) and Christopher Valdes (www.valdudes.com)
Artwork: Christopher Valdes, Emiliano Villani
Book design and layout: Ricki Jaeckel
Primary photographers
(Listed in descending order by number of images that appear in the book)
Jorge Cervantes
Mel Frank
Justin Mclvor
Tonil3
Alex (Gato)
Christopher Valdes
Nomaad
Doobie Duck
Hash Marihuana & Hemp Museum
(Amsterdam and Barcelona)
Hugo Martinez
Chimera
Joop Dumay
Maria Garcia
Contributors: Fred Gardner, Dr. John McPartland, Mel Frank, Samantha Miller (Pure Analytics), Tonil3, and Marc (Carbon Active)
Technical editors: Ralph B., Theo Tekstra (Gavita Holland), Samantha Miller (Pure Analytics)
Copy editor: Linda Meyer
The Cannabis Encyclopedia - Trade Paper
10-digit ISBN: 1-878823-34-5
13-digit ISBN: 978-1 -878823-34-2
The Cannabis Encyclopedia - Hardcover
10-digit ISBN: 1-878823-39-6
13-digit ISBN: 978-1 -878823-39 -7
Second Printing
10 98765432
Neither the publisher nor the author endorses any products or brand names that are mentioned or pictured in the text.
These products are pictured or mentioned for illustration only.
Printed in U.S .A.
For wholesale orders:
USA /Canada: Quick Distribution: qdcb@sbcglobal.net, tel: +1-510-527-7036
Ingram Books: www.ingrambook.com
Europe: Van Patten Editorial, S.L., info@vanpattenpublishing.com
Holland: Kulu Trading, www.kulutrading.com, tel: +31-356-93-22-66
UK: AVALON Wholesale, LTD, www.freedombooks.co .uk, tel: +44 (0) 23-9283-2383 or +44 (0) 23-9278-0600
Check www.vanpattenpublishing.com for a complete list of our distributors.
Page 19, Cannabinoid Receptor Illustration Reprinted by permission from Macmillan Publishers Ltd: NAT. NEUROSCIENCE, Greuter BA, Brasnjo, G.,
Malenka RC. Postsynaptic TRPV1 Triggers cell type-specific long-term depression in the nucleus accumbens. 2010; 13:1519-1525 . © 2012
www.marijuanagrowing.com
This book is dedicated to my mother, Esther J. Van Patten; my father, Dr. C. R .
Van Patten; my brother, C. R . (Bob) Van Patten Jr.; and my wife’s mother, Simona
Cervantes, all of whom could have benefited from medicinal cannabis.
www.marijuanagrowing.com
CONTENTS
Note: This table of contents has been pared down to represent the book's main categories. Individual chapters start with
a detailed table of contents and include page numbers.
Part 1 | Medical Cannabis
Chapter 1 - Medical Cannabis - Page 13
Classification; Medical Use before the Modern Era; Cannabis in the Medical Literature;
Anecdotal Evidence; The Endocannabinoid System; What the Doctors Have Learned;
The CBD Era; P.S . (Post Sanjay)
Chapter 2 - Measuring Cannabinoids - Page 23
Selecting a Cannabis Laboratory; The Potency Testing Process; Gas Chromatography (GC);
High-Performance and Ultra-High-Performance Liquid Chromatography (HPLC and UPLC);
Comparing Test Results - HPLC vs. GC; Alternate Methods of Potency Testing: Thin-Layer
Chromatography (TLC); How Patients Can Use Potency Results; Cannabinoid Potency Testing as a
Tool for the Farmer and Breeder; Cannabis Safety Testing - Pesticides, Microbiological and Other
Contaminants; Focus on Safety - Aspergillus Contamination, Why It Matters
Chapter 3 - Medical Cannabis Varieties - Page 33
Cannabis Varieties; Cannabis sativa; Cannabis indica; Cannabis ruderalis; Feminized Cannabis;
Autoflowering Feminized Cannabis; Indica/Sativa Crosses; High-CBD Varieties; High-THC Varieties
Part 2 | Essential Medical Cannabis Horticulture
Chapter 4 - Cannabis Life Cycle - Page 41
Innate Qualities of Cannabis; Life Cycle of Cannabis; Seeds & Seedlings; Vegetative Growth;
Flowering; Mother Plants; Three Gardens
Chapter 5 - Seeds & Seedlings - Page 49
Seeds; Seed Germination; Agricultural Astrology - Planting by the Moon; How to Germinate Seeds:
Step-by-Step; Howto Plant Seeds: Step-by -Step; Grow More Females from "Regular" Seed;
Seedlings; Finding Seeds; Storing Seeds
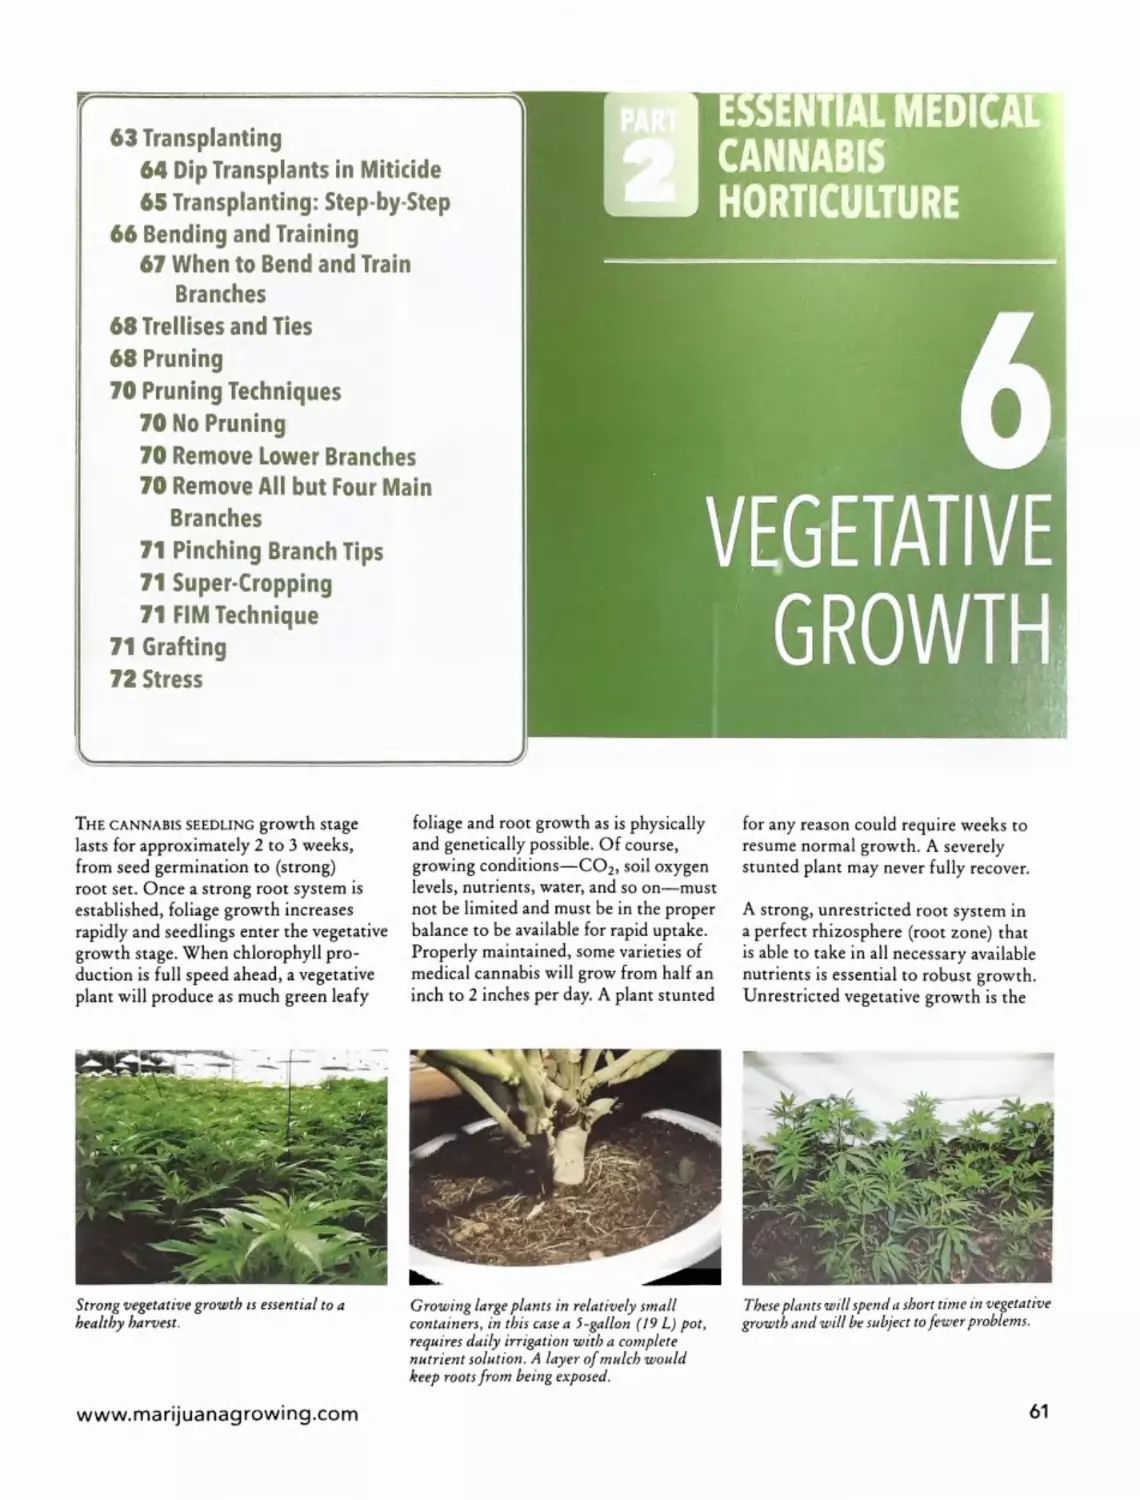
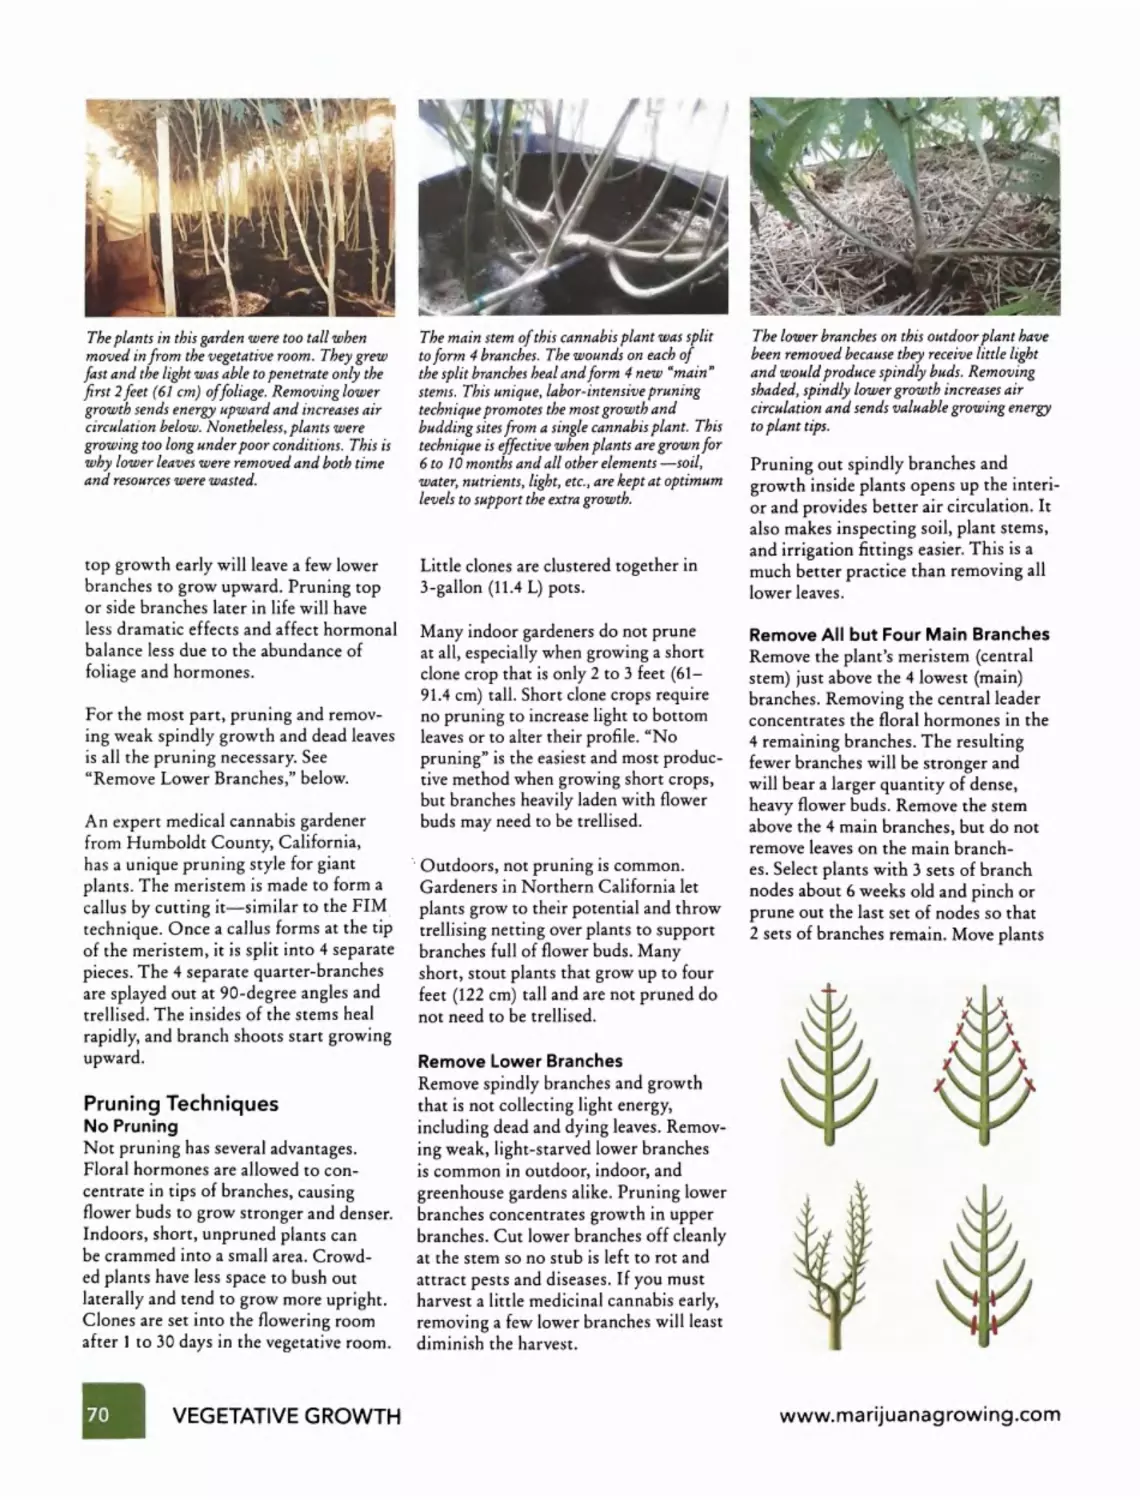
Chapter 6 - Vegetative Growth - Page 61
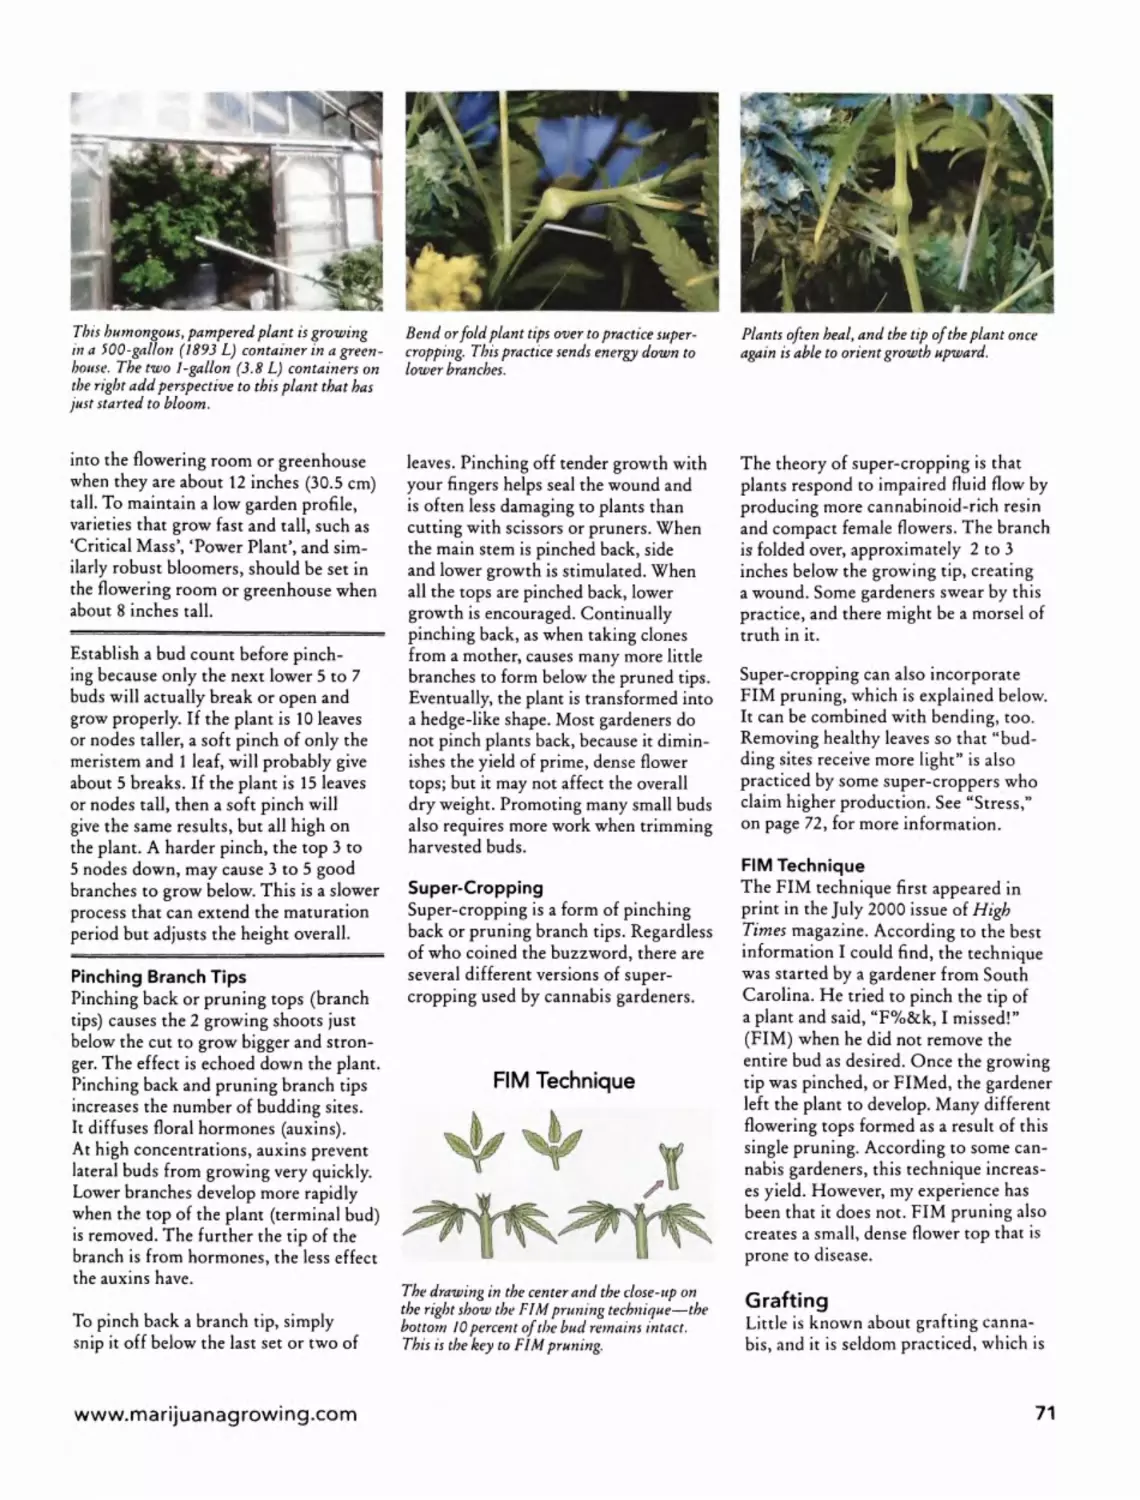
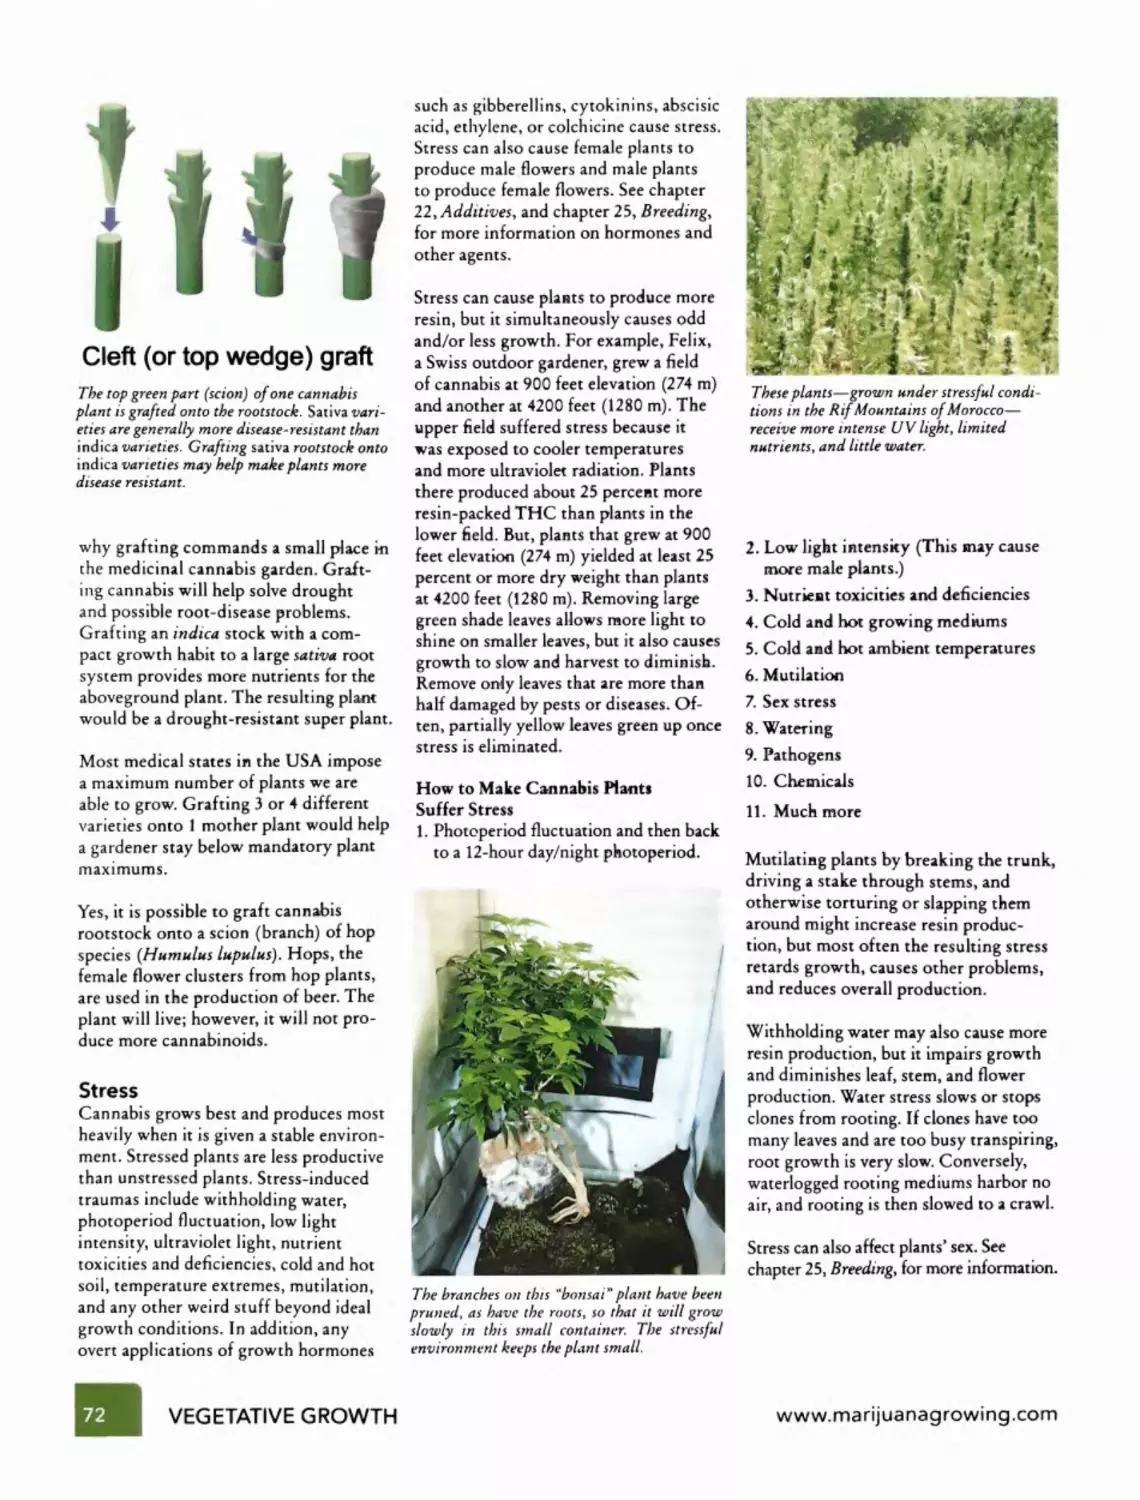
Transplanting; Bending and Training; Trellises and Ties; Pruning; Pruning Techniques;
Grafting; Stress
www.marijuanagrowing.com
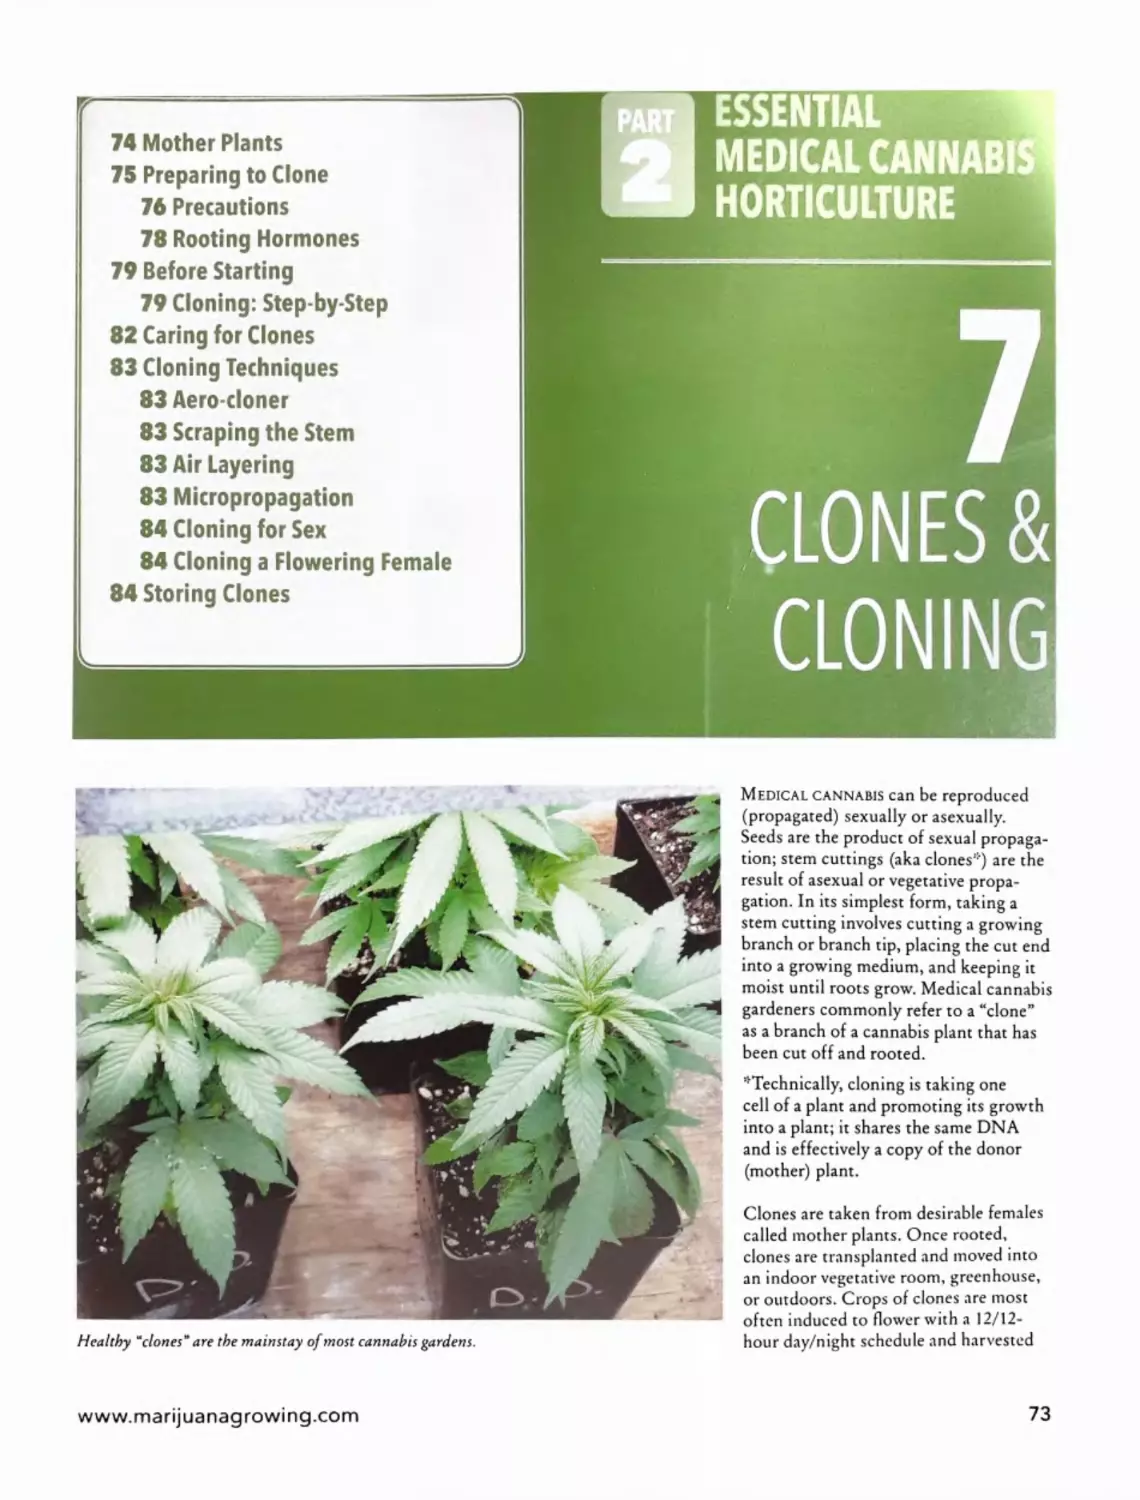
Chapter 7 - Clones & Cloning - Page 73
Mother Plants; Preparing to Clone; Rooting Hormones; Before Starting; Caring for Clones;
Cloning Techniques; Storing Clones
Chapter 8 — Flowering — Page 85
Trichomes and Resin Glands; Indica, Sativa, and Ruderalis; Stress and Sex; Pre-flowering;
Male Pre-flowering; Male Flowering; Female Pre-flowering; Female Flowering; Sinsemilla Flowering;
Calyx, False Calyx, and Bracts; Colas and Foxtails; Rejuvenation
Chapter 9 - Harvest, Drying & Curing - Page 99
Before Harvest; Leaves; Male Harvest; Sinsemilla Harvest; Qualities of Indica, Sativa, and Ruderalis;
Harvest Timing; Harvest: Step-by-Step; Manicuring; Drying; Curing; Packaging and Storage;
What to Do with a Moldy Crop
Chapter 10 - Garden Rooms - Page 123
Carbon Footprint; Closed (Sealed) Rooms; Setting Up the Garden Room: Step-by-Step; Step One:
Define Needs and Desires; Step Two: Budget; Step Three: Tools; Step Four: Site Selection; Step Five:
Design the Room; Step Six: Electrical Needs; Step Seven: Enclose the Garden Room; Step Eight:
Divide into Two Rooms; Step Nine: Increase Light Reflectivity; Step Ten: Install a Vent Fan;
Step Eleven: Install an Air Filter; Step Twelve: Install Circulation Fans; Step Thirteen: Install a
Hygrometer/Thermometer; Step Fourteen: Install Lights; Step Fifteen: Water Source and Reservoir;
Step Sixteen: Install a Hydroponic or Soil Garden; Step Seventeen: Systems Check - Ready to Grow!
Chapter 11 - Greenhouses - Page 137
Siting the Greenhouse; Types of Greenhouses; Greenhouse Construction; Coverings; Climate
Control; Cooling; Heating; Artificial Lighting; Light Deprivation
Chapter 12 - Outdoors - Page 151
Climate; Microclimates; Sunlight and Siting the Garden; Water and Irrigation; Pumps; Temperature
and Humidity; Wind; Rain; Soil; Fertilizers; Backyard Gardens; Container Gardens; Large Gardens;
Remote Gardens; Starting Clones and Seedlings Indoors; Planting Time; Maintenance; Harvest
Chapter 13 - Case Studies - Page 173
#1: Indoor Garden - Page 173
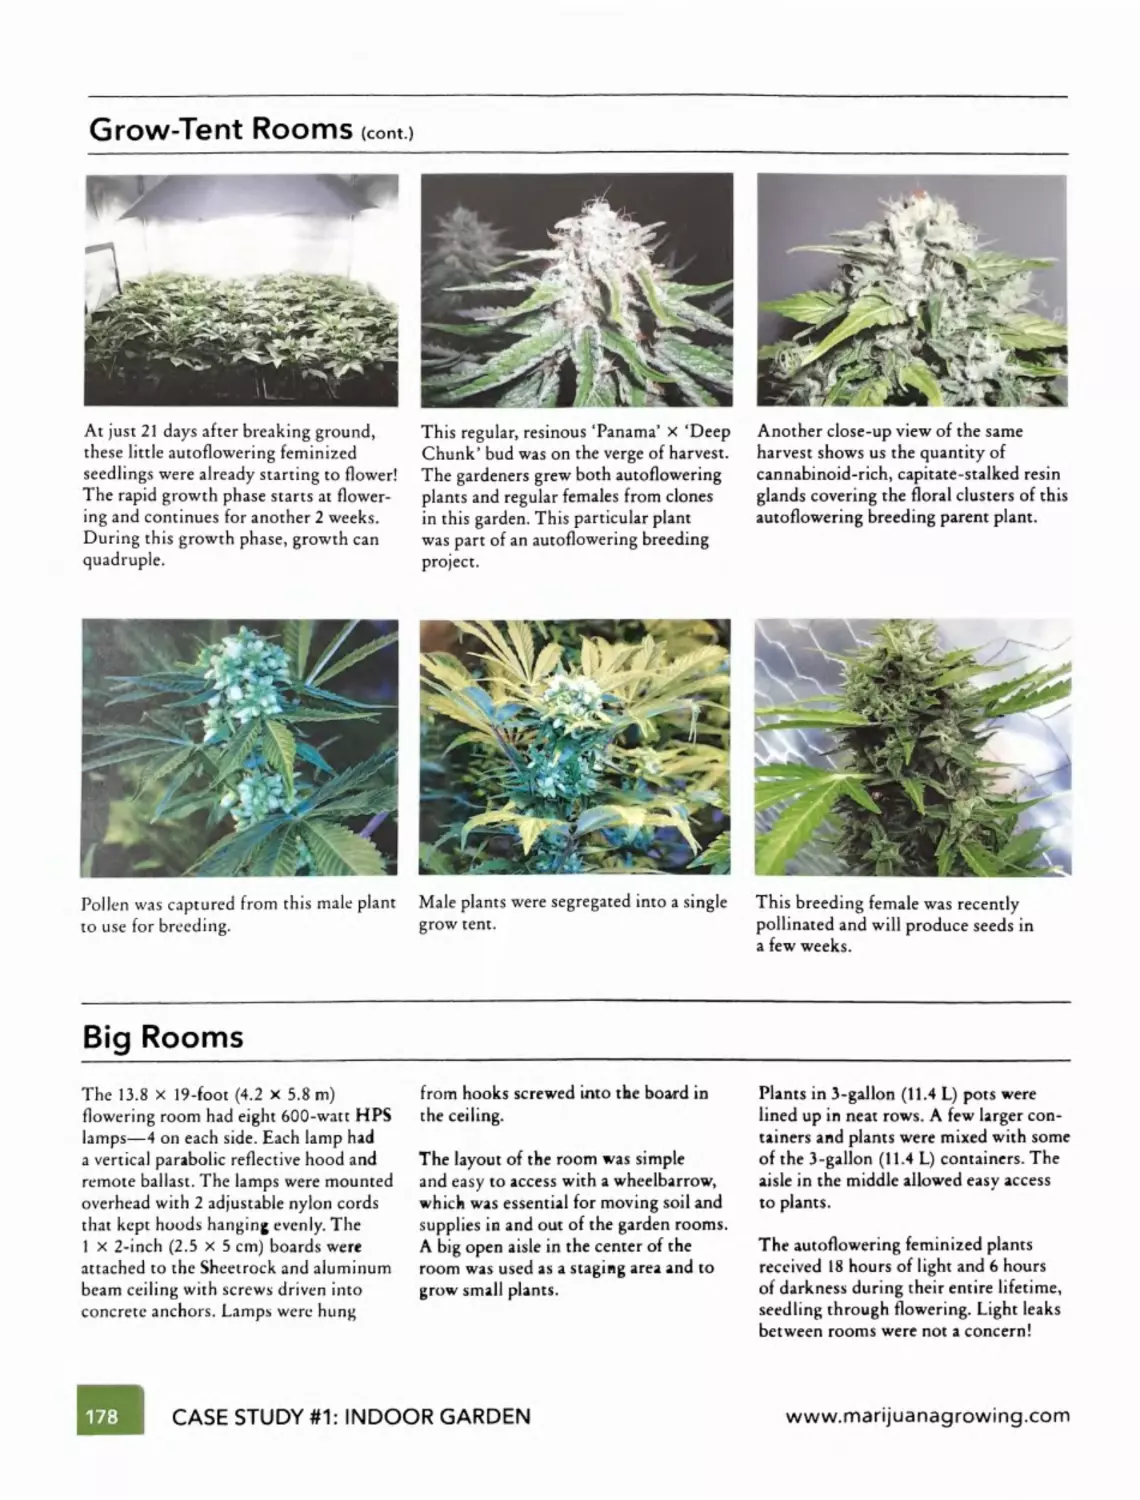
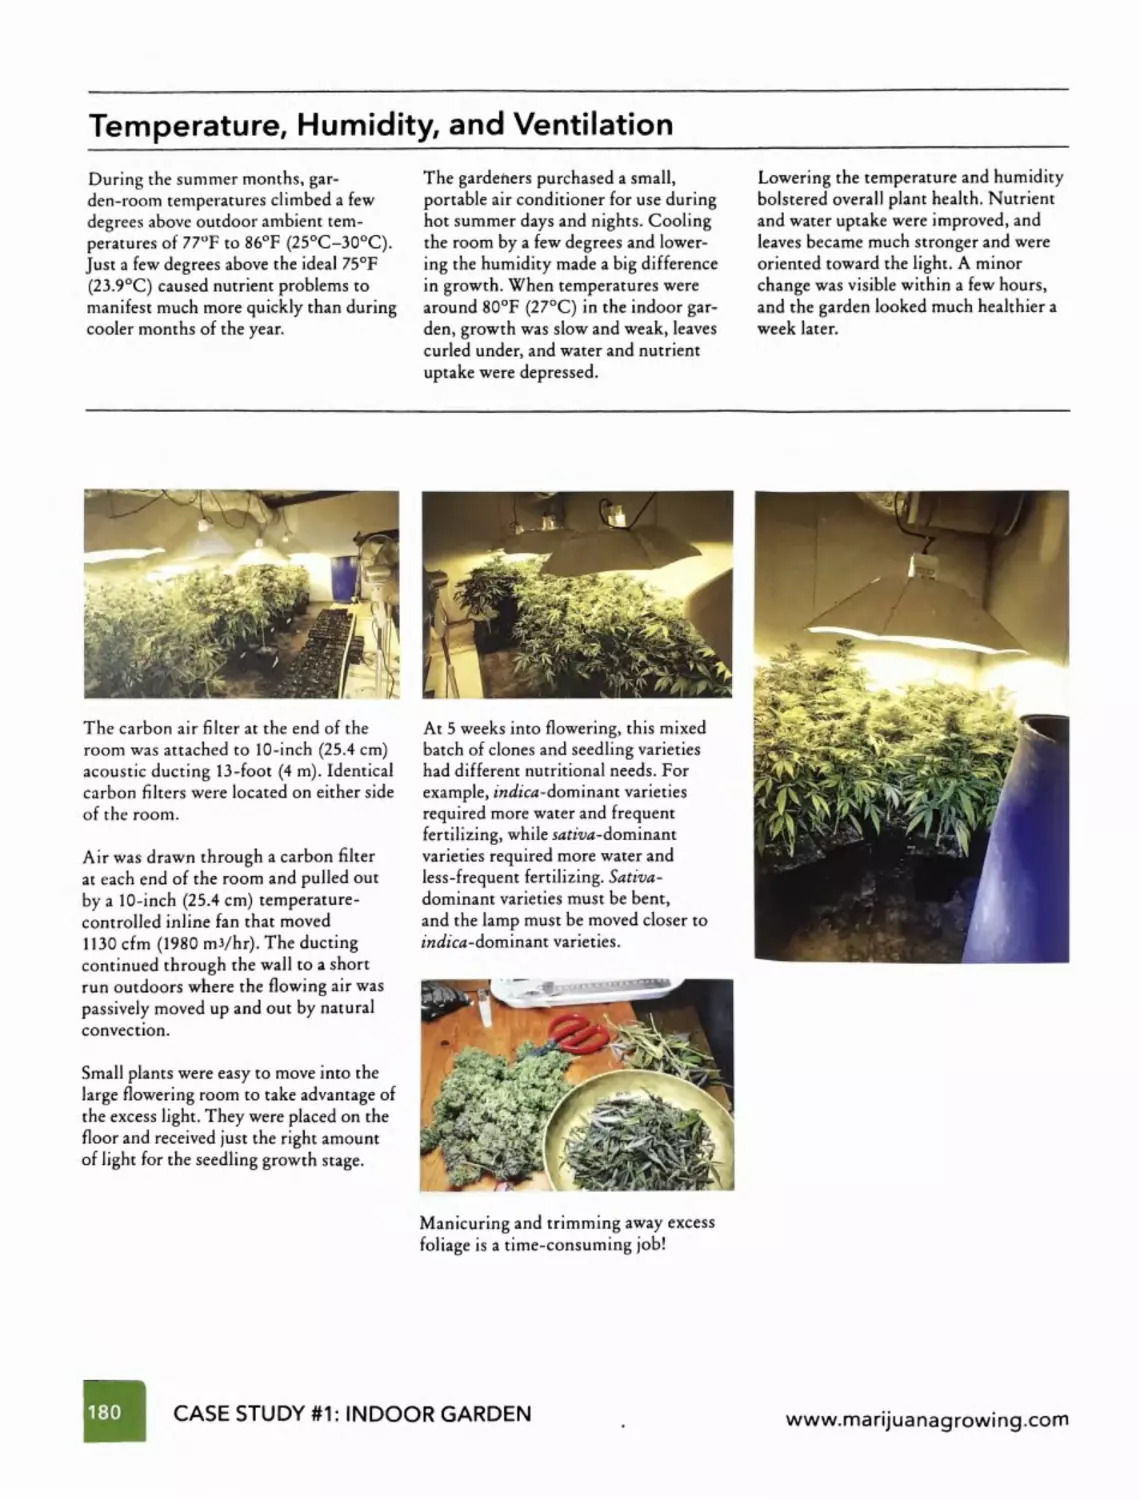
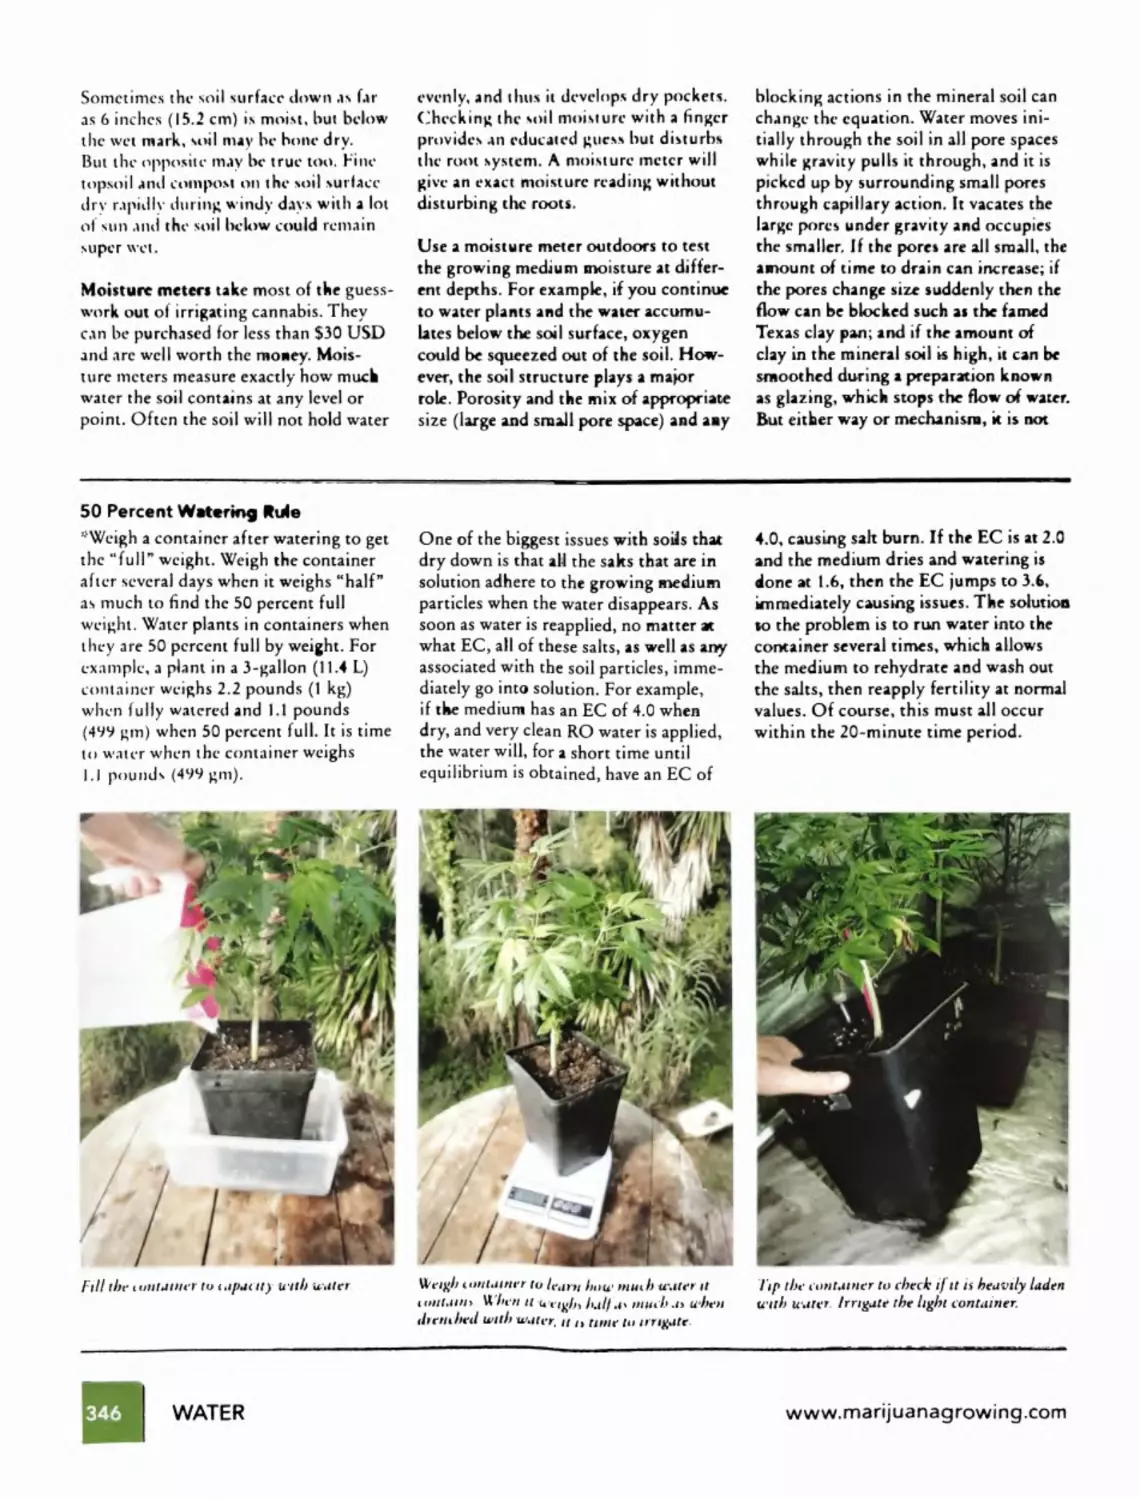
Construction; Soil, Water, and Nutrients; Grow-
Tent Rooms; Big Rooms; Temperature, Humidity,
and Ventilation
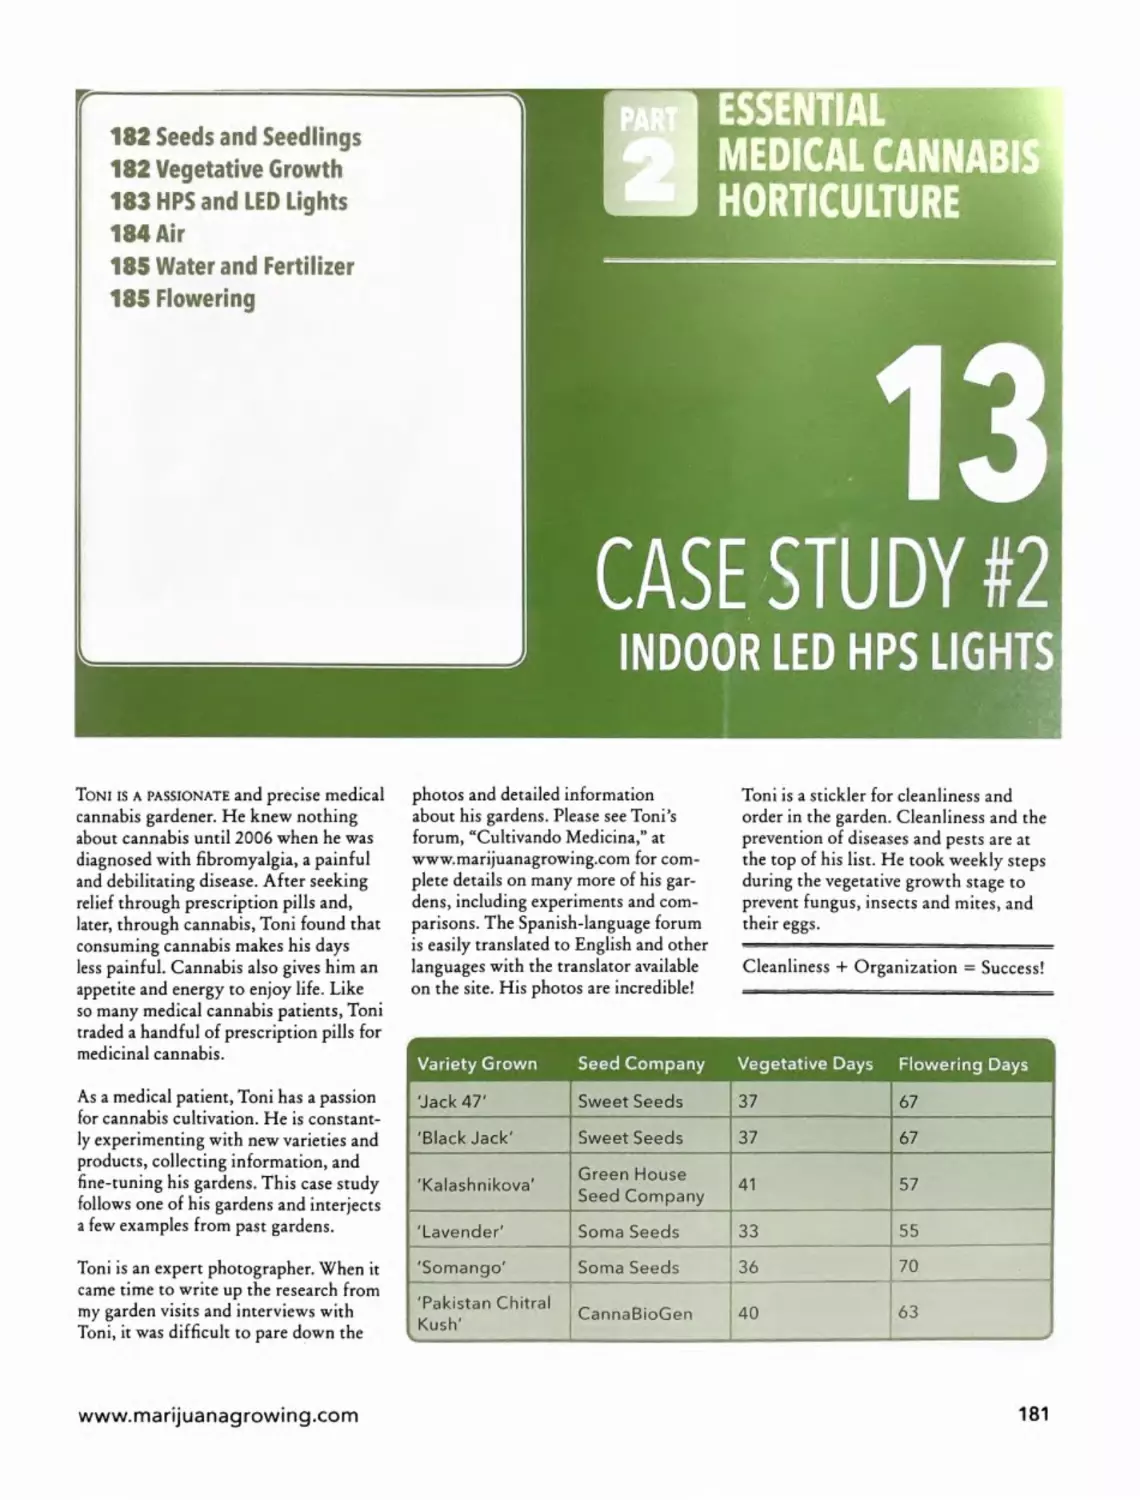
#2: Indoor LED HPS Lights - Page 181
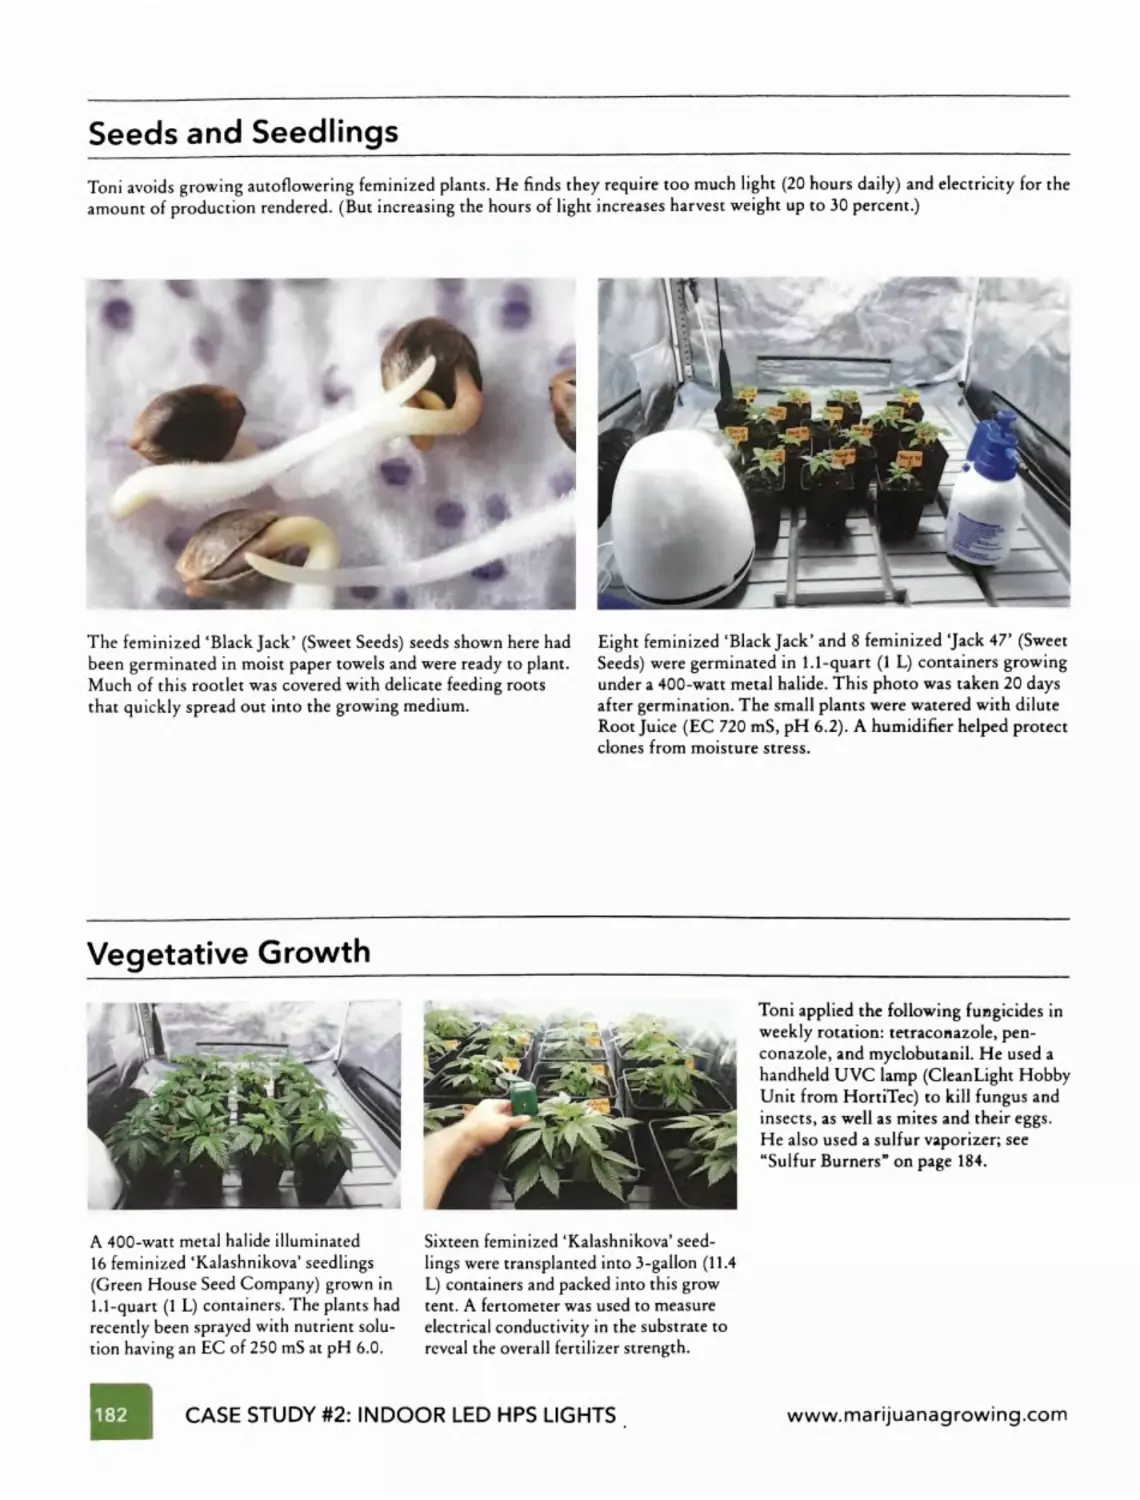
Seeds and Seedlings; Vegetative Growth; HPS and
LED Light; Air; Water and Fertilizer; Flowering
#3: Outdoor Backyard Garden -
Page 189
2010 Backyard Garden; 2011 Backyard
Garden; 2012 Backyard Garden
#4: Outdoor Large Garden -
Page 195
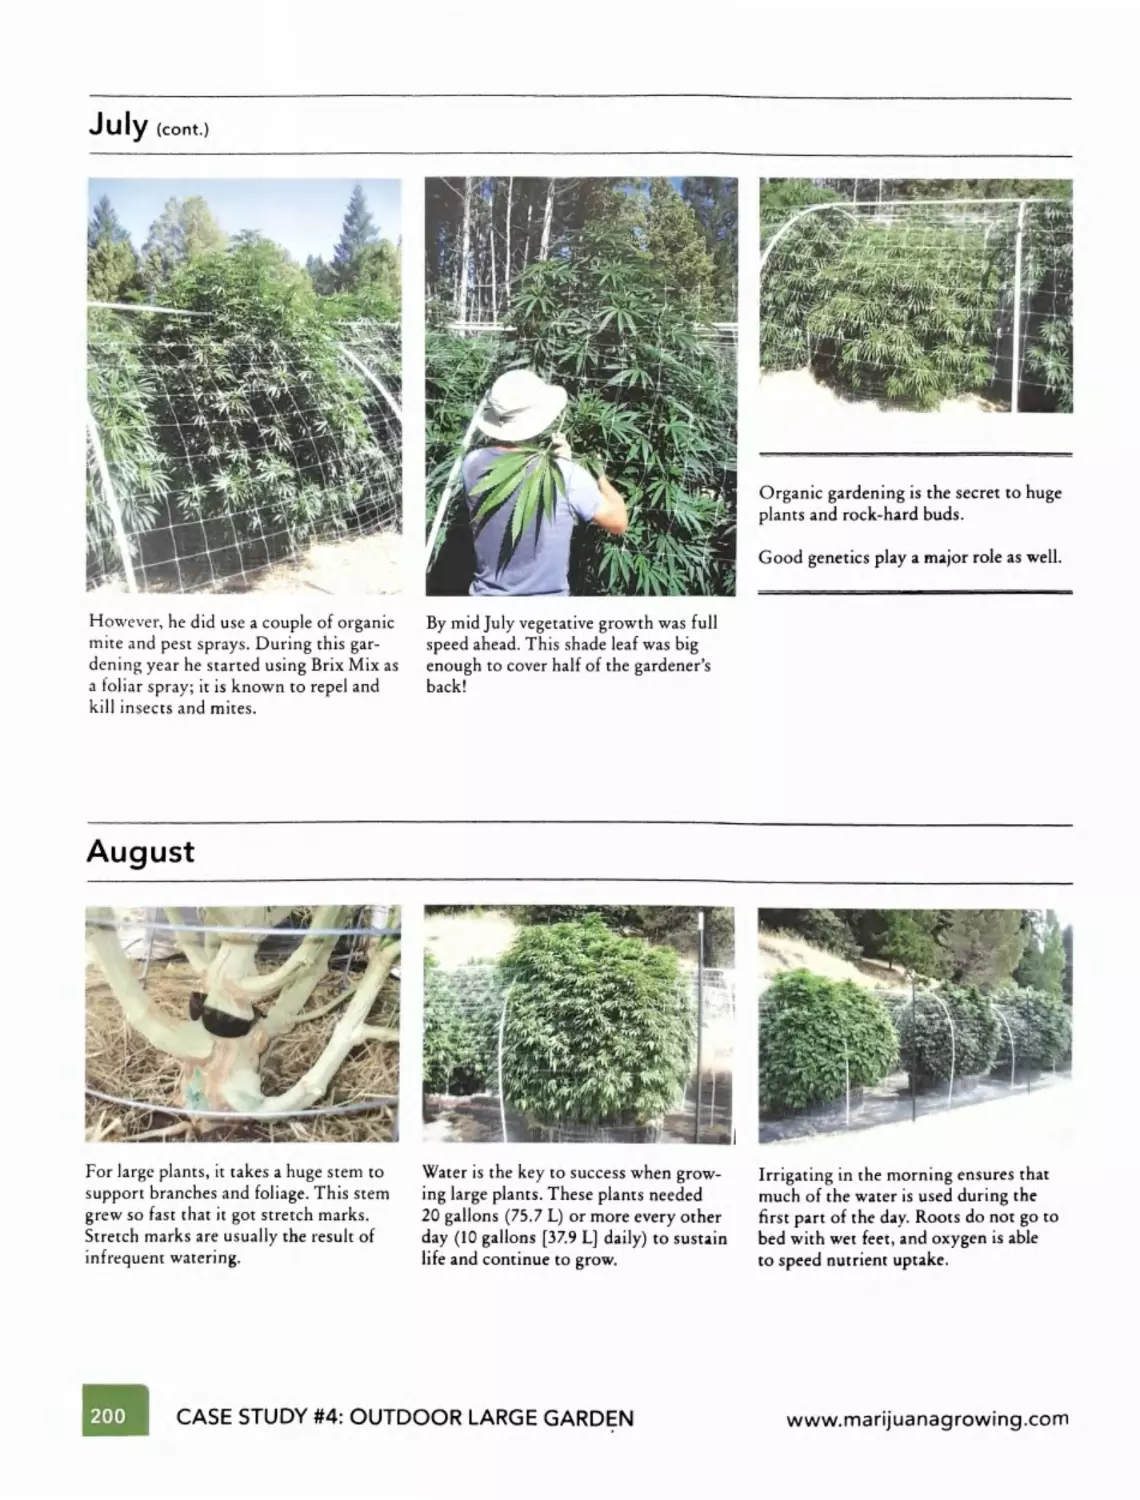
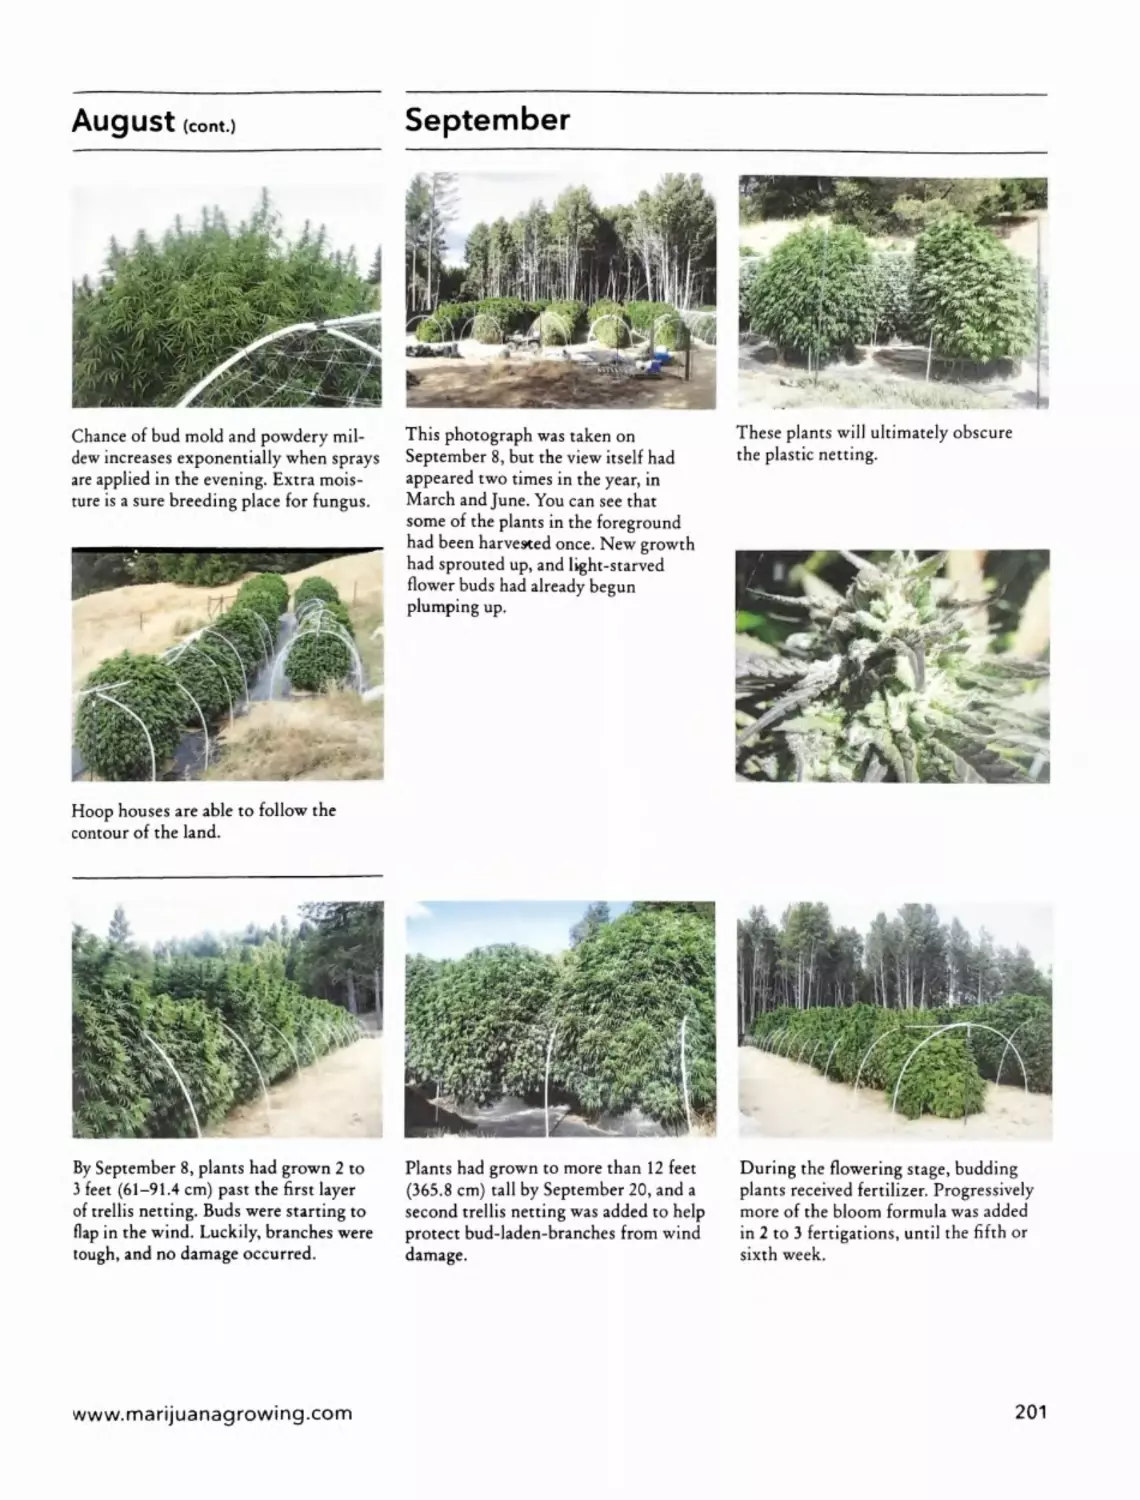
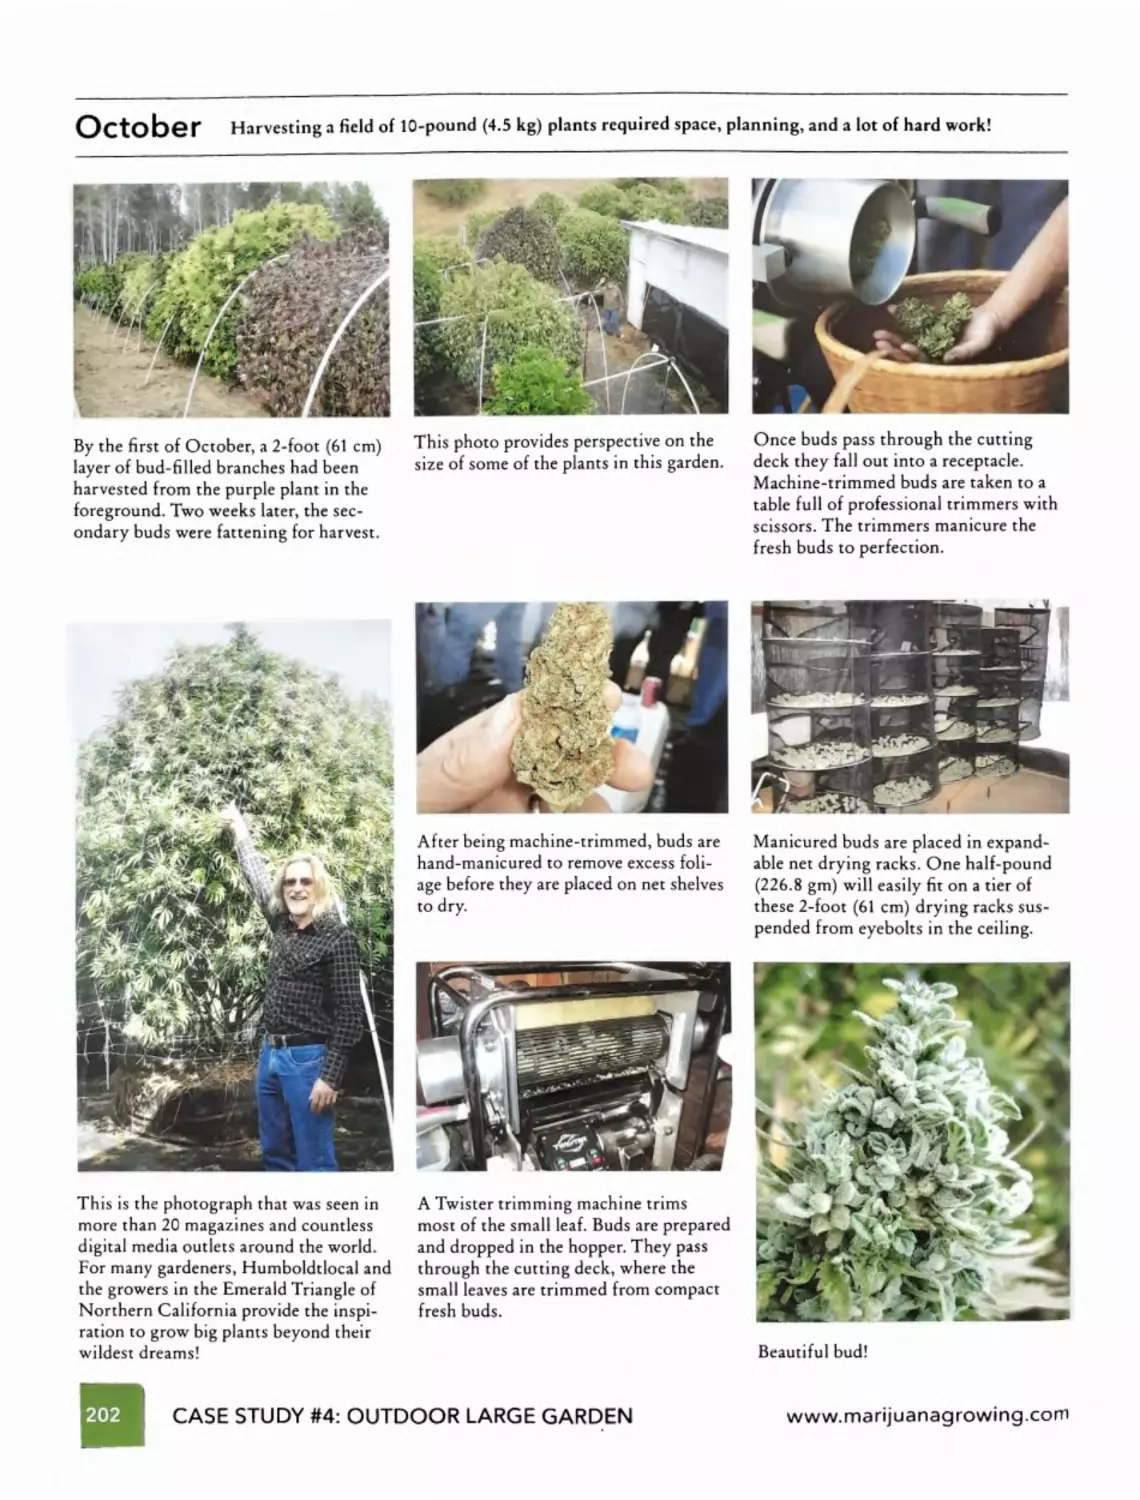
March; April; May; June; July; August;
September; October
www.marijuanagrowing.com
Part 3 | Advanced Medical Cannabis Horticulture
r1
Chapter 14 - Preserving the Sanctuary - Page 203
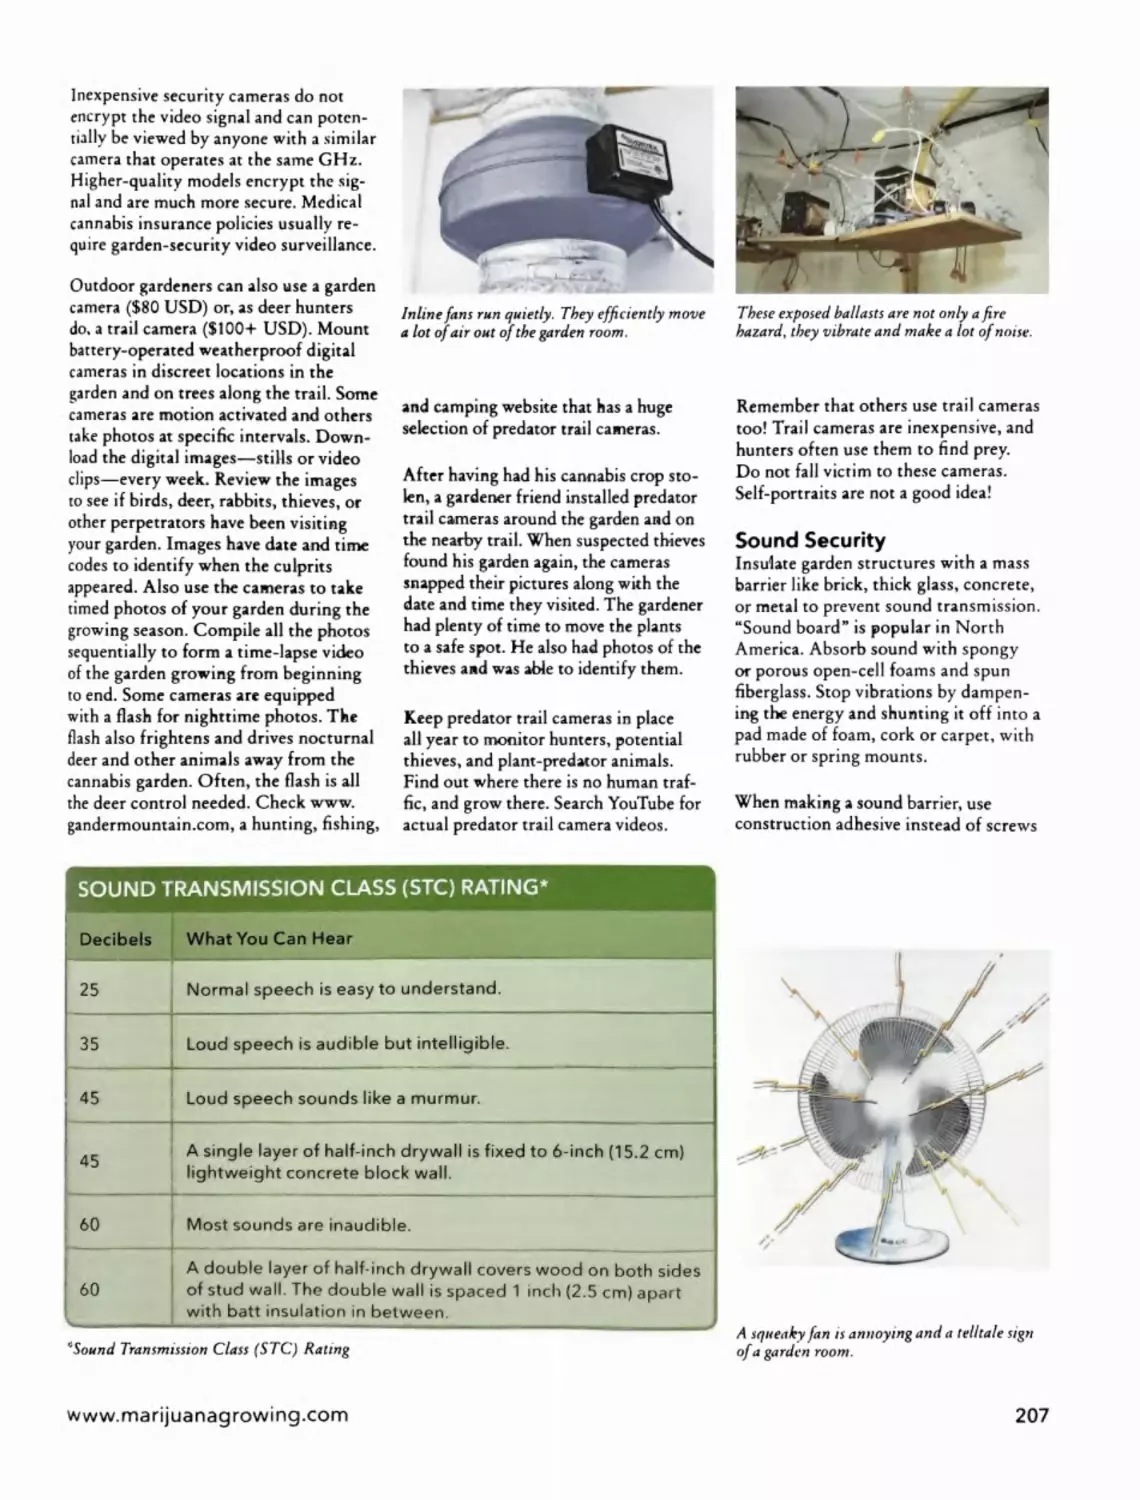
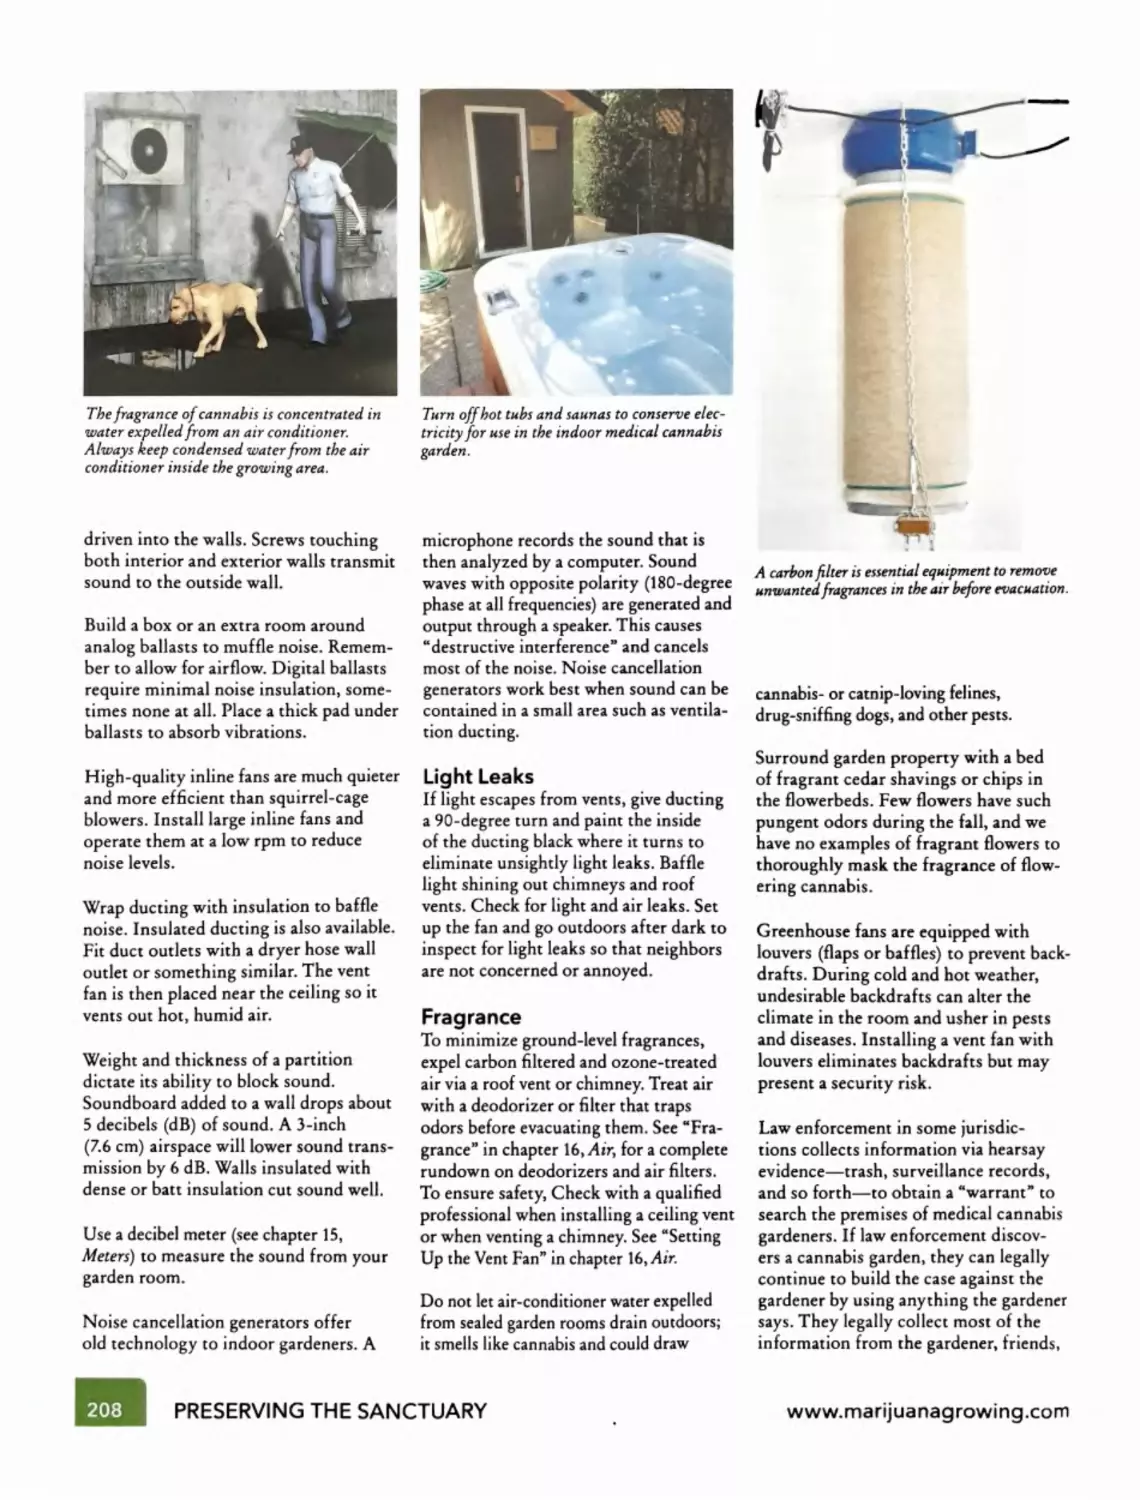
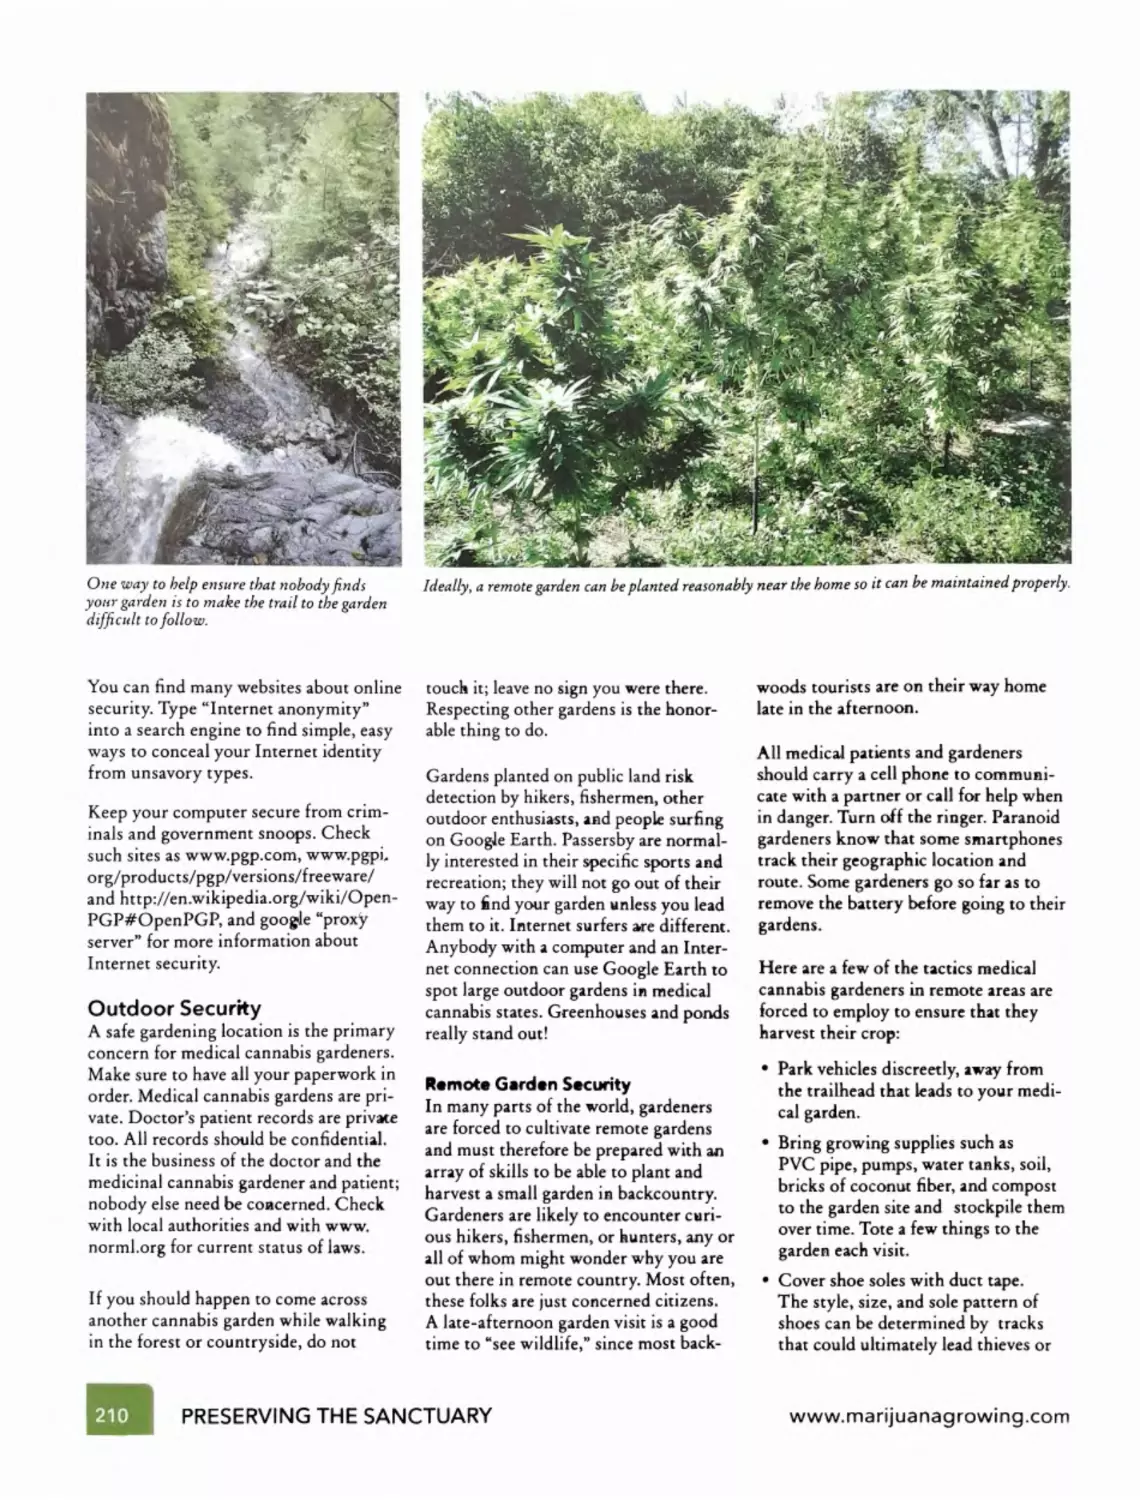
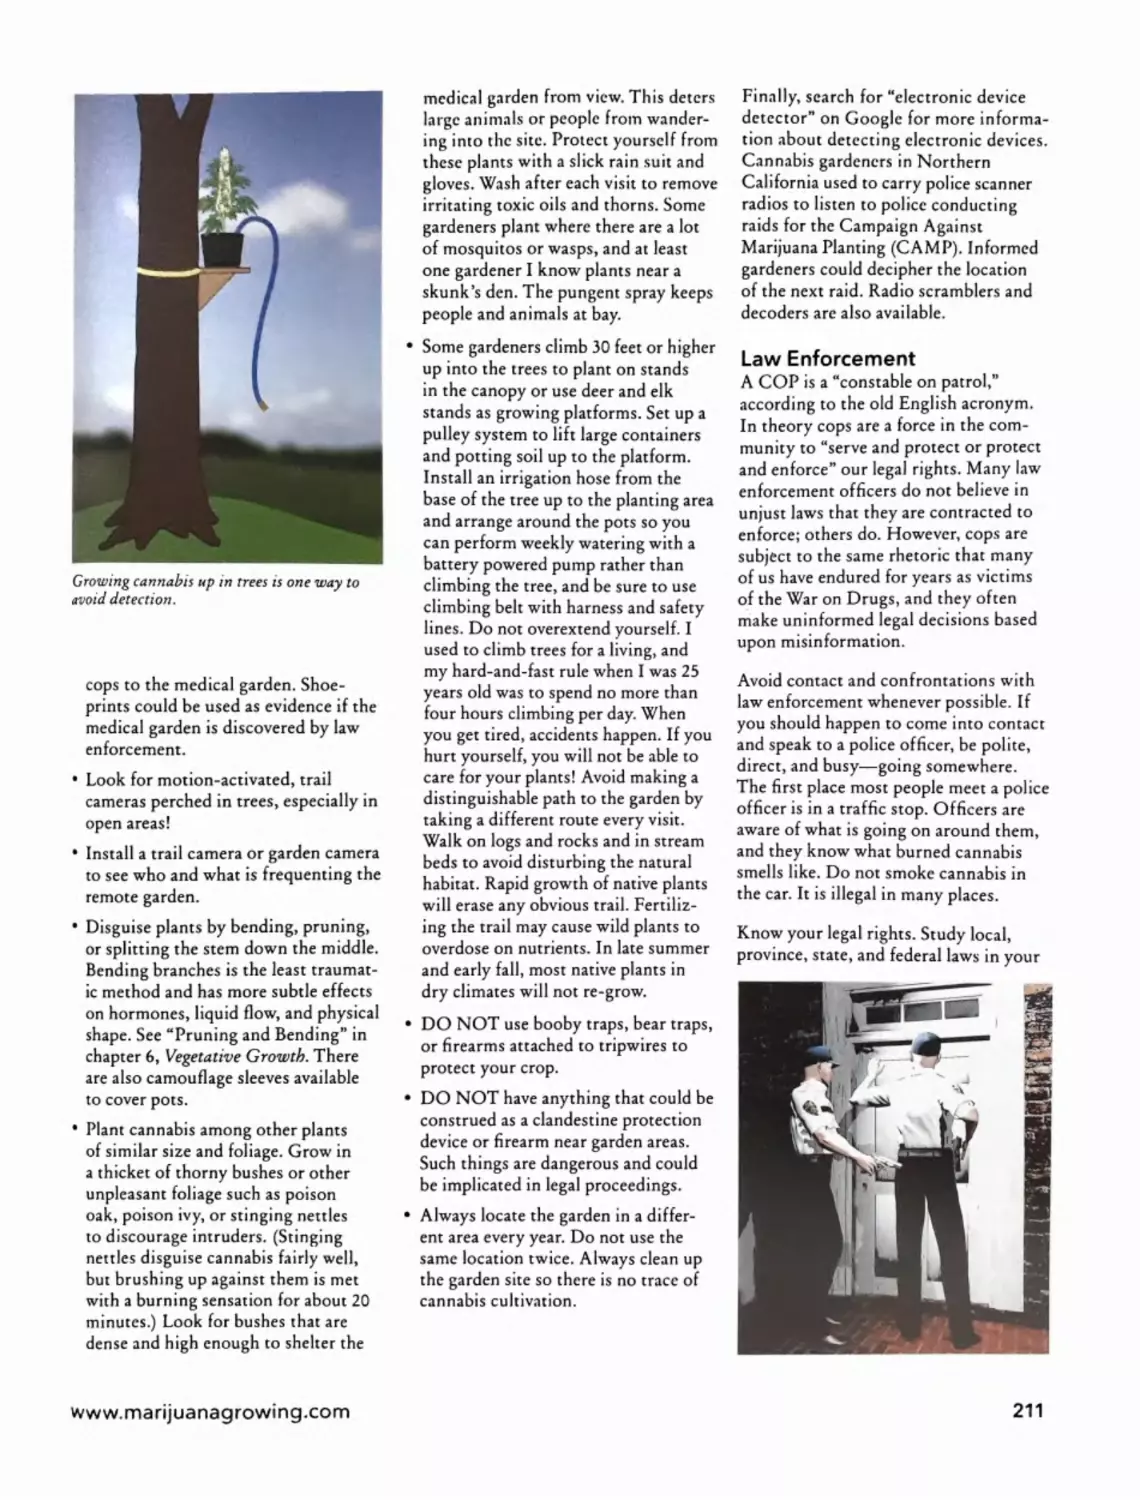
Sanctuary Preservation; Sanctuary Surveillance; Sound Security; Light Leaks; Fragrance; Electrical
Security; Internet Security; Outdoor Security; Law Enforcement; Informants; High-Tech Surveillance
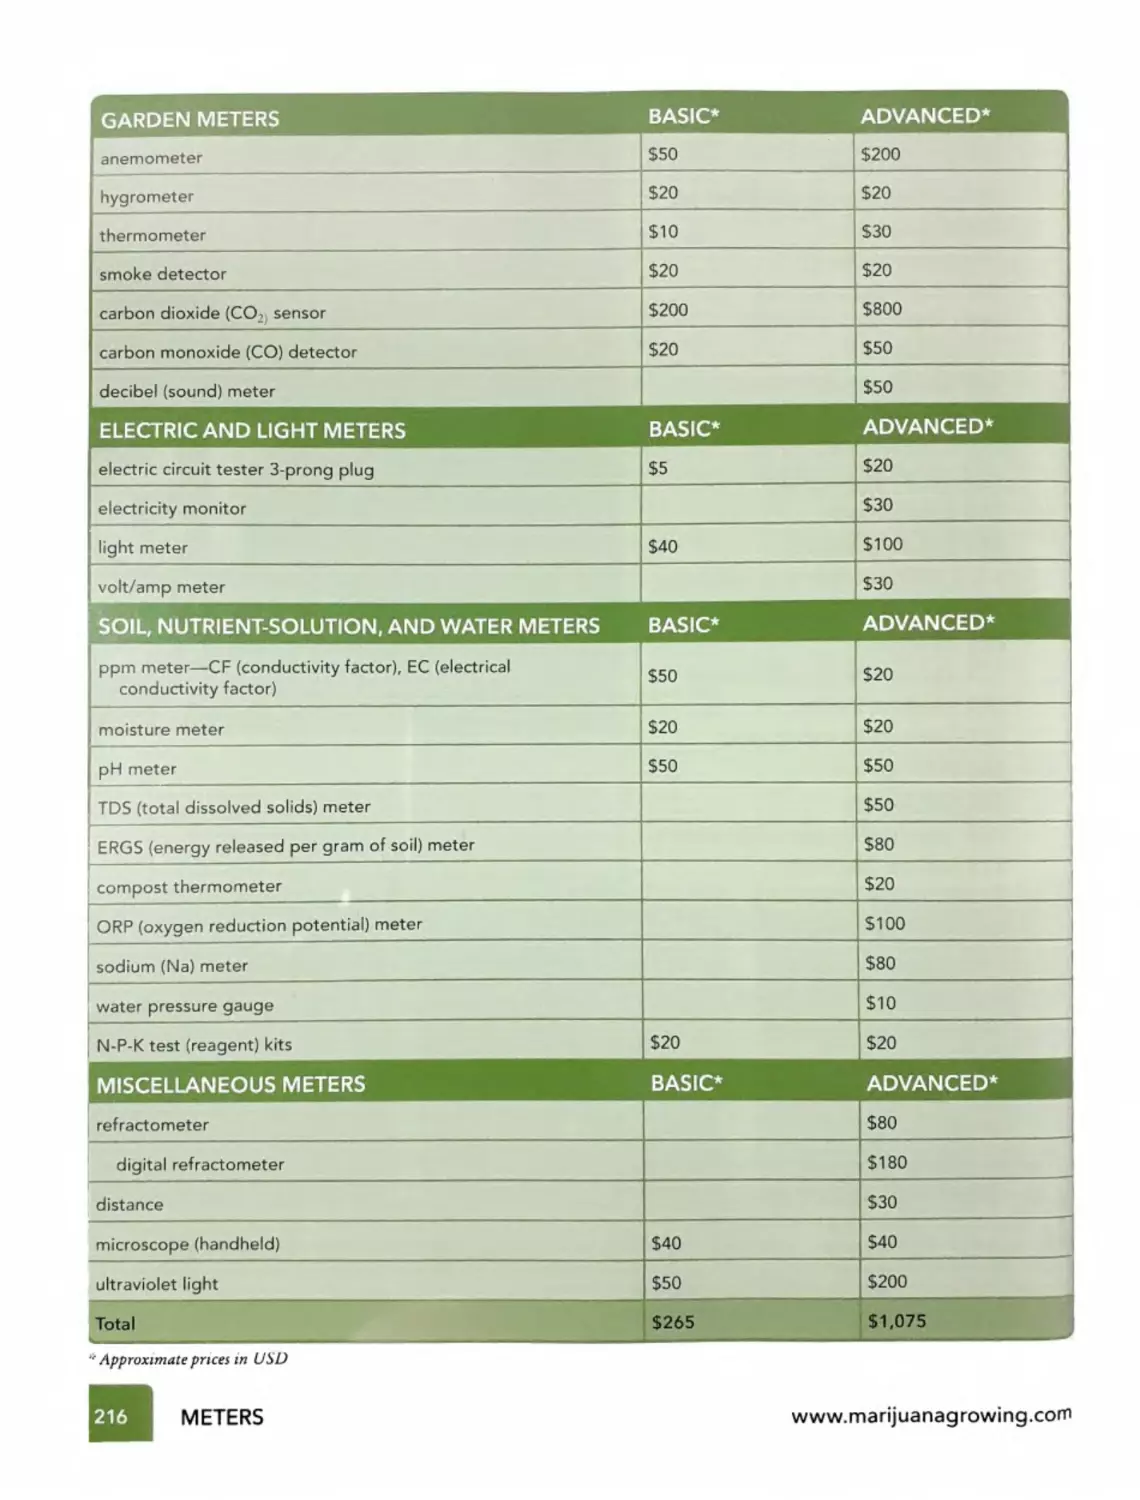
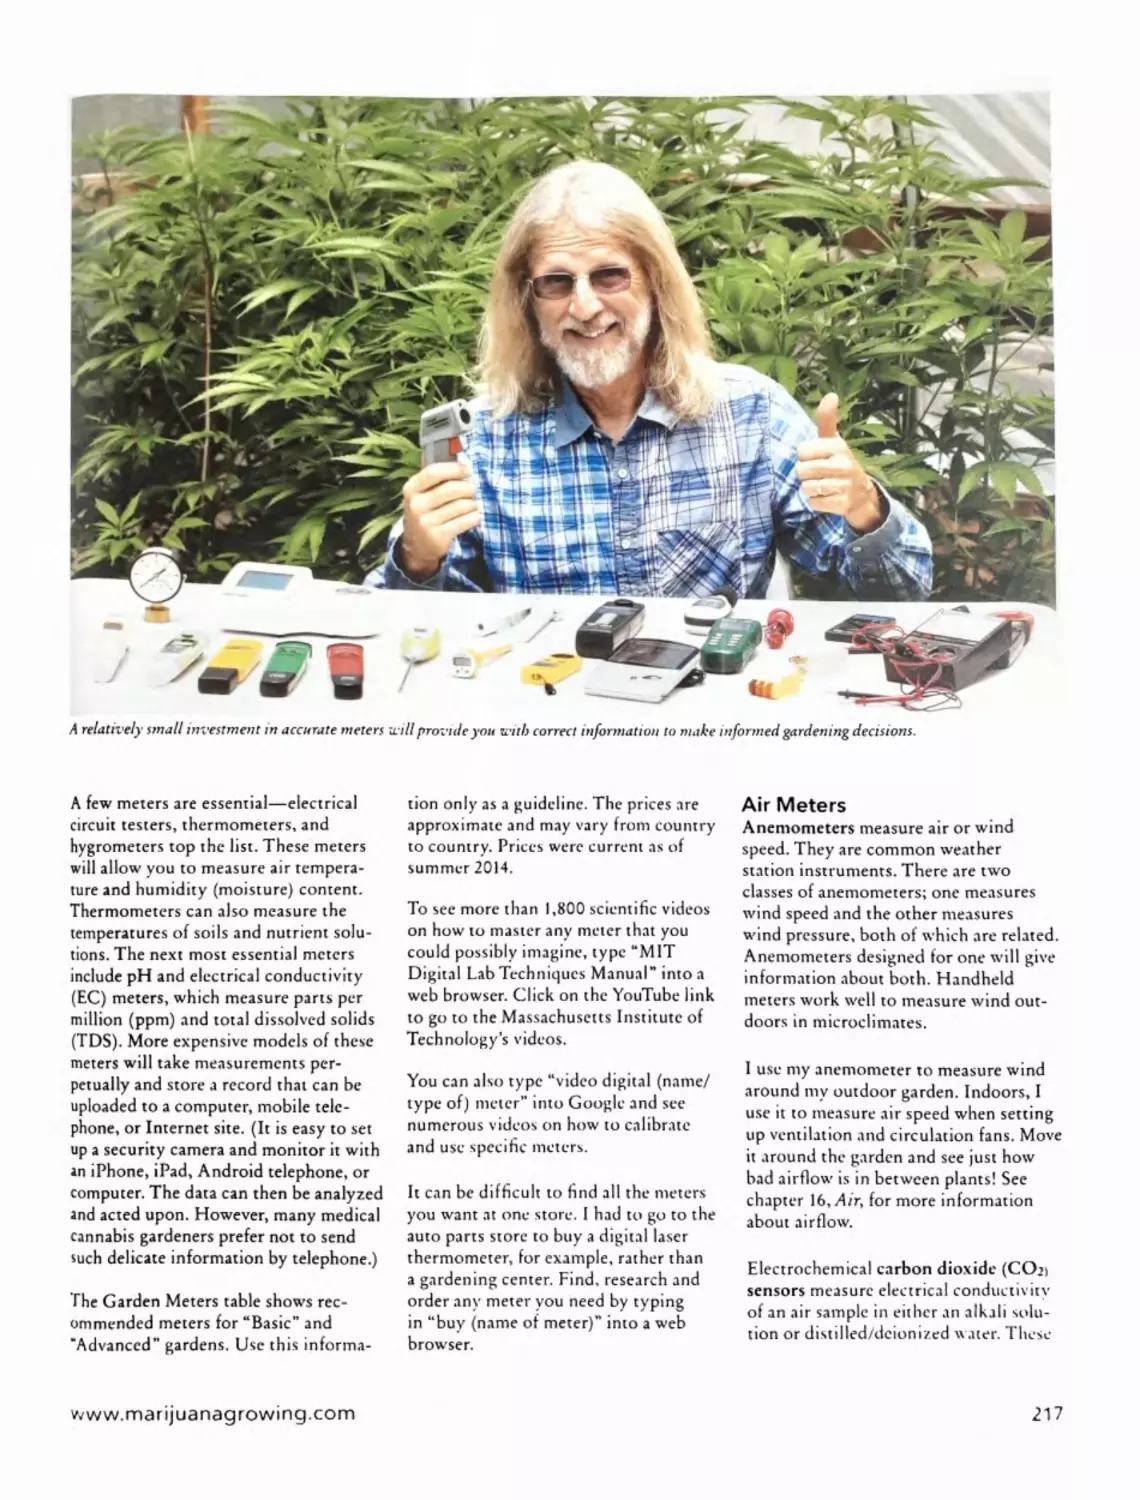
Chapter 15 - Meters - Page 215
Air Meters; Electric and Light Meters; Soil, Nutrient Solution, and Water Meters;
Miscellaneous Meters
Chapter 16 - Air - Page 227
Temperature; Humidity; Air Movement; Intake Air; CO2 Enrichment; CO2 Emitter Systems; CO2
Generator Systems; Other Ways to Make CO2; Fragrance; Air Filters; Types of Activated Charcoal;
Extending the Life of Carbon Filters; Reactivating and Reusing Carbon; The Ventilation System
Chapter 17 - Light, Lamps & Electricity - Page 253
Ultraviolet(UVA, UVB, UVC) Light; Light Intensity; Measuring Light; Photoperiod; Indoorand Green
house Garden Lamps; High-Intensity Discharge (HID) Lighting Systems; HID Ballasts; HID Bulbs;
Mercury Vapor Lamps; Metal Halide Bulbs and Ballasts; High-Pressure Sodium Bulbs and Ballasts;
Conversion Bulbs; Fluorescent Lamps, Ballasts, and Fixtures; Compact Fluorescent Lamps; Plasma
Lamps; Light-Emitting Plasma (LEP) Lamps; Magnetic Induction Lamps; Light-Emitting Diode (LED)
Lamps; Other Lamps, Getting the Most Artificial Light; Rotating Plants; Plant Spacing; Reflective
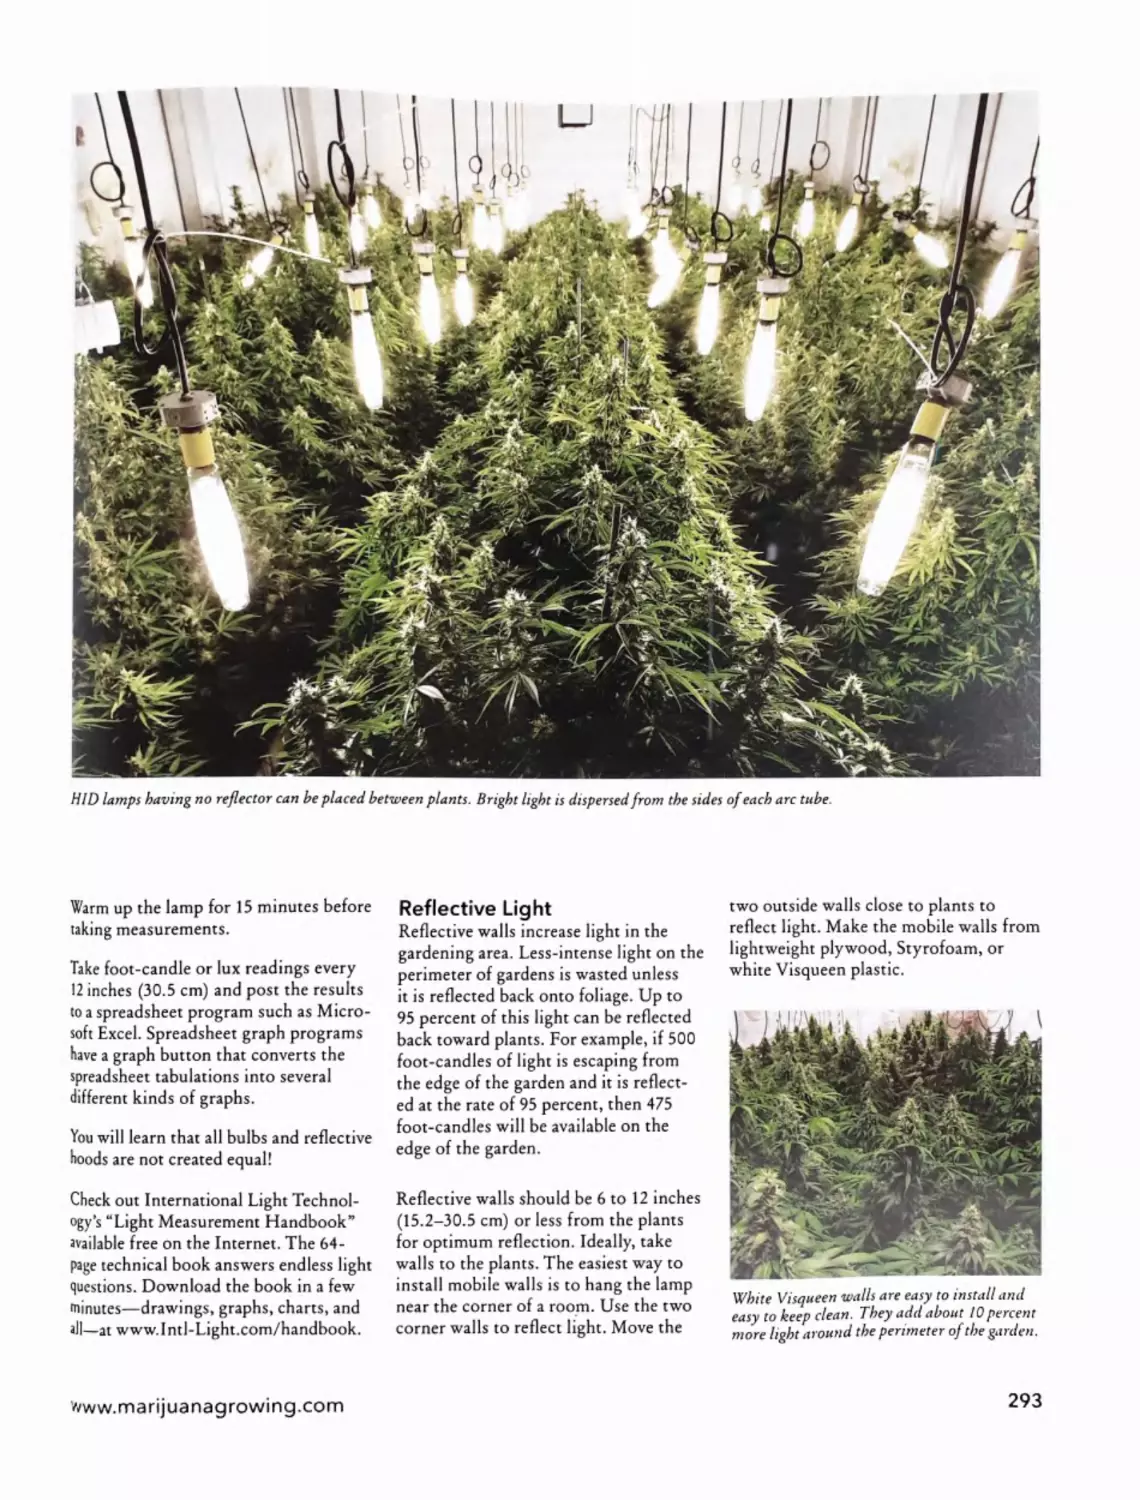
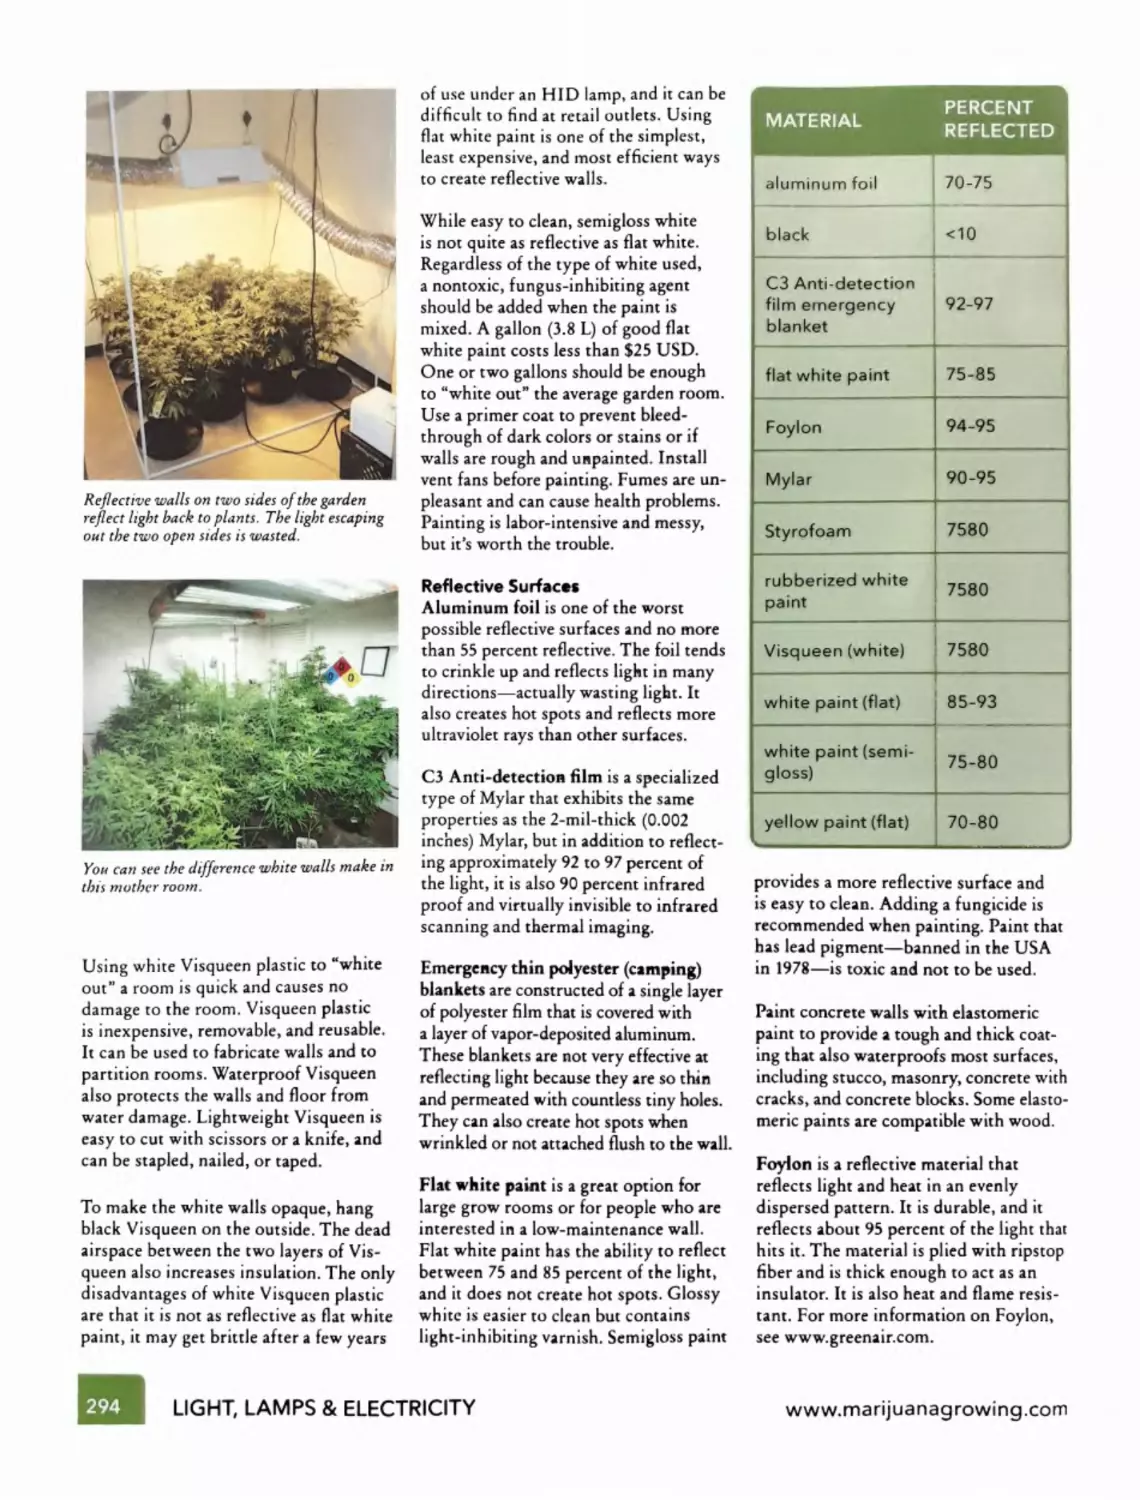
Hoods; Reflective Light; Light Movers; Electricity and Safety; Electricity Consumption
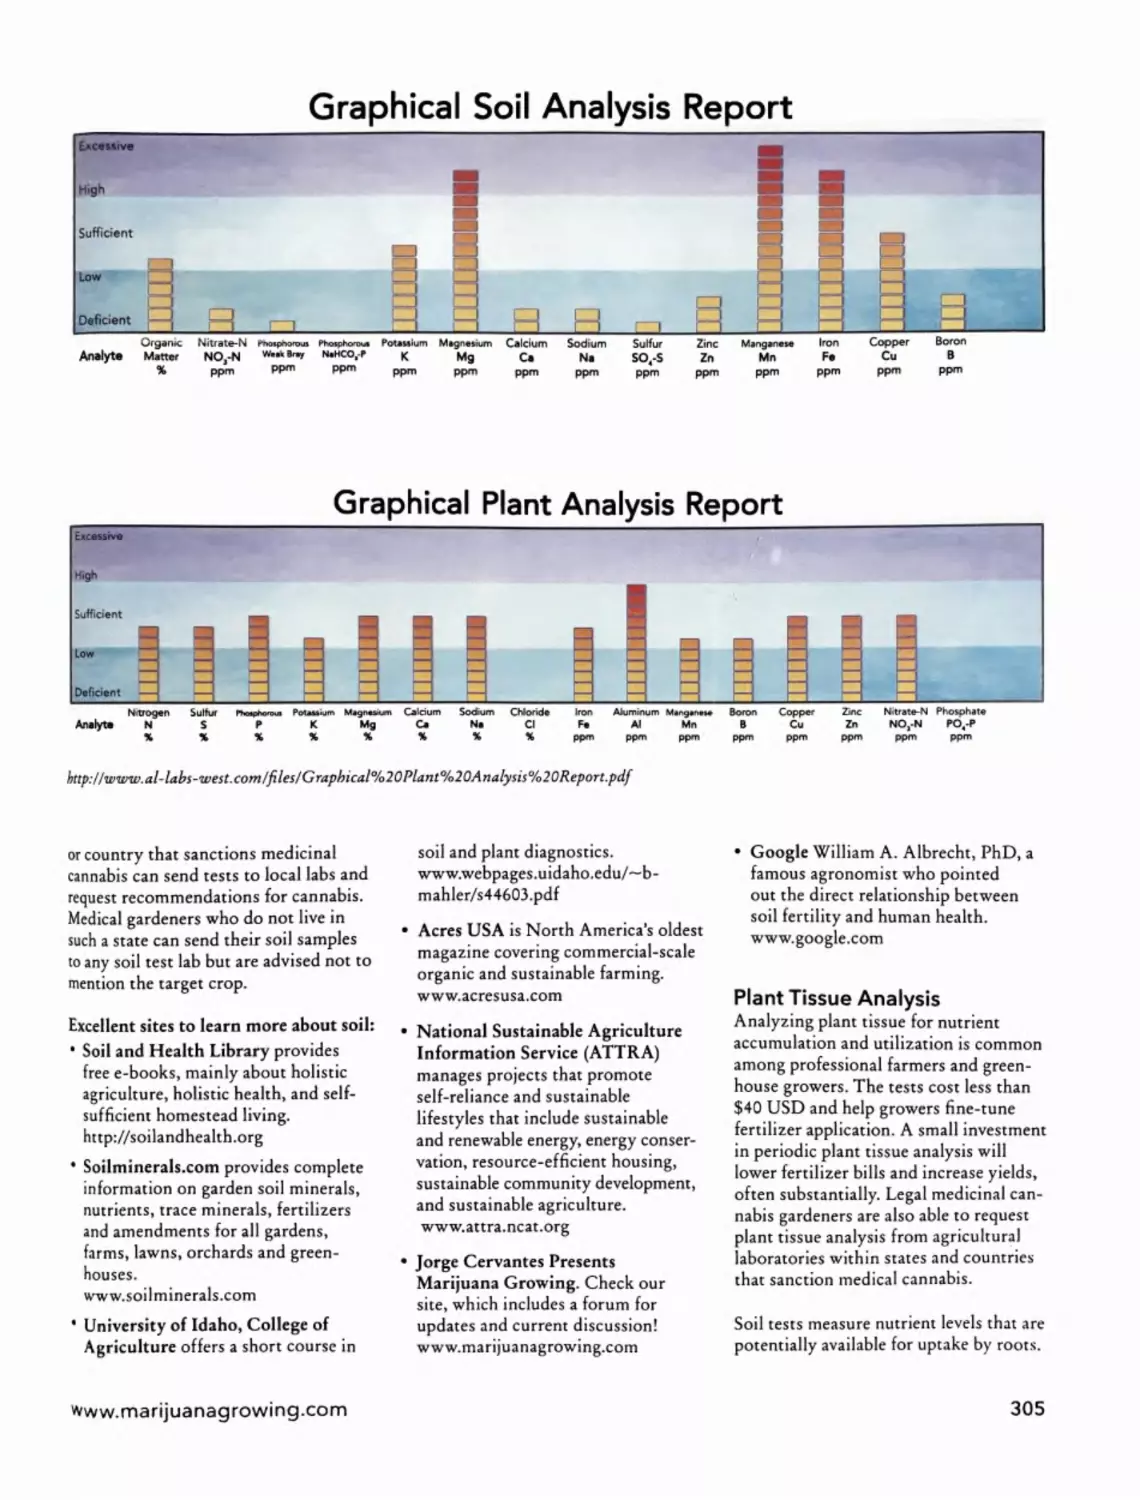
Chapter 18 - Soil - Page 303
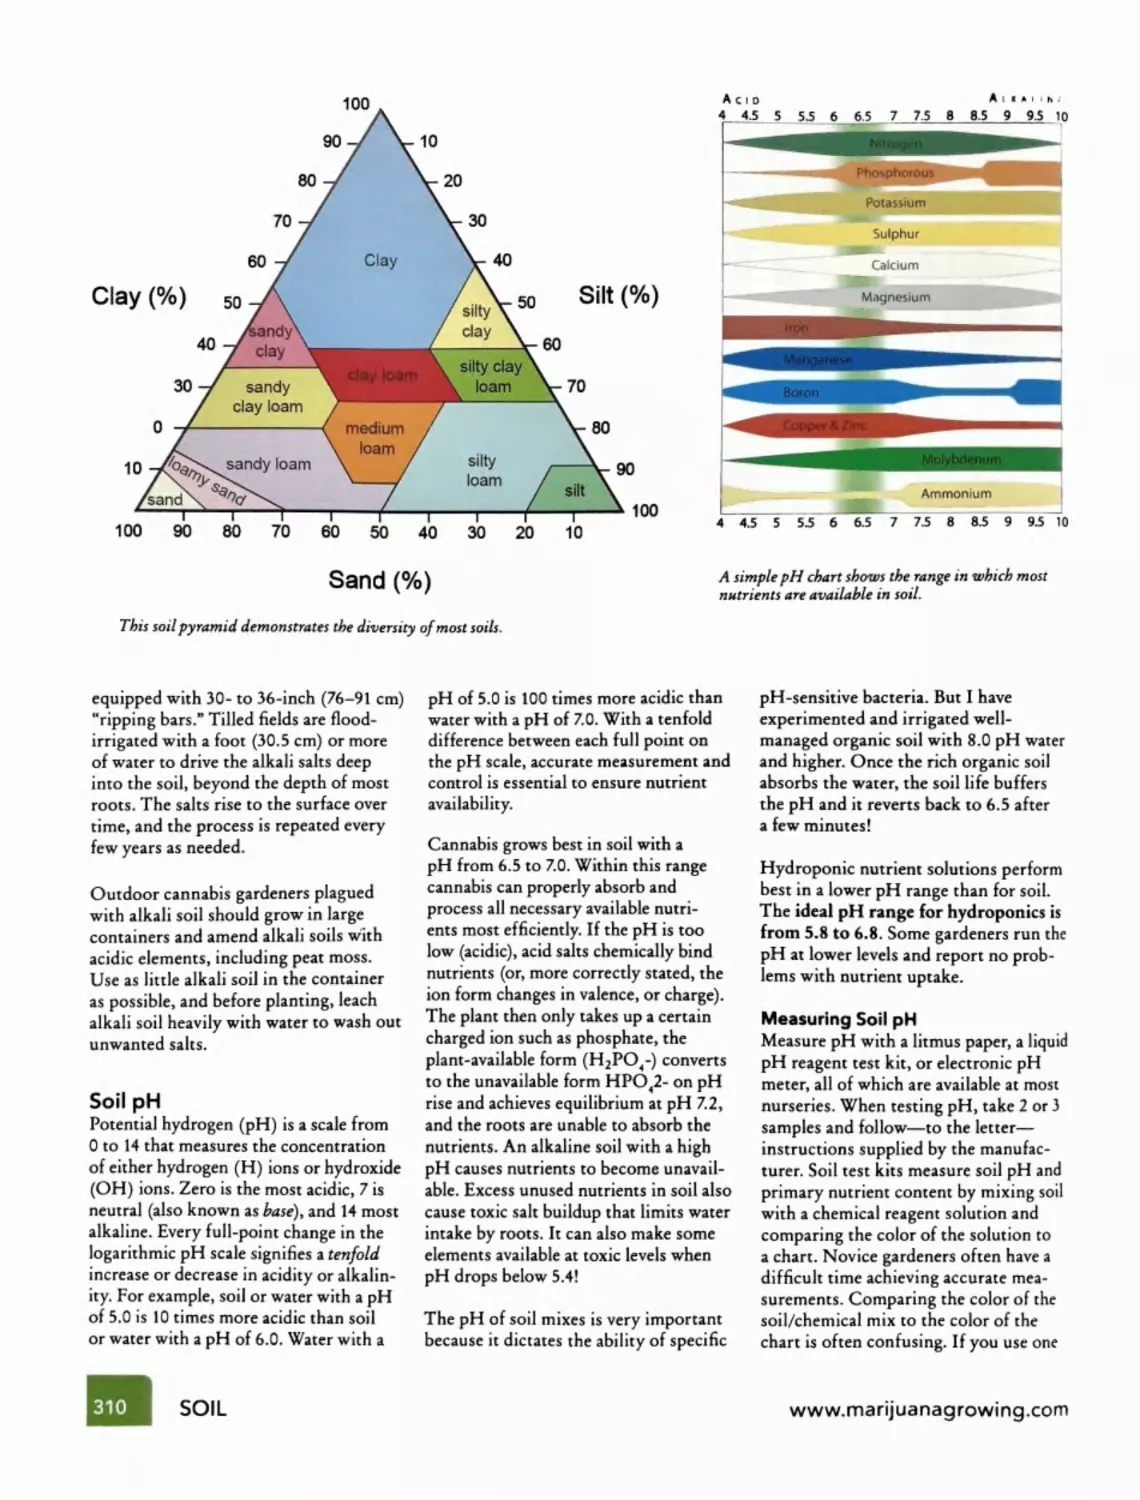
Soil Tests; Plant Tissue Analysis; Texture and Types of Soil; Soil pH; Soil Temperature; Soil
Amendments; Soil Mixes; Potting Soil; Propagation Cubes and Pellets; Used, Indoor Soil Disposal;
Grow-Medium Problems; Organic Soil and the Soil Food Web; Salt-Based Fertilizers; Mulch
Chapter 19 - Containers - Page 327
Types of Containers; Container Shape and Size; Root Pruning; Drainage and Leaching;
Container Problems
Chapter 20 - Water - Page 333
Sources of Water; pH; How Fluids Move within Cannabis; Osmosis; Irrigation
www.marijuanagrowing.com
Chapter 21 - Nutrients - Page 349
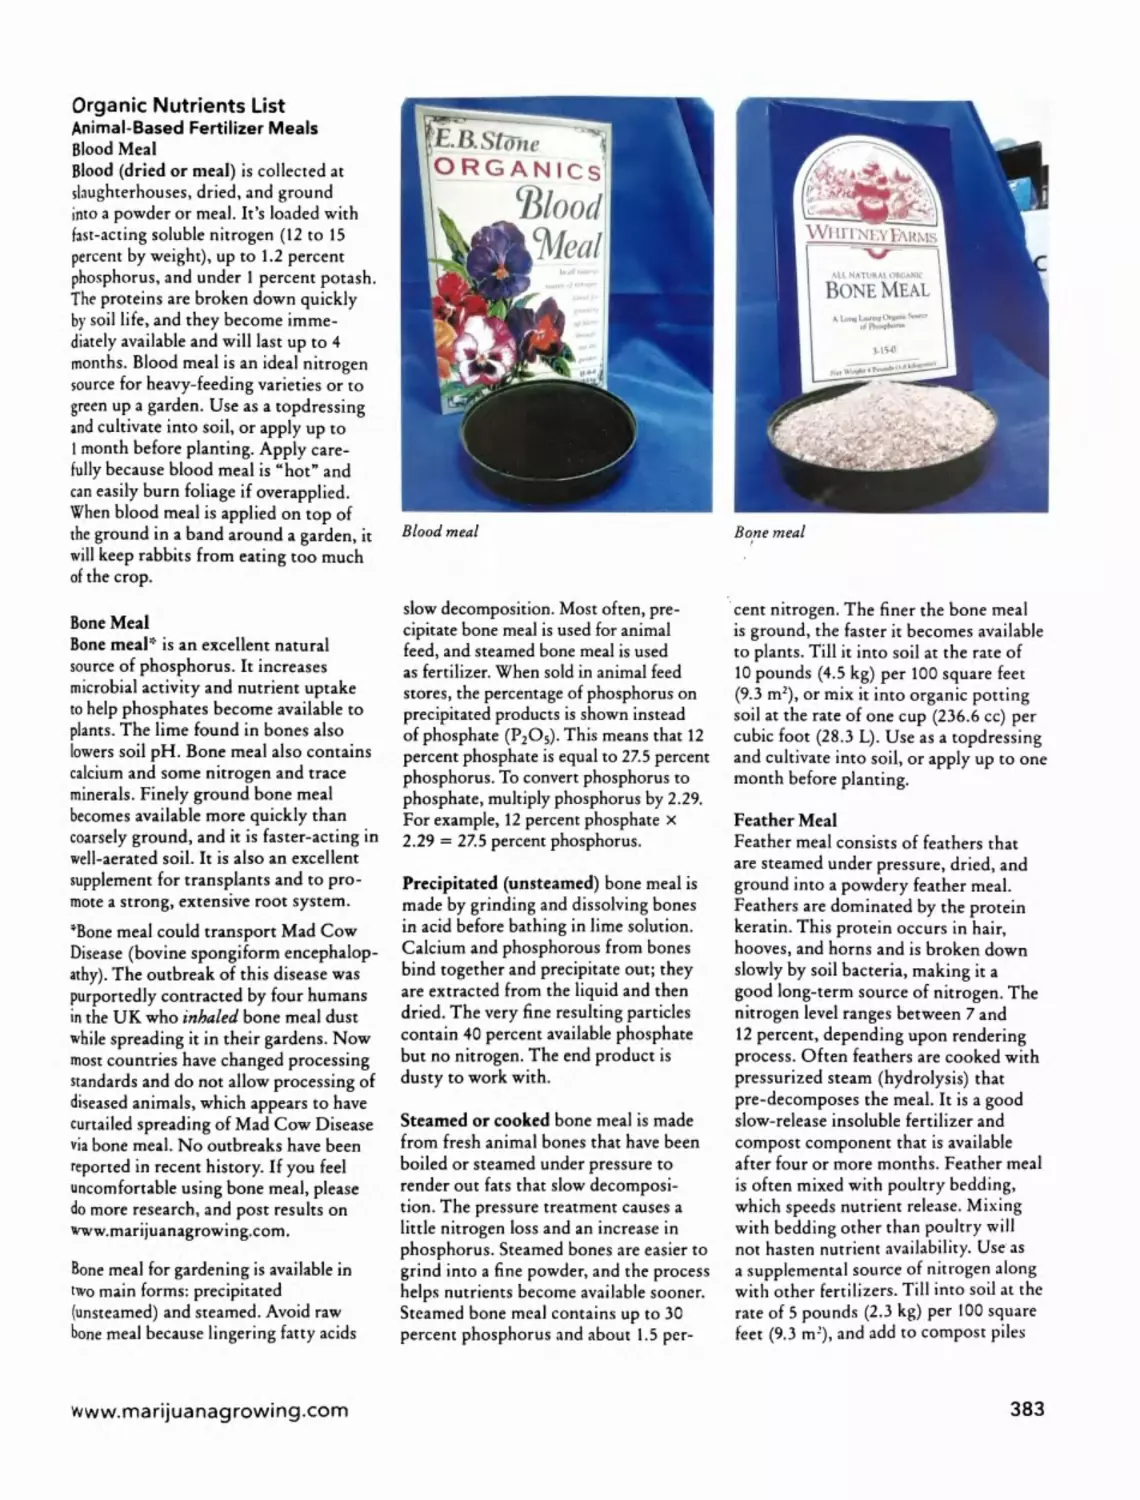
Nutrients; Macronutrients; Secondary Nutrients; Micronutrients; Fertilizers; Organic Fertilizers; Mixing
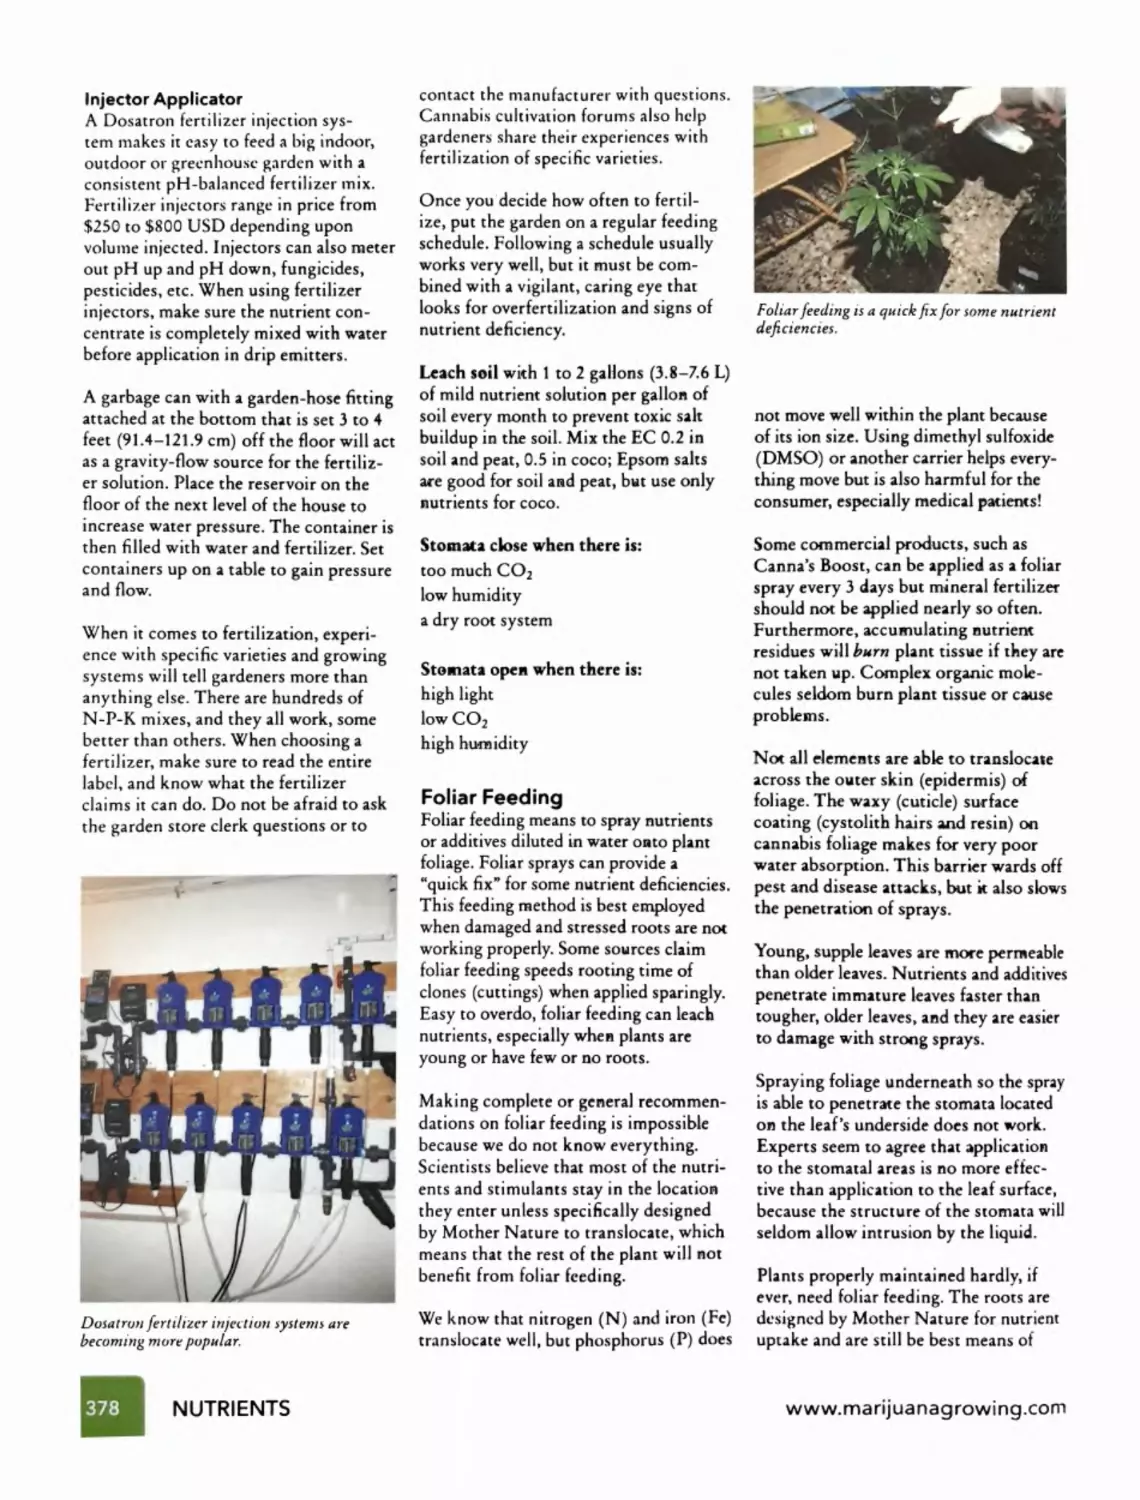
Fertilizers; Fertilizer Application; Foliar Feeding; Common "Nutrient" Problems; Organic Nutrients
List; Compost and Compost Teas; Recipes for Five Gallons of Compost Tea
Chapter 22 - Additives - Page 395
Hormones; Enzymes; Amino Acids; Colchicine; Humic Acid; Fungi; Bacteria; Miscellaneous
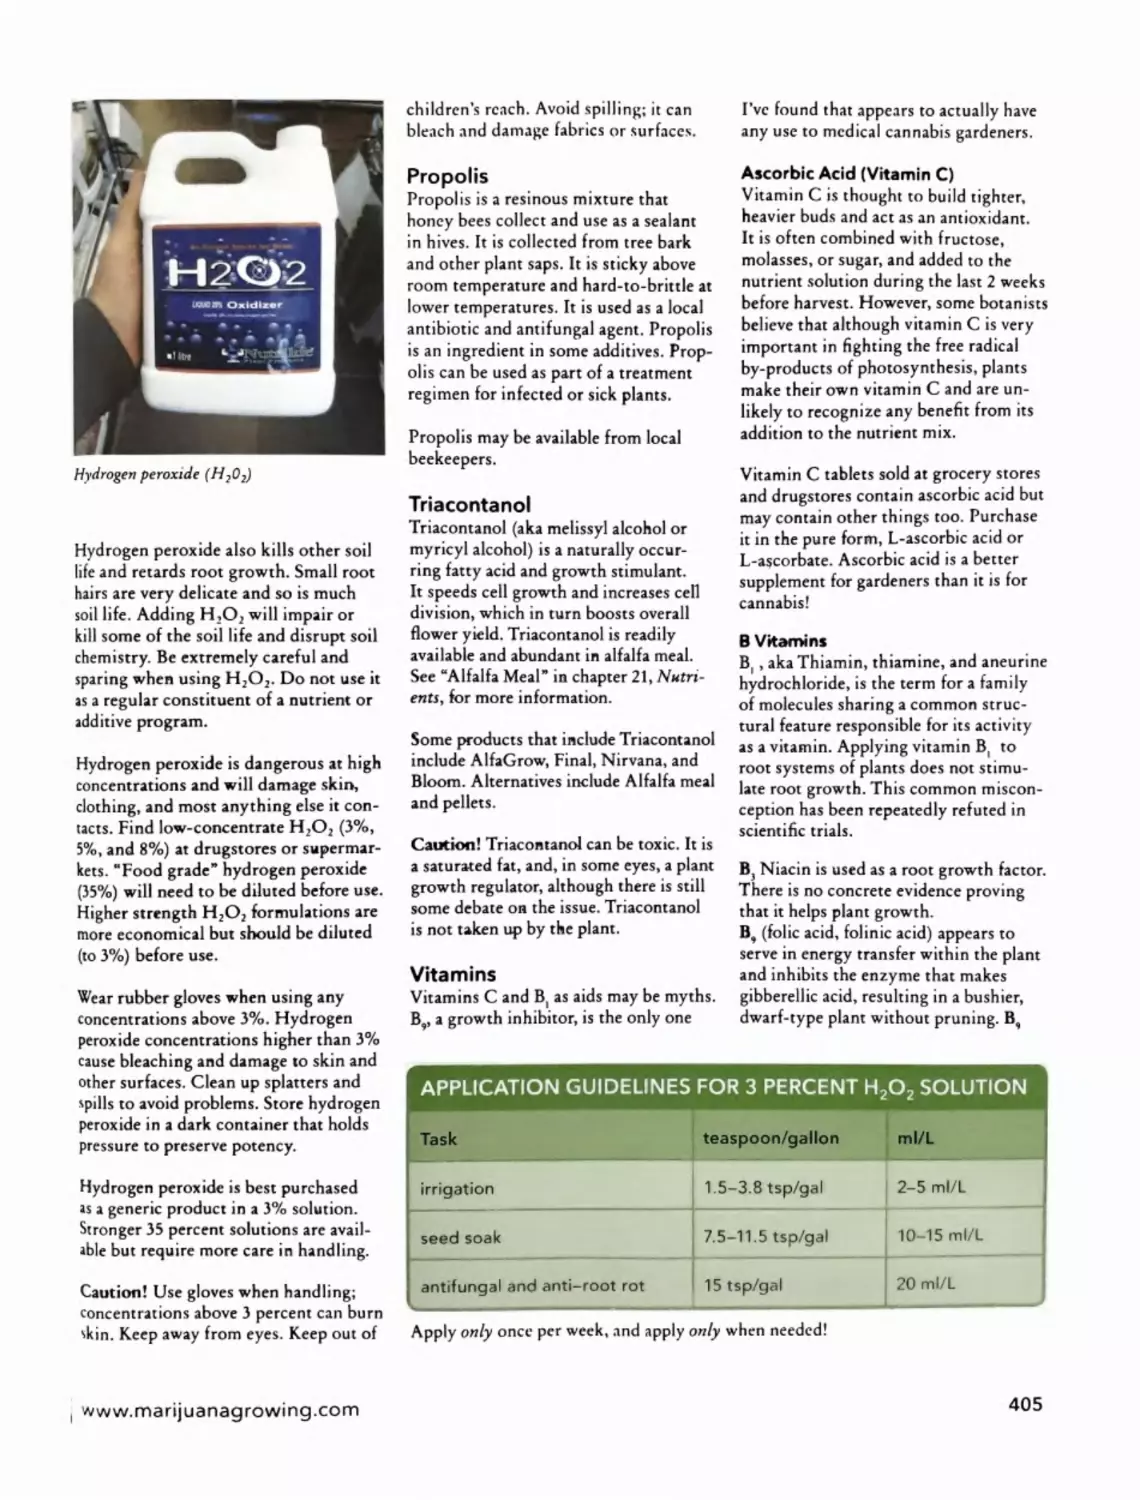
Additives; Colloidal Silver; Hydrogen Peroxide (H2O2); Propolis; Triacontanol; Vitamins; Growth
Retardants
Chapter 23 - Container Culture & Hydroponics - Page 407
Container Culture and Hydroponics; Aeroponic Gardens; Deep Water Culture (DWC); Nutrient
Film Technique (NFT); Hydro-Organic; Ebb-and-Flow Gardens; Top-Feed Gardens; Run-to-Waste
Gardens; Wick Gardens; Aquaponics; Hydroponic Nutrients; Nutrient-Solution pH; Nutrient-
Solution EC; Dissolved Oxygen; Solution Mixing and Maintenance; Reservoirs; Nutrient-Solution
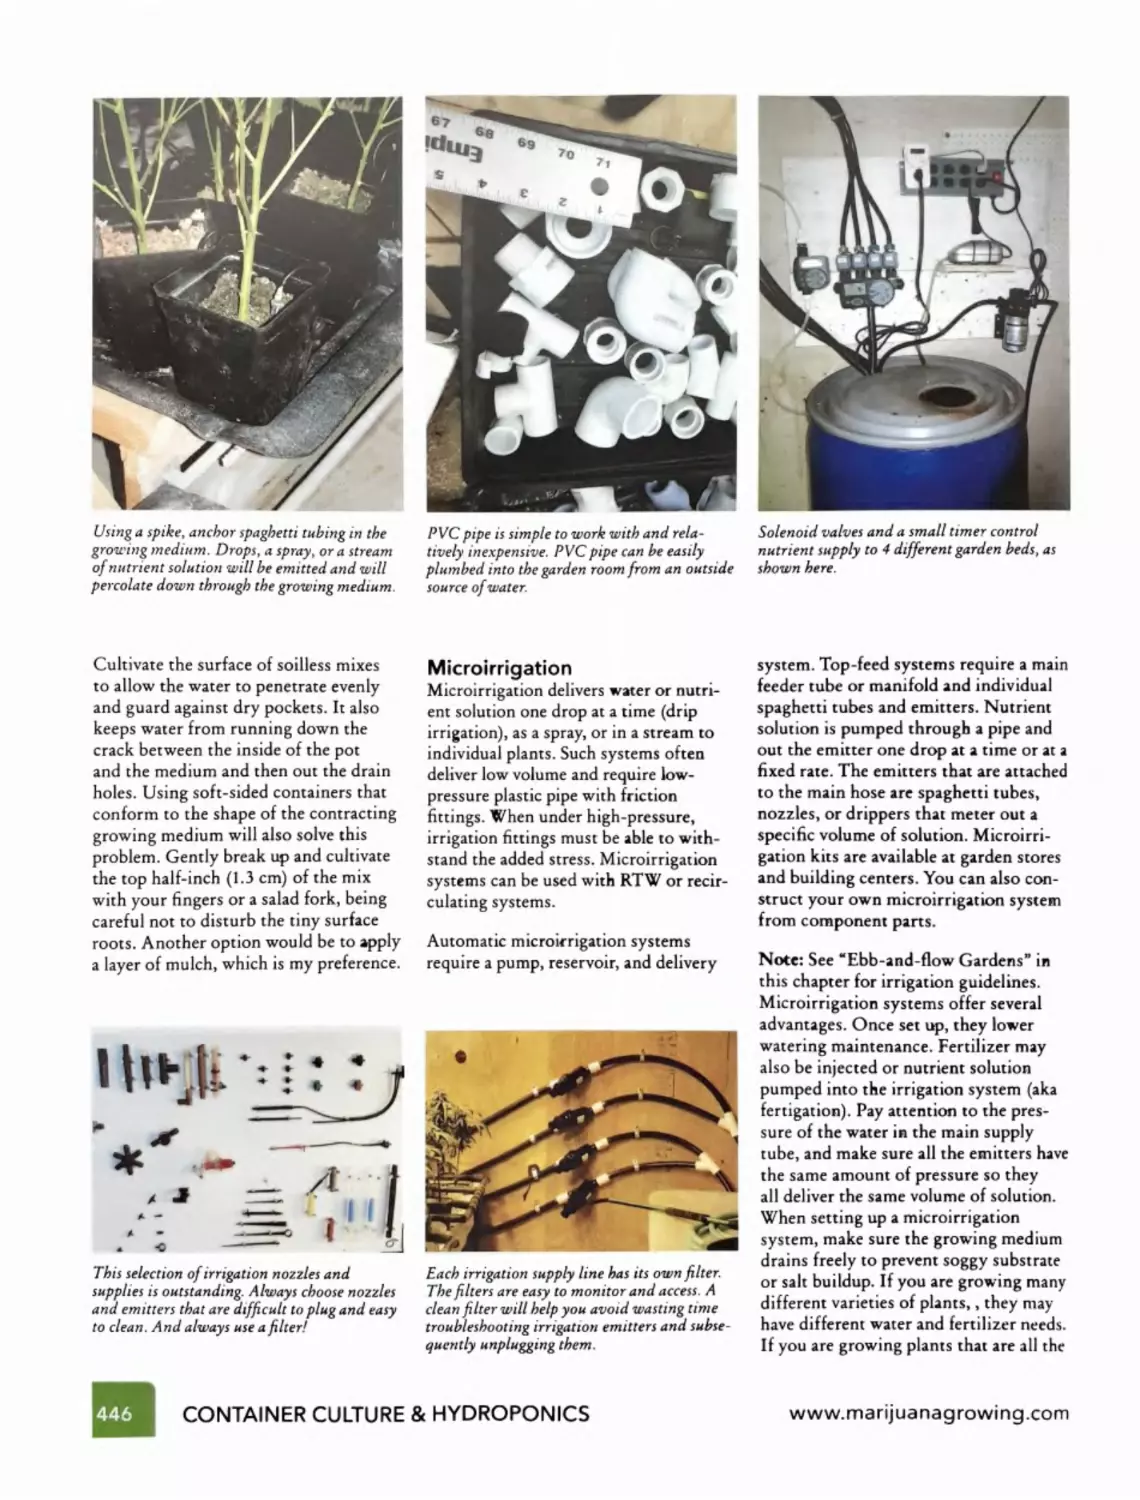
Pumps; Air Pumps; Growing Mediums; Sterilizing Substrates; Irrigation; Microirrigation; Container
Culture and Hydroponic Nutrient Disorders
Chapter 24 - Diseases & Pests - Page 449
Diseases; Bacterial Diseases; Viruses; Storage Fungi and Bacteria; Contaminants; Pest Insects
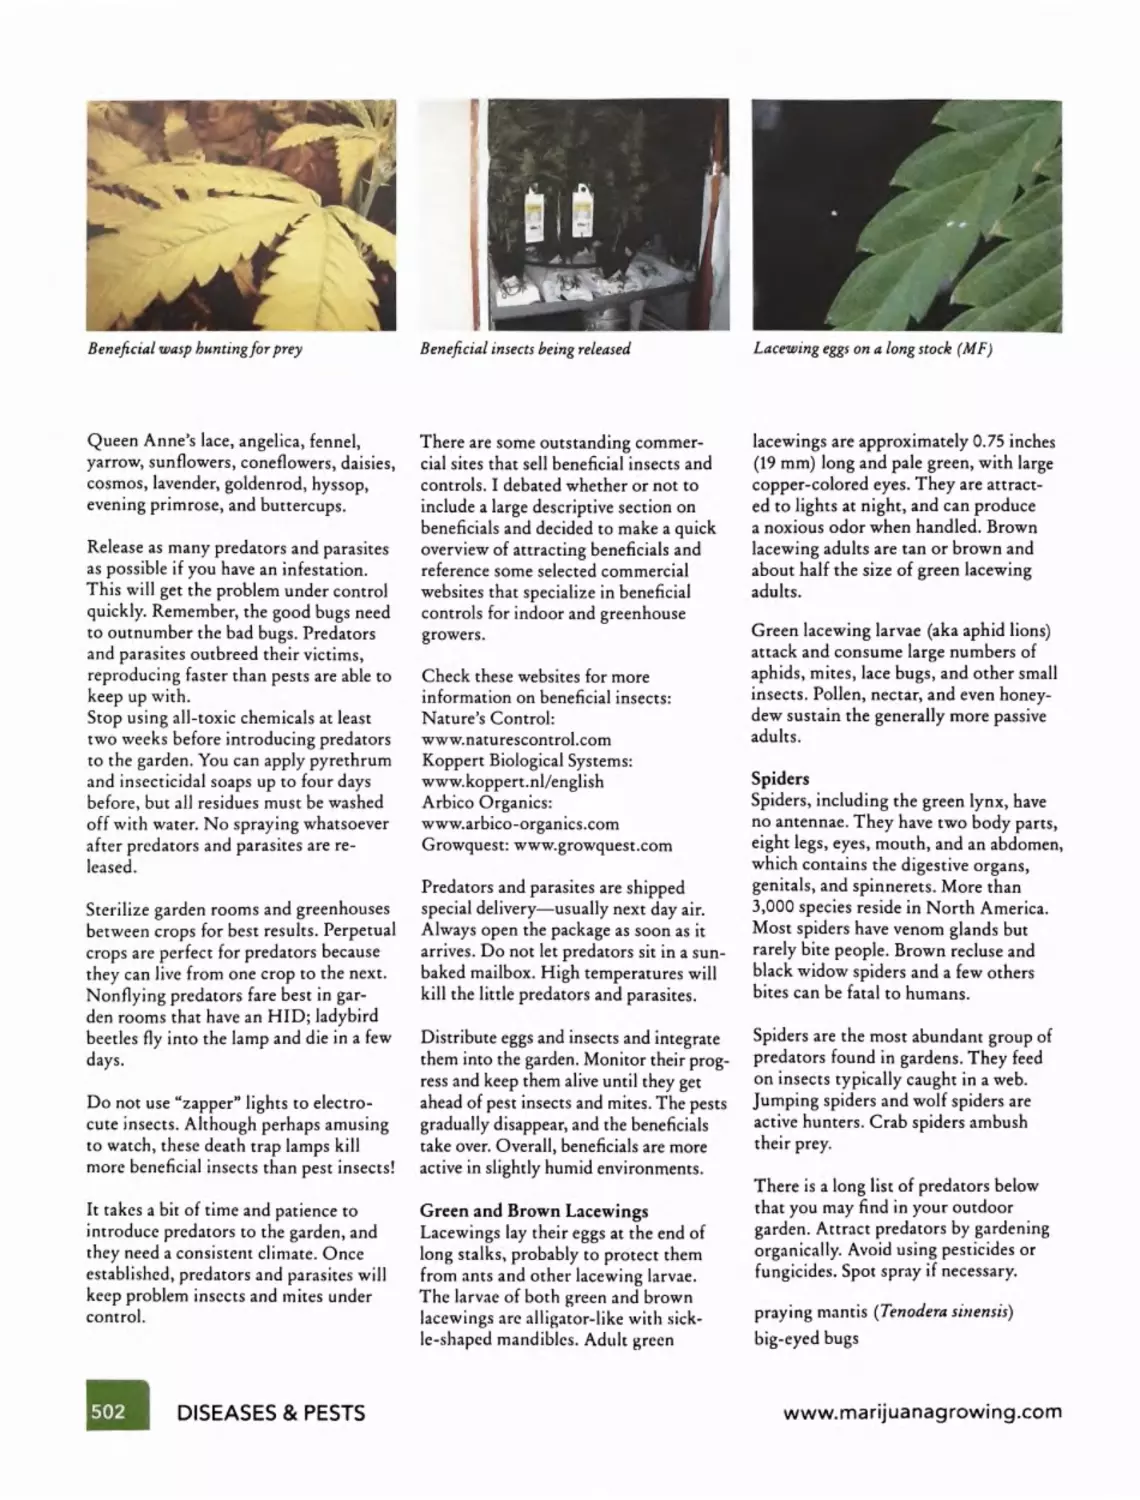
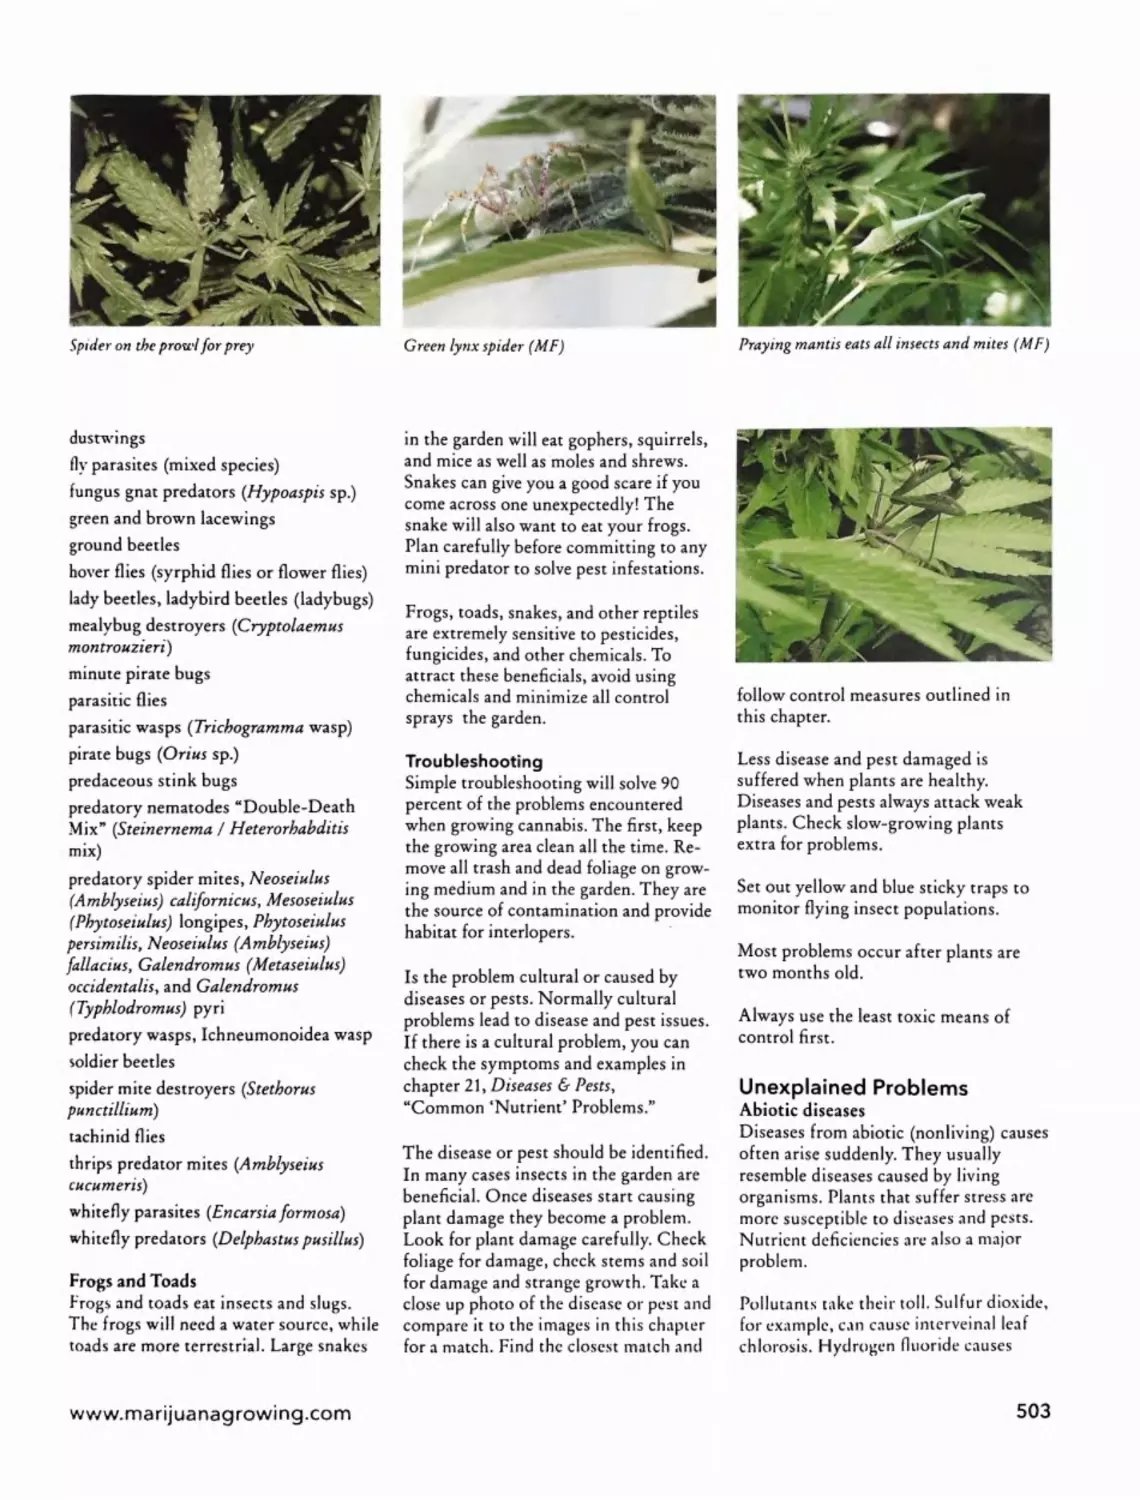
and Mites; Pest Mammals; Other Large Pests; Rogue Pollen; Disease and Pest Controls; Beneficial
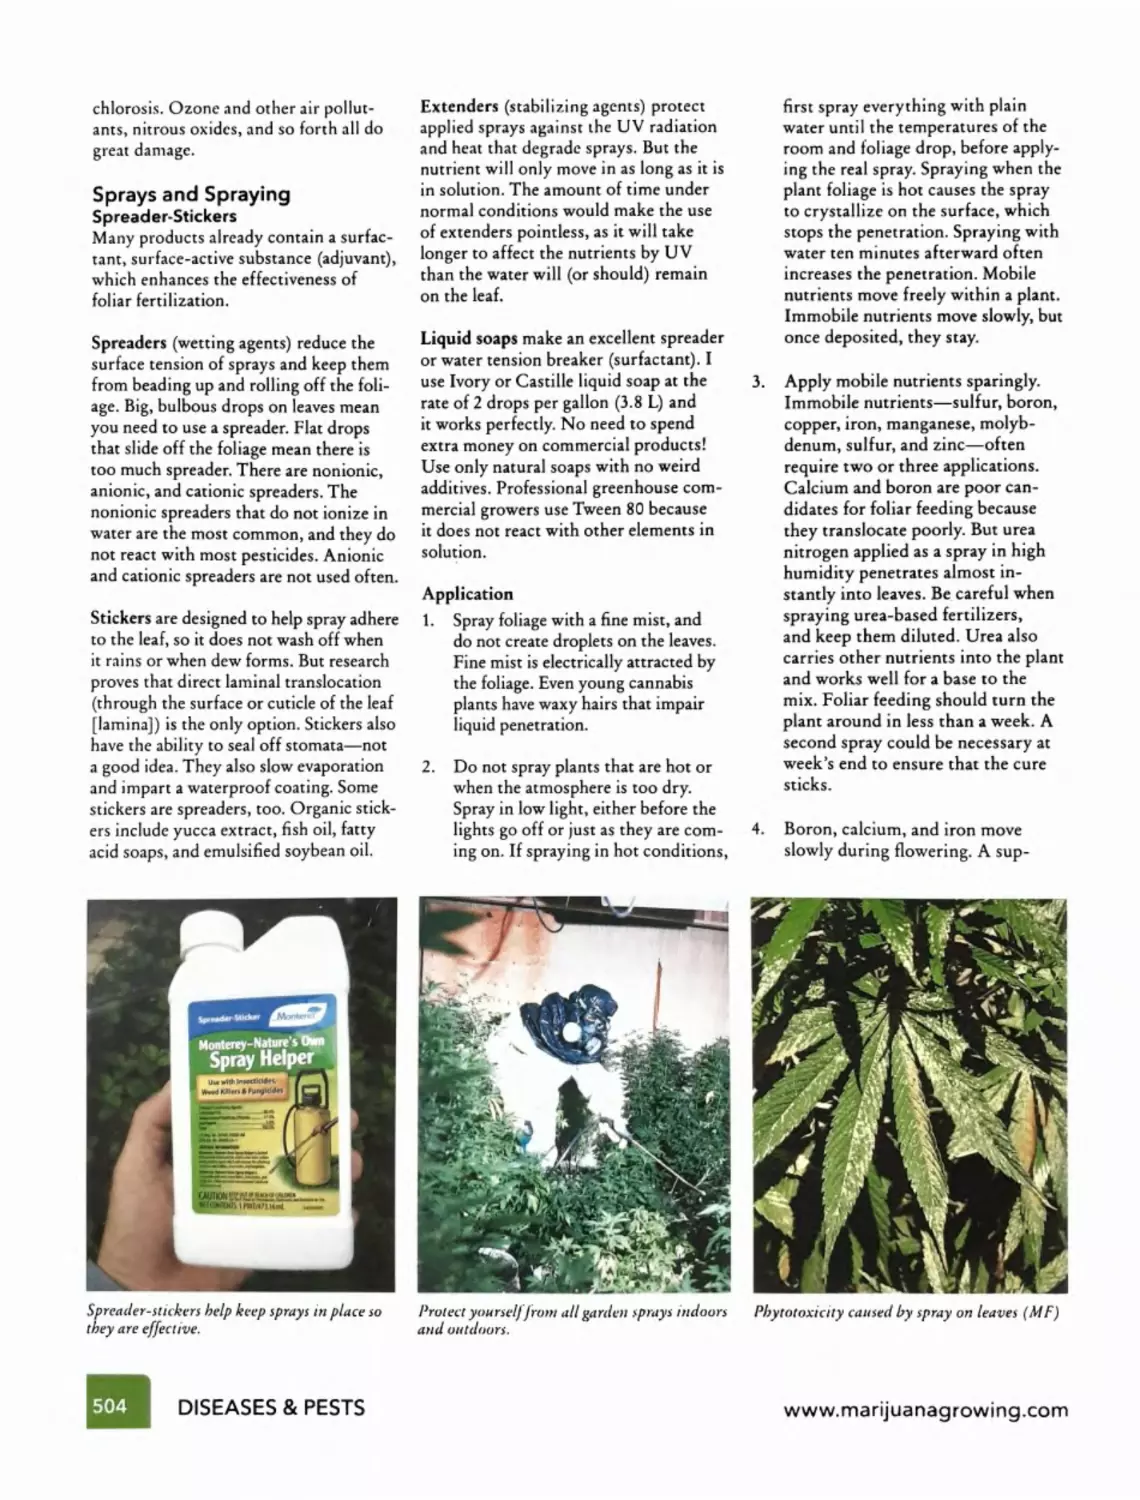
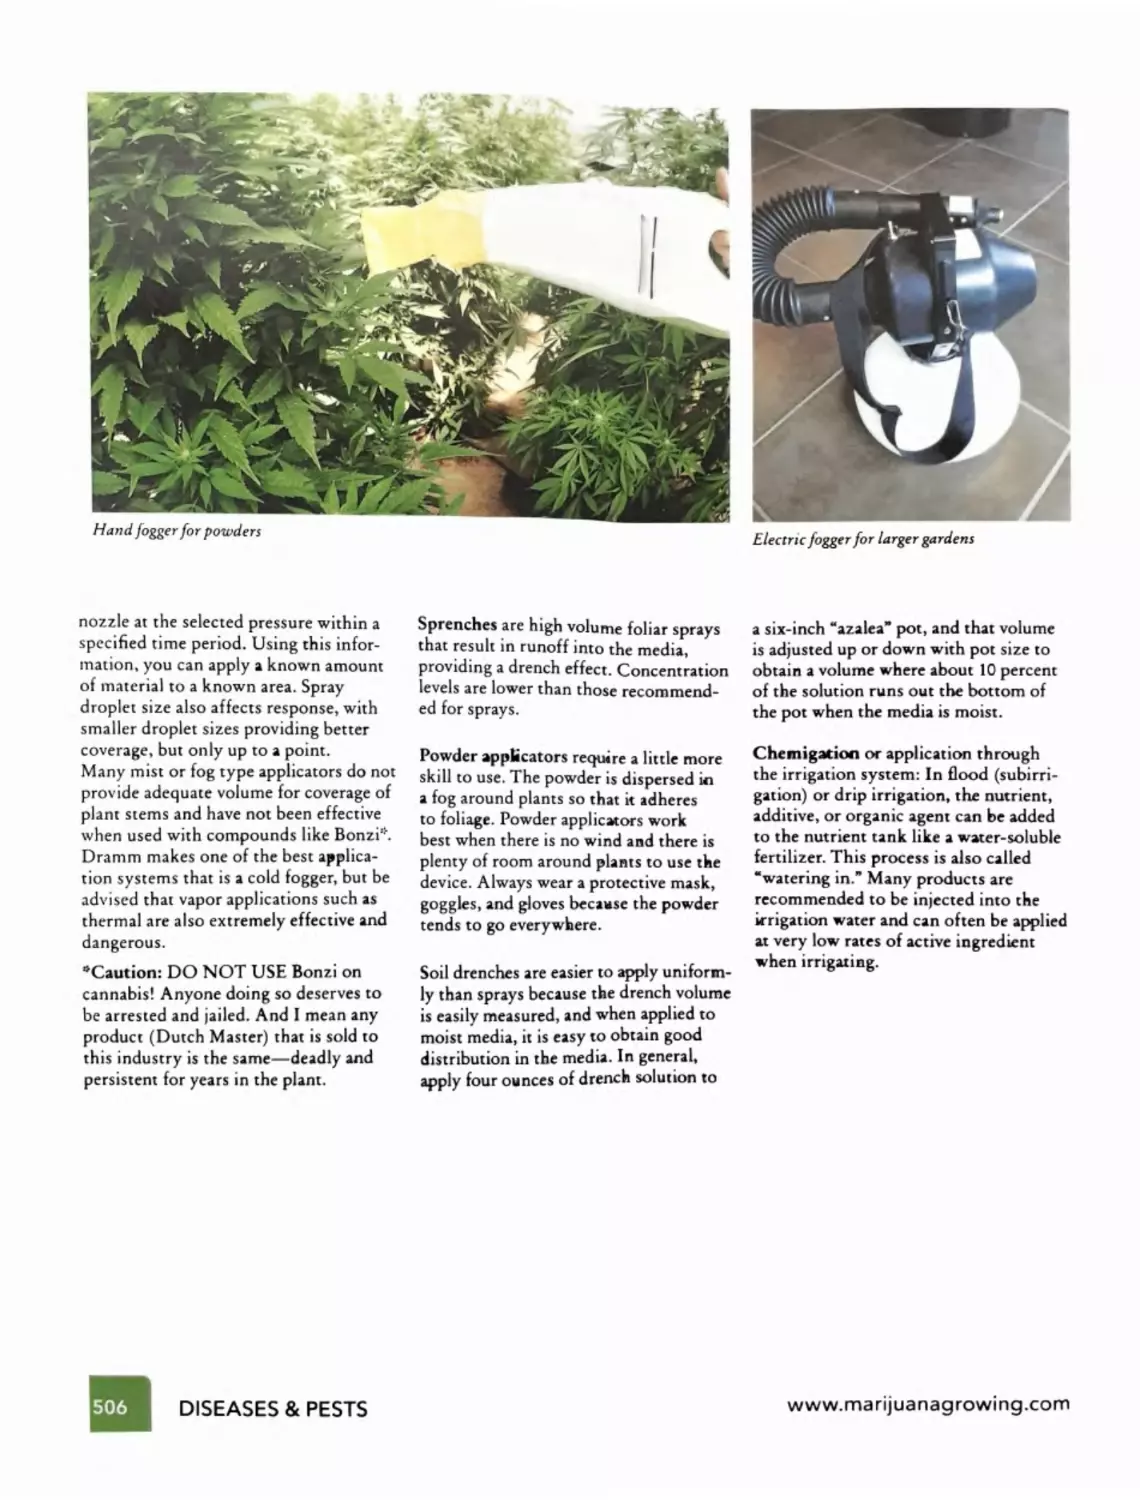
Insects; Unexplained Problems; Sprays and Spraying
Chapter 25 - Breeding - Page 507
Unforgettable Qualities of Cannabis; Physiology of Male and Female Flowers; Sexual Propagation;
Classical Cannabis Breeding; Influence of Alleles; Dominant and Recessive Traits; True Breed;
Hybrids; Inbreeding; Outbreeding; Backcrossing; Self-Pollinating (Selfing); Feminized Seeds;
Day-Neutral (aka Autoflowering) Feminized Varieties; Making Seeds at Home; Making Seeds:
Step-by -Step; Seed-Crop Care; Breeding Terms; Ploidy Factor; Modern Cannabis Breeding
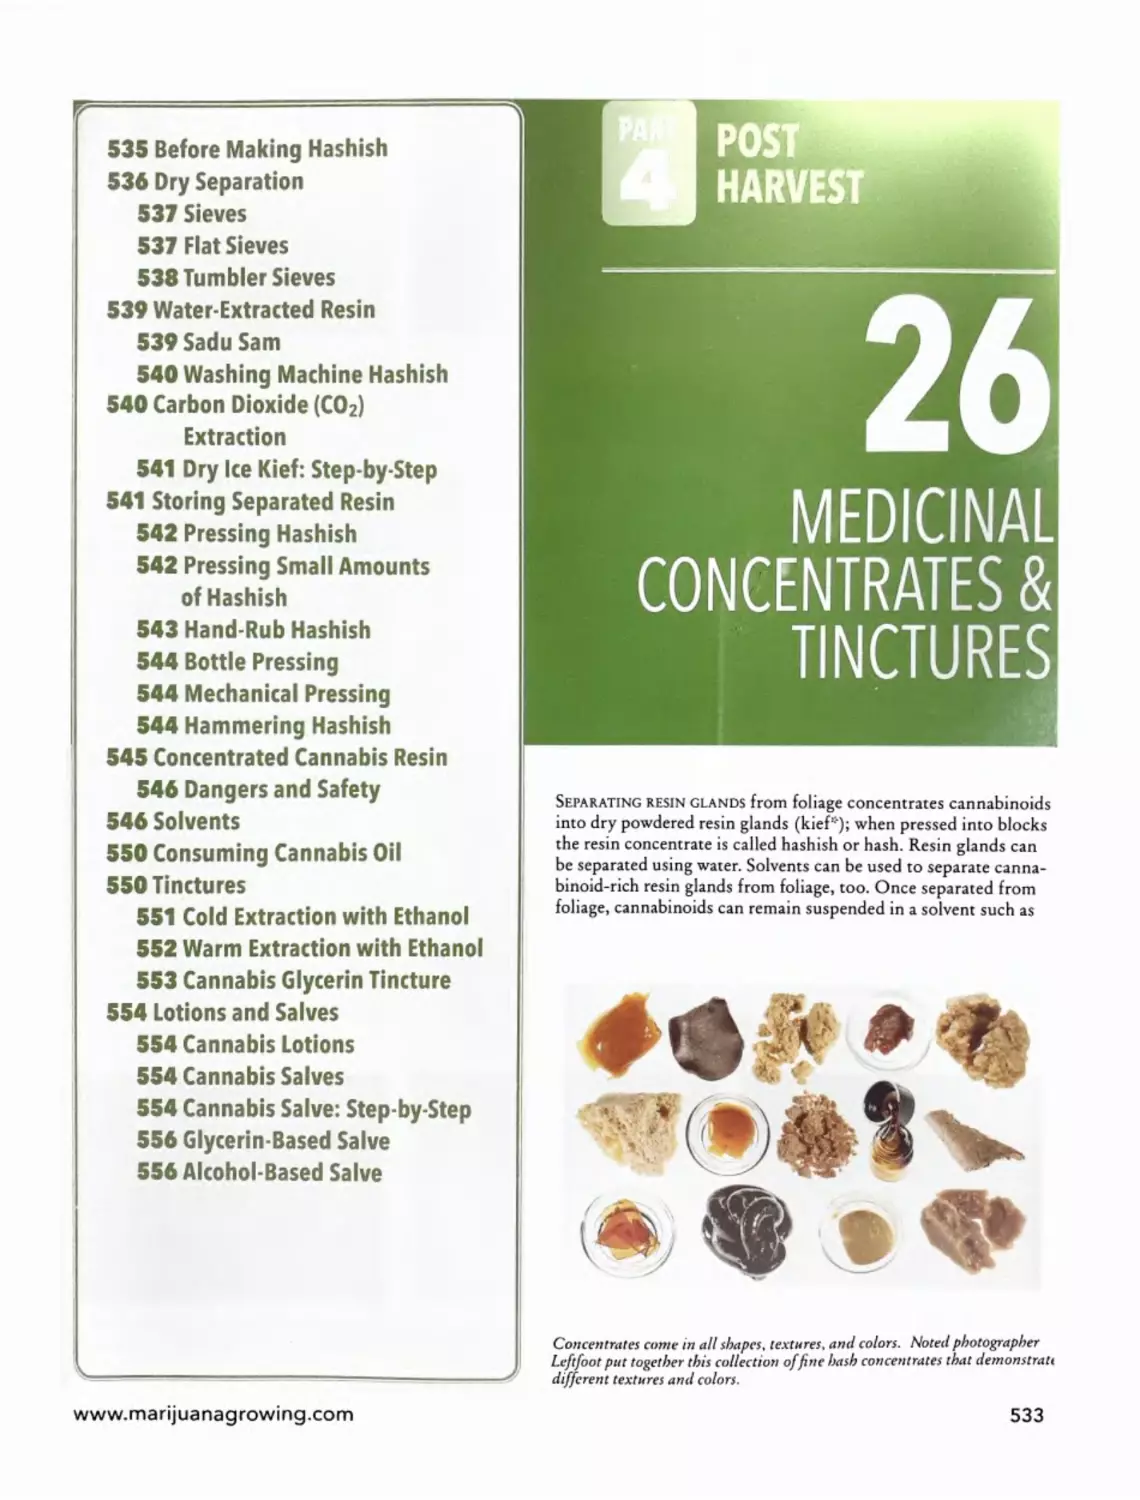
Part 4 | Post Harvest
»$•<»
Chapter 26 - Medicinal Concentrates & Tinctures - Page 533
Before Making Hashish; Dry Separation; Water-Extracted Resin; Carbon Dioxide (CO2) Extraction;
Storing Separated Resin; Concentrated Cannabis Resin; Solvents; Consuming Cannabis Oil;
Tinctures; Lotions and Salves
Chapter 27 - Cooking with Medicinal Cannabis - Page 557
Decarboxylation and Solubilization; Safety - Clean Cannabis; Grades of Cannabis; Temperature and
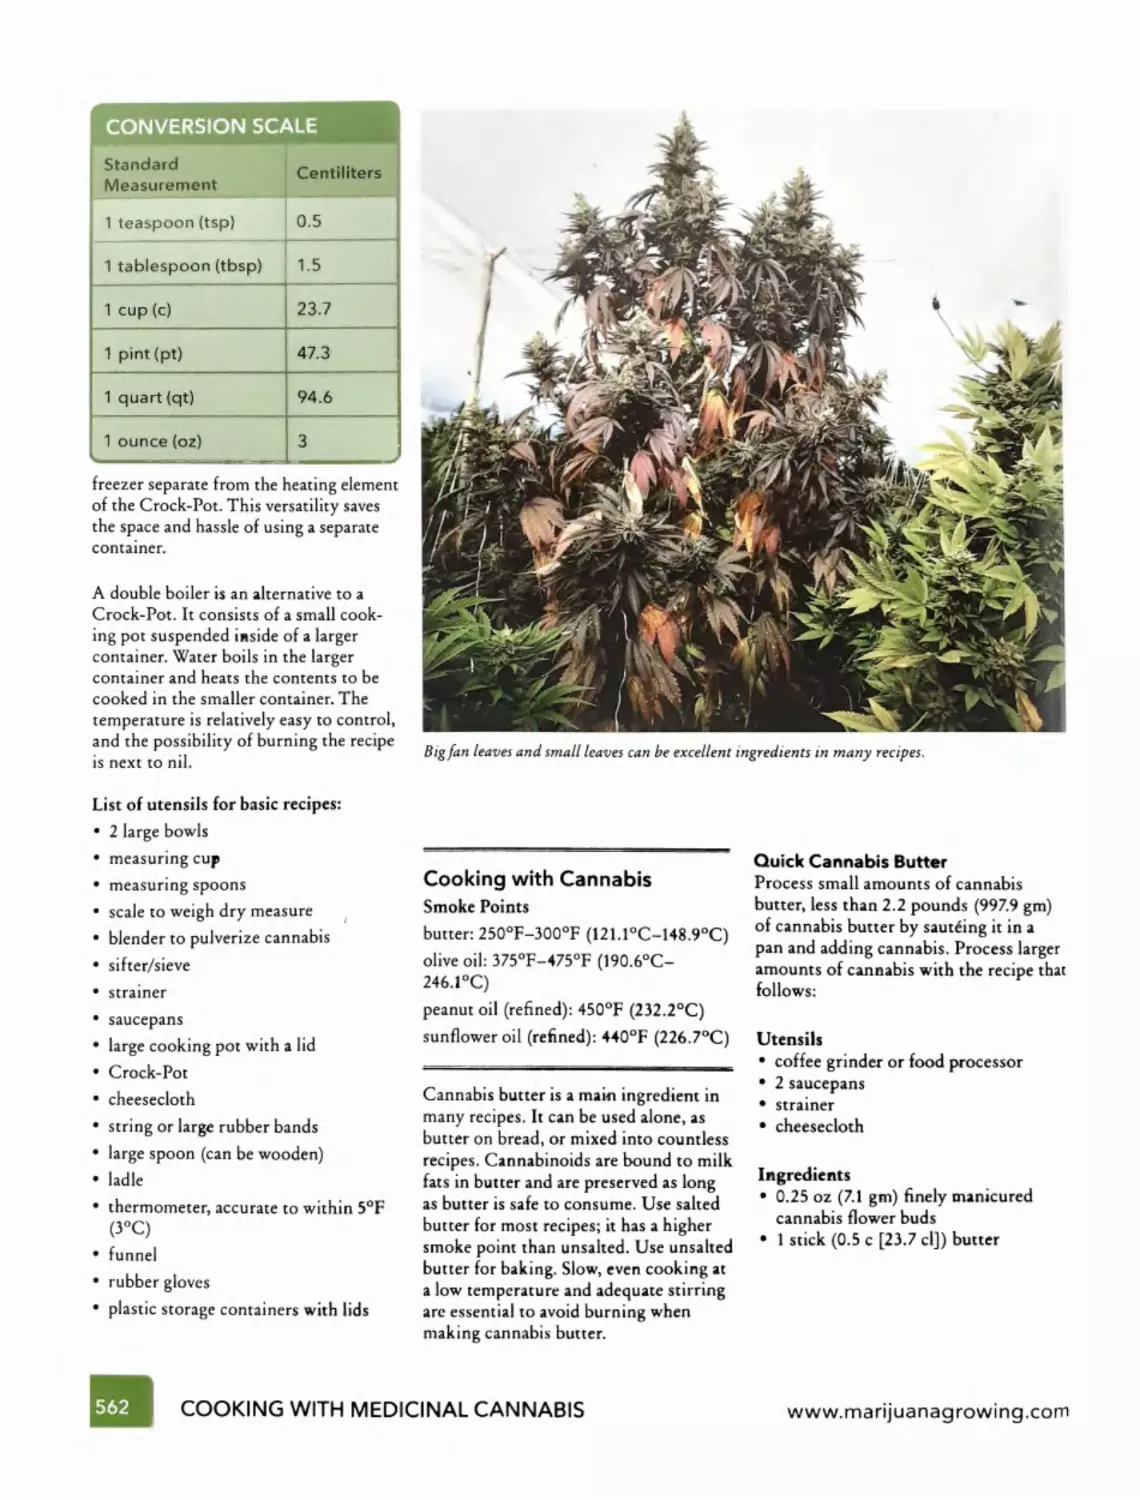
Volatility; Utensils; Cooking with Cannabis; Recipes; Cannabis Beverages
Appendix - Page 575; Contributors - Page 578; Index - Page 581; About Jorge - Page 591
www.marijuanagrowing.com
INTRODUCTION
Cannabis is a unique plant—medicinal,
industrial, and intoxicating—a plant with
natural defenses against the axe, fire, and
intense political and legal control. Every
day we see news articles and television
reports about how the civilized world
deals with cannabis. Media outlets focus
on medical cannabis dispensaries, the
doctors who prescribe cannabis, and the
patients and gardeners who produce it,
frequently centering on the illegal pro
duction. The equation is often driven by
politicians and others who have ignored
science and wield cannabis as a means
to divide and control populations. How
ever, cannabis has a natural and evolu
tional defense that started long before
man cut the first tree and before fire
burned the first leaf. Natural survival
laws ensure that cannabis will be here
long after man-made laws are gone.
Medical patients, caregivers, and rec
reational cannabis gardeners are often
caught in a quagmire. On one side lie
man-made local and federal laws; on the
other side Mother Nature. This unfor
tunate plant prohibition is based on
ignorance and fear. Charles Darwin was
so fearful of hypnosis in relation to the
Theory of Evolution that he waited until
nearly the end of his life to publish the
Origin ofSpecies. To change, societies
suffer as Darwin suffered. No matter
how much our growth is arrested, it can
not stop the evolution of a species.
Fortunately we live in the 21st century
and draconian laws about cannabis are
disappearing. The beginning to the end
of cannabis prohibition is in sight. Med
ical cannabis and scientific research are
promoting social acceptance. Colorado
and Washington state (in the USA) and
Uruguay have legalized recreational
cannabis, and many other countries have
decriminalized or tolerate use and cul
tivation. The tsunami of social change,
mainstream acceptance, and legalization
of cannabis is upon us. We will all be
gardening in peace soon.
About the Encyclopedia
The Cannabis Encyclopedia is the
sequel to Marijuana Horticulture: The
Indoor!Outdoor Medical Grower's
Bible. One wonderful night six years
ago, Michka, our French publisher
(www.mamaedicions.com) and I were
discussing my sixth rewriting of the
“cannabis bible.” After describing the
extent of my new work, she said, “It
sounds like an encyclopedia.” After our
meeting The Cannabis Encyclopedia
took on new dimensions and research. It
is an excellent sequel that is completely
updated and expanded. We changed to
an 8.5 X 11-inch (21.6 X 27.9 cm) format
with three columns to save space and
paper, and the new book contains more
than twice the information of Marijuana
Horticulture, including 2,000 all-new
color images.
This book is a compilation of more than
30 years of personal cannabis research
and collaboration. Within its pages you
will find the experience of thousands of
cannabis gardeners, editors, and writers
from several continents.
Gathering information today is much
easier than it was 30 years ago, when I
started writing, but sorting the wheat
from the chaff is difficult. The informa
tion needed to be verified, so I called
upon well-educated scientists and horti
culturists with expertise in specific
areas—soil, lighting, nutrients, green
houses, cannabinoids, and so forth. With
the addition of new chapters—Medical
Cannabis, Measuring Cannabinoids,
Medical Cannabis Varieties, Medicinal
Concentrates & Tinctures, and Cooking
with Medicinal Cannabis—plus the
complete rewriting of all the original
chapters, the book had grown into
The Cannabis Encyclopedia.
Many people from many different coun
tries helped me research this work; their
names are listed under “Contributors” in
the back of the book.
Influence of the Internet
Today the organic nature of the Internet
is used to spread both information and
seeds. The Internet has linked cannabis
gardeners around the world, and prohibi
tion has helped us forge a unique bond to
understand and promote cannabis.
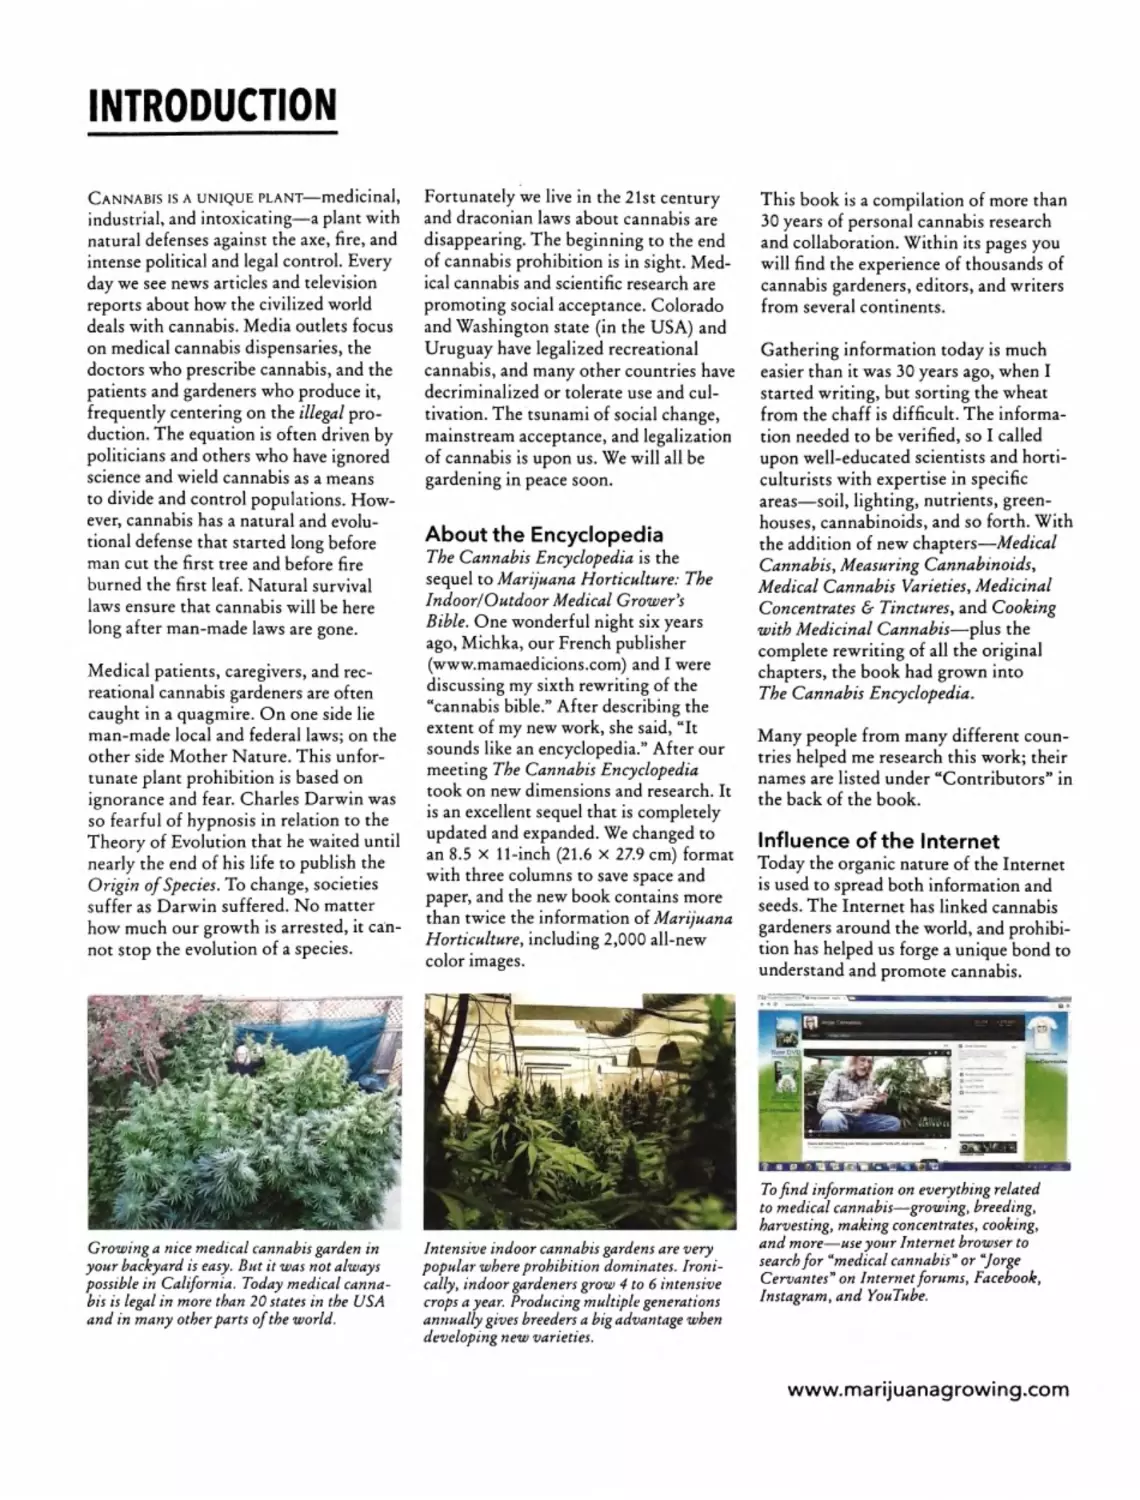
Growing a nice medical cannabis garden in
your backyard is easy. But it was not always
possible in California. Today medical canna
bis is legal in more than 20 states in the USA
and in many other parts of the world.
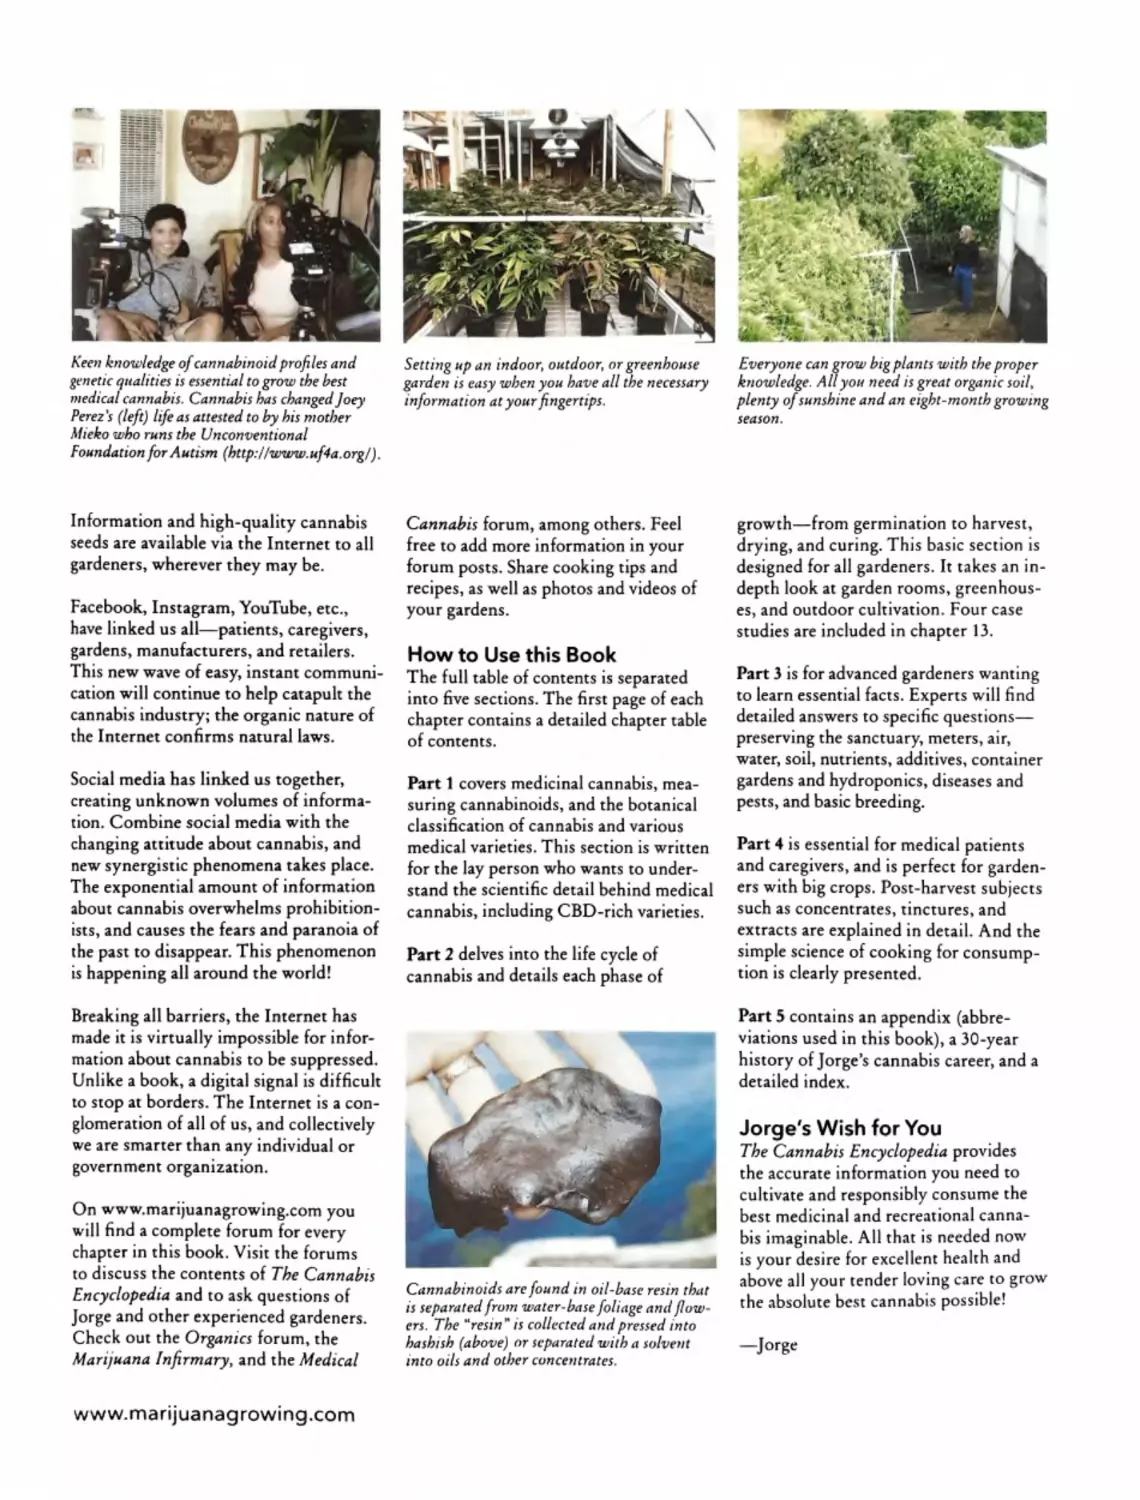
Intensive indoor cannabis gardens are very
popular where prohibition dominates. Ironi
cally, indoor gardeners grow 4 to 6 intensive
crops a year. Producing multiple generations
annually gives breeders a big advantage when
developing new varieties.
■j_ ____
_____
Im
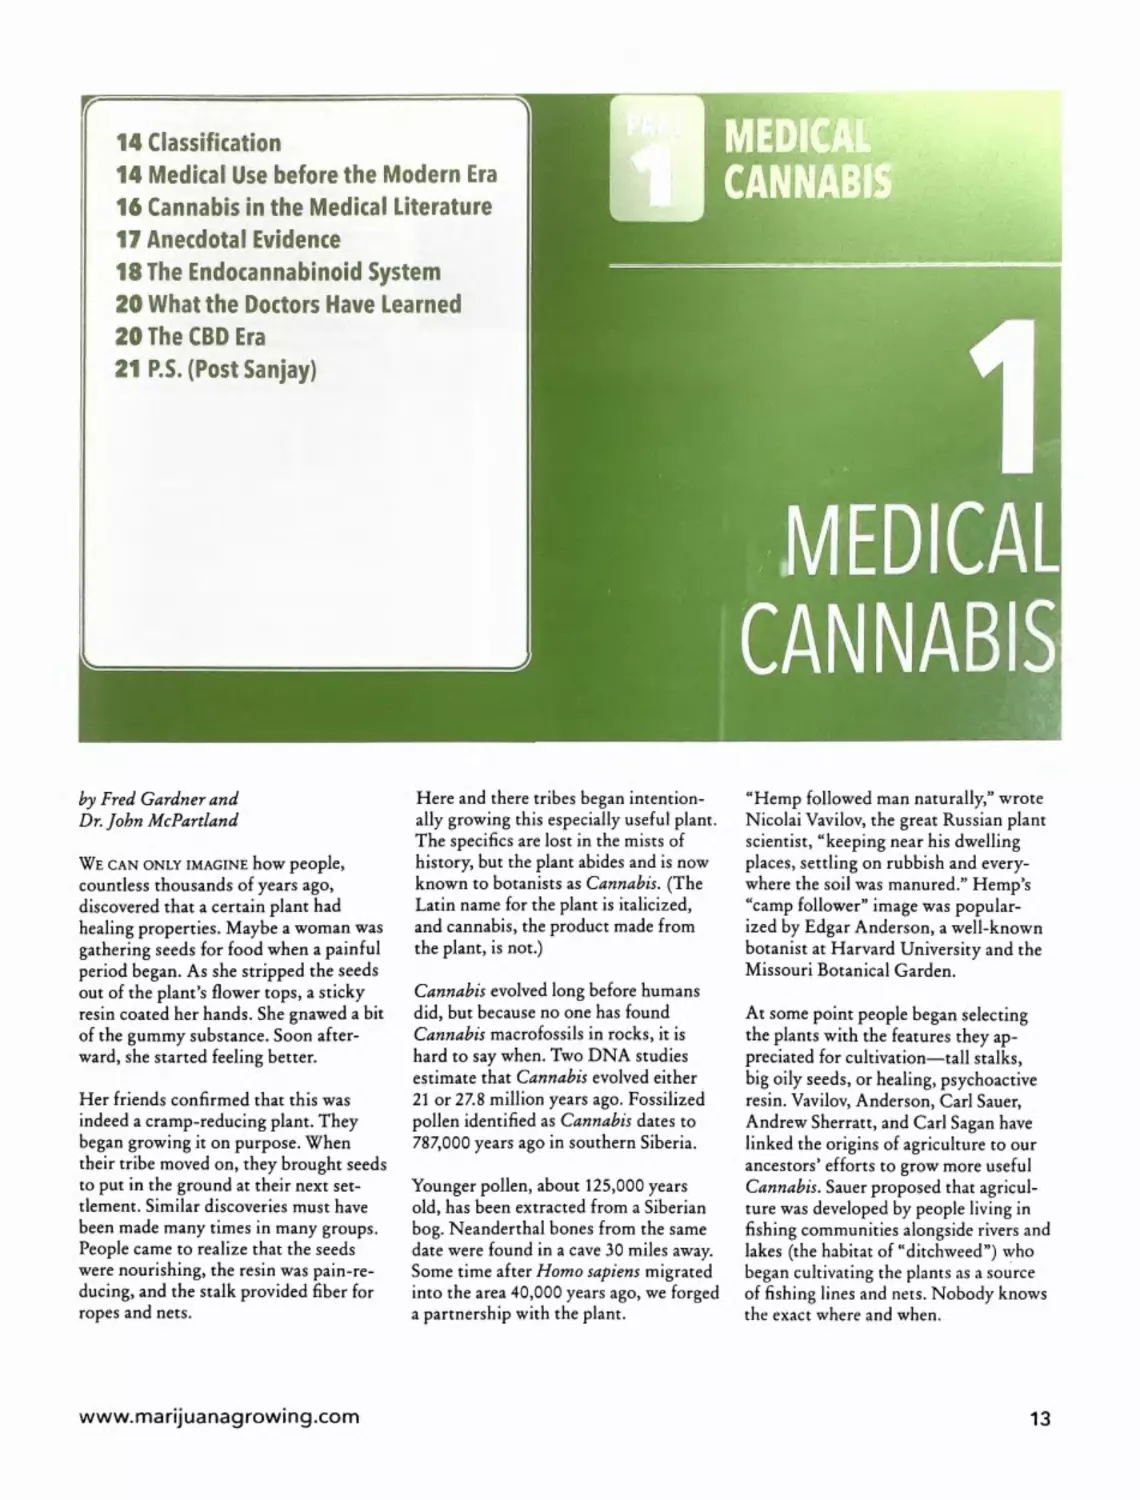
To find information on everything related
to medical cannabis—growing, breeding,
harvesting, making concentrates, cooking,
and more—use your Internet browser to
search for “medical cannabis” or “Jorge
Cervantes” on Internet forums, Facebook,
Instagram, and YouTube.
www.marijuanagrowingxom
Keen knowledge of cannabinoid profiles and
genetic qualities is essential to grow the best
medical cannabis. Cannabis has changedJoey
Perez's (left) life as attested to by his mother
Mieko who runs the Unconventional
Foundation for Autism (http:llwww.uf4a.org/).
Setting up an indoor, outdoor, or greenhouse
garden is easy when you have all the necessary
information at your fingertips.
Everyone can grow big plants with the proper
knowledge. All you need is great organic soil,
plenty ofsunshine and an eight-month growing
season.
Information and high-quality cannabis
seeds are available via the Internet to all
gardeners, wherever they may be.
Facebook, Instagram, YouTube, etc.,
have linked us all—patients, caregivers,
gardens, manufacturers, and retailers.
This new wave of easy, instant communi
cation will continue to help catapult the
cannabis industry; the organic nature of
the Internet confirms natural laws.
Social media has linked us together,
creating unknown volumes of informa
tion. Combine social media with the
changing attitude about cannabis, and
new synergistic phenomena takes place.
The exponential amount of information
about cannabis overwhelms prohibition
ists, and causes the fears and paranoia of
the past to disappear. This phenomenon
is happening all around the world!
Breaking all barriers, the Internet has
made it is virtually impossible for infor
mation about cannabis to be suppressed.
Unlike a book, a digital signal is difficult
to stop at borders. The Internet is a con
glomeration of all of us, and collectively
we are smarter than any individual or
government organization.
On www.marijuanagrowing.com you
will find a complete forum for every
chapter in this book. Visit the forums
to discuss the contents of The Cannabis
Encyclopedia and to ask questions of
Jorge and other experienced gardeners.
Check out the Organics forum, the
Marijuana Infirmary, and the Medical
Cannabis forum, among others. Feel
free to add more information in your
forum posts. Share cooking tips and
recipes, as well as photos and videos of
your gardens.
How to Use this Book
The full table of contents is separated
into five sections. The first page of each
chapter contains a detailed chapter table
of contents.
Part 1 covers medicinal cannabis, mea
suring cannabinoids, and the botanical
classification of cannabis and various
medical varieties. This section is written
for the lay person who wants to under
stand the scientific detail behind medical
cannabis, including CBD-rich varieties.
Part 2 delves into the life cycle of
cannabis and details each phase of
Cannabinoids are found in oil-base resin that
is separated from water-base foliage and flow
ers. The “resin” is collected and pressed into
hashish (above) or separated with a solvent
into oils and other concentrates.
growth—from germination to harvest,
drying, and curing. This basic section is
designed for all gardeners. It takes an in-
depth look at garden rooms, greenhous
es, and outdoor cultivation. Four case
studies are included in chapter 13.
Part 3 is for advanced gardeners wanting
to learn essential facts. Experts will find
detailed answers to specific questions—
preserving the sanctuary, meters, air,
water, soil, nutrients, additives, container
gardens and hydroponics, diseases and
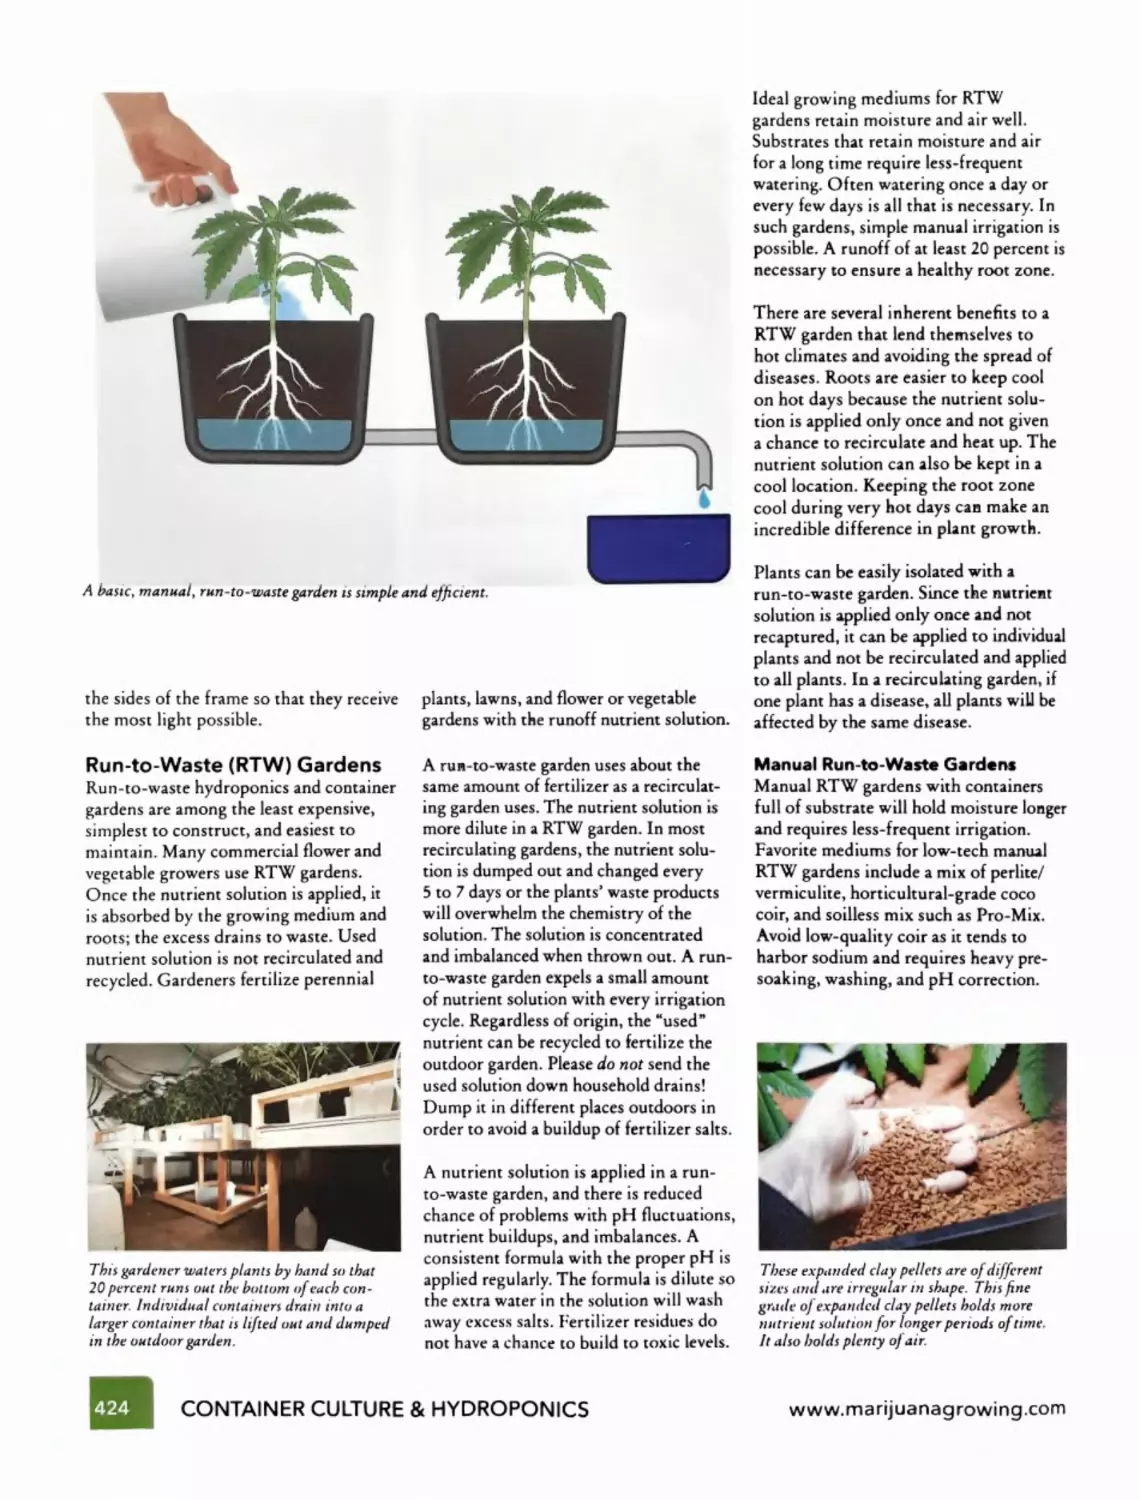
pests, and basic breeding.
Part 4 is essential for medical patients
and caregivers, and is perfect for garden
ers with big crops. Post-harvest subjects
such as concentrates, tinctures, and
extracts are explained in detail. And the
simple science of cooking for consump
tion is clearly presented.
Part 5 contains an appendix (abbre
viations used in this book), a 30-year
history of Jorge’s cannabis career, and a
detailed index.
Jorge's Wish for You
The Cannabis Encyclopedia provides
the accurate information you need to
cultivate and responsibly consume the
best medicinal and recreational canna
bis imaginable. All that is needed now
is your desire for excellent health and
above all your tender loving care to grow
the absolute best cannabis possible!
—Jorge
www.marijuanagrowing.com
FOREWORD
George F. Van Patten and Vicente Fox
Quesada, president of Mexico (2000-2006),
pose for a photo at the 2013 press conference
hosted by Steven DeAngelo (Harborside
Health Center) that announced the
Symposium Mexico-USA on the Legalization
and Medical Use of Cannabis.
I met George Van Patten on July 8, 2013,
in San Francisco, California, during the
press conference that announced the
Symposium Mexico-USA on the
Legalization and Medical Use of Cannabis,
held at the Fox Center.
(htlp://centrofox. org. mx/eri).
On that occasion, George gave me the
fifth edition of his book Marijuana
Horticulture: The Indoor/Outdoor
z
Medical Grower's Bible (2006), pub
lished under his pseudonym, Jorge
Cervantes. Specialists consider this
work to be a comprehensive treatise;
some of them, including George, call it
the bible for cannabis production, since
it covers all forms of indoor and outdoor
cultivation of this medicinal plant.
George shared that when he was up
dating the sixth edition of Marijuana
Horticulture—adding more than twice
the original text and a thousand more
images—his French publisher, Michka,
remarked that the revised content re
sembled a true encyclopedia.
The inclusion of new and important
studies, as well as multimedia elements
and information technologies for
consultation purposes, resulted in the
book that you have in your hands: The
Cannabis Encyclopedia: The Definitive
Guide to Cultivation & Consumption of
Medical Marijuana.
The Cannabis Encyclopedia incorporates
and condenses information that is
difficult to find, representing valuable
research and the modern culture of this
ancient plant. George’s purpose today,
like that of the eighteenth-century
French encyclopedists in their time, is
to arrange in a consistent and systematic
way the current knowledge on a given
topic.
Scientific arguments dispel many pro
hibition myths and antiquated beliefs
about cannabis, affirming that we are
indeed in the process of facing the final
frontier, an unstoppable new paradigm:
the legalization of cannabis.
Prohibition does not work. Prohibition
generates temptations. Prohibition kills.
The dramatic world war on drugs, in
which tens of thousands of young peo
ple have been killed, is proof that prohi
bition has failed. These people were not
born criminals; they were not geneti
cally predisposed toward criminality.
And yet, because of flawed public policy,
disinformation, a lack of education, and
a lack of better economic incentives and
opportunities, they became victims of
an insane war against an enemy we can
never defeat with prohibition.
With its social contribution of infor
mation and knowledge, The Cannabis
Encyclopedia allows us to affirm that
there is no turning back; the legalization
of cannabis—the freedom to choose—
is inevitable. The question essentially
revolves around the issue of freedom of
choice versus prohibition.
We are all created equal and free. It
follows, then, that if we are created this
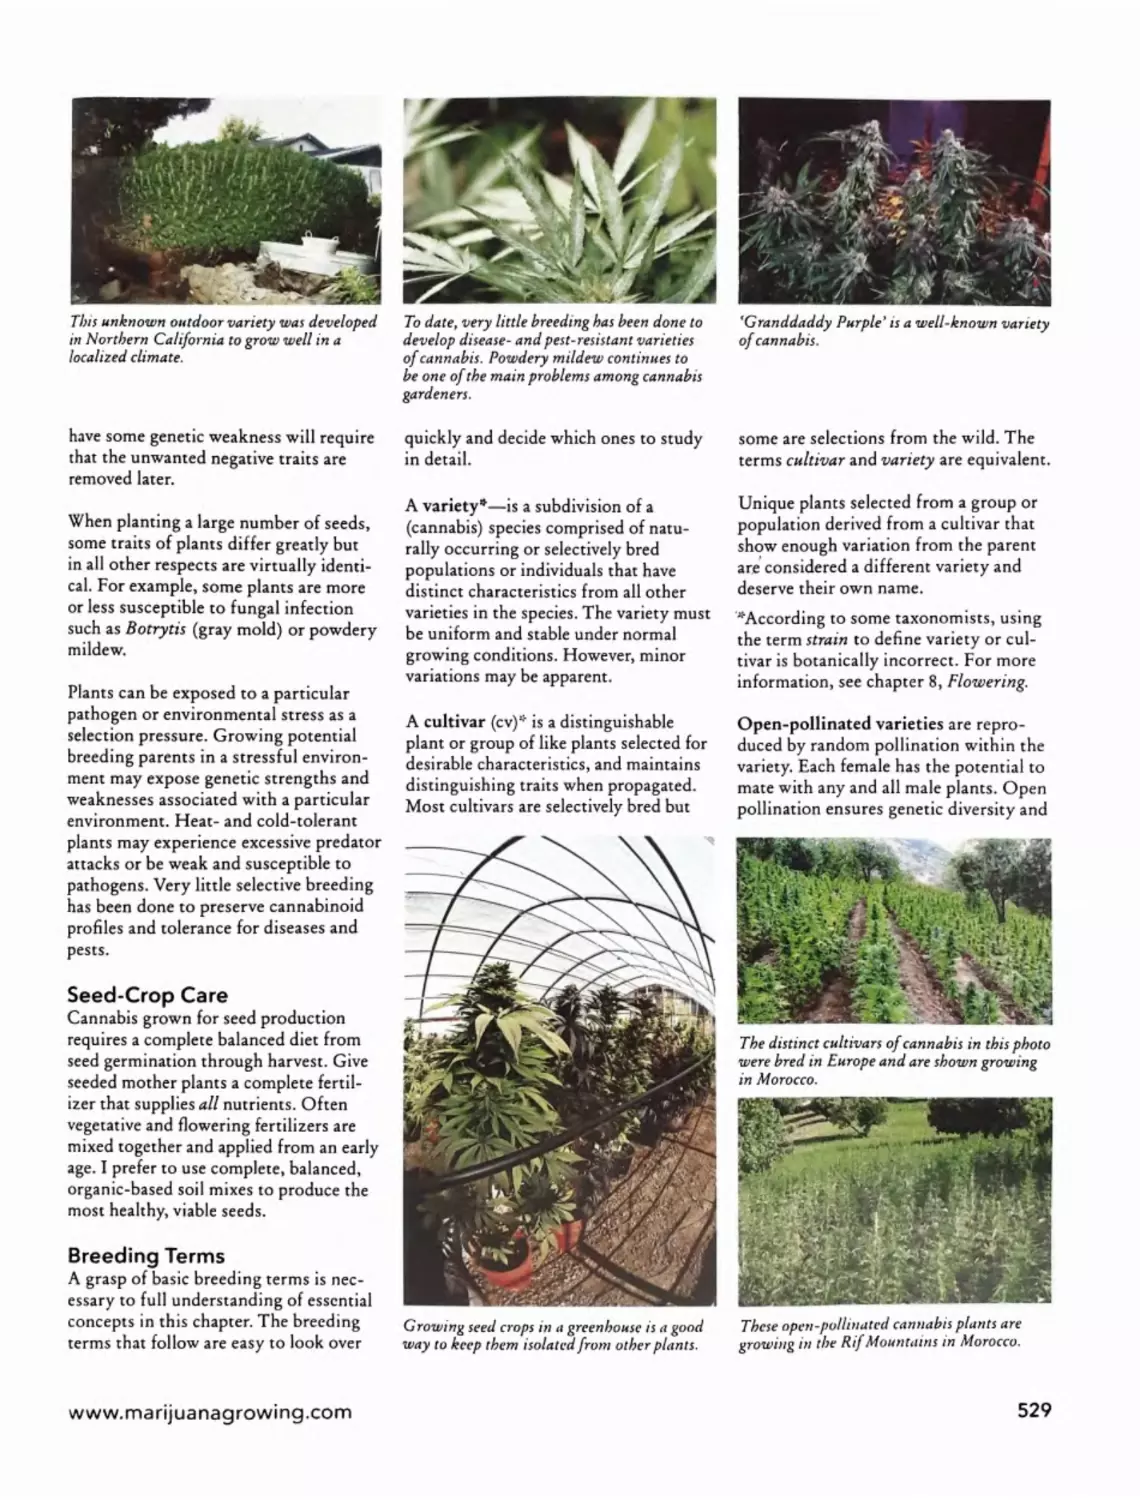
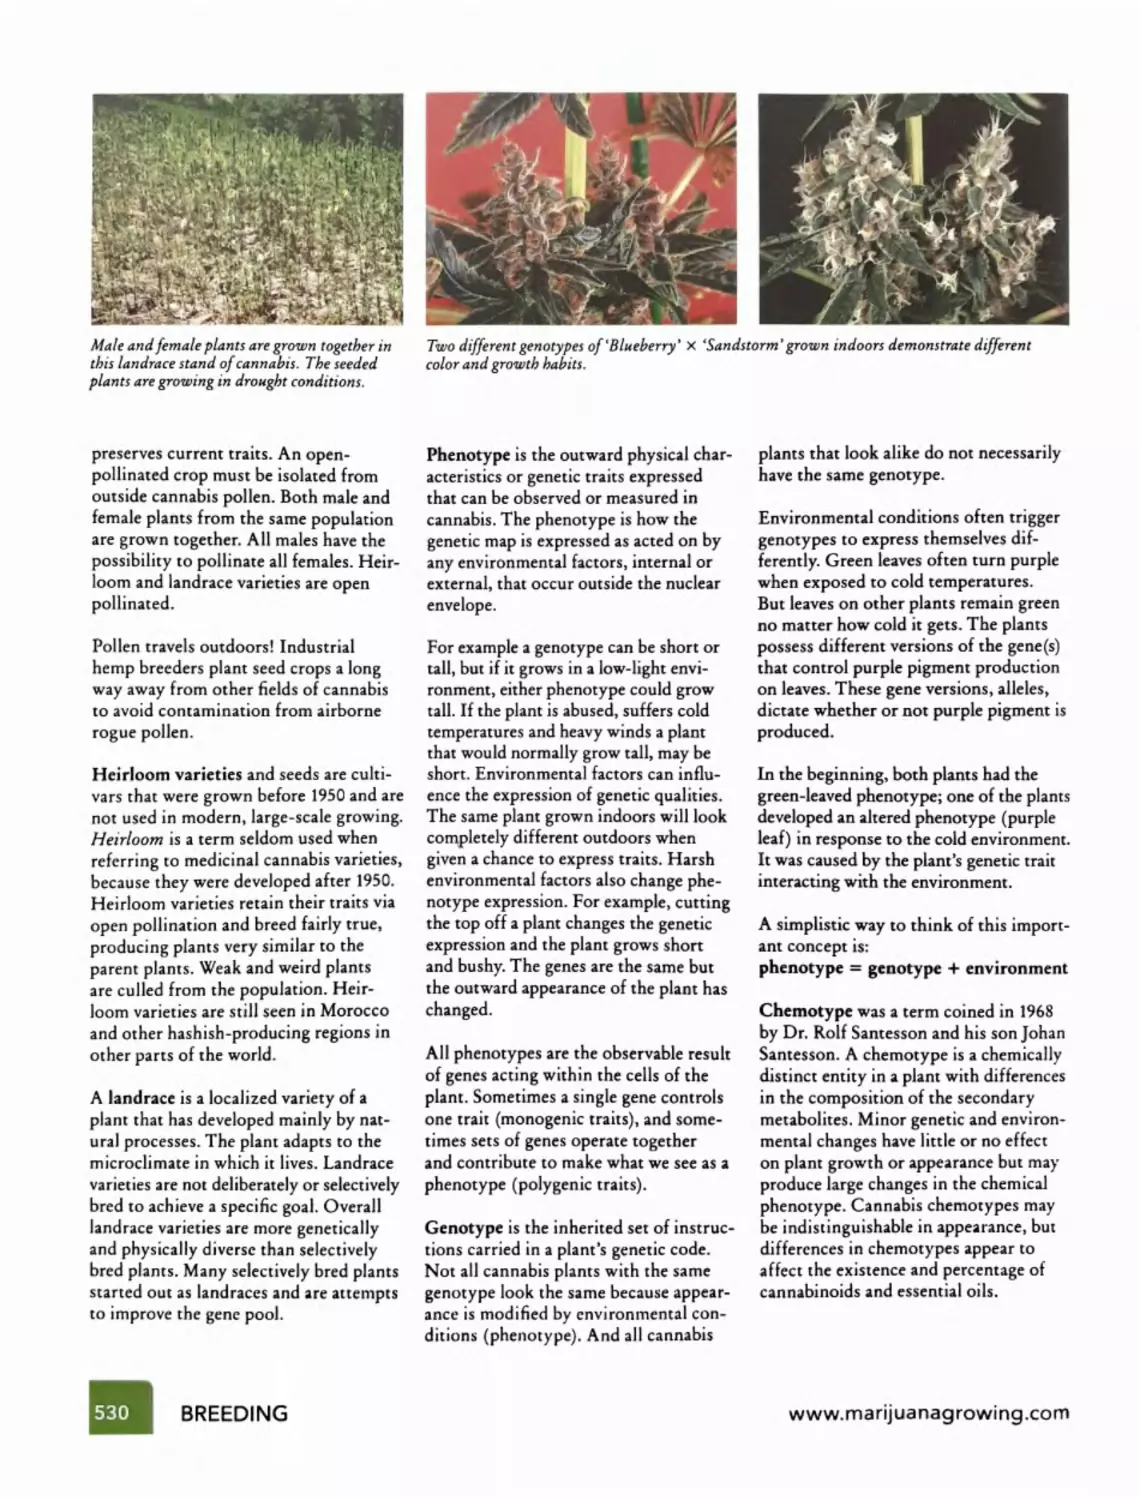
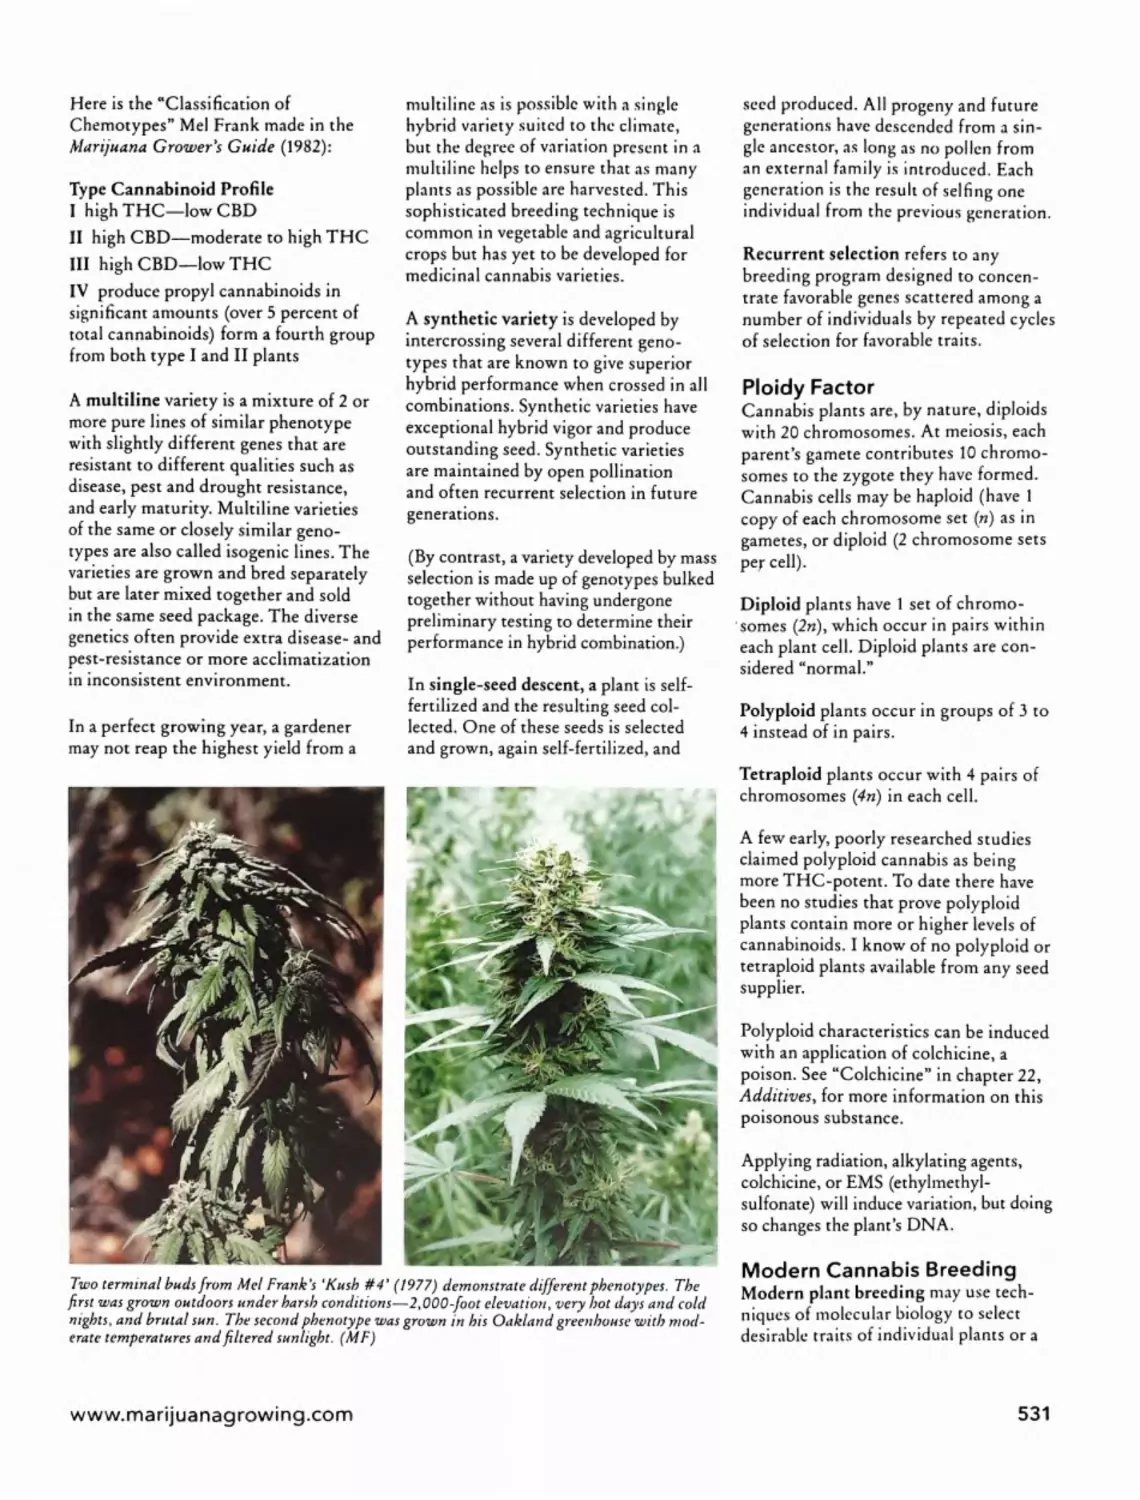
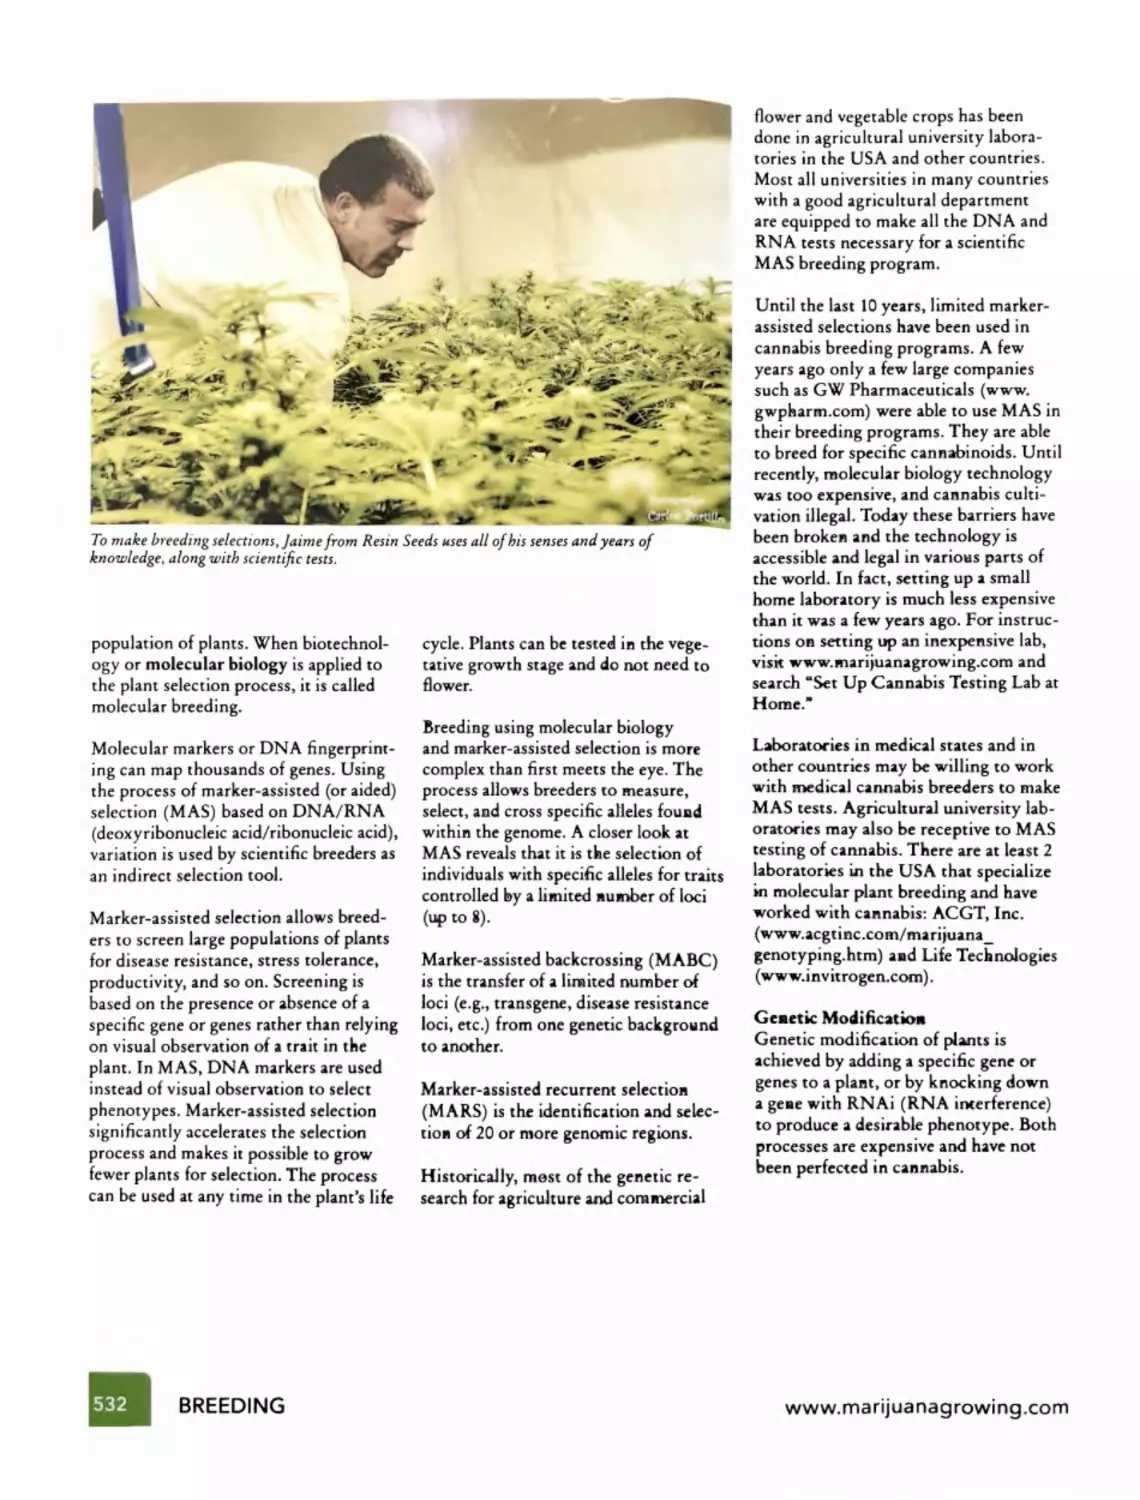
way, we must be allowed the freedom
to determine what is best for ourselves,
to decide our own behavior, and to act
responsibly, as long as we do not detri
mentally affect the rights of others.
Mexico is not a significant producer or
consumer of drugs; however, because
of its unique geography—between
drug-producing countries to the south
and a giant drug-consuming country to
the north—it is caught in a permanent
war from which it must exit.
The United States has demonstrated a
total inability to enforce its own laws
and prevent the importation and distri
bution of drugs within its own territo
ry. One is left to wonder how this has
occurred—how mass quantities of drugs
can easily cross the border from Mexico
into the United States, where they are
sold in every corner of the country. I
wonder who launders the money and
buys the weapons and ammunition
in the United States. Who brings the
proceeds back to Mexico to bribe police,
public officials, even members of the
army? Estimates indicate that about
2,000 weapons enter Mexico illegally
from the United States every day (Small
Arms Survey, 2011, Graduate Institute
of International Development Studies,
Geneva, Switzerland), a figure that could
surely have increased in recent years.
If countries were to adopt a regula
tory policy in conjunction with the
decriminalization of drugs, they would
have money (through taxes) to operate
educational, regulatory, and informative
initiatives, and citizens would not have
to shoulder an immense burden—the
cost of the war on drugs.
In his book, Drogas: Prohibition o
legalization (Drugs: Prohibition or
Legalization) (Colombia, Editorial
Debate, 2013), former president of
Colombia Ernesto Samper Pizano
asserts, “There are 300 million
consumers of different drugs in the
world, and legalizing the use of
marijuana would solve 60 percent of
the drug problem in the world ...
It is no secret that marijuana is less
harmful than alcohol in terms of
www.marijuanagrowing.com
Holland
Consumption and purchase of
cannabis and derivatives are
allowed in small quantities \
from 1976 through coffee
shops
Germany
Decriminalized
consumption, but
punishes trafficking
Belgium
Decriminalized consumption
but punishes trafficking
\
\
England & Wales '
They are the countries
that use most \
marijuana x
illegally
Norway
Smoking marijuana a
felony, with penalties
ranging from loss of
freedom to undergoing
compulsory detoxification
therapies
Sweden
Smoking marijuana is a felony, with
penalties ranging from loss of freedom
to undergoing compulsory detoxification
therapy
Portugal — -
Decriminalized
consumption
but punishes
trafficking I
Spain
Decriminalized
consumption
but punishes
trafficking
Switzerland
Decriminalized consumption
but punishes trafficking
ranging from loss of
freedom to undergoing
compulsory detoxification
therapy
•Finland
Smoking marijuana is a
felony, with penalties
ranging from loss of
freedom to undergoing
compulsory detoxifica7z
tion therapy
China
Smoking marijuana is a
felony, with penalties
ranging from loss of
freedom to undergoing
compulsory detoxifica
tion therapy
Pakistan
The production of
hashish is legal, but
not consumption
United States
In Washington and
Colorado consumption
is legal for recreational
purposes
Chile
Smoking marijuana is a
felony, with penalties
ranging from loss of
freedom to undergoing
compulsory detoxification
therapy *
Argentina
Smoking marijuana is a
felony, ttwith penalties
Uruguay
Consumption and
production are legal
Italy
Decriminalized consumption
but punishes trafficking
Illegal with harsh penalties
Decriminalized, fully or partially legal
Source: Sandra Sanchez, www.sinembargo.mx. Periodismo digital con rigor. Mexico, August 4, 2013. Translated from Spanish to English.
health; no one has died from a cannabis
overdose.”
In this new paradigm, taking responsi
bility for one’s own health would mean
consuming cannabis in a responsible and
controlled manner, the same way that so
ciety currently establishes its expectation
for responsible tobacco and alcohol use.
The public opinion in favor of cannabis
legalization outweighs the approval of
government prohibitionist policies. The
trend is well established and, like many
other prohibitions, this one must even
tually give way to the freedom of choice
exercised in an educated and responsible
manner.
Doctors, specialists, entrepreneurs, ac
tivists, opinion leaders, journalists, leg
islators, members of congress, experts,
and public officials who have attended
seminars and conferences held in the
Americas, Europe, and Latin America on
the legalization and medical use of canna
bis insist on discussing the legalization
of marijuana beyond any ideologies, and
to destigmatize the research for medi
cal use. Even Secretary General of the
Organization of American States, Jose
Miguel Insulza, declared his “sympathy
[with] the emergence of alternative drug
policies, like the recent move toward the
legalization of marijuana in Uruguay or
the debate to regulate it in Mexico.”
Internationally recognized institutions
such as the Global Commission on Drug
Policy and the Cato Institute; Mexican
academic institutions such as the Uni-
versidad Nacional Autonoma de Mexico
(UNAM); and hemispheric leaders,
presidents, and former presidents of sev
eral countries are in favor of a paradigm
shift regarding the fight against drug
trafficking, after more than four decades
of poor results using prohibition to
eradicate violence and drug use.
According to a survey by the Pew
Research Center in March 2013, for the
first time in more than four decades
of surveys on the issue, a majority of
Americans are in favor of legalizing the
recreational use of cannabis. According
to the national survey, 52 percent say
that cannabis use should be legalized,
while 45 percent say it should not. The
support for cannabis legalization has
increased by 11 points since 2010. The
change is even more dramatic since the
late 1960s. In a 1969 survey conducted
by Gallup, only 12 percent were in favor
of legalizing cannabis, while 84 percent
were opposed to it.
In the USA, twenty-one states and
Washington, DC, have approved medical
www.marijuanagrowing.com
use of cannabis, and the approval of rec
reational use is being discussed in other
states, as has already happened in Colo
rado and Washington state. In Canada,
some regulations concerning cannabis
usage have been publicly issued. The
Netherlands and Portugal have already
accomplished legalization, and con
sumption is not penalized in Mexico.
While in the United States, Uruguay,
and Spain, specifically the City of
Barcelona, the legalization of marijuana
progresses, in Mexico such initiatives
are very slow. Our country is slow to
act and, above all, the fundamental issue
of prohibition remains unsolved, which
does not prevent the 40 deaths per day
caused by the drug cartels.
Mexico has had a late start in the pro
cess of cannabis legalization, and the
response has not been as expeditious
; s necessary. Prompt action is required
to reduce violence, achieve peace and
harmony, and improve our country’s
damaged image abroad.
In Mexico, some local and federal
legislators are vigorously pushing these
initiatives. They have studied the sub
ject, visited other countries, had contact
with George Van Patten, and observed
the experiences of the United States, the
Netherlands, Portugal, and Australia,
among others.
However, the federal government of
Mexico and the government of the
Federal District (Mexico City) are not
progressive. They are on the defensive,
resistant to change, and are perceived as
hesitant and indifferent—but the legal
ization process is already irreversible.
Legalizing cannabis is the way out of
the trap in which we find ourselves. This
option provides substantial benefits:
• Separation of violence and crime from
the health issue
• Reduction of consumption, as
happened in Portugal after legalization
• Substantial reduction of revenues for
the drug cartels
• Making funds available to govern
ments for education and to prevent
violence
• Allocation of time and resources to
address other widespread forms of
criminality
• Education to decide and exercise our
freedom responsibly
• Rescue of thousands of young
people—the future of every
country—who walk the wrong direc
tion into a life of crime
• Promotion of economic growth and
the creation of opportunities for
countries to move forward and not
watch others pass them by
The time has come for the governments
of our countries and the governments
all over the world to act and govern as
the great president Abraham Lincoln
envisioned [in the Gettysburg Address]:
“That this nation, under God, shall have
a new birth of freedom and that govern
ment of the people, by the people, for
the people, shall not perish from the
earth.”
When this monumental change happens,
there will be a better world of harmony
and peace for all.
The freedom of choice and decision is
ours; let us exercise it.
—Vicente Fox Quesada, President of
Mexico (2000-2006) and President of
the Fox Center
(http://centrofox.org.mx/en)
www.marijuanagrowing.com
14 Classification
14 Medical Use before the Modem Era
16 Cannabis in the Medical Literature
17 Anecdotal Evidence
18 The Endocannabinoid System
20 What the Doctors Have Learned
20 The CBD Era
21 P.S. (Post Sanjay)
MEDICAL
CANNABIS
by Fred Gardner and
Dr. John McPartland
We can only imagine how people,
countless thousands of years ago,
discovered that a certain plant had
healing properties. Maybe a woman was
gathering seeds for food when a painful
period began. As she stripped the seeds
out of the plant’s flower tops, a sticky
resin coated her hands. She gnawed a bit
of the gummy substance. Soon after
ward, she started feeling better.
Her friends confirmed that this was
indeed a cramp-reducing plant. They
began growing it on purpose. When
their tribe moved on, they brought seeds
to put in the ground at their next set
tlement. Similar discoveries must have
been made many times in many groups.
People came to realize that the seeds
were nourishing, the resin was pain-re
ducing, and the stalk provided fiber for
ropes and nets.
Here and there tribes began intention
ally growing this especially useful plant.
The specifics are lost in the mists of
history, but the plant abides and is now
known to botanists as Cannabis. (The
Latin name for the plant is italicized,
and cannabis, the product made from
the plant, is not.)
Cannabis evolved long before humans
did, but because no one has found
Cannabis macrofossils in rocks, it is
hard to say when. Two DNA studies
estimate that Cannabis evolved either
21 or 27.8 million years ago. Fossilized
pollen identified as Cannabis dates to
787,000 years ago in southern Siberia.
Younger pollen, about 125,000 years
old, has been extracted from a Siberian
bog. Neanderthal bones from the same
date were found in a cave 30 miles away.
Some time after Homo sapiens migrated
into the area 40,000 years ago, we forged
a partnership with the plant.
“Hemp followed man naturally,” wrote
Nicolai Vavilov, the great Russian plant
scientist, “keeping near his dwelling
places, settling on rubbish and every
where the soil was manured.” Hemp’s
“camp follower” image was popular
ized by Edgar Anderson, a well-known
botanist at Harvard University and the
Missouri Botanical Garden.
At some point people began selecting
the plants with the features they ap
preciated for cultivation—tall stalks,
big oily seeds, or healing, psychoactive
resin. Vavilov, Anderson, Carl Sauer,
Andrew Sherratt, and Carl Sagan have
linked the origins of agriculture to our
ancestors’ efforts to grow more useful
Cannabis. Sauer proposed that agricul
ture was developed by people living in
fishing communities alongside rivers and
lakes (the habitat of “ditchweed”) who
began cultivating the plants as a source
of fishing lines and nets. Nobody knows
the exact where and when.
www.marijuanagrowing.com
13
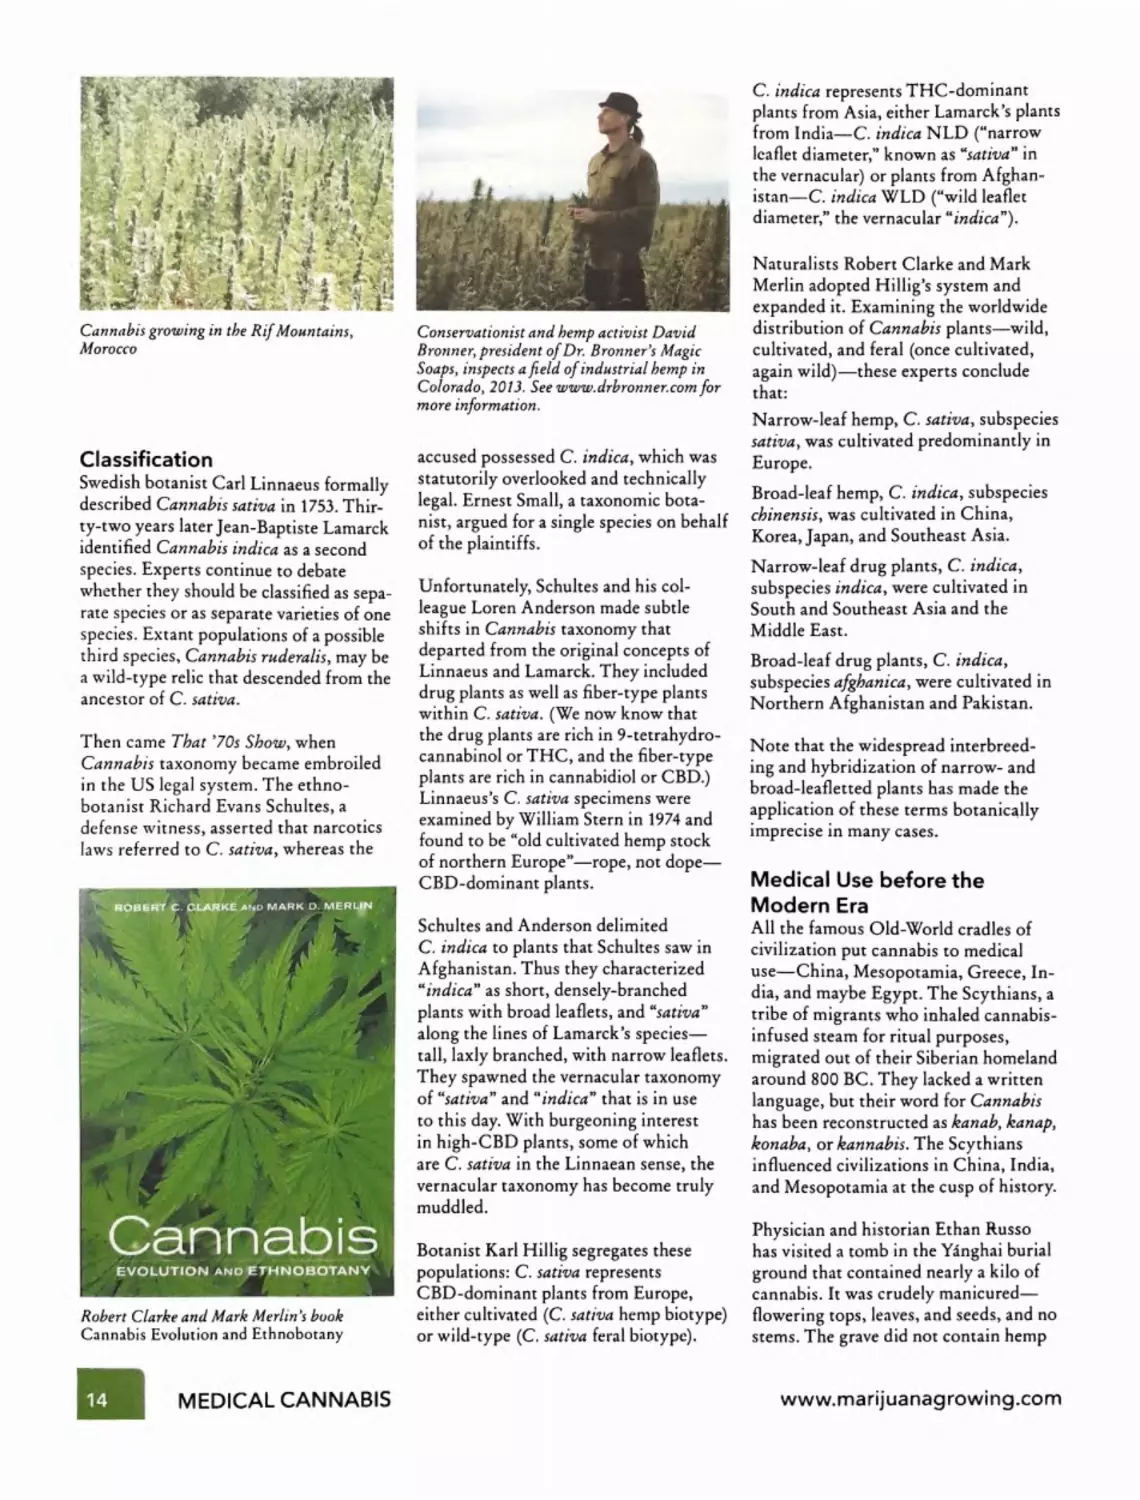
Cannabis growing in the RifMountains,
Morocco
Classification
Swedish botanist Carl Linnaeus formally
described Cannabis sativa in 1753. Thir-
ty-two years later Jean-Baptiste Lamarck
identified Cannabis indica as a second
species. Experts continue to debate
whether they should be classified as sepa
rate species or as separate varieties of one
species. Extant populations of a possible
third species, Cannabis ruderalis, may be
a wild-type relic that descended from the
ancestor of C. sativa.
Then came That ’70s Show, when
Cannabis taxonomy became embroiled
in the US legal system. The ethno
botanist Richard Evans Schultes, a
defense witness, asserted that narcotics
laws referred to C. sativa, whereas the
Robert Clarke and Mark Merlin's book
Cannabis Evolution and Ethnobotany
Conservationist and hemp activist David
Bronner, president of Dr. Bronner's Magic
Soaps, inspects a field of industrial hemp in
Colorado, 2013 . See www.drbronner.com for
more information.
accused possessed C. indica, which was
statutorily overlooked and technically
legal. Ernest Small, a taxonomic bota
nist, argued for a single species on behalf
of the plaintiffs.
Unfortunately, Schultes and his col
league Loren Anderson made subtle
shifts in Cannabis taxonomy that
departed from the original concepts of
Linnaeus and Lamarck. They included
drug plants as well as fiber-type plants
within C. sativa. (We now know that
the drug plants are rich in 9-tetrahydro-
cannabinol or THC, and the fiber-type
plants are rich in cannabidiol or CBD.)
Linnaeus’s C. sativa specimens were
examined by William Stern in 1974 and
found to be "old cultivated hemp stock
of northern Europe”—rope, not dope—
CBD-dominant plants.
Schultes and Anderson delimited
C. indica to plants that Schultes saw in
Afghanistan. Thus they characterized
“indica” as short, densely-branched
plants with broad leaflets, and “sativa”
along the lines of Lamarck’s species—
tall, laxly branched, with narrow leaflets.
They spawned the vernacular taxonomy
of “sativa” and “indica” that is in use
to this day. With burgeoning interest
in high-CBD plants, some of which
are C. sativa in the Linnaean sense, the
vernacular taxonomy has become truly
muddled.
Botanist Karl Hillig segregates these
populations: C. sativa represents
CBD-dominant plants from Europe,
either cultivated (C. sativa hemp biotype)
or wild-type (C. sativa feral biotype).
C. indica represents THC-dominant
plants from Asia, either Lamarck’s plants
from India—C . indica NLD ("narrow
leaflet diameter,” known as “Wd* in
the vernacular) or plants from Afghan
istan—C . indica WLD (“wild leaflet
diameter,” the vernacular “indica”).
Naturalists Robert Clarke and Mark
Merlin adopted Hillig’s system and
expanded it. Examining the worldwide
distribution of Cannabis plants—wild,
cultivated, and feral (once cultivated,
again wild)—these experts conclude
that:
Narrow-leaf hemp, C. sativa, subspecies
sativa, was cultivated predominantly in
Europe.
Broad-leaf hemp, C. indica, subspecies
chinensis, was cultivated in China,
Korea, Japan, and Southeast Asia.
Narrow-leaf drug plants, C. indica,
subspecies indica, were cultivated in
South and Southeast Asia and the
Middle East.
Broad-leaf drug plants, C. indica,
subspecies afghanica, were cultivated in
Northern Afghanistan and Pakistan.
Note that the widespread interbreed
ing and hybridization of narrow- and
broad-leafletted plants has made the
application of these terms botanically
imprecise in many cases.
Medical Use before the
Modern Era
All the famous Old-World cradles of
civilization put cannabis to medical
use—China, Mesopotamia, Greece, In
dia, and maybe Egypt. The Scythians, a
tribe of migrants who inhaled cannabis-
infused steam for ritual purposes,
migrated out of their Siberian homeland
around 800 BC. They lacked a written
language, but their word for Cannabis
has been reconstructed as kanab, kanap,
konaba, or kannabis. The Scythians
influenced civilizations in China, India,
and Mesopotamia at the cusp of history.
Physician and historian Ethan Russo
has visited a tomb in the Yanghai burial
ground that contained nearly a kilo of
cannabis. It was crudely manicured—
flowering tops, leaves, and seeds, and no
stems. The grave did not contain hemp
14
MEDICAL CANNABIS
www.marijuanagrowing.com
fiber. It dates to 766-416 BCE.
Scythians are buried nearby. Yanghai lies
in the Turpan Basin, now part of China.
The ancient Chinese knew cannabis as
“ma.” Their pictogram for ma represents
two plants hung upside down to dry.
Combining ma with the character yao
(drug) means “narcotic” or “anaesthetic.”
The legendary physician Shennong
writes extensively about ma in his
Daoist-flavored medical text, Shennong
Ben Cao Jing (also known as Pen Ts’ao
Ching). He warned, “Taking much of it
may make one behold ghosts and frenet
ically run about. Protracted taking may
enable one to communicate with the
spirit and make the body light.” Shen
nong supposedly lived about 4000 years
ago, but the man’s legendary existence
went unmentioned until about 130 BCE.
The Scythians entered history when they
invaded Mesopotamia during the reign
of King Sargon II (722-705 BCE). After
the Scythians invaded Assyria, a new
word appeared in Neo-Assyrian cunei
form. The word, which means “hemp,”
transliterates as qunubu or qunnabu. The
word appears in contexts that hint of
use by shamans, which strengthens the
Scythian connection.
Herodotus, the Greek “father of history,”
wrote extensively about the Scythians
around 440 BCE. Herodotus coins the
LH IIS 1 Akl •UGHFH
l>re• I ’*>1
EDEN HASHISH CENTRE
Oldeet * Fa»ourH« snap In Town Serving You
Tho Beal Nopaleoo Haoti a Qanja
Hindu deity Shiva has long been associated
with cannabis.
The Chinese pictogram “md” represents
cannabis—two plants hung upside down
to dry.
word xavvafli( from a word he adopted
from the Scythians. He described them
using xdvvaflig for cordage and cloth,
and vaporizing xavvaflig in small tents.
In India there are more than 50 words
for Cannabis and cannabis products.
Archeologists working in the Ganges
River basin have unearthed Cannabis
seeds from at least 1300 BCE. The Athar-
vaveda, compiled around 900 BCE, gives
the name bhanga to a plant that many
experts believe is Cannabis. These dates
preceded the arrival of the Scythians,
whose earliest presence in the Hindu
Kush may date to the 7th century BCE.
Siddhartha Gautama (ca. 563-483 BCE),
the Buddha of our historic era, was an
Indo-Scythian. He supposedly subsisted
on one hemp seed per day during his
six steps of asceticism. Practitioners of
Ayurvedic medicine, India’s traditional
system, recommend the herb to counter
pain, insomnia, and loss of appetite.
The Egyptian hieroglyph smsmt has
been interpreted as Cannabis. The word
appears in the Pyramid Texts of 2350
BCE, “the cords (or ropes) of the smsmt
plant.” However, flax and not hemp
was the primary fiber crop of ancient
Egypt. Other authors interpret smsmt as
Corchorus olitorius, a fibrous herb whose
leaves are eaten and used medicinally in
Egypt. The word also resemblessmsm,
the Arabic word for sesame. Good
evidence of Cannabis in Egypt begins in
the Roman era.
Noted Polish anthropologist Sara
Benet (nee Benetowa) argues that kaneh
bosm (qanzh boiem) is Cannabis in the
Old Testament, Exodus 30:22-25. The
word is usually translated as “aromatic
cane.” Moses used kaneh bosm for a
sacred anointing oil. Benetowa notes
“the astonishing resemblance” between
Semitic kanbos and the Scythian word
for Cannabis. But the Book of Exodus
was composed around the 8th or 9th
century BCE, and the Scythians did not
invade the Land of Israel until 630 BCE.
By then the Israelites had already been
scattered and exiled by the Assyrians.
Cannabis is not native to the Fertile
Crescent. Kanbos, which also
transliterated kanbus or qannabbos, first
appears in Mishnah, written in the 1st
century BC.
Given the evidence that cannabis prod
ucts were widely used to treat illnesses
in the ancient world, the real mystery
is why it fell out of favor—a historical
phenomenon that Ethan Russo dubbed
“Cannabis interruptus.” Seeking an
explanation, Russo cited “the perishable
nature” of the historical record, and
“humanity’s propensity toward constant
warfare, invasion, and cultural conflict.”
It’s as if prohibitionists have always
existed in every society, and from time
to time they prevail over the physicians
and patients who have put cannabis
products to good use. One theory is
that in many cultures, members of the
priestly class viewed psychoactive plants
as a threat to their role as proper inter
mediaries between the material and
spiritual realms. They didn’t want people
having visions and creative insights with
out their supervision. In modern times,
prohibition of cannabis has provided an
effective method of social control—a
mechanism for funding and arming the
police and a marker for disobedience
among the citizenry.
The pattern of cannabis proving medical
ly useful but getting banned continued
in various parts of the world throughout
the Middle Ages. In Islamic Egypt,
according to Russo, “While many derid
ed its psychoactive effects on the basis
of a ban on intoxicants in Muslim sharia
law, a begrudging acknowledgment was
frequently made of its abundant medical
attributes.”
www.marijuanagrowing.com
15
An Egyptian king imposed a prohibi
tion in the 13th century, but by the time
Napoleon invaded Egypt in 1798, use of
the herb was widespread and the French
saw fit to impose a ban of their own.
Thirty years later a French physician,
Aubert-Roche, reported that during
an outbreak of plague in Alexandria,
cannabis alleviated fever, agitation, pain,
bronchitis, and insomnia. And so the
pendulum kept swinging between
proscription and prescription.
Cannabis in the Medical
Literature
England, like France, discovered
medical cannabis via its colonies. The
news was imparted by a brilliant Irish-
born, Edinburgh-educated physician
named William Brooke O’Shaughnessy.
The British East India Company sent
O’Shaughnessy to Calcutta in the 1830s.
He was a young star, having already won
accolades for devising an effective treat
ment for cholera—electrolyte replace
ment therapy—which would give rise to
intravenous drug delivery.
In India, O’Shaughnessy observed that
doctors were using “gunjah” extracts
to treat a wide range of medical prob
lems, including some for which Western
medicine had no useful treatments. He
studied the relevant literature, conduct
ed animal studies, and tested the effects
of cannabis on himself before treating
Dr. Tod Mikuriya holds the first issue of
O’Shaughnessy’s, which he cofounded with
Fred Gardner.
'Sensi Star" is a Cannabis afghanica variety
with a high THC content.
patients. In 1839 O’Shaughnessy present
ed his findings in a paper published in the
Transactions ofthe Medical and Physical
Society ofBengal'. “On the Preparations of
the Indian Hemp, or Gunjah (Cannabis
Indica).”
At a hospital in Calcutta, O’Shaughnessy
treated patients with rheumatism,
hydrophobia, cholera, tetanus, and
epilepsy “in which a preparation of
Hemp was employed with results which
seem to me to warrant our anticipating
from its more extensive and impartial
use no inconsiderable addition to the
resources of the physician.”
O’Shaughnessy’s cannabis prepara
tion—an alcohol extract—alleviated the
symptoms of all three rheumatism pa
tients in his clinical trial. Cannabis saved
the lives of the tetanus patients (though
one died of gangrene), and spared the
hydrophobia patients the terrible ago
nies associated with rabies. It reduced
diarrhea in the cholera patient. And as
for the baby girl who was seen at 40 days
with “infantile convulsion,” O’Shaugh
nessy reported, “The child is now in
the enjoyment of robust health and has
regained her natural plump and happy
appearance.” O’Shaughnessy thought
EXTRACT
CANNABIS
1-64 Gr
Prepared By
MeKesson&Robbins
Maaafaetnrlng Chemists
New York
Gelatin-coated cannabis pills produced by
McKesson & Robbins, one of the many
US drug companies marketing cannabis
extracts prior to prohibition in 1937
Indian hemp held greatest promise as an
anticonvulsant.
In 1841 O’Shaughnessy returned to
Great Britain carrying his message and,
equally important, C. indica seeds of
the narrow-leaf drug type. Plants of the
narrow-leaf hemp type had been widely
grown for fiber in Britain, but the
narrow-leaf drug type was hitherto
unavailable. Its arrival, and the publica
tion in 1843 of O’Shaughnessy’s findings
and recipes in the Provincial Medical
Journal, enabled chemists to produce
potent tinctures for use as doctors and
patients saw fit. Western medicine had
come to employ cannabis.
“The use of cannabis derivatives for
medicinal purposes spread rapidly
throughout Western medicine,” wrote
Tod Mikuriya, MD, who collected and
republished the early journal articles in
Marijuana: Medical Papers 1839-1972.
Prestigious physicians noted its benefits,
including Johns Hopkins University’s
William Osler, who prescribed cannabis
as the first-line treatment for migraine
headaches.
Back in India the British government
undertook large-scale studies to inves
16
MEDICAL CANNABIS
www.marijuanagrowing.com
tigate “deleterious effects alleged to be
produced by the abuse of ganja.” In 1894
an exhaustive Report of the Indian Hemp
Drug Commission concluded: “The
general opinion seems to be that the evil
effects of ganja have been exaggerated.”
Prescriptions for cannabis-based
medicines peaked between 1890 and
1920 in the United States. Factors in
the declining market share included
competition from new and inexpensive
synthetic medicines such as aspirin,
injectable opiates and barbiturates, and
a growing disdain for “crude” herbs.
Above all was the problem of inconsis
tent potency. As explained by the
U.S. Dispensatory for 1926, “Because
of the great variability in the potency
of different samples of cannabis it is
well nigh impossible to approximate the
proper dose of any individual sample
except by clinical trial. Because of occa
sional unpleasant symptoms from un
usually potent preparations, physicians
have generally been overcautious in the
quantities administered.” In other
words, inconsistent potency led to fear
of overdose, which led to too-weak
cannabis preparations! This helps
explain why American consumers did
not protest when the federal government
banned “marihuana” in 1937.
Reefer Madness is the name ofa film that
came to epitomize the propaganda campaign
that led to federal marijuana prohibition in
1937.
Pharmacologists Raphael Mechoulam (left)
and Yechiel Gaoni worked out the exact
molecular structure ofTHC and CBD and
reported their findings in 1963 and 1964.
The only testimony against prohibition
when Congress debated it came from
William Woodward, MD, of the Ameri
can Medical Association. Woodward
argued, “The medicinal use of Cannabis,
as you have been told, has decreased
enormously. It is very seldom used ...
partially because of the uncertainty of
the effects of the drug. That uncertain
ty has heretofore been attributed to
variations in the potency of the prepa
rations as coming from particular plants
used ... To say, however, as has been
proposed here, that the use of the drug
should be prevented by a prohibitive tax,
loses sight of the fact that future investi
gation may show that there are substan
tial medical uses.” How prescient!
In 1938 New York City Mayor Fiorello
LaGuardia assigned the New York
Academy of Medicine to investigate
the claims on which federal marijuana
prohibition was based. A blue-ribbon
commission of scientists and physicians
concluded that marijuana is not addic
tive and does not lead to insanity and
violent crime. Copies of the “LaGuardia
Commission Report” were bought up
and destroyed by agents of the Federal
Bureau of Narcotics.
The end of World War II was followed
by almost two decades of demonization
of marijuana and individuals who used
it. But by the early 1960s, developments
in science and society were causing
cracks in the wall of prohibition. The
precise molecular structures ofTHC
and CBD were determined in 1964 by
Israeli scientists Raphael Mechoulam
and Y. Gaoni. That year in New York
City, Bob Dylan shared marijuana with
Dr. Mechoulam popularized the term
“entourage effect” to describe how compounds
in Cannabis work synergistically.
the Beatles, presaging an era in which
millions of young people around the
world—especially soldiers and stu
dents—would start smoking marijuana,
evaluating its effects for themselves, and
questioning the government’s claims.
Anecdotal Evidence
Those who started smoking marijuana in
social settings in the 1960s,’70s, and ’80s
were generally unaware that it had been
widely prescribed as a medicine in the
not-too-distant past. As Dr. Mikuriya
put it, “It wasn’t just marijuana that got
prohibited, it was the truth about
history.”
Anecdotal reports of medical efficacy
circulated. Seemingly everyone knew
someone in the VA hospital who was
using marijuana for spasticity, or had
an aunt who made it through chemo
thanks to the herb, or a friend who said
it helped him sleep. But no physicians or
researchers were tracking patients who
used marijuana.
In 1990, in response to the AIDS
epidemic, a Vietnam vet named Dennis
Peron created the San Francisco
Cannabis Buyers Club. The club
provided a setting in which people
who were using marijuana for medical
purposes could compare notes and get
a sense of their numbers. Mikuriya,
seeing “a unique research opportunity,”
signed on as medical coordinator and
began interviewing members about their
conditions, patterns of marijuana use,
and results.
Peron’s remarkable club became the
headquarters for activists working to
www.marijuanagrowing.com
17
i Sabes Io quees
docado?
Cheech Mann Tnmrrr, Chong
Tuni Skerrrr Eoe Adams Strother Mamn
Cheech and Chong became icons for
counterculture cannabis. Their movies and
comedy routines made light of the supposed
dangers associated with marijuana.
BALLAD of DENNIS PERON
Dennis Peron outside the San Francisco
Cannabis Buyers Club at 1444 Market Street.
In 1995 the club became the headquarters for
activists planning California's medical mari
juana initiative.
Clinton Administration officials led by
Drug Czar Barry McCaffrey denounced Tod
Mikuriya, MD, and threatened doctors who
approved marijuana use by their patients after
California voters passed Proposition 215 in
November 1996.
legalize marijuana for medical use.
They drafted “Proposition 215,” a ballot
measure that would allow patients with a
doctor’s approval to use cannabis medic
inally. California voters passed Prop. 215
in November 1996 by a 56 to 44 percent
margin—over the opposition of law
enforcement and every elected official in
the state, except for Terence Hallinan,
district attorney of San Francisco.
At Dr. Mikuriya’s urging, the new
law had been written to cover not just
patients suffering from a few grave
conditions, but also those with “any
other condition for which marijuana
provides relief.”
In December 1996, US drug czar Barry
McCaffrey and Attorney General Janet
Reno threatened to revoke prescrip
tion-writing licenses of California
doctors who dared to approve marijuana
use by patients. At a widely publicized
press conference, McCaffrey pointed
mockingly to a large chart entitled “Dr.
Tod Mikuriya’s (215 Medical Advisor)
Medical Uses of Marijuana.” McCaffrey
said it was patently absurd that one drug
could be effective in treating so many
conditions. “This isn’t medicine,” he
scoffed, “it’s a Cheech and Chong show.”
The American Civil Liberties Union
and the reform group now known as the
Drug Policy Alliance backed a suit by
AIDS specialist Marcus Conant, MD,
to prevent the government from car
rying out its threat. The federal courts
agreed with the plaintiffs that doctors
and patients have a Constitutional right
under the First Amendment to discuss
marijuana as a treatment option.
The Endocannabinoid System
As the legal/political conflict was play
ing out, vindication for Mikuriya came
from scientists studying how cannabis
exerts its effects. In 1990— just as the
Cannabis Buyers Club was forming in
San Francisco—a group of scientists met
in Crete and launched the International
Cannabis Research Society. The
“C word” in the group’s name would
be changed to “Cannabinoid” in 1998 be
cause, as one researcher explained, “The
field is moving away from the plant.”
The ICRS members were mostly
pharmacologists and biochemists
employed at academic research centers.
Almost all received or coveted funding
from the US National Institute on Drug
Abuse (NIDA), an agency whose stated
goal for years has been to prove the
harmfulness of marijuana. The scien
tists’ Holy Grail was a drug that exerts
the beneficial effects of cannabis without
causing any psychoactivity.
In their search for such a drug, the re
searchers discovered the body’s
endocannabinoid signaling system—
compounds made in the body that
activate endogenous receptors that also
respond to plant cannabinoids.
The predominant cannabinoids in
Cannabis plants are CBD and THC.
CBD, which is not psychoactive, pre
dominates in hemp—plants bred for fiber
and/or seed. CBD was identified in the
early 1940s by Roger Adams, a University
of Illinois chemist, but he did not work
out its precise molecular structure.
After the discovery of endocannabi
noids, CBD and THC were renamed
“phytocannabinoids”—compounds
found in the plant, almost all consisting
of 21 carbon atoms in ring structures
and side-chains, with atoms of hydrogen
and oxygen attached at different points.
About 100 phytocannabinoids have
been identified to date, including some
biologically active ones that might have
medical potential. (Some cannabinoids
are fleetingly created when plant mate
rial is being analyzed, others are created
by enzymes that metabolize the plant
compounds.)
In addition to phytocannabinoids, the
Cannabis plant biosynthesizes hundreds
of chemical substances that are not
unique to it, some of which are biolog
ically active—including terpenes and
flavonoids that provide smell, taste, and
color. Three flavonoids have been found
that are unique to Cannabis:
cannflavin-A, -B, and -C.
Endogenous (“endo-”) cannabinoids are
made in our bodies for sending signals
from one nerve cell to another. These
compounds in animals preceded the
18
MEDICAL CANNABIS
www.marijuanagrowing.com
plant cannabinoids in order of evolu
tionary appearance. Endocannabinoids
and phytocannabinoids exert similar
effects when tested on lab animals:
reduction of pain, body temperature,
spontaneous activity, and motor control.
Synthetic compounds that exert these
effects are also classified as cannabinoids.
In 1974, Eli Lilly produced nabilone, a
synthetic form ofTHC that was mar
keted as Cesamet (and reintroduced
years later as Nabilone). In the mid 1980s
Pfizer produced a synthetic compound,
CP-55940, which proved too psychoac
tive to market as a medicine. But unlike
THC, which is not water-soluble and
exerts a weak, fleeting effect, CP-55940
can be handled in aqueous solution, and
binds long enough to reveal where in the
body it acts. This was a great boon to
research.
The existence of cannabinoid receptors
in the brain was established in 1988 by
William Devane working in the lab of
Alynn Howlett at St. Louis University.
The receptors are proteins embedded
in cell membranes. Endocannabinoids
or phytocannabinoids binding to them
induce a cascade of molecular events
within the cells.
These receptors, later dubbed CB1
receptors, are concentrated in the cere
bellum and the basal ganglia (regions re
sponsible for motor control, which may
explain why marijuana reportedly eases
muscle spasticity); in the hippocampus
(storage of short-term memory); and in
the limbic system (emotional control).
Cannabinoids acting through the CB1
receptors play a role in the processes of
reward, cognition, and pain perception,
as well as motor control
'Sour Tsunami\ bred by Lawrence Ringo in
Humboldt County, is a CBD-dominant
variety. Ringo made stabilized seeds widely
available to medical users..
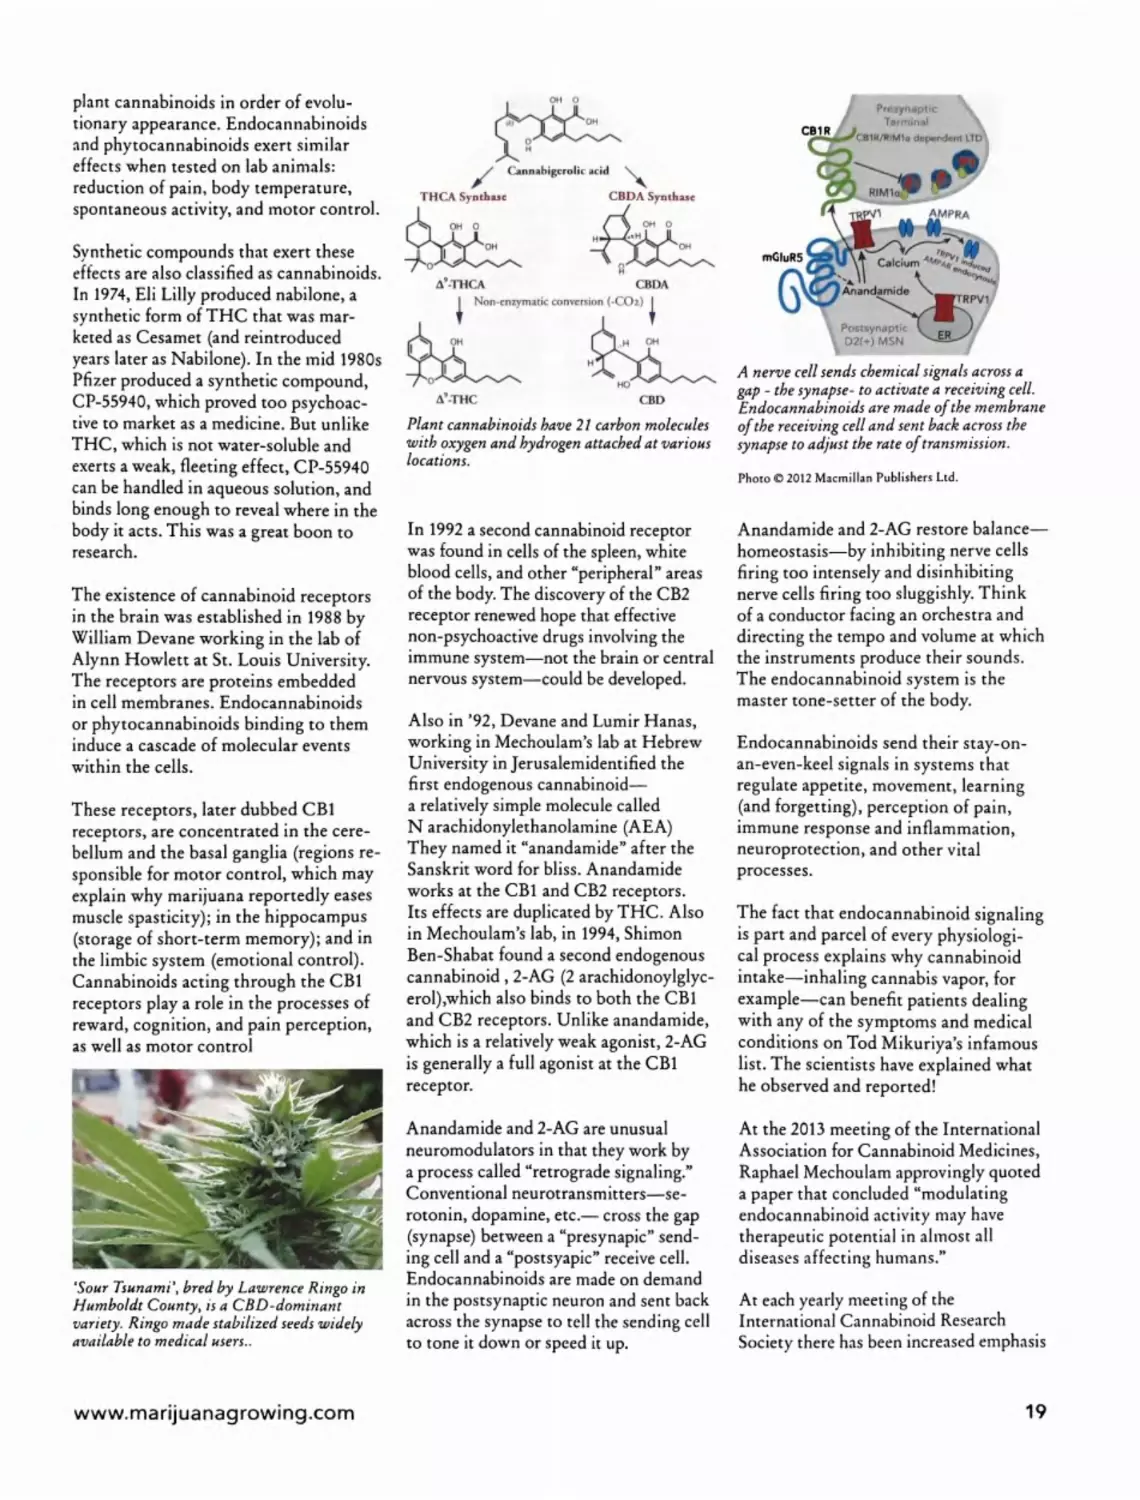
Cannabigcrolic acid
\
THCA Synthase
CBDA Synthase
Plant cannabinoids have 21 carbon molecules
with oxygen and hydrogen attached at various
locations.
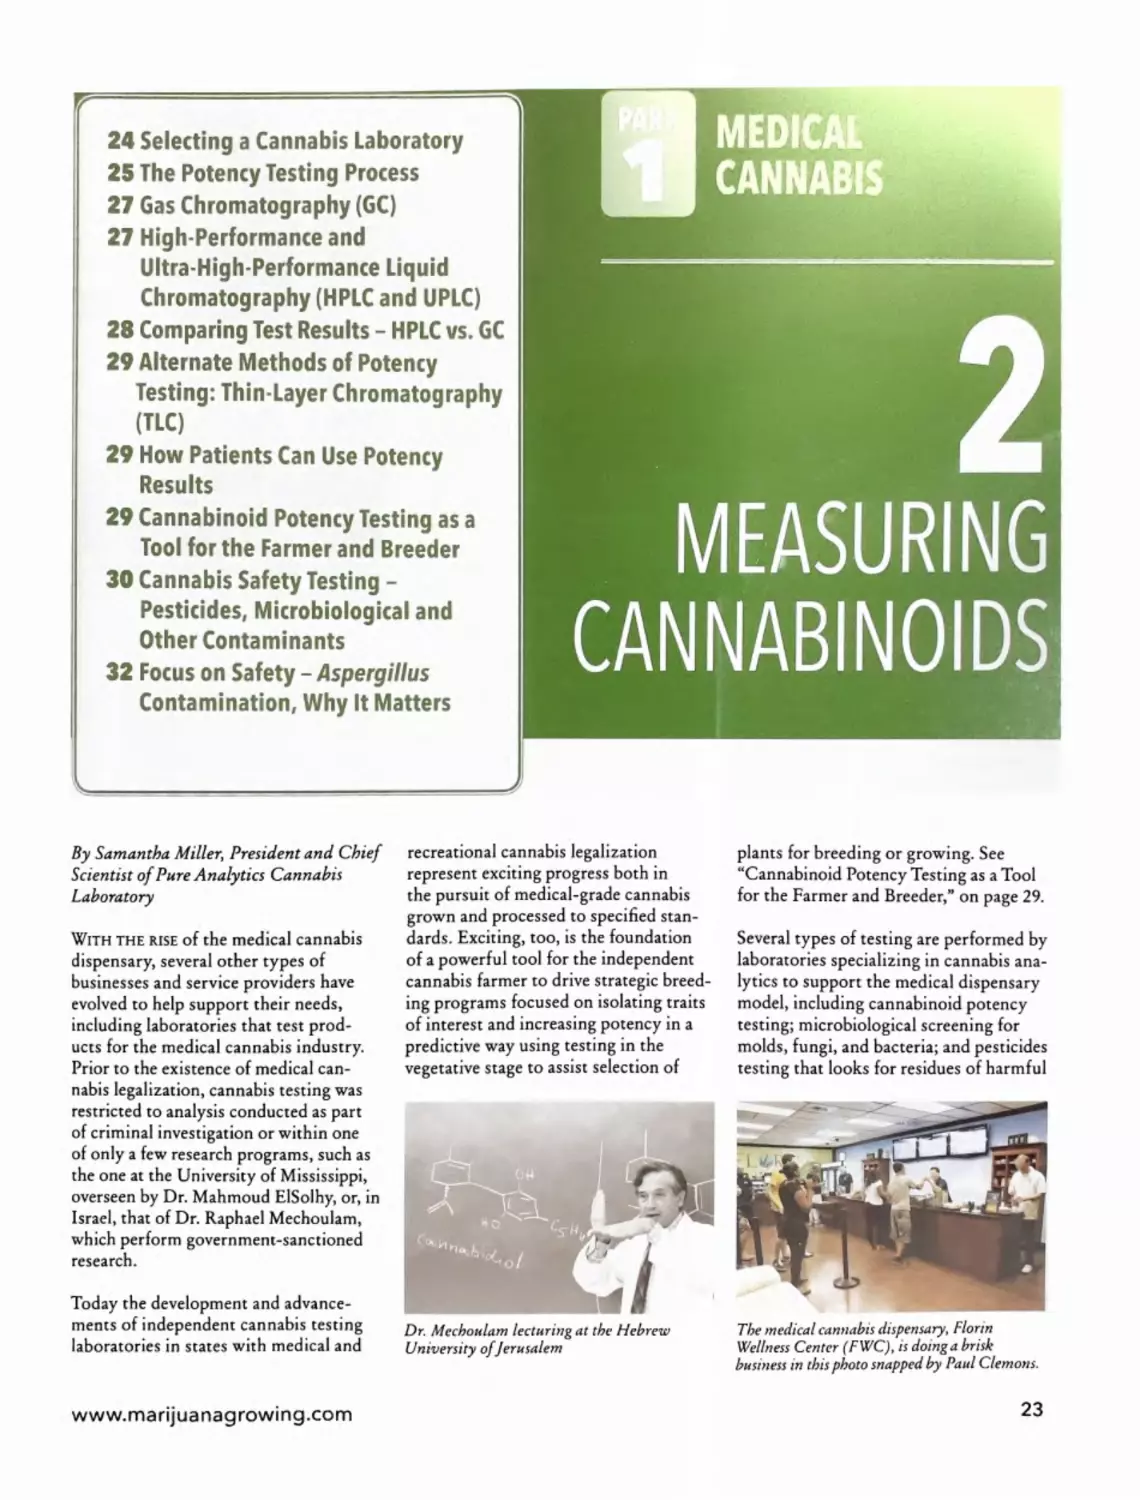
A nerve cell sends chemical signals across a
gap - the synapse- to activate a receiving cell.
Endocannabinoids are made of the membrane
of the receiving cell and sent back across the
synapse to adjust the rate of transmission.
In 1992 a second cannabinoid receptor
was found in cells of the spleen, white
blood cells, and other “peripheral” areas
of the body. The discovery of the CB2
receptor renewed hope that effective
non-psychoactive drugs involving the
immune system—not the brain or central
nervous system—could be developed.
Also in ’92, Devane and Lumir Hanas,
working in Mechoulam’s lab at Hebrew
University in Jerusalemidentified the
first endogenous cannabinoid—
a relatively simple molecule called
N arachidonylethanolamine (AEA)
They named it “anandamide” after the
Sanskrit word for bliss. Anandamide
works at the CB1 and CB2 receptors.
Its effects are duplicated by THC. Also
in Mechoulam’s lab, in 1994, Shimon
Ben-Shabat found a second endogenous
cannabinoid , 2-AG (2 arachidonoylglyc-
erol),which also binds to both the CB1
and CB2 receptors. Unlike anandamide,
which is a relatively weak agonist, 2-AG
is generally a full agonist at the CB1
receptor.
Anandamide and 2-AG are unusual
neuromodulators in that they work by
a process called “retrograde signaling.”
Conventional neurotransmitters—se
rotonin, dopamine, etc.— cross the gap
(synapse) between a “presynapic” send
ing cell and a “postsyapic” receive cell.
Endocannabinoids are made on demand
in the postsynaptic neuron and sent back
across the synapse to tell the sending cell
to tone it down or speed it up.
Photo © 2012 Macmillan Publishers Ltd.
Anandamide and 2-AG restore balance—
homeostasis—by inhibiting nerve cells
firing too intensely and disinhibiting
nerve cells firing too sluggishly. Think
of a conductor facing an orchestra and
directing the tempo and volume at which
the instruments produce their sounds.
The endocannabinoid system is the
master tone-setter of the body.
Endocannabinoids send their stay-on-
an-even-keel signals in systems that
regulate appetite, movement, learning
(and forgetting), perception of pain,
immune response and inflammation,
neuroprotection, and other vital
processes.
The fact that endocannabinoid signaling
is part and parcel of every physiologi
cal process explains why cannabinoid
intake—inhaling cannabis vapor, for
example—can benefit patients dealing
with any of the symptoms and medical
conditions on Tod Mikuriya’s infamous
list. The scientists have explained what
he observed and reported!
At the 2013 meeting of the International
Association for Cannabinoid Medicines,
Raphael Mechoulam approvingly quoted
a paper that concluded “modulating
endocannabinoid activity may have
therapeutic potential in almost all
diseases affecting humans.”
At each yearly meeting of the
International Cannabinoid Research
Society there has been increased emphasis
www.marijuanagrowing.com
19
on therapeutic applications and less on
drug-abuse liability. Studies submitted for
presentation at the 2014 meeting reflected
renewed interest in the cannabis plant
itself.
What the Doctors Have
Learned
California’s 1996 medical marijuana
initiative did not create a record-keeping
system because Dennis Peron and his
coauthors did not want to generate a
master list of cannabis users that federal
prosecutors could consult if and when
they chose to. So, for all the years since,
a vast public health experiment has been
conducted without any state agency
tracking it.
In 2006, ten years after medical use
had been legalized, Mikuriya surveyed
30 doctors who had attended meetings
of the California Cannabis Research
Medical Group (which he had organized
in 2000). He published the results in
O’Shaughnessy's, a journal he cofounded
with one of us (Fred Gardner) in 2003.
Approximately 160,000 patients had been
authorized to use the herb by the doctors
surveyed. Unanimously, the doctors were
struck by the extent to which cannabis
enabled patients to reduce their intake of
prescription and over-the-counter drugs.
As Mikuriya put it: “Opioids, sedatives,
NSAIDS, and SSRI antidepressants are
commonly used in smaller amounts or
discontinued. These are all drugs with .
serious adverse effects.”
Dr. Robert Sullivan, one of the first
MDs to offer cannabis consultations
in Orange County, California, report
ed that his patients had cut down on
“opiates, muscle relaxants, antidepres
sants, hypnotics (for sleep), anxiolytics,
neurontin, anti-inflammatories,
anti-migraine drugs, GI meds, predni
sone (for asthma, arthritis).” Cannabis
was proving to be the anti-drug.
Reports of cannabis-using pain patients
reducing their opioid intake by 50 per
cent jibe perfectly with studies showing
that lab animals need half the opioids
to achieve pain relief when also treated
with a cannabinoid. Is it any wonder
that synthetic drug manufacturers see
the medical use of cannabis as a threat to
their profit margins?
What of the alleged adverse effects,
including addiction, on which marijuana
prohibition rests? Dr. Philip Denney
said of the ten-year survey: “Virtual
ly none reported by patients, except
contacts with the legal system. Patients
are able to easily stop using cannabis in
order to pass drug tests or when travel
ing. Overdose from edible cannabis—an
unpleasant drowsiness lasting six to
eight hours—is rare and transient.”
Dr. Frank Lucido responded that
“decreased productivity” caused two
patients to stop using cannabis. But,
he added, “the overwhelming majority
report that they are more productive
when their symptoms are controlled with
cannabis.” Employers please take note.
Cannabis flowers available at dispensaries
have enabled patients in medical marijuana
states to reduce or entirely stop use ofsynthetic
pharmaceuticals that have adverse side-effects.
The CBD Era
The passage of Proposition 215 in
California encouraged people around
the world to press for access to medic
inal cannabis. Multiple Sclerosis (MS)
patients in England began lobbying the
Health Ministry with increased urgen
cy. In the spring of 1997, MS patients
held a public meeting in London that
caught the attention of pharmaceutical
entrepreneur Geoffrey Guy, MD, who
pledged to help them achieve their goal.
Guy observed that cannabis being used
in England by MS patients and others
reporting medical benefit contained
substantial amounts of CBD as well
as THC. The reduced psychoactivity
of CBD-rich cannabis would be a key
selling point when he pitched the Home
Office his plan to produce a pharma
ceutical-grade cannabis medicine. His
company, GW Pharmaceuticals, was
duly licensed to cultivate Cannabis for
this purpose in the spring of 1998.
To achieve marketing approval, GW’s
extracts would have to be produced
with near-perfect consistency and show
safety and efficacy in clinical trials.
Guy’s first step had been to purchase
the genetically diverse plant collection
of Hortapharm, a Dutch firm founded
in the 1980s by American ex-pats David
Watson and Robert Clarke.
It was they who had the insight that
CBD and compounds other than THC
had significant effects. They traveled the
globe collecting ‘land-race’ strains, some
with substantial amounts of these previ
ously disregarded ‘minor’ cannabinoids.’
Watson and Clarke also understood that
the terpenoids that give Cannabis vari
eties their aromas exerted effects when
ingested.
GW set about growing thousands of
plants in sophisticated glasshouses in
the southeast of England. In addition to
developing high-THC and high-CBD
strains, GW grew plants rich in cannab-
ichromene (CBC), cannabigerol (CBG)
and tetrahydrocannabivarin (THCV) to
test for medical effects. In recent years
cannabidivarin (CBDV) has become a
compound of interest to the company.
20
MEDICAL CANNABIS
www.marijuanagrowing.com
Satiz'ex from GW’ Pharmaceuticals, a sub
lingual cannabinoid spray, consists of approxi
mately equal amounts of CBD and THC.
By 1999 GW was producing its flagship
medicine, Sativex—a whole plant ex
tract formulated for spraying under the
tongue. Sativex contains approximately
equal amounts of CBD and THC, plus
trace amounts of all other compounds
produced by the plant. GW initiated
clinical trials and began providing Sativex
and other cannabis extracts to research
ers. Their findings, reported in journal
articles and at conferences in the years
that followed, suggested that CBD could
ease symptoms of rheumatoid arthritis,
diabetes, epilepsy, alcoholism, PTSD,
antibiotic-resistant infections, and neuro
logical disorders. CBD also demonstrated
neuroprotectire and anticancer effects.
People using Sativex decreased their
use of opiates and other pharmaceutical
drugs. Sativex produced fewer and milder
side effects than pure THC (Marinol).
In April 2005, Sativex won conditional
approval from Health Canada as a treat
ment for pain in MS. The UK and some
20 other countries have approved Sativex
for treatment of spasticity in MS. Sativex
is currently undergoing clinical trials as a
treatment for cancer pain in the USA and
other countries.
For many years it was assumed that CBD
had been bred down to trace levels in
all Cannabis being grown in the USA
for medical and recreational purposes.
Because no analytic chemistry labs were
testing cannabis samples, there was no
way to assess cannabinoid content. This
situation changed in the winter of 2008-
2009 when Steve DeAngelo, director of
Oakland’s Harborside Health Center,
encouraged two erstwhile growers,
David Lampach and Addison DeMoura,
to launch a lab, aptly named Steep Hill.
Harborsidc supplied the lab with a steady
stream of samples to test for mold and
to analyze for levels of THC, CBD, and
CBN.
It turned out that CBD-rich cannabis
was not as rare in California as experts
had predicted. O'Shaughnessy's reported
that about one in 600 samples brought to
Steep Hill and other labs in 2009 held
4 percent or more CBD. ProjectCBD was
created to report what doctors, patients,
growers, and manufacturers were learn
ing about CBD-rich medicines.
RS. (Post Sanjay)
In August 2013, Sanjay Gupta, MD,
narrated a documentary on CNN in
which he acknowledged that we all had
been “systematically miseducated” about
marijuana. The show provided dramatic
examples of cannabis exerting beneficial
effects. Most memorable was the story
of a five-year old, Charlotte Figi, afflict
ed with a severe form of epilepsy.
Charlotte’s seizures had escalated as
conventional treatments failed. Her
mom in Colorado Springs and her dad,
a Special Forces sergeant deployed to
Afghanistan, did research online and
Wcrnard Bruining/ounded the first coffee
shop in Amsterdam, Mellow Yellow, in 1972.
Today he is the Dutch vanguard for medical
cannabis. Visit his site, www .mediwiet.nl for
more information.
Photo by Lika Braining.
Drs. Sanjay Gupta and Geoffrey Guy at the
GW Pharmaceuticals cultivation facility. GW
is seeking FDA approvalfor Sativex (to treat
intractable cancer pain) and Epidiolex (for
pediatric epilepsies).
learned about cannabis as an anticon
vulsant. Paige Figi obtained buds from
dispensaries, and a friend taught her how
to extract oil for Charlotte. A CBD-rich
variety provided seizure relief, but Paige
could not get resupplied.
In February 2012 she met Joel Stanley,
who, with his brothers, grew marijuana
for their own dispensaries and had a
hemp strain that worked miraculously
well for Charlotte. The Stanleys re
named their plant "Charlotte’s Web”
and offered to grow it in large quantities
for the Figis and others in need. When
Sanjay Gupta visited their greenhouse,
one of the Stanley brothers pointed to
a Charlotte’s Web plant and claimed,
“There’s nothing like this in the world.
This plant is 21 percent CBD and less
than 1 percent THC.”
Fortunately, there are other cannabis
plants with CBD:THC ratios greater
than 20:1, and they are being grown in
California and other states where it is
legal to do so. Nor is it clear that the
higher the CBD-to-THC ratio, the more
effective the medicine. There may be an
optimal ratio for treating each illness
and each individual. Terpenoid and fla
vonoid content will influence the effects
of any given cannabis-based medicine.
A challenging research opportunity
presents itself to doctors and patients,
growers and medicine makers.
The federal Farm Bill of 2014 legalized
cultivation of “industrial hemp'contain-
ing 0.3 percent THC or less for research
purposes. This enabled the Stanley
Brothers to grow 36,000 Charlotte’s
Web plants—now bred to contain 30:1
CBD-to-THC—on 17 acres, and to
www.marijuanagrowing.com
21
Lawrence Ringo (left) and Jaime Carion
('Cannatonic' breeder, Resin Seeds)
at the High Times Medical Cannabis Cup in
San Francisco. Nobody did more to expedite
and expand the availability of CBD-rich
plants for medical use than these two men.
redefine their extract as CW Hemp Oil.
Several thousand hemp plants were also
grown in Kentucky for medical use.
“Industrial hemp” is providing more than
food and fiber. A bill to remove CBD and
hemp from the Controlled Substances
Act has been introduced in Congress.
Hundreds of parents of children with ep
ilepsy, cancer, and other serious illnesses
have moved to Colorado in hopes of
obtaining Charlotte's Web. A nonprofit
called Realm of Caring, cofounded by
Paige Figi, counsels families who are us
ing the Stanley Brothers' product, main
tains a waiting list of prospective clients,
and acts as an educational resource. In
2014, eleven states passed bills legalizing
cannabis containing minute amounts of
THC. Prohibitionists see these so-called
CBD-only bills siphoning support from
bills that would legalize THC for medical
Jason David provided CBD-rich oil from
Oakland's Harborside Health Center to his
son Jayden, who achieved seizure relief News
ofJayden's improvement inspired Charlotte
Figi's parents to seek CBD in Colorado. Photo
from Braverman Productions.
use (as happened in Florida in November
2014). Advocates see them as a first step
toward more comprehensive legislation.
Numerous companies are producing and
distributing cannabis-based medicines in
the USA and overseas. The boldest sell
CBD-rich products through the mail
and online. Although CBD remains on
Schedule One of the federal Controlled
Substances Act, hemp food products
containing less than 0.3 percent THC
are legal (and on sale at Costco).
Federal regulators have not moved
against companies importing medical
products containing larger amounts of
CBD extracted from hemp plants grown
legally overseas. The Stanley Brothers—
who were advised in 2014 against ship
ping Charlotte’s Web Hemp Oil from
Colorado to patients in other states—
now plan to grow plants in Uruguay and
other foreign countries, and send the oil
back to patients in the USA.
GW Pharmaceuticals is seeking FDA
approval for Epidiolex, a CBD extract
devoid ofTHC. Epidiolex was made
available in 2014 to epilepsy specialists
conducting Investigational New Drug
(IND) programs at hospitals in the
USA, involving some 200 children.
More than half experienced significantly
fewer and less severe seizures. About
15 percent were unhelped, and about
15 percent were seizure free. A similar
pattern has been reported by Bonni
Goldstein, MD, and Margaret Gedde,
MD, physicians who treat hundreds of
children using CBD-rich cannabis for
epilepsy in Los Angeles and Colorado
Springs, respectively.
Project CBD organizer Martin Lee says,
“How ironic that the prohibition of
cannabis, presented to Congress and a
gullible public as a way to protect chil
dren from a deadly vice, is crumbling
because children are in dire need of
cannabis as medicine.”
The doctors group organized by Tod
Mikuriya in 2000, now known as the
Society of Cannabis Clinicians, had
more than 100 members as of June 2014.
The SCC has been headed since 2009 by
Jeffrey Hergenrather, MD, a founding
member. “Doctors’ and patients’ under
standing of how cannabis works has
advanced significantly in recent years,”
he says. “Now it’s time for the medical
schools to acknowledge the endocanna
binoid system.”
V
O'Shaughnessy’s
online
O’Shaughnessy’s, online at www.beyondthc.
com, covers the ongoing history of the medical
marijuana movement.
ProjectCBD.org reports on the availability of
CBD and what scientists, doctors, patients,
and growers are learning about it.
The CBD Crew, a partnership between
Mr. Nice and Resin Seeds, produces CBD-rich
varieties.
22
MEDICAL CANNABIS
www.marijuanagrowing.com
24 Selecting a Cannabis Laboratory
25 The Potency Testing Process
27 Gas Chromatography (GC)
27 High-Performance and
Ultra-High-Performance Liquid
Chromatography (HPLC and UPLC)
28 Comparing Test Results - HPLC vs. GC
29 Alternate Methods of Potency
Testing: Thin-Layer Chromatography
(TLC)
29 How Patients Can Use Potency
Results
29 Cannabinoid Potency Testing as a
Tool for the Farmer and Breeder
30 Cannabis Safety Testing -
Pesticides, Microbiological and
Other Contaminants
32 Focus on Safety - Aspergillus
Contamination, Why It Matters
By Samantha Miller, President and Chief
Scientist of Pure Analytics Cannabis
Laboratory
With the rise of the medical cannabis
dispensary, several other types of
businesses and service providers have
evolved to help support their needs,
including laboratories that test prod
ucts for the medical cannabis industry.
Prior to the existence of medical can
nabis legalization, cannabis testing was
restricted to analysis conducted as part
of criminal investigation or within one
of only a few research programs, such as
the one at the University of Mississippi,
overseen by Dr. Mahmoud ElSolhy, or, in
Israel, that of Dr. Raphael Mechoulam,
which perform government-sanctioned
research.
Today the development and advance
ments of independent cannabis testing
laboratories in states with medical and
recreational cannabis legalization
represent exciting progress both in
the pursuit of medical-grade cannabis
grown and processed to specified stan
dards. Exciting, too, is the foundation
of a powerful tool for the independent
cannabis farmer to drive strategic breed
ing programs focused on isolating traits
of interest and increasing potency in a
predictive way using testing in the
vegetative stage to assist selection of
Dr. Mechoulam lecturing at the Hebrew
University ofJerusalem
plants for breeding or growing. See
"Cannabinoid Potency Testing as a Tool
for the Farmer and Breeder,” on page 29.
Several types of testing are performed by
laboratories specializing in cannabis ana
lytics to support the medical dispensary
model, including cannabinoid potency
testing; microbiological screening for
molds, fungi, and bacteria; and pesticides
testing that looks for residues of harmful
The medical cannabis dispensary, Florin
Wellness Center (FWC), is doing a brisk
business in this photo snapped by Paul Clemons.
www.marijuanagrowing.com
23
Various cannabis concentrates (left to right): bubble, shatter, bubble-hash, and pressed kief (hash).
chemicals that may have been applied
during the growth cycle. As testing
services and legalized cannabis have
proliferated and the marketplace of
products has quickly evolved and
changed, so have the offerings by
cannabis laboratories. Many laboratories
now offer testing for flavors and fra
grance compounds (known as terpenes)
contained in cannabis. The gravitation
toward chemically extracted concen
trates known as wax, shatter, dabs, and
more has also resulted in the demand
for specific services such as residual
solvent testing and testing for toxic
impurities found in low-grade butane,
propane, and CO2 gas often used to
make wax. In regions where regulation
is in keen focus, you will also find state-
imposed requirements, such as in
Nevada, mandating heavy-metals testing
and residual fertilizer and nutrient
testing.
The first US cannabis lab opened in
Colorado. Many others quickly followed,
the majority in California where the
burgeoning dispensary market saw the
proliferation of hundreds of dispensaries
within a single city, almost overnight.
The most common type of testing
performed by cannabis laboratories is
cannabinoid potency testing. Potency
testing provides medical cannabis
patients with important information on
the active compounds in their canna
bis. This can help them select the right
cannabis for them based on their spe
cific ailment, telling them which active
compounds are present and their relative
amounts. Cannabinoids commonly
tested for include THC, THC A, CBD,
CBDA, CBN, CBC, and CBG, and soon
will include THCV and CBDV, thanks
to the efforts of chemical manufacturing
companies supporting the specific needs
of the cannabis testing industry.
American cannabis laboratories are
limited in the cannabinoids they can
legitimately include in their analysis,
depending on which cannabinoids are
available for purchase as certified refer
ence standards from chemical standards
companies in the USA. At the time of
this book’s publication, the cannabi
noid reference standards available in
the USA for use by analysts include:
THC, THCA, CBD, CBDA, CBG,
CBN, CBDV, and CBC. These reference
standards are purified cannabinoids in
solution, and are used to calibrate the
equipment used to measure potency.
These certified reference solutions are
what allow the chemist to identify and
quantify the cannabinoids present in an
extract. When equipment is properly
calibrated using certified reference stan
dards, two different labs should be able
to measure the same extracted cannabis
and provide a similar result. Some can
nabis labs choose to report on cannabi
noids based on theoretical data rather
than verification of identity and amount
based on the use of a certified chemical
reference standard. Such a practice may
be acceptable in a research setting but
it is not acceptable in a patient-oriented
setting where service providers should
be operating under the same standards
“as if” they were being regulated by the
federal government and their analyses
“certified.” However, in a crowded and
highly competitive marketplace of service
providers, many will “reach” to claim
they can provide services or analyze tor
certain compounds such as exotic and
rare cannabinoids that others cannot
Co glc
■
EB
f>—f;
Finding a cannabis testing lab on the Internet
requires research.
in an attempt to develop a competi
tive advantage in the cannabis-testing
marketplace. If no one else is testing for
a particular compound, there is likely
a reason why, and the legitimacy of the
analysis may be called into question. This
leads us to the importance of selecting a
service provider who can provide reliable
and accurate results.
Selecting a Cannabis
Laboratory
As dispensaries, patients, and farmers
set out to choose the service provider
who is right for them, it can quickly
feel like wading through a confusing
litany of opinions, marketing speak, and
options. Having the facts at hand about
testing processes and equipment relative
to your own needs can help guide you to
the best service provider for your needs.
Cannabinoid potency testing has been
by far the most controversial during the
infancy of the independent cannabis
testing lab industry in the USA. It has
led to many blind tests of service pro
viders within a region by various groups
either seeking to legitimize the testing
process or rather to expose flaws in the
practices of cannabis testing service
providers. One such “ring test,”
24
MEASURING CANNABINOIDS
www.marijuanagrowing.com
COMPARISON OF GC AND HPLC OR UPLC
Gas Chromatography
High-Performance Liquid Chromatography or
Ultra-High-Performance Chromatography
A low-pressure stream of gas helps move the
compounds to the detector
A high-pressure stream of solvent helps move
compounds to the detector
i Detector destroys compounds
Detector usually doesn't destroy compounds
Cannot detect cannabinoid acids
Can detect cannabinoid acids
Analysis does NOT produce significant hazardous waste.
Eco-friendly
>---------------------------------------------------------------------------
Analysis produces a lot of hazardous solvent waste
•
-.. ................... J
published in O'Shaughnessy's journal of
medical cannabis in 2011, was conducted
by California NORML and included
the cannabis labs offering services in
the state of California at the time. The
results from 10 laboratories were quite
revealing and reinforced the fact that
the use of certified reference materials is
needed in order for lab-to-lab results to
be in good agreement. Those labs who
“made their own” chemical reference
standards rather than purchasing certi
fied ones were found to have results that
deviated significantly from the rest of
the pack, whereas good agreement was
seen across a handful of labs. The test
brought to light several basic principles
that can act as a guide in evaluating a
cannabis lab. Read the complete ring
test on the web at www.projectcbd.org/
RingTest.html#RingTest
This harvest of'Bubba Kush" buds measured
from 13 to 19 percent THC. The samples were
taken on different parts of the plants.
Understanding testing processes
and equipment can help guide you in
choosing service providers and testing
options best suited to your needs.
Different service providers specialize
in different types of samples and offer
different analytical options. In the
unregulated environment of canna
bis testing at the time of this writing,
there is no specified way to perform a
particular type of analysis. This leads
to a variety of different methods being
used, making it confusing for the patient
and farmer to interpret and understand
how to compare results between service
providers. Knowing a few key things can
help guide you in the right direction.
The Potency Testing Process
The basic steps of the potency testing
It takes more than good looks to operate
scientific testing equipment.
process that affect the accuracy and
precision of the results are:
1. sampling
2. calibration of equipment
3. quality of chemical reference
standards used
4. experience and expertise of the
person performing the work
Sampling can be performed at several
stages in the movement of cannabis from
the farmer to the patient. The product
may first be sampled at the farm and
provided to a dispensary that then takes
a sample to submit to the lab where
the cannabis is finally sampled by the
lab itself. Each step along the way—as
well as the handling of the sample—can
influence the final potency results and
whether cannabinoids such as CBN (a
degradation product) are present. At
each point at which it is handled and
sampled, the cannabis sample must be
representative of the entire quantity
of material it is selected from. For the
farmer with several pounds of the same
strain of cannabis, taking a representa
tive sample means making a selection of
buds of various sizes from various plants
and various parts of the plant. A recom
mended sample size to submit to the lab
is 0.25 to 1 gram (0.008-0 .035 oz) per
pound of material.
At the lab, the sample should be cut up
or ground to homogenize it or make it
uniform. A portion of this homogenized
sample is weighed on very sensitive
scales and then extracted with solvents
such as methanol or isopropyl alcohol
for analysis. Scales used to weigh sam
ples should be calibrated regularly, and
a dated log of those calibrations should
www.marijuanagrowing.com
25
GAS CHROMATOGRAPHY
Carrier gas
Sample path in a gas chromatograph
Gas chromatograph auto-sampler
£1
High-performance liquid chromatograph.
( Ultra-high-performance liquid chromato
graphs have the same appearance.)
26
MEASURING CANNABINOIDS
www.marijuanagrowing.com
be kept. In some labs, samples are dried
to zero moisture content before being
weighed for analysis. Depending on
how much moisture was in the plant
material to begin with, this can greatly
affect the results anywhere from 3 to
10 percent by weight. The extraction
of the sample involves placing a mea
sured amount of solvent in a vial with
the weighed cannabis sample. Different
laboratories use different solvents for
their extraction. Not every solvent does
a good job at completely extracting all
the cannabinoids. Methanol, ethanol,
and isopropanol are the best options for
complete (also known as exhaustive)
extraction, whereas acetone and hexane
used by some service providers do not
extract THC and CBD as completely.
This incomplete extraction would cause
an overall lowering of the potency
results. After the addition of solvent, the
extraction process can vary. Some may
heat the sample to extract; others may
sonicate using ultrasonic waves, or put
in a shaker bath or table. Using an
ultrasonic water bath is generally the
best method for full extraction of
cannabinoids. (Find a study of these
solvent extraction issues at http://blog.
restek.com/?p=3018.)
Depending on the type of sample being
analyzed, one way of analyzing it may
be more appropriate than another. Most
potency and pesticide testing on cannabis
samples involves analyzing the sample
using some form of chromatography
equipment. Two common types are
gas chromatography (GC) and high-
performance or ultra high-performance
liquid chromatography (HPLC or
UPLC). These pieces of instrumentation
may be equipped with many different
types of detectors. Some service pro
viders claim to be superior based on
their chosen equipment. Both types of
instrumentation yield accurate and viable
results when calibrated correctly and
used by an experienced operator who can
interpret and validate the data output.
Gas Chromatography (GC)
A gas chromatograph is a type of
analytical instrumentation in which
a low-pressure stream of compressed
gas—often hydrogen or helium—
pushes a sample from the injector to
the detector of the instrument through a
small-bore tube known as a column. The
column in a gas chromatograph is a 15-
to 30-meter length of fused silica tubing
coated with various substances on the
inside. These coatings and the length
of the tubing cause the compounds to
separate from one another in space and
time as they travel through the column.
In this way, samples reach the detector
separately and can be measured indi
vidually. If an analysis is not performed
correctly or is performed too quickly,
two compounds may reach the detector
at the same time and be measured as one
compound, resulting in an erroneous
reported result.
Gas chromatographs may be equipped
with several types of detectors. The
most common types of detectors for
cannabis potency testing include FID
(flame ionization detector), MS (mass
spectrometers) and TCD (thermal
conductivity detector). FIDs and MS
detectors are the best choices for reliable
cannabinoid analysis by GC. Pesticides
analysis may include detectors such
as ECD (electron capture detector),
NPD (nitrogen-phosphorous detector),
or PFPD (pulsed flame photometric
detector).
In the case of all GC detector types,
the sample extract that is injected into
the instrument is often heated to tem
peratures between 302°F and 392°F
(150°C-200°C). In order to vaporize the
sample so that it may be moved from the
injector onto the column by the stream
of gas, the sample also is combusted
when it reaches an FID detector. This
sample vaporization will decarboxylate or
activate any acidic cannabinoids as if they
had been combusted or vaporized. In a
mass spectrometer detector, the sample
is ionized and fragmented in order to
identify the compounds present. Sample
vaporization makes gas chromatography
the best option for analysis of cannabis
samples meant for inhalation by combus
tion or vaporization. From an analytical
perspective, this direct measurement of
cannabinoids in their decarboxylated
state best mimics the experience of the
patient upon inhalation.
High-Performance and
Ultra-High-Performance
Liquid Chromatography
(HPLC and UPLC)
High-performance and ultra-high-
performance liquid chromatography
are commonly referred to as HPLC and
UPLC. The difference between HPLC
and UPLC is the maximum pressure
the instrumentation can withstand.
UPLC instruments can analyze faster
and still maintain accuracy in most
cases as compared to HPLC. In HPLC
and UPLC a high-pressure stream of
solvent helps move compounds from the
injector to the detector. As with GC,
there are several types of detectors that
are commonly used for cannabinoid
analysis. UV-Vis (ultraviolet visible
spectroscopy) detectors use wavelengths
of light passing through the sample to
measure what is there. Photodiode array
(PDA) and fluorescence detectors use
certain wavelengths of light to excite
compounds in the detector, which are
then measured as they emit photons
of light falling back down to a less ener
getic state. HPLCs and UPLCs may also
be equipped with MS detectors. These
are generally a second detector in line
after the PDA or UV-Vis detectors.
The measurement of cannabinoids in
an HPLC or UPLC system can be
conducted without vaporizing the sample
using heat. As a result, analysis by
HPLC or UPLC best mimics the mode
of use for edible or ingestible samples.
By not heating the sample during sample
preparation or analysis, different canna
binoid information can be obtained to
understand the properties of the sample
as an ingestible form of cannabis. It is
important to understand whether or not
the cannabinoids are in their acidic form
or decarboxylated form for the purposes
of ingesting cannabis for therapeutic
or recreational uses. THC-acid and
CBD-acid have very different psycho
active and therapeutic properties as
compared to decarboxylated THC and
CBD. For example, THC-acid is non
intoxicating, while heated THC is very
intoxicating when orally ingested in very
small amounts. For example, one oral
dose ofTHC is 15 mg. It is important
to analyze orally ingestible samples by
www.marijuanagrowing.com
27
Cannabis edibles
HPLC if you are unsure about whether
or not the cannabinoids are decarboxyl
ated and need to verify the content of an
ingestible preparation. Many producers
of ingestible cannabis preparations do
not understand clearly the conditions for
complete conversion of cannabinoid acids
to THC and CBD, resulting in many
cases of partially decarboxylated edibles
and tinctures. In some cases it is import
ant to verify that NO decarboxylation
has occurred for those patients seeking
to use a cannabinoid acid therapy
program specifically avoiding the
decarboxylated forms. You can learn
more about considerations for oral
ingestion of cannabinoids by visiting,
www.purenalytics.net/blog.
One of the reasons it is important to
restrict the use of HPLC and UPLC to
specific samples where it is needed is due
to the large amount of environmentally
toxic hazardous waste that is produced
as a result of performing analysis by
HPLC. As described earlier, a high-
pressure stream of solvent is used to
move analyte from the injector to the
detector. This stream of solvent is gener
ally a mixture of acetonitrile and isopro
pyl alcohol. Its destiny is the hazardous
waste bottle, so unnecessary HPLC
analyses should be avoided in an effort
to have low environmental impact, and
use of this method restricted to ingest
ible samples where it is truly required.
Some examples of ingestible samples
include tinctures, juiced cannabis, edibles,
and capsules.
Comparing Test Results -
HPLC vs. GC
A second reason why HPLC and UPLC
Two different cannabis buds have distinct
cannabinoid profiles.
should not be used on samples meant
for inhalation is that the results are
not expressed in the form in which the
cannabinoids will be consumed when
heated and inhaled, the decarboxylated
forms THC and CBD, and can give
the perception of higher potency than
the cannabis contains. For patients on
a specific dosage regimen, it is import
ant to be able to accurately calculate
THC and CBD consumed. Results
from HPLC and UPLC analysis will
show THCA, THC, CBDA, and CBD
in addition to other cannabinoids such
as CBN and CBG. Many laboratories
that use HPLC/UPLC for cannabinoid
analysis of flowers express their final
results as THC=THCA + THC in a
sample. This can be confusing to the
consumer because the THCA value is
not properly mathematically converted
to its equivalent amount of decarboxyl
ated THC. THC is the form that will be
experienced by the user when smoked or
vaporized, thus the potency measure for
cannabis intended for inhalation should
be in the neutral or THC form rather
than THCA because of this.
Expressing results as THC+THCA
can cause the expression of “THC”
results higher than what the user will
experience with smoking or vaporizing
because of the following considerations:
THCA and CBDA are heavier molecules
than THC and CBD. To express the
total decarboxylated THC that a sample
may have in it, you must first adjust the
THCA value by multiplying THCA or
CBDA by a factor of 0.88 to account for
this difference in molecular weight. Un
derstanding the conversions in the figure
below can help you compare results that
were generated by HPLC/UPLC and
GC. You should also consider whether
or not the results are expressed on a dry
weight basis as well. You should know
how the lab you are using calculates and
reports results so you know if you have
to perform any of the conversions noted
below to make the results meaningful
for the way you’ll be using the cannabis.
To convert THCA to THC:
• Multiply the THCA value by 0.88%
• Example: 21% THCA x 0.88 =
18.5% THC
To convert THC to THCA:
• Multiply the THCA value by 1.14
• Example: 17% THC X 1.14 =
19.4% THCA
The same applies to CBDA and CBD
As you can see, depending on your
sample type (flower, concentrate, edible,
or tincture), one type of equipment
may provide more meaningful results,
depending on your use of cannabis.
• Cannabis for inhalation samples
such as flowers and concentrates to
be smoked or vaporized should be
analyzed by GC
• Cannabis for oral ingestion should
be analyzed by HPLC or UPLC if
state of decarboxylation is unknown
or unverified
• When evaluating test results, you
should know if they are expressed
in terms of:
• Acid forms or decarboxylated
forms
• Dry weight or full moisture
Many patients and farmers wonder what
results are typical and how the informa
tion varies by strain:
Potency
Rating
THC Potency
(% by weight)
mild
3-10
moderate
10-16
strong
17-20
very strong
21+
Typical THC results for cannabis
flowers
• Ranges from mild to very strong
• Average: 16.5 percent
28
MEASURING CANNABINOIDS
www.marijuanagrowing.com
H-----------
Potency
Rating
-1
CBD Potency
(% by weight)
low
0-2
moderate
3-5
high
6-20
Typical CBD results for cannabis
flowers
Often not found in significant
amounts
Always accompanied by THC
CBD-rich: >4% CBD by weight
Medical cannabis dispensaries like the Abatin
'Wellness Center in Sacramento, California,
are well stocked.
Test the cannabinoid profile of vegetative
plants to see if they are candidates for a
breeding program.
Alternate Methods of
Potency Testing: Thin-Layer
Chromatography (TLC)
Thin-layer chromatography tests mea
sure the cannabinoid profile for up to
6 cannabinoids: THC, THCV, CBD,
CBN, CBG, CBC, and their corre
sponding acids. The tests cost about
$10 USD each and take some practice
to perform with accuracy. The sample
is prepared and mixed with a solvent.
A selective dye detects the cannabi
noid levels and shows them on blotter
paper. The results are then interpreted
and compared to a chart. Every canna
binoid reacts differently with the dye,
resulting in distinctive colors. Please see
www.marijuanagrowing.com and www.
alpha-cat.org for more information on
thin-layer chromatography.
A segment of service providers presents
results from TLC (thin-layer chroma
tography) on what are often referred
to as “test strips.” In some cases, these
The cannabinoid profiles of 14 different
varieties of cannabis are represented in this
page of thin-layer chromatography tests.
test strips are promoted as being able
to provide accurate potency results for
cannabis. In general, without specialized
equipment, test strips are only viable for
use to tell whether or not certain canna
binoids are present, but not to tell how
much is present (i.e., potency).
How Patients Can Use Potency
Results
Patients are often faced with a dizzy
ing array of options in a medical
cannabis dispensary. Having accurate
cannabinoid potency information can
help patients select the best medicinal
cannabis for their ailment or condition.
Knowing a bit about the different effects
and medical applications of various
cannabinoids can help the patient have
a successful and efficacious experience.
THC is the main active ingredient in
cannabis, responsible for some of the
intoxicating effects of cannabis. THC
is often used to treat pain, nausea,
insomnia, and loss of appetite—among
•••••••••• I
W. I*. IBS l/x 10*. >'A. I*. 13S uw n*
I
■
1____I-------1-------1-------1-------1—1-------1
THC CALIBRATION DOT MEASUREMENT TOOL
Once prepared and tested, the sample circles are
measured with a plastic calibration measure
ment tool to discern cannabinoid levels.
”'b•n*
Pui« Analytic.
>u__
c
5lol.-■■
Pure Analytics developed a testing program to
facilitate rapid high-CBD isolation.
many other ailments. CBD is the second
most predominant cannabinoid and is
considered a nonintoxicating ingredient
in cannabis, although when consumed
there are clear mood-altering effects for
most. CBD provides relief from muscle
spasms, seizures, and anxiety, is known
to have antibacterial and anti-tumor
activity, and prolongs the effects of
THC. CBN is the degradation product
of THC. The presence of CBN can
indicate that a product is old or has not
been stored properly. CBN forms when
THC is exposed to UV light and oxygen
over time. CBN does have some thera
peutic properties and has been shown to
lower heart rate and reduce convulsions.
Cannabinoid acids such as THCA and
CBDA have been reported by patients to
provide relief from symptoms of spastic
ity and convulsions.
Cannabinoid Potency Testing
as a Tool for the Farmer and
Breeder
As the number of medical cannabis
users remains on the rise, there is an
ever-increasing demand for options with
specific THC:CBD ratios. Likewise
is the increasing demand for cannabis
www.marijuanagrowing.com
29
-
Heavy-yielding, CBD-rich ‘Cannatonic X
Sour Tsunami' was developed using tests
provided by Pure Analytics.
with the highest potency levels, since
potency readily translates to the amount
of active compounds and the value of
the cannabis in the current marketplace.
The demand for cannabis with specific
THC:CBD ratios is often driven by a
population with a specific ailment or
disease. One such example gaining
notoriety at the moment concerns the
specific needs of children with a type
of epilepsy known as Dravet syndrome.
Reports of 400 to 800 seizures per day
have not been uncommon for these chil
dren, who also suffer from developmen
tal, cognitive, and emotional issues. Des
peration leads parents of these children
to pursue experimentation with cannabis
extracts as a treatment for their child’s
condition. The type of cannabis required
by these children to reduce their sei
zures is almost entirely CBD with very
little THC. The preferred THC:CBD
ratio for most Dravet children being
medicated with cannabis is 1:20 or
greater. This type of cannabis was first
isolated and identified only about 4
years prior to publication of this book.
At that time there was only one known
plant and source. The miracle that this
particular type of cannabis represented
Measure the cannabinoid content of male
plants before they bloom. Choose males with
desirable cannabinoid profiles for breeding
programs.
for the families of these children has
pushed CBD-rich cannabis toward the
mainstream, as illustrated in a CNN
documentary by Dr. Sanjay Gupta. As
a result, the demand for cannabis with
this specific THC:CBD ratio spiked.
Just as that first 1:20 strain (known as
ACDC) was first isolated, a technique
was developed in an independent canna
bis lab in California based on prelimi
nary research conducted by Pacifico
et al. in Italy that would allow the rapid
development and isolation of this rare
and now important type of cannabis.
The program was developed at Pure
Analytics for analyzing and interpreting
vegetative-stage cannabinoid data to
facilitate rapid high-CBD isolation, ratio
characterization, and CBD and THC
potency optimization, as well as the
prediction of absolute potency numbers
when plants are sampled within the cor
rect stage of development. In the 2014
growing season alone, hundreds of 1:20
THC:CBD phenotypes were isolated
that were to be grown into plants and
made available on the medical canna
bis market. This technique, when it is
performed properly and the data is inter
preted correctly, can allow farmers to
have the crystal ball they always wanted,
to see what the flowers will produce
before they are formed.
With a vegetative-stage cannabinoid test
performed using the proprietary pro
tocol developed by Pure Analytics Lab
in California a farmer may identify his
THC:CBD ratios early in the growth
cycle, identify plants with the highest
cannabinoid accumulation potential,
and obtain a prediction of final flower
potency. The farmer may determine
cannabinoid ratio in both males and
females, and these ratios will remain in
place through the full maturation and
flowering process of the plant. Mean
ing, a 1:20 cannabinoid ratio identified
in a two-week-old vegetative plant will
result in flowers with the same ratio of
THC:CBD. This technique also allows
identification of the seedlings with the
greatest cannabinoid accumulation
potential, enabling the farmer to identify
his most potent strains with desired
THC:CBD ratios while still in the vege
tative stage. This is a powerful advance
ment allowing cloning of both females
and males with desired traits in the veg
etative stage to enable the strategic mass
breeding of genetically identical clones,
thus creating a more consistent resulting
seed population. For more information
on using vegetative-stage testing, visit
www.pureanalytics.net/blog.
Cannabis Safety Testing -
Pesticides, Microbiological
and Other Contaminants
While the testing of cannabinoids is
endlessly fascinating, other types of
cannabis testing are also meaningful to
the health and welfare of patients using
cannabis that they have not controlled
the production of. Many medical can
nabis dispensaries test for various types
of contaminants that may be harmful to
patients. These include pesticides analy
sis and microbiological analysis, as well
as tests for chemical residues such as sol
vent, solvent impurities, heavy metals,
and nutrient residues. There are many
different ways to perform a given type
of analysis. For example, a pesticides
analysis may be performed by a variety
of different pieces of equipment.
30
MEASURING CANNABINOIDS
www.marijuanagrowing.com
r------------------- —- ---- --- —- -- ---- ---- --- --- ---- ---- -- ---- ---- --- --- ---- ---- -- ---- ---- --- --- ---- --- --- ---- ---- -- ---- ---- --- --- ---- ---- -- ---- ---- --- --- ---- ---- -- ---- ---- --- --- ---- --- --- --- ”
TYPES OF INSTRUMENTATION SUITABLE FOR PESTICIDES ANALYSIS
Acronym for
Equipment
Description
GC-FID
gas chromatography with flame ionization detection
GC-ECD
gas chromatography with electron capture detection
GC-MS
gas chromatography with mass spectrometer detection
GC-PFPD
gas chromatography with pulsed flame photometric detection
GC-NPD
gas chromatography with nitrogen phosphorous detection
HPLC or UPLC-UV-Vis high- or ultra-high-performance liquid chromatography with UV-visual photometric detection
HPLC or UPLC-MS
high- or ultra-high-performance liquid chromatography with mass spectrometer detection
HPLCorUPLC-PDA
high- or ultra-high-performance liquid chromatography with photodiode array detection
HPLC or UPLC-FD
high- or ultra-high-performance liquid chromatography with fluorescence detection
For pesticides it is important that a
chromatographic analysis is performed
every time, and that the analysis is sen
sitive enough to be meaningful. There
are “shortcuts” that are tempting to use
because they are cheaper and faster, but
they are not an adequate replacement
for a full chromatographic analysis.
The problem with shortcuts such as
immunoassay screens or general screens
using a mass spectrometer for detection
is that they generally cannot achieve a
detection limit that is truly meaningful
relative to potential pesticide contamina
tion. For example, if a contaminant can
pose a health risk at 50 parts per billion
or ug/kg, then a pesticide screen that
can only detect contamination at higher
levels such as 100 parts per million or
mg/kg is not meaningful or particularly
useful.
When comparing different approaches to
pesticide analysis, you need to consider a
few key areas:
5. Equipment used
6. Sensitivity of the method, also
referred to as “detection limit”
7. Compounds analyzed for and
reported on
8. Whether third-party-certified
reference standards are used when
identifying a positive hit
It is important to realize that not every
type of equipment listed can see every
pesticide that may have been used. Some
detectors are very specific and some are
more general. It follows that the more
generalized the detector is, the more
reduced its sensitivity to potential pes
ticide contamination will be. As noted
earlier, unless specially configured, a
mass spectrometer is not the best choice
for pesticide-contamination detection
due to its higher threshold of detection,
meaning it likely can’t see trace-level
contamination. The use of mass spec
trometer detection may also lead to bad
habits in the lab. Pesticides analysis is
not trivial, nor is it cheap to perform. To
be done properly each class of pesti
cides should be analyzed and evaluated
separately using the detector most
sensitive to that class of compounds. For
example, chlorinated pesticides should
always be confirmed by GC-ECD (gas
chromatography with electron capture
detection) and phenoxyacid herbicides
by HPLC-FD (high-performance liquid
chromatography with fluorescence
detection). They should also always be
confirmed against certified reference
material of the pesticide. Meaning, if
myclobutanil is reported as present,
myclobutanil purchased as a third-
party-certified reference standard from
a chemical company should have been
analyzed along with the sample. If this
was not done, the result was not validated.
That leads us to an explanation of how
the use of mass spectrometers can lead
to bad habits in the lab.
Mass spectrometers are amazing pieces
of equipment with immense capabil
ity to identify unknown compounds
that may be in a mixture. Mass specs
are equipped with access through their
software to a powerful NIST (National
Institute of Standards and Technology)
database developed over the years by
thousands of scientists who have sub
mitted their data to the NIST. It allows
one to run a search of the database
relative to a datapoint from a mass spec
analysis. The software searches the data
base and finds the closest match with a
probability rating that it is a true result.
This is acceptable for a preliminary
identification of a contaminant but not
a basis for reporting that the compound
is present. It must be verified against the
certified chemical standard for the same
compound in order to be a legitimate
result identifying a specific compound.
Here are some key questions to ask a
service provider when learning about
their pesticides analysis:
1. What type of equipment do you use
to perform a pesticides analysis?
www.marijuanagrowing.com
31
Growing organic medical cannabis is one of the best ways to avoid contaminated medicine.
• You want to hear “chromatograph"
in the answer. Ata minimum, all
samples need a chromatography
screen from one type of equipment
listed on page 31. Note that not all
equipment has the same sensitivity
or can “see" the same compounds.
2. Which compounds do you analyze
for?
• They should be able to provide you
a list of compounds they can detect.
Ifa compound is not on their list,
they won't “see" it in the analysis.
• If the response is, “We test for
everything,* this may mean they
are not using certified reference
standards. This is the response
that those performing a mass spec
screen often provide. Not only are
reference standards probably not
being used, but it is unlikely that
the detection limit is meaningful.
3. What is your detection limit?
• You want to hear “parts per billion
(ppb) range to low part per million
(ppm) range." Detection may vary
depending on which chemical it is.
• This may also appear as pg/kg
range to low mg/kg range.
Microbiological analyses are also used
to screen medical cannabis. The major
ity of service providers screen for mold
and fungus contamination while others
also screen for bacterial contamina
tion, which becomes more meaningful
relative to products intended for oral
ingestion. Methods used to screen for
microbiological contamination include
microscopy, PCR analysis (polymerase
chain reaction), plating and culturing
with plates that can indicate classes of
organisms, mycotoxin screens by TLC,
and more. All but microscopy may pro
vide false positives due to mishandling
or cross-contamination of samples.
Analyses for heavy metals are usually
performed using an ICP-MS (inductively
coupled plasma mass spectrometer) and
if done properly by defined methods
offer a fairly reliable analysis. Nutrient
residues may be analyzed by a variety
of methods depending on what type of
contamination is anticipated. ICP-MS
and ion chromatography would be the
two most likely approaches.
Focus on Safety - Aspergillus
Contamination, Why It Matters
Aspergillus is a genus that consists of
more than a few hundred mold species.
It is found in most climates where can
nabis grows. Some Aspergillus species
can cause grave illness in animals—
including humans. Aspergillus fumigatus
and A. flavus are the most problematic
because they produce aflatoxin, a toxin
and carcinogen. Both species can con
taminate cannabis—including edibles.
A. fumigatus and A. clavatus species
commonly cause allergic diseases. Other
Aspergillus species frequently infect
grain crops.
Pulmonary aspergillosis is usually
caused by A. fumigatus, which results in
paranasal sinus infection. The symptoms
include cough, chest pain, fever, and
breathlessness; these common symptoms
make diagnosis difficult. Patients with
asthma, cystic fibrosis, sinusitis, AIDS,
weak immune systems, and weak lungs
are susceptible, as are chemotherapy
patients.
OO
o
O
OoC
c
o
o
Aspergillus mold
MEASURING CANNABINOIDS
www.marijuanagrowing.com
33 Cannabis Varieties
34 Cannabis sativa
35 Cannabis indica
36 Cannabis ruderalis
37 Feminized Cannabis
38 Autoflowering Feminized Cannabis
38 Indica I Sativa Crosses
39 High-CBD Varieties
39 High-THC Varieties
MEDICAL CANNABIS
In 1753, Carolus Linnaeus classified the
plant kingdom for the Western World.
In the process of doing so, Linnaeus
classified and named the genus and spe
cies, Cannabis sativa. He concluded that
the genus Cannabis has but one species,
sativa. However, travel and communi
cations were difficult in the 1750s, and
Linnaeus was unaware of C. indica and
C. ruderalis.
Kingdom: Plantae—all plants
Division: Magnoliopsida—magnolia
class
Order: Rosales—nine families
Family: Cannabaceae—hemp family,
flowering plants, about 170 species in
about 11 genera
Genus: Cannabis—three species
Species: indica, sativa, and ruderalis
Varieties (misnomer of “strain”):
infinite number of combinations
Here is a simple way to remember three
important terms used often in this book:
Indica Sativa Ruderalis
genus = last name
species = first name
variety = nickname
Qualities of Cannabis
1. Annual dioecious flowering herb
2. Imperfect flowers (dioecious) = male
and female 4- intersex plants (aka
hermaphrodites)
3. Produces cannabinoids that are
concentrated in glandular trichomes
which appear on foliage, primarily on
floral clusters
4. Wind pollinated
5. “Short-day” plants except
C ruderalis—equatorial varieties are
possibly autoflowering and may be
“day neutral”
Cannabis Varieties
Legally, all cannabis, whether rope or
dope, is classified as Cannabis sativa
(C. sativa):'’ Regardless of origin, all
cannabis is considered C. sativa under
international law. However, according to
Hemp Diseases and Pests authors
Dr. J . M. McPartland, R. C. Clarke, and
D. P. Watson, as well as CAB Interna
tional, Cannabis sativa can be further
classified as: Cannabis sativa (= C. sativa
var. sativa), Cannabis indica (= C. sativa
var. indica), Cannabis ruderalis (= C. sa
tiva var. spontanea), Cannabis afghamca
www.marijuanagrowing.com
33
Cannabis sativa plants tend to grow tall,
with much space between internodes and
narrow-blade leaves. Image by Mel Frank
(MF).
Cannabis indica is shorter, conical in shape,
and has relatively wide leaflets.
Cannabis ruderalis is generally short with
few branches. It flowers after 3 to 5 weeks of
growth, regardless ofphotoperiod.
(= C. sativa var. afghanica). Each has
a distinct growth pattern, look, smell,
taste, etc. In this book, I have treated
C. afghanica as a subspecies of C. indica.
This is how it is classified by the majority
of cannabis breeders and gardeners.
Cannabis sativa, C. indica, and
C. ruderalis are most often bred together.
Breeders cross the “varieties” together
and select for desirable qualities in the
offspring. See chapter 25, Breeding, for
more information.
Medical cannabis gardeners grow variet
ies with different cannabinoid profiles.
The cannabinoid profiles may change
from plant to plant. Varieties with high
levels of THC and CBD offer the most
therapeutic value.
Cannabis sativa
Cannabis sativa (= C. sativa var. sativa)
originated predominately in warmer to
tropical climates of Asia, the Americas,
and Africa. Each area of origin lends
specific characteristics, but all sativas
have the following general traits: tall,
sometimes leggy stature with more
distance between internodes than
C. indica', a large sprawling root system,
'Peyote Purple" from CannaBioGen is a good
example ofhow C. indica leaves can also be
narrow.
large narrow-bladed leaves that tend
toward lighter shades of green; and
somewhat sparse flowers, especially
when grown indoors under lights or
in low light conditions. Female flow
ers start at branch nodes and typically
develop along the length of the stem and
branches rather than clustering around
branch nodes. Flower formation is slow
er and less dense than with C. indica.
C. sativa flower buds enjoy more air
circulation and are less prone to fungus.
Overall, sativa varieties bloom later than
indica varieties. While good producers
outdoors, often growing to 15 feet (4.6 m)
or taller, indoors pure
varieties
often grow too tall too fast to be prac
tical for grow-room cultivation. Some
sativa varieties grow up to 10 feet in 3
months!
Central African sativas, including THC-
potent ‘Congolese’, grow similarly to
Colombian varieties with a tall leggy
stature, often growing to more than 15
feet tall (4.6 m) with loosely packed buds.
South Africa has major seaports. Sailors
brought C. sativa from many different
places and planted it in South Africa.
Consequently, the potency of South
African cannabis can be very high or
very low, and it can be short, tall, leggy,
bushy, etc. The famous ‘Durban Poison’
yields pale-green, potent early buds and
is the best-known South African variety.
Asian sativas, including Thai, Vietnam
ese, Laotian, Cambodian, and Nepalese,
have diverse growth characteristics and
vary significantly in potency. While Thai
and other
from the area are often
very potent, they are some of the most
difficult to grow indoors and the slowest
to mature. Thai varieties produce light,
wispy buds after flowering for about
34
MEDICAL CANNABIS VARIETIES
www.marijuanagrowing.com
‘Jamaican Grape'from Next Generation
Seeds grows tall with more length between
branch internodes.
Seeds from this Thai plant grown in 1976
came from a “Thai stick” a bud tied around a
bamboo stick. (MF)
This South Indian landrace plant was part of
a breeding program starting in 1977 by Mel
Frank. (MF)
four months on plants with large,
sprawling branches. Thai, Vietnamese,
Cambodian, and Laotian sativas are more
prone to grow into hermaphroditic adults.
Nepalese sativas can grow oversized
leaves on tall, leggy plants that produce
sparse, late-blooming buds, but other
varieties from this region develop into
short, compact plants that bloom earlier.
Tetrahydrocannabinol (THC) produc
tion and potency is often quite high, but
can also be second-rate.
Industrial hemp is C. sativa. The tall
varieties produce the longest fibers for
a wide range of industrial uses. Hemp,
affectionately referred to as “rope,” is
often seeded and contains extremely low
levels of THC and often very high levels
of CBD.
Recreational C. sativa typically causes
an energetic, cerebral, and inspiring
effect, often followed by a desire to
eat (especially sweet items)—aka “the
munchies.” Craving food is especially
important for patients who suffer from
nausea or lack of appetite while under
going chemotherapy, HIV/AIDS treat
ment, and other procedures.
This large, robust Mexican sativa landrace was
grown in 1978. (MF)
Mexican, Colombian, Thai, and Jamaican
varieties can be very potent, with a high
THC:CBD ratio that produces a soaring,
energetic, “speedy” high. But potency
can also be minimal, with low levels
ofTHC. Most exported Colombian,
Mexican, Thai, and Jamaican cannabis is
poorly treated throughout life and abused
when dried and packaged. This abuse
causes more rapid degradation of THC.
Consequently, seeds from fair smoke are
often more potent than the parent.
C. sativa varieties grown indoors
have been crossbred with C indica to
reduce their height and flowering time.
Sativa-indica hybrids generally take
a little longer to flower than pure
C. indica.
Cannabis indica
Cannabis indica (= C. sativa var.
indica) was classified by European
botanist Jean-Baptiste de Lamarck in
1785 from samples he believed to be
from India. Today scholars largely agree
that Cannabis indica L. originated on
the Asian subcontinent or maybe in
present-day Afghanistan.
C. indica is popular among indoor,
outdoor, and greenhouse gardeners and
breeders for its squat, bushy growth;
condensed root system; thick stout
stems; broad leaves with wide blades; and
dense, THC-ladcn, fat, heavy flowers.
Typically, indicas grow a maximum of
www.marijuanagrowing.com
35
'Strawberry Cough' indica from Next
Generation Seeds.
‘Pink Afghani" X African #¥ was an early
Mel Frank hybrid, 1982. (MF)
Original Afghani #1" from 1981 (MF)
6.5 feet (1.9 m) tall and produce more
side branches than sativas do. Typically
foliage is very dark green, and in some
varieties, leaves around buds turn reddish
to purple. Short, whitish stigmas may
turn reddish to purple under natural
sunlight. Flower formation starts around
branch nodes, and thick clusters of buds
develop. Dry flower weight is typically
much heavier for indicas than sativas.
C. indica varieties generally contain a
higher ratio of CBD:THC and often
contain more CBN than C. sativa does.
Indicas tend to produce more corporeal
effects, often described as a more phys
ical, relaxing, and even incapacitating
“couch-lock” effect. Side effects such as
dry mouth may also occur.
Some indicas have a distinctive odor
similar to that of a skunk or cat urine,
while others smell sweet and exotic.
Heavily resin-laden plants tend to be the
most fungus- and pest-resistant. Few
indicas with heavy, dense, compact buds
are resistant to gray (bud) mold.
Cannabis afghanica (= C. sativa var.
afghanica) could be classified as a sub
species of C. indica. It originated near
'BC Kush"from Next Generation Seeds shows
classic short-and-squat growth.
present-day Afghanistan. It is quite
short, seldom reaching 6 feet, with dis
tinctive, broad, dark-green leaflets and
leaves. Dense branching and short inter
nodes, most often with long leaf stems
(petioles), dominate the profile of
C. afghanica. The most common ex
amples of pure C. afghanica include the
many different hash plants and Afghani
varieties. C . afghanica is cultivated ex
clusively for drugs with much of the res
in being made into hashish. It is known
for its high cannabinoid content. Many
growers and breeders do not distinguish
C. afghanica from C. indica, lumping
them both into the C. indica category.
‘Hash Plant’, of which there are many, is
one of the classic C. afghanica varieties.
Cannabis ruderalis
Cannabis ruderalis (= C. sativa var.
ruderalis) f= C. sativa var. spontanea).
Botanists disagree as to whether
C. ruderalis qualifies as a separate species
or subspecies. Russian botanist D. E.
Janichevsky hypothesized in 1924 that
ruderalis found in central Russia was
C. sativa or a separate species,
C. sativa L. var . ruderalis Janisch. In 1929
Nicolai Ivanovich Vavilov, a well-known
plant explorer, named wild and feral
populations of cannabis in Afghanistan
C. indica Lam. var. kafiristamca Vav.,
and wild and feral populations found in
Europe C. sativa L. var. spontanea Vav.
Ruderalis varieties are generally believed
to have C. indica ancestors that acclimat
ed to harsher climates. C . ruderalis is very
short, from 1 to 2.5 feet (30.5-76.2 cm)
MEDICAL CANNABIS VARIETIES
www.marijuanagrowing.com
Seedling of the original 'Lowryder'.
One of the first flower tops from (Lowryder'.
The next step in development was called
'*Lowryder #2'.
tall at harvest and has a weedy, scrubby
growth habit. Branching is sparse and
leaves have wide blades similar to
C. indica but are often a somewhat
lighter shade of green. Stems are thick
and sturdy. Flowers are small and mod
erately dense. Root systems are adequate
to support small plants.
C. ruderalis is unique among cannabis,
in that it flowers according to stage of
maturity, typically after the fifth to sev
enth pair of internodes appear. C rud
eralis crosses available today usually
flower 21 to 30 days after planting seeds.
Mature plants are ready for harvest in
70 to 110 days regardless of the photo
period. C . ruderalis flowers and repro
duces according to an individual plant’s
age, regardless of the photoperiod.
The word ruderalis comes from ruderal.
In the plant kingdom, ruderal means “the
first species to colonize land disturbed
by humans or natural occurrences.”
C. ruderalis is native to Asia, Central
Europe, and Russia, and adapted to
the harsh environments found in these
climates. It is adapted for life in extreme
northern climates with short, 3-month
growing seasons.
C. ruderalis varieties are crossed with
C. sativa and C. indica varieties to
incorporate the daylight neutral gene.
Breeders are hybridizing plants with the
autoflowering gene from C. ruderalis
that incorporate qualities from C. sativa
and C. indica- . robust growth stature,
large flowers, and cannabinoid profile.
See “Autoflowering Feminized Canna
bis,” on page 38.
Feminized Cannabis
'Jorge's Diamonds' from Dutch Passion is a
popularfeminized variety. Cannabis seeds are
available feminized or in female version only.
Virtually any cross or variety can be feminized.
See chapter 25, Breeding, for information on
feminizing plants.
'Kalashnikova' from Royal Queen Seeds is
another example of a new feminized variety
from Europe.
'Black Jack' from Sweet Seeds is a new vari
ety, one of the many new feminized varieties
released every year in Europe.
www.marijuanagrowing.com
37
This 'Lowryder" female is just starting to
flower.
Autofloweringfeminized 'Magnum' can be
found at the Spanish company Hemp Trading
(www. hemptrading, com).
EZ Ryder is another auto-flowering variety
developed by the Joint Doctor.
Autoflowering Feminized
Cannabis
Autoflowering feminized cannabis
plants were originally popularized by
the Joint Doctor, a longtime cannabis
gardener and breeder. These varieties
have almost all the characteristics of
regular cannabis varieties but they flower
automatically. The autoflowering gene
can be incorporated into daylight
sensitive cannabis plants that flower
under a 12/12-hour day/night photo
period so that they flower after 3 to 4 z
weeks of growth.
TWzcrf-dominant varieties are very popu
lar because they naturally flower
early and the trait is easy to select.
Srtto>tf-dominant autoflowering plants
are often called semi-autoflowering or
super-autos because they start flower
ing after about 28 to 32 days of growth.
These plants can grow to more than
5 feet (1.5 m) tall. At harvest (90 to 110
days after planting), super-autos yield up
to 4 ounces (113.4 gm) of dried flower
buds. The extra days of growth translate
into higher yields. Original and smaller
autoflowering seed flowers in about 21
days, matures into ripe buds in 55 to 85
days, and yields up to 2 ounces (56.7 gm).
Autoflowering cannabis is perfect
for cool and cold climates with short
growing seasons. Autoflowering and
super-auto seeds grow easily outdoors
in alpine and northern climates having
short summers with very long days and
short nights. The plants can be started
indoors and moved outdoors after 3
weeks of growth. Autoflowering plants
are also quite resistant to cold, diseases,
and pests.
Outdoors in warm climates, gardeners
can harvest 3 or more crops of autoflow
ering cannabis!
Super-autoflowering plants are mostly
sativa, and grow bigger than original
autoflowering plants, reaching 6.5 to
8 feet (2-2 .4 m) under proper conditions.
Super-autos share the other qualities of
autoflowering plants flowering under any
light regimen and can be feminized too.
They differ in that Super-autos grow for
up to 30 days before they initiate flower
ing. Plants grow bigger during a longer
vegetative growth stage. Larger vegetative
plants have more branches and foliage
and produce more flower buds. Each
super-auto plant can yield 3.5 to
9 ounces (99.2 -255 gm) of dry flower
buds when grown outdoors under the
proper conditions. Plant super-autos in
spring and summer. Harvest 90 to 100
days after seeds pop through the soil.
Stitch, a French breeder, started devel
oping super-autos from Mexican and
Guatemalan genetics in the late 1990s
and continues to develop more varieties
today. Look for ‘Chaze’ super-auto and
other varieties.
Indica / Sativa Crosses
So many varieties are the result of just
two original varieties—‘Skunk #1’ and
‘Haze’. ‘Skunk #T is a fabulous plant.
It was the first stable cannabis variety.
These two plants are the cornerstones of
modern cannabis breeding.
'Power Plant' from Dutch Passion
MEDICAL CANNABIS VARIETIES
www.marijuanagrowing.com
"Sensi Star'from Paradise Seeds
"Skunk #T at peak resin production
"Catatonic3 from Resin Seeds is high in CBD.
CBD-rich "Harlequin from SOHUM Seeds
High-CBD Varieties
About one out of 500 samples brought
into California cannabis testing labs in
2012 had high levels of CBD. Cannabis
can be selectively bred for high CBD
levels. Several breeders have taken on
the task, among them Jaime from Resin
Seeds (Spain) and Lawrence Ringo from
SOHUM Seeds (Southern Humboldt
Seed Collective, California). Other
breeders are hot on their trail, develop
ing CBD-rich varieties as we speak.
High THC Varieties
There are many THC-rich varieties
available to medical cannabis gardeners
today. In fact, most of the varieties are
loaded with THC-rich cannabinoids and
can be grown well indoors, outdoors or
in a greenhouse.
‘Haze’ has been my favorite variety since
1983 when Nevil, Founder of the Seed
Bank in the Netherlands, gave me a big
branch for my trip back to Amsterdam
from the Cannabis Castle. This is my
all-time favorite variety! This opinion
is shared by countless cannabis aficio
nados. Developed in the early 1970s by
the Haze Brothers in Central California,
original ‘Haze’ was bred by crossing
Colombian/Mexican hybrids during
the first year. A South Indian male was
crossed with the best Colombian/
Mexican female offspring during the
second year. The third year, the best
"Arjan's Haze' (The Greenhouse) is one of the
many "Haze'-based varieties available today.
females were crossed with an imported
Thai male. Now there are many versions
of the “Original Haze.” Nevil’s ‘Haze’ is
one of the strongest I have seen.
A safe estimate is that ‘Haze’ is found
in the genetics of 10 to 15 percent of
cannabis varieties today.
‘Haze’ is often crossed with other variet
ies that ripen much quicker. Some of the
favorite crosses include: ‘Buddha’ (Dutch
Passion), ‘Fuma con Diablos’ (Flying
Dutchmen), and ‘Northern Lights #5’
X ‘Haze’ (Sensi Seeds). Of course, there
are many “Original Haze” varieties!
Taste—distinctive sweet and spicy,
pine-lemony
High—clear, up, soaring, vivacious,
animated
Potency—some varieties more potent
than others
Genotype—Colombian,
Mexican, Thai, and South Indian
Culture—difficult, long maturing,
hyper-prone to overfertilization
Odor—Smell it once and you remember
its distinctive odor forever!
Habit—long and lanky with wispy buds
Yield—low
Disease/pest resistance—very resistant
to diseases and pests
www.marijuanagrowing.com
39
‘Skunk #T is known for long tall flowers.
‘Original Skunk #V was developed by Sacred
Seeds. (MF)
‘Northern Lights' was one of the original,
strong breeding plants.
Indoors—three months or more
Outdoors—harvest late-December
through February
Ease to manicure—slow
Water hash quality/quantity from
trim—good
‘Skunk #1’ is the ultimate classic! Nearly
half of Dutch-grown seeds and Canadian
varieties today have a portion of ‘Skunk
#1’ genes. ‘Skunk #1’ was developed in
1978 by California-based Sacred Seeds.
This single variety transformed cannabis
breeding in the Netherlands and the rest
of the world. It has been the winner of
numerous harvest festivals, including
the Cannabis Cup in Amsterdam. You
cannot go wrong with this variety. Sensi
Seeds registered the name, but you can
find this variety at numerous seed banks,
and there is a little bit of skunk in count
less other varieties. This long history has
made ‘Skunk #1’ (and most of its direct
derivatives) one of the least-expensive
varieties available.
‘Skunk #T is probably part of the
genetics of 30 percent of the varieties
available today.
Taste—skunky, sweet
High —soaring, cerebral
Potency—strong but able to function on
it, low CBD
Genotype— ‘Colombian’ sativa!
‘Afgani’ indica X ‘Acapulco Gold’
Mexican sativa
Culture—easy to grow but sensitive to
overfertilization
Odor—distinctive, skunky and sweet,
strong but not overpowering
Habit—high flowerdeaf ratio; thick long
colas; prone to long internode space
Yield—very high
Disease/pest resistance—susceptible to
mold during flowering
Indoors—50 to 70 days, many
early-flowering varieties are available
Outdoors—mid October, excellent
greenhouse crop
Ease to manicure—very easy
Water hash quality/quantity from
trim—good
‘Northern Lights’ (‘NL’) was developed
by “The Indian” on an island in the
Pacific Northwest. He started with 11
seeds and named them ‘NL #1’, ‘NL #2’,
etc. Of the plants, ‘NL #5,’ ‘NL #8’ and
‘NL #T were the best, in that order.
Nevil shuttled clones back to Amsterdam
from Seattle, Washington, in the mid
1980s. Today, ‘NL #5’ is the main vari
ety of ‘NL’ in use by breeders. ‘Northern
Lights #5’ is often crossed with other
varieties such as ‘Blueberry’, ‘Haze’,
‘Juicy Fruit’, and ‘Jack Herer’. Varieties
are available from Sensi Seeds (who has
registered the Northern Lights name),
Canadian Professionals, and Nirvana.
‘Northern Lights #5’ is an absolute
must if you grow indoors. This potent,
user-friendly plant is also very popular
among commercial growers.
Taste—strong, full-bodied, sweet,
piney, hashy
High—body stone, couch-lock,
Potency—very strong, great resin
production
Genotype—predominately Afghan
zwdzc^/Thai sativa, very stable
Culture—easy to grow, can be pushed
with fertilizer
Odor—sweet piney
Habit—high flowerdeaf ratio,
compact buds, purple tinge to leaves
as plant matures
Yield—very good, a favorite among
commercial growers
Disease/pest resistance—somewhat
resistant to thrips and spider mites, best
to cross with sativa
Indoors—60 to 65 days
Outdoors—early October
Ease to manicure—easy and fast
Water hash quality/quantity from
trim—good but low volume
40
MEDICAL CANNABIS VARIETIES
www.marijuanagrowing.com
7
41 Innate Qualities of Cannabis
42 Life Cycle of Cannabis
42 Seeds & Seedlings
42 Germination
42 Seedling Growth
42 Vegetative Growth
43 Pre-flowering
44 Flowering
45 Mother Plants
46 Clones
46 Three Gardens
46 Indoor Gardens
47 Greenhouse Gardens
48 Outdoor Gardens
ESSENTIA'
MEDICAL
HORTICULTURE
CANNABIS
LIFE CYCLE
This male plant is laden with
ripe male flowers that are
packed with pollen. Cannabis
is wind pollinated. Male plants
release their pollen into the
wind to pollinate nearby female
plants. But pollen can also drift
for several hundred miles when
unobstructed. (MF)
This female, thin-leaved sativa
is easily distinguished by the
white fuzzy pairs ofpistils
protruding from each seed bract.
The pistils catch male pollen
that is ushered to fertilize the
female ovary. (MF)
Understanding how cannabis naturally develops and completes
its life cycle is fundamental to growing the best medicinal crop.
Cannabis, whether cultivated indoors or out, has the same basic
requirements for growth. It needs light, air, water, nutrients, a
growing medium, and the proper environment to produce energy
and to grow. Without any one of these essentials, growth stops
and death soon results. Both indoors and outdoors, the light
must be of the proper spectrum and intensity, and the air must be
warm, arid, and rich in carbon dioxide. Water must be abundant
but not excessive, and the growing medium must contain the
proper levels of nutrients in an available form to sustain vigorous
growth. When all these needs are in balance, cannabis plants will
flourish on their own.
Innate Qualities of Cannabis
1. Cannabis is an annual plant, which means it completes its life
cycle within one year or less.
2. Cannabis is dioecious, having both male and female plants.
Mature female flowers contain more cannabinoids than males.
3. Cannabis sativa and Cannabis indica are “photoperiod
determinate” plants; they require long nights to begin flow
ering. Flowering in Cannabis ruderalis is not triggered by the
light cycle of long nights and short days. C . ruderalis flowers
after 3-4 weeks of growth, regardless of the light schedule.
www.marijuanagrowing.com
41
Seeds contain an exact genetic code to grow
into strong, healthy cannabis plants with
a rich cannabinoid profile. Seed selection
is essential to produce a crop of cannabis with
all the desired characteristics.
The initial white rootlet has just emerged from
the seed.
The seed has germinated and the little white
rootlet is growing rapidly. Now is the time to
plant this sprouted seed.
Life Cycle of Cannabis
Cannabis is an annual plant; seeds
planted in the spring will grow through
out the summer and flower in the fall.
Cannabis typically is a dioecious species,
meaning it has separate male and female
plants. Plants with male flowers produce
pollen, which is dispersed by the wind,
and the female-flower-bearing plants
will produce seeds when fertilized. The
annual cycle starts all over again when
the new generation of seeds sprouts the
following year. In nature, cannabis goes
through distinct growth stages: seed
ling, vegetative, pre-flower, and flower.
Seeds & Seedlings
Healthy seeds germinate 3 to 7 days
after absorbing water from the medium,
and transform into little sprouts. The
seedling growth stage lasts about a
month. During this first growth phase,
seeds germinate, or sprout, establish a
root system, grow a stem, and produce
leaves to harvest sunlight and convert it
into usable energy—a process known as
photosynthesis.
Germination
During germination, moisture, heat, and
oxygen activate the embryo within the
durable outer coating of the seed. The
embryo expands, nourished by a supply
of food stored within the seed. Soon,
the seed’s coating splits, a white taproot
grows downward, and a sprout’s cotyle
dons (seed leaves) push upward in search
of light.
Seedling Growth
The primary root (taproot) grows down
ward due to gravity and branches out,
similar to the way the stem branches up
and out aboveground. These secondary
branching roots are called lateral roots,
and produce tiny rootlets that draw in
water and inorganic salts—the chemical
nutrients required to sustain life. Roots
also serve to anchor a plant in the grow
ing medium and provide support for the
growth above the soil. Seedlings should
receive 16 to 24 hours of light to main
tain vegetative growth. The seedling
growth stage usually lasts 4-6 weeks,
and most varieties will continue to vege
tative growth as long as plants receive at
least 16 hours of light every 24 hours.
Vegetative Growth
Cannabis will stay in the vegetative
growth stage as long as it receives a min
imum of 16 hours of light daily. As the
plant grows above soil, its roots contin
ue to fill the medium below the soil line.
Cells in the root tips continue to divide
and push farther and farther into the soil
in search of more water and nutrients.
Lateral root branches sprout, perpendic
ular to the primary roots, and then form
thin root hairs that are also designed
to harvest water and nutrients from the
soil. If the soil dries out completely,
these frail root hairs will desiccate and
die. They are very delicate and are easily
damaged or torn by klutzy hands if
In a week to 10 days, a small seedling will
break through the soil. The first rounded seed
leaves give way to the first set of “true leaves"
having the classic serrated edges.
The tender little seedling continues to grow.
Leaves multiply, stem girth increases, and the
tip continues upward toward the light.
In a few weeks seedlings have established root
systems and have started the vegetative growth
stage. Plants soon outgrow containers and
must be transplanted.
42
CANNABIS LIFE CYCLE
www.marijuanagrowing.com
This indoor vegetative garden room is
illuminated 18 hours a day, with 6 hours
ofdarkness. This light regimen keeps plants
in the vegetative growth cycle.
Stems must be stout to support heavy flower
buds. The internodes on this plant's stems are
growing close together. This is a desirable trait
when cultivating indoors.
This female pre-flower appears about 4 to 5
branches down from the top of the plant, about
2 months after the seed sprouts. The white
fuzzy hairs (female stigmas) show that this
plant has designated sex and is a female.
exposed or moved roughly. Extreme care
must be exercised during transplanting.
A strong, healthy root system is essen
tial for optimum growth.
Like the roots, the terminal growth
shoot at the top of the plant also has
cells that divide and multiply at its tip,
called the meristem. These cells give rise
to new auxiliary buds, which themselves
become lateral leaves and shoots. The
central, or apical, bud carries growth
upward; side, or lateral, buds turn into
branches or leaves. The vascular system,
located within the main stem, trans
mits water and nutrients from the root
system to the growing buds, leaves, and
flowers where sugars are produced via
photosynthesis and are then redistribut
ed throughout the plant. This fluid flow
takes place in specialized tissues called
xylem and phloem; xylem bring nutri
ents and water to the sites of photosyn
thesis in the leaves, and phloem brings
the resulting sugars to parts of the plant
that do not undergo photosynthesis.
The stem also supports the plant with
cellulose and lignin located within cell
walls and structures along the stem.
Outdoors, rain and wind push plants
around, causing microtears in these
tissues, which are repaired by the depo
sition of cellulose and lignin. These tis
sues together provide strength and make
the stem strong and rigid. Indoors and
in greenhouses, with no natural wind or
rain present, cellulose and lignin pro
duction is often lower, so plants develop
weak stems and may need to be staked
up later, especially during flowering.
To help build strong stems, make sure
to have adequate air movement in the
grow-room or greenhouse environment.
Once green tissues are present in the
seedling, the plant starts to manufacture
food (carbohydrates) and produce energy
from the sunlight and nutrients in the
soil. This process is known as photosyn
thesis. Chlorophyll is the substance that
gives plants their green color, and it is
found in cellular structures called chloro
plasts. Inside chloroplasts is where light
energy, carbon dioxide (CO2) taken from
the air, and water and nutrients from the
soil are converted into carbohydrates
and oxygen. This process releases usable
Vegetative growth outdoors is often much
more profuse than indoors. It is difficult for
artificial light and an artificial growing
environment to compete with natural sunlight
and Mother Nature.
energy and creates starches or sugars that
are later used in the production of plant
tissues and cellular components.
Tifiy breathing pores called stomata
are located on the underside of the leaf.
Stomata are the entry point of CO2 into
the plant, where it is then used in photo
synthesis. The stomata open and close
to regulate the flow of moisture and
oxygen from the leaf—both of which are
waste products of photosynthesis. The
stomata are very important to the plant’s
overall health and function.
Pre-flowering
Cannabis grown from seed typically
begins to show early development of
floral bud structures commonly known
as pre-flowers. The vast majority of
varieties begin to produce these imma
ture sexual organs by the fourth or fifth
week of vegetative growth. In some
varietals, pre-flowers can be seen as
early as the fourth node; however they
generally appear between the fourth and
sixth node from the bottom of the plant.
Cannabis plants are normally either all
male or all female, with each sex having
its own distinct form of pre-flower. Use
pre-flowers to identify the gender of the
plants and separate the females for flower
production. Female flowers are cultivated
for their high cannabinoid content, and
are therefore prized. Male plants have
lower levels of cannabinoids (THC,
CBD, CBN, etc.) and are not typically
kept by cannabis cultivators. Male plants
are normally removed and destroyed by
growers, but can also be maintained and
evaluated as potential breeding stock.
www.marijuanagrowing.com
43
A tiny male pre-flower appears near the end of
the natural vegetative growth cycle. The little
shoot has all the characteristics ofa male
flower and will continue to grow and then
manufacture and release male pollen. (MF)
Mother plants are growing on the right in this
garden; rooted clones in the vegetative growth
stage are growing under T5 fluorescent lights
on the left.
Insects and mites can become a big problem,
especially on indoor and greenhouse crops.
This aphid has found a new way to disguise
itself. The translucent spots on its back look
very similar to cannabis resin! (MF)
Indoor plants grown from seed are most
often left in the vegetative growth stage
for 4 to 6 weeks, or until they are a mini
mum of 12 to 18 inches (30-45 cm) tall,
before being induced to flower. Smaller
plants can be induced to flower, but this
practice is typically not recommended
for plants grown from seed and is more
practical for crops grown from clones.
Premature flowering of young plants
from seed can cause sexual instability
(intersex expression) in some varieties.
Flowering
Cannabis enters the flowering stage in
the late-summer and early fall. As the
nights become longer and days shorter,
plants are signaled that their annual
life cycle is beginning to come to an
end, and the flowering stage begins.
C. sativa and indica are photoperiod-
determinate plants requiring longer
nights and shorter days to induce
flowering. C . ruderalis is not induced
to flower by changes in light cycle and
starts flowering when the plants reach 3
or 4 weeks of age, regardless of the light
regimen.
Left unpollinated, female flowers devel
op without seeds, commonly known
as “sinsemilla” from the Spanish sin
semilla, or literally “without seed.”
Unfertilized female plants continue to
produce flowers and become increas
ingly covered in resinous, glandular
trichomes, which produce the essential
oils that give cannabis its unique smells
(terpenes), in addition to the medicinal
compounds known as cannabinoids.
Trichomes produce numerous plant
secondary metabolites, and recent
studies show that some of the molecules
produced in cannabis trichomes belong
to families of compounds with proven
antifungal, antimicrobial, and antibiotic
properties. Genes that provide resistance
to dehydration are also present, and in
many species trichomes are known to
inhibit insect movement. All of these
factors support the hypothesized role of
trichomes and their by-products provid
ing protection from insects, fungi, UV
light, and so forth, that might damage
the developing seed within the female
flower during gestation.
After weeks of heavy flower production,
cannabinoid content and other secondary
metabolite production peaks in the unfer
tilized sinsemilla flowers. This is the ideal
moment for harvest; no new flowers are
Small indoor plants typically yield from
1 to 4 ounces (30-120 gm). Outdoors and
in greenhouses, cannabis is able to stay in
the vegetative growth stage for several
months and reach final heights offrom
5 to 25 feet (1.5 -8 m). Given an ideal
environment, the longer vegetative period
allows single plants to produce 5 to 10 pounds
(2-5 kg) of cannabinoid-rich dried flowers.
being produced, and the unseeded floral
clusters are at their maximum coverage of
glandular trichomes rich in cannabinoids
and other essential oils.
Male plants produce pollen, which is re
leased into the wind and by chance lands
upon the stigma of a nearby unpollinat
ed female flower. The flower becomes
fertilized, and the seed that will form
the next generation begins to grow
under the protective layer of trichomes
found on the female bract. After shed
ding all the pollen from the staminate
flower, male plants senesce and eventu
ally die. The seeds in the female plant
continue to mature for 3 to 6 weeks after
fertilization. Once ripe, the seeds
will split through the protective bract,
and the female plant will also begin
to senesce, leaving the seeds to fall to
the ground.
Indoors, flowering can be induced in
most commercial varieties of cannabis
by providing 12 hours of uninterrupted
darkness and 12 hours of light every 24
hours. Plants that developed in tropical
regions often start flowering when given
12-hour days and nights, but flowering
can continue for up to 20 weeks. Some
growers who cultivate equatorial sativa
varieties will increase the period of
darkness to 13 hours and beyond, in an
attempt to mimic the natural light cycle
in the tropics.
Plant growth structure changes during
flowering. New shoot and leaf growth
slows and flowers begin to form.
Cannabis has both male and female
44
CANNABIS LIFE CYCLE
www.marijuanagrowing.com
This cannabis flower appears to be frosted
with cannabinoid-rich resin and will be ready
to harvest in a couple of days. The cannabis
varieties available today make growing a
potent medical cannabis crop easy.
Some varieties such as 'Power Plant"produce
big central buds very quickly.
This garden has been flowering for 4 weeks.
Small indoor gardens like this 40-inch-square
(1 m2) garden are easy to set up. Note that this
garden is being watered automatically and
requires little maintenance.
plants. When both male and female
flowers are in bloom, male flowers
release pollen into the air that lands on
female flowers, thereby fertilizing them.
The male dies after producing and shed
ding all its pollen. Seeds form and grow
within the female flowers. As the seeds
are maturing, the female plant slowly
senesces and dies. The mature seeds
then fall to the ground and germinate
naturally or are collected for planting
next spring.
Mother Plants
Vigorous, healthy female plants known
to produce high-quality flowers with
desirable cannabinoid profiles make the
best mother plants, although any plant
deemed desirable can be made into a
mother, or donor, plant. Mother plants
are given 18 to 24 hours of light daily
to ensure they stay in the vegetative
growth stage. For vegetative reproduc
tion, stem cuttings of shoots or branches
are cut from mother plants and placed in
a growth medium to establish roots. The
rooted stem cuttings are often called
“clones,” since the new plants share the
exact genetic code of the mother plant
and thus will grow identically when
given the same environment. Cultivating
several vigorous, healthy, insect-free
mother plants is the key to having a
consistent supply of all-female clones.
A single mother plant can supply a
garden with hundreds of clones in a
This C. ruderalis plant was growing along the
highway in Hungary in the mid-1980s, when
Nevil, founder of the Seed Bank, snapped
this photo. Breeders have been working with
daylight-neutral ruderalis genetics for many
decades. In the last few years ruderalis variet
ies have been crossed with “regular” varieties
that impart a strong cannabinoid profile and
harvest weight.
Genetics and temperature play a big role in
purple-colored leaves. Some plants like this
'Purple Pineberry" are predisposed to turning
color. When grown in cool weather the colors
are more pronounced.
Male plants are normally removed from the
garden so that they do not pollinate female
plants. The male plant on the left is in full
flower and spreading its pollen to all the
female plants. Females will grow ripe seeds in
6 to 8 weeks.
www.marijuanagrowing.com
45
Mother plants can be maintained and grown
for many months. These mother plants
on a Mexican farm have been in the ground
for almost a year!
few short months. Indoors clones can
be induced to flower as early as 6 to 12
inches (15-30 cm) tall, or can be grown
until 3 feet (90 cm) or taller before being
induced to flower. The identical “clones”
e moved into the flowering room as
•on as the previous crop is harvested.
Outdoor gardeners grow clones indoors
until they are about 2 feet tall (60 cm)
before moving them outdoors or to a
greenhouse for planting.
Clones
Branch tips are cut and rooted in a new
medium to form stem cuttings or clones.
Once cut, clones are rooted under fluorescent
light for about two weeks, until they develop
a root system.
Clones take 10-20 days to grow a strong,
healthy root system, but can begin to
show roots in as short as 6 days. Clones
are given 18-24 hours of light so they stay
in the vegetative growth stage, and once
the root system is established, clones are
transplanted into larger containers. In
doors, clones grow for an additional 1-4
weeks or more in the vegetative growth
stage before being induced to flower.
Outdoors, clones are transplanted into
large containers or Mother Earth, and
they stay in the vegetative growth stage
until nights grow long in the late sum
mer, which induces them to flower.
This indoor garden is growing under T5
fluorescent lights. The T5s are able to supply
plenty oflightfor vegetative growth. The
plants are in individual containers
and are easy to move in the garden.
Three Gardens
This section outlines 3 different gar
dens in 3 different locations: indoor,
greenhouse, and outdoor. The examples
show different planting and harvesting
scenarios that use the natural advantages
provided by each garden and the varieties
grown. For more complete information
about each type of garden, see chapters
on Garden Rooms, Case Studies, Out
doors, and Medical Cannabis Varieties.
Indoor Gardens
Maintain mother plants and clones
18 to 24 hours of light daily. Induce
Branch tips are cut and rooted in rockwool
cubes or other growing mediums. The cuttings
grow roots in about 2 weeks and are then
ready to plant.
Black plastic is alongside this light deprivation
greenhouse. Every day the black plastic is
pulled over the greenhouse to black it out and
create a total of 12 hours' darkness, which
induces flowering in indica and sativa variet
ies of cannabis.
This autoflowering feminized seedling is an
example ofhow a germinated seed can grow
into a mature plant ready for harvest in just 70
days and receive 18 hours ofdaily light!
CANNABIS LIFE CYCLE
www.marijuanagrowing.com
The garden on the right is about a week ahead
of the garden on the left and will be harvested
a week earlier.
The plants on the left will be ready to harvest
in about a week. The plants on the right are
about 2 weeks into flowering and will be
harvested in about 6 weeks.
Plant a spring crop in warm climates.
Diminished sunlight intensity produces
smaller buds, about half to three-quarters
as big as others. Ifplants get cold at night,
growth slows.
vegetative plants to flower by providing
12 hours of uninterrupted darkness and
12 hours of light every 24 hours. Once
the dark/light schedule has been set
to 12 hours dark and 12 hours light,
most varieties of cannabis will flower
and can be harvested in 60 to 90 days.
First Harvest
Indoor Spring Crop - 90 days
January 1 - Move well-rooted 12- to
18-inch-tall (30-45 cm) female clones
into room under 18 to 24 hours
of light.
January 21 - Transplant clones into
3-gallon (11 L) containers.
January 50 - Induce flowering with
12-hour days and nights.
February 7 - Take cuttings and start the
next crop of clones. Give clones 18 to 24
hours of light.
March 50 - Harvest first crop.
Second Harvest
Indoor Summer Crop - 90 days
April 1 - Move well-rooted female
clones into room under 18 to 24 hours
of light.
April 21 - Transplant clones into
3-gallon (11 L) containers.
April 50 - Induce flowering with
12-hour days and nights.
May 7 - Take cuttings and start the
next crop of clones. Give clones 18 to 24
hours of light.
June 30 - Harvest first crop.
Third Harvest
Indoor Autumn Crop - 90 days
Julyl - Move well-rooted female clones
into room under 18 to 24 hours
of light.
July 21 - Transplant clones into 3-gallon
(11 L) containers.
July 30 - Induce flowering with 12-hour
days and nights.
August 7 - Take cuttings and start the
next crop of clones. Give clones 18 to 24
hours of light.
September 30 - Harvest first crop.
Greenhouse Gardens
Greenhouse crops can be harvested
2 or more times a year, but most
often greenhouses are planted in the
spring and yield a single harvest in
the fall. In cold climates, greenhouses
must be heated. All greenhouses must be
vented or cooled in warm weather. The
This Mexican greenhouse needs shade cloth
and supplemental lighting at night to keep
plants in the flowering growth stage. The days
and nights are between 11 and 13 hours long
all year round. This is the perfect photoperiod
forflowering in cannabis.
basic harvest scenario below shows
how to harvest 3 greenhouse crops
every year.
First Harvest
Greenhouse Spring Crop - 90 days
March 1 - Move bushy, well-rooted
1- to 2-foot-tall (30-60 cm) clones and
seedlings into greenhouse.
March 1 - Long 12-hour nights and
short 12-hour days in spring signal
cannabis to flower.
March 15 - Remove any male plants.
To distinguish plants, look for male
pre-flowers.
March 15 - Transplant clones and fe
male seedlings into large containers.
April 15 - Darken greenhouse after 12
hours of daylight, until harvest.
May 30 - Harvest: The less-intense
sunlight will make for smaller buds than
harvests later in the season.
Second Harvest
Greenhouse Summer Crop - 90 days
June 1 - Move bushy, well-rooted 1- to
2- foot-tall (30-60 cm) clones and seed
lings into greenhouse.
June 15 - Remove male plants; male
pre-flowers distinguish male plants from
females.
June 15 - Transplant clones and seed
lings into larger containers.
Julyl - Induce flowering by blacking
out (covering) greenhouse after 12 hours
of light.
July 15 -Verify the gender of all plants.
Remove any remaining males.
www.marijuanagrowing.com
47
uis small greenhouse protects flowering cannabis from regular rains and bad weather.
also keeps plants a little warmer at night. More regular irrigation is necessary when growing
large plants in small containers.
August 1 - Maintain flowering by cov
ering greenhouse after 12 hours of light
until harvest.
August 30 - Harvest a heavy crop of
top-quality medical cannabis flower
buds that have received maximum levels
of sunlight.
Third Harvest
Greenhouse Autumn Crop - 75 days
September 1 - Move bushy, well-rooted
1- to 2-foot-tall (30-60 cm) clones and
seedlings into greenhouse.
September 15 - Long nights and short
days of autumn signal cannabis to start
flowering.
October 15 - Medical cannabis flowers
develop but low light levels limit growth.
November 15 - Harvest smaller buds
that have received less-intense fall sun-
light.
Outdoor Gardens
Typically, outdoor gardens are planted
in the spring and harvested in autumn.
By applying information from this chap
ter, outdoor gardens can be harvested
2 or 3 times a year within moderate to
temperate climates. Transplanting clones
and seedlings and harvesting a single
crop is all that is possible in cold
climates with a growing season of 90
days. Extra care must also be taken to
protect seedlings and clones from harsh
weather.
First Harvest
Mild Climate Spring Crop - 90 days.
March 1 - Move bushy, well-rooted 1- to
2-foot tall clones and seedlings into a
full-sun-heated greenhouse.
Spring-planted autumn crop -210 days.
A complete 7-month-long season will yield
very big plants when grown properly. These
10-pound (4.5 kg) plants received full sun all
day long and grew in outstanding organic soil.
March 1 - Long nights will induce
cannabis to flower.
March 15 - Remove male plants; male
flowers distinguish male plants.
March 15 - Transplant clones and
female seedlings into large containers.
March 15 - Move outdoors in mild
climates - may need to cover on cool
nights.
April 15 - Darken plants after 12 hours
of daylight if flowering slows.
May 30 - Harvest smaller buds that
received less-intense spring sunlight.
Second Harvest
Mid-summer Crop - 70-75 days
May 1 - Start rWenzZw-dominant
(super-autoflowering feminized) variety
indoors.
May 15 - Transplant autoflowering
feminized variety to 3-gallon (11.3 L)
containers.
May 21- Transplant strong, healthy
plants to outdoor garden.
June 1 - Female flowers are visible.
July 15 - Harvest 3 to 3.5 ounces
(85-100 gm) of dried flower buds per
plant.
Third Harvest
Pure Indica/Sativa and Indica/Sativa
Crosses
March 1 - Plant clones and seedlings
indoors.
May 1 - Move bushy 1- to 2-foot-tall
clones and seedlings outdoors in
temperate climates.
May 1 - Pre-flowers appear; remove
male plants.
June 1 - Move bushy 1- to 2-foot-tall
clones and seedlings outdoors in all
climates.
August 1 - Flowers start to form;
remove any “surprise” male plants.
September - Harvest a large crop from
big plants.
CANNABIS LIFE CYCLE
www.marijuanagrowing.com
51 Seeds
52 Seed Germination
53 Water
53 Temperature
54 Air & Oxygen
54 Agricultural Astrology -
Planting by the Moon
54 How to Germinate Seeds:
Step-by-Step
54 Germinate Hard-Shelled
Seeds
55 Germinate Old or
Stressed Seeds
55 How to Plant Seeds:
Step-by-Step
56 Grow More Females
from "Regular" Seed
57 How to Help Ensure
Female Seedlings
57 Seedlings
58 Finding Seeds
58 Medical Gardeners
58 Seeded Medical Cannabis
59 Medical Cannabis Dispensaries
59 Legal Cannabis Seed Stores
59 Internet Seed Retailers
59 Seed Quantities
and Pricing
59 Storing Seeds
Exponential growth of seed selection and legal seed sales in the
Netherlands, the United Kingdom, Canada, France, Switzerland,
Spain, medical cannabis states in the USA, and many other
countries, is making cannabis genetics more accessible than ever
before. Most of the seeds (genetics) are available worldwide
via Internet purveyors. Cannabis seeds are sold in every country
Cannabis seed varieties developed
in California are often crossed
by European breeders and sold to
gardeners around the world.
This Cannabis sativa plant grown
in 1976 originated in Colombia.
(MF)
www.marijuanagrowing.com
49
This 'Afghani' from 1979 is classified
as Cannabis indica. (MF)
Regular cannabis plants are NOTfeminized.
Regular or naturally occurring cannabis
plants are dioecious, having male plants and
female plants.
Feminized 'Power Plant'
on earth—some of which are illegal.
Google “buy marijuana seeds” for an
eye-opening example. See “Finding
Seeds” on page 58 for more information.
There are thousands of varieties of
cannabis. Most popular varieties include
a combination of two or more of the
following: Cannabis sativa, Cannabis
indica, and Cannabis ruderalis. There
are fewer pure indica, sativa, or ruderalis
seeds available. The majority of seeds are
bred to grow best indoors. Often indoor
varieties are easy to acclimate to green
house climates. Fewer tried-and-true
varieties are available for outdoors, but
their number continues to grow.
Cannabis seeds available today are of 4
basic types:
1. Natural - produce separate male and
female plants
Mother Nature’s original seeds
Natural or “regular” seeds require 11
to 12 hours of light and 11-12 hours
of darkness daily to flower. See chap
ter 8, Flowering, for more information
on indica and sativa varieties.
2. Feminized - produce 994- percent
female plants. No male plants; male
flowers occasionally occur.
Female-only plants were first devel
oped in India in 1982.*
Feminized seeds require 12 hours of
light and 12 hours of darkness daily to
flower.
All regular seeds can be feminized.
* Study by H. Y. Mohan Ram and
R. Sett, Department of Botany,
University of Delhi, Delhi (India) -
“Induction of Fertile Male Flowers
in Genetically Female Cannabis
sativa, Plants by Silver Nitrate and
Silver Thiosulphate Anionic
Complex”
3. Autoflowering - ready for harvest
70-80 days after germination
Seeds contain C. ruderalis genes
mixed with indica and/or sativa genes.
Autoflowering seeds flower regardless
of light regimen. Autoflowering
Cannabis ruderal is from the Joint Doctor
Autoflowering feminized 'Diesel' X
‘ Lowry der'
This beautiful roomful of Ft hybrid
'Bubblicious' plants is from Resin Seeds.
50
SEEDS & SEEDLINGS
www.marijuanagrowing.com
Ruderalis cross
This seed contains the complete instructions
(genetic codes) to grow a 'Jack Herer'plant.
(MF)
Root Cap Cotyledons
Radicle / •
Perianth Calyx
Side View
Shoot Apex
Primary Leaves
Cut Away
Side View
The cutaway drawing in the center shows how
the seed will develop into different plant parts.
feminized seeds have been very
popular in Europe since 2008, with
the introduction of ‘Lowryder II’ ge
netics. Before that they were consid
ered a novelty.
New autoflowering varieties are grow
ing 3 to 4 feet (91—122 cm) tall.
Super-autoflowering varieties are
growing 6 to 7 feet (183-213 cm) tall.
4. Autoflowering Feminized - produce
99+ percent female plants that flower
and are ready for harvest 70 to 110
days after seed germination.
Seeds contain C. ruderalis genes
mixed with indica and sativa genes.
Autoflowering feminized varieties
flower after 3 to 4 weeks of growth,
regardless of light regimen.
Super-autoflowering feminized
varieties flower after 4 to 5 weeks of
growth. They grow longer and bigger.
Fl hybrid seeds have “hybrid vigor.”
Fl hybrids grow faster and bigger than
seeds of non-Fl hybrids. See chapter 25,
Breeding, for more information on Fl
hybrid plants.
Seeds
A seed contains all the genetic char
acteristics of a plant. The genetic code
contained within a plant dictates whether
it is regular, feminized, autoflowering, or
autoflowering feminized. Seeds are the
result of sexual propagation, and con
tain genes from each parent, male and
female/’’ Some (intersex) plants, known
as hermaphrodites, bear both male and
female flowers on the same plant. The
genes within a seed also dictate a plant’s
size; disease- and pest resistance; root,
stem, leaf, and flower production; canna
binoid levels; and many other traits.
The genetic makeup of a seed is the sin
gle most important factor dictating how
well a plant will grow under artificial
light or natural sunlight and the levels
of cannabinoids it will produce.
"See chapter 25, Breeding, for deviations
from the above rule (i.e., in relation to
intersex plants).
The genetic makeup of a seed is the
single most important factor dictating
how well a plant will grow under natural
of artificial sunlight and the levels of
cannabinoids it will produce.
The outer shell oj 'Skunk # I seeds breaks
away when germinating.
All seeds have the same basic require
ments for germination and seedling
growth. Strong healthy parents, proper
breeding practices, and excellent care will
yield strong seeds that germinate well.
Strong seeds produce healthy plants and
heavy harvests. Seeds stored under ad
verse conditions (hot, cold, or humid) or
stored too long will germinate slowly and
have a high rate of failure. Vigorous seeds
initiate growth within a day or two. Some
seeds take longer to germinate. Seeds that
take longer than a month to germinate
might always be slow and less productive.
The cask, or protective outer shell, on
some seeds never properly seals, which
allows moisture and air to penetrate. It
also causes hormone concentrations to
dissipate and make seeds less viable. Per
meable seeds invite diseases and pests to
move in. Such seeds are white, immature,
fragile, and crush easily with slight pres
sure between finger and thumb. These
are weak seeds that do not have enough
strength to germinate and grow well.
A simple view of a seed exposes an
embryo containing genes and a supply
of food wrapped in a protective outer
coating. Seeds range in size from small
dark ones from tropical climates to
huge seeds bred for hemp oil extraction.
Mature seeds that are hard, beige to dark
brown, and spotted or mottled have the
highest germination rate. Soft, pale, or
green seeds arc usually immature and
should be avoided. Immature seeds ger
minate poorly and often produce sickly
plants. Healthy, fresh, dry, mature seeds
less than a year old sprout quickly and
grow robust plants.
www.marijuanagrowing.com
51
SEED TYPE
ADVANTAGES
DISADVANTAGES
regular seeds
F1 hybrid vigor
not F1 hybrids - less vigor
no diseases
slow to start
easy transport
moisture/heat-sensitive
small
easy to lose
genetic expression
must cull males
feminized seeds
F1 hybrid vigor
not F1 hybrids - less vigor
all female
possible intersex qualities
use less space
expensive
use less light
autoflowering
seeds
F1 hybrid vigor
not F1 hybrids - less vigor
flower in 70+ days
could produce poorly
flower in summer
must remove males
difficult to clone
effectively
autoflowering
feminized seeds
F1 hybrid vigor
not F1 hybrids - less vigor
i
i
V
...
----- ■
-
.
■_
---------- -------: --------------
flower in 70+ days
may produce poorly
flower in summer
difficult to reproduce
seeds
99+% female
difficult to clone
effectively
-.......... -
-
J
See chapter 25, Breeding, “Advantages/
Disadvantages” between seeds and clones.
Seedlings are less work to grow out
doors because branches are usually
farther apart at first. Clones grow too
densely from the bottom and require
more pruning work.
Ten seeds from a reputable seed company
germinate into about half female and
half male"' plants. Some plants will be
small, and others will be strong, healthy,
cannabinoid-potent females. Of these
“super” females, one will be more robust
and cannabinoid-potent than her sib
lings. This super female is selected to be
the mother of future “super” clones.
"'Scientific studies show a minimal
weighting of averages that favor one sex
or the other. This could be based on
various factors including the external to
the gene set and a phenotypic control of
gene expression.
Normally all the seeds are germinated
and planted. Males and weak plants are
culled. The best female, or a clone of
the female, is often retained as a mother
plant. The mother can’t be chosen until
harvest. Two scenarios are possible:
re-vegetation or taking cuttings from
desirable females before they flower. This
way, the plants grown out are big by the
time the desirable female and correspond
ing clones are chosen for mother plants.
Strong, healthy seeds germinate quickly.
Seed Germination
Cannabis seeds need only water, heat,
and air to break dormancy and germi
nate; they do not need extra hormones,
fertilizers, or additives. Seeds sprout
without light in a range of temperatures.
Strong, viable, properly nurtured seeds
germinate in 2 to 7 days. At germination,
the outside protective shell of the seed
splits, and a tiny, white sprout (radicle)
pops out. This sprout is the root, or tap
root. Cotyledon, or seed, leaves emerge
on a stem from within the shell as they
push upward in search of light.
Break dormancy: Put newly harvested
seeds in the refrigerator for a week or
two to simulate winter. Remove and
germinate. Seeds will germinate more
uniformly because they all come out of
dormancy at the same time.
Timeline for germinating most seeds:
At 36 to 96 hours Water is absorbed,
root tip (radicle) pops through outer
shell and is visible.
At 10 to 14 days First roots and root
hairs become visible.
At 21 to 30 days At least half of seeds
are rooted by day 21. Seeds not rooted
by day 30 will probably grow slowly.
Once seeds are rooted, cell growth
accelerates; stem, foliage, and roots
develop quickly. Seedlings develop into
full vegetative growth within 4 to 6
weeks of germination.
Seeds are prompted to germinate by:
water
temperature
air (oxygen)
SEEDS & SEEDLINGS
www.marijuanagrowing.com
Plant 10
Regular Seeds:
50% male
50% female
25% weak
25% strong
10% = 1 strong "best" possibly
"super" female mother
tf
1
f1
F
p*
F
Plant 10
Feminized
Seeds:
99+% female
50% weak
50% strong
25% "best" with 1 "super"
female mother
F
F
$
F
F
F
Plant 10
Autoflowering
Seeds:
50% male
50% female
25% weak
25% strong
5 female plants at harvest,
no mothers
tt1 f1
1
"'f
J
Plant 10
Autoflowering
Feminized
Seeds:
99%+ female
50% or less weak
50% or more strong
10 female plants at harvest,
no mothers
f''
F
■
p"
1
■
F
Water
Soaking seeds in water allows moisture
to penetrate the protective seed shell
within minutes. Once inside, moisture
continues to wick in to activate the dor
mant hormones. In a few days, hormones
activate and send enough signals to pro
duce an initial root tip. The white radicle
(rootlet) emerges to bring a new plant
into the world. Once a seed is moist, it
must receive a constant flow of moisture
to transport nutrients, hormones, and
water so that it can carry on life pro
cesses. Some seeds need lots of moisture
to wash out the dormancy hormones
in the seed coat, and if they do not get
enough moisture, they do not germinate.
Conversely, too much water deprives the
seed of oxygen, reducing its quality or
destroying it. If fragile germinated seeds
are allowed to suffer moisture stress now,
seedling growth will be stunted. Soaking
most seeds in water for 12 to 24 hours is
all they need to initiate germination.
All the nourishment for a seed’s initial
growth requirement is pulled from the
fleshy cotyledons, or seed leaves.
Water seedlings with low-EC (electrical
conductivity) household tap water during
the first week or two of life. Supple
mental nutrients are unnecessary and
if applied in excess can disrupt internal
seed chemistry. Some gardeners prefer
to germinate seeds using distilled or
purified water that contains virtually no
dissolved solids.
Temperature
Overall, cannabis seeds germinate
in temperatures from 70°F-90°F
(21°C-32°C) and grow best at 78°F
(26°C). Temperatures below 70°F
(21°C) and above 90°F (32°C) impair
germination. Low temperatures delay
germination. High temperatures upset
seed chemistry causing poor germina
tion. Seeds germinate best under the
native conditions and temperature
ranges where they were grown.
www.marijuanagrowing.com
53
The complexity of soil
Seeds need oxygen from the air to germinate.
Growing mediums that are too moist (soggy)
will cut off oxygen supplies and the seeds will
literally drown. Cannabis seeds germinate best
when moisture is between 60 and 70 percent.
Air & Oxygen
Sow seeds twice as deep as the width of
the seed. For example, 0.125-inch (3 mm)
seeds should be planted 0.25 inches
(6 mm) deep. Adequate oxygen is un
available for seeds planted too deeply, and
tender seedlings have insufficient stored
energy to drive through deep layers of
soil or crusty hard soil when sprouting.
Agricultural Astrology -
Planting by the Moon
Ancient Babylonians and Egyptians
planted and harvested based on moon
phases in relation to geographic loca
tion. The premise is that plants grow
better when planted during the appro
priate moon phase.
Moon phases cause ocean tides to rise
and fall. They also affect the rise and
fall of moisture in soil and fluids inside
plants. The moon phase influence is said
to be the same indoors, outdoors, and in
greenhouse-grown cannabis.
Cannabis gardeners who plant by the
moon report faster-sprouting seeds that
grow into vigorous plants. However,
scientific evidence is lacking in regard to
cannabis and other plants’ relationship
with agricultural astrology.
How to Germinate Seeds:
Step-by-Step
Step One: Soak seeds overnight in a
glass of plain water. They may float on
the surface at first but should sink to
the bottom in a few minutes. Make sure
seeds get good and wet so that water
penetrates the outer shell and growth
is activated. Do not let seeds soak for
more than 24 hours, or they might get
too wet, suffer oxygen deprivation, and
subsequently rot.
Step Two: Remove seeds from glass of
water. Pour water out onto two paper (or
cloth) towels on a dinner plate. Fold the
towels over the seeds to cover them.
Step Three: Drain the water from the
dinner plate by tipping it to the side.
Step Four: Place the seeds in a warm
location (70°F-80°F [21°C-27°C]),
making sure they are in darkness. Some
gardeners go so far as to set the plate
in a vertical position (so taproot grows
downward). The seeds can also be set on
a grate for drainage and air circulation.
Step Five: Check moisture level of
towels several times a day, watering once
or twice to keep them evenly moist. DO
NOT LET THE TOWELS DRY OUT!
Germinate Hard-Shelled Seeds
Set seeds in a matchbox with an emery board
or sandpaper on the bottom.
Close seeds inside the matchbox.
Shake matchbox for 10 to 15 seconds to scarify
the seeds.
Some seeds have a very hard outer shell
(testa) and are difficult to germinate.
Such hard cases can be softened or scari
fied to allow water to penetrate.
To scarify, line a matchbox with a piece
of fine-grain sandpaper or emery board.
Put the seeds in the matchbox and shake
for 10 to 15 seconds. Remove the seeds
and make sure they have been scuffed a
bit. Just a little scuffing will allow water
to enter and set germination in motion.
Some gardeners soak their seeds in a 5
to 10 percent bleach solution to help
dissolve the outer shell of the seed and
speed germination. This practice can be
overdone and is not necessary.
54
SEEDS & SEEDLINGS
www.marijuanagrowing.com
Soak seeds tn water overnight to speed
germination.
Keep seeds moist after soaking in water.
Remove excess water from plate.
Let excess water drain away freely. The
paper or cloth towels will retain enough
moisture to germinate the seeds in a few
days. Each seed contains an adequate
food supply for germination. Prevent
fungal attacks by watering with a mild
2 percent bleach or organic fungicide
solution.
Step Six: In a few days, seeds will
sprout. Once seeds have sprouted and
each seed’s white rootlet is visible, use
tweezers to carefully pick up the fragile,
germinated seeds and plant them. Do
not wait for the white rootlets to grow
more than 0.25 inches (1 cm) before
planting, or growth could slow. Plant
each germinated seed with the white
root tip pointing downward. Take care
not to expose the tender rootlet to pro
longed light and air. Cover germinated
seeds with 0.25 to 0.5 inches (1-2 cm) of
fine, moist planting medium. See “How
to Plant Seeds: Step-by-Step.”
Note: Overwatering and underwatering
are the biggest obstacles most gardeners
face when germinating seeds and grow
ing seedlings. Keep the soil uniformly
moist but not waterlogged. Do not let
the growing medium’s surface dry for
long. Setting root cubes or planting
flats on a grate allows good drainage. A
shallow flat or planter with a heat pad
underneath may require daily watering,
while a deep, 1-gallon (3.8 L) pot will
need watering every 3 days or more. A
properly watered flat of rockwool cubes
needs water every 3 to 5 days when
sprouting seeds. When the growing me
dium’s surface is dry (0.25 inches [1cm]
deep), it is time to water. Remember,
there are few roots to absorb the water
early in life, and they are very delicate.
Germinate Old or Stressed Seeds
Old seeds or seeds that have suffered
temperature, humidity, or light stress
(or all three) are less viable and may not
germinate. Increase germination rates by
using MS (Murashige and Skoog) media
used for tissue culture, available via a
few Internet-based retailers.
Once planted, germinating seeds can
also be placed a few feet below an HID
lamp to add dry heat while they are
pushing up through the soil. The heat
dries the substrate, which requires more
The rootlet on these germinated ‘Skunk #T
seeds is the perfect length to transplant.
At this point , fuzzy little root hairs have not
yet deveIop ed. (MF)
frequent watering. In cold rooms, place
a heat pad or soil heating cables below
growing medium to speed germination.
Cannabis seeds germinate and sprout
quickest when the soil temperature
is from 78°F-80°F (25°C-27 .5°C)
and the air temperature is 72°F-74°F
(22°C-23°C). Stems will stretch
between internodes if temperatures
exceed 85°F (29°C) for long.
How to Plant Seeds:
Step-by-Step
Step One: Prepare fine soil planting
medium, fine soilless mix, rockwool
cube, Jiffy cube, etc., to receive seeds.
Make sure all supplies are ready to go.
Rootlets on many of these sprouted ‘Skunk #/’
seeds arc becoming too long for optimal
planting. Once a rootlet gets a bit longer, small
fuzzy root hairs start to grow. and planting
disrupts their continued growth. (MF)
www.marijuanagrowing.com
55
This germinated seed was allowed to dry out
fora little more than an hour. Notice how the
tip of the root has shriveled. This small over
sight caused the resulting plant to have a very
slow start in life.
Carefully set a germinated seed into a pre
made hole in growing medium.
Press growing medium over planted seed
to ensure complete contact.
Pre-drill planting holes in medium after
saturating with water.
Step Two: When seeds have sprouted
and the white sprout is visible, carefully
pick up the fragile sprouts (with twee
zers). Plant each seed in a pre-drilled
hole in the growing medium or rooting
cube, with the white root tip point
ing down. Take care not to expose the
tender rootlet to prolonged intense light
or air.
Step Three: Cover the germinated
seed with 0.25 inches (1 cm) of moist
growing medium. Keep the medium
evenly moist. Once the taproot sprouts,
small fuzzy feeder roots will appear in
10 to 14 days.
Once a seed receives moisture, it must
remain constantly moist. Moisture stress
now will stunt or stop seedling growth.
Dried or burned rootlet tips are the indi
cator of a good thing gone awry.
Soggy growing mediums cut oxygen
supplies and cause seeds to drown.
Planting seeds too deeply causes poor
germination. Plant seeds twice as deep
as the width of the seed.
Jiffy pellets expand when water is added.
They make excellent pop-up pots to
grow seedlings. They are also very easy
to transplant.
Grow More Females from
"Regular" Seed
Environmental factors that influence sex
determination of cannabis take effect
the moment seedlings have 3 pairs of
true leaves (not counting cotyledons) *
These factors include but are not limited
to the following:
1. Increase the level of nitrogen to make
more female plants. Lower the nitro
gen level to create more male plants.
2. Increase the level of potassium to
increase male tendencies. Lower the
potassium level to encourage more
female plants.
3. A higher nitrogen level and a lower
potassium level for the first 2 weeks
increases females.
4. Low temperatures increase the num
ber of female plants. Warm tempera
tures make more male plants.
5. High humidity increases the num
ber of female plants. Low humidity
increases male plants.
6. Low moisture in the growing medium
increases males.
7. More blue light increases the num
ber of female plants. More red light
increases male tendencies.
8. Fewer hours of daylight (e.g ., 14
hours) increases the number of
females. Longer days (e.g., 18 hours)
make more male plants.
9. Stress: Any environmental stress
tends to yield more male plants when
growing from seed.
This germinated seed has pushed above the soil
and started to grow toward the light.
Ifplanting in rockwool, make sure seed rootlet
is at least 0.25 inches (1 cm) long. Newly
germinated seeds can push or “heave” out of
rockwool. The root pushes the seed out. This is
why it is best to germinate seeds before putting
them into the rockwool substrate.
Color-coded labels make initial plant
identification much easier.
56
SEEDS & SEEDLINGS
www.marijuanagrowing.com
Germinated seeds break through soil and still
carry the outer cask of the seed. (MF)
A germinated seed turns into a seedling when
the rounded cotyledon leaves appear. Cotyle
don leaves will sustain the seedling with nutri
ents throughout the next week or two. (MF)
Strong seeds like the 'Skunk #T on the left
germinate quickly and grow up healthy. Weak
seeds like the 'Cantaloupe Haze' on the right
start slowly and might not grow as well. (MF)
*Henk, owner of Dutch Passion Seeds,
www.dutch-passion.nl, was kind enough
to allow us to adapt this information
about environmental factors from his
archives.
Howto Help Ensure
Female Seedlings
Ethylene diluted in water and sprayed on
cannabis plants increases the number of
female flowers and decreases the num
ber of male flowers. To have the fullest
effect, the hormone must be applied
before pre-flowers appear. At this point
plants are in the process of designating
their sex, male or female.
Ripening fruit (especially bananas)
releases a lot of ethylene. Several bunches
of bananas can be set in a small, enclosed
garden room containing the plants.
Large quantities of ethylene can be
generated through the use of a catalytic
generator, available from http://www.
catalyticgenerators.com.
The spray releases a gaseous vapor of
ethylene. Ethylene gas surrounds and
overwhelms plants with the female
hormone, promoting female tendencies.
When enveloped in female hormone,
cannabis plants designate sex and soon
start producing female hormones, female
pre-flowers, and, later, female flowers.
See chapter 22, Additives, for more
information on the hormone ethylene.
Note: Some of the products that
release ethylene are plant growth regula
tors (PGRs). See chapter 22, Additives.
Note: Ethylene sprays can be phytotoxic
when not diluted properly or when they
are applied in hot weather.
Increase Yields
Treat seeds with carbon dioxide (CO2)
or ethylene before sowing to strengthen
and increase root development, growth,
budding, flowering, ripening, seed pro
duction, and overall yield.
Seedlings
When a seed sprouts, its white taproot
emerges. Soon afterward the sprout
breaks through the soil surface and a
pair of cotyledons, also known as seed
or seedling leaves, appears. The seed
leaves spread out as the stem elon
gates. Within a few days, the first true
leaves appear, and the little plant is now
officially a seedling. This growth stage
lasts for 3 to 6 weeks. During seedling
growth, a root system grows rapidly,
while green, aboveground growth is
slow. Water and heat are critical at this
point of development. The new, fragile
root system is very small and requires a
These strong seedlings are receiving 14 hours
of light and 10 hours of darkness to promote
more female plants.
This 'Chronic' seedling is off to a healthy start
in life.
Plants soon outgrow their containers. Roots
encircle the inside of smooth plastic contain
ers. This seedling will be transplanted into a
larger Smart Pot to promote root growth.
www.marijuanagrowing.com
57
Occasionally a seed or two can be found in
normally sinsemilla cannabis buds.
small but constant supply of water and
warmth. Too much water will drown
roots, often leading to root rot and
damping-off. Lack of water will cause
the infant root system to dry up.
As seedlings mature, some will grow
fast and strong and appear healthy in
general. A little soil heat now will help
nurture small seedlings to a solid start.
Other seeds will sprout slowly and
be weak and leggy. Cull sickly plants,
and focus attention on the remaining
strong survivors. Seedlings should be big
enough to thin out by the third to fifth
week of growth. Thinning out seedlings
is often very difficult for gardeners who
pay exorbitant prices for a few seeds!
Seedlings need at least 14 hours of light
daily. They require less-intense light now
and grow well under fluorescent tubes for
the first 3 to 4 weeks. CFL or HID light
can also be used. Compact fluorescents
should be 12 to 18 inches (30-45 cm) and
the HID 3 to 4 feet (90-120 cm) above
seedlings for best growth.
If not growing in rich organic soil or
pre-fertilized mix, start feeding 2 to 4
weeks after seeds have sprouted. Some
gardeners wait until leaves yellow to
begin feeding. Use a mild quarter
strength solution.
Strong, rapid seedling growth is essen
tial for strong, healthy plants and a
bountiful harvest. Take special care to
nurture seedlings so they get a good
start on life. Any lack or excess of water,
light, or temperature will stunt seed
Retail cannabis seed sales are growing daily.
This photo was snapped in Northwestern
Spain at the Kaya Grow Shop in Vigo, Galicia.
lings. Avoid high temperatures and low
light levels, which cause lanky growth.
The first 3 weeks of life for autoflower
ing and autoflowering feminized variet
ies are critical. These varieties grow for
70-80 days from seed. Without super
strong growth during the first 21 days,
yields are much lower.
The seedling stage is over after 3 to 4
weeks of growth. At this point rapid
The Oaksterdam Nursery in the “Oaksterdam”
district in Oakland, California, supplied
medicinal cannabis seeds and clones to
licensed caregivers and patients. A US govern
ment raid April 3, 2012 , closed the facility.
Before closing, more than 15,000 students
graduated from Oaksterdam University.
foliage and root growth starts. Rapid
growth aboveground is the most obvious
signal that the vegetative growth stage
is in process. Plants need more room to
grow; transplanting into a larger con
tainer is essential to hasten development.
Finding Seeds
Medical Gardeners
Medical cannabis gardeners may have
seeds from the plants they are growing.
These dedicated gardeners usually know
the variety well and can tell you many
specific details about growing it, often
reciting the qualities of the plant—taste,
aroma, and medicinal benefits, etc. —by
heart. Cultivate relationships with these
expert medical gardeners!
Seeded Medical Cannabis
Containers of medical cannabis some
times contain seeds. These seeds are
often referred to as “bag seed.” You will
know more or less the taste, aroma,
and medicinal qualities of the bud the
seed came from. However, you will not
know the growth characteristics of the
plant, and the plant will probably not be
Ten 'Granddaddy Purple" seeds are stored
in this clear vial. The cork breathes, allowing
air to enter and exit. Such containers
are perfect to store seeds for a few months,
but not for the long term.
58
SEEDS & SEEDLINGS
www.marijuanagrowing.com
genetically stable. Such seeds could grow
into magnificent plants and produce
many cannabinoid-potent clones, but
often these seeds will grow into plants
that have only some desirable traits of
the parents.
Medical Cannabis Dispensaries
Many medical cannabis clubs and dis
pensaries in California and other states
where medical cannabis is legal sell
seeds. Google “medical cannabis club,”
“medical marijuana dispensary,” and so
forth. Often the attendant at the dispen
sary knows the seed producer or breeder
and may possess personal information
on growing the seeds. This personal
information will help gardeners and
plants get off to a healthy start.
Legal Cannabis Seed Stores
Seeds are available at shops in many
countries. Stores in Canada, Holland,
Italy, Spain, Switzerland, United King
dom, and a growing list of other coun
tries sell seeds to the public via retail
outlets. Find such seed stores at the web
sites listed in the magazines and cannabis
fair guides. A personal conversation with
knowledgeable, reputable seed merchants
yields precise cultivation information.
Ask many questions and request personal
stories about favorite varieties.
Internet Seed Retailers
Internet cannabis seed purveyors offer
the largest selection and best prices over
all. Many medical cannabis gardeners do
not have access to seeds at local stores,
or the selection at local stores might be
very limited.
Note: We do not advise ordering seeds
via mail or courier service unless they
are legal in your area and also legal to
ship through the post. There are many
seed sellers that advertise in magazines
and on the Internet that send seeds any
where worldwide. We advise to source
medical seeds locally and legally.
Caution! Too often seed merchants do
not tell the truth about their seed stock
in this unregulated industry. They sell
seeds that are not what they advertise
them to be. Other companies receive
payment and do not ship the seeds. It is
easy to overcome such problems with a
little homework.
A simple Internet search will reveal many,
many medical cannabis dispensaries in
Southern California.
Always check our Seed Bank Review
Forum, http://www.marijuanagrowing.
com/forumdisplay.php?39-Seed-Bank-
Review-Forum, for current information
on seed banks. Members make reviews
and tell their experiences with many
seed sellers.
Seed Quantities and Pricing
Seeds are generally sold in packages of
5, 10, and 15. Prices range from about
$3 to $30 USD per seed. Often less
expensive seeds are perfectly adequate
for many gardeners’ needs and desires.
More expensive seeds are usually more
stable, and extra care has been taken to
produce them. Furthermore, expensive
seeds are often winners of recent canna
bis cups or are more difficult to produce.
f
"
Seeds
Cost
Each
Cost
10
Seeds
regular
$50-$300 $5-$30
feminized
$100-$300 $10-$30
autoflowering $5-$6
$50-$60
autoflowering
feminized
$5—$10
$50-$100
Unless feminized, always purchase pack
ages of 10 to 15 seeds, because the odds
are that half of the seeds will be female
and the other half male. Of the desired
female seeds, some will show more desir
able characteristics than others.
Always open the seed pack or inspect
seeds visually before purchasing. Look
for weak, moist, or damaged seeds.
Growing lists of companies package
Jhe world s largest cannabif
__ information community
■1
Download the Leany App
Much information is available online
about cannabis seed companies and the
varieties they offer.
their seeds in hermetically sealed con
tainers that also prevent tampering.
If you are not going to plant all the seeds
in a sealed package at the same time,
remove them from the sealed package
and store in an airtight container in a
cool, dark, dry, place. Keeping seeds
dry is essential, or they might start to
germinate. Place them in a small dark
vial or film canister with a dry packet of
silicone—the kind you find in electron
ics packages. Label the crush-proof con
tainer before you place the seeds inside.
Storing Seeds
Store seeds in a sealed, airtight, crush
proof container and include a packet of
silicon crystals to absorb moisture. Store
seeds in a cool, dark, dry place. Long
term seed storage is most successful at
temperatures of 35°F-41°F (2°C-5°C).
Replace silicon every 1 to 4 weeks to
ensure that seeds stay dry. Place a max./
min. thermometer in the refrigerator to
record maximum and minimum tem
peratures and humidity. Make sure to
label containers! Some seeds will remain
viable for 5 years or longer when stored
properly. When 50 percent of the stored
seeds do not germinate, the average stor
age life is over. Seeds a year old or older
often take longer to sprout and have a
lower rate of germination.
Seed hormones—ABA, cytokinins,
and gibberellins—are primed to respond
to moisture, which is the first signal
to germinate. Prevent moisture from
signaling seeds to germinate by keeping
them dry. Small amounts of moisture in
www.marijuanagrowing.com
59
Always check seed packs for crushed or moist
seeds or seeds that have started to sprout.
the form of condensation can give seeds
a false start on germination and cause
them to expend all their stored energy.
If possible, avoid moisture levels above
5 percent to ensure viable seed when
storing seed long term. Moisture levels
above 5 percent will cause germination
levels to decrease over time.
Seeds with a thin, outer protective shell
never truly go dormant, because mois
ture and air are always present within.
This moisture and air cause hormone
levels to slowly dissipate. Such seeds do
not store well for a long time.
Store seeds in airtight containers along with a packet of silicon crystals to absorb moisture.
Make sure to remove, dry, and replace silicon regularly. (MF)
These ‘Skunk#T seeds were frozen for 16 years. Note some gray dead tissue on all embryonic leaves. Germination was over 90 percent,
and survival was over 80percent. (MF)
60
SEEDS & SEEDLINGS
www.marijuanagrowing.com
63 Transplanting
64 Dip Transplants in Miticide
65 Transplanting: Step-by-Step
66 Bending and Training
67 When to Bend and Train
Branches
68 Trellises and Ties
68 Pruning
70 Pruning Techniques
70 No Pruning
70 Remove Lower Branches
70 Remove All but Four Main
Branches
71 Pinching Branch Tips
71 Super-Cropping
71 FIM Technique
71 Grafting
72 Stress
ESSENTIAL MED
CANNABIS
HORTICULTURE
The cannabis seedling growth stage
lasts for approximately 2 to 3 weeks,
from seed germination to (strong)
root set. Once a strong root system is
established, foliage growth increases
rapidly and seedlings enter the vegetative
growth stage. When chlorophyll pro
duction is full speed ahead, a vegetative
plant will produce as much green leafy
foliage and root growth as is physically
and genetically possible. Of course,
growing conditions—CO2, soil oxygen
levels, nutrients, water, and so on—must
not be limited and must be in the proper
balance to be available for rapid uptake.
Properly maintained, some varieties of
medical cannabis will grow from half an
inch to 2 inches per day. A plant stunted
for any reason could require weeks to
resume normal growth. A severely
stunted plant may never fully recover.
A strong, unrestricted root system in
a perfect rhizosphere (root zone) that
is able to take in all necessary available
nutrients is essential to robust growth.
Unrestricted vegetative growth is the
Strong vegetative growth is essential to a
healthy harvest.
Growing large plants in relatively small
containers, in this case a 5-gallon (19 L) pot,
requires daily irrigation with a complete
nutrient solution. A layer of mulch would
keep roots from being exposed.
These plants will spend a short time in vegetative
growth and will be subject to fewer problems.
www.marijuanagrowing.com
61
Vegetative growth in cannabis is maintained
indoors, outdoors, and in greenhouses with
16 to 24 hours oflight daily. Autoflowering
(feminized) cannabis willflower according to
chronological growth and is not affected by
photoperiod.
key to a healthy harvest. A plant’s
nutrient and water intake changes
during vegetative growth. High levels
of nitrogen are needed. Potassium, phos
phorus, calcium, magnesium, sulfur, and
trace elements are used at much faster
rates. Transpiration is carried on at a
more rapid rate, requiring more water.
The larger a plant gets and the bigger its
root system, the faster the soil will dry
out. The key to strong vegetative growth
and a heavy harvest is supplying plants
with the perfect environment both
aboveground and belowground.
During vegetative growth, plants need
water and often need supplemental
fertilizer too. Outdoor and greenhouse
organic gardeners are able to build
organic soil with bulk nutrients and
amendments. Indoor gardeners usually,
need to add supplemental fertilizer. The
garden will also need adequate air circu
lation and ventilation both day and night.
Nutrient deficiencies that start during
the first or second week of growth in
doors usually show outward signs by the
third to fifth week of growth. Nutrient
deficiencies that start during the fourth
or fifth week of growth outdoors and in
greenhouses show visible outward symp
toms during the sixth to eighth week of
growth. Low-level nutrient imbalances
can take longer to manifest, if ever.
Infestations of diseases and pests often
flare as nutrient deficiencies progress.
Many times new clones from another
garden are already infested with spider
mite eggs, powdery mildew, or root dis
ease, with few outwardly visible signs.
Multiple nutrient deficiencies, excesses ,
diseases, and pests become apparent during
vegetative growth.
Cannabis flowers when given long nights and
short days.
Always quarantine and dip new clones
and seedlings in an organic fungicide/
insecticide/miticide before introducing
them to the garden.
After 1 to 3 months of vegetative
growth, nutrients have had a chance
to build to toxic levels, and plants may
show outward signs of deficiencies or
excesses. Leaching containers will wash
away water-soluble toxic nutrients. See
chapter 21, Nutrients, for more infor
mation. Other problems—overwater
ing, underwatering, air circulation and
ventilation, etc.—also occur now. See
“Common Nutrient Problems” in chap
ter 21 for more information.
Cannabis will continue vegetative
growth for a year or longer under an
18-hour photoperiod and a temperate
climate. But sooner or later a genetic
maximum is reached, causing cannabis to
degenerate. Indica and zWzaz-dominant
varieties suffering stress from wintry
conditions tend to flower regardless of
hours of light, often producing more
resin on stunted plants.
In this garden, mother plants and clones all
grow under long 18-hour days with short
6-hour nights.
Indoors and in greenhouses, growth
stages can be controlled with the light-
and-dark cycle (photoperiod). It is the
main stimulus to induce flowering. Give
plants a 12-hour day and 12-hour night
light schedule to induce flowering. Give
plants 0 to 8 hours of darkness and 16
to 24 hours of light to retain vegetative
growth. Controlling the photoperiod
allows indoor and greenhouse horticul
turists to control vegetative and flower
ing cycles. See chapter 17, Light, Lamps
& Electricity, for more information on
photoperiod control. Outdoor gardeners
work with Mother Nature and harvest
after long nights and short days in
spring and autumn.
Once a plant’s sex is determined, it can
become a mother, clone, or breeding male
and can be harvested or even rejuvenated
(see chapter 8, Flowering).
Note: Plants show early male or female
“pre-flowers” about the fourth week of
vegetative growth. See “Pre-flowering”
in chapter 8, Flowering.
62
VEGETATIVE GROWTH
www.marijuanagrowing.com
Clones are ready to transplant once new, green
growth starts.
The clones in this perfect Trichome Technolo
gies garden are easy to care for.
Fluorescent light is perfect for these recently
transplanted clones. It gives them enough light
to grow a strong root system and put on more
green growth.
Good, strong roots must grow before cubes are
ready to transplant.
A long vegetative growth stage lets cannabis
plants get big enough to grow an abundant crop
offlower buds.
Rockwool rooting cubes provide ready-made
containers to root and transplant clones.
Transplanting, pruning, bending, and
trellising are all initiated when plants are
in the vegetative growth stage. Informa
tion on these subjects follows.
Transplanting
When plants have outgrown their con
tainers, they must be transplanted
in order to continue rapid growth.
Inhibited, cramped root systems grow
sickly, stunted plants. Signs of root
bound plants include slow, weak growth.
Severely rootbound plants tend to grow
straight up with branches that painstak
ingly stretch beyond the sides of the pot.
By the time you see these symptoms,
the plant is rootbound. To check roots,
remove a plant from its pot to see if
roots are deeply matted on the bottom
or circling the sides of the pot.
When growing short plants that can be
watered daily and reach full maturity
in 70 to 90 days from clones or seed
lings, there is little need for containers
larger than approximately 3 to 5 gallons
(11.4 -19 L). Larger plants and mother
plants will need a large pot if they are
kept for more than 3 months.
Outdoors and in greenhouses, plants
can grow much larger than indoors.
Containers should be as big as possible
to accommodate a large root mass. Big
plants that produce 10 pounds (4.5 kg)
of medical cannabis buds can be grown
in 200- to 500-gaJlon (757-1893 L)
containers.
Transplant into the same type or similar
growing medium; otherwise, a water
pressure differential (hydroscopic
tension) develops between the different
mediums, which slows fluid movement
and root penetration. For example, when
a rockwool block is transplanted into
soil, it holds more water than the soil is
able to hold. Roots migrate slowly into
soil. Transplanting small rockwool cubes
into soil works best. Each cube holds
little water, and roots migrate into soil
faster. Make sure to keep the soil evenly
moist and the rockwool semimoist
to promote root growth into the new
medium.
Starting seeds and clones in root cubes
or peat pots makes them easy to trans
plant. Set the cube or peat pot in a hole
in the growing medium, and ensure that
the growing medium is in firm contact
with it. Keep root cubes and substrates
evenly moist after transplanting.
Transplanting is the second most trau
matic experience after severing the stem
during cloning. It requires special at
tention and manual dexterity. Tiny root
hairs are incredibly delicate and easily
destroyed by light, air, or clumsy hands.
Roots grow in darkness, in a secure
environment. When roots are taken out
of contact with the soil or an aeroponic
garden for long, they will quickly dry
and die.
Transplanting should involve as little
disturbance to the root system as pos
sible. Water helps the soil pack around
roots and keeps them from drying out.
Roots need to be in constant contact
with moist aerated soil in order to sup
ply water, oxygen, and food to the plant.
But, the fine line is that these tender
roots also need air (oxygen) so they are
able to absorb nutrients and water.
www.marijuanagrowing.com
63
Dip Transplants in Miticide
Dip rooted clones and seedlings into a miticidal/fungicidal solution before transplanting. Stop diseases and pests before moving
plants into a clean vegetative or flowering room. Mix a fungicidal/insecticidal/miticidal dip to disinfect clones before transplant
ing in the growing medium. Fill a container with low (5.0-6 .0) pH water and add a natural fungicide such as hydrogen peroxide
in a 3 percent solution. Or include a 10 percent mix of chlorine or vinegar. Do not mix chlorine and vinegar! The resulting gas
is hazardous!
Mix the clone dip, and use a rag to cover and
contain soil when dipping.
Remove the clone or seedling, and gently shake
off excess dip before transplanting.
Submerge the entire clone in the dip to ensure
liquid covers allfoliage.
After transplanting, photosynthesis and
chlorophyll production are slowed, as are
water and nutrient absorption via roots.
Transplant late in the day so transplanted
plants will have all night to recover.
Transplants need subdued light so foli
age can grow at the rate roots are able
to supply water and nutrients. Give new
transplants filtered, less-intense light for
Always remove the plastic from rockwool cubes
when transplanting!
a couple of days. If there is a fluorescent
lamp handy, move transplants under it
for a couple of days before moving them
back under the HID, or into a green
house or outdoors to harden-off.
Ideally, plants should be as healthy as
possible before being traumatized by
transplanting. But transplanting a sick,
rootbound plant to a bigger container
This plant is rootbound and in need of trans
planting. Often such compressed roots have to
be gently loosened before transplanting, so that
they will grow outward and downward.
has cured more than one ailing plant.
Once transplanted, cannabis requires
low levels of nitrogen and potassium and
increased quantities of phosphorus. Any
product containing Trichoderma bacte
ria or mycorrhizal fungi will help ease
transplant shock. Plants need a few days
to settle in and re-establish a solid flow
of fluids from the roots throughout the
plant. When transplanted carefully and
disturbed little, there will be no signs of
transplant shock or wilt.
Cutting the bottom off a biodegrad
able fiber or paper container is a simple
transplanting technique that disturbs
roots very little. Simply cut the bottom
half out of the pot and set the plant in
the planting hole. Remove the above-
ground part of the container so that it is
not exposed to air. If exposed to air, it
will take longer to biodegrade and thus
will impair root growth.
For more information on self-pruning
containers and pots that promote and
64
VEGETATIVE GROWTH
www.marijuanagrowing.com
make a lot of roots, see chapter 19,
Containers.
Seedlings and clones can also be trans
planted directly into 3- to 5-gallon
(11.4-19 L) pots, a system that requires
fewer containers and involves less work
and less possible plant stress. The larger
volume of soil holds water and nutri
ents longer and requires less-frequent
watering.
When clones and seedlings in 4-inch
(10.2 cm) pots are transplanted directly
into 5-gallon (19 L) containers, the
roots grow down, out, and around the
container walls and bottom. In fact, the
majority of roots will grow out of the
soil and form a layer behind the con
tainer wall that is subject to temperature
extremes.
To encourage roots to develop a dense,
compact system, transplant just before a
plant has outgrown its container. Trans
planting a well-rooted clone in a root
cube into a 4-inch (10.2 cm) pot, and lat
er transplanting the 4-inch (10.2 cm) pot
into a 3-gallon (11.4 L) pot or grow bag
causes roots to develop a more exten
sive system in a small ball of growing
medium. Successful transplanting causes
minimal stress. Many cannabis crops are
in the ground for such a short time that
bungled transplanting costs valuable re
cuperation time and loss in production.
Transplant clones and seedlings into raised
beds or containers.
Transplant clones and seedlings into
raised beds and large containers or
planter boxes or directly into 3-to-5 -
gallon (11.4-19 L) pots. If plants are
allowed to grow 6 to 7 months in full
sun, 1 or 2 plants will fill a 200-gallon
(757 L) container outdoors. When grow
ing for 3 to 4 months, containers can be
10 to 50 gallons (37.9-189.3 L) in size.
Once plants start crowding and shading
one another, bend stems outward and tie
them to a trellis attached to the planter.
Large planters require less maintenance
than smaller containers or beds. The
larger mass of soil retains water and
nutrients much longer and more evenly.
One downside is that all plants must
receive the same water regimen and diet.
For more information on moving plants
outdoors, see chapter 12, Outdoors.
Transplanting: Step-by-Step
Step One: The day before transplanting,
water clones and seedlings with a half
strength mix of a product that contains
Trichoderma bacteria and/or mycorrhizal
fungi.
Step Two: Fill a 3-gallon (11.4 L) to
200-gallon (757 L) container with rich
potting soil or soilless mix to within
2 inches (5.1 cm) of its top. Water the
growing medium with a mild, quarter
strength organic nutrient tea or a salt
based hydroponic fertilizer solution until
saturated and solution drains freely out
the bottom.
Step Three: Carefully remove the root
ball from the container. Place your hand
over the top of the container with the
stem between your fingers; turn the con
tainer upside down, and let the root ball
slip out of the pot into your hand. Take
special care at this point to keep the root
ball in one integral piece.
Step Four: Carefully place the root ball
in the prepared hole in the new con
tainer. Make sure the roots are growing
downward, and the soil mass is level
with or only a bit deeper than the new
medium, slightly and firmly compressing
(if necessary and possible) the entire new
and old medium into a single unit.
Step Five: Backfill around the root ball.
Gently but firmly place soil into contact
www.marijuanagrowing.com
65
with root ball. Add a top layer of mulch
to conserve moisture and protect the del
icate layer of surface roots. In this case
we used expanded clay pellets.
Step Six: Water with half-strength fer
tilizer containing Trichoderma bacteria
and/or mycorrhizal fungus. Soil should
be saturated—not waterlogged—and
should drain freely. If rooting cube and
new substrate are not identical, pay
special attention to moisture levels. Let
rockwool dry out enough so that roots
penetrate new growing medium in search
of moisture.
Step Seven: Place new transplants under
fluorescent lamps on the perimeter of the
HID garden, or under a screen to subdue
sunlight outdoors or in a greenhouse for
a couple of days. Once transplants look
strong, move them under full light or
into a greenhouse to harden-off.
Bending and Training
The goal of bending branches is to
increase the number of bud sites per
plant exposed to full intense sunlight or
artificial light. More bud sites equates to
more flower buds at harvest. The screen
of green (SCROG) growing technique
teaches gardeners to bend branches with
the help of a horizontal trellis. Buds are
bent out horizontally and produce more
budding sites. In fact, a friend of mine
published an excellent book for indoor
medical gardeners: Secrets ofthe West
Coast Masters, by Dru West (West Coast
Masters, 2011). It is based on trellising
Use heavy aluminum wire to help support
plants. This plant broke in the wind and was
wrapped with duct tape. A piece of aluminum
wire was wrapped around the branch to pro
vide extra support while the plant recovered.
rGREENHOUSE / OUTDOOR CONTAINER SIZE
Plant Age
Container Size
' 1-3 weeks
4-inch (10.2 cm) pot
i 3-6 weeks
1-3 -gallon (4-11 .4 L) pot
6-8 weeks
3-5-gallon (11.4-19 L) pot
2-3 months
5-10-gallon (19-38 L) pot
| 3-6 months
50-200-gallon (189.3-760 L) pot
6-9 months
k
.............-
-
50-500-gallon (189.3-1893 L) pot
.
■ ■ . ..............
Wrap wire around a broomstick to form a coil.
The pliable coil of wire is much easier to wrap
around branches.
66
VEGETATIVE GROWTH
www.marijuanagrowing.com
There are many tie-downs to use when
bending. Favorite tie-downs include the green
insulated wire (bottom left) and the plastic-
covered wire (bottom right). Twine, string, and
ribbon must be tied and are more tedious to use.
I prefer to use insulated wire that does not cut
into branches.
A 'Jack Herer is growing in a 5-gallon (19 L)
container in full sun on a walled balcony pro
tectedfrom the wind. The initial bending starts
as soon as the clone (moved from indoors) is
established in the container.
Directing the branches outward by bending
them toward the edge of the container will en
courage the plant to grow much wider so that
all branches will develop bigger flower buds.
to increase the number of bud sites,
thereby increasing production.
Pruning redirects growth hormones
and affects plants more drastically than
bending. Selective pruning and bending
allow us to manipulate auxin hormone
levels in branch and flower tips. Remov
ing or bending a branch or branch tip
causes hormonal balances to shift.
Cutting the meristem (top growth tip)
of a cannabis plant will diffuse auxins
and cause greater concentrations in
lower branch tips. Bending a growing
tip changes hormone concentrations less
than pruning does.
Bending is similar to pruning, in that
it alters the flow of hormones. Bend
ing efficiently neutralizes the effect
of growth-inhibiting hormones and is
much easier on plants than pruning. To
bend, choose young, supple branches
that are pliable. Lean a branch in the
desired direction, and tie it in place.
Young, supple branches can take a lot of
bending before they fold over or break.
Even if a branch folds, tie it in place; if
necessary, use a wooden splint. The stem
will heal itself. Young, supple branches
take bending much better than old, stiff
ones. Bending branches horizontally
will encourage buds to grow vertically
toward the light. Each bud will turn into
an impressive flower top because they
all receive more light. A wooden planter
box with a lattice trellis alongside or
nylon net above makes great anchors to
tie bent plants to.
When to Bend and Train Branches
Bend plants when branches are still sup
ple enough to avoid injury. Especially on
outdoor plants, branches lose pliability
and become more rigid as they age. For
best results, start bending plants before
they are 12 inches (30.5 cm) tall so that
branches have time to adjust hormone
levels and grow evenly.
When grown in the vegetative stage for
more than a month or two, plants may
need to be bent and trained over a longer
season. Once plants enter the flowering
stage, bending becomes increasingly
more difficult. Bending is less fruitful
after flowering plants initiate the last
upward spurt of growth.
Wire ties, the kind used to close plastic
bags, can be purchased at a nursery.
Wire ties are either precut or cut to
length by the gardener. Use these ties
on small plants that need little direc
tion. Wire ties are generally too small
for larger plants and can cut into stems.
Thicker ties made of plastic-coated elec
tronic wire or telephone cable work well.
They are fastened with a simple twist
and stay rigid, leaving the stem room
to grow. If applied too tightly around a
stem (girdling), liquids cannot flow, and
death could result. See “Trellises & Ties”
on page 68.
Use grafting tape (or green plastic plant
tape with no glue) to cover and support
broken branches. A small stick can be
As the plant grows, its branches are bent fur
ther outward. The branches in the center of the
plant will receive more light and will develop
quickly.
The foliage has grown and the bent plant is
showing nice form. The large plastic netting
will soon fill with foliage.
It is early summer, and the plant is well estab
lished. The larger trellis is accommodating the
extra growth, and bending is continued.
www.marijuanagrowing.com
67
The plant is starting to bud up and has formed
a huge canopy over the small container.
A plastic-coated wire tie was used to bend this
branch down to keep it from growing over the
8-foot (2.4 m) fence.
The plant is now in full bloom. It nearly fills
a large part of the terrace, completely covering
the plastic trellis visible earlier.
Duct tape can work well to repair broken
branches.
A pyramid of twine is suspended overhead
to hold up bud-laden branches. These plants
were started from seed normally grown
indoors, and their branches are weak. The
trellis helps keep the heavy branches upright.
used as a splint for extra support. It pro
tects the wound and also holds broken
branches in place. I used duct tape on
this plant and was lucky, since the glue
can cause issues. Duct tape also stretch
es and breathes with the plant.
Be gentle when bending branches, even
though plants can take some abuse.
Sometimes a crotch will separate or a
branch will fold over, cutting off fluid
flow. These mishaps are often easily
fixed with a small wooden splint snugly
secured with duct tape to support the
split and broken stem. But sometimes
a branch broken at a crotch cannot be
repaired.
Gardeners also combine pruning and
bending. It is easy to prune too much,
but it is hard to overbend.
Trellises and Ties
Medical cannabis plants that grow more
than 3 to 4 feet (91.4 -122 cm) tall often
need to be trellised so that weighty buds
do not cause branches to break. Trellises
serve to direct plant growth within a
given space, and take advantage of sun
light. Adequate trellising also keeps
plants standing with minimal damage
after rainstorms. Complicated, poorly
planned trellises get in the way when
maintaining a garden. Plan a simple,
easy-to-use trellis. Some gardeners use
bamboo stakes or a tomato cage anchored
in containers. Raised-bed gardeners can
build a frame to set up horizontal trellis
netting over plants; branches full of
flower buds grow through the netting.
Outdoor gardeners can set up hoop
house trellises over plants by covering
the hoop house with 6-inch (15.2 cm)
plastic netting, after using the same
hoop house as a greenhouse. Branches
grow through the trellis netting. If
branches grow and start to droop after
the first net is in place, wait until they
are about 2 feet longer and throw another
6-inch (15.2 cm) net over the plants as a
second trellis.
Building your own circular wire trellises
is a good option for big plants. Large
tomato baskets work well for medium
size plants. Buy 3- to 6-foot-tall
(122-182.9 cm) lengths of galvanized
wire fence made from 6-inch (15.2 cm)
squares. Form the fence into a big circle
3 to 4 feet (91.2-122 cm) in diameter.
Cut and bend the ends of wire to
connect the basket into a cylinder. The
result will be a 6-foot-tall (182.9 cm)
trellis that is 3 to 4 feet (91.2 -122 cm)
across. Set it over plants before they
grow too big. Anchor the trellis in the
ground with large staples or tent stakes.
Pruning
Pruning redirects growth hormones
and affects plants more drastically
than bending. Selective pruning allows
gardeners to manipulate auxin hor
mone levels in branch and flower tips.
Removing a branch or branch tip causes
hormonal balances to shift. Cutting the
meristem (top growth tip) of a cannabis
plant will diffuse auxins and cause greater
concentrations in lower branch tips.
Always use clean instruments when
pruning. A straight razor, single-edge
razor blade, a sharp pair of pruners or
68
VEGETATIVE GROWTH
www.marijuanagrowing.com
The 'Flo' plants in this
destined co
grow outdoors. Lower branches and /cuew
will be stripped before transplanting deep
in the soil.
The plants in this greenhouse are trellised with
large tomato cages. They will grow to fill the
greenhouse and will soon need new trellises.
The plastic has been removed, and this hoop
house is now a trellis for some very big plants.
It is near the first ofJune, and these established
plants are ready to grow!
By August 20„ the plants have grown through
the first netting-irellis and a second netting
trellis has been applied over the top.
Prune lower growth that receives little or no
light. These little branches produce small buds
that are difficult to harvest.
This short plant was pruned once by removing
the meristem.
scissors—all work well for different
applications. Sanitize clippers and blades
between cuts by dipping in rubbing
alcohol3* or bleach, or flame with a torch.
Use indoor pruners only in the indoor
garden. Pruners used outdoors have
everything from spider mites to fungus
spores on them. If outdoor clippers must
be used, dip them in rubbing alcohol,
or flame with a butane torch to sterilize
before making cuts. After pruning, the
open wound invites diseases and pests.
Wash your hands and took before and
after pruning. Make cuts at a 45-dcgrec
angle to discourage moisture from
sitting on wounds.
"Alcohol works but it is not 100 percent
effective, especially on spores and virus
particles. A 10 percent bleach solution
or a commercial sanitizer will work 100
percent of the time.
Avoid pruning for a momh (or more)
before inducing flowering. Since pruning
diffuses floral hormones, flowering is
retarded. If cannabis is pruned heavily
4 to 6 weeks before jfowrrittfa peak
maturation will be delayed for a week
or longer. It takes a month or more for
hormones to build up to pre-pruning
concentrations.
Leave leaves alone! Removal of healthy
leaves hacks up a healthy plant. Remov
ing strong, healthy leaves DOES NOT
make plants more productive, even
though this practice supplies more light
to small leaves and growing tips. Plants
need all their leaves to produce the max
imum amount of chlorophyll and food.
Removing leaves slows chlorophyll pro
duction, stresses the plant, and stunts
its growth. Stress is a growth inhibitor.
Remove only dead leaves or leaves that
arc more than 50 percent damaged.
Remove sickly lower growth that
receives little light. This weak growth
is a ready environment for diseases and
pem to attack. Removing shaded lower
growth will also increase air circulation
between and around plants.
Pruning all the branches or removing
more than 20 to 30 percent of the foliage
in a short time frame may cause plants
to suffer so much stress that harvest
is diminished, especially if there is a
short recovery time. However, growth
and pruning also depend upon plant
health, conditions, stem girth, and other
variables.
Over time pruning too much may alter
hormonal concentrations, causing spin
dly growth. This is often the case with
mother plants that provide too many
clones. Mother plants that are up to
12 months old provide the best clones.
Many gardeners keep mothers for only
6 months.
Pruning outdoor plants early to mid
season does not affect harvest time.
Hormones have a chance to relocate and
stabilize before harvest. Pruning branch
tips and the main growing shoot forces
growth down to lower branches and
may be necessary to keep plants under
control in small gardens.
Prune plants when small to have the
most effect on branching. Removing
WWW.rndfijUdfUi9tOWingj.Ofn
69
The plants in this garden were too tall when
moved in from the vegetative room. They grew
fast and the light was able to penetrate only the
first 2 feet (61 cm) offoliage. Removing lower
growth sends energy upward and increases air
circulation below. Nonetheless, plants were
growing too long under poor conditions. This is
why lower leaves were removed and both time
and resources were wasted.
The main stem ofthis cannabis plant was split
to form 4 branches. The wounds on each of
the split branches heal and form 4 new “main”
stems. This unique, labor-intensive pruning
technique promotes the most growth and
budding sites from a single cannabis plant. This
technique is effective when plants are grown for
6 to 10 months and all other elements —soil,
water, nutrients, light, etc., a re kept at optimum
levels to support the extra growth.
top growth early will leave a few lower
branches to grow upward. Pruning top
or side branches later in life will have
less dramatic effects and affect hormonal
balance less due to the abundance of
foliage and hormones.
For the most part, pruning and remov
ing weak spindly growth and dead leaves
is all the pruning necessary. See
“Remove Lower Branches,” below.
An expert medical cannabis gardener
from Humboldt County, California,
has a unique pruning style for giant
plants. The meristem is made to form a
callus by cutting it—similar to the FIM
technique. Once a callus forms at the tip
of the meristem, it is split into 4 separate
pieces. The 4 separate quarter-branches
are splayed out at 90-degree angles and
trellised. The insides of the stems heal
rapidly, and branch shoots start growing
upward.
Pruning Techniques
No Pruning
Not pruning has several advantages.
Floral hormones are allowed to con
centrate in tips of branches, causing
flower buds to grow stronger and denser.
Indoors, short, unpruned plants can
be crammed into a small area. Crowd
ed plants have less space to bush out
laterally and tend to grow more upright.
Clones are set into the flowering room
after 1 to 30 days in the vegetative room.
Little clones are clustered together in
3-gallon (11.4 L) pots.
Many indoor gardeners do not prune
at all, especially when growing a short
clone crop that is only 2 to 3 feet (61-
91.4 cm) tall. Short clone crops require
no pruning to increase light to bottom
leaves or to alter their profile. “No
pruning” is the easiest and most produc
tive method when growing short crops,
but branches heavily laden with flower
buds may need to be trellised.
Outdoors, not pruning is common.
Gardeners in Northern California let
plants grow to their potential and throw
trellising netting over plants to support
branches full of flower buds. Many
short, stout plants that grow up to four
feet (122 cm) tall and are not pruned do
not need to be trellised.
Remove Lower Branches
Remove spindly branches and growth
that is not collecting light energy,
including dead and dying leaves. Remov
ing weak, light-starved lower branches
is common in outdoor, indoor, and
greenhouse gardens alike. Pruning lower
branches concentrates growth in upper
branches. Cut lower branches off cleanly
at the stem so no stub is left to rot and
attract pests and diseases. If you must
harvest a little medicinal cannabis early,
removing a few lower branches will least
diminish the harvest.
The lower branches on this outdoor plant have
been removed because they receive little light
and would produce spindly buds. Removing
shaded, spindly lower growth increases air
circulation and sends valuable growing energy
to plant tips.
Pruning out spindly branches and
growth inside plants opens up the interi
or and provides better air circulation. It
also makes inspecting soil, plant stems,
and irrigation fittings easier. This is a
much better practice than removing all
lower leaves.
Remove All but Four Main Branches
Remove the plant’s meristem (central
stem) just above the 4 lowest (main)
branches. Removing the central leader
concentrates the floral hormones in the
4 remaining branches. The resulting
fewer branches will be stronger and
will bear a larger quantity of dense,
heavy flower buds. Remove the stem
above the 4 main branches, but do not
remove leaves on the main branch
es. Select plants with 3 sets of branch
nodes about 6 weeks old and pinch or
prune out the last set of nodes so that
2 sets of branches remain. Move plants
70
VEGETATIVE GROWTH
www.marijuanagrowing.com
This humongous, pampered plant is growing
in a 500-gallon (1893 L) container in a green
house. The two 1-gallon (3.8 L) containers on
the right add perspective to this plant that has
just started to bloom.
Bend orfold plant tips over to practice super
cropping. This practice sends energy down to
lower branches.
Plants often heal, and the tip of the plant once
again is able to orient growth upward.
into the flowering room or greenhouse
when they are about 12 inches (30.5 cm)
tall. To maintain a low garden profile,
varieties that grow fast and tall, such as
‘Critical Mass’, ‘Power Plant’, and sim
ilarly robust bloomers, should be set in
the flowering room or greenhouse when
about 8 inches tall.
Establish a bud count before pinch
ing because only the next lower 5 to 7
buds will actually break or open and
grow properly. If the plant is 10 leaves
or nodes taller, a soft pinch of only the
meristem and 1 leaf, will probably give
about 5 breaks. If the plant is 15 leaves
or nodes tall, then a soft pinch will
give the same results, but all high on
the plant. A harder pinch, the top 3 to
5 nodes down, may cause 3 to 5 good
branches to grow below. This is a slower
process that can extend the maturation
period but adjusts the height overall.
Pinching Branch Tips
Pinching back or pruning tops (branch
tips) causes the 2 growing shoots just
below the cut to grow bigger and stron
ger. The effect is echoed down the plant.
Pinching back and pruning branch tips
increases the number of budding sites.
It diffuses floral hormones (auxins).
At high concentrations, auxins prevent
lateral buds from growing very quickly.
Lower branches develop more rapidly
when the top of the plant (terminal bud)
is removed. The further the tip of the
branch is from hormones, the less effect
the auxins have.
To pinch back a branch tip, simply
snip it off below the last set or two of
leaves. Pinching off tender growth with
your fingers helps seal the wound and
is often less damaging to plants than
cutting with scissors or pruners. When
the main stem is pinched back, side
and lower growth is stimulated. When
all the tops are pinched back, lower
growth is encouraged. Continually
pinching back, as when taking clones
from a mother, causes many more little
branches to form below the pruned tips.
Eventually, the plant is transformed into
a hedge-like shape. Most gardeners do
not pinch plants back, because it dimin
ishes the yield of prime, dense flower
tops; but it may not affect the overall
dry weight. Promoting many small buds
also requires more work when trimming
harvested buds.
Super-Cropping
Super-cropping is a form of pinching
back or pruning branch tips. Regardless
of who coined the buzzword, there are
several different versions of super
cropping used by cannabis gardeners.
FIM Technique
The drawing in the center and the close-up on
the right show the FIM pruning technique—the
bottom 10 percent of the bud remains intact.
This is the key to FIM pruning.
The theory of super-cropping is that
plants respond to impaired fluid flow by
producing more cannabinoid-rich resin
and compact female flowers. The branch
is folded over, approximately 2 to 3
inches below the growing tip, creating
a wound. Some gardeners swear by this
practice, and there might be a morsel of
truth in it.
Super-cropping can also incorporate
FIM pruning, which is explained below.
It can be combined with bending, too.
Removing healthy leaves so that “bud
ding sites receive more light” is also
practiced by some super-croppers who
claim higher production. See “Stress,”
on page 72, for more information.
FIM Technique
The FIM technique first appeared in
print in the July 2000 issue of High
Times magazine. According to the best
information I could find, the technique
was started by a gardener from South
Carolina. He tried to pinch the tip of
a plant and said, “F%&k, I missed!”
(FIM) when he did not remove the
entire bud as desired. Once the growing
tip was pinched, or FIMed, the gardener
left the plant to develop. Many different
flowering tops formed as a result of this
single pruning. According to some can
nabis gardeners, this technique increas
es yield. However, my experience has
been that it does not. FIM pruning also
creates a small, dense flower top that is
prone to disease.
Grafting
Little is known about grafting canna
bis, and it is seldom practiced, which is
www.marijuanagrowing.com
71
Cleft (or top wedge) graft
The top green part (scion) of one cannabis
plant is grafted onto the rootstock. Sativa vari
eties are generally more disease-resistant than
indica varieties. Grafting sativa rootstock onto
indica varieties may help make plants more
disease resistant.
why grafting commands a small place in
the medicinal cannabis garden. Graft
ing cannabis will help solve drought
and possible root-disease problems.
Grafting an indica stock with a com
pact growth habit to a large sativa root
system provides more nutrients for the
aboveground plant. The resulting plant
would be a drought-resistant super plant.
Most medical states in the USA impose
a maximum number of plants we are
able to grow. Grafting 3 or 4 different
varieties onto 1 mother plant would help
a gardener stay below mandatory plant
maximums.
Yes, it is possible to graft cannabis
rootstock onto a scion (branch) of hop
species (Humulus lupulus). Hops, the
female flower clusters from hop plants,
are used in the production of beer. The
plant will live; however, it will not pro
duce more cannabinoids.
Stress
Cannabis grows best and produces most
heavily when it is given a stable environ
ment. Stressed plants are less productive
than unstressed plants. Stress-induced
traumas include withholding water,
photoperiod fluctuation, low light
intensity, ultraviolet light, nutrient
toxicities and deficiencies, cold and hot
soil, temperature extremes, mutilation,
and any other weird stuff beyond ideal
growth conditions. In addition, any
overt applications of growth hormones
such as gibberellins, cytokinins, abscisic
acid, ethylene, or colchicine cause stress.
Stress can also cause female plants to
produce male flowers and male plants
to produce female flowers. See chapter
22, Additives, and chapter 25, Breeding.
for more information on hormones and
other agents.
Stress can cause plants to produce more
resin, but it simultaneously causes odd
and/or less growth. For example, Felix,
a Swiss outdoor gardener, grew a field
of cannabis at 900 feet elevation (274 m)
and another at 4200 feet (1280 m). The
upper field suffered stress because it
was exposed to cooler temperatures
and more ultraviolet radiation. Plants
there produced about 25 percent more
resin-packed THC than plants in the
lower field. But, plants that grew at 900
feet elevation (274 m) yielded at least 25
percent or more dry weight than plants
at 4200 feet (1280 m). Removing large
green shade leaves allows more light to
shine on smaller leaves, but it also causes
growth to slow and harvest to diminish.
Remove only leaves that are more than
half damaged by pests or diseases. Of
ten, partially yellow leaves green up once
stress is eliminated.
How to Make Cannabis Plants
Suffer Stress
1. Photoperiod fluctuation and then back
to a 12-hour day/night photoperiod.
The branches on this “bonsai" plant have been
pruned, as have the roots, so that it will grow
slowly in this small container. The stressful
environment keeps the plant small.
These plants—grown under stressful condi
tions in the Rif Mountains of Morocco—
receive more intense UV light, limited
nutrients, and little water.
2. Low light intensity (This may cause
more male plants.)
3. Nutrient toxicities and deficiencies
4. Cold and hot growing mediums
5. Cold and hot ambient temperatures
6. Mutilation
7. Sex stress
8. Watering
9. Pathogens
10. Chemicals
11. Much more
Mutilating plants by breaking the trunk,
driving a stake through stems, and
otherwise torturing or slapping them
around might increase resin produc
tion, but most often the resulting stress
retards growth, causes other problems,
and reduces overall production.
Withholding water may also cause more
resin production, but it impairs growth
and diminishes leaf, stem, and flower
production. Water stress slows or stops
clones from rooting. If clones have too
many leaves and are too busy transpiring,
root growth is very slow. Conversely,
waterlogged rooting mediums harbor no
air, and rooting is then slowed to a crawl.
Stress can also affect plants’ sex. See
chapter 25, Breeding, for more information.
72
VEGETATIVE GROWTH
www.marijuanagrowing.com
74 Mother Plants
75 Preparing to Clone
76 Precautions
78 Rooting Hormones
79 Before Starting
79 Cloning: Step-by-Step
82 Caring for Clones
83 Cloning Techniques
83 Aero-doner
83 Scraping the Stem
83 Air Layering
83 Micropropagation
84 Cloning for Sex
84 Cloning a Flowering Female
84 Storing Clones
Healthy “clones” are the mainstay of most cannabis gardens.
Medical cannabis can be reproduced
(propagated) sexually or asexually.
Seeds are the product of sexual propaga
tion; stem cuttings (aka clones'"*) are the
result of asexual or vegetative propa
gation. In its simplest form, taking a
stem cutting involves cutting a growing
branch or branch tip, placing the cut end
into a growing medium, and keeping it
moist until roots grow. Medical cannabis
gardeners commonly refer to a “clone”
as a branch of a cannabis plant that has
been cut off and rooted.
"'Technically, cloning is taking one
cell of a plant and promoting its growth
into a plant; it shares the same DNA
and is effectively a copy of the donor
(mother) plant.
Clones are taken from desirable females
called mother plants. Once rooted,
clones are transplanted and moved into
an indoor vegetative room, greenhouse,
or outdoors. Crops of clones are most
often induced to flower with a 12/12-
hour day/night schedule and harvested
www.marijuanagrowing.com
73
Well-illuminated, healthy clones are fast
growing, and develop more quickly than
fungus and spider mites can reproduce. By
the time such pests and problems take hold,
healthy plants are well on their way to
maturity.
Strong, healthy, cannabinoid-potent females
make good mothers. Weak plants that are
susceptible to disease and pest attacks over time
make poor mothers, even though they might
exhibit strong genetic qualities. Such mothers
tend to lose strength and often contract low
levels ofdiseases that they pass on to clones.
CLONES
Advantages
Disadvantages
all female
can carry undetectable diseases
exact replica of mother
genetic instability maintained
consistent growth
not F1 hybrids-less vigor
less time to harvest than seeds
difficult for some gardeners to root
flower-ready (competent buds)
difficult to find locally and legally
Growing a strong, healthy mother plant is the
first step to producing strong, healthy cuttings.
Label all mothers and corresponding clones.
about 2 months later. Short crops of
clones in small containers are much eas
ier to move and maintain than big plants
in large containers, whether grown
indoors, outdoors, or in a greenhouse.
Mother Plants
Mother plants are selected for desirable
medicinal qualities. Cannabinoid and
terpene content are more important than
harvest weight. The most robust mother
plants are taken from superior Fl hybrid
females. See chapter 3, Medical Cannabis
Varieties, for more information.
All cannabis plants can be cloned, regard
less of age or growth stage. However,
autoflowering plants complete their life
cycle in less than 90 days and make very
short-term mothers. It is time-consum
ing to re-vegetate plants that flowered
before clones were taken. Clones taken
from flowering plants root quickly but
require a month or longer to revert to
vegetative growth. See “Cloning a
Flowering Female,” on page 84.
Take clones from mother plants that are
at least 2 months old. If taking clones
from seedlings, wait until male or female
pre-flowers are easily visible with the
naked eye. Clones taken from female
plants cloned before they have expressed
sex may dawn male flowers or develop
poorly when induced to flower with a
12/12-hour day/night photoperiod.
Mother plants are most resilient when
grown from Fl hybrid seeds. Most often
clones are taken from other clones.
There are countless examples of gar
deners who made clones of clones from
the same variety more than 20 times.
That is, clones (C-l) were taken from
the original female grown from seed.
These clones were grown in the vegeta
tive stage, and clones (C-2) were taken
from the first clones (C-l). Blooming
was induced in (C-l) 2 weeks later and
(C-2), grown in the vegetative stage.
Then, clones (C-3) were taken from the
second clones (C-2). This same growing
technique is still going on with clones
of clones well past (C-20) and there
has been no apparent breakdown in
the clones potency or vigor. However,
mothers that are weak may suffer stress
or contract disease such as powdery
mildew will produce weak clones. Weak
74
CLONES & CLONING
www.marijuanagrowing.com
and diseased mothers should be banished
from the garden, container and all.
A female plant will reproduce 100 per
cent females, all exactly like the mother
except for phenotype deviation*. When
grown in the exact same environment,
clones from the same mother usually
look alike. But the same clones subjected
to distinct environments in different
garden rooms will often look different.
*Since we do not have enough research
on cannabis, we must look at other
plants for information. The Bradford
pear for instance, arose from a genetic
difference in the bud. The new shoot
had better pears, and new trees were
made from them. They are not always
complete to form—older DNA that
has been acted on, and an established
phenotype. A true clone made from a
single cell was used to make a big group,
carry all identical but new DNA, and a
cursory but malleable phenotype.
Once a plant grown from seed has desig
nated sex (male or female), and it receives
any other necessary trigger—tempera
ture, light cycle, etc. —it is biologically
“competent,” ready to enter the flowering
growth stage. See “Florigen” in chapter 8,
Flowerings for more information.
Keep several mother plants in the
vegetative growth stage for a consistent
source of cloning stock. Start new moth
ers from seed every 6 to 12 months. Give
One or two large female plants can be the
source of many clones!
mother plants 18 to 24 hours of light per
day to maintain rapid growth.
Transplant old mother plants into the
outdoor garden. Once mother plants are
6 to 12 months old they are usually
potbound and prone to pest and disease
attacks. Move old mother plants out
doors in the early spring for a spring
crop, or plant them for a fall crop. Once
mothers have hardened-off and accli
mated to the outdoor climate, Mother
Nature takes over!
Preparing to Clone
Cloning is the most traumatic incident
cannabis plants can experience, aside
from harvest. Clones go through an
incredible transformation when they
change from a severed green growing tip
Richard Lee, founder of Oaksterdam
University, inspects a roomful of mother
plants.
to a rooted plant. Their entire chemis
try changes; the stem that once grew
leaves must now grow roots in order to
survive. Clones are at their most fragile
point in life just after being cut.
While rooting, clones require a mini
mum of nitrogen but increased levels
©f phosphorus to promote root growth.
Sprays should be avoided during rooting,
as they compound cloning stress. Given
good instruction and a little experience,
most gardeners achieve a consistent,
100 percent clone survival rate.
Large cuttings having large, starch-
filled stems will grow roots more slowly
than will small clones with small stems.
The excess starch in moist substrate
also attracts diseases. Thin-stemmed
Weak mothers that are susceptible to disease
and pest attacks make poor clones, even though
they may initially exhibit strong genetic
qualities.
Clones below are exact genetic replicas of
mother plants above. Each mother's cell
carries a DNA blueprint of itself Radiation,
chemicals, disease, and poor cultural practices
can damage this DNA. Unless damaged, the
DNA remains intact.
These mother plants provided hundreds
of clones, and were finally moved outdoors
and harvested in the jail.
www.marijuanagrowing.com
75
Big, healthy growth like this makes excellent
clones.
All of these stems were cut on an angle so that
more interior stem surface is exposed. This is
where many roots will grow.
These clones were just taken and still need
to get used to their new environment. When
they grow roots, these clones will look much
stronger.
clones have fewer reserves (accumu
lated starch), but they only need enough
reserve energy to initiate root growth.
Small clones with a few leaves need
less moisture and will root faster than
big cuttings with many leaves. At first
leaves contain moisture, but after a few
days the stem is no longer able to supply
enough moisture to the leaves, and the
clone suffers stress. A small amount
of leaf space is all that is necessary for
photosynthesis to supply enough energy
for root growth.
Integrity in Parents
1. Maintain 18-to-24-hour
day photoperiod
2. Keep plants healthy
3. Grow for 6 to 12 months
4. Repot as needed
Easy-to-clone plants
Look for plants that dawn small (root
let) nubs (primordia) near the base of
the trunk. Such plants tend to strike
roots exceptionally fast.
Most ‘Skunk’ and indica varieties grow
roots easily.
Difficult-to-clone plants
Ruderalis crossed with indica or sativa
varieties are autoflowering and do not
make suitable mother plants.
Outdoor varieties with a slight tendency
to pre-sex (designate sex) in an 18-hour
photoperiod include: ‘Early Girl’, ‘Early
Skunk’, and many others. Check with
seed companies for details. But early
flowering does not always exclude them
as mother plants.
Clones taken from weak, leggy mother
plants most often produce weak, leggy
clones. Harvested plants that have been
induced back into vegetative growth can
also produce weak clones if not fully
reverted.
Precautions
Clones root well within a slightly acidic
pH range of 5.5 to 6.6. Aeroponic clone
gardens normally do best with a pH of
5.4 to 5.6 . Most diseases grow poorly
below these pH levels. Always make
sure there is plenty of air in the rooting
medium to stimulate root growth.
Do not kill clones with kindness and
fertilizer. At best, giving clones an
excess dose of fertilizer causes rooting
to be delayed. In fact, a dose of ammo
nium nitrate, a common salt-based
This table shows average times for roots to grow from the stem.
Note: Clones taken from younger growth root faster than those taken
from older growth.
AVERAGE ROOT GROWTH FOR CANNABIS CLONE
Action
Cut from Young
.
..... ....
Cut from Old
‘ cell division starts
day 4
day 6
first root nubs form
day 6
day 10
; roots start to grow
day 7
day 20
enough roots to
transplant
day 14
day 28
fertilizer, will actually stop root hairs
from growing.
Inexperienced gardeners and dis
eased plants cause most clone-rooting
problems. Weak plants that lack vigor
provide slow-rooting, weak clones.
Poor growing conditions also affect the
strength of clones.
See “Dip Plants in Miticide” in chapter 6,
Vegetative Growth. Watch out for miti-
cidal dips that coat leaves too heavily.
The dip should cover well enough to
protect plants with insecticidal and
fungal properties, yet allow stomata to
breathe.
If a spider mite infestation occurs, many
gardeners destroy infested clones and
start over with clean clones. Others
spray with aerosol pyrethrum or another
organic miticide. Remember, all pesti
cides—natural or not—are phytotoxic.
Spraying cuttings is a bad idea in general,
76
CLONES & CLONING
www.marijuanagrowing.com
Keep a clean room! Leaves on the floor should
be cleared away 3 or 4 times daily.
Transplant clones before they become
rootbound!
Richard Lee, Oaksterdam University,
inspects clones in a spotless clone room.
including antidesiccant sprays. Sprays
clog stomata and can impair root growth
in clones. If you must use sprays, use
natural organic sprays, apply them
when it is cool, and keep their use to a
minimum. See “Sprays and Spraying” in
chapter 24, Diseases & Pests.
The roots on this clone are circling the
container and the roots near the center
are already turning dark, signifying
overwatering and pending death. Do not
overwater clones. Keep the medium even
ly moist but do not let it get soggy. Any
kind of stress disrupts plants and slows
rapid growth. Different mediums need
distinct watering schedules. Rockwool
holds water for a long time, while peat
pellets need watering more often. Clones
are tender; they have a small developing
root system and need extra vigilance now.
Keep the cloning area clean. Do not take
clones where fungus spores and diseases
are hiding! Pythium flourishes in high
temperatures and excessive moisture.
Powdery mildews prefer cool moist
conditions. Spider mites, whiteflies, and
thrips love weak, tender clones. Remove
infested clones from the cloning room.
Cooler, humid conditions, 65°F to 78°F
(18°C-25°C), inhibit most mite repro
duction and avert infestations. But cool,
humid conditions may increase chances
of specific fungal attacks.
Root-Inducing Hormones
Root-inducing hormones may help
speed cannabis root development. Most
often, root-inducing hormones are used
to help strike roots on woody plants that
are not for human consumption. Medi
cal gardeners avoid dangerous synthetic
rooting hormones (IBA and NAA*)
altogether and wait a few days longer
for roots to grow. Use an aero-cloner or
deep water cloner (aka DWC or bubble
cloner) to expedite root growth. Using
just plain water under proper conditions,
roots will strike on 80 tolOO percent of
clones only 1 to 3 days later than when
hormones are employed. Root-inducing
hormones also have less effect when all
the conditions are just right and roots
are naturally ready to grow.
*IBA (Indole-3 -butyric acid,
3-indolebutyric acid, indolebutyric acid)
is synthetic and classified by the EPA as
an agricultural chemical and pesticide. It
is also a mutagenic, able to cause muta
tion. NAA (1-naphthalenaecetic acid) is
a synthetic product registered under the
EPA as a pesticide.
Two main hormones stimulate undif
ferentiated growth: 1-naphthalenae-
cetic acid (NAA) and indolebutyric
acid (IBA). Most commercial rooting
hormones contain one or both of the
synthetic ingredients IBA and NAA.
Many root-inducing hormones also
contain a fungicide to help prevent
pathogens, including damping-off. Read
the labels carefully for root-inducing
hormones. When purchasing, search for
value. Products contain different con
centrations of IBA and NAA. Commer
cial products hold their ingredients in a
powder, liquid, or gel form.
When the stem of a cutting develops
roots, it must transform from produc
ing green stem cells to manufacturing
undifferentiated cells (callus) and, finally,
to fabricating root cells. Once undif
ferentiated, cells quickly transform into
root cells.
As soon as cuttings are taken, clones
start dispatching natural rooting hor
mones to the wound; these hormones
arrive in full force in about a week. The
artificial rooting hormone fills the need
until natural hormones take over. See
chapter 22, Additives, for more informa
tion on root-inducing hormones.
NOTE: If exceeded in concentration or
duration, IBA applications impair root
formation
Rooting hormones are available in liq
uid, gel, or powder form. Liquid forms
are easy to dilute. Gel-holding hor
mones are easy to keep consistent and
are simple for novice gardeners to use.
Powder forms are the choice of most
professional gardeners because they are
inexpensive, consistent, and cause no
problems. Natural root-inducing prod
ucts such as willow water are in liquid
form and are used over the long term.
Do not apply rooting liquids, gels, or
powders, above soil line, or excess stem
swelling could occur aboveground.
Liquid rooting hormones are easy to
dilute and mix in different concentra
tions. Gardeners mix the most dilute
concentration for softwood cuttings.
Apply any rooting hormone containing
IBA only once. Do not exceed concen
tration or dip duration. Give cuttings a
www.marijuanagrowing.com
77
5- to 15-second dip in concentrated
solutions of IBA and NAA. With a
quick dip, stems evenly absorb the 500-
to 20,000-ppm concentrated hormone.
Root-inducing gels are easy to use and
most practical for small amounts of cut
tings. Gels are not water-soluble. Once
applied, gels hold and stay with the stem
longer than liquids or powders. How
ever, the cut end of a clone stem often
develops fungal infections.
Rooting powders often contain mixture
of talc and IBA and/or NAA and are
less expensive than liquids or gels. Many
professional cannabis gardeners prefer to
make their cuttings with powder because
it is so consistent and is easier to contain
than liquids or gels. To avoid contamina
tion, pour a small amount into a separate
container, and throw away any excess.
Damping-off (in this case, Botrytis cinerea^)
has infected these unhappy clones. They must
be tossed out, and the clone area must be
scrubbed down with bleach.
To apply, roll the moistened stem of the
cutting in the powder. Apply a thick,
even coat. Tap or lightly scrape excess
powder off the cutting; excess hormones
can hinder root growth. In the rooting
medium, make a hole bigger than the
stem. If the hole is too small, the rooting
powder gets scraped off upon insertion.
Some gardeners soak their cuttings in a
dilute solution (20-200 ppm IBA and/
or NAA) for 24 hours. But I have seen
few gardeners use this time-consuming
technique, and I am not sure if it is more
beneficial than dipping stems.
Willow (tree) water induces roots. The
substance in willow trees that promotes
rooting is unknown, but repeated
experiments have proven that willow
water promotes about 20 percent more
roots than plain water. This willow
water can be mixed with commercial
rooting hormones for improved results.
To make willow water rooting com
pound, find any willow tree and remove
Rooting Hormones
Hormex is an IBA-based powder
available in 6 different strengths ranging
from 1000 ppm to 45,000 ppm.
Rhizopon AA (Rhizopon B.V.) is an
IBA powder is from Hortus USA, the
world’s largest company devoted to the
research and manufacture of rooting
products. Products are available in both
powder form and water-soluble tablets
in strengths from 500 to 20,000 ppm.
To determine rooting hormone concen
tration, multiply the manufacturer’s listed
percentage by 10,000 (e.g., a product with
0.9 percent IBA contains 9000 ppm IBA.
Warning! Root-inducing hormone
products containing IBA and IAA are
not recommended for use with edible
plants. Root-inducing hormones should
not be used to grow medical cannabis.
Read label carefully before deciding to
use these or any products.
Clonex cloning gel is a blend of vitamins,
minerals, and antimicrobial agents,
0.3 percent (3000ppm) IBA. Gel seals
cutting tissues, thus reducing chance of
infection and embolisms.
Dip-N-Grow IBA, NAA , antibacterial. Cost
is one penny per 100 cuttings.
Olivia's rooting hormone is one of the many
root-inducing hormones available today.
78
CLONES & CLONING
www.marijuanagrowing.com
some of this year’s branches that are
about one and a half inches in diameter.
Remove the leaves, and cut the branches
into 1-inch lengths. Place 1-inch willow
sticks on end, so that a lot of them fit
in a water glass or quart jar. Fill the jar
with water, and let it soak for 24 hours.
After soaking, pour off the willow water,
and use it for rooting hormone. Soak
cannabis clones in the willow water for
24 hours, and then plant them in rooting
medium. If using a commercial liquid
rooting hormone, substitute the willow
water in place of regular water in the mix.
Several commercial products contain
Trichoderma bacteria or mycorrhizal
fungi, both of which help plants grow
bigger, stronger, and faster.
Coconut milk contains the cytokinin
zeatin (see chapter 22, Additives) and
encourages clone root growth. Mix equal
parts coconut milk, grated coconut meat,
and clean hot water in a blender and
blend until smooth. Use to water clones.
Before Starting
Taking clones, or cuttings, is the most
efficient, productive means of cannabis
propagation for many indoor, green
house, and outdoor medical cannabis
gardeners. Once desirable female plants
An extract of weeping willow tree water will
promote rooting.
Mix a mild bleach solution to clean and disin
fect all garden room surfaces.
When taking clones, begin by choosing a strong, healthy, genetically desirable mother plant. Use
a sharp, sterile blade to perform the actual cutting.
have been distinguished and selected,
branch tips and branches can be cut and
rooted.
Disinfect all tools and working surfac
es to kill bacteria, fungi, viruses, and
other diseases already present. Sterilize
a sharp scissors, razor, or razor blade
by dipping in alcohol, vinegar, or bleach
(5 to 10 percent solution) or by heating
with a torch. Wash your hands thor
oughly beforehand. Make sure to have
all cloning supplies within arm’s reach—
rooting cubes, rooting hormone, razor
or scissors, humidity dome, etc.—before
you start to take clones.
To avoid problems:
Keep the work area clean. Wash work
surfaces and tools before starting.
Have grow medium ready.
Prepare mother plant in advance.
Take clones with clean (sterile)
instruments.
Store cut clones in water.
Insert (stick) cutting in growing
medium or aeroponics system.
Place clones under humidity
dome/tent.
Carefully monitor grow medium mois
ture levels and humidity.
Watch for root growth.
Transplant when roots emerge from root
cube or medium.
Harden-off by gradually exposing
cuttings to their new environment.
Cloning: Step-by -Step
Step One: Choose a strong, healthy,
desirable mother plant that is at least 2
months old. If a variety is difficult to
clone, leach the soil with 2 gallons (7.6 L)
of water for each gallon (3.8 L) of soil
every morning for a week before taking
clones. Drainage must be good. Or mist
leaves heavily with plain water every
morning. Both practices help wash out
nitrogen. Do not fertilize mother plant
while leaching the growing medium.
Step Two: With a sharp, sterile blade,
make a clean 45-degree cut across firm,
healthy 0.125- to 0.25 -inch-wide (ap
prox. 3 -6 mm) branches, 2 to 4 inches
(5.1-10.2 cm) in length. Take care not
to smash the end of the stem when
www.marijuanagrowing.com
79
Oasis is a favorite of many gardeners.
Make sure to remove the plastic netting
around Jiffy pellets before transplanting.
Rockwool cubes are super convenient, hold a
lot ofair when wet, and serve as a container.
making the cut. Trim off 2 or 3 sets of
leaves and growth nodes so the stem
can fit into the soil. There should be at
least 2 sets of leaves above the soil line
and 1 or 2 sets of trimmed nodes below
the ground. When cutting, make the
slice halfway between the sets of nodes.
Immediately place the cut end in water.
Store cut clones in water while cutting
more clones.
Step Three: Oasis, Jiffy, and Rockwool
rooting mediums are convenient and
easy to maintain and transplant. All
have different moisture- and air-holding
abilities.
Place a tray containing rooting cubes or
plugs into a standard nursery rooting flat
or strong plastic tray. Fill rockwool tray
with water having a pH of 5.5 to 6.5.
Fill small containers or nursery flats
with fine perlite/vermiculite, soilless
mix, or fine potting soil. Saturate the
This rooting hormone gel is color-coded.
substrate with water. If none exist,
make holes through three-fourths of the
rooting cube for inserting clone stems.
Use an unsharpened pencil, a chopstick,
or a nail to make a hole in the rooting
medium—a little larger than the stem.
The hole should stop about one-half
inch (1.3 cm) from the bottom of the
container to allow for root growth.
Step Four: Use a rooting hormone, and
mix (if necessary) just before using. For
liquids, use the dilution ratio for soft
wood cuttings. Swirl each cutting in the
hormone solution for 5 to 10 seconds.
Place each cutting in a hole in the root
ing medium. Gently pack rooting
medium around the stem. Gel and pow
der root hormones require no mixing;
dip stems in gels as per instructions, or
roll the stem in the powder. When plant
ing, take special care to keep a solid layer
of hormone gel or powder around the
stem when gently packing soil into place.
Watering a tray of clones is as easy as dipping
them in a tank of nutrient solution.
Step Five: Lightly water until the
surface is evenly moist. Keep cuttings
evenly moist at all times! Clones have
no roots to bring water to leaves. Water
arrives from leaves and the cut stem
until roots can supply it. If clones dry
out they will wilt and die. Water as
needed to keep growing medium evenly
moist, but do not let substrate get soggy,
or clone stems will soon contract patho
gens, rot, and die.
Step Six: Clones root fastest with low
levels of light for 18 to 24 hours daily. If
clones must be placed under an HID, set
them on the perimeter of the garden so
they receive less-intense light, or shade
them with a cloth or screen. A fluo
rescent tube 6 inches (15.2 cm) above
clones or a 400-watt metal halide 4 to 6
feet (1.2 -1 .8 m) away supplies the per
fect amount of light for clones to root.
Cool white fluorescents (or a combina
tion of warm white and cool white) are
excellent for rooting clones.
A humidity generator releases moist air into
the cloning room to increase the humidity to
above 90 percent for the first few days after
cloning.
80
CLONES & CLONING
www.marijuanagrowing.com
These clones were taken on August 20. The
date was recorded on the Post-it note.
Cut clones can be held in a glass of water.
Cu tting leaves in half decreases the amount
offluids necessary to support life. Roots must
regrow to support new life.
Heating pads add extra warmth in cool garden
rooms.
Step Seven: Clones root fastest when
humidity levels are 90 to 100 percent
during the first 2 days and gradually
reduced to 80 to 85 percent during the
following week. A humidity tent will
help keep humidity high. Purchase a
premade cloning dome or construct a
humidity tent out of plastic bags, rigid
plastic, or glass. Remember to leave
openings for air to flow in and out so
little clones can breathe. If practical,
mist clones several times a day as an
alternative to the humidity tent. Remove
any sick, rotting, or dead foliage.
Cut leaves in half to lower transpiration
surface and to keep them from overlap
ping. Moisture that could foster fungus
is often trapped between overlapping
leaves. Keep grow medium evenly moist
so there is enough moisture to keep
tender cuttings alive.
Step Eight: Clones root faster when the
growing medium is a few degrees warm-
er than the ambient air temperature. A
warmer substrate increases underground
chemical activity, and lower air tem
perature slows transpiration. For best
results, keep the rooting medium at 75°F
to 80°F (23.9°C-26.7°C). Growing
medium temperatures above 85°F
(29.4°C) will cause damage. Keep the
air temperature 5 to 10 degrees (Fahr
enheit) cooler than the substrate. A
warmer growing medium coupled with
cooler ambient temperature slows dis
eases and conserves moisture. Misting
clones with water also cools foliage and
slows transpiration to help traumatized
clones retain moisture unavailable from
nonexistent roots. Put clones in a warm
place to adjust air temperature, and
use a heating pad, heating cables, or an
incandescent lightbulb below rooting
cuttings.
Step Nine: Some cuttings may wilt but
then regain rigidity in a few days. Clones
should look close to normal by the
Clones are ready to transplant when roots
show out the bottom of rooting flats.
end of the week. Cuttings that are still
wilted after seven days may suffer from
pathogens such as rot and damping-off,
or may root so slowly they never catch
up with others. Cull sick clones. Put
healthy, slow-rooting clones back into
the cloning chamber to grow more roots.
Step Ten: In 1 to 3 weeks, cuttings
should be rooted. Signals that they have
rooted include: yellow leaf tips, roots
growing out drain holes, and vertical
growth of the clones. To check for root
growth in flats or pots, carefully remove
a root ball and clone to see if it has good
root development. For best results,
transplant clones when roots have just
started to break through the growing
medium. If you wait until a dense root
system is growing out the sides and bot
tom of rooting cubes, some roots will be
dead. Clones transplant best when roots
have just started to grow beyond the
walls of rooting cubes.
Note the tips of these roots are turning dark,
signifying too much moisture and the begin
ning of rot. This clone must be transplanted
immediately to avoid further rot.
www.marijuanagrowing.com
81
Cull sickly clones. Weak clones will always
grow poorly and will often spread pests and
diseases to the rest of the garden.
Individual clones can be covered with plastic
containers to keep humidity high.
These well-cared-for clones have been trans
planted to larger containers and have resumed
growth. Soon each will be transplanted to its
final container.
Caring for Clones
Cuttings always look strong and healthy
right after you take them. About 5 or
6 days later, leaves may start to change
color. Leaves stay small and often turn
a deeper shade of green. After about a
week, lower leaves may start to yellow if
their nutrient levels dissipate.
A week after being taken, a clone’s
belowground stem will develop stubby
callused roots called primordia. The
primordia are semitransparent to white,
and should look healthy. The clone will
produce very little green growth during
this process. Leaves and the severed stem
now supply fluids for the clone. Once
the root and vascular transport system
is in place and working properly, roots
are able to supply water and nutrients.
Clones then start vegetative growth.
Any sign of slime, pests, or diseases
means there are problems. Root damage
due to lack of oxygen or overwatering
will kill thin, hairlike roots. They will
turn brown from rot or shrivel when dry.
Once damaged, roots remain damaged.
New roots must grow to replace dam
aged roots. Cull slow-growing clones
that have damaged roots. Some gardeners
let clones with desirable genetic qualities
root longer and will transplant them
when adequate roots develop.
Clone foliage can lose much of its
protective waxy coating when pampered
indoors. Now leaves and stems are very
tender and supple. They will need to be
transplanted and hardened-off before
moving to another location.
Rooting clones need progressively
more light as they grow. Move the light
source closer to clones once roots form.
Fertilize with a mild organic fertilizer
solution when all clones have started
vegetative growth.
Transplant only the strongest well-rooted
clones. Slow-rooting clones should be
kept in the cloning chamber or culled
out. Do not move clones into bright light
until they have fully developed root sys
tems. Once transplanted, clones are ready
to harden-off.
An aero-cloner consists ofa chamber with
small spray nozzles inside. The stems and
roots are bathed in a 100 percent-humidity
root zone environment. Water is pumped
under pressure and atomized into the air
or dispersed as a spray via nozzles. Clones
strike roots nearly as well when water is not
atomized. Clones root incredibly quickly in
this system.
Harden-off strong clones by moving
them into a brighter garden room. Make
sure they have adequate air ventilation
and circulation. Some gardeners “pre
grow” clones in a small vegetative room
before introducing them to the flowering
room or moving them into a greenhouse
or a protected outdoor location.
Set up a vegetative pre-growing area that
is lit with HID or bright compact flu
orescent lighting for the rooted clones.
Place them in this area to let them grow
for the first week or two of vegetation.
Strong, white roots on this clone have initiated
from the callus on the cut stem.
CLONES & CLONING
www.marijuanagrowing.com
Transplant clone when roots have outgrown
the container. This clone could have been
transplanted a few days earlier.
perfect for gardeners wanting to produce
many densely rooted cuttings quickly
and efficiently. Cuttings grow a mass
of roots in seven to ten days and can be
transplanted into hydroponic growing
mediums or soil. Aero-cloners are some
what labor intensive. Clones must be
taken, rooted, and transplanted—care
fully. Producing clones for small gardens
is best accomplished in rooting cubes.
Scraping the Stem
Always cut stems at a 45° angle
when taking cuttings. Very
lightly scraping away the outer
layer of the stem to expose only
the cambium layer below allows
hormones to concentrate where
Left to right: Leaves are cut into small pieces
and set in a specific agar solution where the
green leafy growth changes to white callus -
undifferentiated growth.
Callus (undifferentiated growth) has clearly
formed and roots are ready to form.
This area needs to be just big enough to
accommodate plants from the time they
are a few inches tall until they are about
a foot tall and ready to be moved into
the flowering room. Such a small room
is a very efficient use of space, light,
and electricity.
Cloning Techniques
Aero-cloner
Aeroponic cloners are the most efficient
cloners I have seen. We built one about 30
years ago. Since then, several commercial
models have become available. They are
roots start, and causes many roots to
grow there. Splitting the clones’ stem
exposes more surface area to grow roots.
Both practices increase the number of
healthy roots, but rooting time is longer.
After the cutting has been trimmed and
scraped, dip the bare stem into a rooting
hormone. Now it is ready to “stick” into
the substrate. First a heavy callus de
velops, from which prolific roots grow.
Roots will take longer to strike, 10 to
14 days, but they will grow much more
densely.
Air Layering
Air layering is seldom used by med
ical cannabis gardeners, except with
the most difficult-to-root clones. It is
interesting but normally unnecessary.
Cannabis cuttings strike roots easily.
The classic book Marijuana Botany, by
Robert C. Clarke, has a good section
with accurate drawings on air layering.
Micropropagation
Micropropagation of cannabis is
possible. This form of cannabis propaga
tion is relatively simple in theory, but
From top: Lightly scraping the stem causes a
larger callus to form.
More roots grow from a large callus at the end
of the stem.
From top: The stems on these clones were
scraped lightly before applying a root-inducing
hormone.
This little clone has so many roots that they
are growing out the top and bottom of the
container!
Root clones underfluorescent, CFL, or metal
halide lights. This single 1000-watt metal
halide is illuminating hundreds of clones.
www.marijuanagrowing.com
83
application takes long-term perse
verance, professional knowledge, and
proper management. Micropropaga
tion makes sense only if reproducing
thousands of identical clones. For more
information on micropropagation, see
www.marijuanagrowing.com/.
Cloning for Sex
Determine plant sex accurately, 100
percent of the time, by “cloning for sex.”
To clone for sex, take two cuttings (in
case one dies) from each parent plant
in question. Use waterproof labels and
an indelible marker to identify sets of
clones and corresponding parents.
Keep parents under 18 to 24 hours of
light. Give rooting clones a 12-hour
light/dark regimen. Set them in a shady
spot in the flowering room, set up a
small 12-hour day/night cloning room or
set them in a ventilated closet or under a
light-tight cardboard box so they receive
12 hours of uninterrupted darkness.
Wrap clones in a moist paper towelfor storage and transport.
Unless there is a problem, clones will
show sex within two weeks. Cull all
males except those used for breeding.
Take clones from desirable female plants.
Let little females continue to flower.
mones must be reversed, and rooting
hormone signals must be sent. Now
is the time to give plants 18 to 24 hours
of light to signal them to revert to
vegetative growth.
1. Make 2 cuttings
2. Label each cutting
Cloning a Flowering Female
Taking cuttings from flowering plants
and inducing vegetative growth can take
two months or longer. Females early
in the flowering stage produce better
cuttings, and their roots grow more
quickly. Harvested plants are slower to
revert back into vegetative growth. Once
a plant reaches the senescence point,
growth hormones have dissipated.
Furthermore, powerful flowering hor-
3. Give 12 hours of
light while rooting
4. Cutting will determine
sex in 2-3 weeks
Weak rejuvenated clones often have
irregular branching and occasionally
flower prematurely or when suffering
stress. Foliage and flower buds are more
prone to pest and disease attacks too.
Weak favorite flowering harvested plants
can be cloned, but results axe not always
the best. To clone a harvested female,
cut from the lower green branches
that have the most vegetative growth.
Cut a 3-to-6-inch-long (7.6-315 cm)
stem. Trim off flowers and lower leaves.
Keep several green leaves and bud. If
leaves have yellowed substantially or
are diseased, survival chances diminish
exponentially.
Storing Clones
To store cuttings for later use, wrap
recently cut, trimmed, unrooted stems
in a damp cloth or paper towel. Put the
wrapped clones into a plastic bag and
store in the refrigerator. On a daily
basis, remove the water that condenses
inside the bag in the cool refrigerator.
Keep the temperature above 40°F
(4.4°C). Temperatures below this level
may cause plant cells to rupture. Cut
tings should last in the refrigerator for
about 3 weeks if they get out to have a
daily dose of light.
CLONES & CLONING
www.marijuanagrowing.com
86 Florigen
86 Trichomes and Resin Glands
87 Trichomes
87 Nonglandular Trichomes
87 Bulbous Glands
88 Capitate-Sessile
Resin Glands
88 Capitate-Stalked
Resin Glands
89 Cannabinoid Profile
89 Cannabinoid Production
89 Terpenes
and Essential Oils
90 Indica, Sativa, and Ruderalis
91 Stress and Sex
92 Pre-flowering
92 Male Pre-flowering
92 Male Flowering
93 Female Pre-flowering
94 Female Flowering
94 Sinsemilla Flowering
97 Calyx, False Calyx,
and Bract
97 Colas and Foxtails
98 Rejuvenation
FLOWERING
Cannabis must flower and produce seeds to successfully
complete its annual life cycle. It is a dioecious plant, being either
male (pollen producing) or female (ovule producing). However,
intersex plants—mistakenly called hermaphrodite plants, with
both male and female flowers—can also occur. Feminized seed
that produces only female plants is also available.
These plants are growing in Morocco. You can see the Rif Mountains
in the background.
In nature, cannabis flowers in the fall/5’ after the long, hot days
of summer. The long nights and short days of autumn help
signal cannabis to start flowering. (Plants are either “short-day”
or “long-day.” “Long-day” plants, including most varieties of
cannabis, require short days and long nights to flower. For more
information on this subject, see “Florigen,” on page 86.) Plants
are normally either male or female. Feminized seed that grows
only female plants is also very popular. Cannabis produces male
or female pre-flowers after 4 weeks of vegetative growth. For
more information, see “Pre-flowering” in this chapter.
''Cannabis ruderalis-domtmnt varieties flower after 3 to
four weeks of growth, regardless of light/dark regimen. Plants
with the “ruderalis" gene are called “autoflowering” varieties.
Growth patterns and chemistry change during flowering. Can
nabinoid production slows at first and then accelerates; flower
formation is rapid at first and then slows. Stems elongate; leaves
grow progressively fewer blades. This tendency is more pro
nounced in indica varieties than in sativas. Nutrient needs change
as growth stages change. Plants focus on flower production
www.marijuanagrowing.com
85
Phyllotaxy, the arrangement of leaves on the
stem, changes when a plant enters the flower
ing stage. Branches are symmetrical lower on
the plant, and will change to asymmetrical as
flowering progresses.
rather than vegetative growth. Green
chlorophyll production, which requires
much nitrogen, slows. Calcium, phos
phorus, and potassium uptake increases
to promote floral formation.
When flowering is initiated, organic
cannabis gardeners change to a solu
ble flowering mix with less nitrogen.
Gardeners that use chemical salt-based
nutrients switch to a “super bloom”
formula with less nitrogen and more
calcium, potassium, and phosphorus.
The fertilizer is added when flowering is
Here is a close-up of asymmetrical growth—
one of the first signs offlowering. (MF)
induced indoors. Both fertilizer regi
mens promote bigger flower buds.
Changing the ratio of nutrients during
flowering does not mean that plants
need no nitrogen. For example, there is
a lag time in growing mediums’ ability
to hold fertility while other substrates
hold nutrients for a very short time.
This is why the fertilizer ratio should
be changed after floral induction. The
increase in floral nutrients necessary
during flowering, most notably phos
phorus (P) and potassium (K), is grad
ual rather than immediate. The medium
holds some elements but the cation sites
readjust to equilibrium as necessary.
The plant is vegetating when the light
is changed to 12 hours. It will take 3 to
5 more days for preprogrammed leaf
growth on the meristem to manifest.
After several 12-hour nights, the cells
in the meristem are reprogrammed to
flower. At this point cells start looking
for a different nutrient menu.
Cannabis is in vegetative growth
during the transition to flowering and
has vegetative nutrient needs. The same
nutrients are required during growth
and flowering, only the ratio between
them changes. For the first few days
this ratio may change from minute to
minute, so we provide different ratios of
nutrients during this time and plants are
able to extract what they need. Careful
monitoring of feeding will help plants al
ways have a complete menu of nutrients.
Trichomes and Resin Glands
During flowering, cannabinoid-rich res
in glands and other trichomes on foliage
become clearly visible with the naked
eye. The capitate-stalked glands that
cover bracts and small bud-leaves inter
spersing the buds are the most impor
tant to medical cannabis gardeners.
These glands account for more than half
of all the THC contained in the plant.
Bulbous and sessile resin glands on the
surfaces of all flowers, leaves, stalks, and
branches, along with a small amount of
THC present in interior cells, account
for the balance of total THC. These
large, stalked glands are our focus.
Florigen
Florigen (also known as “the flowering horYnone”) is the term used to describe
the molecules that initiate and maintain flowering. Since the 1930s, biologists have
believed that florigen is responsible for controlling flowering in plants, but it was not
until August 2011 that a group of Japanese scientists discovered specific florigen hor
mone receptors. Florigen is synthesized in leaves and stimulated by environmental
changes such as photoperiod and temperature.
Florigen is found at the apex of shoots where buds grow to induce flowering.
It redirects vegetative stem apexes to become flowering stem apexes. The subject
is quite complex and beyond the scope of this book. I started a thread about
florigen on the forum at www.marijuanagrowing.com that encompasses further
research and discussion.
Florigen is the elusive hormone thought to be
responsible forflowering.
86
FLOWERING
www.marijuanagrowing.com
This crop was induced to flower with a 12/12-
hour day/night photoperiod. The onset of
flowering causes growth patterns, as well as
chemistry, to change.
Pests and diseases would have a difficult time
attacking this 'Chocolope' hud covered with
resin glands.
Pointy sessile resin glands (cystolith hairs)
contain no cannabinoids, but the capitate-
stalked resin glands with a ball on top are
packed with cannabinoids. (MF)
Trichomes
Biologists hypothesize that trichomes
evolved as a defense mechanism of the
cannabis plant against a range of poten
tial enemies. These adhesive sprouts
form a protective layer against offensive
insects and mites, preventing them
from reaching the surface of the plant.
The chemicals in the trichomes make
cannabis less palatable to animals and
can inhibit the growth of some types
of fungus.
The protective trichomes also help
insulate plants from desiccating wind
and low humidity as well as forming a
natural “sunscreen” to protect against
UVB light rays.
Humans may have promoted heavier
resin production through casual
selective breeding.
“All mice are animals, but not all animals
are mice. Similarly, all resin glands are
trichomes, but not all trichomes are resin
glands. Trichome is a general botanical
term for any outgrowth of an epider
mal cell. Trichomes can be scales, root
hairs, glandular or nonglandular, single
or multicellular, often hairlike growths.
Cannabis has three kinds of resin glands
(bulbous, capitate-sessile, and capitate-
stalked) and several of non-resinous
silica and carbonate warts and hairs, all
called trichomes.”
—Mel Frank, Cannabis author, researcher,
and photographer
Nonglandular Trichomes
Nonglandular trichomes—cystolithic
(sessile and cystolith glands [also known
as plant hairs]) are common on many
plants and do not produce cannabinoids.
These trichomes have a pointed tip and
are often long and hairlike. The waxy
protective trichomes are most common
on leaf undersides, petioles, and stems.
More common on some varieties than
others, cystolithic trichomes are most
abundant on outdoor plants. More
cystolithic trichomes form on plants
when they harden-off and are moved
from indoors to outdoors. The glands
exude insecticidal and miticidal sub
stances to gum up pests’ mouthparts
and repel them, but they have no
useful cannabinoids.
Bulbous Glands
Bulbous glands are the smallest glands,
ranging in size from 15 to 30 microme
ters. One to 4 cells constitute the “foot”
and “stalk,” and 1 to 4 cells make up the
“head” of the gland. Head cells secrete
a resin, believed to be cannabinoid-rich,
along with related compounds that
accumulate between the head cells and
the cuticle. A nipple-like bulge may
form on the membrane from the pres
sure of built-up resin as these glands
mature. Look for bulbous glands scat
tered about on foliage surfaces.
Cystolith hairs point in the direction ofgrow
ingshoots. (MF)
These cystolith hairs have mutated and lost
their way. (MF)
Bulbous glands sit on a base of a few cells
located on foliage and flower buds. (MF)
www.marijuanagrowing.com
87
Capitate-sessile (bulbous glands) are visible
near the center of the leaf Capitate-stalked
resin glands grow progressively taller and are
clearly visible on the edges of this leaf of
'Blueberry X Sandstorm'.
Long, thin stalks support the ball-like heads
of capitate-stalked resin glands.
| SECRETORY CAVITY | STRIPE CELL | VACUOLE
ENDOPLASMIC RETICULUM
H BASAL CELLS
PLASTID B VESICLE
Capitate-stalked resin glands are full of chem
ical activity. This is where the majority of
cannabinoids occur. Disc cells, and principally
the secretory cavity, of the gland perform a key
role in the physiology ofsecondary products.
But these activities are not yet completely
understood.
Capitate-Sessile Resin Glands
Capitate-sessile glands measure from
25 to 100 micrometers across the
globular-shaped head or bulb. The
bulb appears to lie flush on young and
immature plants. One to 4 cells below
the bulb is the beginning of a stalk that
elongates and grows during flowering to
transform the capitate-sessile gland into
a capitate-stalked resin gland.
Look closely and you can see the pointy
cystolithic, nonglandular trichomes alongside
the more numerous capitate-stalked glandular
trichomes.
The globular head or ball is composed
of 8 to 16 cells that form a dome. The
specialized cells secrete a cannabi-
noid-rich resin that collects between the
rosette, and its outer membrane
appears spherical.
Capitate-StaNced Resin Glands
Capitate-stalked trichomes appear and
become visible with the naked eye when
flowers form. Use a 10X to 30X handheld
lens to distinguish resin glands—bul-
This electron scanning microscopic view at
37OX ofa single capitate-stalked resin gland
allows us to distinguish individual cells. These
150- to 500-micrometer-tall resin glands are
pretty tough when they are young and strong.
But once they age they become more fragile.
bous, capitate-sessile, capitate-stalked,
and nonglandular trichomes. Look for
them on female flower bracts and new
flower growth and surrounding foliage
where they form heavily on the plant.
The resin glands also tend to accumulate
heavily on veins of lower leaf surfaces
around flower buds. Cannabinoid-
potent varieties typically contain higher
concentrations of capitate-stalked resin
glands.
Male plants and flowers contain smaller
and lower concentrations of less-potent
stalked glands than found on the female
bracts. Male flowers typically have a row
of large capitate-sessile glands along
opposite sides of anthers.
Unless clearly visible on leaf surfaces,
few cannabinoids are found on older
leaves. Leaves around flower buds are
much more densely populated with capi
tate-stalked resin glands rich in
cannabinoids.
Capitate-stalked resin glands are com
posed of a stalk with a bulbous head.
They look like a post with a knob, ball,
or bulb at the top. They form mainly on
flower buds and small leaves. The highest
concentration of cannabinoids is located
at the base of the bulbous resin head.
In the above illustration, disc cells are
shown attached to foliage by stipe cells
(red) and basal cells (green). The plastid
(orange) in disc cells secrete lipoplasts
where they synthesize lipophilic sub
stances that accumulate and ultimately
88
FLOWERING
www.marijuanagrowing.com
A *snake” ofhash has been added to this
cannabis cigarette or joint.
migrate and form BLUE vesicles. THC
occurs in the top of the capitate-stalked
resin gland. For more on this complex
subject, see www.marijuanagrowing.cofn.
Cannabinoid Profile
Many cannabinoids (CBD), not just
THC, have unique effects on brain
functions, which in turn cause different
effects on human cognition and psy
chiatric symptoms. Different levels of
cannabinoids relative to one another
produce different effects. As a result,
measuring the “potency” of cannabis
plants is problematic.
A very resinous plant could have low
levels of THC and high levels of CBD.
Or a plant with little resin could contain
high levels of THC and low levels of
CBD. Cannabinoid profile depends on
the makeup of cannabinoids and other
active ingredients. For example, resin
consists of cannabinoids and other sub
stances such as non-psychoactive resins
like phenolic and terpenoid polymers,
glycerides, and triterpenes. When resin
is concentrated in kief or hashish, about
a third is water-soluble plant material,
another third is non-psychoactive resins,
and the balance cannabinoids.
In many cannabis plants, THC may be
only a very small percentage of the total
cannabinoids. The remainder (5 to 10
percent) of the resin will be essential
oils, sterols, fatty acids, and various
hydrocarbons common to plants.
About 80 to 90 percent of the canna
binoids are synthesized and stored in
microscopic resin glands that appear
on the outer surfaces of all plant parts
except the root and seed.
The arrangement and number (concen
tration) of resin glands vary somewhat
with the particular strain examined.
Marijuana varieties generally have more
resin glands, and they are larger than
resin glands on non-drug varieties.
Resins occasionally secrete through
pores in the membrane of gland heads.
Usually secretion occurs many weeks
after stalked glands appear. The glands
seem to empty their contents, leaving
hollow spaces (vacuoles) in the stalk and
head cells. After secretion, the glands
cease to function and begin to degener
ate. Gland heads, stalks, and trichomes
become clumped together, and the whole
flowering surface becomes a sticky mass.
This is not necessarily desirable.
Small quantities of cannabinoids are
present in the internal tissues of the
plant. The bulk is found in small single
cells (non-articuJated laticifers) that
elongate to form small, individual resin
canals. The resin canals ramify the devel
oping shoots, and penetrate the plant’s
conducting tissue (phloem). Minute
clumps of resin found in the phloem are
probably deposited by these resin canals.
Other plant cells contain insignificant
amounts of cannabinoids and probably a
good 90 percent of the cannabinoids are
localized in the resin glands.
Cannabinoid Production
More than 36 tons (79,366 pounds)
per hectare (2.5 acres) of dry medical
cannabis flower buds can be grown in
successive or continual crops in a well-
equipped greenhouse under controlled
conditions. This works out to 9.92
pounds per 11.1 square feet (3.6 kg/m2)
of greenhouse growing space per year.
The breakdown of the harvest consists
of 9 tons of cannabinoids (about 66%)
and essential oils (about 33 %) per
hectare, 1.98 pounds per 11.1 square feet
(900 gm/m2) per year.
* “Guidelines for Good Agricultural and
Wild Collection Practices for
Medicinal and Aromatic Plants”
(GACP-MAP) http://www.curopam.
net/documcnts/gacp/EUROPAM_
GACPM AP_8 .0.pdf
Terpenes and Essential Oils
Lightweight terpenes belong to a large
group of unsaturated hydrocarbons,
several of which can be extracted with
steam distillation. The product, essen
tial oil, holds aroma, flavor, and specific
character.
Five essential oils, including the
mono- and sesquiterpenes, alpha- and
beta-pinene, limonene, mycene, and
beta-phallandrene impart virtually all of
the sweet, unique, minty, citrusy, etc.,
qualities found in odorless cannabinoids.
The volatile oils enter the atmosphere
and dissipate over time. This causes
cannabis to lose much of its bouquet and
flavor when stored.
Essential oils constitute 0.1 to 0.3 percent
of the dry weight of a fresh marijuana
sample—about 10 percent of the weight
of the cannabinoids. For every 1000
grams of dry bud, from 1 to 3 grams
of essential oil is extracted. Essential
oils are predominately found inside heads
'Jack Herer from Sensi Seeds consistently
produces high levels of cannabinoids.
www.marijuanagrowing.com
89
Small buds are developing on this 'Chocolope'
clone 2 weeks after inducing flowering with a
12-hour photoperiod.
These little clones have just started to flower.
This garden is flowering under 12 hours of
darkness and 12 hours oflight every 24 hours.
resin glands, and they have been detected
in the resin canals or laticifers.
The mix of essential oils is diverse in
different samples of cannabis. Some
scientists hypothesize that cannabis
content and fragrance may be associated
because essential oils are precursors or
are related to the cannabinoids.
Indica, Sativa, and Ruderalis
Induce sativa and indica varieties and
crosses to flower in greenhouses and
indoors by giving plants more hours of
total darkness and fewer hours of light.
Outdoors, cannabis wiM flower when it
receives 12 hours or more of darkness
daily. Give cannabis 12 hours of uninter
rupted darkness and 12 hours of light
to induce visible signs of flowering in
about two weeks. This program is effec
tive in all but the latest blooming pure
sativa varieties.
Medicinal cannabis gardeners with a
vegetative room illuminated 18 to 24
hours a day and a flowering room or
greenhouse with 12-hour days and 12-
hour nights, create environments that
mimic the photoperiod in spring and
fall. With this simple combination a crop
can be harvested every 6 to 10 weeks.
In warm southern climates or with the
help of artificial light, the harvest can
last all year.
Plants show sex (male or female flowers,)
during the pre-flowering stage, which
actually occurs during vegetative growth
(discussed on page 92). Once the sex of
the plant is established, males, unless
used for breeding, are harvested before
they shed pollen, and females are coaxed
into higher yields. Once the photo
period is set, disrupting it can cause
'Original Afghani #/’ from 1978 had reddish
stigmas, but more often this variety would
have had white stigmas. (MF)
This pure saw a from Mexico shows classic
long thin leafblades. (MF)
The tall 'Durban Poison'phenotype has large
narrow-blade sativa leaves.
90
FLOWERING
www.marijuanagrowing.com
This autoflowering feminized plant was bred
to be grown in a sea ofgreen (SOG) garden.
If the photoperiod bounces around, it causes
plants to suffer stress. Make sure the timer
works properly, and inspect it periodically.
A tiny male flower can be seen on this female
flower cluster. The male flower appeared late,
when the female was overripe.
plants to suffer stress. If they suffer
enough stress, intersex (hermaphrodite)
tendencies increase. Water intake of
flowering plants is usually somewhat less
than in the vegetative stage. Adequate
water during flowering is important for
plants to carry on internal chemistry
and cannabinoid production. Withhold
ing water to “stress” a plant will actually
stunt growth and diminish yield.
Pure Cannabis sativa has its origins in
tropical regions. Tropical varieties are
accustomed to 12 hours of sunlight
and equal darkness all year round. The
climate is such that they have a long and
temperate growing season with leisurely
and consistent growth. Super intense
sunlight can be difficult for them to
assimilate. Many tropical sativa variet
ies grow under the shade of the jungle
canopy. Indoors, gardeners often give
pure tropical sativas too much light. The
result is even smaller and lighter flower
buds. Lamps are set further away or use
lower wattage bulbs that produce less
intensity and heat. Plants do not get as
hot and receive adequate light to grow
big flower buds.
Give pure tropical sativas more darkness
and less light to induce flowering—11 or
12 hours of light and 13 or 12 hours of
darkness. Some gardeners go so far as to
gradually decrease daylight hours to 10
daily with 14 hours or more of darkness.
Such practices simulate native climates,
which gives plants a chance to express
their genetics. This technique will pro
mote bigger flower buds.
Autoflowering Cannabis ruderalis variet
ies do not require long nights to flower.
C. ruderalis starts to flower within a
month of germinating. Many autoflow
ering ruderalis varieties are ready to
harvest 70 days after planting and pro
duce up to 4 ounces (112 gm) of dried
medicinal flower buds when properly
grown. European breeders have femi
nized many autoflowering varieties. To
date, the top varieties produce 3 to 3.5
ounces (85-99.2 grams) in 70 to 80 days.
Different Flowering Light/
Dark Schedules
1. 12/12—standard day/night schedule
for most plants
2. 12/12—switch to 11/13 after 1 week
and 10/14 after 2 weeks. This is the
schedule for tropical sativa varieties
like ‘Haze’.
3. 12/12—flower for 3 weeks, then
increase light to 11/13. Flowering is
prolonged but harvest is increased.
Do not remove large fan leaves to allow more
intense light to reach small buds, or to stress
the plants!
Note: Often fWzcrf-dominant variet
ies flower about the same.
4. 24 hours—flowering regime for day
light-neutral C. ruderalis crosses with
C. indica and C.
Note: See “Photoperiod” in chapter 17,
Light, Lamps & Electricity, for more
detailed information on indica, sativa,
and ruderalis varieties and flowering.
Stress and Sex
Bouncing the photoperiod around and
dramatically raising or lowering tem
perature has the effect of producing
more male plants. I recently spoke to a
gardener who induced male flowers on a
female plant by lowering the nighttime
temperature (normally 70°F [21.1°C])
to 60°F (15.6°C) for 2 weeks.
Note: Each stimulus (temperature, photo
period, etc.,) creates a climate that
causes plants to suffer stress. And the
stressful environment does not necessar
ily turn the entire plant male. Normally
a few hard-to-spot male pollen sacks
appear sporadically on a few branches.
The most susceptible plants already have
a predisposition to intersexuality.
To promote male or female plants during
seedling growth, see “Grow More
Females from ‘Regular’ Seed” in chapter
5, Seeds & Seedlings. The most depend
able way to deduce sex is cloning for sex
(see chapter 7, Clones & Cloning).
Large leaves are chockful of food for the
plant. They are essential to plant health
and vitality. Indoors and in greenhouses
www.marijuanagrowing.com
91
Male early pre-flowers are somewhat difficult
to see with the naked eye. A small loupe may
be necessary to see them properly. (MF)
This fully mature male is shedding pollen into
the wind.
This male flower has dispersed all of its pollen.
Other male flowers will open in the next few
days and dispersing their pollen.
where the hours of darkness are con
trolled, cannabis flowers for 6 to 10
weeks or longer. This is a very short time.
However, hacking off leaves and branch
tips to initiate more budding sites can be
somewhat effective. Most lower leaves
supply the roots, while upper leaves sup
ply energy to the top of the plant and
promote flower growth. Remove only
leaves that are more than 50 percent
damaged by diseases, pests, and cultural
practices (e.g ., yellow leaves hanging
straight down should be removed).
Pre-flowering
Pre-flowers are described by Robert
Clarke in Marijuana Botany as “primor
dial.” They are the first indication of a
plant’s sex. Pre-flowers grow at branch
internodes, just behind the leaf spur,
or stipule, around the fourth week of
vegetative growth, when the plant is 6 to
8 weeks old. This is the point of sexual
maturity and the first sign that a canna
bis plant is preparing for flowering, its
next stage in life.
You can see pre-flowers with the naked
eye, but a using a 5X or 10X loupe or
magnifier will make viewing and deter
mining a plant’s sex easier. You can
accurately determine plant sex after
8 weeks, as soon as male and female
flowers are identified. With this method,
sex can be distinguished before inducing
flowering indoors and in greenhouses.
Outdoors, “sexing” plants is used to
separate out unwanted males grown
from seed.
Male Pre-flowering
Male pre-flowers are normally visible
when plants are 6 to 8 weeks old, after
the fourth week of vegetative growth.
The pre-flowers emerge behind the
stipule at the fourth to fifth branch
internodes and generally do not turn
into full flowers. However, male plants
have been known to grow flowers after a
long period of vegetative growth.
Always wait to induce flowering until
after pre-flowers appear. Inducing flow
ering with 12 hours of uninterrupted
darkness and 12 hours of light before
pre-flowers develop will stress the plant.
This stress could cause peculiar growth,
and plants might develop intersex (her
maphrodite) characteristics. Inducing
flowering before pre-flowers form will
The red arrow shows where pre-flowers
develop on both male and female plants.
Staminate flowers are located at the node
between the stipule and emerging branch.
not expedite flowering. In fact, growth
will slow and flowering will occur at
about the same time as if you had waited
for pre-flowers to show.
Plants grown from seed under a 24/0
photoperiod will generally show
pre-flowers after plants that are given
an 18/6 day/night photoperiod. Once
pre-flowers are distinguishable as male
or female, plants can be induced to flow
er with a 12/12 day/night photoperiod.
Until you have plenty of experience,
make sure seedlings have completely
designated sex before removing them
from the garden. Use a 5X or 10X loupe
to identify pre-flowers. Once a male
pre-flower appears, it will take about 10
days before it starts shedding pollen.
Male Flowering
The male (staminate) cannabis plant gets
less attention because once gender shows,
most cannabis gardeners remove all
males to prevent pollination of females
(pistillates). The goal is to have unpolli
nated females remain seedless (common
ly called sinsemilla from the Spanish sin
semilla, meaning “without seeds”).
When flowering under natural sunlight
or an induced 12/12 day/night photo
period, male cannabis normally reach
es maturity and flowers 1 to 2 weeks
before females. However, male plants do
not necessarily need a 12/12 day/night
photoperiod to dawn flowers and shed
pollen. Males can flower under long days
and short nights as well, but produce
FLOWERING
www.marijuanagrowing.com
Male plants are generally taller than females.
Males also die back before females.
This pre-flower is fully mature, and the
stigmas have died halfway.
Pre-flower stigmas on this newly designated
female are strong and healthy!
fewer and weaker flowers with less
pollen. Once male flowers appear, pollen
develops relatively quickly and can
disperse in about 10 days. To avoid pol
lination problems, remove males as soon
as they are distinguished. If growing
male plants, isolate them from females,
so females will not be pollinated.
Males continue flowering and shedding
yellowish, dustlike pollen from bell
shaped pollen sacks well into the females’
flowering stage, which ensures pollina
tion. If you are making seeds, pollinating
females too early, before females have de
veloped many receptive female stigmas,
will result in a small seed crop.
Males are usually taller than females and
have stout stems, sporadic branching,
and fewer leaves. In nature, wind and
gravity carry pollen from male plants
to fertilize (pollinate) receptive females.
Male plants produce fewer flowers than
Be on the lookout for small male flowers that
may suddenly appear on female plants. Such
seemingly harmless male flowers carry viable
pollen that will pollinate receptive females.
females, because one male plant can pol
linate many females. Males also contain
lower levels of cannabinoids.
Males plants fertilize (pollinate) females,
causing females plants to level off THC
production and start seed formation.
Remove and destroy males, except those
that have been selected and used for
breeding, as soon as their sex has been
determined. The instant they show sex,
separate male plants used for breeding
from females. Do not let them shed pol
len. Unnoticed pollen sacks often form
and open early or are hidden under foli
age. If growing from seed, take special
care to ferret out male flowers and plants.
See chapter 9, Harvest, Drying & Curing,
for information on removing males from
the garden.
See chapter 25, Breeding, for complete
information and detailed images of
male flowers.
Tiny stigmas are just starting to emerge from
this newly formed female pre-flower.
Female Pre-flowering
After several weeks of normal vegetative
growth, plants grown from seed develop
pre-flowers. This is when female flower
formation initiates, and it is not contin
gent upon photoperiod. It occurs when
a plant is old enough to show signs of
sexual maturity, about the fourth week
of vegetative growth, or 6 to 8 weeks
from seed germination. The pre-flowers
emerge behind the stipule about the
fourth or fifth branch internodes.
A pre-flower looks like a regular female
flower; most have a pair of white fuzzy
stigmas. Stigmas normally form after the
light-green seed bract of the pre-flower
has formed. Wait until stigmas have
fully formed to ensure that the plant is a
female and not a male. The pre-flowering
stage lasts from 1 to 2 weeks.
Plants grown from seed under an 18/6-
hour day/night photoperiod will usually
show pronounced pre-flowers before
plants given a 24/0-hour day/night
photoperiod. And under a 16/8-hour
day/night regimen, pre-flowers show
more quickly and are often more pro
nounced. As soon as you can distinguish
pre-flowers as male or female, males can
be culled and females can be induced
to flower with a 12/12-hour day/night
photoperiod in enclosed gardens.
Wait to induce flowering until pre-flow-
ers have appeared. Inducing flowering
with 12 hours of uninterrupted darkness
and 12 hours of light before pre-flowers
set will cause plant to suffer stress. Such
stress could cause strange growth, even
www.marijuanagrowing.com
93
Distinct seed bracts with attached stigmas
are easy to distinguish on this 1979 landrace
variety from Thailand. (MF)
Flower buds are just starting to develop on
this outdoor sativa-dominant plant. Notice
that the distance between internodes decreases
as stigmas appear and buds develop.
Tiny developing buds with stigmas cover this
indoor crop in the Netherlands.
cause sex reversal. Inducing flowering
before pre-flowers develop does not
make plants flower faster; plants will
flower at about the same time as if you
had waited for pre-flowers to develop.
Female Flowering
Female cannabis is prized for heavy
cannabinoid production and weighty
flower yield. Ideal female, indica-dom-
inant, indoor varieties grow squat and
bushy with branches close together on
the stem and dense foliage on branches.
Outdoor and greenhouse varieties have
a similar growth habit with a larger
profile. Indoors most varieties show the
first female flowers 1 to 3 weeks after
inducing flowering with the 12-hour
photoperiod. Outdoors, pre-flowers
appear a few weeks after planting, and
flowering is induced with an 11- to
13-hour day/night photoperiod.
High-quality marijuana consists
entirely of female flower clusters; dis
tinct clusters of female marijuana flowers
are called buds. Female flowers are about
0.1 to 0.2 inches (2.5-5.1 mm) long and
usually form in pairs. But you will see
such pairing only in “running” buds
most commonly seen in Southeast Asian
varieties or on plants stretching for light.
More typically, flowers grow tightly
together, forming egg-shaped or tear
drop-shaped clusters usually between
0.8 and 3 inches (2-7.6 cm) long; each
cluster generally consists of between 30
and 150 densely packed flowers.
Clusters of flower buds (colas) develop
rapidly for the first 4 or 5 weeks, after
which they grow M a slower rate. Buds
put on much of their harvest weight as
they swell during the last 2 or 3 weeks
of growth before harvest. Pure sativas
originating in the tropics can flower for
4 months or longer! Once the ovule has
Outdoors in Northern California this sati-
va-indica cross has plenty of space and sunlight
to grow to its fullest potential. Indoors, plants
grow much smaller regardless ofgenetic
background.
been fertilized by male pollen, seed bract
formation and resin production slow, and
seed growth starts.
White, fuzzy female stigmas are fertile
as soon as they appear. Unfertilized,
these flower buds will continue to
develop as sinsemilla. Make sure to keep
all male plants and male pollen away
from female flowering plants. If female
flowers are fertilized by male pollen,
seeds will develop and other flower bud
growth will slow or stop.
C. indica, C. sativa, and C. ruderalis
all have different flowering habits. See
“Sinsemilla Flowering” below for more
information.
See chapter 25, Breeding, for complete
information and detailed images of
female cannabis flowers and “Seed-
Crop Flowering”; see chapter 17, Light,
Lamps & Electricity, for more informa
tion on photoperiod and flowering.
Sinsemilla Flowering
Sinsemilla (pronounced sin-semrya)
is derived from two Spanish words:
sin, which means without, and semilla,
which means seed. Sinsemilla is the
word that describes flowering female
94
FLOWERING
www.marijuanagrowing.com
This Nigerian landrace flower bud has a
wispy growth habit but is still boasts lots of
cannabinoid-rich resin. (MF)
Sativa flower buds like this South Indian bud
grown in 1981 are much lighter and form
more slowly than indicas. (MF)
This beautiful 'Purple Pineberry' male plant
is heavy with flowers that are just starting to
release pollen.
cannabis tops that have not been fertil
ized by male pollen.
Highly prized medicinal sinsemilla
flower buds are the most potent part of
any variety, with a proportionately large
volume of cannabinoids per flower bud.
Unpollinated female plants continue to
flower until bract formation and canna
binoid-rich resin production peak, 6 to
10 weeks after turning the lights to 12
hours indoors, inducing flowering in a
light deprivation greenhouse or naturally
flowering outdoors. During 6 to 10
weeks of flowering, seed bracts develop
and swell along the stem, yielding more
and heavier flower buds than pollinated,
seeded flowers.
Cannabis ruderalis flowers when it is
chronologically ready, after about 3
weeks of growth. Many growers report
best results with a 20-hour light and
4-hour dark period. Most European seed
companies have developed autoflowering-
feminized crosses of cannabis ruderalis
X indica X sativa. Productive varieties
produce 3 to 4 ounces (85-113.4 gm) of
dried cannabis flower buds with each
70- to 80-day crop from seed.
Make any female cannabis plant sinse
milla by removing male plants as soon
as they are identified. Removing males
virtually guarantees that male pollen
will not fertilize succulent female
stigmas. Be aware, however, that pollen
dispersed from wild or cultivated male
cannabis plants could also be floating in
the air. Or sometimes a few early grains
of pollen are shed by premature male
plants that have not been culled. And
sometimes an intersex plant with a few
male flowers will sprout on a predomi
nately female plant. Read about intersex
uality in chapter 25, Breeding.
Indica-^ormHrtrcf 'Shooting Star' from
Hammerhead Genetics shows a completely
different growth habit when cultivated
outdoors.
This crop of'Bonkers' with a very strong
indica influence grows well indoors and in
greenhouses.
'Matanuska Tundra' is predominately indica
and developed in the Matanuska-Susitna
(Mat-su) Valley in Alaska, in conjunction
with Sagarmatha Seeds.
www.marijuanagrowing.com
95
'Grapefruit* from DNA Genetics is a
high-yielding sativa with a sweet taste.
‘NYC Diesel* is a saliva-dominant variety
from Soma Seeds.
‘Chocolope* from DNA Genetics is 95percent
sativa with ‘OG Chocolate Thai* X ‘Canta
loupe Haze* pedigree.
Daylight-neutral 'Lowryder* was crossed with
regular 'Chronic* to yield this autoflowering
variety.
This super-auto (super-autoflowering)
variety, ‘Super Stinky*, was developed by
Stitch, a French breeder. Such varieties flower
after 30+ days, grow to 5 feet (1.5 m), and
perform well outdoors.
Purple colors in buds tend to show toward the
end ofharvest. This bud has a few weeks to
go before harvest, as evidenced by the vibrant
white stigmas.
FLOWERING
www.marijuanagrowing.com
This beautiful cluster offemale flowers, herefrom the variety 1Blackberry', is called a nug.
A nug most often refers to a dried, dense, often small bud about the size of a thumb's end joint.
Fresh flower clusters are almost always called buds; dried clusters are also commonly called
buds. Botanically, marijuana buds are racemes. (MF)
The terms cola or foxtail describe a branch offlower buds that originated in Mexico. Mel Frank
snapped this photo ofMexican foxtails in 1976. (MF)
Calyx, False Calyx, and Bract
Those general terms—bud, nug, cola,
and foxtail—are widely accepted and
consistent, but botanical terms are often
confused in popular culture. Foremost
is the incorrect use of the term calyx.
Growers read or hear about swollen
calyxes being a sign of maturity and an
indication of readiness for harvesting.
What are incorrectly called calyxes or
false calyxes are correctly identified as
bracts.
Bracts might seem a foreign term, but
everyone has seen bracts. On poinset-
tias, the ubiquitous potted plant sold
around Christmas, those large red
“petals” are actually bracts. On bou
gainvilleas, the many-colored vines seen
everywhere in warmer climates, bracts
mak£ up the colorful “petals” that
surround a tiny, white inner flower.
Cannabis bracts have the densest cover
ing of large, stalked resin glands of any
plant part. Bracts make up most of
substance and weight of high-quality
marijuana buds.
Colas and Foxtails
Cola, a commonly used term for female
flower clusters, more often refers to an
aggregate of buds that, having formed so
closely together, looks like a single, very
large bud. Colas form at the ends
of stems and branches. Outdoors,
meter-long colas can form along the
main stem of large plants. Foxtail,
another term for cola, is rarely heard
these days except from those whose
history with cannabis goes back to the
1960s or 1970s. At that time, foxtail
most often referred to high-quality indi
vidual colas from Mexico in contrast to
bagged or compressed bricks
of low-quality Mexican colas.
www.marijuanagrowing.com
97
Store seeds in airtight containers along with a packet ofsilicon crystals to absorb moisture. Make sure to remove, dry, and replace the
silicon regularly. (MF)
Rejuvenation
Rejuvenate harvested females by leaving
several undeveloped lower branches with
foliage on plants. Give re-vegetating
females an 18/6 day/night photoperiod.
Or keep the lights on 24 hours. Keep
the temperature above 70°F (21.1°C)
and below 80°F (26.7°C) both day and
night. Cool temperatures now will slow
reversion to vegetative growth. After
several weeks harvested females will
stop flowering and “rejuvenate”—revert
to the vegetative growth stage.
Leach out old fertilizer in each container
and give the harvested leafy, buddy stem
stubs a dose of high-nitrogen fertilizer
to promote leafy growth. The plants
will show signs of reverting to vegetative
growth in 4 to 6 weeks. New, green,
leafy growth will sprout from branches
and flower tops. Leaves will continue
to grow more and more “fingers” as
re-vegetation progresses.
Let the rejuvenated cannabis plants grow
until they are the desired size before
taking clones or inducing flowering with
a 12-hour photoperiod. If second crops
are allowed to grow too tall and lanky,
they produce sparse buds. Rejuvenated
plants can also be placed outdoors in
the spring. Indoors, rejuvenated plants
should be induced to flower once they
have enough strong foliage.
Rejuvenating harvested cannabis plants
is most often used to save the genetics
of a particular variety. Rejuvenating
plants is never absolute and the re
sults are, for the most part, not pretty.
Furthermore, old harvested plants have
more problems with diseases and pests.
Few cannabis gardeners rejuvenate plants
because doing so makes inefficient use of
their time and space. A completely new,
healthy crop could be grown in the time
it takes to rejuvenate plants.
FLOWERING
www.marijuanagrowing.com
--------------------------------------------------------------------------------------------------------------------------------------------------------------------------------------
100 Before Harvest
101 Loss of Fragrance
102 Leaves
103 Male Harvest
104 Sinsemilla Harvest
106 Capitate-Stalked Resin Glands
108 Qualities of Indica, Sativa, and
Ruderalis
108 Magnifiers and Microscopes
108 Indica and /ndica-Dominant
Varieties
108 Sativa and Sat/va-Dominant
Varieties
110 Ruderalis and Ruderalis-
Dominant Varieties
110 Harvest Timing
111 Harvest: Step-by-Step
112 Manicuring
115 Drying
116 Drying Small Harvests
117 Drying Large Harvests
117 Drying Time
118 Fast Drying
119 Water "Drying": Step-by-Step
119 Dry Ice "Drying": Step-by-Step
119 Curing
120 Air Curing: Step-by-Step
120 Packaging and Storage
121 Vacuum Sealing
122 What to Do with a Moldy Crop
J
A bountiful harvest of consistent, disease- and pest-free
medicinal cannabis is the reward for your financial invest
ment and hours of work and worry about the garden. Strong,
healthy, well-grown clones and seedlings yield the heaviest
harvests. A well-organized harvest will cut the workload,
and a basic knowledge of what is happening in the cannabis
plant will help you preserve its medicinal qualities during and
after harvest. Cannabinoid levels increase as plants approach
peak ripeness. Proper harvest timing is essential to achieve the
desired medicinal cannabinoid levels. The peak harvest window
ESSENTIAL MEDICAI
CANNABIS
HORTICULTURE
I
HARVEST, DRYING
& CURING
indoors is normally open for about 5 to 7 days, and not all
flower buds are ripe at the same time. A few gardeners har
vest their crops early—after 45 to 50 days of flowering, and
before it reaches peak maturity. The vast majority of gardeners
harvest their gardens when at peak maturity. Cannabinoid
profiles, especially THC content, are highest at peak harvest.
/ have been fascinated with outdoor gardening for the last 15 years, since 1
was able to grow cannabis legally with the help of Mother Nature. Growing
big plants outdoors during a long season allows them to express their genetic
potential to the fullest.
www.marijuanagrowing.com
99
Paul Stanford, organizer of Hempstalk
(www.hempstalk.org), is pictured in his
medicinal cannabis garden in Portland,
Oregon. He is standing in front of two female
AK47' plants in full flower.
To make the harvest experience as stress-free
as possible, there are a few things you should
know.
Medical gardeners are harvesting gardens like
this one, full of cannabinoid-rich flower buds
grown to test the varieties of DNA Genetics.
The bulk of cannabinoids, including
THC, are found in resin glands that
cover flowers and leaves; lesser amounts
are present on stem surfaces and in
interior cells of the plant. Stems and
roots may smell like they contain canna
binoids, but they actually contain much
lower levels of desirable cannabinoids.
Male plants contain much lower quan
tities and levels of cannabinoids than
do females, and are normally harvested
before they pollinate females. Unpol
linated female plants (sinsemilla) have
the greatest amount of resin glands and
cannabinoids, and are harvested when
resin glands show peak ripeness. Leaves
and flower buds are harvested, separated,
manicured, dried, and cured.
Growth stops at harvest, and thereafter
the THC (cannabinoid) content cannot
increase. Some plant processes continue
until they run out of stores. Overall
cannabinoid levels are fixed, but the
type changes with harvest from inactive
cannabinoids to active ones or back
again.
Drying removes about 75 percent of the
water weight found in foliage. Drying
concentrates cannabinoids in relation to
overall weight. The actual cannabinoid
content of resin glands will remain the
same or decrease after harvest. Proper
handling is the key to retaining canna
binoid potency. Prolonged periods of
light, temperatures above 80°F (26.7°C),
friction from fondling hands, and damp,
humid conditions should be avoided
because they all degrade resin glands
and cannabinoids.
Washing branches of harvested flower
buds in a mild solution of H2O2 (hydro
gen peroxide) is becoming popular. We
wash vegetables before consuming them,
and cannabis is no different. A gentle
bath of H2O2 removes surface bacteria,
mold, dirt, dead pests and their feces,
and other bad stuff. Such a bath also
creates free radicles'".
*An H2O2 free radicle drench changes
anything composed of carbon, just like
using ozone in a garden room or curing
room. Washing treated buds with plenty
of fresh water is essential. No studies
have been done to determine potential
for damage to carbon chains of cannabis
after an H2O2 bath.
Avoid excessive damage to resin glands
by manicuring fresh flower buds imme
diately after harvest. Manicure when
foliage is supple, by hand or by using a
trimming machine to remove outer, less
Hanging plants upside down to dry is simple,
convenient, and effective. Contrary to rumor,
hanging plants upside down does not drain
existing cannabinoids into flower buds.
Cannabinoids do not migrate to other parts
of the plant after harvest.
cannabinoid-potent foliage from flower
buds. Once manicured, flower buds
are dried slowly to equalize moisture
content, preserve cannabinoids, and
shed chlorophyll. After drying, flower
buds must cure to achieve full aroma
and flavor. Too often beautiful buds are
dried too hot and fast, and are not cured
properly. Mishandling cannabis may
rupture and degrade resin and terpenes.
Such flower buds lose their bouquet. As
resin glands degrade, cannabinoid con
tent decreases. Poorly and quickly dried
cannabis still contains various amounts
of chlorophyll, search, nitrates, etc.
Once cured, proper storage will ensure
that medicinal cannabis retains all its
essential qualities.
Before Harvest
Do not water for 1 or 2 days before
harvest. The soil should be fairly dry,
but not dry enough that plants wilt. This
will speed drying time by a day or more
and will not affect the quality of canna
binoids and terpenes.
The fragrance of flowering medicinal
cannabis is often pungent before,
during, and after harvest. If air in and
around drying and manicuring rooms is
stagnant, odors will linger and accu
mulate. To help control fragrance, keep
drying and manicuring rooms well
vented. If possible, allow plenty of fresh,
circulating air to pass through the dry
ing room to remove fragrances quickly.
Keep temperatures below 70°F (21.1°C)
to minimize aroma.
HARVEST, DRYING & CURING
www.marijuanagrowing.com
Loss of Fragrance
“Terpenes, or terpenoids, are the com
pounds in cannabis that give the plant
its unique fragrance. THC and the other
cannabinoids have no odor, so marijua
na’s compelling fragrance depends on
which terpenes predominate. It’s the
combination of terpenoids and THC
that endows each strain with a specific
psychoactive flavor.”
— Martin A. Lee, “Talking Terpenes,”
High Times
The aroma, taste, and ultimately the
effects of smoked cannabis depend upon
the mix of terpenes and cannabinoids.
Often cannabinoids and terpenes vol-
atize and are destroyed during flowering,
harvest, and storage as a result of high
temperatures and maltreatment. The
absence of these compounds diminishes
bouquet and taste. It can also change the
overall effect of the cannabis.
Cannabis plants lose their fragrance for
a combination of reasons, all of which
involve destruction of terpenes or the
creation of a poor environment for
terpene development. During flower
ing, plants that are subjected to heavy
weather—including wind, rain, and hot
sunlight or artificial light—are often
less fragrant. Outdoor plants also
accumulate surface dust, bacteria, and
other bad stuff. When allowed to remain
on the plant, these pollutants can smell
and may possibly speed cannabinoid and
terpene degradation. Funny thing is that
poorly ventilated indoor environments
are often more polluted than the great
outdoors. Such pollutants can also play a
role in diminishing fragrance.
Terpenes and cannabinoids evaporate
into the air in a wide range of tempera
tures: 246°F to 815°F (118.9°C-435°C).
As temperatures climb, more and more
terpenes evaporate into the air. Terpenes
can be destroyed by high temperatures,
humid weather, wind, rain, and fondling
or rough handling. Also, terpenoids
may not have a chance to develop prop
erly on plants that grow under stressful
conditions caused by climate, poor care,
or attacks by pests and diseases.
Cannabis can lose its fragrance when it
dries too hot and fast. Fast drying does
not allow enough time for chlorophyll
and other pollutants to dissipate, and
they may remain in the foliage. Linger
ing smells and tastes of these undesirable
elements can impart detectable odors
and tastes when consumed.
When poorly dried, and allowed to stay
too wet, as if in a compost pile, cannabis
starts anaerobic decomposition. This
process causes cannabis to smell like wet
hay and, in extreme cases, to have an
ammonia-like odor.
Plants can harbor powdery mildew or
another disease within their tissue.
Powdery mildew is impossible to detect
without laboratory analysis. Such diseas
es weaken plants and could also play a
part in the deterioration of fragrance.
Bacteria, dead microscopic pests and
their feces, dust, and many other pollut
ants remain on the surface of cannabis
foliage at harvest. These elements could
also affect fragrance. Washing harvested
cannabis with a dilute bath of H2O2
will remove and disinfect plants. Clean
plants smell “fresh”; the fragrance of
cannabis is all that remains.
Genetically, some plants appear to be
predisposed to less aroma and to losing
fragrance over time. In combination
with climatic conditions, genetics could
play a role in minimizing cannabis
fragrance.
Negative ion generators act within a
small area and have little impact on the
fragrance of growing cannabis. Ozone
generators introduce ozone (O3) into
an enclosed area. The O3 converts to
O2 within a few minutes. Carbon filters
remove fragrances before air is expelled
outdoors"’.
*A free radicle of O floating next to
O2 becomes stable when they combine
to form O2, oxygen. However this O
molecule could attach to any carbon it
finds and strip it away. Much of the O3
is converted to O2 in the air, but laws of
equilibrium and diffusion also apply.
Ozone generators should be located
outside of occupied cannabis drying
and manicuring rooms. See chapter 16
A/r, for more information.
Plenty ofair circulation and ventilation is
necessary for manicured flower buds to dry.
The buds in these net trays are turned once or
twice a day by hand for even drying.
Hanging complete branches is a great way to
dry flower buds of medical cannabis. These
branches have just been harvested. The large
leaves have been removed and the buds
lightly trimmed.
www.marijuanagrowing.com
101
Watering is important during the flowering
stage. Check soil moisture daily to avoid
overwatering. Always irrigate in the morning
so that the majority of water is used during
the day. Soggy roots at night will slow growth
substantially.
The fragrance of cannabis can also be
controlled by sealing the drying and
manicuring rooms. Set up a fan and
carbon filter in the room to remove
fragrances before venting the air out of
the room. See “Fragrance” in chapter 16,
Air, for more information.
Avoid the taste of chemical and organic
fertilizers in harvested buds by leaching
with plain water or a clearing solution to
remove any residuals and chemicals that
have built up in soil or plant foliage. Five
to six days before harvesting, leach the
growing medium with clean tap water
or reverse osmosis water. Use a clearing
solution such as Final Flush to remove
any built-up nutrients in soil.
Leach soil heavily 5 to 7 days before harvest.
Leaching soil will zvash out any fertilizer salts
that have accumulated in the soil. This allows
the plant to use the balance of the nutrients in
its system before harvest.
This big, healthy crop of'Blue Dream " is
ready for harvest.
Some indoor gardeners fertilize with a
liquid salt-based fertilizer until 2 or 3
days before harvest, and use a clearing
solution to remove fertilizer residues.
They say the practice helps plants retain
weight in flower buds. But it does not
make buds grow any faster, and fertil
izer residues are still present in plant
tissue. The tradeoff is that fertilizer
adds weight at the expense of medicinal
quality.
Apply the leaching solution according to
directions on packaging. Always let at
least 10 percent, preferably more, drain
out the bottom of containers. If using a
recirculating hydroponic system, change
the water after the first 4 to 6 days of
application. Continue to top off the
reservoir with “clean” fresh water.
How to Tell When Fertilizer Could
Affect Taste
1. Leaf tips and margins are burned.
2. Leaves are brittle at harvest.
3. Flower buds smell like chemicals.
4. Flower buds crackle when burning.
5. Buds taste like fertilizer.
Do not water cannabis for 1 or 2 days
before harvest. The soil should be fairly
dry but not dry enough that plants wilt.
This will speed drying time by a day or
more and will not affect the quality of
cannabinoids.
Inspect plants at night with a green light
or a UVB light. Powdery mildew and
insect feces and trails are visible; they
actually jump out at you as if you were
reading an eye chart in the optometrist’s
chair. Carefully remove all signs of
powdery mildew before it enters plant
A green light or a UVB lamp makes pest trails
and diseases very easy to see.
Save large leaves for making concentrates orfor
use in cooking.
tissue. Spray fungus with an organic
fungistat before removing affected plant
parts to ensure that the disease does not
contaminate the rest of the crop. This
method works only when there is very
little mildew.
Some gardeners keep plants in 24 to 48
hours of darkness before harvesting.
They say this practice causes buds to
become more resinous.
Leaves
Once the large leaves are fully formed,
cannabinoid potency has generally
peaked out. Potency increases from
the bottom of the plant upward. Large,
old bottom leaves are not as cannabi
noid-potent as younger smaller leaves
toward the top of the plant. The most
cannabinoid-potent part during much of
the growth stage is found at the tips of
branches in the small leaves and well-
formed shoots.
Cut the entire leaf, including the leaf
stem (petiole) and toss it into a bag. If
left on the plant, the petiole shrivels and
may attract fungus. Paper bags breathe
102
HARVEST, DRYING & CURING
www.marijuanagrowing.com
Once cut, turn plants or branches upside
down, and start removing large leaves by
band. Make sure to inspect all leaves for resin!
Leaves on this ‘Maui’plant are developing
resin as it matures. Leaves closer to flower
buds and near the tops ofplants tend to have
more resin than those closer to the bottom of
the plant. Always check leafundersides for
visible signs of resin. Start another paper bag to
segregate leaves that show visible resin. These
leaves are greatfor making hashish. (MF)
Harvest leaves if they show signs of disease
or rapid yellowing that fertilizer has failed
to cure. Once they start to yellow and die,
their potency decreases rapidly. This is true
especially with large, older “fan” leaves that
turn yellow when nitrogen-rich fertilizer is
withheld duringflowering.
The resin on these ‘Jack the Ripper’ leaves is
as thick as found anywhere on a flower top. It
is easy to separate the resin glands from foliage
into a concentrated form. Save leaf trimmings
laden with visible resin to make concentrated
hashish. (MF)
This ‘Garlic’ leaf is magnified 4X. Often
small leaves around flower buds harbor as
much resin as the flower buds themselves.
These small leaves continue to develop resin
until buds are ripe. These small leaves can be
left with flower buds or separated to be used
for a different purpose. (MF)
The leafstem (petiole) has few resin glands that
contain cannabinoids. This image shows many
cystolith glands.
well and can be closed by folding over
the top. Plastic bags do not breathe and
often “sweat” inside, so the top of the
bag must be left open.
Keep the paper bag in a closet or area
with 40 to 60 percent humidity and 60°F
to 70°F (15.6°C-21 .1°C) temperature.
Reach into the bag once or twice a day
and stir leaves by hand. Leaves should
bedrytothetouchin5to7days.Once
dry, place small resinous leaves in the
freezer so resin glands will readily
separate from foliage. Large leaves
carry fewer cannabinoids and are most
useful to make tinctures, food dishes,
and drinks. See chapter 26, Medicinal
Concentrates & Tinctures, and chapter
27, Cooking with Medicinal Cannabis,
for more information.
Male Harvest
Harvest male cannabis plants as soon
as they are identified, unless they are to
be used for breeding. Males produce less
and lower-quality cannabinoids, as well
as taking up valuable space in the garden.
Male flowers can produce pollen indoors
or in light-deprivation greenhouses as
early as 2 weeks after inducing flowering
with the 12-hour day/night schedule.
Outdoors, male pre-flowers contain
pollen too. Watch out for early openers.
Three to 6 weeks after initiating flower
ing, pollen sacks open. Plants continue
producing flowers for several weeks after
the first pods have begun to shed pollen.
Once male flowers are clearly visible but
not yet open, cannabinoid production is
at peak levels. Remember, though, that
cannabinoid content is low in male
flowers even at peak production. After
males have released their pollen, the
degradation process speeds up and
flowers fall.
Harvest males carefully, especially if
they are close to females. Spraying males
www.marijuanagrowing.com
103
Before removing male plants from the garden,
cover them with a plastic bag to help contain
pollen.
Branches full of male flowers can be stored in
a glass oj water for several days. Their pollen
sacks will continue to open. The pollen is easy
to collect once it is contained in the bag.
This is the last branch on a harvested outdoor
female plant. A couple ofplastic ties mark this
branch full offlower buds that was fertilized by
male pollen and left to mature after harvest.
with water will render pollen useless and
help avoid accidental pollination. Cut the
plant off at the base, taking care to shake
it as little as possible. To help prevent
accidental pollination by an unnoticed
open male flower, carefully cover the
male plant with a plastic bag, and tie it
off at the bottom before harvesting. Or,
if you can see an open male flower, spray
it with water to make pollen unviable.
Keep males used for breeding as far from
Swollen seed bracts on a ripe ‘Jack Herer’
female
flowering females as possible. Make sure
to install fine screens for air coming into
the flowering room and wet them down
regularly to discourage rogue pollen.
Isolate males until needed. After a
month, the male often starts reverting to
vegetative growth even though it retains
viable sacks of pollen. Males can also be
cloned and held in the vegetative stage
until needed. Induce flowering about
3 weeks before viable pollen is needed.
Within 3 to 5 weeks, the male will be
full of viable pollen sacks.
Prolong harvest on 1 or 2 males by
removing flowers with tweezers or
fingernails as they appear. New flowers
soon emerge after plucking old ones.
Continue to remove pollen sacks until
females are 2 weeks from full bloom.
Picking off individual male flowers is a
tedious, time-consuming process, and it
is easy to miss a few.
Harvesting most of the branches and
leaving only 1 or 2 pollen-bearing limbs
is practical. A single male flower con
tains enough pollen to fertilize many
female ovules; a single branch full of
male flowers is more than adequate to
produce enough pollen for most home
seed crops and breeding needs.
See “Making Seeds at Home” in chapter
25, Breeding, for complete information
on harvesting.
Sinsemilla Harvest
According to cannabis expert Mel
Frank, “the “peak potency window”
lasts at least a week while the potency
stays within a few percent of its highest.
It is not critical whether to harvest today
or tomorrow, but it is critical whether to
harvest this week or next.”
Harvest sinsemilla when the flowering
cycle is coming to an end and further
growth will be slow and minimal.
Besides slowed growth, bracts, stigmas,
and resin glands function as 3 easy-to-
use indicators to help you determine
when to harvest. When using commercial
seeds from reputable breeders, medical
gardeners also have the breeders’ rec
ommendation for weeks-to-maturation,
particularly indoors.
Bracts: Especially look at the bracts,
all of which should be mature and
swollen except for bracts at the very
tops of the buds. The topmost bracts
should have begun to swell but not yet
be fully swollen.
Stigmas: Most of the stigmas (a good
90 percent)—the pollen-catching “fuzzy
white “hairs”—will have withered and
turned rust/brown. The few remaining,
still-white stigmas will have started
to curl and will no longer look fresh,
straight, and receptive to pollen. All
cannabis plant parts except roots, seeds,
and stigmas are covered with resin
glands. Stigmas are devoid of resin and
claims that these are potent are simply
wrong. The only resin stigmas might
have would come from contact with res
in from broken or secreting resin glands
on the bracts.
The images opposite follow different
varieties of cannabis through the last
few weeks of flowering. Notice how the
bracts and stigmas change to indicate
peak harvest time.
104
HARVEST, DRYING & CURING
www.marijuanagrowing.com
During flowering, changing the fertilizer to
a high-phosphorus, high-potassium, low-
nitrogen mix causes larger leaves to yellow
as harvest progresses. (MF)
This 'Maui' bud continues to flower and
develop stigmas while waiting for male pollen
to land. When there is no male pollen avail
able, growth continues. (MF)
White female stigmas from this 'Skywalker'
grown indoors continue to grow from seed
bracts. Notice that resin is starting to become
visible with the naked eye. (MF)
Overhead watering and sprays should be
avoided during the last 2 weeks before flower
ing. A drop of dew water is suspended between
the stigmas of this 'MK Ultra' x 'Sensi Star',
but any more water would stay in between
seed bracts and attract rot. (MF)
This indica variety, 'Garlic', is just starting to
develop white stigmas to attract male pollen.
(MF)
Stigmas on this 'Haze' X 'Northern Lights 5'
X 'Sensi Star' cross are dying back a little at a
time and will continue to convert from white
to reddish-brown as flowers mature.
Stigmas tend to die back at the same
rate as capitate-stalked resin glands
start to weather and experience oxi
dation, turning amber in the process.
The images on pages 105-107 show
the change in stigmas as they die back.
The next pictorial will run through a
progressive sequence of capitate-stalked
resin gland maturity through harvest.
More and more stigmas on this 'OG Kush' X
'Master Kush' are dying back as harvest day
nears. Look at the way the resin is continu
ing to pile up on the buds, small leaves, seed
bracts, and foliage. (MF)
Here is a close-up of a 'Maui' bud on which
pairs of white female stigmas are just start
ing to senesce. You can see that a few pairs of
stigmas are completely dark. In this case, the
stigmas have been fertilized by male pollen.
(MF)
Half the stigmas on this 'Purple Heart' bud
have died back and about halfare healthy. This
bud has so much resin that looking at resin
glands could be the best indication ofharvest
time. (MF)
www.marijuanagrowing.com
105
Stigmas on this ‘Diesel’ bud continue to die
back and resin continues to populate buds.
More resin is forming on small leaves now.
(MF)
This plant bud is perfect and ready to harvest.
All the resin glands are glistening in the light,
and just a few resin glands have started to
deteriorate.
The stigma on top is dying back while the
stigmas below are still healthy. This plant
has a few more days until harvest.
Seed bracts on this ‘Jack the Ripper’ bud
continue to swell even though they contain
no seeds. The seed bracts are packed with resin
glands that still glisten in the light, although the
stigmas have completely died back. (MF)
Capitate-Stalked Resin Glands
The best time to harvest is when capitate-
stalked resin glands have developed a
spherical head and have not yet begun
to senesce. The glands start to degrade,
turn amber, and fall apart; cannabinoid
content diminishes and continues to
digress. Check flower buds from each
plant and harvest them individually as
they become ready. Often the uppermost
buds will be ready and harvested, while
lower buds are left for another week or
two to finish. Treat plants individually.
Resin glands that are bruised from being
squeezed or jostled about deteriorate
quickly changing color. The process
is gradual, and individual resin glands
change at different rates. Of course
there are exceptions such as the variety
'Blueberry’, which bears darker, even
purplish resin glands.
On indoor plants a majority of the
glands should be clear or translucent;
fewer should be cloudy or milky, and
very few, if any, should have color. Resin
glands with an amber color signify
oxygen has entered the gland and the
degradation process is under way. Look
for well-formed capitate-stalked resin
glands that are fully intact and translucent.
Resin glands on outdoor plants are
entirely different. More often, a good
number of the visible glands will be
cloudy or milky rather than clear or
translucent, although after harvesting,
a look inside the buds reveals predom
inantly clear or translucent glands.
Larger bud-leaves often have yellow or
amber resin glands, but glands with color
should be a small minority on bracts.
Having some yellow or amber glands
is typical on full-sun outdoor-grown
plants, where lots of sun, significant
swings in temperatures, bad weather,
wet or dry soil, and physical damage
affect resin glands.
This section focuses on capitate-stalked
resin glands. The images show the resin
glands just before peak maturity
through senescence.
All the stigmas on this ‘Haze’ x ‘Northern
Lights 5’ X ‘Sensi Star’ bud have turned a rich
reddish brown and the resin glands are ready
to harvest. This plant was grown indoors.
Indoor plants tend to show resin turning
amber at the same time both on seed bracts
and small leaves around them. (MF)
This outdoor ‘Haze’ X ‘Northern Lights 5’ X
‘Sensi Star’ bud ripens a little different than
indoor cannabis flowers. The small leaves
around the seed bracts tend to show oxidation
first, which is demonstrated by the change in
colorfrom clear to amber. This is a sign of
deterioration and loss of cannabinoid content.
(MF)
The tip of this resin-coated leaf of‘Garlic’
shows a clear view of capitate-stalked resin
glands. The majority of the cannabinoids,
specifically THC, will be located at the base of
the stalk, where the bulbous top connects. You
can see that some of these resin glands
have started to turn amber. (MF)
106
HARVEST, DRYING & CURING
www.marijuanagrowing.com
This close-up view shows beautiful resin
glands at peak harvest. They are fully formed,
strong, and healthy.
The second photo shows that some of the resin
glands are starting to turn amber. Notice that the
heads are thefirst part of the gland to turn amber.
(MF)
This ‘Skunk #1" seed bract has some capitate-
stalked resin glands that are perfectly clear and
others that have started to turn amber. Time to
harvest! (MF)
An amber color signifies oxidation and senes
cence of capitate-stalked resin glands. Once the
inside of the bulbous top is exposed to oxygen,
cannabinoids dissipate at a rapid rate.
This scanning electron microscope image shows
how the bulbous tops of the capitate-stalked resin
glands suffer lesions from friction, wind, or rain,
or start to naturally senesce—all of which will
decrease cannabinoid content and potency. Such
resin glands appear with an amber-colored bulb
on top of a clear stalk under natural light.
Ready to harvest! Look at the resin glands on
this 'Skunk #1" bud to see that they are con
tinuing to turn amber in color. (MF)
Here is the first in a three-photo sequence of
the variety 'Garlic", showing resin glands on a
small leaf. The first photo shows the resin glands
completely clear to translucent. They cover the
leaf! (MF)
The third photo shows resin glands continuing
to mature and turn amber as maturity slowly
turns to senescence. (MF)
This close-up of a 'Mexican" from 1976 shows
that the resin glands are well on their way to .
impotency. The bulbous heads have all ruptured
and cannabinoids have volatized into the air.
Few potent cannabinoids are left in the residue.
(MF)
www.marijuanagrowing.com
107
You can see that the resin gland heads are
decomposing on the top of this leaf and many
resin gland heads on the bottom of the leafhave
already disappeared. This plant is past peak
harvest.
'Cocoa Kush from DJ Short shows short, stocky
resin glands.
Resin glands on this 'Critical Mass' flower bud
have long stalks and small resin heads.
Qualities of Indica, Sativa,
and Ruderalis
The difference between resin glands is
striking—indica and indica-dominant
resin glands tend to have a short,
pyramid-like stalk with a big strong
bulb on top. Sativa and s^zm-dominant
varieties tend to have a long, thin stalk
with a large or small bulb on top. The
bulbs on top of stalks are also different
sizes. Large and small bulbous resin
glands fall through different mesh
(MF)
Magnifiers and Microscopes
Use a magnifying lens or mini micro
scope to examine capitate-stalked resin
glands. Use a 10X magnifying glass,
jeweler’s loupe, or a 20X to 50X hand
held microscope. My preference is a 45X
handheld microscope with a battery-
powered LED lamp. Look at resin
glands without harvesting buds,
or take a small, thin, resinous portion
of a ripe bud and place it under the
microscope at a low 30X to 50X mag
nification setting. If the microscope
does not have a lamp, a flashlight will be
necessary for an unshadowed view.
sieves, making different grades of kief.
Thin stalks tend to fall through sieves
and create a “fiber” in the kief.
Flower buds harvested when the majority
of resin glands have started to senesce
generally deliver a more corporal or
physical effect. Pure indica, afghani, and
zWzctf-dominant varieties harvested
at this late point will possess a heavy
body or tranquilizing effect. Waiting to
harvest pure sativa and s^Urra-dominant
Sometimes it is easiest to remove a small piece
of a bud so that you can get a complete view of
it on the inside.
Look at resin glands right on the plant to make
sure their growth is progressing properly. It is
fun to watch them develop over time.
varieties until this late stage does not
take advantage of the high cannabinoid
content. Such varieties are best har
vested when resin glands are clear and
ripe but not yet senescing.
Indies and /nd/ca-Dominant Varieties
Pure indica varieties and indica-
dominant crosses grown in greenhouses
and indoors are harvested 6 to 9 weeks
after inducing flowering with a 12/12-
hour day/night photoperiod. Outdoors,
zWzc^-dominant plants often initiate
flowering when they receive about 13
hours of daylight and 11 hours of dark
ness. Flowering increases as nights
grow longer.
Some medical gardeners choose to
harvest 6-week-old flower buds with
showy resin glands that have lower can
nabinoid content. Shorter flowering times
make harvesting one more crop every
year possible.
Sativa and Sativa-Dominant Varieties
Pure tropical sativa varieties, especially
Thai and Asian varieties that were
grown from native seed, take longer
to bloom after turning the light to 12
hours. Seeds brought directly from
the tropics can take 4 months to finish
blooming under 12 hours of light. These
types tend to form buds at an even rate
throughout flowering, with no marked
decline in growth rate.
Few indoor gardeners have the time or
patience to grow pure sativa varieties
because of their long flowering period,
leggy stature, and low yield. Buds at the
top of the plant often reach peak potency
long before lower buds. See chapter 8,
HARVEST DRYING & CURING
www.marijuanagrowing.com
'G randdaddy Purple" is a cross between
'Purple Urkle" and 'Big Bud"; both parents
are
dominant.
Sativa-dominant varieties like this 'Afghani
#7’ X 'Chiba Colombian 60" X 'African 3"
from. 1980 tend to ripen later and also grow
differently. (MF)
Mexican varieties are some of the most pro
nounced of this type offlower bud growth.
(MF)
Indica- and sativa-dominant varieties lend to
flower differently. Indica-dominant 'Purple
Hen" flowers tend to come ripe at the same
time if they receive the same amount of light.
(MF)
This 'Amnesia Haze" from Fly-Pro Seeds
shows classic 'blaze" growth habit. Small buds
grow at branch unions and tips of branches are
loaded with flowers.
Ruderal is cross 'Cbaze* takes longer to mature
and produces more than most autoflowering
varieties.
www.marijuanagrowing.com
109
Cannabis ruderalis is crossed with indica and
sativa varieties to yield short, autoflowering
plants with big buds!
Big outdoor plants are often harvested in
stages. First the outer 2-foot (61 cm) layer of
flower bud-filled branches is removed. Two
weeks later a second harvest is taken after
smaller buds have had a chance to fatten up
in the sunlight.
Small plants toward the front of Humboldt-
locals 's garden have been harvested once and
will be harvested again and again. Medical can
nabis gardeners growing outdoors in Northern
California harvest plants twice or even 3 and
4 times. The purple plant in the second row has
been harvested once and will be harvested in
another week or two.
Flowering, for more information on
altering the photoperiod to increase pro
duction and shorten flowering time.
Sativa-dominant crosses with indica
varieties may not be ready for 10 weeks
or more.
Ruderalis and Rudera/is-Dominant
Varieties
Ruderalis crosses (autoflowering and
autoflowering-feminized) varieties are
daylight-neutral and ready to harvest
about 70 to 80 days after germinating
seed. These crosses are harvested the
same as other varieties, when cannabi
noid production has peaked out.
Harvest Timing
Indoors and in “light deprivation”
greenhouses, sinsemilla flowers are
mature from 6 to 12 weeks after the
photoperiod has been changed to 12
hours to induce flowering. Seed compa
nies list “flowering time” in their cata
logs, and much information is available
on the Internet about maturation dates.
Outdoors, the first early harvest is ready
in late spring. Fall crops are harvested
from late September through Novem
ber, depending on varieties grown and
climate. The best time to harvest sinse
milla is when cannabinoid production
has peaked but the degradation process
has not yet started. Established indoor
varieties are bred so the entire plant
reaches peak potency at the same time.
Lower flower tops that received less
light are not as heavily frosted with resin
as upper branches and could be slower
to mature. Varieties that ripen all at once
tend to go through 4 to 5 weeks of rapid
bud formation before growth levels off.
The harvest is taken 1 to 3 weeks after
growth slows.
Outdoor harvests depend upon weather.
Fall rains and cold weather arrive late in
some years, and the harvest can be taken
at its peak. Plants are often harvested
early in bad weather years. Harvest
when there is no longer enough intense
sunlight for buds to grow. At a point of
diminished sunlight, resin development
virtually stops. There are several reasons
to harvest plants early, such as lack of
light, cold rainy weather, and freezing
nights.
Cold weather also influences the devel
opment of resin. Most often prolonged
40°F to 50°F (4.4°C-10°C) nights and
cool days with ample sunlight will slow
foliage growth and promote resin
development.
Harvest large outdoor plants up to
4 times. Harvesting 2 to 4 times over
the course of 2 to 6 weeks can increase
harvest weight by as much as 40 per
cent. The top 1 to 2 feet (30.5 -61 cm) is
removed at the first harvest. Secondary
smaller buds receive more sunlight and
become heavier. The second layer of
medicinal buds is then harvested. If it
is a big, 10-foot-tall plant, up to 2 more
harvests are possible in a good growing
year. We found this technique to work
best with the variety ‘Mr. Nice’.
An inexpensive liquid chromatogra-
A scientist from Canna measures the exact
THC content ofharvested buds with a gas
chromatograph. Canna provides this free
service at Spannabis in Barcelona, Spain.
Spannabis (www.spannabis.com) is the
biggest cannabis fair in the world.
phy test can also be performed. These
tests are relatively inexpensive, about
$10 USD, and are fairly accurate. See
chapter 2, Measuring Cannabinoids, for
more information on liquid chromatog
raphy tests.
Laboratory analysis, though More expen
sive, is also available in many states and
countries that sanction medical cannabis.
Many countries have decriminalized
small amounts of cannabis, and it can be
measured legally by third-party labs.
HARVEST DRYING & CURING
www.marijuanagrowing.com
Stop fertilizing container plants before
harvest.
Bud-heavy branches will be covered with
a dilute H2O2 solution to sanitize against
residuals ofpests and diseases.
Harvest early in the day.
Harvest: Step-by-Step
Step One: Stop supplemental fertiliza
tion 5 to 7 days prior to harvest. Latent
nutrient accumulation in foliage imparts
a fertilizer-like taste and a “nutrient
residual.” Leach nutrients from the
growing medium 7 to 10 days before
harvest. Some gardeners continue to
fertilize until 3 days before harvest if
using a commercial “leaching” product
that expedites the removal of built-up
chemicals in the substrate.
Step Two: If sprays have been applied
during the last 2 weeks (not recom
mended), mist plants heavily to wash
off undesirable residues that may have
accumulated on foliage. A 5-minute pre
bath in a dilute (5%) hydrogen peroxide
(H2O2) solution will disinfect and wash
away pest feces, bacteria, dust, etc.
Remove branches from the H2O2 bath
and gently rinse with a spray of water.
The spray bath will not affect resin pro
duction. Gently jiggle buds after rinsing
to shake off any standing water. To
prevent fungus and bud blight, remove
large leaves and wash the garden early
in the day to allow excess water to dry
before nightfall. If bud mold (Botrytis)
is visible, carefully remove infected bud
an inch below damage. Remove contam
inated growth from garden and destroy.
Wash hands. Insert “amputated” branch
es in H2O2 bath.
Step Three: You may want to give plants
24 to 48 hours of total darkness before
harvest. Some gardeners do this and
say the buds are a little more resinous
afterward.
Step Four: Harvest early in the morn
ing, before direct sunlight warms the
plants. This is when cannabinoid
content is at its peak. Harvest entire
plant or one branch at a time by cutting
near the base with pruners. Jerking the
root ball creates a mess and is unnec
essary. All of the cannabinoids are
produced in the foliage, not in the roots
of the cannabis plant.
Step Five: Once formed, resin does not
move and therefore cannot “drain into
the foliage.” Drying the entire plant by
hanging it upside down is simply conve
nient. When stems are left intact, drying
is much slower.
Step Six: To harvest branches or entire
plants:
a. Remove large leaves 1 or 2 days before
actually harvesting plants. Or remove
leaves upon harvest. Harvesting large
leaves early starts the drying process,
gets them out of the way, and makes
manicuring easier and faster.
b. Harvest entire plants by cutting them
off at the base before manicuring.
c. Or cut each branch into lengths of 6
to 24 inches. Manicure the freshly har
vested tops, trimming away leaves with
clippers or scissors. Hang the manicured
branches until dry. Once dry, cut the
tops from the branches, taking special
care to handle tender flower buds as
gently as possible.
d. Or leave larger leaves on branches to
act as a protective sheath to flower buds.
Harvest with clippers or a saw. Depending
upon how buds mature, you may want to
harvest the entire plant at once, or harvest
individual buds as they become ripe. Indica-
dominant plants are usually harvested all at
once.
Cutting small plants at the stem is the easiest
way to harvest. This plant is about 3 feet tall
(about a meter) and easy to handle. I always
cut it just below the soil line so that all the
branches are attached to the stem.
Next, trim up the bottom branches. I discard
the small growth on the bottom and throw it
in with the big leaves.
www.marijuanagrowing.com
111
Tender resin glands are protected from
bruises and rupture until final mani
curing, but manicuring is much slower
and more tedious when trimming dry
foliage. Resin glands are also more apt
to bruise and resin tends to fall from the
dry foliage when handling.
These branches full offlower buds were
lightly manicured before being hung to dry
on hangers in a dark, well-ventilated closet.
Cut smaller plants at the base to harvest.
Drying bud-filed branches before manicuring
causes many resin glands to be damaged.
Plants can be harvested a branch or bud at
a time. The main stem of the plant remains
in the ground, and large leaves are left in the
garden. The stem and leaves are cultivated
into the soil to benefit the next crop.
Removing large leaves and smaller leaves
around buds is much easier immediately after
harvest when foliage is still supple.
Manicuring
Manicuring is easiest when foliage is soft
and supple immediately after harvest.
Keeping the trimming room at 45 to 50
percent humidity will ensure that buds
stay supple longer. Trimming off leaves
now will also speed drying. Waiting
until foliage is dry to manicure will
make manicuring buds a more tedious
and time-consuming job than it already
is. And removing leaves now keeps dry
buds from being handled again. How
ever, some gardeners prefer to take the
extra time and energy, citing a slower
and more uniform drying process.
Manicuring is easiest and most efficient
with a good pair of trimming scissors
that has small blades to facilitate reach
ing in and snipping off leaf stems and
leaves around flower buds. An ergo
nomic pair of scissors with comfortable
handles is indispensable when manicur
ing cannabis for hours. Small scissors are
preferred because they require much less
motion and energy to operate.
Manicure over a fine silkscreen (see
chapter 26, Medicinal Concentrates &
Tinctures) or a table with a smooth, slick
surface. Scrape up the cannabinoid-rich
resin from under the screen or on the
flat surface. The resin can be consumed
immediately or pressed into blocks of
hashish for easy and practical storage.
Wear inexpensive rubber gloves to col
lect “finger resin.” After trimming for a
few hours, remove accumulated finger
resin on gloves by putting the rubber
gloves in a freezer for an hour. Cooling
will make it easier to remove the accu
mulated resin from the gloves.
Budget enough time to harvest and man
icure your crop. Properly manicuring
one pound (454 gm) takes 1 person 6 to
8 hours by hand with scissors.
Trimming machines speed the manicur
ing process. There are many different
models to choose from. Small manually
powered trimmers cost less than $300
USD and work well for small harvests.
Large machines that can trim 3 to 4
pounds (1.4 -1 .8 kg) of flower buds per
hour cost $12,000 USD or more. A sin
gle machine can do the work of 6 to 10
pairs of hands with scissors. Of course,
1 or 2 people must feed the trimmer
untrimmed buds, and the buds must be
carted away to another room.
You can informative videos on YouTube
about each of the following trimmers:
Big Red Trimmer, Bonsai Buddy, Magic
Trimmer, Rolling Thunder Trimmer,
Samurai Power Trimmer, Trimbox, Trim
Reaper, Trimpro Automatic, Tumble
Trimmer, and my favorite, the Twister.
However, the videos lack the close-up
detail necessary to see what condition
the buds are in after trimming.
112
HARVEST, DRYING & CURING
www.marijuanagrowing.com
Manicuring scissors come in a couple ofbasic
shapes. Many trimmers prefer small, compact
scissors that require little hand movement.
(MF)
Remove large leaves and large stems upon har
vest. Fresh supple leaves are easier to work with
than when dry. Remove large “fan” leaves and
leafstems (petiole) to avoid possible rot. Plants
with outer leaves intact take longer to dry and
require much more time to manicure.
Inexpensive rubber gloves keep the resin on
gloves rather than sticking to hands. The resin
can be removed from gloves later to make
“finger hash. ”
Some gardeners wet a concrete floor, or
employ inexpensive swamp coolers or humidi
fiers. Gardeners in cold, rainy climates must
ventilate adequately and possibly employ
heaters. Using a dehumidifier in a large dry
ing room is often impractical.
Snip off smaller, low-potency leaves around
buds that show little resin, so a beautiful
cannabinoid-potent flower bud remains.
Small scissors make it easier to reach in
between dense buds when manicuring.
Resin can build up heavily on scissors!
Once frozen, resin is easier to remove from
scissors.
Scrape accumulated resin from scissors when
it impairs blade movement. Use a small knife
or razor blade to remove built-up resin from
blades. Ball up small bits of scraped resin
by rubbing it together between fingers. The
ball of “finger hash” will grow as manicuring
progresses.
www.marijuanagrowing.com
113
Drying
Relative humidity of about 50 percent keeps
leaves supple when manicuring.
After passing through the trimming machine, buds are touched up and further manicured by
hand. Hand-manicuring removes rough edges. These trimmers are manicuring over smooth
paper plates. Scrape up fallen resin glands on the table or under the screen.
This SpinPro trimmer has a blade spinning
below a steel grate. Buds are dumped on top
of the grate and moved around with pliable
plastic fingers.
Buds are trimmed after a few spins around the
grate of the SpinPro. Once trimmed, buds are
removed and a new batch is dumped in.
This TrimPro trimmer consists of a rotating
blade below a protective steel grate. Buds are
manually moved across the grate. The blade
trims offany foliage that hangs below the
grate.
The Twister is a top-end trimmer. Buds are
fed into a hopper and passed through a cylin
der with a cutting deck below. Above you can
see trimmed buds coming out the cylinder.
Once trimmed by the Twister, flower buds
fall into a container to be further manicured
by hand.
Wear tight fitting latex gloves when manicur
ing. Remove gloves after trimming to collect
the accumulated resin.
114
HARVEST, DRYING & CURING
www.marijuanagrowing.com
Drying
When an entire plant or branch is har
vested and hung to dry, the transport
of fluids within the plant continues, but
at a much slower rate. Stomata close
soon after harvest, and drying is slowed
since little water vapor escapes. The
natural plant processes slowly come to
an end as the plant dries. The outer cells
are the first to dry, but fluid still moves
from internal cells to supply moisture
to outer cells, which are dry. When
the drying and curing processes occur
properly, plants dry evenly throughout.
Removing leaves and large stems upon
harvest speeds drying; however, mois
ture content within the “dried” flower
buds, leaves, and stems can become
uneven. If flower buds are dried too
quickly, chlorophyll and other pigments,
starch, and nitrates or other fertilizer
salts are trapped within plant tissue,
making it burn unevenly and taste
unpleasantly “green.”
The smell of ammonia in drying can
nabis indicates a lack of air circulation,
anaerobic bacteria, and an excess of
nitrogen in foliage. Avoid the formation
of ammonia by keeping cannabis buds
and foliage well aerated during drying.
Drying facilitates storage for later use.
Drying converts 75 percent or more of a
freshly harvested plant into water vapor
and other gases, and converts carbo
hydrates to simple sugars. Drying also
converts chlorophyll and other pigments
so that no “green” residuals remain.
Manicuring bud-laden branches and hanging
them individually allows them to dry longer.
All the moisture from the stem must dry too.
During drying, starch is converted into
reducing sugars”’. As starch degrades,
reducing sugar concentration increases
and peaks out during the first few days
of drying. After that, respiration is
slowed, which oxidizes reducing sugar
into carbon dioxide and water. The
stored starch is broken down to simple
sugars, which are used for food. This
imparts a sweet earthy aroma and taste.
*See http://en.wikipedia.org/wiki/
Reducing_sugar for complete definition
of “reducing sugars.”
Chlorophyll degradation is apparent as
the green colors pale and fade into yel
lows, browns, reds, and purples.
Although independent of one another,
starch and chlorophyll degradation
occur at about the same rate. The minty
green taste of cannabis also dissipates
with the degradation of chlorophyll.
When dried slowly, over 5 to 14 days,
moisture evaporates evenly into the air,
yielding uniformly dry flower buds with
minimal cannabinoid decomposition.
Slowly dried flowers retain terpenes and
cannabinoids, providing medical users
with full medicinal benefits. Slow, even
drying—where moisture content is the
same throughout stems, foliage and
buds—allows enough time for pigments
to degrade. After 5 to 14 days of slow
drying, all the chlorophyll is gone from
“dry” buds. Hanging entire plants to
dry, although more laborious, allows
this process to take place more slowly
over time.
Circulation and ventilation fans will
help control heat and humidity and keep
them at proper levels. You can also use
a dehumidifier to control humidity. Air
conditioners are ideal to dial in tempera
ture and humidity in warm climates, but
they are environmentally expensive to
operate. Large drying areas may require
a heater to raise temperature and lower
humidity. Do not train fans directly
on drying plants; it causes them to dry
unevenly.
With temperatures above 75°F (23.9°C)
buds may dry too fast, and humidity
can more easily fall below the ideal 50
percent level. Temperatures above 85°F
(29.4°C) cause buds to dry too fast, after
which they burn inconsistently and are
unpleasant to consume. High tempera
tures also ignite fragrance. Relative
humidity below 30 to 40 percent causes
buds to dry too fast and retain chlo
rophyll, giving them a “green” taste.
Quick-dried buds are easy to mistakenly
dry unevenly and for too long, making
To find the approximate moisture
content of dry buds, weigh a specific
bud upon harvest, when it is wet. Weigh
it again during the drying and curing
process to learn how much moisture it
has lost. For example, a bud that weighs
0.5 ounces (15 gm) upon harvest, will
weigh 0.14 ounces (4 gm) when it has
lost 75 percent of its moisture.
Weigh a bud at harvest. This freshly harvested
bud weighs 0.5 ounces (15 gm).
When dry, the same bud pictured above weighs
0.14 ounces (4 gm)—75 percent less.
www.marijuanagrowing.com
115
them crispy on the outside and moist
on the inside. Low humidity also causes
buds to lose flavor and odor. If humidity
is between 30 and 40 percent, allow for
minimum air movement to slowly dry
buds. Always use an accurate maximum/
minimum thermometer and hygrometer
to ensure that temperature and humidity
are kept in the ideal range.
Suspending plants is a laborsaving way
to facilitate slow, even drying. Large,
moist stems can be removed and small
branches hung from the ceiling to cut
drying time by a few days. Use clothes
pins to attach branches to drying lines,
or poke a paper clip through the base of
branches and hang the clip from a line.
Another option is to trim branches to
form a hook and hang from the “hook.”
Use the grow area as a drying room
when not growing a garden. Do not dry
plants in the same room in which plants
are growing. Different climates are
required for growing medicinal cannabis
and for drying it. Fungus, spider mites,
and other insects can also migrate from
dead plants to live ones. Inspect drying
buds daily for any signs of disease, spi
der mites, or insects. Smear Tanglefoot
around the end of drying lines to form
a barrier that keeps mites from migrat
ing to live plants. Mites congregate
at the barrier and are easy to smash
between fingers.
Small harvests like this 'Sensi Star"plant are
manicured before hanging to dry.
Excess foliage has been manicured from this
plant. It is difficult to trim an entire plant and
keep the branches intact.
These bud-filed branches were removed and
manicured individually before hanging to dry.
This nice crop of'Power Plant' was mani
cured and hung to dry on clothes hangers in a
well-ventilated closet.
The ideal air temperature range for slow drying
is between 60°F and 70°F (15.6°C-2E1°C)
and humidity from 45 to 55 percent. Tem
peratures below 60°F (15.6°C) slow drying,
and humidity often climbs quickly. Humidity
above 80 percent extends drying time and
heightens the threat ofbud mold.
Drying Small Harvests
Small harvests can easily be dried in a
closet, cabinet, or a cardboard box that
is smaller than the growing area’s size.
If drying space is a problem, using a
staggered planting schedule or planting
varieties that ripen both early and late
carries over to a staggered harvest that
frees up drying space as buds dry.
A cardboard or wooden box makes an
excellent drying space to hang small
harvests. Airflow in the enclosed area is
diminished, so buds and leaves must be
turned daily to even out the moisture
content and discourage mold. Thread a
large needle with dental floss, and string
the floss back and forth through the
open box near the top to make drying
lines. If the box is tall enough, you can
install several levels of drying lines.
Lock the flaps on the box and set it in a
closet or spare room. Open flaps to allow
air circulation as needed. Or, cut holes
near the bottom and top of the box to
allow air exchange and circulation. Check
daily to see how buds are drying. If buds
and leaves start drying too quickly, open
the box top and set the box in a cooler
location.
Use a portable, foldable clothesline to
make a quick and mobile drying room.
Unfold clothesline, hang buds from lines,
and cover with a large black bedsheet
or cloth to allow for the exchange of air
while maintaining darkness. Train a fan
on the outside of the sheet so air circulates
underneath to help dry the flower buds.
Building a small drying room is as easy
as tacking some plywood together at
116
HARVEST, DRYING & CURING
www.marijuanagrowing.com
Moroccan plants are being dried in the sunlight
on a warm slab. This practice degrades resin.
right angles and hanging lines across the
enclosure. Or you can tack or tape black
Visqueen plastic to the ceiling and floor
to make “walls.”
Manicured buds can also be placed in
boxes to dry. Move buds daily so new
surfaces are exposed to air. Drying
might be slower because the airflow is
reduced. Line boxes with cardboard or
paper to contain and collect resin glands
that fall to the bottom. Or seal cracks
with tape to contain resin glands for
collection.
Drying Large Harvests
Stagger large harvests on big 10- to
15-foot-tall plants by harvesting the top
2 to 3 feet (60-90 cm) from the top of
the plant. The buds located lower on the
plant, now exposed to sunlight, will con
tinue to grow and swell. Harvest again in
a couple of weeks (weather permitting) by
cutting the next 2 to 3 feet (61-91.4 cm)
from the top branches. Most varieties can
be harvested 2 to 3 times over a 4-to-6 -
week period.
Note: Gardeners in Northern California
prefer to keep flower buds harvested last
for use as personal medicine.
Drying a large harvest requires a large,
dark, cool space with good airflow. Do
not harvest more cannabis than avail-
Compartmentalized net bags are inexpensive,
collapsible, and easy to hang, expand into a
drying rack, and store. These drying racks
are perfect!
able drying space can accommodate.
Stagger the harvest so that there will be
enough drying space. Friends in Swit
zerland were compelled to buy a 4-story
industrial building to dry several acres
of cannabis. Other surprised gardeners
have to quickly erect tents and tempo
rary buildings to serve as drying sheds.
Large spaces such as bedrooms, barns,
and sheds are also used.
Cut plants at the base or pull whole
plants from the ground. Remove large
leaves and hang the harvested plants on
lines in the drying room. Cut branches
from 12 to 40 inches (30.5 -101.6 cm).
Manicure each branch and hang on dry
ing lines to complete the drying process.
Save space by building or buying drying
racks for the buds. Make drying racks
from window screen or plastic agri
cultural netting. Stretch the screen or
netting over a wooden frame and secure
with staples. Put 3- to 6-inch (7.62-15.2
cm) spacers between framed screens to
allow for adequate airflow. Or build a
drying box with removable screens.
Hang manicured buds to dry for a day or so
before placing on drying screens to allow the
bulk of the moisture to dissipate. Once on
screens, buds should be turned every day or
two to ensure even drying.
Drying Time
Checklist for Proper Drying
• Temperature 60°F-70°F
(15.6°C-21 .1°C)
• Humidity 45-55 percent.
• Dry under minimal or no light.
• Handle buds as little as possible.
• Hang manicured buds until dry.
• Exact conditions may vary; use
parameters below as a guideline.
Drying time depends upon temperature,
humidity, and bud density. Most flower
buds will be dry enough in 3 to 5 days
before passing to the curing process, but
they may take longer. It takes up to 2
weeks before all chlorophyll—the stuff
that gives the “green” taste—has dissi
pated from foliage. Big, fat, dense flower
buds can take 3 to 4 days longer to dry
than smaller buds. Gently squeeze buds
after they have been drying for a few
days to check for moisture content.
Bend stems to see if they are dry. If the
stem breaks rather than folds, it is ready
to cure.
The harvest is dry or nearly dry ifstems break
when bent.
www.marijuanagrowing.com
117
Check for dryness by bending a stem.
The stem should snap rather than fold
when bent. The bud should be dry to the
touch but not brittle. The bud should
burn well enough to smoke when dry.
Light—especially ultraviolet (UV)
rays from natural sunlight—heat, and
friction hasten biodegradation of resin
glands and cannabinoids. Do not place
dried cannabis in hot automobile glove
compartments, and keep it away from
heat vents and so forth. Friction and
rough handling can bruise and rupture
resin glands. Even with proper drying
and curing, brutal handling of harvest
ed cannabis will diminish cannabinoid
content.
Fast Drying
Here are 6 ways to dry flower buds
quickly. Remember, buds that dry
quickly burn hot, are harsh to the pallet,
and may taste “green” when vaporized.
One: Manicure fresh buds and remove
all branches and leaves containing no
visible resin. Spread evenly on tin foil or
wrap in paper or enclose in an envelope.
Place the paper or envelope on a warm
refrigerator, radiator, television, etc.
Depending upon heat level, buds will be
dry in a few hours or the next day. Buds
will be a bit crispy when dry but may
contain moisture deeper within. Place
them in an airtight container until they
sweat. Put back in the paper and dry
until dehydrated enough to burn well.
Two: Cut up fresh buds and/or foliage.
Place on a 12-inch (30.5 cm) square of
tinfoil. Hold or place it over a 60- to
100-watt incandescent lightbulb. Stir
every 15 to 30 seconds. It will be dry
enough to consume in a few minutes.
Three: Place diced buds and/or foliage
on a cookie sheet in an oven at 150°F
(65.6°C) for 10 to 15 minutes. Check
regularly and stir if needed until dry.
Do not increase temperature above
200°F (93.3°C) or the cannabinoids
will vaporize into the air.
Four: Place chopped buds and/or foliage
on a paper plate in a microwave oven. Turn
the microwave on in short, weak (50%
power) bursts of 15 to 30 seconds each.
Re-cycle until dry, and stir if necessary.
Five: Dry buds in a food dehydrator for
24 to 48 hours. Food dehydrators have a
series of stackable screens. Place bud
and leaf on screens and stack. A fan
blows temperature-controlled air gently
upward to quickly dry the cannabis.
Buds and/or foliage can be cut into small
pieces and place in a glass jar with an
airtight lid. Place several silica gel des
iccant packs (the kind that come with
electronic devices and cameras) into the
glass jar and seal. Moisture will migrate
to the silica gel in a few hours. Remove
the packets and dry using a dry heat
source. Replace silica packs until can
nabis is dry enough to consume. Find
silica gel pack at auto parts or electronics
stores.
Six: Dry buds in a food dehydrator for
24 to 48 hours. Food dehydrators in
clude a series of stackable screens. Place
bud and leaf on screens and stack. A fan
blows temperature-controlled air gently
upward to quickly dry the cannabis.
118
HARVEST, DRYING & CURING
www.marijuanagrowing.com
Water "Drying": Step-by-Step
Water can be used to remove excessive
chlorophyll, salts, and impurities in
harvested cannabis. Cannabis that
is imported from Paraguay, parts of
Africa, and Mexico is often soaked in a
water bath to wash out dirt, chlorophyll,
and other bad stuff, but this method of
curing is seldom used by home garden
ers. Branches are soaked in water that
is replaced daily for several days. The
undesirable soluble plant matter leaches
into the water and after four to seven
days is almost gone. After water curing,
manicured buds on branches are lightly
shaken to remove water before being
hung to dry.
Once completely and evenly dry, buds
smoke smooth and burn evenly. Water-
dried buds are about 30 percent smaller,
but cannabinoids are intact and more
concentrated than with air-dried buds.
Lackluster color, fragrance, and overall
appearance of water-cured cannabis
result in low “bag appeal,” a term pop
ular at medical cannabis dispensaries.
However, using this method, salts are
removed even if plants were fertilized
until harvest.
Note: Be very gentle when handling buds
in water. Resin is not water soluble, but
when branches are knocked around indis
criminately, resin glands can fall into the
water. Be gentle with tender buds.
Step One: Cut branches from plants
and remove large leaves including stems
(petioles). Small leaves are usually left
intact around buds.
Step Two: Carefully place bud-filled
branches in a container of distilled or
RO (reverse osmosis) water. Keep the
temperature between 60°F and 70°F
(15.6°C-21 .1°C). It may be necessary to
gently push the branches down by hand
or with a weight to keep them complete
ly submerged.
Step Three: Pour off the chlorophyll/
salt-contaminated water and replace
daily. Chlorophyll, salts, and contami
nants are drawn out of the plant via os
mosis (see chapter 20, Water). The water
must be changed daily and replaced with
fresh; old water is full of the bad stuff.
Step Four: After 4 to 7 days, remove
branches from water, carefully shake
off excess water, and hang to dry. Use a
circulation fan to ensure that all latent
water evaporates and dries from buds.
Manicure small leaves while they are still
soft and supple.
Step Five: Hang bud-filled manicured
branches to dry (see “Drying Small
Harvests” earlier in this chapter).
Dry Ice "Drying": Step-by -Step
Dry ice drying retains cannabinoids and
freshness and causes very little degra
dation of resin glands from heat, light,
and air. When vaporized or smoked, dry
ice-cured cannabis has a mint-like taste
because the chlorophyll does not break
down. This curing method is expensive
and time-consuming.
Dry ice is frozen carbon dioxide. When
it warms, CO2 converts from a frozen
solid to a gas, without turning into a
liquid. When moist cannabis is enclosed
with dry ice, low relative humidity
occurs and water molecules migrate
from the cannabis to the dry ice. This
causes the relative humidity of the CO2
to increase and the moisture content of
the cannabis to decrease. This process
occurs below 32°F (0°C), and it pre
serves cannabis. Dry ice is expensive and
this method is best used for drying small
amounts of flower buds.
Step One: Place one ounce (28.3 gm)
each of dry ice and flower buds about
three-fourths dry into a 4-quart (3.8 L)
container. Put dry ice on the bottom and
flower buds on top.
Step Two: Make a few small 0.25 -inch
(6.4 mm) holes in the lid of the contain
er for excess gas to exit. Seal the lid on
the container.
Step Three: Defrost freezer. Turn
freezer to coldest setting. Place the
entire container in the freezer. Check
every 12 to 24 hours.
Step Four: When the dry ice is gone, the
buds should be completely dry. If not
dry, add dry ice until cannabis is dry.
Conserve dry ice by partially drying
buds for a few days before enclosing
with dry ice.
Canning jars are excellent containers to store
these dry 'Black Shaman'flower buds. The
rigid glass protects buds from damage. Always
store jars in a cool, dark location to avoid heat
and sunlight.
Curing
Curing after drying helps remove any
remaining chlorophyll, other pigments,
latent fertilizer salts, and so on that
have accumulated in flower buds, leaves,
and stems. If dried too quickly, flower
buds retain more chlorophyll and have a
“green” taste. When vaporized or smoked
these imports are harsh on the pallet and
often burn too hot. Removing chloro
phyll, salts, etc., can be achieved with air,
water and air, and with dry ice (CO?).
Curing is not essential; in fact, many
medical patients prefer the often minty
flavor of uncured cannabis.
Even after plants, branches, or buds have
dried on screens or been suspended in a
drying room for five to seven days and
appear to be dry, they still contain mois
ture inside. This moisture affects taste,
fragrance, and cannabinoid content
(potency). Curing will remove this
excess moisture and all it contains.
Curing makes buds uniformly dry and
pleasant to consume, and preserves nat
ural cannabinoids and terpenes.
Light, air, and water are all that aero
bic bacteria need to start consuming
chlorophyll, salts, and so forth. When
the bacteria consume all the available
food and oxygen dissipates, bacteria
die. This action frees up carbohydrates,
chlorophyll, and other contaminants.
Properly dried and cured cannabis flow
er buds burn evenly and have a smooth,
rich taste. The vibrant green color fades
when chlorophyll dissipates and reddish
hues become more prominent.
www.marijuanagrowing.com
119
Dry cannabis flower buds are packed into
turkey bags to cure.
The first week of curing affects poten
cy in that it evenly removes moisture
within the foliage so that few impurities
—
pigments, salts and contaminants that
affect taste and fragrance — remain in
the dry foliage and flowers. Curing also
allows cannabis to dry so that mold does
not grow when it is stored. Well-cured
flower buds are soft and pliable but dry
inside. Flower buds should feel like they
are dry and only the dry pliable foliage is
holding resin onto stems. When smoked
it should have an even glow and enter the
body smoothly. When vaporized, there
should be no apparent “green” taste.
Air Curing: Step-by-Step
Step One: Remove flower buds from
branches and place in an airtight contain
er. Some plastic bags may impart a plastic
or metallic odor. Clear and opaque
turkey bags used for long-term storage
are airtight. I prefer Black Magic Odor
Barrier Bags because they are black,
durable, and airtight. There are also bags
that reflect heat and are airtight (when
properly sealed) and infrared-proof,
which protects them from heat.
Step Two: Write today’s date on each
curing container.
Step Three: Gently pack as many buds
into container as possible without forc
ing or damaging them. Place containers
in a cool, dry, dark place.
Step Four: Once enclosed in an airtight
container, moisture inside buds migrates
to dry portions of stems and foliage.
Check in 2 to 4 hours to see if buds feel
different. Gently squeeze a couple of
buds to see if they feel moister now. Be
careful! Resin glands bruise easily.
Step Five: Open the drying container 2
to 3 times daily for the first 7 days to re
lease moisture. Take a whiff the instant
you open the container. The fragrance
should be sweet and somewhat moist.
Close the container quickly. If neces
sary, remove buds from jar for a short
time to inspect for mold and disease.
Step Six: After the first week, open con
tainers once or twice a week for a quick
whiff. Do not open too many times or
the slow curing process will not work.
Step Seven: Some gardeners cure flower
buds slowly for 6 months or longer.
However, after 2 to 3 weeks they should
be fully cured and remain fresh, firm,
and pliable. Flower buds can be sealed in
containers and stored.
Once cured, keep medicinal cannabis
flower buds in an airtight container.
Open the container periodically to let
out moisture that may have condensed.
Or you can keep the container sealed
and store in a cool, dry, dark place. Buds
should store well for 2 years or longer.
However, most are consumed earlier!
Packaging and Storage
Packaging dry cannabis in an airtight or
similar environment will help preserve
aroma, taste, and potency. Excessive
exposure to oxygen causes the canna
binoid profile and the medicinal effect
to change. Dry cannabis oxidizes when
exposed to the oxygen in air. Oxidation
breaks down THC molecules, convert
ing them to cannabinol (CBN).
Plastic bags are commonly used to pack
age and store cannabis. Such containers
preserve cannabis best when the bags are
handled very little. Handling bruises
and degrades resin glands. A rigid
container (I prefer dark glass) will help
protect resin glands from extra move
ment and abrasion.
120
HARVEST, DRYING & CURING
www.marijuanagrowing.com
Store dry, cured medicinal cannabis in a
cool, dark, dry place to preserve aroma,
taste, and cannabinoid content. Canna
bis quality is best preserved under these
conditions. Patients store the bulk of
their medicinal cannabis in a cool, dark,
dry location and keep only a few days
supply close at hand. The cannabis does
not have time to degrade and remains
potent.
Silicon packets, newspaper, or paper
towels placed in the drying container
will absorb excess moisture. Make sure
to remove the silicon packets, paper, and
so forth regularly to dry them out before
returning them to the container.
Packaging cannabis for long-term
storage (6 to 48 months) requires a little
more effort to ensure the qualities of
cannabis are retained. Cannabis can be
stored for more than 2 years, but this
is seldom the case. If cannabis must be
stored for more than 2 years, be sure to
make the preparations listed below.
Refrigeration and freezing are also
means of preserving cured and dry
cannabis. Although refrigeration slows
decomposition, household and com
mercial refrigerators and freezers have
high humidity levels. High humidity
can cause condensation inside the sealed
containers. Many refrigerators have a
“low humidity” drawer, but the humidity
is still quite high. Expensive “low humid
ity” refrigerators are available for health
care and other industries. These are
the refrigerators many seed purveyors
use. The storage container must be well
sealed to slow condensation inside.
Place silicon packets in the container
to absorb condensed moisture. Check
stored cannabis periodically for deterio
ration.
Other ways to store cannabis include
concentration into hashish, oil, or
alcohol.
Vacuum Sealing
Vacuum seal cannabis for long-term
storage. Vacuum packaging removes
oxygen from the airtight storage con
tainer, which slows biodegrading of
cannabis flowers to a crawl. The absence
of oxygen in airtight bag makes an
impossible environment for pests and
diseases. Inexpensive vacuum packagers
use a jar with a twist off lid. A small air
suction pump is attached to a tube with
a one-way valve in the top. The air is
sucked out of the jar to form a vacuum
seal. There are simple manual vacuums
for small amounts of cannabis.
A vacuum sealer will help keep harvested
cannabis from biodegrading quickly.
Food Saver and Seal-A -Meal vacuum
sealer machines are very popular in
North America. These vacuum sealers
remove air from the plastic bag full of
cured cannabis, which reduces oxidation
to nil. Once the air is removed from
the bag, the machine forms a hermetic
seal that keeps the cannabinoid profile
and flavor intact. More sophisticated
vacuum packaging machines use special
impermeable plastic bags. The more
expensive models are able to inject CO2
and nitrogen,5' gas into the bag. Models
of these sealers range in price from $50
to $2,000 USD. Inexpensive vacuum
sealers are also available in the canning
section of many grocery and variety
stores in late summer and early autumn.
Containers scaled with inexpensive
vacuum sealers can lose the vacuum after
www.marijuanagrowing.com
121
An industrial vacuum sealer removes the air
inside a strong plastic bag and melts closed
the open end of the bag to hermetically seal in
freshness.
A sophisticated vacuum sealer is able to inject
inert nitrogen gas into sealed bags.
Turkey bags are the favorite storage container
for many medical cannabis gardeners. True
Liberty Bags makes opaque black bags to
exclude light.
Cannabis flower buds must be perfectly dry
to store in JO -gallon (113.6 L) containers.
Excess moisture in such a large amount tends
to attract mold and rot.
a few days. Properly vacuum-packed,
medicinal cannabis flower buds will stay
as fresh as the day they were sealed in
the airtight container. Visit the site of
my good friends at Trim Scene Solutions
in Northern California (www.trimscene.
com). They are experts on the subject.
"Carbon dioxide (CO2) gas in a con
centration of 35 percent, or nitrogen
(N2) gas concentrated at 98 percent will
displace oxygen inside the sealed bag.
In the absence of oxygen, degradation
of cannabis essentially stops. Pests and
diseases cannot survive without oxygen.
The inert gases (CO2 and N2) do not
alter the cannabinoid profile.
What to Do with a Moldy Crop
Moldy flower buds, whether infected
with bud rot (Botrytis cinerea) or
powdery mildew (or oidium, a catchall
term for a fungal disease caused by a
powdery mildew), and depending upon
severity, will have a lower overall harvest
weight. If mold has entered the plant’s
system, it will remain there after har
vest. Medical patients or anybody with
respiratory ailments should not vaporize
or smoke moldy cannabis. For more
information, see chapter 24, Diseases &
Pests.
Medical patients or anybody with respi
ratory ailments should not vaporize or
smoke moldy cannabis.
Stop molds and mildews before they
start and spread through the entire crop.
Inspect plants at night with a UVC
flashlight to spot newly forming fungus.
Spray with a hydrogen peroxide (H2O2)
solution to kill fungus. If the infection is
bad, spray the entire plant with hydro
gen peroxide solution before harvesting.
Harvest plants carefully so that any
remaining spores from the fungal
disease do not contaminate other
plants in the garden. Pour one cup (8
oz [236.6 ml]) of 3 percent H2O2 into
5 gallons (19 L) of water.
Bathe harvested branches full of buds
for 1 to 5 minutes in the diluted H2O2,
then shake dry and hang in a well-
aerated room until excess surface water
is gone. Manicure buds while plants are
fresh and supple. See “Powdery Mildew”
in chapter 24, Diseases & Pests, for com
plete information on control.
Too often gardeners harvest their moldy
crops and trim off mold-affected foliage.
This practice spreads mold spores and
does not control the disease. Drying
the crop will result in lingering mold
living in and on harvested flower buds,
branches, and leaves. Making water-
or dry-sieve hashish will not kill the
disease either. Once the diseases have
entered the system of the harvested
foliage, they will stay even if washed off
the surface of the plant.
Two ways to clean include soaking in
hydrogen peroxide and passing under a
UVC lamp.
Soak freshly harvested cannabis in a
container filled with diluted H2O2 (see
recipe earlier in this section). Mildews
and surface molds will float to the top
and can be skimmed off. Rinse bud-
filled branches with a spray of fresh
water, shake lightly to remove water,
and then manicure and dry.
Pass harvested foliage under ultraviolet
(UVC) light to kill surface molds and
bacteria. About a second or two is all the
UVC light a plant can withstand. Check
with manufacturers for application times.
A moldy crop is a big problem. Always keep a
close eye on the garden, and inspect for early
signs of mold so that it does not spread.
122
HARVEST, DRYING & CURING
www.marijuanagrowing.com
124 Carbon Footprint
125 Closed (Sealed) Rooms
126 Setting Up the Garden Room:
Step-by-Step
126 Step One: Define Needs and
Desires
126 Step Two: Budget
126 Step Three: Tools
127 Step Four: Site Selection
128 Step Five: Design the Room
130 Step Six: Electrical Needs
131 Step Seven: Enclose the Garden
Room
131 Step Eight: Divide into
Two Rooms
132 Step Nine: Increase Light
Reflectivity
132 Step Ten: Install a Vent Fan
133 Step Eleven: Install an Air Filter
133 Step Twelve: Install Circulation
Fans
134 Step Thirteen: Install a
Hygrometer / Thermometer
134 Step Fourteen: Install Lights
135 Setting Up the HID System:
Step-by-Step
136 Step Fifteen: Water Source
and Reservoir
136 Step Sixteen: Install a Hydroponic
or Soil Garden
136 Step Seventeen: Systems Check -
Ready to Grow!
J
ESSENTIAL
MEDICAL CANNAI
HORTICULTURE
Garden rooms require a secure space, consistent environment,
and a regular maintenance schedule. They also increase your
carbon footprint. Climate, consistency, and security are the best
reasons to garden indoors. Medical cannabis can also be started
in a garden room and moved into a greenhouse or outdoors.
Plants get an early start with minimal environmental impact
when moved outdoors.
Growing an indoor garden like this from start to finish requires an
investment of time, money, planning, and hard work.
www.marijuanagrowing.com
To set up a garden room, you must first
assess needs and desires. How much
medical cannabis do you want to grow?
How much time, space, and money are
you able to invest to achieve this goal?
Do you want to build the garden room,
or do you prefer to purchase a prefabri
cated “grow closet?” Building a garden
room takes time, skill, and a budget. The
room will also need adequate electrical
power, an air ventilation outlet, and a
source of clean water.
Your personality traits and habits are
also important to consider. Do you have
a regular schedule? Do you have enough
time to dedicate to this project? Do
you start projects and tend to not finish
them? Are you away from home several
days at a time? All of these factors figure
into your ability to maintain an indoor
medical cannabis garden.
This barrelfull of water illustrates that canna
bis will grow only as fast as its most limiting
factor. Light, air, and imbalanced soil are most
often the factors that limit growth indoors.
You will have to make your own clones
if a source of clones is not readily avail
able. You will have to divide the room
in two to form a clone/mother room and
a flowering room. The harvest can be
periodic or perpetual.
Once divided, the rooms need filters and
vent fans, circulation fans, hygrometers/
thermometers, and sources of water and
electricity.
The size of the garden space dictates the
type, wattage, and number of lamps. The
most efficient lights with the highest
lumens-per-watt conversion include
CFLs (compact fluorescent lamps) and
HIDs (high-intensity discharge lamps).
CFLs are available in various lengths
and wattages. See chapter 17, Light,
Lamps & Electricity, for more informa
tion on each type of lamp.
The goal of the garden room is to supply
everything that medical cannabis needs
to grow well.
Air 20%
temperature
humidity
CO2 and O2 content
Light 20%
spectrum (color)
intensity
photoperiod (hours of light per day)
Water 20%
temperature
pH (a measure of acidity or alkalinity)
EC (electrical conductivity)
O2 content
Nutrients 20%
composition
purity
Growing Medium 20%
air content
moisture content
Carbon Footprint
According to a study by Evan Mills,
PhD*, indoor cannabis gardeners use
1 percent of all electricity in the USA,
Even efficient indoor rooms like this one
create a carbon footprint. Fortunately, these
plants will be moved outdoors in the coming
weeks.
shelling out $5 billion dollars to electric
utility companies every year. This is
the equivalent use of 2 million average
households. Approximately 22 billion
kilowatt hours are consumed. California,
one of 16 states to allow cultivation
of medical cannabis, is estimated to
consume 3 percent of all electricity in
the state. Gasoline and diesel electric
generators use about 140 gallons (530 L)
of fuel to produce 1 plant.
*Read the summary and full report,
Energy up in Smoke: the Carbon Foot
print ofIndoor Cannabis Production,
at http://evan-mills.com/energy-
associates/Indoor.html.
Gardeners cultivate medical cannabis
indoors to produce high-quality crops
and keep their high-value produce
from thieves. Keeping cannabis illegal
increases the carbon footprint of gar
deners. Criminalizing cannabis contrib
utes to long driving distances, odor and
noise suppression, and off-grid fossil
fuel power production.
Reduce your carbon footprint by reduc
ing your use of electricity, gas, and diesel
fuel. Promote renewable energy gener
ation. Use indoor grow-room heating,
cooling, and lighting systems more
efficiently. Install photovoltaic (PV)
solar panels.
More efficient growing practices reduce
carbon footprints, as does using lower-
wattage lamps and fewer electrical and
fossil fuel-using devices. Employing all
the natural principles possible will help
lower carbon footprints. Human caloric
energy is much less expensive than
124
GARDEN ROOMS
www.marijuanagrowing.com
fossil fuel energy, and we can make more
human energy quickly, but fossil fuel en
ergy takes a very long time to recreate.
Growing medical cannabis outdoors
eliminates most costs other than for a
few tools, transport, water, soil amend
ments, and fertilizer.
Mix your own fertilizers from simple,
readily available elements. When you
purchase local ingredients and mix your
own organic fertilizers, you are sup
porting local industry and farmers. You
are also lowering your overall carbon
footprint by decreasing transport, pack
aging, and sales costs.
Use online tools to qualify your carbon
footprint. Enter information on electri
city, gas and diesel fuel usage, vehicle
fuel consumption, and renewable energy
generation to measure your total carbon
footprint. Take a couple of minutes to
fill out the Nature Conservancy’s car
bon footprint calculator (www.nature.
org/greenliving/carboncalculator/index.
htm) to get an idea of the environmental
waste you produce.
Closed (Sealed) Rooms
Closed or sealed garden rooms have most
all of the qualities found in a phytotron,
a scientific growth chamber, and they
create a very big carbon footprint. Just
like a phytotron, precise control of each
factor—light, temperature, humidity,
CO2, and so forth—can be individually
controlled in a closed room. The room
is sealed completely so all air that enters
and exits is controlled. Targeted specif
ically at the high-tech gardener, sealed
rooms are for gardeners with advanced
skills.
The room must be sealed completely
so that no air enters or exits. Caulk all
corners and put weatherstripping around
doors. Some gardeners install a vent fan
to create a very small amount of negative
pressure. An air conditioner is essential
to supply fresh filtered air.
A sophisticated air filter can be installed
to scrub ethylene, nitrous oxides, and
other contaminants such as fungi from
the air in the room and precisely control
fresh air exchange.
This enclosed room has its ballasts outside so
the entire room can be sealed off. In fact, a
fire started in this room several months before
this photograph was taken. Since the room was
tightly sealed, limited oxygen was available
and the fire went out. After the fire, the gar
dener moved the source of the fire—ballasts—
out of the room. Do not count on fires putting
themselves out in sealed rooms, however. This
gardener got lucky!
This sealed room is set up and ready for the
gardener to bring in clones and start grow
ing. The entire room is spotless and free of
pathogens.
\
RECOMMENDED BTU REQUIREMENTS FOR A/C IN SEALED ROOMS
Cumulative
Watts
A/C Btus
Moderate Temp.
A/C Btus
Low Temp.
1
1,000
600
4,000
2,400
3,300
2,000
2 2,000
1,200
8,000
4,800
6,600
4,000
3 3,000
1,800
12,000
7,200
9,900
6,000
; 4 4,000
2,400
16,000
9,600
13,200
8,000
5 5,000
3,000
20,000
12,000
16,500
10,000
10 10,000
6,000
40,000
24,000
33,000
20,000
A 20-pound CO2 tank lasts two weeks
in a sealed room with ten 1000-watt
lamps. The room must be equipped
with a big air conditioner to adequately
dehumidify and cool the air. The grower
must figure out how many watts the air
conditioner uses, and how much it will
cool the room.
Fuel Type
shelled corn
propane
natural gas
kerosene
electricity
Btus per Unit of Fuel
6,300 Btus per pound
91,500 Btus per gallon
100,000 Btus per therm
127,000 Btus per gallon
3,413 Btus per kilowatt
hour
GrowBots (www.growbot.com) are
able to perform robotic control, includ
ing remote iPhone video monitoring.
A fully equipped 12-light grow room
costs $80,000 USD and has a big carbon
footprint. The initial out-of-pocket cost
is more than $6,500 per installed 1000-
watt lamp. It will take two perfect and
heavy harvests to cover the initial cost—
not including genetics, growing supplies,
and electricity. Turnkey convenience is
expensive in both money and carbon
footprint. A small single-light home
made semi-sealed garden room costs
about $1,000 USD to set up and per
forms nearly the same level of control.
www.marijuanagrowing.com
125
Plan the garden room on paper first.
Make a rough sketch of the garden room
showing lights, plants, fans, etc.
First make a rough budget to get an idea of
future expenses. Next make a detailed budget
that fits your needs.
Setting Up the Garden Room:
Step-by -Step
Set up the garden room and make sure
each step is completed before intro
ducing plants. Construction requires
space, a financial budget, and planning.
A garden room under construction is a
terrible environment for plants. Once
the garden room is set up and totally
operational, you will be ready to move in
plants and start growing.
Step One: Define Needs
and Desires
Needs and desires are at the basis of
a garden room. The first decision is
whether or not to purchase a prefabri
cated garden room. Start shopping by
typing ‘‘garden closet,” “garden tent,”
or “garden box” into an Internet search
engine. Garden closets with flexible
plastic walls are the most economical.
Fixed-wall (rigid) models are more
expensive. If this is your first indoor
garden, consider starting with a simple
soil garden rather than more expensive
and often complex hydroponics.
Take an inventory of the prerequisites to
cultivating a medical cannabis garden.
Needs and desires:
1. Legal medical gardener card
2. Time to dedicate to a small, medium,
or large garden
3. Financial budget
4. Desired harvest
5. Available space indoors, in a green
house, or outdoors
How much cannabis is necessary to
fulfill your patient’s medical needs? Will
you need 1 ounce or 6 pounds (28 gm or
2.7 kg) every month to satisfy patient
needs? A properly managed room with a
perpetual crop using one 600-watt flow
ering lamp and two 65-watt compact
fluorescent lamps in a garden space of
4X4X8 feet (1.2 X 1.2 x 2.4 m) will
produce from 0.25 to 0.5 pounds (113—
227 gm) every month when using clones
purchased at a medical dispensary. Buy
clones at medical cannabis dispensaries
for about $15 USD each. When properly
managed, growing 16 clones to harvest
4 to 6 times every year under a 600-watt
HID will yield 4 to 6 pounds (1.6-2 .7
kg) of dried flower tops and about the
same in leaf annually.
Setting up a small indoor garden usually
takes a full weekend. Plan to dedicate
about 2 hours per week to maintaining
a small garden. Budget 1 hour per HID
lamp per week when maintaining larger
gardens. Maintenance time will fluctuate
from planting to harvest. Maintenance
consists of fertilizing and watering by
hand or automatically, staking plants,
measuring growth, cleaning up, and
making sure all systems are functioning
well and all plants are healthy.
Flowering Time: 60 to 70 days
Watts
Yield gm
Yield oz
200
100-200
3.5 -7.0
400
200-400
7.0-14
600
300-600
10.5 -21
800
400-800
14-28
1000
500-1,000 16-32
Step Two: Budget
Budget about $1,000 USD to construct
a do-it-yourself indoor medical cannabis
garden room. Budget $1,5004- if you
purchase a prefabricated “garden closet.”
This is an approximate budget for a 600-
watt HP sodium lamp and two 65-watt
CFLs and the necessary construction
and growing supplies. If you are on a
super tight budget, you can purchase
secondhand equipment by applying
ingenuity and finding deals. Of course
costs will vary depending upon prices in
your area and the components you need
to purchase.
Step Three: Tools
There are some tools an indoor garden
er must have and a few extra tools that
make indoor horticulture much more
precise and cost effective. The extra
tools help make the garden so efficient
that they pay for themselves in a few
weeks. Procure all tools before bringing
plants into the room.
If the tools are on hand when needed,
chances are they will be put to use.
126
GARDEN ROOMS
www.marijuanagrowing.com
EXPENSES FOR CONSTRUCTING A GARDEN CLOSET*
"Both financial and environmental costs increase as the level of sophistication
increases. For example, if electricity costs $0.15 per kWh (1000 watts for 1 hour),
then 30 days X 12 hours = 360 hours X $0.15 = $54 per month for electricity.
Equipment,
Supplies,
and Tools
Average
Economical
Used
grow lights
$300
$200
$50
ventilation fan
$100
$50
$50
circulation fan
$40
$30
$20
charcoal filter
$200
$200
$50
thermometer/
hygrometer
$30
$30
$30
white walls
$30
$20
$0
containers
$30
$0
$0
soil or soilless mix $30
$20
$20
tools
$100
$50
$0
fertilizer
$30
$30
$30
construction
supplies
$110
$50
$10
Total (in USD)
$1,000
$680
$260
Electricity for 2 months of flowering would cost $108.
A hygrometer is a good example. If
plants show signs of slow, sickly growth
due to high humidity, most gardeners
will not identify the exact cause right
away. They will wait and guess, wait and
guess, and maybe figure it out before a
fungus attacks and the plant dies. When
a hygrometer is installed before plants
are brought into the garden room, the
horticulturist will know from the start
when the humidity is too high and is
causing sickly growth.
Tools
Here are a few tools you will need to set
up your garden room.
I like to use both hand tools for small
jobs and power tools when appropriate.
Tools Normally Needed
• saws—Japanese
• Two manual saws: one (flat) for cut
ting boards and one for cutting holes.
(You can also use a power saw.)
• electric drill with a set of drill bits for
wood, metal, and ceramic
• clawhammer
• manual screwdriver or battery-pow
ered screwdriver
• hygrometer
• light meter
• moisture meter
• pH tester
• pliers
• pruners or scissors
• putty knife
• tape measure
• thermometer
• 400-watt lamp
• 15-watt timer
• 150-wattfan
Supplies Normally Needed
• pencil and notebook
• spray bottle
• biodegradable liquid dish soap
• indelible marking pens to mark
distances and identify plants
• measuring cup and spoons
• butterfly screws
• butterfly bolts
• ceramic and wood screws
• screws and nuts for Mecalux
• Sheetrock screws
• cable ties
• wire ties
• duct tape
• Velcro to seal doors and section
off rooms
• Visqueen plastic for walls
• Teflon tape to seal treads and prevent
moisture leaks
• caulk
• plywood for ceiling
• several hooks to hang lamps, cords,
timers, etc.
• 560 total watts of electricity
• yardstick (metrico) to measure
plant growth!
Step Four: Site Selection
The location of the garden room is
often an unused space in a home or
outbuilding. The garden room will need
irrigation water, air circulation and air
exchange, grow lights, soil, and medical
cannabis plants. Walls and ceilings may
need to be insulated to facilitate regu
lating temperature. The flowering room
space should be a minimum of 5 feet
(1.5 m) high to allow space for contain
ers, lights, and maximum plant growth.
Keep tools and supplies organized in a closet.
www.marijuanagrowing.com
127
Clone gardens using fluorescent lamps
can have a low, even profile so that light
is best used.
Four basic locations for a garden room
include: basement, attic, ground floor,
and outbuilding.
Step Five: Design the Room
Once you know how much room you
need in order to grow, where you want
to grow, and if you will need 1 garden
room or 2, you are ready to design your
garden or purchase a ready-made grow
closet. I like to draw the room to scale
on paper before constructing it so that
I can figure out what will be needed
to construct the room. In any event,
constructing a garden room always takes
more trips to the hardware and hydro
ponic stores than planned!
This prefabricated garden closet with
a single growing space measures 4x4
feet (120 x 120 cm). The ballast for the
600-watt HPS lamp is located outside
the room. The space below the growing
bed serves as a storage area.
Garden Room Options
Single room for vegetative
and flowering
a. Purchase clones at a dispensary, grow
them for 2 to 4 weeks before flowering
b. Take clones and grow for 2 to 4 weeks
after roots strike before flowering
This medical cannabis gardener uses a trapdoor
to access an unused part ofthe indoorfacility.
The clone room stays closed and clean.
c. Grow seedlings of autoflowering fem
inized plants
d. Grow seedlings, cull/separate males,
flower females
e. Grow seedlings, open pollinate males
and females. See chapter 25, Breeding.
Two rooms, one vegetative and one
flowering
1. Grow clones and mother plants
a. Grow consecutive crops of clones,
harvest every 2 months
Most gardeners start out with a crop grown
in a single room. After they harvest the crop,
they introduce a new batch of seedlings or
clones. The photoperiod is switched back to
an 18/6-hour day/night photoperiod and the
cycle continues.
b. Grow perpetual crops of clones,
harvest 1 to 3 times weekly
2. Grow consecutive or perpetual crops
of Fl hybrid feminized seedlings
3. Grow consecutive or perpetual crops
of Fl hybrid regular seedlings, cull
male plants
Set up 2 rooms: Productive indoor
gardens consist of 2 rooms, a vegetative/
mother/cloning room, about a quarter
the size of a second room used for
A basement is a great location for a garden
room because the temperature and humidity
stay relatively constant. Concrete walls
backed with soil serve as insulation. Open
earth or subterranean cellars with a dank
moist atmosphere should be avoided. Base
ments are also more isolated and have less
traffic.
Attic garden spaces are isolated and more
difficult to access. Limited access can make
garden room setup and maintenance more
time consuming. Heat buildup can be a
problem too. If the roof is not insulated, the
garden may sufferfrom cold in the winter and
high temperatures in the summer. Unexposed
roofs with attics located under trees or shade
are easiest for controlling temperature and
humidity. Cautious gardeners go so far as to
construct a false wall and doorway or a trap
door to enter the garden room.
Outbuildings are less secure and should have
an alarm system. Outbuildings, barns, and
garages not attached to homes often lack
security unless equipped with a security fence,
motion-detecting floodltghts, an alarm system,
and possibly a guard dog. Less-secure struc
tures are easier for thieves to break into; a
garden is much easier to secure when the entry
is within another building.
128
GARDEN ROOMS
www.marijuanagrowing.com
.
I-L
This grow closet is divided by a shelfjust
below the center point. The vegetative room
for seedlings, clones, and mothers (shown in
the photograph of the garden below) is illu
minated by two 5 5-watt compact fluorescent
bulbs. The flowering room above is illuminat
ed by a 600-watt high pressure sodium lamp.
flowering. The light is on in the vegeta
tive room 18 to 24 hours a day, and the
flowering room has a light schedule of
12 hours on and 12 hours off. Smaller
vegetative plants take up less space
than older flowering plants and can be
huddled together. For example, a 250- or
400-watt metal halide could easily illu
minate vegetative plants and clones that
would fill a flowering room lit by 2 or 3
600-watt HP sodium lamps. If the metal
halide in the vegetative room is turned
off, fluorescent and compact fluorescent
Main-floor garden rooms located in closets,
cabinets, bedrooms, and spare rooms are very
common. These rooms are easy to access and
maintain. The atmosphere is usually easy to
regulate because it is controlled along with the
temperature and humidity of the home. Some
times finding a readily accessible window or
airvent is difficult.
Clones and mothers can be grown in the same
room.
lamps are more economical and will
work well to root clones.
Consecutive harvests every 60 to 70 days:
Fl hybrid seedlings or clones and moth
ers are grown in the vegetative room in
the lower portion of the closet. Seed
lings or clones advance into strong veg
etative growth and are moved upstairs
This compact setup has 2 garden rooms: one
vegetative room for growing seedlings, clones,
and mothers, and a separate room forflower
ing. A 600-watt HPS lamp is in the flowering
room and two 65-watt CFLs illuminate the
vegetative room. The side-by-side orientation
of the rooms allows the vegetative room to
be taller and narrower and the closet a little
wider. The higher profile of the flowering
room allows space fora hydroponic reservoir
below. It also provides space above and below
for appliances and storage.
In this simple sea ofgreen layout, there
are ten plants in each tray (80 total plants)
illuminated by a single 1000-watt HID. Each
week one tray of ten plants is harvested, and
ten new plants are started.
to the flowering room every 60 to 70
days, after ripe buds from the previous
crop are harvested. This room requires a
bit more knowledge and care but is very
productive. Gardeners should harvest
about 7 to 14 ounces (198-396 gm) every
60 to 70 days from this garden.
Perpetual Crops: Harvesting a single
flowering plant every 1 to 4 days is the
most efficient way to employ artificial
lighting, but it is more labor intensive.
Mothers, clones, and Fl hybrid seed-
Three gardens in this photo show a continuous
growth cycle. Clones are growing under
fluorescent lights above a vegetative garden
under CFL light below. To the left HP sodium
and LED lamps illuminate the flowering
garden.
www.marijuanagrowing.com
129
lings are grown in the vegetative room.
Seedlings and clones are grown into
strong vegetative plants that are moved
to the flowering room whenever a
flowering plant is harvested. This room
requires a little more organization but is
about 20 percent more productive than
harvesting an entire crop and replanting.
Several clones are taken every day or
every week. Every one to three days a
plant or two is harvested. A new cutting
takes the place of every plant harvested.
Step Six: Electrical Needs
A typical home has a breaker box, but
older homes may have fuse boxes. Each
fuse or breaker switch controls an
electrical circuit in the home. In North
America using 120-volt service, fuse or
breaker switches are rated for 15, 20, 25,
30, or 40 amperes (amps). Breakers list
the amp rating on the switch lever.
The average small 1- or 2-room garden
closet will need a single 15- to 20-amp
electrical circuit at 120 volts and a 10- to
15-amp circuit at 240 volts. An electri
cal circuit is overloaded when it is at 80
European breaker boxes control 240 volts
of electricity at 50 cycles. The amp rating is
printed on the end of the switch lever.
percent capacity. For example, a 120-volt
15-amp circuit is overloaded when it
draws 12 amps, and a 20-amp circuit is
overloaded at 16 amps.
To find out which electrical outlets are
controlled by a fuse or breaker switch,
remove the fuse or turn the breaker
switch off. Test each and every outlet
in the home to see which ones do not
work. All the outlets that do not work
are on the same circuit. All outlets that
work are on other circuits.
When you have selected a desirable
circuit, unplug everything—lights, TVs,
stereos, toasters, and so forth—on that
circuit. Look at the circuit’s amp rating
on the breaker switch. If it is rated for 20
amps, you can plug one 600-watt HID
into it. A leeway of about 5 amps is there
to cover any power surges and incon
gruence. If the circuit is rated for 20 or
more amps, it may be used for a 1000-
watt HID and a few other low-amp
appliances. To find out how many amps
are drawn by each appliance, add up
the number of total watts they use, and
divide by 120. If you are using 240-volt
service, add the total number of watts
and divide by 240.
Typical electricity consumption for
small room
600-watt lamp
160-watt fluorescents
15-watt timer
200-watt fan
100-watt fan
875 total watts
This large circuit box from a North American
garden is full ofbreaker switches that meter
120 volts of electricity at 60 cycles to the
garden room.
Ideally a ground fault interrupter (GFI)
electrical outlet with a separate breaker switch
inside will be in the garden room; if not, they
are inexpensive and easy to install. A GFI
outlet is essential for safety! Keep water away
from outlets.
Grounded timers connected to an electrical
power strip control several nutrient-solution
pumps at the same time.
130
GARDEN ROOMS
www.marijuanagrowing.com
Volts x Amps = Watts
Volts Amps Watts
120
7.3
876
120
4.7
564
120
6.5
780
Volts Amps Watts
240
3.65 876
240
2.35 564
240
3.25 780
Appliance
Watts
Amps
@120 V
Amps
@240 V
100-watt lamp
0.83
0.42
250-watt lamp
2.08
1.04
400-watt lamp
3.33
1.67
600-watt lamp
5.00
2.50
1000-watt lamp
8.33
4.17
100-watt
circulatory fan
0.83
0.42
150-watt vent fan 1.25
0.60
50-watt pump
0.42
0.21
IMPORTANT! Employ a certified
electrician to complete any work that
requires wiring or opening the fuse box!
An electrician friend recently checked
the new wiring in a small medical canna
bis warehouse garden. It was three-phase
electric service with three hot wires. The
original “uncertified electrician” had
wired the garden room in a way that eas
ily could have created fires in two places.
ALWAYS employ a certified electrician
when installing electrical devices!
If an extension cord must be used, make
sure the wire for the extension cord is at
least 16/3 (16-gauge wire with 3 strands,
one of which is grounded) for 120-volt
systems or it will lose voltage enroute.
When using 240-volt systems, wire thick
ness can be smaller. Do not let the run of
the electrical cord extend more than 10
feet (3 m)—the shorter the better.
Step Seven: Enclose
the Garden Room
Enclose the room with white Visqueen
plastic, plywood, or moisture-resistant
green Sheetrock known as “sound
board” in the United States. Secure
plastic to walls with staples, and screw
down 1 X 2-inch (2.5-5 cm) strips
Enclose the room, if it isn't already enclosed.
Remove everything that does not pertain to
the garden, including furniture, drapes, rugs,
and curtains that may harbor fungi and other
undesirables. An enclosed room allows easy,
precise control of everything and everyone that
enters or exits, as well as what goes on inside.
with Sheetrock screws or duct tape.
Join seams together with duct tape.
Insulating the room will help contain
sound and help control temperature and
humidity. Cover the outside walls with
Sheetrock once it is insulated. Sheetrock
will further deaden the sound and make
the room blend in with the rest of the
rooms in the home.
Insulate windows and walls to keep
room cool in summer and warm in win
ter. If covering a window, make it look
Always use 3-prong grounded plugs.
Ifyour home is not equipped with working
3-prong grounded outlets, buy a 3-prong
grounded plug and outlet adapter. Ground
wires are either green or brown, or brown
with a green stripe. Attach the ground wire
to a grounded ferrous metal object like a
grounded metal pipe or heavy copper wire
driven into the earth to form a ground, and
screw the ground into the outlet face.
NOTE: All electrical outlets and plugs require
a ground wire for safety.
Frame in the new garden room with wood or
metal studs. Coverframed garden closet with
sheet rock or plastic.
aesthetically pleasing and conform to
the architecture of the home. Basement
windows often are insulated and painted
to look like the foundation. Avoid light
leaking through a crack in an uncovered
window, which could annoy neighbors.
Step Eight: Divide
into Two Rooms
Divide the room to make a vegetative
room for seedlings, clones, and mothers
on the bottom third and a flowering
room on top. Install a plywood shelf to
form a partition between the top and
bottom of the garden closet. Or pur
chase a small garden closet and set it
inside the larger flowering room.
Frame 1 X 2-inch (2.5 X 5 cm) boards
(or Mecalux) 3 to 3.5 feet (91-107 cm)
from the floor around the walls of the
room. Secure 1 X 2-inch (2.5 X 5 cm)
boards with screws. Cut a 3 X 4-foot
(91 X 122 cm) piece of 0.75 -inch (1.9
cm) plywood with a 6 X 6-inch (15 X 15
cm) piece cut from the right rear corner
for the duct vent. Set the plywood on
theledgeofthe1X2-inch(2.5X5cm)
boards with the vent hole toward the
back wall.
Install rigid 6-inch (15 cm) ducting
through the hole to connect the vege
tative and flowering rooms. Use small
screws to install a small inline fan in the
pipe to direct air up from the vegetative
room to the flowering room.
www.marijuanagrowing.com
131
Install a door with a lock and key. Make sure
to seal the perimeter of the door with plastic or
carpet to prevent leaks and help control tem
perature, humidity, light, and sound inside the
garden room. Make certain no pest-attracting
light is visible from outside.
Step Nine: Increase Light
Reflectivity
Cover walls, ceiling, floor—everything—
with a highly reflective material like flat
white paint or Mylar. Good reflective
light will increase the effective cover
age of an HID lamp by more than 10
percent—all for a few dollars’ worth
of paint on the walk! Reflective white
Visqueen plastic is another inexpensive
way to “white out” a garden room, with
the added benefit of protecting walls and
floors from moisture.
When painting walk and ceiling white,
use high-quality semigloss latex paint.
A freestanding garden is a good alternative to
making holes in walls.
Do not use inexpensive paint; it takes
longer to apply. Ask the store clerk to
add a fungicide if the paint does not
already contain one. For fast application,
use a roller to apply paint on large flat
surfaces and brush-paint corners.
Ideally, the floor should be concrete or
a smooth surface that can be swept and
washed down. A floor drain is also very
handy. If the floor is not concrete or tile,
cover with heavy plastic or impermeable
painter’s drop cloth to form a large tray
to protect the floor from dirt and water.
Fold the plastic so that at least 6 inches
(15 cm) run up the wall. Attach the plastic
floor covering to the walk with duct tape
or staples.
Clones root under fluorescent lamps on the
right and the mother plant grows on the left.
Step Ten: Install a Vent Fan
Constant air circulation and a supply of
fresh air are essential but often inade
quate for healthy plants. A vent fan is
necessary in virtually all garden rooms,
and there should be at least one fresh-air
vent in every garden room. Vents can be
an open door, window, or duct vented
to the outside. An exhaust fan vented
outdoors that pulls new air through an
open door usually creates an adequate
exchange of air within the room. Larger
rooms will need an intake fan too. If the
room contains a heat or air conditioning
vent, it may be opened to supply extra
heat or air circulation.
Secure shelf to upright vertical supports.
Secure partition to supporting wood around
the perimeter.
A dog carrier was modified to form a small
seedling clone and mother plant room for these
'OG Kush1 X ‘Master Kush'feminized plants.
132
GARDEN ROOMS
www.marijuanagrowing.com
Masking agents work wellfor small garden
rooms.
Heavy air filters can also be set on end or set
on a table. The important thing is that they are
able to whisk out the air and filter it through
the carbon.
Ventilation fans can be affixed to the ceiling
so that they are out of the way. A fan on the
ceiling can provide ventilation to the top parts
of the garden room.
One of the biggest obstacles to con
structing a garden room is where and
how to run the exit ducting for the ven
tilation fan with a minimum of work
and structural change to the room.
Often the vent can run out a window,
chimney, or other preexisting exit. The
last-choice option is to cut a hole in the
ceiling or wall.
See “Setting Up the Ventilation System”
in chapter 16, Azr, for complete informa
tion on setting up a vent fan.
Step Eleven: Install an Air Filter
Most garden rooms require some sort
of fragrance control to keep air fresh. A
charcoal filter is often the best option.
Masking fragrance is often less expen
sive than purchasing a carbon filter,
especially in small grow rooms. Mask
lingering fragrances with a strong air
freshener or a host of odor masking
products. See “Fragrance” in chapter 16,
Air, and search “air freshener reviews”
on the Internet for more information.
Activated charcoal filters are the most
popular and effective method to filter
outgoing air. Unless made from new
lightweight carbon-impregnated materi
al, carbon filters can be quite heavy and
will require stout mounting. Make sure
to choose the right one for your garden
area so you don’t have to mount a filter
that is too heavy. For example, a carbon
filter rated at 200 cfm (cubic feet per
minute) is more than adequate for the
average closet garden room.
See www.carbonactive.ch for information
on outstanding new lightweight carbon
filters. The site also has a good calculator
for filter and fan size in relation to room
size.
Check www.canfilters.com and
phatfilter.com for more on standard
activated charcoal filters. Note: They
are quite heavy.
For more information on air filtering
and fragrance control see chapter 16, Air.
Step Twelve: Install
Circulation Fans
Air circulation is necessary in all garden
rooms, especially during flowering.
Usually air circulation must be increased
with circulation fans. Small clip-on
oscillating fans come in very handy
to circulate air in small garden rooms.
They are easy to move in order to direct
air where it is needed. Mount inexpen
sive oscillating fans to the ceiling or
buy wall-mounted fans. See the fan size
table in chapter 16, Air, to help choose
the proper circulation fan(s) for your
room. In general, rooms require at least
one 12-inch (30.5 cm) circulation fan for
every 400 watts of light. Install fans so
that all leaves on plants can be seen to be
slightly moving in the airflow.
When installing oscillating fans, make
sure they are not set in a fixed position
White walls help reflect up to 10 percent of the
light in a room. This reflective light ensures
that plants on the edges of the garden receive
all possible light.
A good ventilation fan is essential!
A carbon filter is essential equipment in most
garden rooms in order to strip fragrances from
the air before it is expelled outdoors.
www.marijuanagrowing.com
133
and blowing too hard on tender plants,
which could cause windburn and dry out
the plants, especially tender seedlings
and small clones. Regardless of plants’
size, excessive wind will slow growth.
Step Thirteen: Install a
Hygrometer/Thermometer
You can control the climate in most
garden rooms with a vent fan attached
to a timer or a rheostat. See sections
on “Temperature” and “Humidity” in
chapter 16, Azr, for more information.
Personally inspecting the meter and
plants daily will help you gain expe
rience and learn exactly how much venti
lation the room needs in order to keep
the temperature about 75°F (24°C) day
and 65°F to 70°F (18°C-21°C) at night
and the humidity below 50 percent (day/
night) in the flowering room, and the
vegetative room at 75°F (24°C) day and
65°F to 70°F (18°C-21°C) at night and
50 to 60 percent humidity day and night.
Environmental controllers control
temperature and humidity and other
garden room functions. Prices range
from $80 to $1,500 USD. Quality atmo
spheric controllers cost a little more and
are well worth the money. Check these
At least one thermometer is essential in every
garden. Mounting 3 thermometers is a good
idea, 1 near the ceiling, 1 at plant level, and 1
near the floor. This allows you to distinguish
all temperature zones.
sites for more information on atmos
pheric controllers:
www.greenair.com
www. hyd rofar m. c om
www.sunlightsupply.com
Step Fourteen: Install Lights
To install a lamp in the flowering room,
insert 2 hooks strong enough to support
30 pounds (13.6 kg) for each light fix
ture. Position the hooks in a beam or
2X4-inch(5X10cm)boardand
The lamps and ventilation system are suspend
edfrom recoiling hangers that are anchored to
the ceiling with hooks screwed into wooden
beams behind the Sheetrock. The entire system
can be raised and lowered to change the dis
tance from plants.
mount to the ceiling. Mount the HID
reflective hood/bulb fixture, attaching it
to the hook(s) with chain or cord. If
using cord, attach the other end to a
cleat mounted on the wall so that it is
easy to move the fixture up and down.
Hang fixtures from an adjustable chain
or cord. Attach the cord’s loose end to a
cleat mounted on the wall. If a ballast is
attached to the fixture, its hooks should
be strong enough to support 30 pounds
(13.6 kg) for each lamp.
Inexpensive fans are often used in garden
rooms. Removing the fan shroud lowers air
friction and extends the fan's life. Be careful
to not hurt yourselfon a fan with no shroud.
Install at least 1 maximum/minimum
thermometer/hygrometer in each garden
room to measure temperature and humidity.
Digital models are relatively accurate and
easy to use. Calibrate them against 1 or 2
other thermometer/hygrometers so they
remain accurate. Place the thermometer/
hygrometer equidistant between ceiling and
floor, and fasten it to a wall or hang it from
a string. Check the meter daily. Preferably
install 3 units, 1 near the ceiling, 1 halfway
up the wall, and 1 near the floor. Compare
readings daily. Increase air circulation ifair is
stratified with different temperature readings.
This CO2, temperature, and humidity
controller makes it easy to plug in appliances
and start growing.
Atmospheric controllers are normally located
next to timers and all the control systems for
the garden room.
134
GARDEN ROOMS
www.marijuanagrowing.com
f
I
Orient the reflective hood fixture so that
light shines most efficiently. Less light
shines from the ends of the fixture and
more from the sides, thus throwing a
rectangular footprint of light below.
For example, if the room is 3 X 4 feet
(91.4 x 121.9 cm), orient the HID fix
ture so that the ends of the bulb run on
the 3-foot (91.4 cm) axis and the sides
along the 4-foot (121.9 cm) axis.
Setting Up the HID System:
Step-by-Step
Step One: Both the lamp and ballast
radiate quite a bit of heat. Take care
when positioning them, so they are not
so close to plants or flammable walls and
ceiling that they become hazardous. If
the room has limited space with a low
ceiling, place a protective, nonflammable
material such as sheet metal between the
lamp and ceiling to protect from heat.
This garden room has all the electrical controls
in one place, including the light timer. The
lamps are on a dedicated circuit that is able
to handle the load (amperage) drawn by the
six lamps.
When hanging the lamp on the overhead
chain or pulley system, make sure elec
trical cords are unencumbered and not
too close to any heat source.
Buy and use a good electronic or analog
timer to keep the photoperiod consis
tent. It is most effective to place the
remote ballast near the ceiling to keep
the room cool. Place it outside the
garden room if the room is too hot.
Using a paper towel, clean smudges off the
bulb after screwing the bulb in place. Finger
prints attract dust that dims light. A light
deflector is placed under this bulb so that the
bulb and reflector can be placed closer to the
canopy of the garden.
Step Two: Insert the HID lamp plug
into an electrical circuit dedicated to
the garden room. A 1000-watt HID
lamp will use about 9.5 amperes (amps)
of electricity on a regular 120-volt house
current.
Step Three: Once the proper circuit
is selected, the socket and hood are
mounted overhead, and the ballast is
in place (but not plugged in), screw the
HID bulb finger-tight into the socket.
Make sure the bulb is secured in the
Screw a large eyebolt into the wooden beam
behind the Sheetrock. Larger threads may
require drilling a smaller diameter hole first.
Attach the lamp to a chain or a pulley system
so that it is easy to raise and lower.
A timer is essential in every garden room.
Simple inexpensive digital timers will take
care of most tasks.
www.marijuanagrowing.com
135
Plug the HID system into the timer and turn
it on!
Small gardens are easy to water by hand using
a container; fora large garden, hand-watering
with a container is time consuming, tedious,
and exhausting.
The lighting system is all set up and turned on.
This interesting reflective hood and ventila
tion system support two 600-watt HP sodium
bulbs.
♦
socket, but not too tightly, and make
certain there is a good, solid connection.
When the bulb is secure, wipe off all
smudges in order to increase brightness.
Some gardeners prefer to handle HID
bulbs with latex gloves to avoid leaving
greasy fingerprints.
Step Four: Insert the 3-prong plug into
a timer that is in the OFF position. Plug
the timer into the grounded outlet, set
the timer at the desired photoperiod,
and turn the timer on. The ballast will
hum, and the lamp will flicker as it slow
ly warms up, reaching full brilliance in
about 5 minutes.
Step Fifteen: Water Source
and Reservoir
A readily accessible source of water will
reduce labor. The larger your garden
becomes, the more water it will need. A
10 X 10-foot (3 x 3 m) garden could use
more than 50 gallons (189.3 L) per week.
Carrying water is hard, regular work.
One gallon (3.8 L) of water weighs
about 8 pounds (3.6 kg); 50 x 8 = 400
pounds (181.4 kg) of water a week! It is
much easier to run in a hose with an on/
off valve or install a hose bib in the room
than to schlep water back and forth. A
3-foot (91.4 cm) watering wand attached
to the hose on/off valve makes watering
easier and saves cannabis branches from
being broken when watering in dense
foliage. Hook up the hose to a hot and
cold water source so the temperature is
easy to regulate.
Step Sixteen: Install
a Hydroponic or Soil Garden
Move in soil-filled containers and
hydroponic systems. Set up the
irrigation system and make sure it is
functioning properly.
Step Seventeen: Systems
Check - Ready to Grow!
The room is all set up. Now is the time
to test everything to make sure it
operates properly before bringing in the
plants. Turn on the lights, fans, and
everything else. Turn it all on at the
same time to make sure it will not blow
A water source in the garden room makes wa
tering easy. But sometimes the source of water
is overgrown!
a fuse or trip a breaker. Make sure the
humidity and temperature are at safe lev
els. Set a large pan of water on the main
growing beds to simulate plant transpi
ration. Close the doors of the garden
room and let everything run for an
hour or two. Open the doors and check
the temperature and humidity in the
room. Next turn off the fans and let the
light run for 60 minutes with the doors
closed. Check the temperature and hu
midity levels to see if the room is hotter
and more humid with no ventilation, just
in case the vent fan malfunctions.
Test hydroponic garden systems before
adding plants. Cycle all the systems to
ensure that water flows from all emit
ters and runs back to the nutrient tank
unobstructed. Check for leaks, and clear
out any blockages. Cycle the timer’s on/
off functions several times while you
are watching the system to ensure that
everything works properly.
Move seedlings and rooted clones into
the room. Huddle vegetative plants
closely together under the lamp. Make
sure the HID lamp is not so close to
small plants that it burns their leaves.
Position 400-watt lamps 18 inches (45.7
cm) above seedlings and clones. Place a
600-watt lamp 24 inches (61 cm) away,
and a 1000-watt lamp 30 inches (76.2
cm) away. Hang a precut string from
the hood to measure the distance from
lamp to plants. (Measure daily!) Move
in plants and turn on the lights. The
indoor medical cannabis garden is ready
to grow!
-------- 1
136
GARDEN ROOMS
www.marijuanagrowing.com
138 Siting the Greenhouse
138 Types of Greenhouses
141 Greenhouse Construction
141 Size of Greenhouse
141 Framing
142 Benches
142 Hoop-House Construction
143 Coverings
143 Plastic Skins
145 Shade Coverings
146 Climate Control
146 Air Circulation
146 Condensation
147 Cooling
148 Heating
149 Artificial Lighting
149 Light Deprivation
3®
ES
CANNABIS
HORTICULTURE
Growing medicinal cannabis in green
houses is efficient and much less taxing
on the environment and pocketbook than
gardening indoors. Unheated or heated-
and-cooled greenhouses extend seasons
and protect plants from the elements.
Containerized plants are mobile, raised
beds warm early, or you can plant directly
in the ground. Greenhouses can also be
equipped with lights to extend vegetative
growth or augment natural sunlight.
Greenhouses can be blacked out to induce
flowering with a 12/12 day/night schedule
during the summer.
The type of structure you select depends
on the size and location of your growing
area, your budget, and how much time
you can dedicate to your garden. Small,
movable, “pop-up” greenhouses are con
venient and practical. Simple cold frames
and greenhouses can be assembled from
common materials such as old framed
windows and 2 X 4s (5.1 X 10.2 cm).
Small heated-and-cooled greenhouses
are a little more complex. Hoop houses
are inexpensive, practical, and easy to
install. Large commercial greenhouses
are best purchased from and installed
by professionals. A good specialized
greenhouse can be used year round in
most climates. However, heating and
cooling costs vary in relation to climate
and seasonal weather changes.
When deciding on a garden structure,
first take a look at your budget in terms
of both money and time. Greenhouses
Growing in a greenhouse is easy once the
structure is set up and covered. Plants often
grow so fast that they fill the entire greenhouse!
can be just as much or more work as
an indoor garden. Start with a small
greenhouse and learn the ins and outs of
growing in your climate. Greenhouses
tend to warm up quickly when the heat
of the sun hits them, and cool rapidly
when the sun goes down. Keeping the
temperature from fluctuating too much
can be difficult. It takes understanding,
experience, and a little luck to master
temperature management.
Plant in the earth or in containers when
growing in a greenhouse. This gardener is
experimenting with growing the same
varieties in soil and in containers.
www.marijuanagrowing.com
137
Start your greenhouse project by con
sidering how much area you have for the
footprint and how much space you will
need for the desired number of plants.
Think about how many plants you can
grow. For example, if allowed to grow
only 6 plants outdoors, they should be
big plants.
Here are some great greenhouse sites
to get you started:
www.vitallandscaping.com
www.become.com/greenhouses
www.charleysgreenhouse.com
www.cpjungle.com
www.doityourself.com/scat/
basicinformation#b
www.floriangreenhouse.com
www.greenhousemegastore.com
www.hobbygreenhouse.org
www.igcusa.com
www.permies.com
www.turnergreenhouses.com
Greenhouses must have:
• full sun to partial midday shade
• proper air circulation and ventilation
• good humidity and pest control
• water-resistant electrical outlets
• a hose bib to provide water
• insulated water lines to avoid freezing,
if necessary
• tables, benches, and places to hang
plants (if they are not on the floor)
• a dry place to store fertilizers, potting
soil, and tools
Siting the Greenhouse
Choosing a site for the greenhouse may
be easy because certain factors—size of
backyard, property limits, location of
existing buildings and trees, and so on—
may already limit location possibilities.
Greenhouses can be temporary or
permanent. Permanent structures are
more expensive to construct and may
require a building permit.
No matter what, greenhouses should
receive ample light, especially when
plants are flowering. However, midday
sun could create more heat and problems
than simple cooling and shading are able
Site the greenhouse where it will receive full
sun all day long. Remember, though, that the
sun may need to be blocked with shade cloth to
cool the greenhouse.
to control economically. In such a case,
it is advisable to site the greenhouse in
filtered sun or so that it is under filtered
sunlight or a shadow during the hottest
part of the day.
Unless square or round, site the green
house so that the sun passes from one end
to the other rather than from one side
to the other. This way plants receive the
most direct light possible in relation to
the path of the sun. Shadows are reduced
to a minimum when the greenhouse is
oriented parallel to the arc of the sun.
The site will dictate how plants are able
to grow. A good site has:
• super soil
• lots of light
• good ventilation
• nutrients
• water
• flat land
• easy access—you are able to drive to
it to provide the tender loving care
your plants deserve
Location and exposure will depend on
climate, but in general, you will want
the greenhouse to receive ample sunlight
yet not be exposed to strong winds.
The structure should be away from any
areas where falling limbs or other debris
might create problems. Greenhouses in
hot and tropical climates will require
more shade and water. See “Sunlight and
Siting the Garden” in chapter 12,
Outdoors, which is full of pertinent
information.
This greenhouse is located inside a large tool
shed. The walls are white, and the ceiling is clear
plastic to let in sunlight. Discreet greenhouses
help keep neighborhood relations pleasant.
Types of Greenhouses
The type of greenhouse you choose is
governed by your climate, your budget,
and your desires. The first consideration
is climate. An unheated greenhouse in
the mild Pacific Northwest can easily
extend spring and fall growing seasons
by 6 weeks each, 3 months total. Coastal
California gardeners can grow all year in
the same greenhouse and spend little on
heating or cooling. With a little heat and
proper setup, a greenhouse can produce
nearly year round in Michigan and other
northern climates. But be careful when
planting early in the year. Plants out
grow the confines of the greenhouse and
are difficult to cover before harvest if
weather is rainy.
Use miniature greenhouses—cloches,
plastic milk jugs, Wall O Water, and so
forth—to extend the spring planting
season by 2 to 6 weeks. Miniature green
houses protect plants from cold weather
and wind. They are easy to use when
hardening-off cannabis transplants too.
In many climates, extending the spring
season could allow a gardener enough
time to plant both a spring crop and a
fall crop.
Cloches are individual protective cover
ings that keep plants warm at night. A
simple cloche is a plastic milk container
with its bottom cut off and its lid
removed. Placed over a plant, the plastic
will capture and retain heat while allow
ing ventilation through the open top.
Make cloches out of wax paper, glass, or
jars. You can also buy commercial units
made of rigid, transparent plastic or
138
GREENHOUSES
www.marijuanagrowing.com
Cut the bottom from a plastic container to
form a cloche. Remember to remove the lid
for ventilation.
Cover greenhouses with corrugatedfiberglass
to exclude inquisitive passersby.
A window box greenhouse orfreestanding
greenhouse is a great place to start seedlings and
clones. With enough light, vegetative plants do
well. Most window box greenhouses are too
small to accommodate large flowering plants.
heavy-duty wax paper. They are easy to
use and stack well for storage.
The Wall O Water is a plant lifesav
er. It is a water-filled teepee that uses
the heat-emitting properties of water
to shield plants from excess heat and
keep them warm in the cold. It holds 3
gallons (11.4 L) of water and fits over the
plant. During the day, the water absorbs
the heat of the sun, moderating the
temperature inside the teepee. At night,
as the air temperature drops, the water
releases its heat, keeping the plant com
fortable. The Wall O Water does its best
work in the spring when there is still a
chance of freezing. As water freezes, it
releases more heat into the teepee and
can protect plants down to 20°F (-7°C).
Covers protect early transplants and can
help produce a spring crop. The sim
plest option is a lightweight row cover
spread over the plants and held down
with stones or soil. Spun-fiber products
Agronet and Reemay also have sun
protection properties that can be used as
covers in place of the sheet or blanket.
Low-profile greenhouses are perfect for
crops of short plants. It is easy to set up
a low-profile hoop house or greenhouse
alongside a building that gets full sun.
The short greenhouse or cold frame is
easily darkened during full summer and
lets you reap the benefits of the harvest
early! (See “Light Deprivation” on page
149.)
A lean-to or attached greenhouse uses
an existing structure for one or more
sides. The wall of the structure provides
stability and free heat if it is warmed by
sunlight. Attached greenhouses are usu
ally close to water and electricity; how
ever, light might be lacking due to poor
siting or orientation. If the wall gets too
hot, it can be covered with white plastic
to reflect light and cool the wall.
The freestanding greenhouse offers the
most flexibility in size and location. It
can be built to take full advantage of the
sun, but it does not retain heat well and
can be expensive to keep warm. Numer
ous steps can be taken to minimize
heating and cooling costs and environ
mental impact of maintenance. Many
frame types and coverings are available
in kits or raw materials. Coverings can
also be easy to open for ventilation.
There are also a number of good web
sites listed at the beginning of this
chapter to help you choose the plan that
works best for you.
For more information on types
and prices, visit websites such as
www.hoophouse.com.
Hoop houses are inexpensive, practical,
and easy to build. They can be made to
cover raised beds or be constructed on
flat ground. They consist of a series of
parallel PVC plastic or more durable
steel pipes arched over two points of
anchor. The arches are connected across
the top with a stay to add strength to
A Wall O Water will keep plants warm when
temperatures approach the freezing point.
Garden stores sell many different kinds of
small greenhouses.
A lean-to greenhouse uses heat from the house
wall to stay warm.
www.marijuanagrowing.com
139
A crop of 1-2 -foot-tall (30.5 -61 cm) clones
or seedlings planted on May 1 can be harvested
in mid-July in a greenhouse that is darkened
for 12 hours daily.
the structure. A plastic skin is secured
over the arches with tape or removable
clamps. Ends can be closed or kept open
at night for ventilation.
The outer skin can be manually removed
during hot weather and replaced during
cool nights. Once the plants outgrow
the plastic skin it is removed. It is
This greenhouse was built next to a sunny
barn wall. The wall holds heat and protects
the garden from wind.
replaced with a 6-inch (15.2 cm) plastic
mesh that supports and trellises the
plants as they grow.
Hoop greenhouses with removable plastic
coverings work well when growing
medium-to-large plants. The plastic is
removed when weather warms and is re
placed with 6-inch (15.2 cm) plastic mesh
The black plastic is pulled over the PVC
irrigation pipe frame of the greenhouse every
afternoon to give the plants 12 hours of unin
terrupted darkness to induce flowering.
that acts as a trellis to keep branches from
breaking under the weight of buds. See
chapter 11, Greenhouses, and chapter 13,
Case Studies, for more information.
Hoop houses are inexpensive as well as
quick and easy to set up. Plants can be
moved in before or after a hoop house
is set up. Once plants outgrow them,
Hoop houses are easy to set up. First, weed
barrier cloth is set down and secured. The
greenhouse is laid out in a grid in sections
measuring 10 X 8 feet (3 X 2.4 m). Two-foot-
long (0.6 m ) steel rebar stakes are driven
through the weed barrier and halfway into the
ground.
Several arches are erected and connected
with individual pieces of PVC irrigation pipe
secured with duct tape. A long, steelfencepost
provides added stability. The hoop house is
covered with plastic in the spring. When hot
summertime weather arrives, the plastic is
replaced with trellis netting.
This prefabricated greenhouse comes with
its own covering for blackout. The covering
comes equipped with ventilation inlets and
outlets.
Slide a 20-foot (6.1 m) piece ofschedule 40,
0.075-inch (1.9 mm) PVC irrigation pipe over
2 opposing pieces of rebar 10 feet (3 m) apart
to form an arch.
Hoop houses are inexpensive as well as quick
and easy to set up. Plants can be moved in
before or after a hoop house is set up. Once
plants outgrow them, hoop-house structures
turn into trellises to help support heavy
flowering plants.
140
GREENHOUSES
www.marijuanagrowing.com
Adequate airspace is often forgotten when
growing in a greenhouse. This Mexican
greenhouse has plenty ofextra space to let air
circulate.
Always leave enough walkway space so that a
wheelbarrow or small cart can pass through.
Overplanting greenhouses makes mainte
nance difficult and cuts air circulation.
Big plants grow well in the greenhouse floor.
In hard clay soils, a large planting hole filled
with well-amended organic soil is as good as a
large abovegroundfabric container.
hoop-house structures turn into trellises
to help support heavy flowering plants.
Prefabricated greenhouse kits are more
expensive but come with all the parts
and assembly instructions. They can
be complicated to assemble. Some may
offer a video to help with assembly.
Often you can find small and miniature
portable greenhouses at home improve
ment centers and on the Internet.
Medical gardeners interested in larger
greenhouses can see interesting auto
mated greenhouse videos by searching
for “forever flowering greenhouse” on
YouTube.
Setting up a big commercial greenhouse
is beyond the scope of this book. Search
for “commercial greenhouse” using an
Internet browser and you will find all
the greenhouses you could want!
Greenhouse Construction
Both large and small greenhouses cost
money, time, and space. Greenhouses
with a foundation are also more perma
nent. Regardless of the type of green
house you construct, it should be on flat
ground and have easy access.
This section of the chapter on green
houses discusses different construction
options, touching on main points to con
sider. However, providing construction
instructions with diagrams is beyond
the scope of this book. For more specific
information, type “greenhouse plans”
into an Internet browser.
Size of Greenhouse
Total area of the greenhouse is deter
mined by the number of plants you
intend to grow and how long they will
be in the ground or in pots. The longer
plants grow, the more room they will
need and the more problems that can
occur. Induce plants to flower when they
are 3 feet tall, and allow a minimum of 1
square yard (0.8 m2) for indica-
dominant varieties and up to twice as
much space for
dominant variet
ies. Air circulation between plants can
be a problem if plants become too big.
Large plants that are planted early in the
season often outgrow the greenhouse,
which requires that the outside skin of
the greenhouse be removed so growth is
not impaired.
Ample airspace is essential in green
houses. At least half the space in a
greenhouse should be airspace. This
space is necessary for air exchange, air
circulation, and ventilation. Molds,
mites, and insects become problems in
greenhouses with inadequate airspace.
As a general rule, plants should take up
about 0.33 to 0.5 percent of the space in
a greenhouse and air 0.5 to 0.66 percent.
This ratio allows adequate air circulation.
Framing
Framing can be wood, bamboo, metal,
or plastic. Framing to specific dimen
sions and building with premade framed
panels has the advantage of quick
installation and breakdown for win
ter storage. Build all structures using
standard dimensions for framed glass,
plastic panels, and sheeting to get the
most from your materials and work
more efficiently. For example, an 8-foot
(2.4 m) greenhouse can be made with
two 48-inch-wide (122 cm) fiberglass
panels. Center height depends on the
This greenhouse was framed with inexpensive
lumber.
A weed barrier helps retain moisture and
prevents many soil-borne insects from having
easy access to the greenhouse. This medical
cannabis gardener ran the weed barrier outside
the greenhouse for extra protection. It also keeps
mud away and makes the garden floor easy to
clean.
www.marijuanagrowing.com
141
level of the eaves. Low-growing plants
can take an eave of 5 feet (1.5 m); tall
plants need 10 to 14 feet (3—4.3 m).
Greenhouse walkway space is important
for easy access. Too many gardeners are
surprised when it turns into “crawling
room only!” Overgrown foliage in large
or small greenhouses cuts air circulation
and promotes disease and pest attacks,
as well as broken foliage. Room to move
a wheelbarrow in a large greenhouse is
especially valuable when plants grow
beyond beds.
The floor of the greenhouse can be
covered with weed barrier cloth, gravel,
bricks, or concrete. Place a thermal blan
ket under floor covering to insulate from
cold ground. A Styrofoam base in a small
greenhouse keeps cold soil from cooling
containers and greenhouse. You can also
make raised, flat, or sunken beds in the
greenhouse floor. Dirt floors can get
muddy and are difficult to keep “clean.”
Cover muddy floors with sawdust or
straw. A wood, brick, or concrete base
around the bottom of the greenhouse
adds stability to the structure.
Planting in the earth floor of the
greenhouse allows you to use organic
methods. The plants cannot be moved
easily, but they grow bigger and require
less maintenance than container-grown
plants. Without containers, plants also
retain a lower profile, but I still like
raised beds. Growing in Mother Earth is
always better than planting in pots when
growing big plants. Most all the princi
ples that apply to outdoor growing apply
to growing in a greenhouse, too. Check
out chapter 12, Outdoors, and chapter
18, Soil, for more information.
Benches
A greenhouse equipped with benches
makes tending plants much easier. Water
catchment systems can also be set up
to recycle nutrient solution. I like a
greenhouse with tables because when
plants are off the floor, they stay warmer
and are easier to access. Airspace below
benches can serve as storage area for
containers and water reservoirs.
Set up tables along the length of the
greenhouse to make the best use of
space. Allow at least 3 feet (91.4 cm)
between tables and greenhouse walls to
accommodate plant growth and provide
for comfortable access.
Metal benches are much stronger and
more durable than wood but they are
expensive. Frame wooden benches with
enough lumber to support the center
of tables. Cover wood with waterproof
epoxy paint or set plastic ebb-and-flow
tables on benches.
Hoop-House Construction
Mark a rectangular area 6 to 10 feet
(1.8-3 m) wide and up to 50 feet
(15.2 m) long where the greenhouse will
be located. Purchase 20-foot lengths
(6.1 m) of 0.75-inch (1.9 cm) Schedule
40 PVC pipe for every 4 to 8 feet (1.2-
2.4 m) of greenhouse. Two 2-foot-long
A metal hoop superstructure is constructed
over small plants. Long, arced pieces are
pushed into the moist earth. The superstruc
ture is lightweight and fastened together with
duct tape.
This garden was started earlier in the year in
3 different phases. The little clones are planted
2 weeks apart. Planting in sunken beds in the
clay soil allows plants to stay cooler.
(0.6 m) pieces of 0.5-inch (1.3 cm) rebar
are necessary to anchor each end of the
PVC pipe in place. Larger, stronger steel
hoops can be ordered from greenhouse
supply outlets.
Drive the 2-foot (61 cm) rebar 1 foot
(30.5 cm) into the ground on 4- to
10-foot (1.2 to 3 m) centers to form a
rectangle. Place each end of the 20-foot
(6.1 m) PVC pipe over opposing 1-foot
(30.5 cm) pieces of rebar to form an
arch. Use duct tape or zip ties to attach
a stay of 0.75-inch (1.9 mm) Schedule 40
PVC pipe across the top of the arches.
Cover the hoops with a plastic skin and
secure in place with duct tape or clamps.
Remove plastic and replace with 6-inch
(15.2 cm) plastic mesh that supports and
trellises the plants as they grow beyond
the confines of the hoops.
A lightweight shade cloth is stretched over the
hoop house to cover the garden and provide
shade during the hot days of summer.
Once covered, the plants inside the hoop house
cannot be seen from a distance. The shade
cloth breathes so that minimal ventilation is
necessary.
142
GREENHOUSES
www.marijuanagrowing.com
Typically a new gardener will cover a
greenhouse with inexpensive plastic. A door
is framed and installed, as is a vent fam This
greenhouse is covered with a light-reflecting
shade cloth called Aluminet.
There are many interesting videos about
greenhouse design, construction, heating, and
so forth. Search “greenhouse construction” on
YouTube for much more information.
This small backyard patio greenhouse shielded
plants from drizzly rain and kept plants
warmer at night.
Coverings
Greenhouse coverings protect plants
from the elements, but not all are created
equal. Some greenhouse coverings
transmit more light than others, while
some hold heat and stay cool better
than others. Price and durability also
vary substantially. Overall, plastic and
fiberglass coverings provide safe, eco
nomical alternatives to glass. The best
greenhouse films are UV (ultraviolet)
resistant.
Glass greenhouses are traditional. They
enjoy very high light transmission, but
glass is expensive, heavy, and brittle. It is
not practical for most cannabis garden
ers. Keep costs down and use only small
glass greenhouses. Often they can be
assembled from scrap windows.
Plastic Skins
Plastic designed for greenhouses is more
durable than regular plastic, which tears
easily when cut. Greenhouse plastic
resist rips and tears. Quality greenhouse
plastic is knitted instead of formed into
sheets. It costs a little more than regular
plastic but withstands destructive ultra
violet light from the sun. Greenhouse
plastics last for 2 to 3 years before they
need to be replaced. Of course, this does
not take into account extreme weather
such as hurricanes, tornadoes, hail, or
severe icing.
An economical plastic covering is easy
to control and helps to maintain heat
and humidity in the greenhouse. Clear
plastic is equal to glass in producing
quality plants and flower buds. Plastic
greenhouse film is available in clear and
white that diffuses light but still allows
high light transmission.
Choose the plastic that suits your needs.
How long will you need it? Can you use
it and then store it to use for additional
seasons? How will you secure it to the
greenhouse? How will you patch holes?
Rated in mils of thickness, greenhouse
plastics are from 3 to 6 mils thick (1 mil
= 1 thousandth of an inch [0.054 mm]).
Greenhouse plastic is designed to last
This 8-joot-tall (2.4 m) plant is growing in a
large 18-foot-high (5.5 m) greenhouse. Extra
airspace is needed for the transfer of carbon
dioxide and oxygen.
for 2 to 5 years, depending on grade.
Rigid panels are designed to last for 10
years or more.
Polycarbonate multiwall sheeting is
lightweight, almost unbreakable, and
available in double or triple hollow wall
grades. Dual-wall construction makes
this type of covering strong enough to
withstand hailstorms, snow, and tem
perature fluctuations. Clear corrugated
polycarbonate is very durable and has
excellent light transmission.
Biodegradable plastic coverings are
good for a month or two, maybe longer,
depending upon the weather. These
coverings are best used for a short time
to cover individual clones or seed
lings. Normally biodegradable plastic
is available as plastic bags. Sheeting is
expensive, and the short life renders it
impractical.
Polyethylene plastic (PE) is low-cost,
lightweight, provides ample light, and
can withstand fall, winter, and spring
weather. It does not tolerate summer
UV levels. Ultraviolet-inhibited PE lasts
longer, but both types lose heat more
quickly than glass and other plastics.
During the day, this can help keep plants
cooler, but at night the heat loss requires
the use of an artificial heat source. PE is
available in commercial (6 mil) and util
ity (4 mil) grades. Most home improve
ment centers carry lighter-weight utility
grade. Commercial grade is available via
the Internet. Polyethylene plastic will
last for a year or two when kept in good
condition. Smaller tears can be repaired
with a poly repair kit.
www.marijuanagrowing.com
143
Inexpensive plastic and 2 X 4-foot (5 X 10 cm)
boards and a few screws are all that is needed
to construct a greenhouse. Just a little bit of
work building a greenhouse will keep plants
warm and dry and extend growing seasons.
Corrugated fiberglass panels are easy to find at
hardware and building supply stores.
Lexan is one of the best greenhouse coverings
available. The dual-wall construction traps
heat between the outer panes to insulate the
greenhouse. Durable Lexan lasts for years and
is fairly rigid.
Copolymer plastic is more durable and
lasts longer than polyethylene plastic.
Copolymer plastic lasts up to 3 years
before becoming brittle and then break
ing. Freezing and thawing will cause
plastic to become brittle more quickly.
More expensive copolymer plastics are
more durable and equal the light trans
mission of glass.
Polyvinyl plastic is more durable than
polyethylene or copolymer plastics. It is
strong and provides structural strength
when covering a greenhouse. Polyvinyl
plastics will last 5 years or more when
regularly maintained (cleaning it and
fixing any rips or tears).
Polyvinyl chloride (PVC) is 2 to 5
times more expensive than PE but can
last 5 years or longer. Polyvinylchloride
is pliable and transparent or translucent,
and it comes in 4- to 6-foot (1.2 -1 .8 m)
widths that can be sealed together to
provide a super wide piece. Ultraviolet-
inhibited corrugated plastic panels
provide another option; with their
excellent insulating properties (2.5 R
insulation/3.5 mm panels, 3.0 R/5.0 mm
panels), these panels can be used in cold
frames, propagation houses, and green
houses to provide excellent wind and
snow protection and optimal solar heat
collection.
Polycarbonate plastic is the most
durable plastic. The double (twin wall)
construction can last up to a decade. It
maintains heat and humidity well and is
the best plastic covering for year-round
growing in cool and cold climates.
Lexan is one of the first dual-wall green
house coverings. This stuff is tough!
One grade is even bulletproof! This
thermoplastic lasts for years. It transmits
almost as much light as glass and retains
more heat. Lexan is rigid and full of
thermo-storing channels. Clear panels
like those in glass or Lexan may require
shading during the heat of the day.
Corrugated fiberglass panels are readily
available in different colors from clear to
black. Light transmission for corrugated
fiberglass is fair to good, depending
upon color. Poor grades will discolor,
reducing light penetration, but a good
grade of clear fiberglass can cost as much
or more than glass. This covering trans
mits enough light under full sun condi
tions to grow a good crop of cannabis. It
is lightweight, strong, and comes in
8- to 12-foot (2.4-3.7 m) panels. Fiber
glass holds in heat in the winter and cool
air in the summer.
Make sure to use clear or uncolored
fiberglass panels. Colored panels will
exclude light frequencies. For example,
green panels will exclude both red and
blue wavelengths, giving it its green
color and denying plants their two main
sources of energy.
Insulation is most efficiently used
when the sun goes down. It is extreme
ly important for greenhouses in cold
climates. Throw a blanket, tarp or piece
of “bubble plastic” over the top of the
greenhouse to hold in heat at night.
This rooftop garden is set up as a greenhouse.
On rainy days and cold nights plastic is
stretched over the top of the garden.
This photo from the same rooftop garden
above shows how well buds grow under
natural sunlight.
77j/s brilliant grower cut the hillside away
to site the greenhouse. It receives maximum
sunlight all year and is protected from wind.
144
GREENHOUSES
www.marijuanagrowing.com
This nice little greenhouse garden was grown
in France in a populated residential zone.
Shade cloth cuts intense heat from direct sun
light and creates a natural breezeway above
plants. A covering of shade cloth cuts plants'
water consumption, lowers temperatures, and
reduces plants' stress levels.
forge is holding up the Aluminet covering for
this greenhouse. The high-tech shade cloth
is lightweight and reflects intense heat from
sunlight.
Larger greenhouses have automatic
coverings that cover the top half of the
greenhouse from inside. The space to be
heated is reduced and it is more econom
ical to heat at night.
Small greenhouses covered in plastic
can be insulated inexpensively with
double-wall construction. Two skins
are affixed to the superstructure frame.
An air pocket is formed between the
skins. Nylon rope is stretched over the
outer skin in several places and anchored
on either end to hold it down. A small
squirrel cage blower is mounted and
attached to blow air in between the skins
to form a 2- to 3-inch (5-7.6 cm) insu
lating layer of air. Light transmission is
lessened, but the insulation value of the
air makes it much easier to moderate
the temperature inside the greenhouse.
This insulation principle is most simply
and easily applied to inexpensive hoop
houses.
Higher R-value coverings make heating
and cooling greenhouses more effi
cient and cost-effective. An efficient
LP gas, propane, or kerosene heater
will keep the greenhouse warm at night
and during cold spells, but water vapor
and high humidity are the by-products.
Evaporative swamp coolers are the ideal
way to keep greenhouses cool during
hot summer temperatures, however,
these coolers are less effective as tem
peratures and humidity rise outdoors.
Shade Coverings
Shade coverings serve to cool the
greenhouse by blocking light transmis
sion and, in turn, heat. Shade paint can
be applied as a covering on the outer
skin or glass of the structure. Reusable
plastic shade film can cover the outside
of the greenhouse or be fitted against
rigid coverings inside. Roll-up shade
coverings made of cloth or aluminum are
flexible, removable, and reusable.
Shade paint is relatively easy to apply
with a hose-end sprayer or a paint roller
on a long pole. Water-based whitewash is
inexpensive and easy to apply, although
somewhat messy. Once applied, it can be
washed off with a brush on an extended
hose when sunlight intensity diminishes
as the heat of summer passes. Remem
ber, cannabis needs ample light to form
big flower buds in the fall.
Colored plastic can also be used to shade
plants. See “Plastic Skins” on page 143
for more information.
Shade cloth is used to cover greenhouses
to help keep them cool. It is available
in different opacities—from 10 to 80
percent—and 3 predominant colors:
Shade cloth can be hung on part of the green
house to help nurture young plants. Large,
well-established plants on the right receive
full light.
green, black, and white. Traditionally a
permeable cloth fabric, several new syn
thetic products, such as Aluminet, have
emerged. This lightweight economical
covering reflects heat and light as well as
cutting light transmission.
Shade cloth can be used as the only
covering for a greenhouse. It cuts light
transmission, provides ventilation
through the permeable cloth, and keeps
pests and diseases outside.
Shade cloth, when used as a canopy with
no greenhouse, creates a breezeway
between plants and the cloth. The extra
air circulation and ventilation provide
added cooling. Used on the sides of the
greenhouse, shade cloth is an excellent
permeable windbreak. Shade cloth can
also be affixed against walls or fences
that are heated by sunlight. Attaching
shade cloth to a fence can cut emitted
heat by 20 to 30 degrees.
A lath house is built from thin, narrow
strips of wood that allow filtered sun to
enter the structure. In warm climates
lath houses are a good place to take
cuttings and harden-off plants grown
indoors. Lath houses can provide 25
percent shade or more depending on the
placement of the laths. Traditionally lath
houses have been used to keep supplies,
transplant, start seedlings, and so on.
Greenhouse construction and decision
making about greenhouse coverings are
only the beginning. Growing plants
in a greenhouse is often more demand
ing than growing plants indoors. Air
temperature, humidity, light, and air
www.marijuanagrowing.com
145
This gardener placed an oscillating fan on
a stand in the middle ofhis greenhouse in
order to increase air circulation between his
flowering plants.
Setting up a ventilation fan was an after
thought in this greenhouse.
This backyard greenhouse garden in suburban
Paris, France, uses the fence to hold heat and
to block the neighbors' view.
quality must all be controlled in relation
to a constantly changing greenhouse
climate.
Climate Control
Greenhouses heat up quickly on sunny
days and cool equally fast when the sun
ducks behind a cloud or drops below the
horizon. When the air inside the green
house cools, relative humidity rises, often
beyond 100 percent. Water droplets
condense on all surfaces—walls, ceiling,
containers, and foliage. This fluctuation
of heat and humidity is difficult and ex
pensive to control. Temperature fluctua
tions also affect the ratio of nutrient to
water that plants need and use, which
makes growing in a greenhouse more
demanding than growing indoors.
Air Circulation
The greenhouse must be big enough for
air to circulate. A ratio of 33 percent
plants to 63 percent air is ideal. Keeping
air flowing inside small greenhouses is
easy on a cool day, but when it heats up,
air inside the greenhouse is trapped and
temperatures climb beyond outdoor
temperatures. Circulating greenhouse air
is essential and may require large fans.
Small greenhouses can be cooled and
heated relatively easily. Larger spaces are
more demanding.
Condensation
Condensed water droplets that form on
the inside of a greenhouse can reduce
light transmission by up to 50 percent.
Condensed droplets also attract fungus.
Rainy and warm weather, increased
plant transpiration, poor airflow and
ventilation, and insufficient roof slope
all contribute to condensation. Often a
surface tension modifier is included in
the greenhouse plastic to prevent forma
tion of condensation droplets.
Condensation occurs because the green
house is warm and humid. When the
temperature drops at night, hot air rises
and condenses on plants and the ceiling
of the greenhouse. If these drops do not
run down the sides of the greenhouse,
they block light transmission and are
a source of problems. The little water
droplets also spread disease. Not to
mention how it feels to get a shower
when you bump the wall of the green
house!
Condensation is especially bad when
there are hot days and cool nights. The
easiest way to ensure that condensation
does not occur is to have an adequate
ventilation system to remove humid air
at sunset. Also, construct greenhouse
ceiling/roof and sides with enough slope
for gravity to carry condensed water
droplets to the ground. Condensed
water droplets can severely impair light
transmission.
Even the best greenhouses will lose heat
through radiation; conduction and con
vection through glass, walls, and floor
(or soil); and also through vents, doors,
and cracks. To counteract external
variables, the internal structure of the
greenhouse can be more complex than
construction and siting.
Vents control temperatures in all sea
sons and improve growing conditions.
Hand-operated roof vents will require
frequent checks, or you may install
automatic vents with an electric motor
and thermostat that will respond to
conditions around the clock. Venting is
important with a cold frame, too. The
high-end models have wax-filled vents
Water condenses out of the air when there is
more humidity than the air can hold. Humidity
condenses into moisture when humid air cools.
This super-efficient inline fan evacuates hot
air near the ceiling of the greenhouse.
A high-rpm fan moves air across a large area.
146
GREENHOUSES
www.marijuanagrowing.com
Sometimes vent fans break down!
that operate automatically, opening
when the heat rises in the frame and
contracting as the temperature cools.
You can find the paraffin-filled
“Optivent” and many other supplies
at greenhouse supply centers.
Heating systems are important to
keep plants healthy during cold nights.
Cannabis thrives with nighttime temps
of 60°F to 65°F (15.5°C-18.3°C), but
colder nights call for an additional heat
source for sustained growth.
All greenhouses need ventilation, and
most greenhouses need fans. Look for
an extraction fan with the capacity to
change the air every 1 to 5 minutes.
Cooling
Minimum-Impact
Greenhouse Cooling
• Site in cool spot—shade or a
natural breezeway
• Covering— insulate
• Vents—mechanical or automatic
• Shade cloth or shade covering
• Vent fans
• Humidity increase—misting
• Evaporative cooling
The eco-friendly way to cool a green
house is to take advantage of the micro
climate. Locate it to receive shade or a
breeze during the hottest part of the day
and to have natural wind circulation.
Greenhouses that receive full sun all day
long must be covered with shade cloth
or cooled artificially. This eco-friendly
balance between time, money, and phys
ical environment costs more resources
This large greenhouse has plenty of airspace
inside, and hot air is vented out the top of the
structure.
in cold and hot climates. Warm climates
are the most economical location for a
greenhouse.
Evaporating water increases humidity
and lowers temperature in a greenhouse.
Make walkways out of gravel that drains
and holds water that will dissipate into
the air, creating humidity. Setting up
misters to increase relative humidity
is very effective in dry climates, but
more expensive. Remember, increasing
humidity could cause cultural problems
if overdone or mismanaged. Excess
water sitting on leaves or clinging to the
inside of the greenhouse invites cultural,
disease, and pest problems.
Venting off hot air is one of the fastest
and easiest ways to cool greenhouses.
Since heat rises, venting hot air from the
top of the greenhouse is the most effi
cient. If natural breezes are not enough
to keep the greenhouse cool, electric
fans and evaporative cooling are the next
options.
Louvers on vent fans also force the
hottest, most humid air out while pro
tecting the plants from draft. Installing
louvers that close when vent fans are
off will help prevent entry of pests. See
chapter 16, Azr, for more information.
Lifting the sides of the greenhouse
serves as ventilation but is much less
efficient than venting from the top.
When greenhouse sides are lifted, much
warm air still stays within the upper
portion of the greenhouse.
Evaporative cooling eliminates excess
heat and adds humidity, reducing water
needs. Moist air circulates through the
structure while warm air is expelled
through roof vents or exhaust fans.
Properly installed, an evaporative cooler
can reduce interior temperature by as
much as 30 to 40 degrees in hot, dry cli
mates, less in wetter areas. As with fans,
cooler size is determined by greenhouse
size. A general guideline is to find a
cooler equal to the total cubic space of
the structure plus 50 percent.
Evaporative coolers are also known as
swamp coolers because they introduce
humid, swamplike air in order to cool
homes and greenhouses. A typical
greenhouse evaporative cooler consists
of a big fan with large bats of straw or
corrugated, concrete-impregnated pads
that are fixed at the end of the green
house wall. Water is circulated through
the pad. The large fan blows the humid
air from the water-soaked pad into the
greenhouse.
Air conditioners are very expensive to
operate and are not practical in large
greenhouses.
Misting and watering are important
components of greenhouse gardening.
Extended growing periods and higher
sustained temperatures make adequate
water essential. Again, there are meth
ods to suit every temperament from
low-tech to automatic. Most companies
offer watering and misting systems by
component, which can be mixed and
matched to suit the grower’s needs.
Automatic misting systems are a good
investment for busy or forgetful grow
ers. The timer triggers the mist or water
Bring fresh air into greenhouses and garden
rooms from vents located near the floor, and
expel stale air near the ceiling.
www.marijuanagrowing.com
147
at preset intervals. You may want a
toggle switch that allows you to rotate
between manual and automatic watering.
For more information on specific uses
and types of watering systems, check
out www.cloudtops.com. It has good
information about misting systems for
greenhouses. Atomize water for best
results.
A lower-tech method of mist-and-
watering control consists of a series
of screens that tilt downward with the
weight of the water shutting off the flow,
and then raise to restart the cycle as the
screens dry. It is fully automated by
the weight of the water or lack thereof.
Of course, there is also hand-watering,
which is very effective and requires no
mechanical intervention. Automatic
systems, both high and low-tech, are
alternatives to hand-watering that can be
most helpful during a gardener’s absence.
Heating
Heating a greenhouse with coal, gas,
kerosene, electricity, or wood is expen
sive and often unnecessary or wasteful.
Big greenhouse growers with permanent
greenhouses can economically use a
coal, wood, or gas boiler to supply hot
water or steam through steel heating
pipes run through the greenhouse.
Environmentally conscious gardeners
often grow in small greenhouses where
steam heat is not a viable option. They
heat greenhouses with the least expen
sive means and progressively invest
resources according to the dynamics of
Large, black-painted drums full of water
absorb heat from sunlight during the day. Heat
is stored in the water, and at night it slowly
dissipates into the greenhouse to warm the air.
This is a photo of the original boiler that
heated Sensi Seeds' main indoor growing
facility. Heating a greenhouse or large indoor
garden is much more economical with a
fuel-fed boiler.
This small greenhouse is being heated with a
propane gas heater.
the greenhouse. Closing all uncontrolled
air leaks is the first step toward efficient,
effective greenhouse heating. Next, con
trol wall and ceiling insulation, soil heat,
air temperature, and humidity.
1. Close all cracks—enclose greenhouse
2. Insulate skin—see “Coverings” on
page 143.
3. Bank heat—install water barrels
4. Insulate soil—thermal blanket
5. Heat soil—manure/compost, soil
heating cables/mat
6. Heat air—water and stone bank, soil
bank, steam/water, gas, electricity
Thermal blankets can be placed along
walls and ceiling or on the floor to hold
in the heat. Such solutions are somewhat
effective in cold climates with clear
skies. A layer of air between two plastic
skins is also somewhat efficient to hold
in heat. However, the insulation value of
plastic is low.
The floor can cool the greenhouse
substantially. To keep the greenhouse
warmer, cover the floor with a perme
Check this link to learn more about the efficiency of specific fuels:
http://www.ag.ndsu.edu/pubs/ageng/structu/ael015.pdf.
rHEATING-FUEL EFFICIENCY
Fuel
Efficiency (%)
Unit Heat Value
electricity
95-100
3,413 Btu/kWh
; natural gas
80
1,000 Btu/ft3
propane
---------
-----
80-91
000 Btu/gal
----------------------------------- J
able thermal blanket and weed barrier.
The floor of a small greenhouse can be
covered with a layer of Styrofoam for
added insulation.
Soil-heating cables with a thermostat
are the most efficient use of electricity
for heat when air temperatures get
down to 50°F (10°C) at night and go up
during the day. Place the cable on the
soil at the bottom of the bed or on a bed
of sand or vermiculite and cover with
about 2 inches (5 cm) of sand. You will
need to provide 10 to 15 watts of electric
heat for every square foot (0.09 m2) of
growing area. Heat cables are also useful
in greenhouses for warming seedlings,
clones, or flowering plants without the
cost of heating the entire structure.
Heat Source
1
Efficiency
warm floor (insulated)
90%
warm floor (uninsulated) 80%
hot water pipes
85%
hot air heaters
60%
148
GREENHOUSES
www.marijuanagrowing.com
The white box is a gas heater. Notice how
the plants are growing in short blocks of
rockwool. This is how Nevil (Seed Bank,
Holland, 1985) grew plants for breeding.
These CFLs do not throw a lot of light, but it
is enough to keep these plants in the vegeta
tive growth stage.
This grower covers his garden daily. He
removes the shade covering after dark so
that plants receive 12 hours each of light and
dark. The plastic above protects the dark
covering below from wind.
Heating small greenhouses can be
relatively economical with an electric
space heater, or be more effectively
heated with thermostatically controlled
forced air using ducts or plastic tubing
to evenly distribute the heat. Large
greenhouses may be heated with forced
air or by a coal or natural hot water or
steam system. But both hot water and
steam heating are expensive to install.
The inexpensive, low-tech-but-labor-
heavy method of greenhouse warming:
compost. A grower in Portland, Oregon,
stacks organic matter on the sides of the
greenhouse to a height of about 5 feet
(1.5 m) inside and out. The compost
gives off heat as it decomposes, keeping
the structure warm at a very low cost.
A CO2 burner also generates heat as a
by-product. Closed greenhouses often
have too little CO2 during the day for
plants to be able to use light effectively.
Increasing the level of CO2 with a gen
erator will accelerate plant growth. An
infrared sensor/controller can be
The CFL lamps above this garden are turned
on at night to interrupt the dark period. The
extra hour of light in the middle of the night
is enough to keep these plants from flowering.
attached to the CO2 generator to control
it automatically. Detailed information on
CO2 can be found in chapter 16, Air.
Big gas air heaters are available from
horticultural supply stores. With a web
browser, search for “greenhouse heater.”
Everything from gas to electric to kero
sene heaters will pop up. Remember to
keep hot air from blowing directly on
plants.
Artificial Lighting
When combined with natural sunlight,
artificial light is most efficiently used
in most climates during non-daylight
hours. Above 50° north latitude, light
intensity diminishes quickly in the
fall, winter, and spring. Supplemental
lighting is very effective in greenhouses
in these northern latitudes. Anybody
who has flown into Schiphol Airport in
Amsterdam at night has seen the deep
orange glow emitted by HPS lamps in
greenhouses.
Greenhouse growers turn the HID
lights on when sunlight diminishes
(30 minutes before sunset) and off when
sunlight strengthens (30 minutes after
sunrise). Turn on the HPS when the
daylight intensity is less than 2 times the
intensity of the HPS. Measure this point
with a light meter. Turn off the HPS
when the daylight intensity is greater
than 2 times the intensity of the HPS.
A simple photocell that measures light
intensity can be used to turn the lights
on and off automatically when light
levels fall below a specified level. Sup
plementary lighting has greatest effect
when applied to the youngest plants.
It is least expensive and most efficient to
light plants when they are small. These
artificial lighting principles work for
flowering and vegetative growth cycles.
Exclusively HPS lamps are used because
natural sunlight supplies enough light
in the rest of the spectrum. Lamps with
small reflective hoods and attached bal
lasts are used in greenhouses. The small
reflective hood blocks very little natural
sunlight and the attached ballast delivers
electricity more efficiently to the bulb.
Maintain vegetative growth in the spring
with inexpensive CFL lights. Supple
mental nighttime lighting is necessary
to interrupt the dark period and prevent
cannabis plants from flowering. The
lighting can be from HPS lamps or small
60- to 75-watt equivalent CFL lamps.
The small lamps are hung over plants
and turned on for an hour or so in the
middle of the night (dark period).
Small vegetative plants do not need as
much light in the spring. This is when
plants establish a big strong root system
and strong vascular system. Once warm
weather and long days arrive, plants
really start to grow!
Light Deprivation
For many years Dutch growers, com
mercial growers, and other cannabis
gardeners have been using “thermal
blankets” in greenhouses to hold heat in
at night and to black out greenhouses
to simulate 12-hour nights and days
that induce cannabis to flower. Dark
ening greenhouses to induce flowering
during midsummer will allow 3 or more
medicinal cannabis harvests annually in
www.marijuanagrowing.com
149
With this Forever Flowering greenhouse, a
gardener is able to control the photoperiod
during the entire year.
Both of these light-deprivation greenhouses
are covered with black plastic every night.
This greenhouse is blacked out by covering
it with black plastic until darkness falls. The
blackout plastic is removed at night.
mild climates. Cannabis plants (except
C. ruderalisf'’ flower when nights are
long (12 hrs) and days are short (12 hrs).
To induce flowering, darken the green
house so that plants receive 12 hours of
uninterrupted darkness every day.
" Specific medicinal varieties may react
differently to the light schedules outlined
in this section. See chapter 3, Medical
Cannabis Varieties, and chapter 25,
Breeding, for more information.
Midsummer sunlight is much more
intense than sunlight in the spring and
fall. Cannabis requires high levels of
light to produce the biggest and heaviest
medicinal flower buds. Inducing canna
bis to flower under high light levels will
produce a heavier harvest.
Automatic darkening greenhouses can
be constructed or purchased. (Designing
and constructing an automatic-darkening
greenhouse is beyond the scope of this
book.) Automated greenhouses have dif
ferent degrees of automation. There are
many greenhouse companies that offer
automatic darkening greenhouses. The
The black plastic on the right is stretched
over the hoop house after plants receive 12
hours of light. The plastic is removed at
night so plants are able to breathe.
most popular automated light deprivation
greenhouses in the USA are from Forever
Flowering (www.foreverflowering.net.)
Search YouTube for videos that demon
strate how the greenhouses operate.
Imposing the day/night schedule to dar
ken a greenhouse is not as difficult as it
might appear, but it is a daily event. For
example, the longest day of the year,
June 21, can be 15 hours long; the green
house must be blacked out for 3 hours so
that plants receive 12 hours of darkness.
Daily, at about the same time, the green
house must be blacked out. The dark
ening material must be removed after
darkness falls, to ensure that plants are
adequately ventilated during hot summer
nights.
For example, if you black out a green
house at 7:00 a.m . and it is dark at
9:00 p.m., you can remove the cover from
the greenhouse before going to bed. The
ritual does not repeat until the next day/
night. Make sure the cover is lightweight
and the entire “job” of covering the
An automatic darkening system in a green
house at the Cannabis Castle in the Nether
lands blacks out gardens to induce flowering.
I shot this photo in 1986!
greenhouse is as easy as possible. I find
that easy jobs are more likely to be com
pleted regularly.
Tropical greenhouses from latitudes of
0° to 30° north and south receive from
12 to 13 hours of light/dark daily and do
not need to be blacked out. In fact, to
keep plants in vegetative growth, artifi
cial light must be infused to keep plants
from flowering.
In spring and fall, greenhouses do not
need to be darkened to induce flowering,
since darkness and daylight are close to
12 hours each. Check your latitude and
the hours of light your garden receives
to calculate the black-out period.
Use black opaque plastic to completely
cover greenhouses. Small greenhouses
are easy to cover by dragging the plastic
over the superstructure of the green
house. Black plastic should be divided
into 2 lighter-weight pieces to facilitate
work when covering larger greenhouses.
Secure the bottoms of the plastic around
the base of the greenhouse to prevent
light from entering and wind from
lifting the plastic. Use flexible elasti-
cized bungi cords to secure the opaque
covering to eyebolts along the bottom
perimeter of the greenhouse. Toss ropes
over the outside skin of the covered
greenhouse to secure it from wind.
Store the black plastic alongside the
greenhouse when not in use.
GREENHOUSES
www.marijuanagrowing.com
152 Climate
153 Alpine Short-Season Climates
153 Rainy Climates
153 Arid Climates
153 Tropical and Subtropical
Long-Season Climates
154 Microclimates
154 Sunlight and Siting the Garden
156 Special Planting Considerations
156 Water and Irrigation
157 Pumps
159 Temperature and Humidity
159 Growing in Tropical and
Subtropical Humid Climates
160 Wind
161 Rain
161 Soil
162 Prepare Soil
163 Soil Tests
163 Raised Beds
164 Sunken Beds
164 Fertilizers
165 Backyard Gardens
166 Container Gardens
167 Large Gardens
167 Remote Gardens
169 Starting Clones & Seedlings
Indoors
169 Hardening-Off Plants
170 Planting Time
170 Maintenance
171 Harvest
<==============
ESSENTIAL MEDICAl
CANNABIS
HORTICULTURE
if
OUTDOORS
Growing medical cannabis outdoors is the first option for most
gardeners in states and countries where growing medical cannabis
is legal or tolerated. Cannabis evolved naturally and grows best
outdoors naturally. Growing medical cannabis outdoors is ecolog
ically sound and works in concert with Mother Nature. Sunlight
and air are virtually free; water and nutrients are also much less
expensive in outdoor gardens. Bulk organic nutrients—composts,
manures, rock powders, and so forth—are inexpensive and most
often environmentally friendly. Outdoor gardening is more pop
ular than indoor gardening in countries with progressive medical
cannabis laws. More cannabis is grown outdoors than indoors, for
these simple reasons: Cannabis is a strong plant that can be grown
successfully almost anywhere. Virtually any sunny growing area
can be coaxed into yielding a healthy crop.
J
Harvesting two crops, one in spring and another in the fall, is
possible in temperate climates. Long nights and short spring days
trigger cannabis to flower. Savvy gardeners harvest the spring crop
and then plant the fall crop the next day! Harvest the fall crop
when nights become long and days short. Adventurous gardeners can plant the new autoflowering feminized seeds; such stable
hybrids yield 3 to 4 ounces (85-118.3 gm) 70 days after planting seeds. Autoflowering feminized plants can be harvested in the
middle of summer when sunlight is most intense and resin production is at its peak.
Research local garden trends, read local garden columns, and talk to local gardeners about the best time to plant and grow medical
cannabis, tomatoes, peppers, or similar vegetables, and then plan accordingly. Also inquire about common pests and diseases and
when they are most prevalent. Collect publications on local growing conditions. These are often available at hydroponic stores,
nurseries, and garden centers, or through your local department or ministry of agriculture.
www.marijuanagrowing.com
151
Big cannabis plants like these Colombian
plants have been growing for many years. This
giant plant was photographed by Mel Frank in
1977. (MF)
Organic soil preparation, plenty ofsunlight, water, and a long growing season are all most plants
need to thrive.
Security is still a concern when cultivat
ing medical cannabis outdoors. Theft can
be a problem, and so can uninformed law
enforcement. Make sure to have all your
paperwork in order should law enforce
ment knock on your door. Posting your
medical recommendation at the garden
is a common practice.
Much of the information that pertains
specifically to outdoor cultivation is
in this chapter; however, many of the
subjects within this chapter are covered
in great detail in other chapters of this
book. References to these chapters are
made in the appropriate places.
Climate
Cannabis will grow in nearly all climates.
Specific varieties of cannabis grow better
in some zones than others. Most variet
ies of cannabis need a minimum of 120
frost-free days to produce a decent har
vest; gardens in such climates should be
protected with plastic in the springtime.
Transplanting or setting out autoflower
ing feminized seedlings in short-season
climates is an excellent option. Gardens
in short-season climates with 90 frost-
free days require a greenhouse to protect
plants from cold at night. Southern and
warm-climate gardens suffer from exces
sive heat and sometimes humidity both
day and night.
Outdoor gardens are dominated by cli
mate, soil, and water supply whether in a
backyard, on a balcony, in a greenhouse,
or at a remote location. Microclimates
are mini climates that exist within larger
climates. Many maps such as the United
States Department of Agriculture
(USDA) Hardiness Zone map (www.
usna.usda.gov/Hardzone/ushzmap.
html) detail limited climatic boundaries.
The USDA Hardiness Zone map divides
North America into 10 zones plus an
eleventh zone to represent areas that
have average annual minimum tempera
tures above 40°F (4.4°C) and are frost-
free. Look into detailed microclimate
maps for your growing zone. One of the
most detailed climate maps for western
North America can be found in Sunset
Publishing’s Western Garden Book. The
map details 26 distinct climate zones in
13 states in the western United States,
as well as British Colombia and Alberta,
Canada. This is the best climatic map
available for the area. See information
on climate zones in the western United
States at www.sunset.com. Search “Sun
set climate maps picture” on the Inter
net to learn more about climate zones.
Europe and industrialized countries
have much climatic information available
via the Internet. Check out charts show
ing rainfall, temperature, and humidity
for virtually all large cities in the world
and most geographic regions. Visit www.
weather.com for specific information
on your local weather. Temperature,
rainfall, and sunlight vary widely across
the globe, providing unique growing
environments and countless micro
climates. Look for specific information
for your climate at local nurseries and in
regional gardening books and magazines
or through the department or ministry
of agriculture (called County Extension
Agents in the USA) in your area.
Cannabis grows best between 55°F and 86°F
(13°C-30°C).
•
55°F- □c°F
□□
!3° - Rn“c
□u
—
—
—
Below is a brief description of 4 distinct
climate zones where cannabis grows.
Reference the basic climate for your
garden location in terms of the climate,
light, and soil charts in this book.
152
OUTDOORS
www.marijuanagrowing.com
This "Annapurna’ super-autoflowering plant
grows well in most outdoor climates.
Rainy climates create a constant battle with
mold and diseases. This garden in the Basque
Country ofSpain receives rain throughout the
growing season.
Many medical cannabis gardeners post their
medical data at the garden site.
Sonie medical cannabis gardeners are forced
to grow in mountainous terrain to avoid
detection. This gardenerfrom British Colom
bia, Canada, has to put on a special pair of
rock climbing boots to descend the last 80 feet
(24.4 m) to the garden.
Fill out the brief “Garden Climate Data”
form on page 154 so that you will under
stand the overall qualities of your climate.
Alpine Short-Season Climates
Alpine climates are particularly chal
lenging for growing a strong, healthy
medical crop. Medical gardeners in
Colorado, most of Canada, and north
ern or alpine regions such as Switzerland
are growing at elevations ranging from
4,600 feet (1,402.1 m) to 1,000 feet
(304.8 m) in elevation. Most often soil
is difficult to manage in alpine climates,
but a little bit of light and heat works
wonders!
Rainy Climates
Rainy climates can be cool and wet
during winter and spring and hot and
humid during other months. Annual
rainfall most often exceeds 40 inches
(100 liters per m3) and can top 100
inches (250 L/m3)! Winter often blows
in early in these areas, bringing a chill
ing rain and low light levels. The more
northern zones experience shorter days
and wet, freezing weather earlier than the
southern zones. Medical cannabis grows
well in temperate maritime climates.
Growing further inland often requires
more protection. The temperature seldom
The Mediterranean Coast has an arid sub
tropical climate that is perfect for growing
long-season sativas such as this giant "Haze’
plant.
Water is the most precious commodity in a
dry climate. Pounding sunlight heats soil and
plants, which then must use more water. Plant
in sunken beds and use mulch to conserve water.
drops below freezing in many coastal
rainy climates, which contributes to
larger insect populations. Some cold
coastal rainforests are packed with
lush but invasive foliage and fungal
growth brought on by the cold, damp
weather.
Arid Climates
Arid climates have little rainfall and low
humidity. Wind and poor soil often
accompany dry climates. Landscape
flora consists of plants with small
leaves that conserve water. Water is at a
premium. Sunlight is intense and heat
pervasive. Often cannabis needs to be
planted under shade cloth to lower
foliage temperatures that cause heat
stress. Placing mulch around the base
of plants is essential to prevent water
loss. Planting in sunken beds also keeps
plants cooler and attracts moisture.
Tropical and Subtropical
Long-Season Climates
Tropical and subtropical climates are
generally warm to hot and humid. Rainy
and dry seasons vary by location. Most
“selva” or jungle and tropical climates
experience 10 to 30 minutes of daily
www.marijuanagrowing.com
153
Sunlight intensity diminishes as the angle de
clines in the sky. Sunlight is about 15 percent
less bright from September to October when
the sun is lower in the sky. The drawing shows
the sun at a 75-degree angle in summer and
near its lowest angle, in winter, of 28 degrees.
GARDEN CLIMATE DATA
YOUR TOWN NAME
number of days above 50°F (10°C)
monthly rainfall
monthly nighttime temperature lows
monthly daytime temperature highs
monthly mph/kmph wind
monthly average humidity
percent of sunlight monthly
percent of cloudy days monthly
>................................................. ....
75° in Summer
28* in Winter
rainstorms. Protecting flowering females
from rain with a greenhouse or shade
house will help avoid bud mold and
other problems. Nighttime temperatures
and humidity are often high in these
climates. In fact, extended nighttime
temperatures above 85°F (29.4°C) will
cause most plants to stop growing.
See chapter 18, Soil, for more information
on soils in different geographic regions.
Microclimates
Each of the 4 climates (alpine short
season; arid; rainy; tropical and sub
tropical long-season) contains more
localized climates or microclimates.
Within these microclimates are even
more micro-microclimates, all of which
affect cannabis growth. For example,
south-facing hillsides receive more solar
heat than flat-topped or north-facing
slopes. Hills and valleys also affect wind
patterns as warm air rises and cold air
drops.
Each and every garden has even more
microclimates! For example, some places
are shady and others get much more
sunlight. Some growing beds are located
next to a wall or fence that holds heat.
Each one of these variations will influ
ence the microclimate.
We can measure the factors that consti
tute microclimates and apply this knowl
edge in order to grow the best medical
cannabis possible. Cannabis growth is
governed by climatic conditions:
Collect all the information you need to
garden outdoors in your climate. Precise
answers to climate questions will solve
most cultivation dilemmas before they
arise. Take the time to learn the best
times to plant and harvest in your cli
mate—and a lot more. Use the charts in
this book and find additional informa
tion on the Internet to answer questions
related to your climate. A couple of
hours spent on research before planting
a medical cannabis garden will save you
time, money, and gardening-misery.
One of the best measures of outdoor
gardening variables can be found in Sun
set magazine’s climate zone maps, which
take these factors into account. Agri
cultural hardiness zone maps devised
by the US Department of Agriculture
and other government agencies divide
Several different “sun position” apps can be
downloaded for iPhones and Android phones
that will help you site your garden so that it
gets the maximum amount of sunlight.
I
L
zones based strictly on winter low tem
peratures. Sunset's climate zone maps
consider what every medical cannabis
gardener should consider: temperature,
yes, but also latitude; elevation; ocean
influence; continental air influence;
and mountains, hills, and valleys—all
of which together form many micro
climates. To grow the best garden
possible in each of these climate zones,
search the Internet for specific weather
information about your local climate.
Sunlight and Siting the Garden
Before siting the garden, remember that
all tools, irrigation equipment, soil,
fertilizer, and so on must be carried to
the garden. Bulk soil and amendments
are easiest to move on flat ground. Make
plans with this in mind when construct
ing backyard or terrace gardens and
large gardens of any type.
Cannabis plants need 5 to 6 hours of
direct sunlight, preferably during mid
day, at minimum levels of 4,500 foot
candles (48,437.6 lux), to flower well
and produce a good crop. Lower levels
of light prolong harvest and lower both
quality and yield. Cannabis requires the
most intense sunlight during flowering.
Receiving more hours of direct sunlight
during flowering promotes thick, dense
flower buds. Ideally cannabis should
be planted in an open, level field with
no shade. But most often gardens are
shaded by trees, houses, buildings, and
154
OUTDOORS
www.marijuanagrowing.com
HOURS OF LIGHT PER DAY AT DIFFERENT LATITUDES
City
Latitude
Jan
Feb Mar Apr May Jun
Jul
Aug Sep Oct Nov Dec
21
21
21
21
21
21
21
21
21
21
21
21
Honolulu, HI
21° N
11:03 11:34 12:08 12:45 13:14 13:26 13:14 12:45 12:09 11:33 11:03 10:50
San Diego, CA 32° N
10:21 11:14 12:09 13:11 13:58 14:19 13:59 13:11 12:11 11:12 10:21 10:00
Sacramento, CA 38° N
9:56 11:01 12:11 13:26 14:26 14:52 14:28 13:27 12:12 10:59 9:55 9:28
Philadelphia, PA 40° N
9:45 10:56 12:11 13:33 14:38 15:06 14:40 13:34 12:13 10:53 9:44 9:15
Portland, OR
45° N
9:19 10:43 12:12 13:49 15:07 15:41 15:09 13:50 12:14 10:40 9:17 8:42
Seattle, WA
47° N
9:05 10:37 12:13 13:58 15:22 15:59 14:24 13:58 12:15 10:34 9:04 8:25
Calgary, CAN
51° N
8:40 10:25 12:13 14:12 15:49 16:33 15:52 14:13 12:16 10:22 8:39 7:54
Anchorage, AK 61° N
6:51 9:38 12:19 15:17 19:22 19:01 18:01 15:17 12:22 9:32 6:48 5:27
so forth, and it is not possible for them
to receive full sunlight all day long.
On the summer solstice (the longest day
of the year), the angle of the sun at 40.3°
north latitude* is 73.2°. On the winter
solstice, the shortest day of the year, the
angle of the sun at the same latitude is
26.2°. As the angle of the sun climbs in
the sky, sunlight intensifies and lower
shadows are cast from objects over
gardens. In the fall when the angle of the
sun drops in the sky, intensity diminish
es and objects throw a longer shadow.
Measuring the path of the sun through
the sky can be guesstimated by standing
at planting sites and looking toward the
sun. Hold your arm up and track the
arc of the sun. Figure the sun will climb
and drop in the sky, and guess about
how much shadow it will throw. Or you
could buy one of several applications
such as the Sun Seeker for an iPhone or
an Android phone that allows you to
type in any date and see the path of the
sun. I love this application!
*The angle of the sun changes in relation
to latitude. In the USA, Eureka, Califor
nia; Salt Lake City, Utah; and the border
between Kansas and Nebraska, are all
about 40.3° north latitude.
Direct sunlight can heat foliage and
cause plants to transpire excessive
amounts of water in order to stay cool.
Shade cloth stretched over plants will
lower temperatures by blocking a per
centage of the sunlight that hits foliage.
A natural breezeway is also formed be
tween the shade cloth and plants, which
helps to cool them even more. If shade
cloth is not an option, give plants heavier
doses of magnesium and calcium. See
also “drought” in the Index.
Scout garden sites in winter and try to
visualize how trees will cast shadows
during summer months, and how plants
will get 5 to 6 hours of midday sun.
Use one of the many iPhone or An
droid phone apps that tell you exactly
where the sun will be on specific dates.
Remember that the sun takes a higher
path in the late spring and summer. Six
hours of direct midday sun per day is
essential for acceptable growth. More is
better. South-facing gardens, hillsides,
and terraces receive full sun all day long.
See chapter 11, Greenhouses, for more
information on hours of light per day for
various climates.
Outdoors, hours of daylight are short
in spring and increase in length during
summer. Daylight hours diminish in fall
and winter. The shortest day of the year
falls on or near December 21, and the
longest day of the year falls on or near
June 21.
Check the soil drainage by digging a small hole
and filling it with water.
Site the garden in the spring by standing where
the plants will grow. Hold up your harid and
cover the sun. Trace an imaginary line through
the sky where the path of the sun will be.
Shade cloth stretched over plants will help
keep them cooler during the day and a little
warmer at night.
www.marijuanagrowing.com
155
This 20,000-gallon (75,708 L) reservoir is
located on top ofa small hill. Water gravity
flows from the reservoir to the garden.
Store daily irrigation water in a large
reservoir.
Storing water is an option for gardeners who
want a constant supply of water but have only
a sporadic water source.
The table on page 155 shows the number
of daylight hours at different latitudes in
the USA. Note that at 40° north lati
tude, the maximum amount of sunlight
is only 15.2 hours on June 21. If plants
are grown in a greenhouse, supplemen
tal light could be applied to increase
production.
Special Planting Considerations
Little research has been done on canna
bis and plants that produce allelotoxic
chemicals/* Some plants are immune to
these toxins, and others are not. These
chemicals may not affect cannabis, or all
varieties of cannabis. Nonetheless, avoid
planting under trees or near bushes that
produce allelotoxic chemicals, including:
black cherry, cottonwoods, hackberry,
junipers, sassafras, sugar maples, and
walnut trees. Black walnut trees are the
worst.
"Allelotoxic chemicals are released by
one plant that has an effect on another
plant. The release of allelotoxic chemi
cals is a survival mechanism that allows
certain plants to compete with or kill
other plants. The chemicals often inhibit
seed germination, root development, or
nutrient uptake.
Water and Irrigation
Medical cannabis plants grown outdoors
use a lot of water, especially when they
grow large. Big vegetative and flowering
plants may need 5 to 10 gallons (38-75 L)
of water or more daily during the heat of
the growing season. Adequate water can
make the difference between success and
failure. Water use and conservation is
essential now. Backyard gardens are easy
to water with a garden hose, or auto
mated irrigation systems can be set up.
Watering remote gardens is more of a
challenge. Water may have to be pumped
from a well, stream, irrigation ditch,
or river and then stored in a reservoir.
Check local regulations on using water
with regard to public and private water
rights.
Water quality also affects fertilizers and
nutrient availability. Pay special atten
tion to water pH and mineral content
(measured in ppm or EC) of irrigation
water regardless of the source—reser
voir, tap, or well. Active live organic soil
teaming with microbes is blessed with
chemistry that rectifies high- or low-pH
water, seemingly like magic. Nonorganic
gardeners can use one of several commer
cial hydroponic fertilizer formulations to
solve “hard warter” problems.
Irrigate the garden during morning
hours so that plants have time to use all
the water necessary during the heat of
the day. Do not water late in the day;
unused water that sits in the ground or
in containers displaces much-needed
oxygen for roots. If plants are slightly
overwatered, especially late in the day,
Polymers in the soil hold water longer than
soil does.
The garden needs a readily available water
source. If water is not at hand, it must be
hauled to the garden. Big plants can use 5 to 10
gallons (18.9-37.9 L) of water a day. Hauling
water takes time and is a lot of work. One
gallon (3.8 L) of water weighs 8 pounds; 100
gallons (380 L) weighs 800pounds (360 kg)!
Even carrying water by handfor short dis
tances to water small plants is a lot ofwork.
Irrigate with a hose attached to a breaker head
nozzle that aerates the water. Water plants
in containers daily when necessary. Small
containers dry out quickly. Large containers
need watering every few days. Irrigate small
containers every day or two; they might
require water twice daily during hot weather.
A 200-gallon (757 L) container with a full-
grown plant in full sun will use 5 to 10 gallons
(18.9 -37.9 L) of water daily.
156
OUTDOORS
www.marijuanagrowing.com
Many inexpensive battery-operated irrigation
timers are available. This timer took just a few
minutes to set up, and the batteries last a long time.
This gasoline pump is built on a smallframe so
that it is easy to move around.
The High Lifter pump in this creek has pro
vided three growing seasons of uninterrupted
service. The pump runs quietly and is very
efficient.
this oxygen depletion slows growth and
could lead to root rot.
Check the garden daily, if possible, and
water when soil is dry 1 inch (2.5 cm)
below the surface. Irrigate containers
until 10 to 20 percent of the water comes
out the drainage holes. Irrigate plants
in the ground until they are completely
wet, but let them dry somewhat between
waterings to accommodate more air (oxy
gen) in the soil. See “Sources of Water” in
chapter 20, Water, for more information.
Automatic watering systems deliver a
regular supply of water to plants. Con
sistent and fail-proof operation are two
indispensable qualities for automatic
irrigation systems. Type “drip irriga
tion” into your favorite search engine;
hundreds of company sites will pop up
on your screen and tell you all about
drip irrigation and automated watering.
See chapter 20, Water, for more specific
information on irrigation.
Avoid nutrient buildup problems by
leaching container gardens monthly
with three quarts (2.8 L) of water for
each dry quart (liter) of soil.
Many different types of receptacles and
reservoirs can store irrigation water. Use
the biggest storage unit that you can
manage; plants will always need water.
One good option for storing a lot of
water is to dig a big hole and line it with a
plastic pond liner. For all kinds of water
storage devices, see www.realgoods.com.
Pumps
Regardless of the type of water pump, it
will need a filter that is easy to clean. A
pre-filter before the fine filter will also
cut maintenance, especially if pumping
from an open water source. Remember
to clean the filter periodically. Put “clean
the pump filters” on your regular weekly
checklist.
Pumps can be operated by hand, electric
current, batteries, gasoline, gravity, and
pressure from moving water. Moving
water uphill requires a powerful pump.
A gasoline-powered pump is necessary
when lifting water more than 100 feet
(30.48 m). Battery-powered pumps can
lift water 10 to 15 feet (3-4 .6 m) before
they become inefficient. Ram pumps
and the High Lifter can lift water many
feet over time. Manual pumps require a
lot of physical energy to operate and are
impractical for moving a large volume of
water uphill.
Water flow / pressure pumps
With a small flow of water under pres-
The neighbors all agreed to operate their gaso
line pumps in the morning, two days a week to
avoid local noise pollution. Many residents in
this part of Northern California pump water
from a well and store it in a large reservoir.
sure, water pressure pumps use the
power of water running downhill to lift
part of the water uphill. These pumps are
very efficient and can run 24 hours
a day to lift water up to a storage res
ervoir, where it is stored until used for
irrigation. Here is a great website with
more information on pumps: http://
journeytoforever.org/at_waterpump .
html.
Pumps can move water long distances
and uphill. Pump size, horsepower, pipe
size and length, vertical lift, and elevation
above sea level all play a part in water
moving dynamics, but the specifics are
beyond the scope of this book.
Always drain the pump before an ex
pected freeze. Water frozen within
it can rupture the pump. Before shop
ping for a pump, copy the following
9-item list. This necessary information
will tell you everything you need to
know to purchase the proper pump.
Before purchasing a pump, find out:
1. Vertical pipe length
2. Horizontal pipe length
3. Pipe diameter
4. Pump GPM—gallons per minute
(LPM, liters per minute)
5. Elevation above sea level
6. Determine the height of the tank
above water source: (net lift) =_____
ft (m)
7. Next determine the drop from the
water source to the pump: (fall) =----
ft (m). To estimate lift or fall, con
sult topographical maps or use a tape
measure, a handheld sight level, an al
timeter, or a tube and a water-pressure
gauge. Remember that 1 psi = 2.3 ft.
www.marijuanagrowing.com
157
A hydraulic ram pump lifts water from a source
offlowing water located above the pump. The
naturalforce ofgravity and flowing water is all
the power needed. Ram pumps are rugged and
dependable but noisy. For more information
see www.rampumps.com.
The Bamford Hi-Ram Pump is a simple,
self-powered water pump using a plastic ball,
which makes the pump run much quieter
than conventional ram pumps. This pump is
economicaland has many interestingfeatures,
www. bamford. com. au/rampump
8. Use a gallon container and a watch to
measure or estimate the flow of water
at the source = _______
gallons per
minute (LPM).
9. Determine the amount of water
required at the tank ______ gallons
per day.
Make sure all of these specifications
conform to your needs for water pres
sure and volume of water. Most often
water is pumped to a reservoir located
above the garden. Periodically it is dis
persed as irrigation water via gravity
flow drip irrigation.
The High Lifter Water Pump is water-powered and will work with a low flow of water. The
unique design uses hydraulic pressure and is self-starting and self-regulating. If inlet water stops,
so does the pump; the pump starts by itselfas soon as water flow begins. They are very quiet and
lightweight. Investing in this pump is expensive, but it will last for many years. Check it out at
http://high-lifter.com/. I love this pump!
Gasoline-powered pumps are reliable
and can lift much water uphill quickly,
but they are noisy and polluting. You
can purchase a pump already attached to
the motor, or connect one yourself and
mount it on a board or metal platform.
For example, a 4-horsepower pump that
weighs 56 pounds (25.4 kg) and pumps
6,300 gallons (23,848 L) per hour costs
about $450 USD.
Noise is a major factor in starting up
a small, gasoline-powered engine in
the middle of a quiet rural area. An
oversized muffler and small baffle will
deaden most of the exhaust sound, but
will lower the efficiency and will strain
the motor. You can also build a shroud
around the pump or bury it in a large
hole to baffle noise. I was recently in a
Northern California area where neigh
bors agreed to run their pumps the
same day of the week to minimize noise
pollution.
Battery-powered pumps are an option
if noise is a factor. A 1,400 gallons-
per-hour (5,300 LPH) electric pump
at a 9-foot (2.7 m) head pressure costs
about $400 USD. Battery-powered
pumps quickly lose lifting ability after
15 feet (4.6 m).
Solar energy is an outstanding way to
move water. On a sunny day a 75-watt
solar panel supplies enough power to a
pump to move 75 gallons (284 L) of wa
ter 35 feet (10.7 m) uphill and more than
400 feet (121.9 m) away to a reservoir.
Here are 3 great sites to learn more about
solar power, www.realgoods.com, www.
sargosis.com, and www.otherpower.com.
Set up the pump so that the intake
will be able to draw in water easily. An
adequate filter on the intake of the pump
is essential. A hydraulic ram pump lifts
water from a source of flowing water
located above the pump. The natural
force of gravity and flowing water is all
the power needed. Ram pumps are rug
ged and dependable but noisy. See www.
rampumps.com for more information.
The Bamford Hi-Ram Pump is a simple,
self-powered water pump using a plastic
ball, which makes the pump run much
quieter than conventional ram pumps.
This pump is economical and has many
interesting features, www.bamford.com.
au/rampumptial. Pump intakes can be
placed in proprietary ponds and ditch
es, but consult laws about local water
rights before using public sources of this
precious resource.
Siphoning water downhill is free when
the natural force of gravity is applied.
With a little effort and knowledge,
however, gravity-flow water will also
run uphill. The principle is simple:
water flowing downhill develops energy.
This energy can be used to move it
uphill. Water flowing down a hose that
is10feet(3m)longcanbebentatthe
158
OUTDOORS
www.marijuanagrowing.com
bottom and flow uphill for at least 5 feet
(1.5 m). The flow rate decreases as the
elevation increases. Experiment with
your flow rate and pressure to find out
how high water will flow. This is the
secret behind making water run uphill.
For example, as long as the outlet of the
pipe remains below the water surface,
water will move higher than the stored
water, in a pipe that runs over a hill but
then continues until the outlet is below
the actual elevation of the water tank or
siphon pipe. Make sure to install an on/
off valve to stop siphoning. The valve
can be manual, or set on a timer or gal
lon (liter) meter.
Large-diameter hose (0.75 and 1 inch
[1.9 and 2.5 cm]) is more expensive but
allows for better flow rate and more
volume. However, if time, flow rate, and
debris blockage are less important, use
less-expensive 0.5 -inch (1.3 cm) diam
eter hose. Lightweight hose, which is
normally available in green and black,
will not disturb foliage.
Temperature and Humidity
Temperatures below 50°F (10°C) and
above 86°F (30°C) virtually stop can
nabis growth. Temperatures below 40°F
(4.4°C) can cause green tissue damage in
many varieties, especially when succu
lent or weak. Low temperatures cause
stress in plants. On the other hand,
plants in high alpine climates tend to
produce more resin and 10 to 20 percent
more cannabinoids than those in lower-
elevation gardens.
Continental influences cause tempera
tures to drop more rapidly at night and
remain high during the day. Maritime
influences buffer and moderate day and
nighttime temperatures. Microclimates
caused by geography, artificial structures,
and so on, influence temperatures too.
Nighttime temperatures are as import
ant to plant growth as daytime tempera
tures. Nighttime temperatures below
55°F (12.8°C) can slow growth. Night
time temperatures that drop more than
a few degrees cause humidity to increase
proportionately. Conversely, nighttime
temperatures above 86°F (30°C) stop
growth. Southern and tropical gardeners
are often faced with this dilemma and
must find ways to cool plants at night.
This outdoor garden in Mendocino County, California, is located in a small clearing about 500
feet (152.4 m) from a country home. These plants enjoy a 9-month growing season.
Some indica- and ruderalis-dominant
varieties are able to withstand freezing
temperatures but often suffer nutrient
imbalances as a result. See chapter 23,
Container Culture & Hydroponics, for
more information on temperature.
The best way to control temperature
outdoors is to plant in the proper place.
Normally hot temperatures are com
mon during midday in full sun. If you
are planting in a hot climate, make sure
plants receive filtered sunlight during
the heat of the day. Or plant in natural
breezeways so a breeze will cool can
nabis during the heat of the day. Cold
Cannabis grows best between 55°F (13°C)
and 86°F (30°C).
temperatures can be avoided by planting
at the proper times—well after last frost.
Temperature is difficult to control on
sunny terraces and balconies. The
reflection and heat-holding ability of
tile, concrete, and stone make these
spaces a challenge to cool. Shade cloth
shades balcony plants from scorching
midday sun. And dousing soil surfaces
with water also keeps direct sunlight
from heating containers enough to cook
roots. See chapter 19, Containers, for
more information on keeping containers
cool.
Growing in Tropical and Subtropical
Humid Climates
Temperature can be an issue in tropical
climates because there is a dormancy
period in summer when nighttime
temperatures rise beyond 86°F (30°C).
Plants start growing again when night
time temperatures fall into the seventies
(20°C-29°C). For example, an Alabama
gardener who plants by July 15 will still
produce a leafy plant if it is watered well.
Hot wind is better when it is humid but
not so good when it is arid amid high
temperatures. Reduce heat stress with
shade in the afternoon to block the
strongest sunlight. Climates change—
and there are many microclimates—so
each gardener has to fine-tune his or her
garden individually. Select proper plants
for your climate, provide filtered light
from 2:00 p.m. on, balance the humidity
and watering, avoid high-EC feedings
(especially nitrogen), and wish for cooler
weather in September.
www.marijuanagrowing.com
159
1.
Cool plants by misting them with
superfine atomized water. Avoid spray
ing plants with droplets of water during
the heat of the day. Sunlight can burn
foliage, leaving small spots on leaves.
These spots will also stress plants.
Combat hot temperatures by irrigating
with plenty of water. Mulch is essential
and will cool roots and soil and cut down
on water loss. Also make sure plants
have optimum levels of calcium. Do
not overfertilize plants in hot weather.
High EC (ppm) levels of fertilizer salts
and heat do not work well together. See
chapter 18, Soil, for more information.
Humidity is almost impossible to
control outdoors. Locate the garden in
a breezy location or microclimate to
lessen the effects of humidity. You can
plant in cooler, more humid locations in
a garden. Natural breezeways are under
any tree or structure, between two
fences, or in a gulch or canyon. Shady
spots in the garden tend to be cooler
and a little more humid. See chapter 16,
Air, for more specific information about
humidity.
Wind
Wind is one of the strongest forces
medical cannabis plants must with
stand outdoors. Sustained desiccating
wind sucks moisture from plants. Wind
causes plants to draw moisture from the
roots and shed it through the leaves as
a defense mechanism to regulate inter
nal temperature and chemistry. Severe
problems can arise if the water supply is
limited for any reason.
Cool air tends to sit in natural and man
made valleys, which are often a few degrees
cooler than surrounding areas. Coastal breezes
generally carry air from land out to sea at
night. Valleys and exposed hillsides experience
more wind. Coastal winds tend to flow inland
during the day, creating cool zones.
2.
Both cold and warm winds cause mois
ture loss, and plants dry out quickly
in windy conditions. Moisture must
be replaced by irrigating every day or
two. Plants that are allowed to dry out
completely suffer stress and are soon
stunted. Stress also weakens plants and
leaves them open to attack by disease and
insects.
Wind patterns will affect your garden
and influence where plants should be
located. Pay attention to conditions and
research average wind direction and
3.
4.
1. A solid wall causes air to drop and whirl
about the same distance equal to the height of
the wall.
2. A louvered wall diffuses air and protects plants
placed 6 to 12 feet (1.8-3.7 m) from the wall.
3. A solid wall that is angled into the wind
protects plants close to the wall.
4. A solid wall that is angled away from wind
protects plants up to 8 feet (2.4 m) from the wall.
Wind coupled with rain can cause broken
branches.
heavy rainstorm laid this garden on its
side. The 'Green Crack' plant in the back has
the stoutest stems. I shook offthe plants and
installed a wire fence around the garden as a
trellis.
Black shade cloth protects plants from wind
and lets some air through. Or protect by
planting among other annuals and perennials
to block heavy wind. When planting, look for
areas that are protected from the wind.
160
OUTDOORS
www.marijuanagrowing.com
force in wnu* jutjl Windbreaks can help
protect plants f rom wind, heat, and
water loss. Sec chapter 16. Air, and check
your local weather station via the Inter
net tor wind patterns and local condi
tions over time.
On our terrace. L5 miles (2.4 km) from
the Mediterranean Sea. the wind often
blows throughout much of the day and
more in the morning and evening. Plants
grown in 5-gallon (18.9 L) containers
on a terrace that receives full sun and
constant moderate winds use about 2
gallons (7.6 L) of water daily. Indoors,
the same plant would use 75 percent less
water!
Wind carries pollutants, including male
cannabis pollen, dust, and sand. Coastal
winds carry salty seawater mixed with
fine desert sand. All winds carry fine
particles of earth. In Spain "kalmia”
is grit mixed with saline air from the
Mediterranean. These winds can destroy
crops. If your climate is plagued by
such abrasive winds, protect plants with
windbreaks. Wash foliage with plenty
of water to remove the particles after
windstorms. Moderate sustained winds
will dry out container- and field-grown
crops within a few hours. Container
crops suffer the most.
Wind also promotes degradation of
trichomes on flowering plants. Light
breezes cause little damage, but heavy
winds cause branches and leaves to rub
together and damage fragile trichomes.
Rain
Some gardeners in some climates are
able to count on regular spring and
summer rains for irrigation. But most
growers cannot count on Mother Nature
to water their gardens. Cannabis gardens
in most climates must be irrigated for
best results.
Given the value of medicinal cannabis
and the limited cultivation possibilities,
most gardens arc irrigated. Rain is con
sidered by most gardeners as something
U) avoid.
Katnwatcr is heavy and it weighs down
blooming cannabis. Rainwater collects
between leaves and flowers in buds and
on the overall foliage. Many varieties
with weak stems and excessive foliage
are unable to support the extra weight
and will fall over, often one on top of
another. Also, excess moisture creates
a perfect environment for the growth
of mold.
Avoid damage from rainstorms by stak
ing buds adequately before rain arrives.
Use 6-inch plastic or nylon netting to
trellis branches in 1- to 2-foot (30.5-
61 cm) layers as the plant grows. This
will give support to plants in the wind
and when heavy rain falls. Bud-laden
branches will fall into the netting and
not tend to lie over on the side.
A plastic covering over plants is more
work to install but can be the best
option for many backyard and terrace
gardeners. Watch local weather reports
and cover plants with a plastic roof
before heavy rains fall.
Gardeners in rainy climates can black
out greenhouses in mid-summer to
induce plants to flower while sunlight
is intense and before autumn rains start
to fall (see "Light-Deprivation Green
house” in chapter 11). Inducing early
flowering is also a good tactic to avoid
powdery mildew, which is common in
gardens after summer ends. Sunlight is
also brighter when flowers are ripening.
Protect plants—organically—from desic
cating heat and wind. Mix extra calcium,
in the form of gypsum, into the soil mix
so that plants have the optimum amount
available. Fertilizing with the proper
levels of calcium will help leaves become
more rigid and assist them in retaining
moisture. Organic growing techniques
help soil retain moisture and toughen
up leaves. For more information, see
“drought” in the index.
Soil
Soil is divided into 3 basic categories:
clay, sand, and silt. Most soils,including
those found in grasslands, mountainous
areas, bogs, and backyards are combina
tions of the 3 basic soils. Land along
side most rivers and ancient lakebeds
is fertile, while nearby hillside soil is
much less fertile. Fertile topsoil is often
scraped away around houses during
construction. Ask local gardeners and
farmers for details on local soils.
Topsoil is rich and fertile. Soil structure and
fertility change with depth.
Wooden stakes support plants and provide a
frame for irrigation tubing in Eddy Lepp 's
garden in Northern California.
161
Dig hole
12 in.—
Sowing & Planting
Scatter slug pellets
between pockets
18 in.
....... ►
Always make sure to dig a big planting hole to give roots space to spread out.
Clay soil holds water well and provides
slow, even drainage. Clay soils are slow
to warm in the spring but hold warmth
well into autumn when sunlight is fad
ing. The density of clay does not allow
for proper air circulation, however, and
root growth is inhibited. Extremely
hard and dry clay soil is often referred
to as hardpan or adobe. Lime (calcium
carbonate) can also form a thick layer
in some desert soils and is referred to as
hardpan too.
At least a month before planting, pre
pare clay soil by adding lots of compost
and manure. Clay soils can hold water
too well, which can smother roots. Add
ing organic matter will lighten the heavy
soil, thus creating air pockets, improving
drainage, and promoting root growth.
The month’s delay gives the manure and
compost a chance to assimilate into
the soil.
Sandy soil is less common and is often
found near large bodies of water, in
deserts, and in many inland areas. It is
comprised of small, medium, and large
particles and is easy to till even when
wet. Plants can achieve excellent root
penetration. Sandy soil feels and looks
gritty.
Sandy soil is easy to work and warms
quickly in the spring, but it does not
hold fertilizer well, especially when
overwatered, which causes the nutrients
to wash out. Compost, peat moss, and
coco peat help bind the large particles
providing food and air circulation, but in
hot climates the organic matter decom
poses rapidly and is soon consumed by
bacteria and other soil organisms. For
Fix hole with
mixture of
compost or
rotted manure
and soil.
Leave low
mound at top.
best results, keep sandy soil cool and
retain moisture with mulch and addi
tional compost. Winter season cover
crops will hold moisture and prevent
runoff while retaining life in the soil.
Silty soil has all the advantages of clay
and sand; it holds moisture and water
like clay but is quick to warm and has
good drainage and a work-friendly
structure like sand. It is the perfect
growing medium. Most soils are a com
bination of sand and clay. Silty loam falls
in between and feels almost greasy when
rubbed in your hand, though it is less
slippery than clay. The ultimate soil for
growing plants is loam found in ancient
river bottoms and lakebeds where sedi
mentary soil builds up. It is dark, fertile,
and crumbly in the hand.
Forest soils vary greatly in pH and
fertility. Needles and deadfall from the
trees usually make the soil acidic. Most
forests remaining in North America
and Europe are on hillsides, since flat
land is used for farming, recreation, and
urban sprawl. Long-needle pines can
grow in poor soils such as those found in
mountainous and tropical regions. They
have deep roots to look for all the ele
ments in the soil. When a layer of humus
evolves, however, short-needle conifers
dominate. The roots on these trees
spread out on the surface to search for
nourishment and bury roots to anchor it
in place.
Jungles are usually low-growing, moist,
hot, and dense. Jungle soil is shallow
and alive. The hot weather makes all
foliage that falls to the ground de
compose quickly. Often nutrients are
available to plants, but the soil does not
have a chance to build density. Layers of
tropical soils can be very thin. However,
throughout much of Mexico, Central
America, and other parts of the world
volcanic eruptions have brought much
rock and minerals to the surface. Moun
tain valleys and lowlands are full of
alluvial plains packed with nutrient-rich
soil.
Grasslands often have wonderful soil
that recycles nutrients. Sunshine is likely
to be good, but detection could be a
problem in wide-open spaces. Plant in
areas that are protected from wind.
Mountain soils are often very rich in
minerals but lack humus. Alpine valleys
hold the best alluvial-plain soil that is
the product of volcanic rock erosion.
Hillsides are generally less fertile, and
soil must be amended to grow a good
crop. Most alpine soils lack humus, and
strong winds will dry out the plants.
For best results, look for patches where
pasture grass grows. You can help your
plants deal with mountain stress by
backfilling planting holes with a mix of
peat moss, soil, polymer crystals, and
slow-acting layers of organic fertilizer.
Bog soils are moist and spongy. Bogs
are filled with vegetation and often
have very rich soil. They may present a
perfect place to grow individual plants.
However, bogs are located in northern
climates and most often present a short
growing season.
Cut a square yard (0.8 m2) of moist sod
from the ground, turn it over, and plant.
Marsh ground supplies sufficient water
on its own. Add a bit of time-release fer
tilizer during transplanting and another
handful of “flowering” formula during a
checkup in early August.
Prepare Soil
To harvest a strong healthy crop, all soils
except for silt should be amended before
planting. Amendments improve soil,
nutrient uptake, root penetration, and
soil water retention. Here we will look
at how to amend and get the most from
outdoor soils. Compare the descriptions
of the soils above with your garden
soil to learn its basic type. Then follow
amendment recommendations.
OUTDOORS
www.marijuanagrowing.com
Drivings spade into soil, especially clay soil,
causes a microscopic clay soil barrier (aka
glazing, as in pottery) in which soil particles
lay vertically and are very difficult for roots
front transplanted seedlings and clones to
penetrate.
Rent an electric jackhammer and power it with
a generator at your garden in the country. A
jackhammer with a wide blade makes digging
heavy clay and rocky soil much faster.
Preparing soil in an arid climate requires
large holes and a lot of work! This gardener in
Morocco planted in sunken beds to conserve
water.
Once you have discerned the type of
soil, amend it with appropriate amounts
of compost, manure, coco coir, bone
meal, minerals, etc. Dig as large a hole as
possible for each plant. Dig holes at least
18 inches (45.7 cm) wide by 18 inches
(45.7 cm) deep for each plant. Dig holes
3 to 6 feet (0.9-1.8 m) wide and
2 feet (0.6 m) deep if planting big out
door plants. Spending a little extra time
digging a big hole will pay off in fewer
problems and a heavier harvest.
Adding water-absorbing polymers in the
planting mix is a good defense against
dry soil. The crystals expand up to 15
times when watered, making moisture
available to the roots for longer periods of
time. Slow-release crystals will allow an
extended period between watering. This
is very helpful if your patch is in a remote
location that you cannot visit often.
When adding amendments, backfill in
layers. For example: Fill a 2 X 3-foot
(0.6 x 0.9 m) deep hole with an 8-inch
(20.3 cm) layer of steamed bone meal
and soil; cover this with a thin layer of
topsoil blended with a rich compost-
manure-straw mixture, rock phosphate,
and seaweed meal. Build a mound of
compost and soil about a foot above
ground level. The mound will settle to
about half height during the growing
season. See “Organic Fertilizers” in
chapter 21, Nutrients, for more informa
tion. See also chapter 13, Case Studies
#3 and #4.
On hillsides, planting holes must be
terraced and be large enough to catch
runoff water. Dig extra gulleys to chan
nel runoff to growing plants, and make a
sunken “dish” around the plants to hold
runoff water.
If excessive drainage is a problem, which
seldom occurs if soil is properly amended,
place a substance with different surface
tension, such as clay soil or rocks, a foot
or two below the bottom of the planting
hole. The difference in surface tension
will slow downward drainage. You can
add many amendments including com
post, peat moss, coco peat, good soil,
organic nutrients, polymers, and dolo
mite lime—to help soil hold water—then
top with a concave “bowl” of soil that
will catch rain and irrigation water.
Soil Tests
Total dissolved solids (TDS) levels
for soil and water are very important.
Taking a soil test is the only accurate
way to know the contents and profile
of your soil. The soil scientist will also
give recommendations to improve soil.
Planting on a hillside requires a small terrace.
Containers are set into the hillside to form ter
races in this Lake County, California, medical
cannabis garden.
Well water and tap water should also be
analyzed for high levels of sodium and
other dissolved solids that may affect
the soil. See chapter 18, Soil, for more
iriformation on soil tests.
Note: All of these soils and amendments
are discussed in detail in chapter 18, Soil.
Raised Beds
Raised beds are wonderful for grow
ing in the backyard or in greenhouses.
Raised beds warm earlier in the spring
and hold warmth longer in the fall. But
they may heat up too much in the sum
mer when soil enjoys direct sunlight.
Cultivation and weed control are easier
in a raised bed, and soil quality is easy
to maintain. Build a raised bed on top
of poor soils. Planting in a 6- to 8-inch
(15.2 -20.3 cm) raised bed eliminates the
necessity of trying to dig in wet sticky
clay while providing the early warmth
and good drainage clay lacks. Plants
can be put into the ground 2 weeks to
a month early and may even produce
an early spring crop. I like raised beds
framed with lumber because the wooden
sides serve as a base for cold frame green
house construction. See chapter 11,
Greenhouses. Find information on
building and ready-made raised beds by
typing “raised beds” into your favorite
web browser.
Raised beds are similar to giant 200- to
500-gallon (757-1892.7 L) containers,
except they are often bigger and bottom
less, directly in touch with Mother
Earth. Make raised beds outdoors, in a
greenhouse, or in an indoor garden with
www.marijuanagrowing.com
163
Raised beds were set up by pounding stakes
into the ground and lining the “walls” with
permeable fabric.
Sunken beds help hold in moisture. The beds
need to be dug 6 to 12 inches (15.2-30.5 cm)
deep and amended well. Sunken beds allow
water to collect during rainstorms.
Bears and other animals can be problematic in
remote gardens! Organic fertilizers left at the
garden site can attract scavengers.
earthen floors. New soil can be added
on top of the old. If drainage is poor, dig
soil deeper and backfill with well-drain
ing soil. Dig deep ditches to drain excess
water away if necessary.
A raised bed with a large soil mass can
be built up organically after several
crops. To hasten organic activity within
the soil, add organic seaweed, manure,
and so forth, and let Mother Nature go
to work. Do not overdo it! When mixing
soil or adding amendments, use the best
possible organic components and follow
organic soil food web principles. There
should be good drainage, and the soil
should be as deep as possible, 12 to 24
Large planter boxes make a great place for
plants and puppies!
inches (30.5 -61 cm). See “Organic Soil”
in chapter 18, Soil, for more information.
A friend of mine plants on top of the
compost pile. He plants 6, 12-inch-tall
(30.5 cm) clones in 3 to 4 inches (7.6-
10.2 cm) of good soil that is on top of a
2- to 3-foot high (61-91.4 cm) compost
heap. By the time the roots penetrate
into the compost, it has cooled enough
and is releasing nutrients.
See also chapter 19, Containers-, chapter
12, Outdoors-, and chapter 13, Case Studies.
Sunken Beds
Sunken beds conserve moisture in hot
climates. Make a sunken bed by digging
down 6 to 12 inches (15.2-30.5 cm) and
across 2 to 4 feet (0.6-1 .2 m) or more to
form a big, shallow bowl. (Do not dig
deeper; subsoil in hot climates is very
poor.) Dig the planting hole in the center
of the sunken bed. Make sure to aug
ment the soil with plenty of appropriate
amendments. Place a heavy layer of straw,
dry foliage, or rocks as mulch in the basin
around each plant to conserve water. To
accommodate more water and disperse it
better, amplify the sunken bed a little as
the plant grows.
Use low-sodium manure contains few
salts. Cows are fed sodium nitrate, among
other things, to make them gain and
retain weight. The extra salt is passed into
their manure and it will lock up nutri
ents, burning plants and stunting their
growth. Test loads of bulk manure with a
sodium (Na) meter or make sure manure
is well-composted (3 to 6 months) in an
open area to leach out bad salts.
Fertilizers
There are two basic approaches to
outdoor fertilization: (1) adding salt
based (synthetic) fertilizers to soil,
and (2) building the soil with organic
nutrients and supplemental organic
fertilizers. Often gardeners build
organic soil, yet use salt-based fertil
izers that impair or kill soil life. Smart
medical cannabis gardeners grow
organically.
Once soil has been prepared, it is usu
ally amended with organic fertilizers
such as manures and composts that also
serve to condition the soil, improving
water retention and drainage. Most
often a complete range of macro- and
micro-organic nutrients are also added
to the soil mix. These nutrients will
become available as plants mature.
Supplemental fertilization may be
necessary if soil nutrients become
depleted. Supplemental fertilizing is
easy with organic (or salt-based)
fertilizers applied in a liquid or dry
form as per directions. Be careful to
avoid overfertilizing—your soil may
already contain ample nutrients.
Growing in a container, especially a
small container with less than 10 cubic
feet (283.2 L) of soil, is much differ
ent than growing in living organic soil
found in Mother Earth. The difference
is buried in the soil biology. When
cannabis is grown in a small container
for 2 to 4 months, there is no time
for soil biology to kick in and build the
soil. When growing in containers, regu
lar supplemental fertilizing is necessary.
164
OUTDOORS
www.marijuanagrowing.com
Organic products such as mycorrhizal
fungus and Trichoderma will get organic
gardens off to a good start. See chapter
22,/Ue/Ztz^es, for more information.
When choosing organic fertilizers,
remember that many of them are
“alive”—some more so than others! Dry
organic fertilizers can be full of dor
mant soil biology that springs to life and
multiplies when water and air are added.
See chapters 18, Soil, and 21, Nutrients,
for more information on fertilizers and
fertilizer mixes.
Properly mixed in a large container,
organic soil can have all the nutrients
necessary in an available form from
transplant through harvest. The large
growing container and rich organic mix
are the first secrets to success. Build
organic soils using natural elements
such as manures, composts, peat moss
and coco coir, rock powders, kelp and
seaweed. Whenever possible, use the
most readily available and least expen
sive ingredients.
Be sparing with fertilizer during the first
month after transplanting. Depending
upon the fertilizer, application could be
as often as every watering or as seldom
as every week or two. Often gardeners
fertilize with a mild, soluble flowering
Backyard gardens are easy to grow. Wismy,
editor o/Yerba magazine in Spain, stands in
front ofa healthy cannabis plant in one of the
many backyard gardens found in Spain.
This vegetable garden was transformed into a
medical cannabis garden. To facilitate mainte
nance, the gardener left plenty of space between
plants.
solution for germination and seedling
growth. Change to a high-nitrogen
formula during the vegetative stage and
back to a "super-bloom” when long
nights induce flowering.
If fertilizing every few irrigations or
every irrigation, you may need to dilute
the food to half-strength or less until
you figure out the proper dosage. Use
the instructions on the fertilizer label
as a guide.
If you must transport fertilizers, make
sure they are in dry or powder form,
lightweight, and not bulky. Avoid
leaving fertilizers at remote gardens,
especially those with ingredients such
as molasses, blood meal, or bone meal,
which attract animals—including bears.
I recently visited a garden where con
tainers had been ripped open and the
fertilizer consumed by a bear.
Backyard Gardens
Backyard medical cannabis gardeners
are available to give their garden the
tender loving care it deserves. Paying
close attention to plants’ cultural needs
pays off in big, healthy plants and abun
dant harvests at the end of each growing
season.
Site the garden in the sunniest part of
the yard, usually where the vegetable
garden is located. Growing medical
cannabis in flower and vegetable gardens
allows a gardener to glean experience
from past gardens.
Prepare soil in the fall. Remove rocks,
debris, and weeds, and dig planting
Medical cannabis plants can also supply shade.
Four plants shade one wall ofa home, which
keeps it cooler indoors. These plants are 8 feet
(2.4 m) tall!
A backyard garden full of cannabis can be
ornamental.
holes or garden beds. The best gardens
grow in tilled soil with plenty of organic
amendments. Many gardeners prefer
raised beds. No-till organic gardeners
leave the soil "as is” and add a heavy
layer of mulch. Either way, a layer of
mulch is helpful. A 4 - to 6-inch (10.2-
15.2 cm) layer of mulch will keep soil
elements intact, as well as attract mois
ture. Bare soil loses some of its valuable
topsoil and nutrients to erosion during
winter months.
In the spring, mulched amended soil
should be well-mixed and ready for
planting. If soil is poor and was not
amended the previous fall, dig large
holes 3 feet (0.9 m) in diameter by 2 feet
(0.6 m) deep, and backfill with good
soil/compost, potting soil, or planting
mix. Otherwise, break up the top 6 to 8
inches (15.2 -20.3 cm) of soil in a 6-foot
(1.8 m) radius to provide room for root
penetration.
www.marijuanagrowing.com
165
A little plastic stretched over a simple structure
keeps plants much warmer at night. It also
keeps plants from suffering damaging effects of
wind and pounding rain.
Some medical cannabis gardeners are fortu
nate to have big backyards!
Mulch is essential and serves to keep soil cool
and protected from temperature extremes and
compaction by heavy rains.
Transplant cannabis seedlings or clones
into the garden after threat of frost, and
if temperatures dip below 50°F (10°C)
at night, protect with a cloche, hot cap,
or Wall O Water. Follow planting guide
lines for setting out tomatoes.
Water and fertilize as needed. Make sure
to keep up with watering during hot
weather. Irrigate in the morning so that
water has a chance to be used all day
long. Mixing fertilizer with water is a
simple and effective way to fertilize. If
fertilizing with dry powders, mix them
into the top few inches (cm) of soil so
that they are effective.
Be on the lookout for pests and dis
eases, and take appropriate control
measures. Flower and vegetable gardens
can contract seasonal diseases and pests
including powdery mildew, spider mites,
and thrips that can spread to cannabis
gardens. Control diseases and pests on
flowers and vegetables early on so they
do not spread to the cannabis garden.
Follow guidelines below for planting,
maintenance, and harvest.
Container Gardens
Growing in containers is the easiest
option for gardeners with limited space
or very bad soil. Containers can be
moved into sunny and warm locations.
Grow cannabis outdoors in containers
that can hold from 1 to 500 gallons
(3.8-1892.7 L). Small containers are
easy to pick up, scoot around, or move
with a caster platform. Handles on 5- to
20-gallon (18.9 -75 .7 L) containers make
them easier to pick up and move. Large
200-gallon (757 L) containers
can be placed on a pallet and moved
with a forklift-equipped tractor. Always
move plants before watering!
Backyard gardening techniques depend
upon the location and microclimate
in the garden. City building rooftops,
terraces, and balconies tend to be windy,
as do hilltops and hillsides. The higher
the garden, the more wind. Wind
quickly dries plants and soil. Patio
gardens are often protected from strong
winds. If not, erect a wind block made
from 50 percent shade cloth, lattice or
another semipermeable material. Wind
Setting the growing container inside a larger
container will help protect soilfrom heating in
the direct sunlight.
can also carry rogue male pollen or in
dustrial hemp pollen creating problems
for terrace gardeners. Plan ahead and
know your neighbors. For more infor
mation, see “Rogue Pollen* in chapter
25, Breeding.
Small containers fit easily on a patio,
balcony terrace, or rooftop. Plants need
a sunny location, good genetics, good
soil, water, and nutrients. Direct sun
light beaming down on containers can
cook roots, however; shade containers
from direct sunlight. Putting pots inside
other containers can help protect roots
This terrace garden is flowering in the
springtime.
This healthy garden of 5-gallon (18.9 L)
containers is being moved outdoors to flower.
OUTDOORS
www.marijuanagrowing.com
from the sun. See chapter 19, Containers,
for more information.
Daily watering and maintenance are
essential during hot and windy weather.
An automatic watering system is often a
good idea in such gardens to ensure they
receive adequate water, especially if you
will be away from the garden for days at
a time.
For more information, see chapter
19, Containers, and chapter 13, Case
Study #4.
Follow guidelines below for planting,
maintenance, and harvest.
Large Gardens
Large gardens require a full-time invest
ment of time and assets. For example, a
99-plant garden full of big 10-pound
(4.5 kg) plants can yield about 990
pounds (449.1 kg) of dried cannabis
and almost the same amount of stems,
leaves, and trim, all of which must be
processed. Planting, growing, harvest
ing, curing, and packaging a big garden
is a big job. Planning is essential to the
success of large outdoor gardens. Smart
gardeners lay out a week-by-week plan.
big plants grow big buds!
Large outdoor plants require more garden and
soil preparation, water, and maintenance.
This clandestine cannabis gardener hauled her
supplies in on a horse in the late 1970s. (MF)
First, a perfect variety for your climate
(preferably an Fl hybrid), must be
grown from seeds or clones. It must be
planted in January or February indoors
and moved outdoors in April or May.
Lights must be installed in the tem
porary greenhouse over the plants to
keep them from blooming. Hundreds
of gallons (L) of soil must be mixed and
potted. In midsummer, individual plants
will need up to 10 gallons (37.8 L) of
water daily. This garden will need up to
1,000 gallons (3,785.4 L) of water every
day! At harvest, 1 person can manicure 1
pound per day. The fastest machine can
trim 3 to 4 pounds in an hour. A team
of 12 people (that must be paid) with 1
trimming machine can process about 30
pounds (13.6 kg) a day; 1,000 pounds /
30 pounds (453/13.6 = 33) = 33 10-hour
workdays. I have never seen an operation
this efficient. Normally 1,000 pounds
(453.6 kg) takes 12 workers with a trim
ming machine 3 months to manicure,
dry, and preserve. A detailed plan with a
timeline is in order!
Large gardens are a full-time job and
must be cared for at all times. Roaming
around in between the plants is always
fun and informative. Inspecting all the
plants daily is very rewarding; they
teach you something every day. Remem
ber that any problem such as trellising,
diseases, and pests occurs in a big way
to many plants. It is very important to
avoid problems before they occur. Keen
observation skills will be necessary. See
chapter 13, Case Studies, for more infor
mation about large gardens.
Follow guidelines in this chapter for
planting, maintenance, and harvest.
Remote Gardens
Remote gardens are sometimes referred
to as “guerrilla gardens,” a term coined
in the early 1970s. Remote gardens re
quire strategy, time, and frequently,
physical prowess. Unfortunately, inter
national, national, state, and local laws
can deem growing medical cannabis
illegal. Clandestine guerrilla growing
in remote locations is the only option
for medical cannabis gardeners in such
hostile areas. Location and security are
the main concerns for a medical canna
bis guerrilla grower. Choose a location
that has limited public access. Check
regulations for hunting, recreation, and
insurgent movements. Consider who
might be using the area, such as hunters,
mushroomers, illegal marijuana growers,
hikers, dirt-bikers, and Boy Scouts. Select
a remote site unlikely to be used casually.
Loading clones and seedlings in a backpack
in boxes is a safe convenient way to transport
them to the garden site.
www.marijuanagrowing.com
167
'Little Bonkers* seedlings from NGSC are
planted on this fertile hillside terrace.
These seedlings were moved out and trans
planted six weeks before the photo was taken.
Clearing thick undergrowth in the British
Colombia, Canada, forest was a big job.
This Basque cannabis gardener turned an
unused road into a remote garden patch.
Some gardeners go so far as to bury
8X8x40-foot(2.4X2.4X12.2cm)
shipping containers underground to
serve as a garden area. These gardens
are quite interesting. The containers are
set in a trench or hole on 2- to 4-foot
(0.6 -1 .2 m) blocks. The area underneath
the container serves as ventilation duct
ing. Earth is filled in around and over
the container; it also serves to insulate
the subterranean garden.
Other clandestine gardeners have buried
large, 12- to 14-foot (3.7 -4 .3 m) culverts
(big pipes) in the ground. These were
divided into top and bottom garden
rooms.
Growing cannabis on federal or public
land is not advised. Unfortunately, park
rangers in the USA now carry lethal
firearms and have the authority to arrest
“suspected” gardeners. A few trigger-
happy survivalists and a minority of
South American organized crime fac
tions have also moved into national for
ests, installing illegal immigrants with
guns to grow and defend large stands of
guerrilla grass. However, many times
Latin immigrants band together in small
groups and plant in the wild. These
smafl groups of people have nothing to
do with organized crime across borders.
They want only a better life for their
families. The War on Drugs has turned
gardening into a crime, and much of the
world, particularly the Americas, into an
unsafe place to live.
Remote gardens are often located in
or near big green stands of vegetation.
Cannabis is a vigorous plant and can
have a large root system. A flowering
female will stand out if surrounding
vegetation dies back before cannabis is
harvested. Stands of thorny blackberry
bushes, ferns, and meadow grass are
good options for planting locations.
Prepare the medical cannabis garden up
to 6 months before planting. Remove
green vegetation in the fall for a spring
Camouflage grow bags and pots are available.
Poor soil and lack of water are two oj the
biggest problems remote gardens face. These
plants weighed in at between 6 and 12 ounces,
respectively (170.1 and 340.2 gm).
Outdoor medical cannabis gardeners can
purchase clones grown indoors at dispensaries
such as this one in Oaksterdam. Gardeners take
the clones home and grow them indoors for a
month or two before transplanting outdoors.
168
OUTDOORS
www.manjuanagrowing.com
Clones growing in 4-inch (10.2 cm) containers
will soon start the vegetative growth stage.
When the clones are a foot (30.5 cm) tall, they
will be ready to move outdoors.
These seedlings will be transplanted into deep
containers and moved outdoors in 2 months,
after their sex has been determined.
Move transplanted clones outdoors fora few
hours every day to harden-offand acclimate
them to the harsher outdoor climate. After
about a week, they should be acclimated.
garden. Clear a few patches to allow
sufficient sunshine, cut back roots of
competing plants, and dig planting holes
2 to 3 feet square (61-91.4 cm3). Dig
holes wider than deep so that surface
roots can take hold. If possible, allow
amended soil to sit for a month or longer
before planting. Remote locations are
hard to visit on a regular basis, so proper
planning and preparation is important.
If home and remote gardens are simi
lar, you can plant an indicator crop like
tomatoes as a backyard guide to your
hidden plants’ condition.
Ample water is an important factor
for site selection. If you cannot count
on rainfall, locate your garden near a
water source that does not dry up in the
summer; doing so will make watering
easier. Water may have to be piped in
from another source, including pumped
uphill and stored in a reservoir. Exclu
sive access by boat may reduce the risk
of discovery, but make sure your plants
cannot be seen from the water. Many
people use waterways and explore land
bordering rivers.
Follow guidelines in this chapter for
planting, maintenance, and harvest.
Starting Clones &
Seedlings Indoors
Get a jump on the season by starting
cannabis clones and seedlings under
lights indoors. Move small, container
ized plants into heated greenhouses
to harden-off. Transplant them to a
backyard or remote garden once they
have become hardened-off and are
more resistant to environmental stress.
Grow seedlings in tall containers
(3 inches square by 6 inches tall)
(7.6 X 7.6 X 15 cm), which will produce
a strong, deep root system and a plant
that has a better chance of surviving in
tough conditions. Water seedlings and
clones heavily before transplanting.
A little effort preparing the planting
holes will result in healthier plants and a
heavier harvest.
Start seedlings and cuttings indoors and
move them into a heated greenhouse in
March or April or as soon as you can in
your climate. A 400-watt HP sodium
lamp on a timer can augment the less-
intense natural light of early spring.
Seedlings and clones will need at least
16 hours of artificial and natural light
per day until plants are transplanted
outdoors.
Transplant into a temporary greenhouse
as soon as nighttime outdoor tempera
tures are 50°F (10°C), or earlier if the
structure is heated.
Getting plants outdoors and established
early in the spring allows plants to take
advantage of the entire growing season.
Given favorable conditions, a plant that
is 3 feet (0.9 m) tall the first of May will
produce about twice as much as a plant
that is 3 feet (0.9 m) tall by the first of
June.
Some medical gardeners keep a stream
of plants moving from the indoor garden
to the outdoor garden. The first crop of
clones is planted in 3-gallon (11.4 L)
pots in a greenhouse. Once they are
hardened-off they are moved to their
final location outdoors. The second crop
is moved into the greenhouse when the
first crop is moved out. This process
can be repeated 3 to 4 times during the
season.
Transplant 1-foot-tall (30.5 cm) seed
lings and clones by removing the first
few sets of leaves and burying the root
ball deeper, with only 8 inches (20.3cm)
of foliage left above ground. Roots will
grow along the belowground stem in a
few weeks. Outdoors, when planted in
Mother Earth, deep roots will create
more self-sufficient plants. This is of
particular importance in remote areas
that are hard to get to, and in the moun
tains where rainfall may be sporadic.
Note: Outdoors in the ground only!
This technique does not work the same
in containers. Strong roots do not
always grow off the stem and the main
root ball often stays at the bottom of
the pot.
Hardening-Off Plants
Seedlings and clones grown indoors
are very tender. Indoors, seedlings and
clones lose much of their protective
waxy coating when they are pampered
with the indoor climate. Hardening-off
is the process of toughening-up clones
and seedlings so they can be trans
planted outdoors. During hardening-off
the protective wax coating has a chance
to grow back on foliage. Gradually
hardening-off clones assures that they
will suffer a minimum of stress and will
continue to grow rapidly outdoors.
To harden-off seedlings and clones, set
them outdoors for progressively more
hours over the course of a week. Set
www.marijuanagrowing.com
169
transplants out in the shade on the first
day. Gradually move them into the sun
so they receive progressively more hours
of sunlight every day. If temperatures
are below 50°F (10°C), bring transplants
in at night. Or you could set them out
under a plastic greenhouse.
Transplants suffer a huge climate
and temperature shock when moved
outdoors. Wait to move clones and
seedlings outdoors until they are fully
rooted and growing well. It takes time
to toughen up to the climate outdoors.
Transplant seedlings and clones out
doors when nighttime temperatures are
above 40°F (4.4°C). Planting under
plastic will help protect tender plants
from cold temperatures and winds.
A temporary cold frame greenhouse
will give plants a much stronger start
when temperatures are below 50°F
(10°C). The superstructure of a green
house provides a place to hang lights
if there are not enough hours of daily
sunlight for early spring plantings.
Planting Time
Planting time outdoors depends upon
the weather. There has been little
scientific research into planting tem
peratures for cannabis outdoors. In
general, do not transplant seedlings or
clones until nighttime temperatures are
above 50°F (10°C). If the garden bed is
raised or heat is added to a greenhouse
at night, temperatures can be lower.
Hardened-off plants should be protected
from cold weather, rain and wind with
a small plastic greenhouse until weather
warms. The plastic skin or greenhouse
is removed during hot days and replaced
when temperatures drop at night. Some
years the crop can have full exposure in
May. Other years we have to cover the
greenhouse until the middle of June.
Maintenance
Backyard gardens can be watered along
with vegetables, lawns, and trees. Plants
need plenty of water when days get hot.
Keep an eye out for cultural problems,
pests, and diseases. In the USA you can
telephone the local master gardeners at
the County Extension Agency to ask
about current pests and diseases.
THREE GARDEN PLANS
Planting Dates
Plant
Harvest
spring crop
March 15
May 15-30
I fall crop
May 1
October 15-30
i summer greenhouse crop
< ....... ■■ ■■
i. .I
■
May 1
August 15-30*
*Note: Darken greenhouse every evening to black out plants so they
receive 12 hours of uninterrupted darkness.
Note: Dates are the opposite by 180 days in the Southern Hemisphere.
Container gardens require regular
watering—usually daily. Set up a sun
block around containers to keep soil
cool. Containers left to cook in the sun
suffer fried roots and stopped growth.
Large gardens need regular, daily main
tenance. Routinely check plants for
diseases and pests. Water the garden
every day or every other day when
temperatures climb. Add extra mulch
around plants to conserve and attract
moisture.
Large containerized plants like this one require water every couple of days. Always check foliage
for pests and diseases while watering.
Remote gardens require a complete
low-maintenance setup. Loosen the soil,
amend it, and throw in a few handfuls
of polymers to retain moisture. A thick
layer of mulch, early in the year, will
attract water, keep the soil cool, and
prevent evaporation. Water and fertilize
as needed.
Regular irrigation is the primary mainte
nance medical cannabis plants require
outdoors. Basic information about irriga
tion is given under the heading “Water.”
170
OUTDOORS
www.marijuanagrowing.com
X nylon horizontal trellis is easy to stretch over
the garden.
This manicured cannabis will be dried on
screens.
A Swiss gardener harvested a couple ofplants.
Transporting whole plants requires extra space,
but he took them home to manicure.
Plants should also be inspected regularly
for pests and diseases. Caterpillars,
spider mites, thrips, and more can
move into a garden unnoticed. Careful
scrutiny is necessary to find and destroy
pests quickly and efficiently. Pay close
attention to plants every time you are
in the garden. Check foliage for signs
of mold, insects, caterpillars, and fertil
izer excesses or deficiencies. See chapter
24, Diseases & Pests, for more informa
tion on identification and treatment of
disease and pest attacks.
Trellis plants as needed. Always plan
ahead. It is easier to build a trellis when
plants are small. See “Trellises and Ties”
in chapter 6, Vegetatz^e Growth.
Pest prevention is crucial for all medic
inal crops, especially low-maintenance
gardens. It is easier to keep pests from
attacking plants in the first place than
to do damage control later. Build a fence
to protect seedlings and small vegetative
plants from deer. A low, electrified fence
is in order for wild pigs and various
other rodents. See chapter 24, Diseases &
Pests, for more information.
Water and fertilize as needed. See chap
ters in this book that pertain to specific
outdoor needs.
Harvest
Backyard and container-garden har
vests are easy because all facilities are at
hand. Harvest as for indoor gardens. See
chapter 9, Harvest, Drying & Curing, for
more information.
This Moroccan grower has been working
all day. This is one of the many plants he
harvested on a very productive day.
Branches full offlower buds are cut from plants
and transported to the manicuring room in this
lightweight plastic container.
This is one of the top buds from the Purple
Star' plant behind me. The local variety is well
acclimated to the area and produces excep
tionally well there. The entire plant yielded 12
pounds (5.4 kg) ofdried flower buds!
www.marijuanagrowing.com
171
The garden on the right has been harvested once and will be harvested one more time. The garden
on the left will be harvested for the first time.
Some leaves should be framed!
Large outdoor harvests require plan
ning and hard work. Harvesting a 5- to
10-pound (2.3 -4 .5 kg) plant takes time,
space, and physical energy. Read about
harvesting large gardens in chapter 9,
Harvest, Drying & Curing.
A trick that helps prolong harvest and
increase harvest weight is to harvest the
top 2 feet (60.9 cm) of large plants. Let
secondary buds continue to mature in
the newfound sunlight. Some varieties,
such as ‘Mr. Nice’, can be harvested up
to 4 times when grown as big plants!
Harvesting remote gardens is challeng
ing. Harvest before cold, damp autumn
weather sets in. This weather causes fun
gus—Botrytis (bud mold) and powdery
mildew. Many indica-<\om\na.nt plants
can take a short, mild freeze (30°F-32°F
[-l°C-0°C]). But if the temperature
stays below freezing for more than a
few hours, it could kill plants. Pay close
attention to weather forecasts and apply
the information to the microclimate
where your plants are growing. Be ready
to harvest quickly if weather dictates.
Accidents and thieves can force a har
vest, too. Limit potential discovery by
hunters, hikers, and others by harvesting
at night. Find out when hikers are prone
to visit the area, and plan accordingly.
Some gardeners even use police scanners
that pick up local police activities.
Should you encounter other hikers or
unwanted people while visiting or har
vesting the crop, have a believable story
to explain your presence in the area. Of
fer nothing, explain little, and keep con
versations simple. Always remember Bart
Simpson’s words, “I didn’t do it. Nobody
saw me. You can’t prove a thing!”
Take a sharp pocketknife or pruners to
cut plants, and a backpack to haul away
the harvest. If large amounts must be
harvested, it is easier to “field strip”
plants before transporting. If harvesting
more than one variety, put each of them
in separate bags, or wrap them in news
paper before they go into the backpack.
See chapters 8 and 9 for more informa
tion on flowering and harvesting.
Harvested flower buds are tossed into this large
bin after manicuring. They will be moved to
drying racks.
Catch and save all leaves and small trim
around buds. Separate into low, medium,
and high grades. See chapter 9, Harvest,
Drying & Curing, for more information
on drying leaves and leaf trim around
buds. Convert leaves and trim into
concentrates (chapter 26, Medicinal
Concentrates & Tinctures) or cook with
it (chapter 27, Cooking with Medicinal
Cannabis).
172
OUTDOORS
www.marijuanagrowing.com
174 Construction
175 Soil, Water, and Nutrients
153 Soil
153 Water
153 Nutrients
176 Grow-Tent Rooms
178 Big Rooms
180 Temperature, Humidity,
and Ventilation
g,---------- ----
L________ J
ESSENTIAL
MEDICAL CANNA
HORTICULTURE
CASE STUDY #1
INDOOR GARDEN
A rough drawing of the garden rooms and garage was an essential tool when the garden
ers were in the initial planning stages. A detailed drawing with precise measurements
was made before starting construction.
Two GROWERS, Mitch and Tim, personify
many new growers that have learned the
basics of crossing and feminizing cannabis.
They are crossing autoflowering feminized
plants with “regular” photoperiod-reactive
males and females. The regular male and
female plants are grown from seed for selec
tion and then multiplied into cuttings.
The beautiful indoor garden is in a basement
with a concrete floor. The single secure
point of access is through a secret door in
the garage. The entry door, secured with
a deadbolt lock, is hidden inside a locked
storage cabinet.
A doorway to the left leads to a 10 X 10-
foot (3 X 3 m) work and storage room.
An immediate left turn leads through a
doorway to the main flowering room. The
storage room is full of soil, containers, two
55-gallon (208.2 L) reservoirs for water and
nutrient solution, a potting bench, garden
supplies, and a few garden tools.
www.marijuanagrowing.com
173
Construction
Ready and working! Tim kept all his tools at hand on a tool belt and in special
pockets. A dust mask protected him from ever-present construction dust when
working with Sheetrock and plaster.
In the original space, water seeped through the basement walls. To remedy this
perpetual problem, the gardeners built a new inside wall of cinder blocks. They
sandwiched a layer of heavy-duty water barrier material to keep the seepage behind
the cinder block wall.
Four adjustable (400- to 600-watt)
ballasts and a timer were mounted on
a separate board for each side of the
garden room. They were mounted at eye
level for easy monitoring and to avoid
splashes of irrigation water.
The floor was lined with a double-layer plastic water barrier. The barrier developed
small holes after the first year and had to be replaced with a more durable product.
Dry wall (aka Sheetrock) is color-coded
green to signify it is water-resistant.
Aluminum-stud construction is easy
to manage; aluminum studs weigh
much less than wood studs. Wiring can
be threaded through premade holes
in the aluminum studs. The big room
was wired with two separate electrical
circuits, each side of the room having a
dedicated circuit.
The walls were covered with reflective
panels filled with Styrofoam and covered
with thin aluminum sheets. The panels
dovetailed together and were mounted to
a wood backing. Lights were hung from
the aluminum beams that framed the ceil
ing, which was covered with Sheetrock.
174
CASE STUDY #1: INDOOR GARDEN
www.marijuanagrowing.com
Soil, Water, and Nutrients
Soil, water, and nutrients had to be
sorted out before gardening could start.
Soil
Used soil was kept outdoors in 3-foot-
tall (91.4 cm) plastic bins. The gardeners
added an enzyme product whose manu
facturer claims leaches out any built-up
salts. They also include a dose of Gnat
Off to kill gnats and gnat eggs before
bringing the used soil back indoors.
Used soil was left outdoors, exposed to
the elements for a minimum of 30 days,
before being reintroduced to the indoor
garden room.
Water
The water for the gardens came from
a well, and the composition of the well
water changed throughout the year. In
the late summer, more dissolved solids
were in the water supply. Readings for
input water EC were 610 ppm and pH
8.2. Plants would grow well for the first
3 to 5 weeks, and then nutrient problems
would manifest.
The gardeners installed a reverse osmo
sis filter to remove salts from water and
lower the pH. However, water pressure
in the garden room was at 1.4 bars. The
RO device required 2.4 bars of pressure
to force water through the filter. They
replaced the pump, after which the
pressure was 2.7 bars and the RO filter
worked perfectly.
Nutrients
Once a week, 2 heaping teaspoons of
molasses were added to every 8 gallons
(30.3 L) of irrigation water. Fertiliza
tion with molasses started 2 weeks after
transplanting into 3-gallon (11.4 L)
containers. Weekly fertilization with
molasses continued until the end of
flowering.
Epsom salts were applied once during
late vegetative growth and once after
3 to 4 weeks of flowering. Varieties
that needed a higher dose of nutri
ents received a topdressing of chicken
manure. This tactic made it much easier
to care for many plants with different
fertilizer needs.
The gardeners used vertical parabolic reflectors in their garden.
www.marijuanagrowing.com
175
Grow-Tent Rooms
The main door to the gardens opened
into a room that measured 10 X 15 feet
(5 X 4.6 m) and contained 4 grow tents,
each
4x4x6 feet (1.2 X 1.2 X 185 m) and
equipped with a 600-watt HPS lamp.
There are many different grow-tent
manufacturers, and most grow tents are
easy to set up and start using. Setup takes
about 30 minutes, and the tents come
with written setup instructions; some
even have video instructions that can be
found on YouTube.
The grow tents were filled with flow
ering crops or clones, seedlings, and
mother plants. A workbench along the
wall was stocked with indoor garden
supplies, and tools were hung on hooks
above. A big open space in the middie
of the room served as a staging area to
move plants, soil, and supplies in and
out of the garden area.
Each 4 X 4-foot (1.2 X 1.2 m) tent
yielded from 12.6 to 26 ounces per 600
watts (0.6-1.2 grams per watt). Clones
were taken as needed 4 to 5 weeks
beforehand, and seeds were planted 3
to 5 weeks before moving them into the
flowering room.
Grow tents stay a few degrees warmer
when set up off the floor on pallets. Set
ting up individual garden rooms allowed
complete control of the environment.
Each tent could grow a different seeded
variety of cannabis. Or cuttings or seed
lings could be grown in the tent and later
moved into the big flowering room. The
tent could also be used as a drying room.
Seeds from breeding crosses were collected and
planted once the grow tents were completed.
A carbon air filter with an inline 4-inch (10.2 cm) temperature-controlled, 138 cfm
(270 m3/hr) fan was connected to a short run of ducting that efficiently eliminated
cannabis fragrances from the grow tent. The fan also kept the air in the tent changed
and the temperature perfect. The high-quality inline fan ran very quietly, day and
night.
CASE STUDY #1: INDOOR GARDEN
www.marijuanagrowing.com
Grow-Tent Rooms (cont.)
This 18-day-old autoflowering femi
nized seedling showed healthy foliage
growth. Strong vegetative growth trans
forms into robust flowering, which is
perfect for a sea of green garden.
A parabolic dome reflector and 600-watt HPS lamp provided an even canopy of light
to the seedlings in this grow tent. The gardeners kept temperatures lower, which
allowed the lamp to be placed closer to plants.
Genetic differences in flowers became
more pronounced closer to harvest.
This ‘Blueberry’-based automatic turns
purple for harvest.
www.marijuanagrowing.com
177
Grow-Tent Rooms (cont.)
At just 21 days after breaking ground,
these little autoflowering feminized
seedlings were already starting to flower!
The rapid growth phase starts at flower
ing and continues for another 2 weeks.
During this growth phase, growth can
quadruple.
This regular, resinous ‘Panama’ X ‘Deep
Chunk’ bud was on the verge of harvest.
The gardeners grew both autoflowering
plants and regular females from clones
in this garden. This particular plant
was part of an autoflowering breeding
project.
Another close-up view of the same
harvest shows us the quantity of
cannabinoid-rich, capitate-stalked resin
glands covering the floral clusters of this
autoflowering breeding parent plant.
Pollen was captured from this male plant
to use for breeding.
Male plants were segregated into a single
grow tent.
This breeding female was recently
pollinated and will produce seeds in
a few weeks.
Big Rooms
The 13.8 x 19-foot (4.2 x 5.8 m)
flowering room had eight 600-watt HPS
lamps—4 on each side. Each lamp had
a vertical parabolic reflective hood and
remote ballast. The lamps were mounted
overhead with 2 adjustable nylon cords
that kept hoods hanging evenly. The
1 X 2-inch (2.5 X 5 cm) boards were
attached to the Sheetrock and aluminum
beam ceiling with screws driven into
concrete anchors. Lamps were hung
from hooks screwed into the board in
the ceiling.
The layout of the room was simple
and easy to access with a wheelbarrow,
which was essential for moving soil and
supplies in and out of the garden rooms.
A big open aisle in the center of the
room was used as a staging area and to
grow small plants.
Plants in 3-gallon (11.4 L) pots were
lined up in neat rows. A few larger con
tainers and plants were mixed with some
of the 3-gallon (11.4 L) containers. The
aisle in the middle allowed easy access
to plants.
The autoflowering feminized plants
received 18 hours of light and 6 hours
of darkness during their entire lifetime,
seedling through flowering. Light leaks
between rooms were not a concern!
178
CASE STUDY #1: INDOOR GARDEN
www.marijuanagrowing.com
Big Rooms (cont.)
The floor fan was later replaced by
wall-mounted oscillating fans. Four new
fans were mounted on the walls and
directed above plants. Air circulation
improved dramatically, and there were
no electrical cords on the floor.
Water flow was regulated with a button
on the hand-controlled watering wand
attached to the hose bib.
These 3-gallon (11.4 L) containers were clearly labeled on 2 sides. The plants grew
for about 2 weeks too long in the containers, in addition to suffering from an
invasion of thrips. Lower growth slowed down and showed signs of nutrient
deficiencies and spider mite damage, and was then removed.
This robust Fl ‘Sour Boggle’ X ‘LPI’
(autoflower) 21-day-old seedling was
developing well. Note the minor lack of
nitrogen at growing tips, signified by a
light-green color. More nitrogen is used
at growing points, causing leaf color to
become lighter.
Square 3-gallon (11.4 L) containers fit closely together to get the most out of floor
space. These plants stayed in vegetative growth too long. Spindly lower growth was
removed to improve air circulation and facilitate maintenance.
www.marijuanagrowing.com
179
Temperature, Humidity, and Ventilation
During the summer months, gar
den-room temperatures climbed a few
degrees above outdoor ambient tem
peratures of 77°F to 86°F (25°C-30°C).
Just a few degrees above the ideal 75°F
(23.9°C) caused nutrient problems to
manifest much more quickly than during
cooler months of the year.
The gardeners purchased a small,
portable air conditioner for use during
hot summer days and nights. Cooling
the room by a few degrees and lower
ing the humidity made a big difference
in growth. When temperatures were
around 80°F (27°C) in the indoor gar
den, growth was slow and weak, leaves
curled under, and water and nutrient
uptake were depressed.
Lowering the temperature and humidity
bolstered overall plant health. Nutrient
and water uptake were improved, and
leaves became much stronger and were
oriented toward the light. A minor
change was visible within a few hours,
and the garden looked much healthier a
week later.
The carbon air filter at the end of the
room was attached to 10-inch (25.4 cm)
acoustic ducting 13-foot (4 m). Identical
carbon filters were located on either side
of the room.
Air was drawn through a carbon filter
at each end of the room and pulled out
by a 10-inch (25.4 cm) temperature-
controlled inline fan that moved
1130 cfm (1980 m3/hr). The ducting
continued through the wall to a short
run outdoors where the flowing air was
passively moved up and out by natural
convection.
At 5 weeks into flowering, this mixed
batch of clones and seedling varieties
had different nutritional needs. For
example, indica-Aommant varieties
required more water and frequent
fertilizing, while s^fz^-dominant
varieties required more water and
less-frequent fertilizing. Sativa-
dominant varieties must be bent,
and the lamp must be moved closer to
indica-dominant varieties.
Small plants were easy to move into the
large flowering room to take advantage of
the excess light. They were placed on the
floor and received just the right amount
of light for the seedling growth stage.
Manicuring and trimming away excess
foliage is a time-consuming job!
180
CASE STUDY #1: INDOOR GARDEN
www.marijuanagrowing.com
Toni is a passionate and precise medical
cannabis gardener. He knew nothing
about cannabis until 2006 when he was
diagnosed with fibromyalgia, a painful
and debilitating disease. After seeking
relief through prescription pills and,
later, through cannabis, Toni found that
consuming cannabis makes his days
less painful. Cannabis also gives him an
appetite and energy to enjoy life. Like
so many medical cannabis patients, Toni
traded a handful of prescription pills for
medicinal cannabis.
As a medical patient, Toni has a passion
for cannabis cultivation. He is constant
ly experimenting with new varieties and
products, collecting information, and
fine-tuning his gardens. This case study
follows one of his gardens and interjects
a few examples from past gardens.
Toni is an expert photographer. When it
came time to write up the research from
my garden visits and interviews with
Toni, it was difficult to pare down the
photos and detailed information
about his gardens. Please see Toni’s
forum, “Cultivando Medicina,” at
www.marijuanagrowing.com for com
plete details on many more of his gar
dens, including experiments and com
parisons. The Spanish-language forum
is easily translated to English and other
languages with the translator available
on the site. His photos are incredible!
F
Variety Grown
Seed Company Vegetative Days
-- --- ---- --- --- ---- ---- -- ---- --- 1
Flowering Days
'Jack 47'
Sweet Seeds
37
67
'Black Jack'
Sweet Seeds
37
67
'Kalashnikova'
Green House
Seed Company
41
57
'Lavender'
Soma Seeds
33
55
'Somango'
Soma Seeds
36
70
'Pakistan Chitral
! Kush'
CannaBioGen
40
63
..■
........................... j
Toni is a stickler for cleanliness and
order in the garden. Cleanliness and the
prevention of diseases and pests are at
the top of his list. He took weekly steps
during the vegetative growth stage to
prevent fungus, insects and mites, and
their eggs.
Cleanliness + Organization = Success!
www.marijuanagrowing.com
181
Seeds and Seedlings________________________________________
Toni avoids growing autoflowering feminized plants. He finds they require too much light (20 hours daily) and electricity for the
amount of production rendered. (But increasing the hours of light increases harvest weight up to 30 percent.)
The feminized ‘Blackjack’ (Sweet Seeds) seeds shown here had
been germinated in moist paper towels and were ready to plant.
Much of this rootlet was covered with delicate feeding roots
that quickly spread out into the growing medium.
Eight feminized ‘Blackjack’ and 8 feminized ‘Jack 47’ (Sweet
Seeds) were germinated in 1.1-quart (1 L) containers growing
under a 400-watt metal halide. This photo was taken 20 days
after germination. The small plants were watered with dilute
Root Juice (EC 720 mS, pH 6.2). A humidifier helped protect
clones from moisture stress.
Vegetative Growth
Toni applied the following fungicides in
weekly rotation: tetraconazole, pen-
conazole, and myclobutanil. He used a
handheld UVC lamp (CleanLight Hobby
Unit from HortiTec) to kill fungus and
insects, as well as mites and their eggs.
He also used a sulfur vaporizer; see
“Sulfur Burners” on page 184.
A 400-watt metal halide illuminated
16 feminized ‘Kalashnikova’ seedlings
(Green House Seed Company) grown in
1.1 -quart (1 L) containers. The plants had
recently been sprayed with nutrient solu
tion having an EC of 250 mS at pH 6.0.
Sixteen feminized ‘Kalashnikova’ seed
lings were transplanted into 3-gallon (11.4
L) containers and packed into this grow
tent. A fertometer was used to measure
electrical conductivity in the substrate to
reveal the overall fertilizer strength.
182
CASE STUDY #2: INDOOR LED HPS LIGHTS
www.marijuanagrowing.com
HPS and LED Lights
A combination of light-emitting diode
(LED) and high-pressure sodium (HPS)
light illuminated this garden. Plants
needed less light during vegetative
growth. Toni used 400 watts for the first
33 to 40 days of growth. At flowering,
the ballast was set to full power, and the
HPS emitted the maximum amount of
light.
The LEDs were of different colors
and emitted the perfect spectrum for
medical cannabis growth. They were
placed around the HPS lamp to augment
spectrum. The entire canopy of plants
grew evenly because it received the same
amount and proper spectrum of light.
As a rule, HIDs were kept at 14 inches
(35.6 cm) from the canopy of the garden
to provide maximum intensity and even
coverage. LEDs were kept about 6 inch
es (15.2 cm) above the tops of plants.
But if the temperature climbed beyond
75°F (23.9°C) at the tips of buds, Toni
raised the lights so plants would not get
too hot.
LEDs must run at the correct tempera
ture to operate properly. Beyond the
narrow operating-temperature band of
maximum efficiency, LED light output
falls drastically and spectrums become
unstable. See “Light-Emitting Diode
(LED) Lamps” in chapter 17, Light,
Lamps & Electricity.
This beautiful view of the garden shows
600-watt HPS and 420-watt LED fix
tures illuminating 16 flowering plants
growing in 3-gallon (11.4 L) containers.
The electronic ballasts made it possible
to regulate the intensity of HID light
emitted.
Toni used only high-quality Cree or
Osram LEDs. He cited the notable
difference in manufacturing process that
makes these LEDs brighter and more
long-lasting. LED technology is chang
ing rapidly. Please check Toni’s forum to
learn up-to-date information about the
lighting in his garden.
With a 600-watt HPS (Cool Tube) 4-
420-watts LED, light intensity/wattage
could be regulated in both fixtures.
Light intensity and spectrum were dialed
in so that plants received intense light of
the proper spectrum. Quickly evacuat
ing the hot air allowed for placing the
HID closer to the garden’s canopy.
Electronic ballasts allowed Toni to
increase light output when necessary.
Plants needed lower light levels during
vegetative growth, so light output was
cut to 400 watts to save electricity with
out affecting growth rate.
The concentrated HID and LED light
penetrated 28 inches (71.1 cm) into the
canopy covered in buds.
Even with the intense light provided by
the 600-watt HPS (Cool Tube) and 300
watts of LEDs, all the light was used by
plants. No light shined on the floor.
After changing a metal halide bulb for
an HPS bulb at the initiation of flower
ing, light intensity was tested to ensure
high light levels.
www.marijuanagrowing.com
183
Air
F"------------------------------------------------------------------------------------------------------------------------------------------------------------------------------------------------------------------------- 1
AIR QUALITY
Quality
Day
Night
temperature
75°F(23.9°C)
68°F(20°C)
humidity
40%
50%
ventilation
238 cfm (405 m3/h) inline fan
195 cfm (330 m3/h) inline fan
circulation
14-inch (35 cm) oscillating fan
14-inch (35.6 cm) oscillating fan
co2
800-1000 ppm
not used
sulfur burner
not used
used after lights-out every 7-10 days
fragrance
activated carbon filter, ozone generator
activated carbon filter, ozone generator
The device shown here measured tem
perature and humidity and logged it so
Toni could download data via a USB
connection. Internal memory holds
32,000 records.
Horizontal bars in the grow tent added
structure so the walls would not bow in
from negative pressure created by the
extractor fan. This roomful of ‘Kalash
nikova’ flowered for 48 days under a
600-watt HPS lamp.
There were four thermometers in the
room: one above, one at the plant
canopy, one in the plants, and the other
on the floor to measure temperature at
different levels.
Light from a 600-watt HPS and 300-
watt LEDs was optimized with a
CO2 generator and analyzer from
Ecotechnics. Toni found that adding
CO2 during vegetative growth increased
growth by 10 to 20 percent. At the same
time, he advised that CO2 is the last
thing to add to optimize garden
production.
Sulfur Burner
Toni turned on the sulfur burner as a preventive measure against diseases and pests—a weekly application during vegetative
growth only. Vaporized sulfur lands on foliage, quelling diseases and pests—Botrytis^ spider mites, and thrips. Remember that
sulfur burners have a small coverage area; sulfur tends to fall close to where it was vaporized.
Sulfur sublimes (changes from a solid to a gas) between 291°F and 311°F (143.9°C-155°C). At 320°F (160°C), toxic sulfuric acid
forms. This is why it is super important to use and maintain quality equipment.
184
CASE STUDY #2: INDOOR LED HPS LIGHTS
www.marijuanagrowing.com
Water and Fertilizer
FERTILIZER AND ADDITIVE SCHEDULE
Growth Stage
Fertilizer/
Additive
Fertilizer/
Additive pH
Dose in ml/L
To Start
Weekly
seedling
Root Juice
0
max EC 0.4
0
vegetative
BioGrow and
5.6
0
max EC 0.8
max EC 0.8
flowering
L----
BioBloom
6.2
follow instruc
tions on label
EC 0.8-1.0
increase from
200 mS each week
to max of 1800 mS
This was Toni’s base schedule for fertilizer and additives. He
was also experimenting with other Biobizz fertilizers at the
time of my visits to his garden.
Water came out of Toni’s tap with 1,100 ppm of dissolved
solids (salts). A reverse osmosis filter was used to purify raw
water before adding fertilizer.
The substrate was Coco-Mix Biobizz. Toni added a finger
deep layer of expanded clay pellets at the bottom of each
container before filling it, and he left a little extra space on
top to hold water.
Toni with 'Mr. Bubba !
Flowering
Eight feminized ‘Blackjack’ and 8
feminized ‘Jack 47’ in 3-gallon (11.4 L)
containers are packed into the 48 X 48-
inch square (1.2 X 1.2 m) grow tent.
Toni found this the most efficient
configuration for growing medicinal
cannabis.
Note the white female stigmas at the seventh internode from the top of this
feminized ‘Kalashnikova’ at 37 days of growth.
www.marijuanagrowing.com
185
Flowering (cont.)
Here is the garden under a 600-watt
HPS at 25 days of flowering.
Note the male (intersex) flower on a
feminized female plant after 14 days of
flowering.
Some of the plants in this experiment
were trellised using a “plant cage” with
six stakes. Plants grew so densely that
they covered the entire cultivation area.
You could not see the floor!
By day 43 of flowering, leaves next to this feminized ‘Kalashnikova’ bud were packed
with resin along the edges, and formed a small spiral.
Bud of feminized ‘Kalashnikova’ at 49
days of flowering
186
CASE STUDY #2: INDOOR LED HPS LIGHTS
www.marijuanagrowing.com
Flowering (cont.)
Look closely at the glandular trichomes
on this feminized ‘Kalashnikova’ at 44
days of flowering, and you can see the
first amber trichomes and a few broken
resin heads.
On harvest day, after 53 days of flow
ering, this terminal bud of a ‘Lavender’
female (Soma Seeds) was packed with
resin.
In this macro close-up of a ‘Lavender’
bud at 53 days of flowering, you can see
that about 10 percent of the resin glands
have turned amber.
This photo of a feminized ‘Kalashnikova’ (phenotype) at 57 days of flowering was
snapped on harvest day.
This is a different bud (phenotype) of
feminized ‘Kalashnikova’ at 57 days of
flowering at harvest. Note the subtle
differences between this phenotype and
the phenotype shown at left.
www.marijuanagrowing.com
187
Flowering (cont.)
A close-up shows the tip of a bud of
‘Pakistan Chitral Kush’ (CannaBioGen).
The blood-red color is seldom seen.
Here is a terminal bud of a ‘Somango’
female (Soma Seeds) at 68 days of flow
ering, 2 days before harvest.
This ‘Somango’ in a 3-gallon (11.4 L)
container was readv to harvest after 70
days ol flowering. Large, older leaves
exhibited chlorosis caused by washing
nitrogen from the soil.
This ‘Somango’ was pruned to leave just 2 main branches. The result was a single
plant that grew as if it were 2 individual plants.
Toni harvested 4 plants at a time in a perpetual-harvest rotation. Depending upon the variety and growth conditions, each plant
weighed in at between 2 and 2.3 ounces (60-65 gm) of dried medicinal flower buds.
188
CASE STUDY #2: INDOOR LED HPS LIGHTS
www.marijuanagrowing.com
I
190 2010 Backyard Garden
191 2011 Backyard Garden
193 2012 Backyard Garden
ESS
MEDICAL CANN
HORTICULTURE
CASE STUDY #3
OUTDOOR BACKYARD GARDEN
After a decade of living in Spain
where I could legally grow cannabis for
personal consumption, I returned to
the USA. Even though I was examined
by a doctor and prescribed a Medical
Marijuana Identification Card from the
State of California, my new home, I still
felt uncomfortable with the legal sys
tem. When I left the USA years earlier,
convicted “criminal medical cannabis
gardeners” received long prison sen
tences, and their homes and assets were
confiscated under civil law. It took me a
few months to warm up to the new life
in California.
This is a brief, three-year history of a
backyard garden located in California
at latitude 38° north and influenced by
Pacific Ocean maritime weather. It is in
Sunset Garden Climate Zone 14.
This simple history demonstrates that
soil is the essential base of the garden.
Sunlight, temperature, and the varieties
grown are the next most important fac
tors. Once these elements are in balance,
growing outstanding medical cannabis
is easy!
Jorge is always gardening in his backyard!
The first year, the soil was very bad:
heavy clay littered with river-bottom
rocks. Drainage was slow, and the soil
www.marijuanagrowing.com
189
contained little oxygen or organic mat
ter. Water would accumulate on top of
the soil after heavy rains.
I started amending the soil in February,
tilling in plenty of organic matter—
compost, bark dust, sand, and used
indoor soil. Chicken manure was added
to help break down the bark dust. Bone
and kelp meal were added too, but no
lime or other supplemental fertilizers.
The soil texture was transformed. Water
drained readily with good retention.
However, the soil still lacked the proper
balance of organic life that it would take
two more years to attain.
2010 Backyard Garden
Transplanting date: July 4, 2010
My first crop maintained a low profile;
I grew three each of ‘Bubba Kush’ and
‘OG Kush’. These varieties, purchased
from a local medical cannabis dispen
sary, were developed to be grown
indoors under lights.
I transplanted the clones in rockwool
cubes into 1-gallon (3.8 L) containers.
I let them harden-off for more than a
week, and then patriotically transplanted
the 12-inch-tall (30 cm) clones on the
4th of July—Independence Day in the
USA.
The plants, in a 6 X 10-foot
(182.8 X 304.8 cm) bed raised 8 inches
(20.3 cm) were covered with green 50
percent shade cloth. The shade cloth was
extended over one side to help block
ocean breezes.
A week after transplanting, the plants
were growing slowly. July days were hot,
86°F (30°C), but the nights were cool,
45°F (7.2°C). The shade cloth over the
plants kept them cooler during the day
and warmer at night.
This ‘OG Kush’ plant received plenty of
light for rapid growth.
By August 4, the plants were growing
well. The shade cloth cooled the soil and
lowered water consumption.
The garden is located between a
two-story wall and a tall fence. Once
the sun disappears behind the trees and
walls, the garden receives low levels of
light. Back when the sun was directly
overhead, on June 21, the garden area
190
CASE STUDY #3: OUTDOOR BACKYARD GARDEN
www.marijuanagrowing.com
had received almost 6 hours of direct
sun light, but by the first of October the
sun was lower in the sky, and just over
half the plants received 1 to 4 hours of
direct sunlight; the rest received only
ambient light. Plants in the foreground
were also subjected to light from an
adjacent window. Shade cloth helped
block the nighttime light so that all
parts of the plants matured at the
same time.
Five pounds (2.3 kg) of bat guano was
applied and cultivated into the top layer
of soil on August 1. The bat guano was
expensive, but it helped buds swell and
also imparted a sweeter taste.
This appeared to keep the disease at bay,
but it did little for the disease that had
already migrated inside the plant. Bud
mold progressed and was cut out when
visible.
The cannabinoid-potent crop was
harvested one branch at a time, on the
first of October.
On August 10, female flowers started to
grow under 13 hours and 50 minutes of
sunlight! By the end of the month, flow
ering was in full force under 13 hours of
daylight and 11 hours of darkness.
Two weeks before harvest, all foliage
was green—including large leaves. A
heavy dose of nitrogen (chicken manure)
was necessary to combat the bark dust
in the soil.
All 6 plants grew to about 3 feet (91 cm)
tall, with big, thick flower buds. The
first signs of powdery mildew and bud
mold started in mid to late August as
buds began to thicken. The mold be
came progressively worse until control
measures were taken. Serenade Garden,
a broad-spectrum preventative biofun
gicide, was applied as a spray at 1-week
intervals until the first of September.
As an experiment, branches with large
amounts of bud mold were left in the
ground so the disease would progress.
The bud mold infected about a dozen big
buds. I let them go to see how it would
grow. At the end of the experiment, I
decided that the best way to banish the
mold from these buds was to send it up
in smoke!
Caution: Do not try this at home!
2011 Backyard Garden
Transplanting date: June 14, 2011
The second year, clones were trans
planted a couple of weeks earlier. The
soil absorbed water and retained it
much better; 12 months of biological
activity had helped the soil mature. The
varieties—‘Chemdawg’, ‘Headband’, and
‘Blue Dream’—were more robust; they
grew taller and were more resistant (but
not immune) to powdery mildew and
bud rot (Botrytis cinerea).
At planting time, dispensaries offered
the best commercial cuttings available—
and the easiest to acquire. Of course my
research at the time was based on conve
nience, and I chose from stock on hand.
The indoor varieties were not acclimated
to the rigors of outdoors, where stems
must be strong, and growth must be
sturdy and fast.
The second-year garden was easier to
tend because the weather was milder, and
the clones were established before high
temperatures arrived in late July. Water
penetrated the soil better, too. I watered
by hand every few days—about 10 gal
lons (37.9 L) per plant—using an aerating
watering wand and local tap water.
www.marijuanagrowing.com
191
Plants were growing robustly by August
20, and female flower stigmas and bracts
had just started to grow.
Branches blew in the wind, and many of
them could not support the weight of
newly forming flower buds. I installed
a horizontal nylon trellis consisting of
6-inch squares. I fastened it to light
weight stakes set in the ground. Aside
from transplanting, installing the hori
zontal trellis was the most work involved
in this garden. It took 2 hours to press the
posts into the ground, string the trellis,
bend the top branches, and clean up.
On September 6, just over half the
plants received 2 to 5 hours of direct
sunlight; the rest received only ambient
light.
A big rainstorm blew in on October 2.
Here, ‘Headband’, a leafy variety
with a narrow stem, is shown lying
over in front. Strong stems, few leaves,
and compact buds kept the ‘Green
Crack’ variety standing upright in
the background.
Powdery mildew once again haunted
the crop but was kept at bay with
applications of Serenade Garden
every 10 days.
By the last day of August, more small
flower buds had formed and branch
tips were elongating. The extra 8 inches
(20.3 cm) of sideboard added to the raised
bed increased the height to 16 inches
(40.6 cm). I also added compost-enriched
soil to fill the void. The bed warmed
sooner in spring, but it got too hot in
summer until plants shaded the soil.
Buds had started to plump up by
September 20. Branches of big buds
would be harvested in 30 days. Lower
branches were left to fatten-up a week
or more before harvest.
The first bud, with a 2-ounce (56 gm)
flower, was taken from ‘Blue Dream’ on
October 4. Flower buds from different
varieties ripened at different rates,
extending the harvest by 2 weeks.
192
CASE STUDY #3: OUTDOOR BACKYARD GARDEN
www.marijuanagrowing.com
2012 Backyard Garden
Transplanting date: May 15, 2012
The third year, I started with good,
strong clones—three ‘Queen Mother
X Elvira’ and three ‘Lamb’s Bread X
Mother Teresa’—from an expert indoor
medical cannabis gardener. They were in
4-inch (10.2 cm) pots and were 12 to 18
inches (30.5 x 45.7 cm) tall, overgrown.
The roots were in fair condition: even
though a few were brown, most were
strong, white, and vibrant.
I left the little clones outdoors in the
shade and brought them in at night for 3
days. On May 15,1 removed a few lower
branches and transplanted the clones
about 8 inches (20.3 cm) deep. Planting
deeper gave the roots a cool, moist envi
ronment. The subterranean stems grew
strong new roots in about
a month.
Here, in the first week of June, the
established clones were growing well
and needed no protection from intense
sunlight. Planting earlier took advantage
of less-intense sunlight and cooler tem
peratures. Plants had a chance to become
established before warm weather set in.
On June 7, the temperature of the raised
bed was about 86°F (30°C) during the
heat of the day, and about 72°F (22.2°C)
at a depth of 2 inches (5.1 cm). The raised
bed had helped when the days were cool,
before the soil warmed. After 2 days, sun
light was heating the bed to temperatures
that slowed growth to a crawl.
By July 12, the plants had outgrown
the bed and needed support and bend
ing. A new 4-foot (121.9 cm) wire fence
with 6-inch (15.2 cm) squares around
two thirds of the garden provided sup
port to bent branches. I left the shady
sides open to provide easy access to the
interior of the bed. I trained branches
on the perimeter through the 6-inch
(15.2 cm) squares in the fence to pro
vide stability. Bending slowed upward
growth and kept plants below the fence.
Bending branch tips also promoted
bushier growth.
Shade cloth protected the recently trans
planted clones from intense sunlight
and kept soil cool the first 3 weeks after
transplanting. This photo was taken on
June 3, after plants were established and
had started to grow.
To mount the shade cloth, I drove a few
lightweight posts into the ground around
the interior of the raised bed and draped
50 percent shade cloth over the tender
cuttings and stapled cloth to posts. These
clones were planted during a cool spell
that lasted several days. (Weather reports
are right much of the time!)
The surface of bare soil was 120°F
(38.9°C) on June 21. Four inches
(10.2 cm) belowground, temperatures
had climbed to 86°F (30°C). A 6-inch
(15.2 cm) layer of straw mulch cooled
the surface to 70°F (21.1°C) and
4 inches (10.2 cm) belowground to 66°F
(18.9°C). Plants began to grow 1 to 2
inches (2.5-5 .1 cm) daily.
Overgrown bent plants needed thin
ning below to allow for air circulation
and promote growth aboveground that
received intense sunlight. On July 17,
I cut off branches and leaves, using
sharp pruning clippers to avoid wound
ing the plants.
The shade cloth was removed a week
later, but I put it back on for a few more
days when the weather grew hot.
www.marijuanagrowing.com
193
Flower-filled branches grew a foot
(30.5 cm) or more between August 21
and September 5. Notice the ‘Apollo 13’
plant in the right foreground. Its buds
were clearly much more developed than
others. Note that the ‘Jack’s Cleaner’
branches on the left were not as far along
in flowering. They received light from a
nearby window during the nighttime.
The plants used so much water that I in
stalled a drip irrigation system to water
plants daily. The drippers were unable
to supply water evenly, so, as needed,
I watered heavily using a wand with a
breaker head that oxygenated the water.
By August 24, plants were consuming
even more water and were kept on the
every-other-day schedule of about 40 to
60 gallons (151.4 -227 .1 L) in the entire
6 X 10-foot (182.9 x 304.8 cm) bed.
Here is a view of a ‘Jack’s Cleaner’
branch of flower buds that was photo
graphed the same day as the previous
image of ‘Apollo 13’. Notice that this
bud was bigger and slower to mature.
Here is a photo taken in late September
from an upstairs window. The plants
were from 5 to 7 feet (1.5 -2.1 m) tall.
Flower buds were getting so heavy that
they weighed down the branches.
By August 21 the plants had overgrown
the 6 X 10-foot (182.9 X 304.8 cm)
raised bed. In this photo you can see
that the top branches had started to
shoot upward and small bracts and pis
tils had started to grow on the buds that
were forming.
‘Apollo 13’ was the first to ripen, a full 2
weeks earlier than the rest of the garden.
This image was taken September 27, a
few weeks before harvest.
This photo is of a branch of flower buds
from the same ‘Jack’s Cleaner’ plant as
above. It was taken the same day,
September 27, as the previous 2 images.
It was underdeveloped and smaller over
all because it received light from a nearby
window during nighttime hours.
194
CASE STUDY #3: OUTDOOR BACKYARD GARDEN
www.marijuanagrowing.com
CASE STUDY #4
OUTDOOR LARGE GARDEN
Humboldtlocal is a cannabis garden
er from Garberville, California, 40.1°
north latitude, about 20 miles (32.2 km)
from the Pacific Ocean, tucked into a
valley behind the King Range of moun
tains and the Lost Coast. The winters
are rainy and summers are hot. Cannabis
gardens require irrigation.
This garden is located on the border of
the legendary Humboldt and Mendocino
counties in Northern California, where
Humboldtlocal grows big plants. Very
big plants—10 pounds (4.5 kg) plus.
Many states that allow legal medical
cannabis cultivation limit the number of
plants a patient or a patient caregiver can
grow. They therefore grow big plants
that produce more medicine—legally.
There are no secret tricks to growing
giant plants. The only requirements are
simple, consistent organic garden prac
tices and proper genetics in the seeds or
clones that are acclimated to your local
climate. Of course, strong knowledge
of biology, horticulture, and soil and
water chemistry always helps! Once the
genetics arc secured, the most import
ant factors to grow big plants are a long
growing season (6 to 7 months), and
plenty of light, good soil, clean water,
and desire.
The big plants cost from $300 to $500
USD per plant to grow, which includes
all labor, supplies, rents, and so forth.
The production cost is $50 USD per
pound (0.45 kg). Healthy harvests weigh
in at 5 to 104- pounds (2.3-4.5 kg) of
dried flower tops and about the same
volume in leaves. Post-harvest expenses
www.marijuanagrowing.com
195
such as trimming, drying, and storing
are not included in these estimates.
So much of harvesting a big crop has
to do with timing and the weather. In
2010, Humboldtlocal got lucky. Seeds
were started at the optimal time for the
climate. Seedlings were transplanted
at the right times. The weather made it
easy to give them optimal conditions.
Once transplanted into hoop houses, the
plants took off! Plants were transplant
ed and moved to the hoop houses on
April 20, 2010. (The late spring in 2011
prevented the move to hoop houses until
July 1 that next year. Of course, harvest
was affected.)
March
On the night of March 3, the plants were
looking good in the heated greenhouse,
but a sudden storm had blown in and
covered the ground with snow. The little
quail around the farm sought shelter
from the storm by ducking into the
heated greenhouse. There they found a
banquet of tender young seedlings, and
picked and munched the seedlings for
hours before slipping out at daylight.
The next day there were feathers and
bird poop everywhere. The fan leaves
had been pecked away but the growing
tips were untouched. With no other
plants ready to go, Humboldtlocal de
cided to nurse them back to health and
plant them in the garden.
Planted on the first of March, these
seedlings were 3 weeks old when this
photo was taken. They were growing in
1-gallon (3.8 L) containers full of Hum-
boldtlocal’s homemade potting mix.
Each plant was meticulously labeled
with variety name, planting date, and
transplanting date.
Nighttime temperatures dip as low as
40°F (4.4°C) in this area of California,
but a small heater kept the interior of
the greenhouse between 55°F and 60°F
(12.8°C-15 .6°C).
This is the site for the garden. It is in the
best possible place located on flat land.
The entire parcel receives full sun all day
long. Large fir trees around the perim
eter protect the big garden from strong
Pacific Ocean winds.
In 2010, tools, irrigation equipment,
soil, fertilizer, and everything else had
to be carried to the garden. All gardens
need a readily available source of water,
or it too must be hauled to the site.
Plants can use 5 to 10 gallons (18.9-
37.9 L) of water a day. The water source
for this garden is a nearby pond.
Local varieties were planted that were
developed to grow well in this climate.
Smart gardeners in Northern California
grow seeds and clones developed locally
for their own climate.
Clones or seedlings can be started
indoors or outdoors in a heated green
house in temperate climates. Small
plants can be moved from indoors to
a heated greenhouse when plants are a
month old.
The little clones were looking better just a
few days after the viscous quail attack.
It is hard to believe that the little seed
lings that were attacked by a covey of
quail could produce big healthy plants like
this one just a few months later. Mother
Nature works in miraculous ways.
196
CASE STUDY #4: OUTDOOR LARGE GARDEN
www.marijuanagrowing.com
May
The result of the quail attack was
positive! By April 15 the seedlings were
12 to 18 inches (30.5-45.7 cm) tall and
had started showing male and female
pre-flowers. Seedlings were bushier and
demonstrated sex earlier than in other
years. Empirical observations say it was
This indoor garden room was full of
‘OG Kush’ and ‘Mr. Nice’ clones. They
were moved into a hoop house just days
after this photo was taken. The green
house was wired with CFL lamps to pro
vide just enough light to prevent flower
ing under fewer hours of sunlight.
This row of seedlings was planted di
rectly in amended soil. Irrigation tubing
was laid alongside plants. Next a string
of lights would be installed overhead
to keep plants in the vegetative growth
stage.
from the attack of the killer quail.
Here are the same seedlings 8 days later.
They had grown so quickly that the
plants were shading one another. They
had to be moved apart and transplanted
because roots had also overgrown the
1-gallon (3.8 L) containers.
The ‘OG Kush’ plants were transplanted
into 5-gallon (18.9 L) pots. The green
house protected the plants from heavy
spring rains, and the supplemental light
kept them in the vegetative growth
stage.
By May 12, plants in the greenhouse
were continuing to put on new growth.
They would be transplanted into hoop
houses outdoors in the next few days.
Small CFL lamps illuminated this hoop
house full of ‘Mr. Nice’ in the springtime to
keep plants in the vegetative growth stage.
Here the ‘Shoe Goo’ variety was also
kicking into gear.
Here is the ‘Burmese Kush’ X ‘Shoe
Goo’, as it was starting to get cranking.
www.marijuanagrowing.com
197
May (cont.)
Containers were large (200-300 gallons
[757.1-1,135.6 L]) and organic soil was
rich in available nutrients; it drained
well, and retained moisture too. The soil
was covered with permeable weed barrier
cloth and 300-gallon (1,135.6 L) pots
were set on top. This practice contained
the root ball and conserved water.
Hoop houses have access from either
end. On hot days the ends can be rolled
up for ventilation. Plants can usually
withstand 86°F to 90°F (30°C-32.2°C)
and a little more when well established.
Humboldtlocal pushed his plants to
higher temperatures so they would be
ready for 100°F (42°C) temperatures in
summer.
The ends of hoop houses can be closed
in late afternoon to keep the heat inside
during much of the night. Small hoop
houses heat up faster and must be vented
frequently.
Here are a couple of soil mixes from
expert medical cannabis gardeners
from the Emerald Triangle in Northern
California. Both soil mixes are similar.
Humboldtlocal’s mix includes dolomite,
oyster shells, and kelp as additional
sources of calcium, magnesium, and
trace elements. Nitrogen is also supplied
by worm castings and chicken manure.
Tom Hill’s soil mix relies on Brix Mix
for trace elements and does not add
magnesium and calcium in the form of
dolomite. Ever seeking the perfect soil
mix, both gardeners change their mix
slightly every year.
Humboldtlocal's Soil Mix
Tom Hill's Soil Mix
; Makes 50 cubic feet (1,415 L) of soil
Fills 6, 300-gallon (1,135.6 L) containers
25, 1.5 cubic-foot bags (42.5 L) Sunshine Natural and Organic #4
3 cubic feet (85 L) Nutri Rich high-calcium chicken poop
1 cubic feet (28.3 L) Super Soil Earthworm Castings
4 cubic feet (113.3 L) Pahroc Perlite #4
25 pounds (11.3 kg) steamed bone meal
8 5 pounds (2.3 kg) kelp
1 5 pounds (2.3 kg) oyster shells
20 pounds (9.1 kg) dolomite lime
20 pounds (9.1 kg) gypsum
Mix well, water thoroughly; let rest for minimum of 2 to 3 weeks
before using.
<
--
■ ------------- ------------------------
----
Makes 50 cubic feet (1,415 L) of soil
Fills 6, 300-gallon (1,135.6 L) containers
25, 1.5 cubic foot-bags (42.5 L) good-quality organic potting soil
4 cubic feet (113.3 L) chicken manure
4 cubic feet (113.3 L) perlite
50 pounds (22.7 kg) steamed bone meal
20 pounds (9.1 kg) gypsum
Mix well, water thoroughly; let rest for minimum of 2 to 3 weeks
before using.
Add Brix Mix Powder as per package instructions a week
before moving in transplants.
June
These 300-gallon (1,135.6 L) contain
ers were planted in early May with no
protection from wind and cool weath
er. Each container held 2 or 3 plants.
Although the plants were smaller than
plants in hoop houses, the extra number
of plants took advantage of large con
tainers full of great soil.
-------- 1
198
Drip irrigation tubes encircle the plant.
CASE STUDY #4: OUTDOOR LARGE GARDEN
www.marijuanagrowing.com
June (cont.)
down the length of Humboldtlocal’s
hoop house. The plants grew through
the trellis netting and were supported.
Hoop houses are not covered when
autumn rains come because bud mold
and mildew are compounded in dense
foliage. Rain can always be shaken off.
These plants were spaced on 10-to-12-
foot centers—a bit close. Humboldtlocal
wanted them to look like a big, continu
ous hedge from the air.
Water is essential during the entire
cannabis life cycle. Humboldtlocal
irrigated each plant with 20 gallons
(75.7 L) every other day.
Hoop houses made with 20-foot (6 m)
PVC pipe are 6 to 7 feet (182.9-213.4
cm) tall at the crown. They are designed
so that plants outgrow hoops by several
feet. The plastic is taken off as soon as
nighttime weather warms, usually late
June to early July. Two 4-foot-wide
(121.9 cm) trellis nettings were run
Rice straw makes good mulch and was
readily available in Humboldtlocal’s
area. It was not full of seeds, but rodents
loved it. Humboldtlocal relied on the
skills and appetite of several farm cats
to keep the rodent population in check.
However, an occasional plant was lost to
girdling of the stem.
Here is the same view of the main gar
den a few months later. The plants stood
6 to 7 feet (182.9 213.4 cm) tall
July
Instead of using commercial bottled
fertilizers, Humboldtlocal used a
“hot” soil mix and top-dressed with
high-nitrogen bat guano and earthworm
castings during vegetative growth. He
changed to high-phosphorus bat guano
during flowering. He also used a local
compost tea that was rich in micronu
trients, as well as earthworm castings
(EWC) diluted in water as a soil drench.
www.marijuanagrowing.com
199
July (cont.)
Organic gardening is the secret to huge
plants and rock-hard buds.
Good genetics play a major role as well.
However, he did use a couple of organic
mite and pest sprays. During this gar
dening year he started using Brix Mix as
a foliar spray; it is known to repel and
kill insects and mites.
By mid July vegetative growth was full
speed ahead. This shade leaf was big
enough to cover half of the gardener's
back!
August
For large plants, it takes a huge stem to
support branches and foliage. This stem
grew so fast that it got stretch marks.
Stretch marks are usually the result of
infrequent watering.
Water is the key to success when grow
ing large plants. These plants needed
20 gallons (75.7 L) or more every other
day (10 gallons [37.9 L] daily) to sustain
life and continue to grow.
Irrigating in the morning ensures that
much of the water is used during the
first part of the day. Roots do not go to
bed with wet feet, and oxygen is able
to speed nutrient uptake.
200
CASE STUDY #4: OUTDOOR LARGE GARDEN
www.marijuanagrowing.com
August (cont.)
September
Chance of bud mold and powdery mil
dew increases exponentially when sprays
are applied in the evening. Extra mois
ture is a sure breeding place for fungus.
This photograph was taken on
September 8, but the view itself had
appeared two times in the year, in
March and June. You can see that
some of the plants in the foreground
had been harvested once. New growth
had sprouted up, and light-starved
flower buds had already begun
plumping up.
These plants will ultimately obscure
the plastic netting.
Hoop houses are able to follow the
contour of the land.
By September 8, plants had grown 2 to
3 feet (61-91.4 cm) past the first layer
of trellis netting. Buds were starting to
flap in the wind. Luckily, branches were
tough, and no damage occurred.
Plants had grown to more than 12 feet
(365.8 cm) tall by September 20, and a
second trellis netting was added to help
protect bud-laden-branches from wind
damage.
During the flowering stage, budding
plants received fertilizer. Progressively
more of the bloom formula was added
in 2 to 3 fertigations, until the fifth or
sixth week.
www.marijuanagrowing.com
201
Harvesting a field of 10-pound (4.5 kg) plants required space, planning, and a lot of hard work!
By the first of October, a 2-foot (61 cm)
layer of bud-filled branches had been
harvested from the purple plant in the
foreground. Two weeks later, the sec
ondary buds were fattening for harvest.
This photo provides perspective on the
size of some of the plants in this garden.
Once buds pass through the cutting
deck they fall out into a receptacle.
Machine-trimmed buds are taken to a
table full of professional trimmers with
scissors. The trimmers manicure the
fresh buds to perfection.
After being machine-trimmed, buds are
hand-manicured to remove excess foli
age before they are placed on net shelves
to dry.
This is the photograph that was seen in
more than 20 magazines and countless
digital media outlets around the world.
For many gardeners, Humboldtlocal and
the growers in the Emerald Triangle of
Northern California provide the inspi
ration to grow big plants beyond their
wildest dreams!
A Twister trimming machine trims
most of the small leaf. Buds are prepared
and dropped in the hopper. They pass
through the cutting deck, where the
small leaves are trimmed from compact
fresh buds.
Manicured buds are placed in expand
able net drying racks. One half-pound
(226.8 gm) will easily fit on a tier of
these 2-foot (61 cm) drying racks sus
pended from eyebolts in the ceiling.
Beautiful bud!
202
CASE STUDY #4: OUTDOOR LARGE GARDEN
www.marijuanagrowing.com
f-------------------------------------------------------------------------------------------------
205 Sanctuary Preservation
206 Sanctuary Surveillance
207 Sound Security
208 Light Leaks
208 Fragrance
209 Electrical Security
209 Internet Security
210 Outdoor Security
210 Remote Garden Security
211 Law Enforcement
213 Informants
214 High-Tech Surveillance
214 Thermal Image Technology
214 Mini Helicopters
ADVANCED
MEDICAL CANNA
HORTICULTURE
PRESERVING
THE SANCTUARY
The Internet dominates information
today. We can check www.google.earth,
com and see actual cannabis gardens
with big plants in northern
California. Amazing views of legal
cannabis gardens! Security issues have
changed immensely during the last few
years in the United States and countries
that allow or tolerate medical cultivation
of the cannabis plant. As legal patients
and cannabis gardeners, we do not have
to worry about losing our homes in the
USA to “double jeopardy” laws that
prosecute gardeners as criminals, and
later in civil court where we are subject
to asset forfeiture laws and unsavory
“criminal” vultures extorting “favors”
while we cower in the shadows. We
can talk freely with fellow gardeners,
patients, and caregivers without fear
of being labeled as so-called mafia or
organized crime and subject to RICO"
and other prejudicial laws. The Internet
gives cannabis cultivators—medical and
recreational alike—the ability to gather
information yet remain anonymous in
this worldwide legal turmoil. Digital
cameras and camcorders allow us to
share our gardens with fellow gardeners
with little or no fear of being discovered.
The flood of Internet information is
overwhelming to prohibitionists that
criminalize sick people and work counter
to the laws of Mother Nature and the
cannabis plant.
"Racketeer Influenced and Corrupt
Organizations [Act] (RICO) USA.
Many politicians, law-enforcement
agents, and ill-informed people con
tinue to wage war on the cannabis plant,
US citizens, and citizens of many coun
tries. They have an impressive arsenal,
including draconian laws, misinforma
tion, and high-tech surveillance gizmos.
The USA Patriot Act and the Homeland
Security Act of 2002 further erode
personal rights of individuals. Unfortu
nately, the US government has done its
best to export this paranoia.
“Legal” medical cannabis gardeners are
obligated by local law to keep their
Even though medicinal cannabis is legal in
many states in the USA, countless US citizens
are arrested every year. Please pay attention to
local laws!
www.marijuanagrowing.com
203
The Marijuana Policy Project (MPP) is behind
many state cannabis initiatives. The MPP lob
bies Congress to reduce Drug War budgets and
stop deceptive anti-cannabis campaigns.
Posting a “Medical Use Only” notice that states the garden complies with state law can be used as
“evidence” should problems arise.
Outdoor and greenhouse gardeners are subject
to climate change and Mother Nature's needs.
Some years are better than others. For exam
ple, in 2011 the outdoor harvest in California
was lighter overall than in 2010 because ofa
cold, wet spring and early autumn rains.
Insightful gardeners planted more plants over
all to make up for difficult growing
conditions.
paperwork in order. At press time there
are 18 states and the District of Colom
bia (19 total) in the USA with medical
cannabis laws."' Around the world, laws
vary immensely between countries,
zones, states, provinces, and cantons.
And the laws in many areas are unclear
and often change from jurisdiction to
jurisdiction. Cultivating cannabis for
any reason is illegal under US Federal
Law Statutes, and the international
“Single Convention on Narcotic Drugs
of 1961.”"""' However, even the Federal
Government has designated medicinal
cannabis legal in a handful of cases.
Confused? So is everybody else—
including law enforcement and politi
cians. Consequently, medicinal cannabis
laws are open to interpretation. Check
the NORML (National Organization
on the Reform of Marijuana Laws) web
site, www.norml.org, for updated laws
and requirements for medical cannabis
patient cardholders in the USA. Study
news from other countries to learn how
their cannabis laws are changing. For
the first time in recent history, cannabis
antiprohibitionists are on equal ground
with prohibitionists in the world.
"Alaska, Arizona, California, Colorado,
Connecticut, Delaware, Hawaii, Maine,
Massachusetts, Michigan, Montana,
Nevada, New Jersey, New Mexico,
Oregon, Rhode Island, Vermont, Wash
ington state, and Washington, DC.
"'"'http://en.wikipedia.org/wiki/Single_
Convention_on_Narcotic_Drugs
Even though the sunlight afforded by
complete legalization can be seen among
the clouds, medical cannabis gardeners
in “medical” and “nonmedical” cannabis
states must still be concerned with secu
rity. The retail market value of medicinal
cannabis is about $15 USD per gram and
$15,000 USD per kilo (2.2 pounds) at
medical dispensaries. Gourmet toma
toes, a comparable legal crop, fetch up
to $10 USD per pound (454 gm). On the
black market a gardener can sell the crop
for 10 to 50 percent or more. However,
wholesale prices are much less than
$15,000 USD/kg. For example, the
retail price in the USA for one pound
(454 gm) oscillates between $800 USD
for low-quality outdoor cannabis and
high-quality indoor/greenhouse can
nabis that fetches from $2,500 to $3,200
USD per pound (454 gm).
The inflated value of medicinal cannabis
makes gardens an easy target for crimi
nals and law enforcement. The monetary
value of cannabis has made it a hostage
PRESERVING THE SANCTUARY
www.marijuanagrowing.com
Unfortunately, medicinal cannabis has been
kept behind bars for many years. During the
last 15 years' progress in California, Colo
rado, Washington state, and other medical
cannabis states, this condition is changing.
Medical cannabis gardeners in currently
non-medical states in the USA often garden in
rental houses.
of the black market. Secret medical
cannabis gardens are just like the name
says: secret. I asked members on my
website, www.marijuanagrowing.com,
about sanctuary preservation concerns.
Secrecy and maintaining a normal life
style—paying bills and taxes, going to
little league games, and so on—topped
the list. Untold quiet medical cannabis
gardeners have been harvesting crop
after crop for decades in Drug War-torn
America and many other countries
around the world. Every year cannabis-
related arrests increase but actually
appear to promote a disproportionate
increase in cannabis cultivation. Supply
increases, demand increases, and market
prices drop. It is simple economics. See
www.norml.org for more information.
Security—personal, family, home, and
sanctuary—comes first. Thieves, both
illegal and legal, can do you, your family,
friends—human and animal—physical
harm or worse. Thieves and government
officials violate private homes and garden
sanctuaries with little or no threat of legal
recourse from you. In many countries,
states, and provinces, law enforcement
can detain you, your friends, and your
family—they can even kill your pets!—
all under the cloak of law.
Indoors, efficient medical cannabis
gardeners in this Drug War-torn world
should be able to harvest 0.4 to 0.5 grams
of (dried) flower buds from heavy variet
ies (less for others) every month for each
watt of light in the flowering room. Of
ten, indoor medical cannabis gardeners
harvest half (or less!) of the possible har
vest. A half harvest is inefficient and a
misuse of assets. Even such “success
ful” harvests leave twice the carbon
in the environment relative to harvest
weight. Indoor gardeners who do not
harvest this much may be inexperienced,
working too hard, or lazy in regard to
achievable results, and often cheating
the environment. Master the basics of
growing medical cannabis, and you will
be rewarded with a more robust harvest.
Remember, greenhouse and outdoor
gardeners are subject to climate and
space restrictions and should plant early
and harvest often!
In the USA, individual medical canna
bis gardeners who cultivate fewer than
99 total plants are seldom prosecuted
under federal laws that require a 5-year
minimum sentence with no parole when
convicted of growing 100 to 1,000 plants.
Sanctuary Preservation
The vast majority of medical cannabis
gardeners are normal people with a reg
ular schedule, simple lifestyle, and pleas
ant demeanor. They keep their gardens
and grounds in line with neighborhood
standards. They do not have noisy, wild
parties, and they get along well with
neighbors.
Showing a medical garden to anyone
who has no direct involvement invites
problems. People like to talk and embel
lish. Once the word gets out, your gar
den may be subject to compromise and
theft. Strangers can also bring diseases
and pests into the garden.
Even though medical cannabis may be
legal where you live, neighbors, visitors,
Keep the medical garden room locked to
prevent unwanted visitors.
A simple search for "marijuana insurance" will
net several bona fide insurance companies.
This medical cannabis garden in an attic is
accessible via a pull-down stairway.
www.marijuanagrowing.com
205
and family members may oppose it and
create conflict. Indoor medical cannabis
gardeners are able to attain peace of mind
for themselves and loved ones by installing
a secret entrance to gardens via false doors
and difficult-to-find entrances through
workshops, basements, and attics.
Some gardeners mount a tool pegboard
or painting over the door to disguise
the garden room’s entryway. The locked
door is controlled with a remote electric
door opener.
Insurance: If you are concerned about
medical cannabis crop theft and equip
ment theft you can buy insurance and
security services. Many companies sell
home security systems. Search “home
security systems” on the Internet to
learn about current security issues and
surveillance devices. Companies such as
Medical Marijuana Insurance (www.
medicalmarijuana-insurance.com) will
insure your medical cannabis crop.
This company insures medical cannabis
gardeners, processors and dispensaries
against economic loss to their crop from
natural and unnatural hazards. Use your
favorite search engine to check for other
companies that insure valuable medical
cannabis.
Sanctuary Preservation Precautions
• Purchase seeds and clones at local
medical cannabis dispensaries.
• Do not have seeds or gardening
products sent directly to your home
or garden site. Have the merchandise
sent to a “safe legal” address.
• Pay for mail order merchandise with a
money order.
• Have a reasonable electric bill. Pay all
bills and make all garden purchases
with cash.
• Do not visit illegal cannabis gardens
or real criminals who lie, cheat, and
steal.
• Restrict access to your garden. Keep
gardens under lock and key whenever
possible.
• Make discovery of and entry to the
garden difficult.
• Secure the perimeter around the
garden house, greenhouse, or outdoor
Inexpensive motion detectors are often
attached to lightbulbs.
A closed-circuit security camera is simple
to mount. All data can be fed directly to a
computer, and it is easy to access the camera
via an iPhone.
garden. A sturdy fence, motion
detecting floodlights, security cam
eras, and possibly a guard dog will help
ensure security for the sanctuary.
• Unload grow supplies a little bit at a
time or from within a locked garage.
• Itisabadideatotalkonthetele
phone about medical cannabis in
states that do not sanction it.
Sanctuary Surveillance
Motion detectors are an inexpensive
($10-$200 USD) added level of security
for most all medical cannabis gardeners.
A central receiver can be used to collect
signals from several different wireless
sensors. Motion sensors are also built
into garden and industrial security
floodlights. The lamps turn on when
a small sensor detects motion. Other
motion detectors can be used to activate
alarms, security cameras, and sprinklers
via a solenoid valve. Indoor gardeners
use motion-detector floodlights around
This PlantCam takes a photo every 5 minutes.
It records the progress of the garden and any
movement in the garden. Photos are recorded
on a small camera chip.
A convincing guard dog is one of the best
deterrents against thieves.
the exterior of the garden area to in
timidate and expose unwelcome guests.
Outdoor gardeners use motion detectors
and security cameras to activate lights
and sprinklers to scare off destructive
plant predators such as deer, rabbits, and
thieves. Check www.homesecuritystore.
com/ for burglar and fire alarms, security
cameras, and motion detectors.
Predator trail cameras: Security cameras
are affordable ($100+ USD) and easy
to set up. With a security camera, you
can monitor video and sound from your
television or computer. Indoor garden
ers set up cameras outside the building,
usually trained on entry points such as
doors and windows. Outdoor garden
ers mount cameras to monitor activity
in the garden. More expensive security
camera systems can be remotely moni
tored via computer, iPhone, or Android
telephone. Using your cell phone, you
can literally watch your garden grow!
206
PRESERVING THE SANCTUARY
www.marijuanagrowing.com
Inexpensive security cameras do not
encrypt the video signal and can poten
tially be viewed by anyone with a similar
camera that operates at the same GHz.
Higher-quality models encrypt the sig
nal and are much more secure. Medical
cannabis insurance policies usually re
quire garden-security video surveillance.
Outdoor gardeners can also use a garden
camera ($80 USD) or, as deer hunters
do, a trail camera ($1004- USD). Mount
battery-operated weatherproof digital
cameras in discreet locations in the
garden and on trees along the trail. Some
cameras are motion activated and others
take photos at specific intervals. Down
load the digital images—stills or video
clips—every week. Review the images
to see if birds, deer, rabbits, thieves, or
other perpetrators have been visiting
your garden. Images have date and time
codes to identify when the culprits
appeared. Also use the cameras to take
timed photos of your garden during the
growing season. Compile all the photos
sequentially to form a time-lapse video
of the garden growing from beginning
to end. Some cameras are equipped
with a flash for nighttime photos. The
flash also frightens and drives nocturnal
deer and other animals away from the
cannabis garden. Often, the flash is all
the deer control needed. Check www.
gandermountain.com, a hunting, fishing,
Inline fans run quietly. They efficiently move
a lot of air out of the garden room.
and camping website that has a huge
selection of predator trail cameras.
After having had his cannabis crop sto
len, a gardener friend installed predator
trail cameras around the garden and on
the nearby trail. When suspected thieves
found his garden again, the cameras
snapped their pictures along with the
date and time they visited. The gardener
had plenty of time to move the plants
to a safe spot. He also had photos of the
thieves and was able to identify them.
Keep predator trail cameras in place
all year to monitor hunters, potential
thieves, and plant-predator animals.
Find out where there is no human traf
fic, and grow there. Search YouTube for
actual predator trail camera videos.
These exposed ballasts are not only a fire
hazard, they vibrate and make a lot of noise.
Remember that others use trail cameras
too! Trail cameras are inexpensive, and
hunters often use them to find prey.
Do not fall victim to these cameras.
Self-portraits are not a good idea!
Sound Security
Insulate garden structures with a mass
barrier like brick, thick glass, concrete,
or metal to prevent sound transmission.
“Sound board” is popular in North
America. Absorb sound with spongy
or porous open-cell foams and spun
fiberglass. Stop vibrations by dampen
ing the energy and shunting it off into a
pad made of foam, cork or carpet, with
rubber or spring mounts.
When making a sound barrier, use
construction adhesive instead of screws
''Sound Transmission Class (STC) Rating
SOUND TRANSMISSION CLASS (STC) RATING*
Decibels What You Can Hear
25
Normal speech is easy to understand.
35
Loud speech is audible but intelligible.
45
Loud speech sounds like a murmur.
45
A single layer of half-inch dry wall is fixed to 6-inch (15.2 cm)
lightweight concrete block wall.
60
Most sounds are inaudible.
60
--------- —--------
A double layer of half-inch drywall covers wood on both sides
of stud wall. The double wall is spaced 1 inch (2.5 cm) apart
with batt insulation in between.
A squeaky fan is annoying and a telltale sign
of a garden room.
www.marijuanagrowing.com
207
The fragrance of cannabis is concentrated in
water expelled from an air conditioner.
Always keep condensed water from the air
conditioner inside the growing area.
driven into the walls. Screws touching
both interior and exterior walls transmit
sound to the outside wall.
Build a box or an extra room around
analog ballasts to muffle noise. Remem
ber to allow for airflow. Digital ballasts
require minimal noise insulation, some
times none at all. Place a thick pad under
ballasts to absorb vibrations.
High-quality inline fans are much quieter
and more efficient than squirrel-cage
blowers. Install large inline fans and
operate them at a low rpm to reduce
noise levels.
Wrap ducting with insulation to baffle
noise. Insulated ducting is also available.
Fit duct outlets with a dryer hose wall
outlet or something similar. The vent
fan is then placed near the ceiling so it
vents out hot, humid air.
Weight and thickness of a partition
dictate its ability to block sound.
Soundboard added to a wall drops about
5 decibels (dB) of sound. A 3-inch
(7.6 cm) airspace will lower sound trans
mission by 6 dB. Walls insulated with
dense or batt insulation cut sound well.
Use a decibel meter (see chapter 15,
Meters) to measure the sound from your
garden room.
Noise cancellation generators offer
old technology to indoor gardeners. A
Turn offhot tubs and saunas to conserve elec
tricity for use in the indoor medical cannabis
garden.
microphone records the sound that is
then analyzed by a computer. Sound
waves with opposite polarity (180-degree
phase at all frequencies) are generated and
output through a speaker. This causes
“destructive interference” and cancels
most of the noise. Noise cancellation
generators work best when sound can be
contained in a small area such as ventila
tion ducting.
Light Leaks
If light escapes from vents, give ducting
a 90-degree turn and paint the inside
of the ducting black where it turns to
eliminate unsightly light leaks. Baffle
light shining out chimneys and roof
vents. Check for light and air leaks. Set
up the fan and go outdoors after dark to
inspect for light leaks so that neighbors
are not concerned or annoyed.
Fragrance
To minimize ground-level fragrances,
expel carbon filtered and ozone-treated
air via a roof vent or chimney. Treat air
with a deodorizer or filter that traps
odors before evacuating them. See “Fra
grance” in chapter 16, Air, for a complete
rundown on deodorizers and air filters.
To ensure safety, Check with a qualified
professional when installing a ceiling vent
or when venting a chimney. See “Setting
Up the Vent Fan” in chapter 16, Air.
Do not let air-conditioner water expelled
from sealed garden rooms drain outdoors;
it smells like cannabis and could draw
A carbon filter is essential equipment to remove
unwantedfragrances in the air before evacuation.
cannabis- or catnip-loving felines,
drug-sniffing dogs, and other pests.
Surround garden property with a bed
of fragrant cedar shavings or chips in
the flowerbeds. Few flowers have such
pungent odors during the fall, and we
have no examples of fragrant flowers to
thoroughly mask the fragrance of flow
ering cannabis.
Greenhouse fans are equipped with
louvers (flaps or baffles) to prevent back-
drafts. During cold and hot weather,
undesirable backdrafts can alter the
climate in the room and usher in pests
and diseases. Installing a vent fan with
louvers eliminates backdrafts but may
present a security risk.
Law enforcement in some jurisdic
tions collects information via hearsay
evidence—trash, surveillance records,
and so forth—to obtain a “warrant” to
search the premises of medical cannabis
gardeners. If law enforcement discov
ers a cannabis garden, they can legally
continue to build the case against the
gardener by using anything the gardener
says. They legally collect most of the
information from the gardener, friends,
208
PRESERVING THE SANCTUARY
www.marijuanagrowing.com
Keep garden trash out ofplain sight to avoid
drawing attention and to keep the garden area
clean.
This legal cannabis garden was grown a few years ago in Ticino, Switzerland. All the paperwork
was in order with local authorities to harvest a very large field of outstanding cannabis!
and family. Do not be the weakest link
in the chain.
Electrical Security
Keep electrical use to a reasonable
amount for your home and neighbor
hood. And above all, do not steal
electricity. See sections on “Electrical
Safety,” “Electricity Consumption,”
“Conserve Electricity,” and “Smart
Meters” in chapter 17, Lights, Lamps &
Electricity,
Internet Security
Internet traffic is so dense that it is
virtually impossible to monitor or
investigate all perceived crimes. Arrest
ing medical cannabis gardeners who post
photographs and text on the Internet is
beyond the means of most law enforce
ment agencies, which are overwhelmed
with budget cuts and controlling violent
criminals, not to mention addressing
property theft, policing traffic, and help
ing citizens in need.
What is true today can easily change
tomorrow on the World Wide Web and
iPads, iPhones, Androids, and other
“smart” technology. Smart medical
cannabis gardeners can easily have sev
eral levels of security. Personal privacy
and preservation of your sanctuary are
of utmost importance when communi
cating with other cannabis sites, includ
ing those related to activism, cultivation,
nostalgia, and social networking.
Simple security measures for garden
photos and videos uploaded to the
Internet mandate that no tattoos,
photographs, license plates, addresses,
buildings, or landmarks be identifiable.
Medical cannabis gardeners practice
these simple measures to prevent theft
and other possible problems.
Cell phones may record their location
and time with an internal global posi
tioning system (GPS), even when turned
off. Newer cell phones can be turned
off and will not record the location on
GPS. Turn off the “location services”
and put the phone on “airplane mode”
with Wi-Fi disabled. Some gardeners
remove the battery to ensure that their
device is off. When the GPS and Wi-Fi
are not disabled, locations of gardens
photographed and videoed with cell
phones can be pinpointed. Removing
the battery from your cell phone is a
simple way to avoid being tracked when
traveling to secure locations.
As a precaution against automatic trans
mittal of data, turn off iCloud and other
mobile tech services and devices when in
the vicinity of the garden sanctuary.
Facebook and other traceable photos
of your cannabis garden should not
be posted if you are concerned about
crop theft. Be careful if your employer
frowns upon medical cannabis cultiva
tion. Everybody in the world has access
to your “private” Facebook information.
Strangers can access it from any cell
phone or computer.
°
JtI
'•»
emm^« Mt — V<w*«n
w.;tD.A T"*01**
TrueCrypt is a well-known Internet
encryption site. Security experts recommend
carefully researchingall security measures.
www.marijuanagrowing.com
209
One way to help ensure that nobody finds
your garden is to make the trail to the garden
difficult to follo w.
Ideally, a remote garden can be planted reasonably near the home so it can be maintained properly.
You can find many websites about online
security. Type “Internet anonymity”
into a search engine to find simple, easy
ways to conceal your Internet identity
from unsavory types.
Keep your computer secure from crim
inals and government snoops. Check
such sites as www.pgp .com, www.pgpi,
org/products/pgp/versions/freeware/
and http://en.wikipedia.org/wiki/Open-
PGP#OpenPGP, and google “proxy
server” for more information about
Internet security.
Outdoor Security
A safe gardening location is the primary
concern for medical cannabis gardeners.
Make sure to have all your paperwork in
order. Medical cannabis gardens are pri
vate. Doctor’s patient records are private
too. All records should be confidential.
It is the business of the doctor and the
medicinal cannabis gardener and patient;
nobody else need be concerned. Check
with local authorities and with www.
norml.org for current status of laws.
If you should happen to come across
another cannabis garden while walking
in the forest or countryside, do not
touch it; leave no sign you were there.
Respecting other gardens is the honor
able thing to do.
Gardens planted on public land risk
detection by hikers, fishermen, other
outdoor enthusiasts, and people surfing
on Google Earth. Passersby are normal
ly interested in their specific sports and
recreation; they will not go out of their
way to find your garden unless you lead
them to it. Internet surfers are different.
Anybody with a computer and an Inter
net connection can use Google Earth to
spot large outdoor gardens in medical
cannabis states. Greenhouses and ponds
really stand out!
Remote Garden Security
In many parts of the world, gardeners
are forced to cultivate remote gardens
and must therefore be prepared with an
array of skills to be able to plant and
harvest a small garden in backcountry.
Gardeners are likely to encounter curi
ous hikers, fishermen, or hunters, any or
all of whom might wonder why you are
out there in remote country. Most often,
these folks are just concerned citizens.
A late-afternoon garden visit is a good
time to “see wildlife,” since most back
woods tourists are on their way home
late in the afternoon.
All medical patients and gardeners
should carry a cell phone to communi
cate with a partner or call for help when
in danger. Turn off the ringer. Paranoid
gardeners know that some smartphones
track their geographic location and
route. Some gardeners go so far as to
remove the battery before going to their
gardens.
Here are a few of the tactics medical
cannabis gardeners in remote areas are
forced to employ to ensure that they
harvest their crop:
• Park vehicles discreetly, away from
the trailhead that leads to your medi
cal garden.
• Bring growing supplies such as
PVC pipe, pumps, water tanks, soil,
bricks of coconut fiber, and compost
to the garden site and stockpile them
over time. Tote a few things to the
garden each visit.
• Cover shoe soles with duct tape.
The style, size, and sole pattern of
shoes can be determined by tracks
that could ultimately lead thieves or
210
PRESERVING THE SANCTUARY
www.marijuanagrowing.com
Growing cannabis up in trees is one way to
avoid detection.
cops to the medical garden. Shoe
prints could be used as evidence if the
medical garden is discovered by law
enforcement.
• Look for motion-activated, trail
cameras perched in trees, especially in
open areas!
• Install a trail camera or garden camera
to see who and what is frequenting the
remote garden.
• Disguise plants by bending, pruning,
or splitting the stem down the middle.
Bending branches is the least traumat
ic method and has more subtle effects
on hormones, liquid flow, and physical
shape. See “Pruning and Bending” in
chapter 6, Vegetative Growth. There
are also camouflage sleeves available
to cover pots.
• Plant cannabis among other plants
of similar size and foliage. Grow in
a thicket of thorny bushes or other
unpleasant foliage such as poison
oak, poison ivy, or stinging nettles
to discourage intruders. (Stinging
nettles disguise cannabis fairly well,
but brushing up against them is met
with a burning sensation for about 20
minutes.) Look for bushes that are
dense and high enough to shelter the
medical garden from view. This deters
large animals or people from wander
ing into the site. Protect yourself from
these plants with a slick rain suit and
gloves. Wash after each visit to remove
irritating toxic oils and thorns. Some
gardeners plant where there are a lot
of mosquitos or wasps, and at least
one gardener I know plants near a
skunk’s den. The pungent spray keeps
people and animals at bay.
• Some gardeners climb 30 feet or higher
up into the trees to plant on stands
in the canopy or use deer and elk
stands as growing platforms. Set up a
pulley system to lift large containers
and potting soil up to the platform.
Install an irrigation hose from the
base of the tree up to the planting area
and arrange around the pots so you
can perform weekly watering with a
battery powered pump rather than
climbing the tree, and be sure to use
climbing belt with harness and safety
lines. Do not overextend yourself. I
used to climb trees for a living, and
my hard-and-fast rule when I was 25
years old was to spend no more than
four hours climbing per day. When
you get tired, accidents happen. If you
hurt yourself, you will not be able to
care for your plants! Avoid making a
distinguishable path to the garden by
taking a different route every visit.
Walk on logs and rocks and in stream
beds to avoid disturbing the natural
habitat. Rapid growth of native plants
will erase any obvious trail. Fertiliz
ing the trail may cause wild plants to
overdose on nutrients. In late summer
and early fall, most native plants in
dry climates will not re-grow.
• DO NOT use booby traps, bear traps,
or firearms attached to tripwires to
protect your crop.
• DO NOT have anything that could be
construed as a clandestine protection
device or firearm near garden areas.
Such things are dangerous and could
be implicated in legal proceedings.
• Always locate the garden in a differ
ent area every year. Do not use the
same location twice. Always clean up
the garden site so there is no trace of
cannabis cultivation.
Finally, search for “electronic device
detector” on Google for more informa
tion about detecting electronic devices.
Cannabis gardeners in Northern
California used to carry police scanner
radios to listen to police conducting
raids for the Campaign Against
Marijuana Planting (CAMP). Informed
gardeners could decipher the location
of the next raid. Radio scramblers and
decoders are also available.
Law Enforcement
A COP is a “constable on patrol,”
according to the old English acronym.
In theory cops are a force in the com
munity to “serve and protect or protect
and enforce” our legal rights. Many law
enforcement officers do not believe in
unjust laws that they are contracted to
enforce; others do. However, cops are
subject to the same rhetoric that many
of us have endured for years as victims
of the War on Drugs, and they often
make uninformed legal decisions based
upon misinformation.
Avoid contact and confrontations with
law enforcement whenever possible. If
you should happen to come into contact
and speak to a police officer, be polite,
direct, and busy—going somewhere.
The first place most people meet a police
officer is in a traffic stop. Officers are
aware of what is going on around them,
and they know what burned cannabis
smells like. Do not smoke cannabis in
the car. It is illegal in many places.
Know your legal rights. Study local,
province, state, and federal laws in your
www.marijuanagrowing.com
211
Since Barry Cooper, a retired drug cop from Texas, stopped busting citizens, be and his wife,
Candi. haze been endless campaigners for an end to the War on Drugs.
Nate Bradley is one of many ex-law enforce
ment officials from LEAP, Law Enforcement
Against Prohibition.
jurisdiction. Be better prepared than law-
enforcement is!
We had no rights in Spain during the
time of “El Caudillo/’ Francisco Franco,
the last dictator in Europe (1939-1975).
Paramilitary Guardia Civil could enter
your home (or anywhere else) with an
administrative “search warrant.” Extreme
repression, long prison sentences, and
death orders dominated the system.
Today, with no dictator to fear, we enjoy
more persona) freedoms in Spain than in
the majority of states in the USA!
Depending upon the country in which
you live, law enforcement must first have
a search warrant to use infrared or ther
mal imaging devices. But if they have a
search warrant, such high-tech snooping
is perfectly legal. If you want to take a
look at what they see, rent heat-sensitive
night-vision glasses from your local
military supply store, or take a photo of
the outside of your grow operation with
infrared film. You can also add a filter
to your digital camera and convert the
photos with a few clicks of Photoshop to
show heat signatures.
Law enforcement has sophisticated tele
phone bugging devices, sensitive
directional microphones, infrared
scopes, thermal imaging, and more.
They can also subpoena telephone,
Internet, and electrical company
records. Intimidating police officers
coerce electric corn pa nv employees to
break the law, violate personal rights,
and give them the records of unsuspect
ing consumers. Tracking telephone num
bers—including the location and route
of a cell phone—is very easy. There has
been more than one case where US law
enforcement illegally acquired telephone
records and illegally listened to garden
store telephones. Unscrupulous law
enforcement officials use telephone
records to target gardeners.
Here is a real eyeful of how the Internet
has spawned a slew of law enforcement
seminars (www.indoorgrowtraining,
com). Some of these seminars look to
expand city, state, and national law
enforcement budgets in the future;
others are contemporary. Once you
watch the video you will understand
the importance of not keeping cash and
scales at the garden house.
Barry Cooper was a drug cop in Texas;
now he is a friend. But Barry will always
be a Texan! After years of being a home-
grown drug cop hero, Barrv realized he
was part of the problem in the War on
Drugs, not part of the solution. If you
want to know how a cop reacts and w'hat
is on his mind, check our Barry Coo
per’s video and website at www.
nevergetbusted.com. It is crammed with
details of legal (normally called “clan
destine” and “overt”) activities peace
officers use every day to enforce laws.
Law Enforcement Against Prohibition
(LEAP) is a wonderful group of current
and former law' enforcement and crimi
nal justice officials who speak out about
the failures of existing drug policies
in the USA. Check out their website
Check out the LEAP website
http:/>www. leap. cc/.
212
PRESERVING THE SANCTUARY
www.marijuanagrowing.com
National Organization for the Reform of Marijuana Laws (NORML)
The National Organization for the Reform of
Marijuana Laws is one of the many cannabis
legalization organizations around the world
that provide legal information.
Re*
Always keep a lawyer’s card with a 24-hour contact telephone number with you!
Check out the site of the National Organization for Reform of Marijuana Laws
(www.norml.org) and download your NORML Foundation Freedom Card.
THE NORML FOUNDATION FREEDOM CARD
The U.S. Constitution prohibits the government from interfering with your right to
remain silent, to consult with an attorney, and to be free from unreasonable search
es and seizures by law enforcement. However, it is up to you to assert these rights.
This NORML Foundation Freedom Card will help you do so effectively.
If you are confronted by a police officer, remain calm. Be courteous and provide
your identification. Politely refuse to answer any further questions. Ask to talk to
an attorney. Do not consent to any search of your person, your property, your residence or your vehicle. Tell the officer you
would like to give them this card, which is a statement of the constitutional rights you wish to invoke. Do not reach for this card
until you have obtained the officer’s permission to do so.
If the officer fails to honor your rights, remain calm and polite, ask for the officer’s identifying information and ask him or her
to note your objection in the report. Do not attempt to physically resist an unlawful arrest, search or seizure. If necessary, you
may point out the violations to a judge at a later time.
(http://leap.ee/) and learn how law
enforcement is changing.
Here is a brief excerpt from the LEAP
website:
1. Don’t leave contraband in plain view.
Law enforcement can confiscate your
medicine and arrest you. They have
discretion.
2. Never consent to a search or talk to
an officer if you want to reserve your
rights.
3. Don’t answer questions without your
attorney present.
Like me, most of the Law Enforcement
Against Prohibition members, are older
and have seen and felt their fair share of
good and bad. They have been enforcers
of the War on Drugs and understand
that the war on the cannabis plant and
the people who cultivate and consume it
is contrary to Mother Nature.
Informants
In many countries, including states in
the USA, a cannabis gardener is consid
ered a criminal and can suffer endless
legal turmoil including a long stint in
prison. In many countries, conspiracy
laws and “incitement and conspiracy
to grow cannabis” laws—including the
RICO statutes in the USA—were enact
ed to break up real mafias and political
uprisings. Conspiracy, incitement, and
racketeering laws are used every day to
incarcerate medical cannabis gardeners.
Conspiracy and incitement laws are
wide-ranging and a catchall way to use
hearsay evidence to convict medical
cannabis gardeners. They are used all
over the world to enforce restrictive
cannabis laws. Until the proliferation of
Internet communication, these laws have
Police informants like the one above are
often weak-minded “friends” or disgruntled
neighbors that “get even” by squealing on your
gardening activities.
Ed Rosenthal is an expert on the court system
in California in relation to cannabis prohibi
tion laws.
silenced many publications. See “About
Jorge” in the back of the book for more
information.
The USA Patriot Act 2001 also curtails
many personal and human rights in the
USA. Ed Rosenthal’s Marijuana Grower's
Handbook, 2011, has a very good section
on the USA Patriot Act and how to
avoid informants and cops. Ed speaks
from experience! See www.edrosenthal.
com for more information.
A lawyer friend told me that the USA is
an “adversarial” law community. This is
www.marijuanagrowing.com
213
why some medical cannabis gardeners
always deny growing—always, even if
proven otherwise. Some medical can
nabis gardeners transform into helpless
victims once arrested. Other proud
medical cannabis gardeners have their
paperwork in order and do not allow
law enforcement to waste their time
and tax dollars. But when arrest an
un-prescribed “friend” that has seen
your garden is arrested, police in the
USA and other countries can legally use
deception and intimidation to trick your
“friend” into betraying you and your
medical garden. Investigations and inter
rogations can last for months in many
countries.
High-Tech Surveillance
Thermal Image Technology
Unfortunately we are obligated to include
this page in the book. Thermal imaging
technology is an issue among cannabis
gardeners in some countries. Thermal
image technology is an invasion of citi
zen household privacy and is illegal in
every country with specific privacy laws.
In the USA thermal images are illegal as
a means to secure a search warrant, but
in Canada, Holland, and other coun
tries, authorities fly in matrix patterns
over urban areas to look for alleged
indoor cannabis gardens. Thermal imag
ing technology is the same technology
that guides missiles, including smart
bombs. Nonetheless, thermal imaging
technology is seldom a problem for
small gardeners who use less than 2000
watts of light and have a small green
house or a few cannabis plants.
Relatively inexpensive (less than $1,200
USD) thermal imaging devices are now
affordable for smaller police forces.
Thermal imaging devices have been used
legally to measure the heat signature
escaping from structures. This invasive
“evidence” is used with other “evidence”
to secure a search warrant. According to
US police sources, the devices are legal
only to find heat escaping from win
dows, vents, and so forth. Most often,
narcotics agents use the cameras illegally
to secure a search warrant.
Some gardeners avoid potential thermal
imaging problems by turning grow
lights on during the daytime to confuse
thermal imaging devices. Daytime heat
and light make accurate measurement
of heat coming from vents and windows
impossible; thermal imaging cameras
are therefore of limited use during sunlit
daytime hours. Shield and insulate walls
and windows against heat loss from
lamps. Store ballasts in separate rooms,
and channel the heat away from the
garden. Gardeners further safeguard
their gardens by cooling garden room air
before exhausting outdoors so it
does not leave a heat trail. Air vented
out underneath a structure is nice and
cool before mixing with the outdoor
environment.
Learn more about thermal imaging
at http://en.wikipedia.org/wiki/
Thermography.
Mini Helicopters
A mini helicopter called the “Smell
MJ Growing” or “Sniff-O-Copter,”
in German, was developed in Switzer
land and first used in the Netherlands
in 2009. The remote-controlled drone
helicopter is able to search and stay in
the air for up to 8 hours. According to
its manufacturer, its fragrance sensors
are so accurate that the garden room
location and level can be accurately pin
pointed. It can fly over houses and sniff
chimney and other vent exhaust.
To date, no law enforcement budgets
have been able to pay for a mini heli
copter to sniff around my home and
others. We are pleased that law enforce
ment budgets do not include such frivo
lous items to entrap honest citizens.
In some US jurisdictions where firearms
are legal, and where mini helicopters are
being used to spy on residents, expert
marksmen have been known to shoot
the little copters out of the air.
Thermal imaging technology has become less
expensive and more accessible to law enforce
ment and citizens.
Drone helicopters are relatively inexpensive
and easy to outfit with a camera that sends
video to a computer.
Caution! Thieves can find remote gardens!
214
PRESERVING THE SANCTUARY
www.marijuanagrowing.com
217 Air Meters
217 Anemometers
217 Carbon Dioxide (CO2) Sensors
218 Hygrometers
219 Thermometers
219 Smoke Detectors
219 Carbon Monoxide (CO)
Detectors
219 Decibel (Sound) Meters
220 Electric and Light Meters
220 Electric Circuit Testers
220 Electricity Monitors
220 Light Meters
221 Volt/Amp Meters
221 Soil, Nutrient Solution, and
Water Meters
221 pH Meters
221 Nutrient (Ionic Salt) Meters
224 Moisture Meters
224 Compost Thermometers
224 ERGS Meters
224 ORP Meters
225 Dissolved Oxygen (DO) Meters
225 Sodium (Na) Meters
225 Water Pressure Gauges
225 N-P -K Soil (Reagent) Kits
This chapter gives an overview of various inexpensive meters
and tests available today, what they measure, and how to use the
information they provide to help make medical cannabis gardens
more efficient and productive. Meters allow gardeners to measure
specific elements so each can be incrementally improved. Meters
also help you find the weakest point in the chain of growth.
225 Miscellaneous Meters
225 Digital Refractometers
225 Laser Tape Measures
226 Microscopes
226 Ultraviolet Lights
Meters and test kits measure air, water, growing mediums,
electricity, light, sound, and more. They can be analog, digital,
or reagent test kits. Digital and analog meters perform hundreds
of tests; reagent kit tests are limited to consumables, which must
be replaced.
Meter housing should be durable and waterproof, and meters
should be easily calibrated (if necessary) or self-calibrating,
although some more sensitive meters with a sealed housing must
be periodically returned to the factory for calibration. Other
important features include: automatic temperature compensa
tion (ATC), temperature readings in degrees Fahrenheit (°F) or
degrees Celsius (°C), backlit liquid crystal display (LCD), microprocessor, memory, replaceable electrode, a broad range of
accurate measurement, accuracy (+/-) listing, the ability to interface with computers or cell phones, and availability in hand-
held/portable or wall- or counter-mounted units with battery and instructions included. Some meters are available with remote
probes at an additional cost. Some meters may have several components and wireless communication capabilities. Also note
that some meters are subject to contamination and aging.
www.marijuanagrowing.com
215
Approximate prices in USD
GARDEN METERS
BASIC*
ADVANCED*
]
anemometer
$50
$200
f hygrometer
$20
$20
i thermometer
$10
$30
j smoke detector
$20
$20
carbon dioxide (CO2) sensor
$200
$800
I carbon monoxide (CO) detector
$20
$50
i decibel (sound) meter
$50
ELECTRIC AND LIGHT METERS
BASIC*
ADVANCED*
; electric circuit tester 3-prong plug
$5
$20
j electricity monitor
$30
light meter
$40
$100
volt/amp meter
$30
SOIL, NUTRIENT-SOLUTION, AND WATER METERS
BASIC*
ADVANCED*
( ppm meter—CF (conductivity factor), EC (electrical
conductivity factor)
$50
$20
moisture meter
$20
$20
.
pH meter
$50
$50
TDS (total dissolved solids) meter
$50
ERGS (energy released per gram of soil) meter
$80
compost thermometer
$20
ORP (oxygen reduction potential) meter
$100
sodium (Na) meter
$80
water pressure gauge
$10
N-P-K test (reagent) kits
$20
$20
MISCELLANEOUS METERS
BASIC*
ADVANCED*
refractometer
$80
digital refractometer
$180
distance
$30
microscope (handheld)
$40
$40
ultraviolet light
$50
$200
Total
$265
$1,075
216
METERS
www.marijuanagrowing.corn
A relatively small investment m accurate meters will provide you with correct information to make informed gardening decisions.
A few meters are essential—electrical
circuit testers, thermometers, and
hygrometers top rhe list. These meters
will allow you to measure air tempera
ture and humidity (moisture) content.
Thermometers can also measure the
temperatures of soils and nutrient solu
tions. The next most essential meters
include pH and electrical conductivity
(EC) meters, which measure parts per
million (ppm) and total dissolved solids
(TDS). More expensive models of these
meters will take measurements per
petually and store a record that can be
uploaded to a computer, mobile tele
phone, or Internet site. (It is easy to set
up a security camera and monitor it with
an iPhone, iPad, Android telephone, or
computer. The data can then be analyzed
and acted upon. However, many medical
cannabis gardeners prefer not to send
such delicate information by telephone.)
The Garden Meters table shows rec
ommended meters for “Basic” and
“Advanced” gardens. Use this informa
tion only as a guideline. The prices are
approximate and may vary from country
to country. Prices were current as of
summer 2014.
To see more than 1,800 scientific videos
on how to master any meter that you
could possibly imagine, type “MIT
Digital Lab Techniques Manual” into a
web browser. Click on the YouTube link
to go to the Massachusetts Institute of
Technology’s videos.
You can also type “video digital (name/
type of) meter” into Google and see
numerous videos on how to calibrate
and use specific meters.
It can be difficult to find all the meters
you want at one store. I had to go to the
auto parts store to buy a digital laser
thermometer, for example, rather than
a gardening center. Find, research and
order any meter you need by typing
in “buy (name of meter)” into a web
browser.
Air Meters
Anemometers measure air or wind
speed. They are common weather
station instruments. There are two
classes of anemometers; one measures
wind speed and the other measures
wind pressure, both of which are related.
Anemometers designed for one will give
information about both. Handheld
meters work well to measure wind out
doors in microclimates.
I use my anemometer to measure wind
around my outdoor garden. Indoors, I
use it to measure air speed when setting
up ventilation and circulation fans. Move
it around the garden and see just how
bad airflow is in between plants! See
chapter 16, Air, for more information
about airflow.
Electrochemical carbon dioxide (CO?)
sensors measure electrical conductivity
of an air sample in either an alkali solu
tion or distilled/deionized water. These
www.marijuanagrowing.com
217
Anemometer
CO2 sensor
Thermometer
systems are relatively inexpensive, but
they have drawbacks: limited accuracy
and sensitivity to temperature and air
pollutants.
Most CO? sensors or meters are non
dispersive infrared (gas) sensors
(NDIR) and chemical gas sensors.
These sensors are used in the air con
ditioning, horticulture, building, and
safety industries to monitor air quality
and CO? levels. NDIR sensors mea
sure infrared radiation emitted from
a heated surface. Most devices can
measure from 0 to 5,000 ppm CO2. Set
up sensors in the garden room or in air
ducts. CO2 sensor/controllers will turn
compressed CO2 and generators on and
off at desired levels. More sophisticated
CO2 controllers can be synchronized
with controllers that operate heat,
ventilation, and CO2 generators. Shop
around to find sensors that are battery
or AC-powered and wall mounted with
remote probes.
Disposable comparative colorimetric
CO2 test kits are fairly easy to use and
inexpensive. CO2 detector tubes are
used to make spot tests. The tubes con
tain a chemical enclosed in a glass tube
with a break-off tip. The tube is placed
in a small hand pump (syringe), the tip is
broken off, and a sample of air is drawn
into the tube. The tube color length
or intensity indicates the approximate
intensity of CO2. They test from a trace
to about 7 percent (7,000 ppm). Colori
metric kits are reliable to within about
40 ppm. Tubes cost about $5 USD each
and make one test.
Hygrometers measure relative humidity
(RH)—moisture content in the air at a
given temperature. Most hygrometers
convert measurements of tempera
ture, pressure, mass, or an electrical or
mechanical change in a material as it
absorbs moisture. Humidity is difficult
to measure accurately. Hygrometers are
available in three basic types: metal/
pulp coil, hair tension, and electronic.
I cannot recommend metal/pulp coil
types because their accuracy is limited.
Hair tension hygrometers use human or
animal hair under tension that changes
length as humidity changes. Hair tension
hygrometers are more accurate, but still
not as accurate as electronic versions.
Electronic chilled mirror dew point
hygrometers give precise measure
ments—as accurate as ± 0.5 percent RH
when clean and calibrated.
Capacitive humidity sensors are pretty
accurate (± 2%) and are little affected
by condensation and high temperatures
over short periods.
Hygrometer
Carbon monoxide (CO) detector
Smoke detector
218
METERS
www.marijuanagrowing.com
Decibel (sound) meter
LIGHT MEASUREMENT SCALES
'fc
foot-candles
Lux
lux
;LM
lumens
PAR
photosynthetic active radiation
PPFD
photosynthetic photon flux density
K
Kelvin temperature
pmol m2-sec
micromol per square meter per second
pE-m2-sec
microeinsteins per square meter per second
2,000 |jmol-m2-sec
intense sunlight
W/m2/nm
watts per square meter per nanometer
W/cm2
—
-------
.
watts per square centimeter
Resistive humidity sensors measure
electrical resistance relative to humidity.
Meters with capacitive sensors are more
sensitive than those with resistive sen
sors. Resistive humidity sensors usually
have an accuracy rating of ± 3 percent.
Thermal conductivity humidity sensors
measure absolute humidity.
A humidistat is a hygrometer with a
control feature. See chapter 16, Air, for
more information.
A psychrometer also measures relative
humidity. It has 2 bulbs: 1 dry and 1
wet. Water on the wet bulb evaporates
and the temperature of each bulb is
measured. The difference between
temperatures is logged and correlated on
a chart to find the relative humidity. A
psychrometer can also be used to mea
sure dew point and make basic weather
predictions.
Thermometers measure temperature.
Many people prefer old reliable liquid-
and-glass thermometers with a Fahren
heit scale on one side and a Celsius scale
on the other. Inexpensive spring-type
thermometers are not accurate enough
for medical cannabis gardeners. I prefer
digital thermometers that record both
indoor and outdoor temperatures.
They also have a maximum and mini
mum readout that can be reset. More
expensive thermometers record daily
data and store it for downloading to a
computer.
Digital laser thermometers are a lot of
fun and incredibly informative to use.
The thermometer projects a laser beam
and records the temperature at the end
of the beam. I use mine to measure leaf
and stem surface temperatures, and
those of water, soil, and walls—any
temperature, really. See "Temperature”
in chapter 16, Air, for more information
about temperature differentials and
what they mean.
Accurate temperature readings come in
very handy when solving culture issues
or pest and problems. Always take
temperature readings at different points
in the room. For more information, see
"Temperature” in chapters 16, Air, 18,
Soil*, and 20, Water.
A thermostat measures temperature
and perpetually controls heating and
cooling devices such as heaters, fans,
and air conditioners.
Smoke detectors detect smoke. And
where there is smoke, there is usually
fire. Some detectors are connected to a
fire alarm. Inexpensive and readily avail
able battery-powered smoke detectors
should be placed at high points in garden
rooms, where smoke will collect. Most
of these devices detect smoke by optical
detection (photoelectric) or by ioniza
tion. More expensive models use both
detection methods.
Automatic fire extinguishers come with
a built-in smoke detector.
Mount handheld fire extinguishers by
exit and entrance doors so you will
know where they are when a room you
are in fills with smoke.
Carbon monoxide (CO) detectors
identify the presence of deadly CO gas,
to prevent carbon monoxide poisoning.
A product of incomplete combustion,
colorless odorless CO, the "silent killer,”
is virtually undetectable without a CO
detector. Elevated levels of CO are
dangerous to humans, and low concen
trations can be harmful over time. Use
a CO detector to guard against high
levels of CO if using a kerosene or
fossil fuel CO3 generator or internal
combustion motor.
Note:ItcantakeuptoayearforCOto
release from the blood. CO accumulates
over time!
Decibel (sound) meters measure sound
pressure level with an LED (light
emitting diode) screen readout in deci
bels (dB). Most meters are relatively
accurate. Look for a meter with high
www.marijuanagrowing.com
219
Electric circuit tester 3-prongplug
Light meter
Volt/amp meter
(65 to 130 dB) and low (35 to 100 dB)
measuring ranges—great for measuring
noise from fans, analog ballast, pumps,
and so forth. I was most amazed when
I went into the backyard at night with
still, quiet air that carries sound. The
slightest “click” or muffled exhaust fan
echoes! The 4-inch (10 cm) vent fan
registers 50 dB at 10 feet away from the
outlet. Ambient noise levels register 20
dB when the fan is off.
Electric and Light Meters
An electric circuit tester 3-prong plug
shows circuit status for an individual
outlet. I like the 3-light color-coded
display that shows ground, neutral,
and hot circuits. More-advanced plugs
have a GFI (ground fault interrupt) trip
button. These testers are essential for
electrical safety and for solving simple
electrical problems. Keep the circuit
tester in your tool kit. Check all elec
trical circuits periodically to prevent
problems before they start!
Electricity monitors measure elec
tricity use. Inexpensive monitors plug
into electrical outlets and monitor the
electrical use of specific appliances.
More expensive models monitor elec
trical use history that can be uploaded
to a computer. Sophisticated meters are
wireless and can monitor electricity use
in the entire household or garden. There
are many different brands and levels of
technology. Learn more by searching
“electricity monitor” using your search
engine or Amazon.com.
Light meters measure light intensity
and spectrum. Inexpensive to moder
ately priced meters measure light in
foot-candles, lux, and lumens. These
scales measure light that is visible to
humans—400 to 700 nm (nanometers).
But not all light is created equal.
Plants do not use the entire light spec
trum equally, and light sources do not
generate spectrums equally. While our
eyes may see only the blending of the
light frequencies, plants are looking for
specific wavelengths to trigger responses
in the various photosystems. PAR
(photosynthetically active radiation)
light is the spectrum fingerprint plants
need to see, and anything else, while we
Electricity monitor
may see it as very bright, the plant does
not see or use. Matching lamp spectrum
to the PAR requirements of the plant is
important. Having a measuring device
that effectively does this for the grower
is a luxury.
You can use a light meter that measures
foot-candles, lux, or lumens to measure
the intensity of sunlight, HP sodium,
metal halide, CFL, and fluorescent light.
Sunlight is generally perfect for cannabis
growth, and there is little we can do to
change it. Light intensity meters that
measure foot-candles, lux, and lumens
are accurate when measuring the intensi
ty of lamps with known PAR ratings.
Indoors, always use lamps with the high
est PAR rating. For more information,
see “PAR Light” in chapter 17, Light,
Lamps & Electricity.
PAR or quantum light meters often
claim to accurately measure the photons
or light particles that plants need to
grow. Check the technical data closely
on meters before making a purchase.
Meters often measure lux and then con
vert to PAR. High-quality sophisticated
quantum meters can switch to measure
“sunlight” or “electric lamps.” Quantum
light meters display a specific numeric
PAR value in the LED screen. A PAR
meter is not necessary to measure
natural sunlight.*
220
METERS
www.marijuanagrowing.com
Medium-priced pH meters must be regularly
calibrated and the sensor properly maintained.
"Search “Electric and Light Meters”
at www.marijuanagrowing.com for
more information about measuring
PAR light.
Volt/amp meters: This essential device
tells you how many volts and amperes
are flowing in an electrical line at any
point and time. This meter helps you
troubleshoot line amperage and voltage
excesses and deficiencies. Use this meter
to probe electrical outlets for deficien
cies and measure voltage and ampere line
drop when running electrical wires for
more than 10 feet.
Soil, Nutrient-Solution,
and Water Meters
pH meters measure the potential
hydrogen (pH) in a substance or solu
tion. Measurement and control of pH
are essential to healthy medical
cannabis gardens.
Digital meters measure electrical current
between two probes and are designed
to work in water and moist soil. The
growing medium must be moist for
an accurate reading. Digital electronic
meters can make thousands of measure
ments with little or no additional cost
per test.
Electronic pH meters are economical
and convenient. Less expensive pH
A pH test kit measurement can be somewhat
difficult to read but accurate nonetheless.
meters lack automatic temperature com
pensation but are accurate enough for
casual use. Intermediately priced digital
pH meters contain a glass bulb electrode
that must be kept clean and moist at all
times. Proper maintenance ensures accu
rate readings. Digital pH meters—when
properly maintained and calibrated—
can accurately perform hundreds of
tests. More expensive models are quite
accurate when properly calibrated.
These meters must be regularly cali
brated to ensure their accuracy. The
inexpensive probe meters are not very
accurate, and the intermediately priced
meters also have accuracy issues. The
pH sensor must be replaced at required
intervals based on age and usage.
Insert the probe (s) into the nutrient
solution or soil, and the pH value will
appear on a small LCD screen. Pay
special attention to soil moisture when
taking a pH test with an electronic
meter. The meters measure the electri
cal current between two probes and are
designed to work in moist soil. If the
soil is dry, the probes do not give an
accurate reading. I prefer electronic pH
meters to reagent test kits and litmus pa
per because these meters are convenient,
economical, and accurate. Once pur
chased, you can measure pH thousands
of times with an electronic meter, while
the chemical test kits are good for about
a dozen tests. Perpetual pH-metering
devices are also available and arc most
often used to monitor hydroponic nutri
ent solutions.
More-expensive models contain a
glass bulb electrode that must be kept
clean and moist at all times. Failure to
maintain the tester properly could lead
to inaccurate readings. An automatic
temperature compensation (ATC)
feature makes meters much more conve
nient and accurate. Keep litmus paper
or a liquid dye reagent kit as a backup
in case the meter malfunctions.
The pH level can also be measured with
a liquid reagent kit that is similar to the
N-P-K test kits discussed in this chap
ter. Liquid pH reagent test kits work by
adding a drop or drops of pH-sensitive
dye to the nutrient solution. Mix by
shaking, and compare the color of the
treated nutrient solution to a color chart.
Such tests are a little difficult to read but
quite accurate.
Do not measure pH with phenolphthalein
and phenol red (aka phenolsulfonphtha-
lein or PSP) test kits. They are frequently
used in cell biology laboratories but can
distinguish only between a pH of 6.8
and 8.2.
Nutrient (Ionic Salt) Meters
EC = electrical conductivity
ppm = parts per million
CF = conductivity factor
TDS = total dissolved solids
Different measurement systems all
use the same base, but they interpret
the information differently. Let’s
start with electrical conductivity
(EC), the most accurate and consistent
scale. EC is measured in millisiemens
per centimeter (mS/cm) or microsie
mens per centimeter (/xS/cm). One
millisiemen per centimeter = 1,000
microsiemens per centimeter."’ EC is
the most accurate measure of total
ionic salts in solution. An EC meter
measures the overall volume or strength
of elements (ionic salts) in water or
solution.
"’millimhos and micromhos are other
units of measurement often used for
www.marijuanagrowing.com
221
This TDS calibration solution is rated at
1,500 mg/L.
Calibration solution is available in packets.
plant recommendations. 1 millisiemens
= 1 millimhos = 1,000 microsiemens =
1,000 millimhos
Parts per million (ppm) meters actually
measure in EC and convert to ppm.
Unfortunately, the two scales (EC and
ppm) are not directly related. Each nutri
ent or salt gives a different electronic
discharge reading. To overcome this
obstacle, an arbitrary standard assumes
that “a specific EC equates to a specific
amount of nutrient solution.” Conse
quently, the ppm reading is only an
approximation. Also, manufacturers of
nutrient testers use different standards
to convert from EC to the ppm reading.
Every salt in a multielement solution has
a different conductivity factor (CF).
Pure water will not conduct electrical
current, but when elemental salts/metals
The pH 7.0 buffer solution is color-coded.
are added, electrical conductivity
increases proportionately. Simple
electronic meters measure this value
and interpret it as total dissolved solids
(TDS). Nutrient solutions used to grow
cannabis generally range between 500
and 2,000 ppm. If the solution concen
tration is too high, the internal osmotic
systems can reverse and actually
dehydrate the plant. In general, try to
maintain a moderate value of approx
imately 800 to 1,200 ppm. The EC
should stay below a high of 2.7 .
Electrical conductivity (EC) meters
measure the overall volume or strength
of elements in water or solution. A
digital LCD screen displays a reading
of electrical current flowing between
the two electrodes. Pure rainwater has
an EC close to zero. Check the pH and
EC of rainwater to find out if it is acidic
(acid rain) before using it.
Distilled bottled water from the grocery
store often registers a small amount
of electrical resistance, because it is
not perfectly pure. Pure water with no
resistance is very difficuk to obtain
and is not necessary for a hydroponic
nutrient solution. Electrical conductivity
measurement is temperature-sensitive
and must be factored into EC readings
to retain accuracy. High-quality meters
have automatic and manual temperature
adjustments. Calibrating an EC meter is
similar to calibrating a pH meter. Simply
follow manufacturer’s instructions. For
an accurate reading, make sure your
nutrient solution and stock solution are
at the same temperature.
Inexpensive meters last for about a year;
expensive meters can last for many
years. However, the life of most EC
meters, regardless of cost, is contingent
upon regular maintenance. The meter’s
probes must be kept moist and clean at
all times. This is the most important
part of keeping the meter in good repair.
Read instructions on care and main
tenance. Watch for corrosion buildup
on the probes of your meter. When the
probes are corroded, readings will not
be accurate.
Digital dissolved sak meters are used
to measure the overall strength of a
nutrient solution. Nutrient (ionic sak)
concentrations are measured by their
ability to conduct electricity through
a solution. Several scales are currently
used to measure how much electricity is
conducted by the concentration of ionic
salts (nutrients) between two electrodes.
A digital LCD screen displays the read
ing in one of the following scales: CF,
DS, EC, ppm or TDS, which all measure
the same thing: dissolved ionic (fertil
izer) salts. Each meter has a different
scale but more sophisticated meters are
able to make readouts in several scales
including CF, EC, ppm, and TDS.
Most North American gardeners use
the ppm scale to measure overall
fertilizer concentration. European,
Australian, and New Zealand gardeners
use EC, however they still use CF in
parts of Australia and New Zealand.
Parts per million is not as accurate or
consistent as EC to measure nutrient
solution strength.
The difference between CF, EC, ppm,
TDS, and DS is more complex than orig
inally meets the eye. Different measure
ment systems all use the same base,
millisiemens per centimeter, but they
interpret the information differently.
A dissolved solids (DS) measurement
indicates how many parts per million
of dissolved solids exist in a solution. A
reading of 1,800 ppm means there are
1,800 parts of nutrient in one million
parts of solution, or 1,800/1,000,000.
222
METERS
www.marijuanagrowing.com
Make sure to calibrate your meter before
using it.
A total dissolved solids (TDS) meter
measures solution EC and uses an
approximate conversion scale to convert
to ppm. The conversion is not very accu
rate because solutions that are composed
of different elements will have different
ppm values. One conversion figure be
comes exceedingly inaccurate. The most
accurate measure is osmotic concentra
tion (or EC) because this is what the root
systems respond to in a nutrient solution.
Parts per million meters measure the
overall level of dissolved solids or fertil
izer salts. Each fertilizer salt conducts
different quantities of electricity. Use
a calibrating solution that imitates the
fertilizer in the nutrient solution to
calibrate ppm or EC meters. Using
such a solution ensures that the meter
readings will be as accurate as possible.
For example, 90 percent of ammonium
nitrate dissolved in water is measured,
and a mere 40 percent of magnesium is
measured! Do not use sodium-based
calibration solutions. They are intended
for other applications than gardening.
Purchase calibrating solution from the
manufacturer or retailer when you buy
the meter. Ask for a stable calibrating
solution that mimics your fertilizer.
Calibrate EC and ppm meters regularly.
A good combination ppm-EC-pH meter
that compensates for temperature costs
about $200 USD and is well worth the
money. Its batteries last a long time, too.
Inexpensive digital dissolved salt meters
last for about a year. Expensive meters
can last for many years. However, the
life of most EC meters, regardless of
cost, is contingent upon regular main
tenance. The probes must be kept moist
and clean at all times, which is essential
to keep the meter in good repair. Read
instructions on care and maintenance.
Watch for corrosion buildup on the
probes, and keep them clean. When the
probes are corroded, readings will not
be accurate.
Check the scale each manufacturer
uses to measure mS/cm with their
meter. Here are the values that three
major manufacturers assign:
Hanna: 1 mS/cm = 500 ppm
Digital DS meters measure dissolved solids (salts) by their capacity to conduct electricity through a solution.
www.marijuanagrowing.com
223
Total dissolved solids meter
Electrical conductivity (EC) meter
ORP (oxygen reduction potential) meter
Eutech: 1 mS/cm = 640 ppm
New Zealand Hydro: 1 mS/cm =
700 ppm
Moisture meters measure moisture
levels in soil and growing mediums and
should be used as a backup device to
common sense. They work under the
same concept as EC—with an electrical
charge—and temperature, EC, and
pH will all affect the reading, as will
improper or nonstandardized placement,
meter calibration, and media composi
tion. Even the pros do not use these as
anything other than to see trends.
Use moisture meters outdoors to test
overall moisture content around plants.
Dry spots are easy to find. Note how
the moisture level increases deeper in
the soil, especially outdoors. Outdoors,
the top few inches of soil often dry out,
while deeper soil is completely moist.
Nonetheless, watering only the top few
inches leads to problems; all irrigations
should be deep.
Compost thermometers have a 2- to
3-foot-long probe to stick deep into
compost piles so you can measure heat
in the center. The gauge ranges from
50°F to 220°F (10°C-104.4°C) because
compost piles heat up tremendously
while breaking down organic matter.
Use a compost thermometer to check
the level of activity in your compost.
Make sure all compost has cooled to
90°F (32.2°C) before using it in the
garden.
Testing at different depths will give
you an idea of the biological activity
that occurs at different temperatures.
Once compost experiences the digestive
system of bacteria, fungi, microbes, and
other soil live, the entire aspect changes.
See “Compost” in chapter 18, Soil, for
more information.
ERGS (energy released per gram of
soil) meters measure the available nutri
ent level in ERGS, mobile ions of fertil
ity. For cannabis, the soil’s conductivity
(mobile ion reading) should be between
50 and 500 ERGS. Higher ERGS levels
Compost thermometer
mean optimum production. This meter
can also test fertilizers, soil amend
ments, and compost to help determine
the most effective fertilization strategies.
ORP (oxygen reduction potential)
meters measure oxygen reduction
potential or potential available oxygen in
soil and foliar sprays. Oxygen reduction
potential is measured in volts or milli
volts. Available oxygen is essential to
roots’ ability to uptake nutrients.
You can measure available oxygen and
combine the ORP and pH readings to
get an rH value, a more precise measure
of available oxygen. Low oxygen levels
indicate limited biological activity and
less humus-building. Too much oxygen
oxidizes organic materials and loses car
bon to the atmosphere. More oxygen in
Inexpensive moisture meters are handy, and,
when used properly, they take the guesswork
out of watering.
METERS
www.marijuanagrowing.com
Water pressure gauge
Sodium (Na) meter
foliar fertilizer and pest control sprays
increases plants’ absorption ability.
Handheld electronic dissolved
oxygen (DO) meters measure dissolved
oxygen in solution. Inexpensive aquar
ium test kits are also available but less
accurate. DO meters record temperature
and give oxygen levels in percentage
of solution saturation. The nutrient
solution in the reservoir should be a
minimum of 5 ppm (5 mg/L) dissolved
oxygen (DO) at 50°F (10°C), 6 ppm
(6 mg/L) at 65°F (18.3°C). Very cold
fresh water will hold up to 14 ppm
(14 mg/L) of dissolved oxygen. Aer
ating the nutrient solution can inject
5 to 8 ppm (5-8 mg/L) oxygen into the
water and hold it for about 24 hours.
Sodium (Na) meters measure sodium
levels in growing medium, compost, and
organic fertilizer. Use in conjunction
with an ERGS meter. High levels of
sodium reduce fertilizer effectiveness
and become toxic to microorganisms.
If the ERGS reading is high due to high
sodium levels, corrective action will
be necessary to prevent harm to soil
microbes, humus formation, and, ulti
mately, plant growth.
Manure often contains salt that is given
to livestock along with feed. If manure
is not fully leached and composted, the
salt remains. Incompletely composted
manures and other materials that contain
toxic levels of salt are often ingredients
in both bulk and bagged soil. Always test
new bulk soil, compost, and manure for
high sodium levels before purchasing
and using.
Water pressure gauges test pressure at
the water source and along the water
line. Most gauges fit into the water line
and read out in pressure on a dial. A
pressure gauge is inexpensive and espe
cially handy to check irrigation pressure
for a pump outlet or on a hillside.
N-P -K test (reagent) kits will give
you a basic idea of soil fertility for a
few pennies per test. A small bit of soil
and water are mixed with a reagent.
The soil solution is agitated and left
to settle. The liquid turns color and
is then compared with the color on a
chart. An exact reading of nutrients is
difficult
to achieve.
Miscellaneous Meters
Refractometers (aka Brix meters) mea
sure sugar content (Brix) in cannabis
leaves and stems. High Brix readings
indicate adequate nutrition and fertilizer
absorption. Cannabis with Brix above 12
N-P -K test (reagent) kits
has a healthy immune system. Use
clean pliers to squeeze sap from leaves
onto the refractometer’s glass plate, and
then turn it toward the sun to read the
Brix count in the viewer. Most meters
are very accurate and measure from
0 to 30 Brix.
A Digital refractometer measures
sugar content (Brix) of cannabis foliage.
Measurements are simple and quick after
calibration with deionized or distilled
www.marijuanagrowing.com
225
Digital refractometers make measuring sugar
content in foliage easy and very precise.
A digital laser tape measure adds precision to
garden room construction.
Ultraviolet (UVC) light is deadly to many
diseases and pests when briefly exposed.
water. This meter measures the refrac
tive index of the sample and converts it
to percentage of Brix concentration. I
like this meter because it eliminates the
uncertainty associated with mechanical
refractometers.
Laser tape measures are a high-tech
alternative to a mechanical tape mea
sure. These little meters are very useful
in the garden. I use mine all the time
to measure garden rooms and outdoor
garden areas, even distance between
plants. I can stand in the same place and
calculate complete garden room dimen
sions in seconds. Just point it at a large
flat object and get distance readings in
feet or meters. Press two more buttons
to figure square and cubic feet, both of
which are very handy when setting up a
garden room and calculating space.
Microscopes—30X to 50X—can be
handheld, desktop, and with or without
a computer interface. I like the small
handheld 45X LED light microscope. It
fits in my pocket, the light is bright, the
battery is long-lasting, and it is easy to
keep clean. Another favorite is the 30X
fold-open microscope originally used by
stamp collectors. This scope is perfect
to take a close look at resin glands but
is not so powerful that depth of field is
limited. More powerful desktop micro
scopes provide a closer view but are
difficult to focus on all resin glands.
Computer interface microscopes are
relatively inexpensive and show close-up
shots of resin but often lack definition.
Ultraviolet lights expose body fluids,
molds, and insect excrement. Use a
UVB flashlight to detect insect drop
pings and trails, fungus spores, and
damage. UV light has been used in the
hotel industry and by law enforcement
for many years to detect body fluids and
other residues that are not easily visible
to the naked eye. Ultraviolet rays that
are transmitted across a surface show a
chemical signature. More sophisticated
devices available to law enforcement are
able to read the signature.
Spot the bad bugs and the despicable
destruction in their wake. Use the UVB
flashlight to snoop around the garden
room, greenhouse, and outdoor garden
at night. UVB light makes slug and snail
slime trails glisten and both bug exu
dates and bud excrement glow. It also
makes powdery mildew spores take on
iridescent hues and tones.
A handheld microscope simplifies garden
research.
226
METERS
www.marijuanagrowing.com
r--------------------------------------------------------------------------------------------------------
228 Stomata
228 Temperature
233 Humidity
234 Measuring and Controlling
Relative Humidity
235 Air Movement
235 Air Circulation
236 Air Ventilation
238 Ducting
238 Intake Air
239 Filtering Intake Air
239 CO2 Enrichment
241 Effects of Altitude and
CO2 Enrichment
242 CO2 Emitter Systems
243 CO2 Generator Systems
244 Other Ways to Make CO2
245 Fermentation
245 Dry Ice
245 Baking Soda & Vinegar
245 Fragrance
246 Air Conditioners
246 Deodorizers
246 Negative Ion Generators
246 Ozone Generators
248 Air Filters
248 Activated Carbon Filters
249 Activated Carbon Basics
249 Types of Activated Charcoal
249 Crushed or Particle Carbon
250 Granular Crushed Carbon
250 Carbon Pellets
250 Extending the Life of
Carbon Filters
250 Reactivating and Reusing Carbon
250 The Ventilation System
250 Setting Up the Ventilation
System: Step-by-Step
M
HORTICULTURE
t.
Fresh air is essential to grow healthy gardens. Greenhouse and
indoor gardens depend on a supply of fresh air. This precious
resource often defines crop success or failure. Outdoor air is
abundant and packed with the carbon dioxide (CO2) necessary
for plant life. For example, the level of CO2 in the air is about
0.039 percent (389 ppm), but in a field of rapidly growing canna
bis it could be only 250 ppm—approximately a third of normal
on a very still day. Wind blows in fresh CO2-rich air. Rain washes
air and plants of dust and pollutants. The outdoor environment is
often harsh and unpredictable, but there is always fresh air. CO2-
rich air is even more critical in indoor and greenhouse gardens. It
must be carefully controlled to replicate the best of the outdoor
atmosphere.
Air in a garden room or greenhouse must be moved either
by natural currents or mechanically to simulate outdoor
environments. Stale, depleted air is ventilated out and new CO2-
rich air is drawn or forced into garden rooms and greenhouses.
Air must be circulated to prevent stagnant air and stratification
around leaves and within the structure.
J)
Carbon dioxide and oxygen provide basic building blocks for
plant life. Oxygen (O2) is used for respiration—burning
carbohydrates and other foods to provide energy. CO2 must be
present during photosynthesis. Without it, a plant will die. CO2
combines light energy with water to produce sugars. These sugars
fuel the growth and metabolism of cannabis plants. With reduced
www.marijuanagrowing.com
227
Bottom branches are pruned to allow for extra
airflow underplants. Fresh air is essential
to keep plenty of carbon dioxide available
for plants.
levels of CO2, growth slows to a crawl.
Except during darkness, a plant releases
more O2 than is used and uses much
more CO2 than it releases.
Roots use air, too. Oxygen must be
present along with water and nutri
ents for the roots to be able to absorb
nutrients. Compacted, water-saturated
soil has little space for the air that roots
need, and nutrient uptake stalls.
Stomata
Animals regulate the amount of air
inhaled and the carbon dioxide and other
elements exhaled through the nostrils
via the lungs. In cannabis, O2 and CO2
flows are regulated by stomata. The larg
er the plant, the more stomata it has to
take in CO2 and release O2. The greater
the volume of plants, the more fresh,
CC>2-rich air they will need to grow
quickly. When stomata are clogged with
dirt and filmy spray residues, they do not
work properly, thus restricting airflow.
Keep foliage clean. To avoid clogging
Stomata are microscopic pores on leaf under
sides that are similar to an animal's nostrils.
Extra airspace in this greenhouse will run
out before harvest. The buds will soon touch
the roof. The ventilation fans run full speed
24 hours a day.
stomata, spray foliage with tepid water a
day or two after spraying with any pesti
cides, fungicides, or nutrient solutions.
Stomata function is rather complex
and is controlled by many variables,
including external triggers such as light;
increased or decreased internal pressure
based on supply and evaporative poten
tial; and the presence or concentration
of certain gases such as CO2. For exam
ple, a 40-inch (1 m) tall plant can easily
transpire a gallon (3.8 L) per day when
the humidity is below 50 percent. How
ever, the same plant will transpire about
a half-pint (0.2 L) on a cool, humid day.
Molecules—O2, CO2, H2O, etc.— are
moved to the leaf surface in a mass flow
situation known as the atmosphere.
When the air is still, molecules migrate
around under the energy of their own
vibration—a slow process. When the
atmosphere moves, molecules move more
quickly. When they reach the stomata,
molecules encounter their first barrier
to movement, the one at the opening,
and like a port on the sea with lots of
ships, this slows the movement because
the molecules diffuse under their own
power into the stomata and out of the
stomata; the opening is a two-way street.
Circulation in the area moves away those
molecules that have exited faster and
brings new ones to the stomata faster.
Once inside, they vibrate their way across
the cavity to the next barrier, located at
the cell membrane, and the crowding
begins again. Ventilation brings new
molecules in while flushing old ones out.
Ventilation can also be used to distribute
heat and to control humidity.
Temperature
Temperature is a dominant factor for
plant growth as well as most life processes
on earth. An accurate thermometer is
essential to measure temperature in all
garden rooms. Mercury or liquid ther
mometers are typically more accurate
than spring or dial types, but they are
ecologically unsound. An inexpensive
thermometer will collect basic informa
tion, but the ideal thermometer is a day/
night or maximum/minimum type that
measures how low the temperature drops.
at night and how high it reaches during
the day. See chapter 15, Meters, for more
information on thermometers.
Under normal conditions, the ideal
temperature range for cannabis growth
is 72°F to 76°F (22.2°C-24 .4°C). At
night, the temperature can drop 5 to 10
degrees with little noticeable effect on
growth rate. The temperature should not
drop more than fifteen degrees or exces
sive humidity and mold might become
problems. Daytime temperatures above
85°F (29.4°C) or below 55°F (12.8°C)
will slow or stop growth. Maintaining
the proper, constant temperature in
garden rooms and greenhouses promotes
strong, even, healthy growth. Make sure
plants are not too close to heat sources
such as ballasts, heaters, and heating
vents, or they may dry out, maybe even
get heat scorch. Cold intake air will also
stunt plant growth.
Cannabis regulates its oxygen uptake in
relation to the ambient air temperature
rather than the amount of available Ch.
Plants use a lot of O2; in fact, a plant
cell uses as much O2 as a human cell.
The air must contain at least 20 percent
O2 for plants to thrive.”' Leaves are not
able to release O2 at night, but roots still
need it to grow. A plant’s respiration
rate approximately doubles every twenty
degrees. Oxygen use by roots increases
as they warm up, which is why fresh
air is important both day and night.
Temperatures above 85°F (29.4°C) are
not recommended even when using
CO2 enrichment. When it’s too warm,
photorespiration occurs faster than
the plant can compensate, the system
short-circuits, and O2 takes the place of
CO2; this in turn shuts down the Calvin
cycle”'* and thus the conversion of light
to carbohydrates and energy.
228
AIR
www.marijuanagrowing.com
Stomatai function: Increased internal
pressure from active roots, increased
temperature, or a blockage in the exit
pathway, along with suitable triggers
such as a decrease in internal CO2 levels
and appropriate light triggers (usually
UV light), allow for the guard cells
of the stomata to become turgid and
thus open (through other sometimes-
complex processes involving potassium
shifts and so on).
Decreased internal pressure from low
temperatures, decreased water availabil
ity in the root zone, high internal levels
of CO2, lack of environmental triggers,
or a faster demand at the exit pathway
than can be supplied, cause a wilting or
slacking in the guard cells, which par
tially or totally closes them. This limits
the amount of water escaping the plant
and provides some protection. Either
case can cause an imbalance between
water need and fulfillment.
Humidity is similar to the pipe in a
water line. The temperature is the
power to run the pump, which is the
vascular system of the plant. The valve
after the pump and before the end is
the stoma. The other side of the valve
is the container or sink—demand. As
the power is increased to the pump, it
pumps faster and more will flow. The
larger the pipe, the more that will flow.
The more open the valve the more that
will flow. The larger the container at the
end of the lines, the bigger the results of
the system, because it can deliver more.
Even though the pump may be pumping
as fast as possible, the pipes have to be
big enough to deliver the load. The valve
has to be open enough to deliver, and the
Epidermal Cells
Outer Wall
Inner Wall
Stomata Aperture
Chloroplasts
Guard Cells
This photo ofhalf-opened stomata, the
mouthlike openings on leaf undersides,
was magnified 2500 times.
container has to be big enough to handle
the load. If the pump is barely moving
but the pipes arc huge, then there is no
pressure and the water will stop flowing
or reaching all the containers (the valve
is closed more and more to hold pressure
in the system to keep water available for
the life reactions in respiration, etc.).
The opposite is true when the pump runs
rapidly and the pipes are really small: not
enough load is delivered and the process
stops. If the pump runs wide open and
the pipes are really big, then pressure
drops to zero again and function stops;
the same is true the other way. The over
all system will deliver zero load at the
extremes of these four situations. So, in
a situation where water (load) was
available, where the temperature (power)
was normal, where the container (sink)
was appropriate, and the pipes very
small, the valve would be more and more
open to get the load delivered.
*By volume, dry air contains about
78.09 percent nitrogen, 20.95 percent
oxygen, 0.93 percent argon, 0.039
percent carbon dioxide (390 ppm), and
trace amounts of other gases. Note the
ambient level of CO2 has increased from
350 ppm 50 years ago; as CO2 rises, the
earth gets warmer.
*The Calvin cycle [aka Calvin-
Benson-Bassham (CBB) cycle, reductive
pentose phosphate cycle, or C3 cycle] is
a series of biochemical redox reactions
that take place in the stroma of chlo
roplasts in photosynthetic organisms.
The light-independent reactions of
photosynthesis are chemical reactions
that convert carbon dioxide and other
compounds into glucose. Melvin Calvin,
James Bassham, and Andrew Benson
discovered the cycle at UC Berkeley by
using the radioactive isotope carbon-14.
Photorespiration, is a process in plant
metabolism by which RuBP (a sugar)
has oxygen added to it by RuBisCO
(an enzyme) instead of carbon dioxide
during normal photosynthesis. This is
the beginning step of the Calvin-
Benson-Bassham cycle. This process
reduces efficiency of photosynthesis in
C3 plants.
Under proper conditions when the water
supply is abundant, higher air tempera
tures step up metabolic activity and
speed up growth. The warmer the air is,
the more water it is able to hold. This
moist air often restrains plant functions
and decelerates growth rather than
speeding it. Typically, as air tempera
ture rises, humidity falls and plants use
water faster; then later in the light cycle,
because more water moves into the air,
the air becomes more humid. When the
lights go out or air temperature natu
rally cools, humidity levels begin to rise
until saturation, at which point moisture
condenses out of the air. Moving the air
slows or eliminates this process. Night
time—when the lights go out—often
causes complications; problems result
A plastic greenhouse helps regulate tempera
tures outdoors. Indoors, temperature regula
tion is accomplished in a variety of ways: air
ventilation, air circulation, air conditioning,
and more.
from excess humidity and moisture
condensation when the temperature
drops.
Heat buildup during warm weather can
catch any gardener off guard and cause
serious problems. Ideal garden rooms
are located underground, in a basement,
taking advantage of the insulating
www.marijuanagrowing.com
229
An accurate thermometer is necessary equip
ment for all indoor, greenhouse, and outdoor
cannabis gardens.
Ambient temperature regulation is essential
for healthy cannabis growth regardless of
whether plants are grown indoors, outdoors,
or in a greenhouse.
A combination thermometer/hygrometer that
registers maximum and minimum readings
helps keep the garden room's atmosphere
constant.
qualities of Mother Earth. With the
added heat of the HID and hot, humid
weather outdoors, an indoor room can
heat up rapidly and greenhouse tempera
tures can soar. More than a few garden
ers in the USA have lost their crops to
heat stroke during the Fourth of July
weekend, which is the first big holiday
of the summer, and everybody wants to
get away to enjoy it. Some gardeners for
get or are too paranoid to maintain good
ventilation in the garden room while on
vacation. Temperatures can easily climb
to 100°F (37.8°C) or more in garden
rooms and greenhouses that are poorly
insulated and vented. The hotter the air
temperature, the more ventilation and
water that are necessary.
Winter weather comes early to some gardens.
This gardener was able to harvest his crop a
long time before the snow arrived.
The cold of winter is the other tempera
ture extreme. Think back and remember
past winter storms in your climate. Elec
tricity often goes out in cities and sur
rounding areas. Water pipes freeze and
heating systems fail. Some residents are
driven from their homes until electric
ity can be restored, often days later. In
such cases gardeners return to find their
beautiful gardens wiked, stricken with
the deepest, most disgusting green only
a freeze can bring. Broken water pipes,
ice everywhere! It is difficult to combat
such acts of God, but if possible, always
keep garden rooms and greenhouses
above 50°F (10°C) and definitely above
freezing, 32°F (0°C). If the temperature
dips below this mark, the freeze will
rupture plant cells, and foliage will die
back or, at best, grow slowly. Growth
slows or stops when the temperature
dips below 55°F (12.8°C). Stressing
plants with cold weather conditions is
not recommended; it may yield a pro
portionately higher THC content, but it
will reduce plants’ overall productivity.
A thermostat measures temperature
and controls it by turning on or off a
device that regulates heating or cool
ing, keeping the temperature within a
predetermined range. A thermostat can
be attached to an electric or combus
tion heater. Often indoor garden rooms
can take advantage of individually
thermostat-controlled electric baseboard
heaters in each room.
A thermostat can be used to control
cooling vent fans in all but the coldest
garden rooms and greenhouses. When it
gets too hot in a room, the thermostat
turns on the vent fan, which evacuates
hot, stale air. The vent fan remains on
until the desired temperature is reached,
then the thermostat turns off the fan.
A thermostat-controlled vent fan offers
adequate temperature and humidity con
trol for many garden rooms and green
houses. A refrigerated air conditioner
can be installed if heat and humidity are
a major problem, but such devices draw
a lot of electricity. If excessive heat is a
problem but humidity is not a concern,
use a swamp cooler. These evaporative
coolers are inexpensive to operate and
keep garden rooms and greenhouses
cool in arid climates.
Common thermostats include
single-stage and two-stage. The
single-stage thermostat controls a device
that keeps temperature the same both
day and night. A two-stage thermostat is
230
AIR
www.marijuanagrowing.com
This garden room is equipped with a thermo
stat that controls both day and night tempera
tures. On the left is a CO2 controller.
This thermostat is controlled with a mercury
switch visible in the center-left of the photo.
Insulated garden-room walls help immensely
to keep garden-room temperature independent
of outside atmospheric conditions.
A directional air conditioner directs cool air
over the entire area of this garden room.
more expensive but can be set to main
tain different daytime and nighttime
temperatures. This convenience can save
money on heating and provides exacting
control over plant growth.
Note: Sometimes a slight day/night
differential in temperature, even as
slight as two degrees, can bring about
physiological changes in plant growth,
such as intense foliage coloration or an
increased production of resin and other
metabolites.
Many electronic garden room and
greenhouse controllers have been
developed in the last decade. These
controllers can operate and integrate
every appliance in garden rooms and
greenhouses. More sophisticated con
trollers integrate the operation of CO2
equipment and vent and intake fans. If
temperature and humidity regulation
are causing cultural problems in your
garden rooms and greenhouses, consider
purchasing a controller.
Uninsulated garden rooms and green
houses experience significant tempera
ture fluctuations and require special
consideration and care. Before growing
in such a location, make sure it is the
only choice. If forced to use a sunbaked
attic that cools at night, make sure
maximum insulation is in place to help
balance temperature instability. Enclose
the garden room or greenhouse to con
trol heating and cooling.
When CO2 is enriched to levels of
0.7 to 0.9 percent (700-900 ppm), a
temperature of 75°F to 80°F (23.9°C-
26.7°C) promotes faster exchange of
gases. Photosynthesis and chlorophyll
synthesis are able to take place at a
faster rate, causing plants to grow more
rapidly. Remember, this higher tempera
ture increases water, nutrient, and space
consumption, so be prepared. Unless in
a functioning sealed room, CO2-
enriched plants still need ventilation to
remove stale, humid air and promote
plant health.
The temperature in the garden room
tends to stay the same, top to bottom,
when the air is circulated with an oscil
lating fan or fans. In an enclosed garden
room, HID lamps and ballasts keep the
area warm. Placing remote ballasts near
the floor on a shelf or a stand also helps
break up air stratification by radiating
heat upward, while protecting them
from water splashes and floods. Garden
rooms in cool climates stay warm during
the day when the outdoor temperature
peaks, but they often cool off too much
at night, when cold temperatures set in.
To compensate, gardeners turn on the
lamp at night to help heat the room, but
leave it off during the day. Sometimes
it is too cold for the lamp and ballast to
maintain satisfactory room temperatures.
A barrel filled with water (or a nutrient
reservoir) will collect heat during the
day. At night, when temperatures cool,
the heat banked in the water slowly
radiates to warm the growing area.
This passive means of heating requires
only a container and space to locate it.
See chapter 11, Greenhouses, for more
information.
Garden rooms in homes are usually
equipped with a central heating and/
or air conditioning vent. The vent is
usually controlled by a central thermo
stat that regulates the temperature of the
home. By adjusting the thermostat to
72°F (22.2°C) and opening the door to
the garden room, it can stay a cozy 72°F
(22.2°C). However, using electric power
is expensive and often wasteful. Keeping
the thermostat between 60°F and 65°F
(15.6°C-18.3°C), coupled with the heat
www.marijuanagrowing.com
231
Air conditioning is expensive but often
already installed in many homes.
This propane heater is also a CO2 generator.
from the HID system, should be enough
to sustain 75°F (23.9°C) temperatures.
Other supplemental heat sources such as
inefficient incandescent lightbulbs and
electric heaters are expensive and draw
extra electricity, but they provide instant
heat that is easy to regulate. Propane and
natural gas heaters increase temperatures
and burn oxygen from the air, creating
CO2 and water vapor as by-products.
This dual advantage makes using a CO2
generator economical and practical,
especially in greenhouses. Make sure to
properly vent all enclosed spaces when
generating CO2 with fossil fuels.
Kerosene heaters with an open flame
generate heat and CO2. Look for a heat
er that burns its fuel efficiently and com
pletely with no telltale odor of the fuel
in the room. Do not use old kerosene
heaters or fuel-oil heaters if they burn
fuel inefficiently. A blue flame is burning
all the fuel cleanly. A red flame indicates
only part of the fuel is being burned. I’m
not a big fan of kerosene heaters and do
not recommend using them. The room
must be vented regularly to avoid build
up of toxic carbon monoxide (CO), also
a by-product of combustion.
Electric oil-filled radiators are a good option
for many small gardens. They can supply just
enough heat during nighttime hours to main
tain temperature levels and not let humidity
get out of control.
Diesel oil is a common source of indoor
heat. Many furnaces use this dirty, pol
luting fuel. Woodstoves pollute too, but
work well as a heat source. A vent fan is
extremely important to exhaust polluted
air and draw fresh air into a room heated
by an oil furnace or a woodstove.
Propane and LP gas heaters are the
most common way to heat greenhouses.
Some of these heaters have an open
flame, others do not. Combustion burns
oxygen out of the air, which in turn
increases CO2 levels in the greenhouse.
Use an infrared heater to raise the
temperature in enclosed garden rooms
and greenhouses. Infrared heat energy
is directed at objects to be heated. The
energy does not convert to heat until
absorbed by plants, pots, soil, and so
forth. Temperature is easy to control
and accurate because the temperature
sensor receives the same infrared energy
that the plants receive. Infrared heating
allows the air in enclosed gardens to be
5 to 7 degrees lower than if air is heated
with fossil fuels and electricity. Tem
peratures also vary less from the top to
the bottom of the enclosed area. And
leaf surfaces stay drier and are less prone
to attack by airborne diseases, allowing
more plants and denser foliage in the
same area.
The heating system should be designed
around the greenhouse or garden room.
Hang the infrared heater high enough
so that infrared pattern can cover the
desired width. Outdoor gardeners can
suspend infrared heaters 16 feet above
growing beds for nighttime heat.
See manufacturer recommendations
for coverage.
Outdoors, temperature is more diffi
cult to control. Planting in a location
that remains warm, especially at night,
is the easiest way to keep plants warm.
Remember that cool air sinks and tends
to stay in the bottom of canyons or low
geographic spots. Avoid windy plant
ing locations because windchill lowers
temperature in relation to the veloci
ty of wind. If wind is a factor, erect a
permeable windbreak or plant next to a
building or natural wind barrier to lessen
the effect.
Windchill is more difficult to control
outdoors.
AIR
www.marijuanagrowing.com
Planting next to or in between buildings
protects plants from wind, which in turn helps
keep them warmer.
Heat generated by the HID bulb is evacuated
before it affects the room's temperature and
humidity.
According to popular calculations at
50°F (10°C) the windchill factor drops
the temperature ten degrees when the
wind is blowing at 10 mph (16.1 kmh).
Cooling the great outdoors is even more
difficult than heating it. The easiest
way to cool plants outdoors is to plant
in partial shade. Plant in a location that
is shaded during the heat of the day so
that plants do not get warmer than 86°F
(30°C), at which point growth virtually
stops. A shade cloth can also be installed
above plants. A natural breezeway
occurs between the canopy of plants and
the shade cloth.
Note: Cannabis will grow better out
doors in higher temperatures than it will
indoors or in a greenhouse at the same
temperatures. Mother Nature is the best!
Disease, insect, and spider mite exis
tence and survival are also affected by
temperature. In general, the cooler it is,
the slower the insects and fungi repro
duce and develop. Temperature control
is effectively integrated into many
control programs for diseases, pests and
spider mites. Check recommendations in
chapter 24, Diseases & Pests.
Humidity
Humidity is relative; that is, air holds
different quantities of water at different
temperatures. Relative humidity is the
ratio between the amount of moisture
in the air and the greatest amount of
moisture the air could hold at the same
temperature. In other words, the hotter
it is, the more moisture air can hold;
the cooler it is, the less moisture air can
hold. When the temperature in a garden
room drops, the humidity climbs. If
humidity climbs beyond 100 percent,
the moisture in the air condenses into
water droplets. For example, dew forms
on plant surfaces outdoors when the
temperature drops at night.
For example, an 800 cubic foot (10 X
10x8 feet) (22.7 m3) garden room will
hold about 14 ounces (414 ml) of water
when the temperature is 70°F (21.1°C)
and relative humidity is at 100 percent.
When the temperature is increased to
100°F (37.8°C), the same room will hold
56 ounces (1.7 L) of moisture at 100
percent relative humidity. That is four
times more moisture! Where does this
water go when the temperature drops?
It condenses onto the surface of plants
as well as ceilings and walls, just as dew
condenses outdoors.
Relative humidity increases when the
temperature drops at night. The greater
the temperature variation, the greater
the relative humidity variation will be.
The moisture-holding capacity ofair approximately doubles with every 20°F (10°C) increase in
temperature.
Supplemental heat or extra ventilation
is often necessary at night if tempera
tures fluctuate by more than 15 degrees.
Seedlings and vegetative plants grow
best when the relative humidity is from
60 to 70 percent. Flowering plants grow
best in a relative humidity range of 40 to
60 percent.
The lower humidity range discourages
most pests and diseases. As with tem
perature, consistent humidity promotes
healthy, even growth. Relative humidity
level affects the transpiration rate of
plants via the stomata (see “Stomata”
above). When humidity is high, water
evaporates slowly. The stomata close,
transpiration slows, and so does
plant growth.
Water evaporates quickly into drier air,
causing stomata to open, thus increasing
transpiration, fluid flow, and growth.
Transpiration in arid conditions will
be rapid only if there is enough water
available for roots to draw in. If water is
inadequate, stomata will close to protect
the plant from dehydration, causing
growth to slow.
When relative humidity climbs beyond
70 percent, the pressure slows the
movement of gas molecules from
solution to the air. This results in the
increase in energy or temperature in the
overall system because it is not used up
in evaporation. The stomata typically
lodge wide open.
www.marijuanagrowing.com
233
I
Moisture condenses inside this clone dome just as
it can condense inside a garden room. Typically,
the humidity inside a garden room rises when
the temperature cools at night. Ifthe humidity
rises enough, moisture will condense on surfaces.
Clones
Vegetative
Flowering
Measuring and Controlling
Relative Humidity
Measure relative humidity with a
hygrometer. By knowing the exact
moisture content in the air, humidity
may be adjusted to a safe 40 to 60 per
cent level that encourages transpiration
and discourages fungus growth.
Inexpensive spring-type hygrometers
are accurate within 5 to 10 percent. They
are adequate for most hobby garden
ers whose main concern is to keep the
humidity near 50 percent. More expen
sive psychrometers are very accurate.
Today there are many exceptionally
accurate high-tech gadgets; plus they are
equipped with memory! See chapter 15,
Meters, for more information.
Sophisticated atmospheric controllers also
control humidity with a humidistat.
A humidistat is attached to a vent fan,
air conditioner, humidifier, or dehumid
ifier to regulate humidity in a garden
room or greenhouse. Humidistats are
inexpensive (about $20 to $100 USD)
and make controlling the environment
very easy. A humidistat and thermostat
or a combination unit can be set up to
control a vent fan and other appliances.
Each can operate the fan independently.
As soon as the humidity (or tempera
ture) exceeds the acceptable range, the
fan turns on to vent the humid (or hot)
air outdoors.
The HID lamp and ballast radiate heat,
which lowers humidity. Heat from an
HID system and a vent fan on a thermo-
stat/humidistat are all the humidity con
trol necessary for many garden rooms.
Other dry heat sources, such as hot air
vented from a furnace or woodstove,
dry the air and lower the humidity. But
be careful; do not let piped-in, warm,
dry air blow directly on foliage. It will
rapidly dehydrate plants.
Increase humidity by misting the air
with water or setting out a bucket of wa
ter to evaporate into the air. A humidifi
er is convenient and relatively inexpen
sive. Humidifiers evaporate water into
the air to increase humidity. Just set the
dial to a specific level and the humidity
changes to the desired level as soon as
enough water is evaporated into the air.
A humidifier is usually not necessary
unless there is an extreme problem
with the enclosed garden area drying
out. Problems seldom occur that can be
remedied by a humidifier. All too often,
there is too much humidity in the air
because of irrigation and transpiration.
A dehumidifier is more sophisticated
and expensive than a humidifier and will
remove moisture from an enclosed gar
den area by condensing it from the air.
Once the water is separated from the air,
it is captured in a removable container.
This container should be emptied daily.
For example, when the temperature
drops just ten degrees, about ten ounces
(—300 ml) of water from the saturated
air will condense in a 10 X 10 X 8-foot
(800 cubic feet) (22.7 m3) room.
A dehumidifier can be used anytime to
help guard against fungus. Just set the
dial at the desired percent humidity, and
presto! Perfect humidity. Dehumidi
fiers use more electricity and are more
expensive and complex than humidifiers.
But to gardeners with extreme humidity
problems unsolvable with a vent fan,
dehumidifiers are worth the added ex
pense. Check rental companies for large
dehumidifiers if only needed for a short
AIR
www.marijuanagrowing.com
Dehumidifiers are less expensive than air con
ditioners. A dehumidifier is an excellent way
to lower the overall humidity of a room ifvent
fans are unable to do the job.
Humidity tends to hang around this sheltered
corner of the building in the morning and
at night.
Oscillating circulation fans attached high on
garden-room walls are essential to provide
proper air circulation between plants.
time. Air conditioners also function as
dehumidifiers but use a lot of electricity.
Water collected from a dehumidifier or
air conditioner has a very low electrical
conductivity (EC) and can be used to
water plants.
Pests and diseases can also be prevent
ed by controlling humidity. In general,
humidity above 80 percent discourages
spider mites but impairs growth and
promotes fungus, as well as root and
stem rot. Humidity levels below 60
percent reduce the chances of fungus
and rot.
Outdoors, humidity is difficult to reg
ulate. Lowering humidity in the wide-
open outdoors is virtually impossible
because it is impractical to enclose. Rais
ing humidity outdoors is possible by in
stalling windbreaks so that plants do not
dehydrate. Air around plants can also
be misted, which will increase humidity.
However, the best way to control humid
ity outdoors is to plant in a climate with
the desirable humidity levels.
Change or regulate humidity outdoors
by planting in a microclimate that is
less humid, such as on a hillside or in a
natural breezeway.
Change or regulate humidity in a green
house with vent fans and evaporative
cooling methods, such as a swamp cool
er that uses big evaporative cooling pads.
High humidity reduces the ability of the
air to hold water, which slows evapo
transpiration, reduces water movement
in the plant, and diminishes the plant’s
cooling ability. High temperatures
demand water-cooling; and in the light,
the inside of the leaf is 10 to 20 degrees
hotter than the air. As a result, high
humidity is a bigger problem during the
day than it is at night for plant stress.
Note: Disease spores like high humidity,
and they will attack both day and night!
Air Movement
Air ventilation and circulation are es
sential to healthy harvests indoors and
in greenhouses. Fresh air is one of the
most overlooked factors contributing to
a healthy garden and a bountiful harvest.
Fresh air is the least expensive essen
tial component required to produce a
healthy medicinal garden. Experienced,
successful gardeners understand the
importance of fresh air and take the time
to set up an adequate ventilation system.
Air Circulation
Plants use all CO2 around the leaf
within a few minutes. Outdoors, gentle
breezes replace CO2; in greenhouses
and indoor garden rooms, air must be
managed. A dead air zone forms around
leaves when no new CO2-rich air replac
es the used CO2-depleted air. CO2-
depleted air stifles stomata and virtually
stops growth. If it is not actively moved,
air around leaves and in the garden
room stratifies.
Warm air stays near the ceiling, and
cool air settles near the floor in enclosed
areas. Air circulation breaks up these air
masses, mixing them together. Avoid
these would-be problems by opening a
door, window, or vent and/or installing
oscillating circulation fans. Air circu
lation also helps prevent harmful pest
and fungus attacks. Omnipresent mold
This drawing demonstrates how leaves use vir
tually all the surrounding CO2 m a short time.
www.marijuanagrowmg.com
235
Small oscillating circulation fans move
the heat generated by lamps away from the
garden. Position circulation fans below and
above the canopy of the garden. Do not blow
heavy streams ofair directly on plants or they
will dry out quickly.
An inline fan attached directly to the ceiling
removes any hot air near the ceiling.
Small computerfans can be used to ventilate
small garden rooms.
spores do not land and grow as readily
when air is stirred by a fan. Insects and
spider mites find it difficult to live in an
environment that is constantly bom
barded by air currents.
Improve air circulation in and around all
cannabis plants by pruning out lower,
spindly branches and foliage that do not
receive much light.
Air Ventilation
Fresh air is easy to obtain and inex
pensive to maintain—it is as simple as
hooking up and placing the proper-sized
exhaust fan in the most efficient loca
tion of a garden room or greenhouse.
An intake vent or fan may be necessary
to create a flow of fresh air in enclosed
areas. Outdoors, planting in a location
that receives adequate air circulation is
all it takes.
A 10-foot square (0.9 m2) garden will
use from 10 to 50 gallons (37.8 to 189.3
L) or more of water every week. Plants
transpire most of this water into the air.
Every day and night, rapidly growing
plants transpire more moisture into the
air. If this moisture is left in the garden
room or greenhouse, humidity increases
to 100 percent, which stifles stomata and
causes growth to screech to a halt. It
also opens the door for disease and
pest attacks.
Replace moist air with fresh, dry air, and
transpiration increases, stomata function
properly, and growth rebounds. A vent
fan that extracts air from the garden
room is the perfect solution to remove
this humid, stale air. Fresh air flows in
through an intake vent or with the help
of an intake fan.
Ventilation is as important as water,
light, heat, and nutrients. In many cases,
fresh air is even more important. Green
houses use large ventilation fans. Garden
rooms are very similar to greenhouses
and should follow their example. Most
garden rooms have an easy-to-use open
ing such as a window in which to mount
a fan, but security or room location may
render it unusable. If no vent opening is
available, one will have to be created.
All garden rooms require ventilation.
The ventilation system could be as sim
ple as an open door or window that sup
plies and circulates fresh air throughout
the room. But open doors and windows
can be inconvenient and problematic.
Most gardeners elect to install a vent fan
instead. Some gardeners need to install
an entire ventilation system, including
ductwork and several fans.
Connecting light reflectors to a ventilation system removes
hot air generated by lamps. Oftentimes, lamps generate the
majority ofheat in a garden room.
236
AIR
www.marijuanagrowing.com
This squirrel cage blower has been set inside a
box to dampen the noise it generates.
This inline fan is placed in the middle ofduct
ing to speed air movement.
Propeller fans are very efficient and move a
lot of air, but they are noisy when running at
higher speeds.
Squirrel cage blowers are efficient
at moving air, but they are very loud.
Blowers with a balanced, well-oiled
wheel run most quietly. Felt or rubber
grommets below each foot of the fan
will reduce noise caused by vibrations.
Run motor at a low rpm (revolutions per
minute) to lessen noise.
Inline fans are designed to fit into a
duct pipe. The propellers are mounted to
increase the airflow quickly, effortlessly,
and as quietly as possible. Inline fans are
available in quiet, high-quality models
that run with little friction.
Propeller or muffin fans with large fan
blades expel air through a large opening,
and are most efficient and quiet when
operated at low revolutions per minute
(rpm). A slow-moving propeller fan on
the ceiling of a garden room will quietly
and efficiently move the air.
A vent fan pulls air out of a room four
times more efficiently than a fan is able
to push it out. Do not set up a circu
lation fan in the room and expect it to
vent the area by pushing air out a distant
vent. The circulation fan must be very
large to adequately increase air pressure
and push enough air out a vent to create
an exchange of air. A vent fan that pulls
Run vent ducting alongside walls and the
ceiling so they are out of the way. Keep the
vent ducting as straight as possible so air
flows freely.
air out of the garden, on the other hand,
is able to change the pressure and ex
change the air quickly and efficiently.
A vent fanpulls air out of a room 4 times
more efficiently than a fan is able to push
it out.
Vent fans are rated by the amount of
Inline fans move air very efficiently. Here, all
four ventilation ducts are connected to inline
fans.
air they can move, measured in cubic
feet per minute (cfm) or cubic meters
per hour (m3/h). The fan should be able
to replace the air volume (length X
width X height = total volume in cubic
feet or meters) of a large garden room in
less than five minutes, and in a small gar
den room in less than one minute. Once
evacuated, new air is immediately drawn
Inline fans can be placed at the end of ducting,
where they are most efficient, or they can be
placed in the middle of a run of ducting to pull
and push air.
www.marijuanagrowing.com
237
in through an intake vent or via an
intake fan. An intake fan might be nec
essary to bring an adequate volume of
fresh air into the room quickly. Covering
the intake vent with fine mesh silkscreen
will help exclude pests, (see “Filtering
Intake Air” below). Some rooms have so
many little cracks for air to drift in that
they do not need an intake vent.
Ducting
Ducting should be as big as possible so
that air can be moved passively whenever
possible. Hot air rises. Adept gardeners
locate air exit vents in the hottest peak
of garden rooms or greenhouses for
passive, silent air venting. The larger
the diameter of the exhaust ducts, the
more air that can travel through them.
By installing a big, slow-moving vent fan
in this vent, hot stale air is quietly and
efficiently evacuated. A fan running at
50 rpm is quieter than one running at
200 rpm. Smart gardeners install 12-inch
(30.5 cm) or larger ducting and inline
fans whenever possible. Most often,
the vent fan is attached to ducting that
directs air out of enclosed garden areas.
Airflow is impaired proportionately to the
number and angle of turns ducting takes.
Flexible ducting is easier to use than rig
id ducting. Insulated ducting will lessen
noise. Run ducting the shortest possible
distance, and keep curves to a minimum.
When turned at more than a 30° angle,
much of the air that enters a duct whirls
into turbulence, restricting flow. Keep
the ducting straight and short.
Intake Air
Some garden rooms and small green
houses have enough fresh air coming in
via cracks and holes, but most enclosed
areas require fresh air to be ushered in
with the help of an intake vent or fan.*
An intake vent allows air to passively
flow into an enclosed area. An intake fan
blows fresh air into the garden room or
greenhouse. The ratio of 1:4 (100 cfm
[m3/h] incoming and 400 cfm [m3/h]
outgoing) should give the room a little
negative pressure.
An intake fan blows fresh air into the
room. The ratio of 1:4 (100 cfm [m3/h]
incoming and 400 cfm [m3/h] outgoing)
should give the room a little negative
pressure.
Indoor garden rooms can often take full
advantage of the preexisting household
heating, ventilation, and air conditioning
(HVAC) system. The HVAC system of
ten contains an adequate filtering system
to keep air clean and fresh smelling.
Delivering fresh air to plants ensures
that they will have adequate CO2 to
continue rapid growth. One of the best
ways to deliver air directly to plants is to
pipe it in via flexible ducting. Ingenious
A 45° curve cuts up to 40 percent of air
transmission.
Straight ducting (with no bend) is the most
efficient for air transmission.
A 90u curve cuts up to 60 percent of air
transmission.
Ducting can also be insulated, which lowers
noise levels. Prefabricated, insulated, flexible
ducting is readily available.
A 30° curve cuts up to 20 percent ofair
transmission.
238
AIR
www.marijuanagrowing,conn
Intake air in this garden room is heated and
directed downward upon entry.
Cool intake air is being delivered into this
garden via flexible ducting. You can see where
plants directly receiving cold intake air do not
grow as well as plants on either side.
This intake air vent near the floor can be sealed
offat night to help hold heat in the room.
Filter intake air before introducing it to the
garden room or greenhouse.
gardeners cut holes in the intake ducting
to direct air where it is needed. The air is
dispersed evenly throughout the room.
Fresh air for each plant is essential for
fast, consistent growth. Sealed rooms
get all their air via the air conditioner
exchange.
Always make sure fresh air is neither too
hot nor too cold. Keep the temperature
differential less than 10 degrees for in
take air. And bring in cooler air to cause
fewer problems in an overheated garden
room. For example, one friend who lives
in a hot, arid climate brings fresh air in
from the crawl space under the house,
where the air is a few degrees cooler
than ambient air.
Filtering Intake Air
Covering intake air vents with a filter
will help exclude pests and diseases from
the garden area. Often a nylon stocking
stretched over the intake vent is all that
is needed. Some gardeners go so far as to
put a superfine mesh screen over intake
vents. Just remember, fine mesh screens
will restrict airflow and put extra pres
sure on the intake fan, causing it extra
wear and a shorter life.
CO2 Enrichment
Cost versus benefit: CO2 provides the
biggest bang for the buck at a saturation
point of 700 to 900 ppm.
The most common ways to introduce
CO2 into garden rooms and greenhouses
include:
1. Combustion: burning fossil (hydro
carbon) fuels such as propane, butane,
natural (LP) gas, and kerosene. Alco
hols—ethyl, ethanol, methyl, isopro
pyl, and so forth—are too expensive
to consider using for this purpose.
2. Compressed (bottled) CO2
3. Chemical reaction
a. Excellofizz
b. Co2 Boost
c. Dry ice
d. Fermentation
e. Decomposition of organic matter
Carbon dioxide (CO2) is a colorless,
odorless, nonflammable gas that sur
rounds us all the time. Atmospheric
CO2 content has increased rapidly in
the last 60 years, from about 300 ppm
to 380 ppm—more than 25 percent, as
a conservative estimate. Today the air
we breathe contains about 0.038 per
cent (380 ppm) CO2. Rapid-growing
cannabis can use the available CO2 in
an enclosed garden room or greenhouse
within a few hours. Photosynthesis and
growth virtually stop when the CO2
level falls below 0.02 percent (200 ppm).
Carbon dioxide enrichment has been
used in commercial greenhouses for
more than 40 years. Adding more CO2
to air in garden rooms and greenhous
es stimulates growth by as much as 30
percent. Cannabis can use more CO2
than the 0.38 percent (380 ppm) that
naturally occurs in the air. By increasing
the amount of CO2 to 0.7 to 0.9 percent
(700-900 ppm)—the optimum range
widely agreed upon by professionals—
plants can grow up to 30 percent faster,
www.marijuanagrowing.com
239
I-----------1
no growth
I-----------------------------------------------------1
enriched levels
I--------- ►
toxic
providing that light, water, and nutrients
are not limiting. Carbon dioxide en
richment has little or no effect on plants
grown under standard T12 fluorescent
lights. However, brighter T8 and T5
lamps supply enough light for the plants
to process the extra available CO2.
Caution! Carbon dioxide can make peo
ple woozy when it rises above 4000 ppm
and can become toxic at higher levels.
When CO2 rises to such high levels, it
displaces oxygen, causing a lack of O2. In
fact, high levels of CO2 (50004- ppm) can
be used for insect and spider mite control.
Carbon dioxide enrichment does not
make plants produce more potent canna
binoids; it causes more foliage to grow in
less time. CO2 provides more energy for
their production and the basic building
blocks from which they are made. And
while the volume does increase in the
entire plant, the concentration per dried
weight unit remains the same.
A CO2 monitor makes it easier to keep the
carbon dioxide level in the room precise.
Carbon dioxide-enriched cannabis
demands a higher level of maintenance
than normal plants. CCh-enriched
plants use nutrients, water, and space
faster than unenriched plants. A higher
temperature, from 75°F to 80°F (23.9°C
to 26.7°C), will help stimulate more
rapid metabolism within the super
enriched plants. When temperatures
climb beyond 85°F (29.4°C), CO2
enrichment becomes ineffective; and at
90°F (32.2°C) growth stops.
Carbon dioxide-enriched plants use
more water. Water rises from plant roots
and is released into the air by the same
stomata the plant uses to absorb CO2
during transpiration. Carbon dioxide
enrichment affects transpiration by
causing the plants’ stomata to partially
close. This slows down the loss of water
vapor into the air. Foliage on CO2-
enriched plants is measurably thicker,
more turgid, and slower to wilt than
leaves on unenriched plants.
CO2 at Night
Plants do not use CO? at night or during
a dark period. There is no extra O2 and
this ratio should remain constant all the
time. CO2 from outside the plant is used
exclusively in the photosystem; without
light, it is no longer used. Using CO2 at
night wastes money and natural resourc
es, and is harmful to plants.
Carbon dioxide affects plant morpholo
gy. In an enriched growing environment,
stems and branches grow faster, and the
cells of these plant parts are more dense
ly packed. Flower stems carry more
weight without bending. Because of the
increased rate of branching, cannabis
has more flower initiation (budding)
sites. Plants are more likely to set flow
ers early if CO2 enrichment is used.
With CC>2-enriched air, plants that do
not have the support of the other critical
elements for life will not benefit at all,
and the CO2 will be wasted. Plants can
be limited by just one of the critical
factors. For example, the CO2-enriched
plants will use water and nutrients much
faster, and if they are not appropriately
supplied, the plants will not grow. They
might even be stunted.
To be most effective, the CO2 level
must be maintained at 700 to 900 ppm
everywhere in the room. To accomplish
this, the garden room or greenhouse
must be completely enclosed. Cracks in
and around the walls should be sealed off
to prevent CCh-rich air from escaping.
Enclosing the room makes it easier to
control the CO2 content of the air with
in. The room must also have a vent fan
with flaps or a baffle. The vent fan will
remove the stale air that will be replaced
with CC>2-enriched air. The flaps or
baffle will help contain the CO2 in the
enclosed garden room or greenhouse.
Venting requirements will change with
each type of CCb-enrichment system
and are discussed on the next page.
AIR
www.marijuanagrowing.com
A big tank of CO2 can be placed outside large
gro w rooms.
Set this CO2 monitor and controller to man
age two different rooms and provide a log 24
hours a day.
The big ball on the left is one of the many new solid state CO 2 sensors available to cannabis
gardeners. The Evolution NDIR CO2 Sensor works with a controller to regulate carbon dioxide
in a room full ofMK Ultra plants laden with flower buds.
I II1!
1
This inexpensive ($300 USD) CO2 monitor
and controller is easy to mount and use.
Measuring and monitoring CO2 levels in
the air is expensive. Monitoring CO2 lev
els in greenhouses or garden rooms with
six or more lights is economically feasible
and helps keep the levels consistent.
Note: Anytime you vent any gas that
replaces oxygen in a sealed environment
that you might work in, you should defi
nitely know and monitor the level of that
gas and oxygen as well.
See chapter 15, Meters, for more
information.
Stay Safe! Store bottled propane and
other explosive gases outdoors.
The easiest way to calculate CO2 use in
a garden room or greenhouse is to search
“CO2 grow room calculator” in www.
google.com. You will find several pages
of calculators that give CO2 needed and
flow-rate calculations for emitters and
generators they sell.
At a concentration of approximately
2000 ppm, carbon dioxide becomes
detrimental to plant growth: the stoma
tai guard cells become confused and quit
functioning. Plants need a concentration
of about 20 percent oxygen; adding CO2
displaces O2, and at a certain point these
levels will begin to affect respiration in
the plant.
Effects of Altitude and
CO2 Enrichment
A CO2 monitor/regulator must be cali
brated for altitude to provide the proper
level of the gas. Air is much denser at
sea level than it is at, say, 3,000 feet (915
m). Conversely, air is thinner at higher
elevations, so if CO2 is added, it must be
added in proportion to the available air.
Too much CO2 will cause problems.
In fact, when using a CO2 generator at
higher altitudes, incomplete combustion
occurs, the result of which is the release
of ethylene gas. At night in a sealed or
semi-sealed room, both the plants and
the CO2 generator (pilot light) are using
oxygen, so more O2 is depleted, exacer
bating the problem. In such situations,
bottled CO2 with a calibrated monitor/
regulator used in conjunction with a
little nighttime ventilation will keep the
environment copacetic. Or use a CO2
generator that is kept outside the garden
room and duct the gas into the sealed
area. Make sure to place a CO2 monitor/
regulator inside the garden room.
www.marijuanagrowing.com
241
If you arc using CO? and plants’ growth
rate does not increase, check to make
sure the entire garden room is running
properly. Verify that plants have the
proper light and nutrient levels, as well
as the correct temperature and humidity,
and that grow medium moisture and pH
levels are appropriate. Make sure roots
receive enough oxygen both day and
night.
CO2 Emitter Systems
Compressed CO2 systems store the gas
in a tank (cylinder) and meter it out into
the garden room over time. Compressed
CO2 systems are ideal for sealed rooms.
They cost about $0.50 USD per pound
(453.6 gm) of compressed gas and are
virtually risk-free—producing no toxic
gases, heat, or water vapor. Carbon
dioxide is metered out of a cylinder of
compressed gas using a regulator, flow
meter, solenoid valve, and short-range
timer. There are two types of com
pressed CO2 systems: continuous flow
and short-range dispersal. Metal cylin
ders hold CO2 gas under 1000 to 2200
psi (68.9 -137.0 BAR), depending
upon temperature.
In North America, cylinders are
available in four sizes: 10, 20, 35, and
This CO2emitterhas an (a) on/off valve, (b)
solenoid valve, (c) regulator, and (d) flow
meter.
50 pounds (4.5, 9, 15.9, and 22.7 kg).
Tanks must be inspected annually and
registered with a nationwide safety
agency. The 20-pound (9 kg) tank is
the most common and easiest to handle.
Purchasing a complete CCh-emitter
system at a hydroponic store is the
best value for most small gardeners. Pur
chasing component parts—regulator, a
flow meter, and a solenoid valve— is also
an option. For more information, see
Marijuana Horticulture: The Indoor/
Outdoor Medical Grower's Bible.
Most hydroponic, beverage, and welding
supply stores rent, sell, exchange, and
refill tanks. The latter two often require
an identification card. If you purchase
a lighter and stronger aluminum tank,
make sure to request an aluminum tank
exchange. The tank you buy is not
necessarily the one you keep.
Make sure CO2 tanks have a protective
collar on top to shield the valve. If the
valve is knocked off by an accidental
fall, there is enough pressure to send the
top (regulator, flow meter, valve, etc.)
straight through a parked car!
Distribute CO2 from the tank to the
garden room by using a tube or fan.
Suspend lightweight perforated plastic
tubing from the ceiling to disperse the
CO2. The tubing carries CO2 from the
supply tank to the center of the garden
room. The main supply line is attached
to several smaller tubes that extend
throughout the garden. CO2 is heavier
and cooler than air and cascades onto
the plants below.
To make sure CO2 is evenly dispersed
from the tubing, submerge the light
weight plastic tubing in water and punch
the emission holes under water while
the CO2 is being piped into the line.
This way you know the proper diameter
holes to punch and where to punch
them to create the ideal CO2 flow
over the garden.
77ns CO2 emitter system combines the regula
tor and flow meter into a single unit.
242
AIR
www.marijuanagrowing.com
F--------------------------
TANK SIZE
TYPE
WEIGHT FULL
10 lb (4.5 kg)
i ....---,
-
------ -- .
aluminum
25 lb (11.3 kg)
10 lb (4.5 kg)
steel
35 lb (15.9 kg)
20lb(9kg)
aluminum
50 lb (22.7 kg)
20lb(9kg)
steel
70 lb (31.8 kg)
35 lb (15.9 kg)
aluminum
I
75 lb (34 kg)
50 lb (22.7 kg)
...
.-
ateel
170 lb (77.1 kg)
CO2 controllers are a wise investment.
They keep CO2at the proper level in the
indoor (and greenhouse) atmosphere.
Overhead fans help evenly distribute
CO2 throughout the room. The CO2
is released directly below the fan, into
its airflow. This evenly mixes the added
CO2 throughout the air and keeps it
recirculating across the plants.
CO2 Generator Systems
CO2 production is dictated by the rate
at which the fuel is burned. For example,
one pound of fossil fuel yields about 3
pounds (1.36 kg) of CO2 gas, 1.5 pounds
(0.68 kg) of water vapor, and 22,000
BTUs of heat. Amounts vary relative to
fuels being burned.
CO2 generators use a pilot light with a
flow meter and a burner with an open
flame to burn oxygen from the air.
When used in an enclosed area, excess
CO2 is generated. CO2 generators burn
fossil (hydrocarbon) fuels, including
natural (LP) gas, butane, and propane
gas. CO2, heat, and water vapor are
by-products of the combustion process.
The inside of the generator is similar
to a gas-stove burner with a pilot light
enclosed in a protective housing. The
generator must have a cover over the
open flame. You can operate the gener
ator manually or synchronize it with a
timer to operate with other garden room
equipment such as ventilation fans that
expel air at intervals so that less fuel
is burned.
Even though CO2 is heavier than air,
when generated via combustion it is
hotter and less dense, and therefore
rises in a garden room. Good air cir
culation promotes even distribution of
CO2. CO2 generators can burn fossil
fuels such as kerosene, propane, or
natural gas. Low grades of kerosene
can have sulfur content as high as one
tenth of one percent (0.001%)—enough
to cause sulfur dioxide pollution. Use
only high-quality “l-K” kerosene even
though it is more expensive. Mainte
nance costs for kerosene generators
are high because they use electrodes,
pumps, and fuel filters. Propane and
natural gas burners are the best choice
for most applications.
When filling a new propane (cylinder)
tank, first empty it of the inert gas, which
is used to protect it from rust. Never
completely fill a propane tank. Propane
expands and contracts with temperature
change and could release flammable gas
from the pressure vent if too full.
Note: In the USA, as of April 1, 2002,
all new cylinders must be equipped with
an overfill prevention device (OPD). It
is illegal to refill old tanks that do not
have this new valve. Check with your
local propane dealer for current regula
tions on refilling tanks.
Hobby CO2 generators are general
ly priced from $250 to $500 USD,
depending on size. The initial cost of a
generator is slightly higher than a CO2
emitter system that uses small, com
pressed-gas cylinders. CO2 generators
are about three times less expensive to
operate than bottled CO2 emitters. One
gallon (3.8 L) of propane, which costs
about $3 to $5 USD, contains 36 cubic
feet (1019.4 L) of gas and over 100 cubic
feet (2831.7 L) of CO2 (every cubic foot
[28.3 L] of propane gas produces three
cubic feet [85 L] of CO2). For example,
if a garden used one gallon (3.8 L) of
propane every day, the cost would be
$90 to $150 USD per month. In con
trast, bottled CO2 for the same room
would cost more than $250 USD per
month.
One pound (0.5 kg) of fuel produces
1.5 pounds (0.7 kg) of water and 21,800
BTUs of heat. For garden rooms less
than 500 cubic feet (14.2 m3), this
makes CO2 generators very difficult to
use. Even for larger garden rooms, the
added heat and humidity must be care
fully monitored and controlled so
as to not affect plants. Gardeners in
warm climates do not use generators,
A CO 2 generator from Green Air supplies extra
carbon dioxide to this fast-growing garden.
www.marijuanagrowing.com
243
Check for gas leaks by spraying tank fittings
with soapy water. Leaky valves and connec
tions are easy to spot when they form bubbles.
Hobby CO2 generator.
The blue flame from this torch is burning
clean. A red flame signifies inefficient
combustion.
because they produce too much heat
and humidity.
If fuel does not burn completely or
cleanly, CO2 generators can release toxic
gases—including carbon monoxide—
into the garden room. Nitrous oxide,
also a by-product of burning propane,
can grow to toxic levels—not a laughing
matter! Well-made CO2 generators have
a pilot and timer. If leaks or problems
are detected, the pilot and timer will
turn off automatically.
A CO2 monitor is necessary if you are
sensitive to high levels of the gas. Digital
alarm units or color-change plates (used
in aircraft) are an economical alternative.
Carbon monoxide is a deadly gas and
can be detected with a carbon
monoxide detector/alarm available
at most hardware and building supply
stores. See “Carbon Monoxide Mon
itors” in chapter 15, Meters^ for more
information.
Check homemade generators frequently,
including kerosene, propane, and natural
(LP) gas heaters. Propane and natural
gas produce a blue flame when burn
ing efficiently. A yellow or red flame
indicates unburned gas (which creates
carbon monoxide) and needs more
oxygen to burn cleanly.
Oxygen is also burned. As oxygen
becomes deficient in a room, the oxygen
and fuel mixture changes. The flame
burns too rich and turns yellow. This is
why fresh air is essential.
Leaks in a system can be detected
by applying a solution of equal parts
water and concentrated dish soap to all
connections that are under pressure. If
bubbles appear, gas is leaking. Never use
a leaky system.
1 pound (453.5 gm) of CO2 displaces 8.7
cubic feet (0.2 cm3) of CO2.
0.3 pounds (136.1 gm) of fuel produces 1
pound (453.5 gm) of CO2.
Divide the total amount of CO2 needed
by 8.7 and multiply by 0.33 to determine
the amount of fuel needed. In our exam
ple, we found we need 1 cubic foot (28.3
L) of CO2 for an 800 cubic foot (22.7
m3) garden room.
You could either do the math or enter
your raw data into a CO2 calculator such
as the one available on Greentrees
Hydroponics.net (www.hydroponics.
net/learn/co2_calculator.asp), which
does all the calculations for you.
It is best to use a CO2 emitter in a closed
(sealed) garden room so that heat build
up is not an issue.
Turn off CO2 generators at night, since
plants do not use CO2 at night. (See
“CO2 at Night” on page 240.) They
create excess heat and humidity in the
garden room, and they need oxygen
to operate. At night, roots need the
extra oxygen in the room for continued
Other Ways to Make CO2
You can generate CO2 using such meth
ods as dry ice or other chemical reac
tions, fermentation, and burning ethyl
or methyl alcohol in a kerosene lamp.
The Excellofizz puck (check out www.
fearlessgardener.com) releases CO2 into
the atmosphere. It is simple to use; just
add a few ounces of water and a puck or
two to cause a chemical reaction that
will disperse enough CO2 to augment
the air in a 10-foot-square (0.9 m2) room
to about 1000 ppm all day. Excellofizz
also releases a eucalyptus fragrance to
help mask odors. Make sure to keep the
fizz contained so that it does not splatter
on plants and damage them.
Decomposing organic materials like
woodchips, hay, leaves, and manures
release large amounts of CO2. The
company named Co2 Boost
(www.co2boost.com) has a proprietary
product that decomposes to make CO2.
I have received numerous good reports
about their method of generating CO2.
Although you can capture CO2 from
this decomposition and direct it to a
garden room, it is most often impractical
for indoor gardeners. Piping indoors the
CO2 and fumes from a compost pile is
complicated, expensive, and more work
than it is worth. Greenhouse gardeners
can actually compost in the greenhouse,
but it could also complicate matters with
undesirable diseases and pests.
Norwegians are studying charcoal burn
ers as a source of CO2. When refined,
the system will combine the advantages
of generators and compressed gas. Char
coal is much less expensive than bottled
CO2 and is less risky than generators in
terms of toxic by-products. Others are
studying the use of new technology to
extract or filter CO2 from the air.
244
AIR
www.marijuanagrowing.com
The plastic tubing and emitters hooked up to
a Co2 Boost system deliver carbon dioxide
directly to individual plants.
Fermentation
Combine water, sugar, and yeast to
produce CO2 via fermentation. The
yeast eats the sugar and releases CO2
and alcohol as by-products. Mix one cup
(23.7 cl) of sugar, a packet of brewer’s
yeast, and three quarts (283.9 cl) of
warm water in a gallon (3.8 L) jug to
make CO2. You will have to experiment
a little with the water temperature to get
it right. Yeast dies in hot water and does
not activate in cold water.
Once the yeast is activated, CO2 is
released into the air in bursts. Punch
a small hole in the cap of the jug, and
place it in a warm spot (80°F to 95°F
[26.7°C to 35°CJ) in your garden room.
A fermentation lock (available for
under $10 USD at beer-brewing stores)
prevents contaminants from entering
the jug, and they bubble CO2 through
water so the rate of production can be
observed. The hitch is that you must
change the concoction up to three times
a day. Pour out half the solution, and
then add 1.5 quarts (1.4 L) of water and
another cup (23.7 cl) of sugar. As long as
the yeast continues to grow and bubble,
the mixture can last indefinitely. When
the yeast starts to die, add another
packet. Several jugs scattered around the
garden room have a significant impact
on CO2 levels.
Fermentation releases no heat, toxic
gases, or water, and it uses no electricity.
But it stinks. It is unlikely that a garden
er could tolerate the stench of a large-
scale fermentation process. And with
this method, CO2 production is difficult
to measure and keep uniform.
This 5-pound (2,268 gm) chunk ofdry ice
lasted 3 days in my home freezer.
Dry Ice
Two pounds (907.2 gm) of dry ice will
raise the CO2 level in a 10 X 10-foot (3
m2) garden room to about 2000 ppm for
a 24-hour period. Dry ice is expensive,
$3 to $4 USD per pound (453.6 gm).
One chagrined gardener remarked, “I
can’t believe that stuff melts so fast!”
Dry ice is carbon dioxide that has been
chilled and compressed. As it melts, it
changes state (sublimes) from solid to
gas. Gaseous CO2 can be mixed into the
air with fans that circulate it among the
plants. Dry ice works best in small-scale
gardens. It is readily available at super
markets. Because CO2 has no liquid
stage and emits no toxic gases as it melts,
the transformation from solid to gas is
clean and tidy. It’s also easy to approxi
mate the amount of CO2 being released.
One pound (453.6 gm) of dry ice is equal
to a pound (454 gm) of liquid CO2.
Determining the thawing period for a
particular size of dry ice will allow you
to estimate how much CO2 is released
during a particular period. To prolong
the thawing process, put dry ice in an
insulating container such as a foam ice
cooler and cut holes in its top and sides
to release the CO2. The size and number
of holes allow you to control the rate at
which the block melts and releases CO2.
The melting can be slowed through
insulation, but it cannot be stopped.
Because it is extremely cold, dry ice can
cause tissue damage or burn the skin
by freezing (frostbite) after prolonged
contact. Dry ice sublimates at -109.3°F
(-78.5°C) at atmospheric pressure. This
makes the solid dangerous to handle
without protection. While generally
nontoxic, the outgassing from dry ice
can cause asphyxiation due to displace
ment of oxygen in confined locations.
Baking Soda & Vinegar
Mixing vinegar and baking soda to
produce CO2 eliminates excess heat and
water-vapor production, and requires
only household items. Create a system
that drips vinegar (acetic acid) into a bed
of baking soda.
The main disadvantage of this system
is the erratic level of CO2 produced. It
takes a considerable amount of time for
the CO2 to build to a level where it helps
plants, and once it reaches an optimum
level, it can continue to rise until it reach
es levels detrimental to plants, especially
in small, enclosed gardens. If you have
time to experiment, it is possible to set
up a drip system operated by a solenoid
valve and a short-term timer. With
such a system, CO2 could be released
periodically in small increments and
coordinated with ventilation schedules.
Caution! Some recipes replace vinegar
with muriatic (hydrochloric) acid.
Use vinegar—DO NOT USE
HYDROCHLORIC ACID! It off
gases CI2, chlorine gas, which will
kill everything! Hydrochloric acid is
extremely dangerous. It can burn flesh,
eyes, and the respiratory system; it can
even burn through concrete.
Fragrance
A good exhaust fan, vented outdoors, is
the first step in cannabis fragrance con
trol and the easiest way to keep garden
rooms and greenhouses from smelling of
fresh cannabis. The exhaust fan sim
ply carries away fragrances, dispersing
them into outside air so that odors and
other pollutants do not build up in the
enclosed space. Seedlings, cuttings, and
vegetative cannabis odors are much less
pronounced than when flowering. Fra
grance continues to build as flowering
progresses. Often, minimal fragrance
control is necessary until the last four to
six weeks of flowering.
If strong fragrance in your indoor garden
is not controlled by expelling air, follow
the progression-control list on page 246.
www.marijuanagrowing.com
245
Ozone performing
oxidation and
decomposition
functions.
Activated Ozone
Ozone (O3) is formed
The Oxygen
Molecule (Q2)
The Oxygen
Molecule is split by
electrical discharge.
The formation
of Ozone (O3)
A good air filter will keep the area in and
around the garden room smelling fresh
and clean.
This diagram shows how ozone (O3) sheds a molecule to become oxygen (O2)-
1. Air conditioner
2. Negative ion generator (deionizer)
3. Deodorizing liquid, gel, puck,
or spray
4. Ozone generator—keep it out of the
garden and drying rooms!
5. Activated charcoal filter
Most gardeners skip the first four
steps and move directly to efficient
charcoal filters.
z
Air Conditioners
Classic air conditioners are mechanisms
that extract heat and dehumidify air in
an area. Humid air is condensed within
the device into water, which is collected
in a receptacle, removed, or directed
down a drain. Much of the fragrance of
growing cannabis is trapped within the
condensed water vapor. Other air condi
tioners dehumidify the air without cool
ing it. Regardless of the air conditioner
used, keep runoff (condensed moisture)
inside the garden room so that fragrant
water does not escape outdoors.
Air conditioners can contain only a
portion of the fragrance, but it is often
enough to minimize escaping odors.
Deodorizers
Kill odors by changing their structure
at the molecular level. Products such as
Odor Killer, Ona, VaporTek, Ozium,
etc. are made from essential oils that kill
odors by creating a neutral atmosphere
at the atomic level. Such products are
usually available in gel and spray form.
Many gardeners prefer to use gel over
the long term and spray for emergencies.
Deodorizers can be set out in the garden
room, around the house, and near door
ways. Several companies offer products
that affix to a wall or other surface.
One ingenious gardener I interviewed
stuck one such deodorizing puck to the
inside of the front door, just below the
mail slot, to keep the house fresh. Other
products are designed to be attached to
the ventilation ductwork system.
Often these products are used not only
to alter the odor of cannabis, but also
to alter the somewhat unpleasant odor
produced by an ozone generator. Other
companies offer aerosol spray cans with
a dispenser that periodically meters out
a burst of spray.
Negative Ion Generators
Negative ion generators are small and
somewhat efficient in controlling odors,
smoke, airborne pollen, mold, dust, and
static electricity. They pump negative
ions into the atmosphere. Negative ions
are attracted to positive ions containing
odors and other airborne pollutants.
Negative ions attach to positive ions,
and odor becomes neutralized. The
particles fall to the floor and create a fine
covering of dust on the ground, plants,
walls, and objects in the room.
These devices work fairly well for small
garden rooms with minimal odor prob
lems. They plug into a regular 115-volt
current and use very little electricity.
Check the generator’s filter every few
days, and make sure to keep it clean.
Ozone Generators
The presence of natural ozone in the
atmosphere after a rainstorm gives the
air a clean fresh fragrance. Man-made
ozone has many applications including
food and water sterilization and the
removal of odors from the air at the
molecular level. Some gardeners even
use high levels of ozone to exterminate
garden-room pests. See chapter 24,
Diseases & Pests, for more information.
AIR
www.marijuanagrowing.com
Collect the water from air conditioners inside
so that the smell does not linger outdoors.
Ozone generators neutralize odors
by converting oxygen (O2) into ozone
(O3) by exposing the smelly air to
ultraviolet (UV) light. Ozone is a
neutral molecule that is bipolar: it has
both an internal positive and negative
charge that cancel each other out to be
come a neutral molecule. Ozone reacts
with positively charged fragrance cations
that are present in the air, neutralizing
the odor. Once the extra molecule is
shed, O3 is converted back into O2. The
chemistry takes a minute or longer to
occur, so treated air must be held in a
chamber to be converted effectively.
Watch for important features such as
“self-cleaning” (or easy to clean), and
Deodorizers work for short periods in enclosed
areas. Some deodorizers are adequate for
small garden rooms.
easy, safe bulb replacement. When UV
light encounters moisture in the air,
nitric acid is produced as a by-product.
This white, powdery nitric acid collects
around the lamps at connection points.
This is an unpleasant, very corrosive acid
that will severely burn skin and eyes.
Before purchasing and using an ozone
generator, verify that it has proper safety
features such as a switch that turns off
the lamp for maintenance, making it
possible to work without looking at the
retina-searing UV rays. Legal exposure
to ozone for humans is about 0.1 ppm
for a maximum of eight hours. Most
garden-room ozone generators produce
about 0.05 ppm at timed intervals. See
chapter 24, Diseases and Pests, for plant
symptoms of ozone damage.
Give ozone enough time to mix with
smelly air to neutralize fragrances.
Excess ozone exiting a building has
an unpleasant and distinct odor. For
this reason and safety concerns, many
gardeners use a carbon filter to further
scrub the air.
Ozone generators are rated by the
number of cubic feet (m3) they are able
to treat. (To figure cubic feet or meters,
multiply the length X width X height of
the room). Do not set up the ozone gen
erator in the garden room and let it treat
all the air in the room. It can diminish or
remove the fragrance of flower buds. Set
up an ozone generator in a spare closet,
or build an ozone exchange chamber and
route fragrant garden-room air through
the closet for ozone treatment before
being evacuated outdoors. Or set up the
ozone generator in ventilation ductwork
to treat air before it exits. Once gen
erated, ozone has a life of about 30
minutes. It takes a minute or two for O3
molecules to combine with oxygen to
neutralize odors.
Ozone generators do not enjoy the
popularity they had 10 to 15 years ago.
For best results, keep the ozone gener
ator in another room or isolated from
the growing plants. Ozone can cause
chlorotic spots on leaves. Mottled spots
at first appear to be magnesium (Mg)
deficiency, and then increase in size and
turn dark. Most often, the symptoms
are found on foliage near the generator.
Leaves wither a*nd drop, and overall
plant growth slows to a crawl.
Caution! UV light is very dangerous. In
a flash, intense UV light can burn your
skin and the retinas in your eyes beyond
repair. Never, under any circumstances,
Ozone generators that fit in exhaust ducts
ensure that no ozone will remain in the
garden area.
TA/5 drawing demonstrates how to use an
ozone generator so that it will not affect the
fragrance of cannabis. Tainted garden-room
air is ushered into another room to be treated
with ozone before being expelled outdoors.
Ozone damages foliage. Always keep ozone
generators outside ofgarden rooms, green
houses, and drying rooms.
www.marijuanagrowing.com
247
look at the UV lamp in an ozone gener
ator. Sneaking a peek can cost you your
eyesight! Ozone is also capable of burn
ing your lungs and other internal body
tissue. At low levels, there is no damage,
but at higher levels, danger is imminent.
Never use too much ozone!
Ozone disrupts and changes various
chemical compounds and can entirely
remove fragrance from cannabis. The
free radicals involved in ozone gener
ation will take any organic compound
they can find!
'Skunk #T is a, well-known variety of canna
bis that smells like a skunk. Avoid problems
with the neighbors by abating this odor before
it leaves the garden area.
Air Filters
Air filters used by indoor medical
cannabis gardeners fall into two basic
categories: particulate air filters and
activated carbon air filters. Particulate
air filters are made from fibrous
materials that are designed to remove
solid particles such as dust, mold,
bacteria, and pollen from the air.
These volatile organic compound
(VOC) particles measure from 10
to 100 nanometers (nm).
Particulate air filters found in home
heating and air conditioning systems
do not remove fine pollutants from the
air. These filters are designed to remove
some of the larger particles of dust and
pollution but fail to remove fragrances.
Activated carbon filters remove
fragrances (airborne molecular
contaminants) by absorption. Activated
carbon is the most common active
ingredient in air filters used by medical
cannabis gardeners. Fragrance must
be filtered out at the molecular level.
Passing garden-room air at a constant
rate and pressure through an activated
carbon filter will remove pollutants at
the molecular level.
High-efficiency particulate air (HEPA)
filters have been used since the 1950s
in the medical, automotive, and
aeronautic industries. These expensive
filters are used by a few medical can
nabis gardeners to remove extremely
small particles including bacteria from
garden-room air. Buyer Beware! HE-
PA-type, HEPA-like, HEPA-style, etc.,
filters DO NOT meet HEPA standards
and are inferior to a true HEPA filter.
The HEPA standard ensures quality.
Activated Carbon Filters
Activated carbon (aka activated charcoal
and activated coal) filters are the choice
of most gardeners to remove unwanted
cannabis fragrance from garden room
and greenhouse air before venting it out
doors. Activated carbon is contained in a
perforated, flow-through metal canister
or made into a carbon filter.
Look for filters that contain plenty of
the proper activated carbon to clean
garden air. Make your selection based
on the filter’s efficiency in relation to
the weight and absorption ability of
the activated carbon. Some filters are
so heavy that they are mounted upright
in the garden rather than hung from
the ceiling, where the warm, fragrant
air collects.
Use duct tape to seal all joints when
setting up the air filter. Accidental leaks
may cause unfiltered air or an inefficient
exhaust system.
Always follow the manufacturer’s
filter and fan specifications. Filters are
designed to work with specific fans.
Most manufacturers include instructions
to help set up the air filter for maximum
efficiency. To calculate the proper filter
and fan for a room, use Carbon Active’s
online calculator, www.carbonactive.
ch/calculator/.
This efficient activated carbon filter is
connected to ducting that runs straight up
through the roof
Many medical marijuana gardeners
make their own activated carbon filters.
Check the Marijuana Growing Forum
(www.marijuanagrowing.com) for more
information.
Activated carbon consists of at least 90
percent carbon and has an extremely
porous structure. For example, a single
gram of activated carbon has more than
500 m2 in surface area! Sources of raw
carbon include wood, peat, coal, or
coconut shells. First they are processed
similarly to charcoal, and then they are
“activated.”
Charcoal is activated chemically or
with steam and pressure. The activation
process opens millions of minute pores.
These extra passageways increase char
coal’s ability to adsorb odor and pollu
tion molecules. Extra surface area is also
charged with positive ions that attract
negative ions—odors and pollutants.
A charcoal filter needs:
• Relative humidity below 70 percent
• Enough time for charcoal to absorb
fragrances
• A pre-filter, regularly changed to keep
clean—dust blocks pores of carbon!
248
AIR
www.marijuanagrowing.com
Multilayerfleece mats are sealed airtight in the
base and cover, which are made from recycled
plastic, preventing any accidental intake of
(unfiltered) air.
Activated Carbon Basics
Activated charcoal adsorbs odors but also
absorbs moisture. At 65 to 70 percent rel
ative humidity, charcoal absorbs moisture
and starts to clog. At 80 percent or higher
humidity, adsorption drops tremendous
ly, even though carbon never completely
stops working. Once activated charcoal
is saturated with moisture (humidity),
it will shed moisture back into the air as
ambient humidity levels drop, and the
filter will start to extract pollutants once
again. But some moisture will still be
trapped deep within the internal pores
of the activated charcoal, which reduces
efficiency and life expectancy.
Note: An ultrasonic water atomizer will
produce lime and other salts. Retain
lime with a pre-filter. Use only salt-free
water for humidification.
Air must move slowly through charcoal
filters to extract odors. The fan should
let just enough air through the filter so
the odors have enough dwell time to be
Both passive intake air and air brought in by
a fan require a filter to minimize airborne
pollutants in enclosed gardens. Install an
intake air filter or fine screen to remove large
particles such as dust and other pollutants
from intake air.
cfm = Cubic feet per minute
m^h = Meters cubed divided by hours
(cfm)
(m3/h)
0.588
1
59
100
147
250
294
500
589
1,000
absorbed by the carbon filter. Check
with filter manufacturers or retailers
about venting specifications. To ensure
success, always buy a bigger filter than
the fan’s maximum output. Employing
a smaller fan will cause air pressure to
drop, and the contact time between
fragrant air and charcoal will increase.
The capacity of the fan should be 20
percent lower than the capability of the
filter so the activated carbon has enough
time and capacity to neutralize the air
continuously. Lowering fan capacity
more than 30 percent does not make
carbon more effective, and it restricts
airflow. The overall lifespan of charcoal
also increases when properly maintained.
Use a pre-filter to remove fine dust and
pollutants (100 nm or larger) and thus
avoid damaging the carbon. A pre-filter
is typically fitted around the superstruc
ture of the carbon filter to remove larger
particles so they do not clog the activated
carbon. Use the pre-filter designed spe
cifically for the charcoal filter.
Caution! Microparticles such as con
crete dust and smoke pass through the
pre-filter to the carbon. Tobacco smoke
reduces the life of activated carbon.
Caution! DO NOT wash pre-filters
with water. Clean them with a vac
uum or a jet of high-pressure air. Water
destroys the structure of pre-filters.
Remove and clean pre-filters outside the
room to prevent intake of microdust
that could damage activated carbon.
Replace pre-filters when dirty and
difficult to clean thoroughly.
Use CarbonActivc’s calculator (www.
carbonactive.ch/calculator/) to deter
mine which pre-filter, carbon filter, and
extraction fan are best for your airspace.
Types of Activated Charcoal
Activated carbon’s ability to adsorb
fragrances is a function of the carbon’s
hardness, regardless of its crushed or
pelletized form. Harder carbon is less
dusty and more expensive than semihard
or soft carbon/charcoal.
Some gardeners prefer to spend the extra
money on activated carbon made from
coconut fiber. Coco carbon is very hard,
with little dust and the highest charge
of ions.
A volume of activated carbon is nec
essary to remove fragrances from the
air of a garden room. Different forms
of activated carbon react differently to
filtering air. Granular activated carbon
(GAC) is designed to absorb all gases
and fragrances. This is the best activated
carbon filter to use.
Activated Carbon Classifications
granular activated carbon (GAC)—
absorption of all gases
powdered activated carbon (PAC)—
water purification
extruded activated carbon (EAC)—
gas phase applications
beaded activated carbon (BAC)—
water filtration
impregnated carbon—water purification
and chemical absorption
polymer coated carbon—human blood
purification
Crushed or Particle Carbon
Particle carbon is highly active and
heavily charged with ions. This type of
carbon is the most efficient air-cleaning
system. Particle carbon is used in light
weight, low-pressure systems that stir up
no dust. Production is consistent, with
less than 5 percent variation in batches.
Irregular granular and crushed activated
charcoal disperses air, forcing it to travel
farther through the filter. Its irregular
surfaces give more contact between air
www.marijuanagrowing.com
249
and carbon, providing more filtering area,
which in turn absorbs more pollutants.
CarbonActive filters have tiny particles
of activated carbon (0.4 -0 .8 mm). Since
these particles are much smaller than
pellets, the odor-neutralizing surface
is 10,000 times larger so that the effect
is amplified enormously. Special fleece
mats ensure an optimal arrangement of
the activated carbon particles.
Granular Crushed Carbon
Granular crushed carbon is actively
charged with ions. It is mostly used to
purify water. MESH 4 to 12 filters are
specifically for filtering water.
Carbon Pellets
Carbon pellets activate slowly and, by
volume, contain fewer charged ions.
Their low evaporative ability makes
them perfect to clean paints and gases
such as benzene and methanol.
Activated carbon pellets are smooth
and cylindrical in form. The surface
provides a short, direct path for air to
flow through and out the filter, effectively
lowering the filtering ability for minute
odor molecules. Pelletized activated
carbon is less expensive than other
forms of activated carbon, with density
per volume of 50 to 60 g/cc.
Extending the Life of
Carbon Filters
Carbon filters typically last about a year
when properly maintained. Active life
depends upon maintenance, climatic
conditions, and the total volume of
pollutants that are filtered. The quality
of carbon is directly proportionate to its
ionic charge and filtering ability.
This pre-filter is filthy! Its ends are the orig
inal color (white), but the filter itself is very
dirty where it is drawing in air.
Many other factors affect the longevity
of activated carbon. Plants have 2,500
different molecules, and each plant is
unique. Controlling fragrance is relative
to the microclimate— indoors, out
doors, greenhouse, and location—
Canada, Switzerland, Argentina, and so
on. Many other factors influence the air,
including CO2, pre-filter maintenance,
and even the fan being used. Changing
the pre-filter is critical because this is
where dust, dirt, heat, and humidity
form a perfect environment for bacteria
and insects to reside.
Caution! Clean the pre-filter monthly
with a vacuum or jet of compressed air.
Remove the pre-filter from the garden
room to clean. Change pre-filter at least
once every 12 months to avoid disease
and pest problems.
Store activated carbon and filters at room
temperature in a dry, airtight place.
Reactivating and
Reusing Carbon
Spent, clogged carbon can be reactivated
with chemicals or by exposure to very
high temperatures 1,472°F (800°C)
under controlled conditions. It is not rec
ommended unless done by a professional.
Furthermore, repacking carbon requires
precision packing. When the carbon loses
its filtering ability, it is much easier to
purchase newly activated charcoal.
Dispose of used carbon along with
normal household garbage. Or it can be
broadcast in the garden to help sweeten
the soil.
The following sites offer more technical
information and setup instructions for
activated charcoal filters:
CarbonActive, www.carbonactive.ch—
an expert Swiss site, dense with
information
Can-Filters, www.canfilters.com
Organic Air Filters,
www.organicairfilter.com
Phresh Filters, www.phreshfilter.com
Phat Filters, http:// http://phatfilter.
com.au/
Rhino Filters www.rhinofilter.com
You do not need a wind velocity meter
to know that this vent fan is not working
efficiently!
The Ventilation System
Construct a ventilation system that
brings in cool air to the bottom of the
room and expels hot air from the top of
the room.
Locate the vent in the ceiling or near the
ceiling, where hot air naturally accumu
lates. Carefully cut a hole in the wall or
ceiling in the exact place you want it.
Filter incoming air to prevent insects,
spider mites, diseases, and pollen from
entering the room. Filter outgoing air
to neutralize unwanted fragrances (and
to avoid bothering your neighbors).
Filtering incoming air requires a nylon
stocking or a similar fine mesh stretched
over incoming air sources.
The following sites offer exhaust fan
calculators:
Ask the Builder, www.askthebuilder.
com/B98_Sizing_an_Exhaust_Fan_.
shtml
ACF Greenhouses, www.littlegreen
house.com/fan-calc.shtml
Setting Up the Ventilation System:
Step-by -Step
Note: Set up intake vents near the floor
in a corner of the room. Install exhaust
fan(s) in the opposing corner near the
ceiling so that air is drawn through the
enclosed area.
Step One: Figure the total volume of the
garden room. Length X width X height
= total volume. For example, a garden
roomthatis10X10x8feet(21.5m3)
250
AIR
www.marijuanagrowing.corr>
Measure the dimensions of the room: length,
width, and height.
Stretch flexible ducting so it is as smooth and
straight as possible inside. Irregular interior
surfaces cause air turbulence and seriously
diminish airflow.
Install vent fans in the attic, ceiling, or high in
the garden room or greenhouse, where they are
most efficient.
has a total volume of 800 cubic feet
(10X10x8feet=800cubicfeetor
21.5 m3). A room measuring 4x5x2
meters has a total volume of 1,400 cubic
feet (40 m3).
Step Two: Use a vent fan that will
remove the total volume of air in the
enclosed garden in less than five min
utes for large rooms and one minute for
small rooms. Warm garden rooms need
more frequent ventilation. Figure one
complete air change for the maximum
temperature the enclosed garden will
need to operate.
Divide the volume of the growing area
by the number of minutes required to
get one full air change:
A 640-cubic foot (18 m2) room / 4 air
changes = 160 cfm (18 L2/hr) fan (640/4
= 160).
A 640-cubic foot (18 m2) room / 1 air
change = 640 cfm (18 L2/hr) fan (640/1
= 640).
Step Three: Place the fan high on a wall
or near the ceiling of the garden room so
it vents off hot, humid air.
Buy a fan that can easily be mounted on
the wall or inline in a duct pipe. Quality
inline fans move much air and make very
little noise. It’s worth spending the extra
money on an inline fan. Small, enclosed
areas can use a fan that can be attached
to flexible 4-inch (10.2 cm) dryer duct
ing. Many stores sell special ducting to
connect high-speed squirrel cage blowers
with the 4 inch (10.2 cm) ducting.
Step Four: If possible, use an existing
window, chimney, or sewer vent to expel
garden-room air. The last and most-in
volved option is to cut a hole in the
ceiling or wall.
Toplaceafaninawindow,cuta0.5to
0.75-inch (1.3 -1 .9 cm) piece of plywood
to fit the windowsill. Cover window
with a lightproof, dark-colored paint or
similar covering. Mount the fan near the
top of the plywood so it vents air out of
the garden room. Secure the plywood
and fan in the windowsill with sheet
rock screws. Open the window from
the bottom.
Make a lightproof vent using 4-inch
(10.2 cm) flexible dryer ducting. Vent
the hose outdoors, and attach a small
squirrel cage fan to the other end of the
ducting. Make sure there is an airtight
connection between the fan and hose by
using a large hose clamp or duct tape to
fix the connection.
Use rigid ducting instead of flexible
ducting, if possible. Air flows more freely
and quietly in larger ducting. Choose
between 4-, 6-, 8-, 10-, and 12-inch
(10.2, 15.2, 20.3, 25.4, 30.5 cm) ducting.
Vent air up the chimney where
fragrances are seldom a problem.
First, clean the chimney of excess ash
and creosote by tying a chain to a rope
and lowering the chain down the inside,
banging and knocking all debris to the
bottom. There should be a door at the
bottom of the chimney to remove the
debris. If cleaning the chimney yourself
is inconvenient, hire a chimney-sweep
service. Tap ducting into an existing
hole in the chimney.
This window allows air to vent but does not
allow light to escape.
www.marijuanagrowing.com
251
An unused chimney draws vented air up
and outside.
This little garden has all the electrical connections on a board. The CO2 monitor is mounted
on another wall.
Cut a hole in the ceiling and vent air
into the attic. Often a hole can be cwt in
the ceiling and covered with a veat, then
a fan is placed behind the vent.
If cutting into a ceiling with a crawl
space, make sure you have a method to
evacuate the garden-room air from the
crawl space. Install louvers below the
rafters on the outside wall of the house.
Step Five: Attach the fan to a thermostat/
humidistat or other temperature/humid-
ity monitor/control device to vent hot,
humid air outside. Set the temperature on
75°F (23.9°C), and the humidity on 55
percent in flowering rooms and 60 to 65
percent in vegetative rooms. Most control
devices have wiring instructions. More
sophisticated controllers have built-in
electrical outlets, and the peripherals are
simply plugged into the outlets.
Or attach the vent fan to a timer and run
it for a specific length of time. This is
the method used with CO2 enrichment.
Set the fan to turn on and vent out used,
CO2-depleted air just before new CO2-
rich air is injected.
Rip-stop plastic keeps this greenhouse intact when the sheriff's helicopter hovers overhead.
252
AIR
www.marijuanagrowing.com
256 Ultraviolet (UVA, UVB, UVC) Light
257 Light Intensity
258 Measuring Light
259 Inverse Square Law
261 Photoperiod
263 Indoorand Greenhouse
Garden Lamps
263 High-Intensity Discharge (HID)
Lighting Systems
265 HID Ballasts
265 Analog (Magnetic) Ballasts
266 Electronic Ballasts
267 Ballast Features
268 Ballast Safety
268 HID Bulbs
268 Ulbricht Sphere
269 HID Bulb Maintenance
269 Bulb Disposal
270 Mercury Vapor Lamps
270 Metal Halide Bulbs and Ballasts
270 Metal Halide Bulbs
271 Metal Halide Ballasts
271 High-Pressure Sodium Bulbs
and Ballasts
271 HP Sodium Bulbs
272 End of Life
272 HP Sodium Ballasts
272 Conversion Bulbs
273 HP Sodium to Metal Halide
273 Metal Halide to HP Sodium
273 Fluorescent Lamps, Ballasts,
and Fixtures
273 Fluorescent Bulbs
275 End of Life
276 Fluorescent Ballasts
276 Analog (Magnetic) Ballasts
276 Electronic Ballasts
276 Fluorescent Fixtures
277 Fluorescent Bulb Disposal
277 Compact Fluorescent Lamps
278 CFL Ballasts
278 End of Life
278 CFL Bulb and Ballast Disposal
278 Plasma Lamps
279 Light-Emitting Plasma
(LEP) Lamps
280 Magnetic Induction Lamps
280 Light-Emitting Diode (LED) Lamps
280 About LEDs
283 LED Manufacture and Binning
283 Cost
283 LEDs and Heat
284 LED Power Ratings
284 Brilliance
284 Spectrum
285 LED Bulbs and Tubes
285 LED Fixtures
J
www.marijuanagrowing.com
253
285 LED vs. HID Lamps
286 End of Life
286 Other Lamps
287 Getting the Most Artificial Light
287 Lamp Spacing
288 Side Lighting
J
288 Rotating Plants
289 Plant Spacing
289 Reflective Hoods
291 Horizontal Reflective Hoods
291 Adjustable Horizontal
Reflective Hoods
291 Vertical Reflective Hoods
292 Air-Cooled Lamp Fixtures
292 Water-Cooled Lamp Fixtures
292 No Reflective Hood
292 Reflective-Hood Light
Distribution
293 Reflective Light
294 Reflective Surfaces
295 Light Movers
296 Electricity and Safety
298 Electrical Wiring and Circuits
299 Electricity Consumption
299 Conserve Electricity
300 Smart Meters
300 Timers and Controllers
301 Electric Generators
..
_____
J
Cannabis grows best under natural sunlight, where it can express its true
genetic potential.
Light is essential for cannabis to grow
strong, healthy medicine. All plants
grow and evolve under Mother Nature’s
sunlight and care. Plants are accustomed
to natural sunlight and have adapted to
her spectrum, intensity, and photoperiod.
Light is comprised of separate wave
lengths or bands of colors. Each color in
the spectrum used by plants sends them
separate signals, promoting a different
type of growth.
Sunlight contains 4 percent ultraviolet
radiation, 52 percent infrared (heat)
radiation, and 44
percent visible light.
Midday during
the bright summer
growing season, light
intensity can top 8640
foot-candles (93,000
lux), but cannabis
plants use about half
the energy found in
natural sunlight.
Sunlight energy
arrives from the
heavens as electro
magnetic radiation.
It is both wave and
particle in nature.
The smallest divisible
particles of light are
called photons. The
brightness of light
is equivalent to the
number of photons
absorbed per unit of
time. Each photon
contains a fixed amount of energy. The
energy in each photon dictates how
much it will vibrate. The wavelength is
the distance moved by a photon during
one vibration. Wavelengths are measured
in nanometers?
"'One nanometer (nm) = one billionth
(109) of a meter. Light is measured in
wavelengths; the wavelengths are mea
sured in nanometers.
Electromagnetic radiation spans a broad
range of wavelengths. Gamma rays with
a wavelength of IO5 nm are at the far blue
end of the spectrum and radio waves
with a wavelength of 10i2 nm are at the
far-red end. Red light has a longer wave
length. The photons vibrate slower and
contain less energy. Photons in the far
blue ultraviolet (UV) visible spectrum
have shorter wavelengths and contain
more energy. The human eye sees only
“visible light” (wavelengths between 380
and 750 nm) a small part of the entire
spectrum. Visible light wavelengths
(light spectrum) appear to people as all
the colors of the rainbow. Visible light
is measured in foot-candles (fc) and lux
(lx). Lumens are the measure of visible
light emitted by a light source.
Lumens measure “luminous flux,” the
total number of packets (quanta) of light
produced by a light source. Luminous
flux is the quantity of light emitted.
Use the lux measurement to know how
many lumens to give the entire area for
complete illumination.
Greenhouse coverings block some sunlight,
but there is still plenty of light to grow very
big plants.
254
LIGHT, LAMPS & ELECTRICITY
www.marijuanagrowing.corn
Wavelengths (Nanometers)
600 nm
750 nm
10m
1m
1cm
0.01 cm
1000 nm
10 nm
1nm
500 nm
Radio Waves
Microwaves
Infrared Light
Ultraviolet Light
X-Rays
Gamma Rays
I
___
I
greon
yellow
Achon spectrum
of photosynthesis
Chlorophyll A
B
Visible Light
380 nm
This graph shows visible light spectrum and includes the active photosynthesis, chlorophyll a and
chlorophyll b spectrums. Note that visible light is a small part of the spectrum.
X
LL
C
o■M
o
u
+-»
CD
JZ
c
Elevation: 1400m
RH: 30%
/y
1I1IrI1I
-
Logan, Utah
-
Day of Year: 172
(Summer Solstice)
-
Latitude: 41.7°
_
Temp: 25°C
I1I1I1
Clear Sky
Time of Day
■i■i■i■i■i■i■i■i■i■i■i■i
Time from Solar Noon (DST)
%/s graph shows the maximum amount oflight available during June 21, the longest day of the
at Logan, Utah, which is located at 41.7° north latitude. Note how the intensity of the sun
^creases and decreases dramatically before and after 1:45 pm (13:45).
Unlike lumens, lux measures the area
over which the light (luminous flux)
spreads. For example, if 1000 lumens
were concentrated in one square meter,
the illuminated square meter would
have 1000 lux. If the same 1000 lumens
spread over 10 square meters, a measure
ment of 100 lux is registered on the 4
square meters.
Plants “see” other parts of the light spec
trum than humans see. They respond to
wavelengths similar to those that humans
need to see, but they use different
portions of the spectrum. Peak needs to
occur in the blue portion (430 nm) and
red portion (662 nm) of the spectrum,
where chlorophyll* absorption is at the
highest levels. Light used by plants is
measured in PAR (photosynthetically
active radiation), PPF (photosynthetic
photon flux) (/imol/s).
"'Chlorophyll is the most important
light-absorbing pigment in cannabis,
but it does not absorb green light. Green
light is reflected, which is why we see
the color green. Other pigments include
carotenoids (a group of yellow, red,
and orange pigments) that absorb light
energy. Other pigments (e.g . zeaxanthin
[red] and phycoerythrin [red]) absorb
different wavelengths. Each color of
light activates different plant functions.
For example, positive tropism*, the
plant’s ability to orient leaves toward
light, is controlled by spectrum.
*Phototropism is the movement of a
plant part (foliage) toward a source of
illumination. Positive tropism means the
foliage moves toward the light source.
Negative tropism means the plant part
moves away from the light. Positive
tropism is greatest in the blue end of the
spectrum, at about 450 nanometers. At
this optimum level, plants lean toward
the light, spreading their leaves out
horizontally to absorb the maximum
amount of illumination possible.
PAR watts are a measure of light
energy (radiant flux) used by plants
to produce food and grow. PAR watts
are the measure of the actual amount
of specific photons a plant needs to
grow. Light energy is radiated and
assimilated in photons. Photosynthesis
is necessary for plants to grow, and is
activated by the assimilation of photons.
www.manjuanagrowing.com
255
Ultraviolet (UVA, UVB,
UVC) Light
UVA is the most common UV light. It
has little energy and is least harmful of
all UV light. Used in glow-in-the-dark
black lights, UVA light is also used in
phototherapy and in tanning booths.
Black-light fluorescent lamps emit
ultraviolet rays through a dark filter and
glass bulb, but they are not appropriate
to grow cannabis. According to some
sources, ultraviolet light is supposed to
promote more resin formation on flower
buds. However, all known experiments
that add artificial UV light in a con
trolled environment have proven that it
does not make any difference.
UVB is a very damaging form of UV
light. It packs enough energy to destroy
live tissues but not enough energy to
be absorbed completely into the atmo
sphere. Destructive UVB can cause
skin cancer. Be careful when outdoors,
especially in areas with damaged ozone
layers in the atmosphere that let more
UVB light pass through. These are high-
risk areas for skin cancer.
UVC light is absorbed almost complete
ly, and within a kilometer of the atmo
sphere. The UVC photons crash into
oxygen atoms, and the result is ozone.
In nature, UVC is transformed into
ozone and later oxygen so quickly that it
is difficult to capture. UVC light works
well as a germicidal water purifier and
bacteria-killer in food. It also works well
to kill bacteria, mold, and pests on plant
leaf surfaces.
UVC light (100-280 nm) carries too
much electromagnetic radiation, or
energy (the hyper atoms are moving too
fast), for plants to process; the energy
is sufficient to force electrons away
from atoms and rupture fragile chemical
bonds.
UVC light is used in short, limited,
regular applications to kill mold spores
in growing and harvested cannabis. UV
radiation is absorbed by oxygen in the
forms O2 and O3 (ozone). The ozone
layer of our atmosphere protects life
on the planet from high levels of UV
radiation.
UVA (315-380 nm) and UVB (380-315
nm) light help new branch growth and
have a similar effect as blue light. Ultra
violet (UVA and UVB) light emitted by
natural sunlight and plasma lamps has
been proven to increase overall vegetative
growth in cannabis by up to 30 percent.
In experiments, vegetative plants grown
under plasma lamps that emit UVA and
UVB light grew up to 30 percent more
dry weight, and branching was much
more profuse. Cells were stronger and
the outer layer of cells was tougher,
which discourages attacks from diseases
and pests.
I have personally seen plants grown at
1000-foot (300 m) and 4600-foot (1400
m) elevation. The plants at 1000 feet
(300 m) produced more and bigger flow-
UVC light is being used to killfungus,
bacteria, pests, and their eggs. The lamp
must be moved over plants so that it does
not damage foliage.
The plant on the left was grown with an
LEP (light-emittingplasma) lamp, and the
one on the right grew under an MH (metal
halide) lamp.
er buds. The plants at 4600 feet (1400
m) were smaller, with thicker, stronger
stems and smaller buds heavy with resin.
Afterward, both crops were compared.
The plants grown at high elevation had
more resin, but it is unclear if that was
because of more UVB light. There are
many different explanations for heavier
resin production, including cold weather
and wind.
Random photons of infrared light
(750-1000 nm) on the other end of the
spectrum do not contain enough energy
to promote plant growth. Infrared
radiation is not absorbed by plant cells,
because it lacks enough energy to excite
electrons found in molecules and is
therefore converted to heat.
Gardeners who use infrared heaters do
not have to worry about light affecting
plant growth. Infrared radiation is
absorbed by water and by carbon dioxide
in the atmosphere.
This LEP lamp produces UVA and UVB
light, as well as a complete spectrum used
by plants.
256
LIGHT, LAMPS & ELECTRICITY
www.marijuanagrowing.com
T5 fluorescent lamps supply enough light to
keep this roomful of mother plants healthy.
This outdoor medical cannabis garden
receives direct sunlightfor about 9
hours each day, all season long.
Tie a 12- to 36-inch-long string to the HID
reflector. Use the string to measure the dis
tance between the bulb and the plant canopy.
Blue photons carry more energy and
are worth more PAR watts than lower-
energy red photons. It takes from 8 to 10
photons to bind 1 CO2 molecule.
PAR watts in photons-per-second be
came the standard to measure
horticultural lamp spectrum output.
This measurement is called photo
synthetic photon flux (PPF), and is
expressed in micromoles-per-second
(gmol/s). Today PPF is the accepted
lighting and greenhouse industry
standard.
Outdoors, plants receive natural sun
light—100 percent PAR/PPF. Green
house and shade cloth coverings limit
the amount of PPF. Look for the “light
transmission” factor in greenhouse
and shade cloth coverings to figure the
amount of PAR/PPF light available
to plants.
Most artificial lights deliver only a part
of the necessary light spectrum that
cannabis needs to grow. A higher PAR/
PPF rating guarantees that more photons
will be available for healthy plant growth.
Under artificial lights indoors, medicinal
cannabis must receive enough intense
PAR/PPF light to grow well. Gardeners
report that medical cannabis grown under
intense lamps with high PAR/PPF ratings
is healthier and stronger, with fewer
disease, pest, or cultural problems.
Light Intensity
Sunlight on a hot summer day when
the sun is at the highest angle in the
sky produces light levels of more than
93,000 lux—all the PAR light you could
possibly need!
F
ILLUMINANCE (LUX) EXAMPLE
' 93,000
Brightest sunlight at midday
20,000
Shade illuminated by a clear blue sky at midday
10,000-25,000
Overcast day at midday
<200
Super dark storm clouds at midday
400
Sunrise and sunset on a clear day
40
Overcast sky at sunset or sunrise
.
..
.
y„
-
...
----
Outdoors, little can be done to change
the PAR rating except to plant the gar
den in a sunny location, and to shade the
plants as needed. Greenhouses can be
illuminated with HID light, but out
doors we are compelled to work with
Mother Nature during cloud-covered
days. We can use greenhouse coverings
and shade cloth to cool plants and de
crease intense light.
Indoors, artificial lightbulbs and tubes
must supply intense light for medicinal
cannabis to grow well. The lamp must
have the proper spectrum and have a
high PAR rating.
Indoors, generating intense light is
expensive and requires knowledge to
employ a bulb with the proper spectrum.
Intensity is the magnitude of light ener
gy per unit of area. It is greatest near the
bulb and diminishes rapidly as it moves
away from the source. High-wattage
HID (high-intensity discharge) bulbs
supply the most intense light efficiently,
followed by T5 and T8 fluorescent, and
CFL and plasma lamps. But remember
that T5 and T8 bulbs can be placed four
times closer to plants, which makes
them much more efficient than HID
bulbs, according to the Inverse Square
Law (see below).
For example, plants that are 2 feet
(61 cm) from a lamp receive one-quarter
the amount of light received by plants
1 foot away (30.5 cm). An HID that
emits 100,000 lumens produces a paltry
25,000 lumens at 2 feet (61 cm) away. A
1000-watt HID that emits 100,000 initial
lumens yields 11,111 lumens at 3 feet (91.4
cm) away. Couple this meager sum with a
poorly designed reflective hood that has
lost its shine, and the garden suffers.
For plant growth, the brilliance of a
lamp has a limited effect when it does
not produce the proper spectrum. For
example, the efficient 600-watt HP
sodium lamps have the highest lumens
per watt (lm/W) conversion, but a color
rendering index (CRI) of 24 and spec
trum of 2000 K to 3000 K. Even though
these lamps produce more light per watt,
plants can use only parts of it!
www.marijuanagrowing.com
257
Three 600-watt HID lamps cannot supply the
same amount of light as natural sunlight.
Leaves reach for the light. Strong, well-
illuminated plants orient foliage to catch
the maximum amount oflight possible.
A basic light meter is an essential tool in
the garden. Indoors, a light meter will help
save time and electricity, as well as increase
production.
Watts per square foot (W/ft2) (W/m2) measures how many watts are available from a
light source in an area. But the lumens per watt (lm/W), wattage, spectrum, mounting
height of the lamp, and reflective hood are not considered.
LAMP
WATTS
INITIAL LUMENS
- ---- ---- --- --- ---- ---- -- ---- --- 1
MEAN LUMENS
MH
1000
100,000
80,000
SMH
1000
115,000
92,000
HPS
1000
140,000
112,000
HPS
.
...
-
600
90,000
72,000
Lumens emitted are only part of the
equation. Lumens received by the plant
are much more important. Lumens
received are measured in watts per
square foot or in foot-candles (fc). One
foot-candle equals the amount of light
that falls on 1 square foot of surface
located 1 foot away from 1 candle.
Measuring Light
As explained earlier in this chapter,
plants use the PAR portion of the light
spectrum to grow. Artificial lights that
produce the highest PAR rating with
a high-intensity are the logical choice
to grow medicinal cannabis. To find
out which lightbulbs supply the most
usable light for photosynthesis, refer
ence their color rendering index (CRI)
and the Kelvin (K) temperature ratings.
The CRI indicates how close the lamp’s
spectrum is to natural sunlight. The
color temperature (spectrum) of the bulb
is expressed in kelvins. Kelvin is an abso
lute measurement of temperature that
indicates the exact color spectrum a bulb
emits. Lightbulbs with a Kelvin tempera
ture from 3000 to 6500 will grow medic
inal cannabis. These two figures, coupled
with lamp intensity expressed in lumens,
can approximate a PAR rating for lamps
that do not have one.
The color rendering index (CRI) is a
scale used to measure the ability of a
light source to reproduce the colors of
various objects faithfully in comparison
to an ideal or natural light source, which
means how true to life these colors
appear in the visible spectrum when they
are being illuminated with anything
other than natural light.
The color corrected temperature
(CCT) of a bulb is the peak Kelvin
temperature at which the colors in a bulb
are stable. We can classify bulbs by their
CCT rating, which tells us the overall
color of the light emitted. It does not
tell us the spectrum (concentration of
the combination of colors emitted).
Light is commonly measured in
foot-candles or lux, two scales that
measure light visible to humans, but do
not measure photosynthetic response
to light in PAR or PPF. Lumens are
a measurement of light emitted from
the sun or artificial light. Light meters
that measure in PAR or PPF are very
expensive and seldom used by medical
cannabis gardeners. Foot-candle and lux
meters can also be used to achieve an
approximate measure of light available to
plants. The foot-candle and lux readings
are still valuable, because they record
the amount of intense (PAR/PPF) light
spread over a specific area.
Using an inexpensive light meter to
calculate lumens, foot-candles, or lux
is a way to estimate the amount of light
plants receive. But it does not measure
how much light is available to plants.
258
LIGHT, LAMPS & ELECTRICITY
www.marijuanagrowing.coir>
Increasing Wavelength
Increasing Energy
Wavelength (nm)
The visible light spectrum falls within the 400 and 700 nanometer (nm) range. The color rendering index (CRI) and color-corrected temperature
(CCT) of an artificial light source does not take into account the photosynthetically active radiation (PAR) or photosynthetic photon flux (PPF).
The Inverse Square Law
The relationship between light emitted from a point source (bulb) and distance is defined by the inverse square law. This law
affirms that the intensity of light changes in inverse proportion to the square of the distance. Light diminishes rapidly.
I=L/D2
Intensity = light output/distance2
For example:
Distance Intensity = light output/distance2
Feet
Centimeters
Lumens
Lumens/
Distance2
1
30
100000
100000/1
2
60
25000
100000/2
3
90
11111
100000/3
4
120
6250
100000/4
3ft
www.marijuanagrowing.com
259
Lumens Per Watt
L.umens-pcr-watt (lm/W) output oflamps
18 l/w • hcandMCMit Standard 100w
?2 t/w - Tungatan Halogan 500w
89 lAv - FluoroKant Grow-Lux 4Ow
j 51 l/w - Mercury Vapor 1000w
70 IM-CFL Average
81 lAv-Ught Emitting Plaama (LEP,
100 l/w - LED Average
100l/w-T832w
100 l/w - Metal Heide 1000w
1140l/w-HPSodum1000w
150 l/w-HP Sodium 600w
Once you know the PAR rating of a
lamp, using a foot-candle or lux meter
will measure light intensity at the
foliage. The foot-candle or lux light
meter measures the overall intensity of
visible light over a garden. Use the most
efficient lamp with the highest PAR or
PPF (gmol/s) rating for the application:
scedling/clone, vegetative, and flow
ering. Outdoors and in greenhouses,
plants that do not receive enough intense
light grow slowly. Lack of light during
flowering keeps flower buds from filling
out and putting on weight.
Light meter readings vary a lot as a result
of orientation. To get the most accurate
readings, orient the meter at a 90-degree
angle from the garden canopy when
taking measurements. Avoid pointing
the light sensor directly at a bulb unless
measuring directly below bulb.
'‘Light can be measured in many different
scales: foot-candles, lumens, lumens/cm2,
lumens/ft-’, lumens/m2, lux, phot, nox,
candlepower, meter candle, nit, stilb,
lambert, foot-lambert, millilambert,
candcla/m2, candcla/cm2, candela/ft2,
and cjndrla/in-’, watts, microeinsteins,
millimoles, joules, photons, radiant flux,
luminous flux, PAR, PPP, etc. To figure
out conversions to different scales for
measuring light, OnlineConvcrsion.com
will do the math for you:
www.oniincconversion.com/light.htm.
According to lighting expert Theo Tekstra from Gavita-Holland, “Micromoles is the
way to express photons.” Micromoles measure the number of photons per second, or
irradiation of photons per second per meter. Micromole = jLtMol
Kelvin Scale
28.000K North Sky
—
5.600K Nominal Sunlight
—
5.500K Daylight Metal Halide
-
4.200K Cool White Fluorescent
—
4.000K Standard Clear Metal Halide
3.200K Warm (3K) Metal Halide
3.100K
„
Incandescent Lamp
2.600K
r
-
2.200K High Pressure Sodium
-
1.800K Sunrise and Candle
3.000K Halogen
I he Kelvin temperature scale is commonly used to measure the ‘color’ of light. Notice the
difference in spectrum between metal halide and HP sodium HID lights.
260
LIGHT, LAMPS & ELECTRICITY
www.marijuanagrowing.com
Outdoors under natural conditions cannabis
flowers in the autumn, when nights are long
and days are short.
To get an idea of how well a medical
cannabis plant will grow under a specific
greenhouse covering or lightbulb, three
things must be known: (1) PAR, (2)
intensity, and (3) hours of darkness.
Photoperiod
The photoperiod is the relationship
between the duration of the light period
and dark period. In nature, cannabis
normally flowers in the fall, when nights
grow long and days short.
In general, cannabis is a short-day plant
that will flower when it receives short
12-hour days and 12-hour nights.
(C. ruderalis, however, is a long-day
plant.) Most varieties of cannabis will
stay in the vegetative growth stage as
long as an 18- to 24-hour light and a 6-
to Ohour dark photoperiod are main
tained. However, there are exceptions.
Eighteen hours of light per day will
give cannabis all the light it needs to
sustain vegetative growth. Cannabis can
efficiently process 16 to 18 hours of light
per day, after which it reaches a point of
diminishing returns and the electricity is
wasted. (See chapter 25, Breeding.)
Flowering is most efficiently induced in
most varieties of cannabis with 12 hours
of uninterrupted darkness in a 24-hour
photoperiod. When plants are at least 2
months old—after they have developed
male and female sexual characteristics—
altering the photoperiod to an even 12
hours, day and night, will induce visible
Mgns of flowering in 1 to 3 weeks. Older
plants tend to show signs of flowering
sooner. Varieties originating in the trop
ics generally mature later, and more hours
of darkness shorten flowering time. The
This indoor garden is flowering under 12
hours ofdarkness and 12 hours of HID light.
12-hour photoperiod represents the clas
sic equinox and is the standard daylight-
to-dark relationship for flowering
in cannabis.
Some gardeners experiment with grad
ually decreasing daylight hours while
increasing hours of darkness. They do
this to simulate the natural photoperiod
outdoors. This practice prolongs flower
ing and does not increase yields.
Genetically unstable varieties could
express intersex (hermaphroditic)
tendencies if the photoperiod bounces
up and down several times. If you plan
to give plants a photoperiod of 13/11
day/night, stick to it. Do not decide you
want to change the photoperiod to 15/9.
Such variation will stress plants and
could cause intersexuality.
Tropical gardeners that get 12 to 13
hours of light and at least 11 to 12 hours
of darkness year round can grow plants
with artificial light the first month or
two of life and set them outdoors to
induce flowering with the long nights.
Such gardens can flower for two or
three months, harvested and replanted
year round. Other gardens in latitudes
further north with good weather could
grow autoflowering feminized plants
during the long summer days to avoid
having to cover greenhouses to induce
flowering.
The photoperiod signals plants to
start flowering; it can also signal them
to remain in (or revert to) vegetative
growth. Cannabis must have 12 hours of
uninterrupted total darkness to flower
properly. Dim light during the dark pe
riod in the pre-flowering and flowering
stages prevents cannabis from blooming.
Halfof this Haze' plant received light from a
streetlamp, causing it to remain in the vegeta
tive growth stage. The other half of the plant
received total darkness at night and flowered.
This example is proof that floral signals are
generated in the leafand transported to the
nearest buds upstream.
When the 12-hour dark period is inter
rupted by light, plants get confused. The
light signals plants, “It’s daytime; start
vegetative growth.” Given this signal of
light, plants start vegetative growth, and
flowering is retarded or stopped.
Cannabis will not stop flowering if the
lights are turned on for a few minutes
once or twice during the 2-month-long
flowering cycle. If a light is turned on
for 5 to 30 minutes—long enough to
disrupt the dark period—on 3 to 5 con
secutive nights, plants will start to revert
to vegetative growth.
Less than one half of one foot-candle of
light will prevent cannabis from flow
ering. That is a little more light than is
reflected by a full moon on a clear night.
Well-bred indica-dominant plants will
revert within three days. Sativa-dominant
plants take four to five days to revert to
vegetative growth. Once they start to
revegetate, it can take from four to six ad
ditional weeks to induce flowering again!
There are other photoperiods possible.
For example, you can give plants 12
hours of HID light and the remaining
6 hours of incandescent light for a total
of 18 hours to save on electric bills. But
other light regimens that do not allow
for 11 to 12 hours of darkness in 24
hours are going against Mother
Nature. If sales people promise higher
yields, watch out for disproportionate
use of electricity. There are also some
screwy photoperiod regimens that
tyww.marijuanagrowing.com
261
A relationship exists between photo
period response and genetics. Little
scientific information is available about
which specific varieties of cannabis are
affected by photoperiod.
Sifttw-dominant varieties that originated
in the tropics respond to long days better
than zWzoz-dominant varieties, even
though both are short-day plants. On
the equator, days and nights are almost
the same length year round. Plants tend
to bloom when they are chronologically
ready, after completing the vegetative
growth stage. For example, the pure
sativa variety ‘Haze’ flowers slowly for 3
months or longer, even when given a 12-
hour photoperiod.
Give ‘Haze’ varieties more darkness and
less light hours to speed harvest time
and make flower buds fill in faster. Start
with the 12/12 photoperiod and change
to a 14 dark/10 light photoperiod after
the first month. Play around a little with
the photoperiod on pure sativas to dial it
in for specific varieties.
You can start ‘Haze’ on a 12/12 day/
night schedule, but it still must go
through the seedling and vegetative
stages before spending 3 months or
longer flowering. Plants grow more
slowly in 12-hour days than when given
18 hours of light, and inducing flowering
takes longer.
JWzcrf-dominant varieties that origi
nated in northern latitudes tend to flower
sooner and respond more quickly to a 12-
hour photoperiod. Many indica varieties
will flower under a 14/10 or 13/11 day/
night photoperiod. Again, the hours of
light necessary to induce flowering in
an indica-dominant plant is contingent
upon the genetics in the variety. More
hours of light during flowering can cause
some varieties to produce bigger plants,
but flowering time is usually longer and
some gardeners have reported looser,
leafier flower buds as a result.
Some gardeners have achieved higher
yields by inducing flowering via the 12-
hour photoperiod, then changing to 13
to 14 hours of light after 2 to 4 weeks.
This practice works best with ear
ly-flowering indica-dominant varieties,
but flowering might be prolonged.
I spoke with gardeners who increase
light by 1 hour 2 to 3 weeks after
flowering is induced. They say the yield
increases about 10 percent. Flowering
takes about a week longer, however, and
different varieties respond differently.
Horticulturists in the “green industry”
state that once the bud is competent
(after the juvenile stage) and will re
spond to flowering signals, it is deter
mined (changed to a floral bud), which
means it is going to flower. High stress
by light levels, photoperiod, tempera
ture, etc., can delay or cause abortion
and maybe a shift back to adult vege
tative growth. However, it is common
practice that photo controls are dropped
about a third to half of the time to har
vest in most green industry production.
They typically add or subtract an hour
or two of light a day, just like canna
bis growers. Nevertheless, this stress
(longer days) could also be the trigger to
shock plants out of the flowering stage.
Ruderalis-dominant varieties are
autoflowering. Cannabis sativa and
C. indica varieties are crossed with
C. ruderalis. Some of the offspring
contain the autoflowering genes.
Autoflowering plants are often femi
nized. The seeds are planted indoors
and grown indoors, outdoors, or in
greenhouses. These varieties flower
under 24 hours of light after about three
weeks of growth. C . ruderalis crosses
will flower under any light regimen.
However, when growing indoors many
gardeners report that a light regimen of
20 hours light and 4 hours dark will spur
the most growth.
'Super Silver Haze" is a sativa-dominant
variety.
In 1978 this budding 'Kush' landrace variety
represented a growing number ofwild plants
that were brought to the USA by cannabis
breeders like Mel Frank. (MF)
This autoflowering feminized 'NYC Diesel'
from Soma Seeds is in full bloom and ready
for harvest.
262
LIGHT, LAMPS & ELECTRICITY
www.marijuanagrowing.coni
This lightweight flower has few seed bracts.
The pure sativa from Colombia was pollinat
ed and will produce seed. (MF)
This early-flow ering 1Swazi" landrace came
from the Kingdom of Swaziland.
Indoor gardeners use a green light to illu
minate rooms at night so they can attend to
plants. Plants process virtually no green light,
therefore it has little or no affect on flowering.
should not be followed! To learn more
about photoperiod regimens, check out
www.marijuanagrowing.com.
Some gardeners give plants 36 hours
of total darkness just before inducing
flowering with the 12/12 photoperiod.
This heavy dose of darkness sends plants
an unmistakable signal that causes a
hormonal change to stimulate flowering.
Gardeners using this technique report
that plants normally show signs of
flowering, such as stigma formation,
sooner than normal.
Indoor and Greenhouse
Garden Lamps
Medical cannabis can be grown indoors
using exclusively artificial light sources
such as fluorescent, compact fluorescent
(CFL), light-emitting diode (LED),
high-intensity discharge (HID), and
light-emitting plasma (LEP) lamps.
Each of the lamps has its strengths and
weaknesses. The fluorescent, CFL,
LED, and LEP produce less heat than
HID lamps, but HIDs produce more
lumens per watt (Im/W). Many of the
lamps are available in a growing range of
spectrums conducive to plant growth.
All lamps used for indoor growing re
quire ballasts or some sort of extra
circuitry to regulate line electricity
before reaching the bulb. Old-fashioned
heavy magnetic (analog) ballasts are
losing popularity to ever-improving
electronic ballasts and circuitry.
There are many different bulbs and
ballasts, and there are many different
setups for gardens. New manufactures
have entered the market and most of the
old-reliable manufacturers offer more
products than ever before. Next we will
discuss different lighting systems and all
the pertinent gardening details. Find all
This beautiful indoor medical cannabis
garden from Resin Seeds is full of CBD-rich
'Cannatonic'plants, and is illuminated with
eight 600-watt Fl P sodium lamps.
the lamps in this chapter at local hydro
ponic stores and via Internet vendors.
High-Intensity Discharge (HID)
Lighting Systems
Medical cannabis gardeners are
compelled to employ high-intensity
discharge (HID) lamps indoors in lieu
of natural sunlight when they are unable
to garden outdoors or in a greenhouse.
Many medical gardeners start cuttings
and seedlings indoors under lights
before moving them into a greenhouse
or outdoors. To date, some HID lamps
outperform other lamps in their com
bined lumens-per-watt efficiency,
spectral balance, and brilliance.
The HID lamp family contains mercury
vapor, metal halide (MH), high-pressure
(HP) sodium, and conversion bulbs
(MH to HPS and HPS to MH). Metal
halide, HPS, and conversion lamps have
a spectrum similar to actual sunshine
and can be used to grow cannabis.
Popular HID wattages range from 150
to 1100. Smaller 150- to 250-watt bulbs
are popular for small gardens measuring
up to three feet square. Brighter 400- to
1100-watt lamps are favored for larger
gardens. The 400- and 600-watt bulbs
Www.marijuanagrowing.com
263
This simple cutaway drawing of a metal halide
reveals the transformer and capacitor in a
protective metal box. The bulb and hood are
attached to the ballast with 14/3-wire and a
mogul socket.
are most popular among European gar
deners. North American gardeners favor
600- and 1000-watt bulbs. Super efficient
1100-watt metal halides were introduced
in 2000.
The brightest bulbs measured in lumens
per watt are the metal halide and HP
sodium bulbs. Originally developed in
the 1960s, metal halides and HP sodium
bulbs were characterized by one main
technical limitation—the larger the
bulb, the higher the lumens-per-watt
conversion. For example, watt for watt,
a 1000-watt HP sodium produces about
12 percent more light than a 400-watt
HPS and about 25 percent more light
than a 150-watt HPS. Scientists over
came this barrier when they developed
the 600-watt HP sodium. Watt for watt,
a 600-watt HPS produces 7 percent
more light than the 1000-watt HPS.
The “pulse start” metal halides are also
brighter and much more efficient than
their predecessors.
An HID light “system” consists of a bal
last (transformer, capacitor, and starter)
attached to an HID bulb and reflector.
High-intensity discharge lamps produce
light by passing electricity through
ionized gas enclosed in a clear ceramic
arc tube under very high pressure. The
combination of chemicals sealed in the
arc tube determines the color spectrum
produced. The mix of chemicals in the
arc tube allows metal halide lamps to
yield the broadest and most diverse
spectrum of light. The spectrum of HP
sodium lamps is limited because of the
narrower band of chemicals used to dose
the arc tube. The arc tube is contained
within a larger glass bulb. Most of the
ultraviolet rays produced in the arc tube
are filtered by the outer bulb. Some
bulbs have a phosphor coating inside.
This coating makes them produce a little
different spectrum and fewer lumens.
The outer bulb functions as a protective
jacket that contains the arc tube and
starting mechanism, keeping them in a
constant environment, as well as absorb
ing ultraviolet radiation. Protective
glasses that filter out ultraviolet rays are
a good idea if you spend much time in
the garden room.
Caution: To avoid serious damage to
your eyes, never look at the arc tube if
the outer bulb breaks. Turn off the lamp
immediately.
An HID lamp requires a seasoning
period of 100 hours of operation for
all of its components to stabilize. If a
power surge occurs and the lamp goes
out or is turned off, it will take 5 to 15
minutes for the gases inside the arc
tube to cool before restarting. Lamps
Theo from Gavita Holland is getting a close
up view oj an HID. He wears special protec
tive lenses to avoid burning his eyes from the
intense light.
last longer when started only once a day.
Always use a timer to turn lamps on
and off.
Typically, metal halides operate most
efficiently in a vertical ±15degree
position. When operated in positions
other than ±15 degrees of vertical, lamp
wattage, lumen output, and bulb life
decrease; the arc bends, creating non-
uniform heating of the arc tube wall,
resulting in less-efficient operation and
shorter life. There are special lamps
made to operate in the horizontal or any
other position other than ±15 degrees.
HID lamps may produce a stroboscopic
(flashing) effect, making the light appear
bright, then dim, bright, dim, etc. This
flashing is the result of the arc being
extinguished 120 times every second.
Illumination usually remains constant,
but it may pulsate a little. This is normal
and nothing to worry about.
The number of HID lamp manufacturers
has grown during the last few decades.
Today HID bulbs are often made in
China by unknown manufacturers. For
example, go to http://www.alibaba.com/
and search for HID lights. HID bulbs
made in different countries have diverse
quality standards and laws or rules that
HID lamps can transform a simple indoor
room into a Garden oj Eden. All that is need
ed is a little lighty cannabis^ and desire!
264
LIGHT, LAMPS & ELECTRICITY
www.marijuanagrowing.com
Most HID bulbs have changed shape to
a tubular design because of advances in
materials and technology.
At the Gavita-Holland testing facility, bulb
luminescence is measured every 5 degrees. The
bulb is secured in a mogul socket against
a wall when measurements are taken.
These reliable heat-producing analog
ballasts are high up on shelves outside the
garden room.
are not always enforced. Substandard
products result. General Electric,
Iwasaki, Lumenarc, Osram/Sylvania,
Philips, and Venture (SunMaster) con
tinue to manufacture good-quality HID
bulbs. Go to their websites and check the
official statistics for each bulb.
Certain brands of bulbs may have better
attributes than others. Indoor cannabis
gardeners usually come to this conclu
sion because they purchase two different
brands of bulbs and have better luck
using one brand over the other. However,
many manufacturers buy and use the
same components, often manufactured
by competitors.
The best way to ensure that bulbs emit
adequate light all the time is to check the
light output with a light meter.
Pulse-start metal halides operate in the
same way as traditional metal halide
bulbs, but their construction is slightly
different. Traditional bulbs have an elec
trode at each end of the arc tube and an
additional striker electrode close to one
of the main electrodes. When the bulb
starts, a short arc is formed between the
striker electrode and the main electrode.
This creates ionized gas that fills the tube
and provides a path for an arc between
the two main electrodes. A temperature
sensitive bimetallic strip acts as a switch
and removes the striker electrode from
the circuit when the light has fully lit.
Pulse-start metal halides do not have a
striker electrode; instead, their ballast
contains an igniter circuit that provides
a spike or pulse of electricity (1 kilovolt
[kV]to5kVonacoldstrikeandupto
30 kV on a hot restrike) to start the arc.
HID Ballasts
A ballast wired in between the lamp and
the electrical power supply is neces
sary for HID lamps to regulate specific
starting requirements and line voltage.
Purchase the high-intensity discharge
system—ballast, lamp, reflector, and
electrical cords and plugs at the same
time to ensure that they all function
properly and are designed to work
together. Always buy the proper ballast
for HID bulbs. A good rule of thumb is
that ballasts can be used only with bulbs
they were designed for.
A ballast converts and regulates electric
ity. Ballasts can be either the old-style
magnetic (analog or inductive) type or the
newer electronic (digital) type. Inefficient
conversion and regulation of electricity
will result in lost power in the form of
heat. Heat is an excellent measure of
efficiency. Digital ballasts “leak” about 2.5
British thermal units per hour (Btu/h).
Analog ballasts lose about 3.5 Btu/h. The
difference is small, but it adds up over
time. More electricity goes to the bulb and
less heat is generated in the room.
After all the hype of lower electric bills
when using electronic ballasts, our
www.marijuanagrowing.com forum
member JustThisGuy converted 16
analog ballasts to 16 digital ballasts.
With analog ballasts the electric bill was
$1,100 USD per month, and with digital
ballasts it was $1,000 USD, a savings of
about 9 percent. See chapter 15, Meters,
for more information on measuring
electricity use.
Analog (Magnetic) Ballasts
Analog or magnetic ballasts have been
around for decades. They are available in
wattages from 150 to 1100. Magnetic bal
lasts contain an inductor that consists of
copper wire wound around an iron core
(a series of metal plates stuck together by
resin). This serves to regulate the current
and voltage delivered to the lamp. A
capacitor and (sometimes) a starter for
lamps are mounted on a separate board.
The ballast is wired in between the lamp
and the electrical power supply. Magnetic
ballasts weigh in at 30 pounds (13.6 kg)
for a 400-watt and up to 60 pounds
(27.2 kg) for a 1000-watt HPS.
Analog ballast kits contain a trans
former core, capacitor (HPS and some
metal halides), starter, containing box,
and (sometimes) wire. You can purchase
components separately from an electri
cal supply store, but doing so is often
more work than it’s worth. If unfamiliar
with electrical component assembly and
reading wiring diagrams, purchase the
assembled ballast in a package contain
ing the lamp and reflective hood from
one of the many HID retailers. Do not
buy used parts from a junkyard or try
to use a ballast if you are unsure of its
capacity. Just because a bulb fits a socket
attached to a ballast, does not mean that
they will work efficiently together.
Analog ballasts generate noise and about
3.5 Btu/h of heat. As they age, the resin
between plates in the core hardens and
metal plates start to vibrate. Ballasts
operate at 90°F to 150°F (32.2°C-
65.6°C). Touch a “strike anywhere”
kitchen match to the side to check if it is
too hot. If the match lights, the ballast
www.marijuanagrowing.com
265
Analog ballasts are lined up on the shelfand
attached to HID lamps many feet (meters)
away. Much electricity is being lost during
transmission from the ballast. Lamps are not
as bright when they receive less electricity.
This gardener prefers to use reliable analog
ballasts.
Electronic ballasts create little heat and make
little noise when operating. Placing electronic
ballasts close to lamps inside a garden room
reduces electrical transmission loss in lines.
is too hot and should be taken into the
shop for assessment. Heat is the number
one ballast destroyer.
Many types of ballasts are manufactured
with a protective metal box. This outer
shell safely contains the core, capacitor
(starter), and wiring. Dampen noise by
building another box around it. Make
sure there is plenty of air circulation. If
the ballast runs too hot, it will be less
efficient, run more noisily, burn out pre
maturely, and maybe even start a fire.
Electronic Ballasts
Electronic ballasts use a high-frequency
oscillator circuit to provide a high-
frequency current to drive the lamp.
Electronic ballasts operate about 10
percent more efficiently than magnetic
ballasts and consume a little less elec
tricity to produce the same output. A
microprocessor (CPU) that fine-tunes
the electrical supply to the lamp can
be found in some electronic ballasts,
including those supplied by Lumatek.
High-frequency operation requires
special “high-frequency” bulbs. Do not
use a high-frequency lamp in analog
or 50/60 cycle (hertz) ballast. And
do not use a low-frequency bulb with
a high-frequency electronic ballast.
Operating requirements of each system
are different, and interchanging bulbs
or ballasts from digital to analog or vice
versa will result in premature equipment
failure.
The electrical input frequency, mea
sured in hertz (Hz), to the ballast is 50
or 60 Hz. When the electricity leaves
the ballast to go to the lamp, output
frequency increases up to 4000 Hz. The
high operating hertz virtually eliminates
the stroboscopic effect and output does
not fluctuate with input voltage. High
operating frequencies prevent acoustic
resonance and optimize lamp life. The
result of the stable power supply is a
brighter lamp.
HID lamps designed for digital ballasts
also have stronger metals inside the bulb
due to the higher operating frequencies
and demands of a digital system. This
is why it is so important to make sure
ballasts and bulbs are designed to be
used together.
Eight electronic ballasts are mounted on the
wall next to an eight-light timer. Everything
is easy to monitor. Note how all the electrical
components are located high in the room to
avoid water problems.
Electronic ballasts are lightweight and
run cool, generating about 2.5 Btu/h.
They are designed to operate in environ
ments less than 104°F (40°C).
Solid-state electronic ballasts have no
moving parts and make little noise.
Manufacturers often cover components
in resin (a process called “potting”) to
protect them from water, humidity, and
other damage. This is very important in
a garden environment. Mount ballasts
on a small pad or rubber feet to subdue
any noise caused by vibration.
Available in 150- to 1150-watt mod
els, many electronic ballasts are able
to modulate in-between wattages. For
example, a 1000-watt ballast could work
at different settings: 600, 750, 1000, or
1150 watts.
The wattage on some electronic ballasts
can be changed. For example, a 1000-
watt electronic ballast could run at
wattages from 600 to 1150. Dial settings
are adjusted to change the wattage of the
lamp. Underdriving lamps works well
but is less efficient electrically.
Multiple power outputs from ballasts
enable use for different bulbs. Electronic
ballasts can be adjusted to operate at dif
ferent wattages. The “soft dim” switch
requires 60 seconds for each increase or
decrease in wattage. For example:
1000-watt: 600, 660, 750, 825, 1000, 1150
600-watt: 300, 400, 600, 660
400-watt: 250, 275, 400, 440
LIGHT, LAMPS & ELECTRICITY
www.marijuanagrowing.com
Two electronic ballasts: the one on the left is
normal, and the one on the right is coated with
protective resin so that parts do not move and
are moisture resistant.
These ballasts are located up high in the
garden room and do not use a protective
housing.
Electronic ballasts can drive a wide
range of electronic lamps (EL) and in
crease their output by 10 to 15 percent,
but increasing output overdrives the
bulb and shortens its life.
The world of indoor plant lighting is
changing all the time. Keep up with new
developments in plant lighting at
www.marijuanagrowing.com.
Ballast Features
Avoid purchasing ballasts with enclosed
fans or timers. They run too hot, and
the extra appliances tend to break or
cause problems.
Aluminum fins quickly and evenly dissipate
heat generated by this LEP lamp. Aluminum
dissipates heat faster than steel. Enclosed bal
lasts with fins cool fastest, and run at the most
consistent operating temperatures. Set ballasts
so cooling fins are oriented vertically;
heat is dissipated more quickly, and LEP
lamps will stay cooler.
Ballasts can be attached to the light
fixture or remote. The remote ballast
offers the most versatility and is often
the best choice for small HID gardens.
A remote ballast is easy to move. Help
control heat by placing a remote ballast
on or near the floor to radiate heat in
a cool portion of the garden room, or
move the ballast outside the garden to
cool the room. Do not place the ballast
directly on a damp floor or any floor
that might get wet and conduct electric
ity. Attached ballasts are fixed to the
hood; they require more overhead space,
are very heavy, and tend to create more
heat around the lamp.
Attached ballasts have the benefit of
using less electricity and creating a lower
electronic profile around the garden.
The electric cord between the ballast
and the lamp consumes electricity,
lowering lamp efficiency. It works like
an antenna and emits a radio frequency
signal that is very easy to pick up from
afar. Thousands of luminaries can be
operated in the same area.
A handle will make ballasts easier to
move. A small 400-watt analog metal ha
lide ballast weighs about 30 pounds (about
14 kg), and a large 1000-watt HP sodium
ballast tips the scales at about 55 pounds
(about 25 kg). This small, heavy box is
very awkward to move without a handle.
Ballasts with a switch allow gardeners to
use the same ballast with two different
sets of lights. This wonderful invention
is perfect for running two flowering gar
den rooms. The lights go on for 12 hours
in one garden room while they are off
in a second room. When the lights turn
off in the first room, the same ballasts
hooked to another set of lights in the
second room are turned on. There must
be a 10- to 15-minute pause between
initiation of lights in each room.
There are also ballasts to run both metal
halide and HP sodium systems. These
dual-purpose ballasts are not as efficient
as dedicated ballasts. They often over
This attached, enclosed ballast from Gavita
uses aluminum housing with ribs to quickly
dissipate heat.
Airvents allow a ballast to run cooler.
The vents should protect the ballast’s
internal parts and prevent water from
splashing in.
Keep remote ballasts up and out of the way
to avoid risk of electrical shock or accidents
involving moisture.
www.marijuanagrowing.com
267
drive the metal halide bulb, causing it to
burn out prematurely after accelerated
lumen output loss. If you have a limited
budget and can only afford one ballast,
it is more economical to use conversion
bulbs to change spectrum. (See
“Conversion Bulbs” on page 272).
Most magnetic ballasts sold by HID
stores are “single tap,” and are set up
for 120 volt household current in North
America or 240 volts in Europe and other
countries. Some “multi-tap” or “quad
tap” ballasts are ready for 120 or 240 volt
service. North American ballasts run at
60 cycles per minute, while European
counterpart runs at 50 cycles per minute.
European greenhouse HID lighting sys
tems operate at 400 volts. Hobby lights
were developed from professional lights
that operate at 230 watts.
There is no difference in the electric
ity consumed by using either 120 or
240 volt systems. The 120 volt system
draws about 9.6 amperes, and an HID
on a 240-volt current draws about 4.3
amperes. Both use the same amount of
electricity. Work out the details yourself
using Ohm’s Law.
Ballast safety is super important. This set of
electronic ballasts has a heat-sensitive fire
extinguisher mounted above. If the ballasts
catch fire or get too hot, the fire extinguisher is
designed to trigger. Note that I have not seen
one of these extinguishers that was UL ( Un
derwriters Laboratories), CSA (Canadians
Standards Association), or EMC (electromag
netic compatibility), approved.
Ballast Safety
The ballast has a lot of electricity flow
ing through it. Do not touch the ballast
when operating. Do not place the ballast
directly on a damp floor or any floor that
might get wet and conduct electricity.
Always place the ballast up off the floor,
and protect it from possible moisture.
The ballast should be suspended in the
air or on a shelf attached to the wall. It
does not have to be very high off the
ground, just far enough to keep it dry.
Place the ballast on a soft foam pad to
absorb vibrations and lower decibel
sound output on analog ballasts. Loose
components inside the ballast can be
tightened to further deaden noise caused
by vibrations. Train a fan on ballasts
to cool them. Cooler ballasts are more
efficient, and bulbs burn brighter.
Always check with a qualified source
such as a hydroponic store to ensure
that the ballast is designed for a specif
ic lamp. Do not try to mix and match
ballasts and lamps.
Some industrial ballasts are sealed in
fiberglass or similar material to make
them weatherproof. These ballasts are
not recommended for use indoors. They
were designed for outdoor use where
heat buildup is not a problem. Indoors,
the weather-protection of the sealed unit
is unnecessary and creates excessive heat
and inefficient operation.
Purchase only quality ballasts that come
with a guarantee. Read the fine print,
and do not be tricked by misleading
sales phrases such as “all components
UL (or CSA, EMC, etc.) approved.”
Each of the components could be UL,
CSA, or EMC approved, but when the
components are used together to operate
a lamp, they are not UL, CSA, or EMC
approved. Often components are ap
proved, but not approved for the specific
application.
To keep ballasts clean wipe them down
with a damp cloth. Look for heat dam
age such as melted and burned wires.
Take ballast to dealer immediately if
signs of heat or malfunction occur.
Often ballasts are sealed, and opening
the ballast or breaking the seal will void
the warranty.
When using a single ballast to light 2
lamps at 12-hour intervals, let it cool
down before restarting. Run the lamp
12 hours then let the ballast cool for
15 minutes before restarting to oper
ate the second 12-hour stint of light.
Letting the ballast cool will help avoid
burnout.
HID Bulbs
Ulbricht Sphere
An integrating sphere (aka Ulbricht
sphere) is a hollow spherical cavity. The
inside is covered with a diffuse reflective
white paint. Its purpose is to uniform
ly diffuse or scatter light so that it is
distributed equally to all points inside
the sphere.
Measuring light in an Ulbricht sphere is
the standard in photometry and radi
ometry. It measures light produced by a
source where total (light) power can be
acquired in a single measurement.
The number of new HID bulbs that
appear on the market today is mind-
boggling. Osram Sylvania, General
Electric, Gavita, Philips, SunMaster,
Fulham, and Venture are a few of the
manufacturers that make and continue
to develop new HID bulbs.
Theo from Gavita Holland demonstrates
their Ulbricht sphere for measuringlight. He
also uses a digital power analyzer to measure
the output of lights. It measures the input of
the ballast and the actual output to the lamp,
including power, frequency, and wave form.
268
LIGHT, LAMPS & ELECTRICITY
www.marijuanagrowing.com
It is easy to see the difference in spectrum
between the clear metal halide light in the
foreground and the orange HP sodium light in
the background.
Two blown tubular bulbs, an elliptical bulb
dimpled in the middle, and two tubular bulbs
represent some of the most common shapes of
HID bulbs.
Not all HID bulbs are created equal. In
fact, there are brighter brands that sup
ply up to 15 percent more light than the
closest competitor. The Philips Master
GreenPower Plus TD EL 1000-watt
lamp is the brightest lamp and emits
more gmol than any other bulb. This ex
ceptional HPS tubular lamp is secured at
both ends, which allows a straight shot
for the electricity to flow. Coupled with
a bit longer arc tube, the free-flowing
electricity makes the bulb generate more
than 2000 jLtmol of light! Note that other
bulbs, such as the Gavita Enhanced HPS
1000-watt, generate only 1750/zmols of
light—12 .5 percent less light.
Notable new bulbs have a high PAR
rating and pulse-start metal halides.
High-intensity discharge bulbs are
identified by wattage and by the size
and shape of the outer envelope or
bulb. They are further rated by voltage,
ballasting requirements, lumen output,
spectrum, etc.
Overall, HID bulbs are designed to be
tough and durable, and new bulbs are
tougher than used ones. Nonetheless,
once the bulb has been used a few hours,
the arc tube blackens and internal parts
become somewhat brittle. After a bulb
has been used several hundred hours, a
solid bump will substantially shorten its
life and lessen its luminescence.
HID Bulb Maintenance
Always keep the bulb clean. Wait for it
to cool before wiping it off with a liquid
glass cleaner and clean cloth, every 2
to 4 weeks. Dirt and fingerprints will
lower lumen output substantially. Bulbs
get covered with insect spray and salty
water-vapor residues. This dirt dulls
lamp brilliance just as clouds dull natural
sunlight. Hands off bulbs! Touching
bulbs leaves them with your hand’s oily
residue. Baked-on residue weakens the
bulb. Most gardeners clean bulbs with
Windex or rubbing alcohol, and use a
clean cloth to remove filth and grime;
Hortilux Lighting advises cleaning bulbs
with a clean cloth only.
Never remove a warm lamp. Heat ex
pands the metal mogul base within the
socket. A hot bulb is more difficult to
remove, and it must be forced. Special
electrical grease is available to lubricate
sockets (Vaseline works too). Lightly
smear a dash of the lubricant around
the mogul socket base to facilitate bulb
insertion and extraction.
The outer arc tube contains practical
ly all the ultraviolet light produced by
HIDs. If an HID should happen to
break when inserting or removing it,
unplug the ballast immediately and avoid
contact with metal parts, to prevent
electrical shock.
Pulse-start metal halide lighting man
ufacturers are required by the Energy
Independence and Security Act of 2007
to meet certain efficiency standards.
Effective January 1, 2009, standards
require pulse-start metal halide lighting
with a minimum ballast efficiency of
88 percent. Find ballast efficiency by
dividing the lamp wattage by the operat
ing wattage.
Lumen output diminishes over time.
As the bulb loses brilliance, it generates
less heat and can be moved closer to the
garden. This is not an excuse to use old
bulbs; it is always better to use newer
bulbs. However, it is a way to get a few
Place used HID bulbs in a plastic bag and
dispose of them in a dump designated for
hazardous materials.
more months out of an otherwise worth
less bulb.
Write down the day, month, and year
you start using a bulb so you can better
calculate when to replace it for best
results. Replace metal halides after 12
months of operation and HP sodium
bulbs after 18 months. Many gardeners
replace them sooner. Always keep a
spare bulb (in its original box) available
to replace old bulbs. You can go blind
staring at a dim bulb trying to decide
when to replace it.
You may prefer to change bulbs accord
ing to manufacturer's recommendations.
Some companies recommend as often
as once every 8 months, others at 12
months. You are best to measure the
light output; when it has diminished 10
to 20 percent, change bulbs.
Bulb Disposal
All fluorescent, compact fluorescent,
plasma, HID, and any bulbs that may
contain mercury or some other heavy
metal that should not escape into the
environment. Take spent bulbs to the
proper hazardous materials disposal site
in your area. Do not toss bulbs into the
trash.
1. Place the bulb in a dry container,
and then dispose of it at certified
toxic waste dump facility such as a
HAZMAT disposal site in the USA.
Most countries have specific agencies
that dispose of toxic waste.
2. Lamps contain materials that are
harmful to the skin. Avoid contact,
and use protective clothing.
3. Do not place the bulb in a fire.
www.marijuanagrowing.com
269
Mercury Vapor Lamps
The mercury vapor lamp is the oldest
and best-known member of the HID
family. The HID principle was first used
with the mercury vapor lamp around the
turn of the 20th century, but it was not
until the mid-1930s that the mercury
vapor lamp was really employed com
mercially. Today they are too inefficient
to consider as a light source for medical
cannabis cultivation.
Mercury vapor lamps produce only
60 lumens per watt—and a poor light
spectrum for plant growth. Lamps are
available in sizes from 40 to 1000 watts.
Bulbs have fair lumen maintenance and a
relatively long life. Most wattages last up
to 3 years at 18 hours of daily
operation.
Bulbs usually require separate ballasts.
There are a few low-wattage bulbs with
self-contained ballasts. Uninformed
gardeners occasionally try to scrounge
mercury vapor ballasts from junkyards,
and use them in place of the proper
halide or HP sodium ballast. Trying to
modify these ballasts for use with other
HIDs will cause problems.
Metal Halide Bulbs and
Ballasts
Metal Halide Bulbs
The metal halide HID lamp is still one
of the most efficient sources of artifi
cial white light available to gardeners
today. Grow plants from seed through
harvest with metal halide lamps. They
come in wattages from 50 to 1100, and
1500 watts. They may be either clear or
phosphor-coated, and all require a spe-
LAMP
KELVIN TEMPERATURE
AgroSun
3250
Multivapor
3800
Sunmaster Warm Deluxe
315 PAR
Sunmaster Natural Deluxe
315 PAR
Sunmaster Cool Deluxe
315 PAR
SolarMax
7200
MultiMetal
.
—
-
.
!
4200
------......
......
Two metal halide bulbs from different manu
facturers have arc tubes ofdifferent shapes.
cial ballast. The smaller 175- or 250-watt
halides are very popular for closet garden
rooms. The 400-, 600-, 1000- and 1100-
watt bulbs are most popular with indoor
gardeners. The 1500-watt halide is
avoided due to its relatively short 2000-
to 3000-hour life and its incredible heat
output. American gardeners generally
prefer the larger 1000-watt lamps, and
Europeans seem to almost exclusively
favor 400- and 600-watt lamps.
Caution! Do not mix and match ballasts
and bulbs! Ballasts are designed to be
used with specific bulbs. Using bulbs
with improper ballasts will shorten the
life of both components and could cause
excessive heat or catch fire!
More and more new metal halide lamps
are being developed and marketed every
year. New technology and materials
have opened the door to new lighting
products. The intention of this book is
to show the basics of light and electrici
ty, and how cannabis interacts with light
rather than to keep up with all the new
lighting developments. For more current
Metal halide lamps can produce a spectrum
very similar to natural sunlight.
information on new lamps, ballasts,
and reflective hoods, see
www.marijuanagrowing.com.
Clear halides are most commonly used
by indoor gardeners. Clear super metal
halides supply the bright lumens for
plant growth. Clear halides work well for
seedling, vegetative, and flower growth.
Phosphor-coated 1000-watt halides give
off a more diffused light (and produce
less light) but they emit less ultraviolet
light than the clear halides. They pro
duce the same initial lumens and about
4000 fewer lumens than the standard
halide, and have a slightly different color
spectrum. Phosphor-coated halides have
more yellow, but less blue and ultraviolet
light. Phosphor-coated bulbs were popu
lar among gardeners in the 1990s.
The 1000-watt super clear halides are the
most popular metal halides used to grow
cannabis in North America. Compare
energy distribution charts and lumen
output of all lamps to decide which lamp
offers the most light for your garden.
Typically, a home gardener starts with
one super metal halide.
Universal metal halide bulbs designed
to operate in any position, vertical or
horizontal, supply up to 10 percent less
light and often have a shorter life.
Base Up (BU) and Base Down (BD)
metal halide lamps must be vertical to
operate properly. Horizontal (H) lamps
must orient the arc tube horizontally to
burn brightest.
Metal halide lamps are available in a
variety of spectrums.
270
LIGHT, LAMPS & ELECTRICITY
www.rnarijuanagrowing.con'
High-pressure sodium bulbs have a long arc
tube that extends almost the length of the bulb.
Plants tend to stretch between internodes
under the limited light spectrum emitted by
HP sodium lamps.
The distinctive yellow-orange-tinged glow
emitted by HP sodium lamps unmistakable.
AgroSun and Sunmaster Warm Deluxe
emit low (3000 Kelvin) color tempera
tures. The enhanced orange-red com
ponent promotes flowering, stem
elongation, and germination while a rich
blue content assures healthy vegetative
growth. Visit www.growlights.com for
more information.
The average life of a halide is about
12,000 hours, almost 2 years of daily
operation at 18 hours per day. Many will
last even longer. The lamp reaches the end
of its life when it fails to start or come
up to full brilliance. Electrode deteriora
tion is greatest during start-up. Do not
wait until the bulb is burned out before
changing it. An old bulb is inefficient
and costly. Bulbs lose at least 5 percent of
their brilliance every year. Replace bulbs
every 12 months or 5000 hours.
Metal Halide Ballasts
Read “About Ballasts.” Different ballasts
are required for each type of lamp. Use a
magnetic ballast to operate metal halide
bulbs designed for use with them. An
electronic ballast is made specifically for
electronic high-frequency bulbs. Ballasts
must be specific to certain lamps because
their starting and operating requirements
are unique. Electronic ballasts are more
efficient and produce less heat than ana
log or magnetic ballasts.
High-Pressure Sodium Bulbs
and Ballasts
Approximately 60 percent of HP sodium
light is infrared or heat. All lamp power
and light will be converted to heat as
bulbs degrade over time.
HP Sodium Bulbs
The high-pressure sodium (HPS) lamp
is the most efficient source of artifi
cial light available to medical cannabis
gardeners today. HPS lamps come in
wattages from 50 to 1000 watts. All re
quire a special ballast. The smaller 175-
or 400-watt HP sodium systems are
very popular for closet garden rooms.
The 400-, 600-, and 1000-watt bulbs are
most popular with indoor and green
house gardeners.
HP sodium lamps emit a yellow-orange
glow that could be compared to that of
the harvest sun. Cannabis’s light needs
change when blooming; it no longer
needs to produce so many vegetative
cells. Vegetative growth slows and even
tually stops during flowering. The plant’s
energy is focused on flower production
so it can complete its annual life cycle.
Light from the red end of the spectrum
stimulates floral hormones within the
plant, promoting flower production. In
general, American gardeners use 1000-
and 600-watt HP sodiums most often,
while European gardeners use 400- and
600-watt HPS lamps.
These lamps are equipped with a ventilation
system that allows the bulb to be placed closer
to the plants without burning them.
Discount building stores often carry a
good selection including 250- and 400-
watt lamps. All HPS lamps will grow
cannabis. Even though HPS lamps are
brighter and will grow cannabis, the
spectrum contains little blue and more
yellow/orange. Lack of color balance
makes plants stretch between internodes
-a nd experience more cultural and plague
problems. But when grown properly, the
lack of the proper spectrum does not nec
essarily diminish overall harvest.
Gardeners with small rooms often
retain the 1000-watt halide and add a
1000-watt HP sodium during flowering,
when plants need more light to produce
tight, dense buds. Adding an HPS lamp
doubles available light and increases the
red end of the spectrum. This 1:1 ratio
(1 MH:1 HPS) is a popular combination
in flowering rooms.
The average life of an HPS lamp is about
24,000 hours, with about 5 years of daily
operation at 12 hours per day. Many last
even longer. The lamp reaches the end of
its life when it fails to start or come up to
full brilliance. Electrode deterioration is
The Gavita double-ended bulb is my current
favorite HID because it is more efficient than
any other on the market today.
www.marijuanagrowing.com
271
The bulbs in this mother room are attached to
a ventilation system that removes heat gener
ated by the bulbs.
Conversion bulbs are most commonly
purchased for single-light gardens.
has unique needs, including operating
voltages during startup and operation
that do not correspond to similar watt
ages of other HID lamps. Magnetic HPS
ballasts contain a heavy transformer
that is larger than that of a metal halide,
a capacitor, and an igniter or starter.
Electronic ballasts are much lighter
in weight and more compact, and they
consume less power than analog ballasts.
They also require a specific bulb that is
designed for high-frequency output elec
tronic ballasts. Purchase complete HPS
systems from a reputable source.
Self-contained units that have an
integrated solid-state electronic bal
last, a lamp, and a reflector in a single
enclosed unit produce very little EMI
(electromagnetic interference, aka radio
frequency [RF] interference). Large
greenhouses can use up to 10,000 lamps
with no RF interference.
greatest during startup. Do not wait until
the bulb is burned out before changing
it. An old bulb is inefficient and costly.
Bulbs lose at least 5 percent of their bril
liance every year. Replace bulbs every 24
months or 9000 hours.
Double-ended 1000-watt HPS bulbs
from Philips are the best grow lamp
currently available. These bulbs are
more efficient, and their arc tube is a
little bit longer. Electricity flows from
one end of the arc tube and out the
other. This makes them inherently more
efficient than bulbs that require elec
tricity to travel farther. The new bulbs
produce about 15 percent more light
than single-ended bulbs. Since the bulb
is attached at both ends, the arc tube is
always mounted parallel to the reflector
for maximum efficiency and reflection.
The 600-watt high-pressure sodium
lamp produces 90,000 initial lumens.
HPS lamps are available in wattages from
35 to 1000. The Philips GreenPower
400v, 600-watt EL (electronic lamp) has
the highest PAR light output rating and
more than 95 percent light maintenance.
The 430-watt Son Agro by Philips was
designed to augment natural sunlight in
greenhouses. The bulb produces a little
more blue light, about 6 percent, in the
spectrum. Adding a touch more blue
light helps prevent most plants from
becoming leggy.
High-pressure sodium lamps are man
ufactured by: GE (Lucalox), Sylvania
(Lumalux), Westinghouse (Ceramalux),
Philips (Son Agro), Iwasaki (Eye), and
Venture (high-pressure sodium). Many
more HPS bulbs are manufactured by
others in China. Check out different
Chinese manufacturers and their man
ufacturing standards. Chinese products
are not necessarily bad; in fact, several
of the above companies manufacture
bulbs or components in China.
End of Life
HP sodiums have the longest life
and best lumen maintenance of all
HIDs. Over time the sodium bleeds
out through the arc tube. The sodi-
um-to-mercury ratio changes and the
voltage in arc rises. The lamp warms up
and goes out. The sequence is repeat
ed, signaling the end of the lamp’s life,
which is about 24,000 hours—five years
at 12 hours daily use.
Dispose of bulbs in an approved hazard
ous waste facility.
HP Sodium Ballasts
Read “About Ballasts.” A special ballast
is specifically required for each wattage
of HP sodium lamp. Each wattage lamp
Conversion Bulbs
Conversion, or retrofit, bulbs increase
lighting options on a budget. One type
of conversion bulb allows you to utilize
a metal halide (or mercury vapor) system
with a bulb that emits a light spectrum
similar to that of a HP sodium bulb. The
bulb looks like a cross between a metal
halide and an HP sodium. While the
outer bulb looks like a metal halide, the
inner arc tube is similar to that of an HP
sodium. A small igniter is located at the
base of the bulb. Other conversion bulbs
retrofit HP sodium systems to convert
them into virtual metal halide systems.
Conversion bulbs are manufactured in
150, 215, 360, 400, 880, 940, and 1000
watts. You do not need an adapter or any
additional equipment. Simply screw the
bulb into a compatible ballast of compa
rable wattage. Conversion bulbs operate
at a lower wattage and are not as bright
as HP sodium bulbs. Although conver
sion bulbs have less blue, they are up to
25 percent brighter than metal halide
systems and their lumens-per-watt con
version is better than that of super metal
halides. The 940-watt conversion bulb
has a lumens-per-watt rating of 138.
Similar to the HP sodium lamp, the con
version bulb has a life expectancy of up
to 24,000 hours. Unlike most high-pres
sure sodium lamps which flicker on and
off near the end of their lives, conversion
LIGHT LAMPS & ELECTRICITY
www.marijuanagrowing.com
HP sodium to metal halide conversion bulb
Metal halide to HP sodium conversion bulb
Thyee popularfluorescent bulbs include T12
(top), T8 (middle), and T5 (bottom). All three
require different two-pin fixtures and ballasts.
bulbs go off and remain off at the end of
their lives.
Although conversion bulbs are not inex
pensive, they are certainly less expensive
than an entire HP sodium system. For
gardeners who own a metal halide sys
tem, or who deem metal halide the most
appropriate investment for their lighting
needs, conversion bulbs offer a welcome
alternative for bright light. In the United
States, CEW Lighting distributes Iwa-
saki lights. Look for their Sunlux Super
Ace and Sunlux Ultra Ace lamps.
Venture, Iwasaki, and Sunlight Supply
manufacture bulbs for conversion in the
opposite direction—from high-pres
sure sodium to metal halide. Venture’s
White-Lux and Iwasaki’s White Ace are
metal halide lamps which will operate in
an HP sodium system. The 250-, 400-,
and 1000-watt conversion bulbs can be
used in compatible HPS systems with no
alterations or additional equipment. If
you own a high-pressure sodium system
but need the added blue light that metal
halide bulbs produce, these conversion
bulbs will suit your needs.
Many gardeners have great success
using conversion bulbs. If you have a
metal halide system but want the extra
red and yellow light of an HP sodium
lamp to promote flowering, simply buy
a conversion bulb. Instead of invest
ing in both a metal halide and an HP
sodium system, you can rely on a metal
halide system and use conversion bulbs
when necessary, or vice versa.
HP Sodium to Metal Halide
Several companies make HPS to MH
conversion bulbs, including the Sunlux
Super Ace and Ultra Ace (Iwasaki)
and Retrolux (Philips). The bulb emits
an HP sodium spectrum with a metal
halide system. These bulbs make it
possible to use a metal halide ballast and
get the same spectrum as an HP sodium
lamp. Lumens-per-watt efficiency is
traded for the convenience of using
these bulbs. A 1000-watt HP sodium
bulb produces 140,000 initial lumens. A
MH to HPS conversion bulb produces
130,000 initial lumens. If you only
want one lamp, a conversion bulb is a
fair choice.
Metal Halide to HP Sodium
Metal halide to high-pressure sodium
bulbs are manufactured by several
companies, including the White Ace
(Iwasaki) and White Lux (Venture).
They have an MH spectrum and are
used in an HPS system. The bulb con
verts from HPS to MH and produces
110,000 initial metal halide lumens.
Fluorescent Lamps, Ballasts,
and Fixtures
Fluorescent Bulbs
Fluorescent bulbs (tubes) come in a
wide variety of lengths, from 6 inches to
8 feet (15.2 -243.8 cm). Two- and 4-foot
(60-121.9 cm) tubes are easy to handle,
readily available, and the most popular.
Circular (T9) and U-shaped bulbs (B =
bent) are also available.
Fluorescent bulbs are available in at least
7 different diameters. T2 bulbs are the
smallest and T4, T5, T8, T9, T12, and
T17 (Power Twist) are each progres
sively larger in diameter. Many medical
gardeners still use inexpensive reliable
T12 lamps grow cuttings, seedlings and
small vegetative plants. They supply
cool, diffused light in the proper color
Thin, high-output (HO) T5 fluorescent bulbs
are the brightest fluorescents and are very
efficient.
www.marijuanagrowing.com
273
LAMP
USA
LIFE HOURS
WATTS
KELVIN TEMP.
LUMENS
Warm White
T12
24000
40
............. .
...... ......
2700
2200
Neutral White
T12
24000_____
I
40
3500
2200
Cool White
T12
24000
40
4100
2200
Full Spectrum
T12
24000
40
5000
2200
Agrosun T12
T12
24000
40
5850
2450
AgroBriteT12
T12
24000
40
6400
2200
Spectralux T8 HO
T8 HO
20000
54
6500
2700
Ecolux T8 HO
T8 HO
20000
54
6500
2700
Spectralux T5 HO
T5 HO
20000
54
3000 and 5000
5000
Spectralux T5 VHO
T5 VHO
20000
54
3000 and 6500
5000
GE Starcoat T5 HO
T5 HO
20000
54
3000 and 6500
5000
Philips T5 Alto HO
T5 Alto HO
20000
54
3000
5000
GE Starcoat T5 HO
T5 HO
20000
54
Warm
5000
USA
Inches Millimeters
T2
0.25
7
T4
0.5
12
T5
0.625
15.875
T8
1
25.4
T9
1.125
28.575
T12
1.5
38.1
T17
2.125
53.97
*
Big clones receive plenty of light for rapid
growth tinder this bank of T5 bulbs.
spectrum to promote root growth.
Other more brilliant fluorescents
include T5 high output (HO), VHO and
T8 HO, lamps. They are being used in
gardens from seed through harvest.
HO = high output
VHO = very high output
XHO = extra high output
The average lumen output of a 4-foot
(121.9 cm) 40-watt T12 is 2800 lumens
per watt. A 32 watt T8 bulb yields 100
lumens per watt and supplies 100 average
lumens. A 54 watt T5 throws 5000 aver
age lumens, 92 lumens per watt.
Fluorescents produce much less light
than HIDs and must be very close (2 to
4 inches [510 cm]) to the plants for best
results. The light emission is strongest
near the center of the tube, and some
what less at the ends.
Fluorescent lamps are available in a vari
ety of spectrums, from 2700 to 6500 K,
including Warm White, Neutral White,
Cool White, Full Spectrum, Daylight,
and so forth, as listed at left.
Fluorescent lighting manufacturers in
clude GE, Osram/Sylvania, and Philips.
The three main fluorescent tubes used
by gardeners include T12, T8, and T5.
The T12 and T8 bulbs were developed in
the 1930s. The T12s met with immedi
ate success; T8s became popular in the
late 1980s. Today, T5 and T8 bulbs are
more efficient than ever and often used
to grow cannabis from clone or seedling
through harvest.
Designed in the 1990s, T5 bulbs are the
brightest of the fluorescent lamps. The
full-spectrum, high-intensity, fluores
cent T5 tubes come in high output (HO,
54 W), very high output (VHO, 95 W),
and extra high output (XHO, 115 W).
The intensely bright new spectrum is
designed specifically for plant growth.
The VHO and XHO lamps produce
more heat and are more difficult and
expensive to manufacturer than lower-
output bulbs.
The T5 tubes are smaller and will fit in
narrow spaces. The size makes for more
accurate control of light direction with
a reflective hood. Tubes are also rated as
high efficiency (HE) and high output
(HO), but the latter has lower efficiency.
High-output lamps are driven at a higher
current and are brighter. The ends on
the connecting pins are unique so they
LIGHT, LAMPS & ELECTRICITY
www.marijuanagrowing.com
This T12 fixture with bulbs is the basic setup
that can be purchased at most hardware stores.
Such fixtures are commonly used when rooting
clones or growing seedlings.
As a fluorescent bulb nears the end of its life,
the ends become darker and the tube emits less
overall light.
cannot be used in the wrong fixture.
High-output bulbs are labeled HO,
or VHO for very high output. The T5
lamps render peak light output at 95°F
(35°C). The T8 and the T12 lamps pro
vide peak light output at a 77°F (25°C).
The bulbs run most efficiently and last
longest when operated within the proper
temperature range.
A fluorescent lamp consists of a
glass tube coated on the inside with
light-emitting phosphors and filled with
a low-pressure mercury vapor. An elec
tric current is passed through the tube,
exciting the mercury vapor and causing
it to emit UV light. This UV light causes
the coating of the tube to fluoresce,
giving off visible light. The mix of phos
phorescent chemicals in the coating and
the gases contained within determines
the spectrum of colors emitted by the
lamp. The quality of the phosphors and
manufacturing process are essential to
a lamp that will maintain true brilliance
for a long time.
Old-fashioned T12 and T8 lamps are
inefficient halophosphate tubes that
do not render colors well. Today tri
phosphor and multi-phosphor tubes
dominate the marketplace, because they
are much more efficient and retain their
properties well over time. A simple test
with a light meter showed that inex
pensive brand-new VHOs produced 30
percent less lumens than the phosphor
and multiphosphor tubes.
Be very cautious when purchasing
inexpensive lamps that use phosphorous
from China rather than quality phos
phorus (tri-phosphorous) from Japan
and a few other places. Phosphorous
from China generally does not hold the
lumen or blue of the 6.5 K lamps. Lumen
degradation occurs rapidly. Controlled
studies found that inexpensive lamps
start with very high lumens but can drop
off by over 30 percent in a few months.
Check bulbs regularly to ensure they are
up to full brilliance.
Using fluorescents along with HIDs
is awkward and problematic. When
using them in conjunction with HIDs,
fluorescents must be very close to plants
to provide enough intense light for plant
growth. Fixtures may also shade plants
from HID light and generally get in
the way.
End of Life
Fluorescents blacken with age, losing
intensity. Replace bulbs when they reach
70 to 90 percent of their stated service
life listed on the package or label. A
flickering light is about to burn out and
should be replaced. Life expectancy is
around 9000 hours (15 months at 18
hours’ daily operation).
The end-of-life failure mode for fluo
rescent lamps varies depending on their
ballasts and on how the lamps are used.
A lamp that turns pink with black burns
on the ends of the tube lacks mercury.
This analog fluorescent lamp ballast is effi
cient and provides perfect service for years.
The components of electronic fluorescent
This electronic ballast is smaller and more
ballasts can be configured into many differ-
lightweight than its analog counterpart,
ent shapes. In this case they conform to the
restraints of a long, thin fixture.
www.marijuanagrowing.com
275
A main reason that a lamp flickers is as a
result of poor electrical connections.
Change the starter on older fluorescent
fixtures. The starter is the little round
tube that sticks into the fixture at one
end of the bulb. Starters are inexpensive
and have about the same life as a bulb. A
new bulb will last a short time with an
old starter that is on its last leg.
Fluorescent Ballasts
Each fluorescent lamp requires a spe
cific ballast to regulate electricity before
reaching the bulb. Fluorescents require
an appropriate fixture containing a
small ballast to regulate electricity and
household electrical current. The tube
type should always match the markings
on the light fixture. Ballasts are rated for
the size of lamp and power frequency.
Ballasts can also include a capacitor to
correct the power factor. The fixture
is usually integrated into the reflective
hood. The ballast is located far enough
away from fluorescent tubes that plants
can actually touch them without being
burned.
Many of the T12 and T8 fixtures use
old-fashioned magnetic ballasts. Newer
T5, T8 and T12 fluorescents use elec
tronic ballasts. Gardeners prefer slimmer
T8 and T5 bulbs with electronic ballasts
because they run cooler, electricity
cycles faster, and lights do not flicker.
Fluorescent light fixtures cannot be con
nected to dimmer switches intended for
incandescent lamps.
Self-starting “rapid start” ballasts
eliminate voltage spike when they are
properly grounded. There are “instant
start,” “rapid start,” “quick start,”
“semi-resonate start,” and “programmed
start” ballasts. The old-fashioned
semi-resonate start lamps are the slowest
to ignite; some of them even require
a separate starter. All of the others
strike and start lamps much faster.
Programmed start ballasts are found in
premium fixtures. Fixtures and lamps do
take 5 to 10 minutes to warm up.
One of the main problems with fluores
cent lighting is ballast incompatibility
with the bulb. Some manufacturers use
ballasts and lamps because they are the
least expensive, not because they are
designed for specific applications.
Another example comes from garden
ers: running a T8 tube with a ballast
for a T12 will reduce lamp life and can
increase energy consumption.
Analog Ballasts
Analog (magnetic) ballasts are simple,
consisting of a copper wire winding on a
laminated magnetic core. They are heavy
and radiate almost all heat produced by
the system. Analog ballasts consume
about 10 percent of the system’s electric
ity. A wiring diagram is usually glued on
the ballast. Simple wiring is also provided.
These ballasts will normally last 10 to 12
years. The end of the magnetic ballast’s
life is usually accompanied by smoke
and a miserable chemical odor. When
the ballast burns out, remove it and buy
a new one to replace it. Be very careful if
the ballast has brown slime or sludge on
or around it. This sludge could con
tain carcinogenic PCBs. If the ballast
contains the sludge, dispose of it in an
approved location for hazardous waste.
Electronic Ballasts
Electronic ballasts run much cooler,
consume little electricity, and are light
weight. They are normally located
within the lamp fixture. Electronic
ballasts are very quiet, with no annoying
hum. Electronic ballasts use transis
tors to alter incoming electricity into
high-frequency alternating current
(AC), and regulate the current flow in
the lamp simultaneously. Efficacy of a
fluorescent lamp rises by almost 10 per
cent at a frequency of 10 kHz, compared
to efficacy at normal power frequency.
Electronic ballasts are also called digital
ballasts because they are controlled by
a microcontroller or similar hardware.
The electronic controller dims lights
and maintain constant light levels—no
flickering.
Electronic ballasts typically work in
rapid start or instant start mode. Low-
cost ballasts start slowly. More expen
sive ballasts use programmed start,
which ignites the lamps quickly.
At the end of life, electronic ballasts
simply stop. No drama. One of the most
common causes of lamp failure is due
to a lower voltage capacitor and other
parts that cost less are installed. The
stress causes premature failure. Always
purchase quality equipment.
Most electronics failures happen early
in life and diminish thereafter. High
temperatures shorten electronic bal
last life. Typically for every 50 degrees
the temperature rises, the ballast life
is cut in half. Keep the temperature
range within the operating boundaries,
normally at about 77°F (25°C) in most
countries. Dispose of electronic ballasts
in an approved hazardous waste dump.
Fluorescent Fixtures
A “shop light” fixture/reflector that
holds two 40-watt T12 fluorescent tubes
and ballast available at hardware stores
is perfect for growing cuttings and
seedlings until they are about six inches
(about 15 cm) tall. A more substantial
fixture will be necessary for higher
The most common fluorescent bulbs used for
gardening are connected to sockets with bi-pin
connectors. The bi-pins ofT5 and T8 fixtures
are much smaller than bi-pins of T12 fluores
cent fixtures. Ifpurchasing new tubes, make
sure the bulb fits the fixture. The fixture may
contain one, two, or more tubes.
This CFL fixture is similar to a reflective hood
for an HID bulb.
276
LIGHT, LAMPS & ELECTRICITY
www.marijuanagrowing.com
/
^71
------ u.---------= ; ■
This CFL fixture holds two 55-watt bulbs.
The design of the U-shaped bulbs makes
reflecting light efficient.
The T12 fixture on the left is larger than the
T5 fixture on the right. (MF)
light output using brighter bulbs. Many
used shop light fluorescent fixtures are
generally available and usually acceptable
to use.
If your fluorescent fixture does not
work, first unplug the electricity. Next
check all electrical connections to make
sure they are secure. If you see any signs
of burning or heat, take the fixture to
the nearest electric store and ask for
advice. Make sure they test each com
ponent and tell you why it should be
replaced. It might be less expensive to
buy another fixture.
Fluorescent Bulb Disposal
The US Environmental Protection
Agency (EPA) and other similar agen
cies around the world classify fluores
cent lamps as hazardous waste because
bulbs contain mercury and ballasts
contain other unpleasant stuff. They
must be taken to a qualified facility for
recycling or safe disposal of toxic waste.
Compact Fluorescent
Lamps (CFL)
Most consumers know compact fluores
cent lamps (CFL) as the new energy-
Many CFLs are designed to provide light in
homes and offices. Most of these lamps are
too small to be used for anything but growing
clones and seedlings.
efficient replacement for household
incandescent lightbulbs, the ones that
Thomas Edison invented. The character
istic helical spiral was developed in the
mid-1970s for low wattage CFLs. By the
1980s CFLs with electronic ballasts were
available. Other configurations—horse
shoe, round and flat (butterfly) were later
developed. For example, readily available
65-watt floodlights are configured flat so
that light emitted is either direct or easily
reflected. Larger watt ages, 65+, can be
used to grow medicinal cannabis from
seed through flowering. Some of the
smaller wattages fit into household in
candescent lightbulb sockets. Larger 95-,
125-, 150-, and 200-watt bulbs require a
larger mogul socket. Common wattages
used for growing cannabis include 55,
60, 65, 85, 95, 120, 125, 150, and 200.
Regardless of wattage, CFLs must warm
up for about 5 minutes so the chemicals
become stable before they come to full
brightness.
“---------------
CFL
WATTS
---------------i
K TEMP.
Warm
White
13
2700
Cool
White
13
4100
Daylight
i
13
__ ______ __
6400
L
.
CF
GE
13
L-..
6500
' Sylvania
14
3000
Bright
Effects
15
2644
Large CFL lamps tend to throw light back
through glass, losing efficiency. The 95-watt
bulb is most efficient and can be placed close
to plants because it runs relatively cool.
Compact fluorescent lamps are available
in many spectrums, including Daylight,
Cool White, and Warm White. Com
pact fluorescent lamps are perfect for
gardeners with a limited budget and a
small space. They run cooler than HIDs
and require minimal ventilation. When
CFLs were first introduced, wattages
were too small, and bulbs did not emit
enough light to grow cannabis. The new
CFLs provide enough light to grow
cannabis from seed to harvest. Beware
of manufacturer and reseller websites
making outrageous claims about CFL
performance. Add up the actual lumens
and watts to verify claims.
CFL lamps that work well for gardening
are available in two basic styles and shapes:
1. Bulb shaped like a long “U” with a
two- or four-pin fixture (these lamps
are designated “1U”). The 20-inch
(50.8 cm) long “1U” 55-watt, du-
al-pin-base bulbs are common in
Europe. Normally, two 55-watt lamps
are placed in a horizontal reflective
hood.
2. The short lamps consist of several
U-shaped tubes (designated 4U, 5U,
6U, etc., for the number of U-shaped
tubes) that measure approximately 8
to 12 inches (20-30 cm) not including
the 2- to 4-inch (5-10 cm) attached
ballast and threaded base.
Short U-shaped bulbs are most efficient
when vertically oriented. When mount
ed horizontally under a reflective hood,
much light is reflected back and forth
between the bulb s outer envelope and the
hood, which markedly lowers efficiency.
Heat also builds up from the ballast. Both
conditions lessen efficiency.
www.marijuanagrowing.com
277
This clone garden is illuminated exclusively
with small, spiral-shaped energy-saving com
pact fluorescents lamps.
Two Types of CFL Sockets:
The first type of CFL socket is a bi-pin
tube that is designed for conventional
ballasts. A bi-pin tube contains an
integrated starter that averts the need
for external heating pins but causes
incompatibility with electronic ballasts.
The second type of CFL socket is a
quad-pin tube designed for electronic
ballasts or conventional ballasts with an
external starter.
CFLs emit light from a mix of phos
phors inside the bulb, each emitting
one band of color. Modern phosphor
designs balance the emitted light color,
energy efficiency, and cost. Every extra
phosphor added to the coating mix
decreases efficiency and increases cost.
Good-quality consumer CFLs use 3 or 4
phosphors to achieve a white light with
a color rendering index (CRI) of about
80. Running a compact fluorescent lamp
base-up will result in hotter electronics
and a shorter bulb life. Standard CFLs
do not respond well to dimming. They
are either on or off.
Normally, CFL bulbs have a life of
10,000 to 20,000 hours (18 to 36 months
at 18 hours per day). Lamps with
attached ballast burn out 3 to 6 times
faster than the ballast.
CFL Ballasts
The most important technical advance
has been the replacement of analog
(electromagnetic) ballasts with electron
ic ballasts—starting is much faster and
flickering is almost gone. CFLs
that flicker when they start have mag
netic ballasts.
Integrated CFL lamps combine a bulb,
electronic ballast, and a household light
bulb threaded connection or bayonet
fitting into a single unit. When the
lamp s life is over, the lamp and the
attached ballast are both thrown away,
which means you are throwing away a
perfectly good ballast. My preference
is to use the long CFLs that are not
attached to ballasts.
Nonintegrated CFLs have remote
electronic ballasts permanently installed
in the light fixture and are not part of
the bulb. The bulb is changed at its end
of life. Nonintegrated, CFL fixture
mounted ballasts are larger and last lon
ger in comparison to the integrated ones.
The normal life of a CFL ballast is
50,000 to 60,000 hours (7 to 9 years at
18 hours per day). The end of ballast
life is signaled when it stops. When the
ballast burns out, remove and replace
it. Dispose of the ballast in a hazardous
waste dump.
End of Life
The lifetime of any lamp depends on
operating voltage, manufacturing
defects, exposure to voltage spikes, me
chanical shock, frequency of cycling on
and off, lamp orientation, and ambient
operating temperature, among other
The attached encased ballast for this large
CFL lamp has been broken away from the
base. The integrated ballast is thrown out
along with the burned out bulb.
factors. The life of a CFL is significantly
shorter if it is frequently turned on
and off. In the case of a 5-minute on/
off cycle the lifespan of a CFL can be
cut in half. Leave them on for hours. At
the end of life, CFLs produce 70 to 80
percent of original light output. Replace
lamps when they are at 80 to 90 percent
brilliance, after 12 months of operation.
CFL Bulb and Ballast Disposal
New CFLs contain half as much mer
cury as old bulbs. Compact fluorescent
bulbs, old or new, must be disposed of
properly. Place them in a sealed plas
tic bag and dispose the same way you
should dispose of batteries, oil-based
paint, and motor oil: at your local house
hold hazardous waste (HHW) collec
tion site or other authorized disposal site
for hazardous materials.
When buying replacement bulbs, look
for deals on CFLs at Home Depot and
similar discount stores, or check the
Internet. For example, www.lightsite.
net is an outstanding site that also has a
retail store locator. Philips is producing
some of the higher wattage compact
fluorescent lamps. Their PL-H compact
fluorescent lamp is a 4U bulb available in
60, 85, and 120 watts with Kelvin ratings
from 3000 to 4100.
Plasma Lamps
Plasma lamps fall into two categories:
(1) internal or light-emitting plasma
(LEP) lamps, which use radio waves
to energize sulfur or metal halides in
a bulb, and (2) external or induction
lamps, which use fluorescent induction,
including a tube filled with fluorescent
phosphors.
The light-emitting plasma lamp is the
original and most widely used form of
(internal) induction lamp. Radio frequea*
cy is used to excite gases inside a small
ceramic envelope and produce a very
bright light. The small lamps are about
the size of a small camera storage chip.
The external inductor (plasma) lamps
consist of round or rectangular tubes
similar in diameter to T12 fluorescent
lubes. The electromagnetic induction
(plasma) lights are efficient and deliver
81 lumens per watt.
LIGHT, LAMPS & ELECTRICITY
www.marijuanagrowing.cofT’
Plasma lamps produce UVA and UVB light.
They have a radio frequency generator rather
than a ballast.
The Gavita-Holland Pro 300 (watt) LEP
lamp and fixture is the only commercially
available luminaire developedfor indoor
gardeners. With a CRI of 94, the 5600 K
color temperature (spectrum) is like natural
sunlight. The lamp runs cool—so cool you can
put your hand on the protective glass without
burning it. Not possible with an HID fixture!
Light-Emitting Plasma (LEP) Lamps
Todays light-emitting plasma (LEP)
grow lights are much different than the
plasma lamps popular in the 1980s.
Invented by Nikola Tesla in the 1890s,
the first promising plasma lamps were
sulfur lamps developed by Fusion Light
ing. The lamps had technical difficulties,
and they were too bright and had a poor
spectrum for plant growth. Today several
companies are overcoming the techni
cal problems and making the spectrum
conducive to plant growth. Several
high-efficiency plasma (HEP) lamps have
been introduced to the market; these
lamps, including models from Ceravision
and Luxim, achieve 140 lumens per watt.
Commercially available LEP lamps come
in wattages from 40 to 300. Plasma
International also manufactures a 730-
watt microwave-driven sulfur plasma
lamp. Gavita-Holland is the only known
horticultural lighting company applying
plasma lamp technology in the garden.
The plasma lamp family generates light
by exciting plasma inside a bulb using
radio frequency (RF) power. The small
lamp is less than an inch (2.5 cm) square,
and is embedded in a ceramic resonator.
An RF driver, solid-state amplifier, and
microcontroller are in a fully sealed
lamp without electrodes and filaments.
A combination ofplasma (5500 K) and
high-pressure sodium (2100 K) lamps in a
ratio of 1:4 provides the best spectrum for rapid
growth. Plasma light combined with HPS
light produces more branches, increases dry
matter weight up to 30 percent, and improves
overall plant structure. Stronger plants are
more resistant to disease and pest attacks. The
extra plasma light may also promote earlier
and more prolific development of resin glands.
Some gardeners report that resin glands tend
to develop a few days earlier and continue to
form at a more rapid rate when plasma lighting
is us/ed.
Lamps use a noble gas or a mixture of
these gases and metal halides, sodium,
mercury, or sulfur.
The plasma lamp does not have a ballast,
but rather an RF generator (aka magne
tron) and semiconductors that fulfill the
equivalent function. It has more than 90
percent conversion efficiency, and the
solid-state driver eliminates failure. And
there is no noise.
Plasma lamp from a novelty store
LEP bulbs are small and very bright.
Light-emitting plasma lamps are the only light
source for these mother plants. LEP lamps also
emit UVA and UVB light. Natural sunlight
emits UV light; HID bulbs do not. Among
other things, this light is responsible for
making plant cells more resilient.
www.marijuanagrowing.com
279
LAMP
460-WATTHPS
280-WATT LEP
--------------------------------------------------------- --------- 1
BENEFIT
bulb lumens
50,000
23,000
____
none
I—
fixture efficiency
65%
85%
directional source
fixture lumens
32,500
19,465
directional source
light-loss factor
75%
80%
low lumen degradation
mean lumens
24,375
15,572
low lumen degradation
application efficiency
48%
82%
optical control
1
.............. -
-
........ -
Light-emitting plasma is the only
high-intensity light source that can be
dimmed down to 20 percent of light out
put, with both analog and digital con
trols. Dimming even increases longevity
of the lamp. The cost is about $1000
USD for a 300-watt LEP lamp.
Solid-state LEP lamps use electricity
to energize metal halides, and argon
rather than sulfur. These lamps have no
electrodes and no associated failures.
Overall, plasma lamps have a long life—
up to 50,000 hours (7.7 years at 18 hours
per day)—and are rated for 70 percent
lumen maintenance. LEP -lamp efficacy
ranges from 115 to 150 lumens per watt.
The directional nature of the light
source means that no light is lost,
trapped between the light and the
reflector, and allows for the light to be
spread evenly over the grow area with
no overspill. The annual energy and
maintenance costs are up to 45 percent
less than for MH bulbs.
A solid-state electronic ballast with no
moving parts is located in a sealed hous
ing with a Gore-Tex ventilation plug.
A square light pattern reflector with
a UVC glass filter directs light at the
garden. The Gavita lamp will last 30,000
hours (4.5 years at 18 hours per day).
Low levels of UVB light pass through
a shield and UVC light is filtered out.
UVB light is produced by natural sun
light and is essential for healthy plant
growth. The overall light spectrum
contains more blue light too. See “UV
Light” on page 256.
Do not try to air-cool plasma lamps.
When artificially cooled, the bulb is
unable to reach full operating tempera
ture and does not come to full brilliance
or spectrum.
Magnetic Induction Lamps
Magnetic induction lamps are similar
to fluorescent lamps, but the electro
magnets are wrapped around a section of
the lamp tube. High-frequency energy
emitted by an induction coil produces
a very strong magnetic field and excites
the mercury atoms inside the glass tube.
The mercury atoms emit UV light that
Magnetic induction lamps are considered
plasma lamps, but they look more like circular
T9 fluorescent fixtures.
is down-converted to visible light by the
phosphor coating on the inside of the
tube. The lamps contain no electrodes,
and failures caused by filament erosion,
vibration, or seal breach are impossible.
With no electrodes to degrade, the lamps
are very efficient and enjoy a longer life.
Round or rectangular 300-watt magnetic
induction bulbs have a daylight color
temperature of 5000 K and produce
24,500 lumens, 81 lumens per watt, and
have a life of 100,000 hours. A 300-
watt induction lamp system costs about
$300 USD. They come with attached or
remote ballast. The 300-watt induction
lamp is touted to be a replacement for
600-watt HID lamps. Small, 80-watt cir
cular induction lamps with remote bal
lasts produce 6000 lumens of light with a
color temperature (spectrum) of 5000 K.
They have a life of 100,000 hours.
Magnetic induction lamps generate little
heat, and ballasts have a life of 40,000
hours or longer.
Different color temperatures are possi
ble by changing the composition of the
phosphorous inside induction lamps.
Plasma spectrums contain relatively
little red light. At least one company has
developed a bispectrum grow light to
produce one half of the bulb at 2700 K
and the other half at the other end of the
spectrum.
Light-Emitting Diode (LED)
Lamps
About LEDs
Light-emitting diode lamps are every
where. You see them in stoplights,
280
LIGHT, LAMPS & ELECTRICITY
www.marijuanagrowing.com
"------- ------------------------ ------------------
LAMP
WATTS LUMENS
KELVIN COLOR
TEMPERATURE
--- -------------------- ---- --- 1
HOURS
OF LIFE
induction
300
24,500
5000
100,000
-
-
induction
80
6000
5000
100,000
flashlights, Christmas tree lighting,
household lighting, and more. The
technology has come a long way since
it was developed in the early 1960s,
when LEDs were found in appliances
and generated a faint 0.001 lumens per
watt. New LED technology is advancing
rapidly and they are becoming much
brighter and more electrically efficient.
Light-emitting diode lamps are available
across the visible spectrum, and from
ultraviolet through infrared. Gardeners
are successfully using LEDs to cultivate
medical cannabis.
Light-emitting diode lamps can be used
for pre-grow and propagation in horti
culture, as well as some experiments
with interlighting indoors and in green
houses. At press time, LEDs are not
an economically viable replacement for
HID lamps in greenhouses or indoors.
However, the horticultural industry
Purple LED light reflects off cannabis foliage,
causing plants to look purple.
You can see the different color LEDs that
make up the color spectrum.
has a very big interest in LEDs, and I
suggest watching for bona fide advances
in fast-changing LED technology.
There are so many new and different
LED types and so much sales informa
tion about them, that it is difficult to
understand which specific LEDs work
best as a light source to grow medical
cannabis.
Light-emitting diode lamps use solid
state semiconductor energy to produce
light. The technology is similar to that
found in computer circuitry. LEDs do
not use filaments found in incandes
cent and tungsten halogen bulbs, or gas
used in HID, fluorescent, and compact
fluorescent bulbs. LEDs generate less
heat, and are rated for regular household
current—120 V and 240 V. LEDs work
inboth120Vand240V,50to60cycle
electrical service. For this reason, LED
fixtures often come with no plug.
Light output from LEDs continues to
increase with improved materials and
technological advances while maintain
ing the efficiency and reliability of solid
state. Solid-state components are diffi
cult to damage with external shock.
LED lamps are a promising replacement
for HPS lamps because of their high-
efficiency (up to 54 percent), very long
life (they still produce at least 70 percent
of their original output after 50,000
hours), small size, and low operating
voltage.
Outdated LEDs that produce less than
1 watt are not as bright as new 1-, 2-, and
3-watt LEDs. Also, some LEDs of the
same wattage are brighter than others.
See “Brilliance” on page 284.
Rather than a ballast, a series of resistors
or current-regulated power supplies is
necessary to deliver precise voltage and
current for LEDs to operate most effi
ciently. The power supply can be
decreased to dim lights. Some LEDs
have a dimming range of 20 to 100
percent. The necessary hardware is
hardwired and soldered into a small
(circuit board) fixture that is connected
to a power supply. When purchasing a
fixture, individual clusters of LEDs that
can be replaced within fixtures are the
most practical and economical.
Other types of lights are constant
voltage—that is, they require a certain
voltage to work, and they are usually fair
ly tolerant of slight variations in working
voltage. For example, a normal incandes
cent bulb designed for European
230 volts of alternating current (VAC)
will work fine from about 40 VAC to
270 VAC. LEDs are constant-current
devices and require that voltage be con
trolled to maintain an exact current flow
through the LED. Unlike other light
sources, LEDs are nonlinear devices,
which means that a small increase in
voltage causes a large increase in cur
rent flow through the LED. This means
LEDs have to be driven by special power
supplies known as constant-current
power supplies. They adjust their output
voltage to maintain the current through
the LEDs at a constant, preset level.
LEDs are often connected in series or
string. LEDs are also unique; if they fail
there is about an 80 percent chance that
they will still conduct electricity (aka
“slag down”) rather than “blow” like an
incandescent bulb and no longer conduct
electricity. This causes the voltage to the
remaining LEDs to increase. The current
can increase to the point of causing more
LEDs to fail, or even cause a chain reac
tion that can destroy all the LEDs in the
string. A constant-current power supply
will detect the increase in current and
lower its output voltage to compensate—
and protect the remaining LEDs.
Another option is to use a less expen
sive constant-voltage power supply; the
output is constantly adjusted to provide
an exact voltage no matter what load
it is driving. These are usually 24 volts
of direct current (VDC), 36 VDC, or
48 VDC. If this type of power supply
is used, the circuit boards on which
the LEDs are mounted need to have a
small current-regulator chip mounted
www.marijuanagrowing.com
281
This floodlight has multiple LEDs inside, and
screws into a household light socket.
Weird-looking LEDs that resemble a bundle
of chips emit more heat than light.
This small, yellow, 30-watt LED emitter
produces 2700 lumens and a lot ofheat.
on them. Some manufacturers do not
use the regulator chips; instead they
use resistors to adjust the voltage (and
therefore the current flow) through the
LEDs. This is not recommended because
the voltage requirements of the LEDs
vary depending on age and temperature,
and can lead to all the LEDs receiving
too high a voltage and then failing.
When you turn on an LED, electrons
recombine with electron holes in the
LED and release photons (light energy)
in the process of electroluminescence.
Peak performance depends on operating
temperature. To date, the most efficient
LED is 1 watt. Larger wattages run
hotter and are less efficient, producing
fewer lumens per watt. For example, a
3-watt LED produces only 35 percent
more lumens than a 1-watt LED. The
extra electrical energy is converted to
heat rather than light.
If ambient temperatures in the operat
ing environment climb too high, LEDs
overheat and “droop,” producing sub
This 30-watt LED fixture uses standard
heat-dissipation technology to stay cool.
Excessive heat c[uickly lowers tumen output
and efficiency.
The LED UFO was one of the first LED grot
lights available commercially.
stantially less light. Similar to solid-state
computer chips, LEDs fail sooner when
overheated over time.
LEDs are driven in milliamperes (mA).
Some LEDs are driven at lower mA to
increase efficiency. The science and data
behind all the circuitry is more complex
than can be explained within the scope
of this book. The best way for medi
cal cannabis gardeners to discern the
brilliance of an LED or a fixture full of
LEDs is to measure light output with a
light meter.
Overall, most indoor gardeners can
decipher LED output with the following
equation: amperes X voltage = watts
A 2-watt LED is bright, but the bulb needs a
reflector.
(Ohm’s Law). Otherwise, light output
can become quite complicated and con
fusing. For example, a 3-watt LED that
runs at 350 mA yields 1-watt of light.
Small LEDs heat up quickly and lose
efficiency; that is, light energy is
converted to heat beyond a specific
operating temperature. The operating
temperature is a function of electric
current (mA) input.
The optimal temperature for each color
of LED ensures an accurate rendering
of color spectrum. At maximum tem
perature or too high of a temperature
the LED will fail. That is, if too much
current is run through the little LEDs
they get too hot, become inefficient
(light energy is transformed into heat),
and they fail (burn out).
Humidity is detrimental to circuits.
LED circuitry is exposed and must be
protected from humidity to avoid cor
rosion. The LEDs must be enclosed to
isolate them from exterior humidity.
282
LIGHT, LAMPS & ELECTRICITY
www.marijuanagrowing.com
LED Manufacture and Binning
Producing LEDs requires growing
a thin layer of crystal on a substrate
(supporting layer) of synthetic sapphire
or silicon carbide. The process must be
very tightly controlled across a range
of factors; in fact, much of the steady
increase in LED efficiency/brightness
comes from improved quality control in
manufacturing, rather than advances in
technology. Other efficiency increases
have come from modifying the struc
ture of the LED layer to help photons
that get created but then are trapped
within the structure of the LED layer.
This happens because the materials in
LEDs have a very high refractive index,
which causes any photons that strike the
surface of the LED chip at much of an
angle to be reflected back into the chip
and lost.
After the wafer is coated, it is cut into
thousands of tiny chips. It is difficult to
control the manufacturing process, so
each of these tiny chips will have slightly
different properties. That is, the voltage
requirement, wavelength, and brightness
will all be slightly different for each
chip! The distribution of the brightness,
wavelength, and voltage qualities of the
chips from each batch follows a standard
bell curve.
These chips are then individually tested
by machine and sorted into “bins”
according to their properties. Under
standing “binning,” (and that all LEDs
are not created equal) is super import
ant, especially if you plan to build your
own light fixture. For example, the
brightness of the same make and model
of LED can vary up to 100 percent,
depending on the bin designation, and
the voltage required can also vary by up
to 50 percent. This means that the LEDs
from best voltage/brightness bin put out
twice the light for two thirds the power
of LEDs from the worst bin. All quality
LED manufacturers have the bin codes
listed on their website.
LEDs are constantly improving in
brightness and efficiency, but unlike
the ever-increasing speeds of computer
CPUs, these improvements will slow
and eventually stop. This is because
unlike computer CPUs, which can
essentially get faster forever, LEDs
All high-quality LEDs in these EVO LED 70
fixtures are made by Cree. Each 70 cm fixture
contains four groups of LEDs. Each group of
9 LEDs provides 15 watts, for a total of 60
watts.
will eventually reach very close to 100
percent efficiency; experts believe they
will reach a maximum of about 90 per
cent. To achieve this percentage, chips
must be individually tested by machine
and sorted into bins according to their
properties.
Cost
An inexpensive 30- to 50-watt LED
fixture with emitter costs $0.65 to
$0.70 USD per watt. HIDs cost less
than $0.50 USD per watt. A 90-watt
LED grow light costs about $300 USD
when purchased at a garden store or
from a specialty retailer. However, three
30-watt LED floodlight fixtures cost
$66 USD when purchased at a discount
retailer. Remember, all LEDs are not
created equal.
LEDs have historically been more
expensive than most other light sources
due to complex manufacturing process,
high rejection rate, the cost of both
the material in the LED chip and the
substrate the chip was based on—
expensive synthetic sapphire. Improved
manufacturing processes has reduced
the reject rate, thin film technology has
reduced the amount of material required
to make the emitter, and many LEDs are
now being made on low-cost SiC (silicon
carbide) substrates. The efficiency and
consequent brightness of the LEDs has
also improved dramatically. Top-quality
LEDs can now achieve over 50 percent
efficiency. Now fewer LEDs are required
to achieve the same brightness in a light,
further lowering their cost.
This photo was taken a few minutes after
the previous one. Toni (see chapter 13, Case
Study #2), the photographer, changed the
light setting on his camera to show a different
spectrum oflight.
There is a huge variation in the cost
and quality of LEDs. High-quality,
high-brightness LEDs from top man
ufacturers such as Cree, Osram, and
Philips can cost 10 or 20 times as much
as low-quality Chinese LEDs, and there
is a large market in counterfeit LEDs.
LEDs and Heat
All electrical devices create heat, and
LEDs are no exception. One of the dif
ficulties of creating the first high-pow-
er light-emitting diode was to keep
the chip from melting! All the energy
consumed by an LED is converted into
either light or heat. The more efficient
the LED, the greater the amount of light
produced and the smaller the amount of
heat. For example, a high-quality blue
or white LED that consumes roughly
2.4 watts, and converts 50 percent of
its input into light, produces about 1.2
watts of heat. That may not sound like
much heat. But the LED is concentrated
into a super thin chip (1 mm X 1 mm).
Ifthechipwere30mmX30mmit
would generate over 1000 watts of heat!
A low-quality LED that converts only
20 percent of the electricity to light
generates about 1.92 watts of heat.
The heat must be removed or the chip
will overheat and fail. The cooler the
LED stays, the more efficiently it will
operate (produce more light) and the
longer it will last. The emitter (LED
chip) on high-end LEDs is mounted on
a base made of a special heat-conductive
ceramic. Less expensive LEDs use a
small piece of metal known as a “slug.”
Www.marijuanagrowing.com
283
Next the LED is soldered to a special
circuit board that is designed to trans
fer heat. The metal core printed circuit
board (MCPCB) is made from a layer
of aluminum covered with a thin layer
of a material that conducts heat well but
does not conduct electricity. This is the
dielectric layer. The higher the thermal
conductivity (measured in watts per
kelvin [W/K]), the better. Inexpensive
boards have a conductivity of about
0.5 W/K, better quality boards have a
rating of 1 W/K, and the highest quality
boards have a rating of 2.2 W/K. A bit of
copper is placed on top of the dielectric
layer to conduct electricity and provide
solder pads for mounting the LEDs and
a protective layer. These circuit boards
are often mounted to a heat sink that
could have a cooling fan.
Some lights have the LEDs mounted
on conventional plastic circuit boards
to save money. These plastic boards do
no conduct heat well and will cause the
LEDs to overheat and fail very quickly.
LED Power Ratings
Much confusion surrounds LED power
ratings. LEDs are rated in watts. How
ever, this rating is not the actual power
consumption of LEDs in watts. The
wattage rating of LEDs (1, 3, 5, 10 watts,
etc.) is actually a class or family rating,
and bears no real relationship to the
actual power consumed by the LED.
1-watt LEDs operate at 350 mA
3-watt LEDs operate at 700 mA
5-watt LEDs operate at 1000 mA
10-watt LEDs operate at 1500 mA
Note: Larger LEDs require higher
,voltages and are less efficient.
The “wattage classes” were set to
standardize power supplies, and so that
LEDs from different manufacturers
could be combined within the same
fixture. The standards were intended for
white and blue LEDs only. The name of
each rating (class) was fairly accurate—a
3-watt LED did consume about 3 watts.
But the efficiency of LEDs has increased
dramatically, and the voltage required to
drive the LED to 700 mA has dropped.
Today the average 3-watt white or blue
LED consumes about 2.4 watts. Dif
ferent colors of LEDs of the same class
Keep LEDs as close as possible to plants,
because light diminishes to the square of the
distance. Regardless of the benefits of LEDs—
many point sources and dialed-in light
frequencies—light is light, and all natural
laws remain in force.
consume different amounts of power,
because different colors use different
materials and require different voltages.
Wattage is calculated by Ohm’s Law.
The formula is:
watts=voksxamperes(W=VXA)
Here is a breakdown of the actual power
drawn by 3-watt-class LEDs of several
different colors.
Red/hyper red—2.4 volts, actual wattage
at700mAis2.4voks x 0.7watts= 1.68
watts
Blue/royal blue/white—3.4 voks, actual
wattage at 700 mA is 3.4 volts X 0.7
watts = 2.38 watts
Brilliance
When LEDs are “ganged,” or grouped
together, they can produce enough light
to grow medical cannabis. An LED
fixture must be 12 inches (30.5 cm) or
less from plants to be an effective light
source for cannabis cultivation.
Depending upon manufacturer, modern
LEDs produce from 40 to 70 lumens per
watt (Im/W). New and experimental
LEDs produce more than 200 lm/W. As
of 2014, Cree Incorporated markets an
LED that produces 152 lm/W. But, you
will see below that lumens per watt are
just part of the story.
The brightness of LEDs is rated in
two different ways, depending on their
wavelengths. LEDs between 640 nm
and 460 nm are rated in lumens. LEDs
with wavelengths longer than 640 nm
or shorter than 460 nm are rated by
LEDs can be configured in many different
color combinations. This photo shows less-
intense purple light, causing lower leaves to
display green.
their radiant power (radiant flux) in mW
(milliwatts).
Lumens are not a good measurement
system for measuring the output of
LEDs. It is not a linear system, meaning
that it does not measure all wavelengths/
colors equally. It was developed as a mea
surement for visible light and measures
apparent brightness—how bright a light
appears to the human eye. Lumens were
developed to rate white light sources
rather than to measure monochromatic
LED light sources. Furthermore, human
eye response to light is extremely uneven
Colors in the center of the visible spec
trum such as green appear much brighter
than an equally bright light or red or
blue.
Lumens can be used only to compare
(LED) light sources with the exact same
wavelength. This explains why some
LEDs with wavelengths of 660 nm
hyper, near the extremes of human
vision, are often rated as “dominant
wavelength 640 nm.”
Spectrum
Note: The spectrum of each LED may
also dictate brilliance and light output.
LEDs are monochromatic, unlike com’
mon CFLs, fluorescents, etc. LEDs pro
duce a single color over a narrow range
of wavelengths. White LEDs are actuall)
blue, or sometimes ultraviolet. Some
LEDs have a phosphor coating (aka
downshift phosphor), which absorbs
the blue light and re-emits it at longer
wavelengths. The phosphor coating
contains a mix of different phosphors,
284
LIGHT, LAMPS & ELECTRICITY
www.marijuanagrowing.cofl'
r------------------------------------------------------------------ 1
MOST LED GROW LIGHTS
CONSIST OF LEDS WITH THE
FOLLOWING WAVELENGTHS:
hyper red
660 nm
red
630 nm
blue
470 nm
royal blue
<
!■ ■■■■—..... ..
450 nm
r—’
THEY MAY ALSO INCLUDE
SOME OF THE FOLLOWING:
far red
740 nm
orange (amber) 617 nm
yellow
590 nm
green
530 nm
UV (technically 390 nm
near UV)
■■ -J
each of which emits a different color,
which combine to create white light.
The proper mix of colors causes differ
ent temperatures, and that creates white
light. More red and less blue creates a
warmer white. More blue and less red
yields a cooler white.
Note: The human eye perceives cooler
whites as brighter than warmer whites.
This is why they have higher lumen rat
ings even though they may not actually
produce more photons.
White light is categorized by its color
temperature. This is the temperature of
a “black body” (an object that does not
reflect any light) that has been heated
until the light it gives off matches the
hue of the white light source. The color
temperature of the white light is equal to
the temperature in kelvins of the surface
of the glowing black body.
LED grow lights take advantage of the
availability of LEDs of different wave
lengths to make lamps that only create
light at the wavelengths the plant can
use most efficiently. In other words, the
wavelengths match the plants’ photosyn
thetic absorption peaks.
LEDs can be arranged in rows, clusters, and
circles. Note the combination of red and blue
light in this LED fixture.
LED technology allows manufacturers
to literally dial in the spectrum of fix
tures to produce incredibly high PAR
ratings. This point alone makes them
more efficient per watt.
LED Bulbs and Tubes
A vast array of retrofit LEDs can be
packed into a larger bulb that fits in a
household incandescent screw fitting.
Such bulbs cost from $15 to $30 USD
and are generally not bright enough
to grow plants well. They are rated in
replacement terms for an incandescent
bulb. For example, a 15.5-watt LED
bulb replaces a 75-watt incandescent.
LED tubes are shaped like regular T12,
T8, and T5 fluorescent bulbs, but the
LEDs emit the characteristic purple glow that
turns all the photographs purple!
tubes are filled with LEDs. More than
200 LEDs will fit in a 4-foot (121.9 cm)
T12 tube. But not all LEDs are created
equal. LED tubes are filled with little
LEDs. An energy-efficient 22-watt
4-foot T8 LED tube produces 1248
lumens. They do not fit in existing T8
fluorescent fixtures. The flicker-free
tubes have a lifetime of more than
50,000 hours.
T8 red tubes are 660 nm and contain 288
LED bulbs. Spectrums can also be split
into blue and white with a 50/50 split
between LEDs of 420 nm/5500 K that
contain 144 red and 144 white LEDs.
Some fixtures allow LED tubes to be
mixed with T8 fluorescent tubes to im
prove spectrum. The tubes run cool and
can be placed within inches of plants.
/
LED Fixtures
Usually, different LEDs are combined
in a fixture to achieve a specific light
spectrum. A series of individual LEDs
can be mounted and hardwired into a
single fixture that is square, rectangular,
or circular. Or the fixture can contain
long T12 and T8 glass tubes loaded with
LEDs.
The most practical fixtures allow indi
vidual clusters of LEDs packed in a bulb
to be easily replaced. Such fixtures also
make upgrading to LEDs inexpensive.
LED vs. HID Lamps
We can easily compare LED and HID
wattage, lumen output, and lm/W
output. But comparing milliwatts per
square meter (mW/m2) and PAR watts
are the true measures of the light plants
need for photosynthesis. Comparing
PAR watts makes the best comparison.
However, LEDs have several qualities
Plants show their natural green color when the
LEDs are turned off
www.marijuanagrowing.com
285
Combining HP sodium lamps with LEDs
makes a winning combination forflowering.
Incandescent “grow lights” are inefficient and
inadequate to grow medicinal cannabis. These
lamps direct heat and light with an interior
reflector.
Tungsten halogen (aka quartz iodine) lamps
are incandescent lamps with a little hit ofa
halogen, (often iodine or bromine) added to
the envelope. Tungsten halogen lamps retain
clarity and are operated at very high tempera
tures. These lamps are inefficient in terms of
lumens-per-watt conversion, and produce too
much heat to be practical garden lights.
Incandescent lamps are inefficient. They
produce light by heating a filament wire with
electricity until it glows and produces light.
The filament is enclosed in a glass bulb filled
with inert gas. This antiquated, inefficient
technology was popularized by Thomas
Edison.
that HIDs don’t have. LEDs produce
very little heat and can be placed closer
to the canopy of the garden, which
inherently provides plants with more
bright light.* LED light is also able to
be focused and directed through a lens,
which intensifies the light. This factor
can be compared when we look at overall
fixture brilliance only.
There are also a few spectrum details
that must be addressed. LED fixtures
can contain a few to hundreds of LEDs.
The LEDs can be of many different
spectrums. Fixtures are manufactured
to include LEDs of different spectrums
to provide the highest ratings for plant
growth. However, I have had a difficult
time finding accurate brilliance tests for
LED fixtures.
" See the “Inverse Square Law” on page
259, earlier in this chapter.
End of Life
LEDs have a life from 25,000 to 50,000
hours, and sometimes longer. They fail
by dimming over time. LEDs are so new
to gardeners that there is no specific
information about when to replace them.
Many LEDs with a range of spectrums
are packed together in fixtures. A single
LED that fails or is not as bright as
others may not affect the overall output
of the fixture enough to warrant replac
ing. Overall, I can recommend replacing
a fixture when it yields 85 to 95 percent
light output.
Do not worry about tossing out hazard
ous substances when disposing of LEDs.
175 w
rW
400 w
A/
1000 w
—I
1200-2000
_______
3500-5500
____
9000-12000
1 ft.
500-1000
1400-3000
5500-8000
2 ft.
250-400
600-1200
2500-4000
3 ft.
300-500
1500-2000
4 ft.
500-1200
5 ft.
They contain no mercury to pollute the
environment. LEDs and fixtures can be
recycled.
Other Lamps
Several other lamps deserve a short
mention, primarily so that they will not
be used. Cannabis grows poorly under
these lamps. These lamps produce more
heat than light, and in a spectrum that is
not compatible with plant growth.
286
LIGHT, LAMPS & ELECTRICITY
www.marijuanagrowing.com
Getting the Most Artificial Light
A 175-watt HID yields enough light
to effectively grow a 2 X 2-foot (61 X
61 cm) garden. Notice how fast light
intensity diminishes more than a foot
from the bulb.
A 250-watt HID will illuminate up to a
3 x 3-foot (91.4 X 91.4 cm) area. Keep
the bulb from 12 to 18 inches (30.5 -
45.7 cm) above plants.
A 400-watt HID delivers plenty of light
to effectively illuminate a 4 X 4-foot
(1.2 x 1.2 m) area. Hang the lamp from
12 to 24 inches (30-61 cm) above the
canopy of the garden.
A 600-watt HP delivers enough light to
effectively illuminate a 4 X 4-foot (120
X 120 cm) area. Hang the lamp from 18
to 24 inches (30.5 -60 cm) above plants.
A 1000-watt HID delivers enough light
to effectively illuminate a 6 X 6-foot
(1.8 X 1.8 m) area. Some reflective
hoods are designed to throw light over a
rectangular area. Large 1000-watt HIDs
can burn foliage if located closer than
24 inches (61 cm) from plants. Move
HIDs closer to plants when using a light
mover.
Lamp Spacing
Light intensity almost doubles every
6 inches (15.2 cm) closer an HID is to
the canopy of a garden. When PAR light
intensity is low, plants stretch for it.
Low light intensity is often caused by
the lamp being too far away from plants.
Dim light causes sparse foliage and spin
dly branches that are prone to disease
and pest attacks.
1000 watt: lm/W = 140
1 foot (30.5 cm) away 140,000 lumens
2 feet (61 cm) away 35,000 lumens
3 feet (91.4 cm) away 15,555 lumens
4 feet (121.9 cm) away 9999 lumens
1000-watt HP sodium @ 4 feet =
10,000 lumens
4x4 = 16 square feet, 1000 watts/16
square feet = 62.5 watts per square foot
1000 W/m2 = 100 W/cm2
600 watt: lm/W =150
1 foot (30.5 cm) away 90,000 lumens
2 feet (61 cm) away 22,500 lumens
3 feet (91.4 cm) away 9,999 lumens
4 feet (121.9 cm) away 6428 lumens
600-watt HP sodium @ 3 feet = 10,000
lumens
3x3 = 9 square feet, 600 watts/9
square feet = 66 watts per square foot
600 W/m2 = 6 w/cm2
400 watt: lm/W = 125
1 foot (30.5 cm) away 50,000 lumens
2 feet (61 cm) away 12,500 lumens
3 feet (91.4 cm) away 5555 lumens
4 feet (121.9 cm) away 3571 lumens
400-watt HP sodium @ 2.25 feet =
10,000 lumens
2.25 X 2.25 = 5 square feet, 400 watts/5
square feet = 80 watts per square foot
400 W/m2 = 4 w/cm2
400 watt: lm/W = 100
1 foot (30.5 cm) away 40,000 lumens
2 feet (61 cm) away 10,000 lumens
3 feet (91.4 cm) away 4444 lumens
4 feet (121.9 cm) away 2857 lumens
400-watt metal halide @ 2 feet = 10,000
lumens
2x2 = 4 square feet, 400 watts/4 = 100
watts per square feet
400 W/m2 = 4 w/cm2
Increase yield by giving gardening area
uniform light distribution. Uneven light
distribution causes strong branch tips to
grow toward the intense light. Foliage
1000 w
Three 400-watt bulbs (1200 watts) effectively
cover up to 40 percent more growing area
than one 1000-watt lamp. The lower-wattage
bulbs are placed closer to plants, which
increases light intensity.
in dimly lit areas is shaded when light
distribution is uneven.
Reflective hoods ultimately dictate lamp
placement—distance between lamps and
above the plants. Nearly all stationary
lamps have bright (hot) spots that plants
grow toward.
Gardeners prefer high wattage lamps—
400, 600, 1000, or 1100 watts—because
they produce more lumens per watt and
their PAR rating is higher than lower-
wattage bulbs. Plants receive more light
when the lamp is closer to the plants.
Even though 400-watt lamps produce
fewer lumens per watt than a 1000-watt
bulb, when properly set up they actually
deliver more usable light to plants. The
600-watt bulb has the highest lumens-
per-watt conversion (150 lm/W), and
can be placed closer to the canopy of
the garden than the 1000- or 1100-watt
bulbs—without burning foliage.
For example, the lumens-per-watt
conversion is lower with 400-watt bulbs
than with 1000-watt bulbs, but hanging
five 400-watt lamps over the same area
that two 1000-watt lamps cover pro
vides more even distribution of light,
and minimizes shading. The lamps burn
cooler and can be placed closer to plants.
The 400-watt lamps also emit light
from 5 points, where the higher wattage
bulbs emit from 2. Overall, bright light
coverage is increased with the 400-watt
lamps even though their lumens-per-
watt conversion is lower.
1000 w 1000 w
Three 600-watt bulbs (1800 watts) deliver
more intense light to a garden than two 1000-
watt lamps (2000 watts). Three points oflight
provided by the 600-watt bulbs distribute
light better than when the light is generated by
two lamps. The 600-watt lamps can also be
placed closer to the garden canopy.
www.marijuanagrowing.com
287
Side lighting in this room helps plants fill out
all the way around. Most often, however, side
lighting is much less efficient than overhead
lighting.
Two banks offluorescent light illuminate this
plant at night. The extra light keeps the plant
from flowering in the spring. Such side lighting
is impracticalfor most gardeners.
This table has wheels on the bottom and can
be moved back and forth. There are three
tables with wheels in this room. Tables are
moved back and forth to create a walkway
between them. Having only one walkway
increases growing area and production.
Three 600-watt lamps that produce
270,000 lumens from three point
sources, instead of two 1000-watt HPS
lamps yielding 280,000 lumens from two
points, decrease total light output by
10,000 lumens but increase the number
of sources of light. Lamps can be placed
closer to plants, increasing efficiency
even more.
Side Lighting
Lighting from the side is generally not as
efficient as lighting from above. Vertically
oriented lamps without reflectors are
efficient but require plants to be oriented
around the bulb. To promote growth,
light must penetrate the dense foliage of
a garden. The lamps are mounted where
light intensity is marginal—along the
walls—to provide sidelight.
Compact fluorescent lamps are not a
good choice for side lighting when using
HID lamps. (See “Compact Fluorescent
Lamps” on page 277.
The longer that plants are in the flow
ering growth stage, the more light they
need. During the first 3 to 4 weeks of
flowering, plants process a little less
light than during the last 3 to 4 weeks.
Plants flowering during the last 3 to 4
weeks are placed directly under the bulb,
where light is the brightest. Plants that
have just entered the flowering room can
stay on the perimeter until the more
mature plants are moved out. This
simple technique can easily increase
harvests by 5 to 10 percent.
Add a shallow shelf around the perim
eter of the garden to use light that is
consumed by the walls. This sidelight is
often very bright and very much wasted.
Use brackets to put up a 4- to 6-inch-
wide shelf around the perimeter of the
garden. The shelf can be built on a slight
angle and lined with plastic to form a
runoff canal. Arrange small plants in
6-inch pots along the shelf. Rotate them
so they develop evenly. These plants can
either flower on the short shelf or when
moved under the light.
Installing rolling beds in greenhouses
and garden rooms will remove all but
one walkway from the garden. Green
house gardeners learned this space
saving technique long ago. Gardens
with elevated beds often waste light on
walkways. To make use of more garden
ing area, place two 2 inch (5 cm) pipes
or wooden dowels below the garden
ing bed. The pipe allows the beds to
be rolled back and forth, so only one
walkway is open at a time. This simple
technique usually increases gardening
space by up to 25 percent.
Growing a perpetual crop and flowering
only a portion of the garden allows for
more plants in a smaller area and a
higher overall yield. See chapter 4, Can
nabis Life Cycle, for more information
on “Perpetual Crops.”
Rotating Plants
Rotating the plants will help ensure
even distribution of light. When pos
sible, rotate plants every few days by
moving them one-quarter to one-half
turn. Rotating promotes even growth
and fully-developed foliage. Move plants
around under the lamp so they receive
the most possible light. Move smaller
plants toward the center, and taller
plants toward the outside of the garden.
Set small plants on a stand to even out
the garden profile.
Containers on wheels rotate easily. Make sure
wheels are large enough to support the weight
of moisture-laden substrates.
Light intensity is brightest directly under
the bulb. Arrange plants under lamps so they
receive the same intensity oflight. Plants can
also be put up on a support to move them
closer to the bulb and more intense light.
288
LIGHT, LAMPS & ELECTRICITY
www.marijuanagrowing.com
Outdoors, big plants that receive full sunlight
all day long must be spaced much further
apart, on 12-foot (3.7 m) centers to ensure
adequate room for growth.
Plant Spacing
Outdoors and in greenhouses, medical
cannabis gardeners must allow for rapid,
robust growth. This requires extra space
between plants. Greenhouse crops can be
easily controlled with light-deprivation
techniques. Outdoor plants that receive
full sun and are able to grow for several
months reach heights of more than 12
feet (3.7 m) and are 12 feet (3.7 m) in
diameter. Proper planning requires that
such seedlings and clones be planted on
a minimum of 12-foot (3.7 m) cen
ters to allow for adequate growth and
ventilation. See chapter 12, Outdoors,
and chapter 13, Case Studies, for more
information.
When light shines on a garden, the leaves
near the top of plants get more intense
light than the leaves at the bottom. The
top leaves create shade, making less light
energy available to lower leaves. If the
lower leaves do not receive enough light,
they will yellow and die.
Six-foot-tall (1.8 m) plants take longer
to grow and have higher overall yields
than shorter 4-foot-tall (1.2 m) plants,
but the yield of primo tops will be about
the same. Due to lack of light, the taller
plants have large flowers on the top 3 to
4 feet (91.4 -121.9 cm) and spindly buds
nearer the bottom. Tall plants tend to
develop heavy flower tops whose weight
the stem cannot support. These plants
need to be tied up. Short plants better
support the weight of the tops and have
much more flower weight than leaf
weight.
At least 99 two-week-old seedlings or
clones can be huddled directly under a
single 400-watt HID. The young plants
will need more space as they grow. If
crowded too closely together, plants
sense the shortage of space and do
not grow to their maximum potential.
Leaves from one plant shade another
plant’s foliage and slow the overall plant
growth. It is very important to space
young plants just far enough apart
so their leaves do not touch or touch
very little. This will keep shading to a
minimum and growth to a maximum.
Check and alter the spacing every few
days. Eight to 16 mature females that are
3 to 4 months old will completely fill the
space under one 1000-watt HID.
Plants can absorb light only if it falls
on their leaves. Plants must be spaced
so their leaves do not overlap too much.
Yield increases very little when plants
are crowded. Plants also stretch for light,
which makes less efficient use of intense
light. The most productive number of
plants per square foot or square meter
is often a matter of experimenting to
find the magic number for your garden.
In general, each 40-inch square (1 m2)
space will hold from 16 to 32 plants.
Reflective Hoods
Some reflective hoods reflect more
light and more evenly than others do. A
reflector that distributes light evenly—
with no hot spots—can be placed closer
to plants without burning them. These
hoods are most efficient because the
lamp is closer and the light more intense.
This garden is well maintained and fast
growing. Top leaves may shade bottom leaves
now, but the buds receive intense light and
will be harvested in about a week.
Plants in this garden are spaced a little too far
apart to take advantage of all the light in the
room.
The large bed below the metal halide lamp is
crowded with rooting clones.
www.marijuanagrowing.com
289
This bulb from Gavita has a reflector built in.
The internal reflector is very efficient because
it is close to the bulb and always in the same
position.
The Adjust-A-Wing is adjustable for different
coverage patterns. It dissipates heat quickly
and is incredibly efficient.
The Gavita Pro 1000-watt Double Ended
lamp is attached at both ends, which allows
electricity to flow in only one direction in
the bulb.
The farther the lamp is from the garden,
the less light plants receive.
When used in conjunction with reflec
tive walls, the proper reflective hood
over the lamp can double the gardening
area. Gardeners who use the most effi
cient reflective hoods can harvest up to
twice as much as those who don’t.
Reflective hoods are made from steel
sheet metal, aluminum, or even stain
less steel. The steel is either cold-rolled
or prc-galvanized before a reflective
coating is applied. Pre-galvanized steel
is more rust resistant than cold-rolled
steel. This metal can be polished,
textured, or painted, with white being
the most common paint color. Hood
manufacturers apply white paint in a
powder-coating process.
Notes: There are different shades of
white, and some whites are whiter than
others. Flat white is the most reflective
color and diffuses light most effectively.
Glossy white paint is easy to clean but
tends to create hot spots of light. Also,
sheet metal hoods are less expensive
than the same size aluminum hood,
because of reduced materials expense.
Seedlings, cuttings, and plants in the veg
etative growth stage need less light than
flowering plants because their growth
requirements are different. For the first
few weeks of life, seedlings and clones
can easily survive beneath fluorescent
lights. Vegetative growth requires a little
more light, easily supplied by metal
halide or compact fluorescent lamps.
Pebble and hammer-tone surfaces offer
good light diffusion and more surface
area to reflect light. Hot spots are com
mon among highly polished surfaces.
Mirror-like hoods also scratch easily and
create uneven lighting.
Premium reflective hood manufacturers
use a special process developed in
Germany that puts a mirror-like reflec
tive surface on aluminum so that it does
not oxidize. The slightest bit of oxida
tion cuts reflectivity.
The bulb should also fit firm and
straight in the reflector, at perfect
parallel angle to the reflective hood.
When the bulb does not stay parallel to
the reflector, the light pattern below is
out of whack and inconsistent.
Reflective hoods become dirty and may
be scratched when cleaned, resulting in
a loss of up to 5 percent of their reflec
tive ability every year. If they are dirty
and not regularly cleaned, reflective loss
increases. Changing the reflective hood
every year will ensure that the reflector
provides the maximum amount of
reflection over time. More than 65
percent of the light is reflected by the
reflector.
Clean reflectors with a mild detergent
and water. Use a soft dry cloth to avoid
scratching. Do not touch the reflective
part of reflector hoods.
Do not use sulfur vaporizers when gar
den lamps are on, and do not use sulfur
vaporizers and misters close to lumi
naires. Sulfur and calcium deposits will
damage lamps’ reflective surfaces and
decrease the efficiency of reflectors.
Air-cooling high-frequency lamps
causes them to run below peak oper
ating temperature, which also lowers
their efficiency and changes the color
spectrum somewhat.
Air-cooled reflective hoods allow lamps to be
placed much closer to plants without fear of
heat damage. Light is much more intense
when close to plants, and therefore provides
greater value.
290
LIGHT, LAMPS & ELECTRICITY
www.marijuanagrowing.com
Horizontal reflectors are the most reflective.
A 1000-watt reflector with a hot spot must be
placed 36 inches (91.4 cm) above the gar
den. A 600-watt lamp with a reflector that
distributes light evenly can be placed 18 inches
(45.7 cm) above the garden. When placed
closer, the 600-watt lamp shines as much light
on the garden as the 1000-watt bulb!
The Adjust-A-Wing was the first adjustable
reflector available. This reflector has been
improved over the years and is one of the most
popular available.
Horizontal Reflective Hoods
Horizontal reflectors are most efficient
for HID systems, and are the best value
for gardeners. A horizontal lamp yields
up to 40 percent more light than a lamp
burning in a vertical position. Light is
emitted from the arc tube. When the arc
tube is horizontal, half of this light is
directed downward to the plants, so only
half of the light needs to be reflected.
Horizontal reflective hoods are available
in many shapes and sizes. The closer the
reflective hood is to the arc tube, the less
distance light must travel before being
reflected. Less distance traveled means
more light reflected. Horizontal reflec
tors are inherently more efficient than
vertical lamps/reflectors, because half
of the light is direct and only half of the
light must be reflected.
Horizontal reflective hoods tend to have
a hot spot directly under the bulb. To
dissipate this hot spot of light and lower
the heat it creates, some manufacturers
install a light deflector below the bulb.
The deflector diffuses the light and heat
directly under the bulb. When there is no
hot spot, reflective hoods with deflectors
can be placed closer to plants.
Horizontally mounted HP sodium
lamps use a small reflective hood for
greenhouse culture. The hood is mount
ed a few inches over the horizontal HP
sodium bulb. All light is reflected down
toward plants, and the small hood cre
ates minimum shadow.
Adjustable Horizontal
Reflective Hoods
An adjustable reflector allows light to
overlap in the middle and less light to
shine on the wall on its other side.
Vertical Reflective Hoods
Reflectors with vertical lamps are less
efficient than horizontal ones. Like
horizontal bulbs, vertically mounted
bulbs emit light from the sides of the arc
tube. This light must strike the side of
the hood before it is reflected downward
to plants. Reflected light is always less
intense than original light. Light travels
farther before being reflected in parabol
ic or cone reflective hoods. Direct light
is more intense and more efficient.
Parabolic dome reflectors offer the
best value for vertical reflectors. They
reflect light relatively evenly, though
they throw less overall light than
horizontal reflectors. Large parabolic
dome hoods distribute light evenly and
reflect enough light to sustain vegetative
growth. The light spreads out under
the hood and is reflected downward
to plants. Popular parabolic hoods are
inexpensive to manufacture, and provide
a good light value for the money. Four-
foot parabolic hoods are usually manu
factured in nine parts. The smaller size
facilitates shipping and handling. The
customer assembles the hood with small
screws and nuts.
These guidelines will give plants all the light they need to form dense buds. Less light will often
cause looser, less-compact buds to form.
ri
MAXIMUM LIGHT REQUIREMENTS FOR PLANTS
Growth Stage
Foot-Candles
Lux
Hours of Light
seedling
375
4000
16-24
clone
375
4000
18-24
vegetative
2500
27,000
18
flowering
v
... - ------ ------- --
10,000
107,500
12
—.... ..
I, ✓ This HortiStar reflector has adjustable sides to
adjust light pattern when the luminaire is next
to a wall. It also has a replaceable reflector
that snaps into place inside the hood.
www.marijuanagrowing.com
291
Vertical parabolic reflectors throw a wide,
even pattern oflight but are not as efficient as
horizontal reflectors.
A heat vent outlet around the bulb helps dissi
pate heat into the atmosphere. Excessive heat
around the bulb causes premature burnout.
Lightweight reflective hoods with open
ends dissipate heat quickly. Extra air
flows directly through the hood and
around the bulb in open-end fixtures to
cool the bulb and the fixture. Aluminum
dissipates heat more quickly than steel.
Train a fan on reflective hoods to speed
heat loss.
Artificial light fades as it travels from its
source (the bulb). The closer you put the
reflector to the bulb, the more intense
the light it reflects. Enclosed hoods with
a glass shield covering the bulb operate at
higher temperatures. The glass shield is a
barrier between plants and the hot bulb.
Enclosed hoods must have enough vents;
otherwise, heat buildup in the fixture
causes bulbs to burn out prematurely.
Many of these enclosed fixtures have a
special vent fan to evacuate hot air.
Air-Cooled Lamp Fixtures
Several air-cooled lights are available.
Some use a reflective hood with a pro
tective glass face and two squirrel cage
blowers to move air through the sealed
reflective-hood cavity. The air is forced
to travel around corners, which requires
a higher velocity of airflow. Other air
cooled reflectors have no airflow turns,
so the air is evacuated quickly and
efficiently.
Air-cooled reflective hoods are not
recommended for use with electronic
ballasts and corresponding HID bulbs.
Air-cooled reflectors lower the operat
ing temperature of bulbs, which changes
the lamp spectrum and lowers efficiency.
Air-cooled fixtures are inexpensive to
operate and easy to set up.
Water-Cooled Lamp Fixtures
Water-cooled lamp fixtures are expen
sive and impractical for environmentally
conscious medical gardeners. I have
never seen one being used in a garden
room, even though they run cooler and
can be moved closer to plants. The water
and outer jacket account for a 10 percent
lumen loss. On an average day, a 1000-
watt bulb uses about 100 gallons of water
to keep cool, if the water runs to waste.
To recirculate the water requires a big
reservoir. The water in the reservoir that
serves a recirculating cooling system
must also be cooled. Reservoir coolers
can easily cost $1000 USD.
No Reflective Hood
Lamps burn cooler and emit only direct
light with no reflective hood. Bulbs
are hung vertically in between plants.
Circular gardens use no reflective hoods
so that no light is reflected and plants
receive only direct light.
Hortilux Medium 600 HPS
This light study was a simple matter of taking measurements and entering them into an Excel
spreadsheet, then clicking the graph button.
Reflective-Hood Light Distribution
Reflective hoods are designed to throw
light over a specific area. Mounting
height affects the effective light coverage
and intensity.
The light reflected and the overall
light emitted using specific reflective
hoods are scientifically measured with
a 108-degree arc divided into 5-degree
increments from the center of the
bulb’s base. Light measurements are
taken along the arc and plotted on a
graph to show the light output of
specific luminaires.
Reflectors are responsible for about
66 percent of all light plants receive
from specific luminaries. For example,
Gavita rates their lamps as 96 percent
efficient, and their figures are based on
33 percent direct light from the bulb and
66 percent reflected light.
Measure the light output from reflec
tive fixtures when the room is being set
up. Make sure each square inch (cm2)
receives adequate light.
You can make your own light tests; all
you need is a light meter and a room with
no ambient light. Hang a lamp
3 feet (91.4 cm) from the floor. Make
sure the bulb and arc tube are parallel
to the floor. Mark a grid on the floor,
putting dots every 12 inches (30.5 cm).
Mark 12-inch (30.5 cm) increments on
the walls, starting from the floor. Center
the grid under the bulb. Position the bulb
parallel and exactly 3 feet from the floor.
292
LIGHT, LAMPS & ELECTRICITY
www.marijuanagrowing.com
HID lamps having no reflector can be placed between plants. Bright light is dispersed from the sides of each arc tube.
Warm up the lamp for 15 minutes before
taking measurements.
Take foot-candle or lux readings every
12 inches (30.5 cm) and post the results
to a spreadsheet program such as Micro
soft Excel. Spreadsheet graph programs
have a graph button that converts the
spreadsheet tabulations into several
different kinds of graphs.
You will learn that all bulbs and reflective
hoods are not created equal!
Check out International Light Technol
ogy’s “Light Measurement Handbook”
available free on the Internet. The 64-
page technical book answers endless light
questions. Download the book in a few
minutes—drawings, graphs, charts, and
all—at www.Intl-Light.com/handbook.
Reflective Light
Reflective walls increase light in the
gardening area. Less-intense light on the
perimeter of gardens is wasted unless
it is reflected back onto foliage. Up to
95 percent of this light can be reflected
back toward plants. For example, if 500
foot-candles of light is escaping from
the edge of the garden and it is reflect
ed at the rate of 95 percent, then 475
foot-candles will be available on the
edge of the garden.
Reflective walls should be 6 to 12 inches
(15.2 -30 .5 cm) or less from the plants
for optimum reflection. Ideally, take
walls to the plants. The easiest way to
install mobile walls is to hang the lamp
near the corner of a room. Use the two
corner walls to reflect light. Move the
two outside walls close to plants to
reflect light. Make the mobile walls from
lightweight plywood, Styrofoam, or
white Visqueen plastic.
White Visqueen walls are easy to install and
easy to keep clean. They add about 10 percent
more light around the perimeter of the garden.
v/ww.marijuanagrowing.com
293
Reflective walls on two sides of the garden
reflect light back to plants. The light escaping
out the two open sides is wasted.
You can see the difference white walls make in
this mother room.
Using white Visqueen plastic to "white
out” a room is quick and causes no
damage to the room. Visqueen plastic
is inexpensive, removable, and reusable.
It can be used to fabricate walls and to
partition rooms. Waterproof Visqueen
also protects the walls and floor from
water damage. Lightweight Visqueen is
easy to cut with scissors or a knife, and
can be stapled, nailed, or taped.
To make the white walls opaque, hang
black Visqueen on the outside. The dead
airspace between the two layers of Vis
queen also increases insulation. The only
disadvantages of white Visqueen plastic
are that it is not as reflective as flat white
paint, it may get brittle after a few years
of use under an HID lamp, and it can be
difficult to find at retail outlets. Using
flat white paint is one of the simplest,
least expensive, and most efficient ways
to create reflective walls.
While easy to clean, semigloss white
is not quite as reflective as flat white.
Regardless of the type of white used,
a nontoxic, fungus-inhibiting agent
should be added when the paint is
mixed. A gallon (3.8 L) of good flat
white paint costs less than $25 USD.
One or two gallons should be enough
to “white out” the average garden room.
Use a primer coat to prevent bleed-
through of dark colors or stains or if
walls are rough and unpainted. Install
vent fans before painting. Fumes are un
pleasant and can cause health problems.
Painting is labor-intensive and messy,
but it’s worth the trouble.
Reflective Surfaces
Aluminum foil is one of the worst
possible reflective surfaces and no more
than 55 percent reflective. The foil tends
to crinkle up and reflects light in many
directions—actually wasting light. It
also creates hot spots and reflects more
ultraviolet rays than other surfaces.
C3 Anti-detection film is a specialized
type of Mylar that exhibits the same
properties as the 2-mil-thick (0.002
inches) Mylar, but in addition to reflect
ing approximately 92 to 97 percent of
the light, it is also 90 percent infrared
proof and virtually invisible to infrared
scanning and thermal imaging.
Emergency thin polyester (camping)
blankets are constructed of a single layer
of polyester film that is covered with
a layer of vapor-deposited aluminum.
These blankets are not very effective at
reflecting light because they are so thin
and permeated with countless tiny holes.
They can also create hot spots when
wrinkled or not attached flush to the wall.
Flat white paint is a great option for
large grow rooms or for people who are
interested in a low-maintenance wall.
Flat white paint has the ability to reflect
between 75 and 85 percent of the light,
and it does not create hot spots. Glossy
white is easier to clean but contains
light-inhibiting varnish. Semigloss paint
F
MATERIAL
1
PERCENT
REFLECTED
aluminum foil
70-75
black
<10
C3 Anti-detection
film emergency
blanket
92-97
' flat white paint
75-85
Foylon
94-95
Mylar
90-95
Styrofoam
7580
rubberized white
■ paint
7580
Visqueen (white)
7580
white paint (flat)
85-93
white paint (semi-
gloss)
75-80
yellow paint (flat)
L----------------
70-80
provides a more reflective surface and
is easy to clean. Adding a fungicide is
recommended when painting. Paint that
has lead pigment—banned in the USA
in 1978—is toxic and not to be used.
Paint concrete walls with elastomeric
paint to provide a tough and thick coat
ing that also waterproofs most surfaces,
including stucco, masonry, concrete with
cracks, and concrete blocks. Some elasto
meric paints are compatible with wood.
Foylon is a reflective material that
reflects light and heat in an evenly
dispersed pattern. It is durable, and it
reflects about 95 percent of the light that
hits it. The material is plied with ripstop
fiber and is thick enough to act as an
insulator. It is also heat and flame resis
tant. For more information on Foylon,
see www.greenair.com.
LIGHT, LAMPS & ELECTRICITY
www.marijuanagrowing.com
Foylon is a more durable version of
Mylar, made of spun polyester fabric and
reinforced with foil laminate. Foylon is
resistant to most solutions, won’t tear
or fade, and can be wiped or washed
clean. More expensive and more durable
than Mylar, Foylon reflects about 85
percent of heat energy and requires good
ventilation. Attach Foylon to walls with
Velcro, so that it can be easily removed
for cleaning.
Mirrors also reflect light, but much
less than Mylar. Light must first pass
through the glass in the mirror before it
hits the "silver” or metal amalgam. Light
is lost when it is reflected back through
the same glass.
Mylar, a thin (1-2-mil [0.001-0.002 in.])
mirror-surface sheeting in a roll format,
provides a very reflective surface—up to
95 percent. Unlike light-absorbing paint,
reflective Mylar reflects almost all light.
To install reflective Mylar, simply tape
or tack it to the wall. To prevent rips or
tears, place a piece of tape over the spot
where the staple, nail or tack will be
inserted. Although expensive, Mylar is
preferred by many gardeners. The trick
is to position it flat against the wall.
When loosely affixed to surfaces, light is
poorly reflected. To increase its effec
tiveness, keep reflective Mylar clean.
Polystyrene foam (Styrofoam) sheeting
is reflective and serves to insulate too.
Light reflected from Styrofoam is dif
fuse, with no hot spots. Purchase rigid
foam sheets to use as freestanding walls,
or else tape, glue, or nail sheets to walls.
Rubberized roofing paint reflects up
to 90 percent of the light that hits it. It
A. Specular: Mylar and mirror give the best
strength oflight, but it is concentrated. About
90 percent of the light is transferred.
B. Diffuse: Equivalent to a non-shiny (matte)
surface
C. Spread: Flat white surface that is diffuse
with reasonable spread
is mildew resistant, high viscosity, and
rubberized to form a rubberlike blanket
that expands and contracts. It adheres
to most surfaces, wood and metal alike.
Rubberized paints are available at most
hardware stores.
Visqueen plastic, in both white and
white/black, is easy to clean and is per
fect to use as walls or to cover walls of
garden rooms. Attach white Visqueen to
existing walls with screws, tape, or glue,
or hang white/black plastic from ceiling
to form garden-room walls. The black
side does not allow light to penetrate.
The white side is 75 to 90 percent reflec
tive. Always use heavy, 6-mil Visqueen.
Increase light without adding more
watts of light
Use several 400- or 600-watt lamps
instead of one or two 1000s.
Manually rotate plants on a regular basis.
Add a shelf around perimeter of garden.
Install rolling beds.
Grow a perpetual crop.
Use a light mover.
Move small plants closer to the light.
Movable reflective walls are easy to
remove for maintenance, and they give
maximum reflection. Insulated green
house mobile blankets also make great
garden room partitions.
Light Movers
A light mover is a device that moves
lamps back and forth or in circles across
the ceiling of a garden room. The linear
or circular path distributes light evenly.
Use a light mover to get lights up to
12 inches (30 cm) from plants. The
closer a lamp is to plants without burn
ing them, the more light plants receive.
Uniform light distribution makes canna
bis grow evenly, but it is not a substitute
for more lumens from an additional
lamp. It is a more efficient way to use
each HID, especially 1000-watt lamps.
Slower-moving light movers are usually
more reliable. Some fast-moving light
movers can cause lightweight reflectors
to wobble or list. Some light movers spin
at a fairly rapid rate. I’m not sure if this
makes a difference or not.
This light mover shuttles the lamp back and
forth over the garden, providing more even
light coverage from more angles. The mov
ing lamp can be placed closer to the garden
because it generates less heat in one place when
moving.
This drawing shows the overall light coverage
when using a light mover. Note that the plants
receive very intense light under the bulb for
short periods of time.
Light movers can be adjusted to run on a short
or long track.
Gardeners report that light movers make
it possible to use fewer lamps to get the
same yield. And at the same time, I have
never seen a light mover in a garden in
Europe. Light movers increase intense
light coverage by 25 to 35 percent.
According to some gardeners, 3 lamps
mounted on motorized light mover(s)
will do the job of 4 lamps.
Motorized light movers keep an even
garden profile. If the 1000-watt HID
is on a 15- or 20-amp circuit, you can
easily add a light mover that draws one
more amp to the circuit, with no risk of
overload.
www.marijuanagrowing.com
295
Benefits of a light mover:
Bulbs can be placed closer to the canopy
of the garden
Increases bright light to more plants
Delivers light from different angles,
providing even lighting
Increases intense light coverage by
25 percent or more
Light is closer to plants
Economical use of light
Watch out for the following:
Stretched or leggy plants
Weak or yellowing plants
Foliage burned directly under the bulb
Uneven lighting
Light mover binding or getting hung up
Electricity and Safety
Before you touch anything electrical,
always unplug from the electrical outlet.
Work backward when installing electri
cal components or doing wiring. Start
at the bulb, and work toward the outlet.
Always plug in the power cord last!
Purchase a current ABC fire extin
guisher rated to put out wood, paper,
grease, oil, and electrical fires. Some fire
extinguishers are smoke-activated. Place
them over heat sources such as ballasts.
Place regular fire extinguishers alongside
the exit door. You can see it every time
you enter and exit, and if there is a fire
in a room, the tendency is to go out the
door! Make sure the ABC fire extin
guisher is UL, CSA, or EMC approved.
Study the overload table on page 298
see the definitions for ampere, breaker
switch, circuit, conductor, fuse, ground,
3CB
&
Mount fire extinguishers next to the door. If
there is afire, you will headfor the door, and
the fire extinguisher will be there. Always
mount an up-to-date fire extinguisher that
is able to put out wood, grease, and electrical
fires. Such devices are filled with a dry powder
and are commonly known as ABC extinguish
ers: A = wood, B = oil base, C = electric.
GFI (ground fault interrupter) outlet,
hertz, short circuit, volts, and watts in
the following glossary. You will need to
understand these terms to gain full use
of the information in this chapter.
Keep electrical service about 4 feet
(about 120 cm) above the floor, and keep
all water and liquids on or near the floor.
Electricity and water do not mix!
To learn more about electrical safety, check,
out the Occupational Safety and Health
Administration’s website: www.osha.gov/
Publications/electrical-Safety.html
You will be working with water under and
around the HID system. Water conducts elec
tricity about as well as the human body does.
A simple rule of thumb is to keep all things
electrical at eye level in the room, and keep
all things wet or watery below the waist.
Ampere (amp) is the measure of elec
tricity in motion. Electricity can be
looked at in absolute terms of measure
ment, just as water can. A gallon is an
absolute measure of a portion of water;
a coulomb is an absolute measure of a
portion of electricity. Water in motion
is measured in gallons per second, liters
per minute, etc. Electricity in motion
is measured in coulombs per second.
When an electrical current flows at one
coulomb per second, we say it has one
ampere.
This light mover shuttles the lamp back and
forth over the garden, providing more even
light coverage from more angles. The moving
lamp can be placed closer to the garden because
it generates less heat in one place when moving.
This subpanel contains 8 breaker switches.
The 2 main switches on the left turn the panel
on and off.
This set of subpanels shows all the wiring and
connections to fuses and most outlets.
296
LIGHT, LAMPS & ELECTRICITY
www.marijuanagrowing.com
This European electrical panel contains many
breaker switches and timers. Everything elec
tric in a large garden room can be monitored
in one place.
Never replace fuses with pennies or
aluminum foil! They will not melt and
interrupt the circuit when overloaded;
doing so is an easy way to start a fire.
Fuses are virtually obsolete.
A fuse box is an electrical circuit box
containing circuits interrupted by fuses.
GFI: Ground fault
interrupter outlets are
required anywhere water
is used in a home or busi
ness. Install GFI outlets
in all garden rooms to
provide an instant, safe,
electrical shutoff when
necessary.
This is the most impressive electrical panel
I have ever seen. All the switches and timers
ire contained in one big box. The four papers
taped to the door show the location of each
electrical circuit.
Ground means to connect electricity
to the ground or earth for safety. If a
circuit is properly grounded and the
electricity travels somewhere it is not
directed, it will go via the ground wire
into the ground (earth) and be rendered
harmless. Electricity will travel the path
of least resistance. This path must be
along the ground wire.
II
Breaker box is an electrical circuit box
that has on/off switches rather than sin
gle application fuses. The main breaker
box is called a “service panel.”
Sub-breaker box (aka a subpanel) is
attached and located just off the main
service panel. The subpanel controls
specific circuits. The power to the
sub-breaker box must be shut off at the
service panel.
Breaker switch is an on/off safety
switch that will turn the electricity off
when the circuit is overloaded. Look for
This European sub-breaker panel was wired
to add extra fuse protection in the garden
room.
breaker switches in the breaker panel or
breaker box. Breaker switches are rated
for different amperes—10, 12, 20, 25, 30,
40, etc.
Circuit is the circular path that electricity
travels. If this path is interrupted, the
power will go off. If this circuit is given
a chance to do so, it will travel a circular
route through your body!
New circuits: Powering any more than
4 to 6 lamps usually requires adding
new incoming circuits, or else the use of
present circuits will be severely limited,
possibly prone to fire. Employ a certified
electrician to install more than 3000 or
4000 watts of indoor garden Light.
Conductor is something that is able to
carry electricity easily. Copper, steel,
water, and the human body are good
electrical conductors.
DC (direct current) is a continuous
electrical current that only flows in one
direction. Batteries run on DC current.
Fuse is an electrical safety device con
sisting of a fusible metal that melts and
interrupts the circuit when overloaded.
All electrical outlets, fuses, and connec
tions must be grounded. Inspect electrical
connections for signs of heat-blackened
wires, melted connections, and smelly
wiring.
The ground is formed by a wire (usually
green, brown, or bare copper) that runs
parallel to the circuit and is attached
to a metal ground stake. Metal water or
sewer pipes also serve as excellent con
ductors for the ground. Water pipes
conduct electricity well and are all in
good contact with the ground. The
entire system—pipes, copper wire, and
metal ground stake—conducts any mis
placed electricity safely into the ground.
^ww. marijuanagrowing.com
297
The ground wire is the third wire with
the big round prong. The ground runs
through the ballast all the way to the
reflective hood. High-intensity dis
charge systems must have a ground that
runs a continual path from the socket
through the ballast to the main fuse box,
then to the house or circuit ground.
Heat: Use a laser thermometer to inspect
electrical connections for signs of heat
damage; institute repairs immediately.
Ohm’s Power Law
volts x amperes = watts
115 volts X 9 amperes = 1035 watts
240 volts x 4 amperes = 960 watts
Voltage
.
I
10ft.(3m)
Electricity diminishes as it travels through a copper wire. The maximum distance electricity
should travel from outlet to the ballast ofa high-intensity discharge, light-emitting plasma, or
compact fluorescent lamp is about 10 feet (about 3 m). After this distance, the voltage drops due
to resistance in the wire. The problem is compounded by using wire that is too small to carry the
electrical load.
1
An HID lamp that draws about
9.2 amperes x 120 volts = 1104 watts.
r
Amp
Rating
Amps
Available
--------- ---- -------- 1
Amps to
Overload
BH
MB
-
-
■
Wire size is important! See “Electrical
Wiring and Circuits.”
Oo
8
10 12141618
Watts measure the amount of electricity
flowing in a wire. When amperes (units
of electricity per second) are multiplied
by volts (pressure), we get watts. 1000
watts = 1 kilowatt.
Watt-hours measure the amount of
watts that are used during an hour. One
watt-hour is equal to one watt used
for one hour. A kilowatt-hour (kWh)
is 1000 watt-hours. A 1000-watt HID
will use roughly one kilowatt per hour,
and the ballast will use about 100 watts.
Electrical bills are charged out in kWh.
Electrical Wiring and Circuits
Electrical wire comes in many thick
nesses (gauges) indicated by number.
Higher numbers indicate smaller wire,
and lower numbers indicate larger wire.
Most household circuits are connected
with 14-gauge wire in the USA and Can
ada. Wire thickness is important for two
reasons—amperage and voltage drop.
Amperage is the amount of amperes a
wire is able to carry safely.
Electricity flowing through wire creates
heat. The more amperes flowing, the
more heat created. Heat is wasted power.
Avoid wasting power by using the
proper thickness of well-insulated wire
(14-gauge for 120 volt and 18-gauge for
240 volt applications) with a grounded
wire connection.
Using wire that is too small forces too
much power (amperes) through the
wire, which causes voltage drop. Volt
age (pressure) is lost in the wire. For
example, by forcing an 18-gauge wire to
carry 9.2 amperes at 120 volts, it would
not only heat up, maybe even switching
off breakers, but the voltage at the outlet
would be 120 volts, while the voltage 10
feet away could be as low as 108. This is
a loss of 12 volts that you are paying for.
The ballast and lamp run less efficiently
with fewer volts. The further the elec
tricity travels, the more heat that is
generated, and the more voltage drops.
A lamp designed to work at 120 volts
that only receives 108 volts (90 percent
of the power intended for operation),
would produce only 70 percent of the
normal light. Use at least 14-gauge wire
for any extension cords, and if the cord
is to carry power over 60 feet (18.3 m),
use 12-gauge wire.
When wiring an outlet or socket:
The hot wire attaches to the brass or
gold screw.
The common wire attaches to the alumi
num or silver screw.
The ground wire always attaches to the
ground prong.
Caution! Keep the wires from crossing
and forming a short circuit.
Plugs and outlets must have a solid
connection. If they are jostled around
and the electricity is allowed to jump,
electricity is lost in the form of heat; the
prongs will burn, and a fire could result.
Periodically check plugs and outlets to
ensure they have a solid connection.
If installing a new circuit or breaker box,
hire an electrician and purchase Wiring
Simplified by H. P . Richter and W. C.
Schwan. It costs about $15 USD and is
available at most hardware stores in the
USA. Installing a new circuit in a breaker
box is very easy but could turn into
a shocking experience. Before trying
298
LIGHT, LAMPS & ELECTRICITY
www.marijuanagrowing.com
Three-prong electrical outlets with a ground
are essential in all garden rooms.
anything of this scope, read about it and
discuss it with several professionals.
A circuit with a 20-amp fuse,
powering the following items:
1400-watt toaster oven
100-watt incandescent lightbulb
+ 20-watt radio
1520 total watts
1520 total watts -r 120 volts = 12.6
amps in use
OR
1520 total watts -r 240 volts = 6.3 amps
in use
The above example shows that 12.6
amps are being drawn when everything
is on. By adding 9.2 amps, drawn by the
HID to the circuit, we get 21.8 amps, an
overloaded circuit!
There are three solutions:
1. Remove one or all of the high
ampere-drawing appliances, and plug
them into another circuit.
2. Find another circuit that has few or
no amps drawn by other appliances.
3. Install a new circuit. A 240-volt circuit
will make more amps available per circuit.
Solar panels on a home or building collect
and transform solar energy into electricity.
A bidirectional meter is needed when more
electricity is produced than is being used. The
excess generated electricity is sent (sold) back
to the public electric grid.
Electricity Consumption
The average electric bill for a small
apartment that uses about 200 kWh
per month is $40 to $70 USD. A large
house with a hot tub and many electrical
appliances can use 2000 kWh at a cost of
$200 to 400 USD per month.
Most gardeners in the USA can safely use
one 1000-watt lamp per room to grow
medicinal cannabis. The tables on page
300 will give you an idea of the efficiency
of each type of lamp, its “cost per watt,”
and its “value per watt.”
Electrical records are considered to be in
the public domain in some jurisdictions;
Inexpensive circuit testers are easy to use and
ensure that all circuits function properly.
anybody—including disgruntled friends,
thieves, and law enforcement—can
access them with the touch of a computer
keyboard. In some communities, judges
are easily pressured or bullied by law
enforcement into issuing search warrants.
There are many legitimate reasons for
unqualified “suspicious” electricity
consumption that are not investigated.
Armed searches based upon electrical
records are a recipe for failure and for
law enforcement budget shortfalls.
Conserve Electricity
Lower the carbon footprint of indoor
and greenhouse gardens. Avoid using
diesel generators. Use energy-efficient
appliances, refrigerators, water heaters,
and so on. Monitor and minimize elec
trical consumption. To avoid electricity
draw, unplug appliances when they are
not in use.
Use alternative energy sources such as
solar and wind energy, or any non-fossil
fuel, to decrease your carbon footprint.
Alternative energy sources are often
more expensive at startup, but they
pay for themselves many times over in
the long run. Check into rebates and
tax credits offered by local, state, and
national governments.
To limit electrical consumption, move
into a home with a basement, all-electric
heat, and a woodstove. HID lamps
installed in a basement garden also gen
erate heat. Disperse excess heat with a
vent fan attached to a thermostat/
humidistat. Turn off the electric heat,
and use the woodstove as needed.
Set the water heater for 130°F (54.4°C)
instead of 170°F (76.7°C). This easy
Solar panels convert sunlight into electricity.
The best website for solar information is
www.sargosis.com . Contact my friend Pete
(contact@sargosis.com) before installing solar.
vvww.marijuanagrowing.com
299
LAMP
COST PER WATT IN USD LM/W
VALUE PER WATT IN USD
metal halide (MH)
$0.5
100
$200.00
high-pressure sodium (HPS)
$0.5
140
$280.00
T5 compact fluorescent lamp (CFL) $0.5
100
$200.00
T12 fluorescent
$0.27
22
$81.48
light-emitting plasma (LEP)
$3
82
$27.33
light-emitting diode (LED)
I ....... - -
--
-
-
-.-■
-
$0.7
90
$128.57
COST OF ELECTRICITY (IN USD)
Cost per
12-hour days
18-hour days
24-hour days
kWh
Day
Month
Day
Month
Day
Month
$0.10
$1.20
$36.00
........... .
........
$1.80
$32.40
$2.40
$72.00
$0.15
$1.80
$54.00
$2.70
$48.60
$3.60
’—I
$108.00
$0.20
■ .......... .............. I
$2.40
$72.00
$3.60
$64.80
$4.80
$144.00
I ........
J
pioccdtirc saves about 25 kWh per
month. Bui do not turn the water heater
any lower than 130 T (54.4"C). Harmful
bacteria can grow below this sate point.
An alternative would be to install an “on
demand" water heater.
Human electric meter readers are disap
pearing, falling victim to smart meters.
Human meter readers often use high-
tech telescopes to read the meter dials
that store the readings in an integrated
digital entry device. The information is
then dumped into the larger computer
at the central office. Evidence of the
DEA sending instructions to electric
companies in the past exists, but n is
uncommon.
Electric companies often replace meters
that show' a major change in electricity
consumption. The first step is to change
the meter. It is upgraded to a smart meter
where the technology exists.
Smart Meters
Smart electric meters record electricity
consumption in intervals of an hour or
less and send this information back to
the central office at regular intervals.
Electricity consumption is therefore
constantly monitored. Electric compa
nies are replacing old analog meters with
more efficient digital smart meters that
do not require an employee to physically
read electric meters. Utility customers
can monitor electricity use via the
company's website from a computer or
a handheld electronic device. However,
smart meters have been under increasing
scrutiny by those who cite a high degree
of inaccuracy, invasion of privacy, and
extraordinary electromagnetic activity.
Some communities have taken measures
to ban smart meters altogether.
Timers and Controllers
A inner is essential to turn lights on and
off al tile proper times. This inexpensive
All the timers tn this complex of four large
garden room* are centrally located and easy to
monitor and maintain.
300
LIGHT, LAMPS & ELECTRICITY
www.marijuanagrowing.com
Smart meters allow electric companies to
perpetually monitor electric consumption from
a central office.
investment can also turn other appli
ances on and off at regular intervals.
Using a timer ensures that your garden
will receive a controlled light period of
the same duration every day. Purchase a
heavy-duty grounded timer with an
adequate amperage and tungsten rating
to meet your needs. Some timers have a
different amperage rating for the switch;
it is often lower than that of the timer.
Use a timer with a two-pole contact
switch. The sudden rush of electrical
current is not compatible with household
timers. Timers that control more than
one lamp are more expensive, because
they have to be able to switch a very high
current. Many prewired timers are avail
able at stores that sell HID lights.
If running more than 2000 or 3000
watts, attach the lamps to a relay, and
control the relay with a timer. The
advantage of a relay is that it offers a
path for more electricity without having
to change the timer. There are numerous
A subpanel with breaker switches controls this
set ofheavy-duty light timers. The timers were
designedfor use with high-wattage lights.
sophisticated timers on the market that
will solve every timer need you have.
Digital controllers can turn lights on
and off and control fans, air condition
ers, irrigation cycles, and more. Many
cannabis gardeners prefer to use a con
troller to keep the environment in the
room stable. For example, the humidity
rises when the lights go out. The vent
fan must be activated to evacuate the
humid air; using a controller assures
consistent timing.
Electric Generators
Diesel and gasoline generators are noisy,
messy, and expensive to operate. More
importantly, they are extremely pollut
ing to the environment.
Gardeners in Northern California and
Oregon have related many stories of
diesel generators, all of which lacked
glamour and reeked of petroleum and
noise. Imagine a big heavy fuel truck
Small timers are designedfor use with one
lamp or to controlfans and pumps. The timers
are easy to plug in and set. Make sure to use
a timer with a two-pole contact switch. The
inrush of electrical current is not compatible
with inexpensive timers.
arriving to your rural home on a gravel
or dirt road. The truck spills and splash
es gas or diesel fuel on the road, leaving
a “footprint.” The diesel pollution can
seep into groundwater.
Check out the Livingston Survey, which
claims that indoor cannabis gardeners
account for 1 percent of electrical use
in the USA, $5 billion every year. See
“Cannabis Carbon Footprint” in chapter
10, Garden Rooms.
Medical gardeners who use gas and
diesel generators might not be careful
ly considering environmental impact.
These generators can supply all the elec
tricity necessary for an indoor garden to
grow “off the power grid,” but carbon
footprint, reliability, and noise are seri
ous considerations.
Auxiliary generators are essential when
a power-outage emergency arises for a
few days. A couple of small generators
An effective light timer is set up with breaker
switches, and can control up to 16 lamps.
Timers like this make setting up a big indoor
garden much easier.
This 3000-watt Honda generator supplies
enough electricity to operate lights placed over
outdoor plants so they do not fioiver early in
the spring. It also supplies enough power to
operate fans in a greenhouse.
Big generators can supply enough electricity to
run 20 to 30 lights easily. However, they must
be supplied with diesel or gasoline fuel.
www.marijuanagrowing.com
301
Gas and diesel generators are not necessary to grow cannabis in pristine environments.
can save an indoor crop. If the lights go
out for a few hours, no problem; but if
they go out for 3 to 4 days, plants suffer.
A generator that will supply enough
electricity for a skeleton crew of lights
will keep harvest dates on track.
Buy the generator new. Larger genera
tors should be water-cooled and fully
automated. Start it up and check its
noise output before purchasing. Always
buy a generator that is big enough to do
the job. A little extra cushion will be
/*■
/
necessary to allow for power surges. If
the generator fails, the crop could fail.
Allow at least 1300 watts per 1000-watt
lamp to be run by the generator. The
ballast consumes a few watts, as does the
wire. A 5500-watt Honda generator will
run four 1000-watt lamps.
Honda generators are among the most
common generators found in garden
rooms because they are reasonably
priced, dependable, and quiet. But
they are not designed to work for long
This beautiful 'Cripple Creek" bud photo
graphed by DoobieDuck is in perfect light.
periods. Generators also guzzle a lot of
gas. Diesel motors are more economical
to run, but noisy, and the toxic fumes
reek. Always make sure gasoline- or
diesel-powered generators are vented
properly. Their exhaust produces carbon
monoxide, which is toxic to plants and
fatal to humans.
Diesel generators for truck and train car
refrigerators are fairly easy to acquire
and last for years. Once set up, a “Big
Bertha” generator can run many lights.
Big gasoline generator motors can be
converted to propane, which is a cleaner
burning fossil fuel.
Generators are usually moved to a
belowground location covered by a
building. With a good exhaust system
and baffling around the motor, the sound
is soon dissipated. Muffling the exhaust
and expelling the fumes is a little more
complex. The exhaust must be able to
escape freely into the atmosphere. The
generator will need fuel, and must be
monitored regularly. Maintaining a
generator that runs 12 hours per day is a
lot of work. If the generator is left alone
and shuts down prematurely, plants stop
growing.
302
LIGHT, LAMPS & ELECTRICITY
www.marijuanagrowing.com
304 Soil Tests
305 Plant Tissue Analysis
306 Texture and Types of Soil
309 Other Soils
310 Soil pH
310 Measuring Soil pH
311 Adjusting Soil pH
312 Raising Soil pH
313 Lowering Soil pH
313 Soil Temperature
313 Heating Soil
314 Cooling Soil
315 Soil Amendments
315 Organic Soil Amendments
317 Soil Mixes
319 Potting Soil
319 Mixing Potting Soils
320 Recycling Potting Soil
321 Propagation Cubes and Pellets
321 Used, Indoor Soil Disposal
322 Grow-Medium Problems
322 Organic Soil and the Soil Food Web
325 Salt-Based Fertilizers
325 Mulch
Soils are different—very different—from one another. The
average organic mineral soil is made up of 45 percent mineral
particles; 5 percent living and dead organisms such as bacteria,
protozoa, microbes, fungi, and earthworms; and 50 percent air
and water. Three major factors contribute to cannabis roots’
ability to grow in a soil: texture, pH, and nutrient content
(organic and mineral).
Many soils and soilless mixes used by cannabis gardeners are
peat-based and are mixed with other elements.
Most gardeners look at soil in two basic ways. The first is to see
it as a living, organic substance that must be nurtured in order
for cannabis roots to extract the necessary nutrients quickly,
efficiently, and in maximum amounts. There are large volumes of
soil in outdoor gardens and in large containers placed in green
houses or indoors, and for such volumes, we can apply complete
organic principles. The second way to look at soil is as a growing
medium that holds chemical elements, salt-based fertilizers
(nutrients), air, and water. Indoors and often in greenhouses
this is the way many gardeners approach growing.
Dirt, Soil, and Soilless Mix
Dirt is found under your fingernails. Soil is mineral-based and
best employed to grow cannabis in fields, planting beds, and very
large containers. Soilless mixes are best for growing cannabis
in small containers—indoors, outdoors and in greenhouses.
The dynamics of small containers are not the same as in large
containers, planting beds, or Mother Earth.
www.marijuanagrowing.com
303
Rocky, clayey soil is packed with nutrients,
but its texture restricts air and moisture
content.
Soil texture is governed by the size
and physical makeup of the mineral
particles. Proper soil texture is required
for adequate root penetration, water and
oxygen retention, and drainage as well as
many other complex chemical processes.
“Soil texture” is a descriptive tool used
to express mineral particle sizes and
grains in sediment, and is divided into
three main groups, clay, loam, and sand.
Most soils are a mix of three basic soil
particle sizes: clay, silt, and sand
(described below).
Soil pH is a measure of the acid-to-
alkaline balance. Soil life and mineral
(nutrient) availability and uptake by
roots are affected by soil pH levels.
Every full-point change in the 0 tol4
pH scale denotes a tenfold increase or
decrease. Nutrient uptake is best within
a pH range of 6.0 to 6.5. Keeping the
soil and water pH-balanced and within
the proper range is essential to a strong,
healthy cannabis crop.
Soil varies from location to location on
the earth and often varies from one place
to another in your own backyard.
Heavy clay soil is easy to spot. It clumps up
readily, is difficult to work, and drains poorly.
Soil Tests
Soil tests arc remarkably inexpensive
($20-$200 USD) and save medical
cannabis gardeners much time and
money wasted on fertilizers. Such tests
also save the environment from ex
cessive fertilizer pollution, including
nitrates and phosphates, accumulation
in the soil, and runoff in the watershed.
Excess fertilizer salts wash out into the
water system where they cause countless
environmental and health problems. For
example, home gardeners use at least
ten times more fertilizer per square
yard (m2) than big agribusiness farms.
For every $10 USD spent on fertilizer
by home gardeners, $9 USD is wasted!
I recently spoke to an outdoor medical
cannabis gardener who spends $3,000
USD on fertilizer annually. By applying
the above information we see that 10
percent ($300 USD) worth of fertilizer
is actually used and 90 percent ($2,700
USD worth of fertilizer) is washed into
the soil and groundwater. The gardener
could easily save $2,700 USD by invest
ing $20 to $200 USD in soil tests and
the following recommendations.
Familiarize yourself with 2 basic types of
soil analysis: base cation saturation ratio
(BCSR) and sufficiency level of available
nutrients (SLAN).
Base cation saturation ratio is commonly
used by organic farmers and market
gardeners in many countries. The results
of BCSR testing provide the actual
amounts of nutrients in soil. The goal
of BCSR testing is to achieve a balanced
ratio of nutrients. The methodology
uses Mehlich 3 extraction with different
testing parameters. The BCSR soil-test
ing method is supported by the National
Sustainable Agriculture Information
Service (ATTRA).
Standard soil tests provide information
for some or all of the following:
• calcium
• magnesium
• potassium
• sodium
• phosphorus
• sulfur
• chlorine
• minor elements
• trace elements
Get a BCSR soil analysis ($ 110-$ 150
USD) from Earthfort, http://earthfort.
com/lab services.html.
Also known as Index (UK) system,
SLAN is used by the majority of uni
versities, farmers, and big agribusinesses
worldwide. The results of this type of
test provide plant-available nutrient
levels in a well-known range, ensuring
neither a deficiency nor an excess. The
methodology uses ammonium acetate
extraction.
Standard SLAN soil tests provide some
or all of all of the following and many
include recommendations to improve
soil nutrient content.
•pH
• ECe (dS/m)
• NO3-N (ppm)
• NH4-N (ppm)
• PO4-P (ppm)
• potassium (ppm)
• magnesium (ppm)
• calcium (ppm)
• sodium (ppm)
• SO4-S (ppm)
• zinc (ppm)
• manganese (ppm)
• iron (ppm)
• copper (ppm)
• boron (ppm)
An optimum range for each reading and
amendment and fertilizer recommen
dations are also included in many soil
tests. For a little more money many labs
include an easy-to-read graph.
SLAN Soil Test Labs
• Logan Labs, LLC: Least expensive
soil tests I have found. Basic test $20
USD. www.loganlabs.com
• A&L Western Laboratories, Inc.:
Excellent service at a reasonable price,
www.al labs west.com
• Spectrum Analytic, Inc.: This lab
does everything and also shows a
sample soil test, www.spectrumana-
lytic.com
Regardless of the type of test you
choose, BCSR or SLAN, follow soil
collection and submission guidelines
to the letter. Gardeners living in a state
SOIL
www.marijuanagrowing.conn
Graphical Soil Analysis Report
Graphical Plant Analysis Report
http://www.al-labs-west. com/files/Graphical0/o20Plant0/o20Analysis0/o20Report.pdf
or country that sanctions medicinal
cannabis can send tests to local labs and
request recommendations for cannabis.
Medical gardeners who do not live in
such a state can send their soil samples
to any soil test lab but are advised not to
mention the target crop.
Excellent sites to learn more about soil:
• Soil and Health Library provides
free e-books, mainly about holistic
agriculture, holistic health, and self-
sufficient homestead living.
http://soilandhealth.org
• Soilminerals.com provides complete
information on garden soil minerals,
nutrients, trace minerals, fertilizers
and amendments for all gardens,
farms, lawns, orchards and green
houses.
www.soilminerals.com
• University of Idaho, College of
Agriculture offers a short course in
soil and plant diagnostics.
www.webpages.uidaho.edu/~b-
mahler/s44603.pdf
• Acres USA is North America’s oldest
magazine covering commercial-scale
organic and sustainable farming.
www.acresusa.com
• National Sustainable Agriculture
Information Service (ATTRA)
manages projects that promote
self-reliance and sustainable
lifestyles that include sustainable
and renewable energy, energy conser
vation, resource-efficient housing,
sustainable community development,
and sustainable agriculture.
www.attra.ncat.org
• Jorge Cervantes Presents
Marijuana Growing. Check our
site, which includes a forum for
updates and current discussion!
www.marijuanagrowing.com
• Google William A. Albrecht, PhD, a
famous agronomist who pointed
out the direct relationship between
soil fertility and human health.
www.google.com
Plant Tissue Analysis
Analyzing plant tissue for nutrient
accumulation and utilization is common
among professional farmers and green
house growers. The tests cost less than
$40 USD and help growers fine-tune
fertilizer application. A small investment
in periodic plant tissue analysis will
lower fertilizer bills and increase yields,
often substantially. Legal medicinal can
nabis gardeners are also able to request
plant tissue analysis from agricultural
laboratories within states and countries
that sanction medical cannabis.
Soil tests measure nutrient levels that are
potentially available for uptake by roots.
Www.marijuanagrowing.com
305
A soil test and the proper organic amendments before planting saved this gardener hundreds of dollars in fertilizer.
The test is normally performed before
planting, and it does not measure the
actual concentration of nutrients inside
of plants. For example, nitrogen is often
deficient in plants even though it may
be readily available in the soil. A tissue
analysis, on the other hand, will provide
current data to make timely decisions.
Plant tissue analysis also helps ensure
plants are not overfertilized. High
concentrations of nitrogen, in particular,
may affect human health because excess
nitrates can convert to nitrites while
being digested in the gut. Nitrates may
react with other compounds to form
nitrosamines that may be carcinogenic.
Fine-tuning fertilization programs,
including micronutrient levels, is much
easier when accurate information from
analysis of plant tissue is available. Micro
nutrients are required in minute amounts,
and an overdose could easily stunt a crop
or significantly diminish yields.
Soil gardeners are able to test soil,
which gives them an idea of which
nutrients may be lacking. They can
use subsequent plant tissue analysis to
concentrate on determining amounts
of specific elements and how those
elements are utilized by plants.
Hydroponic gardeners, who do not have
soil tests at their disposal, find plant
tissue analysis especially useful.
Plant tissue analysis often takes 1 to
2 weeks when a specimen is sent to a
laboratory. When crops are grown for
10 to 12 weeks total, this might be 10
percent of the plant’s life. But, nitrogen
tests'* can be completed on the spot with
a handheld meter in the garden, and
results are available immediately.
*A chlorophyll concentration meter
measures chlorophyll content index
(CCI) in foliage and the nitrogen
content is extrapolated from this data.
One molecule of chlorophyll contains
four nitrogen atoms.
Texture and Types of Soil
To feel its texture, pick up a handful of
moist outdoor soil and rub it between
your fingers. Heavy clay soil will feel
slick and greasy. Sandy soil feels grainy
and rough. Silty soil will feel soft and
spongy and be dark in color.
Pick up a handful of moist potting soil
and gently squeeze it to feel the texture.
The soil should barely stay together and
have a sponge effect when you slowly
open your hand to release the pressure.
Potting soils that do not fulfill these
requirements should be thrown out
or amended.
The cation exchange capacity (CEC)
of a growing medium is its capacity to
306
SOIL
www.marijuanagrowing.com
hold cations that are available for uptake
by the roots. The CEC is the number
of cation charges held in 3.5 ounces
(100 gm or 100 cc) of soil and is mea
sured in milliequivalents (mEq) orcen-
timoles/kg on a scale from 0 to 100. A
CEC of zero means the substrate holds
no available cations for roots. A CEC
of 100 means the medium always holds
cations available for uptake by roots.
Growing mediums that carry a negative
electrical charge are the best.
Cation exchange capacity is a calculated
value that estimates the ability of a soil
to attract, hold, and exchange cation
elements; CEC values are reported in
milliequivalents per 100 grams of soil
(mEq/100 gm). Soil-sample testing labo
ratories report a value for the CEC. Use
the CEC numeric value on your report
and then compare the number to the
graph below to find your soil type.
High-CEC soils hold more nutrients
and water. But soils with high levels of
clay (and high CEC readings) allow
little room for oxygen and can slow
root growth and nutrient uptake. If
acidic, high-CEC soils also require
more lime to buffer and lower pH.
Nutrients take more time to leach
out of high-CEC soils.
Low-CEC soils hold nutrients poorly,
which requires more frequent irrigation
and lower volumes. These soils have a
low capacity to retain cations. Add
humus-based amendments to acidify
and balance low-CEC soils.
Nutrients must be dissolved in (water)
solution in order to be absorbed by
roots. When dissolved, they are in a
form called “ions.” This means that they
have electrical charges. An electrical
charge is either positive (+) or negative
(-). For example, table salt, sodium
chloride (NaCl), becomes 2 ions when
dissolved: sodium (Na+) and chloride
(C1-) . The sodium ion with a positive
(+) charge is called a “cation,” and the
chloride ion with a negative (-) charge is
called an “anion.” In chemistry, oppo
sites attract and likes repel one another.
In ionic form, nutrients are attracted
to opposite charges—positive attracts
negative and vice versa.
Soil chemistry can become very com
plex, and it is beyond the scope of this
book to dig deeply into the subject. For
more information on the subject, check
www.marijuanagrowing.com.
Use this table to estimate the CEC of
your soil:
/
F---------------------
SOIL
MIN.
------------
MAX.
CEC CEC
sand
1
4
sandy loam
5
8
silt loam
8
20
clay loam
20
40
clay
40
80
]
CEC of popular growing mediums
measured in mEq/100 grams
• compost
90
• Sunshine Mix 90
• peat moss
80
• garden soil
70
• expanded clay 20
• vermiculite
20
• perlite
00
• rockwool
00
This soilless mix is super dry but light and
powdery. It holds a lot ofwater and air at the
tame time.
This handful of soil has everything necessary
for strong plant growth.
This is very heavy clay soil. It is great for
making pottery but horrible as garden soil.
This list shows different growing medi
ums’ ability to hold positive charges that
are ready for root uptake. Note the zero
CEC of perlite and rockwool. Roots
must be constantly bathed in nutri
ents. Other mediums do not provide a
constant flow of nutrients and the CEC
regulates the ability to hold a positive
charge to make nutrients available for
root uptake.
Clay soil consists of very small, flat
mineral particles that have a strong
negative ionic charge. In fact, the
negative electrical charge often ties up
calcium, magnesium, potassium, and
sodium in clay soil. Minute mineral
particles pack tightly together, especially
when wet, causing very slow drainage.
Roots penetrate clay soil slowly, and
damage from waterlogging is more com
mon. Clay soil has little or no space for
oxygen, the lack of which slows nutrient
uptake. Clay soil can be very difficult to
www.marijuanagrowing.com
307
100
S80
3 Salt Sources
Soluble
Top Irrigation
Fertilizer
Watering Water
Subirrigation
®60
X)
ro
g40
20
0
2
4
6
810121416
Soil water potential (-bars)
This cutaway drawing shows how roots penetrate the soil.
Note: There must be enough air trapped in the soil to allow
biological activity and absorption of nutrients.
till; it is often extremely heavy when wet
and is known to clump up.
Amend clay soil with compost, manure,
gypsum, etc. (See Organic Soil Amend
ments later in this chapter for a complete
list.) Incorporating compost, manure, or
other organic amendments in the fall is
one of the best ways to improve clayey
and poor-quality soils. Raised beds are
also an excellent option to combat clay
soil. Till clay soil when it is damp and
workable, and add manure, compost,
or both.
Sandy soil boasts the largest particles
that permit good aeration and drainage.
Drainage can be too fast if particles
The hard, clayey, rocky soil above is packed
with nutrients but rest ricts root growth and
water drainage. Plants shown here are in
sunken beds to conserve moisture.
are too big. The texture of sandy soil is
somewhat gritty depending upon the
size of its mineral particles. Sandy soil is
easy to cultivate and warms quickly in
the spring, but low water-retention rates
mean that frequent watering is neces
sary. Amend sandy soil with compost
and organic matter to help it retain
water more evenly.
Silty soil is very fertile. It is composed
of fine organic particles and minerals
such as quartz. Silty soil is granular, like
sandy soil, but it has more nutrients and
offers better drainage. When silty soil is
dry it has a smoother texture and looks
like dark sand. This type of soil can hold
more moisture and can at times become
Beautiful peat-rich soil is ideal for planting.
This greenhouse and the field in the fore
ground produce nice, big gardens of medicinal
cannabis.
compacted. It offers better drainage and
is much easier to work with when moist.
Soils are seldom all clay, all sand, or all
silt. They are a combination of different
types. This table demonstrates the dif
ferent percentages of soil combinations.
F
NAME OR
TYPE OF SOIL
-------------------------------------------------------- 1
PARTICLE
DIAMETER LIMITS
USDA Classification
clay
Less than 0.002 mm
silt
0.002-0 .05 mm
, very fine sand 0.05-0 .1 mm
fine sand
0.1 -0.25 mm
medium sand 0.25-0 .5 mm
coarse sand
0.5-1 mm
very coarse
sand
L-----------------------
1-2 mm
.......
-
SOIL
www.marijuanagrowing.com
Other Soils
Loam soil is made up of sand, silt, and
clay. Loam is considered by many to be
the perfect soil. Its texture is often
gritty, yet it retains plenty of air and
water and drains well because of its
different-sized particles. Depending
upon its makeup, loam can range from
heavy (clay) to light (sandy).
Peat (bog) soil is formed by the accu
mulation of dead and decayed organic
matter. Found in rainy, marshy areas,
the decomposition of organic matter in
peat soil is blocked by soil acidity. Few
nutrients are present even though peat
soil is rich in organic matter. Peat soils
are prone to waterlogging, so for best
results, they must be mixed with other
soils and compost before cannabis is
planted.
Chalky soil is very alkaline in nature
and is often packed with rocks. It is
prone to dryness, and in summer chalky
soil consumes much water and fertilizer.
This soil also locks up iron and magne
sium due to its high pH activity.
Alkali soils are packed with sodium
carbonate, which is detrimental to can
nabis growth. The farmland around my
hometown is plagued with alkali soil.
Many other regions in the world also
suffer from alkali soil; the pH hovers
around 8.5 and higher. Alkali salt is so
abundant in many places that it appears
as white powder that cakes up on the
surface of soil. Alkali soils also signifi
cantly slow water absorption.
To “purge” alkali salt from soil, farmers
cultivate with a tractor or tracked vehicle
Gravel
Sand
Silt
Clay
lI
io
Invisible at this scale
----------------------------------------------------------------------------------------------------------
2mm to 75mm
«----------- ►
O
0.05mm to 2mm 0.002mm to 0.05mm
mm
0mm
I—
1mm
1-
2mm
3mm
4mm
5mm
inches
o
1/16
2/16
3/16
The size ofsoil particles varies immensely!
www.marijuanagrowing.com
309
100
50
Silt (%)
60
Clay (%) 50
AlKAi.Ih:
Acid
A simple pH chart shows the range in which most
nutrients are available in soil.
Sand(%)
This soil pyramid demonstrates the diversity of most soils.
equipped with 30- to 36-inch (76-91 cm)
“ripping bars.” Tilled fields are flood-
irrigated with a foot (30.5 cm) or more
of water to drive the alkali salts deep
into the soil, beyond the depth of most
roots. The salts rise to the surface over
time, and the process is repeated every
few years as needed.
Outdoor cannabis gardeners plagued
with alkali soil should grow in large
containers and amend alkali soils with
acidic elements, including peat moss.
Use as little alkali soil in the container
as possible, and before planting, leach
alkali soil heavily with water to wash out
unwanted salts.
Soil pH
Potential hydrogen (pH) is a scale from
0 to 14 that measures the concentration
of either hydrogen (H) ions or hydroxide
(OH) ions. Zero is the most acidic, 7 is
neutral (also known as base\ and 14 most
alkaline. Every full-point change in the
logarithmic pH scale signifies a tenfold
increase or decrease in acidity or alkalin
ity. For example, soil or water with a pH
of 5.0 is 10 times more acidic than soil
or water with a pH of 6.0. Water with a
pH of 5.0 is 100 times more acidic than
water with a pH of 7.0. With a tenfold
difference between each full point on
the pH scale, accurate measurement and
control is essential to ensure nutrient
availability.
Cannabis grows best in soil with a
pH from 6.5 to 7.0. Within this range
cannabis can properly absorb and
process all necessary available nutri
ents most efficiently. If the pH is too
low (acidic), acid salts chemically bind
nutrients (or, more correctly stated, the
ion form changes in valence, or charge).
The plant then only takes up a certain
charged ion such as phosphate, the
plant-available form (H2PO4-) converts
to the unavailable form HPO42- on PH
rise and achieves equilibrium at pH 7.2,
and the roots are unable to absorb the
nutrients. An alkaline soil with a high
pH causes nutrients to become unavail
able. Excess unused nutrients in soil also
cause toxic salt buildup that limits water
intake by roots. It can also make some
elements available at toxic levels when
pH drops below 5.4!
The pH of soil mixes is very important
because it dictates the ability of specific
pH-sensitive bacteria. But I have
experimented and irrigated well
managed organic soil with 8.0 pH water
and higher. Once the rich organic soil
absorbs the water, the soil life buffers
the pH and it reverts back to 6.5 after
a few minutes!
Hydroponic nutrient solutions perform
best in a lower pH range than for soil.
The ideal pH range for hydroponics is
from 5.8 to 6.8 . Some gardeners run the
pH at lower levels and report no prob
lems with nutrient uptake.
Measuring Soil pH
Measure pH with a litmus paper, a liquid
pH reagent test kit, or electronic pH
meter, all of which are available at most
nurseries. When testing pH, take 2 or 3
samples and follow—to the letter—
instructions supplied by the manufac
turer. Soil test kits measure soil pH and
primary nutrient content by mixing soil
with a chemical reagent solution and
comparing the color of the solution to
a chart. Novice gardeners often have a
difficult time achieving accurate mea
surements. Comparing the color of the
soil/chemical mix to the color of the
chart is often confusing. If you use one
310
SOIL
www.marijuanagrowing.com
of these kits, make sure to buy one with
good, easy-to-understand instructions,
and ask the sales clerk for exact recom
mendations on using it.
If using litmus paper, collect samples
that demonstrate an average of the soil.
Place the samples in clean jars, and then
moisten the soil samples with distilled
water that has a pH of 7.0. Place 2 pieces
of the litmus paper in the muddy water.
After 10 seconds, remove 1 strip of
litmus paper. Wait a minute before
removing the other one. Both pieces of
litmus paper should register the same
color. The litmus paper container should
have a PH -color chart on the side. Match
the color of the litmus paper with the
colors on the chart to get a pH reading.
Litmus paper will accurately measure
the acidity of the substance to within a
point or less. The pH readings will not
be accurate if altered by water with a
high or low pH, and the litmus paper
could give a false reading if the fertilizer
contains a color-tracing agent.
Liquid pH reagent test kits work by
adding liquid drops of pH-sensitivc dye
to the nutrient solution. Mix by shaking
and compare the color of the treated
nutrient solution with a color chart.
Such tests are a little difficult to read,
but quite accurate.
Do not use phenolphthalein and phenol
red test kits; they are not precise enough
to measure and render an accurate
pH value.
Adjusting Soil pH
For an accurate pH test with an
electronic pH meter:
1. Clean the probes of the meter before
and after each test, and wipe away any
corrosion.
2. Water soil with distilled or neutral pH
water before testing.
3. Pack the soil around the probes.
Lime amendments will raise pH and
lower acidity, but too much lime can
When planting, add 1 cup offine dolomite
lime to each cubic foot (1 ounce per gallon
[30 ml per 4 LJ) ofplanting medium to
stabilize the pH and provide calcium and
magnesium.
Litmus paper is relatively expensive and is
fairly accurate.
Mix water with a chemical in liquid pH
reagent test kits.
This simple N-P-K and pH reagent soil test
bit is inexpensive and easy to use.
Electronic pH meters are economical and
convenient. Also, remember to check the pH
of irrigation water. See chapter 15, Meters, for
complete information on electronic pH meters.
burn roots and make nutrients un
available. If you need more than 1 full
point of pH adjustment, check with
local farmers, nurseries, or agricultural
agencies for recommendations on lime
application.
Lime application differs based on soil
type. Some guidelines are:
• 35 pounds/300 square yards (16
kg/251 m2) very sandy soil
• 50 pounds/300 square yards (23
kg/251 m2) sandy soil
• 70 pounds 300 square yards (32 kg/251
m2) loam
• 80 pounds/ 300 square yards (36
kg/251 m2) heavy clay soil
*Rule of thumb: add 1 to 2 pounds
(0.5 -0 .9 kg) of dolomite lime to each
cubic foot (0.03 cm3) of soil.
Lowering alkaline levels is somewhat
easier than raising the acid level. If your
soil is too alkaline, 1.2 ounces (34 gm)
of finely ground rock sulfur per square
yard (90 cm2)* of sandy soil will reduce
soil pH by 1 point. Other types of soil
will need 3.6 ounces (100 gm) per square
yard (90 cm2).
Ww.marijuanagrowing.com
311
Dolomite lime is an essential additive for most
garden soils and soilless mixes.
*1 cubic yard = 27 cubic feet
(1 m3 = 106 cm3) (1 cubic yard = 105 cm3)
Well-decomposed sawdust, composted
leaves, and peat moss also help to acidify
soil and lower pH.
Raising Soil pH
The most common way to raise pH both
outdoors and indoors is to incorpo
rate lime into the soil (see descriptions
below of different kinds of lime). Other
materials that raise soil pH include pul
verized eggshells, clam and oyster shells,
and wood ashes, all of which have a high
pH. Both eggshells and oyster shells
decompose extremely slowly and are not
recommended. Wood ashes, with a pH
of 9.0 to 11.0, are easy to overapply.
They are also soluble and wash from soil
quickly. Wood ashes from fireplaces are
often adulterated with contaminants
that are not plant-friendly.*
^Cannabis is a well-known accumulator
plant that takes in heavy metals and
sequesters toxins in vacuoles, which are
impermeable. The heavy metals remain
toxic. Cannabis was planted around
Chernobyl, the toxic nuclear site in
Russia, to absorb toxic radioactive
heavy metals.
Agricultural Lime (aka Aglime, agricul
tural limestone, or garden lime) is made
from pulverized limestone or chalk.
Calcium carbonate is the active com
ponent, but it may also include calcium
oxide, magnesium oxide, and magnesium
carbonate. Aglime raises pH and ads cal
cium and possibly magnesium and trace
nutrients. Aglime is usually available in
larger particle sizes and takes much lon
ger than finer grades to affect soil pH.
Calcitic lime is calcium, CaCO3. Lime
is calcium, calcium carbonate. Calcitic
lime is just calcium, CaCO3. Dolomite
lime, on the other hand, is calcium and
magnesium, CaMg (CO3)2. If soil needs
magnesium, apply dolomite lime. But
many soils contain an adequate level to
an abundance of magnesium but insuf
ficient calcium and therefore require
calcitic lime. Granular and coarse lime
reacts slowly in soil. Apply lime to soil
in the fall so that it has time to react. If
applied in the spring it will not change
pH for several months
Dolomite lime (calcium magnesium
carbonate, CaMg(CO3)2) stabilizes pH
and adds calcium and magnesium. As
long as it is thoroughly mixed into the
soil, it is difficult to overapply. Dolomite
has a neutral pH around 7.0, and does
not raise the pH beyond 7.4, the upper
range for carbonates. It stabilizes the
pH safely. Compensate for acidic soil by
mixing dolomite with soil before plant
ing. It will buffer the pH, keeping it
stable when applying mild acidic fertiliz
ers. Dolomite does not prevent toxic-salt
accumulation caused by impure water
and fertilizer buildup. A proper fertilizer
regimen and regular leaching helps wash
away toxic salts. When purchasing, look
for dolomite flour (powder), the finest
fast-acting dustlike grade available.
Coarse dolomite could take a year or
more before it affects soil pH. Mix
Agricultural lime
Gypsum is rich in calcium and works wonders
in cannabis gardens.
dolomite flour thoroughly with the
growing medium before planting.
Improperly mixed, dolomite will
stratify, forming a cake on soil surface
or a subterranean layer that burns roots
and repels water. Lime is sold as a grade
of fineness with a sieve size of 10 to
100. When using different grades, the
amounts are also adjusted, since 3000
pounds of course lime may equal 1000
pounds of a fine grade.
Hydrated or slaked lime (calcium
hydroxide, Ca(OH)2) contains mainly
calcium and might contain magnesium.
It is improperly referred to as hydrated
lime and is actually hydroxide of lime.
As the word hydrated implies, this
lime is water-soluble. Hydrated lime is
more caustic (quickly burns skin) than
quicklime and is usually made by adding
water to burnt lime, forming a hydrate.
It absorbs water readily from the air, and
as a result becomes increasingly difficult
to handle. Fast-acting hydrated lime
alters pH quickly, but the results last
about 2 weeks and it is caustic enough
to burn skin. If you decide to use it, be
very careful. Mix it thoroughly with
warm water, and for fast results apply
small amounts with each watering.
At most, use a mix of 0.25 cup (6 cl)
hydrated lime and 0.75 cup (18 cl)
dolomite lime. Any larger quantity
will toxify soil and stunt or kill plants.
312
SOIL
www.marijuanagrowing.com
Hydrated lime is immediately available,
whereas the slower acting dolomite
buffers the pH over the long term. My
favorite use of hydrated lime is for a
garden room fungicide. Sprinkle it on
the floor and around the room. It also
is used as a fungistat, killing fungus
on contact.
Quicklime (calcium oxide, CaO) is
made by burning rock limestone in
kilns. This highly caustic lime should
never be used in the garden. Quick
lime reacts with water, yielding slaked
(calcium hydroxide) lime. Organic
certification agencies prohibit the use
of quicklime. Although fast-acting, the
effect is short lived and it does not have
the buffering abilities of dolomite lime.
Gypsum (calcium sulfate, CaSO4*2(H2O)
is the “magic ingredient” in many soil
mixes. It is an amendment, conditioner,
and fertilizer. Gypsum lowers the pH of
sodium-rich soils and lowers the level of
exchangeable sodium. It can also raise
soil pH, albeit slowly. Here is a great link
about gypsum: www.usagypsum.com/
agricultural gypsum.aspx. See chapter
12, Outdoors, and chapter 13, Case
Studies, for more information.
Do not mix fast-acting hydrated lime
and fertilizer. At best, acidic fertilizers
will cancel the effects of lime. For
example, urine is slightly acidic. When it
is dispersed into a toilet that was
recently cleaned with bleach, which is
very alkaline, it results in an unpleasant
odor and neutralizing reaction. The
same is true with fertilizers.
Sulfur is used to lower soil pH.
Lowering Soil pH
Soils with a pH above 7.0 are generally
considered alkaline and must be
lowered to accommodate robust
cannabis growth. Use sulfur in the form
of iron sulfate or magnesium sulfate
to lower pH. Sulfur is readily available
at nurseries or garden centers in geo
graphic areas with high-pH soil. Do not
confuse “elemental sulfur” (iron sulfate
and magnesium sulfate) with sulfur used
as a “plant nutrient.” Aluminum sulfate
is often recommended because it lowers
pH instantly as it dissolves in the soil.
Cannabis can tolerate very little alu
minum. Do not use aluminum sulfate.
Other acids in liquid, crystal, and
powder form can be used to lower pH,
but they kill soil life in organic soil
and are not advised. See chapter 23,
Container Culture & Hydroponics, and
chapter 20, Water, for more information.
Needing to lower pH is not as common
as needing to raise it. Fertilizers, includ
ing manures, coconut coir, peat, and
many organic amendments, are naturally
acidic and lower the pH of the growing
medium. In fact, adding too much
manure to soil actually acidifies the soil
so much that nutrients become locked
out. Commercial potting soils and soil
less mixes are generally acidic and their
pH seldom needs to be lowered.
Slower ways to lower pH include adding
cottonseed meal, pine needles, shredded
leaves, sawdust, or peat moss. All have
advantages and disadvantages. Cotton
seed meal also adds nitrogen to soil. Pine
needles take a long time to break down.
Unless well-rotted, sawdust consumes
nitrogen in the soil, and peat moss (pH
3) is nutrient-poor and expensive.
Soil Temperature
Heating Soil
The biological processes for nutrient
transformation and availability are
controlled by soil temperature and
moisture. Raising the soil temperature
speeds the chemical process and can
hasten nutrient uptake. Ideally, the soil
temperature should range from 65°F to
70°F (18°C-21°C) for the most chemi
cal activity. However, microorganisms
living in the soil are very active within
To raise pH 1 point, add 3 cups (65 cl)
of fine dolomite or agricultural lime to
1 cubic foot (30 L) of soil. An alternate
fast-acting mix would be to add 2.5 cups
(590 cl) of dolomite and 0.5 cup (12
cl) of hydrated lime to one cubic foot
(28.3 L) of soil.
Guidelines to raise soil pH from 5.5 to
6.5 in different types of soil:
Soil Type
kg/m2 lb/yd2
clay 0.9
1.67
sand 0.7
1.29
silt
0.8
1.47
organic 1.1
2.03
peat
1.7
3.13
POUNDS OF ELEMENTAL SULFUR NEEDED TO LOWER
THE PH OF A LOAM SOIL TO A DEPTH OF SIX INCHES
Current pH
Desired pH
i lbper100ft2 kgper9.3m2 6.5
6
5.5
5
4.5
8
3.62
3
4
5.5
7
8
7.5
3.4
4
3.5
4.5
6
7
7
3.17
1
2
3.5
;5
I
6
6.5
2.94
1
2.5 L± 4.5
□_
2.72
1
2.5
3.5
—————J
For sandy soils, reduce amount by 0.33; for clay soils, increase amount by 0.5 .
www.marijuanagrowing.com
313
Each image of the thermometer was taken in sequence, an hour apart. Note how the temperature of the soil climbs from 60°F (15.5°C) to
75°F (24°C) in just 2 hours. High soil temperatures stifle growth.
a temperature range of 80.6°F to 89.6°F
(27°C-32°C).
Raised beds and containers that are 6
inches (15.2 cm) or more above ground
level are affected by ambient air tem
perature and thus stay warmer. With
raised beds, gardeners can plant 4 to 6
weeks earlier and can grow 4 to 6 weeks
later in most climates. See chapter 12,
Outdoors^ for more information.
Direct sunlight shining on raised beds
and containers heats outside margins
quickly. Shade your garden beds and
pots to avoid overheating them. Ambi
ent temperatures above 92°F (33.3°C)
cause excessive vapor pressure within
the roots, which can cause damage. At
high temperatures roots send stress
signals to shut down much chemistry in
leaves before damage can occur.
Soil temperatures that climb above 75°F
(24°C) dehydrate roots, and at higher
temperatures the roots literally cook! It
is relatively easy to heat the soil in a pot.
If the artificial light or any heat source is
too close to small pots, it can easily heat
up the outside layer of soil where the
majority of the feeder roots are locat
ed. Once destroyed, roots take at least
2 weeks to grow back. When growing
a cannabis crop that takes 8 weeks to
flower, 2 weeks accounts for a quarter of
the flowering cycle. Even the color
of the container, such as black or white,
will change the rate at which the grow
ing medium warms.
Use soil-heating cables or a heating
pad to warm soil in containers. Fasten
heating cables to a board or table and
set a heat-conducting pad on top of
the cables to distribute heat evenly. Set
cuttings and seedlings in shallow flats
or growing trays on top of the heat-
conducting pad. The added heat speeds
root growth of clones and seedlings
when soil temperature is below 65°F
(18°C). Carefully monitor soil heat
so that it does not climb beyond 70°F
(21°C). To control heat more precisely,
it may be necessary to attach heating
cables and pads to a timer that turns them
on and off at 15- to 30-minute intervals.
Bricks and a white stone wall supply additional
heat to this large cannabis plant.
Soil heating cables cost less than soil
heating pads but must be mounted on
a board, whereas the pads are ready to
use. Most commercial nurseries carry
cables, and hydroponic stores carry
heating pads.
Cooling Soil
Unless measures are taken, soil in
containers heats to the ambient level of
garden rooms and greenhouses, especially
when there is little deviation between
day and nighttime temperatures. To
cool soil naturally, set containers on
cold concrete or earthen floors. They
will stay nearly as cold as the concrete
or earth, which is usually cooler than
the ambient temperature. Keep garden
room temperatures below 75°F (24°C)
to help keep containers cool. Irrigating
containers with cool water will also help
cool the soil.
Outdoors and in greenhouses, soil in
containers that receive direct sunlight
warms rapidly to dangerous levels that
cook roots. Set containers inside other
containers to insulate soil from blazing
sunshine. Or insulate containers with
Styrofoam or a similar material.
Cold soil, below 50°F (10°C), slows
water and nutrient uptake and stifles
growth. Gardeners often overwater
when the soil is too cold, which further
314
SOIL
www.marijuanagrowing.com
.4 6-mch (15 cm) layer ofstraw mulch on top
ofthe soil cooled the soil surfacefrom 120°F to
79°F (49°C-26°C).
slows growth and can waterlog roots.
Damage to roots often goes unnoticed.
Even if realized immediately, however,
plants could take 2 or more weeks to
recover. Root temperatures below 40°F
(4°C) make water expand, which causes
cell damage and stifles growth.
Increase soil temperature by moving
pots up off the floor a few inches. Set
them on an insulating board or piece of
Styrofoam. Use soil heating cables or
pads if necessary.
Soil Amendments
Soil amendments increase the soil’s air-,
water-, and nutrient-retaining abilities.
Amendments with a high CEC rating
hold nutrients and water well and release
them as needed. Soil amendments fall
into 2 categories: mineral and organic.
Mineral amendments are near neutral
on the pH scale (7.0) and contain few, if
any, available nutrients. Mineral amend
ments decompose through weathering
and erosion. They have the advantage
of creating no bacterial activity to alter
nutrient content and pH of the growing
medium. Dry mineral amendments are
also very lightweight and much easier to
move in and out of awkward spaces.
Perlite works especially well for
aerating the soil. This is a good medium
to increase drainage during vegetative
and flowering growth. Perlite has a low
CEC rating, and it does not promote
fertilizer-salt buildup. See chapter 23,
Container Culture & Hydroponics, for
more information on perlite.
Expanded clay pellets (calcined clay,
hadite, Hydroclay, and similar fired clay
products) expedite drainage and hold air
within the growing medium. See chapter
23, Container Culture & Hydroponics,
for more information on expanded clay.
Sand is heavy and has a low CEC rating.
Use no more than 10 percent as a soil
amendment because it tends to wash into
pockets. Sand will also accumulate on
soil surface. See chapter 23, Container
Culture & Hydroponics, for more
information on sand.
Vermiculite is a good soil amendment to
hold moisture, but if used in large quan
tities it can be very expensive. It is rich in
potassium (K) and magnesium (Mg). It
has a high CEC rating and holds water,
nutrients, and air within its fiber, and it
gives body to fast-draining soils. Alone,
fine vermiculite holds too much water for
cuttings but works well when mixed with
a fast-draining medium. See chapter 23,
Container Culture & Hydroponics, for
more information on vermiculite.
Organic Soil Amendments
Organic soil amendments overall have a
high CEC rating. They contain carbon,
and they break down through bacterial
activity, slowly yielding humus as an
end product. Humus is a soft, spongy
material that binds minute soil particles
together, improving the soil texture and
increasing nutrient uptake.
New, actively composting organic
soil amendments require nitrogen to
carry on bacterial decomposition.
Organic amendments are not always
well composted and often contain high,
even toxic, levels of salts. Check bulk
amendments/fertilizers/soils with a
sodium (Na) meter to ensure that they
contain less than 50 ppm of sodium.
/
Amendments must contain at least 1.5
percent nitrogen or they will “rob”
nitrogen from the soil. When using
organic amendments, make sure they are
thoroughly composted (at least 1 year)
and releasing nitrogen rather than pilfer
ing it from the soil. A dark, rich color is
a good sign of fertility.
At a reputable nursery, purchase quality
organic amendments that are
OMRI-approved* (or approved by a
similar third-party organic-certifying
agency). Look carefully at the descrip
tive text on the bag to see if the contents
are sterilized and guaranteed to contain
no harmful insects, larvae, eggs, and
fungi or bad microorganisms. Contami
nated soil causes many problems that are
easily averted by using a clean mix.
’’Organic Materials Review Institute
(OMRI) is the premier independent
Perlite
Expanded clay pellets
Vermiculite is available in fine, medium, and
coarse grades.
^ww.marijuanagrowing.com
315
A little organic soil amendment can help
immensely. Just make sure the planting holes
are big enough so that heavy clay soil does not
restrict root growth.
Mountains ofpeat-based soil—seen here at the
Gold Labelfacility in the Netherlands—are
awaiting processing into top-quality grow
medium mix.
A big, powerful magnet removes an incredible
amount offerrous metals from soil before pro
cessing. Check your soilforferrous metals by
rolling a magnet around in itfor a few minutes.
You may be surprised.
Coco coir was popularized in the cannabis
cultivation industry by Canna, a Dutch
company that continues to lead the industry.
agency that provides organic certifi
cation for growers, manufacturers and
suppliers in North America. Check for
a similar agency in your country, www.
omri.org.
Buyer beware! Batches of commercially
available soil and amendments are not
always mixed consistently. Weather—
heat, cold, rain—diseases, and pests can
also alter the content of bulk and bagged
potting soils that are exposed to such
elements. Often when a company has a
big demand for their products, they do
not have enough bulk materials to mix
the soil and therefore include second-
class materials that are not completely
composted or that contain high levels
of salts.
Organic amendments break down after
a year or less of use, losing much of their
volume and becoming compacted. They
also become contaminated. If reusing
amended soil, see “Recycling Potting
Soil,” on page 320, for guidelines.
Bark chips, bark dust, and wood fiber
are acidic and may use available nitrogen
in the soil to decompose. Mycorrhizal
fungi, Tnchoderma, and many other
decomposers break down bark chips.
In general, cannabis prefers bacterial
activity rather than fungal activity in
the soil. There is virtually no CEC in
the bark chips until after the breakdown
into organic acids and such. Bark chips
work well to impart antiseptic activity
and increase airspace.
Coconut fiber is an excellent soil amend
ment because it holds so much water and
air at the same time. Add to soil and soil
mixes in garden soil or in organic miner
al soil container mixes. Many gardeners
prefer inexpensive coco that has been
pressed into bricks because they are easy
to store and transport. See chapter 23,
Container Culture & Hydroponics, for
more information on coco.
Compost and leaf mold have a medium
to high CEC and are usually rich in
organic nutrients and beneficial
organisms that speed nutrient uptake.
When not allowed to heat to 160°F
(71°C), compost can be full of harmful
pests and diseases. A single cutworm in
a container can kill a defenseless plant
before migrating to another pot. Be
extremely careful when using outdoor
compost indoors.
Well-composted organic matter amends
texture and supplies nutrients. Leaf
mold, garden compost (at least 1 year
old), and many types of thoroughly
composted manure usually contain
enough nitrogen for their decomposition
needs and release nitrogen rather than
using it.
Mushroom compost is an inexpensive
soil amendment with a high CEC,
and it is full of nutrients. Mushroom
compost is sterilized chemically to
provide a clean medium for mushroom
growth. After serving its purpose as a
mushroom growing medium, it is
6
SOIL
www.marijuanagrowing.com
discarded. On average, mushroom
compost contains low levels of nitrogen
(N), potassium (P), potash (K), calcium
<Ca), magnesium (Mg), and iron (Fe).
fiy law, mushroom compost is required
to sit fallow for 2 years or more to allow
•11 the harmful sterilants to leach out.
After lying fallow for several years,
mushroom compost is very fertile and
contains many beneficial microor
ganisms. Check your local nursery or
extension service for a good source of
tnushroom compost. Some of the most
abundant harvests I have seen were
grown in mushroom compost.
Manure: Barnyard manure, a great
fertilizer for outdoor gardens, often
contains toxic levels of salt and copious
quantities of weed seeds and fungus
spores that disrupt an indoor garden. If
using manure, purchase it in bags that
guarantee its contents. There are many
kinds of manure: cow, horse, rabbit, and
chicken, to name a few. When mixing
manures as amendments do not add
more than 10 to 15 percent to avoid salt
buildup and overfertilization. Manures
purchased in bulk should be checked
with a sodium (Na) meter to ensure they
do not contain excessive amounts (more
than 50 ppm). The nutrient content of
manures varies depending upon the ani
mal’s diet and the decomposition factors.
NOTE: Green or fresh manures require
composting for a minimum amount of
time, based on the animal source, and
can range up to five years with chicken
manure. Ammonium levels will be very
high until composting occurs.
See “Manure” in chapter 21, Nutrients,
for more information on manures and
other additives.
Peat is one of the most common soil
amendments both in container (soil
less and soil) gardens and outdoor soil
gardens. Although bulky, large bags and
compressed bails of peat are available
virtually everywhere at a fair price.
See chapter 23, Container Culture &
Hydroponics, for more information
on peat.
Soil Mixes
Outdoor soil mixes that incorporate
garden soil, compost, manure, coco
peat, and rock powders, grow some of
the biggest and best cannabis plants in
the world. Outdoor soil mixes should be
mixed a few months early and left in the
hole to blend and mature. Remember,
outdoor organic soil mixes are full of life!
The following recipes were given to me
by a good friend who is a wise lifelong
gardener. Here are his complete organic
fertilizers (COF) and soil mixes for
growing medicinal cannabis organically
indoors, outdoors, and in containers
within greenhouses. Make sure to mix
the components thoroughly before
applying.
Organic Soil Mix
All measurements are by volume
• 1/3 best organic garden soil
• 1/3 coco coir hydrated with a strong
commercial fertilizer solution such as
Canna Terra Vega
• 1/3 well-rotted, sifted organic
compost
To each 5 gallons (19 L) of mix add 1 cup
(237 ml) of COF.
Complete Organic Fertilizer
(COF) Mix
• 1 quart (1 L) high-calcium aglime
• 0.5 quart (0.5 L) gypsum
• 1 quart (1 L) soft rock phosphate
• 0.33 cup (78 ml) potassium sulfate
• 3 quarts (3 L) canola seed meal
• 2 teaspoons (10 ml) borax or a smaller
quantity of Solubor (1 gm actual boron)
• 1 teaspoon (5 ml) zinc sulfate
• 1 teaspoon (5 ml) manganese sulfate
• 2 teaspoons (10 ml) iron sulfate
• 0.5 teaspoon (2.5 ml) copper sulfate
• 1 quart (1 L) kelp meal
deer manure contains low levels of nutrients
md is an excellent soil amendment.
Well-composted chicken manure is a favorite
organic fertilizer and soil amendment.
Peat is the base ofmany commercial soils and
soilless mixes.
jvww.marijuanagrowing.com
317
Mixing soil is best done outdoors or in an
open area.
Blend soil in a large container.
Lime: Do not use dolomite lime! Use
only high-calcium lime and avoid mag
nesium. Fineness of grind is essential.
Use 100-mesh screened lime.
Soft rock phosphate (SRP) is also
essential. It is by far the best form that
is acceptable to organics. The source
of SRP is Nutri-Tech Solutions,
www.nutri-tech.com.au.
Boron: Borax is 10 percent boron. At
2 teaspoons at a time, 1 kilogram of
Borax from the supermarket might last
months. Solubor supplies 20 percent
boron, but if used, you need to calculate
how much of it is needed to deliver 1
gram of actual boron.
Zinc sulfate is deliquescent; it absorbs
moisture from the air and turns into a
sloppy mess. Avoid such problems by
storing it in an airtight container.
Measuring: There are 2 “dangerous”
elements in this mix: boron and copper.
These must be measured very accurately.
Tom Hill Mix
This mix was given to me by Tom Hill,
a Northern California medical cannabis
gardener. The mix is for 50 cubic feet
This healthy plant is the product of a good soil
mix in a large container.
(1,416 L) and will fill six, 300-gallon
(1,136 L) containers.
25 bags, 1.5 cu ft each (42.5 L) of quality
organic potting soil
4 cu ft (113.3 L) chicken manure
4 cu ft (113.3 L) perlite
50 lb (22.7 kg) steamed bone meal
20 lb (9 kg) gypsum
See “Brix Mix” in chapter 21, Nutrients.
There are many more soil mixes listed
on our website forum. Check out
www.marijuanagrowing.com.
Tom is an excellent gardener, and you can
see that his soil mix grows big, strong, healthy
plants!
In indoor gardens and greenhouses, out
door soil mixes often create problems.
Soil dug up in the backyard and used to
fill containers usually drains poorly and
retains too much water and not enough
air. Problems are compounded when this
soil is mixed with garden compost that
is full of harmful microorganisms and
pests. The end results are low yields and
possible crop failure.
Avoid soil-mix problems by purchasing
all the components in sealed plastic bags.
Use garden soil or compost only if they
are top quality and devoid of harmful
pests and diseases. Use only the richest,
darkest garden soil with a good texture.
Amend the soil to improve water and
nutrient retention and drainage.
Solarize garden soil by setting it out
in the sun in a plastic bag or a shallow
6-inch-deep (15 cm) bed and then cover
ing it with plastic. Turn the bag occa
sionally to heat it up on all sides. Make
sure the entire bag receives full sun and
heats up to at least 160°F (71°C) for a
minimum of 2 hours, or 120°F (49°C)
for 3 to 4 weeks.
Solarizing soil will kill most all the undesirables.
Steam sterilization is the fastest steril
ization method and is the method most
commonly used by greenhouse profes
sionals. It requires a strong source of
steam that will completely permeate
the medium, and the growing medium
must be completely enclosed. Steam the
medium so that it heats to at least 140°F
(60°C) for at least 2 hours.
You can also sterilize soil by laying it
out on a Pyrex plate and baking it at
160°F (71°C) for 10 minutes or micro
waving it for 2 minutes at the highest
setting. It is much easier to purchase
quality potting soil at a nursery.
31
SOIL
www.marijuanagrowing.com
Organic potting soil is available from many
different suppliers, with significant variation
in quality.
Potting Soil
Well-formulated, high-quality potting
soil stored in a sealed bag frequently has
the proper texture, a stable pH, and a
small supply of nutrients. Often these
soils are fortified with trace elements
and also contain low levels of macro- and
secondary nutrients. The proper porous
texture allows good root penetration,
water retention, and drainage. Agricul
tural lime or dolomite lime keeps pH
stable. Many potting soils are formulated
with a wetting agent to evenly retain
adequate water and air. Avoid using
potting soils for longer than 4 months,
because their properties tend to degrade.
Since soil is heavy, transportation costs
tend to keep it somewhat localized. Ask
your nursery person for help in selecting
a quality potting soil for fast-growing
cannabis or annual flowers or vegetables.
Avoid potting soils with more than
10 percent tree bark or wood fiber.
Potting soils in the eastern USA, for ex
ample, often contain high levels of wood
fiber. Such soils with hold water well
but their pH can fluctuate substantially.
The size and shape of bark varies, and its
decomposition by carbon and microbes
is uneven. Furthermore, wood fiber re-
Regardless of the brand ofpotting soil, always
check its pH and sodium level.
quires nitrogen to decompose, which de
pletes the nitrogen intended for plants.
Such soils also promote an environment
that is conducive to perennial “woody”
plant growth rather than herbaceous
annual (cannabis) plant growth.
Buyer Beware! Potting soil that has
been stored outdoors is subject to direct
sunlight and moisture. Any life in the
organic soil could easily be compro
mised. Holes or tears in the plastic let
moisture and adulterants enter the bag
of “sterile” potting soil.
Upon purchase, always check potting
soils—bagged or in bulk—with a pH
meter and a sodium (Na) meter to
ensure that the pH is within a safe range
to grow cannabis, and that it does not
contain excessive sodium (more than
50 ppm).
Read the nutrient description on the
label—carefully—before purchasing.
Mixing Potting Soils
Mixing custom potting soil saves you
money, and it allows you to use specific
amendments and fertilizers to reduce
complications and their subsequent
workload. See discussion of specific
amendments in this chapter and “Fertil
izers” in chapter 21, Nutrients.
Blend soil components when dry to
evenly disperse them into the mix. Add
a light spray of water to dampen dust. To
give an example of how long to mix soil,
a spoonful of fritted trace elements in a
cubic yard (m2) of soil requires at least
5 minutes of mixing by hand.
Caution! Fritted micronutrients are on
glass particles. These are high in potassi
um and can overload the ratio. Sensitive
cannabis varieties are easy to burn.
Here are two good soil mixes from
Vic High, an expert medical cannabis
gardener.
Vic High Mix #1
• 1 bail (3.8 cu ft [107 LJ) Sunshine #2
or Pro-Mix or similar product
• 0.5 gallon (2 L) steamed bone meal - P
• 3.8 quarts (3.6 L) blood meal - N
• 1.3 cups (31 cl) Epsom salts - Mg
• 3.5 cups (83 cl) dolomite lime -
Ca & Mg 4- buffering
• 1 tablespoon (17.8 ml) fritted trace
elements
• 1 cubic foot (28.3 L) chicken manure-
N + trace elements
Mix thoroughly, moisten, and let sit 1 to
2 weeks before use.
Vic High Mix #2
• 1 bail (3.8 cu ft [107 L]) Sunshine #2
or Pro-Mix or similar product
• 8 cups (1.9 L) bone meal
• 4 cups (1 L) blood meal
• 1.3 cups (31 cl) Epsom salts - Mg
• 3.5 cups (83 cl) dolomite lime -
Ca & Mg 4- buffering
• 1 teaspoon (0.5 cl) fritted trace
elements
• 4cups(1L)kelpmeal
• 20 lb (9 kg) pure worm castings
Mix thoroughly, moisten, and let sit 1 to
2 weeks before use.
In regard to the above-listed ingredients,
blood and bone meal are inexpensive
sources ot nitrogen and phosphorus.
Kelp meal contains more than 60
available (trace) elements. Worm castings
Www.marijuanagrowing.com
319
The difference between these potting soils is
striking. The one on the right, with more
perlite, drains best.
This soil mix is high in perlite and dark, rich
elements. It will drain well and hold plenty of
nutrients and water for plants.
Rent a commercial cement mixer to mix large
quantities of soil.
are also a great source of micronutrients.
Bat guano is expensive; use sparingly as
a top dressing during the first week of
flowering.
Use a layer of sand on top of soil to quell
fungus gnat growth. Or use fungus gnat
predators (Hypoaspis milesf, once estab
lished they control fungus gnats, thrips,
and mites.
Caution! Do not use cheap or discounted
low-quality potting soil. These soils can
be full of weed seeds, pests, and diseases.
In addition, they hold water unevenly
and drain poorly. The latest trend in
“cheap” potting soils is to use compost
ed garbage in the mix. Ultimately, saving
a few pennies on soil will cost many
headaches, might result in lower yield-s,
and can even cause crop failure. Most
potting soils supply transplanted
seedlings and clones with enough
nutrients for the first 2 to 4 weeks
of growth. After that, supplemental
fertilization is necessary to retain rapid,
robust growth.
Adding 0.5 cup (11.8 cl) per cubic foot
(28.3 L) of fine-grade dolomite lime to
buffer and stabilize the pH is a good
garden practice.
Trace elements in fortified soil and soil
less mixes can wash out and should be
replenished with chelated elements the
instant deficiency signs occur. Organic
gardeners often add their own blends
of trace elements in mixes that contain
seaweed (including kelp), guanos, and
manures. However, be extremely careful
not to overapply.
Recycling Potting Soil
At right is a recipe from Vic High for
recycling soil used indoors and in green
houses. Recycling potting soil may cause
problems, the most common of which
are pests and diseases, growing-medium
compaction, and poor drainage. Recy
cling indoor and outdoor potting soil to
use outdoors is much less problematic.
The soil must be hot composted or ster
ilized with heat or steam to kill undesir
able diseases and pests. Nutrients must
be replenished too. New amendments
often have to be added to increase water
retention and to avoid compaction and
undesirable CEC levels in most soils,
but not necessarily in clay-based mineral
soils. Carefully monitor and balance pH
in neat-based soils.
X
Simply screening out roots or reusing
the soil “as is” practically guarantees
problems with pests and diseases. Even
reusing half or a third of the old soil and
adding new amendments can be prob
lematic. For best results, the soil must be
hot composted. Peat-based soils decom-
Even when planted in Mother Earth, the bulk
of roots are located around the stem. Roots
spread out quite a bit, but they are not usually
as dense as with plants grown in containers.
pose and become more acidic. Fertilizer
salt buildup is also a problem if the soil
is not leached well enough with water.
Caution! Residual nitrogen that is hot
composted will usually convert to the
toxic nitrite form and kill the plants.
Organic soils rich in soil life can easily
be mixed together and hot composted
for 3 to 4 months. Once composted,
mix the following into every 50 gallons
(190 L) of soil.
• 2.5 cups (59 cl) dolomite
• 0.5 cup (11.8 cl) Epsom salts
• 2.1 quarts (2 L) bone meal
• 3.8 quarts (1 L) blood meal
• 3.8 quarts (1 L) kelp meal
• 1 teaspoon (0.5 cl) fritted trace
elements
• Enough perlite to regain original
drainage qualities
Outdoors: Used indoor soil makes
excellent outdoor potting soil when
broken up and mixed with compost. Let
Soil from these indoor plants will be moved
outdoors, and their stems will be ground up to
be mixed into the outdoor garden soil.
SOIL
www.marijuanagrowing.com
the soil compost outdoors for at least
three months before using. Do not reuse
depleted soil “as is” in outdoor pots. The
same problems that occur indoors when
reusing soil also happen outdoors.
Dry soil is lighter and easier to transport
than wet soil. Cut stems off at or below
the soil line before moving dry, used
soil out to incorporate in the outdoor
garden. If mixed into a vegetable or
flower garden, simply remove used soil
from containers and till it into the top
few inches of garden soil. Drench soil
with dilute dark food coloring so white
perlite is not unsightly. White perlite in
an outdoor garden could call unwanted
attention to an indoor garden.
Propagation Cubes and Pellets
Rockwool root cubes, peat pellets, and
Oasis blocks are preformed containers
that make it easy to root cuttings, start
seedlings, and then transplant them.
Root cubes and peat pots also help
encourage strong root systems. Peat
pots are small, compressed peat moss
containers that have an outer wall of
expandable plastic netting. When
This little seedling was grown in a rootingflat
dong with 50 others. A spoon was used to lift
‘t out of the containerfor transplanting.
watered, a peat pellet pops up into a
seedling pot.
Place a seed or cutting in a moist peat
pot or root cube. If the little container
does not have a planting hole, make one
with a chopstick, large nail, or some
thing similar. Set the seed or clone stem
in the hole. Crimp the top over the seed
or around the stem to ensure constant
contact with the medium. In 1 to 3
weeks, roots grow and show through
the side of the cube. Cut the nylon
mesh from peat pots before it becomes
entangled with roots. To transplant, set
the peat pot or root cube in a predrilled
hole in a rockwool block or into a larger
pot. Clones and seedlings suffer little
or no transplant shock when properly
transplanted.
Check moisture levels in peat pots and
root cubes daily. Keep them evenly
moist but not drenched. Root cubes and
peat pots do not contain any nutrients.
Seedlings do not require nutrients for
the first week or two. Feed seedlings
after the first week, and feed clones as
soon as they are rooted.
This clone is well rooted and prime for trans
planting into soil or soilless mix. Roots will
spread out and grow as soon as they come in
contact with the new growing medium.
Rockwool cubes, or plugs, and Jiffy pellets
are the two most popular rooting cubes for
medicinal cannabis clones.
For many professional clone makers, Rock
wool is the preferred growing medium in
which to root cuttings.
Coarse sharp sand, fine vermiculite, and
perlite work well to root cuttings. Sand
and perlite are fast draining, which helps
prevent damping-off. Vermiculite holds
water longer and makes cloning easier.
A good mix is one third of each: sand,
fine perlite, and fine vermiculite.
Premade seed starter mixes sold under
such brand names as Sunshine Mix
and Terra-Lite are the easiest and most
economical mediums in which to root
clones and start seedlings. Soilless mix
also allows for complete control of
critical nutrient and root-stimulating
hormone additives, which are essential
to asexual propagation.
Used, Indoor Soil Disposal
Disposing of used growing medium can
be inconvenient for indoor gardeners.
Soilless mixes and soils often contain
perlite, which is unsightly in outdoor
gardens. Dead roots must also be
ground up in order to avoid other soil
problems.
Dry soil is lighter and easier to work
with and transport. Press and rub dry
soil through a 0.25- to 0.5 -inch screen
to remove roots, stems, and foliage
Screened soil is easier to handle, contain,
and transport. Some city gardeners
actually place used soil in a trash
compacter to reduce size and make it
more manageable. Please do not dispose
of used soil in the trash. Dump it where
it will benefit other plants. Always
separate transport bags from soil before
disposal. Reuse the bags.
Used indoor growing mediums make
excellent outdoor amendments when
^ww.marijuanagrowing.com
321
Used indoor soil can be unsightly in outdoor
gardens.
7
When discarding indoor mixes in backyard
gardens, some gardeners add diluted food
coloring to cover the white ofperlite.
mixed with compost and garden soil.
Do not reuse the depleted indoor soil in
outdoor pots. Many of the same prob
lems that occur indoors will happen in
outdoor pots.
Grow-Medium Problems
Visible Signs of Grow-Medium Stress
• dry, crispy, brittle leaves
• patchy or inconsistent leaf color
• yellow leaf edges that worsen
• crispy, burnt leaf edges
• chlorosis—yellowing between veins
while veins remain green
• irregular blotches on leaves
• purple stems and leaf stems
• leaf edges curl up or down
• leaf tip curls down
This sickly garden is a result ofgrow-medium
stress.
This compost pile is big enough to hold in heat
and will decompose faster than a smaller pile.
• soft, pliable leaves
• branch tips stop growing
• leggy growth
Many maladies are caused by grow-
medium problems but manifest as nutri
ent deficiencies or excesses. The solution
is found within the growing medium.
When water is abundant in the growing
medium, roots easily absorb it. Roots
use more energy to absorb more water
as it becomes scarce. Finally, the point
comes when the substrate retains more
moisture than plants are able to take in.
Well-rotted manure usually holds mois
ture well and is less prone to have viable
weed seeds and pests.
Build compost piles high, and turn them
regularly. Good compost recipes include
the addition of organic trace elements,
enzymes, and the primary nutrients
(N-P-K). The organic matter should be
ground up and in the form of shredded
leaves and grass. Do not incorporate
woody branches that could take years to
decompose.
Before using compost indoors, pour it
through 0.25-inch (0.64 cm) mesh hard
ware cloth (screen) to break up the
humus. Place a heavy-duty framed
screen over a large garbage can or a
wheelbarrow to catch the sifted com
post. Return earthworms found on the
screen to the medium, and kill any cut
worms you find. Make sure all composts
are well rotted and have cooled before
mixing with indoor and greenhouse
soils. For more information about com
posting, see Let It Rot! Third Edition, by
Stu Campbell (Storey Publishing, 1998).
Some gardeners mix up to 30 percent
perlite into organic potting soil that
contains lots of worm castings. Heavy
worm castings compact soil and leave
little space for air to surround roots.
Adding perlite or similar amendments
aerates the soil and improves drainage.
Organic Soil and the Soil
Food Web
Serious, conscientious medical cannabis
gardeners grow 100 percent organically.
Cannabis gardeners can use 100 percent
chemical fertilizers with outstanding
yields, but the overall health benefits
of the plant may suffer. Use either 100
percent organic fertilizers or (less desir
able) salt-based chemical fertilizers. Do
not mix the two! Chemical fertilizers
kill soil life. It is that simple.
The soil food web is the population
of organisms living all or part of their
lives in the soil. The soil food web is a
complex living system in the soil, and it
interacts with the environment, plants,
and animals.
The soil food web is very complex and
beyond the scope of this book to fully
explain. For a basic description of the
soil food web and to learn how you
can work with it to achieve bountiful
harvests, use a web browser to search for
322
SOIL
www.marijuanagrowing.com
“Dr. Elaine Ingham." She is the world
authority on the soil food web. Also,
pick up a copy of Teamingwith Microbes,
by Jeff Lowenfels and Wayne Lewis, for
more information on the soil food web.
A properly functioning soil food web
retains nutrients in the soil. Nutrients
are bound and do not leach or volatize
easily. Remember, nitrogen volatizes
readily if not bound up; there has to be
a continuous replacement source to feed
the microbes or they will dip into the
nutrient pools. A soil that is too active
will outcompete the plants for available
nutrients.
Nutrients are available in the proper
forms and rates for plants to take up.
Oxygen, water, and nutrients can easily
move into and through well-struc
tured soil. Roots can easily penetrate
noncompacted soil. Disease-causing
organisms are suppressed via compe
tition with beneficial organisms. Plant
surfaces, both above- and belowground,
are protected from disease-causing
organisms by beneficial organisms.
Plant-growth-promoting hormones and
chemicals are produced to stimulate
larger, more productive root systems.
Toxic compounds are decomposed by
soil life when properly managed.
The following descriptions are basic
overviews of different soil organisms
in the soil food web. There are millions
of species involved in the soil food web,
and, as you might expect, we do not
have space to describe all of them here.
Bacteria
Single-celled bacteria are so small that
250,000 to 500,000 of the little single
celled organisms could fit within the
period to a sentence. Bacteria are one of
the main decomposers of fresh, green,
organic garden matter. Different bacteria
eat different organic matter. They travel
short distances and promote medicinal
cannabis health. Once food and nutri
ents are inside bacteria, they are “locked
up” until bacteria are consumed by pred
ators. There are two groups of bacteria:
aerobic and anaerobic.
Anaerobic bacteria do not need oxygen
to survive. In general, anaerobic bacte
ria are to be avoided and not promoted.
By-products of some anaerobic organic
decomposition include hydrogen sulfide
and butyric acid, both of which smell like
vomit and ammonia with the fragrance
of vinegar. If you know these odors, you
know the smell of anaerobic decom
position. But other anaerobic organic
decomposition does not cause unpleas
ant odors, and such decomposition has
a sweet, earthy fragrance. Conditions
that promote anaerobic bacteria include
compacted soil with little pore space and
standing water.
Aerobic bacteria need air to live, and are
the ones we want in the garden overall.
Bacteria recycle three basic elements:
carbon, nitrogen, and sulfur. Sulfur
oxidizing bacteria make water-soluble
sulfates available to plants. The correct
bacteria convert inert atmospheric
nitrogen into “fixed” nitrogen—
ammonium, nitrate, or nitrite ions.
Bacterial slime (biofilm—DNA,
proteins, and sugars) also buffers the
rhizosphere so the pH remains reason
ably constant. Bacteria are attached
to particles of soil, and they lock up
nutrients that stay in the soil and are not
leached away. The nutrients stay in the
same place in the soil and are not washed
out. When other organisms eat the
bacteria, nitrogen is released in their
poop, right next to the rhizosphere
where it is readily available.
Archaea
Similar to bacteria, archaea were discov
ered in the early 1970s. But single-celled
archaea survive in both high- and low-
temperature environments, and many
produce methane. They are decomposers
that break down and recycle organic and
inorganic materials.
Fungi
Classified as lower plants, fungi produce
no chlorophyll and do not need light
to live. The majority of soil fungi are
virtually invisible without being magni
fied by a microscope. Much larger than
bacteria, fungi have many cells
and can stretch threadlike growth
(hyphae) many feet. They can transport
nutrients along their length. Once inside
the soil, fungus nutrients are “locked
in,” and remain in the soil. Fungi also
produce an enzyme that dissolves the
woody compounds lignin, cellulose, and
many others.
Fungi are the number one decomposers
and decayers. Some fungi can decom
pose organic matter and move it from
the soil surface down to the root zone
in nutrient form. Fungi move nutri
ents, most notably phosphorus and
sulfur, making them available to the
plant. Other fungi move these nutrients
horizontally in the soil to where they
are needed. Some fungi trap destructive
root-penetrating nematodes, absorbing
nematode nutrients as nourishment.
Fungi act as living banks for organic
nutrients. Fungi are super fragile and
do not grow well in compacted soil or
when broken up by double digging and
rototilling. Chemicals and salt-based
fertilizers also destroy fungi.
Cannabis and the class of fungi,
Mycorrhizal, form a complex relation
ship in the root zone, or rhizosphere.
Two basic categories of mycorrhizal
fungi include ectomycorrhizal and
endomycorrhizal. Ectomycorrhizal
fungi grow close to the root surface and
are most common around conifers and
hardwood trees. Organic cannabis
gardeners are most interested in endo
mycorrhizal fungi that penetrate both
roots and soil. The mycorrhizae react
with nutrients outside roots and facilitate
nutrient absorption and transport.
Specific types or species of mycorrhizal
fungi form relationships with specific
species of plants and make phosphorus,
copper, calcium, iron magnesium, and
zinc available. Nutrients are released
for roots to take in when fungi die and
decay. The key is to employ only the
specific species of mycorrhizal that form
the proper relationship. For more infor
mation see “Mycorrhizal Fungi” in
chapter 22, Additives.
Endophyte fungi live in plant tissue all
or most of their life. Excluding edible
mushrooms and baker’s and brewer’s
yeast and lichens, many are pathogenic to
cannabis, including gray mold (Botrytis
cinered) and Fusarium. See “Gray Mold”
and “Fusarium” in chapter 24, Diseases &
Pests, for more information.
Algae
Algae are single-celled threadlike organ
isms, including seaweed and kelp. There
are several kinds of algae, among them
www.marijuanagrowing.com
323
blue-green, green, red, and brown. They
can inhabit saltwater, fresh water, and
terrestrial environments, including soil.
Algae need sunlight in order to grow
and produce their own food.
Algae participate in creating soil by
forming carbonic acids during their
metabolism. They also form partnerships
with other organisms, including fungi.
Blue-green algae fix nitrogen using the
nitrogenase enzyme. Overall, algae’s role
in the garden is small, since algae grow
at soil surface level and just below, and
their growth is limited by sunlight pen
etration. Excess algae in soil will attract
soil pests, including fungus gnats.
Slime Molds
Slime molds are slimy, amoeba-like
organisms found in leaves, lawn thatch,
manure, and other organic matter. Spores
germinate in soil and ingest bacteria,
fungi spores, and protozoa. The nutri
ents are thus “locked up” in the soil and
prevented from leaching. Slime molds
are eaten by larger predators, which
digest them and then release nutrients
into the soil. Slime molds surround their
food and digest it internally. They are
also food for larvae, worms, and beetles.
Slime molds cycle nutrients and help
bind soil particles together.
Protozoa
Protozoa are organisms with a
nucleus within a single cell. In most
cases, protozoa cannot make their own
food; they survive by eating thousands
of bacteria—and occasionally fungi
and other protozoa.
Most of the 60,000 different kinds of
protozoa are soil dwellers, but all of them
need water for life, reproduction, and
mobility. They travel in the thin layer
of water enveloping soil particles. When
this dries up they go into dormancy.
Protozoa and bacteria live in symbiot
ic relationships, yet at the same time,
protozoa control bacteria populations.
When they eat all the readily available
bacteria, the big protozoa start consum
ing nematodes and smaller protozoa until
the population becomes balanced once
again. Wastes generated by protozoa are
brimming with mineralized nutrients,
including nitrogen compounds. Once
the waste is in the soil, nitrogen-fixing
bacteria, if present, convert ammonium
(nitrogen) into the readily available
nitrate form of nitrogen.
According to Jeff Lowenfels, coauthor
of Teaming with Microbes^ “As much as
80 percent of the nitrogen a plant needs
comes from the wastes produced by
bacteria- and fungi-eating protozoa.”
Nematodes
Nematodes are nonsegmented, thread
like, blind roundworms. Nematode
waste is high in mineralizing nutrients
liberated after consuming bacteria and
fungi. There are more than 20,000
species of nematodes. Even though
you can find 40 to 50 nematodes in a
single teaspoon of good garden soil,
most gardeners only know about the
bad, root-eating nematodes. For more
information on them, see “Nematodes”
in chapter 24, Diseases & Pests,
Bacterivore nematodes live on bacteria.
Their waste is loaded with mineralized
nutrients. Predator nematodes eat algae,
arthropods, fungi, other nematodes,
protozoa, and even slugs! Wiggling and
crawling through the soil, nematodes
aerate and cultivate as they go. Soil
structure and porous texture are
essential for nematode well-being.
Arthropods
Beetles, flies, mites, mosquitoes,
spiders, and springtails are all arthro
pods. About three-fourths of all living
things are arthropods. These little critters
have jointed legs and segmented bodies
connected by a lightweight exterior
skeleton (exoskeleton). Exterior skeletons
are much stronger and give arthropods
superhuman strength.
Arthropods aerate soil, shred organic
material, and prey on other members
of the soil food web, including bacteria,
fungi, and other arthropods. Arthro
pods also promote fungal and bacterial
activity in soil. Most live on or near
the soil surface, but others burrow
down into the soil, aerating it and leav
ing mineralized nutrient excrement in
their path.
Unfortunately, most gardeners classify
arthropods into three groups: bad bugs,
bad insects, and others! Of course most
cannabis gardeners are familiar with a
few bad ones—spider mites and thrips,
to name a couple, but there are millions
more, and many of them live in and are
strategic to healthy soil and to medical
marijuana. For example, mites (not bad
spider mites) and springtails together are
accountable for recycling as much as 30
percent of the forest floor in temperate
climates. They want to work in your
garden soil too!
We have dedicated a large part of the
“Diseases & Pests” chapter to arthro
pods that are detrimental to plants. Just
remember that not all bugs are bad!
You can find more than 300,000 mites
in a square yard of good organic garden
soil. Depending on species, mites prey
on members of the soil food web—
nematodes, algae, fungi, decaying foli
age, and other arthropods. They are also
prey to other mites and arthropods.
Ants mix organic materials found on the
soil surface, shredding them and toting
them deep into their dens.
This is just the tip of the iceberg. We
do not have enough space to discuss the
rest of the arthropods, including beetles,
spiders, centipedes, millipedes, earwigs,
grasshoppers, crickets, lice, flies, bees,
wasps, sow bugs, pill bugs, and a few
million more, but you should have the
idea of just how important they are for a
healthy soil food web.
Earthworms
Earthworms are tube-shaped, segment
ed worms that range from 1 inch to 3
feet in length. Earthworms are easy to
identify and are an indicator of healthy
organic garden soil. Most gardeners are
familiar with the night crawler (Lumbri-
cus terrestris) that originated in Europe.
And many gardeners know the common
“red wiggler” compost worm (Eisenia
fetida\ which is native to the USA, but
there are 7,000 more earthworm species,
some of which are found in garden soil.
Good organic garden soil has 10 to 50
earthworms per square foot. Each worm
can move up to a pound of soil every
year. A night crawler can move 6 times
its body weight. That’s more efficient
than rototilling, and it’s free! Earth-
324
SOIL
www.marijuanagrowing.com
tforms till the soil, making better access
for air, fungi, and other soil life while
enhancing microbial life and improving
water-holding ability.
Earthworms shred organic matter, aerate
soil, aggregate soil particles, and move
microorganisms and organic matter in
the soil. They normally live in the top
6 inches of soil, but some species can
burrow down 10 feet or more. Garden
earthworms primarily eat bacteria but
may also consume fungi, nematodes, and
protozoa in addition to all the organic
material they take in.
Once through the worm’s mouth, food is
mixed with saliva, and powerful muscles
start breaking it down before grinding
it in the gizzard. Bits of sand help grind
the mix before entering the intestines.
Bacteria in the intestines then start to
digest it. These bacteria produce nutri
ents that are absorbed into the worm’s
bloodstream. Unused materials are
eliminated in the form of vermicastings,
also known as “worm castings.”
Vermicastings have 50 percent more
organic matter than the same soil not
digested and expelled by worms. Chem
ical bonds that make nutrients unavail
able are liberated by this positive-
charged worm poop. Nutrients now have
the ability to attach to soil particles and
become available to roots.
Gastropods
Gastropods—slugs and snails—as well
as some 40,000 other species form this
group. Slugs and snails not only eat your
plants, they also consume algae, fungi,
and rotting organic matter. Many slugs
can even digest cellulose. They shred
their food to help decompose and decay
organic material and organisms. They
spend less than 15 percent of their life
aboveground.
Reptiles, mammals, and birds
Squirrels, mice, rabbits, chipmunks,
moles, voles, gophers, snakes, salaman
ders, lizards, and birds may be annoying
and even destructive in the garden, but
they do have positive value. They move
soil by burrowing, scratching, and simply
moving their bodies, and in the process
they move organic matter from one place
to the other in the garden. They also
defecate in the garden, adding available
nutrient-rich nutrients. Birds in the
garden demonstrate that worms, larvae,
insects, and bugs are also in the garden.
Bird poop (guano) is chock-full of
nutrients and microorganisms. Bird feet
transport protozoa that drop off as birds
move about.
However, once moles and gophers have
“moved enough soil,” you may want to
escort them out of your garden. And
once mice, rabbits, voles, and birds have
eaten enough desirable plants, it is time
for them to go too. See chapter 24,
Diseases & Pests, for information on
removing unwanted reptiles, mammals,
and birds from your garden.
Salt-Based Fertilizers
Salt-based (chemical) fertilizers have
the ability to destroy soil life; over
applied, repeated applications continue
to kill soil life—bacteria, fungi, insects,
etc.—which weakens plants. If the first
salt-based fertilizer application to organic
garden soil does not kill all soil life,
subsequent applications will finish it off.
Outdoors, this scenario also prompts
undesirable weeds to dominate the bleak
environment.
Salt-based fertilizers are big business.
Fertilizer manufacturers rely on low
manufacturing costs and exponential
profit margins. This “formula” allows
for extravagant advertising budgets
that are used to influence consumer
purchasing.
Diseases and pests attack artificially
supported plants. Harsh fungicides and
pesticides are used to kill diseases and
pests, which are secondhand problems
caused by lack of soil life. Water and
nutrients then leach from the soil at a
faster rate, and more fertilizer is subse
quently required. This downward cycle
is repeated every time another fertilizer
salt or killing substance is applied.
Garden and soil-life diversity is the
key to healthy soil. Infuse, attract, and
grow diverse soil friends and workers—
bacteria, fungi, protozoa, arthropods,
and beneficial nematodes. Bring life
and teeming vitality back to your
garden soil and grow healthy, organic,
medicinal cannabis.
Rototilling Soil Kills Soil Life and
Destroys Structure
RototiIlers can do more work than
people, but does this work need to be
done? Ask the average farmer, gardener,
or nurseryperson, and he or she will tell
you that, yes, tilling is the way we have
always done it. Tilling helps the soil; it
breaks up clods and dead roots, and tills
in and kills weeds. Uniformly tilled soil
looks great, and most gardeners have a
wonderful feeling of accomplishment
after the garden or field is tilled.
Ask well-informed organic gardeners if
they till the soil, and you will receive a
firm no. They understand that unnec
essary tilling disrupts and kills soil
life; it destroys the soil’s structure and
water-holding ability. Instead of tilling,
they add compost, organic teas, and
fertilizers to promote soil life so that
bacteria, fungi, protozoa, arthropods,
and earthworms do all the work. These
little creatures make nutrients available
to roots, increase plant vitality, and help
soil retain water and nutrients. Organic
gardeners also selectively use natural
fungicides or pesticides, some of which
may kill soil life.
Mulch
Mulch is a protective cover placed
on the soil to retain moisture, reduce
erosion, provide nutrients, and suppress
weed growth. Mulch keeps the surface
of the soil from forming a hard, cakey
layer, and it promotes a lively layer of
roots and soil life below the surface.
A/ww.marijuanagrowing.com
325
Avoid using mulch in spring when soil
is cool. Mulch insulates soil. It slows
warming and prevents moisture evapo
ration. When mulches mat down, they
form a barrier that blocks the flow of air
and water between soil and atmosphere.
Keep an eye on mulches because they
may wick water from the soil surface
and dry it out.
Apply mulch after soil has warmed
in early to mid summer. Soil tempera
tures will stay on target, and warmth
will hold well into autumn. Mulch also
slows evaporation, but do not forget that
mulch can absorb rainfall and prevent it
from penetrating soil. Irrigate mulched
plants heavily so that water penetrates
into the soil below.
Spread mulch by hand around plants.
Keep mulch at least 6 inches or more
away from stems to discourage diseases
and pests. Finely chopped mulch is often
more effective, but it decomposes faster
than coarser mulch. A thick 6-to-12-inch
(15-30 cm) layer of straw, hay, or grass
mulch around a big plant in full sun will
substantially reduce water consumption.
Keep adding mulch as it decomposes.
Indoors, apply mulch such as expanded
clay pellets or a piece of plastic that is
cut to fit over containers.
Outdoors, almost anything can be used
for mulch—rocks, sticks, newspaper,
plastic, straw, hay, and more.
Composted mulch normally smells like
freshly cut wood or sweet compost. Stay
away from mulches that smell of ammo
nia, rot, sulfur, or vinegar, all of which
signify anaerobic conditions.
Slugs, snails, mice, and other pests are
attracted to mulch. Keep mulch 6 inches
(15 cm) or more away from stems to
discourage rodents from chewing stems.
Place a plastic cuff around the base of
plants to further discourage rodent
damage. Use appropriate control
measures for diseases and pests (see
chapter 24, Diseases & Pests).
Cover crops protect soil in the off
season. These living mulches are tilled
into the soil in the spring, adding nitro
gen, organic matter, and other nutrients.
Indoors, outdoors, or in a greenhouse, mulch is often the least expensive way to conserve water,
protect the soil, and reduce maintenance. Thumbs up for mulch!
The roots of some cover crops such as
alfalfa and clover fix nitrogen in the soil,
providing they are cut and tilled before
flower set.
Straw and alfalfa hay are my favorite
mulches. Straw, available at farm and
garden stores in compressed bails,
is best used during warm weather to
keep moisture from evaporating and to
promote soil life. Avoid sources of hay
and straw that could have been sprayed
with growth regulators or herbicides
that accumulate in foliage. Such straw
also tends to have less available nitrogen,
so the nitrogen pool in the soil is robbed
for the decomposition process. Alfalfa
hay is more expensive than straw, but it
is heavy in nitrogen and adds it to the
soil instead of robbing it from the soil.
Alfalfa hay will biodegrade faster than
straw.
High-carbon mulches such as straw,
woodchips, and tree bark stay on the
surface and are decomposed mainly
by fungi, UV rays from sunlight, and
weather. High-carbon mulches form
a barrier that can deflect irrigation
water. They can also wick water from
the ground, but this is not common. If
sticks are poked into the ground, they
will wick water up toward dry wood.
Mulch made from wood can contain or
feed termites!
Shredded cardboard and newspaper
make a good base to pile organic mulch
on. To hold paper in place, wet it as you
put it down.
Compost used as mulch should be well
rotted and void of weed seeds and heat.
Grass clippings are a high-nitrogen
source that helps compost cook. My
preference is to avoid adding grass that
has been treated with herbicides such as
Weed & Feed.
Leaves and leaf mold (composted
leaves) tend to compact when they lay
flat before adequate composting. Leaf
mold is one of my favorite compost
materials, especially when it comes from
healthy hardwood trees.
Plastic bags, Visqueen, and plastic sheet
ing work well as mulch. I like to use
biodegradable plastic, and have found
that dark-colored plastic is less obtrusive
than light-colored plastic.
A plastic mulch will shade weeds, pre
vent moisture loss, and raise the tem
perature of the soil by 5 to 15 degrees
Fahrenheit (3-8 degrees Celsius) on a
sunny day. As plants grow, their leaves
will shade the plastic and stop the
warming effects. A lake, pond, or small
creek will also moderate air temperature,
keeping it warmer in winter and cooler
in summer. Do not use organic mulches
in the spring; during that time of year
they will cool the soil.
Rocks and gravel are great mulches.
Rocks hold heat and retain it overnight.
Rock mulches also extend growing
seasons.
326
SOIL
www.marijuanagrowing.com
r~
328 Types of Containers
329 Container Shape and Size
330 Small Containers
330 Large Containers
330 Root Pruning
330 Root-Pruning Containers
330 Air Root-Pruning Containers
331 Chemical Root Pruning
331 Physical Root Pruning
331 Drainage and Leaching
332 Container Problems
I par| advanced medica
| CANNABIS
HORTICULTURE
Container size, shape, construction
material, color, and drainage outlets
affect the maintenance schedule and
ultimately the overall health of cannabis
plants.
Containers come in all shapes and sizes
and can be constructed of almost any
thing: plastic, wood, metal, clay, fiber,
and more. Cannabis will grow in any
clean container that has not been used
for petroleum products or deadly chem
icals. Fiber and wood containers breathe
better than plastic or metal pots. Heavy
clay pots are brittle and absorb mois
ture from the soil inside them, causing
the soil to dry out quickly. Metal pots
are also impractical for garden rooms
because they oxidize (rust) and can bleed
off harmful elements and compounds.
Wood, although somewhat expensive, is
great to construct large raised beds and
planters on wheels. Plastic and fiber con
tainers are inexpensive and durable; these
offer the best values to indoor gardeners.
Growing in containers allows garden
ers to control the water and nutrient
regimen of individual plants. Movable
potted plants can be turned every few
days to let plants receive even lighting
for even growth. Huddle small, con
tainerized plants tightly together within
the brightest area under the HID lamp.
Move containerized plants further
apart as they grow. Set small plants on
blocks to move them closer to the HID.
Weak, problematic, or diseased potted
plants can easily be dipped in medicinal
solution, quarantined, or culled from the
garden.
Containers must be:
1. clean,
2. have adequate drainage holes, and be
3. big enough to accommodate plant
growth.
dig containers give roots plenty of room to
t row and expand.
Containers on casters are easy to move, and
they stay warmer since they are up off the
floor.
Growing big plants in 5-gallon (19 L)
containers is possible but more difficult.
Roots use water and nutrients quickly and
must therefore be replenished quickly.
n ww.marijuanagrowing.com
327
Types of Containers
Containers used to cultivate cannabis fall into three basic categories: bags, cans, and beds. Bags consist of containers with a
flexible shape such as plastic grow bags and burlap or fiber bags. Cans are a group of containers with rigid sides: plastic pots, large
planter boxes, and clay pots. Beds may or may not have rigid sides; the main distinction is that they have no bottom and thus
drain freely.
Plastic grow bags are a favorite container
among cannabis gardeners. Inexpensive,
long-lasting grow bags take up little
storage space and are lightweight. A box
of 100, 3-gallon (11 L) bags weighs less
than 5 pounds (2.3 kg) and measures
less than a foot square (30 cm2). One
hundred 3-gallon (11 L) grow bags can
be stored inside two 3-gallon (11 L)
bags. Imagine storing 100 rigid pots in
the same space!
Rigid plastic pots are the most com
monly used containers in garden rooms.
They are the standard container for
nursery stock and are readily available.
Most often they are black with smooth
sides and large drainage holes. Black
containers absorb heat and reflect very
little, causing the root zone to heat rap
idly. When allowed to get too hot, roots
cook and rot. Once cooked, roots may
take a month or more to recover.
Outdoor garden beds should be at least
6 inches (15 cm) tall to take advantage
of a warmer atmosphere aboveground.
They can be higher, but little benefit is
reaped from extra heat. See chapter 12,
Outdoors, for more information on
raised beds.
White containers reflect heat and stay
cooler, but if placed in full sun they still
get hot enough to cook roots. White
containers must be thick or painted a
dark color on the inside so that roots
receive no light, since light is detri
mental to their growth. See “Container
Problems” in this chapter.
Rigid fiber and paper-pulp pots are
popular with gardeners who move their
plants outdoors. Removing the con
tainer’s bottom eases transplanting into
soil. Pot bottoms habitually rot out, but
painting the inside of the fiber container
with latex paint will keep the bottom
from rotting for several crops.
The potting soil sack can be used as a
container. The moist soil inside the bag
expands and contracts. Keeping soil
evenly moist will lessen the chance of
burned root tips that grow down the
side of bags. Always remember to make
adequate drainage holes in bags!
328
CONTAINERS
www.marijuanagrowing.com
Permeable-fabric grow bags are easy to
make with many different types of ma
terial. Commercial brands such as Smart
Pots, GeoPots, and so forth are gaining
in popularity. Grow bags, whether plas
tic or fabric, are easy to wash and reuse.
Empty out the soilless mix and sub
merge bags in a big container of soapy
water overnight. Stir them around with
a stick, wash by hand, and hang to dry.
Once dry, the bags are ready to reuse.
Hike fiber pots the best because the air
in the sides keeps the roots pruned. For
more information, see “Root-Pruning
Containers” in this chapter.
Large planter boxes are wonderful.
Planters should be as big as possible but
still allow easy access to plants. Roots
will have more room to grow and less
container surface for them to run into
and grow down. Set large planter boxes
and pots on blocks or casters to allow
air circulation underneath. The soil
in planter boxes stays warmer and the
plants are more easily maintained.
Garden beds are my favorite! Garden
beds can be raised with rigid sides or
not, but they must be completely open
on the bottom and drain directly into
Mother Earth. Garden beds can easily
be installed on the floor of a greenhouse
and outdoors. In fact, I have seen garden
beds in basement and outbuilding gar
den rooms. Please take note, however:
the soil below basement garden beds is
often poor-quality subsoil that drains
poorly.
Container Shape and Size
Popular container shapes include rect
angular, square, and cylindrical. Square
and rectangular containers can butt up
to one another, providing more overall
growing medium in gardens. Cylindri
cal containers are readily available and
inexpensive but lack the versatility of
square pots.
Containers are wider than deep or
deeper than wide. Cannabis gardeners
growing indoors and in greenhouses
prefer containers that are wider than
deep because they are more stable and
surface roots are able to spread out far
ther. This is true regardless of container
size, small or large. Deep containers tip
over more easily but promote (seedling)
taproot and deep root growth. They are
favored to grow small plants that will be
transplanted outdoors.
The volume of a container definitely dic
tates the irrigation and feeding schedule.
In most cases container size helps deter
mine the size of a plant. Cannabis is an
annual; it grows very fast and requires
a lot of root space for sustained, vigor
ous development. Containers should
allow space for a strong root system but
be just big enough to contain the root
system before harvest. If the container
is too small, roots are confined and both
water and nutrient uptake are limited,
which in turn slows growth. But if the
container is too big, it requires too much
expensive growing medium and becomes
heavy and awkward to move.
Big plants can grow in small containers but
will require several irrigations daily and are
likely to have problems.
Deep containers are ideal to grow seedlings
and clones that will be planted outdoors.
Plants grown in large containers require
less-frequent irrigation and are much easier
to maintain.
www.marijuanagrowing.com
329
"selecting containers
Plant Age
Container Size
Metric Equivalent
0-3 weeks
root cube
root cube
2-6 weeks
4-inch pot
10 cm pot
: 6-8 weeks
2-gallon pot
7.5 L pot
2-3 months
3-gallon pot
11Lpot
i 3-8 months
5-gallon pot
19Lpot
6-18 months
>•
10-gallon pot
38Lpot
This root-pruning container diverts root
growth with different obstacles on the wall.
Note that it also has air holes to air prune roots
that are encircling the inside of the container.
Allow 1 to 1.5 gallons (3.8-5.7 L) of soil or soilless mix for each month that a
given plant will spend in its container. A 2 - to 3-gallon (7.5-11 L) pot supports
a plant for up to 3 months. A 3- to 6-gallon container is good for 3 to 4 months
of rapid plant growth.
Small Containers
Three-gallon (11 L) containers are ideal
for 2- to 3-foot-tall (60-90 cm) plants.
Larger pots are usually unnecessary
because plants grow no longer than a
week or two in the vegetative stage
and 6 to 10 weeks flowering. Smaller
3-gallon (11 L) pots are easy to move
and handle. Roots also grow less during
Small containers are great for small plants.
They are lightweight and easy to handle. Roots
soon outgrow small containers; these clones
are ready to transplant.
flowering. By the time a plant is pot
bound, it is ready to harvest. I used to
recommend up to a 5-gallon (19 L) con
tainer for plants that are harvested after
90 total days of life. I now believe this
is a waste. While the smaller containers
require daily watering, they produce
harvests comparable to those of 5-gallon
(19 L) containers.
Large containers outdoors sit on top of the
ground, forming a barrier to pests that enter
through the soil—such as termites, a problem
insect in many gardens.
Large Containers
Mother (stock) plants usually grow
larger, longer, and require 5- to
50-gallon (19-190 L) containers when
grown in soil. However, mother plants
grow quite well in 5- or 10-gallon
(19—38 L) hydroponic containers for
a year or longer. If you plan to keep
a mother plant for more than a few
months, grow it hydroponically in its
own container for best results.
Root Pruning
Root-Pruning Containers
Root-pruning containers work on a
simple principle. Roots tend to grow
around and down the inside of contain
ers having a smooth wall. Root-pruning
containers place obstacles in the path of
roots to divert them and stop or change
the direction of root growth.
Air Root-Pruning Containers
Unpruned roots encircle the inside of
Square containers fit closely together providing
more growing medium per square foot (m2).
Large containers allow space /or root growth as
well as biological activity. They are the next best
thing to growing in Mother Earth, even indoors.
The roots on the left were grown in a smooth
sided 3-gallon (11 L) container. The root mass
on the right was grown in the 3-gallon (11 L)
root-pruning container above.
330
CONTAINERS
www.marijuanagrowing.com
Uneven surfaces allow for more root growth,
md a series ofholes permits air to prune roots.
These air-pruning containers require little
storage space and are easy to assemble.
Roots on these clones grow through drainage
holes. Once they hit the air, growth stops. Roots
are thus “air pruned. ”
containers, forming thick masses that
are sensitive to temperature changes and
will dry out easily. Roots that become
dry for long or that cook in hot tem
peratures will die. Dead roots soon rot,
leaving plants vulnerable to diseases,
pests, and nutrient deficiencies.
When roots grow to the end of a contain
er with permeable sides and are exposed
to air, the root tips stop growing. More
feeder roots form along the main stem of
the root. Air naturally prunes the tips of
roots, and the roots form a dense mass
inside the container. Gardeners can make
their own permeable air-pruning contain
ers from many different materials, or such
containers can be purchased from retail or
wholesale outlets.
Clone and seedling roots are easy to
air prune. Holes in air-pruning flats
are shaped like a cone with a hole at the
bottom. Roots are directed down the
container and out the hole in its bottom.
The tips of the roots dry out once they
come into contact with air, thus pruning
them. Use these containers if you must
hold clones for a week or longer than
you desire.
Chemical Root Pruning
Chemical root pruning controls root
growth inside containers. Commercial
nurseries have been using chemical root
pruning for many years with outstand
ing results. Uncle Ben, a charter member
of the defunct site www.overgrow.com
tuned us in to chemical root pruning,
and we thank him!
Uncle Ben used a product called
SePRO Griffin’s Spin-Out that con
sists of copper hydroxide suspended in
water-soluble paint as a carrier. To use,
simply brush-paint container insides
with two coats of the product. Roots
grow to within a fraction of an inch of
the copper hydroxide, and then stop.
Roots will not touch the copper com
pound. The result is essentially the same
as is achieved with air pruning. Plants
having a dense root system dispersed
evenly throughout the root ball are eas
ier to maintain, and they grow bigger in
smaller containers.
Note: Medical cannabis gardeners avoid
using copper compounds to prune roots,
citing root burn problems. In elemental
form copper is easy to overapply, and it
quickly becomes toxic to plants. Copper
sulfate (0.3 %) is less toxic than copper
hydroxide. Both compounds are insolu
ble in water and ions do not translocate
to roots.
Physical Root Pruning
Physically pruning roots may be neces
sary to give new life to potbound plants
outdoors or in greenhouses. Remov
ing roots will not make plants grow
faster; in fact, it will slow growth for
about two weeks. Once new roots start
to grow, however, growth rebounds.
About midsummer, root pruning can
help plants that must stay in the same
size container. Root pruning will keep
plants manageable and much easier to
maintain. Physical root pruning is the
last option; try air pruning and chemical
root pruning first.
Drainage and Leaching
All containers need some form of drain
age. Drainage holes allow excess water
and nutrient solution to flow freely out
the bottom of a container. Drainage
holes should let water drain easily but not
be so big that growing medium washes
out. Containers should have at least two
This dense mass of roots is the result of
chemical root pruning. The same result can be
achieved by using air-pruning containers.
Drainage holes are essential in all containers.
I prefer the container on the right with larger
holes that run slightly up the sides to the one on
the left with smaller holes on the bottom only.
This nursery tray is used to hold small con
tainers. It provides extra space below so that
containers drain and do not sit in water.
tyww.marijuanagrowing.com
331
Feeder roots grow near the soil surface, just
under the mulch. I like to add mulch to out
door, indoor, and greenhouse containers.
This rootbound plant appears healthy above-
ground but will stop growing as soon as roots
suffer heat or moisture stress.
Lightly cultivate the soil surface so water
penetrates evenly. Be careful to avoid disturb
ing the roots.
half-inch (1.2 cm) holes per square foot
(929 cm2) of bottom. Most pots have
twice this amount. To slow drainage and
keep soil from washing out of the large
holes, add a 1-inch (2.5 cm) layer of grav
el in the bottom of the pot.
Surface tension created by the varying
sizes of soil and rock particles, and a
lot of other interesting science, causes
water to be retained at the bottom of the
container. Line pots with newspaper if
drainage is too fast or if soil washes
out of drainage holes, but be wary of
overly slowing the drainage.
Put trays under containers to catch
excess water. Do not let water stand in
saucers for more than 20 minutes or
waterlogged roots will die and rot. Set
containers up on blocks so water drains
into saucers or trays and roots do not sit
in water. Nursery trays used for rooting
cuttings and growing seedlings must
have good drainage throughout the
entire bottom. Once clones and seed
lings are in place in the tray, the tray
should always drain freely with no
standing water in the bottom.
Container Problems
Do not place containers in direct heat.
If soil temperature in pots climbs be
yond 75°F (24°C), it can damage roots.
Shade pots that are in direct sun with a
piece of plastic or cardboard to keep the
soil temperature of below 75°F (24°C).
A 1 to 2-inch (2.5 -5 cm) layer of hydro
clay mulch on the soil surface keeps
the soil surface moist. Roots are able to
grow along the surface, and the soil does
not need to be cultivated. The hydroclay
mulch also decreases evaporation and
helps keep irrigation water from damag
ing roots or splashing out of containers.
Roots soon hit the sides of containers,
grow in circles, and later grow down and
mat up around the bottom. The unnat
ural environment inside the container
often causes a thick layer of roots to
grow alongside the container walls and
bottom. This portion of the root zone
is the most vulnerable to moisture and
heat stress and is the most exposed to it.
Often inexperienced or lazy gardeners
set such plants in a saucer to contain
irrigation water. The submerged roots
soon die and rot, compounding the
problems.
Avoid such problems by transplanting
plants before they become rootbound,
or by using root-pruning containers.
When soil dries in a pot, it becomes
smaller, contracting and separating from
the inside of the container wall. This
condition is worst in smooth plastic
pots. When this crack develops, frail
root hairs located in the gap quickly
die when they are exposed to air whis
tling down this crevice. Water also
runs straight down this crack and onto
the floor. You may think the pot was
watered, but the root ball remains dry.
Avoid such killer cracks by cultivating
the soil surface and running your finger
around the inside lip of the pots. Lightly
cultivate the surface of the soil every few
days and maintain evenly moist soil to
help keep root hairs on the soil perim
eter from drying out. A layer of mulch
will also help avoid the gap between soil
and container.
White containers reflect light and keep
soil cooler. Always use thick, white con
tainers so light does not penetrate and
subsequently slow root growth. If roots
around the outside of the root ball start
turning green, you know they are receiv
ing direct light. Remedy the problem by
painting the inside of the container with
a nontoxic latex paint.
Soil shrinks when dry; it causes a gap to form
alongside the container's inside wall.
Low levels of sunlight through container walls
cause unhealthy green roots. Paint containers
black inside to cut light transmission.
332
CONTAINERS
www.marijuanagrowing.com
r------
—====—^^
333 Hard Water
334 Soft Water
335 Sources of Water
336 Purified Water
337 Reverse Osmosis (RO) Water
337 pH
338 Altering Nutrient-Solution pH
339 Raising Nutrient-Solution pH
341 Safety Precautions
341 Lowering Nutrient-Solution pH
342 How Fluids Move within Cannabis
343 Osmosis
344 Irrigation
346 50 Percent Watering Rule
347 Overwatering
347 Underwatering
ADV
MEDICAL CANNABIS!
HORTICULTURE 1
*
WATER
k
7
Water is a part of humans and all living
things. Water moves the fluids that
support life in plants and animals.
Water (H2O) exists in liquid, gaseous,
and solid states. When pure, water is
tasteless and odorless. Reflected light
often gives it a blue appearance, especially
when concentrated in glaciers. Many
substances, including fertilizer salts,
readily dissolve in water, which is known
as the universal solvent. Most sources of
water are rarely pure. The impurities in
water are “invisible” once dissolved and
part of the solution.
Determine basic water quality by
measuring its alkalinity, pH, and total
dissolved solids (TDS). Alkalinity, the
capacity to neutralize or buffer an acid
solution, affects pH, the acid-to-alkaline
balance of water. Two minerals or
dissolved solids, calcium (Ca) and
magnesium (Mg), buffer pH so that
the addition of acidic mineral salts or
fertilizers does not affect the pH a great
deal. Pure and nearly pure water that
contains few or no dissolved minerals is
considered soft because it has little or no
buffering ability. The pH of soft water
(see below) can experience extreme
fluctuations when acidic fertilizer salts
are added.
Hard Water
Hard water contains significant
quantities of dissolved minerals.
Calcium (Ca) and magnesium (Mg)
concentrations are most often used as an
indicator as to how “hard” the water is.
When heated, the carbonates (formed by
reaction of CO2 with bases) in hard
water precipitate (settle) out, forming
scale on plumbing pipes, showerheads,
and so on. Soaps do not lather well in
hard water because it reacts to form
calcium or magnesium salts, which
are insoluble. Water containing 100 to
150 milligrams of calcium carbonate
(CaCO3) per liter (mg/1) is acceptable
to grow cannabis. Nonetheless, water
can have 400 ppm sodium and it will
still be soft, but about 60 to 120 ppm
Ca makes it hard (depending on whose
scale is used)."'
A mountain stream in Vancouver, BC, is an
excellent source offresh, clean water. But most
water sources available to gardeners are far
from pristine.
A/ww.marijuanagrowing.com
333
Salt has started to accumulate on this shower
head. The buildup is from the dissolved solids
(salts) in the water supply. The same salts also
deposit in soil and containers.
This simple filter removes particles and
chlorine from the water supply.
Soft water makes soap lather.
Watering heavily and filling containers
completely so that 20 percent of the irrigation
water drains out will help wash away built-up
fertilizer salts in the growing medium.
*For much more information on hard
water, search “hard water” on the
www.marijuanagrowing.com forum.
Soft Water
Softened water is often treated with
sodium, which binds to the calcium and
magnesium ions, removing their ability to
form scale or interfere with detergents. In
Spain, we have hard water; we put sodium
(granular salt) in the dishwasher so spots
(scale) will not form on dishes. You can
taste the sodium in softened water. Water
softeners are used to lengthen the life of
plumbing pipes, pumps, and so on, and to
increase the effectiveness of soaps. Soft
water contains less than 50 milligrams of
calcium per liter (50 ppm) and should be
supplemented with calcium and mag
nesium. Sodium in excess of 50 ppm is
detrimental to cannabis growth.**
**The sodium ions exchange places
with a chemical the sodium is attached
to, pulling out all multivalent ions
(Ca*2-, Mg2-) with a similar number of
monovalent charges (Na-): every Ca that
binds releases two Na ions because of
the charge difference, a two-for-one deal
(in ppm, 100 ppm Ca removed buys 200
ppm Na in return).
Built-up dissolved fertilizer salts often
become toxic in container gardens.
Excessive salts inhibit seed germination,
burn the root hairs and tips or edges of
leaves, and stunt plants. Leach excess
salt buildup from growing mediums by
applying 3 gallons of water per gallon
of medium and repeat leaching using a
mild pH-corrected fertilizer solution.
Leach the growing medium every
2 to 4 weeks to avoid toxic buildup.
Hard water and well water in dry
climates are often alkaline, and usually
contain notable amounts of calcium and
A better alternative is often potassium,
but it is a little more expensive. Both
potassium and sodium exist as the resin
used in water softeners and both are
monovalent ions—potassium (K-) and
sodium (Na ). Potassium is a better op
tion for cannabis and humans. Sodium
is economical and widely available, but
potassium is more effective.
The metric system facilitates the
measurement of “dry residue per liter.”
Measure the dry residue per liter by
pouring a liter of water on a tray and
allowing it to evaporate. The residue of
dissolved solids that remains after all
the water evaporates is the “dry resi
due per liter.” The residue is measured
in grams. Try this at home to find out
the extent of impurities in your water.
Fertilizers have a difficult time pen
etrating root tissue when they must
compete with resident dissolved solids,
especially sodium. Water that is loaded
with high levels of dissolved solids (salts
in solution) is possible to manage but
requires different tactics. Highly saline
water that contains sodium will block
the uptake of potassium, calcium, and
magnesium. Salt-laden water will always
cause problems. If water contains 300
ppm or less dissolved solids, allow at
least 25 percent of the irrigation water
to drain out of the bottom of containers
with each watering. Ifraw water contains
more than 300 ppm ofdissolved solids, use
a reverse-osmosis device to purify water.
Add nutrients to pure water as a way to
avoid many nutrient problems.
If raw water contains more than
300 ppm of dissolved solids or more
than 50 ppm sodium (Na), use a
reverse-osmosis device to purify water
before using it in the garden.
334
WATER
www.marijuanagrowing.com
magnesium. Cannabis uses large quan
tities of both nutrients, but too much
calcium and magnesium can build up in
soil. In general, water that tastes good to
people also tastes good to cannabis.
Minerals dissolve into groundwater
from rock and sediment. Water sources
in low-rainfall or desert regions contain
relatively high levels of dissolved mineral
salts. For example, Southern Spain and
Italy, southwestern USA, and much of
Mexico all have high levels of dissolved
mineral salts in their groundwater.
More than 85 percent of the gardens in
the USA have hard water. Many rivers
and streams in Alaska, the Great Lakes
region, and Tennessee have moderately
hard water. Hard and very hard water
flows in almost every state in America.
Streams in Arizona, Kansas, New
Mexico, and Southern California have
the hardest water, with dissolved
minerals more than 1,000 ppm.
Soft water flows in many parts of
Hawaii, New England, the Pacific
Northwest, and the South Atlantic and
Gulf states. To get an idea of how hard
the water is in different parts of the
USA, visit www.qualitywatertreatment.
com/city_water_guide.htm.
If your water is soft: pH continues to
drift up in soft water and purified water
with few dissolved mineral solids (less
than 60 ppm) due to little or no buffer
ing capacity. Remedy this problem by
stabilizing the pH and adding soluble
calcium and magnesium, sold at hydro
ponic stores under the name "Cai-Mag.”
If your water is hard: Treat it with the
best option: reverse osmosis (RO).
If water is acidic or alkaline: If EC is
low, acidity or alkalinity are weak and
will not cause problems. If acidity or
alkalinity are driven by multivalent ions,
they will directly add an H proton or
OH (compounds that do not change
things by association). For example, an
organic acid is weak and requires less
added hydroxide to neutralize, versus
phosphoric acid, which requires more
hydroxide to neutralize.
Other conditions could exist, including
the concentration and strength (molal
ity) of an acid/base solution. Remove
problem-causing salts with an RO filter.
Or invest in a sophisticated injector
system to monitor and adjust pH. Many
injectors, in particular those by Ander
son, have multiple injector inputs that
can inject solutions in sequence from
different sources to adjust pH as well as
inject specific nutrients.
Sources of Water
Air conditioner water: Water condensed
from an air conditioner or dehumidifier
is very clean—virtually no dissolved
solids. But the water does trap cannabis
fragrance. Most A/C units generate 2 to
3 gallons (7.6 -11 .4 liters) of water a day.
Empty containers on a daily basis!
Rainwater: You can harvest 600 gallons
of rainwater from 1 inch of rain that falls
on a 1,000 sq ft (93 m2) roof. Although
slightly acidic in urban areas, rainwater
is free of chlorine and pollutants or salts
that normally occur in groundwater.
Clean rainwater is an excellent choice
for irrigation. Collect runoff by plac
ing a barrel under a downspout. Mix
Plants love rainwater for good reason: it is the
best water Mother Nature has to offer.
the rainwater with tap water to dilute
dissolved solids. Roofs and terraces can
accumulate trash, which will pollute the
otherwise clean rainwater. Covering
your catch-barrel will prevent evapora
tion and keep out trash. To make sure it
is not too acidic (acid rain) and harmful
to plants, take pH and parts per million
(ppm) readings from collected rainwater
before using.
Rivers and streams: Usually, these
water resources are publicly controlled.
Alpine watersheds supply "mineralized”
water—water with elements and nutri
ents that plants need to produce food
and grow.
Tap water: Household water often
contains chlorine and other dissolved
minerals. Check two or three times a
year with your local water bureau to find
out what is in your water. Also check the
pH regularly. See discussion above about
water sources.
Clean your tap water by filling barrels
and setting them 2 to 3 feet (61-91.4 cm)
above the ground. Add ammonium
r--------------
ppm
mg/L
1
pg/L
100
100
1,000
200
200
2,000
300
300
3,000
400
400
4,000
—
500
500
5,000
r
HARD/SOFT WATER INDEX
mg/L
gpg
soft
0-60
0-35
: moderately hard
61-210
3.5-7
hard
121-180
7-10.5
} very hard
>181
>180
, mg/L = milligrams per liter
' 9P9 = grains per US gallon
tyww.marijuanagrowing.com
335
Piping water into the garden facilitates
irrigation.
This well in Venice, Italy, has been closed
because the water is brackish (salty). Test
well water to ensure that it contains no
harmful elements.
Distilled water is expensive and is best used in
small amounts such as for watering cuttings
and seedlings.
sulfate to settle out the sodium, then
siphon water from the top of the barrel,
refilling after each watering to allow the
chlorine to evaporate. Chlorine, like
sodium, is beneficial in small amounts.
It is essential to the use of oxygen
during photosynthesis and is necessary
for root and leaf cell division. But too
much chlorine causes leaf tips and mar
gins to burn and leaves to turn a bronze
color. Chlorine (which evaporates) and
chloramine (which must be filtered to
remove) are added to household wa
ter systems to kill bacteria, parasites,
and other organisms. But both oxidize
iron, manganese, and hydrogen sulfide,
making them easier to filter out. Empty
the barrel periodically, and scrub out
residues and sediments. See “Chlorine
(Chloride)” in chapter 21, Nutrients, for
more information.
Well water: Ground water is pumped
from a well. Have your well water
analyzed at least once a year because
mineral content often changes with the
seasons and over time. Do not assume
that the mineral content will be the same
as that of your neighbors’ well water.
Most often well water is hard, with high
levels of calcium and magnesium.
Purified Water
Bottled water enjoys minimal regula
tion in most countries. The US federal
government for example, requires that
bottled water be at least the same quality
as tap water, but some studies show it
is of lower quality. Frequently sold as
“mineral water” for $1 to $4 USD per
gallon, bottled water may contain more
dissolved solids than tap water. If you
are using bottled water, read labels care
fully to ensure that it contains less than
150 ppm (15 mg/L) dissolved solids (aka
minerals).
Carbon filters are effective at removing
chlorine, chloramines, sediment, and
volatile organic compounds (paints,
petroleum solvents, and hazardous
wastes) from water. But they do not
remove dissolved mineral salts from
water. Use carbon filters as a pre-filter to
reverse osmosis (RO) filters.
Deionized (aka demineralized) water
has had its mineral ions removed. A
water deionizer moves water through
special ion exchange resins, complex
sodium salts. These resins bind to the
mineral dissolved solids (salts), filtering
them out of the “pure” water. Deionized
water is similar in purity to distilled
water. Deionization does not specifically
remove viruses or bacteria.
Distilled water has many of its impuri
ties eliminated via distillation, a process
that boils water. The resulting vapor
is captured and condensed into clean
water. Purchasing distilled water is very
expensive: $0.75 to $1 USD per gallon.
But home distillation systems can cut
prices to $0.25 USD per gallon. Dist
illed water is available at most grocery
stores and home improvement centers.
Gardeners often use distilled water for
cuttings.
Electrodialysis-filtered water is
most economical to use in large- and
medium-scale installations when
desalinating brackish water and seawater.
Smaller systems are also available. This
process is most efficient when removing
ionic components with a low molecular
weight.
Water microfiltration systems remove
suspended solids down to 0.1 microm
eters in size. Use microfiltration as a
pre-filter to RO filters to extend the life
of RO filters.
336
WATER
www.marijuanagrowing.com
TYPICAL ANALYSIS
pH AT SOURCE............ 7 .4
CALCIUM..........
mg/1
... ... 55
SULPHATE........
mg/1
..... .. 13
MAGNESIUM.... ...... 19
NITRATE........... ...<0.1
POTASSIUM...... .........1
IRON.................. .......... 0
SODIUM............. ...... 24
ALUMINIUM.... .......... 0
BICARBONATE.. ...248
DRY RESIDUE
CHLORIDE......... ...... 37
AT 180’C............... 280
Official Mineral Water Io
'
RACE FOR LIFE..
CANCER RESEARCH IM
Join the 5km watk/runs for women
raising money for Cancer Research UK.
CALL 08705 134314
www.raceforlife.co .uk
Registered chority number 1089464
A
European bottled water has the guaranteed
analysis printed on the label, but in the USA,
no specific analysis is available on the label.
The dissolved solids in this bottled water are
measured in milligrams per liter (mg/L).
Other processes such as ultrafiltration
and ultraviolet oxidation, also remove
salts and pollutants from water. Check
www.wikipedia.org for more information.
Reverse Osmosis (RO) Water
Reverse-osmosis machines are used to
separate dissolved solids from water.
These machines move the solvent
(water) through the semipermeable
membrane. The process is accomplished
by applying pressure to the “tainted”
water to force only “pure” water through
the membrane. The water is not totally
(EC of zero), but most of the dissolved
solids are removed. The efficiency of
reverse osmosis depends on the type of
membrane, the pressure differential on
both sides of the membrane, and the
chemical composition of the dissolved
solids in the tainted water. Unfortunately,
common tap water often contains high
levels of sodium (Na), calcium (Ca),
alkaline salts, sulfur (S), chlorine (Cl)
and other minerals. The pH could also
be out of the acceptable 6.5 to 7 range.
Sulfur is easily smelled and tasted in
water. Saline water is a little more diffi
cult to detect. Water in coastal areas is
'generally full of salt that washes inland
This reverse osmosis machine transforms
water with a high ppm or EC into “clean”
water with less than 10ppm.
from the ocean or sea. Dry regions
that have less than 20-inches (50.8 cm)
annual rainfall also suffer from alkaline
soil and water that is often loaded with
alkaline salts.
pH
The pH scale, from 0 to 14, measures
acid-to-alkaline balance. Zero is the
most acidic, 7.0 is neutral or base, and
14.0 is most alkaline. Base is 7.0 or above.
Just like the algorithmic earthquake
Richter scale, every full point change in
the pH scale signifies a tenfold increase
or decrease in acidity or alkalinity. For
example, soil or water with a pH of 5.0 is
ten times more acidic than water or soil
withapHof6.0.WaterwithapHof5.0
is 100 times more acidic than water with
a pH of 6.0, and 1,000 times more acidic
than water with a pH of 7.0 . With a ten
fold difference between each point on the
scale, accurate measurement and control
is essential to a strong, healthy garden.
Nutrients are available in a plant
soluble form within a limited pH range.
The range of solubility is different for
each nutrient. Cannabis grows best in
soil within a pH of 6.5 to 7.0 . Within
this range cannabis can properly absorb
and most efficiently process available
nutrients. If pH is too low or high,
mineral salts settle out into a solid
(precipitate) from the nutrient solution.
If the pH of the nutrient solution is too
low, acidic salts chemically bind nutri
ents, which the roots are then unable to
absorb. An alkaline nutrient solution
with a high pH causes nutrients to
become unavailable. Toxic salt buildup
that limits water intake by roots also
becomes a problem. Hydroponic
solutions perform best in a pH range a
little lower than for soil. The ideal pH
range for hydroponics is from 5.8 to 6.8.
Some gardeners run the pH at lower
levels and report no problems with
nutrient uptake.
The pH of the growing medium affects
the nutrient-solution range and should
be kept at a similar pH level as the nutri
ent solution. For example, most store-
bought potting soils are slightly acidic,
and rockwool hydroponic mediums are
often alkaline. For more information on
how pH affects plant growth see “pH”
in chapters 18, Soil, and 23, Container
Culture and Hydroponics, and “Cultural
Problems” in chapter 21, Nutrients.
After repeated irrigation, water or
nutrient solution with a pH that is too
high or low will change the pH of the
growing medium. Raw water with
adequate levels of calcium and magne
sium and a pH above 6.0 will help keep
nutrient solutions from becoming too
acidic. Climatic conditions can also
affect irrigation water pH. For example,
the pH can become more acidic in late
autumn, when leaves fall and decompose.
Large municipalities carefully monitor
Strong plants stand out in the garden. This
plant is at capacity forfertilizer, and a
wide-angle camera lens helps with perspective!
www.marijuanagrowing.com
337
Problems with pHfluctuation or pH imbalance cause nutrients to become unavailable to plants. This leafshows symptoms ofa high pH.
and correct water supply pH, and there
are few water-quality problems.
Add nutrients to water to create a
nutrient solution before measuring pH
because nutrients are acidic and will
affect the outcome. Once nutrients are
mixed in solution, wait a few minutes
so that the solution can stabilize before
measuring. I like to measure the pH of
the original water to get an idea of how
much the nutrients acidify the solution.
If the pH of water is too low, add soluble
potassium bicarbonate to neutralize it.
Find potassium bicarbonate, also an
organic fungicide, at pharmacies and
hydroponic centers. However, water that
is high in bicarbonate (HCO3) makes
it hard to keep the pH down, and it is
difficult to avoid scale (mineral buildup)
on equipment.
Once tested, the pH should be within
the acceptable range for soil or hydro
ponics (see chart on page 340). Continue
to fine-tune the pH level by adding
small amounts of chemicals.
Phosphoric acid is the most popular
substance used to lower pH. Potassium
hydroxide is popular to raise pH. Both
of these chemicals are relatively safe,
although they can cause burns and
should never come in contact with eyes.
Most hydroponic supply stores sell easy-
to-use pH adjusters that are diluted to a
reasonably safe level.
Concentrated pH adjusters can cause
large pH changes and can make adjust
ing the pH very frustrating. The pH will
“bounce” up and down when adjusted
with a concentrated product when added
in very small amounts. Not only does
the pH overshoot the desired mark, the
availability is virtually destroyed. If using
such concentrates, dilute the chemical
with a larger volume of water before add
ing it to the nutrient-solution reservoir.
Altering Nutrient-Solution pH
IliketousepHUpandpHDownfrom
the hydroponic store rather than less-
reliable citric acid, baking soda, or vin
egar. Avoid using potassium hydroxide
and sodium hydroxide, commonly used
in hydroponic gardens, because they are
caustic and require special handling.
Hydroponic gardeners use phosphoric
and nitric acid to lower pH. Calcium
nitrate can also be used but is less
common. Such acids can be used to
lower pH but must be added more often.
338
WATER
www.marijuanagrowing.com
Keep the nutrient reservoir aerated to ensure
maximum uptake from plants.
Test the pH regularly, at least once a
week, to ensure that it stays within
the acceptable range for either soil or
hydroponics. Water evaporates from
hydroponic nutrient-solution tanks
and transpires from foliage, using more
water than nutrients. Both cause a
concentration of nutrients, acidifying
the nutrient solution and lowering the
pH. The pH and electrical conductivity
(EC) of water supplies in municipalities
and cities can also change throughout
the year.
Measure the pH of water and nutrient
solutions with litmus paper or an elec
tronic pH tester. Both arc available at
most nurseries, home improvement cen
ters, and hydroponic stores. Comparing
the color of the soil/chemical mix to the
color of the chart can be confusing. If
you use one of these kits, make sure to
buy one with good, easy-to-read color
codes. Follow instructions supplied by
the manufacturer.
Electronic pH testers are economical
and convenient. Less-expensive pH
meters are accurate enough for casual
use. More-expensive models are very
accurate. I prefer electronic pH meters to
reagent test kits and litmus paper because
pH meters are convenient, economical,
and accurate. Once purchased, you can
measure pH thousands of times with an
electronic meter, while the chemical test
kits are good for about a dozen tests.
Perpetual pH-metering devices are also
available and are most often used to
monitor hydroponic nutrient solutions.
For an accurate pH test with an
electronic pH meter:
1. Clean the probes of the meter after
each test and wipe away any corrosion.
pH Up raises the pH of water ora nutrient
solution.
2. Pack the soil around the probes.
3. Water soil with distilled or pH-neutral
water before testing.
4. Use a dilution test of one part growing
medium to one part distilled water.
Stir, allow to sit, and then drain away
liquid into a separate cup, using a filter
for the medium, and then measure the
water.
Raising Nutrient-Solution pH
Ammonium carbonate (NH4)2CO3,
aka “bakers’ ammonia,” is nitrogen in
pH down lowers pH of water or a nutrient
solution.
Add nutrients to the waterfirst, and then check the pH. For example, the pH of the image on the
left started out at 8.4, which is very high. Once the (acidic) nutrients were added, the pH dropped
after an hour in solution. The gardener had to use pH down to drop the pH one more point to 6.4.
www.marijuanagrowing.com
339
This beautiful crop of folly Bud" grown by DoobieDuck has no trouble
with nutrient or water uptake.
The water for this greenhouse in Santa Cruz, California, is treated
with reverse osmosis to control pH and EC/ppm.
HOW pH AFFECTS
PLANT NUTRIENT UPTAKE
7.5 8.0 8.5 9.0
pH OF SATURATED SOIL
(pH below 5.5 cuts primary nutrients)
EXPERIMENTAL
AVAILABILITY OF NUTRIENTS
.5
5.0
pH OF NUTRIENT WATER OR
SATURATED SOILLESS MEDIUM
(pH above 5.5 cuts phosphorus & manganese)
340
WATER
www.marijuanagrowing.com
the form of ammonia, but it is not a
good choice to alter pH. When crushed
jt is used as smelling salts, and yes, it
smells bad!
Calcium hydroxide (Ca(OH)2, aka
hydrated lime, builder’s lime, or pick
ling lime) is an inorganic compound.
Use only in small amounts because it is
soluble and very fast-acting.
potassium bicarbonate (KHCO3)
works well to neutralize or buffer pH. It
is a common ingredient in club soda and
is used as a source of CO2 in baking and
in dry chemical fire extinguishers, among
other things. Potassium bicarbonate also
works as an organic surface fungicide for
powdery mildew. Be careful, concentra
tions above 0.5 percent can have toxic
effects on plants.
Potassium carbonate (K2CO3) is a
common ingredient in pH up solutions
and it works well to raise pH in nutrient
solutions. It is used as a leavening when
baking gingerbread and as a buffering
agent in wine production. It is also used
for fire suppression.
Potassium (potash) silicate (K2SiO3)
will raise pH quickly and add potassium
to the nutrient solution and growing
medium. It can be used as a foliar mist.
Potassium silicate is also used to make
welding rods and as an anticorrosive
agent.
Potassium hydroxide (NOH, aka
caustic potash) is relatively safe and very
popular to raise pH. Potassium hydrox
ide is also mixed with potassium carbon
ate to buffer pH when using soft water.
This inorganic compound is a strong
base with many industrial uses, includ
ing cleaning chemicals, the manufacture
of biodiesel and batteries.
Sodium bicarbonate (NaHCO3, aka
baking soda, bread soda, cooking soda,
and bicarbonate of soda) will raise pH.
It is also used as a stomach antacid.
Note: See “Ammonium carbonate.”
Sodium carbonate (Na2CO3) is a
commonly used salt in water softeners.
Do not use sodium carbonate to alter
pH. It is detrimental to plant growth.
Sodium hydroxide (NaOH, aka lye
and caustic soda) is very corrosive. It is
commonly used as drain cleaner. Do not
use sodium hydroxide to alter pH.
Safety Precautions
Dilute pH adjusters so they are safer
and more forgiving, and dosages are
easier to control.
Carbonates and hydroxides are bases.
Read labels completely and follow
instructions.
Keep out of the reach of children.
Keep an ample supply of fresh water to
dilute accidental spills.
Wear a mask, rubber gloves, long sleeves,
and other protective clothing.
Do not inhale toxic fumes.
Store pH-adjusting agents in an
airtight container to guard against
spills and accidental activation with
moisture. For example, when potassium
hydroxide absorbs humidity, it turns
into corrosive sludge.
Lowering Nutrient-Solution pH
Why does nutrient-solution pH
constantly drop?
It depends on many things, from the
medium to the air driven into it or
exposed to it. The plant is also giving
off protons (H+ ions ) that add to the
pH pool and lower the pH. This could
almost be another chapter in this book!
The most common reason pH fluctuates
is because native water is soft and has no
buffering agents to stabilize pH.
Acids are used to lower pH. Most
fertilizers are acidic and naturally
lower pH. Acids that are not diluted
in water are dangerous—they undergo
chemical change so readily that they
can react with skin and cause burns.
Use extreme caution when handling
acids. The higher the concentration, the
more corrosive they are. Acids can eat
metals and burn your skin!
Hydroponic gardeners use phosphoric
and nitric acid to lower pH. Calcium
nitrate can also be used but it is less
common. Such acids can lower pH but
must be added more often.
Ammonium monopotassium phosphate
(KH2PO4, aka potassium dihydrogen
phosphate, KDP, or monobasic potassi
um phosphate, MKP) is most effective
to raise pH from 5.5 to 7.0. It also
buffers pH well when within this range.
The buffering ability diminishes below
pH 5.5. It is a source of phosphorus and
potassium. Gardeners can use ammo
nium monopotassium phosphate to
minimize the escape of ammonia from
nutrient solutions and growing medi
ums. It is also used as a fertilizer, food
additive (in Gatorade, for example), and
fungicide. The soluble salt can also be
used as a fertilizer.
Ammonium nitrate (NH4NO3) is a
high-nitrogen fertilizer, and can also be
used-in explosives.
A.mmonium sulfate is often recom
mended to lower pH because it is diffi
cult to overapply; however, cannabis can
tolerate very little ammonium. Avoid
using ammonium sulfate.
Calcium nitrate Ca(NO3)2 is also
known as nitromagnesite, Norwegian
saltpeter, Norgessalpeter, or nitrate of
lime. It is an inorganic compound used
in concrete.
Citric acid is unstable because plants
break it down, and it tends to drift up
after a few hours unless well buffered.
Citric acid can be obtained from lemons
and limes but is most often made from
other sources. Citric acid should be used
in emergencies only. It can also cause
bacteria to grow, lowering dissolved
oxygen in the nutrient solution and
competing with roots.
Hydrochloric acid, a solution of hydro
gen chloride (HC1), lowers pH quickly
and efficiently. It is water-soluble. But it
is a highly corrosive mineral acid that is
used in cleaning supplies, PVC plastic,
swimming pool maintenance, and many
other products. Not recommended!
Muriatic acid (concentrated hydrochloric
acid). Cannabis can tolerate low levels
(<100 ppm) of chloride, which is derived
from hydrochloric acid. Muriatic acid
tyww.marijuanagrowing.com
341
is produced from hydrochloric acid and
common salt, sodium chloride (NaCl).
Nitric acid (HNO3), a major component
in fertilizers, lowers pH and does not
precipitate when pH is high. It is a highly
corrosive, strong, and toxic acid. Use at
high dilutions and low concentrations.
A concentration of 86 percent or more
is called fuming nitric acid and reacts
violently (often creating explosions) with
many nonmetallic compounds.
Phosphoric acid* (H3PO4, aka ortho
phosphoric acid or phosphoric (V) acid)
is one of the most popular chemicals
used to lower pH in hydroponic gardens.
Hydroponic stores sell it in dilute mixes
that are ready to use and relatively safe.
Phosphoric acid changes pH relatively
quickly. Avoid using when pH is high
and there is an abundance of phosphorus
available to plants. Excess phosphorus
tends to precipitate. Change to nitric
acid in such situations.
"Phosphoric acid is also used to “convert
rust” to black ferric phosphate; in gel
form it is called naval jelly. Food grade
phosphoric acid is used to acidify foods
and beverages.
Potassium nitrate (KNO3, aka saltpeter
or saltpetre) is a food preservative and
an important ingredient in gunpowder.
Magnesium nitrate [Mg(NO3)2] has
10.5 percent nitrogen and 9.4 percent
magnesium.
Sodium hydroxide (NaOH) Do not use!
Sodium nitrate (NaNO3, aka Peru
saltpeter or Chile saltpeter) is used in
fertilizer as a source of nitrate, food
preservatives, and explosives.
Sulfur (S) is insoluble and unavailable
to plants. Till elemental sulfur into soil,
and oxygen turns sulfur into SO4, which
is readily available for uptake by roots.
Most efficient oxidation takes place to
convert sulfur to SO4 in warm weather
in lightly moistened, well-aerated soil.
Cold temperatures and water-saturated
soil slow the conversion. Elemental
sulfur works well when applied a few
weeks before the growing season. Take
care when adding large quantities of
elemental sulfur because it can quickly
acidify soil.
Ammonium sulfate is an acid-forming
material; K-Mag fertilizer, potassium
sulfate, and calcium sulfate are neutral
materials and have no effect on soil pH.
Active soil bacteria convert sulfur to
sulfuric acid, lowering soil pH. The
process is slow and soil temperature
must be above 55°F (12.8°C). Do not
flood soil (which creates anaerobic
conditions) or else sulfur will convert
to hydrogen sulfide that will kill roots
(and smell like rotten eggs).
Ferrous sulfate also decreases soil pH,
but it costs more than sulfur, and eight
times more of it is needed in comparison
to elemental sulfur.
Aluminum sulfate is expensive, and
there are reports of aluminum toxicity
when too much is applied. It changes
soil pH instantly once mixed with soil.
Ammonium sulfate and sulfur-coated
urea fertilizers have little effect on pH.
For example, ammonium sulfate fertilizer
21-0 -0 at 10 pounds per 1,000 square
feet (92.9 m2) can change soil pH from
7.5 to 7.4.
Iron sulfate is soluble but 6 times more
of it is necessary than elemental sulfur
to change pH. It reacts in 3 to 4 weeks—
faster than elemental sulfur—but can
damage roots.
Magnesium sulfate (MgSO4) contains
magnesium, sulfur, and oxygen. Soluble
Epsom salts (MgSO4-7H2O) work well
to correct magnesium deficiencies in soil
and cannabis plants.
Sulfuric acid (H2SO4) is sold as swim
ming pool and car battery acid at most
grocery stores, by the quart or liter. Mix
1 cup with a gallon of distilled water
and get a gallon of pH down for about
$1 USD. It also adds sulfur to the mix.
Battery acid is 40 percent sulfuric acid.
Do not use toxic battery acid from a
battery; it is contaminated with lead!
Vinegar is the product of ethanol
fermentation, resulting in acetic acid.
The pH of table vinegar ranges from
2.4 to 3.4 . The pH climbs when diluted.
Typically, acetic acid ranges from 4 to 8
percent concentration for table vinegar.
Vinegar used for pickling can be as high
as 18 percent. Cannabis breaks vinegar
down, causing pH to climb. Vinegar also
causes excess bacterial growth that uses
soil oxygen and acidifies soils.
How Fluids Move within
Cannabis
Water is essential to plant life. It pro
vides a medium to transport nutrients
necessary for plant life and make them
available for absorption by the roots.
Water quality is important for this
process to work at maximum potential.
With this in mind, the first question a
medical cannabis gardener needs to ask
about water is, “What’s in the water, and
how does it affect growing cannabis?”
Everything in water can affect how plant
roots absorb it.
Microscopic root hairs in the rhizosphere
(root zone) absorb water and nutrients in
the presence of oxygen and carry them up
the stem to the leaves. This flow of water
from the soil through the plant is called
the transpiration stream. A fraction
of the water is processed and used in
photosynthesis. Excess water evaporates
into the air, carrying waste products
along with it via the stomata in the leaves.
This process is called transpiration. Some
of the water also returns manufactured
sugars and starches to the roots.
Roots support the plant, absorb nutri
ents, and provide the initial pathway into
the plant’s vascular system. A close-up
look at a root reveals the xylem and
phloem core—vascular tissue enveloped
White, healthy roots absorb water and nutri
ents at a fast rate when grown properly.
WATER
www.marijuanagrowing.com
idermis
Xylem Phloem
Apoplast Pathway
Everything goes through the same pathway, the Casparian strip. This is where the difference in a water root and terrestrial root occurs by thickening.
Symplastic and
transmembrane
pathways
Casparian
Strip
by a cortex tissue, or the layer between
internal vascular and external epidermal
tissue. The microscopic root hairs are
located on the epidermal tissue cells.
These root hair follicles are extremely
delicate and must remain moist. Roots
and root hairs must also be protected
from abrasions, extreme temperature
fluctuations, and harsh chemical concen
trations. Plant health and well-being is
contingent upon strong, healthy roots.
A majority of nutrient absorption begins
at the root hairs, and the flow continues
throughout the plant via the vascular
system. Absorption is sustained by
diffusion, in which water and nutrient
ions are uniformly distributed through
out the plant. The intercellular spaces—
apoplasts and connecting protoplasm,
called symplast—are the pathways that
allow the water and nutrient ions and
molecules to pass through the epider
mis and the cortex to the xylem and
phloem’s vascular bundles. The xylem
channels the solution through the plant
while phloem tissues distribute the food
manufactured by the plant. Once nutri
ents are transferred to the plant cells,
each cell accumulates the nutrients it
requires to perform its specific function.
The solution that is transported through
the vascular bundles or veins of a plant
has many functions. This solution
delivers nutrients and carries away waste
products. It provides pressure to help
keep the plant structurally sound. The
solution also cools the plant by evapo
rating water via the leaves’ stomata.
Osmosis
Water and molecules or atoms smaller
than a water molecule can move through
the semipermeable membrane. All
other stuff enters through various ports
and gates and controlled entry and
transport. Water is given almost free
reign, which is why a plant can recover
from wilt so quickly when dry, but it
takes three days for nitrogen to reach
the right place in the plant. But flow
can go the other way, too; it is all based
on the principle of equilibrium, that
a solution will achieve an equal con
centration or disbursement of the ions
dissolved in it. The solution is separat
ed, the potential still exists, and water
molecules are what move to dilute the
more concentrated areas when the ions
cannot move because of a barrier, in this
case a semipermeable barrier through
which only water molecules can pass. So
water moves into the plant by a differ
ence in the potential between the area of
higher concentration (plant tissue) from
www.marijuanagrowing.com
343
a lower concentration (soil solution). If
the potential is higher outside the plant
tissue, such as overfertilization, water
will move backward, governed by the
laws of equilibrium again, from the plant
into the soil, and thus burns are caused
on the upper tissues.
The roots draw the water up the plant
by osmosis, the process by which fluids
are drawn through a semipermeable
membrane and mix with each other until
the fluids are equally concentrated on
both sides of the membrane. Semiper
meable membranes located in the root
hairs allow specific nutrients that are
dissolved in the water to enter the plant
while the other nutrients and impurities
are excluded. Since salts and sugars are
concentrated in the roots, the electrical
conductivity (EC) inside the roots is
(almost) always higher than that outside
the roots.
Here is a simplistic view of how osmosis
works: It depends on the relative con
centrations of each individual nutrient
on each side of the (root) membrane; it
differentially permeable
membrane
water molecule
sucrose molecule
®9C* A9•
9
t>9
99
c
e*
o
e
©
3
G
3
G
3
3
3
C
This simple drawing shows the basic principle of osmosis on a molecular level. When the concen
tration of “salts” is greater on one side ofa barrier such as a cell zvall in a plant, the salts migrate
to the other side to equalize the pressure.
does not depend on the total dissolved
solids (TDS) or EC of the solution. For
nutrients to be drawn in by the roots via
osmosis, the strength of the individual
elements must be greater than that of
the roots/*
*Osmosis does depend on solution EC
on either side of the root. However, the
ions are allowed into the cell that may
have a root hair by a larger pore struc
ture of the membrane and is pulled in
by the flow of water molecules from the
soil solution into the plant. They may
even be able to continue this pathway to
the core, but will be switched over at the
Casparian strip. In reality, for elements
to enter apoplastically, they have to be
smaller not stronger.
But, the transport of water (instead
of nutrients) across the semipermeable
membrane depends on EC. For
example, if EC is greater outside the
roots than inside, plants dehydrate as
water is drawn out of the roots. In other
words, salty water with a high EC can
dehydrate plants.
Irrigation
Having a readily accessible water source
is convenient, and it saves time and
labor. For example, a 4 X 4-foot indoor
garden of 16 healthy plants in 3-gallon
(11.4 L) pots needs 10 to 25 gallons
(37.9 -94.6 L) of water per week. Large
outdoor plants in big containers can
use 5 to 10 gallons of water daily. Water
weighs 8 pounds per gallon (1 kg/L).
That’s a lot of containers to fill, lift, and
spill. Carrying water in containers from
the bathroom sink to the garden is okay
when plants are small, but when they are
large, it is a big, sloppy, regular job.
Running a hose into the garden saves
labor and mess. A lightweight half-inch
(12.7 mm) hose is easy to handle and is
less likely to damage plants than a hose
having a larger diameter. If the water
source has hot and cold water running
out of the same tap, and it is equipped
with threads, attach a hose and irrigate
with tepid water. Use a dishwasher
coupling or similar coupling if the faucet
has no threads. The hose should have
an on/off valve at the outlet, so water
flow can be controlled. A rigid water
wand prevents breaking branches while
watering in tight quarters. Buy a water
wand at the nursery or construct one
from plastic PVC pipe. Do not leave
water under pressure in the hose for
more than a few minutes. Garden hoses
are designed to transport water, not hold
it under pressure, which may cause hoses
to rupture.
Irrigation guidelines:
1. Water plants in containers when they
are half-full of water; weigh pots to
tell the difference.
2. Water soil gardens when the soil is
dry one-half inch (1.3 cm) below the
surface.
3. Water containers with a mild nutrient
solution and let 10 to 20 percent drain
off at each watering.
4. Do not let soil dry out to the point
that plants wilt.
5. Do not let roots sit in water, such as a
saucer, for more than 20 minutes at a
time or roots will drown.
Large plants use more water than
small plants, and small containers
344
WATER
www.marijuanagrowing.com
33*****
€
99
99
99
%
9
99
C9
C
This drip system in a greenhouse uses two feed
er hoses for each large container to ensure that
the entire soil mass receives adequate irrigation.
Plant in the earth outdoors or in a greenhouse.
The fertilizer-injection irrigation setup above
keeps fertilizer applied at a consistent rate and
controls the pH.
Lightly cultivating the soil surface breaks
up the hard crust that often forms, allowing
irrigation water to penetrate evenly.
This outdoor garden is protected from wind by
white walls that also reflect light. The pallets
under pots allow for better drainage and keep
soil up off the cold concrete floor, which keeps
them warmer.
must be watered more often than large
containers. But many more variables
than plant or container size dictate a
plant’s water consumption. The health,
age, variety, and size of the plant, and
its container size, soil texture, as well
as temperature, humidity, ventilation,
and the intensity of wind and light all
contribute to water needs. Change any
one of these variables, and the water
consumption will change. Good ventila
tion is essential to promote a free flow of
fluids, transpiration, and rapid growth.
The healthier a plant is, the faster it
grows and the more water it needs.
In general, sativa varieties have a more
extensive root system and use more
water than indica, varieties.
Small plants with a small root system in
small containers of soil must be watered
frequently—as soon as the soil surface
dries out. If exposed to wind, small
plants will dry out very quickly.
Irrigate soil and soilless mixes when they
are dry one-half inch below the surface.
As long as drainage is good, it is diffi
cult to overwater fast-growing cannabis.
Four-week-old clones flowering in 2- to
3-gallon (7.6 to 11.4 L) containers need to
be irrigated once or twice daily. In fact,
most gardeners prefer smaller containers
because they are easier to control.
Flowering cannabis uses high levels of
water to carry on rapid floral formation.
Withholding water stunts flower for
mation. Plants exposed to wind dry out
much faster than that are sheltered.
Mulch on top of soil surface conserves
water and prevents a crust from form
ing. But mulch could also be difficult
for irrigation water to penetrate. Always
make sure water penetrates mulch evenly
when irrigating.
Outdoor, terrace, and patio plants will
use up to three or four times more water
than normal on a hot, windy day. Keep
ing up with watering is difficult and
time-consuming. Use an automated
watering system or a windbreak to
lessen wind’s impact on plants. Mulch
will also lessen evaporation from the
soil. Use plenty of water, and allow up to
10 percent runoff during each watering.
The runoff will prevent fertilizer from
building up in the soil. Water early in the
day, so excess water will evaporate from
the soil surface and the leaves. Letting
foliage and soil remain wet overnight
invites fungal attacks.
If planting in the earth outdoors, com
peting plants, especially established trees
and bushes, suck up irrigation, depriving
annual cannabis plants. For example, in
my backyard, the oak trees on the other
side of my fence suck up so much water
that I must give the cannabis plants 3 to
4 times as much irrigation water as the
same varieties in raised beds that have
no competition from trees.
Www.marijuanagrowing.com
345
Sometimes the soil surface down as far
as 6 inches (15.2 cm) is moist, but below
the wet mark, soil may be bone dry.
But the opposite may be true too. Fine
topsoil and compost on the soil surface
drv rapidlv during windy days with a lot
ol sun and the soil below could remain
super wet.
Moisture meters take most of the guess
work out of irrigating cannabis. They
can be purchased for less than $30 USD
and are well worth the money. Mois
ture meters measure exactly how much
water the soil contains at any level or
point. Often the soil will not hold water
evenly, and thus it develops dry pockets.
Checking the soil moisture with a finger
provides an educated guess but disturbs
the root system. A moisture meter will
give an exact moisture reading without
disturbing the roots.
Use a moisture meter outdoors to test
the growing medium moisture at differ
ent depths. For example, if you continue
to water plants and the water accumu
lates below the soil surface, oxygen
could be squeezed out of the soil. How
ever, the soil structure plays a major
role. Porosity and the mix of appropriate
size (large and small pore space) and any
blocking actions in the mineral soil can
change the equation. Water moves ini
tially through the soil in all pore spaces
while gravity pulls it through, and it is
picked up by surrounding small pores
through capillary action. It vacates the
large pores under gravity and occupies
the smaller. If the pores are all small, the
amount of time to drain can increase; if
the pores change size suddenly then the
flow can be blocked such as the famed
Texas clay pan; and if the amount of
clay in the mineral soil is high, it can be
smoothed during a preparation known
as glazing, which stops the flow of water.
But either way or mechanism, k is not
50 Percent Watering Rule
"Weigh a container after watering to get
the “full” weight. Weigh the container
after several days when it weighs “half”
as much to find the 50 percent full
weight. Water plants in containers when
they are 50 percent full by weight. For
example, a plant in a 3-gallon (11.4 L)
container weighs 2.2 pounds (1 kg)
when fully watered and 1.1 pounds
(499 gm) when 50 percent full. It is time
to water when the container weighs
J J pounds (499 gm).
One of the biggest issues with soils that
dry down is that all the saks that are in
solution adhere to the growing medium
particles when the water disappears. As
soon as water is reapplied, no matter at
what EC, all of these salts, as well as any
associated with the soil particles, imme
diately go into solution. For example,
if the medium has an EC of 4.0 when
dry, and very clean RO water is applied,
the water will, for a short time until
equilibrium is obtained, have an EC of
4.0, causing salt burn. If the EC is at 2.0
and the medium dries and watering is
done at 1.6, then the EC jumps to 3.6,
immediately causing issues. The solution
to the problem is to run water into the
container several times, which allows
the medium to rehydrate and wash out
the salts, then reapply fertility at normal
values. Of course, this must all occur
within the 20-minute time period.
Fill the container to capacity with water
IVcjg/y container to leant how much water it
contain*. VI hen it Weigh* half a* much as when
drenched with water, k ti mnr to irrigate.
lip the container to check if it is heavily laden
with water. Irrigate the light container.
WATER
www.marijuanagrowing.com
because the water is heavy, it is because
the water accumulates for a given reason,
indicating blocked or restricted passage.
Cultivate the soil surface to allow water
to penetrate evenly and guard against
dry soil pockets. Such cultivation also
keeps water from running down the
crack between the inside of the pot and
the soil and then out the drain holes.
Using Smart Pots or similar container
will also solve this problem. See chapter
19, Containers, for more information.
Gently break up and cultivate the top
half-inch (1.3 cm) of the soil with your
fingers, a salad fork, or a lightweight
cultivator. Be careful not to disturb
the tiny surface roots. After you
develop some skill at knowing when
the plants need water, you can check
to see how heavy they are simply by
tipping them.
Outdoor gardens may need deeper cul
tivation to aerate soil, but cultivate with
care! If soil compacts around plants,
insert a garden fork in the soil and
wiggle it a little before removing. This
will break up the soil and allow air to
penetrate. Do not disturb soil much or it
will break many roots.
Keep containers lined up in rows when
growing and watering. It is much easier
to keep track of watered and fertilized
pots when they are lined up.
Overwatering
Cannabis does not like soggy soil. Soil
kept too wet drowns roots, squeezing
out the oxygen. This causes slow growth
and possible fungal attack. Poor drain
age is most often the cause of soggy soil.
It is compounded by poor ventilation
and high humidity.
Applying more water to the medium
than it can hold against gravity for
more than 20 minutes causes over
watering. Overwatering occurs when
more water is applied to the growing
medium after it has already been satu
rated for 20 minutes or more, or before
the plant needs watering. After 20 min
utes roots suffer from lack of oxygen
and die.
Overwatering is a common problem,
especially with small plants that have
Inexpensive moisture meters help take the
guesswork out of irrigation.
little volume in containers. Too much
water drowns the roots by cutting off
their supply of oxygen. Again, the most
important thing to remember is to never
let soil be saturated for more than 20
minutes.
If you have symptoms of overwatering,
use a moisture meter. Pay attention
to the levels of moisture in containers
an in outdoor garden soil. Often dry
soil pockets develop amidst moist soil.
Sometimes, parts of the soil are over
watered and other soil pockets remain
bone-dry. Lightly cultivating the soil
surface, allowing even water penetration,
and using a moisture meter will help
overcome this problem. Indoors and
in greenhouses, one of the main causes
of overwatering is poor air ventilation.
Plants need to transpire water into the
air. If there is nowhere for this humid
air to go, gallons of water are locked in
the air of the enclosed area. Well-
ventilated air carries this moist air
away, replacing it with fresh, dry air.
If you are using trays to catch runoff
water, use a turkey baster, large syringe,
or sponge to draw the excess water
from the tray so that plants do not sit in
stagnant water.
Heavy clay soil does not drain well and stays
soggy for a long time. Soil or soilless mixes
that drain well are essential to rapid cannabis
One sure sign of overwatering is when leaves
curl under on the edges.
Signs of overwatering include:
1. Leaves curled down and yellowed
2. Waterlogged and soggy soil
3. Fungal growth
4. Slow growth
Symptoms of overwatering are often sub
tle, and inexperienced gardeners may not
see any blatant symptoms for a long time.
Overwatering at the end of June,
followed by a cold snap in my friend
Nomaad’s garden, retarded plant growth
by two weeks. Plants had to be harvest
ed later and produced about 20 percent
less. If not overwatered, the plants
would not have had spotty growth
and would have flowered earlier. Pay
attention to water temperature, too. If
large outdoor pots are too wet at night,
conditions are perfect for fungus growth
to develop. Irrigate early in the morning
so plants have enough time to absorb the
water during the day.
Underwatering
Underwatering is less of a problem
indoors and in backyards,but fairly com
mon if small (1- to 2-gal) pots are used
and the gardener does not realize the
Www.marijuanagrowing.com
347
A water wand with a breaker mixes air with
irrigation water just before applying.
Add a few drops ofbiodegradable liquid dish
soap concentrate to the irrigation water. The
detergent helps water penetrate the soil more
thoroughly.
Underwatering causes plants to become
stunted and take up water and nutrients at
erratic rates. This little plant could have
grown much better had the soil surface been
cultivated so water could penetrate evenly.
Set up a drip irrigation line to water rows of
plants.
water needs of rapid-growing cannabis.
Small containers dry out quickly and may
require daily watering. If forgotten, wa
ter-starved plants become stunted. Once
the tender root hairs dry out, they die.
Most gardeners panic when they see their
prize cannabis plants wilting in bone-dry
soil. Dry soil, even in pockets, makes
root hairs dry up and die. It seems to take
forever for the roots to generate new root
hairs and resume rapid growth.
Add a few drops (one drop per pint [47.3
ml]) of a biodegradable, concentrated
liquid soap like Castille or Ivory to the
water. It will act as a wetting agent by
helping water penetrate the soil more
efficiently, and it will guard against dry
soil pockets. Apply about one quarter to
one half as much water/fertilizer as the
plant is expected to need, and then wait
10 to 15 minutes for it to totally soak in.
Apply more water/fertilizer until the soil
is evenly moist. Avoid letting runoff
water sit in trays for more than 20
minutes after initial watering. Remove
excess water with a large turkey baster.
Another way to thoroughly wet pots,
especially ones that have fully dried, is
to soak the containers in water. This is
easy to do with small pots. Simply fill a
5-gallon (18.9 L) bucket with 3 gallons
(11.4 L) of water. Submerge the smaller
pot inside the larger pot, for a minute
or longer, until the growing medium is
completely saturated. Wetting plants
thoroughly ensures against dry soil
pockets. Do not submerge pot for more
than 20 minutes or it will kill roots.
Whether in containers or planted directly in
the ground, mulch plants (here with straw) to
conserve moisture and protect soil surface.
348
WATER
www.marijuanagrowing.com
IT
350 Nutrients
351 Toxic Nutrient Conditions
351 Leaching Growing Mediums
352 Macronutrients
352 Nitrogen (N)
354 Phosphorus (P)
356 Potassium (K)
357 Secondary Nutrients
358 Calcium (Ca)
359 Magnesium (Mg)
360 Sulfur (S)
361 Micronutrients
361 Boron (B)
361 Chelates
362 Chlorine (Cl)
363 Cobalt (Co)
363 Copper (Cu)
364 Iron (Fe)
365 Manganese (Mn)
365 Molybdenum (Mo)
366 Nickel (Ni)
366 Selenium (Se)
367 Silicon (Si)
367 Sodium (Na)
367 Zinc (Zn)
368 Fertilizers
370 Organic Fertilizers
373 Brix Mix
374 Mixing Fertilizers
374 Fertilizer Application
375 Fertilizer/lrrigation Schedule
378 Injector Applicator
378 Foliar Feeding
379 Common "Nutrient" Problems
379 Air
380 Heat Stress
380 Light
ADVANCED w
MEDICAL CANNAI
HORTICULTURE
F.,<•
NUTRIENTS
380 Water
381 Growing Medium
382 Nutrient Solution
382 Miscellaneous
383 Organic Nutrients List
392 Compost and Compost Teas
392 Compost
393 Compost Extracts, Leachates,
and Teas
394 Recipes for Five Gallons of
Compost Tea
J
www.marijuanagrowing.com
349
Healthy cannabis plants produce high yields.
Most any nutrient formula (fertilizer),
regardless of its contents, will grow
cannabis. But what quality will the
cannabis be, and what are the residual
health concerns? With the proper nu
trient formula and growing conditions,
medical cannabis can reach its genetic
growth potential.
Nutrients
Cannabis needs the non-mineral
nutrients carbon, hydrogen, and oxygen
to manufacture food and grow. Carbon
(CO2) in the air is fixed via photosyn
thesis. Hydrogen atoms that are building
blocks come almost totally from water.
Oxygen from the atmosphere is used in
respiration and plant processes. The rest
of the elements (called mineral nutrients),
are absorbed from the growing medium
and nutrient solution. Supplemental
nutrients supplied in the form of a
fertilizer help medicinal cannabis to
reach its maximum potential.
Nutrients must be available to roots
in order to be absorbed. Nutrients
occur in many chemical combinations
and forms (called compounds) that are
comprised of two or more nutrients’
ions joined together via positive (anion)
and negative (cation) attractions.* The
compounds release nutrients for uptake
by roots under specific conditions. The
proper nutrient formula delivered at the
proper pH and EC concentration makes
nutrients available for uptake.
*An anion is an ion with a negative
charge because it has more electrons
than protons. A cation is an ion with
a positive charge because it has more
protons than electrons.
Healthy cannabis organically grown by
DoobieDuck attracts birds and other wildlife.
Well-managed life—microbes, bacteria,
fungi, etc. —in organic soil interacts
with naturally occurring nutrients to
make them available for uptake by roots.
Properly mixed and alimented soils with
high fertility require very little supple
mental fertilizer. For example, during
the flowering stage, outdoor gardeners in
Humboldt County, California, add just 2
handfuls of bat guano to grow 10-pound
(4.5 kg) plants in living organic soil.
Mobile & Immobile Nutrients
1. Immobile nutrients show nutrient
defficiency & excess on newer leaves
4. Overwarering is common. Causes
nutrient deficiencies & excesses.
Drowns and rots roots
Avoid Nutrient Problems With:
• Air circulation
• Air ventilation
•Air temperature
• Air humidity
• Adequate light
• Clean water
• Organic soil
• Regular
maintenance
5. Irrigation runoff is essential
for healthy growth
Nutrients are grouped into 3 categories:
macronutrients or primary nutrients,
secondary nutrients*, and micronutri
ents or trace elements.** Each nutrient
in the above categories can be further
classified as either mobile or immobile.
Solving nutrient-deficiency problems
is much easier when you know which
nutrients are mobile or immobile.
*Some confusion exists on what the
secondary nutrients are, but they are
generally considered macronutrients
as well as secondary macronutrients,
and are measured the same way as a
percentage of the overall mix.
**Trace elements are micronutrients
measured in ppm.
Mobile nutrients are able to move
(translocate) from one part of the plant
to another as needed. When a nutrient
shortage occurs, mobile nutrients travel
to the area to solve the deficiency. For
example, nitrogen accumulated in older
leaves translocates to younger leaves to
solve a deficiency. Mobile nutrients show
deficiency symptoms on older, lower
2. Mobile nutrients show deficiency
& excess on older leaves
3. Toxic salt buildup locks
out nutrients causing
deficiencies & excesses
350
NUTRIENTS
www.marijuanagrowing.com
leaves first. Nitrogen will show a deficien
cy on older leaves because it is a part of
essential enzyme structure and has to be
replaced as these enzymes are denatured
and disposed of. Mobile nutrients include
nitrogen (N), phosphorus (P), potassium
(K), and magnesium (Mg).
Immobile nutrients either stay at their
destination or move very little once
assimilated and transported. Immobile
nutrients include calcium (Ca), boron
(B), chlorine (Cl), cobalt (Co), copper
(Cu), iron (Fe), manganese (Mn),
molybdenum (Mo), silicon (Si),
sulfur (S) and zinc (Zn). Deficiencies of
immobile nutrients show symptoms first
in younger leaves. These nutrients do
not translocate to new growing areas as
needed. They remain deposited in their
original place in older leaves.
Other elements—Barium (Ba),
Cadmium (Cd), Chromium (Cr),
Lithium (Li), Palladium (Pd), and
Vanadium (V)—may be necessary for
plant growth and health. These elements
should be available in low concentrations.
Leaching Growing Mediums
To leach* soil or substrate, add enough
water (it takes a lot!) to the medium to
wash out excess fertilizer (nutrient) salts.
For a container that holds 1 gallon (3.8
L) of water, add enough water to make
sure it is full—until water drips out the
bottom. Then apply 1 additional gallon of
water (3.8 L,) and allow 1 gallon (3.8 L)
to drain out the bottom of the container.
Do this a total of 7 times. Once a total
of 7 gallons (26.5 L) of water has been
added and drained, the process is almost
complete.
Add 1 more gallon (3.8 L) of water that
includes the correct ratio and concen
tration of fertilizer. The entire process
must be completed within 20 minutes
or the excess of water will drown the
roots.
The process can be done 2 or 20 times,
as long as it is completed within 20 min
utes. I repeat: the container must drain
completely within 20 minutes. “Drain
completely” means drain to a point at
Toxic Nutrient Conditions
Too often gardeners give their medical
cannabis gardens too much tender loving
care. This care and enthusiasm is kindled
by countless nutrient and additive adver
tisements. As a consequence, medical
cannabis gardeners frequently overapply
fertilizers and additives, creating toxic
soil conditions. Often the solution to
this problem is to leach the built-up
nutrients out of the growing medium
with copious quantities of water. This
will wash away excess nutrients that have
built up in the soil and created toxic con
ditions. An overabundance of nutrients
(fertilizer salts) in the growing medium
disrupts the medium’s chemical balance.
This imbalance causes some nutrients to
become unavailable for uptake by roots
and other nutrients to be oversupplied.
Leaching the substrate works well for
most nutrient problems, but it does not
solve all nutrient problems. For more
information please see specific nutrients.
which the water is held against gravity
within 20 minutes. This practice is not
overwatering.
*Water is used to leach fertilizer salts
from a growing medium. Just before
harvest, plants and soil are flushed to
remove excess nutrients in plant tissue.
Note: See chapter 9, Harvest, Drying &
Curing, for more info about leaching the
substrate and flushing nutrients out of
medical cannabis plants before harvest.
See chapter 23, Container Culture &
Hydroponics, for more information
on leaching hydroponic mediums and
water-based hydroponics.
Leach substrates to wash away nutrient buildup.
In order to measure nutrients in solution,
you will need an accurate, calibrated EC
(electrical conductivity) meter and an
accurate, calibrated pH meter.
r
NUTRIENT
-- ------ ------—
MOBILITY
i nitrogen (N)
mobile
i phosphorus (P)
mobile
Potassium (K)
mobile
: calcium (Ca)
immobile
magnesium
(Mg)
mobile
J sulfur (S)
semimobile
.
zinc(Zn)
immobile
i iron(Fe)
semimobile
manganese (Mn) immobile
i boron (B)
very immobile
> copper (Cu)
semimobile
' molybdenum
, (Mo)
mobile
i chlorine (Cl)
immobile
j cobalt (Co)
immobile
j nickel (Ni)
mobile
■ selenium (Se)
semimobile
silicon (Si)
immobile
j sodium (Na)
_____
mobile /
immobile
------ -- - --- - ............. -I
.
........
.
www.marijuanagrowing.com
351
iPROOUCTOF BRITISH COLUMBIA
:10.41b 74 .7 kg
g 1gal/‘3 .7BL
'
Fertilizer contents are listed on the container.
Read them carefully to ensure that your plants
are receiving a balanced nutrient formula.
“HRIVE
Guaranteed Analysis 5»0 ■ 2
Total Nitrogen (N)-------------
5% Nitrate Nitrogen
Soluble Potash (K»O)---------
Calcium (Cal--------------------
Boron (Bl ----------- - —------ •
Iron(Fe) —---------------------
0.1% Chelated Iron (Pel
Molybdenum (Mo) —. —
Derived From Calcium Nitrate Pooh-*”
Nitrate. Potassium 0lc‘5rr&^±'?;f^
Hydroxide Borax. Iron (FeEOTA). and
Sodium Molybdate
Information regarding ’he contents an'^
levels of metals us this product Is
^p^Twvwvaaprfcoorg/mettNhtm
These seedlings are suffering from nitrogen
deficiency.
The pale leaf on the left is nitrogen deficient;
the leaf on the right is healthy.
The nitrogen level is low in flowering fertilizer
formulas, causing older leaves to yellow.
Macronutrients
Macronutrients are the elements that
the plants use most and must be present
at all times for growth to grow well.
Most fertilizers usually show nitrogen
(N), potassium (P), phosphorous (K)
as (N-P-K) percentages in big numbers
on the front of the package. They are
always listed in the same N-P-K order.
These nutrients must always be in an
available (soluble) form to supply can
nabis with the building blocks for rapid
growth. Nitrogen is the nutrient most
often found deficient.
Nitrogen (N)-mobile (essential)
About: High levels of nitrogen are
needed during vegetative growth, but
lower levels are needed during seedling,
clone, and flowering growth stages.
Reducing nitrogen levels causes earlier
flowering and increased abscisic acid
(hormone) levels.
Nitrogen regulates the cannabis plant’s
ability to make proteins essential for new
protoplasm in the cells, and many other
functions. It is mainly responsible for
leaf and stem growth, as well as overall
size and vigor. Nitrogen is most active in
young buds, shoots, and leaves. Cannabis
absorbs nitrogen mainly in the form of
ammonium (NH4+), which is assimilated
very quickly into mainly amino acids,
and nitrate (NO3-)—the nitrate form
of nitrogen—is assimilated more slowly
into most everything else. Small organ
ic molecules also supply nitrogen. Be
careful when using ammonium; too much
can burn plants. Hydroponic fertilizers
use slower-acting nitrate and mix it with
ammonium. The proper balance keeps
the rhizosphere pH more stable, and
high ammonium levels influence taste
of harvest.
Deficiency: Nitrogen is the most com
mon cannabis nutrient deficiency in
greenhouses, indoors, and outdoors. Low
levels of nitrogen deficiency often go un
noticed. Deficiencies progress as follows:
First there is a lightening and slight
yellow coloration to older mature leaves
followed by leaf death or drop. Leaves
lose luster, turning slightly pale. Stunt
ing can also be seen when there has been
352
NUTRIENTS
www.marijuanagrowing.com
Nitrogen-deficient leaf
This photo of 'Pakistani3 leaves shows the progression of nitrogen deficiency (clockwise from
top left). (MF)
a slight deficiency for a time. Acute defi
ciency will result in decreased flowering.
Leaf margins may discolor. Leaves
continue to yellow and may curl, devel
op brownish spots, and, as deficiency
progresses, start to drop. Growth slows
on shorter plants with smaller leaves
and narrower stems. Yellowing of leaves
progresses upward on plants. Signs of
premature flowering appear on sickly
plants. Yield is substantially diminished.
Cause: Nitrogen is highly soluble and
easily washed out of growing mediums.
It must be replaced regularly, especially
during vegetative growth. Decaying
organic matter and soil life may con
sume available nitrogen in soil and
deplete it faster than roots can take it up.
Nitrogen is used quickly during rapid
growth, and mild deficiency could
occur; even if it is available, roots may
not be able to supply nitrogen fast
enough. Nutrient levels inside plants
catch up when growth slows. The cause
could also be inadequate nitrogen in the
fertilization schedule or when using a
growing medium with a low CEC
(cation exchange capacity) that was
not designed for use with the nutrient
formula. Diseases such as Fusarium
and Pythium can cut fluid flow and the
supply of nitrogen, but they have specific
symptoms apart from nitrogen depletion.
Confused with: Potassium deficiency.
Reddish stems and leaf undersides caused
by potassium deficiency can be misinter
preted in cannabis varieties that naturally
have reddish-purple stems and petioles.
Solution: Leach growing medium with
a slightly more concentrated nutrient
solution. Fertilize with the proper
soluble high-nitrogen fertilizer that has
the proper ratio of ammonium (NH4+)
and nitrate (NO3-)—the nitrate for the
growing medium. Organic sources of
soluble high-nitrogen fertilizers include
blood meal, seabird guano, fish emulsion,
compost teas, and more. Check and cor
rect pH in the root zone. Leaves should
green up in 3 to 5 days. Severely affected
leaves may not recover and should be re
moved. For faster results in foliage, foliar
feed with a soluble, dilute, high-nitrogen
fertilizer. Soil application is also necessary
when foliar feeding, because foliar appli
cations do not translocate. Even though
nitrogen is mobile when plants are foliar
fed, it stays in the leaves.
Excess: First, older bottom leaves turn
lush, dark green, and supple. As the
overdose advances, leaves in the middle
and top of the plant are affected. The
weak foliage is susceptible to tempera
ture and humidity stress, diseases, and
pest attacks. Stems weaken and fold
www.marijuanagrowing.com
353
Excess / Deficiency
NITROGEN
11. Stems become weak
10. Foliage becomes
weak
9. “Greenness” moves up
12. Water/fluid transport
system becomes weak
8. Bottom leaves turn lush
dark green
13. Harvest tastes green Lik&uk
6. Plants are shorter
with smaller leaves
1. Lower leaves turn yellow
4. Leaves continue to yellow,
curl and discolor
5. Leaves start to drop
7. Premature flowering
and low yield
2. Leaves lose luster
3. Yellowing
progresses upward
if stress is allowed to progress. As the
excess progresses, the water transport
system becomes restricted and foliage
turns brownish-copper. Leaves become
thickened and brittle, excess NH4 causes
Ca deficiency. Excess levels of nitrogen
in harvested plants cause the dried can
nabis to taste “green” and burn poorly
when smoked.
Cause: Nitrogen overdose is seldom a
problem unless soil is loaded with the
nutrient or too much was applied via the *
fertilizer mix.
Confused with: Excess nitrogen is not
usually confused with anything unless
salt burn becomes an issue. Some have
related it to viral infections.
Solution: Leach growing medium with a
dilute fertilizer solution. Severe prob
lems require heavy leaching to carry
away all the toxic elements. Leach as per
“Leaching Growing Mediums” on page
351. Add a dilute complete fertilizer. Cut
back on nitrogen dose if plants remain
excessively green. Results should appear
in 3 to 5 days, possibly earlier in hydro
ponic gardens.
Do not withhold nitrogen in subse
quent fertilizing after leaching or when
flowering. The nitrogen in the mix must
be reduced but not removed. The main
issue for cannabis cultivation is when
the level of NH4 is too high. When too
much N is applied, especially as NH4, it
is moved to the vacuole of the cell and
converts to nitrite or nitrosamines or
both—cancer-causing products. Some
“experts” say the ratio of nitrogen needs
to be 1:1 but the experts I believe find
that a more reduced ratio of 1:4 is much
better and safer. This provides a balance
so that the ratio of nitrogen does not
deviate and turn into NH4 quickly.
Phosphorus (P)-mobile (essential)
About: Phosphorus is indispensable for
photosynthesis. It is the energy source
for plants transferring energy generated
in PS and during respiration, from the
release of stored energy in carbohydrates.
Phosphorus—one of the components of
DNA, many being enzymes and pro
teins—is associated with overall vigor,
resin, and seed production. Phosphorus
is extremely important to the health of
young plants. More than two thirds of
the phosphorus absorbed during the
cannabis life cycle is taken in during
the first quarter of life. The highest
concentrations of phosphorus are found
in roots’ growing tips, growing shoots,
and vascular tissue.
Deficiency: Lack of phosphorus is
relatively uncommon and often misdi
agnosed. The deficiency is first noticed
when the petioles begin to take on a pur
ple hue. Do not confuse with purpling of
the main stem, which is indicative of an
overall nutrient deficiency. Leaves take on
a bluish green hue. Vertical growth slows,
as well as lateral development. Dark
copper-colored or purple-to-blackish
dead blotches start to show on deformed
lower leaves after a couple of weeks of de
ficiency. Dark necrotic spots develop on
leaf stems (petioles) as leaves curl down
ward and drop. Severely affected leaves
develop a dark bronze or metallic purple
color as leaves continue to curl, contort,
wither, and drop. Flowering is often
delayed, buds are much smaller, seed
yield is poor, and plants become more
vulnerable to fungal and insect attack.
There is a big difference between
petioles and stems when purpling
occurs. On petioles this is a clear sign of
phosphorus deficiency; on stems this is
an overall deficiency indicating under
feeding. This underfeeding can come
from many reasons, including lack of
nutrients, but also poor water relations,
high humidity, anything that slows
transport, and overdosing microbes in
the root zone as well as soil temp being
too high or low, and overwatering.
Purpling petioles or stems are NOT
associated with a nitrogen deficiency,
except where it was part of an overall
problem including phosphorus.
Phosphorus deficiency
NUTRIENTS
www.marijuanagrowing.com
Cause: When a phosphorus deficiency
does occur, the pH has usually drifted
up too high, beyond 7.0, which makes
the macronutrient unavailable for uptake
because it becomes unavailable as it
changes ion form. Cold temperatures
[below 50°F (10°C)] impair phosphorus
uptake. Deficiencies are aggravated by
clay and soggy soils. Other causes include
acidic growing medium, an excess of iron
and zinc, or soil that has become fixated
(chemically bound) with phosphates.
However, adequate zinc is necessary for
proper utilization of phosphorus.
Confused with: Zinc deficiency, cold
temperatures
Solution: Naturally occurring phosphate
compounds accessible for uptake by
roots are seldom available. Phosphorus
is bound in organic compounds and is
released via decomposition affected by
soil life. Bat guano is a readily available
source of phosphorus. Steamed bone
meal, barnyard manure, and compost are
the next-best sources. Thoroughly mix
in the organic nutrients into living soil.
Always use finely ground organic com
ponents that break down and become
available quickly. Prevent deficiencies by
mixing a complete organic fertilizer that
contains phosphorus into the growing
medium before planting. Outdoors, mix
fine, steamed bone meal and pulverized
rock phosphate into soil the year before
planting.
Use phosphoric acid to lower the pH to
within a range of 5.5 to 6.2 in hydroponic
units, and lower the EC too. Correct the
pH (6.0-7.0 for clay soils and 5.5 -6 .5 for
potting soils) to facilitate phosphorus
availability. If the soil is too acidic and an
excess of iron and zinc exists, phospho
rous becomes unavailable.
Excess / Deficiency
8c. Leaf tips and
margins burn
8d. Less internodal
space
8e. Diminished harvest
8. Zinc and iron micro
nutrient deficiencies
9. Calcium and mag
nesium deficiencies appear
9a. Lower leaves curl, develop
spots
10. Dry buds have a
“ chemical” taste
9b. Root tips die back
3. Vertical and lateral growth slows
6. Weak plant susceptible
to diseases and pests
2. Petioles turn purplish color
1. Leaves turn
bluish green
PHOSPHOROUS
8b. New leaves grow thin blades
8a. Newer leaves develop
interveinal chlorosis
Cannabis absorbs inorganic phosphates
in ionic form only. Check with your
local hydroponic store for appropriate
phosphorous-rich, properly formulated
nutrient mixtures. Use soluble forms of
phosphorus when soil temperatures are
below 50°F (10°C).
Excess: Relatively common, especially
during flowering. In fact, an excess of
phosphorus is promoted to thicken
flower buds and add weight to final
harvest. Excess is usually caused by
adding too much high-phosphorus
fertilizer in an available form. Toxic
signs of phosphorus may take several
weeks to surface, especially if excesses
4. Dark copper-colored or
purple-to-blackish dead
blotches on lower leaves
5. Severely affected leaves
develop dark bronzish
metallic purple colored
leaves continue to curl,
contort, wither and drop
7. Weak plant susceptible to
diseases and pests
are buffered by a stable pH. Symptoms
manifest in the form of micronutrient
deficiencies in zinc, which is the most
common, and iron. Also, as phospho
rus availability increases, calcium and
magnesium availability drops. If signs
of zinc and iron deficiencies are present,
phosphorus could also be lacking.
Excess chemical-based phosphorus in
cannabis buds during flowering causes a
“chemical” taste when smoked.
Cause: Many cannabis varieties can
tolerate high levels of phosphorus. Avail
able phosphorus builds to toxic levels if
heavily applied and not leached from soil.
Www.marijuanagrowing.com
355
Excess / Deficiency
7c. Leaf tips and
margins burn
7e. Lower leaves curl,
develop spots
pH!
6. Root zone is acidified
7f. Root tips die back
7d. Less intcrnodal
7. Causes calcium, mag
nesium, zinc and iron
deficiencies
I. Older leaves turn pale and
suffer chlorosis
2. Leaf margins,
tips turn rusty
color and “burn”
4. Stem branching
may i ncrease
5. Flowering retarded
and diminished
3. Stems often become weak,
scrawny, and sometimes brittle
POTASSIUM
7b. New leaves grow thin blades
7a. Newer leaves develop
interveinal chlorosis
space
Confused with: A deficiency of zinc,
iron, magnesium, or calcium
Solution: Raise the pH. Phosphorus
does not leach very well so leaching the
growing medium has little effect. It just
changes form and can combine with
calcium to form insoluble compounds.
Potassium (K)-mobile (essential)
About: Potassium helps combine y
sugars, starches, and carbohydrates,
and is essential to their production and
movement. Potassium is vital to growth
by cell division. It increases the chloro
phyll in the foliage and helps to regulate
stomata openings so plants make better
use of light and air. It is necessary to
make proteins that augment oil content
and improve flavor in cannabis plants.
It also encourages strong root growth
and is associated with disease resistance
and water intake. The potash form of
potassium oxide is (K2O). Soils with a
high level of potassium increase a plant’s
resistance to bacteria and mold.
Deficiency: Potassium deficiencies are
common in indoor gardens, less common
in greenhouses, and somewhat common
outdoors. Potassium deficiency causes
the internal temperature of foliage to
climb; beyond 104°F (40°C), it causes
protein in cells to burn and degrade. To
cool down leaves, evaporate moisture.
Evaporation is normally highest on leaf
edges, and that’s where the burning takes
place. Up to 70 percent of a plant’s
energy is “burned” to keep cool.
Potassium in excess also moves to these
far areas, pores at the ends of the veins,
and accumulates, causing this burn that
is often confused with general salt burn
but is not. The chlorosis must be seen
first and a dulling in the cuticle layer of
the leaf, all on older leaves.
Plants with a minor potassium deficien
cy appear healthy; leaves are a little too
green and have a dull tone. Stems thin
and branching may increase. Young leaf
fringes and tips discolor turning a rusty
brown, dehydrating and curling up.
Progressively greater numbers of older
leaves (first tips and margins, followed
by whole leaves) develop rust-colored
blotches, turn dark, and die. Stems often
become weak, scrawny, and sometimes
brittle. Deficient plants become very
susceptible to disease and pest attacks.
Flowering is retarded and greatly
diminished.
Cause: Potassium is usually present but
fixed or bound in humus-rich and clay
soils, often locked in by toxic fertilizer
(salt) buildup. Excess sodium in the water
source that has built up in soil, calcium
magnesium and phosphorus and cold
weather impair uptake of potassium.
Confused with: Endema (an abnormal
accumulation of fluids) or spots caused
by bacteria or fungi. Absorption of
magnesium, manganese, and sometimes
zinc and iron is also slowed. Burned leaf
margins are also caused by low humidity
and overall fertilizer (salt) burn.
Solution: Leach the toxic salt out of the
soil by leaching heavily with clean water.
356
NUTRIENTS
www.marijuanagrowing.con!
The burned leaffringes on this 'Dynamite'
clone have classic signs ofpotassium deficiency.
Potassium deficiency
Severe potassium deficiency
This soluble plant food lists its ingredients
in percentages and explains where they were
derived from.
14 18-14 SOLUBLE PLANT FOOD
SEAWEED POWDER & MICRONUTROIT'
GUARANTEED ANALYSIS'
°
Total Nitrogen (Nl.................... ..................
6% Ammomcal Nitrogen
3% Nitrate Nitrogen
5% Water Soluble Organic Nitrogen
Available Phosphate (P205)..........
Soluble Potash (K?0)....................
Magnesium (Mg).........................
Sulfur(S)..................................
Boron (B)
. ..... ..... .... .... ..... .... .... .
Copper (Cu).....................................
0.05% chelated copper
Iron (Fe)
.... ..... .... .... ..... .... ..
0.30% chelated iron
Manganese (Mn).........................
0 15% chelated manganese
Molybdenum (Mo)..................
Zinc (?n) .............................. -r. . * •
0 10% chelated zinc
Derived From: Seaweed Powder; Blood
Ammonium Phosphate, Ammonium Sulphate.
;
Nitrate; Sulfate of Potash; Sodium Molybdate: w '
Borate, Magnesium Sulphate; Copper, Iron,
and Manganese EDTA.
MAXSEA is water soluble and will read<ly a^?£t
In extremely moist or humid conditions
become damp or hard. This does not attec
effectiveness or ability to dissolve m water
NOTICE Buyer assumes all respon^tfv
use not m accordance witli directions '
rfigardmg the contents and lev*1* of me***
.rr^!r'
R ^bte on the ntetnet at W/A*** ■***'’
-
CAUTION: Keep out of the reach of
*
take internally_______
.
M
Apply a well-balanced N-P-K fertilizer
with high potassium content. Organic
gardeners add fast-acting potassium in
the form of liquid kelp or potash. Potas
sium is absorbed quickly and deficiency
symptoms should disappear in a few
days. Add slow-acting granite dust and
greensand to outdoor planting holes.
Excess: Occasionally, too much potas
sium is a problem, but it is difficult to
diagnose because it is mixed with the
deficiency symptoms of other nutrients.
Excess potassium acidifies the root zone,
slows the absorption of calcium, magne
sium, and sometimes zinc and iron. Look
for signs of toxic potassium buildup when
symptoms of calcium, magnesium, zinc,
and iron deficiencies appear.
Cause: Potassium has built up in soil,
and too much is now available to roots.
Confused with: Calcium, magnesium,
and sometimes zinc and iron deficiencies
or general salt burn. However, coco coir
gives off large amounts of potassium,
which is readily absorbed and locks
out calcium and magnesium; the result
is calcium and magnesium deficiency
symptoms but with tip and later marginal
leaf burn from potassium accumulating
at these points. True salt burn comes
not from too many ions in the tissue but
from a reversal of the osmotic gradi
ent, pulling water out of the plants not
moving it into the plant. The fix in coco
is to increase the EC, not back it up and
leach.
Solution: Leach the growing medium
of affected plants with a very mild and
complete fertilizer solution. Severe
problems require that more water be
leached through the growing medium.
Leach with a minimum of three times
the volume of water for the volume of
the growing medium.
Secondary Nutrients
The secondary nutrients—calcium, mag
nesium, and sulfur—are often grouped
with the macronutrients (nitrogen,
phosphorus, and potassium) because
plants use secondary nutrients in large
amounts. Rapid-growing cannabis is able
to process more of these nutrients than
most general-purpose fertilizers are able
to supply. A properly balanced organic or
ionic salt hydroponic fertilizer supplies
all necessary macro and micro (trace)
elements in the proper formulations for
maximum results.
Calcium and magnesium are dissolved
in all water sources, usually in large
amounts. Lower levels of sulfur are
also present in most water supplies.
Always take into account the amount
of preexisting calcium and magnesium
‘nutrients’ already available in the water
supply when fertilizing, especially in
hydroponic formulas. Excessive calcium
causes “hard water,” a condition that
limits nutrient uptake.
If growing in an acidic potting soil
or soilless mix, correct the pH of the
growing medium to 5.8 with agricultural
lime. Calcium is already incorporated
into the peat part of the mix. The proper
rate of all lime tends to be three to five
kilograms per 35 ft3 (3-5 kg per 1 m3).
With a pH below 6.0, incorporating one
cup of fine (flour) dolomite lime per
gallon of growing medium ensures
adequate supplies of calcium and
magnesium. Forms of sulfur are found
as compounds in most fertilizers.
www.marijuanagrowing.com
357
Excess / Deficiency
Ca
CALCIUM
7. Growth may
be stunted
5. Stunted plant, diminished harvest
6. Minor leaf wilt
3. Flower development is slow
2. Yellowish-brown
irregular spots develop
on leaves and margins
1. Lower leaves contort and curl
4. Root tips may die back
8. Uptake of potassium, iron,
magnesium and manganese blocked
Calcium (Ca)-immobile (essential)
About: Calcium is fundamental to cell
manufacturing and growth. Calcium is
necessary to preserve membrane perme
ability and cell integrity, which ensure
proper flow of nitrogen and sugars.
Calcium stimulates enzymes that help
build strong cell and root walls. Cannabis
must have some calcium at the grow
ing tip of each root. Since calcium has
little mobility within the plant, it must
be available in the root zone for uptake
in order to avoid shortages. Tap water
“hardness” is determined by the amount
of dissolved calcium and magnesium
salts. High levels of calcium help
protect plant tissue from pest and
disease attacks. But hard water scale
contains a considerable amount of
calcium carbonate, CaCO3, which is
almost insoluble in water.
Deficiency: Calcium is most often
deficient in hydroponic gardens, but this
deficiency is rather uncommon in green
houses and indoors. Calcium is abundant
in virtually all soils but occasionally
lacking outdoors in cool wet climates
and acidic soil. Calcium is sometimes
deficient in soilless rooting mediums.
Early deficiency causes lower leaves
to contort and curl. As the deficiency
progresses, symptoms appear relatively
quickly, first in lower leaves that develop
yellowish-brown irregular spots with
a dark brown border that enlarges over
time. Often spots are at or near the edge
of leaves. Older affected leaves develop
yellowish hazy zones and spots around
larger necrotic irregular spots. Flower
bud development is inhibited, and root
tips often die back. The plants are
stunted and harvest is diminished.
Cause: An imbalanced fertilizer with
unavailable calcium causes a deficiency.
Calcium can be bound or fixed in (acidic)
soil and unavailable for uptake. Excess
ammonium, magnesium, potassium, and
sodium in the root zone impair calci
um uptake. Often, calcium is available
in solution and growing medium but
unavailable within the plant due to a
transport problem (within the plant)
caused by environmental conditions.
Humidity that is too high or too low
impairs transpiration. An EC that is too
high, or improper irrigation that causes
internal movement of water, will affect
calcium uptake and is demonstrated in
lower leaves. Excess phosphorus could
also be the cause.
Confused with: Root disease, excess
nitrogen (ammonium), magnesium,
potassium and sodium or deficiencies of
iron, potassium and zinc
Solution: Leach soil and soilless mix
with plain or low-EC water to wash out
any built-up fertilizer salts that impair
calcium uptake. Avert deficiencies in
the soil and in most soilless mixes by
adding fine dolomite lime (Ca and Mg)
or gypsum (calcium sulfate hydrate
[CaSO4-2(H2O)]) to the planting mix.
Acidic soils often contain low levels of
calcium.
Use properly formulated soluble-
hydroponic fertilizer that contains
adequate available calcium, prefera
bly calcium nitrate. Dissolve one-half
teaspoon (2.5 cc) of hydrated lime per
gallon of water. Water the deficient
plants with calcium-dosed water as long
as new deficiency symptoms persist.
Remember, damaged tissue will not go
away. Or use a complete hydroponic
nutrient that contains adequate available
calcium. Keep the pH of the growing
medium stable. Reverse osmosis filtered
water must have calcium added.
Excess: Leaves wilt, but very little.
Excessive amounts of soluble calcium
applied early in life can stunt growth.
Too much calcium blocks potassium,
iron, magnesium, and manganese uptake.
If growing hydroponically, an excess
of calcium will combine with sulfur in
the solution, which causes the nutrient
solution to suspend in the water and to
aggregate into clumps, which then causes
the water to become cloudy (flocculate).
Once calcium and sulfur combine, they
form a residue [gypsum CaSO4-2(H2O)]
that settles to the bottom of the reservoir.
Cause: Too much available calcium in
water or nutrient solution
Confused with: Deficiency of potassium,
magnesium, manganese, or iron
Solution: Change nutrient solution,
attempt to wash excess from soil with
heavy leaching.
358
NUTRIENTS
www.marijuanagrowing.com
Magnesium (Mg)-mobile (essential)
About: Cannabis uses a lot of mag
nesium. It is the central atom in every
chlorophyll molecule, and it is essential
io the absorption of light energy and
photosynthesis. It aids in the utilization
of nutrients. Magnesium helps enzymes
nuke carbohydrates and sugars that are
later transformed into flowers. It also
neutralizes the soil acids and toxic
compounds produced by the plant.
Deficiency: Deficiencies are common
indoors and occasionally outdoors,
especially in acidic soils. No deficiency
symptoms are visible during the first 3
to 4 weeks. In the fourth to sixth week
of growth, the first signs of deficiency
appear. Interveinal yellowing and irregu
lar rust-brown spots appear on older and
middle-aged leaves and younger leaves
remain healthy. Size of rust-brown spots
between green veins increases and mi
grates to lower and finally newer leaves
as the deficiency progresses. The entire
plant looks sick. Rusty-brown spots
appear on the leaf margins, tips, and
between the veins. Leaves start dying
and dropping,
possibly curling before falling off. A
minor deficiency will cause few prob
lems with growth. However, minor
deficiencies can quickly escalate during
flowering and cause a diminished
harvest as flowering progresses.
Cause: Magnesium is bound in the soil if
there is an excess of potassium, ammo
nia (nitrogen), and calcium (carbonate).
Most often, magnesium is in the soil but
unavailable to the plant because the root
environment is too acidic, wet and cold.
Clay soils rich in calcium also tend to be
magnesium poor. Small root systems are
magnesium deficiency is easy to correct with
applications of Epsom salts.
Mg
YlAGNESiUB
4. Stunted growth
6. Symptoms appear as an
overall salt toxicity
5. Dark green foliage
2. Interveinal yellowing
and irregular rust-brown
spots appear on older
and middle-aged leaves
4. Olders leaves dry, ofren curl
and drop
1. Deficiencies exist 4-6 weeks
before outward signs arc apparent
also unable to take in enough magne
sium to supply heavy demand. A high
EC slows water evaporation and dimin
ishes magnesium availability.
Confused with: An excess of
potassium, ammoniacal nitrogen, and
calcium carbonate
Spray with a 2 percent solution of
Epsom salts every 4 to 5 days.
Solution: Add superfine dolomite lime
to acidic potting soils before planting; it
will stabilize the pH and add magnesium
and calcium to the growing medium.
Add 2 teaspoons (10 cc) of Epsom salts
(magnesium sulfate) per gallon (3.8 L)
of water with each watering to correct
magnesium deficiencies if no dolomite
was added when planting. Or dilute
Kieserite (magnesium sulfate monohy
drate, MgSO4 H2O) in water. For fast
results spray the foliage with a 2 percent
solution of Epsom salts every 4 to 5 days.
If the deficiency progresses to the top of
the plant, it will turn green there first. In
4 to 6 days, the green-up will start mov
ing down the plant, turning lower leaves
progressively greener. Continue a regular
Excess / Deficiency
3. Overall sickly appearance
watering schedule with Epsom salts
until the symptoms totally disappear.
Use Epsom salts designed specifically
for plants rather than the supermarket
type. Another option is to apply Kiese
rite, found packaged as Ca-Mg fertilizer/
supplement. Composted cow and turkey
manure is also rich in magnesium.
Control room and root-zone
temperatures, humidity, pH, and EC
of the nutrient solution. Keep root zone
and nutrient solution at 70°F to 75°F
(21.1°C-23.9°C). Keep ambient air
temperature at 75°F (21.1 °C) day and
65°F (18.3°C) night. Use a complete
fertilizer with an adequate amount of
magnesium. Keep the soil pH above
6.5, the hydroponic pH above 5.5, and
reduce high EC for a week. Reduce EC
by leaching with plain water.
Excess: Excess magnesium is rare and
does not appear quickly. Extra magne
sium in the soil is in itself generally not
harmful, but it inhibits calcium uptake.
Symptoms appear as an overall salt
toxicity accompanied by stunted growth
and dark-green foliage.
www.marijuanagrowing.com
359
Excess / Deficiency
8. Leaf tips and
margins could discolor
and burn when excess
is severe
SULFUR
6. Bud formation is slow and weak
5. Stems often turn woody
I. Young leaves turn
lime-green to yellowish,
and growth is stunted
7. Overall smaller plant
development and
uniformly smaller,
dark-green foliage
Cause: Magnesium toxicity is rare and
difficult to discern with the naked eye.
If extremely toxic, the magnesium
develops a conflict with other fertilizer
ions, usually calcium, especially in
hydroponic nutrient solutions. Toxic
buildup of magnesium is uncommon in
soil that is able to grow cannabis.
Confused with: Calcium deficiency
Solution: Leach soil heavily to wash
out excess.
Sulfur (S)-semimobile (essential)
About: Sulfur is an essential building
block of many proteins, hormones, and
vitamins, including vitamin Br Sulfur is
also an indispensable element in many
plant cells and seeds. The sulfate form
of sulfur buffers the water pH. Virtually
all groundwater and river or lake water
contains sulfate. Sulfate is involved in
protein synthesis and is part of cysteine
(an amino acid) and thiamine, which
are building blocks of proteins. Sulfur
is essential in the formation of oils and
flavors, as well as for respiration and the
synthesis and breakdown of fatty acids.
2. As shortage progresses, leaf
veins yellow and lack
succulence
3. Leaf tips can burn,
darken, and hook
downward
4. Long purple streaks might
appear the length of the stem
when combined with an
overall nutrient
deficiency
Deficiency: Sulfur is not commonly
deficient; many fertilizers contain some
form of it. Excess sulfur is somewhat
common when the EC is high. Young
leaves turn lime-green to yellowish, and
growth is stunted. As shortage progress
es, leaf veins yellow and lack succulence.
Leaf tips can burn, darken, and hook
downward. Roots also elongate and
stems often turn woody. Acute defi
ciency is usually caused by a rising pH
resulting in a loss of phosphorus, which
in turn causes more and more leaves to
turn yellow and leaf stems to turn purple.
Long purple streaks might appear the
length of the stem when combined with
an overall nutrient deficiency. Buds may
have difficulty forming, often remaining
leafy and fluffy, with reduced potency.
Bud formation is slow and weak. Plants
could have shorter overall life.
Mauk from Canna in the Netherlands,
who has conducted detailed scientific ex
periments with nutrients, says, “We have
repeatedly noticed that the symptoms
were most obvious in the older leaves.
Sulfur deficiency resembles a nitrogen
deficiency. Acute sulfur deficiency causes
elongated stems that become woody at
the base.”
Cause: Sulfur deficiency occurs indoors
when the pH is too high (above 6.0) or
when there is excessive calcium present
and available. Hydroponic fertilizers
separate sulfur from calcium in an “A”
container and a “B” container. If com
bined in a concentrated form, sulfur and
calcium will form crude, insoluble gyp
sum (hydrated calcium sulfate) and settle
as residue to the bottom of the tank.
Confused with: Nitrogen, magnesium,
iron deficiencies
Solution: Fertilize with a hydroponic
fertilizer that contains sulfur. Balance
the pH to 5.5 in hydroponics and above
6.0 in soil gardens. Add inorganic sulfur
to a fertilizer that contains magnesium
sulfate (Epsom salts). Organic sources
of sulfur include mushroom composts
and most animal manures. (To avoid
burning the roots, make sure to apply
only well-rotted manures.) Avoid ele
mental (pure) sulfur in favor of sulfur
compounds such as magnesium sulfate.
The nutrients combined with sulfur mix
better in water.
Excess: Seldom seen or a problem except
in coco mediums that are already rich in
sulfur. Excess sulfur symptoms include
Sulfur is abundant in most fertilizers; when
deficient it is usually mixed with other nutri
ents. Low sulfur levels cause buds to be fluffy
and less potent.
360
NUTRIENTS
www.marijuanagrowing.com
overall smaller plant development and
uniformly smaller, dark-green foliage.
Leaf tips and margins could discolor and
burn when excess is severe.
Cause: An excess of sulfur in the soil
causes no problems if the EC is relatively
low. At a high EC, plants tend to take
up more available sulfur, which blocks
uptake of other nutrients.
Confused with: Potassium and manga
nese deficiencies
Solution: Leach the growing medium
of affected plants with a very mild and
complete fertilizer. Check the pH of the
drainage solution. Correct the input pH
to 6.0. Severe problems require more
water to be leached through the growing
medium. Leach a minimum of 3 times
the volume of water for the volume of
the growing medium. Lower the overall
fertilizer concentration (EC) of nutrient
solution.
Micronutrients
Micronutrients, also called trace ele
ments or trace nutrients, are essential to
cannabis growth and must be present in
minute amounts. They function mainly
as catalysts to the plant’s process and
utilization of other elements.
Organic fertilizers such as marine algae
or kelp (liquid or meal), humic acid,
manures, and composts often contain all
necessary micronutrients.
To ensure that a complete range of
trace elements is available, use ionic salt
fertilizers (designed for hydroponics)
that supply all necessary micronutrients
in proper proportions. High-quality
hydroponic fertilizers use food-grade
ingredients that are completely soluble
and leave no residues.
Due to labeling requirements, many
fertilizer companies do not list trace
elements that are actually contained in
their products. Before adding chelated
trace elements, check with manufacturers
to see if it is a “complete” fertilizer with
all necessary nutrients.
Chelated micronutrients are available
in powdered and liquid form. Add and
thoroughly mix micronutrients into
the growing medium before planting.
Micronutrients are often impregnated
in commercial potting soils and soilless
mixes. Check the ingredients on the bag
to ensure that the trace elements were
added to the mix. Trace elements are
necessary in minute amounts but can
easily reach toxic levels. Follow manu
facturer’s instructions when applying mi
cronutrients; they are easy to overapply.
Zinc, iron, and manganese are the three
most common micronutrients found
deficient. Often deficiencies of all three
occur concurrently, especially when the
soil or water pH is above 6.5 . Deficien
cies are most common in arid climates—
such as Spain, the southwestern United
States, and Australia—with alkaline soil
and water. All three have the same initial
symptom of deficiency: interveinal chlo
rosis of young leaves. It is often difficult
to distinguish which element—zinc,
iron, or manganese—is deficient, and
all three could be deficient. This is why
treating the problem should include add
ing a chelated dose of all three nutrients.
Remember that chelation technology is
expensive and really only required when
mediums are alkaline.
Read your fertilizer’s ingredients—
chelated iron might read something like
“iron EDTA.”
Boron (B)-very immobile
About: Boron is still somewhat of a
biochemical mystery. We know that
boron helps with calcium uptake and
numerous plant functions and is critical
for photosynthate transfer. Scientists
Chelated water-soluble iron is available along
•with a host of other micronutrients in an
organic form.
Chelates
A chelate (Greek for claw) is an organic
molecule that forms a clawlike bond with
free electrically charged metal particles,
combining nutrients in an atomic ring
that is released easily for plants to absorb
only at the root surface. Plants do not
take up a chelate directly. First, the metal
is converted in an ionic form at the root
surface. There, ions are released and
absorbed by the plant, where it is
re-chelated and moves through the plant.
This property keeps metal ions such
as zinc, iron, and manganese soluble in
water, and the chelated metal’s reactions
with other materials is suppressed. Roots
take in the metals in a stable, soluble
form that is used immediately.
Natural chelates such as humic acid and
citric acid can be added to organic soil
mixes. Roots and bacteria also secrete
natural chelates (exudates) in order to
promote the uptake of iron and other
metallic elements. Man-made chelates are
designed for use in different situations.
Chelators may move back to the growing
medium to pick up another metal, but
supporting evidence for this is marginal.
DTPA is most effective in a pH < 6.5 .
EDDHA is effective up to a pH < 8.0.
EDTA chelate is slow to cause leaf burn.
Chelates decompose rapidly in low levels
of ultraviolet (UV) light, including light
produced by HID bulbs and sunlight.
Keep chelates out of the light to protect
them from rapid decomposition.
This information was condensed from
Canna Products, www.canna.com.
www.marijuanagrowing.com
361
8. Leaves yellow
and drop
BORON
Excess / Deficiency
7. Leaf tips yellow before
appearing burned
5. Rust colored corky
stems develop
6. Root tips often swell,
discolor and stop elongating
4. Leaves thicken and
become brittle
2. Growth shoots appear burned
and may contort
have collected evidence to suggest that
boron helps with synthesis, a base for the
formation of nucleic acid (RNA uracil)
formation. Strong evidence also supports
boron’s role in cell division, differentia
tion, maturation, and respiration as well
as a link to pollen germination.
Deficiency: Cannabis uses minute
amounts of boron, and deficiencies
seldom occur indoors. Usually boron
causes no problems, but it must be
available during the entire life of a plant.
Stem tip and root tip grow abnormally
if it is deficient. Root tips often swell,
discolor, and stop elongating. Growing
shoots look burned, which may be con
fused with a burn from being too close
to the light. First, leaves thicken and
become brittle, and then top shoots con
tort or turn dark (or both), which is later
followed by progressively lower-growing
shoots. When severe, growing tips die,
and leaf margins discolor and die back in
places. Necrotic spots develop between
leaf veins. Root steles (insides) often
become mushy—perfect hosts for rot
and disease. Deficient leaves become
thick, distorted, and wilted, with
1. Stem, tip and roots grow abnormally
3. Necrotic spots develop
between leaf veins
chlorotic and necrotic spotting.
Rust-colored cork tissue forms on
stems, and growing tips have a witch’s
broom appearance. Boron deficiency
often brings about calcium deficiency.
Cause: Not present in extremely poor
soil or lacking in fertilizer
Confused with: Calcium deficiency
and light burn (See photos of each to
distinguish.)
Solution: Give boron-deficient plants
one teaspoon (5 cc) of boric acid or borax
soap per gallon (3.8 L) of water. You can
apply this solution as a soil drench to be
taken up by the roots, or apply hydro
ponic micronutrients containing boron.
Hydroponic gardeners should keep
boron dosage below 20 parts per million
(ppm), because boron quickly becomes
toxic if it is concentrated in the solution.
Excess: Excesses are rare but can be
deadly. Older leaves are affected first
and symptoms are similar to salt burn.
Leaf tips yellow first, and as the toxic
conditions progress, leaf margins become
necrotic toward the center of the leaf.
After the leaves yellow, they fall off. Be
careful when adding trace elements to
soil and hydroponic nutrient formula
tions. Avoid using excessive amounts of
boric-acid-based insecticides.
Cause: Overfertilization
Confused with: Leaf spot fungus,
light burn
Solution: Difficult to correct an over-
supply of boron before crop is mature
Chlorine (Chloride) (Cl)-immobile
(essential)
About: Chlorine (chloride) is required
in the molecule that holds the water
molecule, allowing and triggering the
breakdown and release of hydrogen and
oxygen for photosynthesis to occur. It
is necessary for root and leaf cell divi
sion. It also increases osmotic pressure
in the cells, which opens and closes the
stomata to regulate moisture flow within
the plant tissue. Chlorine is found in
many municipal water systems. Canna
bis tolerates low levels of chlorine and
is almost never deficient in gardens that
grow cannabis. Excess chlorine is some
what common indoors. Chlorine tends
to acidify soil after repeated applications.
Deficiency: Chlorine deficiency is rare.
A solution concentration of less than
140 ppm is usually safe for cannabis, but
some varieties may show sensitivity when
new and young foliage turns pale green
and wilts. Excessive chlorine causes leaf
tips and margins to burn and causes the
leaves to turn a bronze color. The roots
develop thick tips and become stunted.
Note: Both severe deficiency and excess
of chloride have the same symptoms:
bronze-colored leaves.
Cause: Not available in water or soil
Confused with: Chlorine excess
Solution: Add chlorinated water
Excess: Young leaves develop burned
leaf tips and margins. Young seedlings
and clones are the most susceptible to
damage. Later, the symptoms progress
NUTRIENTS
www.marijuanagrowing.com
throughout the plant. Characteristic
yellowish-bronze leaves are smaller and
slower to develop. Most grow well with
chlorine levels up to 140 ppm, but some
varieties develop leaf tip and margin burn
when concentrations top 20 ppm.
Note: Both severe deficiency and excess
of chlorine have the same symptoms:
bronze-colored leaves.
Cause: Too much chlorine in the home
or municipal water system
Confused with: An excess of iron
evidenced by bronze-colored leaves
Solution: Let heavily chlorinated water
sit out overnight, stirring occasionally,
or aerate it with a pump. Chlorine will
volatize and disappear into the atmo
sphere in 24 to 48 hours. Place an air
pump or a water pump and fountain in
the chlorine-rich water to speed vol-
atization of chlorine. Use this water to
mix the nutrient solution or to irrigate
the garden. If chlorine noticeably alters
water pH, adjust it with a commercial
pH UP product. Correct soil excesses by
adding fine dolomite or agricultural lime.
Water treated with chlorine dioxide can
be dealt with in this fashion, but water
systems that use chloramine cannot, as
it does not volatize; reverse osmosis is
required, or a chemical purifier could
be used, but the latter is not necessarily
recommended.
Simple water filters do not clean dissolved
solids from water. Such filters remove
only debris emulsified (suspended) in
water, releasing dissolved solids from
their chemical bond isomer complex.
A reverse osmosis machine uses small
polymer, semipermeable membranes that
allow pure water to pass through yet filter
out dissolved solids. Reverse osmosis
machines are the easiest and most
efficient means to clean raw water.
Cobalt (Co)-immobile (beneficial)
About: Cobalt is necessary for nitrogen
fixation, although the need for cobalt
in plants was only recently established.
It is essential for growth of the bacteria
Rhizobium involved in legume nod
ule formation and fixing atmospheric
Cl
4. Yellowish-bronze leaves
are smaller and slower
to develop
5. Young leaves develop
burned tips and margins
Note: Both severe deficiency and
excess of chlorine have the same
symptoms: bronze-colored leaves
CHLORINE
Excess / Deficiency
1. Leaf tips and margins hum,
turn bronze color
nitrogen into amino acids and proteins.
Cobalt, found in vitamin B12, is synthe
sized by Rhizobium to promote nitrogen
fixation.
Cobalt slows ethylene synthesis.
Ethylene, a hormone, inhibits new
shoot development. More new shoot
development is possible when ethylene
is inhibited. It is still not clear as to
other direct influences cobalt might
have on cannabis growth.
Deficiency: Nothing is known yet of
symptoms, etc. Possible symptoms
might include decreased production of
Vitamin B12 and less nitrogen fixation
Copper (Cu)-semimobile (essential)
About: Copper is a component of
numerous enzymes and proteins.
Necessary in minute amounts, copper
helps with carbohydrate metabolism,
nitrogen fixation, and the process of
oxygen reduction. It also helps with the
making of proteins and sugars. Copper
is also used as a fungicide.
2. Young foliage turns pale green
and wilts
3. Roots develop thick tips
and become stunted
Deficiency: Copper is used in minute
amounts by cannabis. Deficiencies
are uncommon indoors or outdoors.
Young leaves and growing shoots
slowly wilt, twisting and turning under
in the process. Leaf tips and margins
develop necrosis and turn dark-green
to copper-gray. Occasionally, an entire
copper-deficient plant wilts, drooping
even when adequately watered. Growth
is slow and the yield decreases. A small
deficiency can cause new shoots to die
back. Flowers are retarded and fail to
mature properly.
Cause: Lack of copper in fertilizer and
growing medium. Copper is concentrated
in roots.
Confused/mixed with: possible boron
deficiency or a pathogen attack (insect,
virus, etc.)
Solution: Apply a copper-based fungicide
such as copper sulfate. To avoid burning,
foliage, do not apply if the temperature
is above 75°F (23.9°C). Apply a com
plete hydroponic nutrient that contains
chelated copper. Or apply chelated trace
www.marijuanagrowing.com
363
Excess / Deficiency
4. Slower overall growth
1. Young leaves and shoots wilt, contort and
may die back
COPPER
5. Interveinal iron chlorosis
6. Fewer branches grow
3. Growth is slow
and yield decreases
7. Roots start to decay, or
become thick and
slow growing
elements containing copper. Be careful
not to overapply.
Excess: Excess copper is somewhat
common indoors but seldom seen out
doors. Copper, although essential,
is extremely toxic to the plant even
in minor excess. Toxic levels slow the
overall plant growth. As the toxic level
climbs, symptoms include interveinal
iron chlorosis (deficiency) and stunted
growth. Fewer branches grow, and roots
start to decay, or become thick and slow
growing. Toxic conditions accelerate
quickly in acidic soils. Hydroponic
gardeners must carefully monitor their
solution to avoid copper excess.
Cause: Too much copper in fertilizer,
copper built up in soil to toxic levels, or
residue accumulated on foliage or in soil
from copper-based fungicides
Confused with: Iron deficiency demon
strated by interveinal chlorosis
Solution: Leach the soil or the growing
medium to help expel excess copper. Do
not use copper-based fungicides or foliar
sprays.
2. Leaf rips and margins
turn dark-green to
copper-gray and
die back
Iron (Fe)-semimobile (essential)
About: Iron is fundamental to the en
zyme systems and to transport electrons
during photosynthesis, respiration, and
chlorophyll production. Iron permits
plants to use the energy provided
by sugar. A catalyst for chlorophyll
production, iron is necessary for nitrate
and sulfate reduction and assimilation.
Iron colors the earth from brown to red,
according to concentration. Most soils
contain plenty of iron in different forms.
But cannabis often has a difficult time
absorbing it under many conditions. Soil
pH is a major factor dictating absorption
of iron. Acidic soils normally contain
adequate available iron for cannabis
growth.
Deficiency: Iron deficiencies are most
common when pH is above 6.5 and un
common when the pH is below 6.5 in soil
and 6.0 in hydroponic gardens. Symp
toms may appear during rapid growth
or stressful times and may disappear by
themselves. Mild iron deficiencies have
little effect on harvest. Young leaves
are unable to draw immobile iron from
older leaves, even though it is present in
the soil. The first deficiency symptoms
appear on young leaves and shoots as
veins remain mostly green and areas in
between turn yellow. Interveinal chloro
sis starts at the opposite end of the leaf
tip: the apex of the leaves attached by
the petiole. As the deficiency progresses
more and larger leaves demonstrate inter
veinal chlorosis. Large leaves may yellow
completely. In acute cases, leaves may
develop necrosis and drop. Medium to se
vere iron deficiencies inhibit growth and
diminish harvest. Do not confuse with
magnesium deficiency where interveinal
chlorosis shows on older leaves first.
Cause: Imbalanced pH, especially
above 6.5 in soil and 6.0 in hydroponics.
Manganese, zinc, and copper inhibit iron
uptake. Overwatering, poor drainage,
cold growing medium, and damaged or
rotten roots will all lower iron uptake.
Nutrient solution exposed to light causes
algae growth. Algae break down chelates
and robs iron from roots. Sterilizing the
nutrient solution with UV light causes
iron to precipitate.
Confused with: Magnesium deficiency;
nitrogen deficiency; and early stages of
copper, manganese, and zinc deficien
cies. In contrast to magnesium, iron
deficiency appears first in younger leaves
because of iron’s relative immobility.
Iron readily oxidizes to the Fe3+ ion
and precipitates out in the tissues of the
plant, including the phloem.
Solution: Lower the soil pH to 6.5
or less; rockwool and hydroponic
substrates require about 5.6 to 5.8 .
Avoid fertilizers that contain excessive
amounts of phosphorus, manganese,
zinc, and copper, which inhibit iron up
take. High levels of phosphorus compete
Iron deficiencies are somewhat common. The
sativa plants on the left are deficient in iron;
the afghani plants on the right are not. (MF)
364
NUTRIENTS
www.marijuanagrowing.com
with the uptake of iron. Improve the
drainage; excessively wet soil holds little
oxygen to spur iron uptake. Increase
root zone temperature. Foliar feed for
guaranteed results with dilute EDDTA
0.2 teaspoons per quart (0.1 gm/L) or
EDTA at half a teaspoon per quart (0.5
gm/L). Apply 5 to 10 times the recom
mended dose of chelated iron in liquid
form to root zone. Chelates are decom
posed by light and must be thoroughly
mixed with the growing medium to be
effective. Leaves should green up in 4 or
5 days. Complete and balanced nutrient
formulas contain iron, and deficiencies
are seldom a problem. Organic sources
of iron, as well as chelates, include
cow, horse, and chicken manure. (To
avoid burning cannabis plants, use only
well-rotted manures.) Remember that
foliar application of chelated iron is only
a temporary fix.
Caution: If iron deficiency is
pronounced, add only chelated iron to
remedy the problem. Iron often reacts
with other nutrients, causing them to
become unavailable.
Excess / Deficiency
6. Phosphorous uptake is impaired,
signs appear in lower leaves
3. Leaves may develop
necrosis and drop
IRON
5. Leaves turn bronze, with
small dark-brown
leaf spots
4. Growth is slowed and
harvest diminished
1. Young leaves and shoots develop
interveinal chlorosis starring at
opposite end of leaf tip
2. As deficiency progresses more
and larger leaves demonstrate
interveinal chlorosis
Excess: Excess of iron is extremely rare
except in flooded soils. High levels of
iron do not damage cannabis but can
interfere with phosphorus uptake. An
excess of iron causes leaves to turn
bronze, accompanied by small, dark
brown leaf spots. Iron excess can also
promote phosphorus deficiencies.
Cause: Flooded outdoor soils where
iron accumulates
Confused with: Phosphorus deficiency
Solution: Leach plants heavily. Avoid
deficiencies by using a high-quality
hydroponic fertilizer that contains
chelated micronutrients.
Manganese (Mn)-immobile
(essential)
About: Manganese is engaged in the
oxidation-reduction process associated
with photosynthetic electron transport.
This element activates many enzymes
and plays a fundamental part in the
chloroplast membrane system. Manga
nese assists nitrogen utilization along
with iron in chlorophyll production.
Deficiency: Manganese deficiency is
relatively uncommon indoors and
relatively uncommon outdoors. Young
leaves show symptoms first, becom
ing yellow between veins (interveinal
chlorosis) while veins remain green.
Symptoms spread from younger to older
leaves as the deficiency progresses.
Necrotic (dead) spots develop on severely
affected leaves, which become pale and
fall off; overall plant growth is stunted,
and maturation may be prolonged. A
telltale sign of manganese deficiency
is where margins remain dark green
surrounding interveinal chlorosis.
Cause: A high pH (above 6.5) or an ex
cess of iron causes manganese deficiency.
Lack of manganese in the soil or fertilize.
Confused with: Severe manganese
deficiency looks similar to magnesium
deficiency.
Solution: Lower the pH, leach the soil,
and add a complete, chelated micronutri
ent formula.
Excess: Problems with manganese ex
cess are somewhat common. Young and
newer growth develops chlorotic, dark
orange to dark rusty-brown mottling
on the leaves. Tissue damage shows on
young leaves before progressing to older
leaves. Growth is slower, and overall
vigor is lost.
Cause: Toxicity is compounded by low
humidity. The additional transpiration
causes more manganese to be drawn
into the foliage. A low pH (5.0-5 .5) can
cause toxic intake of manganese, which
in turn restricts intake of iron and zinc.
Confused with: Excess of iron and zinc
Solution: Raise pH to 6.5.
Molybdenum (Mb)-mobile
(essential)
About: Molybdenum is part of two major
enzyme systems that convert nitrate to
ammonium. This essential element is
used by cannabis in very small quantities.
It is most active in roots and seeds.
Deficiency: Molybdenum deficiencies
and excesses are rare, though occasional
deficiencies occur in cold weather. First,
the older and middle-aged leaves yellow;
some leaves develop interveinal chlorosis
www.marijuanagrowing.com
365
Excess / Deficiency
5. Leaves discolor
MOLYBDENUM
6. Causes a deficiency of iron
4. Leaves drop
1. In cold weather
older and middle
leaves yellow with
possible interveinal
chlorosis
2. Leaves become distorted,
margins dry
3. Leaves drop
and discolor around leaf edges. Leaves
continue to yellow and develop cupped
or rolled-up margins as the deficiency
progresses. Leaves become distorted and
twisted, dry along the edges die, and
then drop. Overall growth is stunted.
Deficiencies are worst in acidic soils.
Molybdenum deficiency promotes
nitrogen shortage.
Cause: Not present in fertilizer, growing
medium, or water
Confused with: Nitrogen deficiency
Solution: Water with chelated micro
nutrients that contain molybdenum. Be
careful not to overapply.
Molybdenum deficiency
Excess: Excess molybdenum is
uncommon in cannabis gardens; it is
difficult to detect and has little effect
on cannabis. Leaves discolor. An excess
of molybdenum causes a deficiency of
copper and iron.
Cause: Too much in soil or fertilizer
Confused with: Copper and iron
deficiency
Solution: No correction needed
Nickel (Ni)-mobtle (beneficial)
About: Nickel was first demonstrated
as an essential plant nutrient in 2004.
Cannabis requires nickel in trace
amounts. It is normally not listed on fer
tilizer labels because nickel is available
in soil. Nickel is essential for activation
of the enzyme urease, which helps
metabolize (urea) nitrogen. It is also
required for absorption of iron. Nickel
also has a function in bacteria, and it
may play a role with interaction between
plants and bacteria.. At a pH less than
6.7 nickel is moderately available, but at
a pH less than 6.5 nickel compounds are
very soluble.
Deficiency: A lack of nickel causes toxic
levels of (urea) nitrogen to accumulate,
causing dead lesions to form on foliage.
Excessive application of zinc, copper, or
magnesium could cause a deficiency. But
cannabis requires so little nickel that I
have never seen a case where it is defi
cient. Plants grown without additional
nickel will gradually reach a deficient
level at about the time they mature and
begin reproductive growth. If nickel
is deficient, plants may fail to produce
viable seeds.
Cause: Excessive zinc, copper, manga
nese, iron, calcium, or magnesium in soil
or by root-knot nematode damage
Confused with: Nitrogen (urea), zinc,
copper, or magnesium excess
Solution: Apply copper, zinc and
magnesium in trace amounts to fertilizers
so that they do not build up to toxic
levels. Nickel-deficient soils have not
been identified.
Excess: A nickel overload is virtually
never a problem unless gross quantities
are available in soil. Cannabis as an accu
mulator plant can absorb a lot of nickel.
Cause: Overdose can be caused by too
much nickel in soil or by soil fertilized
with sewage sludge or packed with heavy
metals from industrial pollution.
Confused with: Does not apply * -
Solution: Grow in soil that is not full of
industrial waste or sewage sludge packed
with heavy metals.
Selenium (Se)-semimobHe
(beneficial)
About: Not yet classified as an essential
nutrient for plants, selenium’s role as a
beneficial element for plants is still being
discovered. Some plants are able to
accumulate large amounts of selenium,
from 100 to 10,000 mg Se kg-1 dry
weight. However, little work has been
done regarding cannabis as a seleni
um accumulator plant. Selenium can
be absorbed by roots in an inorganic
source or via organic compounds. Sulfur
and selenium share close chemical and
physical qualities and their absorption
by roots is also similar.
NUTRIENTS
www.marijuanagrowing.com
Deficiency: Selenium is seldom if ever
deficient. No apparent symptoms.
Cause: No selenium in growing medium
Confused with: No deficiency
Solution: No action
Silicon - (Si)-immobile (beneficial)
About: Silicon deserves mention even
though I have never seen a diagnosed
deficiency. Low levels of silicon can re
duce overall yield and vigor of cannabis.
Only rushes require silicon to complete
their life cycle, but it is beneficial in
other plants and accumulates in the
endoplasmic reticulum, cell walls, and
intercellular spaces as hydrated, amor
phous silica. Silicon is found in all soils
and it is the only nutrient/element that
does not hurt cannabis in excess. Silica
(gel) accumulates in epidermal plant
cells to form a protective shield that
promote stronger leaves, roots, stems,
and resistance to diseases, pests, and
plant stresses (including drought).
Silica (not silicon) is a mineral sand;
hydrated amorphous silica SiO2-H2O is
what Si is deposited as in the intercellular
spaces, converted after take-up.
Deficiency: Lodging (falling over) and
fungal infections.
Cause: Silicon deficiency is usually only
seen in plants not grown on native or
natural soils, or plants grown in water.
Confused with: Nothing
Solution: Add silicon to fertilizer in the
form of diatomaceous earth or prepack
aged supplements. When applied in a
highly soluble form, added silicon takes
effect after two weeks or more.
Note: Pests and diseases have a difficult
time penetrating plants that are sprayed
with a silicon-based repellent/insecticide.
Excess: Evidence suggests that too much
silicon can be an issue, but little research
has been done.
Sodium - (Na)-mobile
At low levels, sodium appears to bol
ster yields, possibly acting as a partial
substitute to compensate for potassium
deficiencies. But in excess of 50 ppm,
sodium is toxic and induces deficiencies
of other nutrients, primarily potassium,
calcium, and magnesium.
About: Very low levels of sodium appear
to promote higher yields in cannabis.
Deficiency: Not a problem in C3 plants
like Cannabis
Cause: Not a problem
Confused with: Nothing
Solution: No action
Excess: Sodium excess (above 50 ppm) is
relatively common, especially in coastal
and rural zones. Sodium in excess is a big
problem. Small amounts of sodium are
quickly taken up by roots. When sodium
levels reach 50 ppm, potassium and other
nutrient uptake is blocked, resulting in
rapid and severe deficiencies. First signs
of toxic sodium levels in plants manifest
as a potassium deficiency. When mixed
with chlorine, sodium turns into table
salt (NaCl), which is the worst possible
salt to put on plants.
Sodium excess causes potassium
deficiency, which in turn causes the
internal temperature of foliage to climb
and protein cells to burn or degrade.
High levels ofsodium in tap water will block
nutrient uptake and stunt growth.
Evaporation is normally highest on leaf
edges, which burn. See Potassium above
for more information.
Cause: Overall toxic fertilizer salt
condition in growing medium, salts in
water from water-softening filters, or
sodium in water or soil. Using too much
baking soda as a fungicide can also
create an excess.
Confused with: Potassium, calcium, or
magnesium deficiencies
Solution: Leach growing medium heavily
with clean water to wash away toxic
sodium. Use reverse osmosis filtration to
remove sodium and other dissolved solids
from irrigation water.
Note: Use a sodium (Na) meter to check
for'salt content in all premixed and bulk
soils—especially those containing
manure fertilizers.
Vanadium
Vanadium is known to be required in
certain microbes and algae, but nothing
is known about its need in higher plant
forms. Some believe it might be required
by cannabis in very low concentrations.
Zinc (Zn)-immobile (essential)
About: Zinc works with manganese
and magnesium to promote the same
enzyme functions. Zinc cooperates with
other elements to help form chloro
phyll as well as prevent its demise. It
is an essential catalyst for most plants’
enzymes and auxins, and it is crucial for
stem growth. Zinc plays a vital part in
sugar and protein production. It is fairly
common to find zinc-deficient cannabis.
Deficiencies are most common in soils
with a pH of 7.0 or more.
Deficiency: Zinc is the most common
micronutrient deficiency and is com
monly found in arid climates and alkaline
soils. The most dynamic evidence of
zinc deficiency is when a leaf turns 90
degrees and is combined with some or
all of the following symptoms: New and
young leaves exhibit interveinal chlorosis,
and new leaves and growing tips devel
op small, thin blades that contort and
wrinkle. Some varieties grow pronounced
smaller leaves. The leaf tips, and later the
margins, discolor and burn. Burned spots
vvww.marijuanagrowing.com
367
ZINC
Excess / Deficiency
1. New and young leaves exhibit
interveinal chlorosis, develop
small, thin blades that
contort and wrinkle
6. Excess zinc interferes
with iron’s ability to
function properly
and causes an
iron deficiency
3. The leaf tips, and
later the margins,
discolor and burn
5. Zinc overload is very rare
but extremely toxic.
Severely toxic
plants die quickly
2. Often stem tips fail to elongate
and growing shoots/tips
become “bunched up.”
4. reduces internode spacing,
new growth, including buds, and
can severely diminish yield
This Colombian bud grown in 1976 is defi
cient in zinc. The result is bunched-up and
contorted growth. (MF)
on the leaves could grow progressively
larger. When zinc deficiency is severe,
new leaf blades contort horizontally and
dry out. Often stem tips fail to elon
gate and growing shoots/tips become
“bunched up.” Flower buds also contort
into odd shapes, turn crispy dry, and are
often hard. A lack of zinc causes reduces
internode spacing, stunts new growth—
including buds—and can severely
diminish yield.
Cause: The pH is too high (above 7.0),
which in turn causes iron, manganese,
and zinc deficiencies to occur together.
Confused with: Symptoms are often
confused with a lack of manganese and
iron.
Solution: Treat zinc-deficient plants
by leaching the growing medium with
a diluted mix of a complete fertilizer
containing chelated trace elements,
including zinc, iron, and manganese. Or
add a quality-brand hydroponic micro
nutrient mix containing chelated trace
elements. Foliar feed if problem is severe.
Be careful; do not overapply chelated
micronutrients.
Excess: Zinc overload is very rare but
extremely toxic. Severely toxic plants
die quickly. Excess zinc interferes with
iron’s ability to function properly and
causes an iron deficiency.
Cause: Oversupply in fertilizer
Confused with: Iron deficiency
Solution: Leach growing medium with a
diluted mix of a complete fertilizer.
A zinc deficiency on the ‘Pakistani' (lower
left) is easy to remedy with an application of
fritted trace elements (PTE). (MF)
Fertilizers
The selection of fertilizers at hydroponic
and cannabis-friendly garden stores can
be overwhelming. Local shop personnel
generally know which ones work best in
the local climate and water. Local hydro
ponic store staff are often well versed on
local water and gardeners’ needs.
Nutrients in a fertilizer formula can be
classified as inorganic, mineral, natural,
organic, and synthetic. Inorganic nutri
ents have no carbon molecules, mineral
elements are inorganic salts; organic
substances are animal or vegetable in
origin and contain a carbon molecule;
synthetic materials are man-made. But
mineral elements such as dolomite lime,
rock phosphate, and Epsom salts are
considered organic. All these terms can
be very confusing, and they are often
misused!
The main difference between organic
fertilizer and mineral fertilizer formulas
is the way in which they are taken up
by plants. In general, organic fertilizers
(mineral and natural) require biological
NUTRIENTS
www.marijuanagrowing.com
The big buds on these plants were grown in
Morocco with the aid oflittle fertilizer.
Ganna Vega and Aqua formulas are just a few
of the many different fertilizers available at
hydroponic stores.
This beautiful field of organically grown
cannabis belonged to Eddy Lepp, who is
currently serving a 10-year sentence for
cultivating cannabis.
life in the soil to break down compo
nents and make nutrients available to
roots for uptake. Mineral fertilizers
(inorganic and synthetic) are taken up
by plants exclusively via ionic activity, a
chemical bond formed by the attraction
of positive and negative soluble ionic
fertilizer salts. Virtually all elements,
regardless of origin, must be broken
down into a single element in order to
pass into a cell of a root. Single ionic
elements react faster and are easier to
control. Of course, the science is much
more complex than this simplified expla
nation. The aim of this book is to give
you a basic understanding of fertilizers,
so you can efficiently grow a healthy
crop of medical cannabis.
Ionic fertilizer salts are separated into
two or three different containers so they
can be mixed together in a concentrate
form and not combine into an insoluble
compound. For example, when calcium
and sulfur are combined in a concentrat
ed form, they combine into an insoluble
compound. This compound (calcium
sulfate) settles to the bottom of hydro
ponic tanks in the form of an insoluble
compound (sludge). They may flocculate
(form aggregates) or not, depending
on agitation. They combine to form an
insoluble compound that you may see
as crystal growth (flocculation) at the
bottom of the tank.
Vegetative and flowering formulas are fur
ther separated into different containers.
Nutrients are available for uptake by
plant roots within a specific pH range.
In hydroponic gardens this range is
from 5.5 to 6.5, and in organic soil
gardens the range is a little higher, 6.0
to 6.8. Maintaining a relatively constant
PH is essential to nutrient uptake. A
common oversight among novice enthu
siasts is to forget about pH. For exam
ple, iron and manganese deficiencies are
rampant when pH climbs beyond 7.0
in hydroponic gardens. No matter how
much of each element is in the nutrient
solution, they will become available only
at a lower pH.
Here is a great site to look up the nutrient
percentages in all fertilizers registered
in Washington State, the first state to
approve recreational use of cannabis.
The Washington State Department of
Agriculture site is http://agr.wa.gov/
PestFert/Fertilizers/FertDB/Productl.
aspx
Fertilizers mixed in liquid concentrate
form are very convenient to use but
are more expensive both in monetary
terms and to the environment. Nutrients
available in a dry form are much more
economical than nutrients mixed with
water. Dry fertilizers are also much more
eco-friendly because no water/fertilizer
concentrate, which is expensive, must be
transported. Dry fertilizers are not sep
arated because the elements do not react
with one another. Purchase dry fertilizers
or concentrated liquid fertilizers that
dilute readily in water.
Fertilizers are either water-soluble or
partially soluble (gradual-release). Both
soluble and gradual-release fertilizers
can be organic or chemical. Soluble salt
(ionic) fertilizers dissolve in water and
are simple to measure and control; they
can easily be added or washed (leached)
out of the growing medium.
Chemical granular fertilizers work well
for perennial shrubs and trees but can
easily be overapplied on annual canna
bis. Long-lasting granular fertilizers are
very difficult to leach out of soil.
Osmocote chemical fertilizers are
time-release and are used by many
nurseries because they are easy to apply
and only require one application every
few months. Using this type of fertilizer
may be convenient, but exacting con
trol is lost. They are temperature- and
moisture-dependent, with release rates
calculated at 70°F (21°C) and normal ir
rigation. I have seen three-month formu
lations release in total during a month
with high soil temps. Also, they release
somewhere between 30 percent and 70
percent the first time water is applied.
They are best suited for ornamental
Osmocote time-release fertilizer is perfect
forfuchsias and other perennial plants, but
it is not a good fertilizer to control a medical
cannabis crop grown in containers.
[ www.marijuanagrowing.com
369
Irrigation hoses with tubing supply a daily
dose ofproperly proportioned nutrient solu
tion to this greenhouse full ofplants.
containerized plants or perennial plants
growing in soil, where labor costs and
uniform growth are the main concerns.
Use hydroponic fertilizers designed to
supply plants with a specific diet that
includes all necessary nutrients at the
proper ratio required for strong growth.
These formulas must be applied on a
regular schedule to achieve the best
results. Precisely formulated fertilizers
allow much easier dosage control dosage
by altering the EC. Less-precise fertil
izers provide plants more nutrients than
they need and let roots absorb what they
need. These formulations tend to build
up in growing mediums. Subsequently,
plants often suffer an excess of nitrogen
or other nutrients that are “overapplied”
when the mix is changed and flowering
is induced.
Apply the proper nutrient combina
tion at the appropriate stage of life.
For example, cannabis absorbs more
phosphorus and potassium for a short
time early on in the flowering stage.
Applying more fertilizer earlier or later
causes it to build up in soil, sometimes
to toxic levels.
1. Ratio for N-P -K fertilizer: start:
2-1 -1, veg.: 1-1 -1, finish 1-2-2*
This big plant grown on a patio in downtown
Barcelona, Spain, was given a simple fertilizer
regimen with plenty ofwater and sunshine.
2. http://www.eplantscience.com
great site!
3. http://en.wikipedia.org/wiki/Plant_
nutrition
*Remember that, by convention, P and
K are confusing on the label, while 1-1-1
is correct, the percentage given on the
label for P is only 40 percent of actual P,
and K is only 80 percent of actual K.
Do not combine fertilizers from differ
ent manufacturers. Each manufacturer
designs formulas to function with prod
ucts in their line. Mixing and matching
brands could easily lead to deficiencies
or excesses.
Take care when including additives in
fertilizer mixes. Use additives designed
for specific fertilizers and mix them ac
cording to the fertilizer schedule. These
products are designed to stimulate spe
cific nutrients and plant process. Adding
too much or too little—or at the wrong
time—could be futile or even toxic.
Fertilizer is big business, and conve
nience is expensive. Manufacturers often
sell “special mixes” that contain just a
few of the necessary nutrients. Be wary
when purchasing high-priced specialized
fertilizers that are broken down into
four or more “essential” products. The
“formulas” often include only one or
two different nutrients that could easily
be combined into a single product and
sold for less. In the end, the goal of such
fertilizer companies is to sell a thimble
ful of salts mixed in a bottle of water—
at astronomical profits.
In the United States, nutrients are mea
sured in parts-per-million (ppm), even
though they are expressed as a percent
age concentration on the label. The ppm
scale is simple and finite—well, almost.
The basics are simple: one ppm is one
part of 1,000,000. To convert from
percentage to ppm, multiply by 10,000
and move the decimal four spaces to
the right. For example: 2 percent equals
20,000 ppm. For more information on
ppm and electrical conductivity, see
chapter 23, Container Culture &
Hydroponics.
Organic Fertilizers
Patients prefer cannabis that is grown
organically because it has a sweeter
taste, but contrary to popular belief,
organically grown cannabis does contain
salts. Fertilizer salts are ions; ions are
released by the breakdown of organic
molecules, which is the only way a plant
will take them up, so salts are there, but
the levels are lower. Implementing an or
ganic garden outdoors, in a greenhouse,
or indoors usually requires a large mass
of rich organic soil with good drainage.
Space is limited indoors, so growing
with a large mass of living organic soil is
impractical for most indoor gardeners.
Most indoor organic gardens use pot
ting soil high in worm castings, peat,
sand, manure, leaf mold, compost, and
fine dolomite lime. In a small container,
there is little space to build nutrient-rich
soil by mixing compost and organic nu
trients that interact. Fill containers with
rich organic potting soil that is ready
to release nutrients. Add a liquid mix of
nutrients periodically if necessary.
Biological activity also takes months
of valuable growing time, and it could
foster destructive diseases and pests.
Tossing out used and depleted soil and
then recycling it in the outdoor garden
keeps indoor and greenhouse gardens
clean.
370
NUTRIENTS
www.marijuanagrowing.com
This fertilizer contains N, K2O, Ca, B , Fe
(EDTA), and Mo, which are the major and
minor nutrients consumed by cannabis. The
mix lacks P, S , Mg, and Z, which are supplied
in other products. The nutrients are provid
ed in a readily available form for uptake by
roots.
Most countries have an agency that certifies
organic materials for gardening. This bale
of Canadian peat moss is certified by the
Organic Materials Review Institute (OMRI).
This organic fertilizer lists N, P , and K on the
label, showing the chemical composition of
each nutrient. At the base of the package is a
list ofwhat the nutrients were derived from.
Always read fertilizer labels carefully. Follow mixing and application instructions.
Pay special attention to the expiration date, especially on organic nutrient packages.
They often contain living organisms that will die or change composition over time.
Make sure all necessary nutrients are listed on the label. For example, Miracle-Gro
does not contain magnesium!
Miracle-Gro plant food is available everywhere. It is a favorite fertilizer for many
flower and vegetable gardeners. The Guaranteed Analysis shows it contains N, P,
K, Mn, and Zn. It is derived from urea, potassium chloride, potassium, phosphate,
manganese EDTA, and zinc EDTA. But, medical cannabis gardeners prefer a more
complete fertilizer that has a complete range oiall necessary nutrients.
Note the “derived from” part of the label. Using potassium and magnesium carbon
ate derivatives can cause the pH to climb. If a high pH brings about phosphorus and
iron deficiencies, add chelated iron to remedy and to avoid precipitation as well.
Fertilizers must be registered so they can be regulated by governments to ensure
content, and protect consumers from illegitimate companies that make false claims.
Even when regulated, companies still make false claims not found on labels. The
“guaranteed analysis” of nutrients on labels guarantees minimums of specific
elements. It does not guarantee that more of these specific elements are in the
container. Often lower-quality fertilizers contain other elements as impurities
that are not included on the label. All “organic” products should be certified by an
independent third party such as the Organic Materials Review Institute (OMRI,
www.ormi.org) in North America and the Control Union (www.controlunion.com)
in Europe. There are many other organic certification organizations around the world, including, Organic Crop Improvement
Association (OCIA, www.ocia.org). Check with these organizations for added information on products that are not allowed.
When using synthetic fertilizers, it is extremely important to carefully read the label and follow the directions. The initials
“WSN” and “WIN” that you may see on the label stand for water-soluble nitrogen and water-insoluble nitrogen. WSN dissolves
readily, and it is considered a fast-release nitrogen source. WIN does not dissolve easily. It is often an organic form of nitrogen
and is considered a slow-release nitrogen source.
www.marijuanagrowing.com
371
Bio-Canna is one of the many different
organic fertilizers available to medical
cannabis gardeners.
Chicken manure has long been a favorite
organic fertilizer for outdoor and greenhouse
gardens. It is packed with nitrogen and other
soluble nutrients to spur rapid growth.
This raised bed is in a suburban backyard gar
den in California, a medical cannabis state.
Raised beds and very large (50-500-gal
[189.3 -1892.7 L]) containers with
good drainage allow organic soil life
to grow in indoor, greenhouse, and
outdoor gardens. The raised beds and
large containers have enough soil to
hold the nutrients, promote soil life,
and when managed properly, ensure
an available supply of nutrients. There
must be enough mass to support healthy
soil life. Outdoor organic gardens are
much easier to implement and maintain.
Using compost tea, manures, compost,
and other big, bulky, fragrant fertiliz
ers is much easier outdoors. Gardeners
in Northern California are using rich
Bigpots 2feet (61 cm) tall and 4 to 6 feet
(121.9 -182 .9 cm) across function like raised
beds. They capture extra heat in the spring and
carry it through fall. The containers must be
shaded if they get too hot in summer.
organic soil mixes to grow big plants,
10 pounds (4.5 kg) plus, with the local
nutrient-rich soil mixes, adding about 2
handfuls of bat guano when plants start
to flower.
Cannabis plants grow from 2 to 6
months in containers indoors and in
greenhouses. Start with rich organic
soil and add (soluble) liquid organic
nutrients to ensure rapid plant growth.
Liquid organic nutrients are often more
expensive to manufacture than ionic salt
fertilizers. Nutrient-rich organic soil is
expensive to build and usually both in
expensive and trouble-free to maintain?’
■'Often organic cannabis gardeners get
carried away and add too many microbes
on a regular basis. Uninformed product
producers and retailers may also promote
such practices. Consequently microbes
are rampantly available, to a fault.
Soil microbes are not all created equal.
There are both specific and general
decomposers and these different species
or types work at differing levels in the
soil. Nutrients form what are collec
tively known as ‘pools’ (freely available
elements locked onto cation exchange
capacity (CEC) sites or drifting in the
soil solution) in the medium, such as
nitrogen or calcium pools, etc. As
organic material decomposes, it adds
to these pools when there is more
released than is used by the microbes.
When mineral fertilizer is used, these
same pools collect these elements. The
elements are collected in pools over time
rather than all at once. Microbes are very
much like vacuums and will suck it up
faster than plants and will outcompete
plants for these elements. Balance in
these microbes is essential so th^ pools
stay in place.
For example, a large amount of organic
soil starts the breakdown with specific
Growing large plants in small containers
requires more work. The substrate must receive
regular irrigation with nutrient solution and
be kept within a good temperature range. These
plants have received excellent care!
372
NUTRIENTS
www.marijuanagrowing.com
Large plants are growing in 2 X 2-foot (61
x 61 cm) planting holes and the surrounding
sod is hard clay. Good organic fertilizer and
plenty of water helped these plants grow up to
6 feet (182.9 cm) tall.
microbes, and what they release is broken
down by the next type, and so on until
it is gone. (For more specific informa
tion, check out the book Teaming with
Microbes by Jeff Lowenfels and Wayne
Lewis). When all these general popula
tions of microbes multiply to greater than
the available organic material for decom
position, these microbes dip into the
pools and outcompete the plants in order
to stay alive. Most commercially available
microbes are largely made up of general
decomposers, and are opportunistic feed
ers that will eat (take up) anything that is
available.
Big issues arise when organic cannabis
gardeners apply microbes above and
beyond the need (uneducated manufac
turers may provide this erroneous infor
mation). In turn these microbes take up
and use nutrients before the plants can.
Proper organic garden maintenance
requires constantly supplying new
organic matter for all the microbes to
enjoy—but not the wrong ones that
the nutrient balance.
The organic nutrient content, solubility,
and rate of release are characteristically
lower than ionic salt-based fertilizer.
Organic fertilizers are more dilute and
less readily available to plants. They
can change slightly from one batch to
another. Testing each batch is necessary
to ensure consistent nutrient levels.
Outdoors, organic gardening is easy be
cause all the forces of nature are there for
you to seek out and harness. When play
ing the role of Mother Nature, you must
create everything in the environment.
Start with good soil that drains well, and
add proper organic nutrients. Organic
fertilizers improve soil life and the
long-term productivity of soil. Increase
soil organisms by providing organic
matter and micronutrients to soil life,
which aids plants in absorbing nutrients
and can drastically reduce pesticides,
fertilizer, and energy use, at the cost
of decreased yield. Organic fertilizers
usually require the use of microbes/
bacteria in the soil in order to make the
nutrients in the fertilizer bioavailable.
That can result in irregular release of
phosphorus/calcium. In sterile potting
soil, there may be no microbes to release
the nutrients.
Note: Nutrients in organic fertilizers
may vary greatly depending upon source,
age, erosion, and climate. For more pre
cise nutrient content, consult the vendor’s
specifications. Make sure composts are
well-rotted and do not contain pathogens
and other disease-causing organisms.
Some commercial liquid organic
fertilizers contain living organisms—
microbes, bacteria, fungi, etc. — and
tend to grow under certain conditions.
Do not leave containers of organic fer
tilizers in warm places. And remember
The selection ofcommercialfertilizers designed
specifically for hydroponics and cannabis
growth is often overwhelming to gardeners.
Worm castings supply readily available
nitrogen and many other nutrients tn an
organically available form. Add potent worm
castings, and mix well in substrates. They
are dense and tend to clump.
to use them before their expiration date!
Check labels closely; some companies
add preservatives to their mixes.
Organic nutrients (manure, worm
castings, blood and bone meal, and so
forth) work very well to increase the
soil nutrient content, but nutrients are
released and available at different rates.
The nutrient availability may be tricky
to calculate, but it is somewhat difficult
to overapply organic fertilizers. Organic
nutrients are typically more consistent
ly available when used in combination
with one another. Usually, gardeners use
a mix of up to 20 percent worm cast
ings with other organic agents to get a
strong, readily available nitrogen base.
Organic fertilizers include ground-up
and rendered animal and fish products,
bird and bat guanos, animal manures,
fish, shellfish, kelp, seaweed, rock pow
ders, vegetable meals and extracts, plus
coffee grounds, compost and compost
teas, ashes, and worm castings. See the
“Organic Nutrient List” on page 383
for information about specific organic
nutrients.
Brix Mix
Brix Mix Powder is used by many
Northern California cannabis gardeners.
www.marijuanagrowing.com
373
r--------------------------------------------
GUARANTEED
ANALYSIS
PERCENT
available phosphoric
acid (P2O5)
0.2
soluble potash (K2O) 18
■ sulfur (S)
8
! copper (Cu)
0.05
i iron (Fe)
0.7
j zinc (Zn)
0.2
k-------------------- -------------------------------
The mix is formulated to increase Brix
(sugar content) in plants. The mix is
derived from Ascoployllum nodosum
kelp, sulfate of potash, iron lignosulfonate,
zinc lignosulfonate, copper lignosulfonate.
Dry Brix Mix contains ratios of
Maxicrop, Diamond K sulfate of potash,
sugar, and available trace minerals. Brix
liquid contains Phytamin 4-3-4, Humax
humic acids, pure malt extract, molasses,
sulfur, and Therm X70 Yucca Extract.
According to the manufacturer,
www.peacefulvalleyfarmsupply.com.
Mixing Fertilizers
To mix wettable powder or crystal fer
tilizers, dissolve into a little warm water.
Mix the super concentrate until all
Always use an accurate measuring container.
powder or crystals have dissolved. Once
it has totally dissolved, add the balance
of the tepid water. This will ensure that
the fertilizer and the water mix evenly.
Liquid fertilizers can be mixed directly
with water. Always agitate fertilizers
before pouring from the container, and
keep nutrient solution in tanks agitated.
Unless fortified, soilless mixes require
fertilization from the start. I like to start
fertilizing fortified soilless mixes after
the first week or two of growth. Most
commercial soilless mixes are fortified
with trace elements.
Mix organic fertilizer components
dry. Sprinkle a mist of water overhead
to dampen dust. Mix components
These plants in Dennis Peron’s* backyard in
San Francisco, California, receive full sun
and quite a bit ofwind all day long. The pots
get too hot and growth is slowed.
^Dennis Peron is coauthor of California
Proposition 215, which enacted the first law
in the USA allowing patients to purchase
cannabis for medicine at dispensaries.
thoroughly before wetting. Mix large
amounts in an electric cement mixer
that can be rented for the day. Mix small
amounts in a barrel, wheelbarrow, or
corner of a basement.
Fertilizer Application
The goal of fertilizing is to supply plants
with proper amounts of nutrients for
vigorous growth, without creating toxic
conditions by overfertilizing. Some
varieties of cannabis can withstand high
A measuring cup, a measuring spoon, and a
funnel are essential to measure and handle
accurate doses of nutrients when mixing.
FloraGro and Flora Bloom from General
Hydroponics are popular hydroponic fertilizers.
Plants use more nitrogen during the vegetative
growth stage. These healthy plants require a
spherical trellis to hold up rapid vegetative
374
NUTRIENTS
www.marijuanagrowing.com
Joses of nutrients, and other varieties
grow best with a minimum of supple
mental fertilizer. Every medicinal can
nabis variety requires specific fertilizer
applications. A blanket application of
fertilizer for all varieties is impossible to
give. Growing several different varieties
in a small garden is common but can lead
to underfertilization of some varieties
and overfertilization of others.
The metabolism of cannabis changes
as it grows and so do its fertilizer
needs. During germination and seedling
growth, intake of phosphorus is high.
The vegetative growth stage requires
larger amounts of nitrogen for green-leaf
growth, and phosphorus and potassium
are also necessary in substantial levels.
During this leafy and vegetative growth
stage, use a general purpose or a grow
fertilizer with high nitrogen content.
In the flowering stage, nitrogen is still
necessary, but potassium and phospho
rus intake increases so the N-P -K ratio
changes. Using a super bloom fertilizer
with less nitrogen and more potassium,
phosphorus, and calcium promotes fat,
heavy, dense flower buds. Cannabis still
needs nitrogen during flowering. With
no nitrogen, buds do not develop to
their full potential.
A 3-gallon (11.4 L) container full of rich,
fertile organic potting soil should supply
all the necessary nutrients for the first
month of growth, but plant development
might be slow. After the roots have
absorbed most of the available nutrients,
more must be added or become available
organically to sustain vigorous growth.
Medical cannabis growing in small
containers will have very little growing
medium in which to hold nutrients, and
toxic salt buildup may become a problem.
Follow fertilizer dosage instructions on
the label. Search cannabis cultivation
forums for more information on specific
fertilizer mixing and application. Adding
too much fertilizer will not make the
plants grow faster. Too much fertilizer
changes the chemical balance of the soil,
supplies too much of a nutrient, or locks
in other nutrients, making them unavail
able to the plant.
Caution! Do not pour nutrients down
household drains—or any drain. The
nitrates, phosphates, and other contents
will pollute the water supply. Use them
outdoors in the garden.
Fertilizer/lrrigation Schedule
A regular fertilizing schedule with
realistic outcome and known input is the
easiest way to ensure that plants receive
all the nutrition they need. When choos
ing a fertilizer, also choose the proper
substrate the formula was designed for.
Many fertilizer programs are augmented
with different additives that expedite
nutrient uptake.
If the fertilization schedule does not
work, and you have discerned that plant
growth is out of whack, check for the
following outward signs of nutrient
deficiencies.
Determine if the plants need to be
fertilized: Make a visual inspection, take
an N-P-K soil test, or experiment on test
plants. No matter which method is used,
remember, plants in small containers
use available nutrients quickly and need
Nutrient solution is delivered at regular inter
vals via the overhead irrigation tube.
With a little practice it is easy to eyeball plants
and tell what they need. The leaf on the right
is properly fertilized. The pale plant on the left
looks like it is deficient in nitrogen.
frequent fertilizing, while plants in large
planters have more soil, supply more
nutrients, and can go longer between
fertilizing.
Visual Inspection: If the plants are
growing well and have deep-green,
healthy leaves, they are probably getting
all necessary nutrients. The moment
growth slows or the leaves begin to turn
pale green, it is time to fertilize. Do not
confuse yellow leaves caused by a lack of
light with yellow leaves caused by a nu
trient deficiency. Leaves should be green
all the way to the bottom of the plant.
But by the time the plant tells you there
is an issue, it is too late.
I Ughf per day
Coco A*B RHIZOTONIC CANNAZYM CANNABOOST PK 13/14
EC+1
PPM
(hours)
^ml/GAj■ ml/GAjI^nl/GAjUl^nl/GAdM |ml/GAlj|
■1J
I. Wrwn lo
iron 10 Io 12
o«Wa
on IM ptanl
GwumoI
ofthumbnoft«2wt
? jfMCaJd E rr. 'Gof, trt-o lowing
IS mf/Gol
3 Me«»xedr>mS/cmwMrowowECof00at777
A<7d ihu EC ><*.-» o' vw
on >O
velvet Atwop th® pH fit
S5 <?
• WMn
tn* COCO doutW fM rwcommencied
This lovely medical cannabis gardener grew
this giant bud in a pot on a patio in Spain.
Regular irrigation and fertilization were her
keys to gardening success.
vvww.marijuanagrowing.com
375
This healthy, properly fertilized plant is grow
ing as fast as naturally possible.
The fact is that the relationship between
nutrient uptake and plant growth is very
subtle. By the time a nutrient deficiency
manifests with a discolored leaf or slow
growth, the dysfunction has already
slowed growth.
To get an idea of which cannabis vari
eties need a little or a lot of fertilizer, I
asked members of my forum on www.
marijuangrowing.com. To learn the best
way to fertilize specific varieties, you
may need to contact the company that
sold you the seeds. Start with an EC of
1.6 and build it up as needed. The abso
lute maximum EC is 2.3.
Varieties that require high doses
of fertilizer:
Overall zWzcrt-dominant clones root
well, with the possible exception of
‘Hindu Kush’ (a landrace, with less vigor
and not as nutrient-hungry as hybrid
indicas). In this case, ‘more fertilizer’
means using the high end of the recom
mended dosage, not exceeding it.
A few of the varieties that in general can
withstand higher doses of fertilizer in
clude: ‘Twilight’, ‘Green Spirit’, ‘Khola’,
A basic EC meter can tell you if nutrients have
built up to toxic salt levels.
An overall toxic buildup ofnutrients is easy to
spot in most plants. You can see that these leaves
are too dark and shiny. The plant in the center
is so overfertilized that leaves have turned dark
purple, with the veins remaining green.
‘Hollands Hope’, ‘Passion#l’, ‘Shaman’
within an EC range of 1.6-2.3.
Varieties that require medium doses
of fertilizer:
Many varieties require a standard dose
of fertilizer including the varieties
below.
‘Skunk #1’, ‘Trance’, ‘Voodoo’, ‘Sacra
Frasca’, ‘California Orange’, ‘Delta 9’,
‘Skunk Passion’, ‘Blueberry’, ‘Durban
Poison’, ‘Purple #1’, ‘Purple Star’, ‘
Super Haze’, ‘Ultra Skunk’, ‘Orange
Bud’, ‘White Widow’, ‘Power Plant’,
and ‘Euforia’
Indoors, regular fertilizer application is essen
tial to ensure rapid growth.
Varieties that require low doses
of fertilizer:
Overall, s^fz^-dominant varieties and
hybrids require much less fertilization.
There are exceptions, including ‘Silver
Pearl’, ‘Marley’s Collie’, and ‘Fruity
Juice’ (sativa hybrids, but with a heavy,
indica-dominant bud pattern). In this
case, less fertilizer means using the
low end of the recommended dosage.
‘Northern Lights #5 x Haze’ has more
open buds in its growth pattern but a
lot of floral bulk by weight, so may
need normal to slightly higher levels
of nutrient.
‘Isis’, ‘Flo’, ‘Dolce Vita’, ‘Dreamweaver’,
‘Master Kush’, ‘Oasis’, ‘Skywalker’ and
‘Hempstar’ are within an EC range of
1.6 to 2.3. ‘Mazar’ needs a higher EC
during weeks three to five to prevent
early yellowing of the leaves.
Take an EC test of runoff water to tell
how much nutrient is trapped in the soil.
Make a batch of 0.1 EC nutrient solu
tion. Drench plants in containers with
one gallon (3.8 L) of solution. Check the
EC of the runoff water. If it is above 0.1
EC, there is a toxic buildup of nutrients
in the soil. The soil needs to be leached
with a mild nutrient solution to purge it
of toxic fertilizer salts.
Take an N-P-K soil test to reveal ex
actly how much of each major nutrient
is available to the plant. Test kits mix a
soil sample with a chemical. After the
soil settles, a color reading is taken from
the liquid and matched to a color chart.
The appropriate percent of fertilizer is
then added. This method is reliable but
requires patience. But this test does not
measure the amount of each nutrient
that plants are actually processing.
Outdoors, plants can take in virtually all the
necessary nutrients from specially mixed soil.
376
NUTRIENTS
www.marijuanagrowing.com
Experimenting on two or three test
plants is the best way to gain experience
and develop horticultural skills. Start
with a fertilization schedule and amend
it as needed according to temperature,
humidity, and growth stage. Clones
(cuttings) are perfect for this type of
experiment. A basic premise is to give
the test plants a fertilizer schedule and
see if they grow better and faster. You
should notice a change within three
to four days. If it is good for the test
plants, it should be good for all plants
of the same varieties.
How much fertilizer? Mix the fertiliz
er as per the instructions and water as
normal, or dilute the fertilizer and apply
it more often. Many liquid fertilizers are
diluted already. Consider using more
concentrated fertilizers whenever pos
sible. Remember, small plants use much
less fertilizer than large ones. Fertilize
early in the day so plants have all day
to absorb and process the fertilizer and
water. Watering late in the day or at
night can lead to waterlogged roots.
Fertilizer programs rely upon soil or sub
strate drainage. Frequency of irrigation
also depends upon drainage. Large plants
with a large root system in large contain
ers use more nutrients than small plants
in small containers. But small containers
must be irrigated more often. The more
often the fertilizer is applied, the less
concentrated it should be. Frequency of
fertilization and dosage are both affected
by substrate drainage ability.
The concept in fertilizing is to either
apply fertilizer periodically or con
stantly. Periodic includes dry and liquid
fertilizers and is applied at higher ranges
(dosages) to get the plant through the
use period until the next application.
This results in too high a concentration
for the first half of the period and too
low for the second half. Weekly applica
tions, for example, begin with an ideal
range the plant needs to satisfy exactly
its requirements. Let’s say that this
particular plant needs a root zone EC
of 1.0 for exactly the right amount of
all nutrients to be available. We feed on
Monday to bring the level to 1.6, and by
the next feeding 7 days later the EC is at
0.4 . For 3.5 days the EC is too high and
the plant has small issues, from day 4 to
day 7 the level is below the ideal level of
1.0 for 3 days as it drops to 0.4 and the
plant development also slows. Then feed
is again applied, and the plant restarts
until the next lag.
The second version is constant feeding.
This applies an EC of 1.1 each watering,
and by the next watering the EC has
fallen to just under 0.9 . Then the lag is
fixed within a day or a day and a half.
The plant never notices and growth
goes unabated. All commercial Green
Industry producers use constant feeding
because the plant is never overfertil
ized, nor is it ever really underfed. Salt
levels remain balanced and the plants do
remarkably better.
A pre-fertilized peat-based mix usually
has enough calcium and possibly other
elements. Coco absorbs large quanti
ties of calcium at the beginning of the
growing cycle. Fertilizer schedules need
to have this and other details built in
to support a successful crop. Choose a
substrate and a fertilizer designed for it.
Some varieties can absorb amazing
amounts of fertilizer and still grow well.
Lots of gardeners add as much as one
tablespoon per gallon (14.8 ml per 3.8 L)
of a standard dry soluble fertilizer such
as Peters (20-20-20) with each watering.
This works best with growing mediums
that drain readily and are easy to leach.
Other gardeners use only rich, organic
potting soil. No supplemental fertilizer
is applied until a super bloom formula is
needed for flowering.
Fertilizing plants in the ground out
doors is much easier than fertilizing
containerized plants. In healthy, out
door organic soil, nutrient uptake is
rapid and buffered, and fertilization is
not as critical. There are several ways to
apply fertilizer. Top-dress a garden bed
by applying the fertilizer and working
it into the top 2 inches (5.1 cm) of soil.
Apply a dilute liquid fertilizer around
the bases of plants. Foliar-feed plants by
spraying a liquid fertilizer solution on
the foliage. The method you choose will
depend upon the kind of fertilizer, the
needs of the plants, and the convenience
of a chosen method.
Use a siphon (venture pump) appli
cator—found at most nurseries—to
mix soluble fertilizers with water. The
applicator is simply attached to the
faucet with the siphon submerged in the
concentrated fertilizer solution with the
hose attached to the other end. Often,
applicators are set at a ratio of 1 to 15.
This means that for every single (1) unit
of liquid concentrate fertilizer, 15 units
of water will be mixed with it. Sufficient
water flow is necessary for the suction to
work properly. Misting nozzles restrict
this flow. When the water is turned on,
the fertilizer is siphoned into the system
and flows out the hose. The fertilizer is
generally applied with each watering,
since a small percentage of fertilizer is
metered in.
Containers full ofsoilless growing medium are
w on top of Canna Coco slabs in this top-feed
hydroponic garden.
This medical cannabis gardener brings in
truckloads of compost and manure. Once in
place she uses a tractor to cultivate it into the
soil before planting.
Leaves curl when given a slight fertilizer
overdose.
www.marijuanagrowing.com
377
Injector Applicator
A Dosatron fertilizer injection sys
tem makes it easy to feed a big indoor,
outdoor or greenhouse garden with a
consistent pH-balanced fertilizer mix.
Fertilizer injectors range in price from
$250 to $800 USD depending upon
volume injected. Injectors can also meter
out pH up and pH down, fungicides,
pesticides, etc. When using fertilizer
injectors, make sure the nutrient con
centrate is completely mixed with water
before application in drip emitters.
A garbage can with a garden-hose fitting
attached at the bottom that is set 3 to 4
feet (91.4 -121 .9 cm) off the floor will act
as a gravity-flow source for the fertiliz
er solution. Place the reservoir on the
floor of the next level of the house to
increase water pressure. The container is
then filled with water and fertilizer. Set
containers up on a table to gain pressure
and flow.
When it comes to fertilization, experi
ence with specific varieties and growing
systems will tell gardeners more than
anything else. There are hundreds of
N-P -K mixes, and they all work, some
better than others. When choosing a
fertilizer, make sure to read the entire
label, and know what the fertilizer
claims it can do. Do not be afraid to ask
the garden store clerk questions or to
Dosatron fertilizer injection systems are
becoming more popular.
contact the manufacturer with questions.
Cannabis cultivation forums also help
gardeners share their experiences with
fertilization of specific varieties.
Once you decide how often to fertil
ize, put the garden on a regular feeding
schedule. Following a schedule usually
works very well, but it must be com
bined with a vigilant, caring eye that
looks for overfertilization and signs of
nutrient deficiency.
Leach soil with 1 to 2 gallons (3.8 -7 .6 L)
of mild nutrient solution per gallon of
soil every month to prevent toxic salt
buildup in the soil. Mix the EC 0.2 in
soil and peat, 0.5 in coco; Epsom salts
are good for soil and peat, but use only
nutrients for coco.
Stomata close when there is:
too much CO2
low humidity
a dry root system
Stomata open when there is:
high light
low CO2
high humidity
Foliar Feeding
Foliar feeding means to spray nutrients
or additives diluted in water onto plant
foliage. Foliar sprays can provide a
“quick fix” for some nutrient deficiencies.
This feeding method is best employed
when damaged and stressed roots are not
working properly. Some sources claim
foliar feeding speeds rooting time of
clones (cuttings) when applied sparingly.
Easy to overdo, foliar feeding can leach
nutrients, especially when plants are
young or have few or no roots.
Making complete or general recommen
dations on foliar feeding is impossible
because we do not know everything.
Scientists believe that most of the nutri
ents and stimulants stay in the location
they enter unless specifically designed
by Mother Nature to translocate, which
means that the rest of the plant will not
benefit from foliar feeding.
We know that nitrogen (N) and iron (Fe)
translocate well, but phosphorus (P) does
Foliar feeding is a quick fix for some nutrient
deficiencies.
not move well within the plant because
of its ion size. Using dimethyl sulfoxide
(DMSO) or another carrier helps every
thing move but is also harmful for the
consumer, especially medical patients!
Some commercial products, such as
Canna’s Boost, can be applied as a foliar
spray every 3 days but mineral fertilizer
should not be applied nearly so often.
Furthermore, accumulating nutrient
residues will burn plant tissue if they are
not taken up. Complex organic mole
cules seldom burn plant tissue or cause
problems.
Not all elements are able to translocate
across the outer skin (epidermis) of
foliage. The waxy (cuticle) surface
coating (cystolith hairs and resin) on
cannabis foliage makes for very poor
water absorption. This barrier wards off
pest and disease attacks, but it also slows
the penetration of sprays.
Young, supple leaves are more permeable
than older leaves. Nutrients and additives
penetrate immature leaves faster than
tougher, older leaves, and they are easier
to damage with strong sprays.
Spraying foliage underneath so the spray
is able to penetrate the stomata located
on the leaf’s underside does not work.
Experts seem to agree that application
to the stomatai areas is no more effec
tive than application to the leaf surface,
because the structure of the stomata will
seldom allow intrusion by the liquid.
Plants properly maintained hardly, if
ever, need foliar feeding. The roots are
designed by Mother Nature for nutrient
uptake and are still be best means of
NUTRIENTS
www.marijuanagrowing.com
Leaves and stalks have waxy, cystolith hairs
that act like feathers on a duck to shed water.
See chapter 24, Diseases & Pests, for
information on spraying.
Always calibrate thermometers and hygrome
ters to ensure their accuracy.
Adequate ventilation is essential in green
houses and in indoor garden rooms.
supplying nutrition. Do not foliar feed
flowering plants; moisture trapped in
between foliage increases probability
of disease.
Foliar feeding should be used only as a
supplement. Never spray more than once
every 7 to 10 days, if at all, and keep
the spray concentration at quarter
strength.
Common "Nutrient" Problems
To help avoid common Problems:
1. Use proper, complete nutrient
2. Do not overwater
3. Control pH and EC
4. Leach soil once a month
There is a short list of common
problems that often result in nutrient
deficiencies and excesses. Unhealthy
plants grow slowly, produce poorly, and
are susceptible to attacks by pests and
diseases. Controlling the critical cultural
factors that cannabis needs to grow will
help avoid nutrient imbalances. Nutrient
imbalances are usually a result of incor
rect cultural essentials—air, light, water,
growing medium, and nutrient solution.
Each of these factors, along with pH and
EC, will affect nutrient uptake. When
the basic needs of plants are not met,
controlling pH and EC will have mini
mal effect on nutrient uptake.
Nutrient deficiencies are less common
when using fresh potting soil fortified
with micronutrients, or a hydroponic mix
containing all necessary elements. If the
soil or water supply is acidic, add dolomite
lime to buffer the soil pH and to keep
it sweet. Evaluate all factors in enclosed
garden rooms and greenhouses, especially
temperature and ventilation, before decid
ing that plants are nutrient deficient.
Overall, plants in indoor gardens start
to show outward stress signs in the sixth
to eighth week of growth. Once a plant
shows symptoms, it has already under
gone severe nutritional stress for one or
two weeks. It will take time for the plant
to stabilize and demonstrate vigorous
growth. To help plants retain vigor, cor
rect identification of each symptom—as
soon as it occurs—is essential. Indoor,
greenhouse, and some outdoor cannabis
crops are harvested so fast that plants do
not have time to recover from nutrient
imbalances. One small imbalance could
cost a week of growth. That could be
more than 10 percent of the plant’s life.
In short, incorrect pH is reflected in
stunted growth and lower harvest weight.
Air
Temperature: Both low and high
temperatures slow the growth of plants.
Large fluctuations in temperature—
more than 15 to 20 degrees Fahrenheit
(8 to 10 degrees Celsius)—cause slow
growth by slowing the plants’
processes, including nutrient uptake.
Solution: Lower the temperature by
removing as many heat sources from the
garden room as possible, or with venti
lation or air conditioning indoors. Vent
greenhouses, cover them with reflective
shade cloth, and install evaporative cool
ing. Outdoors, install shade cloth above
plants. Raise temperatures indoors and in
greenhouses by using a heater. Insulate
garden rooms and install a heat blanket
over greenhouses. Outdoors, cover plants
with plastic to raise the temperature.
Humidity: High humidity causes
stomata to open wide but slows evapo
ration, thus reducing water and nutrient
movement. Low humidity increases
water and nutrient movement, bringing
top much to the plant. Low humidity
stresses plants because they use too
much water and higher nutrient levels.
Solution: Lower the humidity with
ventilation, air conditioning, or a
dehumidifier in enclosed garden area.
Increase humidity by lowering tempera
ture to 70°F (21.1 °C) or by placing a
humidifier in the garden area.
Carbon dioxide (CO2): Growth is
stifled and slows rapidly when CO2 is
lacking. Nutrient and water consump
tion slows too. The growing medium is
often overwatered, causing soggy roots
and growth stagnation.
Solution: Increase air circulation so that
all leaves in the garden flutter a little.
This will keep CO2 from stagnating
around foliage. Remove dense lower
foliage that receives no light. Vent out
CO2-poor air. Install a CO2 generator
or CO2 emitter to increase CO2 levels.
Ozone damage: See chapter 16, Azr, for
more information on ozone damage.
Solution: Stop using an ozone generator
indoors and in greenhouses.
Indoor air pollution: This causes very
difficult-to-solve plant problems. Al
ways be aware of chemicals bleeding or
vaporizing from pressboard and other
building materials. Such pollution causes
plant growth to slow to a crawl. Ozone
damage could also affect plant growth.
www.marijuanagrowing.com
379
Solution: Remove problem-causing
pressboard. Before reinstalling the re
moved pressboard, wait 6 to 12 months
so that harmful chemicals have stopped
outgassing. Stop using ozone generators,
and switch to carbon filters to clean
exhaust air.
Heat Stress
The temperature within the leaves can
climb to an excess of 110°F (43.3°C).
It happens easily because leaves store
heat radiated by lamps and sunlight. At
110°F (43.3°C), the internal chemistry of
a cannabis leaf is disrupted. The manu
factured proteins are broken down and
become unavailable to the plant. As the
internal temperature of the leaves climbs,
plants are forced to use and evaporate
more water. About 70 percent of the
plant’s energy is used in this process.
Solution: Leach growing medium to
wash out excess fertilizer salts. Increase
irrigation frequency, and lower the at
mospheric temperatures with ventilation
or other means described above.
High humidity not only causes plants to
grow looser but also the florets or indi
vidual flowers'"’ to develop looser so that
more water evaporates; this is a survival
response. Because they are loose, fewer
florets (individual flowers) are produced
and overall weight is reduced.
*A bud is a group of flowers, known as
an inflorescence, by botanical definition.
Solution: Lower humidity with ventila
tion, a dehumidifier, or an air conditioner
that also dehumidifies.
Low light levels cause spindly growth and
poor utilization of nutrients. Ifplants are
crowded and have poor air circulation, pests
and diseases are more apt to be a problem.
Heat stress causes loose buds.
Light
Lack of light: Nutrients are used poorly,
photosynthesis is slow, stems stretch,
and growth is scrawny.
Solution: Increase light levels by moving
lamp closer to canopy of garden. Bend
leggy plants to lower their profile so
more light reaches the entire plant.
Too much light: Keep a 600-watt lamp
20 inches (50.8 cm) above plants.
Light burn: Burned foliage is susceptible
to attack by pests and diseases.
Light-burned plant was too close to the hot
HID!
Solution: Indoors, move light further
away from plants. Harden-off outdoor
plants before placing outdoors so foliage
is not soft and prone to burn.
Water
Water quality: Check water quality for
excess sodium (more than 50 ppm), and
excesses of other dissolved solids such
as calcium and heavy metals. Check pH
and composition of dissolved solids on
a well water analysis or a water analysis
from your water district. Compare water
analysis to the label of the fertilizer you
are using. Add up the total of each ele-
Along with curled leaffringes, big ridges
between veins signify temperature stress. Leaf
edges that curl up signify that leaves are trying
to dissipate as much moisture as possible.
Moisture stress could be caused by toxic salt
buildup, lack of water in the growing medium,
or high atmospheric temperatures.
r
Lamp
(watts)
Distance
(inches)
Distance
(centimeters)
j 250 W 10in.
25 cm
400 W 15.7 in.
40 cm
600W 20in.
50 cm
: woow I32in.
L
80 cm
A clean source of water is essentialfora
healthy garden. Always check the water for
dissolved solids with an EC/ppm meter. This
pond is full ofalgae that must be treated and
filtered before use.
380
NUTRIENTS
www.marijuanagrowing.com
This containerized plant was weighed, dry, at
8.1 ounces (230 gm).
When saturated with water, the same contain
erized plant weighs 16.6 ounces (470 gm).
.Catch runoff water from plants to measure
EC and pH.
ment on the fertilizer label and the water
analysis to calculate the entire fertilizer
dosage plants are receiving.
Irrigation: If the growing medium and
root mass are kept saturated with water
for 20 minutes or longer, roots will
not have adequate oxygen and will die
(drown) and start rotting.
Any growing medium that drains well
can be irrigated or washed (leached) as
many times as you want, as long as the
soil does not stay saturated (and thus
contain no oxygen) for longer than 20
minutes at a time.
Water completely, until a minimum of
20 percent drains from the bottom of
the container. Irrigate so that drainage
occurs within 20 minutes of starting.
Then the 50 percent rule applies before
the next watering. See chapter 20, Water,
“50 Percent Watering Rule,” for more
information about watering.
pH and EC: Control pH to the desirable
soil or hydroponic range. Wash nutri
ents from soil to lower dissolved salts in
growing medium.
Solution: Irrigate using reverse osmosis
(RO) water with fertilizer added. RO
water will guarantee that your fertilizer
mix will be consistent and easy to con
trol. Manage EC in hydroponic tanks by
topping off tanks with water every few
days. Change nutrient solution in reser
voirs every 7 to 14 days. When running
higher EC levels, irrigation frequency
must be increased so that plants do not
dry down.
Growing Medium
To avoid most common nutrient
deficiencies and excesses:
1. Use new store-bought soil indoors
and in the greenhouse
2. Use well-composted, amended, or
new store-bought soil outdoors
3. Add 1 cup (23.7 cl) of dolomite lime
to each cubic foot (28.3 L) of
substrate to keep pH “sweet” or in the
6.0 to 7.0 range
4. Measure all bulk soils that tend to
change for sodium (Na)
Soil Temperature: Soil over 90°F
(32.2°C) will harm the roots. Often,
outdoor soil that is used in containers
warms up to well over 100°F (37.8°C). I
notice that my outdoor garden virtually
stops growing when soil temperature
reaches about 80°F (26,7°C).
Solution: Cool soil indoors and in
greenhouses by lowering the tempera
ture of the garden room and placing
containers on concrete or cool floor,
if possible. In any container garden,
shade containers from light, paint them
white to reflect light, and place reflective
mulch on soil surface. Outdoors, mulch
soil with at least 6 inches (15.2 cm) of
straw, hay, or other vegetation, or use
any mulch to cool the soil surface.
Roots receiving light: Roots turn green
if light shines through the container or
the hydroponic system. Roots require a
A good growing medium allows good drainage
and holds plenty of moisture at the same
time. This growing medium is packed with
well-composted bark dust and woodchips.
Dolomite lime has been added to stabilize pH.
vvww.marijuanagrowing.com
381
dark environment. Their function slows
substantially when they turn green.
Solution: Indoors or out, paint contain
ers an opaque color inside so roots stay
in the dark.
pH and EC: Keep both pH and EC at
proper levels.
Nutrient Solution
Nutrient balance: Change the nutri
ent solution in small systems regularly,
every 7 to 14 days. This is the easiest
way to keep recirculating solutions in
balance and avert problems. The nu
trient reservoir should also have a top
to minimize evaporation and avoid the
possibility of pollutants falling into the
tank. Topping off the tank every day or
two will compensate for water used by
plants. Topping off will also keep the
nutrient solution from concentrating.
Always use a complete hydroponic
fertilizer that contains all necessary
nutrients, including micronutrients in a
chelated form. Do not use fertilizers de
signed for soil gardens in a hydroponic
system. Use only fertilizers that list all
necessary nutrients on the label.
Incorrect pH: Out-of-whack pH level
contributes to most serious nutrient
disorders in organic-soil gardens. Many
complex biological processes occur
between organic fertilizers and the soil
Check the nutrient solution's pH and EC/ppm
to ensure that they are in the safe range.
during nutrient uptake. The pH can
be decisive to the likelihood of these
activities. Typically, a pH from 5.2 to
6.0 is acceptable for both vegetative and
flowering growth. But a pH range of 5.6
to 6.0 for vegetative growth and 5.4 to
5.8 for flowering is best.
A low-pH, below 5.5, (acidic growing
medium and nutrient solution) causes
plants to become stunted and fail to
reach their potential. A high pH also
causes stunted growth, as well as a lack
of iron and manganese. With a high pH,
plants have very pale green leaves. Either
way, adjusting the pH will solve the
problem.
Overfertilizing can become one of the
biggest problems for indoor gardeners.
Too much fertilizer causes a buildup of
the nutrients (salts) to toxic levels, and it
changes the soil chemistry. When over
fertilized, plants’ growth is rapid and
lush until toxic levels are reached. At
this point, things become complicated.
Chance of overfertilization is greater in
a small amount of soil that can hold only
a small amount of nutrients. A large pot
or planter can safely hold much more
soil and nutrients, but it will take longer
to leach if fertilizer is overdone. It is
very easy to add too much fertilizer to
a small container. Large containers have
good nutrient-holding ability.
Always keep the pH meter calibrated properly
with 7.0 and 4.0 reference solutions.
Dirty gardens promote pests and diseases.
Solution: To treat severely overfertil
ized plants, leach the soil with 2 gallons
(7.6 L) of diluted nutrient solution per
gallon (3.8 L) of soil to wash out all
excess nutrients. The plant should start
new growth and look better in one week.
If the problem is severe and leaves are
curled, the soil may need to be leached
several times. After the plant appears to
have leveled off to normal growth, apply
the diluted fertilizer solution.
Miscellaneous
Spray application damage: Some sprays
are phytotoxic, others are very phyto
toxic. They can burn foliage if the spray
is too concentrated or if it is sprayed
during the heat of the day.
Solution: Lower concentration of spray
so that it is less phytotoxic. Spray plants
early or late in the day when sunlight or
artificial light is not shining directly on
foliage. The spray should have a chance
to dry on foliage before nightfall. Using
clean water, wash spray off plants after
24 to 48 hours.
Lazy Practices
One lazy guy mixed Miracle-Gro into
the central water system for his house so
that he would not have to measure it out
and apply. It was always in the water!
A novice grower who purchased a pop
ular fertilizer brand with “A” and “B”
nutrients did not read the instructions.
He made the error of applying small
doses of “A” fertilizer until the bottle was
finished. Next he applied “B” nutrient in
doses. His crop was a ruin!
382
NUTRIENTS
www.marijuanagrowing.com
Organic Nutrients List
Animal-Based Fertilizer Meals
Blood Meal
Blood (dried or meal) is collected at
slaughterhouses, dried, and ground
into a powder or meal. It’s loaded with
fast-acting soluble nitrogen (12 to 15
percent by weight), up to 1.2 percent
phosphorus, and under 1 percent potash.
The proteins are broken down quickly
by soil life, and they become imme
diately available and will last up to 4
months. Blood meal is an ideal nitrogen
source for heavy-feeding varieties or to
green up a garden. Use as a topdressing
and cultivate into soil, or apply up to
1 month before planting. Apply care
fully because blood meal is “hot” and
can easily burn foliage if overapplied.
When blood meal is applied on top of
the ground in a band around a garden, it
will keep rabbits from eating too much
of the crop.
Bone Meal
Bone meal* is an excellent natural
source of phosphorus. It increases
microbial activity and nutrient uptake
to help phosphates become available to
plants. The lime found in bones also
lowers soil pH. Bone meal also contains
calcium and some nitrogen and trace
minerals. Finely ground bone meal
becomes available more quickly than
coarsely ground, and it is faster-acting in
well-aerated soil. It is also an excellent
supplement for transplants and to pro
mote a strong, extensive root system.
*Bone meal could transport Mad Cow
Disease (bovine spongiform encephalop
athy). The outbreak of this disease was
purportedly contracted by four humans
in the UK who inhaled bone meal dust
while spreading it in their gardens. Now
most countries have changed processing
standards and do not allow processing of
diseased animals, which appears to have
curtailed spreading of Mad Cow Disease
via bone meal. No outbreaks have been
reported in recent history. If you feel
uncomfortable using bone meal, please
do more research, and post results on
Ww.marijuanagrowing.com.
Bone meal for gardening is available in
two main forms: precipitated
(unsteamed) and steamed. Avoid raw
bone meal because lingering fatty acids
Blood meal
slow decomposition. Most often, pre
cipitate bone meal is used for animal
feed, and steamed bone meal is used
as fertilizer. When sold in animal feed
stores, the percentage of phosphorus on
precipitated products is shown instead
of phosphate (P2O5). This means that 12
percent phosphate is equal to 27.5 percent
phosphorus. To convert phosphorus to
phosphate, multiply phosphorus by 2.29.
For example, 12 percent phosphate x
2.29 = 27.5 percent phosphorus.
Precipitated (unsteamed) bone meal is
made by grinding and dissolving bones
in acid before bathing in lime solution.
Calcium and phosphorous from bones
bind together and precipitate out; they
are extracted from the liquid and then
dried. The very fine resulting particles
contain 40 percent available phosphate
but no nitrogen. The end product is
dusty to work with.
Steamed or cooked bone meal is made
from fresh animal bones that have been
boiled or steamed under pressure to
render out fats that slow decomposi
tion. The pressure treatment causes a
little nitrogen loss and an increase in
phosphorus. Steamed bones are easier to
grind into a fine powder, and the process
helps nutrients become available sooner.
Steamed bone meal contains up to 30
percent phosphorus and about 1.5 per-
Bone meal
cent nitrogen. The finer the bone meal
is ground, the faster it becomes available
to plants. Till it into soil at the rate of
10 pounds (4.5 kg) per 100 square feet
(9.3 m2), or mix it into organic potting
soil at the rate of one cup (236.6 cc) per
cubic foot (28.3 L). Use as a topdressing
and cultivate into soil, or apply up to one
month before planting.
Feather Meal
Feather meal consists of feathers that
are steamed under pressure, dried, and
ground into a powdery feather meal.
Feathers are dominated by the protein
keratin. This protein occurs in hair,
hooves, and horns and is broken down
slowly by soil bacteria, making it a
good long-term source of nitrogen. The
nitrogen level ranges between 7 and
12 percent, depending upon rendering
process. Often feathers are cooked with
pressurized steam (hydrolysis) that
pre-decomposes the meal. It is a good
slow-release insoluble fertilizer and
compost component that is available
after four or more months. Feather meal
is often mixed with poultry bedding,
which speeds nutrient release. Mixing
with bedding other than poultry will
not hasten nutrient availability. Use as
a supplemental source of nitrogen along
with other fertilizers. Till into soil at the
rate of 5 pounds (2.3 kg) per 100 square
feet (9.3 nf), and add to compost piles
www.marijuanagrowing.com
383
and potting soil at the rate of
1 cup (236.6 cc) per 2 cubic feet (56.6 L).
Feather meal is available online and
sometimes at garden centers.
Hoof and Horn Meal
Hooves and horns collected from cattle
at slaughterhouses are cooked, ground,
and dehydrated to make this meal. Fine-
ground horn meal makes slow-release
nitrogen available a little faster. Soil
bacteria must break down this slightly
alkaline meal before it is available to the
roots. Apply it a month before planting,
and nitrogen will be available for up to 12
months afterward. It is a good compost
activator and improves soil structure,
too. This meal contains up to 12 percent
nitrogen, 2 percent phosphorus, and
no potassium. Use it as a supplemental
source of nitrogen along with other fertil
izers. Till into soil at the rate of 5 pounds
(2.3 kg) per 100 square feet (9.3 m2)
and add to compost piles and potting
soil at the rate of 1 cup (236.6 cc) per 2
cubic feet (56.6 L). Available online and
sometimes at garden centers, or it can be
collected from pens for sheep and pigs.
Fish-Based Fertilizers
Fish Emulsion
Fish emulsion, an inexpensive soluble
liquid, is high in organic nitrogen, trace
elements, and some phosphorus and
potassium. This natural fertilizer is
difficult to overapply, and it is immedi
ately available to plants. Fish emulsion
is available from 1 to 4 months after
Fish emulsion
LIQUID FISH HYDROLYSATE
Fresh fish
& fish remains
Fresh fish is
ground up
Cold processed
natural enzymatic
liquidifying
Filtered with
fine mesh
FISH EMULSIONS
Saltwater fish
Extract oil &
protein with heat
Fish hydroslyate is a betterfertilizer than fish emulsion.
application. Inorganic potash is included
in some formulas to add potassium to
the fish emulsion. Odors from this prod
uct can cause real problems with animal
pests. Even deodorized fish emulsion
smells like dead fish. It contains up to 5
percent nitrogen, 2 percent phosphorus
and 2 percent potassium. Apply as a
diluted liquid fertilizer at the rate of 6
tablespoons (88.7 cc) per gallon (3.8 L)
of water.
Note: Often, fish emulsion is processed
after most of the proteins, enzymes, and
nutrients have been rendered in previous
processes. See “Fish Hydrolysate” below
for a more completed fish fertilizer.
Fish Hydrolysate
Fish hydrolysate used as fertilizer
is ground-up fish carcasses. It is not
rendered nearly as much as fish used
in emulsion products. Fish processing
factories remove the meat for human
consumption, and the rest—bones,
cartilage, guts, and scales—are ground
up and mixed with water. Enzymes are
added to make the mix soluble. Higher-
quality fish hydrolysate is ground more
finely. Often bones and scales are sepa
rated, causing the mix to lack calcium,
Liquid fish
hydrolysate
Oil used for
cosmetics &
other products
Protein removed
for animal feed
Depleted liquid
concentrated
into fish emulsion
minerals and proteins. Oil is rendered
from dried products cutting out much of
the plant food.
Although more expensive, the highest
quality liquid fish hydrolysate processes
whole fish, digests them with enzymes
before liquefying the product. The
cold-processed offal putrefies rapidly
and is stabilized with sulfuric acidic at a
low pH. The process uses enzyme-
digested hydrolyzed liquid fish wastes
instead of using heat and acids. This
process retains more of the proteins,
enzymes, vitamins and micronutrients
than fish emulsions. Heated hydroly
sate is moderately heated to render and
concentrate oils into less complex plant
food. Overheating can destroy numer
ous beneficial organisms. Carefully read
product labels.
Fish hydrolysate contains up to 2 per
cent nitrogen, 4 percent phosphorus,
and 1 percent potassium, as well as many
proteins, vitamins, and micronutrients.
It is often difficult to find at retail out
lets but is available via online suppliers.
Apply as a diluted liquid fertilizer at the
rate of 6 tablespoons (88.7 cc) per gallon
(3.8 L) of water.
384
NUTRIENTS
www.marijuanagrowing.com
Fish Meal
Fish meal is made from dried fish or
rendered fish carcasses that are heated
and often treated with acid before being
ground into a meal that is rich in nitro
gen and trace elements. It contains up
to 10 percent nitrogen that is available
immediately and lasts up to four months.
Some meals also contain phosphorus
and potassium. Incorporate fish meal
into soil mixes, cultivate it into soil as a
fast-acting topdressing, or use as a com
post activator. Unless deodorized, this
meal can have an unpleasant odor that
may linger indoors. Outdoors, control
fish meal odors by cultivating it into the
soil, covering it with mulch, and diluting
(irrigating) after application. Always
store it in an airtight container so it will
not attract cats, dogs, or flies. Till into
soil at the rate of 10 pounds. (4.5 kg)
per 100 square feet (9.3 m2) or mix into
organic potting soil at the rate of 1 cup
(236.6 cc) per cubic foot (28.3 L). Use as
a topdressing and cultivate into soil, or
apply up to one month before planting.
Fish Powder
Fish power is similar to meal and hydrol
ysate before processing. The source and
treatment of fish dictates the quality of
fish powder. It is dried with heat and
turned into water-soluble powder. It is a
high source of nitrogen, up to 12 per
cent, with a trace of potassium, 1 percent
phosphorus, and many micronutrients.
Hydrolysate powder also contains up to
5 percent potassium and 1 percent phos
phorus. Most water-soluble fish powders
can be mixed in solution and injected into
an irrigation system.
High-quality fish powders consist of
dehydrated, pulverized whole fish. Some
offer enzyme-treated hydrolyzed fish
protein (see below) processed products.
Make sure to read labels carefully before
applying to plants! Till in 1 to 2 ounces
per 100 square feet (9.3 m2), or mix 1
tablespoon (14.8 cc) per gallon (3.8 L) of
water.
Crab Wastes
Crab wastes contain relatively high
levels of phosphorus and calcium. Crab
waste is ground and dried to stabilize
decomposition. The location, diet,
and species of crab will affect the meal
content. Waste contains chitin, which
promotes organisms that attack pest
nematodes.
Crab waste N-P-K runs about 5-2 -0.5
and up to 10 percent calcium in this
slow release fertilizer. Add crab waste 2
to 4 months before planting. Broadcast
10 pounds per 100 square feet (4.5 kg
per 9.3 m2), and till into topsoil. Add
to compost piles and mix into planting
holes for seeds or transplants.
Guano
Bat Guano
Bat guano consists of the droppings and
remains of bats. It is rich in soluble nitro
gen, phosphorus, and trace elements. The
limited supply of this fertilizer—known
as the soluble organic super bloom—
makes it expensive. Mined in sheltered
caves, guano dries with minimal decom
position. Bat guano can be thousands of
years old. Newer deposits contain higher
levels of nitrogen and can burn foliage
if applied too heavily. Older deposits
are higher in phosphorus and make an
excellent flowering fertilizer. Bat guano
is usually powdery and is used any time
of year as topdressing or diluted in a tea,
also a great compost activator. Do not
breathe the dust when handling it, be
cause it can cause nausea and irritation in
the lungs. Guano superphosphate is also
available. Water-soluble bat guano
runs about 3-10-1 for N-P-K and is
packed with growth-stimulating bacteria
and microbes. Nutrients are available
irqmediately for up to 4 months. Add be
fore planting at the rate of 5 pounds per
100 square feet (2.3 kg per 9.3 m2). Add 3
teaspoons per gallon (14.8 ml per 3.8 L)
of water and start fertilizing 1 to 2 weeks
before flowering. Bat guano also func
tions as a mild fungicide when applied as
a foliar spray.
Seabird Guano
Seabird guano is high in nitrogen and
other nutrients. The Humboldt Current,
along the coast of Peru and northern
Chile, keeps rain from falling, and
decomposition of the guano is therefore
minimal. South American guano is the
world’s best and most accessible guano.
The guano is scraped off rocks of arid
&at guano fertilizer powder
cOUNIV
Bat guano fertilizer liquid
LW GUANO (OmHw
ORGANIC HYDROPONIC
AND SOIL SOl UTION
001-0.10 -0.01
BUDSWEL
Seabird guano
-
>
3
»
Www.marijuanagrowing.com
385
ocean islands and is often mixed with
seal droppings. Sea bird guano is also
collected from many coastlines around
the world, so its nutrient content varies.
The average N-P-K of this soluble fertil
izer is 10-3-1 is also packed with organic
life. Apply before planting for nutrients
that are available for more than four
months. Till in 5 pounds per 100 square
feet(2.3kgper9.3m2)orasateaat3
teaspoons per gallon (14.8 ml per
3.8 L) of water, applied directly to the
soil or made into a tea and applied as a
foliar spray or injected into an irrigation
system. Seabird guano also makes a
good compost activator.
Manures
Manure and Bedding
Sometimes manures are collected,
packaged, and sold pure. Most often,
manures, each of which has specif
ic biological, chemical, and physical
characteristics, is packaged or collected
with varying degrees of bedding—straw,
sawdust, newspaper, chopped hemp
fiber"*, and cardboard. Livestock diet,
weather, cleaning schedules, location,
and so forth, dictate manure availability
and consistency. Often manure can be
delivered in bulk. At least 50 percent of
the nitrogen and up to 70 percent of the
potassium are found in urine mixed with
manures and bedding.
" HempFlax from The Netherlands
produces very popular BioBase Bedding
for livestock from hemp stalks.
Manures are considered either “hot” or
“cold.” Hot manures will burn plants,
cold manures won’t. Poultry and swine
manures, and fresh wet manures are “hot”
and will burn plants. Most other manures
are considered “cold” and seldom burn
plants unless fresh. Well-composted
manures do not burn plants or contain
excessive salts. Fresh manures contain
60 to 70 percent more moisture than
dry. Dried manures contain much higher
levels of nutrients.
Cow and horse manure mixed with
bedding make great additions to the
compost pile and as an outdoor soil
amendment. Swine manure is very wet
and should be mixed with straw. Poultry
manure also performs best when mixed
with sawdust, straw, or other bedding.
Chicken manure
But be careful: too much straw and
sawdust bedding can use much of the
available nitrogen and decrease yields.
Chicken (Poultry) Manure
Chicken (poultry) manure is probably
the richest single organic fertilizer in re
lation to available nitrogen, phosphorus,
potassium, and trace elements. Purchase
dry, composted chicken manure in bags
for convenience, or buy it in bulk. Use it
as a topdressing or mix it into soil before
planting.
Often chicken manure collected from
farms is packed with decomposing feath
ers, which contain as much as 17 percent
nitrogen; this is an added bonus. I used
chicken manure in bulk and in bags.
If you can find it locally at an organic
chicken farm, it is the best! Make sure
the chicken manure is composted for
an extended period before use or it will
burn anything because of the high uric
acid content. Also weed seeds will be a
giant problem.
The N-P -K runs low for chicken
manure—about 1.5 -1 .5 -0.5 wet, and 1.1-
0.8-0.5 dry—and it is packed with trace
elements. Don’t let the low nutrient
readings fool you; it is available immedi
ately for up to 4 months. It can be heavy
and bulky when wet, and bulky when
dry. Add chicken manure up to a month
before planting. Follow mixing instruc
tions found on the bag label.
Cow manure
Cow Manure
Cow manure is often sold as steer
manure but is sometimes collected from
dairy herds. Cannabis gardeners have
used cow manure for centuries. It is a
fair fertilizer and good soil amendment.
Steer manure is most valuable as mulch
and as a soil amendment. It holds water
well and maintains fertility for a long
time. The nutrient value is low, and it
should not be relied upon for the main
source of nitrogen. Let it compost for
several months if salt content is high,
which is often the case with feedlot cow
manure. Washed dairy manure from
healthy cows is an excellent soil amend
ment. The N-P-K runs very low—about
0.7-0.3-0 .4—and it is full of trace ele
ments. Add cow manure to soil a month
or two before planting. Best used as a
soil amendment and secondary fertilizer.
Goat Manure
Goat manure is much like horse manure
but more potent. The uniformly sized
“nanny nuggets” are easy to “handle”
and apply. They are most effective when
broken up while incorporating with soil
and compost. This manure increases
soil’s water-holding ability and micro
bial activity, and does not attract flies
or animals when dry or mixed with soil.
Quality of the product depends upon
goat feed. N-P -K runs about 1.3-1.5 -0 .5.
Apply goat manure as an amendment or
fertilizer.
386
NUTRIENTS
www.marijuanagrowing.com
Horse Manure
Horse manure is readily available from
horse stables and racetracks. Use horse
manure that has straw, hemp straw, or
peat for bedding. Wood shavings could
be a source of plant disease. Compost
fresh horse manure and bedding for two
months or longer before adding it to the
outdoor garden. The composting process
kills weed seeds, and it will make better
use of the nutrients. Hot composting
above 140°F (60°C) kills pests and dis
eases. Many recipes are available on the
Internet for horse manure compost.
New straw bedding often uses much of
the available nitrogen. The N-P -K runs
about 0.6 -0 .6-0 .4, with a full range of
trace elements. Add horse manure a
month or two before planting. It is best
as an amendment and secondary source
of nutrients.
Rabbit Manure
Rabbit manure is an excellent fertilizer
that is high in available nitrogen and
phosphorus. It can be difficult to find
locally, except in Spain and via the
Internet. Use rabbit manure as you
would chicken manure. It breaks down
and becomes available quickly. The
N-P -K runs about 2.4-1 .4-0 .6 in this
very soluble fertilizer with some trace
elements. According to Dr. John
McPartland, rabbit poop is the best.
Bunnies rule!
Sheep Manure
Sheep manure nutrient content is limited
but it makes a wonderful manure tea.
Sheep manures contain little water and
lots of air. They heat up readily and
make an excellent addition to compost
piles. They add bulk, air, and nutrients.
Use this inexpensive, low-odor manure
as mulch, too. The N-P -K runs about
0.8-0 .5 -0.4, with a full range of trace
elements. Add this slow-release soil
amendment/fertilizer to planting mixes
and compost piles more than a month
before planting.
Swine Manure
Swine manure has a high nutrient
content but is slower-acting and wetter
(more anaerobic) than cow and horse
manure. Difficult to find in a bag, most
swine manure is available directly from
the farm. Ask farmers for details on
contents and use. Fresh, anaerobic
lagoon sludge or liquid swine manure
has an N-P-K of about 0.6-0.6-0.4. It
also contains substantial ammonium
and many secondary and trace elements.
Add this hot manure to compost piles
and to soil mixes. Be sparing with this
manure because it is usually anaerobic
in nature.
Urine
Urine is mixed with barnyard manure.
It adds readily available nitrogen and
is good for organic cannabis gardens.
Urine contains mainly water and urea.
The odor of fresh urine dissipates quick
ly, especially when diluted. It does not
attract flies and contains few pathogens.
Urine is okay to use in an organic garden
but synthetic urea is not. See “Haber
process” at right.
Be careful: It is easy to overfertil
ize with urine! Urine is packed with
ammonia plants can’t assimilate and
it acidifies the soil. Use with caution
when applying in liquid form. Human
urine can also be used as fertilizer and
added to compost.
If your dog, horse, or goat urinates in
the same place in the green grass yard,
its urine will often burn grass if it con
tains too much urea. Burn patches are
common when urea is repeatedly applied
in the same place. I have seen “popular”
Caution: Urine is loaded with ammonia
that cannabis plants cannot assimilate, and it
acidifies the soil. Use with care.
The Haber Process
The Haber process, also know as the
Haber-Bosch process, is the chemical
process used to extract nitrogen in the
form of ammonia from the atmosphere.
Ammonia is oxidized to make nitrates
and nitrites for use in fertilizers and
explosives. Synthetic fertilizer generated
from the Haber process is believed to
help generate one-third of the food in the
world!
metal streetlamp poles completely eaten
through by dog urine. The N-P -K of
urine runs about 12-1-2, and this solu
ble fertilizer is readily available. Nor
mally it is mixed with animal bedding
and manure so it is not as hot.
Miscellaneous
Coffee Grounds
Coffee grounds are slightly acidic—pH
6.0 to 6.2 —and fine in texture. The high
carbon-to-nitrogen ratio encourages
acetic bacteria in the soil. Phosphorus,
potassium, magnesium and copper in
coffee grounds are readily available. The
availability of nitrogen, calcium, zinc,
manganese, and iron are low and some
times deficient. Even though available
nitrogen appears deficient, there are 10
pounds (4.5 kg) of total nitrogen per
cubic yard (90 cm2) of coffee grounds.
The nitrogen becomes available with
microorganisms activity. In this way
coffee grounds function as a slow release
nitrogen fertilizer.
Collect coffee grounds only. Remove
paper that uses nitrogen to decompose.
Keep coffee grounds in a covered
container. This will preserve moisture
and nutrients. Mix coffee grounds
into soil surface and soil mixes before
planting. Add no more than 5 percent
coffee grounds to any soil mix or
when sprinkling on soil surface.
Sugar
Molasses, honey, and other sugars can
increase soil microbial life, enhance
regrowth, and make the plants’ use of
nitrogen more effective. Molasses is the
“secret ingredient” in many organic
www.marijuanagrowing.com
387
fertilizers and the natural sugar best for
organic medical cannabis crops. Sucrose
(corn) syrup is the most economical way
to buy sugar. However, it lacks many of
the qualities found in molasses.
Plants manufacture sugars. Plant roots
do not absorb sugars, raw or refined.
Bacteria and other soil life consume
sugars as food or fuel. Adding organic
sugar in the form of molasses to the soil
increases soil life and biological pro
cesses around the rhizosphere or root
zone. Decomposing sugars release CO2
and increase mineralization of organic
elements. Molasses is practically useless
in mineral-fed crops for mineralization.
Any sweet taste or flavor that vendors
attribute to coming from sugars, does
not come directly from adding sugars
or flavorings to the nutrient solution. I
would like to see vendors scientifically
prove this cause-and-effect. Please have
them contact me.
Molasses
Unsulphured molasses is top quality
and is used in cooking. This grade is
made from ripe sugar cane juice that
is clarified and concentrated. It can be
used in the garden.
Sulphured molasses is made from unripe
(green) sugar. Sulfur fumes are applied
during sugar extraction. Afterward it
is boiled repeatedly. First-boil molasses
is of the highest quality because only a
small amount of sugar is removed. Sec
ond and any subsequent boils turn the
molasses dark in color and extract more
sugar. It can be used in the garden.
Blackstrap molasses has been boiled
three times to extract even more sugar.
Mainly used as cattle feed, it is packed
with iron. It can also be used in the
garden.
Overall, the average N-P -K analysis of
molasses is 1-0 -5 and it contains potash,
sulfur, and many trace minerals in a
chelated form. It is also loaded with
carbohydrates and a balance of con
sumables, which are a quick source of
energy and food for microorganisms.
Molasses can be purchased at hydropon
ic, grocery, health food, and livestock
feed stores. Dilute it at the rate of one
There are three main types of molasses:
unsulphured, sulphured, and blackstrap.
tablespoon per gallon (1.5 cl per 3.8 L)
of water. Irrigate plants to feed organic
life in soil. Start feeding soil life when
plants are growing.
Wood and Paper Ash
Wood ash (hardwood) supplies up to 10
percent potash. Softwood ashes contain
about 5 percent. Potash washes out of
wood ash quickly and can cause compact
ed, sticky soil. Avoid using high-pH alka
line wood ashes in soil with a pH above
6.5. Collect wood ash soon after burning,
and store it in a dry place. Be careful
when collecting fireplace ashes. Often
such ashes are full of burned garbage that
contains heavy metals and undesirable
things. Collect and use only wood ashes
from fireplaces, and apply sparingly.
Paper ash contains about 5 percent
phosphorus and over 2 percent potash.
Most inks are now soy-based or non
oil-based. I like to avoid paper ash due
to the possible heavy metal content, but
when clean and void of heavy metals
found in some inks, paper ash is an ex
cellent water-soluble fertilizer. Because
the pH is quite high, do not apply paper
ash in large doses.
Worm Castings
Vermicast (aka worm castings, worm
humus, and worm manure) are excreted,
digested humus and other (decompos
ing) organic matter, the end product
in the breakdown of organic matter by
earthworms. Pure worm castings look
like coarse graphite powder and are
heavy and dense.
Worm castings are an excellent source of
non-burning soluble nitrogen and many
other elements. Vermicast is also an excel
lent soil amendment that promotes fertil
ity and structure. Mix with potting soil to
form a rich, fertile blend, but do not add
more than 20 percent to any mix; vermi
cast is so heavy that root growth can be
impaired. Vermicast is very popular and
easier to obtain at commercial nurseries.
Vermicomposting can be done indoors,
outdoors, or in a greenhouse. Red
Wigglers (Eisenia fetida and Eisenia
andreT) are the most active and com
monly used worms in vermicomposting.
Check the Internet for vermicompost
ing setups to turn your vegetable food
wastes into rich fertilizer.
Rode (Mineral) Powders
Aragonite
Aragonite is biological and physical ma
rine and freshwater precipitation-formed
crystalline deposits of such shells as
mollusk and oyster, which contain
about 95 percent calcium carbonate. Use
Aragonite to restore soil balance after
applications of magnesium-rich lime that
tie up other nutrients. Mined in Molina
de Aragon, Spain, Aragonite is difficult
to find in North America.
Ground into a fine powder, aragonite is
used to adjust pH and raise calcium levels
in the soil. It lowers acidity without
increasing magnesium content. Avoid
using aragonite with gypsum.
Azomite
This naturally occurring mineral con
tains micronutrients. Azomite consists
of hydrated sodium calcium alumino
silicate derived from a natural volcanic
mineral deposit. Add to compost or other
fertilizer at the rate of 2 pounds (0.9 kg)
per 10 square feet (.9 m2) and mix into
soil up to a month before planting. Use in
a 1 percent dilution in water.
Biotite
Biotite [K(Mg,Fe)3AlSi3Ol0(F,OH)2]
is a dark mica sheet silicate. It contains
available iron, magnesium, aluminum,
silicon, oxygen, and hydrogen to form
NUTRIENTS
www.marijuanagrowing.com
Dolomite lime
sheets that are weakly bound together
by potassium ions. This is vermiculite
and a source/concern for asbestos. Even
though it also increases CEC of the me
dium, since even though the K is washed
out, the bind sites remain. Biotite is also
known as “iron mica” and black mica.”
Phosphorus rock powders are available
only when soil pH is below 7.0.
Diatomaceous Earth
Diatomaceous earth (DE), the fossilized
skeletal remains of fresh and saltwater
diatoms, contains a full range of trace el
ements. DE is a good insecticide. Apply
DE to the soil when cultivating or use it
as a topdressing. It is more commonly
used as an insecticide than as a source
of calcium.
Dolomite Lime
Dolomite lime adjusts and balances
the pH and makes phosphates more
available. It is generally applied to
sweeten or deacidify the soil. It con
sists of calcium and magnesium, and is
sometimes listed as a primary nutrient,
though it is generally referred to as a
secondary nutrient. Add dolomite lime
to acidic soils and potting soils. Pur
chase flour or fine grades of dolomite
that are available a little faster in the soil.
Add dolomite a month or more before
planting, at the rate of 0.5 cup per cubic
foot (11.8 cl per 28.3 L) of soil. Use
agricultural calcium if soil magnesium
content is high.
Granite Meal
Soft, fine granite rock powders contain
trace elements in a water-insoluble, slow-
release form. Granite forms naturally
in many different chemical structures.
Softer granite from the southeastern
USA breaks down more easily than
granite from the Northeast. Granite dust
or granite stone meal contains up to 5
percent potash and several trace elements.
Releasing nutrients slowly over several
years, granite dust is an inexpensive
source of potash and does not affect soil
pH. Not recommended indoors because
it is too slow acting.
Epsom Salt
Hydrated magnesium sulfate (MgSO4),
Epsom salts, is a fast-acting soluble
source of magnesium and sulfur. Use
Epsom salts in alkaline soils to overcome
magnesium deficiencies. Avoid using to
raise pH in acidic soils; dolomite lime is a
better choice. Apply Epsom salts
(9 percent magnesium, 2 percent calcium,
and 13 percent sulfur) when plants show
a deficiency of magnesium. Continue
adding weekly until symptoms disappear.
Soluble magnesium sulfate washes out of
soil quickly.
Applying Epsom salts is also an out
standing way to leach out excess salts
that accumulate in CEC mediums,
especially sodium.
Greensand
Greensand (glaucomite) is an iron
potassium silicate sandstone rock. The
minerals in which it occurs give it a pale
olive-green tint. Greensand is a great
source of potassium and trace elements
and is used in many organic mixes. It is
able to absorb ten times more moisture,
making it an exceptional soil conditioner
Epsom salts
Greensand
I
in potting mixes. It slowly releases its
treasures in about four years. It is too
slow-acting for indoor gardens but is a
good long-term fertilizer outdoors.
Greensand contains potassium, iron,
magnesium, calcium, and phosphorus,
plus as many as 30 other trace minerals.
It is said to mineralize soil, improving
plant and soil health by increasing pop
ulations of beneficial bacteria that make
insoluble mineral nutrients available.
Greensand is quite heavy and dense,
with the consistency of sand, but can
hold one-third its weight in water and
has the ability to open tight soils and
bind loose soils.
In the USA, greensand is mined from
ancient New Jersey-seabed deposits of
shells and organic material rich in iron,
phosphorus, potash (5 to 7 percent), and
numerous micronutrients. Some organic
gardeners do not use greensand because
it is such a limited resource, yet at the
same time it is used to make garden
walls in parts of the UK.
Greensand in the UK is often called
“Upper” and “Lower” Greensand, which
refers to two different deposits separated
by Gault Clay. Lower Greensand (aka
Woburn Sand) consists of a few deposits
that contain of varying degrees of Ather-
field (marine) Clay. Upper Greensand is
a sand-based deposit within Gault Clay.
Both greensands are found in the hills
www.marijuanagrowing.com
389
surrounding the London Basin and other
sites in the UK.
Stay away from greensand coated with
manganese oxide (aka manganese green
sand). It is used to remove insoluble
oxidized iron and manganese from pipes.
Apply greensand as a long-term source
of potassium and to correct potash
deficient soils. Apply up to 100 pounds
(45 kg) per 1000 square feet (92.9 m2).
Gypsum
Gypsum, hydrated calcium sulfate,
CaSO4-2(H2O), is similar to plaster
board used in construction. Granular
gypsum is ground up into a fine, white
powder that is more rapidly available to
plants and soils. It contains 23 percent
calcium, 19 percent sulfur, and trace
amounts of potassium and magnesium.
Gypsum converts (ties up) salts, includ
ing magnesium in soils, prevents crusty
soil, breaks up and aerates clay soils, and
regulates micronutrient uptake—copper,
iron, manganese, and zinc in cannabis.
Gypsum works by pulling together
clay particles in the soil to make bigger
particles, creating porous spaces for air,
water, and plant roots. For example, in
saline-infused soil, gypsum removes
sodium and replaces it with calcium.
Gypsum adds calcium and sulfur to all
soils. It also helps soil retain water and
helps decrease soil erosion.
Calcium sulfate (CaSO4), aka Gypsite,
is used to lower soil pH and improve
drainage and aeration. It is also used to
hold or slow the rapid decomposition of
nitrogen. The formula carries calcium
and sulfur in sulfate form. Cannabis is
a major user of sulfur, and this is a great
nutrient to add to any planting mix or
compost pile.
Gypsite is unrefined gypsum that con
tains the clays and other minerals from
the location it was mined. It is mined in
arid areas, not typically wetter areas; it is
not usually hydrated gypsum,
CaSO4-2(H2O).
Many states and provinces in the USA,
Mexico, Thailand, and Spain have large
deposits of calcium sulfate. Gypsum
(CaSO4-2H2O) is one of the most com
mon natural minerals and is really a type
of rock.
Natural Nitrate of Soda
Natural Nitrate of Soda (NNS) aka
Chilean Nitrate of Soda, is highly
soluble, quick-acting granular fertilizer
with 16 percent nitrogen in nitrate form,
which is used directly by plants. This
form of nitrogen is available to canna
bis in cold soils. Temperature-sensitive
microorganisms also use this source of
nitrogen. But NNS is high in sodium
too! Do not use NNS on arid soils where
salt buildup is common. It is mined from
a desert in northern Chile, where the
only known deposit of this mineral sak
exists. Mix this nitrate with cocoa meal,
peanut meal, compost, and other organic
amendments to buffer sodium content.
Applying NNS with organic compost
increases efficiency of both amendments.
The high sodium content makes NNS
a poor choice for the main nitrogen
source. N -P -K is 16-0 -0 and 26 percent
sodium in this very soluble fertilizer.
Add with an organic amendment and
do not rely on NNS for a sole source of
nitrogen. NNS is not compatible with
high-sodium contents found in arid and
semi-arid regions.
Rock Phosphate
Rock phosphate (hard) is a calcium or
lime-based phosphate rock that is finely
ground to the consistency of talcum
powder. The rock powder contains over
30 percent phosphate and a menagerie
of trace elements, but nutrients are very
slow to become available.
Colloidal Phosphate
Colloidal phosphate (powdered or soft
phosphate) is a natural clay phosphate
deposit that contains just over 20 per
cent phosphorus (P2O5), calcium, and
many trace elements. It yields only 2
percent phosphates by weight the first
few months. Apply colloidal phos
phate to outdoor gardens for uptake of
slow-acting potassium during the next
four years. The rock powder contains
18 percent total phosphate (2 percent
available), 19 percent calcium (27 percent
CaO), and 18 trace minerals.
Potash
Potash is also the common name for sev
eral mined and manufactured salts that
contain a water-soluble form of potassi
um. Typically measured in fertilizer as
K2O, there are many chemical formulas
depending on the source, collection,
and form of potash. Occasionally
potash will form with traces of organic
plant remains. Potash was principally
obtained by leaching the ashes of land
and sea plants. It was refined from the
ashes of broadleaved trees. Most po
tassium mines are in ancient deposits
from inland oceans that evaporated. The
potassium salts crystallized into beds of
potash ore. The deposits are a mixture
of potassium chloride (KC1) and sodium
chloride (NaCl), aka table sak.
Potash rock supplies up to 8 percent
potassium, and some deposits contain
many trace elements. This slow-release
fertilizer is not practical indoors but is
a good long-term outdoor fertilizer and
compost component. Potash is found in
several different fertilizers, among them
wood ashes and seaweed.
Sulfate of Potask
Sulfate of potash is normally produced
chemically by treating rock powders
with sulfuric acid, but one company,
Great Salt Lake Minerals and Chemi
cals Company, produces a concentrated
natural form. The sulfate of potash is
extracted from the Great Salt Lake.
In natural mineral form, sulfate of
potash (K2SO4) contains more than 50
percent soluble potash and 18 percent
sulfur as well as calcium and magnesium.
The brands Sul-Po-Mag and K-Mag are
natural mineral saks. These water-soluble
products are made from langbeinite and
contain about 22 percent potash, 11 per
cent magnesium, and 23 percent sulfur.
Apply as a supplement or blend into soil
when making organic soil mixes.
Zeolite
The naturally occurring zeolite, clinopt-
lolite, provides a source of potassium that
is slowly released. Some deposits also
contain nitrogen that is slowly available
over time. Zeolites also function to
absorb more than half their weight in
water and slowly release it as needed by
plants. Incorporating zeolites into desert
soils helps them withstand drought
during hot dry weather.
390
NUTRIENTS
www.marijuanagrowing.corn
Oyster Shells
Oyster shells are ground and normally
used as a calcium source for poultry.
Garden blends are pulverized to in
crease assimilation. Calcium formed
in this non-crystalline state is more
easily dissolved and utilized by the soil
and plant. Oyster shells contain up to
55 percent calcium and traces of many
other nutrients that release slowly. They
are not practical to use indoors because
they breakdown too slowly. Outdoors,
oyster shells can be used as a long-term
steady-release source of calcium and
trace elements that raises pH in acidic
soils. This is a good additive for compost
piles and worm bins. Use 50 pounds
(22.7 kg) of Oyster Shell Lime per 1,000
square feet (92.9 m2), depending on soil
analysis and crop.
Seaweed
Seaweed meal and/or kelp meal should
be deep-green, fresh, and smell like the
ocean. Seaweed contains 60 to 70 trace
minerals. Check the label to ensure
that all elements are not cooked out.
Kelp and seaweed are harvested from
the ocean or picked up along beach
es, cleansed of salty water, dried, and
ground into a powdery meal. Cold
water kelp contains more elements.
It is packed with potassium (potash),
numerous naturally chelated trace
elements, vitamins, amino acids, and
plant hormones. It is often combined
with fish meal to add N-P-K value. The
nutrient content varies according to the
type of kelp and its growing conditions.
Seaweed meal is easily assimilated by
cannabis plants, and it contributes to
soil life, structure, and nitrogen fixation.
It may also help the plants resist many
diseases and withstand light frosts. Kelp
meal also eases transplant shock. As
an additive, cytokinins are most often
derived from the kelp Ascophyllum
nodosum. Seaweed is expensive to use as
a bulk soil amendment unless it is locally
available.
Kelp is normally processed three ways,
ranked in order of elements available:
(1) enzyme digested (liquid),
(2) cold-processed (usually liquid), and
(3) extracts (meal or powder).
Apply diluted solution to the soil for
a quick cure of nutrient deficiencies.
Alfalfa meal
Cottonseed meal
Liquid seaweed is also great for soaking
seeds and dipping cuttings and bare
roots before planting. Also used as a
foliar spray.
Kelp liquid has a negligible N-P -K but
is brimming with readily available mi
cronutrients. Add kelp liquid regularly
to gardens; it is immediately available
and used within a month. Apply 1 to 2
tablespoons (14.8 -29.6 ml) per gallon
(3.8 L) of water and apply every 2 to 4
weeks.
Kelp meal releases its cache of numerous
trace elements 2 to 6 months after mixing
it into the soil. Even with an insignificant
N-P-K value, kelp meal is an excellent
ingredient in potting soils.
Kelp powder has an N-P-K of about
1-0-4 plus many micronutrients. It is
an excellent ingredient as a soluble plant
nutrient and source of micronutrients.
Mix one-half teaspoon per gallon (2.5
ml per 3.8 L) of water and apply to
containers once or twice monthly.
Vegetable Meals
Alfalfa Meal
Alfalfa meal is an alternative to blood
meal for nitrogen. It is balanced with
phosphorus and potassium. It is avail
able in meal or pellets that are common
ly livestock feed, which has 17 percent
crude protein content equivalent to
2.75 percent nitrogen. Meal and pellets,
I
available in different sizes, are used to
increase organic matter in the soil and
also provide soluble nutrients, including
trace minerals as well as triacontanol, a
natural fatty-acid growth stimulant.
Indoor, outdoor, and greenhouse gar
deners use the pelletized livestock feed
as a slow-release fertilizer. Alfalfa meal
contains fiber and other substrates that
feed populations of soil organisms. The
carbon-to nitrogen ratio also speeds
availability. Alfalfa meal is a great com
post activator.
Apply half a cup (11.8 cl) per plant for
new plantings; one-half to a full cup
(11.8 -23.7 cl) to a depth of 4 to 6 inches
(10.2-15 .2 cm) deep around each plant.
Medical cannabis garden beds need 2
to 5 pounds (0.9-2.3 kg) to 100 square
feet (9.3 m2). Do not overapply. Rapid
decomposition of alfalfa in the root zone
generates heat, which can damage roots.
The average N-P -K analysis is 2-1-2 that
releases in one to four months. Find
alfalfa pellets at feed stores.
Corn Gluten Meal
Corn gluten meal materials have a high
percentage of nitrogen. Allow at least
one to four months of decomposition in
the soil prior to seeding. The allopathic
properties inhibit seed germination, but
do not affect established and transplant
ed plants. This product is also marketed
as a pre-emergent weed control for
www.marijuanagrowing.com
391
annual grasses. Remember, most corn is
grown with GMO (genetically modified
organism) seeds.
The typical N-P-K analysis is 9-0-0 with
a release time of 1 to 4 months. Apply
20 to 40 pounds (9.1 -18.1 kg) per 1000
square feet (92.9 m2).
Cottonseed Meal
Cottonseed meal is the by-product of
oil extraction and is a rich source of
nitrogen. Many pesticides are applied to
cotton crops, and residue remains in the
seeds. According to the manufacturers,
pesticide-free cottonseed is available.
They say that virtually all chemical resi
dues from commercial cotton production
are dissolved in the oil and are not found
in the meal.
Cottonseed meal can be combined with
steamed bone meal and seaweed to form
a balanced fertilizer blend.
Cottonseed meal is often sold as live
stock feed. It contains almost 85 percent
water-insoluble nitrogen, and it will
acidify soil. Nine pounds (4.1 kg) of
lime will neutralize the acidity caused
by 100 pounds (45.4 kg) of cottonseed
meal. Remember, most cotton is grown
with GMO seeds.
The N-P-K is approximately 6-0 .4 -1 .5,
and the nutrients are released in 1 to
4 months. Till in 10 pounds (4.5 kg)
per 100 square feet (9.3 m2) of regular
garden soil.
Peanut Meal
Peanut meal is available in southern
states where peanuts are grown. It is high
in nitrogen, but water-soluble nitrogen is
limited. The average N-P -K is 8-1-2, and
the meal is available long term.
Soybean Meal
Soybean meal is the by-product after
milling and extracting oil from soy
beans. The meal is loaded in protein
and is normally sold as a livestock feed.
When mixed with soil, the microor
ganisms change proteins into amino
acids and then break down the acids to
make ammonium ions and nitrate ions,
which are available for roots. Soybean
meal acidifies the soil, lowering pH.
The average N-P -K analysis is 7-2 -1,
and the nutrients are available in one to
four months. Purchase soybean meal at
livestock feed stores. Remember, most
soybeans are grown with GMO seeds.
Apply 8 pounds (3.6 kg) per 100 square
feet (9.3 m2) of garden soil.
Compost and Compost Teas
Compost
Compost and compost teas are used
by many organic gardeners as the only
source of fertilizer. Outdoor gardeners
love compost. It is inexpensive, abun
dant, and works wonders to increase
water retention and drainage. Biological
activity within the pile also increases
nutrient uptake in plants. Indoors, com
post is not as practical to use in contain
ers unless it has been hot composted and
is free of pests and diseases. Unfinished
compost could have unwanted guests. If
using compost indoors, make sure it is
well-rotted and screened.
Compost piles need a mix of elements
rich in nitrogen (N) and carbon (C). To
ensure proper aerobic composting, the
mix should be at the ratio of one part N
and three parts C.
Nitrogen-rich elements include:
• Algae blood meal
• Coffee grounds
• Cottonseed meal
• Fish meal
Compost tumblers allow more aeration, which
speeds decornposit ion.
• Green garden clippings: grass clip
pings, weeds, leaves, etc. (Clippings
must not contain chemical fertilizers
or other chemicals, including weed-
and-feed products used on grass.)
• Legumes: alfalfa, clover, etc.
• Manures: chicken*, cow, goat, horse,
pig, rabbit, etc.*
• Seaweed
• Vegetable kitchen scraps
*Salts are commonly found in uncom
posted manures (chicken, cow, pig,
horse, etc.) Decompose salts by letting
them compost for at least 3 months.
Bacteria, fungi, and other compost
biology will dismantle, bind, and immo
bilize salts in the compost pile. Use a
salt (Na) meter to measure salt levels
in manures and composts.
*Note: Chicken litter is often packed
with different types of weed seed that are
very difficult to kill with composting.
Carbon-rich materials include:
• Cardboard, shredded
• Corn stalks, including cobs
• Dried (brown) leaves
• Eggshells
• Needles (fir, pine, etc.)
• Newspaper, shredded
• Paper, with soy-based ink if printed
• Sawdust, in very small amounts and
from wood not chemically treated
• Straw
• Woodchips, best if small or pulverized
Do not add:
• Animal meat, fat, or grease
• Ashes from chemically treated wood
• Ashes from coal or charcoal
• Bones
• Cat, dog, or human feces
• Dairy, cheese, milk, yogurt
• Fish scraps
• Meat
• Oils
• Potatoes
The pile will also need:
Air circulation, oxygen is essential to
microbial growth in compost piles
392
NUTRIENTS
www.marijuanagrowing.com
Volume of at least 3 feet (0.3 m2) square
(any less and heat dissipates faster than
it is generated).
Fast, high-maintenance compost:
Compost will be ready in 60 to 90 days,
depending upon size and consistency
of ingredients. Apply the list below to
making compost for outstanding results.
1. Confine the compost in a compost bin
or use a freestanding compost pile.
Cover or enclose the pile to protect
from varmints.
2. The volume of the pile must be at least
3 feet (0.3 m2) square.
3. Lay out a 2-to-4-inch layer of bark
chips or twigs. This will provide aera
tion from below.
4. Combine materials at the rate of 1
part nitrogen to 3 parts carbon. Layer
materials or mix thoroughly. Make
sure all materials are in small pieces,
which will speed decomposition.
5. Add enough water to wet ingredients,
but do not saturate. Pile should be like
a wrung-out sponge.
6. Cover pile with tarp to protect from
excess rainwater or sunlight, which
dries the pile quickly.
7. Turn or stir the pile with a fork every
2 to 4 days. Check for even consisten
cy of moisture. Stirring adds oxygen
and moves cold outside particles to
the inside and cooked particles to
the outside. Pile will heat to between
100°F and 160°F (37.8°C-71.1°C)
within a few days—even in cold
weather. Temperatures above 131°F
(55°C) kill most disease-causing
pathogens along with seeds and
weeds.
8. Add water as needed to keep the
pile the consistency of a wrung-out
sponge.
9. Compost is finished when the parti
cles are small, uniform, dark brown
and smell earthy.
Slow, low-maintenance compost:
This compost will take a few months
longer than the recipe above. This recipe
is perfect for gardeners who have a little
more time to compost. Use the recipe
above and add ingredients as they be
come available. Piles with a volume less
than 3 feet (0.3 m2) square will compost
much more slowly.
Retail organic garden outlets often make
actively aerated compost tea for their clients.
This brewer makes tea 24/7.
1. Turn or stir the pile when it is
convenient to do so.
2. Do not add weeds or diseased plant
residue, because pile will probably
not get hot enough to kill pathogens,
seeds, and weeds.
3. Solarize used soil to kill pests and dis
eases. Compost piles must be at least
three feet (91.4 cm) square to retain
more heat than they give off.
Compost Extracts, Leachates,
and Teas
The aim of compost extracts, leachates,
and teas is to complement and improve
compost/soil mixes rather than replace
them. Outdoors the enhanced soil
biology continues to improve soil for
months after application.
Compost leachate is the dark-colored
liquid that leaches out of the bottom
of compost piles and worm bins. The
solution is most likely rich with solu
ble nutrients, but it could also contain
pathogens early on. The leachate works
well to increase soil biology but in gen
eral is not a good foliar spray.
Compost extract is made from compost
suspended in a permeable bag (burlap,
nylon stocking, etc.) in a container
of water for one or two weeks. The
extracted liquid fertilizer from this
centuries-old technique is usually full of
soluble nutrients and soil biology. The
volume, richness, and brewing time of
the compost determine the potency of
the final extract
Non-aerated compost teas are a mix of
compost that serves as a source of biol
ogy and water. The mix is left to sit for
a week or two and stirred occasionally.
Anaerobic conditions created in the mix
help plant pathogens flourish. Non-aer-
ated compost tea could be detrimental
to plants. Most pathogens that attack
plants are anaerobic, living in low- and
no-oxygen environments. It is easy to
eliminate up to three-fourths of poten
tial pathogens by aerating the solution.
Actively aerated compost tea (also
called AACT or ACT) is actively
brewed using compost, microbial foods,
and catalysts added to the solution,
which is aerated with a pump to infuse
oxygen. The goal is to extract beneficial
microbes from the compost and grow
(and multiply!) populations of microbes
during a 24-to-36 -hour brewing period.
Compost is the source of microbes.
Microbial food (molasses, kelp and fish
powders, etc.) and catalysts (humic acid,
rock dust, yucca extract, etc.) encourage
growth and multiplication of the mi
crobes. Homemade ACTs are as potent
as commercial natural or organic fer
tilizers or amendments. Under optimal
conditions, the biology in the tea can
increase more than 10,000-fold!
A growing number of farmers, gar
deners, and horticulturists love aerated
compost tea. It helps suppress pathogens
such as Fusarium, Pythium, Phytopthora,
and powdery mildew. Aerated compost
tea also helps break down soil toxins and
those found on plants by inhabiting the
space around wounds and infections,
thus denying entry to pathogens.
Properly brewed natural organic aerated
compost tea cannot be overapplied. Food
and oxygen levels are decisive as to the
ability of microorganisms to reproduce
and multiply. The aim is to maximize
beneficial microbe growth without
over-replicating, which uses all the avail
able oxygen and causes the tea to become
anaerobic. Low- and no-oxygen teas can
www.marijuanagrowing.com
393
contain bad stuff including E. coli and
root-feeding nematodes. Achieve this
goal by keeping dissolved oxygen levels
above 6 mg/L during all brewing.
Two kinds of aerated compost tea
(ACT) include bacterially dominated
compost, which is made with humus,
vermicompost, and other sources of
bacteria. This type of tea is best for an
nual cannabis. Fungal ACT is promoted
and brewed with compost comprised of
woody materials and is best for woody
perennial plants.
Less oxygen is available at higher eleva
tions, and ACTs require longer brewing
times. Brews made at temperatures
above 90°F (32.2°C) need a shorter
brewing time and often less food. Cold
temperatures require a longer brewing
time. The water’s mineral and chemical
content will affect the final tea. Remove
bacteria-killing chlorine and chloramines
from water before adding compost.
Manure tea is made by placing manure
in a permeable bag (burlap or nylon
stocking) and suspending it in a con
tainer of water. The tea is left to steep
for a few days to two weeks. Manure tea
is dominated by anaerobic bacteria and
other organisms. Pathogens and other
bad things are most often present and
can burn foliage or cause other problems
when applied.
Take a look at the super-compost tea
makers at www.soilsoup.com. There is a
good “Organic Fertilizer and Amendment
Guide” at: http://www.extremelygreen.
com/fertilizerguide.cfm.
Recipes for Five Gallons of
Compost Tea
Compost tea: Add a shovelful of fin
ished, screened organic compost to a
5-gallon (18.9 L) bucket of clean water.
Let soak for 7 days, stirring several times
daily to add oxygen. Add a cup or two
of alfalfa (pellets) to increase nitrogen if
desired. Remove and apply one-quarter
strength to full strength to outdoor
containers or plants growing in soil.
This 30-gallon (113.6 L) compost-brewing
barrel makes enough compost tea to cover a
2,000 square foot (183 m2) garden.
Aerated compost tea: Use the above
mix and add an air pump. Include an
inexpensive aquarium air stone to make
bubbles smaller and more dispersed,
which will aerate the solution better.
This will increase aerobic microbial
growth. Add an eighth to a quarter cup
of molasses (1 to 2 tablespoons (14.8 -
29.6 ml) for every 3 days of
brewing) to maximize microbial
activity. This will boost soluble nutrient
levels substantially. Further enhance the
mix with catalysts, humic acid, yucca
extract, and so forth.
Aerobic tea is ready to use when it has
either an earthy or “yeasty” smell or a
foamy layer on top of the tea.
Excellent Ingredients for the
Compost Pile
Alfalfa meal or pellets: add extra
nitrogen, proteins and bacteria
Apple cider vinegar: adds about 30 trace
minerals and acidifies the solution a little
Brown sugar and corn syrup: are not as
good as molasses
Complex sugars, starches, and carbo
hydrates: rotten fruit, canned fish, etc.,
are best for fungal mixes
Corn meal: adds nitrogen, proteins,
bacteria, and has fungicidal properties
Epsom salts: a tablespoon or three
increases magnesium and sulfur levels
Fulvic acid: increases trace elements and
soil fertility
Green weeds: Grind them up to quickly
supply more food for bacteria
Once set up, air is injected into the active
compost mix for several hours.
Humic acid: adds organic matter and
water-holding ability to soils
Molasses: available in liquid or powder; an
outstanding sugar source for bacteria-
rich teas
Organic garden soil: packed with aerobic
bacteria, fungi, and other microbes
Seaweed: supplies all trace elements
and many growth hormones. But, after
a short time they become inactive or
break down entirely and add nothing to
growth.
Urine water: a potent organic nitrogen
source
Yucca extract: great soap-like
spreader-sticker and also used as a
human health-food supplement
Do not keep compost tea for more than
a day or two so that it does not turn
aerobic or lose potency. Apply as a soil
drench to increase microbial activities
and supply soluble N-P -K and trace ele
ments to soil. Foliar feed in conjunction
with soil drench as a quick fix to nutri
ent deficiencies and to protect plants and
control diseases.
Do not use harmful liquid soaps or
spreader-sticker agents when applying
compost teas. Use molasses, fish oil, or
yucca extract instead.
394
NUTRIENTS
www.marijuanagrowing.com
F
396 Hormones
396 Abscisin (Abscisic Acid [ABA])
396 Brassinolide (BR)
397 Auxins
397 Cytokinins (CK)
398 Ethylene (Ethene)
398 Gibberellins
399 Jasmonate (JA)
399 Salicylates (Aspirin) [ASA]
399 Enzymes
400 Amino Acids
400 Colchicine
400 Humic Acids
401 Fulvic Acid
401 Fungi
401 Mycorrhizal Fungi
402 Trichoderma
403 Bacteria
403 Rhizobia
403 Miscellaneous Additives
403 Alginic Acid
403 Carbohydrates and Sugars
404 Molasses
404 Colloidal Silver (CS)
404 Hydrogen Peroxide (H2O2)
405 Propolis
405 Triacontanol
405 Vitamins
405 Ascorbic Acid (Vitamin C)
405 B Vitamins
406 Growth Retardants
ADVANCED
MEDICALCANNA
HORTICULTURE
BJ/
BJip"
ADDITIVES
The terms additives, boosters, and supplements describe the
hormones, bacteria, fungi, sugars, vitamins, nutrients, and other
substances medical cannabis gardeners use to improve plant
growth. Until recently, most additives were a product of the
greenhouse industry or developed by organic gardeners.Today
many additives are being developed and popularized by medical
cannabis gardeners and hydroponics manufacturers.
*See “Organic Soil” in chapter 18, Soil, for more information on
the contents of organic supplements or additives.
Many of these substances are effective and true to their claims.
Some work quickly, while others require a week or longer to
affect growth when applied properly. Application and timing are
often very important. Be wary of scientifically undocumented
claims about products that promise unrealistic results. Manu
facturers of such products are more concerned with taking your
money than telling the truth. Read advertising carefully and with
a critical eye. Go to medical cannabis forums to see how other
gardeners fared with the product. Remember that plant growth
regulators cannot correct poor gardening practices. Use additives very carefully or not at all when plants are sick. Also, be wary
of different “scientific” websites, and know that most blogs are prowled by charlatans. Beware of shills!
Some additives, such as gibberellic acid, ethylene, and fulvic acid, are available in pure form, but most often they are packaged
together with other additives in products to perform specific tasks—to promote rooting, setting more buds, growing bigger
flower buds, and increasing overall vigor. Again, read labels; be sure you know what all the ingredients are before giving any
additives to plants.
www.marijuanagrowing.com
395
Superthrive was one of the first additives
available at garden centers.
Study instructions for additives and
carefully determine the correct dosage
and application timetable. Additives may
be available as liquids, powders, crystals,
granules, and more. They are also avail
able in various concentrations. Check
with manufacturers and retailers. Most
additive manufacturers have a website
that provides additional information on
their products. As with any additive,
make sure the effects of one do not
counter the effects of another.
Caution! Additives, especially those
containing hormonal products, can be
and often are dangerous for the end
user. Plant growth regulators (PGRs)
are regulated by most governments for a
reason— some are proven carcinogens,
even at very low rates. Residuals from
growth regulators also tend to remain in
the plant and in the harvested parts, and
are thus passed on to the consumer. The
intent of medicinal growing is the same
as the intent of a medical doctor—to do
no harm. Use of PGR products outside
of their specific safety registration is not
wise and should be confined entirely to
the person or persons that decide to use
them, and not passed along to unsus
pecting patients or other consumers.
This chapter will give you an overview
of additives and how they complement
medical cannabis growth.
Hormones
Plant hormones are chemical messengers
that control or regulate germination,
growth, metabolism, or other physiolog
ical activities such as root growth and
flowering. Environmental conditions
cause plants to release appropriate hor
mones that will elicit changes in growth.
These organic compounds are generally
effective even at very low concentra
tions. They interact with target tissues
to guide cell growth and development.
Each response is often the result of 2 or
more hormones acting together. Plant
hormones can be naturally occurring
within plants, and many can be syn
thesized in the laboratory, increasing
the quantity of hormones available for
commercial applications.
Hormones are also called plant growth
regulators. The successful use of PGRs
is often by trial and error, not an exact
science. Understanding cannabis growth
and development will diminish the
learning curve. Hormones are most effec
tive when applied at specific times, in the
proper conditions and dosage, and when
integrated into regular growth schedules.
To achieve desired results when experi
menting with hormones, pay very close
attention to dosage concentration and
application time, taking into consider
ation the time of day and the growth
phase of plants. Often, plants being
treated with hormones must be isolated.
For example, a dilute concentration
of auxins encourages cuttings to grow
roots. But when overdone, the same
hormone (auxin) spurs more of another
hormone (ethylene) to be produced.
Ethylene, the “death hormone,” causes
plants to grow smaller and have thicker
stems and smaller flower buds that ripen
earlier.
Two valuable hormone classes, cyto
kinins and gibberellins, can be used to
change plant sex, which is very handy
when making plant crosses with a single
male or female plant. Cytokinins cause
female flowers to form on male plants,
and gibberellins cause male flowers to
grow on female plants. Colloidal silver,
which is not a hormone, also makes male
flowers grow on female plants.
Abscisin (Abscisic Acid [ABA])
Abscisin maintains dormancy in seeds
and can cause dormancy in developed
plants. Its primary effect is to inhibit
cell growth. Water stress caused by high
temperature, low humidity, or a high EC
in the growing medium triggers increases
in abscisin synthesis, causing stomata to
close. It inhibits shoot growth and may
stimulate root growth. It may also help
defend from pathogens. During winter,
abscisin accumulates to slow or stop
cell division to protect plants from cold
damage or dehydration. In case of an
early spring, abscisin will also prolong
dormancy, preventing premature sprouts
that could be damaged by frost. Abscisin
is a gibberellin inhibitor.
Abscisin II is extracted from cotton
as the abscission-inducing chemical.
Dormin was extracted from sycamore
leaves for the same purpose. ABA does
induce dormancy in a few species of
plants. Mainly it seems to inhibit the
gibberellic acid enzyme production
pathways.
Applied in the garden, ABA may help
plants resist drought and unseasonable
conditions, as well as improve plants’
productivity, strength, and performance.
ProTone SL is an example of a product
that contains abscisin.
Brassinolide (BR)
Brassinolide is one of the hormones
from the brassinosteroid class (plant ste
roids) that regulate plant development
and growth. It promotes stem elonga
tion, root mass, and cell division. It
is also involved in other plant processes
including drought resistance, stress
response, cold resistance, pollen growth,
and aging. A deficiency causes stunted
growth and infertility. It is a naturally
occurring plant hormone that was the
first brassinosteroid to be isolated, in
1979. Since then more than 70 BRs
have been isolated from plants. Little is
known about how BRs relate to cannabi
noids. Brassinolide also appears to work
with all other hormones to heighten
effects or as integral parts of the path
ways. They also mimic human steroids
and can be anabolic.
396
ADDITIVES
www.marijuanagrowing.com
MaximaGro is an example of a product
that contains brassinolide.
Auxins
Auxins represent a group of plant
hormones that regulate growth and
phototropism. Auxins affect many
processes, including water assimilation,
cell division, and cell stretching—often
softening cell walls. Top branches grow
vertically taller where auxins are concen
trated and inhibit lateral buds in the phe
nomena known as “apical dominance.”
“Pinching off” branch tips or pruning
branches will reduce the auxin level and
encourage bushy, lateral growth as well
as inducing new root formation.
Auxins are ingredients in many rooting
products because they encourage roots
to form on stems. Medical cannabis
gardeners use various auxins to encour
age root growth. Synthetic auxins are
more stable and last longer than natural
solutions. In high concentrations, auxins
are sometimes used as potent herbicides.
One of the many examples of auxin hor
monal action is seen in phototropism,
the movement of plants in response to
a light source. Light causes auxins to
be transported to the shaded side of
the shoot. Auxins cause the cells on the
shaded side to elongate more than the
cells on the lit side. The shoot or leaf
bends toward the light and hopefully
improves its exposure.
Experiments by Canna proved that weak
concentrations of auxins slightly stimu
lated flower formation but flowers took
longer to ripen. High concentrations
inhibited growth and caused deformities
and tumor-like symptoms.
Indole-3 -acetic acid (IA A) is the most
potent naturally occurring plant auxin.
It is manufactured primarily in young
leaf shoot tips, in embryos, and in devel
oping flowers. It suppresses leaf drop
and flowering in cannabis. However,
IAA is unstable and therefore not used
as a commercial plant growth regulator.
1-naphthaleneacetic acid (NAA) is a
synthetic organic compound similar to
IAA but with a longer shelf life. This
man-made plant hormone is included
in many commercial rooting products.
This PGR improves cell division and
expansion. As a rooting agent, NAA
is used for vegetative propagation of
cannabis stem cuttings (clones). NAA
tends to be counterproductive to
seedling root development,as it inhibits
taproot growth and enhances horizon
tal root growth. NAA also suppresses
growth tip development, which redirects
growing energy to the roots.
4-chloroindole-3 -acetic acid (4-C1-IAA)
is a chlorinated derivative of the IAA
auxin. Commonly found in legume seeds
and believed to be a “death hormone,”
maturing seeds use 4-C1-IAA to induce
death of the parent plant and activate
nutrients to be stored in the seed.
Indole-3-butyric acid (IBA) is the
main rooting plant hormone in many
commercial products. It is naturally
occurring in small amounts, but most
sources are synthetic. Applications of
IBA help generate roots, build larger
root masses, and improve plant growth
and yield.
Many commercial formulas are available
in the form of water-soluble salts. Cut
tings can be dipped or immersed in IBA
before planting, and roots can be dipped,
sprayed, or drenched during transplant
ing. Once established, plants should be
treated at 3- to 5-week intervals during
the growing season.
There is very little written to support
the theory that IBA can be used to
encourage regeneration of flowers.
However, auxins’ effects are many and
wide, including floral production,
delaying dormancy, and synergistic
effects with many other hormones, espe
cially cytokinins and ABA. We do know
that it is a required hormone for proper
floral development and that it might be
the key in producing another batch of
flowers, but regeneration of the plant
and plant flowers is doubtful. Commer
cial auxins such as IBA have many other
effects that might be categorized as
causing a breaking (growth) of any dor
mant lateral vegetative buds. This may
be more of a cytokinin response as it
allows previously differentiated cells to
begin division again. IBA’s possible role
in the regeneration of flowers remains in
controversial, and nothing definitive can
be stated at this time.
2-Phenylacetic acid (PAA) is primarily
found in fruits. Its effects are much
weaker than the effect of the IBA. It is
also an ingredient in methamphetamines
and is a controlled substance in most
countries.
The auxin family also contains man
made synthesized herbicides. The infa
mous Monsanto-Dow product “Agent
Orange” included a 1:1 ratio of the
synthetic auxins dichlorophenoxyacetic
acid (2,4-D) and 2,4,5-trichlorophe-
noxyacetic acid (2,4,5-T ). The illnesses
caused by Agent Orange are thought to
be a result of contaminated 2,3,7,8-
tetrachlorodibenzo-p-dioxin (TCDD)
as a result of the manufacturing process,
an^ not a result of the auxins.
Products that contain root-inducing
hormones are available in liquid, pow
der, and gel forms. Examples of such
products are Rootone (NAA), Hormex
(IBA), Clonex (IBA), Schultz TakeRoot
(IBA). Many of these products are avail
able in a generic form that costs much
less than the name brand.
Caution! IBA and other hormones are
hazardous to humans and animals. Some
can cause moderate eye injury and are
harmful if inhaled or absorbed through
the skin. Read the entire label and
follow directions!
Cytokinins (CK)
Cytokinins (aka cell division hormones)
are plant hormones that promote cell
division in root tips and growing shoots.
Cytokinins also affects leaf senescence
(aging). Naturally found in coconut
milk, cytokinins encourage metabolism
by stimulating the transport of sugars
and bud development on side shoots.
Concentrations are highest in young
leaves, root tips, and seeds. Cytokinins
also stimulate female flowers to form on
male plants.
Added to the soil or sprayed on plants,
cytokinins help plants make efficient
use of existing nutrients and water in
drought conditions. Leaf surfaces are
larger and flower formation is faster in
cytokinin-treated plants, but harvest
www.marijuanagrowing.com
397
time is the same as if cannabis plants
were untreated.
Take extra care when using or exper
imenting with cytokinins mixed with
other plant hormones. Many commercial
formulas contain hormone cocktails that
may include both auxins and cytokinins,
which can work in opposition to each
another. A high ratio of auxins to cyto
kinins stimulates root formation. A low
ratio promotes shoot formation.
Derivatives of the adenine-type include
6-benzylaminopurine, kinetin, and
zeatin. The most active and common is
zeatin, isolated from corn (Zea mays).
Cytokinins are synthesized in the roots,
promoting cell division, chloroplast
development, and leaf development,
and delaying leaf aging. As an additive,
cytokinins are most often derived from
the kelp Ascophyllum nodosum. Look for
seaweed products that contain this sea
weed. Kelp meal is also added to many
organic fertilizers.
6-benzylaminopurine (BAP) is a
synthetic cytokinin used to encourage
growth, flower setting, and cell division.
Pure BAP does not dissolve directly into
water; it is first combined with alcohol
or another solvent and then diluted with
water. BAP is commercially available as
the product Configure.
According to some gardeners, a concen
tration spray of 6-Benzylaminopurine at
300 ppm halfway through flowering will
increase flower bud growth and weight.
Kinetin is a cytokinin often used in
plant-tissue culture combined with an
auxin to induce callus formation. Cyto
kinin derivatives have been synthesized
and many are as effective as kinetin.
Different cytokinin:auxin ratios affect
growth rate of plants. For example, if
kinetin is high and auxin is low, shoots
are formed; if kinetin is low and auxin
high, roots are formed. Kinetin suppres
ses ethylene production. Many antiaging
skincare cosmetics use kinetin.
Zeatin is a cytokinin growth hormone
used to encourage lateral plant growth.
Upon germination, zeatin moves from
the endosperm to the root tip where it
stimulates mitosis. It encourages auxil
iary stem growth that sets more buds.
Coconut milk is a naturally occurring
source of zeatin. Zeatin is also com
monly used in skincare products. It is
available as a white crystal powder and
in an aqueous solution.
Products that contain cytokinins
include Maxicrop, Dr. Earth Kelp Meal,
Neptune’s Seaweed, Alg-A-Mic, and
Bushmaster.
Ethylene (Ethene)
Ethylene is a naturally occurring
hormone that activates the aging and
ripening of flowers and fruit, prevents
the development of flower buds, and
retards plant growth. Roots, senescing
flowers, and green growth tips contain
the largest amounts of ethylene. It is
the primary hormone responsible for
chlorophyll destruction, leaf detach
ment, flower senescence, and fruit
ripening. This growth regulator is
called the “ripening,” “post-harvest,”
or “death” hormone.
Ethylene concentrates in plant tissues
when plants suffer stress. Production
will increase in roots when necessary
to add girth so they can penetrate hard,
impairing surfaces. In windy areas out
doors or indoors where a fan is blow
ing too much air, plants produce more
ethylene to increase stem diameter and
counteract effects from the wind. The
result is thicker stems on smaller plants
with small buds that ripen prematurely.
Soggy, waterlogged growing mediums
cause ethylene to accumulate in the root
zone and migrate up the stem as severity
increases. Symptoms include leaf yellow
ing (chlorosis), thickening of stems, leaf
margins curving downward, and greater
vulnerability to diseases and pests.
Avoid infusing ethylene where young
plants are present, or you will risk
dwarfed growth, premature flowering,
and small flower buds. Stressed and
flowering plants release ethylene that
must be vented and removed daily when
they are around young plants, to prevent
the risk of premature ripening.
Ethylene is also a by-product of fossil
fuel combustion in CO, generators.
High concentrations will cause leaves to
yellow very quickly. Adequate ventila
tion will evacuate “toxic” levels of eth
ylene. Minute concentrations as low as
10 parts per billion (ppb) in the air can
cause abnormal growth and susceptibili
ty to diseases and pests. Excess ethylene
can also be a major issue with improper
ly vented or unvented gas heaters as well
as leaking heat exhaust systems, and is
normally seen in colder months when
plants are grown indoors.
In a sealed environment, natural ethylene
production levels increase over time. A
closed refrigerator allows ethylene to
build up. Any closed environment—
a paper bag, room, or jar—will have a
similar effect. Placing fruit, tomatoes, or
avocados in a sealed paper bag will speed
ripening. Ripe fruit will emit ethylene
and impact harvested cannabis flower
buds in the vicinity. Storage areas should
have adequate ventilation to evacuate
built-up ethylene.
Sealing dry cannabis in a vacuum will
decrease ethylene production by lower
ing temperature and available oxygen.
Ventilation will carry away ethylene and
reduce levels to tolerable concentrations.
Seed treatment with carbon dioxide or
ethylene before sowing has a positive
influence on growth, budding, flower
ing, and ripening of hemp. Root devel
opment, seed production, and total
yields also are increased by treatment.
Products that contain ethylene include
Ethephon, Etacelasil, Glyoxime, and
Sensa-Spray, and are most often available
in a liquid (foliar spray). Be careful using
Ethephon and Etacelasil or any other sys
temic plant regulator. Once sprayed with
a PGR, plants should not be consumed.
Caution! Ethylene can be phytotoxic
if applied during hot weather or when
improperly diluted. Isolate plants so that
nontarget plants are not affected.
Gibberellins
Gibberellins are natural plant growth
hormones that act with auxins to break
dormancy and increase seed germina
tion, stem diameter, fiber content, and
vertical growth. Found naturally in
seeds and young shoots, they stimulate
cell division and elongation. At least 75
398
ADDITIVES
www.marijuanagrowing.com
plant-based gibberellins have been iso
lated. They are referred to as GAI, GA2,
GA3, and so on. Gibberellic acid (GA3)
is the most common.
Gibberellic acid is an ingredient in com
mercial products and is used to extend
the garden season and force larger blooms
in some agricultural crops. It is widely
used in the grape-growing industry to
increase production of larger fruit bun
dles and bigger grapes, and to produce
grapes on seedless varieties. GA3’s
primary use in cannabis gardens is to
increase plant height and encourage male
flower development on female plants.
Be very cautious with application rates;
plant stems can grow, stretching up to 4
inches (10 cm) a day! Application during
vegetative growth delays flowering.
Pollen from male flowers that were in
duced with GA3 on female plants is used
to pollinate female flowers. Resulting
seeds from this union always produce
female (feminized) plants. Low doses
(25-100 ppm) of GA3 sprayed on female
plants for 7 to 10 days immediately
before flowering will cause up to
80 percent of treated plants to grow
male flowers. Use this pollen to polli
nate “feminized” seeds. For more infor
mation, see chapter 25, Breeding.
Environmental factors also cause extra
gibberellin production. Low light levels
cause gibberellin production that results
in lanky growth. Too much light causes
buds to shoot up, creating tall, narrow
flower tops. A rule of thumb is to keep a
600-watt lamp a minimum of 20 inches
(50 cm) above the plant canopy.
When seeds absorb water, gibberellins
develop in the embryo and activate
plant metabolism to initiate sprouting.
GA3 helps difficult-to-germinate seeds
sprout. However, I advise to use scarifi
cation (see chapter 5, Seeds & Seedlings')
rather than GA3.
GibGro is an example of a product that
contains gibberellic acid. It is available
in 5 percent, 10 percent, and 20 percent
wettable powder packages, as well as the
4 percent liquid solution.
Caution! If misapplied, gibberellic acid
can cause very tall, lanky cannabis plants.
Jasmonate (JA)
Jasmonate is, by definition, a hormone,
although it arises from linolenic acid as
either jasmonic acid, a response to insect
attack primarily involved in gene activa
tion and expression, and jasmonate,
which activates resistance, as well as
pollen and anther development.
Salicylates (Aspirin) [ASA]
Aspirin, or salicylic acid, is effective
in preventing pathogens (bacteria,
fungi, and viruses) by speeding up the
natural “systemic acquired resistance
(SAR)” and thereby reducing the need
for pesticides. It is a naturally occurring
plant hormone associated with willow
tree bark. Often, plants do not produce
enough on their own to be effective. Sal
icylic acid (SA) will block abscisic acid
(ABA), allowing the plant to return to
normal after a period of stress—some
thing to consider if ABA is being used
to strengthen plants. It is added to a vase
of water to prolong the life of cut flowers.
Aspirin can be ground up and diluted in
water to be used as a spray or soak, or
it can be added to compost and root
ing compounds. A 1:10,000 solution
used as a spray will stimulate the SAR
response, and the effects will last weeks
to months. “Willow water” also makes a
popular rooting bath. See “Willow
Water” in chapter 7, Clones & Cloning.
Many forms of salicylic acid are available
in the form of aspirin.
Caution! Some people have an aller
gic reaction to salicylic acid, which is
responsible for numerous deaths in the
world every year.
Enzymes
Enzymes are biological protein catalysts
that accelerate rates of reaction but do
not change themselves as a result of this
action. They are added to fertilizers and
growth additives to accelerate biological
activity and speed nutrient uptake by
roots. For example, the enzyme nitrate
reductase reduces nitrates and steals
electrons for energy, breaking them
down into the nitrite form. This is the
first step in assimilating N into organic
compounds. Nitrite reductase assim
ilates nitrite into the ammonium ion.
Some products that include enzymes are
Sensizym, Hygrozyme, Power Zyme, and
Cannazym. Many organic compost products
contain beneficial enzymes.
Ammonium is then transferred to the
“vacuole if high levels are present of 2
other enzymes: glutamine synthetase,
which reduces ammonium to glutamine,
or glutamate synthase on Its way to
being converted into amino acids.
More than 1,500 different enzymes have
been identified. Enzymes are grouped
into 6 main classes: oxidoreductases,
transferases, hydrolases, lyases, isomer
ases, and ligases.
Enzymes are a naturally occurring by
product of composting. Many seaweed
extracts are brimming with enzymes
(along with many trace elements, hor
mones, etc.). However, as their function
tends to be isolated to cellular function
outside of soil or medium function, I am
unaware of any beneficial use in applying
enzymes.
Most enzymatic reactions occur within
a temperature range of 85°F to 105°F
(29.4°C-40.6°C), and each enzyme has
an optimal pH range for activity. Most
enzymes react with only a small group
of closely related chemical compounds.
Enzymes are highly specific and only
function on their matching substrate.
For instance, cellulose only breaks the
bonds of cellulose, pectinase only breaks
down pectin, and individual molecules
are usually used over and over until they
lose their form, or denature. Also, soil
www.marijuanagrowing.com
399
enzymes work at standard soil tempera
tures of 70°F to 80°F (21°C-26l,CJ)
even though they can speed up, with
elevated chemical reactions coming at
higher temperatures.
Cellulase is a group of enzymes that act
in the root zone to break down organic
material that may rot and cause disease.
Dead materials are converted into glu
cose and returned to the substrate to be
absorbed by the plant. Cellulase breaks
down cellulose fiber. For example, the
enzyme contained in the product Can-
nazym breaks down dead root cellulose
and hemicelluloses into simple sugar
compounds. Cellulase is used through
out production as roots are constantly
shed. It also functions against the cell
wall that contains cellulase of several
classes of fungi including the water
molds [Pythium, Phytophthora) and
Rhizoctonia (decreases the availability of
its parent material before its populations
get to plant-affecting levels), providing
some protection from these pathogens.
Amino Acids
Plants produce biosynthesize amino
acids naturally. Applying specific sup
plemental amino acids as a foliar spray
or soil drench can increase crop yield
and quality. Amino acids can directly or
indirectly contribute to a plant’s physi
ological activities. Apply specific amino
acids as a soil drench or foliar spray to
help improve soil life, which in turn
facilitates nutrient uptake.
Note: A complete discussion of the
many, many amino acids is beyond the
scope of this book. This is an isomer
form known as an optical isomer that
occurs in two states, the L and D forms
effectively doubling. Also, plants’ amino
acid uptake is species dependent, and
ectomycorrhizal roots expand this. For
instance, the Scot’s pine is known to take
up 13 types of amino acids, all L isomer
and all basically containing 15 nitrogen
and 13 carbon atoms. However their
function seems to be relatively the same
in that they are used for the ammonium
ions and the carbon they contain...the
only direct uptake and utilization
of carbon.
Plants absorb amino acids best through
foliar spraying. There is a soil life benefit
Humic acid is available in liquid form
from exposure, and at least partial soil
application is recommended.
Colchicine
Colchicine, an alkaloid, is prepared from
the dried corms and seeds of the autumn
crocus (Colchicum autumnale) that pro
duces saffron; it is available in the form
of a pale-yellow, water-soluble powder.
Caution! Colchicine is a very dangerous,
poisonous compound. Colchicine poison
ing is similar to arsenic poisoning. Canna
bis breeders have used it to induce poly
ploid mutations, and more than 30 years
ago started producing polyploid varieties
with colchicines. None of the varieties
showed outstanding characteristics, and
their cannabinoid levels were unaffected.
Colchicine can also be used to induce
female chromosomes in female plants
that produce seeds. However, many of
the resulting seeds may not sprout, and
a large percentage of them could have
intersex (hermaphrodite) tendencies.
Rather than explain how to use
colchicine, I will advise not to use it.
It is very toxic and produces no change
in potency. I do not know any seed
breeders that use it today. If you are
not convinced, search the Internet for
“colchicine poisoning.” For more infor
mation, see Marijuana Botany by Robert
Connell Clarke.
Humic acid is also available in powder form
to dilute in water
Beautiful 'Mom Booey' X 'Kona Sunset' bud!
Humic Acids
Humic acids are carbons formed by the
decomposition of organic matter, pri
marily vegetation. It is not a single acid;
rather, it is a complex mixture of many
different acids. Often humic acids are
“talked up” by vendors making outra
geous claims. Scientific research proves
that humic acids do 4 basic things: (1)
act as a colloid in providing structure
in the soil, (2) act as chelating agents
to facilitate nutrient availability to the
plant, (3) act like a docking station by
attaching to a single cation-exchange site
and providing space for many elements
to bind, and (4) increase cell permeabil
ity, which would also allow for better
nutrient uptake. Cannabis roots and
plant tissue do not take in humates.
Humates act in the soil and help nutri
ents become more available. Canada
does not allow “humates” on fertilizer
labels, and neither does the Association
of American Plant Control Officials.
400
ADDITIVES
www.marijuanagrowing.com
Humates Chelate
Organic humic and fulvic acids chelate
semisoluble metallic ions (nutrients),
making them readily transportable by
water. This ability is dependent upon the
water pH level. Copper, iron, manga
nese, and zinc are difficult to dissolve.
When mixed in a chelated form, they
become readily available for absorption.
Humus is formed from compost that
has matured to the point of stability.
It is so stable and so mature that it can
remain unchanged for thousands of
years in that state. Humic acid, fulvic
acid, and humin are all humus extracts.
Humic acid is made from finely grinding
humus and then adding a low-pH water
solution so humic acid can be separated
from the fulvic acid. Humic acid helps
free nutrients from the soil so they
become available to the plants.
Humin is the fraction of the soil’s or
ganic matter that is not dissolved when
the soil is treated with this alkali. Colors
range from yellow (fulvic acid) to brown
(humic acid) and black (humin).
Fulvic Acid
Fulvic acid is a humic acid that has
a lower molecular weight and higher
oxygen content than other humic acids.
Fulvic acid is commonly used as a soil
supplement. Contrary to popular belief,
fulvic acid is not able to be absorbed into
plant tissue and is not an antioxidant.
Fulvic acid is the fraction of humic
substances that is water soluble under
all pH conditions. Fulvic acid stays in
solution after humic acid dissipates due
to acidification. Fulvic acids are poly
electrolytes, unique colloids that easily
diffuse through membranes.
Gardeners can create fulvic acid by
composting, or it can be purchased from
a retailer. It is available in forms that are
suitable for hydroponic or soil mediums.
See “Organic Soil” in chapter 18, Soil,
for more information on fulvic acid.
Fungi
Mycorrhizal Fungi
Mycorrhizal refers to a class of fungi
that forms a symbiotic relationship
Humic Substances
(Pigmented Polymers)
/;\
Fulvic Acid
Humic Acid
Humin
Distinguish fulvic and humic acids and humin by color.
between mycelium of specific fungi and
roots of plants. The ectomycorrhizal
fungal hyphae (microscopic strands that
grow from fungal spores) surround and
encapsulate roots and exchange nutri
ents because they are so close together.
Endomycorrhizal fungal hyphae actually
enter the cells of roots to exchange nu
trients. Mycorrhizal fungi grow around
and even penetrate root tissue and grow
out into the soil to find more water and
nutrients than roots could find on their
own. This is essentially a second root
system that improves water and nutrient
uptake and contributes to the overall
health of the plant.
The two fungi species that are known
to colonize the roots of cannabis are
Glomus intraradices and Glomus
mosseae. Make sure these species are
included in any mycorrhizal fungi
product you purchase. These species
have the maximum potential to colonize
cannabis roots. However, there are many
mycorrhizal fungi that have yet to be
discovered and studied.
Mycorrhizal fungi naturally occur in
areas where plants are not disturbed by
human activity, but these beneficial
fungi are often lacking in urban and
indoor environments.
Mycorrhizal fungi take time to become
established enough to be of assistance to
the plant, so they should be introduced
early in a plant’s life cycle. Apply spores
to seeds or a cutting’s roots when plant
ing. It can take 6 weeks or longer for full
mycorrhizae colonization to occur. Plants
that grow for 3 months or more receive
the most benefit from mycorrhizae
colonization.
Apply fungal spores to the seeds or
prepared cuttings’ roots when planting
or transplanting. For best results, inocu
late the root zone with a high spore
(propagule) count per gram. Typically,
G. intraradices powder-based products
Mycorrhizal fungi, available in powder form
vvww.marijuanagrowing.com
401
Phosphorus
Zinc
Copper
Root hair
Casparian
strip
Cortical cells
Stelar cells
Vesicle
Epidermal Arbuscules
cells
Endodermal
Phloem
cells
tubes
Xylem
vessels
Mycorrhizal fungi help make nutrients in the soil more readily available for uptake. Most organic molecules, especially long-chain types derived
from humates breaking down to form humic and fulvic acids, are not taken up by the roots or through the leaves, and the same is true for the fungi.
have about 3,200 spores per gram, and
liquid products have about 2 million
spores per gram. G. mosseae is typically
available at 200 spores per gram. Most
mixes don’t contain both G. intraradices
and G. mosseae . You may have to pur
chase them separately in bulk. Here is a
good resource for products:
www.usemykepro.com.
Encourage mycorrhizae by inoculating
soil. Compost tea, fulvic acid, humic
acid, and carbohydrates are used to
promote healthy mycorrhizae growth.
Add as a soil amendment or mix with
a nutrient solution and use as a drench.
Incorporate mycorrhizal fungi into the
top 4 inches of soil, or mix with potting
soil when planting.
Here is an example of a mycorrhizal fun
gi mix that comes from my friend Sannie
in the Netherlands: www.sanniesshop.
com/sy mbiosis-mycorrhiza.html.
Analysis:
93 endomycorrhizae spores I gram
Glomus intraradices
Glomus clarum
Entrophospora colombiana
Glomus sp.
Glomus geosporum
Glomus mosseae
Glomus etunicatum
Rhizobacteria:
Bacillus subtillus
Paenibacillus azotofixans
Bacillus pumilus
Bacillus polymixa
Bacillus megaterium
Bacillus licheniformis
Trichoderma
Trichoderma are fungi that colonize in
the root zone, crowding out negative
fungi and microorganisms while stimu
lating root development and resistance
to environmental stress. The result is a
stronger, more vibrant plant. Trichoder
ma are naturally present in coconut fiber
and growing medium. Note that steriliz
ing coco growing medium with steam or
other means kills Trichoderma.
There are 89 species in the Trichoderma
genus. Several varieties of Trichoderma
have been developed as biocontrol agents
against fungal diseases of plants. The
various mechanisms include antibiosis,
parasitism, inducing host-plant resis
tance, and competition. Most biocontrol
agents are from the species Trichoderma
harzianum, T. viride, and T. hamatum.
The biocontrol agent generally grows in
its natural habitat in the rhizosphere on
the root surface, and affects root disease
in particular but can also be effective
against foliar diseases. Trichoderma is
also effective in suppressing pathogenic
fungi that cause damping-off—rot in the
seeds, roots, and stems. Some strains of
T. harzianum have an antagonistic effect
on Botrytis cinerea development in some
crops.
Canna was the first company to popu
larize a commercial product as a growth
promoter that contains Trichoderma
fungi. Now there are many similar prod
ucts available. Trichoderma products
can be applied to seeds, used during
transplanting, mixed with liquid ferti
lizer or via drip irrigation, and/or
watered in. Quality Trichoderma prod
ucts contain living organisms that will
reproduce after application, so a small
amount will do a lot. Most all are
nontoxic and environmentally safe.
There is one documented case of a
402
ADDITIVES
www.marijuanagrowing.com
human Trichoderma-related death in
South America; the species invaded the
digestive system and blocked it.
Products that include Trichoderma
species include Promot Plus and Canna
Trichoderma Powder. Trichoderma are
naturally present in coconut fiber, com
post, and compost tea.
Bacteria
Bacteria, considered the earliest form
of life, are found in virtually every
environment on earth. For at least 3
million years they have managed to
adapt to most environments and avoid
extinction. Single-celled bacteria are
so small that 250,000 to 500,000 of the
little single-celled organism could fit on
the period to a sentence. More than a
billion bacteria, constituting hundreds
of species, are found in a single gram of
soil. Overall, microscopic bacteria are
beneficial to plant growth.
Bacteria are one of the main decompos
ers of fresh green organic garden matter.
Different bacteria eat diverse organic
matter. Beneficial bacteria travel short
distances and promote good health in
medical cannabis. Once food and nutri
ents are inside bacteria, they are “locked
up” until the bacteria are consumed.
There are 2 groups of bacteria: aerobic
and anaerobic.
Anaerobic bacteria do not need oxygen
to survive. In fact, O2 is poisonous to
them. In general, anaerobic bacteria
are to be avoided and not promoted.
By-products of some anaerobic organic
decomposition include hydrogen sulfide
and butyric acid, both of which smell
like vomit, and ammonia, which smells
like vinegar. If you know these odors,
you know the smell of anaerobic decom
position. Conditions that promote
anaerobic bacteria include standing water
or compacted soil with little pore space.
A few species of anaerobic bacteria
attack plants. They launch their assault
on sick plants with few defenses, or ones
that are suffering from diseases or pest
wounds. Bacteria colonize, entering
through weak tissue and wounds. How
ever, healthy plants are very resistant to
bacteria attacks.
Aerobic bacteria need oxygen to live
and, overall, are the ones we want in the
garden. For the most part, aerobic bac
teria are beneficial, but parasitic varieties
do exist. Aerobic, organic decomposi
tion does not cause unpleasant odors;
instead, it has a sweet, earthy fragrance.
Bacteria recycle 3 basic elements: carbon,
nitrogen, and sulfur. Sulfur-oxidizing
bacteria make water-soluble sulfates
available to plants. Bacteria convert
inert atmospheric nitrogen into “fixed”
nitrogen—ammonium, nitrate, or nitrite
ions. Bacterial slime (biofilm—DNA,
proteins and sugars) also buffers the
rhizosphere so the pH remains reason
ably constant. Bacteria attach to parti
cles of soil and lock up nutrients. The
nutrients stay in the same place in the
soil and are not leached out. When other
organisms eat the bacteria, nitrogen is
released in their poop—right next to the
rhizosphere where it is readily available
to roots. Bacteria act as living containers
of organic fertilizer and also serve as
food to members of the soil food web.
Beneficial bacteria need decompos
ing plant material to thrive, and a pH
around 7.0 . Bacteria are naturally
occurring worldwide and will form in
the correct environment.
Healthy compost teas are rich in
beneficial bacteria.
Rhizobia
Nitrogen in the air becomes “fixed” by
rhizobia—bio-fertilizing bacteria.
Naturally occurring bacteria such as
rhizobia live in the roots of legumes
(beans, clover, peas, peanuts, etc.). Once
colonized with the bacteria, legumes
will create nodules that act in symbiosis
with the plant. Because of this symbiotic
relationship with nitrogen-fixing bacte
ria; legumes can be planted as compan
ion plants to cannabis. They are often
referred to as “plant growth promoting
rhizobacteria” (PGPRs).
Rhizobia are host-specific according
to their type and will not work with all
crops. With the proper host, however,
rhizobia fix atmospheric nitrogen while
simultaneously providing an additional
source of available nitrogen. Rhizobac
teria are added with legume cover crops
to improve nitrogen levels in deplet
ed garden soil. The product Azopar
contains nitrogen-fixing Azospirillum
inoculum for non-leguminous plants.
Miscellaneous Additives
Alginic Acid
Alginic Acid (aka algin or alginate) is
an anionic polysaccharide found in cell
walls of brown algae. When it binds with
water, it forms a viscous gum that holds
vast quantities of water. The extracted
form soaks up water quickly and can
absorb 200 to 300 times its own weight
in water. Its color ranges from white to
yellowish-brown.
Products that include Alginic acid
include: B52, Dr. Earth Kelp Meal,
Neptune’s Seaweed, Alg A Mic. Many
seaweeds and kelps include alginic acid.
/
Carbohydrates and Sugars
Carbohydrate is a hydrate of carbon.
Carbohydrates provide energy to living
cells, such as soil life. They are com
pounds containing carbon, hydrogen,
and oxygen with a ratio of 2 hydrogen
atoms for every oxygen atom. Carbo
hydrates are known as sugars, starches,
saccharides, and polysaccharides.
Sugars are carbohydrates that can be
used immediately to supply energy to
living organisms. Molasses, honey, and
other sugars can increase soil microbial
life, enhance growth, and make the
plant’s use of nitrogen more effective.
Molasses is the “secret ingredient” in
many organic fertilizers, and the natural
sugar best for organic medical cannabis
crops. Sucrose (corn) syrup is the most
economical way to buy sugar, but it
lacks many of molasses’ qualities.
Plants manufacture sugars. Plant roots
do not absorb sugars, raw or refined.
Bacteria and other soil life consume
sugars as food or fuel. Adding organic
sugar in the form of molasses to the soil
increases soil life and biological proc
esses in and around the root zone.
The extra life allows roots to absorb
nutrients more quickly and efficiently,
which increases plant growth. In fact,
flower buds can gain up to 20 percent
more weight when a regular regimen of
molasses is added to irrigation water.
www.marijuanagrowing.com
403
Buds grow bigger because there was
more microbial activity in the soil.
Sugars feed the soil life, and more
healthy microbial activity makes more
nutrients available that are taken in
faster. And the soil life releases the
carbon as CO2 that moves up through
the plant canopy, enhancing CO2 uptake
and subsequent carbohydrate production
by the plant.
Add sugar (molasses) at the rate of 2
tablespoons per gallon (4 ml/L) to soil,
starting during vegetative growth and
continuing through flowering. Adding
more will not increase plant growth;
instead it will imbalance soil life and
attract scavengers.
NOTE: Any sweet taste or flavor that
vendors attribute to coming from
sugars, does not come directly from
adding sugars or flavorings to the nutri
ent solution. If they insist that it does, I
would like to see scientific proof. Please
have them contact me immediately.
Molasses
Molasses is available in 3 main types:
unsulphured, sulphured, and blackstrap.
One of the ingredients in some compost
and potting soil is molasses waste. Molas
ses is made from several sources, includ
ing corn, sugar beets, and sugar cane.
Unsulphured molasses is top quality and
is used in cooking. This grade is made
from ripe sugar cane juice that is clari
fied and concentrated. It can be used in
the garden.
Sulphured molasses is made from unripe
(green) sugar. Sulfur fumes are applied
during sugar extraction. Afterward it is
boiled repeatedly. First-boil molasses
is of the highest quality because only a
small amount of sugar is removed. Sec
ond and any subsequent boils turn the
molasses dark in color and extract more
sugar. It can be used in the garden.
Blackstrap molasses has been boiled three
times to extract ever more sugar. Mainly
used as cattle feed, it is heavy with iron.
It can also be used in the garden.
Overall, the average N-P-K analysis
of molasses is 1-0-5, and it contains
potash, sulfur, and many trace minerals
in a chelated form. It is also packed with
carbohydrates and a balance of consum
ables, which are a quick source of energy
and food for microorganisms. Molasses
can be purchased at grocery, health
food, and livestock feed stores.
Products that contain molasses include
Hi-Brix, Bud Candy, FloraNectar, and
Sweet. It is also available in bulk form
for livestock or human consumption.
Most molasses is applied at the rate of
1 to 2 tablespoons per gallon.
Caution! Molasses and products that con
tain it attract large and small scavengers. I
have visited more than one garden where
molasses-based products attracted bears.
Colloidal Silver (CS)
Colloidal silver is made of particles of
metallic silver suspended in distilled
water. It is sprayed on female cannabis
plants to encourage male flower devel
opment. Seeds from a plant using the
pollen from these male flowers will be
“feminized.” Silver ions also inhibit
the (female) hormone ethylene. Many
commercial cannabis seed producers use
colloidal silver to create feminized seeds.
A few ounces (ml) of colloidal silver
can be purchased online, at many health
food stores, and at some drugstores for
$30 to $40 USD. It can be made at home
by connecting leads to each terminal
of a 9-volt battery and a piece of pure
silver, which may be hard to find. Each
lead (- and +) is connected to a piece of
pure (0.999%) silver, usually a coin. The
pieces of silver, attached to the battery
via clips, are submerged in a small quan
tity of distilled water and left for several
hours. The coins are not allowed to
touch one another. The electrical current
will deposit minute silver particles into
the water, creating colloidal silver.
Detailed instructions are available
on the Internet.
To apply, mist target branches with a
30 to 40 ppm solution of colloidal silver
solution every day, starting a week
before flowers emerge. Spray at the
same time early in the day, and continue
spraying daily until male flowers clearly
appear. Pollen from these male flowers
is used to fertilize female flowers. The
resulting “feminized” seeds will grow
female plants.
Caution! Health risks! Do not con
sume plants that have been treated with
colloidal silver. However, it is consid
ered safe to consume cannabis that was
grown from seeds that were produced
from a mother treated with colloidal
silver. Some gardeners spray only one
branch with colloidal silver and consume
the balance of the plant. They shield the
nontarget foliage when spraying. I advise
against this practice.
Many products contain emulsified col
loidal silver.
Caution! Store colloidal silver in a light
proof container. It kills beneficial bacte
ria and fungus, so avoid soil contact. It
may also be toxic to humans.
Hydrogen Peroxide (H2O2)
Hydrogen peroxide (H2O2) is similar
to water but carries an extra, unstable
oxygen atom. This extra atom will either
attach itself to another oxygen atom or
attack an organic molecule. In medical
cannabis gardens, hydrogen peroxide
can provide a host of benefits by cleans
ing water of harmful substances such as
spores, dead organic material, and
disease-causing organisms while pre
venting new infections from occurring.
It also suppresses algae growth. It
removes the methane and organic sul
fates often found in well water, as well as
removing chlorine from city tap water.
Hydrogen peroxide is often mistakenly
used in soil and hydroponic gardens to
provide oxygen in substrates with poor
soil biology, compaction, and overwater
ing. Purveyors mistakenly believe that it
prevents oxygen depletion in the water
around the roots. The free radicle O2-
will rapidly combine with anything but
other oxygen molecules. Oxygen is only
useful to any life form in the diatomic
format O2. Saturating the medium or
water with hydrogen peroxide may clean
the water, but it will kill roots as well.
There is no oxidative value in this prod
uct, and it should be employed only as
a last ditch attempt to save a crop from
disease issues.
404
ADDITIVES
www.marijuanagrowing.com
Hydrogen peroxide (H20i)
Hydrogen peroxide also kills other soil
life and retards root growth. Small root
hairs are very delicate and so is much
soil life. Adding H2O2 will impair or
kill some of the soil life and disrupt soil
chemistry. Be extremely careful and
sparing when using H2O2. Do not use it
as a regular constituent of a nutrient or
additive program.
Hydrogen peroxide is dangerous at high
concentrations and will damage skin,
clothing, and most anything else it con
tacts. Find low-concentrate H2O2 (3%,
5%, and 8%) at drugstores or supermar
kets. “Food grade” hydrogen peroxide
(35%) will need to be diluted before use.
Higher strength H2O2 formulations are
more economical but should be diluted
(to 3%) before use.
Wear rubber gloves when using any
concentrations above 3%. Hydrogen
peroxide concentrations higher than 3%
cause bleaching and damage to skin and
other surfaces. Clean up splatters and
spills to avoid problems. Store hydrogen
peroxide in a dark container that holds
pressure to preserve potency.
Hydrogen peroxide is best purchased
as a generic product in a 3% solution.
Stronger 35 percent solutions are avail
able but require more care in handling.
Caution! Use gloves when handling;
concentrations above 3 percent can burn
skin. Keep away from eyes. Keep out of
children’s reach. Avoid spilling; it can
bleach and damage fabrics or surfaces.
Propolis
Propolis is a resinous mixture that
honey bees collect and use as a sealant
in hives. It is collected from tree bark
and other plant saps. It is sticky above
room temperature and hard-to-brittle at
lower temperatures. It is used as a local
antibiotic and antifungal agent. Propolis
is an ingredient in some additives. Prop
olis can be used as part of a treatment
regimen for infected or sick plants.
Propolis may be available from local
beekeepers.
Triacontanol
Triacontanol (aka melissyl alcohol or
myricyl alcohol) is a naturally occur
ring fatty acid and growth stimulant.
It speeds cell growth and increases cell
division, which in turn boosts overall
flower yield. Triacontanol is readily
available and abundant in alfalfa meal.
See “Alfalfa Meal” in chapter 21, Nutri
ents^ for more information.
Some products that include Triacontanol
include AlfaGrow, Final, Nirvana, and
Bloom. Alternatives include Alfalfa meal
and pellets.
Caution! Triacontanol can be toxic. It is
a saturated fat, and, in some eyes, a plant
growth regulator, although there is still
some debate on the issue. Triacontanol
is not taken up by the plant.
Vitamins
Vitamins C and Bj as aids may be myths.
B9, a growth inhibitor, is the only one
Apply only once per week, and apply only when needed!
F----------------
1
APPLICATION GUIDELINES FOR 3 PERCENT H2O2 SOLUTION
. d' ....
..
...
..
.
.
.
Task
teaspoon/gallon
ml/L
irrigation
1.5-3.8 tsp/gal
2-5 ml/L
■ seed soak
7.5-11.5 tsp/gal
10-15 ml/L
antifungal and anti-root rot
<.
.
......... ...................... 1
15 tsp/gal
20 ml/L
____ _
____
J
I’ve found that appears to actually have
any use to medical cannabis gardeners.
Ascorbic Acid (Vitamin C)
Vitamin C is thought to build tighter,
heavier buds and act as an antioxidant.
It is often combined with fructose,
molasses, or sugar, and added to the
nutrient solution during the last 2 weeks
before harvest. However, some botanists
believe that although vitamin C is very
important in fighting the free radical
by-products of photosynthesis, plants
make their own vitamin C and are un
likely to recognize any benefit from its
addition to the nutrient mix.
Vitamin C tablets sold at grocery stores
and drugstores contain ascorbic acid but
may contain other things too. Purchase
it in the pure form, L-ascorbic acid or
L-a^corbate. Ascorbic acid is a better
supplement for gardeners than it is for
cannabis!
B Vitamins
B( , aka Thiamin, thiamine, and aneurine
hydrochloride, is the term for a family
of molecules sharing a common struc
tural feature responsible for its activity
as a vitamin. Applying vitamin B( to
root systems of plants does not stimu
late root growth. This common miscon
ception has been repeatedly refuted in
scientific trials.
B3 Niacin is used as a root growth factor.
There is no concrete evidence proving
that it helps plant growth.
B9 (folic acid, folinic acid) appears to
serve in energy transfer within the plant
and inhibits the enzyme that makes
gibberellic acid, resulting in a bushier,
dwarf-type plant without pruning. B9
i //ww.marijuanagrowing.com
405
'Cripple Creek" bud a week from harvest
' Cocoa" macro close up showing capitate-
stalked resin glands
Hummingbird inspecting a 'Jolly Bud"
can be applied as a spray or as a soil
drench. It effectively suppresses growth
when applied frequently at low concen
trations. Flowering onset and harvest
are progressively delayed with increased
applications, but flower buds tend to all
ripen simultaneously.
Folic acid is also used to increase vase
life in cut flower buds and branches. A
few branches of a male plant can be kept
“fresh” for several days. Dilute B9 in
water and store cut branches of flower
producing male plants to keep them
“fresh” for longer periods. >9 is con
sidered to be a safe, short-term growth
retardant with few phytotoxicity prob
lems.
Products that include B vitamins include
Ortho Vitamin B Blend and B-52 .
Growth Retardants
Caution! Do not use growth regulators
on cannabis! NO GROWTH REGU-
LATOR IS LABELED FOR HUMAN
CONSUMPTION. All growth retar
dants leave residues in the plant, and
some, like paclobutrazol (aka Bonzi or
Bushmaster, among others) remain in
the plant for years and will show up in
the buds and other foliage. The use of
some PGRs will show up in the seeds.
In the USA and Canada, none of these
products is allowed on the shelf or for
use without a license to sell and apply.
One company, Dutch Master, almost
went out of business because their
formula contained growth regulators.
Growth regulators CAUSE CANCER
and immune system problems, and have
very low mammalian toxicity values and
even lower primate values. Ethylene (the
gas) and Ethephon (the liquid that con
verts to ethylene on heating) are about
the safest alternatives.
Ill-informed cannabis growers apply
growth retardants to inhibit vertical
growth and increase internodal branch
ing. Leaves are supposed to remain
the same size but internode length is
retarded. Deadly toxic growth retar
dants are often called “chemical
pinchers.”
Outside of the use of PGRs for root
induction in cuttings, and maybe
working with seed production, I would
not knowingly consume any plant or
plant part that PGRs have been used
on. There is a level of risk here that is
unacceptable. It makes zero sense to use
PGRs in commercial grows and even less
in medical gardens.
406
ADDITIVES
www.marijuanagrowing.com
409 Container Culture and
Hydroponics
409 Solution Culture
409 Media Culture
410 Aeroponic Gardens
411 Deep Water Culture (DWC)
412 Bubbleponics and Raft
or Pond Culture
413 Transplant Clones or
Seedlings and Grow
414 Nutrient Film Technique (NFT)
414 Deep Flow Technique (DFT)
415 Transplant Clones or Seedlings
415 Problems
415 Hydro-Organic
417 Chelates and Nutrients
417 Ebb-and-Flow Gardens
417 Ebb-and-Flow Tables
419 Growing Mediums
419 Irrigation
421 Variations of Ebb-and-Flow
421 Top-Feed Gardens
421 Top-Feed Containers
422 Top-Feed Slabs
422 Transplanting Rockwool
Cubes onto Slabs
423 Vertical Top-Feed Gardens
424 Run-to-Waste (RTW) Gardens
424 Manual Run-to-Waste Gardens
425 Automated Run-to-Waste
Gardens
425 Wick Gardens
425 Flood Wick Gardens
427 Aquaponics
427 Hydroponic Nutrients
428 Nutrient-solution Composition
428 Homemade Nutrients
ADVANCEDI
MEDICAL CANNABIS
HORTICULTURE
23
CONTAINER CULTURE
& HYDROPONICS
429 Nutrient-solution pH
430 Nutrient-solution EC
431 Dissolved Oxygen
432 Increase Dissolved Oxygen
432 Solution Mixing and Maintenance
433 Reservoirs
434 Aeration
434 Nutrient-Solution Pumps
436 Air Pumps
436 Growing Mediums
436 Texture
437 Popular Substrates
442 Sterilizing Substrates
443 Irrigation
445 Water Supply
J
www.marijuanagrowing.com
407
f
V
445 Even Solution Penetration
446 Microirrigation
447 Container Culture and
Hydroponic Nutrient Disorders
-
J
Hydroponic gardening is cultivating
plants without soil, typically in an inert
growing medium. “Container culture”
is very similar to hydroponics but uses
soil, soilless mix, or some other grow
ing medium that is not inert, that is, the
growing medium reacts chemically.
Hydroponic and container culture
gardening are often confused; container
culture is often called hydroponics. I
believe that the confusion arises for two
simple reasons: gardeners who use the
term do not understand the difference,
and “hydroponics” sounds so much
cooler than “container culture”!
Hydroponics has been a buzzword that
alludes to higher production and scien
tific superiority, something special that
is new—bigger and better. The misused
word hydroponic has also spawned other
terms that are invented to distinguish
one “unique” product from another. My
current favorite terms are ultraponics
and fishponics.
Hydroponic gardens are more technical
in nature and require precise measure
ments and monitoring for high perfor
mance. Setting up a hydroponic garden
is often more expensive and relies most
often on man-made, processed chemicals
and electrical power.
Hydroponics and container culture
are practical for gardeners who cannot
grow outdoors and are limited to an
indoor or greenhouse space. Changing
and working with soil is inconvenient
for many apartment and home dwellers.
Household electricity seldom fails, and
the small gardens can be monitored
easily. Indoor gardens arc full of life and
provide a “breath of fresh air” during
long winter months, too.
Greenhouse setups
range from inexpen
sive to expensive,
depending upon the
degree of sophisti
cation. Greenhouse
dynamics—size,
heating, cooling, and
so forth—can also
be more demanding
than growing indoors.
Outdoor hydroponic
gardens are less
common and not practical because dirt
and dust can easily pollute the garden.
Where electricity is not readily available,
container gardens can be maintained with
battery-powered irrigation controllers
and dust and pollutants filtered easily.
Mother plants grow longer and are best
suited to large hydroponics or container
culture container gardens, which allow
room for root development. The mother
plant’s root system is easier to control in
individual containers, and she is able to
produce hundreds of clones during her
lifetime. Mother plants need a large root
system to take in nutrients in order to
keep up with the demanding growth and
clone-production schedule.
Hydroponics is not as forgiving as
container gardens using soil, soilless
mix, coco, and so forth. Soil and soilless
mixes not only provide “terra firma” to
anchor plants, they also buffer water im
balances and hold air and nutrients well.
Gardens with more components have
more to go wrong. Complicated high-
tech gardens often require more time
A properly managed rockwool top-feed
garden such as this one, from Trichome
Technologies, is super productive.
and management. Even simple gardens
rely on electricity to operate a pump and
timer. If the electricity goes out and the
pump stops, or even if it only malfunc
tions, plant growth is impaired. A lack of
water for a few hours is long enough to
cause damage to plants. Irrigation emit
ters can clog; pH can climb or plunge,
and EC levels can change rapidly. All of
these “hydroponic” variables can cause
more problems than when growing in
container gardens using soil or soilless
mix, etc., that provide a buffer or safety
zone to hold water and oxygen.
Rule of Thumb: The more parts in a
garden, the more there is to malfunction.
Environmentally conscious gardeners
select hydroponic fertilizers with an eye
on their budgets. Manufacturers consis
tently dilute nutrient formulas in water
to increase profits—often exponentially.
Shipping excess water is expensive, cost
ing more fossil fuel and increasing the
garden’s carbon footprint. Purchasing
nutrients in a dry form is less expensive
and lowers the environmental impact.
Advantages
• no soil necessary
• water can be reused
• complete control of nutrient levels
• clean environment—no dirt!
Disadvantages
• no soil in hydroponics to buffer
problems
• disease can spread through entire
crop quickly
Healthy container gardens like this one are
irrigated automatically. Penetrating the
foliage in this garden is difficult and could
break branches.
408
CONTAINER CULTURE & HYDROPONICS
www.marijuanagrowing.com
A small hoop greenhouse like this is easy to
manage when growing medical cannabis in
individual containers.
Air root-pruning containers are available that
encourage more dense root growth.
These little seedlings are being hardened-off
to transplant outdoors. They are watered
from the top with a water wand that has an
aerating nozzle.
• large carbon footprint from manufac
turing of components and transport
to stores
• water can be recirculated with the
wastes of the plant
Contrary to popular belief, hydropon
ically grown cannabis does not grow
faster or produce heavier harvests.
Scientific research (not funded by
commercial interests) since the mid-
1950s shows no significant difference
between container-grown crops in soil,
soilless mix, etc., and hydroponically
grown crops. Work by D. R . Hoagland
and D. I. Arnon in the first half of last
century failed to prove that there was an
increase in potential yields from grow
ing hydroponically. They described the
first nutrient solution to use for hydro
ponics, still in use today. To date no
one has been able to refute this, and it
remains a referenced work.
Container Culture and
Hydroponics
Solution Culture
Cannabis grown in hydroponic solution
culture gardens does not use grow
ing medium. However, plants in some
gardens are started in a small net pot
in a handful of substrate. Examples of
solution culture include aeroponics,
bubbleponics, deep water culture
(DWC), deep flow technique (DFT),
nutrient film technique (NFT), and raft
solution culture. These gardens require
an electric pump that must function 24
hours a day to operate nutrient-solution
drippers, emitters, air (oxygen) diffusers,
misting nozzles, often with a good filter
to ensure debris-free solution.
Media Culture
Media-based hydroponics uses an inert
substrate such as rockwool or expanded
clay pellets. The inert substrate does not
react chemically with nutrients. Con
tainer culture employs substrate such as
soilless mix, or coco coir that is not inert
and will react chemically with the nutri
ent solution. The substrate, whether
inert or not, serves multiple functions—
to anchor plants and to hold air, water,
and nutrients for root uptake. The
media also holds precious oxygen that
is essential for rapid nutrient uptake.
Ideal growing mediums hold plenty of
air (oxygen) and nutrient solution at
the same time. Soilless mix and coconut
coir are two of the most popular grow
ing mediums used in container culture.
Rockwool and expanded clay are the
most common substrates found in
hydroponics. Nutrient solution is
delivered to the media via flood-and-
drain, top-feed, or passive wicking that
relies on capillary action.
In container culture and many types of
hydroponics, the supply of oxygen in
growing media can be maximized, which
in turn allows properly grown plants
with healthy roots to take in peak levels
of nutrients. However, in “solution cul
ture” it is very difficult, if not impossible,
to consistently achieve the same oxygen
levels as in properly aerated growing
media. Fine-tuned nutrient solutions can
steer plants to grow less leafy vegetative
foliage and more dense flower buds.
Properly mixed and applied hydroponic
nutrients—chemical salts diluted in
water—are able to supply exact element
levels so that roots have access to them
and the possibility of taking them in at
maximum capacity. Aerated nutrient
solution is absorbed, wicked up from
the growing medium, or it passes over
roots, later draining off. The oxygen in
solution, around roots or trapped in the
soilless medium, speeds nutrient uptake.
Organic nutrients—natural elements
and compounds—are more difficult to
control in container culture than their
chemical counterparts. In nature these
nutrients are often bound in complex
www.marijuanagrowing.com
409
This hydroponic garden is made from 5-gallon
(18.9 L) containers connected together with
half-inch (1,3 cm) tubing.
living chemical compounds that are
difficult to measure accurately.
Regardless of the nutrient-solution
application method, nutrient solutions
are either run-to-waste (RTW) and
not reused, or they are recirculated and
used again and again rather than being
discarded after one use. Recirculating
systems have the added complication of
concentrating the nutrient solution and
the accumulation of plant wastes—
broken roots, leaves, and so forth.
Nutrients are diluted in water in a
“soil solution” or in an inert medium
“hydroponic solution.” In soil, soilless
mix, coco coir, etc., there is a naturally
occurring ratio of oxygen to nutrient
solution. However in hydroponics using
rockwool, expanded clay pellets, or other
inert ingredients, this ratio must be
“manufactured.” And in any hydroponic
garden where roots are covered with
nutrient solution all the time, oxygen
is contingent upon oxygenating the
solution artificially, and it is very easy to
screw it up.
Oxygen is pulled or moves into the soil,
soilless mix, etc., or dissolves hydroponic
solution where it can move into the roots.
If the roots dry out, oxygen movement
Nutrient solution floods into the garden bed
to irrigate. The nutrient solution pulls more
oxygen into the moist rockwool cubes when
it drains.
becomes restricted, especially if it drops
below the critical oxygen pressure (COP)
(amount of O2 dissolved into solution).
In cannabis, COP is the point where
respiration is first slowed from a lack of
oxygen at about 20 mg/L*. The root tips
are very active and have relatively high
energy requirements, almost as high as
humans but below the COP this
activity slows.
''Plant Physiology, 3rd ed., by Lincoln
Taiz and Eduardo Zeiger, (Sunderland,
MA: Sinauer Associates, Inc., 2002).
At maximum levels of stirring, the
amount of dissolved oxygen will be
barely enough to keep up with O2 utili
zation, and to get as close to 60 ppm as
possible, oxygen must be diffused into
the solution, typically with an electric
air pump.
In the older root zones this lack of
oxygen becomes an issue earlier at lower
rates. Since their uptake is reduced to
10 percent of the tips’ uptake, the cores
can become anoxic (severely deficient in
oxygen) or hypoxic (oxygen deficiency
causing a very strong drive to correct
the deficiency), killing the roots or
affecting performance. The best way
to achieve maximum aeration is not by
growing in deep water that covers roots
all the time, but by allowing dry time for
the roots; because at this time, the solu
tion on the root surface is still dissolving
O2 at higher levels when the air moves in
and the water is gone. No extra aeration
is needed other than stirring the nutrient
reservoir. The amounts of oxygen needed
by the root system will be absorbed at
the root surface as well.
Solution Culture
aeroponics
bubbleponics
deep water culture (DWC)
deep flow technique (DFT)
nutrient film technique (NFT)
raft solution culture—passive
Media Culture
ebb-and-flow (flood-and-drain)
hydro-organic
top-feed—containers and slabs
run-to-waste (RTW)
wick—passive
Aeroponic Gardens
Aeroponic gardens are true to their
name. Plants grow in a chamber of air
and nutrients. Roots are suspended in a
dark growth chamber without growing
medium and continually or at regular
intervals misted with a fine oxygen-rich
nutrient solution. Medical cannabis
gardeners use efficient aeroponic
gardens to root cuttings, but seldom
for vegetative or flowering. Since
cuttings grow with no media attached,
they can be transplanted into solution
or media hydroponic gardens as well as
soil. However, damage to minuscule
root hairs is impossible to avoid.
The origin of aeroponics dates back
to the first half of the 20th century;
the first patent was issued in 1985 to
Richard Stoner. In fact, the first cannabis
aeroponic clone garden that I saw was in
the mid-1980s, and it was very similar to
Stoner’s. It was homemade. Aeroponics
makes control of conditions in the root
zone much easier in hot climates than
with conventional hydroponics. Often
fatal nutrient-solution stagnation,
waterlogging, and oxygen starvation are
easier to control with aeroponics. The
temperature inside the root chamber is
easy to control, which is essential for
410
CONTAINER CULTURE & HYDROPONICS
www.marijuanagrowing.com
avoiding pathogens and keeping adequate
oxygen available. Properly designed and
maintained, an aeroponic clone garden
will yield a profuse, strong, and healthy
root system.
Root systems of small seedlings and
clones thrive in net pots specifically
designed for aeroponic gardens. Clone
roots strike (initiate) and seedling
roots grow down from net pots into the
dark, humid, nutrient-and-oxygen-rich
environment. Regular misting in the 100
percent humid atmosphere prevents ten
der clones from drying out, all the while
speeding root development. The totally
dark chamber stops algae growth as root
growth thrives.
Solution droplets of less than 30 microns
tend to form a fog that humidifies the
air but is not easily absorbed by roots.
Larger, 30- to 100-micron droplets are
more readily absorbed by roots.
Droplets of greater than 100 microns
Aeroponic gardens that throw 30- to 50-micron
droplets promote fast root growth.
Root growth is phenomenal m an aeroponic
clone machine.
The aeroponic clone garden on the right is in
front of medical cannabis prescriptions that
certify patients.
precipitate from the air too quickly for
root absorption.
The opening on a 30-micron (0.018 inch
[0.046 mm]) nozzle is very small, clogs
easily, and must be kept super clean. Use
reverse osmosis water and low nutrient
levels (about 10 percent strength), and
maintain pump pressure to keep nozzles
free of debris. Using a pre-pump filter
and inline filter helps to remove debris
and keep nozzles clean. Avoid or heavily
filter any additives or nutrients contain
ing organic matter.
Both continual and intermittent opera
tion work well and achieve the same
results—as long as the proper environ
ment is maintained. Forcing solution
through a 30-micron nozzle requires
more pressure and a stronger, more
expensive fitting and pump, which are
also more costly to operate. If growing
in large aeroponic gardens, electrici
ty consumption becomes expensive;
intermittent misting will save money.
Use a timer that will cycle mist for one
to two minutes, and then turn off for up
to five minutes, 24 hours a day, to save
resources.
Temperatures are easy to control in any
climate in an insulated root chamber.
Simply heat or cool the nutrient solution
before misting roots to bring the root
zone temperature to the desired level.
Avoid disease by keeping temperatures
below 72°F (22°C) and regularly inspect
roots for signs of discoloration, rot, and
lack of fine root hairs.
Simple, small aeroponic gardens that
pump nutrient solution up from the
reservoir located below the root cham
ber are best suited to clone rooting and
seedling growth. These gardens are less
expensive than larger gardens with a
separate reservoir and rooting chamber
designed to grow mature plants. Gardens
with a separate reservoir are less likely
to clog as mature roots grow into the
nutrient solution.
Aeroponic gardens are easy to construct,
bui fine-tuning a homemade unit could
kill a few crops of clones before success
is achieved. The basics are simple: the
unit must be light- and watertight, and
mist from nozzles must be of the proper
size and delivered under adequate
pressure. For information on readily
available aeroponic gardens, visit www.
marijuanagrowing.com
EC and pH considerations for aeroponic
gardens are the same as for any hydro
ponic garden. But aeroponic gardens
require greater attention to detail. There
is no growing medium to act as a water/
nutrient bank, and if the electricity goes
out, the pump fails, or the nozzles clog,
roots will soon dry out, killing tender
root hairs. The whole root begins to die,
starting at the tip.
There are several variations of aeroponic
gardens including the Ein Gedi method,
aero-hydroponics, and air-dynaponics.
Deep Water Culture (DWC)
Deep water culture (DWC) is simple
and inexpensive. This low-maintenance
method is typically employed by casual
medical gardeners who want to grow
a few plants in a small area. Seedlings
and clones are held in net pots full of
expanded clay pellets, rockwool, or
a similar growing medium. Six-inch
(15.3 cm) net pots are most common
for single 5-gallon (18.9 L) containers.
Smaller 2-inch (5.1 cm) net pots are
www.marijuanagrowing.com
411
This plant is irrigated from above. The rock
wool holds the plant, and the roots grow down
into the water about an inch (2.5 cm) below
the rockwool. (MF)
often used for multiple plants in the
same container. The net pots are nestled
in a plastic lid that covers the reservoir.
Roots dangle into a somewhat dilute
(75 percent concentration) nutrient
solution that is aerated with an air stone
and pump. Feeder roots absorb nutrients
Roots are bathed in nutrient-rich aerated
solution in DWC. (MF)
and water from the solution in the oxy
genated environment. The simple design
requires no timer for the air pump that
runs 24 hours a day.
Closed or self-contained, recirculat
ing DWC gardens stand alone with
the reservoir directly under the net pot
containing the plant. Closed gardens are
perfect for gardeners who want to grow
a few plants. The gardens also work well
for large mother plants and to contain
any waterborne diseases. The pH, EC,
and solution must be checked for each
individual reservoir. Nutrients, pH up,
pH down, and any other additives must
also be added to each container.
Multi-unit recirculating gardens are
more complex, with a central reservoir
connected by tubing to several container/
reservoirs. A central air pump aerates
nutrient solution in each container via a
manifold connected to air tubes that are
in turn connected to an oxygen diffuser
in each container. Although the garden
has more complex plumbing, the pH,
EC, nutrients, and other additives can
be controlled from a central reservoir.
Bubbleponics and Raft or Pond Culture
Bubbleponics and raft or pond culture,
are a variation of DWC. In bubbleponics
the nutrient solution is delivered via top
feed nozzles or spaghetti tubes to a small
amount of growing medium that holds
the plant in place. The nutrient solution
is allowed to percolate down through the
growing medium before falling back into
the aerated reservoir and recirculated.
Bubbleponic gardens require two pumps,
one to deliver nutrient solution, and an
air pump attached to an air stone or other
diffuser to aerate the nutrient solution.
A (submersible) pump lifts nutrient,
solution to the top of a discharge tube
connected to a top-feed irrigation
system. Nutrient solution is delivered
to individual plants and cascades down,
wetting roots and splashing into the
(self-contained) reservoir below, which
in turn increases dissolved oxygen in
the solution.
In raft or pond solution culture, plants
are placed in a sheet of buoyant plastic
that is floated on the surface of the nutri
ent solution. Roots are always submerged
in artificially aerated nutrient solution.
A closed DWC system is completely
self-contained.
Drip Tubing
Clones or seedlings in rockwool
cubes are nestled in net
pots filled with expanded
clay pellets and irrigated
Submersible Pump |rr)gatlon Manifold
Large Air Stone
The nutrient solution flows to all containers
in this recirculating DWC garden.
412
CONTAINER CULTURE & HYDROPONICS
www.marijuanagrowing.com
The grow tanks are set up and filled with
nutrient solution.
The little plants are set in the beds on top in
net pots full of expanded clay pellets. Roots
hang down into the aerated solution.
One week later, the same clones look a lot
stronger and healthier, but they have not
completely recoveredfrom the transplanting.
Two weeks later, the garden looks like it is
thriving, and plants have put on growth.
The harvest from a small garden is small but
enough to sustain many medical cannabis
gardeners until the next crop.
The levels of all reservoirs—central and
all container/reservoirs—seeks the same
solution level. Simply check the reservoir
level to learn the level of all the others.
Use a Mariotte’s bottle or a float valve to
automatically maintain the solution level.
The air pump must supply each
5-gallon (18.9 L) reservoir with at least
1.3 gallons per minute (4.9 LPM) to
ensure that adequate oxygen is available
to roots. Less than this amount will
deprive roots of oxygen, slow nutrient
uptake, and open the door to cultural
problems, pests, and diseases.
Set the air frump above the reservoir so
that water will not siphon back through
the air pump and destroy it if electricity
goes out or the pump malfunctions.
Caution! Do not keep air pumps
inside CO2-rich garden rooms or green
houses, or the extra CO2 will drive the
pH downward as the conjugate acid of
the carbonate base or upward as the
conjugate base of the carboxyl acid.
(It really depends on many factors.)
Transplant Clones or Seedlings
Fill with nutrient solution until the
bottom inch of the 6-inch (15.2 cm)
net pot is covered. Avoid filling to the
level of the stem to prevent stem rot
and other diseases. Hand irrigation may
be necessary for the first few days if
capillary action does not wick nutrients
upward to roots. After the roots grow
through the net pot, lower the level of
the nutrient solution to about 2 inches
(5.1 cm) below the net pot. An external
dark-green translucent “drain tube” on
reservoirs will indicate solution level.
The nutrient solution tends to stay the
same temperature as the room unless
it is cooled slightly. Insulating and
placing it on a cold floor will help keep
solution cool. Always aim for the ideal
nutrient temperature range 55°F-65°F
(12.8°C-18.3°C) to prevent disease
and increase dissolved oxygen (DO) in
solution. Change nutrient solution at
the first sign or suspicion of problems—
solution discoloration, pH fluctuation,
or a change in EC.
Top off nutrient solution with plain water
daily. Change the reservoir every week to
ensure proper nutrient levels. Changing
the solution can be a bit of a job. If the
reservoir has a drain plug, the solution
can be drained and replaced weekly
without removing the plant. This will
help minimize salt buildup too. With no
drain plug, the plant has to be removed
from the container/reservoir and placed
in another container. The air stone must
be removed and the solution dumped.
Dump old nutrient solution that is full
of nitrates, sulfates, phosphates, and so
forth, in the outdoor garden rather than
down household drains. The container/
reservoir must be completely cleaned
and refilled with fresh nutrient solu
tion. Many deep water culturists dilute
nutrient solution to 75 percent strength
to safeguard against overdose. Always
run EC at lower levels in DWC gardens.
Check with fertilizer manufacturers for
recommendations.
Outdoors, the container/reservoir must
be shielded or insulated so that direct
www.marijuanagrowing.com
413
A big. healthy, white root system is a sign that
there is enough dissolved oxygen in solution.
Note that some of these roots are discolored
and only a few roots are strong and white.
This root system does not receive enough
dissolved oxygen. (MF)
Nutrient solution in the tubes is kept about
6 inches (15.2 cm) deep. The nutrient solution
is constantly moving and being aerated as it
moves around roots.
NFT gardens were more popular 15 years ago
than they are today.
sunlight does not cause the temperature
inside to climb beyond 70°F (21.1°C).
Outdoor gardens also need an overflow
drainage hole in the side of the reservoir
to prevent rainwater from diluting
solution or causing it to overflow.
Nutrient Film Technique (NFT)
Deep Flow Technique (DFT)
Deep flow technique is similar to NFT
except roots in gulleys are submerged
with 1 to 2 inches (2.5-5 .1 cm) of nutri
ent solution. Make sure nutrient solution
is well aerated and flows quickly enough
through tubes and gulleys to maintain
adequate oxygen levels for roots. Check
the temperature in different parts of the
tubes to ensure that it does not climb
above 70°F (21.1 °C) and holds at least
8 ppm of dissolved oxygen.
The nutrient film technique (NFT)
was developed by Allen Cooper from
England in the 1960s. Cooper introduced
the garden to the world in his book, The
ABC of NFT. NFT hydroponic gardens
are most suitable for short-term crops
with a compact root system including
predominantly indica and ruderalis vari
eties that are harvested in 3 to 4 months.
When grown too long, extensive canna
bis root systems tend to block solution
flow in gulleys.
The system supplies aerated nutrient
solution to plants with roots held in
gulleys. Seedlings or cuttings in small net
pots full of substrate with strong root
systems are placed on capillary matting
located on the bottom of a covered
channel or gulley. Capillary matting
takes the place of a growing medium,
stabilizes nutrient-solution flow, and
holds roots in place. The nutrient flow
can also be intermittent when used
with a base like sand or perlite. Plastic
tubes or sleeves are available that can
be filled and laid on the ground as well.
Well-aerated nutrient solution flows
down the gulley, over and around the
roots, and back to the reservoir. Irriga
tion is constant—24 hours a day. Roots
receive plenty of oxygen and are able to
absorb a maximum of nutrient solution.
Gulleys must have the proper incline,
volume, and flow of nutrient solution for
a successful crop. NFT gardens must be
fine-tuned to perform well.
Gulleys or channels are covered to keep
humidity high in the root zone. A white
exterior reflects light and the interior
can be painted black to keep roots in
the dark and stop algae growth. Roots
that are completely submerged have less
access to oxygen in the air compared to
oxygen available in the nutrient solution.
Maintain a thin layer, 0.4 to 0.8 inches
(10.2 -20.3 mm) of nutrient solution to
Capillary matting under rockwool cubes holds
roots, air, and nutrient solution.
allow for adequate air absorption. Roots
submerged in turbulently flowing
nutrient solution are intermittently
exposed to humid air.
Nutrient solution is pumped from the
reservoir into gulleys via a manifold and
tubing at the upper end. The table is set
up on a slope with a 1:50 fall in 12 feet.
For example, if the bed is 50 inch
es (127 cm) long, the fall is 1 inch in
50 inches, or 1 centimeter in 50 centi
meters. The incline helps solution flow
that in turn compensates for surface,
while avoiding both accumulation and
waterlogging the roots. As a general
guide, flow rate should be 0.5 GPM
(1.9 LPM) at planting. After plants are
established, flow rates for each gulley
should be at least 0.25 GPM (0.9 LPM)
and can be a maximum of twice this
amount. Beyond this, extreme nutrient
uptake problems can occur.
Gulley length should be less than 40 feet
(12.2 m) to avoid slow growth. Oxygen
in solution is frequently adequate, but
nitrogen can become depleted at the low
end of gulleys. Longer runs require
meticulous leveling of gulleys to avoid
high and low spots that expose roots too
much or cause puddles. Double rein
forced bottoms make gulleys durable
and rigid when supporting large plants,
large root systems, and large volumes
of nutrient solution. Some NFT gulleys
have ribs below to provide support and
prevent warping and movement. The ribs
also function as drainage channels and
direct nutrient solution evenly along the
bottom of the gulley.
414
CONTAINER CULTURE & HYDROPONICS
www.marijuanagrowing.com
A good filter will prevent debris from
blocking gulleys, supply tubes, and
pumps. NFT gardens have very little
buffering against interruptions in the
flow caused by plumbing blockages,
power outages, and so on. In the absence
of a growing medium, roots must be
kept perfectly moist by the nutrient
solution at all times. If a pump fails,
roots dry and die. If the garden dries out
for a day or longer, small feeder roots
will die and grave consequences will
result. Problems occur quickly in NFT
gardens, and decisive corrective action
is necessary. This garden is not recom
mended for new growers.
Place a filter on the pipe that returns
nutrient solution to keep the reservoir
clean. Organic garden filters may clog
and need cleaning more often. Use
0.25 -inch (6.35 mm) microtube feeders
so that small chunks of debris pass right
through. Filters on pressurized lines
create backpressure, which causes
pumps to strain and pump efficiency
to diminish, consequently a more
powerful pump is necessary.
NFT gardens are very easy to clean and
lay out after each crop. However, only
The ridges in each gulley bottom direct water
and help add rigidity and stability.
There are many different styles ofgulleys for
NTT gardens.
gardeners with several years of experi
ence should try an NFT garden.
Transplant Clones or Seedlings,
and Grow
Start clones and seedlings in small
2-inch (5.1 cm) net pots full of rockwool
or substrate that does not shed debris to
clog the irrigation system. Or cut large
holes in small pots for an inexpensive
alternative to net pots. The small pots
must permit unrestricted root expansion
when growing into gulleys. Do not grow
clones and seedlings in soil or media that
will shed debris. And do not try to wash
media from root mass with cold water.
This will severely damage roots,
compound transplant shock, and slow
their establishment in gulleys. Plants
started in soil or messy substrate should
be lightly shaken to remove “debris” and
then be transplanted. This will lessen
damage from the move substantially.
Install a temporary filter such as a nylon
stocking or something similar at the end
of channels to catch debris.
Set small pots in gulleys so that they
remain stable while roots are establishing.
Keeping clones and seedlings firmly in
channels with no vertical movement will
Good filters that are easy to access and clean
are essential for NFT gardens.
Roots quickly grow into the main growing
medium.
reduce transplant shock and speed root
growth. Movement of plants can cause
damage to roots, which causes stress
and possible root disease. Often the
first signs include leaf tip burn and slow
growth. Even minimal transplant shock
will slow growth for several days.
Problems
Most hydroponic garden problems are
solved by keeping the garden and sur
rounding area clean, and by controlling
the nutrient solution’s dissolved oxygen
levels, EC, and pH, and temperature in
the reservoir and gulleys. See sections
on each for specific information.
Broken or discolored roots found in
reservoirs and filters indicate problems
from disease, pests, oxygenation, heat,
nutrients, and so on. More broken and
discolored roots signify a bigger prob
lem. Check for slow nutrient flow and
stagnation. Both conditions can cause
waterlogged roots. Make sure that
gulleys and the entire system are as
light-tight as possible to discourage
algae growth.
An excellent troubleshooting guide can
be found at www.amhydro.com.
Hydro-Organic
Hydro-organic (aka organoponic) is
growing in an inert medium fertigated
with a soluble organic nutrient solution.
When somebody talks about hydro
organics, they probably mean organic
container culture. Organic fertilizers
are most often defined as containing
substances with a carbon molecule
or a natural unaltered substance such
www.marijuanagrowing.com
415
Hydro-organic gardens combine principles of
hydroponics and organic gardening.
A dirty reservoir causes nonstop problems!
Hydro-organic nutrient mixes are heavier,
requiring a stronger pump and heavy-duty
filters.
A constant-readout monitor/controller for
nutrient solution takes the guesswork out of
nutrient formula delivery.
as ground-up minerals. Many of the
nutrients must be “processed” by micro
organisms and be chelated before they
are available to plants. These gardens can
be top-feed, flood-and-drain, or wick.
Refer to those specific sections in this
chapter for more information.
Organic nutrients require places to
collect. The concept is similar to
buffering a video online. Without a place
to accumulate, the rate of mineralization
will not keep up with need. Much of the
released nutrients would be used up by
the microlife in the soil, or “volatized.”
Other major issues arise with macro
nutrients—most notably, P and Ca. It is
impossible to grow 100 percent organic
cannabis in hydroponics. There must
be sources and pools where nutrients
accumulate at appropriate levels.
Oxygen is also required to break
down organic complexes as well as the
appropriate varieties and numbers of
microflora to be effective.
Dedicated gardeners spend the time
and trouble it takes to grow organically
because the natural nutrients bring out
a sweet organic taste in flower buds.
Indoor and outdoor crops grown in less
than 90 days do not have time to wait
for organic nutrients to be broken down.
Organic nutrients must be soluble and
readily available for short-term cannabis
crops to benefit.
An exact balance of organic nutrients
can be achieved with experimentation
and attention to details. Even when you
buy ready-mixed commercial fertilizers
like BioCanna or Earth Juice, you will
need to try different feeding amounts
and schedules to get the exact combi
nation to grow a top-quality harvest.
Always check with manufacturers for
recommendations.
Taking an accurate EC reading or
mixing the exact amount of a specific
nutrient is very difficult in organic
hydroponics. Chemical fertilizers are
easy to measure out and apply, and it is
easy to give plants the specific amount
of fertilizer in each stage of growth.
Organic nutrients have a complex struc
ture, and measuring content is difficult.
Organics are difficult to keep stable, too
Some manufacturers with products such
as BioCanna have managed to stabilize
their fertilizers. When buying organic
nutrients, always buy from the same
supplier, and find out as much as possible
about the source from which the
fertilizers were derived. Always use
fertilizers well before the expiration date.
Combine premixed soluble organic
fertilizers with other organic ingredients
to make your own blend. Experiment
to find the perfect mix for the cannabis
varieties being grown. Adding too much
fertilizer can make the substrate toxic,
binding nutrients to the point that they
become unavailable. Foliage and roots
burn when buildup is severe.
Soluble organic fertilizers are more
difficult to overapply, yet they are also
difficult to leach from the growing
medium. And when overapplied, soluble
organic fertilizers are more likely to
cause symptoms that are hard to read.
For example, too much bone meal causes
a pH imbalance of the growing medium
that manifests as leaf burn. Fertilizer
recirculating systems are the trickiest
to control. When the microbial life is
off balance by a small amount and the
conversion of released ammonium to
nitrate is slowed, it causes a buildup to
toxic levels.
416
CONTAINER CULTURE & HYDROPONICS
www.marijuanagrowing.com
Chelates and Nutrients
Mix seaweed with macronutrients and
secondary nutrients to make a hydro-
organic fertilizer. The amount of
primary and secondary nutrients is not
as important as the melange of trace ele
ments that are in an available form in the
seaweed. Major nutrients can be applied
via soluble fish emulsion for nitrogen,
while phosphorous and potassium can
be supplied by bat guano, bone meal,
and manures. More and more organic
gardeners are adding growth stimulators
such as humic acid, Tnchoderma,
bacteria, and various hormones.
Minerals such as silica, nickel, cobalt,
and selenium are not essential for plant
growth but have the ability to enhance
growth and development. They are
needed in minute quantities and are
provided via the contaminants in the
water supply and fertilizer. Add humic
and fulvic acids (available in mineral
soils) to the hydroponic garden and
soilless container gardens. Fulvic acid,
a humic acid, is yellow in color and
soluble. Humic acids are most effective
as additives to the soil to help build soil
and stimulate plant growth.
Humic acids have an important ability
as chelating agents—they are, in fact,
excellent in this role as they are strong
enough to protect micronutrients but
weak enough to release the micro
elements to plants when required. Fulvic
acid is particularly good for this role of
natural chelation, because it has the abil
ity to enter the plant and move through
out its tissue. In organic production
gardens where synthetic chelation agents
such as EDTA cannot be used, addition
of humic acid appears to be the ideal way
of ensuring that micronutrients remain
available to the plant through a more
natural form of chelation.
Organic nutrients are typically processed
by microorganisms before plants can
take them up. Humic acids promote
the conversion of many elements into a
form available to plants. Adding humic
acids promotes microbial growth, helps
decompose minerals and organic matter,
and makes different elements available
io plants. Iron would usually be supplied
in a chelated compound. In an organic
garden, fulvic acid is used instead. Humic
and fulvic acids accelerate cell division
and increase the rate of development and
the length of root systems.
Ebb-and-Flow Gardens
Ebb-and-flow (aka flood-and-drain)
gardens are low-maintenance, simple,
and inherently efficient by design. This is
often the easiest and most cost effective
hydroponic or container culture garden
for indoor and greenhouse cannabis
cultivation, whether growing just a few
plants in a small area or a large garden.
Individual plants in pots or rockwool
cubes are set on a special table with
drainage channels and sides, a grow
ing bed that can hold up to 4 inches
(10.2 cm) of solution. The nutrient
solution is pumped into the table or
growing bed. The rockwool blocks or
containers are flooded up through an
inlet from the bottom, which pushes
the old, oxygen-poor air out. Once the
nutrient solution reaches a set level, an
This ebb-and-flow garden has an air stone to
increase nutrient-solution aeration.
overflow pipe drains the excess back
to the reservoir. At the end of the
irrigation cycle, the pump is turned off
and the solution drains and draws new,
oxygen-rich air into the growing medium.
The aerated substrate is just what roots
need to take in nutrients at a rapid rate.
A maze of drainage channels in the bot
tom of the table directs runoff solution
back to the catchment tank or reservoir.
This cycle is repeated several times a
day. Ebb-and-flow gardens are ideal for
growing clones, seedlings, and short
plants in a sea of green (SOG) garden.
Ebb-and-Flow Tables
Nutrient solution is pumped up into
the bed via an inlet fixture and evacu
ated out the same inlet/drain. There is
only one entrance and exit to clog, leak,
or otherwise malfunction. Delivering
nutrient solution via more than one
outlet compounds problems every time
a new emitter is added. An overflow
fitting guarantees the nutrient solution
will reach a specific level and not spill
Roots grow out drainage holes but stop
growing when they come in contact with air
between irrigation cycles.
Each bed in this flood-and-drain garden is
controlled by timers that can be seen at the
end of the aisle.
These plants grew for about a week too long
and needed to be pruned from below. But as
you can see, the buds on the top of the plant are
at least 2 feet (61 cm) long.
www.marijuanagrowing.com
417
Flood-and-drain tables are scrubbed down by
hand and disinfected between crops.
Plants wick up nutrient solution in the ebb-
and-flow tables.
Drains should be efficient and simple to clean.
Adjustable legs make it easy to level and add
an incline to a growing table.
over the top of the table. Excess solution
drains back into the reservoir via the
overflow fitting. The solution is aerated
when it cascades from the drain hole in
the table into the reservoir below.
Ebb-and-flow tables or growing beds
are designed to hold up to 4 inches
(10.2 cm) of solution and let excess
water flow freely away from the growing
medium and roots. Nutrient solution
is pumped up into the bed, filling it in
5 to 10 minutes. It should take about
8 minutes for a 350 GPH pump to fill a
4 X 8-foot (1.2 X 2.4 m) table with 40
Flooding garden beds is the easiest and most
efficient form of irrigation.
gallons (151.4 L) of solution 2 inches
(5.1 cm) deep. The solution is moved
relatively slowly, and a low-volume
350 GPH (1325 LPH) pump is adequate
(see "Nutrient-Solution Pumps,” on page
434.) These gardens are fairly quiet and
use less power than some other setups.
The bed should drain faster than it
takes to fill. Total fill-and-drain time
cannot exceed 20 minutes or roots will
be deprived of oxygen too long and
will drown, rot, and attract problems.
Passive drainage requires a large tube (at
least 2 inches [5.1 cm]) to allow solution
to drain rapidly. Complete and speedy
drainage is essential so that the growing
medium pulls fresh air into the growing
medium and root zone. Excess solution
sitting in substrates after irrigation does
not allow adequate oxygen to enter.
Slow suffocation occurs when nutrient
solution does not drain completely. The
surface of the growing media must also
dry out completely to help prevent algae
growth and fungus gnat infestations.
Avoid algae growth on substrate surface
by covering to exclude light. Remove
any debris—dead leaves, organic matter,
and so forth—from the surface of the
growing medium to deter pests and
diseases. Keep clean, pest-and-disease-
free medium enclosed in plastic until it
is used.
The table must be sturdy enough to
hold a volume of water. For example,
a4X8-foot(1.2X2.4m)tablethatis
2 inches (5.1 cm) full holds 40 gallons
(151.4 L) of solution that weighs 240
pounds (108.9 kg).
When flooded with 1 to 2 inches (2.5 -
5.1 cm) or more of nutrient solution, the
growing medium wicks up the solution
Steel tables with wooden supports bear all the
weight ofthe growing table. The tables are
equipped with wheels so an aisle can be opened
between them.
418
CONTAINER CULTURE & HYDROPONICS
www.marijuanagrowing.com
into the freshly aerated medium. Tables
with drain channels require deeper
flooding, up to 4 inches (10.1 cm), to
compensate for channels. Homemade
tables with no drain channels require
shallower levels. But such tables could
also allow pools of stagnant water if
not perfectly flat and with an adequate
incline.
Adjustable-height legs, similar to those
found on a washing machine, work well
to support ebb-and-flow garden beds.
Individual legs can be adjusted to dial
in the slope of a garden bed table. Allow
enough incline so that solution drains
readily but not so much slope that plants
at the high end do not receive enough
solution. An 8-foot-long table should
have a slope of about 0.5 to 0.75 inch
(about 1.3-1.9 cm). Growing beds lon
ger than 10 feet (3 m) drain slowly, and
solution stays on the beds longer than
roots are able to use it.
Growing Mediums
Growing medium must wick solution
up and must also hold plenty of air.
For example, a 4-inch (10.2 cm) rock
wool cube flooded with 1 inch (2.5 cm)
of solution wicks up about 3 inches
(7.6 cm) into the cube. Growing medi
ums must provide adequate capillary
action for water uptake and movement.
Rockwool, soilless mix, and coco are
the preferred growing mediums for
ebb-and-flow gardens. However, some
people do use expanded clay pellets and
irrigate deeper and more often.
Irrigation
Flood the table with 1 to 2 inches
(2.5 -5.1 cm) of solution to ensure even
nutrient-solution distribution. Avoid
lightweight mediums such as perlite
that may cause containers to float and
fall over. A large volume of water is
necessary to fill the entire table. Make
sure the reservoir has enough solution
to flood the reservoir and still retain an
absolute minimum of 50 percent extra
to allow for daily evaporation. Before
introducing plants, calculate the amount
of solution needed to flood the table.
Also calculate the size of reservoir
needed. Use the tables at right as a
guideline.
r----------------------
TABLE
CUBIC
LITERS FOR RESERVOIR CUBIC
LITERS FOR
----------------------------------------------------------’
RESERVOIR
Size (cm)
3-cm Depth Size (L)
6-cm Depth Size (L)
30x60
5400
5.4
10.8
21.6
60x60
10800
10.8
21.6
43.2
60x90
16200
16.2
32.4
64.8
' 60 x120
21600
21.6
43.2
86.4
90x90
24300
24.3
48.6
97.2
!90 x120
32400
32.4
64.8
129.6
90x150
40500
40.5
81
162
!90x180
48600
48.6
97.2
194.4
;120x120
43200
43.2
86.4
172.8
120 x 150
54000
54
108
216
120 x180
64800
64.8
129.6
259.2
120 x 210
75600
75.6
151.2
302.4
120 x 240
86400
86.4
172.8
345.6
120 x 270
97200
97.2
194.4
388.8
120 x 300
X ,■■■-
■■■■■■J
108000
108
216
432
www.marijuanagrowing.com
419
This rockwool hydroponic garden by Trichome Technologies is completely automated.
Each clone in this top-feed garden is fed via a
spaghetti tube attached to an emitter.
1
Roots hang in the moist air below the garden
bed. Irrigation water is recirculated back to the
reservoir.
To check the moisture level, saturate
substrate with nutrient solution. Weigh
rockwool containers or blocks when
saturated, and weigh them again a few
hours to a day later to check the amount
or percentage of water used. For exam
ple, a block that weighs 4 ounces (11.8 cl)
when saturated will weigh 2 ounces
(5.9 cl) when 50 percent of the nutrient
solution has been used. Check with the
grow medium or substrate manufacturer
for recommendations on moisture
content and irrigation frequency.
To learn the amount of solution a
grow medium contains, weigh it when
saturated and after squeezing lightly.
Water rockwool when it is 50 percent
dry. Remember, rockwool holds a lot
of moisture and air, even when satu
rated. Irrigation frequency and volume
change substantially when temperatures
go down and light is lacking. Over
watering is much more likely when
temperatures cool. Do not let nutrient
solution stand on the table for more than
20 minutes. Submerged roots drown in
the depleted oxygen environment.
Ebb-and-Flow Irrigation Guidelines
1. Rockwool cubes: 3 times @
10 minutes
2. Soilless mix: 3 times @ 10 minutes
3. Expanded clay: 6 times @ 10 minutes
4. Lava rock: 12 times @ 10 minutes
Note: Lower the EC to between 600
and 800 ppm when increasing feeding
frequency. It is easy to burn plants when
irrigation frequency increases.
The first cycle should start first thing in
the morning and be followed by cycles
2 to 4 hours apart. The irrigation
schedule will fluctuate depending upon
variables such as temperature, humidity,
plant age, and growth rate. No watering
is necessary at night. The entire irri
gation cycle must be completed in no
more than 20 minutes total, or roots will
drown. The fill time is important and
should occur relatively quickly, prefer
ably in ten minutes or less. Drain time
should be relatively quick so that the
draining solution sucks new, oxygen
rich air into the container or cube. This
is an essential principle of irrigation in
any flood-and-drain garden.
A large amount of nutrient solution is
required to fill garden beds. For example
a 4 X 8-foot (1.2 X 2.4 m) table requires
40 gallons (151.4 L) of solution to reach
a depth of 2 inches (5.1 cm). Conse
quently a large reservoir is necessary.
Garden beds are flooded in sequence
or will have individual reservoirs when
more than one such table is set up in a
growing area.
The entire table floods and is exposed to
air, causing a huge volume of water from
the solution to evaporate into the air.
This creates more humid atmospheric
conditions. Extra ventilation will be
necessary to whisk away moist air. The
balance of the nutrient solution is also
affected and must be compensated.
Since all plants are in the same bed and
are irrigated together, pests and diseases
can also run through an entire garden
420
CONTAINER CULTURE & HYDROPONICS
www.marijuanagrowing.com
This top-feed container is irrigated by a
spaghetti tube that circles the plant. Nutrient
solution is delivered around the circle so it
penetrates growing medium evenly.
quickly. Keeping garden rooms clean is
essential to avoid the spread of pests and
diseases.
Variations of Ebb-and-Flow
A few gardeners place a capillary mat
between the table and containers to
hold nutrient solution and promote root
growth. I do not recommend this prac
tice. Once plant roots have anchored
into the capillary matting, they cannot
be moved without damaging roots.
Excessive algae growth and waterlogged
roots that leads to root rot are inher
ent problems with this practice. After
irrigation, the water under matting takes
a very long time to dry.
Top-Feed Gardens
Top-feed hydroponics and container
culture gardens are efficient and pro
ductive, and once set up, they are easy
to control and maintain. The nutrient
solution is metered out in specific doses
at intervals over time and delivered to
individual plants via spaghetti tubing or
an emitter placed near the base of the
stem. Aerated nutrient solution flows
down into the growing medium. Roots
take in some of the nutrient solution and
the balance drains out the bottom. The
runoff solution is directed back to the
reservoir as soon as it drains from the
growing medium. Rockwool and expan
ded clay pellets are the most common
growing mediums in hydroponics, and
container culture gardens commonly use
such mediums as soilless mix, coco coir,
and soil. Versatile top-feed gardens can
be used with individual containers slabs
in individual beds or lined up on tables.
Top-feed 5-gallon (18.9 L) containers
of growing medium work well to grow
large plants that may require support.
Small 1- to 3-gallon (3.8-11.4 L)
containers work well for smaller plants.
Top-Feed Containers
Individual self-contained recirculating
top-feed container gardens consist of
anetpotorpotsnestedinthelidofa
container/reservoir containing a pump.
Popular setups include a single net pot
suspended in the lid of a 5-gallon con
tainer/reservoir or multiple net pots
suspended in the lid of a larger container.
A submersible pump in the bottom of the
container lifts nutrient solution to irri
gate individual plants via spaghetti tubing
and emitters around the stems. Expanded
clay pellets are the preferred growing
medium for continuous irrigation, and
rockwool for intermittent application.
Nutrient solution drips down through
the growing medium and runs to waste
or falls back into the reservoir before
recirculating. The solution is aerated ev
ery time drops fall and splash down into
the self-contained reservoir below. The
pump must cycle nutrient solution
24 hours a day to ensure that water is aer
ated. This garden does not need a timer.
Roots grow down into the nutrient
solution and, over time, form a mass
on the bottom. Irrigation from the top
circulates aerated nutrient solution and
This top-feed container has a reservoir
and a pump.
Multiple containers are connected to the same
drainage tubing. The containers are irrigated
from the top and all drain back into the same
reservoir.
flushes out old, oxygen-poor solution.
Some containers have a 1-inch (2.5 cm)
pipe to draw air directly down into the
root zone. Nutrient-solution aeration in
the bottom of the container can become
a constant problem. Place a grate or
platform in the bottom of the container
so roots do not sit in water and drown.
If the nutrient solution is more than an
inch (2.5 cm) deep, an air stone attached
to an external air pump must be added
to the bottom of the reservoir to ensure
that roots receive enough oxygen. At this
point the garden changes names. (See
“Deep Water Culture” in this chapter.)
Individual top-feed 5-gallon (18.9 L)
containers are easy to move and perfect
for growing 1 or 2 large plants, includ
ing mothers. Culling out and replacing
a slow-growing or diseased plant is
also quick and easy. Controlling each
container’s nutrient solution pH, EC,
and temperature are the tradeoffs for
versatility.
Top-feed gardens cycle for 5 minutes or
longer and should be irrigated at least
3 times daily. Often gardeners cycle the
nutrient solution 24 hours a day, espe
cially when growing in fast-draining
expanded clay or similar mediums. In
fast-draining mediums, overhead irriga
tion is continual. Microirrigation in coco
coir is generally 4 to 5 times daily.
Multiple-container, recirculating, top
feed gardens employ several containers
that are connected to a main reservoir.
A flexible drain hose is attached near the
bottom of the container/reservoir. The
hose is connected to a drainage manifold
www.marijuanagrowing.com
421
At transplanting, the bottoms are cut out of
containers full of coco. Roots grow down into
the coco slabs. Individual plants are watered
with spaghetti tubing from above.
Many plants can fit in a small area when
growing in coco slabs.
that shuttles runoff nutrient solution
between reservoirs. A central pump dis
tributes solution from a central reservoir
to individual containers via an irrigation
manifold and spaghetti tubing. Once
delivered, the nutrient solution flows and
percolates through the growing medium.
Roots take in the aerated nutrient solu
tion before it drains onto the tray and
back to the central reservoir.
Each reservoir below the growing con
tainer can hold an inch (2.5 cm) or more
of water. It is important to regularly
cycle irrigation in these gardens, so the
solution in the bottom of the container
does not stagnate and drown roots—
remember the 20 minute rule! Top-feed
containers can also be lined up on a
drainage table. Square containers make
most efficient use of space.
More extensive plumbing allows
nutrient pH, EC, and temperature to
be controlled via the central reservoir.
The reservoir must be located below
growing containers to avoid high levels
of solution stagnating in the bottom of
Individual trays with drainage channels
can also hold slabs. The trays are connected
by a manifold of tubes or troughs that drain
runoff to waste or back to the catchment tank.
Versatile individual trays are easy to configure
for different-sized gardens, but algae growth
is common when directing runoffback to the
reservoir via an open-faced trough.
containers. A reservoir located at the
same level or plane as growing containers
causes the levels of all reservoirs—
central and all container/reservoirs—
to seek the same solution level.
Individual containers in top-feed
gardens can be easily arranged to fit into
the allotted garden space. Plants can also
be transplanted or removed from pots
and cared for individually.
Top-Feed Slabs
Top-feed rockwool and coco coir slabs
(bats) that are covered with plastic serve
as growing containers. Clones and seed
lings are grown in individual containers,
most often rockwool blocks, and set on
top of slabs (transplanted). See “Trans
planting Rockwool Cubes onto Slabs,”
at right.
An irrigation tube is attached to a short
manifold with spaghetti tubes fed by a
pump submerged in a reservoir in a re
circulating garden. Spaghetti tubes with
or without emitters are attached to thin
stakes that are anchored in the grow
ing medium. They deliver a measured
dose of nutrient solution. The nutrient
solution is aerated as it is applied, before
being absorbed by the growing medium
and draining back to the reservoir.
In recirculating gardens, slabs should be
set on tables that have drainage chan
nels to carry runoff nutrient solution
back to the reservoir. Elevated tables are
not necessary in run-to-waste gardens.
Tables with a flat surface do not allow
adequate drainage, and solution tends
to puddle and stagnate, quickly leading
to problems with root rot, pests, and
diseases. Excess nutrient solution drains
from pots onto the table with drainage
channels and is carried back to the res
ervoir. Make sure the table is set up on
an incline so it drains evenly. Pockets of
standing water on the table contain less
oxygen and promote rot.
Transplanting Rockwool Cubes
onto Slabs
Root clones and grow seedlings in 1- to
2-inch (2.5-5.1 cm) rockwool cubes.
When roots are established and just
starting to grow through the sides,
transplant into larger 3- to 4-inch
(7.6-10.2 cm) rockwool blocks. Avoid
root damage and minimize shock by not
letting roots grow more than a quarter
inch (0.6 cm) beyond the sides of cubes
before transplanting into blocks.
This cutaway drawing sho ws that nutrient
delivery is simple and easy with a top-feed slab
garden. Aerated nutrient solution is metered
via emitters onto a growing cube. Aerated
solution percolates down through the medium.
Channels in the bottom of the tray speed drain
age back to the reservoir.
422
CONTAINER CULTURE & HYDROPONICS
www.marijuanagrowing.com
Vertical gardens take advantage ofall
available HID light.
Transplant blocks onto slabs when the
first roots start to show out the bottom
of blocks. A 40-inch (101.6 cm) slab can
easily support three individual plants.
Transplant each of three individual
blocks onto a slab by cutting an “X”
that corresponds to the corners of the
block on top of the slab. Peel the plastic
covering back and set block on top of
conditioned slab. Hold block in place
with toothpicks or thin stakes until
established.
Vertical Top-Feed Gardens
Growing small plants in a vertical garden
saves space and increases yield per square
foot. Fences, sunny garden walls, and
bare but well-illuminated walls around
garden rooms are usable garden space.
Side light in garden rooms is often un
derutilized or wasted. Backyard fences
and walls—sunny, partially shady, and
even shady—are also excellent locations
for vertical gardens.
DFT gardens and top-feed irrigation can
be mounted on a fence or garden wall.
Containers can be placed in a trough
along the walls of indoor garden rooms
to take advantage of lost side light. An
automated top-feed spaghetti-tubing
manifold can deliver nutrient-solution.
Or a sunny backyard fence or wall can
be fitted with 4-inch (10.2 cm) tubing
to make a DFT garden. Extra heat is
absorbed and emitted from fences and
walls. Take care to shade nutrient tubes
to keep solution cool and prevent roots
from baking. Fences and garden walls
heat up to beyond 100°F (37.8°C) in
direct sunlight. (The fence in my back
yard reaches temperatures of about
130°F (54.4°C) during the summer.) In
such hot conditions, it would be almost
impossible to succeed with this type of
garden. Protect gardens and plants by
spacing tubes and containers away from
excessive heat, and shade all garden beds
and tubes. Cool nutrient solution by set
ting reservoir on cool ground in a shady
location. Artificially cooling nutrient
solution is expensive, impractical, and
environmentally unsound.
A vertical garden that consists of shelves
stocked with a layer of cannabis plants
in 1- to 3-gallon (3.8 -11 .4 L) contain
ers is another growing option. Plants
are stacked on shelves and trained to
grow out and up toward lights located
in the center of the room. Shelving can
be placed all the way around the lamps.
Containers are irrigated with spaghetti
tubing connected to individual emit
ters. A trough or plumbing tubes below
containers carry nutrient solution back
to the reservoir.
The light can be either fixed in the
center of the room with shelves sur
rounding it, or mobile and able to move
out of the way for maintenance. The
latter arrangement is a lot of work to set
up and maintain. Few gardeners have
the time and energy to make it work
properly. Several commercial, vertical,
space-saving gardens are still on the
market; others have been short lived.
Search “vertical marijuana garden”
online for more information.
An A-frame structure having growing
containers on walls of both sides and a
reservoir below will save space. Orient
www.marijuanagrowing.com
423
the sides of the frame so that they receive
the most light possible.
plants, lawns, and flower or vegetable
gardens with the runoff nutrient solution.
Run-to-Waste (RTW) Gardens
Run-to-waste hydroponics and container
gardens are among the least expensive,
simplest to construct, and easiest to
maintain. Many commercial flower and
vegetable growers use RTW gardens.
Once the nutrient solution is applied, it
is absorbed by the growing medium and
roots; the excess drains to waste. Used
nutrient solution is not recirculated and
recycled. Gardeners fertilize perennial
This gardener waters plants by hand so that
20 percent runs out the bottom of each con
tainer. Individual containers drain into a
larger container that is lifted out and dumped
in the outdoor garden.
A run-to-waste garden uses about the
same amount of fertilizer as a recirculat
ing garden uses. The nutrient solution is
more dilute in a RTW garden. In most
recirculating gardens, the nutrient solu
tion is dumped out and changed every
5 to 7 days or the plants’ waste products
will overwhelm the chemistry of the
solution. The solution is concentrated
and imbalanced when thrown out. A run-
to-waste garden expels a small amount
of nutrient solution with every irrigation
cycle. Regardless of origin, the “used”
nutrient can be recycled to fertilize the
outdoor garden. Please do not send the
used solution down household drains!
Dump it in different places outdoors in
order to avoid a buildup of fertilizer salts.
A nutrient solution is applied in a run-
to-waste garden, and there is reduced
chance of problems with pH fluctuations,
nutrient buildups, and imbalances. A
consistent formula with the proper pH is
applied regularly. The formula is dilute so
the extra water in the solution will wash
away excess salts. Fertilizer residues do
not have a chance to build to toxic levels.
Ideal growing mediums for RTW
gardens retain moisture and air well.
Substrates that retain moisture and air
for a long time require less-frequent
watering. Often watering once a day or
every few days is all that is necessary. In
such gardens, simple manual irrigation is
possible. A runoff of at least 20 percent is
necessary to ensure a healthy root zone.
There are several inherent benefits to a
RTW garden that lend themselves to
hot climates and avoiding the spread of
diseases. Roots are easier to keep cool
on hot days because the nutrient solu
tion is applied only once and not given
a chance to recirculate and heat up. The
nutrient solution can also be kept in a
cool location. Keeping the root zone
cool during very hot days can make an
incredible difference in plant growth.
Plants can be easily isolated with a
run-to-waste garden. Since the nutrient
solution is applied only once and not
recaptured, it can be applied to individual
plants and not be recirculated and applied
to all plants. In a recirculating garden, if
one plant has a disease, all plants will be
affected by the same disease.
Manual Run-to-Waste Gardens
Manual RTW gardens with containers
full of substrate will hold moisture longer
and requires less-frequent irrigation.
Favorite mediums for low-tech manual
RTW gardens include a mix of perlite/
vermiculite, horticultural-grade coco
coir, and soilless mix such as Pro-Mix.
Avoid low-quality coir as it tends to
harbor sodium and requires heavy pre
soaking, washing, and pH correction.
These expanded clay pellets are ofdifferent
sizes and are irregular in shape. This fine
grade of expanded clay pellets holds more
nutrient solution for longer periods of time.
It also holds plenty ofair.
424
CONTAINER CULTURE & HYDROPONICS
www.marijuanagrowing.com
This simple run-to-waste system holds runoff
water in the soil below.
This amazing run-to-waste garden is filled
with small expanded clay pellets to a depth of
3 inches (7.6 cm).
These plants receive plenty of light and are
irrigated with nutrient solution several times
a day. As you can see, they are strong and
healthy.
Five-gallon (18.9 L) containers are
excellent for a low-maintenance gar
den. To make containers into growing
containers, drill a hole as close to the
bottom of the container as possible so
that very little water sits on the bottom.
Insert a thru-hull fitting and attach a
drainage hose to the fitting or simply let
the irrigation solution run out the fitting
or hole into another container. Run the
hose down into another container to
catch the runoff that will be used in the
outdoor garden. Put a screen in front
of the drainage hole to keep it free of
blockage.
Automated Run-to-Waste Gardens
Automated RTW gardens use a pump
and timer to apply nutrient solutions
more frequently at regular intervals.
The gardens can be set up using the
“Top-Feed Gardens” or “Ebb-and-Flow
Gardens” above as a guideline. Medi
ums that work well with more frequent
irrigations include expanded clay, coco
coir, and rockwool. Algae grow on any
uncovered medium with a moist sur
face, attracting fungus gnats, stem rot,
and other problems. Rockwool, coco
coir, and peat tend to stay too wet in
the upper parts and too wet toward the
bottom when using large volumes in tall
containers. But when in a low profile,
slabs and cubes are much easier to keep
moisture and air retention near ideal
levels. Regardless of how often plants
are watered, there must be at least
20 percent runoff every time.
Wick Gardens
Low-tech wick gardens have no moving
parts to break or malfunction. Low ini
tial cost and little maintenance are other
positive points. These gardens consist of
a container full of an absorbent growing
medium such as coco coir, rockwool, or
The wick in this passive garden continually
draws nutrient solution up to roots.
soilless mix containing more absorbent
and air-holding mediums such as peat.
A wick made from cotton rope, yarn,
or other absorbent material transfers
nutrient solution from a reservoir to the
growing medium via capillary action.
Simple low-tech wick gardens may
not be well suited to the demands of
fast-growing cannabis plants. If the
growing medium stays too wet and
soggy, can
to supply enough
oxygen for rapid nutrient uptake.
Flood Wick Gardens
High-tech flood wick gardens rely on
nutrient solution delivered manually
or via a pump. These advanced wick
gardens are actually half of a flood-and-
drain garden. The difference is that they
do not drain; nutrient solution is flooded
into a growing table or area with sides to
contain the liquid. The liquid is slowly
absorbed by plants in containers for one
to several days afterward.
Setting up a flood garden is relatively
easy and inexpensive. The growing bed
can be set up on a table or directly on
the floor. The bed must be flat and level
so that nutrient formula is available to be
www.marijuanagrowing.com
425
wicked up by all plants at the same rate.
Unlevcled growing beds cause plants on
the low end of the table to receive more
solution than those on the high end.
These flood wick gardens work best
with 1- to 3-gallon (3.8 -11 .4 L) con
tainers somewhat wider than they are
deep. Larger containers tend to hold too
much solution, which promotes soggy
substrate, low oxygen levels, and root
disease. Containers with holes around
the bottom rim work better than pots
with holes in the bottom only. Contain
ers can be set on capillary mats.
An absorbent substrate such as rockwool
or coco coir that holds plenty of air and
solution is preferable for these gardens.
Substrates can also be mixed together to
achieve the desired ratio of air to nutri
ent solution. There are many variables in
substrates, and giving ratios is difficult.
Consult other gardeners in your area or
check www.marijuanagrowing.com.
Irrigation cycles depend upon plant
size, growth habit, humidity, and tem
perature of the growing area and sub
strate, as well as the depth of the irriga
tion solution. When plants are small and
growing slowly they consume less water
and nutrients and need less-frequent
irrigation. In general, irrigate with
enough solution to cover the bottom of
the table to a depth of 0.5 -inch (1.3 cm)
so that all the solution is wicked up in a
few hours. Increase the frequency and
depth of nutrient-solution irrigation as
This flood garden is so crowded with plants
that watering any other way is impossible.
plants’ needs grow. Small plants should
use the nutrient solution in 5 days or
less. Medium to large plants commonly
need irrigation every 2 to 5 days.
Mix nutrient solutions with a low EC
and use very clean (low EC or reverse
osmosis) water. Since the nutrient
solution does not drain away from roots,
mineral salts have a big opportunity to
build up to toxic proportions. Prevent
possible fertilizer salt buildup in the
root zone by applying low EC solutions
so that plants use nutrients before they
build to toxic levels.
I have seen such gardens work quite
well even though the substrate appears
to stay too wet. Here is why: the higher
the salinity, the moister the medium
needs to be. Allowing the medium
to dry out even a little bit causes ions
to come out of solution and onto the
medium. When water is reapplied, all
the ions go back into solution, even the
ones that normally are there, so noth
ing is on the particle and the EC for a
short time spikes causing damage. With
proper care, this type of garden can be
successful.
If porosity is correct, the medium only
appears to stay wet. The reality is that
water stays in the small pores and weeps
to the larger ones with air. The air
pores never fill up; air does not really
need suction to get into the root zone
with correct pores. The results are a
better-watered plant than most, with a
steady supply of nutrients, and the roots
do not drown. However, salts can accu
mulate in the medium’s topmost layer.
The roots cannot fill the total column of
medium because of this layer. The level
ofO2isnotashighasitwouldbewith
suction. The ratio of available ions is
skewed to reflect the leftovers.
The feeding schedule should include low
EC values to avoid salt accumulation,
and a fertilizer would really need to be
calibrated to do better than average. This
is to allow for irrigation water, plant
types, life stage, and seasons.
Under high-salinity conditions it
becomes critical to (1) never allow a
dry-down, and (2) allow for evaporation
between irrigations, which forces us to
water more and more often (or further
decrease the feed EC) until the roots
drown or we can put nothing else in the
supply water. Periodic leaching of the
medium is essential.
SYLVIA BERNSTEIN
Canna A and Canna B are designed specifically
for the coco that Canna sells. Designing nutrient
for proprietary products has given this company
a big edge for research and development.
General Hydroponics produces several
different formulas that are very popular
among medical cannabis gardeners.
AQUAPONIC
GARDENING
A STEF BY SUPGUfDl io RAISING VEGETABLES
FISH TOGETHER
426
CONTAINER CULTURE & HYDROPONICS
www.marijuanagrowing.com
Humboldt Honey from Humboldt Nutri
ents is a good example ofan organic-based
fertilizer company that gives medical cannabis
gardeners in California the mixes they want.
A clean garden area is essential. Trichome
Technologies' gardeners keep all their contain
ers organized and labeled.
Canna produces one of the many fertilizer
formulas that are packaged in two parts.
Aquaponics
Aquaponics combines traditional
aquaculture (raising aquatic animals)
with hydroponics in a symbiotic sustain
able environment. The toxic by-products
in solution generated by aquatic animals
are directed into a hydroponic garden.
These toxins, many of which are
nutrients, are filtered out and used by
plants to grow. Once cleansed of toxins,
the water is recirculated back to the fish,
shellfish, mollusks, and so on.
Aquaponic gardens are not yet common
among cannabis gardeners. The closest
thing to an aquaponic garden I have seen
was in the mid-1990s in Vancouver,
Canada, where an eccentric grower was
filtering wastes from his freshwater
predatory fish tank into his container
culture nutrient tank. Technically, this
was only half of an aquaponic garden.
Aquaponic gardens are more complex
than standalone hydroponic or container
culture gardens and are beyond the
scope of this book. For more current
information, see Aquaponic Gardening
by Sylvia Bernstein and check the forum
on www.marijuanagrowing.com.
Hydroponic Nutrients
Nutrients are necessary for cannabis to
grow. These nutrients must be broken
down chemically within the plant,
regardless of origin, organic or mineral.
The nutrients could be derived from
natural organic bases, or they could
be simple chemical elements and com
pounds, man-made or naturally
occurring. When properly applied, each
type of fertilizer, organic or chemical,
theoretically produces the same results.
Soluble complete nutrients properly
applied under the right conditions are
immediately available for uptake. Fertil
izer designed for use in soil is unsuitable
for hydroponics or container gardens
because it is not “complete” and does
not contain all nutrients a plant needs
to grow. Low-quality fertilizers contain
impure components that often leave
residue and sediments. These impurities
build up in reservoirs, containers, and ir
rigation tubes and nozzles, causing extra
maintenance and other problems.
Caution! These impurities will build up
in the plant faster than in the soil.
Premium complete fertilizers designed
for cannabis container culture and
hydroponics are soluble and mixed in the
proper ratios to form a balanced formula
that includes all the necessary nutrients.
Commercial premixed solutions are
diluted or dissolved in water before use.
These fertilizers come in 1,2, 3, 4, or
more parts. There is a “base” formula that
separates calcium from other nutrients,
all of which are soluble and dissolve in
solution, but calcium will combine with
many other elements when at the right
level. When united in a concentrate, the
two (calcium and any other nutrient)
combine, precipitating and falling to the
bottom of the reservoir, unavailable to
plants."' It is easy to change the ratio of
the mineral elements by mixing other
components of the formula to tailor the
mix to the native water limitations or the
plant growth stage—seedling, vegetative,
and flowering. Special nutrient formula
tions are available for people with “hard
water” that contains large amounts of
calcium. For more specific information,
check the fertilizer application chart
provided by manufacturers.
"Note: Be wary of fertilizers that sepa
rate out many nutrients into many parts.
This is often done to simply increase the
product line and make more income!
Purchase 1- and 2-part nutrients in
powder or liquid form
Purchase 1, 2, 3+ formulations in
liquid form
Soluble complete “hydroponic” fertil
izers (nutrient formulas or recipes) are
diverse combinations of chemical salts.
Mix a predetermined amount of fertil
izer concentrate with water to make a
nutrient solution. The most frequently
used macronutrient chemicals include
potassium nitrate, calcium nitrate,
potassium phosphate, and magnesium
sulfate. Plant nutrients (inorganic and
www.marijuanagrowing.com
427
ionic form) are the dissolved cations
(positively charged ions) Ca2+, Mg2+,
and K+. The major nutrient anions (neg
atively charged ions) in nutrient solu
tions are NO3- (nitrate), SO42’ (sulfate),
and H2O4P" (dihydrogen phosphate).
Micronutrients used in hydroponic
formulas are Fe (iron), Mn (manganese),
Cu (copper), Zn (zinc), B (boron), Cl
(chlorine), and Ni (nickel). Chelating
agents are regularly added so that Fe
stays soluble. Plants use water and some
nutrients faster than others; this changes
the composition of the nutrient solution
and alters the pH. Plants also give off
ions such as hydrogen, which will drive
the pH up and down, depending upon
circumstances, as well making elements
such as phosphates more soluble.
Nutrient-solution Composition
The table below is a guideline of
acceptable nutrient limits for cannabis
expressed in parts per million. To avert
nutrient deficiencies and excesses, do
not deviate too far from these ranges.
[The table below is a guideline of acceptable nutrient limits for cannabis expressed
in parts per million. To avert nutrient deficiencies and excesses, do not deviate too
far from these ranges.]
Solution
Vegetative
Formula
Weight in
Grams
A
CaNO3
3
calcium nitrate
A
kno3
1.044
potassium nitrate
A
TE
0.2
trace elements
B
K2SO4
0.23
potassium phosphate
B
kh2po4
0.696
monopotassium phosphate
B
MgSO4
2.24
magnesium sulfate
Main reasons nutrient deficiencies
occur:
1. Low nutrient strength—not enough
nutrients for plant growth
2. Imbalanced formula that lacks one or
more elements
3. Missing fertilizer element or wrong
element in mix
4. Balanced solution, but reactions
with growing media prevent nutrient
uptake
5. Balanced solution, but conditions
inside plant prevent nutrient uptake
Homemade Nutrients
Gardeners who mix their own nutrients
from dry components save hundreds,
F----------------------------------
EXPRESSED IN PPM CHEMICAL
LIMITS
LIMITS
LIMITS
1
LIMITS
Element
Symbol
Low
Medium
High
Average
nitrogen
N
150
650
1000
250
potassium
P
100
300
400
300
phosphorus
K
50
100
100
80
calcium
Ca
100
350
500
200
magnesium
Mg
50
100
100
75
sulfur
S
200
700
1000
400
iron
Fe
2
7
10
5
manganese
Mn
0.5
3
5
2
copper
Cu
0.1
0.35
0.5
0.05
zinc
Zn
0.5
1
1
0.5
molybdenum
Mo
molybdate
0.01
0.035
0.05
0.02
boron
>-
■-■
B
0.5
3
5
1
428
CONTAINER CULTURE & HYDROPONICS
www.marijuanagrowing.com
The numbers from 4 to 9 signify pH value of the nutrient solution. Nutrient availability is
shown for various nutrients in different pH ranges.
often thousands, of dollars every year.
Most small-scale cannabis gardeners opt
to purchase expensive premade formulas
from hydroponic stores. Preformulated
nutrients are usually the best option for
small-scale gardeners. The commercial
formulas usually contains all necessary
nutrients, and they are available to plants
for uptake.
Look forward to at least an eightfold
savings when mixing nutrients from
scratch. For example, a gallon (3.8 L) of
store-bought dilute nutrient (EC 2.0)
costs about $0.25 USD a gallon (3.8 L).
The same gallon (3.8 L) of nutrient
mixed at home costs $0.03 USD a gallon
(3.8 L) for two-part soluble powders.
Mix pH Up or pH Down in water for
a 10 percent solution, and then use this
dilute solution to adjust the nutrient
solution in the reservoir. This will avoid
the pH “bounce,” which causes too
much change followed by more change.
Such dynamic change or “bouncing” is
not good for the ions in solution, as it
will cause issues such as precipitation
and ion lockup.
Mixing and making hydroponic nutri
ents is relatively easy. Many variations
of the nutrient formulas developed at
University of California, Berkeley, by
Dr. D. I. Arnon and Dr. D. R. Hoagland
have been modified and are widely used
today. Here is a base formula you can use
and modify to fit your needs.
Working with a concentrated nutrient
solution is most convenient. Make a
100X concentrate by mixing 10 times the
amount for each “A” and “B” nutrient
formulas in 2 separate containers.
For information on where you can buy
all-in-one packs of these mix-it-yourself
nutrients, visit www.homegrown.ca.
Vinegar can also be used to lower pH, but it is
not as stable as phosphoric acid.
Nutrient-solution pH
When grown hydroponically or when
using soilless media, nutrients are
available to plants within a narrow band
of the pH scale; it is a slightly lower pH
than for soil-grown plants. The pH is
a measure of positive hydrogen ions.
Plants feed via an exchange of ions. The
pH changes as ions are removed from
solution. Ions are taken up by roots as
plants grow, which in turn causes pH
to rise. Typically the ideal hydroponics
and soilless media pH range is 5.5 to
6.0. Nutrient uptake diminishes quickly
beyond this limited range of pH. The
pH of the nutrient solution controls
the availability of chemical ions that
cannabis needs in order to assimilate
nutrients.
The nutrient-solution pH in hydro
ponics is a little lower than for soil and
the nutrients’ availability is somewhat
different too.
Check the input water before mixing
hydroponic nutrients into solution.
Stabilize the pH of the water before
adding fertilizer. If water is “soft” with
a low EC (ppm), the pH will climb,
sometimes for several days after mixing
in nutrients. Adding a stabilizing agent
such as Cal Mag (Ca and Mg) will
minimize fluctuation. “Hard” water
usually contains high levels of calcium
and magnesium ions, which in turn can
limit availability of other nutrients.
Add fertilizer before altering pH of
nutrient solution. Fertilizer salts tend
to be acidic and cause the pH of the
nutrient solution to fall. Follow the
directions on the container for raising
and lowering pH. Mix pH adjusters into
the reservoir slowly and completely.
Roots take in more water than chemical
salts and use the nutrients at differ
ent rates, which causes their ratios in
solution to change, which in turn causes
the pH to climb. When the pH is above
7.0 or below 5.5, some nutrients are not
absorbed as fast as possible. Check the
pH every day or two and correct with an
acid or base to make sure it is within the
desired range of 5.5 to 6.0 .
Check the pH of the nutrient solution,
growing medium, and runoff every few
www.marijuanagrowing.com
429
pH Up and pH Down
days, or daily if necessary. Growing
medium measurements reveal the pH in
the root zone. Runoff pH measurements
disclose possible toxic conditions of sub
strate. For example, if the EC is higher
in runoff water than in the nutrient
solution or media, you know there is a
toxic fertilizer salt buildup in the media.
Correct the toxic conditions by leaching
media thoroughly with diluted nutrient
solution, and replace with new solution.
See chapter 21, Nutrients, for more
information on specific nutrients.
The pH of organic hydroponic gardens
is the same as for any hydroponic garden.
The ion availability works the same;
however ideal pH range may vary because
of the need for the product to morph or
mineralize for availability.
Correct pH if readings vary ± half of a
point. Chemical concentration to move
the pH up or down varies. Consult the
label on the product for dosage instruc
tions. Use rubber gloves when handling
products that alter pH. Small-scale gar
deners find that purchasing pH Up and
pH Down is more expensive but easier
than making it yourself from concen
trated acids or bases. Commercial mixes
are usually buffered and safe to use.
The pH is influenced by many factors
including water quality, growing
medium, nutrient content, etc. Please see
www.marijuanagrowing.com for more
information.
pH Up
potassium hydroxide
(Do not use dangerous and caustic
sodium hydroxide to raise pH!)
pH Down
nitric acid
phosphoric acid
citric acid
vinegar
Nutrient-solution EC
The concentration of the nutrient
solution has an enormous effect on plant
development and growth. Measuring the
overall concentration or strength of a
“balanced” solution is essential. Focus
on nutrient balance and concentration
in the solution to head off deficiencies
before they cause big problems.
Fertilizers (dissolved ionic salts)
conduct electrical current when in
solution. The ions in an ionic compound
are held together by ionic bonds. These
ions “cation” (4- positive) and “anion”
(- negative) have positive and negative
charges that attract one another and
bond. Nutrient (salts) concentrations are
measured by their ability to conduct elec
tricity through a solution. A dissolved
salts meter measures the overall concen
tration or strength of a nutrient solution.
For example, pure distilled water has no
resistance and conducts virtually no
electrical current. When nutrients
(dissolved ionic salts) are added to pure
distilled water it conducts electricity.
A greater concentration of nutrients in
solution conducts more electricity.
Several scales are currently used to
measure how much electricity is con-
Measure pH and EC (ppm) at the same time
on each testing day.
ducted by nutrients including: electrical
conductivity (EC), conductivity factor
(CF), parts per million (ppm), total dis
solved solids (TDS), and dissolved solids
(DS). Most US gardeners use ppm to
measure overall fertilizer concentration.
European, Australian, and New Zealand
gardeners use EC, however they still
use CF in parts of Australia and New
Zealand.
The difference between EC, CF, ppm,
TDS, and DS is more complex than
originally meets the eye. See chapter 15,
Meters, for a more detailed explanation.
Each variety of cannabis has an ideal EC
range for optimum growth. Some vari
eties are incredibly heavy feeders while
others are easy to overfertilize. Check
with seed and clone vendors for details.
A high EC leads to “water stress,” caus
ing plant cells to lose water. The water
moves via osmotic pressure into the
more concentrated solution surrounding
roots. Wilting foliage is the first sign of
an EC that is too high. When a mild EC
overdose occurs, plants compensate and
foliage growth becomes tough or hard,
with brittleness to it. Foliage is often
darker green, and plants are shorter and
have smaller leaves.
Many commercial cannabis gardeners
give their flowering crops progressively
higher EC concentration. Flower buds
plump up and put on weight but this
practice tends to make flower buds
develop a very harsh taste when smoked
or vaporized due to the excess salts left
in plant tissues. The residual ash is also
very dark and abundant.
EC is also affected by water uptake. On
hot days when more water is taken up
A constant readout pH meter makes keeping
track of the nutrient solution much easier.
CONTAINER CULTURE & HYDROPONICS
www.marijuanagrowingxom
from the solution, nutrients concentrate
and EC climbs. A low EC also causes
more water uptake and foliage soon
becomes weak and soft, often lighter
green too. However, lowering EC during
hot spells is essential to avoid problems.
Measure EC daily and adjust accordingly
in relation to growing conditions.
To check the EC of the nutrient solution,
collect samples from the reservoir, grow
ing medium, and runoff. Save time and
effort: collect EC and pH samples simul
taneously. Collect samples with a syringe
or turkey baster used for cooking by
inserting it at least two inches (5.1 cm)
deep into the rockwool or growing me
dium. Collect separate samples of runoff
and solution from the reservoir. Place
each sample in a clean jar—washed and
triple rinsed with double-distilled water.
Use a calibrated EC meter to measure
each of the samples, and record measure
ment on a piece of paper.
Measure the EC and pH of:
• nutrient reservoir
• substrate
• runoff
Under normal conditions, the EC in
the growing medium and the runoff
should be a little higher than that of
the nutrient solution in the reservoir. If
the EC of the solution drawn from the
growing medium is substantially higher
than the one from the reservoir, there is
a fertilizer salt buildup in the substrate.
Correct the imbalance by leaching sub
strate thoroughly with diluted nutrient
solution, and replace with new solution.
Regularly check the EC of your water,
slab, and runoff.
EC Guidelines:
Growth Stage
seedling
clone
vegetative
flowering
EC Range
0.8-1 .3
0.5-1.3
1.3-1 .7
1.2 -2
Note: These guidelines are recommen
dations only. Some varieties of cannabis
require higher or lower EC values than
listed above.
Let a minimum of 20 percent of the
nutrient solution drain from growing
medium after each irrigation cycle to
help maintain EC stability. The runoff
carries away any excess fertilizer salt
buildup in the growing medium. If
the EC level of a solution is too high,
increase the amount of runoff so that
30 percent of the solution drains out the
bottom of containers. To raise the EC,
add more fertilizer to the solution, or
change the nutrient solution.
Many factors can alter the EC balance
of a solution, such as irrigation, evapo
ration, and nutrient uptake by roots. For
example, if the substrate is underwatered
or allowed to dry completely, the EC
reading will rise. In fact, the EC may
increase to two or three times as high as
the input solution when too little water
is applied to rockwool. This increase in
slab EC causes some nutrients to build
up faster than others. When the EC
doubles, the amount of sodium can
increase as much as four to six times
under the right conditions! There should
not be any sodium present in your gar
den unless it is in the water supply, and
it should not be in excess of 50 ppm.
Nutrient-solution concentration levels
are also affected by roots’ nutrient
absorption and by water evaporation.
The solution weakens as plants use
nutrients, but water also evaporates from
the solution, which increases the nutrient
concentration. Counteract the concentra
tion of fertilizer salts by regularly adding
plain water to the nutrient solution to
replace what has been used by plants.
Dissolved Oxygen
Dissolved oxygen (DO) in solution is
essential for nutrient uptake by the root
system. Nutrient solutions hold more
dissolved oxygen at lower temperatures,
and the solutions ability to carry oxygen
diminishes as temperatures rise. For
example, well-aerated nutrient solution
holds 8 to 10 ppm of oxygen between
60°F and 80°F (15.6°C-26.7°C). At
60°F (15.6°C) 10 milligrams per liter
(MPL) or 10 ppm is held in solution. But
at 80°F (26.7°C) only 8 MPL (8 ppm)
of oxygen is available—20 percent less.
Deadly Pythium loves temperatures
above 60°F (15.6°C). Pythium is always
present but only deadly when it gets out
of hand.
Large flowering cannabis plants growing
under optimal conditions require 10 ppm
of dissolved oxygen. Maintaining high
DO levels in solution requires close
vigilance of temperature and constant
replenishment of oxygen.
Keep nutrient-solution temperature be
tween 60°F and 70°F (15.6°C-21 .1°C) to
help ensure adequate dissolved oxygen.
Never let nutrient-solution temperature
climb above 85°F (29.4°C), because its
oxygen-holding ability plummets. Once
roots weaken, they are easily damaged
and susceptible to rot, wilts, and fungus
gnat attacks at above 85°F (29.4°C).
The respiration rate of roots doubles
between 68°F and 86°F (20°C-30°C).
But the ability of the solution to hold
dissolved oxygen will drop within this
temperature range by more than 25
percent. This causes DO in solution to
become depleted at a much higher rate
and oxygen starvation then occurs.
Organic microbial life also requires
oxygen to sustain life and grow. Con
versely an increase in nutrient-solution
temperature lowers the availability of
oxygen. Roots suffocate in low-oxygen
environments, causing growth to slow
and eventually stop.
When air is cooler than water, moisture
rapidly evaporates into the air; the greater
the temperature differential, the higher
the relative humidity. Maintaining the
nutrient-solution temperature around
60°F (15.6°C) will help control transpira
tion and humidity.
Aerating this organic nutrient solution helps
keep microbes and other life flourishing.
www.marijuanagrowing.com
431
An air pump submerged in the reservoir not
only aerates the solution, it will help level out
the temperature differential between ambient
air and the reservoir.
Solution-based gardens such as NFT,
wick, and aeroponic, are extremely sen
sitive to DO depletion. The air-holding
ability of the substrate in media-based
gardens offers another source of oxygen,
but these gardens are not immune to
rapid DO depletion.
Oxygen depletion and starvation
symptoms are often general and diffi
cult to diagnose. The first sign is often
wilting when midday temperatures
climb. Roots’ ability to draw in water
and nutrients diminishes, slowing the
rate of photosynthesis and growth. As
malnourishment continues, nutrient
deficiencies surface, roots die back and
plants become stunted. When severe,
anaerobic conditions occur and plants
start producing the hormone ethylene
in reaction to stress.
Oxygen starvation causes leaf epinasty,
a downward curving of leaf edges. The
leaves yellow prematurely when severe.
Avoid Pythium and other problems
associated with lack of oxygen in the root
zone by aerating the solution and keeping
it in the proper temperature range.
Increase Dissolved Oxygen
Let runoff solution cascade or fall back
into the reservoir to introduce more
oxygen into solution. The higher the
waterfalls to the reservoir, the more
oxygen is introduced. Fountains, air
pumps, and diffusers (including air
stones) break air into smaller bubbles
to oxygenate irrigation water more. Use
an air pump to add extra oxygen to the
nutrient solution. Attach an air stone
diffuser to the outlet to break up and
multiply bubbles.
Save energy and money by heating cold
nutrient solution instead of the air in
a room. Use a submersible aquarium
heater or grounded propagation heating
cables. The heaters might take a day or
longer to raise the temperature of a large
volume of solution. Do not leave heaters
in an empty reservoir. They will soon
overheat and burn out. Aquarium heat
ers seldom have ground wires, a seem
ingly obvious oversight. But I have yet
Use an accurate, easy-to-read container to
measure out nutrient dosage.
to learn of an electrocution by aquarium
heater. Avoid submersible heaters that
give off harmful residues.
Solution Mixing and
Maintenance
If possible, get a water analysis before
water is mixed with hydroponic
nutrients. A water analysis will indi
cate the dissolved ionic salts already in
solution. Hard water contains elevated
levels of calcium and magnesium. Both
elements should be added sparingly to
nutrient solutions. Soft water has very
few impurities (ionic salts) that cause pH
to fluctuate, requiring chemical buffers,
usually calcium and calcium compounds,
to be added to solution. If no water
analysis is available from your local water
district, a simple EC reading will measure
An inexpensive aquarium heater will warm a
reservoir by a few degrees in 24 hours. Always
purchase a heater that is big enough for the res
ervoir. Do not let the reservoir run dry when
the heater is on, or the heater will burn out!
Note: Milligrams per liter (mg/L) is approximately equivalent (~) to parts per
million (ppm).
(10 mg/L — 10 ppm)
r PERCENTAGE OF
OXYGEN IN WATER
FRESH WATER MG/L
Temperature
Fahrenheit
Temperature
Celsius
Sea Level
2,000 ft
Elevation
50°F
10°C
11.3
10.5
59°F
15°C
10.1
9.4
68°F
20°C
9.1
8.4
72°F
22°C
8.7
8.1
75°F
24°C
8.4
7.8
79°F
26°C
8.1
7.5
83°F
28°C
7.8
7.3
86°F
30°C
7.5
7
-
J
432
CONTAINER CULTURE & HYDROPONICS
www.marijuanagrowing.com
Small reservoirs are easier to manage than
large tanks. This ingenious series of reservoirs
along a wall uses gravity to keep them all
full. Individual reservoirs can be bypassed,
drained, and cleaned.
the overall concentration of dissolved
solids (ionic salts) in native water. If
growing hydroponically and EC is 0.3 or
higher, treat water with reverse osmosis
before adding nutrients. See chapter 20,
Water, for more information.
Plants use so much water in relation to
nutrients that nutrient solutions need to
be replenished regularly. Casually top
ping off the reservoir with pH-balanced
water daily will keep the solution rela
tively balanced for a week, maybe two.
Use an electronic EC pen to monitor the
level of dissolved solids in the solution.
Occasionally you will need to add more
fertilizer concentrate to maintain the
EC level in the reservoir during topping
off. Keep the reservoir full at all times.
The smaller the reservoir, the more rapid
the depletion and the more critical it is
to keep it full. Employing an automatic
filling function for smaller reservoirs will
help ensure a balanced nutrient solution.
A few gardeners top off the nutrient
solution with 500- to 600-ppm-strength
nutrient solution every 2 to 3 days.
If topping off with nutrient solution,
keep the EC within safe limits. Avoid
problems by draining the reservoir and
adding fresh solution regularly.
Most gardeners leach the entire system
with weak nutrient solution for an hour
or more between changes of the reservoir.
Leaching with a mild fertilizer solution
avoids an absence of nutrients for any
amount of time. But, the EC will still
drop to the levels the medium is leached
with which removes all the excess, resets
the ratio, and ensures that the plant has
nutrients at all times.
Check EC of reservoir, growing medium,
and runoff nutrient solution at the same
time every day. Check solution tempera
ture to ensure that adequate dissolved
oxygen is available to plants.
Reservoirs
Reservoirs should be opaque, as large
as possible, and have a lid to lessen evap
oration, prevent algae growth, and keep
debris out of the system. Paint the exteri
or of reservoirs black or an opaque color
to exclude light and stop algae growth.
Spray paints are packed with plant-un
friendly chemicals; make sure to keep
paint on the outside of the reservoir.
A fast-growing flowering plant in an ideal
indoor garden can process a gallon (3.8 L)
This is a pop-up reservoir. It is easy to store
and holds a large volume of solution.
or more of nutrient solution daily. Ten
maturing plants need at least 10 gallons
(38 L) of water or more daily. Cannabis
consumes a greater percentage of water
than the percentage of nutrients from the
solution. Simple arithmetic tells us that a
100-gallon (380 L) reservoir depletes at
least 10 percent, 10 gallons (38 L) daily,
which concentrates nutrients. Measuring
EC daily will give a closer estimate of the
solution’s overall concentration.
A large reservoir and volume of
nutrient solution will minimize nutrient
imbalances and help ensure that plenty
of oxygen is available to roots. A large
volume of nutrient solution tends to
have a more stable temperature, which
in turn helps keep the dissolved oxygen
A capillary mat is set under the net pots in this
garden. The capillary mat will hold moisture
longer so roots will not dry out. Dram holes in
the bottom of the table allow excess solution to
drain freely.
www.marijuanagrowing.com
433
Both feeding hoses in this automated irrigation
system have easy-to-clean fliers.
Big preformed reservoirs make large amounts
of nutrient solution available. They also make
it easy to mix and control the chemistry of the
solution. These reservoirs require more space
to transport and subsequently house in the
garden.
in the solution more constant. As plants
use water, the concentration of elements
in the solution increases; there is less
water in the solution and nearly the
same amount of nutrients. Add water
daily or when the solution level drops
more than 5 percent. The reservoir
should contain at least 50 percent more
nutrient solution than it takes to fill
flood-and-drain beds to compensate for
daily use and evaporation. The greater
the volume of nutrient solution, the
more forgiving the system and the easier
it is to control.
Install a float valve to automatically
replenish reservoirs with water. A
float valve or Mariotte’s bottle will turn
water on to fill the reservoir when the
level drops. Check the level of the
reservoir daily and replenish if necessary.
Forgetting to replenish the water supply
and nutrient solution as necessary will
cause slow growth and could result in
crop failure.
A 2-part nutrient solution is mixed
before application. Each reservoir holds
1 part of the solution. However, many
professional growers avoid such systems,
citing that both parts of the nutrient
solution should be present together
for a while to stabilize pH and overall
chemistry of the mix. Typically, mixing
an hour before use provides enough time
for stabilization.
If the reservoir does not have graduated
measurements to denote liquid volume,
use an indelible marker to make a “full*
line and the number of gallons or liters
contained at that point on the inside
of the reservoir tank. Use this volume
measure when mixing nutrients.
Set reservoirs below growing beds
so recycled nutrient solution can use
gravity-flow or be siphoned into a
receptacle or the outdoor garden. Drains
and pumps should be as big as possible.
Most hydroponic reservoirs are built
of plastic, but other materials have
been used, including concrete, glass,
metal, vegetable solids, and wood.
Nonreactive plastic is still the preferred
choice because other materials could
react with the solution.
Clean reservoirs completely after har
vesting each crop. Add 1 cup of house
hold vinegar per 5 gallons (23.7 cl per
18.9 L) and let the solution sit overnight
to dissolve built-up salts and scum. Drain
solution, and scrub reservoir with soap
and water. Rinse with plain water to
remove residues before refilling. Apple
cider vinegar is the least expensive
Nutrient solution is aerated when jailing
through the air while returning to the reservoir.
but there are also commercial products
available.
Aeration
Extra aeration is always good for nutrient
solutions, especially when gravity gives it
to us for free. Nutrient solution is aerated
by falling through the air when it returns
to the reservoir. Hydroponic and
container culture gardens can use the
Attach a recirculating pipe with an on Ioff
valve to the pump outlet pipe. This is a
convenient, inexpensive, and easy-to-control
method ofaerating the nutrient solution. Add
a water breaker head, similar to a showerhead,
with many small holes to increase aeration.
fall of a return solution or fountain,
to take advantage of this simple and free
aeration principle.
Reservoir aeration is essential in solution
culture. Simple gravity and recirculating
pipes are not enough to ensure adequate
oxygenation of nutrient solution. Make
use of an air pump to diffuse air and
subsequently guarantee adequate levels
of oxygen.
Nutrient-Solution Pumps
Pumps are either submersible or non
submersible. Submersible pumps pump
solution from inside a reservoir. Non
submersible pumps are either platform
or external, located outside the reser
voir. The base of a platform pump stands
in the water; the motor and pump stand
above the solution and remain dry.
Platform pumps are usually inexpensive,
and many are not designed specifically
to pump nutrient solution.
Always purchase high-quality sealed
pumps, especially if they are to be
submerged in a nutrient reservoir. Sub
mersible pumps must run cool so they
434
CONTAINER CULTURE & HYDROPONICS
www.marijuanagrowing.com
Inexpensive hydroponic pumps can be found
dt garden centers and aquarium stores.
This one-horsepower high-pressure pump
supplies the pressure to move nutrient solution
through a warehouse garden.
Pumps and plumbing often collect residues
when pumping organic fertilizers. Make sure
to use a pump that is strong enough to handle
the extra weight and volume from the organic
fertilizer.
r
BASIC GUIDELINES
FOR PUMP SIZE
1
GPH LPH
Plants
Watered
USD
30
115
1
$15
70
265
2
$15
90
340
2
$20
190
720
4
$45
240
910
6
$50
350
1325
8
$60
500
1890
10
$100
700
2650
12
$115
950
3600 16
$140
1250
—
4800 20
$130
do not heat the nutrient solution. They
also must be reliable and hermetically
sealed so that no internal lubricants leak
and contaminate the solution.
The pump needs to be large enough to
supply all the demand necessary. The
nutrient solution must be lifted a few
feet from the reservoir to the growing
bed or table. The pump must create
enough flow to fill flood-and-drain
tables within a few minutes. Microirriga
tion systems also need adequate flow and
pressure through the delivery manifold,
spaghetti-tubing drippers, and nozzles.
A more powerful pump is also required
to lift the nutrient solution, which is
heavier and thicker than water.
Caution! Overdriving and burning out
a pump is easy when there is no head
(backpressure caused by height or re
strictions against flow) or when solution
viscosity is too high. Most pumps used
in hydroponic gardens are fountain or
water garden pumps designed to move
pure water against a small head. The
more fertilizer added, especially heavy
organic nutrients, the higher the vis
cosity and the harder the pump works.
Overcome this obstacle by using a larger
pump than “normally” necessary.
Pumps that run on 12-volt direct current
(DC) batteries need 12-volt timers
and wiring. Deep cell batteries used in
golf carts and for power outboard boat
motors or marine motors are designed
to hold electricity for a long time. Use
a solar charger to charge batteries in
remote gardens.
Remember the following when installing
a new irrigation system. All plumbing
pipes and tubes should be opaque or
dark in color to stop light from entering
and thus prevent algae growth. A handle
and stand on larger pumps make them
easy to move and mount into a fixed
position. A removable foam filter on the
intake of submersible pumps removes
particles that could clog the impeller and
feeder tubes.
An air pump is easy to set up, but it will make
a bit of noise.
Attach a manifold to the air pump so that air
can be dispersed via many different tubes.
www.marijuanagrowing.com
435
These plants are ready to be transplanted into larger containers. (MF)
Air Pumps
Use an air pump when simple gravity
aeration does not supply enough oxygen
to solution. Air pumps inject air into the
nutrient solution, increasing the dis
solved oxygen (DO) level. The outlet to
the air pump is often attached to an air
stone to diffuse or break the air into tiny
bubbles. Or air is separated into many
small tubes via a manifold before being
injected into the solution.
Caution! Air in such gardens should
be drawn from outside CO2-enriched
areas to avoid CO2 combining with Ca
to form carbonates and drive the pH
up. This is a problem in all air diffusion
systems because CO2 dissolves more
readily in water and will drive out O2
as it competes for available dissolution
space in the water, which is limited by
pressure and temperature.
Growing Mediums
Hydroponic and container culture
substrates provide support for root sys
tems, and they hold oxygen, water, and
nutrients. The ratio of oxygen to nutrient
solution is a key factor in determining
nutrient uptake by roots. Three main
factors contribute to cannabis roots’
ability to grow and absorb nutrients in
a substrate: pH, texture, and nutrient
content.
Substrate pH must be within the desired
range of 5.5 to 6.0 for optimum nutrient
uptake. For best results, monitor pH
daily or perpetually and control with
pH Up and pH Down. See “Nutrient
solution pH” in this chapter for re
lated information. Substrates such as
rockwool must be treated (soaked) in
a determined pH solution in order to
fall within proper pH parameters. See
“Popular Substrates” for more specific
information.
Texture
The texture of any substrate is governed
by the size and physical structure of the
particles that constitute it. Proper texture
promotes strong root penetration, oxy
gen retention, nutrient uptake, and drain
age. Growing mediums that consist of
large particles permit good aeration and
drainage. Increased irrigation frequency
is necessary to compensate for low water
retention. Water- and air-holding ability
and root penetration are a function of
texture. The smaller the particles, the
closer they pack together and the slower
they drain. Larger particles drain faster
and retain more air in between.
Irregularly shaped substrates such as
perlite and some expanded clays have
more surface area and hold more water
than round substrates. Avoid crushed
This substrate (rockwool cubes and slabs) has
excellent texture, holding both air and
nutrient solution.
gravel with sharp edges that cut into
roots if the plant falls or is jostled
around. Round pea gravel; smooth,
washed gravel; and lava rocks are
excellent mediums to grow cannabis in
an active recovery garden. Thoroughly
wash clay and rock growing mediums
to get out all the dust that will turn
to sediment in the system. Fibrous
materials like vermiculite, peat moss,
rockwool, and coconut coir retain large
amounts of moisture within their cells.
Such substrates also work well in passive
gardens that operate via capillary action.
Mineral growing mediums such as coco
coir and peat moss (and rockwool*) are
not inert; often they are mistakenly clas
sified as inert growing mediums. They
react in solution and supply minerals as
they break down, which in turn affects
the CEC and moves the pH.
*Rockwool is not inert until it is treated.
Non-inert growing mediums (mineral
and organic) are not hydroponic sub
strates, and may cause unforeseen
problems when minerals and organic
substances react chemically with water
and supplemental nutrients. Two exam
ples: gravel from a limestone quarry
is full of calcium carbonate, and old
concrete is full of lime. When mixed
with water, calcium carbonate will raise
the pH, and it is very difficult to make it
go down. Growing mediums made of re
constituted concrete bleed out so much
lime that they soon kill the garden.
Substrates composed of organic material
that is still decomposing will interact
with nutrient solutions, altering nutrient
availability and pH. These substrates
also compact, which eliminates many
of the air-filled pores. Even substrates
436
CONTAINER CULTURE & HYDROPONICS
www.marijuanagrowing.com
designed to hold air and absorb moisture
lose effectiveness when overwatered.
Avoid substrates found within a few
miles (km) of an ocean, sea, or large body
of salt water. Most likely, such mediums
are laden with toxic salts. Rather than
washing and leaching salts from the
medium, it is easier and more economical
to find another source of substrate.
Oxygen is contained in the pores of
growing media. Fresh air is drawn into
the root zone as nutrient solution drains
from the growing medium; that is if the
medium is not overwatered or saturated.
Oxygen must be replenished habitually
to keep up with root tissue needs. The
oxygen content in a substrate is essen
tial to a healthy root zone and nutrient
uptake. But “oxygen use” is probably
the most difficult concept for many con
tainer culture and hydroponic gardeners
to master.
One of the best ways to maintain high
oxygen levels in the root zone is by using
proper irrigation techniques. Make sure
air-filled pores in substrates are allowed
to drain completely between irrigation
cycles. Overwatering is one of the main
reasons for lack of oxygen to roots.
The duration that nutrient solution is
held in a substrate is dependent upon
the cation exchange capacity (CEC).
Substrates with a high CEC hold
nutrient solutions in their ionic form
longer than substrates with a low CEC.
Nutrient solution is more difficult to
leach from substrates with a high CEC
rating. Hydroponic mediums with a
low CEC offer more exacting control
because nutrients can be leached quickly
and replaced with new nutrient solution
with a different formula. See chapter 18,
Soil, for more information on CEC.
Buyer beware! There are many over
priced hydroponic growing mediums with
“special” qualities. I have seen more than
one “new” grow medium hit and miss the
marketplace. My best advice is to properly
use a tried-and-true medium.
The best way to buy substrate is to go to
the manufacturer. It is impossible to as
certain what the values of a soil or soilless
mix are by simple written description.
For example, peat vermiculite will depend
on the grade and type of peat as well as
the vermiculite used by size and age. You
need to physically examine the product,
like Pro Mix BX or a 3:1 peat perlite mix.
The manufacturer will include airspace as
well, based on the medium. Usually they
list values based on size of the
particle. Pro-Mix BX is the typical mix
(www.pthorticulture.com).
Popular Substrates
Expanded clay pellets and rockwool are
the most common substrates in hydro
ponics. Soilless mixes and coconut coir
are the most popular growing mediums
used to grow cannabis in container
culture. Peat (Jiffy pellets), Oasis, and
small rockwool cubes are the most
popular growing mediums used to start
clones and seedlings.
Brick shards (not inert) have similar
properties to gravel. They have the added
disadvantages of possibly altering the pH
and requiring extra cleaning before reuse.
Caution! They can cause heavy metal
contamination due to poor sources of clay.
Coconut fiber (not inert) also called
coco peat, palm peat, coir, coco(s), and
kokos is coconut pith, the fiber part just
under the heavy husk of a coconut. It
is the by-product after the fibrous shell
(bolster) has been removed from the
coconut. Pith is soaked in water for up
to 9 months to remove salts, natural
resins, and gums in a process called
retting. The retted, straw-brown fiber is
beaten to extract the husk. Low-quality,
poorly processed coconut fiber may
contain undesirable elements (primar
ily salts) that have not been extracted.
Quality coconut coir is guaranteed
to have sodium content of less than
50 ppm. Some of the best coconut coir
Coco is available in slabs.
is from the interior of the Philippines,
where the environment is not heavy with
coastal salts.
Darker coco is typically mature at har
vest and contains tough, durable lignins
apd cellulose. It degrades slowly and
provides good aeration and solution
holding ability. Coco that is lighter in
color generally signifies immature fibers
with poor structure that break down
quicker and provide less aeration.
To test coco for salts, see Canna’s
“Coco Infopaper,” available for down
load at http://other.canna.com/media.
The “Coco InfoPaper” is outstanding
and tells you everything you need to
know and do to measure coco root envi
ronment for EC and pH.
Quality coir has an appearance and
texture similar to peat moss, but coco
fiber is tougher and coarser than peat
moss and difficult to overwater. The
nearly perfect air-to-water ratio of coir
compacts very little during the course of
a single crop.
Horticultural grade coco is available
loose in bags, pressed into bricks, or
compressed into slabs and covered
in plastic. The fibers can be found in
long strands, coarse chopped, and fine
chopped, all of which can also be mixed
together to provide different air- and
solution-holding abilities.
Use coir in containers by itself or mix
50/50 with perlite, expanded clay pellets,
or other mediums to add air and drain
age to the mix. Coarse, fast
draining coco is often used in lieu of peat
moss. Containers full of coco should be
low profile because coir holds so much
www.marijuanagrowing.com
437
solution that gravity will concentrate
liquids in the lower portion of the
medium. This creates an uneven ratio
of solution to air within the container.
Low-profile plastic-covered slabs are
very popular and easy to use. See “Top
Feed Gardens” on page 421 for more
information.
Washed and pressed blocks or bricks
are easy to store and transport and are
very popular among outdoor gardeners.
Bricks weigh about 1.3 to 2.2 pounds
(0.6-1 kg) and typically the pH is
between 5.5 and 7.0. To wet, flake dry
bricks of coconut coir apart by hand or
soak the bricks in a bucket of water for
15 minutes. One brick will expand to
about 9 times its original size.
Treating Coco
Often coconut coir must be “conditioned”
or “treated” before use. Conditioning
usually requires soaking coir in a pH
altering solution for a length of time to
bring the pH to a neutral 7.0 . Check with
coir manufacturers or suppliers for more
information about specific products.
Unlike most coco, coco sold by Canna
and some other companies is colonized
with Trichoderma fungi that protect
Store-bought compost is available at most
garden centers.
roots and stimulate their growth. It also
teams with naturally occurring growth
hormones and other biostimulants.
The low cation exchange capacity
(CEC) of the coir fiber also helps to
reduce incidence of salt burn. The min
erals stored in spongelike particles are
released over time when roots are able to
readily absorb them. However, it does
store some anions such as phosphates
and sulfates. Coco also offers some
buffering against positively charged ions
such as sodium.
Coir has a good anion exchange capacity
(AEC) and holds onto negatively charged
particles. AEC is related to CEC, the
measurement of the positive charges in
soils that affects the amount of nega
tive charges a soil is able to absorb. Few
anions are restrictive in cannabis cultiva
tion, but they are important. For example
it will hold phosphate well but not more
common nutrients such as calcium, mag
nesium, etc. This bit of chemistry makes
fertilizers containing much phosphorus
an issue when overapplied, especially
early on during the growth cycle. The
AEC usually drops when pH decreases,
and rises when pH increases.
Expanded clay pellets are an excellent medium
to mix with Peat-Lite and other soilless mixes
in container culture. 1 like the way it drains
so well yet still retains nutrient solution while
holding lots oj oxygen.
Coco fiber can be reused, but it may
compact a little. It should also be
sterilized or treated to remove any
signs of pests and diseases it might be
harboring. When reusing any growing
media, impurities such as sodium tend
to accumulate over time. Check with
manufacturers and suppliers for specific
guidelines for reusing coco fiber
products.
Visit the Canna site (www.canna.com)
for detailed information about growing
cannabis in coco. See “Coconut Fiber”
under “Soil Amendments” in chapter 18,
Soil. for more information.
Expanded clay pellets (inert) are
sold under different names, including
expanded clay aggregate, Hydroton,
GroRocks, Hydrokorrels, Geolite, and
LECHA. Expanded clay pellets are
inert and typically pH neutral. They
are environmentally friendly, made
from naturally occurring clay. Fired and
sometimes tumbled in a rotary kiln at
2,190°F (1,198.9°C), clay expands like
porous popcorn with a protective shell.
Many little catacomb-like pockets form
inside each pellet; these pockets hold air
and nutrient solution. Shapes are irregu
lar or uniform, and size ranges from 0.8
to 2 inches (20.3-50.8 mm) depending
upon the manufacturing process.
This lightweight substrate does not
compact over a long lifetime, and it can
be reused. Once used, separate the clay
pellets from roots and other substrate.
Pour expanded clay pellets into a contain
er and soak them in a sterilizing solution
of 0.3 ounces (10 ml) hydrogen peroxide
per 1.1 gallon (4 L) of water, or 5 percent
chlorine bleach or white vinegar. Soak for
20 to 30 minutes. Remove expanded clay
and place on a screen of hardware cloth.
Wash clay pellets thoroughly with clean
water and separate them from remaining
dead roots and dust. Let pellets dry and
then reuse them. Always reuse!
Caution! Avoid using expanded clay
made for the construction of tall build
ings, which is not inert and is often
full of undesirable substances. This
expanded clay also tends to bleed a lot
of heavy clay dust that collects in the
garden and could contain pollutants.
438
CONTAINER CULTURE & HYDROPONICS
www.marijuanagrowing.com
Fine-grade peat moss
Medium-grade peat moss
Coarse-grade peat moss
Gravel (not inert) is heavy but inex
pensive and easy to keep clean. It holds
plenty of air and drains well. Gravel has
low water retention and low buffering
ability. But it is difficult to overwater
and is suited to continuous irrigation. It
holds moisture, nutrients, and oxygen
on its outer surfaces. Use pea gravel
or washed river gravel with round edges
that do not cut roots when jostled
about. Avoid using crushed rock with
sharp edges. Gravel should be 0.125 to
0.375 inches (3.2 -9.5 mm) in diameter,
with more than half of the medium
about 0.25 inches (6 mm) across. Pre
soak and adjust pH before use.
To reuse, follow guidelines outlined
under “Expanded Clay.”
and is not spongelike. Peats are harvested
and used to amend soil or soilless mix;
they can be used as a growing medium.
There are three common kinds of peat
moss: sphagnum, hypnum, and reed/
sedge. Sphagnum peat, the most com
monly used peat moss, is light-brown
and is about 75 percent fiber with a pH
of 3.0 to 4.0 . This bulky peat gives soil
body and retains water well, absorbing
15 to 30 times its own weight. It contains
essentially no nutrients of its own, and
its pH ranges from 3.0 to 5.0.
After sphagnum moss decomposes for
several months, pH could continue to
drop and become very acidic. Counter
this propensity for acidity and stabilize
the pH by adding fine dolomite lime
to the mix. Peat adsorbs water by its
clinging to the outer portions of the
very small stem and leaves and does
not absorb it into the tissues of the
plant parts.
/
Hypnum peat is more decomposed and
darker in color, with about 50 percent
fiber and a pH of about 6.0. This peat
moss is less common and contains some
nutrients. Hypnum peat is a good soil
amendment even though it cannot hold
as much water as sphagnum moss can.
Reed/sedge peat is about 35 percent
fiber with a pH of 6.0 or more. This
peat holds less water and air and is more
difficult to find commercially.
Oasis is rigid, open-celled, water
absorbing, phenolic foam. It is designed
for optimum callus formation and rapid
root growth of clones and seedlings.
Oasis rooting cubes have a neutral
pH and hold more than 40 times their
weight in water. Plus, the water is drawn
into the foam by wicking action. Trans
plant versatile Oasis cubes into any
hydroponic medium.
Once used, Oasis cubes lose structure
and cannot be cleaned, disinfected, and
reused.
Peat moss (not inert) is partially
decomposed vegetation. Its decay has
been slowed by the cold, wet conditions
and low pH of the northern latitudes
where it is found in vast bogs. It consists
of long strands of highly adsorbent,
spongelike material that holds water
while simultaneously having good aera
tion. Water adsorbs onto a peat particle
Perlite is available in three main grades: fine, medium, and coarse. Most gardeners prefer the
coarse grade as a soil amendment for container planting and outdoor planting. The fine grade
is best to use when making a seedling mix. To keep it from floating and stratifying, lightweight
perlite should make up less than one third of any mix.
www.marijuanagrowing.com
439
Peat moss is typically bone dry and
difficult to wet the first time. Wet peat is
heavy and awkward to transport. When
adding peat moss as a soil amendment,
cut your workload by dry-mixing all of
the components before wetting. Lightly
sprinkle with water to quell dust, and
use a wetting agent.
Another trick to mixing peat moss is to
kick the sack a few times to break up the
bale before opening.
Purchase peat in dry, compressed
blocks, or bails. Peat moss must be
soaked in water for approximately
an hour to become completely wet
before use. Two drops of natural liquid
dish soap per gallon (3.8 L) will ensure
thorough wetting.
Peat mixed half and half with perlite
is one of the all-time favorite growing
mediums. It is also an excellent soil
amendment. Sphagnum peat moss is a
major ingredient in many potting soils
and soilless mixes.
Avoid reusing peat, because it compacts.
Also, it decomposes over time and sheds
small particles that can plug pumps,
irrigation lines, and emitters. For more
information, see “Soil Amendments” in
chapter 18, Soil.
Perlite (inert) is sand or volcanic glass
that has been superheated and expanded
by heat. It holds water and nutrients on
its many irregular surfaces, and it drains
fast, but it’s very light and tends to float
when flooded with water. Perlite has no
buffering capacity and is best used to
aerate soil or soilless mix.
Perlite can be reused once sterilized,
but it tends to disintegrate and become
smaller.
Caution! Perlite may contain high
levels of fluoride (F), which is toxic to
plant foliage. See “Soil Amendments” in
chapter 18.
Polyurethane grow slabs (inert) have
approximately 75 to 80 percent airspace
and 15 percent water-holding capacity.
As this substrate is so new, very little in
formation is available about it. Cannabis
is an accumulator plant that may absorb
petroleum-based styrene and pass it to
the consumer. Few gardeners use it to
cultivate medicinal cannabis.
Polystyrene packaging peanuts are
inexpensive, readily available, and have
excellent drainage. They are very light
weight and float when mixed with other
elements. The same health precautions
are applicable to peanuts as to polyure
thane slabs.
Do not use biodegradable packing pea
nuts. They will decompose into sludge.
Rice hulls (not inert) are underutilized
by cannabis gardeners even though they
are as effective as perlite. A by-product
of rice production is commonly used in
compost mixes, rice hulls can be very
inexpensive through a good source.
This free-draining medium has low to
moderate water-holding capacity, a slow
rate of decomposition, and a low level of
nutrients.
Check the origin and storage condition
for rice hulls. They are often stored out
doors and, when uncovered, rice hulls
are subject to the forces of nature and
pollution. They also have a tendency to
ward salt buildup. Make sure to sterilize
rice hulls before use. They decompose
Rockwool cubes
after one or two crops, so avoid reusing
rice hulls.
Rockwool, also called stonewool or
mineral wool (inert once treated), is an
exceptional growing medium and popu
lar among indoor cannabis gardeners. It
is a sterile, fibrous, porous, nondegrad-
able growing medium that provides firm
root support. Rockwool has the ability
to hold adequate levels of both water and
air for roots. Roots are able to draw in
most of the water stored in the rock
wool, but it has no buffering capacity
and a naturally high pH. To become
inert, rockwool must be treated—
soaked in a low pH solution prior to use.
Popular brand names in horticulture
include Grodan, HydroGro, and Vacrok.
Rockwool is made from molten rock,
basalt or ‘slag’ that is spun into bundles
of single filament fibers and bonded into
a medium capable of capillary action.
It has proven its efficiency and effec
tiveness as a commercial hydroponic
substrate. Fibers run vertically on blocks
and horizontally on slabs. Fiber orienta
tion affects air- and solution retention.
Check with specific manufacturers and
suppliers for reuse guidelines.
Caution! Use rockwool designed for
horticulture only! Do not use rockwool
that is designed for insulation, sound
proofing, or filtration, since these typi
cally have all kinds of bad stuff in them,
including metals that can bleed into
the nutrient solution and accumulate in
cannabis plant tissue.
Pumice (not inert) is a naturally oc
curring, porous, lightweight volcanic
rock that holds moisture and air in
catacomb-like surfaces. Light and easy
to work with, some lava rock is so light
that it floats. Be careful that sharp edges
on the rocks do not damage roots. Lava
rock acts similarly to expanded clay. See
“Pumice” in chapter 18, Soil.
To reuse follow guidelines outlined in
the “Expanded Clay” section.
Sand (not inert) is heavy, inexpensive
and readily available. It has no buffering
ability. Some sand has a high pH. The
best sand to use is a grade known as
440
CONTAINER CULTURE & HYDROPONICS
www.marijuanagrowing.com
#2 mortar in the USA. If it or a similar
type is not available, use sharp river
sand. These sands have irregular and
sharper edges that avoid compacting,
thereby creating better airspace. Do
not use ocean, sea, or salty beach sand.
Sand drains quickly, retains some mois
ture, and is very slow to decompose.
Sterilize it between uses. Sand is best
used as a soil amendment in volumes of
less than 10 percent. Be sparing when
adding sand in order to break up clay
soil. Coarse sand has the tendency to
wash upward and accumulate on the
soil surface.
Sawdust (not inert) is a popular and
inexpensive growing medium among
many commercial vegetable growers.
But it holds too much water for cannabis
growth and is usually too acidic, and
new or fresh sawdust robs the medium
of its nitrogen reserves.
Soilless mixes (not inert) are very
popular, inexpensive, lightweight, and
clean growing mediums. Commercial
greenhouse growers have been using
them for decades. Soilless mixes are
available in different grades including
small, medium, and coarse.
Premixed commercial soilless mixes
retain moisture and air while allow
ing strong root penetration and even
growth. The fertilizer concentration,
moisture level, and pH are very easy to
control with precision in soilless mix.
Soilless mixes have good texture, hold
water, and drain well. Unless fortified
with nutrients, soilless mixes contain
no nutrients and are pH balanced near
6.0 to 7.0. Fortified elements supply
nutrients for up to a month, but follow
directions on the package.
Coarse soilless mixes drain well and
are an easy choice to push plants into
growing faster with heavy fertilization.
The fast-draining mixes can be leached
efficiently so soluble nutrients have little
chance of building up to toxic levels.
Look for ready-mixed bags of fortified
soilless mixes such as Jiffy Mix, Ortho
Mix, Sunshine Mix, Terra- Lite, Pro-Mix,
and Terra Professional Plus (Canna). To
improve drainage, mix 10 to 30 percent
coarse perlite before planting.
Pro-Mix is a favorite ofprofessional nurseries
and medical cannabis gardeners alike.
Sunshine Mix is very popular among medical
cannabis gardeners from British Colombia,
Canada, and western USA.
Add dolomite lime (1 cup per cubic foot
[24 cl per 28 L]) to all heavily irrigated
soil and soilless mixes when growing
cannabis, unless a given mix already
contains it. Regular heavy irrigation
tends to leach out both calcium and
magnesium in most any soil or soilless
mix. Add a little calcium carbonate for
immediate pH control.
Pro-Mix contains Canadian sphagnum
peat moss, perlite, macro- and micro
nutrients, and dolomite and calcitic
limestone. At least one product is for
tified with beneficial endomycorrhizal
fungus to strengthen roots and increase
plants’ ability to completely utilize avail
able nutrients. One version of Pro-Mix
contains MX fungus. Inoculants are
often short-lived; some have a shelf life
of only 30 days.
Sunshine Mix consists of Canadian
sphagnum peat, perlite, dolomitic lime
stone, gypsum, and a wetting agent to
provide plants a growing environment
with abundant oxygen and quick drain
age. This mix comes in different formulas
and textures to suit needs of seedlings
and clones, vegetative and flowering.
Soilless components can be purchased
separately and mixed to the desired
consistency. Ingredients always blend to
gether best when mixed dry and wetted
afterward using a commercial wetting
agent or organic liquid dish soap to make
water more adhesive. Mix small amounts
right in the bag. Larger batches should
be mixed in a wheelbarrow, concrete
slab, or in a cement mixer. Blending your
own soil or soilless mix is a dusty, messy
job. To cut down on dust, lightly mist
the pile with water several times when
mixing. Always wear a respirator to
avoid inhaling dust.
The texture of soilless mixes—for rapid
growing cannabis—should be coarse,
light, and spongy. Such texture allows
drainage with sufficient moisture and
air retention, as well as providing good
root penetration qualities. Fine soilless
mix holds more moisture and works
best in smaller containers. Soilless mixes
that contain more perlite and sand drain
faster, making them easier to fertilize
heavily without excessive fertilizer-salt
buildup. Vermiculite and peat hold water
longer and are best used in small pots
that require more water retention.
The pH is generally 6.5 to 7.0 in soilless
mixes, which are peat-based as a rule but
could include coco and other organic
products. As the organic components
decompose, especially when pH is
adjusted to correct more neutral val
ues, the chemistry of the soilless mix
www.marijuanagrowing.com
441
Vermiculite is mica superheated until it expands into small, lightweight pebbles. Its natural wick-
ing ability draws in nutrient solution in passive hydroponic gardens. Vermiculite holds so much
water that it is typically mixed with perlite to improve drainage.
Green algae grow anywhere there is a
moisture and light. Algae completely cover
this mat!
Expanded clay pellets are an easy substrate
to wash and reuse. This gardener set a plastic
grate inside a container. This allows him to
rinse the clay pellets efficiently.
changes. Added lime makes changing
the pH of soilless mix very difficult and
tends to bring the pH back to adjusted
levels in spite of water pH. The acidic
quality of basic elements with a large pH
capacity like sulfur or lime can alter the
pH permanently.
Check the pH of soilless mix regular
ly—a minimum of once a week. Check
the pH of the runoff water to ensure that
the pH in the medium is not too acidic.
Avoid reusing soilless mixes. They tend
to compact, and they have issues with
salts, pests, and diseases. If you do
reuse, add 20 to 30 percent used medium
to 70 to 80 percent new medium.
Vermiculite (inert) holds a lot of water
and is best suited for rooting cuttings
when it is mixed with sand or perlite.
With excellent buffering qualities, ver
miculite holds lots of water and contains
traces of magnesium (Mg), phosphorus
(P), aluminum (Al), and silicon (Si).
Used in hydroponic wick gardens, ver
miculite holds and wicks much moisture.
Vermiculite comes in three grades: fine,
medium, and coarse. Use fine vermiculite
as an ingredient in seedling and cloning
mixes. If fine is not available, crush
coarse or medium vermiculite between
your hands, rubbing palms back and
forth. Coarse is the best overall choice as
a soil amendment. Use finer vermiculite
in seedling and clone mixes.
Do not reuse vermiculite; it breaks
down substantially after a single crop.
Caution! Do not use construction-grade
vermiculite, which is treated with phyto
toxic chemicals.
Caution! Vermiculite has also been a
source of asbestos. Most manufacturers
test for asbestos at mines. Nonetheless,
I am always leery of cheap imports.
See “Soil Amendments” in chapter 18,
So//, for more information.
Sterilizing Substrates
Properly sterilizing a growing medium
after use ensures that destructive
microorganisms, including bacteria,
fungi and pests and their eggs, will
be eliminated. For most gardeners,
sterilizing is easier and less costly, both
economically and environmentally, than
replacing the growing medium.
The most popular ways to sterilize
substrates include bathing them in an
antiseptic liquid such as laundry bleach,
(hydrochloric) acid, or, my favorite,
hydrogen peroxide (H2O2). Steam
sterilization is also an option, but it is
too much work for small gardens.
Heating in an oven or with natural
sunlight also cooks all the bad stuff out
of a growing medium. Ultraviolet (U VC)
light has limited applications and is sel
dom used to sterilize growing mediums.
Sterilizing works best on rigid
(aggregate) growing mediums such as
gravel and expanded clay, which do not
442
CONTAINER CULTURE & HYDROPONICS
www.marijuanagrowing.com
Hydrogen peroxide (H2O2) IS one °f
safest
sterHants to use. But do not use H2O2 on or
around live roots.
Wash garden room walls, floor, and other
surfaces with a mild bleach solution to kill any
bacteria, fungus, or insect eggs.
Beds in this garden are irrigatedfrom the
300-gallon nutrient tank at the end of the
room, on the right.
lose their shape. Sterilizing and reusing
substrates such as rockwool, coconut
coir, peat, perlite, or vermiculite may
cause them to compact and lose struc
ture. Replace “spent” growing mediums
to avoid problems caused by compaction.
Take the growing medium out of the
hydroponic garden. Remove all dangling
and easy-to-eliminate roots by hand
before sterilizing. A 3- to 4-month-old
cannabis plant can have a gallon (3.8 L)
or more of root mass. Manually remove
the mats of roots that are entwined near
the bottom of the bed, and shake loose
any attached growing medium. Pour
growing mediums such as expanded clay
and gravel through a screen placed over a
large bucket. Most of the roots will stay
on the screen. Latent, dead and decaying
roots cause pest and disease problems
and clog irrigation systems and drains.
Substrates can also be washed in a large
container such as a bucket, barrel, or
bathtub. Washing works best with rigid
substrates such as expanded clay. Roots
float to the top and are readily skimmed
off with a screen or by hand.
Once excess roots are manually removed,
submerge the substrate in a sterilant such
as a 10 percent laundry bleach (calcium
or sodium hypochlorite), or mix a
5 percent solution of hydrochloric acid,
the kind used in hot tubs and swimming
pools. Place the substrate in a barrel or
bathtub and soak for at least an hour.
Pour, drain, or pump off the sterilant,
and leach the medium with plenty of
fresh water. Make sure to wash the harsh
chemicals away so no future crops are
damaged. It may be necessary to fill the
bathtub with fresh water and drain it sev
eral times to rinse any residual sterilants
from the substrate.
Hydrogen peroxide (H2O2) is an
excellent sterilant for aggregate media.
H2O2 solution breaks down naturally
when exposed to air. It does not need
to be rinsed out unless you are planting
immediately.
Mix the solution at a 9:1 ratio, 16 ounces
(47.3 cl) of 3 percent concentration
H2O2 to 5 gallons (19 L) of water.
Or dilute more powerful 35 percent
hydrogen peroxide. Mix 4 ounces (12 cl)
per 10 gallons (38 L). Wear gloves and
protective clothing so 35 percent H2O2
does not touch skin.
Place the substrate in the bathtub,
bucket, or barrel. Set a screen over the
drain, and use the showerhead or a hose
to wash the medium. The media must
sit in the H2O2 solution for at least one
hour to be sterilized.
Mix a bucket of dilute bleach solution
to scrub walls, tables, pots, and floors.
Use a 5 percent bleach solution to scrub
down the garden room including the
inside of growing beds, reservoirs, and
system plumbing. Fill the reservoir
with the dilute bleach mix, and cycle it
through the irrigation system to steril
ize. Pump the solution off. Avoid
sending bleach solution down house
hold drains, and definitely do not pump
it into a septic tank; the nutrients will
disrupt the chemistry. Fill the reservoir
again and flush for at least an hour with
plenty of fresh water to wash away any
trace of bleach.
Once sterilized, lay out growing medium
on the floor, and train an oscillating fan
on it to dry.
Sterilizing substrates in the oven works
for small amounts that are able to fit in
the oven. First, roots must be removed
and the medium rinsed with plenty
of water. Next the medium is set on a
baking sheet and placed in an oven at
250°F (121°C). Allow the substrates to
bake for 2 hours. Check the temperature
inside the substrate to ensure that it has
reached 250°F (121°C).
The sun can also be used as a source of
heat. Set growing media in the sun in a
sealed plastic bag for several days. Place
the media-filled bag in full sun, up off
the ground. The temperature inside the
bag and the growing medium will climb
to 140°F (60°C) or more, enough to kill
most all harmful pests and diseases.
Irrigation
Irrigation volume and frequency
depend on the crop, plant size, climate
conditions, type of garden, kind of
medium, and the root environment. Each
one is as important as the next, and one
functioning below optimum levels will
drag others to the same level of malfunc
tion. The type of medium is determined
by needs of the crop and gardener. Roots
need the correct ratio of air, water, and
nutrients. Large, round, smooth particles
of substrate drain rapidly and need to
be irrigated more often, 4 to 12 times
daily for 5- to 15-minute cycles. Fibrous
mediums with irregular surfaces, such as
vermiculite, drain slowly and require less
frequent watering, often once per day
or less.
www.marijuanagrowing.com
443
Short spaghetti tubes that come offa larger
manifold supply nutrient solution to individual
plants.
This plant is irrigated with two separate
spaghetti tubes so that the entire growing
medium will be evenly moist.
Keep containers in straight rows and arrange
rows in a matrix when growing and watering.
It is much easier to keep track of watered and
fertilized pots when they are lined up in rows.
Cannabis root systems require 100
percent humidity to keep tiny root tips
from dying back. The minute tips are
responsible for absorbing most of the
minerals and water. Further up, root
surfaces are more rigid and absorb much
less nutrient solution. If root tips die,
they must regenerate before being able
to push forward into the medium.
During and soon after irrigation, the
nutrient content of the bed and reservoir
are the same concentration. As time
passes between irrigations, the EC and
the pH gradually change. If enough time
passes between irrigations, the nutrient
concentration might change so much
that the plant is not able to draw it in.
When minerals are depleted, root tips
grow to find and take in more nutrients.
When minerals and water are abundant,
root systems do not grow and spread
out. They do not develop a balanced
relationship with green foliage abo
veground. When this balance is disrupt
ed and plants do not receive adequate
nourishment, they become weak. Small
containers must be irrigated more often
than large containers, and the oxygen-
to-solution balance is more difficult
to maintain. Big root systems in large
containers make it easier to maintain
the oxygen-to-nutrient solution balance.
Overall sativa and s^fz^a-dominant vari
eties have a more extensive root system
and use more water than indica and
zWzoz-dominant varieties.
Growing mediums that drain well can
be watered for longer periods because
excess water drains away quickly.
Poor-draining mediums must be
watered for shorter periods. As long as
the drainage is good, it is difficult to
overwater fast-growing cannabis. When
the proper environment is maintained,
virtually the only way to overwater is by
saturating the medium for 20 minutes or
longer, which drives out air and oxygen
and drowns roots.
Rule of Thumb: 1 square meter (39.4 in
per side) of indoor or greenhouse grow
ing bed covered with foliage will use 4 to
7 quarts (3.8 -6 .6 L) of water a day. New
plants in the same square meter that
don’t cover table completely with foliage
Leach growing medium as per “Leaching
Growing Mediums'" in chapter 21, Nutrients.
Leaching must be completed in 20 minutes or
less so that water does not displace oxygen in
the substrate and drown roots. Leaching the
growing medium monthly helps avoid nutrient
excesses and deficiencies.
will use about 3 quarts (2.8 L) of water
a day. This rule of thumb holds true
whether there are 4 or 40 plants in the
square meter quadrant.
Rule of Thumb: Irrigate soilless mixes
when they are dry one-half inch below
the surface. Stick your finger into the
soilless medium to the first knuckle. If it
is dry, plants need water.
Small plants with a small root system in
small containers or rockwool cubes must
be watered often. Water frequently—as
soon as the surface dries out.
Flowering cannabis uses high levels of
water to carry on rapid floral formation.
Withholding water stunts flower forma
tion. Plants that are exposed to wind dry
out quickly.
Start irrigation cycles first thing in the
morning; plants have used much of the
solution during the dark of night. Even
slow-draining media dry a little at
night. Growing mediums that remain
moist enough during the day may need
irrigation only in the morning. Avoid
watering growing mediums within a few
hours of lights-out or nighttime. Excess
solution in the growing medium at night
displaces oxygen. A soggy medium that
lacks air is cooler, and both conditions
slow growth, weaken plants, and invite
attacks by pests and diseases.
Irrigate mineral soils, soilless mixes,
coco, etc., when about 50 percent of the
total volume of water in the container is
gone. To figure when the moisture level
444
CONTAINER CULTURE & HYDROPONICS
www.marijuanagrowing.com
Spaghetti tubes direct nutrient solution to the
base of each plant, ensuring complete wetting
of the rockwool growing medium.
is at 50 percent, weigh the container
when it is bone dry. Water it until satu
rated, let it sit for 10 minutes, and then
weigh it again. The difference in weight
is how much water the growing medium
and container will hold. When half of
this weight is reached, moisture levels
are at 50 percent. For example, a
3-gallon (11.4 L) container full of grow
ing medium weighs 10 ounces (29.6 cl)
when bone dry and 60 ounces (177.4)
when saturated with water. We know
the container can hold 50 ounces (147.9
cl) of water. When the plant has used 25
ounces (73.9 cl) of water the growing
medium is at 50 percent moisture level.
Once you have an idea of when and
how much the plants need to be watered,
it is a simple matter of picking up the
containers to “weigh” them. When they
are about 50 percent full, they need water.
After experimenting with this “heft the
pot” method for a while, you will have a
feel for it and will soon be able to tip each
pot to access its moisture level.
You can estimate the water needs of
entire gardens can by weighing sever
al containers and figuring the average
weight. But the crop must all be the
same age, size, light, and ventilation
exposure, and so on.
Irrigate containers and let at least 20
percent of the solution flow out the
bottom as runoff. The runoff solution
will carry away any nutrients that build
up in the growing medium.
Vertical Gardens: Indoors, grow bags,
pots, tubes, or slabs can be positioned
vertically around an HID to form a
vertical garden. Short plants are usually
placed at a 30-degree angle in the medium
and fed individually with microirrigation.
The runoff drains through the growing
medium and back to the reservoir to be
reused, or it drains to waste. Plants at the
top of slabs receive less irrigation solution
than those below. Solution dosage to in
dividual containers should be controlled
by individual emitters. When using DFT,
solution depth is controlled by their
degree of incline.
Water Supply
A readily accessible water source is
essential. If a water tap or outlet is not
located in or near the garden room, it is
a good idea to plumb one into the area.
Water weighs 8 pounds (3.6 kg) per gal
lon (3.8 L). It is much easier to transport
water via a hose than it is to schlep it by
hand.
If you are growing hydroponically and
your water contains more than 300 ppm
of dissolved solids (salts), it should be
demineralized with reverse osmosis
(RO) before using. If growing in me
diums like coco, peat, or mineral soil,
the tolerances for salts in the water are
higher, and watering is more frequent.
Even Solution Penetration
Use a moisture meter to test growing
mediums for even nutrient-solution
penetration. Insert the probe into the
medium at several different points and
levels to check for consistent readings.
Dry pockets in growing medium will
lead to dead roots. Direct top-feed emit
ters so that solution will percolate evenly
down through mediums, ensuring even
penetration to the entire root zone.
Hot water comes in very handy in all garden
rooms. This large room is equipped with an
electric water heater.
Spread a layer ofperlite, expanded clay pellets, or plastic mulch across the substrate surface of
hydroponic and container gardens to discourage algae growth. The mulch also protects surface
roots from temperature extremes and the force ofpelting water.
www.marijuanagrowing.com
445
Using a spike, anchor spaghetti tubing in the
growing medium. Drops, a spray, or a stream
of nutrient solution will be emitted and will
percolate down through the growing medium.
PVC pipe is simple to work with and rela
tively inexpensive. PVCpipe can be easily
plumbed into the garden room from an outside
source of water.
Solenoid valves and a small timer control
nutrient supply to 4 different garden beds, as
shown here.
Cultivate the surface of soilless mixes
to allow the water to penetrate evenly
and guard against dry pockets. It also
keeps water from running down the
crack between the inside of the pot
and the medium and then out the drain
holes. Using soft-sided containers that
conform to the shape of the contracting
growing medium will also solve this
problem. Gently break up and cultivate
the top half-inch (1.3 cm) of the mix
with your fingers or a salad fork, being
careful not to disturb the tiny surface
roots. Another option would be to apply
a layer of mulch, which is my preference.
This selection of irrigation nozzles and
supplies is outstanding. Always choose nozzles
and emitters that are difficult to plug and easy
to clean. And always use a filter!
Microirrigation
Microirrigation delivers water or nutri
ent solution one drop at a time (drip
irrigation), as a spray, or in a stream to
individual plants. Such systems often
deliver low volume and require low-
pressure plastic pipe with friction
fittings. When under high-pressure,
irrigation fittings must be able to with
stand the added stress. Microirrigation
systems can be used with RTW or recir
culating systems.
Automatic microirrigation systems
require a pump, reservoir, and delivery
Each irrigation supply line has its own filter.
The filters are easy to monitor and access. A
clean filter will help you avoid wasting time
troubleshooting irrigation emitters and subse
quently unplugging them.
system. Top-feed systems require a main
feeder tube or manifold and individual
spaghetti tubes and emitters. Nutrient
solution is pumped through a pipe and
out the emitter one drop at a time or at a
fixed rate. The emitters that are attached
to the main hose are spaghetti tubes,
nozzles, or drippers that meter out a
specific volume of solution. Microirri
gation kits are available at garden stores
and building centers. You can also con
struct your own microirrigation system
from component parts.
Note: See “Ebb-and-flow Gardens” in
this chapter for irrigation guidelines.
Microirrigation systems offer several
advantages. Once set up, they lower
watering maintenance. Fertilizer may
also be injected or nutrient solution
pumped into the irrigation system (aka
fertigation). Pay attention to the pres
sure of the water in the main supply
tube, and make sure all the emitters have
the same amount of pressure so they
all deliver the same volume of solution.
When setting up a microirrigation
system, make sure the growing medium
drains freely to prevent soggy substrate
or salt buildup. If you are growing many
different varieties of plants,, they may
have different water and fertilizer needs.
If you are growing plants that are all the
446
CONTAINER CULTURE & HYDROPONICS
www.marijuanagrowing.com
same variety, age, and size, an automatic
microirrigation system works very well.
Microirrigation systems cost a few more
dollars to set up, but with the consisten
cy they add to a garden, their expense
is often paid off by a bountiful yield.
Vigilantly monitor all vital signs: mois
ture, pH, ventilation, humidity, and so
on. Everything still needs to be checked
and adjusted daily. Automation, when
applied properly and monitored, adds
consistency, uniformity, and usually a
higher yield.
A microirrigation system attached to
a timer disperses nutrient solution at
regular intervals. If using such a sys
tem, check emitters and substrate daily
to ensure that plants are watered and
that all the substrate receives solution
evenly. Microirrigation systems are very
convenient—often indispensable when
you have to be away from the garden
for a few days. Avoid leaving automatic
irrigation systems unattended for more
than 3 to 4 consecutive days, or you
could return to a surprise!
Container Culture and
Hydroponic Nutrient Disorders
Hydroponic and container culture
nutrient disorders show the same signs
in plants grown in soilless or soil gar
dens. But the causes are often specific to
hydroponics or container culture. A reg
ular maintenance schedule and adhering
to “Guidelines for Success,” (on the next
page), will help avoid nutrient deficien
cies and associated cultural problems.
If nutrient deficiencies or excesses affect
more than a few plants, check irriga
tion fittings to ensure that all plants are
receiving a full dose of solution. Check
substrate around affected plants to ensure
that nutrient solution is penetrating the
entire medium and all roots are moist.
Check the root zone to ensure that roots
have not plugged drainage conduits and
are not standing in stagnant solution.
Nutrient disorders most often affect
plants of a given variety of cannabis at
the same time when they are receiving
the same nutrient solution. Different
varieties often react differently to the
same nutrient solution. Check with seed
purveyors for the fertilization recom
mendations of specific varieties.
Overfertilizing during vegetative growth
is a common error. Typically, signs of
overfertilization and toxic nutrient lock
up appear between the sixth and eighth
weeks of growth. It can cause excessive
lush leafy growth and can result in
overdoses and deficiencies of different
nutrients. Flower formation is then
often slow and weak.
Hydroponics and container culture pro
vide the means to supply the maximum
amount of nutrients a plant needs but
can also starve plants to death or rapidly
overfertilize them. Many automated
gardens are designed for high perfor
mance. If something malfunctions—the
electricity goes off, the pump breaks, a
drain gets clogged with roots, or there
is a rapid fluctuation in the pH—major
problems could result. A mistake could
kill plants or stunt them so seriously that
they cannot recover before harvest.
Run-to-waste (RTW) gardens tend to
have fewer problems—toxic substrate,
pH and EC imbalances, temperature
issues, and so on—than recirculating
systems do. RTW gardens also use about
the same volume of nutrient as recircu
lating systems use.
Plants absorb different nutrients at dif
ferent rates, and some nutrients become
unavailable before others, creating an
imbalanced solution. The best form of
preventive maintenance is to change the
solution often. Avoid nutrient problems
in recirculating systems by changing
the solution in small and medium-sized
reservoirs every week, and remember
to top off reservoirs with fresh water
to compensate for water used by plants.
Large reservoirs can be changed less
often when monitoring nutrient content
very carefully.
Nutrient imbalances also cause pH
to fluctuate, usually to drop. Avert
problems by using pure nutrients and
leaching the substrate with fresh water
between nutrient-solution changes.
Change the nutrient solution if there is
a good flow of nutrient solution through
the root zone but plants still appear
sickly. Make sure the pH of the water
is within the acceptable 5.5 to 6.5 range
before adding new nutrients.
Hydroponic gardens have no soil or
soilless mix to buffer the uptake of nu
trients. This causes nutrient disorders to
rapidly manifest as problems like discol
ored foliage, slow growth, or spotting.
Novice gardeners must learn to recog
nize nutrient problems in their early
stages in order to avoid serious problems
that cost valuable time for plants to re
cover. Treatment for a nutrient deficien
cy or excess must be quick and certain.
Once treated, plants take several days
to respond to the remedy. For a fast fix
of some nutrients, foliar feed plants. See
“Foliar Feeding” in chapter 21, Nutri
ents, for more information on nutrient
disorders.
/
Diagnosis of nutrient deficiency or
excess becomes difficult when two or
more elements are deficient or in excess
at the same time. Symptoms might not
point directly at the cause. The easiest
way to solve most unknown nutrient
deficiency syndromes is to change the
nutrient solution.
Plants do not always need an accurate
diagnosis when the nutrient solution
is changed. Overfertilization, once
diagnosed, is easy to remedy. Drain the
nutrient solution. Flush the system at
least 3 times with fresh, dilute (5-10
percent) nutrient solution to remove
small amounts of lingering sediment
and salt buildup in the reservoir. Replace
with properly mixed solution.
The proper balance of nutrients in a solu
tion does not guarantee that all nutrients
are available to roots for assimilation.
Inside plant tissue, deficiencies occur even
when plants have the proper balance of
nutrients. Calcium is the most common
nutrient found deficient. It results from
transport problems within the plant. Leaf
tip burn and dry burnt leaf margins are
the most common symptoms of calcium
deficiency. This sort of calcium deficiency
in plant tissue is difficult to diagnose when
calcium is abundant in the nutrient solu
tion. Frequently misdiagnosed, calcium
deficiency within plant tissue is often con
fused with damage resulting from chemical
salt burn, temperature, or wind.
www.marijuanagrowing.com
447
Keeping plants strong and healthy is the first
defense against nutrient and culture disorders.
This sad plant is farfrom strong and healthy!
This greenhouse full of clones is growing in a
perfect environment.
Tip burn starts on younger inner leaves.
At first leaf tissue looks water-soaked,
but then it turns brown and ultimately
black. Cells break in affected areas caus
ing cell fluid to leak out. The ruptured
area is an excellent place for diseases like
rot to start growing.
Coco coir contains large amounts of
potassium. Calcium and magnesium
uptake are affected by high level's of
potassium. A nutrient solution that is ,
formulated specifically for coco coir will
ensure that cannabis receives the exact
balanced blend of nutrients it needs.
The symptoms of calcium deficiencies
show as contorted leaves early in older
foliage. Tip burn on new growth is
caused by the buildup of potassium.
Calcium becomes less available and
potassium accumulates at tips causing
interior salt burn. This is not the normal
salt burn that is caused when EC levels
are too high in the medium. However,
the issue can replicate if potassium is
in excess and calcium is being applied
correctly. In other words, potassium
toxicity is the actual problem in coco.
Do not confuse other problems such
as windburn, lack of light, temperature
stress, or fungi and pest damage with
nutrient deficiencies. But these cultural
issues could very well be the cause of
nutrient deficiencies. Such problems
usually appear on individual plants that
are most affected. For example, foliage
next te a heat vent might show signs of
heat scorch, while the rest of the garden
looks healthy. Or a plant on the edge
of the garden might be small and leggy
because it receives less light or a lower
temperature.
Guidelines for Success
• Mix nutrients with low-EC or RO
water.
• Keep solution temperature about 60°F
(15.6°C).
• Use sterile growing medium.
• Calibrate electronic EXZ), EC, and pH
meters before use.
• Regularly measure and rectify DO,
EC, and pH in reservoir, media, and
runoff.
• Use high-quality hydroponic nutri
ents designed to grow cannabis.
• Keep growing area clean.
• Use a black or opaque reservoir with
a lid.
• Aerate nutrient solutions continually
(24/7) in solution culture gardens.
• Aerate nutrient solutions in hydro
ponic and container culture gardens
during daytime hours.
• Change nutrient solution and clean
the reservoir weekly in recirculating
systems.
• Regularly check the irrigation system
for blockages and leaks.
Main Reasons Nutrient Solutions
Create Problems
1. Imbalanced pH
2. Inaccurate pH or EC meter
3. Nutrient solution is too concentrated
or imbalanced
4. Input water has too many dissolved
solids
5. Nutrients combine and precipitate,
becoming locked out
6. Temperature is too high and lacks
dissolved oxygen
7. Temperature is too cold and slows
root system functions, including
water and nutrient uptake
448
CONTAINER CULTURE & HYDROPONICS
www.marijuanagrowing.com
450 Cleanliness and Prevention
451 Diseases
451 Anthracnose
452 Blights
452 Canker
453 Damping-Off
453 Fusarium Wilt
454 Gray Mold (Botrytis cinerea,
aka Bud Mold)
456 Leaf Spot
456 Mildews
457 Root Rot
458 Pythium
458 Phytophthora
459 Rust
459 Verticillium Wilt
460 Algae
460 Bacterial Diseases
460 Crown Gall
460 Viruses
461 Storage Fungi and Bacteria
462 Contaminants
462 Pest Insects and Mites
462 Ants
463 Aphids
464 Root Aphids
464 Bees and Wasps
465 Beetles
466 Borers
466 Caterpillars and Loopers
467 Crickets
468 Cutworms
468 Grasshoppers
468 Leafhoppers
469 Leaf Miners
469 Fungus Gnats
Z
-------------- --
-
470 Mealybugs
471 Scale
471 Nematodes
472 Root Maggots
472 Seed Maggots
473 Slugs and Snails
474 Spider Mites
476 Broad/Cydamen Mites
478 Hemp Russet Mites
479 Termites
479 Th rips
480 Whiteflies
481 Pest Mammals
481 Bears
481 Birds
<
---------- J
www.marijuanagrowing.com
449
481 Boar (Wild Pigs)
482 Deer
482 Gophers
483 Mice, Rats, and Voles
483 Moles
483 Rabbits
484 Other Large Pests
484 Rogue Pollen
484 Disease and Pest Controls
501 Beneficial Insects
503 Troubleshooting
504 Unexplained Problems
504 Sprays and Spraying
504 Spreader-Stickers
505 Fungicide and Pesticide
Application Basics
To prevent transmission ofdiseases,
wash hands before and after enter
ing or exiting the garden room.
Keeping the garden room clean helps
prevent cultural and maintenance
problems.
Immediately sweep up any debris on the garden room floor.
The cannabis plant is plagued by more
than 200 diseases and pests. Diseases are
caused by bacteria, fungi, nematodes,
viruses, other plants, environmental
stress, genetics, and pollutants. Pest
insects, mites, mollusks, animals, and
many diseases are ushered in by poor
sanitation procedures in the garden or
garden area.
The most common diseases include
powdery mildew, bud rot, and damp
ing-off. Spider mites are by far the
most common pest found indoors, and
fungus gnats are second. Outdoors and
in greenhouses, corn earworms are most
destructive. However, other large pests
such as mice, squirrels, and wild pigs can
cause serious damage.
Most diseases and pests can be avoided
by using simple sanitary precautions in
the garden. Constant monitoring of
foliage and garden area is essential to
catch any infestations in their infancy.
Cleanliness and Prevention
Diseases and pests of all kinds can sneak
into garden rooms, greenhouses, and
outdoor gardens. Some are airborne,
others hitch a ride on plants, tools, or
gardeners. They will come in and make
themselves at home if you let them.
Insects, mites, and maggots slither into
garden rooms to eat and reproduce—
wasting cannabis. Outdoors, they live
everywhere they can. Indoors, they live
anywhere you let them. Fungi are present
in the air at all times. They may be
introduced by an infected plant or from
air containing fungus spores. Fungi will
settle down and grow if climatic condi
tions are right. Pests, fungi, and diseases
can be prevented, but if allowed to grow
unchecked, extreme control measures
are often necessary to eradicate them.
Garden Cleanliness Guidelines
Wear latex gloves, and regularly dip into
a sanitizing agent.
Use disinfectant-filled footbaths to
prevent carrying pathogens on boots
and shoes into the garden room.
Disinfect pruning tools and knives.
Do not smoke in the garden.
Do not work in the garden if foliage
is wet.
Keep garden room and greenhouse
floors clean. Keep outdoor gardens tidy,
and always remove debris from soil
surface. Insects and fungi like nice hide
away homes found in dirty, dank corners
and under decaying leaves or rotting
450
DISEASES & PESTS
www.marijuanagrowing.com
mulch. Indoors and in greenhouses,
use clean mulch such as expanded clay
pellets or plastic. Outdoors, straw is the
best all-around mulch.
Gardeners and their tools often
transport microscopic pests, diseases,
and fungi into the cannabis garden. To
prevent problems, take regular sanitary
precautions. Wearing clean clothes and
using clean tools reduces problems con
siderably. A separate set of indoor and
greenhouse tools are easy to keep clean.
Pests, diseases, and fungi habitually
ride from plant to plant on dirty tools.
Disinfect tools by dipping in rubbing
alcohol or washing with soap and hot
water after using them on a diseased
plant. Another quick way to sterilize
pruners is with a handheld torch. A
quick heating with the torch will
sterilize metal tools immediately.
Personal cleanliness is fundamental to
preventing diseases and pests. Wash
your hands before touching foliage and
after handling diseased plants. Smart
growers do not walk around the buggy
outdoor garden and then visit the indoor
garden without taking precautions.
Think before entering the indoor garden
or greenhouse and possibly contaminat
ing it. Stay away from outdoor diseases
and pests such as a rust-covered lawn,
and indoors stay away from spider mite-
infested houseplants. Avoid problems by
washing your hands and changing shirt,
pants, and shoes before entering a clean
indoor cannabis garden. Smokers should
be especially careful to clean up and
change clothes before entering gardens.
Once a crop has been grown in potting
soil or soilless mix, throw out the used
growing medium. Some growers brag
about using the same old potting soil
over and over, unaware that this savings
is repaid with a diminished harvest.
Used soil may harbor harmful diseases
and pests that have developed immunity
to sprays. Starting a new crop in new
potting soil will cost more up front but
will eliminate many potential problems.
Used soil makes excellent outdoor
garden soil.
Once potting soil is used, it loses much
of the fluff in its texture, and compaction
becomes a problem. Roots penetrate
compacted soil slowly, and there is little
room for oxygen, which restricts nutrient
uptake. Used potting soil is depleted of
nutrients. A plant with a slow start is a
perfect target for disease, and worst of
all, it will yield less! Companion planting
helps discourage insects outdoors. Pests
have nowhere to go indoors, so com
panion planting is not viable in garden
rooms.
Plant insect- and fungus-resistant vari
eties of cannabis. If buying seeds from
one of the many seed companies, always
check for disease resistance. If you live
in one of the medical cannabis states,
you can actually ask local gardeners and
other medical patients without being
subject to legal penalties.
In general, Cannabis indica is the most
resistant to pests, and C. sativa is more
resistant to fungal attacks. Choose
mother plants that you know are resis
tant to diseases and pests. Keep plants
healthy and growing fast at all times.
Disease attacks sick plants first. Strong
plants tend to grow faster than diseases
and pests can spread. However, a balance
must be struck in order to avoid the
excess nitrogen and softer tissue due to
fast growth.
Carefully remove and destroy dead
leaves. Wash your hands after handling
diseased foliage. If the problem attacks
one or a few plants, isolate and treat
them separately. Diseases can spread
like wildfire if the conditions are right.
If disease gets a good start even after all
preventive measures are taken, extreme
control methods may be necessary,
perhaps even spraying the entire garden
with the proper fungicide.
Disease and Pest Prevention
prevention
healthy atmosphere for plants
cleanliness
low humidity
ventilation
removal
copper, lime sulfur sprays
specific fungicide
The best approach to disease and pest control is
a healthy garden that is easy to maintain and
offers a pleasant working environment.
Diseases
This chapter approaches disease and pest
control by first encouraging gardeners
to grow strong, healthy gardens and to
keep all medical cannabis paperwork
in order.
Fungi do not produce green chlorophyll,
and they reproduce by spreading tiny
microscopic spores rather than seeds.
Countless fungal spores are present in
the air at all times. When these micro
scopic airborne spores find the proper
conditions, they will settle, take hold,
and start growing. Some fungi, such as
bud-rotting gray mold (Botrytis), are so
prolific that they can spread through an
entire crop in a matter of days!
Unsterile, soggy soil coupled with humid,
stagnant air provides the environment
most fungi need to thrive. Although
there are many different types of fungi
and related diseases, they are usually
prevented with similar methods.
Anthracnose
Fungus
Common names: anthracnose, leaf
blight, leaf shoot, brown blight
Specific diseases that cause anthracnose
include: anthracnose (Colletotrichum
coccodes = C. atramentarium Taubenhaus
= C. dematium)
Threat to garden: low to medium
Identify: Leaves show first symptoms
when they turn light green. Soon, sunk
en water-soaked spots that grow into
irregular shapes develop grayish centers
with dark borders. Stems develop white
www.marijuanagrowing.com
451
Anthracnose
Blight
Canker
wounds that turn black. Little black
and white dots soon develop in wounds.
Stems may develop cankers. This disease
is worst during cool, damp weather
(especially in clay and bog soils) and
when plants are stressed (especially in
hydroponic systems). Anthracnose is not
transmitted in seeds but can be found on
seed surfaces.
Damage: Anthracnose slows growth and
diminishes harvest. It is occasionally
fatal.
Cause: Anthracnose is caused in cannabis
by three species of Colletotrichum fungi.
Colletotrichum atramentarium also causes
anthracnose. Brown blight (anthracnose)
is caused by Alternaria and Stemphylium.
Fungi overwinter in plant debris or soil,
and start to grow in the spring.
Prevention: Sanitation is the best pre
vention. Remove plant residues. When
pruning, make clean cuts with sharp,
sterile tools to keep wounds clean. Use
new soil, and avoid underwatering or
overwatering. Avoid planting in clay
soils, or amend clay soils to improve
drainage. Do not wet foliage and stems
when watering.
Control: Trichoderma harzianum
(Trichodex) controls anthracnose.
Sulfur or copper powders or sprays
applied weekly as soon as the disease is
identified will keep spores from spread
ing, but they will not kill the disease.
Look for contact fungicides that contain
chlorothalonil. There are many systemic
fungicides that kill anthracnose.
Blights
Fungal disease
Common names: brown blight, south
ern blight, twig blight
Specific diseases that cause blight
include: bacterial blight (Pseudomonas
syringae pv. cannabina)
Cylindrosporium blight (Cylindrosporium
spp., C. cannabinum Ibrahimov)
Leptosphaeria blight (Leptosphaeria
cannabic, L. woroninii, L. acuta)
brown blight (Alterneria alternata =
A. tenuis)
southern blight (Sclerotium rolfsii).
Sclerotium root and stem rot (Athelia
rolfsii [teleomorph])
twig blight (Dendrophoma marconii,
Botryosphaeria marconii [teleomorph])
Threat to garden: low to medium
Identify: Blight is a general term that
describes many plant diseases that are
caused by fungus, most often a few
weeks before harvest. Signs of blight
include discolored leaf tips; dark,
blotchy spots on foliage; slow growth;
sudden yellowing; wilting; and plant
death. Most blights spread quickly
through large areas of plants.
Damage: kills leaves, slows growth, and
kills plants
Cause: unsanitary garden room condi
tions; infected soil, air or plant tissue is
introduced into the garden
Prevention: Cleanliness! Use fresh,
sterile growing medium. Avoid excess
nitrogen fertilization. Avoid blights by
keeping plants healthy with the proper
nutrient balance and good drainage to
prevent nutrient buildup.
Biological: Use Serenade (Bacillus
subtilis) against brown blight. Use
Binab, Bio- Fungus, RootShield,
Supresivit, Trichopel, (Trichoderma
harzianum) or SoilGuard (Trichoderma
virens). Use a Bordeaux mixture to
stop fungal blights. Stopping blights
in advanced stages is difficult; the best
solution is to remove diseased plants
and destroy them.
Control: Once blight takes over plant
tissue, little can be done. Remove plants
from the garden and sterilize the area to
avoid contamination.
Canker
Fungal disease
Common names: stem canker, hemp
canker
Specific diseases that cause canker
include: Cladosporium stem canker
(Cladosporium cladosporioides, C.
herbarum, Mycosphaerella tassiana
[teleomorph])hemp canker (Sclerotinia
sclerotiorum)Ophiobolus stem canker
(Ophiobolus cannabinus, O. anguillidus)
Phoma stem canker (Phoma herbarum,
P. exigua)
Phomopsis stem canker (Phomopsis
cannabina, P. achilleae, Diaporthe arctii
var. achilleae [teleomorph])
Threat to garden: low
Identify: The first water-soaked wounds
appear on maturing stems and branches.
They develop into dark cankers that
continue to deepen, and fungus invades
the plant. Finally, the black-hearted
disease continues to grow on dead stems.
Damage: Hemp canker, mainly a fiber
hemp disease, occasionally affects
medicinal cannabis.
Cause: present in soil or unsterile,
tainted soil
Prevention: Use fresh soil or growing
medium for each crop. Keep garden
and garden area clean. Remove all plant
residues from soil surface. Compost by
452
DISEASES & PESTS
www.marijuanagrowing.com
Damping-offhit this seedling before it
developed true leaves. (MF)
Cut the stem ofan infected plant to find
evidence o/Fusarium
Fusarium wilt destroyed this plant.
using a big pile and high temperatures.
Control: Best to prevent hemp canker.
All chemical controls are systemic. Once
disease takes over, it is often too late.
Contans WG contains Coniothyrium
minitans bacteria, a parasite to
S. sclerotiorum.
Damping-Off
Fungus: kills seeds, seedlings, and
clones
Common names: damping-off, stem
rot, moldy germination, young plant
disease
Specific diseases that cause damping-
off include: (Botrytis cinerea,
Botryotiniafuckeliana [teleomorph],
Fusarium oxysporum, F. solani,
Nectria haematococca [teleomorph],
Macrophomina phaseolina, Pythium
aphanidermatum, P. debaryanum auct.,
P. ultimum, Rhizoctonia solani,
Thanatophorus cucumeris [teleomorph]
= Pellicularia filamentosa).
Threat to garden: High threat to seed
lings! See “Gray Mold (Botrytis cinerea,
aka Bud Mold): Stems, Flower Buds.”
About: Damping-off is a catchall term;
the disease has many causes.
Identify: There are two kinds of
damping-off: one kills seeds when
they germinate and before they break
through the soil; the second type, post/
emergence damping-off, is the rotting
or wilting of seedlings soon after they
emerge from the soil. Succulent stems
have become water-soaked and then
necrotic and develop a sunken, zone
at ground level. The little herbaceous
plants fall over on the ground. Root
decay follows.
Damage: Damping-off attacks rooting
cuttings at the soil line if present in
growing medium. As the fungi invade
stem tissue, the stem loses girth at the
soil line, weakens, and then discolors
with a brown, watery soft rot. Finally,
fluid circulation is cut, killing the seed
ling or cutting. Damping-off prevents
newly sprouted seeds from emerging and
attacks seedlings, causing them to rot at
the soil line; it yellows foliage and rots
older plants at the soil line.
Cause: Various fungal species, includ
ing Botrytis, Pythium, and Fusarium,
are present in the air, growing medium,
plant, or seed. This disease breeds in
humid conditions and in poorly aerated,
overwatered growing mediums. It attacks
weak plants.
Prevention: Control soil moisture.
Overwatering is the main precursor to
damping-off. Careful daily scrutiny of
soil will ensure that the proper amount
of moisture is available to seeds or cut
tings. Germinate seeds between clean,
fresh, moistened paper towels and move
seeds to soil once sprouted. Do not plant
seeds too deeply; cover with soil one and
a half times the width of the seed. Use
fresh, sterile growing medium and clean
pots to guard against harmful fungus
in the soil. Start seeds and root cuttings
in a fast-draining, sterile coarse sand,
rockwool, Oasis, or Jiffy cubes, which
are difficult to overwater. Set them on a
grate or surface that readily drains. Do
not place a humidity tent over sprouted
seedlings—a tent can lead to excessive
humidity and damping-off. Damping-
off is inhibited by bright light; grow
seedlings under the HID rather than
fluorescent bulbs. Keep fertilization to
a minimum during the first couple of
weeks of growth.
Seeds: Coating the seed with protec
tive dust is a form of insurance. Seed
disinfection is used to kill organisms of
anthracnose and other diseases carried
on seed. Damping-off organisms are in
the soil, not on the seed. The coating is
intended to kill or inhibit fungi in the
soil immediately surrounding the seed
and so provide temporary protection
during germination.
Cuttings: Cuttings are less susceptible
to damping-off and love a humidity tent
to promote rooting. Keep germination
temperatures between 70°F and 85°F
(21.1°C-29.4°C).
Control
Biological: Apply Polygangron
(Pythium oligandrum) granules to soil
and seed. Bak Pak or Intercept is applied
to the soil and Deny or Dagger—forms
of the bacterium Burkholderia cepa
cia—is put on the seeds. Epic, Kodiac,
Quantum 4000, Rhizo-Plus, System 3,
and Serenade also suppress many causes
of damping-off.
Chemical: Dust the seeds with Captan.
Avoid benomyl fungicide soil drench
because it kills beneficial organisms.
Fusarium Wilt
Fungal root disease
Common names: Fusarium, stem
canker, Fusarium wilt
Specific diseases that cause Fusarium
wilt include: Fusarium foot rot and root
rot (Fusarium solani)
Fusarium stem canker (Fusarium
sulphureum, Gibberella cyanogena
[teleomorph], = G. saubinetn)
www.marijuanagrowing.com
453
Fusarium wilt {Fusarium oxysporum
f.sp. cannabis, F. oxysporum f.sp.
vasinfectum)
Threat to garden: medium to high
Identify: Fusarium wilt is most common
in warm garden rooms and greenhouses.
Fusarium starts as small spots on older,
lower leaves. Interveinal leaf chlorosis
appears swiftly. Leaf tips may curl before
wilting and suddenly drying to a crisp.
Portions of the plant or the entire plant
will wilt. The entire process happens so
fast that yellow, dead leaves dangle from
branches.
Damage: This disease starts in the
plant’s xylem, the base of the fluid trans
port system. Plants wilt when fungi plug
the fluid flow in plant tissue. Cut one of
the main stems in two, and look for the
telltale reddish-brown color.
Cause: The water and nutrient solution
carries this disease with it when contami
nated. The disease is present in the room,
growing medium, or plants. Recirculat
ing nutrient solutions above 75°F (24°C)
creates perfect conditions for Fusarium.
It is also spread by contaminated plants,
cuttings, etc. Fusarium can also enter via
the root system.
Prevention: Cleanliness! Use fresh,
clean growing medium. Avoid nitrogen
Cut the stem ofan infected plant to find
evidence o/Fusarium
overfertilization. Preventive action is
necessary. Keep nutrient solution below
75°F (23.9°C). Hydrogen peroxide kills
bacteria and will also arrest Fusarium.
Always remove and destroy infested
plants.
Biological: Mycostop (Streptomyces
griseoviridisfi or Deny, or Dagger
(Burkholderia cepacia) and Trichoderma.
Control
Sprays: Treat seeds with chemical
fungicides to eradicate the seed-borne
infection. Chemical fungicides are not
effective on foliage. A metal spray such
as copper or zinc helps by making the
leaf environment more difficult to
penetrate.
If there is any root rot, do not spray
vitamins onto the plants. Vitamins
around roots may strengthen the fungus
that is attacking your plant. If mold or
fungal attacks appear on leaves discon
tinue sprays and foliar feedings.
Aboveground indications of root rots
are difficult to distinguish from wilt
diseases. The three most important wilt
diseases include Fusarium wilt that is
caused by two forms of Fusarium oxys
porum, Verticillium wilt that is caused
by two Verticillium species, and prema
ture wilt (aka charcoal rot) caused by
Macrophomina phaseolina.
Note: Fusarium oxysporum has been
studied and genetically modified to
create a “mycoherbicide” or an “attack”
fungus that preys on cannabis. To the
best of my knowledge, the attack fungus
has not been released.
Gray Mold (Botrytis cinerea,
aka Bud Mold)
Fungal disease
Disease/fungi/bacteria/microbe/virus/
pathogen/contaminant
Common names: bud mold, stem rot,
bud rot
Specific disease that causes damp
ing-off: Botrytis cinerea
Threat to garden: very high
Identify: Gray mold is the most com
mon fungus that attacks indoor plants
and flourishes in moist, temperate
climates common to many garden
rooms. It attacks seedlings, clones,
stems, buds, and stored cannabis.
Seeds/seedlings, clones: see
“Damping-Off”
Stems: Gray mold arises as a gray-brown
to blackish mat of fungus and fungal
spores. Stems yellow at margins of
infection. Soft cankers develop that may
cause stems to snap. When advanced, the
entire stem dies above the infection.
Damage: Gray mold slows growth,
diminishes harvest, could cause plant
death, and infects other plants.
Prevention and control: the same as for
flower buds
Flower buds: Bud leaflets yellow and
wilt, and pistils brown. Inside the bud—
where it is difficult to see at the onset,
and is grayish-whitish to bluish-green
in color—Botrytis appears hairlike and
similar to laundry lint in moist climates.
Entire buds become enveloped in a
fuzzy gray mold that morphs into gray
brown slime. Damage can also appear
as dark, brownish spots on buds in less
humid environments. Dry to the touch,
the BoZrym-affected area often crumbles
if rubbed. Constant observation, espe
cially during the last two weeks before
harvest, is necessary to keep this disease
out of the garden.
Botrytis is visible on this stem. It is killingall
the growth.
454
DISEASES & PESTS
www.marijuanagrowing.com
Botrytis cinerea spread through this entire
greenhouse in about two weeks.
Botrytis cinerea attacked this flower bud.
Flaming flowers is one of many ways to kill
Botrytis in the garden. This method is very
rewarding and also kills fungus spores.
Damage: Single leaves that mysteriously
dry out on the buds. They could be the
telltale signs of a Botrytis attack inside
the bud. Flower buds are quickly reduced
to slime in cool, humid conditions or
unsmokable powder in warm, dry rooms.
Botrytis can destroy an entire crop in
seven to ten days if left unchecked. Stem
damage—Botrytis starts on stems and
not buds—is less common indoors.
First, stems turn yellow, and cankerous
growths develop. The damage causes
growth above the wound to wilt and can
cause stems to fold over. Transported
by air, contaminated hands, and tools,
gray mold spreads very quickly indoors,
infecting an entire garden room in less
than a week when conditions are right.
I saw Botrytis destroy an entire green
house in Switzerland in two weeks.
Cause: Caterpillars, wounds, humidity,
and dense flowers all factor as causes of
gray mold. Airborne spores are present
virtually everywhere as gray mold attacks
many plants. It is also transmitted via
seeds. Botrytis damage is compounded
by humid (above 50 percent) climates. In
temperate regions with high humidity
(60 to 70 percent) and low temperatures,
Botrytis can completely destroy a hemp
crop within a week.
Prevention: Keep the garden room,
tools, and yourself clean. Do yourself a
favor and start with clean growing
medium! Buy clean medium or treat with
steam or electricity. Remove lower leaves
and improve air circulation between
plants. Grow disease-resistant varieties.
Dense, tightly packed,
moisture-retaining buds of Cannabis
afghanica are the most susceptible to
gray mold. Some afghanica varieties
came from arid climates and have no
resistance to gray mold.
Minimize Botrytis attack incidence with
low humidity (50 percent or less), ample
air circulation, and ventilation. Grow
varieties that do not produce heavy,
tightly packed buds that provide a
perfect place for this fungus to flour
ish. Cool (below 70°F [21.1°C]), moist
climates with humidity above 50 percent
are perfect for rampant gray mold
growth. Many crosses are more resistant
to gray mold than pure indica varieties.
Remove dead leaf stems, petioles, from
stalks when removing damaged leaves
to avoid Botrytis outbreaks, which is
often harbored by dead, rotting foliage.
Increase plant spacing, and air circulation
between plants. Increase ventilation, keep
humidity below 60 percent, and keep
the garden room clean! Use fresh, sterile
growing medium for each crop. Water
when the lights go on so water does not
sit all night. Mulch plants to avoid water
splashing from soil onto leaves.
Excessive nitrogen and phosphorus
levels make foliage tender, letting
Botrytis can get a foothold. But higher
levels of calcium lower the incidence of
Botrytis. Make sure pH is around 6.0
to facilitate calcium uptake. Low light
levels also encourage weak growth and
gray mold attack. Keep the light lev
els bright. Botrytis needs UV light to
complete its life cycle; without UV light
it cannot live.
Control
Cultural and physical control: As
soon as Botrytis symptoms appear, use
alcohol-sterilized pruners to remove
Botrytis-iniected. buds at least one inch
(2.5 cm) below the infected area. Do
not let the bud or anything that touches
it contaminate other foliage. Remove it
from the garden and destroy it. Wash
hands and tools after removing infect
ed buds. Increase temperature to 80°F
(26.7°C) and decrease humidity to
below 50 percent.
Biological: Spray plants with
Gliocladium roseurn and Trichoderma
species. Prevent damping-off with a
soil application of Gliocladium and
Trichoderma species. The Hemp Diseases
and Pests book suggests experimenting
with the yeasts Pichia guilliermondii
and Candida oleophila or the bacterium
Pseudomonas syringae.
Sprays: Fixed copper (copper hydrox
ide, copper oxide, copper oxychloride),
copper sulfate, hydrated lime, lime sulfur,
and elemental sulfur keep early stages of
Botrytis in check as long as it is present
on the foliage. Preventive spraying is
advised if in a high-risk area, but spraying
buds near harvest time is not advised.
Seeds are protected from Botrytis with a
coating of Captan. Check with your local
nursery or hydroponic store for product
recommendations.
Sprays of calcium silicate (Ca-silicatey
2,000 ppm, a sealant for concrete and
egg shells), (California) calcium
bentonite (Ca-bentonite), and calcium
formate (Ca-formate, 2,000 ppm)
provide effective control of fungi and
are safe alternatives to highly toxic
fungicides. Potassium bicarbonate,
baking soda, changes the pH of the
surface of the foliage it contacts.
Botrytis cannot grow there.
www.marijuanagrowing.com
455
Leaf spot can be caused by many different
problems. Once dead tissue appears on leaves,
mold and fungus can take hold and grow.
AQ10, a microbial biofungicide that
parasitizes powdery mildew, can
control and even eliminate the disease.
AQ10 will actually eliminate Botrytis
when plants are no more than 3 percent
infected.
See “Sulfur Burners and Pests” under
“Sulfur” in this chapter.
Leaf Spot
Fungal and bacterial disease
Common names: brown blight,
brown leaf spot, leaf spot root disease,
Curvularia leaf spot, olive leaf spot,
pink rot, tar spot, Stemphylium leaf
and stem spot, white leaf spot, yellow
leaf spot
Specific diseases that cause leaf spot
include: brown leaf spot and stem can
ker (Ascochyta spp., A. prasadii, Phoma
spp., Didymella spp. [teleomorph], P.
exigua, P. glomerata, P. herbarum).
Curvularia leaf spot (Curvularia
cymbopogonis, C. lunata, Cochliobolus
lunatus [teleomorph]
olive leaf spot (Cercospora cannabis,
Pseudocercospora cannabina)
pink rot (Trichothecium roseurn)
Stemphylium leaf and stem spot
(Stemphylium botryosum, Pleospora
tarda [teleomorph], S. cannabinum)
white leaf spot (Phomopsis ganjae)
yellow leaf spot (Septoria cannabis; S.
cannabina Peck)
Alternaria alternata Keissler is a common
fungal pathogen of some 380 different
plants and seeds. The opportunistic
pathogen causes leaf spot and other
diseases.
Caution: Alternaria alternate
Keissler also causes upper respiratory
tract infections and asthma in people
who are sensitive.
Threat to garden: These diseases rarely
kill plants, but they do sharply reduce
crop yields.
Identify: Leaf and stem fungi, includ
ing leaf spot, attack the foliage. Brown,
gray, black, or yellow to white spots or
blotches develop on leaves and stems.
Damage: Leaves and stems discolor and
develop spots that impair plant fluid flow
and other life processes. Spots expand
over leaves, causing them to yellow and
drop. Growth is slowed, harvest pro
longed, and in severe cases, death results.
Leaf spot is the symptomatic name given
to many diseases.
Cause: Bacteria, fungus, and nematodes
carry (vector) this disease. Spots or
lesions caused by fungi often develop
different colors as fruiting bodies grow.
Leaf spots are often caused by cold
water that was sprayed on plants under a
hot HID. Temperature stress causes the
spots that often develop into a disease.
Viral pathogens are also a major cause of
some leaf spots.
Cause: Leaf spot can be caused by
Serenade contains Bacillus subtilis, a power
ful natural fungicide.
(1) fungi already present in an unsterilc
rooting medium, (2) overwatering and
maintaining a soggy growing medium,
or (3) excessive humidity.
Prevention: Cleanliness! Use fresh,
sterile growing medium with each
crop. Move HIDs away from the garden
canopy about 30 minutes before spray
ing, so plants won’t be too hot. Do not
spray within four hours of turning the
lights off, as excess moisture sits on
the foliage and fosters fungal growth.
Do not wet foliage when watering,
avoid overwatering, and lower garden
room humidity to 50 percent or less.
Check the humidity both day and night.
Employ dry heat to raise the nighttime
temperature to five or ten degrees below
daytime levels, and keep humidity more
constant. Allow adequate spacing
between plants to provide air circula
tion. Remove damaged foliage. Avoid
excessive nitrogen application.
Control
Biological: Copper- and sulfur-based
sprays may help keep leaf spots in check,
but they are often phytotoxic when
applied regularly indoors.
Sprays: Copper- and sulfur-based
sprays. Many bacterial and fungal
diseases can be controlled with Bacillus
subtilis (Serenade).
Mildews
Fungal disease
Common names: black mildew, downy
mildew, powdery mildew
Specific diseases that cause
mildew include: downy mildew
(Pseudoperonospora cannabina,
P. humuli)
black mildew (Schiffnerula cannabis)
powdery mildew (Leveillula taurica,
Oidiopsis taurica [anamorph],
Sphaerotheca macularis, = S. humuli,
Oidium sp. [anamorph])
Threat to garden: medium to very high
About: Mildews are called “powdery
mildew” among cannabis growers. This
term encompasses all mildews. Mildew
grows on foliage, leaves, and buds. Most
look like foliage was sprinkled with fine
flour or talcum powder. Mildews drain
the vigor of plants, and pose a health
risk for some people when smoked.
Identify: The first indication of infection
is small spots on the tops of leaves. Next,
456
DISEASES & PESTS
www.marijuanagrowing.com
Mildews appear as a little bit of white powder
on leafsuface.
Soon powdery mildew enters plant tissue and
spreads.
Powdery mildew has taken over this plant.
3l powdery looking substance (flowering
fungus) appears on foliage. At this point,
the systemic disease has been inside the
plant a week or more, and the disease can
be only arrested by external treatments—
but not eliminated. Spots progress to a
fine, pale, gray-white powdery coating on
growing shoots, leaves, and stems.
Damage: Powdery mildew is not always
limited to the upper surface of foliage.
Growth slows, leaves yellow, and plants
die as the disease advances. Occasionally
fatal indoors, this disease is at its worst
when roots dry out and foliage is moist.
Plants are infected for weeks before they
show the first symptoms.
Cause: Mildew is caused by one of the
many different species of fungi from the
order Erysiphales. Spores are present in
the air all the time. They find cool, moist
garden rooms with poor circulation the
perfect place to live.
Prevention: Once established, mildews
must be eliminated from an empty
garden room. They cannot be eliminated
from plant tissue without the help of a
systemic chemical. Cleanliness! Prevent
this mildew by avoiding cool, damp,
humid, dim conditions in the garden
room, as well as fluctuating tempera
tures and humidity. Low light levels
and stale air affect this disease. Increase
air circulation and ventilation, and
make sure light intensity is high. Space
containers far enough apart so air freely
flows between plants. Allow foliage to
dry before turning off lights. Remove
and destroy foliage more than 50 percent
infected. Avoid excess nitrogen. Copper,
sulfur-lime, and potassium bicarbonate
sprays are good prophylactics.
Clones: If buying clones at a dispensary
or if acquiring from friends, quarantine
or isolate the clones for a week to see if
they have powdery mildew and other
diseases or pests before introducing
them to the main plant population.
Sulfur products such as Safer’s Defender
prevent powdery mildew on contact
with foliage, but the disease is still inside
the plant. Applying sulfur make the can
nabis taste bad when smoked. It appears
to concentrate on resins. Chimera, a
cannabis breeder, does not recommend
using sulfur on vegetative or flowering
plants. He recommends using a sulfur
burner in a room to kill all mildew when
no plants are in the room.
Apply Serenade (Bacillus subtilis)
or spray with a saturation mix of
baking soda and water to kill surface
contamination to keep the disease in
check. Copper-based sprays may keep
this mold in check. A saturation of
baking soda spray dries to a fine powder
on the leaf; the baking soda changes the
surface pH of the leaf to 7.0, and pow
dery mildew cannot grow. An organic
“systemic” called AquaShield is available
from Botanicare, and it has had very
favorable reports. A mixture of 10 to 20
percent milk and 80 to 90 percent water
is also effective, but it smells bad.
Control: None. Destroy damaged plant
material.
Root Rot
Fungal disease
Common names: root rot, soil rot
Specific diseases that cause root rot
include: Phymatotrichum root rot aka
cotton root rot (Phymatotrichopsis
omnivore = Phymatotrichum
omnivorum)
pink rot (Trichothecium roseurn =
Cephalothecium roseurn Corda)
Rhizoctonia soreshin and root rot
(Rhizoctonia solant Kiihri)
tropical rot (Lasiodiplodia theobromae —
Botryodiplodia theobromae Pat)
Threat to garden: medium
Identify: Root rot disease is a catchall
term for different fungal and pathogen
root infections (see Pythium below).
These rots cause roots to turn from a
healthy white to light brown. As the
rot progresses, roots turn darker and
become slimy. Growth aboveground
is slow. Leaf chlorosis is followed by
wilting of the older leaves on the entire
plant. When severe, rot progresses up
to the base of the plant stock, turn
ing it dark. Root rot is most common
when roots are deprived of oxygen and
allowed to stand in unaerated water.
Soil pests that cut, suck, and chew roots
create openings for rotting diseases to
enter. Inspect roots with a 10X magnify
ing glass for signs of pest damage.
Damage: brown slimy roots, slow
growth, damaged foliage, and a low yield
Cause: Many fungi cause root rot in
cannabis including charcoal rot
(Macrophomina phaseolina), tropical
rot (Lasiodiplodia theobromae =
Botryodiplodia theobromae), Rhizoctonia
soreshin.) and root rot (Rhizoctonia solani).
Prevention: Cleanliness! Use fresh,
sterile growing medium. Make sure
calcium levels are adequate, and do not
overfertilize with nitrogen. Keep pH
above 6.5 in soil and about 6.0 in hydro
ponic mediums to lower disease occur
rence, except cotton rot, which likes a
www.marijuanagrowing.com
457
Pythium attacks roots in the entire garden.
Phytophthora is killing this garden.
Root rot killed these roots.
high pH. Control any insects, fungi, or
bacteria that eat roots.
Biological: Binab, Bio-Fungi,
RootShield, Supresivit, Trichopel
(Trichoderma harzianum), or SoilGuard
(Trichoderma virens).
Control: Once roots are more than half
covered with rot, recovery will be very
slow if at all. The best control is to toss
out the plants. Completely sterilize and
sanitize the garden after a bout with
root rot.
Sprays: Sprays are not effective for root
rot once damage is done.
Pythium
Plant parasites
Common names: Pythium wilt, Pythium,
root rot, damping-off,
Specific diseases that cause root rot
in cannabis include: Pythium irregulare,
Pythium ultimum, and Pythium
aphanidermatum
Threat to garden: high
Identify: Pythium can be everywhere
and it spreads easily. Infestations can
wipe out an entire crop in a green
house or indoor garden. Pythium is a
fungus-like organism that grows and
colonizes a plant by producing hyphae
(threadlike, filamentous cells) that suck
nutrients from host cannabis plants and
release enzymes that destroy root tissue.
Pythium attacks cannabis roots, causes
cutting rot, stem rot, and foliar blight
under the right conditions. P. ultimum,
has a very wide range of hosts.
P. ultimum diseases occur most often
at temperatures below 68°F (20°C).
P. aphanidermatum infections occur
more often at temperatures above 77°F
(25°C).
Damage: First plants appear stunted
and if you look at the root carefully
you will see the tips are dead. The roots
appear water-soaked and slimy. Seeds
may be infested at germination. Stems
of seedlings and cuttings may appear
soft and watery. Root rot symptoms,
regardless of the cause, are surprisingly
similar. Accurate diagnosis of Pythium is
essential because fungicides labeled for
other root rot pathogens will not control
Pythium root rot.
Cause: Pythium that attacks cannabis
loves wet substrates with high EC.
Sometimes they even contaminate soil
less potting mixes. Poor sanitation—
using dirty tools and containers or
keeping dead infected plants in the
garden—are some of the main causes.
Fungus gnats and shore flies vector
Pythium in cannabis gardens.
Prevention’: Clean everything! Disin
fect everything—walls floor, benches,
containers, tools, everything! Use
high-quality cuttings—remove any
cuttings that show signs of disease. Use
clean potting mix. Keep potting soil
covered and dry when stored.
Growing media, especially peat that
holds more than 70 percent moisture
is predisposed to P. ultimum damage.
Highly decomposed (dark) peat is more
susceptible to Pythium root rot than a
nondecomposed medium or light peat
that holds less moisture.
Overwatering and overfertilizing, poorly
draining media and roots in standing
water all increase Pythium infection
rates. When overfertilized, excess
nitrogen suppresses natural plant defens
es. Toxic salt buildup in the substrate
damages root tips which provides an
easy wound for Pythium to infect.
Control
Biological: The commercial
products Mycostop and Actino-Iron
(Streptomyces griseoviridis) are available
to protect cannabis and suppress
Pythium. Applications of Activated
Aerated Compost Tea (AACT) will
help prevent infection. Pseudomonas
fluorescens, Streptomyces griseoviridis,
S. lydicus, Streptomycin lydicus,
Gliocladium virens, Pythium oligandrum
and Trichoderma harzianum may be
available in commercial substrate mixes
to prevent and combat Pythium.
Sprays: Pythium becomes resistant to
sprays after repeated applications. Make
sure to rotate sprays to avoid disease
resistance. Once Pythium infests a plant,
sprays do little good. They are best used
as a preventative measure. Apply Alude,
Biophos, Rampart (phosphorous acid),
Banol (propamocarb) and Segway
(cyazofamid) as per instructions.
Phytophthora
Fungal disease/host-specific parasite
Common names: water mold, plant
destroyer, blight, Phytophthora blight
Specific diseases that cause root rot in
cannabis include: Phytophthora species
Threat to garden: medium to high
Identify: The Phytophthora genus, referred
to as water molds (Oomycetes), contains
an estimated 500 species that damage
cannabis. An infestation can wipe out an
entire cannabis crop. These pathogens are
usually host-specific parasites.
They thrive, grow, reproduce, and infect
plant roots in water and saturated soil.
Phytophthora produces swimming spores
(zoospores) are attracted to the roots
and infect them. Symptoms are often
misdiagnosed.
458
DISEASES & PESTS
www.marijuanagrowing.com
Damage: This disease attacks the entire
plant—roots, stems and foliage—often
causing sudden wilting and death. It can
infect plants in different growth stages.
When plants are infected early in life
they die quickly. For example, when
clones and seedlings dampen-off they
rot at soil line. Infected older plants wilt
irreversibly. When you see lesions that
girdle the stem, it is too late to save the
plant.
First, small dark green spots develop
that later get bigger and look scalded.
The fungal disease infests and penetrates
plant tissue with long threadlike struc
tures (sporangiophores). It causes blights,
damping-off and rots. This disease cuts
fluid flow within plants and causes leaf
yellowing, browning and premature fall
and death. These symptoms are worst in
hot weather. Plants often wilt and collapse
in less than a week.
Belowground you will find rotten roots
and few or no feeder roots. The zone
between phloem and xylem are dark and
discolored. The cambium layer is often
reddish brown in color. But conclusive
diagnosis requires laboratory analysis of
irrigation water or plant material.
Cause: Occurs naturally in most soils
and is promoted by excessive substrate
moisture and warm wet humid weather.
Rain and water spread the disease from
plant to plant and throughout garden.
Phytophthora also survives on and in
infested seed. Wind also disseminates
the disease.
Prevention: Disinfect all tools,
containers, water, soil and garden area
with bleach, peroxide or another disin
fectant. Keep garden temperatures cool
when possible. Avoid overwatering and
standing water in garden. Use clean
growing media. Avoid excessive nitrogen
fertilization.
Biological: Plant resistant cannabis
varieties. Composted bark added to soil
mixes kills Phytophthora as do organ
ic materials that release ammonia and
nitrous acid and sulfur-based fertilizers
Add composted hardwood or fir bark in
potting mixes. They help aerate media,
release inhibitors and promote antago
nistic soil fungi such as Trichoderma sp.
to build up
Control: Phytophthora is difficult to
control with sprays. Fungicides—
maneb, mancozeb, zineb and Bravo
(Chlorothalonil) are contact fungicides
that prevent the disease from entering
the seed and plant. Treat water with
disinfectant or ozone system. Sterilize
growing medium. Keep everything
clean!
Sprays: They have limited success.
Phosphorous acid (Allude) and the
cinnamic acid group (dimethomorph
(Acrobat, Forum)) inhibit but do not
kill Phytophthora. Read label carefully
and follow directions because applica
tion timing is essential.
Rust
Fungal disease
Common names: rust, hemp rust
Specific diseases that cause rust
include: rust (Aecidium cannabis, Uredo
kriegeriana, Uromyces inconspicuus)
hemp rust (Melampsora cannabina)
Threat to garden: very low
Identify: Rust appears as orange blotch
es on both sides of leaves, mainly on
industrial hemp. Tiny yet visible yellow
spores fall to infest more foliage.
Damage: Rust discolors and kills foliage
but is not fatal.
Cause: Rust is caused by unsterile grow
ing conditions, infested soil, and another
host. Sometimes controlling the second
plant, the host, will control the rust. In
the end, rusts have two separate forms
that must have both hosts to propagate.
Prevention: clean growing conditions
Control: It can be controlled by
spraying with thiocarbamate (the same
Rust is a fungal disease that is easy to mistake
for cultural problems.
stuff they put in Odor Eaters shoe in
soles). Thiocarbamate (Zineb-Maneb), is
systemic and restricted. DO NOT USE
on consumable cannabis.
Verticillium Wilt
Fungal disease
Common names: wilt, Verticillium wilt
Specific diseases that cause
Verticillium wilt include: Verticillium
wilt (Verticillium albo-atrum,
Verticillium dahliae)
Threat to garden: low to medium
Identify: Lower older leaves develop
chlorotic yellowing on margins and
between veins before turning dingy
brown. Plants often wilt during the day
and recoup when the light goes off. Wilt
soon overcomes parts of the plant or the
entire plant. Disease starts in the roots
apd progresses upward, plugging the
vascular system. Cut the stem in two
and look for the telltale brownish xylem
tissue. The fungus blocks the flow of
plant fluids, causing wilt and death.
Damage: Blocks the flow of fluids in
plants causing wilt and eventual death.
Cause: This fungus is present in unster
ile soils and growing mediums. It can
be transmitted via cuttings and seeds.
Verticillium can persist in soils for long
periods, and once activated can quickly
overtake your garden. It is sensitive to
moist soil and moderate temperatures:
75°F (23.9°C) is optimum with 55°F
(12.8°C) minimum and 86°F (30°C)
maximum for infection to occur.
Prevention: Cleanliness is critical. Use
sterile tools. Use fresh, sterile soil with
good drainage. Keep plants growing
Verticillium wilt
www.marijuanagrowing.com
459
Algae on the surface of rockwool
Crown gall on the stem of a cannabis plant
Crown gall infected this entire garden.
strong and vigorous. Avoid wounding
plants. Use ammoniacal nitrogen as a
source of nitrogen and less overall
nitrogen and higher levels of potassium.
Do not overfertilize. Make sure to
remove infected plants, and keep
everything clean!
Biological: Bio-Fungus (Trichoderma
species), Rhizo Plus (Bacillus subtilis)
Control: None. Once Verticillium is in
the plant, the end is near. Sterilize the
entire room if this disease appears.
Sprays: No chemical spray is effective
on Verticillium wilt.
Algae
Common names: algae, green algae,
blue-green algae, green slime
Threat to garden: medium
Identify: Earthy/moldy smelling algae,
most often green, can also be brown,
reddish, or black. Slimy green algae need
nutrients, light, and a moist surface on
which to grow. These algae are found
growing on moist rockwool and other
growing mediums exposed to light.
They cause little damage but attract
fungus gnats and other critters that
damage roots. Once roots have lesions
and abrasions, diseases enter easily.
Damage: Algae grow anywhere—
growing media; hydroponic, gulleys,
pumps, and reservoirs—blocking
feeder nozzles and blocking the flow
of nutrients in the garden. Algae also
attract root-destroying fungus gnats
and nematodes. See “Fungus Gnats” and
“Nematodes” for more information.
Cause: The earthy/moldy smell comes
from decomposition in the growing
medium and nutrient solution. Algae
use nutrients and remove oxygen from
the nutrient solution, which suffocates
roots. Decomposing algae also release
toxins that make roots more susceptible
to disease attacks.
Prevention: Algae grow when water and
nutrients combine under a light source.
Remove the light and algae cannot grow.
All containers, reservoirs, tubing, chan
nels, and so forth must be lightproof.
Prevention of algae is vital. Algae attract
fungus gnats and their larvae, as well as
nematode infestations. Because control
options for these problems and pests
once present are limited, the best method
of algae control is to prevent the problem.
Cover the moist rockwool and growing
mediums to exclude light. Run an
algaecide in the nutrient solution or
water with an algaecide.
Control: A little bit of algae causes few
problems, but thick, earthy growth re
quires action. Clean the system and add
an algaecide in the proper proportions.
Algae quickly regrow after the algaecide
wears off, and the next application must
be heavier to be effective. Most often,
algaecides are not effective and actually
more phytotoxic to roots than damage
caused by algae. Unestablished and weak
plants will suffer most.
Sprays/drenches: Diazinon,
Endosulfan, Propiconazole, Thiram,
Ziram, Quinomanid, Irgarol 1051 and
hydrogen peroxide. Some grapefruit
seed extracts kill algae without harming
the plants.
Bacterial Diseases
Crown Gall
Common names: crown gall
Specific disease that causes crown and
stem gall: crown gall (Agrobacterium
tumefaciens)
Threat to garden: low
Identify: Crown gall (Agrobacterium
tumefaciens) causes galls or tumorlike
growths on stems and the root crown.
Plant growth is stunted.
Damage: Large galls form on stems and
root crown. Although usually not fatal,
once crown gall invades plant tissue, the
plant cannot be saved.
Cause: Crown gall is caused by
Agrobacterium tumefaciens bacteria that
live in the soil as well as on root surfaces.
It enters and infects plants via a fresh
wound.
Prevention: Practice good garden
and tool sanitation. Clones are most
susceptible to crown gall disease. Take
all sanitary precautions when taking
clones. Prevent crown gall with appli
cations of Agrobacterium radiobacter
strain K1026 or strain K84, sold under
the brand names Galltrol and Gallex).
Control: None. If crown gall is found in
the garden, isolate and destroy affected
plants immediately. Disinfect entire
garden.
Viruses
Viral disease
Common names: hemp mosaic virus,
hemp streak virus (HSV)
Specific viruses include: alfalfa mosaic
and Lucerne mosaic (genus Alfamovirus,
alfalfa mosaic virus [AMV])
arabis mosaic (genus Nepovirus^ arabis
mosaic virus (ArMV))
cucumber mosaic (genus Cucumovirus.
cucumber mosaic virus (CMV))
hemp mosaic (hemp mosaic virus)
460
DISEASES & PESTS
www.marijuanagrowing.com
hemp streak (hemp streak virus)
Threat to garden: low to medium-high
Identify: Classic virus infection symp
toms include sickly growth, leaf spots,
stem spots, yellowing, intcrveinal yellow
streaks, and diminished harvest. Some
times leaf margins darken sporadically.
Damage: Viruses inhabit the fluid
distribution system in plants and impair
it. Telltale signs of many viruses include
some or all of the following: discolored
spots, mottling, chlorosis, streaking, and
sometimes margins and leaf tips roll up
ward. Once a plant gets a virus, little can
be done to kill the virus. Viruses seldom
kill cannabis, but a viral infection can
seriously reduce yields.
Cause: Viruses enter plants via (insect)
wounds, pollen, and seed infections.
They invade every part of a plant. Once
established, viruses multiply in plant
cells where they can completely take
over the plant. They seldom kill but can
severely reduce cannabis yields. Once
taking hold in a plant, viruses are almost
impossible to exterminate.
Vectors: Viruses are spread by insects,
mites, plants, animals, and human
vectors. Aphids, whiteflies, seeds, and
cuttings are the worst. Infected tools
also transport viruses from one plant to
another.
Prevention: Cleanliness! Always use
fresh, sterile growing medium. Disinfect
tools before cutting foliage on different
plants. Do not wound plants, and keep
other diseases and pests from wounding
plants. If you smoke, wash your hands
with disinfectant before handling plants.
DO NOT SMOKE TOBACCO prod
ucts around cannabis plants.
Leaf infected by a mosaic virus
Poorly dried and cured cannabis can smell
like ammonia.
Control: Destroy all plants infected
with virus.
Biological: none
Sprays: No chemical sprays are effective
against viruses.
Storage Fungi and Bacteria
Disease
Common names: bacteria, fungi,
viruses, gray mold, hemp cancer, brown
blight
Specific diseases that cause damping-
off include: gray mold (Botrytis
cinerea)
Sclerotinia sclerotiorum, Alternaria
alternata
Bacteria pathogenic to humans
found on cannabis include:
Salmonella muenchen, Klebsiella
pneumoniae, Enterobacter cloacae,
E. agglomerans, Streptococcus
(Group D), Thermoactinomyces Candi
das, T. vulgaris, Micropolyspora faeni,
Aspergillus fumigatus, A. mger, A. flavus,
A. tamarii, A. sulphureus, A. repens,
Penicillium chrysogenum, P. itahcum,
Rhizopus stolomfer, Alternaria alternata,
Curvularia lunata, and Histoplasma
capsulatum.
Mold soon becomes a problem when cannabis
is improperly dried and cured. These buds
were infected with mold, and the jar made a
perfect environment for growth. (MF)
Aspergillus can be killed by baking can
nabis at 150°C for 15 minutes, but only
about 15 percent is destroyed by smok
ing through a water pipe.
Threat to Dried Buds: high
Identify: Contaminated stored can
nabis is often darker, and the texture
is changed by the whitish, light-gray
fungus that becomes visible. Fungi often
appear fuzzy and you may see shades
of bluish-green and dark-green. A stale
musty “locker room” odor is often
apparent. Other times it could exude an
ammonia-like odor. If decomposition
is rapid, biological activity makes the
cannabis warm to the touch.
Damage: Storage molds and bacteria
degrade and decompose dry cannabis.
Most of the bacteria and fungi that attack
dry cannabis are only pathogens and do
not infect humans unless they suffer from
infections, allergies, or immune system
problems. When you light a joint, burning
cannabis does not kill fungus. The fungus
actually precedes the smoke entering the
body. Other contaminants arc pet hair,
human hair, dust, insect feces, residues,
and so on; some of them are highly infec
tious and others give off toxins.
www.marijuanagrowing.com
461
If any of the above screening tests is
positive, the suspect cannabis is discard
ed without identifying the contaminant.
Cause: Enclosing and storing buds before
they are completely dry can give rise to
storage fungi and bacteria. Unsanitary
contaminated tools, garden rooms, and
plants carry pests and diseases.
Prevention: Carefully cultivated and
harvested cannabis harbors a minimum
of hazardous microorganisms. Thor
oughly dry buds and leaves before stor
age. Available vacuum packing machines
are, and will inject inert nitrogen into
the storage bag when sealing. Inert ni
trogen gas takes the place of all oxygen
and prevents further decomposition.
Control: Screen for contamination before
packaging for use as medical canna
bis. Opportunistic infections pose the
greatest danger to immune-suppressed
consumers. Sterilize medical cannabis,
preferably by gamma irradiation. Baking
at low temperatures, gas-sterilizing, even
Cobalt 60 irradiation do not kill microbes
and are therefore not acceptable methods
of decontaminating dry cannabis.
Drying: Dry cannabis contains about
10 percent moisture. Storage fungi can
not live in an environment below
15 percent. Once dry, keep it dry. Avoid
damaging dry and drying cannabis. Do
not place apple or citrus peels in the
drying container; they decompose and
attract diseases.
Store dry cannabis in vacuum-sealed
containers. Opening sealed containers
reexposes cannabis to contaminants and
moisture. Be careful avoid letting the
dried cannabis absorb more moisture.
Making hash from contaminated cannabis
is common—and a bad idea. The contam
inants remain in the hash but in a con
centrated form, and microbial pathogens
and toxins are not always destroyed by
heating or other methods of sterilization.
There is no truth to the rumor that
moldy cannabis is more psychotropic.
Unlike moldy grapes, moldy cannabis is
not more potent!
Check out “What to do with a moldy
crop?” in chapter 9, Harvest, Drying &
Curing,
Contaminants
Contaminants adulterate almost all
consumed cannabis. Most of these
contaminants are harmless, such as dust,
but many of the contaminants may be
harmful especially to medical patients
with a compromised immune system.
At best, contaminants taint the taste
of cannabis. Contaminants include but
are not limited to fungi, bug bodies and
feces, sprays, pet hair, dirt and grime,
and metal flakes.
In Hayward, California, a well-known
cannabis patient with an unusual
immune disease died from repeated
exposure to the miticide called Avid.
Avid is still registered for use in the
USA on lawn and garden ornamentals
and flowers only.
Caution! DO NOT USE AVID ON
MEDICAL OR ANY CANNABIS
CROPS. It is derived from the soil
microorganism Streptomyces avermitilis,
Translaminar insecticides and miticides
penetrate the leaf tissue and remain in
the plant’s system. Avid is illegal to sell
in the USA, but it is available in Canada.
It is for ornamentals only. Avid contains
a powerful neurotoxin that is absorbed
and accumulates over time.
In the late 1970s, the US government
sprayed the herbicide Paraquat on
cannabis crops in Mexico, and more
recently in Hawaii. Paraquat and
other Drug War pesticides permeate
vegetative growth. They cause serious
health problems in humans.
Fungal or bacterial infections can
result from sloppy cultivation tech
niques. A small number of plant
pathogens remain in poorly dried and
stored cannabis. Some of these patho
gens can infect humans. Individuals
with a depressed immune system are
most at risk.
Aspergillus, a bacterial contaminant, is
found in some improperly stored canna
bis. It has been cited by organ transplant
experts as a risk to exclude a candidate
from receiving a transplant. Tim Garon
from Washington state was denied a liv
er transplant due to these consequences;
he passed away in 2008.
Controlling all cannabis for Aspergillus
and preventing its occurrence with clean
gardening and proper drying and storage
are essential. See chapter 9, Harvest,
Drying & Curing, for more information.
Gritweed is cannabis buds covered in
tiny, glasslike particles that are actually
silica. Gritweed was a big problem in the
Netherlands for a few years. It started
when the number of coffee shops was
cut in half by government policies. Find
references to gritweed in old issues of
Soft Secrets (www.softsecrets.nl).
Pest Insects and Mites
Ants
Common names: ants, piss ants, red
ants, big-headed ants, little black ants,
pavement ants
Latin names: order Hymenoptera
Garden threat: low
Identify: ants
Damage: Ants are annoying; they
spread diseases from the outdoor garden
to the indoor garden and from plant
to plant. Some species of ants “farm”
aphids, moving them from source to
source for the honeydew aphids give off.
Cause: Ants can enter a garden room
that is not sealed shut. They may be
drawn by a food source inside the gar
den room.
Prevention: If ants are entering from
outside the garden room, block their
entry with a small barrier of cinnamon,
Tanglefoot, etc.
Control: Apply as per directions for sweet
bait traps: Terro, Pic, Drax Ant Kill Gel
(sugar-feeding ants), Drax-FP (grease and
sugar-feeding ants), MAXFORCE, (cock
roach and Pharaoh ant killer—hydrameth-
ylnon). See “Ant Bait” on page 486.
Aphids
Common names: peach aphid, black
bean aphid, bhang aphid, hops aphid
Aphid species that attack cannabis
include: green peach aphid (Myzus
persicae, Homoptera: Aphididae. =
Phorodon persicae)
black bean aphid (Aphis fabae,
Momoptera: Aphididae)
bhang aphid aka hemp louse (Phorodon
cannabis, Homoptera: Aphididae. =
Aphis cannabis = Mysus cannabis, =
462
DISEASES & PESTS
www.marijuanagrowing.com
Ants farm aphids, spreading them to other
plants.
Young adult aphids, translucent with green
and brown (MF)
A
Paraphorodon cannabis, = Diphorodon
cannabis, = Aphis sativae, = Phorodon
asacola, = Capitophorus cannabifoliae,
= Semiaphoides cannabiarum)
hops aphid (Phorodon humuli)
Garden threat: Low. Aphids seldom
attack indoor plants and occasionally
infest outdoor plants.
Identify: Aphids, also called plant lice,
are about the size of a pinhead. They
are easy to spot with the naked eye, but
use a 10X magnifying glass for positive
identification. Aphids are found on leaf
undersides, branches, and buds.
Normally grayish to black, aphids can be
green to pink. In any color, aphids exude
sticky honeydew as they feed. Most
aphids have no wings, but for those that
do, their wings are about four times the
size of their bodies. Aphids give birth to
mainly live female larvae, without mat
ing, and can produce 3 to 100 hungry
larvae every day. Each female reproduces
between 40 and 100 offspring that start
reproducing soon after birth. Aphids are
most commonly found indoors when
they are plentiful outdoors.
Install yellow sticky traps near the base
of several plants and near the tops of
other plants to monitor invasions of
winged aphids, often the first to enter
the garden. As they feed, aphids exude
sticky honeydew that attracts ants that
feed on it. Ants like honeydew so much
that they take the aphids hostage and
make them produce honeydew. Look for
columns of ants marching around plants,
and you will find aphids.
Damage: Aphids suck the life-giving sap
from foliage, causing leaves to wilt and
yellow. Aphids prefer to attack weak,
stressed plants. Some species prefer
succulent, new growth, and other aphids
like older foliage or even flower buds.
Look for aphids under leaves or huddled
around branch nodes and growing tips.
This pest transports (vectors) bacteri
um, fungi, and viruses. Aphids vector
more viruses than any other source.
Destructive sooty mold also grows on
honeydew. Any aphid control must
also control ants, if they are present.
Some aphids infest flower tops, causing
buds to distort. Aphids can cause entire
plants to wilt, be stunted, and die.
Cause: Aphids enter garden rooms and
greenhouses on dirty tools, clothes,
etc. Or they are naturally present in the
garden area outdoors.
Prevention: Grow strong, healthy
plants. Inspect plants regularly for
aphids. Blast off any sign of aphids with
a heavy spray of water.
Control: Manually remove small
numbers of aphids. Spot-spray small
infestations, and control ants. Introduce
predators if problem is persistent.
Cultural and physical control: Manual
removal is easy and works well to kill
aphids. When affixed to foliage—suck
ing out fluid—aphids are unable to move
and easy to crush with fingers or spong
es dipped in an insecticidal solution.
Biological: Lacewings, Chrysoper-
la species, are the most effective and
available predators for aphids. Release
one to 20 lacewings per plant, depending
on infestation level, as soon as aphids
appear. Repeat every month. Eggs take a
few days to hatch into larvae that exter
minate aphids. Gall midge Aphidoletes
aphidimyza is available under the trade
name Aphidend; parasitic wasp Aphidius
matricariae is available commercially.
Ladybugs also work well to exterminate
aphids. Adults are easily obtained at
many retail nurseries during the summer
months. The only drawback to ladybugs
is their attraction to the HID lamp—re
lease about 50 ladybugs per plant, and at
least half of them will fly directly into
www.marijuanagrowing.com
463
the HID, hit the hot bulb, and buzz to
their death. Within one or two weeks, all
the ladybugs will fall victim to the lamp,
requiring frequent replenishment.
Verticillium lecanii (fungus)—available
under the trade name of Vertalec—is
aphid-specific and effective.
Control ants with borax. See “Boric
Acid” on page 488.
Sprays: Homemade and insecticidal soap
sprays are very effective. Apply two or
three times at five- to ten-day intervals.
Pyrethrum (aerosol) applied two to
three times at five- to ten-day intervals.
Root Aphids
Common name: root aphid
Garden threat: very high
Root aphid species that attack cannabis
include: grape phylloxera
Identify: Root aphids (grape phylloxera)
are tiny aphid-like insects that feed on
a number of plant roots. They are often
confused with fungus gnats. Oval- to
pear-shaped, phylloxera are small (0.04
inch [1 mm] long) and from yellow/
yellowish green/olive green to light- to
dark-brown or orange in color. Oval
shaped eggs are yellow. Nymphs are small
versions of adults. The majority of grape
phylloxera adults are wingless females.
Root aphids,in the genus Phemigus, are
increasingly feeding on cannabis root
systems and have become a major pest in
parts of the USA and other parts of the
world. Inspect roots by sliding the root
ball out of the container. Root aphids
are super tiny insects with legs. Aphids
colonize roots on the outside of the root
ball especially near drainage holes. They
are about the size and color of coco fiber
grains.
Damage: Phylloxera feed on roots and
rootlets, causing them to yellow from
the bottom up, swell, and turn hard.
Dead (necrotic) spots develop where
pests feed. Secondary fungi infect
wounds and often girdle roots, killing
large sections. Plants become stunt
ed, and yield diminishes substantially.
Infestations can kill plants. Damage is
easily confused with disorders caused by
nutrients, water, and so forth.
Cause: Root aphids can be introduced
Root aphids
to the garden by infested soil clones or
seedlings. They can also be carried in on
dirty tools, or fly or crawl into unfil
tered rooms. They overwinter as small
nymphs on roots. In spring when soil
temperatures exceed 60°F (15°C), they
start feeding and growing. Indoors, root
aphids are very active 24/7. When soil
temperatures fall below 60°F (15°C), all
life stages die except the small nymphs.
There are three to five generations each
year. First instar nymphs are active
crawlers and may move from plant to
plant in the ground, on the soil surface,
or by blowing in the wind. They may
also be moved between vineyards on
cuttings, boots, or equipment. Grape
phylloxera is more common near vine
yards, where they infest grape vines.
Prevention: Avoid cool, heavy clay
soils and soils in grape-growing regions
that are infested with grape phylloxera.
Avoid overfertilization with nitrogen.
Use sticky yellow traps to monitor
flying adults.
Pesticide treatment will not eradicate
phylloxera populations; even if much
of the phylloxera is killed, populations
often rebound quickly.
Control: Once the garden is infested,
root aphids are hard to dispatch. A
multipronged approach may be necessary
to completely break their life cycle. A
strong drench such as BotaniGard slows
root aphids down, followed by releases
of predatory nematodes {Heterorhabditis
bacteriophora), which helps ensure that
they are all killed and eaten!
BotaniGard is an insecticide that is
composed of a living fungus, Beauveria
bassiana. This fungus seeks out aphids
and infects them, causing death. Then it
releases spores, waiting for more victims.
It also works to control whiteflies and
thrips. You can order it at many garden
stores or through garden websites on the
Internet.
Neem oil and citrus oil have also been
used to kill aphids, but they sometimes
affect plant roots. Test them on a sample
plant before using either of them in the
garden.
The aphids should be treated every other
day with a minimum of six treatments.
Rotate the insecticides.
BotaniGard can be combined with
pyrethrum. The neem and citrus oils
can be mixed with each other as well as
with pyrethrum. The idea is to totally
eliminate the pests.
Predatory nematodes {Heterorhabditis
bacteriophora) are super effective and
easy to use. The best part about using
the nematodes is that they will kill all of
the little root aphids!
Once aphids are gone, it is difficult for
them to re-infect the garden. They were
probably introduced to the garden by a
new element such as a clone or infected
planting mix.
Bees and Wasps
Garden threat: none
Bees (Anthophila, more than 20,000
known species)
Wasps (order Hymenoptera and suborder
Apocrita)
Hornets (order Hymenoptera, family
Vespidae, genus Vespa)
Identify: Bees and wasps that sting are
usually from a half-inch (1.3 cm) to more
than an inch (2.5 cm) long. Many have
yellow stripes around their bodies; others
have none. They are especially attracted
to indoor gardens when weather cools
outdoors. They move right in.
They have many names and manifesta
tions. For example, in Alabama there
are four wasps that sting: red, red-faced,
small red, and black. Also, there are two
hornets, one that builds big nests and
has a bald or white face. European wasps
also make appearances.
Note: Many beelike insects are beneficial.
See “Beneficial Insects” in this chapter.
464
DISEASES & PESTS
www.marijuanagrowing.com
Sticky yellow traps are kept in place to
monitor insect populations.
Green lynx spider attacking a bee (MF)
This unknown beetle was captured in
Alabama and measures nearly two inches
(5 cm) in length!
• Attractant lasts for weeks
• Double-chambered design prevents escape
• Durable construction holds up for seasons
• Used by major U.S. parks, zoos, resorts,
campgrounds & school districts
• 10 -week attractant cartridge available
Wasp traps keep wasps in check and work well
to monitor activity
Damage: No damage to plants but can
become a nuisance in garden rooms—
they hurt like hell when they sting!
Cause: Bees and wasps occur in garden
areas during spring, summer, and au
tumn in most climates but can be active
in winter in warm climates.
Prevention: Exclude from garden rooms
and greenhouses with screens and traps.
Control: Bees and wasps are occasion
ally a problem indoors and are most
efficiently controlled with sprays.
Cultural and physical control: They
enter garden rooms through vents and
cracks, and are attracted by the growing
plants, a valuable commodity in the mid
dle of a cold winter! Screen all entrances
to the room. Install more circulation
fans to make flying difficult. Wasp traps,
sweet flypaper, and Tanglefoot impair
these pests. Bees and wasps are also
attracted to the hot HID and fly into it
and die.
Biological: unnecessary
Sprays: Pyrethrum is recommended.
Stuff small nests into a wide-mouthed
jar—do it at night when the wasps are
quiet—and place the jar in a freezer for
a few hours. Use Sevin (carbaryl) only
if there is a problem with a wasp nest.
Use wasp and hornet sprays to control
as well, but DO NOT allow the spray to
get on plants, as it will damage the plant
tissue.
Beetles
Common names: beetles, black beetles,
ground beetle, stink beetles, flea beetles
Beetle species that attack cannabis
include: beetle (order Coleoptera)
hemp flea beetle (Psylliodes attenuate,
Coleoptera: Chrysomelidae. = Haltica
attenuata, = Phylliodes japonica> =
Psylliodes apicalis)
tarnished plant bug (Lygus lineolarisy
Hemiptera: Miridae)
click beetle (family Elateridae)
Japanese beetle (Poptllia japonica,
Coioptera: Scarabaeidae)
Garden threat: low
Identify: Beetles are a large family,
and their larvae and grubs often act as
borers. Typically, beetles have two pairs
of wings: the front pair is hard and shell
like to protect the wings below, which
ate used to fly. A ladybug (ladybird
beetle) is a good example.
Damage: Beetles larvae infest soil and
eat roots. They also eat tender plant
tips. This mutilates, deforms, and stunts
plants. Diseases enter the wounds.
Hemp flea beetles feed on seedling and
clone foliage. Stalks and stems can be
infested by European corn borers and
hemp borers, weevils, and an assortment
of grubs and borers that love stems.
Cause: Contaminated tools and plant
material and an unsterile indoor garden
or garden area can lead to beetle infesta
tions. Outdoors, borers’ eggs could be
present in the soil or could come from
adjacent plants.
Prevention: Keep indoor garden area
clean. Use sterile growing medium.
Exclude beetles from garden. Outdoors,
till soil and keep adjacent garden area
clean.
Control
Biological: Control wireworms with
beneficial nematodes (Heterorhabidis
and Steinernema spp.) . Control tarnished
plant bugs with predatory spined soldier
bug (Podisus spp.) .
Borers
Garden threat: outdoors medium,
seldom seen indoors
Borer species that attack cannabis
include: European corn borer (Ostrin-
ia nubilalisy Lepidoptera: Pyralidae. =
Pyrausta nubilalis, = Botys silaceahs)
hemp borer (Grapholita deltneana,
www.marijuanagrowing.com
465
Lcpidoptera: Olethreutidae. = Cydia
delineana, — Laspeyresia delineana, =
Grapholita siriana, = Cydia smand)
common stalk borer (Papaipema nebris,
Lcpidoptera: Noctuidae. = P. nieta)
Identify: Many boring insects are
members of several families that include
boring larvae, grubs, minors, maggots,
and so forth that tunnel or bore into
stems, foliage, and roots. At one stage in
their lives they could turn into beetles,
caterpillars, or moths of many shapes,
colors, and sizes. Look for their entry
hole and dead growth on either side of
the entry hole along the main stem, often
discolored and accompanied by sawdust.
Borers are more common outdoors than
indoors. Borers are more common in
areas where industrial hemp is growing.
Borers have accounted for serious crop
loss in Europe.
Many borers are able to produce three
to five generations per year that flourish
in temperatures above 60°F (15.6°C).
Borers overwinter in the soil and emerge
the following year. Disrupting the life
cycle is the best long-term control. Some
borers spin cocoons.
Damage: Tunnels and burrows inside
stems, foliage, and roots curtail fluid
flow and cause plant parts to wilt. If
borer damages the main stem severely,
fluid flow to the entire plant could stop,
causing death. Wounds and feces attract
moisture, disease, and infections. Hemp
borers have a ravenous appetite and can
destroy flowering tops and cannabis
seeds.
Cause: Outdoors, borers are in the soil
and in agricultural crops and roses,
among other ornamentals and vegeta
bles. Though seldom a problem indoors,
borers occasionally attack outdoor crops.
Prevention: Seldom a problem indoors.
Bait with Bt {Bacillus thuringiensis) to
prevent and kill borers. Watch for bee
tles and moths that lay borer eggs.
Controls: Borers can be fought with 50
percent methyl parathion (0.5 oz [14.8
ml]) for 1,000 square feet (9.3 m2). After
harvesting, the stubble and waste stalks
should be burned, and the field plowed.
Cultural and physical control: Hand
pick all beetle grubs. Borers often cause
so much damage on a particular stem
that it has to be removed and destroyed.
Sprays: Bacillus popilliae is specific to
beetles or rotenone individually injected
into stems.
Biological: Several mixes of beneficial
nematodes control these borers in soil.
Biological Control: The wasp
Trichogramma evanescens Westwood,
Hymenoptera species of parasites and
predators prey on Grapholita delineana.
Caterpillars and Loopers
Caterpillar species that attack
cannabis include: silver moth
(Autographa gamma, Lepidoptera:
Noctuidae. = Plusia gamma, =
Phytometra gamma) dot moth
(Melanchra persicariae, Lepidoptera:
Noctuidae. = Polia persicariae, =
Mamestra persicanae) cabbage moth
(Mamestra brassicae, Lepidoptera:
Noctuidae. = Barathra brassicae)
garden tiger moth (Arctia caja,
Lepidoptera: Arctiidae)
common hairy caterpillar (Spilosoma
obliqua, Lepidoptera: Arctiidae. =
Diacrisia obliqua)
beet webworm (Loxostege sticticalis,
Lepidoptera: Pyraustinae. = Phlyctaenodes
sticticalis)
corn earworm moth (Helicoverpa zed)
chrysanthemum webworm (Cnephasia
interjectana, Lepidoptera; Tortricidae. =
Cnephasia virgaureana)
death’s-head moth (Acherontia, atropos,
Lepidoptera: Sphingidae. = Sphinx
atropos)
Garden threat: low indoors, high
outdoors and greenhouses
Caterpillars and loopers leave
plenty of droppings on the plant.
The droppings accumulate between
buds. Droppings fall out when the
buds are hung to dry; inspect
Borers live inside stems.
Caterpillar populations can explode. The little
worms eat more than their body weight in
foliage every day.
Sticky yellow traps are kept in place to
monitor insect populations.
466
DISEASES & PESTS
www.marijuanagrowing.com
This beautiful caterpillar is able to munch
down many leaves in a single day!
Look closely at the left side of the photo and
you will see a corn earworm disguised as part
of the resinous foliage. (MF)
This moth lays the eggs that hatch into the
(cannabis) corn ear worms. Always keep an
eye out for this moth in your garden! (MF)
below the hung buds to find the
droppings.
Caterpillars turn into moths or butterflies
and fly away. Some transform quickly and
fly; others take longer to migrate. Cater
pillars have a peak occurrence and can be
planned for, in most instances. They may
complete a life cycle and do it again, but
most typically they develop slower and
pupate or lay eggs that overwinter. Some
do so as a larva. They will also move like
armyworms.
Identify: From a half-inch to four
inches long (1.3 -10.2 cm), caterpillars
and loopers are cylindrical with feet,
often green, but can be virtually any
color from white to black. Caterpillars
have sets of feet the entire length of the
body, while loopers have two sets of
feet at either end of the body. Loopers
place their front feet forward, arch their
body upward in the middle, and pull
their rear set of legs forward. Some have
stripes, spots, and other designs that
provide camouflage. Seldom a problem
indoors, caterpillars and loopers are in a
life stage—between a larva and a flying
moth or butterfly—and are most com
mon when prevalent outdoors. One way
to check for caterpillars and loopers is to
spray one plant with pyrethrum aerosol
spray and shake the plant afterward. The
spray has a quick knockout effect, and
most caterpillars will fall from the plant.
Caterpillars are problems primarily for
outdoor growers. Caterpillars eat floral
clusters from the inside out, and their
activities provide a vector for a pervasive
cannabis fungal disease.
Leaf-eating caterpillars spend most
of their time on leaves. They often
manipulate leaves before eating them;
their feeding habits include eating small
sections of leaf in between leaf veins, or
eating large chunks of leaf outright.
Damage: These munching critters chew
and eat pieces of foliage and leave telltale
bites in leaves. Some caterpillars will roll
themselves inside leaves. An infestation
of caterpillars or leafhoppers will dam
age foliage and slow growth, eventually
defoliating, stunting, and killing a plant.
Cause: Untilled soil outdoors around
and in garden area. Eggs overwinter in
soil and are often killed by tilling. Ad
jacent plants attract or have caterpillars
and their eggs.
Prevention: Bait with Bt (Bacillus
thuringiensis) before caterpillars are
normally out.
Control: Shake plants several times a
day to dislodge the insects. Preventive
sprays containing insecticidal soaps and
organic toxins can be used selectively
during vegetative cycle, but extreme care
must be taken during floral cycle.
Cultural and physical control: Manually
remove.
Biological: Trichogramma wasps, spined
soldier bug (Podisus maculiventris,
Podibug).
Sprays: Pyrethrum aerosol works great!
Homemade spray/repellent, hot pepper
and garlic, Bt, pyrethrum, rotenone, and
neem products.
Crickets
Common names: crickets, field crick
ets, house crickets, mole crickets, tree
crickets
Cricket species that attack cannabis
include: family Gryllidae (Gryllus
desertus, Gryllus chinensis)
mole cricket (Gryllotalpa gryllotalpa,
Gryllotalpa hexadactyla)
tree cricket (Oecanthus indicus)
Garden threat: low
Identify: There are more than 900 spe
cies of crickets. They range in size from
0.6 to 1 inch (15-25.4 mm). Crickets
have somewhat flattened bodies and long
antennae. Generally nocturnal, crickets
may be confused with grasshoppers
that have similar (jumping) hind legs
and body structure. The familiar chirp
(stridulation) of crickets is produced
predominately by males. Crickets are
found in moist areas and climates and are
known to frequent gardens, especially
around water sources, singing their song
on warm summer nights.
Crickets are omnivorous scavengers.
They eat decaying plant material, fungi,
and tender seedling plants. Crickets lay
eggs in the fall that hatch in the spring.
A single female can lay up to 200 eggs.
Damage: Crickets eat young seedlings
and emerging plants.
Cause: Crickets are common in humid
conditions in (tropical) warm weather
and during hot summers.
Prevention: Keep crickets outdoors!
Drive them away from greenhouses by
cleaning the perimeter. They have many
food sources and seldom attack cannabis.
Cutworms
Common names: beet armyworm, black
cutworm, cabbage moth, common cut
worm, paddy cutworm
www.marijuanagrowing.com
467
Cutworms live near the base ofa plant.
Cutworm species that attack cannabis
include: black cutworm (Agrotis
ipsilon Lepidoptera: Noctuidae. =
Euxoa ypsilori)
paddy cutworm (Spodoptera litura
Fabricius, Lepidoptera: Noctuidae. =
Prodenia litura Fabricius}
beet army worm (Spodoptera exigua^
Lepidoptera: Noctuidae. = Laphygma
exigua)
claybacked cutworm (Agrotis gladiaria,
Lepidoptera: Noctuidae)
common cutworm (Agrotis segetum,
Lepidoptera: Noctuidae. = Euxoa
segetum)
Bertha armyworm (ALzmesfra configurata,
Lepidoptera: Noctuidae)
Garden threat: low
Identify: Cutworms are larvae of other
pests that are in the soil during a stage
of their life. Cutworms are larvae that
eat the base of the stem and cut off
the plant. They come in many shapes
and sizes. Cutworm larvae have a big
appetite and will devour seeds, sprouted
seeds, and seedlings. They must become
strong to transform into moths or but
terflies. Once plant roots and stems are
stronger and tougher, cutworms are less
of a threat. Cutworms rarely find their
way into an indoor garden. Outdoors
they are most common in backyard
gardens and in greenhouses where plants
grow in the ground.
Damage: Cutworms dine on emerging
plants and seedlings, ultimately killing
them. Often small plants emerge for a
few days and the roots are eaten by a
cutworm.
Cause: untilled soil that contains
cutworm eggs
Prevention: Till soil or use new soil.
Control: Bt bait mixed in soil
Grasshoppers
Common names: two-spotted grass
hopper, clear-winged grasshopper, citrus
locust. (I always call them saltamontes,
Spanish for grasshopper.)
Grasshopper species that attack can
nabis include: Melanoplus bivittatus,
Chloealtis conspersa, Camnula pellucida,
Zonocerus elegans, Chondracris rosea
Garden threat: low
Identify: Grasshoppers and locusts pose
little threat to cannabis crops unless large
swarms of the pests arrive. Some years
there are plagues of grasshoppers, and lo
custs swarm and migrate, eating all plants
in sight. They are easy to identify and
come in many sizes. With long, folded
legs, grasshoppers are built to bound long
distances. They are occasionally problem
atic outdoors. Grasshoppers stay around
only for a short period of time and move
on. Grasshoppers are best handpicked
from your plants if you wish to control
them. Birds also eat grasshoppers.
Damage: Very little damage to leaves.
Seldom will swarms of locusts appear
and eat all foliage in sight.
Cause: You let them into your indoor
garden room. Outdoors, grasshoppers
have a free range and cause little damage.
Prevention: none needed
Control
Biological: Encourage birds in your
garden. Handpick grasshoppers with
nimble fingers.
Leafhoppers
Common names: Leafhopper, green
house leafhopper, spittlebug,
Leafhopper species that attack
cannabis include: (family Cicadellidae)
Zygina (Erythroneura) pallidtfrons,
Graphocephala cocanea, Empoasca fabae,
Empoasca flavescens, Philaenus spumarius,
Bothrogonia ferruginea, Stictocephala
bubalus
Garden threat: low indoors, high out
doors and greenhouses
Identify: Leafhoppers include many
small, 0.125 inch (3.2 mm) long, wedge-
shaped insects that are usually green,
white, or yellow, but some are larger
and look like green grasshoppers with
leafs for wings. They can move very fast.
Many species have minute stripes on
wings and bodies. Their wings peak like
roof rafters when not in use. Leafhoppers
suck plant sap for food and exude sticky
honeydew as a by-product. Spittlebug
and leafhopper larvae wrap themselves
in foliage and envelop themselves in a
saliva-like liquid, plant sap. They can be
serious pests, especially the glasshouse
leafhopper (Zygina pallidifrons).
Damage: Leafhoppers cause stippling
Grasshoppers are normally not attracted to
cannabis. But if they get hungry, grasshoppers
will eat anything! (MF)
7 here are many, many different species oj
grasshoppers. (MF)
The leafhopper on the left-hand side oj the
photo blends in with the foliage. (MF)
DISEASES & PESTS
www.marijuanagrowing.com
(spotting) on foliage, similar to that
caused by spider mites and thrips.
Leaves and plant lose vigor, and in severe
cases death could result.
Cause: Eggs come in via unclean garden
practices. Adults enter via the front
door, cracks, or holes in garden rooms.
Outdoors, this pest has free range.
Prevention: Cleanliness! Screen win
dows and use hygienic control.
Cultural and physical control: Black
light traps are attractive to potato
beetles.
Biological: The fungus Metarhizium
anisopliae is commercially available
under the trade name Metaquino.
Sprays: pyrethrum, rotenone, sabadilla
Leaf Miner
Common name: leaf miner
Leaf miner species that attack cannabis
include: (family Agromyzidae) Liriomyza
(Agromyza) strigata, Phytomyza horticola,
Agromyza reptans, Liriomyza eupatorii,
Liriomyza cannabis
Garden threat: very low
Identify: Adult leaf miner flies lay eggs
that hatch into one-eighth-inch (0.25
mm) long green or black maggots. You
seldom see the maggots before you see
the leaf damage they create when they
tunnel through leaf tissue. Leaf miners
are more common in greenhouses and
outdoors than indoors.
Damage: The tiny maggots burrow
between leaf surfaces, leaving a telltale
whitish-tunnel outline. The damage
usually occurs on or in young supple
growth. It is seldom fatal, unless left
unchecked. Damage causes plant growth
to slow, and if left unchecked, flowering
is prolonged and buds are small. In rare
cases the damage is fatal. Wound damage
encourages disease.
Cause: These little pests fly in through
the door and are often abundant out
doors.
Prevention: Little prevention is neces
sary because they pose little threat to
the garden.
Controls: Leaf miners cause little prob
lems for indoor crops. The most effi
cient and effective control is to remove
and dispose of damaged foliage, which
includes the rogue maggot, or to use
Leaf miners burrow between the surfaces of
foliage, leaving telltale channels.
the cultural and physical control listed
below.
Cultural and physical control: Smash
the little maggot trapped within the leaf
with your fingers. If the infestation is
severe, smash all larvae possible and
remove severely infested leaves. Compost
or burn infested leaves. Install yellow
sticky traps to capture adults.
Biological: braconid wasp (Dacnusa
sibinca), chalcid wasp (Diglyphus isaea),
parasitic wasp (Opius pallipes)
Sprays: Repel with neem oil and
pyrethrum sprays. Maggots are protect
ed within tunnels, and sprays are often
ineffective. Hemp Diseases and Pests
suggests to water plants with a 0.5
percent solution of neem. This solution
works fast and stays on plants for four
weeks after application.
Fungus Gnats
Fungus gnat species that attack canna
bis are from two families: Mycetophili-
dae and Sciaridae.
Garden threat: medium
Identify: Winged adult gnats are gray
to black, long-legged flies with wings.
Related to crane flies that also infest
soil and root zones, fungus gnats are
also called “sciarid flies” or “sciarids.”
Adults measure 0.06 to 0.125 inches
(1.5-3.2 mm) long. Spot flies scurrying
near plant bases and on growing media
or foliage. Females deposit eggs in moist
growing media.
White to transparent larva with black
heads feed on both dead and living plant
tissue, including roots. Maggots (larvae)
grow to 0.16 or 0.2 inches (4 or 5 mm)
long. Fungus gnats are long with long
legs. Look for them around the base of
plants in soil and soilless gardens. They
love the moist, dank environments in
rockwool and the environment created
in NFT-type hydroponic gardens. Adult
females lay about 200 eggs every week to
ten days.
Fungus gnats are believed to spread
plant disease pathogens in the media, so
gbod control is important.
Damage: Fungus gnats infest growing
mediums and roots near the surface.
They can eat fine root hairs and scar
larger roots when in large numbers and
food is scarce, causing plants to lose vig
or and foliage to turn pale. Fungus gnat
damage can penetrate roots and stems
when severe. Root wounds invite wilt
fungi like Fusarium or Pythium, espe
cially if plants are nutrient-stressed and
growing in soggy conditions. Maggots
prefer to consume dead or decaying,
s°ggy plant material; they also eat green
algae growing in soggy conditions.
Adults and larvae can get out of control
quickly, especially in hydroponic systems
with very moist growing mediums. The
adult gnats stick to resinous buds like
flypaper! The gnats are very difficult to
clean from the buds.
Cause: Overly moist overfertilized soil
or growing medium rich in organic
nitrogen and green algae growth attract
fungus gnats.
Prevention: Keep garden room, tools,
supplies, and yourself clean. Do not
overwater or overfertilize. Do not let
green algae grow on substrate surface.
Lower the humidity in the room. Cover
air intakes with fine screens. Monitor for
fungus gnat presence with yellow sticky
traps set out at the base of plants.
Controls: The easiest control for these
pests is with Vectobac, Gnatrol, or Bac-
timos—all contain Bacillus thuringiensis
www.marijuanagrowing.com
469
Fungus gnats often go unnoticed. A yellow
sticky trap placed near substrate or above
plant canopy helps monitor their presence.
*
*
Z
1
77
A close-up view of this yellow sticky trap
reveals a fungus gnat infestation.
Mealybug (MF)
Mealybug eggs (MF)
var. israelensis (Bt-i). This strain of Bt
controls the maggots; unfortunately, it
is available only in one-gallon (3.8 L)
containers. It is difficult to find at garden
centers; check hydroponic stores.
Azadirachta (neem tree) kinoprene,
difubenzuron, or cyromazine can also
be effective.
Gnatrol controls larvae, but it must be
specific to gnats and not for caterpillar
control.
Cultural and physical control: Do not
overwater. Keep ambient humidity low.
Do not let growing medium remain
soggy. Cover growing medium so green
algae will not grow. Yellow sticky traps
placed horizontally one to two inches
(2.5 -5.1 cm) over growing medium
catch adults.
Biological: Bt-i works best. Alternatives
include the predatory soil mite Hypoas-
pis (Geolaelaps mites) and the nematode
Steinernema feltiae.
Heavy-duty chemical controls include
heavy soil drenches with malathion,
acephate, or diazinon.
Pyrethrum (pyrethroids) works some
what effectively, but repeat applications
are necessary.
Gnats can be killed by disturbing or
heating soil, by predatory wasps, and by
applying insecticidal soap, neem, rote
none, or garlic oil to gnat infestations. It
is best to control gnats proactively.
Sprays: Apply neem or insecticidal soap
as a soil drench.
Mealybugs
Garden threat: medium
Mealybug species that attack cannabis
include: long-tailed mealybug
Pseudococcus longispinus
Identify: Somewhat common indoors,
these 0.08 to 0.2 inch (2-5 mm) oblong,
waxy-white insects move very little,
mature slowly, and live in colonies that are
usually located at stem joints. Like aphids,
mealybugs excrete sticky honeydew.
Damage: Mealybugs suck sap from
plants, slowing plant growth. They leave
sticky honeydew in their wake, which
attracts sooty mold and draws ants that
eat the honeydew.
Cause: Mealybugs can be brought into the
garden on contaminated plants or as the
result of an unclean garden and surround
ing garden area. Humans and animals
transfer this pest at the crawler stage.
Prevention: Little damage is caused by
these pests, and they are seldom present
in clean garden rooms. Outdoor and
greenhouse growers must keep gardens
clean and tidy to avoid infestations.
They are most problematic during mid
to late summer.
Control: Manual removal is tedious but
very effective. Wet a Q-Tip in rubbing
alcohol and wash scale away. A small
knife, fingernails, or tweezers may also
be necessary to scrape and pluck the
tightly affixed mealybugs and scales
after they are treated with alcohol.
Biological: There are numerous species
of mealybugs. Each has natural pred
ators, including species of ladybeetles
TAzs photo of a Hibiscus mealybug was taken
on an infested 'Haze'plant. Males have wings
and are not stationary. Nymphs move and
are known as crawlers. An immature female,
pictured above, reaches maturity in a few
weeks. {MF)
DISEASES & PESTS
www.marijuanagrowing.com
Scale on cannabis stem (MF)
This little scale is living on the surface ofa
leaf
This colony of scale is living on the plant stem.
They spread fast!
(ladybugs) and parasitic and predatory
wasps. There are so many species of each
that it would be exhaustive to list them
here. For more specific information, see
Hemp Diseases and Pests,
Sprays: Homemade sprays that contain
rubbing alcohol, nicotine, and soaps
all kill these pests. Insecticidal soap,
pyrethrum, and neem oil are all recom
mended.
Scale
Common names: Scale
Scale species that attack cannabis
include: cottonycushion scale (Icerya
purchasi)
European fruit lecanium
(Parthenolecanium corni)
hemispherical scale (Saissetia coffeae)
white peach scale (Pseudaulacaspis
pentagona)
Garden threat: low to medium
Identify: Scale looks and acts similar
to mealybugs but is usually more round
than oblong. Scales may be white,
yellow, brown, gray, or black. Their
hard protective shell is 0.08 to 0.15 inch
(2-3.8 mm) across. Once established,
mealybugs and scale rarely or never
move. Check for them around stem
joints where they live in colonies. Scales
sometimes excrete sticky honeydew.
Damage: These pests suck sap from
plants, which causes growth to slow.
They also exude sticky honeydew as a
by-product of their diet, which encour
ages sooty mold and draws ants that eat
the honeydew.
Cause: Scale can be brought into the
garden on contaminated plants or as
the result of an unclean garden and
surrounding garden area. Humans and
animals transfer this pest on dirty tools,
clothes, and so on.
Prevention: Keep garden and surround
ing area clean. Do not bring in infested
plants.
Controls: These pests present little
problem to indoor growers. The easiest
and most efficient control is listed under
"Cultural and physical control” below.
Cultural and physical control: Man
ual removal is somewhat tedious but
very effective. Wet a Q-Tip in rubbing
alcohol and wash scale away. A small
knife, fingernails, or tweezers may also
be necessary to scrape and pluck tightly
affixed mealybugs and scales after they
are treated with alcohol.
Biological: There are numerous spe
cies of mealybugs and scales. Each has
natural predators, including species of
ladybeetles (ladybugs) and parasitic and
predatory wasps. There are so many spe
cies of each that it would be exhaustive
to list them here. For specific informa
tion, see Hemp Diseases and Pests,
Sprays: Homemade sprays that contain
rubbing alcohol, nicotine, and soaps
all kill these pests. Insecticidal soap,
pyrethrum, and neem oil are all recom
mended.
Nematodes
Common names: root-knot nematode,
stem nematode, nematodes, needle
worm, eelworm
Nematode species that attack cannabis
include: cyst (Heterodera humuli
Filipjev, H. schachtii Schmidt)
needle (Paralongidorus maximus
(Butschli) Siddiqi = Longidorus
maximus (Butschli) Th. et Swang)
root-knot (Meloidogyne incognita
(Kofoid &White) Chitwood,
M. javanica (Treub) Chitwood)
stem (Ditylenchus dipsaci (Kuhn)
Filipjev)
Garden threat: low to medium
Identify: Of the 15,000 of species of
microscopic nematodes, only a few are
destructive to plants, including cannabis.
Most often nematodes attack roots and
are found in the soil; however, a few nem
atodes attack stems and foliage. Big ones
are sometimes called eelworms. Others,
called needle worms, can be seen only
under a microscope. Root nematodes can
often be seen in and around roots with
the help of a 30X microscope. Often
growers just diagnose the damage caused
by destructive nematodes rather than
actually seeing them. Do not confuse
nematode symptoms with nematode
attacks. If plants already have adequate
water and nutrients, be sure to check for
nematodes.
Damage: Slow growth, leaf chlorosis,
wilting for several hours during daylight
hours from lack of fluid flow—symp
toms can be difficult to discern from ni
trogen deficiency. Root-knot nematodes
are some of the worst. Root damage is
evidenced by swollen knots and galls.
Lesion nematodes make reddish brown
wounds and cause leaf yellowing when
they scrape stems. Cut and scraped roots
are compounded by fungal, viral, and
bacterial attacks. Roots turn soft and
mushy. Bad nematodes attack both hy
droponic and soil gardens. Stem nema
todes live aboveground, attacking foliage
that then swells and yellows. Foliage
later distorts and plants are stunted.
Cause: Nematodes spread from soil to
hydroponic gardens in the wind and on
www.marijuanagrowing.com
471
Root-knot nematodes cause growth to slow
dramatically. Roots develop nodules and
have a difficult time drawing in water and
nutrients.
equipment, pets, and people. Fungus
gnats and their larvae also transport and
spread nematodes. Unsterile, infected
soil and water also carry nematodes.
Prevention: Do not raise seedlings in
soil and transplant to hydroponics.
Control: In soil, control with fumiga
tion; in hydroponics, clean the system.
Remove and destroy all plant material
and growing medium. Disinfect and
sterilize garden room with bleach.
Cultural and physical control: Clean
liness! Use new, sterilized potting soil
or soilless mix to exclude nematodes’
entrance. Nematodes rarely cause prob
lems indoors in clean garden rooms.
Biological: French marigolds (Tagetes
patula) repel soil nematodes, as does the
fungus Myrothecium verrucaria. trade
name DiTera ES).
Sprays: Neem used as a soil drench.
Root Maggots
Common names: Root maggots,
seedcorn maggot
Root maggots ate this root down to a point.
The little maggots consumed all the tender
root hairs.
Root maggot species that attack
cannabis include: seedcorn maggot
(Delia platura)
cabbage maggot (Delia radicum)
Garden threat: low to medium
Identify: Both the seedcorn maggot
and the cabbage maggot attack cannabis
roots. The seedcorn maggot is 1.5 to 2
inches (3.8-5 cm) long. The seedcorn
maggot converts into a fly that is a bit
smaller than a common housefly. Cab
bage maggots are 0.3 inch (0.8 cm) long,
and the adult fly is bigger than a house
fly. These pests winter over in unclean
soil. In the spring they emerge as adult
flies and soon lay eggs in the soil at the
base of young plants. The squirmy, whit
ish larvae hatch several days later with a
ravenous appetite.
Damage: Root maggots chew and bur
row into stems and roots. The seedcorn
maggot attacks seeds and seedling roots.
Cabbage maggots attack roots, leaving
hollowed-out channels and holes in larg
er roots. Both maggots destroy small,
hairlike feeder roots. Wounds made by
root maggots also foster soft rot and
fungal diseases.
Cause: unsterile soil or growing medium
Prevention: Cleanliness! Use fresh,
new, store-bought soil when planting in
containers. Cover seedlings with Agr
onet to exclude flies, and plant late in the
year to avoid most adult flies. Place an
18-inch (45.7 cm) collar of foam rubber
around the base of the plant to exclude
flies.
Cultural and physical control:
Biological: Control with nematodes
Steinernema feltiae or Heterorhabditis
bacteriophora.
Sprays: Kill root maggots with neem and
horticultural oil used as a soil drench.
Seed Maggots
Common names: seed maggots, seed
worms
Species that attack cannabis seeds
include: Delia platura
Garden threat: low to medium
Identify: Several species of mites, (fly)
maggots, and weevils attack stored seed.
Once established, these pests are diffi
cult to destroy.
Damage: Pests burrow into seeds and
eat seeds and sprouted seeds.
Cause: contaminated seeds, pests
already in the storage container, or pests
allowed to enter seed storage area
Prevention: Mechanical damage of
hempseed stimulates the breeding of
mites.
Control: fungitoxic preparations (i.e.,
Panogen and Aldogen)
The miticide Cinnamite (cinnamalde-
This minute nematode is entering a root to
suck the life from the plant!
Root maggots are found in and around roots
Seed maggots are relatively uncommon in
cannabis seeds.
DISEASES & PESTS
www.marijuanagrowing.com
Snail damage
Slugs leave a slimy trail and can be a big
problem in moist climates.
Deadline stays on the soilfor weeks.
hyde), produced by Mycogen, is very
effective.
Tyrophagus mites can be controlled by
seed treatment.
See “Cutworms” and “Crickets” in this
chapter.
Slugs and Snails
Slug and snail species that attack
cannabis include: (gastropods from the
Mollusk phylum) Agriolimax species,
Arion species, Helix asp ersa, Deroceras
reticulatum
Garden threat: high for tender seed
lings, low as plants mature
Identify: Slugs and snails are soft and
slimy white, dark, or yellow, occasion
ally striped. They are 0.25 to 3 inches
(0.6-7.6 cm) long. Snails live in a circular
shell; slugs do not. Slugs and snails hide
by day and feed at night, leaving a slimy,
silvery trail of mucus in their wake.
They lay translucent eggs that hatch in
about a month. Slugs and snails repro
duce prolifically, and the young mollusks
often eat relatively more than adults.
Damage: Slugs and snails make holes in
leaves, often with a weblike appearance.
They will eat almost any vegetation,
roots included. These creatures winter
over in warm, damp locations in most
climates. Slugs and snails especially like
tender seedlings. They will migrate to
adjacent gardens in quest of food.
Cause: Snails and slugs overwinter in
the soil and garden debris. They are
distributed in unsterile soil and garden
residue.
Prevention: Till garden soil and soil
around garden perimeter to disrupt life
cycle. Use clean tools and soil.
Control
Cultural and physical control: A clean,
dry perimeter around the garden will
make it difficult for slugs and snails to
pass. Spotlight and handpick them at
night. A thin layer of lime, diatomaceous
earth, or salty beach sand about two to
six inches (5-15 cm) wide around indi
vidual plants, beds, or the entire garden
will present an impassable barrier. The
lime is not thick enough to alter soil
pH, yet it will repel or dissolve pests.
To trap, attach short one-inch (2.5 cm)
feet on a wide board and leave it in the
garden. The pests will seek refuge under
the board. Pick up the board every day
or two, and shake the slugs off and step
on them. Poisonous baits usually have
metaldehyde as a base. Confine the bait
to a slug hotel. Cut a 1 X 2-inch (2.5-5
cm) slot in a covered plastic container
to make a slug and snail hotel. Place slug
and snail bait inside the hotel. The hotel
must keep the bait dry and off the soil.
In a slug hotel, none of the poison bait
touches the soil, and the bait is inacces
sible to children, pets, and birds. Place
slug and snail hotels in out-of-the-way
This gardener tossed snails into a bucket every
time he found one. He fed the snails cornmeal
for a week and sauteed them in garlic cannabis
butter.
places. Natural baits include a mix of jam
and water and beer. If using beer, it must
be deep enough to drown mollusks.
Biological: The predatory snail Rumina
decollata—available commercially—is
yet another way to combat plant-eating
slugs and snails.
Sprays: Young slugs and snails are not
attracted to bait; spray for young at
night or early morning with a 50 percent
ammonia-water solution. After an hour,
rinse off solution with water.
Spider Mites
Spider mite species that attack can
nabis include: two-spotted spider mite
(Tetranychus urticae, Acari: Tetrany-
chidac. = Tetranychus bimaculatus, =
Tetranychus telarius = Epitetranychus
althaea)
www.marijuanagrowing.com
473
Slug and snail bait is an option for outdoor
gardens.
Spider mites stippled this leaf
Spider mites have covered this male branch of
flowers with webbing. They are congregating
at the top of the plant because it is dead, and
they do not know where to go!
carmine spider mite (Tetranychus
cinnabarinus. Acari: Tetranychidae. =
Tetranycbus telarius)
hemp russet mite (Aculops cannabicola.
A. (Vasates) cannabicola, Acari: Erio-
phyidae)
oriental mite (Eutetranychus orientalist)
privet mite (Brevipalpus obovatus. Acari:
Tenuipalpidae, Brevipalpus rugulosus')
ta ma mite (Typhlodromus cannabis.
Acari: Phytoseiidae)
Garden threat: common in all garden
rooms, especially untidy rooms
Identify: Find microscopic spider
mites on leaf undersides, sucking away
life-giving fluids. To an untrained naked
eye, the 0.04-inch (1 mm) mites are hard
to spot. Early infestations produce little
visible evidence. Spider mites appear as
tiny specks on leaf undersides; however,
their telltale signs of feeding—yellow-
ish-white spots, stippling on the tops
of leaves—are easy to see. Stippling is
virtually identical to damage caused by
thrips. A magnifying glass or low-pow
er microscope (10X to 30X) helps to
identify the yellow-white, two-spotted
brown or red mites and their translucent
eggs. Indoors, the most common is the
two-spotted spider mite, but many other
mites attack cannabis.
After a single mating, females are fertil
ized for life. Females lay up to 20 eggs
per day during a lifespan of two to four
weeks. Eggs hatch in three days at 80°F
(26.7°C). A single female can spawn a
million mites a month in ideal conditions!
Accelerated reproduction allows mites
to quickly adapt and become resistant
to pesticides. Effective control measures
must incorporate many different meth
ods and products.
Damage: Mites suck life-giving sap
from plants, causing overall vigor loss
and stunting. Leaves are pocked with
suck-hole marks and are yellow from
failure to produce chlorophyll. Leaves
lose partial to full function, and then
turn yellow and drop. Once a plant is
overrun with spider mites, tiny webs can
easily be seen when misted with water.
Spray water mist on suspect stems and
under leaves as infestations progress.
Severe cases cause plant death. Spider
mites also function as vectors, spreading
diseases as they mutilate foliage. Some
estimates claim 60 percent of British
Colombia, Canada, garden rooms are
infested with spider mites.
Cause: Mites enter a garden on infest
ed clones, plants, clothes, pets, etc., or
they can blow in with the wind. Unclean
growing conditions are the main cause
of mites.
Prevention: Cleanliness is the most
important first step to spider mite
control. Keep the garden room and tools
spotless and disinfected. Mother plants
often have spider mites. Spray mothers
regularly with miticides, including once
just three days before taking cuttings.
Dip cuttings in a miticide after roots
have formed and before they are moved
out of the clone room. Dip small plants
again one week later.
If spider mites become established in a
garden room, they are nearly impossible
to exterminate. You must remove all
grow equipment and plants and clean
the entire garden room with a 5 percent
bleach solution. You can also rent a wall
paper steamer to steana/sterilize cracks
in the room.
Cultural and physical control: Spi
der mites thrive in a dry, 70°F to 80°F
(21.1°C-26.7°C) climate, and reproduce
every five days in temperatures above
80°F (26.7°C). Create a hostile envi
ronment by lowering the temperature
to 60°F (15.6°C) and spray foliage,
especially under leaves, with a jet of cold
water. Spraying literally blasts mites off
the leaves, as well as increases humid
ity. Manual removal works for small
populations. Smash all mites in sight
between the thumb and index finger, or
wash leaves individually in between two
sponges. Avoid infecting other plants
with contaminated hands or sponges.
474
DISEASES & PESTS
www.marijuanagrowing.com
Remove leaves with more than 50 percent
damage and securely destroy them, mak
ing sure insects and eggs do not reenter
the garden. If mites have attacked only
one or two plants, isolate the infected
plants and treat them separately. Take
care when removing foliage not to spread
mites to other plants. Severely damaged
plants should be carefully removed from
the garden and destroyed.
Smear a layer of Tanglefoot around the
lip of containers and at the base of stems
to create barriers spider mites have a
difficult time crossing. Spider mites can
also stream a web strand and float to
the next branch or plant. Avoid over
crowding. This will help isolate them to
specific plants.
Note: To contain spider mites, smear a
layer of Tanglefoot at each end of drying
lines when hanging buds. Once foliage is
dead, mites try to migrate down dry
ing lines to find live foliage with fresh,
flowing sap.
Biological: Neoseiulus (Amblyseius)
californicus and Mesoseiulus Phytoseiulus)
longipes, are the two most common and
effective predators. Phytoseiulus
persimiliS) Neoseiulus (Amblyseius)
fallacius, Galendromus (Metaseiulus)
occidentalis, and Galendromus
(Typhlodromus) pyri predators are also
available commercially. When properly
applied and reared, predatory spider
mites work very well. Read the section
“Beneficial Insects” in this chapter be
fore ordering. There are many suppliers;
just type “spider mite predator” into a
web browser such as Google.
About predators: First, predators can
eat only a limited number of mites a day;
the average predator can eat 20 eggs or
5 adults daily. As soon as the predators’
source of food is gone, some mites die
of starvation while others survive on
other insects or pollen. Check with
suppliers for release instructions related
to specific species. A general dosage of
20 predators per plant is a good place
to start. Predatory mites have a diffi
cult time traveling from plant to plant,
so setting them out on each plant is
necessary. Temperature and humidity
levels must be at the proper levels to give
the predators the best possible chance to
thrive. When spider mites have infested
a garden, the predatory mites cannot eat
them fast enough to solve the problem.
Predatory mites work best when there
are only a few spider mites. Introduce
predators as soon as spider mites are
seen on vegetative growth, and release
them every month thereafter. This gives
predators a chance to keep up with
mites. Before releasing predators, rinse
plants thoroughly to ensure that toxic
spray residues from insecticides and
fungicides are gone.
Persimilis (Phytoseiulus persimilis) will
destroy spider mites
Progressive control measures for spider
mites
Cleanliness: Clean the garden room dai
ly and disinfect tools. Do not introduce
new pests into the garden on clothes. No
animal visits, etc.
Create hostile environment: humidity,
temperature, water spray
Create barriers: Smear Tanglefoot
around pot lips, at the base of stems, and
on the ends of drying lines.
Dip cuttings and vegetative plants: Dip
small plants in pyrethrum, horticultural
oil, or neem oil.
Remove damaged foliage: Removefoliage
that is more than 50 percent damaged.
Introduce predatory mites: Release
predators before infestations get out of
hand.
Homemade sprays often lack the
strength to kill infestations, but they
work as a deterrent by repelling mites.
Popular homemade sprays include Dr.
Bronner’s soap, garlic, hot pepper, citrus
oil, and liquid seaweed combinations. If
these sprays do not deter spider mites
after four to five applications, switch
to a stronger spray such as neem oil,
pyrethrum, horticultural oil, nicotine
sulfate, or cinnamaldehyde. Insecticidal
soap does a fair job of controlling mites.
Usually two or three applications at five-
to ten-day intervals will do the trick.
Horticultural oil smothers eggs and can
be mixed with pyrethrum and home
made sprays to improve extermination.
i
Rotate sprays so mites do not develop
immunity.
Spray: Pyrethrum (aerosol) is the best
natural miticide! Apply two to three
applications at five- to ten-day intervals.
Pyrethrum is the best control for spider
mites. Spider mites should be gone after
two or three applications at five- to ten-
day intervals, providing that sanitary
preventative conditions are maintained.
Eggs hatch in five to ten days. The sec
ond spraying will kill the newly hatched
eggs and the remaining adults. The third
and subsequent applications will kill any
new spider mites, but mites soon devel
op a resistance to synthetic pyrethrum.
There are no pesticides registered for
hemp growing. This is a bridge that will
be crossed as cannabis becomes legal.
Spider mite adults, juveniles, and eggs on a
leaf underside (MF)
Close-up of spider mite adults and eggs (MF) Stippling on leaves is the clue that spider mites
live on the undersides.
www.marijuanagrowing.com
475
Tanglefoot is an excellent product to help
contain spider unites. Smear it around the lip
of containers, the base of stems, and at the end
ofdrying lines.
Neem Oil
Heavy-duty chemical miticides are avail
able but are not recommended for use on
plants that will be consumed by humans.
If using any chemical miticide, be sure
it is a contact poison and not systemic.
Use Stirrup M (cinnamaldehyde) ex
tracted from Cinnamomum zeylanicum.
The synthetic hormone attracts spider
mites, and is used very successfully to
enhance miticides.
Miticides: acaricides
Miticides: The organotins are a group of
acaricides that double as fungicides. Of
particular interest is Plictran (cyhexatin).
Floramite is a contact miticide, and
thorough coverage is essential. This
miticide is active on all mite life stages,
including eggs. Do not apply less than a
week before harvest.
TetraSan is a growth regulator for
mites, inhibiting the molting process
to control mites in greenhouses and on
outdoor ornamentals. It is a contact and
translaminar miticide that leaves four
weeks’ residual control after one appli
cation. It is effective on all stages of life;
even adult females become sterile.
Vendex: This product is a restricted-use
pesticide
AzaMax is developed from neem seed and
very potent.
Broad/Cyclamen Mites
Garden Threat: low to high
Common Names: Broad mite, yellow
tea mite, citrus silver mite, tropical mite,
chilli mite, jute white mite, rubber leaf
mite. Cyclamen mite, Stenotarsonemus
pallidus
Broad Mite Species that Attack Canna
bis include: Polyphagotarsonemus latus,
Acari species
Common names: broad mite, yellow tea
mite, citrus silver mite, tropical mite,
chilli mite, jute white mite, rubber leaf
mite, cyclamen mite (Stenotarsonemus
pallidas')
Broad mite species that attack canna
bis include: Polyphagotarsonemus latus,
Acari species
Broad mites (Polyphagotarsonemus latus)
and cyclamen mites (Stenotarsonemus
pallidus ) are very similar in their life
cycle and the damage they cause, so
they are together in this section. First
r-------------------------
BRAND NAME ACTIVE INGREDIENT
SAFETY
-------------------
RESIDUAL
DAYS
Avid
Streptomyces avermitilis DO NOT USE
28
-
TetraSan
1
etoxazole
i
.
.
.
-------------- ----------
DO NOT USE
28
L-------,- -- -- --- -- --- -- -- --- -- --- -- --
they are distinguished, and then symp
toms and control measures are lumped
together.
Broad mites and cyclamen mites live and
breed on many plants, including can
nabis. They migrate to lower leaves and
infest plants quickly. The symptoms can
easily be confused with nitrogen defi
ciency. They do not make spiderwebs.
Garden threat: low to high
Identify broad mites: Aggressive adult
mites are microscopic, about 0.1 mm
long with eight legs. Larvae have six legs
and are hungry at hatch. They are less
than half the size of the red spider mite.
Soft-bodied nymphs move fast. Color
is translucent white and yellowish and
other light tones. Broad mites repro
duce most prolifically at temperatures
between 70°F to 80°F (21.1°C-26.7°C).
The long eggs (0.08 mm) have a series of
about 30 whitish bumps, an oval shape
with protruding circular surface, and
they stick hard to the leaves. The adult
has a dark dorsal band. Each female can
produce 40 to 50 eggs in a lifetime. They
hatch in two to three days—with an
appetite. After eating for two to three
days, they start the pupal stage en route
to adulthood.
Identify cyclamen mites: Less than 0.2
mm long, these waxy looking mites have
four pairs of legs and range from col
orless to green or brownish. Cyclamen
mites share many characteristics with
broad mites. Male cyclamen mites have a
very strong claw mounted at the end of
each fourth leg.
These mites avoid light and prefer
high humidity and cool 60°F (15.6°C)
temperatures. They hide inside buds,
under leaves, and in any protected place
on foliage. Eggs are smooth and hatch in
about 11 days when deposited in dark,
moist locations.
Damage: Mites secrete a plant growth
regulator or toxin as they feed. And a
476
DISEASES & PESTS
www.marijuanagrowing.com
CHEMICAL INSECTICIDES AND MITICIDES
''Not all trade names are included. Check insecticides and miticides for chemical names.
Trade Name*
Active Ingredient
Safe for
Cannabis
Notes
Akari SC
tert-butyl
No
Do not use in successive applications.
Avid
abamectin
No
Produced by soil fungi, Streptomyces species
Brigade
bifenthrin
No
Systemic miticide/insecticide, DO NOT USE
Floramite
bifenazate
Limited
Apply only once then rotate to another miticide.
1..
Forbid 4F
spiromesifen
No
Systemic miticide/insecticide, DO NOT USE
Hexygon W
hexythiazox
No
Systemic miticide/insecticide, DO NOT USE
Judo
spiromesifen
No
Systemic miticide/insecticide, DO NOT USE
Kelthane
dicofol
No
Selective miticide, DDT relative, DO NOT USE
Mavrik
tau-fluvalinate
No
---------------------------- J—----------- ----
Systemic miticide/insecticide, DO NOT USE
Orthene
acephate
No
Systemic miticide/insecticide, DO NOT USE
Ovation SC
clofentezine
No
Systemic miticide/insecticide, DO NOT USE
Pentac
dienochlor
No
Canceled!
ProMITE
fenbutatin-oxide
No
Systemic miticide/insecticide, DO NOT USE
Pylon
chlorfenapyr
No
Systemic miticide/insecticide, DO NOT USE
Pyramite
pyridaben
No
Systemic miticide DO NOT USE
Sanmite SC
pyridaben
No
Systemic miticide DO NOT USE
Savey
hexythiazox
No
Systemic miticide/insecticide, DO NOT USE
Shuttle O
acequinocyl
No
Systemic miticide/insecticide, DO NOT USE
Sirocco
bifenazate/abamectin
No
Systemic miticide/insecticide, DO NOT USE
Temik
aldicarb
No
Systemic miticide DO NOT USE
TetraSan
diphenyloxzoline
No
Do not apply more than twice per crop
Ultiflora
milbemectin
Yes
Derived from soil microorganisms and fermentation
Vendex
fenbutatin-oxide
No
Systemic miticide/insecticide, DO NOT USE
Whitmire
Beethoven
etoxazole
No
Toxic to fish and aquatic organisms
Zeal
1_
etoxazole
No
Systemic miticide DO NOT USE
www.marijuanagrowing.com
477
few mites can cause a lot of damage fast!
Feeding damage deforms and distorts
young buds and leaves. Leaf edges can
curl up or entire leaves can cup down,
pucker, crinkle, become brittle, and
show signs of scarring. Internodes
shorten, growing tips are stunted, and
overall growth is underdeveloped. New
growth can blacken and die. Damage
resembles herbicide damage and can also
be confused with viral disease, micro
nutrient deficiency, or herbicide injury.
Damage may appear for weeks after the
mites have been controlled.
Damage is usually not detected until
significant damage is incurred. Damaged
foliage will not recover. A microscope
will be necessary to detect the actual
mites; a handheld loupe is not powerful
enough to see them.
Cause: Microscopic or micro-mites
are able to walk short distances and are
dispersed long distances by wind or by
attaching themselves to people, tools,
or a winged insect (aphid, whitefly, etc.)
and hitching a ride. Male mites actual
ly transport eggs to new foliage. They
migrate to cannabis from many plants,
including but not limited to houseplants,
African violets, cyclamen, begonias,
snapdragons, impatiens, gerbera daisies,
fuchsias, daisies, azaleas, ivy, camellias,
jasmine, lantana, marigolds, grapes, and
vegetable hosts—beets, beans, cucum
bers, eggplants, peppers, potatoes, and
tomato plants. Mites are also common
greenhouse pests in some crops.
Prevention: Cyclamen mites cannot
take temperatures above 92°F (33.3°C)
but the spider mite will. If you drop the
This leafshows signs ofa severe infestation of
hemp russet mites.
humidity to 30 percent, they cannot de
velop into adults. But the conditions in
most garden rooms are perfect for spider
mites to thrive.
Do not let broad mites enter the garden
room or greenhouse. They are more dif
ficult to prevent, and they thrive in hot
conditions. Use certified pest-free grow
ing mediums. Keep the garden room
very clean. Wear clean clothes and shoes
into the garden room and greenhouse.
Do not grow ornamental or food plants
that attract cyclamen or broad mites.
It is important to eliminate broad mites
before flowering because plants cannot
recuperate if they go into flowering with
broad mite damage.
Control
Biological: Locally occurring mite pred
ators give satisfactory control in many
areas. Two natural enemies—Euseius
stvpulatus and Typhlodromus ovalis are
being evaluated as biocontrol agents of
these mites.
Amblyseius californicus eats red spider
mites and broad mites Polyphagotar
sonemus latus. If there is no food for
the predators, they leave or die. Ambly
seius californicus can also eat pollen to
maintain themselves. The strawberry
(Ricinus communis L.) and margaritas
(genebra) are some of the foods with
pollen.
Sprays: Broad mites and cyclamen mites
are not susceptible to some dinitrophe
nol compounds and synthetic pyre
throids. Submerging plants completely
in a miticide dip is very effective to
treat small plants. Fenbutatin, diazinon,
and dicofol (Kelthane)—all very harsh
chemicals that I do not recommend—
have been effective in the control of
mites.
Hemp Russet Mites
Garden Threat: low to high
Common Names: hemp russet mite,
mites
Hemp Russet Mite species that attack
cannabis include: Aculops cannabicola
Identify: Hemp russet mites are not
well-known but this appalling pest is
growing in infamy because it is so hard
to control. The mites are very small
reaching only 0.2 mm in length and
they have just two pairs of legs attached
to their pale beige bodies. Even though
hemp russet mites are virtually impos
sible to see with the naked eye, they are
easy to distinguish from other destruc
tive mites because they leave no web
bing. At 80°F (27°C) hemp russet mites
achieve a 30-day life cycle.
Damage: Feeds on all types of cannabis
plants. They live and feed mainly on
leaves, petioles, and meristems. Feeding
damage causes leaflets to curl at edg
es followed by chlorosis and necrosis.
Leaves and petioles become brittle.
Infestations turn leaves beige with hemp
russet mite bodies! Mites feed on female
stigmas rendering them sterile. They
also consume resin glands which can
reduce resin production severely. Hemp
russet mites feed on cannabis plants un
til host is dead. They congregate on the
upper part of the plant as it dies. Hemp
russet mites vector viruses.
Cause: Introduced to gardens by
unsanitary practices, contaminated
stock and bad luck. Hemp russet mites
hide on plants indoors and in green
houses. They are believed to overwinter
on contaminated seed indoors and out
doors. The minute mites spread easily to
nearby plants by splashing water. Wind
also carries them greater distances.
Prevention: Keep garden area clean and
disinfected. Introduce only pest-free
stock into gardens. Disinfect seeds.
Keep the garden below 70°F (21 °C) and
below 50% humidity to slow reproduc
tive process. Remove seriously damaged
foliage and plants from garden.
Control
Biological: The fungus, Hirsutella
thompsonu, is a pathogen to hemp russet
mites, but I have not seen it available
commercially.
Sprays: Miticides and sulfur sprays are
somewhat effective. Make sure to get
complete foliage coverage when spraying.
Termites
Common names: termites, wood
termites
Termite species that attack cannabis
include: Odontotermes obesus (Isoptera:
Termitidae)
Garden threat: low indoors moderately
high outdoors
Identify: Termites can be a big problem
478
DISEASES & PESTS
www.marijuanagrowing.com
These microscopic hemp russet mites (Aculops cannabicola) infested Cannabis plants in a secure
greenhouse at Indiana University. This picture by Karl Hilling shows them on a leafpetiole that
was about 2 mm wide.
in outdoor gardens. They are worse
near wooded areas, and they have been
a big problem in California and warm
states in the southern USA and similar
climates. They live entirely underground
or in elevated tubes.
Damage: Termites like weak and dead
plants more than they like wood. Weak,
diseased plants will attract termites.
Termites eat roots and gnaw away at
stems. In fact, they can even burrow
through the center of stems and kill
plants. Termites are seldom noticed
until damage occurs.
Cause: Termites are present in rotten
wood or decaying plant matter near the
garden.
Prevention: Spray termite insecticide
around the perimeter of the garden. Set
termite bait in the garden and outside
garden structures. Paint exposed wood
in garden with a borate to disrupt ter
mite life cycle. Avoid mulching plants
with woodchips.
Biological: Add natural predators to
your environment. Encouraging ants,
flies, and spiders around your home is
one way to keep termites out—they’ll
eat them! Frogs are also good predators.
Sprays: Terminix or Spectracide stakes
are often used to control termites. They
come in a box of 20 ($70 USD) with
a drill bit to put them in the soil. The
active ingredient is 0.1 percent and is
slow-acting bait so the termites can take
it back to the mound. The bait does not
release into the soil nor does the plant
pick it up.
Thrips
Common names: greenhouse thrips,
western flower thrips, onion thrips
Thrip species that attack cannabis
include: greenhouse thrips (Heliothrips
haemorrhoidalis)
onion (tobacco) thrips (Thrips tabaci)
marijuana thrips (Oxythrips cannabensis)
Indian bean thrips (Caliothrips indicus)
western flower thrips (Frankliniella
occidentalism
Attacks: foliage
Attacks: roots
Garden threat: low to high both in
doors and outdoors
Identify: These tiny, winged, fast-mov
ing critters are hard to see but not hard
to spot. From 0.04 to 0.05 inch (1-1 .3
mm) long, thrips can be different colors,
including white, gray, and dark colors,
often with petite stripes. Check for them
under leaves by shaking parts of the
plant. If there are many thrips present,
they choose to jump and run rather than
fly to safety. But often you will see them
as a herd of specks thundering across
foliage. Females make holes in soft plant
tissue where they deposit eggs that are
virtually invisible to the naked eye.
Winged thrips easily migrate from in
fested plants to the entire garden. Several
different thrips attack cannabis; some,
known as marijuana thrips, are specific
to cannabis. Thrips are more common in
greenhouses than indoors.
Damage: Thrips rasp and scrape tissue
from leaves and buds, and then suck out
the sap for food. Stipples—whitish-yel
lowish to silvery specks—appear on top
of leaves; chlorophyll production di
minishes and leaves become brittle. You
will also see black specks of thrip feces
and little thrips. Many times thrips feed
inside flower buds or wrap up and distort
leaves. Thrips prefer succulent young
leaves and flowering tops. Common
thrips often eat female calyxes, causing
deformed flower tops.
Cause: Thrips enter the garden on
contaminated plant stock and on
Replace the wood with a slow-acting
pesticide available at your local home
and garden store. The pesticide will be
spread through the colony when the
termite returns home.
Control: Locate termite colonies in at
tics, walls, and in underground burrows
under and near buildings. Spray each
colony and the surrounding area.
Control requires that termites are
physically prevented from entry, which
is very difficult, or the colony must be
eradicated.
Termites are most common in wooded areas.
Thrip
www.marijuanagrowing.com
479
Thrips rasp the top ofleaves.
Thrips will attack cannabis in all stages of life.
(MF)
Whiteflies in all stages ofgrowth can be seen
on this leaf (MF)
gardeners, tools, and pets as a result
of an unclean garden and garden area.
Prevention: Cleanliness! Use yellow
sticky traps, which attract thrips, to
monitor populations and impair move
ment. Misting plants with water impairs
thrips. Manual removal works okay if
only a few thrips are present, but they
are hard to catch. Thrips can be very
vexing to control once they become
established.
Thrips migrate daily. They hide in soil
and foliage and feed actively in the
mornings. The best time to kill them
is during feeding. Soil treatments work
well too.
Control
Biological: Predatory mites
(Amblyseius cucumeris and Amblyseius
barkeri, Neoseiulus cucumeris, Iphtseius
degenerans, Neoseiulus barken, Euseius
hibisci), parasitic wasps (Thripobius
semiluteus, Ceranisus menes, Goetheana
shakespearei), pirate bugs (Orius
species). The fungus VerticiUium lecanii
is effective.
Sprays: Homemade sprays such as tobac-
co/nicotine (nicotinic acid) base; com
mercial pyrethrum, synthetic pyrethrum,
insecticidal soap, and garlic. Apply two
to four times at five- to ten-day intervals.
Whiteflies
Common names: greenhouse whitefly,
sweet potato whitefly, tobacco whitefly,
silverleaf whitefly
Whitefly species that attack cannabis
include: greenhouse whitefly
(Trtaleurodes vaporiorum, Homoptera:
Aleyrodidae)
sweet potato aka tobacco whitefly
(Bemisia tabaci, Homoptera:
Aleyrodidae, = Bemisia gossypiperda)
silverleaf whitefly (Bemisia argentifolii,
Homoptera: Aleyrodidae, = Bemisia
tabaci (strain B)
Garden threat: low to high, worse in
hot climates
Identify: The easiest way to check for
the little buggers is to grab a limb and
shake it. If there are any whiteflies, they
will fly from underneath leaves. White
flies are easily spotted with the naked
eye. Whiteflies look like a small, white
moth about 0.04 inches (about 1 mm)
long, approximately the size of the tip
of a pencil lead. Adult whiteflies have
wings. They usually appear near the
top of the weakest plant first. They will
move downward on the plant or fly off
to infest another plant. Eggs are also
found on leaf undersides, where they are
connected with a small hook. Whiteflies
behave very much like spider mites do.
Damage: Whiteflies hide underneath
leaves and suck sap from them. Like
mites, whiteflies may cause white
speckles known as stipples on the tops
of leaves. Chlorophyll production and
plant vigor diminish as the infestation
Whitefly
progresses. Whiteflies leave residue on
foliage that attracts harmful fungi and
diseases.
Cause: unclean garden room, sloppy
hygiene
Prevention: Cleanliness! Screen the
incoming air.
Control
Cultural and physical control: Adults
are attracted to the color yellow. To
build a whitefly trap similar to flypa
per, cover a bright, yellow object with a
sticky substance like Tanglefoot. Place
the traps on tops of pots among the
plants. Traps work very well. When they
are full of insects, toss them out.
Biological: The (assassinator) wasp
Encarsia formosa, released before an
infestation of whiteflies, is the most
effective parasitic control. These small
wasps only attack whiteflies; they do
not sting people. Set new wasps in the
garden every two weeks. All toxic sprays
must be completely washed off plants
before introducing parasites and preda
tors. Since Encarsia formosa is a parasite
about 0.125 inch (about 3 mm) long—
smaller than the whitefly—it takes them
much longer to control or even keep
the whitefly population in check. The
parasitic wasp lays an egg in the whitefly
larva that later hatches and eats the larva
alive, from the inside out—death is slow.
If you use Encarsia formosa, set them
out at the rate of two or more parasites
per plant as soon as the first whitefly
is detected. Repeat every two to four
weeks throughout the life of the plants.
The fungus Verticillium lecanii aka
Cephalosporium lecanii, trade name
Mycotal, is also very effective as whitefly
control.
480
DISEASES & PESTS
www.marijuanagrowing.com
Yoh can see the winged whitefly trying to hide
under the male flower cluster! (MF)
I love dogs—especially cute, little ones. But
my little dog loves to dig and chase moles! The
moles do enough damage. So far moles one,
little dog zero.
Edgar, a raven friend from Northern
California, provided endless amusement as
he bullied the dogs, cats, and other animals
around the cannabis farm.
Sprays: Easily eradicated with natural
sprays, pyrethrum works great to kill
whiteflies when they are airborne. Before
spraying, remove any leaves that have
been over 50 percent damaged and cure
with heat or else burn infested foliage.
Homemade sprays applied at five- to
ten-day intervals work well. Insecticidal
soap applied at five- to ten-day intervals.
Pyrethrum (aerosol) applied at five- to
ten-day intervals.
Pest Mammals
Once your plants are in the ground, well
fed and watered, check them weekly (if
possible) for pest and fungal damage.
Inspect the top and bottom of leaves
for stippling (small spots) from mites or
damage from chewing insects and slugs
and snails. First identify the pest, and
then determine a course of action.
Properly grown outdoor cannabis has
few problems with pests.
Low-tech, natural approaches to pest
control work well. A few large pests like
caterpillars and snails can be handpicked
from the foliage. Caterpillar populations
can be reduced at the source by installing
bat houses. Resident bats will eat moths
and decrease the number of chewing cat
erpillars. Birds will eat caterpillars too, as
well as aphids and other insects. Attract
birds with suet, birdhouses, birdbaths,
and feeders, but cover tender seedlings
and clones with wire or nylon mesh to
protect from birds, too! Ladybugs and
praying mantis are good options for
insect control and can be purchased from
nursery supply stores.
Barn owls eat mice, gophers, and voles
but are hard to come by in the city. If
you are lucky enough to have barn owls
nearby, take advantage of their ability
to eat plant pests. On the other hand,
rodents such as moles and shrews help
your garden by dining on slugs, insects,
and larvae.
Marigold cultivars of the Tagetes erecta
and T. patula species will repel nem
atodes (aka eelworms) from the soil
for two to three years if planted in an
infested area and then tilled under. Just
planting these marigolds in an area
doesn’t accomplish anything. Numerous
tests indicate that they do not have an
effect on insects above the ground.
Bears
Bears present the biggest problems in
gardens where there is a food source. If
bears are common in your area, do not
plant other garden fruits and vegetables
nearby. Remove or secure all container
ized garden fertilizers, especially ones
containing molasses or sugars. Bears
may appear out of nowhere if they are
in the area, but normally they avoid
contact with humans.
Birds
Insect- and pest-eating birds are welcome
guests in most gardens, but the bad birds
eat cannabis seeds and young tender plants.
Common names: birds, flying pigs,
doves, hemp linnet, magpies, nuthatch,
pheasants, pigeons, quail, sparrows,
starling, crows, blue jays, cardinals
Garden threat: Low to medium. Seeds,
tender seedlings, and clones are most
vulnerable.
Damage: Birds eat seeds and young plants.
Cause: Birds are in the area and hungry,
with little else to eat.
Prevention: Cover young plants with
plastic or wire netting. Make sure the
netting is securely attached around the
perirfieter of the garden to keep birds
from sneaking underneath. Remove
netting when plants are one to two feet
(30.5-61 cm) tall. Inflatable plastic
snakes and owls often scare birds, but
not for long!
Control: scarecrow, sonic boom
machine, shotgun or rifle (only in
hunting season)
Boar (Wild Pigs)
Common names: wild pigs, wild boar,
javali (Spain)
Garden threat: medium, but could be
devastating
Identify: wild pigs, mostly nocturnal
and travel in packs
Damage: uproot plants and eat lower
foliage and roots
Cause: Wild pigs run loose in many
rural areas and along the perimeters of
urban areas.
Prevention: Install a battery-operated
electric fence around outdoor plants.
Keep a big, protective dog near the
plants to scare off pigs. Do not leave out
anything that will attract them; secure
ly stow fertilizer and safely dispose of
garbage.
Control: Shoot pigs with a gun (only in
hunting season), and keep a big dog to
protect garden from pigs. Big box traps
are also available for pigs.
Sprays: none
www.marijuanagrowing.com
481
Wild pigs from Northwest Spain have uproot
ed many gardens.
Deer stop by and munch a few tender buds
every night.
Gopher traps (pictured at top of image) and
a mouse trap (pictured at bottom of image)
are very important means of rodent control in
outdoor medical cannabis gardens.
Deer
Common names: deer (buck, doe,
fawn), elk (cow, bull, calf)
Garden threat: low to medium
Damage: Deer are browsers and eat the
tender new growth first, but they can
devour buds too! They take a bite (or
maybe several bites) of a plant and move
to another plant. Damage ranges from
sporadic bites to large parts of plants
being eaten.
Cause: Deer are in the area and have few
food sources, of which cannabis is one.
Prevention: A proper fence or a cage
around plants will help keep deer away
from plants. Deer are afraid to jump into
a small, enclosed area. Set up the fence
a few feet around plants so they cannot
reach over or through it to get to foliage.
The ideal deer fence for large rural
gardens is eight feet (2.4 m) tall with
the top foot (30.5 cm) sloping outward,
away from the garden at a 45-degree
angle. Electric fences and large dogs are
also good deterrents.
If a fence is too conspicuous or difficult
to construct, use repellents. Place hand
fuls of dried blood in cloth sacks and
dip in water to activate the smell. Hang
sacks from a tree to discourage dogs
and other predators from eating them.
Scented soaps have repelled deer from
some gardens, but soap has also been
known to attract rodents.
Predator urine, most often coyote urine,
keeps deer away well when applied
regularly. It is available at garden centers
and many hunting stores. Some guerilla
growers say that to deter deer damage,
they urinate in several locations around
the perimeter of the garden so animals
take their human presence seriously. Some
growers save urine all week and disperse it
during regular visits to their patch.
Control: It is best to prevent damage.
Shooting deer out of season or in popu
lated areas is illegal and dangerous.
Elk are somewhat of a problem, and deer
are a problem!
Gophers
Common names: pocket gopher
Identify: herbivorous rodents
Garden threat: low to medium
Damage: Gophers eat roots and foliage
and disrupt soil with tunnels. Annually,
females bear four to five litters of up to
eight offspring. That’s a lot of hungry
mouths to feed!
Cause: Gophers may just stop by for a
meal and like the way the plants taste.
Prevention: Line planting holes with
hardware cloth or fine chicken wire 12
to 18 inches (30.5 -45 .7 cm) deep and 3
feet (91.4 cm) aboveground to exclude
gophers. The gopher plant (Euphorbia
lathyris) and castor beans/plants are said
to repel gophers when stuffed in holes,
but they have not worked for me.
Control: Traps are difficult to use and
require experience and skill to actually
catch gophers. Avoid getting any human
scent on the trap. If human scent is
apparent, gophers simply push dirt onto
the trap, making it harmless.
Mice, Rats, and Voles
Gopher Granola is available for areas
such as the Northern California moun
tains, where wood rats and gophers will
eat your crop if given any opportunity
to do so. The best fence in the world will •
not keep rats away from your plants! (If
rats are a problem in your area, do not use i
soap to keep deer away; the fat in soap
is edible for rats.) Put the poison grain
in a feeder only small rodents can enter,
so that birds and deer can’t eat it. Set
<
out poison early, before actual planting |
begins. Rats must eat the grain for several >
days before it will have any effect on
j
them. Ultimately, you may find it’s easier
to grow in a greenhouse shed in your
own backyard rather than try to keep the
rats from eating your outdoor plot.
The root system of this 'Jack Herer' female is
protected with chicken wire. (MF)
482
DISEASES & PESTS
www.marijuanagrowing.com
Mice populations can skyrocket outdoors in
the late summer. Setting traps around plants
helps monitor rodent populations and keep
them in check.
A mousetrap properly set and baited is one of
the most effective means of mouse control.
Common names: mice, voles, rats,
kangaroo rats, vermin
Garden threat: low indoors; medium to
high outdoors and in greenhouses
Damage: Mice and voles can chew bark
from around the base of cannabis plants
(girdling).
Cause: Rodents have a nearby food
source and are expanding their territory.
Prevention: Keep mulch a foot away
from plants, and install wire mesh
around the trunks. Mice and voles make
nests in large piles of mulch, and they
are attracted to stored water. Cover all
water sources to exclude them, but keep
in mind that they might chew through
the container if water is super scarce.
The best mouse deterrent is a cat that is
serious about hunting.
Control
Physical: Mousetraps work well on small
populations. Removing a large number
of mice with traps can be tedious and
unpleasant.
Caution! DO NOT USE POISON!
Scavenger animals will eat the dead rodents
and may become poisoned themselves.
Moles are generally not a problem unless the
soil is chock-full ofworms and insects.
Moles
Common names: mole
Garden threat: low
Damage: Moles are minor pests. They
are primarily insectivores that eat cut
worms and other soil grubs, but their
tunnels may dislodge cannabis roots.
Moles dig tunnels a few inches below the
soil surface, creating a maze of tunnel
mounds in the garden.
Cause: Moles are living nearby and
looking for a new food source.
Prevention: Repel moles with castor
plants or gopher (mole) plants (Euphorbia
lathyris). Castor bean leaves and castor
oil, as well as applications of tobacco and
red pepper, will repel moles if put into
their main runs.
Mixing: Blend two tablespoons
(30 ml) of castor oil with three table
spoons of dish soap concentrate and ten
tablespoons (148 ml) of water. Mix in a
blender. Use this as a concentrate at the
rate of two tablespoons per gallon (4
ml/L) of water.
Application: Apply as a soil drench
directly over mole holes.
Control
Physical: Barrel traps, scissor traps, and
guillotine traps are effective and kill
moles instantly.
Rabbits
Common names: Cottontail, bunny
rabbit, rabbit, hare
Garden threat: very low
Rabbits are burrowing, plant-eating
mammals of the Leporidae family. They
can be recognized by their long ears and
short, fluffy tails. Rabbits are voracious
eaters and can reduce a crop to nothing
in a couple of days. They will continue
to feed from the same patch until they
are done or the patch is destroyed. The
best way to keep rabbits from your gar
den is to use predator urine. Rabbits also
shy away from cats and dogs.
Identify: Long-eared rabbits (Bugs
Bunny!) are plant-eating mammals.
Most often cottontails, little “bunny
rabbits” inhabit outdoor gardens. They
multiply quickly and often eat from the
same patch until it is destroyed.
Damage: Rabbits eat cannabis plants.
Cause: Rabbits have the opportunity
to enter the cannabis garden and eat
cannabis plants.
Prevention: Repel rabbits with a light
dusting of rock phosphate on young
leaves or dried blood sprinkled around
the base of plants. Manure tea sprayed
on leaves and soil may keep rabbits from
dining on your plants. They also find
plants dusted with hot pepper or a spray
of dilute fish emulsion and bone meal
repulsive. A dog will help keep rabbits
in check, but the only surefire way to
keep rabbits out of the garden is to fence
them out with one-inch (2.5 cm) poultry
wire. The poultry wire should be buried
at least six inches (15.2 cm) in the
ground to prevent burrowing and should
rise two or three feet (61-91.4 cm) abo
veground. Wrap trunks with wire mesh
Rabbits may be cute in the country, but they
can be extremely destructive in a garden.
www.marijuanagrowing.com
483
Cats are particularly fond of cannabis.
Rogue pollen is a big problem in some parts of
the world when growing outdoors. Indoors, an
occasional male flower can pollinate an entire
roomful ofplants. Always be on the lookout
for spontaneous male flowers on female plants.
Manually remove small populations of insects
and pests by smashing them between your
thumb and index finger or between two
sponges. Smash all pests (and their eggs).
or aluminum foil to keep rabbits from
chewing bark in winter or early spring.
Control: Rabbit baits and traps are diffi
cult to use. Pull out the shotgun or rifle
as a last resort. Observe local gun laws
and hunting regulations.
Other Large Pests
Domestic and wild animals that can be
a problem in cannabis gardens include:
cats, cows, chipmunks, dogs, groundhogs
(“woodchucks”), hamsters, horses, mon
keys, raccoons, rats, squirrels, and voles.
Rogue Pollen
Common names: rogue pollen, pollen
from the neighbor
Garden threat: low to medium
Identify: Female plants develop seeds,
yet there are no male flowers in the
Damage: Once pollinated, female plants
spend all their energy developing seeds
and bud growth stops. Such plants pro
duce less consumable harvest.
Cause: Male plants are within a few
inches to several hundred miles,
depending on wind patterns, from re
ceptive female plants.
Prevention: Indoors, if neighbors are
growing cannabis from seed and do not
cull out male plants, or if your garden is
near an industrial hemp farm, you will
have to cover intake air ducts with fine
mesh screen and wet it occasionally to
keep rogue pollen outside. Outdoors, in
spect plants continually and pick off all
developing seeds. Once plants are seed
ed, they stop putting on flower weight.
Control: Keep female plants out of the
path of male pollen. Remove all male
plants from the garden.
Disease and Pest Controls
Prevention and cleanliness are at the top
of the control list. Problems first estab
lish on weak plants, but even when all
prevention measures are taken, disease
and pest problems can arise. The first
measures of control include identifying
the problem. The next step is to use the
least-toxic means of solving the prob
lem. Remove pests manually, if possible,
or spray them off with water. Next use
organic sprays. Fungus can be stopped
with many surface sprays that are not
harmful to plants or the environment.
I do not recommend using chemical
fungicides, fungistats, insecticides, or
miticides on plants that are destined for
human consumption. Most contact sprays
that do not enter the plant system are
approved for edible fruits and vegetables.
Read all labels thoroughly before using
control measures. Use only contact
sprays that are approved for edible
plants. Avoid spraying seedlings and
tender unrooted cuttings. Wait until
cuttings are rooted and seedlings are at
least a month old before spraying.
Common chemicals with their trade
names and the insects they control:
Note: Do not apply these substances to
edible plants.
Minute grains ofpollen can escape from male
flowers and pollinate females. Be careful when
working with male plants!
Note: This list is not all-inclusive. The
basic rule is to not use systemic products.
Organic contact pesticide, miticide
Controls: russet and spider mites, fire
ants, leaf miners, and nematodes.
Brand names: Abba, Affirm, Agri-Mek,
Avid, Dynamec, Epi-Mek, Genesis
Horse Wormer, Reaper, Vertimec,
Zephyr, and Cure 1.8 EC.
About: Abamectin derivatives include
emamectin and milbemectin. It does
not bioaccumulate. Not truly systemic,
abamectin is absorbed from the exterior
of foliage to other leaf parts, especially
young leaves, in the process of translam-
inar activity.
Forms: liquid
Mixing: DO NOT USE!
Application: DO NOT USE! DO NOT
APPLY!
Persistence: DO NOT USE!
Safety: DO NOT USE! Toxic to mam
mals, fish, and honeybees in high con
centrations. Sucking insects are subject
484
DISEASES & PESTS
www.marijuanagrowing.com
"-----
GENERIC NAME PURPOSE
ENTER SYSTEM
DO NOT USE
griseofulvin
fungicide
systemic
Do NOT Use
streptomycin
bactericide
systemic-registered for various food crops Do NOT Use
carbaryl
fungicide
systemic
Do NOT Use
tetracycline
bactericide
semisynthetic
Do NOT Use
nitrates
foliar fertilizers
systemic
Do NOT Use
abamectin
insecticide not a true insecticide translaminar
Do NOT Use
dienchlor
miticide
systemic
Do NOT Use
aldicarb
insecticide
systemic
Do NOT Use
neem
insecticide
systemic
Do NOT Use
triforine
fungicide
systemic
Do NOT Use
carboxin
fungicide
systemic
Do NOT Use
acephate
insecticide
systemic
Do NOT Use
.
r
1
NATURAL REMEDY TABLE
Active Ingredient
EPA Class
Bacillus species
G, D, WP Bt, DiPei, M-Trak, IV Match, Javelin, etc.
copper sulfate
D, WP, Brscop III
copper sulfate/lime
D, WP, Bordeaux mixture III
diatomaceous earth
D, Celite IV
neem
O, EL Neem, BioNEEM IV
nicotine sulfate
L, D, Black Leaf 40 II
oil, dormant horticultural O, Sunspray IV
pyrethrin
A, L, WP Many trade names III, IV
quassia
WP, bitterwood IV
rotenone
D, WP, EC Derris, Cube II, III
ryania
D,WPDyna50IV
sabadilla
D, Red Devil IV
soap, insecticidal
L, M-Pede, Safer's IV
sodium bicarbonate
P, baking soda IV
sodium hypochlorite
L, bleach II, III
sulfur
D, WP, Cosan V
--- ----
-
J
Caution! We do not recommend using
any products in any form in a manner
inconsistent with their label. Note that
no pesticide, fungicide, or any other
product is approved by any government
for use on cannabis.
If you should decide to use any of
the products mentioned in this book,
please FOLLOW THE LABEL
DIRECTIONS!
Medicinal cannabis is to be consumed
by sick patients, and a pesticide-and-
fungicide-free crop must be ensured.
Many fungicides and pesticides are
SYSTEMIC and FOR USE ON
ORNAMENTAL PLANTS ONLY!
Do not use such dangerous products
on consumable cannabis. PLANT
GROWTH REGULATORS,
SYSTEMIC PESTICIDES, AND
FUNGICIDES CAN BE FATAL TO
HUMANS!
Legend
L
liquid
A
aerosol
WP wettable powder
D
dust
O
oil
EL
emulsifiable liquid
G
glandular
www.marijuanagrowing.com
485
DO NOT USE Avid on cannabis!
DO NOT USE Shuttle on cannabis!
Ant baits work great. The ants enter the
container and do not leave.
to control, while beneficials are not hurt.
Wear gloves, mask, and safety glasses.
In one example from Hayward,
California, a well-known cannabis
patient with an unusual immune disease
died from repeated exposure to the mi
ticide Avid. Avid is now illegal to sell in
the US, though it remains available from
Canadian sources. Directed for used on
ornamentals only.
SHUTTLE 15 SC: Do Not Use!
Systemic pesticide, miticide
Controls: Two-spotted spider mite
(Tetranychus urticae) and spruce spider
mite (Oligonychus ununguis'). SHUTTLE
destroys damaging mites at every life
stage, from eggs to adults.
Brand names: SHUTTLE (For
ornamentals only)
About: SHUTTLE Miticide developed
by Arvesta Corporation is for use on
ornamentals only. SHUTTLE provides
excellent control of two-spotted mite,
red mite, and related species. It does not
demonstrate cross-resistance to miticide
resistant mite species. A reduced risk
compound, it has no impact on most
predacious species. Some growers use
this chemical on mother plants and wait
one month before taking clones.
Safety: Do Not Use! Kills fish and water
life, although it is not carcinogenic.
Wear protective clothing, goggles, and
gloves. Read label carefully. Do not use
on cannabis that will be consumed!
Ampelomyces quisqualis
Fungicide
Controls: powdery mildew
Trade name: AQ-10
Caution! This product registration
that was started in 1994 was canceled
in 2004. This product is no longer
available in the USA. For more infor
mation see http://www.pesticideinfo.
org/Detail_Product.jsp?REG_
NR=05563800016&DIST_NR=071771
Ant Baits
Organic contact pesticide
Controls: ants
Brand names: Terro, Pic, Drax Ant Kill
Gel (sugar-feeding ants)
Drax-FP (grease and sugar-feeding ants)
MAXFORCE, (cockroach and Pharaoh
ant killer—hydramethylnon)
About: Sweet-loving ants are easy to at
tract and control with sweet baits mixed
with ant-specific poison. They return
to the nest and distribute the poison,
killing the nest in a matter of days. Ants
start feeding on bait within two hours.
Forms: store-bought containers or
homemade
Mixing: homemade
Application: Set out or lay a barrier
where ants are prevalent.
Persistence: Poison stays in container and
is good for several months. We recom
mend baits with boric acid or hydramethyl
non as their active ingredient. Big-headed
ants, little black ants, and pavement ants
are attracted to animal grease, protein,
and fruits. A plastic squeeze bottle with
a pointed tip is a great applicator. Make a
protein/grease bait with:
• 4 tablespoons peanut butter
• 6 tablespoons honey
• 3/4 teaspoon boric acid
Sweet Baits
• Argentine ants
• carpenter Ants
• odorous house ants
• small honey ants
Grease and Sweet Baits
• big-headed ants
• little black ants
• pavement ants
Safety: Read label carefully and follow
directions.
Bacillus thuringiensis (Bt) and
Bacillus Species
Bacilluspumilus: QST 2808
Organic beneficial fungus
Controls: Fusarium
Name: Bacillus pumilus strain QST 2808
About: Bacillus pumilus strain QST
2808, commonly found in soil, is
sprayed on crops to control many
fungal, mildews, blights and rusts pests.
It forms a barrier between leaves and
bad fungal spores, and B. pumilus strain
QST 2808 actually colonizes the spores.
Like several other varieties of B. pum-
ilus, this strain may also stimulate the
plant’s own resistance system by induc
ing systemic acquired resistance (SAR).
Forms: Wettable powder
Mixing: Follow instructions on label for
tomatoes and vegetables.
Application: Ground, aerial, or chemical
spray; follow instructions on label for
tomatoes and vegetables.
486
DISEASES & PESTS
www.marijuanagrowing.com
Persistence: Stays around until weathered
or washed away.
Safety: No adverse environmental
effects and Bacilluspumilus strain QST
2808 is NOT harmful to insects, birds,
mammals, plants, or marine species
when used as directed.
Bacillus thuringiensis (Bt) Species
Organic contact pesticide, miticide
Controls: caterpillars, larvae, and
maggots
Pesticide: insecticide
About: Bacillus thuringiensis (Bt) is a
well-known bacterium. There are several
varieties, each with special qualities that
are listed below. Bt kills pests a few days
after it is eaten by pests. But they stop
eating soon after ingesting Bt. Com
mercial Bt products do not reproduce
within insect bodies, so several appli
cations may be necessary to control an
infestation. Commercial Bt products do
not contain living Bt bacteria, but the Bt
toxin is extremely perishable. Bt is most
effective on young caterpillars, larvae,
and maggots, so apply as soon as they
are spotted.
Forms: powder, granules
Mixing: as per instructions on label
Application: Spray, dust, or granules.
Inject liquid Bt into stalks to kill
borers. Keep within prescribed tem
perature range, and apply according to
the directions. Get the most out of Bt
applications by adding a UV inhibitor,
spreader-sticker, and a feeding stimulant
such as Entice, Konsume or Pheast. Bt is
completely broken down by UV light in
one to three days.
Controls: fatal to caterpillars’ larvae
and maggots, cabbage loopers, cab
bageworms, corn earworms, cutworms,
gypsy moth larvae, and hornworms
Safety: Microbial Bt bacteria are nontoxic
to animals, humans, beneficial insects,
and plants; however, some people do
develop an allergic reaction to it.
Bacillus thuringiensis var. kurstaki (Btk)
is the most popular Bt. Bacillus thuring
iensis var. aizawai (Bta) is effective
against hard-to-kill budworms, borers,
armyworms, and pests that have built up
a resistance to Btk.
Controls: moth and caterpillar larvae,
including most of the species that feed
on cannabis
Brand names: DiPei, BioBit, Javelin,
etc., Btk is also available in a microen
capsulated form, M-Trak, Mattch, etc.
The encapsulation extends the effective
life on foliage to more than a week.
B. thuringiensis var. israelensis (Bt-i)
kills mosquito and fungus gnat larvae.
Use Bt-i to get rid of them as soon as
they are identified. B . thuringiensis var.
morrisoni is a new strain of Bt under
development for insect larvae with a
high pH in their guts.
Controls: larvae of mosquitoes,
blackflies, and fungus gnats
Brand names: Gnatrol, Vectobac, and
Bactimos. All are lethal to larvae. Adults
do not feed on plants and are not affected.
B. thuringiensis var. san diego (Btsd)
Controls: larvae of Colorado potato
beetles, elm beetle adults, and other leaf
beetles
Bacillus thuringiensis var. tenebrionis
(Btt) is lethal to the Colorado potato
beetle
Bacillus cereus helps control damping-off
and root-knot fungus. It flourishes in
water-saturated mediums and promotes
beneficial fungus that attacks the diseases.
Controls: Colorado potato beetle larvae
Bacillus subtilis is a soil-dwelling
bacterium that curbs damping-off. Soak
Bacillus thuringiensis is one of the most
versatile and safe pesticides in the garden.
seeds and apply as a soil drench.
Controls: Fusarium, Pythium, and
Rhizoctonia that cause damping-off
Brand names: Epic, Kodiac,
Rhizo-Plus, Serenade, etc.
Bacilluspopilliae colonize larvae and
grub bodies that consume it, causing
them to turn milky-white before dying.
It is often called milky spore disease.
Controls: It is most effective against
Japanese beetle grubs.
Beauveria bassiana (Beneficial Fungi)
Pesticide: pesticide/miticide
Controls: mites and insects—
broad-spectrum kills ALL
Controls: whiteflies, thrips, aphids, and
other soft-bodied sucking insects
Brand names: Naturalis H&G,
BotaniGard, Mycotrol
About: Spores of Beauveria bassiana
-germinate upon contact with insects.
The fungus grows directly into the pest/
host. The fungus kills the insect in a
week or two, and in doing so multiplies
to infest new pest/host insects!
Forms: beneficial fungi wettable
powder, liquid
Mixing: Follow instructions on label.
Application: Follow instructions on
label.
Safety: kills beneficial insects
Baking Soda
Fungistat controls: powdery mildew
and other surface fungus
Mycotrol® O
*
tMULStflAlU SUSPENSION MYCOlNSECTlCIDf
For um; m controlling Whitcfly, Aphids. Thnps. PsylWs. Mealybug s. Lealhoppcrs.
Weevils. Plant Bugs, Borers and LeaMccding Insects in Field, Agronomic,
Vegetable and Orchard Crop; Grasshoppers. Mormon Crickets, L<x.u*(\ and Beetles
in Rangeland, Improved Pastures and Agronomic Crops, Whitefly. Aphids. Thnp. ,
PsyllKls ami Mealybug-, in Vegetables and Ornamentals grown in lndoarOutdoor
Nursery, Greenhouse. and Shadchouse.
Active Ingredient: Beauveria bassiana Strain GHA . .. 10.9%*
Inert Ingredients: ......................... ...........................
.
89,1 %
Total:....................................................................................... 100.0^
’Based on the weight estimate of 4 7H v H> "grams per spore
Mycotrol O contains 2 x 10" viable spores per quart
To-7ab„7^-F
CAUTION SHAKE WELL
Sec additional precautionary statements and first aid statements m ai inched Not kt
KEEP OUT OF THE REACH OF CHILDREN
Beauveria bassiana is a broad-spectrum
pesticide/miticide. It kills all insects and
mites, good and bad!
www.marijuanagrowing.com
487
1
Baking soda
Laundry bleach
Boric acid
Brand names: Arm & Hammer
About: Baking soda (sodium bicarbonate,
NaHCO3) acts as a fungistat to change
the pH of foliage surface so that fungal
diseases cannot grow there.
Forms: powder, wettable powder
Mixing: dilute 2 tablespoons (30 ml) per
quart (liter)
Application: Use as a duster or spray.
Baking soda will persist on foliage one
to three days and is easily washed off.
Wash off with plain water after three
days.
Safety: Baking soda is not toxic to
mammals, fish, or beneficial insects.
Wear a mask to avoid inhaling dust.
Bleach, Laundry
Germicide and disinfectant
Controls: numerous bacteria, fungi, and
pests
Brand names: Clorox and many generic
brands
About: Liquid bleach (sodium hypo
chlorite, NaClO) is a strong disinfectant
for pots, walls, tools, and more when
mixed in 10 percent solution with water.
Apply with a brush, mop, or rag, or use
as a dip.
Forms: liquid
Mixing: dilute in water at rate of 1 part
bleach to 10 parts water.
Application: Spray, wipe on with rag
or mop, or submerge seeds. To control
stripping (seed virus), dilute a 25 percent
solution of bleach and water, adjust to
9.0 pH. Soak seeds for ten minutes, and
then rinse with fresh water. Residues
linger a day or two.
Safety: Diluted bleach solution evapo
rates, leaving a slight residual in a couple
of days. It is toxic to fish, beneficials,
animals, and humans if swallowed or
comes in contact with the eyes. Wear a
mask and gloves when handling concen
trate. Avoid respiration and skin contact.
The concentrate burns skin and stains
clothes.
The Bordeaux and Burgundy mixtures
are too strong for indoor and outdoor
cannabis plants in most conditions. You
can find many recipes for them on the
Internet. I have decided not to include
them in this book.
Boric Acid
Pesticide: insecticide
Controls: earwigs, cockroaches, crickets,
termites, fleas, silverfish, and ants.
About: Boric acid (also called boracic
acid, orthoboric acid, or Acidum boricum
(H3BO3)) is a lethal stomach poison for
earwigs, cockroaches, crickets, termites,
fleas, silverfish, and ants. Purchase
ready-to-use products or mix borax soap
powder or crystals in equal parts with
powdered sugar to make toxic bait. Do
not wet the bait or it will disperse quick
ly. Set bait on soil near plant base.
Forms: liquid, powder, crystals
Mixing: Follow instructions on label.
Boric acid dissolves in water.
Application: Follow instructions on
label.
Safety: Phytotoxic when applied to
foliage. Not toxic to honeybees and
birds. Avoid breathing boric acid dust.
Bug Bombs
Pesticide controls: everything in
the room
Brand names: Look for brands
with the highest concentration of
pyrethrins—0.5 percent.
About: Single-application aerosol bombs
are usually packed with strong insecti
cides and miticides, including synthetic
pyrethrins that exterminate every pest
in the room. Piperonyl butoxide and
N-Octyl bicycloheptene dicarboximide
are often added to pyrethrums to inhibit
pest life processes. Propellants are also
added to distribute the insecticide/miti-
cide. Bug bombs were developed to kill
fleas, roaches, and their eggs that hide in
furniture and in carpets. Place the bug
bomb in the empty garden room, turn it
on, and leave the room.
Forms: single-use aerosol can
Mixing: none required
Application: Set the bug bomb in the
middle of the clean garden room with all
equipment removed, turn it on, and leave
the room.
Safety: Be careful; read the entire label
before using a bug bomb. Even though
they have a low residual and persist for
488
DISEASES & PESTS
www.marijuanagrowing.com
only a day or two, use these products
as a last resort. Wear a mask and gloves,
and cover exposed skin and hair.
Castor Oil
Pesticide: said to control moles
Brand names: Mole-Med, Mole-Go,
Mole Repel
About: Castor oil plant or castor bean
plant, Ricinus communis, is the same
one that yields castor oil. We used to
stuff bean pods and leaves down gopher
holes, but I have never seen it work.
Forms: oil
Mixing: Follow instructions on label.
Application: Follow instructions on
label.
Safety: Raw castor beans are toxic to
humans if ingested Avoid contact with
skin. A lethal dose in adults is four to
eight seeds, although reports of poison
ings are unusual.
Compost Tea
Compost teas, especially the “fast teas,”
are teaming with beneficial microbes that
protect roots and foliage from disease
and pest attacks.
See chapter 18, Soil, for more information.
Copper
Fungistat
Fungicide controls: gray mold, foliar
fungus, anthracnose, blights, mildews,
and a number of bacterial diseases.
Brand names: There are many manufac
turers of copper fungicide.
About: Common ingredients—copper
sulfate, copper oxychloride, cupric hy
droxide, and cuprous oxide—are forms
of fixed copper and are less phytotoxic
than unfixed (pure) copper. Mix powder
or liquid as per instructions and apply
immediately after preparing. Agitate the
mixture often while spraying, so ingre
dients do not settle out. Be careful when
applying, and make sure the temperature
is not too hot. The temperature range
for application is 65°F to 85°F (18.3°C-
29.4°C). It is best to stay nearer the
bottom end of the temperature range.
Forms: liquid, powder
Mixing: Follow instructions on label for
tomatoes and vegetables.
Application: Follow instructions on
label for tomatoes and vegetables.
Safety: Easy to overapply and burn
foliage or create a copper excess in
plants. Copper fungicide lasts two weeks
or longer indoors if not washed off. It is
toxic to fish. Not toxic to birds, bees, or
mammals. Wear a mask and gloves, and
cover exposed skin and hair.
Coriander Oil
Pesticide: insecticide, miticide
Controls: spider mites and soft-bodied
insects
Brand names: SM-90, Brigade 2EC
About: Plant coriander seed and harvest
cilantro plants. Although not a main
stream miticide and insecticide, cori
ander oil is at the base of a few popular
products. This contact poison kills by
drying out pest insects. SM-90 is made
from coriander oil, sulfonated canola oil,
and an acidic emulsifier.
Forms: emulsifiable liquid, liquid
Mixing: Follow instructions on label.
Application: Follow instructions on
label.
Safety: Use protective clothing when
handling and spraying.
Diatomaceous Earth (DE)
Pesticide: insecticide, miticide
Controls: Diatomaceous earth (DE)
abrades the waxy coating on the shells
and skin of pests, including aphids and
slugs, causing body fluids to leak out.
4 bug bomb is designed to be set in the middle
of the room and disperse the entire contents of
the can at one time.
This aerosol pyrethrum (0.5 percent) is one of
the best sprays for spider mites and insects.
“A breakthrough book for the field of organic gardening.” —wimicaa cxxocnis
Teaming
with
Microbes
The Organic Gardener's Guide
to the Soil Food Web
Jeff Lowenfels & Wayne Lewis
Foreword by Elaine Ingham
Teaming with Microbes is an excellent book
to learn about life in soil, compost, and
compost teas.
www.marijuanagrowing.com
489
A
Copper fungicide
I
SM-90 was developed in Canada more than
20 years ago as a natural miticide.
IQVHel229lbs
105Ltr/MetI04kg
ROOT SYSUM/FOIIAR SPRAY
SVSTTMt RACINAIRi/ARROSAGt fOUARt
A multi purpose wetting agent.
fe Nutrilife
Diatomaceous earth is safe and works very
well as a pesticide in many cases.
Once ingested, the razor-sharp particles
in DE rip tiny holes in the pest’s guts,
causing death.
Brand names: There are many.
About: Naturally occurring DE includes
fossilized silica-shell—remains of the
tiny one-celled or colonial creatures
called diatoms. It also contains 14 trace
minerals in a chelated (available) form.
Apply powder on soil, dust it onto
foliage, or create a barrier around plants.
Dilute DE in water as per instructions
for spray. Apply weekly as soon as pests
are apparent.
Forms: powder, wettable powder, liquid
Mixing: Follow instructions on label.
Application: Follow instructions on
label. DE is swept away by wind and rain.
Safety: Use only horticultural-grade
DE. Do not use chemically treated DE
meant for swimming pools. DE stays on
foliage for a few days or until washed off.
Earthworms, animals, birds, and humans
can digest diatomaceous earth with no ill
effects. Avoid contact with skin and eyes.
To guard against respiratory and eye
irritations, wear a protective mask and
goggles when handling this fine powder.
Homemade Sprays for Diseases
and Pests
Organic pesticide/miticide controls:
diseases and pests
Brand names: Homemade, however,
many store-bought controls include
the same elements as active ingredients,
most often in a concentrated form.
About: A strong hot taste, smelly odor,
and a desiccating powder or liquid are
the main components in home-brewed
pesticide and fungicide potions. Home
made sprays discourage and control
pests such as aphids, thrips, spider mites,
scale, and many others. Be careful when
testing a new spray; apply it to a single
plant and wait for a few days to learn the
outcome before applying it to all plants.
Forms: liquid, powder, emulsifiable
liquid, plant matter
Mixing: To make organic pesticide/
miticide spray concentrates, mix re
pellent substances with a little water
in a blender. Strain the resulting slurry
concentrate through a nylon stocking or
fine cheesecloth before diluting it with
water for application.
Application: Spray foliage until it drips
from both sides of leaves.
Safety: Safe. In fact, ingredients can be
found in most kitchens.
Toxicity: Homemade organic pesticide/
miticide usually is not toxic to humans
in dosages lethal to pests.
Safety: Wear a mask and gloves, and
cover skin and hair. Avoid contact with
eyes, nose, lips, and ears.
Homemade Recipes and Controls
Alcohol: Add isopropyl (rubbing) alco
hol to sprays to dry out pests.
Bleach: Use a 5 percent solution as a
general disinfectant. Use 10 percent for a
sure kill. Use a 25 percent solution when
treating seeds. Wash off residual bleach
with plenty of fresh water.
Cinnamon: Dilute cinnamon oil with
water. Use two teaspoons per quart of
water, or a few drops per pint as a fungi
cide or pesticide. It is relatively effective
to slow powdery mildew and control a
host of insects.
Citrus: Citrus oils are great ingredients
that kill insects.
DISEASES & PESTS
www.marijuanagrowing.com
Making y our
organic insecticide, miti
cide, orfungicide is as easy as blending the
ingredients together with water.
Dr. Bronner’s Pure-Castile Soap is natural
soap that is a great insecticide, miticide,
fungicide, and cleaning agent. Also, mix
Dr. Bronner’s soap with garlic, hot pepper,
citrus oil, and liquid seaweed combinations.
Isopropyl alcohol is widely available.
Clove: Clove oil is aromatic and repels
pests.
Garlic: Use a garlic press to squeeze
garlic juice into a homemade mix. Use
liberal amounts.
Horseradish: Add as you would garlic.
Best to use fresh root.
Hot pepper: Dilute Tabasco or any
store-bought hot pepper concentrate in
water.
Capsaicin: hot pepper spray; Bonide
Hot Pepper Wax; Repellex mole, vole
and gopher repellent; BrowseBan, and
Liquid Pence for deer
Hydrated lime: Saturate in water to
form a fungicide.
Mint: Mint oil drives insects away.
Dilute in water; measure several drops
per pint.
Oregano; Grind up fresh herb and use
a repellent, Mix with water.
Rosemary: The predatory mite
Phytoseiulus persimilis is less susceptible
to rosemary oil and ECOTROL than
spider mites, both in the laboratory and
in the greenhouse. The parasitic wasp
Encarsia formosa is more susceptible to
rosemary oil than whiteflies.
Sesame: Use sesame oil or any other
light oil sparingly to kill pests.
Soap: I like Ivory or Dr. Bronner’s
Pure-Castile soap. Use as an insecticide
and wetting agent. Mix a few drops with
water.
Tobacco: Mix tobacco with hot water to
extract the poisonous alkaloid. Do not
boil. Dilute concentrate with water.
Vegetable oil: Mix vegetable oil
(comprised mainly of fatty acids and
glycerides) with rubbing alcohol to
emulsify in water. See “Oils” in this
chapter.
Recipes for Homemade Mixes to
Control Diseases and Pests
Cooking or heating preparations can
destroy active ingredients. To draw
out (extract) ingredients, mince plant
material and soak in mineral oil for a
couple of days. Add this oil to the water,
including a little detergent or soap
to emulsify the oil droplets in water.
Biodegradable detergents and soaps are
good wetting-sticking agents for these
preparations. Soap dissolves best if a
teaspoon (5 ml) of alcohol is also added
to each quart (0.9 L) of mix.
Chrysanthemum, marigold, and
nasturtium blossoms; pennyroyal;
garlic; chive; onion; hot pepper; insect
juice (target insects mixed in a blender);
horseradish; mint; oregano; tomato; and
tobacco residues will all repel insects
such as aphids, caterpillars, mites,
and whiteflies. Spray made from pests
ground up in a blender and emulsified in
water will reputedly repel related pests.
Best used on large pests! The insecti
cidal qualities in the dead bug parts will
degrade quickly if combined with other
things; do not include insects mixed in
a blender with other ingredients be
sides water. Mixes that include tobacco
may kill these pests if the mix is strong
enough. These mixes can vary in pro
portions, but always filter the blended
slurry before combining with water for
/✓ /vw, rrionjuuriaqfowjng.com
491
the final spray. Straining avoids clogging
spray nozzles and plumbing.
Recipe One: Mix three tablespoons (44
ml) each of isopropyl alcohol, lemon
juice, garlic juice, horseradish juice,
Ivory liquid soap, and a few drops each
of Tabasco, mint oil, and cinnamon oil.
Mix all the ingredients in a small bowl
to form a slurry. Dilute the slurry at the
rate of one teaspoon per pint (5 ml per
470 ml) of water and mix in a blender.
Potent mix!
Recipe Two: Place one teaspoon (5 ml)
of hot pepper or Tabasco sauce and four
cloves of garlic in a blender with one
pint of water. Liquefy, then strain the
mix through a nylon stocking or cheese
cloth before using it in a sprayer.
Recipe Three: A mix of one-eighth to
one-quarter cup (30-60 ml) of hydrated
lime combined with a quart (0.9 L) of
water makes an effective insect and mite
spray. Mix a non-detergent soap with
lime. The soap acts as both a sticking
agent and an insecticide. Lime can be
phytotoxic to plants in large doses.
Always try the spray on a test plant and
wait a few days to check for adverse
effects to the plant before applying to
similar plants.
Recipe Four: Liquid laundry bleach
(sodium hypochlorite) is a good fungi
cide for non-plant surfaces. Mix as a 5
or 10 percent solution. It is an eye and
skin irritant, so wear goggles and gloves
when using it. Mix 1 part bleach to 9
parts water for a 5 percent solution. Mix
1 part bleach to 4 parts water for a 10
percent solution. Use this solution as
a general disinfectant for garden room
equipment, tools, and plant wounds. The
bleach solution breaks down rapidly and
has little, if any, residual effect.
This mix is an antifeedant when eaten
by pests. It performs best in rooms with
604- percent humidity.
Hydrogen Peroxide (H2O2)
Germicide: disinfectant
Controls: algae and slime
Fungistat: It is said to be helpful in
controlling bacterial wilt, Pythium and
Fusarium wilts.
Hydrogen peroxide (H2O2) is readily
available and best used to disinfect branches
offlower buds after harvest. H2O2 can he
destructive ifused on live roots, even if
diluted in solution.
Brand names: generic product
About: Hydrogen peroxide acts as an
algaecide and disinfectant in water.
Although effects are short-lived, they
can be devastating to small feeder roots.
Do not use H2O2 in hydroponic systems
or as a soil drench. Use only to steril
ize and clean. It will kill diseases, but
not after they have entered the plant’s
system. All municipal wa-ter systems and
old plumbing pipes contain slime mold.
H2O2 kills slime mold and lots of other
stuff, including algae.
Forms: liquid
Application: Use to kill diseases and
pests on harvested cannabis and to clean
garden containers, tool, and so forth.
H2O2 dissipates quickly when not kept
in an airtight container. H2O2 controls
diseases on surface for three to five days
but can destroy tender feeder roots.
Safety: H2O2 is safe for humans. On
contact, it kills pathogens that cause
infections. It kills tiny feeder roots on
plants.
Limonene
Pesticide: insecticide, miticide
Fungistat: Limonene controls some
fungus on the surface of foliage.
Brand names: Concern Citrus Home
Pest Control, Clean Green
CONCENTRATIONS
0.5 -1 cup
(118-237 ml)
6 gallons (22.7 L)
water
8 tablespoons
(11 ml)
2 gallons (7.6 L)
water
4 tablespoons
(59 ml)
L ........ '..... -.... --
1 gallon (3.8 L)
water
I
-------- -----
-
500 to 1,000 ppm is the recommended
concentration of 3 percent H2O2 solution.
MAKE SURE you are using 3 percent
H2O2, NOT a higher concentration.
Higher concentrations burn plants and
skin.
About: Limonene occurs naturally in
citrus fruits, a few vegetables, meats, and
spices. It is normally an extract from
orange peels (D-limonene). Limonene
has insecticidal, miticidal, and fungicidal
properties. It is antimicrobial and also a
dog and cat repellent. Limonene can be
used as a wetting and dispersing agent.
It is often used as a solvent in household
and industrial cleaners and degreasers.
It is very flammable and can be used
as a fire starter. It destroys an insect’s
system. Effective contact spray.
Mealybug and scale control
Forms: liquid
Mixing: Insoluble in water, must emul
sify in water. Read instructions on label
for tomatoes and vegetables. Corrosive—
clean equipment after use.
Application: Follow instructions on
label for tomatoes and vegetables.
Safety: can produce localized skin,
mucus membrane, and lung irritation
on contact. It has a very low toxicity in
humans. Keep away from kittens and
puppies. Leaves an oily film on water and
can be toxic to aquatic life. Corrosive.
Neem and Neem Oil
Pesticide: insecticide, miticide
Germicide: sterilant, disinfectant
Fungistat: controls some fungi on the
surface of foliage
Pesticide/miticide controls: many
diseases and pests
Brand names: There are many.
492
DISEASES & PESTS
www.marijuanagrowing.com
Limonene is found as the base of many natural
insecticides.
About: The Indian neem tree,
Azadirachta indtca, and the chinaberry
tree, Melia azedarach, have spawned a
host of insecticides and miticides. The
active ingredient, azadirachtin, is most
effective against young insects and is
available in various concentrations. It is
an antifeedant and disrupts insect life
cycles. Neem is available in powders,
liquids, oils (always use cold pressed oil),
and cakes. Different parts of the tree
and fruit, including the seeds, are used
to make pesticides. Neem also contains
nitrogen, phosphorus, potassium, and
trace elements. Neem is used for a host
of other things too.
Neem’s traditional use is based on its
detoxifying benefits that help maintain
healthy circulatory, digestive, respira
tory, and urinary systems. It is used for
external applications in skin diseases.
Neem extracts possess antibacterial
and antiviral properties. Its principle
constituents are nimbin, nimbinin, and
nimbidin. All parts of the plant yield
B-sitosterol.
Forms: oil, concentrate, liquid
Different products control different
insects
Neem controls: Neem is most effective
against caterpillars and other immature
Einstein Oil is a popular brands of neem
oil.
insects, including larvae of whiteflies,
fungus gnats, mealybugs, and leaf miners.
Mixing: Neem is often mixed with
vegetable (canola) oil. Just before using,
add neem to water with a pH below
7.0, and use a spreader-sticker. Agitate
constantly while using to keep the mix
emulsified. Throw out excess.
Application: Use as a soil drench or
add neem to the nutrient solution. This
allows neem to enter the plant’s tissue
and become systemic. Used in a sprayer,
neem becomes a contact spray.
Toxicity: Toxicity to beneficial insects
has been reported, but neem is not toxic
to humans.
Safety: Neem irritates eyes and skin;
wear a mask and gloves. Neem products
have numerous other applications. For
additional product and safety informa
tion, check out the Neem Foundation,
www.neemfoundation.org and www.
einsteinoil.com.
Pesticide organic
Neem oil controls: Neem oil is effec
tive against spider mites, fungus gnats,
and aphids. It is also a fungistat against
powdery mildew and rust.
Brand names: NeemGuard, Triact,
Einstein Oil
Mixing: Just before using, mix emul
sifiable concentrate in water with a pH
below 7.0, and use a spreader-sticker.
Agitate constantly while using to keep
the mix emulsified. Throw out excess.
Application: Spray on foliage, especially
under leaves, where mites live. Apply ev
ery few days so hatching larvae will eat it
immediately. Spray heavily so mites have
little choice but to eat it. Avoid spraying
the last few days before harvest. Some
growers report a foul taste when applied
just before harvest.
Persistence: Contact neem stays on
foliage for up to a month or until it is
washed off. Stays in plant system up to a
month when absorbed via roots.
Toxicity: Toxicity to beneficial insects
has been reported, but neem is not toxic
to humans.
Safety: Neem irritates eyes and skin;
we^r a mask and gloves. Neem products
have numerous other applications. For
additional product and safety informa
tion, check out the Neem Foundation,
www.neemfoundation.org and www.
einsteinoil.com.
Botanical insecticide, miticide, and
nematicide
AzaMax controls: spider mites, thrips,
fungus gnats, aphids, whiteflies, leaf
miners, worms, beetles, leafhoppers,
scales, mealybugs, nematodes, and other
soilborne pests.
AzaMax is a natural (neem tree) product
with a broad spectrum of pest control
and broad plant applications. Contains
azadirachtin A and B as active ingre
dients and more than 100 food-grade
limonoids.
Application: AzaMax can be applied up
to the time or day of harvest. It leaves no
harmful residue on foliage and buds.
Nicotine and Tobacco Sprays
Pesticide: insecticide, miticide
Pesticide organic: sucking and chewing
insects
Brand names: There are many brands
available.
About: This nonpersistent pesticide is
derived from tobacco, Nicotiana
tabacum. It is a stomach poison, contact
poison, and respiratory poison. This
very poisonous compound affects the
neuromuscular system, causing pests to
go into convulsions and die. Nicotine
www.marijuanagrowing.com
493
sulfate is the most common form. Use
a spreader-sticker when mixing this
liquid. Seldom phytotoxic when used as
directed. Combine with insecticidal soap
to increase killing ability.
The nicotinoids are new (nicotine-based)
systemic insecticides. The active ingre
dient, imidacloprid, could sell more than
all pesticides, but it has no effect on
mites or nematodes.
Forms: liquid
Mixing: Follow instructions on label for
tomatoes and vegetables.
Application: Follow instructions on
label for tomatoes and vegetables.
Safety: Nicotine and tobacco sprays
are very toxic to most insects (includ
ing beneficials), honeybees, fish, and
humans for a week to ten days after
application. If concentrate is ingested or
built up over years, humans may devel
op lung cancer and other cancers. Wear
a mask and gloves; avoid skin and eye
contact. Do not swallow any of this vile
poison. Do not use around nightshade
family—eggplants, tomatoes, peppers,
and potatoes—because they may con
tract tobacco mosaic virus (TMV) from
exposure to tobacco-based substances.
Oil, Horticultural
Organic contact pesticide insecticide,
miticide
Controls: Virtually invisible, horticul
tural oil kills slow-moving and immobile
sucking insects, spider mites, and their
eggs by smothering them.
Brand names: There are many brands
available.
About: Similar to medicinal mineral oil,
horticultural oils are made from animal (fish)
oils, plant seed oils, and petroleum oils re
fined by removing most of the portion that is
toxic to plants. Lighter-weight oil (viscosity
60-70) is less phytotoxic. Vegetable oil is also
horticultural oil. Mix 3/« teaspoon (75 ml) of
oil liquid spray—no more than a 1 percent
solution—per quart (0.9 L) of water. More
than a few drops could burn tender growing
shoots. Spray foliage thoroughly, including
the undersides of leaves. Apply oil sprays up
until two weeks before harvest. Repeat appli
cations as needed. Usually three applications,
one every five to ten days, will put insects
and mites in check. Lightweight-oil residue
evaporates into the air in a short time.
Horticultural oil should be lightweight and
organic.
Forms: oil
Mixing: Follow instructions on label for
tomatoes and vegetables.
Application: Follow instructions on
label for tomatoes and vegetables.
Safety: Residuals disappear in one to
three days under normal growing condi
tions. Horticultural oil is a safe, nonpoi-
sonous, and nonpolluting insecticide.
It can become phytotoxic if too heavy
(viscosity), if applied too heavily, or when
temperatures are below 70°F (21.1°C), or
when very humid; this slows evaporation,
increasing phytotoxicity. Wear a mask
and gloves. Do not use lubricating oils
such as 3-in-l or motor oil!
Vegetable Oil
Pesticide: insecticide, miticide
Pesticide organic controls: Vegetable oil
is virtually invisible. Like horticultural
oil, it kills slow-moving and immobile
sucking insects, spider mites, and their
eggs by smothering them.
Brand names: There are many brands
available at the grocery store.
About: Comprised of fatty acids and
glycerides, lightweight vegetable oil
smothers slow-moving and immobile
sucking insects, spider mites, and their
eggs. Mix two drops of oil—no more
Vegetable oil can be used in the garden, but
its use should be limited. Do not add too
much vegetable oil in sprays, or the spray will
disperse unevenly across leaves.
than a 1 percent solution—per quart of
water. Spray foliage thoroughly, includ
ing the undersides of leaves. Stop spray
ing two weeks before harvest.
Forms: oil
Mixing: 1 tablespoon per gallon
(15 ml /L)
Application: Mix sparingly in sprays
because it tends to decompose and leave
a residual that lasts several days.
Safety: Not toxic to mammals or fish.
Wear a mask and gloves.
Predator Urine
Discourages: rabbits, mice, voles, deer,
and other animals
Brand names: Piss Off!
About: Predators eat herbivores
(plant-eating animals), and predators’
urine scares away cannabis-munching
varmints. Create a predator (coyote)
urine barrier to frighten off rabbits,
mice, voles, deer, and more by applying
predator urine around problematic gar
dens. Note that the urine washes off in a
few days. This is why coyotes continually
pass by to mark their territory.
There are also numerous products con
taining hot peppers, citrus, eggs, salts,
soaps, garlic, and so on that work in
494
DISEASES & PESTS
www.marijuanagrowing.com
;*^sJatemJ!?
8? OUT OF REACH
OF CHILDREN
CAUTION
FWST MO
Pro-Control Plus is one of many brands of
encapsulated pyrethrum available. Whitmire's
X-clude is another brand-name product with
encapsulated pyrethrum that lasts several
hours after application.
varying degrees as repellents. They must
be applied properly to be effective.
Use also: fine plastic netting, wire fence
Forms: liquid
Mixing: Follow instructions on label.
Application: Products are often applied
via weatherproof applicators or “scent
rags” hanging around the garden. Follow
instructions on label for tomatoes and
vegetables.
Safety: Do not let any spill on you!
Pyrethrum
Pesticide: insecticide, miticide (broad
spectrum)
Controls: Pyrethrum kills aphids,
whiteflies, spider mites, and insects—
including beneficials. It is very effective
to control flying insects, but they must
receive a killing knockdown dose.
Brand names: Whitmire’s X-clude is
encapsulated and lasts longer
About: Natural pyrethrum is extracted
from the flowers of the pyrethrum
chrysanthemum, Chrysanthemum
coccineum and C. cinerariifolium,
Pyrethrins—pyrethrins, cinerins, and
jasmolins—are the active ingredients in
natural pyrethrum and kill insects and
mites on contact. Pyrethroids are axonic
poisons that affect nervous system of
Liquid pyrethrum can be as effective as
aerosol brands if it covers foliage completely.
insects and mites, eventually causing
paralysis.
Synthetic pyrethroids act as broad-spec
trum, nonselective contact insecticides
and miticides. There are more than
30 synthetic pyrethroids available in
different formulations. Deltamethrin is
available as a sticky paint that is used as
a trap when applied to stems and colored
objects. Many insects and mites are
resistant to pyrethroids.
Natural pyrethrum is expensive and
decomposes rapidly in sunlight, with
a short effective life. Synthetic pyre-
thrin-like materials, pyrethroids are
stable in sunlight and are effective against
insect and mites.
Pyrethrums have gone through four
evolving generations:
1. Pyrethrum, naturally occurring
2. Tetramethrin, resmethrin (Synthrin,
20 times as effective as pyrethrum),
bioresmethrin (50 times as effective as
pyrethrum)
3. Permethrin is virtually unaffected by
ultraviolet light in sunlight, lasting
four to seven days on crops.
4. Current generation, bifenthrin,
cypermethrin, cyfluthrin, deltame
thrin, esfenvalerate, fenpropathrin,
flucythrinate, prallethrin, tau-fluvali-
nate, tefluthrin, tralomethrin, zeta-cy-
permethrin. All are photostable. They
do not degrade in sunlight, and the
residual effectiveness is up to ten days.
Pyrethrum is often combined with
other botanical pesticides—rotenone,
ryania, etc.—to ensure effectiveness.
Aerosol forms contain synergists. (See
“Application” below.) Pest insects and
mites become immune to pyrethrins;
alternating with other sprays works best.
Synthetic Pyrethroids
Nonselective pyrethroids: kill all
insects and mites, including beneficials
and bees
Forms: powder, liquid, aerosol
Mixing: Follow instructions on label.
Application: Follow instructions on
label. Make sure to spray undersides of
leaves so spray contacts pest insects and
mites.
Persistence: 30 minutes to several hours
Toxicity: Toxic to all insects. Synthet
ic pyrethroids are somewhat toxic to
mammals.
Safety: Wear a mask and protective
clothing when applying sprays or
breathing in any form of pyrethrum,
especially aerosols. Aerosols contain
toxic piperonyl butoxide (PBO) and
MGK 464—possible carcinogens that
are easily inhaled.
Caution: Do not mix with sulfur, lime,
copper, or soaps. The high pH of these
substances render the mix ineffective.
Wash these substances off foliage with
plain water (pH below 7.0) before apply
ing pyrethrum.
Application: Spot spray infested plants.
Aerosol sprays are most effective on spi
der mites. This can burn foliage—spray
is ice-cold when it exits the nozzle—if
applied closer than one foot. Aerosol
spray contains a synergist, PBO or
MGK 264. Both are toxic to people.
Pyrethrum dissipates within a few hours
in the presence of air, HID light, and
sunlight. Overcome this limitation by
applying just before turning off the
lights, the circulation, and vent fans
for the night. Use encapsulated aerosol
pyrethrum.
www.marijuanagrowing.com
495
Persistence: Effective several hours
after application when the lights are on,
longer when applied after lights-out and
the fan is turned off.
Forms: wettable powder, dust, liquid,
granular bait, and aerosol
Toxicity: Synthetic pyrethroids are
not toxic to animals and humans when
eaten but become toxic to people when
inhaled. Toxic to fish and beneficials.
Safety: Wear a mask and protective
clothing when applying sprays or
breathing in any form of pyrethrum,
especially aerosols. Aerosols contain
toxic PBO and MGK 464 (possible
carcinogens), which are easily inhaled.
The pyrethroids have a low-to-moderate
acute toxicity to mammals and may be
irritating to the skin.
Quassia, Rotenone, Ryania, and
Sabadilla
This “group” of pesticides—quassia,
rotenone, ryania, and sabadilla—is often
combined to improve pest kill rate.
Quassia
Pesticide: insecticide, miticide
Controls: Soft-bodied insects including
aphids, leaf miners, and some caterpillars.
About: Quassia is made from a sub
tropical South American tree, Quassia
amara, and the tree-of-heaven,24/Azn£Zws
altissima. It is most often combined with
rotenone, ryania, and sabadilla because
it is difficult to extract.
Mixing: Follow instructions on label for
tomatoes and vegetables.
Application: Follow instructions on la
bel for tomatoes and vegetables. Quassia
stays active for two to five days on the
surface of plants.
Safety: Wear a mask and gloves; cov
er exposed skin and hair. Avoid skin
contact.
Toxicity: Quassia is safe for mammals
and (possibly) beneficials.
Rotenone
Pesticide: insecticide
About: Rotenone is an extract from
roots of several plants, including Derris
species, Lonchocarpus species, and
Tephrosia species. Rotenone is a non
selective contact insecticide, stomach
poison, and slow-acting nerve poison.
Controls: Nonselective control of bee
tles, caterpillars, flies, mosquitos, thrips,
weevils, and beneficial insects, but death
is slow. According to Hemp Diseases and
Pests, target insects can consume up to
30 times their lethal dose before dying!
Forms: powder, wettable powder, liquid
Mixing: Follow the manufacturer’s
instructions.
Application: Rotenone breaks down in
three to ten days.
Toxicity: This insecticide kills benefi
cials, birds, and fish; the effect on mam
mals is undetermined. Chronic exposure
may cause Parkinson’s disease.
Safety: Wear a mask and gloves; cov
er exposed skin and hair. Avoid skin
contact.
Ryania
Pesticide: insecticide
Controls: Ryania is toxic to aphids,
thrips, European corn borers, hemp bor
ers, flea beetles, leaf rollers, and many
caterpillars. Once pests consume ryania,
they stop feeding immediately and die
within 24 hours.
Forms: powder, wettable powder
Mixing: Follow instructions on label for
tomatoes and vegetables.
Application: Follow instructions on
label for tomatoes and vegetables. Stays
for active two weeks or longer.
Safety: Wear a mask and gloves;
cover exposed skin and hair. Avoid skin
contact.
Toxicity: somewhat toxic to mammals,
birds, fish, and beneficials
Sabadilla
Pesticide: insecticide, miticide
About: This alkaloid pesticide is
made from the seeds of a tropical lily,
Schoenocaulon officinale, native to
Central and South America, and a
European hellebore, Veratrum album.
Controls: A contact and stomach poison,
this centuries-old poison controls aphids,
beetles, cabbage loopers, chinch bugs,
grasshoppers, and squash bugs.
Forms: powder, liquid
Mixing: Follow instructions on label for
tomatoes and vegetables.
Application: Sabadilla is most potent
when applied at 75°F to 80°F (23.9°C-
26.7°C). Follow directions on package.
Persistence: two or three days
Toxicity: Sabadilla is somewhat toxic to
mammals, toxic to honeybees.
Safety: Wear a mask and gloves;
cover exposed skin and hair. Avoid skin
contact.
Seaweed
Pesticide: insecticide, miticide organic
Brand names: There are many brands;
check with your local hydroponic store
or retail nursery for a recommendation.
About: Seaweed contains numerous
elements, including nutrients, bacteria,
and hormones.
Controls: Suspended particles in sea
weed impair and even kill insects and
spider mites by causing lesions. The
particles cut and penetrate soft-bodied
pest insects and mites, causing their
body fluids to leak out.
Forms: powder and liquid
Mixing: Dilute as per instructions for
soil application.
Application: Spray on foliage, especially
under leaves where mites live. Stays active
up to two weeks when a spreader-sticker
is used.
Toxicity: Seaweed is not toxic to mam
mals, birds, or fish, but it is nonselective
and kills beneficials.
Safety: Wear a mask and gloves.
Sevin, carbaryl
Pesticide: insecticide, miticide
Controls: Sevin is often used to kill bees
and wasps; it kills all insects, good and
bad!
Brand names: Sevin
About: The development of carbamate
insecticides in the 1950s was a major
breakthrough because they do not
persist as long as chlorinated pesticides.
Carbaryl is broad spectrum, killing
both targeted and beneficial insects and
crustaceans. Carbaryl is detoxified and
eliminated rapidly in vertebrates. It does
not concentrate in fat and milk.
Forms: liquid, powder
Mixing: Follow instructions on label for
tomatoes and vegetables.
Application: Follow instructions on
label for tomatoes and vegetables.
496
DISEASES & PESTS
www.marijuanagrowing.com
Seaweed can be applied to foliage in a dilute
spray to kill insects and mites.
Sevin is a very strong insecticide often used to
kill wasps.
Applying insecticidal soap is one of the first
control measures in the garden.
!
Safety: Carbaryl is toxic to humans and
is considered a likely human carcinogen
by the EPA. Carbaryl is illegal in
several countries, including the United
Kingdom, Austria, Denmark, Sweden,
Iran, Germany, and Angola.
Soap, Insecticidal
Pesticide: insecticide, miticide
Brand names: There are many brands
available
About: Insecticidal soaps are contact
insecticides made from fatty acids of
animals and plants and are considered
organic. A variety of soaps are available
in potassium-salt-based liquid concen
trates. Soft soaps such as Ivory liquid
dish soap, Castile soap, and Murphy’s
Oil soap are biodegradable and kill in
sects in a similar manner to commercial
insecticidal soaps, but they are not as
potent or effective.
Controls: Insecticidal soaps control
soft-bodied insects such as aphids and
mealybugs, spider mites, thrips, and
whiteflies by penetrating and clogging
body membranes.
Caution: Do not use detergent soaps,
because they may be caustic.
Forms: liquid
Mixing: Add a few capfuls of soap to a
quart of water to make a spray. Ivory or
Castile soap can also be used as a spread
er-sticker to mix with other sprays. The
soap helps the spray stick to the foliage
better.
Application: Spray at the first appear
ance of insect pests. Follow directions
on commercial preparations. Spray
homemade mixes every four to five days.
Soft soaps will last only for about a day
before dissipating.
Toxicity: These soaps are safe for bees,
animals, and humans.
Safety: Wear a mask and gloves.
Spinosad
Pesticide: insecticide, miticide organic
Brand names: Spinosad
About: Spinosad (spinosyn A and
spinosyn D) is a new chemical class of
insecticides. The active ingredient is
derived from the rare species bacterium
Saccharopolyspora spinosa actinomycete.
Spinosad kills susceptible species by
exciting the nervous system after being
ingested by the insect. Spinosad must
be ingested by the insect, therefore it
has little effect on sucking insects and
nontarget predatory insects.
Spinosad is relatively fast-acting. The
pest insect dies within one to two days
after ingesting the active ingredient. It
is classified as an organic substance by
the USDA National Organic Standards
Board. The Organic Materials Review
Institute (OMRI) listed Spinosad for
use in organic production.
Controls: Fruit flies, caterpillars, leaf
miners, thrips, sawflies, spider mites,
fire ants, and leaf beetle larvae. It kills
caterpillars, fire ants, fruit flies, leaf bee
tle larvae, leaf miners, sawflies, spider
mites, and thrips.
Forms: liquid
Mixing: Mix 4 tablespoons per gallon of
water.
Application: Follow instructions on
label.
Toxicity: Spinosad has low mammal
Spinosad is a great natural pesticide against
caterpillars, thrips. and leaf miners.
www.marijuanagrowing.com
497
toxicity when ingested and no adverse
effects from chronic exposure. There
is a slight toxicity to birds, moderate
toxicity to fish, and moderate toxicity to
aquatic invertebrates. It is highly toxic
to bees and to oysters and other marine
mollusks. Avoid application where it is
toxic.
There is little or no phytotoxicity for
cannabis. To prevent insect pesticide
resistance, do not spray Spinosad more
than 10 times in 12 months in a garden
room or greenhouse.
Safety: Always wear protective clothing
when spraying Spinosad.
Streptomyces griseoviridis
Fungicide
Beneficial bacteria organic controls:
fungi that cause seed rot, root and stem
rot, wilt, and damping-off diseases
Brand names: MycoStop, RootShield,
Microgrow
About: More than 500 species of Strep
tomyces bacteria are known. Streptomy
ces griseoviridis strain K61 is a natu
rally occurring soil bacterium that was
isolated from decaying peat in Finland.
It produces spores that cause it to have
an earthy odor. It works to prevent fun
gal attacks and must be applied before
fungi invade. Streptomyces griseoviridis
colonizes plant roots before the disease
organisms arrive, displacing the bad
guys taking their food. It also makes
other chemicals that attack harmful fun
gi. This fungicide is effective against Al
ternaria, Botrytis, Fusarium, Phomopsis,
and Pythium. Streptomyces bacteria also
produce secondary chemicals, root-stim
ulating hormones that increase germina
tion, as well as root growth and overall
plant vigor. Applying 5. griseoviridis is
an excellent prevention measure to use
in Integrated Pest Management (IPM)
programs.
Apply fungicide as a preventative
measure before any sign of harmful
fungus so S. griseoviridis has a chance to
colonize and get established to prevent
harmful fungal attacks. Apply to seeds,
soil, or roots, and to transplants as a dip
or spray.
Forms: wettable powder (dried spores
and mycelium)
Mixing: Follow instructions on label for
tomatoes and vegetables.
Application: Follow instructions on
label for warm weather crops—toma
toes, peppers, etc.
Safety: OMRI Listed for use in organic
production. Wear protective gear includ
ing a respirator that filters dust and mist
when handling. Mild skin, eye and lung
irritation is possible. Watch for possible
side effects on pH and EC.
Sulfur
Sulfur Burners and Pests
Fungicide
Beneficial bacteria organic controls:
Sulfur protects against fungi that cause
seed rot, root and stem rot, wilt, and
damping-off diseases.
Brand names: MycoStop, RootShield,
Microgrow
About: Streptomyces griseoviridis strain
K61, a naturally occurring soil bacte
rium, colonizes plant roots before the
disease organisms arrive, displacing the
bad guys taking their food. It also makes
other chemicals that attack harmful
fungi. This fungicide is effective against
Alternaria, Botrytis, Fusarium,
A thin coat of sulfur on foliage will kill many
insects, mites, and, eggs. It also makes an in
hospitable environment for newly germinating
fungal spores. Vaporized sulfur is not labeled
for insect control even though it is toxic to
insects, as well as desiccating.
Phomopsis, and Pythium. Streptomyces
bacteria also produce root-stimulating
hormones that increase germination, as
well as root and plant vigor.
Apply before any sign of harmful fungus.
Apply to seeds, to the soil, to roots, to
transplants as a dip or spray. Apply before
diseases start so the Streptomyces
griseoviridis has a chance to get established
and can prevent harmful fungal attacks.
Forms: powder
Mixing: Follow instructions on label for
tomatoes and vegetables.
Application: Follow instructions on
label for warm weather crops—toma
toes, peppers, etc..
Safety: OMRI Listed for use in organ
ic production. Watch for possible side
effects on pH and EC.
Pesticide: insecticide
Pesticide/miticide/fungicide
Brand names: many
About: Sulfur is a centuries-old
fungicide that is toxic to insects and
controls fungus but is also quite phyto
toxic to plants if overdone. Application
temperatures
should be about 60°F (about
15°C). Sulfur can be applied directly
to foliage or evaporated into the air in
an enclosed area when using a sulfur
burner.
Sulfur is easiest and most economical
to apply in a liquid spray. Sulfur mixed
with liquid must not stay on foliage or it
will burn and damage it. Follow instruc
tions on the product label.
Sulfur evaporated in a garden room
stops Botrytis cinerea and powdery
mildew from growing on surfaces and
plants, but it does not enter the system
of the plant. Use only high-grade refined
sulfur. Sulfur burners heat sulfur to
evaporate it into the atmosphere of gard
enrooms and greenhouses. Evaporated
or volatized sulfur hangs in the air and
coats surfaces when it falls.
Controls: Sulfur can kill mildews,
Botrytis, and more diseases and pests
such as spider mites.
Caution: Do not apply in temperatures
above 90°F (32°C) and less than 50
percent humidity. It will burn foliage.
498
DISEASES & PESTS
www.marijuanagrowing.com
Forms: powder
Mixing: Follow directions on package.
Application: Apply in light concentra
tion. It is phytotoxic during hot, arid
weather. Follow instructions on label for
tomatoes and vegetables.
Evaporated sulfur: Turn off the vent
fans and lights when using evaporated
sulfur. Apply one hour after lights go
off. Apply for at least two hours to be
effective. Exhaust for three hours before
lights come back on. Apply weekly,
biweekly, or more often. Do not apply
two weeks before harvest.
Sulfur dusted on the floor of garden
rooms volatilizes in arid climates to pro
vide long-term protection from infection.
Phytotoxicity can be a problem during
high temperatures. Sulfur stays on foli
age several days or until washed off.
Toxicity: Too much sulfur results in
burned pistils in the buds closest to the
evaporator. Way too much sulfur turns
the leaves yellow in the margins between
the veins. Sulfur is toxic to insects but
phytotoxic to plants. It is not toxic to
honeybees, birds, and fish.
Sulfurfungicides are very strong and can burn foliage ifapplied when temperatures are too hot.
Sulfur is a common ingredient in many fungicides.
Safety: Wear a mask, gloves, and safety
goggles; cover exposed skin and hair.
Avoid skin, eye, ear, and nose contact.
Sulfur irritates eyes, lungs, and skin.
Trichoderma
Beneficial fungi organic controls
Brand names: Trichoderma is sold under
many brand names; look for the word
trichoderma on the label or ingredients list.
About: Trichoderma is added to many
soil mixes and hydroponic growing
mediums to protect plants from diseases
and pests and increase plant vigor.
Trichoderma spp. are common free-liv
ing fungi found in soil and root ecosys
tems. Some varieties colonize roots and
release antifungal antibiotic compounds
that induce resistance to diseases and
pests. Trichoderma enhances root
growth and development, crop produc
tivity, resistance to abiotic stresses, and
the uptake and use of nutrients.
Forms: Trichoderma is mixed in various
products.
Mixing: Follow instructions on label for
tomatoes and vegetables.
small handheld lamp will help keep pathogens
and pests out ofyour garden.
Ultraviolet light works incredibly well to kill
molds and mildews. The gardener passes the
UVC lamp briefly over the tender little clones
every day to kill any new mold spores. You
can also spot mold in the garden with a UVB
or green light. I put my headlamp on and walk
around the garden at night looking for signs of
iridescent mold on foliage.
Application: Follow instructions on
label for tomatoes and vegetables.
Safety: safe
UVC Light
Disinfectant, germicide, miticide,
insecticide
Brand names: Big Blue, Turbo Twist,
Air Probe Sanitizer
About; Germicidal UVC light deac
tivates the DNA of mites, bacteria,
viruses, and other diseases in air, liquids,
on surfaces, and on plants. The diseases
die or try to reproduce and then die.
This natural purifier also kills allergy-
and disease-causing microbes. Special
UVC lamps are available and produce
no residual contamination. Low-level
mercury lamps made from special glass
emanate 253.7 nanometers, precisely the
bandwidth to kill diseases.
UVC light is a sterilant and germicide. It
destroys any microorganisms that may
www.marijuanagrowing.com
499
be directly exposed to it. UV light has
little penetrating ability and is unable
to pass through opaque material, glass,
or water. Quartz is transparent to U V
light. UV rays from sunlight are filtered
off by the time the sun’s light reaches
earth's surface.
Application: UVC light is used to
sterilize medical cannabis in The
Netherlands. Run buds under UVC
light for a few seconds to kill bad stuff
such as mold, mold spores, and Botrytis.
Forms: artificial light
Safety: UV light is damaging to the skin
and eyes. Avoid all contact!
Vinegar
Pesticide: insecticide
Germicide: disinfectant
Fungistat: kills many fungi on contact
Pesticide/miticide
Controls: Vinegar helps with many gar
den problems. See “Application” below.
Brand names: generic
About: Table vinegar ranges in concen
tration from 4 percent to 8 percent by
volume. Pickling vinegar can be up to 18
percent. Any type of vinegar can be dis
tilled into a white (colorless) solution of
about 4 percent to 8 percent acetic acid in
water. White vinegar is used for cleaning
and sterilizing. Find white distilled
vinegar at your local grocery store.
Forms: liquid
Mixing: Dilute in water.
Application: To preserve cut flower
buds, add 2 tablespoons (30 ml) white
distilled vinegar and 1 teaspoon sugar (5
ml) to a quart of water in a glass.
Clean pots with a 50 percent solution of
white distilled vinegar.
Remove rust on spigots and tools by
soaking overnight in undiluted white
distilled vinegar.
Neutralize garden lime by adding white
distilled vinegar to the area.
Increase the acidity of soil by adding white
distilled vinegar to your watering can.
Eliminate anthills by pouring white
distilled vinegar into them.
Kill slugs by spraying them with a 1:1
vinegar:water mix using white distilled
vinegar.
Catch moths with a mixture composed
Vinegar has a low pH and can be used as a
disinfectant and to decalcify plumbing and
reservoirs. It is inexpensive and smells bad.
of 2 parts white distilled vinegar and 1
part molasses. Dangle the mix in a tree.
Cats, dogs, and rabbits are repelled by
vinegar-soaked cotton balls. Put them in
a small container with a few holes in it to
let the smell out.
Remove mold from terra cotta pots by
soaking in a solution of 1 cup white dis
tilled vinegar, 1 cup chlorine bleach, and
1 gallon of warm water before scrubbing
with a steel wool pad.
Safety: Vinegar has a low pH and is
corrosive. It also smells bad!
Traps
Pesticide: insecticide, miticide
Brand names: Tanglefoot
About: Sticky traps, such as Tanglefoot
resins, can be smeared on attractive yel
low or red cards to simulate ripe fruit.
When pests land on the “fruit,” they are
stuck forever!
Controls: Traps help contain spider
mites and nonflying insects within the
bounds of the barriers. Traps monitor
fungus gnat populations and help con
trol thrips. Other insects get stuck hap
hazardly to the sticky stuff. Black-light
traps catch egg-laying moths and other
flying insects, most of which are not
plant pests. Light and fan traps attract
many insects including beneficials, and
their use may do more harm than good.
Sex-lure traps exude specific insect
pheromones, sexual scents, of females that
are ready to mate. These traps are most
effective to monitor insect populations for
large farms.
Caution: Do not touch sticky substance.
It is difficult to remove!
Forms: sticky, thick paint
Mixing: Follow directions on container.
Smear on desired objects.
Application: Smear Tanglefoot around
the edges of pots, base of stems, and
at the end of drying lines to form an
impenetrable barrier-trap against mites
and insects. This simple precaution helps
keep mites isolated. However, resource
ful spider mites can spin a web above the
barrier. The marauding mites also ride
from plant to plant on the air currents
created by fans! Tanglefoot is persistent
until it is wiped off or completely fouled
with insect bodies.
Toxicity: Traps are not toxic to mam
mals or insects. Trapped insects and
mites starve to death.
Safety: Wear gloves, and do not breathe
fumes. Read and follow directions.
Sticky Yellow Traps
Hang sticky yellow traps around your
growing area to catch whiteflies, aduk
fungus gnats, winged aphids, and many
other garden pests. They’re not only
effective pest control, they’re also a great
early warning system. Pests are much
easier to spot against the yellow than on
your plants. Place the traps about three
feet (about 90 cm) apart within or just
above plant foliage.
Sticky blue traps: Similar to the orig-
Tanglefoot is an excellent product that keeps
pests from crossing a given boundary. V/ipe on
stems, container lips, drying lines, and more to
contain pests.
500
DISEASES & PESTS
www.marijuanagrowing.com
inal sticky yellow traps, sticky blue
traps attract pests to the blue portion of
the color spectrum. Customers report
success using Sticky Blue Traps against
thrips and leaf miners.
Water
Pesticide: insecticide, miticide organic
Brand names: Use tap water or reverse
osmosis (RO) water. Bottled water is
too expensive.
About: A cold jet of water—preferably
with a pH between 6.0 and 7.0—blasts
insects, spider mites, and their eggs off
leaves, often killing them. Hot water
vapor and steam also work as a sterilant.
Controls: A cold jet of water is an ex
cellent first wave of attack against spider
mites, aphids, and other sucking insects.
Steam controls spider mites, insects, and
diseases on pots, growing mediums, and
other grow-room surfaces.
Caution: Avoid spraying fully formed
buds with water. Standing water in or on
buds promotes gray mold. Do not apply
hot steam to foliage.
Forms: liquid
Mixing: Use RO or low-EC water when
possible.
Application: Spray leaf undersides with a
jet of cold water to knock off sucking spi
der mites and aphids. Apply water as a mist
or spray when predatory mites are present.
The extra humid conditions impair the
pest mite lifecycles and promote predatory
mite health. Rent a wallpaper steamer. Get
it cooking, and direct a jet of steam at all
grow-room cracks and surfaces.
Toxicity: Water is not toxic to mam
mals, fish, or beneficials.
Safety: Do not spray strong jet of water
Sticky yellow traps can be used to monitor
insect activity and to trap pest insects
over time.
Water is a great pesticide. Spray foliage vigor
ously with water to dislodge and mutilate insects
and their eggs. Often a brisk water spray will be
all the insect control necessary on outdoorplants.
in eyes, up nose, or into other body
orifices.
Beneficial Insects
The predators for specific insects and
mites are listed in the entry after each pest
under “Beneficial Insects.” This section
is about predators, how to identify them,
and how to receive, introduce, and apply
their help in medical cannabis gardens.
Predators and parasitoids are the two
types of predators. Most predators are
larger than their prey. Parasitoids are
typically smaller than hosts. Parasites
lay eggs on or inside the host. The eggs
hatch into larvae and eat the host from
the inside out. Parasites kill one to sev
eral hosts. Predators kill many pest prey.
Predator and parasite availability and
supply have changed substantially over
the last few years. Today many more
beneficial insects are available to medical
cannabis gardeners than ever before.
Shipping, care, cost, and application of
each predator or parasite is very specif
ic and detailed instructions should be
provided by the supplier. Make sure the
supplier answers the following:
1. Latin name of the predator, so there
is no confusion as to identity
2. Specific pests attacked by the predator
3. Life cycle information
4. Preferred climate, including
temperature Application rate and
mode of application
For more information about predators,
check out the following web pages:
Nature’s Control:
www.naturescontrol.com
Koppert Biological Systems:
www.koppert.nl/english
University of Wisconsin-Madison,
Department of Entomology:
www.entomology.wisc.edu/mbcn/mbcn.
html
By definition, a predator must eat more
than one victim before adulthood. Some
predators such as ladybugs (ladybird bee
tles) and praying mantises have chewing
mouthparts to eat their prey whole. But
lacewing larvae have piercing-sucking
mouthparts to suck the life from victims.
Typically adult parasitoids insert a single
egg into many hosts. The egg hatches for
the larva to eat the host from the inside
out, often emerging as adults.
Predators like to be surrounded by prey.
When the prey population diminishes,
predators look for infestations where
food is easy to find. They never com
pletely eradicate the pest insects. Preda
tors are best used for preventive control.
Of all insect species, more than 97 per
cent of those usually found around the
home landscape are beneficial or are not
interested in cannabis.
To get the most from predators, get
used to a little pest damage on plants.
Cannabis is tough and can deal with the
damage. Beneficials also need shelter in
the form of leaf litter and debris (mulch)
to hide and cool down on hot days.
Growing other non-cannabis plants helps
provide a diverse environment to accom
modate other natural enemies of pests.
Most beneficials stay in the garden when
there is a constant source of pollen and
nectar (available commercially) substi
tutes available when prey is scarce.
Flowers and plants that attract and
maintain beneficials include: aster
species, sweet alyssum, pansies, dill,
www.marijuanagrowing.com
501
Beneficial wasp hunting for prey
Beneficial insects being released
Lacewing eggs on a long stock (MF)
Queen Anne’s lace, angelica, fennel,
yarrow, sunflowers, coneflowers, daisies,
cosmos, lavender, goldenrod, hyssop,
evening primrose, and buttercups.
Release as many predators and parasites
as possible if you have an infestation.
This will get the problem under control
quickly. Remember, the good bugs need
to outnumber the bad bugs. Predators
and parasites outbreed their victims,
reproducing faster than pests are able to
keep up with.
Stop using all-toxic chemicals at least
two weeks before introducing predators
to the garden. You can apply pyrethrum
and insecticidal soaps up to four days
before, but all residues must be washed
off with water. No spraying whatsoever
after predators and parasites are re
leased.
Sterilize garden rooms and greenhouses
between crops for best results. Perpetual
crops are perfect for predators because
they can live from one crop to the next.
Nonflying predators fare best in gar
den rooms that have an HID; ladybird
beetles fly into the lamp and die in a few
days.
Do not use “zapper” lights to electro
cute insects. Although perhaps amusing
to watch, these death trap lamps kill
more beneficial insects than pest insects!
It takes a bit of time and patience to
introduce predators to the garden, and
they need a consistent climate. Once
established, predators and parasites will
keep problem insects and mites under
control.
There are some outstanding commer
cial sites that sell beneficial insects and
controls. I debated whether or not to
include a large descriptive section on
beneficials and decided to make a quick
overview of attracting beneficials and
reference some selected commercial
websites that specialize in beneficial
controls for indoor and greenhouse
growers.
Check these websites for more
information on beneficial insects:
Nature’s Control:
www.naturescontrol.com
Koppert Biological Systems:
www.koppert.nl/english
Arbico Organics:
www.arbico-organics.com
Growquest: www.growquest.com
Predators and parasites are shipped
special delivery—usually next day air.
Always open the package as soon as it
arrives. Do not let predators sit in a sun
baked mailbox. High temperatures will
kill the little predators and parasites.
Distribute eggs and insects and integrate
them into the garden. Monitor their prog
ress and keep them alive until they get
ahead of pest insects and mites. The pests
gradually disappear, and the beneficials
take over. Overall, beneficials are more
active in slightly humid environments.
Green and Brown Lacewings
Lacewings lay their eggs at the end of
long stalks, probably to protect them
from ants and other lacewing larvae.
The larvae of both green and brown
lacewings arc alligator-like with sick
le-shaped mandibles. Adult green
lacewings are approximately 0.75 inches
(19 mm) long and pale green, with large
copper-colored eyes. They are attract
ed to lights at night, and can produce
a noxious odor when handled. Brown
lacewing adults are tan or brown and
about half the size of green lacewing
adults.
Green lacewing larvae (aka aphid lions)
attack and consume large numbers of
aphids, mites, lace bugs, and other small
insects. Pollen, nectar, and even honey
dew sustain the generally more passive
adults.
Spiders
Spiders, including the green lynx, have
no antennae. They have two body parts,
eight legs, eyes, mouth, and an abdomen,
which contains the digestive organs,
genitals, and spinnerets. More than
3,000 species reside in North America.
Most spiders have venom glands but
rarely bite people. Brown recluse and
black widow spiders and a few others
bites can be fatal to humans.
Spiders are the most abundant group of
predators found in gardens. They feed
on insects typically caught in a web.
Jumping spiders and wolf spiders are
active hunters. Crab spiders ambush
their prey.
There is a long list of predators below
that you may find in your outdoor
garden. Attract predators by gardening
organically. Avoid using pesticides or
fungicides. Spot spray if necessary.
praying mantis (Tenodera sinensis)
big-eyed bugs
502
DISEASES & PESTS
www.marijuanagrowing.com
Spider on the prowl for prey
Green lynx spider (MF)
Praying mantis eats all insects and mites (MF)
dustwings
fly parasites (mixed species)
fungus gnat predators (Hypoaspis sp.)
green and brown lacewings
ground beetles
hover flies (syrphid flies or flower flies)
lady beetles, ladybird beetles (ladybugs)
mealybug destroyers (Cryptolaemus
montrouzieri)
minute pirate bugs
parasitic flies
parasitic wasps (Trichogramma wasp)
pirate bugs (Orius sp.)
predaceous stink bugs
predatory nematodes “Double-Death
Mix” (Stemernema / Heterorhabditis
mix)
predatory spider mites, Neoseiulus
(Amblyseius) californicus, Mesoseiulus
(Phytoseiulus) longipes, Phytoseiulus
persimilis, Neoseiulus (Amblyseius)
fallacius, Galendromus (Metaseiulus)
occidentalis, and Galendromus
(Typhlodromus) pyri
predatory wasps, Ichneumonoidea wasp
soldier beetles
spider mite destroyers (Stethorus
punctillium)
tachinid flies
thrips predator mites (Amblyseius
cucumeris)
whitefly parasites (Encarsia formosa)
whitefly predators (Delphastuspusillus)
Frogs and Toads
Frogs and toads eat insects and slugs.
The frogs will need a water source, while
toads are more terrestrial. Large snakes
in the garden will eat gophers, squirrels,
and mice as well as moles and shrews.
Snakes can give you a good scare if you
come across one unexpectedly! The
snake will also want to eat your frogs.
Plan carefully before committing to any
mini predator to solve pest infestations.
Frogs, toads, snakes, and other reptiles
are extremely sensitive to pesticides,
fungicides, and other chemicals. To
attract these beneficials, avoid using
chemicals and minimize all control
sprays the garden.
Troubleshooting
Simple troubleshooting will solve 90
percent of the problems encountered
when growing cannabis. The first, keep
the growing area clean all the time. Re
move all trash and dead foliage on grow
ing medium and in the garden. They are
the source of contamination and provide
habitat for interlopers.
Is the problem cultural or caused by
diseases or pests. Normally cultural
problems lead to disease and pest issues.
If there is a cultural problem, you can
check the symptoms and examples in
chapter 21, Diseases & Pests,
“Common ‘Nutrient’ Problems.”
The disease or pest should be identified.
In many cases insects in the garden are
beneficial. Once diseases start causing
plant damage they become a problem.
Look for plant damage carefully. Check
foliage for damage, check stems and soil
for damage and strange growth. Take a
close up photo of the disease or pest and
compare it to the images in this chapter
for a match. Find the closest match and
follow control measures outlined in
this chapter.
Less disease and pest damaged is
suffered when plants are healthy.
Diseases and pests always attack weak
plants. Check slow-growing plants
extra for problems.
Set out yellow and blue sticky traps to
monitor flying insect populations.
Most problems occur after plants are
two months old.
Always use the least toxic means of
control first.
Unexplained Problems
Abiotic diseases
Diseases from abiotic (nonliving) causes
often arise suddenly. They usually
resemble diseases caused by living
organisms. Plants that suffer stress are
more susceptible to diseases and pests.
Nutrient deficiencies are also a major
problem.
Pollutants take their toll. Sulfur dioxide,
for example, can cause interveinal leaf
chlorosis. Hydrogen fluoride causes
www.marijuanagrowing.com
503
chlorosis. Ozone and other air pollut
ants, nitrous oxides, and so forth all do
great damage.
Sprays and Spraying
Spreader-Stickers
Many products already contain a surfac
tant, surface-active substance (adjuvant),
which enhances the effectiveness of
foliar fertilization.
Spreaders (wetting agents) reduce the
surface tension of sprays and keep them
from beading up and rolling off the foli
age. Big, bulbous drops on leaves mean
you need to use a spreader. Flat drops
that slide off the foliage mean there is
too much spreader. There are nonionic,
anionic, and cationic spreaders. The
nonionic spreaders that do not ionize in
water are the most common, and they do
not react with most pesticides. Anionic
and cationic spreaders are not used often.
Stickers are designed to help spray adhere
to the leaf, so it does not wash off when
it rains or when dew forms. But research
proves that direct laminal translocation
(through the surface or cuticle of the leaf
[lamina]) is the only option. Stickers also
have the ability to seal off stomata—not
a good idea. They also slow evaporation
and impart a waterproof coating. Some
stickers are spreaders, too. Organic stick
ers include yucca extract, fish oil, fatty
acid soaps, and emulsified soybean oil.
Extenders (stabilizing agents) protect
applied sprays against the UV radiation
and heat that degrade sprays. But the
nutrient will only move in as long as it is
in solution. The amount of time under
normal conditions would make the use
of extenders pointless, as it will take
longer to affect the nutrients by UV
than the water will (or should) remain
on the leaf.
Liquid soaps make an excellent spreader
or water tension breaker (surfactant). I
use Ivory or Castille liquid soap at the
rate of 2 drops per gallon (3.8 L) and
it works perfectly. No need to spend
extra money on commercial products!
Use only natural soaps with no weird
additives. Professional greenhouse com
mercial growers use Tween 80 because
it does not react with other elements in
solution.
Application
1. Spray foliage with a fine mist, and
do not create droplets on the leaves.
Fine mist is electrically attracted by
the foliage. Even young cannabis
plants have waxy hairs that impair
liquid penetration.
2. Do not spray plants that are hot or
when the atmosphere is too dry.
Spray in low light, either before the
lights go off or just as they are com
ing on. If spraying in hot conditions,
first spray everything with plain
water until the temperatures of the
room and foliage drop, before apply
ing the real spray. Spraying when the
plant foliage is hot causes the spray
to crystallize on the surface, which
stops the penetration. Spraying with
water ten minutes afterward often
increases the penetration. Mobile
nutrients move freely within a plant.
Immobile nutrients move slowly, but
once deposited, they stay.
3. Apply mobile nutrients sparingly.
Immobile nutrients—sulfur, boron,
copper, iron, manganese, molyb
denum, sulfur, and zinc—often
require two or three applications.
Calcium and boron are poor can
didates for foliar feeding because
they translocate poorly. But urea
nitrogen applied as a spray in high
humidity penetrates almost in
stantly into leaves. Be careful when
spraying urea-based fertilizers,
and keep them diluted. Urea also
carries other nutrients into the plant
and works well for a base to the
mix. Foliar feeding should turn the
plant around in less than a week. A
second spray could be necessary at
week’s end to ensure that the cure
sticks.
4. Boron, calcium, and iron move
slowly during flowering. A sup
Spreader-stickers help keep sprays in place so
they are effective.
Protect yourselffrom all garden sprays indoors
and outdoors.
Phytotoxicity caused by spray on leaves (MF)
504
DISEASES & PESTS
www.marijuanagrowing.com
piemental foliar dose often speeds
growth when it slows. A foliar spray
of potassium can also help flower
ing, especially if the temperatures
dip below 50°F (10°C) or above
S0°F (26.7°C).
5. Always spray new growth. The thin,
waxy layer and a few trichomes
allow for good penetration.
6. Measure the pH of the spray, and
keep it between 7.0 and 8.5 . Potassi
um phosphate (K2HPO4) becomes
phytotoxic below pH 4.0 and above
8.5 . Stomata are signaled to close
within these pH ranges.
7. Use a surfactant with all sprays, and
apply these as per the instructions
on the label. Add the proper amount
of surfactant so droplets do not
form on the leaves. Once formed,
droplets roll off the foliage, render
ing the spray ineffective.
8. Stop the application before drop
lets form on the leaves. Make a test
spray on a mirror to ensure that
the spray is even and does not form
droplets that roll off the mirror.
Fungicide and Pesticide
Application Basics
Use only contact sprays approved for
edible fruits and vegetables.
Warning: DO NOT USE TOXIC
SYSTEMIC CHEMICALS! Read the
entire label on all sprays. The toxic or
active life of the spray is listed on the
label. Wait twice as long as the label
recommends, and thoroughly wash any
foliage before ingesting it. Toxic life
is many times longer indoors, because
sunlight and other natural forces are not
able to break down chemicals.
Sprays are beneficial if not overdone.
Every time a plant is sprayed, the stomata
are clogged and growth slows. At 24 to
28 hours after spraying, rinse leaves on
both sides with plain water until it drips
from leaves. Avoid sprays that leave a
residual during the weeks before harvest.
Spraying increases chances of gray (bud)
mold once dense buds form.
Phytotoxicity is the injury to plants
caused by sprays. Symptoms include
burned leaves, slow growth, or sudden
wilt. Spray a test plant and wait a few
days to see if spray is phytotoxic. Water
plants before spraying. Phytotoxicity
is diminished when more liquid is in
foliage.
Temperatures above 68°F (20°C) make
virtually all sprays, even organic ones,
phytotoxic and damaging to foliage.
Intense light causes leaves to take in
the chemicals too quickly and will often
cause leaf damage.
Spray early in the day so ingredients are
absorbed and foliage dries. Spraying two
hours or less before lights-out can cause
foliar fungus when water sits on leaves
for too long.
Do not mix two products. It could
change the characteristics of both.
Warm temperatures mean spraying
twice as often, because bugs breed twice
as fast.
Use a clean, accurate measuring cup or
spoon. Measure quantities carefully!
Mix pesticides and fungicides just
before using them, and safely dispose of
leftovers.
With soil active sprays (sprays that leave
an active residue in soil), precautions
should be taken to avoid overapplication.
Spray applications require more atten
tion to detail, because overspray material
lands or drips onto the medium.
Remember that dosage equals
concentration times volume (dose =
concentration X volume).
Spray equipment: To assure proper
spray volumes, your compressed air
sprayer should be equipped with a pres
sure gauge and regulator. Your sprayer
should be calibrated by determining the
output of the chemical with the selected
Hand'pump sprayer for small jobs
Pump-up band sprayer for small gardens
Pump-up sprayer for large gardens
www.marijuanagrowing.com
505
Hand fogger for powders
Electric fogger for larger gardens
nozzle at the selected pressure within a
specified time period. Using this infor
mation, you can apply a known amount
of material to a known area. Spray
droplet size also affects response, with
smaller droplet sizes providing better
coverage, but only up to a point.
Many mist or fog type applicators do not
provide adequate volume for coverage of
plant stems and have not been effective
when used with compounds like Bonzi*.
Dramm makes one of the best applica
tion systems that is a cold fogger, but be
advised that vapor applications such as
thermal are also extremely effective and
dangerous.
^Caution: DO NOT USE Bonzi on
cannabis! Anyone doing so deserves to
be arrested and jailed. And I mean any
product (Dutch Master) that is sold to
this industry is the same—deadly and
persistent for years in the plant.
Sprenches are high volume foliar sprays
that result in runoff into the media,
providing a drench effect. Concentration
levels are lower than those recommend
ed for sprays.
Powder applicators require a little more
skill to use. The powder is dispersed in
a fog around plants so that it adheres
to foliage. Powder applicators work
best when there is no wind and there is
plenty of room around plants to use the
device. Always wear a protective mask,
goggles, and gloves because the powder
tends to go everywhere.
Soil drenches are easier to apply uniform
ly than sprays because the drench volume
is easily measured, and when applied to
moist media, it is easy to obtain good
distribution in the media. In general,
apply four ounces of drench solution to
a six-inch “azalea” pot, and that volume
is adjusted up or down with pot size to
obtain a volume where about 10 percent
of the solution runs out the bottom of
the pot when the media is moist.
Chemigation or application through
the irrigation system: In flood (subirri
gation) or drip irrigation, the nutrient,
additive, or organic agent can be added
to the nutrient tank like a water-soluble
fertilizer. This process is also called
“watering in.” Many products are
recommended to be injected into the
irrigation water and can often be applied
at very low rates of active ingredient
when irrigating.
506
DISEASES & PESTS
www.marijuanagrowing.com
509 Unforgettable Qualities of
Cannabis
510 Physiology of Male and
Female Flowers
510 Female Flowers
513 Sexual Propagation
515 Classical Cannabis Breeding
515 Thin-Layer Chromatography
515 Influence of Alleles
516 Dominant and Recessive Traits
517 True Breed
517 Hybrids
517 F1 Hybrid Varieties
518 Inbreeding
519 Outbreeding
519 Backcrossing
520 Backcrossing: Incorporating a
Dominant Trait
520 Backcrossing: Incorporating a
Recessive Trait
520 Self-Pollinating (Selfing)
521 Self-Pollinating Breeding
521 Feminized Seeds
521 Environmental Stress
522 Alter Hormone Levels
522 Day-Neutral (aka Autoflowering)
Feminized Varieties
523 Making Seeds at Home
523 Making Seeds: Step-by -Step
529 Seed-Crop Care
529 Breeding Terms
531 Ploidy Factor
531 Modern Cannabis Breeding
Casual and serious cannabis breeders working with Mother
Nature use selective breeding have transformed a wild plant into
countless varieties of medicinal cannabis. New varieties are easy,
fun, and satisfying to create. Home cannabis gardeners breed
plants for many reasons—to increase yield, cannabinoid profile,
disease and pest resistance, and so forth. Most often, modern
medicinal cannabis has been bred for high cannabinoid con
tent (specifically THC), for
heavy yield, for early harvest
indoors, and occasionally
for harsh outdoor climates.
Today, more attention is being
given to other cannabinoids,
such as CBD, and cultivation
stress—resistance to diseases
and pests and tolerance of
drought and cold.
Countless cannabis gardeners
are patiently applying their
imagination and creativity
using basic breeding (sexual
propagation) techniques to
create new generations of
seed. Breeding is easy, low-
cost, fun, and exciting. It
requires minimal time and
skill but results in big rewards.
Nevil, founder of the Seed Bank of
Holland, traveled the world to find
the best cannabis seeds.
www.marijuanagrowing.com
507
This colorful 'Pakistan Chitral Kush" from
CannaBioGen is a pure landrace line from
Chi tral. Pakistan. It is also on the cover of this
book!
Seated in the center in white, Sensi Seeds
owner Ben Dronkers is pictured collecting
seeds in Afghanistan.
The Internet has changed the availability of
genetics (seeds) worldwide.
The basics outlined in this chapter show
any gardener how to start breeding and
create new generations of viable medic
inal cannabis seeds. Indoor, backyard,
and greenhouse breeding is essential
to acclimate varieties to local climates
and to increase resistance to diseases,
pests, and stress. Indoor and green
house cultivation can expedite outdoor
breeding programs. Unfortunately, med
ical cannabis seeds are not available in
some jurisdictions, and indoor breeding
is a matter of necessity for patients and
caregivers.
To date, much of the cannabis breeding in the
USA has been done by clandestine breeders
such as Mel Frank, who introduced varieties
such as 'Afghani", 'Nepalese", and 'Mexican",
as well as many Colombian varieties.
On the surface, breeding is simple:
pollen from a male plant is used to
fertilize (pollinate) a female plant, and
seeds result. In fact, this is what most
cannabis crosses are based upon—
crossing a cannabinoid-potent male
with a cannabinoid-potent female plant,
often referred to as “pollen chucking.”
However, a few important genetic
details are involved.
Crossing cannabis plants can become
very complex, and plants take time to
grow to express their genes. Modern
plant breeders study statistics, chemis
try, plant physiology, microbiology, and
other disciplines to understand and breed
plants. The basic information presented
here is in an easy-to-understand format
so it is as straightforward to reference as
possible. Cannabis breeding is a long
term process, and the possible outcomes
of progeny are infinite.
Much more scientific information
about plant breeding is available on
the Internet, including modern genet
ic principles by Gregor Mendel and
inspiring stories from American breed
ers such as Luther Burbank. Be sure to
read about Dr. Kevin McKernan, who
mapped the cannabis genome!
Please continue studying after you have
digested this basic chapter. Remember,
breeding cannabis is a long-term
endeavor—even in an indoor garden
room where four generations are possible.
The cannabis world today consists of
millions of small gardeners in more than
200 countries around the world'"*. Many
gardens exist in unstable and difficult
growing conditions. Adopting new
cannabis varieties developed for culti
vation in faraway climates and indoor
grow rooms does not meet the needs of
many outdoor gardeners and their local
The Afghani" x 'Congolese"plants in the
foreground are the product ofselective breed
ing. The miscellaneous sativa plants in the
background represent wild cannabis plants.
(MF)
508
BREEDING
www.marijuanagrowing.com
Choosing the proper male breeding stock is
halfof the equation. Choose the best males pos
sible that exhibit the desirable traits you want.
This beautiful garden of "Sonoma Coma3
females is the result ofyears ofselective breed
ing in a valley full ofvineyards in California.
Individual male flowers that appear on a
female flower bud are often called “bananas”
because they look like little bananas.
This "African3grown in 1977 has a small male
flower on this predominately female flower
bud. This is an intersex male flower.
climates. The Internet"’ and cannabis
gardeners’ ingenuity have broken ground
for gardeners everywhere to participate in
the breeding process. Breeding goals can
now be identified and defined by local
gardeners instead of large seed companies
or fad-driven advertising.
"For example, the following YouTube
video has received more than 5 million
hits from more than 180 countries:
www.youtube.com/user/
jorgecervantesmj.
Most gardeners prefer to acquire seeds
from a reputable seed company, and
too often assume they these seeds are
consistently of the highest genetic
quality. Often, commercially available
seeds are produced by a few large seed
makers who wholesale to resellers, many
of them with Internet sites and retail
store outlets. Other seeds are produced
by basement growers, small startups,
or small- to medium-sized established
companies.
Few small companies can maintain a
library of true-breeding stock and breed
stable parent stock over time. Stock pro
duced by large companies usually fills
demand and maintains standards.
Unforgettable Qualities
of Cannabis
Cannabis has a unique set of qualities
that influence its life cycle and repro
duction. Working with these natural
qualities is essential to breeding cannabis.
Please remember them when working on
all breeding projects.
Cannabis is photoperiodic reactive,
flowering under 12 hours of uninter
rupted darkness and 12 hours of light,
which gives breeders the ability to grow
up to 6 crops every year. These charac
teristics facilitate fast-track breeding
because 6 years of crosses can be com
pleted in 1 year.
Cannabis is dioecious; it produces each
of the male (staminate; stamen bearing)
and female (pistillate; pistil bearing)
sexual organs on different individuals,
and it is one of the few annual dioecious
plants. This quality makes it very easy
to cross an individual male cannabis
plant with an individual or population of
females.
Male (staminate) and female (pistillate)
plants are easy to distinguish. See close
up details of male and female flowers
along with full descriptions below in
this chapter.
Monoecious varieties produce both
staminate and pistillate flowers on the
same plant. Monoecious varieties are
mainly used for hemp seed production.
Monoecious varieties do not make
good medical cannabis breeding stock.
Plants with both male and female
flowers are often called by the mis
nomer “hermaphrodite.”
Outcrossing plant: Outcrossing
cannabis grows best when plants cross
with other plants with different genes.
Corn, dogs, cannabis, and people are
all outcrossers. Backcrossing and
inbreeding cannabis for too many
generations will be detrimental.
Intersexuality occurs when flowers of
a male plant grow on a predominantly
female plant, or when female flowers
grow on a predominately male plant. It is
a trait that can be caused by both genetic
and environmental factors. Intersex
plants with the inherited gene grow
flowers from both sexes on the same
plant even in perfect growing conditions.
Intersex plants arc often called by the
misnomer “hermaphrodite.”
www.marijuanagrowing.com
509
Indoors, plants are easily exposed to
stress—inconsistent or extreme tempera
ture, light cycles, fertilizer, pH, etc. —
and this stress can cause female plants to
grow an occasional male flower. Breeders
prefer not to perpetuate the intersex
gene, and when possible they eliminate
it. A single male flower on a female plant
can pollinate a big part of the female. See
“Feminized Seeds,” on page 521.
Physiology of Male and
Female Flowers
Male Flowers
Male (staminate) cannabis flowers are
about 0.25 to 0.5 inches (0.6 -1.3 cm)
long, and thousands of individual flow
ers can develop on a large plant. Most
of the flowers develop in loose clusters
(cymes or cymose panicles') of about 5 or
10 flowers each, borne on tiny branches
and their side (lateral) branches. The
clusters can pile atop each other to form
dense aggregates of hundreds of individ
ual flowers, particularly at the ends of
stems and branches.
Each male flower’s calyx consists of
5 tepals (sometimes identified as
“sepals”)—usually white, yellowish or
greenish, but often tinged purple—that
might be described as “petals,” and 5
pendulous stamens that bear pollen in
sacks called anthers. Anthers hang by a
thin, threadlike filament and together,
filament and anther make up the stamen.
Once mature, 2 openings on opposite
sides of each anther open zipper-like,
starting at their base, to slowly release
their pollen into the wind, carrying it
(hopefully) to stigmas. It has been esti
mated that the thousands of flowers on
a single male can release more than 500
million pollen grains.
Unopened male flower clusters remind
some growers of tiny grape clusters,
and fresh anthers look somewhat like
bunches of tiny bananas. Male flowers
are simply called male flowers or male
flower clusters, and the pollen holders are
referred to as either stamens or anthers.
Female Flowers
Each female marijuana flower has 2
stigmas that protrude from the single
ovule enclosed in the bracts; fresh
stigmas are “fuzzy” (hirsute), about
This drawing shows the main parts ofa male cannabis plant.
"Jack Herer* male (staminate) flowers fully
formed in clusters but not yet open. (MF)
Outer tepals on the ‘Skunk #T staminate
calyxes have separated, exposing the pollen
containing anthers. (MF)
As anthers on this Jack Herer* mature, they
rupture to disperse superfine grains ofpollen
into the air. (MF)
510
BREEDING
www.marijuanagrowing.com
Staminate anthers on this ‘Skunk #T grown
in 1987 continue to split open and disperse
more and more pollen into the air. (MF)
Anthers hang in the wind after dispersing all
their pollen throughout several days. (MF)
Pollen from this 'Skunk #T has been dis
persed from anthers in the foreground.
Staminate calyxes in the background will
disperse pollen in the near future. (MF)
hhis drawing shows the main parts of a female cannabis plant.
Compare this tiny male flower to the size ofa
US penny. (MF)
0.25 to 0.5 inches (0.6 -1 .3 cm) long,
and usually white, but sometimes they
are yellowish or pink to red, and, rarely,
lavender to purple. Stigmas (stigmata is
another botanical plural) are the pollen
catchers. Stigmas are often misidentified
as pistils. By definition, a pistil is all of
the reproductive parts of a flower—
2 stigmas and an ovule make up the
female pistil. Each flower then has only
, 1 pistil but has 2 stigmas. The term is
misused in much of popular culture,
which describes a single cannabis flower
as having 2 pistils.
Stigmas begin dying after pollination
and begin to turn rust-colored about
3 days later; if not pollinated, as with
sinsemilla (seedless buds), stigmas begin
to die when they are about 4 or 5 weeks
old. Upon landing on a stigma, a pollen
grain germinates and begins to grow a
pollen tube through the style passage
way to pass its DNA to join the ovule’s
DNA (the 2 stigmas of each female
flower make up a bifid style). The fertil
ized ovule becomes a fruit, essentially
a single seed (an achene). The perianth,
which includes the calyx, tightly clasps
the seed and often contains tannins,
which give mature seeds their mottled
or spotted coat. Between a thumb and
finger you can rub the perianth off of
seeds. A well-pollinated single bud
develops dozens of seeds, a cola easily
holds many hundreds, and even a small,
but thoroughly pollinated female can
bear thousands of seeds.
Cannabis female flowers do have a calyx,
but it is barely perceptible even with a
microscope. The female calyx is one
part of the perianth, a nearly trans
parent, delicate tissue that partially
encloses the ovule, or prospective seed.
www.marijuanagrowing.com
511
The seed bract still covers the perianth, pistil
late calyx, gametes, and ovule connected to a
pair of stigmas. (MF)
The seed bract has been stripped away to
reveal the perianth and pistillate calyx, both
of which appear transparent, covering the
gametes and ovule. Note the white stigmas
have not been pollinated. (MF)
Stigmas start dying back as soon as pollen is
ushered down the shaft to unite with the ovule
below. (MF)
Each female flower has a single ovule
partially enclosed in its perianth, which
is encapsulated by bracteoles, which are
covered by a whorl of bracts. The bracts
and bracteoles are small, modified leaves
that enclose and protect the seed in what
some growers refer to as the seedpod.
Bracts contain the highest concentra
tion of THC and other cannabinoids of
any plant part and about 50 percent of a
plant’s total THC. The perianth and its
calyx contain no THC.
By definition, a perianth consists of a
corolla and a calyx. In more familiar
showy flowers, the corolla is the brightly
colored petals we generally appreciate
when looking at flowers, and the calyx
is the smaller green cup (sepals) at the
flower’s base. Bright showy colors, large
flower sizes, and enticing fragrances
have naturally evolved to attract insects
such as bees and flies, or animals such as
birds and bats that collect and transfer
pollen (unintentionally) to other flow
ers. Cannabis flowers are not brightly
colored, large, or enticingly fragrant
(at least to most nonhumans); cannabis
plants are wind-pollinated with no need
to attract insects or animals to carry
The stigmas on this 'Haze' X 'Northern
Lights' X 'Sensi Star' flower top are just start
ing to turn a rusty color. (MF)
The perianth on this 'Skunk #V can be seen
near the top of the seed on the left. (MF)
The female perianth is clearly visible as a
nearly transparent layer covering the seed.
(MF)
512
BREEDING
www.marijuanagrowing.com
males’ pollen to female flowers; canna
bis plant parts never naturally evolved
into colorful, attractive, or showy parts.
Cannabis breeders, though, do breed for
fragrance and color once cannabinoid
content is firmly established.
The cannabis perianth is only about
6 cells thick, so to distinguish calyx cells
from corolla cells is best left to bota
nists. This book uses the botanically
correct term bracts for the green or
purple, resin-gland-studded specialized
“leaves” encasing each female flower,
and uses perianth or calyx for the trans
lucent “veil” that clasps and covers about
60 to 90 percent of a mature seed.
Hopefully, when growers use botanical
terms such as calyx, bracts, stigma, pistil,
anther and stamen, they will follow this
book and use the terms correctly. Since
readers will find seed catalogs and Inter
net sites calling bracts calyxes and stig
mas pistils, it is important for readers to
understand this confusion when reading
other sources. Hopefully, this chapter
will help get us all on the same page.
Sexual Propagation
Sexual propagation is the process in
which male and female sex cells (gam
etes) from separate parents unite in the
female plant to form what will eventual
ly mature into a new, genetically distinct
individual. This process occurs when
pollen from a male (staminate) parent
unites with an ovule within the ovary
of a female flower to create an embryo.
This embryo, when mature and fully
developed, will become a seed.
In nature, cannabis is wind-pollinated.
Male flowers shed pollen (dehiscence),
dispersing millions of grains into the
wind. Wind carries the pollen to a
“chance” rendezvous and acceptance by
a female stigma.
Pollination occurs when male pollen
grains land on a female stigma. The
evolutionary attraction is both physical
and chemical. The grain of pollen, with
moisture found in the stigma, germi
nates. This is the best part: A grain
of pollen germinates just like a seed,
sending a taproot down, but instead of
sending it into the ground, the grain of
Pollen
Staminate Flowers
Gametes
Ovule
Pistillate Calyx
Enlarged Pollen
Grains
pollen sends the “root” down the stigma
toward the ovary. Once united with the
ovary, the pollen fertilizes the ovule.
This union creates an embryo that grows
within a seed coat. When mature in 4 to
6 weeks, the seed can be planted.
Fertilization occurs when the tiny grain
of male pollen sticks to the stigma. Then
it develops a tube through the style,
and releases 2 gametes, 1 to fertilize the
ovule and 1 to fertilize the endosperm
(double fertilization). Seeds are the
result of this sexual propagation and
contain genetic characteristics of both
parents. Once fertilized with male pol
len, female plants put the bulk of their
energy into producing strong, viable
seeds.
Actual fertilization takes place when the
minute grain of male pollen sticks to the
stigma. The successful angiosperm pol
len grain (gametophyte) containing the
male gametes (sperm) gets transported
to the stigma, where it germinates and
its pollen tube grows down the style
to the ovary. Its 2 gametes travel down
the tube to where the gametophyte(s)
containing the female gametes are held
within the carpel. One nucleus fuses
with the polar bodies to produce the
endosperm tissues, and the other with
the ovum to produce the embryo hence
the term double fertilization.
(MF)
Close-up photo of a female stigma
shows that no resin glands are located
on the entire length. The well-defined
protruding growth appears as fuzz on
the stalk of the stigma. The stigma is the
plant version of a vagina. It is covered
with stigmatic fluid that acts like glue
when a piece of pollen lands on it. The
fluid is packed with sugars that are food
for the pollen. When in place, the grains
of pollen start growing a new “pollen
tube,” a long tunnel that pushes through
the tissue of the style all the way to
the ova, where it fuses with egg cells to
create a little baby plant. The ovules go
through a series of steps known as
meiosis, a type of cell division by which
a cell duplicates into 2 genetically identi
cal daughter cells. The chromosomes
in the cell nucleus separate into 2 match
ing sets of chromosomes, each with a
nucleus.
Deoxyribonucleic acid (DNA) or
“genetic material”* is coiled into long
strands or chromosomes. The DNA is
located inside the nucleus of each cell.
When cannabis is pollinated, each indi
vidual seed inherits 10 different chromo
somes from the male, and 10 different
chromosomes from the seed mother—
20 chromosomes total. Each seed has 2
copies of each of the 10 chromosomes,
or 1 full genome each. There are 2 copies
of every gene in the plant, 1 from the
www.marijuanagrowing.com
513
mother and 1 from the father. Every cell
in the plant has a copy of this unique
DNA. The genetic code of this unique
individual is embedded in a specific loca
tion along the length of the chromosome
strands.
Each seed contains genes from both par
ents. Progeny grown from seed usually
have slightly different traits than other
plants from the same seed lot. The same
happens in humans; biological chil
dren are different from one another in
many aspects and at the same time they
resemble their parents. In cannabis, the
variability is marked, like it is in apples.
Sexual reproduction is used to cross
different individuals with a population
or family of plants. It can also be used
to hybridize unrelated lines and inbreed
their offspring. This phenomenon,
“recombination of traits,” also gives
breeders the opportunity to recover
individuals with a combination of the
positive traits of both parental lines.
'
“■'Genes are hereditary units that consist
of a sequence of DNA that resides in a
precise place on a chromosome and it
determines a specific trait in cannabis.
Little bits of DNA are codes or tem
plates for proteins.*
* Proteins are made in the sequence of
DNA. Like instructions in a recipe for
making brownies, the DNA and sequence
of proteins is the recipe or instructions.
**Having 2 versions of the same pro
tein, from 2 different genes, is better
than having just 1, particularly if the
protein plays some vital part in cannabi
noid production. This effect is called
overdominance. For example, if there
are 2 different proteins, and both work
well but 1 works a little better under
hot conditions and the other works
well under cool conditions. Having 2
versions of the same protein gives the
plant a wider range of climates where it
produces effectively. See “Multiline,” on
page 531.
The majority of DNA is the same; it
deals with basic cell processes, photo
synthesis, chlorophyll production, etc.
A few or a combination of genes con
trol variables such as height, leaf shape,
fragrance, and disease resistance. But we
are not sure exactly which genes are
responsible for specific traits, even
though the cannabis genome has been
mapped. These traits are influenced by
multigene families (a group of genes that
evolved to become a little bit differ
ent from each other, even though they
started out as copies of the same gene).
Knowing the named genes would make
it easier to find individual plants with
your desired traits. But single genes
controlling specific traits of cannabis are
neither isolated nor well studied.
Multigene traits allow you to fine-tune
to your favorite characteristics. For
example, a single gene that controls leaf
size would give only 2 leaf sizes, large
and small. Many genes influencing the
same trait provide many different leaf
sizes.
Naturally occurring mutated cannabis
genes are uncommon. They are abnor
mal genes that are mutations of normal
genes. When a mutated gene combines
with a normal gene, there is no detri
mental outcome. But when 2 mutated
genes join, the result is much different.
For example, in people and animals the
number of albinos or dwarfs is minimal.
The same is true in cannabis. Growing
large populations of cannabis or treating
cannabis with stress or chemicals will
bring about mutation. Overall, most
cannabis plants grow normally with no
mutations whatsoever. Many different
genes control the desirable traits we care
about. Broken recessive genes do not
play a role in most breeding programs.
Deleterious recessive genes: The plants
most likely to have the same dangerous
mutation in the immediate family are
inbred. Marry your sister and inbreed
ing genes take over to start all kinds of
problems because recessive deleterious
genes appear.
'RoyalMoby', predominately sativa, is very
THC-potent. This variety is quite similar to
'Moby Dick'from Dinafem Seeds in Spain.
Once a good variety reaches the marketplace,
many similar varieties appear within a year or
two.
BREEDING
www.marijuanagrowing.com
Classical Cannabis Breeding
Classical breeding is an ancient cycli
cal process that cannabis breeders still
use today. Decisions are made based on
observation of large numbers of plants;
the breeder does not know exactly what
genes have been introduced to the new
cultivars. All the breeder can do is choose
plants based upon visual inspection,
smell, and gut-feeling.
Classical cannabis breeding is simple:
2 varieties, a male and a female, are
chosen. Each parent has desirable char
acteristic—fragrance, potency, mold
resistance, and so forth. The male pollen
fertilizes the female flower and their
genes combine into a new genetic mix
contained in the seed.
The next step is to choose individual
plants with the desirable traits of both
parents. A lot of the time you get lucky
and the offspring carry the desirable
genes and traits. Cannabis breeders
often take clones of these desirable
individual plants. Too often they do not
retain the male plant and have a “clone
only” variety.
When a desirable trait has been bred
into a plant, crossing other plants to this
parent makes new plants similar to the
favored parent. For example, to make
the mildew-resistant progeny of the
cross most like the high-yielding parent,
the progeny will be backcrossed to
that parent for several generations (see
“Backcrossing,” page 519). This process
removes most of the genetic contribu
tion of the mildew-resistant parent.
To breed for mold resistance, grow out
plants in moldy conditions. Remove
plants from garden that contract mold
easily. Keep plants that do not get mold
or are late to get mold. Breed plants that
do not mold
It is very difficult to isolate specific
genes to guarantee specific qualities such
as extreme resistance to powdery mil
dew or insect and mite attacks. There are
recessive genes and dominant genes that
are controlled by alleles; this is where
breeding becomes much more complex.
See “Influence of Alleles.”
Other traits, such as acclimatization
to a specific climate, are relatively easy
because the plants that grow best in the
environment are continually selected.
Organic gardeners breed plants accli
mated to their outdoor climate and
achieve much higher yields. For this
reason, organic medical gardeners in
Northern California are able to grow
10-pound (4.5 kg) plants.
To breed for cold tolerance, grow out
plants in cold conditions. Remove plants
that suffer cold damage easily. Breed
plants that withstand cold temperatures.
Thin-Layer Chromatography
Thin-layer chromatography can be used
to take tests and make selections based
upon cannabinoid profiles. Cannabinoid
profiles are similar throughout a plant’s
life stages, and breeding decisions can be
based upon these profiles. For example,
the cannabinoid profile can be tested on
2-month-old seedlings. Plants with de
sirable profiles are kept, and those with
undesirable plants are culled.
See “Modern Cannabis Breeding” at the
end of this chapter for an overview of
marker-assisted selection (MAS).
Influence of Alleles
The phenotypes seen in a given indi
vidual are the result of an interaction
between the plant’s genotype and the
environment. For example, here are 3
phenotypes: short, medium, and tall.
Remember, the genotype describes .
'LA Confidential'from DNA Genetics was
the first Cannabis indica variety to have its
genome mapped.
Phenotypes
Genotypes
1
short
ss
medium
Ss
tall
SS
h.---------------------------------------- .
the genetic condition responsible for the
phenotype, and to represent it in discus
sion we assign it symbols.
There are always 2 versions of every
gene (allele). For example, if there are
2 lower-case “s” plants with “small stat
ure” the plant will be shorter. But if the
plant has capital “S” and has the “tall”
gene, the phenotype is tall. If both genes
are inherited, the plant is medium height.
Homozygous / heterozygous: These are
terms used in describing the genotypic
condition of a plant, with regard to the
similarity of the alleles for a given trait.
If a plant is homozygous for a given
trait, it has 2 copies of the same allele.
If a plant is heterozygous, it has 2 differ
ent alleles for a given trait.
The offspring inherits 1 set of alleles
from each parent. This inheritance of
alleles can be homozygous (both alleles
are the same) or heterozygous (each
alleles is different). Furthermore reces
sive alleles do not surface completely
for several generations. The influence of
alleles makes it impossible to use simple
mathematical probability to predict the
outcome of offspring.
In August 2011, Dr. Kevin McKernan
announced that his company had
successfully mapped the genomes
(shotgun sequence) for Cannabis sativa
(‘Chemdawg’ variety) and later C. indica
(‘LA Confidential’). Medicinal Genomics
then publicized its work on C. sativa via
Amazon’s EC2, a cloud-computing ser
vice that gives free access to the scientific
community. Search “Cannabis genome
EC2 cloud” on www.google.com for
more information.
www.marijuanagrowing.com
515
This indica-dominant 'Peyote Purple' was
developed by CannaBioGen.
Dominant and Recessive Traits
Dominant and recessive traits are dictat
ed by alleles that are inherited from both
parents. But, even though the cannabis
genome has been decoded, specific gene
function has not been deciphered. Con
sequently, the examples below must be
used as guidelines because many traits
are driven by a combination of genes.
Dominant: An intra-allelic interaction
such that the presence of an allele of 1
parent masks the presence of an allele
from another parent plant, in the ex
pression of a given trait in the progeny.
Only the dominant trait is shown in the
first generation of offspring. Of the F2
generation, 75 percent will also show the
dominant condition.
Recessive: An intra-allelic interaction
such that an allele of 1 parent is masked
by the presence of an allele from the
other parent plant, in the expression of a
given trait in the progeny. The recessive
trait is not shown in the first generation
of progeny (Fl) but will reappear if sib
lings are mated, and the F2 progeny will
result in 25 percent of plants showing
the recessive condition.
Numbers Can Be Misleading
Simplistic math models are often used
to explain what happens when male
and female cannabis plants are crossed.
These models do not take into account
dominant and recessive genes, they allow
nothing for genotype and phenotype,
and they do not consider that specific
traits may be controlled by many
different genes.
Use the Punnett square to help predict
the outcome.
'Afghani'-dominant crosses are in the fore
ground and saliva-dominant crosses are tn
the background. (MF)
The 'Afghani' seedling on the left demonstrates
the dominant traits of short, squat growth and
broad leaves. The 'Kush' seedling on the right
demonstrates the dominant traits of taller
growth, and has much different leafformation.
F1
F2 Punnet Square (Right)
Phenotypes:
S => short
s-tall
B = purple
b = green
Capital letter represents dominant phenotype.
P1 - original parents
F1 - first generation
F2 - second generation
The hypothetical dihybrid cross ratio is demonstrated in the Punnett square.
This genetically purple 'Mexican' sativa from
1980 is one of the varieties that added a purple
hue to many current varieties. (MF)
516
BREEDING
www.marijuanagrowing.com
We can demonstrate Mendel’s Laws in
a Punnett square to predict the possible
outcome of 1 genetic trait (monohybrid).
The example below uses Mendel’s pea
plant experiment. He crossed 2 yellow
pea plants, and they produced 3 quarters
yellow peas and 1 quarter green peas.
The Punnett square accounts for all the
possible combinations for 1 gene. Each of
the 4 squares in the box represents 1 new
offspring.
A monohybrid is a genetic cross
between 2 parents; 1 parent has 2 dom
inant alleles for a specific gene and the
other 2 recessives for the same gene.
The offspring, monohybrids, have 1
dominant and 1 recessive allele for that
gene. A cross between the offspring
produces a 3:1 ratio when grown out of
the following (F2) generation of
dominant:recessive phenotypes/'
"This example is based on Mendel’s
monohybrid pea plant cross. Little
information is available to the public
about specific gene loci of cannabis.
An excellent worksheet is available at
BiologyCorner.com (www.biologycorner.
com/worksheets/pennygene_key.html).
N dihybrid is a genetic cross between
parents that have 2 characteristics con
trolled by genes at different loci.* The
example below shows both parents AaBb
and AaBb are heterozygous for both
traits (color and height). The possible
outcome can be predicted with the help
of a Punnett square. The example below
is based on Mendel’s dihybrid cross with
pea plants. Note the dihybrid Punnett
square has 16 different possibilities. This
will yield a genotype ratio of 1:2:1:2:4:2:
1:2:1 and a phenotype ratio of 9:3:3:1.
F
E
M
A
L
E
FEMALE
The monohybrid cross ratio is demonstrated
in the Punnett square.
At 4 weeks offlowering, ‘Big Bud" is just start
ing to put on weight. The genetics of‘Big Bud",
from northwestern USA, are found in many of
today"s varieties.
This example is based on Mendel’s
pea plant cross, and is hypothetical
because little information is available
to the public about specific gene loci of
cannabis.
True Breed
True-breeding (or inbred) plants make
the best breeding stock. A true-breeding
variety (aka inbred line [IBL] and true
line) of cannabis is the result of a seed lot
that has been bred for generations while
selecting repeatedly for specific traits.
These plants breed true for the specific
traits—cannabinoid content, strong
growth, desirable aroma and flavor, and
so on. There is little or no variation of
traits, growth is uniform, and the out
come of future generations is easier to
predict. These plants are said to be stable.
If seed is true breeding (IBL) it should
be easy to reproduce by open pollination.
See “Making Seeds at Home,” page 523,
for a list of true-breeding seed varieties.
After many generations of repetitive
breeding and selecting for the same
traits, other genetic traits may deteri-
‘Purple Urkle" is an Oregon ‘Big Bud" hybrid.
Here is a little more of Mel Frank"s breeding
handiwork. The cross is between ‘Afghani #/’
and ‘Congolese" and was grown in New York
in 1982. (MF)
orate. See “Inbreeding,” page 518, for
more information.
Hybrids
Hybrids are a product of a cross between
genetically distinct parents. Hybrids do
not reproduce their parent characteris
tics completely or reliably when repro
duced sexually. Develop hybrid cultivars
by using inbred (true-breeding) genetics
or by segregating populations, inbreed
ing them, and selecting for hybrid line
production. Various hybrid varieties are
described below.
Hybrid Crosses
Fl hybrids (‘Northern Lights’ X ‘Blue
berry’, ‘Northern Lights’ X ‘Haze’)
3- way crosses (‘Skunk #1’—a cross of
(‘Mexican’ X ‘Colombian’) X ‘Afghani’)
4-way or double cross hybrids (cross of
2 unrelated Fl hybrids ‘Haze’ (‘Afghani’
X ‘Thai’) X (‘Mexican’ X ‘Colombian’).
F1 Hybrid Varieties
Achieve an Fl hybrid population by
crossing 2 unrelated, true-breeding
varieties. Fl hybrids are uniform when
www.marijuanagrowing.com
517
This 'Afghani #T X "Mexican #3' was the
product of a cross made in 1981 by Mel Frank.
(MF)
grown from seed, but, like all hybrids,
they are genetically unstable. If repro
duced sexually by inbreeding within the
Fl population, the subsequent genera
tion will be neither uniform nor similar
to the Fl generation. Seeds from Fl
hybrids, F2, will all be different; parents
are heterozygous and diverse. They av
erage twice as many monozygous genes
and will be less vigorous. Seeds lose
uniformity and hybrid vigor.
Fl hybrid vigor (heterosis) occurs when
2 true-breeding varieties are crossed. The
resulting seed and plant has “hybrid
vigor,”—growing more robustly, stron
ger, faster, and with a heavier harvest
than both parents. For example, a
(‘Skunk#r x ‘Blueberry’) Fl hybrid
grows faster and yields more than either
the pure ‘Skunk #1’ or ‘Blueberry’ parent
populations.
Fl hybrid seeds grow into strong plants
that produce well. Seed companies sell
them because they keep clients coming
back for more seeds every year. Few seed
companies are interested in selling seed
that is easy to open pollinate or easy to
reproduce. Most seed companies make
and release hybrids. Often “true-breed
ing” (IBL) seeds are not stable. Compet
itors in the unregulated market continu
ally pirate seed varieties from companies
that have developed the seeds.
Fl hybrid is a term used in genetics and
selective breeding. Fl stands for Filial 1,
the first filial generation of seeds/plants
or animals.
Maintaining strong, reliable Fl hybrid
stock requires growing 2 different lines
of the same parents. The 2 lines are
BREEDING
crossed to make seed. Deviation is min
imized. This is necessary to maintain
genetic diversity and avoid recessive trait
domination.
For information on F2, F3, etc., genera
tions, see “Filial Breeding,” on page 520.
Cross-pollination is the transfer of
pollen from an individual male canna
bis flower to a stigma of the flower of a
female plant. Strive to combine the best
qualities of a true-breeding line with
other lines to increase desired traits
when using cross-pollination in cannabis
breeding.
Inbreeding
Inbreeding is crossing a group, family,
or variety of plants within themselves
with no addition of genetic material
from an outside or unrelated population.
“True Breed,” above, is an example of
inbreeding. The most severe form of
inbreeding is the self-cross (see “Self-
Pollination (Selfing)” on page 520),
in which only one individual’s genetic
material forms the basis of subsequent
"Afghani #T is an inbred variety that was
developed over years of inbreeding among
large populations of cannabis plants. This
landrace variety was collected in the moun
tains oj Afghanistan by Sacred Seeds in the
1970s. It was one of the first pure indica
true-breeding strains used in worldwide
cannabis breeding programs. (MF)
generations. And 1:1 hybrid populations
are only slightly less narrow, derived
from the genetic material of 2 individ
uals. Such tight or narrow breeding
populations lead to a condition called
“inbreeding depression” upon repeated
self-breeding or inbreeding.
Inbreeding depression is a reduction in
vigor (or any other character) due to
prolonged inbreeding. This can manifest
as a reduction in potency or a decrease
in yield or rate of growth. Progress of
depression is dependent, in part, on the
breeding system of the crop.
Cannabis is an outcrossing or cross-pol
linating species. Cross-pollinated canna
bis exhibits a higher degree of inbreed
ing depression when “selfed,” or inbred,
than do selfing crops such as tomatoes,
which can be selfed for 20 generations
with no apparent loss in vigor or yield.
In cross-pollinated crops, deleterious
genes remain hidden within populations,
and the negative attributes of these
recessive traits can be revealed when
inbred several generations.
Inbreeding depression can be noticeable
in SI (see “Self-Pollinating (Selfing),”
on page 520) populations after a single
generation of self-fertilization. When
breeding cannabis using small popula
tions, as is often the case with continual
1:1 mating schemes, inbreeding depres
sion typically becomes apparent with
in three to four generations. This 1:1
breeding model is being used today by
most commercial seed banks.
Cannabis is naturally an outcrossing or
cross-pollinating species and existed in
wild breeding populations of hundreds
if not thousands of individuals. Within
these many individuals lies a wide range
of versions of different genes. When
only 1 or 2 plants are selected from this
vast array as the breeding population,
there is a drastic reduction in the genetic
variability found in the original popu
lation, resulting in a genetic bottleneck.
Once this variability is lost from a popu
lation, it is gone.
It space is available, overcome this
problem is by maintaining 2 separate
parallel breeding lines. After genera-
www.rnarijuanagrowing.com
tions of inbreeding, when each of the
inbred lines or selfed populations start
showing inbreeding depression, they are
hybridized or outcrossed to each other
to restore vigor and eliminate inbreeding
depression while preserving the genetic
stability of the traits under selection.
Outbreeding
Outbreeding is the process of crossing
or hybridizing plants or groups of plants
with others to which there is no relation
or the relationship is very distant. Any
time a breeder is hybridizing using plants
that reside outside of the family, group,
or variety, hybrid seed is produced.
An Fl hybrid seed is the first generation
offspring that results from crossing 2
distinct true-breeding plants or pop
ulations. Each of the (true-breeding)
parents was hybridized (outcrossed to
each other) to produce the new genera
tion, which is now comprised of genetics
from both parental populations. Out-
crossing results in the introduction of
new and different genetic material to
each of the pools.
'Super Skunk' from Semi Seeds is a good
example ofan outbred variety. It takes the
stable 'Skunk #1' and adds a dominant
amount of'Afghani' genetics.
Often there are recessive genes or dom
inant genes that have not had a chance
to fully express themselves until being
inbred 3 to 4 times, or being outcrossed
several times. It is important to remem
ber that cannabis is naturally outcross
ing. Inbreeding plants that are naturally
outcrossing too many generations
sacrifice the health of offspring. Keep
outcrossing plants healthy, and maintain
diversity by growing large numbers of
plants.
Filial Breeding: Siblings of the same
progeny lot and generation are inter
mated to produce new generations. The
first hybrid generation of 2 distinct
true-breeding lines is the Fl generation
(F, filial). If 2 Fl siblings are bred, or
the Fl population is allowed to be open
pollinated, the resulting generation is
labeled F2, F3, F4, etc. Mating siblings
chosen from the F2 results in the F3
population. F4, F5, F6 generations, etc.,
are produced the same way, by cross
ing plants of the same generation and
progeny lot.
Note: As long as any number of siblings
of a generation (F[n]) are mated, the re
sulting generations is denoted (F[n+lJ).
Filial inbreeding with selection for spe
cific traits is the most common method
for establishing a pure or a true-breeding
population in cannabis. After a few gen
erations, genetic problems will surface.
Backcrossing
Backcrossing is the pollination of a
female flower from a male flower on
the same plant. Backcross breeding is
repeated crossing of progeny with one
of the original parental genotypes. It
is cross-pollinating 1 generation back
to a previous generation; most often
the progeny is crossed with the mother
plant. The parent is called the “recurrent
parent.” The nonrecurrent parent is the
“donor parent.”
Backcross breeding is the most widely
used form of breeding cannabis to date.
Backcross breeding is simple and can be
done with small populations of plants.
Most often the goal of backcrossing is to
create a population from the genetics of
a single parent (the recurrent parent).
Donor parents are chosen based on de
sirable traits. One parent is backcrossed
to another to introgress genetics, to
move genes from one variety to another.
Repeated backcrossing is the best way to
achieve this goal.
Use backcrossing to add desirable traits
to a mostly ideal, relatively true-breed
ing genotype. The recurrent-parent
should be an ideal genotype such as
an existing inbred line. Look for traits
that are easily identified in the proge
ny of each generation. The best donor
parent must possess the desired trait,
but should not be seriously deficient in
other traits. Backcross line production is
repeatable, if the same parents are used.
Simple backcrossing to incorporate a
dominant trait is easy and very common
among the vast majority of breeders.
However, plants come with both domi
nant and recessive genes. When making
selections, it is best to select for one
single quality at a time and select the
absolute best males possible from each
population.
'Apollo 13 BX' (Back Cross) from TGA
Genetics is a good example ofa backcrossed
variety.
www.marijuanagrowing.com
519
Backcrossing also uses the terms squaring
(to denote the second backcross to the
same parent) and cubing (to designate the
third backcross).
Backcrossing: Incorporating a
Dominant Trait
Step One: Cross recurrent parent x
donor parent
Step Two: Select desirable plants
showing dominant trait, and hybridize
selected plants to recurrent parent. The
generation produced is denoted BC1
(some cannabis breeders call this genera
tion Bxl. [BC1= Bxl]).
Step Three: Select plants from BC1 and
hybridize with the recurrent parent; the
resulting generation is denoted BC2.
Step Four: Select plants from BC2 and
hybridize with the recurrent parent; the
resulting generation is denoted BC3.
Backcrossing: Incorporating a
Recessive Trait
Recessive traits are more difficult to
select for in backcross breeding, since
their expression is masked by domi
nance in each backcross to the recurrent
parent. An additional round of open
pollination or sib-mating is needed after
each backcross generation to expose
homozygous-recessive plants. Individu
als showing the recessive condition are
selected from F2 segregating generations
and backcrossed to the recurrent parent
as in the “Backcrossing: Incorporating a
Dominant Trait” above.
Step One: Cross recurrent parent x
donor Fl hybrid generation
Step Two: Select desirable plants,
and create an F2 population via full
cross-pollination.
Step Three: Select plants showing the
desired recessive trait in the F2 genera
tion. Hybridize selected F2-recessive
plants to the recurrent parent. The
generation produced is denoted BC1.
Step Four: Select plants from BC1,
and create a generation of F2 plants via
sib-mating; the resulting generation can
be denoted BC1F2.
Step Five: Select desirable BC1F2 plants
showing the recessive condition, and
hybridize with the recurrent parent; the
resulting generation is denoted BC2.
Step Six: Select plants from BC2, and
create an F2 population via sib-mating;
denote the resulting generation BC2F2.
Step Seven: Select plants showing the
recessive condition from the BC2F2
generation, and hybridize to the recur
rent parent; the resulting generation is
denoted BC3.
Step Eight: Grow out BC3, select and
sib-mate the most ideal candidates to
create an F2 population, where plants
showing the recessive condition are then
selected and used as a basis for a new
inbred, or open-pollinated, seed line.
This new generation created from the F2
is a population that consists of, on
average, about 93.7 percent of genes
from the recurrent parent, and only
about 6.3 percent of genes leftover from
the donor parent.
Note: Only homozygous-recessives
were chosen for mating in the BC3F2
generation; the entire resulting BC3F3
generation is homozygous for the
recessive trait, and breeds true for this
recessive trait. Our new population
meets our breeding objective. It is a pop
ulation derived mainly from the genetics
of the recurrent parent, yet breeds true
for our introgressed recessive trait.
Backcross-derived lines are most often
well-adapted to the environment in
which they will be grown. Indoor
garden rooms are easily replicated, and
plants grow in a similar environment to
that in which they were bred. Progeny
therefore need less extensive environ
mental field-testing.
If 2 or more characters are to be intro
gressed into a new seed line, these would
usually be tracked in separate backcross
programs, and the individual products
would be combined in a final set of
crosses after the new populations have
been created by backcrossing.
Backcrossing has drawbacks. If the
recurrent parent is not very true-breed-
Small male flower appears on this Chemdog
inbredfemale flower. Inbreeding often causes
male intersex flowers to form on female plants.
ing, the resulting backcross generations
segregate, and many of the traits deemed
desirable to the line fail to be repro
duced reliably. Another limitation of the
backcross is that the “improved” variety
differs only slightly from the recurrent
parent (e.g ., one trait). If multiple traits
are to be introgressed into the new
population, other techniques, such as
inbreeding or recurrent selection, may
be more rewarding.
Self-Pollinating (Selfing)
“Clone Only” Varieties
Often, 2 hybrid plants are crossed and
the “variety” is given a name, but soon
the male plant is lost, and the plant is
available only as a clone. In this case the
plant must be “selfed” to produce male
flowers on a female plant.
Self-pollinating (aka selfing) is the
process of creating seed by pollinating a
plant with its own pollen. Self
pollinating is a plant having sex with
itself. Self-crossing can derive popula
tions of plants from a single individual.
The first generation population derived
from selfing an individual is called the SI
population. An individual from SI that
is selfed again is called S2. Subsequent
generations derived in the same manner
are denoted S3, S4, etc.
Traits for which the plant is homozy
gous remain homozygous upon selfing,
whereas heterozygous loci segregate and
may demonstrate novel expressions of
these characters.
520
BREEDING
www.marijuanagrowing.com
We know homozygous loci remain
homozygous in future generations upon
selfing. Heterozygous loci are increased
by 50 percent. Every subsequent
generation will be 50 percent more
homozygous than the parent from
which it was derived.
Repeated selfing, or single-seed descent,
is the fastest way to achieve homozy
gosity within a group or family. The
more plants grown from a selfed popula
tion, the better probability a breeder has
of finding selfed progeny that show all
the desired traits.
Self-Pollinating Breeding
Step One: Identify superior genotypes
for the trait under selection.
Step Two: Cross superior genotypes and
select improved progeny.
Step Three: Repeat steps One and Two
over a series of generations.
Feminized Seeds
Breeders produce all-female or femi
nized seeds by obtaining pollen from a
male flower on an individual female
and using this pollen to fertilize
another female plant. In order to pro
duce feminized seed, pollen must be
collected from male flowers that occur
on an otherwise female plant.
As stated in “Sexual Propagation”),
there are 20 chromosomes in each plant
cell. Female cannabis plants have 2
copies of the X chromosome, and their
genotype is expressed as XX. Male
plants have 1 copy of the X chromosome
and 1 copy of the Y chromosome. The
genotype expression of male plants’
sex chromosomes is XY. However, the
ability to change sex based on external
factors is believed to be controlled by
X-autosome or X-A.
When pollen is created within the plant,
1 of each of the sets of chromosomes
from each parent is packaged into the
cells that develop into pollen. This
process, mitosis, is the process of a
single cell dividing into 2 identical cells.
Each cell contains the same chromo
somes and genetic content as the parent.
Each pollen grain or ovule contains
Seeds must develop completely before they are
ready to harvest. (MF)
MALE
X
Y
Punnett square view ofa simple
male.female cross
lSour Bubbly" is one of the many new femi
nized autoflowering varieties.
FEMALE
This Punnett square ofa female cross demon
strates that female:female breeding crosses
produce only female (XX) offspring. Pollen
from a few male flowers that appear on a
female plant is used to produce female only
(XX) offspring.
10 chromosomes, 1 copy of each pair.
When the pollen deposits the genetic
material into the ovule, the 10 chromo
somes from the pollen and the ovule
unite to make a total of 20 chromo
somes, a full genetic complement. There
are 2 gametes: 1 fertilizes the ovule of
the female, the other fertilizes the endo
sperm of the seed that gives the new
plant its initial food source and chemical
profile.
Use a Punnett Square to predict the
outcome of a breeding cross. It is used
to determine the probability of an off
spring having a particular genotype. The
Punnett square summarizes all possible
combinations of 1 maternal allele with 1
paternal allele.
The next step is to produce male flowers
on a female plant. Pollen from the male
flowers is used to fertilize the same
female plant (selfing) or other female
plants (outbreeding). If this female plant
is the same self-pollinated plant, it will
be a mix of its own genes. If the plant is
different and from outside the genetic
pool of the first plant, new genes will be
introduced to the outbred cross.
There are 2 common ways to induce
male flowers on a female plant—
inducing environmental stress and
altering hormone levels.
Environmental Stress
Pollen from environmentally stressed in
tersex plants is used to fertilize females
that will produce mostly (more than
www.marijuanagrowing.com
521
Large, round, capitate-stalked resin gland
heads add perspective to minute grains of male
pollen. (MF)
77>zs autoflowering feminized ‘Big Low" from
Seeds of Life is one example of the many new
aauto-femsn available today.
‘Jack 47 ’ from Sweet Seeds proves that auto
flowering feminized seeds produce plenty of
resin.
99%) female seeds. But, the offspring
will have intersex tendencies. More pro
nounced intersex tendencies in parent
plants bring about the same traits in
offspring. There is no way around this
simple genetic fact.
Produce feminized seed by collecting
pollen from carefully selected, latent,
stress-induced male flowers on a female
plant, and use it to pollinate female
plants.
One of the easiest stress techniques
is to let the plant flower and continue
growing. Sooner or later most females
will produce a few male flowers. Other
stress methods include irregular light
cycle or low temperature. The process is
time-consuming but yields mostly
female plants when grown without
stress. As soon as stress is introduced,
intersex tendencies can quickly surface.
Remember, genetic weaknesses—
including a predisposition for male
flowers to appear on female plants—will
be passed to offspring. To select against
the intersex condition, take female
breeding candidates and grow them un
der stressful conditions such as irregular
light cycle or high heat. Only plants that
resist intersexuality under stressful con
ditions should be tested to produce an
all-female seed lines. Intersex-resistant
plants are called “true females.” Always
select females that resist changing sex to
pass the trait to offspring.
Environmental stress is not the only
way to produce male flowers on a
female plant.
Alter Hormone Levels
Feminized seeds can also be produced
with applications of sprays that alter the
hormonal concentration of the plant.
There are 2 popular methods of inducing
male flowers on a female plant. Both
methods require a spray application to
the plant.
Colloidal silver (CS) consists of very
small silver particles suspended in water.
There is quite a bit of disagreement
as to the overall safety and efficacy of
colloidal silver. Please research safety
aspects before using it. In cannabis, CS
inhibits female flowering hormones, so
male hormones dominate. Male flowers
appear on an otherwise female plane.
Purchase high-quality CS at health
food stores, natural pharmacies, or via
Internet stores. Look for CS that is 15
to 30 ppm concentration. Or you can
make it yourself at home, which is a
bit more complicated. There are many
YouTube videos and Internet methods to
follow. They involve using a 9- to 12-volt
battery or generator that can produce
at least 250 milliamperes, a silver rod or
coin, and distilled water. For instruc
tions on colloidal silver, see chapter 22,
Additives.
Silver thiosulfate is more difficult to
find than CS, but it is available on the
Internet. It works on the same principles
as CS. Check package for spray concen
tration and application.
Gibberellic acid (GA3) is a very popular
hormone used to produce feminized
seeds. See chapter 22, Additives, for
complete information.
Ethylene, a plant hormone, plays a
major role in the determination of sex
by regulating which flowers should be
produced-male or female. High con
centrations of ethylene sprayed on male
flowering plants causes female flowers to
form. See chapter 22, Additives, for more
information on ethylene.
Applying ethylene-inhibiting agents to
pistillate individuals as they enter flow
ering results in the formation of stamens
in place of pistils. Breeders use this
technique to create “feminized” seeds
(all-female [gynoecious] seed lots).
Day-Neutral
(aka Autoflowering)
Feminized Varieties
Day-neutral cannabis plants are called
autoflowering plants in the popular can
nabis industry today. Autoflowering
feminized seeds are produced the same
way as other seeds, except 1 or both of
the parents are autoflowering. These
varieties were originally created by cross
pollinating Cannabis ruderalis that
flowers after 3 to 4 weeks of growth with
regular cannabis plants that flower under
11 to 12 hours of darkness after the
vegetative growth stage is complete.
Autoflowering varieties are relatively
easy to create, but they take time to
stabilize. Seed companies sell them to
you every year so that you do not have
to reproduce them.
Breeding new autoflowering varieties is
more difficult when making hybrids and
incorporating a non-autoflowering vari
ety. A few short-day cannabis varieties
are heterogeneous, contain the recessive
522
BREEDING
www.marijuanagrowing.com
day-neutral (autoflowering) genes and
dominant short-day genes.
Autoflowering plants have homozygous
recessive traits for the day-neutral genes.
Most short-day varieties and autoflower
ing crosses produce few autoflowering
progeny in the Fl generation. When
recrossed, the F2 generation contains
approximately 25 percent of homozy
gous recessive plants that are autoflow
ering. Once this point is reached, the
population requires further stabilization.
Learn to breed with regular seeds before
starting to breed autoflowering fem
inized plants. Once you have a good
background with the variety you are
breeding, you can start autoflowering
breeding. Remember, half the equation
is finding a male that fits your needs and
is super strong-smelling, resinous from
an early age, disease- and pest-resistant,
and so on. Such males are often short
and squat, with female-like growth and
stature characteristics.
Once autoflowering plants are genet
ically stable, they are feminized via
inbreeding pollen from a male flower
that occurs on a predominately female
plant. The process is fairly simple and is
outlined below.
Breeding Basics for Autoflowering
Feminized Plants
1. Cross regular seed with an auto
flowering variety.
2. Cross Fl seeds together again under a
12/12 photoperiod.
3. The first generation contains recessive
autoflowering genes that manifest in
the next generation.
4. The next generation has some auto
flowering genes.
5. Plant and stabilize over time to get
100 percent autoflowering plants.
6. Feminize 100 percent autoflowering
female and produce seeds.
Backcross regular seeds to an autoflow
ering male to achieve an autoflowering
plant too.
Making Seeds at Home
Making seeds at home requires a secure
garden area that can be dedicated to
breeding. It must be clean and free of
male pollen. Indoor garden rooms and
greenhouses are best suited to breed
ing cannabis if there is danger of rogue
pollen from neighboring male canna
bis plants contaminating faraway seed
crops. If growing more than 1 male to
produce pollen, measures must be taken
to isolate each male once they start
producing pollen. Segregate pollen
producing male plants by keeping them
in an enclosed area as far away from
flowering females as possible.
The basics of breeding cannabis at
home are simple:
1. Start with diverse group of plants
and know their traits.
2. Cross desirable plants.
3. Select desirable individuals and
maintain diversity.
Slow and steady breeding is not
dynamic, but it is very effective. Polli
nate a few branches on several plants and
have more seeds than you can grow. The
breeding project is never finished!
Grow small seed crops inside a garden
closet or inside a portable wardrobe
made from fine cloth or something
similar that will block pollen from
entering or escaping.
Recordkeeping is the most important
aspect of cannabis plant breeding.
Accurate written and photographic
records with dates help you to make
informed decisions.
Naming Varieties
Many varieties have names known only
in the local area where they are cultivated.
These varieties often bear the name of
the region from which they originated or
a person with whom they are associated.
Other varieties are named for fragrance,
bud size, effect, or appearance. The
names are often very descriptive
and creative!
Making Seeds: Step-by-Step
Step One: What is your goal?
Common goals include making seeds
for next year’s crop, reproducing new
parents just like the old ones, and adding
new traits to existing plants. When
setting a goal, work with a single trait
at a time so that it is easier to control
the selection and outcome. Breeding
will bring about dominant and recessive
genes. Each has its own qualities. Impec
cable recordkeeping and a consistent,
stable climate are essential. Write out a
breeding plan and plot your findings.
Step Two: Select parents—(A) female,
(B) male—to breed.
Few varieties commercially available
to medical cannabis gardeners are
true-breeding and stable. Most often
seeds have many different genes and are
not stable or uniform. True-breeding
seed stock ensures Fl hybrid seeds that
have hybrid vigor. Stable true-breeding
stock is sometimes difficult to find from
seed companies, and gardeners often
elect to stabilize their own.
Sirpply crossing 1 of the stable
true-breeding varieties (see list below)
with another stable variety will produce
an Fl hybrid.
List of relatively stable seeds
‘Afghan#l’ (IBL)
‘Big Bud’ (IBL)
‘Blackberry’ (VISC)
‘Burmese’ (VISC)
‘Durban Poison’ (IBL)
‘Hash Plant’
‘Hindu Kush’
‘Island Sweet Skunk’
‘KGB’ (VISC)
‘Malawi Gold’ (IBL)
‘Master Kush’ = stabilized hybrid
‘Original Blueberry’ = stabilized hybrid
‘Original Haze’ (IBL)
‘Power Plant’ (IBL)
‘Skunk Passion’ (IBL)
‘Skunk #1’
More stabilized seed stock is updated at
www.marijuanagrowing.com
Step Two A: Select a female that has
been flowering for about 4 weeks and
has many white stigmas.
Female plants are easy to select. Medical
cannabis gardeners and patients know
the growth characteristics of each plant
in the garden. The most common desir
able characteristics include cannabinoid
www.marijuanagrowing.com
523
'Skunk #T is a stable breeding plant and is at
the base of many varieties and breeding
programs. Choose stable breeding stock
whenever possible. (MF)
This beautiful medical 'Chronic' female is an
excellent candidate for a breeding program.
'Hash Plant' x 'G13' x 'Chronic'yielded
this pistil-heavy female. Although showy, the
breeder culled the plant in favor of others with
heavier bud development.
profile with quality fragrance and flavor,
strong growth habit, heavy yield, and re
sistance to diseases and pests. Outdoor
gardeners in climate-sensitive areas look
for strong branching, a big root system,
and tolerance of drought, heat, and cold
Take a thin-layer chromatography test
to help make correct choices based upon
cannabinoid profiles. Cannabinoid pro
files are similar throughout different life
stages of a plant, and breeding decisions
can be based upon these profiles.
Observe plants carefully as they develop
during the season. Watch for desirable
characteristics. Pay close attention to
flower buds and how they fill out and
mature. Apart from looking at resin
gland development and stigma senes
cence, take a toke. Vaporize a sample
bud from each plant to determine taste,
fragrance, effect, and so on. Remember
that flower bud flavors and aromas can
change over time as they dry and cure.
Additional tasting may be necessary.
Step Two B: Select a male with
desirable characteristics.
Choosing male plants for breeding is
difficult. One basic test is to rub the
stem with your finger. If it exudes a
pungent, resinous odor, it may be rich
in cannabinoids. Look for male plants
that are short with dense foliage and that
contain other desirable characteristics—
cannabinoid profile, strong growth,
disease and pest resistance, drought,
heat and cold tolerance.
To determine cannabinoid profiles,
make thin-layer chromatography tests
before males flower. Soon laboratory
analysis of the cannabinoid profile and
genetic marker (alleles) tests will
become more common.
The most reliable way to select the best
male breeding stock is to use the pollen
from specific males to pollinate cho
sen females. The plants are grown to
maturity and males are then selected. It
takes time to stabilize males, and few
seed companies put much time into male
plant selection. Once selected, a super
male and subsequent male lineage can be
kept alive for years.
Clone promising male plants and cull
the rest to keep stock alive.
Step Three: Collect pollen.
Set up small “plates” of aluminum foil to
collect pollen. Once plates are in place,
jiggle branches so pollen is dispersed and
falls onto plates for collection.
Carefully collect pollen from male flow
ers and store it in an airtight container
in a cool dry place or in a low-humidity
refrigerator or freezer. Or cut a male
branch from a plant and store it in a
glass of water in subdued light.
Pollen can be stored for several years if
kept cool and dry. Viability decreases as
time passes. But consider that there are
millions of grains of pollen in a single
male flower. It takes just a fraction of
the pollen to fertilize an entire bud.
Even though pollen has lost viability,
there is still enough good pollen to
fertilize pistils and produce seeds.
One branch of male flowers will supply
all the pollen necessary for small-scale
breeders to produce many seeds for
personal use.
Strip away other branches to guard
against accidental random pollination.
To avoid premature pollination, isolate
the male as soon as anthers show. Be
considerate of the fact that airborne
pollen can travel miles. Brushing up
against a plant jostles and releases
524
BREEDING
www.marijuanagrowing.com
Testing male plants with thin-layer chroma
tography is a good way to learn much about
the cannabinoid profile. Without the test, can
nabinoid profile would have to be measured
subjectively.
Waiting for a male plant to mature is difficult
when growingfemales in the same vicinity.
Pollen is being collected on lightweight alumi
num foil. (MF)
millions of grains of pollen that travel
everywhere.
Step Four: Store pollen.
Store small amounts of pollen in alumi
num foil, enclosed with silicon to absorb
excess moisture so that it does not de
stroy the pollen. Pollen has a short shelf
life in nature. High temperatures and
moisture destroy it. Pollen can be stored
in the freezer for several months.
Store pollen in an airtight container
along with silicon pellets to absorb any
moisture in the container. Periodically
remove silicon to dry and then be
returned to the container. Make sure to
let container sit at room temperature for
several hours to avoid moisture conden
sation from temperature change.
Carefully remove pollen from the col
lection bag and pass it through a screen
to remove flower remnants. Remember,
dead flowers and foliage attract moisture
and will contaminate and spoil pollen.
Place wax paper under the screen to catch
pollen. Pour pollen into a sterile test tube
or small container from a craft store.
Scrape remaining pollen into tube or
container with a sterile instrument. Seal
test container. Put test tube in a larger
airtight container with several packets
of silicon to absorb moisture. Seal pollen
with silica gel and leave at room tempera
ture so the silica draws moisture from
pollen before putting it in the freezer.
(MF)
At pollination time, pull pollen out
of freezer and let it warm up to room
temperature. Do not open the container
when cold or water will condense inside
Grains of male pollen such as the one in the
photo (magnified 4,000 times) stick to the
stigma, develop a tube through the style, and
release 2 gametes—1 to fertilize the ovule and
1 to fertilize the endosperm.
and kill the pollen. Keep refrigerator at
low humidity. Thawing and refreezing
pollen will diminish its viability.
Step Five: Pollinate female.
Flowering females grow many ready,
receptive stigmas until pollination
occurs. Best pollination takes place
about 3 to 5 weeks after females show
their first flowers. At this point the
majority of receptive stigmas are ready
for pollination. This is when a few of the
stigmas start to curl and slightly dis
color, signifying the onset of senescence.
Receptive stigmas are turgid and most
often are white or off-white in color.
www.marijuanagrowing.com
525
Male flowers can be stored for a few days in
a glass ofwater, but they have a tendency to
open prematurely.
Cannabis is very promiscuous! Michaelfrom
www.SickMeds.com demonstrates a special
bag with a window to prevent pollination. Pa
per bags are good indoors and in greenhouses;
waterproofplastic may be necessary outdoors.
A single lower branch of this big female is
fertilized with male pollen. The seeds are left
to mature for about 2 weeks after flower buds
have been harvested.
A little dab ofpollen is all that is necessary to
selectively pollinate a few stigmas.
Senescing and dying stigmas that are
brownish are not viable.
Not all pollinations are successful. If in
doubt, you may want to pollinate 2 or 3
times to ensure your success.
Once pollinated, the majority of the
female’s energy is directed toward seed
production, and bud formation stops.
Pollinate well-formed buds packed with
well-formed stigmas to produce the
maximum number of viable seeds.
Home breeders need to pollinate a flower
bud full of stigmas or a single branch full
of buds to make more seeds than they
need. Humboldtlocal calls pollinating
one branch “planned parenthood.” The
unpollinated branches are sinsemilla.
The sinsemilla tops are harvested when
ripe. Seeded branches continue to mature
for another week or two until ripe.
A little bit of pollen on your thumb or
finger is the best way to pollinate spe
cific sets of stigmas in a flower bud. Hu
man skin is oily and it holds pollen well
without altering it. Brush pollen-laden
thumb or finger lightly to disseminate
countless grains of pollen to fertilize
females. Be very careful with remaining
pollen on finger. Rinse fingers in water
to remove pollen, or quickly lick pollen
with your tongue.
Label everything. It is easy to lose
track of names. Cross-reference notes
or codes on plants with copious notes
in a notebook. Color-code pollinated
females with small pieces of yarn for
easy identification. Some breeders use
barcodes to track plants. The barcode is
fixed onto the plant tag and attached to
the plant.
Put a little pollen into a plastic bag.
Carefully cover a single female branch
packed with receptive ripe stigmas with
the bag. Tie the end of the bag around
the stem of the branch to ensure that no
pollen escapes. Shake the branch lightly
for complete dispersal of pollen to all
stigmas. Leave the bag for 2 days and
nights to ensure thorough pollination.
Move the target plants to a “safe” area
to avoid accidental pollination of other
plants. Be careful not to scatter pollen
when removing the bag.
Avoid using an artist’s paintbrush to
pollinate individual buds. Pollen is very
fine; a paintbrush tends to hold too
much pollen, and it is difficult to con
tain. Pollen can easily disperse beyond
the targeted stigmas.
Set a group offemales in an enclosed area.
Set a single male plant a few feet from an oscil
lating circulation fan. Turn on the fan
to help disperse pollen in the room to pollinate
all the females.
526
BREEDING
www.marijuanagrowing.com
Some commercial breeders and seed
makers place multiple males or clones
of the same male in the seed produc
tion garden room with their breeding
females. Males release pollen in the
well-vented room, allowing complete
pollination of the crop.
Wash clothes and shower afterward to
avoid transporting pollen to nearby
plants away from the breeding zone.
Spray pollinated females with water a
couple of times before returning them
to the normal “sinsemilla” grow-room
population.
Clean seed room thoroughly after each
seed crop to avoid accidental pollination
of future crops.
Step Six: Harvest seeds.
Seeds are ripe when they are mostly dark
brown or gray. Many seeds are spotted
and mottled; some are even tiger-striped.
Green, yellow, or white seeds are almost
always immature and not viable. Seeds
that are lighter in color or float in water
after 24 hours are slow to germinate and
often unviable.
When a few seeded buds are mature,
remove seeds from the bracts by picking
seeds out by hand. This can be done
with green buds or dry seeded flow
er buds. Once dry, rub seeded buds
between your fingers and hands over
a screen or tray. A little bit of light
friction will not damage seeds. However,
they are susceptible to heat, cold, and
moisture. Avoid all three when harvest
ing and handling seeds.
Cleaning seeds by hand can be a laborious
task. (MF)
Note: Do not use excessive heat or a
microwave to dry seeded buds.
Collect seeds and foliage on the tray or
screen. Move the tray back and forth so
that lightweight foliage stays on one side
as the tray is tipped and seeds congre
gate on the other end. Remove excess
foliage by hand and repeat the process.
Rub separated seeds together gently
in your hands to remove traces of seed
bracts that still adhere to seeds. If not
This seeded bud of Afghani' X 'Chiba
Colombian 60' X African 3' was grown as a
seed crop in 1980. (MF)
The same bud from above held 50 seeds. (MF)
collecting resin, use canned air, a fan, or
your breath to blow away small amounts
of lightweight foliage.
Test for ripeness by pressing a few seeds
between your thumb and finger. Seeds
that do not crush easily are most often
viable.
Under humid and rainy conditions,
ripe seeds can actually sprout in place,
in flower buds. Once moisture enters
Once pollinated, female plants produce seeds
that become ripe in 6 to 8 weeks. (Occasion
ally they mature later.) As seeds mature they
become darker. Eventually the containing seed
bract starts to senesce and dry out around the
edges to expose the maturing seed within.
Seed-cleaning devices save hours of work.
The seeded buds are placed on top of the upper
screen. Human seed cleaners rub buds together
between their hands. The friction causes seeds
to separate from seed bracts and buds. Cleaned
seeds are collected below in a pan.
Seeded 'Diesel'female (MF)
www.marijuanagrowing.com
527
Plenty of silicon desiccant and small contain
ers are needed to store a variety ofseeds.
A Canadian friend near Montreal sent me
this photo. He was fantasizing about making
breeding selections. Unfortunately, this is a
field of industrial hemp!
Continue to grow out your crops and make
selections, as is being done in this beautiful
garden from DNA Genetics.
the outer shell of the seed, it starts to
germinate. Or if foliage dries around
seeds and they fall to the ground, they
often germinate on the soil surface. But
most often they are planted outdoors
and consumed by birds or many other
hungry creatures.
Seeded flower buds can contain as much
resin as sinsemilla flower buds. How
ever, much resin is degraded during the
harvest process. Resin glands are broken
or resin sticks to fingers and is exposed
to excessive light and air when seeds are
removed. Seeds are often cleaned over a
screen so that the resin powder can be
collected below.
Step Seven: Store or plant
harvested seed.
Seeds are ready to plant immediately
after harvest, and will germinate well.
Maintain high germination rates by
letting seeds dry in a cool, dark, well-
ventilated place after harvest. Seeds that
dry for a month or longer before plant
ing develop a hard outer cask to protect
the embryo inside. See “Storing Seeds”
in chapter 5, Seeds & Seedlings,
Place harvested seeds in a glass or rigid
plastic container with a desiccant. Label
and date the container. Store seeds in a
cool, dry, dark place. Change desiccant
every month or two.
Step Eight: Grow and evaluate.
Growing more plants means greater
variation and a bigger pool of individu
als. Undesirable plants are easy to cull in
order to provide more space for adjacent
plants to grow.
Felix from Owls Production, Switzer
land, culled all plants that did not meet
his requirements for tolerance to cold
and mold. This simple technique worked
very well. Only the strongest individuals
survived the selection process.
Criteria
1. Cannabinoid profile
2. Growth habit
3. Susceptibility to diseases and pests
4. Climatic conditions for acclimatization
5. Genetic stability
Step Nine: Monitor, select, and apply
selection pressures.
Post-harvest selection requires either
partial seeding of each plant or keeping
clone copies of each and every plant
for future seed-production use once
post-harvest evaluations are done.
Pursue Goals
• Desirable characteristics—
cannabinoid profile
• Overall vigor and good health—
growth habit, susceptibility to
diseases and pests
• Genetic stability
• Acclimatization to your climate
and conditions
Varieties for indoor cultivation: These
include short, squat, bushy growth;
large, densely formed buds; discernible
taste or particular flavors and aromas;
high content of specific cannabinoids,
and quality of the effects (long-lasting,
soaring, sedative); and resistance to
diseases and pests.
Often, varieties that grow well indoors
will also perform well in a greenhouse
and outdoors after 2 to 3 years of
acclimatization. During the first year in
which varieties are moved from an
indoor environment to an outdoor
garden or greenhouse, some will grow
better than others and acclimate more
quickly. However, varieties that grow
well outdoors often grow poorly
indoors, especially pure sativa and
softwz-dominanc varieties.
Greenhouse varieties grow well in
containers. Both outdoor and indoor
varieties often grow well in greenhouses.
Look for robust growth habit and early
flowering if plants are grown in contain
ers. Plants grown in Mother Earth in
the floor of the greenhouse must mature
before they consume 75 percent of the
space inside the greenhouse. Air circu
lation and ventilation, as well as diseases
and pests become problematic if plants
grown in greenhouses become too big.
It is especially important for outdoor
varieties to be acclimated to local con
ditions. Heat, humidity, rain, and cold
temperatures are the main aspects of
concern among outdoor breeders. Out
door varieties should be acclimated to
the local climate before selecting plants.
Smart breeders select plants that mature
early in their climate. Pragmatic breeders
select the earliest plants with a desirable
cannabinoid profile. Selecting for an early
harvest without considering cannabinoid
content is counterproductive.
It is important to balance positive and
negative aspects of each plant and future
generations. Selecting plants that may
528
BREEDING
www.marijuanagrowing.com
This unknown outdoor variety was developed
in Northern California to grow well in a
localized climate.
To date, very little breeding has been done to
develop disease- and pest-resistant varieties
of cannabis. Powdery mildew continues to
be one of the main problems among cannabis
gardeners.
'Granddaddy Purple' is a well-known variety
of cannabis.
have some genetic weakness will require
that the unwanted negative traits are
removed later.
When planting a large number of seeds,
some traits of plants differ greatly but
in all other respects are virtually identi
cal. For example, some plants are more
or less susceptible to fungal infection
such as Botrytis (gray mold) or powdery
mildew.
Plants can be exposed to a particular
pathogen or environmental stress as a
selection pressure. Growing potential
breeding parents in a stressful environ
ment may expose genetic strengths and
weaknesses associated with a particular
environment. Heat- and cold-tolerant
plants may experience excessive predator
attacks or be weak and susceptible to
pathogens. Very little selective breeding
has been done to preserve cannabinoid
profiles and tolerance for diseases and
pests.
Seed-Crop Care
Cannabis grown for seed production
requires a complete balanced diet from
seed germination through harvest. Give
seeded mother plants a complete fertil
izer that supplies all nutrients. Often
vegetative and flowering fertilizers are
mixed together and applied from an early
age. I prefer to use complete, balanced,
organic-based soil mixes to produce the
most healthy, viable seeds.
Breeding Terms
A grasp of basic breeding terms is nec
essary to full understanding of essential
concepts in this chapter. The breeding
terms that follow are easy to look over
quickly and decide which ones to study
in detail.
A variety*—is a subdivision of a
(cannabis) species comprised of natu
rally occurring or selectively bred
populations or individuals that have
distinct characteristics from all other
varieties in the species. The variety must
be uniform and stable under normal
growing conditions. However, minor
variations may be apparent.
A cultivar (cv)* is a distinguishable
plant or group of like plants selected for
desirable characteristics, and maintains
distinguishing traits when propagated.
Most cultivars are selectively bred but
Growing seed crops in a greenhouse is a good
way to keep them isolated from other plants.
some are selections from the wild. The
terms cultivar and variety are equivalent.
Unique plants selected from a group or
population derived from a cultivar that
show enough variation from the parent
are considered a different variety and
deserve their own name.
"’According to some taxonomists, using
the term strain to define variety or cul
tivar is botanically incorrect. For more
information, see chapter 8, Flowering.
Open-pollinated varieties are repro
duced by random pollination within the
variety. Each female has the potential to
mate with any and all male plants. Open
pollination ensures genetic diversity and
The distinct cultivars of cannabis in this photo
were bred in Europe and are shown growing
in Morocco.
These open-pollinated cannabis plants are
growing in the Rif Mountains in Morocco.
www.marijuanagrowing.com
529
Male and female plants are grown together in
this landrace stand of cannabis. The seeded
plants are growing in drought conditions.
Two different genotypes of "Blueberry" X "Sandstorm" grown indoors demonstrate different
color and growth habits.
preserves current traits. An open-
pollinated crop must be isolated from
outside cannabis pollen. Both male and
female plants from the same population
are grown together. All males have the
possibility to pollinate all females. Heir
loom and landrace varieties are open
pollinated.
Pollen travels outdoors! Industrial
hemp breeders plant seed crops a long
way away from other fields of cannabis
to avoid contamination from airborne
rogue pollen.
Heirloom varieties and seeds are culti
vars that were grown before 1950 and are
not used in modern, large-scale growing.
Heirloom is a term seldom used when
referring to medicinal cannabis varieties,
because they were developed after 1950.
Heirloom varieties retain their traits via
open pollination and breed fairly true,
producing plants very similar to the
parent plants. Weak and weird plants
are culled from the population. Heir
loom varieties are still seen in Morocco
and other hashish-producing regions in
other parts of the world.
A landrace is a localized variety of a
plant that has developed mainly by nat
ural processes. The plant adapts to the
microclimate in which it lives. Landrace
varieties are not deliberately or selectively
bred to achieve a specific goal. Overall
landrace varieties are more genetically
and physically diverse than selectively
bred plants. Many selectively bred plants
started out as landraces and are attempts
to improve the gene pool.
Phenotype is the outward physical char
acteristics or genetic traits expressed
that can be observed or measured in
cannabis. The phenotype is how the
genetic map is expressed as acted on by
any environmental factors, internal or
external, that occur outside the nuclear
envelope.
For example a genotype can be short or
tall, but if it grows in a low-light envi
ronment, either phenotype could grow
tall. If the plant is abused, suffers cold
temperatures and heavy winds a plant
that would normally grow tall, may be
short. Environmental factors can influ
ence the expression of genetic qualities.
The same plant grown indoors will look
completely different outdoors when
given a chance to express traits. Harsh
environmental factors also change phe
notype expression. For example, cutting
the top off a plant changes the genetic
expression and the plant grows short
and bushy. The genes are the same but
the outward appearance of the plant has
changed.
All phenotypes are the observable result
of genes acting within the cells of the
plant. Sometimes a single gene controls
one trait (monogenic traits), and some
times sets of genes operate together
and contribute to make what we see as a
phenotype (polygenic traits).
Genotype is the inherited set of instruc
tions carried in a plant’s genetic code.
Not all cannabis plants with the same
genotype look the same because appear
ance is modified by environmental con
ditions (phenotype). And all cannabis
plants that look alike do not necessarily
have the same genotype.
Environmental conditions often trigger
genotypes to express themselves dif
ferently. Green leaves often turn purple
when exposed to cold temperatures.
But leaves on other plants remain green
no matter how cold it gets. The plants
possess different versions of the gene(s)
that control purple pigment production
on leaves. These gene versions, alleles,
dictate whether or not purple pigment is
produced.
In the beginning, both plants had the
green-leaved phenotype; one of the plants
developed an altered phenotype (purple
leaf) in response to the cold environment.
It was caused by the plant’s genetic trait
interacting with the environment.
A simplistic way to think of this import
ant concept is:
phenotype = genotype + environment
Chemotype was a term coined in 1968
by Dr. Rolf Santesson and his son Johan
Santesson. A chemotype is a chemically
distinct entity in a plant with differences
in the composition of the secondary
metabolites. Minor genetic and environ
mental changes have little or no effect
on plant growth or appearance but may
produce large changes in the chemical
phenotype. Cannabis chemotypes may
be indistinguishable in appearance, but
differences in chemotypes appear to
affect the existence and percentage of
cannabinoids and essential oils.
530
BREEDING
www.marijuanagrowing.com
Here is the “Classification of
Chemotypes” Mel Frank made in the
Marijuana Grower's Guide (1982):
Type Cannabinoid Profile
I high THC—low CBD
II high CBD—moderate to high THC
III high CBD—low THC
IV produce propyl cannabinoids in
significant amounts (over 5 percent of
total cannabinoids) form a fourth group
from both type I and II plants
A multiline variety is a mixture of 2 or
more pure lines of similar phenotype
with slightly different genes that are
resistant to different qualities such as
disease, pest and drought resistance,
and early maturity. Multiline varieties
of the same or closely similar geno
types are also called isogenic lines. The
varieties are grown and bred separately
but are later mixed together and sold
in the same seed package. The diverse
genetics often provide extra disease- and
pest-resistance or more acclimatization
in inconsistent environment.
In a perfect growing year, a gardener
may not reap the highest yield from a
Two terminal buds from Mel Frank's 'Kush #4' (1977) demonstrate different phenotypes. The
first was grown outdoors under harsh conditions—2 ,000-foot elevation, very hot days and cold
nights, and brutal sun. The second phenotype was grown in his Oakland greenhouse with mod
erate temperatures and filtered sunlight. (MF)
multiline as is possible with a single
hybrid variety suited to the climate,
but the degree of variation present in a
multiline helps to ensure that as many
plants as possible are harvested. This
sophisticated breeding technique is
common in vegetable and agricultural
crops but has yet to be developed for
medicinal cannabis varieties.
A synthetic variety is developed by
intercrossing several different geno
types that are known to give superior
hybrid performance when crossed in all
combinations. Synthetic varieties have
exceptional hybrid vigor and produce
outstanding seed. Synthetic varieties
are maintained by open pollination
and often recurrent selection in future
generations.
(By contrast, a variety developed by mass
selection is made up of genotypes bulked
together without having undergone
preliminary testing to determine their
performance in hybrid combination.)
In single-seed descent, a plant is self
fertilized and the resulting seed col
lected. One of these seeds is selected
and grown, again self-fertilized, and
seed produced. All progeny and future
generations have descended from a sin
gle ancestor, as long as no pollen from
an external family is introduced. Each
generation is the result of selfing one
individual from the previous generation.
Recurrent selection refers to any
breeding program designed to concen
trate favorable genes scattered among a
number of individuals by repeated cycles
of selection for favorable traits.
Ploidy Factor
Cannabis plants are, by nature, diploids
with 20 chromosomes. At meiosis, each
parent’s gamete contributes 10 chromo
somes to the zygote they have formed.
Cannabis cells may be haploid (have 1
copy of each chromosome set (n) as in
gametes, or diploid (2 chromosome sets
pef cell).
Diploid plants have 1 set of chromo
somes (2ri), which occur in pairs within
each plant cell. Diploid plants are con
sidered “normal.”
Polyploid plants occur in groups of 3 to
4 instead of in pairs.
Tetrapioid plants occur with 4 pairs of
chromosomes (4ri) in each cell.
A few early, poorly researched studies
claimed polyploid cannabis as being
more THC-potent. To date there have
been no studies that prove polyploid
plants contain more or higher levels of
cannabinoids. I know of no polyploid or
tetrapioid plants available from any seed
supplier.
Polyploid characteristics can be induced
with an application of colchicine, a
poison. See “Colchicine” in chapter 22,
Additives, for more information on this
poisonous substance.
Applying radiation, alkylating agents,
colchicine, or EMS (ethylmethyl
sulfonate) will induce variation, but doing
so changes the plant’s DNA.
Modern Cannabis Breeding
Modern plant breeding may use tech
niques of molecular biology to select
desirable traits of individual plants or a
www.marijuanagrowing.com
531
To make breeding selections, Jaime from Resin Seeds uses all ofhis senses and years of
knowledge, along with scientific tests.
population of plants. When biotechnol
ogy or molecular biology is applied to
the plant selection process, it is called
molecular breeding.
Molecular markers or DNA fingerprint
ing can map thousands of genes. Using
the process of marker-assisted (or aided)
selection (MAS) based on DNA/RNA
(deoxyribonucleic acid/ribonucleic acid),
variation is used by scientific breeders as
an indirect selection tool.
Marker-assisted selection allows breed
ers to screen large populations of plants
for disease resistance, stress tolerance,
productivity, and so on. Screening is
based on the presence or absence of a
specific gene or genes rather than relying
on visual observation of a trait in the
plant. In MAS, DNA markers are used
instead of visual observation to select
phenotypes. Marker-assisted selection
significantly accelerates the selection
process and makes it possible to grow
fewer plants for selection. The process
can be used at any time in the plant’s life
cycle. Plants can be tested in the vege
tative growth stage and do not need to
flower.
Breeding using molecular biology
and marker-assisted selection is more
complex than first meets the eye. The
process allows breeders to measure,
select, and cross specific alleles found
within the genome. A closer look at
MAS reveals that it is the selection of
individuals with specific alleles for traits
controlled by a limited number of loci
(up to 8).
Marker-assisted backcrossing (MABC)
is the transfer of a limited number of
loci (e.g ., transgene, disease resistance
loci, etc.) from one genetic background
to another.
Marker-assisted recurrent selection
(MARS) is the identification and selec
tion of 20 or more genomic regions.
Historically, most of the genetic re
search for agriculture and commercial
flower and vegetable crops has been
done in agricultural university labora
tories in the USA and other countries.
Most all universities in many countries
with a good agricultural department
are equipped to make all the DNA and
RNA tests necessary for a scientific
MAS breeding program.
Until the last 10 years, limited marker-
assisted selections have been used in
cannabis breeding programs. A few
years ago only a few large companies
such as GW Pharmaceuticals (www.
gwpharm.com) were able to use MAS in
their breeding programs. They are able
to breed for specific cannabinoids. Until
recently, molecular biology technology
was too expensive, and cannabis culti
vation illegal. Today these barriers have
been broken and the technology is
accessible and legal in various parts of
the world. In fact, setting up a small
home laboratory is much less expensive
than it was a few years ago. For instruc
tions on setting up an inexpensive lab,
visit www.marijuanagrowing.com and
search “Set Up Cannabis Testing Lab at
Home.”
Laboratories in medical states and in
other countries may be willing to work
with medical cannabis breeders to make
MAS tests. Agricultural university lab
oratories may also be receptive to MAS
testing of cannabis. There are at least 2
laboratories in the USA that specialize
in molecular plant breeding and have
worked with cannabis: ACGT, Inc.
(www.acgtinc.com/marijuana_
genotyping.htm) and Life Technologies
(www.invitrogen.com).
Genetic Modification
Genetic modification of plants is
achieved by adding a specific gene or
genes to a plant, or by knocking down
a gene with RNAi (RNA interference)
to produce a desirable phenotype. Both
processes are expensive and have not
been perfected in cannabis.
532
BREEDING
www.marijuanagrowing.com
535 Before Making Hashish
536 Dry Separation
537 Sieves
537 Flat Sieves
538 Tumbler Sieves
539 Water-Extracted Resin
539 Sadu Sam
540 Washing Machine Hashish
540 Carbon Dioxide (CO2)
Extraction
541 Dry Ice Kief: Step-by-Step
541 Storing Separated Resin
542 Pressing Hashish
542 Pressing Small Amounts
of Hashish
543 Hand-Rub Hashish
544 Bottle Pressing
544 Mechanical Pressing
544 Hammering Hashish
545 Concentrated Cannabis Resin
546 Dangers and Safety
546 Solvents
550 Consuming Cannabis Oil
550 Tinctures
551 Cold Extraction with Ethanol
552 Warm Extraction with Ethanol
553 Cannabis Glycerin Tincture
554 Lotions and Salves
554 Cannabis Lotions
554 Cannabis Salves
554 Cannabis Salve: Step-by-Step
556 Glycerin-Based Salve
556 Alcohol-Based Salve
Separating resin glands from foliage concentrates cannabinoids
into dry powdered resin glands (kief*); when pressed into blocks
the resin concentrate is called hashish or hash. Resin glands can
be separated using water. Solvents can be used to separate canna
binoid-rich resin glands from foliage, too. Once separated from
foliage, cannabinoids can remain suspended in a solvent such as
Concentrates come in all shapes, textures, and colors. Noted photographer
Leftfoot put together this collection offine hash concentrates that demonstrate
different textures and colors.
www.marijuanagrowing.com
533
Here are several pieces ofpressed resin
separated using cold water and sieves.
Once separated from buds and leaves,
kief is collected.
Kief is collected and made ready to press
together into hashish.
butter, coconut butter (as a food),
or alcohol (as a tincture), or the
solvent can be removed so that concen
trated oil remains.
Resin glands are oil-based and plant
foliage is water-based. The two act
differently, and this simple difference
has been used for many years
to separate resin glands from foliage.
The first and most common form
of separation is for the oily resin glands
to accumulate on fingers and trimming
tools. This is commonly referred
to as “hand rub” or “finger” hashish.
Resin can be collected by separating
it from foliage and letting it fall through
a sieve. Or it can be separated from
foliage using a combination of cold
water and sieves.
Dry cannabis foliage and flower buds
can also be sieved to separate resin
glands. The resin, bits of foliage, and
foreign matter fall through the sieve.
The resulting powder below the sieve is
called kief* Europeans often mistakenly
call it “pollen.”** This golden-colored
resin dust is lightweight. It can easily be
collected and pressed lightly together to
form a ball. Kief is pressed to form hash.
*Kief consists of resin glands that are
collected after passing through a sieve.
Once pressed together it forms hashish,
also known as hash. The more resin in
the processed cannabis, the more resin
ous the hashish. This chapter will touch
on the basics of making hashish using
safe extraction methods. Detailed
information on chemical extraction
methods using butane, acetate, different
alcohols, and toxic dangerous solvents
has been omitted because of possible
health risks from explosion, fire, and
fumes. Chemical damage may result
from premature use of the end product
before all solvents and residuals have
been extracted. You can find much
information on these subjects at many
Internet sites.
**Pollen: In Europe and other parts
of the world, sieved resin powder is
called pollen. The term is used because
the two look similar, but resin powder
is not pollen. When you hear somebody
talking about “pollen,” you know they
are most likely referring to resin powder.
Wet separation uses a similar principle
to separate resin from foliage, except
cannabis is immersed in cold water
before passing through the separation
screen. Once separated wet resin is
collected and dried.
Resin can also be separated and
concentrated with the use of solvents
such as petroleum, fats, oils, and CO2.
When concentrated in an alcohol or
oil-based solvent, the solvent is removed
and a cannabinoid-potent liquid re
mains. This liquid, hash, or cannabis oil
is usually very dense and increases in
viscosity as it warms. The concentrate
can also be manipulated with a vacuum
to inject air and change the appearance
of the end product.
Kiefwas rolled into a big ball and weighs in at
just under 12 ounces (340.2 gm).
Resinous water hash becomes more pliable
when warm.
Clear amber denotes purity in concentrated
CBD oil.
534
MEDICINAL CONCENTRATES & TINCTURES
www.marijuanagrowing.com
This bud of'Sour Tsunami" is so resinous
that it actually globs together.
Capture resin glands with small heads
by using a smaller mesh sieve.
dominant varieties often have smaller
heads on capitate-stalked resin glands than
indica-dominant varieties have. Smaller
mesh sieves do a good job of separating
smaller resin heads.
Before Making Hashish
Make sure your plants are as clean
as possible before you begin to make
hashish. Remove all stems and large or
damaged leaves. Any oil-based residues
on leaves will show up in the separated
resin glands. For example, if extracting
resin with water, you can see impurity
residues as sheen of oil on the surface of
the water. During the month before har
vest, do not use any harmful chemicals
that leave residues. To avoid potential
health risks after harvest, I prefer to use
only water-based organic products.
Leach growing medium with water
for 5 days before harvest to remove
built-up fertilizers in the soil and
foliage. This will help ensure clean,
sweet-tasting hash.
See chapter 9, Harvest, Drying & Cur
ing, for more on washing plants with
hydrogen peroxide (H2O2) at harvest.
Freeze First: Once dry, freeze cannabis
to prepare for making kief and pressing
Place cannabis leaves and buds to be made
into hash in a cardboard box in the freezer.
Resin glands generally break off near
the bottom of the stalk and just under
the round head.
\nA\c^dominant varieties often have larger
resin beads with short, stout stocks.
it into hashish. Place leaves in a paper
bag or cardboard box in the freezer for
an hour or longer. Remove them from
the freezer, and use a dry or wet sieve
to separate gland heads from foliage.
Freezing makes it possible to collect
more resin by making foliage and resin
glands brittle. Cold, brittle resin glands
snap off and separate easily from foliage.
The yield from 7 ounces (198.4 gm)
of leaves and small buds is between 0.2
and 0.7 ounces (5.7 -19.8 gm) with the av
erage around 0.36 ounces (10.2 gm). The
quantity of hash produced depends upon
the quality of the original material. Clean
stems, large leaves with no visible resin,
dead material, and any debris from leaves
and buds before making kief. Male plants
do contain resin with THC but much
less overall than is contained by female
plants. Outdoor plants are subject to
wind, rain, and dust, which may prevent
resin growth or cause much of the resin
to be knocked off the plant. Plants pro
tected in indoor and greenhouse environ
ments exude as much resin as possible.
Such plants with heavy resin are best for
kief-making. Great hash also comes from
the closely trimmed leaves around buds.
Keep the entire hash operation clean.
This is the key to keeping everything
separated properly and having minimal
contamination.
Yield Per Ounce/Gram of Leaf
and Small Buds
Quantity of Leaf
3.53 oz (100 gm)
Dry Sieve
0.14-0.21 oz (4-6 gm)
Water Extraction
0.21 -0.283 (6-8 gm)
www.marijuanagrowing.com
535
Dry-separated resin is passed through sieves.
It retains natural fragrances and flavors.
This big batch of resin was collected from
leaves. In earlier days it would have been
tossed out with the leaves!
This box of sieves makes dry-sieving cannabis
easy. Each sieve below is a different size mesh
to collect different grades of resin.
Dry Separation
Many hash-makers prefer dry separation
because with this method the natural
resin fragrances are retained. Dry-sieve
kief is not as concentrated as water-
extracted hash. Along with plants’
essential fragrances, dry kief retains
more contaminants—plant matter,
stigmas, insect parts, dirt, and so forth.
The resin is simply sifted through
a sieve or a series of fine sieves.
Resin heads are different sizes.
With the help of different-sized sieves,
you can use the differences in resin
head sizes to separate them from other
plant matter. Typically, a minimum
of two sieves is used to make hash.
The first one filters out the large plant
matter and larger debris, letting the
resin glands and small debris pass
through to the second sieve.
The first sieve should have approximate
ly 110- to 150-micron pores. The second
sieve allows small resin glands to pass,
while it holds back large, mature resin
glands. The pores on the second sieve
should have 60- to 150-micron pores.
You can find silkscreens at your local
This sieved resin from 1999 has been pressed
into hashish.
CONVERSION TABLE FOR SIEVE OPENINGS
A micron = one millionth oj a meter (///, 000,000 m) or one-thousandth of a millimeter
(1/1000 mm) or a micrometer or the symbol jor micron “/x”
US Mesh
Inches
Microns p
Millimeters
40
0.0165
400
0.400
45
0.0138
354
0.354
50
0.0117
297
0.297
60
0.0098
250
0.250
70
0.0083
210
0.210
80
0.0070
177
0.177
100
0.0059
149
0.149
120
0.0049
125
0.125
140
0.0041
105
0.105
170
0.0035
88
0.088
200
0.0029
74
0.074
230
0.0024
63
0.063
270
0.0021
53
0.053
325
0.0017
44
0.044
400
0.0015
37
0.037
L.
536
MEDICINAL CONCENTRATES & TINCTURES
www.marijuanagrowing.com
hobby and art supply store. Printing
supply stores also sell framed screens.
The sieves can be stretched out flat and
fastened to a frame or stretched over a
cylinder to form a tumbler. (Tumblers
are typically automated.)
Sieves
Sieves are made from woven wire,
nylon (silkscreen), and laser-cut metal.
Wire screens generally have wider
openings and are made from various
materials, including stainless steel.
Nylon silkscreen is the most common
sieve material used for resin separation.
It is relatively inexpensive, durable,
and the sizes of the small micron holes
are relatively consistent. Laser-cut
sieves are much more expensive and
are not used by skilled hash-makers.
Check this link for an example,
http://www.precisioneforming.com.
In the USA, the number of openings
across 1 inch is the mesh size. For
example, a “5 mesh screen” means there
are 5 little squares across 1 linear inch
(2.5 cm) of screen. A 100 mesh screen
has 100 openings.
Mesh size is not precise, relative
to particle size. Screens are made with
different thicknesses of wire, which
causes the holes in the sieve to change
size too. Wires are closer on fine-weave
mesh. If the weave is too fine there
is no space between wires. Sieve mesh
is rated with a
or “+”. For example,
-100 mesh aluminum means all particles
would pass through a 100 mesh screen.
A +100 mesh means all particles are
retained on a 100 mesh screen.
The Resin Heaven from Portland, Oregon,
USA, was the first rolling tray equipped
with a screen to collect resin. This device has
spawned countless similar products.
Make sure sieves are labeled with the
micron size. Color-coding helps too.
Flat Sieves
A flat screen can be stretched taut and
fastened to the frame. Find nylon silk
screen and frame at your local art supply
store. Or you can also buy prefabricated
screens and frames at art supply stores
for screen-printing. Or you can find one
through many retailers on the Internet.
Always use monofilament rather than
multifilament mesh. Frames of different
micron sizes can be stacked on top of
one another to render different qualities
of kief. Do not use pantyhose or any
similar filters.
To sieve, plants should be as dry
as possible and cold (about 41°F [5°C])
so resin glands break off easily. Be care
ful not to force plant material through
the sieve. Forcing will break more resin
glands and smear their contents on
the sieve and other plant material.
The contents of these ruptured glands
cannot be recovered. Normally, the
largest mature resin glands fall first.
They are followed by less-mature glands
and debris, including pistillate hairs
and plant debris. If you force too much
through the sieve, much green matter
passes; the resulting hash will be green
and of low quality.
Atmospheric relative humidity can slow
the sieving process to a halt because
it causes the pores of the sieve to clog.
High humidity also remoistens dry
plants, thus making it more difficult
for resin to fall free.
Once prepared, break up buds and
foliage over a sieve, and tap the sieve
lightly to jostle resin heads through
the pores. You can also rub the leaves
lightly on the sieve, but this will force
through more green foliage and other
contaminants. Resin powder will sift
through the screen. The more resin on
the plant material, the more resin that
will fall through the sieve. Use a credit
card to move the cannabis back and
forth across the sieve. Exert minimal
pressure on the cannabis to coax the
highest-quality resin through the sieve.
The first layer of powder will be the
purest. Sieved hash contains more debris
than most other methods, but sieving
is a simple and inexpensive method to
make hash.
Remember, there are several sizes
of resin glands. Use the appropriate
screen size to collect the most resin
powder for the varieties you are process
ing. Fine sativa glands can be collected
with a 70-micron sieve. A 110-micron
sieve is the best all-around sieve, and
These bails of Mexican cannabis were pressed
tightly together and many of the resin glands
were compressed and ruptured.
The bails were broken up into a powder,
which further broke down the resin glands
and mixed them with green matter.
This version of the 6.5 foot-long (2 m)
Pollinator works great to make hash.
www.marijuanagrowing.com
537
7 he cannabis spins down a long sloped tube
made from Jine-mesh sieve material.
Scrape the resin from the bottom of the box.
Collect the dry resin, and press it into hash.
Water-extracted hash after it has been dried
a 150-micron sieve is best for very
resinous varieties.
Sift hash through screen. Let drop onto
paper with a piece of cardboard below.
The dry paper and cardboard will help
draw the moisture out of the separated
resin glands.
('ollect the powder below the sieve.
Now the resin powder is ready to
press into a piece of hash. Pressing
generates a little heat, which also
helps the resin glands and debris
congeal.
Tumbler Sieves
Mila, owner of the Pollinator in
Amsterdam, Holland, and a good friend,
has spent much of her life learning and
teaching how to extract more resin from
cannabis. She invented and popularized
the Pollinator, a motorized cylindrical
sieve to separate resin powder from leaf
and buds.
The Pollinator consists of a drum
that turns inside a box. Cold, dried
cannabis is placed inside the drum
that is made from 150-micron screen.
A motor turns the drum, and resin
glands fall through the screen as the
cannabis tumbles inside. Resin is
collected below the drum. Today there
are several other devices that use the
same principles.
Highest-quality resin falls through the
screen first. Progressively lower-quality
resin falls through the mesh the longer
the drum turns. More green matter and
other adulterants fall through the screen
when the Pollinator turns for longer
periods of time.
But first the dry cannabis must be pre
pared. The leaf must be bone-dry so
that it does not gum up the sieve. Put
super dry cannabis in the freezer for 2
hours, until it freezes. This will make
Mila, from the Pollmato) in Aimti )dam, hosted
the Dab-a-Dou n K bnition in lit ikilc), ( dll
Jorma. Jorge ( er canto i> po inn d the right
(hire the punv» it t uniplele, the sieve />
removed ami the bash remains.
Bubble Man continues to contribute
to and innovate in rhe world of cannabis
concentrates.
MEDICINAL CONCENTRATES & TINCTURES
www.marijuanagrowing.com
Making hash with one of the original
Ice-O -Lator setups
the cannabis resin glands separate
more easily from the foliage and
make the sieving process much more
efficient and productive.
Letthedrumturnfor2to5
minutes. Use a short-range kitchen
timer to avoid running the drum for
too long. As the drum turns, the purest
cannabinoid-rich resin falls through the
screen first, onto the bottom of the box
underneath the drum.
Pollinators and similar devices place
cannabis in an enclosed drum that
spins for a few minutes to several
hours. The kief falls through the sieve
and is collected afterward.
Water-Extracted Resin
Resin (glands) extracted using cold
water is known as water hash, ice hash,
or Ice-O -Lator hash. Very pure hash
will bubble and release volatile resins
when exposed to a flame, hence the
name bubble-hash. This boiling effect
is called “full-melt bubble.”
Mila continued to play with the sepa
ration method and refined it. Within a
short time, she combined the dry sieving
process with ice-cold water; the out
come was Ice-O-Lator bags. They are
3 waterproof nylon bags with progres
sively smaller micron silkscreens sewn
into the bottom of each. Clean cannabis
is chopped and placed in ice-cold water
in the bags. The water is mixed. When
the slurry settles, the resin glands pass
through the screens, and the foliage and
debris are retained in bags. The water
is drained, and a few nice clumps of
high-quality hash remain.
Bubble Man refined the process by add
ing more bags with progressively smaller
mesh. He uses 7 different screens to
sieve resin. He found that each screen
separates unique sediments, some of
•f
y
Once processed and separated, residual hash
is left to dry.
which contain exceptionally pure THC.
This hash is so pure that it bubbles when
heated. Bubble Man popularized this
saying, “If it don’t bubble, it ain’t worth
the trouble.”
Water-soluble terpenoids found in
cannabis resin contribute to fragrance
and taste. The majority of these soluble
terpenoids dissolve and are washed
out when extracting resin with water.
The result is often hash with little flavor
and aroma.
Now the hash is out of the bag!
Many manufacturers have jumped
The book HASHISH! was a landmark work.
Sadu Sam
Modern water hash extraction started with “Sadu Sam’s Secret” that was published
in HASHISH! by Robert Connell Clarke. Sadu Sam’s Secret is simple physics: resin
is oil-based, and cannabis foliage is water-based. This difference makes separating
the two in aqueous solution easy. Heavy, oil-soluble resin glands will not dissolve in
water; they are heavier than water so they will sink. Water-soluble material dissolves
in liquid, and foliage is lighter than water, which makes it float!
A passage from HASHISH! states, “Sadu Sam’s Secret involves stirring a few grams
of pulverized flowers or freshly sieved resin powder into a tall container of cool wa
ter containing ten to twenty times the volume of water to dry powder. Cool or cold
water is essential because warm water softens the resin, which tends to stick together
forming an unmanageable lump. The mixture must be stirred vigorously for several
minutes until the lumps of the powder disperse. Once stirring ceases, the differing
particles in the suspension begin to separate. Plant particles and other light debris
(such as plant “hairs”) float to the surface. Small, immature resin glands also tend to
float. Mature resin glands and any dense debris such as sand and mineral dust sink,
settling to the bottom.” You can still use this method to separate resin from foliage.
www.marijuanagrowing.com
539
When pressed, Ice-O-Lator resin sticks together
into easy-to-manage hash.
on the bandwagon. Your time and
budget will dictate how many bags
you want to use for making water hash.
Use 3 bags and process the mix twice to
extract the bulk of the THC-rich resin.
Keep the wet plant material from the
first water hash extraction. Freeze it and
process again to extract more resin. Or
you can use 5 or more bags in a single
run and harvest different qualities, some
of which are very pure.
Use leaves that have visible resin.
Using large fan leaves or immature
leaves will result in disappointing hash.
Th is method calls for a mixer with
paddles. Note that paddles can bruise
resin glands. If you can, find one with
long shanks on the paddles for easy, deep
mixing in a 5-gallon (18.9 L) bucket. You
can cover the bucket when mixing to help
contain splashes. However, moving the
mixer around the perimeter of the slurry
helps mix up any dry or stagnant places.
When you press powder, the resin
crystals will break and the oil
will be released. The mix will darken
as it oxidizes. The resin crystals from
very fresh leaf will remain white, a very
high quality. For more information see
www.pollinator.nl.
For complete examples, please see
Marijuana Horticulture: the Indoor/
Outdoor Medical Grower's Bible,
chapter 15, Hash and Oil Making,
“Ice-O-Lator Instructions”
and “Water Hash with 15 Bags.”
This is the 19 grams (6.7 oz) that my friend
Mono separated from 100 grams (3.53 oz) of
resinous leaf There are 14 vials, one for each
bag. The 15th bag or “work bag” is not counted
because it retains the bulk of the leafmaterial.
More wet sieves separate more and
different qualities of cannabis resin.
Resin heads are different sizes and
therefore fall through different size
pores in a sieve. You can separate
different sizes of resin glands with wet
or dry sieves having progressively small
er sized pores.
The “work bag” is the one that contains
the bulk of the processed, resinless leaf.
The work bag is usually drained and set
aside so the debris inside can be discarded
at will. Bags with rigid sides perform bet
ter because they retain their shape inside
the bucket and are easier to use when
only one person is making water hash.
The hash-laden water that is left over
after passing through six bags is sepa
rated again by running it through eight
more bags. The resulting hash is very
clean.
When starting with 100 grams (3.53 oz)
of pretty good leaf from a resinous vari
ety, using water extraction with 15 sieves
you should be able to separate out 10 to
15 grams (0.35-0 .53 oz).
This synopsis was adapted from Bubble
Man’s postings on www.overgrow.com
(now closed).
1. 25pt bag - most often full of sativa
full-melt and physically the smallest
bag
2. 45/x bag - nice head hash, most often
consistent and yellowish to white in
color
3. 73/x bag - full melt all the way
4. 120/x bag - good bubble
5. 160/x bag - best for big-headed indica
glands. Debris can also settle here.
6. 190/x bag - removes the majority
of the big debris from the settling
process
7. 220/x bag - is the first filter where all
the big stuff stays
Washing Machine Hashish
Using a washing machine rather than a
bucket and an egg beater, to separate res
in from leaf saves labor. A large machine
is necessary to make big runs of water
hash. A big machine saves hours of
labor. Use a small machine to make runs
of up to a half pound (226.8 gm).
For complete examples, please see
Marijuana Horticulture: the Indoor/
Outdoor Medical Grower's Bible,
chapter 15, Hash and Oil Making,
“Washing Machine Hash.”
Carbon Dioxide (CO2) Extraction
In this extraction process, dry CO2
literally freezes resin glands, making
them easy to shake loose from foliage.
Properly set up CO2 extraction is very
efficient. Large-scale extraction would
Small, tabletop, 5 - to 10-gallon (18.9-37.9 L)
washing machines are available at hydroponic
and discount stores, and on the Internet. The
agitator in these small machines works like a
lawn sprinkler and does not rip and tearfoliage.
540
MEDICINAL CONCENTRATES & TINCTURES
www.marijuanagrowing.com
function under high pressure and have
precision tolerances to get the most out
of the separation process. When CO2
is used as a solvent, it requires much
pressure (73.8 bar [1070.38 psi]), and
the initial setup is expensive. Please see
www.marijuanagrowing.com for more
information on using CO2 as a solvent
to concentrate cannabis resin. Most
people are interested in small-scale
separation.
Supercritical fluid extraction (SFE)
is the most precise way to extract not
only cannabinoids, but essential oils
as well, and is a means of separating
different elements of botanicals. Herbal
essential oils, hops for beer, pharmaceu
tical precursors, and decaffeinated coffee
are all processed using SFE.
The supercritical fluid extraction
method forces a solvent (CO2) through
plant matter under high pressure. When
the solvent is pushed through the plant
matter at such a high pressure, it can
separate the matter precisely, which
allows us to isolate only the purest
essence of our botanicals—in this case,
cannabis. The result is pure, transparent,
amber oil.
Supercritical CO2* has high diffusion
rates which allow it to penetrate
solids faster than a liquid solvent.
Naturally occurring carbon dioxide
leaves no residue. Other popular
solvents used to extract resin, such
as butane, can leave heavy metal residues
in the extracted resin.
*See http://en.wikipedia.org/wiki/
Supercritical_carbon_dioxide
Dry ice is solidified CO2 gas.
When frozen, CO2 is super cold and
must be kept in a special freezer that
is even colder. It sublimes (transforms
from a solid to a gas) and evaporates
into the atmosphere. Dry-ice extraction
freezes off resin glands. The frozen
glands fall through a 120 to 220 mesh
sieve and are collected below.
A 5-pound, solid piece of dry ice costs
$15 to $20 USD. If kept in a freezer
overnight, dry ice will lose up to half
of its weight. For most people, using
frozen CO2 to separate resin is too ex-
A chunk ofdry ice is actually frozen
CO 2 gas.
pensive to be practical. And it is so cold
that it can burn skin on contact. Always
handle with gloves.
Dry ice is easy to use. Cover a 5-gallon
plastic bucket with a 120 to 220 mesh
sieve Bubble Bag normally used to make
water hash.
The final product can be of many
grades. The first few shakes will yield
the highest quality. The smaller sieves
(120, 160, etc.) let less green matter
through. Larger mesh (200, 220, etc.)
lets a lot through!
Always shake over a large, flat mirror or
large, smooth surface. Such an area makes
it easy to scrape up kief.
Dry Ice Kief: Step-by-Step
Step One: Place a few chunks of dry
ice in a can or container. Add about 3
times as much leaf and small buds to the
container with the dry ice. Let the pieces
of dry ice mix with the pre-chilled can
nabis so that it freezes resin glands. The
cannabis should be as intact as possible.
Do not grind it up.
Step Two: Place a Bubble Bag (or some
thing similar) with a 160 mesh sieve at
the bottom over the container. The sieve
end of the bag should cover the container
opening. The bag may fit completely over
the container. Secure the bubble bag so
its screen is taut over the opening.
Step Three: Shake the CO2 cannabis
mixture in the can so the chunks
of dry ice break up and freeze the pre
cooled cannabis.
Step Four: Turn the container upside
down so the sieve is facing the mirror
below. Shake the container for a few
seconds or up to 5 minutes. White vapor
emerges from the container as the CO2
sublimes and resin glands slide through
the sieve onto the mirror.
The first couple of shakes you’ll get
top-quality resin glands. The resulting
powder progressively turns to green leaf
matter. Shake the container a few times
so that the highest-quality kief passes
through the sieve. Collect this kief
before progressing to the next grade.
Repeat process as many times as desired.
Step Five: Remove any remaining pieces
of dry ice. Scrape kief from sieve and
inside the container onto the mirror.
Scrape kief that fell through sieve into
a pile. Store the kief in a glass container
and use for cooking. The hash is lower
quality and contains contaminants. But
the cannabinoids are concentrated in the
final product.
In simple experiments, this method
yields 15 to 18 percent or more final kief.
As with any kief, the end product is con
tingent on the original buds. Resinous
buds make the best kief. Lower-quality
leaf and buds make lower-quality kief.
This process is an easy way to store large
quantities of leaf and small buds that
might otherwise go to waste.
Storing Separated Resin
Make sure hash is completely dry before
storing. Moist hash contracts fungus
easily and decomposes quickly. Decom
position decreases THC levels. If you
make hash using ice and water, be care
ful to dry it well. Dry by pressing the
water hash into a flat pancake that has
much surface area. Leave the pancake
out in an arid room for a few days to dry
completely. Cover the hash with a paper
towel so dust does not contaminate it.
If you made hash with a dry method such
as sieving, you should not have to take
any extra precautions before storing, un
less you are working in a humid climate.
My favorite way to store high-quality
water hash is to put it in a glass tube.
This way all the resin stays intact until it
www.marijuanagrowing.com
541
Semidry water hash is passed through
a strainer to help remove moisture locked
inside larger pieces.
Once resin passes through the large sieve,
it is collected and left to dry in containers
for a few days.
Dry resin is pressed into slabs. The two dark
pieces in the middle top contain the most resin.
is consumed. Upon smoking, you should
press it a little so it will burn evenly.
Store hash in a cool, dark, dry place.
Keep in an airtight container with a
packet of silica crystals. You can also
put hash in the freezer for long-term
storage.
For a complete account of the history
and detailed methods of production, see
HASHISH! by Robert Connell Clarke,
(Redeye Press, 1998), www.fsbookco.
com. If you want to make the best hash
and have a springboard to launch into
advanced processes, this is the book
for you!
Pressing Hashish
Once collected, kief (resin powder) is
often pressed into hash to facilitate han
dling and storage. Bulky resin powder is
awkward to handle. It is easily spilled,
blown away, or contaminated by dust
and dirt. Kief is also more difficult to
smoke, especially if no screen is available.
Once pressed into a piece of hash, how
ever, the resin is easy to handle, store,
transport, and consume. Proper pressing
is essential for easy handling, storage,
and to slow decomposition. Pressing
determines how hash will burn and also
affects taste and smell.
Small amounts of hash can be pressed
by hand (hand rub); larger amounts will
need to be pressed with an object such
as a bottle or rolling pin. Mechanical
presses are able to apply more pressure.
Hydraulic presses apply the most pres
sure to make larger pieces.
Pressing hash creates heat that fuses
resin glands together. Heating resin
with a hair dryer is not necessary with
pure resin. If heat is applied, a drop or
two of water or alcohol can be added
while pressing to make less-pure hash
stick together in a block. The idea is
to heat the hash a little but not melt it,
keeping the heat level constant. This
will help the resin bond together.
Regardless of how the resin glands are
pressed, they must be contained in
cellophane plastic. The cellophane is
essential because the resin does not stick
to this type of plastic. Do not use more
durable plastic found in Ziploc bags or
the resin will stick to it. Use inexpensive
cellophane.
Mechanical presses must be precise and
align well so pressed hash does not ooze
out seams of cellophane bags. When
pressed, heat and friction cause the outer
layer of pressed hash to oxidize and turn
darker than the interior. In fact, hash
can have a dark exterior and a blonde in
terior packed with creamy resin glands.
Pressing Small Amounts of Hashish
By hand pressing, you experience the
transformation of the resin powder into
your very own piece of fragrant, dense
hash. To hand press, collect one to four
grams of resin powder in the palm
of your hand and apply pressure to the
Store dry resin pieces in small containers for
easy transport and consumption.
Pressing ruptures resin glands and warms
the resin, causing many volatile aromatic
terpenoids to release their aromas but many
flavors are held in the pressed hashish.
This bubble-hash is so resinous that machine
pressing is not necessary. All these pieces have
been worked into shapes by hand.
542
MEDICINAL CONCENTRATES & TINCTURES
www.marijuanagrowing.com
A small hand press makes nice little
hash wafers.
Here are three different kief collections pressed
into hash, still in the cellophane bags used for
pressing. Make sure to pre-press water-extracted
hash in a piece of cellophane to contain it and
help get rid of the water. The cellophane will
give the pressed hash a shiny skin.
This piece of “finger hash” was scraped
from fingers and trimming tools in a single
day of trimming!
powder, working it between the palms
of your hands. Also push your thumb
into your palm full of resin powder to
work it into a piece of hash. Continue
this process for 10 to 30 minutes until
the piece of hash is completely pliable
and whole. Heat will be generated and
help rupture and meld the resin glands
together. Relatively pure resin powder
will congeal faster than less-potent pow
ders that contain impurities. But a little
vegetable matter and debris gives hash
different flavors and more body.
Potent resin powder is a creamy white
to gold in color. Pressing the powder
together and working it in your hands
ruptures and oxidizes resin glands,
which makes the mass turn ever darker.
Hand-Rub Hash
Hand-rubbing hash is simple and easy
but horridly inefficient and wasteful.
All you need to hand-rub are a good
pair of hands, adequate cannabis buds,
and desire. Much of the resin falls to the
ground or becomes “lost” deep within
buds or it sticks to other foliage. Over
all, hand-rubbed hash is lower quality
and contains more debris than sieved or
water-extracted hash.
Hand-rubbing is most common in the
Himalayan foothill regions of Nepal,
India, and Kashmir where “charas”
(the Indian word for [hand-rubbed]
hash) is fairly popular. Most small-scale
and commercial growers collect the
little bit of hash from their hands and
tools during manicuring. This is the
closest thing to hand-rubbed hash most
growers experience.
Plants that are best suited to hand-rub
bing have sticky resin that adheres to
hands much better than it sticks to other
foliage. At the same time, the resin must
be relatively easy to roll into little balls
to remove from hands.
Collect hand rub from healthy, strong,
mature plants with green leaves. Some
large leaves may already have started to
turn yellow. Remove brown, crisp, and
dead foliage before rubbing. Remember,
cannabis plants are generally pretty
tough and can take vigorous (but not
abusive) rubbing.
Once collected on hands, resin must
not be allowed to collect other debris
or foliage. Any foreign matter that
sticks to resin-laden hands should
be able to be brushed off easily.
Gather resin by rubbing individual
flowering branches firmly between
hands. Slowly move hands up from the
bud, continually rubbing back and forth.
Rub palms and fingers in between
resin-covered flower clusters so they
come in contact with as much resin
as possible. Each branch should be rubbed
for 20 seconds or more. After rubbing
Small pieces of resin accumulate on hands,
gloves, and trimming tools. This resin is
scraped up and consolidated.
Once in hand, the small pieces of resin
are molded together. The body heat generated
by the band and light pressing melds the small
pieces together.
After a few minutes ofhandwork, the pieces
ofhand-rub hash form a spherical ball that
is easy to store, transport and use.
www.marijuanagrowing.com
543
The heat and pressure from the bottle will heat
the resin so that it sticks together. The cello
phane keeps the resin in place during pressing
and serves to protect the hashish afterward.
Add a little heat to hard-to-press hash that
contains impurities. The heat will help the
mass congeal so bricks do not need excessive
pressure to stay together. But remember that
pressing also increases heat; do not heat the
resin too much or it will be damaged.
a few branches, you settle into an intox
icating, hypnotic rhythm. Aromatic fra
grances are released as you rub the buds.
The resin sticks to hands slowly at first,
but once they are covered with a light
sheen of resin, the accumulation process
speeds. Brush off any foliage or debris
from hands as soon as it sticks so the
resin remains reasonably pure.
To remove the resin from hands, rub
your palms together so resin clusters to
gether into sticky little balls. At first the
resin will ball up relatively quickly. Lump
the balls together to form a single piece.
Use this piece to rub on resin that is still
on your hand to help remove it. If hands
are moist or sweaty, soak up moisture
with a paper towel before removing hash.
Once collected, knead resin in your hand
until it reaches your desired consistency.
Hand-rubbed hash is best enjoyed within
a few weeks of collection. Collecting
hand-rubbed resin is time consuming.
An average collector can rub all day and
collect a mere 5 to 10 grams!
Bottle Pressing
Press small amounts of resin powder
between cellophane to form a pancake.
Fill a long cylindrical bottle with warm
water and use it as a “rolling pin” to
press the pancake of hash. The extra heat
from the warm water will help loosen and
blend the kief into hashish.
Use a laminator—the kind that overlays
photos and documents between 2 sheets
of plastic—to press hashish. Sprinkle
the best resin powder, kief, you can
make onto a piece of cellophane. Lay
another piece of cellophane on top. Roll
over it with a bottle full of warm water
to get it into preliminary shape and
make it easy to work. Remove the piece
of hash from the cellophane; treat it like
you would a document and laminate it.
Laminating machines usually have a heat
control that helps with pressing hash.
Mechanical Pressing
Place resin powder in a plastic bag
or cellophane wrapper to contain it
while pressing. All the powder will be
pressed within the wrapper into a brick
or plaque of hash. Poke a few small
pinholes in the bag before pressing to
allow trapped air to escape. The bag is
placed into a heavy-duty steel mold, and
pressure is applied with a hydraulic jack.
Hydraulic jacks have a capacity from 10
to 20 tons and are mounted to heavy-
Use a hydraulic press to press larger amounts
(50-100 gm) ofkiej into hashish.
duty steel frames that normally contain
a 100-gram mold.
The pressure exerted to form a cohesive
block is contingent upon the volume of
contaminants in the powder. The more
pure the resin powder, the less pressure
it takes to form it into a block.
If your hash was made with water, make
sure it is totally dry before pressing, to
avoid mold. Water hash does not react
like dry-sieved hash when pressed. Resin
has been melded together in a different
way than dry powder. Pressing the resin
when it is wet will trap moisture inside
the hash. The hash will not dry complete
ly, and it will not properly gel together
later. It will retain a powdery consistency.
Dry-sieved resin powder will press easily
and stay together under lower pressure
when it is relatively pure. If it is adulter
ated with impurities, more pressure
and heat will be necessary to press it
into a block.
You can also add a drop of alcohol in the
form of brandy, whiskey, bourbon, rum,
etc., to help meld the glands together.
Spirits with higher alcohol content are
favored. Be careful to add only a drop
at a time; alcohol takes a few minutes to
completely penetrate and act.
Hammering Hashish
Hammering hash is a popular pressing
method in Morocco but uncommon else
where. Hammering bursts and blends res
in glands together into a cohesive mass.
544
MEDICINAL CONCENTRATES & TINCTURES
www.marijuanagrowing.com
'Granddaddy Purple' (left) and Head Cheese' (right) are two examples of “wax”—concentrated
resin containing cannabinoids that have been extracted with solvent, usually butane. Harmful
residual chemicals from butane hash oil (BHO) are purged by placing it in a vacuum under
controlled conditions. Texture, color, and structure of the wax are governed by the duration and
exposure to vacuum pressure and heat.
Often resin glands are hammered before
being hydraulically pressed into plaques.
To hammer hash, pour resin powder into
an extra-heavy-duty plastic bag. Place
the bag on a wooden board and top it
with another board. Whack the board
with a hammer until the resin powder
forms a cohesive pancake. Remove the
hash from the bag and fold once or twice
to make it smaller and thicker. Repeat
hammering and folding until resin glands
transform into a sticky piece of hash.
Hammering will heat the resin, but apply
a little heat if the hash is slow to form.
Online resources: Supplies and equip
ment for making kief or water hash:
www.GreenHarvest.ca
www.BubbleBag.com
www.IceCold.org
Concentrated Cannabis Resin
Hash oil is a concentrate of hash or can
nabis (cannabis oil) that has been dis
solved in a solvent. The ingredients are
combined, the mix “cooks” for a time,
and the cannabinoids are later separated
from the liquid solvent. The solvent is
usually removed by evaporation, leaving
concentrated cannabis. Impurities can
be filtered, but the process takes longer.
More if not all residual butane, other sol
vents and impurities can be purged in a
vacuum chamber. Once purged of impur
ities, concentrated resin takes on a new
texture and is often referred to as wax,
earwax, budder, shatter, and crumble.
Nasty hydrocarbon solvents such as
ether and alcohol are used to extract
cannabinoids. When improperly pro
cessed, cannabis, hashish cannabis, and
hemp oils retain residues from solvents
used to extract cannabinoids. These
residual solvents are often locked in
chemically. Such solvent residues pose a
health risk. The residual is a sludge that
contains chlorophyll, plant waxes, other
debris, and cannabinoids. These residues
are a health risk when inhaled. I do not
recommend volatile solvent extraction
because it requires the use of danger
ous chemical solvents.
Explaining in detail how to make
solvent-based cannabis concentrates
and oils is beyond the scope of this book.
I do not like such concentrates because
the residuals are often difficult to
remove. There are numerous videos on
YouTube and website forums that explain
in detail many of these processes.
Hydrocarbons are released when using
petroleum products to extract resin.
The process is usually finalized by
boiling or evaporating off the solvent.
Ventilation must be adequate, and the
heat source should be electric. An open
flame is out of the question. Fire and
explosions are a reality!
Cannabis oils can be very concentrated
and potent. Honey oil was popular in
America in the early 1970s. The oil was
a translucent golden-amber color. The
oil transformed from stiff, toffee-like
consistency to runny oil when warmed.
Today there are many different cannabis
and hashish oils.
Cannabis oils that are greenish in color
contain chlorophyll; dark colors sig
nify other contaminants. Filtering the
oil through charcoal will remove most
of the impurities. Hashish oils never
became super popular because they are
inconvenient to consume, and many
people do not want to be exposed to the
Bubble hash'
■>
"Strawberry Cough'honeycomb
“Tangie” wax
www.marijuanagrowing.com
545
Boiling extract mixes to remove solvents
from concentrate almost always leaves solvents
locked in residuals.
Golden Buddha oil is a popular concentrate
at California medical cannabis dispensaries.
Hash oil has a high concentration
ofcannabinoids.
health risks associated with the solvents
used for processing.
Making cannabis oil is easy, though. First
the solvent and cannabis are combined.
Next the cannabinoids migrate chem
ically to the solvent. This could take a
few minutes to a couple of months. Later
the solvent-laden cannabis mix is placed
in an open container to evaporate. Once
the solvent is completely evaporated, the
concentrated cannabis oil remains.
Solvent efficiency is dictated by its
chemical properties and purity. Overall
the polarity of a solvent determines what
it is able to dissolve. Solvents are polar,
nonpolar and semipolar. Extract can
nabinoid molecules only with nonpolar
solvents. Nonpolar solvents dissolve
only oil-based resin and the resulting
concentrate is a rich honey color. Polar
solvents extract only water-soluble plant
material molecules including chloro
phyll. Semipolar solvents extract oil-sol
uble cannabinoids and water-soluble
plant material. The contaminants—
water soluble plant material including
chlorophyll—cause a green color and
taste. Impurities include water and com
mercial additives combined with
the solvent during manufacturing and
can be an issue with industrial solvents.
Butane and hexane are non-polarity
solvents and extract only cannabinoid
molecules. Butane and hexane are the
most common solvents used to make
concentrated cannabis oil.
Isopropyl alcohol, methanol alcohol, and
ethyl alcohol are all semipolar solvents
and extract both cannabis resin and
plant material. A higher concentration
of alcohol with few contaminants will
extract the greatest amount of canna
binoids. For example high-grade ethyl
alcohol (95%) has only 5 percent water
to dissolve plant matter.
Solvents
Butane (nonpolar)
Severely hazardous
Very flammable
Highly explosive
Boiling point: 31.1°F (-0.5°C)
Flash point: -76°F (-60°C)
Butane is a non-polar solvent that does
not dissolve plant material. Butane hash
oil (BHO) is made by passing butane
gas through chopped cannabis in an
enclosed container. Butane dissolves
cannabinoids very quickly. The lique
fied, butane-laden cannabis resin mix is
carried by gravity out the drain on the
lower end of the airtight receptacle.
The liquid is collected in an open bowl.
Dangers and Safety
The boiling point is the temperature at
which a liquid boils and turns to vapor.
The flash point of a flammable liquid is
the lowest temperature at which it can
form an ignitable mixture in air. At this
temperature the vapor may cease to burn
when the source of ignition is removed.
The fire point, is defined as the tem
perature at which the vapor continues to
burn after being ignited
Note: The ideal solvent has a high flash
point and a low boiling point.
Solvent must have a lower boiling point
than the residual cannabis resin (380°F
[193°C] and CBD at 320°F-356°F
[160°C-180°C]). Solvents with a
boiling point greater than the highest
temperature achieved will remain in the
concentrate! DO NOT USE!
The chemistry of solvent separation is
complex. For example butane may refer
to either of two structural isomers,
n-butane or isobutene (methylpropane)
or a mixture of the two “butanes.* The
flash point of isobutene (i-butane) is
higher than n-butane. As isomers n-bu
tane and i-butane have the same chemi
cal formula but different structures and
do not always share the same properties.
Research each chemical you are con
sidering using to extract cannabinoids.
Check all chemistry, hazards -
flammability, health warnings, etc.
Here is a good place to start:
www.engineeringtoolbox.com.
546
MEDICINAL CONCENTRATES & TINCTURES
www.marijuanagrowing.com
The butane is then allowed to evaporate
into the air. Setting the bowl in a pan
of warm water will speed evaporation.
Once the butane has dissipated com
pletely, the residual, honey-colored oil
can be scraped from the bottom of the
glass collection pan.
Butane lighter fluid refill cans are the
most common source of this solvent.
It is relatively inexpensive, easy to find,
and very fast-acting. Avoid brands that
contain additives.
Caution! Butane gas is very flamma
ble. Be extremely careful when using it.
Use only in a well-ventilated area and
never around an open flame, sparks,
or anything that might ignite it. Wear
protective gloves and a breathing mask
when handling butane. Avoid contact
with skin and body parts.
To Make Butane Hash Oil
Step One: Fill a 1-quart (1 L) plastic
beverage container with chopped canna
bis leaf or flower buds. (Higher-quality
cannabis contains more cannabinoids
and will render higher-quality hash oil.)
Do not pack cannabis too tightly in con
tainer. Butane needs airspace to be able
to penetrate all the cannabis quickly.
Step Two: Poke a small hole in the
bottom of the container and insert the
fitting provided with the butane cans.
Step Three: Cut a small hole in the cap
of the container. This is where canna
binoid-laden oil will exit into an open
bowl below.
Step Four: Move outdoors. Do not stay
indoors to complete this project! You
will be working with very volatile butane
under pressure. It is extremely flamma
ble and requires much ventilation.
Do not have any lit cigarettes, barbe
ques, or any open flames within 50 feet
(15.2 m) of the project. Turn the con
tainer upside down and start filling
it with butane fuel.
A 10-ounce (29.6 cl) container of butane
will extract cannabinoids from a half
ounce (14.2 gm) of cannabis buds, trim,
or shake. Always use premium-grade
pure butane with no additives.
A small vial ofbutane hash oil (BHO) is very
concentrated. Almost all homemade BHO
contains unhealthy residuals.
Step Five: Place the cap of the container
over an open bowl so that solvent drains
out the hole and into the bowl. When
the last can of butane has run through
the cannabis, the solvent is ready to
evaporate.
Step Six: Butane in an open bowl is
very volatile and must be kept away
from open flames, lit cigarettes, etc. The
project should be completed outdoors
to provide adequate ventilation to carry
away toxic fumes. Evaporation can be
natural over time. Set the bowl in a safe,
well-ventilated place outdoors, and
the solvent will evaporate within a few
hours. Or (still outdoors) set the bowl in
a pan of water on an electric skillet for
faster evaporation.
Step Seven: Once all butane is evapo
rated, collect the oil by scraping it from
the bottom of the glass bowl. A flat-bot
tomed glass or Pyrex bowl is much
easier to scrape than one with a round
bottom.
Caution! Making butane hash oil is
dangerous. Fumes are toxic, and a small
flame or spark will make the butane ex
plode. Butane hash oil must be made in
a well-ventilated or outdoor location.
Jelly hash is a mix of high-quality hash
and cannabis butane oil. The recipe is
as follows: 8 parts hash and one part
butane hash oil. Dark jelly hash is sticky,
oily, and difficult to handle.
Caution! Do not use a pressure cooker
to make cannabis oil. Solvents do not
react like water under pressure. Solvents
under pressure may explode.
Other methods: Bathe cannabis in
solvent, then squeeze out the solvent and
let it evaporate from the solvent/canna-
binoid/plant material mix. Once evap
orated, the remaining cannabinoid and
plant residue mix can be extracted again
with another solvent that will remove
water-soluble contaminants.
Hexane (nonpolar)
Hazardous
Flammable
Highly explosive
Boiling point: 177.8°F (81°C)
Flash point: 0.4°F (18°C)
Hexane is made by refining crude oil.
It is inexpensive, but it can be hard to
find. It is often available in paint stores.
Even though it is highly flammable and
slow to evaporate, hexane is commonly
used to make concentrates.
Petroleum Ether
Petroleum ether is also known as ben
zene, VM&P Naphtha (varnish mak
ers’ & painters’), petroleum naphtha,
naphtha ASTM, petroleum spirits, X4,
or ligroin (semipolar)
Hazardous
Very flammable
Highly explosive under pressure
Boiling point: 100.4°F (38°C)
Flashpoint: <0°F (<-17.8°C)
Petroleum ether is a very selective sol
vent. To minimize danger and cut costs,
petroleum is first extracted from the
cannabis with alcohol and re-extracted
with petroleum ether.
Petroleum ether is available at hardware
stores in most countries. Do not confuse
petroleum ether with diethyl ether.
The term “ether” most often refers to
diethyl ether.
Petroleum ether has a specific gravity of
between 0.6 and 0.8, depending on its
composition.
www.marijuanagrowing.com
547
Acetone is an explosive and very flammable
chemical mix.
Madeline Martinez, owner of the World
Famous Cannabis Cafe in Portland, Oregon,
and Executive Director of Oregon NORML,
holds a syringe of Rick Simpson Oil.
The bottle on the left has been packed with
cannabis flower buds.
The following distillation fractions"' of
petroleum ether are commonly available:
30°C to 40°C
40°C to 60°C
60°C to 80°C
80°C to 100°C
80°C to 120°C
100°C to 120°C
The 60°C to 80°C distillation fraction is
often used as a replacement for hexane.
Petroleum ether is mostly used by phar
maceutical companies and consists mainly
of pentane. It is sometimes used instead
of pentane.
" See http://en.wikipedia.org/wiki/
Distillation_fraction
Do not confuse petroleum ether
(synonym of benzene) with benzene or
benzyne. Do not confuse with gasoline.
The words benzin (German), benzine
(Dutch), zndbenzina (Italian) are all
used to describe gasoline. Petroleum
ether is a mixture of alkanes (e.g., pen
tane, hexane, and heptane), whereas
benzene is a cyclic, aromatic hydrocar
bon, C6H6. Likewise, petroleum ether
should not be confused with the class of
organic compounds called ethers, which
contain the R-O-R’ functional group.
For Rick Simpson’s “Hemp Oil Recipe”
using naphtha, hit our site,
www.marijuanagrowing.com.
Acetone
Severely hazardous
Very flammable
Highly explosive under pressure
Boiling point: 132.8°F (56.1°C)
Flash point: -4°F (-20°C)
Acetone is readily available and sold as
a solvent or degreaser and as fingernail
polish remover. Do not use acetone
mixed with other chemicals. It evaporates
rapidly and is generally recognized as
safe to use. It has low acute and chronic
toxicity if ingested or inhaled. It is rated
as a GRAS (generally recognized as safe)
substance for food use.
Acetone is very flammable. Tempera
tures above acetone’s flash point of -4°F
(-20°C) and an air mixture of 2.5 to 12.8
percent acetone by volume, may explode.
Vapors can drift for distances to ignition
sources and flash back. Acetone is too
dangerous for safe use. Acetone’s boiling
point is 132.8°F (56.1°C).
This solvent has relatively low acute and
chronic toxicity if accidently inhaled or
ingested.
Ethanol / Ethyl Alcohol /
Grain Alcohol
Hazardous
Flammable
Explosive under pressure
Boiling point: 173°F (78.3°C)
Flash point: 53.6°F (12°C)
Purchase high-percentage (high proof)
ethyl alcohol at liquor stores. Look
for Everclear that is 95 percent alcohol
(190-proof). If this is not available, use
151-proof rum (75% alcohol). A higher
proof alcohol means less residual water
content. Oil made from ethyl alcohol
is dark or greenish in color because it
dissolves water-soluble plant material as
well as cannabinoids.
The easiest way to infuse cannabis into
ethyl alcohol is to place flower buds in
bottles of brandy, rum, vodka, gin, or
various liqueurs. Always find the most
potent alcohol—the highest percentage
or “proof,” which is half the percentage
(i.e ., 80-proof is 40% alcohol).
The bottle of 151-proof rum started life
as one fifth of a gallon (0.8 qt [757 ml])
and 1.8 ounces (50 gm) of manicured
cannabis buds. (Some liquid is displaced
as the cannabis is added to the bottle.)
548
MEDICINAL CONCENTRATES & TINCTURES
www.marijuanagrowing.com
Do not use denatured alcohol!
Denatured
Alcohol
CHr^un^Wbirrwtwa
_
Alcohol
Desnaturalizado
Rubbing alcohol is easy to find at any pharmacy
or supermarket.
The! torch heats the bowl red-hot before
a small piece ofhashish or oil is dropped
or “dabbed” in.
The dry buds suffered being squeezed
through the neck of the bottle. Many
broke up. The good news is that they
are inside the bottle, soaking up the
151-proof alcohol. Buds were as dry as
possible, with few stems, all of which
contain moisture that dilutes the ability
of the alcohol to absorb cannabinoids.
Alcohol can be evaporated so that a
potent concentrate remains. However,
when using beverage alcohol as a solvent,
the alcohol serves to hold the cannabi
noids and make a potent elixir.
Cannabis concentrates are often consumed in
a titanium bowl heated with a torch. A little
“dab” of concentrate is placed on the hot metal
to immediately smoke and burn.
Isopropyl Alcohol / Isopropanol-
Rubbing Alcohol (moderately polar)
Hazardous
Flammable
Explosive under pressure
Boiling point: 180°F (82.2°C)
Flash point: 53.6°F (12°C)
Rubbing (isopropyl) alcohol is easy to
find in a 70 to 99 percent concentration.
Isopropyl is highly toxic to ingest. When
used to extract there is almost always
residual solvent in the concentrate.
This alcohol dissolves THC, other
cannabinoids, and plant fiber. It makes
dark-green oil that contains water,
and water-soluble substances are also
extracted. Cannabis oil extracted with
isopropanol is sometimes referred to as
“ISO (oil)”.
Re-extract the oil later with a more
selective solvent to remove impurities.
Once most of the alcohol is evaporat
ed, the water and remaining isopropyl
alcohol that were in the solvent remain
with the oil. Terpenes and aromatics are
also destroyed.
This solvent is less toxic and explosive
than methanol, but it is flammable! Be
careful when handling.
Methanol / Methyl Alcohol I Wood
Alcohol (moderately polar)
Hazardous
Flammable
Explosive
Boiling point: 149°F (65°C)
Flash point: 53.6°F (12°C)
This popular solvent evaporates at
approximately 149°F (65°C) with a boil
ing point of 149°F (65°C). It dissolves
cannabinoids and plant material to make
green-black oil. Methanol (as stove fuel
and paint thinner) is easy to find at paint
stores and hardware stores.
A small amount of concentrated hashish
is placed on a stainless steel pipe screen and
ignited. Within a second, the concentrated
hash melts and bubbles.
www.marijuanagrowing.com
549
DJ Short Blueberry Tincture is unique in the
medical cannabis industry in that it is one
of the few tinctures that has the ingredients
printed on the label.
The total cannabinoid content is fully de
carboxylated including whole plant terpene
profile: 11.24 mb per 1 ml dropper full: THC:
10.11 mg, CBD: 0.73 mg, CBG: 0.40 mg
(SCFP/CO2)
Cannabis tinctures are becoming very popular
at medical dispensaries. Avoid products that
do not show a “guaranteed analysis.n
This solvent is toxic and explosive.
Fumes are toxic to inhale. Any traces
of methanol in the oil are extremely
hazardous to the consumer.
Denatured Alcohol
Severely hazardous
Very flammable
Explosive under pressure
Boiling point: 173.3°F (78.5°C)
Flash point: 57°F (13.9°C)
This very toxic solvent has extraction
properties similar to methanol. Poison is
added to denatured (ethanol) alcohol to
lower the beverage alcohol tax and dis
courage consumption. Do NOT drink
denatured alcohol! It is more widely
available and is cheaper than poison-free
ethanol, but the denaturing agent MUST
be removed. Depending on what type of
poison is used to create the denatured
alcohol, the poisons are impossible to
completely remove from the alcohol
with evaporation.
Caution: Do NOT use denatured
alcohol as a solvent!
Consuming Cannabis Oil
Cannabis oil can be wiped on joint
papers, cigarettes, pipe screens, and hot
knives. A popular smoking method is
to smoke it in an oil pipe—a stem with
a glass bubble on one end. A little oil
is placed inside the glass bubble. When
heat is applied, the THC vaporizes and is
inhaled through the stem.
You can find out more about these pro
cesses on many Internet cannabis sites.
A new and popular method to consume
such high-potency oils and resins is to
place them on a piece of titanium and
heat it super-hot. The resin or oil vol-
atize immediately at 428°F (220°C); the
rest is overkill but looks cool! However,
there may be a health risk. Superheating
titanium may give off unpleasant chemi
cal substances. More study is necessary.
Cannabis oil can be placed in a vacuum
container and over time of turning on
and off the vacuum, air is infused into
the oil and removed. The process causes
oil to turn a golden yellow in color with
air holes interspersed. The resulting
material is known as “earwax.”
Tinctures
11.24 mg per 1 ml dropperful
THC 10.11 mg
CBD 0.73
CBG 0.40 mg
{sCFP/CO2}
Suggested dosage on the DJ Short
Blueberry Tincture label is: 5.5 mg or 0.5
dropper every 4 hours Protect from light
and heat and store at room temperature
The following text was extracted from
“Marijuana Tincture Recipe, How to
Make Cannabis Tincture” by Jay R.
Cavanaugh. Please check the late
Dr. Cavanaugh’s Wikipedia entry http://
en.wikipedia.org/wiki/Jay_Cavanaugh.
A cannabis tincture is an extraction
of active cannabinoids from the cannabis
plant. Ethanol alcohol or glycerin is used
as a solvent to extract the cannabinoids.
Properly extracted cannabinoids do not
upset the stomach or taste bad. Cannabi
noids are extracted and the vast majority
of terpenes and chlorophylls volatilize or
are lost in the process.
A tincture delivers medicine quickly
with consistent dosing. High-quali
ty tinctures can be applied under the
tongue, sublingually. The cannabis
Set buds in freezerfor 1 to 2 hours.
MEDICINAL CONCENTRATES & TINCTURES
www.marijuanagrowing.com
tincture is absorbed by the arterial blood
supply under the tongue in a few sec
onds. If tincture is swallowed,
absorption is via the gastrointestinal
tract, which slows effects by 1 to 2
hours. The dosage is delivered via a med
icine dropper, teaspoon, or spray. Dos
age depends upon potency of tincture.
While the methods are optimized for
purity and potency, ultimately these will
be determined by the purity and potency
of the cannabis from which the tincture
is made.
A rough rule of thumb is to select indica-
dominant varieties for cramping and
muscle spasticity and s^fzw-dominant
for pain relief. The reality, though, is that
the variety may be unknown or not well
characterized. Trial and error is usually
required to acquire the appropriate vari
ety and the proper dose level.
There are two main solvents: methanol
alcohol and glycerin. The extraction
process can be cold, warm, or hot,
but always below 173°F (78.3°C), the
boiling point of alcohol. Dangerous hot
processes are discouraged, and excessive
heat degrades cannabinoids.
Common Tincture Processes Include:
Cold extraction with ethanol alcohol
Warm extraction with ethanol alcohol
Hot extraction with ethanol alcohol
Glycerin-based extraction
Sunshine extraction
Cold Extraction with Ethanol
Utensils:
• Grinder or blender
• Freezer
• Strainer
• Cheesecloth
• 1 quart (L) container with lid that can
withstand freezing
• Small dark bottles to store tincture
Ingredients:
• 1 oz (28.3 gm) cannabis
• 16 oz (1 pt [47.3 cl]) ethyl alcohol—
Everclear (190-proof) or 151-proof rum
Step One: Cold-processing cannabis
tinctures preserves the integrity of
cannabinoids. Use high-quality flowers
or kief made from small leaves and trim.
Ensure that the material is dry by placing
it in a defrosted, low-humidity freezer at
25°F to 14°F (-3 .9°C to -10°C) for 1 to
2 hours.
Step Two: Once frozen, place dried buds
in a coffee grinder and grind until thor
oughly ground but not powdered. Kief
and pre-pressed hashish can be ground
as well. This process will open more
surface area on the material, allowing
cannabinoids to transfer more quickly.
Step Three: More cannabinoids are
extracted when using high-percentage or
high-proof ethyl alcohol (ethanol). Proof
refers to half of the percentage of alcohol.
For example, 90-proof is 45 percent
alcohol and 150-proof is 75 percent. The
highest-proof alcohol available is Ever
clear at 190-proof or 95 percent ethanol
alcohol. Pure 100 percent, 200-proof
alcohol is not available. If unable to
find Everclear, 151-proof rum is a good
substitute. Other spirits that are popular
for tinctures include Russian vodka in a
lower proof. Some patients prefer lower
proof alcohols because they burn less
when sprayed under the tongue. Any
distilled spirits will work.
Place the high-proof alcohol in the
freezer to keep it cold.
Step Four: Mix one ounce (28.4 grams)
ground flowers or kief per pint (16 ounces
[47.3 cl]) of ethanol alcohol. Combine in
a pre-cooled mixing container with a lid.
Step Five: Close tightly and shake vigor
ously for about five minutes.
Step Six: Place in freezer.
Step Seven: Remove container and
shake every two to eight hours and
refreeze. Repeat process for 48 to 72
hours. Remove the container from the
freezer.
www.marijuanagrowing.com
551
Step Eight: Use rubber gloves through
out the rest of the process. Pour the cold
mixture through a kitchen strainer and
then pour through a double thickness of
sterile cheesecloth. The ball of cheese
cloth can be saved in the freezer for
topical applications.
Step Ten: Batches of Everclear or a clear
alcohol should yield a pale-green or
possibly golden color. Amber-colored
alcohol generally stays amber and may
darken in color or change hue.
Let the alcohol soak for a few months. A
few drops of flavor extract can be added
to the alcohol to impart a pleasant taste.
Step Nine: Pour the liquid that was col
lected through the cheesecloth, through
a paper coffee filter—twice. Squeeze
the last drops from the cheesecloth and
coffee filters into the container. Make
sure to wear gloves!
Storage: Both heat and light adverse
ly affect cannabinoids and should be
avoided or minimized. Tinctures should
be stored in airtight, dark glass contain
ers kept at room temperature or below.
Avoid plastic containers if storing for
more than a day. The ethanol in the
tincture may solubilize some of the free
vinyls in the plastic.
Today Green Dragon is a popular name
for many different cannabis tinctures.
Green Dragon is made just like any other
alcohol-based tincture using high-quality
flower buds, small leaf and trim, or kief
and hashish. Some Green Dragon recipes
are glycerin-based tinctures. There are
several Green Dragon recipes, some of
which heat the alcohol to 170°F (76.7°C).
Heating alcohol tinctures is dangerous,
and excessive heat degrades cannabinoids.
The name “Green Dragon” may have
originated among cannabis tincture
pioneers before the process was perfect
ed. A green color signifies plant material
and other pollutants in the tincture.
Warm Extraction with Ethanol
Warm extraction with ethanol is just like
cold extraction, except heat is added to
speed the process.
Utensils:
• Grinder or blender
• Strainer
• Cheesecloth
• 1 quart (L) container with lid
• Small dark bottles to store tincture
Ingredients:
• 1 ounce (28.3 gm) cannabis
• 16 ounces (1 pt [47 cl]) ethyl
alcohol—190-proof Everclear or
151-proof rum
Step One: Use small leaf trim and large
leaves for this recipe. Grind the leaves
to expose more surface area. Use a hand
grinder for small amounts and a blender
for large amounts. Do not pulverize.
Step Two: Use ethanol alcohol for a
solvent, as described above in the same
proportions. In this preparation the
materials are kept warm (not hot). Light
must be avoided.
Step Three: Place the ethanol and
chopped cannabis in a large glass jar.
Shake it vigorously for a few minutes and
at least once a day thereafter. Place the
jar in a dark-brown bag to exclude light.
Step Four: Place in a warm spot (near a
window) for 30 to 60 days. The mixture
will turn a very dark green. Strain as
through cheesecloth and a coffee filter,
as described for cold extraction.
Step Five: Once strained, the tincture is
finished. The taste of this powerful can
nabis tincture is usually unpleasant and
may upset stomachs. Mix the tincture
with coffee, cranberry juice, or sugar so
it is more palatable.
Save the “shake ball” for topical applica
tions. The shake ball should also be kept
in the freezer. For topical applications,
just take out the cold shake ball and
apply a few drops of fresh tincture to
the cloth then hold it on the affected
area of skin or wound for a few minutes
with gentle rubbing.
552
MEDICINAL CONCENTRATES & TINCTURES
www.marijuanagrowing.com
Cannabis Glycerin Tincture
Utensils:
• Blender or grinder
• Crock-Pot
• Dark glass jars
• Strainer
• Cheesecloth
Ingredients:
• 100 gm high-quality cannabis flower
buds
• 1 qt (94.6 cl) USP food-grade glycerin
Doses: about 100
Estimated Time: 6 hours—5 weeks
Make a glycerin-based tincture with
gland-rich cannabis flowers, about 2
cups (47.3 cl). If possible, make your
batches of tincture variety-specific.
Soak cannabis in cold water for 15 to 20
minutes to rinse away much chlorophyll;
let drain. Put enough trim in your jar to
fill it to about three-fourths full. Add
vegetable-grade glycerin to within a few
inches of the top. Cap and store in a cool,
dark place, taking it out at least once dai
ly to roll and shake for 5 to 10 minutes.
This process should be done for at least
60 days, and can be left even longer for
stronger tincture. I then set the jar into a
pot of hot water under very low heat for
10 to 15 minutes to help separate more of
the trichomes (never getting over 185°F
[85°C]), which makes it easier to strain.
Then strain and or press to separate trim
from glycerin. Some people use coffee
filters for final straining; I use silkscreen.
Keep refrigerated.
The recipe below was extrapolated from
“Glycerin-based Tincture” by Leanne
Barron. The original work appears on the
Marijuana Growing forum: http://www.
marijuanagrowing.com/showthread.
php?1674 Glycerine based
Tincture&p=10700#postl0700.
Glycerin is vegetable-based and has
little impact on blood sugar and insulin
levels. Even though it is sweet, it has less
than 5 calories per gram and contains no
alcohol. Alcohol-based tinctures have a
longer life than glycerin-based tinctures.
Extend the life of glycerin-based tinc
tures by keeping them in the refrigerator.
Step Three: Do not let the mixture boil!
Keep the temperature below boiling, and
let simmer for up to 24 hours.
Step One: Place cannabis in a clean
coffee grinder or blender, and grind.
Step Two: Pour glycerin and canna
bis into a Crock-Pot. Carefully brush
residual cannabis out of the grinder. Stir.
Set the Crock-Pot on its lowest possible
setting. Some Crock-Pots’ low settings
are too high and cannot be used. If there
is a “Keep Warm” setting, that is the
best option.
Step Four: Turn off the Crock-Pot
and let mixture cool enough to handle
with gloves. Strain the mixture through
cheesecloth. It takes longer for glyc
erin to pass through the process than
alcohol. Be patient. Do not use a paper
coffee filter that will clog.
www.marijuanagrowing.com
553
Step Five: Tincture is ready to be bot
tled in dark glass containers.
If using a clear container to contain
the tincture, store in a dark place and
minimize contact with sunlight and
artificial light.
Lotions and Salves
Cannabis Lotions
The basic recipe for any lotion is incredi
bly simple: Oil and water are combined
and bonded together with an emulsifier.
Once the emulsifier is blended in, fra
grance and essential oil are added.
There are two types of emulsifiers. Oil-
in-water (o/w) emulsifiers keep oil drops
packed in water. The other kind, water-
in-oil (w/o) emulsifiers keep water drops
packed in oil. Use w/o emulsifiers for
sun-protection creams. Use o/w emulsi
fiers for moisturizing body lotions.
Make cannabis body lotion with
skin-nourishing cannabis oil and pure
water. Add vitamin E oil to the mix
as a short-term preservative, and keep
natural products in the refrigerator. See
http://www.makingcosmetics.com for
more information.
Step One: Combine a half cup (11.8 cl)
of cannabis oil and 2 tablespoons
(28.3 gm) of beeswax, an emulsifier, in a
saucepan on the stove. Melt the beeswax
and mix with the cannabis oil.
Step Two: Slowly pour distilled water
into the warm mixture and stir rapidly
with a whisk until well blended. Use a
stick blender to add air to the mix and
make it fluffy. Be careful when submerg
ing the mixer and keep it on a low speed
to avoid splashing.
Step Three: Let lotion cool, during which
time it will become thicker, and spoon it
into a clean jar with a pump applicator.
Cannabis Salves
Cannabis salves and balms are easy-to-
make topical medicinal ointments. First
the beneficial properties of cannabis
are extracted in oil or glycerin, then
beeswax is added to harden the oil. The
base to all recipes is either hemp oil
or a cannabis tincture mixed with oil.
Cannabis salves, ointments, and balms
are applied to the skin, and cannabinoids
do not transfer to the bloodstream, so
the quality and concentration of spe
cific cannabinoids is less important.
Low-cannabinoid, clean leaves are ideal
for making these topical medicines.
Grape-seed oil is a particular favorite
ingredient because it is easily absorbed
by the skin. Coconut oil and glycerin are
also popular. Olive oil is avoided because
it is much slower to be absorbed.
Many other essential oils can be incorpo
rated into the mix. Some mixes such as
Tiger Balm can be used as a base to which
extracted cannabis is added. The ingredi
ents are usually added near the end of the
process, once the mix has cooled. Active
ingredients are added and emulsify in the
mix. Stirring evenly is important to get
an even mix. Popular healing salves today
often include menthol crystals, ichtham
mol, phenyl alcohol, or Arnica montana,
echinacea, and calendula. There are
numerous recipes on the Internet.
Do not use fresh cannabis unless you
add a preservative such as Germaben.
Balms and lotions made with fresh can
nabis should be stored in the refrigerator
to prolong life.
Tiger Balm
Cannabis Salve: Step-by-Step
Ingredients:
• 1 pt (47.3 cl) of grape-seed oil
• 1.5 oz (42.5 gm) beeswax
• 1 oz (28.3 gm) cannabis leaf
554
MEDICINAL CONCENTRATES & TINCTURES
www.marijuanagrowing.com
Step One: Add cannabis to a glass,
enamel, or stainless steel Crock-Pot.
Add one pint (47.3 cl) grape-seed oil.
Step Three: Heat the mix on low heat
for 2 to 3 hours. Do not let boil. I prefer
to use a Crock-Pot because the heat is
easy to control and they are lined with a
ceramic bowl.
Step Four: After heating, let the oil mix
cool before pouring through a cheese-
cloth-lined strainer. Once oil has filtered
through and cooled enough to handle,
pick up cheesecloth containing cannabis
and squeeze out residual oil.
Step Five: Add beeswax to the warm
oil mix and heat on low until the wax
melts. To test to see if your salve is hard
enough, put some on a spoon and set it
in a cool place for a few minutes. If your
salve is too soft, add more beeswax.
Step Six: If you are using essential oils
or vitamin E you can blend them in now.
Finally, pour your salve into containers
and label.
www.marijuanagrowing.com
555
Glycerin-Based Salve
We have two recipes for glycerin-based
salves. The first recipe uses an emulsi
fying wax and liquid vegetable glycerin
along with a couple of preservatives.
The second uses beeswax, coconut oil,
aloe vera oil, and hemp oil as a base.
Note: The coconut oil can consist
of cannabis coconut oil.
Ingredients:
• 24 oz (71 cl) distilled water
• 4.0 oz (11.8 cl) strong cannabis oil or
fat
• 1.2 oz (3.5 cl) emulsifying wax
• 1.2 oz (3.5 cl) cosmetic grade (benign)
stearic acid
• 1 oz (3 cl) liquid vegetable glycerin
• 0.3 oz (0.9 cl) Germaben (a natural
preservative that prevents spoilage)
• 0.3 oz (0.9 cl) essential oil of your
preference
Step One: Heat all ingredients in a dou
ble boiler until melted, and then whisk
until creamy.
Step Two: Add the last two ingredients
and whisk thoroughly. Add menthol
crystals instead of essential oils to make
a cooling menthol sunburn salve.
Step Three: While warm, pour into
bottles. Makes approximately 32 ounces
(94.6 cl)
Alcohol-Based Salve
Utensils:
Crock-Pot
Ingredients:
• 0.5 lb (226.8 gm) beeswax
• 32 oz (94.6 cl) unrefined coconut oil
• 8 oz (23.7 cl) aloe vera oil
• 32 oz (94.6 cl) hemp oil or cannabis
tincture
• 0.5 to 1 tsp (0.25-0.5 cl) essential
vanilla oil
• 0.5 to 1 tsp (0.25-0 .5 cl) vitamin D
oil (optional)
Step One: Melt 2 cups of cannabis
coconut oil in a Crock-Pot. Set the
Crock-Pot to low and simmer. Do not
bring to a boil.
Step Two: Melt and measure 1 ounce
(28 gm [1/8 cup]) of beeswax into
the Crock-Pot. Add 5 ounces (14.8 cl)
cannabis (unrefined) coconut oil. Stir
until clear. Add aloe vera oil and stir
until clear.
Step Three: Turn off the Crock-Pot
and put the liner with contents into
the refrigerator until a skin develops
on the top.
Step Four: Remove mixture from the
refrigerator and stir in hemp oil, vanilla
oil, and 1 tablespoon vitamin E oil and
any drops of fragrance and other oils
now. Mix together in Crock-Pot. Stir or
whisk until well mixed. An immersion
blender can also be used to “fluff” salve,
adding air and volume.
Step Five: Scoop salve into small con
tainers with lids for storage, and use.
Budder, aka wax, is a super-rich concentra
tion of cannabis resin glands. (MF)
Budder (wax) (MF)
Glass or shatter will burst into countless pieces
ifdropped on a hard surface. (MF)
Butane hash oil (BHO) is chemically
extracted from dry cannabis. (MF)
Budder (wax) close-up (MF)
A close-up view of this shatter shows the subtle
differences in the extraction. (MF)
556
MEDICINAL CONCENTRATES & TINCTURES
www.marijuanagrowing.com
ir
—
i
558 Decarboxylation and Solubilization
559 Safety - Clean Cannabis
560 Grades of Cannabis
561 Temperature and Volatility
561 Utensils
562 Cooking with Cannabis
562 Quick Cannabis Butter:
Step-by-Step
564 Clarified Cannabis Butter
(Ghee)
566 Cannabis Coconut Oil
569 Cannabis Vegetable (Olive) Oil
570 Raw Cannabis
570 Cannabis (Hemp) Seeds
571 Hemp Flour
571 Hemp Milk
571 Hemp Oil
572 Storage
572 Recipes
572 Cannabis Brownies
572 Cannabis Cookies
573 Cannabis Lollipops
573 Cannabis Cookbooks
573 Cannabis Beverages
573 Cannabis Beer
574 Cannabis Drinks
574 Cannabis Wine
Combine 1 ounce (28 gm) of
cannabis with a quart (0.9 L)
of vegetable cooking oil to
liberate cannabinoids.
Combine cannabis with butter,
vegetable oil, or any fat to
liberate cannabinoids.
27
Cannabis can be cooked or baked into food for medical
consumption. Cannabinoids are liberated and become “active”
when mixed with fats, oils, and alcohols. Fats can be saturated or
unsaturated. Saturated fats often turn solid at room temperature
and are often from animal origin. Unsaturated oils such as avoca
do, canola, olive, safflower, sesame, and sunflower are preferable.
Olive, with a large oleic acid molecular structure, appears to help
cannabinoids dissolve and is a good choice.
The recipes in this chapter for cannabis butter, clarified butter,
milk, coconut oil, vegetable oil, and so forth are designed to con
centrate medicinal cannabinoids in a fat, oil, or alcohol that can
be used with other recipes. Concentrating in fats and oils (lipids)
converts cannabinoids from the non-psychoactive form to the
psychoactive form, preserves them for storage, and makes it easy
to include them in many cooking and baking recipes. Cannabis
in oils can be added to salads, noodles, and more.
The bulk of cannabinoids in cannabis are located in the resin.
Resin is soluble in alcohol, fats, and oils. Combine cannabis leaf,
buds, hash, and so on with an oil or alcohol to liberate the
cannabinoids into the solvent. Later, separate the green leafy
matter from the concentrated resin and solvent.
Cannabis-potent butter, oil, and alcohol are concentrated,
which makes them easier and more consistent to measure out
into recipes. Keeping dosage consistent is a major concern for
cannabis patients. Extraction has already liberated
www.marijuanagrowing.com
557
cannabinoids. Cooking with concen
trates is much easier than using bulky
and messy dry or fresh cannabis.
Cannabis used in cooking often retains
much of the unpleasant taste associated
with green foliage. Soaking cannabis in
cold water for two to three hours will
leach out much of the chlorophyll and
other pollutants. Concentrating resin
into kief, hashish, or oil will alleviate
most if not all of the “green” taste.
Lingering unpleasant tastes and odors
can be masked by powerful ingredients
such as chocolate, lemon, cinnamon,
and mint.
Decarboxylation and
Solubilization
Raw cannabis is generally non-intoxi
cating, but may have some psychoactive
effects depending on how much free
THC is present versus THCA. Patients
report that the therapeutic effects of raw
cannabis include providing relief from
spasticity and inflammation and some
reported no therapeutic effect.
Cannabinoids are found in the form of
acids (THCA) and attached to the car
boxylic group (COOH). It must first be
“liberated”; that is, cannabinoids includ
ing THC must change from an acid to a
nonacid form to become psychoactive.
The process of decarboxylation converts
CBD and non-psychoactive THC acid
found in raw cannabis to psychoactive
nonacid THC. Decarboxylation con
verts CBD to its nonacid form, which is
extremely therapeutic.
The process of solubilization also
converts CBD and THC found in dry
cannabis from their acid forms to their
nonacid forms. Decarboxylation and
solubilization, achieve the same end but
through different processes.
Decarboxylation is a chemical reaction
that releases carbon dioxide (CO2).
Decarboxylation of cannabis denotes a
reaction of carboxylic acids, removing a
carbon atom from a carbon chain.
Decarboxylation can be achieved by
heating THC-dominant dry canna-
Excretion
A1THC
INHALED
versus
SWALLOWED
Smoked or vaporized cannabis that enters the lungs passes directly to the brain via the blood system;
the effects are usually felt within 30 to 90 seconds. The dose is easy to control. Decarboxylized and
solubilized cannabis that is eaten passes through the stomach and liver before entering the blood
system. Effects normally appear in 45 to 60 minutes and last up to 12 hours. Dosage is more difficult
to control.
bis to above 212°F (100°C) or heating
CBD-dominant dry cannabis to above
295°F (146°C) for 60 to 90 minutes. Do
not heat cannabis - both THC-dominant
and CBD-dominant - to above 320°F
(160°C) to prevent boiling off cannabi
noids. Heating beyond 320°F (160°C)
may cause desirable cannabinoids, CBD
and THC, to volatize and be lost when
they mix with the air.
Decarboxylation also occurs rapidly
during vaporization: heating cannabis
A1-THC via stomach
11
OH1-THC from liver
to 370°F to 380°F (187.8°C-193°C), at
which point it vaporizes and the conver
sion to the “active” nonacidic form takes
place. Do not heat above 380°F (193°C)
or it may cause preliminary burning/
charring. This process frees molecules to
convert into carbon dioxide (CO2) and
water vapor (H2O).
Note: THC is liberated rapidly at
temperatures between 370°F to
380°F (187.8°C-193°C), and CBD is
liberated rapidly at 370°F to 380°F
558
COOKING WITH MEDICINAL CANNABIS
www.marijuanagrowing.com
(187.8°C -193°C). The other 80+
known cannabinoids volatize at different
temperatures often lower than 380°F
(193°C).
The same decarboxylation process also
occurs at a very rapid rate when canna
bis combusts (burns). Heat in smoked
cannabis causes THC to convert into the
psychoactive form. CBD is converted
into its nonacid form. Combustion re
leases many toxic compounds—aromatic
hydrocarbons such as benzopyrene and
other carcinogens—that are inhaled into
the lungs. See www.marijuanagrowing.
com for more information.
Cannabinoids are soluble in fats, sugars,
and oils (lipids), alcohol, and other oil
based solvents. Once combined, canna
binoids are soluble and convert from the
acid to the nonacid form. THC becomes
psy-choactive, and CBD becomes much
more therapeutic.
Solubilization occurs when cannabis is
mixed with fats, sugar, oils, alcohol, and
other oil-based solvents. The cannabi
noids migrate and concentrate in the
solvents.
Combine cannabis with these solvents,
and heat at low temperatures (122°F-
145°F [50°C -62.8°CJ) for 60 to 90
minutes to solubilize (extract) cannabi
noids. Simmering and stirring ensures
that complete extraction occurs.
Combining cannabis with alcohol (spirits
or glycerin) requires no heat, but the
process takes much longer. For example,
place a bud in a bottle of ethyl alcohol—
vodka, rum, or spirits of any kind. Over
time the alcohol will take on the flavor
and the potency of the cannabis. Or
the alcohol can be evaporated to leave a
concentrate.
Carbon dioxide (CO2) can also be used
as a solvent to liberate cannabinoids. CO2
is becoming a popular method to extract
CBD and THC from dry cannabis. See
chapter 26, Medicinal Concentrates &
Tinctures, for more information.
Safety - Clean Cannabis
Growing your own medicine or purchas-
Always label cannabis recipes and cooking
concen trates clearly to ensure they are not
mistakenly used by others. Keep out of the
reach of children!
ing it from a medical cannabis dispensary
that tests cannabis for pollutants, molds,
and insect residues are excellent options.
However, little control is exercised in
the marketplace and many dispensaries
do not test the cannabis they sell. Wash
fresh cannabis with a 0.5 percent solu
tion (see page 122) of hydrogen peroxide
(H2O2) to remove surface fungi and pest
carcasses, eggs, and feces. Washing dry
cannabis requires extra care. Concentrat
ing cannabis in tinctures, kief, hashish,
or oils also concentrates pollutants such
as pesticides, fungus, and insect residues.
Dry plants can be sterilized with UVC
light before processing. The UVC light
will kill pathogens and insects on the
surface of the plant. Only short applica
tions are given to avoid damaging resin
with UVC radiation.
Patients susceptible to plant fungi should
use only cannabis that is certified to be
clean, or grow it at home to ensure purity.
Mold, mildew, and many other fungi
can be present inside plant tissue and
not visible to the human eye, and even
when visible, an untrained gardener
will not notice. When minor infections
are present, small amounts of mold and
mildew can slip into drying containers.
Take special care to weed out this infect
ed plant tissue. For example, dry flower
buds infected with powdery mildew
feel mealy and are easy to crush. They
are not firm, and have little substance;
instead, they are soft, pliable, and easy
to compress.
Heat kills potentially dangerous fungi
such as Aspergillus, powdery mildew
and bud mold {Botrytis cinerea). Heating
cannabis to 302°F (150°C) for 5 minutes
will kill the organisms without degrading
THC; other cannabinoids volatize below
this temperature. But these temperatures
do not degrade or decompose microbial
toxins.
Aspergillus, a common household mold,
seldom causes harm in humans. However,
people with compromised immune sys
tems, AIDS, cancer, asthma, and other
diseases can be affected \yy Aspergillus.
Powdery mildew is caused by many
species of fungi from the order
Erysiphales.
Pesticides and fertilizer residues stay
longer on indoor and greenhouse plants
than on outdoor plants. Wind, natural
sunshine, and rain weather away any
thing that is applied to leaves. Indoors,
degradation of pesticides and fertilizers
is much slower. Indoor plants should
be watered with pure water for 5 to 6
days before harvest. This rinse will help
plants use all the fertilizer in their tissue
before harvest. Commercial products
are also available to expedite the final
leaching and make it more efficient.
Microscopic fungus, dead insects, spider
mites, and their eggs and feces stay on
plants after harvest. Caterpillar and
larvae feces attract fungus that must
be cleaned from cannabis. Pests stick
To wash cannabis in H2O^ water before
drying, fill a large container with a 0.5 percent
solution ofhydrogen peroxide. Submerge
manicured, bud-filled branches in container
and agitate for 1 to 5 minutes. Fungus and
other debris form a thin layer on the surface of
the water or, ifheavy, sink to the bottom. Use
a sponge to skim offthe layer of scum. Remove
bud-filled branches, rinse and lightly shake
water from foliage. Let branches drip dry for
30 minutes in front of an oscillating fan.
www.marijuanagrowing.com
559
Diseased and desiccated foliage should be
removed and discarded. Do not consume it.
Foliage with nutrient deficiencies is okay to use,
but it may have lower levels of cannabinoids.
Cannabis roots contain no cannabinoids,
but little is known as to their therapeutic
effects. Roots are recycled back into the
garden or compost.
Stems have little or no cannabinoid content.
After harvest, small buds and foliage may
remain on stems. Separate stems from leaves
and small buds. Do not add stems to recipes.
Stems make good compost when chopped.
to resinous buds and are consumed by
patients. Cooking alone is not enough to
destroy bacteria, fungi, pest carcasses,
eggs, and feces.
Here is a short list of laboratories that
can test for contaminants of medicinal
cannabis in California:
Pure Analytics, http://pureanalytics.net/
Steep Hill Halent Laboratories, Inc.,
http://steephilllab.com/
The Were Shop, http://thewercshop.com/
Cooking with fresh cannabis is not
always possible; dry cannabis is usually
all that is available. Keep dry cannabis
in an airtight container in a cool, dark
place to maintain minimal preservation
of active ingredients, cannabinoids. See
“Storage” in chapter 9, Harvest.
Grades of Cannabis
Cooking with kief, hash, or oil instead
of flower buds or leaf has many benefits.
Seeds are rich in oil and omega-3 . Find hemp
seeds in bulk by searching “hemp seeds bulk”
on www.google.com. Sometimes you can find
hemp seeds from China, where they grow
varieties that produce huge seeds.
Large leaves contain low levels ofpotent
cannabinoids.
Small leaves around flower buds are often
glistening with resin and make excellent
hashish and tinctures for cooking. (MF)
Flower buds,the most resinous part of canna
bis plants, are often small and lightweight but
still contain high levels of cannabinoids. Chop
fresh flower buds. Chop or grind dry flower
buds before adding to fats, oils, and alcohols.
Large flower buds are often loaded with visi
ble cannabinoid-rich resin. We advise people
to use high-quality buds for cooking. Large
flower buds are often submerged in cooking
and salad oils or bottles oj spirits.
Kief (also known as keef or kifj, the raw
resin glands that fallfrom buds and leaves, is
collected. It is usually adulterated with small
amounts offoliage and debris from the garden
Kiefis best used when added directly to fats,
oils, and alcohols.
560
COOKING WITH MEDICINAL CANNABIS
www.marijuanagrowing.com
Hashish (aka hash) is concentrated, com
pressed resin glands (kief). Hashish must be
broken into small pieces or ground before
adding to fats, oils, and alcohols.
Here are the basic utensils you will need to
make most medicinal cannabis concentrates.
Remove all stems and small leaf debris from
manicured buds before making concentrates.
Cannabis leaves and buds are in their acid
form and not decarboxylized. The cook
ing process must perform the decarbox
ylation, and most often it is inefficient.
Consistent dosage and no “green” flakes
or taste are other strong reasons to use
only cannabis concentrated in fats, oils,
and alcohols. Water hash is most econom-
Once vaporized for several minutes, terpenes
are volatized into the air and the dried can
nabis loses its fragrance. However, vaporized
buds still retain more than half their original
cannabinoid content. Grind vaporized buds
into a powder just before adding to fats, oils,
and alcohols.
ical, and since many terpenes are already
gone, heating while cooking does mot
destroy more flavors.
Hemp is industrial-grade cannabis that
is often used for its fiber, seed, and oil.
Hemp has low levels of THC and, most
often, other cannabinoids. Hemp is an
ingredient in many balms, lotions, and
soaps. Hemp fiber is used to make cloth
ing and rope along with new products
such as cannabis bedding for animals.
Large leaves are separated at harvest.
Dry leaves in a paper bag, turning every
day by hand. Leaves have low cannabi
noid content. Large, older leaves near
the bottom of plants contain less can
nabinoids than those located further up.
Remove leaf stems before grinding or
adding to recipes. Often large quantities
of large leaves must be added to achieve
therapeutic effects. Discard brown or
discolored leaves.
Small leaves are located higher on the
plant and around flower buds. Resin is
often visible on these “trim” leaves that
are packed with cannabinoids. Small
leaves without visible resin, or recently
formed and immature leaves contain
fewer cannabinoids. Remove leaf stems.
Chop fresh leaves and grind or chop dry
leaves before adding to fats, oils, and
alcohols.
Temperature and Volatility
THC volatizes into the air at 380°F
(193°C), CBD volatizes at 360°F-380°F
(182°C-193°C), and the other 80+
known cannabinoids volatize at lower
temperatures. See chapter 2, Measuring
Cayinabinoidsy for more information on
the boiling point of specific cannabinoids.
Baking and cooking require a heat
source that is easy to control so that high
temperatures do not cook out beneficial
elements. Temperatures are easiest to
control quickly with a gas stove or oven.
Electric burners often heat and cool
slowly. However, a hot plate is a conve
nient source of heat that can be plugged
in anywhere. If you use recipes that
heat beyond 300°F (148.9°C), calibrate
with an accurate thermometer to avoid
volatizing cannabinoids.
NOTE: To avoid destroying cannabi
noids, do not bake cannabis recipes at
more than 350°F (176.7°C).
Low heat = 200°F (93.3°C)
Medium heat = 250°F-275°C
(121.1°F-135°C)
High heat = 300°F-350°F
(148.9°C-176.7°C)
Utensils
Use Pyrex glass, ceramic, or stainless
steel utensils when following these
recipes.
A Crock-Pot is a stand-alone electric
cooker that supplies low, even heat. A
removable ceramic liner is very practical
to simmer cannabis recipes for hours.
The liner can be removed for cleaning,
and it can be placed in the refrigerator or
www.marijuanagrowing.com
561
CONVERSION SCALE
Standard
Measurement
Centiliters
1 teaspoon (tsp)
0.5
1 tablespoon (tbsp)
1.5
1 cup (c)
23.7
1 pint (pt)
47.3
1 quart (qt)
94.6
1 ounce (oz)
3
--- --
J
freezer separate from the heating element
of the Crock-Pot. This versatility saves
the space and hassle of using a separate
container.
A double boiler is an alternative to a
Crock-Pot. It consists of a small cook
ing pot suspended inside of a larger
container. Water boils in the larger
container and heats the contents to be
cooked in the smaller container. The
temperature is relatively easy to control,
and the possibility of burning the recipe
is next to nil.
List of utensils for basic recipes:
• 2 large bowls
• measuring cup
• measuring spoons
• scale to weigh dry measure
• blender to pulverize cannabis
• sifter/sieve
• strainer
• saucepans
• large cooking pot with a lid
• Crock-Pot
• cheesecloth
• string or large rubber bands
• large spoon (can be wooden)
• ladle
• thermometer, accurate to within 5°F
(3°C)
• funnel
• rubber gloves
• plastic storage containers with lids
Bigfan leaves and small leaves can be excellent ingredients in many recipes.
Cooking with Cannabis
Smoke Points
butter: 250°F-300°F (121.1°C-148.9°C)
olive oil: 375°F-475°F (190.6°C-
246.1°C)
peanut oil (refined): 450°F (232.2°C)
sunflower oil (refined): 440°F (226.7°C)
Cannabis butter is a main ingredient in
many recipes. It can be used alone, as
butter on bread, or mixed into countless
recipes. Cannabinoids are bound to milk
fats in butter and are preserved as long
as butter is safe to consume. Use salted
butter for most recipes; it has a higher
smoke point than unsalted. Use unsalted
butter for baking. Slow, even cooking at
a low temperature and adequate stirring
are essential to avoid burning when
making cannabis butter.
Quick Cannabis Butter
Process small amounts of cannabis
butter, less than 2.2 pounds (997.9 gm)
of cannabis butter by sauteing it in a
pan and adding cannabis. Process larger
amounts of cannabis with the recipe that
follows:
Utensils
• coffee grinder or food processor
• 2 saucepans
• strainer
• cheesecloth
Ingredients
• 0.25 oz (7.1 gm) finely manicured
cannabis flower buds
• 1 stick (0.5 c [23.7 cl]) butter
562
J
COOKING WITH MEDICINAL CANNABIS
www.marijuanagrowing.corri
Quick Cannabis Butter: Step-by-Step
, Step Two: Melt the butter on low heat.
Step One: Chop cannabis flower buds in a small coffee grinder (or food processor).
Make sure coffee grinder is clean and used only for cannabis. Chopped flower buds
release cannabinoids into the butter faster.
Step Three: Once the butter has melted,
add the chopped cannabis.
Step Four: Let the butter and canna
bis mix simmer for about 45 minutes,
stirring every few minutes, which mixes
cannabinoid and butter molecules and
speeds, speeding absorption.
Step Five: Filter butter and cannabis
through a cheesecloth-lined strainer.
Wait until the mix has cooled enough to
handle, and then wear rubber gloves to
squeeze residual liquid from cheesecloth.
www.marijuanagrowing.com
563
Quick Cannabis Butter: Step-by -Step (cont'd)
Step Six: Pour the cooled, filtered liquid
into a storage container.
Cannabis butter is green because milk
fat takes on green plant molecules and
cannabinoid molecules. The taste of
green cannabis is objectionable to most
people. Here are some quick, easy
recipes to disguise the taste of cannabis
in butter.
Basil Butter—Add a minced clove of
fresh garlic and 0.5 cups (11.8 cl) of
fresh chopped basil to every 0.5 cups
(11.8 cl) of butter. Great garnish for
chicken or fish.
Cilantro Lime Butter—Add 3 table
spoons (4.4 cl) chopped cilantro and
two 3 teaspoons (1.5 cl) of lime juice
to every 0.5 cups (11.8 cl) of butter.
You can spice it up with a dash of hot
sauce, too!
Garlic Butter—Mince 1 clove of garlic
and combine with 0.5 cups (11.8 cl)
butter. Use the butter on garlic bread
and meat dishes. Chop up some parsley
to add more flavor.
Lemon Butter—Add 1 teaspoon (0.5 cl)
fresh lemon juice and 1 tablespoon
grated lemon peel to 0.5 cups (11.8 cl)
of butter. Pour it on chicken, fish, or my
favorite, grilled asparagus.
Blue Cheese Butter—Add 2 ounces
(56.7 gm) blue cheese to 0.5 cups
(11.8 cl) of butter. Include minced chives
or shallots, rosemary, or thyme.
Clarified Cannabis Butter (Ghee)
Clarified butter (aka drawn butter, ghee,
or samna) has a longer shelf life than
cannabis butter and a higher smoke
point, which makes it desirable for
sauteing, basting seafood, and numerous
recipes. A certain percentage of butter
is lost to friction, to butter that remains
Dark green cannabis butter is ready to use!
in the saucepan, and to contaminants
in the clarifying process. However,
clarified butter has negligible amounts
of lactose and is acceptable for most
lactose-intolerant consumers.
Avoid “green” taste by using concen
trated cannabis resin that contains little
plant material. Clarified butter made
from good kief has little objectionable
foliage and contaminant residues which
helps exclude the foliage taste.
Utensils
• saucepan or double boiler
• spoon
• measuring cup
• scale
• strainer
• cheesecloth
• airtight storage containers
Ingredients
One stick (0.5 c [11.8 cl]) of cannabis
butter infused with 0.25 oz (7.1 gm)
cannabis flower buds)
Time to prepare: 30 minutes
Cooking time: Cooking time at 150°F
to 200°F (65.6°C-93 .3°C)
Step Seven: Refrigerate the liquid until
solid.
564
COOKING WITH MEDICINAL CANNABIS
www.marijuanagrowing.com
Clarified Cannabis Butter (Ghee): Step-by -Step
Step One: Follow instructions to make
Cannabis Butter, above.
Step Two: Melt cannabis butter in a pan
or double boiler at low heat. Do not boil.
Step Three: Simmer butter for 30
minutes, stirring regularly.
A bubbly froth may come to the top during Step Three, but if the butter was filtered with cheesecloth, much less froth develops.
Skim froth and scum that forms on surface. It thins slowly and the color of the butter changes to deep green. Continue simmer
ing until butter turns greenish-golden color. The green tint will always remain. Residues settle on the bottom and the clarified
cannabis butter is a translucent golden color with a deep, rich fragrance.
Step Four: Pour the liquid butter
through a strainer lined with two layers
of cheesecloth. Ball up and push the
cheesecloth containing residuals against
the strainer to exude all remaining but
ter into a warmed saucepan below.
Step Five: Pour the clarified butter into
a receptacle.
Note that the clarification process
removed a volume of butter. The “freeze
line” from cannabis butter can be seen
above the butter’s surface.
www.marijuanagrowing.com
565
Cannabis Coconut Oil:
Step-by-Step
Ghee: Step-by-Step (cont'd)
Step Six: Store clarified cannabis butter
in airtight containers in the freezer or
refrigerator. It will last up to a year or
longer in the freezer and several months
in a refrigerator. Bathing butter in water
extends shelf life.
Cannabis Butter
(2.2 pound [1 kg] plus)
This recipe requires separating water
from butter and is best used to process
several pounds (kg) or more of cannabis
butter.
/
You will need a couple of days to make
this recipe, but the process is low
maintenance and easy to follow. In fact,
you can follow instructions for mak
ing “Cannabis Coconut Oil,” at right.
Simply substitute the same quantity of
butter and cannabis.
Cannabis Coconut Oil
Coconut oil, a healthy saturated fat,
absorbs the maximum amount of can
nabinoids. Coconut oil is solid at room
temperature; if semiliquid, a half hour
in the freezer will solidify it. Coconut
oil (unrefined) has a higher smoke point
(350°F [176.7°C]) than butter. (It can
also be used for skin salves and creams,
as well as be put into capsules.) Coconut
oil can be used in many recipes as a
substitute for vegetable oil or butter.
Utensils
• large pot
• 1 qt(1L)water
• spoon
• container to store cannabis-
coco-butter
Ingredients
• 16 oz (453.6 gm) organic coconut oil
• loz (28.3 gm) cannabis flower buds
Step One: Boil one quart (1 L) of water
in a large pot.
Step Two: Add 1 ounce (28.3 gm) of
manicured cannabis flower buds.
COOKING WITH MEDICINAL CANNABIS
www.marijuanagrowing.com
Cannabis Coconut Oil: Step-by -Step (cont'd)
Let simmer and stir during the next hour.
Remove the lid and stir regularly.
Step Three: Add 16 ounces (47.3 cl)
coconut oil kept at room temperature to
the hot water/cannabis mix.
Stir in coconut oil for at least a minute
to ensure that it is well mixed.
Cover and continue simmering for
10 minutes.
www.marijuanagrowing.com
567
Cannabis Coconut Oil: Step-by-Step (cont'd)
Step Four: Remove from heat. Set aside
for two days so that more cannabinoids
can be absorbed by the coconut oil.
Step Five: Set the pot on the stove and bring to a simmer so that all the coconut
oil is dissolved.
Step Six: Pour the mix through a strain
er and cheesecloth. Let cool. Wear rubber
gloves and squeeze the cooled cannabis/
coconut oil mix so that all the liquid
comes out.
Step Seven: Refrigerate the mix over
night so that the water and coconut oil
separate. Remove the pot and pour off
water. Retain solidified coconut oil.
Step Eight: Heat solidified coconut
oil in a saucepan until liquid. Pour into
small containers with lids for storage.
Place in refrigerator to store.
568
COOKING WITH MEDICINAL CANNABIS
www.marijuanagrowing.com
Cannabis Vegetable Oil: Step-by -Step
Cannabis Vegetable (Olive) Oil
Choose your preferred vegetable oil—
olive, canola, sunflower, flaxseed, grape
seed, etc.— to use in this recipe. Notice
that different oils react differently to
heat. For example, the smoke point
of olive oil is 375°F-475°F (190.6°C-
246.1°C), the smoke point of peanut oil
(refined) is 450°F (232.2°C), and the
smoke point of sunflower oil (refined) is
440°F (226.7°C). This should make lit
tle difference at low heat levels. If using
my favorite, olive oil, always purchase
extra virgin (first cold press) to ensure
the highest quality. Avoid using bland
oils such as canola with little taste. Al
ways use gloves to avoid contamination.
Vegetable oils must be placed in the
freezer for several hours and frozen to
become solid.
The first method is not as efficient as the
Step One: Use a Crock-Pot to heat 4 cups (94.6 cl) of olive oil. When it reaches
150°F (65.6°C) add 1 ounce (28.3 gm) dry, manicured cannabis flower buds. Add
buds slowly so that they are sure to be permeated with hot oil.
second, but it is much easier.
Step Two: Simmer the mix on low heat
for 45 minutes and stir regularly.
Step Three: Remove from heat and let
cool before handling.
www.marijuanagrowing.com
569
Cannabis Vegetable Oil: Step-by -Step (cont'd)
Step Four: Pass mix through a strainer
lined with cheesecloth and collect liquid in
a receptacle below. Press out residual liq
uid from cheesecloth using rubber gloves.
Compost cheesecloth and cannabis mix.
Step Six: Save oil in an airtight container.
Notes: A pressure cooker can be used to reduce cooking times and extract more
cannabinoids, but chlorophyll and other contaminants are also extracted.
One half cup of cannabis olive oil is roughly equivalent to one ounce of cannabis.
Step Five: Set in the refrigerator over
night to separate out the water.
Step Seven: Store in the refrigerator for
up to 60 days.
Raw Cannabis
Dr. William Courtney (http://www.
cannabisinternational.org) advises that
raw cannabis plants eaten or juiced don’t
get anyone high. The CBD overpowers
the THC. Dr. Courtney believes raw
cannabis eaten or juiced prevents more
diseases than any other food available.
A growing number of doctors are taking
notice. For a complete description on
YouTube, see http://www.youtube.com/
watch?v=qaOnLdVJiIg.
Utensils
wheatgrass juice extractor
Ingredients
raw cannabis leaves
Juicing Raw Cannabis
Raw cannabis leaves are fed into a
juicer and deep-green cannabis juice
trickles out a nipple while the bulk of
the processed leaf is expelled from
another outlet.
Juice 15 to 20 cannabis leaves. Juice a
carrot or two. Mix 10 parts carrot juice
to 1 part cannabis juice. The sweet
carrot juice will cut the bitter taste
of the cannabis juice.
The juice will keep in the refrigerator
about 3 days, but it is best to consume
during the first day. Drink in 3 to 4
servings throughout the day. Keep
refrigerated.
Avoid using stems and large, damaged,
or discolored leaves. Upper foliage and
flower buds make the most concentrated
juice.
Cannabis (Hemp) Seeds
In spirits, hemp seeds are used to flavor
beer, cider, wine, liquors, and other
spirits. Toasted cannabis (hemp) seeds
instill creamy, earthy, and nutty char
acteristics in ales. Normally they are
soaked in the mix and strained out,
however some spirits leave them to
swim around in the bottom of bottles.
Little is known about the nutritional
value of alcohol-marinated seeds.
Hemp seeds contain easily digested
proteins, essential fats (omega-3 and
omega-6), gamma linolenic acid (GLA),
antioxidants, amino acids, fiber, iron,
zinc, carotene, phospholipids, phytos-
570
COOKING WITH MEDICINAL CANNABIS
www.marijuanagrowing.com
Cannabis buds and leaves are fed into the
hopper of this high-quality juicer.
terols, vitamin Bp vitamin B2, vitamin
B6, vitamin D, vitamin E, chlorophyll,
calcium, magnesium, sulfur, copper,
potassium, phosphorus, and enzymes.
All amino acids essential to optimum
health are found in hemp seeds, including
the rarely found gamma linolenic acid.
The recommended minimum daily
intake of shelled hemp seeds is 4 heaping
tablespoons (42 gm). Larger individuals
or those suffering with chronic health
conditions such as arthritis, high blood
pressure, high cholesterol, cardiovascular
disease, acne, eczema, psoriasis, diabetes,
circulation problems, intestinal prob
lems, constipation, obesity, or prostate
problems (to name a few) may want to
consider taking 5 to 6 heaping table
spoons (55 gm) per day.
Hemp seeds contain approximately
25 percent protein, 31 percent fat (in
the form of nutritious hemp oil), and
34 percent carbohydrates (mostly from
fiber), in addition to an excellent array
of vitamins and minerals.
Various vegetables are juiced and the juices
blended together.
Hemp Flour
Hemp flour is typically sold at health
food stores and on the Internet. It is
milled from hemp seeds. Hemp flour is
an alternative to wheat and corn flour. It
is rich in omega-3, omega-6, vitamins B
and E, calcium, potassium, and fiber. It
is also completely gluten-free. Make sure
to keep hemp flour refrigerated after open
ing, because it contains no preservatives.
Hemp Milk
Hemp milk or hemp seed milk is made
from hemp seeds. The seeds are soaked
in water and ground into creamy milk
with a nutty flavor. Health and fitness
stores may stock hemp milk, and you
can also find it via the Internet.
Cannabis (hemp) seeds contain virtually
no THC. The seeds hold a 3:1 ratio of
omega-6 and omega-3 essential fatty
acids, plus magnesium, phytosterols,
ascorbic acid, beta-carotene, calcium,
fiber, iron, potassium, phosphorus,
riboflavin, niacin, and thiamin. Hemp
milk is easy to digest and contains 10
essential amino acids.
)
Cannabis seeds contain all the essential amino
acids (EAAs) and are rich in essential fatty
acids (EFAs), mainly omega-3 and omega-6 .
Cannabis seeds are also high in magnesium
and have the maximum levels ofdigestible and
absorbable globulin protein.
Hemp Oil
Hemp oil or hempseed oil is made by
pressing hempseeds. Cold-pressed,
unrefined hemp oil is dark to light-green
or clear in color, with a nutty flavor.
Darker colored oils have a green, hempy
taste. THC and cannabinoid content in
seeds is miniscule. Hempseed oil has no
psychedelic effects.
Hempseed oil has a three-to-one ratio
of omega-6 to omega-3 essential fatty
acids—in perfect balance with the
human body. The clear, colorless oil
is also used for body care products,
lubricants, paints, inks, and biofuel.
Do not confuse hempseed oil with hash
oil, Rick Simpson Oil (RSO, also known
as Phoenix Tears). Hash oil is used for
both medicinal and recreational purpos
es and is made from the mature female
flowers and leaves of the drug cannabis,
thus having a much higher THC content.
Hash oil should not be confused with
hemp, as the modern usage of the word
hemp is reserved for plants that meet the
legal requirement of containing 0.3 per
cent THC or less.
www.marijuanagrowing.com
571
This 2.2-pound (7 kg) packag e ofhemp flour
was produced on Farm Renego in Slovenia.
Storage
Store cannabis butters and oils in the
refrigerator. Cannabis tinctures do
not need refrigeration, but it does not
hurt them.
Store dry cannabis in a cool, dry, dark
location. Sunlight, heat, and air are the
biggest enemies of stored cannabis. Store
larger amounts of cannabis in airtight
containers. Keep airtight packages in
cool, dry, dark surroundings.
Recipes
Cannabis Brownies
Utensils
• large mixing bowl
• wooden mixing spoon
• 9x13-inch(22.9X33cm)
baking pan
• measuring cup
• measuring spoons
• wire cooling rack
Ingredients
• 4 oz (28.3 gm; 4 squares) unsweetened
chocolate
• 0.75 c (17.7 cl) cannabis butter
(recipe, page 562)
•2c (47.3 cl) white (granulated) sugar
This 16.9 ounce (0.5 L) bottle ofhempseed oil
was produced on Farm Renego in Slovenia.
• 3eggs
• 1 tsp (0.5 cl) vanilla extract
• 1 c (23.7 cl) all-purpose flour
• 1 c (23.7 cl) chopped walnuts
Directions
Step One: Preheat oven to 350°F
(176.7°C)
Step Two: In a saucepan on low heat,
melt chocolate and cannabis butter. Stir
the mix as it melts in the pan.
Step Three: When the mix has melted
and combined, slowly stir in sugar. Next
Cannabis brownies are easy to make and very
popular among medical cannabis patients.
Brownies became famous in North America
during the 1960s when it seemed that every
body started making them. Of course, grandma
always made the best brownies!
add eggs one at a time while blending
into the mix. Add vanilla. Stir in flour
and chopped walnuts. Mix until batter is
consistent.
Step Four: Spread the batter in a greased
9 X 13-inch (22.9 x 33 cm) baking pan.
Step Five: Bake in preheated oven for
35 minutes at 350°F (176.7°C). Remove
from the oven, let cool, and consume!
Cannabis Cookies (Biscotti)
Utensils
• large mixing bowl
• wooden mixing spoon
• cookie sheets
• measuring cup
• measuring spoons
• wire cooling rack
Ingredients
• 0.25 lb (113.4 gm) cannabis butter
(recipe, page 562)
• 0.5 c (11.8 cl) white (granulated) sugar
• 0.5 c (11.8 cl) brown sugar
• 2eggs
• 1 tsp (4.9 ml) vanilla extract
•2c (47.3 cl) unbleached all-purpose
flour
• 1 tsp (4.9 ml) baking powder
• 0.5 tsp (2.5 ml) salt
• 3 c (71 cl) quick-cooking oats
• 0.5 c (11.8 cl) chocolate chips
Step One: Cream butter and sugar in a
large bowl. Beat in eggs separately, and
stir in vanilla. Stir in flour, baking pow
der, and salt. Stir in oats and chocolate
chips, mixing to a consistent dough.
Cover and chill for 1 hour or more.
Cannabis chocolate chip biscotti
572
COOKING WITH MEDICINAL CANNABIS
www.marijuanagrowing.com
Cannabis lollipop!
Step Two: Preheat oven to 350°F
(176.7°C). Grease cookie sheets. Form
dough into balls about the size of a
walnut, and set on 2-inch centers on the
cookie sheets. Use the back of a spoon
to flatten each ball a little.
Step Three: Bake for 10 to 12 minutes
(8 to 10 minutes if you like chewy cook
ies). Let cookies cool for 5 to 10 minutes
on cookie sheets or transfer to a wire
cooling rack for faster cooling.
Cannabis Lollipops
Utensils
• parchment paper or tinfoil or small
ice-cube tray or candy mold (Lolli
pop molds are available at most large
stores with a cooking section.)
• cooking spray (nonstick)
• candy thermometer
• cooking pot
• stirring spoon
• measuring spoon
Ingredients
• 0.25 c cannabis butter (recipe, page 562)
• 2 c (47 cl) white (granulated) sugar
• 0.66 c (15.6 cl) corn syrup
• 0.5 c (12 cl) water
• 0.5 tsp (.25 cl) cream of tartar
• 2 tsp (1 cl) flavored dry Jell-O mix
• of your desired color and flavor
Step One: Prepare your molds by
spraying them with nonstick cooking
spray. Insert lollipop sticks into the
molds.
Step Two: Melt cannabis butter in a
heavy-bottomed pot over medium heat.
Slowly stir in sugar.
Step Three: Add syrup and stir the mix
ture thoroughly. Stop stirring when it is
well blended and starts to boil.
Step Four: Hang candy thermometer on
the side of the pot. Be careful! The pot
and mixture are very hot!
Step Five: The blended mixture will
continue to boil and will ultimately
reach 275°F (135°C).
Step Six: Remove from heat and add fla
vored Jell-O mix. Stir thoroughly. The
flavor and color of the Jell-O determines
the flavor and color of the lollipops.
Step Seven: Spoon the mix into the
mold cavities and make sure to cover the
back of the stick. Or set lollipop sticks
out on nonstick parchment paper or
tinfoil and cover the end of each stick
with one tablespoon (1.5 cl) of mix. The
candy mix is heavy and forms a circle
around the stick.
Step Eight: As they cool to room
temperature, lollipops harden. Wrap
separately in plastic wrap or consume!
Refrigerate wrapped lollipops for up to a
month. Makes about 12 lollipops.
Cookbooks
Here is a short list of some of my
favorite cookbooks. They are chock-full
of recipes and everything you need
to know to combine the concentrated
cannabis butter, oil, milk, etc. into
flavorful dishes.
The Joy of Cooking - This indispensable
classic cookbook explains everything
about cooking.
The Fannie Farmer Cookbook - This
basic American cookbook has nearly
2,000 recipes.
The Official High Times Cannabis
Cookbook is outstanding! It is a must-
have for all cannabis cooking.
Betty Crocker Cookbook: 1500 Recipes
for the Way You Cook Today - Classic
cookbook!
The Cook’s Illustrated Cookbook: 2,000
Recipes from 20 Years ofAmerica’s Most
Trusted Cooking Magazine - Amazing
instructions to prepare great meals!
Jerusalem: A Cookbook -Diverse
Muslim, Jewish, and Christian recipes.
The Everything Gluten-Free Cookbook
- This book is a great resource for all
sufferers of celiac disease (gluten/wheat
allergy).
Check our website forum
“Cooking with Cannabis” at
wyyw.marijuanagrowing.com for more
cookbook information and recipes.
Cannabis Beverages
Cannabis Beer
Countless beer recipes can easily incor
porate cannabis. This short section will
discuss cannabis preparation and when
to add it to the brew. Hemp, low-
cannabinoid cannabis, can be added
to the brew for flavoring. Medicinal
cannabis is to be added to beer to impart
flavor and/or meter out cannabinoid-
rich beer.
Raw cannabis often lends an unpleasant
taste to beers, which has made market
ing difficult. Avoid the “hempy” taste by
using kief, hashish, or oil that does not
contain foliage residue. Soak cannabis
in cold, low-EC water for 3 to 4 hours
Hemp is used to flavor ale. Cannabis concen
trate can also be added for extra effect!
www.marijuanagrowing.com
573
One Hit Won^t
Pomegranate-jiavored cannabis drink (MF)
The ingredients in this beverage include can
nabis (alcohol less than 1% by volume). (MF)
Crane Carter from Napa Valley Marijuana
Growers is holding one of their bottles of
cannabis wine.
«>
to remove water-soluble chlorophyll and
tars responsible for the “green” flavor.
This will help purge the hempy taste.
Shake water off and dry cold-water-
washed cannabis to the point that it
crumbles into a powder before adding it
to the brew. Contain ground cannabis
in a nylon stocking or similar “tea bag”
found at beer brewing stores. Add
approximately 01.7 to 0.7 ounces (4.81-
19.8 gm) of leaves per 3 ounces (8.9 cl)
of finished beer.
Ales and beers can be any style: pilsner,
porter, cream, stout, and so on. Strong-
flavored brews work best to mask the
cannabis taste. Cannabis is put into beer
brews when hops are added. Some of
the alcohol- or oil-soluble cannabinoids
dissolve into the mix as it ferments.
A few hemp beers include Greenleaf
(Germany), Hanfblute (Switzerland),
Humboldt Hemp Ale (USA), Liquid
Hemp (Austria), and Nirvana (Holland).
Note: Cannabis and hops (Humulus
lupulus) are both from the Cannabinaceae
family, but hops grafted to cannabis root-
stock does not produce cannabinoids.
Cannabis Drinks
Several companies in the USA and other
countries have launched carbonated and
concentrated cannabis drinks. Concen
trated cannabis syrup is added to differ
ent products after the heating process so
as to not destroy the active cannabinoid
ingredients. The list of new cannabis
products is growing rapidly.
Cannabis Wine
“Cannabis wine is becoming popular in
the wine country of California. In fact,
I believe it is the only original style of
wine created in the New World,” said
Crane Carter, president of Napa Valley
Marijuana Growers, and later added,
“Cabernet sauvignon from the Stag’s
Leap district is thought to pair particu
larly well with pot.”
Cannabis wine delivers cannabinoids
more quickly than baked foods, and the
combination of alcohol and cannabis
produce a different effect.
To make cannabis wine, add 0.05 to
0.1 ounce (1.5-3 gm) of cannabis per
bottle (75 cl) of fermenting wine.
Cannabinoids are extracted as part of
the alcohol fermentation process, but to
date little is known about the efficacy
of cannabinoids extracted thus. None
theless, high-quality cannabis produces
more cannabinoid-potent wine. Aging
cannabinoid wine for nine or more
months before bottling ensures the max
imum amount of cannabinoids will be
extracted. Aging also mellows cannabis
flavor.
Many cannabis wines and spirit drinks
are available in Austria, Germany,
Holland, and Switzerland.
The scope of this chapter is to
introduce subjects and stimulate
thought. Please consult our website,
www.marijuanagrowing.com, to learn
more about cannabis wine.
574
COOKING WITH MEDICINAL CANNABIS
www.marijuanagrowing.com
APPENDIX: MEASURES & ABBREVIATIONS
Light Measurement Scales
fc = foot-candle(s)
K = kelvin (s)
lm = lumen(s)
lx=lux
PAR = photosynthetically active
radiation
PPFD = photosynthetic photon flux
density
W/cm2 = watts per square centimeter
W/m2/nm = watts per square meter per
nanometer
/xmol m2-sec = micromole per square
meter per second
jxE*m2’Sec = microeinsteins per square
meter per second
2,000/xmobm2-sec ~ intense sunlight
CPW = cost per watt = cost of fixture
divided by watts
VPW = value per watt 1 joule of energy
per second = 1 watt
1 lumen = 1 candle from 1 foot away
shining on 1 square foot
1 lumen = 10 lux. 1 lux has only 1/10
the photons of a lumen
1 lux = 1 candle from 1 foot away
shining on 1 square meter
1 mired = 1 million divided by the color
temperature in kelvins
foot-candle = lumens per square foot
illumination = lumens per area = 1
cos(a)/r2
lux = lumens per square meter
luminous flux = lumen = 1/685 watts
@ 555 nm (energy = lumens per sec)
microeinsteins (gE) are occasionally
used to indicate 1 mole per square meter
per second. 1 /xE = 6 x 10²³ photons that
fall on 1 square meter of leaf surface.
Using this system, the amount of radiant
flux that initiates photosynthesis can be
defined in microeinsteins, gmol-2.-sl or
PAR watts per square meter.
phot = lumens per square centimeter
Plant Nutrients
Al aluminum
B boron
Ca calcium
Cl chlorine
Co cobalt
Cu copper
Fe iron
K potassium
Mg magnesium
Mn manganese
Mo molybdenum
N nitrogen
Na sodium
Ni nickel
N-P -K nitrogen; phosphorus;
potassium
P phosphorus
S sulfur
Se selenium
Si silicon
Zn zinc
Other Abbreviations
AACT actively aerated compost tea (aka
ACT)
ABA abscisin (abscisic acid)
ABV already been vaporized
AC alternating current
A/C air conditioning
AEA anandamide, aka
N arachidonylethanolamine
AIDS acquired immune deficiency
syndrome
amp ampere
ASA salicylates (aspirin)
ATC automatic temperature
compensation
ATTRA National Sustainable
Agriculture Information Service
BAC beaded activated carbon
BAP 6-benzylaminopurine
BC before Christ
BCE before the Christian Era /
before the Common Era
BCSR base cation saturation ratio
(soil test)
BHO butane hash oil
BLD broad-leaf drug
BR brassinolide
Brix sugar content of plant
Bt Bacillus thuringiensis
Btu British thermal unit
Btu/h Btus per hour
Bj aka thiamin, thiamine, and aneurine
B3 niacin
B9 aka folic acid, folinic acid
C Celsius, centigrade
CBfe Calvin-Benson-Bassham cycle
(Calvin cycle)
CBC cannabichromene
CBCV cannabichromevarin
CBD cannabidiol
CBDV cannabidivarin
CBE cannabielsoin
CBG cannabigerol
CBGM cannabigerol monomethyl ether
CBGV cannabigerovarin
CBL cannabicyclol
CBT cannabicitran
cc cubic centimeter(s)
CCI chlorophyll content index
CCT color corrected temperature
cd candle or candela
CE Conformance European
CEA controlled environment
agriculture
CEC cation exchange capacity
CF conductivity factor
cfh cubic feet per hour
CFL compact fluorescent lamp
cfm cubic feet per minute
CK cytokinin
cl centiliter
cm centimeter
CNN Cable News Network
CO2 carbon dioxide
COP constable on patrol
575
COP critical oxygen pressure
CPU central processing unit
(microchip)
CRI color rendering index
CS colloidal silver
CSA Canadian Standards Association
C3 plant carbon fixation of most plants
C4 plant carbon fixation of fast
growing plant
CB1 cannabinoid receptor 1
CB2 cannabinoid receptor 2
cm3/min cubic meters per minute
dB decibel
de direct current
DEA Drug Intelligence Agency
DFT deep flow technique
DIY do-it-yourself
DMSO dimethyl sulfoxide
DNA deoxyribonucleic acid
DO dissolved oxygen
DPA dichlorophenoxylacetic acid
DS dissolved solids
DWC deep water culture
E einstein(s)
EAC extruded activated carbon
EC electrical conductivity
ECS endocannabinoid system
ERGS energy released per gram of soil
Eye a division of Iwasaki Electric Co.
fc foot-candle(s)
FIM “F%&k, I missed!” pruning
technique
FTE fritted trace element(s)
GA/GA3 gibberellic acid
GAC granulatar activated carbon
GE General Electric
GFI ground fault interrupter
GHz gigahertz
GI gastrointestinal
gm gram(s)
GPM gallons per minute
GPS global positioning system
GRAS generally recognized as safe
H hydrogen
H2O water
H2O2 hydrogen peroxide
HEP high-efficiency plasma (lamp)
HEPA high-efficiency particulate air
(filter)
HID high-intensity discharge
HIV human immunodeficiency virus
HO high output
HP high-pressure sodium lamp
HSA Homeland Security Act
HVAC heating, ventilating, and air
conditioning
Hz hertz
IAA indole-3-acetic acid
IACM International Association for
Cannabinoid Medicines
IBA indole-3 -butyric acid,
3-indolebutyric
IBL inbred lines
ICRS International Cannabinoid
Research Society
ID identification
ISO oil cannabis oil extracted with
isopropanol
j joule
JA jasmonate
K kelvin(s), Kelvin-scale temperature
kg kilogram
kmh kilometers per hour
kV kilovolt
kW kilowatt
kWh kilowatt-hour
L liter
lb pound(s)
LCD liquid crystal display
LEAP Law Enforcement Against
Prohibition
Leca light expanded clay aggregate
LED light-emitting diode
LEO law enforcement organization
LEP light-emitting plasma
im/W lumens per watt
LP gas natural gas
LP low-pressure sodium lamp
LPH liters per hour
LPM liters per minute
lx lux
m meter
mA milliampere
MABC marker-assisted backcrossing
MARS marker-assisted recurrent
selection
MAS marker-assisted selection
MCPCB metal core printed circuit
board
MD medical doctor
mEq milliequivalents
MH metal halide
mired micro reciprocal degrees
MJ marijuana
mL milliliter
MMJ medical marijuana
mph miles per hour
mS millisiemen(s)
mW milliwatt(s)
N-P-K nitrogen; phosphorus;
potassium
m2 square meter
m3 cubic meter
m3/k cubic meters per hour
NA A 1-naphthalenaecetic acid
NDIR nondispersive infrared sensor
NFT nutrient film technique
NIDA National Institute on Drug
Abuse
NLD narrow-leaf drug
NLD narrow leaflet diameter or
narrow-leaf drug
NLDA narrow-leaf drug ancestor
NLH narrow-leaf hen^j
nm nanometer
NORML National Organization for the
Reform of Marijuana Laws
OCIA Organic Crop Improvement
Association
OH hydroxide
OMRI Organic Materials Review Insti
tute
OPD overfill prevention device
ORP oxygen reduction potential
O’S O'Shaughnessy's (publication)
oz ounce (s)
O2 oxygen
Oj ozone
PAA 2-phenylacetic acid
576
PAC powdered activated carbon
PAR photosynthetically active
radiation
PCB polychlorinated biphenyl
PE polyethylene plastic
PGR plant growth regulator
ph phot
pH potential hydrogen
PPF photosynthetic photon flux
PPFD photosynthetic photon flux
density
ppm parts per million
psi pounds per square inch
PSP phenolsulfonphthalein
PV photovoltaic
PVC polyvinyl chloride
RF radio frequency
RH relative humidity
RICO Racketeer Influenced and
Corrupt Organizations (Act)
RNA ribonucleic acid
RNAi RNA interference
RO reverse osmosis
rpm revolutions per minute
RTW run to waste
SCF supercritical fluid
sCF subcritical fluid
SCFP supercritical fluid process
SCROG screen of green
SFE supercritical fluid extraction
SLAN sufficiency level of available
nutrients (soil test)
SOG sea of green
sp. I spp. species singular; species plural
ssp. I sspp. subspecies singular;
subspecies plural
SRP soft rock phosphate
STC sound transmission class
T5 lamp tube diameter is 0.625 inches
T8 lamp tube diameter is 1 inch
T12 lamp tube diameter is 1.5 inches
TDS total dissolved solids
THC tetrahydrocannabinol
THCA tetrahydrocannabinolic acid
THCV tetrahydrocannabivarin
thm therm
UK United Kingdom
UL Underwriters Laboratories
US / USA United States of America
USD United States dollar
UV ultraviolet light
UVA ultraviolet light A ~ mild
UVB ultraviolet light B ~ somewhat
harmful
UVC ultraviolet light C ~ harmful
V volt
VAC volts of alternating current
var. variety
VDC volts of direct current
VHO very high output
VOC volatile organic compound
W watt(s)
W/K watts per kelvin
w/o water-in-oil emulsifier
Wi-Fi Wireless Fidelity, transmission of
data over wireless networks
WIN water-insoluble-nitrogen
WLD wild leaflet diameter or w
WSN water-soluble-nitrogen
W/ft2 watts per square foot
W/m2 watts per square meter
XHO extra high output
juE microeinstein(s)
2-AG 2 arachidonoylglycerol
2,4 DPA dichlorophenoxylacetic acid
4-CI-IAA 4-chloroindole-3 -acetic acid
420 (4/20) code word for anything
cannabis-related
577
CONTRIBUTORS
The names below represent most of this
book’s contributors from around the
world. More and more people are proud
to see their legal name in print here;
others prefer anonymity and the use of
a pseudonym.
I have done my best to include everyone
who has contributed to this work. To
include any names I might have missed,
I started a thread at
www.marijuanagrowing.com.
10K
2mins4roughing
420USAPride
Aaron (DNA Genetics)
Adam Dunn (T.H .Seeds)
Al (Insta Print)
Alan Dronkers (Sensi Seeds)
Albert (Sensi Seeds)
Aleen (FS Books)
Aleksandr
Alex (Flowery Field)
Alex (Marimberos Seeds)
Alex de Nasario (RIP)
Allen St. Pierre (NORML)
Amadeo (RIP)
Ammiraglio
Andre Grossman (High Times)
Annie Riecken
ApollollGenius
Arjan (Strain Hunters)
Arno Hazekamp (Bedrocan)
Aurora Avansena
Badar
Balta
Barbas
Barge
Barry Cooper (LEAP)
Bean (High Times)
Belpe
Ben Dronkers (Sensi Seeds)
Bernard Rapaz (Valchanvre)
Bev
Beverly Potter (author)
BiglslandBud
BigSkyBud THC
Bill
Bill Cattterson (RIP)
Bill Drake (author)
Bill Kuffler
Bill R.
Blackdog
Bob Van Patten
BOG (Bushy Older Grower)
Boy Ramsahai (Soft Secrets)
Breeder Steve (Spice of Life Seeds)
Brian (SNB)
Bubbasix
Bubble Man
Bud-E
Buddy (Nirvana), Holland
Buddy R.
Buko
Candi Cooper
Carlos
Carlos Hernandez
Cezar Doll (Canamo)
Charlie
Charlie Frink (author)
Chimera (Chimera Seeds)
Chris Conrad (author)
Chris Ivenson
Chris Payaso
Chris Simunek (High Times)
Christopher Valdes
ClassicNugz
Cliff Cremer (High Life and Soft Secrets)
Clint Werner (author)
Connie (Hanf)
Consuelo
Cosmic Jimmy
Crystal (Kind Seeds)
Crystal P. (Green Universe)
Crystalman (Joop Dumay), Holland
Curt, Holland
D. B. Turner
D.C.
D. J. Short (DJ Short Seeds)
DaChronicKing
Dan (Vancouver, BC)
Dana Larsen (Cannabis Culture)
Darryll (Kind Seeds)
Daryl
Dave (Sonoma Patients Group)
Dave Bienenstock (author)
David
David (Flowery Field)
David Garcia (translator)
David Strange (Heads)
David Tatelman (Homestead Books)
David W.
David Watson (author)
Debbi (Homestead Books)
Debbie Goldsberry (Berkeley Pts. Grp.)
Dennis (Grass Times)
Dennis H.
Dennis Peron (coauthor Prop. 215)
Dennis Stovall (author)
Dennos
Derry (Barney’s Farm)
Deva
Dieter Hagenbach
Dion (Nug)
Dirk Rehahn
Doc Ontario
Doctor Dangerous
Don Collins (Pypes Palace)
Donald Abrams, MD
Donna (OrganiCann)
Donny
DoobieDuck
Doug (Hemp Works)
Dr. John McPartland (author)
Dr. Lester Grinspoon
Drew Bennie
Dutch Grown
Eagle Bill (RIP)
Ed Borg, Holland
Ed Rosenthal (author)
Ed S., Canada
Eddie (Flying Dutchmen)
Eddy Lepp (drug war prisoner)
Eduardo DC
Eirik (photographer)
Elise McDonough (author)
Elizabeth
Elmar (BTT)
Emilio Gomez Reig
Enric
Eric Taylor (California Botanicals)
Ernesto (Canamo)
Ernesto (Hemp Trading)
Estella Cervantes
Everybody’s kids
Evie Hayes
Farmer in the Sky
Fatima
Felipe
Felipe Borallo (Canamo)
Felix Kautz (Owl’s Production)
Feran (Good House Seeds)
Fergetit
Flick Ford (High Times)
Fluus
Foz
Fran (Osona Canem)
Franco Casalone (author)
578
Franco Losa (Strain Hunter)
Jay (NGSC)
Les
Frank
Jeff Lowenfels (author)
Liam (Pollinator)
Frank (Canna)
Jeff Raber, PhD (The Were Shop)
Linda
Fred Gardner (www.projectcbd.org)
Jeffrey Y. Hergenrather, MD
Lock
G. I. Joe
Jen Matthews
Lord of the Strains
Gabbi (Water Spout)
Jerry
Lorna (Cannabis College)
Gaspar Fraga (Canamo) (RIP)
Jess
Loti, Switzerland
Gato
Jim
Luc Krol (Paradise Seeds and Cannabis
George
Jim from Chicago
Medical Bike Tour)
GIB
Jim Gierach (LEAP)
Lyndon (CC Newz)
Gillis (Canna)
Jim Goodwin (breeder)
Madeline Martinez (OR NORML)
Gisela (worldly woman)
Jim R.
Mani, Spain
Glass Joe
Jimmy Chicago
Manuel Guzmdn, PhD
Gloria (Kind Seed)
JJ Jackson (Advanced Hydroponics)
Marc Brown
Gonz
JJ Turner (RIP)
Marc Emery (Cannabis Culture)
Gordon
Joel, Forestville
Marco Kuhn (CannaTrade)
Grant
J°ey
Marcus Von Bueler
GrassDaddy
Joey Perez
Maria Garcia (translator)
Green Man
John
Mario Belandi (Reyna Madre)
Greg (Northern Lights)
John (Avalon)
Martin Lee (author)
Gregorio (Goyo) Fernandez
John H.
Martin Palmer (Avalon)
Grey (Humboldt)
John L.
Martin Trip
Grubbycup
John S.
Mary Anderson
Guido (Hanfblatt)
John Williams
Master Haze
Gurney
Johnny Sage, Ocean Beach
Matej (Medical Cannabis Bike Tour)
GvtCheese
Joint Doctor (Low Ryder)
Matt Stang (High Times)
Gypsy Nirvana (drug war prisoner)
JomJom
Mauk (Canna founder)
Hank Gonzales
Jordi Bricker (Canamo)
Max Acuna
Harmon Davidson
Josete (Canamo)
Max Messerli
Harry (Cultiva)
Juan
Mel Frank (author)
HashMan
Juan Vaz, Uruguay
Melani (Sow What! Association,
HempHappy
Juan, Barcelona
Barcelona)
Henk (Dutch Passion)
Juaquin (El Conde) Bucati
Michael
Henk (HESI)
Justin Mclvor
Michael (SickMeds Seeds)
Hillary Black
Karen (The Amsterdam)
Michael A.
Homer
Karl Hilling
Michka (Mama Editions)
Howard Marks (Double Agent)
Karulo (l’lnterior)
Mickey
Huero
Kees (Super Sativa Seed Club)
Mieko Perez (Unconventional Founda
Hugo (Soft Secrets)
Keith Stroop (Founder of NORML)
tion for Autism)
Humboldtlocal
Kelly
Miguel
Ian
Ken
Miguel Bella
Ignaci Pena (author)
Ken Morrow (Trichome Technologies)
Miguel Gemino
Ignacio Acuna
Kevin
Miguel Torres (Abogado, Barcelona)
Ivan (Ivanart)
Klaatu
Mike
ixnay007
Kristen Nevedal (bud whisperer)
Mike A. S.
J. D., Spain
Kyle (Kind Seed)
Mike Brown
Jack Herrer
Kyle Kushman (Veganics)
Mike Miller
Jaime Carion (Resin Seeds)
Larry Armantrout
Mikki Norris (activist)
Jaime Prats (Canamo)
Larry Turner (photographer)
Mila Jansen (Pollinator)
Jan
Lars (Nirvana Seeds)
Moises Lopez (Canamo)
Jan Sennema (Biker)
Laura (Sow What! Association,
Mono
Jane (Homestead Books)
Barcelona)
Mr. Beaner
Jane Klein (Quick Distribution Co.)
Laura Blanco, Uruguay
Mr. Ito
Jason King (author)
Laurence Cherniac (author)
Mr. Majick
Jason Miller (Pure Analytics)
Laurence Ringo (RIP)
Murphy Stevens (author)
Javi
Leaf
Napoleon (Martin)
Javi (The Plant)
Lee Bridges (Cannabis Poet, RIP)
Natalia Casado
Javis
Lennarts
Nate Bradley (LEAP)
579
Ned Eduardo
Neil Wilkinson
Nevil (The Seed Bank)
Nick (Red Eye Express)
Noel Palmer (Montana Botanical
Analysis)
Nol Van Schaik (Willie Wortel’s)
Nomaad
Noucetta
Oakie
Ocean
Olaf (Greenhouse)
Olde Sonoma Public House
Oli, Switzerland
Oneshot LED
Opti
Oscar (Osona Canem)
Patricia
Patrick (Paradise Seeds)
Patrick, Switzerland
Patty Collins (Pypes Palace)
Paul
Paul (Austrian videographer)
Paula Morris (Medea Labs)
Peace and Medicine
Pete Sargosis (Sargosis Solar & Electric)
Phil (Weed World)
Pirn (Super Sativa Seed Club)
Podencoid
PREMIER
Psychotropic Nomad
R.C. (founder, overgrow.com)
Raphael Mechoulam, PhD, (Isolated
THC and CBD)
Ravi Dronkers (Sensi Seeds)
Red (Legend Seeds)
Reeferman
Richard (Plant Photonics)
Richard Lake County
Richard Lee (Oaksterdam University)
Rick
Rick Cusick (High Times)
Ringraziamenti
Roach from Spain
Rob
Rob Clarke (author)
Robbie (Agromix)
Robert Melamede, PhD
Robert the ex-COP
Robert W.
Roberto C.
Roger
Roger (Nachtschatten Verlag)
Roger Botlanger (Hanf)
Roger Watanabe (RIP)
Rolf
Rollitup.com - BigSkyBud THC
Romulan Joe
Ron Turner (Last Gasp)
Ron Wilks
Ross
Rubio
Salvatore
Salvatore Casano (Phytoplant)
Sam S.
Sam the Skunk Man
Samantha Miller (Pure Analytics)
Sammy
Saskia (Canna)
Saskia from OZ
SC
Scott
Scott (Rare Dankness)
Scott Blakey (Mr. Nice)
Sebastain Orfali (RIP)
Sebastien Beguerie (AlphaCAT)
Sergi Doll (Canamo)
Simon (Serious Seeds)
Sita Von Wilhelm
Sixfinger
Skip
Skip Stone
Snoofer
Soma (Soma Seeds)
Spanish Hash Guy
Spence (Cannabis College)
Stefan Meyer (Phytoplant)
Steve
Steve Bloom (celebstonerxom)
Steve from Amsterdam
Steve from OZ
Steve Hagar (High Times)
Steve Huxley (Steve’s Beer)
Steve Rogers
Steve Solomon (author)
Steven DeAngelo (Harborside Heakh
Center, founder)
Stitch (Super Autos)
Subcool (TGA Genetics)
Sus
Susan (Canna)
Susan LaPolice
T.
Taylor (Kind Seeds)
Tea House Collective
Ted B.
Ted Zitlau (RIP)
The thinker
Theo Tekstra (Gavita Holland)
Tigrane (Mama Editions)
Tim
Tim G.
Tim I.
Tom Alexander (Sinsemilla Tips)
Tom Flowers (RIP)
Tom Hill
Toni (Barney's Farm)
Toni 13
Tony (Sagarmatha)
Tony B.
Twenty Three
Twofingered
Uncle Ben
Uncle Stoner
Valdudes
Valerie Corral (WAMM)
Vansterdan
Vic High
Vital Landscaping
Wally Duck
Warlock
Watcha
Wayne Oliver (RIP)
Wendover Brown
Wernard Braining (author, visionary)
Whirly
Wili
William
William (Grow Room)
William L. Courtney, MD AACM
Willie (Hanfblatt)
Wilson (Steep Hill Laboratory)
Wim (Pollinator)
Winnie (Grow!)
Wismy (Yerba)
Xavier Nadal (Phytoplant)
Xus (RIP)
Yechiel Gaoni, PhD, (Isolated THC
and CBD)
Yorg, Switzerland
Yorgos
Zeke Van Patten
(marijuanagrowingxom)
ZtefaN
580
INDEX
Page numbers in italics indicate pages with
pictures.
AA&L Western Laboratories, Inc., 304
abamectin, 484, 486
The ABC ofNFT (Cooper), 414
abiotic diseases, 504
abscisin (abscisic acid, ABA), 352, 396
acephate, 485
acetone, 548
acidic soils, 162, 310, 311-13
acidity, 337. See also pH levels
acids. See specific types
Acres USA magazine, 305
Aculops cannabicola, 479
Adams, Roger, 18
additives, 395-406 . See also specific types
about, 395-96
bacteria, 403
fertilizers and, 370
fungi, 401-3
hormones, 396-99
vitamins, 405-6
AEC (anion exchange capacity), 438
aerated compost tea (ACT), 394
aerobic bacteria, 119
aeroponics, 76, 82, 83, 410 -7/
afghanica. See under Cannabis
2-AG (2 arachidonoylglycerol), 19
Agent Orange, 397
agricultural lime, 312
AIDS, 17-18
air. See also carbon dioxide; humidity; oxygen
circulation, 115, 132-34, 141, 146, 227-28,
235-38
composition of, 228-29
filtration, 102, 133, 238, 239,248-50
in growing medium, 54, 436-37
nutrient deficiencies and, 379, 380
in nutrient solution, 412-13, 432, 434-36
in soil, 308, 347, 436-37
temperature, 159, 228-33
ventilation, 115, 132-34, 141, 146, 236-39,
250-52
air conditioners, 125, 147, 208, 230, 235, 246
air layering, 83
air meters, 134, 217-19
air pumps, 413, 432, 435, 436
Albrecht, William A., 305
alcohol
denatured, 550
ethyl, 546,548 -49, 551-52
isopropyl (rubbing), 68, 269, 490, 549
methanol, 549-50
aldicarb, 485
alfalfa hay, 326
alfalfa products, 391, 394
algae, 323-24, 364, 460
alginic acid, 403
alkaline soils, 309-11, 313, 361
alkalinity, 333, 337. See also pH levels
alleles, 515-17
allelotoxic chemicals, 156
alpine climates, 153
aluminum foil, 294
aluminum sulfate, 313, 342
amendments
about, 162-63, 164, 308
for raising pH, 311-13
types of, 315-17, 386-93, 439-41
amino acids, 400
ammonia-based fertilizer, 341, 342, 352, 387
ammonia odor, 101, 115, 323, 461
ammonium carbonate, 339-40, 341
ammonium monopotassium phosphate, 341
ammonium nitrate, 341, 352, 387
ammonium sulfate, 341, 342
Ampelomyces quisqualis, 486
amperes (amps), 268, 296,298
anaerobic decomposition, 101, 115, 323, 403
anandamide, 19
Anderson, Edgar, 13
Anderson, Loren, 14
anemometers, 217-18
animals, 165,171, 325, 481-84
anion exchange capacity (AEC), 438
anions, 307, 428, 430
anthers, 510, 511
anthracnose, 451-52
ants, 462-63, 486
aphids, 44, 462-64,463
apical dominance, 397
appetite stimulation, 35
apple cider vinegar, 394
apps, for sun position, 154,155
Aquaponic Gardening (Bernstein), 427
aquaponics, 427
aragonite, 388
archaea, 323
arc tubes, 264, 265, 269, 270-71, 272, 291
arid climates, 153
aroma/fragrance
ammonia, 101,115, 323, 461
changes in, 100,101, 115, 524
control of, 102, 208-9, 245-50
desireable qualities, 89,100,101,102,119, 524,
539
of hash/hashish, 539
arthropods, 324
asbestos, 442
ascorbic acid (vitamin C), 405
Aspergillus, 32, 462, 559
aspirin (ASA), 399
astrology, 54
atmosphere, 228
atmospheric controllers, 134, 234
attics, 128
Aubert-Roche, Dr., 16
autoflowering-feminized seed, 52, 53
autoflowering-feminized varieties, 38, 51, 95, 110,
262-63,522-23
autoflowering plants, 37, 38, 41, 44, 46, 85, 91, 95,
110, 262-63, 522-23
autoflowering seed, 50-51, 52, 53
auxins, 67, 68, 71, 397, 398
Avid, 462, 484, 486
Ayurvedic medicine, 15
AzaMax, 493
azomite, 388
Azospirillum inoculum, 403
B
Bacillus species, 469-70, 485, 486-87
backcrossing, 509, 515, 519-20, 523, 532. See also
inbreeding; true-breeding
bacteria. See also fungi; microbes
about, 323-24, 372-73, 388, 403
aerobic, 119
anaerobic, 115, 323, 403
in compost tea, 393-94
Trichoderma, 64, 65, 66, 79, 165, 316, 402-3,
499
bacterial diseases, 460, 461-62
bacterial slime, 403
baking soda (sodium bicarbonate), 487-88
ballasts
about, 265-68 , 267
electronic, 265,266-67, 268, 272, 276
fluorescent, 275-76
metal halide, 265, 267-68, 270-71
sodium, 265,267,271,272
Bamford Hi-Ram Pumps, 158
barium (Ba), 351
base cation saturation ratio (BCSR), 304
basements, 128
Bassham, James, 229
bears, 481
Beauveria bassiana, 487
.bedding, livestock, 386
beds, 142,163-64, 165,192, 193, 288, 329,372
beer, cannabis, 573-74
bees, 464-65
beetles, 465
bending and training, 66-68, 67, 193
beneficial fungi, 487. See also microbes
beneficial insects, 501-3
Benet, Sara (nee Benetowa), 15
Benson, Andrew, 229
benzene, 548
6-benzylaminopurine (BAP), 398
Bernstein, Sylvia, 427
beverages, cannabis, 573-74
BioBase Bedding, 386
biotite, 388-89
birds, 325, 481
bleach, 79, 443, 485, 488, 490
blights, 452
blood meal, 165,383
blooming. See flowers/flowering
blowers. See fans
boar, 481-52
bogs, 162
bone meal, 319,383, 416
Bonzi, 506
Bordeaux mix, 488
borers, 465-66
boric acid, 488
boron (B), 318, 351, 361-62, 428, 504-5
Botrytis (gray mold), 111, 191, 453, 454-56
bracts, 93, 94, 97, 104,106, 513
branches/branching
asymmetrical, 86
internodes, 43, 92, 94
tips (meristem), 43, 67, 70, 71, 86
brassinolide (BR), 396-97
breeding
about, 507-9
autoflowering-fcminized varieties, 522-23
backcrossing, 509, 515, 519-20, 523, 532
classical, 515
hybridizing, 517-18
molecular markers, 531-32
outbreeding and outcrossing, 509, 518, 519
popular varieties, 39-40
581
selection criteria, 528
self-pollinating, 520—21
terms, 529-31
true-breeding, 517, 518-19, 523
brick shards, 437
brilliance, 284, 286
Brix Mix Powder, 373-74
broad mites, 476, 478
Bronner, David, 14
brownies, cannabis, 572
Bruining, Wernard, 21
Bt (Bacillus thuringiensis), 469-70, 485, 486-87
Bubble Man, 538, 539
bubbleponics, 412-14, 413
bud count, 71
budgets, 126-27
bud mold (Botrytis), 111, 191, 453, 454-56
bug bombs, 488-89
bulbous glands, 86, 87, 88
bulbs. See specific lamps
Burbank, Luther, 508
Burgundy mix, 488
burns
copper compounds, 331
from fertilizer or nutrients, 164, 334, 344, 346,
362-63,367-68,386
light, 136,380
from nutrient deficiency, 356
from sprays, 382
butane, 24, 541, 546-47
butter, cannabis, 562-66
B vitamins, 405-6
c
cadmium (Cd), 351
calcitic lime, 312
calcium (Ca), 161, 334-35, 351, 357-58, 427, 428,
447-48, 504-5
calcium carbonate, 162, 312, 333, 436
calcium hydroxide, 341
calcium nitrate, 341, 358, 428
calcium sulfate, 358, 360, 369, 390
California Cannabis Research Medical Group, 20
callus cells, 83
Calvin, Melvin, 229
Calvin cycle, 229
calyxes, 97, 510, 5W-12 , 513
cambium, 83
cameras, 206-7
Campaign Against Marijuana Planting (CAMP),
211
canker, 452-53
cannabidiol (CBD). See CBD
cannabinoids. See also testing; specific types
activating by cooking, 557-58
agricultural production levels, 89
CBD vs. THC levels, 14, 21, 29-30, 35, 36, 39
decarboxylation, 27-28, 558-59
degradation of, 101, 103
male vs. female plants, 43
measurement of, 23-32, 89, 110
molecular diagram, 19
physical effects, 108
preservation of, 100, 115, 118, 120-21
production by resin glands, 86-88, 89
profile, 89, 100, 524
psychoactive effects, 19, 20, 27-28, 462, 557
receptors, 19
solubility, 559
synthetic, 19
therapeutic applications, 19-22, 29, 30, 35
types of, 18-19, 24, 28
volatility, 561
cannabinol (CBN), 19, 120
cannabis
aroma and flavor, 36, 89, 100, 101, 102, 115, 119,
524, 539, 558
curing, 100, 119-20
history of, 13, 14-16
manicuring, 100, 111, 112-73, 114
production levels, 44, 63, 89, 126, 167, 195-96
testing for contaminants, 30-32, 462, 560
testing for potency, 23-30, 110
Cannabis
afghanica, 33 -34,36, 455
autoflowering-feminized varieties, 38, 51, 95,
110,262-63,522-23
botanical classification, 14, 33—34
CBD-rich varieties, 14, 21, 29-30, 35, 36* 39
feminized varieties, 37-38 , 521 -23
genome, 515
high-THC varieties, 39
indica
about, 35-3-6
disease resistance, 451
growth habit, 34, 109
nomenclature, 14, 33
nutritional needs, 180, 376
photoperiod for flowering, 41, 44, 62, 90,
108,262
popular varieties, 50
resin head size, 535
reverting to vegetative growth, 261
tranquilizing effect, 108
indica NLD, 14
indica WLD, 14
land race varieties, 35, 94, 95, 262 , 263, 508,
518, 530
life cycle, 41-45, 85, 92
metabolic changes, 375
multigene traits, 514
qualities/characteristics, 33, 44, 509-10
ruderalis
about, 36-37
cloning issues, 76
flowering cycle, 37, 41, 44, 85, 94, 95,110,
261,262
growth habit, 45, 50, 109,110
nomenclature, 14, 33-34
sativa
about, 34-35
flower form, 95
growth habit, 41, 90
growth rate, 108
nomenclature, 14, 33-34
nutritional needs, 180, 376
photoperiod for flowering, 44, 50, 90-94,
262
qualities/characteristics, 108-10
resin head size, 535, 537
sativa feral biotype, 14
sativa hemp biotype, 14
varieties
‘ACDC,’ 30
‘Afghani,’ 576
‘Afghani #1,’36, 518
‘Afghani #1’ x ‘Chiba Colombian 60’ x
‘African 3,’ 109
‘Afghani #1’ x ‘Mexican #3,’ 518
‘Afghani’ x ’Congolese,’ 508
‘AK47,’ 100
‘Amnesia Haze,’ 109
‘Annapurna’ super-autoflowering, 753
‘Apollo 13,’ 194
‘Arjan’s Haze,* 39
‘BC Kush,’ 36
‘Big Low,’ 522
‘Blackberry,’ 97
‘Blackjack,* 37
‘Blueberry’ X ‘Sandstorm,’ 530
‘Blue Dream,’ 702
‘Bonkers,’ 95
‘Bubblicious,’ 50
‘Burmese Kush x Shoe Goo,’ 797
‘Cannatonic,’ 263
‘Cannatonic’ x 'Sour Tsunami,’30
‘Catatonic,’ 39
‘Charlotte’s Web,’ 21
‘Chaze,’ 709
‘Chemdawg,’ 515
‘Chocolope,’ 96
‘Chronic,’ 57, 524
‘Cocoa Kush,’ 108
‘Cripple Creek,’ 302, 406
‘Critical Mass,’ 108
‘Diesel,’ 706
‘Diesel’ x ‘Low Ryder,’ 50
‘Durban Poison,’ 90
‘Garlic,’ 703, 705, 106,107
‘Granddaddy Purple,’ 109, 529
‘Grapefruit,’ 96
‘Harlequin,’ 39
‘Hash Plant’ X ‘G13’ X •Chronic,’ 524
‘Haze,’ 38, 39-40, 753, 262
‘Haze’ X ‘Northern Lights’ X ‘Sensi Star,’
572
‘Haze’ x ‘Northern Lights 5’ X ‘Sensi Star,’
705, 706
•Haze’ x ‘White Widow,’ 514
‘Headband,’ 792
‘Hindu Kush’ landrace, 376
‘Jack’s Cleaner,’ 194
‘Jack the Ripper,’ 703, 706
‘Jamaican Grape,’ 35
‘Jamaican Lion,’ 27
‘Jolly Bud,’ 340, 406
‘Jorge’s Diamonds,’ 37
•Kalashnikova,’ 37, 186, 187
‘Kush,’ 576
‘Kush #4,’ 537
•Kush’ landrace, 262
TA Confidential,’ 575
‘Lavender,’ 187
‘Lowryder,* 37, 38, 96
‘Lowryder II,’ 51
‘Magnum,’ 38
‘Matanuska Tundra,’ 95
‘Maui,’ 703, 705
‘Mexican,’ 107, 516
‘MK Ultra’ x ‘Sensi Star,’ 705
‘Mr. Nice,’ 110,172,197
‘Northern Lights,’ 40
‘Northern Lights #5,’ 40
‘NYC Diesel,’ 96, 262
‘OG Kush’ x ‘Master Kush,’ 705
‘Original Afghani #1,’ 90
‘Pakistan Chitral Kush’ landrace, 181,188,
508
‘Panama’ X ‘Deep Chunk,’ 178
‘Peyote Purple,’ 34, 516
‘Pink Afghani’ X ‘African #3,* 36
‘Power Plant,’ 38, 45, 50
‘Purple Heart,’ 705
‘Purple Hen,’ 709
‘Purple Pineberry,* 45, 95
‘Sensi Star,’ 16, 39
‘Shoe Goo,’ 797
‘Shooting Star,* 95
‘Skunk #1,* 38,39, 40, 107, 524
'Skywalker,* 705
‘Sonungo,’ 188
‘Sonoma Coma,* 509
'Sour Bubbly,’ 52/
‘Sour Tsunami,* 79, 535
582
'Strawberry Cough/ 36
'Super Silver Haz^/ 40, 262
‘Super Skunk/ 89
‘Super Stinky/ 38, 96
‘Swazi’ landrace, 263
Cannabis Evolution and Ethnobotany (Clakc &
Merlin), 14
cannabis oil, 5J4, 545-50
capillary matting, 414, 420-21
capitate-sessile resin glands, 86, 87, 88
capitate-stalked resin glands, 86, 87, 88 , 106 -7 ,
406
capsaicin, 491
carbamate insecticides, 496-97
carbaryl (Sevin), 465, 485, 496-97
carbohydrates, 43, 403-4
carbon (C), 392
carbon dioxide (CO2), 125, 379, 436
air circulation, 235-36
emitter systems, 242-43, 244
enrichment, 184, 231, 239-42
generators, 149, 232, 243-44
importance of, 227-28
monitors, 240-41, 244
photosynthesis, 43
seed treatment, 57
SFE extraction, 541
sources of, 244-45
for storage, 122
toxic impurities, 24
carbon filters, 208,248-50
carbon footprint, 124-25
carbon monoxide detectors, 218, 219
carboxin, 485
Carion, Jaime, 22
Carter, Crane, 574
Casparian strip, 343
castor oil, 489
caterpillars, 466-67
cation exchange capacity (CEC), 306-7, 437, 438
cations, 247, 428, 430
Cavanaugh, Jay R., 550
CB1 and CB2 receptors, 19
CBD (cannabidiol). See also testing
CBD-rich Cannabis, 14, 21, 29-30, 35, 36, 39
decarboxylation, 27-28, 558-59
identification and profile, 18, 89
measurement of, 21,23-30
molecular diagram, 19
reduced psychoactivity, 20
therapeutic applications, 19—22, 29, 30, 35
CBD-acid (CBDA), 27-28, 29
CBD-to-THC ratio, 14,21, 29-30, 35, 36, 39
CBN, 29, 36
CEC (cation exchange capacity), 306-7, 437, 438
cellulase, 400
CFL (compact fluorescent lamp), 149, 277-78,
288, 300
chalky soils, 309
Cheech and Chong, 18
chelates, 361, 401, 417
chemical extraction, 24, 534, 545-49
chemigation, 506
chemotypes, 530-31
China, cannabis history, 14-15
chlorine (Cl), 64, 335-36, 351, 362-63
4-chIoroindole-3 -acctic acid (4-C1- IAA), 397
chlorophyll, 43, 61,115, 117, 119,255,558
chlorophyll content index (CCI), 306
chlorosis, 188, 322. 364, 504
chromatography, 25-29, 31, 110, 515, 524
chromium (Cr), 351
chromosomes, 513-14, 521, 531
cinnamon oil, 490
citric acid, 341
citrus oils, 490-91
Clarke, Robert Connell, 14, 83, 503, 539, 542
clay, expanded, 315, 409, 421, 424, 436, 437,
438-39 , 442
clay soils, 162, 163,307-8
cleft grafting, 72
climate, 110, 152-56,515
climate control, in greenhouses, 145, 146-49
climate maps, 152, 154
cloches, 138-39
clone only varieties, 515, 520
clones and cloning, 73-84
about, 46, 73-74
acroponics, 82, 83, 410-11, 411
disease resistance, 453
mother plants, 74-75
root-inducing hormones, 77-79
step-by-step, 79-81
techniques, 83-84
Clonex, 78
clove oil, 491
CO2 burners, 149
CO2 emitter systems, 242-43, 244
CO2 generators, 219, 232,243-44
CO2 sensors, 217-/5
cobalt (Co), 351,363
coconut coir, 316, 409, 424, 437-38, 448
coconut milk, 79
coconut oil, cannabis, 566-68
coco slabs, 422
coffee grounds, 387
colas, 94, 97
colchicine, 400
cold frames, 137, 139,140
cold tolerance, 515
colloidal phosphate, 390
colloidal silver, 396, 404, 522
color corrected temperature (CCT), 258, 259
color rendering index (CRI), 257, 258, 259
color temperature, 254-55, 257, 258-60,269, 271.
272,280,284-85
companion planting, 451
complete organic fertilizer (COF), 317
compost
about, 308, 392-94
amending soil with, 162,163, 316-17
creating, 322, 392-94
indoor use of, 322, 392
manure, 317, 360, 386-87, 392
mulch, 326
mushroom, 316-17, 360
nitrogen requirements, 315, 392
planting into, 164
quality, 316, 318, 320, 392
recommended ingredients, 391, 394
compost extract, 393
compost leachate, 393
compost teas, 393-94, 489
compost thermometers, 224
Conant, Marcus, 18
concentrates, 533-34. See also hash/hashish; hasl
oil; lotions; tinctures
condensation, 146
conductivity factor (CF), 222
container culture, 408, 409-10, See also
hydroponics
container gardening, 166-67
containers
about, 327-29
common problems, 332
drainage, 331-32
fertilizing, 377, 382
vs. in-ground planting, 137. 164
root protection, 381-82
root-pruning. 329, 330-31,409
size/shape, 63, 65. 166, 329-30, 372
sizing charts, 66
soil temperature, 314
for top-feed gardens. 421-22
controllers, electronic, 231,234, 243,252
Control Union, 371
conversion bulbs, 272-73
cookbooks, 573
cookies, cannabis, 572-73
cooking, 557-73
about, 557-58
cannabis buttcr/oil, 562-70
hemp seeds, 570-71
raw cannabis, 570
recipes, 571-73
sources of cannabinoids, 559, 560, 561
temperature, 558-59, 561
Cooper, Allen, 414
Cooper, Barry, 212
Cooper, Candi, 212
copper (Cu). 317-18, 351, 363-64, 428
copper fungicides, 363, 489
copper hydroxide, 331
copper sulfate, 331, 363, 485
copper wire, 297, 298
coriander oil, 489
corn earworms, 467
corn gluten meal, 391-92
corollas, 512
cottonseed meal, 39!, 392
cotyledons, 52, 57, 60
cover crops, 326
crab wastes, 385
crickets, 467-68
critical oxygen pressure (COP), 410
cross-pollination, 518. See also hybridizing; pollen
and pollination
crown gall, 460
Cultivando Medicina forum, 181
cultivars, defined, 529
cultivation, 347
curing, 100, 119-20
cuttings. See clones and cloning
cutworms, 316, 322, 467-68
cyclamen mites, 476, 478
cymes (cymose panicles), 510
cystolith hairs, 87, 88 , 103 , 378, 379
cytokinins, 59, 72, 79, 396, 397-98
D
damping-off, 58, 78, 453
daylight neutral. See autoflowering plants
day-neutral feminized varieties, 522-23
DeAngelo, Steve, 10, 21
decarboxylation, 27-28, 558-59
decibel meters, 219-20
deep flow technique (DFT), 414-15,423
deep water culture (DWC), 411-12, 433
deer, 482
dehiscence, 513
dehumidifiers, 115,234-35
deionization, 336
DeMoura, Addison, 21
denatured alcohol, 550
Denney, Philip, 20
detectors, 27, 31
Devane, William, 19
dew point, 233
diatomaceous earth, 389, 485. 489-90
dienchlor, 485
diesel oil heaters, 232
dihybrid crosses, 517
dimethyl sulfoxide (DMSO), 378
dioecy, 33,41.42 .85,509
583
diploids, 531
Dip-N-Grow, 78
disc cells, 88
diseases, 450-62
about, 450
bacterial, 460, 461-62
fungal, 55, 64, 234, 235, 345, 347, 451-60,
461-62
prevcntion/control of, 79, 450-51, 484—85
troubleshooting, 503
viral, 460-61
disinfectants, 79, 450-51, 488, 490, 492, 499-500
dispensaries, for seeds, 59
dissolved oxygen (DO), 225, 431
distillation, 336
DJ Short Blueberry Tincture, 550
DNA (deoxyribonucleic acid), 75, 354, 513-/4,
532
dolomite lime, 311,312, 318, 357, 389
DO meters, 225
drainage
containers, 331-32
for ebb-and-flow gardens, 418, 420
in outdoor soil, 155, 157
raised beds, 163
for RTW gardens, 424-25
soil amendments, 315
soil types, 162, 307-9
for top-feed gardens, 421, 422
Dravet syndrome, 30
drenches, 506
drones, 214
Dronkers, Ben, 508
dry ice, 119, 245,541
drying process, 100, 115-20, 461-62
drying racks, 117, 202
DTPA, 361
ducting, 237-38
Dylan, Bob, 17
E
earthworms, 324-25
earwax, 550
ebb-and-flow gardens, 417-21, 418
EC (electrical conductivity)
adjustments, 381, 431
effect on pH, 429
fluctuation, 346, 430-31
ideal levels, 430-31
as indication of toxic salts, 376, 430-31
measurement process, 376, 431
osmosis, 344
EC meters, 222-23,224, 376
EDDHA, 361
EDTA, 361
Egypt, cannabis history, 15-16
electric circuit testers, 220
electricity, 296-302
breaker box/switch, 296, 297, 298
capacitor, 264, 276
consumption of, 124,209, 299-301
cost of, 127, 300
generators, 301-2
ground wire, 297-98
Ohm’s Law, 268, 282, 284,298
overload chart, 298
requirements, 125, 130-31
voltage, 281-82,298
wiring and circuits, 297,298-99
electricity monitors, 220
electrodes, 265, 271
electrodialysis, 336
electronic controllers, 231
endocannabinoid system, 18-20
endophyte fungi, 323
England, cannabis history, 16
enzymes, 399-400
Epidiolex, 22
epilepsy, 22, 30
Epsom salts, 342, 359,389
ERGS (energy released per gram of soil) meters,
224
ethanol/ethyl alcohol, 548-49, 554-52
ethephon, 406
ethylene/ethene, 57, 72, 241, 363, 398, 406, 522
evaporative cooling, 147
expanded clay pellets, 315, 409, 421,424, 436, 437,
438-39 , 442
F
Fl hybrids, 518,519
fans, 132-34,146,208,230, 235-38, 243,251. See
also air:circulation
feather meal, 383-84
female plants. See also mother plants
about, 94, 509
cloning, 75
flowers, 44-45, 85, 94,104-7, 510-/3, 511, 512
male flowers on, 91, 93,186 , 396, 404, 509,
521-22
ovules, 94,104, M0, 511-/2, 513, 521
' pistils, 4/, 94, Z05, 511, M3
pre-flowers, 43, 90, 93-94
rejuvenation of, 98
selection for breeding, 523-24
stigmas, 43, 93, 94, 510 -//, 512, 513, 525-26
feminized seeds, 50, 52, 53, 399, 404, 521-22
feminized varieties, 37-38
fermentation, 245
ferrous sulfate, 342
fertilization (reproductive process), 513, 521, 525.
See also pollen and pollination
fertilizers and fertilizing. See also leaching;
specific nutrients
about, 368-69
acidity, 341
additives and, 370
application methods, 377-79
chemical vs. organic, 322
constant feeding, 377
for flowering, 86, 370, 375
before harvest, 111
hydro-organic, 409-10, 415-17
hydroponic, 352, 355, 357, 358,360,361, 370,
382, 408-9, 424, 427-36, 447-48
ionic fertilizer salts, 361, 369, 370
measuring concentration, 430-31
mixing, 374
organic, 161,163,164-65,317, 368-69, 370-74,
383-94, 398
overfertilization, 76, 304, 306, 317, 344, 351,
370, 374-75, 376, 382, 447
pollution from, 304
for rejuvenation, 98
salt buildup, 62, 312, 320, 334, 337, 346, 351,
375, 376, 382, 430, 458
schedule, 165, 375-76, 377
for seed crops, 529
soluble, 165, 361, 369, 371, 416-17, 427-28
for specific growth stages, 370, 375
for specific varieties, 376
synthetic, 164, 325, 369, 371, 387, 409, 416, 427
fiberglass panels, 144
fibromyalgia, 181
Figi, Charlotte, 20
filial breeding, 519
filters
air, 102, 133, 208, 238, 239, 248-50
for hydroponic gardens, 411, 415
for irrigation systems, 435, 446
reverse osmosis, 335, 337, 363, 381
water, 334, 335, 336-37
FIM pruning, 71
fire extinguishers, 219, 296
fires, 125
fish emulsion, 384
fish hydrolate, 384
fish meal, 385
fish powder, 385
flavonoids, 18
flavors. See terpenes
flood-and-drain gardens, 417-21, 418, 433
Floramite, 476, 477
florigen, 86
flowering rooms, 128-29
flowers/flowe rin g
about, 85-90, 94-98
cycle of, 44-45, 352, 509
female (pistillate), 44-45,85, 94,104-7, 509,
510-13, 511, 512
inducing, 41,44-45, 62, 69,90-94,92, 93,94,
108, 149-50, 261-62, 263, 509
inducing with HPS lamps, 271
male (staminate), 41, 44, 92-93 , 186 , 509,
510-11 , 513
nutritional needs, 86, 370, 375
pre-flowering, 92, 93-94
prevention ©f, 149, 261
sinsemilla, 44, 92, 94-95, 100,104-7
soil temperature and, 314
fluorescence detectors, 27
fluorescent lamps, 273-78, 288, 300
flushing. See leaching
foliar feeding, 359, 378-79, 400, 504-5
folic acid, 406
foot-candles, 254, 258
Founder, Neville, 39
foxtails, 97
fragrance. See aroma/fragrance
Frank, Mel, 508, 531
frogs and toads, 503
frost/freezing, 172,230
fulvic acids, 394, 401, 417
fungal diseases, 55, 64,234,235, 345, 347, 451-60,
461-62
fungi, 323, 401-3 . See also bacteria; microbes
fungicides. See also specific types
for clones/transplants, 62, 64
copper based, 363, 489
hydrogen peroxide, 64, 404-5, 492
in root-inducing hormones, 77
safety, 484-85, 505
sprays and spraying, 505-6
fungistats, 102
fungus gnats, 469-70
Fusarium wik, 453-54
fuses, 297
G
gametes, 513, 521, 525
Gaoni, Y., 17
garden rooms
about, 123-25
case studies, 173 -74,178 -80
step-by-step, 126-36
Gardner, Fred, 13
garlic, 491
gastropods, 325, 326
GC (gas chromatography), 25,26, 27, 31
generators, electric, 301-2
genes, 51,514,515-17
genetic modification, 532
584
genome, 515
genotypes, 530
germination, 5/, 52-57, 156, 182. 399, 528
ghee, 564-66
gibberellic acid (GA), 399, 522
gibberellins, 59, 72, 396, 398-99, 522
glandular trichomes. See resin glands
Glomus intraradices, 401 -2
Glomus mosseae, 401-2
glutamate synthase (GOGAT), 399
glutamine synthetase (GS), 399
glycerin tinctures, 553-54
gophers, 482
grafting, 71-72
granite meal, 389
grass clippings, 326
grasshoppers, 468
gravel, 439
gray mold (Botrytis). 454-56
Green Dragon tinctures, 552
greenhouses
about, 47-48, 137-38
artificial lighting, 149-50
climate control, 145,146-49
construction, 141-42
coverings, 143-46
earth floors, 141-42
temperature control, 146-47, 229
types of, 138-41
greenhouse varieties, 528
green lights, 102. 263
green lynx spider, 465, 503
greensand, 3^9-90
griseofulvin, 485
gritweed, 462
ground wires. See electricity
grow bags, 328. 329
GrowBots, 125
growing mediums. See also specific types
about, 436-37
air content, 54, 436-37
CEC of, 306-7
fertilizer adjustment for, 377
nutrient deficiency due to, 381-82
pH levels, 337, 436, 441-42
problems, 322
for RTW gardens, 424, 425
sterilizing, 318, 438, 442-43
for transplanting, 63, 77, 80, 321
types of, 319-22, 437-43
grow tents, 176-77.178. 185
guano, 320, 385-86
guerilla growing. See growers
Gupta, Sanjay, 20,21
Guy. Geoffrey, 20,21
GW Pharmaceuticals, 20-22
gynoecious seeds, 522. See also feminized seeds
gypsite, 390
gypsum, 161, 312, 313, 358, 360, 390
H
Haber-Bosch process, 387
haploid, 531
Harborsidc Health Center, 10
hardening-off, 79, 82, 169-70
hardpan,162
harvesting, 99-111
about, 99-100,171-72
cycles of, 46-48, 110, 129-30, 151
leaves, 102-3
light deprivation, 149-50
male plants, 103-4
multiple, 110, 151,172,202
preparation for, 111
seeds. 527-28
sinsemilla, 104-7
staggered. 117
step-by-step. Ill
timing, 110
hash/hashish. 89
about, 533, 534. 535
CO2 extraction, 540-41
dry ice method, 541
finger, 113
hand-rubbed, 113, 534, 542-44, 543
pressing methods, 542-45
resin sources, 103, 112
storage of, 541-42
water/icc extraction, 539- 40
yield, 535
HASHISH! (Clarke), 539. 542
hash oil, 545-50
heat. See temperature
heating pads/mats/cables, 55, 81, 148, 314, 432
heating systems, 148-49,230-32
heat stress, 328, 332, 380
heavy metals, 24,32, 312
heirloom varieties, 530
hemp, 14, 35, 51,166
Hemp Diseases and Pests (McPartland, Clarke &
Watson), 503
HempFlax, 386
hemp flour, 571
hemp milk, 571
hemp mosaic virus, 460-6/
hemp oil, 571-72
hemp russet mites, 478
hemp seeds, 560, 570-71
HEPA filters, 248
herbicides, 397
Hergenrather, Jeffrey, 22
hermaphrodites. See intersex plants
Herodotus, 15
hertz (Hz), 266
heterosis (Fl hybrid vigor), 518
heterozygous, 515, 521
hexane, 547
HID (high intensity discharge) lamps. See also
HPS lamps; light/lighting; metal halide lamps
about, 263-65
ballasts, 265-68
bulbs, 268-69,272-73
energy use, 300
intensity, 257,286-87
step-by-step installation, 135-36
as supplemental light, 149
High Lifter pumps, 157
Hill, Tom, 198
Hillig, Karl, 14,479
‘Hindu Kush’ landrace, 376
Hoagland and Arnon, 409
homozygous, 515, 520, 521
hoods and reflectors, 264,276,277,287,289-93
hoof and horn meal, 384
hoop houses, 139-41,142. 198. 199
hoop house trellises, 68
Hormex, 78
hormones
about, 51, 59, 77-79, 352,396
floral, 69, 71,86
for producing feminized seed, 522
root-inducing, 77-79, 80, 397
types of, 396-400
hornets, 464-65
horseradish, 491
Hortapharm, 20
hoses, 344
Howlett, Alynn, 19
HPLC (high-performance liquid chromatography)*
25, 26,27-28,31
HPS (high pressure sodium) lamps, 149, 257, 260,
264.269, 271-72,280,300
Humboldtlocal, 195. 198
humic acids, 394, 400-401, 417
humidifiers, 234
humidistats. 219, 234
humidity
about, 233
changes in, 229
for cloning, 80, 81
control of, 134, 234-35, 431, 453
during drying, 115-16
high levels of, 56, 235, 347, 380
LED circuit damage, 282
low levels of, 233
for manicuring, 112, 113, 114
measuring, 218-19
nutrient deficiency due to, 379
in outdoor gardens, 159-60
storage and, 121
humin, 401
humus, 162, 315, 401
HVAC systems, 238
hybrids, 51, 74. 517-18
hybrid vigor, 52. 74, 518
hydrated lime, 312-13, 491
hydrochloric acid. 245, 341
hydrogen (H), 362
hydrogen fluoride, 503-4
hydrogen peroxide (H2O2)
about, 404-5, 492
for cleansing cannabis, 100, 101, ill, 122,559
for sterilizing growing medium, 318, 438,
442-43
for transplanting, 64
hydro-organic gardens, 415-17, 416
hydroponics. See also containers; fertilizers; NFT;
reservoirs
about, 408-9
fertilizers, 352, 355, 357, 358, 360. 361, 370,
382, 408-10, 424, 427-36, 447-48
growing medium, 424, 425, 437-43
nutrients, 352, 408, 424, 427-36, 447-48
nutrient solutions, 381, 382
organic gardening, 409-10, 415-17
pH levels, 310, 337,338
solution vs. media culture, 409-10
systems, 409-27
tissue analysis, 306
hygrometers, 127,134,218, 234
I
IAA (indole-3 -acetic acid), 397
IBA (indolebutyric acid), 77-78, 397
IBL (inbred lines), 514, 517, 518-21, 523
ice hash, 539-40. 541
Ice-O-Lator, 539
illumination. See light/lighting
inbreeding depression, 518-19
inbreeding/inbred lines (IBL), 514, 517, 518-21,
523
incandescent lamps, 286-87
India, cannabis history, 15
indica. See under Cannabis
indole-3 -acetic acid (IAA), 397
indolebutyric acid (IBA), 77-78. 397
indoor harvest cycle, 46-47
inflorescence, 380
informants, 213-14
infrared heaters, 232
infrared light, 254, 256-57. 271
Ingham, Elain, 322-23
injector applicators, 378
585
inorganic nutrients, 368
insecticides, 362, 389, 477, 485, 506. See also
specific types
insects and mites, 233, 240, 324, 462-81, 501-3.
See also specific types
insolation values, 155
insurance, 206
International Cannabinoid (Cannabis) Research
Society, 18, 19-20
Internet, 59, 203,209-10
intersexuality
causes of, 44, 91, 92, 261, 396, 400
defined, 509-10
feminized seeds, 52, 521-22
male flowers, 91, 93 , 186, 396, 404, 309, 521-22
pollination issues, 95
resistance to, 522
interveinal yellowing, 359
inverse square law, 259
ionic fertilizer salts, 361, 369, 370
ions, 307
iron (Fe), 351, 361, 364-65, 428, 504-5. See also
chlorosis
iron sulfate, 342
irrigation
about, 156-57, 344-48, 443-44
cycles, 443-45
drip, 157, 194, 345
in ebb-and-flow gardens, 419-20
flooding, 309-10
frequency, 345
microirrigation/drip, 446-47
pH for, 304, 310, 311
top-feed, 412
volume, 444-45
isopropyl alcohol, 490
J
Janichevsky, D. E., 36
jasmonate (JA), 399
Jiffy pots/pellets, 36, 80
Jorge Cervantes Presents Marijuana Growing
(website), 305
K
Kannaway, 22
kelp, 323-24, 391,398
Kelvin temperature scale, 258, 260, 274
kerosene heaters, 232
kief, 89, 533, 334, 536 -39, 541
kilowatt-hour (kWh), 298
kinetin, 398
L
laboratories, 23-25, 31-32, 110
lacewings, 463-64, 302
ladybugs, 463-64
LaGuardia, Fiorello, 17
Lamarck, Jean-Baptiste, 14
Lampach, David, 21
lamps. See light/lighting
lamp spacing. See specific lamps
landrace varieties, 33, 94, 93, 262, 263 , 308 , 318,
330
laser tape measure, 226
lath houses, 145
Law Enforcement Against Prohibition (LEAP),
212-13
laws/law enforcement
CBD-only, 22
conspiracy and incitement laws, 213
hemp, 22
limits on number of plants, 195
police officers, 211-13
Prohibition, 17
Proposition 215, 18, 20
recent changes, 203-4
telephone tracking, 212
variability, 204
warrants, 208, 212
leaching (toxic salts)
about, 62, 312, 320, 334, 351, 381
alkali soils, 309-10
EC testing, 376, 431
before harvest, 111, 535, 559
process, 334, 351, 378
recommendations, 102,157, 382, 430, 433, 444
leafhoppers, 468-69
leaf miners, 469
leaf mold, 316, 326
leaf spot, 436
leaves, harvesting, 102-3
LED lights, 183,280-86, 300
Lee, Martin, 22,101
Lee, Richard, 73, 77
leggy (stretched) plants. See stem elongation
LEP lamps, 236, 278-80, 300
Lexan, 144
life cycle of cannabis, 44-45, 85, 92
light cycle. See photoperiod
light deprivation, 46, 111, 149-50, 263
light-emitting diode (LED) lamps, 183,280-86,
300
light-emitting plasma (LEP) lamps, 256,278-90,
300
light leaks, 208
light/lighting, 254-93. See also sunlight; specific
lamps
for clones/transplants, 33, 63, 64,-66, 80, 82, 83,
84
daylight, 155-54
distance, 80,134,183, 259,274,275, 284, 296-87,
380,399
fluorescent, 63, 83, 273-78
in garden rooms, 124
in greenhouses, 149-50
green lights, 102, 263
HPS lamps, 149, 257,260,264,269,271-72, 280,
300
infrared light, 254,256-57, 271
installation, 134-36
intensity, 150, 220,254-55, 257-61,284-87,288
measurement of, 254-55,257-61
metal halide lamps, 260, 263, 264, 265, 269,
270-71,277-78,280, 300
photoperiod, 37, 90-91, 92, 93, 94,149-50,
261-62, 263, 509
plant spacing, 289
reflective, 293-95
reflective hoods, 287
requirement chart, 291
for seedlings, 58
side lighting, 288
spacing, 287
spectrum, 149, 183, 254-55, 257, 258-60, 271, 272,
280,284-85
ultraviolet light, 102, 122, 247,248, 256-57,264,
279,280, 361
light meters, 149, 220-21,258,260
light movers, 295-96
Lilly, Eli, 19
lime, 162, 311-13, 318, 341, 357, 389, 491
limonene, 492
Linnaeus, Carolus, 14, 33
lithium (Li), 351
litmus paper, 311
loam soils, 309
Logan Labs, LLC, 304
lollipops, cannabis, 573
long day plants, 85
loopers, 466-67
lotions and salves, 554-56
Lowcnfels, Jeff, 323, 324
Lucido, Frank, 20
lumens, 254, 258, 260, 264, 284, 287
lux, 254-55, 258, 260
Mmacronutrients, 350, 352, 357, 428. See also
nitrogen; phosphorus; potassium
Mad Cow Disease (bovine spongiform
encephalopathy), 383
maggots, 472-73
magnesium (Mg), 312, 333, 334-35, 351, 357,
359-60, 428
magnesium nitrate, 342
magnesium sulfate, 342, 428
magnetic induction lainps, 280
magnifiers, 108
male flowers
about, 44, 92-93 , 513
appearance, 41, 309-10, 311
on female plants, 91, 93 , 186, J96,404, 309
inducing, 396,404, 521-22
male plants
about, 103-4, 509
cannabinoid levels, 100
harvesting, 90, 93, 103—4
influences on sex, 56-57
pollen, 92-93, 95,166, 523, 524, 525-27, 326
pre-flowers, 43,44, 90,92,103
selection for breeding, 524
manganese (Mn), 351, 361, 365, 428
manicuring, 100, 111, 112-/3, 114
manure, 224, 317, 360, 372, 386-87
manure tea, 394
marijuana. See Cannabis
Marijuana Botany (Clarke), 83
Marijuana Grower's Guide (Frank), 534
Marijuana Grower's Handbook (Rosenthal), 213
Marijuana: Medical Papers 1839-1972 (Mikuriya),
16
“Marijuana Tincture Recipe, How to Make
Cannabis Tincture" (Cavanaugh), 550
marker-assisted backcrossing (MARC), 532
marker-assisted recurrent selection (MARS), 532
marker-assisted selection (MAS), 532
Martinez, Madeline, 548
mass spectrometers, 27, 31
Mauk, 360
McCaffrey, Barry, 18
McCormick, Todd, 533
McKernan, Kevin, 508, 515
McPart land, John, 13, 387, 503
mealybugs, 470-71
Mechoulam, Raphael, 17, 19, 23
media culture, 409-10
medical cannabis. See also CBD (cannabidiol);
testing
CBD profile, 89
CBD-to-THC ratio, 14, 21, 29-30, 35, 36,
39
contaminants, 30-32, 78, 462, 560
historical uses, 14-17
market value, 204-5
research, 18-20
therapeutic applications, 19-22,29, 30, 35
medical marijuana dispensaries, 23,24, 59
medical marijuana laws, 203-4
meiosis, 513
Mendel, Gregor, 508
Mendel’s Laws, 517
586
mercury vapor lamps, 263, 270
meristems, 43, 67, 70, 71, 86
Merlin, Mark, 14
metal halide lamps, 260,263,264,265, 269,
270-71, 277-78, 280, 300. See also HID lamps
metal ions, 361
meters
about, 215-17
for air, 134,217-19
for electricity, 220-21
for light, 149, 220-21,258, 260
pH, 311, 339, 430
for soil/water/nutricnt solution, 221-25,
346-47, 376, 430
methanol/methyl alcohol, 549-50
mice, 4/?2-83
microbes, 372-73, 393-94, 416, 417, 488. See also
bacteria; fungi
microclimates, 152, 154,159
microirrigation, 446-47
micronutrients, 361, 428. See also specific nutrients
micropropagation, 83-84
microscopes, 108, 226
Mikuriya, Tod, 16, 17,18, 20
Mila, 538
mildew, 77, 101, 102, 122, 161, 456-55, 457, 529,
559-60
Miller, Samantha, 23-32
mineral amendments, 315
mineral fertilizers, 368-69
mint oil, 491
Miracle-Gro, 371
misting, 147-48, 160, 411, 506
mites, 77,233,240, 473-79, 474, 475
miticides, 64, 76, 462, 476, 477. See also specific
types
mitosis, 521
moisture meters, 134, 224, 346-47
molasses, 388, 394, 403-4
mold, 32,101, 111, 120, 122,154,161, 256,
461-62, 559. See also Botrytis
molecular breeding, 531-32
moles, 483
molybdenum (Mo), 351, 365-66, 428
monoecious varieties, 509
monohybrid crosses, 517
moon phases, 54
mosaic virus, 460-6/
mother plants, 45-46, 69, 73, 74-75, 79, 84, 330,
408,529
moths, 466-67
motion detectors, 206
MS (Murashige and Skoog) media, 55
mulch, 160, 165, 799, 325-26, 332, 345
multiline varieties, 531
multiple sclerosis, 20
muriatic acid, 341-42
mutations, 514
mycorrhizal fungi, 64, 65, 79, 165, 316,323,
401-402
N
NA A (1-napthalenaecetic acid), 77-78
nabilone, 19
1-naphthaleneacetic acid (NAA), 77-78,397
National Institute on Drug Abuse (NIDA), 18
National Sustainable Agriculture Information
Service (ATTRA), 305
natural nitrate of soda (NNS), 390
NDIR sensors, 217
neem/neem oil, 476, 485, 492-93
negative ion generators, 101-2, 246
nematodes, 324, 394, 471-72
neurotransmitters, 19
Neville, 507
nickel (Ni), 351, 366
nicotine sprays, 493-94
nicotinoids. 494
nitrate reductase. 399
nitrates, 306, 352, 485
nitric Acid, 247, 341, 342
nitrogen (N)
about, 86, 352-54
in compost, 315, 392
deficiency/cxcess, 179, 306, 351, 428
influence on sex, 56
organic sources, 383-94
solubility, 371
nitrogen gas, 122
nodes (internodes), 43, 55, 71,94, 271
noise, 158,207-8, 237, 238
NORML (National Organization on the Reform
of Marijuana Laws), 204, 213
N-P-K . See macronutrients; nitrogen;
phosphorus; potassium
N-P-K test kits, 225
nugs, 97
nutrient film technique (NFT), 414-15, 433
nutrient meters, 221-22
nutrients. See also macronutrients; micronutrients;
specific nutrients
about, 350-51
acidity, 338
availability, 340
classifications, 368
deficiencies/disorders, 62, 379-84, 428,
447-48
foliar feeding, 504-5
macronutrients, 350, 352, 357, 427
measurement, 370
micronutrients, 361, 427
mobility, 350-51, 504-5
organic sources, 383-94
soil tests for, 304-5
nutrient solutions
aeration, 434, 435-36
concentration of, 424
disposal of, 424
DO level, 431-32
EC level, 376, 430-31
guidelines, 448
homemade, 428-29
maintaining, 432-33
pH levels, 337-42, 432
problems/solutions, 382
pumps, 434-35
o
Oaksterdam University, 58
Oasis cubes, 321, 439
odor control, 101-2, 133,208-9, 245-50
Ohm’s Law, 268,282, 284, 298
oils
for cannabis cooking, 562, 566-70
cannabis/hash, 534, 545-50
dormant horticultural, 485, 494
essential, 89-90
hemp, 571-72
neem, 476, 485, 492-93
for pest control, 489, 491, 494
olive oil, cannabis, 569-70
Olivia’s rooting hormone, 78
“On the Preparations of the Indian Hemp, or
Gunjah (Cannabis Indica)” (O’Shaughnessy),
16
open-pollination, 529-30
oregano, 491
organic fertilizers, 161, 163, 164-65, 368-69,
370-74, 383 -94, 398
organic gardening
amendments, 162-63. 164,311-13,315-17
beneficial insects, 501-3
case studies, 195-202
compost, 316-17, 322
compost teas, 393-94
discasc/pcst control, 484, 485
fertilizers, 161, 163, 164 - 65, 368- 69, 370 -74,
383-94,398
homemade sprays, 490-92
hydroponic fertilizers, 409-10, 415-17
microbes, 372-73
nutrients, 161, 164,416
soil food web, 322-23, 325
Organic Materials Review Institute (OMRI),
315-16,371
organic soils, 322-25
organoponic gardens, 415-17, 416
ORP (oxygen reduction potential) meters, 224
O’Shaughnessy, William Brooke, 16
O’Shaughnessy's (journal), 20, 21, 22, 25
Osler, William, 16
Osmocote, 369-70
osmosis, 119, 343-44
outbreeding and outcrossing, 509, 518, 519
outbuildings, 128
outdoor gardens, 151-72. See also specific topics
about, 48, 151-52
advantages of, 151
backyard gardens, 165-66
Cannabis varieties, 528
case studies, 189-94, 195-202
harvest cycle, 48, 110
rain damage, 192
remote gardens, 167-69, 172
size of, 167
temperature control, 159,232-33
transplanting, 63, 162, 163, 166, 169-70
overdominance, 514
overwatering, 56, 314-15, 347, 420, 437
ovules, 94,104, 510, 511-12, 513, 521
oxygen (O)
about, 347
in compost, 393
in compost tea, 393-94
in container culture, 409, 410
depletion, 420, 431-32
dissolved oxygen (DO), 225, 431-32
for germination, 54
in hydroponic systems, 409, 410, 437
plant respiration, 227, 228
in wick gardens, 426
oyster shells, 312, 391
ozone generators, 101, 246-48
p
PAA (2-phenylacetic acid), 397
palladium (Pd), 351
PAR (photosynthetically active response), 219,
220-21,255,257,258, 260,285
parasites, beneficial, 480, 501-3
parents, 51, 514, 515, 517, 519-20, 524
parts per million (ppm) meters, 222-23
passive heating, 231
peanut meal, 392
peat moss/pellets, 56, 317, 321, 439-40
peat soils, 309
peppers, 491
Perez, Joey, 22
Perez, Mieko, 22
perianth, 511-/2, 513
perlite, 307, 315, 4J9, 440
Peron, Dennis, \7-18, 20 . 374
pesticides. See also insecticides; miticides;
587
specific types
about, 484-85
phytotoxicity, 76
safety, 462, 506
sprays and spraying, 228, 505-6
testing for, 31
pests, 171, 207, 326, 450-51, 481-84. See also
insects and mites
petroleum ether, 547-48
pH adjusters, 338-39, 341-42, 430
phenotypes, 515, 530
2-phenylacetic acid (PAA), 397
pH levels
about, 310
for cloning, 76
effect on nutrient availability, 310, 337, 340
of growing medium, 381
for hydro organic gardens, 430
for hydroponics, 310, 429, 447
ideal levels, 369
instability, 341
nutrient deficiency and, 355, 360, 361, 364, 369,
382
of nutrient solution, 338-39, 432
of soil, 162,304, 309-13
of soilless mixes, 441-42
stabilizing, 429
testing for, 221-22, 310-11
of water, 156, 333, 335, 337-38
phloem, 43,343
phosphor-coated bulbs, 264, 270, 275
phosphoric acid, 338, 341, 342, 355
phosphorus (P), 75, 86, 351, 354-56, 383-94, 428
photodiode array (PDA) detectors, 27
photons, 254
photoperiod. See also light/lighting
about, 261-62
female pre-flowering, 93
in greenhouses, 149-50
for inducing flowering, 41, 44-45, 62, 85, 86,
90-91, 92, 93, 94, 108, 149-50, 261, 263, 509
for producing female plants, 56, 76, 91
for rejuvenation, 98
for seedlings, 58
for vegetative growth, 42-43, 62
photorespiration, 228-29
photosynthesis, 43, 228-29,239, 255, 350, 354,
359
phototropism, 255
pH testers, 220-21, 311, 339, 382
phyllotaxy, 86
phytocannabinoids, 18
Phytophthora, 458-59
phytotoxicity, 57, 382, 504, 505
pinching. See pruning
pistils, 94,105, 511,513
planning process, for garden rooms, 126-27
planter boxes, 329
plant growth promoting rhizobacteria (PGPRs),
403
plant growth regulators (PGRs), 396, 398, 406.
See also hormones
planting, 55-56, 80,166. See also transplants and
transplanting
plant tissue analysis, 305-6
plasma lamps, 256, 278-80
plastic skins, 143-44
ploidy factor, 531
police. See laws/law enforcement
pollen and pollination, 522
about, 44, 92-93,94, 104
collection, 524-25
cross-pollination, 518
described, 511, 513
hand-pollination, 525-27, 526
misuse of term, 534
open-pollination, 529-30
rogue pollen, 484, 530
selfing, 518,520-21
storage, 525
wild, 95, 161, 166
The Pollinator (tumbler sieve), 537, 538-39
polycarbonate sheeting, 143
polyploids, 531
polyurethane grow slabs, 440
pond culture, 412—14
potash, 390. See also potassium entries
potassium (K), 56, 86, 334, 351, 356-57, 428
potassium bicarbonate, 338, 341
potassium carbonate, 341
potassium hydroxide, 338, 341,430
potassium nitrate, 342, 428
potassium phosphate, 428, 505
potassium silicate, 341
pots. See containers
potting soils, 319-21
powdery mildew, 77,101,102,122,1*61, 45i6-5£,
457, 529, 559
PPF (photosynthetic photon flux), 255, 257
ppm meters, 222-23
praying mantis, 503
predators and parasites, 501-J
pre-flowers and pre-flowering, 43-44,62,92,93,
261
prices, for medical cannabis, 204-5
production levels
for indoor gardens, 44,126
for outdoor gardens, 44, 63, 89,167,195-96
Prohibition, 17
ProjectCBD, 21, 22
Pro-Mix, 441
propagation, asexual. See dLones and cloning
propagation, sexual, 73, 93, 94, 513
propagation cubes and pellets, 321
propane, 24, 241, 243
propane heaters, 232
propolis, 405
Proposition 215, 38, 20
protozoa, 324
pruning
about, 67, 68-70
root pruning, 72, 329, 330-31, 409
techniques, 70-71
psychrometer, 219
pumice, 440
pumps
air, 413, 432, 435, 436
water, 157-59,158, 434-35
Punnett square, 536-17, 521
Pure Analytics Lab, 29, 30
purple coloration, 96
PVC (polyvinyl chloride), 144
pyrethroids, 495-96
pyrethrum/pyrethrin, 476, 485, 495
Pythium, 77, 453, 458. See also wilts
Q
quassia, 485, 496
quicklime, 313
R
rabbits, 383, 4£3-84
radiant power, 284
raft culture, 412-14
rain, 153, 161
rainwater, 335
raised beds, 163-64, 165, 192, 193 , 329 ,372
ram pumps, 158
rats, 482-83
recessive genes, 514
recurrent selection, 531
Reefer Madness (film), 17
reflectors and hoods, 264, 276, 277, 287, 289-93
refractometers, 225-26
rejuvenation, 98
Reno, Janet, 18
Report of the Indian Hemp Drug Commission, 17
reservoirs
aeration, 412, 432
in hydroponic gardens, 412-13 , 414, 417, 419,
421-22
maintaining, 443, 443, 447
for outdoor gardens, 156, 157
sizing, 419,433-34
for water-cooled lights, 292
resin glands, 86, 87-88 , 89,103,105-8 ,106 , 107,
108, 110,120. See also trichomes
resin powder. See hash/hashish; kief
respiration process, 228, 229
reverse osmosis, 335, 337, 363,381
rhizobia (PGPRs), 363, 403
Rhizopon A A, 78
rhizosphere, 342
rice hulls, 440
Rick Simpson Oil, 548
Ringo, Lawrence, 22
ring tests, 24-25
ripeness, 100,103, <04,105-8,106, 107,110,117
RNAi (RNA interference), 532
rock mulches, 326
rock phosphate, 318, 390
rock powders, 388-89
rock sulfur, 311
rockwool, 54, 63, 80, 307,321, 409, 420, 422, 436,
440
rogue polka, 484, 530
root aphids, 463-64
root-inducing hormones, 77-79, 80, 397
root maggots, 472
root-pruning containers, 329,330-31,409
root rot, 457-58
roots and Footing. See also clones and cloning;
hormones
about, 308
aeroponics, 411
cuttings, 75-76, 77-84, 274, 321
damage recovery, 56, 82,314, 348
heat damage, 328, 332
in hydroponic gardens, 420-21
light exposure, 328, 332, 381-82
NAA, 397
oxygen levels, 410, 434-32
pruning, 72, 329, 330-31,409
rhizosphere, 342-43
rooebound plants, 57, 63,64, 329,332
root hairs, 42, 334, 342-43,344, 348
root rot, 457-58
suffocation, 351, 418, 420, 431, 444
transplanting and, 65, 81-82
troubleshooting hydroponic gardens, 415
rosemary, 491
Rosenthal, Ed, 213
rotenone, 485, 496
rototilling, 324-25
ruderalis. See under Cannabis
run-to-waste (RTW) gardens, 424-25, 447
Russo, Ethan, 14-15
rust, 459
ryania, 485, 496
s
sabadilla, 485, 496
safety. See also specific products
588
additives, 396
ballasts, 268
electricity, 296, 297
hormones, 78, 396, 397, 398
insecticides, 476-77
ozone generators, 247, 248
pesticides/fungicides, 484-85, 505, 506
pH adjusters, 341
propane, 241
solvents, 546
testing for contaminants, 30-32, 462, 560
vermiculite, 442
salicylic acid, 399
salt buildup. See fertilizers; leaching; total
dissolved solids (TDS)
saltpeter, 342
salves and lotions, 554-56
sand, 315, 440-41
sandy soils, 308
San Francisco Cannabis Buyers Club, \7-18
sanitation, 69, 79, 450-51
sativa. See under Cannabis
Sativex, 20-21
sawdust, 441
scale (pests), 471
scarification, 54
Schultes, Richard Evans, 14
scientific classification, 14, 33
SCROG technique, 66
Scythians, 15
Sea of Green (SOG) gardens, 129, 417
seaweed, 323-24, 391, 394, 417, 496-97
secondary nutrients, 357
Secrets of the West Coast Masters (West), 66-67
security
electrical usage, 209
Internet, 209-10
noise control, 207-8
odor control, 101-2, 133, 208-9, 245-50
for outdoor gardens, 210-11
secrecy, 205-6
site selection, 128, 167, 210
surveillance equipment, 206-7, 214
The Seed Bank in Holland, 507
seed companies, 49-50, 59, 524
seedlings. See also germination
about, 42, 57-58
containers for, 329
cotyledons, 52, 57, 60
damping-off, 58, 78, 453
light cycle, 58
transplanting, 63-66,169-70, 321
vegetative growth, 61-63
seed maggots, 472-73
seeds
about, 51-52
availability, 49-50
development, 511-12, 513
Fl hybrids, 519
female plants from, 56-57
feminized, 50, 52, 53, 521-22
germination, 42, 52-57, 156, 399, 528
harvesting, 527-28
production of, 93, 523-24
sources of, 58-59, 509
stabilized varieties, 509, 523
storage of, 58, 59-60, 98, 528
types of, 50-51
selenium (Se), 351, 366-67
selfing, 518, 520-21. See also inbreeding
senescence, 107
sepals/tepals, 510
sesame oil, 491
Sevin (carbaryl), 465, 485, 496-97
sex. See also female plants; male plants; propagation
about, 44, 62
changing with hormones, 396
cloning for, 84
determining, 92, 93
influences on, 56, 91,93-94
reversal, 93
sexual propagation, 513-14
shade coverings, 145, 155,190, 193 , 233
Shalala, Donna, 18
Sh£nn6ng, 15
short day plants, 85
SHUTTLE 15 SC, 486
sib-mating, 520
Siddhartha Gautama, 15
side lighting, 288
sieves and sieving, 534, 536-39
silicon (Si), 351, 367
silty soils, 308
silver thiosulfate, 522
single-seed descent, 531
sinsemilla, 44, 92, 94-95,100, 104-7
siphoning systems, 158-59, 377
site selection, 138,154-56, 162,167-69
slaked lime, 312-13
slime molds, 324
slugs, 326
slugs and snails, 473-74
SM-90, 490
smoke detectors, 218, 219
snails, 326, 473-74
soaps, insecticidal, 485, 491, 497, 504
Society of Cannabis Clinicians, 22
sodium (Na), 164, 333, 334, 351, 367, 431
sodium bicarbonate, 341, 485, 487-88
sodium carbonate, 309, 341
sodium hydroxide, 338, 341, 342, 430
sodium hypochlorite, 485, 488, 490
sodium meters, 225
sodium nitrate, 164, 342
soft rock phosphate (SRP), 318
soil. See also drainage; fertilizers; leaching
aeration, 315, 322, 324, 390, 436-37
amendments, 162-63, 164, 311-13, 315-17,
322-25, 386-87
composition, 303
dry pockets in, 347, 348
organic amendments, 315-17, 322-25
organic soil mix, 529
pH, 162, 304, 309-13, 337, 342, 359, 360, -369,
381
reusing, 451
sterilization, 318, 438, 442-43
temperature, 55, 313-15, 326, 328, 332, 381
texture/types, 161-62, 304, 306-10, 436
Soil and Health Library, 305
soil food web, 322-23, 325
soil heating cables, 148, 314
soilless mixes, 303, 320, 321, 374, 409, 441-42
soil microbes, 372-73, 393-94
soil mixes, 198, 317-19, 529
soil pyramid, 310
soil tests, 163, 304-5, 376
solar energy, 158
solarizing, 318
solstice, 155
solubilization, 550-552, 557-559
solution culture, 409-10
solvents, 27, 28, 30-31, 533-34, 545-46
soybean meal, 392
Spannabis, 110
Spectrum Analytic, Inc., 304
spider mites, 77, 233, 240, 473-75, 474
spiders, 502, 503
Spinosad,497-98
SpinPro trimmer, 114
sprays and spraying, 76-77, 111, 228, 490-92,
504-6. See also foliar feeding
sprcnchcs, 506
stamens, 510
Stanford, Paul, 100
Stanley, Josh, 20
Steep Hill, 21
stem elongation, 271
stem strength, 43
sterilization, 69, 318, 364, 438, 442-43. See also
disinfectants
Stern, William, 14
steroids, 396
stigmas
appearance, 93, 94, 96, 185, 510 -//, 512, 513
defined, 511
maturity/fertility, 94, 104-6, 105, 525-26
stomata, 43, 228, 229, 233, 342, 356, 362, 378, 379
Stoner, Richard, 410
storage
cannabis, 120-22, 461-62
hash,541-42
seeds, 58, 59-60, 98, 528
strains. See varieties
Streptomyces griseoviridis, 498
streptomycin, 485
stress
effects of, 160,230, 262, 314, 322, 353-54
from heat, 328, 332, 380
for increased resin production, 71, 72
influence on sex, 91, 93-94, 261
stretch marks, 200
substrates. See growing mediums
sufficiency level of available nutrient (SLAN), 304
sugars, 387-88, 394, 403-4
sulfate of potash, 390
sulfur (S), 313, 342, 351, 357, 360-61, 428, 485,
498-99
sulfur dioxide, 503
sulfuric acid, 342
Sullivan, Robert, 20
sunlight, 144, 149, 254, 257, 272, 280
hours per day, 154-56
intensity, 154, 166
Sunshine Mix, 441
super-autos, 38, 51
supercritical fluid extraction (SFE), 541
super-cropping, 71
surveillance equipment, 206-7, 212, 214
swamp coolers, 230
synthetic varieties, 531
T
“Talking Terpenes” (Lee), 101
tap water, 335-36
Teamingwith Microbes (Lowenfels), 323, 489
Tekstra, Theo, 260
telephone tracking, 212
temperature
air, 159,228-33
for cloning, 81
control of, 229, 230
for drying, 101, 115-16
for germination, 53, 55
in greenhouses, 146-47, 229
nutrient deficiency due to, 180, 379, 380, 381
nutrient solution, 431-32
outdoor gardens, 159, 232-33
for rejuvenation, 98
soil, 55,313-15,326,328,332,381
water, 347
tepals/sepals, 510
terminal buds, 43, 71, 187, 188 , 531
termites, 478-79
589
terpenes, 24, 89, 101
terpenoids, 539
terraces, 163
testing. See also GC (gas chromatography);
HPLC (high-performance liquid
chromatography)
comparison of methods, 25
.
for contaminants, 30-32, 462, 560
HPLC vs. GC, 28-29
laboratories for, 23-25, 31-32, 110
plant tissue analysis, 305-6
potency testing process, 25, 27
reference standards, 24, 25
vegetative-stage, 30
tetracycline, 485
tetrapioids, 531
TetraSan, 476
THC (tetrahydrocannabinol). See also testing
about, 18-19
Cannabis varieties, 14, 35, 39
decarboxylation, 27-28, 558-59
measurement of, 28, 89, 110
oxidation, 120
production by resin glands, 86, 88-89
synthetic, 19
therapeutic applications, 19-20, 29
volatility, 561
THC-acid (THCA), 27-28, 29
THC-to-CBD ratio, 14, 21, 29-30, 35, 36, 39
thermal imaging technology, 214
thermometers, 134, 218, 219, 224, 228, 230
thermostats, 219, 230-37
thin-layer chromatography (TLC), 29, 515, 524
thrips, 77, 479-80
timers, 135, 157, 300-301
tinctures, 550-54
titanium, 549, 550
toads and frogs, 503
tobacco, 491, 493-94
tobacco sprays, 494
Tom Hill Mix, 318
tools (garden), 68-69, 126-27, 451
top-feed gardens, 427-23, 422, 433
total dissolved solids (TDS), 163, 222-23, 334-35,
337, 344
toxic impurities, 24, 30-31
trace elements. See micronutrients
trail cameras, 207
training and bending, 66-68, 67
traits, 51, 514, 515, 516, 520
transpiration, 81, 228, 233, 240, 342-43
transplants and transplanting
about, 42, 63-66, 321
coco slabs, 422
in hydroponic gardens, 413, 415
outdoor gardens, 63, 162, 163, 166, 169-70
step-by-step, 65-66
traps, 465, 482-83, 500-501
trellises and trellising, 67, 68-69, 201
triacontanol, 405
Trichoderma, 64, 65, 66, 79, 165, 316, 402-3, 499
trichomes, 44, 86-87,187. See also resin glands
triforine, 485
trimming machines, 112, 774, 202
TrimPro trimmer, 774
tropical climates, 153-54,159-60, 162
true-breeding lines (IBL), 517, 518-19, 523
tungsten halogen lamps, 286
Twister trimmer, 774, 202
u
ultrasonic extraction, 27
ultraviolet light (UV)
about, 256-57, 279
chelate decomposition, 361
ozone generators, 247, 248
safety, 248, 264
UVA light, 256
UVB light, 102, 226,256,280
UVC light, 122, 256, 442, 499-500, 559
University of Idaho, College of Agriculture, 305
UPLC (ultra-high-performance liquid
chromatography), 25, 27-28, 31
urease, 366
urine, 387, 394, 494-95
USA Patriot Act, 213
USDA Hardiness Zone map, 152, 154
U.S . Dispensatory, 17
V
vacuum sealers, 121-22
vanadium (V), 351, 367
vaporization, 561
varieties, defined, 529
varieties, for medical cannabis, 33-40
Vavilov, Nicolai, 13, 36
vegetable oil, 491, 494
vegetable oil, cannabis, 569-70
vegetative growth
about, 42-44, 61-63
cannabinoid testing, 30
nitrogen requirements, 352, 353, 375
photoperiod, 84, 261
reverting to, 74, 84, 98, 104, 261, 262
vegetative rooms, 128-29
vent fans, 132-33
ventilation, 115, 132-34, 141, 146, 236-39,
250-52 . See also air, circulation
vents, 146-47
vermicastings, 320, 322, 325, 373
vermicomposting, 388
vermiculite, 315, 321, 389, 442
vertical gardens, 423-24, 445
Verticillium wilt, 459-60
Vic High Mixes, 319
vigor. See growth rate; hybrid vigor
vinegar, 64, 342, 429, 500
viral diseases, 460-61
Visqueen, 295, 326
vitamins, 405-6, 454
voles, 482-83
voltage. See electricity
volt/amp meter, 221
w
Wall O Water, 138,139
warrants, 208, 212
Washington State Department of Agriculture, 369
wasps, 464-65
water-absorbing polymers, 163
water and watering. See also drainage; EC;
irrigation; reservoirs
about, 156-57,333-48
aeration of, 339, 348
automated systems, 147-48
for cloning, 80
conserving, 153, 345
50% rule, 346
filtration, 334, 335, 336-37, 435, 446
for germination, 53, 54
hardness, 333-35
before harvest, 101, 102
for insect control, 501
irrigation guidelines, 344
for outdoor gardens, 170-71
overwatering, 56, 314-15, 347, 420, 437
pH levels, 333, 335, 337-38, 429
quality, 333, 380-81, 432-33, 445
soil shrinkage, 332
sources, 136, 335-37
temperature of, 347
time of day, 200, 345, 347
underwatering, 56, 91, 347-48
UV purification, 256
water drying/curing, 119
water-insoluble nitrogen (WIN), 371
water pressure gauges, 225
water-soluble nitrogen (WSN), 371
water testing, 432
water wands, 348
Watson, D. P., 503
waxes, 545, 550
well water, 336
West, Dru, 66-67
Western Garden Book (Sunset), 152
wetting agents, 319, 348, 491, 504
whiteflies, 77, 480-81
wick gardens, 425-26, 433
wild pigs, 481-52
willow water, 79
wilts
Fusarium, 453-54
Pythium, 77, 453, 458
Verticillium, 459
wind, 93, 160-61, 166, 526-27, 530
windbreaks, 161
wine, cannabis, 574
Wismy, 165
wood ashes, 312, 388
Woodward, William, 17
worm castings, 320, 322, 325, 373, 388
worms, 324-25
X
xavvafii^, 15
xylem, 43,343
Y
Yanghai tomb, 14-15
yucca extract, 394
z
zeatin, 398
zeolite, 390
zinc (Zn), 351,361, 367-68, 428
zinc sulfate, 318
zone maps, 152,154
590
ABOUTJORGE
Jorge Cervantes is the nom de plume that
George Van Patten took to conceal his identity
from 1983 to 2010. Taking the name of his wife,
Estella Cervantes, and that of his favorite author,
Miguel de Cervantes, Van Patten wore black
dreadlocks and a beret to cloak his public
identity. Cervantes came "out of the closet" in
a 2010 interview on National Public Radio (USA),
and continues to research, publish, make videos,
and draw a discussion about his favorite plant
with an international community on his forum
at www.marijuanagrowing.com .
JORGE'S 30-YEAR PUBLISHING HISTORY
The Bible
1983 First edition Indoor Marijuana Horti
culture is self-published. The 96-page book
was dubbed the “Indoor Grower’s Bible” by
growers.
1985 Second edition Indoor Marijuana
Horticulture
2002 Fourth edition Indoor Marijuana
Horticulture.
2006 Fifth edition Marijuana Horticulture:
The Indoor/Outdoor Medical Growers Bible.
Indoor Marijuana
Horticulture
1993 Third edition Indoor Marijuana
Horticulture.
Indoor
Marijuana
Horticulture
ib.LvX-
www.marijuanagrowing.com
591
Translated Books
1988 Marihuana Binnen, Dutch
1994 Marihuana Drinnen & Drauflen,
German
2001 Jorge contributes to Pourquoi &
comment cultiver du chanvre, French
2001 Marihuana en Exterior Cultivo de
Guerrilla, Spanish
2002 Marihuana Cultivo en Interior,
Spanish
2003 Marihuana drinnen: Alles uber den
Anbau im Haus, German
MARIHUANA
EN EXTERIOR^
CULTIVO DE GUERRILLA
JORGE CERVANTES
2005 Culture en interieur, French
2007 Marijuana: horticultura del
cannabis La biblia del cultivador Medico
de interior y exterior, Spanish
2007 Culture en interieur: Basic Edition,
French
2007 Culture en interieur: Master
Edition, French
2008 Marijuana: Orticoltura Indoor/
Outdoor La Bibbia del coltivatore
Medico, Italian
2008 Hydroponic Basics, Japan
Jorge Cervanl**
Marihuana
drinnen
Alles uber den Anbau im Haus
JORGE CERVANTES
en interieur
L'ABC
DU JARDINAGE
nrrrn
2011 Marihuana Fundamentos de
Cultivo, Spanish
2011 Marihuana Anbaugrundlagen,
German
2012 Marijuana Horticulture, Russian
592
www.marijuanagrowing.com
DVDs
2006 Jorge Cervantes’ Ultimate
Grow DVD
Jorge Cervantes’ Ultimate
Grow DVD 2
2008 Jorge Cervantes’ Ultimate Grow DVD 111 (3-box set)
2012 Jorge Cervantes’ Cannabis Expeditions: The Green
Giants of California DVD
Internet
1997 Started the website
www.marijuanagrowing.com
2013 Jorge Cervantes’ Channel on YouTube tops
7 million views!
Jorge conducts a seminar to a crowd of hundreds at the
Cultiva Cannabis Fair in Vienna, Austria.
Cannabis Fairs Jorge Attends
CannaTrade - Bern, Switzerland
Cultiva - Vienna, Austria
Expo Cannabis - Madrid, Spain
GrowMed - Valencia, Spain
Hemp Fair - London, UK
HighLife - Barcelona, Spain
HighLife - Amsterdam, Netherlands
High Times Cannabis Cup - Amsterdam,
Netherlands
High Times Cannabis Cup - San Francisco,
CA, USA
Interhanf - Colon, Germany
International Cannabis & Hemp Expo -
San Francisco, CA, USA
Spannabis - Barcelona, Spain
THC Expose - Los Angeles, CA, USA
www.marijuanagrowing.com
593
Magazines Jorge Writes For
19S4 Sinsemilla Tips, USA
1998 Cannabis Culture, Canada
1985 High Times, USA
1998 Canamo, Spain
2000 First of 10 years of “Jorge’s Rx”
Q&A column High Times, USA
Sinsemilla Tips
wine wi j—m
■
,e’u-irT’iT'’-R“E-
2004 High Life, Netherlands
2004 Weed World, UK
2005 Soft Secrets, UK, France, Italy,
Germany, Poland, Czech Republic,
Spain, Argentina, Chile
2006 Dolce Vita, Italy
2010 Cannabis Kultusz, Hungary
2010 Canna Habla, Spain
2012 THC, Argentina
2013 TPABA, Russia
CANN4,Wfl
CRATU1TA.
Magazines Not Pictured
Burst High, Japan
CCHews, UK
Cdnhamo, Portugal
Grass Times, Germany
Grow!, Germany
High Times Medical Marijuana, USA
Il Ligito, Italy
International Cannagraphic, Netherlands
Red Eye Express, UK
THCene, Germany
Yerba, Spain
594
www.marijuanagrowing.com
Saturday, 15 November 2014
JORGES
CERVANTES
CANNABIS EXPERT y
Articles ■*
Q&A
Books • Videos
8+
MARIJUANA HORTICULTURE
The Indoor/Outdoor Medical Grower's Bible
■jjC’
—
k ' Featuring exclusive
r greenhouse and outdoor
jnn , growing chapters!
*
Aboutjorge Contact Us Forum Blog
FORUM
jaiuiii
CERATES
PRESENTS MARIJUANA GROWING
to search type and hit enter
Popular Recent
On The Inside with Jorge Cervantes
Episode 2
September 1, 2014
RECENT POSTS
Q&A with Jorge: Transplanting Hydro
to Soil
August IS, 2014
£
j
lh CANNABIS
ENCYCLOPEDIA
Jorge Cervantes
The Cannabis Encyclopedia has it all! Medicinal Cannabis, Measuring
Cannabinoids, Medical Varieties, Cultivation - Seeds, Clones, Indoor,
Outdoor, Greenhouse, Case Studies, Meters, Air, Light and Electricity,
Hydroponics, Organics, Soil, Water, Containers, Nutrients, Additives,
Diseases and Pests, and Breeding - Medicinal Concentrates and
Cooking with Medicinal Cannabis
8.5 x 11 inches, 596 pages, 2,000+ color images, charts, graphs, appendix, and ind
Trade Paperback $50.00
10-digit ISBN: 1-878823-34-5
13-digit ISBN: 978-1 -878823-34-2
Hardcover $70.00
10-digit ISBN: 1-878823-39 -6
13-digit ISBN: 978-1 -878823-39-7
Marijuana Horticulture: The Indoor/Outdoor MEDICAL Grower's Bible
MARINAM
*{iorticuHuri
TRiDBEWra
$29.95 (USD)
Spanish $39 95 (USD)
Russian S29.95 (USD
w\vxv..unazon .coni (only)
6 x 8.25 inches (210 x 150 cm), 512 color pages, 1,120 color images, countless charts & graphs, plus detailed glossary and index
Page count may change as per language.
Marijuana Grow Basics: The Easy Guide for Cannabis Aficionados
$21.95 (USD)
German €21.95 (EURO)
ttuu.nachisch Jitcn.ch (only)
Most books are available at www.marijuanagrowing.com or at your local bookstore!
Spanish $21.95 (USD)
RETAIL ORDERS
www.amazon.com
www.amazon.ca
www.amazon.co .uk
www.amazon.com.au
www.amazon.de
www. a m azon.es
www.amazon.it
www.amazon.in
www.amazon.jp
www.amazon.mx
www.amazon.br
Note: .ill books not available at all
Amazon stores.
WHOLESALE ONLY
USA /Canada: Quick Distribution: qdcb@sbcglobal.net, tel: +1-510-527-7036
Ingram Books: www.ingrambook.com
Europe: Van Patten Editorial, S.L., info@vanpattenpublishing.com
Holland: Kulu Trading, www.kulutrading.com, tel: +31-356-93 -22 -66
UK: AVALON Wholesale, LTD, www.freedombooks.co.uk , tel: +44 (0) 23-9283-2383 or +44 (0) 23-9278-0600
Check www.vanpattenpublishing.com for a complete list of our distributors.