/


Автор: Zhen L.G.
Теги: art drawing fine art drawing lessons drawing art books
ISBN: 978-1-60061-088-2
Год: 2009


Текст
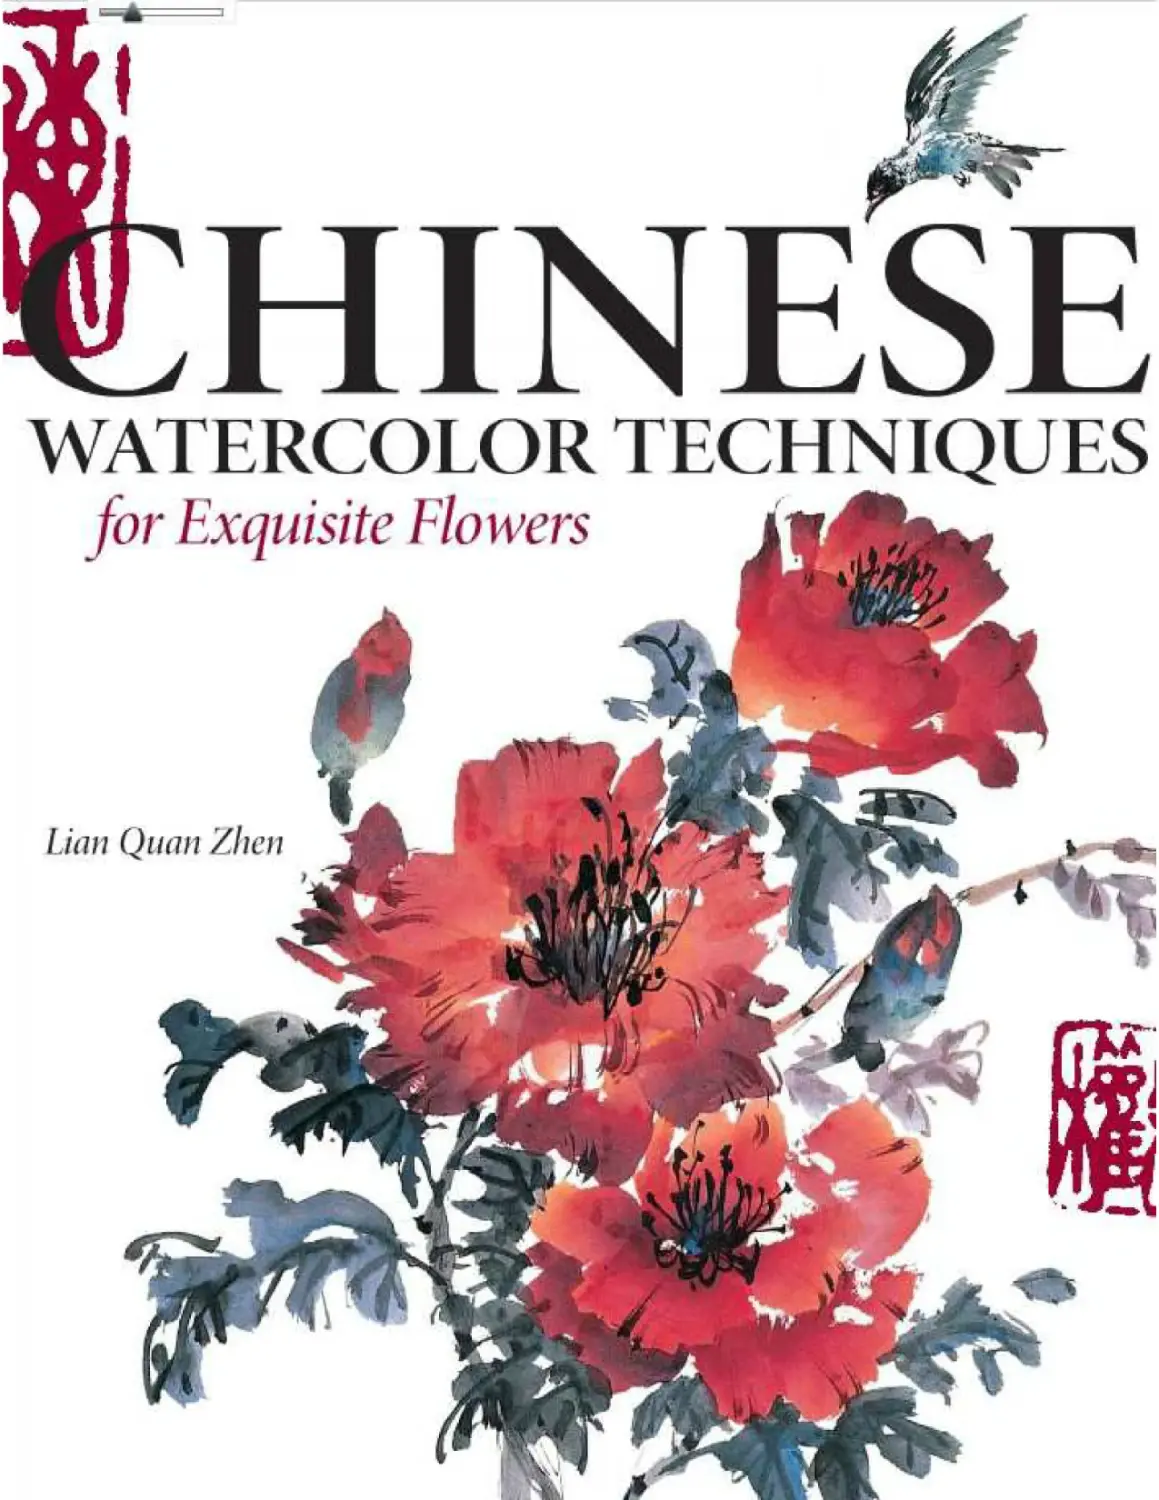
                    CHINESE
WATERCOLOR TECHNIQUES
for Exquisite Flowers
Р Р ON IК 4 Ol/r*l4P IrlA 4П J - •»A *i М». । Ц |v Sr'lPit'r,’ fWfr,	л f/ц p| I
Lian Quan Zhen
HINESE
WATERCOLOR TECH NIQUES
for Exquisite Flowers
Cl
MOUTH LIGHT BOOKS
. . .гмАП l-
<| Г.'.Щ
'JhiuJ i/ег 4uf/nw
I iX11	Zfu-n n in HUfUnl-Wm»ШЦЛ11ill ird li b hn <|l W4’ITI »i« ff uh! ChuH «-Г pvirH
ir«z.h?ih irhind-T incuhi.’od. Hrrttrted it f’Vh inlandpuirt.iq£ eunn£ childhood
and ciiHinucd hi« hnH^v while pnrrtidmga lami’i phyiimn rn ГлМрп Prnvin •.
Chnii tn I uh iniir.ipuciiui she U.S lie reiciv/c l taih’liii 11 ulf decree h-mi
fn< I luiftjnny ‘Mi jJiliiihu л Berkeleylu W2 jftJiicuiwrкirchi rcidridiqiictKuii
Ml Г I Nif.U IlbrJlULd ui ItfOluxsU.i I Mi . 99ti.
I ни hn hud munvniir-trin 1¥|WA in Ih«- lr,£. Н.ш/, KiWir nn: Chin* nidi liw«
h и Ii:p d .in .iilrm*l * ni.il hillir.vi ii); Hi»- pi iii’ii .цч hftll£ 1 '• ir.nrrn . in %l ilk I г niq|
wdprrn*aicco6kGi*:4>Siiiicludjmgthc МП* Миэсшг. Itaiifc' hdding m&nyojiioni ind
inEmaiuiual w ii^h'-pc. I tan hinjvqhi it: miner pi *ip inr; Iг иг-.» и FJnnrriiip
nl i."j1jIi rnu u llcrkriey.
hull I -IA -.IHU-JI IWU li:iuk> D-H Aihfllh j.ifjhl jIuiXSl C 'AjijiJl4 AiZUIrJbjf Jk.’rfMiqiri'A kH
kxijWillM IfiliuiLuiHi 1 «.nd t JlniVJL r^dL ’.itliH JeJlijiiJiiiAF; JL- 'il. 4jJ .lidHiu. i Hr m.^uiin
I i.-Jl ill rd 41 »|il |Fi-..4*rrthw :Sim h aPjiiiIfi •. Qfc к k П i inm. г |гтн . It’iiikx
O-r«e W&lercokf technique* for ’ мер.latte • liwen « cfpnjin ’ ’ by ।	1 *i -n Jinn
kLrj’fc-..-»-: г Ггг^.д*.-qini, ?f»i-v>c Чх.гмпп r:« teU im^ l**vn*cu 11« r .ry г- гу м i
Ч<<Ф Hfi_. Г ciHbr «цг« .1.1 h 1ЧЖ* fKM -Jf	>	(IF ♦
нкЛХЬу i 'rviwrwfnHTWf iujH lmU-Him. * 4 *rmw	!л •Ari' I -qhl
•- eip-H . • r+*A Г.И." <2iii Г ь - Ir->j '.nnw’-.’ii TJ <• 2i.4i =M.iVjl г.--Г|т ,
ffustfe
Uttu" Ifc* Nonr 1ДОГ Вос*л n MiiLih* Irar focal кии ".raw
iv 1 ^n K 'Jrii- гт r I.v i.whuti*w	я гггч
U 13 It ID UM В 4	3 J I
4FTXH ПЛ’ГГ HSHiK ГЦ i.RT
TOLllRVUTF	TO	ЙПТ1Р1Т IT
	rjnfinwi	г.н
	Jficrti	IM
Frrl	Tri rill Icier.	III 5
1 rillll3=te!>	Ftt4	Dirt
Yanh	MrlET!	119
к&сып	IJIlik	11
L«mkrxc n LnatTj'’шгЬ’чп
Iw Air»*Tn 1г-аь*г-<•
I Mt-ji !*’. |F| • e»uiu I7;i^:4
TH iMfF.Jr- UH
p IbfFrt It-I’l 11	< r nt F-;Tf ГгчJI Л Г1 •
I -я I и. м-в:и«^1Л::	ТйЧ2-»H • r-ifii-jj
In >-MiiMb3MW' • -< |e-Mi IbasTJTjr i
F«mk I» :< ’•«|’*н>4П1иНф
L .? Г-лаа* л i -	1 -
rij »*:*• ЛЧ •. №кил 17Д. ’i’All: -.глги
Те ЛСг*5771та
I itv iry nt Глгиртк! СашГаф-ад Ki липп Глии
ibeh ,lM' ЦииП
И» • 1: <-. *•• “L .•!—-.. Ils I ЛШ».1Л.* h- 1ч|чи
П hti
ь- jh into
I	i.tth . ii. riv. ..,-	. । «...
’	7 Irtrair-"’г, C Whni> • tea
qnrrtGLfi^i-N
ЭД 4Z?4T<3- КГ71	JCrtllC 741ft!
Шн1Ц МиГ} Busier
OiijrvdK Jennifer ‘Гфг-Чпвг.
Folin I! 4 uCfitt-3 hp Mdll VlrfyFiMl
|-| I -hr I.UG’i .Liir -ГП •IH'.VJ .411 ill . Illfryirvi iJld |in l-i i!	I
'4	'Г| 16m 4 ’ V n. I
Jl ЛJ-r.’iTHfr
Man ihaiu. LLi ilv. wlct, Vi liny. /’i:u I Hri	IL.y Cliifcih*. Ii mid
IHnisii -ilr.myirH.hiT iiu lx Iin-in -Uta. YiiniMi 7u xn*. Zh* »*•’»
71 .ir^, r-.ir I > ir miii* i_i n.rnl iiul thru rT irh in xkin^L xu ц| ni1,'
Лгпгк r- -«I nil IcuifdfrxuBiiii win mg
Л V » muiy tfiaitFVH the liillnwingfrimdi «ho nvr heiped me
*iiciiiL4ii^juilv in mv tn career. BenerJq Lcurd. «ггмл Gum. Lie
1.*t- Siiui h, Lirhn Лии Pruidi Ал hum, 11ылш HiLkUinJ, J.lLn 1
Rui ix, Gtii llicy, CiiвсеCJjik, iBiitflNie Llcwcy, lagum Veruan,
IrnarP. .-i>« in b Л*, к мн! 'RngtT- ILiriiiiUirnt П’У-: *' Fx*  • К 11 i| ?j . •».inb
1 ji.ur Trn;m, Маг», r -. H-i^in. Mtrv W. •.iiuHl.i Ainrlr, X.iii* v
SteJinn NuKTinil lUhTerrrh inr»-. Nniwv‘Пштрмп II т*мЬег|.
Pimda । cvell. ftд. l ugiitShircui [ 'igiuha Shrrta1 ’A i ight-Vjjl
I if ftyiu Uni Sac и id liihji Cluib: n
Mi ihaiLM j_hi u> kiiiad Markle hit	-Jija hiHik poiAthk
ihn i-jflh Ninth Ljj/ii HiHikh. Ibiak&altt in MJr, Buri lid, my tdi
 I .. Illi b»«|p*|| rnitkc ПЦ irrrtniH I rar i:u. I .«• Ill .iiiili гЧ Hill 1гъ.|1н
стоик с'чс и Niirth [ |д!’« tank;who hdped py. tnii h> ♦: whether
FmallpJinuik ir-ап . иПгапч.'Л’пЬх 'г.мгчцррг .1 t
he r lull umc artiiL, uAUl^ h iey* Iik\ dtcini
«> imv ^ifr.YihiiLj/hrh ’Hri Zhiuigj.wlktka wnit
du IuI lUtisl laetificES Ker arc career hit mine
and Inrrnir siin Ainnld. Jb my rranther, who ] wiih
Liyjkl I'mH'K I jV(\l I. » Stt II «V Ull S! 1 ImhJlS. ^гн( ll iH
।«nt in риЫклГлнп Shenilwii-xllit:rd«. ncvuraging
□ nd с1и!ЕППр.ЫМ rne1
TABLE OF CONTENTS
[Jit.liipmm’ iTHmhm ЯпмПЧи'Ппк 1 •
71-j-rc S:\a, ;L'?1uid Pdini 111^1	11
Ita.'NfclhMti* k’tf J*ilr*ili|;pJirWSil	IZ
• ^inesefs FndirinrMl Wcjnmi Volmhr^ I v
1гчхп ISh
MATERI ALS & BASIC TECHNIQUES
X
X
X
X
X
Ch ji tew Pijimnk; MumtiaU
1111ГМ- Hr l|u|»r-
WiimMvr Moto i wl ar-1 Ti’. h inqur
Sejpiiin! E'Mntuiy
irriJuhitikj a CbilTKic Pftintin^
I nil'* ГАНЬ «I .uh i»i tiUfAfi <i.4iii|fupn J< - !Я\16гц . 4*iHil
2 SECRETS OF CHINESE
PAINTING COMPOSITION
page 28	\ i Л page 42
W	Focal Paints
Я	Seven Princtples tit Lun Irasl
Я	Balance
Я	Tiree-T ий Integration
Я	Geometric Organization
Я	Dynamic Movement
Я	[ «vi ng While Space
Я	COmpositkui Methods in Actum
uaciitn MruierroferMArches UOO^im) iuG'
DEMONSTRATIONS
X	iris
Ji	lotus
Я	Magnolia*
Я	Peony*
Я	Orchid*
Я Coconut Tree
Я	Banana Tree
Я Rose*
Я Wawr Lily*
Я Ibnuto*
Я Grapes*
Я Hollyhocks*
Chrysanthemum
watmolor рчрег 21 ‘ t 1Г (53an к Jifern I
A EXPERIMENTAL CHINESE
^4* PAINTING TECHNIQUES
Я	Printing With Cilass—Wisteria
a
<5 Я	Using Glue as a Resist—Cactus
Я	Crinkling Rice Paper- Orchids
Я	Fainting mi Primed C-anvas Puppies
'	/• rrrsfrboth nuditnjruj/
CTnnesf Uesfcrn	Tedniiipies
М Лб NO 1 I A	)r i Jrtrf	#*l»‘ Sfrl44l и ptf/U'r /Г ’ X rfr”	If J - 41. b V
IrftTVfita ГЮп
PhmVinul: & • uki «d.'ir. . Hi t lulit^i jl J Tvx'.cruLikii |uinUny IhiJ b.nik U UHCuikJ lu
|4iivi*  Iijlm.. niilriii Itmi ini Iv.ilb hi ;unil :|’.-ir % нi л-Гп ly Г .nil г* <laiii rhi'iiri»** mil
lL-ihHh|Ur Jlilir Ihlll’ Ь lll.TII CHIU V\Wrni 1Г ЛЛЧ11Г71Ч	iVll || tillДГ711Г" v 4,r-|i *p-|
jnd vcp Ivj-4cpdcniiinx:r3ik«nf I dcvdopcd then Icwni with Iniili the hepimimp and
рпГвптпа! iriv in mind
For yean. I’v- studied with bothChine и piHMinp and rriicr-zdor maneri and hove
u tempted l>  blend Luui n and Wenrni in iheonci and wchinqu» 1 n my owit w rk Ire
itsiilb Ji’ihrfcc tfiuji Jiiiiii&are in:i ipciii^ jtad anmettmea even JtHuin^, Млмм <d the paint*
1ВД JMU’II ire III ihrJhaj- ui: dilTh-iik Li Unaidv мь ttfhei CIiuiem: <if л A^riuxii Llkddil-
h •-•in  и mil iir • 1г1лп ii nir mIi«v лх I lu-f x.nl.iir iK ча.-п. • if г hr llivwm
Fo* Chinese piiin тд" in :h и book unc created in a <irktl” indu inn J mimxi ih>uph
I do .«momiriw irximl frincw thniTci and hj<K. technique? Hi: nibcdfi n| yeanaph 1
lam*ku ChuiBK ?imi nip masier fid. "Mruffi aad ink shock! ihllr/rt rhe chingf □! 1 Inw." I
lake лиword ип lusiy in my an creaiton  гика» hi s. A; j n-ecli, nrrr paiRJnfp have dco: i.pcd
шшс div uktive chai uimiik: 1. Specificsly. the <diuicui |.uiiair^> л e lull u: vihi ^ntciiliii >
<whn>i 11 iLxire typical id Мезени |.м1пппу । лн! nit womuku рашпл^ .aye ev:»-uure
J-III* Ч|Х1! г I id-n h. r mrfi’iyi’ii 1I ill ri-ni* <1 I’linrii^l
I Irjvt kiVvd рчш! i’’-r; «m. • 1 w.-м j hl I. I .  .1- I nruri j pr. If. In K-. 1 mr 1 I ill  иг
iTir^ .Mvbrrakthnnigh carer ir I he err? 1990k after E had been livinp in ibc Г s hn nzirlr
leu yean l-.hnu 1ас11гвд1 rnydi?jitl’.-.4ii^-1 чачaideand k-u..ri nn man.
пшют and lechiiKpei chu were n>x avadiNc inChtru whrn I lived :hcre Vjjic impiirimu
I $jv. myself a hn il hccduinnipainr.ing. I diuin wanrxi ^mj'ly их*;, nhieci-s irii unuee
HLULdlh ibdhftdr. Skillidl4in±l I H.kL* rtd.ll Ii.; iluJrju> in dbC L.V. kAyUig di JI C .HlltaJi* all-
iil.Bpnnl Ir.rly h-i.niHlhiyir-t -h.- Irrcilinr I hql ran । .-1и1> m I Imr I rtxhl гш .! Mt.irh
fty M«i.rnal. rnr Ainirii лп.1|1|»1ч-»111|1 I 1.1 j,p.-ih.i|i4	lli> mu- -or- u. Ii
Irct6>m 111 ine»rlrvr-
Painnnp <hi.4ild.hea happy n^eneiKCurwit aprevmred rnny Sb iniucan pvnta
mjsierp.jLC ewrv ninr К* рипш. lulni arwl id.nir theaepcofiny рмш.п^рпкж You
can kai n a kx, have 11 11 jt>d be happy.
— J ill 11 I..’LUI 11 /Jvr
l”rtr« U irn/
Since 2АШЗ we re hid ihc okavai t-.tl hcr^ury I un Zhevi innc.a, * jKanaftwnrkshnpin^nn
idc llripAinun^cvkciiupieJ wiih hiskniiH.edgc».>fthc iiadiLnxul рани inp-iethiiii|uts;iil
ihe LiujubJ .l*jd Luii^ukii leuhniiputJi ль] j'trkixr.beiiieury ur die KVeu, Saj аш5е hun
111Г i /i:< I ilYllfli. II14IUII :•. I ЦК» alrnl JilirJlIrr 11 НЛ. lll>| -:l 4 |*. Iri sni .l! г♦ F
I’I. w<irld I ;i 411 III. I • w irkih.. Лп rn:h:iii;Hli; inaltui i>e« i:>d dli u ! in l .im mu nn 1
|».л "и hcbi 'hia 4hMJtTV5 кЬюте iheirown unique ^;vlr ичпр hit Отеле Ьпри рипппр
lcdimqcr< пп« ht^wimn nhir ?iiurnicand hkndnig mrih-Hfc 1 ian iin<:ruLU-»nimdriirn
.	andcnlur will r.i rngibrn your i- ilhand help mu bccunw a bnirr aiiul I пиит.
ihisboDkai I.ian takes wu nephy vsqpihnicjn piunrngiliiHv^*
— J h.? ги Лпгл A'tiJkv A ilhr/h
ЛН Wi и<лЬирСчхЛпп||г
ДИ In Thr Min:nt ыпк fk in:. I И i y*«
DEVELOPMENT OF CHINESE FLORAL PAINTING
Chinese I lord paintings usually include
birds, insects and smalt animals in ih<
compositions They are called tknal-bird
paintings, one of the three main catego-
ries oft'.hi nese painting. Hie remaining
two are figure and landscape. Floral bird
painting developed later than the figure
and landsca^categories. Wlten figure and
landscape paintings reached their golden
age in the Tang Dynasty (618-907
Hora I-bird paintings ivere rust emerging.
Floral-bird paintings first appeared in
the Tang court, which employed famous
artists to paint the palace4 daily life
ArtiM Huang Chuan created colorful,
detailed paintings from the collection sol
rare species of birds, animals and beau-
tiful flowers enjoyed by the royal family
Later, 1 luang i diuan's offspring and stu-
dents continued his magnificent works
during the Sung Dynasty (960-1280
л.г>,:«. Iheir painting style, called court
painting, was vivid In color and highly
detailed. This marked the beginning of
detail-style painting.
During the latter part ot the Sung
Dynast)*, artist 1 Isu I I si developed a new
technique tor floral-bird paintings. He
was an official who traveled extensively,
which allowed him to explore a variety of
Howers and birds in nature. He painted
them with fewer colors and less detail
than the detail-style artists did, empha-
sizing instead the brushstrokes and
use of ink. Many artists followed lhi<
less meticulous way of painting, which
marked the emergence of spontaneous-
style painting.
ORCIIID	CJttSllittt* i/iA. mid tutor 4»t rhk .Shudn fMptif 27 X 17* (69t‘rn < •L<Crn)
II*
THREE STYLES OF FLORAL PAINTING
Over the centuries, JloraLbird paintings
have evolved into three main styles;
detail style, spontaneous style and a th ird
style I hat combines elements of the first
two styles,
A detail -style painting depicts objects
in detail with vivid colors (see /ns on
this page). To paint in this style, start by
using ink and a small brush to outline
theobiecteon mature Shuan paper, 1 hen
call out the shapes with a variety of in к
tones After the ink dries, apply layers of
color until the color reaches I lie desired
saturation and value (the ink-tontng
step can be omitted i n some cases). For
a detail-style demonstration, sec the Ins
step-by-step on page I I.
Spontaneous style is the most com-
mon style of Chinese painting. It empha-
sizes capturi ng the essence but not the
appearance of the subject, "Simple is
beautiful” “Less is more " "Paint what
you want to see hut not what you sec.'
[best ideas express the essence of this
style. Puil Breeze mi a l.oitJ.i Pond i.s a
typical spontaneous-style painting. I
painted it with minimum strokes and
tew colors, but you can teel the breeze, see
the movement of the leaves and grasses
and hear the songs of the birds. 1 here are
many demonstrations tn chapter three
that will allow you to explore these tech-
niques further.
In the combined half-detail—half-
spontaneous style, some ob eds are
painted with detail while others are ere
ated spontaneously this doesn't mean
dividing the objects into two equal
groups, one painted in detail and the
other spontaneously. In gene ml, the focal-
point objects are detailed and the oth
ers are loose. For example, the frogs in
Wafer Li/y Frpgs have a lot ot details
while the waler lily and other objects
are merely suggested, To enhance your
understanding ofthis style, See the Lotus
demonstration on page IX.
WA I l-H I 1LV ANU J-ROGS
Cfthiitxv mA. djid rtltar twi rndfitrt?
S/imni paper JuT x
FA I 1 ttRfiEZt ON A 1.0 I US 1*0 МП
ОгШОД i!rlA. d.ifd LI.IHMJJ Ou jnigk' •ж’ггГг.» Лй’м Sk’NdJr pdpfl
26"x 26*(66cm * 66cm)
!itis C/iinese uR им//1on ma tu/c SJiuuri pap^ r 16 ’ x 23“ (4 tern x
И
TWO METHODS FOR PAINTING FLOWERS
There are many ways Lo depict flowers in
Chinese painting, hut most fall into two
primary methods: bone and no-hone.
The hone method starts with outlining
the tlowers and t hen h 11 i ng in colors. I he
outlines are relerred to as the "bones."
I he no-hone method, on the other hand,
starts without an outline or a sketch
Всон' .MefAoJ
НсгеЧ a peony pu i nied I n
three steps: HrtL, J outlined
the plnuvrwilh ink Then,
after the ink dried. I {Mintd
cadi petal with color 1 molly.
I added darker colors to the
petal bases to further define
thcirthapcc The hcMie meth
<»d kcommonly HiqMcmLiited
in painting detail Howers.
4»«<
Kite
iVo-Bo/tL’ Afet/ioJ
’П-гечс peonies were painted
uAang the no-hcine method.
Tn each image yrni can wc six
uepi I hi иг (eft tc r igiit. upjH:i
mw tn bower ruw) the peo-
nies were neither outlined nor
sktftdsod prior to my applying
the color On 1 he top, 1 created
cadi petal withom. wrote. On
Lhc bottom, I he rase colors <il
11 к ftnwcr were appl icd ii rst.
arid then 1 defined tlic petals
with white pigment I tic no
hone mrtliod ЕЛ Widely Used m
ipnntancouv-ayk paint in»
PmtHrrrg
Some ipnnto nrniiv style paintings an* created
with ink акте. I he у are called ifeu^-nto Awu
I water-ink painting I in China andiunn'-e in
lapati 1 nk is a main pigment i n Chi nese p-ai m-
mg. a ixl water-ink painritig takes advantage । *t
iK variety of tcwies and texturrt A biw you can
uc eight dirfcicht tones raw Sliuan paper
Chincu.' ink is very dark. Ihc more water ynu
Add, the lighter i 5 becomes You can dilute the
ink to create many roocj. I jke a link in k and
•'Xpcrimrnt lyou can u«c any к Ind cl ink I On
the ngltfHa typical water-ink-jximtnig.
CHRVSANTIIFMUM С/гллгм-' jhA; rm wrgk' iryrr miv $шпл /м/vr M’x
12
CHINESE VS. TRADITIONAL WESTERN PAINTING
Differences
Besides differences in med turn, Chinese
painting uses strokes to define objects,
while Western pan it i ng relies on surfaces,
lights and shadows to render objects.
Also. Chinese painting uses the power
ot suggestion to capture the essence ol
objects, while traditional Western paint-
ing relies on rhe meticulous depiction of
the objects’ terms.
Similarities
With the emergence of Impressionism,
many Western paintings moved away
from strict representation to impression.
I Ins 15 dose to the Chinese method ol
capturing the essence ot objects.
Another similarity between Chinese
painting and modern Western painting
is the harmonious use ol colon Every
painting lends to have a dominant color.
Even though I use Chinese painting
materials to paint ( hinese paintings and
watercolor materials to paint watercolors,
people sometimes can’t easily identify my
paintings as Chinese or watercolor. This
is because Г integrate the theories and (he
techniques of each style, and focus on cap-
turing the 11 Ге ot 11 te objects Th Ls frees ami
encourages me Io create paintings that arc
different from those otother artists,
On du' right U thv Western method ul dkpu.ling objix tv 1 be cylinder and peony arc rendered
according to the light gourcewith highlights. darkest areas, reflection*and shadow. 11k image
ort the к ft ihow the Chinese |iaintiiig method: RvgflrdleiS ol the Light uiu/cc, the cylinders and
Hnwrrsarr depiewd without highlights, rrdcctinnsnr diadows, yet they still furec al D rtircr Ft4
interesting tn notctJwr in painting mgltr scenes, Chinese urtnwdn ixx puinr dark colors Instead
□ moon in the sky or a lamp lit nn a table indicates that it is night, v»hik liu; rest nt the painting
is rendered as if ft were n bright day
SutrilciHrie* (MowJ
Compare tlttK-water hly paintings, whiJi dlusti aicriir merging nl the Fust and West. On cbfleh
is a spontaneous-style Chinese painting. On the rightist an impression! st it painting by my Wife,
Yihng Use Chinese [tainting ha* minimum ttrokesand thcnbjcirti arc «mphfird I iki’wisr.thrc I
painting ignores many dccailsin attempt to uapturctlte spirit cd the flowers
WA П И I1LV
WATER Lil V 1П YIL1VG ZIII N ai,'pit rriinw .M “ < J?-
fd/t’Jrt x 9Jmj
C/iirirseu^ 4iiJ oi.’pnnr nn^i'-kiyiTrww
Sriiurn pdf*>r Jb" x 2D"(4Itm x 5ЛmJ
J A
IRIS CJrruesv rotor он oii/fareS/rwrtpi/ptv M' x 23’(41ог\ x Slfcwt)
14
MATERIALS
& BASIC TECHNIQUES
To learn Chinese painting you need only a few materials: ink,
Shuan paper (rice paper)» a Chinese brush» Chinese color and a
mat. Eventually» you may want to purchase a chop, a stamp carved
on soapstone tor sealing the painting. You do not need fancy and
expensive materials when you arc just starting out. 1 strongly believe
that a great painting comes from the artist’s brain and hands rather
than from exotic materials.
t
CHINESE PAINTING MATERIALS
Some art supply stores carry small
Chinese panning kib th.it contain tiny
bi ushes, ink stones, ink sticks. chops,
rouges and water containers. These are
very economical, but the materials they
include are low quality They are designed
for children to play with or for display.
While 1 recommend buying quality sup-
plies, I don't encourage spending a lot of
money on supplies. However, in general,
you get what you pay lor.
Color
Chinese painting color is less transpar-
ent than watercolor but less opaque
than gouache. This paint is made with
strong binding glue, so it doesn't hlend
as dramatically as watercolor; the paint
adheres firmly to Shuan paper. After a
Chinese painting is finished. it needs to
be stretched to bring up the colors. Many
Shuan papers, are semitransparent and
the colors bleed through the surface.
During stretching, a second layer of
Shuan Is pasted cm the back of (he paint-
ing. 11ns additional layer makes the col
ors more visible. I he stretching process
also removes the wrinkles in the Shuan
paper. During lhe stretching process
the painting is wetted, but the Chinese
painting colors don’t bleed (tor more on
stretching see page 26).
Many Chinese painting colors are
made by Marie's, a famous brand in
China comparable to Winsor & Newton
in the United Kingdom. Keep in mind
that Maries also makes watercolor and
oil paints. Sometimes my students acu
dentally buy Marie's watercolor, think-
ing that Maries produces only Chinese
painting colors. Read the label on the
box carefully to make sure you’re buy-
ing the right product. Ttshould he clearly
marked ‘'Chinese Painting Color.’
Piwwt Es.<erUitds
Cl-Mricsc paint colors can be diluted separately
insmdll di dies or mixed ап л paL’lti*.
Ink
Traditionally- Chinese artists have made
ink by grinding ink slicks on an ink stone
with water. In recent years» high-qual-
ity bottled ink has become available. It
doesn't require preparation (thus, you
don't need an ink stone or ink sticks) and
is easy to transport. In fact, I use boltkd
ink most of the time, including in all the
Chinese painting demonstrations in this
book. Similar to Chinese painting colors
the mk is made with strong glue. Once it
dries on Shuan paper, it will remain there
4
until lhe paper js destroyed. When diluted
with water it becomes a nice gray tone like
graphite. Japanese su mi ink ts stmikir to
(’hinese ink. and you can use it to paint
Chinese paintings. However, do not use
other inks (such as lountain pen ink) to
paint on Shuan paper, because they wdl
bleed during the stretching process
Ih
Brushes
Unlike watercolor brushes, Chinese
brushes don't have a numeric sizing sys-
tem. Some brushes ire as Ingas a broom,
while others have only one hair.
Chinese brushes come in three tex
tores: sol l: medium and hard. Those
made from sheep and rabbit hairs are
white m color and soft in texture. Use this
type of brush for painting soft objects like
flowers. Brushes made from wolf, ox and
horse hairs are brown or black in color
and hard in texture. Use these brushes
to paint rough objects.sm.li as rocks and
trees. The medium-texture brushes are
made from a combi nation of soil and
hard ha • s. These brushes can be used for
painting a var iety ot texture*, To start,
you need both soft and hard hrushes in
sizes ranging from small to large.
What makes a good Chinese brush?
First, the hairs oi the brush should be
firmly attached to its handle Every
Chinese brush loses its hairs, hut a good
one loses hairs at a slow rate and lasts a
long lime. A good brush will retain most
of its hairs after hundreds of uses, while
.1 poorly made brush might lose most
of its hairs after being used only a few
times. Second, when the hairs are open
•see the instruction on how to open a
Chinese brush on page 19) and soaked
with water, they should come together,
forming a point al the tip. The price of a
high-qua hl у Chinese brush is similar to
that ol a well made watercolor brush.
Paper
Shuan paper (rice paper} is made from
Shuan grasses grown m mideastern
China. Two kinds ot Shuan papers arc
commonly used for painting: Raw (non-
sized) is used lor sponlaneous-slvlc
paintings, and mature (sized) is used for
detaibstyk and halt detail halt spon-
taneous style paintings.
RawShi ia n paper has stroog absorpt <»i t
and blending capabilities, similartoa paper
towel. It comes in douhk-layvr and single-
layer sheets. Hie double layer is thicker and
more absorbent, but allows lor less blend-
ing, while the single layer is thinner, less
absorbent and al lows for more blending
Mature Shaun paperis thin and sized
with alum on both sides. It is some-
what like hot-pressed tvalcrcolot paper.
It al lores a little blending, but it isn’t
absorbent. Some mature Shaun paper is
sparkly on one side; this is the side for
painting. Other mature Shaun papers do
not have sparkles, and cither side can be
used for painting.
Л-fy Brushes of Choice
lhew hrudips л ret Iw sizes Тиле тп<#4.пгпгппп1у
in paintings. the i ukof thumb inchnoiLng
a brush: the larger lb*.1 Ягиксл, tht bigger th*,
brudi . and vice rersa
RawShuan paper create* unique effects At the
top left you can iwe the Need л ig that tKCUri at
the edge oi itrokuл. On the teip right are over-
l^ppmg strokes separated hy шыегпмгкл. At
the bottom Ln vcxi can wv the ctfect of addi ni*
intense <nk cm topnf medium toned ink On
the-bottom right is the tuxnin.-of Ink strokes
painted over a wet area.
x-ч югмнаи  uivm НТО
I?
There are several reasons. why you
shouldn’t sketch on rawShuan paper
before painting in the spontaneous style:
1 Most Chincflc-style artists have prac-
ticed painting the same subjects over
and over again, hundreds ol times,
to the point that "Bamboo grows in
one s soul?
2	You um organize the composition in
your mind rather than on the paper.
3	You will be able to change the com-
position by fol low i ng the flow of rhe
painting process.
4	Raw Shuan paper is fragile and
sketching can break it very easily.
If you must sketch on the raw Shuan
paper before painting, do so lightly with
charcoal. Then use a dry flat brush to
shake the excess charcoal from the paper,
Like raw Shuan paper, mature Shuan
paper is easy to break. When using ii
to paint in the detail style and/or the
half- detail—half-spontaneous style, do
the sketches on tracing paper, then trace
the images onto the mature Shuan paper
with a small brush and medium-toned
ink. You can see this method in the Гп<
and Lotus painting demonstrations in
chapter three i,pages 12 and -16).
L'Amese Pointing Tools
Traditinrwl riiinru* painting m-tenalj.inrlid*-
dtops» tXMijts, win । J welgki and fdt rnais.
Chop
Chops are carved stamps commonly
made From soapstone Every Chinese
□rust has a name chop. Many also have
"leisure chops," which are carved with
whatever words or expressions the art
1st likes, such as “peace? "lucky? “love?
"less is more” or “no Free lunch " Every
finished painting should have a name
chopa.sa seal, below the artist's name. In
some cases, more than one chop should
he used. Sometimes an additional chop
Is used to balance the composition. For
example, il one corner of □ painting is
loo empty, and the artist does not want
to add more objects to it, a chop can be
applied there instead. Another reason to
use a chop is to show the dramatic con-
Irastbelwctn the red color of ihechopfor
chops) and the black in к on the painting,
especially hi a water-ink painting (see
the Chinese painting Сг'ггуятГЬешшн
painted in water-шк style on page 12).
Mat
1 typically create Chinese paintings on
a flat surface covered by a tell mat that
provides a soli absorbent surface lor the
Shuan paper l ight-gray fabric, about 1/8-
inch (3mm) thick , works well for the mat.
Many Sb uan papers are semit ranspa rent.
so don't use black or intensely colored
fabrics. If you do, I he mat's color will
deceive your eyes and cause color con-
tusion in your pointing.
Paper Weights
Place paper weights on the edges ol the
paperto keep it flat and easy to paint on.
1 use long, wooden weights
I«
USING CHINESE BRUSHES
Opening and Cleaning
A newly purchased brush lias firm hairs
glued together and covered by a plastic
cap. Unbi nd i he hairs before using the
brush by leaving the hatr portion ol lhe
brush in water for several minutes (up to
an hour). The glue will dissolve and the
hair will loosen up so you can use the
brush tor painting After painting. Hose
the hair with water (soap isn't neces-
sary l. Don’t put the cap back on the brush
because к will keep the hair wet, and the
moisture will damage the brush.
Holding the Brush
To hold the brush, use your index finger
and thumb to grip I he middle of the handle,
t hen close t he other three fi ngers loosely to
reinforce lhe grip (see images al right).
Do not hold lhe brush as you would a
pencil or pen. You wont he able to man Ip
u late the brush to create beautiful strokes.
Holding the brush sideways to paint is
called "side brush” (sec boll urn left).
Another common way to hold the
brush is straight From (he surface of the
Shuan paper. It is called ’center brush"
(see bottom right).
Controlling the Brush
The amount of water, ink and color in
a brush affects the stroke textures and
the way the ink or paint blends on the
Shuan paper. Tins effect is exaggerated
when you’re painting on rawShuan paper
(see image at right), h takes lime to learn
how to control the amount of water, ink
and color in lhe brush topaini the right
strokes. Keep practicing and you will
achieve perfection.
Cmi/fog Fr.r/urr
LheLesA waler, ink and color in lhe bruih.lhc
rougher the texture (left «roke.l and vice versa
•I right arnke).
Ffo/Jinx lhe Brush
Here arc t tic side (ahtiwl a nd top (right) vjcwa
of a correctly hdd hru <h
Side Впде/г
I I old the brush sidcwiVA achieve Ьгп.к!
and rough-textured irrokei.
Center Brush
Painting centerhntdi allows you tci create hill,
round stroke* kj a variety of sizes.
$1 UH S’11 IVI XVT11 V SIVIH JIVVI

Loading Several Colors
on One Brush
When painting flowers, you can load
several colors on one brush to create л
petal with a single stroke, See steps 1-5
to load yellow, Vermilion, Carmine and
Rouge on one brush, Use one stroke to
pamt a petal. You can practice this tech
nique by following many of I he Chinese
spontaneous-style painting demonstra-
tions in chapter tour.
Places to Buy Chinese
Painting Materials
Sometimes it's not easy to rind Chinese
painting materials. Often, ynur favorite
local art supplier can order specific ftems
lor you. You can also order them from
me at www.lian.spaint • ng.com
I Joetd УеПои*
Wet rhe brush completely
and load ydlaW nn its. heel
(«he part nr ih*? brush bead
doscU tolhe lurid k)
2	Load Vermi/ton
Load Vvrmilkmnelt Ln
the yd low on the upptr-
niiddk section.
3	Load Lunrjrnr
Load Carmine лп the
lowef-middlr ion
next to the Vermilion.
4	l oad Rouge
Load Rouge al the lip
5 Blend the Colon
Fi nal ly, dah «he whole brush лп the palette л taw ti met яр that the colons
Wend unoeach«her smoothly
6 MoArSMeMroArf
After you’ve loaded the brush, hxdd it sidewavs tn paint several strokes.
Use the tip as a pivot point (poi nn ng to ihe center of the Hower). and drag
rhe middle And hud
WATERCOLOR MATERIALS AND TECHNIQUES
Paper
1 use Arches 140-lb. (300gsm) cold-
pressed watercolor paper because I like
the sizing on the paper, and its strong
surtace holds up to masking fluid. When
I pamt flowers or other soft subjects like
fish and birds, I use the smooth side with
the watermark. When 1 paint landscapes
I use the side with the rough texture
Flatten the Paper Without
Pre-Stretching
To prevent the paper from warping
when it dries and to такс pouring and
blending color easier, tape or staple the
watercolor paper on a firm board, such
as three-ply plywood board or Gator
board I typically use dear packing tape
or masking tape to attach each edge of
the watercolor paper Co the hoard (place
(he (ape about *4 inch [6mm from the
edge). L'se the plastic handle of a brush
co press the tape onto the paper and
board, removing air bubbles for a secure
attachment. Ifyou use a stapler, shoot the
staples approximately I inch (3cm) from
each other al abnut l4 inch (6mm) from
the edgeot the paper
Colors
For years I have tried to minimize my
palette. In fact, I completed every waler’
color painting in th is book using just three
colors: blue, yellow and red. For the blue
I usually use Antwerp Blue (Wrnsor &
Newton). Occasionally, I use Prussian
Blue (Winsor & Newton) or Royal Blue
(Holbein}. For the yellow. 1 use Arylide
Yellow iDa Vtnci) and Azo Yellow
Medium (Van Gogh). Permanent Yellow
Lernon i Ho1bein)and Hansa Yellow Light
Lemon »Da Vinci) arc also on my list
I use different red pigments depending
on the color of the flower. For example, to
paint pinkish Howers I use Quinacridonc
Rose Red Deep (Da Vtnci). To paint
orange-red flowers I use Naphthol Red
Mid-Tone (Da Vinci) or Permanent Red
L>eep (Van Gogh).
Using Watercolor Pigments
Tliere are many benefits to using a lim-
ited palette. With only three primary
colors, you can create many second-
ary colors. Also, its easier to achieve a
dominant color in a painting, A limited
palette also helps keep the painting from
becoming muddy. For whites, I preserve
the white or the paper. Sometimes 1 use
masking fluid to help me do this. To gel
dark colors, I mix undiluted blue with a
little undiluted red and a small amount
of water (sec below).
Pigments
1he« nmhrwlypnd primary cokwG aw brwattfrrnlnr painting
Hie difctaicontain chew colors diluted wuli dear waler.
Afr Palette
1 lere vou С1П л he see how t lay nut the three
colors on a palette. 1 make three pudd les of each
color, I vm for mixing with ill her colon, and one
tor pure coloring Ih'b. isеле of the «cretstn
keeping painting* Jean.
<1>r>1Kll wr irwil 1 41V.’H,-|VF|
21
Diluting Paint
To prepa re d 11uted p.i * ni tor pouri ng a nd
blending, 1 mix each color with clear
water in a small dish, using a separate
brush to stir each color. There arc (tvo
rules of thumb for making diluted col-
ors: First, to darken the value of a paint
ing. use stronger values of the blue and
red mixtures, i Го lighten the value, use
weaker values of lhe blue and red mix-
tures.! Second never create anything
darker than a medium value ot yellow or
it will become muddy.
Pouring and Blending
Before pouring the paint (see photo ot
diluted paint bclowl, use a spray bottle
towel the paper lightly. I hen pour the
diluted paints next to each other on the
wet area, lhe colors will fol low the water
and blend into each other. The more water
and paint, the greater the blending.
For more dram atic color blending, ti 11
the watercolor paper so that lhe colors
flow mlo each other. To keep the painting
from becoming muddy, tilt the painting
in one direction only. Otherwise, the col-
ors will overiTiix.
Using Your Fingers and
Mouth to Paint
After pouring diluted paints I use my
lingers and brushes to direct lhe flowing
and blending (see below). Using my fin
gers to paint is run; it takes me back to my
childhood art projects.
Another tun technique is blowing
on the diluted paints lo crealc clledS
like stems and grasses (see below}. Place
your mouth close to the pamt and blow
il onto the dry areas with a short, strong
bursts of air.
At firslt it won't be easy to control the
pouring, blending and blowing tech
niques. Practice on small xvatercolor
papers without painting any subjects until
you become ta m i liar with I he I ech n iqпек
and can handle them comfortably,
Diluted Pairii aud Hleudiug
[ usuailv try tocreate a medium value, пл vcmi can wcewi the bewer texting
strokes above the dishes, lhe stroke* on dw top dinw very strong color
valin while the muddle strokes show the very weak value.
In lhe lipper middle whrre rhe hl«e. yellow and red meet, ynu гяг. ut
the blend i ng effect of a highe r percentage of water 1 n согмгач. leu water
and point create a ‘llulfy’’ icxturc. You can ste ibis ctfcvl al lhe n^ht side
of the red paint
BWrt-Piwif Effects
Shnrt, strong hursts of air can be used to c rcaie ясли and graces.
fMnJr-Orj PaiiHrng
Manipulating lhe paint with my linger* allows me Ln have direct contact
with my pai iwi ng so that T fed 1 a in part of it
Brushes
Hike synthetic sable brushes because (hey
have good elasticity and arc easy to handle,
the brushes shown on this page are the
ones 1 typically use. They are not fancy
or expensive. I don't like to use Chinese
brushes for watercolor painting because
they retain a I nt of water and their hairs
are too soft to work with. Conversely. I
don’t like Io use watercolor brushes lor
spontaneous-style painting because they
can’t be loaded with j lot ot water, ink
and colors, which is necessary for creat-
ing long strokes on strong, absorbent rw
Shuan paper Hit rough hairs in synthetic
sable watercolor brushes will also easily
break the delicate Shuan paper.
Masking Fluid
Use masking fluid to preserve detailed
areas such as the focal-point flowers so
that they aren’t contaminated during the
color pcnin ng and blending process. I pre
tera light yellow masking fluid, but I used
a gray masking fluid for the watercolor
demonstrations in this book since it shows
up better in photographs. It doesn’t matter
what color o! masking fluid you use: but
keep in mind that brightly colored fluid
can distract your eyes and interfere with,
your color perception.
Handling Masking Fluid
When you open a new bottle of masking
fluid, the sol ids arc usually condensed in
the neck of I he hot I le. 1 u se t he ha nd le of
a small brush to stir the solids back into
the liquid Don’t shake the bottle since
this will create bubbles After applying
masking fluid, replace the cap immedi-
ately Its not a good idea to use masking
fluid that has been open lor more than
a year. Old masking fluid is difficult Io
apply and remove. Worst of all, и can
become permanently stuck to the paper.
Мли.н:л15 ± lLV%Ju Tr.LHNrqUbb
23
Applying Masking Fluid
1 essentially use two tools to apply mask’
mg iluid. For large areas such as a whole
Hower, I use my fingers. For smaller
areas such as stems and grasses» I use the
wedge-shaped end of a brush handle. You
can make tiny strokes with the end of a
brush handle if you use its sharp edge,
or you can make large strokes if you use
the flat side.
Correcting Mistakes
and Speeding Up the
Drying Process
If you make a mistake while applying
the masking fluid, wait for it to dry, then
remove and reapply it. Masking dries in
about an hour, depending on how thickly
il is applied and how much moisture is
In the air. Masking fluid manufacturers
recommend letting the masking air-dry.
However, I've also used a hair dryer, and
even pul it in direct sunlight lor quick
drying. I hold the hairdryer a minimum
ot 2 feet (6km) away from the masking,
and I don't expose the paper to sunlight
tor more than half an hour,
Removing Masking
To remove the masking. 1 use packing or
masking tape. Cut the tape into pieces
about 2 inches (5cm) long, then press
the pieces on top of the dried masking
and drag and peel the masking from
the paper. To keep the masked area
clean, peel the dried masking away from
the center of the masked area outward
toward its edges. Also» change to a new
piece of tape after a tew uses.
Ahiskmg IVitJf Fingers (top left)
1 use my fingers to applv masking fluid tn largearea^
Afaskirij* IVft/r Вrjrs/i Hum/fe Hop right)
U v ! he i' rui .-st д finish h.i nd le tn create stems л nd
^rweswith masking fluid.
Rente twig Af «sling (bottom left}
Apply 2 i nch 1’51 mml piece* nt tape to t he maski ng
aixl peel the tape up to remove 1 he maekinjj.
24
NEGATIVE PAINTING
I frequently use negative painting to
define objects a nd create beaut itul effects,
as you can see in nianyot the demonstra-
tions in chapter tour, Here is a simple
way to implement this technique in
watercolor You can apply this technique
si m i la rty i n ( -h i nese pa i nt ing.
I PourCotoo’ drid CM Our FtowrSfaape
Pour or wa«h m the three primary colon. Nue.
yellow and rcdl. After the paint druA, Use a brush
to call nut t he shapes -H the Hoswrs with blue (nr
a ocfcr with a darker value than the base colors)
Ijghlly Wet another brush and use it to blend
the blue chat it gradually fades i orn the bock
ground colors Without a hard edge
2 Define the Edges. then Blend
Use red to defi nr t he Area where the two rlowc rs
touch Jjeave a hard edge леи to the doser flower
hut blend the red into the Jknwr behind so that
it gradually blends into the base colors
5 CM Olli the Petal*
Callout the petals ol each Hower Utoone brush
Ln apply the red al the base nl the pclali, then
lightlv wet another brn;h a nd uw it tn biend the
color couurd du- tips of the |4tals.
I Dt’/irrc the /. mvrs tiad Stems
Use u. pa rate Ivu^tus to define leaves and item s,
as in яер 3 Uh* one brush tn apply blue and
another to Wend the blue into lIil base colot %
NEGA riVl PAIN 1 ING I IPS
1. Раяil around the obvcl. but don't paint the object.
To u ndcntand thh «wept, place one of your hand ь
on л sheet of paper and open your fingers. Paint
amu nJ rnur ha nd and fingers- 1 irt your ha nJ up a nd
you can tor its shape с /rated by the paint a mu nd it.
2. Retain the base colors at du* object4 color even
if they don’t *caL«icaliy represent the colors of the
actual object l-nmamplr, it4 OK tnr Iraivc to remain
Nur or dark pu rple (11istrod ol gtееol You wi II define
lhe shape nt lhe nbjecl by pointing around it. and its
shape will make И s identity dear
J. Pnvrvr the object4edges, while blending them
smoothly ।neo the ba ч- colon nt the backgmcind.
4. lhe blending brush should be only dtyhrly wet
И it has coo much water, it will blend the color ton
much and wash nut the base colors
MArEtUMft 1 ПАЛП jhiltNlOtbs
25
STRETCHING A CHINESE PAINTING
When colors and ink dry on Shuan paper
(both raw and mature), the paper wrinkles.
Also, the pigments sink nlolhe unpainted
side of the raw paper, making the colors look
drab. To remove the wrinkles and showcase
the vivid colors, you have to stretch a fin-
ished Chinese painting Го do tins you'll
attach another layer of Shuan paper to the
hack of the original painting.
A
*4> a
StwlcJirnX ЛЫгтй/у fnk»n*.)
This picture show* the materialsyou need to stretch
a Chinese painting wnllpaper p*ute,a Л’Л-inrh We m l
take brush, paper towels and a spray bouk
Ltasfrefcferf Painting (left/
Ffcre’; the paint ing we r e d retching And the double
layer naw Shuan paper underneath
I Ati’gw Pimi/r dm/Spr m IVrt/i Iter
Mark two edge* and a corner of the pat utmg
nnthe glass with masking tape, almut 2 inrh<?<
i fcmMrnm the edges nf the glass. Lay the paint-
I ng upside dmv n cm the glus, aligning one enr
ner a nd twoedge* with the pieces ot tap. Spray
with water until it’s |uu wvl
2	Apply Wallpaper Paste
Use the large Hat brush to apply the wallpapci
paste to the hack nf the paint ing Start 1 rom the
center nl the pointing and brush nut toward
the ng hl edges- Continue to apply Lhe pa.sle to
the left side of the painting the same way
3	Bru* Jr Oltf Bubble
After brushing nut die bubbles (air gpps between
tba* pointing лги! the use л paper towel tn
wipe off the spilled paste around rhe painting He
careful n« to touch the painting nr it Will tear
2 b
4	Begin Applying the Кии1 Sbuufl Paper to the Back ofPainting
Rnl I up the raw Shuan paper and hnld it i n ynur nght hand. Uv you г left
hand tn roughly align the tower-left comer of the raw Shuan paper with the
k’-wer-kfl corner ol the gbuv Slowly lay a small portion ill the raw Shuan
paper down onto the painting
5	CcuiHmw Apphni^ the Raw Shuan Paper
While dowty unrolling the raw Shuan paper onto the pai nti ng with
your nght hand, use у our Lett hand and She paper tnweJ noil to gently
pn^xthc raw Shuan paper down onto I he pairvting After the raw Shuan
paper attadte&totbc painting completely. uw yxwr right hand and liw
paper towel mil tn further Hatten the raw Shuan paper, attaching il
strongly to i he painting
6	.Attach Painting to the Plywood
Immediately brush a inch ihmml bordered wallpapi г paste amund the
pct irnetcrs of the raw Shuan papen then use both hand.t to lift up the raw
Shuan paper a nJ the paint lag together. (Start from one Lome rand lh*inlift
the whole painting.) Attach the peri meters nf the raw Shuan paper tn rhe
5-ph’ plywood. It wilI take ttwral hour.* few the painting todry, depending
on the humidity
e
7	Си/ the Painting From the Board
When tIw pointing and the raw Shuan paper nne анпрк-tdy dry, the poitit- >
ing will be llal wHIumiL any wnnklci. Cut il Irnm the plywood by dicing the u
raw Shuan paper at about  meh H ml from the edge* nt the painting >
Now the jxunting can Ik matted and framed like a waiertnlor
н
z
i
c
CMtr: HID (Тпдем jhA мЛ лч'мг. щ шч \Jiu.jm pw/wr J4 * . 2i ' л HcrttJ
SECRETS OF
CHINESE PAINTING
COMPOSITION
Chinese painting compositions are unique and create an aesthetic
that is distinctly different from Western paintings. Among the secrets
of creating these special compositions are: clear focal point, strong
contrast, relative balance, three-line integration, grouping objects
in geometric shapes, dynamic orientation and leaving white space.
Study the lessons in this chapter to learn how to incorporate these
composition secrets into your own painting
FOCAL POINT
The focal point in a painting is like
the commander in a group of soldiers
Without .1 leader, the soldiers tight indi
vidua I ly rather than asa team. They must
tight together to be successful ni bailie.
Likewise, without a local point, objects
on a painting have no relationship or
communication with each other, They
look like they just happen tn he there and
lack interaction a nd connection.
Generally, the local point is located
in one of tour primary spots: the inter-
sections of nine equal divisions ot the
paintings (three horizontal and three
vertical). I lie circles on the illustration
above indicate the lour spots. This con
cept holds true regardless of whether it
is a vertical от horizontal composition
Compositions centered in one of these
four spots are naturally pleasing to the
viewer’s eyes.
IVeffcnt Cormeition
П in division into thirds is also enmmon ly
iiwd in U еМсгп painting. Il it nlten ndetxed
tn a, rhe "гик n| thirds.’
Fora/ porn L Lower Right
The flnuvron ibr lower right i; the focal
point. Ils petal, arc forge j, iw colors are
more ViVid. and il hax more delatk thin
the flow? above
NIGHT NARCISSUS CWfliVi«Loud
rotor l*?i rd iv S/inj/n pci per i*C x Г S
fjfcrir x
Focal point; Upper Right
In this-painting the fiical point is located Ln
the upper fight The flower there is large, with
IпТспк*colort and moredetail s.
Focal Point: Lower L eft
Similartr* Chinese paintings. Western watiTvnlor paintings can also have
hu al points fall I ng on nix of rhe fruit sp I he two Hower, on rive lower
left dcumnate the object*- in the painlmg
wai ъя t.i I y ivuren-otartwi Ardies M0-/6. fJildjpmJ ra/d-pfwsed
nwreriwW paper Jd" X JT’|Скх гл x Лктл/
TIG It Я 1.1 LT	CWn«e frrk 0 nd .vu’pt-
ntw Shuum pwpvz M " x 2o ’ Hdcjti x 6tSrnt)
SEVEN PRINCIPLES
OF CONTRAST
Another Chinese painting composition
secret is rhe emphasis on strong con-
trast between dark and light, huge and
small long and short, singular and mul-
tiple, vertical and horizontal, defined
and blurryi and shapes and lines. This
principle is based on an ancient Chinese
beliet: things In the universe are created
in opposing but complementary pairs
c.g., light and dark, lire and water, life
and death. The yin and yang symbol
(right) represents this concept: lhe two
parts are opposite but rely on each other
for existence and survival. On the fol-
lowing pages you can see examples of
the seven principles ofconlrasL
Purl Itf, hgfif
The wry dark focus koveson the left cor* гам
•strongly ivilh tbir light leaves rm the nght
Together they creak a Harmonic eristcnce
If all ihe leaves were the same value, the
Сйпфоы1Ш1 would be plain and taring
Ww and У wp£
ThiA well-known symbol represents lhe
Chine»: ph ifosophy that th** e foment* nt
the universe arc created in opposing bur
complementary pairs.
Lan# w. Short
This painting has two тази branches, onr of which и longer than the other
II they were lhe umc length theccirnptMitinn would scu m mechanical
bir/e и,
lhe larger flower near tlx* center contrasts with the
smaller Dmve r ixx L tn il on 1 he right. Alw, il al lows
1 he la rge г Hower tn dnm i nal e I he rompcsirinn *| hc
imalkr flower brings more attention to the Larger
Ikwcr and makes st seem even bigger
X‘LM.IM‘1 L112SI>1 I’AIN 1 ISU (.LLMimbJ J IOS
Sln^w/drv>, Multiple
In grouping the objects, it's
best to avnid axogning thu
«me number nt objects to
each group. Thia composi-
tion has a Ini nt flowers nn
the upper parr and lust a few
flowers on the bottom I he
void in the Inwr poninn nl
the painting create* a break
lor the eyes
Vert/caf vi. Horizontal
Hu? i-ompoiitinn showsiwn maiorfnncrs crossing fiich
ether in an interfiling wav 11к flowers Immlelltn nghl
form a strong hnrixnntal The stem and leaves fnjrm a
strong vertical. lliew lines create tension. as well as аПглс-
linn. jhe hnn/xinlal and vertical lines arc nnt straight lines
defined by th rec points as In math lliey relate tn forcei
: lines) crnswng each other in a ruin right angle. Bvaeally.
1 he I ip<s don’t haw tn be rnmpleh fy straight nr rompMHy
vertical or horizontal.
III И 11 ОI PA И Л 111 5 I'	OtlWSC rrik ।nut iljfiW* пл
iing/e-u’dpe’r rd и .S/jHUfi pitptt 22" X XtT (56t'rw X	MI
Ihafiiifd vs, Blurry
Objects in a painting arc defined bydiffcTunt
lewl s oi drtai I and va lue. This va nanon -n detai I
and value i traces depth ns writ ns a clear local
point. Hem, part nl the barge branch is pa i л Led
with intense, dark ink. while the nt her portion ?s
Murry and light. I lie same principle can he seen
in th*’ smalkrbranehrs This i ttcvr *s sim ilar tn
a close -up picture lhe йкич-Л object is clear
while the rest nt the image is blurry.
Chinese paintli^ relies heavily on hrtuhanokes
to dtditv whjcctv When strnbes ane larg»’ they’
С-.1П become shape ^nr ми^лсга llw four leaves
.shown here were painted with a lew strokes
and they app. ir as sliapes that arv much larger
thaji the strokes outlining the flowers. lhe
contrast between the shape; and I inc* makes
the paiiirmg^lrig
BALANCE
Balance between objects is an important
part ot Chinese painting composition
Hus balance is not perfectly even fright)
On rhe other hand, a composition totally
out of balance doesn’t reel comfortable
(far right). Balance in Chinese painting
composition is a relative balance. Imagine
trying to balance two objects ot different
weights on a scale. You must locale the
heav.er one closer to the pivot poi nt. wh i le
lhe smaller object should be farther away
In make the objects balance The three
paintings below illustrate different ways
rdative balance can he accomplished.
Evenly HuJawn/ txwiposilrou
lhe perfectly even balance ul the twn groups
nl bamlw is i•inl-чп torth-or ig Chinese
painting composite mi involves relative balance.
Ibitafa need Comportftou
J be left side ol the painting iiempty, and lhe
wrwen eyes will seek sonneth i ng there Tr ill 11 he
void. include another .smaller poupnf flowers-,
«птc cal I igrap4iy, and ynur sign.itu re a nd chop
Rebtffre Balance: UWrador Ри/гИйде
'Ihecoiiipv.tftiofi pi in^iplu implemented in
thn waprector is sjmi Isi r in th.it nr rhe Ch i nev
paintiftg I near ngjul arwJ it works well
graves wferrnioron Ardw WO tb
(JiKigsrnJ	wfwltv pupef
14“ x 1!* f-kx. in x 53cm)
Itafcttfw Bdi/iwe
]Lc bamboo on the righris painted widtdaek
i пк л г J has a heavy лррелппкг On the Irh. thr
bamboo is depicted wit Ii I igln i nk lhe I ighter
bamboo combine** Math tl» calligraphy, signa
ture and rlvrp ns a whnlc to halaive the rigln wde
Here, the heavier center u balanced by objects,
on hath sides.
KOI I I •< i.UXlI > *' "ч I I 41S Л i- IK. JI > KlVjfill/<
THREE-LTNE INTEGRATION
Another Chinese painting composition
secret i$ the three-1 me or three-force
integration that leads the viewer’s eye
around the composition. Objects in a
pamtmg are organized into three groups
(one major and two minor). These three
groups act like three h nes crossing each
other to create harmonious interac-
tions. Keep the following in mind as you
arrange the three groups at least two of
them should overlap, they should not he
parallel, they should all move in a similar
direction, j nd one group should bedom
inant and the other two supporting.
Hirer-Li we	uf H'orA
Herevnu елл fcvfourccnapoetinnstwUigdinic-Umikntc^rttlon/nie beaver
dotted line with lnrjj<vArmis’hej*fsiruiicatrthrmaxvhn<4 ignxip«)
Mtignoita TJrrrr Line Diagram (above)
Hiirnunuom Interne1iOrn
Ihe heavy dotted line in the middle iifdiep&i nil ng indicates du: maun
gjroupaf magnolia tl-пмлтч ih.it extends trnrn rhe h*xtnm kit through thu
middle right and upper leh. Ft helps to enforce the focal -point flowers
in Lhe mid.dk right. A minor Urie (group) пПмипиЬсл, leave* and budt
. xtends from th*- upper middle nghi down rot hi- lower кН lhe hraorh
cxichdinj* from the lower r ight corner to du- lower к-ft forms another
m i nor group ’Пи- глуп m i nor I шея integrate and overlap нч1 h the majnr
line, creating an intereattngcompnution
mag NOL1 л Cfowse fofc Mid color ori яц^/iiyrr ru iv S/imcpi piper
x 211’ pMem x SAin.l
Л4
Dfrech»^ the Vie i*rrr< Fir
The rwn orchid blossom along wji h the
large leaves an cither side, liirm tin. nuinr
I me The two t lowers creati* th< focal
point. Iwo mum lines formed hy the
Items» roots and kaves start al the bot-
tom of the pel nting and mow th rough
the Howers to the lap Ihrse mnxw lines
di rrrt the viewer s rye to th*- (oca I poi nl
DOI! Hi Е ОЯСШП5 Ourt-’fc* fnAi
<rrh/ cafor mi iru^e-tayer r*nr Start»
paper W x 24 ’ H&f/rt x бкт)
Double Orchids Three-Line
Diagram (left)
к
Мсг/вгшм/ Miwr I ina
Thebgcr Illy stem extending fniindk.*Ml<nti t.^lil
to the upper left creates the major line and focal
po, in of the painting The smaller lily and wem in
du background is a minor line that is paraJld tn the
maxwiir* A parallel linetendon look st.rl <r aenrr-
positMMk ’Ihcrdba-.rtriccdsaiwthci minor! I iu. Ihu
1 hi nl I me, formed hr rhe la rgc leaf extendi ng from
tlx- lower nght to upper right, breaks the rigidity
ГIG l! И L11 Y Cfanwe ent rind n>toron single-
fo ver гичу S/nru'ri fuper 20" x Lt” (51 rm x J3e/n J
Гдегг Lily
Jhree-Liite
Diagrams
Three-I ine Integration in Wiil^rtotor CoittjwWru
П rcc-hik: integration Lfi.alL-sliLUbtlful Liiri.pHwlinrK InChim-M. paint
mg. sol civ It in witcrrnlnr paintings a* well In th is example, the trunk
and thccncomit.i tngethef farm nn upward line, the major force hi the-
unmptHition. lhe leaves nn lhe tup fam a minor line, eilending from
right tn middle left 'lhe stem andihe leaf on thr lower right and the bird
liecome the other minor hue
COCUNUI П11 ANM Itlflli wrwnfaruri Arrfo’f i4d-l'b
fJWgsm)rih!Lf-presscd miteriofor ^i^r 2-1" x	x 4<к*ш)
\l.l ll .’.Is CM . H.StJSI. I’MS 11 Mu самтм I IC*S
25
GEOMETRIC ORGANIZATION
Organizing objects geometrically in a
composition is another Chinese paint-
ing composition secret. These formations
create interesting and hcauti in I painting?
that keep lhe eye flowing through the
picture plane.
Geometric Compos trow Comparison (n&ow)
I .<r я an*i hv.d tw sketches to see bow che uw nf geomet nc nrgani ration
allecu Ehl composition lhe 1x^4 lyl^ixks Oairlie left ait arranged in a circle,
while die Ikiwcrs an the nghl are hived nut i n an S-shape. I lie circle causes
iheeyv to move around the «imposition, rd rawing (hr focal роик.чп die
lower left. Similarly., the S shapefortns-aii ink-reiting path for die viewer’s
rye. leading it cn lhe pnint ni interest on the lower nghi
Arc Shupe (left)
Here the flowers and leaves are pamted i n an arc tfiapc IliU compowtinn
is more attractive dian painting Lh«.m die way sunflower*actually gmw,
untight up nod down
SU S’ F L OWER (.Vuntil ntk dlftd iijLr» lmi	rtJU' .SJlltiiri fMp£t
27"x 1У*(бйгт x
Rectangular Shape
Ihc uiitLi Ij Npieads uut tn the turn coi tiers ui lb* paper, lot ml ng
4 redangiilir shape This shape has the p*wrr to grasp the viewer's
attention a! first glance -because of its fullness.
vvisTi- hi д Ошим гик aridcolorvhtjfte-totr r ruwShaunpupin
It)" x J4” (25c ni x 36cm)
Triangular Shape
A. basket containing grapes is larger at the bottom*
tiH-nnngihr huv- nt I hr triangle. Il hr cnnies.smaller
at the tof^ suggest 111g the lip of themangle. Then I-
angular shape lend s a sense nfstahility’to the objects.
GRAPES AND BASKET Chniese ink
11nd color ort tingle-layer raw Shaun paper
24' x Зо'Уб/пл x 9/a.vJ
Georne/rrt Organizalfon in
Watercolor Compaq too hs
The arc starts with the three orchid flowers
in the middle right and continues to the
left with Hie пн Ил and stems. Il ih*n <urve.-
down toward the tower left with more roots,
flower buds and unothei flower It ends at
the bottom tight. Arranging objects on an
arc creates a circular, flowing motion View-
ers si .i r I w it h I hr ti и a I • poi HI (towers i n 1 he
upper right. After they haveenpiyed those
details, their eye* move around theanc, tak*
trig in the whole picture.
OttCtllD PI OWKRS n-lirerruJiiron
Arches Wtl-lb. fjOfljgsnrJ cu/d-pressed
wuterudor ^rpc r J5 ’ a 24 ’ fdtfrrti •< 6/пгт?
5L« HI TS Of rillSE -r. TAINTING COMPOSlTiaX
DYNAMIC MOVEMENT
Another important principle In Chinese
composition is (he dynamic movement of
the objects as a whole In one main direc-
tion. This creates tension and communi-
cation between objects and emphasizes
the local point
Crnrru/jiri ng Movemenr
Ibis ink sketch is a gcxxl example cif cen-
tral i? ing movement The lcav<«u stein«a nd
gratae* a II lead the viewers eye toward the
crnkrnl rhe painting, where the Ifowrrnnd
the drngonlty form thr focal poml
CeFrfraftzmg’Afewmefft in РшШггде
Compare dm painting to the ink sketch on the lek You
can ^ec the similar I tics
THUM РГТ CREEPER	("hirreseoik «/n,f rojnr nu rww
Skinrii pripci JN*x J6" (46crif x nrnvuj
Uptown/ Mo метел/
In addition IocentriccricntatHwi. upward, downward aixl hnnZnnLal dmx
non*ore а1и>сопшюп1у u*cd These three images are al I upward moving
compositions. However, cuchvariei blighrly at die top: Ihc corn rtock
(above left) «hi in toward 1 hr Irti, the v«v and thr flowers (ahow nght)
иге straight upaBddowm and ihc hilnwus (right) shifts in the right
1I1B1SGVS Г Juni'u1 ruA u/u,' rolnr ini mw S/нгяи /мргг
_ч < _4 ’ ffl-Jem < h/cnij
.MAGNO U Л C.htHCSC JJJX Шп/со/оГ 0H
5nij»/c /dyer nhv S/rmrnpdprr И"к 18"
ГЗбеги x ^бОП)
Downward .Movement
These three paintings are all downward mewing
viunpiwil nifis. In I hr painting cm I he lower left,
the tnoriMng glories hang down Lowa/d the right.
In lhepainting on the upper left, a branch moves
from the upper right Inward iht* lower left
leading viewers' eyes to the small insect. In the
painting above, the tlowrrsand branches mow
iruin upper right toluwei left.
/ lorizvntal Movem cut
I his ink painting tier left) is an example of
a horizonufty 01 tented Lumpusilruti. lumaln
force moves from right to left, twinchingcrat
a little <>n the way
V)
LEAVING WHITE SPACE
lhe Iasi but must important principle of
Chinese painting composition is Icav
ing white space on the paintings. “Count
the unpainted area as painted” is a very
common phrase among Chinese painting
artists, lhe unpainted area un a painting
provides a place lor the eye to res I MOK
importantly, it invites the viewer to use
his imagination to complete the painting.
As a result, he is more attracted to the
painting since the longer he luuks at the
painting, the more he can led and "see?’
Room for the
Imagination
this painting has a Lit
of uti painted space*
where yom eyes can rest
after viewing the vivtdly
colored tinwein. Yuli Саш
also imagine whatever
you want to see tn those
spaces, such as other
Hi»wvrs,small animate,
birds and insects
Two Mediums, Олг Technique
I .caving whiles is also essentia I tor wa'.rui iloi coni position. Heir art* two
paintings ot the same subject, one done tn Chinese ink and color and the
other in watercolor. Ikith have white spaces. In a way, the whites on the
painting aie like sccicts that ait-being kept treini vlkc You ait- interested
in tinding the secrets out. but you have to spccu kite about them by y« lursek
lhe more you want to know, the morecurmlisyou become and lhe more
pro NY ( a BOV г I HwfcTcu/ur <m A nches MO lb. (JOOgsm)
cold-pref fed watercolor paper 14 “ x 2 Г (Ж* m x 53cm)
PEONY (I F FTI ChllifH* лД mid га/ргпл HJH- -S/iruur paper
J6‘ x 20” (4 km x 5km)
attractive the painting is to you
I и
COMPOSITION METHODS TN ACTION
Now that you’ve learned Lhe secrets
of Chinese painting composition, let’s
implement them with hands-on experi-
ments. This composition method pro-
vides maximum opportunities to create
numerous compositions from lhe same
sketches by tlippi ng and rearrangi ng the
sketches. Also, n reduces the amount of
sketching and erasing on Shuan and
watercolor papers, which saves time and
prevents paper surface damage Here arc
the bask steps for creating compositions
with this method:
1 Choose a 15" < 22" (38cm x 56cm)
sheet of Shuan or watercolor paper
(this is equal to half a sheet d! water
color paper). Now get a piece of tracing
paper in lhe same size (either by cut-
ting a large sheet or pasting smaller
ones together),
2	Lay I he tracing paper on top of lhe
Shuan or watercolor paper.
3	Choose several flowers among the
sketches and arrange them on the
tracing paper as focal points,
4	Arrange other sketches of leaves and
stems on lhe tracing paper to com
pletc lhe composition.
5	Use cicar tape to attach the sketches
to the tracing paper,
6	Put the tracing paper with the sketches
on a lightbox or a window, and lay the
Shuan paper or watercolor paper on top.
7	Trace t he composit ion onto! he Shuan
or watercolor paper, You can use pen-
cil to trace on watercolor paper. Set
"Chinese Painting Materials'" (page IK)
to see howto trace the images onto
Shuan papers.
Below arc four different compositions
I got from lhe same sketches using this
method.
Iris SAefcAe*
Here are d i he rent sketches nt i ri s llowers,
kaVcs and slvm 1 an tree i m; paper I d id them
rin I argc- pieeeR ni paper, which 1 mm med
down Now I will liw dww sketches to for in
a Variety nl OHnpCKdkmL
1 crtkal Compositions
Inhotli cnmpnsir inns, 1 pl лам object! higher on rhe kfrand inwron the
right. Hnwuvcr, by placing more flowers-tn the upper teft in nix image (left)
a rxi more in Lhn Imwr right i n : h</ <X her I nghl !, I've created з di It erent local
pni nt fnr each
HcuTzowta/ Comprotaortf
In both nt these cnmpnsiunns the objects л ГС
arranged on in art-shaped path, moving from
Ihc upper kn dmvn tn ihc middle Center and
curving up again to the upper right When
wc change die quantity of flowers at different
inns xw creflte й di Here nt local point in
each cnmposit ten
>y.l.d i. L s CM 4 I!. Vl-AJt 1*AI * П N<J< O.M I'ibll jo>
-H
MAG NOT TA	ii’tfh’iVflwwi'm АггЛсХ »6 pfltygvni) гг.чЛ frnwjf wftfrnrtnr/id/'irr T5nx 224 (Jtfrin к 56crw)
42
DEMONSTRATIONS
Having learned the basics of Chinese and watercolor painting, its
time to implement the theories and practice the techniques. When
you follow the step-by-step demonstrations in this chapter you may
not achieve the same results as 1 did. I can’t duplicate them either
Focus on learning the principles rather than copying every detail.
I ry using different colors. Or, instead of copying my brush-loading
sequence of light pigment at the brush heel gradating to dark at the
tip, you can experiment by loading your brush in the reverse order.
Most artists develop their own painting method. I encourage you
to temporarily forget the way you normally paint when following my
demonstrations. Learn the principles and essence of my techniques,
then integrate them with your principlesand techniques to create your
own style. Don't th i nk of trying to create a masterpiece every time you
paint, especially when you’re learning another artists techniques.
Finally, I strongly advise watercolor artists to study Chinese
painting. It will help you learn to control waler, manipulate the
brush, and avoid overworking. Must importantly, il will teach you
to discard paintings that have even a tew wrong brushstrokes. Keep
practicing and you will achieve your goal.
CHINESE PAIN II Hr DFMilNSTR ATI'JN-DF TAII STYlF
IRIS
Learning detail style is the foundation training tnr Chinese artists. Its equivalent tn learning
to sketch m Western art. In the beginning, students learn how to use ink and brush to sketch
objects with strokes (lines). When they have sullinenily developed their skills. they a re ready
to develop detail itylc pamimgs. A ricr they have reached a high level or proficiency, they
are ready to tUvelop spontaneous-style paintings.
S MATERIALS
PAPER
mature Shuan paper, 16* ж 23’
(41cm x 58cml
BRUSHES
small * medic™ • large
CHINESE PAINTS
White • Yellow • Berne Sienna •
Vermilion * Carmine, Rouge •
Phthalo В ue • Blue - Green Labe
Гпгес - Ind go
OTHER SUPPLIES
Chinese ink • :racirg paper • ballpoint
pen * transparent tape • drawing
tape • репс l.ccilicr-ah
i Form the Composition With Tracing Paper
Use a ballpoint pen ar pencil ta sketch the iris flowers an tracing paper, then cut item
out separately. Arrange the cut-out sketches on э 16“ x 2 3 ‘ (41cm x 58cm) piece ol
tracing paper to form a composition Attach the sketches to the tracing paper with
transparent tape Lay the mature Shuan paper on top of the tracing paper and attach
them together with several small pieces of drawing tape
3 A ppi у Foundation Colors
When the strokes are dry. use a large
brush to apply Carmiine and yellow to the
flower area and Phthalo Blue and yellow
to the leaves
i Trace the Composition in Ink
Dip a brush into a small amount of medium-toned ink and hold it straight to trace the
entire composition Use one hand to hold down the mature Shuan paper while rest-
ing the wnst or forearm ot the other hand (the one holding the brush) on the psper
Move the lorearm and the hand together when painting long strokes
44
4 Paint тпг Background Foundation Colors
Paint the foundation colors of tin? background in Hie same manner with
yellow, blue and Carmine. Blend them smoothly into each other
5 Add Another Layer to Intensify Color
When the background colors are dry, use small and medium brushes to
apply Rouge, blue. Phthalo Blue and ink to intensify the value
6 Start Painting the Pf.tais
Use a medium brush to paint the first three
petals of the central flower with Rouge
and Carmine. Lightly wet an other medium
brush to blend the two colors smoothly
into the foundation colors
7 Continue Painting Petals
The petals above those three are lighter
and are orange-yellov-* Apply yellow and
Vermilion at the bases and white at the
tips Blend the colors smoothly where
they meet
•i.WUJ tussoi^iu
is
Я Add Texture to tfif Petals
When the colors are dry, use a small brush to
paint texture on the petals with undiluted yel-
low and white. Use more white pigment on
petals with light base colors, and less whrte
pigment on petah with dark base colors,
9 Paint the .Stems axd Leaves
Use a couple of medium brushes to paint the
stems and leaves First apply Burnt Sienna and
then yellow, Green Label Three and ink wet
into-wet The colorswill blend into each other
loosely and create beautiful textures
10 Define the Leaves a.vd Stems
When the colors are dry, define tin? leaves and stems by separating them Use a medium
brush to paint Indrqo into the portions of the leaves and stems behind the overlapping
areas. Immediately use another slightly wet medium brush to blend the Indigo away from
the overlapping regions into the base colors
11 Loosely Call Out Distant Flowers, Stems and Leaves
In the upper portion of the background, use the negative painting technique (see pages
24-25} to loosely call out the distant flowers, stems and leaves. Paint around the objects
with a mixture of ink and Indigo. Leave hard edges next to the other objects, but smoothly
blend the remaining edge into the background colors rhe darker the background color
the more Ink should be used for the negative painting.
11 Highlight tuf Background Flowers and Paint тпг Rocks
Highlight the background flowers with yellow and white Use the negative painting technique
to define the rocks at the lower portion behind the leavesand stems. Use a medium brush
to mix ink and Indigo, and paint the rock edges Lightly wet another medium brush to blend
this color into the background
i r r5	жА <indm/or uw i^cirwm Shirii» рирет 16” * 23*(4kn? x
47
LOTUS
This style of Chinese painting influences my watercolor floral painting more th.in any
other lb combination of detailed flower» with a spontaneous background creates a unique
contrast between tight and loose, defined and blurry. Viewers enjoy the detail* of lhe flowers,
□nd they are able to “breath” and use their imaginations to complete lhe background.
I think we can extend this approach to our everyday lives, work hard and relax well.
« MATERIALS
PAPER
mature Shuan paper, 14“ x 18'
(36cm x 46cm)
BRUSHES
small • medium • large • extra targe
CHINESE PAINTS
White • Ydkjw • Vermilion • Carmine *
Rouge • Green Label Three • Indigo
OTHER SUPPLIES
Chinese ink • tracing paper • ballpoint
pen • pencil (dpumall • spray bottle
i Sketch the Composition and Transfer it to Sjictan Paper
Sketch the composition with a ballpoint pen on tracing paper Lay the mature Shuan
paper on top of the sketch with the side up Use a small brush to trace the objects
onto the mature Shuan paper with medium-toned ink (dilute the mk with water) Hold
the brush straight so that itrs easy to make thin, uniform strokes. Apply a little more
pressure to form thicker lines at lhe turns and folds of the petals
•1Я
i Tone the Flowers and Hdds With Ink
4 Paint the Red Flower and Add
Ione the flowers and buds with mk. Use the small brush io apply medium-toned ink at the
base of each petal immediately use a slightly wet medium brush to blend the ink into the
middle of the leaf, but leave white on the tip.
3 Paint the Petals, Stamen and Seeds
When the ink is dry. use the small brush to apply light yellow at the bases of the petals
With a medium brush, gradually blend the yellow into the middle pan ol the petals, leav-
ing white on the tips. Wait until the paint dries, and repeat the process with more yellow
Apply a little Indigo at the stamen. Paint the seeds with yellow and white.
Texture to Both Flowers
Next, use a small trush to paint the tips of
the reddish flower with Carmine and a little
Rouge Lightly wel a medium brush and use
it to drag and blend lhe color down lo lhe
middle areas. When the paint is dry, take a
small brush and paint the texture Imeson rhe
petals using Carmine f<x the reddish lotus and
white lor lhe yellowish flower.
ntMUNbl KAllDNb
49
5 Sprat Water Around the Flowers and Buds
Start painting the lea^res and background by spraying water around
the flowers and buds. Use one hand to shield the flowers and buds
so that they don’t gel wet
7 Add .Mori Leaves and Stems and Paint
the Grasses With Ink
While the ink is wet, use a large brush to add more leaves and stems
with dark ink Also, paint the grasses with minimal strokes (one or
two strokes per stem or leal).
6 Paint the Leaves and Stems With Ink
Use an extra-large brush to paint the leaves and stems. Wet the
brush and load ink onto its tip and middle. Hold • t sideways to paint
the objects The distant leaves in the upper section should be lighter
in value. Dilute the ink with 'water to produce this lighter color
8 Paint the /.eaves With Color
Immediately toad a large brush with green and paint the daik leaves.
Mix Green Label Three with yellow to pamt the cthe* leaves
9 Рд/х’т тпг G'rassf.s With Color and Sign tht Painting
When the paint and ink on the leaves and background ate approximately 80 percent dry. use
the small brush to mix Vermilion and yellow to paint the light grasses. Sign and place your
chop at the bottom right to balance the composition
l otus С/НИДО fJjjk Uilri	<rn ftktfw SJwtlfl pilpfr ЛГ X 18' ftfam X
51
MAGNOLIA
In thisdemonsl ration voif II learn how Io load iwu colors on a brush and use one .stroke
to paint a single magnolia pciak This is a bask Chinese painting technique for painting
Howers. Once you master tl you can load even more colors on one brush to paint other
ikiwcrs in a similar manner.
К MATERIALS
PAPER
single-layer raw Shuan paper. 2 Г x 1G‘
i53cm x4tcm)
BRUSHES
small • medium • large
CHINESE PAINTS
Blue • Rouge • Vermilion •
White • Yellow
OTHER SUPPLIES
Chinese ink
i Wft the Large Brush and Load Two Colors
Dip the brush m water and let the excess water run off, Then
load the tip with white and the heel (the part of the brush head
closest to the handle) with Rouge (For more information on
loading a brush see paqe 20.) Dab the brush on the palette to
allow the colors to blend where they meet
3 Replenish Water. Load the Brush
Dip the brush tip lightly m water and tilt it upside down to
allow the water to flow back into the brush head Then reload
the brush and continue paintmq the other petals as described
in Step 2 Immediately use a small brush to add texture to the
petals with Rouge
x Paint Flower Petals
Holding the brush sideways as shown in Step T paint three
brush strokes to form flower petals lone stroke per petal} Lay
the entire brush head on the paper, with the tip at lhe top (It's
almost like stamping with a brush ) Start with the petal on lhe
right and work yourway to the left. You can see the watermarks
at the overlap between each stroke, a unique characteristic that
only raw Shuan paper exhibits
4 Paint Upper Flower, Add Texture
Use lhe large brush to paint the flower in the upper left with the
same technique you used tor the first flower To paint the buds,
hold the brush sideways as you paint the petals, painting only
two or three strokes for each bud Use the small brush to paint
the texture lines with Rouge while the petal colors are still wet
52
5	Paint the Sepals
Wet a medium brush and load it with yellow. Then load it with Vermilion up to the middle
and a hnle Rouge at the tip. Blend the colors by dabbmg the brush on the patette a few
times. Lightly dip the brush tip in the ink Holding the brush sideways. with the tip pointing
toward the bottom of the flower or bud. paint two 01 three strokes to form the sepals
6	Add Stems
Wet a large brush and load ink at the tip The water in the brush automatically blends the
ink from the tip to the upper middle of the brush head. This creates a van eh/ of ink tones
from very dark at the tip to light at the middle Hold rhe brush vertically {"center brush"
see page 19) to pamt the dark stems The brush will be at a nght angle to the surface
Add a little water to the brush to paint the light stems Next, load the brush tip with a
bltle ink to paint the dots on the stems. These are called "happy dots" and suggest the
texture and energy of the objects.
7	Paint Moke Stems, Buds
Use the large brush to paint more stems as in previous steps. Also, use a medium brush
to add mure buds as shown in Step 4
8	Sign and Kai ancf Your Work (next page}
Use the medium brush and thick blue to paint the happy dob Sign and stamp in the
upper right where more objects are needed to balance the composition
5 •
М л о N о L (л	Chinese 11 ik дл J га/pr ан f m^le-kver гJк Shr«w paper 211 x J6 Г5_гсл? x 4 It i??j
W A 1 F к C D I О ft DE M 0 N S T ft A I I 0 M
MAGNOLIA
Tn this demonstration you* IJ use masking fluid to cover the magnolia flowers and pint the
background first. using color pouring and blending techniques. After the colors dry, you’I I
lift the masking and paint (he flower details. Masking fluid works well on watercolor paper,
but Can’t be used on Shuan paper because lifting the masking will tear the delicate paper
Й MATERIALS
PAPER
Arches 140-lb. (3G0gsm) cold-pressed
'AQTE-Tder paper, 15“ x 221 l3Scr^ x 56cmi
BRUSHES
nos. 2 and В rc< ’-•ds • I -inch (2Srnml and
’4-inch <19mmlt-als
WATERCOLORS
Aryde Yellow iDaY-ned • Qulnacridone
Rose Red Deep (Da Virci) • An:werpB-je
(WiW & WcwKXi)
i Хкггсп the ComposjT/o.v axd .Wash the Focus Flowers
Sketch the flowers and stems lightly with a no. 2 pencil. T lit* thre*? Jmeint^qtaiion
of this composition directs the viewer's eye in ал arc-shaped movement. Block rn
the flowers at the focal point and the surrounding buds with masking fluid (For
more information on applying masking fluid, see page 24.)
i W'f r the Painting
When the masking fluid is dry, lightly wet the upper part of the painting using
a spray bottle
3 Pour the Paint
Pour the thinned Arylide Yellow first, Ant-
werp Blue second and Quinacndone Rose
Red Deep last on the wet area. (For more
information on pouring diluted paint, see
page 22} Each color should te next to the
others but not overlapping. Spray a little
more water on top lor more blending
I H.MDN.S L К Л I lOSb
4	СОЛТГ.МТ TO BlT.VD THE COLORS
To further blend the colors, use a 1 -inch (25mm) flat brush anchor
your fingers to guide them However. don't mix them too much
or the painting wHI become muddy
5	Tilt the Painting
After pouring and blending paint over most of the painting, till
rhe upper edge of the paining about 6 inches (15km) higher than
the lower edge. The colors will flow down and blend into each
Dttier beautifully.
6	Add Depth With Dark Purple
Use the bench (25mm) flat brush to mix Antwerp Blue and Quinaai-
done Rose Red Deep into a wry dark purple to paint around the center
of interest where the large, light-colored flowers are located. Apply
the purpie white the other colors are still wet so that they will blend.
Also, apply the dark purple randomly throughout the middle-right
and lower-left areas. Adding this dark color gives the whole painting
more depth.
7	Wa/t for the Painting to Dry and Remove Masking
Wait for the painting to dry completely before removing the masking.
(See “Removing Masking“ on page 24.)

a Paint the Focal-Point Flower
To paint che central flower, use the ^qnch (l^mrn) flat brush to
lightly wet the base and middle of the petals. Use a no 8 round
brush to apply a little Arylide Yellow. then The Qumacndone Rose
Red Deep on the bases. Wet the flat brush a httle and use it to
blend lhe motors toward the tips of the petals.
9 Paint Textlel
When the colors are about halfway dry, use the no. 2 round brush
to pamt the texture on the center, base and tip with Qumacndone
Rose Red Deep.
io Paint the Sepal
After the other blossoms liatveheen painted, paint the sepal. Wet the no.
8 round brush slightly, then apply a little Arylide Yellow Apply Antwerp
Blue to the sepal's middle, dragging it toward the tip. Ai the op. apply
Qumacndone Rose Red Deep. Next, call out the trunk and branches
usmg the negative painting technique: With Cheng. 8 round brush, paint
Antwerp Blue around the objects. Then, immediately use the U-inch
(19mm) flat brush to blend the paint into the background colors.
11 L\l Negative Painting to Call Out Buds
Call out more buds from the background. Using the no 2 round brush
paint around them with Antwerp Blue. The darker the background
color. lhe darker the blue used (thick Antwerp Blue mixed with thick
soft Qumacndone Rose Red Deep makes a w?ry dark color) Blend the
pigment into the background with the slightly wet no. 8 round biush.
VNOriVV 144’O-.Vbl
11 Add FttfrsMNG Details
When the first layer of negative paintinq isdry, stait defining more brands
and buds behind with darker blue pigment. Define more layers and details
near the focal point while allowing the other areas to lade out Stop the
negative painting once the background color around the focal pont reaches
the darkest dark.
м aun Ol l л и izrtVAii и г uri Ardirf .'-ri I Ik (JQfljgwd с oM-preswd н-dk-ii r.'Jiv рггрег
/5" x J2 v (’ТХ| гл x 56£m)
(HiNFSE PAINTING DEMONSTRATION— SPONTANEOUS STYIF
PEONY
JIm.* pccwiy is cwicot the most popular tlnral subjects for Chinese paintings, hi the iciMiog-
rjphv of Chinese culture, peonies connote prosperity, abundance and beauty. I n this
demonstration you’ll try to capture the spirit of the Hewers, but not their еш color
or shape (i.c , as they would appear in a garden I
« MATERIALS
PAPER
Slngpedayer raw Shuan Dacier, 14 ’ « 1B’
<36cm x 46cm}
BRUSHES
smaBI • medium • large
CHINESE PAINTS
Blue • Carmine • indigo • Rouge »
Vt*m un • Wnitff • Yellow
OTHER SUPPLIES
Chinese nk
i Blend Pigment* on Brush
Wet the large brush and load the heel to upper-middle sei
tion of the head with white and the lower middle and up with
Carmine Dab the brush on the palette a few times to let the
pigments gradually blend into each other
i Paint the Jnner Petals
Hold the brush sideways with the tip toward the center of
the Hower to paint the inner petals Use one stroke to create
each petal.
5 Paint Petals With Large Brush
Clean the large brush. Load the hed to die upper-middle sec-
tion of the head with Carmine and the lower middle and tip
with Rouge. Dip a little ink on the tip Hold the brush sideways
with the tip pointing toward the center of the flower Faint the
petals to the right ot the inner petals.
4 Complete Outer Petals
Reload the larqe brush with the same pigments, and a little
water. Complete the outer-penmeter petals to the left of and
below the inner petals Always keep the brush tip pointing
toward the center of the flower.
<sorrv < 1 4 Ml Al 11
5	Paint гяе Cmi«
Load lhe tip of the large brush with more Kouqe and ink Paint the
center of the flower and add the dark red to the bases ol lhe petals
on the nght Gently use your finger to smear the dark red into the
base colors so that they blend smoothly into each other
6	Paint the Left H ou er
Io paint the peony blossom on the left, load a little yellow and a lot
of white on the heetf to upper middle of a large brush and Carmine
at the lower middle and tip. Dab the brush on your palette to blend
the colors. Hold the brush sideways to paint the f font petals
7	Conttnue to Paint the Left Flower
Load the heel of the brush with more yellow and white, the middle
and lip with Rouge and the tip with ink. Hold lhe brush sideways
to paint the other petals.
Я Paint Flower Center Details
Load the medium brush with blue and paint die centers of the
flower Load the small brush with a thick mixture ol white and
yellow to parnt the stamens Load the heel of a large brush with
yellow and the middle 'with indigo and the up with ink Hold the
brush sideways to paint the leases and the stems
9	Р.-ПЛТ Leavts and Buds
Continue to paint more leaves the same way. To achieve the light-
colored leaves, load less of all three pigments on the brush To
paint the two butte, load the heel and middle of a large brush with
Carmine and the tip with Rouge and ink Hold the brush sideways
to pamt a couple of strokes for each bud
Ы1
io Лпо Finishing Details
Use ihe small brush to paint the veins of the leaves For lhe dait-cdored leaves, use Indigo and
ink For the light ones, use diluted indgo and ink (mixing the pigments before you load them
onto the brushF Sign and stamp the chop on the upper left to balance the composition
pf-on y Ckiiw? ink nn J wfor nil fingte -layer n?ir ЗДлдо paper И' x " (Жш x 46cimJ
DilMOXSTR ЛТЮМ*
61
PEONY
In the previous Chinese painting demonstration you controlled the shape and colors of
all the dowers In this wakicolor demonstratioiv you'll control unh the flower you cover
in masking fluid. J lie other flowers will emerge and "go with the flow.” We'll create loose
I lower shapes by pouring diluted yellow and red paint. *Ihen well use the negative paint-
ing technique Lu develop the dower shapes, following the suggestion of the blended paint.
« MATERIALS
PAPER
Arches (40-lb. (BOOgsm) cold-pressed
watercolor paper. 15“ x22* (38cm x 56cm)
BRUSHES
ncs 2, Band 10rounds - inch (19mm).
t-mrh <2Smm} and Ift-inch (38mm) flats
WATERCOLORS
Antwerp Blue (Winsnr ft Newton) • Azo
Yellow Medium (Van Gogh) • ^errnanem
Red Deep (Van Gogh)
OTHER SUPPLIES
no ? pencil • masking fluid • %prav
bottle * straw
i Sketch the Сол< position
Sketch the composition briefly with a no 2 pencil Apply the
masking fluid on the flower in the central focal point and
the chrysanthemums above Splash the masking fluid on top
of the pamt<ng to create small background flowers Mix the
three colors with water in three separate small dishes. creating
medium-toned liquids
2 Wet Parts of the Painting
Use the 1 Fi-inch (38mm) flat brush tu wet the petals of the two
flowers next to the central flower, randomly leaving dry areas,
which will become highlights. (For demonstration purposes, i
added a little Permanent Red Deep to the water so that you can
see where I've applied the water You should use dear water)
Next use the spray bottle to lightly wet the upper left quarter
of the painting
A Pour the Coeors
Pour the thmned Azo Yellow Medium first ^nd the Permanent
Red Deep second on the Wet areas of the flower The colors
should blend where they meet
4	Pour and Blend Blue
Pour the thinned Antwerp Blue on the upper left and lower-
middle left where the leases should be located The colors will
run into each other and flow down to the vase area Use a finger
arid brush to guide the blending and flowing Blow the colors
on ihe upper left directly or blow through a straw to create the
foliage in the distance Don't paint details
62
5	Pour Paint on Right Side
While the colors continue to blend on the left side, wet and pour the
paint on the right side of the painting in a similar way
6	Tilt the Painting
Tilt the upper-right comer of the pa^ntmq up about 6 inches (15cm)
to lei the color flow from the upper right toward the lower left. This
will remove excess liquid (it will drip off the paper) and will blend the
colors beautifully In the tower-middle portion of the painting use a
1 Уг-inch (38mm} flat brush to direct the flow of the liquids so they
create shadows
7	Spi a.sii Coigr on Painting
When the colors are about 70 percent dry, use the flat brushes {one
brush for each thinned color) to splash the pamt on the painting
This creates the colorful illusion of flowers.
8	Give Depth to the Painting
Using the 1 ’Z?-<nch {38mm) flat brush, mix undiluted Antwerp Blue
with a little undiluted Permanent Red Deep to create a dark purple.
Apply this mixture around the flowers Lightly wet another flat
brush and drag the dark purple, lightening it and blending it into
the background colors This gives depth and a variety of values to
ж
the painting Also, use the dark purple to define the vase
9	Paint the Extra Flowers
Uss the nos 8 and 10 round brushes to define the three flow-
ers around the peony in the local point Use the no. 8 to apply
color, and the по. Ю to blend At the bases of petals, apply the
background colors mixed with a little blue to make them darker
Then blend them to the center of the petals and fade out into the
background colors at the tips of the petals To call out the leaves,
use the no 2 round brush to paint the veins with the leaf colors
mixed with a little blue to make them darker.
io	Remove the Masking
When the painting dries completely, take off the masking Now
you can see the shapes of rhe main flower, the chrysanthemums
and the little flowers. Block m the stamens of the peony with
masking fluid so that you can paint its petals freely.
11	Paint thf Centra; Pfoxy
Use two round brushes to paint this flower the no 8 for applying
colors and the no 10 for blending At each petal paint the base with
Permanent Red Deep and a little Antwerp Blue then lightly wet the no
10 round brush and use it to drag the upper edge of the colors toward
the center of the petal. Leave white at the tip The colors of each petal
gradually change from a darker value at the base, to a lighter one in
the middle, to paper-white at the tip
ii Define Objects rx Blue
Next, define the leavesand flower on the right side of the central peony
Use the no. 10 round brush to paint around the objects with Antwerp
Blue Use the 1 ft-inch (38mm) flat brush to blend the paint away from
the objects so that n gradually fades cut nto the background colors
The darker the value of the base colors <the colors poured in Step 3}. the
darker the Antwerp Blue should be to define the objects. To achieve a
dark blue, dilute the paint less and add a little Permanent Red Deep.
н Remove Masking, Add F/xishfng Details
When the petals are dry. remove the masking from the stamens, Use the no. 2 round brush
to supply A/о Yellow Medium to the stamens. When H is about so percent dry. add a hide
Permanent Red Deep at the bottom of each stamen. The two colors should blend where
they meet. Fill in the little white spots with Antwerp Blue. Finally, paint the stamens of the
chrysanthemums with Azo Yellow Medium and Permanent Red Deep
PF. О S’ '• wJriwii T пл Л гг/п'с	.'i- (cnh i prey.si’ J MWlrnrpirtГ5" x 22' ( ’ Wrw x SSnnJ
b5
t н I N F $ F FAINTING DEMONSTRATION — SPONTANEOUS 5 1 Y i F
ORCHID
In this demonstration you'll learn tn use minimum strokes m achieve maximum effect.
Each brushstroke counts in depicting the flowers. If you make one or two wrong strokes,
you should throw away the painting (1 prefer to call к lhe paper! and start again
«MATERIALS
PAPER
snqle-ayerraw S-пиал pape. *4’ x20’
(Bbcm x S1cm>
BRUSHES
s^all - medium • |>»дг
CHINESE PAINTS
Carmine • Indigo • Phtha a Blue •
Rouge • Vermilion • Whiin • Yellow
OTHER SUPPLIES
Chinese ink
i Paint the Center of the Labellum
Load the heel of a large brush with yellow. then the middle with
Carmine and the tip with Rouge. Dip the tip into a little ink. and
hold the brush sideways., painting several strokes to create the
center of the labellum
a Paint thf Center and Add Texture
immediately, use the small brush to paint thick, soft yellow
pigment in the center to add texture.
3	Paint the Labellum Pouch
Load the heel of a medium brush with white, the middle with
yellow and the tip with Phthalo Slue. Dab the brush on the
palette several times to let the colors blend. Hold the brush
sideways with tl_»e tip facing away from the center of the label-
lum. Paint two strokes forming lhe corn-shaped pouch of the
labellum. Immediately use the small brush with Rouge to paint
the texture in the reddish area.
4	Pour and Blend Blue
l oad lhe large brush with white, yellow. Carmine and Phthalo
Blue from the heel to the lip Hold it sideways with the tip poml-
inq toward the center of the flower. Paint each of the petals and
sepals with one stroke. Immediately use the medium brush to call
out the centers of tl>e petals with thick, soft white pigment
b6
5	Paint the Stems
Use the large brush to mix yellow. Carmine and a little ink into a
brownish color. Dip the Up ot the brush into ink. Hold it sideways to
paint the large stems, Use the medium brush to mix yellow. Phthalo
Blue and а little Carmine into an orangey green Hold the brush
straight lo paint the smaller stems, then load a little ink on lhe Up 10
paint the texture on the la/ger stems.
6	Pajnt the Buds and Leaves
Load the entire head of the medium brush with yellow, the middle to
the tip with Phthalo Blue and the tip with Vermilion Hold the brush
sideways lo paint (he buds (two strokes lor each bud). Wet the large
brush and load the entire head with yellow, then the upper middle
with ink. Dip the Up and middle of the brush into the ink. Hold it
sideways to paint the leaves.
- Finishing Touches
Finally, use the medium brush to mix a little yellow, Vermilion and
light ink (for more information on achieving different shades ot ink,
see page 12) with a very small amount of water Pamt the grasses
with minimum strokes and a swift motion
ORCHID t ".hineie mk and. Сй'мг r.«n iiiigle- Ui . г г riiw .ЗДнлм pdp£f
W" x 20’	x 5kr/U
ЧЧ0Г1 VX 144’QKT41
W Д T F A < il I О R Df M О N S T К A F I О H
ORCHID
In this demonstration you’ll learn to combine the detail style and spontaneous style in one
painting. You’ 11 paint the objects in the background loosely, but youll depict the toe al-point
flowers and the objects near them with great detail Some of my students define all the
objects in lheir paintings with the sanw level of detail. 1 call this uneconomical production
Hie ГП1ИГ hihoi you pul III, die Sss money VMlvarn Sir h paintings hi k I’H'iirhing room
foi the viewer and, therefore, don't tend to sell wed.
«MATERIALS
PAPER
Arenes *40-10 (ЗОСдь*ч) cc^d-jyessed
watercolor pврет, 15* x22‘ (38cm x 56c™)
BRUSHES
nos 2, 4, 8 and Ю rounds • tk-irxh
(6mm). 'Л-inch 113mm}, Ч-inch i19mm)
and 1-inch (25mm) flats
WATE RCOLORS
Antwerp BluefWinscr & Newton) • Azo
Yellow Medium (Van Gogh) * Permanent
Red Deep (Van Gogh)
OTHER SUPPLIES
no 2 pencil • massing flu d • spray
ba:l-e • table sal: • straw  caper Iowes
i Sketch the Composition. Apply Masking Fluid
Sketch the composition lightly with a no. 2 pencil. Apply the mask-
ing fluid on the orchid flowers at the focal point. Dilute the three
colors with water to create thin, medium-toned mixtures in three
separate small dishes
2 Pot u Bi uf and Vlij uh Paint
Start painting when the masking is dry. Spray water lightly on the
area around the focal-point flowers Pour the thinned Azo Yellow
Medium first, then the Antwerp Blue next to it. Spray a little more
water on the colors so they blend more
j Pour Ped Paint
Pour the thinned red pa>nt on the upper right and around
the flowers Kow pour all three colors on the middle part of
the painting Spray a little water to facilitate blending Tilt the
upper-left comer ot the painting up about 6 inches (15cm) to
let the liquids How down toward the bottom right. I his will
create die vines in a random fashion. You can also use a brush
or your fingers to direct the how while creating the vines.
4	Add Details
Lay lhe painting flat- While lhe paint is still wet, use the 1-inch (25mm)
flat brush to mtx undiluted blue with a little red to create a very dart
blue Paint the dark blue next to the flowers and other parts o{ the
painting to provide value contrast Use the ^-inch (19mm) flat brush to
splash thinned yellow paint an the painting. (Yellow-green will be the
dominant color in this painting.) Drop about iwenty grains ot table sail
at the bottom left and middle nght to create an abstract background
The salt dissolves in the watercolor and pushes the color away, creating
the illusion of ram or snow
5	Я emove Masking on Large Orchjds, Sketch Mowers
When the paint is completely dry, remove the masking from the
large orchid flowers (leave the masking on the smaller flowers). Use
a no. 2 pencil to lightly sketch the details of shape and texture on
the focal-point flowers.
6	Wet and Paint Center of Labellum
Use lhe no. 8 round brush to wet the center parts of the labellum.
Immediately use the no. 4 round brush to apply undiluted yellow
pigment to the wet area
7	Blow Teytlre Onto Painting
Next, use the no. 4 round brush to apply red m the upper and
lower par ь of the yellow on the labellum, to create I he texture of
die labellum, blow through a straw or directly onto tb- panting
to push the red into the lower parts of the labellum. Then use the
no. 10 round brush to paint some blue and red on the lower part
of the labellum The colorswill mix on the paper,
СНОПУ Л 1ЯЮДОП41

8	CONTFNUJE 4£>nf.VG COLOR TO Fl OWL RS
Use the ’/Hndi (13mm) flat brush to wet lhe bases of (he petals and
sepals. Use the no. 10 round brusJn to paint light blue and light red
on the wet areas. Immediately use the 1 -inch (25mm) hat brush to
blend the colors into the middle and tips of the petals Lightly wet
the pouches of the labellum Apply light yellow and light red with a
'/j-inch (13mm) flat brush, leaving some whites then use the no 2
round Liu$h io add textuie to the poucheswith red pigment.
9	LtS£ NEcMTIVF Pa/NTJNG TO Df-.FtNF FlOWERs
Define (he flower buds, leaves and vines. Use a no. 8 round to apply
color and a no. 10 to blend To call out the buds, use one brush to
mix blue with a little red into a darker blue than the background color
Paint this mixture around the buds. Lightly wet the other brush to
ttend the dark blue into the background. I he buds will be lighter than
the colors around it (for more on negative painting see page 25).
IO DiFfNf MOR£ Fl EMENTS
Using the same negative painting technique you used to define
the buds, continue to define more leaves, vines and stems. In the
darker area, where you can't use (he negative painting technique
but want to call out the objects, use a damp ’i-inch (6mm) flat
brush to Ml the colors The lines between and under the colorful
labella are defined in this way
11 Rimove Remaining Masking
Lift the rest of the masking, use the no. 2 and no. 4 rounds to paint
the vines over the smaller orchid Howers. Now these flowers are
pushed behind the vines Use a wet paper towel to scratch away some
of the color at the bottom edges of the flower on the lower left.
oRcirin мччггтго/уг до Н0-Ц? (JOOgsm)coM-pwwd watennlot paper /5” x ZF’D&rti x 56<nij
12 Finishing
Flower Details
Paint the background
flowers in the same
manner as the larger
ones, but with less
detail and lighter col
ors because they are in
the background Use
yellow and blue and a
no 2 round brush to
fill rn the small white
dots created by mask-
ing and pouring These
dots are similar to the
happy dots in Chinese
painting: They create
highlights and energy
flow in the painting
TIL MllXSTR ШПХ-
71
COCONUT TREE
Most spvnuncous-style paintings arc created with the no-bone method, but in this
demonstration you'll use the bone method (see page 12) to outline the coconut with ink
before apply ing colors. You'll also learn how to split lhe brush lip with your fingers, and
use the split up to paint hairy texture.
Й MATERIALS
PAPER
singfe-layer raw Shuan paper. 1И" x 20"
Bticm x 5icm>
BRUSHES
medium • large
CHINESE PAINTS
Burnt Sienna  Салтппе • indigo •
Vermtlinn • While • Yellow
OTHER SUPPLIES
Chinese ink
i Л1гх Colors a.vd Paint Stems
Use a large brush to mix a little white. Carmine and Burn Sienna
Holding the brush sideways, paint four strokes to depict the
broken stems of the leaves. Now the brush head should be free
of water and color, and the brush tip should be split open (If
the tip doesn't split naturally. use your fingers to split it.) Apply
a small amount of ink to the split tip. and hold the brush straight
to paint the textures
3	Paint the Trunk, Coconuts
After you've painted the silks, don't clean the brush. Instead,
load it with ink and paint the trunk Wet a medium brush and
dip the tip of rt into the mk. Hold ft perpendicular to the painting
to paint the coconuts. Also, mix Burnt Sienna and Carmine and
paint the lighter-colored stems of the coconuts with a medium
brush Clean the brush, then load ink on the tip of it to paint
the darker stems.
i Paint the Silks
Ube a large ЬгиьЬ to mix Burnt Sienna with a little ink Split
Its tip Into many sections (like a comb) with your fingers and
pamt the silks
72
4	Рл/vr Leaf Stems
Load live entire head of a large brush with Burnt Sienna, and the tip
to the lower-middle section of the head with ink. Hold the brush
slightly sideways to paint the stems of the leaves.
5	Paint the Leaves
Next, load the heel of a large brush v/ith yellow and Burnt Sienna, the
muddle and tip with Indigo. Dip the tip of the brush into the ink Hold
the brush slightly sideways to paint the leaves. Wait a few minutes
until the colors are about 70 percent dry Using a medium brush, paint
ink strokes on the leaves to define them
6	/'n r in Coconuts
Load the entire head ot a large brush with yellow. the heel with a
small amount of Indigo, the center with a small amount of Ve-rmilion,
and the tip and lower middle section with Burnt Sienna. Hold the
brush sideways, with the tip on the pointed tip of each coconut. Paint
two strokes for each nut Leave some white to suggest highlights
CO C ON UT TRET C7w/?t’Jf Гпк and Color Oil Single -An-t’r nr И -SfrwiJW prtprr
И ’ x 20 ' ГЗбсгм x 5Гснр
sjiouv иллдомод
73
BANANA TREE
Artists occasionally sketch on raw Shuan paper before painting. Here’s an example
ufhuw to use light and medium-tuned ink to roughly sketch lhe images of a banana
Dower, a banana and a banana tree before applying colors.
Й MATERIALS
PAPER
singit?-layer raw Shuan paper. 2СГ x
(51cm x 36cm)
BRUSHES
small • medium • large
CHINESE PAINTS
Blue • Carmine • indigo • Phthalo
Blue • Rouge • Verrmhon • Yellow
i Sketch the Banana Trfe
Dilute the ink with water, creating a medium tone With a
small brush, use a little of the medium-toned ink to sketch
the banana tree.
3 Рлглгт thf Iiowfr Texture
Using a small brush, lightly mix Rouge and ink on the palette
Pamt the texture of the flower Load the brush with more ink,
then outline the bananas and paint the textures of the stem
2 Paint the Flower
Wet a large brush and load the heel with yellow: the middle with
Carmine and the tip with Rouge Dip the tip lightly into the ink. To
paint the flower, hold the brusn sideways, pointing the tip toward
the tips of the flower petals. Load the entire head of a med-um
brush with yellow, the middle with Phthalo Blue and the tip with
Carmine and ink. Paint each banana in one stroke, holding the
brush sdeways and aligning the tip with the end of the banana.
Next, load the same colors in the same manner, but hold the
brush straight (perpendicular to the painting) to paint one stroke
tor the stem that connects the flower and the bananas.
4	Рлгхг the Bananas, Stems. Leaves
While the colors are still wet use a medium brush and add blue
to hiqhliqht the lips of several bananas Load the entire head of a
large brush with yellow, then load its middle with a small amount
of blue and Vermilion, and its middle and tip with Carmine Hold
the brush sideways to paint the stems of the leaves on the nght
Load a large brush with yellow, then load it from middle to tip with
blue and Vermilion Hold the brush straight to paint lhe stems of
the leaves in the upper right
5	Pafvt the Other I eaves
Load the entire head of a large brush with yellow. Add a small amount
of blue and Vermilion to the middle, and Carmine and ink to the tip
Hold the brush sideways to paint the leaf on the right. Load a large
brush with Indigo, then load it from middle to tip with ink. Hold it
sideways to paint the other leaves
6	Add Pr.vrsrnvG Details
Finally, load a large brush with yellow, then load its middle and tip with
a httle blue and Vermilion, and its tip with Carmine Hold it sideways to
pamt the two leaves in the background. Immediately, load the tip with
a little light (diluted) ink to paint the texture of the leaves
banaxa tree СУггпе.ч* М tvfor un iing/e kmt*r rrtMr Shuan paptr
20 *x /4 ’ (Stem x
75
DEMONSTH ATIONS
ROSE
hi I his demon si ration you’ll I earn a new method for painting floxver petals. First you’ll
pat nt the finiruktiun colors of the entire (lower, then you'll i m mediately use thick, barely
diluted white to call out the petals from the foundation colors, litis technique is commonly
used by Lmgnan School artists, a relatively new Chinese painting school founded approxi-
mately I III years ago. Il is popular in southern China. I long Kong and Taiwan, as well
«s among Chi ncse com mundics abroad.
# MATERIALS
PARER
tingle-layer raw Shuan paper, 14" x 2СГ
(36cm x 51cm)
BRUSHES
sniall * medium • large
CHINESE PAINTS
Carmine * rjhthak5 Blue • Rouge •
White • VpIIdw
OTHER SUPPLIES
Chinese ink
i	Soak Brush, Pa/nt Petals
Load the back to middle part of a large brush w(th white, then
load the middle to the tip with Carmine, and the tip with Rouge.
Hold the br। ish sideways with the tip toward the center of the
flower Pam: several strokes to create petals
2	Higiiiigut Petals
Lightly wet a large brush load it Lorn the middle to the tip
with thick white. Hod it sideways to highlight the petals. Use
one stroke per petal
3	Use Your F/vgers to Smear Write Pigment
For smoother blending, immediately use your fingers to smear
the undiluted white pigment into the background colors
4	Pa/nt Base of Other Rose
Soak a large brush and load the entire head wrth yellow Then
load the middle to the tip with Carmine Dab the brush on the
palette to blend the pigments Hold the brush sideways to paint
several strokes, creating the base color ot the other rose
76
5	Blend, Paint Bur>s and Stems
Wet a large brush lightly and load the middle to the tip of the brush
head with thick white. Hold it sideways to call out the petals, formng
the shapes through highlights. Also, use your fingers to blend the
white pigment into the base colors. Load the back of a medium brush
head with Phthalo Blue, then load the back to the tip with yellow,
the middle to the tip with Carmine and the bp with Rouge Hold the
brush slightly sideways to paint the buds and stems
6	Add Details
Paint more buds and stems in the same manner To highlight the tips
of the budsr wet a medium brush and load from the middle to tip of
the brush head with white and then Carmine. Dab the brush to blend
the colors, then paint one stroke on each bud Wet a large brush and
load the back to middle of the head with Phthalo Blue, the middle
with a little yellow and the middle to bp With Carmine Hold the brush
sideways to paint the young leaves around the roses.
7	Paixr the Darker Leaves
Wet a large brush and load the back to middle of the brush head
with Phthalo Blue and the middle to tip with ink Hold the brush
sideways to paint the darker leaves While the colors on the leaves
are stdl wet. use a small brush to call out their veins with ink.
К Paint the Stems
To paint the stems, lightly wet a large brush, then load the entire
head with Carmine. Then load middle of the head to the tip with
ink Hold the brush straight (perpendicular to the painting! to paint
the large stem first Load the tip and middle of the brush head with
more Carmine, and paint the smaller stems.
П1 MON ЧТИ ATKINS
77
9 Paint тле Thorns, Large Stem
load a medium brush with a little ink and Carmine Hold the brush straight to paint the
thorns. (The thorns facing you look like dots.) Split the lip of the brush with your fingers.
Dip the split brush into a little ink and paint the texture on the lower part of the ‘arge stem.
10 Ai>d Finishing Details
Continue adding more leaves and buds as shown in Steps 6 and 7. Sign and stamp the upper
left to balance the composition
rosf Chinese ink anti <. dvr nn single layer raw Shuan paper I4"x 2O'(36cnt x 5lcmJ
78
W A 1 F R И) I D R D F M О N $ T ft A T I О N
ROSE
In the previous rose demonstration you learned how co paint a flower by applying its base
colors first- Now you’ll apply this method to a watercolor painting of the same flower. You
won't use masking fluid in this painting Instead, you'll puur the diluted yellow and red on the
paper and guide their blending to L rente lhe colorsand loose shapes of roses. Finally ton'll
use ihc negative painting iichniqm ю v .ill out the duipesot the flower stems and leaves.
a MATERIALS
PAPE R
Arches 140- d OOOgsmi cold-pressed
чуаг&гсоснпарег, 15’ x 22’ QSrr- «. 56cm •
BRUSHES
no. i o round * айunch (19mm) and
1-incn i.25mml tia:s
WATERCOLORS
Antwerp Blue (Winsor & Newtoni *
Arylide Yellow (DaVinci) • Naphthol
Red M d'Tme iDa Vino)
OTHER SUPPLIES
spray bottle
i Organize the Composition
Organize the composition roughly in your mind without sketch-
ing You are going to paint several roses as a focal point in the
Upper right portion of the painting, with yellowish flowers in
front and ieddish ones behind. Also, lhe stems will grow from
the lower left to upper right. Dilute rhe three pigments in three
separate small dishes, creating medium-toned mixtures. Use a
spray bottle to wet the local point area slightly
i Pour the Yellow Paint
Pour the yellow paint onto the area you ve desjgrated tor the
yellowish roses.
3	Drop Ped Paint Onto Yellow'
Use the i-inch (25mm) flat brush to drip some red paint onto
the yellow* area The colors win start to biend. Use ttie same
brush to guide the How. Leave some whites on the flowers.
4	Pour the Rfh Paint
Pour the red paint on the upper-left area of the yellow roses.
Let the color blend into the yellow flower a little,
ЧЧО11
5	Роил the Hlue Paint
Pour ihe blue paint to the left of the yellow and red. where the
leaves will go
6	Rtow the Paint
Next use the %-inch (19mm) not brush to paint the buds m the
lower left and middle right with the thinned yellow and red paint.
Pou- more blue and red on tte upper left and yellow or. the lower
left. Eilcrw the paints on the upper left toward the cornel to create
the illusion of distant flowers.
- Defjjve the Roues
When the focal-point flowers are almost dry. begin defining the petals.
Use the ^-inch (19mm) fiat brush to paint the petals of the yellow roses
with thick, barely diluted yellow Then lightly wet the 1 -inch (25mm) flat
brush and use it to blend we thick yellow into the yellow petals. Using
red pigment, follow the same procedure to define lhe red roses.
H Def/at the Plow er Edges
Use the 1 -ткН (25rviri) flat brush to mix thick blue and a intle thick red
into a dark blue. Define the edges of the flowers and the buds, as well
as the stems at the lower left» using the negative painting technique.
Use the no 10 round brush to paint the center of the yellow rose w ith
red and yellow, and (he center of the red rose with red and blue.
80
9 Add Fr.vfsnnvG Details
When the colors are about 80 percent dr^ use the ^-inch (19mm) flat
brush to rrix thick blue and thick red into a very dark blue Using the
negative painting technique, define more leaves in the center next to the
focal-point flowers.
rose mi terco/ur uh Ardius 140 Д? cuW pirssif^ wfertoJur paper
I5' x 22 ” (Jton x 56fHiJ
SX01JA HlSKUIt iLl
A]
WATER LILY
I he flowers in sj4inlftncoiis-slylcChinc.sc paintings lend to be suggested th rough color,
shape and texture rather than through realistic depiction. In this painting of waterlilies,
you won’t attempt Lo define each petal, instead» you'll depict thr entire Hower with mini-
mal strokes. Alsu, rather than painting the water itself, you'll paint the small plants and
weeds growing from the water io suggest its presence.
W MATERIALS
PAPER
singfedayer raw Shuan paper. 14" x 18"
(36cm x 46cm)
BRUSHES
small • medium  large • extra large
CHINESE PAINTS
i Pa wt the Sfpa ls
Wet a large brush and load the heel with yellow, the middle with
Scarlet and the tip with Rouge. Dip the tip into a little ink Hold
the brush sideways to paint the sepals, one stroke per sepai
2 Paint the Stems
Rewet the brush and load the same colors again but with more ink
at the tip Hold the brush slightly sideways to paint the stems
5 Patvt the Petals
Rinse the brush to dean n Load the heeI to middle with Scarlet
and the tip with Rouqe Hold tine brush sideways to paint the
petals, one stroke per petal.
4	Pa iX T Texture
Slightly wet a medium brush and split the tip with your fingers
Paint the texture of the sepals with a mixture of Rouqe and ink
Use a small brush to call out the center of each petal with the
Rouge and ink mixture.
5	Paint the Lilt Pads
Wet an extra-large brush and load the entire brush head with
Indigo, then the lower middle to the tip with Ink. Hold the brush
sideways to paint the Illy pad on the left, movinq from the center
out Load the brush again with the same colors, but add a little
Rouge to the middle and tip. Paint the lily pad on the right
82
6	Finish the l.ii.v Pads
Use Pie brush to paint the other lily pads the same wary Wart until
the pads are about 60 percent dry Load the brush with ink to paint
the texture on the pads. For the pad on the upper left, use lighter
(diluted) ink
7	Paint Small Pl ants on Н'аггя
Next, load the entire head of a medium brush with Indigo, then
the middle to tip with Scarlet and the tip with ink. Hold the brush
sideways to paint the small plants on the water
8	Add Finishing Details
Load the medium brush with ink to paint the grasses Sign and place
your chop on the upper right to finish the painting
water i. 1 ly С/мпде? rn& iiriti color on single-layer raw S/rwun paper
14" x DTOotrti л 46crn)

83
WATER LILY
Similar to lhe Chinese painting demonstration of the waterlily, in this watercolor demon-
stration vou’ll suggest Lhe flowers with minimum details. Some petal tip 1.
with left-whites rather than colors. You'll also learn a new approach to lloral painting: l'irsl:.
you'll paint (he Howers and bud, then you'll pour the diluted pigments to paint the water,
lily pads, weeds and rellections.
» MATERIALS
PAPER
Arches 140-ILi (300qsrn)cold-pressed
watercokx paper. 22'x 15* (Sbcm x 38cmi
BRUSHES
nos. 4 and 10 rounds • ft-lnch (13mm),
4-mrh (19mm I and 1 -mrh (25mm) fiats
WATERCOLORS
Antwerp Blue (Winsor & Newton) •
Arylide Yellow (Da Vind) • Naphthol
Red Mid-Tone (Da Vinci)
OTHER SUPPLIES
no ? pencil • spra/ bottle • paper tovek
i Sketch thf. Composition
Lightly sketch the composition on the watercolor paper with
a no. 2 pencil. Dilute the three pigments with water m three
separate small dishes to create m edium-toned color mixtures.
3	Add Rm Paint to Base of Petals
When the yellow is about 50 percent dry, add a little thinned
red to the petal bases Use the no. 4 round brush to paint the
stamens with a mixture of undiluted red and blue.
i Begin Painting the Petals
Use the J4inch (19mm) flat brush to lightly wet the petals of
the foreground flower, leaving the tips dry immediately use we
14-tnch (13mm) flat brush to paint thinned yellow on the bases
Use the tt-inch (19mm) 11at brush to blend the yellow into the
upper-middle portion of the petals
4	Paint the Red Petals
When the petals are almost dry, use the Иг-inch (13mm) flat
brush to paint a little blue on the bases, blending rt into the
middle Next, wet the petals of the background flower with the
tt-inch (19mm) flat brush Use the ft-inch (13mm) flat brush to
paint the base and middle sections of the petals with undiluted
red from the palette.
84
5	Paint Shadowed Areas
Immediately, use the !/г-inch (13mm) flat brush to mix thick red and
a little thick blue into a darker red. Use this mixture to paint the pet
als in the shadow areas, as wet I as the stamens, While the stamen
colors are wet use the па IQ round brush to add a few strokes of
yellow that has been diluted io a medium ton?
6	Pajnt the Bud
Next, use the no. 10 round brush io wet the bud tightly. Use this
brush tc paint the bud with medium-toned yellow, then add
medium-toned blue at the base and red at the Up. While the colors
are still wet, mix thick blue with thick red into a dark blue to paint
the center of lhe bud.
7	F/nesh Bl d akd J?efzj?ctjon
Continue to paint the red petals of the bud using the no. 10 round
brush First paint then yellow, then red and then the dark blue
When vou're finished painting the bud. paint its reflection in the
same manner but more loosely.
8	Paint Water and /jet PaM
Now start painting the water and lily pads. U-a* a spray bottle to boiilly
wet the upper part ot the painting, without wetting the flowers Use
the 1 -inch (2 5mm) fiat brush to wet the area abo*/e the yellowish flower
This way you can wet the area close to the flower without getting the
flower itself wet Pour the three paint colors side by srie on the welled
area (the order in which you pout rhe colors doesn't matter).
CNOUV»14^0W^<1
85
9	Blow the Paint
Blow the paint toward the upper left to create the illusion of grasses.
Use a paper towel to remove the excess paint. Use the -ti-inch (19mm)
flat brush to них thick blue and thick red mtoa dark blue Paint this color
at the top of the yeilcwsh Hower to tall out ihe tips of its petals.
10	Paint Grasses anh Details
use the no. 4 round brush to paint more grasses with the thick Ыие
when the colors are about 70 percent dry. Next, wet the rest of the
waler and hly pad area with the 1 -inch (25mm) flat brush and the spray
bottle (use the brush f<x the areas closest to the flowers!- Pour the three
paint colors, adding more red below the red flower for reflection
ii	Blend the Colors
Use the 1-lnch (25mm) fiat brush to guide the blending of the
thinned paint and to call out the reflection of the yellowish flower
and the shapes ol the lily pads. While the colors are still wet, mix
thick blue with a hide thick red into a dark blue to add a darker
value to rhe water.
11 ADD FfNLSifZNG DETAILS (NEXT PAGE)
Use the no. 4 round brush to paint the texture of the lily pads with
a mixture of blue and a little red When the colors of the water are
almost completely dry, use lhe %-inch (19mm) flat brush to pain]
I he reflection of theyellow^h flower, hnally, use the !6-inch (t3mm)
flat blush with light (diluted) blue to paint the shadow-. of the yel-
lowish flower's petals.
Kb
WAFER I II Y HVJZmVhfoF OlJ AfT/fCi NO- 01. (JOCjgSlrt) <*<h!ci -pftflii’rf	pttpff 22“ X J S ’ (5ЙГ/И X jWfHt?
xxpnv Ж ISNIWin
t H I N F S F PAINTING DEMONSTRATION — SPONTANEOUS 5 T V i F
TOMATO
Tnnutociarc rarely Featured in Chinese pointings. Howcvei, I think the । г colors are very
beautiful, ranging from blue-green to green, ye 1km. orange, orange-red and red. \lso, tbeir
long stems and wide leaves are nice features lo paint with strokes. I've learned from my
painting стрепете that I can extend the use ol a partkularmcthod to a variety of subjects.
hM  example. чпк’С I dont know of any Chi nC 4' p-imhrlgSOt tonUtOCS. 1 < an Use my regular
dower-painting techniques to paint this new subject.
Й MATERIALS
PARER
sngle ayerraw Shuan paper. 20 ’ x И'
(51cm x 36cmF
BRUSHES
small • medium • ккде
CHINESE PAINTS
Blue * c .irmire • K.rbQo * Rojqp *
Vermilion • Yellow
OTHER SUPPLIES
i Paint the Tomatoes
Lo^d the entire head of a large brush with yellow. Then load
the heel with a little blue the middle with Vermilion and the tip
with Rouge. Hold We brush sideways to paint the four tomatoes
on the upper nght. using two strokes per tomato. Wet another
large brush and load It with yellow I her. load lhe heel with
a little Vermilion, the middle to tip with blue and the tip with
indigo. Hold the brush sideways to paint the three tomatoes
on the middle left. Use a small brush to outline the reddish
tomatoes with a mixture of Rouge and ink. and the greenish
ones with a mixture of Indigo and ink.
2	Paint the Sepals and Stems
Wet a medium brush and load it with ‘yellow. Then load the
middle with blue and the t<p with indigo and Carmire. Hold the
brush slightly sideways to paint the sepals. Wet a large brush
and load the same colors in the same manner Hold it straight
lo paini rhe stems. Move lhe brush continuously, but slop for
. . . .i half a second at each connection and curving point.
3	Paint the Leaves
Load a large brush with yellow, (hen lhe middle with Indigo
and the tip with mk Hold the brush sideways co plaint the dark
leaves. Load lhe brush with the same colors in the same manner
extent with less ink at its lip Paint (he light-value leaves
,4.4
4	Pa/nt Leaf, Stem Texturi
While the leaves are still w^t. load the large brush tip with more ink
and paint the veins on the leaves and the texture on the stems.
5	Add .Worf Tomatoes
Use a large brush to add more tomatoes in the background To pamt
the three in the lower left and the one on the upper-right edge, load
the brush with yellow; the heel with Indigo, the upper middle with
blue, and the Up with Carmine. Use a large brush to paint the third
stem with yeflow; Indigo and ink (mix yellow with a little Indigo and
add a little ink to the tip of the brush) This stem should be lighter
than the other two in the foreground
6	Add T/NJXHf.vc; Deta/ls
Finally. use a medium brush to paint the grasses with a little yellow.
Indigo and ink (mix yellow with a little Indigo and add a little ink
to the tip of the brush) Sign and stamp the lower nght to balance
the composition
том at о (Г/гшзд* hiA. ami eater пл пгдеи? -Layer ruн Sh.ujai paper
20“ x N'75/ггп x Збсто)
(«.(ШИ ХЛ I IONS
MM
WATERCOLOR OF M OH S T R АГ1О H
TOMATO
You have used masking tl u»d to blixk meal -point flowers in previmui w&tercofof demon-
strations. Now you will do the opposite, use masking fluid to block the negative spaces
between the tomatoes and their foliage. Ibis alternate use of masking Пи id works well here
Го apply lhe masking fluid on lhe negative spates precisely; you have to make a detailed
drawing ol lhe painting to de tv i in me white they ЛП'.
® MATERIALS
PAPER
Arenes'40-lb GOOgsm) cdchp'essed
watercolor paoer. 15' « 22* (3Bcm x 56cm)
BRUSHES
nos. 4 and 10 rounds * h- nth <r3Wl),
St-inch 119mm) and 1-nch i'25mm) flats.
i	Sketch the Composition o.v Tracing Paper
Sketch the composition with а ла. 2 pencil on tracing pape. En-
tity the negative spaces (see the hatch patterns) of the painting.
You will use masking fluid to block out the negative spaces
j Skiген the Composition on Watercolor Paper
Lightly sketch the composition on watercolor paper with .a no.
2	pencil. Apply masking fluid to the negative spaces. Mix die
three colors with water in three separate small dishes to create
medium toned mixtures
3	Sprat Water on Tomatoes
Wait for the masking to dry completely. Lightly spray water
on the tomatoes.
4	Pot/R Yfuonr AND RED PAINT
Pour ihe yellow paint, then the red paint onto the wet area

5	Л’рллу With И'атея
Use the spray Lottie to lightly wet the rest of the paintinq. In the leaf
area, pour yellow and blue paint In the tomato area, pour yellow
and red Spray more water on the camt to facilitate blending
б Лро Highlights, Removi Masking
When the colors are about SO percent dry. use the Nr<h (25mm) flat
brush co lift colors on the tomatoes, creating highlights. Then wait for
the painting to dry completely before removing the masking.
7 Use Negative Painting
Define the tomato shapes with the negative painting technique. Use
the r.o 4 round brush to paint the outside edges ol the tomatoes
with blue. Then lightly wet the '/?-inch (I3mm) flat brush and use it
to blend lhe blue into the case colors next to the tomatoes.
я Continue Negative Painting
Let the paint to dry. 1 hen lurcher call out the tomato shapes, as well
as other objects such as the sepals and stems, using the negative
painting technique. Use the no 4 round brush to mix blue and a httie
red into a dark blue to paint around the objects Immediately, use
the V^-inch (13mm) flat brush to blend the dark blue away from the
tomatoes so the color fades into the base colors around t№ fruits.

9 Define More Tomatoes, Stems
Define the other tomatoes, stems and leaves
m the same manner I he farther away from
the focal point the objects are (e.q., the
tomatoes on die upper middle right), the
less detail they should have.
10 Add Fjnjsk/nc Deta/es
Finally, use the 3-£-inch (19mm) Rat brush to
pamt the background leaves. Wet the brush
and use it to drag tfve colors of d ie loaves mto
trie negative spaces. This blurb the edges of
the leaves a Idtle. but this is OK. Lightly sug-
gest the shape of the distant leaves.
ГОМ ATO iwif-fTro^run AnJWA /413 »fr, if.tVJprrSfcdHwtrrrrjkir/ju/.irr J5"x 22 '(СЧгп? x 56»‘1Л/
v2
С H I N F S e FAINTING D F M a N S I R A T I 0 N - S Г О N 1 А ГН О U S S T Y I F
GRAPES
This demonstration features an interesting combination oi elements from northern and
southern Chinese painting. Generally, Chinese artists in the north 'north of the Yangtze
River) use fewer colors and nioir ink, and emphasize br и strokes, Ry contrast, artists from
the soul h (south ol the Yangtze River ' use more colors, lew ink and moderately manipu
lated hi ii.shstinkes, In this panning, you’ll observe thin thr leaves and seems are painted
in the northern style and the grapes arc depicted in the southern style.
St MATERIALS
PAPER
sing e-laye*- raw Shuan uauer, 14' x 20'
(36cm x Stem)
BRUSHES
smo-l  medium * large
CHINESE PAINTS
i Paint the Vines
laghtfy wet a iarge brush and load the tip with a little ink. Hold
the brush slightly sideways to paint the large vines. Pause tor
about half a second at the connections and the turns. Use a
small brush to paint the small vines in the same manner
a Paint the Leaves
Wet a large biush and load the middle and tip with ink. Hold the
brush sideways to paint the leaves, using three or four strokes
tor each leaf, Paint the dark leaves first then add a tittle water
to the brush to dilute the ink, and paint the light leaves.
3 Paint Leaf Details. Light Grapes
White the leaves are still wet, use a medium brush to paint the
•/eins with ink. Next, wet a medium brush lightly and load it with
yellow Then losd the lower middle to tip with a little indigo
and Carmme Hold the brush straight to paint the light-value
grapes, using one stroke per grape
4 Paine Morl Grapes
Immediately use the medium brush to paint the dark grapes
around and behind the lighter ones Load the entire brash head
with mere yellow, and then the middle to tip with more Indigo
to pamt the medium-value grapes Add a little ink to the tip to
pamt the darker ones.
snor i vx 144ciivi<i
5 Адо Finishing Details
To paint the grape stems, load a small brush with a mixture of indiqo and ink. Hold the brush
straight and paint them quickly. Highlight the grapes m the front with a small dot o1 ink.
Finally, use the large brush to add the vines at the bottom left
GRAPES Clnriosi* Лп4 глМг ли u/igk hrjwr.iH S/шил paipry M'x 2O'(.36i?n x 5/cjhJ
W A T F R ( IИ D R DEMONSTRATION
GRAPES
About two years ago 1 beggn developing a new way tn paint grapes in watercolor. Without
using*detailed sketch or masking fluid, I pour the diluted colors on the paper and use my
fmgjrrvand brushestoguide the liquids, blending incm ami furnunginteresting<okirs
and textures, dien I use the negative painting let hnique to define the grapes, leaves and
.vtern.^lollowing the colors andshApesgenemted hom die color pouting and blending, This
method is a lot ot tun and allows me the freedom and creativity to mid the shapes ot the
subjects. It’s similar to the way children look tor images farmed by clouds. I'm pleased to
share this fun, new method with you
Я MATERIALS
PAPER
Arches 140-lb. OCOgsm) cold-pressed
waipcdor paper, *5 x22’ I38cmx 56cm'
BRUSHES
nos. 4, 8 and 12 rounds • 1^>indl (13nynX
U- Inch l!9mmiand 1-incn i’25mmt flats
WATERCOLORS
AmwtypB iciWmsnr& Newton i *
Лгу de Yeilow IDs Vinci) * Rose Madde'-
i Sketch the Composjt/on
3 Pour the Bile Рл/.vt
Sketch the composition roughly (without
details) on the watercolor paper with a
no. 2 pencil, Dilute the three colors with
water in three separate small dishes, cre-
ating medium-toned mixtures. Spray a
little water on the grape area
i Pour the Red Paint
Pour the red pamt on the area where the
Pout the blue pa.nt on die same area. Sprav a little more water
to facilitate blending. Use your fingers to drag the colors, paint-
ing little circles to form grapes
4	Develop the Leaves
spray waler on ihe leaf areas. Pour ihe yellow and blue paints.
Spray more water for blending. Use your fingers and/or the
1 -inch (25mm) flat brush to guide the blending.
grapes are located
14 51CI.4S U Al JONb
45
5	Tilt the Painting
Tilt the upper left of the painting up about 4 inches 00cm) so fie
paint flows down toward the lower right. While the paint is flow-
mg down use your fingers and fingernails to gude it, formmg fie
vines Use your fingers to paint the large vines, and your fingernails
to paint the small vires Blow the paini on the lower left toward lhe
right to create texture.
6	Рл/NT CONTRAST
Use the 34-inch (19mm) flat brush to mix thick blue with a little
thick red., making a dark blue Paint around the grapes randomly
to create value contrast. When the colors are about 60 percent drv,
lightly we I lhe !4-m<h (19mm) flat brush and use it to I if I the colors,
creating the light beams.
7	Identify the Grapes
When the <_okMS are completely dry. use a no. 2 pencil to lightly sketd i
lhe grapes. Start from lhe edge or bottom of the group where the
circular edges seem, to suggest grapes
В L’.st №0AtlV£ Pa/A'/V.VG
Define each grape using the negative painting technique. Starting at
rhe bottom of each group, use the no. 4 round brush to apply blue
to lhe background, blend«ng so that the color becomes lighter as
H moves away from the grapes Also apply blue to the dark places
where the grapes overlap. Immediately use the to. 8 round brush to
blend the blue into those overlapping grapes the blue should fade
into the grapes, but not mask the original colors.

9	HIGHLIGHT STEMS
Use blue and the negative painting technique to define the sterns.
The base colors created by the pouring technique in the earlier steps
will remain as the stem, color. The darker the base colors, the darker
the Ыие should be Lightly wet the 'Z?-mch (13 mm) flat brush and use
it lo hft lhe colors on the grapes, creating highlights
10	Define the Leaves
After defining the grapes, call out tlse leaves. One approach is to paint
the leaves (positive painting}. Wet the no. 12 round brush and load
lhe entire brush head with yellow, then the noddle and tipwrthblue
Hold the brush sideways with the up aligned with the tip or the leaf,
lhe leaf ^olor should be darker than that of the grapes.
ii	Paint the Leaf Ve/.vs
When the leaf colors are about 80 percent dry. use the no. 4 round
brush to paint the wins with blue and red
ii Lrsf Negative Painting
Another way to call out the leaves is to use the negative painting
technique Use the no 12 round brush co define the edges of the
leaves by painting the giapes behind die leaves with the dark blue
mixture from Step 6. Then use the Zi-inch (13mm) flat brush to
blend the blue so that it fades into the grapes
цикл  i
97
13 Continue Painting Leaves
When the leaves next ta the grapes are complete, continue to paint
the remaining leaves the same way. The lighter the leaves, the lighter
the blue should be Follow the suggestion ot the colors and shapes
on the painting to form a variety of leal shapes.
14 Add Finishing Details
The closer they are to the grapes., the more detailed the leaves
should be and vice versa. Finally, use the negative painting tech-
nique to define mere vines For the vines in the middle right, use the
no 8 round c rush to paint the edges with dark blue, then blend the
colors onto the leaves w‘i!h the yj-inch (Brnr-i) flat brush
GM A l*H 5 hiJlcrcti'or (Mr ArJirs HU-Jh (30Црт,1 fa'jf пикт oio»
piper 15" x 22" {Jflrnt x 56rTriJ
С H I N F S F PAINTING DEMONSTRATION — SPONTANEOUS S T Y I F
HOLLYHOCKS
In my workshops 1 always mention the importance nt value contrast. In this demon
stration, you'll learn how to use dark ink and colors to form йогчтгshapes and make
the flowers “pop."
И MATERIALS
PAPE R
зпд e-laye* raw Shuan Daoer, 16’ « 2C
(41cm x 51cm)
BRUSHES
smaJ • medium * large
CHINESE PAINTS
WTiite • Yellow • < arrrne » Rocge •
Green Ubo Three - Blue - Indigo
OTHER SUPPLIES
Chinese nk
i Start Pa/nting the Petals
Wet a large brush and load it from live heel to the upper middle
with white, the lower middle to tip with Carmine and the tip
with Rouge. Hold the brush sideways, pointing the tip to the
center of the <lower to paint the petals
i Paint the Stamen and Add /f atith to Ретаел
Lightly wet a medium brush and load the heel with Green
Label Three, the middle with yellow and the tip with white.
Hold the brush sideways with the tip pointing up to paint the
stamen Highlight the bp ol the stamen wHh undiluted white.
Lightly wet another large brush and Split its hairs wilh your
fingers. Load it with a small amount of Rouge to paint the
textures on the petals.
3 F/NISW PAlNTfNG THE PETAL TEXTURE AND
Paint the Next Two Flowers
Use a small brush to highlight the textures on the petals wilh
thick white. Then paint the two howers below the same way
flowing Steps I and 2,. but using less white
^4'oriv» is4'ow«i
4 Paint the Half-Open Flowers
To paint the half-ap^n flowers in the upper portion of the cornposi
non. wet the large crush and load it with white. Carmine and Rouge
(see Step 1) Hold it sideways, pointing the tip toward the bases of
the flowers Use one stroke to form each petal
6 Pa/nt the Stems
Use a large brush to paint the stems. Load the brush with yellow from
the middle to tip, with indigo from tlse lower middle to tip and with a
little ink at the tip. Hold the brush straight (center brush) to pa»nt the
stems. The darker the stems are, the more ink should be used
5 Pa/NT THE HUD.S .4ND CaLY.YES
We t a medium brush and load the heel with yet low, the middle with
Green Label Three, and the tip with blue and indigo Hold the brush
sideways to paint the buds m two to tour strokes. Abo. load the colors
and paint the calyxes ot the two halt-open flowers the same way
7 Paint the Leave*
Wet tiie laiqe brush and load the entire head with yellow, the middle
to ip with indigo and the tip with ink Ho’d the brush sideways to
oamt the leaves with two to three strokes each The larger the leaves
are, the more pressure you should put on the brush and vice versa.
Paint more dark leaves around the light-colored petals
too
a Add Hiciuicuth and Tkxture
Load a small brush with ink to paint Che veins. On each leaf, paint The center vein first and then
the others. Use dart ink for intensely colored leaves and Lght ink for light-value leaves. H^ghUght
the dark leaves with a few strokes of blue while their colors are wet Add ink dots to the stems
to suggest texture Finally, sign and stamp the upper right to balance the composition,
HOH.T1IOCKS I OrJt dJtdL’uli.'f 4WI Ahix't'-fa>vr .'!.‘H’.S7L44rii pupdr Гб” х jn'V-IJi’rjf X 5i’urU
ui.MDNbi х л1 Юм-
101
W A T E R C Cl l О R D F M □ N 5 T R A T I 0 N
HOLLYHOCKS
In this demonstration you’ll kain how to paint secondary flowers, which arc less detailed
and dehned than focal-point flowers, and sometimes partially Nocked hr leaves and stems.
You'll leave dry areas lor lhe shapes of lhe flowers, and blow diluted colors to depict
lhe Hower textures. I hen you'll define die flowers, following the suggestion of lhe color
pouring and blending effects
® MATERIALS
PAPER
Arches MO-lb.	I cdd-pressed
watercolor paper, 15* x 22’ (<8cm x 56cm>
BRUSHES
nos Hard 12rounds * Уг nchOawn),
ftdnch (19mm) and 1<nch (25mm) flats
WATERCOLORS
Arylide Ye owlDa Vine♦ Rose Madder
(Qumaendone) (DaVino’l * Antwerp Blue
(Winsor S Ncw:ori
OTHER SUPPLIES
cig. 2 pencil • ma&Kirgflud -
spray bottle
i Sketch the Composition and Mask the Flo и era
Lightly sketch t he composition on the water color paper with a
no. 2 pencil Cover the focal-point flowers by pouring masking
fluid on them and using your finger to spread it around
2	Dilute Paint and Wet Around
Foe al-Puint Flowers
Dilute the three colors with water in three separate small dishes,
creating medium toned matures When the masking is dry, use
the 34-mch (19rr.m) flat brush to wet around the flowers next
to the focal point.
j .Sprat on Morl Water
Spray water tightly to wet more areas around the flowers. Use
one hand to shield the flowers so they don’t get wet.
4	Pour the Paint
Pour the diluted paints on the damp area yellow first red
ground lhe flowers and blue on lhe leaves
5	Sprax More Water and Blend
Spray a little more water on the paint. Use your fingers and brush
to guide their blending Here you can see the areas that should be
left dry for the flowers
6	Paint Dara Uwe Around the Flowers
Use the ^Hnchd^rnmjflat brush io mix (hit.* blue and a little thick
red into a dark blue. Paint it randomly around the focal-pant flowers.
This dark color wil contrast with the light value ol the flowers.
7	Paint Feoker Centers and Create Petal Texture
Use lhe 1-inch (25mm) flat brush to apply the diluted red and yel-
low paint to the centers of the three Howers that have, until now,
remained white Blow the cokx liquids out to the edges of the flowers
to create the petal texture
Я Рл/NT Вас,’KGROirND' Add Deta/z to /.laves
AND REMOVE Л/ASKING
While trie background colors are still wet. use the !6-inch (13mm) flat
brush to splash the diluted yellow This will create a yellowish green
suggesting the shapes of leaves and stems To call out the leaves on
the nght, use the no. 4 round brush to c-aint the veins with blue and
red, let the pamtmg dr/ completely before removing the masking.
|»bMD\M  Л I JOS*
103
9	Sketch Flower Detailsand Paint Top Flower
Use a no. 2 репей to lightly sketch the details of the focal-point
flowers. Wet the center of the top flower with the I-inch (25mm)
flat brush and paint it with medium-toned (diluted} yellow imme-
diately paint red around the yellow 50 they ciend into each other a
little While the red 15 still wet, use the ^i-lnch (19mm) flat brush to
qraduallv blend ц toward the petals* tips. Leave the tips white.
10	Pa/nt the Other Two Flowers
Paint the other two Howers in the same manner For the one on
the lower nght, use the -^-mch (19mm) Hat brush to drag the sur-
rounding colors into lhe petals with a little water- When the colors
are about 60 percent dry. use the no. 4 round brush with red to
call out the textures.
11	Define the Individual Petals
When the flowers are completely dry., define the individual petals.
Use the no. 4 round brush to paint red on the edges ot the petals,
immediately use the no 12 round brush to blend the colors with a
little water so that the red fades into the petals layered underneath
1 2 Fl RINER DEFINE I HI STAMENS AND PETALS
Let this color layer dry. Use the no. 4 round brush to mix a darker
red from thick red with a little btue. Add this color to lhe center and
edges of the petals to further define the stamens and petals Gradu-
ally blend the dark red so it fades into the base colors ol the petals
layered underneath.
114
13 Paint the Other Flowers
Using the same technique, paint the stamens tn rhe centers of the
secondary flowers and define the petals. However, these flowers
should have less detail and definition than the focal-point flowers
1 4 D££'IN£ THE Hens, Шт AMD STJfMS
When you've completed all lhe flowers, use the negative painting
technique to define the buds, leaves and stems. The light-colored
spots {yellowish green) will become the buds Use the no 4 round
brush to pamt around them with diluted blue, then use the /r meh
(Bmm) flat brush to blend the blue so that it gradually fades into the
background Define the leaves and stems Che same way
15 Paint the Details on the Buds and Leaves
Finally, use the no 4 round brush to pamt The details on the buds
ana veins on the leaves with blue The closer to the focal point these
objects are, the more detail they should have, and vice versa. Sign
your name on the lower right to balance the composition
пот i.y hocks •wrXtJreflifdr i)n An'Adi 140-tb. f30i^a»zr> cokl-phtuftt
wwtrrrotor ptipcr f 5 ’ x 22" (АНст x
I
IPS
WATER COLOR DEMONSTRATION
CHRYSANTHEMUM
Ilus painting l> л typical example or my floral watercolor style. litre’s an emphasis on detail
in the focal-point flowers and a gradual reduction of detail and definition m the others. I used
masking fluid to carefully block the three focal point flowers CO t could paint details after
the color pounng and blending I didn't use making fluid to cover the other fl nu'ers because
they r । "i ihe background and don't require details or de fined shape s. Ihisconcepc n hires
tn photography W hen a camei a lens is focused to take a close shot of a grouping of flowers,
the flowers in the foreground will be clear, but those in the background will be blurred
К MATERIALS
PAPER
Arenes '10-lb i30Cqs",i cold pressed
watercolor paoer, 15’ x 121 (38cm x 56cm)
BRUSHES
пев Hard Sounds • h-inch <13nv»4,
U-inch (19mm) and 1- nch (25mm) Hats
WATERCOLORS
Arylide Yellow (Da Vine I • Rose Madder
(Qc naendotne) (DaVinci) • Antwerp Blue
(WirisorS Newxr-i
OTHER SUPPLIES
no. 2 pencil • masking dud •
soray buttle
i Sketch the Com position and Apply Masking Fluid
Lightly sketch the composition on the watercolor paper with a no. 2
penal Use the wedge-shaped end of a й-inch 03mm) flat brush to apply
the masking fluid to the focal-point flowers
3 Pour the Diluted Paint
Рол the chi u ted paint on the wei area: red and yellow on the back-
ground flowers and buds, blue and yellow on the leaves. Guide
the colors with your fingers to paint the flowers on the left
2 Dilute the Paint and Spray Water Around the Flowers
Dilute ihe ihree colors with water in three separate -.rr..ill dishes, creating
medium-tonedmixtures. When the masking is dry. fightiy spray water on
the area around the masked flowers
A Pour and Blow Paint to Create Flowers
Pouf diluted red and a little blue on II* upper-middle area- Blow
the pamt downward to create the shapes of the reddish flowers.
Likewise, pour yellow and a small amount oi red on the uppe
left and blow it toward the middle right to create the shape of
a yellowsh mum
|P6
5	Tilt the Рл/м/лч;, Paint Around the
Focal Point Flowers
Tilt the upper nght comer ot the board up about 6 inches (15cm)
for about a minute so the pamt flows down toward the lower left.
Use the ^-inch (19mm) flat brush to mix thick blue with a little thick
red to create a dark blue. Paint this color randomly around the focal-
point flowers, which will be lighter in color.
6	Define the Flower Shapes
When the backqiound flowers are about 80 percent dry, define the
flower shapes. For the yellowish one in the upper left, use the no.
8 round brush to paint the petals with an orange mixture created
from yellow and a little red For the other flowers paint around the
petals using a mixture of blue and red that is darker than the local
cokxs. Then gradually blend the cokx into the local colors.
7	Define the Leaves and Paint the Veins and Stems
Use the no. В round brush to paint around the edqe^ of the leaves
with a color (blue or a mixture ot blue and red) that ts darker than
the local colors. Use the te-inch (13mm) flat brush to bend it into the
local colors. Use the no 4. round brush to paint the veins with a mix-
ture of blue and red 1 he darker the leaves are. the da< ker the mixture
of blue and red should be. Paint the stems in die same manner.
8	RcjHOVf the Masking and Paint the
Focal-Point Flowers
Remove the masking when the painting is completely dry. Use the
pencil to lightly sketch details on the focal-point flowers. To paint the z
yellowish mum, use the no 4 round brush to apply a small amount of £
yellow to the bases of the petals, i hen lighUywel lhe '/?-inch (13mm)
flat brush and use it to gradually blend the color into the middle of E
the petals. Leave the tips white.	J
9	-Add Rid and Blue to the Flower
Let the yellow dry. then use the no. 4 found brush to apply a small
amount of red to die bases ot the petals. Then use the ’Л-inch {13mm}
flat brush to blend the paint toward the rr.iddle ol the petals When
the red Is dry, add blue in the same manner
и Applv Dark Hid to the Red Flower
Let the red dry. Add a dark red made from thick red and thick blue
to the bases ot the petals. 8fend the dark red into the middle of the
petals and leave white on the hps At the center of the flower, use
the same brush to define the smaller petals with yellow and blue
io Pain? the Red Flower
Next, define the petals of the reddish flower using the same tech-
nique. Use the no 4 round brush to pamt the bases of each petal on
lhe lower part of the flower wnh red Then use the ’/a-mch (13mm)
flat brush to blend the paint to the tips. Leave white at the center
of the flower.
ll>8
и Рл/nt тчг Red Mum in tiil Upper Right
Parnt the reddish murn at tire upper right using the same method, but this time use
only red and blue. Finally, lightly wet the 1 inch (25mm) flat brush and use it to pull
the colors from the leaves into the background
CHRYSAXTHF MUM wtltenmW<»iXtc/itiS IW-ifr.	tdJd-pnfiiiJtfwrtWfltorpd/№
/5^ x 22” (38cm x SaWiJ
pop fI es Шлде» шк uruf iW on pruned un Vib Г6’ x 2D" (Ист x 5kJrt)
HO
EXPERIMENTAL
CHINESE PAINTING TECHNIQUES
Starting in the late .seventeenth century. Western painting techniques were introduced
concurrently with Christianity in China. The Western painting techniques were appreciated
by the emperors who had their portraits painted by the foreigners. Consequently, the court
painters were exposed to Western art. A handful of (hem learned the foreign techniques
and integrated them into Chinese painting
In the early twentieth century, Chinese artists studied abroad in Europe and Japan.
Those who went to Europe brought back Western painting media, methods and styles.
Those who studied in Japan were influenced by modern Japanese painting techniques,
which combined Japanese and Western painting. Thus. oil. watercolor and sculpture
gained popularity in China.
Since the early 1950s, college-level art students in mainland China are required
to study Western sketching, painting theory and technique, regardless of whether
they major in Chinese or Western art. Now many Chinese artists are moving beyond
traditional Chinese painting methods. In addition lo adopting Western painting
techniques, these artists arc experimenting with Western materials. The following
demonstrations exemplify' these exper iments.
F X P f R I M F N T a L p A I N T । M G DEMONSTRATION
PRINTING WITH GLASS---------WISTERIA
Tn (his demonstration you']] learn how tn make a print troin painted glass on raw Shuan
paper, and then adjust the image into recognizable objects, this technique produces
unexpected and magical clTcclsk
8 MATERIALS
PAPER
rawShuan oaDer, 20" x *4'
1’51 cm x 36cml
CHINESE PAINTS
White • Yellow • Vr^mflon •
С1Г'*зи.с • Indigo
OTHER SUPPLIES
Chinese ink * piece of glass approximately
3 i nches iBcml larger than '.be Taw Shuan
paper • spray bon e • felt mat
BRUSHES
small • modi' m - Ijtye
i Spray Нагея and Splash Paint on the Glass
Lightly spray water on the glass. Use the medium and large brushes to splash and
pamt yellow, white. Carmine, Indigo and ink on the glass At tfus stage i decided to
use a horizontal composition
2 Add Mont Paint and Tilt Glass
Add more C armine and while ‘o ine glass I ill the upper-left comer of lhe glass up 2
inches{5in) for about one minute so the colors flow- d^n to the lower right slightly.
3 Press the Paper on the Glass
Lay the glass flat again. Place the raw Shuan paper on the glass (either side is OK).
Use your hands to hghtly press lhe paper down onto the glass. Let the paper absorb
and blend the colors.
112
4 Lift the Paper
Wait a couple of minutes before lifting the paper. Place it on a felt
mat with the printed side up. At this point I decided to change
the onentanon ot the painting because the vertical composition
looked better
6 Paint More Flowers
Continue to paint more flowers the same way.
Use the small brush to connect the petals with
Carmme and ink
5 to Paint the Flowers
Lightly wet a medium brush and load it from the heel to middle
with white, the middle to tic with Carmine, and the tip with a
mixture of Carmine and Indigo, Hold the brush sideways to paint
the flowers, a single stroke per petal
; XI'LIIIMI-S l.u	I4IMINU !.МНМф i-b
113
wim iiRiA Oiwsr nA unJ rotor on lYiwS/iwirn pu/vr J4Tx N 75fcm x tocm.l
7 PAfiVI ГН£ VfN£S
When the painting <s about 90 percent
dry, use a large brush to paint the vines.
Load the tip and middle with ink and
hold it sideways to paint the vines with
minimal strokes (one or two strokes per
vine) Finally. use a medium brush to paint
the small. dark vines behind the flowers
to call out the shapes of the flowers and
the lighter vines.
114
F X P F H I M E N Г A L PAINTING DEMONSTRATION
USING GLUE AS A RESIST—CACTUS
Ihtb demonstration illustrate? another noinraditiorul use nt materials; applying glue and Я MATERIALS LIST
water before painting on mature Shuan paper. lhe glue provides resistance to the flowing рд pg p
and mining of the paint, lhe colorsblcnd slowly, creating soft and waxy «fleets,	^a’ute Shuan paper bl * 18’
<36cm x £6cml
BRUSHES
smal • medium * large
CHINESE PAINTS
White • Yellnw • Vermilion • Scarlet *
0-.»£ • Inchju
OTHER SUPPLIES
Chinese irx • white craft glue
i Create Glue Mixture and Applf ro Paper
Mix the white glue with clear cold water. The ratio ot glue io
water should be approximately 1 5 (if you want more color blend-
ing. use less glue and vice versa) Use a large brush to apply a thin,
even layer of the glue mixture to the mature Shuan paper
i Paint th/ Cactus Feoutrs
While the paper is still wet, use a large brush to paint the cactus
flowers with Scarlet
л ADD KeLIOW ГО THE FLOWERS AND Pa/NT
the Stems and Background
Immediately use a large brush to paint yellow on the lower
portion of the flowers and paint indigo on the stems and the
background Allow- lhe colors to Wend slightly.
. M'LkJMl.N LU l.tilS££l: 14IN llSCi 1: UINBB t.
lis
4 Paint the Upper Left a nd Ground the Flowers
Continue usmq a latqe hush to apply yellow ат the upper left ot The
painting and ink and Indigo around the flowers
6 Paint the Flower Details
While the flowers are slightly damp, use a medium brush to paint the
details or the flower with thick white
5 Define the Flowers and Stems
The colors will flow slowly and blend on the paper creating interest-
ing shapes and textures it isn’t necessary io tilt the painting; the
colors will flow and blend on their own. When the paint is about 60
percent dr y, use a medium brush to mix ink and Indigo, then paint
around the flowers and stems, defining their shapes.
7 Define the Stems With Negative Painting
When the painting is dry. use the negative painting technique to
callout lhe stems With ink and Indigo. Paint around the stems, lhen
blend the ink and indigo away from the stems so the color fades into
The background
1(6
К Pa/jvt тик Thorns and Sign тнг. Painting
Finally, use the small brush 10 paint the thorns witin thick white and a little Scarlet
Sign and place your chop on the lower right to balance the composition.
С л€ TVS	Ofucsc mfc <wii m'or <w m iiM/re 5Лг«ш piper J J' x W736cm x
я-Чич|П’| r»4irsiv.i т-лч-;п пч s iimih i.iv •
117
F X f F fi I M f N I A l Г A I N T I H Ci Df МП N $Т« AT I () N
CRINKLING RICE PAPER—ORCHIDS
Crinkling Shuan papci tn depict the texture nt snow, trcciand rocks is. a common
practice in Chinese art. I his demonstration shows you how to use this method to create
the texture of orchid kave^ stems. grasses and dir'.
Й MATERIALS
PAPER
mature Sncian paper. 22 * x 16 ‘ (56cm x
BRUSHES
small • medium • ldrgc
CHINESE PAINTS
White * Yellow • VernUion • Carmine *
Rouge • Burnt Senna • Blue
OTHER SUPPLIES
Chinese ink
i Paint tut Petals
№1 a large brush and load tiie middle and heel with wfirte and
the middle and tip with Carmine. Hold the brush sideways to
paint the petals. pointing the tip away trom the center of the
flowers, Use one stroke per petal
2	Paint the Flower Centers and Small Stems
Use a medium brush to paint the centers of the flowers with
blue. Then mix yellow and blue to paint the small stems
3	Paint the Labellum and the Veins
of the Petals
Load yellow on the entire head of a medium brush, then load
Carmine at the tip Paint the center of lhe labellum i ightly wet
a small brush and split lhe lip wilh your fingers, Load lhe lip
with a little Rouge to pami the veins of the petab-
4	PaLNT THE VELLOW-ORANfiE FLOWERS
Paint the yellow-orange flowers the same way but using yellow
and Vermilion. Load the heel to middle of a large brush with
yellow. then load the tip with Vermilion to paint the petals
НИ
5 Paint the Center of the Labellum
and the Petals
While the colors зге still wet. pamt the center of the labellum. Load
the entire head of з medium brush with Carmine, then load the
middle and up with Rouge Dip the bp in a little ink. Hold the brush
sideways to pamt Next, use a small brush to paint one stroke at the
center of each petal with Carmine.
6 Pa/яг the Dark-Red Flowers
Now paint the dark red flowers with a large brush. Load the entire
brush head with Carmine, then load the middle to tip with Rouge
and dip the tip in a little ink. Hold the brush- sideways, pointing the bp
away from the center of the flowers to paint the petals Leave white at
tne center of the flowers. While the petals are -.till wet. use a medium
brush to paint the center s with a mixture ot vellow and Vermilion
.-П01К1Г1.-Г ПЧПКЦ.Г "M i> in iKiiri.ix
II1'
7 Рл1Л'Г TMJ? CfNT£R OF THE LaBELLUM
Load the entire head of a small brush with Carmine, then load the
tip to middle with Rouge and place a little ink on the tip Hold the
brush sideways to paint the center of the labellum, leaving orange
m the middle as the stamen
н Crinkle the Paper
Let the painting dry completely, then use both hands to crinkle
the painting.
120
9	Spread the Painting and Paint the Stems
and Leaves
Use both hands to carefully spread the painting as flat as possible
Lay it on the felt mat on your painting table Wet a large brush and
load и with yellow, lhen a hide Vermilion, from lhe upper middle
to bp, and due from lhe middle to tip. Place a httie ink on the tip.
Hold the brush sideways to paint the stems and leaves with one
stroke for each.
10	Paint Af ore Leaves and Create Texture
on the Leaves and Stems
Continue to use the large brush to pamt lighbcolored leaves with
yellow, Vermilion and a little blue Use a medium brush with ink to
tall out lhe veins of the leaves and lhe texture of the stems.
£XI’|.KIMI:M.U С.‘№МЭД f'AlMINU	1Л
Ill
1 1 PAINT 7 НЕ BACKtfKQVNP />1И7
Lightly wet a medium brush and load the
entire brush head with Burnt Sienna, then
load the middle to tip with ink Paint around
the HcnA’ers.. leaves and stems to create the
appearance of dirt in the background.
11	Paint the Grasses
Finally, use a small brush to paint lhe grasses
•n the lower left with ink
OSCFims CVrini’H* гмА . ил J гр|лглл inurin’ S/ruu/i paper 22" x Гб ’^лгж x JfrrwJ
122
F X P F R I M F N T A I PAINTING DEMONSTRATION
PAINTING ON PRIMED CANVAS—POPPIES
Mv wife paints with oils, and we share the same studio at home. One day. 1 аса&»та11у
dripped sonic Ch inese paint on one of her canvases, and I could not remove the paint com
plclr'y Rathcr than discarding the canvas, I tried to paint on it with Chinese pigments and
ink. I ivassurprised by the cruUomc: lheccHursappeared mure vivid than they do un Shuan
P.ipt г Ako, the colors .an be par I ully lifted to t it-iitr beautiful circc tk
Я MATERIALS
SURFACE
ail canvas. 16’ x 20’ (41cm x 5kml
BRUSHES
Chinese brushes:	I * medium •
large * watercolor brushes nos <8
rounds • nrh (&nm) flat
CHINESE PAINTS
i Organize the Composition Mentally and
Spray Water in the Upper Area of the Canvas
I first organize lhe composition mentally. Poppy flowers will
be the focal point in the upper-left portion of the canvas.
Other flowers and plants will! he scattered randomly in the
background Io start painting, lightly spray water on the upper
area of the canvas.
2 Splash Paint and Create Texture
Use the watercolor brushes to splash yellow. Vermilion and
Carmine on the wet area. Blow the colors to suggest the tex-
ture of the petals (Blow straight down so the color disperses
in all directions )
3 Paint Indigo Around the Flowers
Use a medium Chinese brush to paint Indigo around tlvj flowers.
Allow the indigo to blend mto the other colors a little
? .414 KIMI N I Al. C li2.NPA.il I'Alhll^ 3 M 11 N l<>. I S
125
4 Sprat More Water and Tilt the Canvas
Spray water on the upper left and the tower part of the canvas. I tit the
upper edge ot the canvas up 2 inches (5cm) to allow the colors to flow
down and Ыеп-d Use a medium Chinese brush to guide the flow
6 Splash Paint Around the Background Flowers
Use a 'i-inch (6mm) flat brush to splash yellow, then blue around
the 1 lowers in the background. It's OK to leave the splashed colors
on the flowers
5 Ann Znk Around the Flowers and Mix
ihf Colors
With the same Chinese bru-s.fi. add ink aiound the flowers. Use your
fingers to guide the flawing and mixing of the colors.
7 Define the Center of the Flowers
Next, use the no. 4 round brush to define the centers of lhe flowers
with Carmine. Then blend the color toward the tips of the petals
with a slightly wet no. 8 round brush.
» Dlfi.vl тш= 5 ил pcs With
Nbgat/vc Paint/ng
Use the watercolor brushes to define the
shapes and stems of the flowers and the
plants. Use the no 4 round brush to paint
around those objects with Indigo and ink.
then blend the Indiqo and ink away from
the objects, fading into the background
colors. The darker the base colors are, lhe
9 CftLATC .$T£MN AND PLANTS THJtOLTGH L/CTJNG
Finally use the no. 4 round brush то Mt colors to create the stems and
plants. (Lightly wet the brush and use it to remove color.)
I' О PPI E S СЛшслг г nA UJtJ СгЖ»r riri Oil iSi/ii't/i /rt* x 2tJ” (4 km x 5|ля)
more ink should be used
:.\I'I.IIIMI:M.U CIUfsKSfi KMlMJ ULIIMl? L5
125
INDEX
Background. 55
abstract, 6'1
flnwcrs. 62
leaves, 92
spoiitoriLtfUii 48
Balance, IH, 33.51,4,61,83,89. НН 1(6. 117
ВатЫхк 33
Banana true. spontaneous-tfyle, 74-75
ford, 35
Bird of paradise, 32
Blending. 22,25
Chinese paint, 20
watercolor, 22-23,25,55-56,63
Brush tip, splitting a,
Brushes, Chinese, 17
leading, 20. 52
using, 19
Brushes, watcrenlnr, 23
folds. 52-53, S7
Cactus. 115-117
Calligraphy, 33
Canvas painting on. 123-125
C hep, placing*, 15. I8> 33,51,6J, 78. КЗ. Я81 НН, 117
Chrysanthemum, watercolor, 106-HW, 126
Coconut tree. 35
spontaneous style, 72 73
Color
Wowing, 22.62.69.80.86.96.102-103.106.123
lifting, X9l,96-97,125
manipulate, linger, 22. 56,95 96, 1416,124
painting, fingernail, 96
scratching. 70
splashing, 112,123-124
Colors, Chincte, 15-16
load i ng. 3». 52
Colors, watercolor, 21
Snr tf/м Watercolor
Con .pmiTuin.. Chi new pu гл ng, 28-41
uc-ateped 36-37,41.55
balance, Л3.51.53.6kM3,M9. HU. IO5. i IT
circular, 36
contrast in. 29. 31-32. 18.69,96
focal point. 29-M.32,38.41
horizontal 39,41, 112
movement in. 48 49
nb|CLts i г», ijrouping and organizing.
19,32, 34-37
orgamration in, деодйсСтьс, 36-37
rectangular 137
S shaped,
three -line integration, 29,34-35,55
triangular, 37
WfDCfl], 41. 113
White spate, 29, 4<l
CnmpDsii inn, watercofor. 47
Contrast, 29. 31 -32,48,69,96
Corn tree. 38
Гк-pth. creating, 32,56,63
Detail, H.32JO5 Ни»
wc?/su Painting, detail-style
Dirt. 122
Effect», paper. 17
crinkled, 118,120-121
Eye, leading the, 4 I 49. 55
l loral painting, Chinese development <4, 10
Slittfho Painting
Flowers
luckgroutid, 106
distant, 46,8o
half-open, 100
painting, nulliodsfor, 12
secondary, 102-105
under .s/Vii/j* ffuwer
Fowl point. 29 io, 32, 38.41
FoliiH;c,distant 62
Г mgs, 11
Glaus pruning with, 112-114
Gluc.asrcsisT, 115-1Г
Grapes. 33. 47
spontaneous-style, 93-94
watercolor. 95-98
Grass.. 22, 24:51,86,89,122
Happy dots, 53
Hibiscus. 38
Highlights, 13,71,91.94,9?
Hollyhncks, 36
spcinfencpiifi-tfyfc, 99-HH
watercolon 102-105
linagy.sbtrnnng, IH.41 44
Ink. 16
diluting, 12
Inses 11,41
detail-STyk, 44—17
hnlvllum. 66.69, 118-130
leaves
IxN-kgmund, 92
grape. 93,95,97-98
h>lh4iock, 100-НЯ
ins,46
negative painting,97-98,107
orchid, 12 L
Light beams 96
1Лкч
tiger. Ml, 35
water, 11,13.30,82-87
Lily pads. 83, 85-86
Lincs. 32
I uigjiari School, 76, I H
Lotus. 48 51
CHRYSANTHEMUM iMih’rcvh'orArete [40-lh (Mtyim) co/d-pHMsrd wterajtorjMprr Г4° X 2Г'(Збст x 53cwJ
I 26
1 XHUS pond, I I
MaennLa. 8, 34, 39
«pnnlancous-style, 52-51
watercolor, 55-58
Matkuij; fluid, 21, 23-14, 55-56,62,68-69
Mrt.feit, IS. |H, in
Mak i i;ds Chinese, 15-2(1
brushes J 5, 17.19-20
buying, 20
tutor. 15-16
ink, 12, Ih
nuu.fch, 15, IK, 113
paper, Shuan, 15-18
See *tfsG Chop, placing a
Mater iaK watercolor, II, 23
Morning glories 39
Karcusui, 30
Negative painting, 25, 46-17, 57-58,62,70
cactua, lift
flowers, distant, 46
grapes and leaves, 95 98
poppas 115
row, 79-81
Negative space, masking. 90
XighEfcere*, 13
Objects essence nt, captnn ng the, ii. 13
Orchids 10,37
double. 35
experimental 118-122
spontaneous-wylek 66-67
watercolor, 6И 71
PaUuLng
lapane.se. til
tilting a. 56,63,106,112, 124
See dto Negative painDflg
Paintings Ch toe sc
Lingnari School 76, 111
northern versus southern, 93-94
stretching a, 26-27
vmuswesteni, 13.111
Pai nt i ng, dcwi I style, • i
bribe method in. 12
demunslralKHi, 44-47
paper for, 17-18
Paiiuini; spontaneous-style,, 11,111
bone method in, 72
demon stratums, 52-54 59-61,66-67,72-78,
82-83,88-89,93-94,99-101
no-bone method in, 12
paper for, 17
water ink, 12, IK
POPMJ'.S |ГРГ|*ПТМ*1ГЛ|'| l'ii'ii’5 Jdtf-.'tr Г3|1|‘х<о<> ГРк/-;»П’У5.’.-|' wri’G-> svpppi*'
bT x ЛГ’рбет x 53сш1
Painting,.spontnivnuvdeta11 style, II
demonstration, 48-5 i
paper for, Г 18
sketching, 18
Pak’lle. limited, 21
Paper
crinkling, 118, 120-121
Shuan, 15 18
watercolor, 21
Paper weights, 18
Paper white, saving, 21
Konies. 12-13,41)
sfwntaneniK style, 59 61
watercolor, 62-65
Petals, 76-78
one «ягпке, Ж 52
Poppes-, 123-125, ]27
Printing, glass, 112 114
Palo, 69
Reflections, 13
Resist, glue, 115 l Г
Rill paper.ClinkIing. I IK, 120-121
Sir uko Paper, Shuan
Roses
tprmtaneouA-style, 76-78
wutcrcnlor. 79- КI
Rule <4 thirds 36
Sah. table, 69
Sepals 53, 5"
Shadows, 13
Watercolor. 6.3
Sliui -raiohua, 12
Signature, adding a, 33. 51,<»| ,89
Sketching, 1H
feu.al -point, 104, 107
ink, 74
See tl/ft) I rnagev t/aotig
Snow, 69, 118
Stents., 22,24- 46. S3
Strokes 13
u-nttr-lrfush, 19,53
minimiring,66
as «di apes, 32
tide-brush, 19-20
Style. Sre Painting
Sunn-e, 12
fonflnwrv, 56
Tech ni^ues See Color
icxturv, 19,22. 72,96. 102-103
btown,69,9fc, 102 103.123
pajK-r, I IK. 120-121
Thorns 78
Tiger I Hies 30,35
FomatocK
spontaneous style,MK 89
watcecotor, 90-92
Frees
banana, 74-"S
СССЛПШ, 35,72-73
Tnimpct creeper, ЛН
Value. 22,31-32
contrast, (v9,9ft, 99
gradfltjnn. 64
variatiun.32,63
Vi ne% 68
grape. 93-94,96, 98
Water 82,85 86
Water lilies Hi 13
.spnntnnccHLS-style, 82-83
wiue.woior, 84 87
Watcrcnkw
demonstrations, 55 S6.62 65,64 "1,79 81
84-8" 90-92,95-98, Ю2-1О9
maiLTiak aixl techniques 21-23
pcxmng, 22 2.3,55,62 <>3.68,84 8ft Ktft
White красе, 9,29, 40
Wisteria. 37, 112 114
Yin and yang. 31
]
THE BEST IN FINE ART INSTRUCTION AND
INSPIRATION IS FROM NORTH LIGHT BOOKS!
depthr
\ .irrrwnif
Watercolor Depth & Realism
by Laurie Humble
ISBN -13:97.S  IНЙ061-ГМ 5-5. IsBN -10 1 - ЫЮ61 -(145- -5
hankwr. 128 pages, *Z159?
Learn how to take a "flat" painting and create a sense of depth using 5 different
techniques to animate the composition and increase the overall depth and realism.
The 5 key concepts lealurtd include contrast, color saturation, perspective, detail
and unifying washes. Step-by-step demonstrations, .short exercises,close-up details,
before and-aftercom^xinsons and samplesof finished work help convey and reinforce
the importance of the 5 key concepts.
exploring
textures
in watercolor
Ahands <in дрргин1'
Exploring Textures in Watercolor
A Hnrn/j-Uw Approach
liy Joye Moon
ISBN В 97м I WIN 1ВД H.1SBN 10 I 6lX*»|	5
hardcover wwh eoiiccakd spiral. H4 page*. *Z 1315
Гдркилцу 7?л7гггс$ m	otters a combination ot examples, mini-denionstra
lions and full stcp-by-siep demonstrations showing ways to master the concepts of
value, color, negative space and texture. A full range of techniques is explored, i ndud-
ing pouring, masking, splatter, stippling-, resist collage, scraping and more. These
basic .ski I Is and techniques are then incorporated i nto full-length demons! rations, a nd
bonus inspirational sidebars provide readers with ways to add texture to I heir lives.
Confident Color
An A nisi 5 (jutdc lo Harmony, Contrast и nJ Urnty
by iVitu Leland
ISBN J3 97м I Ш1М PI2 7JSBN H> I 6011*1 012 9
hanionwer wait concealed spiral. 160 pages. *Zl059
The approach to color theory in Ctmfiiterrt С<Ж>г makes selecting colors easy and
efficient, Learn the importance ot color schemesand color contrasts and howto use
them effectively when paint nig to take your compositions to new heights. A lively
illustrated color glossary provides a ref resher on color basics so (hat you can focus
on more complex theories.
These books and otherfine North Light titles arc avuifabit u/ your local fine art retail?r or
iHMdattiirvorfnitn tMiIinr supplier*. Also. please rmf uur verbdir at trnu.ttrthtsnrtHrirk.cfUri.
12,4
1Н т Г. I НКПЛЧ *-Л ТИН И ми
EAST MEETS WEST
Combine Chinese and Western painting techniques
to create beautiful flower paintings.
In this beautifully illustrated book, two proud traditions mix
and mingle to create fresh watercolor expressions. Learn how to
in fuse you г flowers with new life using a combination of traditional
Chinese brush painting and Western watercolor techniques.
8 80 pages of exciting step by-step watercolor demonstrations
8 16 popular flowers, 8 of them in both Western and Eastern styles
8 traditional Chinese painting materials and techniques
8 4 creative variations for further experimentation
I ian Quan Zhen makes Eastern art ideas and techniques accessible
and approachable. Written with both beginning and advanced
artists in mind, the lessons in this book will sharpen your sense
of composition, enrich your use of color and help you capture the
essence of your flower subjects.
US$29.99
CAN $32.99)
Zlft77
lieu t ЁСО51 C<£ 2
ВЯГчМО -flOOGt-Oae-S
9 9 9
0
з