/


Автор: Сусак К.Р. Стеф'юк Н.А.
Теги: вишивка шиття шиття хрестиком українська етнічна вишивка українське народне вишивання двомовне видання
ISBN: 966-675-416-9
Год: 2006


Текст
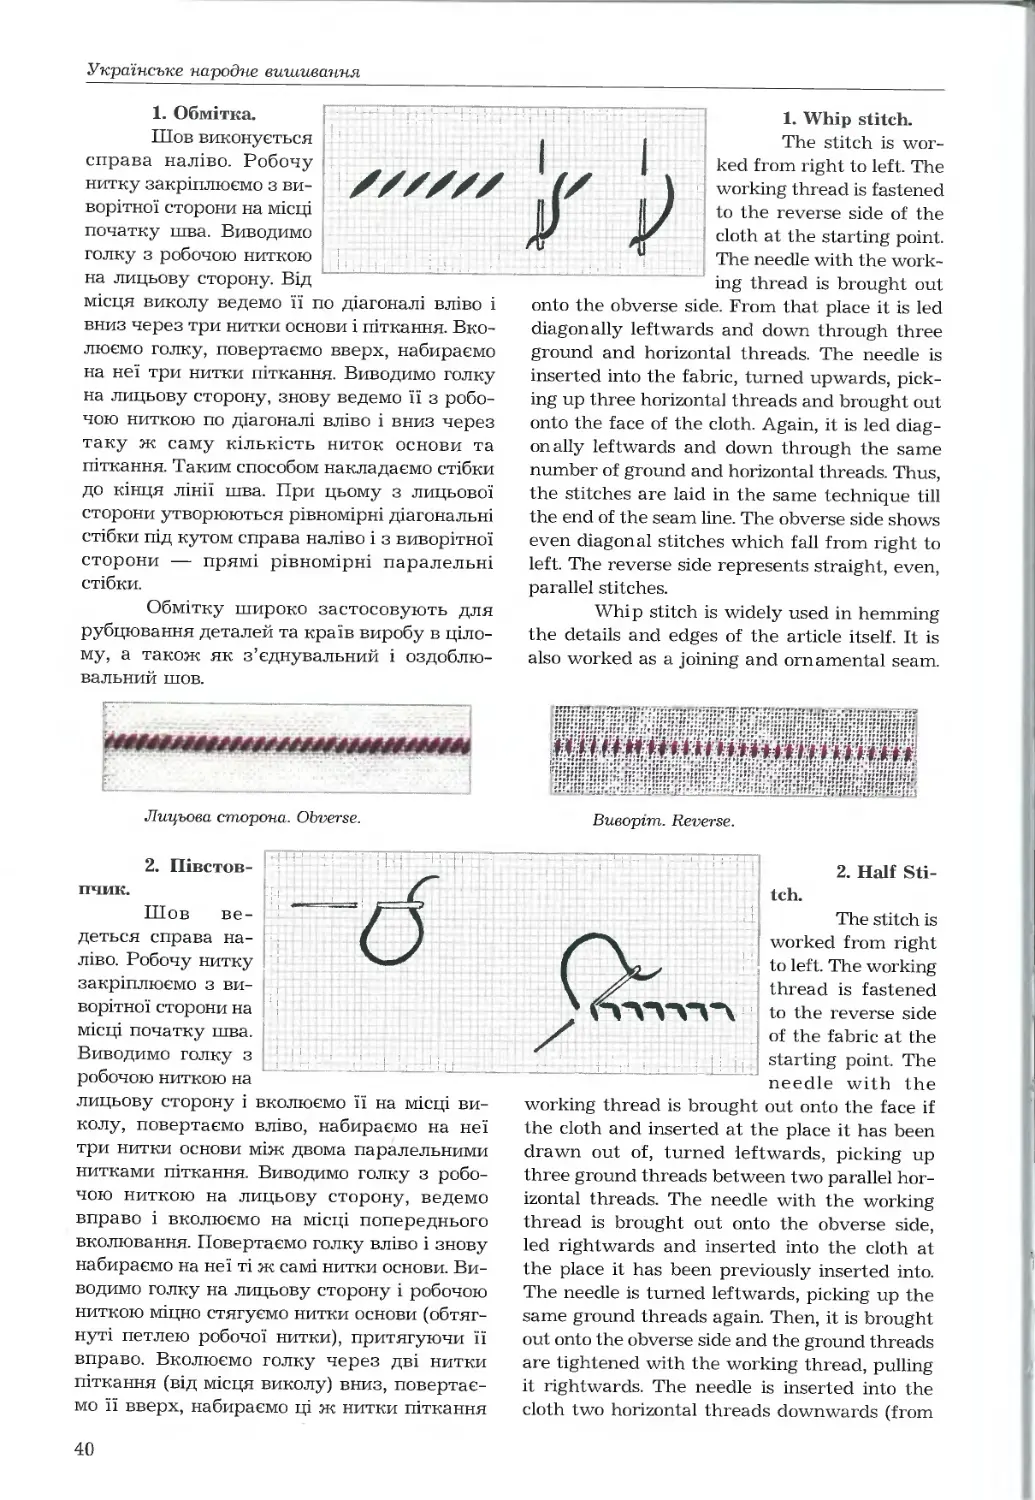
і.
К.Р. Сусак, Н.А. Стеф'юк
■■■■ s
/
/
■А'
І/ */ ... ». » ;*• »....... /^ .^к.-,
..' ::::г ••* - / <- *--*■:<*
У "J
техніки
методологія
методика пГ::
Ч
^
4 7
-I
X
^
\
x Л
\
\
V.'
techniques
methodology
: • methods
V:-.s«
I jl
•л :l
■ ттвч**»»^
Utf4takiFoJI
*.j
> ...
JT I* * *
. /."
p
lIFf
: 1
6
<.•
K.R. Susak, N. A. Stefyuk
T __ -!_,
К.Р. Сусак, Н.А. Стеф'юк
техніки
методологія
методика
Рекомендовано
Міністерством освіти і науки України
як навчальний посібник для студентів
вищих навчальних закладів
ищііШ'іЧниш^ил
І Т 1 І'
л
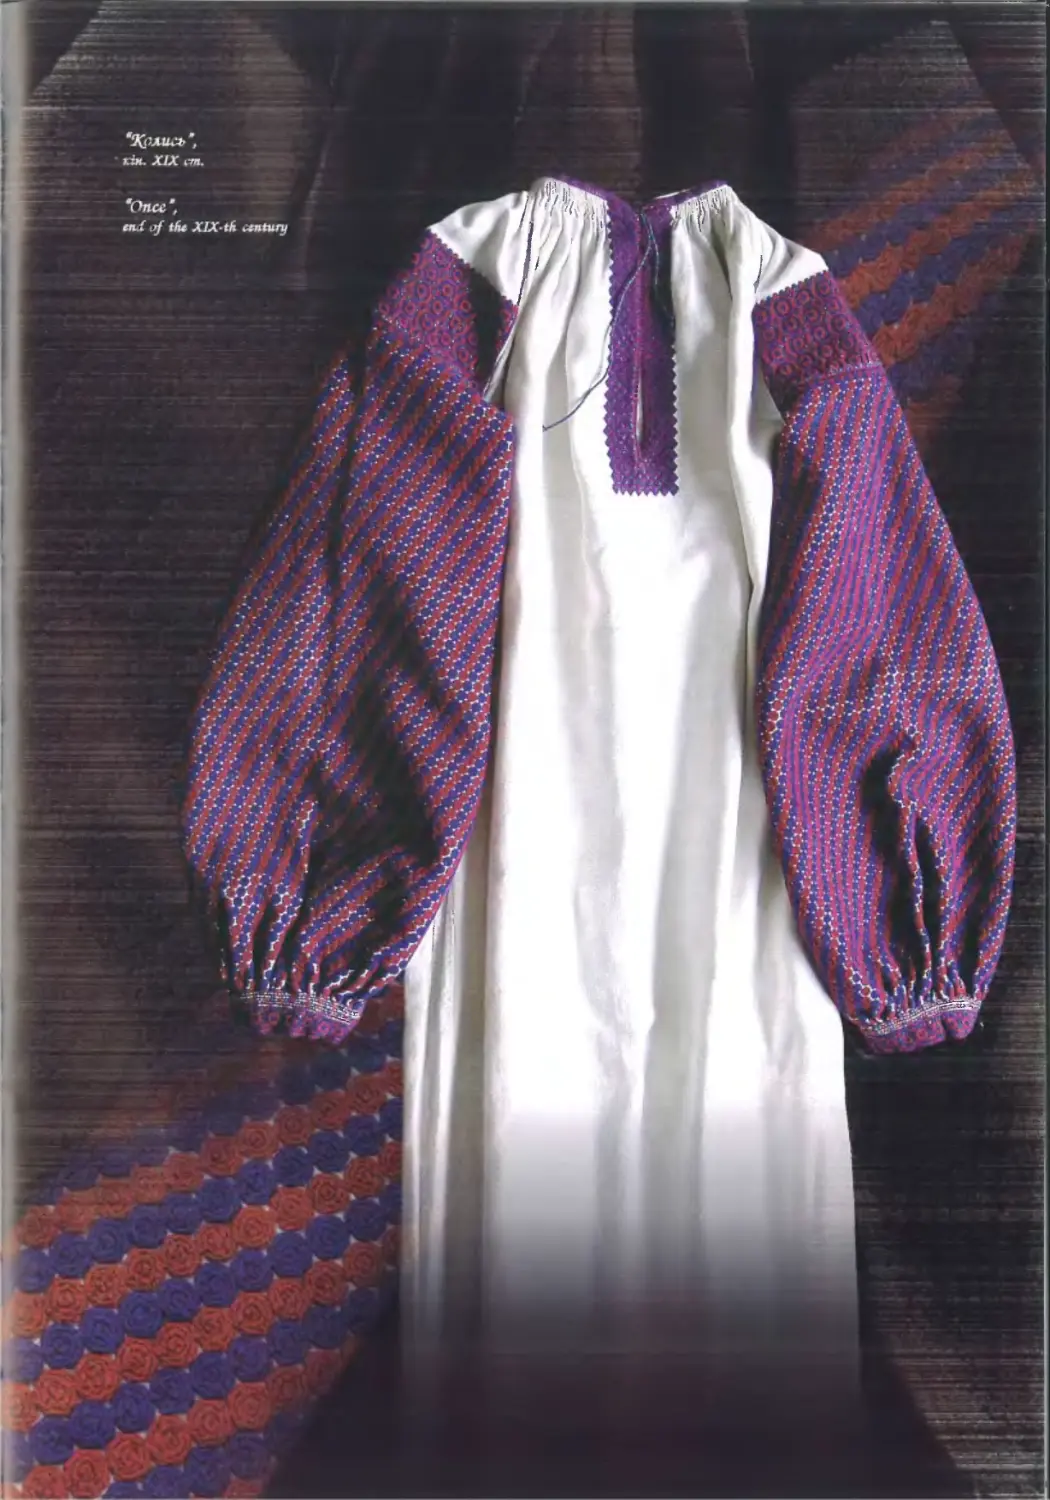
тепер
once
ись
%
*
k/
Київ
Видавництво Науковий світ
2006
2s.
завжди
*A
EL
always
nowadays
Or IQq
% >.
Recommended
by Ministry of Education and Science of Ukraine
as a practical course for students
of higher educational establishments
techniques
methodology
methods
K.R. Susak, N.A. Stefyuk
Kyiv e
Publishing House Naukovyi Svit
2006
"->.,
^1
>1
scan: The Stainless Steel Cat
ББК 85.126я7
С 90
УДК 677.026.6(075.3)
У книзі вперше подано українське народне вишивання як навчальну дисципліну,
сформульовано предмет та завдання, визначено роль і місце її серед фахових дисциплін декоративно-
прикладного мистецтва. Методика вивчення матеріалу навчальної дисципліни запропонована в
ракурсі некласичної освітньої парадигми з урахуванням прилучення України до Болонської конвенції.
Відтворені практично, графічно, детально описані теоретично давно забуті шви: ключове
шитво, шов ріжкатий, ключка, парована ключка, заігліно-І, заігліно-П, верхоплут гуцульський,
шов кучерявий, колодки-П, шов кочелистий, штепування, навиване тощо, введення їх в
навчальний процес, відтворення ними прадавніх композицій та авторська класифікація швів у своєму підсумку
обумовлюють наукову цінність посібника.
Посібник пропонується для викладачів, студентів навчальних закладів
декоративно-прикладного мистецтва України та в межах Європейського освітнього простору.
Науковий редактор доктор мистецтвознавства, професор, член-кореспондент
Академії мистецтв України М. Є. Станкевич, заввідділом
народного мистецтва інституту народознавства НАН України.
Рецензенти: доктор мистецтвознавства, професор Р. В. Захарчук-Чугай, старший
науковий співробітник інституту народознавства НАН України;
доктор мистецтвознавства Г. Г. Стельмащук, професор кафедри історії
та теорії мистецтва Львівської національної академії мистецтв.
На основі проведеної незалежної експертизи Міністерство освіти і науки України ухвалило
рекомендувати як навчальний посібник для студентів вищих навчальних закладів.
Лист №14/18-2-2778 від 18.12.2005 р.
Сусак К. Р.
С 90 Українське народне вишивання: Навч. посібник /К. Р. Сусак, Н. А. Стеф'юк. — К.:
Наук, світ, 2006. — Бібліогр.: с. 279-281. — 281 с.
ISBN 966-675-416-9
У книзі вперше подано українське народне вишивання як навчальну дисципліну,
сформульовано предмет та завдання, визначено роль і місце її серед фахових дисциплін
декоративно-прикладного мистецтва. Методика вивчення матеріалу навчальної дисципліни
запропонована в ракурсі некласичної освітньої парадигми з урахуванням прилучення України
до Болонської конвенції.
Посібник пропонується для викладачів, студентів навчальних закладів
декоративно-прикладного мистецтва України та в межах Європейського освітнього простору.
ББК 85.126я7
ISBN 966-675-416-9 © К. Р. Сусак, Н. А. Стеф'юк, 2006
For the first time Ukrainian folk art is presented as an educational discipline in this book. The
subject matter and tasks have been formulated as well as the role and place of Ukrainian folk embroidery
among the professional disciplines of decorative and applied arts have been determined. Methods of
studying the material of the educational discipline are suggested in non-classical educational paradigm,
taking into consideration Ukraine's participation in Bologna Convention.
The long forgotten stitches such as Klyuchove Shytvo, Rizhkatyi Stitch, Klyuchka, Parovan a
Klyuchka, Zaihlino-I, Zaihlino-II, Hutsulian Verkhoplut, Kucheryavyi. Stitch, Kolodky-II, Kochelystyi
Stitch, Shtepuvannya, Navyvane, etc. have been represented practically and graphically and described
theoretically in every detail. Introduction of them into the educational process, revival of ancient
compositions and the authors' classification of the stitches in the summary contribute to the scientific
value of this practical course.
The practical course is recommended for teachers and students of educational establishments
of decorative and applied arts in Ukraine and in European educational systems.
Scientific editor
doctor of Art Criticism, professor, Corresponding Member of the
Academy of Arts of Ukraine M. E. Stankevych, head of the department
of folk art of the institute of ethnology of the National Academy of
Sciences of Ukraine.
Reviewers:
doctor of Art Criticism, professor R. V. Zakharchuk-Chuhai, senior
scientific worker of the institute of ethnology of the National Academy
of Sciences of Ukraine;
doctor of Art Criticism H. H. Stelmashchuk, professor at the department
of history and theory of art of Lviv National Academy of Arts.
On the basis of an independent examination Ministry of Education and Science of Ukraine
approved and recommended the book as a practical course for students of higher educational
establishments.
Letter № 14/18-2-2778 from 18.12.2005.
© K. R. Susak, N. A. Stefyuk, 2006
Українське народне вигнивання
ЗМІСТ
*зм.
Передмова 12
**СП.І. Вишивка — вид мистецтва.
1. Зміст понять «вишивати», «вишивання», «вишивка» 16
2. Історичні витоки вишивання, розвиток та становлення його
як виду декоративно-прикладного мистецтва 17
3. Засоби виробництва 26
4. Корисні поради 32
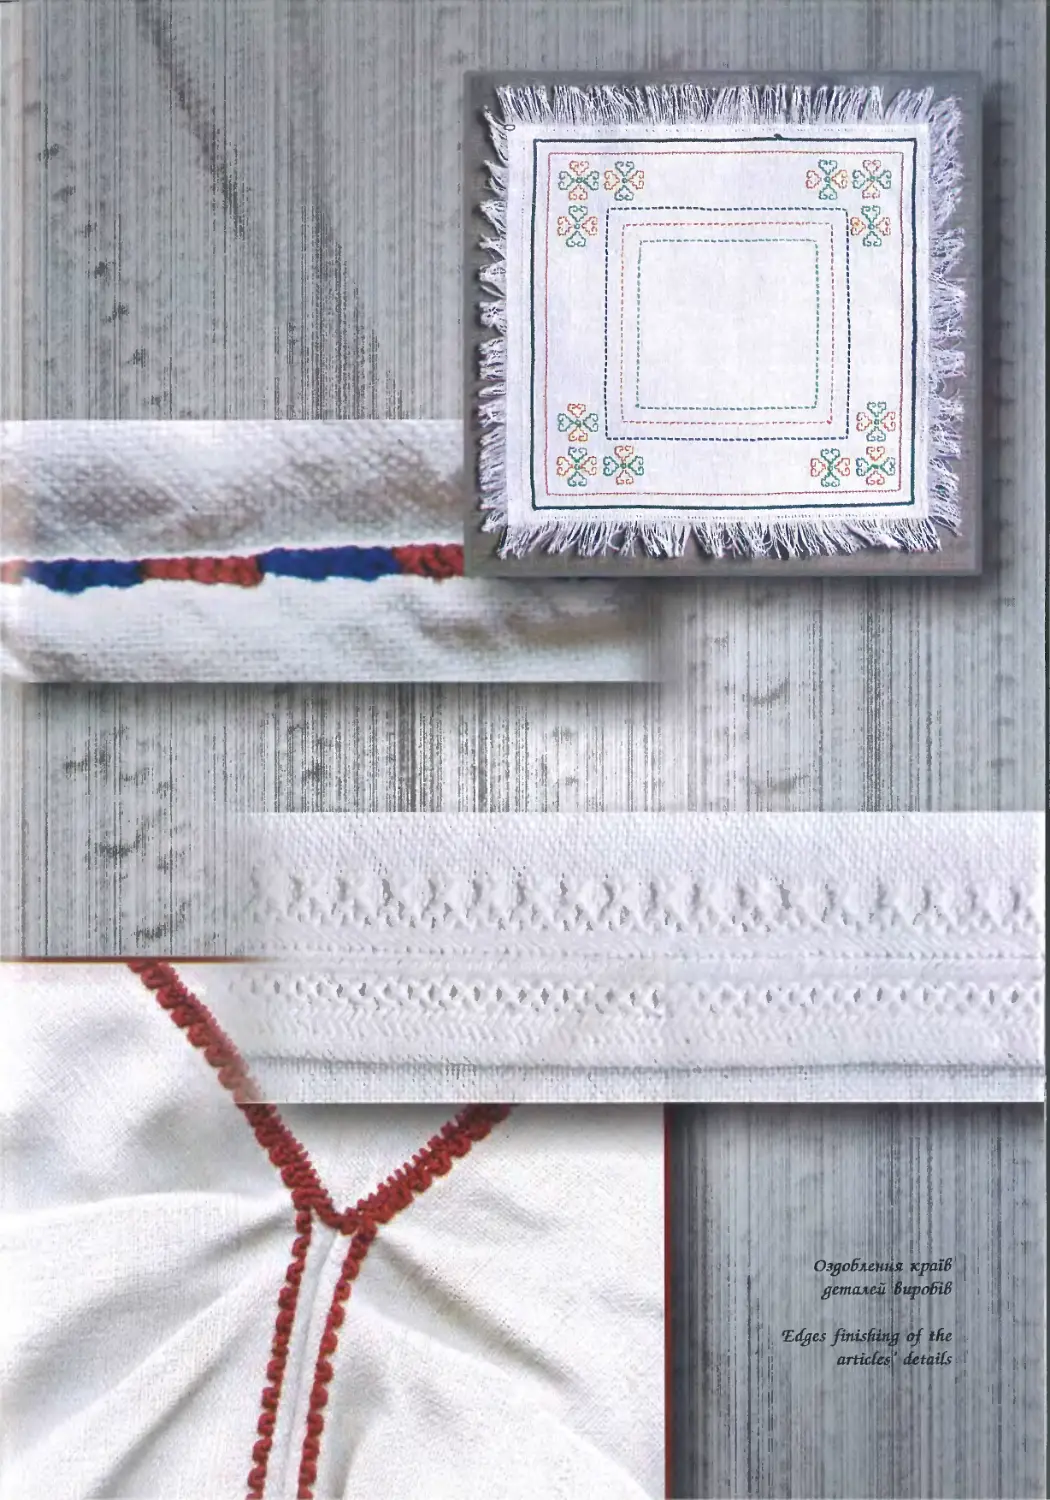
СП.ІІ. Обробка країв деталей виробів
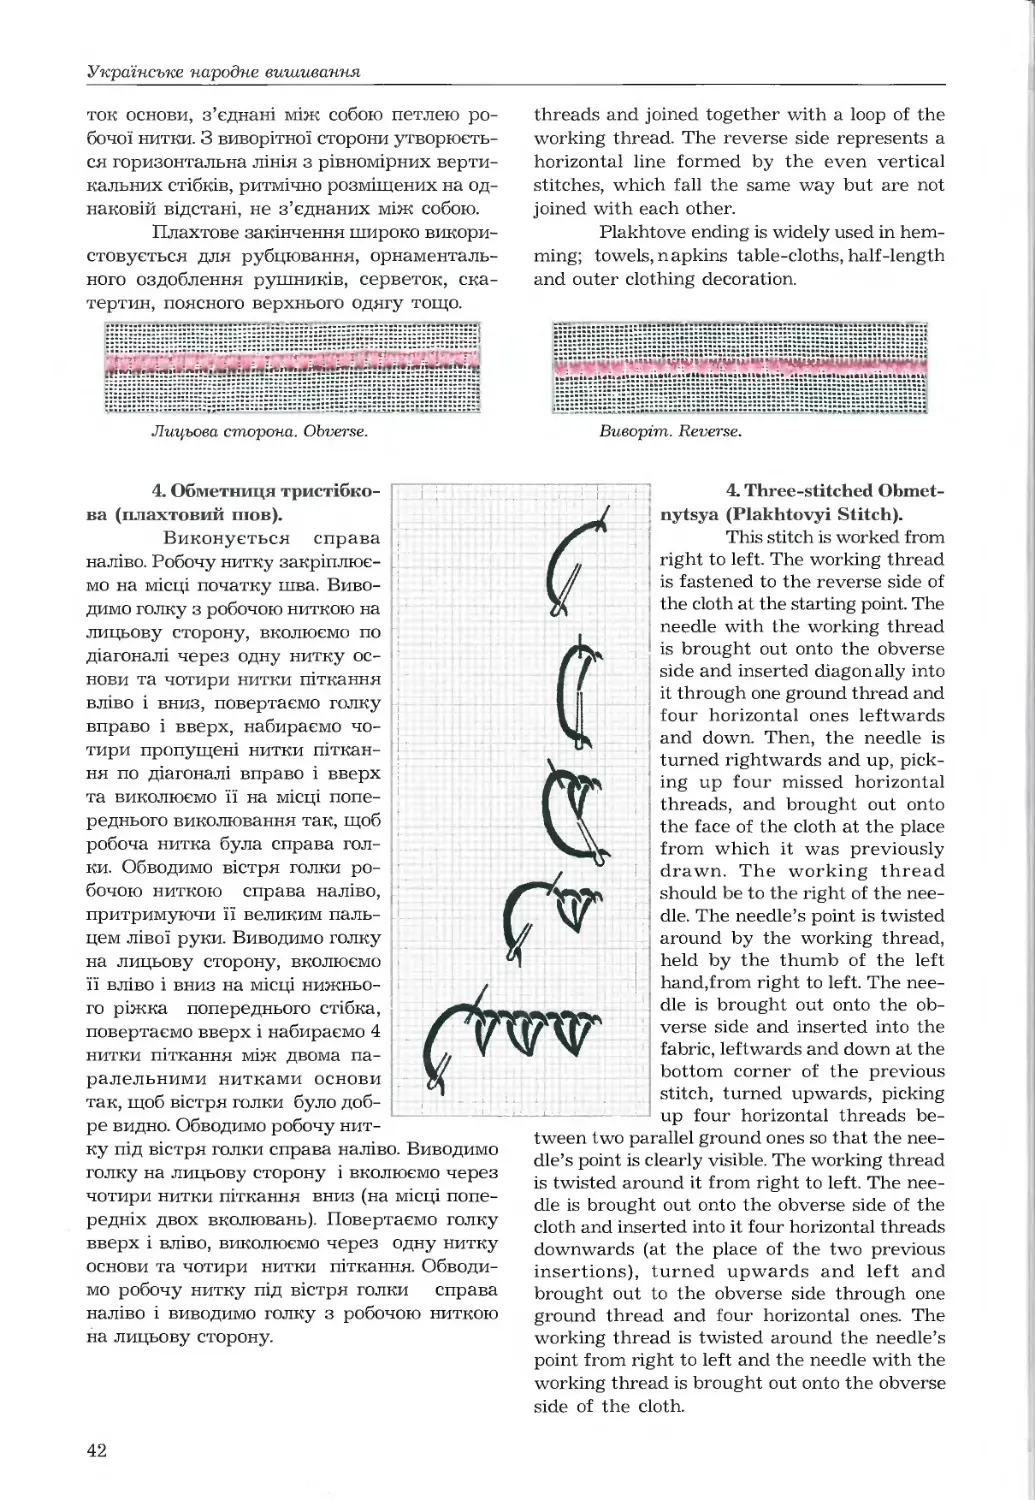
1. Обмітка 40
2.Півстовпчик 40
3. Обметниця одностібкова 41
4. Обметниця тристібкова 42
5. Хрестикування 43
СП.ІІІ. Початкові шви.
1. Затяганка 48
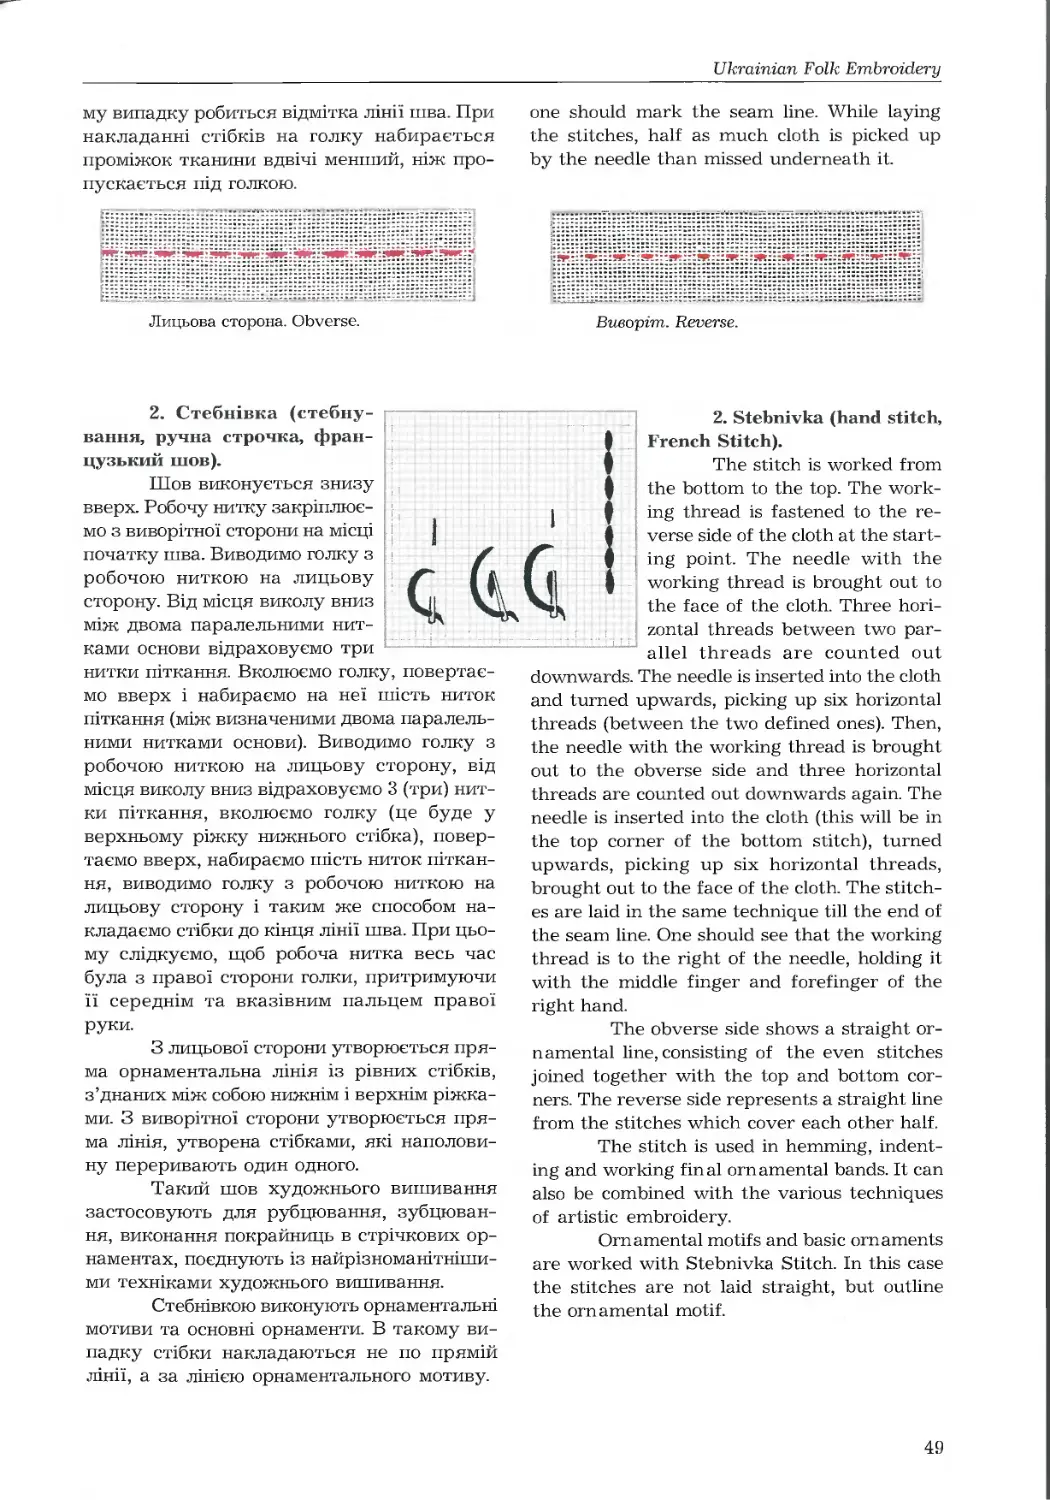
2. Стебнівка 49
3. Кривулька одностороння 50
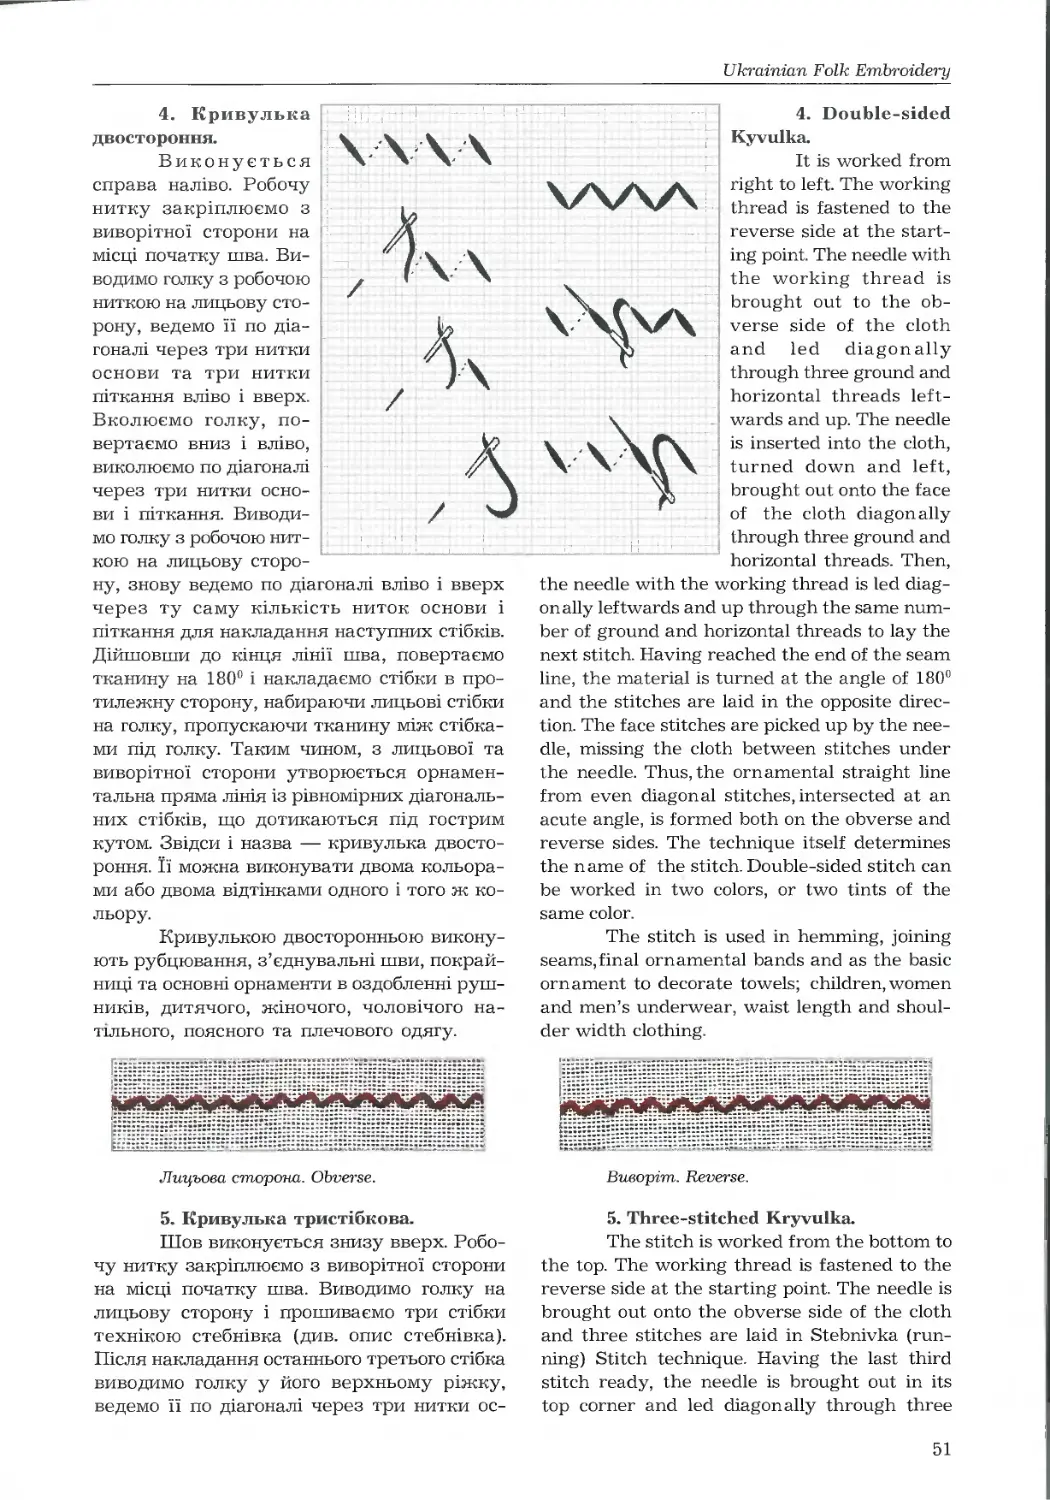
4. Кривулька двостороння 51
5. Кривулька тристібкова 51
6. Ланцюжок 52
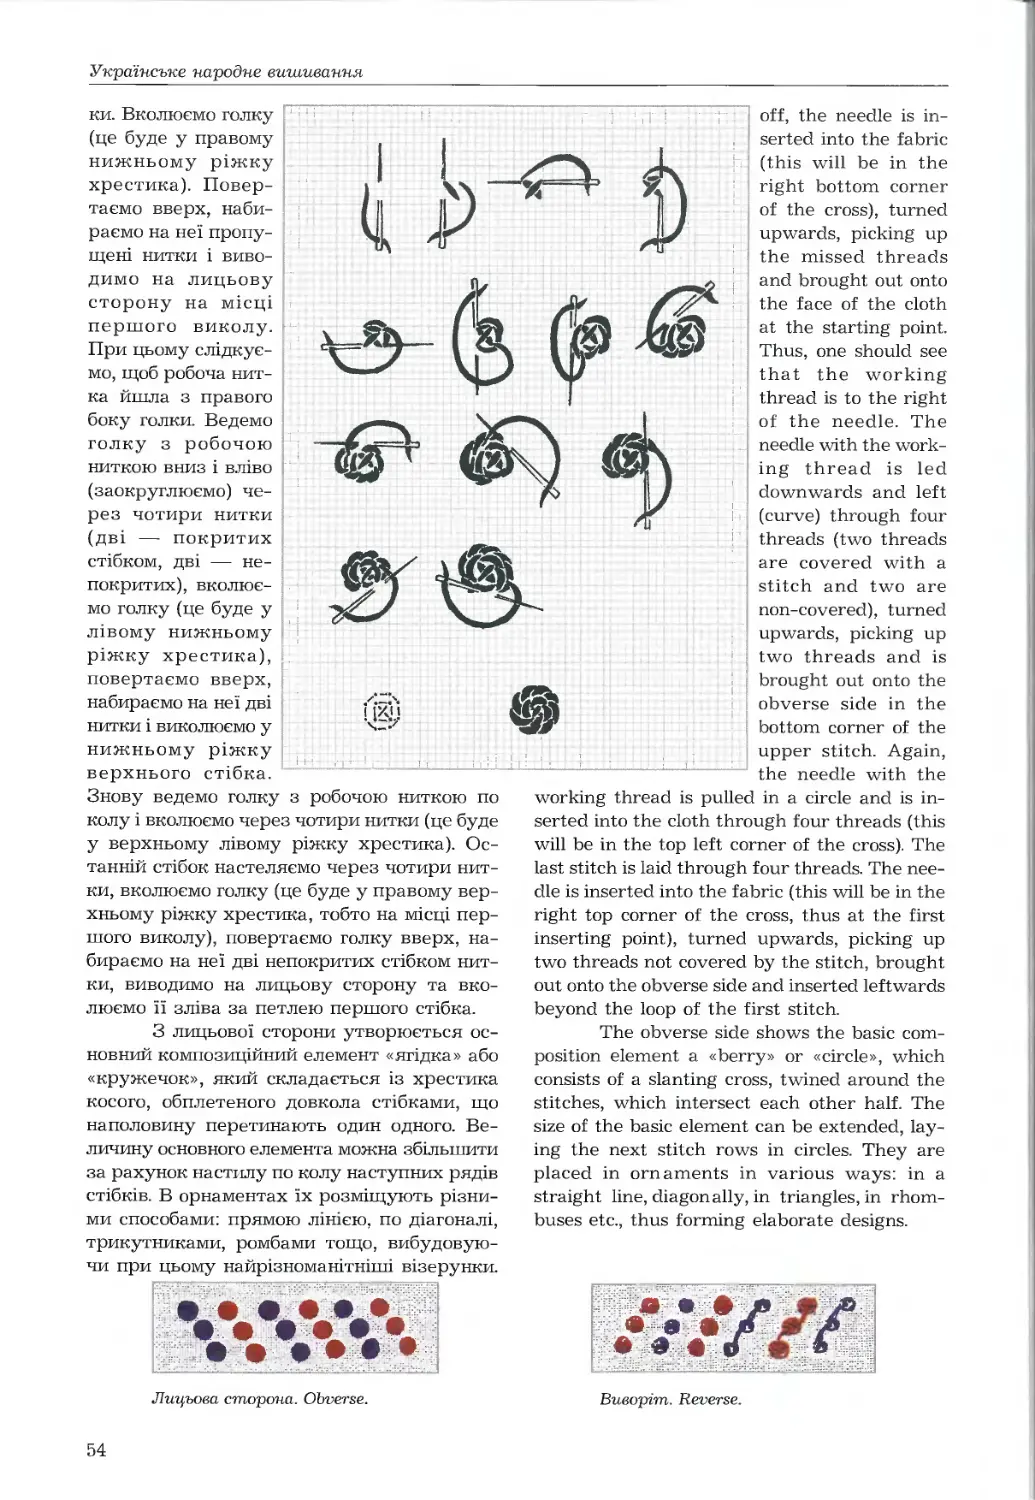
7. Кручений шов «позад голки» 53
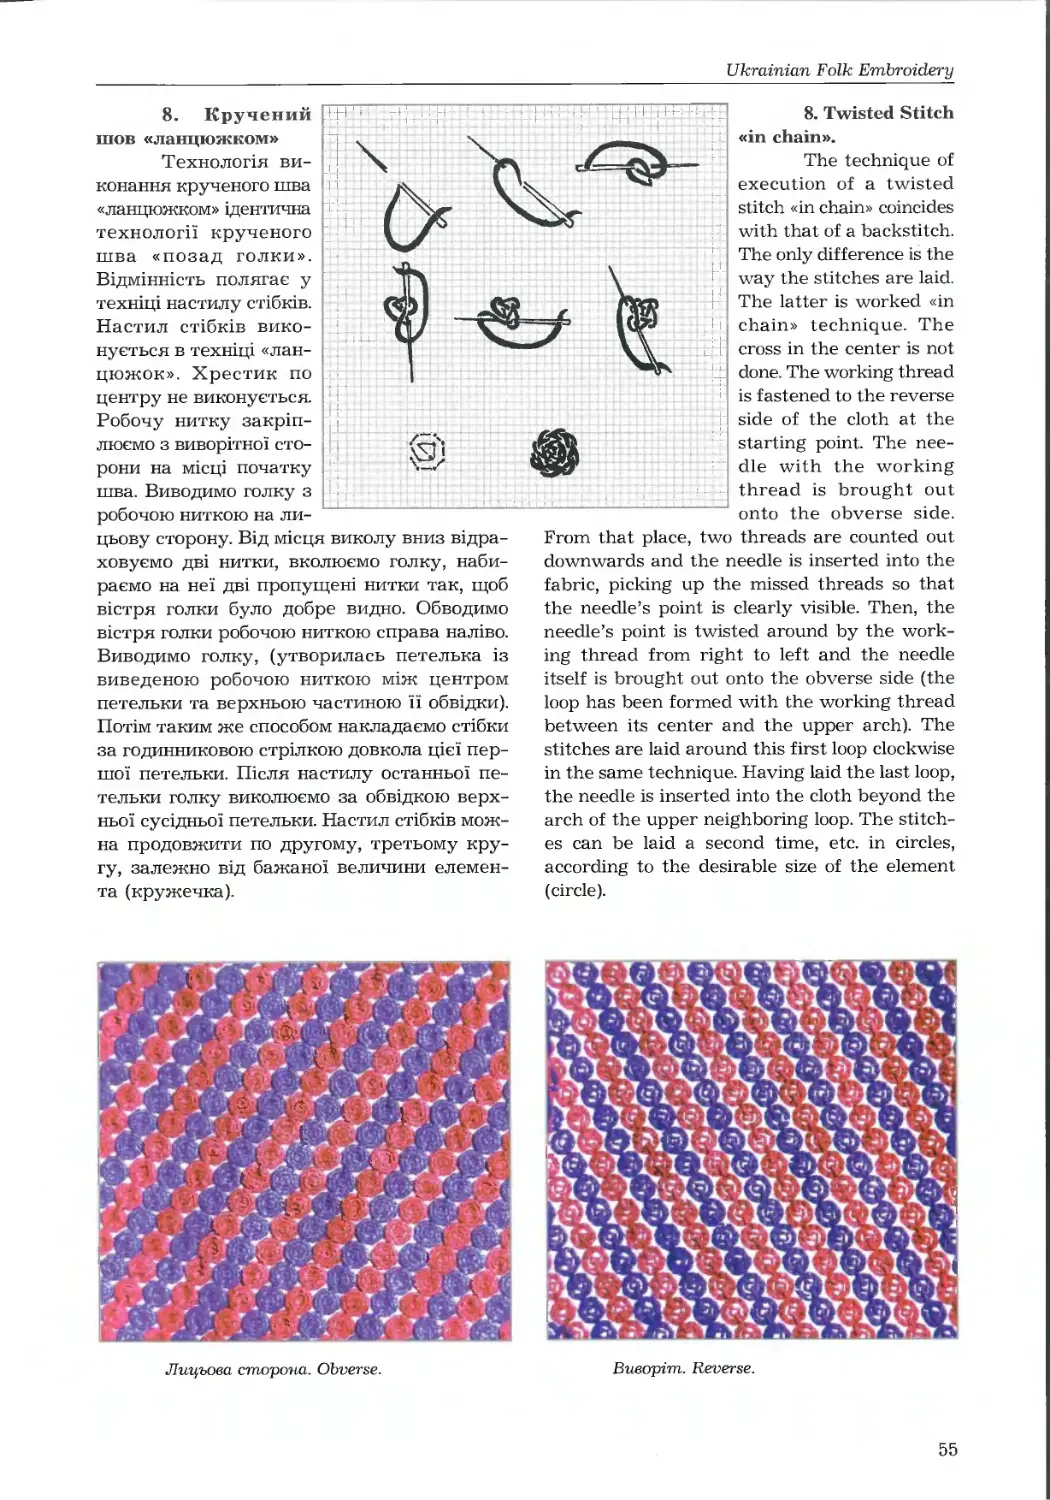
8. Кручений шов «ланцюжком» 55
Cn.IV. Оздоблювальні шви.
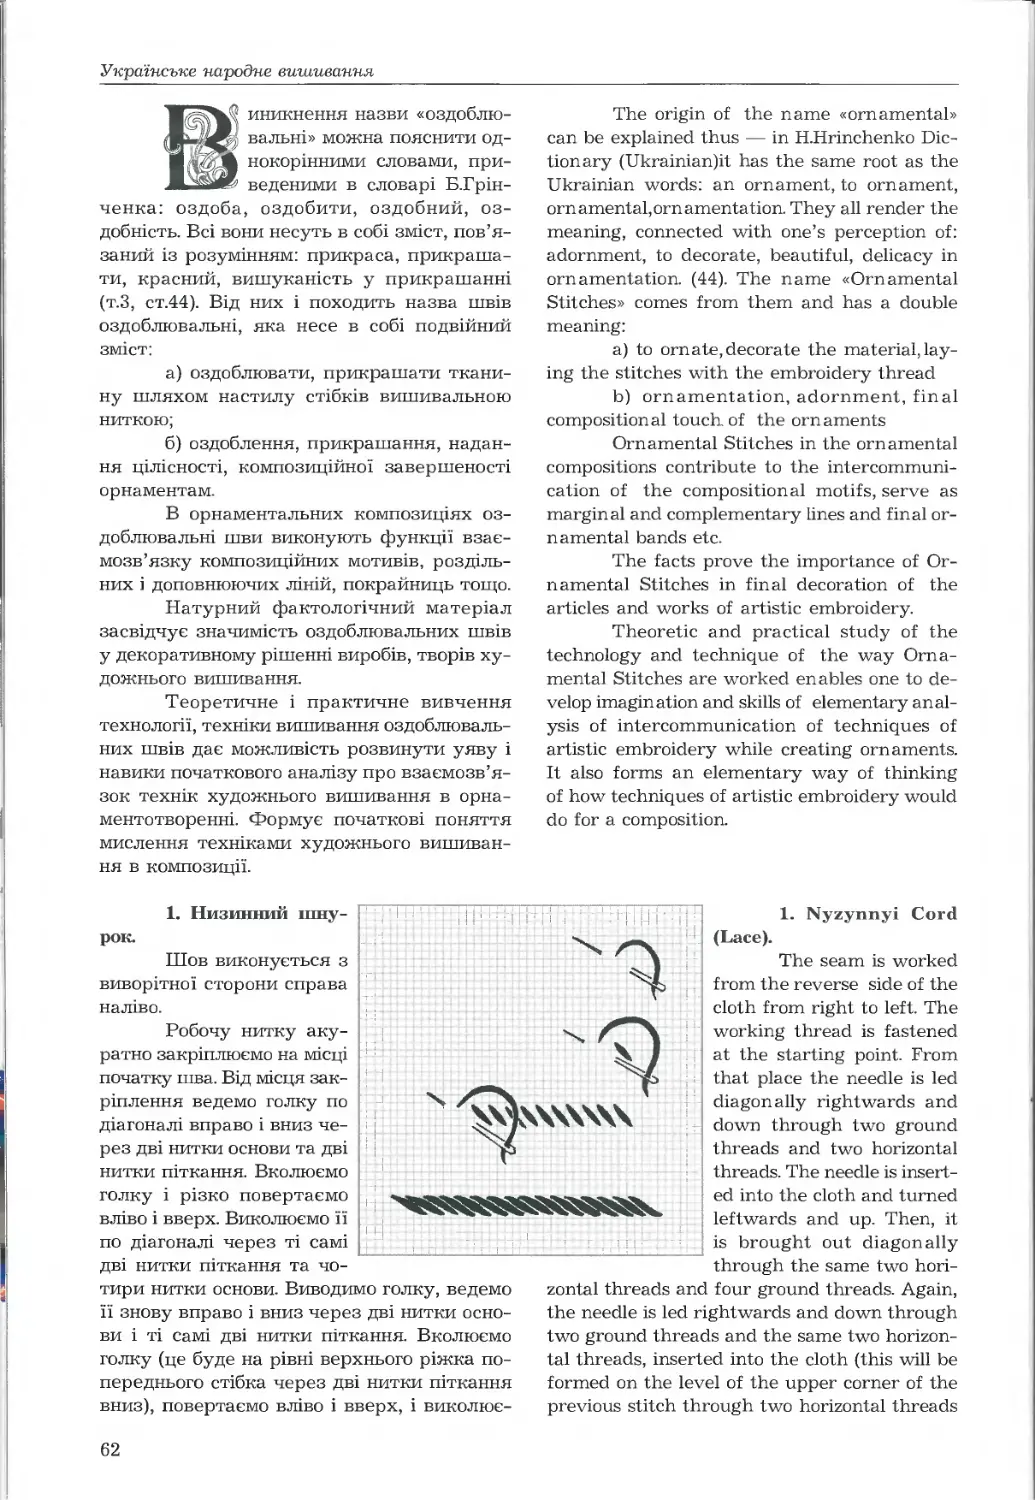
1. Низинний шнурок 62
2. Ретязь поперечний 63
3. Ретязь кольоровий 64
4. Соснівка 65
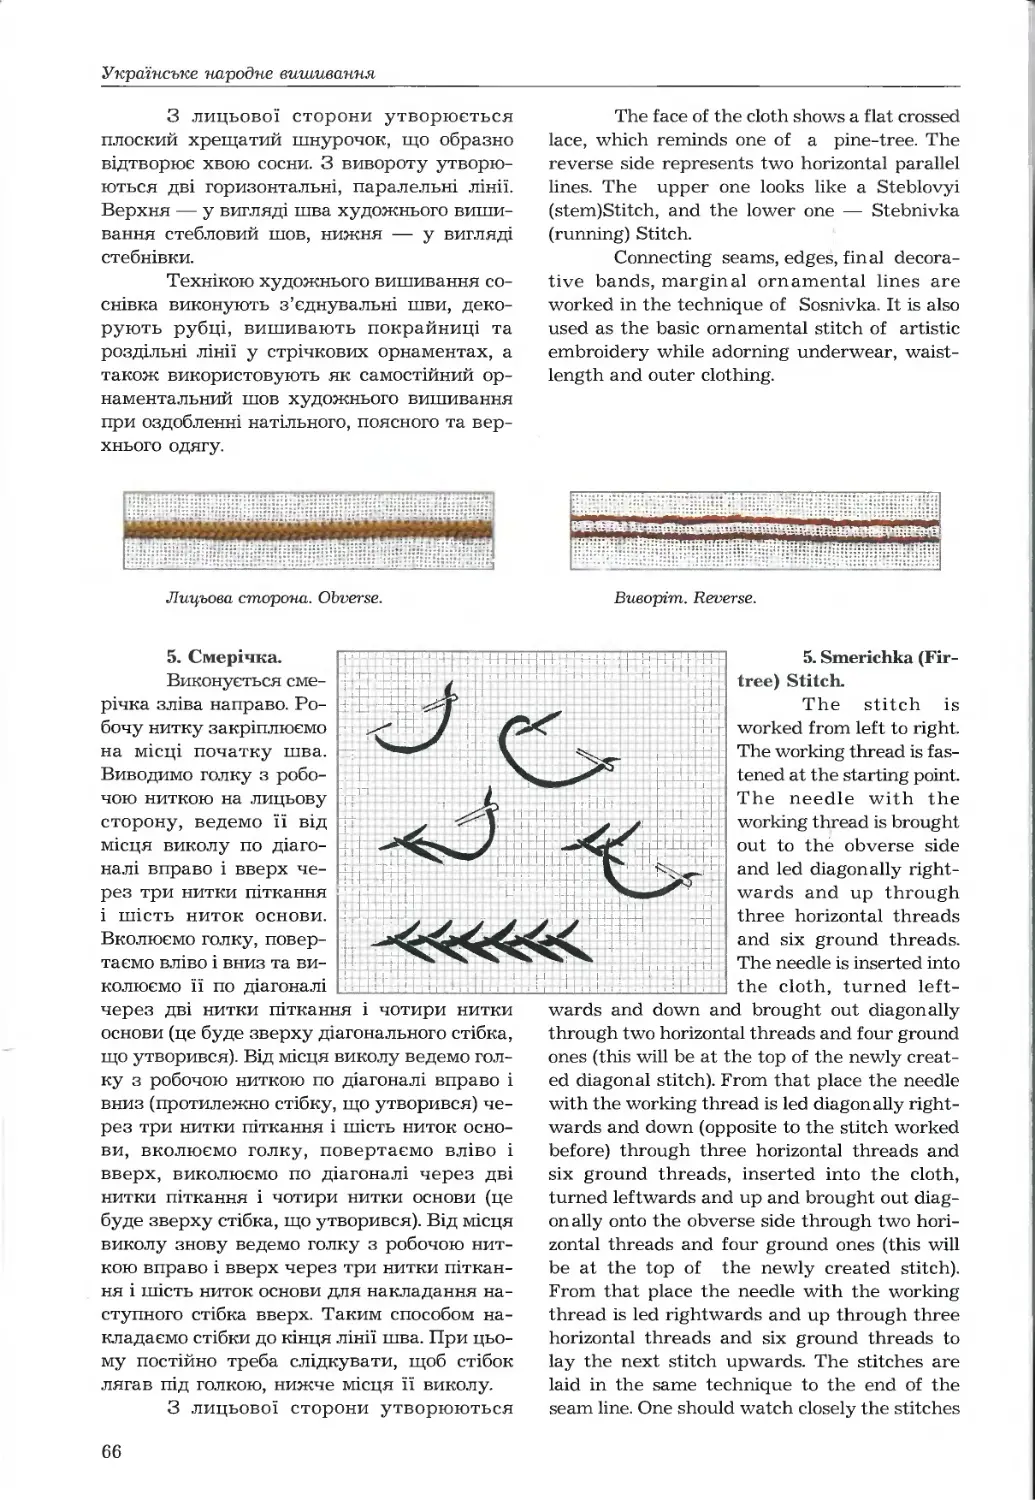
5. Смерічка 66
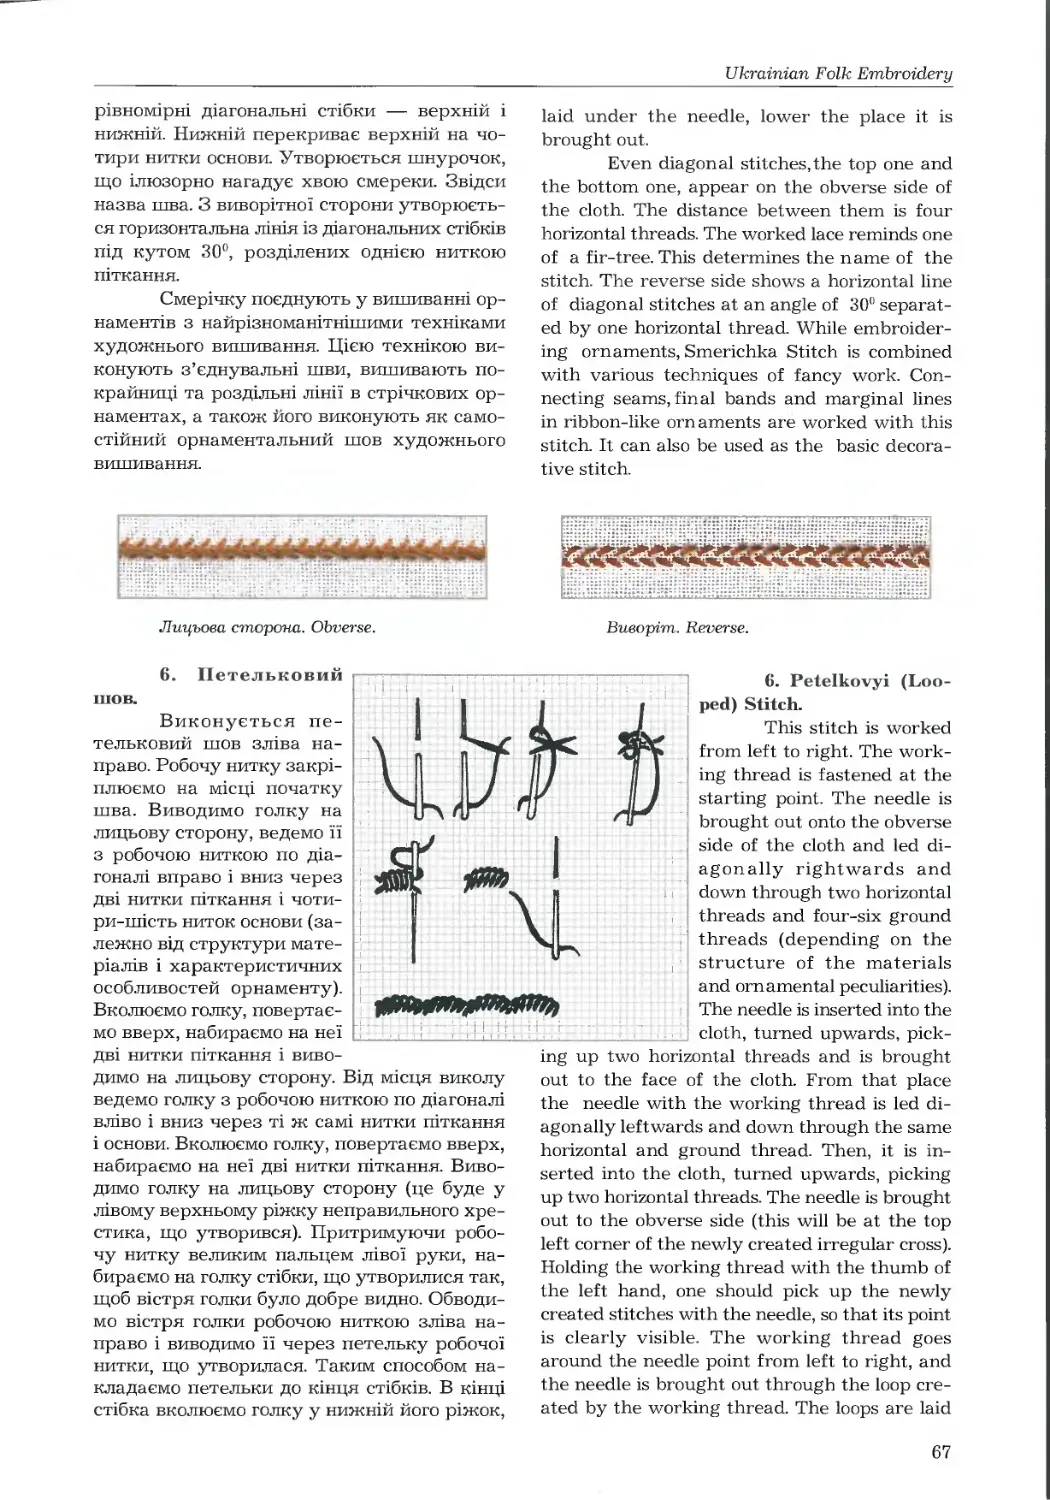
6. Петельковий шов 67
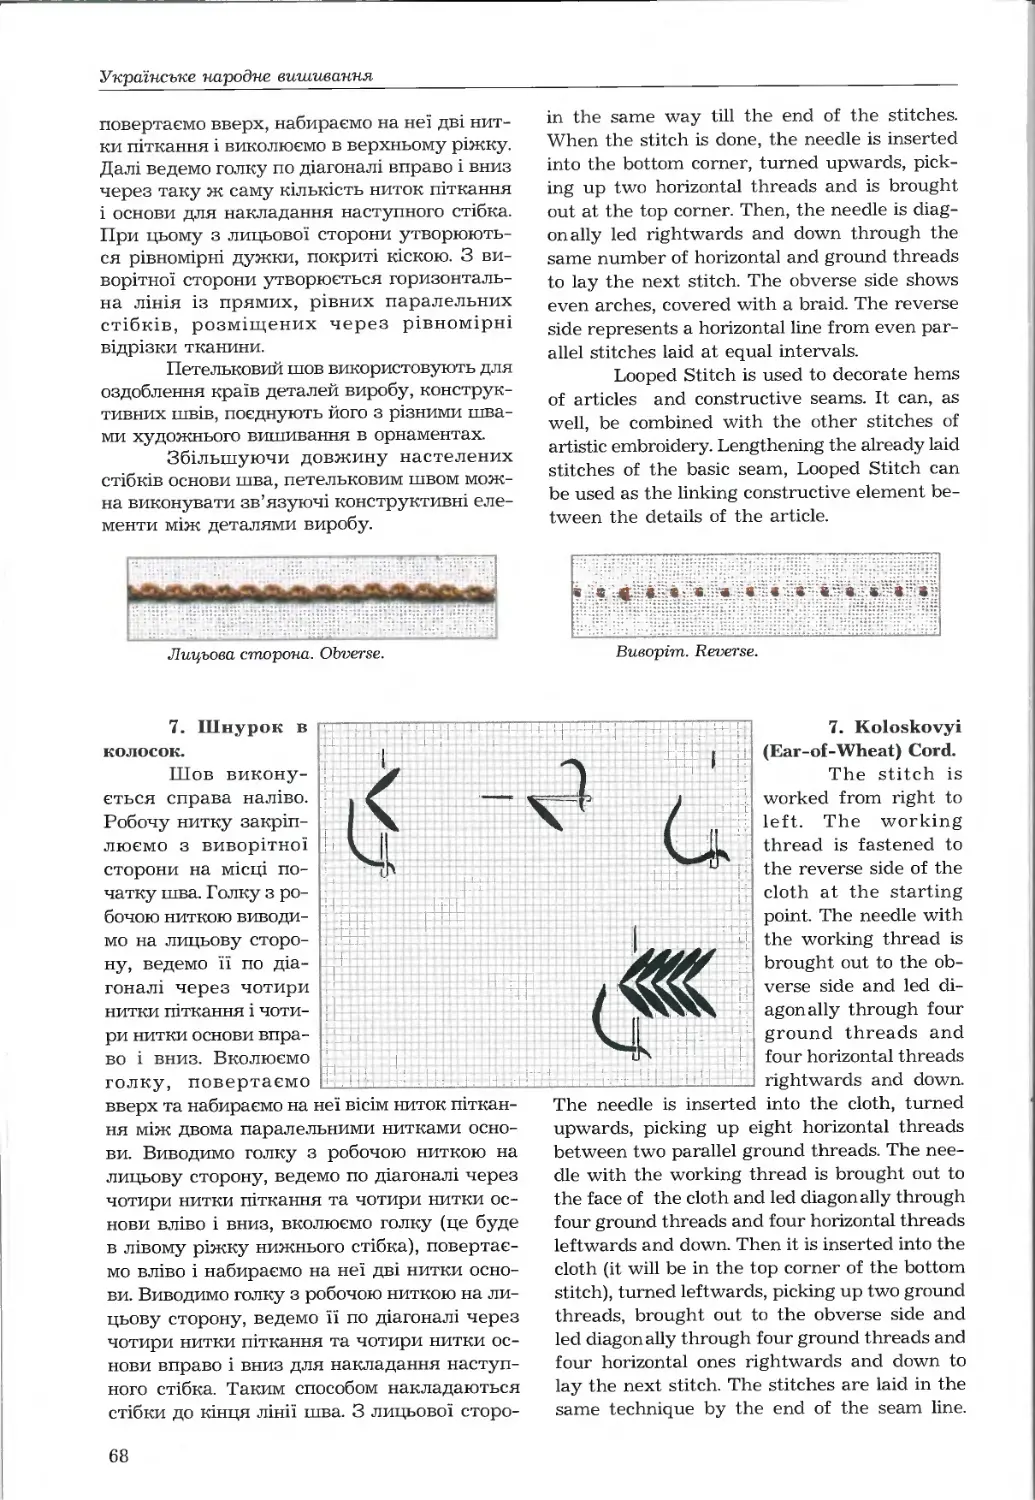
7. Шнурок в колосок 68
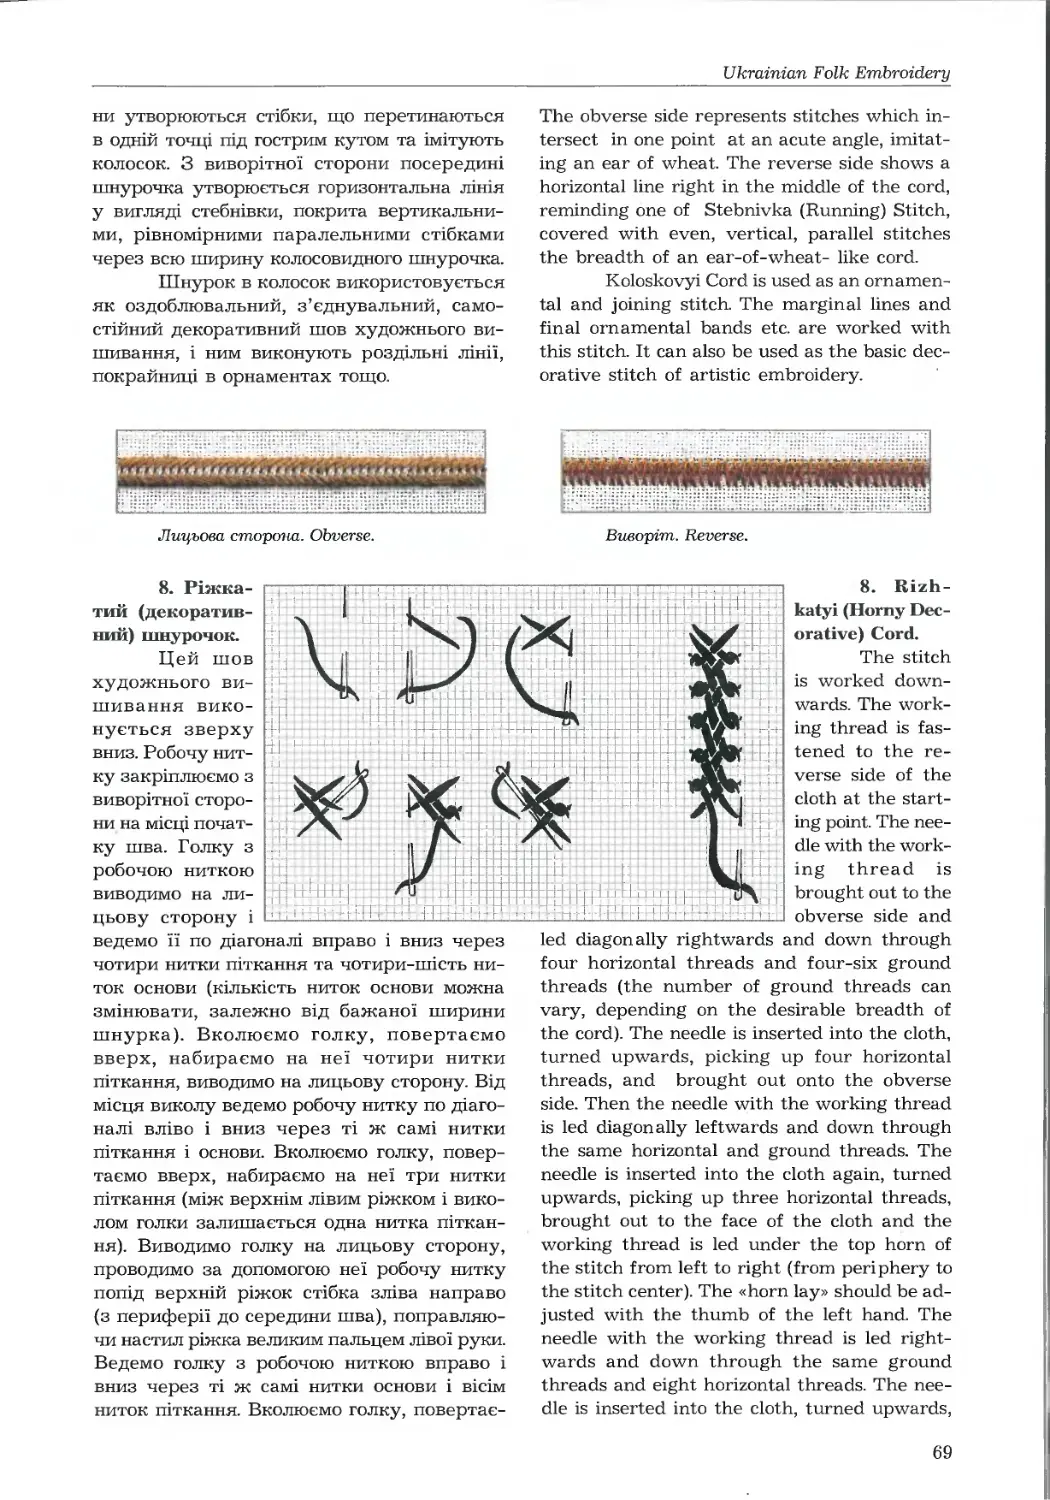
8. Ріжкатий шнурочок 69
9. Снурок 70
10. Обметниця поверхнева 71
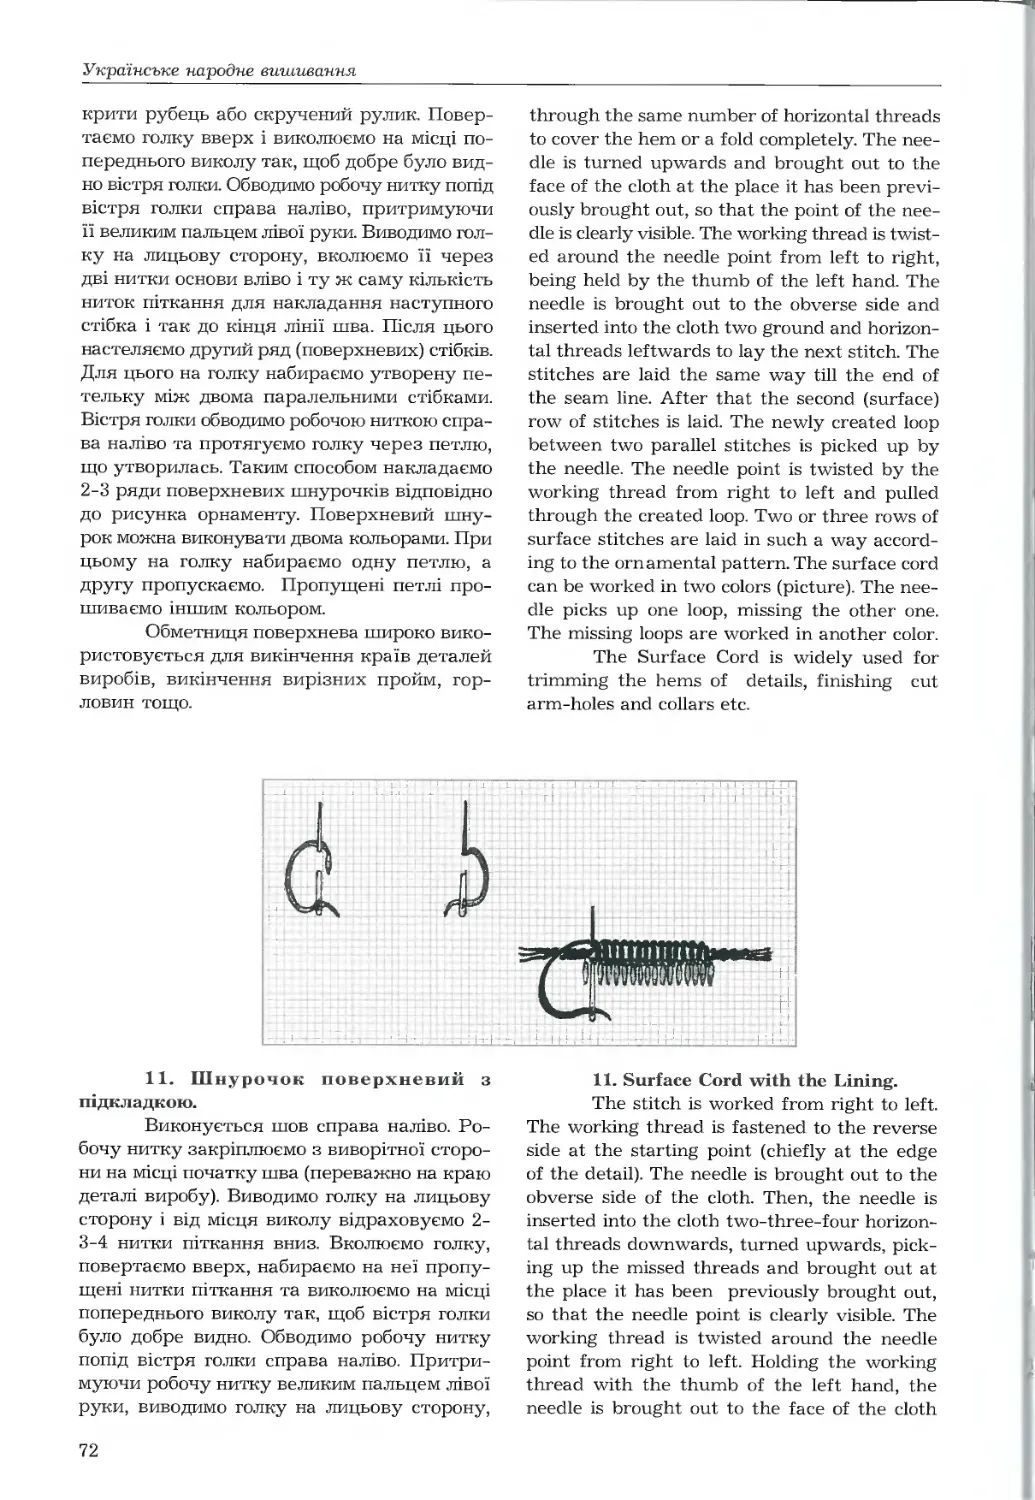
11. Шнурочок поверхневий з підкладкою 72
12. Пропіиттє 73
13. Вівсик 74
СП.У. Рахункові шви.
а) непрозорі рахункові шви
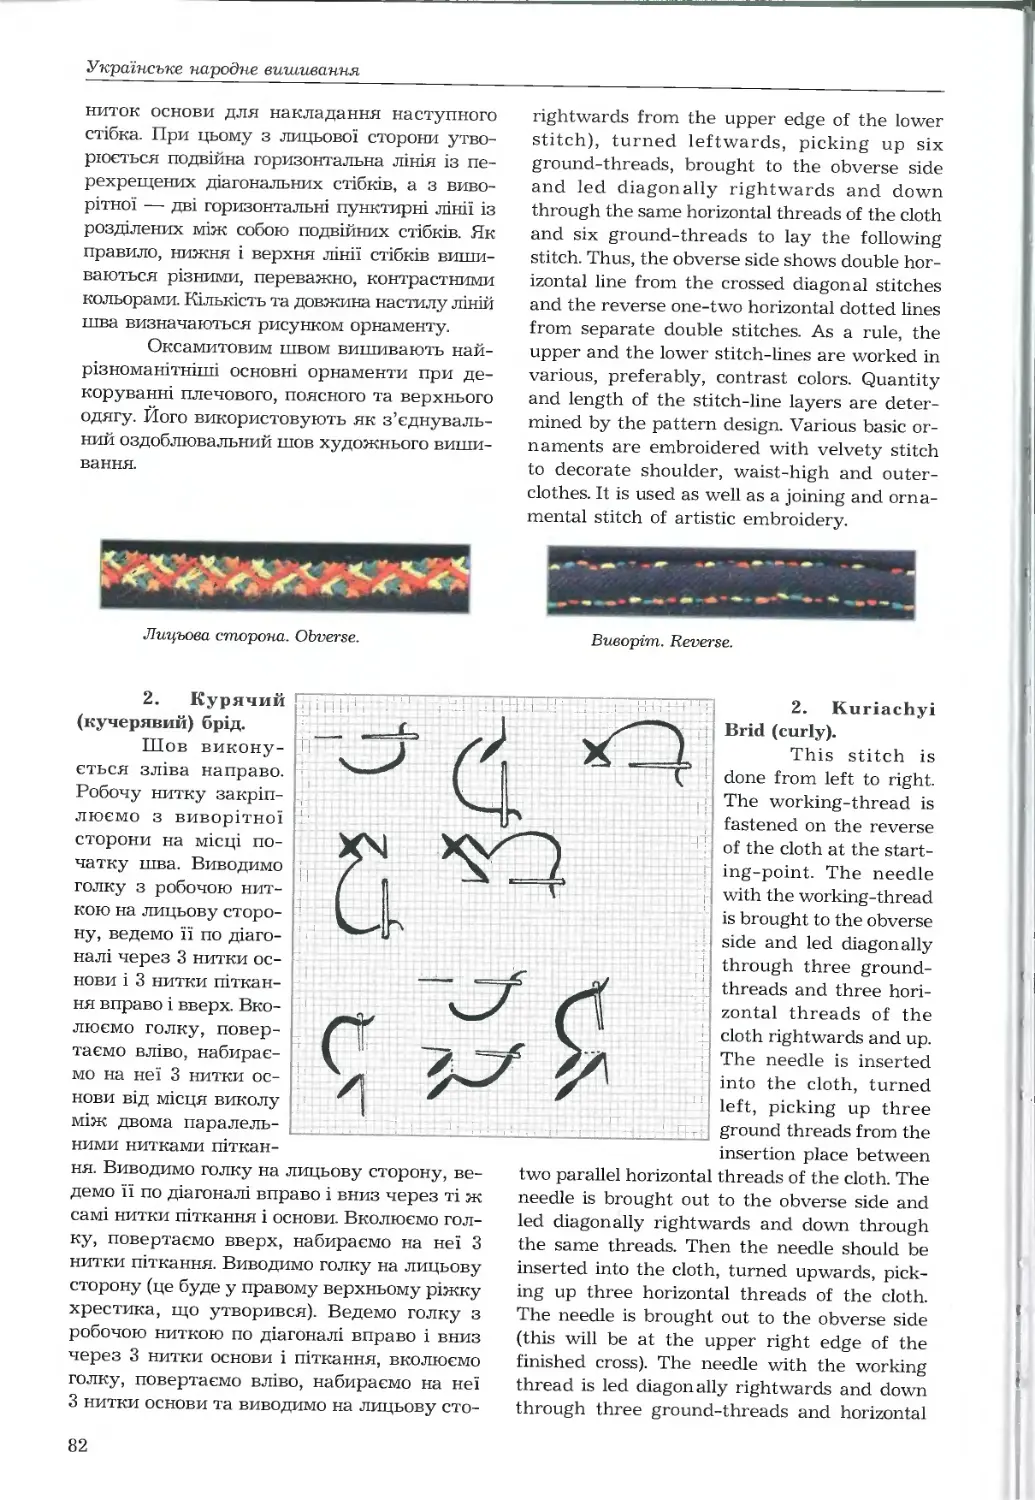
1. Оксамитовий шов 81
2. Курячий брід 82
3. Хрестик косий 84
4. Хрестик прямий 85
5. Хрестик з косою підкладкою 85
6. Хрестик з прямою підкладкою 86
7. Хрестик розсипний 87
ЗМ — змістовий модуль.
" СП — структурний підрозділ
6
Ukrainian Folk Embroidery
8. Півхрестик 88
9. Хрестик подвійний 89
б) прозорі рахункові шви
1. Вирізування 91
2. Сліпе вирізування 92
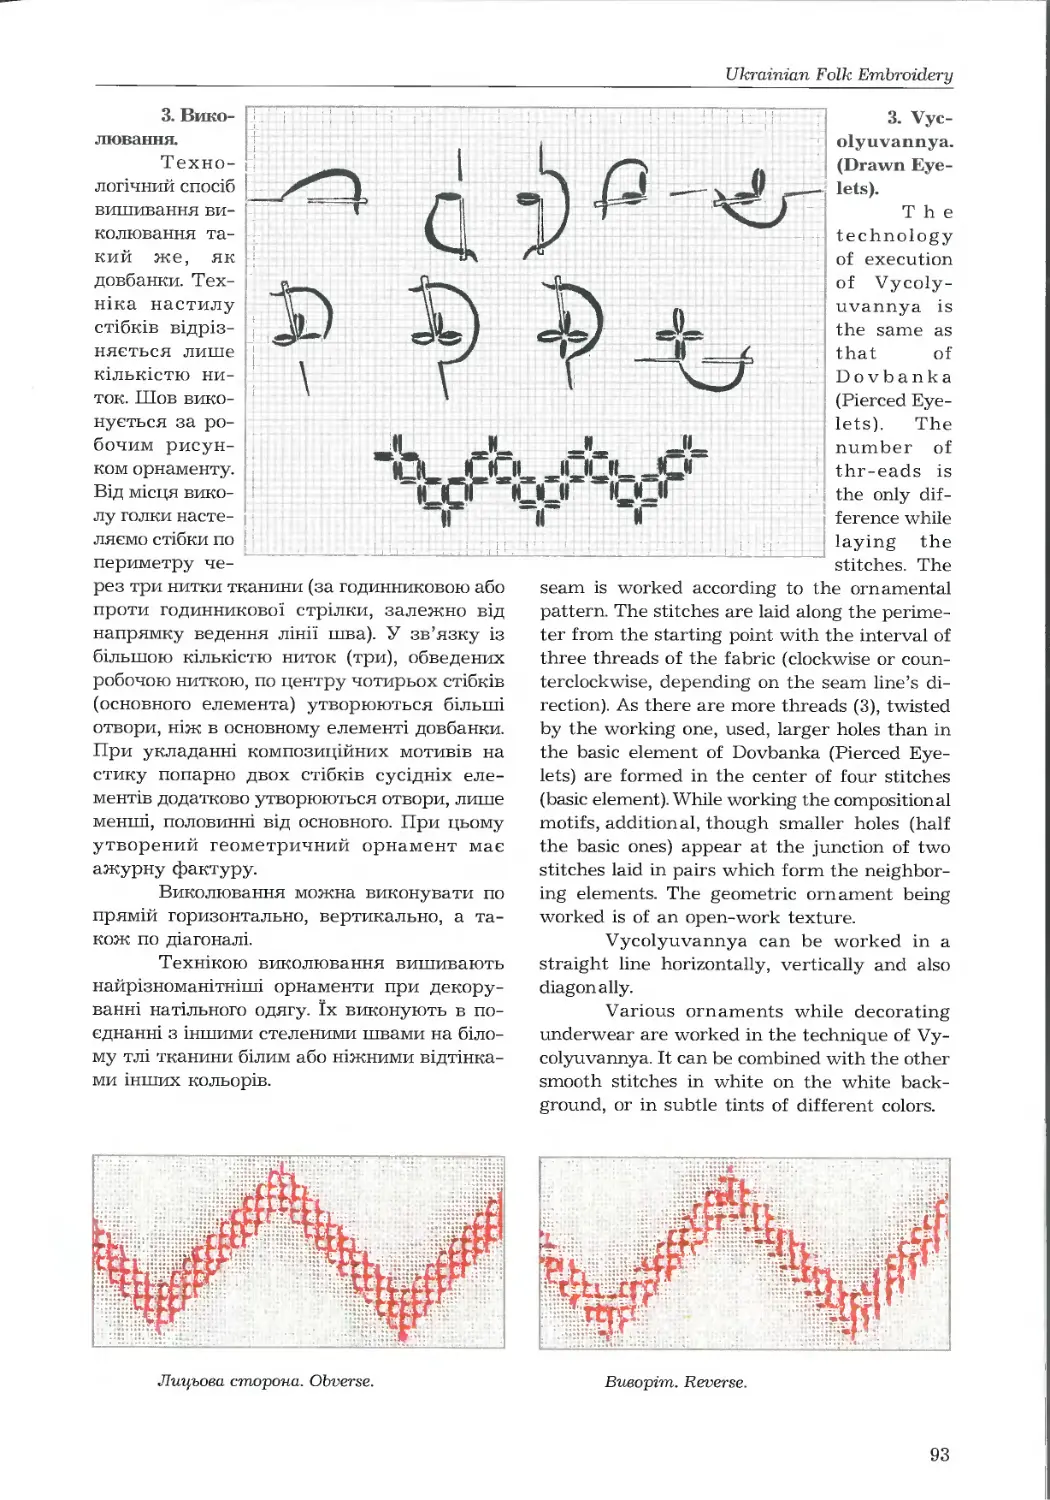
3. Виколювання 93
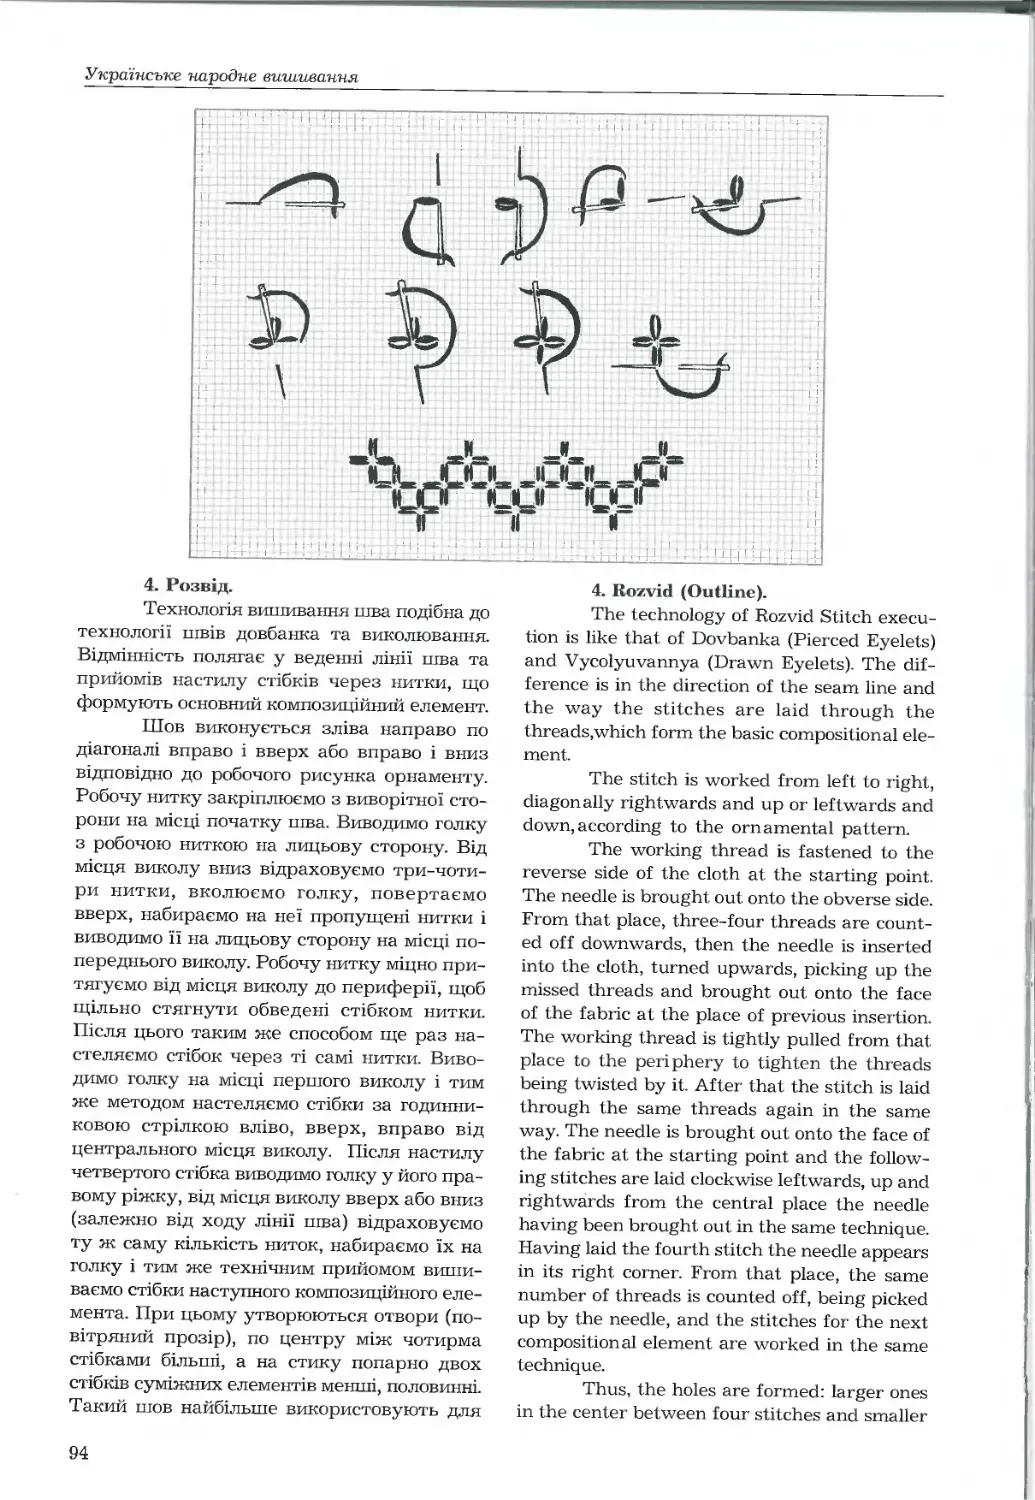
4. Розвід 94
5. Довбанка 95
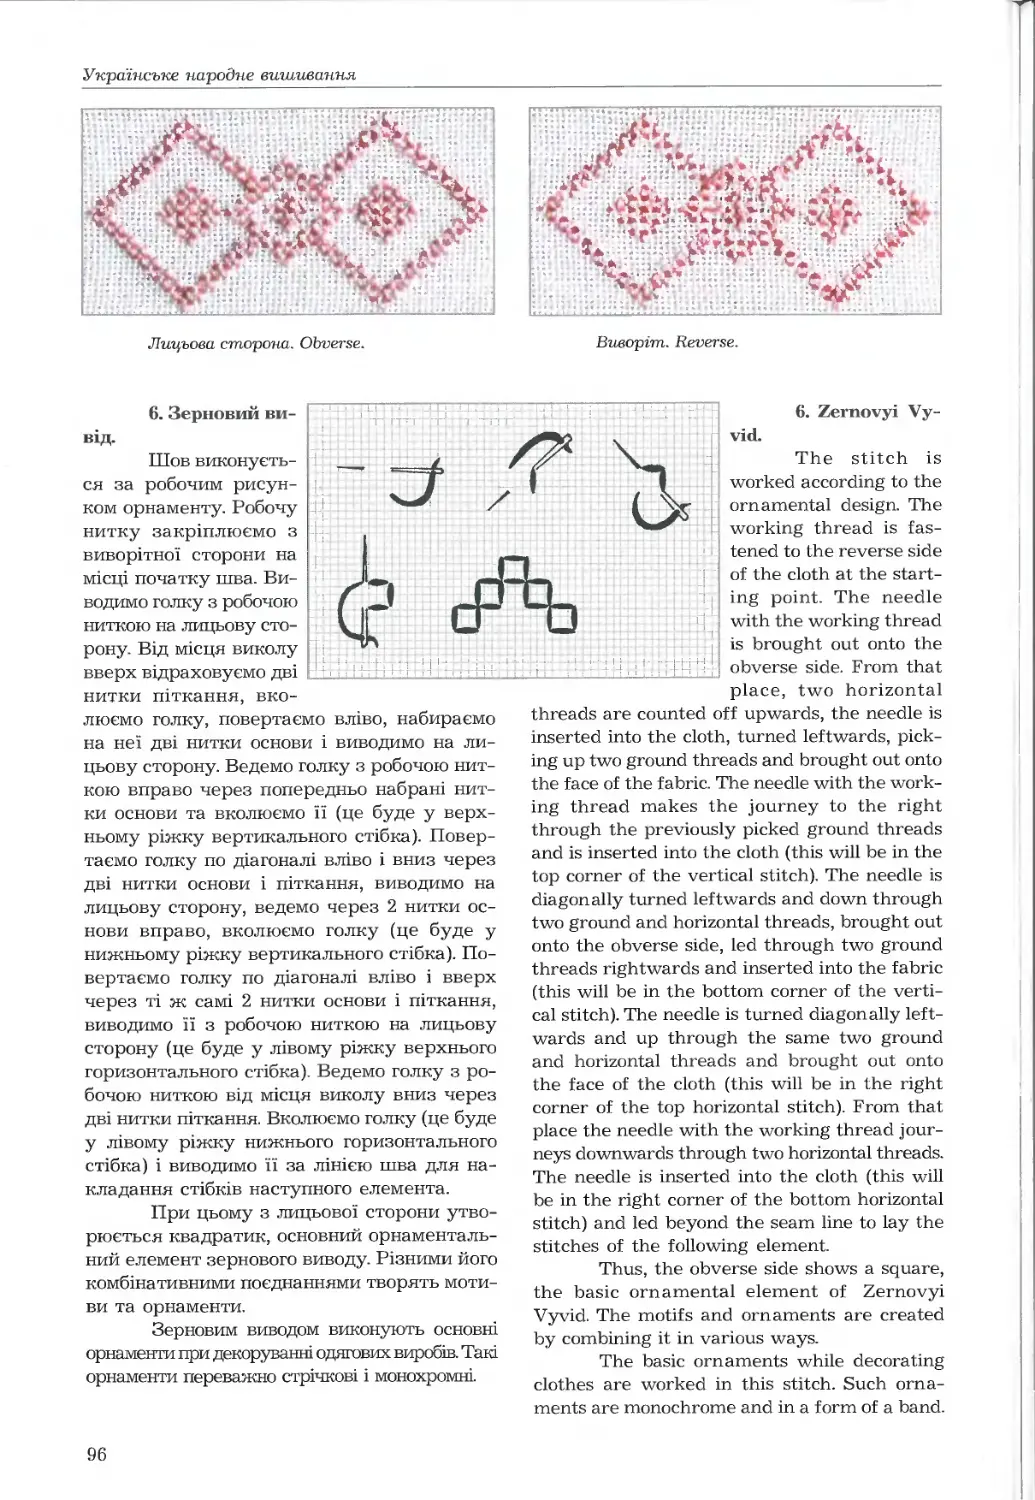
6. Зерновий вивід 96
7. Солов'їні вічка 97
8. Шов кочелистий 98
9. Товмацька зірка 99
10. Клітка або штапівка 100
CII.VI. Складені шви.
1. Верхоплут подвійний 110
2. Навиване 112
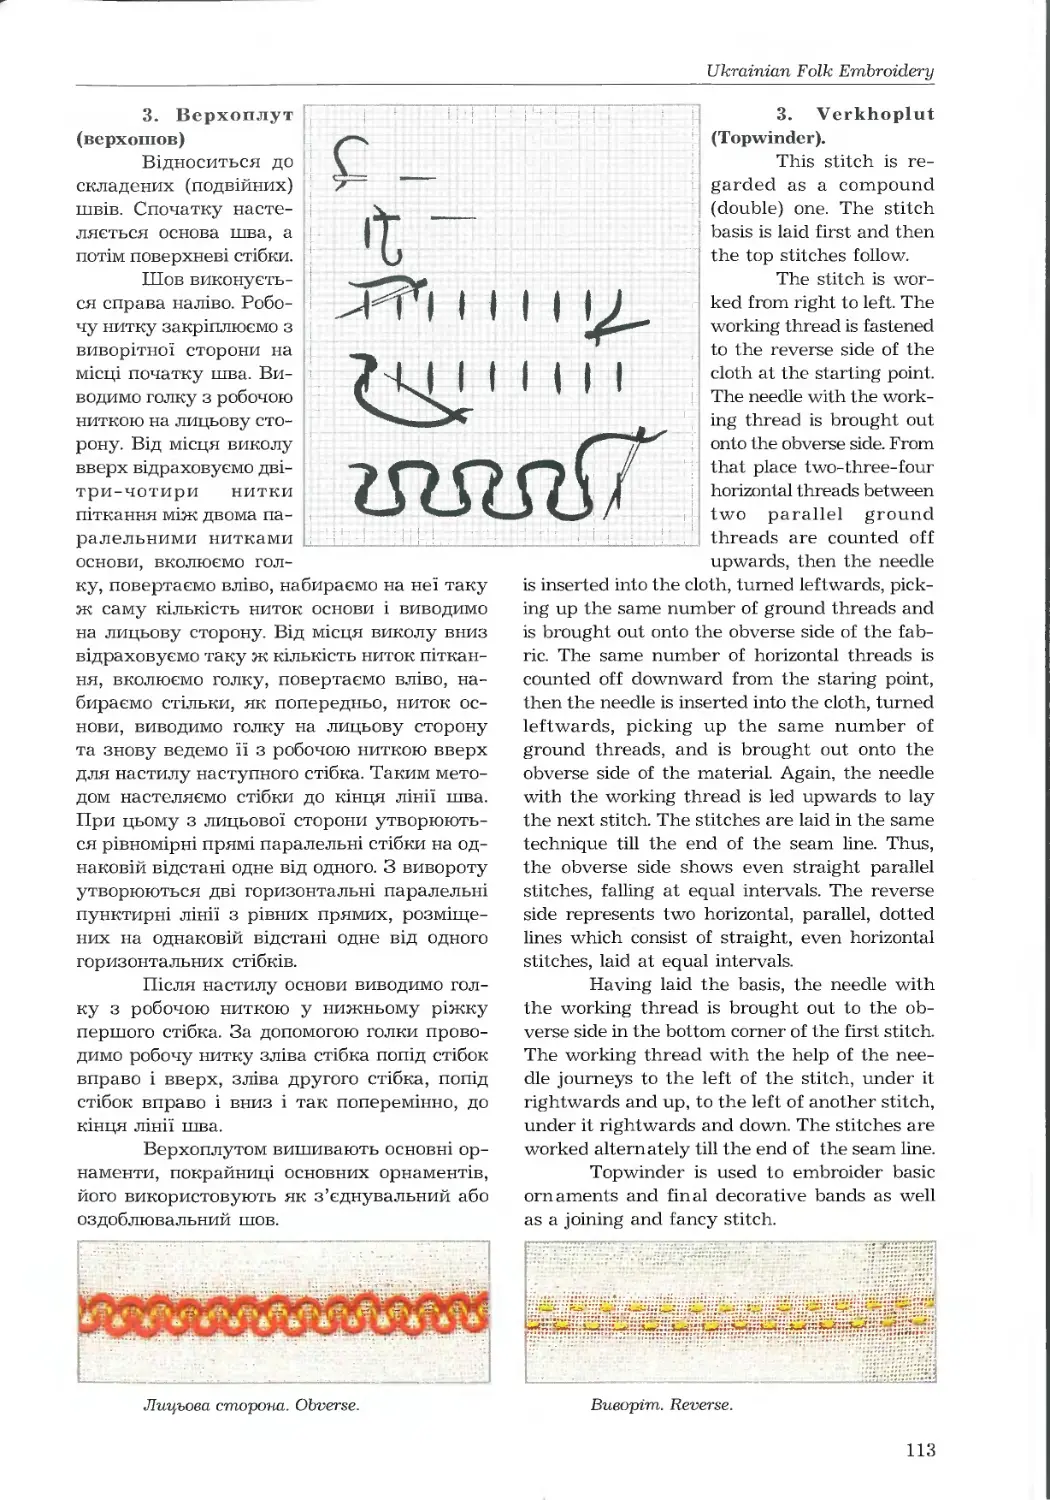
3. Верхоплут 113
4. Ключовий шов 114
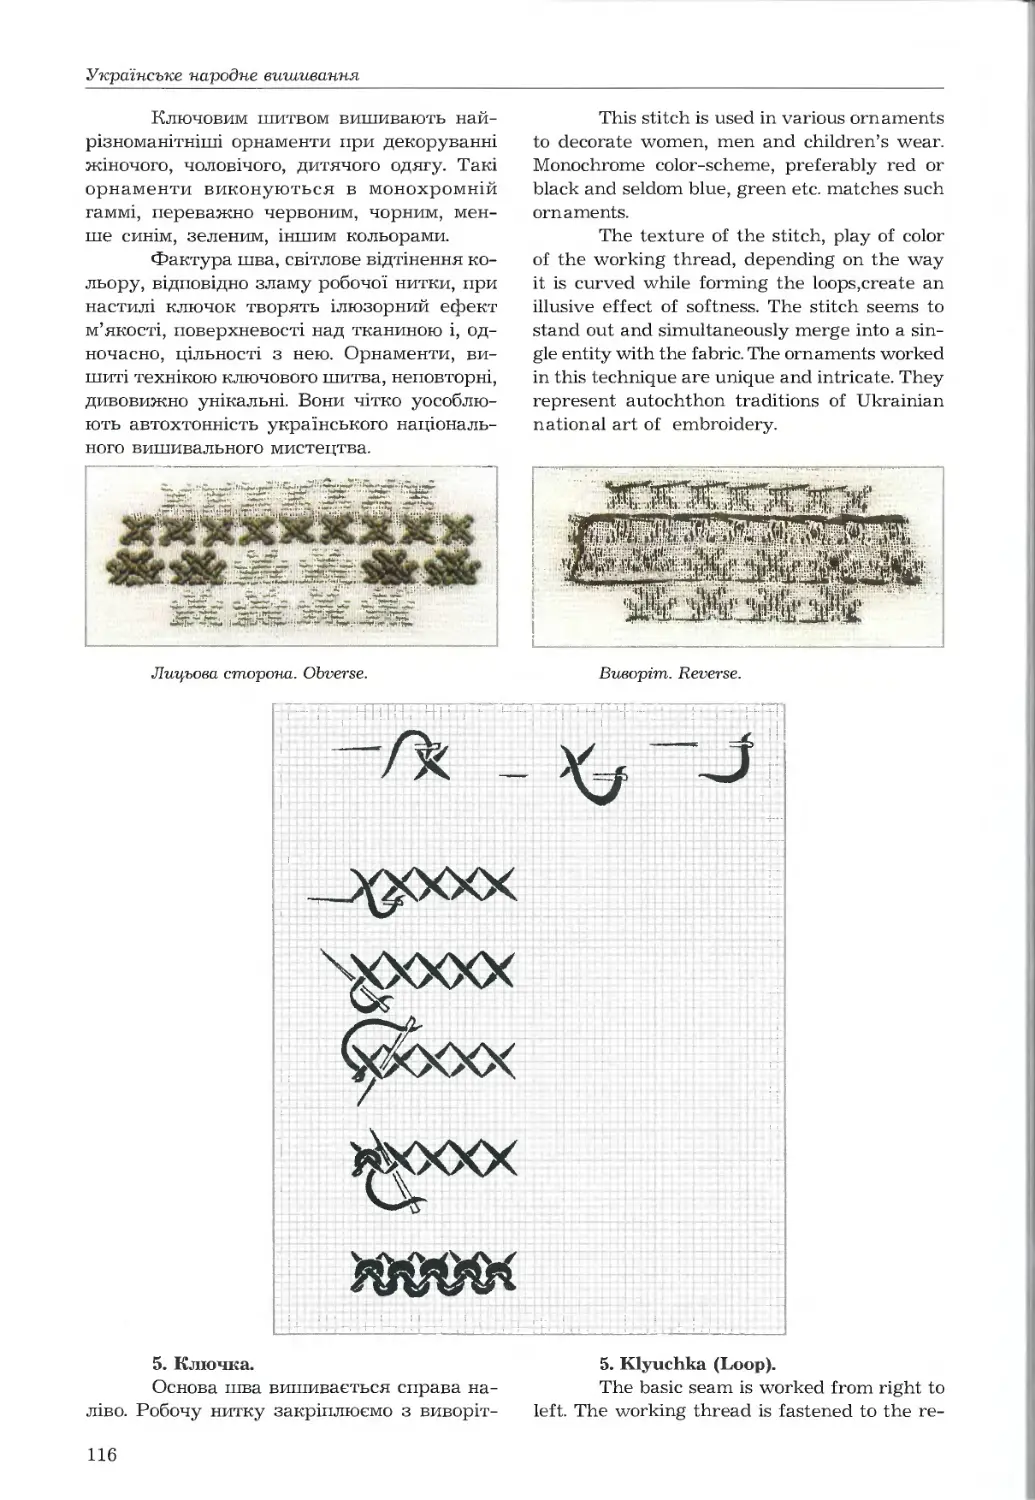
5. Ключка 116
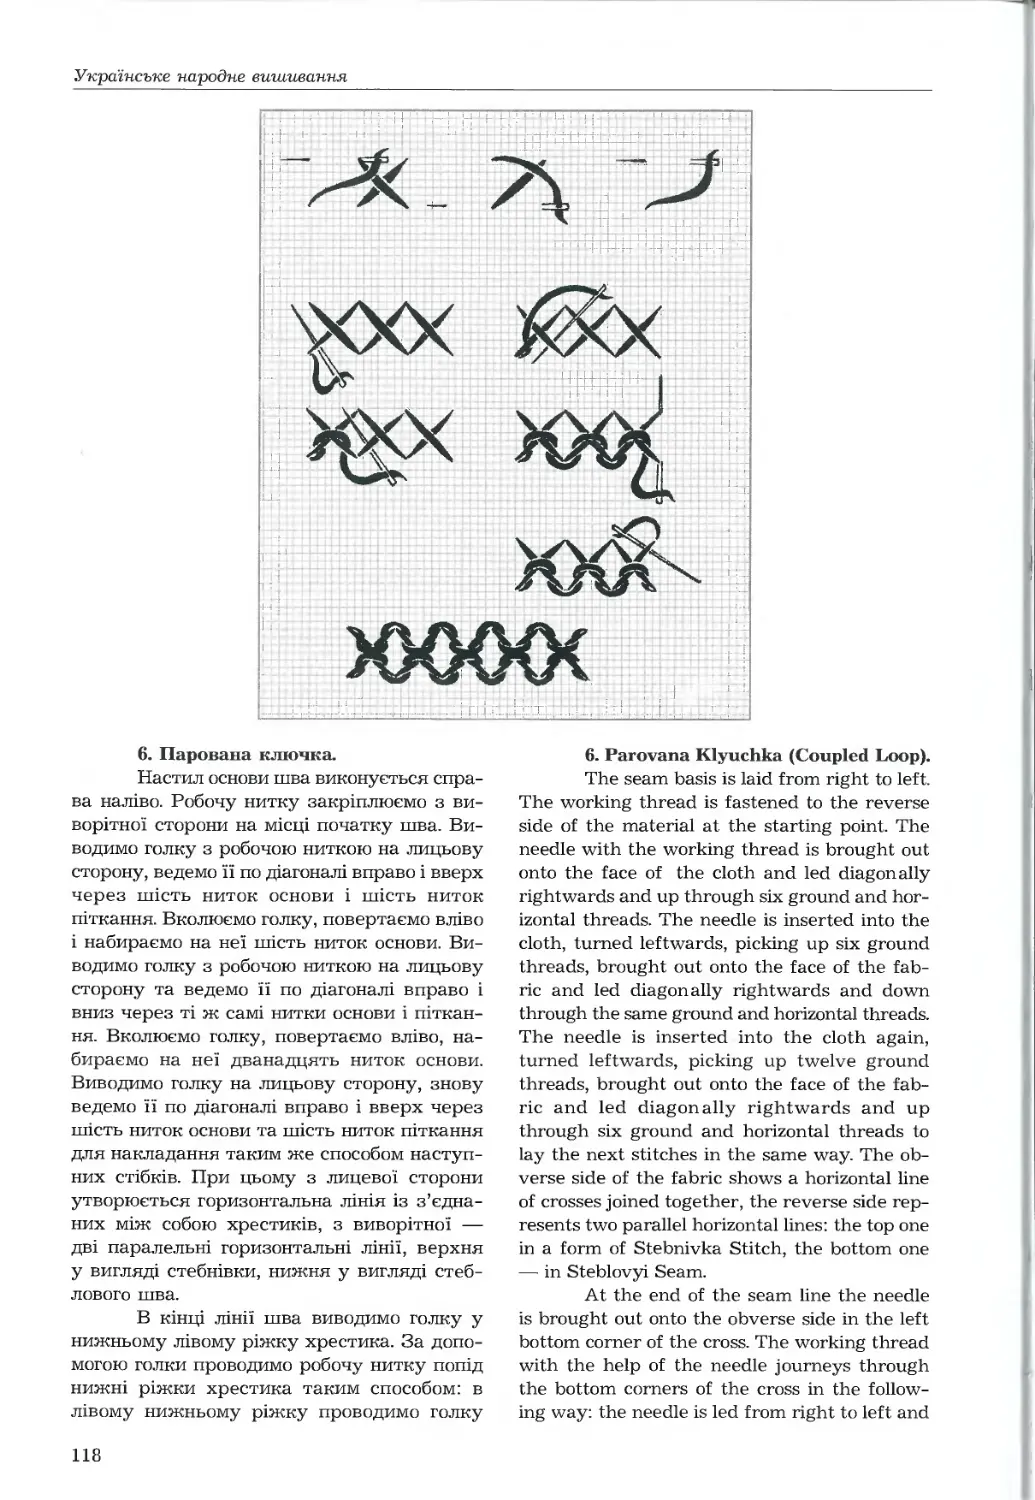
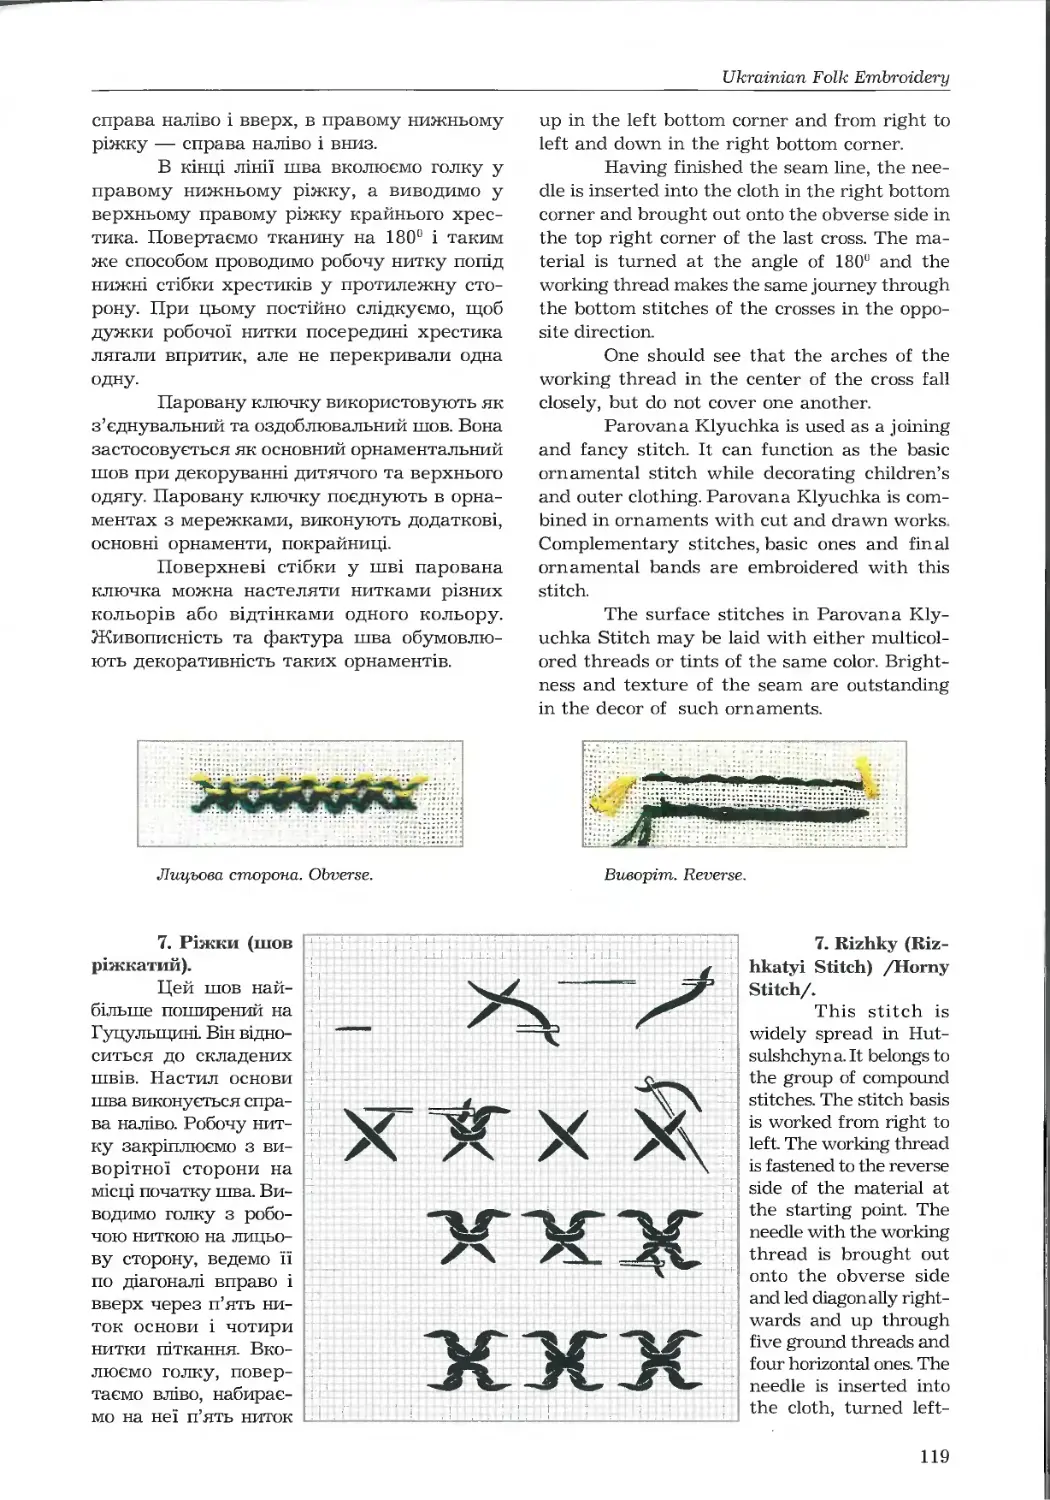
6. Парована ключка 118
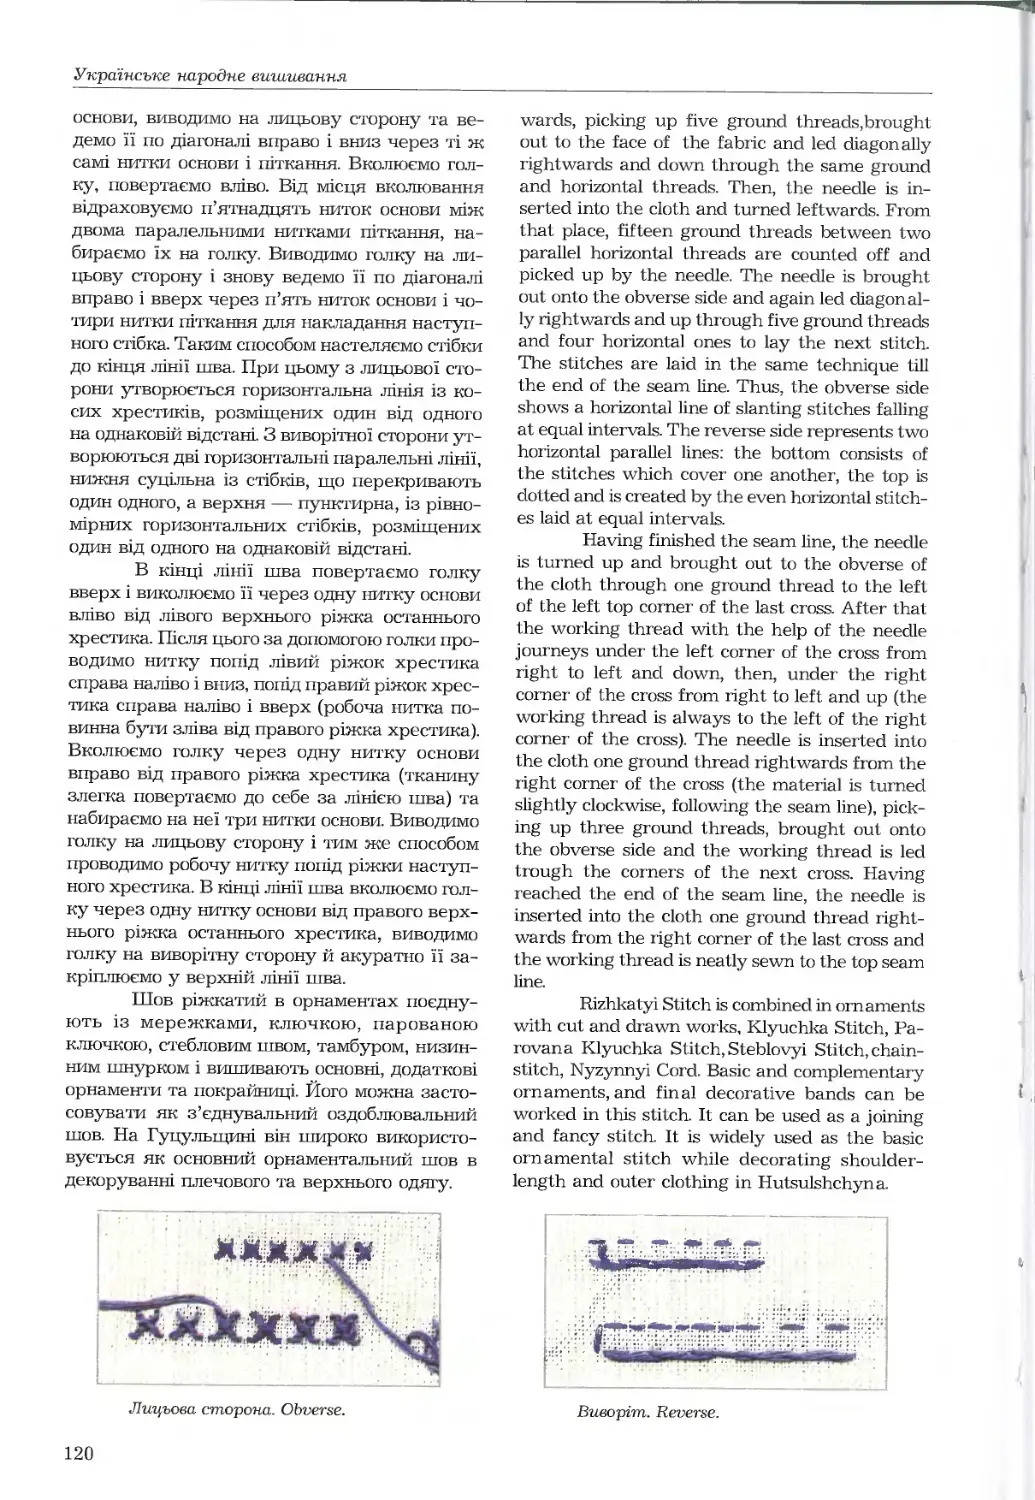
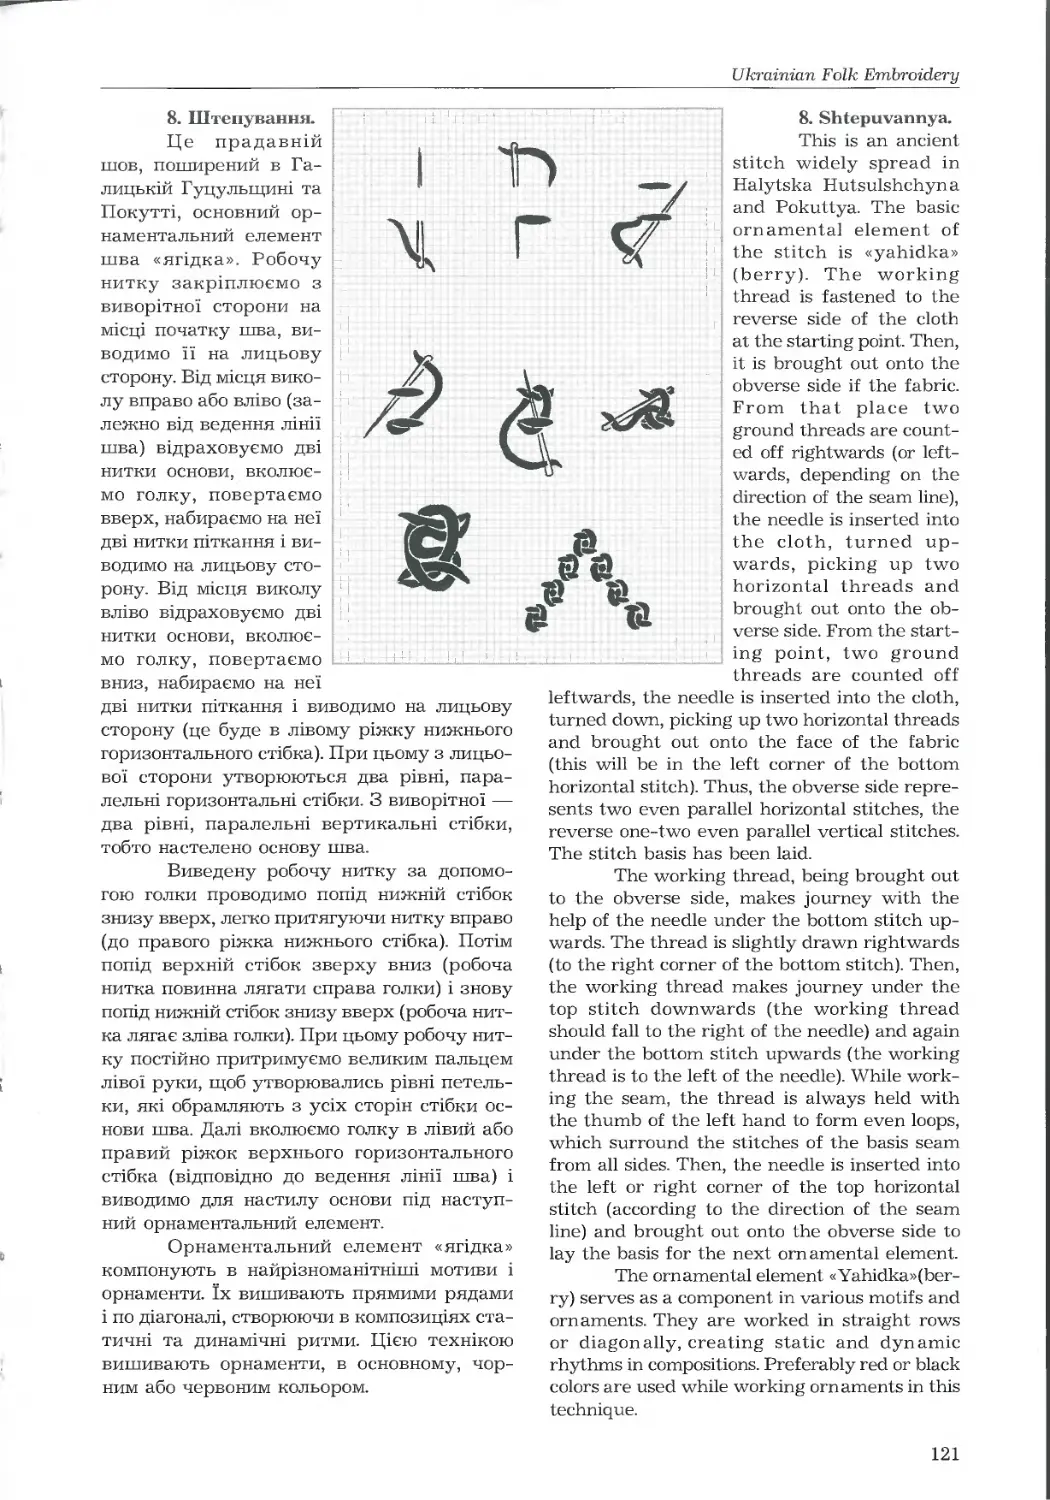
7. Ріжки 120
8. Штепування 121
9. Кучерявий шов 122
10. Шов «черв'ячок» 123
CII.VII. Стелені рахункові шви.
а) стелені рахункові шви з несуцільним покриттям тла тканини
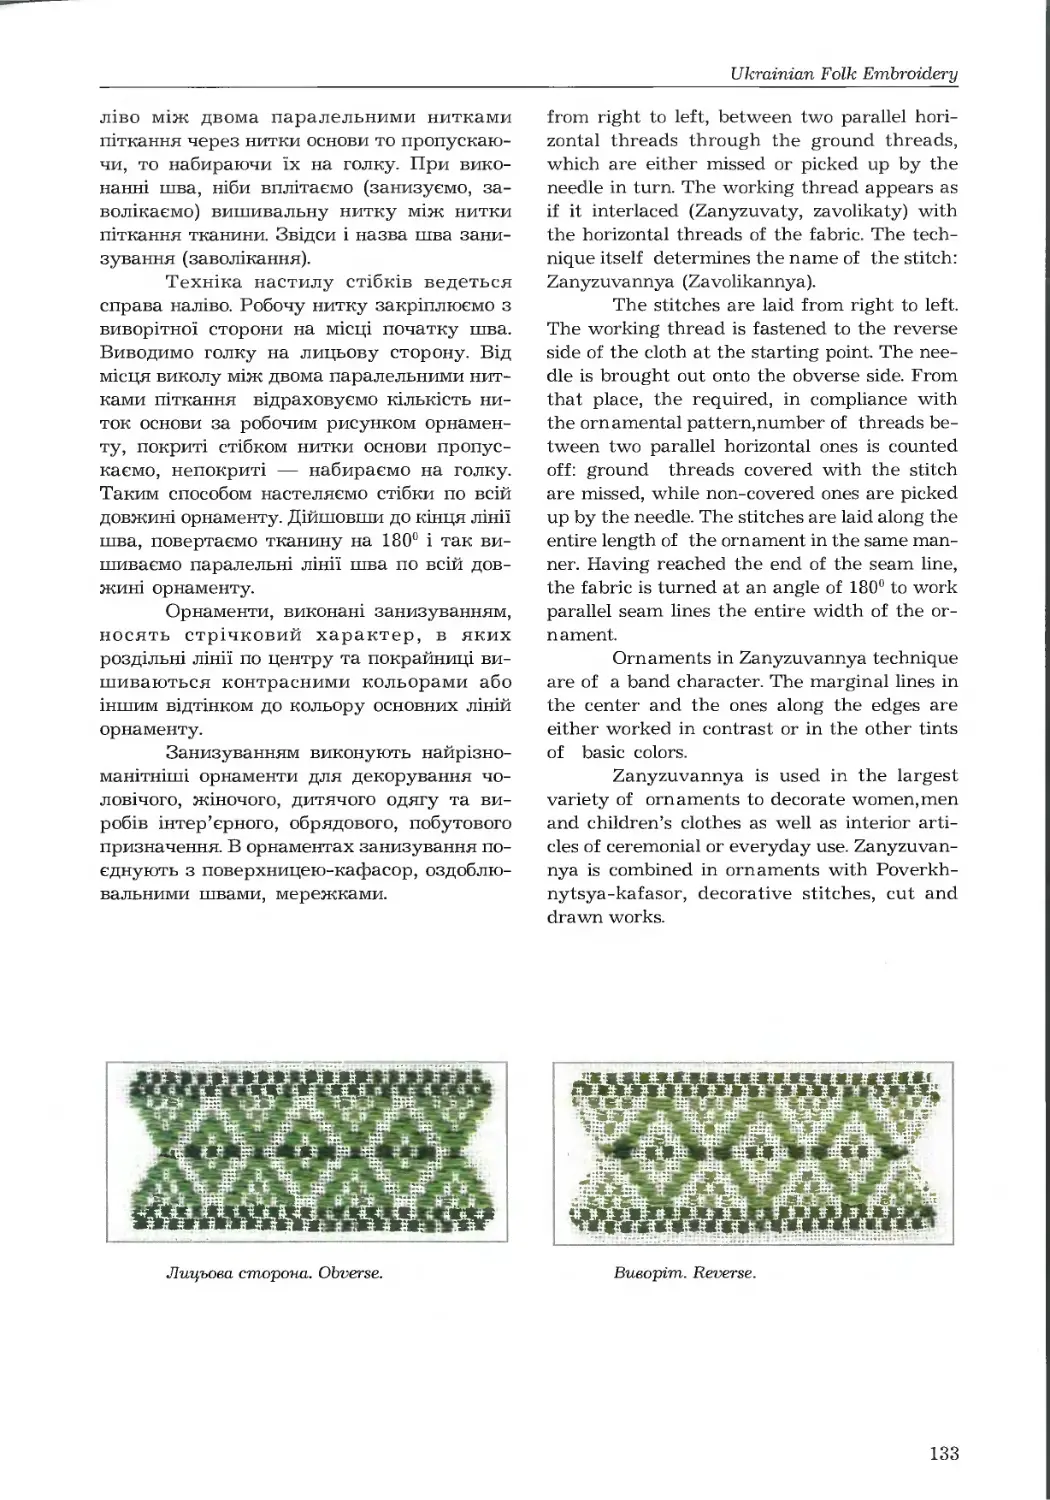
1. Занизування 132
2. Занизування з вузленням 134
3. Набирування 134
4. Низинка проста 136
5. Низинка замкова 137
6. Поверхниця-кафасор 138
7. Лиштва проста 139
8. Лиштва качалкова 140
9. Заігліно-І 141
10. Заігліно-П 142
11. Гладь стеблова 143
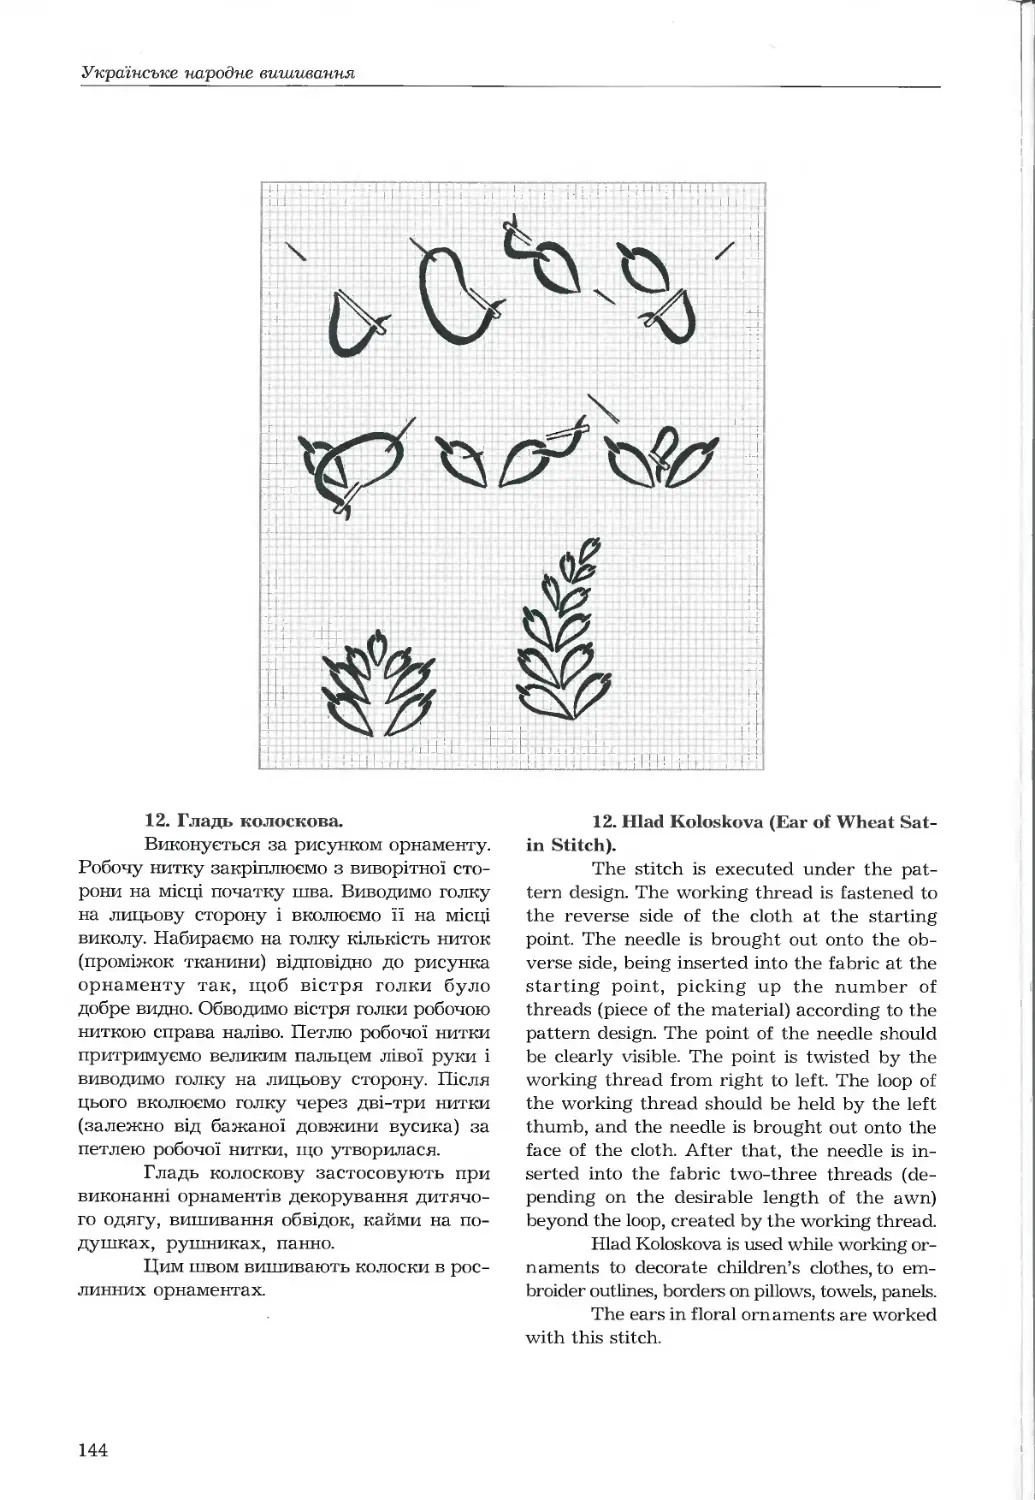
12. Гладь колоскова 144
б) стелені рахункові шви з суцільним покриттям тла тканини
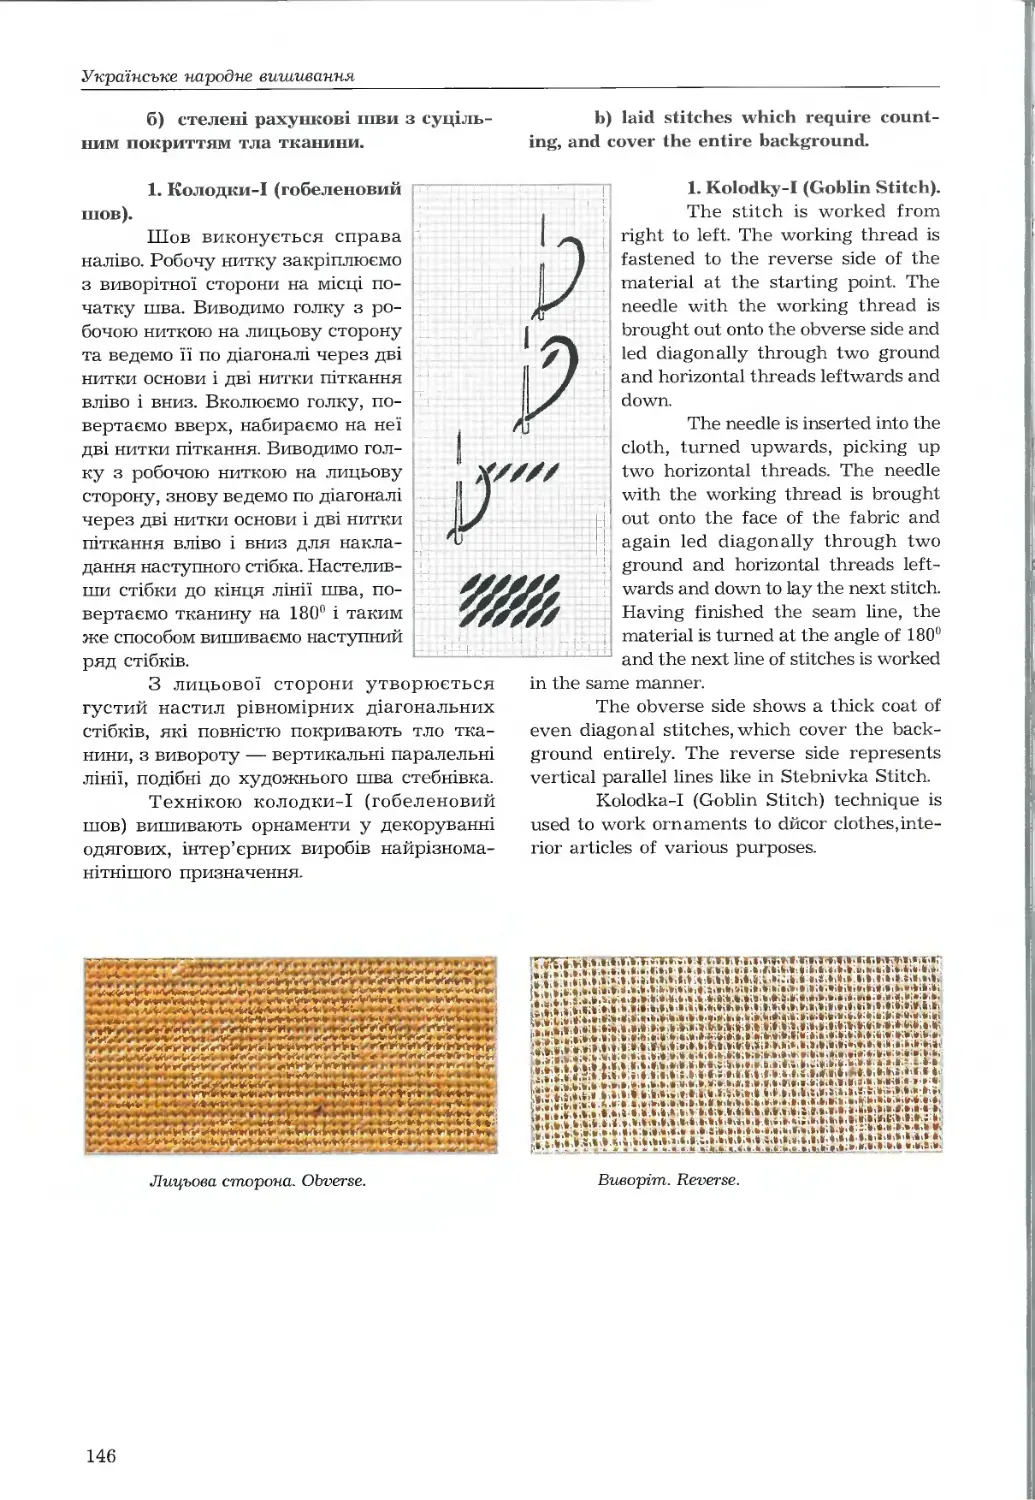
1. Колодки-І 146
2. Колодки-П 147
3. Гладь пряма тіньова 148
4. Гладь коса атласна 149
5. Гладь коса оздоблювальна 150
6. Гладь плетінка 151
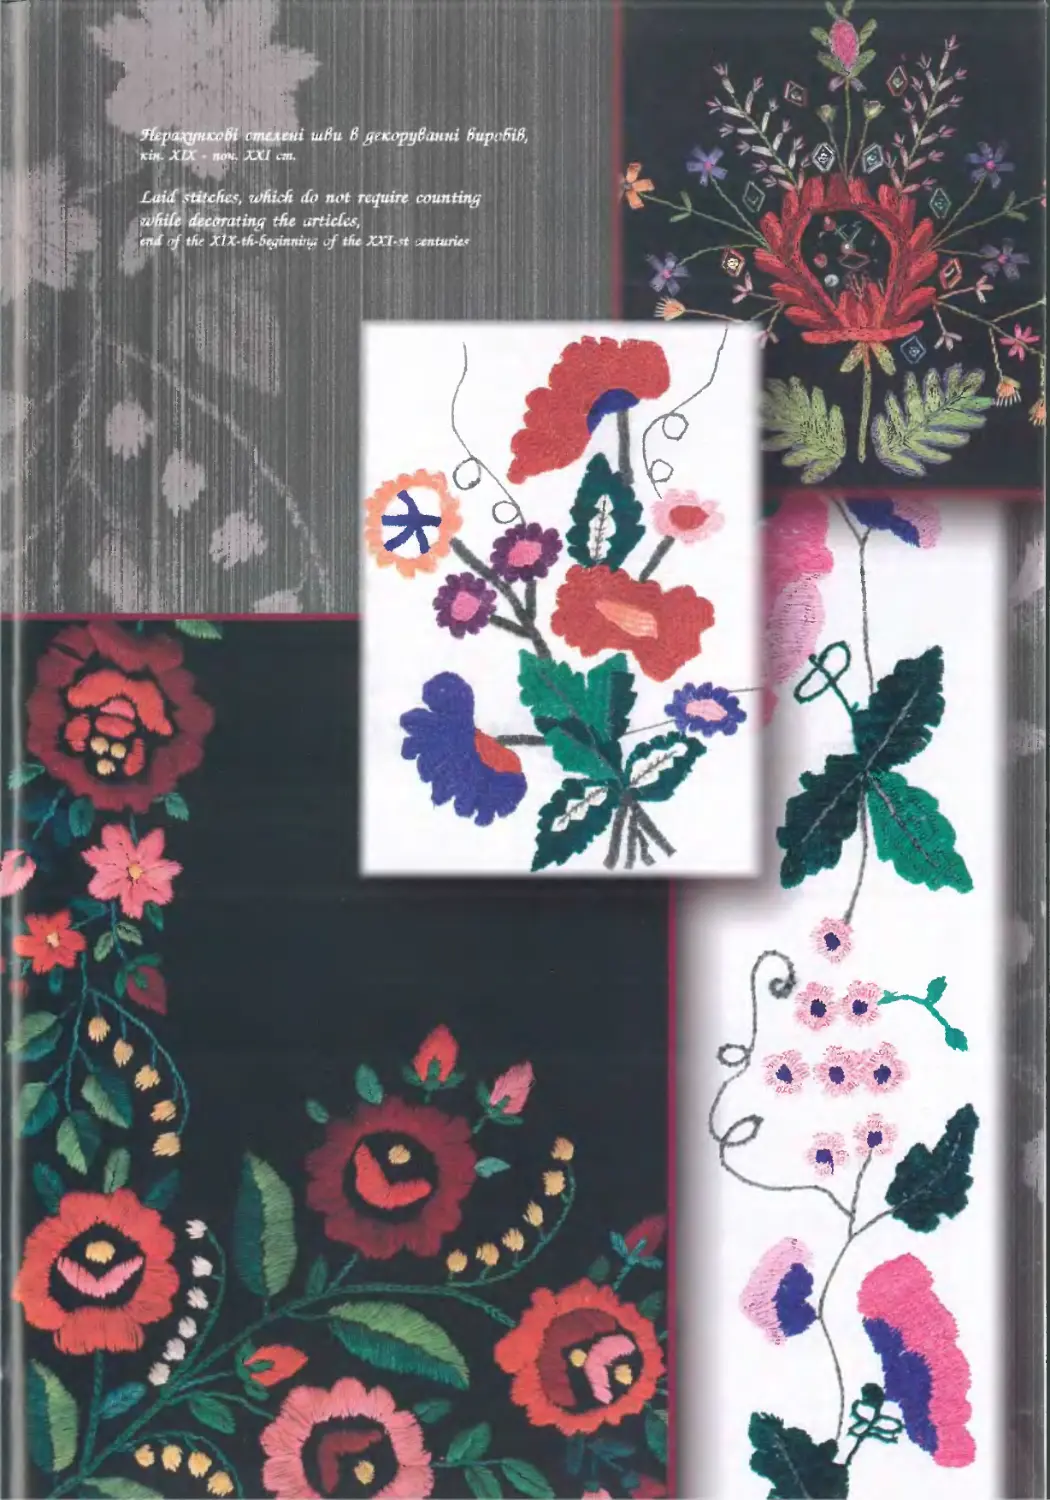
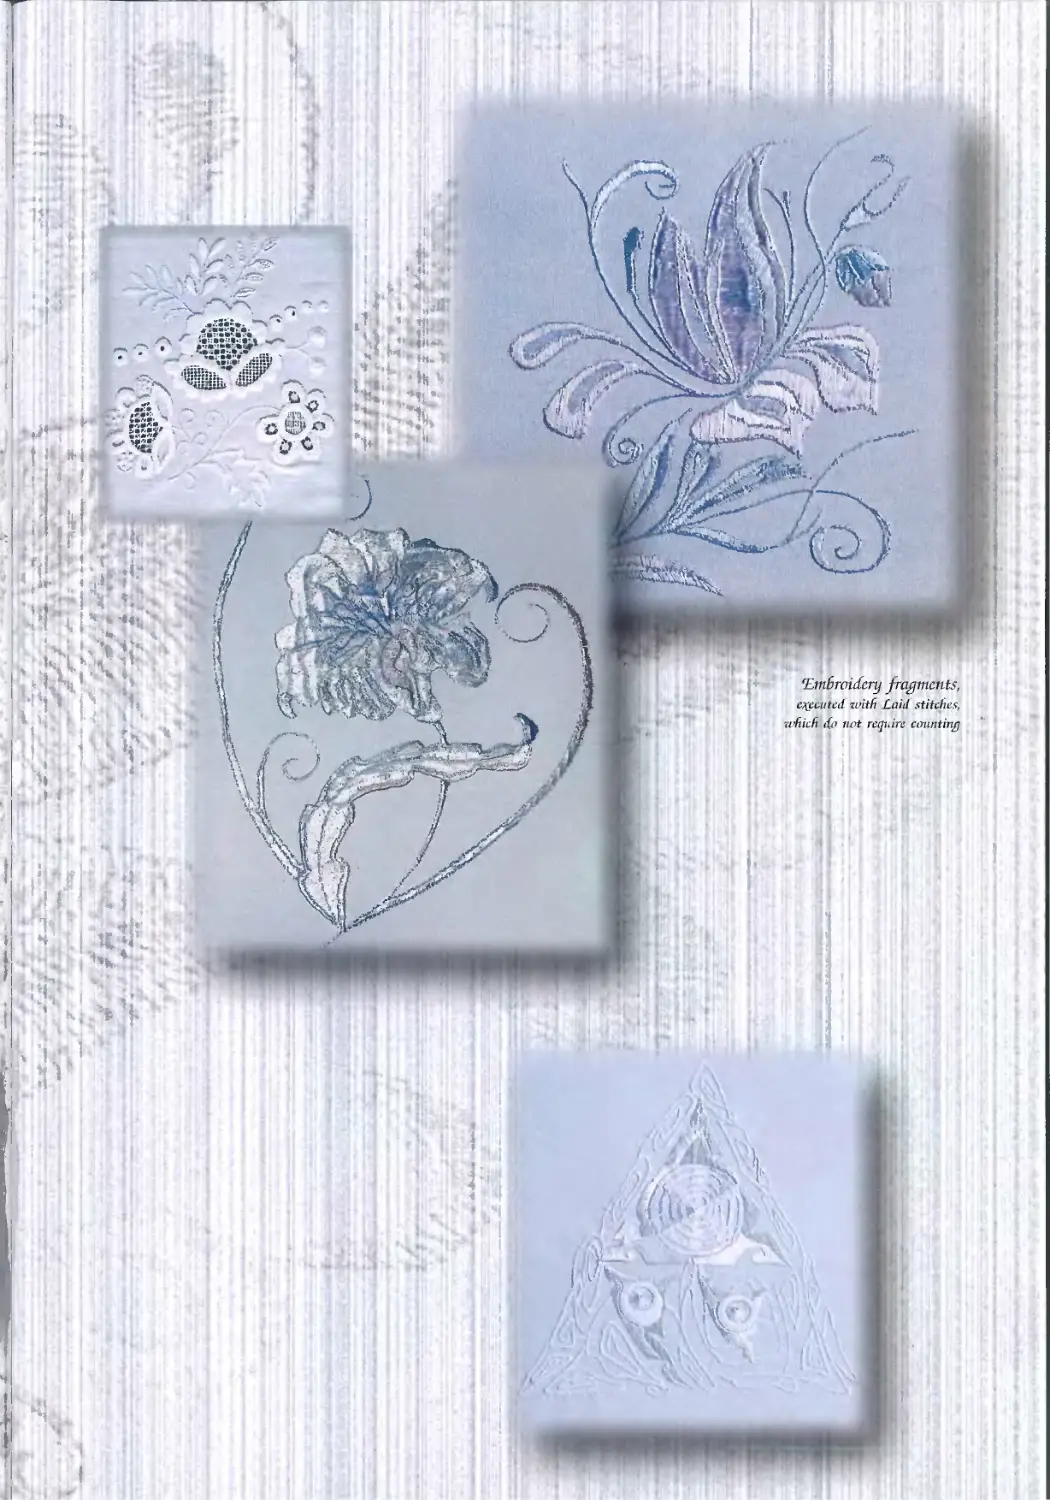
CII.VIII. Нерахункові стелені шви.
1. Гладь двобічна 163
2. Гладь з пересягами 164
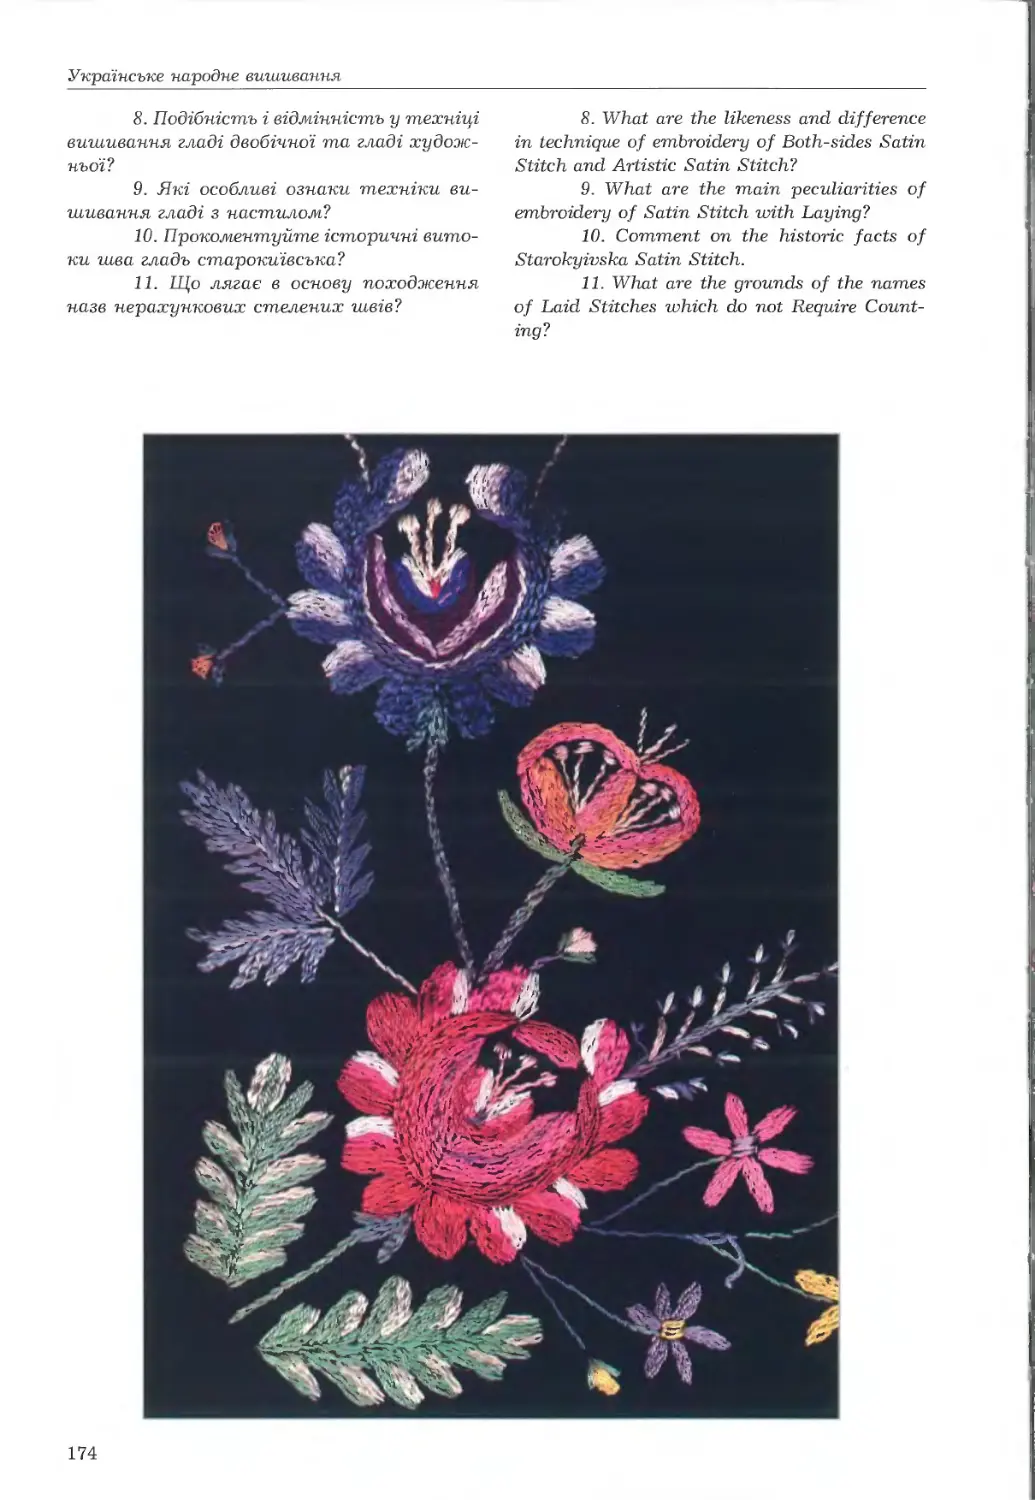
3. Гладь художня 166
4. Гладь з настилом 167
5. Одностороння гладь 168
6. Гладь біла 169
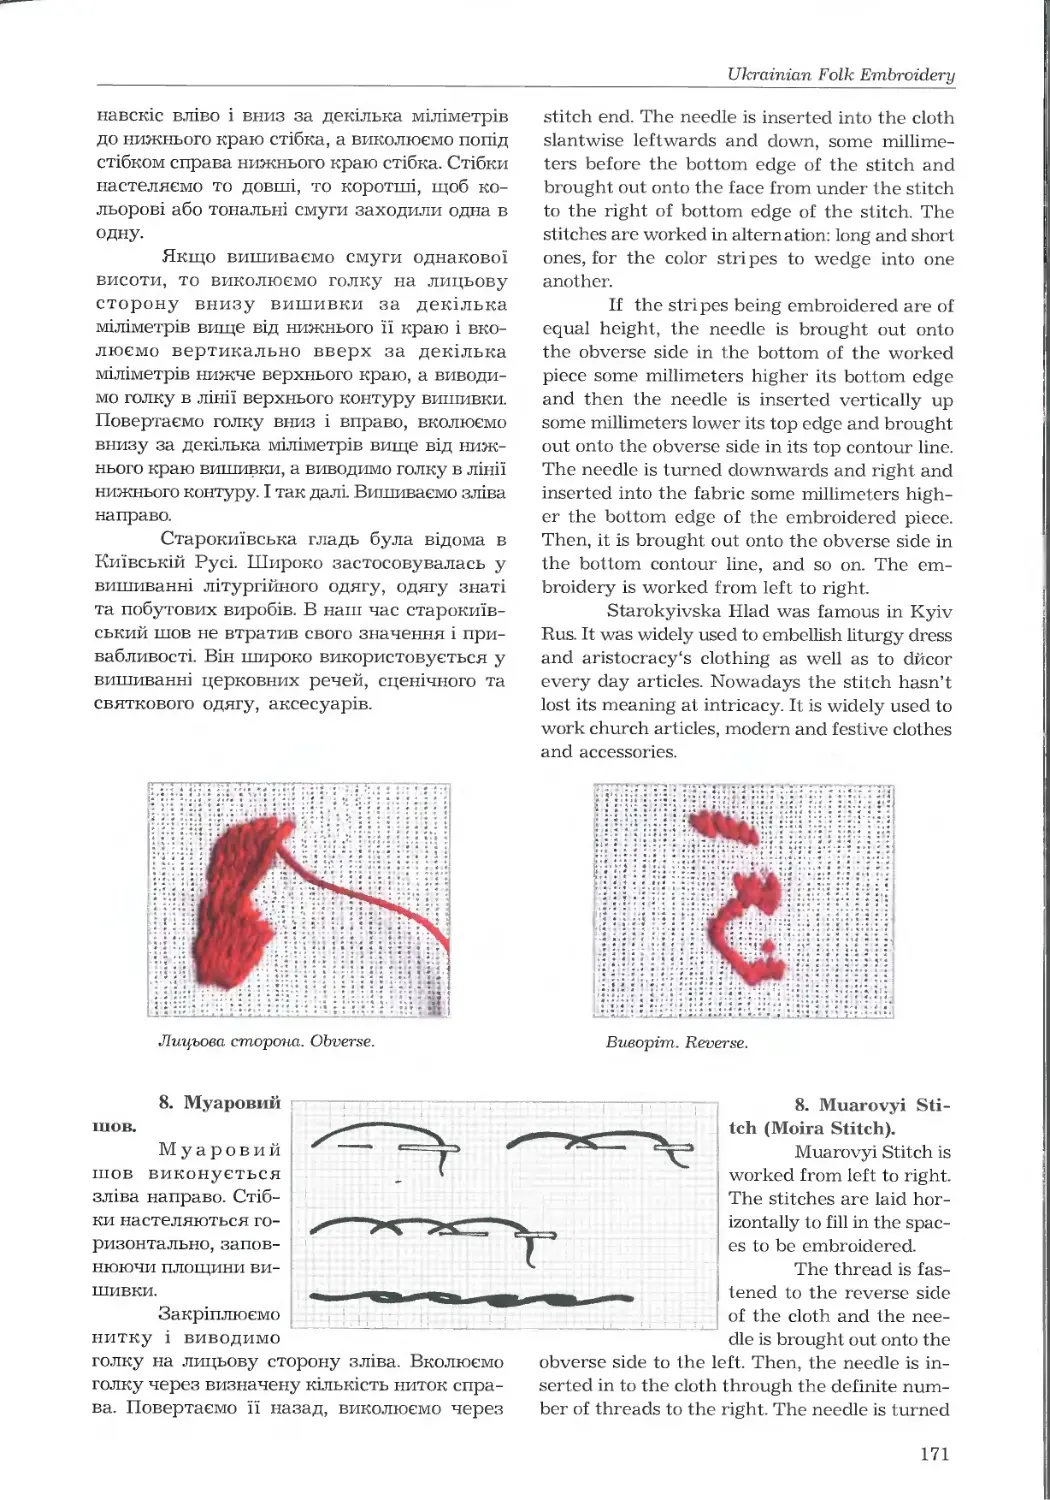
7. Старокиївська гладь 170
7
Українське народне вишивання
8. Муаровий шов 171
9. Обкрутка 172
СП.ІХ. Рушникові шви.
1. Техніки вишивання рушникових швів 180
СП.Х. Вишивання, силяння та ткання пацьорками.
1. Вишивання пацьорками 188
2. Силяння пацьорками 189
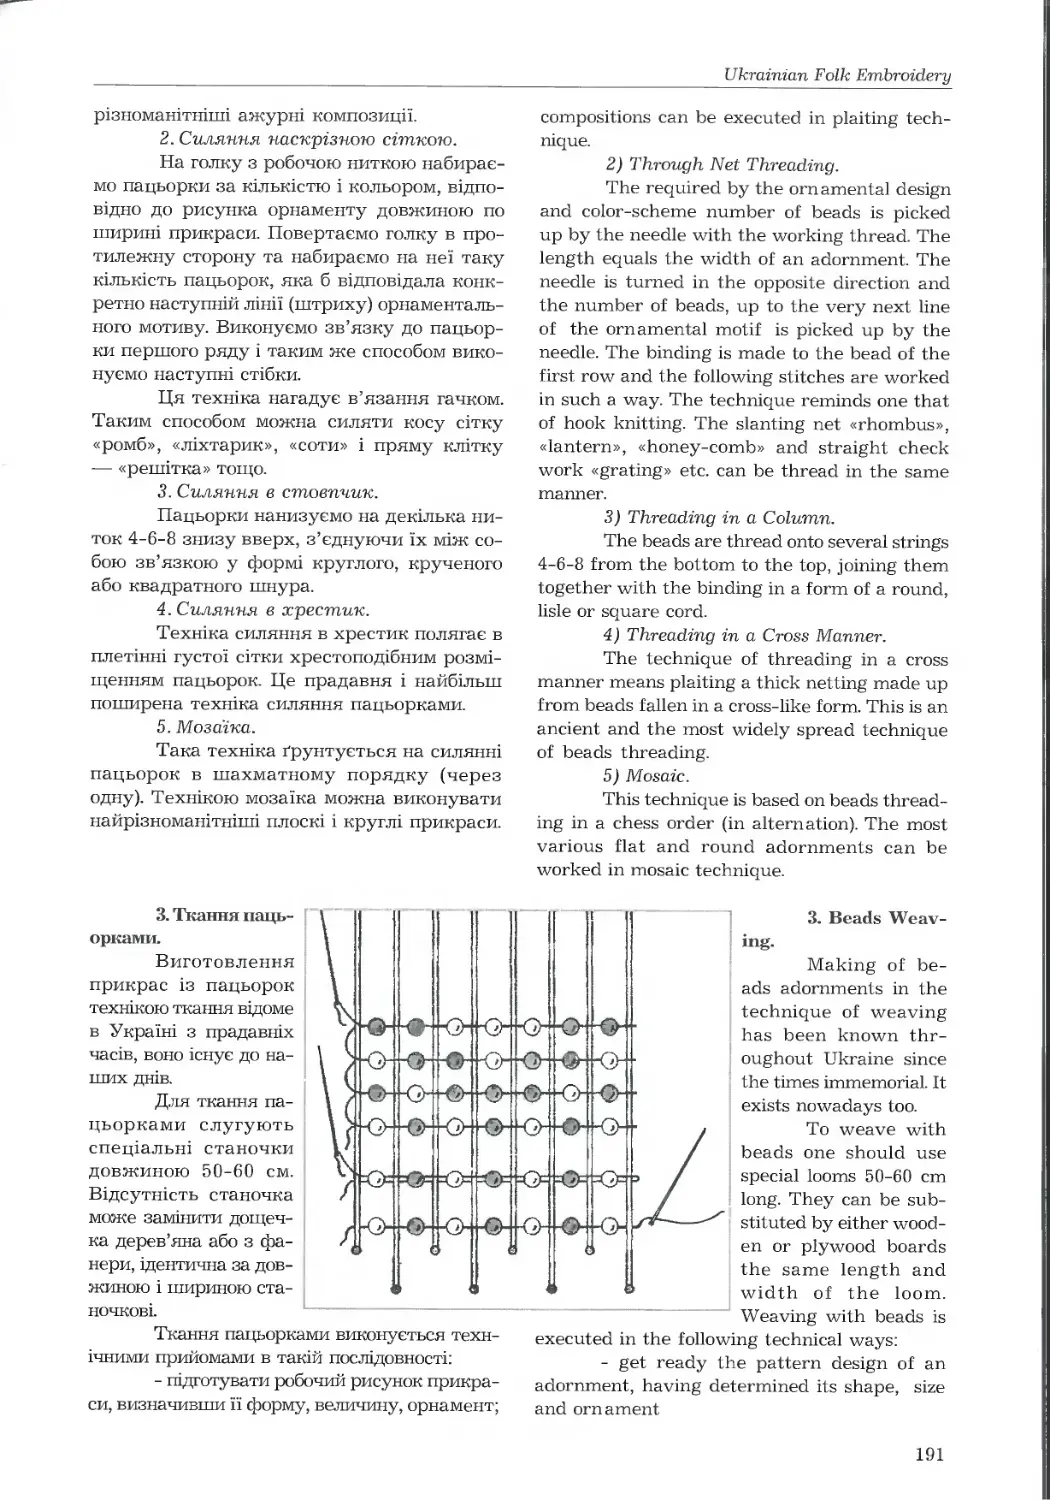
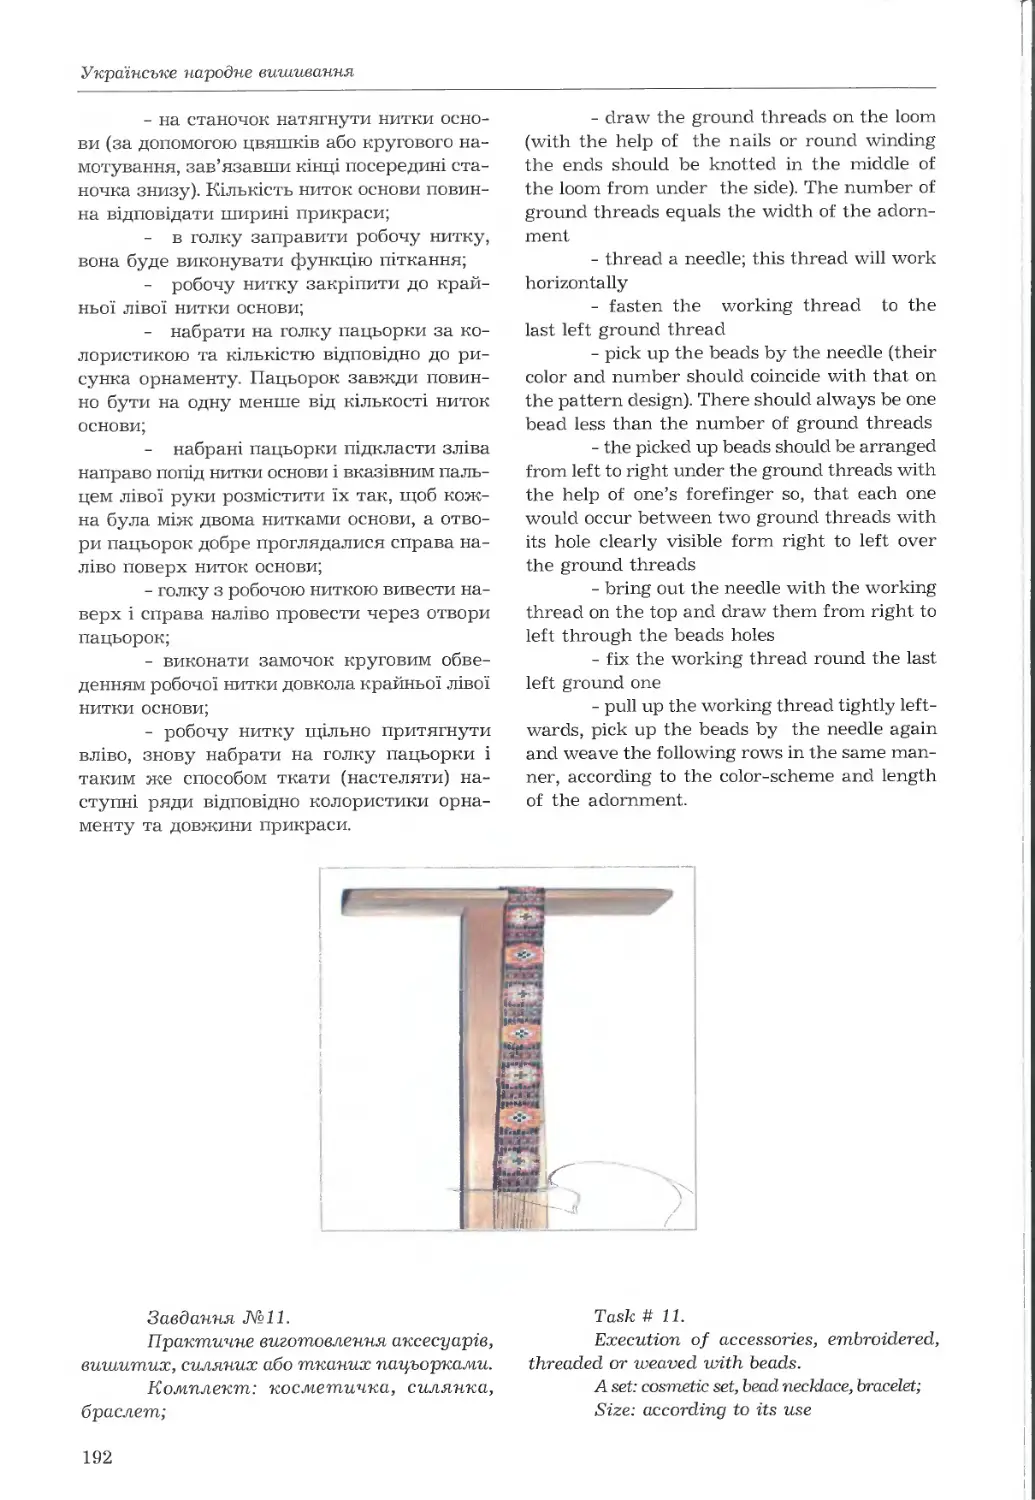
3. Ткання пацьорками 191
СП.ХІ. Аплікація.
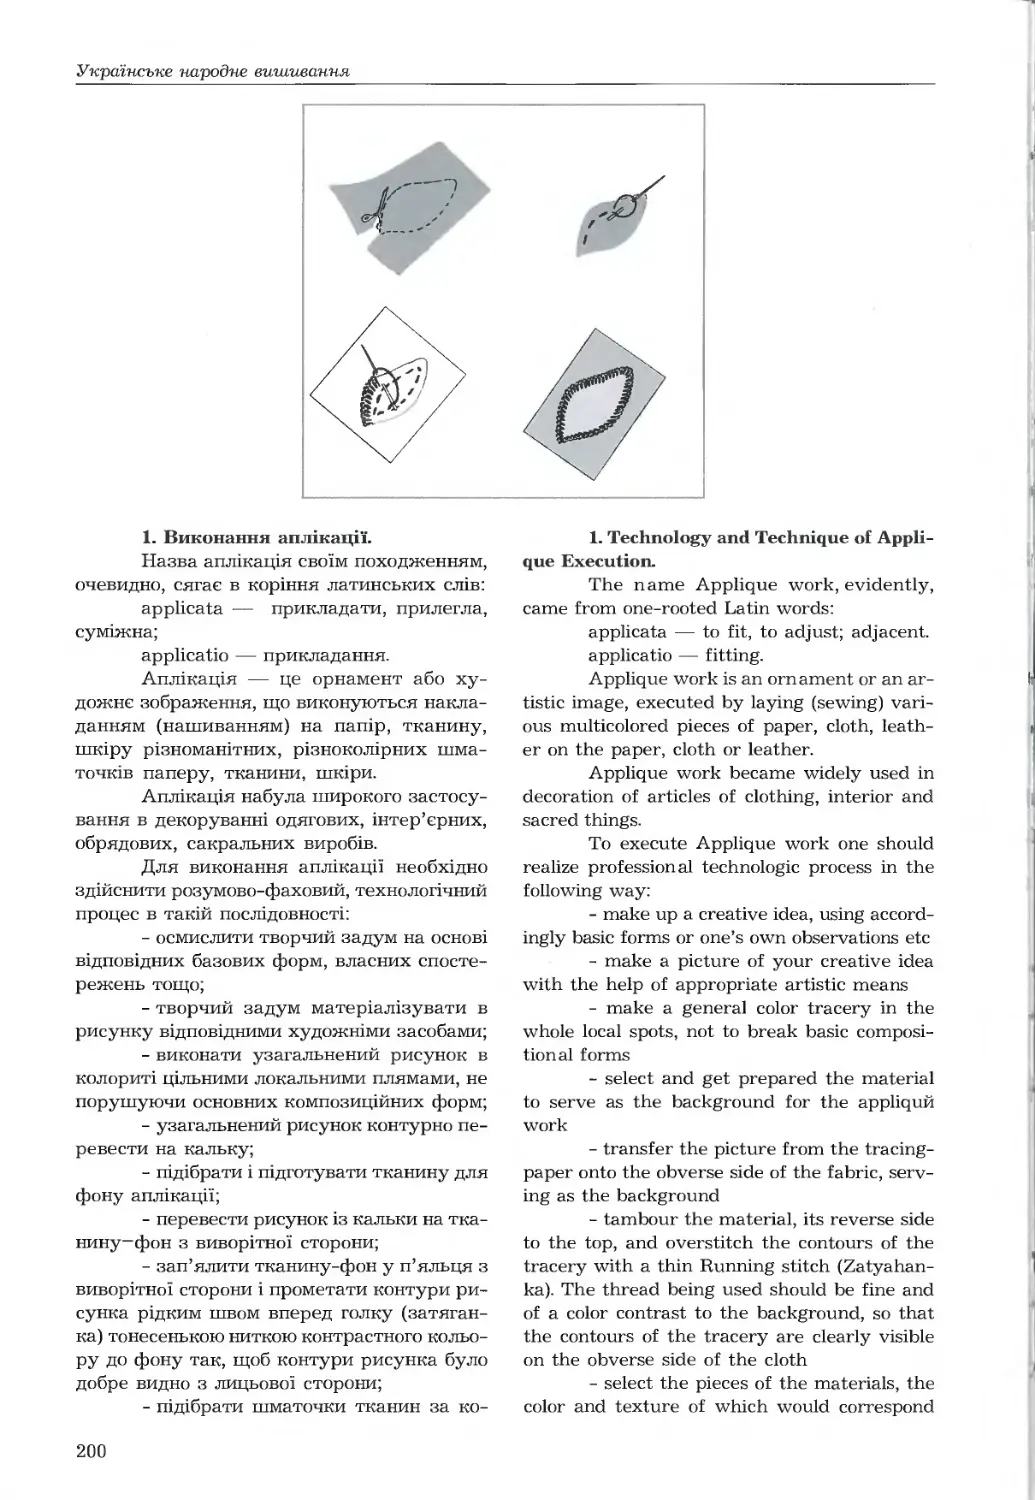
1. Виконання аплікації 200
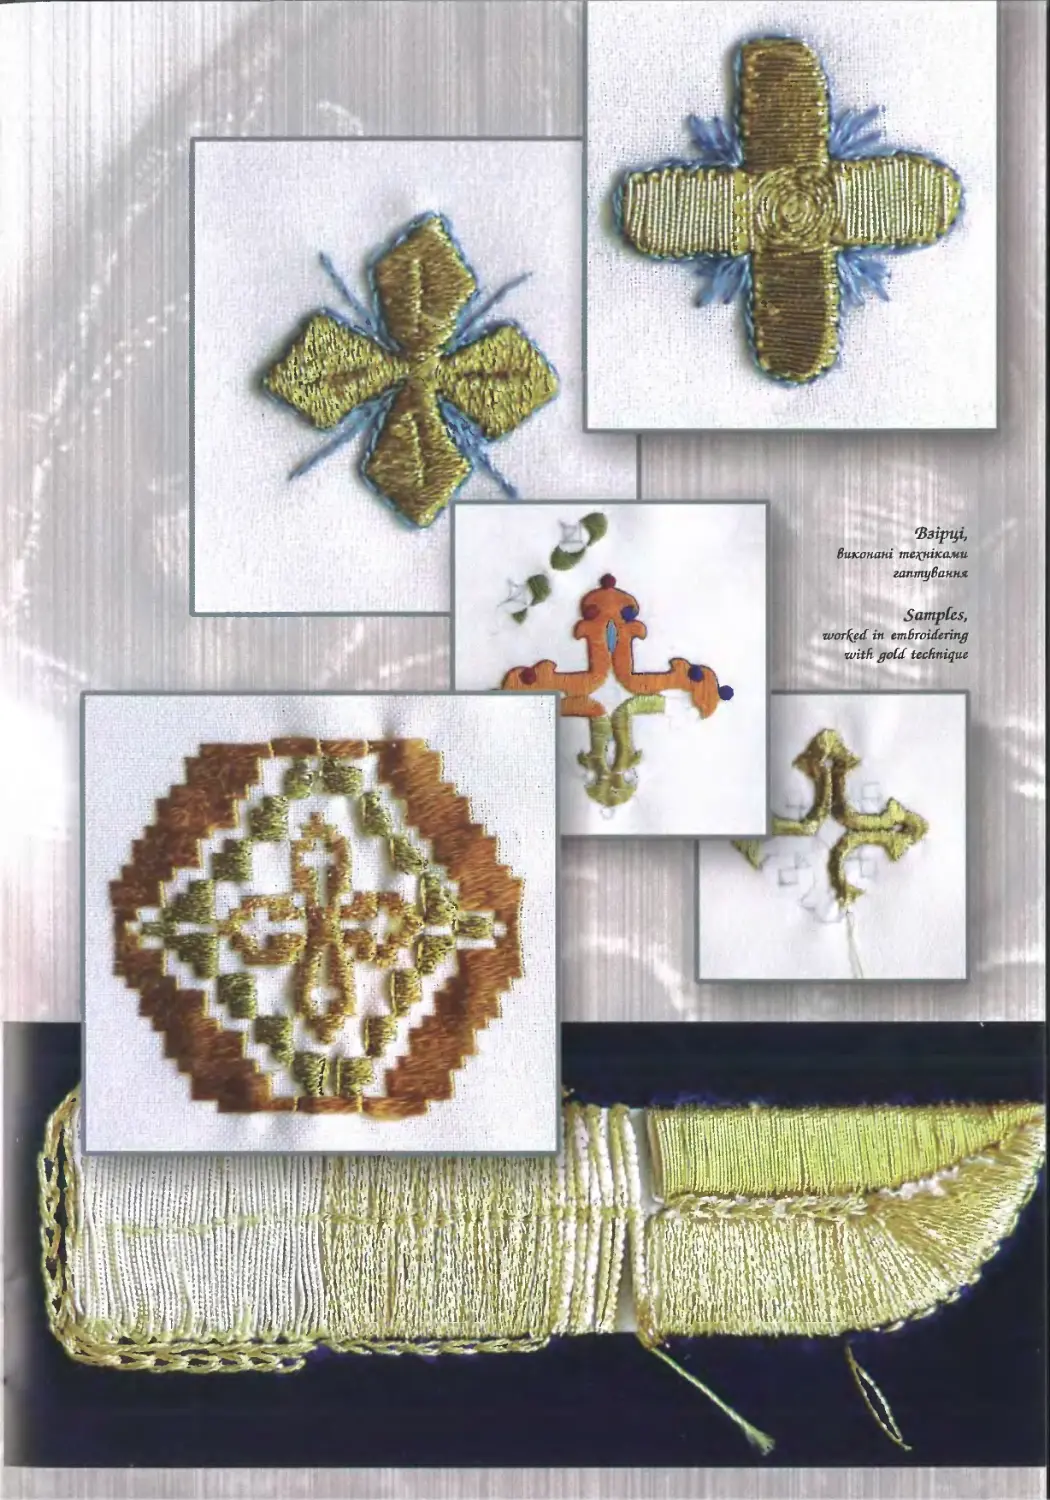
СП.ХІІ. Гаптування.
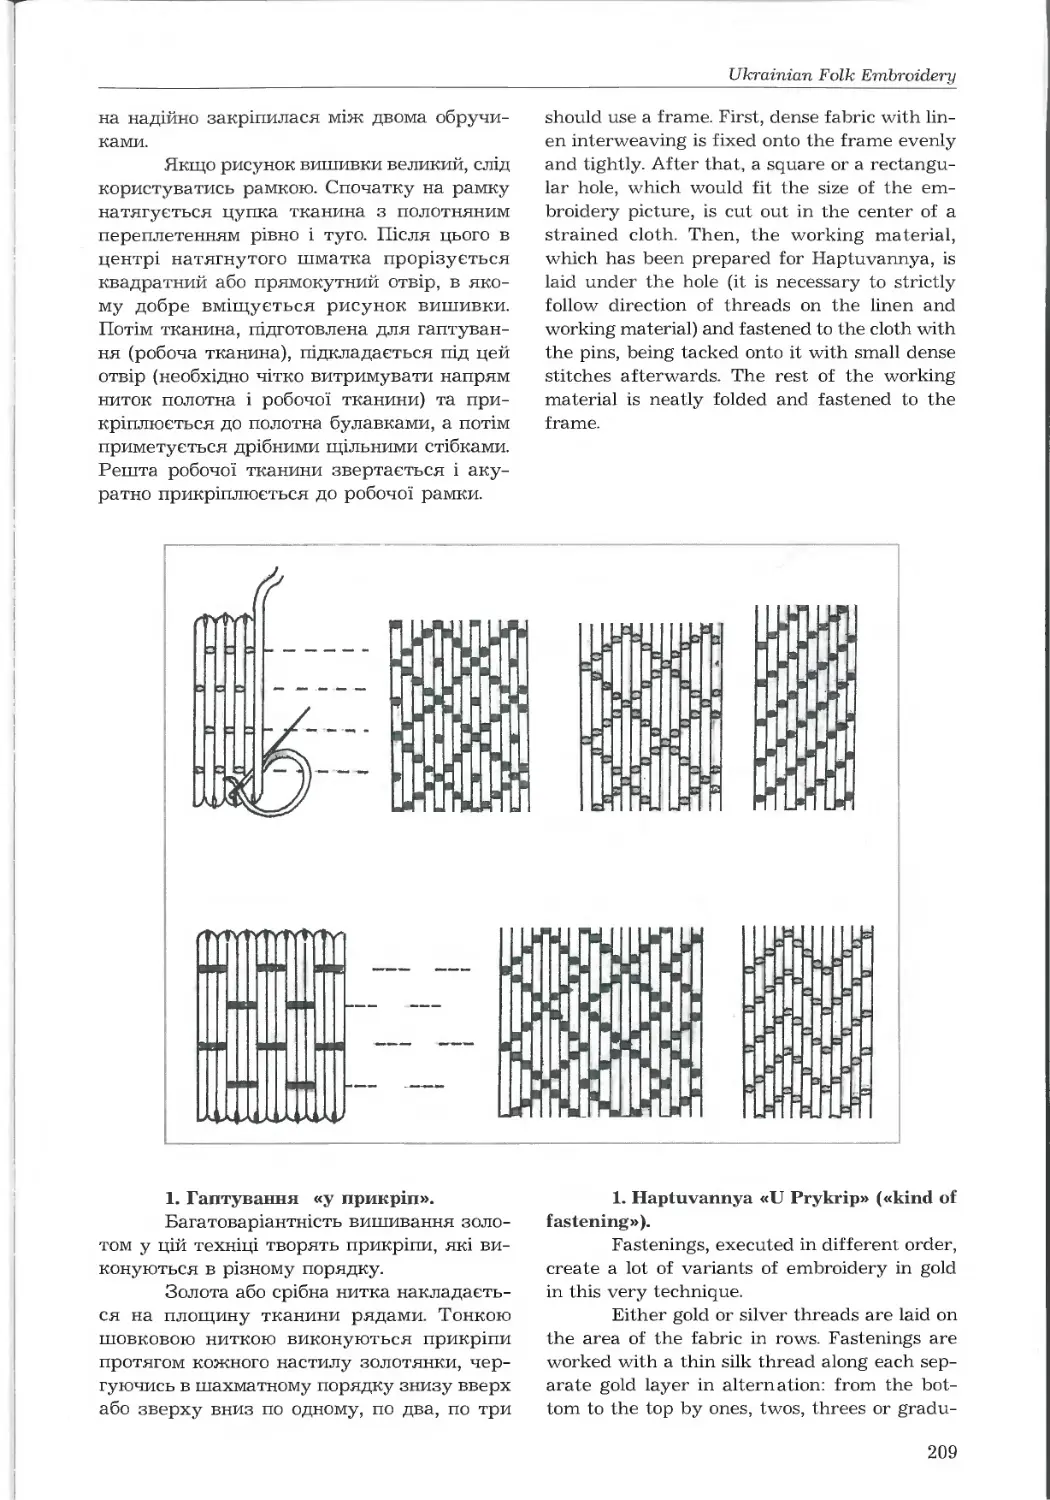
1. «У прикріп» 209
2. «По карті» 210
3. «По настилу» 211
4. «По мотузці» 211
5. «У прокол» 212
Додаток.
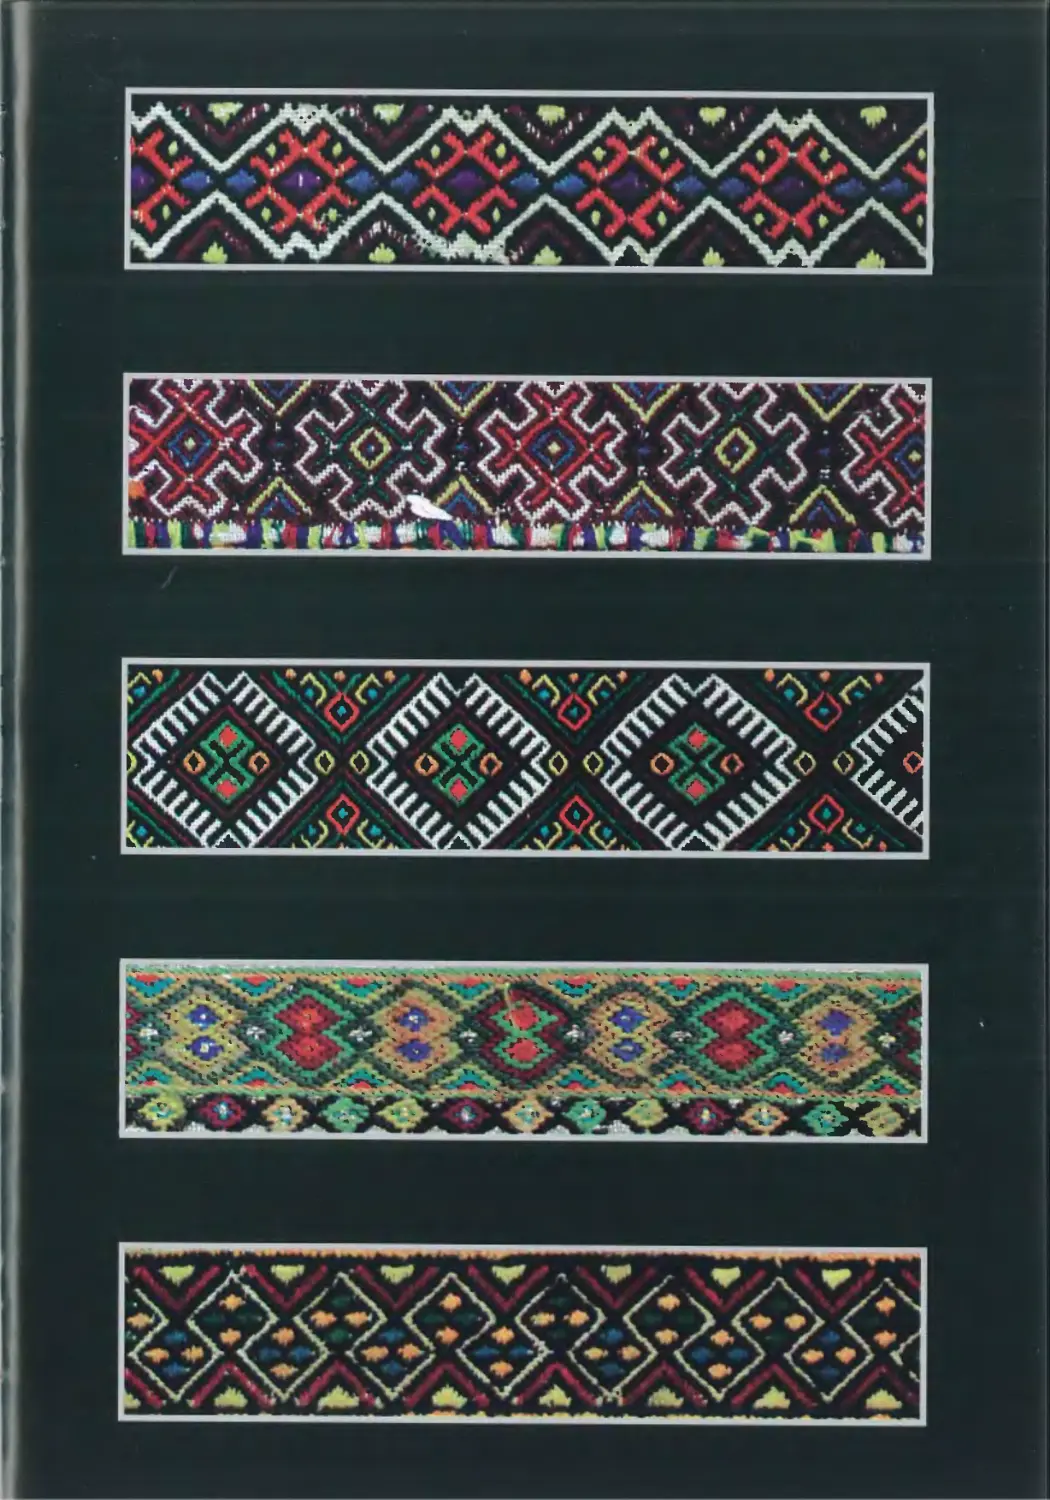
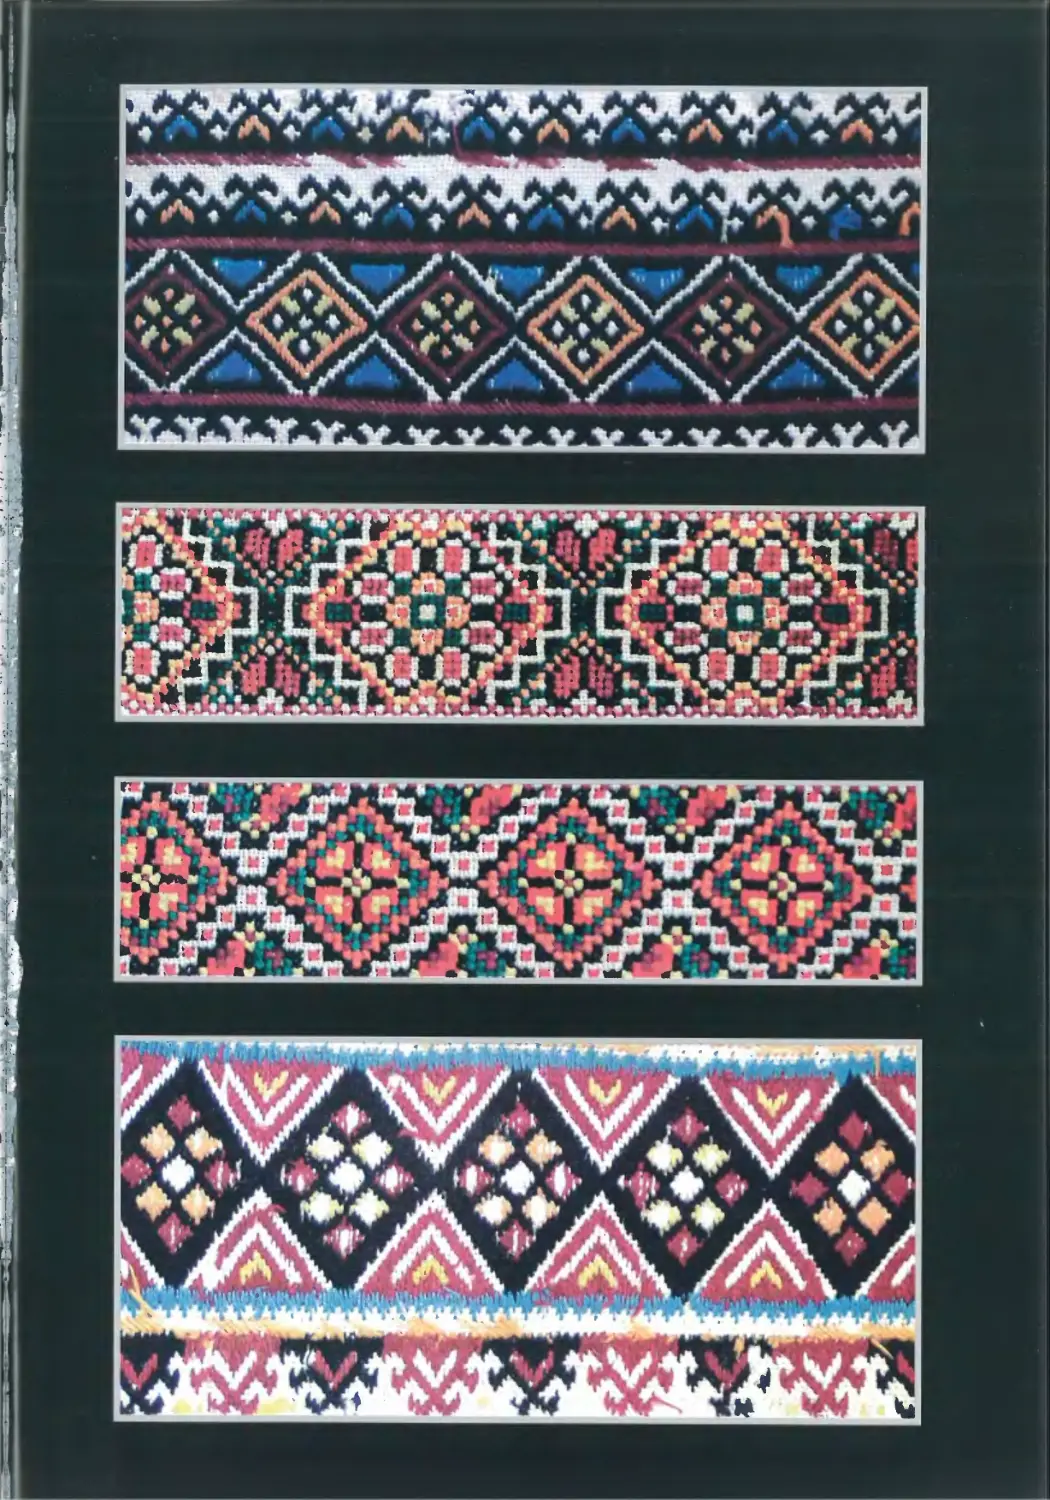
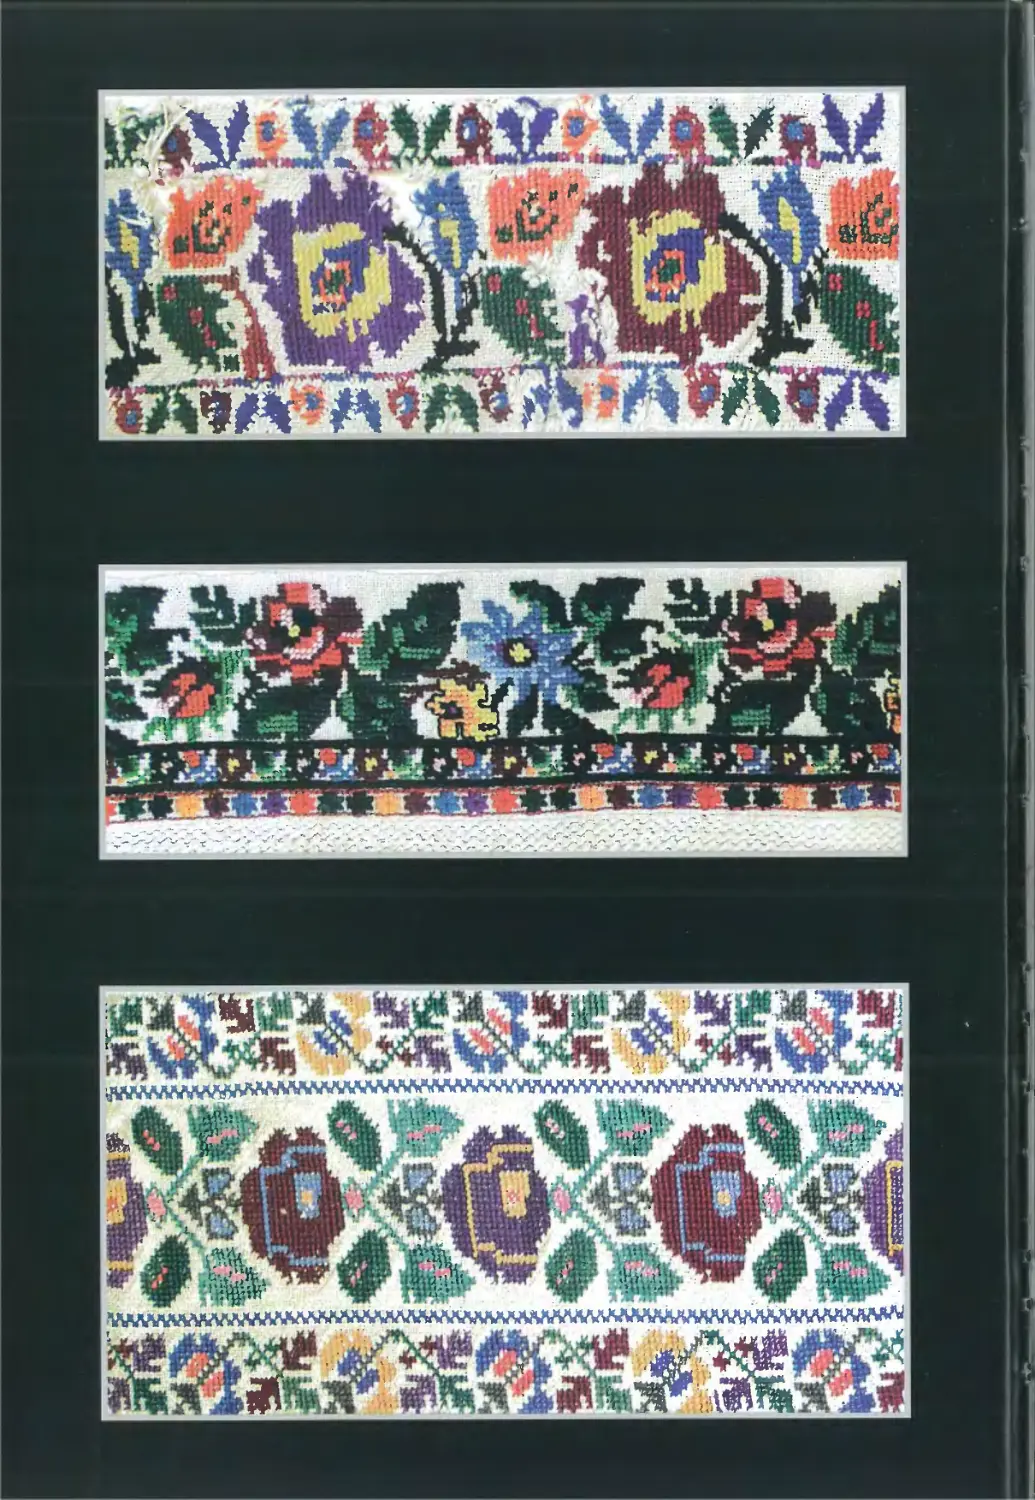
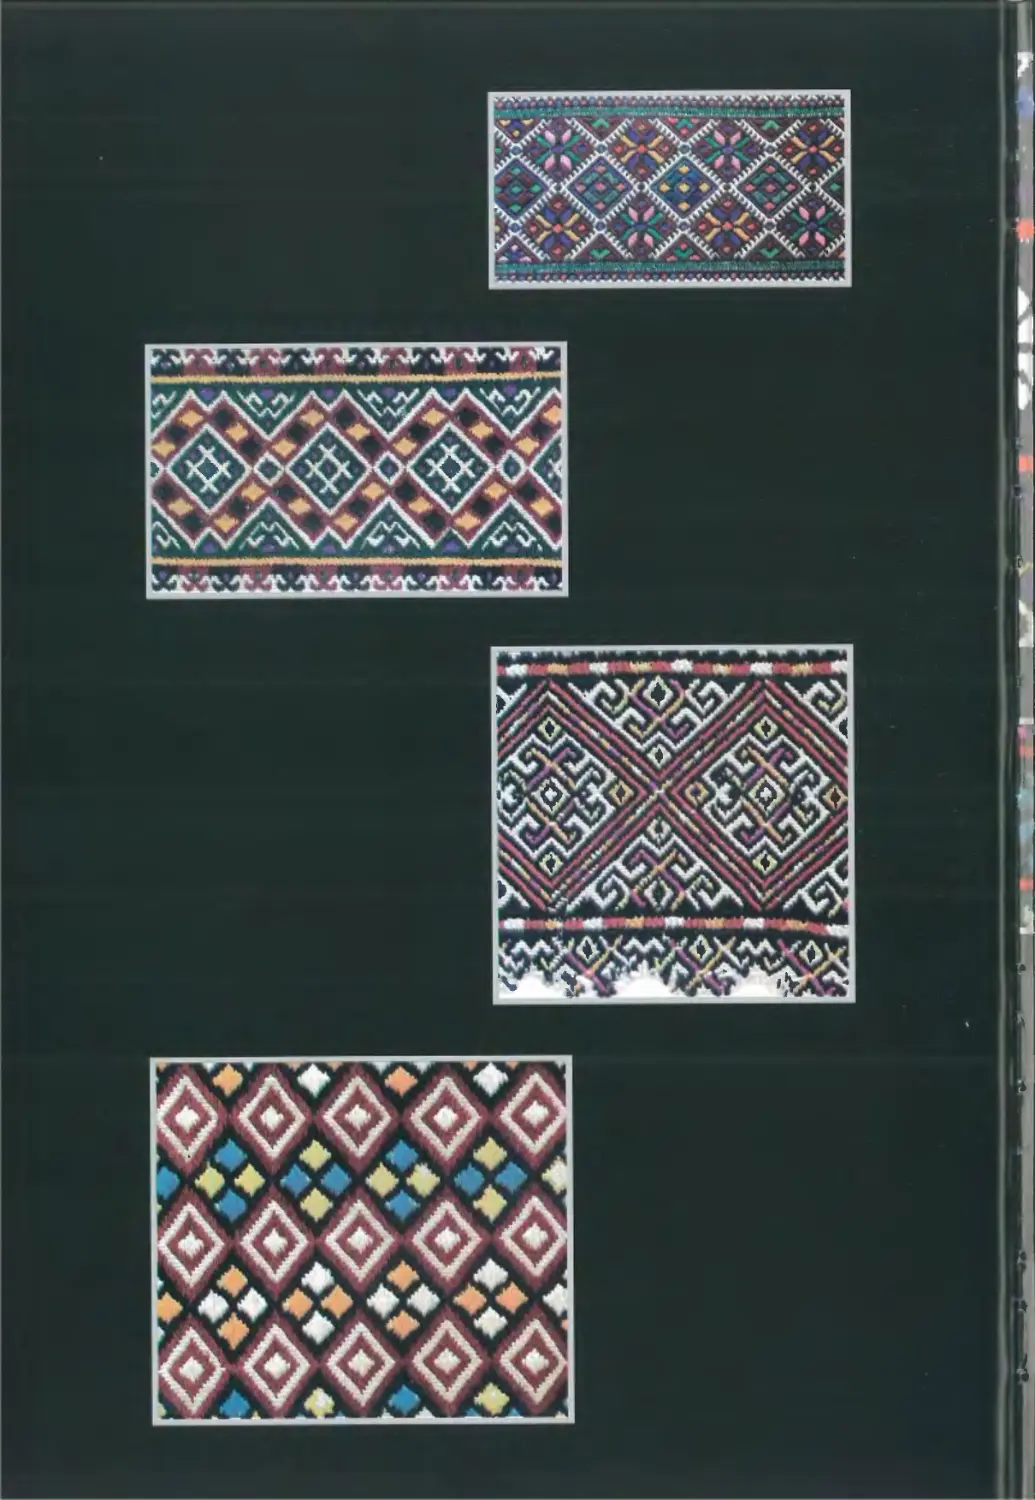
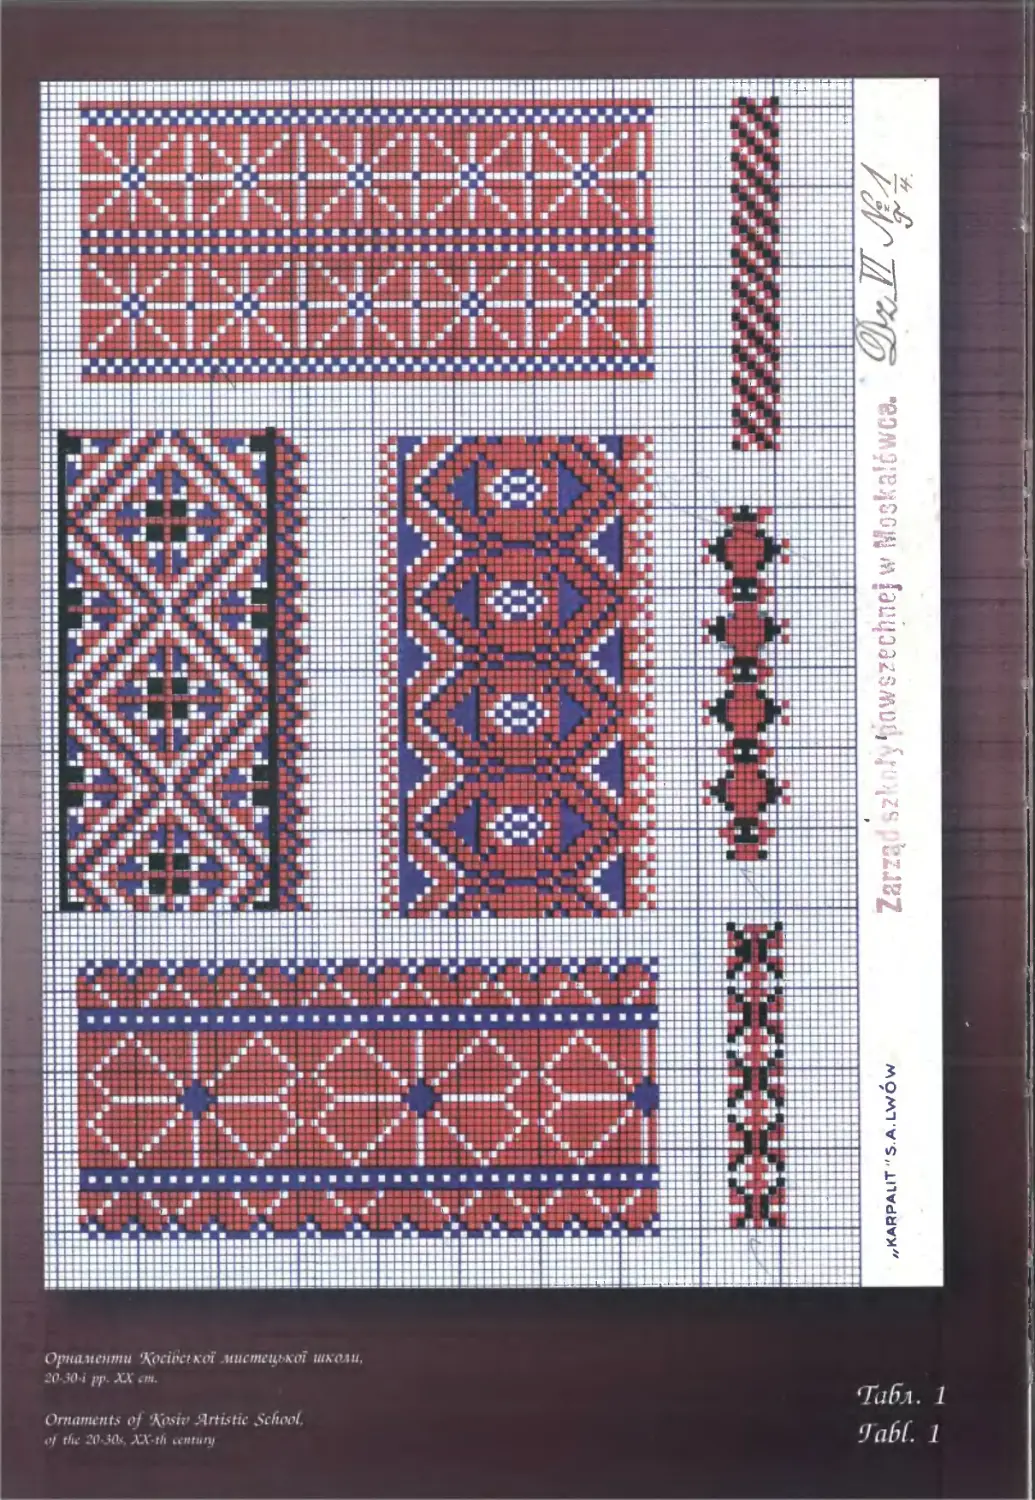
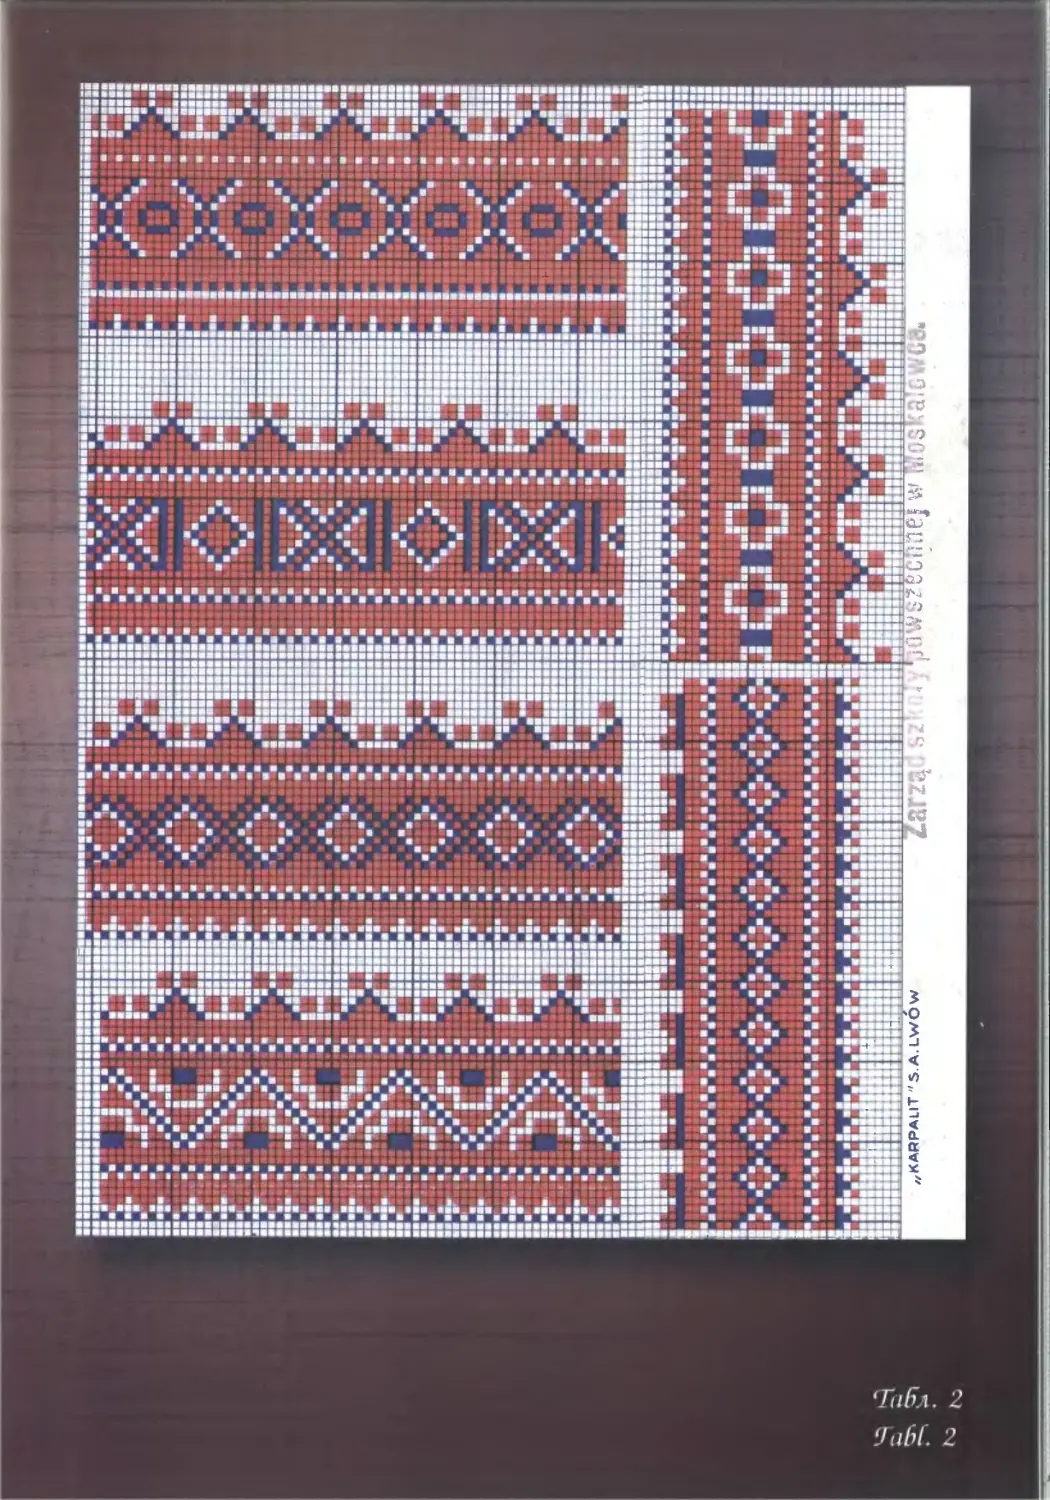
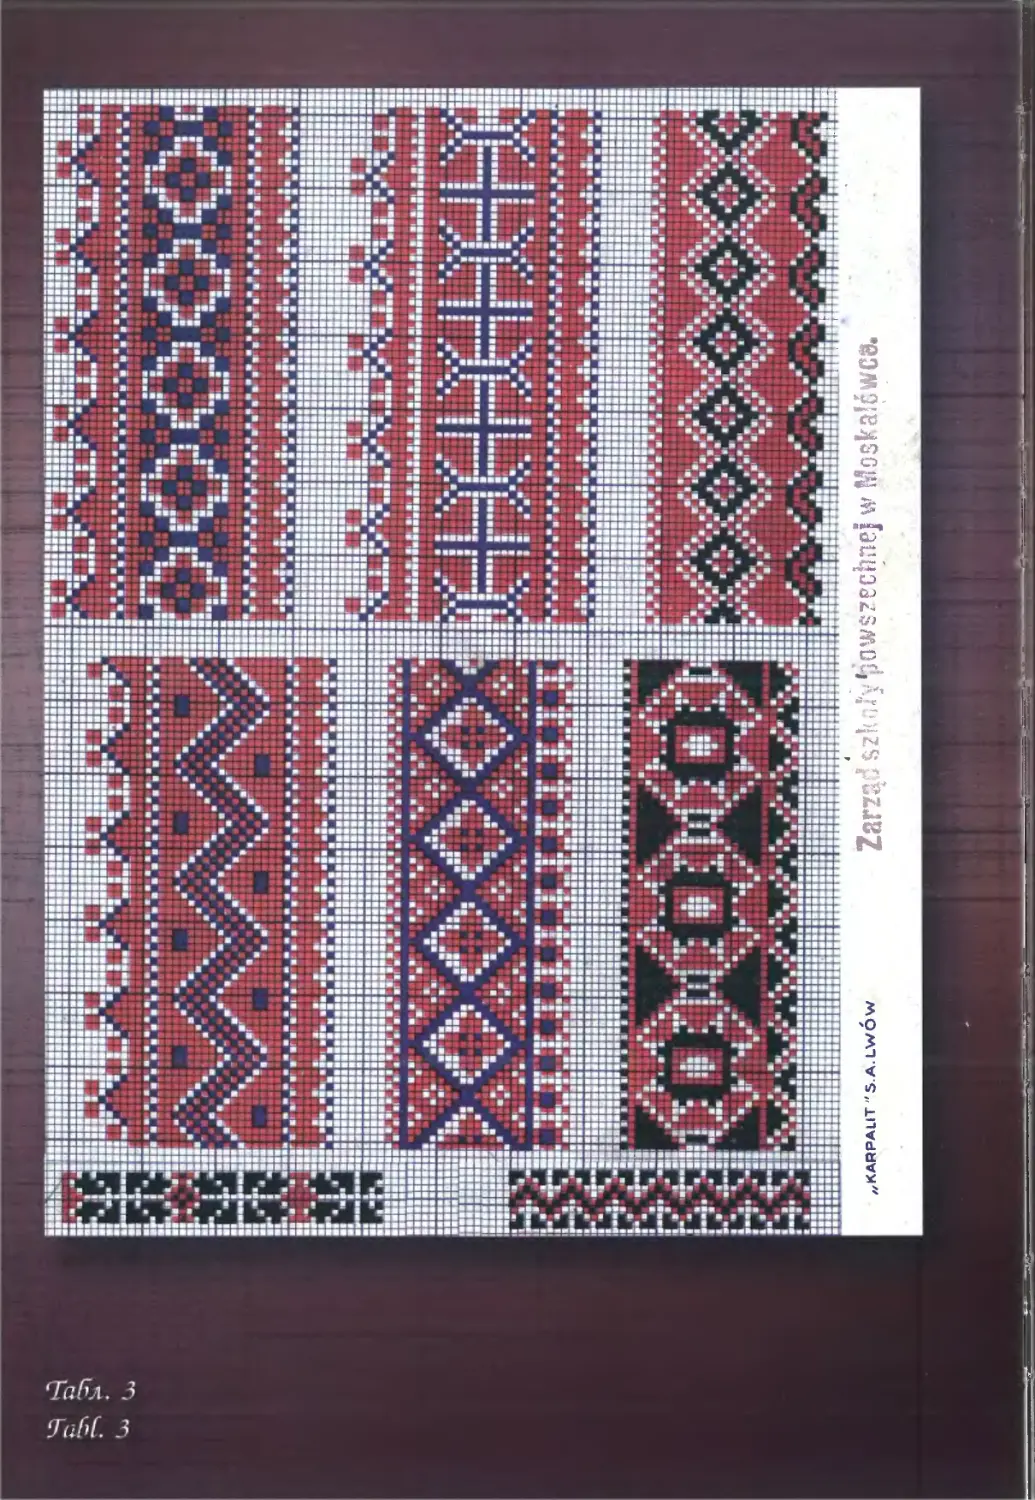
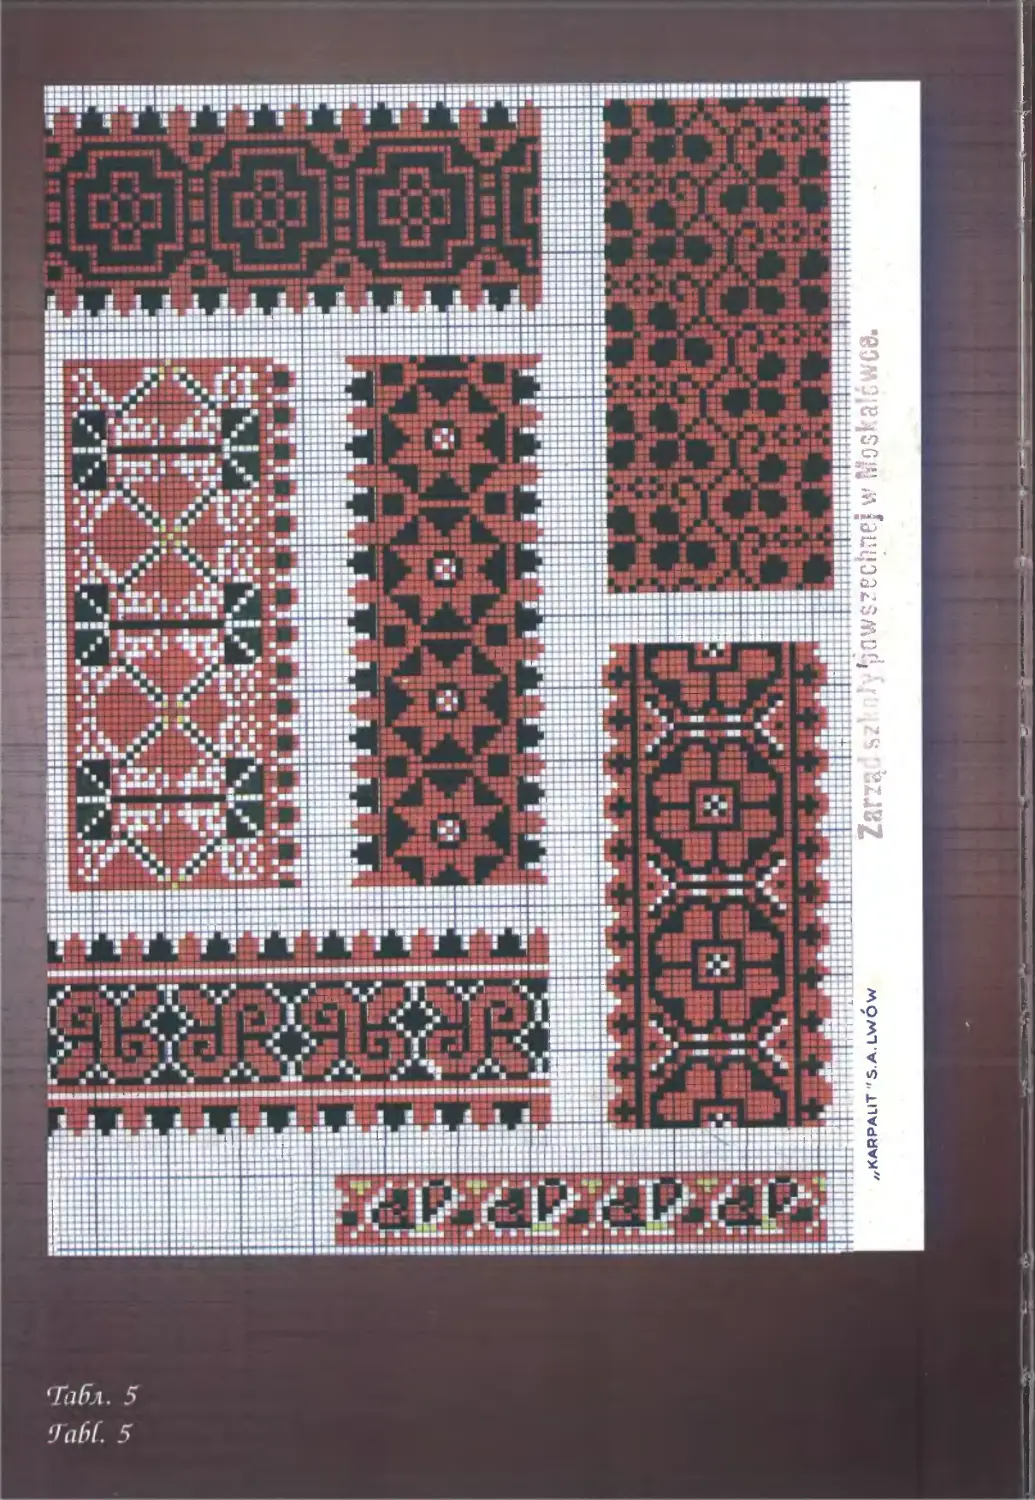
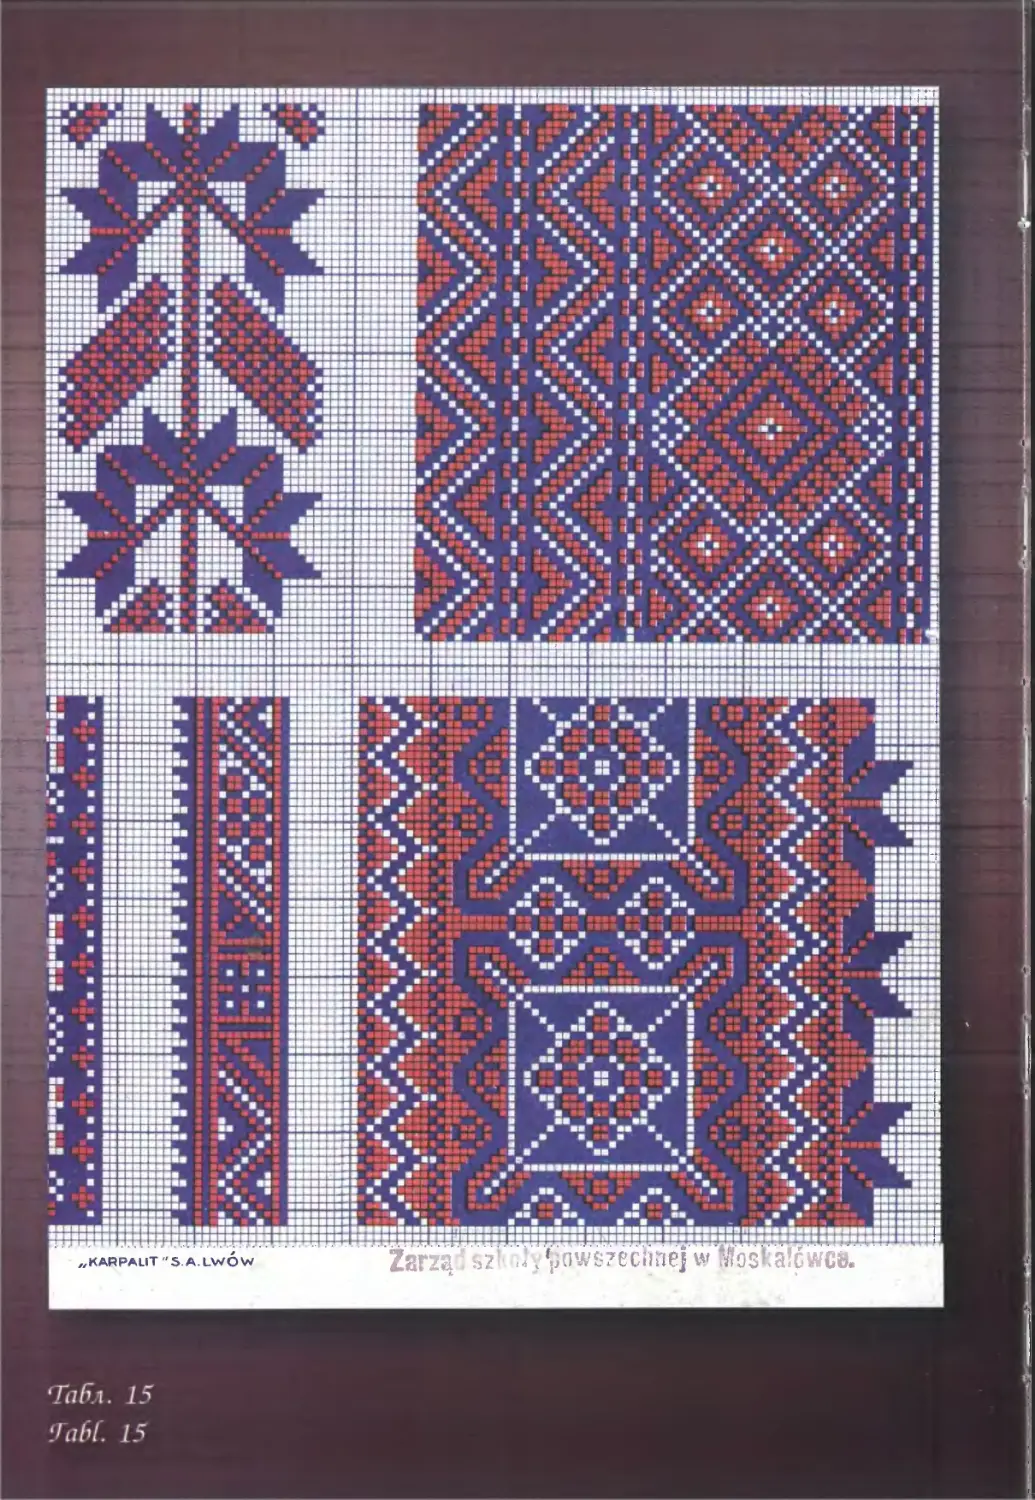
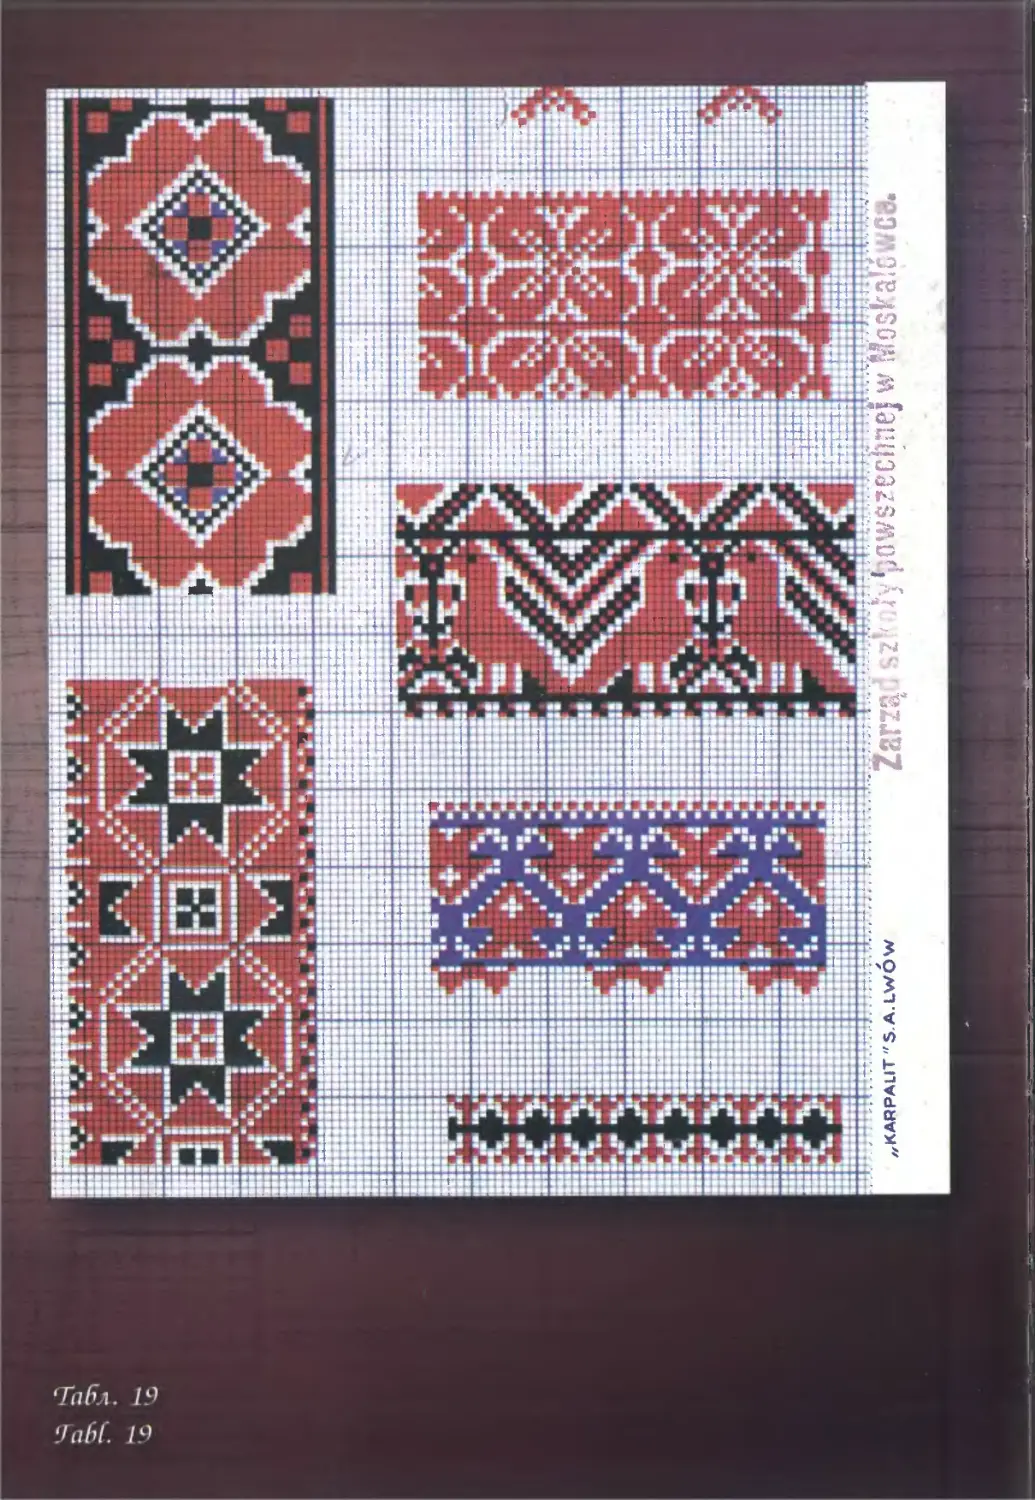
1. Орнаменти вишивок 217
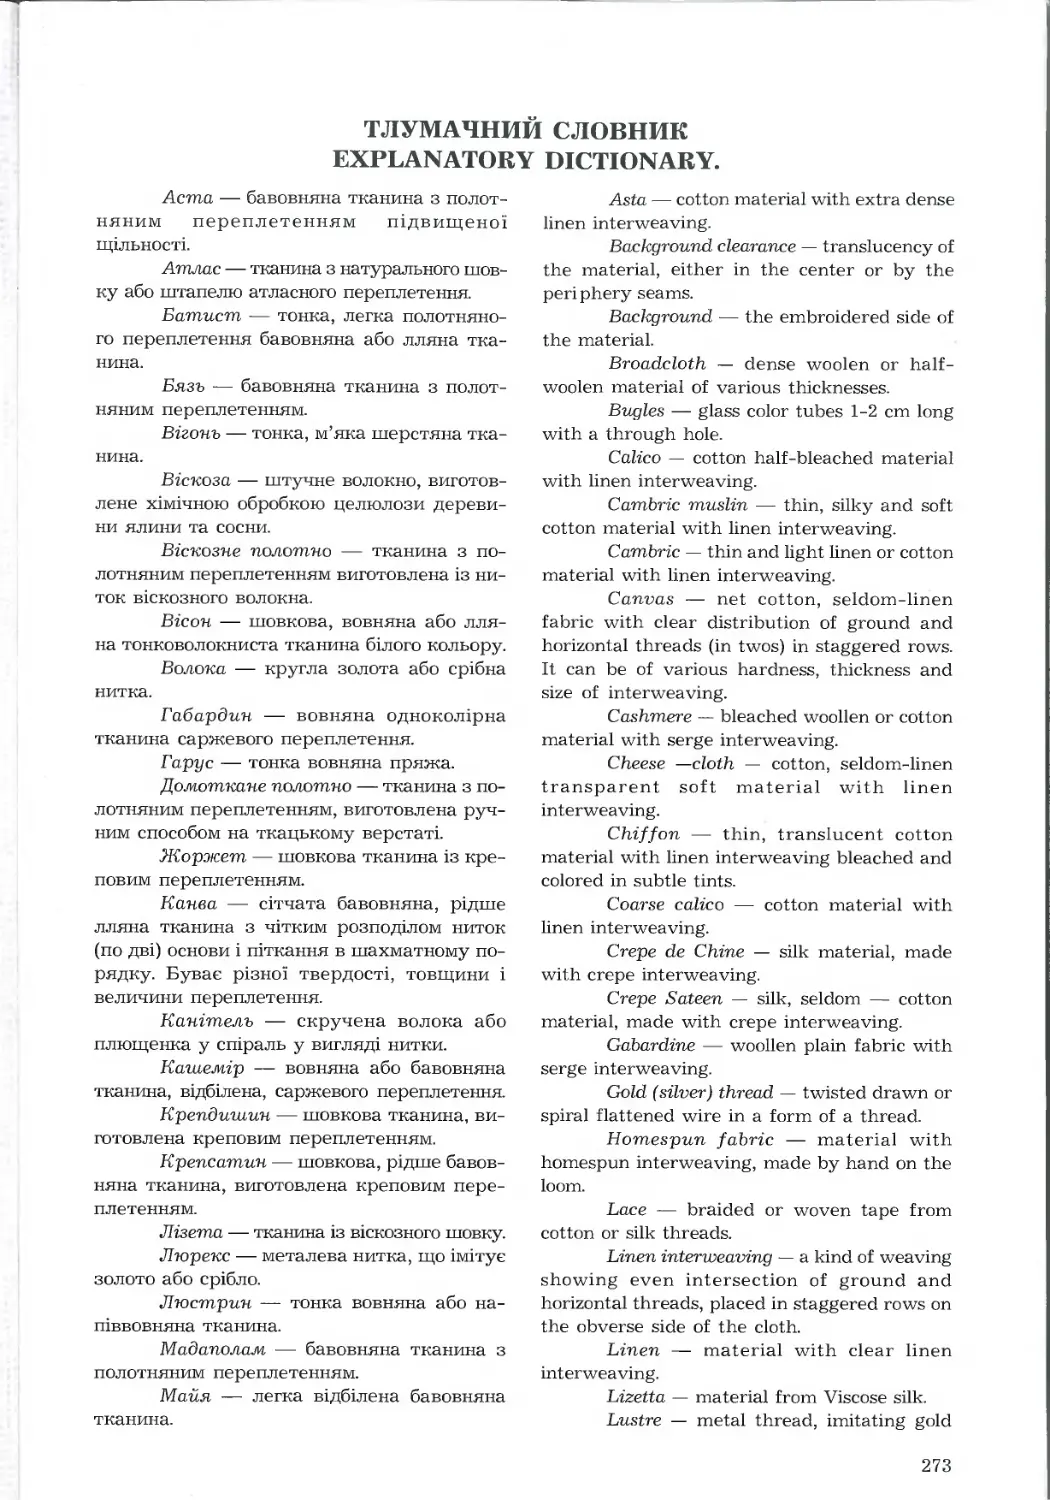
2. Тлумачний словник 273
3. Предметний покажчик 276
4. Список використаних джерел 279
5. Список рекомендованої літератури для поглибленого
вивчення курсу 280
8
Ukrainian Folk Embroidery
CONTENTS
*TE.
Foreword 13
**SS.I. Artistic Needlework.
1. Meaning of the notions «to embroider»,
«fancy-work», «embroidery» 16
2. Historical Foundations of Embroidery: Development and Formation
as Part of Decorative and Applied Arts 21
3. Appliances for Artistic Needlework 28
4. Helpful Hints 33
SS. II. Finishing off the Embroidered Edges.
1. Whip stitch 40
2. Half Stitch 40
3. One-stitched Obmetnytsya (Plakhtove Ending) 41
4. Three-stitched Obmetnytsya (Plakhtovyi Stitch) 42
5. Crossing (Kozlyk) 43
SS. III. Primary Stitches of Artistic Embroidery.
1. Zatyahanka («to tighten») 48
2. Stebnivka (hand stitch, French Stitch) 49
3. Kryvulka (Wave Stitch) 50
4. Double-sided Kyvulka 51
5. Tree-stitched Kryvulka 51
6. Lantsiuzhok (Chainstitch) 52
7. Twisted Backstitch 53
8. Twisted Stitch «in chain» 55
SS. IV. Ornamental Stitching Seams.
1. Nyzynnyi Cord (Lace) 62
2. Transversal Retyaz 63
3. Color Retyaz 64
4. Sosnivka (Pine-tree) 65
5. Smerichka (Fir-tree) Stitch 66
6. Petelkovyi (Looped) Stitch 67
7. Koloskovyi (Ear-of-Wheat) Cord 68
8. Rizhkatyi (Horny Decorative) Cord 69
9. Snurok (Snuruvannya) (Lacing) 70
10. Obmitnytsya Poverkhneva (Surface Whip-stitch) 71
11. Surface Cord with the Lining 72
12. Proshyttye (Stebnove Needlework), (Running Stitch) 73
13. Vivsyk («Oats») 74
SS. V. Stitches which Require Counting.
a) opaque stitches of artistic embroidery which require counting.
1. Velvety stitch 81
2. Kuriachyi Brid (curly) 82
3. Slanting Cross (plain) 84
4. Straight Cross 85
5. Cross with the Slanting Lining 85
6. Cross with the Straight Lining 86
*TE — training element.
"SS — structural subunit.
9
Українське народне вишивання
7. Rozsypnyi Cross ( Scattered Cross) 87
8. Half-cross 88
9. Double cross ( Bulgarian) 89
b) transparent stitches which require counting.
1. Vyrizuvannya (Cut Work) 91
2. Slipe Vyrizuvannya (Blind Cut Work) 92
3. Vycolyuvannya. (Drawn Eyelets) 93
4. Rozvid (Outline) 94
5. Dovbanka (Pierced Eyelets) 95
6. Zernovyi Vyvid 96
7. Solovyini Vichka (Nightingale's Eyes) 97
8. Kochelystyi Stitch (Circle Stitch) 98
9. Tovmatska Star 99
10. Klitka /Shtapivka/; (Check work) 100
SS. VI. Compound Stitches of Artistic Embroidery.
1. Double Verkhoplut (Hutsulskyi) /Hutsulian Topwinder/ 110
2. Navy vane. (Laid Stitches) 112
3. Verkhoplut (Topwinder) 113
4. Klyuchovyi Stitch (Klyuchove Shytvo). /Looped Stitch/ 114
5. Klyuchka (Loop) 116
6. Parovana Klyuchka. (Coupled Loop) 118
7. Rizhky (Rizhkatyi Stitch). /Horny Stitch/ 120
8. Shtepuvannya 121
9. Kucheryavyi Stitch. (Curly) 122
10. «Chervyachok» Stitch («Worm» Stitch) 123
SS. VII. Laid Stitches which Require Counting
(laying, Satin Stitch which requires counting).
a) Laid Stitches which Require Counting and do not Cover
the Entire Background.
1. Zanyzuvannya (Zavolikannya) 132
2. Zanyzuvannya (Perevolikannya) with the Knot-making 134
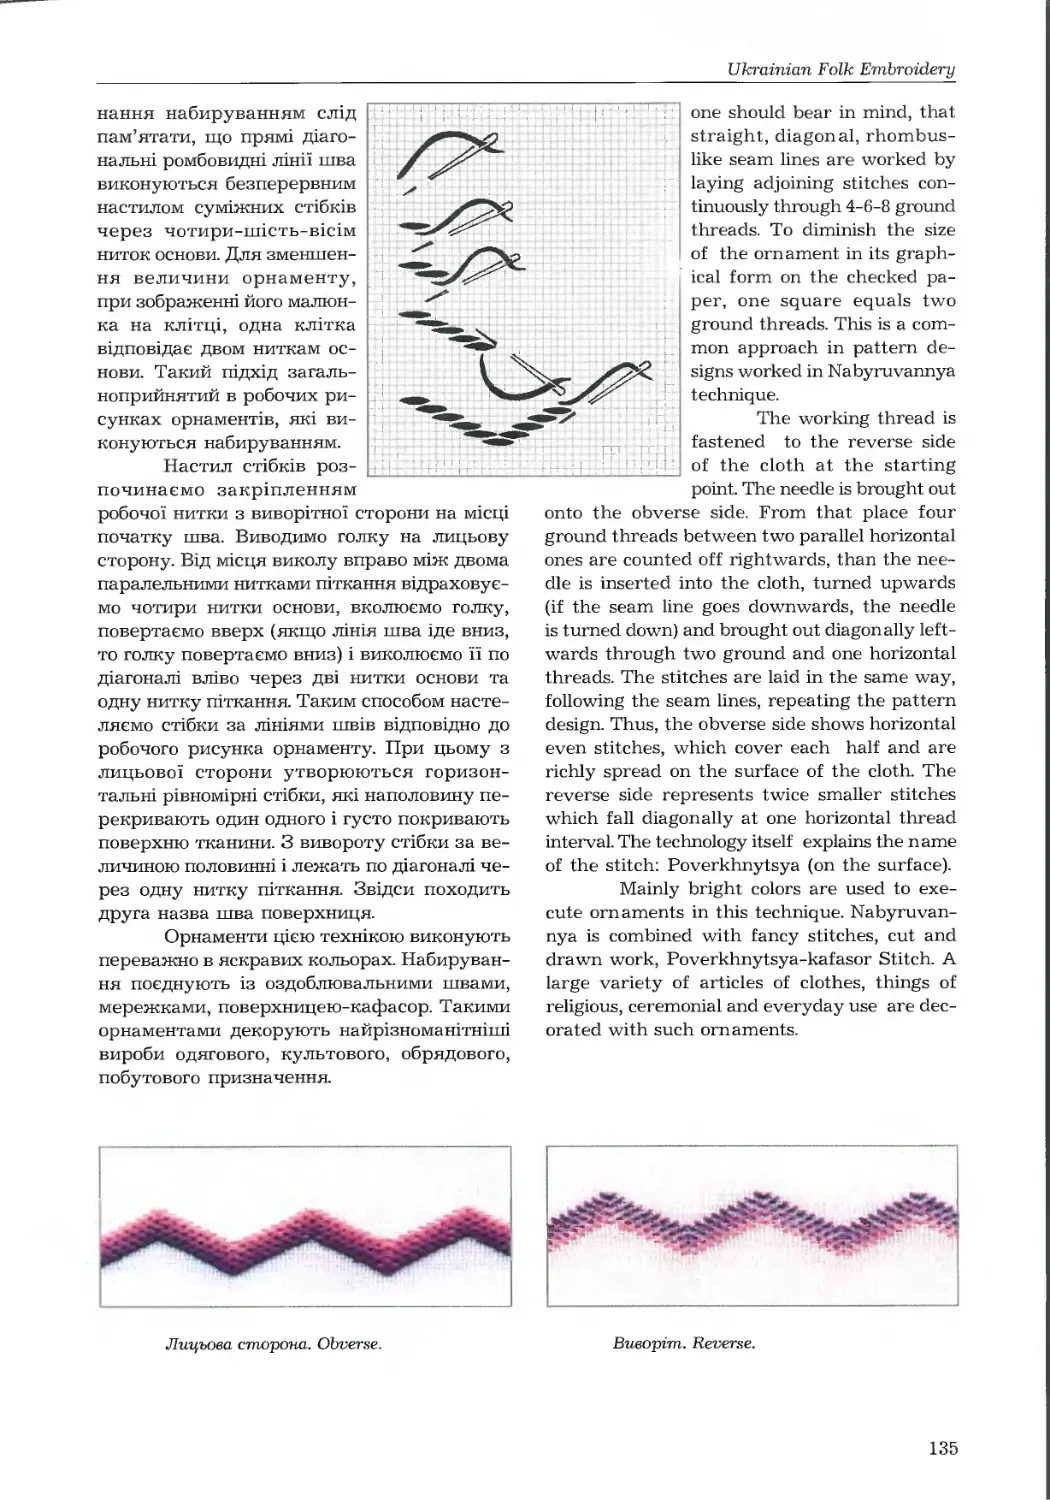
3. Nabyruvannya (Poverkhnytsya) 134
4. Simple Nyzynka Stitch 136
5. Nyzynka Zamkova 137
6. Poverkhnytsya-kafasor 138
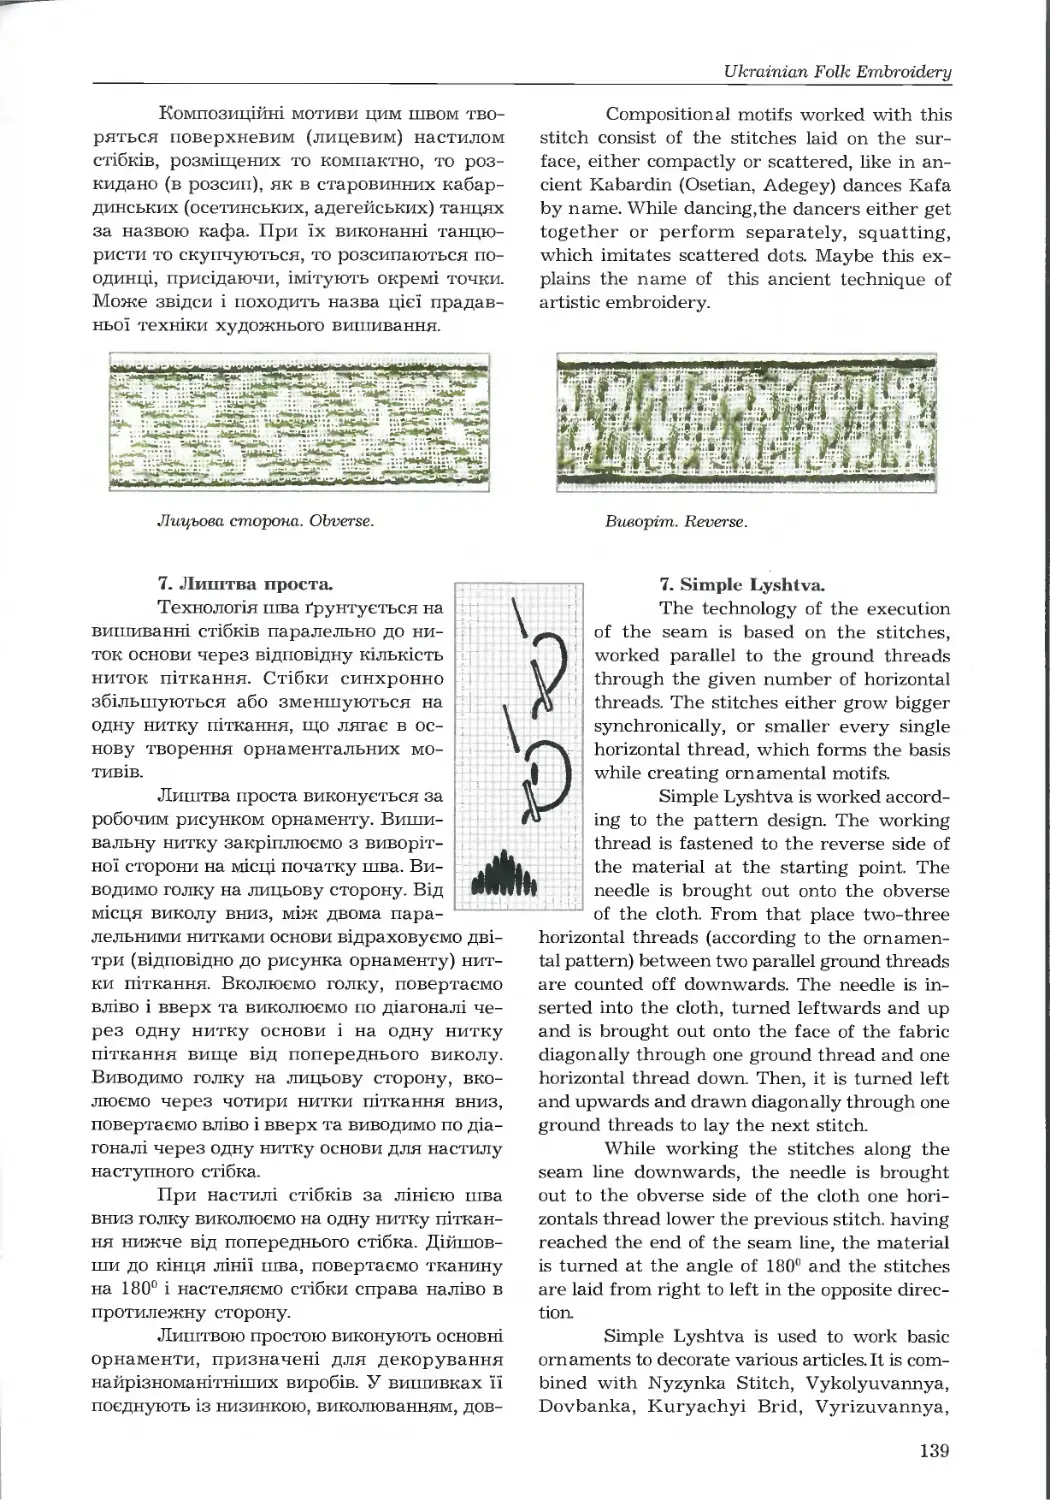
7. Simple Lyshtva 139
8. Kachalkova Lyshtva (Kachalochka) 140
9. Zaihlino (Zaihlyane)-I 141
10. Zaihlino (Zaihlyane)-II 142
11. Hlad Steblova (Stem-like Satin Stitch) 143
12. Hlad Koloskova (Ear of Wheat Satin Stitch) 144
b) laid stitches which require counting, and cover the entire background.
1. Kolodky-I (Goblin Stitch) 146
2. Kolodky-II 147
3. Hlad Pryama Tinyova (Straight Shady Satin Stitch) 148
4. Hlad Kosa Atlasna (Satin Slanting Satin Stitch) 149
5. Hlad Kosa Ozdoblyuvaln a (Decorative Slanting Satin Stitch) 150
6. Hlad Pletinka (Plaiting Satin Stitch) 151
Ukrainian Folk Embroidery
SS. VIII. Laid stitches which do not require counting (satin stitches under
a free tracery).
1. Hlad Dvobichna (Both Sides satin Stitch) 163
2. Hlad with Peresyahy (Poltavian); /Poltavian Satin Stitch/ 164
3. Artistic Satin Stitch 166
4. Hlad with Nastyl (A Kind of Satin Stitch) 167
5. Odnostoronnya Hlad /One-sided Satin Stitch/ (Verkhoshov,
Volodymyr Stitches) 168
6. White Satin Stitch (underwear, embossed or relief) 169
7. Starokyivska Hlad (Old Kyiv Satin Stitch) 170
8. Muarovyi Stitch. (Moir Stitch) 171
9. Obkrutka (Twist stitch) 172
SS. IX. Rushnykovi (Towel ) Stitches.
1. Techniques of Embroidery of Towel Stitches 180
SS. X. Beads Embroidery, Threading and Weaving.
1. Beads Embroidery 188
2. Beads Threading 189
3. Beads Weaving 191
SS. XI. Applique-work.
1. Technology and Technique of Applique Execution 200
SS. XII. Haptuvannya (embroidery with gold or silver threads).
1. Haptuvannya «U Prykrip»(«kind of fastening») 209
2. Haptuvannya «By the Chart» 210
3. Haptuvannya «Po Nastylu» («on the laying») 211
4. Haptuvannya «Po Motuztsi» (along the rope/cord) 211
5. Haptuvannya «U Prokol» («by pricking») 212
Appendix.
1. Embroidery Ornaments 217
2. Explanatory Dictionary 273
3. English Index 276
4. List of the Sources Used 279
5. List of Literature for Further In-depth Study 280
11
Українське народне вигнивання
ПЕРЕДМОВА
інець XX ст. — початок XXI ст. — період, характерний появою
науково обґрунтованих досліджень в галузі зародження, розвитку,
суспільної значимості вишивання в контексті історичного розвою, еволюції
буття української нації, взаємозв'язку із вишивальним мистецтвом
інших народів.
Наукові висліди у своєму підсумку формують визначальний зміст вишивання як
складової декоративно-прикладного мистецтва.
Базуючись на глибинних наукових дослідженнях Р.Захарчук-Чугай, Т.Кара-Ва-
сильєвої, А.Кульчицької, Ю.Мельничука, сконцентрованих в теоретичних описах
матеріалів практики художнього вишивання та на основі власної багаторічної пошуково-
дослідної, педагогічної діяльності, автори книги ставлять за мету розкрити
методологію, методику і методи вивчення художнього вишивання як навчальної дисципліни.
Вишивання — невід'ємна складова декоративно-прикладного мистецтва, одна
із конструктивних ланок української національної духовності, морально-етичної,
матеріальної культури, що і є визначальним у значенні даної дисципліни при підготовці
фахівців декоративно-прикладного мистецтва.
Предмет навчальної дисципліни — це техніки швів художнього вишивання.
Вишивання як предмет розкриває в своїй основі такі проблеми:
1) вивчення методики та техніки виконання швів художнього вишивання;
2) вивчення технологічних, фактурних, візуальних особливостей технік
художнього вишивання та їх художньо-виражальних можливостей у матеріалізації
орнаментальних, тематичних композицій.
Навчальний матеріал в книзі подано за структурою, логічною послідовністю,
відповідно до програми дисципліни «Робота в матеріалі» з художнього вишивання та
моделювання одягу в її першій частині: технологія і техніки художнього вишивання.
Його вивчення пропонується в форматі, що творить цілісне підґрунтя не тільки для
засвоєння технік вишивання, а й підготовки спеціаліста-фахівця, людини, яка
розуміє, усвідомлює та володіє знанням специфіки суспільного буття і через сформовані
знання уміє шукати засоби, шляхи, методи розвитку мистецтва, культури, вносячи
особистісний доробок у контексті національного самозбереження.
В книзі сформульовано наукове визначення технологічних операцій, подано
назви швів та їх груп. Класифікація та групування швів рекомендується в авторській
інтерпретації, базовою основою якої є техніка виконання швів їх
зовнішньо-структурні та асоціативні ознаки.
Вишивання як навчальний предмет відноситься до фахових дисциплін. Він тісно
пов'язаний із основами композиції, кольорознавством, спецкомпозицією, проектною
графікою, конструюванням та моделюванням одягу. Це навчальна дисципліна
фундаментального циклу і є визначальною у формуванні фахових кваліфікаційних знань і
вмінь з декорування одягових виробів, виготовлення мистецьких творів інтер'єрного,
релігійного, обрядового, сакрального призначення.
Враховуючи входження України в європейський освітній простір, прилучення
до Болонської конвенції, в посібнику передбачено часовий аспект вивчення матеріалу
навчальної дисципліни в кількості 9 (дев'яти) кредитів. Засвоєння технології та технік
художнього вишивання рекомендується змістовими модулями з урахуванням
наступності, послідовності, складності, узагальнення, порівняння аналізу та взаємозв'язку
технології та техніки виконання швів художнього вишивання. Вони логічно об'єднані у
12 (дванадцяти) структурних підрозділах матеріалу навчальної дисципліни
(навчальних модулях). Кожен із них відповідно передбачає формування певного ступеня
кваліфікації.
12
Ukrainian Folk Embroidery
Успішне засвоєння за навчальними модулями теоретичних знань, практичного
тренінґу, порівняльно-дослідницької, творчої роботи, синтезу знань із суміжних
предметів творить фундаментальну основу набуття кваліфікаційних умінь, знань і
навичок:
- досконало користуватись інструментом, приладдям, технічним та
технологічним устаткуванням, візуальною інформацією та відеотехнікою для виконання
технічних рисунків, лекал художнього вишивання, обробки деталей та виробів в цілому;
- практично виконувати понад 90 (дев'яносто) технік художнього вишивання;
- виконати робочий малюнок орнаменту із графічною подачею технік
художнього вишивання для виконання в матеріалі;
- органічно поєднувати в орнаментах, тематичних композиціях вивчені техніки
художнього вишивання на основі їх синтезу, відповідно технологічних, фактурно-
візуальних ознак;
- кваліфіковано виконувати твори декоративно-прикладного мистецтва,
передаючи їх зміст, семантику, символіку, інші художньо-виражальні засоби техніками
художнього вишивання;
- виховувати в собі внутрішню діяльну потребу матеріалізувати власне
духовне надбання, фахові знання в особистій творчості, праці у різних суспільних сферах
для розвою матеріальних благ, культури, мистецтва України.
Аналітичний розбір технік художнього вишивання за теоретичним описом,
схеми, практичні взірці їх виконання та поєднання в орнаментах забезпечують другу
функцію книги як індивідуального навчального посібника самопідготовки фахівця з
художнього вишивання та індивідуальних занять за інтересом.
FOREWORD
The end of the XXth and the beginning of the XXIst centuries is the period,
characterized by theoretically substantiated research in the fields of conception, development
and social importance of artistic embroidery during the golden age of history, evolution of
Ukrainian nation's being and correlation with the art of embroidery of other people.
Summing up of the scientific research determines artistic embroidery as part of
decorative and applied arts.
The authors of the book, taking as the basis profound knowledge of the scientific
research-works of R. Zakharchuk-Chuhai, T. Kara-Vasilyeva, A. Kulchytska, Yu. Melnychuk,
collected in theoretical descriptions,materials of practical embroidery and one's own research,
investigatory and pedagogic work of many years, set themselves as an object to reveal
methodology, methodic and methods of artistic embroidery study as a subject.
Artistic needlework is an inseparable part of decorative and applied arts. It is one of
the constructive branches of Ukrainian national spiritual life, moral, ethic and material
culture. These factors determine importance of the subject while preparing the specialists in
decorative and applied arts.
The subject matter of the discipline is technology and technique of artistic embroidery.
Artistic embroidery, as a subject, reveals the following problems in its roots:
1) study of the technique and technology of embroidery stitches execution;
2) study of the technological, texture and visual peculiarities of the techniques of
artistic embroidery and their expressiveness in ornamental and subject compositions being
executed.
The structure and logical consequence of the training material given in the book meet
13
Українське народне вишивання
the requirements of the program of the subject «Artistic Needlework and Clothes Modeling
Execution» chapter #1: technology and techniques of artistic embroidery. Its study provides
an integral basis not only for mastering techniques of artistic embroidery but trains a
professional specialist,a person who understands and realizes subtleties of social being and is
able to findout the ways and methods of the development of art and culture using profound
knowledge and making personal contribution under the context of national self-preservation.
The scientific definition of technological operations is formulated in the book as well
as the names of the stitches and their groups are given. The classification and groups of the
stitches are recommended the way the author interprets them. The basis of such interpretation
is technology, execution techniques, surface structural and associative signs.
Artistic embroidery as a subject is a professional discipline. It is closely connected with
the principles of composition, color studies, specialized composition, projecting graphics,
clothes design and modeling. This is a subject of fundamental cycle and is decisive while
forming professional qualification skills and knowledge to decorate articles of clothing, to
make artistic things of interior, religious, ceremonial and sacred purposes.
Taking into account that Ukraine is entering European educational «space»and starts
practicing Bologna Convention, the curriculum envisages time aspect while studying the
material of the subject: 9 credits. Modules, which come in sequence according to their
complicacy, generalization, comparison, analysis and interdependence of technology and
execution technique of the stitches of artistic needlework, are recommended to master
technology and techniques of artistic embroidery. They are logically united in 12 structural
sub-units of the material of the training disci pline (study modules). Each of them envisages
formation of a certain level of qualification.
Theoretical knowledge, successfully mastered following the study modules, practical
training, comparative research and creative work, synthesis of knowledge of closely related
subjects form the fundamental basis for acquiring professional skills,knowledge and habits
of work:
- to make perfect use of the instruments, equipment, technical and technologic
devices, visual and video techniques to execute technical drawings, curves of artistic
embroidery, to work details and articles
- to execute over 90 techniques of artistic needlework
- to make a pattern design, having represented techniques of artistic embroidery
graphically, to be executed further on
- to combine studied techniques of artistic needlework naturally in the ornaments,
theme and subject compositions, on the basis of their synthesis, according to the technical
and technologic, texture and visual signs
- to make works of decorative and applied arts skillfully, rendering their idea,
semantics, symbolism and other artistic expressive means through techniques of artistic
embroidery
- to develop one's own active forming principles which call forth inner need to materialize
one's own spiritual acquirements and professional knowledge in personal creative work and
activity in different social spheres to make material welfare, culture and art of Ukraine
flourish.
Analysis of techniques of artistic needlework under their theoretical description,
schemes,samples of their execution and combination in ornaments cause another function
of the book, as an individual textbook for independent work of a specialist of artistic
embroidery and personal studies to one's liking.
14
.s
4*
• m
CSV. L ФишиВка — Bug мистецтва
SS* h Artistic 9{$ed(eworfi
Українське народне виїпивання
1. Зміст понять «вишивати», «вишивання», «вишивка».
озуміння необхідності збереження культури свого народу, традиційного
народного мистецтва в період демократизації наглого суспільства стає явним і
очевидно неминучим.
У контексті відродження і розвитку традицій українського народу
мистецтву вигнивання належить одна з пріоритетних ролей, оскільки вишивка є давнім і
вічно молодим мистецтвом, візитною карткою українського народу. В синтезі з іншими
видами декоративно-прикладного мистецтва є часткою української народної традиції,
національний культурний образ якої, за словами М.Жулинського, є унікальним явищем світової
цивілізації (6,8-0).
Українські словники тлумачать зміст слова «вишивати» такими поняттями.
Вишивати — означає прикрашати, оздоблювати одяг та інтер'єрно-обрядові тканини.
Вигнивати — створювати вишивку на тканині або шкірі шляхом настеляння стібків
за допомогою нитки з голкою.
Вигнивання — це технологічний процес, який супроводжується настелянням,
накладанням стібків, протягуванням, закріплюванням робочої нитки або інших матеріалів на
вишивальній тканині або шкірі.
В науковій літературі, в мистецькій практиці, в побуті широко вживається слово
вишивка.
Термін вишивка акумулює в собі подвійне значення — вишивка у вузькому
розумінні і вишивка у широкому розумінні.
Вишивка у вузькому розумінні — декорована тканина, шкіра, повсть засобами
вишивання.
Вишивка у широкому розумінні — складова, вид декоративного мистецтва з
комплексом характеристик: історичних, типологічних, стилістичних і семантичних.
Багаті традиції народної вишивки, мистецький досвід, тривала праця вітчизняних
науковців дають підстави з'ясувати стан дослідження вишивання в нашій країні, а також
передбачити перспективу її розвитку.
Ще в 1876 році, коли Олена Пчілка видала свій альбом українських вишивок, два
французькі вчені Лєже і Рамбо з того приводу виголосили низку схвальних відгуків,
відкриваючи для Європи українське народне мистецтво. Для Заходу твори нашого мистецтва
стали тоді небаченою красою, яку не один чужинець захотів пізнати і зрозуміти.
Брак дослідників з питань українських вишивок був очевидним. Мистецтвознавці
цікавилися переважно лише архітектурою, малярством, скульптурою або музикою,
справу народного мистецтва залишали етнографам, а вони, в свою чергу, займалися, в
основному, матеріальною культурою та фольклором.
Почин до дослідження народного мистецтва дав у 1870-х роках професор Хведір
Вовк, Олена Косач-Пчілка, а потім професор Микола Сумцов. З того часу дорога до
подальших дослідів була відкритою. З'явилися дослідження Миколи Біляшівського, доктора Ми-
рона Кордуби, Данила і Вадима Щербаківських, доктора Володимира Січинського,
доктора Володимира Залозецького, Степана Таранушенка, Ірини Гургули, Віри Свєнціцької,
Савини Сидорович. Поряд з вітчизняними дослідниками багато уваги українському
народному мистецтву присвятили зарубіжні дослідники, зокрема, німці: професор Міхаель Га-
берляндт, Рудольф Айтельберґер, Альойд Ріґль. Інженер Еміль Кольбенгаєр видав
високого рівня об'ємну збірку буковинських вишивок, зібрану, проаналізовану і замальовану в
Чернівцях, а видану у Відні (Австрія, 1912). За свідченнями Дам'яна Горняткевича, дуже
цікавились дослідженням нашого народного мистецтва поляки Людвик Вержбіцький,
доктор Тадеупі Северин, доктор Степан Шуман та інші, праці яких мали здебільшого
спеціальний характер. Зараз ці твори мало доступні.
1. Meaning of the notions «to embroider», «fancy-work», «embroidery».
Understanding the fact that it is necessary to preserve national culture and traditional folk
art during the democratization of our society becomes more and more evident and inevitable.
Artistic embroidery is a priority during the revival and development of traditions of
Ukrainian people. It is both an ancient and modern art, a visiting card of our folk in the synthesis with
16
Ukrainian Folk Embroidery
other kinds of decorative and applied arts. As well, it is a part of Ukrainian folk tradition, the
national and cultural image of which is a unique phenomenon of the world civilization,according
to M.Zhulynskiy's words. (6, 8-9)
Ukrainian dictionaries explain the meaning of the word «to embroider» with the help of
the following definitions:
to embroider — means to decorate, embellish clothes and cloths of interior and ceremonial
use;
to embroider — means to create fancy-work either on the material or leather by laying
stitches with the help of a thread and needle;
fancy-work — is a technologic process which involves laying stitches, drawing and
fastening the working thread or other materials on the fabric or leather to be embroidered.
The word «embroidery» is widely used in scientific literature, creative work and every day life.
The term «embroidery» accumulates a double meaning: that is, needlework in its wide and
narrow sense.
Embroidery in its narrow sense stands for material and leather decorated with the means
of fancywork.
Embroidery in its wide sense is part of decorative art, in which design is worked in various
hand or machine stitches.
Rich traditions of folk art, artistic experience, and continuous work of scientists and
researchers, in our country, enable us to view the present state of artistic embroidery in our
country, as well as to foresee the prospects of its development.
As early as 1876,when Olena Pchilka published her album of Ukrainian kinds of
embroidery, two French scientists, Lezhe and Rambo, gave unexpected references to this, thus
introducing Ukrainian folk art to Europe. Works of our art were, for the West, of an unprecedented
beauty they were eager to perceive and understand.
Lack of researchers in the fields of Ukrainian embroidery was evident. The art critics were
predominantly interested only in architecture,painting and woodcarving or music; leaving folk art
for the ethnographers, who in their turn dealt chiefly with material culture and folklore.
Professor Khvedir Vovk and Olena Kosar-Pchilka,and later on,professor Mykola Sumtsov
initiated the research of folk art in 1870-s. Since that time, the road to the further investigations
was open. There appeared research-works by Mykola Bilyashivs'ky, Dr. Myron Korduba, Danylo
and Vadym Shcherbakivs'kys, Dr. Volodymyr Sichyns'ky, Dr. Volodymyr Zalozets'ky, Stepan
Taranushenko, Iryna Hurhul, Vira Sventsits'ka, and Savina Sydorovych. Along with our native
researchers, those of foreign countries focused their attention on Ukrainian folk art. In particular
Germans: Pr. Mikhael Gaberlyandt, Rudolf Aitelberber, and Alyoiz Ribl. The engineer Emil Kol-
bengaer gathered a high standard volumetric collection of Bukovynsky embroidery. He collected,
analyzed and sketched samples in Chernivtsy,though published in Vein (Austria, 1912). By Dalian
Hornyatkevych's evidence, Poles Lyudvik Verzhbits'ky, Dr. Tadeush Severyn and Dr. Stepan Shu-
man showed keen interest in researching our folk art, as did Englishmen, whose works were
mainly of special character. It is a pity, that these works are not readily available nowadays.
2. Історичні витоки вишивання. Розвиток та становлення його як декоративно-
прикладного мистецтва.
Прадавні праці античних вчених Геродота, Лісія, Діодора, Діонісія дають не прямі,
а опосередковані свідчення про існування вишивки на території сучасних земель України.
Матеріальним підтвердженням цього є археологічні знахідки з розкопок курганів,
які засвідчують про виникнення вишивки та еволюцію вишивального мистецтва від часів
енеоліту. В цьому ми завдячуємо титанічній праці таких дослідників, як Ірині Гургулі,
Раїсі Захарчук-Чугай, Тетяні Кара-Васильєвій, Майї Білан, Галині Стельмашук, Якиму
Запаско, Павлу Жолтовському, Людмилі Кравчук, Зінаїді Васіній, Юрію Мельничуку,
Анні Кульчицькій, Тамарі Ніколаєвій. їхні наукові праці дають змогу в комплексі про-
слідковувати історичні, художні та технологічні особливості вишивання.
Про те, що вишивка виникла в глибині віків, нам залишається лише здогадуватись,
аналізуючи генеалогію цього мистецтва.
Розкопки скіфських курганів дають матеріальне підтвердження про декоративне
оздоблення одягу вишивкою, що є незаперечним доказом побутування вишивки в цей
17
Українське народне вишивання
період. Опосередкованим прикладом є золота пектораль (курган Товста могила, IV ст. до
н.е.), срібна ваза (курган Чортомлик, IV ст. до н.е.), чаша (курган Гайманова могила, IV ст.
до н.е.) тощо.
Одяг сарматів також оздоблювався вишивкою, особливо одяг багатих жінок (курган
Сватова Лучка, І ст. до н.е.; курган Соколова Могила, І ст. до н.е.). Саме знахідка з Соколової
могили є унікальною тому, що, по-перше, є свідченням високої майстерності вишивання
золотом «в прикріп» та технікою пряденого золота, по-друге, очевидно є наслідком
попереднього тривалого етапу розвитку вишивального мистецтва і найдавнішою з досі відомих.
Доктор мистецтвознавства Т.Кара-Васильєва арґументує, що вишивка, як вид
мистецтва, розвивалась у дохристиянський період (курган Мартинівський скарб, VI ст. н.е.). Як
стверджує фахівець, саме тоді сформувалися художньо-стилістичні способи шиття,
народжувалися знаки, що символізували сили природи, космогонічні уявлення про будову
Всесвіту, створювались образи, які потім довго жили у вишивці та в інших видах мистецтва,
нагадуючи про язичницькі вірування наших давніх предків. Вишивка в одязі мала
заклинальну символіку, була оберегом. Вишитий узор набував магічної сили й виконувався в
суворо визначених місцях — навколо шиї, на грудях, на подолі (5, 12-13).
Активна праця вела до удосконалення художньої творчості і художнього бачення
людиною навколишнього світу, осмислення навколишньої природи, споконвічного потягу
до всього прекрасного в житті і побуті, уявлення людей про життя і смерть, про добро і
зло, здоров'я і хвороби. З праць науковців довідуємось, що на деревах, хащах,
молитовниках вішали вишиті рушники, слали скатертини. Магічне та естетичне виступало в єдиному
синтетичному зв'язку.
Про те, що вишивка була поширена на території сучасної України, довідуємось не
лише з археологічних матеріалів, а й з повідомлень літописців, мандрівників, з поховань
Х-ХІ ст. Відомі начільні пов'язки, стрічки, комірці, пояси, плащі, вишиті золотими
нитками на шовку.
Х-ХШ ст. — історичний період формування унікальної традиції в декоративному
мистецтві Галичини. Вишивкою оздоблювали інтер'єрні, обрядові, побутові речі в
княжому, міщанському і сільському побуті. Про це свідчать іконопис, книжкова мініатюра,
фольклорні та етнографічні дослідження.
...Давньогалицька мистецька традиція спричинилась до формування унікальних
художніх особливостей мистецтва України... Вона була настільки потужною, що протягом
майже тисячоліття забезпечувала енергією творення, надихала любов'ю до краси. (11, 89)
З прийняттям Київською Руссю християнства, надзвичайного розвитку набуває
літургійне шитво — гаптування (вишивання) золотом або сріблом тканини для оздоблення
церковних храмів та літургійного одягу. Запозичивши візантійську декоративну систему
оформлення культового богослужіння, наші предки не наслідували її, а активно творчо
інтерпретували, використовуючи власну багатовікову народну традицію язичництва, своє
народне розуміння ідеалів краси в контексті багатовікового розвитку власного вишивального
мистецтва. Пам'ятки цього періоду розвитку вишивання характеризуються більшою
декоративністю, глибокою змістовністю. В цей період з'являються перші майстерні — школи
золотошвейництва. Саме вони дали поштовх до професійного розвитку літургійного шитва.
Вишивки виконували металевими (золотою, срібною) нитками на цупких шовкових
тканинах. Домінуючою технікою золотошвейництва була « в прокол». Крім неї використовували
«шов по формі» скісними стібками, «шов в ялиночку» (зображення вузьких стрічок,
галузок).
У кінці XII на початку XIII ст. у вишивці почали застосовувати шиття «в прикріп» —
золоті (срібні) нитки настелялись рівними стібками, прикріплювались до тканини. Єдина
пам'ятка 900-1100 років — складний ромбовий розвід з розетками на краях ромбів у
круглих обрамленнях, знайдена на Тернопільщині, виконана технікою «в прикріп».
Шедевром давньоруського шитва є фраґменти єпитрахилі з зображенням Оранти з
ангелами (Софія Київська XII ст.). Цей твір свідчить про високий професіоналізм місцевих
майстрів в художньому трактуванні іконопису. Засобами гаптування почали зароджуватися
звичаї з нагоди свят виставляти в храмах дорогоцінний одяг, а храми прикрашати
дорогоцінними вишитими тканинами. Князі дарували до церкви дороге багато гаптоване вбрання
на пам'ять і на зберігання. Мистецтво вишивання золотом і сріблом, про що свідчать літо-
18
Ukrainian Folk Embroidery
писи і пам'ятки, дуже цінувалося.
Визначним твором гаптування кінця XV ст. є Золочівський фелон (церква Святого
Миколая, м. Золочів, Львівська обл.), який вражає художньо-стилістичним вираженням
сюжету композиції в цілому і кожного образу зокрема засобами гаптування. Унікальною за
художніми та технологічними особливостями є відома плащаниця з села Жиравки (церква
Архангела Михаїла). Найдавнішою є плащаниця Зосима Прокоповича (Успенська церква
Києво-Печерської Лаври, 1655р.), на якій майстерно вигаптовано тіло Ісуса Христа «швом
по формі» кольоровим шовком, що засвідчує синтез гаптування з вишиванням шовком.
У вишивальному мистецтві цього періоду процвітають такі техніки золотошвейниц-
тва, як «у прокол», «у прикріп», «за картою». Для цих художніх прийомів використовували
сухозлітку — вузьку металеву волочену нитку з золота або срібла, яку виготовляли місцеві
ювеліри (відомими були ювеліри м. Львова). Крім сухозлітки вишивали золотною ниткою
або пряденим золотом (сріблом) — лляною або шовковою ниткою, щільно обкрученою
вузькою золотою (срібною) стрічкою.
Друга половина XVII ст. характеризується розвитком і піднесенням освіти,
культури і мистецтва. На арену українського суспільства виходить козацька старшина і заявляє
про себе, утверджуючи свою владу через широке будівництво світських і церковних
споруд. Та найбільшим явищем національної культури періоду Козаччини є заснування
козацькою старшиною монастирів. її опіка і обдарування останніх сприяли розвитку
монастирського життя, а особливо їх як центрів вишивання і гаптарства. Мистецтво
монастирського вишивання демонструє високий професіоналізм художнього вирішення і майстерність
технічного виконання, які панують у вишивальному мистецтві з XV по XVII століття.
Предметом золотошвейництва були церковні речі, які використовувались під час
Святої Літургії: ікони, напрестольні шати, воздухи, катапетасми, плащаниці. Вони мали
чітко визначене місце в храмі, певну роль і значення в сюжетно-символічній структурі. У
другій половині XVII ст. в золотошвейництві виникає техніка шиття «за настилом» —
гаптування набуває виразної рельєфності. Ця техніка є різновидом шиття «в прикріп».
З'являється панцирне шиття, різні методи закріплення металевих ниток, які утворюють зиґзаґи,
кривулі, ромби.
Поряд з літургійним гаптуванням розвивається вишивка одягового та інтер'єрного
призначення. Як стверджує Л.Т. Кравчук, до нас не дійшло жодної пам'ятки української
народної вишивки XVI ст. Однак з тогочасного церковного живопису (ікон) довідуємось про
узори народних тканин та вишивок: уставки сорочки, манжети, передник, очіпок,
прикрашені вишивками, які подібні до аналогічних вишивок народного одягу XIX ст. у тій же
місцевості (10,20-21). Це свідчило про те, що вишивка на той час була поширена у
народному побуті. Найстарішою датованою пам'яткою народного вишивання є фраґмент рушника
1673 року, виконаний на високому технічному рівні.
Вишивки XII-XVIII ст. виконувались на домотканих і мануфактурних тканинах,
шкірі. Для них використовували найдоступніші ручнопрядні лляні, конопляні, вовняні
нитки природного кольору, відбілені або пофарбовані природними барвниками. З середини XII
ст. для вишивки використовували привізні бавовняні, шовкові, металеві нитки.
Найвизначнішим твором XVIII ст. є скатертина, вишита бавовняною ниткою технікою дрібного
хрестика.
Золотом, сріблом, шовком та яскравим шитвом вишивалися компоненти жіночого та
чоловічого костюма і заповнення до нього. Надзвичайно майстерно вишивалося жіноче вбрання
з дорогих тканин. Цікавим зразком вишивки є шапки гетьманів Богдана Хмельницького та
Данила Апостола, декоровані рослинними орнаментами і вишиті технікою гладі. Хоча
відомості про народну вишивку XV-XVII ст. скупі, все ж свідчать про її поширення на всій
території України. Особливо яскравим вишиванням оздоблювався одяг козацької
старшини, а також речі їх побуту, які козаки замовляли, щоб показати свою міць і багатство.
Серед побутових речей — скатертини, килими, покривала. Особлива увага надавалась
вишиванню кінського спорядження, насамперед парадних сідел, попон. Твори художнього
вишивання були коштовним доробком до церковних храмів і монастирів.
Українське гаптування мало міцне фольклорне підґрунтя з усталеними морально-
етичними ідеалами краси — стверджує науковець Т.Кара-Васильєва. Наприкінці XVII ст. в
шитві запанував стиль бароко, що прийшов з Європи і поєднався з тяжінням народного
19
Українське народне вишивання
мистецтва до підвищеної декоративності і образної наснаженості і перетворився на яскраво
виражений національний стиль — українське бароко (5,21). У вишивальному мистецтві вперше
цей стиль започаткував П'ятницький монастир (Чернігівщина). У XVIII ст. серед технік
гаптування сріблом, золотом, кольоровим шовком розвиваються техніки «за настилом»,
«за картою», «по мотузці». Натомість занепадає шиття «в прикріп» у його першооснові.
Провідна роль в утвердженні стилю бароко належить Києво-Фролівському жіночому
монастиреві. Українській історії унікального вишивання відомі імена гаптувальниць, які
«розписували голкою» дорогоцінні тканини.
Видатними шедеврами гаптарського мистецтва є роботи ігумені Києво-Фролівського
монастиря Олени, (яка очолювала його в 1749-54-х роках), катапетасма Успенської церкви
Києво-Печерської Лаври (1756 року), фелони «Собор Архістратига Михаїла», «Таємна
вечеря» (1748 року), плащаниця до Михайлівського Золотоверхого монастиря. В покрові
«Собор Архістратига Михаїла» ігуменя вперше застосовує прийом вишивання сканим золотом,
до золотої нитки додає кольорову шовкову, внаслідок чого створюється чудова гармонія
кольо-рів вишивки.
Золотошвейні речі славилися досконалістю техніки вишивання, але нововведення в
літургійному шитві, серед яких малювання деяких деталей зображень обличчя і тіла,
прикрашання золотошитих речей блискітками, напівдорогоцінним камінням призвели до
занепаду мистецтва гаптування, який відбувається у XVIII-XIX століттях.
У процесі історичного і культурного розвитку в Україні розвивалась українська
народна вишивка, матеріальні пам'ятки якої дійшли до нас лише з 80-х — 90-х років XIX ст.
З XIX - початку XX ст. збереглася велика кількість пам'яток народної вишивки, які
утверджують високий художній і технічний рівень розвитку вишивального мистецтва. Так
вишивка шовком була поширена в одязі і побуті заможного населення. Однак на її художнє
вирішення впливав народний ідеал краси навколишньої дійсності. Дорогоцінні вишиті
шовкові вироби перекликались з вишивками заполоччю на рушниках, скатертинах з полотна.
Як стверджує Р.В.Захарчук-Чугай, XIX ст. — важливий період в історії розвитку
української народної вишивки. З цього часу збереглось більше датованих пам'яток,
вишивка зазнала масового поширення, стала одним із основних видів народного декоративного
мистецтва. Вишивали в кожному селі, а в містах вишивкою займалися в дворянському,
купецькому, міщанському середовищах, монастирських майстернях (2, 44).
У 1870-х pp. прогресивні діячі звернули увагу на високу художню цінність
українських народних вишивок. В Україні в кожній місцевості утворилися самобутні орнаментальні
мотиви і композиції, колірна гамма, специфічні техніки вишивання, які стали продуктом
матеріалізації пізнання і віддзеркалення через свідомість майстринь навколишнього буття,
навколишньої природи, середовища побутування. Звідси і назви технік вишивання — вперед
голку, позаігліно, солов'їні вічка, курячий брід, товмацька зірка, ключка, черв'ячок, просо,
клітка, кучерявий шов, шов кочелистий, хрестик, довбанка, виколювання, вирізування,
обкрутка, прутик, ланцюжок тощо. Великі вишивальні майстерні у Григорівці (Київщина),
Качанівці (Чернігівщина), Клембівці (Вінниччина) та ін., вишивали скатертини, рушники
наволочки, одяг. На творчість вишивальниць часто впливали смаки замовників, однак
перевагу мали класичні зразки вишивок, які створювались у сфері домашнього виробництва.
Послідовно активізувались складні процеси перетворення вишивки в ремесла і
промисли. В XIX ст. поширюється міський промисел вишивки пацьорками (бісером) і тамбурної
вишивки: Косів, Вижниця, Чернівці, Охтирка, Пирятин.
Вишивка як ремесло розрахована на порівняно вузьке коло споживачів, своїми
коренями сягає в глибокі місцеві традиції. На її якість впливала творча ініціатива виконавців.
У працях науковців І.Гургули, Р.Захарчук-Чугай, Т.Кара-Васильєвої, А.Чорномо-
рець, Л.Кравчук простежується еволюція художньо-виражальних засобів вишивального
мистецтва, характеризуються локальні художні особливості, типи народних узорів,
частково технічні особливості вишивок Волинської, Рівненської, Київської, Чернігівської,
Полтавської, Дніпропетровської областей, Східного і Західного Поділля, Галичини, Бойківщи-
ни, Гуцульщини, Буковини, частково їх окремих осередків.
Л.Кравчук, яка дослідила розвиток вишивки XIX - початку XX ст., робить
висновок, що, незважаючи на прагнення прогресивних кіл затримати занепад і відродити
традиції народних вишивок, все ж фабрична продукція своїм міщанським безсмаком і антиху-
20
Ukrainian Folk Embroidery
дожніми впливами вплинула на розвиток мистецтва вишивання.
У XX ст. вишивка стає одним з найпоширеніших видів декоративного мистецтва. В
цей час у відомих центрах народного мистецтва — Київщині, Чернігівщині, Полтавщині,
Поділлі організовуються кооперативні майстерні — перші багатолюдні школи вишивання.
Колективізація та її головний засіб — голодомор 1932-1933 pp., а в західних
областях воєнний період та спад життєвого рівня в повоєнні роки на всій території України
призвели до величезного занепаду вишивального мистецтва нашого народу. Під емоційно-
розумовим керівництвом прогресивної української інтелігенції в нових умовах праці
вишивання досягло свого розквіту. Велике значення для його подальшого розвитку мало
введення вишивання як мистецької спеціальності в художніх навчальних закладах. Починається
процес ґрунтовного і глибокого вивчення вишивки. Особлива увага при цьому приділяється
народному вишиванню, яке стає першоджерелом для нових художніх композицій.
Робота над розвитком і популяризацією українських вишивок зосереджується в
художньо-промислових майстернях, зокрема Київщини, Чернігівщини, Полтавщини,
Поділля, західних областей УРСР, які стали своєрідними мистецькими школами, формуючи
стилістику вишивок окремих районів України. Найвідомішими майстернями стали Решети-
лівська на Полтавщині, Дігтярівська на Чернігівщині, Глинки і Кути на Івано-Франків-
щині, а також у містах: Києві, Львові, Косові, Вижниці, Вінниці, Клембівці, Тернополі. їх
твори вражають художніми особливостями і виконані на високому технічному рівні.
З кінця 1940—50-х pp. вишивання всебічно розвивається завдяки спільній творчій
праці народних майстрів і художників-професіоналів. У післявоєнний період дрібні
кооперативи об'єднуються. А в 1960-х pp. промислові артілі реорганізовуються в державні
підприємства, які в 1970-х роках зосереджуються в системі підприємств Міністерства місцевої
промисловості, Укрхудожпрому, Міністерства побутового обслуговування населення.
Художники і народні майстри розвивають художній рівень виробів. З'являється машинне
вишивання.
Вишивка у XX ст. стає об'єктом всебічного дослідження. Великий доробок у
дослідження вишивки на Україні внесли ІХургула, Р.Захарчук-Чугай, Т.Кара-Васильєва, А.Чор-
номорець, Л.Кравчук. Дослідники розглядають закономірності розвитку вишивки, особливо
ХІХ-ХХ ст., з'ясовують художню природу, функції, значення, спільні та локальні
художні особливості, основні тенденції і проблеми розвитку.
Наукові дослідження вишивки засвідчують, що творчою співпрацею нагромаджений
досвід відродження і вдосконалення художньої культури вишитих виробів, творчого
використання локальних особливостей, нового підходу до вибору матеріалів вишивання,
різноманітних видів технічного виконання.
У наш час опрацьовано близько 150 технік вишивання на території України. Всі вони
засвідчують, що, не дивлячись на місцеві локальні особливості, основні технічні прийоми
вишивання притаманні всій загалом території нашої держави. Це є свідченням їх спільних
рис і коренів.
Вишивка — цінне історико-художнє джерело, яке дає можливість глибше
усвідомити питання специфіки матеріальної і духовної культури українського народу. Це мистецтво
всенародне ...в якому через віки пронесена і збережена колективна художня пам'ять,
естетичні ідеали краси. (2, 188).
Автори книги вважають за доцільне глибинне вивчення історії становлення,
еволюції, розвитку технології, формування умінь і навиків вишивання.
Саме використання вишивального мистецтва (декору вишивкою) з його
орнаментальними символами, семантикою, своєрідним синтезом технік вишивання, що за своєю
природою акумулюють в собі символи природи (природотворчу знаковість), є шляхом до
національного духовного самозбереження. Це лежить в основі державотворчих принципів,
що так необхідно нашому народові, нашій нації сьогодні.
2. Historical Foundations of Embroidery: Development and Formation as Part of
Decorative and Applied Arts.
Ancient works of the scientists Herodotus, Lisiy, Diodor, Dionysius give indirect, but
definite, evidence that embroidery existed on the lands of modern Ukraine.
The archeological findings from the excavations of burial mounds are material evidences
21
Українське народне вишивання
about embroidery origin and evolution of the art of needlework since time immemorial.
This all is due to the titanic research works of Iryna Hurhulya,Raisa Zakharchuk-Chuhai,
Tetyana Kara-Vasylyeva, Maya Bilan, Halyna Stelmashchuk, Yakym Zapasko, Petro Zholtovs'ky,
L. Kravchuk, Zinaida Vasina, Yuriy Melnychuk, Anna Kulchyts'ka, and Tamara Nikolaeva. Their
scientific work enables us to trace historical,artistic,and technological peculiarities of embroidery
in complex.
After analyzing the genealogy of this art,nothing remains,but to suspect that embroidery
dates back into past centuries.
The excavations of Scythian burial mounds confirm that clothes were adorned with
decorative embroidery,which proves unquestionably the existence of needlework during those times.
The Golden Pectoral (the burial mound Thick Tomb, IV century BC), the silver vase (the burial
mound Chortomlyk, IV century BC), and the bowl (the burial mound Haiman's Tomb, IV century
BC), etc. can serve as an example.
Sarmats' clothes were also ornamented with embroidery,especially those of rich women
(the burial mound Svatova Luchka, I century BC; the burial mound Sokolov's Tomb, I century BC).
The discovery from the Sokolov's Tomb is unique, because; firstly, it is evidence of highly skillful
embroidery techniques with gold «V Prykrip»and spun gold; secondly, it apparently is the result
of a previous long-term stage of development of the art of embroidery and is one of the most
ancient ones known up till now.
The Doctor of Art Criticism, T.Kara-Vasilyeva, argues that embroidery as a kind of art was
developing during the pre-Christian period (the burial mound Martyniv's Treasury, VI century BC,
Poltavs'ky Mohylnyk, VI century BC). The specialist asserts, that just then artistic and stylistic ways of
needlework were being formed. The signs,symbolizing power of nature and cosmogonical idea of the
Universe's hierarchy were born. The images, which lived a long life in embroidery and other kinds of
art afterwards, reminiscent of pagan beliefs of our distant ancestors, were created. Embroidery in
clothes had a charming symbolism,being a kind of a mascot. An embroidered ornament gained magic
power and was executed in strictly determined places: round the neck, on the front and on the bottom
(5, 12-13).
Intensive work improved artistic creativity and human's artistic vision of the outer world:
comprehension of nature,eternal bent for everything wonderful in life and one's mode of
life,people's idea of life and death, kindness and evil, health and illnesses. We come to know from the
scientists' works that embroidered towels and tablecloths were hung on the trees, thickets and prayer
books in pagan times. Magic and aesthetics came forward in a single symbiotic interdependence.
We learn that embroidery was widespread on the territory of modern Ukraine, not only
from archeological materials, but also from the chronicles and travelers' notes. Forehead bands,
fillets, collars, belts and mantles, embroidered with gold threads on silk, are known from the
burial places of X-XI centuries.
X-XIII centuries are a historical period when unique traditions of decorative art of Haly-
chyna were formed. The interior, ceremonial, and things of everyday use in princely, lower
middle classes, and rural mode of life were ornamented with embroidery. Literary, folk,
ethnographic researches and scientific sources are evidence of this.
...Ancient Halych artistic tradition led to formation of unique artistic peculiarities in
Ukrainian art... It was so powerful that it gave creative energy and inspired a love for beauty for almost
a millennium. (11, 89)
Liturgy embroidery, that is embroidery (Haptuvannya) of the material with gold or silver
to adorn church temples and liturgy clothes, was extremely developed with the adoption of
Christianity in Kyiv Rus. Having borrowed Byzantine decorative system of cult divine service, our
ancestors did not follow it, but actively and creatively interpreted, using one's own centuries-old
pagan tradition and national understanding of the beauty ideals developed while improving their
art of embroidery. The artifacts of this period of development of needlework are decoratively
more emphatic and are characterized by intricate subjects. The first workshops — schools of
embroidery with gold or silver appear during that period. They just stimulated liturgy embroidery
to the professional development. Embroidery works were executed with metal (either gold or silver)
threads on dense silk cloths. «V Prokol» was the dominating technique of gold-embroidery. Besides
it, they used «contour stitch» worked in slanting stitches and «herring-bone stitch» (images of
narrow bands and twigs).
22
Ukrainian Folk Embroidery
By the end of the XII-th and the beginning of the XIII-th centuries they started using
embroidery technique «V Prykrip». That is, gold or silver threads were laid in even rows and
fastened to the material with a silk thread in small stitches. The only artifact of the 900-1100-s is
a complicated rhombus-like coloring ■with rosettes edging the rhombuses in round settings, found in
Zhyshava village (Ternopil region) and worked in «V Prykrip» technique.
The masterpiece of Old Rus embroidery is fragments of epitrachilion (the dress worn by
priest on the neck), depicting Oranta with angels (Sophia Kyivska XII cent.). The work shows high
professionalism of the local masters in artistic interpretation of icon painting by means of gold-
embroidery. On the occasions of holidays there appeared traditions to display valuable clothing in
the temples, and to adorn the temple itself ■with precious embroidered cloths. The princes used to
present churches with expensive richly embroidered, ■with gold, garments as keepsakes to be
preserved. The art of embroidery -with gold and silver was of great value, as the chronicles and
artifacts evidence.
Zolochivsky mantle (St. Mykolay church, town of Zolochiv, Lviv region) is an outstanding
work of gold embroidery of the end of the XV-th century. It strikes one with artistic and stylistic
expression of the compositional subject as a ■whole and each separate image in particular by means
of gold embroidery. The famous shroud of Christ from Zhyravka village (Archangel Michael's
church) is unique in terms of its artistic and technologic peculiarities. The most ancient one is the
shroud of Zosym Prokopovych (Uspenska church of Kyivo-Pecherska Lavra, 1655), which bears
skillfully embroidered, with gold and color silk, Jesus Christ's body in the technique of «contour
stitch». This proves synthesis of gold embroidery and embroidery in silk.
Such techniques of gold embroidery as «U Prokol»,«U Prykrip», «Za Kartoyu» flourish in
the art of fancy-work during this period. Sukhozlitka - a narrow metal drawn thread from gold or
silver, made by the local jewelers (the famous ones were those from Lviv city) was used for these
technical methods. Besides Sukhozlitka they would embroider with gold thread (or spun gold or
silver),linen or silk threads tightly twisted with a narrow gold (silver) band.
The second half of the XVII-th century is characterized by the development and upsurge
of education, culture, and art. The Kosak leader (Starshyna) enters the Ukrainian society and
claims his rights through extensive building of public places and churches, thus consolidating his
power. Nevertheless, the biggest phenomenon of national culture in the period of Kosachchyna
was the founding of monasteries by the Kosak leader. Taking care of them and presenting them
contributed to the development of monastery life,especially monasteries themselves as the
centers of fancy-work and gold embroidery. The art of monastery embroidery demonstrates high
professionalism of artistic solution and skillfulness of technique execution, which dominated in
the art of needlework since the XV to XVIII centuries.
The works of gold embroidery were church things, used during Saint Liturgy: icons, altar
dressings, vozdukhy (a big serviette to cover the church tableware with the Eucharist), catapetasmy
(a big towel decorating the entrance to the Heavenly Gateway), and shrouds. They had a strictly
determined place in the temple, certain role and meaning in the subject and symbolic structure. In the
second half of the XVII-th century there appeared a gold embroidery technique «Za Nastylom»,
that is gold embroidery acquires expressive relief. This technique is a kind of embroidery «V Prykrip».
There appeared «testaceous» embroidery and various methods of fastening metal threads, ■which
create zigzags, curves, and rhombuses.
Embroidery of clothes and things of interior use develops along with liturgy gold embroidery.
According to the researcher L.T.Kravchuk, none of the artifacts of Ukrainian folk embroidery of
the XVI-th century was preserved. However, we learn about patterns of folk cloths and embroidery
from church painting (icons) of those times: the shirtfronts, cuffs, and head dresses were decorated
with embroidery, analogous of those of the XIX-th century in the same area (10,20-21). This
evidences that embroidery was widely spread in folk mode of life in those times. The oldest artifact
of folk embroidery is a fragment of the towel of 1673, worked at a high technical rate.
In the XII-XVIII-th centuries embroidery was ■worked either on homespun and
manufactured cloths or leather. They used the most easily accessible hand spun linen, hemp and ■woolen
threads of natural color,either bleached or dyed with natural dyes. From the second half of the
XVII-th century they started using imported cotton, woolen, silk and metal threads for
embroidery. The most outstanding masterpiece of the XVIII-th century is the tablecloth, worked with
cotton threads in technique of a small cross.
23
Українське народне вишивання
Details of women and men's dress and its additional things were embroidered with gold,
silver, silk and bright fancy work. Women's clothes from expensive materials were embroidered
with extreme skillfulness. Hetmans B. Khmelnytsky and Danylo Apostol's hats, decorated with
floral ornaments and densely embroidered in Satin Stitch technique are an interesting sample of
needlework. Nevertheless, we lack information about folk embroidery of the XV-XVIII-th
centuries, the known facts evidence that it was spread all over Ukraine. The dress of a Kosak leader was
decorated especially brightly with embroidery, as well as Kosaks' things of every day use, they
bespoke of their power and wealth. Tablecloths, carpets and bedspreads were the most popular
among things of every day use. Particular attention was paid to embroidery of harnesses, mainly
saddles and horse-cloths. Works of artistic embroidery were valuable contributions to the church
temples and monasteries.
Ukrainian gold embroidery had a strong folk foundation with staunch moral and ethic ideals
of beauty, as the scientific worker T.Kara-Vasilyeva asserts. By the end of the XVII-th century
there dominated a new style baroque in embroidery,which came from Europe and combined with
the tendency of folk art towards heightened decoration and subject vividness, thus developing into
a strongly pronounced national style «Ukrainian Baroque» (5;21). P'yatnytsky monastery (Cherni-
hivshchyna) was the first to introduce that style into the art of embroidery. In the XVIII-th
century there were developing the following techniques: «Za Nastylom», «Za Kartoyu», «Po Mo-
tuztsi» among those of embroidery with gold, silver and color silk. However, the original
embroidery «V Prykrip»fell into decay. The leading role in assertion of baroque style belongs to Kyivo-
Florivsky women's monastery. Ukrainian history of unique artistic embroidery knows the names
of gold weavers, who «painted with a needle» valuable materials.
The outstanding masterpieces of the art of gold embroidery are works by Mother Superior
Olena of Kyivo-Florivsky monastery (she was the head of it in 1749-54-s): katapetasma 1756 of
Uspenska church of Kyivo-Pecherska Lavra, mantles «Cathedral of Archistratyh Michael», and
the shroud «The Last Supper» 1748 for St. Michael's Golden-Domed monastery. For the first time
Mother Superior uses the method of embroidery with Skan gold — she adds a color silk thread to
the gold one, creating a wonderful harmony of embroidery colors afterwards — while working the
mantle «Cathedral of Archistratyh Michael».
Things, embroidered with gold, were famous due to the perfect technique of gold
embroidery and original artistic solution,but innovations in liturgy needlework such as painting of some
details, depicting face and body, adornment of gold embroidered things with sparkles and half-
gems led to the decay in the art of gold embroidery, which fell on the XVIII-XIX-th centuries.
In the run of historical and cultural development in Ukraine,Ukrainian national embroidery
was developing as well. The artifacts we have date back only into the 80-90-s of the XIX-th century
Since the XIX-th beginning of the XX-th centuries there has been preserved a great
number of folk embroidery works, confirming a high artistic rate of development of the art of
fancy work. Thus, embroidery in silk was widespread in clothing and everyday life of rich people,
though its artistry was influenced by the national ideal of beauty of surrounding reality. Valuable
embroidered silk articles had something in common with embroidery with zapoloch on towels and
tablecloths from linen.
According to R.V.Zakharchuk-Chuhai, the XIX-th century is an important period in the
history of development of Ukrainian national embroidery. Since that time,more artifacts,bearing a
date, have been preserved. Embroidery spread and acquired a mass character, becoming one of the
main kinds of folk decorative art. They embroidered in every village, and in towns only nobility,
merchant class,lower middle classes and monastery workshops were occupied with needlework (2,44).
In 70-s of the XIX-th century progressive public figures paid attention to the high artistic
value of national Ukrainian embroidery works. Every area in Ukraine created distinctive
ornamental motifs and compositions, color scheme and specific embroidery techniques, which became
materialized cognition and reflection of the social environment,nature and dwelling place through
consciousness of craftswomen. Hence came the names of embroidery techniques: Running Stitch,
Pozaiglino, Solov'ini Vichka (nightingale's eyes), Kuryachyi Brid, Tovmatska Star, Klyuchka,
Cherv'yachok, Millet, Check work, Curly Stitch, Kochelystyi Stitch, Cross, Dovbanka, Vyri-
zuvannya (Blind Cut Work), Obkrutka (Twist stitch), Prutyk (twig), Lantsyuzhok (chain stitch),
etc. Big embroidery workshops in Hryhorivka (Kyivshchyna), Kachanivka (Chernihivshchyna),
Klembivtsi (Vinnychyn a), etc. worked tablecloths, towels, pillow cases and clothes. The clients'
24
Ukrainian Folk Embroidery
tastes often influenced creative work of the embroideresses, though classical embroidery patterns,
made at home, predominated.
Consequently, complicated processes of transformation of embroidery into trades and
handicrafts took place. In the XIX-th century town handicrafts of beads embroidery and chain stitch
embroidery were widespread: Kosiv, Vyzhnytsya, Chernivtsi, Okhtyrka, and Pyryatyn.
Embroidery as a craft is meant for a comparatively narrow circle of customers. Its roots
date back into deep local traditions. Its quality was influenced by creative initiative of executors.
One can trace the evolution of artistic expressive ways of the art of needlework,
characteristics of local artistic peculiarities, types of national ornaments, partially, technical features of
embroidery of Volynska, Rivenska, Kyivska, Chernihivska, Poltavska, and Dnipropetrovska
regions, Eastern and Western Podillya, Halychyna, Boikivshchyna, Hutsulshchyna, Bukovyna and
some of their separate areas in works of the scientists LGurgula, R.Zakharchuk-Chuhai, T.Kara-
Vasilyeva, A.Chornomorets, and L.T.Kravchyk.
L.T.Kravchuk, the researcher of embroidery of the XIX-th and beginning of the XX-th
centuries, concludes that in spite of the aspiration of progressive circles to halt the decline and
revive traditions of folk embroidery works, manufactured goods with their vulgar taste and anti
artistic impact influenced the development of the art of embroidery.
In the XX-th century fancy work becomes one of the most widespread kinds of decorative
art. During that time cooperative workshops, the first crowded schools of embroidery are organized
in well-known centers of folk art, such as Kyivshchyna, Chernihivshchyna, Poltavshchyna, and
Podillya.
Collectivization and the forced famine of 1932-1933, military period in western regions and
decay of the living standard in post war years in all of Ukraine led to a tremendous decline of
embroidery art of our people. It reached its flowering,being guided emotionally and intellectually,
by progressive Ukrainian intelligentsia under new working conditions. Introduction of needlework
as an artistic specialty in artistic establishments was of great importance for its further
development. The process of in-depth study of fancy work begins. Special attention is paid to folk art,
which becomes the source of new artistic compositions.
Work on the development and popularization of Ukrainian embroidery pieces centers in
artistic handicraft workshops, in particular in Kyivshchyna, Chernihivshchyna, Poltavshchyna,
Podillya and western regions of Ukraine, which became original artistic schools, thus creating
embroidery style of individual regions of Ukraine. The most famous workshops were Reshetylivska
in Poltavshchyna,Dihtyarivska in Chernihivshchyna,Hlynky and Kuty in Ivano-frankivshchyna
and as well those in the cities and towns of Kyiv, Lviv, Kosiv, Vyzhnytsya, Vinnytsya, Klembiv-
ka, and Ternopil. Their works impress with their artistic peculiarities and are executed at a high
technical rate.
Since the end of the 40-50-s of the XX-th century, the art of embroidery develops
comprehensively due to the common creative work of folk artisans and professional artists. During the
post war period small cooperatives join. In the 60-s small producers' artels reorganize into state
businesses, which in the 70-s center in the system of enterprises of the Ministry of Local
Industry, Ukrainian Artistic Industry, Ministry of Light Industry, and Ministry of Consumer Services.
Artists and artisans develop artistic rate of goods. There appeared machine embroidery.
State resolutions and decrees about development of folk artistic handicrafts were an
important phenomenon in artistic education of the development of the embroidery art. They evidenced
that folk art was under the state protection.
In the XX-th century embroidery becomes an object of detailed research. LGurgula,
R.V.Zakharchuk-Chuhai, T.Kara-Vasilyeva, A.Chornomorets, and L.T.Kravchuk made a valuable
contribution into research of the theories of the art of embroidery in Ukraine. The researchers
consider natural development of embroidery, especially the XIX-XX-th centuries, discovering
artistic nature, functions, meaning, common and local peculiarities, basic tendencies and problems
of development.
Scientific researches of the art of needlework evidence that experience of revival and
improvement of artistic culture of embroidered pieces, stored in course of joint work means a
creative use of local features, new approach when selecting embroidery materials and various
kinds of technical execution.
Nowadays we know about 150 techniques of artistic needlework in Ukraine. All of them in
25
Українське народне вишивання
spite of local peculiarities and basic technical embroidery methods are characteristic of the whole
state, which proves their common roots and features.
Embroidery is a valuable historical artistic source,which enables one to realize more
profoundly the question of specifics of material and spiritual culture of Ukrainian nation. This is the
nation wide art,which retained and preserved through the centuries collective artistic memory
and aesthetic ideals of beauty. (2, 186)
The authors of the book aim at in-depth study of the historical grounds, evolution,
development of technology and techniques, forming of abilities and skills in the art of needlework.
The use of the art of embroidery itself with its ornamental symbols,semantics,original
synthesis of techniques of artistic needlework,which in fact accumulate symbols of nature
(natural signs), is the way to the national spiritual self-preservation. This is the basis of the state-
working principles, needed by our people, our nation today.
3. Засоби виробництва для заняття художнім вишиванням.
Ручне вишивання як в широкому розумінні (діяльність майстерень), так і ву
вузькому (індивідуальне заняття) потребують матеріально-технічних затрат, тобто відповідних
засобів виробництва, що включають в собі засоби праці, предмети праці.
Із засобів праці, як правило, необхідні:
- приміщення з відповідним освітленням, отепленням, відтоком і притоком повітря
природнім способом, або за допомогою кондиціонера, місцем для розміщення швейного
устаткування, пристроїв для прасування, а саме: прасувальна дошка з прасками або прес
марки Bonuchi тощо;
- стіл, крісло, настільний освітлювальний прилад, комп'ютер;
- шафи невеликі, зручні для зберігання літератури, тканин, вишивальних матеріалів.
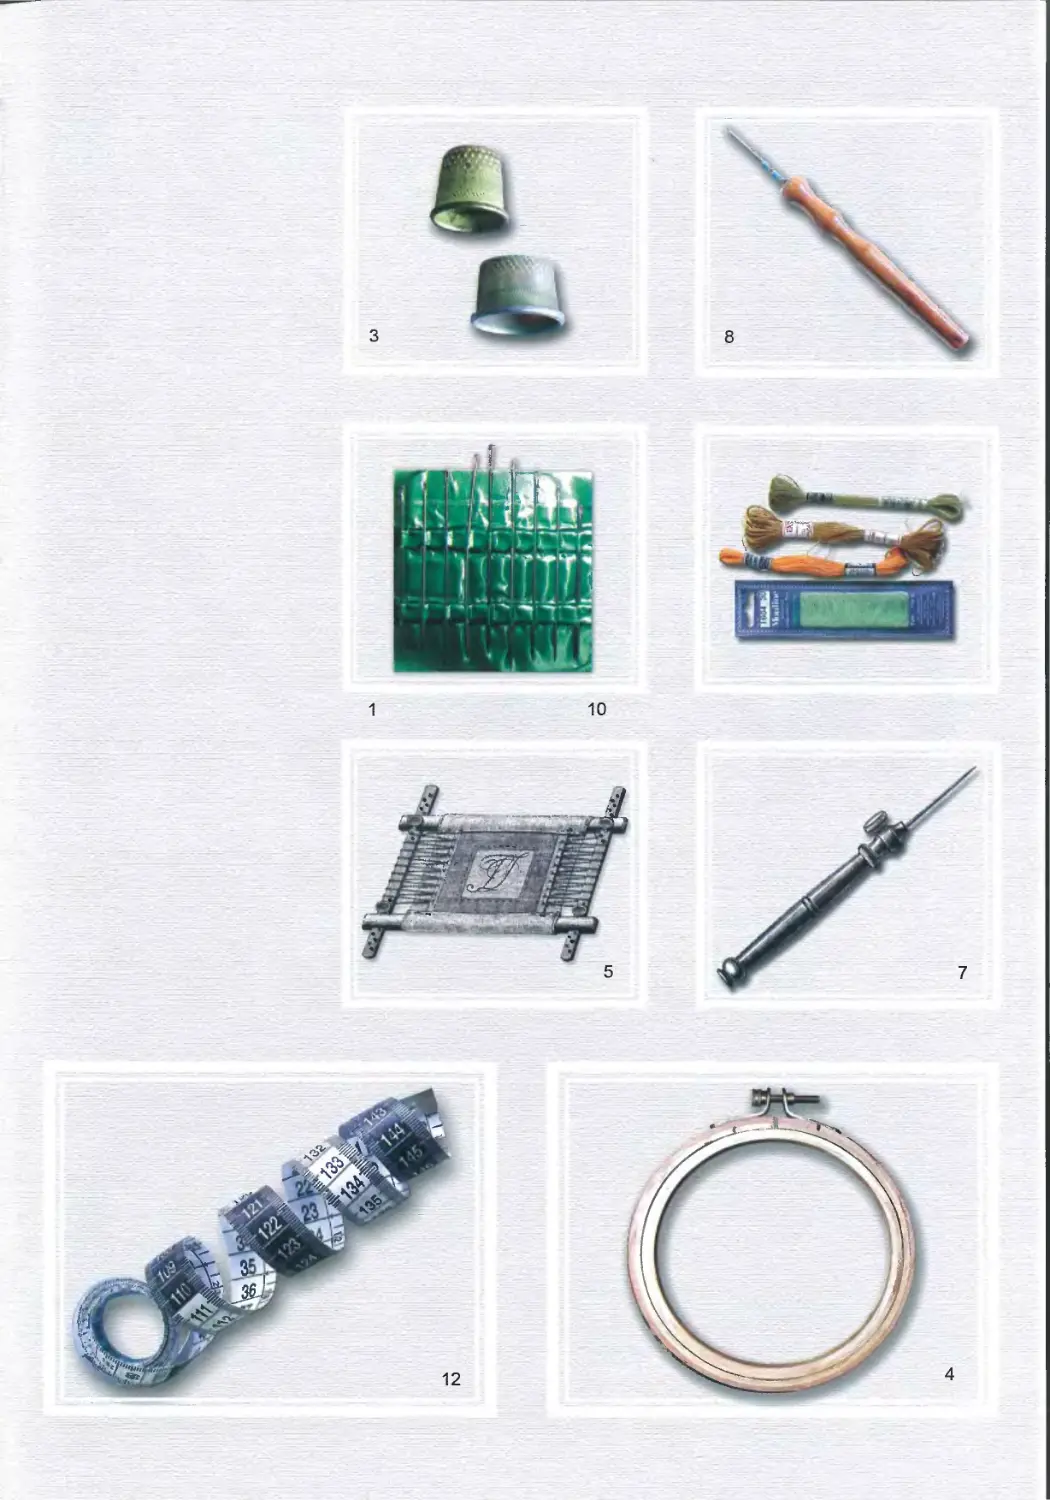
Інструменти для вишивання.
1. Голки. їх необхідно декілька наборів. Довжину, товщину, міцність, форму вістря,
вушка підбирають відповідно до техніки вишивання та механічної структури вишивальних
матеріалів.
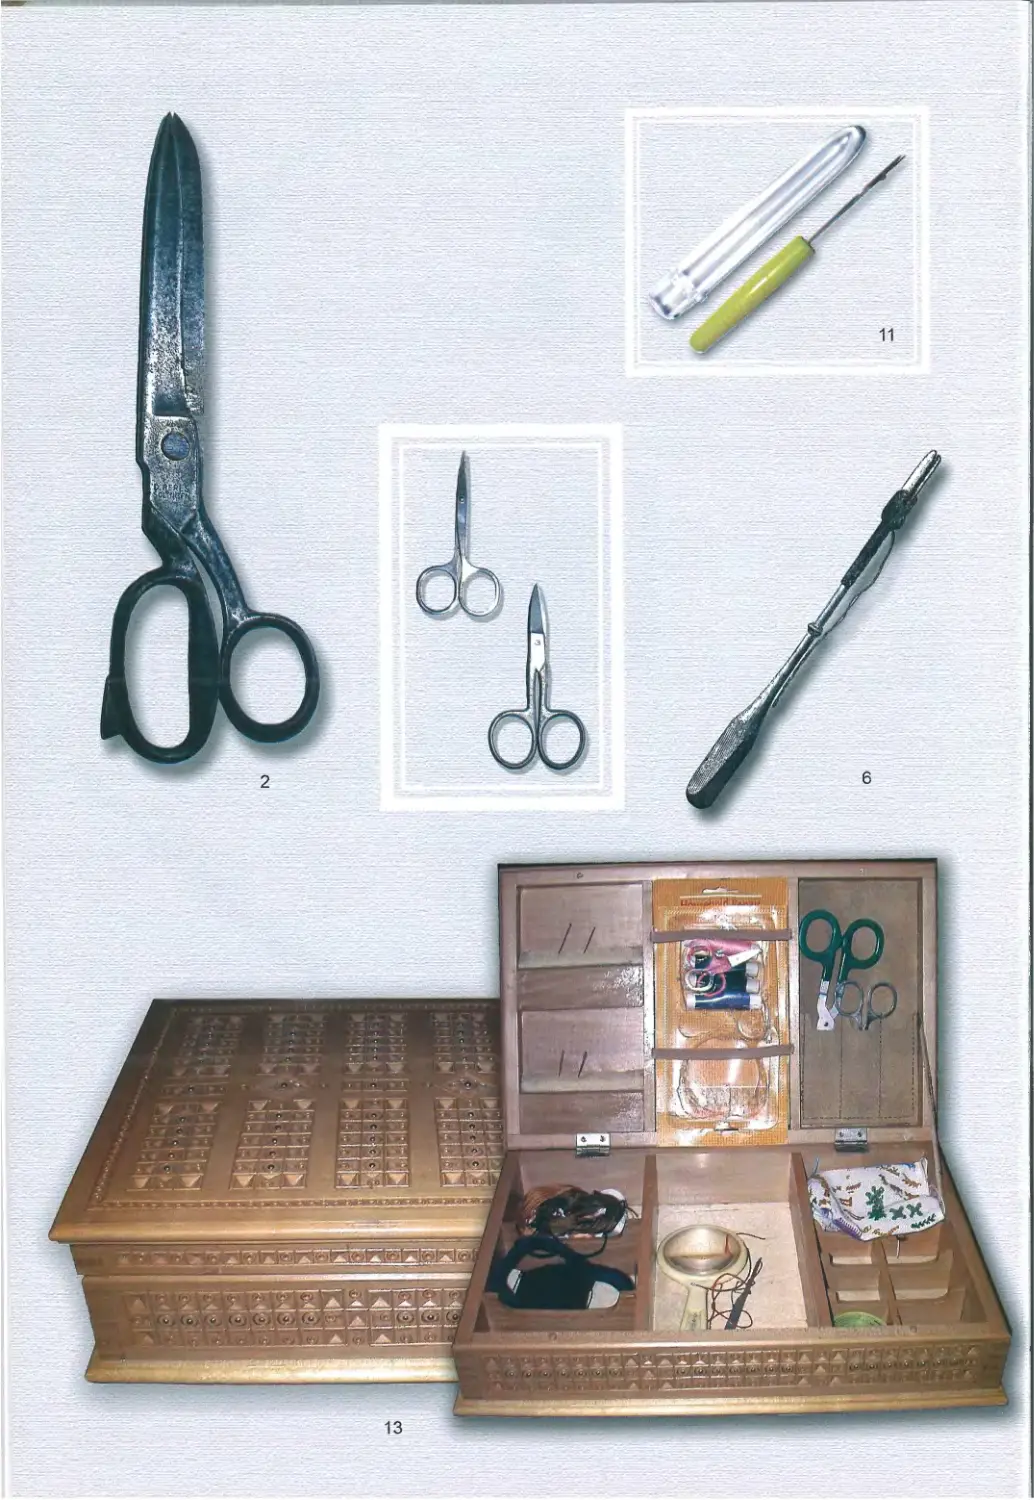
2. Ножиці. У процесі ручного вишивання необхідно користуватись трьома видами
ножиць:
- малі, з прямими лезами для відрізування робочої нитки;
- малі, з підігнутими вгору лезами для виконання техніки художнього вишивання
вирізування;
- великі кравецькі для розрізування тканин на деталі виробу.
3. Наперстки. Вони бувають з денцем і без денця. За технологією виготовлення:
кістяні, алюмінієві, срібні, нікельовані. Кістяні швидко ламаються. Срібні і алюмінієві
тонкостінні і тому привабливі, але мають неглибокі ямки, що спричиняє постійне сповзання
голки, тому не практичні в роботі. Найкращі нікельовані наперстки з заокругленим верхом
і плоскою обвідкою.
4. П'яльця. Сучасне виробництво пропонує дерев'яні, пластмасові п'яльця різних
розмірів, одинарні та комплектом, із зажимами і без зажимів. Кращі для ручного
вишивання п'яльця дерев'яні із закручувальним зажимом.
5. Рамки. Дерев'яні, невеликих розмірів, для закріплення в статичному положенні
вишивальної тканини прямокутної чи квадратної форми. їх можна виготовити індивідуально.
6. Веретенце. Використовують при гаптуванні.
7. Шильце. Інструмент для виконання гаптування.
8. Виколка. Додатковий до голки інструмент для виконання технік художнього
вишивання виколювання, довбанка, солов'їні вічка, розвід, шов кочелистий тощо
9. Станочок. Для ткання пацьорками.
10. Голки. Спеціального призначення для роботи з пацьорками (бісером). Вони
повинні бути тонкі з довгим вушком №11, №12, №13, імпортного виробництва. Для ткання
пацьорками №7.
11. Поролка для випорювання помилково настелених стібків.
Голка для вишивання набивною технікою.
12. Мірна стрічка. Довжина її 1-1,5 м, з круговим роликовим механізмом для
скручування і розкручування.
26
Ukrainian Folk Embroidery
13. Скринька для рукоділля. Вона повинна бути зручною в користуванні, вміщати
необхідний інструмент та матеріали для виконання конкретного завдання, мати
привабливий естетичний вигляд.
Простирадло. Для накриття колін або столу на занятті вишиванням.
Серветка темно-зеленого кольору, м'якої структури, розміром 30Х40см.
Предмети праці для ручного вишивання.
До предметів праці належать матеріали:
а) матеріали, на яких вишивають.
Вишивальна практика засвідчує, що матеріалом, на якому вишивають, можуть бути
найрізноманітніші види тканин. Особливо технологічно якісними є тканини натуральні,
виготовлені з волокон природного походження. Це конопляні, лляні, шовкові, шерстяні
тканини, а також шкіра тонкої обробки одягово-галантерейного призначення.
Конопляні тканини. Домоткані сурові, кислотні, напівбілі, гладкофарбовані.
Лляні тканини. Вишиванка різних видів, маркізет, батист, вісон, фабричного
виробництва кислотні, напівбілі, гладкофарбовані, домоткані, сурові тощо.
Бавовняні тканини. Ситець, б'язь, мадаполам, різні види канви, марльовка, гладкий
оксамит, памут, перкаль, батист, репс, сатин, аста, майя, маркізет, міткаль, шифон,
муслін, нансук, різні види вишиванки тощо.
Шовкові тканини. Атлас, репс, крепсатин, туаль, бархат з низьким ворсом,
оксамит, шифон, крепдешин, жоржет, туаль.
Шерстяні тканини. Люстрин, марселін, вігонь, габардин, кашемір, тонкі
шерстяні тканини білі або гладкого фарбування, різні види сукна.
Натуральна шкіра. Лайка, сап'ян, замша, велюр, шевро, шеврет, нубук.
В контексті сучасного текстильного виробництва у вишивальному рукоділлі широко
використовуються штучні та синтетичні тканини.
Штучні тканини. Основою для виготовлення штучних тканин є відходи бавовни
або високоякісна целюлоза певних порід дерев. Із штучних тканин найбільше
використовують штапель, ацетатне полотно, крепдешин, крепсатин, лізета, тафта, віскозне полотно
тощо. Для вишивання також використовують різні види штучної шкіри.
Синтетичні тканини. їх виготовляють із волокон, одержаних хімічним способом,
шляхом синтезу органічних речовин, утворених поза живим організмом (з неживої
природи). Із них для вишивання можна використовувати: твіст, лавсан (він же терлен, дакрон,
тергаль, тетерон, елана), нітрон, капрон, кашмілон, силон тощо.
Сучасне виробництво пропонує багатий асортимент тканин, виготовлених із
змішаних волокон: натуральних і синтетичних, натуральних і штучних, штучних і синтетичних.
Серед них льон з лавсаном, шерсть з лавсаном, різновиди сукна, шерстяних тканин із
домішками віскози та синтетичних ниток. Більшість із них мають якісну механічну
структуру, гігроскопічність, стійкість до миючих засобів та волого-термічної обробки. Вони
займають значне місце серед матеріалів, на яких вишивають.
В наш час промисловість пропонує матеріали, виробництво яких виконується не
тканням, а іншими технологіями. їх використання можливе також у ручному художньому
вишиванні;
б) матеріали, якими вишивають.
Вишивання — це дія, що супроводжується накладанням, нанесенням, виконанням
стібків, плям, точок, ліній на тканині або шкірі конкретними матеріалами. Вони різні за
природою походження, механічною структурою, формою, кольором. Домінуюче місце
серед матеріалів, якими вишивають, займають нитки, а саме:
- бавовняно-паперові: муліне, відбілені та невідбілені нитки різної товщини на
шпульках і в пасмах;
- бавовняні: в пасмо або кручені, муліне, кроше, ірис, заполоч, ДМС тощо;
- шовкові: шовк штучний, натуральний кручений або в одинарну нитку
найрізноманітніших кольорів від яскравих до світло-пастельних відтінків, а також шовк для
машинного шиття, шовкове муліне;
- лляні: невідбілені, грубого та тонкого кручення або в пасмо;
- штапельні: вишивальні нитки у великих мотках або на шпульках різних відтінків;
- віскозні: вишивальна віскоза різної товщини, скручення в мотках або на шпульках;
27
Українське народне вишивання
- шерстяні: волічка, гарус, шерсть кручена, шерсть в одну нитку, в пасмо
хроматичних та ахроматичних кольорів і їх відтінків;
- синтетичних та змішаних волокон: акрилон, півшерсть, тасьма, сутаж, люрекс,
металізовані нитки фірм ДМС, Madera;
- металеві: волока, плющенка, мішура, золотий, срібний шнур, галун, прядиво
тощо.
Крім широкого різновиду ниток вишивальним матеріалом є: пацьорки (цятки, бісер),
склярус, намистинки, лелітки (блестки), металічні та синтетичні пластинки тощо.
Формотворення з погляду народного мистецтва і дизайну є передовсім проблемою
вибору основних функціональних параметрів...(9, сі 12). Однак кожен конкретний творчий
задум акумулює в собі різновид матеріалізації його засобами художнього вишивання,
адекватний індивідууму, творчій особистості. В цьому аспекті підбір матеріалів, в першу чергу,
залежить від людино-творчого фактору. Крім цього в кожному конкретному випадку при
підборі вишивальних матеріалів слід враховувати їх механічну структуру,
якісно-технологічні, колористичні співвідношення, потребу комбінативного поєднання технік, необхідність
вираження фактурно-візуальних ознак тощо.
Ручне вишивання, особливо на перших етапах засвоєння вишивальних технік і
технології швів, потребує розрахунку ниток або розмірених відрізків тла тканини. При цьому
слід використовувати матеріали із чітким полотняним переплетенням, такі як домоткане
полотно, льон з лавсаном, а також тканини із розрідженою структурою за технологією
ткання (різні види вишиванки, канви, зокрема канви «пенелопи», в якій чітко з'єднані дві
нитки по основі і пітканню).
На початковому етапі з матеріалів, якими вишивають, значну перевагу має муліне.
Воно дає можливість використовувати нитки у варіативній кількості, що обумовлює
набуття практичних умінь, навичок, знань і ведення індивідуального моніторингу щодо
взаємозв'язку механічної структури вишивальних матеріалів, поверхневих та фактурних
характеристик орнаменту.
3. Appliances for Artistic Needlework.
Hand embroidery both in wide meaning (activity of the workshop) and in narrow one
(individual activity) demands material and technologic expenses, that is proper appliances, which
include means and things of work.
As a rule, among means of work one needs:
A light, warm, well ventilated either naturally, or with the help of the conditioner room,
place for sewing appliances, devices for ironing: an ironing board, with the irons, or a press
Bonuchi, etc.
A table, a chair, a table-lamp and a computer.
Closets, not big but convenient to store literature, cloths and embroidery materials.
Tools for embroidery.
1. Needles. One needs several sets of needles. The length, thickness, firmness, form of a
point and an eye of a needle are selected according to the embroidery technique and mechanic
structure of embroidery materials.
2. Scissors. One needs three kinds of scissors while embroidering:
- small ones with straight blades to cut out the working thread;
- small ones with pointed up blades to work Cutting out technique and the like;
- big tailor's ones to cut out material into the details;
3. Thimbles. They can be with a bottom or bottomless. According to the production
technology, they can be ivory, aluminum, silver and nickel. Those made of ivory break quickly.
Aluminum and silver ones are attractive because they are thin, but they have small hollows, which cause
constant sliding of the needle and are not practical in work because of that. The best thimbles are
nickel ones with a round top and flat border.
4. Tambours. Modern production suggests wooden and plastic tambours of various sizes,
separate and with a complete set,with or without clips. Wooden tambours with a winding clutch
suit hand embroidery better.
5. Frames. Wooden and of small sizes to fasten embroidery cloth of rectangular or square
form in a static position. They can be made individually.
28
ЬП-
а
10
г ~г~
vgr
*&
ц
xcj4 -
•О .jy
12
■і.
Жі «*'
*0Ф
*%
11
■ «їх-.*'
' О
г
II
п
М і
илі ft
V і
м
. ■ и
о \
>1
/
( Ср ** Си
(о
4. *
■.і І.1'.,. j..-i!I'I'
* *
13
Ukrainian Folk Embroidery
6. Spindle. It is used in gold embroidery.
7. Awl. A tool, which is used in gold embroidery.
8.Vykolka (a gadget to prick out). It is an additional instrument to the needle to work
Vykolyuvannya, Dovbanka, Solovyini Vichka and Rozvid techniques of embroidery, Kochelystyi
stitch, etc.
9. Loom. To weave with beads.
10. Needles. Special needles to work with beads. They should be thin with long eyes: #11;
# 12; # 13; imported. To weave with beads # 7 suits.
11. A needle. To work in printed technique.
12. Measuring band. Its length is 1-1,5 m with a circular roller mechanism to roll it out and in
13. Box for needlework. It should be convenient and spacious to contain necessary
instruments and materials to execute a proper task. It should also be aesthetically attractive.
Sheet. To cover ones knees or a table while embroidering.
Napkin. Of a dark green color, soft texture, size 30X40 cm.
Things to Work Hand Embroidery.
To the things of work belong:
embroidery materials.
Embroidery practice shows that the most diverse kinds of fabrics serve as an embroidery
material. Natural fabrics,made of fibers of natural origin, are especially technologically
qualitative. They are hemp, linen, cotton, silk and woolen materials, as well as leather of fine processing
used for clothes or haberdashery.
Hemp cloths. Homespun unbleached, acid, half-white and smoothly dyed.
Linen cloths. Embroidery of various kinds, Marquisette, cambric, Vison, of fabric
production acid, half-white, smoothly dyed, homespun unbleached, etc.
Cotton cloths. Printed cotton, coarse calico, madapollam, various kinds of canvases,
cheesecloth, smooth velvet, Pamut, cambric muslin, cambric, reps, sateen, Asta, Maya, Marquisette,
calico, chiffon, muslin, nainsook, different kinds of embroidery, etc.
Silk cloths. Satin, reps, crepe sateen, Tual, velvet with low nap, chiffon, crepe de Chine
and Zhorzhet.
Woolen cloths. Lustrine, Marsellin, vicuca, gabardine, cashmere, fine woolen fabrics —
white or smoothly dyed, different kinds of broadcloth.
Natural leather. Kidskin, morocco, suede, velour's, kid, Shevret, Nubuk. Manmade and
synthetic materials are widely used in hand embroidery in the frameworks of modern textile
production.
Manmade fabrics. Cotton wastes or cellulose of particular kinds of trees serve as the basis
to manufacture manmade materials. Among manmade materials they mostly use: staple, acetate
cloth, crepe de Chine, crepe sateen, Lizeta, taffeta, viscose cloth, etc. Various kinds of manmade
leather are also used in embroidery.
Synthetic materials. They are made of fibers, produced in a chemical way, through
synthesis of organic substances,created beyond living organism (from inanimate nature). One can
use twist, lavsan (or Terlen, Dakran, Tergal, Teteron, Elana), Nitron, kapron, Kashpilan, Silan,
etc. among them to embroider.
Modern production suggests a wide choice of materials,made of mixed fibers: natural and
synthetic, manmade and synthetic, natural and manmade. Among them there are linen with
lavsan wool with lavsan, various kinds of broadcloth, woolen fabrics with additions of viscose and
synthetic threads. Most of them have qualitative mechanic structure, hygroscopic, resistance to
liquid detergents and wet thermal treatment. They take a considerable place among the materials
used in embroidery.
Nowadays industry suggests materials, manufactured not in weaving but in other
technologies. They can also be used in hand embroidery.
Materials with which they embroider.
Embroidery is the action accompanied with the process of laying, drawing and working
stitches, spots, dots and lines on the fabric or leather with concrete materials. They are different by
origin, mechanic structure,form and color. Threads dominate among the embroidery materials:
cotton-paper: Mouline, bleached and unbleached threads of various thickness on spools and
in strands
31
Українське народне вигнивання
cotton: in a strand or lisle, Mouline, Kroshe, iris, Zapoloch, etc.
silk: manmade silk,natural lisle or thin one-threaded of various colors from bright to light
pastel tints; silk for machine sewing, silk Mouline;
linen: unbleached, bleached of thick and thin twisting or in a strand;
staple: embroidery threads in big skeins or on bobbins, of different colors and tints;
viscose: embroidery viscose of various twisting thickness in skeins or on spools;
woolen: wool, worsted, lisle wool, one threaded wool, in a strand, of chromatic and
achromatic colors and tints;
synthetic and of mixed fibers: Akrylon, half-wool, Tasma, Sutazh, Lyurex, metallic threads
of the firms DMC and Madera;
metal: Voloka, flattened thread, gold and silver cord, Galun, tinsel, spinning, etc.
Apart from a wide choice of threads, embroidery materials are beads, bugles, glitter
beads, metal and synthetic plates, etc.
Creation of a form from the point of view of folk art and design is a problem of choice of
the basic functional parameters... (9,-p. 112). However, every concrete creative idea accumulates
itself a kind of materialization by means of embroidery and is adequate to the individual. In this
respect,the choice of materials depends on a personal creative factor in the first place. Apart from
that, while choosing embroidery materials in every concrete case one should take into account their
mechanic structure, qualitative technologic and color correlation, need to combine techniques and
to express textural visual signs etc.
On the first stages of study of embroidery techniques and stitches technology hand
embroidery requires counting threads or intervals on the background of the material. Thus, one
should use fabrics with visible linen interweaving: homespun cloths, linen, linen with lavsan and
materials with loose structure as to the technology of their weaving and canvases («Penelopa»)
where two ground and horizontal threads are clearly joined.
At the beginning, Mouline dominates among the embroidery materials. It enables to vary
number of threads, which helps to acquire practical skills and knowledge and to carry out
individual monitoring as to the interrelation of mechanic structure of embroidery materials, surface and
textural characteristics of the ornament.
4. Корисні поради з питань гігієни, естетики праці, дотримання умов
життєдіяльності при ручному вишиванні:
- перед початком вишивання руки вимити миючими засобами;
- одягнути робочий одяг;
- коліна застелити білою тканиною, підготовленою для цієї цілі;
- вишивальну тканину (якщо вона великого розміру) скласти і закріпити у захисну
прозору плівку;
- на стільці сидіти прямо, притулившись до спинки крісла по нижній лінії лопаток;
- під ноги поставити стільчик висотою 20-25 см;
- виріб держати від очей на відстані 25-30см;
- найкраще вишивати при денному освітленні;
- в похмурі дні і ввечері можна використовувати настільну лампу, пам'ятаючи, що
світло повинно падати тільки на вишивку і з лівої сторони;
- кімнату провітрювати або періодично включати кондиціонер;
- через кожних 45-60 хвилин вишивання робити перерву на 5-10 хвилин, при цьому
бажано дивитися на відрізок темно-зеленої тканини м'якої структури;
- робочу нитку заправляти у вушко голки за допомогою спеціального пристрою;
- довжина робочої нитки не повинна перевищувати 35-40 см;
- один кінець робочої нитки повинен бути незакріпленим, щоб голку можна було
вільно пересувати і при потребі вивільнити;
- виводити голку з робочою ниткою не вище рівня свого правого плеча;
- наперсток натягати на середній палець правої руки, він повинен щільно прилягати
до пальця;
- ниточки із пасма муліне витягати по одній;
- не використовувати браковані пацьорки (з технологічними вадами);
- при вигниванні, силянні, тканні пацьорки набирати голкою;
32
Ukrainian Folk Embroidery
- щоб гострі кінці склярусу не різали нитку при силянні, вишиванні, тканні, з двох
сторін склярусу набирати по пацьорці;
- на початку та при закінченні шва робочу нитку закріплювати, виходячи із його
технологічних властивостей, але так, щоб не було помітно з лицювої і виворітної сторони;
- робочу нитку відрізати спеціальними ножичками;
- ножиці в робочому стані повинні лежати по правій руці;
- чітко дотримуватись правил користування різальними та виколювальними
інструментами;
- голку не залишати без робочої нитки, не вколювати її в одяг, або інші предмети;
- загубивши або поломивши голку, відшукати її уламки за допомогою магнітного
сердечка і викинути у безпечне місце;
- не маніпулювати голкою та іншими інструментами у вільних неробочих рухах;
- перед проведенням волого-теплової обробки виробів переконатись у справності
електроприладів;
- не залишати після роботи включеними електроприлади;
- після закінчення вишивання інструменти і приладдя поставити на призначене для
них місце зберігання.
Самостійна робота.
Ознайомлення з науковою літературою з навчальної дисципліни, методикою її
опрацювання.
Підготовка реферату на тему: «Художнє вишивання мого краю».
Ознайомлення із натурними експонатами мистецьких творів, декорованих вишивкою.
Питання для контролю знань.
Ваше розуміння виникнення вишивання як матеріальної та естетичної потреби
буття людини.
Поясніть значення термінів «вишивати», «вишивання», «вишивка».
Назвіть перших дослідників вишивального мистецтва.
Які факти засвідчують про існування вишивки в античний період на території
сучасних земель України?
Розкажіть про розвиток вишивального мистецтва в Київській Русі.
Охарактеризуйте визначні твори гаптування кінця XVI століття.
Проаналізуйте вишивку одягового та інтер'єрного призначення періоду Козаччини.
Розкажіть про розвиток української народної вишивки у ХІХ-ХХ столітті.
Як Ви усвідомлюєте роль художнього вишивання в національній культурі України?
Які засоби виробництва необхідні для організацгі майстерні та індивідуальних
занять ручним вишиванням?
Прокоментуйте поняття натуральні, штучні, синтетичні тканини.
4. Helpful Hints on Hygiene, Aesthetic Work and Following the Rules of Vital Activity
while Embroidery.
wash your hands before starting embroidery
put on your working clothes
cover your knees with a white cloth, prepared beforehand
fold the embroidery material (if it is of a big size) and put into protective transparent film
sit straight, leaning the lower parts of your shoulder blades to the back of a chair
put a small chair under your feet
the material should be within 25-30 cm from your eyes
it is better to embroider by day light
on cloudy days and in the evening you can use a table lamp; remember, the light should fall
only on embroidery from the left
air the room or switch on the conditioner from time to time
make 5-Ю minutes pauses every 45-60 minutes, it is desirable to contemplate a piece of
dark green fabric of soft texture
thread the needle with the help of a special gadget
33
Українське народне вигнивання
the length of the working thread should not exceed 35-40 cm
one end of the working thread should stay free to easily move the needle
the needle with the working thread should not be pulled out higher your own right shoulder
put the thimble on your middle right finger, it should fit it
pull one Mouline thread out of a bundle each time
do not use defective beads
pick up beads with the needle while embroidering, threading and weaving
for sharp ends of bugles not to cut the threads while threading, embroidering and
weaving, put a bead at each side of a bugle
fasten the thread at the starting point and at the end of the seam line according to its
technologic peculiarities, so that it is not visible form the obverse and reverse sides
cut out the working thread with special scissors
the scissors should lie on the right hand side
strictly follow the rules of how to use cutting and sharp tools
never leave the needle without a working thread, do not insert it into your clothes or other
things
when you have lost or broken the needle find it with the help of a magnet and throw away
into the safe place
do not manipulate with the needle and scissors when you are not working
before ironing the details or articles, be sure your electric devices are in good repair
do not leave electric devices switched on after work
having finished embroidery, put the instruments and tools into their right places.
Independent Work.
Introduction of the scientific literature of the discipline and methods of its study.
Prepare an essay «Artistic Embroidery of my Region».
Study of the real exhibits of artistic works decorated with embroidery.
Final Questions.
How do you understand spring up of embroidery as a material and aesthetic need of human's
every day life?
Explain the meanings of the definitions «to embroider», «embroidery» and «fancy work».
Name the first researchers of the art of embroidery.
What facts serve as the evidence that embroidery existed during the Antique period on the
territory of modern Ukraine?
Tell about development of embroidery art in Kyivan Rus.
Characterize outstanding works of gold embroidery of the end of XVI-th century.
Analyze embroidery on the articles of clothing and of interior use of Kozachchyna period.
Tell about development of Ukrainian folk embroidery in XIX-XX-th centuries.
What is the role of artistic embroidery in the national culture of Ukraine from your point of
view?
What appliances does one need to organize workshops and individual trainings on hand
embroidery?
Comment on the definitions natural, manmade and synthetic fabrics.
34
їм. т—Л
*-ф
qjr
.££
■££&.
.^1^^ ****** ^
Vі ^W»^»-WV>
■^і^МЬ' їй » »ЦМ
г-£~
«sssttstsf
T%n»»»«,iiii;.'^.iilt
*^5^f
*■ ~~^-
фрагмент чоловічої сорочки
з гербом Галичини,
поч XX cm.
■ ■i%-%i*<.,>i%iw»»
f5SS№
fragment of a men's shirt
with the coat
of arms of 9{aCyckyna,
beginning of the. XX-th century
*
л.*Ч*+ •«%*#
^ ^ ^ ^ ^ ^ ч
0 ♦
■*
.'4
f ,:
*< і
і
,!'f
; ,V :
A-
s#
4
* * о
ooo
^
V
ST °
r
Жіноча сорочка "'Волове око",
поч. XX cm.
Chemise "Ot^s 'Eye",
beginning of the XX-th century j
і <*■ і 4'Cri
СЯ* IL Обробка країв деталей виробів
55- /J. ^finishing off the ^Embroidered ILdges
Українське народне вишивання
сторичні дослідження в
аспекті технології
виготовлення одягу народами, які
побутували на території
сучасної України, засвідчують, що він, як і в
інших народів, поділявся на нешитий та
шитий. [2, с.Ш]
Нешитий одяг утримувався на тілі за
допомогою накидування, зав'язування,
використання защіпок (заколок), поясів тощо.
Шитий одяг з часів його появи
складався з окремих деталей. В історичному
розвитку такий процес удосконалювався.
Деталей в компонентах натільного, поясного,
плечового одягу збільшувалось. Поява
шитого одягу обумовлює потребу з'єднувати
деталі в цільну форму.
Виникає технологія згнивання, що
супроводжується процесом активного
вплітання, втручання вишивальної нитки в
структуру тканини». [2, с.82] Зшивання
деталей вимагало виконання стібків різного
спрямування, розмірів для забезпечення
практичної, а пізніше естетичної функції.
З'єднання деталей виробу з прадавніх
часів до сьогоднішніх днів виконують
рубцюванням.
Рубець — це утворене з'єднання двох
суміжних сторін деталей виробу внаслідок
цільного прогнивання його певним видом шва
та способом.
Рубці бувають:
а) одинарний з'єднувальний;
б) подвійний з'єднувальний із запахом
(підгином) поверхні однієї із суміжних
деталей в сторону першого з'єднувального шва.
Наукові дослідження та наявні
натурні зразки засвідчують про використання
найрізноманітніших технік зшивання
деталей виробів: вперед голку, позад голки, в
прикріп, стебловий шов (прошите), півстов-
пчик, різні види змережування тощо.
Виготовлення шитого одягу та інших
виробів з прадавніх часів супроводжується
технологічним процесом підрублення
(підрубка). Його поява зумовлена
механічними властивостями тканин відповідно
технології їх виготовлення. За технологією
ткання вони поділяються:
а) тканини з полотняним
переплетенням;
б) тканини без полотняного
переплетення.
З полотняним переплетенням — це
тканини, на тлі яких чітко вирізняються
нитки основи і піткання.
Historic investigations into the
technological field of dressmaking by people, who
inhabited the territory of modern Ukraine, are
evidence of their division into sewn and non-
sewn, like among the other people. [2, p.lll]
Non-sewn clothes were held on one's
body either being slipped on, knotted or with
the help of clasps, belts, etc.
Since they appeared, sewn clothes have
consisted of separate details. This process has
been developing through the course of history.
The number of details in underwear, waist-
length and shoulder widths in clothes
developed. Emergence of sewn clothes calls forth the
need to join the details into an entire form.
Thus, appears the technology of
sewing, followed by the process of «...active
plaiting in, introduction of an embroidery thread
into the texture of the cloth» [2, p.82]. To sew
the details together one had to execute stitches
of various nature and size,to provide for the
practical and later aesthetic function.
Joining the details of an article, has
been done with hemming since times
immemorial till now-a-days.
A hem is a joining, created after two
adjacent details of the article had been sewn
together by a particular kind of stitch or way.
The hems can be:
a) single joining;
b) double joining, when the surface of
one adjacent detail is folded under towards the
first joining seam;
The scientific investigations, as well as
real samples, testify to the fact that the most
various techniques were used to sew the details
of articles: Running stitch, Backstitch, Uprykrip,
Steblovyi Stitch (Proshytte), Pivstovbchyk,
different kinds of Cut and Drawn Work, etc.
This technological process of hemming
accompanied manufacturing of sewn clothes and
other articles since ancient times. Its emergence
can be explained by the mechanical properties
of materials, according to the technology of
their production. In terms of the technology of
weaving they are:
a) fabrics with linen interlacing;
b) fabrics without linen interlacing;
Fabrics with linen interlacing are those,
ground and horizontal threads of which are
clearly visible.
The basis consists of vertical threads,
which lie along the length of the material
(parallel to us).
Pitkannya is horizontal threads, fallen
in the width of the fabric (horizontal to us).
38
Ukrainian Folk Embroidery
Основа — це вертикальні нитки, які
лежать по довжині тканини (паралельно до
нас).
Піткання — це нитки, які лежать
горизонтально по ширині тканини
(горизонтально по відношенню до нас).
У тканинах без полотняного
переплетення нитки основи і піткання не
переплітаються перпендикулярно (під прямим кутом),
на їх тлі чітко не вирізняються.
Тканини з полотняним
переплетенням розкроюють на деталі виробу за
прокладеною міткою по витягнутій нитці
основи або піткання.
Після розкрою таких тканин нитки
піткання (або основи) легко виторочуються,
тому з незапам'ятних часів впроваджується
технологічна операція підрубка.
Підрубка — це щільне закріплення
швом горизонтальних ниток поміж
вертикальними або одинарний, подвійний підгин
країв виробу в бік виворітної, рідше
лицевої сторони.
Таку технологічну операцію
виконують техніками: півстовпчик, стебнівка, за-
тяганка, обмітка, кривульки, обметниці
(одинарна, подвійна, потрійна), хрестику-
вання (козлик) тощо. Підрубку виконують в
межах таких розмірів:
- подол, рукави жіночих, чоловічих
сорочок — 1 см,
- краї серветок — 1 см;
- краї рушників, скатертин, інших
інтер'єрних виробів — 2-2,5 см.
Однак розміри підрубки країв
виробу визначаються його формою,
призначенням та характеристичними особливостями
декору.
Краї деталей виробів — комірців,
манжетів, пазушок, чохлів тощо
викінчують ще технікою зубцювання.
Фактологічні матеріали (натурні
зразки вишитих виробів різноманітного
призначення) засвідчують про високохудожній
рівень обробки країв деталей та вишитих
виробів в цілому.
Вивчення технік рубцювання, підруб-
лення, зубцювання, формування
практичних умінь, навиків їх виконання складають
фундаментальні засади у надбанні
кваліфікаційних знань.
The ground and horizontal threads in
fabrics, without linen interlacing, are not
perpendicular and because of that are difficult to
be distinguished.
Fabrics with linen interlacing are cut out
into the details of an article, following the
marks either along the ground or horizontal
threads.
Having been cut out, the horizontal (or
ground) threads of any fabric easily fray out.
That is why, since time immemorial the
technology of hemming has been introduced.
Hemming means a tight fixing of
horizontal threads between vertical ones with a
seam; or either single or double fold of the
edges of an article towards the reverse side,
seldom obverse one.
This technologic operation is worked in
such techniques as: Pivstovbchyk, Stebnivka,
Zatyahanka, Whip Stitch, Kryvulky, Obmit-
nytsi (single, double, triple), Crossing (Kozlyk
etc.). The hemming is executed within the
following limits:
- the hems (of a skirt), sleeves of men
and women's shirts — 1 cm
- edges of the napkins 1 cm
- edges of the towels, tablecloths etc.
2-2.5 cm
But the sizes of hemming are
determined by the form of the article itself, its use
and characteristic decor peculiarities.
The edges of the details of the articles:
collars, cuffs, fronts of shirts etc. are worked
in Zubtsyuvannya (kind of an Overstitch)
technique.
Real samples of embroidered articles,
of various use, are actual proofs of a high
artistic level at which the details, edges and the
finished products were worked.
Study of such techniques, gaining
practical experience while executing them are of
primary importance to acquire qualification
knowledge.
39
Українське народне вишивання
1. Обмітка.
Шов виконується
справа наліво. Робочу
нитку закріплюємо з
виворітної сторони на місці
початку шва. Виводимо
голку з робочою ниткою
на лицьову сторону. Від
місця виколу ведемо її по діагоналі вліво і
вниз через три нитки основи і піткання.
Вколюємо голку, повертаємо вверх, набираємо
на неї три нитки піткання. Виводимо голку
на лицьову сторону, знову ведемо її з
робочою ниткою по діагоналі вліво і вниз через
таку ж саму кількість ниток основи та
піткання. Таким способом накладаємо стібки
до кінця лінії шва. При цьому з лицьової
сторони утворюються рівномірні діагональні
стібки під кутом справа наліво і з виворітної
сторони — прямі рівномірні паралельні
стібки.
Обмітку широко застосовують для
рубцювання деталей та країв виробу в
цілому, а також як з'єднувальний і
оздоблювальний шов.
1. Whip stitch.
The stitch is
worked from right to left. The
working thread is fastened
to the reverse side of the
cloth at the starting point.
The needle with the
working thread is brought out
onto the obverse side. From that place it is led
diagonally leftwards and down through three
ground and horizontal threads. The needle is
inserted into the fabric, turned upwards,
picking up three horizontal threads and brought out
onto the face of the cloth. Again, it is led
diagonally leftwards and down through the same
number of ground and horizontal threads. Thus,
the stitches are laid in the same technique till
the end of the seam line. The obverse side shows
even diagonal stitches which fall from right to
left. The reverse side represents straight, even,
parallel stitches.
Whip stitch is widely used in hemming
the details and edges of the article itself. It is
also worked as a joining and ornamental seam.
Лицьова сторона. Obverse.
2. Півстов-
пчик.
Шов
ведеться справа
наліво. Робочу нитку
закріплюємо з ви- |-
ворітної сторони на
місці початку шва.
Виводимо голку з
робочою ниткою на
лицьову сторону і вколюємо її на місці
виколу, повертаємо вліво, набираємо на неї
три нитки основи між двома паралельними
нитками піткання. Виводимо голку з
робочою ниткою на лицьову сторону, ведемо
вправо і вколюємо на місці попереднього
вколювання. Повертаємо голку вліво і знову
набираємо на неї ті ж самі нитки основи.
Виводимо голку на лицьову сторону і робочою
ниткою міцно стягуємо нитки основи
(обтягнуті петлею робочої нитки), притягуючи її
вправо. Вколюємо голку через дві нитки
піткання (від місця виколу) вниз,
повертаємо її вверх, набираємо ці ж нитки піткання
Виворіт. Reverse.
"ГП 2. Half
Stitch.
The stitch is
worked from right
to left. The working
thread is fastened
to the reverse side
of the fabric at the
starting point. The
needle with the
working thread is brought out onto the face if
the cloth and inserted at the place it has been
drawn out of, turned leftwards, picking up
three ground threads between two parallel
horizontal threads. The needle with the working
thread is brought out onto the obverse side,
led rightwards and inserted into the cloth at
the place it has been previously inserted into.
The needle is turned leftwards, picking up the
same ground threads again. Then, it is brought
out onto the obverse side and the ground threads
are tightened with the working thread, pulling
it rightwards. The needle is inserted into the
cloth two horizontal threads downwards (from
40
Ukrainian Folk Embroidery
і виводимо голку на лицьову сторону, міцно
стягуючи робочою ниткою набрані нитки
піткання. Вколюємо голку на місці виколу,
повертаємо вліво, набираємо на неї три
нитки основи між двома паралельними
нитками піткання і накладаємо таким же
способом наступний стібок. Кількість ниток
основи та піткання, які набираються на голку,
може змінюватися, залежно від структури
тканини, робочої нитки та характеру
орнаменту.
Півстовпчик застосовують для
рубцювання деталей та виробу в цілому, як
з'єднувальний шов, а також ним виконують
покрайниці основних орнаментів.
Лицьова сторона. Obverse.
і:::::.::::::::::::::::?:::-і:::::::::™::::::5^
3. Обметниця одностіб-
кова (плахтове закінчення).
Цей шов художнього
вигнивання виконується справа
наліво. Робочу нитку
закріплюємо з виворітної сторони на місці
початку шва. Виводимо голку з
робочою ниткою на лицьову
сторону. Від місця виколу
відраховуємо чотири нитки піткання
вниз між двома паралельними
нитками основи. Вколюємо
голку, повертаємо вверх і
набираємо на неї пропущені нитки
піткання. Виводимо голку на
лицьову сторону (утворився
вертикальний стібок із
виведеною робочою ниткою у
верхньому ріжку). Від місця виколу
пропускаємо дві нитки основи,
вколюємо голку через ту саму
кількість ниток піткання вліво і
вниз (на рівні нижнього ріжка попереднього
стібка), повертаємо голку вверх, набираємо
на неї чотири нитки піткання так, щоб вістря
голки було добре видно. Робочу нитку
обводимо під вістрям голки справа наліво,
притримуючи її весь час великим пальцем лівої
руки. Виводимо голку на лицьову сторону і
ведемо її з робочою ниткою вліво і вниз
через ту саму кількість ниток основи і
піткання для накладання наступного стібка. З
лицьової сторони утворюються рівні
вертикальні стібки через однакову кількість ни-
the insertion place), turned upwards, picking
up the same horizontal threads and brought out
onto the obverse side, tightening them with
the working thread. The needle is inserted into
the fabric at the place it has been drawn out
of, turned leftwards, picking up three ground
threads between two parallel horizontal threads,
thus laying the next stitch.
(The number of ground and horizontal
threads, picked up by the needle, can vary,
depending on the texture of fabric, working
thread and design character).
Half stitch is applied in hemming
details and articles themselves. It is also used as a
joining seam and to work final ornamental bands
of basic ornaments.
Виворіт. Reverse.
3. One-stitched Obmetny-
tsya (Plakhtove Ending).
This stitch is worked from
right to left. The working thread is
fastened to the reverse side at the
starting point. The needle with the
working thread is brought out onto
the obverse side of the cloth. From
that place four horizontal threads
between two parallel ground ones
are counted out downwards. The
needle is inserted into the fabric,
turned upwards, picking up the
missed horizontal threads. The
needle is brought out onto the obverse
side (a vertical stitch has been
formed, with the working thread
in its top corner). From that place
one should miss two ground threads
and insert the needle through the
same number of horizontal threads
leftwards and down (at the level of
the bottom corner of the previous stitch), turn
the needle upwards, picking up four horizontal
threads, so that the needle's point is clearly
visible. The working thread is twisted around
the needle's point from right to left, being
constantly held by the thumb of the left hand. The
needle with the working thread is brought out
onto the face of the cloth and led leftwards
and down through the same number of ground
and horizontal threads to lay the next stitch.
The obverse side shows even vertical
stitches laid at the equal interval of the ground
41
Українське народне вишивання
ток основи, з'єднані між собою петлею
робочої нитки. З виворітної сторони
утворюється горизонтальна лінія з рівномірних
вертикальних стібків, ритмічно розміщених на
однаковій відстані, не з'єднаних між собою.
Плахтове закінчення широко
використовується для рубцювання,
орнаментального оздоблення рушників, серветок,
скатертин, поясного верхнього одягу тощо.
th/ї f Ї««М "««ТІ
Ш kffen I
threads and joined together with a loop of the
working thread. The reverse side represents a
horizontal line formed by the even vertical
stitches, which fall the same way but are not
joined with each other.
Plakhtove ending is widely used in
hemming; towels, napkins table-cloths, half-length
and outer clothing decoration.
,„1, ».. - ■■.«)■«*■■■ li.a|i*ll.**iaa.«IM..i<.l»t>i ■»■■..» ■««■•■«■■*lt«ai«llAikatl»l«ilU
Лицьова сторона. Obverse.
Виворіт. Reverse.
4. Обметниця тристібко-
ва (плахтовий шов).
Виконується справа
наліво. Робочу нитку
закріплюємо на місці початку шва.
Виводимо голку з робочою ниткою на
лицьову сторону, вколюємо по
діагоналі через одну нитку
основи та чотири нитки піткання
вліво і вниз, повертаємо голку
вправо і вверх, набираємо
чотири пропущені нитки
піткання по діагоналі вправо і вверх
та виколюємо її на місці
попереднього виколювання так, щоб
робоча нитка була справа
голки. Обводимо вістря голки
робочою ниткою справа наліво,
притримуючи її великим
пальцем лівої руки. Виводимо голку
на лицьову сторону, вколюємо
її вліво і вниз на місці
нижнього ріжка попереднього стібка,
повертаємо вверх і набираємо 4
нитки піткання між двома
паралельними нитками основи
так, щоб вістря голки було
добре видно. Обводимо робочу
нитку під вістря голки справа наліво. Виводимо
голку на лицьову сторону і вколюємо через
чотири нитки піткання вниз (на місці
попередніх двох вколювань). Повертаємо голку
вверх і вліво, виколюємо через одну нитку
основи та чотири нитки піткання.
Обводимо робочу нитку під вістря голки справа
наліво і виводимо голку з робочою ниткою
на лицьову сторону.
4. Three-stitched Obmet-
nytsya (Plakhtovyi Stitch).
This stitch is worked from
right to left. The working thread
is fastened to the reverse side of
the cloth at the starting point. The
needle with the working thread
is brought out onto the obverse
side and inserted diagonally into
it through one ground thread and
four horizontal ones leftwards
and down. Then, the needle is
turned rightwards and up,
picking up four missed horizontal
threads, and brought out onto
the face of the cloth at the place
from which it was previously
drawn. The working thread
should be to the right of the
needle. The needle's point is twisted
around by the working thread,
held by the thumb of the left
hand,from right to left. The
needle is brought out onto the
obverse side and inserted into the
fabric, leftwards and down at the
bottom corner of the previous
stitch, turned upwards, picking
up four horizontal threads
between two parallel ground ones so that the
needle's point is clearly visible. The working thread
is twisted around it from right to left. The
needle is brought out onto the obverse side of the
cloth and inserted into it four horizontal threads
downwards (at the place of the two previous
insertions), turned upwards and left and
brought out to the obverse side through one
ground thread and four horizontal ones. The
working thread is twisted around the needle's
point from right to left and the needle with the
working thread is brought out onto the obverse
side of the cloth.
42
Ukrainian Folk Embroidery
Лицьова сторона. Obverse.
bi^«*«iW»*>ft"fr»^«akii«>fli«*Mtii*i>%>rtatltHiiKii«;a««rtc^
Виворіт. Reverse.
5. Хрестикування
(козлик).
Шов виконується зліва
направо. Робочу нитку закріплюємо
на місці початку шва з виворітної
сторони. Виводимо голку з
робочою ниткою на лицьову сторону,
ведемо її від місця виколу вправо
і вверх по діагоналі через чотири
нитки основи і піткання.
Вколюємо голку, повертаємо вліво та
набираємо на неї дві нитки основи.
Виводимо голку з робочою ниткою
на лицьову сторону, ведемо її
вправо і вниз по діагоналі через чотири нитки
основи і чотири нитки піткання. Вколюємо
голку, повертаємо вліво, набираємо на неї
дві нитки основи. Виводимо голку з робочою
ниткою на лицьову сторону, ведемо її знову
вправо і вверх по діагоналі через ту саму
кількість ниток основи і піткання для
накладання наступного стібка (кількість ниток
основи та піткання, через які по діагоналі
ведеться робоча нитка і які набираються на
голку, може змінюватись, залежно від
структури тканини, робочої нитки та
бажаної характеристики орнаментальної лінії
шва).
При цьому з лицьової сторони
утворюється орнаментальна лінія із
діагональних стібків, накладених то вправо, то вліво,
які перехрещуються між собою зверху і
знизу, з виворітної сторони — дві паралельні
горизонтальні пунктирні лінії, утворені
рівними стібками через однакову відстань
тла тканини.
Хрестикуванням виконують
рубцювання, з'єднувальні шви, покрайниці
стрічкових орнаментів, а також
використовують як самостійний оздоблювальний шов
художнього вишивання.
5. Crossing (Kozlyk).
This stitch is worked from
left to right. The working thread is
fastened to the reverse side of the
cloth at the starting point. The
needle with the working thread is
brought out onto the obverse side
and led diagonally from that place
rightwards and up through four
ground and horizontal threads. The
needle is inserted into the cloth,
turned leftwards, picking up two
horizontal threads. The needle with
the working thread is brought out
onto the obverse side and led diag-
onally rightwards and down through four
ground and horizontal threads. Then, the
needle is inserted into the cloth again, turned
leftwards, picking up two horizontal threads,
brought out onto the face of the fabric and led
diagonally rightwards and up through the same
number of ground and horizontal threads to
lay the next stitch, (the number of ground and
horizontal threads the working thread takes
diagonal journey through and which are picked
up by the needle can vary, depending on the
texture if the fabric, the working thread and
desirable orn amental quality of the seam line).
The face of the material shows the
ornamental line, consisting of diagonal stitches,
laid rightwards and leftwards, which intersect
each other from above and from below. The
reverse side represents two parallel horizontal
dotted lines, formed by the even stitches at the
equal intervals of the cloth background.
Crossing is applied in hemming, joining
seams, final ornamental bands etc. It can also
be used as the basic decorative stitch of
artistic embroidery.
* ж * ж^:*:*»:*:*:*-^*^»?
і%:Й-!&:-*;£:Ія%:!Й:*йвЗ
Лицьова сторона. Obverse.
Виворіт. Reverse.
43
Українське народне вишивання
Самостійна робота.
1. Опрацювати натурні зразки
вишитих одягових, інтер'єрних, обрядових
виробів; ознайомитись із формами обробки
країв деталей та виробів в цілому.
2. Зробити замальовки характерних
рубців, з'єднувальних швів, підрубок, різних
форм зубцювання.
Завдання № 1.
1. Серед демонстрованих зразків
тканин визначити тканину з полотняним
переплетенням.
2. Розкроїти тканину з полотняним
переплетенням на задані деталі.
Контрольна робота.
Самостійне практичне вишивання
вивчених швів за поданим зразком.
Розмір 14 см х 6 см.
Матеріали: полотно домоткане;
нитки — муліне;
оправа — картон.
Питання для контролю знань.
1. Зобразіть графічно одинарний
з'єднувальний рубець.
2. Проімгтуйте із двох відрізків
тканини подвійний з'єднувальний рубець з
підгином до вивороту.
3. Дайте визначення технологічній
операції підрублення.
4. Які функції несуть в собі рубці
та підрубка у виробах?
5. За якими ознаками розрізняють
тканини з полотняним переплетенням?
6. Яким способом виконуються
мітки для розкрою на деталі виробу
тканин з полотняним переплетенням?
Independent Work.
1. Examine samples of embroidered
clothes, interior, ceremonial articles; study the way
the edges of the details and articles themselves
are finished.
2. Make sketches of characteristic hems,
joining seams, and different forms of hemming.
Task No 1.
1.Determine fabric with linen
interlacing among the show-samples.
2.Cut out the material, with linen
interlacing, according to the given specifications.
Test.
Independent practical embroidery of
already studied stitches with the given
sample.
Size 14cm x 6cm
Materials: home spun cloth
threads — Mouline
framing — cardboard
Final Questions.
1. Draw a single joining hem.
2. Imitate a double joining hem, folded
under to the reverse side, on two pieces of the
material.
3. Give the definition of the technologic
operation of hemming.
4. What are the functions of hems and
hemming in articles?
5. How are fabrics with linen interlacing
determined?
6. How are the marks, to cut out the
details of an article, made on the fabrics with linen
interlacing?
44
I
»
Mf
t J
■ рч-н
\
I
і
і
і
■ iif
•і
r •
ft
1 .. і
]:№
j.
і
і
ill*
'r'fj
№ >'
!І>.ІЯ
Iі''
I ІНІ
i.!:
i;
i*
'J
4
ШШШШШ.Ш <*.
s
.<//»
##
^
І і
®m
-\ 11 ®
• і
t і
#4
j °&>
:tf
t
н "Щ^'Щ^ЩЩі^^Ш^
і :1t <!
fourth
ЇЙ'
<і
if
її
І!
all- її \и
її
*Й
Ні
:'Іі ' .;
,1:1 І
т
if .
'І
'! 'І
.' lib
И'
І!
І,' к і JІ
іі, ЇЙ;
4 І. і*1
н. 4U
ю
■■і і
■ J
'ЛІ і
1 ' * І і
л :
/ t
л '
• >:♦',
■* ' « * * Vi
J * * « *
I *
. .ДО* . ... t
:1!:
l!
f
Оздоблення країв'
деталей Виробів
.! v
, 'Edges fmisfiirva of the
І! аггіс&зі details ^
i\
її і
t
s,.
v.-
■-г-ч-"
Д
\
^
i.
*
..*•*■
•* \
«v
1
J.
4.
•. 0 $ і
tit*- і * t * * $
<£}£<&&
(Ж. J. 9їо а каві шви
SS* * с 'шагу Stitches of Artistic %mb oidery
Українське народне вишивання
авчання мистецтву
художнього вишивання — процес
складний. Він потребує
аналітичного мислення,
теоретичних знань з технології виконання
швів, практичних умінь, навиків
користування інструментами, вишивальними
матеріалами та власними знаннями.
Формування умінь, практичних
навиків вишивання слід починати із
найпростіших швів, доступних розумінню,
аналізу, технологічному розбору. При їх вивченні
найкраще започатковувати знання, вміння
з техніки настилу стібків, технології
ведення шва, закладати основи фахового
технологічного мовлення, а також початкові
вправи практичного виконання технік
художнього вишивання за їх теоретичним описом.
Studying the art of artistic embroidery
is a rather complicated process. It requires an
analytical way of thinking, theoretic
knowledge in the fields of technology and techniques
of seam execution, practical skills, skills in using
tools,embroidery paraphernalia and one's own
knowledge.
To acquire habits and practical skills in
embroidery one should start with elementary
stitches, which are clear and easy to analyze
and investigate. To get profound knowledge and
skills while studying, it is better to begin with
the technique which with the stitches are
worked, technology of the seam, to operate
the vocabulary as well as to be able to execute
techniques of artistic embroidery for beginners
under their theoretic description.
1. Затяганка.
Цей шов
художнього вишивання
виконується знизу вверх
(шов вперед голку).
Робочу нитку
закріплюємо з виворітної сторони
на місці початку шва.
Виводимо голку з
робочою ниткою на лицьову
сторону. Від місця вико-
лу відраховуємо чотири
нитки піткання між
двома паралельними
нитками основи, вколюємо
голку і набираємо на неї
дві нитки піткання.
Виводимо голку з робочою ниткою на лицьову
сторону, знову пропускаємо чотири нитки
піткання між тими самими паралельними
нитками основи для накладання наступного
стібка. (Кількість пропущених та набраних
ниток піткання можна змінювати, залежно
від структури робочої тканини,
вишивальної нитки та якісної характеристики
орнаменту.) При цьому з лицьової та
виворітної сторін утворюється пунктирна
горизонтальна лінія, вишита стібками робочої
нитки, тільки стібки з лицьової сторони вдвічі
більші від стібків виворітної сторони.
Затяганку виконують при
рубцюванні, зубцюванні як з'єднувальний шов та
заповнення тла середини і покрайниць в
окремих виробах, а також як самостійний
орнаментальний шов для контурної вишивки.
Затяганку можна виконувати на
тканині без полотняного переплетення. В тако-
1. Zatyahanka
(«to tighten»)
The stitch is
worked from the bottom
to the top (running stitch).
The working thread is
fastened to the reverse
side of the cloth at the
starting point. The needle
with the working thread
is brought out to the
obverse side.Four horizontal
]i threads between two
parallel ground threads are
counted out from the
place the needle has been
brought out. Then, the
needle is inserted into the cloth, picking up two
horizontal threads and brought out to the
obverse side to lay the next stitch. Again, four
horizontal threads between the same parallel
ground threads are missed, (the number of
missed and picked horizontal threads can vary
depending on the texture of the material,
embroidery thread and qualitative characteristics
of the ornament) Both, the obverse and
reverse sides show a dotted horizontal line, worked
with the stitches of the working thread. But,
the stitches on the obverse are twice longer the
stitches on the reverse.
Zatyahanka Stitch is used while
hemming, indenting etc. It is also used as a joining
stitch and to fill the background, center and hems
in separate articles. As the basic ornamental stitch
it is worked in contour embroidery.
Zatyahanka can be worked on the
material without canvas interweaving. In this case,
48
Ukrainian Folk Embroidery
му випадку робиться відмітка лінії шва. При
накладанні стібків на голку набирається
проміжок тканини вдвічі менший, ніж
пропускається під голкою.
В!
Е==е|ііі
2. Стебнівка (стебну-
вання, ручна строчка,
французький шов).
Шов виконується знизу
вверх. Робочу нитку
закріплюємо з виворітної сторони на місці
початку шва. Виводимо голку з
робочою ниткою на лицьову
сторону. Від місця виколу вниз
між двома паралельними
нитками основи відраховуємо три
нитки піткання. Вколюємо голку,
повертаємо вверх і набираємо на неї шість ниток
піткання (між визначеними двома
паралельними нитками основи). Виводимо голку з
робочою ниткою на лицьову сторону, від
місця виколу вниз відраховуємо 3 (три)
нитки піткання, вколюємо голку (це буде у
верхньому ріжку нижнього стібка),
повертаємо вверх, набираємо шість ниток
піткання, виводимо голку з робочою ниткою на
лицьову сторону і таким же способом
накладаємо стібки до кінця лінії шва. При
цьому слідкуємо, щоб робоча нитка весь час
була з правої сторони голки, притримуючи
її середнім та вказівним пальцем правої
руки.
З лицьової сторони утворюється
пряма орнаментальна лінія із рівних стібків,
з'днаних між собою нижнім і верхнім
ріжками. З виворітної сторони утворюється
пряма лінія, утворена стібками, які
наполовину переривають один одного.
Такий шов художнього вишивання
застосовують для рубцювання, зубцюван-
ня, виконання покрайниць в стрічкових
орнаментах, поєднують із
найрізноманітнішими техніками художнього вишивання.
Стебнівкою виконують орнаментальні
мотиви та основні орнаменти. В такому
випадку стібки накладаються не по прямій
лінії, а за лінією орнаментального мотиву.
one should mark the seam line. While laying
the stitches, half as much cloth is picked up
by the needle than missed underneath it.
2. Stebnivka (hand stitch,
French Stitch).
The stitch is worked from
the bottom to the top. The
working thread is fastened to the
reverse side of the cloth at the
starting point. The needle with the
working thread is brought out to
the face of the cloth. Three
horizontal threads between two
parallel threads are counted out
downwards. The needle is inserted into the cloth
and turned upwards, picking up six horizontal
threads (between the two defined ones). Then,
the needle with the working thread is brought
out to the obverse side and three horizontal
threads are counted out downwards again. The
needle is inserted into the cloth (this will be in
the top corner of the bottom stitch), turned
upwards, picking up six horizontal threads,
brought out to the face of the cloth. The
stitches are laid in the same technique till the end of
the seam line. One should see that the working
thread is to the right of the needle, holding it
with the middle finger and forefinger of the
right hand.
The obverse side shows a straight
ornamental line, consisting of the even stitches
joined together with the top and bottom
corners. The reverse side represents a straight line
from the stitches which cover each other half.
The stitch is used in hemming,
indenting and working final ornamental bands. It can
also be combined with the various techniques
of artistic embroidery.
Ornamental motifs and basic ornaments
are worked with Stebnivka Stitch. In this case
the stitches are not laid straight, but outline
the ornamental motif.
Лицьова сторона. Obverse.
Виворіт. Reverse.
<;
dO
49
Українське народне вишивання
Лицьова сторона. Obverse.
КРИВУЛЬКИ.
3. Кривулька
одностороння.
Шов виконується
знизу вверх. Робочу нитку
закріплюємо з виворітної
сторони на місці початку
шва. Виводимо голку з
робочою ниткою на лицьову
сторону. Від місця виколу
ведемо робочу нитку по
діагоналі через три нитки
основи та піткання вправо
і вниз. Вколюємо голку,
повертаємо вверх,
набираємо на неї шість ниток піткання. Виводимо
голку на лицьову сторону, ведемо робочу
нитку по діагоналі через три нитки основи і
піткання вліво і вниз, вколюємо голку (це
буде у верхньому ріжку нижнього стібка),
повертаємо її вверх, набираємо на неї шість
ниток піткання. Виводимо голку з робочою
ниткою на лицьову сторону, ведемо її по
діагоналі через ту саму кількість ниток
основи і піткання вправо і вниз для
накладання наступного стібка. (Кількість ниток
основи і піткання могкна змінювати, залежно від
структури тканини та бажаної якісної
характеристики орнаментальної лінії шва).
З лицьової сторони утворюється
орнаментальна лінія із рівномірних діагональних
стібків, що дотикаються під гострим кутом. З
виворітної сторони — дві паралельні
горизонтальні лінії, утворені рівними стібками.
Кривульку односторонню
застосовують як з'єднувальний шов в декоруванні
рубців. Нею виконують орнаменти покрай-
ниць, поєднують із найрізноманітнішими
швами художнього вишивання при виконанні
основних орнаментів. Широко її
використовують при оздобленні натільного,
верхнього, поясного та плечового одягу.
Лицьова сторона. Obverse.
Виворіт. Reverse.
3. Kryvulka (Wave
Stitch).
One-sided Kyvulka.
The stitch is worked from
the bottom to the top. The
working thread is fastened
to the reverse side of the
cloth at the starting point.
The needle is brought out to
the obverse side. From that
place the needle with the
working thread is led
diagonally through three ground
and horizontal threads
rightwards and down. The needle is inserted into
the cloth again, turned upwards, picking up
six horizontal threads and brought out onto the
face of the material. Then the working thread
is led diagonally through three ground and
horizontal threads leftwards and down. The needle
is inserted into the cloth (this will be at the
upper corner of the bottom stitch), turned
upwards, picking up six horizontal threads,
brought out onto the obverse side and led
diagonally through the same number of ground and
horizontal threads rightwards and down to lay
the next stitch, (the number of horizontal and
ground threads can vary depending on the
structure of the material and desirable qualitative
characteristics of the ornamental seam line).
The face shows the ornamental line,
consisting of the even diagonal stitches,which
intersect at the acute angle. The reverse side
represents two parallel ornamental lines,formed
by the even stitches.
One-sided Kryvulka Stitch is used as the
joining stitch and decoration of hems. The
ornaments of the final fancy bands are worked
with this stitch. It is combined with various
stitches of artistic embroidery while working
the basic ornaments. It is widely used to
decorate underwear and outer waist length and
shoulder-width clothing.
Виворіт. Reverse.
50
Ukrainian Folk Embroidery
4. Кривулька
двостороння.
Виконується
справа наліво. Робочу
нитку закріплюємо з
виворітної сторони на
місці початку шва.
Виводимо голку з робочою
ниткою на лицьову
сторону, ведемо її по
діагоналі через три нитки
основи та три нитки
піткання вліво і вверх.
Вколюємо голку,
повертаємо вниз і вліво,
виколюємо по діагоналі
через три нитки
основи і піткання.
Виводимо голку з робочою
ниткою на лицьову
сторону, знову ведемо по діагоналі вліво і вверх
через ту саму кількість ниток основи і
піткання для накладання наступних стібків.
Дійшовши до кінця лінії шва, повертаємо
тканину на 180° і накладаємо стібки в
протилежну сторону, набираючи лицьові стібки
на голку, пропускаючи тканину між; стібка-
ми під голку. Таким чином, з лицьової та
виворітної сторони утворюється
орнаментальна пряма лінія із рівномірних
діагональних стібків, що дотикаються під гострим
кутом. Звідси і назва — кривулька
двостороння, її можна виконувати двома
кольорами або двома відтінками одного і того ж
кольору.
Кривулькою двосторонньою
виконують рубцювання, з'єднувальні шви, покрай-
ниці та основні орнаменти в оздобленні
рушників, дитячого, жіночого, чоловічого
натільного, поясного та плечового одягу.
Лицьова сторона. Obverse.
5. Кривулька тристібкова.
Шов виконується знизу вверх.
Робочу нитку закріплюємо з виворітної сторони
на місці початку шва. Виводимо голку на
лицьову сторону і прошиваємо три стібки
технікою стебнівка (див. опис стебнівка).
Після накладання останнього третього стібка
виводимо голку у його верхньому ріжку,
ведемо її по діагоналі через три нитки ос-
4. Double-sided
Kyvulka.
It is -worked from
right to left. The working
thread is fastened to the
reverse side at the
starting point. The needle with
the working thread is
brought out to the
obverse side of the cloth
and led diagonally
through three ground and
horizontal threads
leftwards and up. The needle
is inserted into the cloth,
turned down and left,
brought out onto the face
of the cloth diagonally
through three ground and
horizontal threads. Then,
the needle with the working thread is led
diagonally leftwards and up through the same
number of ground and horizontal threads to lay the
next stitch. Having reached the end of the seam
line, the material is turned at the angle of 180°
and the stitches are laid in the opposite
direction. The face stitches are picked up by the
needle, missing the cloth between stitches under
the needle. Thus, the ornamental straight line
from even diagonal stitches, intersected at an
acute angle, is formed both on the obverse and
reverse sides. The technique itself determines
the name of the stitch. Double-sided stitch can
be worked in two colors, or two tints of the
same color.
The stitch is used in hemming, joining
seams,final ornamental bands and as the basic
ornament to decorate towels; children, women
and men's underwear, waist length and
shoulder width clothing.
Виворіт. Reverse.
5. Three-stitched Kryvulka.
The stitch is worked from the bottom to
the top. The working thread is fastened to the
reverse side at the starting point. The needle is
brought out onto the obverse side of the cloth
and three stitches are laid in Stebnivka
(running) Stitch technique. Having the last third
stitch ready, the needle is brought out in its
top corner and led diagonally through three
WW
WVA
^ VNS4A
4
/
A> w^
51
Українське народне вишивання
fj>
СІ
з\'Л
нови та піткання вправо і вниз. Вколюємо
голку, повертаємо вверх, набираємо на неї
три нитки піткання, прошиваємо три стібки
технікою стебнівка, виводимо голку на
лицьову сторону у верхньому ріжку третього
стібка та ведемо її по діагоналі через три
нитки основи і піткання вліво і вниз.
Вколюємо голку, і таким же способом
накладаємо стібки до кінця лінії шва (кількість
ниток основи і піткання, через які
накладаються стібки, можна змінювати, відповідно
структурних вишивальних матеріалів та
якісної характеристики шва, але кількість
ниток піткання, через які настилаються
стібки стебнівки і діагонального стібка,
повинна бути однаковою).
Кривульку тристібкову застосовують
як з'єднувальний шов для оздоблення
деталей та конструктивних швів вишитих
виробів, поєднують в орнаментах із
найрізноманітнішими техніками художнього
вишивання, а також нею виконують доповнюючі
й основні орнаменти.
Лицьова сторона. Obverse.
6. Ланцюжок (тамбур, тамбурний
шов).
Цей шов художнього вишивання
виконується знизу вверх. Робочу нитку
закріплюємо з виворітної сторони на місці
початку шва. Виводимо голку з робочою ниткою
на лицьову сторону, вколюємо її на місці
виколу. Повертаємо голку вверх, набирає-
ground and horizontal threads rightwards and
down. The needle is inserted into the cloth,
turned upwards, picking up three horizontal
threads and again three stitches are laid in Steb-
nivka technique. The needle is brought out onto
the face of the material in the top corner of
the third stitch and led diagonally through three
ground and horizontal threads leftwards and
down. The needle is inserted into the cloth and
the stitches are laid in the same way till the
end of the seam line. The number of ground
and horizontal threads the stitches have been
laid through can vary according to the texture
of embroidery stuff and qualitative
characteristics of the seam line. But the number of
horizontal threads Stebnivka and diagonal stitches
that havebeen laid through should be the same.
Three-stitched Kryvulka is used as a
joining seam, to decorate the details and
constructive seams of already embroidered
articles. It is combined with the most diverse
techniques in ornaments and used in
complementary and basic designs.
Виворіт. Reverse.
6. Lantsiuzhok (Chainstitch).
This stitch of artistic embroidery is
worked from the bottom to the top.The
working thread is fastened to the reverse side of
the material at the starting point. The needle is
brought out onto the obverse side,inserted into
the cloth, turned upwards, picking up two-three
horizontal threads between two parallel ground
52
Ukrainian Folk Embroidery
mo на неї дві-три
нитки піткання між
двома паралельними
нитками основи і
виколюємо її так, щоб
вістря голки було
добре видно (не
менше 1/3 голки).
Робоча нитка при цьому
повинна постійно
лежати справа голки.
Обводимо робочу
нитку попід вістрям
голки справа наліво,
притримуючи її великим пальцем лівої руки.
Виводимо голку на лицьову сторону, знову
вколюємо на місці попереднього виколу (за
петлевим стібком, що утворився) і таким же
способом накладаємо стібки до кінця лінії
шва.
Ланцюжок (тамбур, тамбурний шов)
використовують при рубцюванні,
з'єднувальних швах, декоруванні рубців та країв
деталей виробу. Ним виконують покрайниці,
в стрічкових орнаментах поєднують з
найрізноманітнішими техніками художнього
вигнивання.
Техніку художнього вишивання
«ланцюжок» можна виконувати не тільки по
прямій лінійним способом, а й за лінією
орнаментального мотиву. Мотиви поєднують в
орнаментальні стрічки і, таким чином,
«ланцюжком» (тамбуром, тамбурним швом)
виконують найрізноманітніші основні
орнаменти, якими декорують дитячий, жіночий,
чоловічий одяг.
Лицьова сторона. Obverse.
КРУЧЕНІ ШВИ.
7. Кручений шов «позад голки»
Характерна технологічна особливість
шва в тому, що стібки настеляються
круговим способом (по колу).
Техніка виконання шва поєднує в собі
наступні прийоми у відповідній
послідовності: робочу нитку закріплюємо з
виворітної сторони і вишиваємо хрестик косий.
Голку з робочою ниткою виводимо у правому
верхньому ріжку хрестика. Від місця
виколу вниз відраховуємо дві горизонтальні нит-
threads, and taken out
so that the needle point
is clearly visible (not less
than 1/3). The working
thread should always be
to the right of the
needle. The working thread
is twisted around the
needle's point form
right to left, being held
by the thumb of the left
hand. The needle is
brought out onto the
face of the cloth and
inserted into it again at the place the needle has
previously been taken out of (beyond the loop
stitch formed before). The stitches are laid the
same way till the end of the seam line.
Chain stitch is used while hemming, in
joining seams, decoration of hems and article
edges. It is applied to work final ornamental
bands and combined with various techniques
of artistic embroidery.
Chain stitch can be worked not only in
a straight way, but according to the line of the
ornamental pattern. Motifs are combined into
ornamental bands. Thus,chain stitch is a means
to work basic designs in children, women and
men's clothing.
Виворіт. Reverse.
7. Twisted Backstitch.
The characteristic technologic
peculiarity of the seam is that the stitches are laid in
circles. While working the stitch one should keep
to the strict succession. The working thread is
fastened to the reverse side of the cloth at the
starting point. The needle is brought out to the
obverse side and a slanting stitch is worked.
The needle with the working thread is brought
through the upper corner of the cross. From
that place two horizontal threads are counted
53
Українське народне вигнивання
ки. Вколюємо голку
(це буде у правому
нижньому ріжку
хрестика).
Повертаємо вверх,
набираємо на неї
пропущені нитки і
виводимо на лицьову
сторону на місці
першого виколу.
При цьому
слідкуємо, щоб робоча
нитка йшла з правого
боку голки. Ведемо
голку з робочою
ниткою вниз і вліво
(заокруглюємо)
через чотири нитки
(дві — покритих
стібком, дві —
непокритих),
вколюємо голку (це буде у
лівому нижньому
ріжку хрестика),
повертаємо вверх,
набираємо на неї дві
нитки і виколюємо у
нижньому ріжку
верхнього стібка.
Знову ведемо голку з робочою ниткою по
колу і вколюємо через чотири нитки (це буде
у верхньому лівому ріжку хрестика).
Останній стібок настеляємо через чотири
нитки, вколюємо голку (це буде у правому
верхньому ріжку хрестика, тобто на місці
першого виколу), повертаємо голку вверх,
набираємо на неї дві непокритих стібком
нитки, виводимо на лицьову сторону та
вколюємо її зліва за петлею першого стібка.
З лицьової сторони утворюється
основний композиційний елемент «ягідка» або
«кружечок», який складається із хрестика
косого, обплетеного довкола стібками, що
наполовину перетинають один одного.
Величину основного елемента можна збільшити
за рахунок настилу по колу наступних рядів
стібків. В орнаментах їх розміщують
різними способами: прямою лінією, по діагоналі,
трикутниками, ромбами тощо,
вибудовуючи при цьому найрізноманітніші візерунки.
off, the needle is
inserted into the fabric
(this will be in the
right bottom corner
of the cross), turned
upwards, picking up
the missed threads
and brought out onto
the face of the cloth
at the starting point.
Thus, one should see
that the working
thread is to the right
of the needle. The
needle with the work-
ing thread is led
downwards and left
(curve) through four
threads (two threads
are covered with a
stitch and two are
non-covered), turned
upwards, picking up
two threads and is
brought out onto the
obverse side in the
bottom corner of the
upper stitch. Again,
the needle with the
working thread is pulled in a circle and is
inserted into the cloth through four threads (this
will be in the top left corner of the cross). The
last stitch is laid through four threads. The
needle is inserted into the fabric (this will be in the
right top corner of the cross, thus at the first
inserting point), turned upwards, picking up
two threads not covered by the stitch, brought
out onto the obverse side and inserted leftwards
beyond the loop of the first stitch.
The obverse side shows the basic
composition element a «berry» or «circle», which
consists of a slanting cross, twined around the
stitches, which intersect each other half. The
size of the basic element can be extended,
laying the next stitch rows in circles. They are
placed in ornaments in various ways: in a
straight line, diagonally, in triangles, in
rhombuses etc., thus forming elaborate designs.
Лицьова сторона. Obverse.
Виворіт. Reverse.
54
Ukrainian Folk Embroidery
8. Кручений
шов «ланцюжком»
Технологія
виконання крученого шва
«ланцюжком» ідентична
технології крученого
шва «позад голки».
Відмінність полягає у
техніці настилу стібків.
Настил стібків
виконується в техніці
«ланцюжок». Хрестик по
центру не виконується.
Робочу нитку
закріплюємо з виворітної
сторони на місці початку
шва. Виводимо голку з
робочою ниткою на
лицьову сторону. Від місця виколу вниз
відраховуємо дві нитки, вколюємо голку,
набираємо на неї дві пропущені нитки так, щоб
вістря голки було добре видно. Обводимо
вістря голки робочою ниткою справа наліво.
Виводимо голку, (утворилась петелька із
виведеною робочою ниткою між центром
петельки та верхньою частиною її обвідки).
Потім таким же способом накладаємо стібки
за годинниковою стрілкою довкола цієї
першої петельки. Після настилу останньої
петельки голку виколюємо за обвідкою
верхньої сусідньої петельки. Настил стібків
можна продовжити по другому, третьому
кругу, залежно від бажаної величини
елемента (кружечка).
8. Twisted Stitch
«in chain».
The technique of
execution of a twisted
stitch «in chain» coincides
with that of a backstitch.
The only difference is the
way the stitches are laid.
The latter is worked «in
chain» technique. The
cross in the center is not
done. The working thread
is fastened to the reverse
side of the cloth at the
starting point. The
needle with the working
thread is brought out
onto the obverse side.
From that place, two threads are counted out
downwards and the needle is inserted into the
fabric, picking up the missed threads so that
the needle's point is clearly visible. Then, the
needle's point is twisted around by the
working thread from right to left and the needle
itself is brought out onto the obverse side (the
loop has been formed with the working thread
between its center and the upper arch). The
stitches are laid around this first loop clockwise
in the same technique. Having laid the last loop,
the needle is inserted into the cloth beyond the
arch of the upper neighboring loop. The
stitches can be laid a second time, etc. in circles,
according to the desirable size of the element
(circle).
V
V
J .-?-,
ґГ
1 I
.*. \ -. ■ V'
л \* 4* \\ ' • .-
k
v
.*'v4 ч A
Лицьова сторона. Obverse.
Виворіт. Reverse.
55
Українське народне вишивання
Самостійна робота.
Тренінгові вправи з практичного
виконання шва художнього вишивання за
теоретичним описом його техніки і
технології.
Започаткувати словничок з основ
фахового технологічного мовлення.
Завдання № 2.
Практичне виконання гивів
художнього вигиивання: затяганка (вперед голку),
стебнівка (позад голки), кривульки:
одностороння, двостороння, тристібкова, ланцюжок
(тамбур).
Independent Work.
1. Training exercises to execute artistic
embroidery stitches under the theoretic
description of its technique and technology.
2. Develop one's own vocabulary of
professional words in technology.
Task # 2.
Execute artistic embroidery stitches:
Zatyahanka (Running Stitch), Stebnivka
(Backstitch), Kryvulky: one —sided, double-sided, three-
stitched, Lantsyuzhok (Chain stitch).
Контрольна робота.
Самостійне практичне вигиивання
вивчених гивів за поданим зразком.
Розмір 14 см X 6 см.
Матеріали: полотно домоткане;
нитки — муліне ;
оправа — картон.
Питання для контролю знань.
1. Перелічіть вивчені початкові шви.
2. Прокоментуйте техніку
виконання і технологію ведення гива вперед голку.
3. Практично прошийте по прямій
кривульку односторонню.
4. Походження назви шва
художнього вишивання кривулька тристібкова.
5. За поданими натурними
зразками швів художнього вишивання з лицьової
та виворітної сторін визначіть
кривульку двосторонню.
6. Прокоментуйте поняття:
а) техніка виконання гива;
б) технологія ведення гива.
Test.
Independent execution of already
studied stitches following the given example.
Size 14 cm X 6 cm
Materials homespun cloth
threads — Mouline
framing — cardboard
Final Questions.
1. Innumerate elementary stitches, that
have been studied.
2. Comment on the execution technique
and seam technology of the stitch Vpered Holku
(kind of a Running Stitch).
3. Work One-sided Kryvulka straight
ahead.
4. The roots of the name Three — stitched
Kryvulka.
5. Identify Double-sided Kryvulka from
the obverse and reverse sides on the given real
samples of stitches of artistic embroidery.
6. Comment on the definitions:
a) execution technique of the stitch
b) seam technology.
56
V-1*.
l&mmwm' ,№ Щ. ^ ц/, ..../ ■
g^Vj£^t;4Mi£'
'»'! І !(!'>• ,, {|і ,11111 In і in і
^Початкові шви в інтер'єрни?с Виробах.
^Primary stitches in interim works
» 1*9 $ t I
t Ф t 10 ' t
4\
j&
l"L
*"■ ч^... ^^^^/^^y^
O c2
.»«•.'*
If
поїш
f-
^^т^шетшьжгєтещ^
І5/^5Л^ААЛЛАЛА^^
і."*'
>л- І
Шіїо/дагвд/сз^/р
NMMWN^^
П
V І Шг
JT»
"<g^
^
і.1 - і V\- N
'Тепер ",
поч. XXI cm.
"9{pzv",
beginning
of the XXI-st century
3 «>
Afs,
3gi
1
Д
^
1XXx\v
^
\
Зі '
\
IT
4 ■
r • *>
I. +
h
і ■ ■ ■>
1-І .1 ■*
:,fc4
\A
ЗГОРї
І —: )
(УІ. W. Osgo люіїальні и и
$$. W* Ornamented Stitching Seams
/
/
/ /
t
Українське народне вишивання
Шиникнення назви
«оздоблювальні» можна пояснити од-
нокорінними словами,
приведеними в словарі Б.Грін-
ченка: оздоба, оздобити, оздобний, оз-
добність. Всі вони несуть в собі зміст,
пов'язаний із розумінням: прикраса,
прикрашати, красний, вишуканість у прикрашанні
(т.З, ст.44). Від них і походить назва швів
оздоблювальні, яка несе в собі подвійний
зміст:
а) оздоблювати, прикрашати
тканину шляхом настилу стібків вишивальною
ниткою;
б) оздоблення, прикрашання,
надання цілісності, композиційної завершеності
орнаментам.
В орнаментальних композиціях
оздоблювальні шви виконують функції
взаємозв'язку композиційних мотивів,
роздільних і доповнюючих ліній, покрайниць тощо.
Натурний фактологічний матеріал
засвідчує значимість оздоблювальних швів
у декоративному рішенні виробів, творів
художнього вишивання.
Теоретичне і практичне вивчення
технології, техніки вишивання
оздоблювальних швів дає можливість розвинути уяву і
навики початкового аналізу про
взаємозв'язок технік художнього вишивання в орна-
ментотворенні. Формує початкові поняття
мислення техніками художнього
вишивання в композиції.
1. Низинний
шнурок.
Шов виконується з
виворітної сторони справа
наліво.
Робочу нитку
акуратно закріплюємо на місці
початку шва. Від місця
закріплення ведемо голку по
діагоналі вправо і вниз
через дві нитки основи та дві
нитки піткання. Вколюємо
голку і різко повертаємо
вліво і вверх. Виколюємо її
по діагоналі через ті самі
дві нитки піткання та
чотири нитки основи. Виводимо голку, ведемо
її знову вправо і вниз через дві нитки
основи і ті самі дві нитки піткання. Вколюємо
голку (це буде на рівні верхнього ріжка
попереднього стібка через дві нитки піткання
вниз), повертаємо вліво і вверх, і виколює-
The origin of the name «ornamental»
can be explained thus — in H.Hrinchenko
Dictionary (Ukrainian)it has the same root as the
Ukrainian words: an ornament, to ornament,
ornamental,ornamentation. They all render the
meaning, connected with one's perception of:
adornment, to decorate, beautiful, delicacy in
ornamentation. (44). The name «Ornamental
Stitches» comes from them and has a double
meaning:
a) to ornate, decorate the material,
laying the stitches with the embroidery thread
b) ornamentation, adornment, final
compositional touch of the ornaments
Ornamental Stitches in the ornamental
compositions contribute to the
intercommunication of the compositional motifs, serve as
marginal and complementary lines and final
ornamental bands etc.
The facts prove the importance of
Ornamental Stitches in final decoration of the
articles and works of artistic embroidery.
Theoretic and practical study of the
technology and technique of the way
Ornamental Stitches are worked enables one to
develop imagination and skills of elementary
analysis of intercommunication of techniques of
artistic embroidery while creating ornaments.
It also forms an elementary way of thinking
of how techniques of artistic embroidery would
do for a composition.
1. Nyzynnyi Cord
(Lace).
The seam is worked
from the reverse side of the
cloth from right to left. The
working thread is fastened
at the starting point. From
that place the needle is led
diagonally rightwards and
down through two ground
threads and two horizontal
threads. The needle is
inserted into the cloth and turned
leftwards and up. Then, it
is brought out diagonally
through the same two
horizontal threads and four ground threads. Again,
the needle is led rightwards and down through
two ground threads and the same two
horizontal threads, inserted into the cloth (this will be
formed on the level of the upper corner of the
previous stitch through two horizontal threads
62
Ukrainian Folk Embroidery
mo по діагоналі через дві нитки піткання і
чотири нитки основи (з них дві до місця
попереднього виколу, дві вліво після нього) для
накладання наступного стібка. Цим же
способом накладаємо стібки до кінця лінії шва.
З виворітної сторони (зі сторони
виконання шва) утворюються рівномірні,
одинарні діагональні стібки зліва направо
через дві нитки основи і дві нитки піткання. З
лицьової сторони також утворюються
рівномірні діагональні стібки, але удвічі
довші (через чотири нитки основи та дві
нитки піткання) і лежать справа наліво,
суцільно покриваючи тло тканини, утворюють
шнурочок. Назва низинний шнурок походить
від технології виконання (знизу, з
вивороту) та зовнішньої форми шва.
Низинним шнурком виконують
з'єднувальні шви, декорують конструктивні
шви виробів, вишивають покрайниці та
роздільні лінії у стрічкових орнаментах,
поєднують з іншими вишивальними
техніками і застосовують як самостійний
орнаментальний шов художнього вишивання. _
Лицьова сторона. Obverse.
2. Ретязь
поперечний.
Виконується
такий шов художнього
вишивання справа
наліво. Робочу нитку
закріплюємо з виворітної
сторони на місці
початку шва. Виводимо голку
на лицьову сторону,
ведемо її по діагоналі
вліво і вниз через
чотири нитки основи і
чотири нитки піткання. Вколюємо голку,
повертаємо вверх, набираємо на неї чотири нитки
піткання. Виводимо голку з робочою ниткою
на лицьову сторону, ведемо її по діагоналі
вправо і вниз (в протилежну сторону) через
ті ж самі чотири нитки основи та піткання.
Вколюємо голку, повертаємо вверх,
набираємо на неї чотири нитки піткання (паралельно
попередньому набору), виводимо голку на
лицьову сторону. Утворився хрестик косий із
виведеною робочою ниткою у його правому
верхньому ріжку.
down), turned leftwards and up and brought
out diagonally through two horizontal threads
and four ground threads (two per each side) to
lay the next stitch. The stitches are worked in
the same way till the end of the seam-line.
The reverse side shows even, single,
diagonal stitches from left to right through two
ground threads and two horizontal ones. The
obverse side shows even diagonal stitches,but
twice as long (through two horizontal threads
and four ground threads), which lie from right
to left and cover the background of the cloth
completely (forming a lace).The technique
itself determines the name of the stitch (from
below, from the reverse side).
Connecting seams, ornamental bands,
marginal lines of the band ornaments etc. are
worked with this stitch. It is combined with other
embroidery techniques, as well as worked as
an independent ornamental seam of artistic
embroidery.
Виворіт. Reverse.
2. Transversal
Retyaz.
This seam is
worked from right to
left. The working thread
is fastened to the
reverse side of the cloth
at the starting point.
The thread is brought
out to the obverse side
and led diagonally
leftwards and down
through four ground
threads and four horizontal ones. The needle is
inserted into the cloth, turned upwards,
picking up four horizontal threads. Then, the
needle with the working thread is brought out to
the face of the cloth and led diagonally
rightwards and down (in the opposite direction)
through the same four ground and horizontal
threads. The needle is inserted into the cloth,
turned upwards, picking up four horizontal
threads (parallel to the previous seam) and
brought out to the obverse side (a slanting stitch
has been formed, with the working thread in
J
w
63
Українське народне вишивання
Від місця виколу ведемо голку по
діагоналі вліво і вниз через ті ж самі чотири
нитки піткання і шість ниток основи.
Вколюємо голку, повертаємо вверх, набираємо
на неї чотири нитки піткання. Виводимо
голку на лицьову сторону і ведемо її з робочою
ниткою по діагоналі вправо і вниз (в
протилежну сторону) через чотири нитки основи
і чотири нитки піткання. Вколюємо голку,
повертаємо вверх, набираємо на неї ті ж
самі чотири нитки піткання і виводимо її на
лицьову сторону (це буде посередині
хрестика, що утворився). Знову ведемо голку по
діагоналі через ті ж самі чотири нитки
піткання і шість ниток основи, вколюємо
голку для накладання наступного стібка. Цим
же способом накладаємо стібки до кінця лінії
шва.
З лицьової сторони утворюється
чудовий хрещатий, дещо випуклий шнурок,
з виворітної сторони — горизонтальна
орнаментальна лінія, утворена ритмічним
повтором рівних, вертикальних, паралельно
розміщених стібків.
Ретязь поперечний використовують
для виконання з'єднувальних швів, покрай-
ниць та роздільних ліній у стрічкових
орнаментах. Ними декорують конструктивні
вузли виробів, а також виконують основні
орнаменти, оздоблюючи верхній одяг.
its upper corner) From that place, the needle is
led diagonally leftwards and down through the
same four horizontal and ground threads. The
needle is inserted into the cloth, turned
upwards, picking up four horizontal threads. The
needle with the working thread is brought
onto the obverse side and led diagonally
rightwards and down (in the opposite direction)
through four ground and horizontal threads.The
needle is inserted into the cloth, turned
upwards, picking up the same four horizontal
threads and is led onto the face of the cloth
(this will be in the middle of a newly created
cross). Again,the needle is led diagonally
leftwards and down through the same four
horizontal threads and six ground threads and is
inserted into the cloth to lay the next stitch.
The stitches are laid in the same way by the
end of the seam line.
The obverse side shows a wonderful
crossed, a little salient lace. The reverse one
represents a horizontal ornamental line,
created from rhythmically repeated even,vertical,
parallel laid stitches.
Transversal Retyaz was used in
connecting seams, to work the final ornamental band
and marginal lines in band ornaments.
Constructive nodes of the articles as well as the basic
ornaments while adorning outer clothing are
worked with this stitch.
Лицьова сторона. Obverse.
wmm
Виворіт. Reverse.
3. Ретязь
кольоровий.
Технологія
виконання шва така ж сама
як і ретязя
поперечного, тільки стібки шва
накладаються відрізками
робочих ниток різних
кольорів. Підбирають,
переважно, кольори,
які домінують в
основному орнаменті.
Виконання шва
починають відповідним кольором і
прошивають 1-1,5-2 см (залежно від рисунка
орнаменту). Після цього за допомогою другої
голки попід стібки з лицьової сторони
проводимо і акуратно заховуємо кінець робочої
3. Color Retyaz.
The seam is
worked in the same
technique as the
Transversal Retyaz.
The seam stitches are
laid with pieces of the
working threads of
different colors. In
general, the colors
predominant in the basic
ornament are selected.
The seam is
started with the corresponding color and is
worked 1-1.5-2 cm. (depending on the
ornamental pattern). After that, with the help of
another needle, the working thread of a
different color is led through the stitches on the ob-
64
Ukrainian Folk Embroidery
нитки іншого кольору (справа наліво) та
продовжуємо накладати стібки. Для
зручності виконання шва використовують стільки
голок, скільки є кольорів робочої нитки. За
їх допомогою здійснюємо перехід попід
стібки шва з лицьової сторони від одного до
іншого кольорових відрізків. З виворітної
сторони лінія шва чиста, акуратна, без
вузликів та зайвих кінчиків робочої нитки.
Ретязь кольоровий найбільше
використовують для виконання покрайниць та
роздільних ліній в орнаментах, виконаних
техніками низинка пряма, низинка
замкова, а також для оздоблення верхнього одягу.
і:: ' - ■ ■ .і
Ііг І
Лицьова сторона. Obverse.
4. Соснівка.
Шов виконується
зліва направо. Робочу нитку
закріплюємо з виворітної
сторони на місці початку шва.
Виводимо голку з робочою
ниткою на лицьову сторону,
ведемо її по діагоналі вправо
і вверх через чотири нитки
основи і чотири нитки
піткання. Вколюємо голку,
повертаємо вліво, набираємо на неї
чотири нитки основи між
двома паралельними нитками піткання.
Виводимо голку на лицьову сторону, ведемо її
по діагоналі вправо і вниз через ті ж самі
чотири нитки основи і чотири нитки
піткання. Вколюємо голку, повертаємо вліво,
набираємо на неї дві нитки основи, виводимо
на лицьову сторону. Від місця виколу знову
ведемо голку по діагоналі вправо і вверх
через чотири нитки основи і чотири нитки
піткання. Вколюємо голку, повертаємо вліво,
набираємо на неї чотири нитки основи,
виводимо на лицьову сторону (це буде
посередині хрестика, що утворився). Знову ведемо
голку з робочою ниткою вправо і вниз через
чотири нитки основи та чотири нитки
піткання, вколюємо голку (це буде на рівні правого
ріжка попереднього стібка), повертаємо
вліво, набираємо на неї дві нитки основи,
виводимо на лицьову сторону (це буде у
нижньому ріжку попереднього стібка) і
ведемо по діагоналі вправо і вверх для
накладання наступного стібка.
verse side, neatly hiding its end under them,
(from left to right). The stitches continue to be
laid. The number of needles depends on the
number of colors being used. This makes it
convenient to work. These needles with color
threads, being drawn through the stitches on
the face of the cloth, help the color pieces to
alternate. The reverse side shows a neat seam
line, without any knots and odd ends of the
working thread.
Color Rotyaz is widely used to work the
final fancy bands,marginal lines in the
ornaments in Plain Nyzyna,Zamkova Nyzyna and
to adorn outer clothing.
Виворіт. Reverse.
4. Sosnivka. (Pine-tree)
The stitch is worked
from left to right. The working
thread is fastened to the reverse
side of the cloth at the starting
point. The needle with the
working thread is brought out to the
obverse side of the cloth and
led diagonally rightwards and
up through four ground threads
and four horizontal threads. The
needle is inserted into the cloth,
turned leftwards, picking up
four ground threads between two parallel
horizontal threads. The needle is brought out onto
the obverse of the cloth and led diagonally
rightwards and down through the same four ground
and horizontal threads. The needle is inserted
into the material again, turned leftwards,
picking up two ground threads, and is brought out
to the face of the cloth. From that place the
needle is led rightwards and up through four
ground and four horizontal threads. Then, it is
inserted into the cloth, turned leftwards,
picking up four ground threads and brought out onto
the obverse side (this will be in the middle of
the newly created cross). Again the needle with
the working thread is led rightwards and down
through four ground and horizontal threads,
inserted into the cloth (this will be even with
the right corner of the previous stitch), turned
leftwards, picking up two ground threads, led
onto the obverse side (this will be at the bottom
cornerof the previous stitch) and led
diagonally rightwards and up to lay the next stitch.
-^. _!_■_[. r.i.:... '_■
65
Українське народне вишивання
З лицьової сторони утворюється
плоский хрещатий шнурочок, що образно
відтворює хвою сосни. З вивороту
утворюються дві горизонтальні, паралельні лінії.
Верхня — у вигляді шва художнього
вишивання стебловий шов, нижня — у вигляді
стебнівки.
Технікою художнього вишивання со-
снівка виконують з'єднувальні шви,
декорують рубці, вишивають покрайниці та
роздільні лінії у стрічкових орнаментах, а
також використовують як самостійний
орнаментальний шов художнього вишивання
при оздобленні натільного, поясного та
верхнього одягу.
Лицьова сторона. Obverse.
5. Смерічка.
Виконується
смерічка зліва направо.
Робочу нитку закріплюємо
на місці початку шва.
Виводимо голку з
робочою ниткою на лицьову
сторону, ведемо її від
місця виколу по
діагоналі вправо і вверх
через три нитки піткання
і шість ниток основи.
Вколюємо голку,
повертаємо вліво і вниз та
виколюємо її по діагоналі
через дві нитки піткання і чотири нитки
основи (це буде зверху діагонального стібка,
що утворився). Від місця виколу ведемо
голку з робочою ниткою по діагоналі вправо і
вниз (протилежно стібку, що утворився)
через три нитки піткання і шість ниток
основи, вколюємо голку, повертаємо вліво і
вверх, виколюємо по діагоналі через дві
нитки піткання і чотири нитки основи (це
буде зверху стібка, що утворився). Від місця
виколу знову ведемо голку з робочою
ниткою вправо і вверх через три нитки
піткання і шість ниток основи для накладання
наступного стібка вверх. Таким способом
накладаємо стібки до кінця лінії шва. При
цьому постійно треба слідкувати, щоб стібок
лягав під голкою, нижче місця її виколу.
З лицьової сторони утворюються
The face of the cloth shows a flat crossed
lace, which reminds one of a pine-tree. The
reverse side represents two horizontal parallel
lines. The upper one looks like a Steblovyi
(stem)Stitch, and the lower one — Stebnivka
(running) Stitch.
Connecting seams, edges, final
decorative bands, marginal ornamental lines are
worked in the technique of Sosnivka. It is also
used as the basic ornamental stitch of artistic
embroidery while adorning underwear, waist-
length and outer clothing.
Виворіт. Reverse.
5. Smerichka (Fir-
tree) Stitch.
The stitch is
worked from left to right.
The working thread is
fastened at the starting point.
The needle with the
working thread is brought
out to the obverse side
and led diagonally
rightwards and up through
three horizontal threads
and six ground threads.
The needle is inserted into
the cloth, turned
leftwards and down and brought out diagonally
through two horizontal threads and four ground
ones (this will be at the top of the newly
created diagonal stitch). From that place the needle
with the working thread is led diagonally
rightwards and down (opposite to the stitch worked
before) through three horizontal threads and
six ground threads, inserted into the cloth,
turned leftwards and up and brought out
diagonally onto the obverse side through two
horizontal threads and four ground ones (this will
be at the top of the newly created stitch).
From that place the needle with the working
thread is led rightwards and up through three
horizontal threads and six ground threads to
lay the next stitch upwards. The stitches are
laid in the same technique to the end of the
seam line. One should watch closely the stitches
66
Ukrainian Folk Embroidery
рівномірні діагональні стібки — верхній і
нижній. Нижній перекриває верхній на
чотири нитки основи. Утворюється шнурочок,
що ілюзорно нагадує хвою смереки. Звідси
назва шва. З виворітної сторони
утворюється горизонтальна лінія із діагональних стібків
під кутом 30°, розділених однією ниткою
піткання.
Смерічку поєднують у вишиванні
орнаментів з найрізноманітнішими техніками
художнього вишивання. Цією технікою
виконують з'єднувальні шви, вишивають по-
крайниці та роздільні лінії в стрічкових
орнаментах, а також його виконують як
самостійний орнаментальний шов художнього
вишивання.
Лицьова сторона. Obverse.
6. Петельковий
шов.
Виконується
петельковий шов зліва
направо. Робочу нитку
закріплюємо на місці початку
шва. Виводимо голку на
лицьову сторону, ведемо її
з робочою ниткою по
діагоналі вправо і вниз через
дві нитки піткання і чоти-
ри-шість ниток основи
(залежно від структури
матеріалів і характеристичних
особливостей орнаменту).
Вколюємо голку,
повертаємо вверх, набираємо на неї
дві нитки піткання і
виводимо на лицьову сторону. Від місця виколу
ведемо голку з робочою ниткою по діагоналі
вліво і вниз через ті ж самі нитки піткання
і основи. Вколюємо голку, повертаємо вверх,
набираємо на неї дві нитки піткання.
Виводимо голку на лицьову сторону (це буде у
лівому верхньому ріжку неправильного
хрестика, що утворився). Притримуючи
робочу нитку великим пальцем лівої руки,
набираємо на голку стібки, що утворилися так,
щоб вістря голки було добре видно.
Обводимо вістря голки робочою ниткою зліва
направо і виводимо її через петельку робочої
нитки, що утворилася. Таким способом
накладаємо петельки до кінця стібків. В кінці
стібка вколюємо голку у нижній його ріжок,
laid under the needle, lower the place it is
brought out.
Even diagonal stitches,the top one and
the bottom one, appear on the obverse side of
the cloth. The distance between them is four
horizontal threads. The worked lace reminds one
of a fir-tree. This determines the name of the
stitch. The reverse side shows a horizontal line
of diagonal stitches at an angle of 30°
separated by one horizontal thread. While
embroidering ornaments, Smerichka Stitch is combined
with various techniques of fancy work.
Connecting seams, final bands and marginal lines
in ribbon-like ornaments are worked with this
stitch. It can also be used as the basic
decorative stitch.
Виворіт. Reverse.
6. Petelkovyi
(Looped) Stitch.
This stitch is worked
from left to right. The
working thread is fastened at the
starting point. The needle is
brought out onto the obverse
side of the cloth and led di-
agonally rightwards and
down through two horizontal
threads and four-six ground
threads (depending on the
structure of the materials
and ornamental peculiarities).
The needle is inserted into the
cloth, turned upwards,
picking up two horizontal threads and is brought
out to the face of the cloth. From that place
the needle with the working thread is led
diagonally leftwards and down through the same
horizontal and ground thread. Then, it is
inserted into the cloth, turned upwards, picking
up two horizontal threads. The needle is brought
out to the obverse side (this will be at the top
left corner of the newly created irregular cross).
Holding the working thread with the thumb of
the left hand, one should pick up the newly
created stitches with the needle, so that its point
is clearly visible. The working thread goes
around the needle point from left to right, and
the needle is brought out through the loop
created by the working thread. The loops are laid
67
Українське народне вишивання
повертаємо вверх, набираємо на неї дві
нитки піткання і виколюємо в верхньому ріжку.
Далі ведемо голку по діагоналі вправо і вниз
через таку ж саму кількість ниток піткання
і основи для накладання наступного стібка.
При цьому з лицьової сторони
утворюються рівномірні дужки, покриті кіскою. З
виворітної сторони утворюється
горизонтальна лінія із прямих, рівних паралельних
стібків, розміщених через рівномірні
відрізки тканини.
Петельковий шов використовують для
оздоблення країв деталей виробу,
конструктивних швів, поєднують його з різними
швами художнього вишивання в орнаментах.
Збільшуючи довжину настелених
стібків основи шва, петельковим швом
можна виконувати зв'язуючі конструктивні
елементи між деталями виробу.
Лицьова сторона. Obverse.
7. Шнурок в
колосок.
Шов
виконується справа наліво.
Робочу нитку
закріплюємо з виворітної
сторони на місці
початку шва. Голку з
робочою ниткою
виводимо на лицьову
сторону, ведемо її по
діагоналі через чотири
нитки піткання і
чотири нитки основи
вправо і вниз. Вколюємо
голку, повертаємо
вверх та набираємо на неї вісім ниток
піткання між двома паралельними нитками
основи. Виводимо голку з робочою ниткою на
лицьову сторону, ведемо по діагоналі через
чотири нитки піткання та чотири нитки
основи вліво і вниз, вколюємо голку (це буде
в лівому ріжку нижнього стібка),
повертаємо вліво і набираємо на неї дві нитки
основи. Виводимо голку з робочою ниткою на
лицьову сторону, ведемо її по діагоналі через
чотири нитки піткання та чотири нитки
основи вправо і вниз для накладання
наступного стібка. Таким способом накладаються
стібки до кінця лінії шва. З лицьової сторо-
in the same way till the end of the stitches.
When the stitch is done, the needle is inserted
into the bottom corner, turned upwards,
picking up two horizontal threads and is brought
out at the top corner. Then, the needle is
diagonally led rightwards and down through the
same number of horizontal and ground threads
to lay the next stitch. The obverse side shows
even arches, covered with a braid. The reverse
side represents a horizontal line from even
parallel stitches laid at equal intervals.
Looped Stitch is used to decorate hems
of articles and constructive seams. It can, as
well, be combined with the other stitches of
artistic embroidery. Lengthening the already laid
stitches of the basic seam, Looped Stitch can
be used as the linking constructive element
between the details of the article.
e«4.«»s -*******«*
Виворіт. Reverse.
7. Koloskovyi
(Ear-of-Wheat) Cord.
The stitch is
worked from right to
left. The working
thread is fastened to
the reverse side of the
cloth at the starting
point. The needle with
the working thread is
brought out to the
obverse side and led
diagonally through four
ground threads and
four horizontal threads
rightwards and down.
The needle is inserted into the cloth, turned
upwards, picking up eight horizontal threads
between two parallel ground threads. The
needle with the working thread is brought out to
the face of the cloth and led diagonally through
four ground threads and four horizontal threads
leftwards and down. Then it is inserted into the
cloth (it will be in the top corner of the bottom
stitch), turned leftwards, picking up two ground
threads, brought out to the obverse side and
led diagonally through four ground threads and
four horizontal ones rightwards and down to
lay the next stitch. The stitches are laid in the
same technique by the end of the seam line.
68
Ukrainian Folk Embroidery
ни утворюються стібки, що перетинаються
в одній точці під гострим кутом та імітують
колосок. З виворітної сторони посередині
шнурочка утворюється горизонтальна лінія
у вигляді стебнівки, покрита
вертикальними, рівномірними паралельними стібками
через всю ширину колосовидного шнурочка.
Шнурок в колосок використовується
як оздоблювальний, з'єднувальний,
самостійний декоративний шов художнього
вишивання, і ним виконують роздільні лінії,
покрайниці в орнаментах тощо.
Лицьова сторона. Obverse.
8. Ріжка-
тий
(декоративний) шнурочок.
Цей шов
художнього
вишивання
виконується зверху
вниз. Робочу
нитку закріплюємо з
виворітної
сторони на місці
початку шва. Голку з
робочою ниткою
виводимо на
лицьову сторону і
ведемо її по діагоналі вправо і вниз через
чотири нитки піткання та чотири-шість
ниток основи (кількість ниток основи можна
змінювати, залежно від бажаної ширини
шнурка). Вколюємо голку, повертаємо
вверх, набираємо на неї чотири нитки
піткання, виводимо на лицьову сторону. Від
місця виколу ведемо робочу нитку по
діагоналі вліво і вниз через ті ж самі нитки
піткання і основи. Вколюємо голку,
повертаємо вверх, набираємо на неї три нитки
піткання (між верхнім лівим ріжком і вико-
лом голки залишається одна нитка
піткання). Виводимо голку на лицьову сторону,
проводимо за допомогою неї робочу нитку
попід верхній ріжок стібка зліва направо
(з периферії до середини шва), поправляю-
чи настил ріжка великим пальцем лівої руки.
Ведемо голку з робочою ниткою вправо і
вниз через ті ж самі нитки основи і вісім
ниток піткання. Вколюємо голку, повертає-
The obverse side represents stitches which
intersect in one point at an acute angle,
imitating an ear of wheat. The reverse side shows a
horizontal line right in the middle of the cord,
reminding one of Stebnivka (Running) Stitch,
covered with even, vertical, parallel stitches
the breadth of an ear-of-wheat- like cord.
Koloskovyi Cord is used as an
ornamental and joining stitch. The marginal lines and
final ornamental bands etc. are worked with
this stitch. It can also be used as the basic
decorative stitch of artistic embroidery.
Виворіт. Reverse.
8. Rizh-
katyi (Horny
Decorative) Cord.
The stitch
is worked
downwards. The
working thread is
fastened to the
reverse side of the
cloth at the
starting point. The
needle with the
working thread is
brought out to the
obverse side and
led diagonally rightwards and down through
four horizontal threads and four-six ground
threads (the number of ground threads can
vary, depending on the desirable breadth of
the cord). The needle is inserted into the cloth,
turned upwards, picking up four horizontal
threads, and brought out onto the obverse
side. Then the needle with the working thread
is led diagonally leftwards and down through
the same horizontal and ground threads. The
needle is inserted into the cloth again, turned
upwards, picking up three horizontal threads,
brought out to the face of the cloth and the
working thread is led under the top horn of
the stitch from left to right (from periphery to
the stitch center). The «horn lay» should be
adjusted with the thumb of the left hand. The
needle with the 'working thread is led
rightwards and down through the same ground
threads and eight horizontal threads. The
needle is inserted into the cloth, turned upwards,
69
Українське народне вишивання
мо вверх, набираємо на неї три нитки
піткання (між виколом голки і нижнім
ріжком стібка знову залишається одна
нитка піткання). Виводимо голку на лицьову
сторону і за допомогою неї проводимо
робочу нитку попід нижній правий ріжок стібка
справа наліво. Ведемо голку з робочою
ниткою по діагоналі вліво і вниз через ті ж самі
нитки основи і вісім ниток піткання для
накладання наступного стібка. При цьому, з
лицьової сторони утворюється шнурочок-
плетінка із завитками (ріжками) через кожні
чотири нитки піткання. З виворітної
сторони утворюються дві паралельні вертикальні
пунктирні лінії з рівномірних вертикальних
стібків, розділених між собою однією
ниткою піткання.
Декоративний шнурочок
використовують як з'єднувальний оздоблювальний
шов. Ним вишивають покрайниці та основні
орнаменти, по'єднують в орнаментах з
іншими техніками художнього вишивання.
Лицьова сторона. Obverse.
9. Снурок
(снурування).
Цей шов
художнього
вишивання найбільш
поширений на теренах
Галицької Гуцуль-
щини. Прадавнє
його походження,
автохтонність
засвідчує сама назва
шва (див. сл. Б.Грін-
ченка, том. IV. — сі63).
Виконується снурок зліва направо.
Робочу нитку закріплюємо з виворітної
сторони на місці початку шва. Виводимо голку
з робочою ниткою на лицьову сторону. Від
місця виколу ведемо її по діагоналі вправо і
вверх через чотири нитки піткання і три
нитки основи (кількість ниток можна
змінювати, але в поданому співвідношенні).
Вколюємо голку, повертаємо вліво, набираємо
на неї три нитки основи. Виводимо голку з
робочою ниткою на лицьову сторону та
ведемо її по діагоналі вправо і вниз через ті ж
самі три нитки основи і чотири нитки піткан-
picking up three horizontal threads (one
horizontal thread is left between the bottom
corner of the stitch and the place where the
needle has been inserted). The needle is brought
out to the face of the cloth and the working
thread is led under the right bottom corner of
the stitch from right to left. Then, the needle
with the working thread is led diagonally
leftwards and down through the same ground
threads and eight horizontal ones to lay the
next stitch. The obverse side shows a braided
cord with the curls (horns) at the interval of
four horizontal threads. The reverse side
represents two parallel vertical dotted lines, formed
from the even vertical stitches, separated by
one horizontal thread.
Decorative Cord is used as a joining
and decorative stitch. The hems and the basic
ornaments are worked with this stitch. It can
also be combined with the other techniques of
artistic embroidery.
Виворіт. Reverse.
9. Snurok
(Snuruvannya).
/Lacing/
This stitch
of artistic
embroidery is widespread
in the area of
Halytska Hutsulsh-
chyna. The name of
the stitch itself is
evidence of its
ancient and
autochthonous origin.
The cord (lace) is worked from left to
right. The working thread is fastened to the
reverse side of the cloth at the starting point.
The needle with the working thread is brought
out to the obverse side. From that place the
needle is led diagonally rightwards and up
through four horizontal threads and three
ground threads (the number of the threads
can vary, but in the given correlation). Then,
the needle is inserted into the cloth, turned
leftwards, picking up three ground threads and
brought out to the face of the cloth and led
diagonally rightwards and down through the
--3
V
_LLL_U
70
Ukrainian Folk Embroidery
ня. Вколюємо го^ку, повертаємо вліво,
набираємо на неї три нитки основи і
виколюємо її у нижньому ріжку стібка, що
утворився. Ведемо голку по діагоналі вправо і
вверх через шість ниток основи і ті самі
чотири нитки піткання. Вколюємо голку,
повертаємо вліво, набираємо на неї три нитки
основи. Виводимо голку на лицьову сторону
(це буде у верхньому ріжку попереднього
нижнього стібка), ведемо її по діагоналі
вправо і вниз через ті ж самі чотири нитки
піткання і три нитки основи для
накладання наступного стібка. Стібки зліва направо і
вверх удвічі довші від стібків, що
настеляються зліва направо і вниз. У зв'язку з цим
з лицьової сторони утворюється
переплетення настелених стібків, що
матеріалізуються у цікавий шнурочок. З виворітної
сторони утворюються дві горизонтальні
паралельні лінії у вигляді стебнівки.
Технікою художнього вишивання
«снурок» виконуються роздільні лінії
основних орнаментів, рубцювання, з'єднувальні
шви. Декорують цим швом краї деталей
виробу в цілому, а також використовують як
самостійний орнаментальний шов
художнього вишивання.
На Гуцульщині «снурок» є
невід'ємним в уставкових орнаментах жіночих
сорочок. Основний орнамент уставки
обрамляється п'ятьма рядами «снурка» з двох
сторін. З них два ряди «снурка» глухі
(одноколірні), три вишиваються поперемінно
відрізками кольорів, що переважають в
основному орнаменті. Обабіч уставка обрам-
люється покрайницями.
Лицьова сторона. Obverse.
10. Обметниця
поверхнева.
Шов виконується
справа наліво. Робочу
нитку закріплюємо з
виворітної сторони на місці
краю рубця (або
закрученого в рулик краю
деталі виробу). Виводимо
голку на лицьову
сторону, вколюємо її вниз від
місця виколу через таку
кількість ниток піткання, щоб повністю no-
same four horizontal threads and three ground
ones. The needle is inserted into the cloth again,
turned leftwards, picking up three ground
threads and brought out in the bottom corner
of the newly created stitch. The needle is led
diagonally rightwards and up through the same
four horizontal threads and six ground threads.
Then, the needle is inserted into the cloth,
turned leftwards, picking up three ground
threads, brought out to the obverse side (this
will be in the top corner of the previous stitch)
and led diagonally rightwards and down
through the same four horizontal threads and
three ground to lay the next stitch. The stitches
from left to right and up are twice longer the
stitches laid from left to right and down. That's
■why the obverse side shows an intricate
interlacing of the laid stitches, reminding one of a
cord. The reverse side represents two
horizontal parallel lines in the form of Stebnivka
(Running) Stitch.
The marginal lines of the basic
ornaments, hemming, joining stitches are worked
in the «lacing» technique. The stitch is used for
trimming edges of the details and the articles
themselves. It can also be used as the basic
ornamental stitch.
In Hutsulshchyna «lacing» is
inseparable while working inset orn aments in chemises.
The basic design of an inset is embroidered in
five rows of «lacing» from both sides. Two rows
are blind (of one color), three rows are worked
in alternating pieces with colors predominant
in the basic ornament. The inset is trimmed with
the final decorative band.
Виворіт. Reverse.
10. Obmitnytsya
Poverkhneva. (Surface
Whip-stitch)
The stitch is
worked from right to left.
The working thread is
fastened to the reverse side
of the cloth at the edge of
the hem (or a folded edge
of the detail). The needle
is brought out to the
obverse side and inserted into
the cloth downwards from the insertion place
71
Українське народне вишивання
крити рубець або скручений рулик.
Повертаємо голку вверх і виколюємо на місці
попереднього виколу так, щоб добре було
видно вістря голки. Обводимо робочу нитку попід
вістря голки справа наліво, притримуючи
її великим пальцем лівої руки. Виводимо
голку на лицьову сторону, вколюємо її через
дві нитки основи вліво і ту ж саму кількість
ниток піткання для накладання наступного
стібка і так до кінця лінії шва. Після цього
настеляємо другий ряд (поверхневих) стібків.
Для цього на голку набираємо утворену
петельку між двома паралельними стібками.
Вістря голки обводимо робочою ниткою
справа наліво та протягуємо голку через петлю,
що утворилась. Таким способом накладаємо
2-3 ряди поверхневих шнурочків відповідно
до рисунка орнаменту. Поверхневий
шнурок можна виконувати двома кольорами. При
цьому на голку набираємо одну петлю, а
другу пропускаємо. Пропущені петлі
прошиваємо іншим кольором.
Обметниця поверхнева широко
використовується для викінчення країв деталей
виробів, викінчення вирізних пройм,
горловин тощо.
11. Шнурочок поверхневий з
підкладкою.
Виконується шов справа наліво.
Робочу нитку закріплюємо з виворітної
сторони на місці початку шва (переважно на краю
деталі виробу). Виводимо голку на лицьову
сторону і від місця виколу відраховуємо 2-
3-4 нитки піткання вниз. Вколюємо голку,
повертаємо вверх, набираємо на неї
пропущені нитки піткання та виколюємо на місці
попереднього виколу так, щоб вістря голки
було добре видно. Обводимо робочу нитку
попід вістря голки справа наліво.
Притримуючи робочу нитку великим пальцем лівої
руки, виводимо голку на лицьову сторону,
through the same number of horizontal threads
to cover the hem or a fold completely. The
needle is turned upwards and brought out to the
face of the cloth at the place it has been
previously brought out, so that the point of the
needle is clearly visible. The working thread is
twisted around the needle point from left to right,
being held by the thumb of the left hand. The
needle is brought out to the obverse side and
inserted into the cloth two ground and
horizontal threads leftwards to lay the next stitch. The
stitches are laid the same way till the end of
the seam line. After that the second (surface)
row of stitches is laid. The newly created loop
between two parallel stitches is picked up by
the needle. The needle point is twisted by the
working thread from right to left and pulled
through the created loop. Two or three rows of
surface stitches are laid in such a way
according to the ornamental pattern. The surface cord
can be worked in two colors (picture). The
needle picks up one loop, missing the other one.
The missing loops are worked in another color.
The Surface Cord is widely used for
trimming the hems of details, finishing cut
arm-holes and collars etc.
11. Surface Cord with the Lining.
The stitch is worked from right to left.
The working thread is fastened to the reverse
side at the starting point (chiefly at the edge
of the detail). The needle is brought out to the
obverse side of the cloth. Then, the needle is
inserted into the cloth two-three-four
horizontal threads downwards, turned upwards,
picking up the missed threads and brought out at
the place it has been previously brought out,
so that the needle point is clearly visible. The
working thread is twisted around the needle
point from right to left. Holding the working
thread with the thumb of the left hand, the
needle is brought out to the face of the cloth
72
Ukrainian Folk Embroidery
вколюємо її через дві нитки основи і ту ж
саму кількість ниток піткання вниз.
Повертаємо голку вверх, набираємо на неї
пропущені нитки піткання, обводимо вістря
голки робочою ниткою, виводимо голку через
петлю та ведемо її далі вліво через ту ж
саму кількість ниток основи і піткання для
накладання наступних стібків. При цьому
необхідно слідкувати, щоб робоча нитка весь
час йшла справа наліво і притримувати її в
горизонтальному положенні великим
пальцем лівої руки.
Коли стібки настелені до кінця лінії
шва, на кіску шва накладаємо кручену
нитку або тонкий шнурочок (залежно від
бажаної фактури поверхневого шнурочка)
кольору, відповідно до вишитої основи. Нитку
або шнурочок притримуємо великим
пальцем лівої руки і справа наліво настеляємо
стібки. На голку набираємо петельку міме
двома вертикальними стібками нижнього
шва і шнурочок або настелену нитку. Вістря
голки обводимо справа наліво робочою
ниткою, виводимо голку, вколюємо її попід
наступну петельку для подальшого
накладання стібків.
При цьому з лицьової сторони
утворюється широкий поверхневий (не
пришитий до тканини) шнурок. З виворітної
сторони утворюється горизонтальна лінія із
рівномірних паралельних вертикальних
стібків, розміщених на однаковій віддалі
один від одного.
Лицьова сторона. Obverse.
12. Прошите (стебнове
шитво).
Назва походить від слів
прошивати (прошиває) і стеб-
нувати (стебнове шитво). Шов
виконується зверху вниз.
Робочу нитку закріплюємо з
виворітної сторони на місці
початку шва. Виводимо голку на
лицьову сторону. Від місця виколу вниз
відраховуємо дві нитки піткання між двома
паралельними нитками основи. Вколюємо
голку, повертаємо вверх, набираємо ці
нитки піткання на голку. Виводимо голку на
лицьову сторону, вколюємо її через чотири
and inserted into it two ground threads
leftwards and two horizontal threads downwards
The needle is turned upwards, picking up the
missed horizontal threads. The needle point is
twisted by the working thread and the needle
itself is pulled through the loop and led
further leftwards through the same number of
ground and horizontal threads to lay the next
stitch. One should see that the working thread
goes from right to left and is held horizontally
by the thumb of the left hand.
When the seam line is ready, a twisted
thread or a thin cord (depending on the
desirable texture of the surface cord), the color of
which corresponds to that of the embroidered
background, is laid over it. The thread or the
cord is held by the thumb of the left hand. The
stitches are laid from right to left. The needle
picks the loop, formed between two vertical
stitches of the bottom seam and the cord. The
working thread twists around the needle point
from right to left. Then, the needle is pulled
out, inserted into the cloth under the next loop,
the stitches to be laid parallel further on.
The obverse side shows a broad surface
(not sewn to the material) cord. The reverse side
represents a horizontal line, consisting of even,
parallel, vertical stitches, placed at equal
intervals.
ЙЯЯ^^
Виворіт. Reverse.
12. Proshyttye (Stebnove
Needlework), /Running Stitch/.
The name comes from the
words «to stitch» and «stebnu-
vaty». The stitch is worked from
the top to the bottom. The
working thread is fastened to the
reverse side of the cloth at the
starting point. The needle is brought
out to the obverse side. Then, it is inserted
into the cloth two horizontal threads between
two parallel ground threads downwards, turned
upwards, picking up these horizontal threads.
The needle is brought out to the obverse side
of the cloth and inserted into it four horizon-
73
Українське народне вигнивання
нитки піткання вниз між тими самими
паралельними нитками основи. Повертаємо
голку вверх, набираємо на неї дві нитки
піткання і виводимо на лицьову сторону (це
буде у нижньому ріжку попереднього стібка).
При настилі стібків треба слідкувати, щоб
робоча нитка постійно йшла з правої
сторони голки.
Прошиттєм (стебновим швом)
вишивають покрайниці, роздільні лінії в
основних орнаментах, його використовують як
з'єднувальний, оздоблювальний та основний
шов при виконанні орнаментів.
ку .і і.іиш.ті . a lijf 11 ■■№■ WWmm\mi Щ ff
Лицьова сторона. Obverse.
13. Вівсик.
Шов
виконується зліва
направо. Робочу
нитку
закріплюємо з
виворітної сторони.
Виводимо голку
на лицьову
сторону і вколюємо
її через чотири
нитки основи вправо. Повертаємо голку вліво
і вниз та виколюємо її по діагоналі через
чотири нитки основи і дві нитки піткання.
Виводимо голку на лицьову сторону,
вколюємо через чотири нитки основи вправо
(паралельно верхньому стібку). Повертаємо
голку вліво і вверх, виколюємо її по
діагоналі через дві нитки основи і одну нитку
піткання (це буде посередині верхнього та
нижнього стібків). Виводимо голку на
лицьову сторону, вколюємо її через чотири
нитки основи вправо між двома паралельними
нитками піткання. Повертаємо голку вліво і
вверх, виколюємо її по діагоналі через дві
нитки основи і одну нитку піткання (це буде
у правому ріжку верхнього стібка). Таким
же способом настеляємо стібки до кінця лінії
шва.
Технікою художнього вишивання
вівсик виконують основні орнаменти,
покрайниці та обвідки.
tal threads between the same parallel ground
threads downwards. The needle is turned
upwards, picking up two horizontal threads, and
brought out to the face of the cloth (this will
be in the bottom corner of the previous stitch).
While laying the stitches one should see that
the working thread goes from the right side of
the needle.
Proshyttye is used to work hems and
marginal lines in basic ornaments. It is also used
as a joining, decorative and basic stitch while
embroidering the ornaments.
Виворіт. Reverse.
13. Vivsyk
(«Oats»).
The stitch
is worked from
left to right. The
working thread
is fastened to
the reverse side
of the cloth. The
needle is
brought onto the
obverse side and inserted into the fabric four
ground threads rightwards. The needle is turned
leftwards and down and brought out
diagonally through four ground and two horizontal
threads onto the obverse side. Again, the
needle is inserted into the cloth four ground threads
rightwards (parallel to the top stitch), turned
leftwards and up and brought out diagonally
through two ground and one horizontal thread
(this will be in the middle of the top and
bottom stitches) and onto the face of the material.
Then, the needle is inserted into the cloth four
ground threads between two parallel horizontal
ones rightwards, turned leftwards and up and
brought out diagonally through two ground and
one horizontal threads (this will be in the right
corner of the top stitch) onto the obverse side.
The stitches are worked in the same way till
the end of the seam line.
The basic ornaments,final ornamental
bands and outlines are embroidered in Vivsyk
technique.
74
Ukrainian Folk Embroidery
Щ
Лицьова сторона. Obverse.
Самостійна робота.
1. Практичні вправи на засвоєння
методики оформлення вишитих зразків
технік художнього вишивання.
2. Засвоєння методики графічного
зображення швів художнього вишивання.
Завдання № 3.
1. Вишивання вивчених швів на
тканині з полотняним переплетенням.
Контрольна робота.
Самостійне практичне виконання
вивчених швів за поданим зразком.
Розмір 14 X 6 см.
Матеріали: тканина — домоткане
полотно із чітким полотняним
переплетенням;
нитки — муліне;
оправа — картон.
Питання для контролю знань.
1. Чим обумовлена назва швів
художнього вигнивання оздоблювальні?
2. Способи застосування
оздоблювальних швів у художньому вишиванні.
3. Як пояснити походження назви
шва низинний шнурок?
4. Прокоментуйте спільність
техніки та відмінність технології вишивання
швів ретязь, ретязь кольоровий.
5. За розглядом натурних зразків з
лицьової і виворітної сторони визначіть
шви художнього вишивання соснівка,
смерічка. Прокоментуйте аспект походження
їх назви.
6. За поданим зразком прошийте
практично 5 см довжиною шнурок в колосок.
7. Вкажіть подібність та
відмінність техніки і технології виконання швів
шнурочок поверхневий, шнурочок
поверхневий з підкладкою.
8. Прошийте практично 5 см шва
шнурочок ріжкатий (декоративний).
Прокоментуйте технологію та техніку його
виконання.
9. В яких випадках найбільше
використовуються шви художнього
вишивання: петельковий шов, поверхневий
шнурочок, шнурочок з підкладкою.
їт^тшжтш^ттт
Виворіт. Reverse.
Independent Work.
1. Practical exercises: how to finish
already worked samples of techniques of artistic
embroidery;
2. Methods of sketching artistic
embroidery stitches.
Task # 3.
1.Embroidery of studied stitches on
material with linen interweaving.
Test.
Independent execution of studied stitches
following the example.
Size: 14 X 6 cm
Materials: linen — homespun with clearly
visible linen interweaving;
threads — Mouline;
framing — cardboard;
Final Questions.
1. What is the history of the name
«Ornamental» in artistic embroidery stitches?
2. Ways Ornamental Stitches are used in
artistic embroidery.
3. Where does the name Nyzynnyi Cord
come from?
4. Comment on the similarity of
technique and difference of technology of execution
of Retyaz and Color Retyaz Stitches.
5. Identify the stitches of artistic
embroidery Sosnivka and Smerichka, having
examined the obverse and reverse sides of the
given samples. Comment on the aspect their names
came from.
6. Execute Koloskovyi Cord 5cm long on
the given sample.
7. Explain the similarity and difference
of technique and technology when executing
Poverkhnevyi Cord and Poverkhnevyi Cord with
the Lining (Surface Cord) Stitches.
8. Work Rizhkatyi (Horny/Decorative)
Cord 5cm long. Comment on the technology and
technique of its execution.
9. When are the stitches of artistic
embroidery: Petelkovyi (Looped) Stitch,
Poverkhnevyi (Surface) Cord, Cord with the Lining, most
widely used?
75
. J s
, Г а, гід u.#k.» .д» * f і і iVI' * і
Яг V
«.!<•«»••** М» ■ ■* #.і » * «і 5і • ■
It *. Г і * » f f •* 1**' и. < * ' • *• і ,•_ •/
Уфлекція святковий жіночий комплектів
"%елія сонця", XXI cm.
1еі(ніки вишивання: оздоблювальні шви
Collection of festive women's sets
"Упе Sun's Celt", XXI-st century
'Embroidery techniques: fancy stitches
,\
J
-—:::£$
**»w»««»»
\
*~"-*r::r-'--J
VP*
і ^ \ *} .yv,-
Оздоблювальні шви
в декоруванні виробів
fancy stitches
white decorating the articles
і t
СОЇ* <]/. (Рахункові шви
55- V* St'tches which %tquirt Counting
Українське народне вишивання
Шазва рахункові шви
акумулює в собі фізичний та
технологічний зміст понять:
а) виконання шва
здійснюється за фізичним рахунком ниток;
б) настил стібків ведеться через
відповідну кількість ниток основи піткання
по прямій чи діагоналі в закономірній
послідовності.
Рахункові шви мають
найрізноманітніші якісні техніко-технологічні
ознаки. Однак за спільністю характеру техніки
настилу стібків, покриття ними тла
тканини та утворення прозорів їх умовно можна
розділити на дві групи:
а) непрозорі рахункові шви;
б) прозорі рахункові шви.
Непрозорі — це рахункові шви,
настилом стібків яких можна здійснювати
суцільне покриття тла тканини. При їх
виконанні не утворюються повітряні прозори чи
прозори тла тканини.
Прозорі — це рахункові шви, які
уособлюють в собі цілісне комбінативне
єднання настилу стібків з повітряним про-
зором або прозором тла тканини.
Подібність рахункових швів —
вишивання їх за рахунком ниток, відмінність —
в техніках настилу стібків: по прямій,
діагоналі, перетину під прямим, гострим
кутом, рівних та різних за довжиною стібків,
стібків з обвідкою, без обвідки, за
годинниковою стрілкою, проти годинникової
стрілки, по колу тощо.
Вивчення рахункових швів є
ґрунтовним джерелом для усвідомленого пізнання
природи походження швів та їх назв:
хрестик, шов «кочелистий», курячий брід,
«солов'їні вічка» тощо.
Натурні зразки орнаментів, виконані
рахунковими швами, з прадавніх часів і до
наших днів слугують фактологічним
матеріалом для формування усвідомленого
розуміння появи та творення семантики,
символіки у вишивці.
Синтез знань з основ композиції і
набутих навичок з технології і техніки
вишивання рахункових швів дають глибинні
можливості розвитку початкових умінь
мислити техніками художнього вишивання в ор-
наментотворенні, творчого мислення та
аналітичного розуміння, як вишивальними
техніками матеріалізувати творчий задум.
Знання технік рахункових швів
формують вміння і навички виконувати робочі
рисунки орнаментів, розрахувати їх на
The name «Stitches which Require
Counting» combines manual and technologic
meaning:
a) the stitch is executed when the
threads are manually counted off;
b) the stitches are laid through the
appropriate number of ground and horizontal
threads either straight or diagonally in strict
succession;
Stitches which Require Counting have
the most diverse qualitative technique and
technologic peculiarities. While taking into account
the common character of the way the stitches
are laid, the way they cover the background
of the fabric and create unfilled space, they
can be generally divided into two groups:
a) opaque stitches which require counting;
b) transparent stitches which require
counting.
Opaque stitches are those that been laid
cover the entire background of the cloth. While
working them none of the unfilled spaces are
formed, i.e. the background is invisible.
Transparent ones are those which
combine stitches laid with either airy or background
clearances.
Similarity of the stitches, which require
counting, is that they are worked according to
the number of threads counted off._The
difference is, the techniques in which the stitches
are laid: straight, diagonally, intersecting at
straight or acute angles, of equal or different
length, with or without outlining, clockwise or
counterclockwise, or in a circle etc.
Study of the stitches, which require
counting is the foundation to perceiving the
nature and origin of the stitches and their
names: Cross, Kochelystyi, Kuryachyi Brid,
and Solovyini Vichka etc.
Since times immemorial till now-a-days,
samples of the ornaments worked with
stitches which require counting, are main factors in
the formation of conscious understanding of
how semantics and symbolism appeared and are
created in embroidery.
Synthesis of knowledge in the fields of
composition as well as acquired skills in
technology and technique of embroidery of
stitches which require counting provide one with
ample opportunities to develop elementary
abilities of thinking how techniques of artistic
embroidery would do for a composition. They
favor creative ways of thinking and analytic
understanding and help one to achieve one's
creative idea.
Knowledge of stitching techniques,
80
Ukrainian Folk Embroidery
клітці і полотні, визначати шви за
натурними зразками орнаментів, розвивають
культуру праці, естетику виконання швів
та викінчення завдання в цілості.
а) непрозорі рахункові шви
художнього вишивання.
1. Оксамитовий F
шов. :
Виконується за :
робочим рисунком ор- :
наменту зліва направо. :
Робочу нитку закріп- :
люємо з виворітної сто- :
рони на місці початку н
шва. Виводимо голку з j-
робочою ниткою на ли- F
цьову сторону, ведемо -
її по діагоналі вправо і :
вниз через 4 нитки ;
піткання і 6 ниток ос- :
нови. Вколюємо голку, :
повертаємо вліво, на- :
бираємо на неї 2 нитки
основи, виводимо на лицьову сторону. Від
місця виколу ведемо голку з робочою
ниткою по діагоналі вправо і вверх через ті ж
самі 4 нитки піткання (нитки піткання не
міняються до кінця лінії шва) і 6 ниток
основи (2 покритих стібком зліва направо, 4
непокритих стібком). Вколюємо голку,
повертаємо вліво, набираємо на неї 2 нитки
основи та виводимо на лицьову сторону (це
буде нарівні верхнього ріжка стібка, що
утворився). Виводимо голку на лицьову
сторону і знову ведемо її по діагоналі вправо і
вниз через ті ж самі 4 нитки піткання та 6
ниток основи, вколюємо голку для
накладання наступного стібка і так до кінця лінії
шва. Наступну лінію шва виконуємо поверх
першого настилу стібків. Для цього
виводимо голку з робочою ниткою на 2 нитки лівіше
від лівого нижнього ріжка першого стібка
нижньої лінії шва. Ведемо голку по
діагоналі вправо і вверх через 4 нитки піткання і
6 ниток основи, вколюємо голку (це буде
через 2 нитки основи вправо від верхнього
ріжка, нижнього стібка), повертаємо вліво,
набираємо 2 нитки основи, виводимо на
лицьову сторону і ведемо по діагоналі вправо і
вниз через ті ж самі нитки піткання та 6
which require counting, develops abilities and
skills to work ornamental pattern designs. It
helps one to calculate them either on the square
or fabric, to determine seams on the given
ornamental samples; to develop a work culture,
aesthetic execution of the seams and
completion of the entire task.
a) opaque stitches of artistic
embroidery which require counting.
1. Velvety stitch.
It is done
according to the
ornamental scheme from left to
right. The working
thread should be
fastened on the reverse of
the cloth at the starting-
point. The needle with
the working thread is
brought out to the
obverse side and is led
diagonally up rightwards
and down through four
horizontal threads of
the cloth and six
ground-threads. The
needle should be inserted into the cloth, turned
leftwards, picking up two ground-threads and
brought out to the obverse side. From that place
the needle with the working thread is led
diagonally rightwards and up through the same four
horizontal threads of the cloth (these threads
never change to the end of the stitch line) and
six ground-threads (two threads are spanned
by the stitch from the left, the other four are
not spanned). The needle is inserted, turned
leftwards, picking up two ground-threads and
brought out to the obverse of the cloth (this
will be at the level of the upper edge of the
ready stitch). The thread should be brought out
to the obverse of the cloth and led diagonally
rightwards and down through the same four
horizontal threads of the cloth and six ground-
threads again and inserted to lay the next stitch.
The same method is used at the end of the
stitch line. The new stitch line is done over the
first stitch-layer. The needle with the working
thread is brought two threads leftwards from
the bottom edge of the first stitch of the lower
stitch-line. The needle is led diagonally
rightwards and up through four horizontal threads
of the cloth and six ground-threads, inserted
into the cloth (it will be two ground-threads
81
Українське народне вигнивання
ниток основи для накладання наступного
стібка. При цьому з лицьової сторони
утворюється подвійна горизонтальна лінія із
перехрещених діагональних стібків, а з
виворітної — дві горизонтальні пунктирні лінії із
розділених між собою подвійних стібків. Як
правило, нижня і верхня лінії стібків
вишиваються різними, переважно, контрастними
кольорами. Кількість та довжина настилу ліній
шва визначаються рисунком орнаменту.
Оксамитовим швом вишивають
найрізноманітніші основні орнаменти при
декоруванні плечового, поясного та верхнього
одягу. Його використовують як
з'єднувальний оздоблювальний шов художнього
вишивання.
Лицьова сторона. Obverse.
2. Курячий
(кучерявий) брід.
Шов
виконується зліва направо.
Робочу нитку
закріплюємо з виворітної
сторони на місці
початку шва. Виводимо
голку з робочою
ниткою на лицьову
сторону, ведемо її по
діагоналі через 3 нитки
основи і 3 нитки
піткання вправо і вверх.
Вколюємо голку,
повертаємо вліво,
набираємо на неї 3 нитки
основи від місця виколу
між двома
паралельними нитками
піткання. Виводимо голку на лицьову сторону,
ведемо її по діагоналі вправо і вниз через ті ж
самі нитки піткання і основи. Вколюємо
голку, повертаємо вверх, набираємо на неї З
нитки піткання. Виводимо голку на лицьову
сторону (це буде у правому верхньому ріжку
хрестика, що утворився). Ведемо голку з
робочою ниткою по діагоналі вправо і вниз
через 3 нитки основи і піткання, вколюємо
голку, повертаємо вліво, набираємо на неї
З нитки основи та виводимо на лицьову сто-
rightwards from the upper edge of the lower
stitch), turned leftwards, picking up six
ground-threads, brought to the obverse side
and led diagonally rightwards and down
through the same horizontal threads of the cloth
and six ground-threads to lay the following
stitch. Thus, the obverse side shows double
horizontal line from the crossed diagonal stitches
and the reverse one-two horizontal dotted lines
from separate double stitches. As a rule, the
upper and the lower stitch-lines are worked in
various, preferably, contrast colors. Quantity
and length of the stitch-line layers are
determined by the pattern design. Various basic
ornaments are embroidered with velvety stitch
to decorate shoulder, waist-high and outer-
clothes. It is used as well as a joining and
ornamental stitch of artistic embroidery.
Виворіт. Reverse.
2. Kuriachyi
Brid (curly).
This stitch is
done from left to right.
The working-thread is
fastened on the reverse
of the cloth at the
starting-point. The needle
with the working-thread
is brought to the obverse
side and led diagonally
through three ground-
threads and three
horizontal threads of the
cloth rightwards and up.
The needle is inserted
into the cloth, turned
left, picking up three
ground threads from the
insertion place between
two parallel horizontal threads of the cloth. The
needle is brought out to the obverse side and
led diagonally rightwards and down through
the same threads. Then the needle should be
inserted into the cloth, turned upwards,
picking up three horizontal threads of the cloth.
The needle is brought out to the obverse side
(this will be at the upper right edge of the
finished cross). The needle with the working
thread is led diagonally rightwards and down
through three ground-threads and horizontal
82
Ukrainian Folk Embroidery
рону. Знову ведемо голку з робочою ниткою
вправо і вниз через таку ж саму кількість
ниток основи і піткання, вколюємо голку,
повертаємо вверх, набираємо на неї 3
нитки піткання, виводимо на лицьову сторону
для накладання наступного стібка. При
цьому з лицьової сторони від хрестика вниз
утворюється лінія з дужкоподібних стібків, що
нагадують сліди курячих лапок. Для
повороту лінії вверх вишиваємо хрестик так, щоб
голка з робочою ниткою була виведена у
правому нижньому ріжку хрестика. Після
цього ведемо робочу нитку по діагоналі
вправо і вверх через 3 нитки основи та 3 нитки
піткання, вколюємо голку, повертаємо
вліво, набираємо на неї 3 нитки основи,
виводимо на лицьову сторону і знову
ведемо по діагоналі вправо і вверх через таку
саму кількість ниток основи і піткання для
накладання наступного стібка.
Курячий брід можна виконувати без
вишивання хрестика. Для цього робочу
нитку закріплюємо з виворітної сторони на місці
початку шва. Виводимо голку з робочою
ниткою на лицьову сторону, від місця виколу
ведемо її по діагоналі вправо і вверх через
З нитки основи і 3 нитки піткання,
вколюємо голку, повертаємо вліво, набираємо на
неї 3 нитки основи, виводимо на лицьову
сторону, знову ведемо вправо і вверх через
З нитки основи та 3 нитки піткання для
накладання наступного стібка (якщо лінія шва
іде вниз, то голку з робочою ниткою ведемо
по діагоналі вправо і вниз через таку ж саму
кількість ниток основи і піткання).
Курячий брід поєднують в
орнаментах із лиштвою простою, качалочкою, швом
«кочелистий», «солов'їними вічками»,
довбанкою тощо. Цим швом найбільше
вишивають лінії розводу в основних орнаментах,
виконаних білим по білому або ніжними
відтінками інших кольорів.
Лицьова сторона. Obverse.
threads of the cloth, inserted into the cloth,
turned left, picking three ground-threads and
brought out to the obverse side. Then again,
the needle with the working thread is led
rightwards and down through the same quantity of
threads, inserted into the cloth, turned
upwards, picking up three horizontal threads of
the cloth and brought out to the obverse to lay
the next stitch. Thus the obverse side
represents the line of arc-like stitches from the cross
downwards, which remind one of the chicken-
claws prints. To turn the line upwards, the cross
is worked so, that the needle with the
working-thread appears in the right bottom edge of
the cross. After that the working-thread is led
diagonally rightwards and up through three
ground-threads and three horizontal threads of
the cloth, inserted into the cloth, turned
leftwards, picking up three ground-threads,
brought out to the obverse side and again led
diagonally rightwards and up through the same
quantity of threads to lay the next stitch.
Kuriachyi Brid can be worked without
any cross. To achieve this affect, the working
thread should be fastened to the reverse side at
the starting-point of the stitch itself. The
needle with the working thread is brought out to
the obverse of the cloth. It is led diagonally
rightwards and up from the place it was drawn
out of through three ground-threads and three
horizontal threads of the cloth, inserted into
the cloth, turned leftwards, picking up three
horizontal threads of the cloth, brought out
onto the obverse side and again led rightwards
and up through three threads to lay the next
stitch. (If the stitch-line goes downwards, the
needle with the working thread is led
diagonally rightwards and down through the same
quantity of the threads).
Kuriachyi Brid is ornamentally
combined with simple lyshtva, kachalochka,
«kochelystyi» stitch, «solovyini vichka», and
dovbanka, etc. This stitch is mostly used to
embroider outlines in basic ornaments in white
or other delicately colored tints.
..J"
Виворіт. Reverse.
83
Українське народне вишивання
3. Хрестик косий (звичайний).
Місце початку шва
визначається робочим рисунком
орнаменту. Робочу нитку закріплюємо з
виворітної сторони (можна з лицевої
шляхом її підгинання під нижній
стібок) на місці початку шва.
Виводимо голку з робочою ниткою на
лицьову сторону, ведемо її від місця
виколу по діагоналі через 2 нитки
основи і 2 нитки піткання (кількість
ниток можна змінювати, залежно
від структури матеріалів та
характеристичних особливостей
орнаменту) вправо і вниз. Вколюємо голку,
повертаємо вверх, набираємо на неї
дві нитки піткання, виводимо на
лицьову сторону, ведемо її по
діагоналі вліво і вниз (в протилежну сторону)
через ті ж самі 2 нитки основи і 2 нитки
піткання. Вколюємо голку, повертаємо
вверх, набираємо на неї 2 нитки піткання
(паралельно попередньому набору).
Виводимо голку на лицьову сторону через 4 нитки
піткання вверх для накладання наступних
стібків. При вишиванні хрестиків по
горизонталі в орнаменті краще спочатку
настеляти нижні стібки (зліва, направо), а потім
верхні стібки (справа, наліво). При цьому
треба слідкувати, щоб верхній стібок лягав
до великого пальця лівої руки.
Технікою художнього вишивання
хрестик косий (або звичайний) виконують
найрізноманітніші орнаменти з декорування
виробів.
При вишиванні хрестика косого з
лицьової сторони настиляються 2 рівні
діагональні (косі) стібки зліва направо і справа
наліво. Звідси й назва хрестик косий. Його
ще називають звичайним, бо ним
вишивають повсюдно, в усіх регіонах України, в
країнах слов'янських народів тощо.
Лицьова сторона. Obverse.
3. Slanting Cross (plain).
The starting-point of the stitch
is determined by the ornamental
scheme. The working thread should be
fastened to the reverse of the cloth.
This can be done on the obverse side.
In this case its end is hidden under
the lower stitch at the beginning of
the stitch. The needle with the
working thread is brought out to the
obverse side and led, from the place it
was drawn out from, diagonally
through two ground-threads and two
horizontal threads of the cloth (the
number of threads can be varied,
depending on the structure of the
material and characteristic peculiarities
of the ornament) rightwards and
down. The needle is inserted into the cloth,
turned upwards, picking two horizontal threads
of the cloth, brought out to its face and led
diagonally leftwards and down (in the opposite
direction) through the same two threads. Then,
the needle is inserted into the cloth, turned
upwards, picking up two threads of the
horizontal threads of the cloth (parallel to the
previous set). The needle is brought out to the
obverse side through four horizontal threads of
the cloth upwards to lay the next stitches. If
the crosses are worked in a vertical line, the
stitches are laid by turns: first the lower one,
then the upper one. While embroidering the
crosses in horizontal ornament, it is better to
lay first lower stitches (from left to right) and
then the upper ones(from right to left). The
upper stitch must lay to the left thumb.
Various ornaments in the articles'
decors are worked in the technique of artistic
embroidery «slanting cross». If the slanting cross
is worked on the face of the cloth, two equal
diagonal (slanting) stitches are laid from left to
right and visa versa. This explains the name of
the cross — «slanting cross». It can also be called
a common stitch, because it is widely spread in
all the regions of Ukraine, Slavonic countries
and others.
Виворіт. Reverse.
-ТТТТТГГ
"Чі
<l
V44V
V
і XXXXXK
r,, , : ! і! r і:' ■
84
Ukrainian Folk Embroidery
4. Хрестик прямий.
Робочу нитку закріплюємо |_[
з виворітної сторони на місці
початку шва. Виводимо голку на
лицьову сторону, від місця виколу
вниз (можна і вверх, залежно від
ходу лінії шва) відраховуємо 2
нитки піткання, вколюємо голку,
повертаємо вліво та виколюємо її по
діагоналі вліво і вверх через одну
нитку основи і одну нитку
піткання. Виводимо голку на лицьову
сторону, ведемо її вправо через 2
нитки основи між двома
паралельними нитками піткання, покритими
прямим нижнім стібком.
Виколюємо голку, виводимо її по діагоналі
через одну нитку піткання і 2
нитки основи для накладання наступного стібка.
З лицьової сторони утворюються прямі,
рівні вертикальний та горизонтальний
стібки, що перпендикулярно
перехрещуються між собою і утворюють хрестик. Звідси
назва хрестик прямий.
Хрестиком прямим виконують
найрізноманітніші основні, додаткові
орнаменти, покрайниці у декоруванні одягових,
обрядових, інтер'єрних виробів. Його
поєднують в орнаментах з іншими техніками
художнього вишивання.
4. Straight Cross.
The working thread is
fastened to the reverse side at the
beginning of the stitch. The needle is
brought out to the obverse of the
cloth. Two horizontal threads of the
cloth are counted off downwards
\ J (can be upwards, depending on the
stitch-line) from the starting point
and the needle is inserted, turned
leftwards and drawn diagonally to
the left and up through one ground-
thread and one horizontal thread of
j-J the cloth. The needle is brought out
to its face and led rightwards through
two ground-threads between two
parallel horizontal threads of the
cloth laid with a straight bottom
stitch. The needle is inserted and is led
diagonally through one horizontal thread of the cloth
and two ground-threads to lay the next stitch.
The obverse side shows straight, even vertical
and horizontal stitches perpendicularly crossed
with each other forming a cross. The name
«straight cross» originate from this technique.
Various basic and additional ornaments,
dress, ritual, and interior articles are worked
in straight cross. It is combined with the other
embroidery techniques while ornamenting.
ЯКЖТРІЇ. ..' .'lirhrtt*?*!*?*?^^
ІШ.!%.Щ
'*•'?• ■.?"**.
,*■,:!?"? :,r"f''.*r",r!;,,*::frt:*,;*;:!?i!*'':rt:i!f;.;,j;:!S!.!ff;:rJ'.!!
Лицьова сторона. Obverse.
Виворіт. Reverse.
5. Хрестик з гі ~і Ті ~ г-і і і ..і | ■, і_
косою підкладкою.
Робочу нитку
закріплюємо з
виворітної сторони на
місці початку шва.
Виводимо голку з
робочою ниткою на
лицьову сторону,
ведемо її по діагоналі
вправо і вниз через 2
нитки піткання і 4-6-
8 ниток основи.
Вколюємо голку, повертаємо вверх, набираємо
на неї 2 нитки піткання, виводимо на
лицьову сторону (утворився діагональний стібок
зліва направо через пропущені нами 4-6-8
ниток основи). Від місця виколу ведемо
голку з робочою ниткою по діагоналі вліво і вниз
5. Cross with
the Slanting Lining.
The working
thread is fastened to
the reverse of the cloth
at the starting point of
the stitch. The needle
with the working
thread is brought out to
the obverse side and is
led diagonally
rightwards and down
through two horizontal
threads of the cloth and four-six-eight ground-
threads. The needle is inserted into the cloth,
turned upwards, picking up two horizontal
threads of the cloth and brought out to its face.
(The diagonal stitch from left to right has been
formed through the missed four-six-eight
85
Українське народне вишивання
через 2 нитки основи та піткання,
вколюємо голку, повертаємо вверх, набираємо 2
нитки піткання паралельно попередньому
набору. Виводимо голку на лицьову сторону
і таким способом накладаємо косі,
рівномірні, діагональні стібки справа наліво
і вниз до кінця нижнього косого стібка. Вкінці
вколюємо голку і виводимо її відповідно до
рисунка орнаменту для накладання
наступного діагонального стібка.
При цьому з лицьової сторони
утворюються косі хрестики із спільною основою,
підкладкою(косим діагональним стібком
зліва направо і вниз).
Хрестик із косою підкладкою
широко використовують для заповнення в
орнаментах великих площин при декоруванні
диванних подушечок, килимків, покривалець
та інших інтер'єрних виробів.
ground-threads). The needle with the working
thread is led diagonally from the starting point
leftwards and down through two ground-
threads and two horizontal threads of the cloth.
Then the needle is inserted into the cloth, turned
upwards, picking up two horizontal threads of
the cloth parallel to the previous set.The needle
is brought out to the obverse side and slanting,
even, diagonal stitches from right to left and
downwards to the end of the bottom slanting
stitch are laid in the same technique. In the end
the needle is inserted and brought out
according to the design to lay the next diagonal stitch.
The face of the cloth shows slanting crosses
with a common basis, lining (slanting diagonal
stitch from left to right and downwards).
The cross with the slanting lining was
widely used to fill large ornamental spaces while
decorating cushions, rugs, shawls and other
interior articles.
Лц^./ИІЦЇМ *.%
Лицьова сторона. Obverse.
Виворіт. Reverse.
6. Хрестик з прямою
підкладкою.
Шов виконується за
робочим рисунком орнаменту.
Робочу нитку закріплюємо з
виворітної сторони на місці
початку шва. Виводимо голку
з робочою ниткою на лицьову
сторону. Від місця виколу
ведемо її вправо через 4-6-8-10
ниток основи між двома
паралельними нитками
піткання. Вколюємо голку,
повертаємо по діагоналі вліво і
вверх, виколюємо через одну
нитку основи і піткання. Від
місця виколу вниз
відраховуємо 2 нитки піткання,
вколюємо голку, повертаємо вліво і
вверх, а виколюємо по діагоналі через одну
нитку піткання і 2 нитки основи. Таким
способом накладаємо стібки до кінця нижнього
прямого стібка (підкладки). З лицьової
сторони при цьому утворюються прямі
хрестики, що мають спільний нижній стібок
(підкладку), звідси і походить назва шва
художнього вишивання.
Прямим хрестиком з підкладкою
виконують поверхниці основних орнаментів та
6. Cross with the
Straight Lining.
The seam is worked
according to the ornament. The
working thread is fastened to the
reverse of the cloth at the
beginning of the stitch. The
needle with the working thread is
brought out to the face. It is led
rightwards from the starting-
point through four-six-eight-ten
ground-threads between two
parallel horizontal threads of the
cloth. The needle is inserted,
turned diagonally leftwards and
up and is brought out through
one ground thread and
horizontal thread of the cloth. Two
horizontal threads of the cloth are
counted from the starting-point downwards.
Then the needle is inserted, turned leftwards
and up and brought out diagonally through one
horizontal thread of the cloth and two ground
threads. The stitches are laid further on in the
same technique to the end of the lower straight
stitch (lining). The face shows straight crosses
which have a common bottom stitch (lining).
Hence appears the name of the artistic stitch.
The basic ornaments in dress and inte-
86
Ukrainian Folk Embroidery
основні орнаменти у декоруванні одягових,
інтер'єрних виробів.
р*!::::;м::;-.:»:::::ій::::;Ж;::::іл::::;*;:;;:«:::;:^:;:;;»«:::;.1»і:::;;гк;;
rior decorative articles are worked in straight
cross with the lining.
Лицьова сторона. Obverse.
Виворіт. Reverse.
7. Хрестик
розсипний.
Виконується
шляхом настилу рівномірних
діагональних стібків у дві
сторони (зліва направо і
вниз, справа наліво і
вниз, залежно від
напрямку лінії шва), які
стикаються між собою під
гострим кутом.
Робочу нитку закріплюємо з
виворітної сторони на місці початку шва.
Виводимо голку на лицьову сторону, ведемо її по
діагоналі через 2 нитки основи і піткання
вправо і вниз (число ниток можна
змінювати відповідно до структури вишивальних
матеріалів та якісної характеристики
орнаменту). Вколюємо голку, повертаємо її
вправо і вверх та виколюємо по діагоналі через 2
нитки основи і 2 нитки піткання. Виводимо
голку на лицьову сторону, ведемо її вліво і
вниз (в протилежну сторону) і вколюємо на
місці попереднього вколювання. Утворений
діагональний стібок (зліва, направо і вверх)
набираємо на голку. Виводимо голку на
лицьову сторону, знову вколюємо через 2
нитки основи і піткання вправо і вниз для
накладання наступного стібка. Кількість стібків
у лінії шва визначається рисунком
орнаменту. В кінці лінії шва стібок, настелений зліва
направо і вверх на голку, не набираємо, а
повертаємо її вверх, набираємо на неї 4
нитки піткання, виводимо голку на лицьову
сторону і ведемо по діагоналі вліво і вниз
(тобто протилежно настилу стібків у
першому ряді) через 2 нитки основи та 2 нитки
піткання. Вколюємо голку і тим же
способом настеляємо стібки до кінця другої,
третьої і т. д. лінії шва. Таким же способом
хрестик розсипний можна вишивати по
вертикалі.
Хрестиком розсипним оздоблюють
дитячий одяг, виконують основні
орнаменти при декоруванні плечового, поясного
жіночого одягу. Його використовують як
з'єднувальний оздоблювальний шов, ним
7. Rozsypnyi Cross
(Scattered Cross).
It is worked by
laying even diagonal stitches to
both sides (from left to right
and down, and from right
to left and down depending
on the direction of the stitch
line) which form an acute
angle.
The working thread is fastened to the
reverse side of the cloth at the starting point.
The thread is brought out to the face and led
diagonally through two ground-threads and
horizontal threads of the cloth rightwards and
down (the number of the threads can vary
according to the cloth structure and qualitative
characteristics of the ornament). The needle is
inserted, turned rightwards and up and brought
out diagonally through two ground threads and
two horizontal threads to the obverse side. Then,
it is led leftwards and down (in the opposite
direction) and inserted into the place of the
previous insertion. The newly created diagonal
stitch (from left to right and up) is taken onto
the needle. The needle is brought out to the
face of the cloth and again inserted through
two ground threads and horizontal threads of
the cloth rightwards and down to lay the next
stitch. The pattern of the orn anient determines
the quantity of the stitches in the seam line. At
the end of the seam line the stitch being laid
from left to right and upwards is not picked
onto the needle. The needle is turned up,
picking four horizontal threads of the cloth, brought
onto the face and led diagonally leftwards and
down (i.e. in the opposite direction to the
stitches being laid in the first row) through two
ground threads and two horizontal threads of
the cloth. The needle is inserted into the cloth
and the stitches are laid by the end of the
second, third etc. seam line in the same manner. In
the same way the scattered stitch can be worked
vertically. Children's clothes, basic ornaments
to adorn shoulder width and_waist length
woman's dress are decorated with the scattered stitch.
It is also used as a joining and ornamental stitch.
87
Українське народне вишивання
виконують покрайниці у стрічкових орна- It is worked in band ornaments,
ментах.
Лицьова сторона. Obverse.
Виворіт. Reverse.
8. Півхрестик.
Шов виконується справа
наліво. Робочу нитку
закріплюємо з виворітної сторони на місці
початку шва. Виводимо голку на
лицьову сторону. Від місця
виколу ведемо голку з робочою
ниткою вліво і вниз через 2
нитки основи і 2 нитки піткання
(число ниток основи і піткання
може мінятися, залежно від
структури матеріалів та
характеристичних особливостей
орнаменту), вколюємо голку,
повертаємо вверх, набираємо на неї 2
нитки піткання, виводимо на
лицьову сторону, знову ведемо по діагоналі
вліво і вниз через ту ж саму кількість ниток
основи і піткання для накладання
наступного стібка. Таким способом накладаємо
стібки відповідно до рисунка орнаменту.
Півхрестиком вишивають роздільні
лінії та покрайниці в стрічкових
орнаментах. Його використовують як з'єднувальний
та оздоблювальний шов.
tt іііи in1:'.1; ib'jggjSBgggtfwg»^.*.-»'-
8. Half-cross.
The stitch is worked from
right to left. The working thread is
fastened to the reverse side of the
cloth at the starting-point. The
needle is brought out to the face of
the cloth. From that place the
needle with the working thread is led
leftwards and down through two
ground threads and two horizontal
threads of the cloth (the number
of the ground and horizontal
threads can vary depending on the
structure of the materials and
ornamental peculiarities), the needle
is inserted into the cloth, turned
upwards, picking up two horizontal threads,
brought out to the obverse side and is again led
diagonally to the left and down through the
same number of ground and horizontal threads
to lay the next stitch. The stitches are laid in
the same manner according to the pattern
design.
Separating lines and band ornaments are
worked with the half-cross. It is used as a
joining and decorative stitch.
Лицьова сторона. Obverse.
ііяіїпйпт:іі&&гиШ^іїп
Виворіт. Reverse.
9. Хрестик подвійний або
болгарський.
Робочу нитку закріплюємо з
виворітної сторони на місці початку шва.
Виводимо голку з робочою ниткою на лицьову
сторону, ведемо її по діагоналі через
чотири нитки основи і піткання вправо і вниз
(число ниток можна змінювати залежно від
потреби, але воно повинно бути парним).
Вколюємо голку, повертаємо вверх,
набираємо на неї чотири нитки піткання,
виводимо на лицьову сторону. Від місця виколу
ведемо голку з робочою ниткою по діагоналі
9. Double cross (Bulgarian).
The working thread is fastened to the
reverse side of the cloth at the starting-point.
The needle with the working thread is brought
out to the obverse side and is led diagonally
through four ground and horizontal threads
rightwards and down (the number of threads
can vary as required, but it should form a pair).
The needle is inserted into the cloth, turned
upwards,picking up four horizontal threads and
brought out onto the face of the cloth. The
needle with the working thread is led diagonally,
from the place it emerged, leftwards and dawn
88
Ukrainian Folk Embroidery
вліво і вниз через ті ж самі
нитки основи і піткання,
вколюємо голку, повертаємо
вверх, набираємо на неї дві
нитки піткання (половинне
число всіх ниток піткання),
виводимо голку на лицьову
сторону (утворився
правильний косий хрестик із
виведеною робочою ниткою
посередині його з лівої сторони). Від
місця виколу ведемо голку з
робочою ниткою по прямій
вправо через чотири нитки
основи, вколюємо голку,
повертаємо по діагоналі вліво і
вверх, виколюємо через дві
нитки основи і піткання (це
буде посередині верхньої
частини косого хрестика). Виводимо голку на
лицьову сторону. Від місця виколу
відраховуємо чотири нитки піткання вниз,
вколюємо голку (це буде посередині нижньої
частини косого хрестика) і виводимо її для
накладання таким же способом стібків для
наступного хрестика.
При цьому утворюється два
хрестики — нижній косий, верхній прямий. Звідси
і назва шва хрестик подвійний. Назва
хрестик болгарський, мабуть, пішла від найшир-
шого його застосування в Болгарії.
Хрестиком подвійним найбільше
вишивають речі інтер'єрного призначення:
килимки, диванні подушечки, забори до
подушок, серветки, доріжки, покривальця
тощо. Однак його широко використовують
як оздоблювальний шов. Ним виконують
покрайниці, роздільні лінії стрічкових
орнаментів, заповнення центрів геометричних
мотивів в орнаментах тощо. На Гуцульщині
хрестиком подвійним вишивають покрайниці
в мережках, забезпечуючи цим самим
цільність фактури вишивки.
through the same ground and
horizontal threads, inserted,
turned upwards, picking up two
horizontal threads (half of all
the horizontal threads) and
brought out to the obverse side.
(A correct slanting stitch has
been formed.) From the place it
emerged, the needle with the
working thread is led straight
to the right through four ground
threads, inserted into the cloth,
turned diagonally leftwards and
up and brought onto the obverse
through two ground and
horizontal threads (this will be in the
middle of the upper part of the
slanting stitch). From the place
where it appears, we count four
horizontal threads downwards, insert the
needle into the cloth (this will be in the middle of
the bottom part of the slanting stitch) and bring
it out to lay the stitches in the same manner to
form the next cross.
Thus, two crosses are formed: the
lower is a slanting one, the upper is a straight one.
The name of the stitch comes from the
technique as it is worked: double cross. The name
Bulgarian cross, probably, came from the
country where it was widely used.
Interior articles are embroidered with
the double cross: carpets, cushions, napkins,
strips of carpet,and small spreads etc. Though
it is more often used as an ornamental stitching
seam. The final ornamental bands, marginal
lines of the ornamental bands,centers of
geometric motifs of a pattern are done with this
stitch. The final bands of drawn-works in Hut-
sulshchyna are worked with the double cross,
rendering the whole texture of embroidery.
Ь""-і Ш "^ *'im~"m"
Лицьова сторона. Obverse.
Вгшоріт. Reverse.
89
Українське народне вишивання
Самостійна робота.
1. Ознайомлення із орнаментами,
виконаними рахунковими непрозорими
швами.
2. Зарисовка орнаментальних
елементів, мотивів, фрагментів орнаментів.
3.Компонування орнаменту для
виконання рахунковими непрозорими
техніками художнього вишивання.
Завдання № 4.
1. Практичний тренінг з
вишивання рахункових непрозорих швів за
теоретичним описом технології та техніки їх
виконання.
Контрольна робота.
1. Практичне вишивання
фраґменту орнаменту рахунковими непрозорими
техніками в поєднанні із раніше
вивченими швами художнього вишивання.
Розмір 14 см X 12 см
Композиція за власним задумом
(дозволено трансформацію елементів, мотивів
із опрацьованих самостійно орнаментів).
Матеріали: тканина — полотно
домоткане;
нитки — муліне;
оправа — дерев'яні рамки відповідно
до розміру виконаного завдання
Питання для контролю знань.
1. Поясніть фізичний та
технологічний зміст поняття рахункові шви.
2. Які ви знаєте спільні та відмінні
техніко-технологічні ознаки рахункових
швів?
3. На які групи за техніко-техно-
логічними ознаками умовно поділяють
рахункові шви?
4. Дайте визначення поняття
рахункові непрозорі шви.
5. Перечисліть види швів
художнього вишивання хрестики.
Прокоментуйте спільність та відмінність технології
та техніки їх виконання.
6. Прошийте практично за поданим
зразком шов художнього вишивання
«курячий брід».
7. За характером настилу стібків
з лицьової і виворітної сторони визначіть
тип (назву) хрестиків.
Independent Work.
1. Introduction of the ornaments worked
in opaque stitches which require counting.
2. Sketching of ornamental elements,
motifs, and fragments.
3. Designing ornaments to be worked in
opaque techniques of artistic embroidery which
require counting.
Task # 4.
1. Practical application in executing
embroidery of opaque stitches requiring counting
under the theoretic description of technology and
technique.
Test.
1.Executing the ornamental fragment in
opaque techniques which require counting,
combined with the stitches of artistic embroidery
already studied.
Size: 14 X 12 cm;
Composition: one's own creative idea (it
is allowed to transform the elements and motifs
of the ornaments studied on one's own);
Materials: fabric — homespun linen
threads — Mouline
framing — wooden frames, to fit the size
of the executed task.
Final Questions.
1. Explain manual and technologic
meaning of the notion «stitches which require
counting.
2. What similar and different methods
in technique and technology of the stitches which
require counting do you know?
3. What groups, in terms of technique and
technology, are stitches which require counting
routinely divided into?
4. Give the definition of the notion
«opaque stitches which require counting».
5. Innumerate kinds of stitches of
artistic embroidery «Crosses». Comment on the
similarity and difference of technology and
technique of their execution.
6. Execute the stitch of artistic
embroidery «Kuryachyi Brid» on the sample given.
7. Determine the type of crosses,having
examined the character of the stitches laid on
the obverse and reverse sides.
90
Ukrainian Folk Embroidery
б) прозорі рахункові шви.
хинх
л
XJWX TJXIWX
8 J/ 1
xmix xmix
хннх
в<
IWX
1.
Вирізування.
Основним
елементом в
орнаментах, виконаних
технікою
художнього вишивання
вирізування, є
квадратик. Його
величина залежить
від структури
вишивальних
матеріалів та якісно-
творчих
особливостей орнаменту.
Квадратики є
структурною
складовою творення
мотивів, які
лягають в основу
орнаменту.
Техніка
художнього
вишивання вирізування
виконується за
робочим рисунком
орнаменту. Робочу
нитку закріплюємо
з виворітної
сторони на місці
початку шва. Виводимо
голку з робочою ниткою на лицьову
сторону і вишиваємо хрестик косий (3x3, або 2x2
нитки основи і піткання). Робочу нитку
виводимо у лівому верхньому ріжку
хрестика, вколюємо голку у нижньому ріжку
хрестика (тканину повертаємо до себе так, щоб
сторона квадратика, яку вишиваємо,
лежала до нас горизонтально). Виколюємо голку
через одну вертикальну нитку вправо і
вверх, настеляємо густі стібки через
горизонтальні нитки (технікою качалкова
лиштва), які кількістю повинні дорівнювати
горизонтальним ниткам вишитого хрестика.
Настеливши стібки до кінця першої
сторони квадратика, знову вишиваємо таким же
способом другу, третю, четверту сторони
квадратика. Коли орнамент вишитий
повністю, з виворітної сторони спеціальними
ножичками (леза яких повернуті вверх),
підрізаємо з двох сторін нитки основи, а
потім піткання. При цьому треба пильно
слідкувати, щоб не підрізати стібки робочої
нитки, настелені по периметру квадратиків.
Нитки легенько витягуємо.
ХИМХ
ХІЖХШХШІХ
хштхтЯ
ХННХ
t
-і 1-і-: і-lift-! H-,
b) transparent stitches which require
counting.
1. Vyrizu-
vannya (Cut Work).
The basic
element, in the
ornaments worked, in
the technique of
Vyrizuvannya is the
square. Its size
depends on the texture
of the embroidery
materials and
quality of the ornament
to be created. The
squares are a
structural part of the
motifs, which form
the ornament.
This
technique of artistic
embroidery is worked
according to the
ornamental pattern.
The working thread
is fastened to the
reverse side of the
material at the
starting point. The needle
with the working
thread is brought
out to the obverse
side to embroider a
slanting cross (3x3 or 2x2 horizontal and ground
threads). The working thread is brought out to
the face of the fabric in the top right corner of
the cross and is inserted into the cloth in the
left corner of the cross (the material is turned
so that the side of the square being worked
will lie horizontally facing us). The needle is
brought out of the cloth one vertical thread
leftwards and up, and dense stitches are laid
through horizontal threads (in the technique of
Kachalkova Lyshtva). Their number should be
equal to that of the horizontal threads of the
existing cross.
Having laid the stitches to the end of
the first side of the square, one should work
the cross again, the side of which is
embroidered in the same technique, and so are the
other three. When the ornament has been
entirely made, the ground threads are cut from
both sides first, with the special scissors, and
then cut the horizontal ones. While doing this
one should be careful not to cut the stitches of
the working thread, which are laid along the
squares' perimeters. Then unnecessary threads
are drawn out.
xmix
І!
rH . .1-. t
91
Українське народне вишивання
З лицьової і виворітної сторони
утворюються квадратики з прозорими
повітряними отворами посередині. Квадратики в
орнаментах у шахматному порядку
залишаються прозорими, зашиваються
тонесенькою ниточкою технікою павучок у вигляді
двох вісімок, настелених перпендикулярно
від протилежних сторін квадратика.
Вирізування в орнаментах поєднують
із лиштвою простою, лиштвою качалковою,
гладдю косою оздоблювальною, курячим
бродом, розводом тощо. Цією технікою
виконують найрізноманітніші орнаменти при
декоруванні натільного одягу.
Both the face and reverse of the cloth
reveal squares with transparent empty holes in
the center. The squares in the ornaments are
arranged in staggered rows-a chessboard type
pattern. The latter ones are filled up with a thin
thread in Pavuchok (spider) technique which
remind one two figure eights, laid
perpendicular to two opposite sides of a square.
Vyrizuvannya is combined in ornaments
with Simple Lyshtva, Kachalkova Lyshtva,
Slanting Decorative Satin Stitch, Kuryachyi
Brid,Rozvid etc. Various ornaments are worked
in this technique while decorating underwear.
Лицьова сторона. Obverse.
Виворіт. Reverse.
2. Сліпе вирізування.
Технологія та техніка
вишивання шва сліпе
вирізування така ж сама, як і шва
вирізування. Відмінність полягає в
тому, що сторони квадратиків
вишиваються тільки білим
кольором. Нитки основи і
піткання в квадратиках не
вирізуються, їх зашивають нитками чорного (або
насиченого темно-синього) кольору. Якщо
орнамент сліпим вирізуванням вишито на тлі
чорної тканини, то квадратики зашивати не
треба. В народі техніку вишивання сліпе
вирізування називають обманка.
Сліпе вирізування найбільш
поширене в орнаментах, якими декорують
натільний одяг літніх жінок. Цим
переслідується мета застерегти просвічування тіла
через прозорі отвори квадратиків, що в
похилому віці вважається неетичною манерою.
• •а
**■•
lit
*
fif
eftftft
«as
2. Slipe Vyrizuvannya
(Blind Cut Work).
The technology and
technique of Slipe Vyrizuvannya stitch's
execution is the same as that of
Vyrizuvannya (Cut Work). The only
difference is that the sides of the
squares are outlined in white. The
ground and horizontal threads in the
squares are not cut out, but are finished off with
black (or rich dark blue) threads. If the
ornament in Blind Cut Work technique is worked on
the black background, there is no need to fill up
the squares. The technique of Slipe
Vyrizuvannya is commonly called Delusion.
Slipe Vyrizuvannya is most widely used
in ornaments,underwear of elderly women is
decorated with. Thus, to hide the body, which
can occasionally be visible through the empty
holes in the squares, which is considered to be
indecent at such an age.
Лицьова сторона. Obverse.
Виворіт. Reverse.
92
Ukrainian Folk Embroidery
3.
Виколювання.
Технологічний спосіб
вишивання
виколювання
такий же, як
довбанки.
Техніка настилу
стібків
відрізняється лише
кількістю
ниток. Шов
виконується за
робочим
рисунком орнаменту.
Від місця вико-
лу голки
настеляємо стібки по
периметру
через три нитки тканини (за годинниковою або
проти годинникової стрілки, залежно від
напрямку ведення лінії шва). У зв'язку із
більшою кількістю ниток (три), обведених
робочою ниткою, по центру чотирьох стібків
(основного елемента) утворюються більші
отвори, ніж в основному елементі довбанки.
При укладанні композиційних мотивів на
стику попарно двох стібків сусідніх
елементів додатково утворюються отвори, лише
менші, половинні від основного. При цьому
утворений геометричний орнамент має
ажурну фактуру.
Виколювання можна виконувати по
прямій горизонтально, вертикально, а
також по діагоналі.
Технікою виколювання вишивають
найрізноманітніші орнаменти при
декоруванні натільного одягу. їх виконують в
поєднанні з іншими стеленими швами на
білому тлі тканини білим або ніжними
відтінками інших кольорів.
3. Vyc-
olyuvannya.
(Drawn
Eyelets).
The
technology
of execution
of Vycoly-
uvannya is
the same as
that of
Dovbanka
(Pierced
Eyelets). The
number of
thr-eads is
the only
difference while
laying the
stitches. The
seam is worked according to the ornamental
pattern. The stitches are laid along the
perimeter from the starting point with the interval of
three threads of the fabric (clockwise or
counterclockwise, depending on the seam line's
direction). As there are more threads (3), twisted
by the working one, used, larger holes than in
the basic element of Dovbanka (Pierced
Eyelets) are formed in the center of four stitches
(basic element). While working the compositional
motifs, additional, though smaller holes (half
the basic ones) appear at the junction of two
stitches laid in pairs which form the
neighboring elements. The geometric ornament being
worked is of an open-work texture.
Vycolyuvannya can be worked in a
straight line horizontally, vertically and also
diagonally.
Various ornaments while decorating
underwear are worked in the technique of
Vycolyuvannya. It can be combined with the other
smooth stitches in white on the white
background, or in subtle tints of different colors.
Лицьова сторона. Obverse.
Виворіт. Reverse.
93
Українське народне вишивання
■■■чи'ІЛ-ц-: ■ J1! Г^
4=;*W
JL «А
idWLp
Jd
itbiLL
4. Розвід.
Технологія вигнивання шва подібна до
технології швів довбанка та виколювання.
Відмінність полягає у веденні лінії шва та
прийомів настилу стібків через нитки, що
формують основний композиційний елемент.
Шов виконується зліва направо по
діагоналі вправо і вверх або вправо і вниз
відповідно до робочого рисунка орнаменту.
Робочу нитку закріплюємо з виворітної
сторони на місці початку шва. Виводимо голку
з робочою ниткою на лицьову сторону. Від
місця виколу вниз відраховуємо три-чоти-
ри нитки, вколюємо голку, повертаємо
вверх, набираємо на неї пропущені нитки і
виводимо її на лицьову сторону на місці
попереднього виколу. Робочу нитку міцно
притягуємо від місця виколу до периферії, щоб
щільно стягнути обведені стібком нитки.
Після цього таким же способом ще раз
настеляємо стібок через ті самі нитки.
Виводимо голку на місці першого виколу і тим
же методом настеляємо стібки за
годинниковою стрілкою вліво, вверх, вправо від
центрального місця виколу. Після настилу
четвертого стібка виводимо голку у його
правому ріжку, від місця виколу вверх або вниз
(залежно від ходу лінії шва) відраховуємо
ту ж саму кількість ниток, набираємо їх на
голку і тим же технічним прийомом
вишиваємо стібки наступного композиційного
елемента. При цьому утворюються отвори
(повітряний прозір), по центру між чотирма
стібками більші, а на стику попарно двох
стібків суміжних елементів менші, половинні.
Такий шов найбільше використовують для
4. Rozvid (Outline).
The technology of Rozvid Stitch
execution is like that of Dovbanka (Pierced Eyelets)
and Vycolyuvannya (Drawn Eyelets). The
difference is in the direction of the seam line and
the way the stitches are laid through the
threads.which form the basic compositional
element.
The stitch is worked from left to right,
diagonally rightwards and up or leftwards and
down,according to the ornamental pattern.
The working thread is fastened to the
reverse side of the cloth at the starting point.
The needle is brought out onto the obverse side.
From that place, three-four threads are
counted off downwards, then the needle is inserted
into the cloth, turned upwards, picking up the
missed threads and brought out onto the face
of the fabric at the place of previous insertion.
The working thread is tightly pulled from that
place to the periphery to tighten the threads
being twisted by it. After that the stitch is laid
through the same threads again in the same
way. The needle is brought out onto the face of
the fabric at the starting point and the
following stitches are laid clockwise leftwards, up and
rightwards from the central place the needle
having been brought out in the same technique.
Having laid the fourth stitch the needle appears
in its right corner. From that place, the same
number of threads is counted off, being picked
up by the needle, and the stitches for the next
compositional element are worked in the same
technique.
Thus, the holes are formed: larger ones
in the center between four stitches and smaller
94
Ukrainian Folk Embroidery
розводу основних ліній орнаменту, звідси і
назва шва розвід.
Лицьова сторона. Obverse.
5. Довбанка.
Шов художнього
вишивання довбанка
виконується за робочим
рисунком орнаменту.
Робочу нитку
закріплюємо з виворітної
сторони на місці початку
шва. Виводимо голку на
лицьову сторону. Від
місця виколу вправо
відраховуємо дві нитки,
вколюємо голку,
повертаємо вліво, набираємо
на неї пропущені нитки
і виколюємо на місці
першого виколу. Робочу
нитку міцно притягуємо
вправо, щоб щільно
змістити обведені нитки
стібком від центру до
периферії. Таким же
способом настеляємо
стібки вниз, вліво, вверх за годинниковою
стрілкою або вверх, вліво, вниз проти
годинникової стрілки, залежно від ведення
лінії шва. При цьому утворюється хрести-
коподібний елемент із маленьким отвором
посередині.
Звідси і назва довбанка. Укладаючи
(взаємозв'язуючи, відповідно до рисунка
орнаменту) ці елементи між собою,
творимо геометричний орнамент.
Орнаменти, з використанням
техніки художнього вишивання довбанка,
виконуються по білому тлу (білому фоні
полотна) білим або ніжними відтінками інших
кольорів.
(half)ones at the junction of two stitches laid in
pairs, creating neighboring elements. This stitch
is mostly used to outline the basic ornamental
lines,which determines the name of the stitch:
Rozvid (outline).
Виворіт. Reverse.
5. Dovbanka
(Pierced Eyelets).
This stitch of
artistic embroidery is
worked according to the
pattern design. The
working thread is fastened to
the reverse side of the
material at the starting
point. The needle is
brought out onto the
obverse side of the fabric.
From that place two
threads are counted off
rightwards, the needle is
inserted into the cloth,
turned leftwards, picking
up the missed threads and
brought out onto the face
of the fabric at the
starting point. The working
thread is tightly pulled
rightwards to tighten the
twisted by the stitch threads from the center
to the periphery. The stitches are laid
clockwise in the same technique downwards,
leftwards and up or counterclockwise up, leftwards
and down, depending on the direction of the
seam line. Thus, a cross-like element with little
hole in its middle is formed, which determines
the name of the stitch: Dovbanka (Pierced
Eyelets). Such elements, having been laid
according to the pattern design, form a geometric
ornament.
Ornaments, worked in Dovbanka
technique, are embroidered in white on the white
background, or in the other tints of different
colors.
n_
i>
JO LU UL
jr-qrtjAj.
_rh
95
Українське народне вишивання
'-'5."
і'-"
•*
j-i. ■.
-Г"Ї~ТЇТГТТЧ-
ijrj;;;::j:"
Лицьова сторона. Obverse.
Виворіт. Reverse.
6. Зерновий
вивід.
Шов
виконується за робочим
рисунком орнаменту. Робочу
нитку закріплюємо з
виворітної сторони на
місці початку шва.
Виводимо голку з робочою
ниткою на лицьову
сторону. Від місця виколу
вверх відраховуємо дві
нитки піткання,
вколюємо голку, повертаємо вліво, набираємо
на неї дві нитки основи і виводимо на
лицьову сторону. Ведемо голку з робочою
ниткою вправо через попередньо набрані
нитки основи та вколюємо її (це буде у
верхньому ріжку вертикального стібка).
Повертаємо голку по діагоналі вліво і вниз через
дві нитки основи і піткання, виводимо на
лицьову сторону, ведемо через 2 нитки
основи вправо, вколюємо голку (це буде у
нижньому ріжку вертикального стібка).
Повертаємо голку по діагоналі вліво і вверх
через ті ж самі 2 нитки основи і піткання,
виводимо її з робочою ниткою на лицьову
сторону (це буде у лівому ріжку верхнього
горизонтального стібка). Ведемо голку з
робочою ниткою від місця виколу вниз через
дві нитки піткання. Вколюємо голку (це буде
у лівому ріжку нижнього горизонтального
стібка) і виводимо її за лінією шва для
накладання стібків наступного елемента.
При цьому з лицьової сторони
утворюється квадратик, основний
орнаментальний елемент зернового виводу. Різними його
комбінативними поєднаннями творять
мотиви та орнаменти.
Зерновим виводом виконують основні
орнаменти при декоруванні одягових виробів. Такі
орнаменти переважно стрічкові і монохромні.
6. Zernovyi Vy-
vid.
The stitch is
worked according to the
ornamental design. The
working thread is
fastened to the reverse side
of the cloth at the
starting point. The needle
with the working thread
is brought out onto the
obverse side. From that
place, two horizontal
threads are counted off upwards, the needle is
inserted into the cloth, turned leftwards,
picking up two ground threads and brought out onto
the face of the fabric. The needle with the
working thread makes the journey to the right
through the previously picked ground threads
and is inserted into the cloth (this will be in the
top corner of the vertical stitch). The needle is
diagonally turned leftwards and down through
two ground and horizontal threads, brought out
onto the obverse side, led through two ground
threads rightwards and inserted into the fabric
(this will be in the bottom corner of the
vertical stitch). The needle is turned diagonally
leftwards and up through the same two ground
and horizontal threads and brought out onto
the face of the cloth (this will be in the right
corner of the top horizontal stitch). From that
place the needle with the working thread
journeys downwards through two horizontal threads.
The needle is inserted into the cloth (this will
be in the right corner of the bottom horizontal
stitch) and led beyond the seam line to lay the
stitches of the following element.
Thus, the obverse side shows a square,
the basic ornamental element of Zernovyi
Vyvid. The motifs and ornaments are created
by combining it in various ways.
The basic ornaments while decorating
clothes are worked in this stitch. Such
ornaments are monochrome and in a form of a band.
96
Ukrainian Folk Embroidery
Лицьова сторона. Obverse.
Виворіт. Reverse.
7. Солов'їні вічка.
Робочу нитку
закріплюємо з виворітної
сторони на місці початку шва.
Виводимо голку з робочою
ниткою на лицьову
сторону. Від місця виколу вниз
відраховуємо три,
чотири, п'ять ниток (залежно
від структури матеріалу,
характеристичних
особливостей орнаменту),
вколюємо голку.
Повертаємо вверх, набираємо
на неї пропущені нитки і
виводимо її на лицьову сторону на місці
першого виколу. Робочу нитку притягуємо від
місця виколу до периферії, щоб щільно
зімкнути обведені стібком нитки. Наступні
стібки настеляємо таким же способом через
таку саму кількість горизонтальних ниток,
вколюючи голку по діагоналі через одну
вертикальну нитку вправо проти годинникової
стрілки. Виколюємо голку при настилі
кожного стібка по центру квадрата (тобто, на
місці першого виколу).
При цьому з лицьової і виворітної
сторін утворюється рівномірний настил стібків
по квадрату з отвором по центру. Настелені
протилежно довкола отвору стібки
спричиняють різне заломлення променів світла.
Квадратик ілюзорно сприймається як око
соловейка. Звідси і назва шва солов'їні вічка.
Квадратик є основним композиційним
елементом у творенні мотивів та орнаменту
в цілому.
Солов'їні вічка в орнаментах
найбільше поєднуються з розводом, курячим
бродом, лиштвою простою, качалковою,
зерновим виводом тощо. Такі орнаменти
виконуються переважно білим або ніжними
відтінками інших кольорів.
7. Solovyini Vichka
(Nightingale's Eyes).
The working thread
is fastened to the reverse side
of the cloth at the starting
point. The needle with the
working thread is brought
out onto the obverse side.
From that place three-four-
five threads are counted off
downwards (depending on
the texture of the materials
and characteristic
peculiarities of the ornament),then
the needle is inserted into the
fabric, turned upwards, picking up these messed
threads and brought out onto the face of the
material at the starting point. The working thread
is pulled to the periphery to tighten the threads,
twisted by the stitch. The next stitches are laid in
the same technique, through the same number
of horizontal threads. The needle is inserted into
the cloth diagonally one vertical thread
rightwards, counterclockwise. Having laid the next
stitch in turn the needle is brought out onto the
obverse side in the center of the square (that is,
at the starting point).
Thus, both the obverse and reverse sides
represent evenly laid stitches in a form of a square
with a hole in its centre. The stitches are
scattered around the hole in such a way, that it
creates the effect of refracted sunrays. The square
is illusively interpreted as a nightingale's eye,
which explains the name of the stitch: Solovyini
Vichka.
The square is the main compositional
element while forming the motifs and ornaments on
the whole.
Solovyinin Vichka are often combined in
ornaments with Rozvid, Kuryachyi brid, Simple
or Kachalkova Lyshtva, Zernovyi Vyvid etc. Such
ornaments are mostly worked in white or in
subtle tints of other colors.
\ ' &.
■ «
■■■:■ = ■ -v ■:.
„,;;,
Ш-
ж
ц '■
.::.':::!
:!■:::::
■ f
■:::::::: .
■ .. - :;"
S' і
■•"::::■
■■ m » -
!:;-;'::і;рч?';":;
■■';,"■■.
Лицьова сторона. Obverse.
Виворіт. Reverse.
97
Українське народне вишивання
8. Шов кочелистий.
Основний
елемент шва — коло із
отвором по центру (коло,
кочело). Звідси і назва
шва кочелистий. Для
виконання шва робочу
нитку закріплюємо з
виворітної сторони. Виводимо
голку з робочою ниткою
на лицьову сторону.
Вколюємо її на місці вико-
лу, повертаємо вверх,
набираємо на неї дві,
три, чотири горизонтальні нитки (кількість
ниток обумовлюється особливостями
матеріалу та орнаменту) так, щоб вістря голки
було добре видно. Обводимо вістря голки
робочою ниткою зліва направо, виводимо
голку на лицьову сторону, притягуючи робочу
нитку від центру до периферії. Наступні
стібки настеляємо по колу таким же
способом, вколюючи голку на місці першого ви-
колу (по центру кола) і, виколюючи через
одну вертикальну нитку вправо за
годинниковою стрілкою. Після настилу
останнього стібка вколюємо голку зліва дужки
(петельки) першого стібка, щоб коло було
цільним, і виводимо голку на місці
вишивання наступного елемента.
Утворену кіску по колу підіймаємо
так, щоб 1/3 стібка залишилась за нею від
периферії. При цьому утворюється ажурний
кружечок із специфічною фактурою. Такі
кружечки укладають в композиційні мотиви.
Поєднуючи їх із зерновим виводом,
лиштвою простою, качалковою, швом позад
голки тощо, творять найрізноманітніші
орнаменти із специфічною фактурою та ажуром.
Таким орнаментом декорують одягові вироби.
8. Kochelystyi
Stitch (Circle Stitch).
The basic element
of the stitch is the circle
with the hole in its center.
This determines the name
of the stitch: Kochelystyi.
To work this stitch, one
should fasten the working
thread to the reverse side
of the fabric. The needle
with the working thread is
brought out onto the face
of the cloth, inserted at
the starting point, turned upwards, picking up
two-three-four horizontal threads (the number
of threads depends on the peculiarities of the
material chosen and the ornament worked) so,
that the needles point is clearly visible. The point
is twisted by the working thread from right to
left and the needle is brought out onto the
obverse side of the fabric. The working thread is
pulled from the center to periphery. The next
stitches are laid circle wise in the same
manner, inserting the needle into the cloth at the
starting point (in the center of the circle) and
bringing it out onto its face one vertical thread
left and counterclockwise. Having laid the last
stitch, the needle is inserted into the fabric to
the left of the first stitch's arch (loop) to form
a full circle and brought out to the point of the
next element to be worked.
A newly formed braid is held up so,
that 1/3 of the stitch will be left beyond it. An
openly-worked circle with a specific texture
appears. Such circles are arranged into
compositional motifs. Being combined with Zernovyi
Vyvid, Simple and Kachlkova Lyshtva, and
Backstitch etc. they create various ornaments
with a specific texture and open-work. Clothes
are decorated with this ornament.
( '
Лицьова сторожі. Obverse.
Виворіт. Reverse.
98
Ukrainian Folk Embroidery
9. Товмацька
зірка.
Робочу нитку
закріплюємо на місці
початку шва. Виводимо
голку на лицьову
сторону. Від місця виколу
вниз відраховуємо 4-5-
6 (залежно від бажаної
величини елемента)
ниток, вколюємо голку,
повертаємо вверх,
набираємо пропущені нитки і виколюємо її на
місці першого виколу. Робочу нитку
притягуємо щільно вниз (до периферії). Таким
способом і через таку ж саму кількість
ниток настеляємо стібки від центру вліво,
вверх, вправо. Настил стібків утворює
хрестоподібний елемент з повітряним прозором
(отвором) по центру. Наступні стібки
настеляємо за годинниковою стрілкою по
діагоналі від правого до нижнього стібка на одну
нитку коротші за початкові. При цьому з
лицьової і виворітної сторони утворюється
ромбовидний елемент з повітряним
прозором по центру.
Товмацьку зірку в орнаментах
поєднують із зерновим виводом, курячим
бродом, виколюванням, качалковою лиштвою
тощо.
9. Tovmatska Star.
The working
thread is fastened to the
reverse side of the cloth at
the starting point. From
that place 4-5-6 threads
(depending on the
desirable size of the element)
are counted off
downwards, the needle is
inserted into the fabric,
turned upwards, picking
up the missed threads, and brought out onto
the obverse side at the starting point. The
-working thread is tightly pulled downwards (to the
periphery). The stitches are worked in the same
manner and through the same number of
threads from the center leftwards, up and
rightwards. The stitches laid, create a cross-like
element with a space in its center. The following
stitches are worked diagonally clockwise from
the right to the bottom stitch, but one thread
shorter of the previous ones. Thus both, the
obverse and reverse sides show a rhombus-like
element with a space in its center.
Tovmatska Star is combined in the
ornaments with Zernovyi Vyvid,Kuryachyi Brid,
Vykolyuvannya, and Kachalkova Lyshtva, etc.
► * •
» « Щ й f • *
■ « • t
il-H a 4 * * я t « l m t * і * •#*«*
■ <I« l|ii<it|l | « | * t «. < * 1 «»•«•««
» « ■_•_.* _» .-...« # * >«l« Hln»»« tf І «-Л-Є.
,«1*1 *!■»*« « 4 « • ,
«If W » «I t • • ,' •*
, j » a » » -
і «
• і
-. « •
M *
* I 4 * ) » 1 «
» * і
» « » *
*^J*. * » * *
«t
Лицьова сторона. Obverse.
Виворіт. Reverse.
'A
4^
99
Українське народне вишивання
10. Клітка,
або штапівка.
Шов
виконується за робочим
рисунком
орнаменту справа наліво.
Робочу нитку
закріплюємо з
виворітної сторони на
місці початку шва.
Виводимо голку з
робочою ниткою на
лицьову сторону.
Від місця виколу вверх відраховуємо три
нитки піткання між двома паралельними
нитками основи, вколюємо голку,
повертаємо вліво, набираємо на неї три нитки
основи. Виводимо голку на лицьову сторону і
таким же способом настеляємо стібки до
кінця лінії шва. При повороті лінії шва вліво
і вниз нитки піткання відраховуємо від місця
виколу голки вниз. При цьому утворюються
на однаковій відстані з лицьової сторони
рівні, паралельні вертикальні стібки, з
виворітної — горизонтальні.
Настеливши стібки до кінця лінії
шва, повертаємо тканину на 180° і лицьові
стібки набираємо на голку. З лицьової і
виворітної сторони утворюється замкнута
ромбовидна лінія із вертикальних та
горизонтальних стібків. Знову повертаємо тканину
на 180° і таким же способом вишиваємо другу
лінію стібків. При цьому потрібно уважно
слідкувати, щоб верхній ріжок
вертикального стібка з'єднувався із кутом дотику
вертикального і горизонтального стібків
верхньої лінії шва. Після закінчення настилу
стібків з лицьової і виворітної сторін
утворюється декоративна ромбовидна лінія,
вистелена рівномірними квадратиками.
Штапівку можна вишивати по прямій
лінії. Шов ведеться справа наліво. Робочу
нитку закріплюємо з виворітної сторони на
місці початку шва. Виводимо голку з
робочою ниткою на лицьову сторону. Від місця
виколу пропускаємо чотири нитки основи
між двома паралельними нитками
піткання, вколюємо голку, повертаємо вверх,
набираємо на неї чотири нитки піткання між
двома паралельними нитками основи
(кількість ниток можна міняти, відповідно
до якісної характеристики матеріалів і
орнаменту). Виводимо голку на лицьову
сторону та вколюємо вниз через набрані нитки
піткання на місці попереднього вколювання.
Повертаємо голку вліво, набираємо на неї
10. Klitka
/Shtapivka/;
(Check work).
The stitch is
worked according to
the pattern design.
The working thread
is fastened to the
reverse side of the
fabric at the starting
point. The needle is
brought out onto the
obverse side. From
that place three horizontal threads between two
parallel ground ones are counted off upwards,
then the needle is inserted into the cloth, turned
leftwards, picking up three ground threads. The
needle is brought out onto the obverse of the
fabric and the stitches are laid further on in
the same technique by the end of the seam
line. When the seam line curves leftwards and
down, the horizontal threads are counted off
from the place the needle is brought out of
downwards.
Thus, the obverse side of the material
shows even, parallel, vertical stitches laid at
equal intervals. The reverse side represents
horizontal ones.
Having laid the stitches by the end of
the seam line, the fabric should be turned at
the angle of 180° and the stitches worked on
the obverse side are picked up by the needle.
Both the obverse and reverse sides show a closed
rhombus-like curve from vertical and
horizontal stitches. Again, the fabric is turned at the
angle of 180° and another stitch line is worked
in the same manner. Thus, one should see that
the top corner of the vertical stitch joins the
neighboring corner of vertical and horizontal
stitches of the top seam line.
Having laid the stitches, one can see a
decorative, rhombus-like line, consisting of
even squares on both the face and the reverse
of the cloth.
Shtapivka Stitch can be worked in a
straight line. The stitch is embroidered from
right to left. The working thread is fastened to
the reverse side of the fabric at the starting
point. The needle with the working thread is
brought out onto the obverse side. From that
place four ground threads between two parallel
horizontal threads are missed and the needle is
inserted into the cloth, turned upwards,
picking up four horizontal threads between two
parallel ground threads (the number of threads
can be varied, depending on qualitative char-
100
Ukrainian Folk Embroidery
чотири нитки основи, виводимо на лицьову
сторону. Від місця виколу вліво (між двома
паралельними нитками піткання)
пропускаємо чотири нитки основи, вколюємо голку,
повертаємо вверх і набираємо на неї чотири
нитки піткання. Виводимо голку на лицьову
сторону, вколюємо через чотири
(попередньо набраних) нитки піткання вниз на місці
попереднього вколювання. Таким способом
настеляємо стібки до кінця лінії шва. При
цьому з лицьової і виворітної сторін
утворюються горизонтальні та вертикальні стібки
із стиком в одній точці, утворюючи кут у
вигляді друкованої латинської літери L.
Дійшовши до кінця лінії шва,
повертаємо тканину на 180° і таким же способом
настеляємо стібки в протилежну сторону. З
лицьової і виворітної сторони утворюються
окремі рівні квадратики. Повертаємо тканину
так, щоб декоративна лінія, утворена
квадратиками, була розміщена по відношенню
до нас паралельно. Після цього бокові стібки
квадратиків з однієї, а потім з другої
сторони набираємо на голку, з'єднуючи їх
таким способом у цільну пряму лінію.
Штапівкою виконують основні
орнаменти в поєднанні із лиштвою простою, ка-
чалковою, гладдю косою оздоблювальною
тощо. Колористичні рішення таких
орнаментів найрізноманітніші — від
монохромних до поліхромних, але перевалено в
ніжних відтінках.
Лицьова сторона. Obverse.
acteristics of the materials used and the
ornament worked). Then, the needle is brought out
onto the obverse side of the cloth and inserted
into it downwards through the horizontal
threads, already having been picked up, at the
starting point. The needle is turned leftwards,
picking up four ground threads, and brought
out onto the face of the fabric. From that place,
four ground threads between two parallel
horizontal ones are missed leftwards, the needle is
inserted into the cloth, turned upwards,
picking up four horizontal threads and brought out
onto the obverse of the cloth. Then, it is
inserted into the fabric through four previously
picked up horizontal threads downwards, at the
starting point. The stitches are laid in the same
technique by the end of the seam line. Thus,
both the obverse and reverse sides represent
horizontal and vertical stitches, joined in one
point, forming an angle, reminding a Latin block
letter «L».
Having reached the end of the seam
line, the material is turned at the angle of 180°,
and the stitches are laid in the same way, but
in the opposite direction. Thus, both the
obverse and reverse sides show separate, even
squares. The cloth is turned so, that the
decorative line from the squares should be parallel
towards us. After that, the side stitches of the
squares from one and then from another side
are picked up by the needle, thus joining them
into an entire straight line.
Shtapivka Stitch (Check work),
combined with Simple and Kachalkova Lyshtva,
Slanting and Fancy Satin Stitches etc., is used
to work the basic ornaments. The color scheme
of such ornaments varies: from monochrome
to polychrome, but preferably in subtle tints.
Виворіт. Reverse.
101
Українське народне вишивання
Самостійна робота.
1. Збір, ознайомлення із
орнаментами, виконаними рахунковими прозорими
швами.
2. Аналіз взаємозв'язку рахункових
прозорих швів та їх асиміляція з іншими
швами художнього вишивання в
орнаментах.
З.Зарисовка елементів, мотивів, фраґ-
ментів орнаментів, виконаних техніками
рахункових прозорих швів художнього
вишивання.
Завдання № 5.
1. Практичне виконання рахункових
прозорих швів на тканині.
2. Графічне зображення вивчених
рахункових прозорих швів на клітці.
Контрольна робота.
1. Практичне вишивання
фрагменту орнаменту рахунковими прозорими
техніками художнього вишивання.
Розмір 14 см X 12 см
Композиція за власним задумом
(дозволено трансформацію елементів, мотивів
із самостійно опрацьованих орнаментів).
Матеріали: тканина — полотно
домоткане;
нитки — муліне;
оправа — рамки дерев' відповідно
до розміру виконаного завдання.
Питання для контролю знань.
1. Вкажіть на подібність та
відмінність техніки виконання швів
художнього вишивання «виколювання» і «довбанка».
2. Прошийте практично за поданим
зразком шов «кочелистий».
3. Прокоментуйте техніку
вишивання шва «солов'їні вічка», походження його
назви.
4. Зобразіть графічно на клітці шов
художнього вишивання «клітка»
(штапівка).
5. Прошийте практично за поданим
зразком шов художнього вишивання
«розвід». Прокоментуйте походження його
назви.
6. Перелічить та охарактеризуйте
особливість інструментів для виконання
техніки художнього вишивання «вирізування».
7. Дайте визначення поняття
рахункові прозорі шви.
Independent Work.
1. Collection, acquaintance with the
ornaments, executed in transparent stitches which
require counting.
2. Analysis of the intercommunication
of transparent stitches which require counting
and their assimilation with the other stitches of
artistic embroidery in ornaments.
3. Sketching of the ornamental elements,
motifs, fragments, executed in techniques of
transparent stitches of artistic embroidery which
require counting.
Task # 5.
1. Execution of transparent stitches
which require counting.
2. Graphic picture of the transparent
stitches which require counting, previously
studied, on the square.
Test.
1. Execution of the ornamental fragment
in transparent techniques of artistic embroidery
which require counting.
Size: 14 X 12 cm;
Composition: one's own idea (it is allowed
to transform elements, motifs of the ornaments
studied on one's own).
Materials: fabric — homespun linen;
threads — Mouline;
raming — wooden frames, fit the size of
the executed task.
Final Questions.
1. Demonstrate the similarities and
differences in execution techniques of the stitches
of artistic embroidery Vykolyuvannya and
Dovbanka.
2. Work Kochelystyi Stitch on the given
sample.
3. Comment on the embroidery technique
and name of Solovyini Vichka Stitch.
4. Make a tracery of the Check work
Stitch (Shtapivka) on the square.
5. ork Rozvid Stitch on the given
sample. Comment on its name.
6. Identify and characterize peculiarities
of the tools to execute technique of artistic
embroidery Vyrizuvannya.
7. Give the definition of Transparent
Stitches which require Counting.
102
44
»;л
"^Колись ",
кін. XIX cm.
"Once",
end of the
XIX-th century
za&
&#
\ I
' в
Ф
>Y <
lf
♦.*
- /
X^V
'v.
N4
v.
«*
■ *»
*
v£
v ;іаАч -
Л-
\'A .
a
.ff
IT
«^
-'£■
m
■■»
.7
../■
N.
+ Ф4
V
4
■*•
І.
■»♦♦
*4 +
■»♦♦
1'
Сорочка жіноча.
'Вирізування, розвід,
лиштва проста, наВирування
Cfiemise.
Cutting out, Adorning,
SimpCe Lyshtva, 9{abyruvannya (coUection)
r
"Тепер"
"fXprv"
"колись'
"Once
• -1
^З^^йтЯЛ?
(«ЗДаТОРДО
СЯ. Vh Складені шви
SS* *VL Compound Stitches of Artistic ILmbroiderx
Українське народне вишивання
Ш кладений шов являє собою
розуміння асиміляції
(поєднання, взаємозв'язку)
різних технік в складовій
одного шва. Методологія їх складна. В
технології вишивання складених швів
первинним є настил основи, вторинним —
виконання поверхневих стібків, в окремих —
виконання центральної частини, а після
зовнішніх стібків шва іншими техніками.
Вивчення складених швів створює
найкращі можливості розвитку початкових
умінь за практичним розбором техніки
художнього вишивання провести її
теоретичний опис. Формувати розуміння реального
та візуального сприйняття швів
художнього вишивання, початкові поняття й уміння
творення фактури вишитих орнаментів.
1. Верхоплут подвійний (іуцульський).
Настил стібків основи шва
виконується знизу вверх. Робочу нитку закріплюємо
A compound stitch means assimilation
of different techniques. Their methodology is
complicated. The technology of execution of
compound stitches is as follows: first, the basis
is worked; second, the surface stitches are; in
some cases, the central part is; and after outer
stitches are laid the seam is done in various
techniques.
Studying compound stitches is the best
opportunity to develop primary skills to give
theoretical description of any technique of
artistic embroidery, having examined it before.
One is able to percept and visualize the stitches
of artistic embroidery — acquires «ABC» to
create texture of the embroidered ornaments.
1. Double Verkhoplut (Hutsulskyi)
/Hutsulian Topwinder/.
The stitches of the basic seam are laid
llllllllll)
литі іM»
^1..11.(11.
*
110
Ukrainian Folk Embroidery
з виворітної сторони на місці початку шва.
Виводимо голку з робочою ниткою на
лицьову сторону. Від місця виколу вліво
відраховуємо дві нитки, вколюємо голку,
повертаємо вверх, набираємо на неї дві
горизонтальні нитки (кількість ниток може бути
збільшена, але їх число повинне
обов'язково бути парним). Виводимо голку на
лицьову сторону і вколюємо її вправо через дві
вертикальні нитки. Таким способом
настеляємо стібки до кінця лінії шва. Останній
стібок настеляємо зліва направо. Тканину
повертаємо на 180°, набираємо на голку дві
горизонтальні нитки, виводимо її у
правому ріжку другого стібка нижньої лінії шва і
тим же способом настеляємо попарно по два
стібки через шість горизонтальних ниток.
Утворюється подвійна лінія основи шва,
нижня — із рівних паралельних стібків через
дві нитки, верхня — із таких же стібків,
розміщених попарно через два стібки
нижньої лінії шва.
Настил верхніх стібків на основу шва
виконується зліва направо. Виводимо голку
з робочою ниткою на лицьову сторону на
одну нитку основи вліво від першого стібка
нижнього ряду шва. За допомогою голки
проводимо робочу нитку попід стібки
основи шва справа наліво і вверх, справа наліво
і вниз. Після четвертого нижнього стібка
вколюємо голку через одну нитку основи
вправо на рівні його нижнього ріжка,
повертаємо вліво і вверх і виколюємо по
діагоналі через дві нитки піткання і шість
ниток основи (це буде через одну нитку
основи вліво від крайнього стібка верхнього ряду
основи шва). Виводимо голку на лицьову
сторону, тим же способом проводимо
робочу нитку попід два стібки і вколюємо через
одну нитку основи від другого стібка.
Повертаємо голку вправо і вниз та виколюємо
її по діагоналі через дві нитки піткання і
три нитки основи (на місці попереднього
виколювання в нижній лінії шва). Таким
способом настеляємо поверхневі стібки до кінця
лінії шва.
Верхоплутом подвійним
(гуцульським) вишивають основні, доповнюючі
орнаменти. Його використовують в орнаментах,
виконаних мережками, техніками
художнього вишивання із повітряним прозором
тощо.
from the bottom to the top. The working thread
is fastened to the reverse side at the beginning
of the seam. The needle with the working thread
is brought out to the face of the cloth. Two
threads are counted out from the starting point
leftwards and the needle is inserted into the
cloth, turned upwards, picking up two
horizontal threads (the number of the threads may
be increased, but their quantity should form a
pair). The needle is brought out to the obverse
side and inserted into the cloth rightwards
through two vertical threads. The stitches are
laid in the same technique to the end of the
seam-line. The last stitch is laid from left to
right. The cloth is turned at the angle of 180°.
Then two horizontal threads are picked up by
the needle and the latter is brought out at the
right corner of the second stitch of the bottom
seam line. The stitches are laid in twos in pairs
at the interval of six horizontal threads in the
same technique. Thus the double line of the
seam's foundation is formed: the lower one
consists of even parallel stitches at the interval of
two threads, the upper one consists of the same
stitches in pairs at the interval of two stitches
of the lower seam-line.
The upper stitches are laid on the seam's
foundation from left to right. The needle with
the working thread is brought out to the
obverse side one ground thread leftwards from the
first stitch of the lower seam's row. The
working thread with the help of the needle is led
under the stitches of the seam's foundation form
right to left and upwards, from right to left and
downwards. After the fourth bottom stitch is
done, the needle is inserted into the cloth one
ground thread rightwards, at the level of its
bottom corner, turned leftwards and up and
brought out diagonally onto the obverse side
through two horizontal and six ground threads
(this will be one ground thread leftwards from
the final stitch of the top row of the seam's
basis). The working thread is led under two
stitches in the same technique and the needle is
inserted into the fabric one ground thread
rightwards from the second stitch. The needle is turned
rightwards and down and brought diagonally
onto the obverse of the cloth through two
horizontal and three ground threads (at the place it
has previously been inserted into the bottom seam
line). The surface stitches are laid the same way
till the end of the seam line.
Double Verkhoplut is used to
embroider basic and complementary ornaments. It is
combined with the ornaments in cut and drawn
work techniques.
Ill
Українське народне вишивання
і 4 •> • • « •>
* * #. ч * я
- щ
V-
■>-•*,.
1 •» ч *•>
- * 1»« -
«}
У/.
» • * •
Mf 1
«НІ
• 4 •
: f
- «• • » »,
#
.t.
„м.иіп, ^
■ * *
*
■> * -
*-
*
,,*
* * - л
- * * ч
* » t ■*
14 4*
*
• • „ - -
* • •> * *
* Ч 1 ч І
Ч » • » 4
: і
•■■»'
4 <
7 *
■* - * -ч*
* -«1
* * *
■ я «
* •
і
* *
• •«
.TTT.a,y,TTTVT.._
#»*»<'«*Ч#«>«
...* - :-.
* Л •} •''иу » 4 *
t . • • - « *
*
*
*.***
* 1 « «
« » Ч »
* «J
% ■
*
,/
.«•■♦.
Ч -
*«-
/ 4
Лицьова сторона. Obverse.
• «««••Cm «»>v
"ЧГ-wy МГ4
і»*. »
> • **. > .
»% * * і
* « « а •*
* « « ^
# ft *мі.Уі~
' я * а т » *
«•*«•«
«**•••
^ • * «
« • * .
• ~ * * ■ % щ
« ■•>•*%■
•*- -- - -*
«f • •»
* » • • • „
_»: ',"Ч»««,
Виворіт. Reverse.
2. Навиване.
Це прадавня техніка
художнього вишивання. Вона, ніби,
імітує писанковий розпис.
Орнаменти, виконані цією технікою,
найбільше призначались для
декорування натільного одягу.
Основний композиційний елемент —
прутик (завиток), який
компонують в найрізноманітніші мотиви та
орнаменти. Вони виконувались
грубою, крученою, м'якою
(розпушеною) вовняною ниткою. В наш час
навиване можна виконувати
крученими шерстяними, шовковими
нитками, ірисом або цілою ниткою
муліне.
Навиване виконується
знизу вверх за робочим рисунком
орнаменту. Робочу нитку
закріплюємо з виворітної сторони на місці
початку шва. Виводимо голку з
робочою ниткою на лицьову сторону. Від
місця виколу ведемо її вправо і вверх по
діагоналі через дві нитки основи і дві-чоти-
ри-шість (відповідно до рисунка орнаменту)
ниток піткання. Вколюємо голку,
повертаємо вліво, виводимо її через дві нитки
основи (утворився вертикальний стібок по
діагоналі через дві нитки основи і дві-чотири-
шість ниток піткання). Від місця виколу вниз
через ті ж самі дві нитки основи і кожні дві
нитки піткання настеляємо (навиваємо)
стібки. Звідси і назва шва навиване.
Перехід від одного до іншого
вертикального стібка здійснюється настилом
горизонтального стібка через дві нитки основи між
двома паралельними нитками піткання
вправо або вліво, залежно від ходу лінії шва.
2. Navyvane. (Laid Stitches).
This is an ancient technique of
artistic embroidery. It resembles egg-
painting. The ornaments, worked in
this technique, were chiefly meant to
diicorate underwear. A short switch
(curl) is the basic compositional
element which is combined with various
motifs and ornaments. It is worked in
a rough, soft (fluffy) woolen lisle
thread.
Nowadays Navyvane can be
worked in lisle woolen, silk, Iris or
Mouline threads.
Navyvane is worked from the
bottom to the top according to the
ornamental pattern. The working thread
is fastened to the reverse side of the
fabric at the starting point. The
needle with the working thread is brought
out onto the obverse side. From that
place it is led diagonally rightwards
and up through two ground threads and two-
four-six (according to the pattern design)
horizontal ones. The needle is inserted into the cloth,
turned leftwards and brought out to the face
of the fabric through two ground threads (the
vertical stitch has been formed diagonally
through two ground threads and two-four-six
horizontal ones). From that place stitches are
laid downwards through the same two ground
threads and every two horizontal ones. This
technique determines the name of the stitch.
To pass from one to another vertical
stitch one should lay a horizontal stitch through
two ground threads between two parallel
horizontal ones rightwards or leftwards,
depending on the direction of the seam line.
Лицьова сторона. Obverse.
Виворіт. Reverse.
112
Ukrainian Folk Embroidery
3. Верхоплут
(верхошов)
Відноситься до
складених (подвійних)
швів. Спочатку
настеляється основа шва, а
потім поверхневі стібки.
Шов
виконується справа наліво.
Робочу нитку закріплюємо з
виворітної сторони на
місці початку шва.
Виводимо голку з робочою
ниткою на лицьову
сторону. Від місця виколу
вверх відраховуємо дві-
три-чотири нитки
піткання між двома
паралельними нитками
основи, вколюємо
голку, повертаємо вліво, набираємо на неї таку
ж саму кількість ниток основи і виводимо
на лицьову сторону. Від місця виколу вниз
відраховуємо таку ж кількість ниток
піткання, вколюємо голку, повертаємо вліво,
набираємо стільки, як попередньо, ниток
основи, виводимо голку на лицьову сторону
та знову ведемо її з робочою ниткою вверх
для настилу наступного стібка. Таким
методом настеляємо стібки до кінця лінії шва.
При цьому з лицьової сторони
утворюються рівномірні прямі паралельні стібки на
однаковій відстані одне від одного. З вивороту
утворюються дві горизонтальні паралельні
пунктирні лінії з рівних прямих,
розміщених на однаковій відстані одне від одного
горизонтальних стібків.
Після настилу основи виводимо
голку з робочою ниткою у нижньому ріжку
першого стібка. За допомогою голки
проводимо робочу нитку зліва стібка попід стібок
вправо і вверх, зліва другого стібка, попід
стібок вправо і вниз і так поперемінно, до
кінця лінії шва.
Верхоплутом вишивають основні
орнаменти, покрайниці основних орнаментів,
його використовують як з'єднувальний або
оздоблювальний шов.
■»■ "". " .- «- г
Лицьова сторона. Obverse.
3. Verkhoplut
(Topwinder).
This stitch is
regarded as a compound
(double) one. The stitch
basis is laid first and then
the top stitches follow.
The stitch is
worked from right to left. The
working thread is fastened
to the reverse side of the
cloth at the starting point.
The needle -with the
working thread is brought out
onto the obverse side. From
that place two-three-four
horizontal threads between
two parallel ground
threads are counted off
upwards, then the needle
is inserted into the cloth, turned leftwards,
picking up the same number of ground threads and
is brought out onto the obverse side of the
fabric. The same number of horizontal threads is
counted off downward from the staring point,
then the needle is inserted into the cloth, turned
leftwards, picking up the same number of
ground threads, and is brought out onto the
obverse side of the material. Again, the needle
with the working thread is led upwards to lay
the next stitch. The stitches are laid in the same
technique till the end of the seam line. Thus,
the obverse side shows even straight parallel
stitches, falling at equal intervals. The reverse
side represents two horizontal, parallel, dotted
lines which consist of straight, even horizontal
stitches, laid at equal intervals.
Having laid the basis, the needle with
the working thread is brought out to the
obverse side in the bottom corner of the first stitch.
The working thread with the help of the
needle journeys to the left of the stitch, under it
rightwards and up, to the left of another stitch,
under it rightwards and down. The stitches are
worked alternately till the end of the seam line.
Topwinder is used to embroider basic
ornaments and final decorative bands as well
as a joining and fancy stitch.
Виворіт. Reverse.
C
^f\ II II U_
wsis€T
113
Українське народне вишивання
V
^Щ^
4. Ключовий шов
(ключове шитво).
Ключовий шов
найбільш поширений в
прибережних районах
Дністра
Івано-Франківської, Тернопільської
областей.
Цей шов
художнього вишивання
складений із двох швів, тому в
народі називається не
просто швом, а ключовим
шитвом, що підкреслює
його технологічну
складність, своєрідність та
визначеність в контексті
виконання основних орнаментів.
Основні елементи
орнаментальних мотивів
ключового шитва: ріжок,
півріжок (рисі), ружка,
півружка (рис.2), квадрат
(рис.З), ромб (рис.4), пів-
ромб (рис.5), ромбовидні
лінії (рис.6), з яких
компонують найрізноманітніші
орнаменти.
При виконанні шва,
спочатку за робочим рисунком орнаменту
настеляємо (вишиваємо) його основу
технікою поверхниця-кафасор (див. шов поверх-
ниця-кафасор). Після закінчення настилу
основи шва попід її стібки за допомогою
голки проводимо робочу нитку, яка утворює
між стібками петлі (ключки). Робоча нитка
при настилі ключок лягає то зліва, то
справа голки, залежно від ходу лінії шва. При
повороті робочої нитки, у кутах або
посередині орнаментального мотиву
закріплюємо її між нижнім та верхнім стібками за одну
нитку основи і піткання, виводимо попід
стібок і ведемо далі за робочим рисунком
орнаменту. Петлі (ключки) робочої нитки
настеляємо в системному (чітко
визначеному) порядку (схеми: 1; 2; 3; 4; 5; 6).
Основу шва слід виконувати
міцними нитками (бажано муліне) ідентичного
кольору і відтінку ниткам, якими
настеляються поверхневі ключки. Для настилу
ключок використовують кручені нитки шерсті,
шовку, муліне тощо.
Складність технології шва,
характерність настилу поверхневих (вторинних)
стібків у вигляді ключок (петель) і
обумовлюють його назву ключове шитво.
я,-
1ТГІ-
4. Klyuchovyi Stitch
(Klyuchove Shytvo)
/Looped Stitch/.
Klyuchovyi stitch is
widely spread in the river
regions of the Dnister,
Ivano-Frankivsk and Terno-
pil oblasts.
This stitch of
artistic embroidery consists of
two stitches, that's why in
common language it is not
called a plain stitch, but Kly-
uchove Shytvo, which
stresses its complicated
technology, peculiarity and
definite role in basic ornaments.
The basic elements
of ornamental motifs in
Klyuchovyi Stitch are: Rizhok
(corner), Pivrizhok
(half-corner, picture 1), Ruzhka
(rose, picture 2), Pivruzhka
(half-rose, picture 3), square
(picture 4), rhombus (picture
4), half-rhombus (picture 5),
rhombus-like lines (picture 6).
They can make up the most
diverse ornaments.
The stitch is started according to the
working ornamental pattern. Its basis is worked in the
technique of Poverkhnytsya-kafasor. Having
finished the seam, the working thread with the help
of the needle journeys through the basic
stitches,forming the loops (klyuchky) between
them. The working thread while laying the loops
falls either to the left or to the right of the
needle, depending on the seam line. When the
working thread appears in the corners or in the center
of the ornamental motif, it is fastened to one
ground and one horizontal thread of the fabric
between the bottom and top stitches and led
afterwards under the stitch to the face of the cloth
to follow the pattern design. The loops are worked
systematically, according to the schemes (1, 2,
3, 4, 5, 6).
The basis of the seam should be done
with firm threads (preferably mouline), the color
and shade of which are identical to the latter,
the surface loops are laid in. To work the loops
one can use lisle woolen, silk, mouline etc. threads.
The complicated technology of the stitch
execution and distinctive features the surface
(secondary) stitches are laid to form of a loop
and determine the name of the stitch:
Klyuchove Shytvo.
iilij
114
ж
ї
ш
CS1
!"[!
І
ї
~н=
ї
*
її
І
CS1
■І
ї
1
І
^
Українське народне вишивання
Ключовим шитвом вишивають
найрізноманітніші орнаменти при декоруванні
жіночого, чоловічого, дитячого одягу. Такі
орнаменти виконуються в монохромній
гаммі, переважно червоним, чорним,
менше синім, зеленим, іншим кольорами.
Фактура шва, світлове відтінення
кольору, відповідно зламу робочої нитки, при
настилі ключок творять ілюзорний ефект
м'якості, поверхневості над тканиною і,
одночасно, цільності з нею. Орнаменти,
вишиті технікою ключового шитва, неповторні,
дивовижно унікальні. Вони чітко
уособлюють автохтонність українського
національного вишивального мистецтва.
This stitch is used in various ornaments
to decorate women, men and children's wear.
Monochrome color-scheme, preferably red or
black and seldom blue, green etc. matches such
ornaments.
The texture of the stitch, play of color
of the working thread, depending on the way
it is curved while forming the loops,create an
illusive effect of softness. The stitch seems to
stand out and simultaneously merge into a
single entity with the fabric. The ornaments worked
in this technique are unique and intricate. They
represent autochthon traditions of Ukrainian
national art of embroidery.
,, жшяш
. ;. .. -'■ ■■■:.
ш
іжрШШЩШШШщЩЩЩШЩіїт..
Лицьова сторона. Obverse.
Виворіт. Reverse.
5. Ключка.
Основа шва вишивається справа
наліво. Робочу нитку закріплюємо з виворіт-
5. Klyuchka (Loop).
The basic seam is worked from right to
left. The working thread is fastened to the re-
116
Ukrainian Folk Embroidery
ної сторони на місці початку шва. Виводимо
голку з робочою ниткою на лицьову
сторону та ведемо її по діагоналі вправо і вверх
через чотири нитки основи і чотири нитки
піткання. Вколюємо голку, повертаємо вліво,
набираємо на неї чотири нитки основи.
Виводимо голку з робочою ниткою на лицьову
сторону, ведемо її по діагоналі вправо і вниз
через ті самі нитки основи і піткання.
Вколюємо голку, повертаємо вліво, набираємо
на неї вісім ниток основи. Виводимо голку з
робочою ниткою на лицьову сторону,
ведемо її по діагоналі вправо і вверх через
чотири нитки основи і чотири нитки піткання,
вколюємо голку (це буде у верхньому
лівому ріжку попереднього хрестика) для
накладання наступного стібка. При цьому з
лицьової сторони утворюється
горизонтальна лінія із з'єднаних між собою хрестиків, з
виворітної — дві горизонтальні паралельні
лінії, верхня у вигляді стебнівки, нижня у
вигляді стеблового шва.
Настеливши основу шва до кінця
орнаментальної лінії, виводимо голку у
лівому нижньому ріжку хрестика. Після цього
за допомогою голки проводимо робочу
нитку попід верхній стібок хрестика справа
наліво і вверх, попід нижній стібок хрестика
справа наліво і вниз. При цьому постійно
слідкуємо, щоб петлі робочої нитки були
рівномірними. В кінці шва виводимо голку
на виворітну сторону у правому нижньому
ріжку хрестика й акуратно зашиваємо
кінець робочої нитки у нижній
горизонтальній лінії шва.
Ключка широко використовується у
вишиванні основних орнаментів у поєднанні
із швом ріжкатий та мережками, а також
як з'єднувальний і оздоблювальний шов.
Ключкою виконують додаткові орнаменти,
покрайниці в стрічкових орнаментах.
Лицьова сторона. Obverse.
verse side of the cloth at the starting point.
The needle with the working thread is brought
out onto the obverse side and led diagonally
rightwards and up through four ground and
four horizontal threads. The needle is inserted
into the fabric, turned leftwards, picking up
four horizontal threads, brought out onto the
face of the cloth and led diagonally rightwards
and down through the same ground and
horizontal threads. The needle is inserted into the
cloth, turned leftwards, picking up eight ground
threads, brought out onto the face of the
fabric and led diagonally rightwards and up
through four ground and horizontal threads. The
needle is inserted into the material (this will be
in the top left corner of the previous cross) to
lay the next stitch.
Thus, the obverse side shows a
horizontal line, consisting of crosses, joined together.
The reverse side represents two horizontal
parallel lines: the top one — in a form of Stebniv-
ka, the bottom one — in Steblovyi Stitch.
Having finished the stitch basis,
according to the ornamental line,the needle is brought
out to the face of the cloth in the left bottom
corner of the cross. After that the working
thread with the help of the needle is led through
the top stitch of the cross from right to left
and up, and then through the bottom stitch of
the cross from right to left and down.One should
see that the loops of the working thread are
even. Having worked the seam, the needle is
brought out to the reverse side of the fabric in
the right bottom corner of the cross and the
end of the working thread is neatly sewn in
the bottom horizontal line of the seam.
Klyuchka is widely used while working
basic ornaments, combining with Rizhkatyi
Stitch, cut and drawn work, as well as a
joining and fancy stitch. Additional ornaments and
final ornamental bands are also worked in
Klyuchka Stitch.
Виворіт. Reverse.
117
Українське народне вишивання
6. Парована ключка.
Настил основи шва виконується
справа наліво. Робочу нитку закріплюємо з
виворітної сторони на місці початку шва.
Виводимо голку з робочою ниткою на лицьову
сторону, ведемо її по діагоналі вправо і вверх
через шість ниток основи і шість ниток
піткання. Вколюємо голку, повертаємо вліво
і набираємо на неї шість ниток основи.
Виводимо голку з робочою ниткою на лицьову
сторону та ведемо її по діагоналі вправо і
вниз через ті ж самі нитки основи і
піткання. Вколюємо голку, повертаємо вліво,
набираємо на неї дванадцять ниток основи.
Виводимо голку на лицьову сторону, знову
ведемо її по діагоналі вправо і вверх через
шість ниток основи та шість ниток піткання
для накладання таким же способом
наступних стібків. При цьому з лицевої сторони
утворюється горизонтальна лінія із
з'єднаних між собою хрестиків, з виворітної —
дві паралельні горизонтальні лінії, верхня
у вигляді стебнівки, нижня у вигляді
стеблового шва.
В кінці лінії шва виводимо голку у
нижньому лівому ріжку хрестика. За
допомогою голки проводимо робочу нитку попід
нижні ріжки хрестика таким способом: в
лівому нижньому ріжку проводимо голку
6. Parovana Klyuchka (Coupled Loop).
The seam basis is laid from right to left.
The working thread is fastened to the reverse
side of the material at the starting point. The
needle with the working thread is brought out
onto the face of the cloth and led diagonally
rightwards and up through six ground and
horizontal threads. The needle is inserted into the
cloth, turned leftwards, picking up six ground
threads, brought out onto the face of the
fabric and led diagonally rightwards and down
through the same ground and horizontal threads.
The needle is inserted into the cloth again,
turned leftwards, picking up twelve ground
threads, brought out onto the face of the
fabric and led diagonally rightwards and up
through six ground and horizontal threads to
lay the next stitches in the same way. The
obverse side of the fabric shows a horizontal line
of crosses joined together, the reverse side
represents two parallel horizontal lines: the top one
in a form of Stebnivka Stitch, the bottom one
— in Steblovyi Seam.
At the end of the seam line the needle
is brought out onto the obverse side in the left
bottom corner of the cross. The working thread
with the help of the needle journeys through
the bottom corners of the cross in the
following way: the needle is led from right to left and
118
Ukrainian Folk Embroidery
справа наліво і вверх, в правому нижньому
ріжку — справа наліво і вниз.
В кінці лінії шва вколюємо голку у
правому нижньому ріжку, а виводимо у
верхньому правому ріжку крайнього
хрестика. Повертаємо тканину на 180° і таким
же способом проводимо робочу нитку попід
нижні стібки хрестиків у протилежну
сторону. При цьому постійно слідкуємо, щоб
дужки робочої нитки посередині хрестика
лягали впритик, але не перекривали одна
одну.
Паровану ключку використовують як
з'єднувальний та оздоблювальний шов. Вона
застосовується як основний орнаментальний
шов при декоруванні дитячого та верхнього
одягу. Паровану ключку поєднують в
орнаментах з мережками, виконують додаткові,
основні орнаменти, покрайниці.
Поверхневі стібки у шві парована
ключка можна настеляти нитками різних
кольорів або відтінками одного кольору.
Живописність та фактура шва
обумовлюють декоративність таких орнаментів.
up in the left bottom corner and from right to
left and down in the right bottom corner.
Having finished the seam line, the
needle is inserted into the cloth in the right bottom
corner and brought out onto the obverse side in
the top right corner of the last cross. The
material is turned at the angle of 180c and the
working thread makes the same journey through
the bottom stitches of the crosses in the
opposite direction.
One should see that the arches of the
working thread in the center of the cross fall
closely, but do not cover one another.
Parovana Klyuchka is used as a joining
and fancy stitch. It can function as the basic
ornamental stitch while decorating children's
and outer clothing. Parovana Klyuchka is
combined in ornaments with cut and drawn works
Complementary stitches, basic ones and final
ornamental bands are embroidered with this
stitch.
The surface stitches in Parovana
Klyuchka Stitch may be laid with either
multicolored threads or tints of the same color.
Brightness and texture of the seam are outstanding
in the decor of such ornaments.
Лицьова сторона. Obverse.
Виворіт. Reverse.
7. Ріжки (шов
ріжкатий).
Цей шов
найбільше поширений на
Гуцульщині. Він
відноситься до складених
швів. Настил основи
шва виконується
справа наліво. Робочу
нитку закріплюємо з
виворітної сторони на
місці початку шва.
Виводимо голку з
робочою ниткою на
лицьову сторону, ведемо її
по діагоналі вправо і
вверх через п'ять
ниток основи і чотири
нитки піткання.
Вколюємо голку,
повертаємо вліво,
набираємо на неї п'ять ниток
_t I
t
-1
І*
... '" . ,
р !
.1 .■
V
ЖХ
XX
X\t
~\€ ~УГ ~%€
^0%^- ^Ж%^ -*»\г -
7. Rizhky (Riz-
hkatyi Stitch) /Horny
Stitch/.
This stitch is
widely spread in Hut-
sulshchyna. It belongs to
the group of compound
stitches. The stitch basis
is worked from right to
left. The working thread
is fastened to the reverse
side of the material at
the starting point. The
needle with the working
thread is brought out
onto the obverse side
and led diagonally
rightwards and up through
five ground threads and
four horizontal ones. The
needle is inserted into
the cloth, turned left-
119
Українське народне вишивання
основи, виводимо на лицьову сторону та
ведемо її по діагоналі вправо і вниз через ті ж
самі нитки основи і піткання. Вколюємо
голку, повертаємо вліво. Від місця вколювання
відраховуємо п'ятнадцять ниток основи між
двома паралельними нитками піткання,
набираємо їх на голку. Виводимо голку на
лицьову сторону і знову ведемо її по діагоналі
вправо і вверх через п'ять ниток основи і
чотири нитки піткання для накладання
наступного стібка. Таким способом настеляємо стібки
до кінця лінії шва. При цьому з лицьової
сторони утворюється горизонтальна лінія із
косих хрестиків, розміщених один від одного
на однаковій відстані. З виворітної сторони
утворюються дві горизонтальні паралельні лінії,
нижня суцільна із стібків, що перекривають
один одного, а верхня — пунктирна, із
рівномірних горизонтальних стібків, розміщених
один від одного на однаковій відстані.
В кінці лінії шва повертаємо голку
вверх і виколюємо її через одну нитку основи
вліво від лівого верхнього ріжка останнього
хрестика. Після цього за допомогою голки
проводимо нитку попід лівий ріжок хрестика
справа наліво і вниз, попід правий ріжок
хрестика справа наліво і вверх (робоча нитка
повинна бути зліва від правого ріжка хрестика).
Вколюємо голку через одну нитку основи
вправо від правого ріжка хрестика (тканину
злегка повертаємо до себе за лінією шва) та
набираємо на неї три нитки основи. Виводимо
голку на лицьову сторону і тим же способом
проводимо робочу нитку попід ріжки
наступного хрестика. В кінці лінії шва вколюємо
голку через одну нитку основи від правого
верхнього ріжка останнього хрестика, виводимо
голку на виворітну сторону й акуратно її
закріплюємо у верхній лінії шва.
Шов ріжкатий в орнаментах
поєднують із мережками, ключкою, парованою
ключкою, стебловим швом, тамбуром,
низинним шнурком і вишивають основні, додаткові
орнаменти та покрайниці. Його можна
застосовувати як з'єднувальний оздоблювальний
шов. На Гуцульщині він широко
використовується як основний орнаментальний шов в
декоруванні плечового та верхнього одягу.
ЖШШ'М-
wards, picking up five ground threads,brought
out to the face of the fabric and led diagonally
rightwards and down through the same ground
and horizontal threads. Then, the needle is
inserted into the cloth and turned leftwards. From
that place, fifteen ground threads between two
parallel horizontal threads are counted off and
picked up by the needle. The needle is brought
out onto the obverse side and again led
diagonally rightwards and up through five ground threads
and four horizontal ones to lay the next stitch.
The stitches are laid in the same technique till
the end of the seam line. Thus, the obverse side
show's a horizontal line of slanting stitches falling
at equal intervals. The reverse side represents two
horizontal parallel lines: the bottom consists of
the stitches which cover one another, the top is
dotted and is created by the even horizontal
stitches laid at equal intervals.
Having finished the seam line, the needle
is turned up and brought out to the obverse of
the cloth through one ground thread to the left
of the left top corner of the last cross. After that
the working thread with the help of the needle
journeys under the left corner of the cross from
right to left and down, then, under the right
corner of the cross from right to left and up (the
working thread is always to the left of the right
corner of the cross). The needle is inserted into
the cloth one ground thread rightwards from the
right corner of the cross (the material is turned
slightly clockwise, following the seam line),
picking up three ground threads, brought out onto
the obverse side and the working thread is led
trough the corners of the next cross. Having
reached the end of the seam line, the needle is
inserted into the cloth one ground thread
rightwards from the right corner of the last cross and
the working thread is neatly sewn to the top seam
line.
Rizhkatyi Stitch is combined in ornaments
with cut and drawn works, Klyuchka Stitch, Pa-
rovana Klyuchka Stitch, Steblovyi Stitch, chain-
stitch, Nyzynnyi Cord. Basic and complementary
ornaments, and final decorative bands can be
worked in this stitch. It can be used as a joining
and fancy stitch. It is widely used as the basic
ornamental stitch while decorating shoulder-
length and outer clothing in Hutsulshchyna.
Wvm*
!.«MW**Bf«*»
Лицьова сторона. Obverse.
Виворіт. Reverse.
120
Ukrainian Folk Embroidery
8. Штепування.
Це прадавній
шов, поширений в
Галицькій Гуцульщині та
Покутті, основний
орнаментальний елемент
шва «ягідка». Робочу
нитку закріплюємо з
виворітної сторони на
місці початку шва,
виводимо її на лицьову
сторону. Від місця вико-
лу вправо або вліво
(залежно від ведення лінії
шва) відраховуємо дві
нитки основи,
вколюємо голку, повертаємо
вверх, набираємо на неї
дві нитки піткання і
виводимо на лицьову
сторону. Від місця виколу
вліво відраховуємо дві
нитки основи,
вколюємо голку, повертаємо
вниз, набираємо на неї
дві нитки піткання і виводимо на лицьову
сторону (це буде в лівому ріжку нижнього
горизонтального стібка). При цьому з
лицьової сторони утворюються два рівні,
паралельні горизонтальні стібки. З виворітної —
два рівні, паралельні вертикальні стібки,
тобто настелено основу шва.
Виведену робочу нитку за
допомогою голки проводимо попід нижній стібок
знизу вверх, легко притягуючи нитку вправо
(до правого ріжка нижнього стібка). Потім
попід верхній стібок зверху вниз (робоча
нитка повинна лягати справа голки) і знову
попід нижній стібок знизу вверх (робоча
нитка лягає зліва голки). При цьому робочу
нитку постійно притримуємо великим пальцем
лівої руки, щоб утворювались рівні
петельки, які обрамляють з усіх сторін стібки
основи шва. Далі вколюємо голку в лівий або
правий ріжок верхнього горизонтального
стібка (відповідно до ведення лінії шва) і
виводимо для настилу основи під
наступний орнаментальний елемент.
Орнаментальний елемент «ягідка»
компонують в найрізноманітніші мотиви і
орнаменти. їх вишивають прямими рядами
і по діагоналі, створюючи в композиціях
статичні та динамічні ритми. Цією технікою
вишивають орнаменти, в основному,
чорним або червоним кольором.
8. Shtepuvannya.
This is an ancient
stitch widely spread in
Halytska Hutsulshchyna
and Pokuttya. The basic
ornamental element of
the stitch is «yahidka»
(berry). The working
thread is fastened to the
reverse side of the cloth
at the starting point. Then,
it is brought out onto the
obverse side if the fabric.
From that place two
ground threads are
counted off rightwards (or
leftwards, depending on the
direction of the seam line),
the needle is inserted into
the cloth, turned
upwards, picking up two
horizontal threads and
brought out onto the
obverse side. From the
starting point, two ground
threads are counted off
leftwards, the needle is inserted into the cloth,
turned down, picking up two horizontal threads
and brought out onto the face of the fabric
(this will be in the left corner of the bottom
horizontal stitch). Thus, the obverse side
represents two even parallel horizontal stitches, the
reverse one-two even parallel vertical stitches.
The stitch basis has been laid.
The working thread, being brought out
to the obverse side, makes journey with the
help of the needle under the bottom stitch
upwards. The thread is slightly drawn rightwards
(to the right corner of the bottom stitch). Then,
the working thread makes journey under the
top stitch downwards (the working thread
should fall to the right of the needle) and again
under the bottom stitch upwards (the working
thread is to the left of the needle). While
working the seam, the thread is always held with
the thumb of the left hand to form even loops,
which surround the stitches of the basis seam
from all sides. Then, the needle is inserted into
the left or right corner of the top horizontal
stitch (according to the direction of the seam
line) and brought out onto the obverse side to
lay the basis for the next ornamental element.
The ornamental element «Yahidka»(ber-
ry) serves as a component in various motifs and
ornaments. They are worked in straight rows
or diagonally, creating static and dynamic
rhythms in compositions. Preferably red or black
colors are used while working ornaments in this
technique.
4rs nr-
І Г> -
Ч г #"
|r
4++:
121
Українське народне вишивання
Лицьова сторона. Obverse.
Виворіт. Reverse.
9.
Кучерявий шов.
Технологія
вишивання
кучерявого шва за своєю
суттю асимілює в
собі технології
декількох швів. Центр
основного
орнаментального елемента
вишивається швом
«кочелистий» (див.
шов. «кочелистий»).
Довкола центральної частини шва стібки
настеляються швом «позад голки» (див. шов.
«позад голки») або «штепуванням» (див.
«штепування»).
Основний орнаментальний елемент
буває різної форми, але найпоширенішим є
абстрагована, восьмипелюсткова розетка
(ружка). В орнаментах їх розміщують по
діагоналі або прямими рядами.
Центральну частину шва і настил
його крайніх стібків вишивають переважно
різними кольорами в такому поєднанні:
червоний і зелений, зелений і оранжевий,
коричневий і зелений, синій і
темно-червоний.
Такі орнаменти із-за фактури шва,
синтезу кольорів у своєрідних
композиційних ритмах сприймаються не вишивкою, а
фактурною, рукотворною тканиною з
унікальним живописним нюансом.
9. Kucherya-
vyi Stitch. (Curly)
The
technology of embroidery of
this stitch, in fact,
utilizes the
technology of several stiches.
The centerpiece of
the basic ornamental
element is worked in
Kochelystyi stitch.
The stitches around the central part of the seam
are laid in Pozad Holky Stitch way or Shtepu-
vannya.
The basic ornamental element comes in
different forms, but the most widely used one
is an abstract eight-petal rosette (ruzhka). It is
placed diagonally or in straight rows in
ornaments.
The central part of the seam and its
final stitches are preferably worked in various
colors. The combination can be as follows: red
and green, green and orange, brown and green,
blue and dark red.
Because of the stitch's texture and
color synthesis in peculiar compositional rhythms
such ornaments don't look like embroidered
pieces, but hand-made fabric with a unique
picturesque nuance.
і
4k
Лицьова сторона. Obverse.
Виворіт. Reverse.
122
10. Шов «черв'ячок».
Відноситься до
складених швів. Спочатку
настеляємо основу шва. Робочу
нитку закріплюємо з
виворітної сторони так, щоб шов
можна було виконувати
справа наліво. Виводимо
голку на лицьову сторону,
ведемо по діагоналі через три
нитки основи і піткання вліво
і вверх. Вколюємо голку,
повертаємо вліво і вниз та
виколюємо по діагоналі через
таку ж кількість ниток
основи і піткання. Виводимо
голку на лицьову сторону, знову ведемо по
діагоналі вліво і вверх через три нитки
основи і піткання для настилу наступного
стібка. При цьому з лицьової і виворітної
сторони утворюються одинарні діагональні
стібки. Дійшовши до кінця лінії шва,
тканину повертаємо на 180° і настеляємо стібки в
протилежну сторону, набираючи на голку
лицьові стібки. Для цього голку вколюємо у
нижній ріжок стібка, а виколюємо у
верхньому ріжку.
З лицьової і виворітної сторони
утворюється пряма лінія із рівномірних,
діагональних стібків, які стикаються між
собою під гострим кутом.
Таким способом ми настелили
основу шва. Для виконання шва по поверхні
основи виводимо голку з правої сторони лінії
шва у нижньому ріжку крайнього стібка. За
допомогою голки почергово проводимо
робочу нитку попід стібки зліва направо і
вверх, зліва направо і вниз. При цьому на
стиках стібків робоча нитка утворює
рівномірні петлі (дужки) то знизу, то
зверху лінії шва.
Технікою художнього вишивання
«черв'ячок» виконують покрайниці основних
орнаментів, а також застосовують як
самостійний оздоблювальний шов.
\ЛЛЛЛ*ЛЛЛЛЛЛЛЛЛ
Лицьова сторона. Obverse.
Ukrainian Folk Embroidery
10. «Chervyachok»
Stitch («Worm» Stitch).
It is regarded a
compound stitch. First, the basis of
the seam is laid. The working
thread is fastened to the
reverse side of the cloth, so that
the stitch can be executed from
right to left. The needle is
brought out onto the obverse
side and led diagonally three
ground and horizontal threads
leftwards and up. The needle is
inserted into the cloth, turned
leftwards and down and
brought diagonally out onto the
face of the cloth through the same number of
ground and horizontal threads. Again, the
needle is led diagonally leftwards and up through
three ground and horizontal threads to work
the next stitch. Thus, both the obverse and
reverse sides show single diagonal stitches.
Having reached the end of the seam line, the
fabric is turned at the angle of 180° and the stitches
are laid in the opposite direction; the obverse
stitches are picked up by the needle. For this,
the needle is inserted into the bottom corner of
the stitch and brought out onto the face of the
cloth in its top corner.
Both, the obverse and reverse'sides
represent a straight line from even,diagonal
stitches, joined together at an acute angle.
The basis of the seam is worked in such
a way. To finish it on the surface, the needle is
brought out onto the obverse side to the right
of the seam line in the bottom corner of the
last stitch. The working thread with the help
of the needle journeys under the stitches from
left to right and up, from left to right and down.
The working thread creates even loops (arches)
at the joints of the stitches now at the bottom,
now at the top of the seam line.
The final decorative bands of the main
ornaments are worked in «Chervyachok»
technique. It can also be used as the basic fancy
stitch.
й^іЦ^
Виворіт. Reverse.
123
Українське народне вишивання
Самостійна робота.
1. Замальовки орнаментальних
елементів, мотивів та фрагментів унікальних
композицій, виконаних складеними швами.
2. Тренувальні вправи з виконання
складених швів художнього вишивання.
Завдання № 6.
1. Практичне вишивання складених
швів на тканині.
2. Графічне зображення основних
орнаментальних елементів, мотивів
складених швів із зазначенням наступності їх
виконання.
Контрольна робота.
1. Практичне вишивання
фрагмента орнаменту складеними швами.
Розмір 14 см X 12 см
Композиція за власним задумом
(дозволяється трансформація елементів,
мотивів із вивчених орнаментів).
Техніка виконання: складені шви в
поєднанні з іншими попередньо вивченими
швами.
Матеріали: тканина із чітким
полотняним переплетенням;
нитки — муліне;
оправа — рамка дерев'яна відповідно
до розміру завдання.
Питання для контролю знань.
1. Прокоментуйте зміст поняття
складений шов.
2. Які компоненти входять до
складених швів?
3. Назвіть первинну і вторинну
технологічні операцїі при виконанні складених
швів.
4. Зобразіть графічно елементи
ключового шитва: ріжок, півружка, квадрат,
ромб.
5. Прошийте довжиною 5 см верхо-
плут подвійний (гуцульський).
6.Виконайте практично за зразком
два елементи шва навиване.
7. Прошийте практично за зразком
шов парована ключка.
8. Прокоментуйте техніку
виконання шва штепування.
Independent Work.
1. Sketching the ornamental elements,
motifs and fragments of unique compositions,
worked with compound stitches.
2. Practicing working compound
stitches of artistic embroidery.
Task # 6.
1. Execution of compound stitches.
2. Graphic picture of the basic
ornamental elements and motifs of compound stitches,
pointing out the succession, while doing this task.
Test.
1. Executing the ornamental fragment
with compound stitches.
Size: 14 cm X 12 cm
Composition: one's own idea (it is allowed
to transfer the elements and motifs from the
ornaments studied on one's own)
Technique of execution: compound
stitches, combined with already studied ones.
Materials: fabric with accurate linen
interweaving
threads — Mouline
framing — wooden frame, the size that
fits the task.
Final Questions.
1. Comment on the notion «Compound
Stitch».
2. What are the components of compound
stitches?
3. Name initial and secondary
technologic operations, while working Compound Stitches.
4. Make graphic pictures of Klyuchove
Shytvo, Rizhok, Pivruzhka, Square, Rhombus.
5. Work Double Top winder (Hutsulian)
Stitch 5 cm long.
6. Execute two elements of Navyvane
Stitch under the given sample.
7. Work Parovana Klyuchka Stitch
under the sample.
8. Comment on the embroidery technique
Shtepuvannya.
124
$ »$*•»* і в $ і *
9 f 9 І
З
ь
'•*>•*,
.»•
; Ha- k^
'h
fCw «її і
У
r
I
H !
> »
4.
\
- ^
^ \
Y
***-
\
rf
„ і
■і
і. її
Tift
i<l P"
ftfl?
44$-
"■^4-
}■- . .-^V
»
t 1
«I
4
- - -- Y4;fe -ч-ї<^ *^£^* r '
1 ■■«-*? -JtiSjtir. л.
» .♦
.♦ >,
,•+'
rf$
1*4
fc'l
1B
CI'
I- I
d і:,
.і
н
і
і« >!
їй і!
'■|->«і
f
і
13
м
і»
і
щ
і
•І
'І
■»
ч
і
' ч
!ч
# # # *f » ' 9 І t I '
0 ~,
"f
^fe^ir
<
is,
і tl
І t
if
і
4
tf'UWi.
і
i.
!| v
■t pi'
it «
^.«..ИКчо.Ц.гл'- ■ ■*.
an . if-.'
• -сі
*.JP*
1 Ч І
■4?,
ii«
*.'■
h
:«*' ■
1 it h
te
ЇШ
ti. , I-'
и. Ik
J
«
%
v
і
<
\ Mi
•*
3
/
у
і.
її
,;* fc:
f I
ii.
1
4 '
'. hi
V
Ф t і • * t 11
і
'A
\M* H'
:* м і:
r v
\
У, I
\
> ,
3»8*%^
#*
* ' t * $ r t /
фффф
->^-
ШШШШШШШШ^
У
» • .,t» ft
t a
# 4
* • #
~^Ш*Ш}(ШЖіШ<ЖїЮ;й53^" J*^: «. \ V' . *• ■
• <• • » і
» > • • »
д . . «
І
Т *^7aw4<iPWMHM№ «^ -*Г —*ч У '
і
»
г
•І <
І" »
If.
і
' $ і * І */
V
АЧ
ш • «.
• «
^ V
< » v
У/
С7Г. І/І І. Стелені papqjHKoBi шви
SS. VII. Laid Stitches which %eauire
Counting (laying, Satin Stiteh
which requires counting)
Українське народне вишивання
Шазовим підґрунтям назви
стелені рахункові шви (на-
стилування, рахункова
гладь) є технологія їх
вишивання. Шви, об'єднані цією назвою,
вишиваються шляхом настилу стібків через
визначену кількість ниток між двома
паралельними нитками основи або піткання.
Техніки виконання, характеристичні
особливості цих швів найрізноманітніші,
вони і визначають їх назви та застосування.
Стелені рахункові шви умовно
можна поділити на дві групи:
а) стелені рахункові шви з
несуцільним покриттям тла тканини. Цими швами
найбільше вишивають орнаменти з
декорування одягових, інтер'єрних виробів;
б) стелені рахункові шви з суцільним
покриттям тла тканини. Діапазон виробів,
що декоруються вишитими ними
орнаментами, дуже широкий. їх використовують для
настилу тла (основи) під орнаменти для
вишивання стеленими швами з несуцільним
покриттям тла тканини, але найбільше ними
декорують вироби інтер'єрного,
релігійного, обрядового, сакрального призначення.
Вивчення стелених рахункових швів
забезпечує усвідомлене розуміння
закономірності розрахунку ниток при творенні
елементів, мотивів, орнаментів у цілості;
специфіки виконання робочого рисунку,
колористичної гами відповідно вигнивання
орнаментів конкретними стеленими
рахунковими швами.
а) стелені рахункові шви з
несуцільним покриттям тла тканини.
1. Занизування
(заволікання).
Такий шов
художнього вишивання
виконується за робочим
рисунком орнаменту.
Структурною одиницею
орнаменту є
квадратики, прямокутнички,
настелені стібками робочої
нитки відповідно
творчого задуму.
Технологія
виконання занизування
подібна до перебірного
ткацтва. За допомогою голки
вишивальну нитку протягують справа на-
The basic reason of the name Laid
Stitches which require counting (laying, Satin
Stitch which requires counting) is the
technology of their execution. This name unites the
stitches, laid through the required number of
threads between two parallel either ground or
horizontal threads.
The techniques of execution and
characteristic peculiarities of these stitches are the
most diverse. Just, they determine their name
and use. Laid Stitches which require counting
can be routinely divided into two groups:
a) Laid Stitches which require counting
and do not cover the entire background of the
material. Mainly, ornaments to decorate
articles of clothing and interior articles are worked
with these stitches.
b)Laid Stitches which require counting
and cover the entire background of the
material. The range of products, decorated with
ornaments, executed in these techniques,is rather
wide. They are used to work the foundation
(background) of the ornaments, to be
executed with laid stitches which do not cover the
entire background of the fabric. But mostly
articles of interior, religious, ceremonial,
sacred character are decorated with them.
Studying Laid Stitches which require
counting guarantees conscious understanding of
appropriateness of counting threads while
creating elements, motifs and ornaments
themselves; specificity of pattern design execution;
color scheme to be chosen to work ornaments
namely with laid stitches which require
counting.
a) Laid Stitches which Require
Counting and do not Cover the Entire Background.
1. Zanyzuvannya
(Zavolikannya).
This stitch of
artistic embroidery is
worked according to the
pattern design. Squares
and rectangles, made up
by the stitches of the
working thread in
compliance with the creative
idea, are structural units
of the ornament.
The technology of
Zanyzuvannya's execution
is like that of finger (Pere-
birne) weaving. The
working thread with the help of a needle is drawn
132
Ukrainian Folk Embroidery
ліво між двома паралельними нитками
піткання через нитки основи то
пропускаючи, то набираючи їх на голку. При
виконанні шва, ніби вплітаємо (занизуємо,
заволікаємо) вишивальну нитку між нитки
піткання тканини. Звідси і назва шва
занизування (заволікання).
Техніка настилу стібків ведеться
справа наліво. Робочу нитку закріплюємо з
виворітної сторони на місці початку шва.
Виводимо голку на лицьову сторону. Від
місця виколу між двома паралельними
нитками піткання відраховуємо кількість
ниток основи за робочим рисунком
орнаменту, покриті стібком нитки основи
пропускаємо, непокриті — набираємо на голку.
Таким способом настеляємо стібки по всій
довжині орнаменту. Дійшовши до кінця лінії
шва, повертаємо тканину на 180° і так
вишиваємо паралельні лінії шва по всій
довжині орнаменту.
Орнаменти, виконані занизуванням,
носять стрічковий характер, в яких
роздільні лінії по центру та покрайниці
вишиваються контрасними кольорами або
іншим відтінком до кольору основних ліній
орнаменту.
Занизуванням виконують
найрізноманітніші орнаменти для декорування
чоловічого, жіночого, дитячого одягу та
виробів інтер'єрного, обрядового, побутового
призначення. В орнаментах занизування
поєднують з поверхницею-кафасор,
оздоблювальними швами, мережками.
Лицьова сторона. Obverse.
from right to left, between two parallel
horizontal threads through the ground threads,
which are either missed or picked up by the
needle in turn. The working thread appears as
if it interlaced (Zanyzuvaty, zavolikaty) with
the horizontal threads of the fabric. The
technique itself determines the name of the stitch:
Zanyzuvannya (Zavolikannya).
The stitches are laid from right to left.
The working thread is fastened to the reverse
side of the cloth at the starting point. The
needle is brought out onto the obverse side. From
that place, the required, in compliance with
the ornamental pattern,number of threads
between two parallel horizontal ones is counted
off: ground threads covered with the stitch
are missed, while non-covered ones are picked
up by the needle. The stitches are laid along the
entire length of the ornament in the same
manner. Having reached the end of the seam line,
the fabric is turned at an angle of 180° to work
parallel seam lines the entire width of the
ornament.
Ornaments in Zanyzuvannya technique
are of a band character. The marginal lines in
the center and the ones along the edges are
either worked in contrast or in the other tints
of basic colors.
Zanyzuvannya is used in the largest
variety of ornaments to decorate women,men
and children's clothes as well as interior
articles of ceremonial or everyday use.
Zanyzuvannya is combined in ornaments with Poverkh-
nytsya-kafasor, decorative stitches, cut and
drawn works.
Виворіт. Reverse.
133
Українське народне вишивання
2.
Занизування
(переволікання) з вузленням.
Цей шов
художнього
вишивання виконується за
робочим рисунком
орнаменту справа
наліво. Технологія
виконання шва
частково подібна до
занизування та затя-
ганки (див.
занизування та затяганка).
Робочу
нитку закріплюємо з
виворітної сторони
на місці початку
шва. Виводимо голку з робочою ниткою на
лицьову сторону. Від місця виколу за
робочим рисунком орнаменту настеляємо лінію
шва технікою занизування (затяганка). Після
цього у визначених за рисунком місцях
підбираємо стібок на грубшу голку (або
підготовлений для цієї техніки інструмент у
вигляді грубої голки), злегка підтягуємо його
вверх, прокручуємо проти годинникової
стрілки і відпускаємо. Після цього
повертаємо тканину на 180° і вишиваємо наступну
орнаментальну лінію шва.
Такі орнаменти імітують ткання, їх
найкраще виконувати вовняною крученою
ниткою, можна шовком, ірисом та
крученими нитками муліне.
2. Zanyzuvan-
nya (Perevolikannya)
with the
Knot-making.
This stitch of
artistic embroidery is
worked according to
the pattern design
from right to left. The
technology of the
stitch's execution
partially reminiscent of
Zanyzuvannya and
Zatyahanka (see
Zanyzuvannya and
Zatyahanka).
The working
thread is fastened to
the reverse side of the material at the starting
point. The needle with the working thread is
brought out onto the obverse side. From that
place the seam line is laid in Zanyzuvannya
(Zatyahanka) technique according to the
ornamental pattern. After that, stitches, marked in
the ornament,are picked up by a thicker
needle (or by a special tool in a form of a thick
needle, used in this technique), slightly pulled
up, twisted counter clockwise and released.
Then, the material is turned to an angle of
180° and the following ornamental seam line is
worked.
Such ornaments imitate weaving. It is
better to embroider them with woolen lisle
thread. Also silk, iris or lisle mouline threads
can be used.
Ш-"т"Ш"т--Шг.Ш"
І"*'Ш'І*.'«'" '!'«*"•''
ш*
**<^>««*«>ЇЧ**ИЇ*^Я* >*■«»■ «WIS. #4 *••*•*•!•*«* *■***•!
Лицьова сторона. Obverse.
Виворіт. Reverse.
3. Набирування (поверхниця).
Технологія виконання шва
ґрунтується на вишиванні горизонтальних
рівномірних стібків між двома паралельними
нитками піткання, які по висхідній наполовину
перекривають один одного. Шов ведеться
зліва направо, настил стібків знизу вверх,
зверху вниз через парну кількість ниток
основи. При творенні орнаментів для вико-
3. Nabyruvannya (Poverkhnytsya).
The technology of the stitch's
execution is based on that of horizontal, even
stitches between two parallel horizontal threads,
which gradually cover each other half. The seam
is worked from left to right, the stitches are
laid from bottom to the top and visa versa
through the ground threads, forming a pair. To
create ornaments in Nabyruvannya technique,
134
Ukrainian Folk Embroidery
нання набируванням слід
пам'ятати, що прямі
діагональні ромбовидні лінії шва
виконуються безперервним
настилом суміжних стібків
через чотири-шість-вісім
ниток основи. Для
зменшення величини орнаменту,
при зображенні його
малюнка на клітці, одна клітка
відповідає двом ниткам
основи. Такий підхід
загальноприйнятий в робочих
рисунках орнаментів, які
виконуються набируванням.
Настил стібків
розпочинаємо закріпленням
робочої нитки з виворітної сторони на місці
початку шва. Виводимо голку на лицьову
сторону. Від місця виколу вправо між двома
паралельними нитками піткання
відраховуємо чотири нитки основи, вколюємо голку,
повертаємо вверх (якщо лінія шва іде вниз,
то голку повертаємо вниз) і виколюємо її по
діагоналі вліво через дві нитки основи та
одну нитку піткання. Таким способом
настеляємо стібки за лініями швів відповідно до
робочого рисунка орнаменту. При цьому з
лицьової сторони утворюються
горизонтальні рівномірні стібки, які наполовину
перекривають один одного і густо покривають
поверхню тканини. З вивороту стібки за
величиною половинні і лежать по діагоналі
через одну нитку піткання. Звідси походить
друга назва шва поверхниця.
Орнаменти цією технікою виконують
переважно в яскравих кольорах. Набируван-
ня поєднують із оздоблювальними швами,
мережками, поверхницею-кафасор. Такими
орнаментами декорують найрізноманітніші
вироби одягового, культового, обрядового,
побутового призначення.
one should bear in mind, that
straight, diagonal,
rhombuslike seam lines are worked by
laying adjoining stitches
continuously through 4-6-8 ground
threads. To diminish the size
of the ornament in its
graphical form on the checked
paper, one square equals two
ground threads. This is a
common approach in pattern
designs worked in Nabyruvannya
technique.
The working thread is
fastened to the reverse side
of the cloth at the starting
point. The needle is brought out
onto the obverse side. From that place four
ground threads between two parallel horizontal
ones are counted off rightwards, than the
needle is inserted into the cloth, turned upwards
(if the seam line goes downwards, the needle
is turned down) and brought out diagonally
leftwards through two ground and one horizontal
threads. The stitches are laid in the same way,
following the seam lines, repeating the pattern
design. Thus, the obverse side shows horizontal
even stitches, which cover each half and are
richly spread on the surface of the cloth. The
reverse side represents twice smaller stitches
which fall diagonally at one horizontal thread
interval. The technology itself explains the name
of the stitch: Poverkhnytsya (on the surface).
Mainly bright colors are used to
execute ornaments in this technique.
Nabyruvannya is combined with fancy stitches, cut and
drawn work, Poverkhnytsya-kafasor Stitch. A
large variety of articles of clothes, things of
religious, ceremonial and everyday use are
decorated with such ornaments.
ft-**-*
*t «і *
Лицьова сторона. Obverse.
Виворіт. Reverse.
135
Українське народне вишивання
тг
ь
м
м
* ■
* І
МННІІМНІ
|!»!|МІ|ІМ|
А ф А
V,|.V
ііііУіііі
і МИНІМ НІ
І іРн
І І
І (І
ННІНІІІЮ
VvV
НИНІШНІ
ІІІМНІІІІН
4. Низинка проста.
Шов виконується за робочим рисунком
орнаменту з виворітної сторони. Це зумовлює
назву шва низинка, низь.
Настил стібків здійснюється справа
наліво або знизу вверх протягуванням робочої
нитки між двома паралельними нитками
піткання через відповідну кількість ниток основи.
Основні орнаментальні мотиви
творяться шляхом варіативного настилу стібків
через непарну кількість ниток основи, одна,
три, п'ять, сім, дев'ять і більше. Такі
мотиви укомпоновують в найрізноманітніші
орнаменти. Для матеріалізації орнаменту у
вишивку виконують робочий рисунок
орнаменту з виворітної сторони з розрахунком
ниток.
Відповідно технології ведення шва,
робочу нитку закріплюємо на місці його
початку. За робочим рисунком орнаменту
відраховуємо вертикальні нитки полотна.
Покриті стібком нитки на рисунку
пропускаємо, непокриті стібком набираємо на
голку. Таким способом настеляємо стібки до
кінця лінії шва через всю ширину
орнаменту. При переході до наступної лінії шва
вколюємо голку через одну горизонтальну нит-
4. Simple Nyzynka Stitch.
The stitch is worked according to the
pattern design on the reverse side of the cloth.
This explains the name of the stitch:
Nyzynka, Nyz.
The stitches are laid from right to left
(or from the bottom to the top). The working
thread is drawn between two parallel
horizontal threads through corresponding number of
ground ones.
The basic ornamental motifs are
created in the following way: the stitches are
selectively laid through the unpaired number of
ground threads 1,3,5,7,9 and more. Such motifs
are arranged into various ornaments. To
execute the ornament, its pattern design is
previously made on the reverse side, having
counted the threads.
According to the technology of the
seam's execution, the working thread is
fastened at the starting point. According to the
pattern design, one should count off the
vertical threads of the cloth. The threads covered
with the stitch are missed, while the
non-covered ones are picked up by the needle. The
stitches are laid in the same technique by the
end of the seam line the breadth of the orna-
136
Ukrainian Folk Embroidery
ку вище. Щоб нитка не провалювалась (не
зміщувалась), її можна закріпити круговим
стібком довкола горизонтальної нитки.
Орнаменти низинкою простою
виконують в монохромній гамі. Однак в багатьох
областях України такі орнаменти з
лицьової сторони заповнюють технікою лиштва
проста різними кольорами, відповідно
творчого задуму та традиції.
Низинкою простою вишивають
основні, доповнюючі орнаменти та покрайниці
в основних орнаментах. їх поєднують у
вишивці із оздоблювальними швами, поверх-
ницею-кафасор, нескладними мережками.
merit. To pass on to the next seam line one should
insert the needle one horizontal thread up. The
working thread, not to shift, can be fastened
in a circle stitch around the horizontal thread.
Ornaments in Simple Nyzynka are
preferably monochrome. However, in many parts
of Ukraine such ornaments are filled in on the
obverse side of the material in Lyshtva
technique with various colors, depending on the
creative idea or traditions.
Either basic or supplementary
ornaments and final ornamental bands in the basic
ones are worked with Simple Nyzynka Stitch.
It is combined with decorative stitches, Pov-
erkhnytsya kafasor Stitch and
non-complicated cut and drawn work.
\ Z*"V i?"\. $*"%
1*1
Лицьова сторона. Obverse.
Виворіт. Reverse.
5. Низинка замкова
Технологія вишивання
низинки замкової тотожна
технології низинки простої.
Відмінність полягає тільки в
техніці настилу стібків.
Низинкою замковою
вишивають, в основному,
орнаменти широкі, які добре
сприймаються на відстані. Такими
орнаментами декорують
вироби для інтер'єру: портьєри, ламбрекени,
дитячі покривальця, диванні подушечки,
прошви на простирадла і подушки тощо. При
вишиванні таких орнаментів стібки
настеляються через велику кількість ниток
основи — дев'ять, одинадцять, тринадцять і
більше.
Настил такого стібка накладається
спочатку через частину ниток, наприклад,
набираємо на голку п'ять ниток основи,
виводимо її, обводимо п'яту нитку круговим
стібком, після чого набираємо на голку
останні чотири нитки основи. Робочу нитку
легко притягуємо. При цьому з лицьової
сторони утворюється суцільний стібок через
дев'ять ниток основи, з виворітної сторони
видно круговий стібок (замочок) на п'ятій
нитці основи. Кругових стібків (замочків)
5. Nyzynka Zamkova.
The technology of
Nyzynka Zamkova's execution
is like that of Simple Nyzynka.
The way the stitches are laid is
the only difference.
Chiefly broad
ornaments, easily perceived at the
distance are worked in
Zamkova Nyzyna. The interior things
such as curtains, lambrequins,
children's bedspreads, cushions, blanket
covers, pillow-slips etc. Are decorated with the
mentioned above ornaments. While working
such ornaments, the stitches are laid through
a big number of ground threads: 9-11-13 and
more. Such a stitch is executed in parts: five
ground threads are picked up by the needle,
then the needle with the working thread is
brought out onto the face of the cloth having
previously twisted the fifth thread with a
circle stitch, after that the last four ground threads
are picked up by the needle. The working thread
is slightly pulled. Thus, the obverse side of the
cloth shows an entire stitch through 9 ground
threads, the reverse one represents a circle
stitch (zamochok/a lock) on the fifth ground
thread. There can be 1,2,3 circle stitches (locks)
in one stitch, depending on its length. The tech-
137
Українське народне вишивання
може бути один, два, три в одному стібку,
залежно від потреби, яка визначається його
довжиною. Техніка настилу стібків
обумовлює назву шва низинка замкова.
nology itself determines the name of the stitch:
Nyzynka Zamkova.
Лицьова сторона. Obverse.
Виворіт. Reverse.
6. Поверхниця-ка-
фасор.
Виконується знизу
вверх за робочим рисунком
орнаменту. Робочу нитку
закріплюємо з виворітної
сторони на місці початку
шва. Виводимо голку на
лицьову сторону. Від місця
виколу вліво відраховуємо
три нитки основи,
вколюємо голку, повертаємо
вверх, набираємо на неї
кількість ниток піткання
відповідно до рисунка
орнаменту і виводимо на
лицьову сторону. Наступний
стібок настеляємо зліва
направо через таку ж саму
кількість ниток основи.
Дійшовши до кінця
лінії шва, повертаємо
тканину на 180° і вишиваємо
наступний ряд стібків.
При цьому з
лицьової сторони
утворюються рівномірні,
горизонтальні, паралельні стібки, розміщені
вертикальними рядами через різну кількість
ниток піткання. З виворітної сторони
утворюються вертикальні, паралельні,
нерівномірні стібки.
Технікою художнього вишивання по-
верхниця-кофасор виконують
найрізноманітніші геометричні орнаменти. Нерідко їх
виконують як продовження (розтяжка)
основних орнаментів, виконаних низинкою,
занизуванням, набируванням, заігліно-І,
колодки-ІІ тощо. В таких випадках орнамент
поверхницею-кафасор виконується
ніжними тонами переважаючого кольору в
основному орнаменті.
6. Poverkhnytsya-
kafasor.
The stitch is worked
from the bottom to the top
according to the pattern
design. The working thread is
fastened to the reverse side
of the cloth at the starting
point. The needle is brought
out onto the obverse side of
the material. From that place
three ground threads are
counted off leftwards, then
the needle is inserted into the
fabric, turned upwards,
picking up the number of
horizontal threads required
by the pattern design, and
the needle is brought out onto
the face of the cloth. The next
stitch is laid from left to right
through the same number of
ground threads. Having
reached the end of the seam
line, the fabric is turned at
the angle of 180° and the
following row if stitches is
worked.
Thus, the obverse side shows even,
horizontal, parallel stitches which fall in vertical
rows through different number of horizontal
threads. The reverse side represents vertical,
parallel, uneven stitches.
The most various geometric ornaments
are worked in the technique of Poverkhnytsya-
kafasor. They often complement to the basic
ornaments in Nyzynka, Zanyzuvannya, Naby-
ruvannya, Zaihlino-I, Kolodky-II etc. technique.
In this case the ornament in Poverkhnytsya-
kafasor technique is worked in subtle tints of
the color which dominates in the basic
ornament.
138
Ukrainian Folk Embroidery
Композиційні мотиви цим швом
творяться поверхневим (лицевим) настилом
стібків, розміщених то компактно, то
розкидано (в розсип), як в старовинних
кабардинських (осетинських, адегейських) танцях
за назвою кафа. При їх виконанні
танцюристи то скупчуються, то розсипаються
поодинці, присідаючи, імітують окремі точки.
Може звідси і походить назва цієї
прадавньої техніки художнього вишивання.
•час ::іич«...:: •*%*;.:: ^<<уі;)!іу-.>ч :•.:>«»< ■ІГ:і***їЧу;'**мї-
МійшнОЛш
Г. іМ'И .
Compositional motifs worked with this
stitch consist of the stitches laid on the
surface, either compactly or scattered, like in
ancient Kabardin (Osetian, Adegey) dances Kafa
by name. While dancing,the dancers either get
together or perform separately, squatting,
which imitates scattered dots. Maybe this
explains the name of this ancient technique of
artistic embroidery.
І-Щуз* М^тЖ$І$щщІ
■■■■ ■■.:.1Л .-ї ■ , St;, ,«:&;•- ГЬгч'Ж.лм -fa». *•:,».:*
«PMMMMI
Лицьова сторона. Obverse.
Виворіт. Reverse.
7. Лиштва проста.
Технологія шва ґрунтується на
вишиванні стібків паралельно до
ниток основи через відповідну кількість
ниток піткання. Стібки синхронно
збільшуються або зменшуються на
одну нитку піткання, що лягає в
основу творення орнаментальних
мотивів.
Лиштва проста виконується за
робочим рисунком орнаменту.
Вишивальну нитку закріплюємо з
виворітної сторони на місці початку шва.
Виводимо голку на лицьову сторону. Від
місця виколу вниз, між двома
паралельними нитками основи відраховуємо дві-
три (відповідно до рисунка орнаменту)
нитки піткання. Вколюємо голку, повертаємо
вліво і вверх та виколюємо по діагоналі
через одну нитку основи і на одну нитку
піткання вище від попереднього виколу.
Виводимо голку на лицьову сторону,
вколюємо через чотири нитки піткання вниз,
повертаємо вліво і вверх та виводимо по
діагоналі через одну нитку основи для настилу
наступного стібка.
При настилі стібків за лінією шва
вниз голку виколюємо на одну нитку
піткання нижче від попереднього стібка.
Дійшовши до кінця лінії шва, повертаємо тканину
на 180° і настеляємо стібки справа наліво в
протилежну сторону.
Лиштвою простою виконують основні
орнаменти, призначені для декорування
найрізноманітніших виробів. У вишивках її
поєднують із низинкою, виколюванням, дов-
7. Simple Lyshtva.
The technology of the execution
of the seam is based on the stitches,
worked parallel to the ground threads
through the given number of horizontal
threads. The stitches either grow bigger
synchronically, or smaller every single
horizontal thread, which forms the basis
while creating ornamental motifs.
Simple Lyshtva is worked
according to the pattern design. The working
thread is fastened to the reverse side of
the material at the starting point. The
needle is brought out onto the obverse
of the cloth. From that place two-three
horizontal threads (according to the
ornamental pattern) between two parallel ground threads
are counted off downwards. The needle is
inserted into the cloth, turned leftwards and up
and is brought out onto the face of the fabric
diagonally through one ground thread and one
horizontal thread down. Then, it is turned left
and upwards and drawn diagonally through one
ground threads to lay the next stitch.
While working the stitches along the
seam line downwards, the needle is brought
out to the obverse side of the cloth one
horizontals thread lower the previous stitch, having
reached the end of the seam line, the material
is turned at the angle of 180c and the stitches
are laid from right to left in the opposite
direction.
Simple Lyshtva is used to work basic
ornaments to decorate various articles. It is
combined with Nyzynka Stitch, Vykolyuvannya,
Dovbanka, Kuryachyi Brid, Vyrizuvannya,
139
Українське народне вишивання
банкою, курячим бродом, вирізуванням,
розводом, солов'їними вічками, швом ко-
челистим тощо.
Лиштва проста — це прадавній шов
художнього вишивання. Вона поширена в
усіх областях України.
Rozvid, Solovjini Vichka, Kochalystyi Stitch etc.
in embroidery.
Simple Lyshtva is an ancient stitch of
artistic embroidery. It is widely spread in all
regions of Ukraine.
Лицьова сторона. Obverse.
Виворіт. Reverse.
/
D & л»
4ІМІ4
8. Лиштва ка-
чалкова (качалочка).
Технологія
вишивання шва
адекватна технології лиштви
простої. Відмінність
полягає тільки в
техніці настилу стібків.
їх настеляють через
однакову кількість
ниток піткання за
робочим рисунком
орнаменту. Орнаментальні
елементи, мотиви
творять настилом
варіативної кількості стібків. їх укомпоновують в
найрізноманітніші орнаменти, які
збагачують поєднанням кольорів та відтінків. Краї
орнаментальних мотивів в орнаментах
нерідко обводять однією лінією стібків
штапівки.
Лиштва качалкова застосовується як
елемент орнаментальної вишивки при
декоруванні найрізноманітніших виробів одяго-
вого, обрядового, інтер'єрного призначення.
№
1Ь
8. Kachalkova
Lyshtva (Kachalochka).
The technology
of the execution of the
stitch reminds one that
- . of Simple Lyshtva. The
way the stitches are laid
is the only difference.
They are worked
through the equal number
of horizontal threads
according to the pattern
design. The ornamental
elements, motifs are
created by laying the
stitches, the number of which can vary as desired.
They are arranged into different ornaments,
enriched by combinations of colors and their
tints.
Kachalkova Lyshtva is used as the
element of ornamental embroidery while
decorating various articles of clothing, ceremonial
and interior character.
8ЙГ
4
4
ь v
:#*3» £*t
***ay
Лицьова сторона. Obverse.
Виворіт. Reverse.
140
Ukrainian Folk Embroidery
9. Заігліно (заіг-
ляне)-І.
Шов виконується
зліва направо
діагональними лініями знизу
вверх, зверху вниз.
Робочу нитку
закріплюємо з виворітної
сторони на місці початку
шва. Від місця виколу
вниз між двома
паралельними нитками
основи відраховуємо чотири
нитки піткання, вколюємо голку,
повертаємо вправо і вверх та виколюємо по діагоналі
через одну нитку основи і чотири нитки
піткання. Від місця виколу знову вколюємо
голку через чотири нитки піткання вниз,
повертаємо вправо і вверх, виколюємо по
діагоналі через одну нитку основи і дві
нитки піткання. Виводимо голку на лицьову
сторону і таким же способом настеляємо
наступні стібки. При повороті лінії шва вверх,
повертаємо в руці голку або тканину на 180°.
При цьому з лицьової сторони
утворюються парні, рівномірні, паралельні
стібки. Вишиваючи їх діагональними
лініями зверху вниз, знизу вверх, можна
створювати найрізноманітніші орнаменти.
З виворітної сторони утворюються
парні, діагональні, через одну нитку
основи один на половину коротший від другого
стібки.
Технікою художнього вишивання за-
ігліно-І виконують найрізноманітніші
орнаменти, які застосовують в декоруванні одя-
гових, інтер'єрних, обрядових, сакральних
виробів тощо.
Найбільш поширена така техніка у
вишивальному мистецтві Галицької Гуцуль-
щини.
9. Zaihlino (Zaih-
lyane)-I.
The stitch is
worked from left to right
in diagonal lines from the
bottom to the top and visa
versa.
The working
thread is fastened to the
reverse side of the cloth at
the starting point. From
that place four horizontal
threads between two
parallel ground threads are counted off
downwards, the needle is inserted into the fabric,
turned rightwards and up and brought out di-
agon ally through one ground and four
horizontal threads. From that place the needle is
inserted into the cloth again four horizontal
threads downwards, turned rightwards and up
and brought out diagonally onto the face of
the cloth through one ground thread and two
horizontal threads. The next stitches are worked
in the same way further on. When on the
corners of the seam, the needle should be either
turned in ones hand or the material itself should
be turned at the angle of 180°.
Thus, the obverse side of the cloth
shows even parallel stitches forming pairs.
Working them in diagonal lines from the top to the
bottom and visa versa one can create the most
various ornaments.
The reverse side represents diagonal
stitches forming pairs through one ground
thread interval. One stitch is half shorter than
another one.
Zaihlino technique is used while
working different ornaments to decorate clothes,in-
terior, ceremonial and sacred articles etc.
This technique is widely spread in the
art of embroidery of Halych Hutsulshchyna.
ЧГ, ИГ
^^^^^в^^Щ в^^^^^^^т Щ^^^^^^тт *^^^^W4^*
! •»*
і \
Ґ*
\l>
.
'. (
V
\
л
h. ї
Г" 1
1" /
Лицьова сторона. Obverse.
Виворіт. Reverse.
141
Українське народне вишивання
10. Заігліно
(заігляне)-ІІ.
Шов
виконується зліва направо.
Робочу нитку закріплюємо
з виворітної сторони на
місці початку шва.
Виводимо голку на
лицьову сторону. Від місця
виколу вниз між
двома паралельними
нитками основи
відраховуємо дві нитки
піткання, вколюємо голку, повертаємо вправо
і вверх та виколюємо її по діагоналі через
дві нитки піткання і одну нитку основи.
Виводимо голку на лицьову сторону, від місця
виколу вниз відраховуємо чотири нитки
піткання, вколюємо голку, повертаємо
вверх, виколюємо її по діагоналі вправо
через одну нитку основи і дві нитки піткання
для накладання наступного стібка. Таким
способом настеляємо парні, паралельні
вертикальні стібки поперемінно через дві-чо-
тири нитки піткання до кінця лінії шва. При
повороті лінії шва знизу вверх повертаємо
тканину або голку на 180и.
При цьому з лицьової сторони
утворюються парні прямі, паралельні стібки, з
яких попередній наполовину коротший від
наступного. З виворітної сторони стібки,
рівні за довжиною, розміщені по діагоналі
через одну нитку основи.
Технікою художнього вишивання
заігліно-ІІ вишивають лінії розводу, покрай-
ниці та основні орнаменти в
найрізноманітнішій кольоровій гамі.
Заігліно-ІІ найбільш поширине у
вишивальному мистецтві західних областей
України.
Лицьова сторона. Obverse.
10. Zaihlino (Zai-
hlyane)-II.
The stitch is
worked from left to right.
The working thread is
fastened to the reverse
side of the material at the
starting point, the needle
with the working thread
is brought out onto the
obverse side. From that
place two horizontal
threads between two
parallel ground threads are counted off
downwards, the needle is inserted into the cloth,
turned rightwards and up and brought out onto
the face of the cloth diagonally through two
horizontal threads and one ground thread. From
that place four horizontal threads are counted
off downwards, the needle is inserted into the
cloth again, turned up and brought out onto
the obverse side diagonally to the right through
one ground and two horizontal threads to lay
the next stitch. So, parallel, vertical stitches
forming pairs through two or four horizontal
threads in turn are worked in the same
technique by the end of the seam line. When the
seam line curves from the bottom to the top,
either material or the needle should be turned
at the angle of 180°.
Thus, the obverse side shows straight,
parallel stitches forming pairs. Each previous
one from which is half shorter than the
following stitch. The reverse side represents stitches
of equal length, fallen diagonally with one
ground thread interval.
Zaihlino-II technique is used to
embroider outlining,final ornamental bands and
basic ornaments in various color-scheme.
Zaihlino-II is mostly spread in the art
of needlework in the western regions of
Ukraine.
Виворіт. Reverse.
ДТ—птп
r І" І t '
ЇІТ'-
/ x/
fi
vv
k/ k/
142
Ukrainian Folk Embroidery
11. Гладь
стеблова.
Техніка
виконання гладі стеблової
подібна до стеблового
шва. Відмінність
полягає в тому, що стібки
можна настеляти за
рахунком ниток або за
розміряним відрізком
тканини на малюнку.
Шов виконується зверху вниз.
Робочу нитку закріплюємо з виворітної сторони
на місці початку шва. Виводимо голку на
лицьову сторону, вколюємо її через дві-три-
чотири нитки (або такий же проміжок
тканини по лінії малюнка), повертаємо голку
вверх, набираємо на неї пропущені нитки
(тканину) і виколюємо на місці
попереднього виколювання. Знову ведемо голку з
робочою ниткою вниз через подвійну кількість
ниток відповідно до попереднього стібка чо-
тири-шість-вісім (або подвійний проміжок
тканини), вколюємо голку, повертаємо
вверх, набираємо на неї пропущені нитки
(тканину) і виводимо на лицьову сторону у
нижньому ріжку верхнього стібка. При
цьому треба слідкувати, щоб робоча нитка
постійно знаходилась з правої сторони голки.
Утворюються стібки, які наполовину
перекривають один одного у безперервній лінії.
Змінюючи товщину робочої нитки та
величину стібків, можна змінювати характер
вишитої орнаментальної лінії.
Гладь стеблову застосовують для
обведення контурів малюнка в орнаментах,
вишивання гілочок, прожилків у листочках
та стеблах. Звідси і походить назва гладь
стеблова.
11. Hlad Steblova
(Stem-like Satin Stitch).
The technique of
execution of Hlad
Steblova reminds one that of
Steblovyi Stitch. The only
difference is that the
stitches can be laid by
counting threads or
according to the marked piece of
material.
The stitch is worked from the top to the
bottom. The working thread is fastened to the
reverse side of the cloth at the starting point.
The needle is brought out onto the obverse side
and inserted into the fabric at 2-3-4-th reads
interval (the same interval of cloth, following
the pattern design), turned upwards, picking
up the missed threads (cloth) and brought out
onto the face of the material at the starting
point. Again, the needle with the working thread
makes journey downwards through the
doubled number of threads, according to the first
stitch 4-6-8 (or double space of the cloth) and
is inserted into the fabric, turned upwards,
picking up the missed threads (cloth) and
brought out onto the obverse side of the
material in the bottom corner of the upper stitch.
Thus, one should see to the working thread to
constantly be to the right of the needle. The
stitches which cover one another half, forming
an entire line, have been worked. Changing the
thickness of the working thread and size of
the stitches one can influence the character of
the ornamental line, been embroidered.
Hlad Steblova is used to outline the
contours of tracery in ornaments,to work
branches, leaves veins and stems. This explains the
name of the stitch Hlad Steblova.
Лицьова сторона. Obverse.
Виворіт. Reverse.
143
Українське народне вишивання
Уф^С?*&
ш
Ul.Ll J ~ЗГГГ±
12. Гладь колоскова.
Виконується за рисунком орнаменту.
Робочу нитку закріплюємо з виворітної
сторони на місці початку шва. Виводимо голку
на лицьову сторону і вколюємо її на місці
виколу. Набираємо на голку кількість ниток
(проміжок тканини) відповідно до рисунка
орнаменту так, щоб вістря голки було
добре видно. Обводимо вістря голки робочою
ниткою справа наліво. Петлю робочої нитки
притримуємо великим пальцем лівої руки і
виводимо голку на лицьову сторону. Після
цього вколюємо голку через дві-три нитки
(залежно від бажаної довжини вусика) за
петлею робочої нитки, що утворилася.
Гладь колоскову застосовують при
виконанні орнаментів декорування
дитячого одягу, вишивання обвідок, кайми на
подушках, рушниках, панно.
Цим швом вишивають колоски в
рослинних орнаментах.
12. Hlad Koloskova (Ear of Wheat
Satin Stitch).
The stitch is executed under the
pattern design. The working thread is fastened to
the reverse side of the cloth at the starting
point. The needle is brought out onto the
obverse side, being inserted into the fabric at the
starting point, picking up the number of
threads (piece of the material) according to the
pattern design. The point of the needle should
be clearly visible. The point is twisted by the
working thread from right to left. The loop of
the working thread should be held by the left
thumb, and the needle is brought out onto the
face of the cloth. After that, the needle is
inserted into the fabric two-three threads
(depending on the desirable length of the awn)
beyond the loop, created by the working thread.
Hlad Koloskova is used while working or-
naments to decorate children's clothes, to
embroider outlines, borders on pillows, towels, panels.
The ears in floral ornaments are worked
with this stitch.
144
Ukrainian Folk Embroidery
Виворіт. Reverse.
Independent Work.
1. Introduction of real ornamental
samples, worked in laid techniques which require
counting.
2. Sketch fragments of the studied
ornaments.
3. Design the ornamental fragment to be
executed with laid stitches which require
counting.
Task # 7.
1. Sketching of laid stitches which
require counting.
2. Execution of laid stitches which
require counting and do not cover the entire
background of the material.
Test.
Execution of the ornamental fragment.
Size: 14 X 12 cm
Composition: one's own idea (it is allowed
to transform the elements and motifs from the
ornaments studied before)
Technique of execution: laid stitches
which do not cover the entire background of the
material
Materials: fabric with clear linen
interweaving
threads — Mouline
framing — wooden frames, fit the size of
the task.
Лицьова сторона. Obverse.
Самостійна робота.
1. Ознайомлення із натуральними
зразками орнаментів, виконання
стеленими рахунковими техніками художнього
вишивання.
2. Виконати фраґменти вивчених
орнаментів графічно.
3. Розробити фраґмент орнаменту
для виконання стеленими рахунковими
швами в матеріалі.
Завдання № 7.
1. Графічне зображення стелених
рахункових швів.
2. Практичне вигнивання на тканині
стелених рахункових швів з несуцгльним
покриттям тканини.
Контрольна робота.
Вишивання фраґмента орнаменту.
Розмір 14 см X 12 см
Композиція — за власним задумом
(дозволяється трансформація елементів,
мотивів із вивчених орнаментів).
Техніка виконання — стелені
рахункові шви з несуцгльним покриттям тла
тканини.
Матеріали: тканина з чітким
полотняним переплетенням;
Нитки — муліне;
Оправа — рамки дерев'яні,
відповідно до розміру завдання.
145
Українське народне вишивання
б) стелені рахункові шви з
суцільним покриттям тла тканини.
b) laid stitches which require
counting, and cover the entire background.
1. Колодки-І (гобеленовий
шов).
Шов виконується справа
наліво. Робочу нитку закріплюємо
з виворітної сторони на місці
початку шва. Виводимо голку з
робочою ниткою на лицьову сторону
та ведемо її по діагоналі через дві
нитки основи і дві нитки піткання
вліво і вниз. Вколюємо голку,
повертаємо вверх, набираємо на неї
дві нитки піткання. Виводимо
голку з робочою ниткою на лицьову
сторону, знову ведемо по діагоналі
через дві нитки основи і дві нитки
піткання вліво і вниз для
накладання наступного стібка.
Настеливши стібки до кінця лінії шва,
повертаємо тканину на 180° і таким
же способом вишиваємо наступний
ряд стібків.
З лицьової сторони утворюється
густий настил рівномірних діагональних
стібків, які повністю покривають тло
тканини, з вивороту — вертикальні паралельні
лінії, подібні до художнього шва стебнівка.
Технікою колодки-І (гобеленовий
шов) вишивають орнаменти у декоруванні
одягових, інтер'єрних виробів
найрізноманітнішого призначення.
1. Kolodky-I (Goblin Stitch).
The stitch is worked from
right to left. The working thread is
fastened to the reverse side of the
material at the starting point. The
needle with the working thread is
brought out onto the obverse side and
led diagonally through two ground
and horizontal threads leftwards and
down.
The needle is inserted into the
cloth, turned upwards, picking up
two horizontal threads. The needle
with the working thread is brought
out onto the face of the fabric and
again led diagonally through two
ground and horizontal threads
leftwards and down to lay the next stitch.
Having finished the seam line, the
material is turned at the angle of 180°
and the next line of stitches is worked
in the same manner.
The obverse side shows a thick coat of
even diagonal stitches, which cover the
background entirely. The reverse side represents
vertical parallel lines like in Stebnivka Stitch.
Kolodka-I (Goblin Stitch) technique is
used to work ornaments to dncor
clothes,interior articles of various purposes.
***
' " '--—— ~!
«vVV ««WW»******"**»**»*» ■*#» *t *•*** •
ГіЛЙ^Ї^З^^Ж^ЙЗЖ^ЖЙїзїї^
Лицьова сторона. Obverse.
Виворіт. Reverse.
146
Ukrainian Folk Embroidery
2. Колодки-IL
Виконання шва
здійснюється настилом
(одновекторних) в
одному напрямку
рівномірних, діагональних
стібків рядами (лініями)
поперемінно справа
наліво і зліва направо.
Робочу нитку
закріплюємо з
виворітної сторони на місці
початку шва так, щоб
шов виконувати
справа наліво. Виводимо
голку з робочою
ниткою на лицьову
сторону. Ведемо її по діагоналі через дві нитки
основи і дві нитки піткання вправо і вниз.
Вколюємо голку, повертаємо вверх,
набираємо на неї дві нитки піткання, виводимо
на лицьову сторону. Знову ведемо голку вліво
і вниз через таку ж саму кількість ниток
основи і піткання для настилу наступного
стібка. Цим же способом настеляємо стібки
до кінця лінії шва.
Наступний ряд стібків настеляємо
зліва направо. Для цього при настилі
останнього стібка нижнього ряду голку
повертаємо ввверх та виколюємо її через чотири
нитки піткання і дві нитки основи вправо.
Виводимо голку з робочою ниткою на
лицьову сторону, ведемо вліво і вниз через
дві нитки основи і дві нитки піткання.
Вколюємо голку, повертаємо вверх,
виколюємо її по діагоналі вправо через чотири
нитки основи і ті ж самі дві нитки піткання.
Виводимо голку на лицьову сторону,
знову ведемо по діагоналі вліво і вниз через
дві нитки основи і ті ж самі дві нитки
піткання для накладання наступного стібка. При
цьому вколювання голки здійснювати
строго на місці верхнього ріжка, ідентичного
стібка нижнього ряду шва.
Шов художнього вишивання
колодки II з лицьової сторони являє собою густий
настил діагональних стібків, які щільно
покривають тло тканини. З вивороту
горизонтальні паралельні лінії стібків чергуються
поперемінно: одна — із рівних
вертикальних, рівномірно розміщених стібків, друга
— із густо настелених діагональних стібків
(подібно до низинного шнурка).
Технікою колодки-ІІ заповнюють в
орнаментах великі і малі площини.
Утворена щільним настилом стібків поверхня імітує
2. Kolodky-II.
То work the
seam, one should lay
even, diagonal stitches
in the same direction
(one-vector) in rows
(lines) from right to left
and visa versa.
The working
thread is fastened to the
reverse side of the cloth
at the starting point so,
that it makes it possible
to work from right to
left. The needle with the
working thread is
brought out onto the obverse
side of the fabric and led diagonally through
two ground and horizontal threads rightwards
and down. The needle is inserted into the cloth,
turned upwards, picking up two horizontal
threads and brought out onto the face of the
fabric. Again, the needle makes journey to the
left and down through the same number of
ground and horizontal threads to lay the next
stitch. The stitches are worked in the same way
by the end of the seam line.
The following row of stitches is laid from
left to right. For that, while working the last
stitch of the bottom row, the needle is pointed
up and brought out onto the obverse side four
horizontal and two ground threads rightwards.
Then, the needle with the working thread
makes journey leftwards and down through two
ground and horizontal threads, is inserted into
the cloth, turned up and brought out onto the
obverse side diagonally rightwards through four
ground threads and the same two horizontal
ones.
Again,the needle is led diagonally
leftwards and down through two ground threads
and the same two horizontal ones to lay the
next stitch. One should see to the needle to be
inserted right into the top corner of the
identical stitch in the lower row of the seam.
The stitch of artistic embroidery
Kolodky-II represents a thick coat of diagonal
stitches, which cover entirely the background of the
material, on its obverse side. The reverse side
shows horizontal, parallel lines of stitches in
alternation: one line consists from straight,
even, vertical stitches, another one — from
thickly laid diagonal stitches (like in Nyzynnyi
String).
This technique is used to fill in large
and small spaces in ornaments. The surface,
«J""" fix)
_jp*0WH* ЦІЮ**
v/уЖі
147
Українське народне вишивання
рукотворну тканину. її використовують як
основу для виконання поверхневих
орнаментів техніками стебнівка, гладь
стеблова, лиштва проста, лиштва качалкова тощо.
-» «*■ M^Hft, **-»-*-*♦ •
Лицьова сторона. Obverse.
3. Гладь пряма тіньова.
Шов виконується
настилом ліній рівних, паралельних,
вертикальних стібків справа
наліво, зліва направо.
Робочу нитку
закріплюємо з виворітної сторони на місці
початку шва. Виводимо голку на
лицьову сторону і вколюємо її
через 4 (чотири) нитки піткання
вниз між двома паралельними
нитками основи. Повертаємо
голку вверх та виколюємо її по
діагоналі через 6 (шість) ниток
піткання і 1 (одну) нитку основи
вліво. Виводимо голку з робочою
ниткою на лицьову сторону,
вколюємо її через 4 (чотири) нитки
піткання вниз між двома
паралельними нитками основи,
повертаємо вверх, виколюємо по
діагоналі вліво через 1 (одну)
нитку основи і 2 (дві) нитки піткання (це буде
на рівні верхнього ріжка першого стібка та
посередині суміжного стібка). Виводимо
голку на лицьову сторону. Таким же способом
настеляємо наступні стібки. В кінці лінії шва
виколюємо голку на 2 (дві) нитки піткання
вище стібків верхньої лінії і таким же
способом ведемо шов зліва направо.
При цьому з лицьової сторони
утворюються горизонтальні лінії вертикальних
рівних, паралельних стібків, розміщених на
2 (дві) нитки піткання то нижче, то вище
один від одного. На місці стику суміжних
стібків верхнього і нижнього ряду
утворюються впадини (ямочки).
Ритмічний повтор, симетрично
розміщених стібків із впадинами на місці
стику, творить специфічну фактуру вишитої
made up of the thickly laid stitches, imitates
handmade cloth. Kolodky - II serves as the
basis to work surface ornaments in Stabnivka,
Hlad Stablova,Simple Lyahtva Lyahtva
Kachalkova etc. techniques.
Виворіт. Reverse.
3. Hlad Pryama Tinyova
(Straight Shady Satin Stitch).
To execute the stitch one
should lay even, parallel, vertical
stitches in a line form from right to
left and visa versa.
The working thread is
fastened to the reverse side of the cloth
at the starting point. The needle is
brought out onto the obverse side and
inserted into the fabric four
horizontal threads between two parallel
ground threads downwards. The
needle is turned up and brought out onto
the face of the cloth diagonally
through six horizontal threads and
one ground thread leftwards. When
the needle is on the face of the cloth,
it is inserted into it again through
four horizontal threads between two
parallel ground ones downwards,
turned upwards and brought out onto
the obverse side diagonally leftwards through
one ground and two horizontal threads (this will
be on the level of the top corner of the first
stitch, in the middle of the neighboring stitch).
The following stitches are laid in the same
manner. At the end of the seam line the needle is
brought out onto the obverse side two
horizontal threads higher the stitches of the top line
and the seam is laid in the same way from left
to right.
Thus, the obverse side shows
horizontal lines of vertical, even, parallel stitches,
which fall two horizontal threads either lower
or higher one another. The junction between
the neighboring stitches of the top and bottom
rows takes the form of a hollow (hole).
Stitches with hollows at the junctions,
laid symmetrically and rhythmically, create a
148
Ukrainian Folk Embroidery
поверхні і спричиняє різнобічне
заломлення світла, а відповідно гру відтінків
кольору. Звідси й назва гладь пряма тіньова.
З вивороту утворюються діагональні
(через одну нитку основи) стібки,
поперемінно один довгий — через 6 (шість) ниток
піткання, один короткий — через 2 (дві)
нитки піткання.
specific texture of and embroidered surface and
cause different light refraction, hence the play
of color tints. This explains the name of the
technique: Hlad Pryama Tinyova.
The reverse side represents diagonal
stitches, fallen at one ground thread interval,
in alternation: the long one through six
horizontal threads and the short one through two
horizontal threads
Лицьова сторона. Obverse.
Виворіт. Reverse.
4. Гладь коса атласна.
Шов виконується справа
наліво. Робочу нитку
закріплюємо з виворітної сторони на місці
початку шва. Виводимо голку на
лицьову сторону і ведемо її по
діагоналі вліво і вниз через 2 (дві)
нитки основи і 4 (чотири) нитки
піткання. Вколюємо голку,
повертаємо вверх, набираємо на
неї 4 (чотири) нитки піткання,
виводимо на лицьову сторону
для накладання наступного
стібка. В кінці лінії шва на голку
набираємо 2 (дві) нитки
піткання, виводимо її на лицьову
сторону, тканину повертаємо на
180° та настеляємо таким же
способом наступний ряд стібків.
Вишивальну нитку настеляємо по
діагоналі через 2 (дві) нитки
основи і 4 (чотири) нитки піткання
(2 покритих стібками верхнього ряду, 2 (дві)
непокритих), виколюючи голку через 2 (дві)
нитки піткання між стібками верхнього ряду.
Таким чином стібки нижнього ряду
наполовину вклинюються між стібками верхнього
ряду.
Рівномірний нахил стібків під кутом
та підвищена їх щільність на місці суміж-
4. Hlad Kosa Atlasna
(Satin Slanting Satin Stitch).
The stitch is worked from
right to left. The working thread is
fastened to the reverse side of the
fabric at the starting point. The
needle is brought out onto the obverse
side and led diagonally leftwards
and down through two ground
threads and four horizontal threads.
Then it is inserted into the cloth,
turned upwards, picking up four
horizontal threads, brought out onto
the obverse side to lay the next
stitch. At the end of the seam line
two horizontal threads are picked
up by the needle. The material
should be turned at the angle of
180° after that, and the following
row is worked in such a way. The
working thread is laid diagonally
through two ground and four
horizontal threads (the two ones are covered by the
stitches of the top row; another two are non-
covered), being pulled out onto the face of the
fabric through two horizontal threads between
the stitches of the top row. Thus the stitches
of the bottom row are half wedged in the
stitches of the top row.
The stitches are laid at even angles and
149
Українське народне вишивання
ності рядів спричиняють зміни заломлення
променів світла, що урізноманітнює
колористичні відтінки вишитої поверхні. Звідси
і назва шва — гладь коса атласна.
grow increasingly thicker at the place the rows
meet. This causes different light refraction,
which contributes to the color-scheme of
already embroidered surface and explains the
name of the stitch: Hlad Kosa Atlasna.
Лицьова сторона. Obverse.
Виворіт. Reverse.
5. Гладь коса
оздоблювальна.
Шов виконується
настилом діагональних стібків
через кількість ниток,
відповідно до рисунка орнаменту.
Робочу нитку
закріплюємо на місці початку шва
з виворітної сторони.
Виводимо голку на лицьову
сторону, набираємо на неї по
діагоналі 4-6 ниток (відповідно
до рисунка орнаменту),
виводимо на лицьову сторону і
вколюємо на місці першого
виколу. Таким чином
настеляємо ще три стібки по
квадрату або діагональний стібок
в протилежну сторону.
Наступні стібки настеляємо
паралельно першому,
відступивши на одну нитку вверх або вбік (залежно
від рисунка), збільшуючи або зменшуючи
відповідну довжину стібків.
Настил стібків однаковий як з
виворітної, так і з лицьової сторони.
5. Hlad Kosa Ozdobly-
uvalna (Decorative Slanting
Satin Stitch).
To work the seam, the
stitches should be laid
diagonally with the interval of
threads, according to the
pattern design.
The working thread is
fastened to the reverse side of
the cloth at the starting point.
The needle is brought out onto
the obverse side, picking up
diagonally 4-6 threads
(according to the pattern design) and,
being brought out onto the face
again, is inserted into the cloth
at the starting point. Three
more stitches are worked in a
square in the same way or a
diagonal stitch in the opposite
direction. The following
stitches are laid parallel to the first
one, either one thread up or to the side
(depends on the tracery), accordingly increasing or
decreasing the length of the stitches.
Both the obverse and reverse sides of
the material embroidered show the same
design.
.-*■>.
'' ' Ш
* . ■ .
■* Ш- ; «.
- ■ ■ ж
•
■!
*<;
■■? "
■ Ш.
1*
""* '
7Г».»
/
■>4
?4
1 •
:"■"
-"* .
-*"*
і
N
/
■ . .
4;
£
Лицьова сторона. Obverse.
Виворіт. Reverse.
150
Ukrainian Folk Embroidery
6. Гладь плетінка.
Виконується такий шов
настилом діагональних стібків
рядами поперемінно (почергово)
справа наліво і зліва направо.
Робочу нитку
закріплюємо з виворітної сторони на місці
початку шва. Виводимо голку з
робочою ниткою на лицьову
сторону і ведемо по діагоналі через
2 (дві) нитки основи і 4 (чотири)
нитки піткання вліво і вниз.
Вколюємо голку, повертаємо вверх,
набираємо на неї 4 (чотири)
нитки піткання і виводимо на
лицьову сторону для настилу
наступного стібка.
В кінці лінії шва на голку
набираємо 6 (шість) ниток
піткання. Виводимо її на лицьову
сторону, ведемо по діагоналі
вправо і вниз через 2 (дві) нитки
основи і 4 (чотири) нитки піткання
2 (дві) непокритих, а 2 (дві)
покритих стібками нижнього ряду),
вколюємо голку, повертаємо
вверх, набираємо на неї 4
(чотири) нитки піткання, виводимо на лицьову
сторону і таким же способом накладаємо
наступний стібок.
При цьому з лицьової сторони
утворюються рівномірні діагональні стібки,
розміщені поперемінно рядами справа наліво і
зліва направо, які наполовину
перетинаються. Фактура вишитої поверхні
сприймається ніби плетево. Звідси і назва шва —
плетінка.
З виворітної сторони утворюються
вертикальні рівні, паралельні стібки,
наполовину суміщені рядами.
6. Hlad Pletinka (Plaiting
Satin Stitch).
To work the seam, the
stitches are laid diagonally in rows
from right to left and visa versa.
The working thread is
fastened to the reverse side of the
material at the starting point. The
needle with the working thread is
brought out onto the obverses side
and is led diagonally through two
ground threads and four horizontal
threads leftwards and down. The
needle is inserted into the cloth,
turned upwards, picking up four
horizontal threads and brought out
onto the face of the cloth to lay
the next stitch.
By the end of the seam line
six horizontal threads are picked
up by the needle. The needle makes
journey diagonally rightwards and
down again through two ground
threads and four horizontal ones
(the two ones are not covered and
another two are covered by the
stitches of the bottom row), is
inserted into the fabric, turned upwards,
picking up four horizontal threads and brought out
onto the obverse side. The next stitch is worked
in such a way.
Thus, the face of the material shows
even diagonal stitches in rows,placed in
alternation: from right to left and visa versa. They
intersect each other half. The texture of the
embroidered surface reminds one of a
plaiting, which explains the name of the stitch —
Pletinka.
The reverse side represents vertical,
even, parallel stitches in half joined rows.
•> w
V.
л w _.
Ч ваг
' f *' . .*
' J ' 'i ' # *
A-
~" f
T
. y. . .
;■••>■/"■
.. ....
<• '■ і ....
'•.'.;■' . ' ■*>
}f.i.{. » •' ■ * :
. f.t'4■ ■■•• *:*<■?.. і
'" .... ^ .і *,-і . *■ * ■i1"' *■•!•-.
>-./; д-л/.-гч.х*. * -." v-л
'.'лі' У "" Ч'у
•""'*■ "»'Л>*\"...І
« Ь і
';, У'..?
'/ / "•
■». і •
#
• '
.
V..' ■ !-
'^У
/■ч"
V
-*ч ft * Л*^*
'". *j«,v fVc"-;'.*
¥+г<гг-'№яА'~
■-;•;:>/• - iv-Л *.
4 ^h'V .."VA* --,
• * * ■ | t
\i ' * r*A ' "-W .
vv . .;,■; v„*
■"■'.'
<i-.i.1
•Jr.,
Лицьова сторона. Obiierse.
Виворіт. Reverse.
151
Українське народне вишивання
Контрольна робота.
Вишивання панно.
Розмір: 18см X 15см;
Композиція: за власним творчим
задумом;
Техніка виконання : стелені
рахункові шви з суцільним покриттям тла тка-
матеріали: цупка тканина з чітким
полотняним переплетенням;
нитки — муліне;
оправа — рамки дерев відповідно
до розміру завдання.
Питання для контролю знань.
1. Які стелені рахункові шви з несу-
цільним покриттям тканини ви знаєте?
2. Охарактеризуйте спільність
ознак технологи вишивання стелених
рахункових швів з несуцільним покриттям
тканини?
3. Яка відмінність у техніці
вишивання низинки замкової і низинки простої?
4. Прошийте практично лиштву ка-
чалкову за поданим зразком.
5. На поданих натурних зразках
орнаментів визначіть шви: набирування, по-
верхниця-кафасор, заігляне-І. Дайте
підтвердження своїй відповіді.
6. Чим зумовлена назва стелені
рахункові шви з суцільним покриттям тла
тканини?
7. Подібність та відмінність
техніки виконання швів гладь коса атласна і
гладь плетінка?
8. Прошийте практично за поданим
зразком техніку художнього вишивання
колодки-П.
9. За поданими зразками технік
художнього вишивання з лицьової та
виворітної сторони визначіть їх назви. Поясніть,
чому?
10. Яке найбільш доцільне, на вашу
думку, комбіноване поєднання в орнаментах
вивчених швів?
Test.
Embroidery of a panel (picture).
Size: 18 X 15cm
Composition: one's own idea;
Technique of execution: laid stitches
which require counting and cover the entire
background of the material;
Materials: dense cloth with clear linen
interweaving
threads — Mouline
framing — wooden frames, which fit the
size of the task.
Final Questions.
1. What laid stitches which require
counting and do not cover the entire background of
the material do you know?
2. Characterize common technological
features of embroidery of laid stitches which
require counting and do not cover the entire
background of the material.
3. What is the difference in embroidery
technique of Nyzynka Zamkova and Simple
Nyzynka?
4. Work Lyshtva Kachalkova following
the given sample.
5. Identify the stitches: Nabyruvannya,
Poverkhnytsya-kaorasor, Zaihlyane-I, on the given
ornamental samples. Confirm your answer.
6. Why are laid stitches which require
counting and cover the entire background of the
material called so?
7. Show the similarity and difference of
execution technique of the stitches: Slanting
Satin Stitch and Plating Satin Stitch.
8. Work the technique of artistic
embroidery Kolodky-II, following the given sample.
9. Identify names of embroidery
techniques, having examined their samples from the
obverse and reverse sides. Prove why.
10. What is the most successful
combination of studied stitches in ornaments, from your
point of view?
152
л
Щ^в|^^ЩІ^ |8Гг^*й« Р**
|«іі
^•"^ ! sl^'ICS £'"?
""V
«W- 'І
Iff ! ! і Яр. < <
«1=
h
Ч5*
JgjgjUiS,1
лС-
PHI.
I. I
І
'ft
N*4
-it" *
і': J
'rill'
я.
iff Ф|
«1
і і
,1 A."'
t^'4-i-i! T;
i!l,
І :
'it f^V
Kit ^ J.1
St
Образ 'Богоматері, }.„,.''
поч. XXI cm. / }j,t
Mother of God icon, "*
Beginning of the XXI-st century
. I'
і і
. '■* * і
і. к
;1^зВДР
\
\
V .3
F4
^
\
V
J?
■V-V.A)'
№■■
І їй
! :-...--
• -■'■ :
\--z.:,-r-
Ьч
\
V
i:-^
5 ¥ * Iі
'^«•«ЧіІш,,.
' A«
Л
-#* e
іркш
-і
■\і
■ь
Іі
■ Vі
ІВ'
ттштяшшшштщтщммштштяпт
гагате . »в^»ивид*гі &v?^w^aw№-«gagS:w^»w
1'
til
ЇЧ" декоративні панно
!!i Виконані стеленими рахунковими швами
w j : їм ,
і 'Decorative panels,
executed with Laid stitches, which require counting
11.
w
J і
'««i
.«a
4
1
III.
■«■$■.
Ks- jfi
1 !■ I,
4 ч
'Mi
Hi
ttt
ш
Л
S:
S',
■*■>#
m
- f
■« *>■■
S*f?
SA
.'.VA j-.v;. .
^,ч
%
I.
V'V
і fan , і
і І ■
І!
V
■,' I
/.«
№
І
Pi '
&
in
11,1,
. V
..,.^
■<:
■V /
.... k ■■
,lJ**4r
.hivr
F'll till' '
■'■« ffi gf.fi
Щ
-4,
1.) t
*4 *
iMifSf?
%fe>;
-ч^--.
=§
II
•чи tl
if |*ї
!l ' і '
-J»
, J |i Iі і |i
1 1
111
p f
* •'.'•У
'•л--*лГ
■ ^- .-"
il
•j
Л".
і ■' I'
'l I
',.r
і і
'і
v
1' "
i!..
K
\
- ■ v \ .*
Г--К. y
{ V V >
%
». .
v£%
•4
"h -;
У!
IP і
M
»i і т!
I
'• ч fi'
!f P.' і
-;«XiiJ^:^'
- "».•.•.--■
•" v.V- .
.У
■"-v.-
•я-v
•x .
N
4
II
Ь
N
■■J.
*Л 'і t
WW . ,V
■' '■!
', декоративне панно "Соняшники",
кін. XX cm. .Т < ! {' iys. .і • ';
2ІІ [і.?1- IS». 1
,:Ї^/'!«І1
і
м
У 4 Ніі , її
decorative panel Sunflowers",
"' і1 " "Р «шГ of *йе XX-th century
ЦІН.' ■
м
s «
tl
*
< (
>
!' '
V
ih
і
л і '„'
V
v :ч
і
» 't
>
Iі-
,'*
'fit
4 li |H
'Ярлись:
'Оясе -
\
1 "'
4fea..,.
:,л
їал/г(*
Г
-.A'iV.
Й&"
**-
\
"v. \
»/
.•>
! і
* fv
\Ч
. J
■f , ft ^«
і 71 ' ' 'Iі it1
Ufa',14 ч Г
о^;л^';. гір;
• .... . •<• Я"\ і
,'■'•*" ■
її1
І""
b »
ft
■\fc"
•vv.-
.-■:■.:
1»
4 *
'.*;--
•..«•
<fr.
I
І П »
І » >t
• и
ні
?
'і:
к
\
* ..■»■•■
* ■■■
.1,1'
■JJ-/
ws"*M'
, І«'.
• %—Г.»
і \ *
і • V\
, * « » -і І f > ї
. т •,.... *
""• • •■ і :."
• * •
,* v *w
Сукня,
поч. XXI cm.
Jrockj,
Beginning of the
XXI-st century
• ".::.•,
~JT "
4ir-::-*-
Hr J
у
'■^■r
• ... •
.: •'■":-"•■•■■
S •"■" • v
;::■ • ■ .. ~ «Ц
. • -;:::: '-■•.■.;""i
.»
• ■■ •
№* чг
■J т Л %*■ ;J
: u till" rki'lf in
1 Jiff t 'i* *aru,rtntu.n* V
J і 'It «Ярослави*", \
*1« If Ф
I. P. '
f ft .
-'■<
І " " і' -*l
£,
*
7* ♦ *
І
■ т
-О ' І
т
■'If* і І
і» S» ' .і
,.Л. ?1 і
'vvX'1. ■
їіл'Ц-
V
-УЛ
* • • *?
«,
Vff ''
Комплект одягу "Уаличанка",
кін. XX cm.
v.Vv
І Clothes set
etui of the , H
XX-th century • &
| ll . d Г
4
IP.
Ml
•i
t .*•-
mm
wm
Ш
Ш
w
-о- ;
• ^ < av
I» ^ ll
'1
if I
+
3'
it
*' 'I
*.
tf "я'
ut-f: і
♦ * »f
Clothes set "fMychanta", « '^ЙЬ'"^ » 4/• v'«jl0^ * *»"•' **V •»•»*»* •
nd of the XX-th century 'J ,*?5^^/N^^r'^'' •'•••••«••♦•••«««••«•«•«
.'!■
» і IB
- «
• r *
і
Cft> ISIII. И(ера?(ункові стелені шви
55- VIII. Laid stitches which do not require counting
(satin stitches under a free tracery )
Українське народне вишивання
Ш<$ итоки назви нерахункові
У стелені шви зумовлюються
| технологією і техніками їх
* виконання. Суть її в тому,
що вишивання стібків виконується не за
рахунком ниток або рівномірним відрізоком
тканини, а вільним настилом. Звідси і назва
нерахункові стелені шви.
Стібки робочої нитки в цих швах
суцільно покривають тло тканини і
утворюють гладку поверхню, як «гладь» стоячої
води — це надає їм другу назву вільні
гладдєві шви.
Вільний настил стібків — поняття
відносне. Воно лише підкреслює відсутність
рахунку ниток, тотожність їх величин.
Вишивання цих швів, як інших, обумовлене
відповідними закономірностями технології та
техніки настилу стібків.
Невід'ємним технологічним
компонентом нерахункових стелених швів є
виконання їх за контурами та додатковими
роздільними лініями в елементах, мотивах
рисунка орнаменту. Це характерна
технологічна особливість і вона зумовлює ще одну
їх назву — гладдєві шви за вільним
рисунком. Орнаменти, виконані такими швами —
гербальні, тобто рослинного характеру,
близькі до натурного світосприйняття і
нерідко містять в собі вкраплення зоо-, орні-
то-, антропоморфних елементів.
Техніки настилу стібків в
нерахункових стелених швах найрізноманітніші:
односторонні, двосторонні, подвійний настил
(потаємні, поверхневі стібки), вільним
входженням між собою, перетином під певним
кутом, петлеподібно, суміжним дотиком
тощо. Техніка виконання, колористика, в
основному, і визначають їх назви.
Нерахункові стелені шви природньо
поєднуються між собою. їх синтез
забезпечує фактуру і цілість орнаменту на площині.
Теоретичні знання, практичний
тренінґ з технології, техніки виконання цих
швів формують уміння, навики виконувати
робочий рисунок орнаментів і переводити
їх на тканину, закладають основи
аналітичного мислення, засади творчих умінь
матеріалізувати виражальні засоби композиції
шляхом їх синтезу в аспекті розкриття
змісту твору (творчого задуму) відповідно
його семантики, символіки, назви тощо.
The technique and technology of
execution themselves determine the name of Laid
stitches which do not require counting. Its point
is that, the stitches are executed not by
counting out threads or at equal intervals of the
material, but being freely laid. The technique
itself determines the name «Laid Stitches which
do not require counting». The stitches of the
working thread of them cover the entire
background of the material and create a smooth
surface, reminding one that of mirror-like. This
gives them another name Free Satin Stitches.
Free laying of stitches is a rather
relative notion. It only stresses, that there is no
need in threads counting and that one should
fit the stitches sizes. Executing these stitches,
as well as the others, one should follow
peculiar technology and technique of the way the
stitches are laid.
The inseparable technologic component
of the laid stitches which do not require
counting is that they are worked in the elements and
motifs of the ornamental pattern,following the
contours and complementary marginal lines. This
is a characteristic technologic peculiarity, which
calls forth one more name of the stitches —
Satin Stitches under an independent design.
Ornaments, worked with these stitches are
herbal, i.e. of floral character, and are look natural.
Often they bear zoomorphic, ornitomorphic and
anthropomorphic elements.
There exist the most diverse techniques
in the way laid stitches which do not require
counting are worked: one-sided, both-sided,
double laying (secret, surface stitches), loose
interlacing, intersection at a required angle,
loop-like, adjacent etc. Basically the technique
of embroidery and color-scheme determine their
names.
Laid stitches which do not require
counting organically merge into a single entity. Their
synthesis provides for the texture and integrity
of the ornament.
Theoretic knowledge, training in
technology and technique of execution of these
stitches form practical skills in how to make
pattern design and to transfer it onto the
material. One is able to think analytically and
afterwards creatively materialize one's ideas with
the help of compositional expressive means,
the synthesis of which reveals their «salt»,
according to their semantics, symbolic, name,
etc.
162
Ukrainian Folk Embroidery
1. Гладь двобічна.
Виконується шов за
робочим рисунком орнаменту. Рисунок
орнаменту переносимо на
тканину так, щоб чітко продивлялися
контури орнаментальних мотивів.
При вишиванні гладі
двобічної бажано, щоб величина стібків
не перевищувала 1 см. В
протилежному випадку, вони будуть
обвисати і не прилягатимуть щільно один до одного.
Нерівномірний настил стібків руйнуватиме
фактуру утвореної швом поверхні.
Для забезпечення настилу стібків, не
довших 1 см, пелюстки квіток та листки
рисунка орнаменту розділяємо лініями на
декілька частин, після чого приступаємо до
виконання шва.
Робочу нитку закріплюємо з
виворітної сторони так, щоб вивести голку на
лицьову сторону в правому кутку контуру
рисунка. Виводимо її на лицьову сторону,
ведемо з робочою ниткою вниз і вколюємо
на місці першої роздільної лінії напроти
виколу по контуру вверху. Повертаємо
голку вверх, набираємо на неї тканину та
виколюємо по лінії верхнього контуру поряд
із місцем першого виколу. Робочу нитку
щільно притягуємо вверх, притримуючи
утворений стібок великим пальцем лівої
руки. Таким способом настеляємо стібки до
кінця лінії шва. При цьому слідкуємо, щоб
робоча нитка весь час йшла з правої
сторони голки.
Настил стібків можна здійснювати по
прямій, по діагоналі, по колу або окремими
плямами, відповідно характеристичних
особливостей мотивів, елементів, плям,
ліній орнаменту. Густота настилу стібків
повинна бути такою, щоб вони щільно
покривали тло тканини.
Наступну лінію стібків можна
вишивати іншим відтінком або кольором,
відповідно до колористичного зображення
орнаменту, поданого в робочому рисунку.
При виконанні таким способом шва з
лицьової і виворітної сторони утворюється
однаковий настил стібків, звідки і назва —
гладь двобічна.
1. Hlad Dvobichna (Both Sides
satin Stitch).
The stitch is worked
according to the pattern design. One should
make a tracery on the material, so
that the outlines of the ornamental
motifs are clearly visible.
While working Hald
Dvobichna, the desirable size of the stitches
should not exceed 1 cm, otherwise
they will be loose. Stitches laid unevenly would
spoil the embroidered texture. The flower
petals and the leaves on the tracery are divided by
the lines before hand to reach such an effect.
Now it is possible to execute the stitch itself.
The working thread is fastened to the
reverse side of the cloth, to bring the needle
out onto the obverse side in the right corner of
the tracery contour. Then, the needle with the
working thread makes journey downwards
where it is inserted into the first marginal line
right across the point it has been previously
brought out of. The needle is turned upwards
picking up the cloth and brought out onto the
obverse side in the top contour line next to the
starting point. The working thread is pulled
tightly up, while a newly created stitch is held
by the left thumb. The stitches are laid in the
same way by the end of the seam line. One
should see to the working thread to always be
to the right of the needle.
The stitches can be worked straight,
diagonally, circle-wise or in separate spots,
according to peculiarities of motifs, elements,
spots, ornamental lines. The stitches should be
laid that thick, to cover the entire background
of the material.
The following stitch line can be worked
either with the other tint or a color,
corresponding to the orn amental color-scheme on the
pattern design.
Both the obverse and reverse sides of
the material embroidered show the same
design which explains the name of the stitch —
Hlad Dvobichna.
163
Українське народне вишивання
Ш*л*\.
■А \ v/
1 і "
І*
1
1
t л
'І -
'4. ,
--
•
Лицьова сторона. Obverse.
Виворіт. Reverse.
2. Гладь з пересягами (полтавська).
Шов виконується за робочим
рисунком орнаменту. Рисунок орнаменту
переносимо на тканину. Ця техніка художнього
вишивання дозволяє виконувати стібки
довжиною від 1 до 3 см і покривати ними
великі площини.
Для виконання шва робочу нитку
закріплюємо з виворітної сторони. Виводимо
голку на лицьову сторону на місці
верхнього контуру елемента і ведемо з робочою
ниткою до нижнього контуру. Вколюємо голку,
2. Hlad with Peresyahy (Poltavian);
/Poltavian Satin Stitch/.
The stitch is worked under the pattern
design, the tracery of which should be made
on the material. This technique of artistic
embroidery allows to work stitches from 1 to 3 cm.
by size and to cover with them large areas.
The working thread is fastened to the
reverse side of the cloth. The needle with the
working thread is brought out onto the obverse
side at the top contour of the element and led
to the bottom contour. The needle is inserted
164
Ukrainian Folk Embroidery
повертаємо вверх та виколюємо через 3-4
мм зліва попід утворений довгий стібок.
Робочу нитку щільно притягуємо вверх і
вколюємо голку за 3-4 мм до верхнього
контуру справа довгого стібка. Набираємо на
голку тканину, виколюємо її на місці
верхнього контуру поряд із попереднім стібком.
Виводимо голку на лицьову сторону і ведемо
вниз для накладання наступного стібка.
При настилі таким способом стібків
з лицьової сторони утворюються довгі стібки
1-3 см через всю довжину вишивальної
тканини, обведеної контурами, пересягнуті
знизу і зверху коротким стібком зліва
направо. Вишита площина щільно покрита
стібками, стібки-пересяги ніби закріплюють
довгі стібки на тканині. Технологія ведення
шва, техніка настилу стібків зумовлюють
творення своєрідної фактури вишитої
поверхні з лицьової сторони. З вивороту стібки
творять неширокі лінії 3-4 мм за контурами
рисунка елементів, мотивів орнаменту.
Технологія, техніка виконання шва
зумовлює його назву — гладь з пересягами.
Друга назва — полтавська, мабуть,
походить від того, що найбільш поширена на
Полтавщині.
ї
^
•'* 6
cv9
'і-
^п
•
<
^
*. . "... СЛ
-У
ґ V.
/•
с
Лицьова сторона. Obverse.
into the cloth, turned up and brought out onto
the face of the fabric 3-4 mm leftwards under
a long stitch been worked. The working thread
is tightly pulled up and the needle is inserted
into the cloth 3-4 mm before the top contour
the long stitch to the right. The cloth is picked
up by the needle, which appears on the
surface again in the top contour, next to the
previous stitch. The needle is brought out onto the
obverse side and drawn down to lay the
following stitch.
While working the stitches in such a
way, the obverse side shows long 1-3 cm stitches
the entire length of the embroidered material
through, which are fastened at the top and in
the bottom by a short stitch from left to right.
The embroidered surface is thickly covered with
the stitches. Stitches- peresyahy as if fasten
long stitches on the material. The technology
of the execution of the seam and technique
the stitches are laid make for a peculiar texture
of the embroidered surface on the obverse side.
The stitches form not wide lines 3-4 mm on the
reverse side according to the tracery contour
and ornamental motifs.
The technology and technique
themselves determine the name of the stitch: Hlad
with Peresyahy. Another name is Poltavska,
maybe because it was the most widely spread
in Poltava region.
Виворіт. Reverse.
165
Українське народне вишивання
3. Гладь
художня.
Виконується
шов за робочим
рисунком орнаменту.
Спочатку рисунок
орнаменту контурно
переносимо на тканину.
Композиційні елементи розділяємо лініями
відповідно колористичних плям рисунка
орнаменту. Якщо квітку треба вишити
трьома, п'ятьма кольорами, то її пелюстки,
відповідно, ділять на стільки ж частин. Після
підготовленого рисунка на тканині
приступаємо до виконання шва.
Робочу нитку закріплюємо з
виворітної сторони на місці початку шва.
Виводимо голку на лицьову сторону по
верхньому контуру, ведемо її з робочою ниткою
вниз по прямій або по діагоналі (залежно
від характеру орнаменту) і вколюємо на місці
першої роздільної лінії напроти верхнього
виколу. Повертаємо голку вверх,
набираємо на неї тканину та виколюємо на
верхньому контурі поряд з місцем попереднього
виколювання. Виводимо голку на лицьову
сторону і ведемо її вниз для накладання
наступного стібка. При настилі стібків до кінця
лінії шва слідкуємо за колористикою лінії
мотиву, елемента на рисунку орнаменту і,
відповідно характеру лінії входження
кольорів, стібки виконуємо то довші, то коротші.
При вишиванні наступної лінії стібки
іншого кольору чи відтінку заходять поміж стібки
попередньої лінії шва, що дозволяє
здійснювати плавний перехід кольорів та їх відтінків.
Така вишивальна техніка імітує технологію
живопису. Звідси і назва шва — гладь
художня (живописна).
З- Artistic Satin
Stitch.
The seam is
worked under the
pattern design. First, one
should make the
contours of the tracery on
the material. The
compositional elements are divided by the lines
according to the color spots of the ornamental
design. If a flower requires five colors, its
petals are divided into the same number of parts.
Having prepared the tracery on the cloth, one
can start working the stitch.
The working thread is fastened to the
reverse side of the fabric at the starting point.
The needle is brought out onto the obverse side
in the top contour, led with the working thread
either straight downwards or diagonally
(depending on the character of the ornament) and
is inserted into the cloth in the first marginal
line across the top starting point. The needle is
turned upwards, picking up some cloth, and
brought out onto the face of the fabric in the
top contour, next to the place it has been
previously brought out of. After that, the needle is
led downwards to lay the following stitch. While
working the stitches by the end of the seam
line, one should see to the color-scheme of the
motif,ornamental elements and accordingly the
way the matching colors are added; the
stitches are worked in alternation: the long and short
ones. When laying the next seam line, the
stitches of different color or tint wedge into the
stitches of the previous seam line, which allows
smooth change of colors and tints. This
technique of embroidery imitates technology of
painting. This explains the name of the stitch,
Artistic Satin Stitch.
IVS
^\
•Ч.Ч
4 -
v J
1
4
y.
і
- l\ ■
* 4
\
1
1 V -
Лицьова сторона. Obverse.
Виворіт. Reverse.
166
Ukrainian Folk Embroidery
і
4. Гладь з настилом.
Технологія виконання техніки
художнього вишивання гладь з настилом дещо
подібна до гладі двобічної. Вишиті цією
технікою орнаменти асоціюють в собі більш і
менш плоскісно — об'ємні елементи і цілі
мотиви.
Шов виконується за робочим
рисунком орнаменту. Робочий рисунок контурно
переносимо на вишивальну тканину. На
площинах елементів, мотивів, де необхідно
створити об'єм (сферичну поверхню),
спочатку вишиваємо стібки технікою затяган-
ка (вперед голку). Вони повинні лежати
впоперек настилу верхніх гладдєвих стібків.
Товщина робочої нитки, характер та
густина стібків повинні відповідати характеру
задуманого об'єму в окремих мотивах
орнаменту. Після настилу допоміжних,
потаємних стібків вишиваємо основні поверхневі
стібки технікою двосторонньої гладі.
Густо вишиті стібки з лицьової
сторони в місцях допоміжно-потаємного настилу
робочої нитки утворюють сферичну
поверхню окремих частин орнаменту та ілюзорно
творять ефект його природнього сприйняття.
З виворітної сторони настил стібків
ідентичний гладі двосторонній.
Технологія та техніка виконання шва
обумовлюють його назву — гладь з
настилом.
Лицьова сторона. Obverse.
4. Hlad with Nastyl (A Kind of Satin
Stitch).
The technology of execution of Hlad
with Nastyl technique somewhat reminds one
that of Both Sides Satin Stitch. The ornaments
executed in this technique render more or les
flatly 3-D elements and even the whole motifs.
The stitch is worked under the pattern
design. First, one should make a tracery on the
material. The areas, elements and motifs of
which require volume (sphere-like surface), are
first worked with stitches in Zatyahanka
technique (Running Stitch). They should lie
perpendicular to the upper Satin stitches. The
thickness of the working thread, the character and
density of the stitches must correspond the
volume desired in separate ornamental motifs.
Having laid auxiliary secret stitches, basic
stitches in Both Sides Satin Stitch technique
are worked on top.
Densely laid stitches, over auxiliary
secret ones, on the obverse side of the material
form a spherical surface of some parts of the
ornament to create an effect of illusion, for
the ornament itself to look natural.
The stitches on the reverse side of the
cloth are identical to the way they would be
worked in Both Sides Satin Stitch technique.
The technology and technique
themselves stand for the name of the stitch: Hlad
with Nastyl.
Виворіт. Reverse.
167
Українське народне вишивання
5. Одностороння
гладь (верхошов або
володимирські шви).
Характерною
особливістю такого шва
є настил стібків майже
цілковито з лицьової
сторонни. Одностороння
гладь виконується за
робочим рисунком
орнаменту. Рисунок
контурно переводимо на тло
вишивальної тканини.
Для виконання
шва закріплюємо
робочу нитку з виворітної
сторони на місці його початку. Виводимо
голку на лицьову сторону у верхньому контурі
(по центру або у правому кутку елемента) і
ведемо її вниз по прямій або по діагоналі
(залежно від характеру елемента, мотиву
орнаменту) до нижнього контуру. Вколюємо
голку, повертаємо вверх, набираємо на неї
1-1,5 мм тканини, виводимо на лицьову
сторону зліва утвореного стібка. Ведемо голку
з робочою ниткою вверх, вколюємо за 1-1,5
мм до верхнього контуру, набираємо
тканину на голку і вколюємо на верхньому
контурі зліва попереднього стібка. Таким
способом настеляємо стібки до кінця лінії шва:
від цетра до краю, якщо форми елементів
сферичні; справа наліво — якщо лінія шва
виконується по прямій. Довжина стібків
залежить від площини вишивальної тканини,
обведеної контурами. При виконанні
односторонньої гладі, стібки настеляються не
щільно, на невеликій відстані.
Настил стібків з лицьової сторонни
творить основний рисунок орнаменту, з
вивороту майже вся площина тканини не
покрита стібками, дрібненькі стібки тільки
описують контури рисунка орнаменту. Звідси
і назва шва — одностороння гладь,
верхошов.
Одностороння гладь вишивається
грубими нитками: шерстю, крученими або
в пасму (шість ниток) муліне. Такою
технікою вишивають рослинні орнаменти при
декоруванні виробів інтер'єрного та
обрядового призначення.
5. Odnostoronnya
Hlad/One-sided Satin
Stitch (Verkhoshov, Vol-
odymyr Stitches).
The characteristic
peculiarity of this stitch is
that the stitches are
worked almost entirely on
the obverse side of the
fabric.
One-sided Satin
Stitch is worked under the
pattern design. The
contours of the tracery are
made on the background
of the material
embroidered.
The work the seam, the working thread
is fastened to the reverse side of the cloth at
the starting point. The needle is brought out
onto he obverse side in the top contour (either
in the center or in the right corner of the
element) led straight or diagonally downwards
(depending on the character of the element or
ornamental motif) to the bottom contour. The
needle is inserted into the fabric, turned
upwards, picking up 1-1,5 mm of the cloth,
brought out onto the obverse side to the left of
a just worked stitch. The needle with the
working thread is led up and inserted 1-1,5 mm
before the top contour, picking up some cloth,
and is brought out onto its face in the top
contour to the left of the previous stitch. The
stitches are laid in the same manner by the end of
the seam line: from the center to the edge, if
the forms of the elements are spherical; from
right to left, if the seam line is straight. The
length of the stitches depends on the size of
the area to be embroidered, following the
contours. While working One-sided Hlad, the
stitches should not be worked densely but at a little
interval.
The stitches on the obverse side of the
material are laid so that they create the basic
ornament,while the reverse one is almost
empty: tiny stitches only repeat the contours of the
ornamental tracery. The technique itself
determines the name of the stitch: One-side
satin Stitch, Verkhoshov (top stitch).
One-sided Satin Stitch is worked with
thick threads: wool, lisle or six-threads Muline.
Floral ornaments to dftcor articles of interior
and ceremonial purpose are worked in this
technique.
168
Ukrainian Folk Embroidery
I
Лицьова сторона. Obverse.
6. Гладь біла (білизняна, випукла або
рельєфна).
Така техніка художнього вишивання
впродовж століть формувалась,
удосконалювалась у процесі декоративного оздоблення
білизни, блузок, накидок із тонких тканин,
носових хусточок тощо. Звідси і назва —
білизняна гладь. У зв'язку з тим, що
орнаменти цією технікою в основному
виконуються білим кольором, інша назва — гладь біла.
Назви випукла, рельєфна
асоціюються із виконанням на окремих елементах
орнаменту подвійного настилу стібків:
потаємних нижніх та поверхневих лицьових.
Потаємні нижні стібки настеляються
технікою затяганка (вперед голку) по
площині вишивальної тканини, обведеної
контурами, які описують форми елементів,
мотивів орнаменту. Лицьові стібки
настеляються технікою двосторонньої гладі. Контури
елементів обшивають поверхневим качал-
ковим, стебловим, тамбурним швами, стеб-
нівкою тощо. Така асиміляція технік творить
рельєфні поверхні мотивів та орнаменту в
цілому.
В наш час цією технікою художнього
вишивання декорують різні види одягу,
тому найпоширеніша її назва — гладь біла.
Виворіт. Reverse.
6. White Satin Stitch (underwear,
embossed or relief).
This technique of artistic embroidery was
developing and improving centuries long in the
process of underwear, blouses, lace pillow
covers, handkerchiefs etc. decoration. Here comes the
name of the stitch: Underwear Stitch. The
ornaments in this technique are worked mainly with
white colors, in this connection it has another
name — White Satin Stitch.
The names Embossed or Relief associate
with double stitching: some elements of the
ornament are worked first with secret bottom and
then obverse top stitches.
The secret bottom stitches are worked in
Zatyahanka technique (Running Stitch) along the
contours on the material embroidered, which
describe the shapes of the elements and
ornamental motifs. The obverse stitches are laid in
Both Sides Satin Stitch technique. The contours
of the elements are worked with Poverkhnevyi
Kachalkovyi, Steblovyi, Chain, Stabnivka
Stitches etc. Such technique assimilation creates 3-D
surfaces of the motifs and the ornament itself.
Nowadays this technique of artistic
embroidery is used to dftcor various kinds of
clothing. That's why its most widely spread name is
White Satin Stitch.
169
Українське народне вишивання
В орнаментах рельєфну гладь
поєднують з іншими техніками
прикрашальних швів: вузлики (виконуються технікою
обкрутка), дірочки, сіточки, горошинки,
тіньова гладь тощо.
Комбінативне поєднання вищенаве-
дених швів, стібки яких лягають у різні
сторони, творить рельєфні площини,
своєрідну фактуру, яка урізноманітнює
заломлення світлових променів і одноколірна біла
вишивка ілюзорно сприймається
різноманітними відтінками.
Relief Satin Stitch is combined in
ornaments with the other different fancy
stitches: Vuzlyky (twist technique), Dirochky (holes),
Sitochky (nets), Horoshynky (spotted), Nyzyn-
ka, Satin Stitch etc.
The above mentioned seams, the stitches
of which fall in different directions, combined
together create three-d surfaces, peculiar
texture, which causes various light refractions so
that one-color white embroidery illusively splits
into various tints.
і I at ' 4
/ і $Г^ ї
* *і fc&
<SJfK Mr Vi l| •
■\vw' *№ • •■/'*
*tC-\
"^^wT's&m- Win s
*#Ш^«^й^
Лицьова сторона. Obverse.
Виворіт. Reverse.
7. Старокиївська
гладь.
Технологія
виконання старокиївської
гладі подібна до гладі з
пересягами
(полтавської), але відрізняється від
неї тим, що стібки
настеляються в радіальному
напрямку.
Рисунок вишивки поділяємо
радіально на поперечні смуги. Переносимо його на
тканину. Закріплюємо нитку під стібками
майбутнього настилу. Починаємо вишивати
зліва направо. Виколюємо голку на лицьову
сторону вишивки внизу площини рисунка і
вколюємо радіально вверх в лінію контура
смуги, яку необхідно заповнити відповідним
кольором нитки. Повертаємо голку вниз,
виколюємо на декілька міліметрів нижче
справа від кінця стібка. Вколюємо голку
7. Starokyivska Hlad
(Old Kyiv Satin Stitch).
The technology of
execution of Starokyivska
Satin Stitch reminds one
that of Hlad with Pere-
syahy (Poltavian). The only
difference is that the stitches
are worked diametrically.
The pattern design
is divided into cross-sections. After that the
tracery is made on the material. The thread is
fastened under the stitches to be worked further
on. The process of embroidery starts from left
to right. The needle is brought out onto the face
of the cloth in the bottom of the tracery space
and inserted diametrically upwards into the
contour line of the stripe to be filled in with an
appropriate thread color. The needle is turned
downwards and brought out onto the obverse
side some millimeters lower to the right of the
170
Ukrainian Folk Embroidery
навскіс вліво і вниз за декілька міліметрів
до нижнього краю стібка, а виколюємо попід
стібком справа нижнього краю стібка. Стібки
настеляємо то довші, то коротші, щоб
кольорові або тональні смуги заходили одна в
одну.
Якщо вишиваємо смуги однакової
висоти, то виколюємо голку на лицьову
сторону внизу вишивки за декілька
міліметрів вище від нижнього її краю і
вколюємо вертикально вверх за декілька
міліметрів нижче верхнього краю, а
виводимо голку в лінії верхнього контуру вишивки.
Повертаємо голку вниз і вправо, вколюємо
внизу за декілька міліметрів вище від
нижнього краю вишивки, а виводимо голку в лінії
нижнього контуру. І так далі. Вишиваємо зліва
направо.
Старокиївська гладь була відома в
Київській Русі. Широко застосовувалась у
вишиванні літургійного одягу, одягу знаті
та побутових виробів. В наш час старокиїв-
ський шов не втратив свого значення і
привабливості. Він широко використовується у
вишиванні церковних речей, сценічного та
святкового одягу, аксесуарів.
Лицьова сторона. Obverse.
8. Муаровий
шов.
Муаровий
шов виконується
зліва направо.
Стібки настеляються
горизонтально,
заповнюючи площини
вишивки.
Закріплюємо
нитку і виводимо
голку на лицьову сторону зліва. Вколюємо
голку через визначену кількість ниток
справа. Повертаємо її назад, виколюємо через
stitch end. The needle is inserted into the cloth
slantwise leftwards and down, some
millimeters before the bottom edge of the stitch and
brought out onto the face from under the stitch
to the right of bottom edge of the stitch. The
stitches are worked in alternation: long and short
ones, for the color stripes to wedge into one
another.
If the stripes being embroidered are of
equal height, the needle is brought out onto
the obverse side in the bottom of the worked
piece some millimeters higher its bottom edge
and then the needle is inserted vertically up
some millimeters lower its top edge and brought
out onto the obverse side in its top contour line.
The needle is turned downwards and right and
inserted into the fabric some millimeters
higher the bottom edge of the embroidered piece.
Then, it is brought out onto the obverse side in
the bottom contour line, and so on. The
embroidery is worked from left to right.
Starokyivska Hlad was famous in Kyiv
Rus. It was widely used to embellish liturgy dress
and aristocracy's clothing as well as to dftcor
every day articles. Nowadays the stitch hasn't
lost its meaning at intricacy. It is widely used to
work church articles, modern and festive clothes
and accessories.
Виворіт. Reverse.
8. Muarovyi
Stitch (Moira Stitch).
Muarovyi Stitch is
worked from left to right.
The stitches are laid
horizontally to fill in the
spaces to be embroidered.
The thread is
fastened to the reverse side
of the cloth and the
needle is brought out onto the
obverse side to the left. Then, the needle is
inserted in to the cloth through the definite
number of threads to the right. The needle is turned
171
Українське народне вишивання
невелику кількість ниток під стібком, і так
далі. Утворюються вертикальні пересяги.
Вони мають бути на однаковому рівні,
утворюючи муар.
Муаровий шов відомий ще з часів
Київської Русі. Він використовується у
вишиваних виробах інтер'єрного та одягового
призначення.
Лицьова сторона. Obverse.
9. Обкрутка.
Робочу
нитку закріплюємо на
місці початку шва.
Виводимо голку на
лицьову сторону і,
відступивши вниз
по прямій або
діагоналі (залежно від
характеру
орнаменту) на 4-6
ниток або адекватний
відрізок тканини,
вколюємо голку,
повертаємо вверх, набираємо на неї
тканину і виколюємо на місці попереднього вико-
лу так, щоб вістря голки було добре видно.
На вістря голки круговими
завитками намотуємо робочу нитку (кількість за-
витків повинна відповідати величині
набраної на голку тканини та формі рельєфу
орнаменту). Притримуючи завитки великим
пальцем лівої руки, протягуємо крізь них
робочу нитку, різко повертаємо її вниз,
щільно притягуємо, вколюємо голку на місці
попереднього вколювання (внизу стібка, що
утворився) і виводимо для накладання
наступного стібка.
Обкруткою вишивають
найрізноманітніші мотиви в рослинних орнаментах,
широко поєднуючи із стеленими (гладдє-
вими) швами.
backwards and brought out onto the face of
the fabric through a couple of threads under
the stitch and so on. Vertical Peresyahy have
been worked. Their level must be equal,
forming а тоігй.
Moire stitch is known since the times
of Kyiv Rus. It is used to embroider articles of
clothing and interior purpose.
iiliiiii
Виворіт. Reverse.
9. Obkrutka
(Twist stitch).
The working
thread is fastened to the
reverse side of the cloth
at the starting point.
The needle is brought
out onto the obverse
side, having indented 4-
6 threads or an
adequate stripe of the
material down straight
ahead or diagonally
(depending on the
character of the ornament). The needle is inserted
into the cloth, turned upwards, picking up the
cloth and brought out onto the face of the
fabric at the starting point so that the needle point
is clearly visible.
The working thread is twisted around
the needle point (the number of curls must meet
the size of the cloth been picked up by the
needle and relief of the ornament). Holding
the curls with one's left thumb, the working
thread is drawn them through and is sharply
and tightly pulled up. Then the needle is
inserted into the cloth in the bottom of a just worked
stitch and is brought out onto the obverse side
to lay the next stitch.
Obkrutka is used to work various
motifs in floral ornaments, widely combined with
Satin Stitches.
172
Ukrainian Folk Embroidery
f\ * * ,: -Фтмштж mm
i*- ■
Лицьова сторона. Obverse.
Самостійна робота.
1. Ознайомлення із натурними
зразками орнаментів, виконаних нерахункови-
ми стеленими швами (гладєвими швами за
вільним рисунком).
2. Виконати замальовки фраг'ментів
орнаментів, вишитих нерахунковими
стеленими швами.
3. Розробити орнамент для
декорування конкретного виробу інтер'єрного
призначення.
Завдання № 8.
Практичне вишивання фраґмента
орнаменту для конкретного інтер'єрного
виробу.
Розмір: 23см X 20см.
Композиція: за власним творчим
задумом.
Техніка виконання: нерахункові
стелені шви в поєднанні з іншими швами
художнього вишивання.
Матеріали: тканина — цупка без
полотняного переплетення
Нитки — муліне;
Оправа — рамки дерев
відповідно до розміру завдання.
Питання для контролю знань.
1. Чим зумовлена назва нерахункові
стелені?
2. Який основний технологічний засіб
вигнивання нерахункових стелених швів?
3. Чи існують відповідні
закономірності в техніці настилу стібків при
вишиванні нерахункових стелених швів?
Прокоментуйте їх.
4. Прогаийте за поданим зразком
гладь з пересягами.
5. Яка довжина стібків
технологічно ефективна при вигниванні гладі
двосторонньої?
6. Походження та суть гладдєвого
гава верхогаов?
7. Які основні характеристичні
особливості орнаментів, що виконуються
нерахунковими стеленими швами?
ШшШШШшШШШ
Виворіт. Reverse.
Independent Work.
1. Introduction of visual ornamental
patterns, worked with laid stitches which do not
require counting (Satin Stitches under an
independent design).
2. Sketch the fragments of the ornaments,
worked with laid stitches which do not require
counting.
3. Design an ornament to decorate the
article of interior use.
Task # 8.
Work the fragment of the ornament for
a definite interior thing.
Size: 23 X 20 cm;
Composition: one's own idea;
Technique of execution: laid stitches
which do not require counting, combined with
the other stitches of artistic embroidery;
Materials: fabric — dense, without linen
interweaving
threads — Mouline
framing — wooden frames, which fit the
size of the task.
Final Questions.
1. Why are Laid Stitches which do not
Require Counting called so?
2. What is the basic technologic means to
work Laid Stitches which do not Require
Counting?
3. Is there any order in the technique in
which the stitches are laid, while working Laid
Stitches which do not Require Counting?
Comment on it.
4. Execute Hlad with Peresyahy under
the given pattern.
5. What is the permissible length of the
stitches in Both-sides Satin Stitch?
6. Where did Satin Stitch Verkhoshov
come from?
7. What are the most characteristic
peculiarities of the ornaments, worked with Laid
Stitches which do not Require Counting?
173
Українське народне вишивання
8. Подібність і відмінність у техніці
вишивання гладі двобічної та гладі
художньої?
9. Які особливі ознаки техніки
вишивання гладі з настилом?
10. Прокоментуйте історичні
витоки шва гладь старокиївська?
11. Що лягає в основу походження
назв нерахункових стелених швів?
8. What are the likeness and difference
in technique of embroidery of Both-sides Satin
Stitch and Artistic Satin Stitch?
9. What are the main peculiarities of
embroidery of Satin Stitch with Laying?
10. Comment on the historic facts of
Starokyivska Satin Stitch.
11. What are the grounds of the names
of Laid Stitches which do not Require
Counting?
^
43H
4g^
"4.
ї
v > ' ■ t-
h
'** Jk.
$*■'>
\\\V
v .
V wA..
V
- » «if t
■<)
.-ши&
WC~.
,4
_- '-&<+ "
"""vi*^:^» *\.x
4-
vi
**\.
174
" * I '/ f< ft I tier
Ф -
і і
і !
І l
',
'. 4,
A*
Ф. лї
Л;А
^
■*'
V
* *
•fZ. -.
ГЛ
W*
ц.<
t.*
if *>w<
.^Г^
k
•. ,!,іч
♦ «*-
>
її М.
• • * - v! f «{ .' И , 1
• »^ if («і
f -Vis
"«■ М' ТІ " **♦ *> \
фрагменти вишивок,
Виконані нсрсщ/нкоВиліи
стеленими швами
її
І І
1
"X
& ifl
*■' 'і
т
» "' !
Ні '
£!'|
,;■ v
|Н і'
' Ч Ч* і1» 1-
4* ' «І
«■і .'І ft f
^ 'її'
' ¥ її>»Г ;
. іН і
V4
*.,■
м'
г
ть
; .і
«1
» ■:
ш
•№"■
h tl **
і V
u
'Л
jii
f
•Mi
, I'
I
« r . ».
4»
"ЇЙ |<
■•!t!' і! і
, rt.' ь P
t
•I
' 4.
Ї-
■Iі
■■v/-^
V*"\ /~
• i!
J « in
•1 і ^ -
£'<< 1*
СЛ
- j!sS'\ "~
м uv*\
\дал
I j i"
♦1
'V
''«1
r
■:v-лі ;•■&
1 %} /*''•$%
,-• ***
І і
Embroidery fragments,
executed with Laid stitches,
tvhich iio not require counting
\
t
/(V-j)
4\ !'
J.k.
-\
X
•">
Яксільна сщня,
ппч. XXI cm.
1\ 'adding frocf^,
beginning of the XXI-st century
,*<
)
c
\
СОЇ. IX. (Рушникові шви
SS. IX. (Rushnyf^pvi ( (ГогоеС ) Stitches
Українське народне вишивання
1. Техніки вишивання рушникових
швів
Шазва рушникові шви
походить від їх конкретного,
багатовікового
застосування та призначення —
вишивання рослинних орнаментів на
рушниках. Це нескладні рахункові шви в специ-
фічно-комбінативному поєднанні між собою.
Рушниковими швами виконують в
основному рослинні орнаменти, що асоціюються із
зображенням «Дерева життя», «Вазона» і
найрізноманітніших квіткових композицій.
Такі орнаменти нерідко поєднують в собі
антропоморфні, зооморфні, орнітоморфні
мотиви.
Задуманий орнамент контурно
переносимо на тло вишивальної тканини.
Тканину закріплюємо в п'яльця і приступаємо до
обшивання контурів рисунка орнаменту
швом «позад голки».
Робочу нитку закріплюємо з
виворітної сторони на місці початку шва.
Виводимо голку на лицьову сторону на контурі
елемента орнаменту і повертаємо лінію
обвідки так, щоб шов можна було вести
зверху вниз. Від місця виколу пропускаємо 2-3
мм тканини, вколюємо голку, повертаємо
вверх, набираємо пропущену тканину на
голку та виколюємо її на місці першого
виколу. Ведемо голку з робочою ниткою вниз,
знову вколюємо по контуру рисунка через
такий самий відрізок тканини. Повертаємо
голку вверх, набираємо на неї пропущену
тканину і виколюємо в нижньому ріжку
верхнього стібка. Таким способом настеляємо
стібки по контуру рисунка орнаменту. При
цьому слідкуємо, щоб робоча нитка
постійно йшла справа голки.
Для обведення контурів рисунка
орнаменту крім шва «позад голки» нерідко
використовують густий стелений, тамбурний
шви, стебнівку тощо.
Обведені площини елементів, мотивів
орнаменту, відповідно їх характеристичних
особливостей, заповнюють різноманітними
рушниковими швами.
Натурні зразки стверджують, що
існує понад п'ятдесят видів рушникових
швів. Це композиційні формотворення та
комбінативні поєднання технік художнього
вишивання: лиштва качалкова, кривульки,
лиштва проста, гладь пряма тіньова,
хрестик звичайний, гладь коса, штапівка
двостороння, занизування тощо.
1. Techniques of Embroidery of Towel
Stitches.
The name Rushnykovi Stitches comes
from their specific use and purpose many
centuries ago with embroidery of floral ornaments.
These are not complicated stitches, which don't
require counting, in special mutual
combination. Mainly floral ornaments associated with
images of: «A Life Tree», «A Flower-pot» and
various flower compositions are worked in Rush-
nykovyi Stitches. Such ornaments often
combine anthropomorphic, ornithomorphic and zoo-
morphic motifs.
The contours of an ornament are drawn
on the background of the material to be
embroidered. The fabric is fastened by the
tambour and so one can start working the contours
of the tracery in Pozad Holky (Backstitch)
technique.
The working thread is fastened to the
reverse side of the material at the staring point
The needle is brought out onto the obverse side
in the contours of the ornamental element. The
line to be worked should be turned so that the
seam is led from the top to the bottom. From
that place 2-3 millimeters of cloth are
indented, the needle is inserted into the cloth, turned
upwards, picking up the missed cloth by the
needle and is brought out onto the obverse
side at the starting point. The needle with the
working thread makes journey downwards and
is inserted into the contour on cloth again at
the same interval of the material. The needle is
turned upwards, picking up the missed cloth
and is brought out onto the obverse side in the
bottom corner of the top stitch. Thus, the
stitches are worked in the same way following the
tracery contours. One should see to the working
thread to always be to the right of the needle.
To work the contours of the pattern
design, often the other stitches are used, apart
from the Backstitch, such as: Hustyi Stelenyi,
Chain-stitch, Stebnivka etc.
The samples testify to the fact that there
exist more than 50 kinds of Towel Stitches.
These are compositional forming and
combinative unity of techniques of artistic embroidery:
Lyshtva Kachalkova, Kryvulky, Lyshtva Pros-
ta, Hlad Pryama Tinyova, Simple Cross,
Slanting Satin Stitch, Shtapivka Dvostoronnya and
Zanyzuvannya etc.
180
Ukrainian Folk Embroidery
1. Рушниковий густий шов.
Rushnykovyi Hustyi Stitch (Towel
Thick Stitch)
2. Штапівка двостороння.
Shtapivka Dvostoronnya (Both Sides
Shtapivka).
181
Українське народне вигиивання
3. Качалочки.
Kachalochky.
4. Кутики.
Kutyky (Angles).
5. Хрестики.
Crosses.
6. Просо.
Proso (Millet).
-і ,^Г ^^^^^^Шш
... .U-1 :..
14-і :■- i-.fJ;i.. ';■ ..
і
і ..-
і. і. і :
182
Ukrainian Folk Embroidery
7. Кривульки.
Kryvulky (Curves ).
8. Шахматка.
Shakhmatka (Chess Order).
Т7ТГ
і ; т t
Самостійна робота.
1. Вивчення характерних
особливостей орнаментів, вишитих рушниковими
швами.
2. Збір орнаментів рушникових швів,
композиційних мотивів за Іх назвами.
3. Підготувати робочий рисунок
орнаменту для практичного вишивання
рушниковими швами.
Independent Work.
1. Study of the characteristic peculiarities
of the ornaments, worked with Towel Stitches.
2. Collection of the ornaments of Towel
Stitches and compositional motifs, according to
their names.
3. Make a pattern design to be executed
with Towel stitches.
Завдання № 9.
Практичне вишивання фраґмента
орнаменту.
Розмір: 12см X 10см.
Композиція: за власним вибором.
Техніка виконання: рушникові шви.
Матеріали: тканина — лляна,
полотняна, цупкого ткання без полотняного
перетину
Нитка — муліне;
Оправа — рамки дерев'яні,
відповідно до розміру завдання.
Питання для контролю знань.
1. Який зміст акумулює в собі назва
рушник?
Task # 9.
Execution of the ornamental fragment.
Size: 12 X 10 cm
Composition: one's own idea
Technique of execution: Towel Stitches;
Materials: fabric-linen, of dense weaving
but without linen interweaving
threads — Mouline
framing — wooden frames, which fit the
size of the task.
Final Questions.
1. What is the idea of the name «towel»
(Rushnyk)?
183
Українське народне вишивання
2. Ваше розуміння походження
слова рушник?
3. Форма, призначення рушника в
житті українського народу.
4. Проаналізуйте специфіку
орнаментального оздоблення рушників, локальні
особливості.
5. Вкажіть на характерні
особливості орнаментів, вишитих рушниковими
швами.
6. Якою є генеалогія назви
рушникові шви?
7. Що являють собою рушникові шви
в техніко-технологічному понятті?
8. Переведіть фраґмент орнаменту
на тканину.
9. Прокоментуйте послідовність
технології та техніки вишивання
орнаментів рушниковими швами.
10. Зобразіть графічно найбільш,
відомі вам композиційні формотворення
рушникових швів.
2. Where did the word «towel» come
from? (In your own opinion).
3. What are the form and use of a towel
in the life of Ukrainian people?
4. Analyze specifics of the towel
decoration and local peculiarities.
5. Show characteristic peculiarities of the
ornaments, worked with Towel Stitches.
6. What is the genealogy of the name
Towel Stitches?
7. What are technical and technologic
aspects of Towel Stitches?
8. Transfer the ornamental fragment on
the material.
9. Comment on the succession of
technology and technique of execution of the
ornaments with Towel Stitches.
10. Sketch the compositional forming of
Towel Stitches, which you know best of all.
184
І
о 0
у-~
О
о
0
О
т
**
о
о
о
о
/ » і* J' $ і її
$ t §
$ § f '+ ft
•*•!■/ §
*
*.
♦ •і
І
І І ІН
f ral
5* ».»
ч
3%#k#%
Сії. X (Вишивання, силяння та тка ня
пацьорками
SS. X 'Beads "Embroidery, Threading
and "Weaznng
Українське народне вишивання
і—і; і- і і- :
■"*ІІ'
і/.
0
і і 1. і ч !,1г-
1. Вишивання пацьорками.
Пацьорками вишивають за
підготовленим робочим рисунком орнаменту.
Найбільш поширеними є дві техніки
вишивання пацьорками: рахункова і в
прикріп.
1. Beads Embroidery.
То embroider with beads one should get
the ornamental pattern ready before hand.
The most widely spread are two
techniques of beads embroidery: the one which
requires counting and u prykrip (fastening).
1) Рахункова техніка вишивання
пацьорками.
Основним технологічним прийомом
рахункової техніки вишивання пацьорками
є настил стібків півхрестика по діагоналі
(колодки - І, гобеленовий шов) та по прямій
через відповідну кількість ниток піткання.
Для виконання шва робочу нитку
закріплюємо з вивороту тканини. Виводимо голку
на лицьову сторону, набираємо на неї
кількість пацьорок відповідно до рисунка
орнаменту (в основному одна пацьорка
відповідає одній нитці на полотні) та вколюємо її
по діагоналі вліво і вниз через дві нитки
основи і дві нитки піткання, повертаємо вверх,
набираємо на неї дві нитки піткання.
Виводимо голку на лицьову сторону, щільно
притягуючи робочу нитку вверх. Набираємо на
голку пацьорки і таким же способом
виконуємо наступні стібки кількістю та лініями
відповідно до рисунка орнаменту.
Кольорове рішення реалізовуємо методом набору на
голку пацьорок по кольору відповідно
колористичних плям, ліній орнаменту. З
лицьової сторони орнаментальні мотиви на
тканині повністю вистелені пацьорками, з
виворітної — робоча нитка утворює прямі
вертикальні лінії, подібні до шва стебнівка.
Рахунковий шов пацьорками можна
a) The Technique of Beads Embroidery
which Requires Counting.
The basic technologic means of beads
embroidery which requires counting is a
diagonal and straight, through a definite number of
horizontal threads, way half cross stitches fall
(Kolodky-I, Goblin Stitch). To work the stitch,
the working thread is fastened to the reverse
side of the cloth. The needle is brought out
onto the obverse side, picking up the number
of beads required by the ornament (basically
one bead is up to one thread on the cloth) and
inserted diagonally rightwards and down
through two ground and horizontal threads. The
needle is brought out onto the obverse side of
the material, at the same time tightly pulling
the working thread upwards. The beads are
picked up by the needle every time, and the
following stitches are worked in the same
manner. The number of the stitches themselves and
made up by them lines meets the tracery of
the ornament. To realize the color-scheme,one
should pick up by the needle beads, the color
of which corresponds to that of the color spots
and ornamental lines.
The ornamental motifs on the obverse
side of the material are entirely covered with
beads. The reverse side represents straight,
vertical lines, created by the working thread, which
remind one of Stebnivka Stitch.
188
Ukrainian Folk Embroidery
виконувати і прямим півхрестиком. При
цьому лицьовий стібок настеляємо по прямій
через дві нитки піткання, а закріплюємо
його по діагоналі справа наліво і вверх
через одну нитку основи і дві нитки піткання.
2) Вишивання пацьорками у прикріп.
Шитво пацьорками у прикріп
виконується за робочим рисунком орнаменту.
Рисунок контурно переносимо на
вишивальну тканину. Робочу нитку
закріплюємо з виворітної сторони на місці початку шва.
Виводимо голку на лицьову сторону,
набираємо на неї необхідну кількість пацьорок.
Викладаємо нитку з пацьорками за лініями
орнаменту і за допомогою другої голки з
робочою ниткою акуратно прикріплюємо її
на контурах орнаменту.
3) Вишивання склярусом,
намистинками, лелітками, металічними пластинками.
Найрізноманітніші вироби, особливо
одягового призначення, декорують
орнаментами, вишитими склярусом, намистинками,
лелітками, металічними пластинками.
Такі орнаменти вишивають за
робочим рисунком. Склярус, намистинки,
лелітки, металічні пластинки нашивають на
тканину різними видами швів: вперед голку,
позад голки, півхрестик, у прикріп тощо.
The beads embroidery stitch, which
requires counting, can be worked in straight Half-
cross. Thus, the obverse stitch is laid straight
through two horizontal threads and is fastened
diagonally from right to left and up through
one ground thread and two horizontal ones.
b) Beads Embroidery Uprykrip (fastening).
Beads embroidery Uprykrip is worked
under the pattern design.
The contours of the tracery are made
on the material to be embroidered. The working
thread is fastened to the reverse side at the
starting point.. The needle is brought out onto the
obverse side, picking up the required number
of beads. The thread with beads is laid,
following the ornamental lines,and is neatly fastened
to the contours of the ornament with the help
of another needle with the working thread.
c) Bugles, Beads, Glitter-beads, Metal Plates
Embroidery.
The most various articles, especially
those of clothing, are decorated with
ornaments, embroidered with bugles, beads,
glitter-beads and metal plates.
Such ornaments are worked under the
pattern design. Bugles, beads, glitter-beads,
metal plates are sewn to the material in
different kinds of stitches: Running Stitch,
Backstitch, Half-Cross, Uprykrip etc.
Лицьова сторона. Obverse.
і::''!!^!ї'?'і1][;і-*\уі.:;.:.
: ::її'ЇИНім'ітіиїі»і*!*,*;Ц.;- ■;,
. . -Ія<;;і:.':::»»я;>;*і«и;:яа'«;т«ї«і*<«""!»'?!»?'!?""-:• •:;:
;;"^:.іі«пЛііііііі«іііиіі»іііііі|іііііи»!«и'».і?.і»!,,.,!,!',і;::;
г.:кї:"«і,і<і>"";*"г'«';,!">'<і:;к::""!,!,":""',-*"!!!!:":
:™i'iirtmhi<i№hihm«iH>S::t:mMnn!«q»>'»»!»"-
,: »<nthit«4intiii!t№**m>
W''<*t«»«''»ti«''«!t>»::i:
■^ДЧЇїігатеякїСкіЗі;
Виворіт. Reverse.
2. Силяння пацьорками.
Найбільш поширені технології
силяння пацьорками:
а) силяння в одну нитку або з однією
голкою;
б) силяння у дві нитки — ниткою з
голками на кожному кінці.
2. Beads Threading.
The most widely spread technologies of
beads threading are
a) one string threading, or with one
needle
b) two strings threading — each one has
got a needle at its end
189
Українське народне вишивання
7Г
—К>
( < 2 * * 4
Способи (техніки) силяння
пацьорками.
1. Плетення.
Технікою плетення виконують вузькі
на 4-6-8 ниток і широкі до 25 ниток
візерунки. Для цього на кожну нитку за
допомогою голки набираємо по рахунку
пацьорки за кількістю і кольором відповідно до
рисунка орнаменту. Після цього виконуємо
зв'язку: нитки переплітаємо між собою під
прямим або гострим кутом, з'єднуючи їх
перехрест пацьоркою.
Плетенням можна виконувати най-
Tehniques of Beads Threading.
1) Plaiting.
Plaiting technique is used to work
narrow (4-6-8 threads ) and broad (up to 25 threads)
designs. For that, the required by the
ornamental design and color-scheme number of
beads is counted off and picked up by the
needle to be thread further on. After this, the so
called binding is made: the threads are
interlaced with one another either at straight or acute
angles, being joined together by a bead at the
intersection point. The most various open-work
190
Ukrainian Folk Embroidery
різноманітніші ажурні композиції.
наскрізною сіткою.
На голку з робочою ниткою
набираємо пацьорки за кількістю і кольором,
відповідно до рисунка орнаменту довжиною по
ширині прикраси. Повертаємо голку в
протилежну сторону та набираємо на неї таку
кількість пацьорок, яка б відповідала
конкретно наступній лінії (штриху)
орнаментального мотиву. Виконуємо зв'язку до
пацьорки першого ряду і таким же способом
виконуємо наступні стібки.
Ця техніка нагадує в'язання гачком.
Таким способом можна силяти косу сітку
«ромб», «ліхтарик», «соти» і пряму клітку
— «решітка» тощо.
в стовпчик.
Пацьорки нанизуємо на декілька
ниток 4-6-8 знизу вверх, з'єднуючи їх між
собою зв'язкою у формі круглого, крученого
або квадратного шнура.
в хрестик.
Техніка силяння в хрестик полягає в
плетінні густої сітки хрестоподібним
розміщенням пацьорок. Це прадавня і найбільш
поширена техніка силяння пацьорками.
5. Мозаїка.
Така техніка ґрунтується на силянні
пацьорок в шахматному порядку (через
одну). Технікою мозаїка можна виконувати
найрізноманітніші плоскі і круглі прикраси.
compositions can be executed in plaiting
technique.
2) Through Net Threading.
The required by the ornamental design
and color-scheme number of beads is picked
up by the needle with the working thread. The
length equals the width of an adornment. The
needle is turned in the opposite direction and
the number of beads, up to the very next line
of the ornamental motif is picked up by the
needle. The binding is made to the bead of the
first row and the following stitches are worked
in such a way. The technique reminds one that
of hook knitting. The slanting net «rhombus»,
«lantern», «honey-comb» and straight check
work «grating» etc. can be thread in the same
manner.
3) Threading in a Column.
The beads are thread onto several strings
4-6-8 from the bottom to the top, joining them
together with the binding in a form of a round,
lisle or square cord.
4) Threading in a Cross Manner.
The technique of threading in a cross
manner means plaiting a thick netting made up
from beads fallen in a cross-like form. This is an
ancient and the most widely spread technique
of beads threading.
5) Mosaic.
This technique is based on beads
threading in a chess order (in alternation). The most
various flat and round adornments can be
worked in mosaic technique.
3. Ткання
пацьорками.
Виготовлення
прикрас із пацьорок
технікою ткання відоме
в Україні з прадавніх
часів, воно існує до
наших днів.
Для ткання
пацьорками слугують
спеціальні станочки
довжиною 50-60 см.
Відсутність станочка
може замінити
дощечка дерев'яна або з
фанери, ідентична за
довжиною і шириною ста-
ночкові.
Ткання пацьорками виконується
технічними прийомами в такій послідовності:
- підготувати робочий рисунок
прикраси, визначивши її форму, величину, орнамент;
3. Beads
Weaving.
Making of
beads adornments in the
technique of weaving
has been known
throughout Ukraine since
the times immemorial. It
exists nowadays too.
To weave with
beads one should use
special looms 50-60 cm
long. They can be
substituted by either
wooden or plywood boards
the same length and
width of the loom.
Weaving with beads is
executed in the following technical ways:
- get ready the pattern design of an
adornment, having determined its shape, size
and ornament
191
Українське народне вишивання
- на станочок натягнути нитки
основи (за допомогою цвяшків або кругового
намотування, зав'язавши кінці посередині ста-
ночка знизу). Кількість ниток основи
повинна відповідати ширині прикраси;
- в голку заправити робочу нитку,
вона буде виконувати функцію піткання;
- робочу нитку закріпити до
крайньої лівої нитки основи;
- набрати на голку пацьорки за
колористикою та кількістю відповідно до
рисунка орнаменту. Пацьорок завжди
повинно бути на одну менше від кількості ниток
основи;
- набрані пацьорки підкласти зліва
направо попід нитки основи і вказівним
пальцем лівої руки розмістити їх так, щоб
кожна була між двома нитками основи, а
отвори пацьорок добре проглядалися справа
наліво поверх ниток основи;
- голку з робочою ниткою вивести
наверх і справа наліво провести через отвори
пацьорок;
- виконати замочок круговим
обведенням робочої нитки довкола крайньої лівої
нитки основи;
- робочу нитку щільно притягнути
вліво, знову набрати на голку пацьорки і
таким же способом ткати (настеляти)
наступні ряди відповідно колористики
орнаменту та довжини прикраси.
Завдання №11.
Практичне виготовлення аксесуарів,
вишитих, силяних або тканих пацьорками.
Комплект: косметичка, силянка,
браслет;
- draw the ground threads on the loom
(with the help of the nails or round winding
the ends should be knotted in the middle of
the loom from under the side). The number of
ground threads equals the width of the
adornment
- thread a needle; this thread will work
horizontally
- fasten the working thread to the
last left ground thread
- pick up the beads by the needle (their
color and number should coincide with that on
the pattern design). There should always be one
bead less than the number of ground threads
- the picked up beads should be arranged
from left to right under the ground threads -with
the help of one's forefinger so, that each one
would occur between two ground threads -with
its hole clearly visible form right to left over
the ground threads
- bring out the needle with the working
thread on the top and draw them from right to
left through the beads holes
- fix the working thread round the last
left ground one
- pull up the working thread tightly
leftwards, pick up the beads by the needle again
and weave the following rows in the same
manner, according to the color-scheme and length
of the adornment.
Task # 11.
Execution of accessories, embroidered,
threaded or weaved with beads.
A set: cosmetic set, bead necklace, bracelet;
Size: according to its use
Y-
192
Ukrainian Folk Embroidery
розмір: відповідно призначення;
форма, орнамент:за власним
творчим задумом.
Матеріали: пацьорки різного
розміру, склярус, намистинки,
тканина — крепсатин, репс, твіст,
оксамит тощо;
нитки — цупкі шовкові, капронові,
синтетичні;
Питання для контролю знань.
1. Історичні витоки появи і
розвитку вишивання, силяння пацьорками в
Україні.
2. Чи існують національні
особливості цього виду вишивального мистецтва?
3. Назвіть етнічно-локальні
осередки в Україні вишивання, силяння і ткання
пацьорками.
4. Пацьорки, склярус, бусини. їх
технологічні та формотворчі особливості?
5. Перелічіть необхідні
інструменти, обладнання для вишивання, ткання,
силяння пацьорками.
6. Вишийте пацьорками фрагмент
орнаменту за поданим зразком.
7. Які основні техніки вишивання
пацьорками ви знаєте?
8. Перелічіть відомі вам способи
(техніки) силяння пацьорками.
9. На підготовленому до роботи ста-
ночку продемонструйте техніку ткання
пацьорками за поданим зразком.
10. Прокоментуйте Ваше
розуміння поняття комплект.
11. Дайте визначення поняття
комплект.
Form, ornament: one's own creative idea;
Materials: beads of different size, bugles
materials — crepe sateen, reps, twist,
velvet, etc
threads — firm silk; kapron; synthetic.
Final Questions.
1. Historical grounds of how beads
embroidery and threading appeared and developed
in Ukraine.
2. Are there any peculiarities of this kind
of embroidery art of national character?
3. Name ethnic local areas in Ukraine
where they embroider, thread and weave with
beads.
4. Beads, bugles...What are technologic
peculiarities of their shapes?
5. Innumerate all necessary tools;
embroidery, weaving and beads threading
appurtenances.
6. Work with beads the ornamental
fragment under the given sample.
7. What main techniques of bead
embroidery do you know?
8. Innumerate (ways) techniques of beads
threading you know.
9. Demonstrate technique of beads
weaving under the given sample on the loom,
prepared beforehand.
10. Comment on the way you understand
the term «set».
11. Give the definition of the term «set».
193
*
Ч1\".
ligg
і :•
І !
t ,,,
А У
Л
V-
!!
Г»
*>
І.
1>
7Г^ *w
* /
A»
! *, . !.
lit*
•j
r:
* 1
І >
а і
II**
l
( ':!) .
її * і •
I?
«I,, Ї
I I
I ' I
f
\*
- J1
/
/
*
«•4
4**-%t
ai
&
ft
S\
шм
Qr
І
І
\
^
V
г., *
і т
»..
• г
ч
ч - *
Яксесуаридо одягу,
кін. XX - поч. XXI cm.
Clothes accessories,
end of the XX-th- beginning
of the XXI-st centuries
ї:К
**
s Г «.
'&
^
и- "L *: •■,*
і І" ч
Іг* х і
vi
<*,' ^
о»#• - » ►■> і
І І л
CJL XL Яплікація
55- XL Я-р-рСщиг-zvorf^
Українське народне вишивання
JT у
1. Виконання аплікації.
Назва аплікація своїм походженням,
очевидно, сягає в коріння латинських слів:
applicata — прикладати, прилегла,
суміжна;
applicatio — прикладання.
Аплікація — це орнамент або
художнє зображення, що виконуються
накладанням (нашиванням) на папір, тканину,
шкіру різноманітних, різноколірних
шматочків паперу, тканини, шкіри.
Аплікація набула широкого
застосування в декоруванні одягових, інтер'єрних,
обрядових, сакральних виробів.
Для виконання аплікації необхідно
здійснити розумово-фаховий, технологічний
процес в такій послідовності:
- осмислити творчий задум на основі
відповідних базових форм, власних
спостережень тощо;
- творчий задум матеріалізувати в
рисунку відповідними художніми засобами;
- виконати узагальнений рисунок в
колориті цільними локальними плямами, не
порушуючи основних композиційних форм;
- узагальнений рисунок контурно
перевести на кальку;
- підібрати і підготувати тканину для
фону аплікації;
- перевести рисунок із кальки на тка-
нину-фон з виворітної сторони;
- зап'ялити тканину-фон у п'яльця з
виворітної сторони і прометати контури
рисунка рідким швом вперед голку (затяган-
ка) тонесенькою ниткою контрастного
кольору до фону так, щоб контури рисунка було
добре видно з лицьової сторони;
- підібрати шматочки тканин за ко-
1. Technology and Technique of
Applique Execution.
The name Applique work, evidently,
came from one-rooted Latin words:
applicata — to fit, to adjust; adjacent.
applicatio — fitting.
Applique work is an ornament or an
artistic image, executed by laying (sewing)
various multicolored pieces of paper, cloth,
leather on the paper, cloth or leather.
Applique work became widely used in
decoration of articles of clothing, interior and
sacred things.
To execute Applique work one should
realize professional technologic process in the
following way:
- make up a creative idea, using
accordingly basic forms or one's own observations etc
- make a picture of your creative idea
with the help of appropriate artistic means
- make a general color tracery in the
whole local spots, not to break basic
compositional forms
- select and get prepared the material
to serve as the background for the appliquft
work
- transfer the picture from the tracing-
paper onto the obverse side of the fabric,
serving as the background
- tambour the material, its reverse side
to the top, and overstitch the contours of the
tracery with a thin Running stitch (Zatyahan-
ka). The thread being used should be fine and
of a color contrast to the background, so that
the contours of the tracery are clearly visible
on the obverse side of the cloth
- select the pieces of the materials, the
color and texture of which would correspond
200
Ukrainian Folk Embroidery
льором і фактурою відповідно творчого
рисунка та тканини-фону;
- підібраним шматочкам тканин
надати форми відповідно декоративних плям
творчого рисунка, але з деяким запасом
(величиною 0,5 см );
- настелити шматочки тканини за
контурами кольорових плям рисунка і
приметати їх рідким швом вперед голку (затя-
ганка) в такий спосіб, щоб кінці суміжних
шматочків були вільними;
- зап'ялити тканину в п'яльця з
виворітної сторони і прошити контури
рисунка густим швом (стебнівкою),
прострочуючи шматочки тканини з лицьової сторони;
- вийняти тканину з п'ялець і
обрізати кінчики шматочків тканини з лицьової
сторони, підганяючи суміжні кінці
шматочків по формі рисунка (виконувати це
необхідно особливо уважно, щоб не порушити
форми деталей рисунка і не здеформувати
його в цілому);
- зап'ялити тканину в п'яльця з
лицьової сторони;
- обшити вистрочені контури
густими швами: качалочка, гладь стеблова, стеб-
нівка, тамбур тощо. Нитки для цього
підібрати відповідно кольору шматочків тканин,
фопу та колористики композиції в цілому;
- для художньої завершеності твору,
повного розкриття його змісту додатково
можна використовувати найрізноманітніші
шви художнього вишивання;
- після закінчення художнього
оздоблення тканину заправляємо в п'яльця з
виворітного боку і обшиваємо контури
рисунка рідким стеленим швом, не виколюючи
голку на лицьову сторону, шов
прокладається тільки по тканині-фону для проглядання
силуету рисунка та естетичного вигляду
виробу з виворітної сторони;
- остаточно викінчений художній твір
чи виріб оформляють відповідно його
призначення.
to the creative picture and material,
functioning as the background
- model the pieces of the materials been
selected before according to the decorative spots
of the creative picture, but with some margins
(0.5 cm)
- lay the pieces of the materials,
following the contours of the color spots on the
picture and tack them to the background with
a thin Running stitch (Zatyahanka), so that the
edges of the adjoining pieces are loose
- tambour the material, its reverse side
to the top, and sew the contours of the tracery
with a thick Stebnivka Stitch, holding the pieces
of the materials on the obverse side
- take the material, serving as the
background, out of the tambour and trim the
edges of the pieces of the materials on the
obverse side, repeating the shapes on the picture
(do it carefully, for not to break the shapes of
the details and not to deform the picture itself)
- tambour the material, its obverse side
to the top
- overstitch the contours been sewn with
thick stitches: Kachalochka, Hlad Steblova,
Stebnivka, Chain-stitch etc. The colors of the
threads selected should correspond to those of
the pieces of the materials, background and
the whole color-scheme of the composition
- to make the article artistically finished
and to reveal its idea one can additionally use
the most various stitches of artistic
embroidery;
- having finished the final decoration,
tambour the material again, its reverse side to
the top, and overstitch the contours of the
tracery with a thin Stelenyi (kind of a Satin Stitch)
stitch. Never bring the needle out onto the
obverse side. The stitches are worked only on
the material, serving as the background, to
trace the silhouette of the picture and to make
the reverse side of the article look
aesthetically beautiful
- the already made artistic article should
be finally designed, according to its use.
201
Українське народне вишивання
Самостійна робота.
1. Тренувальні практичні вправи з
технологїі виконання аплікації.
2. Виконати фраґмент орнаменту
аплікацією з чітким дотриманням вимог
технології, техніки виконання. Для
цілісного завершення композиції фраґментарно
використати шви художнього вигнивання.
Контрольна робота.
Виконання портрету з
використанням аплікації як основного технічного
прийому.
Розмір: 40см X 38см
Композиція: за власним творчим
задумом
Матеріали: калька, цупка тканина,
клаптики кольорових тканин;
Нитки — муліне шовк, інші
Оправа — рамки дерев'
відповідно до розміру завдання.
Питання для контролю знань.
1. Прокоментуйте походження
назви аплікація.
2. Який зміст поняття аплікація?
3. Чи застосовується аплікація в
декоруванні виробів?
4. Яку розумово-фахову діяльність
необхідно здійснити, щоб приступити до
виконання аплікації?
5. Які характерні особливості
рисунка творчого задуму для матеріалізації
його засобами аплікації?
6. Прокоментуйте наступність
технологічних операцій при виконанні
аплікації.
7. Які шви художнього вишивання
найбільше використовуються в техніці
аплікації?
8. За поданими натурними
зразками виробів визначіть, які із них декоровані
аплікацією?
Independent Work.
1. Training exercises on technology of
Applique-work execution.
2. Execute the ornamental fragment in
Applique technique, strictly following demands
of technology and execution technique. To
complete the whole composition, use stitches of
artistic embroidery as needed.
Test.
Execution of the portrait, using
Applique-work as the main technical means.
Size: 40 X 38cm
Composition: one's own creative idea;
Materials: tracing-paper, dense cloth,
patches of color materials
threads — Mouline, silk, etc
Framing: wooden frames, which fit the
size of the work.
Final Questions.
1. Comment on the grounds of the name
«Applique-work».
2. What does the term «Applique-work»
mean?
3. Is Applique-work used to decorate
articles?
4. What skills one should acquire to be
able to execute appliquu-work?
5. What are characteristic peculiarities
of the pattern design to be worked in Applique
technique further on?
6. Comment on the sequence of
technologic operations while executing Applique-work.
7. What stitches of artistic embroidery
are most widely used in Applique-work
technique?
8. Identify articles, which were
decorated with Applique-work, under the given
samples.
202
"^
\
^
4
%
v
4
4.
\
V.
t
\
*+v*
^"-'
J ^ I
V
1 •*■
*.
.'111.'
4
•ft
Шм,Ф
ті і * і
З'Ф -? ' J1 ,;Д я-». ■ «чиї ш ■-f • 'і ' ^ШїЧШ ' і ,J -
'•'.: ■' Ч 'ЛІ!! ■' *W. '' '■'.. ч
«*, Ч;*.. ; /лі
§?
ііЙійш ,г; ■■ *•
>ч
:3г
П'.
" і 1.
1-М '
Л і
W-
■ tv
І№
V^f
,fef.1'-'.'
1'
її її *
і. -ад (■■■-«
«IS*!1'ЇЇМГ.Ї*-'
Ж!
Ді і
■Й/і»' Ші^'і-йНмгдаштаи-.
J. tUIJ і II *' t ІїГїі.; *" ї fill А І' 1» іЗ--ЇиЛ7 н ЬлЯїї вїЛІї*
f w І ■ ' -'і 1 11 ІІІІШЯк-'
ін>№Ні! «L 'ІІЗ.&Д it. rffitfei-1; &ЗД*Іч--*$:Г-«йі1 №№M№
« ? # # «■ . # «# * # * *
(І
* -1 * * *
1 ,:' '.їжі?„a;vy ч ' tt^ *
«d«u-*-j^* nfJWn J~£ji wjIjhhw ^nt fnftfc foatf—.у й щ^ігі^.іаь.ійзі.
^ддвайодад
,f.. 1,1.0! t
V/'V,':'/'/! --'^ «'•' '"
•1 ''■'.* ■ ■
4; "<,
V i/';'
'1'vk
» 1
•і 1
і
га„д .т-іЬч/
^
{
I'll
•1
1 -Kvo
11"' IIIII " III
-.-_ --£_-£-*_-
\
*>
i-
v-
f'
'П,
•«.. -'.1
'' 'a^rTt. ^ m'
.*
. to
ifl'N Hi , ' I',
1 '>lt\
V "і"
V»
I
iJtf*
&Г
V."
t- • • r >
'" її і
. 1 •
ЇМ
^
M 11
\ Ж I' ' '
f*
%
V
V-J
/»
N
A
■
СЛ. XIL Таптуванш
55. XIL !Haptuvannya (embroidery with
gold or silver threads)
/ " "
Українське народне вишивання
Шаптування (золотошвейниц-
тво) — це вишивання
металевою золотою або срібною
ниткою.
Гаптування виникло на основі
простої народної вишивки у зв'язку з появою
панівних верств суспільства і їх побутом —
природнім потягом до розкоші, а також до
потреб церкви — прикрашати дорогими
тканинами інтер'єр храмів (скатертини,
покривала, плащаниці, рушники) та вишукано
оздоблювати літургійне вбрання.
Особливого розвитку золотошвейництво набуло в час
Гетьманщини як в оздобленні вжиткових
речей для інтер'єру, так жіночого та
чоловічого, а насамперед, вбрання козацької
старшини.
Матеріалами для виконання
гаптування є міцні, щільні тканини: шовк, оксамит,
парча, сукно, шкіра та нитки: сухозлітка,
прядене золото і срібло, скані металізовані
нитки, а також шовк різної товщини.
Сухозліткою називають волочене
золото — металева нитка у вигляді тонкої
стрічки (срібної або срібно-золоченої).
Прядене золото, або срібло — тонка
золота (срібна або срібно-золочена) стрічка,
обвита навколо шовкової або лляної нитки,
що створює враження суцільної металевої
нитки.
Сканим золотом або сріблом
називається блискуча металева нитка з
кольоровою шовковою ниткою.
У гаптуванні для прикріплення
золотої або срібної нитки використовується
кручений і некручений шовк різної товщини.
Техніки вишивання золотом або
сріблом вимагають використання
відповідних ниток. Малоеластичною сухозліткою
вишивається декор технікою «в прикріп».
Гнучкими еластичними сканими нитками
виконується техніка «у прокол». Пряденим
золотом або сріблом шиють технікою «по
настилу», «по карті», «по мотузці».
При вишиванні золотом і сріблом
необхідно користуватися спеціальними
інструментами і приладами.
Найважливішим предметом для
гаптування є міцні і щільні п'яльця для зап'я-
лювання робочої тканини або рамка, якщо
необхідно вишивати декор більших розмірів.
Тканина, на якій слід виконувати
гаптування, накладається на внутрішнє
кільце п'ялець так, щоб композиція стала в
центрі кільця. Потім верхній обручик
накладається поверх нижнього так, щоб ткани-
Haptuvannya means embroidery with
metal gold or silver threads.
It appeared on the grounds of common
folk embroidery, as there was established the
upper strata with their mode of life, evidently
drawn towards luxury. It "was also used for the
needs of the church- to decorate the interiors
of the temples with expensive cloths
(tablecloths, shawls, shroud of Christ and towels etc.)
and to adorn liturgy decoration. Haptuvannya
was extremely developed during Hetmanshchy-
na time. Things of every day use in interior,
woman and man's clothes and, in the first rate,
dress of a Kozak foreman -were decorated in
this technique.
Dense fabrics, such as: silk, velvet,
brocade, broadcloth, leather and threads, such as
Sukhozlitka (gilt-band), woven gold or silver,
«Skan» metal-threads and silk of various length
served as materials to -work Haptuvannya
technique.
Sukhozlitka means drawn gold, that
is metal thread, -which looks like a thin
gold string (silver or both silver and gold).
Spun gold or silver are a thin gold
(silver or both silver and gold) band, twisted round
silk or linen threads, -which creates an illusion
of the entire metal thread.
Bright metal thread, twisted with color
silk one, is called «Skan» gold or silver.
To fasten gold or silver threads they use
either lisle or not twisted silk of different
thickness in Haptuvannya technique.
Techniques of embroidery with gold or
silver demand one use of suitable threads. Not
very elastic «Sukhozlitka» is used to work dftcor
in «U Prykrip»techniques. Flexible elastic «Skan»
threads are used to embroider «U Prokol»
techniques. Spun gold or silver are used to -work
«Po Nastylu», «Po Karti» and «Po Motuztsi»
techniques.
While working with gold or silver, one
should use special instruments and tools.
Firm and tight tambours to tambour the
working material or a frame, if there is the
need to embroider dftcors of larger sizes, are
the most important things in Haptuvannya
technique.
The fabric for further work in
Haptuvannya technique is laid on the inner circle of
the tambour so, that the composition would
appear in its center. Then, the outer circle is
laid over the inner one with the cloth so, that
the latter -would be tightly fixed bet-ween the
two hoops.
If the embroidery picture is large, one
208
Ukrainian Folk Embroidery
на надійно закріпилася між двома обручи-
ками.
Якщо рисунок вишивки великий, слід
користуватись рамкою. Спочатку на рамку
натягується цупка тканина з полотняним
переплетенням рівно і туго. Після цього в
центрі натягнутого шматка прорізується
квадратний або прямокутний отвір, в
якому добре вміщується рисунок вишивки.
Потім тканина, підготовлена для
гаптування (робоча тканина), підкладається під цей
отвір (необхідно чітко витримувати напрям
ниток полотна і робочої тканини) та
прикріплюється до полотна булавками, а потім
приметується дрібними щільними стібками.
Решта робочої тканини звертається і
акуратно прикріплюється до робочої рамки.
1. Гаптування «у прикріп».
Багатоваріантність вишивання
золотом у цій техніці творять прикріпи, які
виконуються в різному порядку.
Золота або срібна нитка
накладається на площину тканини рядами. Тонкою
шовковою ниткою виконуються прикріпи
протягом кожного настилу золотянки,
чергуючись в шахматному порядку знизу вверх
або зверху вниз по одному, по два, по три
should use a frame. First, dense fabric with
linen interweaving is fixed onto the frame evenly
and tightly. After that, a square or a
rectangular hole, which would fit the size of the
embroidery picture, is cut out in the center of a
strained cloth. Then, the working material,
which has been prepared for Haptuvannya, is
laid under the hole (it is necessary to strictly
follow direction of threads on the linen and
working material) and fastened to the cloth with
the pins, being tacked onto it with small dense
stitches afterwards. The rest of the working
material is neatly folded and fastened to the
frame.
1. Haptuvannya «U Prykrip» («kind of
fastening»).
Fastenings, executed in different order,
create a lot of variants of embroidery in gold
in this very technique.
Either gold or silver threads are laid on
the area of the fabric in rows. Fastenings are
worked with a thin silk thread along each
separate gold layer in alternation: from the
bottom to the top by ones, twos, threes or gradu-
ІШ
■ "
■ I
в 1
Й 1
■ ■
■/!' =====
■ :•:
■ - = =a
:■: •
■
..,■■" ■ .■
= з=; ■■■•
-="a ■" ■
~s*l ' ■■■'
I
«■,,■
»" ■
fir
/^vTYtYfYfY^YlY'
Л|х лі лІХіЛілД/
LHTHJrWJ LWILW UU №
■ ■ ■. .■ ■■ a : =
■ ■_ i.i л* з - »
■ V \ -' . = : = - = =
■ ' '• 'l •' У
:■: ■: :■ : === ='=■>=':.
-wTl П%_ГЖ-*ЛигП Ц=ГІ ГШ Lm
209
Українське народне вишивання
або поступово піднімаючись чи опускаючись
— рядочками, кривульками,
прямокутниками, ромбиками, паралельними або почер-
говими ромбами, ромбами з ромбиками,
прямими або хвилястими лініями тощо,
утворюючи щільний декор з цікавою
світлотіньовою грою золота або срібла.
2. Гаптування «по
карті». у.
Рисунок вишивки *-^у^
переводимо на тканину за
допомогою кальки і копію- у^*
вального паперу. Якщо це /
зробити неможливо, тоді ^S
ниткою яскравого кольору ^=5sa==—--ss*5
пришиваємо кальку з
нанесеним на неї рисунком
вишивки до тканини по
контурах рисунка швом «упе- U
ред голку». Кальку обереж- ^\^^
но обриваємо. Вирізуємо з /^ч
картону необхідної форми у/
елементи і мотиви. За до- ^Сі^
помогою клею старанно і -
охайно наклеюємо їх у
відповідних місцях рисун-
ка вишивки. Лицьову
сторону рисунка, виклеєну картоном,
прикладаємо до твердої гладенької поверхні, а з
виворітного боку розгладжуємо,
притискаючи і висушуючи під пресом.
Картонні елементи і мотиви можна
також пришивати.
Зайві нитки від наметаного рисунка
витягуємо.
З лицьового боку на тканині
тоненьким шилом проколюємо дірочку на межі
картону, а зі звороту знизу вверх у цю дірочку
вколюємо голку з закріпленою шовковою
ниткою відповідного кольору. Виводимо голку на
лицьову сторону, робимо петлю і
спрямовуємо голку у цю ж дірочку зверху вниз
навиворіт. В утворену петлю протягуємо золоту
нитку. Затягуючи петлю, прикріплюємо зо-
лотянку з цього боку контуру. Зі звороту
шовковою ниткою переходимо на протилежний
бік контуру, виводимо голку на лицьову
сторону і так само петлею прикріплюємо золо-
тянку з іншого боку контуру.
Золотянку накладаємо
паралельними щільними рядами по всій площині
картону, щоразу прикріплюючи наступний ряд
настилу.
ally going up or down in rows, curves,
rectangles, rhombuses, parallel or alternating
rhombuses, rhombuses with tiny rhombuses, straight
or wavy lines etc., creating a thick сійсог of an
interesting light-and-shadow play of gold or
silver.
2. Haptuvannya «By
JSFS^ the Chart».
\\ J) The tracery of an em-
•jb/ broidered pattern should be
Т/ьГїУ transferred to the fabric with
^V the help of the
tracing-pall) per and copying-paper. If the
fKiil^^ procedure is impossible, the
' tracing paper with the picture
to be embroidered drawn on
it, should be sewn to the
material, following its contours,
-Ytvtv^ with a thread of bright color
\\l' TK m Running Stitch technique.
y, In After that, the tracing paper
L_ IvJLM"^ is carefully torn off. The ele-
^№fJ57)) ments and motifs of the
^-і—^-=^^ forms desired are cut out from
card-board. They should be
neatly and carefully glued to
the required places of the tracery to be
embroidered form the obverse side. Then, the side
of the material, glued with the card board, is
put onto the hard smooth surface, ironed from
the reverse side and dried under the press.
The card-board elements and motifs can
also be sewn to.
The basting threads are drawn away.
A small hole is made with a fine awl on
the obverse side of the cloth on the
cardboard edge. The needle with a silk thread of a
required color is pulled though this hole from
the reverse side from the bottom to the top and
brought out onto the obverse side. The loop is
made by the thread and the needle is headed
back into the same hole from the top
downwards, to the reverse side. A gold thread is
drawn through the loop. Tightening the loop,
the gold thread is fastened to this side of the
contour. The silk thread on the reverse side
makes journey to the opposite side of the
contour, the needle is brought out onto the
obverse side and the gold thread is fastened with
the loop to another side of the contour in the
same way. The gold thread is laid in parallel
thick rows along the whole area of the
cardboard, every single row being fastened.
210
Ukrainian Folk Embroidery
3. Гаптування «по
настилу».
Переводимо рисунок
вишивки на тканину за
допомогою копіювального паперу
або наметування яскравою
ниткою. На необхідних елементах
декору паралельно і щільно
накладаємо стібки грубими
м'якими нитками відповідного
кольору. Середину елементу
настеляємо більшою кількістю
рядів. Поверх виконуємо ще
кілька рядів щільного настилу
грубими нитками, які
закріплюємо тоншими. При
накладанні кожного іншого ряду
настилу, змінюємо кут
настиланням стібків.
Поверх останнього настилу
вишиваємо двобічною гладдю, а поверх неї, в
протилежному напрямку, накладаємо золотян-
ку і закріплюємо її, як у техніці гаптування
«по карті».
Золоту або срібну нитки можна
настеляти і за формою мотиву,
прикріплюючи їх тонкою шовковою ниткою, як у техніці
гаптування «в прикріп».
3. Haptuvannya «Po Nas-
tylu» («on the laying»).
The tracery to be
embroidered should be transferred onto
the fabric with the help of
tracery-paper or basting with a bright
thread. The stitches form thick soft
threads of a required color are
worked parallel and richly on the
necessary dficor elements. The
middle part of the element is laid
with a larger number of rows.
Some more rows of tight laying
with thicker threads, fastened by
thinner ones, are made atop. The
angle at which the stitches are laid
is changed with every following
row. The last layer is worked with
Both-sides Satin Stitch, and a gold
thread is laid it over in the opposite direction,
being fastened like in Haptuvannya «By the
Chart» technique.
Both gold and silver threads can be laid,
following the shape of a motif, being fastened
by a thin silk thread like in Haptuvannya
«U Prykrip» technique.
4. Гаптування «по мотузці» /«по
шнурочку»/.
За рисунком декору прикріплюємо
шнур до тканини тонкою ниткою. Золоту або
срібну нитку накладаємо на шнурочок
поперечними паралельними і щільними
настилами, закріплюючи кожен настил тонкою
шовковою ниткою відповідного кольору то
справа, то зліва шнурочка.
4. Haptuvannya «Po Motuztsi» (along
the rope/cord).
The cord is fastened to the fabric with
a thin thread, following the dficor of the
image. Gold or silver threads are worked on the
cord in diametrical parallel and thick layers. Each
layer is fastened by a thin silk thread of an
appropriate color, either to the right or left of
the cord.
211
Українське народне вишивання
5. Гаптування «у прокол».
Техніка вишивання золотом
«у прокол» характеризується тим,
що золота або срібна нитки
проколюються через тканину або шкіру.
Переводимо рисунок
вишивки на тканину за допомогою
копіювального паперу або
наметування яскравою ниткою. Зап'ялює-
мо тканину в п'яльця. Закріплюємо золотян
ку. Тонким шилом з лицьового боку проко
люємо отвір і вколюємо в нього голку з ро
бочою золотою або срібною ниткою.
5. Haptuvannya «U Prokol»
(«by pricking»).
The technique of
embroidery in gold «by pricking» is
characterized by the way gold or silver
threads are pricked through the
material or leather.
The tracery of embroidery
is transferred to the fabric with the
help of the copying-paper or basting with a
bright thread. Tambour the material. Fasten a
gold thread. Prick a hole with a fine awl in the
obverse side and insert the needle with the
working thread, either gold or silver, into it.
Самостійна робота.
1. Ознайомотись із взірцями
гаптування золотою або срібною ниткою,
виконаними техніками «в прикріп», «в прокол»,
«по карті», «по мотузці», «по настилу», а
також їхніми комбінаціями.
2. Здійснити практичний тренінґ
із засвоєння навиків вивчених технік
вишивання.
Independent Work.
1. Introduction of the samples of
Haptuvannya with gold or silver threads, worked in
«Prykrip»,«V Prokol»,«Po Karti»,«Po Motuzt-
si», «Po Nastylu» techniques and their
combinations.
2. Practical training work to demonstrate
one's skills in studied techniques execution.
Контрольна робота.
Завдання: виконати фраґмент
орнаменту сакральних тканин.
Розмір: 15 X 15см
Матеріали: тканина — оксамит,
парча, сукно або шкіра, полотно; нитки: зо-
лотянка, металеві ДМС, шовк, картон.
Інструменти та прилади: шило,
ножиці, голки, п'яльця.
Оправа: рамка картонна.
Test.
Task: execute the ornamental fragment
from sacred cloths
Size: 15 X 15 cm
Materials: fabric — velvet, brocade,
broadcloth, or leather, linen
threads gold, metal, silk; cardboard
Tools and equipment:
awl,scissors,needles, tambour
Framing: cardboard frame.
Питання для контролю знань.
1. Визначте місце гаптування у
вишивальному мистецтві.
2. Назвіть центри золотошвейниц-
тва на території України.
3. Які техніки гаптування вам
відомі?
4. Прокоментуйте технічні
особливості гаптування «в прикріп».
5. Які види гаптування «в прикріп»
ви знаєте?
6. Зобразіть графічно один із видів
гаптування «по карті».
7. Проаналізуйте суть технології
гаптування «по карті».
8. Поясніть послідовність золотого
шиття «по настилу».
9. Виконайте рисунок-схему
гаптування «по мотузці».
Final Questions.
1. Define the role of Haptuvannya in the
art of embroidery.
2. Name the centers of Zolotoshveinytst-
vo on the territory of Ukraine.
3. What Haptuvannya techniques do you
know?
4. Comment on the technical
peculiarities of Haptuvannya «V Prykrip».
5. What kinds of Haptuvannya
«V Pykrip» do you know?
6. Sketch one of the kinds of
Haptuvannya «Po Karti».
7. Analyze the essence of the technology
of Haptuvannya «Po Karti».
8. Explain the sequence of gold
embroidery «Po Nastylu».
9. Make a sketch scheme of
Haptuvannya «Po Motuztsi».
212
iV
,''W.
:"lf ■
1
{
1
r
f
1
1- '•
v!1
■.. |Іг'і;!"І,і--'ііііП'
і !іуігІ:И:|Гі.:»!«'•
•їй»'
/v
t
!li
'Взірці,
виконані техніками
гаптування
Samples,
worked in embroidering
with gold technique
\
-" Зі
'fe^
. . *"' ч
-fcs-
^~s
-1
-Г'
т~
-
•~
-5І.
ч-
a«£.
-. -.
,^b«. ~
* . —v
I
:Tg==s^^
"%»
• -.-«
»i
A
\
%!
л
I
32
4
*^^
"" *> -» m if
J* I
V
I
* » • * 9 $ • m $ і
*
d>
*чр
^w
tsa*--. -=-==:
*£*Г
!-■
х^»Ф
7.rxfc"fcy ■
-6<УЇ
3,5S^S®®8BEPttW
■-.ИЖ-
аяяя=з:і«7
•ТЗУ _
^©?В-СЗ^Ш.ШІ0:^Ш1ШЗ:
i Л--і-—
Т-И—ЛТ^Т'^^^Г
•/
V
ik
к
V
\
v) -v
ч
ї
)
c —■
?v
1
4 \
-\
\
J ' 1
'Vb
Опліччя фелона,
XX cm.
^Гаптування
The Back, of the mantle,
XX-th century.
"Embroidering with gold
1
г
Орнаменти* ишиВок*
Tmbroidem Ornaments
С г ГГ.
1 1 . -"ТР
Y
1
•■ і
*
і
«• U
г
л
, 1
1 F
г
і» г
І
'л^т.
І
І
І І
І
Г !
і
І
1 f
І 1
і Г
Fh
ГГ
' Г
ГГГ
і TJ г-
l
Т"~_
1
г
г
І J
г zr гг
Г ГГ
г
J_l_ LL.L
V»\Y\.' , U »,
1
I
;-■,. і
. і-
... і
^
P.-
I ,
t»»"1
■t
il
I
!?U
і
іф
f =V
fl-'ft
p.- A. . |
І» іу f
■li.'f
?T
,!!. »
\.
■*,JJr. . \
'IF'
1 "I
-te-
f
53l
,§^^??І
■т 1.
m
■■ ■ i'L . 4
1 ■ , *L: ^
v.
J I f / tit I I .It I • I I I
r^w-^J—^ ^r3"
і * $ і » І 0 І * г І $ І І
-* • *' і/ # І t І і * І
* і . t t ; /
^уз^яіччі
Р
* <
-1.
о
1 ...
1
<
1
•■■
•^
■ 1 1
«.
ч •
- ЗІ
//
.'..,..(
h * •/
Ач
* . » »■ / » .
і*'
і Ч .
:Н "* >
*?
««: '
І'»
9:
■І ■-
И
•4'
, \\
+J
v г
!
і
1
Ч'
' >,
♦,
V ■
«ч
V
Лі і
^-ч л
■TV ■ V
. v
ч -^.
^ і"4
-■ * ^
-*ч
,3
^^Й^^^^
. -^&»
Г^ \.
V
<*
V
*£■
'Щ*.
5-
'-»
\Ґ
. ■*£
1"-ч,
\ ■
> " *
"-4—■? **.'
/74
*•_
і**"
\
Ч
■^
■\.
•s*
-'
ft*-
-іі.
Л.
л - - ~—— —
»к>
, ~* >- >-
v r^SiA-^
» -*.
-:-«-<*
t ш $ $$»•*$$$ m$ ш # *
/W
! ! і
. t
&&♦** **3*gs«**********
їяааййй
Я^
gaxt">s-
V.
1
V
S^- ^N - «v
:^
Л-Lt
/
it
4 r
\
* Г-
.■!-,
"• '•&
w».
ж\ ,
t- • I
>
# « « # «
* § t it
9 9 9* ш , t
■;..'•&
'/
*-.■•■
^
^
V
^n3
♦ ♦
X
♦ ♦
♦ ♦
*-- %-■»
,•>■ ^47
14
» >
£С
л^'
І .
«1««<«ЛЬ]|
V
,ч
I
4
lit ч*і Ч * Ч * Ч
і
/
» > І
**V**
к
І- і І
■
І
4
V
*«
а І*
0
*'t
* #% #*
>
A
&
r
Л
if
'v'VV-v----
■W-
л; v-»
V ЧяІ ■** "*^
w^--
h
&
;p
Ж
^J
&'■*'
йН '-'a !V 1,-.Ь \\, ' '
. :.'U4 '•
tt«\*
li,
*Ґ tit
Ш
.:■>-.:„.
• ■' ■ if.
.'.-«si.
І1 *v
>-- ,
■^
:*•
лс
/
«r
v- *
* і
Ifr ф -» J,
0 <> ♦ Ф
ч*
4 *
,>
Jl
> ♦
♦ ♦
♦ <
ф ♦
ч ■*
♦ ♦ ♦
*
A
A
«v
M
/\ч
4" •■*
. л jf .*ЧЛ> *
V, "
V і
- X ■ у ч
1
• *
4
чч
*. ц1
\ ,;n
A
/
&»
■ K
s-
f
*&Ґ
J.
*1
mV
► v
\
\
*<~
r
1
■r *
r
V 4
'b ,.
1 '
■ w
-I
4
. , ft
*
"*ff "V
A,
1 ' |N
X ■.
•Y..
/■ '
•in
0.' '"-'Ч-
.""■ *
•' *•.
- f
1 I.
' iite; ' v.-.-л
Ml' , ^MjVj "J.«','.. і . v - iVv Vi ■ '!?' '-'1i
:■ ..T ?' Л ~, л.;; -- -' ■ -
, ■ '■ »■ ,v /A* •
,1 /'I '
.;, 1
')-.| ■ .л ' "
і ,i - | 'її,.'
,1 I
.< 4..
\ ь і >v
ibW^v ^
Lv®4. ■/■■ *
.• <•«
ї І!Я
.W*
і і , і > v;
ywm, ж т ;'
*-\^' і
,rt *
і Ч ■
7* fr>', . ; .
*V .jfjf' ч
}
і
4..
iBMl
Я' v
* їй "ІЛі!-. ' .
1 оЛ N'
і
V
Ч А V\ :
4 Vv^'-4
■Ч ;.*
«•V
-w. - -J l.H ) і
V".
V
I '• 1.1 \ V » !,[ 1.
11
^Л( і .
f> " ,v.
.. jf'-.v-'
л„.
■■ Iff
.'4
i\
..A
* *r'
\ -
V
4t?v
Л*.
• >
M,
.-w*
J
;.*
» 'Л
,»« •.»'.
» t > » -
4
04gpo^s^o«^-o<KA^o
V4
■■■4* "'\ЛЖі
>» ^
-/' X/" N/ V 'VV*
% /ч /\ ^x /x z4
V
<
I *
і>^к
•ФФК^НМ№^*#Ф#*ФФФФ? фф£фф#
*v«r
♦ ♦
^^^^:^^4^:ф^фф4ф:^:^:^ф^^^4іф^
t
* t ■■ . v
%
-«i-i-l ~«
N.
■k. ■. «
.4
^.
N
V
Ч .' ■
т
V.
^.«к.
•rs
і
ч
•J i-: ''.■И),-':>""^./Л(А;:, Jh'U,; 'ІІМШМ/Ш-
» \
* -
; t
*• ь-»:,
u і
<
it
■ *
nAX
% X
I I
f
t t
» *
ч ч
.v . ' .
1 ♦ і
I
■/.Ї
Ai
f
1
і r8-
-\
і
rf
**
1 **
4
»k J
iff»* t в■ f в
л
* # в ш § * 0
19 t § в в
і
І
1
а
і. ".'
.. /
'і
*
Л А
*'
\
ШШЩ
\
1 ч v • Щ «8 Р
3#*
с V. •'
<щ
iff
і1!
t
V
.1
(
м
, .ф ; №■: • •
а
а
ч
#
л
І » иИГ-КЇ1 М» ,-V i.'.Yil1 ■
ф ф' ф
,г**.-
>:
\
.jf'
-\ ■ <і
» «
І
L
г
і
І
І
\
>'*,
\ •
■.*».
' * І
.>?
\
♦ *♦♦♦♦♦♦
\
4 ♦ ♦
^ - iV'tb if.
■VMM
4 4*
0
А Д
A
A A
0
ф і
6
A A
A
* • ♦ ♦
' ^
«
•if .
в і t в» * 9
ч/
"W
<ф «^
4
II III I '» I »•'
«I
♦" »
\
ь
I»'
Д\ ЛЧ /»«Ч /X
■» <
*
I !
\
V
> ,
' I
* (,,.
U!
С£&йй£Г>-
'«<
/^
•^
і «•
/^ *
^
it
*і*
і? є-
її
g><ss
♦ ,>t^<#«
>• <*>
Чь
<<&
/
* і і І 0 •* . 0 * f
( «- * / # *■
J f » Г ' Г
І
N
4Г •
<* Ф
• *-
ш
44+44 '
«"І
І
'І
||
ІІІІІІІІІ
1'
!І!
іі
І!
і|И
|| II
ІІІІІІІІІ
ІІ
ІІ
ь
11 'І
ІІІІІІ.І
II-
І
ІМІІЧІГ
t
І
!
■ і1
■■'і і
1 ТІ
їй І
Iі >і.іі 'iNlilM1
І
ІІІІІІІІІ
11111
II Iі
і
ні
lijii
ї'і
ІІ
■ ч
11'
111
Ні
ГчІї
ІІІІІІІІІ
І!
пі
!
!
і
11ІЇЮТ"1"*" "'Чі ■'■ ■ЧЧШІ*?!
W >І^І|і| Ш\>''№
!' | uJM '!
ІІ. І > Iі ' І 'і1 і ! ,іі
і' 'і і',1
і І ! If !l J
1
<і'
Iі!
і
II
і
І'
1!
І
її
II
Iі!
і-
І і
if:
■ч
III,
/І!
Iі'
1
І
і
>l|jjl'
І Iі
і!і'і
і!
і!"
!і
1 і
1«|І4-І-
!!|||'«'||||
Мі1 і і 'і і1
і
■ї'ііїіі
їі'Г
ій
її
'■'і1
ні
і",
ІІІІІ
1 ■?■
ііііі;
Ж[
'ІІІІІ
ї'і1
!і
Ф "і
■ІМіїіііі
oil І Iі
І
І
І! 'і
Iі Ч
!.і
/'.
Й" №
і|і|і'^і|і|і
І Iі ї 'і Iі
ІНН1'
III
If.'
№
ї 1'1 Iі
і
і
■і
іііі"
і.'
її'
■ Iі - і
'1-І
'(''і
н
І
-і І
ж
і,,.і.
'Ч1,
V
,karpaut"s.a.lwow Zzn* ^ <VjOws?echnej w Moskalcwoa. Ж^Ш^І
-t-
. [
1.
,KARPAUT "S.A.LWOW
£.3 Ze o.
/ЬУс?ЄС«їЛЄ| W ,UJJ,niy
u *
4
,kappaut"s.a.lwow lixisfi szKm^1 '{і о ws?echnej w Mos^afswca
r-
«karpaut's.a.lwow 1%тщ\ sz?' -\Ц fiows?echnej w MoskalGWCS.
,J і і
.11 J-
,KARPAUT "S.A.LWOW
Zsr
*.«i v5«
f,iow£7ecfinej w Mosf a.cwoe.
^•■чіР^і
ШМІШ
J. J
t-
4
- hf+ - -*-,'■ і і і . t u ■ ■ I- - -t , І-ГТ1Т +І-Г+И Н-ґ -I- , -i !-M-f-
,kappalit"s.a.lw6w Zsr~~ ь2 'tjow$?ecf7nej w f.!os!'a!cwc .
ti
.KARPAUT "S.A.LWOW
Zarz^siVoJfy'jjow'STechneJ w Moskaltwc .
" ' ' № -
і •
.KARPAUT "S.A.LWOW ZSfZfe- • Z?
hr+fU
1-t
ІЇГ '4rfL
t I
J
44 I
■•tJij-
-н -*•
*
О
to
о
о
О
CO
14
ft
Ч
5
-О
<
<
а
<
(-- t г
-+4
# <
# *
\ ' ч 4+4Г.
» J
,KARPAUT"S.A.LWOW ZSfZ^ hZ "_, f iti WS7PC If ПЄ| W i<lOo 3, C
«
о
І
о
CO
■ іи
>-.
- їм
-о
<
<
а
<
11
11
^+-
,KARPALIT 'S. A.LWOW
Г$Г
M- t
If
t і
■t!
■*-i±*
—« ■ ■ » І Д ., j-* «■*"»-*--Г" ■»-* *H* »
.fctii
^ і
.і*
lb
"tixi [' . 2 '• s '.jfl'wsyecbnel w ,* osFa'.c
'Ill il I i\,
-4 + t
h
+ ... Г t r*X 'І і 11 і t і
і- , , - ■ 1
-4
fl
tr
Ex
ч
Г. .
.-J
^
4
».♦ H^ : Hit; '-tHJr! ,fF*i3t
. -, U u .'-.—^1 ,
.4--
I ii ( t-
,KA«PAUT"S.A.LWOW
.1.!. '
'J -..tj..: 'М.ЛЧ.-.4. .'■Л-t, .M II
arza. ozK^y'iinwszeclinejwMosKaicwc .
11
-^ '-L
4 4*
f<-'
,KARPALIT "S.A.LWOW
Zarz44 ьг*'-щ rHows?ecJinej'w MosikafGwes."
KARPALIT "S.A.LWOW
Zarzi' a2'"MVVows7ecnrie[w"Wos^a!cwc8.'
t !
АЬ -і
- J
.+, І
1- ■(•
t- л * \
А-
т
і- f -f I 4-І
Ті
karpaut-'s.a.lwow Zarza;. s»2'< ij ,sflws^ecuле] *» Ftocka.cwee
к. ґ
1 *i
-t -+3 *,
1*
-t T +
■fi
,, :tv
$
#-
sir;
r?
-Htr it
♦pU:"
W ft*
t- +
-K+r +■
m
t і , ,
b.%
- 'H
vff
4Гтл* t *.4t їй
- . ► f
.-+,
'V
!P
.tti
,KARPAUT"S.A.LWOW
Zsrz
<*
Д_і,^,ц L. -1-і tit I I |
: _. т_4
ttttt
■4"
r
o^:
:o
~; -з
t -4-і.
w
tin
ll.fr
X X
-J -4
I 1
X ' X
:x
u. .■
t±
tT
X » X
^rtor
i- ■♦-■■ -f -*-!>
;■)':'■
«-і-*.—
mrrr
4-H—1-4-1-
s і і і X*. -> -і~£П- -.-+
*t, Ml]
-ТГР
iftli-
Шї£
«2J
ге
so
З*
О
' CO
-І
<
<
а
а
<
"1
і..
It
t
I I
t
«»
?!
4},.} \h.p 'I VJTt '4"
• 4
• t
fi
№
4 4
ll
J
\
■1
*v
i'i
. I 4 4
\9 , f t*;
■iHi
:' ЧИ:
М4ч
tl
ГІ
ІI .;.!%. ,tt;
iltlf
II *
:3
^ I t
t*
t «f
іП
* • n, і
fi:
:3S
.. if . ; ft H> "t+T}+ : Л\И.* it t- TOP'
2*»
f*,»
1
*
t-4
■ it
Й
- і
-t~r
I
■■ *$*
.: ^
ІЧ **"
:«8
'і1*4
*
t"
■t -
Ц
/•
і
l-O
v. S
; J
: <
1: **
t: t
'■ з
: <
• a
1 a
<
, *
ч
N
H'H 'Hffil
г
•ч
Г
п ^
1:
*
О
«яз
'wvix.
О
О
; :cl>
т *- *
tt -
'U.;
t+ -
i.: .>"■■*
і"
4?
4: «Й
'- '■ ІГ
; *~
- : Св
■4 -
■t
:*jx * ' t
*
-J
<
to
4* rtl i1-
<
- a
•i a
<
ж:
$ $
$ $
5f * *
r&?3>-*
..fe"1^ >
.f 7:
V.
її
>-;r>
4.^
.1Щ
4
u4.
'4?*
*>*
>\
її
«Sir
- * *ч>? 'Ф&
Ж'
«w«§g
1»П
.V
4Й&
f
,.. 1
: t.
t
І*
І>
і* *
•ІA'it::,!
tr*1
1
V
Колекція молодіжного вбрання * -і
"Квіткова феєрія'
CoCCection of clothes for youth
"Jlcrwer [Fairy ФСау"
тГЩІї'І
І ІИі *
в і І'
і
І я
л| ШЩ ЩЩШІЇ ЩЩЩ
'Молодіжна сцкня
за прадавніми
орнаментальними мотивами
youth frocf^ .
$оі(тиіпд ancient ornamental motifs
-*~*■
l|t! H
fPtim|i|Hii4)ttii)ti|» {#» ^Ійі^іЦір і -p ш p#*
til
ill
mm
•IT
1 j.
J ^sj 1 _J 1^__ і
:^r
■II
\
\
e У
'»,
'\
!:$?
h
V-
тлумачний словник
explanatory dictionary.
Аста — бавовняна тканина з
полотняним переплетенням підвищеної
щільності.
Атлас — тканина з натурального
шовку або штапелю атласного переплетення.
Батист — тонка, легка
полотняного переплетення бавовняна або лляна
тканина.
Бязь — бавовняна тканина з
полотняним переплетенням.
Вігонь — тонка, м'яка шерстяна
тканина.
Віскоза — штучне волокно,
виготовлене хімічною обробкою целюлози
деревини ялини та сосни.
Віскозне полотно — тканина з
полотняним переплетенням виготовлена із
ниток віскозного волокна.
Вісон — шовкова, вовняна або
лляна тонковолокниста тканина білого кольору.
Волока — кругла золота або срібна
нитка.
Габардин — вовняна одноколірна
тканина саржевого переплетення.
Гарус — тонка вовняна пряжа.
Домоткане полотно — тканина з
полотняним переплетенням, виготовлена
ручним способом на ткацькому верстаті.
Жоржет — шовкова тканина із
креповим переплетенням.
Канва — сітчата бавовняна, рідше
лляна тканина з чітким розподілом ниток
(по дві) основи і піткання в шахматному
порядку. Буває різної твердості, товщини і
величини переплетення.
Капітель — скручена волока або
плющенка у спіраль у вигляді нитки.
Кашемір — вовняна або бавовняна
тканина, відбілена, саржевого переплетення.
Крепдишин — шовкова тканина,
виготовлена креповим переплетенням.
Крепсатин — шовкова, рідше
бавовняна тканина, виготовлена креповим
переплетенням.
Лгзета — тканина із віскозного шовку.
Люрекс — металева нитка, що імітує
золото або срібло.
Люстрин — тонка вовняна або на-
піввовняна тканина.
Мадаполам — бавовняна тканина з
полотняним переплетенням.
Майя — легка відбілена бавовняна
тканина.
Asta — cotton material with extra dense
linen interweaving.
Background clearance — translucency of
the material, either in the center or by the
periphery seams.
Background — the embroidered side of
the material.
Broadcloth — dense woolen or half-
woolen material of various thicknesses.
Bugles — glass color tubes 1-2 cm long
with a through hole.
Calico — cotton half-bleached material
with linen interweaving.
Cambric muslin — thin, silky and soft
cotton material with linen interweaving.
Cambric — thin and light linen or cotton
material with linen interweaving.
Canvas — net cotton, seldom-linen
fabric with clear distribution of ground and
horizontal threads (in twos) in staggered rows.
It can be of various hardness, thickness and
size of interweaving.
Cashmere — bleached woollen or cotton
material with serge interweaving.
Cheese —cloth — cotton, seldom-linen
transparent soft material with linen
interweaving.
Chiffon — thin, translucent cotton
material with linen interweaving bleached and
colored in subtle tints.
Coarse calico — cotton material with
linen interweaving.
Crepe de Chine — silk material, made
with crepe interweaving.
Crepe Sateen — silk, seldom — cotton
material, made with crepe interweaving.
Gabardine — woollen plain fabric with
serge interweaving.
Gold (silver) thread — twisted drawn or
spiral flattened wire in a form of a thread.
Homespun fabric — material with
homespun interweaving, made by hand on the
loom.
Lace — braided or woven tape from
cotton or silk threads.
Linen interweaving — a kind of weaving
showing even intersection of ground and
horizontal threads, placed in staggered rows on
the obverse side of the cloth.
Linen — material with clear linen
interweaving.
Lizetta — material from Viscose silk.
Lustre — metal thread, imitating gold
273
Українське народне вишивання
Маркізет — тонка, напівпрозора
бавовняна тканина з полотняним переплетенням.
Марльовка — бавовняна, рідше
лляна прозора, м'яка тканина з полотняним
переплетенням.
Марселін — тонка, щільна вовняна
тканина.
Міткаль — бавовняна напіввідбіле-
на тканина з полотняним переплетенням
Мішура — скручена нитка із кількох
волок або плющенок.
Муслін — тканина із віскозного,
ацетатного шовку і капрону з полотняним
переплетенням.
Нансук — високоякісна тонка
бавовняна тканина з полотняним переплетенням.
Оксамити — шовкова, півшовкова,
рідше бавовняна тканина, виготовлена ос-
нововорсовим переплетенням.
Памут — домоткане бавовняне
полотно із фабричної пряжі.
Пацьорки — бісер або цятки.
Перкаль — тонка, шовковиста і
м'яка бавовняна тканина з полтняним
переплетенням.
Півшерсть — нитки або тканини,
виготовлені із вовняного волокна від 20 до 80%,
решта відсотків — штучні та синтетичні
волокна.
Плющенка — золота або срібна
нитка у вигляді стрічечки.
Полотно — тканина із чітким
полотняним переплетенням.
Полотняне переплетення — вид
ткання з наявністю на поверхні тканини
рівної кількості перекрить основи і
піткання, розміщених у шаховому порядку.
Прозір повітряний — повітряне
просвічування по центру або периферії шва.
Прозір тла — просвічування
тканини по центру або периферії шва.
Прозорі шви — шви з прозором
повітряним або тла тканини.
Прядиво — бавовняна або шовкова
нитка, обмотана волокою.
Репс — шовкова рідше бавовняна
тканина виготовлена технікою репсового
переплетення.
Саржа — бавовняна або шовкова
тканина саржевого переплетення.
Сатин — шовкова або бавовняна
тканина із креповим переплетенням.
Ситець — бавовняна тканина
полотняного переплетення.
Склярус — скляні кольорові
трубочки 1-2 см довжиною з наскрізним отвором.
or silver.
Lustrine — thin woollen or half-woollen
material.
Madapollam — cotton material with linen
interweaving.
Marcelin — thin dense woollen material.
Marquisette — thin translucent cotton
material with linen interweaving.
Maya — light bleached cotton material.
Muslin — material from viscose or
acetate silk and kapron with linen interweaving.
Nainsook — thin cotton material with
linen interweaving of high quality.
Pamut — homespun cotton linen from
factory-made yarn.
Patsyorky — beads or glitter beads.
Plyushchenka — gold or silver thread
in a form of a stripe.
Printed cotton — cotton material with
linen interweaving.
Reps — silk, seldom cotton material,
made in the technique of reps interweaving.
Sateen — silk or cotton material with
crepe interweaving.
Satin — material from real silk or staple
with satin interweaving.
Seams with clearances — seams with
through or background clearances.
Serge — cotton or silk material with
serge interweaving.
Spinning — cotton or silk thread,
twisted by the drawn wire.
Sutazh — a thin silk or woolen braid.
Taffeta — dense silk or cotton material
with linen interweaving.
Through clearance — light transmission,
either in the center or by the periphery seam.
Tinsel — thread, twisted from several
drawn or flattened wires.
Tual — silk light material with linen
interweaving.
Velvet — silk, half-silk, seldom-cotton
material, made with ground pile interweaving.
Vicuna wool — thin and soft woollen
material.
Viscose — artificial fibre, made through
chemical processing of cellulose of fir — and
pine-trees timber.
Viscose linen — material with linen
interweaving made from the threads of Viscose
fibre.
Vison — silk, woollen or linen thin fibre
material of white colour.
Voloka (drawn wire) — round gold or
silver thread.
Wool mixture — threads or materials
274
Ukrainian Folk Embroidery
Сукно — щільна різної товщини
вовняна або напіввовняна тканина.
Сутаж — тонкий шовковий або
вовняний плетений шнурок.
Тасьма — плетена, ткана стрічка із
бавовняних або шовкових ниток.
Тафта — цупка шовкова або
бавовняна тканина полотняного переплетення.
Тло — поверхня тканини, на якій
вишивають.
Туаль — шовкова легка тканина із
полотняним переплетенням.
Шерсть — нитки різної товщини та
скручення, виготовлені із вовняного волокна.
Шифон — тонка, напівпрозора
бавовняна з полотняним переплетенням,
відбілена, фарбована у ніжні відтінки
кольорів.
composing 20-80% from woolen fiber, the rest
is made up from artificial and synthetic fibers.
Wool — threads of various thicknesses
and twisting made from woolen fiber.
Worsted — thin woollen yarn.
Zhorzhet — silk material with crepe
interweaving.
275
Українське народне вишивання
ПРЕДМЕТНИЙ ПОКАЖЧИК
ENGLISH INDEX.
А
Аплікація
Б
Біла гладь
Болгарський хрестик
В
Верхоплут
Верхошов
Виколювання
Вирізування сліпе
Вишивання пацьорками
Вівсик
Володимирські шви
Г
Гаптування
«по карті»
«по мотузці»
«по настилу»
«у прикріп»
«у прокол»
Гладь
біла
білизняна
двобічна
з настилом
з пересягами
колоскова
коса атласна
коса оздоблювальна
одностороння
плетінка
пряма тіньова
старокиївська
стеблова
художня
д
Довбанка
3
Заволікання
Заігліно-І
Заігліно-П
Занизування
Затяганка
Звичайний хрестик
Зерновий вивід
Золотошвейництво
Зубцювання
200
169
88
110
113
93
91, 92
188
74
168
208
210
211
211
209
212
162
169
169
163
167
164
144
149
150
168
151
148
170
143
166
95
132
141
142
132
48
84
96
208
39
А
Applique work 200
Artistic Satin Stitch 166
В
Beads Embroidery Uprykrip
(fastening) 188
Beads Threading 189
Beads Weaving 191
Bugles, Beads, Glitter-beads,
Metal Plates Embroidery 208
Bulgarian cross stitch 88
«Chervyachok» Stitch
(«Worm» Stitch) 123
Color Retyaz 64
Cross with the Slanting Lining 85
Cross with the Straight Lining 86
Crossing (Kozlyk) 43
D
Double Cross (Bulgarian) 88
Double Verkhoplut (Hutsulskyi)
/Hutsulian Topwinder 110
Double-sided Kryvulka 51
Dovbanka (Pierced Eyelets) 95
H
Half stitch 40
Half-cross 88
Haptuvannya «By the Chart» 210
Haptuvannya «Po Motuztsi»
(along the rope/cord) 211
Haptuvannya «Po Nastylu»
(«on the laying») 211
Haptuvannya
«U Prokol» («by pricking») 212
Haptuvannya «U Prykrip»
(«kind of fastening») 209
Hlad Dvobichna
(Both Sides satin Stitch) 163
Hlad Koloskova
(Ear of Wheat Satin Stitch) 144
Hlad Kosa Atlasna
(Satin Slanting Satin Stitch) 149
Hlad Kosa Ozdoblyuvalna
(Decorative Slanting Satin Stitch) 150
Hlad Pletinka (Plaiting Satin Stitch) 151
Hlad Pryama Tinyova (Straight
Shady Satin Stitch) 148
Hlad Steblova
(Stem-like Satin Stitch) 143
276
Ukrainian Folk Embroidery
K
Кафасор
Качалочка
Клітка
Ключка
парована
Ключове шитво
Козлик
Колодки-І
Колодки-П
Кривульки
двостороння
одностороння
тристібкова
Кручені шви
«позад голки»
«ланцюжком»
Курячий брід
Л
Лиштва
качалкова
проста
М
Муаровий шов
Н
Набирування
Навиване
Низинний шнурок
Низинка
замкова
проста
о
Обкрутка
Обметниця
одностібкова
поверхнева
тристібкова
Обмітка
Основа
П
Парована ключка
Переволікання
Півстовпчик
Підрубка
Підрублення
Піткання
Поверхниця
Полтавська гладь
Прошите
Р
Ретязь
138
140
100
116
118
114
43
146
147
50
50
51
51
53
53
55
82
139
140
132
171
134
112
62
136
137
136
172
41
41
71
42
40
39
118
134
40
39
39
39
138
164
73
63
Hlad with Nastyl
(A Kind of Satin Stitch)
Hlad with Peresyahy (Poltavian);
/Poltavian Satin Stitch/
K
Kachalkova Lyshtva (Kachalochka)
Klitka /Shtapivka/; (Check work)
Klyuchka (Loop)
Klyuchovyi Stitch (Klyuchove
Shytvo). /Looped Stitch/
Kochelystyi Stitch (Circle Stitch)
Kolodky-I (Goblin Stitch)
Koloskovyi (Ear-of-Wheat) Cord
Kryvulka (Wave Stitch)
Kucheryavyi Stitch (Curly)
Kuriachyi Brid (curly)
T
Li
Lantsiuzhok (Chainstitch)
M
Muarovyi Stitch ( Moire Stitch)
N
Nabyruvannya (Poverkhnytsya)
Navyvane (Laid Stitches)
Nyzynka Zamkova
О
Obkrutka (Twist stitch)
Obmitnytsya Poverkhneva
(Surface Whip-stitch)
Odnostoronnya Hlad /One-sided
167
164
140
100
116
114
98
146
68
50
122
82
52
171
134
112
137
172
71
Satin Stitch (Verkhoshov, Volodymyr
Stitches)
One-stitched obmetnytsya
(Plakhtove Ending)
P
Parovana Klyuchka (Coupled Loop
Petelkovyi (Looped) Stitch
Poverkhnytsya — kafasor
168
41
118
67
138
Proshyttye (Stebnove Needlework),
/Running Stitch/
R
Rizhkatyi (Horny Decorative) Cord
Rizhky (Rizhkatyi Stitch)
/Horny Stitch/
Rozsypnyi Cross (Scattered Cross)
Rozvid (Outline)
Rushnykovi (Towel) Stitches
S
Shtepuvannya
73
69
119
87
94
180
121
277
Українське народне вишивання
кольоровий
поперечний
Ріжкатий шов
Розвід
Рубець
одинарний
подвійний
Рушникові шви
с
Силяння пацьорками
Смерічка
Снурок
Солов'їні вічка
Соснівка
Стебнівка
Т
Тамбур
Ткання пацьорками
Товмацька зірка
X
Хрестик
з косою підкладкою
з прямою підкладкою
косий
півхрестик
подвійний
прямий
розсипний
Хрестикування
ч
Черв'ячок
64
63
119
94
38
38
38
180
189
66
70
97
65
49
52
191
99
84
85
86
84
88
88
85
87
43
123
ш
Шви 48
нерахункові стелені 162
оздоблювальні 62
початкові 48
рахункові 80
рахункові стелені 132
складені 110
Шнурок в колосок 68
Шнурочок 69
ріжкатий 69
поверхневий з підкладкою 72
Шов 98
кочелистий 98
ключовий 114
кучерявий 122
петельковий 67
Штапівка 100
Штепування 121
Simple Lyshtva
Simple Nyzynka Stitch
Slanting Cross (plain)
Slipe Vyrizuvannya
(Blind Cut Work)
Smerichka (Fir-tree) Stitch
Snurok (Snuruvannya) /Lacing/
Solovyini Vichka
(Nightingale's Eyes)
Sosnivka. (Pine-tree)
Starokyivska Hlad
(Old Kyiv Satin Stitch)
Stebnivka
(hand stitch, French Stitch)
Straight Cross
Surface Cord with the Lining
139
136
84
92
66
70
97
65
170
49
85
72
The Technique of Beads
Embroidery which Requires
Counting
Three-stitched obmetnytsya
(Plakhtovyi Stitch)
Tovmatska Star
Transversal Retyaz
Tree-stitched kryvulka
Nyzynnyi Cord (Lace)
Twisted backstitch
Twisted Stitch «in chain»
V
Velvety Stitch
Verkhoplut (Topwinder)
Verkhoshov
Vivsyk («Oats»)
Vycolyuvannya (Drawn Eyelets)
Vyrizuvannya (Cut Work)
W
Whip Stitch
White Satin Stitch
188
42
99
63
51
53
55
81
113
74
93
91
169
169
White Satin Stitch
(underwear, embossed or relief) 169
Zaihlino (Zaihlyane)-I 141
Zaihlino (Zaihlyane)-II 141
Zanyzuvannya (Perevolikannya)
with the Knot-making 134
Zanyzuvannya (Zavolikannya) 132
Zatyahanka («to tighten») 48
Zernovyi Vyvid 96
278
Ukrainian Folk Embroidery
СПИСОК ВИКОРИСТАНИХ ДЖЕРЕЛ
LIST OF THE SOURCES USED
1. Грінченко Б. Словарь української мови. Т.4. К: репринтне видання, 1909. — К.:
Лексикон, 1996. — 563 с.
2. Захарчук-Чугай Р. Українська народна вишивка. Західні області УРСР. — К.:
Наукова думка, 1988. — 190 с.
3. Запаско Я. Декоративно-ужиткове мистецтво. Словник. Т.1. — Львів: Афіша, 2000.
— 362 с.
4. Запаско Я. Декоративно-ужиткове мистецтво. Словник. Т.2. — Львів: Афіша, 2000.
— 400 с.
5. Кара-Васильєва Т., Чорноморець А. Українська вишивка. — К.: Либідь, 2002. —
160 с.
6. Кара-Васильєва Т. Шедеври церковного шитва України (ХП-ХХ ст.) — К.: ІВЦ
УНЦ., 2000. — 96 с.
7. Kolbenhejer E. Motive der hausandustriellen stickerei in der Bukowina. — Viena,
1912.— 112 c.
8. Лекції з історії світової та вітчизняної культури: навчальний посібник. Вид. 2-е
перероб. і доп. / За ред. проф. А.Яртися та проф. В.Мельника. — Львів: Світ, 2005. — 568 с.
9. Мельничук Ю. Дерево життя у вишивках // Артанія. Альманах, кн. 4., 1998. —
С. 51-52.
10. Нариси з історії українського декоративно-прикладного мистецтва. Відповід. ред.
Я.П.Запаско. — Львів: Видавництво Львівського університету, 1969. — 190 с.
11. Станкевич М. Автентичність мистецтва. — Львів: Афіша, 2004. — 189 с.
12. Сусак К., Кириченко Н. Робота в матеріалі з художнього вишивання та
моделювання одягу: Програма навчальної дисципліни. — Івано-Франківськ: облдрук., 2003. — 46 с.
13. Шухевич В. Гуцульщина: Перша і друга частини. Репринтне відтворення
видання 1899. — Верховина: Журнал «Гуцульщина», 1997. — 352 с.
279
Українське народне вигнивання
СПИСОК РЕКОМЕНДОВАНОЇ ЛІТЕРАТУРИ
ДЛЯ ПОГЛИБЛЕНОГО ВИВЧЕННЯ КУРСУ
LIST OF LITERATURE FOR FURTHER IN-DEPTH STUDY
1. Антонович Є., Захарчук-Чугай P., Станкевич М. Декоративно-прикладне
мистецтво. — Львів: Світ, 1992. — 272 с.
2. Аронець М. Видінівські вишивки вчора і сьогодні // НТЕ. — №1., 1982. — С. 68-70.
3. Білан М., Стельмащук Г. Український стрій. — Львів: Фенікс, 2000. — 326 с.
4. Блажейовський Д. Українські релігійні вишивки та інші зразки. 7-а збірка. —
Львів:, 1996. — 110 с.
5. Божко Л. Бісер. — М.: Мартін, 2002. — 120 с.
6. Васіна 3. Український літопис вбрання. — К.: Мистецтво, 2003. — 430 с.
7. Гасюк О., Степан М. Художнє вишивання. Альбом. — К.: Вища школа, 1989. — 259 с.
8. Гургула У. Народне мистецтво західних областей України. — К.: Мистецтво, 1965.
— 76 с.
9. Гургула У. Майстри вишивки // Красу у побут трудящих. — Львів, 1963 — 42 с.
10. Ганжа П. Таємниці українського рукомесла. — К: Мистецтво, 1996. — С. 64-110.
11. Дільмон Т. Полньїй курс женских рукоделий. — М.: Зксмо, 2004. — 698 с.
12. Duchonova M. Vysivame. Bratislava: Alfa, 1976. — 222 с.
13. Запаско Я. Декоративно-ужиткове мистецтво. Словник. Т.1. — Львів: Афіша, 2000.
— 364 с.
14. Запаско Я. Декоративно-ужиткове мистецтво. Словник. Т.2. — Львів: Афіша, 2000.
— 400 с.
15. Захарчук-Чугай Р. Українська народна вишивка. Західні області УРСР. — К.:
Наукова думка, 1988. — 190 с.
16. Захарчук-Чугай Р. Українська вишивка в США: Дослідження, збереження, традиції
// Мистецтвознавство '02. Інститут народознавства НАН України. — Львів, 2003. — С. 27-34.
17. Кара-Васильєва Т. Полтавська народна вишивка. — К., 1983. — 133 с.
18. Кара-Васильєва Т. Українська вишивка: Альбом. — К.: Мистецтво, 1993. — 263 с.
19. Кара-Васильєва Т. Українська сорочка: Альбом. — К.: Томіріс, 1994. — 32 с: іл.
(Таємниці чарівної нитки).
20. Кара-Васильєва Т. Шедеври церковного шитва України (ХП-ХХ ст.) — К.: ІВЦ
УНЦ., 2000. — 96с.
21. Кара-Васильєва Т., Чорноморець А. Українська вишивка. — К.: Либідь, 2002. —
160 с.
22. Кива Г. Гуцульська художня вишивка // Жовтень. — №3., 1976. — С. 110.
23. Кисильова Н., Кара-Васильєва Т., Придатко Т. Художні промисли України:
Альбом. — К: Мистецтво, 1979. — 253 с.
24. Колотило Ксенія: Альбом/Автор упорядник Д.У.Богданова. — К.: Мистецтво,
1992. — 160 с.
25. Кулинич-Стахурська О. Мистецтво української вишивки. — Львів: Місіонер,
1996. — 163 с.
26. Кульчицька А. Орнамент трипільської культури і українська вишивка XX ст. —
Львів: Атлас, 1995. — 17 с.
27. Лекції з історії світової та вітчизняної культури: Навчальний посібник /За
редакцією проф. В.Мельника. — Львів: світ, 2005. — 568 с.
28. Мельничук Ю. Дерево життя у вишивках // Артанія. Альманах, кн. 4., 1998. — С 51-52.
29. Мельничук Ю. Семантика українських вишитих рушників // Народне
мистецтво. — №1-2., 2005. — С. 59-65.
30. Нариси з історії зарубіжного декоративно-ужиткового мистецтва. — К.: Віпол,
1995. — С. 65-117.
31. Нариси з історії українського декоративно-прикладного мистецтва //Відповід.
ред. Я.П.Запаско. — Львів: Видавництво Львівського університету, 1969. — 190 с.
32. Ніколаєва Т. Історія українського костюма. — К: Либідь, 1996. — 171 с.
33. Радкевич В., Пащенко Г. Технологія вишивки. — К.: Вища школа, 1997. — 302 с.
280
Ukrainian Folk Embroidery
34. Сорокина Л. Учитесь вишивать.: Альбом. — К: Радянська школа, 1984. — 79 с.
35. Sorochaniuk E. Njzjnka. — Embroidery of the Hutsuls. Pennsauken, NJ, USA 2002.
— 284 c.
36. Соломченко М. Народні таланти Прикарпаття. — K: Мистецтво, 1969. — С. 36-39.
37. Станкевич М. Проблеми теорії мистецтвознавства // Мистецтвознавство'02.
Інститут народознавства НАН України. — Львів: 2003. — С. 9-18.
38. Станкевич М. Автентичність мистецтва. — Львів: Афіша, 2004. — 189 с.
39. Стеф'юк-Кириченко Н. Мальована поезія космацької вишивки // Образотворче
мистецтво. — №1-2, 1999. — С. 53-55.
40. Сусак К. Художня вишивка села Вербовець Косівського району //
Мистецтвознавство'02. Інститут народознавства НАН України. — Львів: 2003. — С. 89-99.
41. Сусак К. Автохтонність у вишивальному мистецтві Гуцульщини //Вісник. Львівська
національна академія мистецтв. — Випуск 15. — Львів: ЛНАМ., 2004. — С. 154-163.
42. Тканко 3., Коровицький О. Моделювання костюма в Україні XX століття. —
Львів: Брати Сиротинські і К, 2000. — 96 с.
43. Українська культура: історія і сучасність /За редакцією Черепанової С. — Львів:
Світ, 1994. — 456 с.
44. Українське народне мистецтво: Тканини і вишивки /Упорядник Манчурова Н.Д.,
Сидорович С. Й. — К.: Державне видавництво образотворчого мистецтва і музичної
літератури УРСР, 1960. Таб. XXI-XL.
45. Українська минувшина: Ілюстрований етнографічний довідник. — К.: Либідь,
1993. — С. 110-132.
46. Українське народне мистецтво: Вбрання/Упорядники С.Г.Колос (керівник),
У.ВХургула, Б.Б.Лабановський, О.Т.Полюскевич. — К.: Державне видавництво
образотворчого мистецтва і музичної літератури УРСР, 1961. — 326 с.
47. Фисун О. Космологія українських рушників. //Артанія. Альманах, кн.4., 1998. —
. С. 35-39.
48. Chlupova Anna a kolektiv. Slovenska ludova vysivka: techniky a ornamentika. —
Bratislawa: Alfa, 1985. — 538 c.
49. Цибульова Г., Гаврилова Г. Ручне вишивання. — К.: Мистецтво, 1982. — С. 8-29.
50. Шеретюк Л. Художня вишивка. — К.: Техніка, 1996.
51. Шухевич В. Гуцульщина: Перша і друга частини. Репринтне відтворення
видання 1899. — Верховина: «Гуцульщина», 1997. — 352 с.
281
Навчальне видання
Сусак Катерина Романівна
Стеф'юк Ніна Андріївна
Українське народне вишивання
техніки
методологія
методика
Навчальний посібник
Авторське редагування
Коректор українського тексту Турянська Жанна Дмитрівна
Англійський відповідник тексту Гаврилей Вікторія Михайлівна
Редактори англійського тексту Джуді Девіс (Judy Davis) USA
Джеральд Бреніфф (Gerald Braniff) USA
Вишиті роботи
(із фондів власних збірок, курсові та дипломні роботи студентів Косівського державного інституту
прикладного та декоративного мистецтва, виконані під керівництвом авторів книги)
Оформлення практичних зразків Микола Кузів
Світлини Івана Ваха
Комп'ютерне макетування, верстка та дизайн
Іван Вах,
Оксана Липка
Комп'ютерний набір
Дзвенислава Івасюк
Відповідальний за випуск
Олександр Ростунов
Фінансова підтримка видання:
Всеукраїнський фонд відтворення видатних пам'яток історико-архітектурної
спадщини імені О.Гончара
голова правління фонду Петро Тимофійович Тронько,
виконавчий директор фонду Ірщенко Валентина Михайлівна,
Національна Спілка майстрів народного мистецтва України
голова Спілки Шевченко Євген Ігорович
Побажання та зауваження щодо вдосконалення навчального посібника
будуть радо сприйняті авторами із висловленням вдячності за Вашу небайдузкість
в торуванні шляху до національного самозбереження.
Підписано до друку 09.02.2006 р. Формат 60x84/8
Папір офсет. Гарнітура Тайме. Друк офсет.
Ум. друк. арк. 35,12. Обл.-вид. арк. 34,26.
Тираж 1000.
Видавництво - «Видавництво «Науковий світ»»®.
Свідоцтво ДК № 249 від 16.11.2000 р.
м. Київ, вул. Боженка, 17, оф. 504.
тел. 200-87-13, 200-87-15.
E-mail: nsvit@mail.ru <mailto: nsvit@mail.ru>
Зам. № 6-88
ЗАТ «Книга» 04053, МСП, Київ-53, Артема, 25.
Свідоцтво про внесення до Державного реєстру виготівників
Серія ДК № 2325 від 25.10.2005 р.
Educational edition
Susak Kateryna Bomanivna
Stefyuk Nina Andriivna
Ukrainian Folk Embroidery
techniques
methodology
methods
Practical course
Ukrainian text proofreader Turyanska Zhanna Dmytrivna
Translator into English Havryley Viktoria Mykhailivna
English text editors Judy Davis (USA)
Gerald Braniff (USA)
Embroidered works
(from the funds of private collections, Kosiv State Institute of Applied and Decorative Arts students'
undergraduate and degree works, executed under supervision of the authors of the book)
Photographs Ivan Vakh
Computer model, page proof and design
Ivan Vakh
Oxana Lypka
Computer composition
Dzvenyslava Ivasyuk
Responsible for the publication
Olexandr Bostunov
Financial support of the edition:
O. Honchar All-Ukrainian Fund of Recreation of the Outstanding Monuments of Historical
and Architectural Heritage
President of the board of the Fund Petro Tymofiyovych Tronko,
Executive director of the Fund Irshchenko Valentyna Mykhailivna,
Ukrainian National Folk Masters' Union
Head of the Union Shevchenko Evhen Ihorovych
The authors will readily accept the readers' wishes and comments
as to the improvements of the practical course. They are grateful to them for
not being indifferent while paving the way towards national self-preservation.
Су сак Катерина Романівна - перший ректор Косівського
державного інституту прикладного та декоративного
мистецтва. Понад 36 років пропрацювала в даному навчальному t
закладі на посадах викладача, заступника директора, директора,
ректора. В теперішній час активно працює в аспекті фахової J.
підготовки спеціалістів. Напрямки наукових досліджень:
автохтонність вишивання, відтворення прадавніх технік та
орнаментів.
31995 року - член Національної Спілки МНМ України, ч ' і Л
член НТШ. Заслужений працівник освіти України Нагород- рі
жена орденом Княгині Ольги III ступеня,членкиня "Союзу
українок", веде активну громадську роботу серед жінок - " " (, •
Косівщини.
Susak Kateryna Romanivna is the first rector of Kosiv State
Institute of Applied and Decorative Arts. She has been working
at this very educational establishment as a teacher, deputy director,
director and rector for over 36 years. Nowadays she works actively
in the fields of professional training of the specialists. Scientific
research tendencies: autochthon embroidery, recreation of ancient
techniques and ornaments.
She has been a member of the Ukrainian National Folk Masters'
Union and a member of Shevchenko Scientific Society since 1995.
She is an Honored Education of Ukraine Worker. She was decorated
with the Order of Princess Olha of the third degree. She is a member
of the Ukrainian Women's Union and takes tic five part in public
work among women of Kosivshchyna.
\
Стеф'юк Ніна Андріївна - старший викладач кафедри
моделювання одягу Косівського державного інституту
прикладного та декоративного мистецтва, член Спілки дизайнерів
України, займається педагогічною та науковою діяльністю
на кафедрі моделювання одягу, керівник курсових і дипломних
проектів з моделювання сучасного одягу за мотивами народного
мистецтва України.
Stefyuk Nina Andriivna is the senior lecturer of the department
of clothes modeling at Kosiv State Institute of Applied and Decorative
Arts, member of the Ukrainian Designers' Union. She is engaged
in pedagogic and scientific activity of the department of clothes
modeling and is the supervisor of undergraduate and degree
projects on modern clothes modeling following the motifs of folk
art of Ukraine.