/


Теги: magazine magazine quilts and more
Год: 2020


Текст
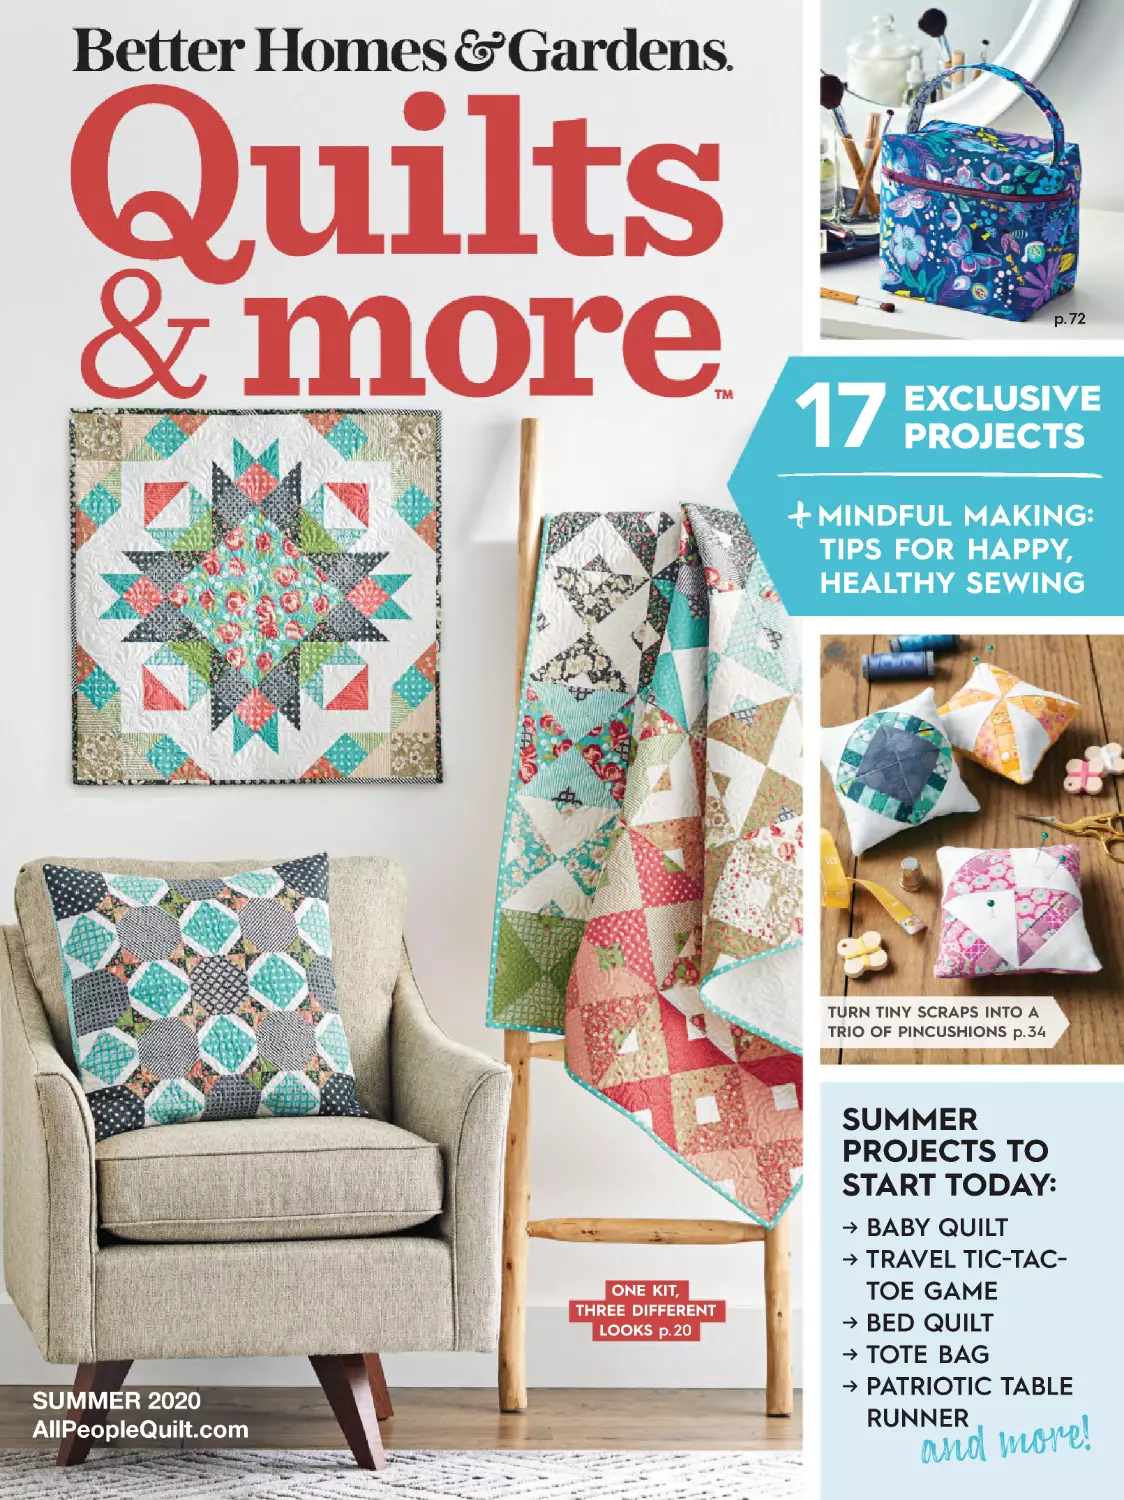
17 EXCLUSIVE
PROJECTS
SUMMER
PROJECTS TO
START TODAY:
→ BABY QUILT
→ TRAVEL TIC-TAC-
TOE GAME
→ BED QUILT
→ TOTE BAG
→ PATRIOTIC TABLE
RUNNER
+MINDFUL MAKING:
TIPS FOR HAPPY,
HEALTHY SEWING
and more!
ONE KIT,
THREE DIFFERENT
LOOKS p. 20
TURN TINY SCRAPS INTO A
TRIO OF PINCUSHIONS p. 34
p. 72
SUMMER 2020
AllPeopleQuilt.com
Meet Moda’s newest designer!
Cathe Holden’s love of vintage typography
and promotional art began with her career in
advertising. As an artist and crafter, Cathe uses
vintage ephemera to create fun, attention-getting
components in her collage work. After years of flea
market shopping, her collection of handwritten
recipe cards, old photos, delightful sewing notions,
and vintage needlework makes for beautiful fabric
for quilts, decor, applique, and more.
Yardage, Precuts, and Patterns Available May 2020!
modafabrics.com
© 2020 moda fabrics • all rights reserved
AllPeopleQuilt.com
1
When I was 13 years old, I was
diagnosed with the back condition
scoliosis, a sideways curvature of the
spine, and was told I’d need to wear
a back brace for the next two years.
It was the first major medical issue
I’d had, and to my teenage mind,
it meant my life was over. It wasn’t,
of course, but having scoliosis did
change some things. My doctor told
me the important thing was to “know
my limits” (well, that and no sustained
lifting, but the idea of acknowledging
my limitations was my favorite
takeaway). It turns out learning to understand my limits was pretty
good life advice in general. How many of us struggle with things like
stress and burnout because we push ourselves too hard and take on
too much in our daily lives? We always think we can do it all, but it’s
okay to admit that we can’t.
I was lucky because all my favorite hobbies—sewing, knitting,
drawing, and reading—were back-friendly. However, after one
particularly long bout of sewing on a deadline, I found that I could
barely move the next day. It made me realize that even activities we
don’t think of as active, such as quilting, have ramifications on our
bodies. It made me evaluate what healthy sewing meant to me.
It turns out I wasn’t the only one talking about it either—the idea
of healthy sewing has become quite the buzz-worthy topic around
the office. We’ve compiled some of our favorite sewing health and
wellness facts and tips into a story called “Mindful Making,” starting
on page 14. If, like me, you’ve ever come away from a sewing
session in pain, I urge you to read it. We’ve also scattered “Mindful
Moments” throughout the issue that provide reader tips or health-
related ideas for particular projects. My hope is that you’ll continue
quilting in fun and healthy ways.
Joanna Burgarino
Editor
What does
“healthy sewing”
mean to you?
Sewing is healthy when I’m
careful to keep it a positive part
of my life—both physically and
emotionally. It means setting
guidelines for myself so that
I don’t wear down my body
physically through poor habits
or overcommitting myself to
deadlines but also guarding
against psychological dangers,
like dwelling on criticism.
Healthy sewing doesn’t
happen by accident.
— Heidi Staples, designer of
Two Can Play on page 58
People often laugh and say,
“sewing is my therapy.” This year,
after my husband passed away,
I found sewing really was the
therapy I needed. Hard projects
give me something to think about
besides him. Sewing 500 triangle-
squares lets me unwind with
repetitive work. I think it would
be accurate to say I’m quilting my
way through grief.
— Jo Kramer, designer of Yankee
Doodle on page 48
Healthy sewing means happy
sewing. If it’s not enjoyable
because it is too stressful or too
frustrating, then it’s not healthy
to me.
— Kelli Marshall, designer of
Pop Star on page 64
Quilting is my creative outlet and
helps reduce my stress levels.
There’s nothing more satisfying
than some one-on -one time with
my Innova long-arm sewing
machine.
— V icki Ruebel, designer of
Abstract Floral on page 92
search: American
Patchwork & Quilting
@allpeoplequilt
from the editor
1 From the Editor
6 Now Trending
8 Stuff We Love
Discover our favorite books and products
for on-the-go stitching.
10 One Block Three Ways
See a Prairie Queen block
in three colorways.
12 Sewing Toolbox
Learn about types of sewing
machine needles.
14 Mindful Making
Explore the mental and physical benefits
of healthy sewing habits.
104 Dear Quilter
Our readers have questions;
we have answers.
33 Finishing Pillows
Find out how to add piping and create
snug pillow corners.
39 Foundation Piecing
Discover how to foundation-piece a block.
71 Accurate 1/4 " Seams
Improve the accuracy of your seams for
easier piecing.
90 Make & Use Templates
Learn how to make and use templates.
96 Back to Basics
Review what you need to know—from
start to finish.
20 Scrap Lab
See three projects featuring the same set of fabrics.
34 Take a Spin
Three foundation-pieced pincushions utilize one
rotated scrappy block to achieve different looks.
40 Breath of Fresh Air
Strip piecing and stitch-and-flip units combine in a
bed quilt that’s easier to sew than it looks.
48 Yankee Doodle
Be ready for Fourth of July with a red-white-and-blue
table runner.
52 Rays of Sunshine
Use up your scraps in a baby quilt that’s a modern
take on Rail Fence blocks.
58 Two Can Play
Tic-tac-toe just got cuter with a travel-size game
board and button pieces.
64 Pop Star
Ombré and novelty prints add flair to the star blocks
in a bright throw.
72 Pack Your Bags
Carry your travel essentials in a stylish train-case-style
toiletry bag.
78 Inner Glow
Change up the look of a classic Log Cabin throw by
dividing the blocks with pure white sashing.
84 Strip Ease
Try your hand at sewing strips to a muslin foundation
with a simple yet feminine tote.
92 Abstract Floral
Turn triangle-squares into a bold, modern wall quilt.
LEARN MORE
PROJECTS
IN THIS ISSUE
2 Quilts & More | SUMMER 2020
CONTENTS
AllPeopleQuilt.com
3
pick your projects SUMMER 2020
34
40
72
84
92
78
48
64
52
58
20
CRAFTS GROUP
Group Editor JODY SANDERS
Editors DORIS BRUNNETTE, JOANNA BURGARINO
Associate Editor DIANE TOMLINSON
Audience Insights Manager LINDSAY MAYLAND
Design Director KIMBERLY MORGAN METZ
Group Art Director NICOLE DEAN TEUT
Art Director ELIZABETH STUMBO
Graphic Designer ALISON GAMM
Administrative Assistant LORI EGGERS
EDITORIAL ADMINISTRATION
Editorial Directors JENNIFER DORLAND DARLING, JILL WAAGE
Managing Director, SIM KARMAN WITTRY HOTCHKISS
Creative Director MICHAEL D. BELKNAP
Assistant Managing Editor JENNIFER SPEER RAMUNDT
Senior Copy Editor ERIKA BJORKLUND
Business Manager, Editorial CINDY SLOBASZEWSKI
Lead Business Office Assistant GABRIELLE RENSLOW
Director, Premedia Services AMY TINCHER-DURIK
Director, Quality JOSEPH KOHLER
Director, Meredith Photo Studio REESE STRICKLAND
Photo Studio Set Construction Manager DAVE DECARLO
Photo Studio Business Manager TERRI CHARTER
Premedia Trafficking Supervisor PATRICIA J. SAVAGE
Color Quality Analyst PAMELA POWERS
FOR EDITORIAL QUESTIONS
EMAIL: APQ@MEREDITH.COM
OR WRITE US AT AMERICAN PATCHWORK & QUILTING,
1716 LOCUST ST., LN-204, DES MOINES, IA 50309-3023
MEREDITH SPECIAL INTEREST MEDIA
Vice President & Group Publisher SCOTT MORTIMER
Vice President, Group Editorial Director STEPHEN ORR
Vice President, Marketing JEREMY BILOON
Executive Account Director DOUG STARK
Director, Brand Marketing JEAN KENNEDY
Associate Director, Brand Marketing BRYAN CHRISTIAN
Senior Brand Manager KATHERINE BARNET
FINANCIAL ADMINISTRATION
Associate Business Director JENNA BATES
Business Managers LISA CARLSON, MARISA CLARK
CIRCULATION
Consumer Marketing Manager ED LICHINSKY
ADVERTISING & BUSINESS DEVELOPMENT
Advertising Sales Director
AMY GATES amy.gates@meredith.com
Sales Promotion Manager
BETHANY PETERSON bethany.peterson@meredith.com
Sales Assistant
ASHLEY JACOBS ashley.jacobs@meredith.com
ADVERTISING OPERATIONS
1716 Locust St. , Des Moines, IA 50309-3023
Associate Production Director PATRICK MCGOWAN
Production Managers JENNIFER MAY, ANGELA SCHOPP
FOR ADVERTISING QUESTIONS
PHONE: 515/284-3575
OR WRITE US AT AMERICAN PATCHWORK & QUILTING,
1716 LOCUST ST., LN-200, DES MOINES, IA 50309-3023
For syndication or international licensing requests or reprint and reuse permission, email syndication@meredith.com .
PRINTED IN THE USA
MEREDITH NATIONAL MEDIA GROUP
President, Meredith Magazines DOUG OLSON President, Consumer Prod ucts TOM WITSCHI
President, Chief Digital Officer CATHERINE LEVENE Chief Business & Data Officer ALYSIA BORSA
Chief Revenue Officer MICHAEL BROWNSTEIN Marketing & Integrated Communications NANCY WEBER
SENIOR VICE PRESIDENTS
Consumer Revenue ANDY WILSON Corporate Sales BRIAN KIGHTLINGER Direct Media PATTI FOLLO
Research Solutions BRITTA CLEVELAND Strategic Sourcing, Newsstand, Production CHUCK HOWELL
Digital Sales MARLA NEWMAN The Foundry MATT PETERSEN Prod uct & Technology JUSTIN LAW
VICE PRESIDENTS
Finance CHRIS SUSIL Business Planning & Analysis ROB SILVERSTONE
Consumer Marketing STEVE CROWE Corporate Communications JILL DAVISON
Vice President, Group Editorial Director STEPHEN ORR Director, Editorial Operations & Finance GREG KAYKO
MEREDITH CORPORATION
President & Chief Executive Officer TOM HARTY | Chief Financial Officer JASON FRIEROTT
Chief Development Officer JOHN ZIESER | Chief Strategy Officer DAPHNE KWON
President , Meredith Local Media Group PATRICK MCCREERY | Senior Vice President, Human Resources DINA NATHANSON
Chairman STEPHEN M. LACY | Vice Chairman MELL MEREDITH FRAZIER
Editor JOANNA BURGARINO
Designer ALISON GAMM
Product Editor LINDSAY MAYLAND
Administrative Assistant LORI EGGERS
Contributing Writers MARTHA GAMM, EMILY LARSON ,
DEL WALKER
Contributing Quilt Testers JULIE DOY, MARTHA GAMM ,
SARAH HUECHTEMAN
Contributing Copy Editors ANGELA INGLE,
MARY HELEN SCHILTZ
Contributing Technical Editors CAROLYN BEAM, LISA FLYR
Contributing Proofreader MARY HEATON
Contributing Illustrator LIZ GORDON
Contributing Stylists CAROL LINNAN, KATE MALO,
LESLIE POYZER
We're celebrating 25 years of
promoting local independent
quilt shops! Plan your next
quilting adventure using this
travel guide to 10 top shops.
• Enjoy detailed shop profiles.
• Make one or more of the shops'
exclusive projects.
• Treat yourself to a kit—they're
offered with all 10 projects.
Coming Soon
On Sale May 1
Find us online:
AllPeopleQuilt.com
search: AllPeopleQuilt
Retailers:
To order American Patchwork
& Quilting®, Quilt Sampler®,
Quilts & MoreTM, and other
quilting magazines, email
apq2@meredith.com or call
866/378-1064.
Letters & Comments:
Share your thoughts with
us at apq@meredith.com
Note to readers:
It is permissible to make and
publicly display a single finished
product of any project in this
issue, including for purposes of
competitive winnings up to $1,000,
so long as visible credit is given
to the designer and Quilts & More
magazine.
Stitch Harmony provides
balanced stitches to make
my projects look like the pros.
Knowing I made my
quilt from start to finish
is a great feeling.
I love the flexibility of
being able to sit or
stand while I quilt.
THE ALL NEW
Quilt your way, every day! The speedy, versatile Regent makes
it easy create large or small projects while you quilt standing up
or sitting down. Regent also includes a table with the new Stitch
HarmonyTM Stitch Regulator built right in! Use it for perfectly-
balanced stitches or go hands-on for complete control. It’s the
ideal longarm quilting machine for any sewing room.
It’s how you quilt.
I don’t have much space,
but I love making big
projects, so this machine
is perfe ct!
BabyLock. co m
Now Trending
BABY STEPS
Celebrate a new
arrival with a fast-
to-make quilt.
AllPeopleQuilt
. com/848
6 Quilts & More | SUMMER 2020
Get “sew-cial”! Connect with our online
community to learn, inspire, and share.
connEct with us
search: American Patchwork & Quilting
@allpeoplequilt
ON THE ROAD
Find ideas for projects you can
sew from the passenger seat.
AllPeopleQuilt.com/850
RED, WHITE & OOOH
Create patriotic quilts
to display all summer.
AllPeopleQuilt.com/849
PACK YOUR BAGS
Stitch a handmade tote to carry to
a quilt retreat or a farmers market.
AllPeopleQuilt.com/851
stuff we love
See which products and books,
the editors are loving right now.
8 Quilts & More | SUMMER 2020
ENGLISH PAPER PIECING
MADE MODERN TEMPLATES
Get the look of English paper piecing with your
sewing machine. Cut fabric 1⁄4" larger than the sticky
hexagon templates, then use the hexagon as a
guide to sew shapes together. Templates come in
hexagon sizes from 3⁄4" to 2" and can be reused up
to eight times. $12.95; sewforever.com
TINY WORLD: EMBROIDERY!
If you’re often on the go, learning to embroider, or
encouraging a child to try a new craft, this kit is for you. It
contains all the supplies you need to stitch a cute cactus,
as well as a booklet with step-by-step instructions and
embroidery basics. $14.99; odddot.com
PILLOW TALK
Author Edyta Sitar presents 25 pillow cover patterns
for every season and style. The pillows use a variety of
techniques including English paper piecing and appliqué.
$27.48; fatquartershop.com
FRESH QUILTS FROM TRADITIONAL BLOCKS
The 14 quilts in this book showcase traditional blocks in
modern settings. Each quilt features tips from author
Sarah J. Maxwell on how to experiment with color and
design as well as challenges to get you out of your sewing
comfort zone. $21.99; foxchapelpublishing.com
QUICK
PRESS SEAM
ROLLER
Press seams with ease
using this stylish tool from Lori
Holt. It is ideal for foundation
piecing, curved seams, and
fabric you can’t iron, such as
laminates. $14.98; fatquartershop.com
A BrIgHt HaNdLe
HeLpS YoU SpOt It
In A ClUtTeReD
WoRk SpAcE.
ROXANNE GLUE STICK
Instead of pins, use a smooth-
application glue stick for concise
placement of appliqué shapes and
embellishments before sewing.
$6.62; colonialneedle.com
QUILT
FINISHING
TUMBLER
Fuel up for a day
of sewing with an
insulated coffee mug
sporting a clever
message. $24.95;
apqshop.com
606 IRON ON ADHESIVE
Adhere appliqué shapes or
embellishments permanently with a
heat-activated spray. Once the spray
is added, position the shapes and
reposition as needed. When you’re ready
to adhere the shapes permanently,
simply press the shapes for 45 seconds.
The adhesive stands up to washing
and wear. $10.43; odifusa.com
PERFECTLY
PRETTY PATCHWORK
Sew common blocks into
beautiful quilts; then
feature the same block
in matching decor items,
such as a pillow, wall art, or
pincushion. This book by
author Kristyne Czepuryk
features 16 patterns.
$25.99;
shopmartingale.com
IDEAL SEAM GUIDE
Get accurate seams every time with a repositionable
10"-long seam guide. A notch allows it to work with wide
feed dogs or a walking foot as well. Bonus: The rubber
guide sticks to fabric, so you can use it to sew diagonal
lines on triangle-squares without marking or to chain-piece
easily. $20; sewverysmooth.com
WARM CROCHET SCISSORS
Available in two styles and four colors (we chose Elizabeth
in silver), these TSA-compliant scissors have an antique look
and travel well. $13.99; warmcrochet.com
one block three ways
Composed of simple Four-Patch units and triangle-squares,
the Prairie Queen block works up quickly.
10 Quilts & More | SUMMER 2020
PRETTY IN PINK
The softer ivory
background and light
pink prints form a plus-
sign design through the
middle of the block.
Fabrics are from the
Buffalo Flats collection
by Violet Craft for
Robert Kaufman Fabrics
(robertkaufman.com).
FEELING SHEEPISH
Fussy-cut sheep are
framed by red prints
that mimic the look
of a Churn Dash
block. Fabrics are
from the Farm Charm
collection by Gingiber
for Moda Fabrics
(modafabrics.com).
The red prints against the low-
volume background emphasize
the Churn Dash shapes.
Dark blue squares draw the eye
to the center of each block,
while the alternating colors in
the Four-Patches add motion.
A secondary Square-in-a-Square
design appears where the darker
pink and yellow print triangle-
squares touch between blocks.
CLASSIC
CONFIGURATION
In the traditional block
layout, the colors in the
Four-Patch units match
those in the triangle-
squares. Fabrics are from
the Fluidity collection by
PDR, LLC for P&B Textiles
(pbtex.com).
Go to AllPeopleQuilt.com/852 for instructions to make a
9"-square-finished Prairie Queen block.
SeE FoUr BlOcKs
SeWn ToGeThEr!
12 Quilts & More | SUMMER 2020
1. UNIVERSAL
Best for most piecing and quilting
projects. This needle type in size 80/12 is
one of the most common and probably
is in your sewing machine right now. It also
comes in the smaller 70/10 size and larger
90/14 size. The slightly rounded point
of the needle is sharp enough to pierce
woven cotton fabrics but not so sharp that
it will damage knits. Works well with all-
purpose thread.
2. MICROTEX /SHARP
Best for piecing, topstitching, and sewing
tightly woven fabrics like batiks. Microtex
needles, sometimes called “sharps,” have a
very fine point that makes straight, precise
stitching. These needles come in a variety
of sizes.
3. DENIM
Best for heavy woven fabrics, such as
denim and canvas. Denim needles have
a sharp point, narrow eye, and thick shaft,
allowing them to sew through heavy fabrics
while maintaining an accurate, straight line.
4. JERSEY/BALLPOINT
Best for knits and loosely woven fabrics.
Jersey needles are a medium ballpoint
needle, which means they have a blunt
tip designed to push aside the fibers of
knit fabrics without breaking the fibers
or creating large holes.
5. LEATHER
Best for leather, synthetic leather, and
vinyl. Leather needles have a special
wedge-shape point that makes them
stronger for piercing heavy nonwoven
fabrics. These needles leave holes in
the fabric and aren’t designed to be
used on woven and knit fabrics.
sewing toolbox: sewing machine needles
Sewing machine needles are vital to the success of your sewing
projects. The following are five popular types of needles and their
most common uses.
1
2
3
4
5
Be SuRe To
ChAnGe YoUr
NeEdLe AfTeR
8 HoUrS Of
SeWiNg!
Elements by Ghazal Razavi of FIGO features
24 colors in abstract depictions of earth,
water, fire and air in subtle, tonal and textural
looks. The textures depicting the artwork are
not random but rather carefully drawn out in
a mark-making style and aesthetic.
Visit FIGOFabrics.com to view the entire
collection and use the Product Finder tool to
locate a quilt shop that carries this line.
INSPIRED BY
THE FOUR ELEMENTS
@FIGOFabrics
Air
Water
Fire
Earth
By Ghazal Razavi of FIGO Studio
Sewing has undeniable mental health benefits. Taking care
of its physical components can maximize those benefits.
14 Quilts & More | SUMMER 2020
Mindful Making
Sewing is a great stress
reliever because you can
absorb yourself in your
project and forget about
your problems for a while.
—
Monique Jacobs, designer of Inner Glow
on page 78
Quilting as a hobby has many healthy rewards. Like
many hobbies, however, it has hidden risks if you
sew improperly. Bad posture, a table at the wrong
height, long periods of sitting in one position, and
repetitive motion can all lead to injury. If you get
injured, you can’t enjoy sewing and, over time,
you may avoid sewing altogether because you
know it may cause you pain.
How then does a quilter get the maximum amount
of benefits and enjoyment from her hobby while
minimizing the risk of it affecting her health?
In the next few pages, the staff and designers of
Quilts & MoreTM magazine explore the influence
of sewing on mental health and how to take care
of your physical health as you sew. We found that
mindfulness and wellness can mean different things
depending on each quilter and her situation. Utilize
the information and tips to find out what it means
for you personally to be “sew healthy.”
Take Action
Brain & Mental Health
Try improvisational piecing.
Let your creativity lead you
down unexpected paths by
making improvisationally
pieced blocks. Sew
together pieces at random,
and even try chopping
up your pieced block and
putting it back together.
The lack of a pattern to
follow can be very freeing.
Make your sewing room
a social-media–free zone.
We love posting our quilts
on Instagram and other
social media platforms,
but if keeping up with
social media is distracting
you or stressing you out,
give yourself a technology
break. Put on some music,
get in your sewing groove,
and relax.
Be a little selfish.
How often do you find
yourself sewing projects for
others, especially projects
with deadlines? It can easily
turn your relaxing hobby
into a source of stress! Start
a project that’s just for you—
one with no time limit where
you get to pick your favorite
prints, blocks, and colors.
In a 2019 Harris Poll survey, 36% of American women said they are more
stressed in their daily lives than they were five years ago. And 81% of the
women surveyed said that “we live in a society that glorifies being busy.”
Stress, anxiety, and burnout are on the rise.
Studies done on the effects of crafting on the brain have shown it
increases the amount of the neurotransmitter called dopamine,
which helps fight against anxiety and depression.
Crafts, such as knitting, have been used as therapy for years, including as
occupational therapy to treat soldiers from World War I who had post-
traumatic stress disorder (PTSD).
Sewing is my escape from life’s stresses.
It’s my outlet to let my mind create and run
wild. It brings back my sanity so that I can be
present with all my other life
responsibilities.
—
Jamie Siel, designer of Rays of Sunshine on page 52
I have found so
much friendship
and love in the
Instagram quilting
community.
Someone is always
willing to lend a
hand, offer support,
or share their
stash. Being part
of such a close-
knit community is
important to my
well-being.
—
Stephanie Luiere,
designer of Breath of Fresh Air
on page 40
Did you know?
Sew Healthy
3
2
1
Hand sewing, including
embroidery, English paper
piecing, and hand quilting,
has seen a resurgence over the
last few years as crafters look
for ways to slow down and be
intentional with their stitching.
Focusing on the smooth,
repetitive motion of hand
stitching can be a remedy
for the stress of daily life, and
it distracts a person from the
various anxieties that might
otherwise occupy her mind.
Don’t discount the benefits of
machine sewing! Sewing as a
hobby gives sewers a creative
outlet to express themselves
amid the busyness of their
daily responsibilities, which
can be emotionally draining
or frustrating.
I
L
L
U
S
T
R
A
T
I
O
N
S
S
H
U
T
T
E
R
S
T
O
C
K
/
I
V
E
C
T
O
R
16 Quilts & More | SUMMER 2020
Take Action
Visit your optometrist.
Proper corrective lenses
can help prevent you from
squinting at your work,
alleviate eye strain, and
eliminate the need to hunch
forward to see better. For
most people under 50 years
of age, you should visit
the optometrist every 2–3
years. If you are over 50,
or if you have a history of
vision problems, you should
go yearly.
Plan to sew with the light.
Try to adjust your schedule
to sew during the day so
that the room has more
natural light. If you must sew
at night, compensate with
additional daylight and LED
bulbs to see properly and
reduce strain.
Buy a magnifying glass,
especially for handwork.
A magnifying glass will
greatly decrease eye strain
as well as the temptation to
squint. Even more beneficial
are products that combine
the magnifying glass with a
daylight bulb.
Eye strain can result from intense use of your eyes, whether working
on the computer for hours or concentrating on your sewing, and it can
lead to headaches, a sore neck, and many other problems.
The actual cause of eye strain is the small muscles around your eyes
tiring over time. You often notice the symptoms of eye strain as
soreness around your eyes, behind your eyes, and in your forehead
as well as a dry, burning sensation when you close your eyes.
Eye strain is uncomfortable but temporary. It is often relieved by
stopping the activity that is causing the strain for a while, resting
your eyes, and then starting the activity again.
Did you know?
3
2
1
I take lots of
breaks. If I feel
my eyes getting
stressed from
sewing monotony,
I get up and walk
around or change
what step I am
working on (for
example, I switch
from piecing
to pressing or
from pressing to
cutting).
—
Kelli Marshall, designer of
Pop Star on page 64
Sew Healthy
Lighting matters. Good, natural
(or simulated natural) lighting
helps reduce eye strain, whereas
poor lighting tires your eyes
quickly. Evaluate the lighting in
your sewing space and make
adjustments as necessary.
Try the 20-20-20 rule to prevent
eye strain. Every 20 minutes, look
at something 20 feet away for 20
seconds. This allows your eyes to
relax. It wouldn’t be a bad idea
to get up and stretch as well, since
that will help prevent back pain
from sitting too long.
Don’t position your work too close
to your eyes or your face. Sewing
involves many sharp pins and
rotary-cutter blades, and it is best
to keep your eyes a safe distance
from them. If you have to get too
close to what you’re doing in order
to see, look for other solutions like
getting reading glasses to help
magnify your work or increasing
the light in the room.
I try to move around and not sit for too
long focusing closely on my project.
—
Jessica VanDenburgh, designer of Pack Your Bags: Summer
on page 72
Eye Health
Take Action
Plan your cutting.
Most quilters know that
rotary cutting saves time
because you can cut
through multiple layers of
fabric at once, but it also
can help decrease the
amount of cuts you have to
make. Review your pattern
and look for ways you can
minimize cutting, such as
lining up pieces to trim and
then using a long ruler to
trim them all in one stroke.
Buy a wrist brace or learn
to do a wrist wrap.
Ifyouknowyouareata
point in the sewing process
that will require a lot of
repetitive motion with
your hands, such as hand-
stitching binding or cutting
lots of strips, wear a wrist
brace to protect yourself.
There are many types
available, from compression
gloves to braces with hard
plastic plates. You also can
find resources online on
how to wrap your wrist using
inexpensive athletic wraps
or tape.
The human hand is complex and includes 27 bones,
three major nerves, 34 muscles, and 29 joints.
Repetitive strain injuries (RSI) are some of the most common
causes of hand pain. The repeated motions and positions you
hold your hand in while machine piecing, rotary cutting, and
hand stitching can all cause inflammation over time.
Carpal tunnel syndrome, which involves the median nerve
being pinched by the bones that make up the carpal tunnel in
your wrist and is characterized by numbness in your fingers, is
one of the most common wrist ailments. Other causes of wrist
pain include: arthritis, tendonitis, and neurological conditions.
Contact your doctor if wrist pain persists to determine what is
wrong and the best way to treat it.
Did you know?
3
2
1
When I’m sewing by hand, I always make
sure that the needle is sharp enough to pass
through the fabric without too much effort.
I’m also careful to replace the blade on my
rotary cutter whenever it gets dull so that I
don’t have to put too much pressure on my
wrist as I cut. Whether I’m sewing or cutting,
it’s important to take breaks so that my
fingers and hands have the chance to rest.
—
Heidi Staples, designer of Two Can Play on page 58
Sew Healthy
More and more notions and sewing tools are being designed with
ergonomics in mind. Test products like rotary cutters in the store before
you buy them and see how they fit in your hand. A tool that fits well will
be more comfortable during long sewing sessions.
Die-cutting tools are a good alternative to rotary cutting if you
are prone to wrist pain. Some tools use a hand crank, which could
potentially aggravate the wrist and shoulder when done for long
periods of time. Electric die-cutting tools push the die through the
machine with a motor, eliminating the need to crank.
Change your rotary-cutter blade often. It takes more pressure to cut
with a dull blade, which causes more stress on the wrist.
Hand & Wrist Health
18 Quilts & More | SUMMER 2020
Take Action
Force yourself to move.
One of the biggest dangers
of sewing is sitting too long
in one position. Quilters
often organize their sewing
spaces for maximum
efficiency, with all the tools
they need close at hand,
but that encourages them
to sit even longer. Move
your pressing, cutting, and
sewing stations to different
sides of the room so you
get up, stretch, and walk
throughout the sewing
process.
Anti-fatigue mats help
more than you think.
Place anti-fatigue mats at
your cutting and pressing
stations or long-arm quilting
machine to help take some
of the stress off your back
from standing and leaning.
Set a timer.
In the middle of a project,
it’s easy to lose track of how
long you’ve been working.
Set a timer as a reminder to
take a break.
Improper posture is one of the leading causes of back pain as it
puts pressure on particular vertebrae. Do not roll your shoulders
or lean forward.
Sleep can have a big impact on your back health. A supportive
mattress and sleeping in a side position can help the muscles in
your back relax so you wake up refreshed and pain-free.
Holding your hips, shoulders, or back at odd angles for long
periods of time can lead to spinal discomfort.
Did you know?
3
2
1
I make sure that my sewing
machine is in the correct position so I’m not
leaning over or to the side. I have an office
chair that lets me adjust the back position,
height, and lumbar support, and remove the
arms. Finally, my cutting table is the right
height for me so that I don’t bend over too
much and strain my back.
—
Monique Jacobs, designer of Inner Glow on page 78
Sew Healthy
Make your work station ergonomically correct. When sitting at your
sewing machine, your elbows should be at 90° angles and your wrists
flat. Keep your feet flat on the floor (use a foot rest if you’re short). If
your foot pedal slips, add adhesive grips to the back of it so that you
aren’t extending your spine to chase after it with your foot. Finally, if
you find yourself hunched over or stretching upward, adjust the height
of the table or use bed risers to lift the table.
Sitting for long periods of time is hard on your back. Get an adjustable
chair and add a lumbar support pillow if necessary. Consider sewing
standing up using a standing desk. If your sewing machine has a
start/stop button, it might be easier to use than the foot pedal
when standing.
Look for sewing-machine tables with a hole to drop in your machine.
It will help keep your wrists in a flat position, which reduces wrist and
shoulder tension, especially when quilting on a domestic machine.
Back & Shoulder Health
Take Action
Check out our video
on healthy sewing.
Go to AllPeopleQuilt
. com/853 to watch a video
that goes into more detail
on how to set up your
sewing space to promote
safe and productive sewing.
Learn some new stretches.
Getting up and stretching
will help alleviate a
multitude of aches and
pains in the body, and it will
keep you limber for longer
periods of sewing. Search
online for some simple
hand and back stretches
that you can implement
right in your sewing room.
Always remember to stretch
within your limits and tailor
your stretching routine to
fit your individual needs.
Actively engaging in crafts, including sewing and quilting, can improve
hand-eye coordination. It can also help fend off dementia and keep your
fingers nimble as you age.
Social involvement and community are important for mental health.
Quilting groups that share your interests can help you forge healthy
relationships.
Sewing can help you lower your blood pressure and maintain a healthy
heart. The stress-relieving qualities have physical health benefits as well
as mental health benefits.
Did you know?
3
2
1
I stopped worrying about perfection and
learned to focus on just being happy that I
finished a pattern or learned a new skill.
—
Kelli Marshall, designer of Pop Star on page 64
To keep sewing
stress free, I try
to clean up after
myself as I go. I’m
not perfect and
things are still a
bit messy, but it
is so much nicer
to sew without
piles of fabric and
scraps cluttering
the table.
—
Leila Gardunia, designer of
Take a Spin on page 34
Sew Healthy
Don’t forget the small safety
things—make sure cords aren’t
running across the room, tie
back your hair if you keep it
long, and use a magnetic wand
to pick up any stray pins on
the floor.
Be careful with rotary cutters.
They are sharp and it can be
easy to have an accident should
one be left open or if old blades
aren’t covered before they are
thrown in the trash. Always
cut away from you and make
sure the blade stays firmly
against the acrylic ruler so that
it doesn’t jump.
Quilting should never be painful.
If you find you are getting
mysterious aches and pains,
stop and evaluate your sewing
habits. Try changing habits one
by one until you can determine
what the cause is. When in
doubt, take more breaks!
Overall Health
20 Quilts & More | SUMMER 2020
SCRAP LAB
DESIGN
CHALLENGE
MEET THE
DESIGNERS:
Susan Ache
@yardgrl60
We challenged three designers to
create something using a kit containing
one Layer Cake (forty-two 10" precut
squares) of aqua, green, white, tan,
pink, black, and coral prints and florals
from the Bloomington collection
by Lella Boutique and 1∕2 yard of
solid white from the Bella Solids
collection, both from Moda Fabrics
(modafabrics.com). Our designer
friends—Jessie Zeigler of Threaded
Quilting Studio, Susan Ache, and fabric
designer Vanessa Goertzen of Lella
Boutique—showed off their styles and
created the projects you see here.
PHOTOGRAPHER CARSON DOWNING
To order a kit of one Layer Cake and
1∕2 yard solid white for $55 ppd. (Utah
residents $57.67 ppd.) in continental
U.S ., contact Vanessa Goertzen,
vanessa@lellaboutique.com.
Jessie Zeigler
Threaded Quilting Studio
threadedquilting.com
Vanessa Goertzen
Lella Boutique
lellaboutique.com
EnTeR fOr yOuR cHaNcE
tO wIn tHiS kIt!
Visit AllPeopleQuilt.com/
winscraplab. Contest rules
are on page 26.
1
2
3
Presented by
Moda Fabrics
P
h
o
t
o
:
J
u
s
t
i
n
J
o
n
e
s
P
h
o
t
o
g
r
a
p
h
y
WALL HANGING
1
PILLOW
2
BABY QUILT
3
C
H
A
I
R
:
R
e
e
g
a
n
H
i
g
h
L
e
g
S
w
i
v
e
l
C
h
a
i
r
(
l
a
-
z
-
b
o
y
.
c
o
m
)
22 Quilts & More | SUMMER 2020
WALL HANGING
Finished size:
251∕2" square
Finished block:
18" square
MATERIALS
Yardages and cutting
instructions are based
on 42" of usable fabric
width.
❏ 1∕2 yard solid white
(block, setting triangles)
❏ 10" square each aqua
lattice print, black
dot, coral dot, aqua
diamond print, black
small floral, black lattice
print, green dot, green
lattice print, and aqua
large floral (block)
❏ 10" square each green
stripe, aqua dot, pink
stripe, tan stripe, tan
floral, coral small floral,
and coral stripe (setting
triangles)
❏ Enough assorted black
print 21∕2"-wide strips
in varying lengths to
total 124" in length
for binding (Designer
Jessie Zeigler used four
leftover 10" squares
from the kit.)
❏ 1 yard backing fabric
❏ 34"-square batting
❏ Acrylic ruler with 45°
angle line
CUT FABRICS
Cut pieces in the following order.
From solid white, cut:
■ 8—23∕4×73∕4" rectangles
■ 2—71∕4" squares
■ 8—23∕4×5" rectangles
■ 12—23∕4" squares
From each aqua lattice print and black
dot, cut:
■ 1—71∕4" square
From coral dot, cut :
■ 4—23∕4" squares
From each aqua diamond print, black
small floral, black lattice print, green
stripe, and aqua dot, cut:
■ 8—23∕4" squares
From each green dot and green lattice
print, cut:
■ 2—23∕4×5" rectangles
From aqua large floral, cut:
■ 1—91∕2" square
From each pink stripe and tan
stripe, cut:
■ 1—55∕8" square, cutting each diagonally
twice in an X to make four pink stripe
large triangles and four tan stripe large
triangles total
From tan floral, cut:
■ 4—35∕8" squares
From coral small floral, cut :
■ 4—31∕8" squares, cutting each in
half diagonally to make eight small
triangles total
From coral stripe, cut:
■ 4—23∕4×5" rectangles
A large-scale floral is the center of attention in a stellar wall quilt.
DESIGNER JESSIE ZEIGLER (THREADEDQUILTING.COM)
WALL HANGING
1
AllPeopleQuilt.com
23
ASSEMBLE BLOCK
Measurements include 1∕4" seam allowances.
Sew with right sides together unless otherwise
stated.
Press seams in directions indicated by
arrows on diagrams. If no direction is
specified, press seam toward darker fabric.
1) Use a pencil to mark two diagonal lines in
an X on wrong side of each solid white 71∕4"
square. (To prevent fabric from stretching
as you draw lines, place 220-grit sandpaper
under each square.)
2) Layer a marked solid white square atop an
aqua lattice print 71∕4" square. Sew together,
stitching 1∕4" on each side of drawn lines
(Diagram 1).
3) Referring to Diagram 2, cut layered
71∕4" squares horizontally and vertically
through the center into four 35∕8" squares.
Then cut each 35∕8" square on its diagonal
line to make eight triangles. Press open
one triangle to make an aqua triangle-
square (Diagram 3); press open remaining
triangles to make eight aqua triangle-
squares total. Using the 45° angle line on an
acr ylic ruler, trim each unit to 23∕4" square
including seam allowances.
4) Repeat steps 2 and 3 using remaining
marked solid white square and black dot
71∕4" square to make eight black triangle-
squares.
5) Referring to Diagram 4, lay out one solid
white 23∕4" square, two aqua triangle-
squares, and one coral dot 23∕4" square
in pairs. Sew together pieces in pairs.
Join pairs to make a corner unit. The
unit should be 5" square including seam
allowances. Repeat to make four corner
units total.
6) Use a pencil to mark a diagonal line on
wrong side of each aqua diamond print and
black small floral 23∕4" square.
“ When I saw these pretty fabrics,
my first inclination was to make
something with a star. Star quilts are
some of my favorites. ”
—
JESSIE ZEIGLER, DESIGNER
71⁄4"
sq.
DIAGRAM 1
DIAGRAM 2
DIAGRAM 3
DIAGRAM 4
23⁄4"
sq.
WALL HANGING
1
24 Quilts & More | SUMMER 2020
7) Align a marked aqua diamond print
square with one end of a solid white 23∕4×5"
rectangle (Diagram 5; note direction of
marked line). Sew on marked line. Trim
seam allowance to 1∕4" and press open
attached triangle. Add a second marked
aqua diamond print square to opposite end
of rectangle to make an aqua Flying Geese
unit. The unit should be 23∕4×5" including
seam allowances. Repeat to make four aqua
Flying Geese units total.
8) Repeat Step 7 using marked black small
floral squares, green dot 23∕4×5" rectangles,
and green lattice print 23∕4×5" rectangles to
make four green Flying Geese units total.
9) Referring to Diagram 6, lay out two
black triangle-squares, one aqua and one
green Flying Geese unit, and two black
lattice print 23∕4" squares in two rows. Sew
together pieces in rows. Join rows to make
a side unit. The unit should be 5×91∕2"
including seam allowances. Repeat to make
four side units total.
ASSEMBLE SETTING TRIANGLES
1) Referring to Diagram 8, sew pink stripe
large triangles to two adjacent edges of a
tan floral 35∕8" square to make a pink stripe
pieced triangle. Repeat to make a second
pink stripe pieced triangle.
2) Repeat Step 1 using tan stripe large
triangles to make two tan stripe
pieced triangles.
3) Repeat Assemble Block , steps 6 and 7,
page 23, using green stripe 23∕4" squares and
solid white 23∕4×5" rectangles to make four
green stripe Flying Geese units.
10) Referring to Diagram 7 and noting that
side units with matching green fabrics are
placed opposite each other, lay out corner
units, side units, and aqua large floral 91∕2"
square in three rows. Sew together pieces
in rows. Join rows to make block. The block
should be 181∕2" square including seam
allowances.
working with bias edges
The bias edges on the triangles can
warp easily because they have more
stretch than pieces cut on the grain.
Avoid handling the bias edges as
much as possible, use lots of pins,
and consider applying a lightweight
interfacing to the squares before cutting
triangles to help minimize stretch.
TIP
91⁄2"
sq.
DIAGRAM 7
DIAGRAM 8
35⁄8"
sq.
5
5
⁄
8
"
DIAGRAM 5
23⁄4"
sq.
23⁄4×5"
23⁄4"
sq.
DIAGRAM 6
AllPeopleQuilt.com
25
4) Referring to Diagram 9, lay out two coral
small floral small triangles, two aqua dot
23⁄4" squares, and a green stripe Flying
Geese unit in a row. Join pieces to make
a coral floral row. Repeat to make four
rows total.
5) Repeat Assemble Block , steps 6 and 7,
using solid white 23⁄4" squares and coral
stripe 23⁄4×5" rectangles to make four
coral stripe Flying Geese units.
6) Using acrylic ruler, trim a solid white
23⁄4×73⁄4" rectangle at a 45° angle starting
at bottom left-hand corner (Diagram 10).
Repeat to make four units total with angle
at bottom left-hand corner, then repeat to
make four units total with angle starting at
bottom right-hand corner.
7) Referring to Diagram 11, lay out left and
right Step 6 units on short ends of a coral
stripe Flying Geese unit. Sew together
pieces to make a white row. Repeat to
make four white rows total.
8) Referring to Diagram 12, lay out a pink
stripe pieced triangle, coral floral row, and
white row. Sew together rows to make
a setting triangle. Repeat to make a second
setting triangle.
9) Repeat Step 8 using tan stripe
pieced triangles to make two more
setting triangles.
23⁄4"
sq.
31⁄8"
DIAGRAM 9
23⁄4×73⁄4"
23⁄4×73⁄4"
23⁄4"
23⁄4"
DIAGRAM 10
DIAGRAM 11
DIAGRAM 12
MAKE IT
YOURS
Coloring Diagram
on Pattern
Sheet 1.
WALL HANGING
1
26 Quilts & More | SUMMER 2020
ASSEMBLE WALL HANGING TOP
1) Referring to Quilt Assembly Diagram,
lay out block and setting triangles, noting
setting triangles with matching stripe
fabrics are in opposite corners.
2) Join setting triangles to opposite edges
of block. Add remaining setting triangles
to remaining edges to complete wall
hanging top. Press seams toward setting
triangles.
FINISH WALL HANGING
1) Layer wall hanging top, batting, and
backing; baste. (For details, see Finishing,
page 100.)
2) Quilt as desired. Designer Jessie Zeigler
machine-quilted her wall hanging using a
digital pantograph called Feathered Spirals
from longarmleague.com/store .
Contest Rules:
NO PURCHASE NECESSARY TO ENTER OR
WIN. Subject to Official Rules at
www.facebook.com/allpeoplequilt. The
Summer Scrap Lab Sweepstakes begins at
9:00 a.m . C.T. on 4/24/20 and ends at 11:59
p.m . C.T. on 7/24/20. Open to legal residents
of the 50 United States, and the District of
Columbia, 18 years or older. Limit one (1)
entry per person, using only (1) email address
and one (1) Facebook account. Void where
prohibited. Sponsor: Meredith Corporation.
This sweepstakes is in no way sponsored,
endorsed, administered by, or associated with
Facebook. You are providing your information
to Sponsor and not to Facebook.
3) Using diagonal seams, sew together
assorted black print 21⁄2"-wide strips
to make a pieced binding strip. Bind
wall hanging with pieced binding strip.
(For details, see Binding, page 102.)
QUILT ASSEMBLY DIAGRAM
AllPeopleQuilt.com
27
PILLOW
Finished size: 20" square
MATERIALS
Yardages and cutting
instructions are based
on 42" of usable fabric
width.
❏ 10" square each pink
small floral, green small
floral, coral small floral,
black dot, black lattice
print, black stripe, aqua
dot, and black diamond
print (pillow top)
❏ 1⁄2 yard solid white
(pillow top)
❏ 2—10" squares each
black small floral and
aqua diamond print
(pillow top)
❏ 24"-square muslin
(lining)
❏ 1⁄2 yard backing fabric
❏ 24"-square batting
❏ 20"-square pillow form
CUT FABRICS
Cut pieces in the following order.
From pink small floral, cut:
■ 16—13∕4" squares
From each green small floral and coral
small floral, cut:
■ 8—13∕4" squares
From black small floral, cut:
■ 32—13∕4" squares
From solid white, cut:
■ 48—21∕2" squares
From each black dot, black lattice print,
black stripe, and aqua dot, cut :
■ 4—41∕2" squares
From black diamond print, cut :
■ 1—41∕2" square
From aqua diamond print, cut:
■ 8—41∕2" squares
From backing fabric, cut:
■ 2—123∕4×201∕2" rectangles
ASSEMBLE UNITS
Measurements include 1∕4" seam
allowances. Sew with right sides together
unless other wise stated.
Press seams in directions indicated
by arrows on diagrams. If no direction
is specified, press seam toward darker
fabric.
1) Use a pencil to mark a diagonal line
on wrong side of each floral
13∕4" square and solid white 21∕2"
square. (To prevent fabric from
stretching as you draw lines,
place 220-grit sandpaper under
each square.)
2) Align a marked pink small floral
square with a corner of a black
dot 41∕2" square (Diagram 1; note
direction of drawn line). Sew on
drawn line; trim excess fabric, leaving
1∕4" seam allowance. Press open
attached triangle to make Unit A.
The unit should be 41∕2" square
including seam allowances. Repeat
to make four A units total.
3) Align a marked green small floral
square with bottom left-hand corner
of a black lattice print 41∕2" square
(Diagram 2; note direction of drawn
line). Sew on drawn line; trim excess
fabric, leaving 1∕4" seam allowance.
Press open attached triangle. Repeat
with a marked coral small floral square
on bottom right-hand corner to make
Unit B. The unit should be 41∕2" square
including seam allowances. Repeat to
make four B units total.
Tiny hourglasses twist and turn like pieces in a
kaleidoscope in a pillow of Snowball blocks.
DESIGNER SUSAN ACHE
MACHINE QUILTER SUSAN ROGERS
PILLOW
41⁄2"
sq.
13⁄4"
sq.
Unit A
DIAGRAM 1
41⁄2"
sq.
13⁄4"
sq.
Unit B
DIAGRAM 2
2
PILLOW
2
28 Quilts & More | SUMMER 2020
4) Align two marked pink small floral squares
on opposite corners of a black stripe 41∕2"
square (Diagram 3; note direction of drawn
line). Sew on drawn line; trim excess fabric,
leaving 1∕4" seam allowance. Press open
attached triangle. Repeat using marked
green small floral and coral small floral
squares on remaining corners to make
Unit C. The unit should be 41∕2" square
including seam allowances. Repeat to
make four C units total.
5) Repeat Step 4 using four marked pink small
floral squares and black diamond print 41∕2"
square to make Unit D (Diagram 4).
6) Repeat Step 4 using marked solid white
squares, aqua diamond print 41∕2" squares,
and aqua dot 41∕2" squares to make eight
aqua diamond subunits and four aqua dot
subunits total (Diagram 5).
7) Align a marked black small floral square
with bottom left-hand corner of an aqua
diamond subunit (Diagram 6; note
direction of drawn line). Sew on drawn
line; trim excess fabric, leaving 1∕4" seam
allowance. Press open attached triangle.
Repeat using a second marked black small
floral square on bottom right-hand corner
to make Unit E. The unit should be 41∕2"
square including seam allowances. Repeat
to make eight E units total.
8) Align two marked black small floral squares
on opposite corners of an aqua dot subunit
(Diagram 7; note direction of drawn line).
Sew on drawn line; trim excess fabric,
leaving 1∕4" seam allowance. Press open
attached triangle. Repeat on remaining
corners to make Unit F. The unit should
be 41∕2" square including seam allowances.
Repeat to make four F units total.
ASSEMBLE PILLOW TOP
1) Referring to Pillow Top Assembly
Diagram and noting rotation of units,
arrange units A–F in five rows.
2) Sew together units in rows. Join rows to
make pillow top.
FINISH PILLOW
1) Layer pillow top, batting, and muslin lining;
baste. (For details, see Finishing, page 100.)
2) Quilt as desired. Susan Rogers machine-
quilted an allover design of zigzag lines and
circles across the pillow top.
3) Trim batting and muslin lining even with
pillow top edges.
41⁄2"
sq.
13⁄4"
sq.
Unit C
DIAGRAM 3
Unit D
DIAGRAM 4
41⁄2"
sq.
21⁄2"
sq.
DIAGRAM 5
13⁄4"
sq.
Unit E
DIAGRAM 6
13⁄4"
sq.
Unit F
DIAGRAM 7
“ When designing my pillow, I wanted
the hourglasses to look like they were
moving. I didn’t even realize there
was a secondary pattern of stars! ”
—
SUSAN ACHE, DESIGNER
AllPeopleQuilt.com
29
4) Turn under 1∕4" along one long edge of each
backing fabric 123∕4×201∕2" rectangle; press.
Turn under 1∕4" again and stitch in place to
hem pillow back pieces. Each pillow back
piece should be 121∕4×201∕2" including seam
allowances.
5) Referring to Pillow Back Assembly
Diagram, overlap hemmed edges of pillow
back pieces by 4" to make a 201∕2" square.
Stitch across overlaps to make pillow back.
6) Layer quilted pillow top and pillow back
with right sides together. Stitch 1∕4" from
outer edges to make pillow cover.
7) Turn pillow cover right side out through
opening in pillow back. Insert pillow form
through opening to complete pillow.
practice your quilting
Pillow covers are excellent projects
for building your machine-quilting
skills, especially on your home sewing
machine, because they aren’t too big.
The smaller quilt sandwich is easier to
maneuver as you learn the basics, and
you’ll be finished in practically no time!
TIP
201⁄2"
2
0
1
⁄
2
"
Stitch.
F
o
l
d
F
o
l
d
121⁄4"
121⁄4"
4"
overlap
Stitch.
PILLOW BACK ASSEMBLY DIAGRAM
PILLOW TOP ASSEMBLY DIAGRAM
MAKE IT
YOURS
Coloring Diagram
on Pattern
Sheet 1.
30 Quilts & More | SUMMER 2020
QUILT
Finished size: 481∕2" square
Finished block: 8" square
MATERIALS
Yardages and cutting
instructions are based on
42" of usable fabric width.
❏ 1∕2 yard solid white (blocks)
❏ 24—10" squares assorted
fabrics (Group 1) (Designer
Vanessa Goertzen used one
square each black large
floral, black stripe, aqua
dot, black small floral, aqua
stripe, aqua large floral,
tan lattice print, tan small
floral, white large floral, tan
medium floral, green stripe,
tan large floral, coral dot, tan
stripe, green lattice print,
green diamond print, pink
stripe, green small floral,
coral stripe, pink small floral,
coral small floral, and pink
lattice print; and two squares
white small floral.)
❏ 12—10" squares assorted
fabrics (Group 2) (Vanessa
used one square each black
lattice print, black medium
floral, black dot, black small
floral, aqua lattice print, aqua
medium floral, coral large
floral, pink small floral, coral
medium floral, and tan small
floral; and two squares aqua
diamond print.)
❏ 3—10" squares assorted
fabrics (Group 3) (Vanessa
used one square each black
diamond print, green small
floral, and white dot.)
❏ 1∕2 yard aqua dot (binding)
❏ 31∕4 yards backing fabric
❏ 57"-square batting
CUT FABRICS
Cut pieces in the following order.
To ensure a good mix of fabrics in
her blocks, Designer Vanessa Goertzen
divided her Layer Cake into a group
of 24 squares (Group 1), a group of
12 squares (Group 2), and a group
of three squares (Group 3). Group 1
should have three black , three aqua,
three white, five tan, four green, three
coral, and three pink squares. Group 2
should have four black, four aqua, two
coral, one pink , and one tan square.
Group 3 should have one black, one
green, and one white square. Keep
pieces from each group together as
you cut.
From solid white, cut:
■ 24—21∕2×61∕2" rectangles
■ 48—21∕2" squares
From each 10" square in Group 1, cut:
■ 4—21∕2×61∕2" rectangles
■ 4—21∕2" squares
From each 10" square in Group 2, cut:
■ 2—21∕2×61∕2" rectangles
■ 2—21∕2" squares
From each 10" square in Group 3, cut:
■ 16—21∕2" squares
From aqua dot, cut:
■ 6—21∕2×42" binding strips
Variety is the slice of life in a baby quilt composed of
Courthouse Steps blocks that are cut and put back together.
DESIGNER VANESSA GOERTZEN (LELLABOUTIQUE.COM)
MACHINE QUILTER NATALIA BONNER (PIECENQUILT.COM)
BABY QUILT
3
AllPeopleQuilt.com
31
PLAN BLOCKS
Sort fabrics into sets using the following
combinations. Each finished block is
composed of two sets of fabric, and the sets
of fabric are taken from different groups for
variety.
Refer to the photo, opposite, if you would
like to replicate the fabric combinations that
Vanessa used. Note that she cut extra 21∕2"
squares from Group 2 and swapped them for
some of the 21∕2" squares from Group 3.
1) Gather 24 sets of two matching 21∕2×61∕2"
rectangles from Group 1, two matching
21∕2" squares from Group 1, and one solid
white 21∕2" square.
2) Gather 24 sets of two matching 21∕2×61∕2"
rectangles from Group 1, two matching
21∕2" squares from Group 1, and one 21∕2"
square from Group 3.
3) Gather 12 sets of two matching 21∕2×61∕2"
rectangles from Group 2, two matching
21∕2" squares from Group 2, and one 21∕2"
square from Group 3.
4) Gather 12 sets of two solid white 21∕2×61∕2"
rectangles, two solid white 21∕2" squares,
and one 21∕2" square from Group 3.
5) Pair together a set from Step 1 and a set
from Step 2. These sets will make one
block. Repeat pairing together sets from
steps 1–4 to decide which fabrics will
appear in each block .
ASSEMBLE BLOCKS
Measurements include 1∕4" seam allowances.
Sew with right sides together unless other wise
stated.
Press seams in directions indicated by
arrows on diagrams. If no direction is
specified, press seam toward darker fabric.
1) Select one pair of sets from Plan Blocks. For
first set in pair, sew matching 21∕2" squares
to opposite sides of nonmatching 21∕2"
square (Diagram 1). Add matching 21∕2×61∕2"
rectangles to remaining edges to make
framed unit (Diagram 2). The unit should
be 61∕2" square including seam allowances.
2) Repeat Step 1 for second set in pair to make
a second framed unit. Keep the pair of
framed units together.
3) Repeat steps 1 and 2 with remaining pairs
to make 72 framed units divided into 36
pairs total.
4) Referring to Diagram 3, cut each framed
unit in half on the diagonal to make two
pieced triangles. Each pair should now be
a set of four pieced triangles.
“This project is great for mixing the many fabrics in a Layer Cake.
Arrange the blocks in color order like I did, or come up with your own
scrappy variation!”
—
VANESSA GOERTZEN, DESIGNER
make it bigger
It’s easy to change the baby quilt into a 641⁄2×721⁄2" throw!
Purchase a second kit so you’ll have two Layer Cakes and one
yard of solid white, which is enough fabric to make 72 blocks.
Arrange them in nine rows of eight blocks each.
TIP
21⁄2"
sq.
DIAGRAM 1
21⁄2×61⁄2"
DIAGRAM 2
DIAGRAM 3
BABY QUILT
3
32 Quilts & More | SUMMER 2020
5) Referring to Diagram 4, sew together
nonmatching pieced triangles from one
set in pairs. Join pairs to make a block. The
block should be 81⁄2" square including seam
allowances.
6) Repeat Step 5 with remaining sets of pieced
triangles to make 36 blocks total.
ASSEMBLE QUILT TOP
1) Referring to Quilt Assembly Diagram, lay
out blocks in six rows. Vanessa arranged
her blocks so that the black , aqua, tan,
green, pink , and coral blocks were grouped
together diagonally across the quilt top.
2) Sew together blocks in rows. Press seams
in one direction, alternating direction with
each row. Join rows to complete quilt top.
Press seams in one direction.
FINISH QUILT
1) Layer quilt top, batting, and backing; baste.
(For details, see Finishing, page 100.)
2) Quilt as desired. Natalia Bonner machine-
quilted an allover swirl design across the
quilt top.
3) Bind quilt with aqua dot binding strips.
(For details, see Binding, page 102.)
QUILT ASSEMBLY DIAGRAM
81⁄2"
DIAGRAM 4
AllPeopleQuilt.com
33
learn more: finishing pillows
Most pillow patterns feature basic seamed edges. For pillows with
flair, learn how to add piping and create crisp corners.
ADDING PIPING
1. To figure width of fabric strip for
piping, determine width of piping
cord, add seam allowance, and
multiply by two. Cut enough strips
to total length of cord plus 1⁄4". Join
short ends of strips to make one
continuous piping strip.
2. Fold piping strip in half lengthwise,
wrong side inside; press and open.
Insert piping cord inside strip against
fold. Align long raw edges and pin.
Starting about 1" from one short
end of strip, use a zipper foot to sew
piping strip closed with a scant 1⁄4"
seam allowance. Sew close to cord
but not through it (Photo 1). Stop
sewing about 1" from remaining
short end, leaving end of strip
unsewn.
3. On right side of pillow top, align
long raw edges of piping strip with
raw edge of pillow top, starting in
middle of one side and curving strip
around corners; pin. Make small
snips in piping strip seam allowance
at corners (Photo 2). When short
ends of piping strip meet, cut
cord ends so they abut each other,
fold in one piping strip short edge
1⁄4", and layer folded end of strip
over other end (Photo 3).
4. If making a pillow with an envelope-
style back, layer a hemmed pillow
back piece atop pillow top, right
sides together, with right-hand edges
of both pieces aligned. Repeat with
second hemmed pillow back piece,
aligning left-hand edges. The two
pillow back pieces should overlap
about 4". Sew around outer edges
through all layers. Turn right side
out through overlapped pillow back
pieces to make pillow cover.
5. If making a pillow with a zipper back,
layer zipper back atop pillow top,
right sides together with zipper slider
pulled halfway down. Sew around
outer edges through all layers. Turn
right side out through open zipper
to make pillow cover.
STITCHING CORNERS
Ever wonder how to get tight, smooth
corners on pillows? Try this!
1. Using your favorite marking tool,
mark 3⁄8" in from each corner of
pillow cover (Photo 4). Then mark
1⁄4" in from center of each side
edge. Using an acrylic ruler, connect
center mark of one side to adjacent
corner mark, making a slightly
angled seam allowance.
2. Sew on drawn line.
3. Trim across each corner, being careful
not to cut into seam allowance
(Photo 5).
1
2
4
3
5
AllPeopleQuilt.com
35
CUT FABRICS
Cut pieces in the following order.
Because the blocks are foundation-pieced,
fabric pieces are cut larger than necessar y. You’ll
trim them to the correct sizes after stitching them
to the foundation material.
From each pink print, gray print, yellow print, and
solid white 5" square, cut:
■ 4 triangles, cutting each square diagonally twice in
an X for 24 triangles total
PREPARE FOUNDATION PAPERS
The Pincushion Foundation Pattern is on Pattern
Sheet 1.
1) Photocopy or use a pencil to trace Pincushion
Foundation Pattern 12 times onto lightweight copy
paper, tracing paper, or foundation material of your
choice. If tracing, include all lines and numbers.
(Alternatively, download the foundation pattern
at AllPeopleQuilt.com/854 and print 12 patterns
on your foundation material. Be sure to print
foundation patterns at 100% or full scale and check
the accurac y of printing with 1"-square guide.)
PINCUSHION
Finished size: 4" square
Finished block:
2" square
MATERIALS
FOR THREE
PINCUSHIONS
❏ 28—11∕4" squares
each assorted pink
prints, assorted teal
prints, and assorted
yellow prints (block
positions 1–7)
❏ 5" square (charm
square) each pink
print, gray print, and
yellow print (block
position 8)
❏ 3—5" squares (charm
squares) solid white
(block position 9)
❏ 41∕2" square each pink
print, teal print, and
yellow print (backing)
❏ Polyester fiberfill or
crushed walnut shells
❏ Lightweight copy
paper, tracing paper,
or foundation material
of your choice
❏ Flat head pins
❏ Add-A -Quarter ruler
(optional)
Just one repeated block makes three pincushions!
Rotating a foundation-pieced block unveils many
design possibilities.
DESIGNER LEILA GARDUNIA (LEILAGARDUNIA.COM)
PHOTOGRAPHER ADAM ALBRIGHT
take a spin
36 Quilts & More | SUMMER 2020
2) Cut out foundation patterns roughly
1∕4" outside dashed lines to make 12
foundation papers.
ASSEMBLE PINCUSHION TOPS
To foundation-piece, stitch fabric pieces to a
foundation paper with marked side of paper
facing up and fabric pieces layered underneath.
The resulting pieced unit is a mirror image
of the foundation paper. When foundation-
piecing, use a tiny stitch length (12–16 stitches
per inch). For additional instructions, refer to
“Foundation Piecing” on page 39.
Press seams in directions indicated by
arrows on diagrams. If no direction is
specified, press seam toward darker fabric.
1) Turn a foundation paper over so
marked side is down. Place assorted
pink print position 1 square right side
up over position 1 of foundation paper
(Diagram 1). Pin with a flat head pin.
Hold paper up to light to check that fabric
piece completely covers position 1.
2) Turn foundation paper over so marked
side is up. Referring to Diagram 2, fold
foundation paper back on the stitching
line between positions 1 and 2.
3) Measure 1∕4" from folded edge of
foundation paper. Trim using a rotar y
cutter and clear ruler to create 1∕4" seam
allowance (Diagram 3). If using an Add-A-
Quarter ruler to create 1∕4" seam allowance,
place ruler lip against folded edge of paper
and use rotar y cutter to trim along edge of
ruler. Unfold paper after trimming.
4) Working on unmarked side of foundation
paper, align edge of assorted pink print
position 2 square with trimmed edge of
pink print position 1 square with right
sides together; pin and check placement of
position 2 square (see “Check Placement,”
opposite).
5) Working on marked side of foundation
paper, sew on stitching line through
all layers, extending stitching past
beginning and end of line by a few
stitches (Diagram 4). Turn paper
over. Press open position 2 piece using
a dry iron, pressing seam toward
newly added piece (Diagram 5).
1
5
3
8
9
7
2
4
6
5
9
7
4
6
4
5
1
5
3
8
9
7
2
4
6
DIAGRAM 1
Unmarked side of paper
Marked side of paper
1
5
3
8
9
7
2
4
6
1
2
3
4
DIAGRAM 2
1
5
3
8
9
7
2
4
6
1⁄4"
DIAGRAM 3
AllPeopleQuilt.com
37
6) In the same manner as before, fold
foundation paper on stitching line
between position 3 and positions 1 and
2 unit. Trim 1∕4" from folded edge.
7) Working on unmarked side of foundation
paper, align edge of pink print position 3
piece with trimmed edge of positions 1 and
2 unit with right sides together; pin
and check placement of position 3 piece.
8) Working with marked side of foundation
paper up, sew on stitching line between
position 3 and positions 1 and 2 unit
through all layers, extending stitching past
beginning and end of line by a few stitches.
9) Continue adding pieces in order, trimming,
stitching, and pressing in the same manner,
until you have pieced entire foundation
paper; press, leaving paper in place. Using
a rotar y cutter and a clear ruler, trim
along dashed outer lines to make a pink
block (Diagram 6). The block should be
21∕2" square including seam allowances.
check placement
Pin with a flat head pin on the
stitching line between the two
positions you are sewing. Flip the
top fabric piece open. Hold the unit
up to the light to see through the
paper; make sure the fabric piece
completely covers the new position
and extends into the next position
that will be sewn by at least 1∕4". If
fabric piece doesn’t cover, reposition
and recheck until it does.
TIP
1
5
3
8
9
7
2
4
6
1
5
3
8
9
7
2
4
6
5
9
7
4
6
5
DIAGRAM 4
Unmarked side of paper
Marked side of paper
1
5
3
8
9
7
2
4
6
1
5
3
8
9
7
2
4
6
DIAGRAM 5
Unmarked side of paper
1
5
3
8
9
7
2
4
6
DIAGRAM 6
Trimmed block
Marked side of paper
38 Quilts & More | SUMMER 2020
“ In 2017, I started a series of paper-pieced triangle-
squares as a way to relax and play with fabric. I loved
picking through my box of scraps. I still have them up
on my website!”
—
LEILA GARDUNIA, DESIGNER
10) Repeat steps 1–9 to make four pink
blocks total.
11) Referring to Diagram 7 and noting rotation
of blocks, sew together pink blocks in
pairs. Join pairs to make pink pincushion
top. The pincushion top should be 41∕2"
square including seam allowances. Remove
foundation papers carefully to avoid pulling
or distorting blocks.
12) Repeat steps 1–11 to make teal and yellow
pincushion tops (Diagram 8).
4) Repeat steps 1 and 2 using yellow pincushion
top and yellow print 41∕2" square to complete
yellow pincushion.
FINISH PINCUSHIONS
1) Referring to Diagram 9, lay pink
pincushion top atop pink print 41∕2"
square. Sew around all edges, beginning
and ending with a backstitch and leaving
a 11∕2" opening on one side. Clip corners,
being careful not to cut into stitching.
2) Turn pieces right side out. Stuff firmly
with polyester fiberfill. Hand-sew opening
closed to complete pink pincushion.
3) Repeat steps 1 and 2 using teal pincushion
top and teal print 41∕2" square to complete
teal pincushion.
DIAGRAM 7
DIAGRAM 8
Yellow pincushion top
Teal pincushion top
11⁄2"
opening
DIAGRAM 9
learn more: foundation piecing
Often called paper piecing, foundation piecing involves stitching
fabric to a marked foundation paper to easily make accurate blocks.
AllPeopleQuilt.com
39
HOW TO FOUNDATION-PIECE
1. On the unmarked side of
the foundation paper, place the
position 1 fabric piece right side
up over the position 1 foundation
area; pin (Photo 1). Turn over
and use a light box or window to
ensure that fabric completely covers
position 1 area, with about 1⁄2"
extending past all lines (Photo 2).
2. With marked side of foundation
paper facing up, fold paper back
on line between positions 1 and 2.
(Because the paper is folded over,
it will look like the unmarked
side is facing up.) Line up ruler
so that 1⁄4" of fabric extends
past folded edge of paper; trim
fabric (Photo 3). Unfold.
3. On unmarked side, align edge of
position 2 piece with edge
trimmed in Step 2; pin. Turn paper
over and stitch on line between
positions 1 and 2, beginning
and ending a few stitches past
marked line (Photo 4, marked
side; Photo 5, unmarked side).
4. Fold back paper on line between
positions 1 and 2, and trim so
1⁄4" extends past folded edge
(Photo 6). On unmarked side,
press open position 2 piece.
5. Continue trimming and adding
pieces in numerical order
until block is assembled. Trim
around block, leaving a 1⁄4"
seam allowance. Carefully
remove foundation paper.
1
2
5
4
3
6
BEST PRACTICES
• Use a tiny stitch length and a larger
needle so the foundation material
will easily tear away.
• Try an Add-A-Quarter ruler, shown
in photos 3 and 6, which fits snugly
against the folded edge of the
paper, making it easier to trim 1⁄4".
• Slip a piece of cardstock against
each marked line before folding
paper back for more accurate results.
• Sew as straight as possible on the
marked lines.
• Fine-point tweezers are great for
gently pulling out small paper bits.
Strip piecing, stitch-and-flip units, squares, and
rectangles combine in a quick-to-make bed quilt.
DESIGNER STEPHANIE LUIERE
MACHINE QUILTER DEBBIE INGRAM OF STRAWBERRY SWING STUDIO
PHOTOGRAPHER ADAM ALBRIGHT
breath
O
F
fresh air
AllPeopleQuilt.com
41
42 Quilts & More | SUMMER 2020
QUILT
Finished size:
931⁄2" square
Finished blocks:
Block A—9×15";
Block B—15" square
MATERIALS
Yardages and cutting
instructions are based
on 42" of usable fabric
width.
❏ 23⁄8 yards solid white
(Block A, border strips,
block rows, sashing
rows)
❏ 21⁄2 yards dark teal
print (blocks A and B,
border strips, block
rows)
❏ 11⁄3 yards blue print
(Block A, border strips,
block rows)
❏ 1⁄2 yard dark pink print
(Block A)
❏ 2 yards teal print
(Block B, binding)
❏ 21⁄4 yards light pink
print (Block B)
❏ 3⁄4 yard medium pink
print (Block B)
❏ 2—1⁄4-yard pieces
chartreuse prints
(Block B)
❏ 81⁄2 yards backing
fabric
❏ 102"-square batting
FABRICS are from the
Playground collection
by Dylan Mierzwinski
for Windham Fabrics
(windhamfabrics.com).
CUT FABRICS
Cut pieces in the following order.
From solid white, cut:
■ 12—31⁄2×42" strips
■ 9—91⁄2" squares
■ 12—31⁄2×91⁄2" rectangles
■ 4—31⁄2" squares
From dark teal print, cut:
■ 24—31⁄2×42" strips
From blue print, cut :
■ 12—31⁄2×42" strips
From dark pink print, cut :
■ 3—31⁄2×42" strips
From teal print, cut:
■ 10—21⁄2×42" binding strips
■ 128—31⁄2" squares
From light pink print, cut:
■ 64—61⁄2" squares
From medium pink print, cut:
■ 6—31⁄2×42" strips
From each chartreuse print, cut :
■ 8—31⁄2" squares
ASSEMBLE A BLOCKS
Measurements include 1⁄4" seam
allowances. Sew with right sides
together unless otherwise stated.
Press seams in directions indicated
by arrows on diagrams. If no direction
is specified, press seam toward darker
fabric.
1) Referring to Diagram 1, sew
together two solid white
31⁄2×42" strips, two dark teal
print 31⁄2×42" strips, and one
blue print 31⁄2×42" strip along
long edges to make Strip Set A.
Repeat to make six A strip sets
total. Cut strip sets into sixty-four
31⁄2"-wide A segments. Set aside
16 A segments to be used as
border units.
2) Referring to Diagram 2, sew
together two dark teal print 31⁄2×42"
strips, two blue print 31⁄2×42" strips,
and one dark pink print 31⁄2×42"
strip along long edges to make
Strip Set B. Repeat to make three
B strip sets total. Cut strip sets into
twenty-four 31⁄2"-wide B segments.
3) Sew together two A segments and
one B segment along long edges to
make Block A (Diagram 3). The
block should be 91⁄2×151⁄2" including
seam allowances. Repeat to make 24
A blocks total.
ASSEMBLE B BLOCKS
1) Use a pencil to mark a diagonal line
on wrong side of each teal print
31⁄2" square. (To prevent fabric
from stretching as you draw lines,
place 220-grit sandpaper under
each square.)
31⁄2"
DIAGRAM 1
Strip Set A
31⁄2"
DIAGRAM 2
Strip Set B
A
A
B
DIAGRAM 3
Block A
MAKE IT
YOURS
Coloring Diagram
on Pattern
Sheet 4.
AllPeopleQuilt.com
43
2) Align a marked teal print square with
top left-hand corner of a light pink print
61∕2" square (Diagram 4; note direction of
marked line). Sew on marked line. Trim
seam allowance to 1∕4" and press open
attached triangle. Add a second marked teal
print square to bottom right-hand corner
of unit to make a corner unit (Diagram 4).
The unit should be 61∕2" square including
seam allowances. Repeat to make 64 corner
units total.
3) Sew together a dark teal print 31∕2×42"
strip and a medium pink print
31∕2×42" strip along long edges to make
Strip Set C (Diagram 5). Repeat to
make six C strip sets total. Cut strip sets
into sixty-four 31∕2"-wide C segments.
31⁄2"
sq.
61⁄2"
sq.
DIAGRAM 4
31⁄2"
Strip Set C
DIAGRAM 5
44 Quilts & More | SUMMER 2020
4) Sew together two C segments and one
chartreuse print 31⁄2" square in a row to
make a center unit (Diagram 6). The
unit should be 31⁄2×151⁄2" including seam
allowances. Repeat to make 16 center
units total.
5) Referring to Diagram 7, lay out four corner
units, two C segments, and a center unit in
three rows. Sew together pieces in top and
bottom rows. Join rows to make Block B.
The block should be 151⁄2" square including
seam allowances. Repeat to make 16 B
blocks total.
ASSEMBLE QUILT TOP
1) Referring to Diagram 8, lay out two solid
white 31⁄2" squares, four A segments, and
three solid white 31⁄2×91⁄2" rectangles in
a row. Sew together pieces to make top
border strip. The strip should be 31⁄2×931⁄2"
including seam allowances. Repeat to make
bottom border strip.
2) Referring to Diagram 9 and noting
rotation of A segments, lay out two A
segments, four B blocks, and three A blocks
in a row. Sew together pieces to make a
block row. Repeat to make four block rows
total. Designer Stephanie Luiere alternated
the two chartreuse prints in her B blocks.
3) Referring to Diagram 10 and noting
rotation of A blocks, lay out two
solid white 31⁄2×91⁄2" rectangles, four
A blocks, and three solid white 91⁄2"
squares in a row. Se w together pieces
to make a sashing row. Repeat to make
three sashing rows total.
4) Referring to Quilt Assembly Diagram,
page 46, lay out top and bottom border
strips, block rows, and sashing rows in
nine horizontal rows. Join rows to complete
quilt top. Press seams in one direction.
A
31⁄2"
sq.
31⁄2×91⁄2"
DIAGRAM 8
DIAGRAM 9
B
A
A
3
1
⁄
2
×
9
1
⁄
2
"
91⁄2"
sq.
DIAGRAM 10
A
31⁄2"
sq.
31⁄2"
sq.
C
C
DIAGRAM 6
C
C
DIAGRAM 7
Block B
Bohemian Rhapsody
Sea Swept
Tone it Down
Star Bright, Star White
Get Together
Shared History
Way Around
Color Me Crochet
Way Around
Create a Classic
Festive Foundations
.
c
o
m
s
h
o
p
P
u
r
c
h
a
s
e
&
P
r
i
n
t
!
V
i
s
i
t
A
P
Q
S
h
o
p
.
c
o
m
t
o
fi
n
d
m
o
r
e
t
h
a
n
2
0
0
q
u
i
l
t
i
n
g
a
n
d
s
e
w
i
n
g
p
a
t
t
e
r
n
s
.
B
u
y
,
d
o
w
n
l
o
a
d
,
a
n
d
p
r
i
n
t
h
a
r
d
-
t
o
-
fi
n
d
p
a
t
t
e
r
n
s
f
e
a
t
u
r
e
d
i
n
p
r
e
v
i
o
u
s
i
s
s
u
e
s
o
f
A
m
e
r
i
c
a
n
P
a
t
c
h
w
o
r
k
&
Q
u
i
l
t
i
n
g
®
,
Q
u
i
l
t
s
&
M
o
r
e
TM
,
a
n
d
Q
u
i
l
t
S
a
m
p
l
e
r
®
.
S
e
a
s
o
n
a
l
S
e
r
i
e
s
Stash & Carry
Only
$2.99!
Only
$2.99!
mindful MOMENT
“Experts are now recommending
that we move every hour, in addition
to 30 minutes of aerobic exercise
each day. To keep me moving more
often, I sew on the main floor of my
house and iron in the basement.
My setup has the added bonus of
reducing any muscle stiffness at the
end of the day.”
—Tara M. Andrews Miles City,
Montana
FINISH QUILT
1) Layer quilt top, batting, and backing; baste.
(For details, see Finishing, page 100.)
2) Quilt as desired. Debbie Ingram machine-
quilted diagonal lines through the 31⁄2"
squares of the quilt top, then added
custom swirl, paisley, and loop designs
to mimic the look of triangle-squares
and hourglass units.
3) Bind with teal print binding strips.
(For details, see Binding, page 102.)
QUILT ASSEMBLY DIAGRAM
A throw pillow is a fast project that can easily
change the look of a room. Quilt tester Sarah
Huechteman transformed one of the Breath
of Fresh Air blocks into a 16"-square-finished
pillow in blue and purple batiks that are
evocative of summers at the beach. Fabrics
are from the Bali Margarita and Superior Solids
collections for Benartex Fabrics (benartex.com).
FREE PATTERN!
AllPeopleQuilt.com/855
Project
Option
AllPeopleQuilt.com
47
48 Quilts & More | SUMMER 2020
TABLE RUNNER
Finished size:
181⁄2×421⁄2"
Finished block:
6" square
MATERIALS
Yardages and cutting
instructions are based
on 42" of usable fabric
width.
❏ 7⁄8 yard mottled white
dot (blocks)
❏ 1⁄2 yard mottled red
dot (blocks)
❏ 7⁄8 yard mottled blue
dot (blocks, binding)
❏ 11⁄2 yards backing
fabric
❏ 27×51" batting
FABRICS are from the
Grunge Hits the Spot
collection by BasicGrey
for Moda Fabrics
(modafabrics.com).
CUT FABRICS
Cut pieces in the following order.
From mottled white dot, cut:
■ 22—31⁄2" squares
■ 176—2" squares
From mottled red dot, cut:
■ 44—2×31⁄2" rectangles
■ 44—2" squares
From mottled blue dot, cut:
■ 4—21⁄2×42" binding strips
■ 44—2×31⁄2" rectangles
■ 44—2" squares
ASSEMBLE BLOCKS
Measurements include 1⁄4" seam
allowances. Sew with right sides
together unless other wise stated.
Press seams in directions
indicated by arrows on diagrams.
If no direction is specified, press
seam toward darker fabric.
The stars align in a patriotic table runner that proudly
displays the red, white, and blue colors of the American flag.
DESIGNER JO KRAMER AND KELLI HANKEN OF JO’S COUNTRY JUNCTION (JOSCOUNTRYJUNCTION.COM)
PHOTOGRAPHER CARSON DOWNING
1) Use a pencil to mark a diagonal line
on wrong side of each mottled white
dot 2" square. (To prevent fabric
from stretching as you draw lines,
place 220-grit sandpaper under
each square.)
2) Align a marked mottled white dot
square with one end of a mottled red
dot 2×31⁄2" rectangle (Diagram 1;
note direction of marked line).
Sew on marked line. Trim seam
allowance to 1⁄4" and press open
attached triangle. Add a second
marked mottled white dot square
to opposite end of rectangle to make
a red Flying Geese unit. The unit
should be 2×31⁄2" including seam
allowances. Repeat to make four
red Flying Geese units total.
yankee doodle
2"
sq.
2×31⁄2"
DIAGRAM 1
“The beauty of small projects is they
sew up quickly, just in time for Fourth
of July or any other holiday.”
—
JO KRAMER, DESIGNER
50 Quilts & More | SUMMER 2020
3) Referring to Diagram 2, arrange four
mottled red dot 2" squares, red Flying
Geese units, and a mottled white dot
31⁄2" square in three rows. Sew together
pieces in rows. Join rows to make a red
block . The block should be 61⁄2" square
including seam allowances.
4) Repeat steps 2 and 3 to make 11 red
blocks total.
5) Repeat steps 2 and 3 using mottled blue dot
pieces instead of mottled red dot pieces to
make 11 blue blocks.
6) Referring to Diagram 3, measure 1⁄4" up
from inner points of Flying Geese units
in middle row of a blue block . Trim off
top portion to make a blue half-block.
Repeat to make a red half-block. Discard
trimmed portions.
2"
sq.
31⁄2"
sq.
DIAGRAM 2
1⁄4"
DIAGRAM 3
AllPeopleQuilt.com
51
ASSEMBLE TABLE RUNNER TOP
1) Referring to Table Runner Assembly
Diagram, lay out red and blue blocks and
half-blocks in three vertical rows.
2) Sew together pieces in each row. Press
seams in one direction. Join rows to
complete table runner top. Press seams
in one direction.
FINISH TABLE RUNNER
1) Layer table runner top, batting, and
backing; baste. (For details, see Finishing,
page 100.)
2) Quilt as desired. Designer Jo Kramer
machine-quilted a diagonal grid across the
table runner top.
3) Bind with mottled blue dot binding strips.
(For details, see Binding, page 102.)
mindful MOMENT
Head, shoulders, knees, and toes ... when you take a sewing break to stretch, don’t
neglect certain parts of your body. Start with stretches for your neck, then move to your
arms, core, legs, and feet. A head-to-toe stretch after an hour of sewing will help prevent
soreness and stiffness you didn’t know were building up.
TABLE RUNNER ASSEMBLY DIAGRAM
52 Quilts & More | SUMMER 2020
QUILT
Finished size:
391⁄2" square
Finished blocks:
10" square
MATERIALS
Yardages and cutting
instructions are based
on 42" of usable fabric
width.
❏ 1 yard total assorted
pink prints (blocks,
binding)
❏ 1⁄2 yard total assorted
yellow prints (blocks)
❏ 1⁄2 yard total assorted
orange prints (blocks)
❏ 11⁄4 yards solid white
(blocks, sashing)
❏ 22⁄3 yards backing
fabric
❏ 48"-square batting
CUT FABRICS
Cut pieces in the following order.
From assorted pink prints, cut :
■ 12—21⁄2×41⁄2" rectangles
■ 24—21⁄2" squares
■ Enough 21⁄2"-wide strips in var ying
lengths to total 180" in length for
binding
From assorted yellow prints, cut :
■ 24—21⁄2" squares
From assorted orange prints, cut:
■ 12—21⁄2×41⁄2" rectangles
■ 24—21⁄2" squares
From solid white, cut:
■ 1—41⁄2×42" strip
■ 2—41⁄2×34" sashing strips
■ 1—41⁄2×18" strip
■ 2—41⁄2×141⁄2" sashing rectangles
■ 6—41⁄2×101⁄2" sashing rectangles
■ 16—21⁄2×101⁄2" rectangles
Wrap your little one in a scrappy baby quilt
that exudes warmth and happiness.
DESIGNER JAMIE SIEL OF SEW BRAINY DESIGNS (SEWBRAINY.COM)
PHOTOGRAPHER CARSON DOWNING
RAYS
OF
sunshine
54 Quilts & More | SUMMER 2020
ASSEMBLE BLOCKS AND HALF-BLOCKS
Measurements include 1⁄4" seam allowances.
Sew with right sides together unless otherwise
stated.
Press seams in directions indicated by
arrows on diagrams. If no direction is
specified, press seam toward darker fabric.
1) Referring to Diagram 1, lay out three each
of assorted pink print 21⁄2" squares, assorted
yellow print 21⁄2" squares, and assorted
orange print 21⁄2" squares; two assorted pink
print 21⁄2×41⁄2" rectangles; two solid white
21⁄2×101⁄2" rectangles; and one orange print
21⁄2×41⁄2" rectangle in five rows.
2) Sew together pink, yellow, and orange
pieces in rows (Diagram 1). Join rows to
make an A block . The block should be
101⁄2" square including seam allowances.
3) Repeat steps 1 and 2 to make four A
blocks total.
4) Repeat steps 1 and 2, switching positions
of pink and orange prints, to make four B
blocks total (Diagram 2).
5) Referring to Diagram 3, cut an A block in
half diagonally to make A1 and A2 half-
blocks. Note direction of diagonal before
you cut. Repeat with a second A block to
make two A1 and two A2 half-blocks total.
6) Repeat Step 5 using B blocks to make two
B1 and two B2 half-blocks (Diagram 4).
ASSEMBLE ROWS
1) Referring to Diagram 5 and noting rotation
of half-blocks, lay out one A2 half-block ,
one solid white 41⁄2×141⁄2" sashing rectangle,
and one B2 half-block , aligning bottom
edges. Sew together pieces to make row 1.
2) Referring to Diagram 6 and noting rotation
of half-blocks and blocks, lay out one A1
half-block , three solid white 41⁄2×101⁄2"
sashing rectangles, one A block, one B
block , and one B2 half-block in a row.
Sew together pieces to make row 2.
DIAGRAM 2
Block B
21⁄2×10 1⁄2"
21⁄2×41⁄2"
21⁄2"
sq.
DIAGRAM 3
A1
A2
DIAGRAM 4
B1
B2
4
1
⁄
2
×
1
4
1
⁄
2
"
A2
B2
DIAGRAM 5
DIAGRAM 1
Block A
21⁄2×10 1⁄2"
21⁄2×41⁄2"
21⁄2"
sq.
AllPeopleQuilt.com
55
3) Referring to Diagram 7 and noting rotation
of half-blocks and blocks, lay out one A2
half-block , three solid white 41∕2×101∕2"
sashing rectangles, one A block, one B
block , and one B1 half-block in a row.
Sew together pieces to make row 3.
4
1
⁄
2
×
1
0
1
⁄
2
"
A1
A
B
B2
DIAGRAM 6
4
1
⁄
2
×
1
0
1
⁄
2
"
B
B1
A
A2
DIAGRAM 7
56 Quilts & More | SUMMER 2020
4) Referring to Diagram 8 and noting rotation
of half-blocks, lay out one A1 half-block ,
one solid white 41⁄2×141⁄2" sashing rectangle,
and one B1 half-block , aligning top edges.
Sew together pieces to make row 4.
ASSEMBLE QUILT TOP
1) Sew together solid white 41⁄2×42" and
41⁄2×18" strips along short edges to make
a 41⁄2×591⁄2" sashing strip.
2) Referring to Quilt Assembly Diagram,
lay out rows 1–4, two solid white 41⁄2×34"
sashing strips, and pieced 41⁄2×591⁄2" sashing
strip in seven rows. Join rows; press seams
toward sashing strips.
3) Referring to Trimming Diagram, trim
sashing strips even with half-blocks to
complete quilt top.
4
1
⁄
2
×
1
4
1
⁄
2
"
A1
B1
DIAGRAM 8
4
1
⁄
2
×
3
4
"
4
1
⁄
2
×
5
9
1
⁄
2
"
QUILT ASSEMBLY DIAGRAM
AllPeopleQuilt.com
57
FINISH QUILT
1) Layer quilt top, batting, and backing; baste.
(For details, see Finishing, page 100.)
2) Quilt as desired. Designer Jamie Siel
machine-quilted parallel straight lines
through the solid white pieces of the
quilt top.
3) Using diagonal seams, sew together
assorted pink print 21⁄2"-wide strips to
make a pieced binding strip. Bind quilt
with pieced binding strip. (For details,
see Binding, page 102.)
bust your scrap collection
Designer Jamie Siel created this modern take on a Rail Fence
quilt to make a dent in her scrap bin. When grouping scraps
from many fabric collections by color, try to preview them in
natural light so that the colors are represented accurately.
TIP
TRIMMING DIAGRAM
58 Quilts & More | SUMMER 2020
CUT FABRICS
Cut pieces in the following order.
From duck print, cut:
■ 1—51⁄2×121⁄2" rectangle
■ 4—11⁄2" squares
From solid white, cut:
■ 2—1×41⁄2" rectangles
■ 6—1×11⁄2" rectangles
From yellow print, cut :
■ 4—11⁄2" squares
From solid blue, cut:
■ 4—11⁄2×51⁄2" rectangles
■ 4—1×41⁄2" rectangles
From frog print, cut:
■ 1—31⁄2×41⁄2" rectangle
■ 1—1×41⁄2" rectangle
From fish print, cut:
■ 1—41⁄2" square
■ 1—31⁄2×41⁄2" rectangle
■ 1—1×41⁄2" rectangle
From yellow stripe, cut:
■ 1—2×42" binding strip
GAME
Finished size: 5×12"
(open), 5×6" (closed)
MATERIALS
Yardages and cutting
instructions are based
on 42" of usable fabric
width.
❏ 9×21" piece (fat
eighth) duck print
(game board unit, kit
exterior)
❏ 5" square each solid
white and yellow print
(game board unit)
❏ 11∕2" square gold print
(game board unit)
❏ 10" square solid blue
(game board unit,
pocket unit)
❏ 5" square frog print
(pocket unit)
❏ 10" square fish print
(pocket unit)
❏ 1∕8 yard yellow stripe
(binding)
❏ 2—51∕2×121∕2"
rectangles batting
❏ Binding clips
❏ 7"-long plastic zipper
❏ Adhesive basting
spray
❏ 3∕4"-diameter button:
brown (closure)
❏ 4"-long piece
1∕8"-wide round
elastic: white
❏ 5—5∕8"-diameter
buttons: tan
(game pieces)
❏ 5—5∕8"-diameter
buttons: brown
(game pieces)
The duck, frog, and fish
prints are from various
Heather Ross collections
for Windham Fabrics
(windhamfabrics.com).
Other fabrics are from
the designer‘s stash.
Be ready to entertain your kids on summer
road trips with a cute-as-a-button travel
tic-tac-toe game.
DESIGNER HEIDI STAPLES OF FABRIC MUTT (FABRICMUTT.BLOGSPOT.COM)
PHOTOGRAPHER CARSON DOWNING
play
can
two
Safety warning: Button game pieces can pose a choking
hazard, especially for children who are under 3 years old.
Always supervise children as they play.
60 Quilts & More | SUMMER 2020
ASSEMBLE GAME BOARD UNIT
Measurements include 1⁄4" seam allowances.
Sew with right sides together unless
other wise stated.
Press seams in directions indicated by
arrows on diagrams. If no direction is
specified, press seam toward darker fabric.
1) Referring to Diagram 1, lay out duck print
11⁄2" squares, solid white 1×11⁄2" and 1×41⁄2"
rectangles, yellow print 11⁄2" squares, and
gold print 11⁄2" square in five vertical rows.
Sew together pieces in pieced rows. Join
rows to make game board center. The
game board center should be 41⁄2" square
including seam allowances.
2) Referring to Diagram 2, join solid blue
1×41⁄2" rectangles to side edges of game
board center. Add solid blue 11⁄2×51⁄2"
rectangles to top and bottom edges to
make game board unit. The unit should
be 51⁄2×61⁄2" including seam allowances.
ASSEMBLE POCKET UNIT
1) Place frog print 31⁄2×41⁄2" rectangle right
side up on a flat surface. With zipper
closed, center zipper right side down along
top 41⁄2" edge of rectangle; pin in place
(Diagram 3). The zipper will extend past
the edges of the rectangle.
2) Place fish print 31⁄2×41⁄2" rectangle right
side down atop Step 1 unit, aligning raw
edges; pin along top edge. Using a zipper
foot, sew along top edge through all layers
(Diagram 4).
DIAGRAM 1
1
×
4
1
⁄
2
"
1×11⁄2"
11⁄2"
sq.
11⁄2×51⁄2"
1
×
4
1
⁄
2
"
DIAGRAM 2
DIAGRAM 3
31⁄2×41⁄2"
DIAGRAM 4
“I love how the wooden buttons make
the game kit feel sweet and old-
fashioned. You can change the kit’s
‘personality’ based on the fabric and
buttons you use. ”
—
HEIDI STAPLES, DESIGNER
AllPeopleQuilt.com
61
3) Press frog print and fish print rectangles
away from zipper, aligning edges of both
rectangles. If desired, use binding clips to
keep layers together. Topstitch 1⁄8" from fold
to make pocket bottom (Diagram 5).
4) Using frog print and fish print 1×41⁄2"
rectangles, repeat steps 1–3 along
remaining edge of zipper to add pocket top.
5) Place fish print 41⁄2" square right side up
on work surface. Slide zipper pull to zipper
center, and place Step 4 unit right side
up atop fish print square (Diagram 6).
Zigzag-stitch 1⁄8" from all edges through
all layers. Trim excess tape from zipper
ends, including zipper stops, to make
pocket center. The pocket center should
be 41⁄2" square including seam allowances.
DIAGRAM 5
1×41⁄2"
DIAGRAM 6
62 Quilts & More | SUMMER 2020
6) Referring to Diagram 7, repeat Assemble
Game Board Unit, Step 2, to add remaining
solid blue 1×41⁄2" and 11⁄2×51⁄2" rectangles to
edges of pocket center to make pocket unit.
The unit should be 51⁄2×61⁄2" including seam
allowances.
FINISH GAME
1) Place a batting 51⁄2×121⁄2" rectangle on a
flat surface. Lay game board unit right
side up on batting, aligning bottom edges
(Diagram 8). Lay pocket unit, right side
down and with zipper end aligned with
bottom edge, atop game board unit.
2) Referring to Diagram 8, sew together
game board and pocket units 1⁄4" from
top edge, stitching through all layers
including batting. Press open pocket unit
so it covers batting rectangle. Following
manufacturer’s instructions, use basting
spray to adhere game board unit and
pocket unit to batting rectangle to make kit
interior. Topstitch 1⁄8" from edges of game
board center and pocket center squares.
3) Quilt game board unit portion of kit
interior as desired. Designer Heidi Staples
machine-quilted straight lines in the solid
white rectangles of the game board.
4) Use basting spray to adhere duck print
51⁄2×121⁄2" rectangle to remaining batting
rectangle. Quilt as desired. Heidi machine-
quilted cur vy lines following the pattern
on the duck print.
5) Referring to Diagram 9, make a mark
23⁄4" from left-hand edge of Step 4 unit
and 3⁄4" from bottom edge. Center brown
3⁄4"-diameter button on mark and sew it
in place.
6) Referring to Diagram 10, align cut ends of
4"-long piece of white elastic to form a loop.
Center cut ends on top edge of Step 5 unit
and baste in place 1⁄8" from edge to make
kit exterior.
11⁄2×51⁄2"
1
×
4
1
⁄
2
"
DIAGRAM 7
51⁄2×121⁄2"
DIAGRAM 8
23⁄4"
3⁄4"
DIAGRAM 9
Be ready to celebrate at Fourth of July
barbecues with a set of patriotic 5"-square-
finished coasters made from the tic-tac-toe
game board center of Two Can Play. Quilt
tester Martha Gamm fussy-cut motifs to make
each coaster unique. Fabrics are from the
Fireworks & Freedom collection by Bella Blvd
for Riley Blake Designs (rileyblakedesigns.com).
FREE PATTERN!
AllPeopleQuilt.com/856
Project
Option
mindful MOMENT
The American Academy of Pediatrics
recommends limiting the media and
technology use of children over 6 years
old so that it doesn’t take the place
of play, talk, study, sleep, and other
healthy behaviors. A technology break
has advantages for adults, too! Enjoy
some family time away from screens by
playing a game, such as Two Can Play.
AllPeopleQuilt.com
63
7) Layer kit interior and exterior with batting
sides together (Diagram 11). Topstitch 1∕8"
from each side of center seam, then zigzag-
stitch around all edges.
8) Bind with yellow stripe binding strip.
(For details, see Binding, page 102.) Insert
tan and brown 5∕8"-diameter buttons into
pocket and close zipper. Fold kit in half,
securing elastic loop around button closure,
to complete game.
DIAGRAM 10
DIAGRAM 11
AllPeopleQuilt.com
65
Incorporating a gray ombré stripe into an
eight-point star block adds flair to a bright,
happy throw.
DESIGNER KELLI MARSHALL OF SIMPLY MACKBETH DESIGN CO. (SIMPLYMACKBETH.COM)
PHOTOGRAPHER CARSON DOWNING
POPSTAR
QUILT
Finished size:
581⁄2×721⁄2"
Finished block:
12" square
MATERIALS
Yardages and cutting
instructions are based
on 42" of usable fabric
width.
o 11⁄4 yards gray stripe
(blocks)
o 37⁄8 yards solid white
(blocks, sashing,
border)
o 11⁄2 yards pink print
(blocks)
o 1⁄2 yard yellow floral
(blocks)
o 5⁄8 yard orange print
(binding)
o 41⁄2 yards backing
fabric
o 67×81" batting
FABRICS are from the
Butterscotch collection
by Dana Willard for Figo
Fabrics (figofabrics.com).
CUT FABRICS
Cut pieces in the following order.
From gray stripe, cut:
n 40—11⁄2×14" strips
n 20—11⁄2×11" strips
n 20—11⁄2×7" strips
From solid white, cut :
n 13—21⁄2×42" strips for sashing
and border
n 80—11⁄2×14" strips
n 15—21⁄2×121⁄2" sashing strips
n 20—11⁄2×11" strips
n 20—11⁄2×7" strips
n 40—11⁄2×61⁄2" rectangles
n 40—11⁄2×41⁄2" rectangles
n 80—11⁄2×31⁄2" rectangles
From pink print, cut:
n 160—31⁄2" squares
From yellow floral, cut:
n 20—41⁄2" squares
From orange print, cut:
n 8—21⁄2×42" binding strips
66 Quilts & More | SUMMER 2020
ASSEMBLE BLOCKS
Measurements include 1⁄4" seam allowances.
Sew with right sides together unless otherwise
stated.
Press seams in directions indicated by
arrows on diagrams. If no direction is
specified, press seam toward darker fabric.
1) Referring to Diagram 1, sew together a
gray stripe 11⁄2×7" strip and a solid white
11⁄2×7" strip along long edges to make Strip
Set A. Cut strip set into four 11⁄2"-wide A
segments.
2) Referring to Diagram 2, sew together a
gray stripe 11⁄2×11" strip and a solid white
11⁄2×11" strip along long edges to make
Strip Set B. Cut strip set into four 21⁄2"-wide
B segments.
3) Sew together an A segment and a B
segment (Diagram 3; note rotation of
B segment). Join a solid white 11⁄2×31⁄2"
rectangle to top edge to make a corner
unit (Diagram 4). The unit should be 31⁄2"
square including seam allowances. Repeat
to make four corner units total.
4) Referring to Diagram 5, sew together two
solid white 11⁄2×14" strips and a gray stripe
11⁄2×14" strip along long edges to make
Strip Set C. Cut strip set into two 61⁄2"-
wide C segments. Repeat to make four C
segments total.
5) Use a pencil to mark a diagonal line on
wrong side of eight pink print 31⁄2" squares.
(To prevent fabric from stretching as you
draw lines, place 220-grit sandpaper under
each square.)
6) Align a marked pink print square with
one end of a C segment (Diagram 6; note
direction of marked line). Sew on marked
line. Trim seam allowance to 1⁄4" and press
open attached triangle. Add a second
marked pink print square to opposite end
of segment to make a Flying Geese unit.
The unit should be 31⁄2×61⁄2" including seam
allowances. Repeat to make four Flying
Geese units total.
7) Sew solid white 11⁄2×41⁄2" rectangles to
opposite edges of a yellow floral 41⁄2" square
(Diagram 7). Add solid white 11⁄2×61⁄2"
rectangles to remaining edges to make
block center (Diagram 8). The block center
should be 61⁄2" square including seam
allowances.
DIAGRAM 1
11⁄2"
A
DIAGRAM 2
21⁄2"
B
DIAGRAM 3
A
B
DIAGRAM 4
11⁄2×31⁄2"
DIAGRAM 5
61⁄2"
C
DIAGRAM 6
31⁄2"
sq.
C
DIAGRAM 7
41⁄2"
sq.
1
1
⁄
2
×
4
1
⁄
2
"
DIAGRAM 8
11⁄2×61⁄2"
MAKE IT
YOURS
Coloring Diagram
on Pattern
Sheet 4.
using smaller strip sets
For Pop Star, it is important that the strip sets are sewn and cut accurately so that the gray
pieces form a frame within the block. Designer Kelli Marshall finds this is easiest to achieve
by using smaller strip sets rather than width-of-fabric ones; the narrow 11⁄2"-wide strips are
prone to warping when they are cut and pieced as longer strips.
TIP
AllPeopleQuilt.com
67
68 Quilts & More | SUMMER 2020
21⁄2×541⁄2"
21⁄2×541⁄2"
2
1
⁄
2
×
1
2
1
⁄
2
"
2
1
⁄
2
×
7
2
1
⁄
2
"
QUILT ASSEMBLY DIAGRAM
8) Referring to Diagram 9, lay
out four corner units, four
Flying Geese units, and the
block center in three rows.
Sew together pieces in rows.
Join rows to make a block . The
block should be 121⁄2" square
including seam allowances.
9) Repeat steps 1–8 to make 20
blocks total.
ASSEMBLE QUILT CENTER
1) Piece and cut six solid white
21⁄2×42" strips to make:
Q 4—21⁄2×541⁄2" sashing strips
2) Referring to Quilt Assembly
Diagram, lay out blocks, solid
white 21⁄2×121⁄2" sashing strips,
and solid white 21⁄2×541⁄2"
sashing strips in nine rows.
3) Sew together pieces in block
rows. Press seams toward
sashing strips. Join rows to
make quilt center. Press seams
in one direction. The quilt
center should be 541⁄2×681⁄2"
including seam allowances.
ADD BORDER
1) Piece and cut remaining solid
white 21⁄2×42" strips to make:
Q 2—21⁄2×721⁄2" border strips
Q 2—21⁄2×541⁄2" border strips
DIAGRAM 9
Join the American
Patchwork & Quilting®
magazine One Million
Pillowcase Challenge! In
each 2020 issue of Quilts
& More, we’ll be sharing a
coordinating pillowcase to
go with a quilt in the issue.
Make one for yourself and one to donate to a charity of your choice! Be sure
to add any pillowcases you donate to our counter as we work toward spreading one
million smiles to those in need. For details, go to millionpillowcases.AllPeopleQuilt
.c om. Fabrics are from the Modern Farmhouse collection by Simple Simon and Co.
for Riley Blake Designs (rileyblakedesigns.com).
FREE PATTERN!
AllPeopleQuilt.com/857
Project
Option
mindful MOMENT
Save your wrist a few extra strokes
of the rotary cutter. When working
with strip sets, fold the strip set in
half, making sure to align the short
raw edges. Then cut the segments
as directed. This will let you cut
two segments from the strip at
once, reducing the number of
repetitive cuts you have to make
using your wrist.
70 Quilts & More | SUMMER 2020
2) Sew short border strips to short edges
of quilt center. Add long border strips to
remaining edges to complete quilt top.
Press all seams toward border.
FINISH QUILT
1) Layer quilt top, batting, and backing; baste.
(For details, see Finishing, page 100.)
2) Quilt as desired. Designer Kelli Marshall
machine-quilted an allover diamond design
across the quilt top.
3) Bind with orange print binding strips. (For
details, see Binding, page 102.)
AllPeopleQuilt.com
71
learn more: accurate 1/
4
" seams
Sewing with consistent 1/4 " seams ensures that blocks will
finish at the correct size and rows will come together easily.
TEST YOUR 1⁄4" SEAM
ALLOWANCES
1. Cut three strips 21⁄2" wide. Sew
them together (Photo 1).
2. Press seam allowances away from
center strip.
3. Measure width of center strip; it
should be 2" wide (Photo 2). If it is
wider, your seams are too narrow.
If it is narrower, your seams are
too wide. A measuring gauge can
help you check the width of the
seam allowances (Photo 3).
USE A SPECIALTY FOOT
• A 1⁄4" presser foot takes much of
the guesswork out of sewing 1⁄4"
seams. Run the edge of the fabric
along the right-hand edge of the
foot as you sew. Measure the seam
before beginning each project to
verify that it is an accurate 1⁄4" seam.
Watch the guide and not the needle
as you sew.
ADJUST THE NEEDLE POSITION
• Needles on many machines move
right or left. Move needle in
small increments and test seam
allowances. Jot down the needle
position for each seam size so you
can quickly set it as needed.
START AND END SEAMS
WITH A FABRIC SCRAP
• To prevent puckering and
incomplete stitches at the
beginning or end of a seam, use
small scraps of fabric to begin and
end your seam. Feed the small
scrap in first, followed by your
patchwork, and then another small
scrap. Snip off the attached scraps.
ADDITIONAL TIPS
• Make a seam guide by stacking
several strips of painters tape or
using adhesive moleskin. To set
the guide, lower the needle, place
a quilting ruler against the front of
the needle, and position the guide
along the 1⁄4" line. Align fabric
against the raised edge as you sew.
• Use the same ruler and sewing
machine throughout your project.
Slight variances between tools
add up quickly.
• Change your sewing machine
needle often. It helps prevent
many problems, such as nests
of thread appearing on the
underside of your seams.
1
2
3
S
I
D
E
V
I
E
W
TOP VIEW
Some 1/4" presser feet
have a bumper to align
fabric against.
A 1/4" presser
foot is exactly
1
/4" from needle
hole to right-
hand edge.
travel series:
toiletry case
72 Quilts & More | SUMMER 2020
Travel in style using a toiletry bag that’s inspired by vintage
train cases but made in modern, colorful prints.
DESIGNER JESSICA VANDENBURGH OF SEW MANY CREATIONS (SEWMANYCREATIONSNY.COM)
PHOTOGRAPHER CARSON DOWNING
PACK YOUR BAGS
CUT FABRICS
Cut pieces in the following order.
To prepare fabric for cutting, complete the
following steps.
1) Cut two 18×21" rectangles from fusible
interfacing.
2) Following manufacturer ’s instructions,
adhere a fusible interfacing 18×21"
rectangle to wrong side of navy print
18×21" rectangle. Repeat with white
print 18×21" rectangle.
CASE
Finished size:
61⁄2×7×41⁄2"
MATERIALS
Yardages and cutting
instructions are based
on 42" of usable fabric
width.
o 18×21" rectangle (fat
quarter) navy print
(handle, bag body)
o 18×21" rectangle (fat
quarter) white print
(handle, lining)
o 1⁄2 yard 45"-wide
medium-weight iron-
on fusible interfacing
(Designer Jessica
VanDenburgh used
Decor Bond #809 by
Pellon.)
o 14"-long or longer
plastic zipper:
magenta
o Binding clips
o Air-soluble fabric-
marking pen
FABRICS are from the
Juniper collection
by Jessica VanDenburgh
for Windham Fabrics
(windhamfabrics.net).
use nondirectional prints
Because of how the case is constructed,
it will be easier—and will yield a more eye-
appealing result—to use nondirectional
prints for the bag body and lining.
TIP
74 Quilts & More | SUMMER 2020
From each fused navy print and white
print, cut:
Q 1—12×15" rectangle
Q 1—8×12" rectangle
Q 1—2×12" rectangle
ASSEMBLE HANDLE
Measurements include 1⁄4" seam allowances.
Sew with right sides together unless otherwise
stated.
1) Layer navy print 2×12" rectangle and
white print 2×12" rectangle. Sew along one
long edge (Diagram 1). Press seam open
to make handle unit. The unit should be
31⁄2×12" including seam allowances.
2) Fold handle unit in half lengthwise with
wrong sides together; finger-press seam and
unfold. Fold long edges to meet at center
seam (Diagram 2); fold in half again and
press. Topstitch 1⁄8" from each long edge to
make handle. The handle should be 7⁄8×12".
ADD ZIPPER
1) Place navy print 12×15" rectangle right side
up on a flat surface. With zipper closed,
center zipper right side down along 12"-
wide top edge; pin in place (Diagram 3).
The zipper will extend past edges of
rectangle.
pretty topstitching
Designer Jessica VanDenburgh recommends using a stitch-
in-the-ditch sewing machine foot when topstitching. The foot
features a guide for stitching a hair’s width from a seam when
quilting stitch-in-the-ditch designs. By moving her needle
to the far-left position, Jessica uses the guide to make sure
the 1⁄8" topstitching stays straight and even. She also likes
to lengthen her stitch for a cleaner look.
TIP
12×15"
DIAGRAM 3
2×12"
DIAGRAM 1
DIAGRAM 2
AllPeopleQuilt.com
75
2) Place white print 12×15" rectangle right
side down atop Step 1 unit, aligning raw
edges; pin along same top edge. Using a
zipper foot, sew together along top edges
through all layers (Diagram 4).
3) Press navy print and white print rectangles
away from zipper. Topstitch 1∕8" from fold
(Diagram 5).
4) Repeat steps 1–3 to attach navy print and
white print 8×12" rectangles to remaining
edge of zipper tape (Diagram 6).
5) Slide zipper pull to zipper center, but do not
trim excess tape yet.
contrasting handle
The handle is double-sided, with one
side matching the lining fabric and the other
matching the bag body. The project is written
for the bag body fabric to be on the top of
the handle, but you can easily switch it to
have the contrasting lining fabric on top. In
Finish Case, Step 9 (page 77), if you are sewing
the boxed corner with the pressed open seam
facing up, the 1⁄2" of handle fabric you see
will be the print that ends up on the top of
the handle.
TIP
“This train-case-style bag is perfect
for all sorts of objects—makeup,
toiletries, or even sewing supplies.
And it’s a great way to show off a
larger scale print!”
—
JESSICA VANDENBURGH, DESIGNER
DIAGRAM 4
DIAGRAM 5
DIAGRAM 6
76 Quilts & More | SUMMER 2020
FINISH CASE
1) Referring to Diagram 7, fold up bottom
edge of larger navy print rectangle so it
aligns with top edge of smaller navy print
rectangle. Sew together along edge; press
seam open.
2) Repeat Step 1 with white print rectangles,
leaving a 4" opening for turning
(Diagram 8).
3) Referring to Diagram 9, align seam of navy
print rectangles with zipper; clip in place.
Repeat with seam of white print rectangles.
4) Referring to Diagram 10, locate the eight
side edges formed by the folded smaller and
larger rectangles. Starting from folded edge
and stopping just before zipper tape, sew
along each side edge.
5) Flatten layers so smaller rectangles are
together and larger rectangles are together.
Sew over zipper tape to close gaps left in
Step 4, extending stitch line a few stitches
beyond zipper tape and backstitching at
beginning and end of seam (Diagram 11).
Trim excess tape from zipper ends,
including zipper stops.
DIAGRAM 7
4" opening
DIAGRAM 8
DIAGRAM 9
DIAGRAM 10
AllPeopleQuilt.com
77
looking ahead
Collect all four bags in the 2020 seasonal series by
designer Jessica VanDenburgh. Each issue will feature
a different type of bag; make them in coordinating
fabrics to create a travel set. In the Fall 2020 issue,
we’ll show you how to make a fashionable backpack.
TIP
6) Using air-soluble fabric-marking pen,
mark 2×21⁄4" rectangles in all eight corners.
Carefully cut out rectangles (Diagram 12).
7) For four corners of larger rectangles, pull
apart top and bottom layers of one corner;
pinch together so side seam lines up with
bottom fold. Pin in place and sew across
with a 1∕4" seam allowance (Diagram 13).
Repeat with remaining three corners.
8) Repeat Step 7 to close the two corners of
white print smaller rectangle.
9) Feed handle through two open corners of
navy print smaller rectangle, making sure
not to twist it. Adjust handle so raw edges
stick out of corners 1∕2" on each side and
the navy print fabric is facing the pressed
open seam. Repeat Step 7 to sew remaining
corners closed, stitching handle ends in
place (Diagram 14).
10) Turn case right side out through opening
in lining from Step 2. Hand-stitch opening
closed. Insert lining into case and shape as
needed to complete case.
DIAGRAM 11
21⁄4"
2"
DIAGRAM 12
DIAGRAM 13
DIAGRAM 14
CHAIR: Better Homes & Gardens Flynn Mid-Century
Chair Wood with Linen Upholstery (walmart.com)
SHELF: Better Homes & Gardens 4 Cube Storage
Organizer (walmart.com)
QUILT
Finished size:
521⁄2×721⁄2"
Finished block:
18" square
MATERIALS
Yardages and cutting
instructions are based
on 42" of usable fabric
width.
o 1⁄2 yard light teal print
(blocks)
o 11⁄4 yards white tone-
on-tone (blocks,
sashing)
o 5⁄8 yard medium teal
print (blocks)
o 21⁄2 yards dark teal
print (blocks, sashing,
border, binding)
o 31⁄2 yards backing
fabric
o 61×81" batting
FABRICS are from
the Kimberbell
Basics collection for
Maywood Studio
(maywoodstudio.com).
Pure white sashing divides an ombré Log Cabin
design, creating a striking throw that seems to
radiate from within.
DESIGNER MONIQUE JACOBS (OPENGATEQUILTS.COM)
PHOTOGRAPHER CARSON DOWNING
CUT FABRICS
Cut pieces in the following order.
From light teal print, cut:
n 2—21⁄2×42" strips
n 24—21⁄2×41⁄2" rectangles
From white tone-on-tone, cut :
n 2—21⁄2×42" strips
n 17—21⁄2×181⁄2" sashing rectangles
n 24—21⁄2×81⁄2" rectangles
From medium teal print, cut :
n 24—21⁄2×61⁄2" rectangles
n 24—21⁄2×41⁄2" rectangles
From dark teal print, cut:
n 6—51⁄2×42" strips for border
n 7—21⁄2×42" binding strips
n 24—21⁄2×81⁄2" rectangles
n 24—21⁄2×61⁄2" rectangles
n 18—21⁄2" squares
AllPeopleQuilt.com
79
80 Quilts & More | SUMMER 2020
ASSEMBLE BLOCKS
Measurements include 1⁄4" seam allowances.
Sew with right sides together unless otherwise
stated.
Press seams in directions indicated by
arrows on diagrams. If no direction is
specified, press seam toward darker fabric.
1) Sew together a light teal print
21⁄2×42" strip and a white tone-on-
tone 21⁄2×42" strip along long edges to
make a strip set (Diagram 1). Repeat
to make a second strip set. Cut strip sets
into twenty-four 21⁄2"-wide segments.
2) Referring to Diagram 2, sew a light teal
print 21⁄2×41⁄2" rectangle to left-hand edge
of a Step 1 segment. The unit should be
41⁄2" square including seam allowances.
3) Sew a medium teal print 21⁄2×41⁄2" rectangle
to top edge of Step 2 unit (Diagram 3). Join
a medium teal print 21⁄2×61⁄2" rectangle to
left-hand edge. The unit should now be
61⁄2" square including seam allowances.
4) Sew a dark teal print 21⁄2×61⁄2" rectangle
to top edge of Step 3 unit (Diagram 4).
Join a dark teal print 21⁄2×81⁄2" rectangle to
left-hand edge to make a Log Cabin unit.
The unit should be 81⁄2" square including
seam allowances.
5) Repeat steps 2–4 to make 24 Log Cabin
units total.
6) Referring to Diagram 5 and noting rotation
of units, lay out four Log Cabin units, four
white tone-on-tone 21⁄2×81⁄2" rectangles,
and one dark teal print 21⁄2" square in
three rows. Sew together pieces in rows.
Join rows to make a block . The block
should be 181⁄2" square including seam
allowances. Repeat to make six blocks total.
mindful MOMENT
“Sometimes it’s a tough choice between working out or quilting, so I keep a pair of
dumbbells under my ironing board and do a few reps every time I press a seam. I also
tied my tape measure around a pair of kettlebells and make sure to do a few exercises
before I use the tape.”
— Diane Murtha Bettendorf, Iowa
21⁄2"
DIAGRAM 1
2
1
⁄
2
×
4
1
⁄
2
"
DIAGRAM 2
21⁄2×41⁄2"
2
1
⁄
2
×
6
1
⁄
2
"
DIAGRAM 3
21⁄2×61⁄2"
2
1
⁄
2
×
8
1
⁄
2
"
DIAGRAM 4
21⁄2"
sq.
2
1
⁄
2
×
8
1
⁄
2
"
DIAGRAM 5
AllPeopleQuilt.com
81
ASSEMBLE QUILT CENTER
1) Referring to Quilt Assembly Diagram, lay
out blocks, white tone-on-tone 21⁄2×181⁄2"
sashing rectangles, and remaining dark teal
print 21⁄2" squares in seven rows.
2) Sew pieces together in rows. Press seams
toward sashing rectangles. Join rows to
make quilt center. Press seams away from
block rows. The quilt center should be
421⁄2×621⁄2" including seam allowances.
21⁄2×181⁄2"
51⁄2×521⁄2"
5
1
⁄
2
×
6
2
1
⁄
2
"
21⁄2"
sq.
QUILT ASSEMBLY DIAGRAM
ADD BORDER
1) Piece and cut dark teal print 51⁄2×42" strips
to make:
Q 2—51⁄2×621⁄2" border strips
Q 2—51⁄2×521⁄2" border strips
2) Sew long border strips to long edges of quilt
center (Quilt Assembly Diagram, page 81)
Add short border strips to remaining
edges to complete quilt top. Press all
seams toward border.
FINISH QUILT
1) Layer quilt top, batting, and backing; baste.
(For details, see Finishing, page 100.)
2) Quilt as desired. Designer Monique Jacobs
machine-quilted an allover scroll pattern
across the quilt top.
3) Bind with dark teal print binding strips.
(For details, see Binding, page 102.)
Welcome a new addition in your life with
an adorable baby quilt. By taking four
Inner Glow blocks and omitting the border,
quilt tester Diane Tomlinson constructed
a 421⁄2"-square-finished baby quilt that
makes a great gift. Fabrics are from the
Jungle Friends collection by Makower UK
(andoverfabrics.com).
FREE PATTERN!
AllPeopleQuilt.com/858
Project
Option
AllPeopleQuilt.com
83
We’re Celebrating!
Quilts & MoreTM magazine turns 15 years old in
2020, and we’re sharing some of our favorite projects
from past issues in case you missed them the first
time! Strip Ease first appeared in the Fall 2011
issue. In the original project, the bag front and back
were different and it featured an additional outside
pocket. For the anniversary version, we simplified it
by making the front and back the same—losing the
extra pocket in favor of a faster finish. Both versions
of the pattern are stylish and great for daily use!
BAG
Finished size: 12×121⁄2"
MATERIALS
Yardages and cutting
instructions are based
on 42" of usable fabric
width.
❏ 18×21" piece (fat
quarter) each sun
print, lilac print, and
navy print (bag front
and back)
❏ 1⁄2 yard muslin (bag
front and back
foundations)
❏ 18×21" piece (fat
quarter) navy stripe
(handles)
❏ 9×21" piece (fat
eighth) pink print
(pocket)
❏ 1⁄2 yard gold print
(lining)
❏ 1⁄2 yard fusible fleece
FABRICS are from the
Stellar collection by
Rashida Coleman-Hale
for Ruby Star Society
(rubystarsociety.com).
CUT FABRICS
Cut pieces in the following order.
Patterns are on pattern sheets 2
and 3. To make templates, trace each
pattern onto a large sheet of folded paper,
cut out on drawn lines, and unfold.
From sun print, cut:
■ 2—5×121∕2" rectangles
From muslin, cut:
■ 2ofPatternA
Sew and flip fabric strips on a muslin foundation
for an eclectic bag with a decidedly feminine flair.
DESIGNER BARI J. ACKERMAN (BARIJDESIGNS.COM)
PHOTOGRAPHER MARTY BALDWIN
From each lilac print and navy
print, cut:
■ 4—21∕2×121∕2" strips
From navy stripe, cut:
■ 2—31∕2×201∕2" strips
From pink print, cut:
■ 2ofPatternB
From gold print, cut:
■ 2ofPatternA
From fusible fleece, cut :
■ 2—31∕2×201∕2" strips
■ 2ofPatternA
EASE
strip
OF
AllPeopleQuilt.com
85
86 Quilts & More | SUMMER 2020
ASSEMBLE BAG FRONT AND BACK
Measurements include 1⁄4" seam allowances
unless other wise indicated. Sew with right
sides together unless other wise stated.
1) Place a sun print 5×121⁄2" rectangle right
side up on a muslin A piece, matching
centers.
2) Place one lilac print 21⁄2×121⁄2" strip
facedown on sun print rectangle, matching
right-hand raw edges. Stitch in place
(Diagram 1). Press lilac print strip open.
3) Matching raw edges, sew a navy print
21⁄2×121⁄2" strip to right-hand edge of
lilac print strip (Diagram 2). Press open
as before.
4) Repeat steps 2 and 3 to add lilac and navy
print 21⁄2×121⁄2" strips to left-hand edge of
sun print rectangle.
5) Turn Step 4 unit muslin side up. Sew a
scant 1⁄4" from curved edges of muslin A
piece (Diagram 3). Trim strips even with
edges of muslin A piece.
6) Following manufacturer ’s instructions, fuse
one fleece A piece to wrong side of muslin
A piece to make bag front.
7) Repeat steps 1–6 to make matching
bag back .
MAKE HANDLES
1) Fuse a fleece 31⁄2×201⁄2" strip to wrong side
of each navy stripe 31⁄2×201⁄2" strip.
2) With right side inside, sew together long
raw edges of a Step 1 strip, backstitching at
beginning and end of seam (Diagram 4).
Turn strip right side out and press,
centering seam.
3) Referring to Diagram 4, sew five rows of
topstitching 1⁄4" apart on Step 2 strip to
make a handle.
2
1
⁄
2
×
1
2
1
⁄
2
"
5
×
1
2
1
⁄
2
"
DIAGRAM 1
2
1
⁄
2
×
1
2
1
⁄
2
"
DIAGRAM 2
DIAGRAM 3
DIAGRAM 4
AllPeopleQuilt.com / millionpillowcases
Make a pillowcase.
Make a difference.
For people who love to sew or quilt, it’s so easy to
lift spirits and provide comfort to hospitalized kids,
homeless families, and others in need. Simply join
American Patchwork & Quilting® magazine’s 1 Million
Pillowcase Challenge and make and donate one,
two, or more pillowcases. You’ll make a difference
with every pillowcase you donate.
Join the movement today. Find complete details,
download free patterns, and be sure to record your
donations online at:
#millionpillowcasechallenge
How you’re making a difference
For a special Veteran’s Day project, teacher Justina Wright and her
preschool class in Waverly, Tennessee, learned about the military and
made 18 pillowcases for veterans. The kids chose their fabric pieces and
helped run the serger by stepping on the foot pedal while Justina serged.
The students had a blast sewing and felt great when they realized their
pillowcases would be helping people who have served their country.
2020 SPONSORS
Now you can send pillowcases to us and we’ll
distribute to charities across the country.
Visit AllPeopleQuilt.com/donate for details.
Help us reach one million pillowcases in 2020! Current count: 948,645
88 Quilts & More | SUMMER 2020
4) Repeat steps 2 and 3 to make a second
handle.
MAKE LINING
1) Sew together pink print B pieces along
straight edge. Press seam in one direction,
then turn B pieces right side out and press
flat. Topstitch 1∕8" from seam along straight
edge to make pocket.
2) Place a gold print A piece right side up
on a flat surface. Aligning rounded edges,
position pocket on top of A piece; pin.
Join side and bottom edges with a scant
1∕4" seam allowance. Draw a centerline
on pocket and topstitch to make divided
pocket (Diagram 5), reinforcing at upper
edge with a small stitched triangle.
3) With right sides together, sew together
Step 2 unit and remaining gold print
A piece, leaving upper edge open and
a 4" opening at lower edge for turning,
to make lining (Diagram 6).
FINISH BAG
1) Referring to Diagram 7, position raw ends
of a handle on right side of bag front, 3" on
each side of center. Baste in place. Repeat to
add remaining handle to bag back.
2) Join bag front and back with right sides
together, leaving upper edge open, to make
bag body. Turn right side out.
3) With right sides together, slip bag body into
lining, matching side seams (Diagram 8).
Sew together upper edges of bag body and
lining, reinforcing handles by stitching over
them twice.
DIAGRAM 5
3"
3"
DIAGRAM 7
4" opening
DIAGRAM 6
4) Turn bag right side out through lining
opening . Machine-stitch opening closed.
5) Insert lining into bag body. Press upper
edge and topstitch 1∕8" from edge to
complete bag.
DIAGRAM 8
www.fabricshack.com
toll free: 1-877-666 -4245
99 South Mar vin Lane • Waynesville, Ohio 45068
T
h
e
f
a
b
r
i
c
s
f
e
a
t
u
r
e
d
i
n
t
h
i
s
a
d
a
r
e
f
r
o
m
t
h
e
P
e
r
f
e
c
t
U
n
i
o
n
C
o
l
l
e
c
t
i
o
n
b
y
L
a
u
n
d
r
y
B
a
s
k
e
t
Q
u
i
l
t
s
f
o
r
A
n
d
o
v
e
r
d
u
e
i
n
J
u
n
e
.
20,000 FABRICS ONLINE
90 Quilts & More | SUMMER 2020
learn more: make & use templates
A template is a pattern made from extra-sturdy material so you
can trace around it many times without wearing away the edges.
MAKING A TEMPLATE
1. Trace p attern onto transparent template plastic, available
at quilt shops and crafts supply stores. (Cardboard and
other thick materials can be used in a pinch, but they
are not as sturdy and will wear down over time.) Be sure
to trace all lines, dots, and arrows. Use a ruler and
a permanent marker to ensure straight, lasting lines
(Photo 1).
2. Cut out the template and check it against the original
pattern for accuracy. Even small errors will multiply as
you assemble the quilt. If you printed or photocopied
the original pattern and made a template based on the
printout, double-check that it was printed at 100% and
check its measurements against the original.
3. Using a pushpin, make holes large enough to
accommodate a pencil point in all marked dots
(Photo 2).
USING A TEMPLATE
1. Place fabric right side down on 220-grit sandpaper to
prevent it from stretching as you trace. Place template
facedown atop fabric, paying attention to grain direction
arrow on template if applicable, and trace around
template using your favorite fabric-marking tool. (Don’t
use a ballpoint pen or ink pen because it might bleed.)
2. Mark any matching points through the holes in
the template.
3. Repeat steps 1 and 2 to trace the number of pieces
needed, positioning the tracings without space between
them (Photo 3). Use scissors or a rotary cutter and
an acrylic ruler to precisely cut fabric pieces on the
drawn lines.
2
3
1
Crazy Quilt Band pillowcase uses GO! Crazy Quilt - 6” Finished Block Die #55226
View fabrics online at
AllPeopleQuilt.com/featuredfabrics
Hubert and Sorrel
by Simone Gooding
Sweet Honey Kisses
by Tammie Green
featured fabrics
Visit your local quilt shop for these
featured fabrics! Get the free patterns at
allpeoplequilt.com/millionpillowcases
Forest Frolic
Stonehenge Savanna
by Linda Ludovico
Fine and Sunny
by Jen Kingwell
Branded
by Sweetwater
QUILT
Finished size:
601∕2" square
MATERIALS
Yardages and cutting
instructions are based
on 42" of usable fabric
width.
❏ 1 yard solid olive
green (quilt center)
❏ 3∕4 yard solid lime
green (quilt center)
❏ 1∕3 yard solid light pink
(quilt center)
❏ 21∕4 yards solid dark
teal (quilt center,
border, binding)
❏ 3∕8 yard solid aqua
(quilt center)
❏ 3∕8 yard solid dark pink
(quilt center)
❏ 37∕8 yards backing
fabric
❏ 69"-square batting
FABRICS are from the
Kona Cotton Solids
collection by Robert
Kaufman Fabrics
(robertkaufman.com).
double the batting
Designer Vicki Ruebel used two types of batting
(Hobbs 80/20 layered with Quilters Dream Wool)
in Abstract Floral to give extra dimension to the
quilting. The difference in thickness between
the batting and the stitched lines causes the
clamshell motifs to puff up.
TIP
AllPeopleQuilt.com
93
Transform simple triangle-
squares into a graphic, modern
wall quilt that’s sure to
command attention.
DESIGNER VICKI RUEBEL OF ORCHID OWL QUILTS
(ORCHIDOWLQUILTS.COM)
PHOTOGRAPHER CARSON DOWNING
floral
abstract
CUT FABRICS
Cut pieces in the following order.
Designer Vicki Ruebel prefers to make her
triangle-squares larger than necessary, then
trim them to size. To do this, cut 6" squares
instead of the 57∕8" squares specified in the
cutting instructions.
From solid olive green, cut:
Q 4—51∕2×101∕2" rectangles
Q 20—57∕8" squares
Q 4—51∕2" squares
From solid lime green, cut:
Q 18—57∕8" squares
Q 4—51∕2" squares
From solid light pink, cut:
Q 6—57∕8" squares
From solid dark teal, cut:
Q 6—51∕2×42" strips for border
Q 7—21∕2×42" binding strips
Q 4—51∕2×101∕2" rectangles
Q 12—57∕8" squares
Q 4—51∕2" squares
From solid aqua, cut:
Q 4—57∕8" squares
Q 4—51∕2" squares
From solid dark pink, cut:
Q 8—57∕8" squares
ASSEMBLE UNITS
Measurements include 1∕4" seam allowances.
Sew with right sides together unless otherwise
stated.
Press seams in directions indicated by
arrows on diagrams. If no direction is
specified, press seam toward darker fabric.
1) Use a pencil to mark a diagonal line on
wrong side of 12 solid olive green, 18
solid lime green, and four solid light pink
57∕8" squares. (To prevent fabric from
stretching as you draw lines, place 220-grit
sandpaper under each square.)
2) Layer a marked solid olive green square
atop a solid dark teal 57∕8" square. Sew
together with two seams, stitching 1∕4"
on each side of drawn line (Diagram 1).
Cut pair apart on drawn line. Press open
to make two Unit A triangle-squares.
Each unit should be 51∕2" square including
seam allowances. Repeat to make 24 A
units total.
3) Repeat Step 2 to make units B–F using
remaining marked squares and solid 57∕8"
squares in the following color combinations
(Diagram 2):
Q 16 B units—solid olive green and marked
solid lime green squares
Q 8 C units—solid aqua and marked solid
lime green squares
Q 8 D units—solid dark pink and marked
solid lime green squares
Q 8 E units—solid dark pink and marked
solid light pink squares
Q 4 F units—solid light pink and marked
solid lime green squares
ASSEMBLE QUILT CENTER
1) Referring to Diagram 3 and noting
rotation of units, arrange one solid dark
teal and one solid olive green 51∕2×101∕2"
rectangle; one each of solid dark teal,
olive green, lime green, and aqua 51∕2"
squares; and six A, four B, two C, two
D, two E, and one F unit in five rows.
2) Sew together pieces in rows. Join rows to
make a quilt top quadrant. The quadrant
should be 251∕2" square including seam
allowances.
3) Repeat steps 1 and 2 to make four
quadrants total.
94 Quilts & More | SUMMER 2020
DIAGRAM 1
Unit A
57⁄8"
sq.
DIAGRAM 2
Unit D
Unit B
Unit C
Unit E
Unit F
4) Referring to Quilt Assembly Diagram and
noting rotation of quadrants, sew together
quadrants in pairs. Press seams in opposite
directions. Join pairs to make quilt center.
Press seam in one direction. The quilt
center should be 501∕2" square including
seam allowances.
ADD BORDER
1) Piece and cut solid dark teal 51∕2×42" strips
to make:
Q 2—51∕2×601∕2" border strips
Q 2—51∕2×501∕2" border strips
2) Sew short border strips to opposite edges
of quilt center. Add long border strips to
remaining edges to complete quilt top.
Press all seams toward border.
FINISH QUILT
1) Layer quilt top, batting, and backing; baste.
(For details, see Finishing, page 100.)
2) Quilt as desired. Vicki used a digital quilting
pattern called Peltas by Patricia E. Ritter and
Mar ybeth O’Halloran to machine-quilt an
allover clamshell design.
3) Bind with solid dark teal binding strips.
(For details, see Binding, page 102.)
AllPeopleQuilt.com
95
DIAGRAM 3
51⁄2×10 1⁄2"
51⁄2"
sq.
A
A
A
B
B
D
C
A
E
B
C
A
F
E
B
D
A
QUILT ASSEMBLY DIAGRAM
5
1
⁄
2
×
5
0
1
⁄
2
"
51⁄2×601⁄2"
BASICS INDEX
97 CUTTING
die-cutting tool, rotary cutter,
acrylic ruler, rotary cutting mat,
scissors and shears
98 PIECING & PRESSING
machine needles, thread, pinning,
1⁄4" seam, stitching, seam ripper,
pressing, starch
100 FINISHING
batting, quilt sandwich, basting,
marking tools, quilting feet, classic
quilting designs
102 BINDING
103 QUILT CARE
labeling, washing, storage
BASICS
Here’s what you need to know to get
started on your quilt project.
F
A
B
R
I
C
S
a
r
e
f
r
o
m
t
h
e
G
r
u
n
g
e
B
a
s
i
c
s
c
o
l
l
e
c
t
i
o
n
b
y
B
a
s
i
c
G
r
e
y
f
o
r
M
o
d
a
F
a
b
r
i
c
s
(
m
o
d
a
f
a
b
r
i
c
s
.
c
o
m
)
.
back to
cuttin
AllPeopleQuilt.com
97
1. DIE-CUTTING
TOOL
These tools use dies
for cutting multiple
layers of fabric at
one time. Center
layers of fabric over
die blade, cover
with plastic mat,
and roll die through.
3. ACRYLIC RULER
Use a thick, clear
acrylic ruler with
your rotary cutter.
To ensure accurate
measurements, use
markings on ruler
and make sure it
does not slip as
you cut.
2. ROTARY
CUTTER
Rotary cutters
have round blades
that enable you to
cut straight-edge
shapes quicker and
more accurately
than with scissors.
They come in
various blade and
handle sizes.
4. ROTARY
CUTTING MAT
Always use a cutting
mat designed for
your rotary cutter.
The mat protects
your work surface
and helps keep the
fabric from shifting
as you cut.
5. SCISSORS &
SHEARS
Have a pair of
scissors or shears
reserved only for
cutting fabric. Using
scissors to cut
paper, interfacing,
and other materials
will dull blades
faster. A smaller pair
of snips is ideal for
cutting threads as
you sew.
Blades on rotary
cutters are extremely
sharp. Close or
retract the blade
after each cut.
1
2
3
4
5
Not sure what to buy?
The following are good sizes to start with:
Cutting mat: 18×24" with 1" grid and hash marks every 1⁄8"
Acrylic ruler: 6×24" with hash marks every 1⁄8" and 45° and 60° angles
Rotary cutter: 45-millimeter blade
TIP
piecin & prein
98 Quilts & More | SUMMER 2020
1. MACHINE
NEEDLES
The preferred
sewing machine
needle for woven
cotton fabrics is
called a sharp. Sizes
75/11 and 80/12
are good choices
for piecing, quilting,
and binding. Use
a smaller needle
(70/10) if you’re
piecing tightly
woven batiks and
a larger needle
(90/14) for flannels.
3. PINNING
Place pins
perpendicular to
edge being sewn.
When joining
two pieced units,
“nest” your seams
by matching
seam allowances
pressed in opposite
directions. Pin
so that pieces
don’t shift. Avoid
sewing over pins—
it can damage
your machine
and injure you.
2. THREAD
Match thread fiber
to your fabric. For
piecing and quilting,
we recommend
high-quality 100%
cotton or cotton
blend threads
because they leave
less fuzz, which
can damage your
machine over
time. In general,
choose 40-weight
or 50-weight thread
and use the same
thread in both the
bobbin and the top
of the machine.
4. 1⁄4" SEAM
Use exact 1⁄4" seam
allowances, unless
otherwise noted,
so that units match
up. Be sure to
frequently test the
accuracy of your 1⁄4"
seam and adjust
as needed. A 1⁄4"
sewing machine
foot or seam guide
can help you sew a
consistent 1⁄4" seam.
5. STITCHING
Use a stitch
length of 10 –12
stitches per inch
(2.0 -millimeter
setting). To chain-
piece, sew several
units, one after
the other, without
trimming thread
in between. Cut
connecting threads
after all pieces
are sewn. This
technique saves
time and thread.
Check out how to test your 1⁄4" seam
accuracy! AllPeopleQuilt.com/seam
1
2
3
4
5
R
e
p
l
a
c
e
n
e
e
d
l
e
a
t
t
h
e
s
t
a
r
t
o
f
e
v
e
r
y
p
r
o
j
e
c
t
b
e
c
a
u
s
e
d
u
l
l
n
e
e
d
l
e
s
c
a
n
c
a
u
s
e
s
k
i
p
p
e
d
o
r
u
n
e
v
e
n
s
t
i
t
c
h
e
s
.
AllPeopleQuilt.com
99
6. SEAM RIPPER
A sharp, good-
quality seam ripper
is a necessity. There
are many seam
rippers on the
market—pick one
that fits comfortably
in your hand.
» Setting seams:
Press seam as it
was sewn, without
opening up pieces.
This helps lessen
bulk in seam
allowance.
» Pressing direction:
Press seams in
direction indicated
in instructions.
Typically you will
press the entire
seam to one side
and toward the
darker fabric, but
sometimes seams
are pressed open
to reduce bulk.
7. PRESSING
Pressing seams
properly ensures
accurate piecing.
Make sure you are
pressing the fabric
(moving iron up and
down), not ironing
(moving iron back
and forth). Ironing
stretches and
distorts seams.
» Matching seams:
When two seams
will be joined, press
seam allowances in
opposite directions
and abut them so
the pieces line up.
» Planning ahead:
If pressing
directions aren’t
given, plan your
pressing in advance
so that all seams
abut. A simple
method is pressing
odd-numbered
rows one direction
and even-numbered
rows the other.
8. STARCH
Some quilters like
to use starch, or
starch alternatives,
on fabric; they find
stiffer pieces easier
to handle and less
likely to distort.
6
8
7
Use consistent, accurate
seam allowances throughout
your project. Small piecing
inaccuracies add up quickly!
prevent distortion
When sewing rows together,
alternate starting points.
TIP
finshin
100 Quilts & More | SUMMER 2020
2. QUILT
SANDWICH
Cut and piece
backing fabric to
measure at least 4"
larger on all sides
than quilt top. Press
seams open. Place
quilt backing wrong
side up on a large
flat surface. Center
and smooth batting
atop quilt backing.
Center quilt top,
right side up, on
top of batting
and smooth out
any wrinkles.
3. BASTING
Use safety pins or
long hand stitches
to baste together
all layers of the quilt
sandwich, spacing
pins or stitches
3" or 4" apart.
Work out from the
center of the quilt,
smoothing layers
as you go. Some
quilters prefer to
use basting spray,
which acts as a
temporary adhesive,
to hold layers
together.
1. BATTING
Batting comes in
different fibers and
thicknesses (lofts).
In general, choose
a cotton or cotton-
blend batting with
low to medium loft
for hand or machine
quilting. Follow
manufacturer’s
instructions for
maximum distance
between rows of
quilting so that
the batting won’t
bunch up and
create lumps.
4. MARKING
TOOLS
Choose marking
tools that will not
show once quilting
is complete. These
include water- or
heat-soluble pens
and plastic marking
tools. Test your
marking tool on
a scrap of fabric
from the quilt
before use; some
marks permanently
set into fabric,
especially after
ironing.
5. QUILTING FEET
The two presser feet
commonly used for
machine quilting
are the walking foot
and the free-motion
quilting foot. A
walking foot evenly
feeds multiple
layers; it is ideal for
straight-line designs.
A free-motion
quilting foot requires
disengaging the
feed dogs so you
can move the quilt
sandwich around;
it is ideal for curvy
quilting designs.
1
2
3
3
4
5
quilting distance
Always check your batting’s package to
see if it’s compatible with the amount of
quilting you plan to do on your project.
TIP
classic quilting designs
AllPeopleQuilt.com
101
6. STITCHING IN THE DITCH
(WALKING FOOT)
Stitch inside the seam lines on the quilt top. Stitches
should “disappear” into existing seam.
7. DIAGONAL GRID
(WALKING FOOT)
Stitch lines diagonally across quilt top at evenly spaced
intervals. If quilt top features squares, it can be helpful
to line up quilting lines through the squares’ diagonals.
8. CURVY LINES
(FREE-MOTION QUILTING FOOT)
Stitch gentle curving lines across the quilt top using
a free-motion quilting foot. Be sure to move the quilt
sandwich at an even pace through the curves or your
stitch quality will not be consistent.
9. RIBBON CANDY
(FREE-MOTION QUILTING FOOT)
Stitch lines that curve back and forth using a free-
motion quilting foot. Be sure to move the quilt
sandwich at an even pace when switching directions
or your stitch quality will not be consistent.
Searching for quilting designs and
inspiration? AllPeopleQuilt.com/inspiration
6
7
9
8
bindin
102 Quilts & More | SUMMER 2020
1. Cut strips in the
width specified in
project instructions.
Join binding strips
with diagonal
seams to make one
long binding strip.
Trim seams to 1⁄4";
press open.
2. Trim batting and
backing fabric
even with quilt top
edges; machine-
baste a scant 1⁄4"
from quilt top
edges if desired.
3. Stop sewing when
you reach a distance
from the corner
that is equal to your
seam allowance (for
example, for a 1⁄4"
seam allowance,
stop 1⁄4" from the
corner). Backstitch,
then clip the
threads. Remove
quilt from under
the sewing-machine
presser foot.
With wrong side
inside, fold one
end of binding strip
under 1"; press.
Fold strip in half
lengthwise, wrong
side inside; press.
Align raw edge
of binding strip
with raw edge of
quilt along one
edge; don’t start
at a corner. Begin
stitching binding
to quilt 2" from
folded end.
4. Fold the
binding strip
perpendicularly,
creating a
45-degree
diagonal fold,
and finger-press.
5. Holding diagonal
fold in place with
your finger, bring
binding strip across
in line with the
next raw edge of
quilt top, making a
vertical fold. Start
sewing again over
the vertical fold,
stitching through all
layers. Sew around
quilt, turning—
or mitering—
each corner in
same manner.
6. When you return to
the starting point,
encase the binding
strip’s raw end
inside the folded
end. Finish sewing
to starting point.
Backstitch to secure.
1
6
2
3
4
5
quil car
7. Turn binding over
edge of quilt to
the back. Use
binding clips to
hold it in place.
Hand-stitch binding
to backing fabric
only, covering the
machine stitching.
To miter corners
on the quilt back,
hand-stitch up to
2. WASHING
If a cotton quilt
must be washed, do
so with cold water
and gentle soap,
either by hand or in
a washing machine
on gentle cycle.
Do not wring or
twist quilt; instead
gently squeeze out
water. Wet quilts
are heavy and need
to be supported as
they are moved to
a flat area to dry.
To prevent dyes from
running, include a
dye catcher sheet in
the wash cycle.
1. LABELING
Quilts can last for
generations, so it is
important to label
them with your
name, date, and any
other information
you feel is valuable,
such as city of
origin, quilt name,
recipient’s name,
etc. Labels can
be written directly
on quilt back with
a permanent-ink
pen or written on a
separate label that
is stitched to the
quilt back.
3. STORAGE
Make sure quilts
are not stored in a
place exposed to
direct sunlight.
To avoid potential
mold and mildew
issues, store
them in a cool,
dry location
wrapped in cotton
pillowcases
that allow air to
pass through. If
quilts are folded,
periodically
refold them so
that creases do
not become
permanent.
7
corner and make a
fold in the binding.
Secure fold with a
couple stitches, and
continue stitching
the binding in
place along the
next edge.
2
3
1
See the binding process in action!
AllPeopleQuilt.com/binding
You asked, we answered. Here are responses to three reader questions,
including how to choose a quilting design and how to prevent rulers
from slipping.
Dear Quilter...
Q
u
i
l
t
s
&
M
o
r
e
TM
(
I
S
S
N
1
9
3
9
-
2
3
6
2
)
,
S
u
m
m
e
r
2
0
2
0
.
Q
u
i
l
t
s
&
M
o
r
e
i
s
p
u
b
l
i
s
h
e
d
f
o
u
r
t
i
m
e
s
a
y
e
a
r
i
n
J
a
n
u
a
r
y
,
A
p
r
i
l
,
J
u
l
y
,
a
n
d
O
c
t
o
b
e
r
b
y
M
e
r
e
d
i
t
h
C
o
r
p
.
,
1
7
1
6
L
o
c
u
s
t
S
t
.
,
D
e
s
M
o
i
n
e
s
,
I
A
5
0
3
0
9
-
3
0
2
3
.
B
e
t
t
e
r
H
o
m
e
s
&
G
a
r
d
e
n
s
i
s
a
r
e
g
i
s
t
e
r
e
d
t
r
a
d
e
m
a
r
k
i
n
t
h
e
U
n
i
t
e
d
S
t
a
t
e
s
,
C
a
n
a
d
a
,
a
n
d
A
u
s
t
r
a
l
i
a
.
B
e
t
t
e
r
H
o
m
e
s
&
G
a
r
d
e
n
s
m
a
r
c
a
r
e
g
i
s
t
r
a
d
a
e
n
M
é
x
i
c
o
.
©
M
e
r
e
d
i
t
h
C
o
r
p
.
2
0
2
0
.
A
l
l
r
i
g
h
t
s
r
e
s
e
r
v
e
d
.
P
r
i
n
t
e
d
i
n
t
h
e
U
.
S
.
A
.
104 Quilts & More | SUMMER 2020
Whenever I see the phrase
“quilt as desired,” I get a little
panicked. There are so many
options. How do you pick the
right design for your quilt?
— Deborah Hansen
Consider the “feel” of your
quilt when choosing a quilt
design. A whimsical quilt might
benefit from a quilt design that
has a lot of motion, like swirls.
Many modern quilters like to
use geometric and straight-
line quilting designs that are
simple but effective. For a bit
of contrast, choose a design
that’s slightly different than the
piecework, such as using a ribbon
candy motif.
Finally, think about where your
quilt is going to go and how stiff
you want the finished project to
be; that should help narrow down
your options. If it is going to be
draped over a sofa, choose a less
dense pattern. If you are having
a long-arm machine quilter stitch
your project, don‘t be afraid to
ask for her advice, too. Make use
of her design expertise!
When I am rotary-cutting,
my ruler keeps slipping and I
end up wasting fabric due to
miscuts. Any tips on how
to keep the ruler steady?
— Laura Rocha
When using a rotary cutter and
an acrylic ruler, one hand is
cutting and the other is holding
the ruler steady. Pay attention to
your steadying hand. You want
to hold the ruler with what many
quilters call a “spider hand,”
which means pushing down with
the pads of your fingers and
lifting up your palm. You can buy
products to help with ruler slip,
including handles that can be
attached to the ruler to give you
more even pressure. It also helps
to change out your rotary-cutter
blade. A fresh blade requires less
pressure to cut the fabric; too
much pressure can push your
ruler out of alignment.
I‘ve noticed the ends of my
seams are popping open as
I join blocks. On some of my
quilt tops, I even have to sew
up holes between blocks. What
am I doing wrong?
— Abigail Crane
Have you been backstitching at
the beginning and end of your
seams as you construct blocks? It
seems like a small thing, and it is
easy to forget, but it strengthens
your seams and keeps them from
splitting. When you think about
it, your fabric gets tugged on
quite a bit as you sew together
units, and it puts pressure on the
seams. The backstitches keep
the seams together until all your
pieces are sewn together into a
quilt top.
We’d love to answer your
questions! Email them to
apq@meredith.com with
“Dear Quilter” in the subject line.
Don’t miss the
Fall 2020 issue of
Quilts & MoreTM
magazine—on
newsstands
July 24, 2020.
Upcoming Topics
PREVENT BACK AND NECK
PAIN WHILE SEWING
SEW FOR CHARITY:
WE’LL GET YOU STARTED
INTRO TO HAND QUILTING
Hear it now
THE BEST SEWING ADVICE
WE’VE RECEIVED
MONEY-SAVING
SEWING TIPS
MAKE THE MOST OF
YOUR STASH
Available on Apple Podcasts, Stitcher, Spotify, and iHeartRadio
ALLPEOPLEQUILT.COM/PODCAST
Listen in!