/


Текст
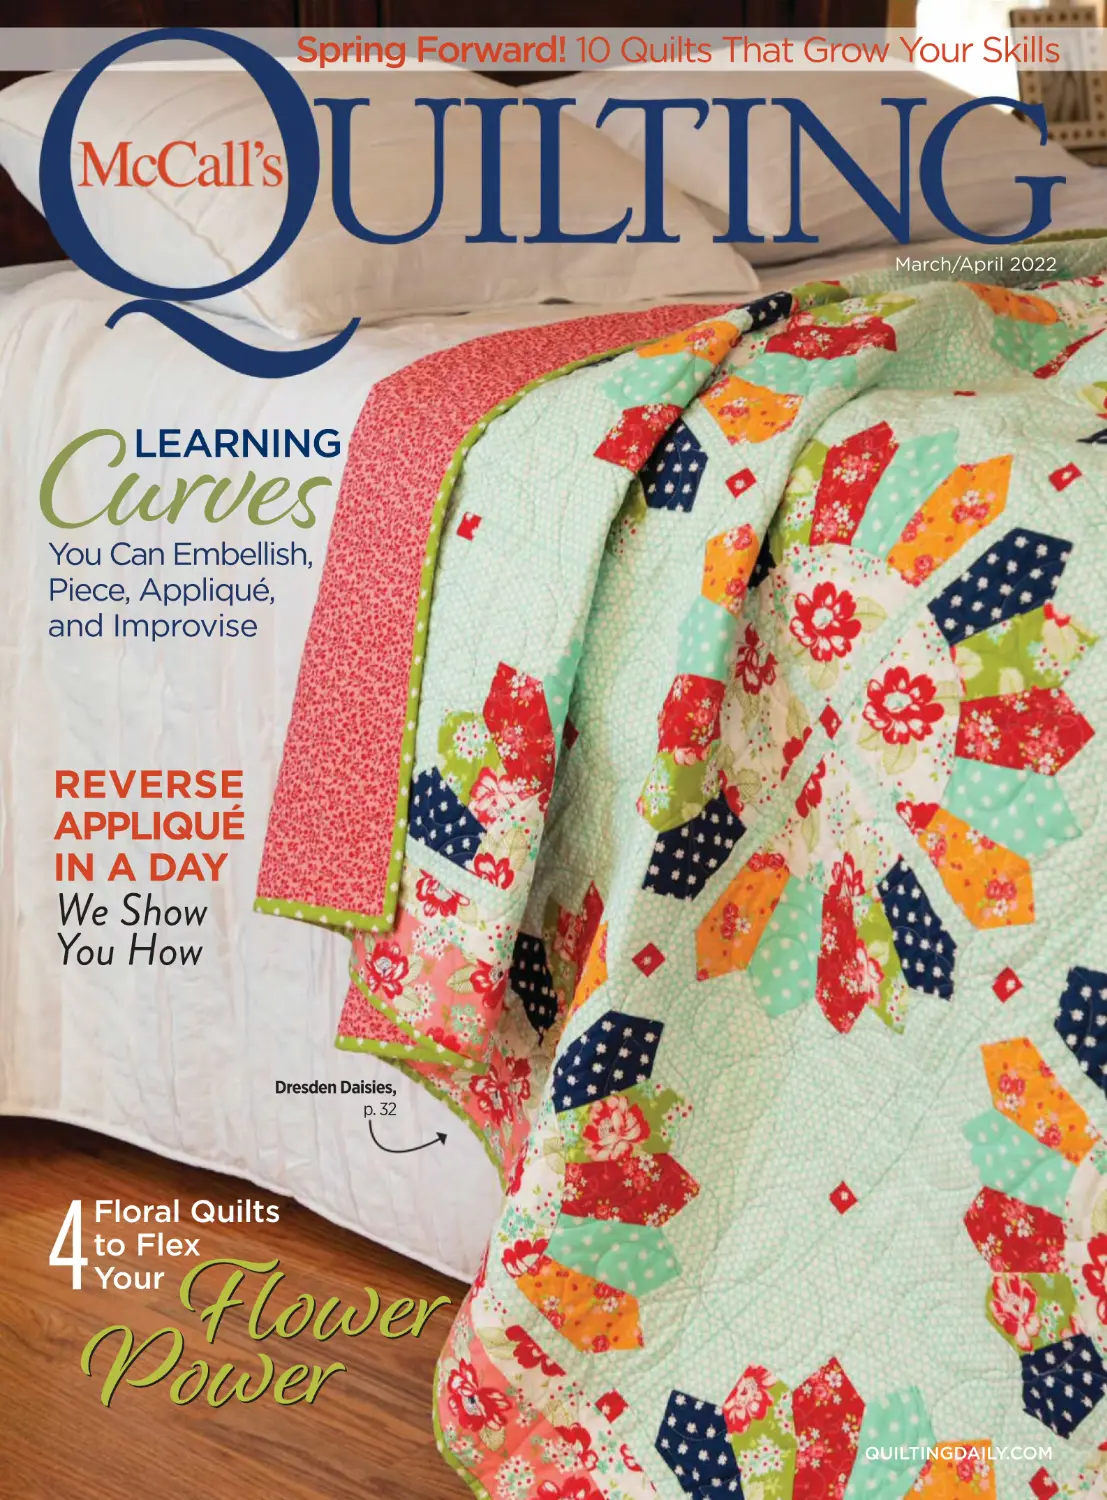
                    Spring Forward! 10 Quilts That Grow Your Skills

March/April 2022

LEARNING

Curves
You Can Embellish,
Piece, Appliqué,
and Improvise

REVERSE
APPLIQUÉ
IN A DAY

We Show
You How
Dresden Daisies,
p. 32

4 Flower
Power
Floral Quilts
to Flex
Your

Power

QUILTINGDAILY.COM

IN HOME SERVICE
When your longarm quilting machine needs a
little TLC, you want timely, easy-to-schedule
service so you can get back to
quilting confidently.
Gammill Technicians come directly to your
home or business where we
service the entire machine, not just
the sewing head.
No packing up your machine. No shipping it
back to the factory. No hauling it to a dealer
to be fixed. No being without your machine
for days or weeks on end.
We come to you.

10

LOVE OF QUILTING TV
SERIES 3900 IS HERE

3$77(516

0 series of
from the 390
Porter s
PBS Fons &

J

/RYH RI 4XLOWLQ

৲৸৯৯6(5

,(6

Join Angela Huffman and Sara Gallegos in the quilting
studio for an all-new series of fun quilts, new techniques,
and fresh projects!
•
•
•

Discover 13 brand new episodes
Get practical tips on everything patchwork
Learn the latest techniques, trends, and more!

Visit QuiltingDaily.com for more ways to watch!

Fons & Porter’s Love of
Quilting TV would not
be possible without the
support of our sponsors:

March/April 2022
Vol. 29, No. 2

Contents
Special Interest
4 Editor’s Letter
Coming full circle and arriving at
new beginnings.

6 Contributors
Our beautiful quilt designers
design beautiful quilts.

8 Fresh Picks
Try a few new quilting products!

10 McQ&A
Forget UFOs! What new projects
are the staff planning?

88 Index
Our handy reference guide for
this issue.

2

McCall’s Quilting

March/April 2022

24 A Spring Time Afternoon
Whip up a cool reverse appliqué project in a
single afternoon!

56 Curve Roundup
There’s more than one way to stitch a
curve—master them all!

78 I Love This Quilt!
Gigi Levsen turns a Celestial Waltz into a
psychedelic samba.

Quilt Basics
Find Quilt Basics for this issue at
QuiltingDaily.com/quilt-basics-and-lessons

Patterns
12 Spring Storm
No April showers needed for these
pretty flowers.

18 Star Roundup
A two-color, two-block quilt with a
ton of appeal.

26 Ringmaster

12

Straight seams create the illusion
of curves.

32 Dresden Daisies
These Dresden Plates are serving
up serious style.

38 Bloom & Grow
Clever cutting and sewing to make
quick, cool décor.

44 Lori’s Legacy
Make a scraptastic signature quilt
for someone special.

32

50 Floral Fancy
Follow the Drunkard’s Path to a
pretty flower garden!

62 Streamers & Confetti
Play with raw-edge fusible appliqué
today!

68 Floret
A sweet update of the classic
wreath motif.

38

72 Stoney the Bunny
Welcome spring with a cute,
friendly critter.

QuiltingDaily.com

March/April 2022

McCall’s Quilting

3

From the Editor

T H E B E S T O F A M E R I C A N Q U I LT I N G

EDITORIAL

Coming Full Circle
With the busy cheerfulness of the holidays behind us and as the cold chill
of winter begins to thaw, it is time to think about springtime and new
growth, both within and without. The changing of seasons, particularly
with the burst of new life in spring, reinforces the constant growing,
changing, developing, and learning. While I always get great satisfaction
from using familiar quilting skills and techniques when making my quilts,
it’s even more fulfilling to overcome the challenge of learning something
new and developing that new skill to become proficient, then adding it to
my ever-expanding quilting toolkit.
And speaking of new beginnings, I am so thrilled to be writing this as the
(relatively new) editor of McCall’s Quilting. You may have seen me pop up
in the previous issue, but I was mostly shepherding work that had already
been done by the hardworking quilting team at Golden Peak Media. I had
much more involvement in this issue, and I am so honored to continue
sharing inspiring, creative quilting content in the magazines to come—
starting a new cycle of McCall’s Quilting as the seasons change too.
Cycles and curves go hand in hand, as the path must curve for the cycle to
complete and begin again. We have gone all-in with the idea of curves for
this issue, with many quilts featuring curves of one kind or another. Make
sure to read our Curve Roundup feature article on page 56 before beginning
any of the quilts featured, as it provides detailed walkthroughs of multiple
curve techniques; you could apply any technique to any quilt featured,
making these unique, new designs even more unique and new.
Gather ‘round our well-rounded selection—including bold, modernlooking curved designs, like Floral Fancy by Ramona Sorenson and Bloom &
Grow by Charisma Horton. Find new takes on classic curved designs, such
as Dresden Daisies by Shannon Arnstein and Floret from Jen Daly. We even
have a couple of designs where the piecing creates the illusion of curves
without curved seams, like Ringmaster by Jennifer Thomas and Spring Storm
by Elaine Theriault. And much more!
Let’s get started on a new cycle of learning and creating!
Gigi Levsen, Editor
The Holiday Gifts article on page 46 of our November/December 2021
issue was incorrectly attributed; the project was designed and described
by Natalie Santini. We regret the error.

?!

Quilt Basics, the instructions for things you use often in quiltmaking, are
available online. If you need help with a technique in any of the projects
in this issue, go to QuiltingDaily.com/quilt-basics-and-lessons.

4

McCall’s Quilting

March/April 2022

EDITORIAL DIRECTOR Denise Starck
EDITOR Gigi Levsen
CONTRIBUTING EDITORS Eileen Fowler
Tracy Mooney
Valerie Uland
ADMINISTRATIVE ASSISTANT Megan Reece

CREATIVE
GRAPHIC DESIGNER Chris Davis
PHOTOGRAPHER Molly Stevenson
CONTRIBUTING STYLIST Emily Smoot

BUSINESS
DIRECTOR OF CONTENT Vivika Hansen DeNegre
GROUP ART DIRECTOR Kerry Jackson
ADVERTISING DIRECTOR Cristy Adamski
cadamski@goldenpeakmedia.com
ADVERTISING DIRECTOR Diane Kocal
dkocal@goldenpeakmedia.com
ADVERTISING SALES MANAGER Mary-Evelyn Dalton
maryeveholder@comcast.net

CHIEF EXECUTIVE DIRECTOR
VP, DIGITAL
VP, STRATEGY
NEWSSTAND SALES

Gregory J. Osberg
Melanie Darienzo
Andrew Flowers
Scott T. Hill
scott.hill@pubworx.com

McCall’s Quilting Vol. 29, #2 (ISSN 1072-8295), is published six
times per year in January/February, March/April, May/June, July/August, September/October, and November/December by Peak Media
Properties, LLC, dba Golden Peak Media, 4868 Innovation Drive,
Fort Collins, CO 80525-5596. Periodicals’ postage paid at
Fort Collins, CO 80525 and additional mailing ofwces.
EDITORIAL COMMENTS OR CONCERNS:
mccallsquilting@goldenpeakmedia.com
McCall’s Quilting, 500 Golden Ridge Rd., Suite 100, Golden, CO 80401
BACK ISSUES: QuiltingDaily.com/go/mccalls-issues
SUBSCRIPTIONS: To subscribe to McCall’s Quilting, renew
your subscription or change the address of your current
subscription, visit Subscriber Services at QuiltingDaily.com.
Or contact: McCall’s Quilting, PO Box 37869, Boone, IA 50037-0869
(800) 388-7023.
Email: mccallsquilting@emailcustomerservice.com
SHOPS: If you are interested in carrying this magazine in your
store, email sales@goldenpeakmedia.com.
ERRATA: Visit QuiltingDaily.com/errata if you suspect a problem
Reproduction in whole or in part in any language without written
permission from McCall’s Quilting is prohibited. No one may copy,
reprint or distribute any of the patterns or material in this magazine
for commercial use without written permission of McCall’s Quilting.
Templates and patterns may be photocopied as necessary to
make quilts for personal use only. Quilts made from any element of
a McCall’s Quilting pattern may be publicly displayed at quilt shows
or donated to charity with credit given to the designer and McCall’s
Quilting magazine.
POSTMASTER: Send address changes to:
McCall’s Quilting, PO Box 37869, Boone, IA 50037-0869.
Copyright ©2022 Golden Peak Media

VISIT US ON THE WEB:
QuiltingDaily.com

EVERY VISION, ELEVATED.
EVERY INTERACTION,

EFFORTLESS.

To learn more, visit
creativeicon2.pfaff.com

WiFi
Enabled

Coming soon to a
dealer near you.

Built-in
Camera

computerized sewing & embroidery machine

creative ™
Embellishment
Attachment

Artificial
Intelligence
Technology

Built-in
Projector

Speech
Recognition

PFAFF, PFAFF PERFECTION STARTS HERE, CREATIVE, and CREATIVE ICON are trademarks of KSIN Lusembourg II, S.a.r.l.
© 2021 KSIN Luxembourg II, S.a.r.l. All rights Reserved. Availanility varies by location.

Contributors
Shannon Arnstein

Jen Daly

Susan Deshensky

Shannon has a lot of creative outlets,
but nothing has matched her passion
for quiltmaking. She is a sample maker,
pattern tester, and quilt pattern designer.

Jen is a quilt designer, author, and Etsy
shop owner who lives in New Hampshire.

Susan is an award-winning quilt pattern
designer, a life member of the American
Needlepoint Guild, and the Embroiderers'
Guild of America.

Abigail Dolinger

Charisma Horton

Pam Nourse

Abigail enjoys sharing her love of quilting
with children and is the Children's
Ministry director at her church.

Charisma is a wife, mother of six, and a
prolific quilter, designer, and longarmer.

Pam has been quilting for over 30 years,
and creating her own designs for almost
as long. She divides her time between
Massachusetts and Maine.

Becky Rico

Ramona Sorensen

Elaine Theriault

A lifelong maker, Becky is passionate
about all things quilting, whether
traditional or modern. She lives in
western Washington.

Ramona grew up surrounded by
quiltmakers and hand quilters. She also
designs quilting motifs.

Elaine is obsessed with life, fun, quilting,
reading, cycling, and figuring out how to
do all of them at once!

also
featuring

Jennifer Thomas
Jennifer spends her days sewing in an
old vintage farmhouse in the rolling
countryside of North Carolina with her
children, cats, and nature all around.

6

McCall’s Quilting

March/April 2022

Anne Hein

Gerri Robinson

Anne's passion for all things quilting,
embroidery, and digitizing started in a
Home Economics class.

In addition to being a prolific quilt
designer, Gerri is also a fabric designer
for Riley Blake Designs.

EXTEND YOUR REACH

Get all the professional
abilities with a comfortable Consistently Beautiful Stitches
Built-in stitch regulation
“at-home” feel. Top-of-the line
features like built-in stitch
regulation, an enhanced motor,
and a user-friendly touch
screen will make this machine
the star of your quilting space!

Full color touch screen

Extended Range of Motion

Superior Stitch Quality

19-Inch throat-space

Enhanced motor, faster top speed

Call now to get your best promo pricing

800-264-0644
Learn more at your local dealer
www.graceframe.com

Easy to use Interface

Fresh Picks

• trends
• tools
• cool stuff

Square-in-a-Square Foundation Paper Pad Set
Get perfect square-in-a-square units every time with these handy foundation
papers from It's Sew Emma, exclusively available at Fat Quarter Shop. Avoid tiny
patches and sewing on the bias, while getting precise units every time. The papers
come in bound pads and are available in multiple finished sizes, from 1" up to 4 ½".
Use the square-in-a-square units for any pattern that calls for them, or use them in
place of fabric squares to elevate an existing pattern.
fatquartershop.com

Tula Pink Rotary Cutter 45mm
Bring beauty to every step of your quilt making! This gorgeous iridescent rotary cutter
from Tula Pink is ergonomically designed for both left and right hand cutting and is
presented in a lovely aluminum keepsake box. It will bring a sharp cutting edge to all
your fabrics, along with its cutting-edge style. Perfect for gifting, though once you see
it you’ll probably want to keep it for yourself. Replacement blades and additional
Tula Pink cutting accessories are available as well.
ihearttulapink.com

Dritz Wooden Quilt Hangers
Try a new way to display your quilts on the wall using these clever wooden
quilt hangers from Dritz. Fast to install and easy to use, the unique design
showcases your quilted artworks without puncturing the fabric in any way;
the marble inside the hanger uses tension to hold the quilt securely in place.
The unfinished wood can be stained or painted before installation to match
any decor. Each package includes 2 hangers.
handicraft.com

Panasonic NI-QL1000A Cordless Iron
The sleek, compact design of this cordless iron packs a lot of pressing power, enabling
you to cover large swaths of fabric with a 360-degree range of motion. It also works
as a vertical handheld steamer for complete fabric care on-the-go. The heat-resistant
power base snaps right into the convenient carrying case for quick and easy
transport. It's perfect for your home studio and for bringing along on retreats.
amazon.com

8

McCall’s Quilting

March/April 2022

SIZED FOR YOUR SPACE.
PRICED FOR YOUR BUDGET.
BERNINA Q 16 Longarm
Our robust, feature-rich longarm won’t overwhelm your space or
budget. It comes loaded with everything that makes the quilting
life easier, faster and oh so perfect, including:
• BERNINA Stitch Regulator for perfect stitches
every time.
• Spacious 16" workspace.
• 2,000 stitches per minute for fast finishes.
• More cabinet options than most longarms
this size.
– Foldable Table with Adjustable
Height by Horn Australia
– Standard and Elevated Cabinets
by Koala
– Lift Table by Horn USA

Find a store at bernina.com today and
make your quilting dreams come true!

McQ&A
For this issue, we asked the staff, “You’ve finished every last one of your UFOs; congratulations!
What’s the quilt project you are going to start next?”

Vivika DeNegre

Director of Content
I’d really love to make a charm quilt with a piece of every
fabric in my stash—just a simple quilt, but there are oh-somany memories represented by each of those lovely fabrics.
I’d choose a simple triangle and go from there. When I took
up quilting in the 1990s, one of my first projects was to make
a charm quilt for my daughter’s baby doll. Full Circle!

Valerie Uland

Editor of Fons & Porter’s Love of Quilting
I will begin by pulling out all the bright and cheerful fabrics from my
scrap bins, the ones that make me feel like spring. Then, I will pour
myself a refreshing glass of iced tea and pore over my stockpile of
magazines for inspiration. Once I settle on a design, I will head to my
sewing room and make all those pretty scraps into blocks. It will be so
much fun to see what unfolds—and will undoubtedly involve a trip to
my local quilt shop for some additional fabric to unify my scraps!

Kristine Lundblad

Managing Editor of Quilting Arts
I have a couple quilt designs in my head—sparked by recent
online classes with Maria Shell and Daisy Aschehoug—to
create a small quilt or two using improvisational cutting
and piecing techniques. I am an exacting, rules-following
person, so these new quilts will challenge and exercise the
improv part of my brain. (We all have one of those, right?)

Gigi Levsen

Editor of McCall’s Quilting
I’ve been wanting to make a big bed quilt backed with minky
or cuddle fabric for quite a while. I’ve got a the minky already;
a deep, dark, navy blue. But what will I make for the quilt
top? I’m envisioning a scrappy design with a background of
dark blues to match the backing fabric, sprinkled with pieced
stars of various sizes in whites, yellows, silvers, and golds.

10

McCall’s Quilting

March/April 2022

w
e
n

!

Design.
Quilt.
Repeat.
Press play on
precision quilting
and perfect
stitches with
Pro-Stitcher Lite™
for HQ Moxie™.
Creative designs
and custom quilting
at your fingertips.

WITH

Learn more about Pro-Stitcher Lite at HandiQuilter.com/Moxie

12

McCall’s Quilting

March/April 2022

Spring Storm
To make these flowers grow, just

sew. No rain needed!

Quilt Designed & Made by
Elaine Theriault
Skill Level
Intermediate
Finished Size
66" x 78"
Finished Blocks
30 Block Y 4" x 4"
20 Block Z 8" x 8"

NOTE: See Pattern Pull-Out Section for
foundation section.

Planning
“The Storm at Sea block is filled with
curves!” Elaine said, “Yet there are no
curves! It’s one of my all-time favorites.”
And one of ours too! We’ve separated the
block into a center block Z with pieced
sashings and sashing posts completing
the look. The combination of shapes
creates gentle, undulating curves across
the surface without any curved piecing or
applique.
You may want to starch and press your
fabric before cutting, as this quilt has lots
of bias edges to handle during construction. Starch will prevent excessive fabric

QuiltingDaily.com

distortion, but you’ll still need to handle
all the bias edges carefully. When sewing
a bias edge to a crossgrain or length grain
edge, place the bias patch on top for better control; using a stiletto to help guide
and feed the fabric under the needle will
help keep everything in place as well.
Elaine cut the second border lengthwise
from a border print, and cut the binding
lengthwise from the same print. If you
do not use a border print, you will need
just 1⅜ yards for 8 border 2 strips cut
crosswise, and ¾ yard for 8 binding strips
cut crosswise.

March/April 2022

McCall’s Quilting

13

Fabric Requirements
Fabric yardage assumes 40" usable width
of fabric (WOF) unless otherwise noted.
• Dark green print
2½ yds. for block Y and sections
• Light green print
2½ yd. for sections
• Blue daisy print
1½ yds. for blocks and border 1
• Blue floral
⅞ yd. for blocks
• Yellow print
½ yd. for block Z
• Border print*
8⅞ yds. for border 2 and binding
• Foundation paper
• Backing
5⅛ yds.
• Batting
74" x 86"
*Read Planning.

(Although fabric amounts are adequate
for foundation piecing, you may need
more if you cut very generous patches.)
NOTE: Fabrics in the quilt shown are from
the Daisy Delight collection by Kanvas
Studio for Benartex Fabrics.

Cutting Instructions
Patches are lettered in order of use. Measurements include ¼" seam allowances.
Cut foundation patches at least 1" larger
than the corresponding foundation area.
= cut in half once diagonally
= cut in half twice diagonally

• Dark green print

•

How to Add Mitered
Borders
Center and pin border strips to
sides, top, and bottom of quilt.
Strips will extend beyond quilt top.
Starting and stopping ¼˝ from quilt
corners and backstitching to secure,
sew strips to quilt top. Press seam
allowances toward quilt center. Fold
quilt on diagonal, right sides together. Align border strip raw edges
and border seams at the ¼˝ backstitched point; pin together. Align
ruler edge with fold, extending ruler
completely across border. Draw line
at a 45° angle from the backstitched
point to the border raw edges. Stitch
on drawn line, backstitching at both
ends. Press seam open. With quilt
right side up, align 45° line of square
ruler on seam line to check accuracy.
If corner is flat and square, trim
excess fabric to ¼˝ seam allowance.
Reepeatt for all corners.

14

McCall’s Quilting

March/April 2022

60 squares 2⅞" cut to make
120 triangles (C)
Foundation patches
Light green print
Foundation patches

• Blue daisy print
7 strips 2½" x WOF for border 1
40 squares 4⅞" cut to make
80 triangles (F)
30 squares 2½" (A)
• Blue floral
20 squares 5¼" cut to make
80 triangles (E)
30 squares 3¼" cut to make
120 triangles (B)
• Yellow print
20 squares 4½" (D)
• Border print*
2 strips 5½" x 81", cut lengthwise
centered on design for border 2
2 strips 5½" x 69", cut lengthwise
centered on design for border 2
4 strips 2½" x 81" cut lengthwise
at edge of fabric for binding
*Read Planning.

Piecing the Blocks
1 Make 49 accurate copies of the
foundation section. Referring to
Foundation Piecing in Quilt Basics,
foundation section, and Diagram I
for fabric placement; make 49 sections
as shown.

3 Similarly, referring to Diagram III, join
yellow print D, 4 blue floral E’s, and 4
blue daisy F’s as shown to make block Z.
Make 20 block Z’s.

F

E

E

D

Section
Make 49

F

Finishing Touch
The Two by Two Quilting motif fits
perfectly in the patchwork of blocks
and sashings of Spring Storm. The gentle
curves of the quilting mirror the illusion
of gentle curves in the piecing.

Go to QuiltingDaily.com/finishing-touch
to download the Two by Two Quilting motif.

Diagram I

2 Referring to Diagram II, join blue daisy
print A, 4 blue floral B’s, and 4 dark
green print C’s as shown to make
block Y. Make 30 block Y’s.

Block Z
Make 20
Diagram III

C B C
B A

Block Y
Make 30
Diagram II
Alternate Quilting Placement Diagram

Two by Two Quilting

QuiltingDaily.com

March/April 2022

McCall’s Quilting

15

5½" x 69"

2½" x 64½"

5½" x 81"

2½" x 56½"

Assembly Diagram

Assembling the Quilt Top
NOTE: Refer to Assembly Diagram for
following steps.
4 Join 5 block Y’s alternately with 4
sections as shown to make sash row.
Make 6 sash rows.
5 Join 5 sections alternately with 4 block Z’s
as shown to make block row. Make 5
block rows.
6 Sew sash rows alternately with block
rows to complete quilt center. Carefully remove foundation papers.

16

McCall’s Quilting

March/April 2022

7 Refer to Borders in Quilt Basics. Join

8

blue daisy border 1 strips and cut to
sizes shown in Assembly Diagram.
Matching centers and ends, sew border 1 side strips to quilt; repeat to add
top and bottom strips.
Finger-press all border 2 strips in
half; finger-press quilt center in half
on each side as well. Matching folds
and referring to How to Add Mitered
Borders, join side border print 2 strips
to sides of quilt. In same manner, add
border 2 strips to top and bottom.
Miter corners.

Quilting and Finishing
9 Layer, baste, and quilt. Elaine machine
quilted allover swirls and daisies. Bind
the quilt.

Color Your Way
Use our blank coloring page to help you plan your version of this beautiful quilt. You could enhance different
aspects of the design with your color choices, like the diagonal lines, block centers or even the sashing posts.
Make multiple copies to try out lots of different compositions!

QuiltingDaily.com

March/April 2022

McCall’s Quilting

17

18

McCall’s Quilting

March/April 2022

Star Roundup
Let this two-color design dazzle

you.

Quilt Designed & Made by
Becky Rico
Skill Level
Intermediate
Finished Size
80" x 80"
Finished Blocks
50 Block X 8" x 8"
26 Block Y 8" x 8"
24 Block Z 8" x 8"

NOTE: See Pattern Pull-Out Section for
templates E and F.

Planning
Becky’s two-color quilt has movement,
style, and sparkle, thanks to her dynamic
block combination. “The variable star
block is one of my favorites, and I enjoy
seeing how it plays with other blocks,”
Becky said. “The drunkard’s path blocks
add a lot of movement and interest.
While this makes a striking two-color
quilt, I think it also lends itself to a diagonal layout or possibly a totally scrappy
design.”

Fabric Requirements
The E’s and F’s are cut from templates.
To prepare templates, trace on template
plastic, including seam lines, grain lines,
and match points. Cut out directly on
outer lines. Make small holes at match
points using an awl or large needle. Place
templates right side down on wrong
sides of appropriate fabrics; mark around
templates. Cut out fabric patches and
transfer match points to wrong sides of
each. See the Cutting Diagram for the
most efficient method for cutting F’s.

Fabric yardage assumes 40" usable width
of fabric (WOF) unless otherwise noted.
• Green solid
5½ yds. for blocks and binding
• White solid
4⅞ yds. for blocks
• Template plastic
• Backing
7⅞ yds.
• Batting
88" x 88"
NOTE: Fabrics in the quilt shown are from
the Solids collection by Spoonflower.

QuiltingDaily.com

March/April 2022

McCall’s Quilting

19

Cutting Instructions
Patches are lettered in order of use. Measurements include ¼" seam allowances.

• Green solid

•

9 strips 2½" x WOF for binding
25 squares 5¼" (A)
25 squares 4⅞" (C)
150 squares 2⅞" (B)
50 squares 2½" (D)
24 template E
26 template F (see Cutting Diagram)
White solid
25 squares 5¼" (A)
25 squares 4⅞" (C)
150 squares 2⅞" (B)
50 squares 2½" (D)
26 template E
24 template F (see Cutting Diagram)

Piecing the Blocks and
Sections
1 Referring to Fast Flying Geese in
Quilt Basics and to Diagram I-A, use
green solid A’s and white solid B’s to
make 100 Flying Geese 1’s as shown.

Flying Geese 1
Make 100

F

F

20

McCall’s Quilting

March/April 2022

Diagram II-A

Diagram I-A

Similarly, referring to Diagram I-B,
make 100 Flying Geese 2’s using
white A’s and green B’s.

Flying Geese 2
Make 100

Cutting Diagram

Referring to Triangle-Squares in
Quilt Basics and to Diagram II-A, use
remaining green B’s and white B’s to
make 100 unit 1’s.

Unit 1
Make 100

F
8½"

2

Diagram I-B

Similarly, use green C’s and white C’s
to make 50 unit 2’s as shown in Diagram II-B.

Unit 2
Make 50
Diagram II-B

3 Referring to Diagram III, join 2 Flying
Geese 1’s, 2 Flying Geese 2’s, 2 unit 1’s,
1 unit 2, 1 green D, and 1 white D to
make block X. Make 50 block X’s.

4 Referring to Diagram IV-A, join
white E and green F to make block Y.
Make 26 block Y’s.

F

Finishing Touch
A quilting motif with gentle curves
and diamonds is a nice option for
complementing the patchwork in
this two-color quilt; it also adds extra
interest to the larger areas of solid fabric.

D
E

Go to QuiltingDaily.com/finishing-touch
to download the Two by Two Quilting motif.
Block Y
Make 26
Block X
Make 50

Diagram IV-A

Diagram III
Similarly, join green E’s and white F’s
to make 24 block Z’s as shown in
Diagram IV-B.

F
E

Alternate Quilting Placement Diagram

Block Z
Make 24
Diagram IV-B

Two by Two Quilting

QuiltingDaily.com

March/April 2022

McCall’s Quilting

21

5 Referring to Diagram V-A, join 2

Color Play!
This pattern looks great in solids,
though we wanted to try it with
some luscious prints, like the
Painted Patchwork collection by Sue
Zipkin for Clothworks. One section
is the perfect size for a pretty pillow
sham—make several for a set of
coordinating home décor pieces!

22

McCall’s Quilting

March/April 2022

block X’s and 2 block Y’s as shown to
make section 1. Make 13 section 1’s.

In same way, make 12 section 2’s using
block X’s and block Z’s as shown In
Diagram V-B.

Section 1
Make 13

Section 2
Make 12

Diagram V-A

Diagram V-B

Assembling the Quilt Top
NOTE: Refer to Assembly Diagram for
following steps, watching section placement.

Quilting and Finishing
6 Join sections into rows as shown, join
rows to complete quilt center.

7 Layer, baste, and quilt. Becky machine
quilted a crosshatch motif. Bind the
quilt.

Assembly Diagram

QuiltingDaily.com

March/April 2022

McCall’s Quilting

23

I designed the center using the Janome
Artistic Digitizer software. Repurposing
a quilting motif I already had, I turned it
into a reverse appliqué design with a pop
of color peeking out. After bringing in the
design, I used the Array tool to multiply
the design equally in the hoop. (Fig 2)

Fig. 2

I created a straight line grid to make it
look like it might have been pieced. (Fig 3)

Fig. 1

A Spring Time Afternoon
Fig. 3

By Anne Hein, Embroidery Software Specialist, Janome America

Spring, a time of
renewal, a time to
refresh. The flowers
are starting to bloom
with bits of color here
and there; it’s time to
bring some color into
our rooms. Pillows are
an easy way to do just
that , but who needs so
many pillows?

A pillow wrap is ideal, quick to make, and
easy to pack away until next season. Plus,
you can tailor it to any pillow you already
have. (Fig 1)
This project took just an afternoon
and a few supplies. I picked my pillow,
measuring around the middle to find out
how long to make it; I added 4" to have
an overlap in the back. Pillow wraps can
be just about any width—how much of
the pillow do you want to show? For my
pillow, 9½" would be perfect. To make it
even easier, I wrapped the backing fabric
to the front as a faux binding. This is
achieved by cutting your backing 1¾" to
2" wider.

Next, the reverse appliqué windows
were added. With reverse appliqué, the
top fabric is cut away to reveal the color
underneath. The shape that was created
when the points of the design came
together looked like a perfect spot. Using
the digitize outline tool, I drew the shape;
this would be where I would clip the
fabric. (Fig 4 and Fig 5)

Fig. 4
Fig. 5

24

McCall’s Quilting

March/April 2022

SPONSORED CONTENT

When I finished all the elements, I
reordered them to stitch the grid first
then the quilting motif, and finally the
reverse appliqué boxes.
At the machine, I put the stabilizer in the
hoop—most of the time I use a tearaway,
but I wanted to leave this stabilizer in
so I chose a poly mesh cutaway. Under
the hoop, I placed a hoop-size square of
batting. I would be adding more batting
as I stitch along to create a fluffier look.
With the square of reverse appliqué fabric
in the hoop, I placed the front fabric over
all of that. I used the basting stitch on my
machine to hold this all together. (Fig 6)
Fig. 8

From the front, I opened and trimmed
the appliqué parts. Using a pin, I slid it
under the top fabric, making sure to not
clip the appliqué fabric. With the pin in
place, I clipped the fabric above it, then I
could remove the pin and open the fabric.
(Fig 8)

Fig. 6

After stitching the grid, I added two more
pieces of batting underneath the hoop.
Now I just need to wait as the machine
would do all the work!

I used the backing fabric to create the
look of a binding. Laying the backing
fabric and quilted top right sides together,
I stitched the long edges; the backing is
wider than the front so I moved it out of
the way. Before closing one end, I’d push
an even amount of the backing fabric to
each side. Then I stitched across the end.
I did the same on the other end but left an
opening to turn it right side out.

Once turned right side out, I pressed all
the edges. To close the opening, a piece
of fusible web could be used. On each
side, I drew lines coming out from the
quilting motif points. Using the same
thread as the quilting motifs, I stitched on
the lines. I started on one side, stitched to
the point, turned, then stitched down the
other side.
I placed the wrap on the pillow, overlap
on the back to determine where to put
the closure. I used several plastic snaps.
This was a quick project—finished in an
afternoon; it will certainly brighten up my
room. (Fig 9)

Once completed, I could trim the parts
that are under the top fabric, being very
careful not to clip the front thread. (Fig 7)

Fig. 7

QuiltingDaily.com

Fig. 9

SPONSORED CONTENT

March/April 2022

McCall’s Quilting

25

26

McCall’s Quilting

March/April 2022

Ringmaster
Create the illusion

of circles without curved seams!

Quilt Designed & Made by
Jennifer Thomas
Skill Level
Intermediate
Finished Size
66" x 66"
Finished Blocks
13 Block Y 12" x 12"
12 Block Z 12" x 12"

NOTE: See Pattern Pull-Out Section for
foundation section.

Planning

Fabric Requirements

Jennifer’s dramatic two-block patchwork
quilt creates the illusion of circles with
clever color placement. Though there
are no curved seams, you do get a nice
variety of other techniques, like pieced
rectangles and foundation piecing. “I was
playing with blocks and loved the suggestion of circles in this design,” she said.
“Circles are a favorite design element in
my quilts.”

Fabric yardage assumes 40" usable width
of fabric (WOF) unless otherwise noted.

Handle bias edges carefully to avoid
distortion. Use an accurate ¼" seam
throughout to ensure all elements of the
quilt fit together well.

•

• Dark gold batik
•
•
•

•
•
•

QuiltingDaily.com

(Although fabric amounts are adequate
for foundation piecing, you may need
more if you cut very generous patches.)

2⅞ yds. for blocks
Brown batik
⅝ yd. for blocks
Blue batik
2 yds. for blocks and border 1
Light gold batik
2 yds. for blocks, border 2, and binding
Navy batik
⅝ yd. for blocks
Foundation paper
Backing
4½ yds.
Batting
74" x 74"

NOTE: Fabrics in the quilt shown are from
the Interubin collection by Island Batik.
Batting: Hobbs

March/April 2022

McCall’s Quilting

27

Cutting Instructions

Piecing the Blocks

Patches are lettered in order of use. Measurements include ¼" seam allowances.
Cut foundation patches at least 1" larger
than the corresponding foundation area.
= cut in half once diagonally

1 Referring to Triangle-Squares in Quilt
Basics and to Diagram I, use dark
gold batik A’s and brown batik A’s to
make 208 unit 1’s as shown.

•

•

•

½”

½”

½”

B
Right side
of fabric

B

½”

13 squares 6½" (F)
48 rectangles 2½" x 4" (B)
104 squares 2⅜" (A)
104 squares 2⅜" cut to make 208
triangles (D)
104 squares 2" (C)
Foundation patches
Brown batik
104 squares 2⅜" (A)
Blue batik
7 strips 2½" x WOF for border 1
96 rectangles 2½" x 4" (B)
Foundation patches
Light gold batik
8 strips 2½" x WOF for binding
7 strips 1½" x WOF for border 2
52 squares 3⅞" cut to make 104
triangles (E)
48 rectangles 2½" x 4" (B)
Navy batik
48 squares 3½" (G)

Wrong
side of
fabric

½” ½”

• Dark gold batik

•

½”

½”

Unit 1
Make 208
Diagram I

2 Referring to Diagram II-A, mark the
right side of a blue batik B ½" in from
the upper left top/side and on the
lower right bottom/side as shown. On
the wrong side of a light gold batik B,
mark ½" in from the upper right top/
side and the lower left bottom/side
as shown. Draw a line connecting
the dots on the light gold B. Align the
marks, pin, and stitch on both sides
of the marked line. Cut on the marked
line, open and press. Referring to the
Trimming Diagram, line up ruler as
shown and trim to 2" x 3½" to make 2
unit 2’s. Make 48 unit 2’s.

¼"

Trim
¼"

Unit 2
Make 48
Diagram II-A

In the same way, make 48 unit 3’s using
dark gold B’s and blue B’s as shown in
Diagram II-B.

Unit 3
Make 48
Diagram II-B

28

McCall’s Quilting

March/April 2022

3 Similarly, referring to Diagram III-A,
mark dark gold and blue B’s as shown,
noting opposite orientation of marks.
Following instructions described in
step 2, make 48 unit 4’s.

4 Referring to Diagram IV, join 2 unit 1’s
and 2 dark gold C’s as shown to make
section 1. Make 52 section 1’s.

7 Referring to Diagram VII, join 4 section 1’s, 8 section 2’s, and dark gold F
as shown to make block Y. Make 13
block Y’s.

C
½”

½”
½” ½”

B
Right side
of fabric

Wrong
side of
fabric
B

½”

F
½”

½”

½”

Section 1
Make 52
Diagram IV

5 Join 1 unit 1, 2 dark gold D’s, and 1 light
gold E as shown in Diagram V to make
section 2. Make 104 section 2’s.
D
Block Y
Make 13

E

Diagram VII

Section 2
Make 104
Diagram V

8 Join 4 each units 2–5, 2 section 3’s, and
4 navy G’s as shown in Diagram VIII to
make block Z. Make 12 block Z’s.

G

6 Make 24 accurate copies of foundation section. Referring to Foundation
Piecing in Quilt Basics, foundation
section, and Diagram VI, foundation
piece 24 section 3’s as shown.
Unit 4
Make 48
Diagram III-A

Section 3
Make 24
Diagram VI

Make 48 unit 5’s using light gold and
blue B’s as shown in Diagram III-B.
Block Z
Make 12
Diagram VIII

Unit 5
Make 48
Diagram III-B
QuiltingDaily.com

March/April 2022

McCall’s Quilting

29

Assembling the Quilt Top
NOTE: Refer to Assembly Diagram for
following steps, watching block placement.
9 Join blocks into 5 rows of 5 blocks
each as shown. Sew rows together to
complete quilt center.

10 Refer to Borders in Quilt Basics. Join
blue border 1 strips and cut to sizes
shown in Assembly Diagram. Matching centers and ends, sew border 1
side strips to quilt; repeat to add top
and bottom strips. In the same manner, add light gold border 2.

1½" x 66½"

2½" x 60½"

1½" x 64½"

2½" x 64½"

Assembly Diagram

30

McCall’s Quilting

March/April 2022

Quilting and Finishing
11 Layer, baste, and quilt. Jennifer machine quilted a loopy meaner across
the surface of the quilt. Bind the quilt.

Color Your Way
The illusion of circles starts to appear as color is strategically added to the design. Try coloring the large circles
first, then fill in the rest of the composition to give this gorgeous quilt a new look. Use our handy coloring page
to help you place the colors exactly where you want them before you start to sew. We encourage you to make
several copies to help get your unique design just right!

QuiltingDaily.com

March/April 2022

McCall’s Quilting

31

32

McCall’s Quilting

March/April 2022

Dresden Daisies
Here’s a dazzling,

delightful dream of a Dresden plate design.

Quilt Designed & Made by
Shannon Arnstein
Machine Quilted by
Christy Bowman
Skill Level
Intermediate
Finished Size
68¼" x 68¼"
Finished Blocks
36 Blocks 9" x 9"

NOTE: See Pattern Pull-Out Section for
templates A and C.

Planning
“I love a Dresden quilt, they just make me
so happy!” Shannon said. “I often think
about the ladies in the 1930s making this
quilt design and the tools they would
have used versus the tools we use now.
The retro fabrics make me smile and
are perfect for a Dresden quilt. It’s like
a double dose of happy and cheerful!
Make it for your very own and tag me on
Instagram—I cant wait to see your quilt!”
Whatever fabrics you choose, your quilt
will be lovely and bring a smile to all.
For the C templates, Shannon used the
fused Finished Edge Appliqué method; if
you wish to do the same, you will need a
lightweight fusible interfacing (not the

QuiltingDaily.com

paper-backed variety); cut 36 Cs from the
interfacing. You could also do needleturn appliqué if you wish, or fusible
raw-edge appliqué (remove the seam allowance from the curve of the C template
if you plan on doing raw-edge appliqué).
To cut the A templates, cut a 5" x width of
fabric strip and cut the A’s from the strip,
flipping the template 180 degrees after
each cut.
Shannon put each of the 5 assorted prints
in the same place on each block; do
likewise if you wish. Or you could select
more than 5 prints to make the quilt
really scrappy, and place them randomly
throughout the blocks.

March/April 2022

McCall’s Quilting

33

Fabric Requirements

Cutting Instructions

Piecing the Blocks

Fabric yardage assumes 40” usable width
of fabric (WOF) unless otherwise noted.

Patches are lettered in order of use. Measurements include ¼" seam allowances.

1 Prepare assorted print A’s by folding in

• 5 assorted prints

• 5 assorted prints

•
•
•
•
•
•
•

½ yd. each for blocks
Aqua dot
3½ yds. for blocks and sashes
White floral
1¼ yds. for blocks and border 1
Red dot
¼ yd. for sashing posts
Pink floral
1 yd. for border 2
Green dot
¾ yd. for binding
Backing
4⅝ yds.
Batting
77" x 77"

NOTE: Fabrics in the quilt shown are from
the One Fine Day collection by Bonnie
and Camille for Moda Fabrics.

•
•
•
•
•

cut from each:
36 template A
Aqua dot
36 squares 9½" (B)
84 rectangles 1¼" x 9½" (E)
White floral
7 strips 2" x WOF for border 1
36 template C
Red dot
49 squares 1¼" (D)
Pink floral
8 strips 3½" x WOF for border 2
Green dot
8 strips 2½" x WOF for binding

half lengthwise, right sides together.
Stitch across the top edge and trim
corner. Turn right side out and press
to complete A wedge. Make 36 from
each assorted print, for a total of 180
A wedges.

A

Sew

Turn right side
out to form point

Trim

Join wedges

Batting: The Warm Company

Join 1 A wedge from each print as
shown in Diagram I to complete section. Make 36 sections.
A
A

Section
Make 36
Diagram I

34

McCall’s Quilting

March/April 2022

2 Finger-press B in half twice; use folds
as placement guide. Referring to Diagram II, position section and C on B as
shown. Appliqué section in place using
a blind stitch; appliqué C in place
using your preferred method (Read
Planning) to complete block. Make 36
blocks total.

C
Section
B

Block
Make 36
Diagram II

Blind Stitch

QuiltingDaily.com

March/April 2022

McCall’s Quilting

35

Assembling the Quilt Top
NOTE: Refer to Assembly Diagram for
following steps, watching block orientation.
3 Join 7 red dot D’s and 6 aqua dot E’s as
shown to make sash row. Make 7 sash
rows.
4 Join 7 E’s and 6 blocks as shown to
make block row. Make 6 block rows.

5 Sew sash rows alternately with block
rows as shown to complete quilt center.

6 Refer to Borders in Quilt Basics. Join
white floral border 1 strips and cut to
sizes shown in Assembly Diagram.
Matching centers and ends, sew border 1 side strips to quilt; repeat to add
top and bottom strips. Join pink floral
border 2 in the same way.

3½" x 68½"

2" x 59¾"

3½" x 62¾"

2" x 62¾"

Assembly Diagram

36

McCall’s Quilting

March/April 2022

Quilting and Finishing
7 Layer, baste, and quilt. Christy machine quilted an allover loopy daisy
motif. Bind the quilt.

Color Your Way
Shannon's Dresden Plate pattern can be made in so many different ways, depending on your personal style and
fabric choices. Use our coloring sheet to plan your version—you may want to make multiple copies to get your
design colored just right before you start sewing! Consider making the sashings and sashing posts different
colors throughout the composition to create a brand new look for this traditional pattern.

QuiltingDaily.com

March/April 2022

McCall’s Quilting

37

38

McCall’s Quilting

March/April 2022

Bloom & Grow
Welcome spring with a cute,

creative, and contemporary pillowcase pattern!

Quilt Designed & Made by
Charisma Horton
Skill Level
Intermediate
Finished Size
18" x 18"
Finished Sections
4 Section 1 4½" x 4½"
4 Section 2 4½" x 4½"
4 Section 3 4½" x 4½"
4 Section 4 4½" x 4½"

NOTE: See Pattern Pull-Out Section for
piecing templates B–F.

Planning
Charisma designed a lovely springtime
décor piece with clever piecing and
curved seams, a pattern that will sharpen
both your skills and the look of your
space! It’s got a real floral vibe, thanks to
the colors and composition, but in a very
abstract, modern sense. The creative piecing, along with appliqué, makes it a very
satisfying project to sew and to admire.

or large needle. Place templates right
side down on wrong sides of appropriate
fabrics; mark around templates. Cut out
fabric patches and transfer match points
to wrong sides of each. The D patch does
not include seam allowance for use with
raw-edge fusible appliqué. If you want to
do turned-edge appliqué for the D patch,
add seam allowance to the template.

The B’s, C’s, E’s, and F’s are piecing
templates. To prepare templates, trace
patterns on template plastic, including
seam lines, grain lines, and match points.
Cut out directly on outer lines. Make
small holes at match points using an awl

For this project, templates are placed
on triangle-square units to cut patches.
The remaining portions of the trianglesquares can be saved to use in a smaller
bonus pillow project.

QuiltingDaily.com

March/April 2022

McCall’s Quilting

39

Fabric Requirements

Cutting Instructions

Piecing the Sections

Fabric yardage assumes 40" usable width
of fabric (WOF) unless otherwise noted.

Patches are lettered in order of use.
Measurements include ¼" seam allowances. Prepare orange tonal fabric with
paper-backed fusible appliqué before cutting template D’s, or add seam allowance
to template D if you are planning to do
turned edge appliqué.

1 Referring to Triangle-Squares in Quilt

• Gray tonal
1 fat quarter* for sections
• Dark green tonal and light green tonal
1 fat eighth** each for sections
• Dark pink tonal
¼ yard for sections
• Light pink tonal
⅜ yd. for sections
• Orange tonal
1 fat eighth** for sections
• Yellow tonal
1 fat eighth** for sections
• Lining fabric
⅝ yd. for lining
• Backing
⅜ yd. for envelope back
• Template plastic
• Paper-backed fusible web
• Batting
19½" x 19½"
• 18" pillow form
*fat quarter = 18" x 20"
**fat eighth = 9" x 20"
NOTE: Fabrics in the quilt shown are from
the Shadow Play collection by Maywood
Studios.
Batting: Quilters Dream Blend 70/30

40

McCall’s Quilting

March/April 2022

Basics and to Diagram I-A, use gray
tonal A’s and dark green tonal A’s to
make 4 unit 1’s as shown.

• Gray tonal
•
•
•

•
•
•
•

4 squares 5⅜" (A)
4 template B
Dark green tonal and light green tonal
cut from each:
2 squares 5⅜" (A)
Dark pink tonal
4 squares 5⅜" (A)
4 template F
Light pink tonal
4 squares 5⅜" (A)
4 template C
4 template E
Orange tonal
4 squares 2" (G)
4 template D
Yellow tonal
4 template C
Lining fabric
1 square 19½" (H)
Backing
2 rectangles 12" x 18½" (I)

Unit 1
Make 4
Diagram I-A

In the same manner, referring to Diagram I-B, use gray A’s and light green
tonal A’s to make 4 unit 2’s. Use dark
pink tonal A’s and light pink tonal A’s
to make 8 unit 3’s.

Unit 2
Make 4

Unit 3
Make 8

Diagram I-B

2 Referring to Diagram II-A and watch-

3 Referring to Diagram III-A and watch-

ing color placement, use template B
to cut unit 1 as shown to make unit 4
(Save the remainder for a bonus pillow
project if you wish). Make 4 unit 4’s.

ing color placement, use template C to
cut 4 unit 3’s into 4 unit 6’s as shown
(saving the remainder if desired).

5 Referring to Diagram V-A, join unit 4
and unit 6 as shown to make section 2.
Make 4 section 2’s.

Unit 3
Unit 1

B

C
save for
bonus pillow

save for
bonus pillow

Section 2
Make 4

Unit 6
Make 4

Unit 4
Make 4

Diagram V-A

Diagram III-A

Diagram II-A
In the same way and watching color
placement, use template C and unit 3’s
to cut 4 unit 7’s as shown
(Diagram III-B).

Similarly, referring to Diagram II-B,
use template B to cut unit 2’s as shown
to make 4 unit 5’s as shown (save
the remainder for a bonus project if
desired).

Unit 2

Similarly, make 4 section 3’s using
unit 5’s and unit 7’s as shown in
Diagram V-B.

Unit 3
C

B

save for
bonus pillow

save for
bonus pillow

Section 3
Make 4
Unit 7
Make 4
Unit 5
Make 4

Diagram V-B

Diagram III-B

6 Referring to Diagram VI, join yellow

Diagram II-B

4

Join gray B and light pink C as shown
in Diagram IV. Fold in half diagonally
as shown and use fold as a placement
guide for orange tonal D. Fuse and
appliqué D in place as shown, making
sure the D patch is not in the seam
allowance of the C, to make section 1.
Make 4 section 1’s.

tonal C, light pink E, and dark pink F
as shown. Referring to Stitch-and-Flip
in Quilt Basics, join orange G to yellow C as shown to complete section 4.
Make 4 section 4’s.

F

E
C

B
G

C

D
Section 4
Make 4
Diagram VI
Section 1
Make 4
Diagram IV

QuiltingDaily.com

March/April 2022

McCall’s Quilting

41

Assembling the Pillow
Front
NOTE: Refer to Assembly Diagram for
following steps, watching section placement and orientation.
7 Lay out 4 rows of 4 sections each as
shown. Join sections into rows; join
rows to complete pillow top.

Quilting and Finishing
8 Layer H, batting, and pillow top; baste.
Referring to Quilting Diagram, quilt
vertical wavy lines as shown. Center
and trim all layers to 18½" square to
complete pillow front.

H

9 Fold over ¼" on one long side of backing fabric I rectangle; press. Fold over
¼" once more, press, and stitch close
to fold to make 1 envelope backing
panel. Make 2. Referring to Pillow
Assembly Diagram, layer pillow front
and envelope backing panels, right
sides facing and raw edges aligned.
Stitch ¼" from raw edges all around
through all layers. Clip corners, turn
pillowcase right side out through envelope back opening and press. Insert
pillow form through opening.
¼”

Pillow Front

Assembly Diagram

Quilting Diagram
Trim to 18½" x 18½"

I

I

Pillow Assembly Diagram

42

McCall’s Quilting

March/April 2022

¼”

Bonus Pillow Project
Avoid fabric waste and re-purpose the
leftovers of this project! Join the remaing
curved patches into another, coordinating pillowcase as Charisma did, or
arrange the joined curved seam units to
your liking.

Color Play!
This design looks great in just about
any color combination, as seen in
the pillow with an alternate palette
that Charisma made, incorporating
different colors from the Shadow
Play collection by Maywood Studios.
The darker blues make this pattern appropriate for just about any
season, and the modern style makes
it universally appealing, so it's great
to make for a quick gift (after you
make one or two for yourself first,
of course). You might try a favorite
collection of prints to change up the
look even more!

QuiltingDaily.com

March/April 2022

McCall’s Quilting

43

44

McCall’s Quilting

March/April 2022

Lori ’s Legacy
Make a stunning signature

quilt for someone special.

Quilt Designed & Made by
Abigail Dolinger
Skill Level
Intermediate
Finished Size
74½" x 74½"
Finished Blocks
86 blocks 4½" x 4½"

Planning
Friends, colleagues, and contributors
came together to make signature blocks
dedicated to our beloved former McCall’s
Quilting editor Lori Baker upon her retirement. Everyone who worked with Lori
loved her, and she worked with a lot of
people over the years! Lori's favorite color
is purple, so that was the obvious choice
for her gift, though this quilt would be
gorgeous in any color combination. You
could even make each border a different
color!
Whether you make the blocks yourself
and get people to sign the quilt at a party,
or you ask people to contribute blocks,
this is a beautiful, versatile design that
makes a gift to be treasured for years. If
you’d like to make this without the sig-

natures, you can just use a favorite print
or color instead of white, or make simple
Triangle-Square blocks in lieu of the
signature blocks. The options are virtually
endless!
The purple pieced borders are all sewn
improvisationally; the yardage and
quantities of assorted purple strips provided in the pattern are a general guide
rather than a strict amount. Depending
on how wide you cut your strips and the
consistency of your seam allowance, you
may need more or fewer assorted purple
strips. Do select as many fabrics as possible, and cut a variety of strip widths
for visual interest. Whatever colors you
choose, this project will definitely make a
dent in your stash!
March/April 2022

McCall’s Quilting

45

Fabric Requirements

Cutting Instructions

Fabric yardage assumes 40" usable width
of fabric (WOF) unless otherwise noted.

Patches are lettered in order of use. Measurements include ¼" seam allowances.
= cut in half once diagonally

• Assorted white tonals
•
•
•
•
•

1¾ yds. total for blocks
Assorted purple prints and tonals
5-6 yds. total for blocks, center,
border 1, border 4, and border 7
White print
1¾ yds. for center, border 2, border 4,
and border 6
Dark purple print
¾ yd. for binding
Backing
7⅜ yds.
Batting
83" x 83"

NOTE: Fabrics in the quilt shown are
assorted prints from contributors and
Abigail’s personal stash of fabrics.

46

McCall’s Quilting

March/April 2022

• Assorted white tonals
•

cut a total of:
86 squares 5" (A)
Assorted purple prints and tonals
from one print cut:
2 squares 6⅞" cut
to make 4 triangles (H)
cut 86 sets of:
2 matching squares 4" (B)
cut 1 set of:
5 matching squares 3½" (F)
cut 1 set of:
4 matching squares 2⅜" (D)
and cut a total of:
4 squares 3⅜" (E)
Approximately 190 rectangles
1"–2½" x 6" for border 7

•

•

Approximately 78 rectangles
1"–2½" x 5" for border 5
Approximately 26 rectangles
1"–2" x 3½" for section 2’s
Approximately 56 rectangles
1"–2" x 3" for border 1
White print
7 strips 3" x WOF for border 6
6 strips 2¾" x WOF for border 4
3 strips 2½" x WOF for border 2
1 square 4¼" (C)
4 squares 3⅞" cut to make 8
triangles (G)
4 rectangles 3½" x 6½" (I)
4 squares 2" (J)
Dark purple print
9 strips 2½" x WOF for binding

Piecing the Blocks
1 Referring to Stitch-and-Flip in Quilt
Basics and to Diagram I, join an assorted purple print B to one corner of
an assorted white tonal A as shown. In
the same way, join matching assorted
purple B to opposite corner as shown
to complete block. Make 86 blocks total. Signatures should go in the center
of the white space of the block.

3 Referring to Triangle-Squares in
Quilt Basics and to Diagram III, use
assorted purple E’s to make 4 units as
shown.

6 Referring to Diagram VI, join 4 white
print J’s, 4 Flying Geese, and remaining
assorted purple F as shown to make
section 3.
Flying
Geese

Unit
Make 4
Diagram III

4 Referring to Diagram IV, join 1 asB

sorted purple F, 2 white print G’s, and
1 assorted purple H as shown to make
section 1. Make 4 matching section 1’s.

A

Section 3
Make 1
Diagram VI

H

7 Join 4 section 1’s, 4 section 2’s, and 1
section 3 as shown in Diagram VII to
make center.

B

Section 1
Make 4 Matching
Diagram IV

Block
Make 86
Diagram I

2 Referring to Fast Flying Geese in

5 Sew together assorted purple
3½"-long rectangles until the pieced
strip measures 3½" x 6½"; trim if necessary. Referring to Diagram V, join
pieced rectangle and white print I
as shown to make section 2. Make 4
section 2’s total.

Quilt Basics and to Diagram II, use
white print C and 4 matching assorted
purple D’s to make 4 Flying Geese as
shown.
3½" x 6½"

Flying Geese
Make 4
Diagram II

QuiltingDaily.com

Section 2
Make 4

Center
Make 1

Diagram V

Diagram VII

March/April 2022

McCall’s Quilting

47

Assembling the Quilt Top
NOTE: Refer to Assembly Diagram for
following steps, watching block placement and orientation.

8 Join assorted purple 3"-long rectangles until the pieced strip measures
3" x 18½" (trim if necessary) to make
pieced border 1. Make 4 total; join
border 1’s to both sides of center. Sew
units to both ends of remaining border 1’s
and join to top and bottom.

9 Refer to Borders in Quilt Basics. Join

11 Join white print border 4 strips and

white print border 2 strips and cut to
sizes shown in Assembly Diagram.
Matching centers and ends, sew border 2 side strips to quilt; repeat to add
top and bottom strips.
10 Join 12 blocks as shown to make side
pieced border 3. Make 2 and sew to
both sides. Join 20 blocks as shown to
make top pieced border 3; repeat to
make bottom pieced border 3 and sew
to top and bottom of quilt.

cut to sizes shown in Assembly Diagram. Matching centers and ends, sew
border 4 side strips to quilt; repeat to
add top and bottom borders.
12 Join assorted purple 5"-long rectangles until pieced strip measures
5" x 36". Make 4 pieced strips total. Sew
5 blocks to one end of a pieced strip
to make pieced border 5. Make 2 total,
noting orientation and placement of
blocks. Matching the raw edge of the

6" x 77"

3" x 64"
5" x 36"
2¾" x 50"

2½" x 27½"

3" x 18½"

2½" x 23½"

5" x 36"

6" x 77"

3" x 59"

2¾" x 45½"

3" x 18½"

Assembly Diagram

48

McCall’s Quilting

March/April 2022

block end of pieced border to raw edge
of quilt, join pieced border 5’s to both
sides of quilt, stopping stitching ¼"
from edge of quilt on pieced strip end.
The pieced strip ends of borders will
extend beyond quilt edge for mitering.
Sew 6 blocks to one end of pieced strip,
noting block orientation and placement, to make top pieced border 5.
Repeat to make bottom pieced border 5. Matching block ends of border
and seam, sew top border 5 to quilt,
stopping stitching ¼" from quilt edge
on pieced strip end; pieced strip end
will extend beyond quilt edge. Repeat
to join bottom pieced border 5. Referring to How to Add Mitered Borders,
miter border corners on pieced strip
ends as shown.

13 Join white print border 6 strips and
cut to sizes shown in Assembly Diagram. Matching centers and ends, sew
border 6 side strips to quilt; repeat to
add top and bottom border 6.
14 Join assorted purple 6"-long rectangles
until pieced strip measures 6" x 77" to
make pieced border 7. Make 4 total.
Finger-press all border 7 strips in half.

Centering folds, add pieced border
7 strips to all sides of quilt (see How
to Add Mitered Borders) and miter
corners.

Quilting and Finishing
15 Layer, baste, and quilt. Abigail machine quilted an allover loopy floral
motif. Bind the quilt.

How to Add Mitered
Borders
Center and pin border strips to
sides, top, and bottom of quilt.
Strips will extend beyond quilt top.
Starting and stopping ¼˝ from quilt
corners and backstitching to secure,
sew strips to quilt top. Press seam
allowances toward quilt center. Fold
quilt on diagonal, right sides together. Align border strip raw edges
and border seams at the ¼˝ backstitched point; pin together. Align
ruler edge with fold, extending ruler
completely across border. Draw line
at a 45° angle from the backstitched
point to the border raw edges. Stitch
on drawn line, backstitching at both
ends. Press seam open. With quilt
right side up, align 45° line of square
ruler on seam line to check accuracy.
If corner is flat and square, trim
excess fabric to ¼˝ seam allowance.
Repeat for all corners.
corn

QuiltingDaily.com

March/April 2022

McCall’s Quilting

49

50

McCall’s Quilting

March/April 2022

Floral Fancy
Traipse along this curvy, swervy, drunkard’s path to a

delightful garden with big, beautiful flowers!

Quilt Designed & Made by
Ramona Sorenson
Skill Level
Intermediate
Finished Size
80" x 80"
Finished Sections
1 Section 1 36" x 36"
1 Section 2 36" x 36"
1 Section 3 36" x 36"
1 Section 4 36" x 36"
NOTE: See Pattern Pull-Out Section for
templates A and B.

Planning
These pretty, modern-looking flowers
come together by reimagining the layout
of the traditional drunkard’s path block.
“I like curved piecing,” Ramona said, “but
I don’t get much chance to do it. One day,
I ran across a block for a clamshell quilt.
I got to thinking, 'Could I arrange the
blocks to make rounds? And how would I
make the corners?' It didn’t take long for
me to realize that I could use the drunkard’s path block to get the same look.” You
too can make a big, beautiful flower patch
in the same way.

QuiltingDaily.com

Curved piecing can seem daunting, but
if you follow a few simple rules, prepare,
and sew slowly, you will get the hang of it,
and it will become second nature.
The A’s and B’s are cut from templates.
To prepare templates, trace on template
plastic, including seam lines and grain
lines. Cut out directly on outer lines.
Place templates right side down on
wrong sides of appropriate fabrics; mark
around templates. Cut out fabric patches.

March/April 2022

McCall’s Quilting

51

Fabric Requirements

Piecing the Sections

Fabric yardage assumes 40" usable width
of fabric (WOF) unless otherwise noted.

1 Referring to Diagram I-A, join lime
tonal A and white solid B as shown to
make unit 1. Make 20 unit 1’s.

In the same manner, referring to
Diagram I-B, make units 2–10 in color
combinations and quantities shown.

• Lime tonal
•
•
•
•
•
•
•
•
•

1¼ yds. for sections 1 and 4
White solid
4⅛ yds. for sections and border
Aqua dot
1¼ yds. for sections 1 and 4
Pink tonal
1⅛ yds. for sections 1 and 4
Blue tonal
2 yds. for sections 2, 3, and binding
Green tonal
1¼ yds. for sections 2 and 3
Purple print
½ yd. for sections 2 and 3
Template plastic
Backing
7⅞ yds.
Batting
88" x 88"

NOTE: Fabrics in the quilt shown are
from the Elements collection from Art
Gallery Fabrics.

Cutting Instructions
Patches are lettered in order of use. Measurements include ¼" seam allowances.

• Lime tonal
•

•
•
•

•
•

20 template A
12 template B
White solid
9 strips 4½" x WOF for border
32 template A
88 template B
Aqua dot
20 template A
12 template B
Pink tonal
24 template A
8 template B
Blue tonal
9 strips 2½" x WOF for binding
20 template A
12 template B
Green tonal
20 template A
12 template B
Purple print
8 template A

52

McCall’s Quilting

March/April 2022

B
A

Unit 1
Make 20

Unit 2
Make 20

Unit 3
Make 12

Unit 4
Make 12

Unit 5
Make 8

Unit 6
Make 20

Unit 7
Make 20

Unit 8
Make 12

Unit 9
Make 12

Unit 10
Make 8

Diagram I-A

Diagram I-B

Color Play! One section of this quilt is just the right size to make a quick
and cute baby quilt! We used the Believe collection by Kim Schaefer for Andover
Fabrics, enhancing the pattern with contrast bias strips on the curves.

2 Referring to Diagram II-A, sew together 12 unit 1’s, 8 unit 2’s, 4 unit 3’s,
8 unit 4’s, and 4 unit 5’s as shown to
make section 1.

Section 1
Make 1
Diagram II-A

QuiltingDaily.com

March/April 2022

McCall’s Quilting

53

Similarly, referring to Diagram II-B,
join units 6–10 as shown to make section 2. Use remaining units to make 1
section 3 and 1 section 4 as shown.

Section 2
Make 1

Section 3
Make 1

Section 4
Make 1

54

Diagram II-B
McCall’s Quilting

March/April 2022

Assembling the Quilt Top
NOTE: Refer to Assembly Diagram for
following steps, watching section placement.
3 Join sections into 2 rows as shown; join
rows to complete quilt center.
4 Refer to Borders in Quilt Basics. Join
white border strips and cut to sizes
shown in Assembly Diagram. Matching centers and ends, sew border side
strips to quilt; repeat to add top and
bottom strips.

Quilting and Finishing
5 Layer, baste, and quilt. Ramona machine quilted an allover floral motif.
Bind the quilt.
4½" x 80½"

Section 2

4½" x 72½"

Section 1

Section 3

Section 4

Assembly Diagram
QuiltingDaily.com

March/April 2022

McCall’s Quilting

55

Curve
Roundup

mN
Streamers & Confetti by Pa

By Gigi Levsen

In this issue of McCall’s
Quilting, we’ve rounded
up some of our favorite
designs with curves.
Consider that you
might create curves
with a variety of
different techniques—
not just the one
technique described
in the pattern. While
curved piecing is an
important tool in any
56

McCall’s Quilting

March/April 2022

quilter’s repertoire,
there are several
workarounds if you
just don’t want to
piece them. With a few
tips, and a thorough
understanding of the
alternative options,
you can get the look of
curved seams without
any trouble.

our se

Every curved block or unit has two main
parts—the convex patch and the concave
patch. The convex patch is usually the
largest, curving outward. We’ll call this
patch the A patch. The concave patch
curves inward, and often has very small
corners on two sides This will be the B
patch. Measuring one long side of the B
template can give you the overall size of
the block or unit, which you will need
to know to do some of the techniques
described here.

Curved Seams
Cut A: A template
Cut B: B template
Make plastic templates (with marks
indicating match points), and use the
templates to cut and mark the fabric
patches. Finger press both A and B
patches in half diagonally (Photo A).
Align raw edges and match points at
one corner and pin; repeat on remaining
corner (Photo C).
Remove pins as you approach them. An
awl or stiletto can help control the fabric
and keep it in place as you sew. Continue
slowly stitching around the curve, adjusting and aligning all the way to the end
(Photo E).

A

C

With right sides together, place the B
patch on top of the A patch, aligning
folds, and pin (Photo B).

Align raw edges of curves of both patches
and pin at intervals. With the B patch on
top, begin stitching a ¼" seam, sewing
slowly while turning and easing the raw
edges together (Photo D).

E

Clip seam allowance to allow unit to lay
flat and press (Photo F).
B

D

F

ra
Flo
l Fan
c y by

R a m o n a S o r e ns o n
March/April 2022

McCall’s Quilting

57

Fusible Appliqué

Fused Finished Edge
Appliqué

Cut A: A template, without seam
allowance on curve only
Cut B: square (finished size plus ½"
seam allowance)

Cut A: A template
Cut B: square (finished size plus ½" seam allowance)

Trace the A template (with seam allowance removed on the curve) on paperbacked fusible web and cut out patch,
leaving a bit of space beyond the marked
line (Photo A).

Using the A template, cut a patch from a lightweight fusible
interfacing (not the paper-backed variety) and from the fabric.
Layer the fabric and interfacing patches, with the right side of
the fabric facing the fusible side of the interfacing. Join along
the curved edge only; trim the seam allowance close to the seam
(Photo A).

A
A

Fuse the A to the wrong side of A fabric and
cut on the marked line (Photo B).

Turn right side out then push out and finger press the seam
(Photo B).

B
B

Peel off the paper backing and place A
patch on the B fabric square, aligning
the straight raw edges; fuse in place
according to manufacturer’s instructions
(Photo C).

C

Fabric: Talisman by Katia Hoffman
for Windham Fabrics
Secure the curved raw edge by stitching a
straight or decorative stitch directly next
to the raw edge. You can wait to stitch the
A down until the quilting process if you
prefer.

58

McCall’s Quilting

March/April 2022

Do not press the A unit until you are ready to fuse it to the B
square. Place the A unit on the B square, aligning straight raw
edges; fuse in place (Photo C). Secure curved edge by stitching
close to fold by hand or machine.

C

Fabric: Fire & Ice by P&B Textiles
This method creates a little pocket under the convex patch,
ideal for inserting a piece of batting for a trapunto effect. If you
do add extra batting under the patch, make sure you cut it a bit
smaller than the template so there is no batting caught in the
seam allowance when blocks are sewn together.

Contrast Bias Edge Curve
Cut A: A template, without seam allowance on curve
Cut B: square (finished size plus ½"
seam allowance)
This technique is a really nice way to add
a cool, graphic look and a polished finish.
You will also need to cut a bias strip from
a contrast fabric, 1"-wide. Make sure it
is long enough to completely cover the
curve, with a little extra. With right sides
together and matching raw edges, sew
the bias strip to the A curve with a 1/4”
seam, curving the bias to match the raw
edge (Photo A).

D re sden D

aisies by Shannon Arnstein

Turn and press the bias strip open, seam
allowance toward the strip (Photo B).

Align the straight raw edges of the A
patch and the B square; pin in place.
Secure the A patch to the background by
stitching in the ditch between the patch
and the bias strip (Photo D).
B

A

Then fold the bias strip over the curved
edge, easing the bias strip to cover the
curve without wrinkles; pin in place
(Photo C).

D

Fabric: Believe by Kim Schaeffer
for Andover Fabrics

C

QuiltingDaily.com

March/April 2022

McCall’s Quilting

59

Folded Bias Curve
Cut A and B: 1 square each (finished size
plus ½" seam allowance)
This technique provides a gentler curve, plus a bit of texture
for extra interest. Fold the B square in half diagonally and press
(Photo A).

Press well. Stitch folds down with matching thread, directly next
to each of the folds (Photo D).

D

A

Fabric: Painted Patchwork by
Sue Zipkin for Clothworks
Baste the folded, pressed triangle to the remaining A square,
aligning raw edges on two sides (baste just shy of ¼" from the
edge) (Photo B).

B

Gently bring down the diagonal bias fold with your fingers,
folding it towards the corner and smoothing out any wrinkles
(Photo C).

C

60

McCall’s Quilting

March/April 2022

Improvisational Curve
Cut A and B: 1 square each (at least 1½" bigger than
finished size)
This technique provides a basic framework; it’s up to you what
your curve will look like, and each completed curve unit will be
unique. Layer the contrasting squares face up on a cutting mat,
raw edges aligned. Using a rotary cutter, slowly cut a freehand
curved line through both layers, taking care not to shift the
layers as you cut (Photo A).

A small 28mm rotary blade makes it easier to cut tight curves.
You will have an A and a B from each fabric (Photo B).

B

Sew the A to the contrasting B, using the curved seam technique
(Photo C).

A

C

With this technique, you may want to use a smaller seam
allowance to help the fabric patches fit together better; there
will be some easing required. Once sewn and pressed, trim unit
to desired size (Photo D).

B lo o

m&G

row by Ch

arisma Hor ton

D

Fabric: Bubble Up Basics by
Wilmington Prints
Curves in any pattern can be completed more than one way—
if you bring a bit of creativity and knowledge to your project
planning. If you like to make an existing pattern truly your own,
these techniques will empower you to do so. Feel free to apply
these techniques to any of the patterns in this issue, though of
course the yardage requirements may change depending on
the different techniques. Your quilting journey may have many
curves ahead; enjoy them!
March/April 2022

McCall’s Quilting

61

62

McCall’s Quilting

March/April 2022

eamers & Confetti

A bright and lively way to decorate

and celebrate!

Quilt Designed & Made by
Pam Nourse
Machine Quilted by
Pat Harrison of Ocean Waves Quilting
Company
Skill Level
Beginner
Finished Size
60" x 72"
Finished Blocks
3 Block V 12" x 12"
7 Block W 12" x 12"
10 Block X 12" x 12"
7 Block Y 12" x 12"
3 Block Z 12" x 12"
NOTE: See Pattern Pull-Out Section for
appliqué templates B–E

Planning
Bright, bold curves and circles dance
across the surface of this super fun quilt,
recalling the fluttering streamers and flying confetti of a fabulous party. “I worked
to create a fun, whimsical collection of
circles, wedges, and arcs dancing across
the surface of the quilt,” Pam said. “The
controlled colors in the diagonal processions of arcs give the design enough
structure to keep ‘scrappy’ from descending into ‘chaos’.” Our instructions call for
fusible raw-edge appliqué to make quick
work of the variety of appliqué patches.
Pam used 20 different bright tonal
fabrics—some are randomly placed, and
others are arranged consistently through-

QuiltingDaily.com

out the quilt. Study the quilt photo and
note that each of the continuous diagonal
“streamers” is cut from a single color.
We’ve called out these streamer colors
individually to get the same result. Cut
the D’s from each of the green, orange,
yellow, blue, and pink tonals first, then
add the remainder of those fabrics to the
assorted bright tonals to cut the rest of
the appliqué patches.
The B’s, C’s, D’s, and E’s are cut from
templates for fusible appliqué. Prepare
fabrics for fusible appliqué by following manufacturers instructions, and cut
the template patches from the prepared
fabrics.

For the D’s, Pam used bias strips instead
of templates. If you prefer to do the same,
you will have sufficient fabric to do so—
cut the appropriate number of 2½" x 9½"
bias strips first, then add the remaining
fabrics to the assorted bright tonals and
prepare for fusible appliqué of the B’s,
C’s, and E’s. To make bias strips, fold 2½"
strips in half, wrong sides together. Stitch
¼" from raw edges. Trim seam allowance
to ⅛". Press tube flat, centering seam
allowance on the back so the raw edge
isn’t visible from the front. Using a 1"
bias bar makes pressing faster and easier.
Appliqué bias strips in place of D’s on the
blocks.

March/April 2022

McCall’s Quilting

63

Fabric Requirements

Cutting Instructions

Appliquéing the Blocks

Fabric yardage assumes 40" usable width
of fabric (WOF) unless otherwise noted.

Patches are lettered in order of use. Measurements include ¼" seam allowances.
Prepare appropriate fabrics for fusible
appliqué before cutting template patches.

1 Finger-press white tonal A in half

• White tonal
3¾ yds. for blocks
• Assorted bright tonals
1⅛ yds. total for blocks
• Green tonal and pink tonal*
½ yd. each for blocks
• Orange tonal and yellow tonal*
½ yd. each for blocks
• Blue tonal*
⅞ yd. for blocks and binding
• Paper-backed fusible web
• Template plastic
• Backing
4⅛ yds.
• Batting
68" x 80"
*Read Planning.

NOTE: Fabrics in the quilt shown are from
the Toscana collection by Northcott.

64

McCall’s Quilting

March/April 2022

• White tonal
30 squares 12½" (A)

twice; use folds as placement guide.
Referring to Diagram I-A, position
B–E in alphabetical order, noting color
of the D patch. Fuse and appliqué in
place to make block V. Make 3 block
V’s total.

• Assorted bright tonals*
cut a total of:
30 template B
30 template C
120 template E
• Green tonal and pink tonal*
cut from each:
3 template D
• Orange tonal and yellow tonal*
cut from each:
7 template D
• Blue tonal*
8 strips 2½" x WOF for binding
10 template D
*Read Planning.

B

A

E

D
C
Block V
Make 3
Diagram I-A

In the same way, referring to Diagram I-B and noting color
placement of D’s, make blocks W–Z in quantities shown.

D

D

Block W
Make 7

Block X
Make 10

D

D

Block Y
Make 7

Block Z
Make 3
Diagram I-B

Color Play! This fun
design can be made even more
exciting by fussy cutting some
prints to use in the appliqué
patches, like these lush, ornate
motifs from the Talisman collection by Katia Hoffman for
Windham Fabrics. The circular
motifs fit the templates perfectly, adding another layer of
visual interest. The bias stripe,
cut on the bias, curves with
the arcs in an interesting way,
creating even more movement.
Rearranging the orientation
of the blocks can create new,
interesting looks as well.

QuiltingDaily.com

March/April 2022

McCall’s Quilting

65

Assembling the Quilt Top

Quilting and Finishing

NOTE: Refer to Assembly Diagram for
following steps, watching block placement and orientation.
2 Join blocks into 6 rows of 5 blocks
each as shown. Sew rows together to
complete quilt top.

3 Layer, baste, and quilt. Pat machine
quilted allover bubbles and spirals.
Bind the quilt.

Assembly Diagram

66

McCall’s Quilting

March/April 2022

Color Your Way
This fabulous quilt design has so many possibilities—try a favorite print collection, fussy-cut motifs, or a your
favorite color combination. You could make this a Christmas quilt by trying reds and greens, or use the colors
of your Alma Mater or a favorite sports team. Use our coloring page to plan your perfect project.

QuiltingDaily.com

March/April 2022

McCall’s Quilting

67

68

McCall’s Quilting

March/April 2022

Floret

Welcome spring with a dainty

floral wreath.

Quilt Designed & Made by
Jen Daly
Skill Level
Beginner
Finished Size
18" x 18"
Finished Blocks
1 Block 14" x 14"
NOTE: See Pattern Pull-Out Section for
appliqué templates B–E.

Planning
Jen was inspired by springtime and the
idea of ‘coming full circle’ for her delicate,
dainty wall quilt. This is one project you’ll
bring out every year to celebrate the
coming of spring and new growth. “I had
the idea to appliqué circle flowers on a
circular wreath,” she said. “I’m making
this as a mini quilt wall hanging, but it
would also be pretty finished as a pillow.
This project would be easy to make using
scraps from a quilter’s stash.” Jen’s pastel
print choices are lovely, but you could try
bright, vibrant prints, or even a simple
monochromatic color scheme to make
this project your own.
The appliqué patches are all raw-edge
fused appliqué, making this a quick, easy,
and fun quilt. The B, C’s, D’s, and E’s are
cut from templates. Make templates from
template plastic then trace templates
onto the paper side of paper-backed
fusible web. Roughly cut shapes out, leaving a bit extra beyond the marked lines.
Fuse shapes to wrong side of appropriate
fabrics. Cut out fabric patches on the
marked lines.

QuiltingDaily.com

March/April 2022

McCall’s Quilting

69

Fabric Requirements

Cutting Instructions

Making the Block

Fabric yardage assumes 40" usable width
of fabric (WOF) unless otherwise noted.
• White heart print
1 fat quarter* for block
• Green heart print
1 fat quarter* for block
• Assorted pastel prints
¼ yd. total for block
• Assorted green prints
scraps for block
• Green stripe
⅜ yd. for block and binding
• Floral print
¼ yd. for border
• Paper-backed fusible web
• Template plastic
• Backing
¾ yd.
• Batting
22" x 22"
*fat quarter = 18" x 20"

Patches are lettered in order of use. Measurements include ¼" seam allowances.
Fuse appropriate fabrics with paperbacked fusible web before cutting template patches for raw-edge appliqué.

1 Note: The white heart print appliqué

• White heart print
•
•

•
•
•

NOTE: Fabrics in the quilt shown are
from the Love Note collection by Lella
Boutique for Moda Fabrics.

1 square 15½" (A)
Green heart print
1 template B
3 template E
Assorted pastel prints
cut a total of:
8 template C
8 template D
Assorted green prints
cut a total of:
6 template E
Green stripe
3 strips 2½" x WOF for binding
3 template E
Floral print
2 rectangles 2½" x 14½" (F)
2 rectangles 2½" x 18½" (G)

background A square is cut oversized
to allow for shrinkage during appliqué.
Finger-press white heart A square
in half twice; use folds as placement
guide. Referring to Diagram I, position
B–E’s in alphabetical order, keeping
in mind that square will be trimmed
to 14½" x 14½" ( finished size is 14"
square). Fuse and appliqué in place
with matching thread and a machine
straight stitch close to the raw edge
of patches. Trim to 14½" square to
complete block.

A

B

E

C D

Block
Make 1
Trim to 14½" x14½"
Diagram I

70

McCall’s Quilting

March/April 2022

Assembling the Quilt Top

G

NOTE: Refer to Assembly Diagram for
following steps.
2 Sew floral print F’s to both sides of
block. Join floral G’s to top and bottom
as shown to complete quilt top.

Quilting and Finishing
3 Layer, baste, and quilt. Jen hand
quilted diagonal cross hatching across
the background and borders, without
quilting any of the appliqué. Bind the
quilt.

F

Block

Assembly Diagram

QuiltingDaily.com

March/April 2022

McCall’s Quilting

71

72

McCall’s Quilting

March/April 2022

Stoney the Bunny
Hop into spring with this furry,

friendly fellow.

Quilt Designed & Made by
Susan Deshensky
Machine Quilted by
Erin Byrne
Skill Level
Intermediate
Finished Size
40" x 40"
Finished Blocks
4 Block W 6" x 6"
4 Block X 6" x 6"
1 Block Y 6" x 6"
4 Block Z 9" x 9"

NOTE: See Pattern Pull-Out Section for
foundation sections and appliqué templates E–H and J.

Planning
Susan wanted to design something
spring-like, using seasonal colors, and
came up with this cheerful design that
can be used for a baby quilt, lap quilt, or
wall quilt. “I see bunnies on my lawn at
night and thought of them,” Susan said.
“This quilt is smaller in size but has different techniques to try: foundation paper
piecing, appliqué, and strip piecing.”
There is also a bit of embroidered embellishment to create the bunny’s face.

QuiltingDaily.com

The bunny ears, face, nose, and basket
handle are cut from templates for fusible
appliqué. Trace templates on paper side
of paper-backed fusible web and cut out,
leaving a bit of space around the shape.
Fuse traced shapes on wrong side down
on wrong sides of appropriate fabrics. Cut
out fabric patches on marked lines.

March/April 2022

McCall’s Quilting

73

Fabric Requirements

Cutting Instructions

Fabric yardage assumes 40" usable width
of fabric (WOF) unless otherwise noted.
• Aqua batik
1 fat eighth* for block W and section 3
• White batik
1¼ yds. for blocks and section 3
• Medium pink batik
½ yd. for blocks
• Dark blue batik
1 yd. for blocks, section 3, border, and
binding
• Lavender batik
⅜ yd. for section 3
• Light blue batik
1 fat eighth* for section 3
• Dark pink batik
1 fat quarter** for blocks Y and Z
• Light pink batik
1 fat eighth* for block Y
• Foundation paper
• Paper-backed fusible web
• 2 black buttons ⅜"
• Black embroidery floss
• Backing
2¾ yds.
• Batting
44" x 44"
*fat eighth = 9" x 20"
**fat quarter = 18" x 20"

Patches are lettered in order of use. Measurements include ¼" seam allowances.
Prepare fabrics with paper-backed fusible
web for raw-edge fusible appliqué before
cutting template patches. Handle bias
edges carefully to avoid distortion. Cut
foundation patches at least 1" larger than
the corresponding foundation area.
= cut in half once diagonally

(Although fabric amounts are adequate
for foundation piecing, you may need
more if you cut very generous patches.)
NOTE: Fabrics in the quilt shown are from
the 1895 Batiks collection by Hoffman
California Fabrics.
Batting: The Warm Company

74

McCall’s Quilting

March/April 2022

• Aqua batik
•

1 strip 1½" x 20" for band A
2 squares 5¾" (A)
White batik
1 strip 1½" x WOF for band C
3 strips 1½" x 20" for bands A and B
2 squares 9⅞" cut to make
4 triangles (I)
16 squares 3½" (C)
8 rectangles 2¾" x 18½" (L)
1 template G
Foundation patches

• Medium pink batik

•

•
•
•
•

1 strip 1½" x WOF for band C
2 strips 1½" x 20" for bands A and B
2 squares 6⅜" cut to make
4 triangles (K)
1 template E
1 template F
4 template J
Foundation patches
Dark blue batik
4 strips 2½" x WOF for border
5 strips 2½" x WOF for binding
1 strip 1½" x WOF for band C
4 squares 5¾" (A)
4 squares 3½" (C)
Lavender batik
32 squares 3⅛" (B)
Light blue batik
2 squares 5¾" (A)
Dark pink batik
1 template H
Foundation patches
Light pink batik
1 square 6½" (D)

Piecing the Blocks
1 Sew together 1 each aqua batik, white
batik, and medium pink batik 20"
strips as shown to make band A (Diagram I-A). Cut into segments 1½" wide
to make 8 unit 1’s.

2 Referring to Diagram II-A, join 2 unit 1’s
and 1 unit 2 as shown to make NinePatch 1. Make 4.

3 Referring to Fast Flying Geese in Quilt
Basics and to Diagram III-A, use dark
blue A’s and lavender batik B’s to make
16 Flying Geese 1’s as shown.

Flying Geese 1
Make 16

1½˝

Diagram III-A

1½˝ x 20˝

Unit 1
Cut 8

Band A
Make 1
Diagram I-A

Similarly, referring to Diagram I-B,
join 2 white and 1 medium pink 20"
strips as shown to make a band B.
Press and cut into 1½" segments to
make 12 unit 2’s.

Nine-Patch 1
Make 4
Diagram II-A

Similarly, sew together 2 unit 3’s and
1 unit 2 as shown in Diagram II-B to
make Nine-Patch 2. Make 8.

In same way, referring to Diagram III-B,
make 8 Flying Geese 2’s with aqua A’s
and lavender B’s; make 8 Flying Geese
3’s with light blue A’s and lavender B’s.

Flying Geese 2 Flying Geese 3
Make 8
Make 8
Diagram III-B

1½˝
1½˝ x 20˝

Unit 2
Cut 12

Band B
Make 1
Diagram I-B

Nine-Patch 2
Make 8
Diagram II-B

In same way, sew together 1 each dark
blue batik, white, and medium pink
1½" x WOF strips to make a band C as
shown in Diagram I-C. Press and cut
into 1½" segments to make 16 unit 3’s.

1½˝
1½˝ x WOF

Unit 3
Cut 16

Band C
Make 1
Diagram I-C

QuiltingDaily.com

March/April 2022

McCall’s Quilting

75

4 Make 4 accurate copies each of foundation sections 1 and 2. Referring to
Foundation Piecing in Quilt Basics,
foundation section, and Diagram IV,
foundation piece 4 each sections 1
and 2.

6 Sew together 2 Nine-Patch 2’s and 2
white C’s as shown in Diagram VI to
make block X. Make 4.

8 Finger-press I in half; use fold as a
placement guide. Referring to Diagram VIII, position J on I and appliqué
in place using a machine zigzag stitch.
Join 1 section 1, 1 section 2, 1 medium
pink K, and appliquéd I as shown to
make block Z. Make 4.

C
Section 1
Make 4
I
Section 2
Make 4
Diagram IV

5 Referring to Diagram V, join 1 dark
blue C, 2 white C’s, and 1 Nine-Patch 1
as shown to make block W. Make 4.

C

C

K

J
Block X
Make 4
Diagram VI

7 Finger-press D in half twice; use folds
as placement guides. Referring to
Fusible Applique in Quilt Basics
and Diagram VII, position E–H in
alphabetical order. Fuse and appliqué
in place using a machine zigzag stitch.
Use black embroidery floss and outline
stitch for the bunny’s whiskers to
complete block Y.

Block Z
Make 4
Diagram VIII

9 Referring to Diagram IX, sew together
D

4 Flying Geese 1’s, 2 Flying Geese 2’s,
2 Flying Geese 3’s, and 2 white L’s as
shown to make Section 3. Make 4.

Block W
Make 4
L

Diagram V

Block Y
Make 1
Diagram VII

Machine Zigzag Stitch
Section 3
Make 4
Diagram IX

Outline Stitch

76

McCall’s Quilting

March/April 2022

Assembling the Quilt Top
NOTE: Refer to Assembly Diagram for
following steps, watching block placement and orientation.
10 Join 3 rows of 3 blocks each as
shown. Sew section 3’s to both sides
of joined blocks. Sew block Z’s to both
ends of remaining section 3’s; join
to top and bottom to complete quilt
center.

11 Refer to Borders in Quilt Basics. Join
dark blue border strips and cut to sizes
shown in Assembly Diagram. Matching centers and ends, sew border side
strips to quilt; repeat to add top and
bottom strips.

Quilting and Finishing
12 Layer, baste, and quilt. Erin machine
quilted bunnies and flowers in the
center blocks, loops and feathers in
the section 3’s, crosshatching in the
baskets and more flowers under the
basket handles and in the borders.
Bind the quilt and add buttons for the
bunny's eyes.

2½˝ x 36½˝

2½˝ x 40½˝

Assembly Diagram

QuiltingDaily.com

March/April 2022

McCall’s Quilting

77

I Love This Quilt!
Gigi Levsen
Editor

When I look through old issues of McCall’s Quilting, I
am always struck by (1) the creativity of our quilt
design contributors and (2) the endless possibilities
for making each pattern in a new way, so I can follow
a pattern but still make a quilt that is totally unique.
I love the delicate simplicity of Celestial Waltz,
designed by Gerri Robinson for McCall’s Quilting
March/April 2011, and I knew I could find a way to
explore this pretty pattern and make it my own.
I chose fabrics that were completely different from
the original quilt to make it look a bit more modern
and edgy. The BioGeo-2 collection designed by
Adrienne Leban for FreeSpirit Fabrics is bold,
graphic, and has a bit of a psychedelic vibe, which is
a big contrast from the sweet florals of the original
quilt. I paired these prints with the Shadow
colorway of FreeSpirit’s Shot Cotton collection by
the Kaffe Fassett Collective for the background
fabric. Shot cottons have one color for the lengthgrain threads and a contrasting color for the
cross-grain threads, giving the fabric a shimmery,
iridescent look that is hard to see in photos but is so
beautiful in person. I hoped that iridescence would
complement the prints and amplify the psychedelic
effect.
The next change I made to the pattern was to double
the size of the blocks—nine 24" blocks would make
the same size quilt top as 36 12" blocks, with half the
sewing. Large blocks would go together quickly and
make my quilt even more different than Gerri’s
original quilt. The larger spaces of background fabric
will be ideal for showing off the quilting; the unique
characteristics of the shot cotton background will
give that quilting even more dimension, shimmer,
and visual interest.
With my quilt top finished so quickly, I am especially
motivated to get it quilted and bound! I cannot wait
to see what the finished quilt will look like; I hope to
share an update on QuiltingDaily.com when I have
completed it.

78

McCall’s Quilting

March/April 2022

By QUILTERS,
For QUILTERS
At Quilting Daily,
we are passionate
about inspiring
others.
That’s why we’ve created the
best online hub for all things
quilting! Find your inspiration
with thousands of patterns,
motifs, videos, workshops,
magazines and more.
We’ve got something for
every quilter at any skill level.

START YOUR
NEXT PROJECT AT
QuiltingDaily.com

80

McCall’s Quilting

March/April 2021

Celestial Waltz

This twinkling starfield reveals several secondary patterns when blocks are set
together. On display, it’s an exciting design, softened by its delicate pink background.

Designed by Gerri Robinson
Machine Quilted by
Rebecca Segura of Zeffie’s Quilts
Skill Level
Confident Beginner
Finished Quilt Size
90½˝ x 90½˝
Number of Blocks and Finished Size
36 Celestial Waltz Blocks 12˝ x 12˝

Planning
This pretty quilt was made with fabrics
from the Wild Rose collection by Blackbird Designs for Moda. The secondary
pattern that emerges when blocks are
sewn together creates a sense of movement and energy. Select an assortment
of gold, blue, red, green, and tan prints to
duplicate the look of Gerri’s quilt. Enough
patches are cut from each fat quarter
to have the print appear in 4 different
blocks. You may wish to match up pairs
of block fabrics in advance to assure good
color balance throughout the quilt.

QuiltingDaily.com

March/April 2021

McCall’s Quilting

81

Fabric Requirements

Cutting Instructions

• 18 assorted prints (blocks)

(Cut in order listed)
• 18 assorted prints—cut from each:
8 squares 2⅞˝
32 squares 2½˝
• Pink texture
288 squares 4½˝

1 fat quarter* each
• Pink texture (blocks)
4¾ yds.
• Olive/pink large floral (border, binding)
3⅝ yds.
• Backing
8⅜ yds.
• Batting size
100˝ x 100˝
* Read Planning.
NOTE: A fat quarter is an 18˝x 20˝
cut of fabric.

82

McCall’s Quilting

March/April 2022

• Olive/pink large floral
10 strips 2½˝ x width of fabric
(binding)
2 strips 9½˝ x 94˝,
cut on lengthwise grain*
2 strips 9½˝ x 76˝,
cut on lengthwise grain*
*Border strips include extra length for
trimming.

Piecing the Blocks
1 Select 2 assorted prints to use in 1st
block. Draw diagonal line on wrong
side of #1 print 2⅞˝ square. Place
marked square on #2 print 2⅞˝ square,
right sides together (Diagram I-A).
Sew ¼˝ seam on each side of marked
line; cut apart on marked line. Open
and press to make 2 pieced squares.
Make 4 matching.

2 Draw diagonal line on wrong side of
#1 print 2½˝ square. Place marked
square on pink texture 4½˝ square,
right sides together, aligning raw
edges (Diagram II). Sew on marked
line; trim away and discard excess
fabric. Open and press. Repeat on
opposite corner of pink square using
#2 print 2½˝ square to make corner
square. Make 4 matching.

4 Sew 3 rows using corner squares,
edge squares, and center square
(Diagram IV). Sew rows together to
make Celestial Waltz Block.

2½˝
2⅞˝
Make 4
matching
per block

4½˝

Diagram I-A

Referring to Diagram I-B and watching orientation, sew together to make
center square.

Make 4
matching
per block

Diagram II
Make 36 total

Diagram IV

3 Using Step 2 technique and watchMake 1
per block

ing fabric placement, add #1 and #2
print 2½˝ squares to adjacent corners
of pink square to make edge square
(Diagram III). Make 4 matching.

5 Repeat Steps 1 through 4 to make 36
total blocks.

Diagram I-B
2½˝

4 ½˝
Make 4
matching
per block

Diagram III

QuiltingDaily.com

March/April 2022

McCall’s Quilting

83

Assembling the Quilt Top
Note: Refer to Assembly Diagram for
following steps.

Quilting and Finishing
6 Sew 6 rows of 6 blocks each. Sew rows
together.

7 Stitch olive/pink large floral 76˝ length
strips to sides; trim even with top and
bottom. Stitch 94˝ length strips to
top/bottom; trim even with sides.

9½˝ x 76˝

9½˝ x 94˝

Assembly Diagram

84

McCall’s Quilting

March/April 2022

8 Layer, baste, and quilt. Rebecca
machine quilted a continuous feather
design in pink thread. Bind with olive/
pink large floral.

Color Your Way
Plan your version of Celestial Stars with our free coloring sheet; you may want to make several copies to try a
few different color options. This composition offers a lot of choices for enhancing different aspects of the design.
Notice the strong diagonals created by the piecing; consider using two colors for the background to bring forward
the diagonal design element.

QuiltingDaily.com

March/April 2022

McCall’s Quilting

85

Submission Info
Become Our Next New Designer
We invite you to submit your original designs to be considered for publication in
Quiltmaker, McCall’s Quilting, Fons & Porter’s Love of Quilting, and Fons & Porter’s
Quick + Easy Quilts magazines.

SE W
ILT S TO
HE AR T QU
LO VE : 4
LO TS TO

y 2022

Februar
January/

the
Blast from

What we look for:

Past:

Vintage
Vibes

• Traditional, contemporary, modern, whimsical, and seasonal designs.
• Home décor items, totes, etc.

Try a Little y:
Hanky Pank tage
h Vin
Decorate wit
efs
Handkerchi

• Techniques including appliqué, foundation piecing, and
hand embroidery.

CREATIVITYE!
CHALLENG
rk
Master Cutwo
with Machine
Embroidery

• Sizes from table runner to bed size.

OM
GDAILY.C

QUILTIN

Quiltmaker
s for Hand
: Top 10 Tip
Hand Yoga

• Quilts for children and babies.

Care

• Quilts designed for precuts like 2½" strips, 5" and 10" squares.

‘21
ecember
November/D

HoYlHidAaNyD
B
to
5 Patterns
Slow Sew

• Pattern writing experience is not required. We diagram the quilt
and write the pattern.

Penguine
Playtim40

• Articles about quilting.

p.

ly.com
QuiltingDai

All submissions must be original, unpublished designs. This includes patterns in the
store in which you work, in classes you conduct, on your website or online store, as
well as images of the quilt or in progress on Instagram, Facebook, Pinterest, and all
other social media. We are interested in designs suitable for all skill levels. Appliqué,
foundations, or templates should fit onto one or two magazine pages.

QUILTINGION
INSPIRAT
from
ell
Marti Mich
and
Black
Heather

CK YOUR
NS TO DE
LING DESIG
ZEN DAZZ
OVER A DO

Submission Guidelines

HALLS!

E
MAGAZIN

™

FAVORITE

AM

Please submit a computerized image, colored drawing of your design on graph paper,
or a jpg, tiff, or PDF file via email. Electronic files are required. We don’t accept
mailed-in submissions. Note the following:

a!
rap

7 Pre-cut
Patterns
for Quick fts
Holiday Gi

2. Our typical payment for designs ranges up to $400. This amount is based on you
making the entire quilt and providing information needed for publication. You
will receive design credit in the magazine and 2 copies of the magazine.

P lus

Charmed
by Precuts! with
ow
Trunk Sh
ickey
Cheryl Br

NOV EMBE

R/DE CEMB

ER 2021

3. If your design is chosen, we send a contract, which includes publication rights
and payment amount.

Embellish
Your Quilt ns
With Crayo
ILY.COM
QUILTINGDA

4. Quilts will need to be mailed to us for in-house photography.

ts
ting Projec
7 Stash-bus
Check out

DEC EMB

/JAN
ER 2021

5. We will keep your quilt for approximately eight to twelve weeks. Please keep this
in mind when you submit a quilt design.

UAR Y 2022

y

New
Year!

Scrap Happ
r p. 20
Stash Buste
Wrapped
ilt p. 84
Presents Qu
Pines
Sparkling
er p. 90
Table Runn

EAT

tter
Peanut Bu p. 26
ilt
& Jelly Qu
ds
Furry Frien p.54
gs
Ba
ack
Sn

DRINK e

Beverag
72
Gift Bag p.

QUI LTIN

86

GDA ILY.C

6. With your signed contract, we have exclusive rights to first publication of
the pattern. Ninety days after first publication, we share rights to the pattern
allowing you to publish the pattern and us to republish at a later date in print,
digital, or any other form.

and
BE MERRYy

ED
STRING-PIEC
GIFT BAG
BEVERAGE ger
by Abigail

Email your design ideas to quiltsubmissions@goldenpeakmedia.com.

Dolin

OM

McCall’s Quilting

March/April 2022

READY TO LEARN?
New Online Quilting
Workshops Added Monthly!
Sign Up Today at QuiltingDaily.com

Pattern Index
12
Spring Storm

18
Star Roundup

32
Dresden Daisies

March/April 2022

Lori's Legacy

68

62
Floret

Streamers & Confetti

Stoney the Bunny

McCall’s Quilting

44

Bloom & Grow

72
88

Ringmaster

38

50
Floral Fancy

26

78
Celestial Waltz

The World Of Quilting
At Your Fingertips
Subscribe to the TOP QUILTING
Magazines from Quilting Daily!

DISCOVER NEW:
• Patterns
• Projects
• Techniques
• Trends

SAVE
UP TO

%

55

SUBSCRIBE TODAY AT QuiltingDaily.com/Subscribe

BLOOM & GROW

Bloom & Grow

Template B

Bloom & Grow

Template C

Print at 100% (no scaling). This
box measures 2 inches wide
by 1 inch high. Use this as an
accuracy guide when printing
the templates.

1 © 2021 McCall’s Quilting

January/February 2022

QuiltingDaily.com

BLOOM & GROW

ow
Gr D
&

te

m a
oo pl
Bl em

T

Bloom & Grow

Template F

Bloom & Grow

Template E

Print at 100% (no scaling). This
box measures 2 inches wide
by 1 inch high. Use this as an
accuracy guide when printing
the templates.

2 © 2021 McCall’s Quilting

January/February 2022

QuiltingDaily.com

RINGMASTER

Foundation is the reverse of the finished unit.
Ringmaster

Section 3

1
blue

2
dark gold

3
blue

Ma
ke
24
Co
pie
s

4
dark gold

1”

Print at 100% (no scaling). This
box measures 2 inches wide
by 1 inch high. Use this as an
accuracy guide when printing
the templates.

3 © 2021 McCall’s Quilting

January/February 2022

QuiltingDaily.com

DRESDEN DAISIES

Dresden Daisies

Template C

Dresden Daisies

Fold

Template A

Print at 100% (no scaling). This
box measures 2 inches wide
by 1 inch high. Use this as an
accuracy guide when printing
the templates.

4 © 2021 McCall’s Quilting

January/February 2022

QuiltingDaily.com

STAR ROUNDUP

Print at 100% (no scaling). This
box measures 2 inches wide
by 1 inch high. Use this as an
accuracy guide when printing
the templates.

Star Roundup

Template E

5 © 2021 McCall’s Quilting

January/February 2022

QuiltingDaily.com

STAR ROUNDUP

6 © 2021 McCall’s Quilting

January/February 2022

Print at 100% (no scaling). This
box measures 2 inches wide
by 1 inch high. Use this as an
accuracy guide when printing
the templates.

QuiltingDaily.com

STAR ROUNDUP

Print at 100% (no scaling). This
box measures 2 inches wide
by 1 inch high. Use this as an
accuracy guide when printing
the templates.

Star Roundup

Template F

7 © 2021 McCall’s Quilting

January/February 2022

QuiltingDaily.com

FLORAL FANCY

Flower Garden Fancy

Template B

Flower Garden Fancy

Print at 100% (no scaling). This
box measures 2 inches wide
by 1 inch high. Use this as an
accuracy guide when printing
the templates.

8 © 2021 McCall’s Quilting

January/February 2022

QuiltingDaily.com

FLORAL FANCY

Flower Garden Fancy

Template A

Print at 100% (no scaling). This
box measures 2 inches wide
by 1 inch high. Use this as an
accuracy guide when printing
the templates.

9 © 2021 McCall’s Quilting

January/February 2022

QuiltingDaily.com

10 © 2021 McCall’s Quilting

January/February 2022

QuiltingDaily.com

4
light green print

2
light green print

Make 1 Copy

MQ357

Print at 100% (no scaling). This
box measures 2 inches wide
by 1 inch high. Use this as an
accuracy guide when printing
the templates.

Foundation is the reverse of the finished unit.

1
dark green print

5
light green print

3
light green print

Section

FLORAL FANCY

11 © 2021 McCall’s Quilting

January/February 2022

QuiltingDaily.com

Make 4 Copies

9
dark pink

Print at 100% (no scaling). This
box measures 2 inches wide
by 1 inch high. Use this as an
accuracy guide when printing
the templates.

8
white

Stoney the Bunny

Stoney the Bunny

7
dark pink

7
dark pink

6
white

Make 4 Copies

6
white

3
dark pink

5
dark pink

4
white

3
dark pink

Foundation is the reverse of the finished unit.

5
dark pink

4
white

2
white

2
white

1
medium pink

Section 2

1
dark pink

Section 1

STONEY THE BUNNY

STONEY THE BUNNY
Stoney the Bunny

Template J

Images are presented in
reverse for the fusing process.

Stoney the Bunny

Stoney the Bunny

Template F

Template E

Stoney the Bunny

Template G

Stoney the Bunny

Template H

Print at 100% (no scaling). This
box measures 2 inches wide
by 1 inch high. Use this as an
accuracy guide when printing
the templates.

12 © 2021 McCall’s Quilting

January/February 2022

QuiltingDaily.com

FLORET

Floret

¼ Template B

Floret

Template C
Floret

Template D

Floret

Template E

Center
of A

Print at 100% (no scaling). This
box measures 2 inches wide
by 1 inch high. Use this as an
accuracy guide when printing
the templates.

13 © 2021 McCall’s Quilting

January/February 2022

QuiltingDaily.com