


Теги: magazine needlework
Год: 2010


Текст
£iv&
-W-
Cfiensd Veste-rda-
(Dream
(Tomorro^
No 1
a$8.95 in=i osr
NZ$9.95 Ind GST
ions tb brighten your
from Teiielle jbbie Smalls
Visit www.CraftLovers.com & get inspired
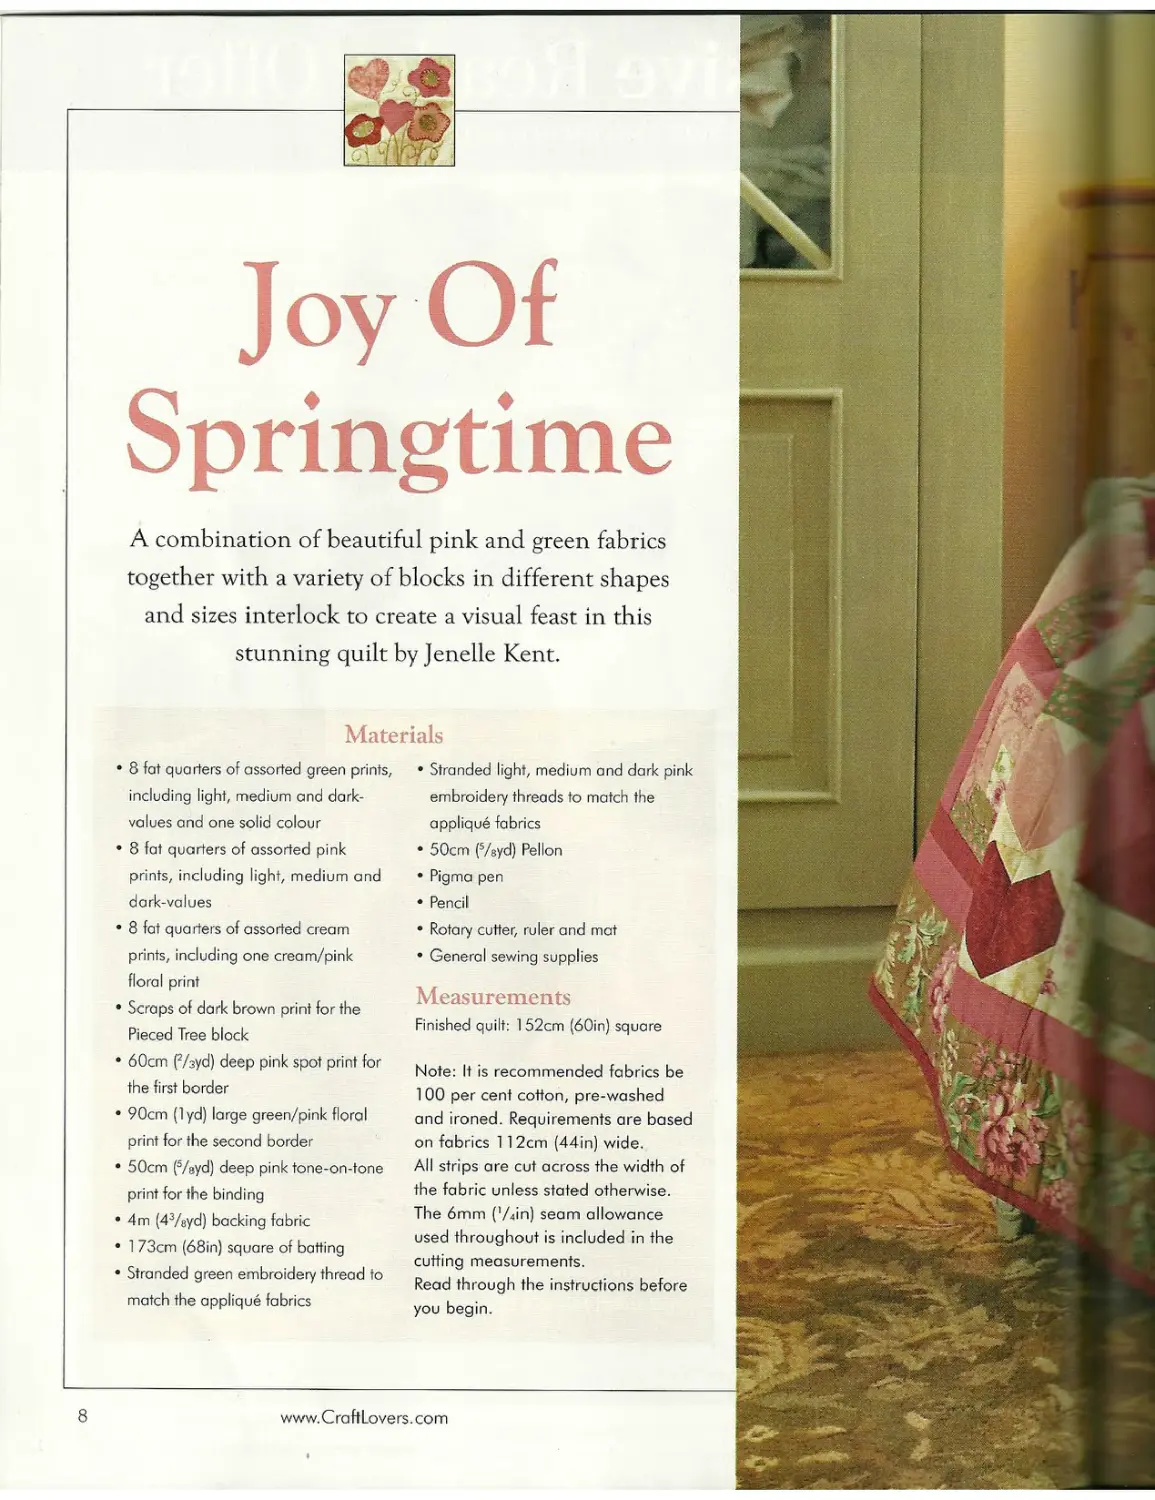
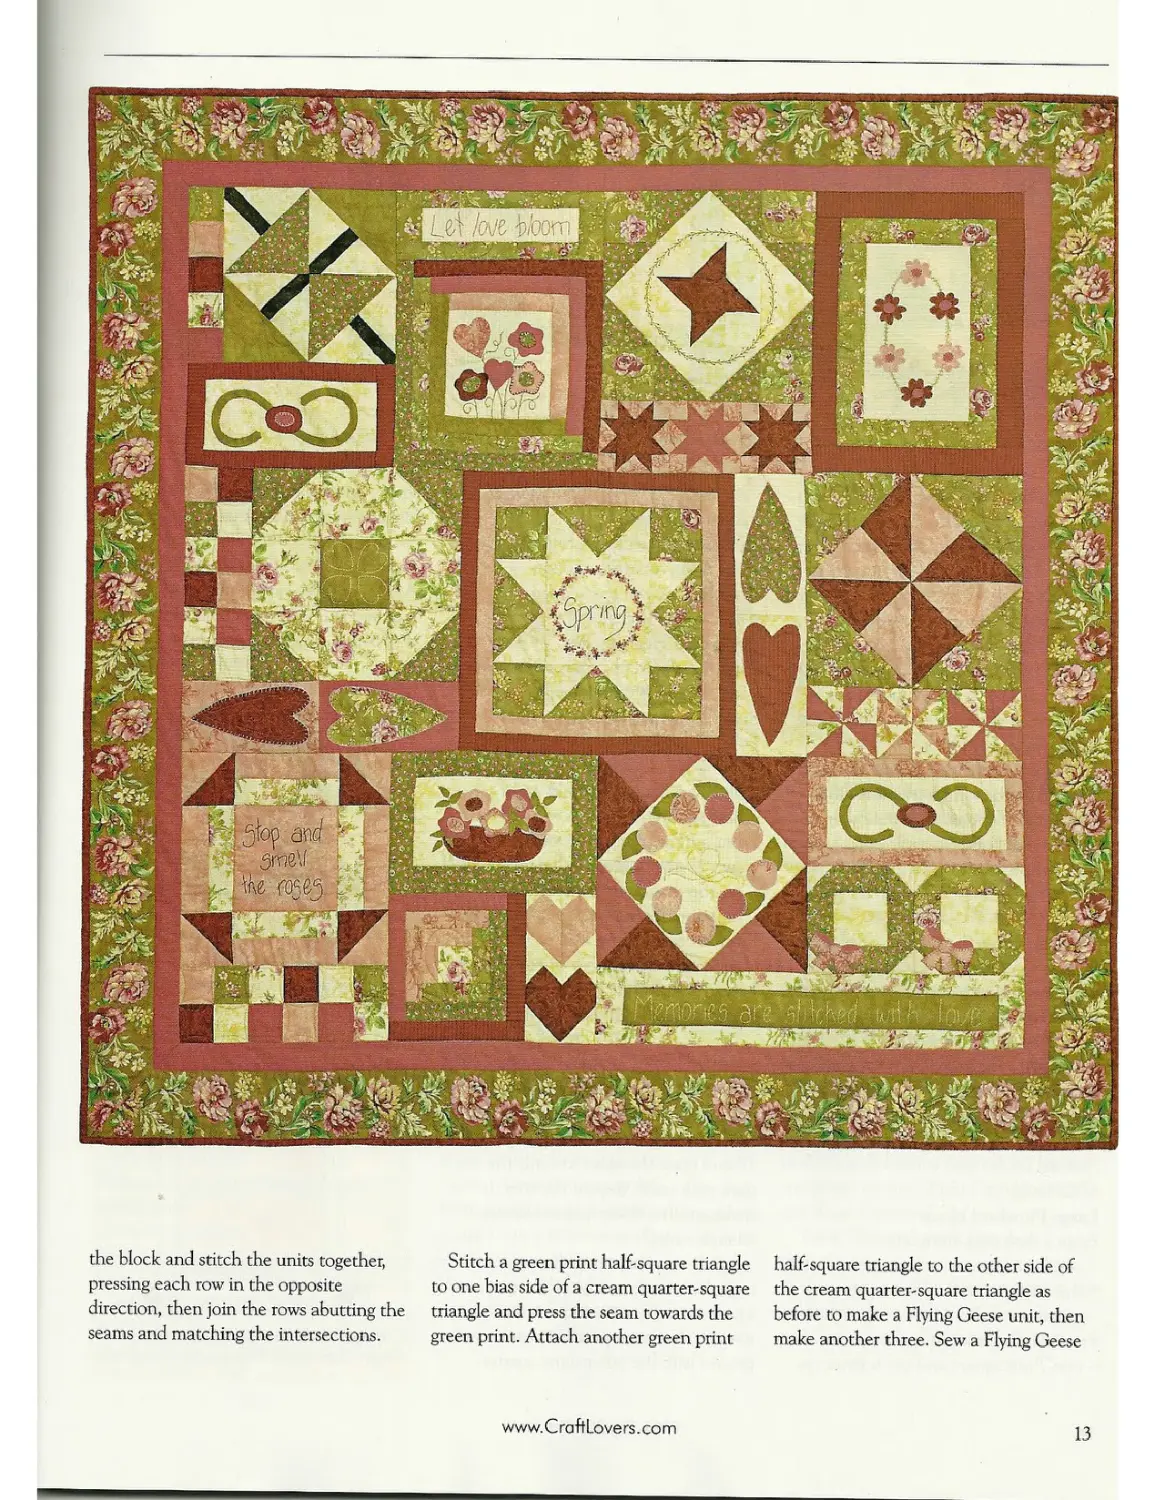
Joy Of Springtime
A combination of beautiful pink and green fabrics together with a variety of blocks in different shapes and sizes interlock to create a visual feast in this stunning quilt by Jenelle Kent.
Materials
* 8 fat quarters of assorted green prints, including light, medium and darkvalues and one solid colour
• 8 fat quarters of assorted pink prints, including light, medium and dark-values
• 8 fat quarters of assorted cream prints, including one cream/pink floral print
• Scraps of dark brown print for the Pieced Tree block
• 60cm p/syd) deep pink spot print for the first border
• 90cm (1yd) large green/pink floral print for the second border
• 50cm (Veyd) deep pink tone-on-tone print for the binding
• 4m (4%yd) backing fabric
• 1 73cm (68in) square of batting
• Stranded green embroidery thread io match the applique fabrics
• Stranded light, medium and dark pink embroidery threads to match the applique fabrics
• 50cm (5/eyd) Pelion
• Pigma pen
• Pencil
• Rotary cutter, rulerand mat
• General sewing supplies
Measurements
Finished quilt: 152cm (60in) square
Note: It is recommended fabrics be 1 00 per cent cotton, pre-washed and ironed. Requirements are based on fabrics 112cm (44in) wide.
All strips are cut across the width of the fabric unless stated otherwise. The 6mm ('Ain) seam allowance used throughout is included in the cutting measurements.
Read through the instructions before you begin.
www. C raft Lovers. co m
Decorative
PATCHWORK
VOLUME 1
PATTERN SHEET
COPYRIGHT EXPRESS PUBLICATIONS PTY LTD
2010
FOR PRIVATE USE ONLY
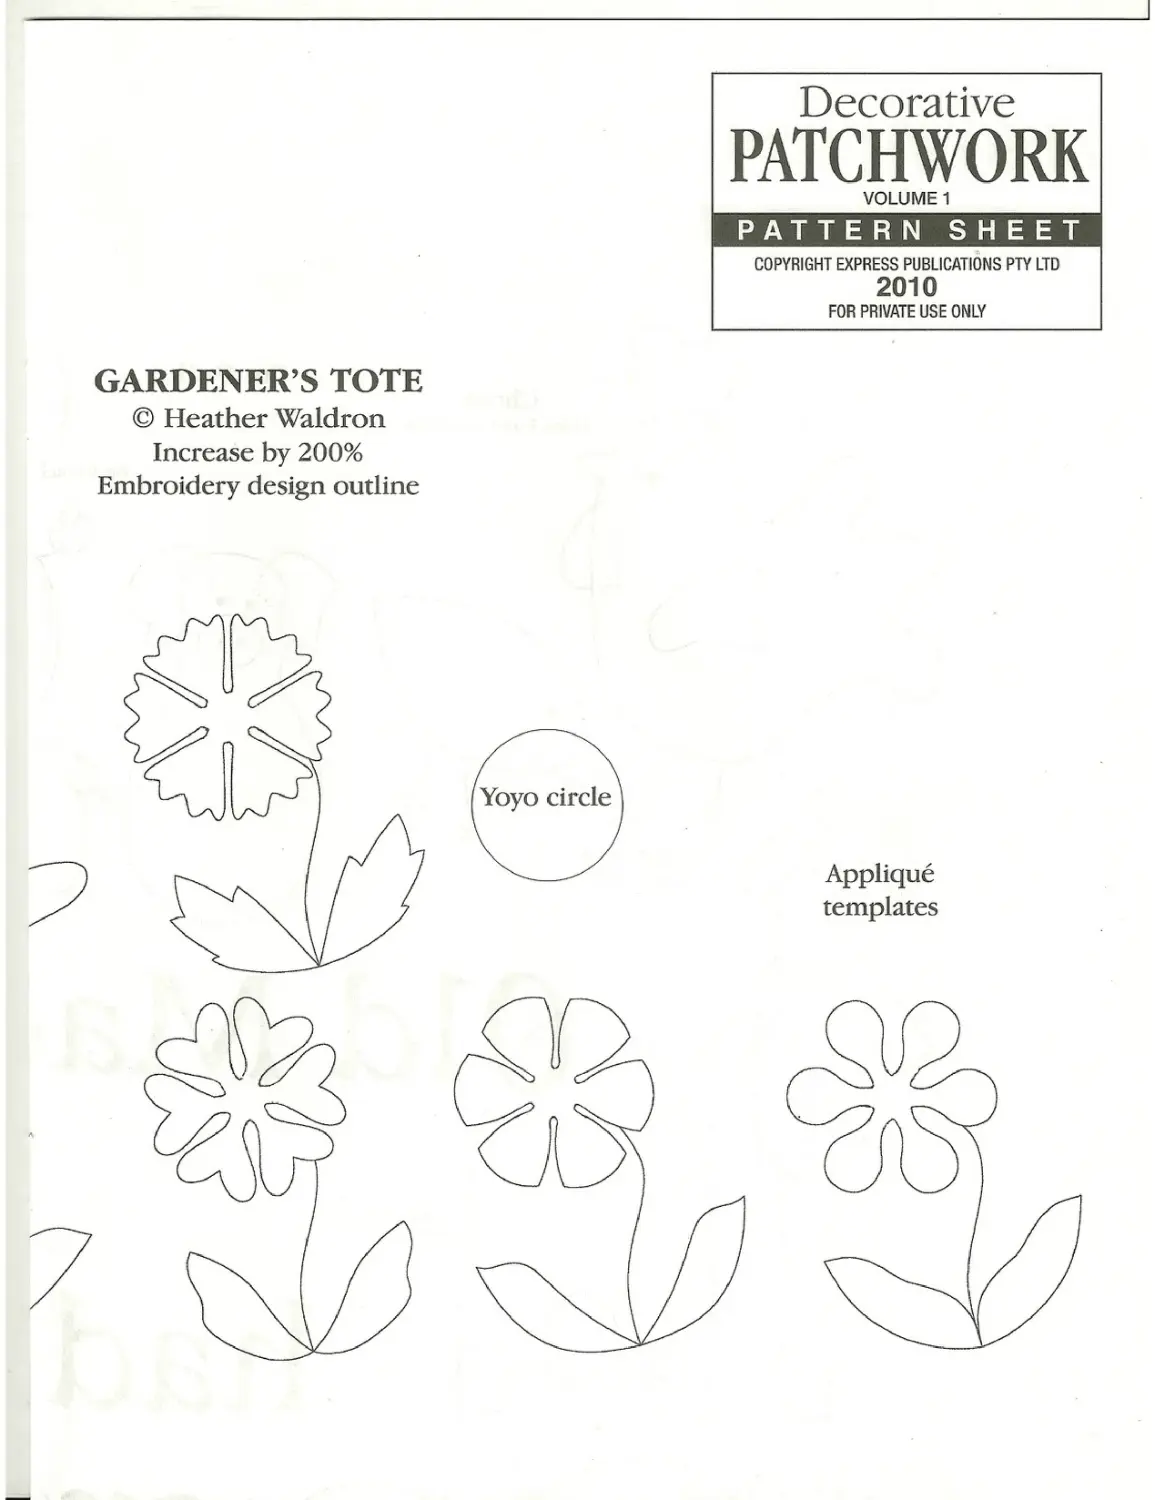
GARDENER’S TOTE © Heather Waldron Increase by 200% Embroidery design outline
Applique templates
perpendicular to the edge. This ensures that the stitches are not only tiny but also that they won’t distort or twist the applique piece. Sew anticlockwise if you are right-handed and clockwise if you are left-handed. To end, make a few small backstitches at the rear of the work, bury the thread and snip it off.
Leaf points
Start an inch or so from the point and sew right to the end of the drawn line, not the end of the fabric, see diagram 1 (a). Take an extra stitch in the same place as the last stitch to secure it in place. Use the needle tip to tuck the point under, trim away any surplus fabric and tuck the seam allowance under again. Give a gentle tug with the thread, see diagram 1 (b), and when you are happy with the point, continue sewing, see diagram 1 (c).
Circles
These can be cut with the usual ‘/sin seam allowance and simply needletumed a stitch at a time which ensures a round shape. Alternatively, cut out an accurate cardboard template and cut out the fabric roughly ‘A-'/zin larger all round. Running-stitch around the edge, put the cardboard template inside, draw up the thread and secure it. Press it well and when you want to sew the circle in place, snip the running stitch and remove the cardboard gently. This method makes lovely round shapes and depending on the seam allowance, the circle can also look a bit padded. Curves
Sew the concave curves of an applique piece first. The outer convex curves should not require any clipping into the seam allowance but the inner ones may need it to allow the seam allowance to tuck under smoothly. For very deep curves you may need to clip every ‘Ain or so.
Deep Vs
As you near the V, tuck the loose side
under the applique piece and continue sewing right to the drawn line. You may need to sew several stitches in place then sweep out the tucked piece with the needle and continue sewing.
Construction
When the blocks are complete, trim them to 16*/zin square keeping the designs centred. Join the four blocks together, orientating them as shown in the photograph. The wall-hanging should now measure 32’/?in square.
First border
Sew the I’Ain x 3272in pale green tone-on-tone print strips to the sides of the wall-hanging and press the seams towards the border. Stitch the I3 Ain x 35in strips to the top and bottom.
Second border
Sew the I'Ain x 35in dark green tone-on-tone print strips to the sides and the I'Ain x 36'/2in strips to the top and bottom. The wall-hanging should now measure Зб'/zin square.
Third border
Make a left and right half unit using two 23/gin cream print squares, two 23/sin medium/dark pink print squares, two 2in pink/beige floral pink squares and four 2Vein pink/beige floral pink squares — these are really full units which are not joined together, see diagram 2.
Pair a 23/sin cream print square with a 23/ein pink/beige floral pink square and rule a line diagonally across the wrong side of the cream print square with the HB pencil, see diagram 3.
With right sides together and all the edges matching, place the two squares together with the lighter marked one on top. Sew down each side of the drawn line using a scant 'Ain seam allowance, see diagram 4-
Cut down the line, press the squares open with the seam allowances to the dark side and trim away the ‘ears’. Repeat with a 23/sin cream print square and a 23/ein medium/dark pink floral square. Make another unit with a 23/sin medium/ dark pink floral square and a 23Ain pink beige floral pint square. Piece them together along with a 2in pink/ beige floral pink square to make a left half unit following diagram 5.
Make a right half unit by reversing the layout. Stitch a total of four right and left half units.
Follow the same method and join a left and right half unit to form a full unit, see diagram 2(a). A total of 20 full units is needed.
Join five full units end to end then a right and left half unit, to either end to form a continuous design.
Make two of these border strips and join them to the sides of the wall-hanging. Make two more pieced strips the same way and add a 3'/2in cream, print square to either end of them, see diagram 6.
Sew these border strips to the top and bottom of the wall-hanging.
Fourth border
Stitch the 2in cream print strips together end to end. Measure the width of the wall-hanging through tha centre and cut two cream print strips to this measurement.
Pin-mark the centres of the upper and lower edges of the wall-hanging and the border strips and join then-right sides together matching the a -sJ
Press the seams outwards then measure the length of the wall-hanging through the centre and cut two cream print strips to this measurement.
Pin-mark the wall-hanging and t| border strips as before then sew to either side of the wall-hanging.
48
www.CraftLovers.com
OF SPRINGTIME
© Jenelle Kent
Diagram 1. Join the pieces together to make the block.
Diagram 3. Join the piece: moke the Puss in the corner I
Diagram 2. Layout for the Wreath block.
Preparation
Trace all the applique shapes from the pattern sheet onto the paper side of the fusible webbing with a pencil, leaving about 'Ain between them, then cut them out roughly. Fuse the shapes to the wrong side of the chosen fabrics and cut them out on the lines.
Tip
This quilt is pieced in seven different sections, which are then assembled to complete the quilt top. As you cut the pieces for each block put them in labelled zip-lock bags to make it less confusing.
Section 1
Centre Star Block Cutting
From an assorted cream print, cut:
- one 6‘/’in square for the centre
— four 37Ain squares cut once on the diagonal to yield eight half-square triangles.
From an assorted green print, cut:
- four З’/zin squares for the corners
— one 7'Ain square cut twice on the diagonals.
From light pink print, cut:
- two I'Ain strips and crosscut two I'/zin x 12'Ain strips and two I'Ain x 14'Ain strips.
From dark pink print, cut:
- two 1 'Ain x 147zin strips and two
16'Ain strips.
From the Pelion, cut:
- one 6in square.
Stitch a 37/sin cream print half-square triangle to one bias edge of a 7'Ain green
print quarter-square triangle and the seams towards the cream fabi the same way, join another 37Ain triangle to the opposite side of th quarter-square triangle. Make an three Flying Geese units in the sa Lay out these units with the 6'Ait print square and the four 3'Ain gi print squares as shown in diagran stitch the rows together, pressing seams of each row in opposite dir Join the rows together abutting tl and matching the intersections, t press the completed block.
Lay the block over the Spring on the pattern sheet on a lightbi well-lit window and trace it witl Pigma pen. Fuse the Pelion squa the wrong side, then backstitch word and work the flowers in la:
i I
Diagram 4. Lay out the blocks and join them together to complete section 2.
Diagram 5. Layout for the Snowball Ы
10
www.CraftLovers.com
KEEPING IT ALL TOGETHER © Meredith Harmer
ее
Floating On Lacy W ings What’s better than one country angel? Two of course - and these heavenly dolls by Laraine Green are just adorable from the toes of their shoes to the tips of their lacy wings. They belong in a country home - or the arms of a special little girl.
Materials
Note: Materials listed are for one doll only.
• 30cm (’Ayd) calico for the body
• 35cm (3Ayd) burgundy star print for the dress
• 25cm (1 Oin) square of cream tea-dyed star print for the apron
• 7cm (23/4in) white cotton lace:
1 rn (1 ’/eyd) for the wings
• 1,5cm (Vein) tea-dyed cotton lace: 25cm (’/4yd) for the dress
• 1 Ocm x 30cm (4in x 12in) rectangle of burgundy felt for the slippers
• 3 black safety pins
• Primitive brown yam for the hair
• Stranded embroidery cotton: brown
• Crochet cotton: ecru, brown, burgundy
• 5, 6mm (’/4in) burgundy buttons
• 4, 6mm (’Ain) rusty bells
• Fabric stiffener
• Parisian essence
• HB pencil
• Template plastic
• Blusher
• Polyester filling
• Turning tool
• Stuffing tool
* Doll needles
• 2 plastic shopping bags
• General sewing supplies
Finished Size: 45cm (1 73Ain) tall
Note: It is recommended that fabrics be 100 per cent cotton, pre-washed and well ironed. Requirements are based on fabrics 112cm (44in) wide. Cut all strips across the fabric width. The 6mm (’Ain) seam allowance used in the clothing sections is included in the cutting requirements.
Read the instructions carefully before beginning.
'«ft-W- F-
52
www. C ra ft Lo ve rs. co m
)
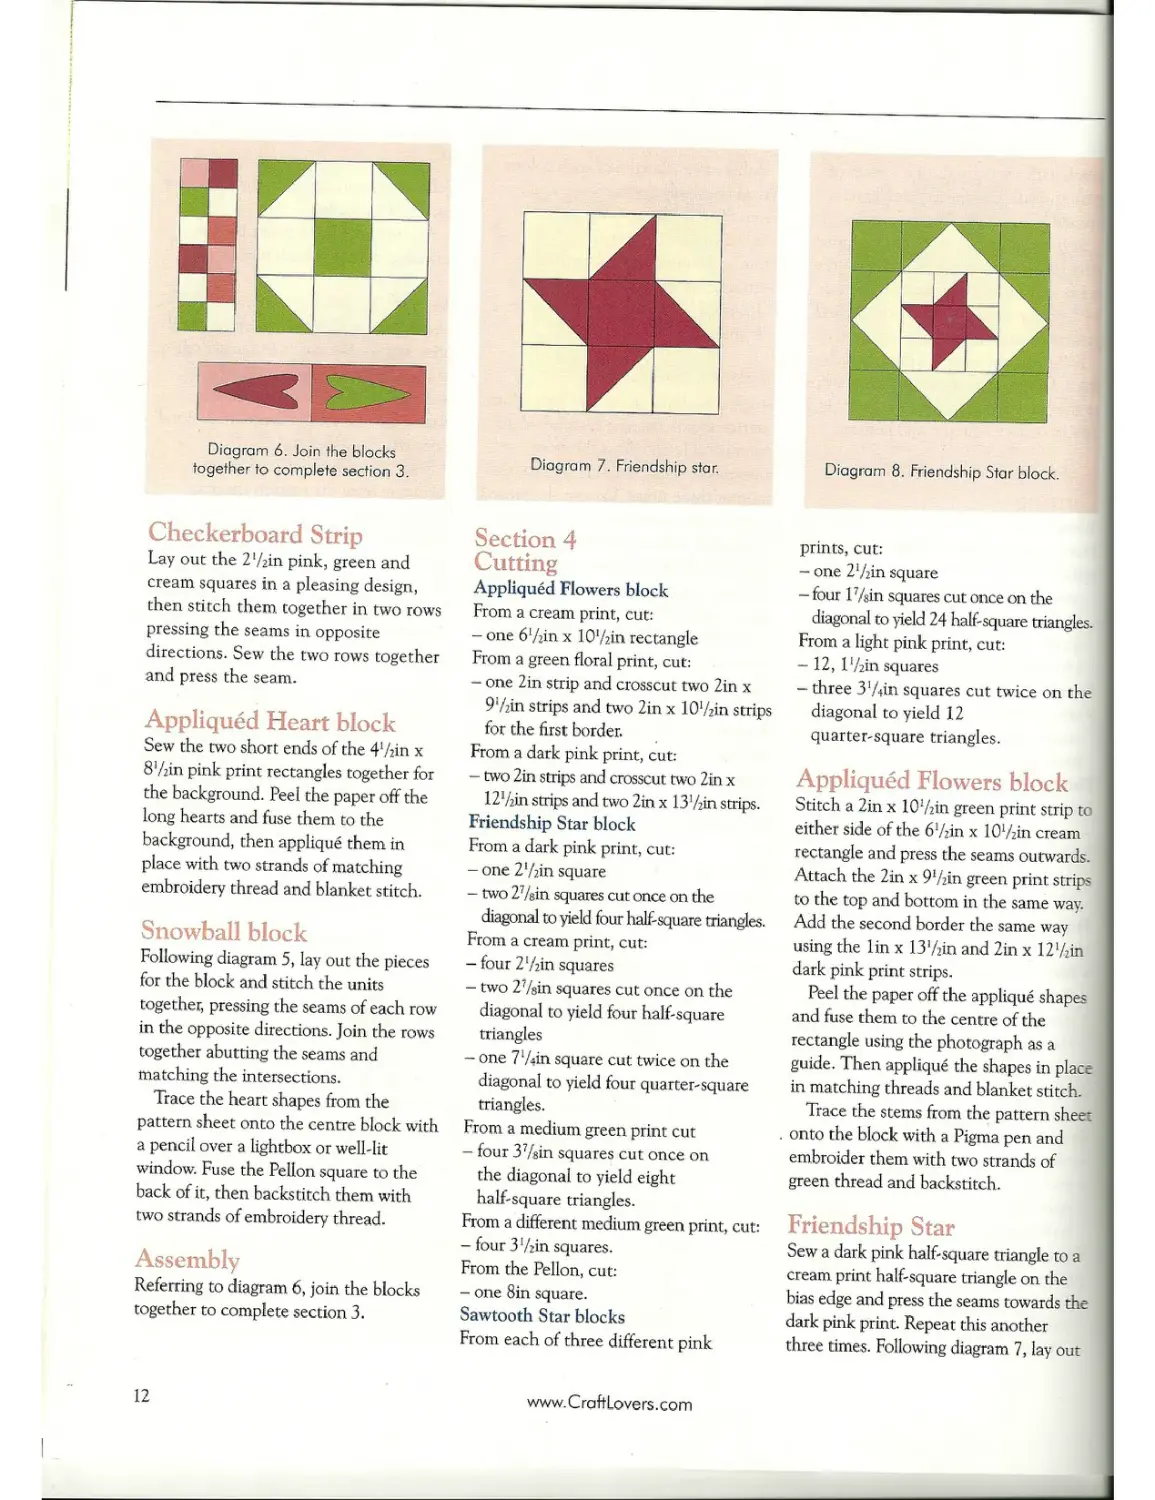
Diagram 6. Join the blocks together to complete section 3.
Checkerboard Strip
Lay out the 2‘/jin pink, green and cream squares in a pleasing design, then stitch them together in two rows pressing the seams in opposite directions. Sew the two rows together and press the seam.
Appliqued Heart block
Sew the two short ends of the 4‘Ain x 8'/zin pink print rectangles together for the background. Peel the paper off the long hearts and fuse them to the background, then applique them in place with two strands of matching embroidery thread and blanket stitch.
Snowball block
Following diagram 5, lay out the pieces for the block and stitch the units together, pressing the seams of each row in the opposite directions. Join the rows together abutting the seams and matching the intersections.
Trace the heart shapes from the pattern sheet onto the centre block with a pencil over a lightbox or well-lit window. Fuse the Pelion square to the back of it, then backstitch them with two strands of embroidery thread.
Assembly
Referring to diagram 6, join the blocks together to complete section 3.
Diagram 7. Friendship star.
Section 4
Cutting
Appliqued Flowers block
From a cream print, cut:
- one 6‘/,in x lO’/jin rectangle
From a green floral print, cut:
- one 2in strip and crosscut two 2in x 9!/jin strips and two 2in x lO'frin strips for the first border.
From a dark pink print, cut: - two 2in strips and crosscut two 2in x 12‘Ain strips and two 2in x 13’/zin strips.
Friendship Star block
From a dark pink print, cut:
- one 2‘/jin square
— two 27/ein squares cut once on the diagonal to yield four half-square triangles.
From a cream print, cut:
- four 2‘/jin squares
- two 2'/sin squares cut once on the diagonal to yield four half-square triangles
— one 7'Ain square cut twice on the diagonal to yield four quarter-square triangles.
From a medium green print cut - four 37/sin squares cut once on the diagonal to yield eight half-square triangles.
From a different medium green print, cut: — four 3‘/jin squares.
From the Pelion, cut:
- one 8in square.
Sawtooth Star blocks
From each of three different pink
Diagram 8. Friendship Star block.
prints, cut: - one 2'/jin square - four l7/8in squares cut once on the diagonal to yield 24 half-square triangles.
From a light pink print, cut: - 12, I'Ain squares - three З'Дт squares cut twice on the diagonal to yield 12 quarter-square triangles.
Appliqued Flowers block Stitch a 2 in x 10'/jin green print strip to either side of the б'/jin x 10'Ain cream rectangle and press the seams outwards. Attach the 2in x P’/zin green print strips to the top and bottom in the same way. Add the second border the same way using the lin x 13‘/jin and 2in x 12'Ain dark pink print strips.
Peel the paper off the applique shapes and fuse them to the centre of the rectangle using the photograph as a guide. Then applique the shapes m place in matching threads and blanket stitch.
Trace the stems from the pattern sheet onto the block with a Pigma pen and embroider them with two strands of green thread and backstitch.
Friendship Star
Sew a dark pink half-square triangle to a cream print half-square triangle on the bias edge and press the seams towards the dark pink print. Repeat this another three times. Following diagram 7, lay out
12
www. Croftlove rs. com
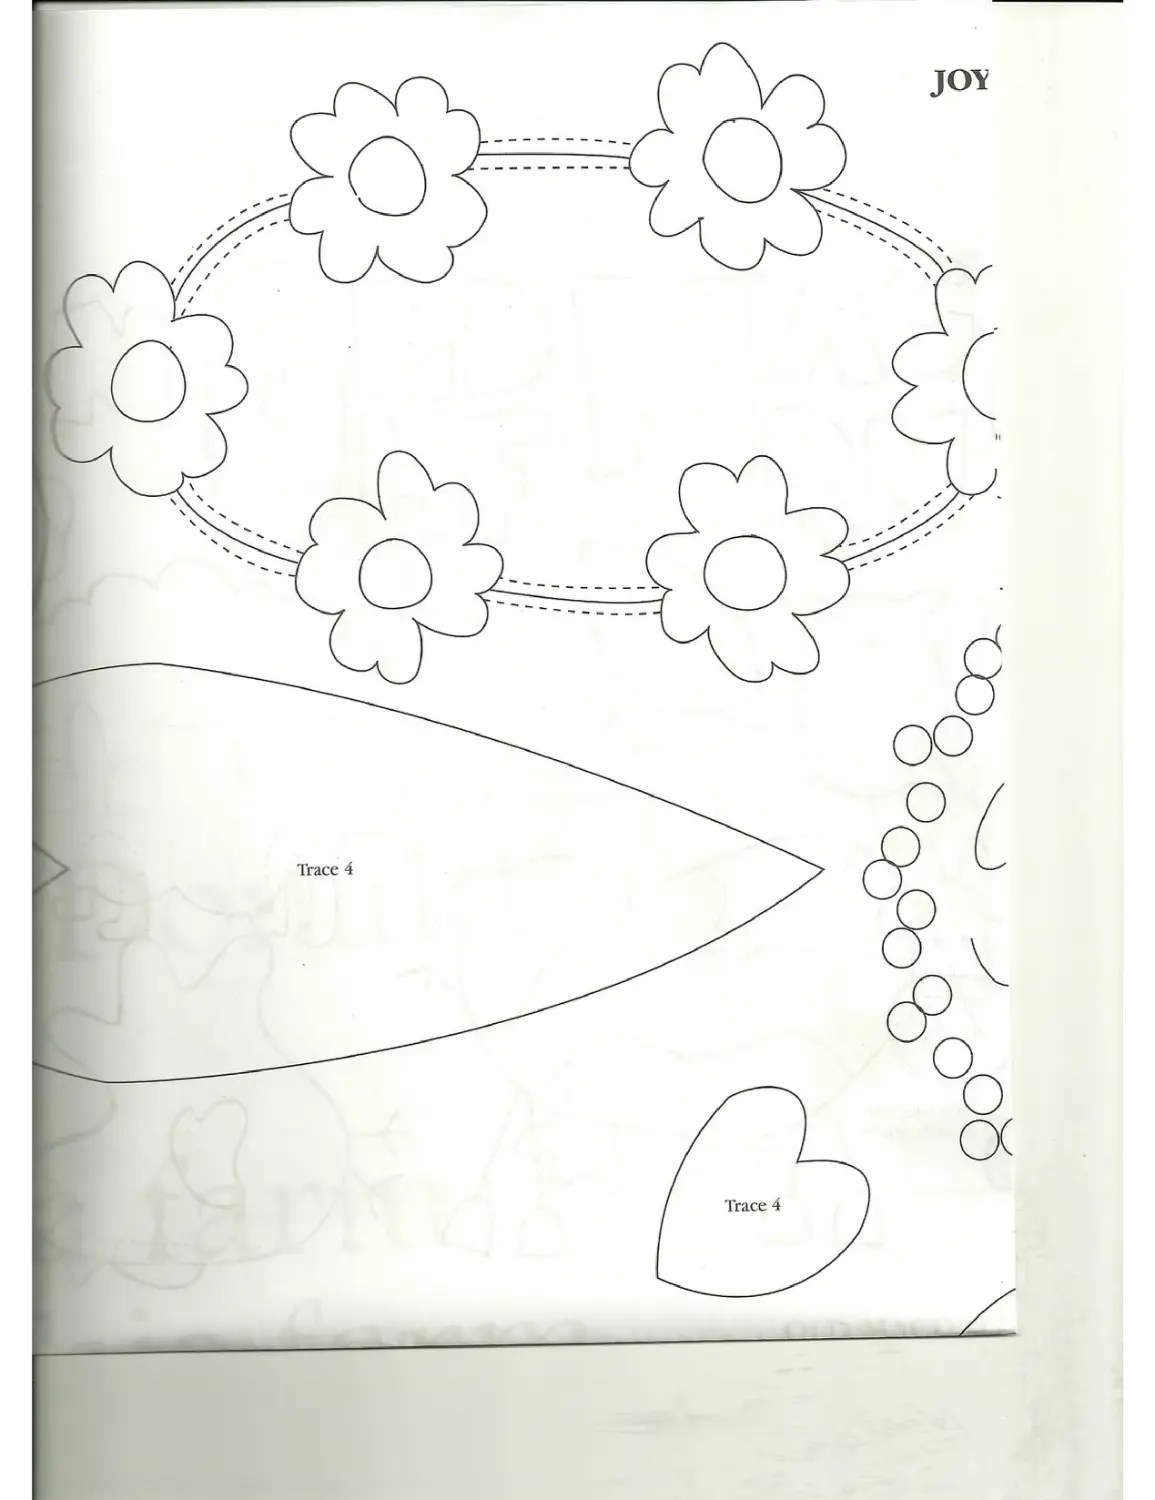
Trace 4
the block and stitch the units together, pressing each row in the opposite direction, then join the rows abutting the seams and matching the intersections.
Stitch a green print half-square triangle to one bias side of a cream quarter-square triangle and press the seam towards the green print. Attach another green print
half-square triangle to the other side of the cream quarter-square triangle as before to make a Flying Geese unit, then make another three. Sew a Flying Geese
w w w. C ra ft Lo ve rs. co m
13
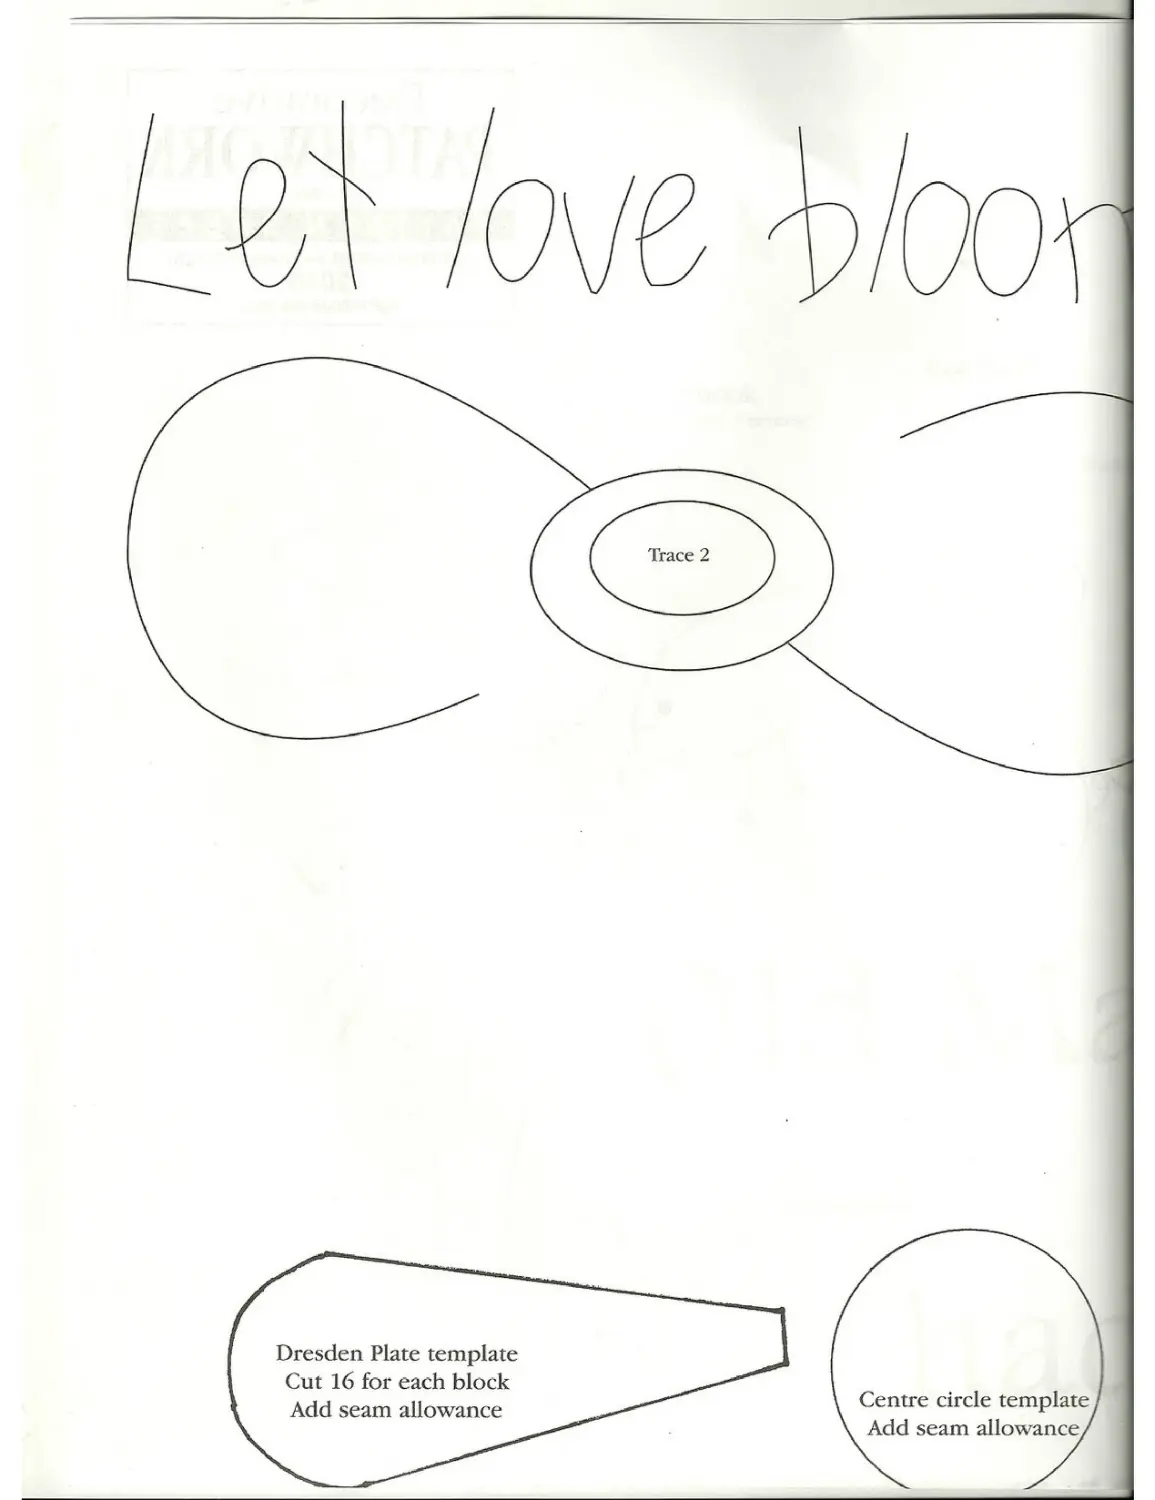
1 Dresden Plate template 1 1 Cut 16 for each block 1 Add seam allowance \ Centre circle template. \ Add seam allowance/
Diagram 9. Join the blocks together to complete section 4.
Diagram 10. Large Pinwheel block.
unit to either side of the Star block with the cream print quarter-square triangle facing towards the block and press the seams outwards. Attach а 3'Ain green print square to each end of the remaining two Flying Geese units, pressing the seams to one side. Join the strips to the top and bottom of the block and press the seams outwards as shown in diagram 8.
Fuse the Pelion square to the back in the centre of the block.
Draw a circle with a pencil around the star and feather-stitch over the circle in two strands of green embroidery thread. Add French knots on each feather stitch with two strands of pink thread.
Sawtooth Star blocks
There are three Sawtooth Star blocks in this section and they are all made the same way as the block in section 1. Join the three stars in a horizontal row and
press the seams to one side.
Following diagram 9, lay out section 4, then stitch it together and press the completed section.
Section 5
Cutting
Large Pinwheel block
From a dark pink print, cut:
-one 7'Ain square and cut it twice on the diagonal to yield four quartersquare triangles.
From a light pink print, cut:
- one 7'Ain square and cut it twice on
the diagonal to yield four quartersquare triangles.
From a medium green print, cut;
- two 6!/sin squares cut once on the diagonal to yield four half-square triangles.
Appliqued Heart blocks
From two different cream prints, cut: - one d'Ain x 8'Ain rectangles.
Small Pinwheel blocks
From a medium pink print, cut: - four 27sin squares cut once on the diagonal to yield eight half-square triangles.
From a light pink print, cut: - two 27/sin squares cut once on the diagonal to yield four half-square triangles.
From a cream print, cut:
- six 2r/»in squares cut once on the diagonal to yield 12 half-square triangles.
Large Pinwheel block
Sew a dark pink print quarter-square triangle to a light pink print quarter- • square triangle as shown in diagram 10 and press the seam towards the dark pink print. Repeat the step to make another three quarter-squaretriangle units.
Stitch a cream print half-square triangle to the long edge of the quartersquare-triangle unit and press the seam towards the cream print. Repeat the process with the other three quarter
square'triangle units. Join the Pinwh block as shown in diagram 10 and ~
Small Pinwheel blocks
A total of three small Pinwheel bl required and they are all made th way. Stitch a medium pink print
Diagram 11. Layout for sect:
Diagram 12. Lay out the pieces Churn Dash block, then sew them
14
www.CraftLovers.com
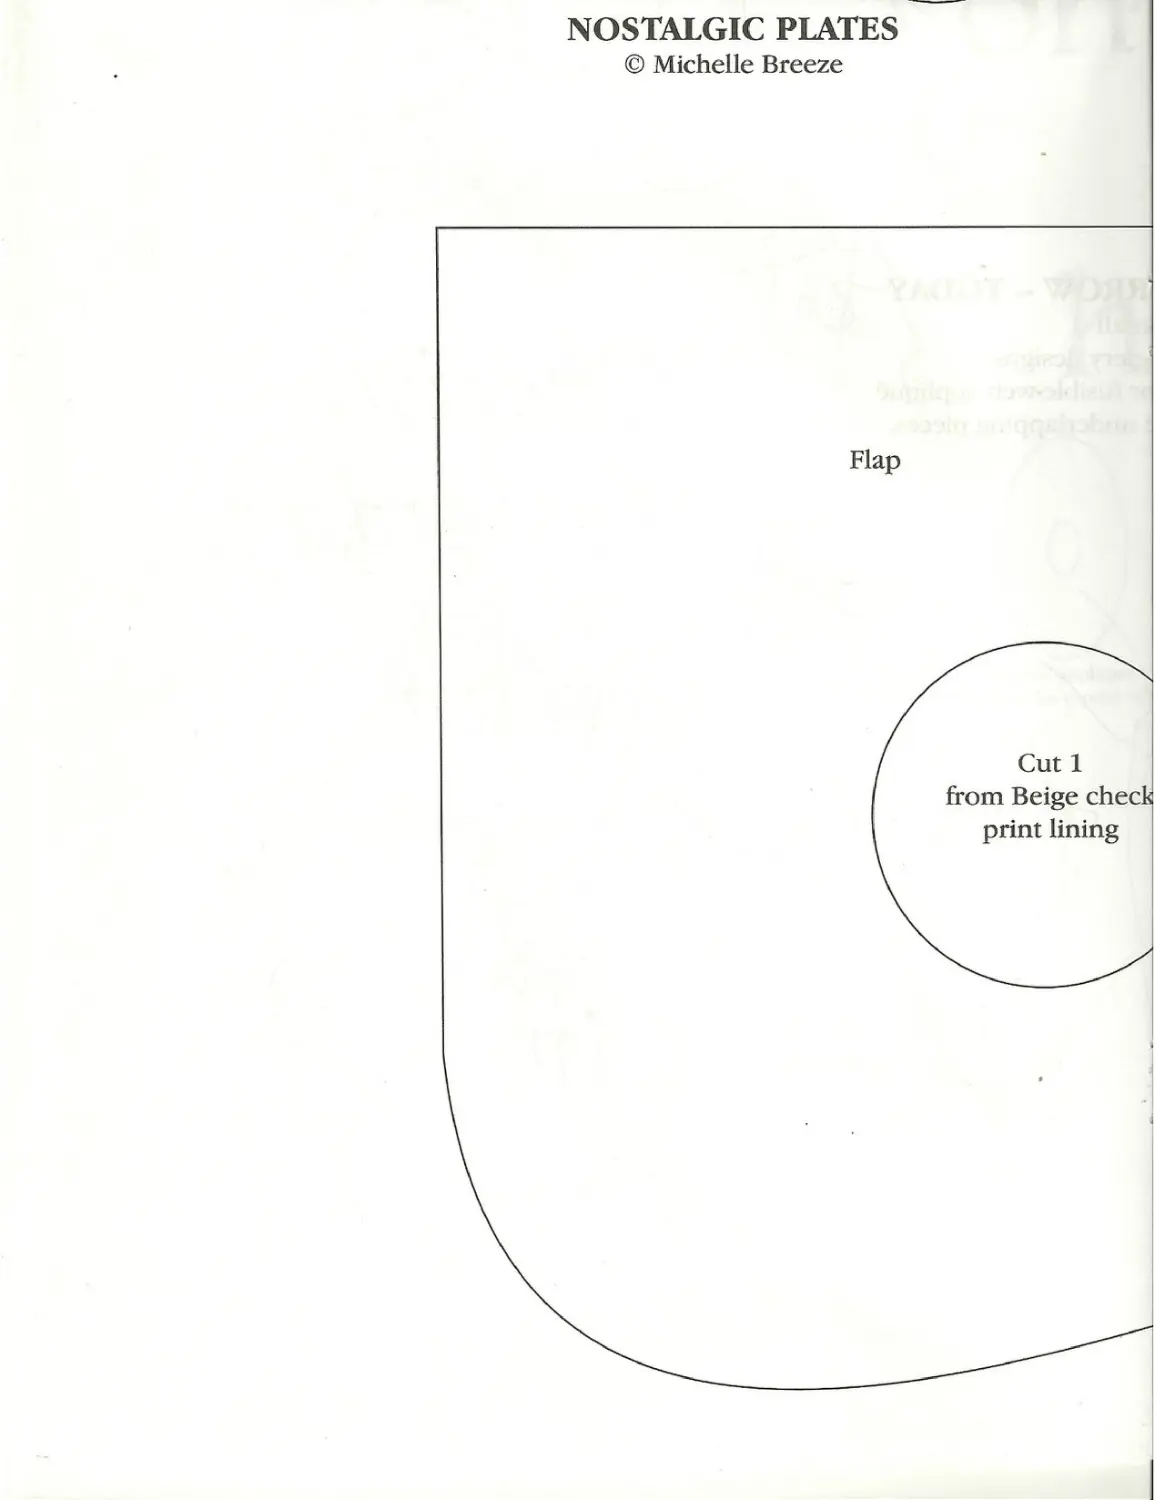
NOSTALGIC PLATES
© Michelle Breeze
Cut 1 from Beige check print lining
half-square triangle to a cream, print half-square triangle and press the seam towards the pink print. Make another seven half-square-triangle squares with these fabrics and four with the light pink and cream print half-square triangles. Join these units into three Pinwheel blocks, then sew them into a row and press the seams to one side.
Appliqued Heart blocks Fuse two long hearts to the 47zin x 87zin cream print rectangles the same as in section 3 and applique them as before.
Following diagram 11, lay out
• the blocks for section 5, then stitch them together and press the completed section.
Section 6 Cutting Churn Dash block From a cream print, cut: - four 2in x 6‘Ain strips.
From a dark pink print, cut:
- two 37dn squares cut once on the diagonal to yield four half-square triangles.
From a light pink print, cut:
- two 37ein squares cut once on the diagonal to yield four half-square triangles
- four 3in x 67rin strips
- one 67zin square.
From the Pelion, cut: - one 67zin square. Checkerboard strip From a green print, cut: - two 2 7: in squares. From each of three different pink prints, cut:
- two 27zin squares.
From each of two different cream prints, cut:
- two 2 7: in squares.
Basket block
From a cream print, cut: — one 5‘Ain x 97:10 rectangle. From a medium green print, cut:
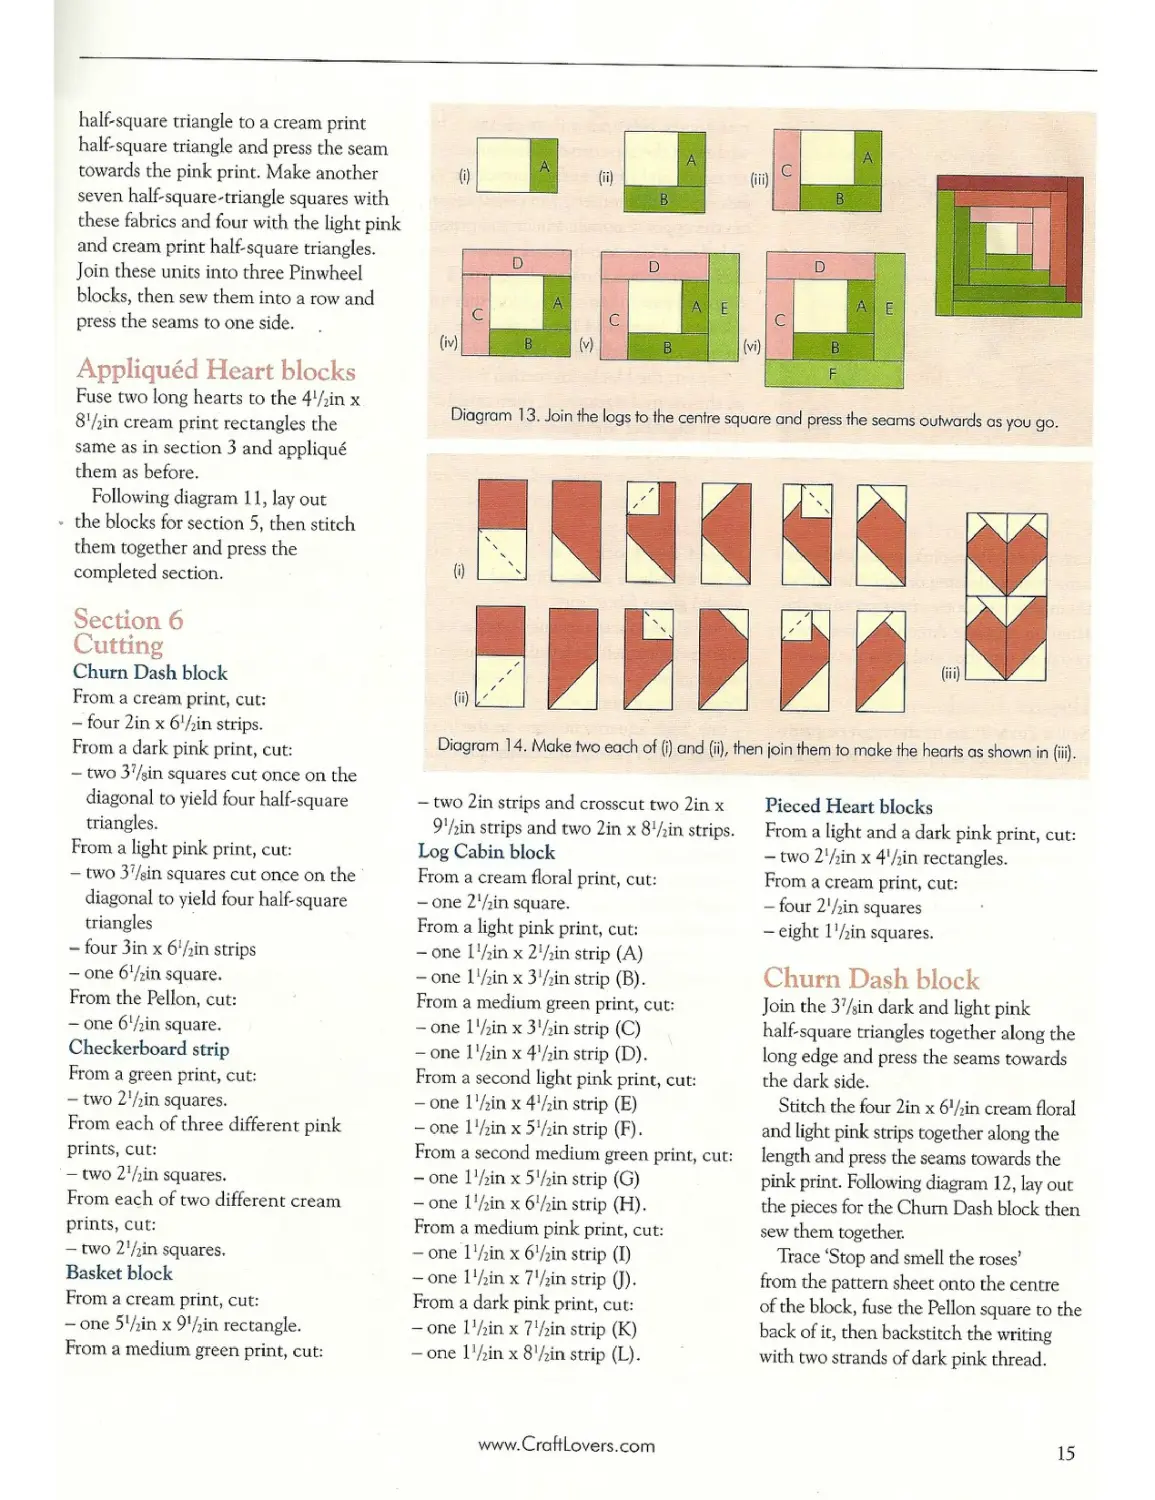
Diagram 13. Join the logs to the centre square and press the seams outwards as you go.
Diagram 14. Make two each of (r) and (it), then join them to make the hearts as shown in (iii).
— two 2in strips and crosscut two 2in x 97?.in strips and two 2 in x 87’in strips.
Log Cabin block
From a cream floral print, cut: - one 2‘Ain square.
From a light pink print, cut: - one l‘Ain x 27’in strip (A) - one 17rin x 3‘Ain strip (B). From a medium green print, cut: - one l‘Ain x 3‘Ain strip (C) - one 17zin x 47zin strip (D).
From a second light pink print, cut:
- one 17zin x 4‘Ain strip (E)
- one 1‘Ain x 5‘Ain strip (F).
From a second medium green print, cut: - one 17>in x 57rin strip (G) - one L/zin x 6‘Ain strip (H).
From a medium pink print, cut:
- one 17:in x 6‘Ain strip (I)
-one 1‘Ain x 7'Ain strip 0).
From a dark pink print, cut: - one 1‘Ain x 7‘Ain strip (K) — one 1‘Ain x 8‘Ain strip (L).
Pieced Heart blocks
From a light and a dark pink print, cut: - two 2‘Ain x 4‘Ain rectangles.
From a cream print, cut: — four 2‘Ain squares - eight 1 ‘Ain squares.
Churn Dash block
Join the 37sin dark and light pink half-square triangles together along the long edge and press the seams towards the dark side.
Stitch the four 2in x 6‘Ain cream floral and light pink strips together along the length and press the seams towards the pink print. Following diagram 12, lay out the pieces for the Churn Dash block then sew them together.
Trace ‘Stop and smell the roses’ from the pattern sheet onto the centre of the block, fuse the Pelion square to the back of it, then backstitch the writing with two strands of dark pink thread.
www.CroftLovers.corn
15
Yesterday
- Tomorrow
- Today
The sentiments on Bobbie Small’s cushion are a subtle reminder for many of us that we should never allow ourselves to become too busy to live each day to the fullest - creating new memories to treasure!
Materials
• 50cm (Vsyd) cream quilter's muslin for the lining
• 30cm (’/syd) yellow tone-on-tone fabric for the cushion bock
• 20cm (’Ayd) burgundy print for the binding
• hot quarter of dark cream tone-on-tone striped print for the feature blocks
• Fat quarter of yellow large-scale floral print for the border
• Fat eighth of yellow small-scale floral print for the sashing
• Small pieces of coordinating prints for the applique
• 50cm (20in) square of thin iron-on Pelion
• 50cm (20in) square of cotton batting
• 6mm (’Ain) green ribbon: 15cm (6in)
• Buttons: 2, 12mm (Azin) dark green stars
• Stranded embroidery threads to match the applique fabrics and green for the antennae and flower stems
• Neutral-coloured cotton thread for piecing and quilting
• 46cm (1 Sin) cushion insert
• 40cm (16in) zipper to match the cushion back
• Fusible webbing
• 2B mechanical pencil
• Baking paper
• Seam ripper
• Scissors: fabric, craft, embroidery
• Rotary cutter, ruler and mat
• Iron and ironing-board
• Sewing machine with walking foot and zipper foot
• General sewing supplies
Finished Cushion Size:
47cm (18Azin) square
Note: It is recommended that fabrics be 100 per cent cotton, pre-washed and well ironed. Requirements are based oh fabric 112cm (44in) wide. The'/Jn seam allowance used for piecing, and the ’/zin zipper seams are included in the cutting measurements .
Read the instructions before you begin.
58
www.CraftLovers.com
Checkerboard strip
Lay out the 2‘Ain pink, green and cream squares in a pleasing design, then stitch them together in two rows pressing the seams in opposite directions. Sew the two rows together and press the seam.
Basket block
Sew a 2in x 9‘Ain medium green print strip to the upper and lower edges of the 5‘Ain x 9‘Ain beige print rectangle and press the seams outwards. Then attach the two 2in x 8‘Ain strips to either end of the rectangle and press the seams as before.
Applique the basket and flowers onto the block as before with two strands of matching pink threads. Do the same with green thread around the leaves, then backstitch the stems with the same thread.
Log Cabin block
Following diagram 13 sew a Log Cabin block, keeping the logs in order and pressing the seams outwards after each log is joined.
Pieced Heart blocks
Referring to diagram 14 (i), stitch diagonally across a 2‘Ain cream print square that’s right sides feeing on one comer of a 2‘Ain x 4‘Ain dark pink rectangle. Trim ‘Ain off the seamline and press it downwards to form a triangle on
one comer. Next put a 1 'Ain cream square on the top comer of the same rectangle and stitch it, then press it as before. Stitch another 1‘Ain cream square on the opposite corner, trim it and press it as before. Make another dark pink half-heart unit as shown in diagram 14 (ii), then join the two halves together as shown in diagram 14 (iii). Repeat the process for the light pink Heart block.
Lay out the blocks for section 6 as shown in diagram 15, then stitch them together and press the completed section.
Section 7
Cutting
Pieced Tree block
From a medium green print and a solid green fabric, cut:
— one 57/sin square cut once on the diagonal to yield four half-square triangles.
From a cream print, cut:
- one 57Ain square cut once on the diagonal to yield four half-square triangles.
From the dark brown print scraps, cut: — four lin x 4‘Ain strips.
From a variety of pink, cream and green prints, cut:
- five 2‘Ain squares.
Flower Swirl block
From a cream print, cut: — one 4‘Ain x 10'Ain rectangle.
From a light pink print, cut:
— one 1‘Ain strip and crosscut two 1‘Ain x 10'Ain strips and two 1‘Ain x 6‘Ain strips.
Wording block
From a cream print, cut: - one 2‘Ain x 9‘Ain rectangle.
From a green floral print, cut:
— one 1 ‘Ain strip and crosscut two 1‘Ain x 9‘Ain strip
- one 2in strip and crosscut two 2in x 4‘Ain strips.
From the Pelion, cut: — one 2in x 9in rectangle. Log Cabin Flower block From a cream print, cut:
- one 6‘Ain square.
From a light pink print, cut:
- one 1‘Ain x 6‘Ain strip (A)
- one 1‘Ain x 7‘Ain strip (B)
From a solid green fabric, cut:
- one 1‘Ain x 7‘Ain strip (C)
- one 1 ‘Ain x 8‘Ain strip (D)
From a medium pink print, cut:
- one 1 ‘Ain x 8‘Ain strip (E)
- one 1‘Ain x 9‘Ain strip (F)
From a green floral print, cut:
- one 1‘Ain x 9‘Ain strip (G)
- one 1‘Ain x 10‘Ain strip (H)
From a dark pink print, cut:
- one 1‘Ain x 10‘Ain strip (I)
- one 1‘Ain x 11‘Ain strip (J)
From a different green floral print, cu
- one 1‘Ain x 11‘Ain strip (K)
— one 1‘Ain x 12‘Ain strip (L)
From the Pelion, cut:
- 2‘Ain x 9‘Ain rectangle.
Pieced tree block
Turn ‘Ain under on the long sides of 1 lin x 4‘Ain dark brown print strips ar press them. Following diagram 16(i). arrange the tree trunks on the four H cream print half-square triangles and slip-stitch them in place, then trim d ends of them level with the triangles Stitch a 57Ain green print half-square triangle to the tree trunk triangle and press it towards the green print, then stitch these units together as shown in diagram 16(ii).
Sew the five 27/sin squares into a s and press the seams to one side.
Flower swirl block
This block is made the same as in section 2.
Wording block
Stitch a 1‘Ain x 9‘Ain green print stm the upper and lower edges of the 2‘ 9‘Ain cream print rectangle and press seams outwards. Attach the 2in x 4-green print strips to each end of the: and press it as before. Trace ‘Let love bloom’ onto the cream print rectang fuse the Pelion to the wrong side : .
16
www.CraftLovers.com
Diagram 16. Make the tree trunks. Join the four trees together to complete the block.
embroider it with two strands of pink embroidery thread and backstitch.
Log Cabin Flower block Applique the flowers and hearts on the 6in cream print square and blanket-stitch around them with two strands
of matching embroidery threads. Then backstitch the stems with two strands of green embroidery thread.
Starting with log A, add the Log Cabin strips around the flowers the same as in section 6.
Following diagram 17, lay out the blocks for section 7, then stitch them together and press the completed section carefully.
Quilt assembly
With the the photograph of the quilt as guide, lay out the blocks as shown in diagram 18 noting that some are interchangeable. Stitch the blocks together in three rows, then join the rows abutting the seams and matching the intersections.
First border
Cut eight 2'Ain deep pink spot print strips and join them end to end in pairs and press the seams open. Measure the width of the quilt top through the centre and cut two strips to this measurement. Stitch them to either side of the quilt top and press the seams outwards. Measure the length of the quilt top through the centre and cut two strips to this measurement. Attach them to the top and bottom of the quilt top the same as for the sides.
Second border
Cut eight 4l/zin large green/pink floral print strips and attach them to the quilt as for the first border.
Backing
Cut the backing fabric in two equal lengths and trim the selvedges, then stitch them together with a 'Ain seam and press it open.
Lay the backing fabric face down, the batting and then the well pressed quilt top right side up. Safety-pin-baste the layers together for machine-quilting or thread-baste it for hand-quilting.
Quilting
This quilt was machine-quilted in the ditch in all the seams and various designs were used on some of the pieced blocks.
Binding
Cut six ZViin deep pink tone-on tone print strips, join them end to end with 45-degree seams and press them open. Fold the strip in half lengthwise with the wrong sides feeing and press it. Stitch the binding to the quilt, aligning the raw edges and mitring the comers. Trim the batting and backing, turn the binding to the back and slip-stitch it in place. Label die quilt with your name and die completion date.l
Diagram 1 7. Lay out the blocks for section 7, then stitch them together and press the completed section.
Diagram 18. Quilt layout.
www.CraftLovers.com
17
Decorative
PATCHWORK
VOLUME 1
PATTERN SHEE1
COPYRIGHT EXPRESS PUBLICATIONS PTY LTD
2010
FOR PRIVATE USE ONLY
fold
Bloomers
Cut 2 on fold
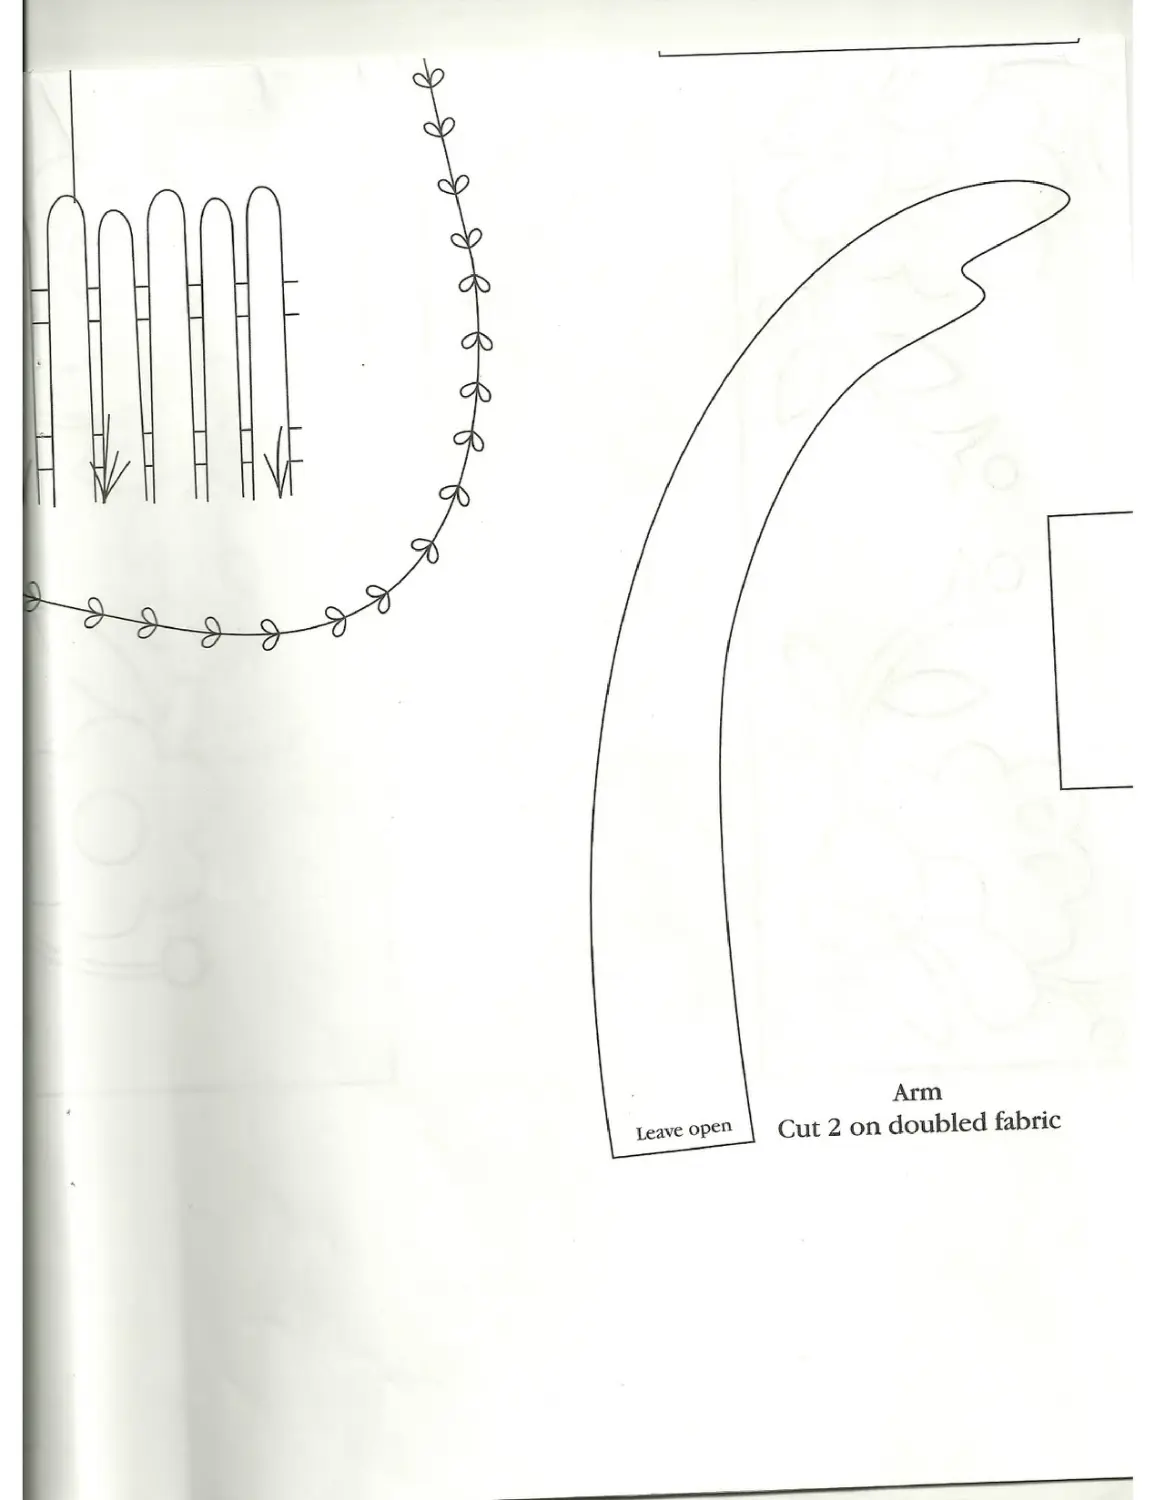
Arm
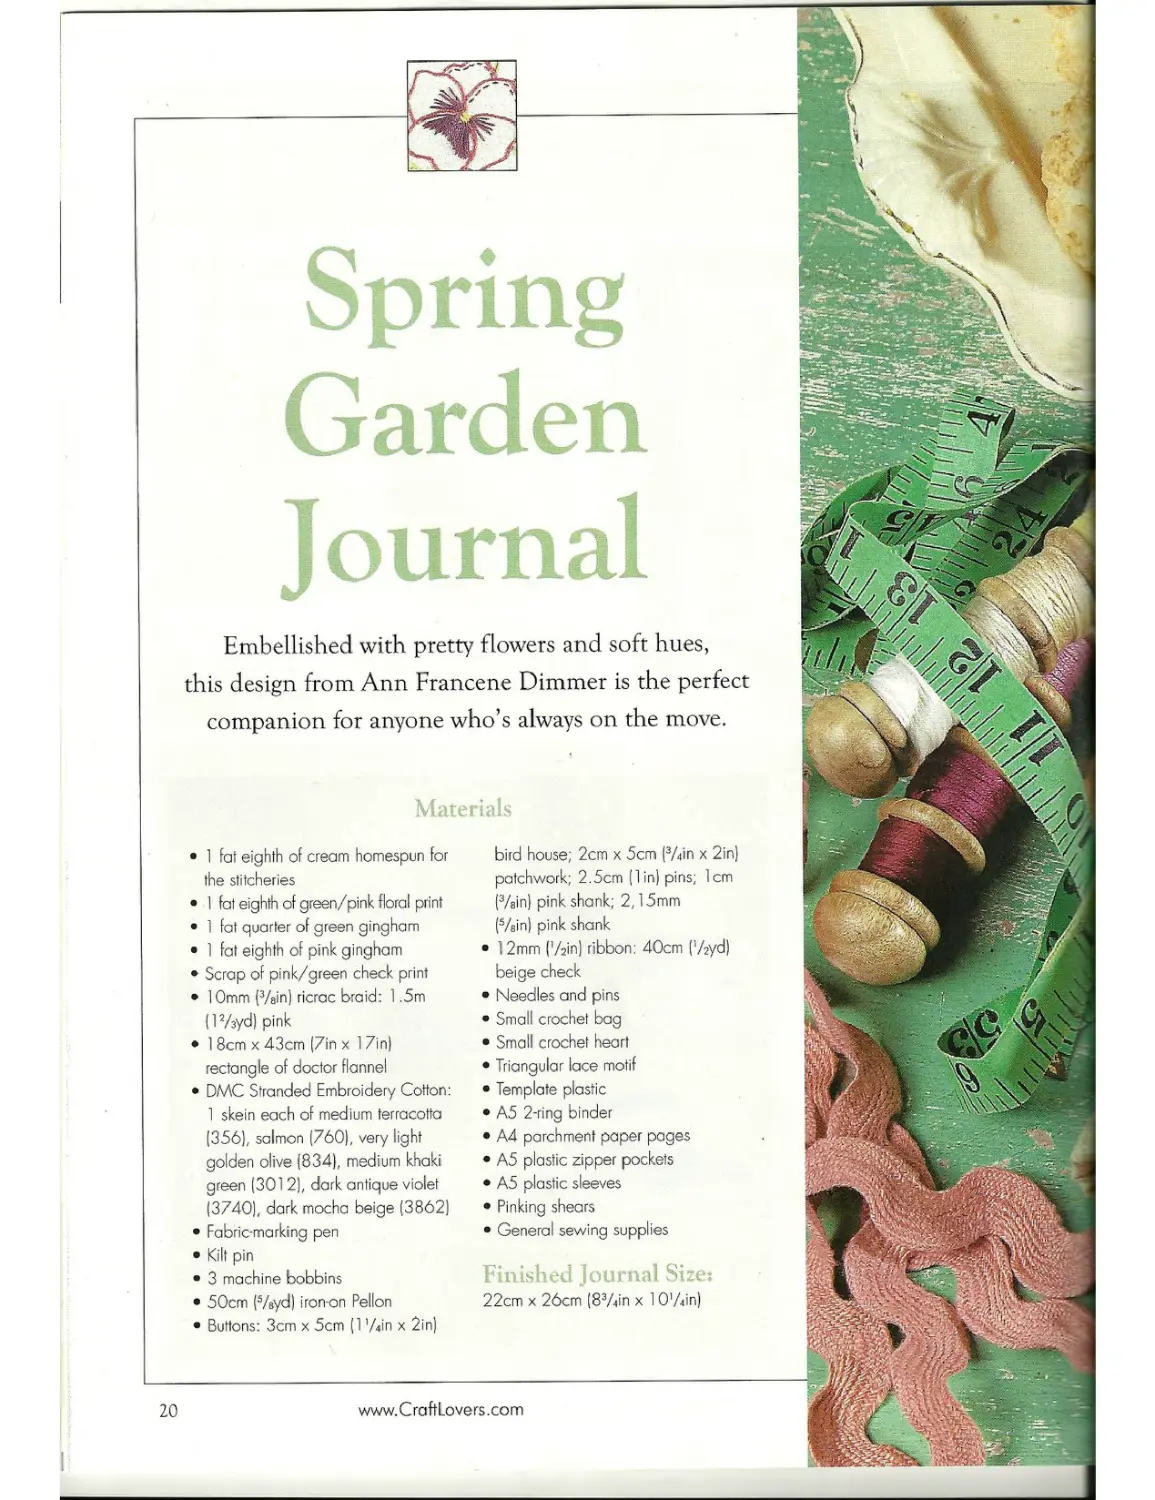
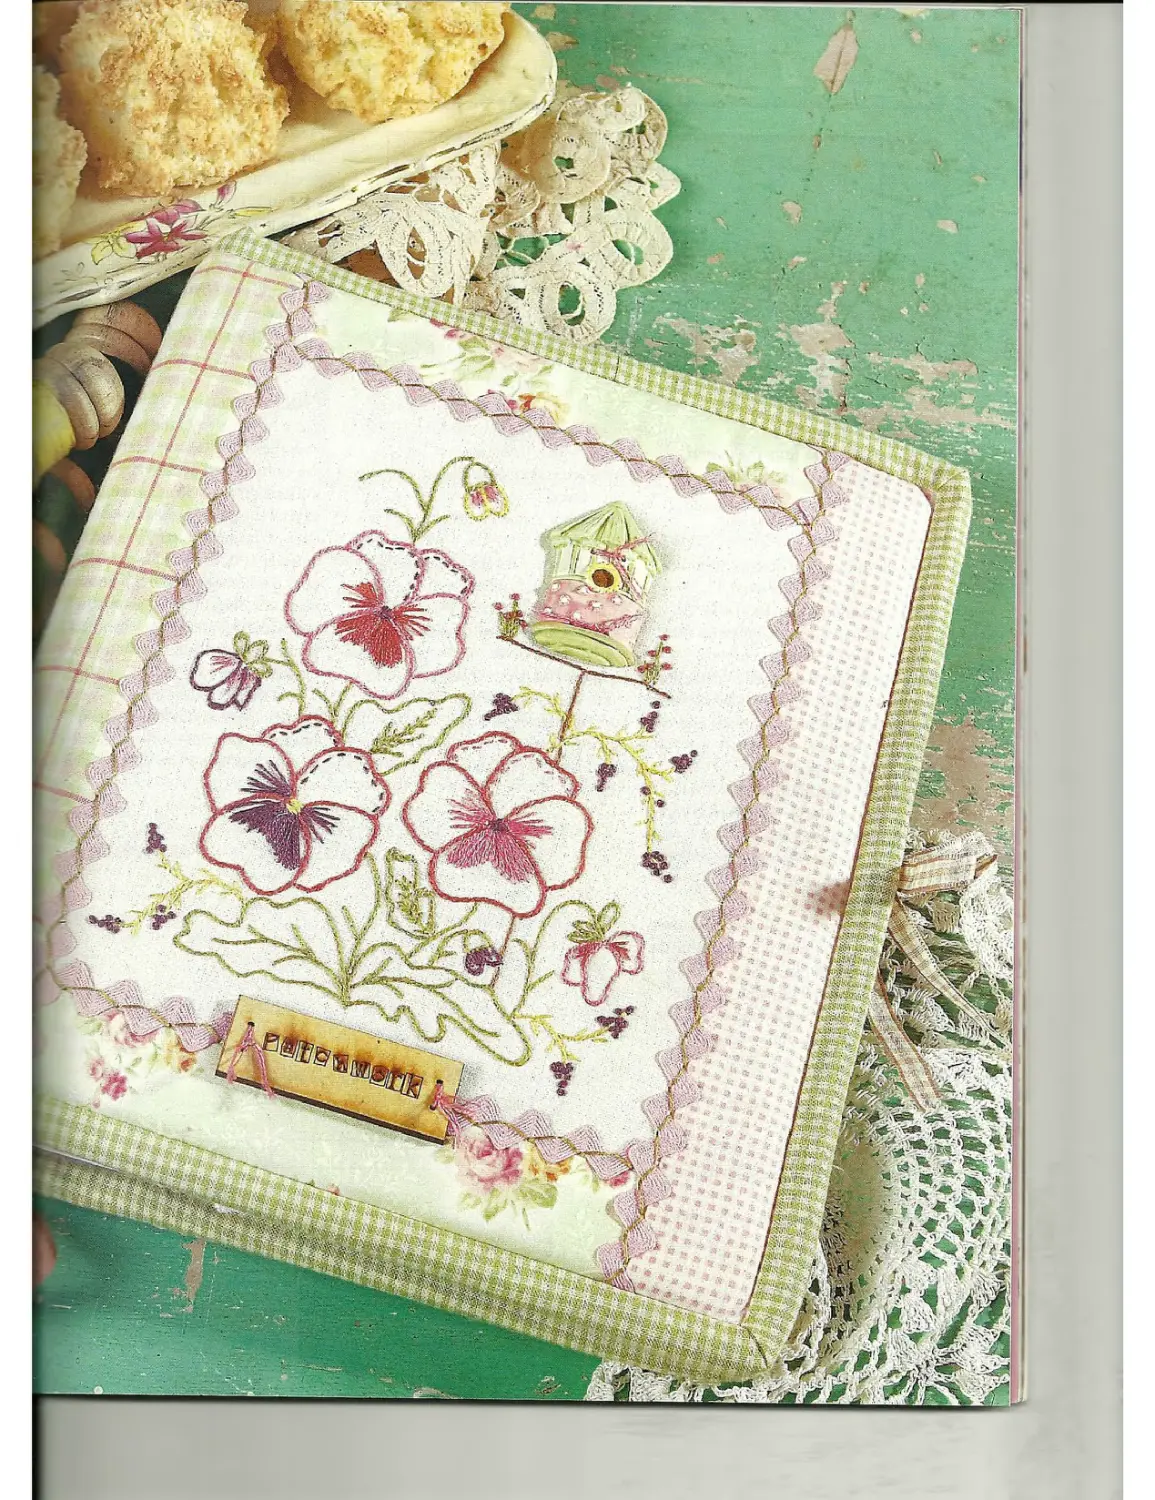
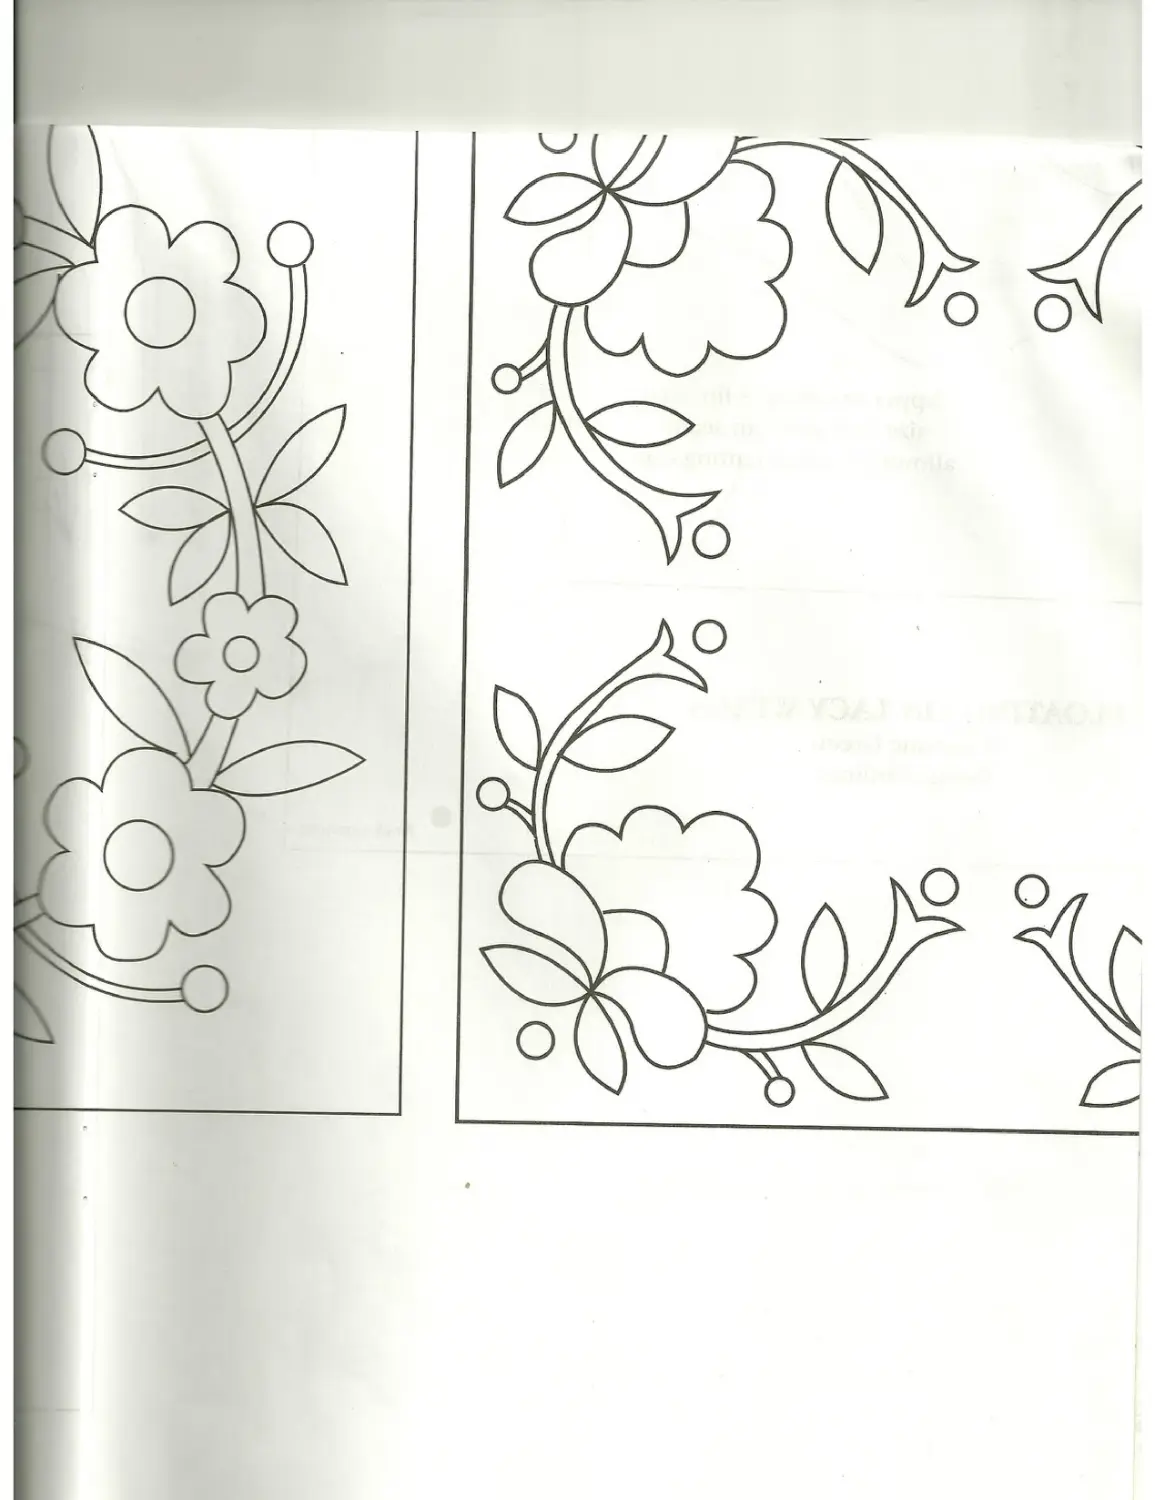
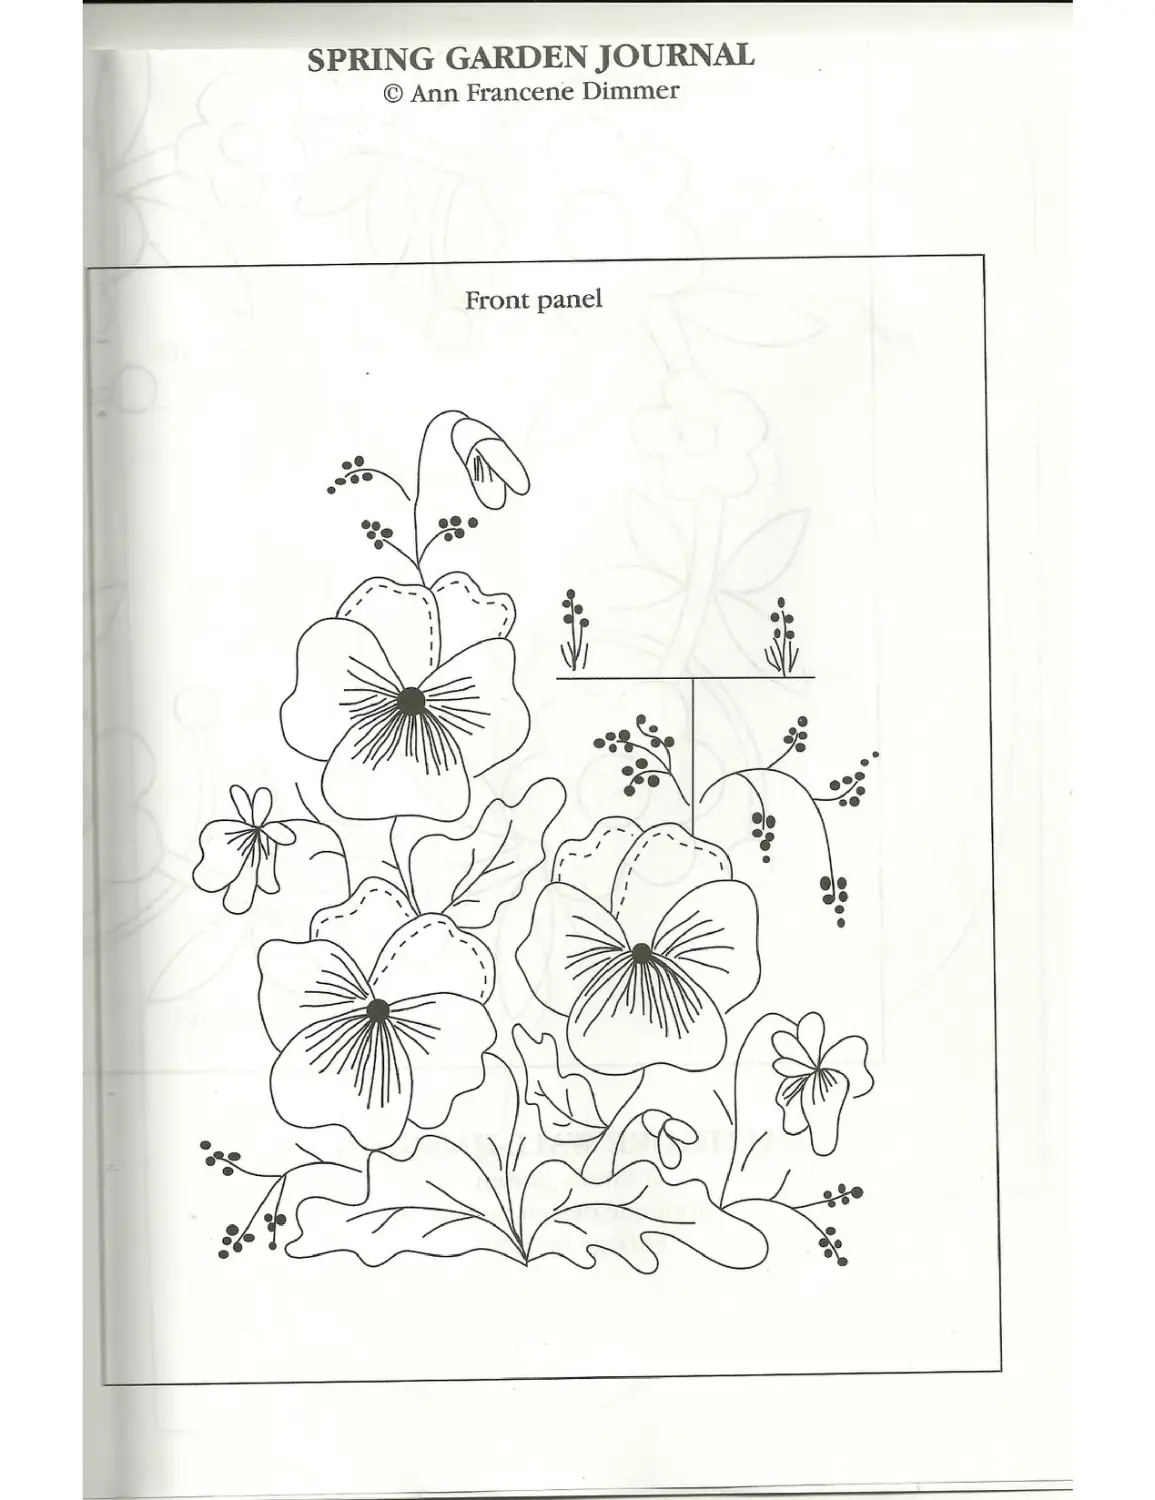
Spring Garden Journal
Embellished with pretty flowers and soft hues, this design from Ann Francene Dimmer is the perfect companion for anyone who’s always on the move.
Materials
1 fat eighth of cream homespun for the stitcheries
1 fat eighth of green/pink floral print
1 fat quarter of green gingham
1 fat eighth of pink gingham Scrap of pink/green check print
1 Omm (Vein) ricrac braid: 1,5m (l1 2Ayd) pink
1 8cm x 43cm (7in x 17in| rectangle of doctor flannel DMC Stranded Embroidery Cotton: 1 skein each of medium terracotta [356), salmon (760), very light golden olive (834), medium khaki green (301 2), dark antique violet (3740), dark mocha beige (3862) Fabric-marking pen
Kilt pin
3 machine bobbins
50cm PAyd) iron-on Pelion Buttons: 3cm x 5cm (1 'Ain x 2in)
bird house; 2cm x 5cm (3Ain x 2in) patchwork; 2.5cm (1 in) pins; 1cm (3/sin) pink shank; 2,15mm
(Vein) pink shank
• 12mm ('Ain) ribbon: 40cm ('Ayd) beige check
• Needles and pins
• Small crochet bag
• Small crochet heart
• Triangular lace motif
• Template plastic
• A5 2-ring binder
• A4 parchment paper pages
• A5 plastic zipper pockets
• A5 plastic sleeves
• Pinking shears
• General sewing supplies
Finished Journal Size:
22cm x 26cm (83Ain x 10'Ain)
20
www. C raftLovers. com
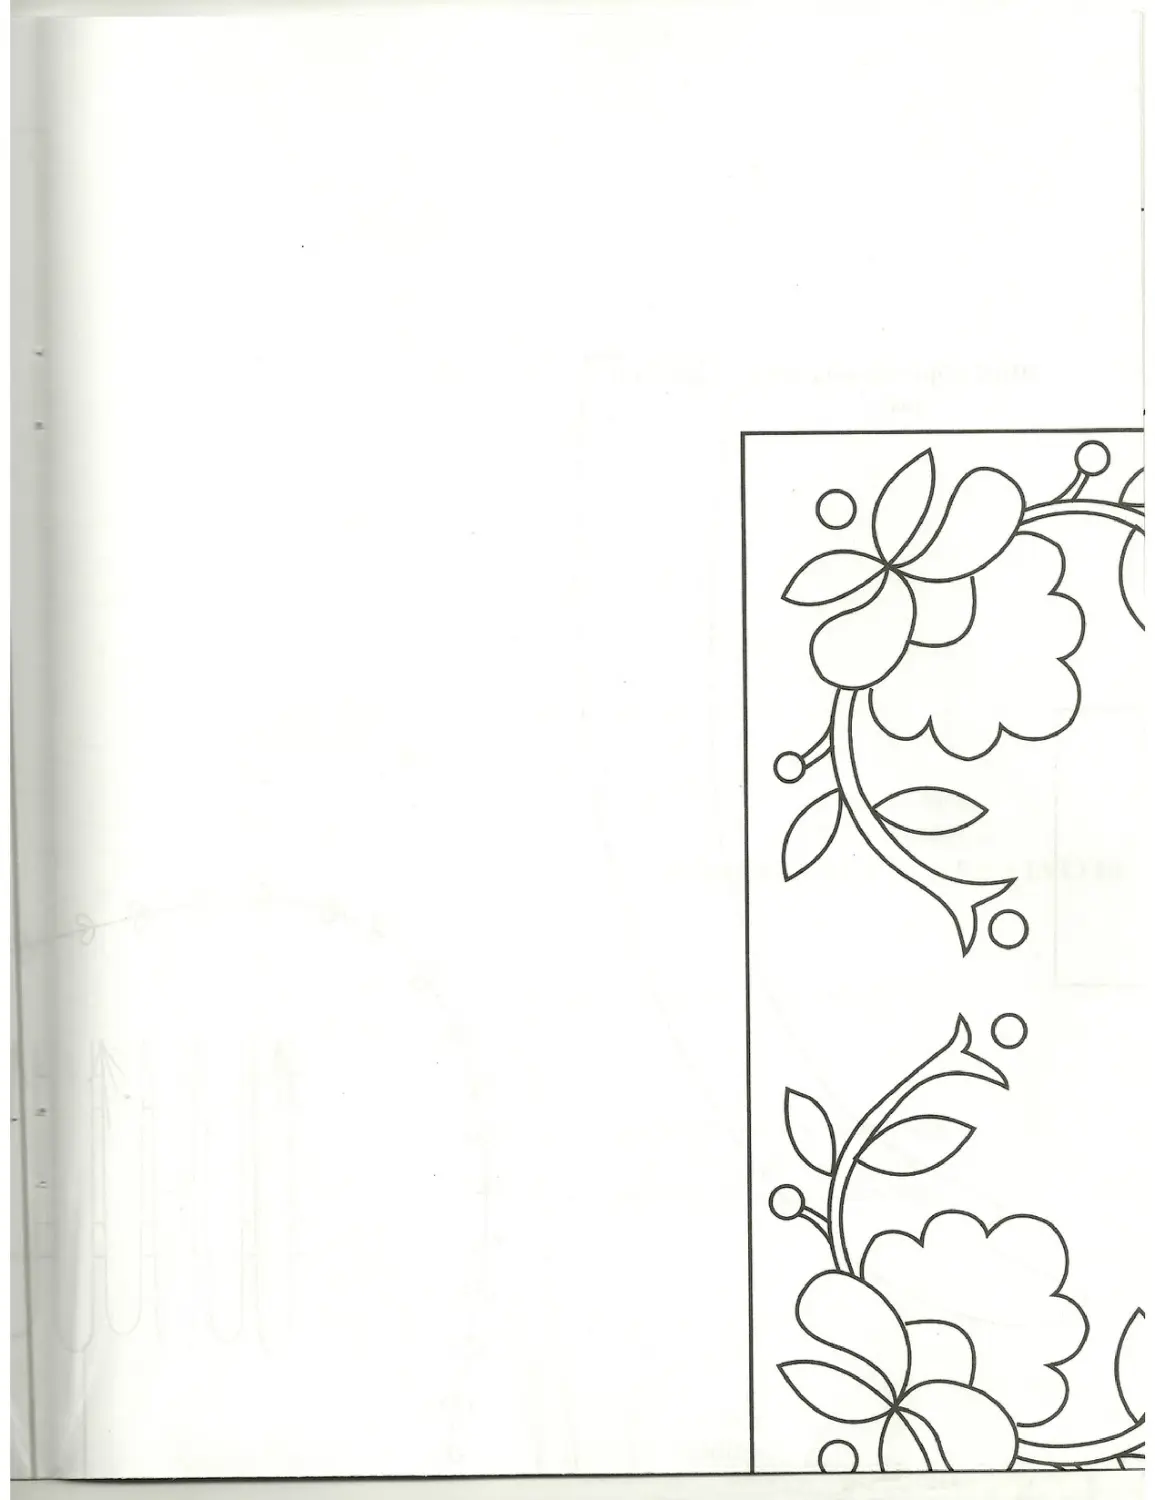
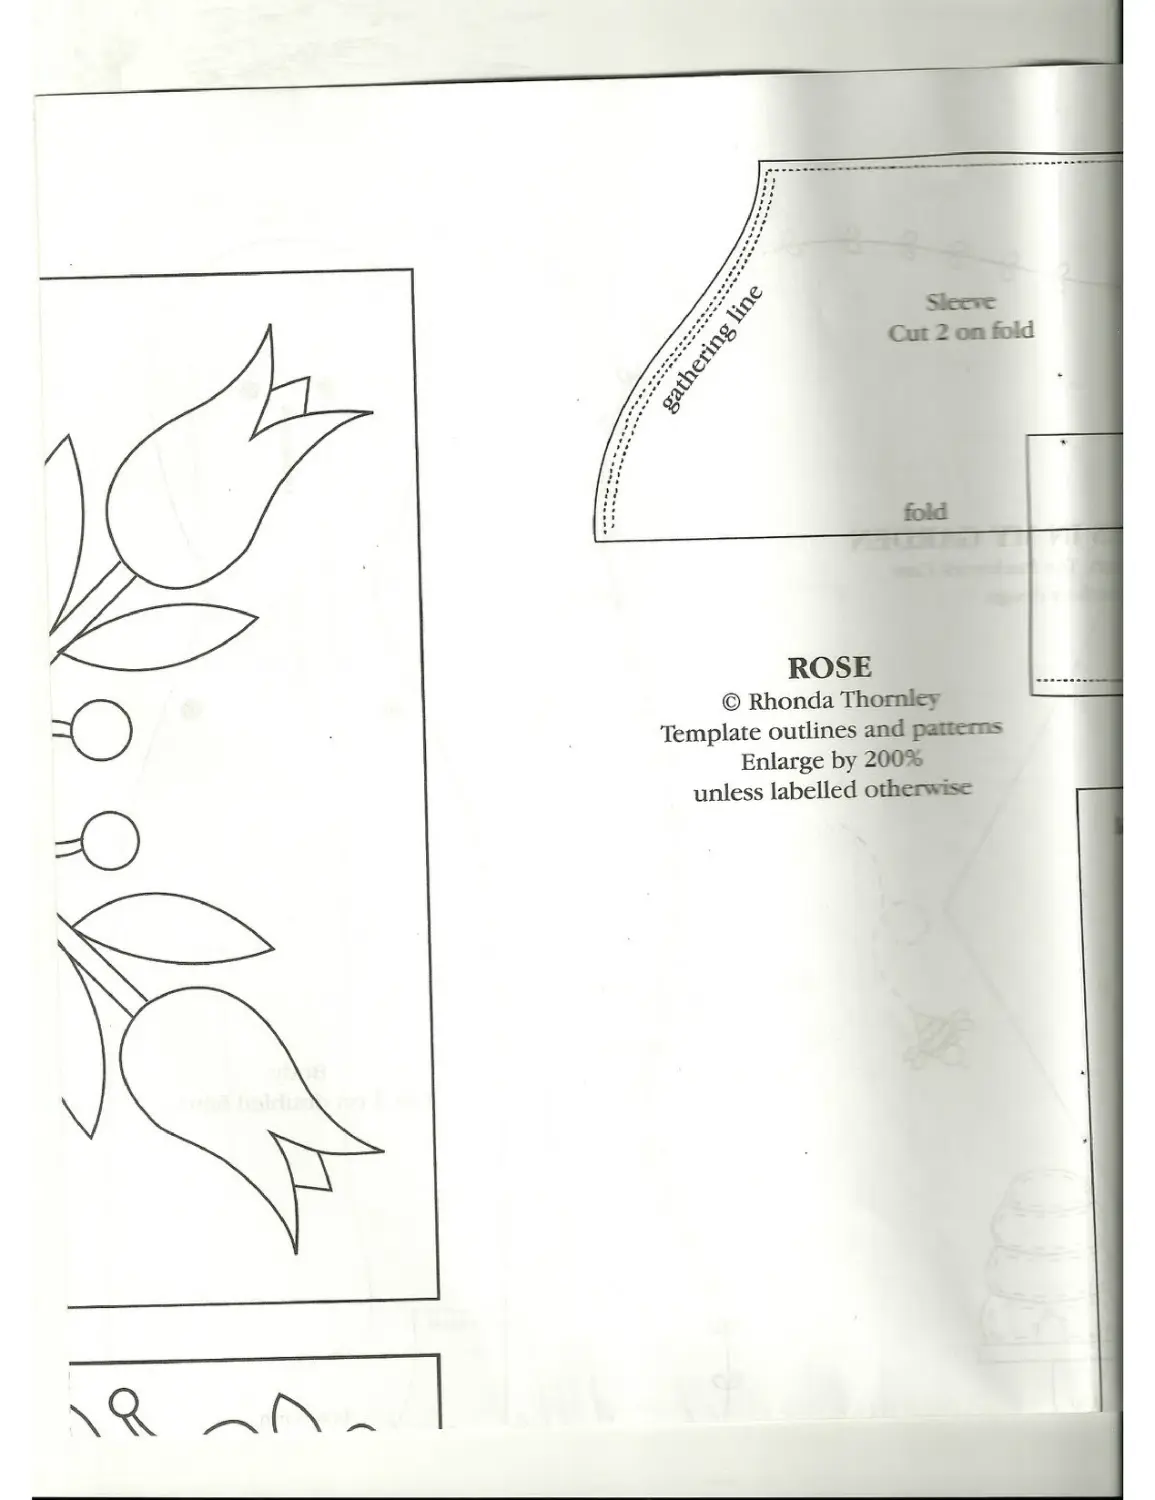
ROSE
© Rhonda ТЬоггъ с Template outlines and -
Enlarge by 200% unless labelled otherwise
о о
ЕЕ
4ftoRIHV4KW{№-пгнр ftryni fenn Fb> MlJUp A^OKaj
ЧЯ*т -Ч1 ,J--' Ap4*f K-1 -HW * 4-№Гр*Н(п4НаМ| fF31 -<p >JM1 pu*Jtp UI puwy
г.пя.Т" w дек! ?’.тл<гчэл1 1!+]-wtj3>p
Э.Ч ттэяр Ля-КЧХЛЬТ-’ Р '"*|1 >|Г рплн( pi |\£f чгде-р Нч -УяцД qT-ui-dp puruMjaiiч| эфС1м.т '?Ч JFV HfT^api '||,|J ТЖ|2Гф IM -unfti.p р>^Н>1Г1.> вря Ар iprci ILTT'Scfl T-^J >p Л1 ^р1
Ар |Т-Т '“мч'»' я яг.?'эу- 1+тр-.-1Ч pu- »JA^-K>±r.j4|fUtp.‘TrW»4^| taf^j JH-jAiJi ugmp afijq эф ДО-
T«J pi ra*«| usfrcp e жд
-^.TAKIi.i.i^
1JfT>pi ‘fTISprE JJCrC'-i-MJ Til - >p РЯЛТ-ПЯПТ pup) ilijpfc,Ъ£>Ц ₽рЯЛТЯД‘’Ц'ЧГЛ-.'Ч1 рчтфй:!.
TftlFt^K^-hp 1|>Ч UTA g.J pi piA IIWT pi Ufi CLHM тр?Ч?р Эф-л uqiy м ГР Ui|l AHM-hfi “ЧТ 1 wfih’p ?Л ISf J-- >TAUf1LpbM U 1л|jlAq '+s"|l 4>JJI upi A*.< -Г]
a vr.-.dl I !_ f АЮ* лдэ ’’p’ uwi^fnJ pjibeLj
I 4fJ? ТЭТ? ?рт^5
pi i-1 Э|*Н>|Ш 1*7Д | i вдям □ Ain и^Д T AM -AJ^nJ*rЙ TJ»3 pi w.‘l-|
>-»f-4 41 «Н 0"b -
’i:*t A+I f Ч Ц*ИВЫ И[д я ИГ №?-*«Ч +*»
F><-лр КЗ >;4и:-чи и[Е X жш-
Т•Л 11- ".<’££ W>-
□m--i-l.^-J> uJJJ
TATI p I Lb." 9FW 3Hp К*1 p” >.> pl >rr>*iiH4n6iftpi JJTJird pi Lji. -I Цкйпр Ар Э T|J_
UDJFEndllJJ
ВД»
ripcrv >3ш Ч^ртЧ^И «*-
wrvai^i jpoi яр
4ПЧ 41 iw®-
□ns VJ-JpL-p fjtTiud жрувд
’,ЧЧЧ’1ГитЧ*Л
Ар K’ чр" *|iiwwt i-i-Xin rp- Г7> fri-LHi^
ЙМ> r Rfl |wwd &i]ini<x>pj ЛффШ Ц f4i<.ur «.рЧАир >^|U>| я.р u."wj idfeuj |пи j-Lp :-jA!:- j
ЧЧ я *»|1г1ия &4»j кип Эф !OJ4 pur jpH. Vd. Ap i .;. jji- h J>! 'vjpJ'J -I И кфр AJi HS-p-.-, *nru??rpd TWfT?
к, 'tfrAttyd +41 J-’s^rt *^H|ik lujie — -Lu|i:^f-OT.-j-AJ-u Тяг Ап-р рч ‘паян тJ1 [
r> u-| 1.1-—u| 1 !-».-|.^f- - чиж 71-51FI ^ЗСЖЧ^ЭТЯ p'-Ч L|NU* JUip <LI|-I^ фпл яга - uw^jr.j
P' Т-Jf ipcapi шр*‘Afii* pjjfM-V р
-pjn-in t-ll pi J>p kp^rF
Ш|| Euqi^. 1>р»ф<л wfiupiTijq _uj ?ibi.- D 'Jkpi ДфЦк-" piK U_pi JFУП'1"ч5 JOkp
ВДЗРАр KJ 'Ч.зчрч »;£***- ь qV l «1-.-.. |1лг i_.i|id л^эаьл: *p у ьрь-j^xj эф
2hIAp|[MqU3^
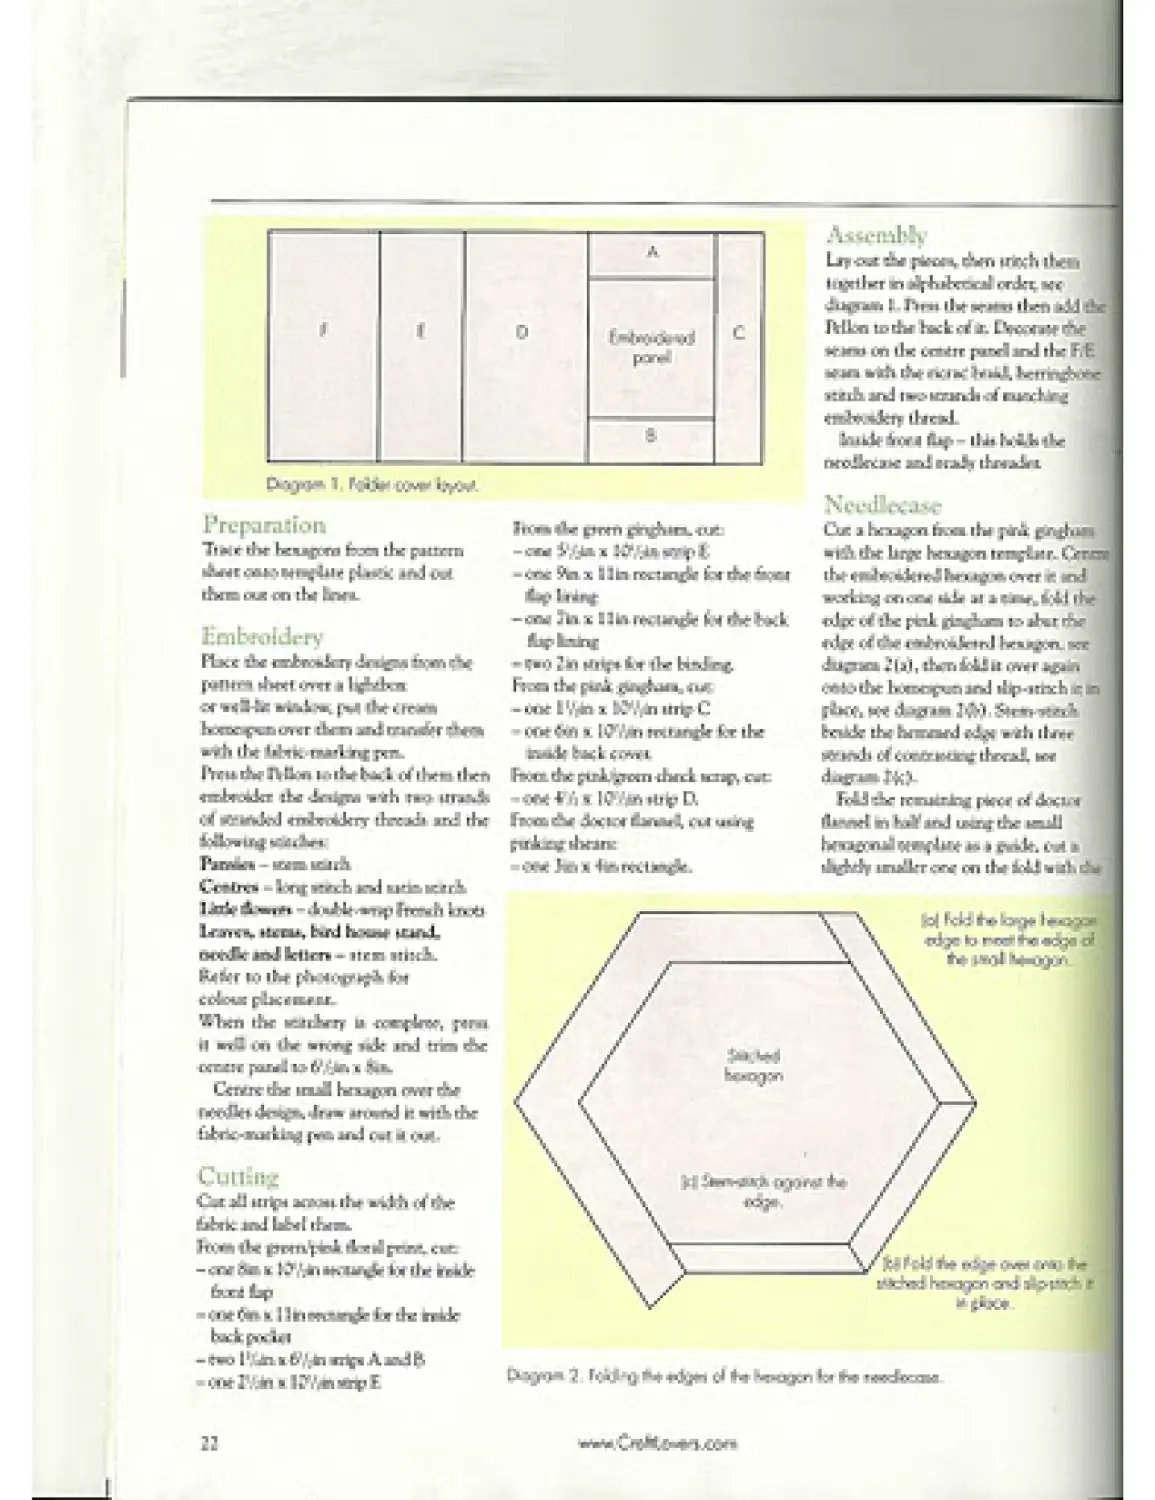
Preparation
Trace the flap and side panel patterns from the pattern sheet onto tracing paper and cut them out.
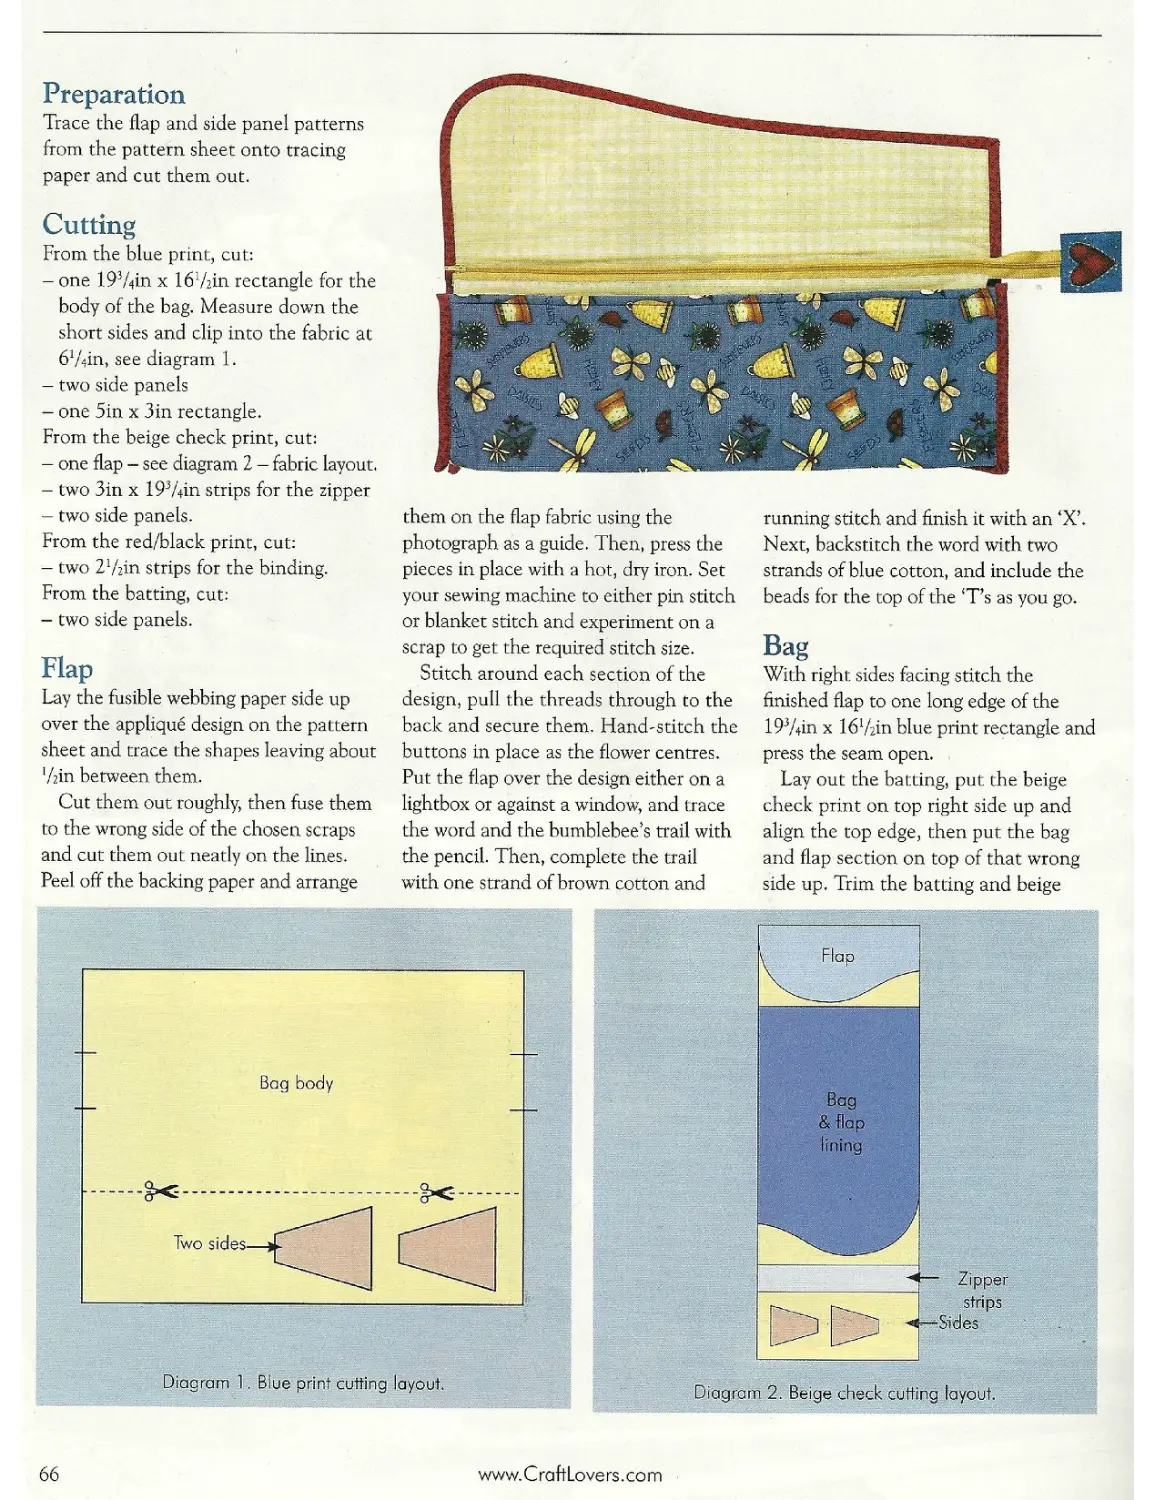
Cutting
From the blue print, cut:
- one 193frin x Ih’frin rectangle for the body of the bag. Measure down the short sides and clip into the fabric at 6‘Ain, see diagram 1.
- two side panels
- one 5in x 3in rectangle.
From the beige check print, cut:
- one flap - see diagram 2 - fabric layout.
- two 3in x 193Ain strips for the zipper — two side panels.
From the red/Ыаск print, cut:
- two 2‘Ain strips for the binding.
From the batting, cut:
- two side panels.
Flap
Lay the fusible webbing paper side up over the applique design on the pattern sheet and trace the shapes leaving about ’frin between them.
Cut them out roughly, then fuse them to the wrong side of the chosen scraps and cut them out neatly on the lines. Peel off the backing paper and arrange
them on the flap fabric using the photograph as a guide. Then, press the pieces in place with a hot, dry iron. Set your sewing machine to either pin stitch or blanket stitch and experiment on a scrap to get the required stitch size.
Stitch around each section of the design, pull the threads through to the back and secure them. Hand-stitch the buttons in place as the flower centres. Put the flap over the design either on a lightbox or against a window, and trace the word and the bumblebee’s trail with the pencil. Then, complete the trail with one strand of brown cotton and
running stitch and finish it with an *X’. Next, backstitch the word with two strands of blue cotton, and include the beads for the top of the ‘T’s as you go.
Bag
With right sides facing stitch the finished flap to one long edge of the 193/dn x 16‘Ain blue print rectangle and press the seam open.
Lay out the batting, put the beige check print on top right side up and align the top edge, then put the bag and flap section on top of that wrong side up. Trim the batting and beige
Diagram 1. Blue print cutting layout.
Diagram 2. Beige check cutting layout.
66
www. C raftLo ve rs. co m
BALTIMORE WALL-HANGING © Emma Jansen Applique design outline Enlarge by 200%
feere ?z_. - :: the back of the 1L? cr—r. pink floral
Kbe. Piice :: top of the 9in in steer. przham rectangle
-prt nces racing and the ts~- edges aligned, then stitch
this edge. Fold the wrong t.cjaher creating a mock Bag on one side, see diagram 3. в j' well and trim the lining, -sat along the seam edge of
5 as before.
fab wrong sides facing, pin Esde flap to the pieced
er ctrer.
att back flap - Fuse Pelion to the tz side of the 6in x lO'/rin pink A— rectangle then fold the 6in x i preenpink floral print rectangle in ‘widthwise and press it. Attach к: braid to the top edge as before, dhe pocket to the right side of the r Ilingreen/pink floral print with
-jm and side edges aligned.
azr. the 7in x Ilin lining rectangle to Hleft-hand side of the flap creating a
^ck binding as for the front inside flap, being-stitch next to the binding with Basting thread, see diagram 4- With it; sides facing and raw edges bed, tin it to the inside of the back l& folder cover.
ding
r the binding strips together with a к seam, trim it and press it open. Fold к strip in half lengthwise with wrong fees facing and press it. Sew it to the of the folder cover, mitring the
bgram 3. Making the mock binding.
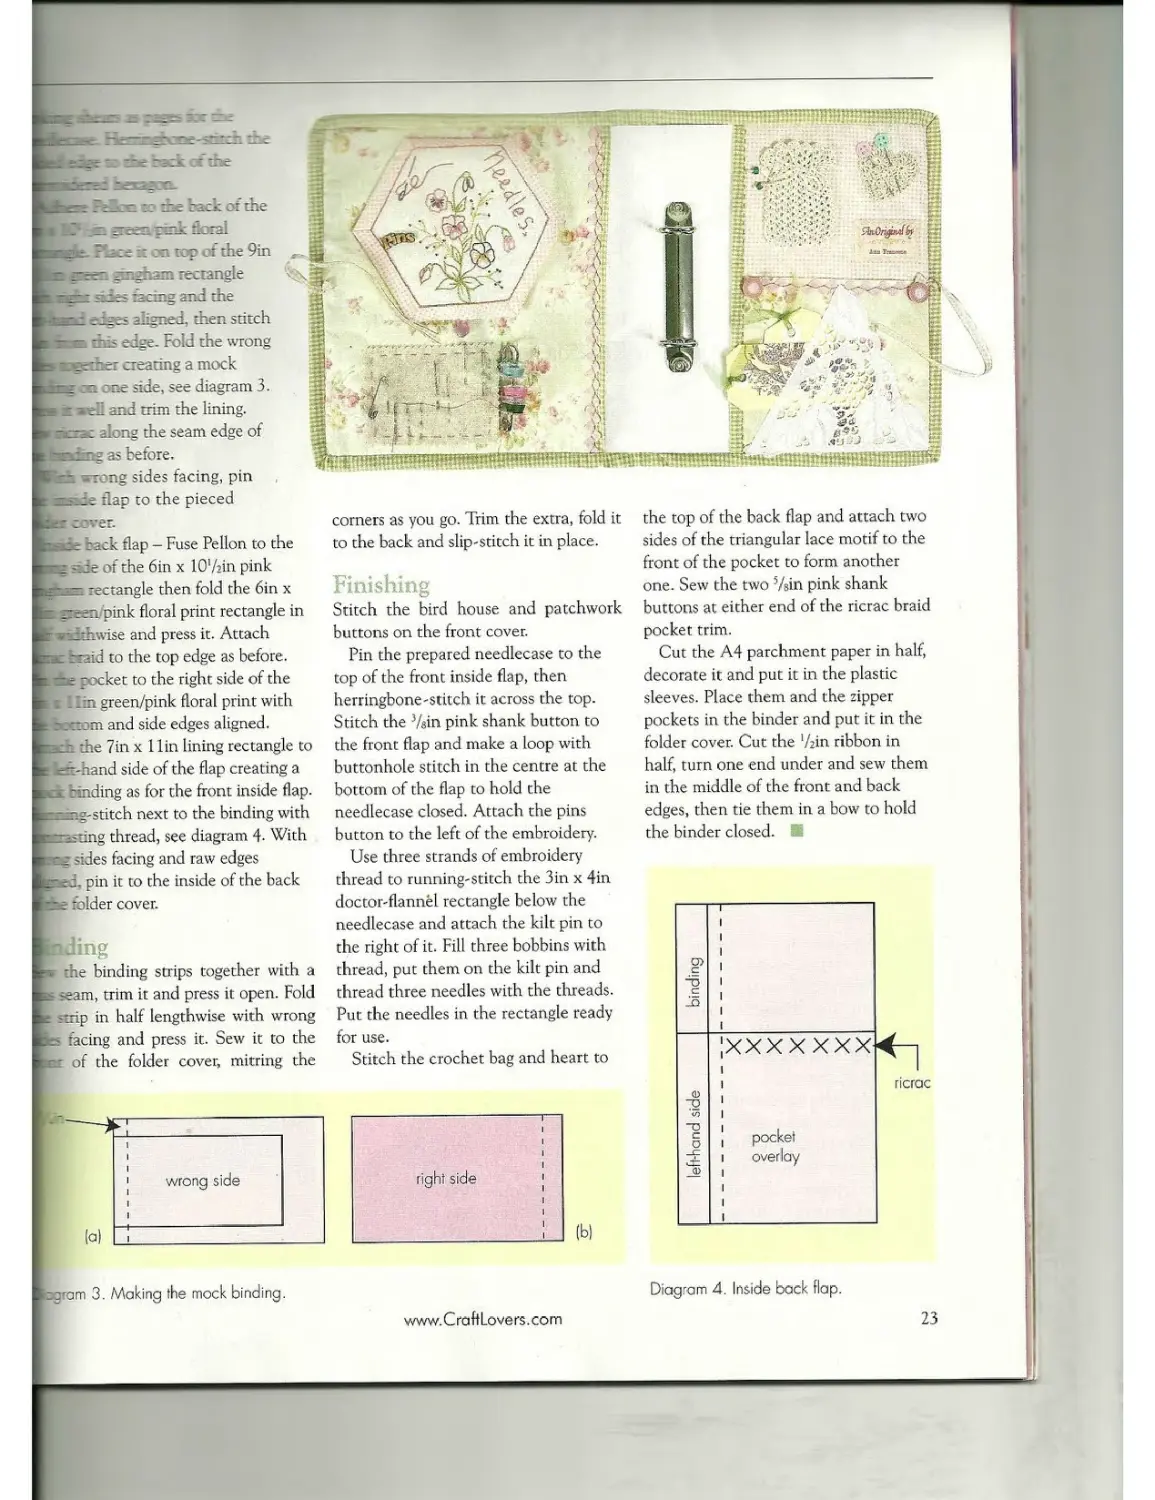
corners as you go. Trim the extra, fold it to the back and slip-stitch it in place.
Finishing
Stitch the bird house and patch work buttons on the front cover.
Pin the prepared needlecase to the top of the front inside flap, then herringbone-stitch it across the top.
Stitch the Vein pink shank button to
the front flap and make a loop with buttonhole stitch in the centre at the bottom of the flap to hold the needlecase closed. Attach the pins button to the left of the embroidery.
Use three strands of embroidery thread to running-stitch the 3in x 4in doctor-flannel rectangle below the needlecase and attach the kilt pin to the right of it. Fill three bobbins with thread, put them on the kilt pin and thread three needles with the threads. Put the needles in the rectangle ready for use.
Stitch the crochet bag and heart to
right side
the top of the back flap and attach two sides of the triangular lace motif to the front of the pocket to form another one. Sew the two ’/sin pink shank buttons at either end of the ricrac braid pocket trim.
Cut the A4 parchment paper in half, decorate it and put it in the plastic sleeves. Place them and the zipper
pockets in the binder and put it in the
folder cover. Cut the 'frin ribbon in half, turn one end under and sew them in the middle of the front and back edges, then tie them in a bow to hold the binder closed.
Diagram 4. Inside back flap.
www. C ra ft Lo ve rs. com
23
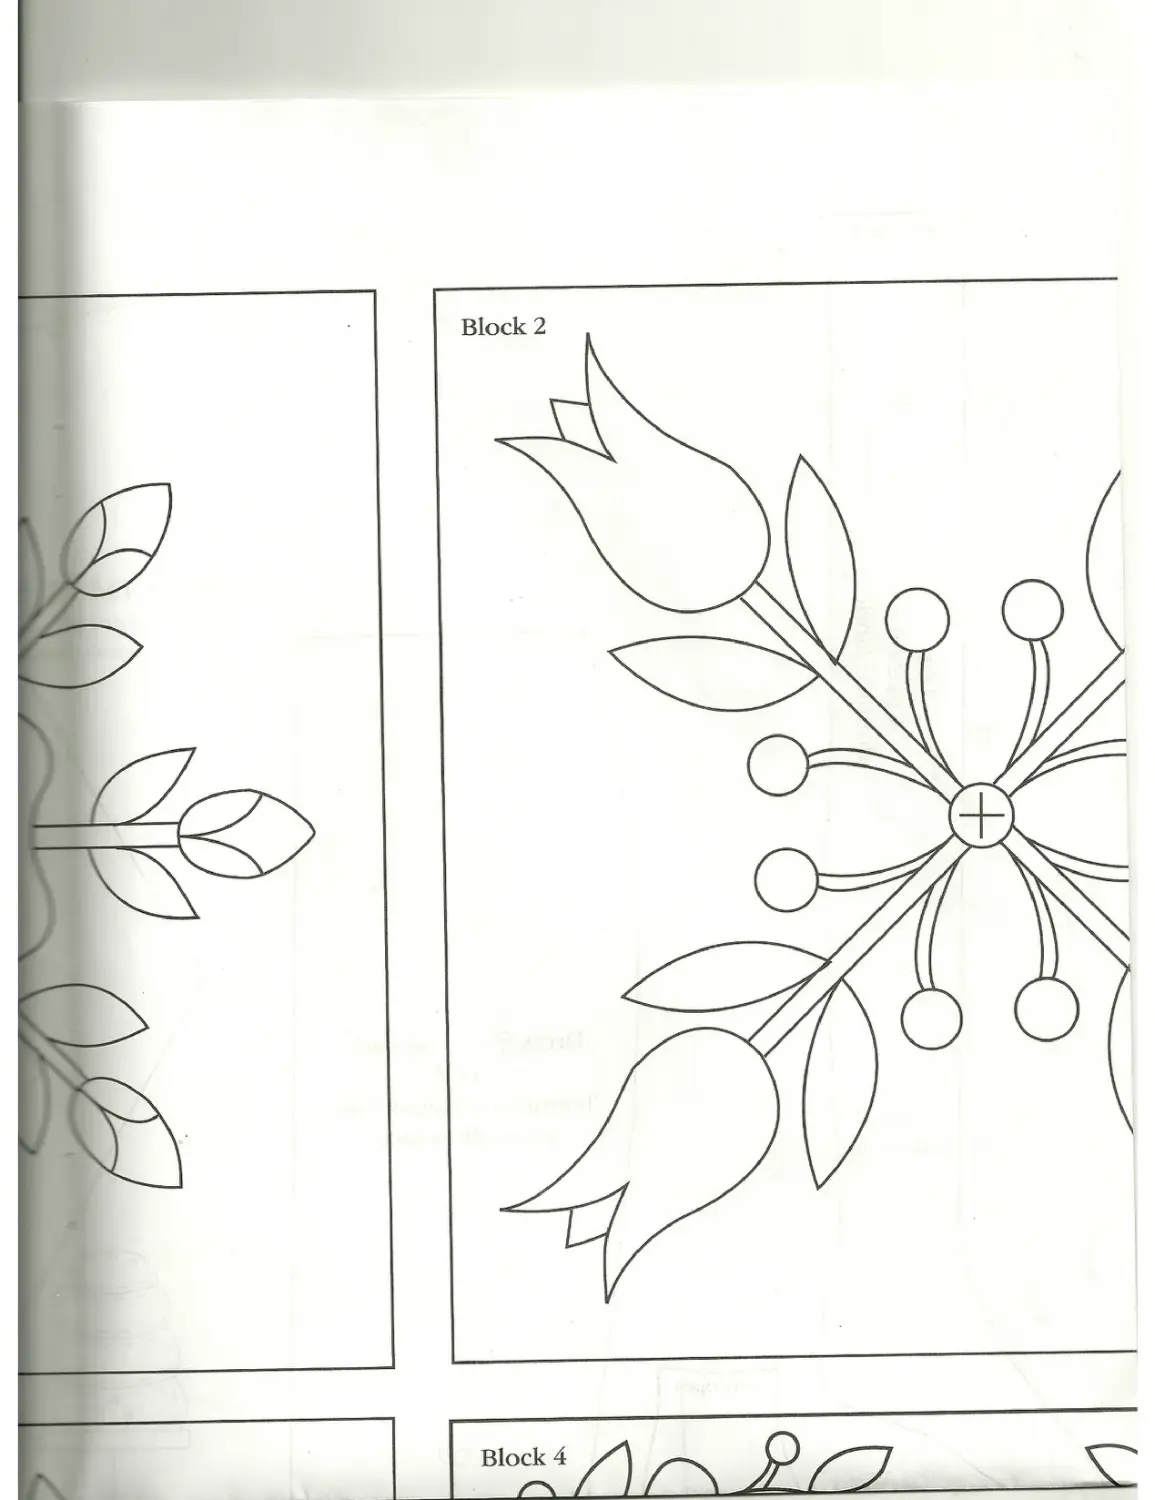
Block 1
Block 3
Г \ 3!
-------------•! * 1------------
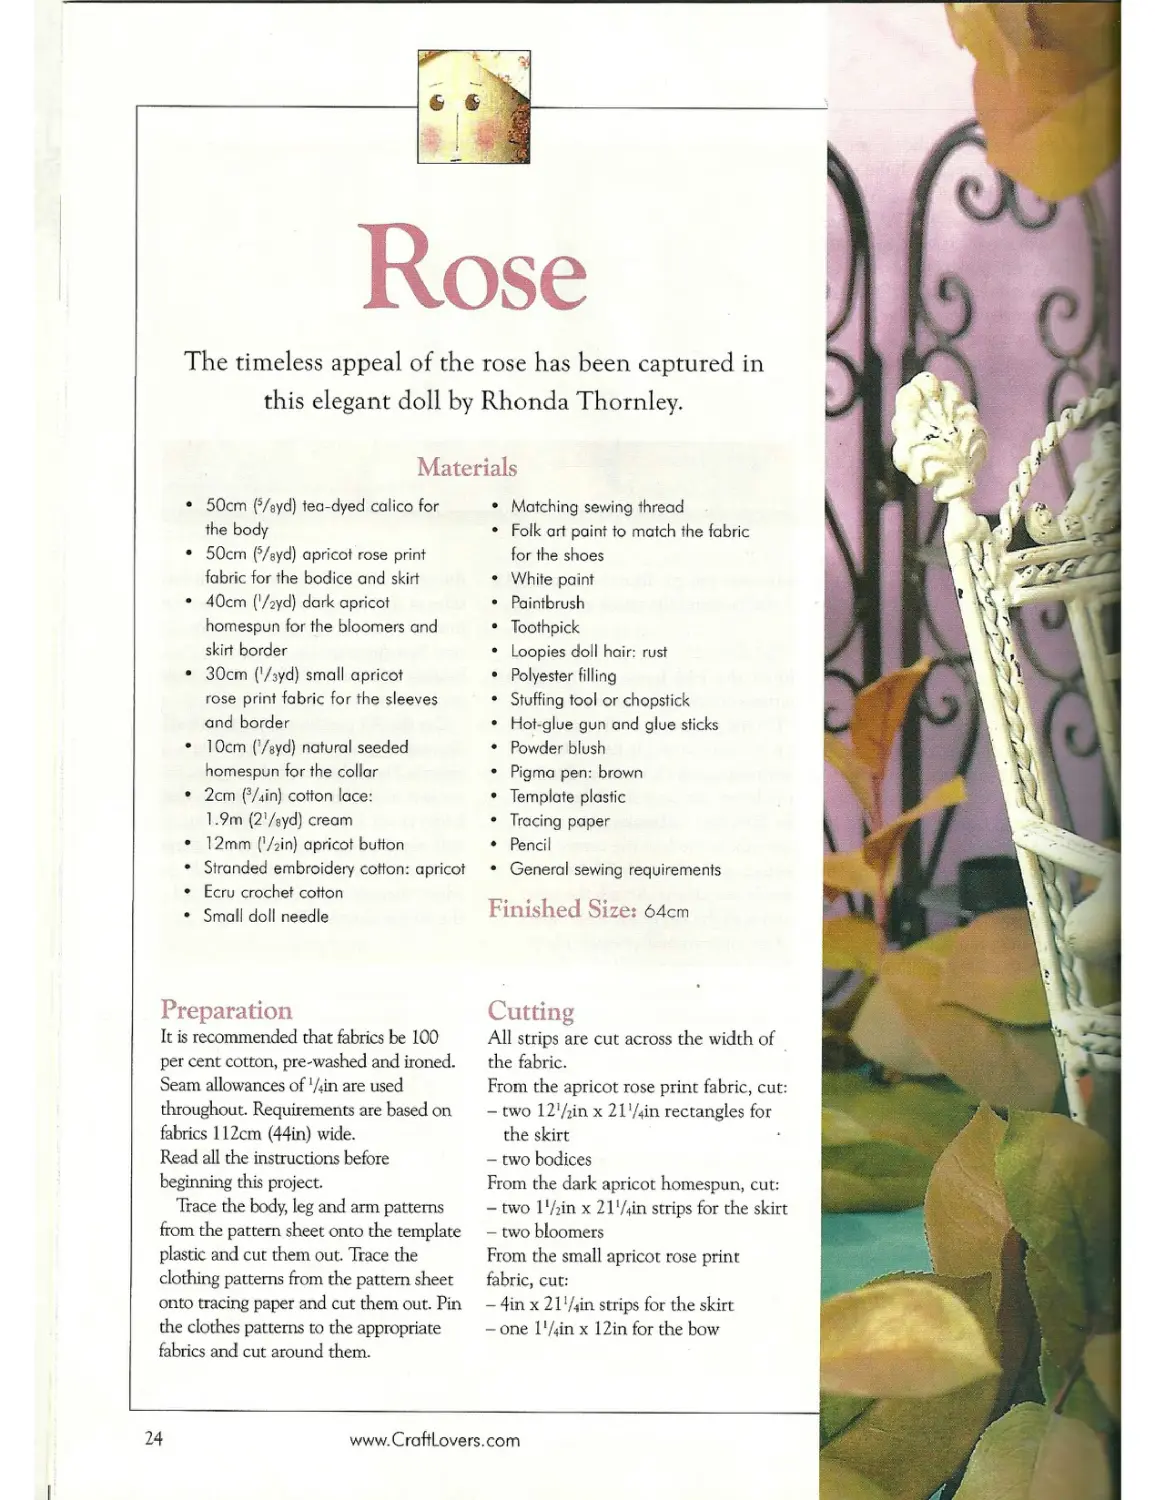
Rose
The timeless appeal of the rose has been captured in this elegant doll by Rhonda Thornley.
Materials
• 50cm (5/eyd) tea-dyed calico for the body
• 50cm (Vsyd) apricot rose print fabric for the bodice and skirt
• 40cm f/syd) dark apricot homespun for the bloomers and skirt border
• 30cm (’/syd) small apricot rose print fabric for the sleeves and border
• 10cm (’/eyd) natural seeded homespun for the collar
* 2cm (э/д!п) cotton lace:
1.9m (2’Ayd) cream
• 12mm (’/sin) apricot button
• Stranded embroidery cotton: apricot
* Ecru crochet cotton
• Small doll needle
Preparation
It is recommended that fabrics be 100 per cent cotton, pre-washed and ironed. Seam allowances of ’Ain are used throughout. Requirements are based on fabrics 112cm (44in) wide.
Read all the instructions before beginning this project.
Trace the body, leg and arm patterns from the pattern sheet onto the template plastic and cut them out. Trace the clothing patterns from the pattern sheet onto tracing paper and cut them out. Pin the clothes patterns to the appropriate fabrics and cut around them.
* Matching sewing thread
• Folk art paint to match the fabric for the shoes
• White paint
• Paintbrush
• Toothpick
• Loopies doll hair: rust
• Polyester filling
• Stuffing tool or chopstick
• Hot-glue gun and glue sticks
• Powder blush
• Pig ma pen: brown
• Template plastic
• Tracing paper
• Pencil
• General sewing requirements
Finished Size: 64cm
Cutting
All strips are cut across the width of the fabric.
From the apricot rose print fabric, cut:
- two 12'Ain x 21’Ain rectangles for the skirt
- two bodices
From the dark apricot homespun, cut: - two I'frin x 21’Ain strips for the skirt - two bloomers
From the small apricot rose print fabric, cut:
- 4in x 21’Ain strips for the skirt
- one l’Ain x 12in for the bow
24
www. C roftLove rs. co m
Block 4
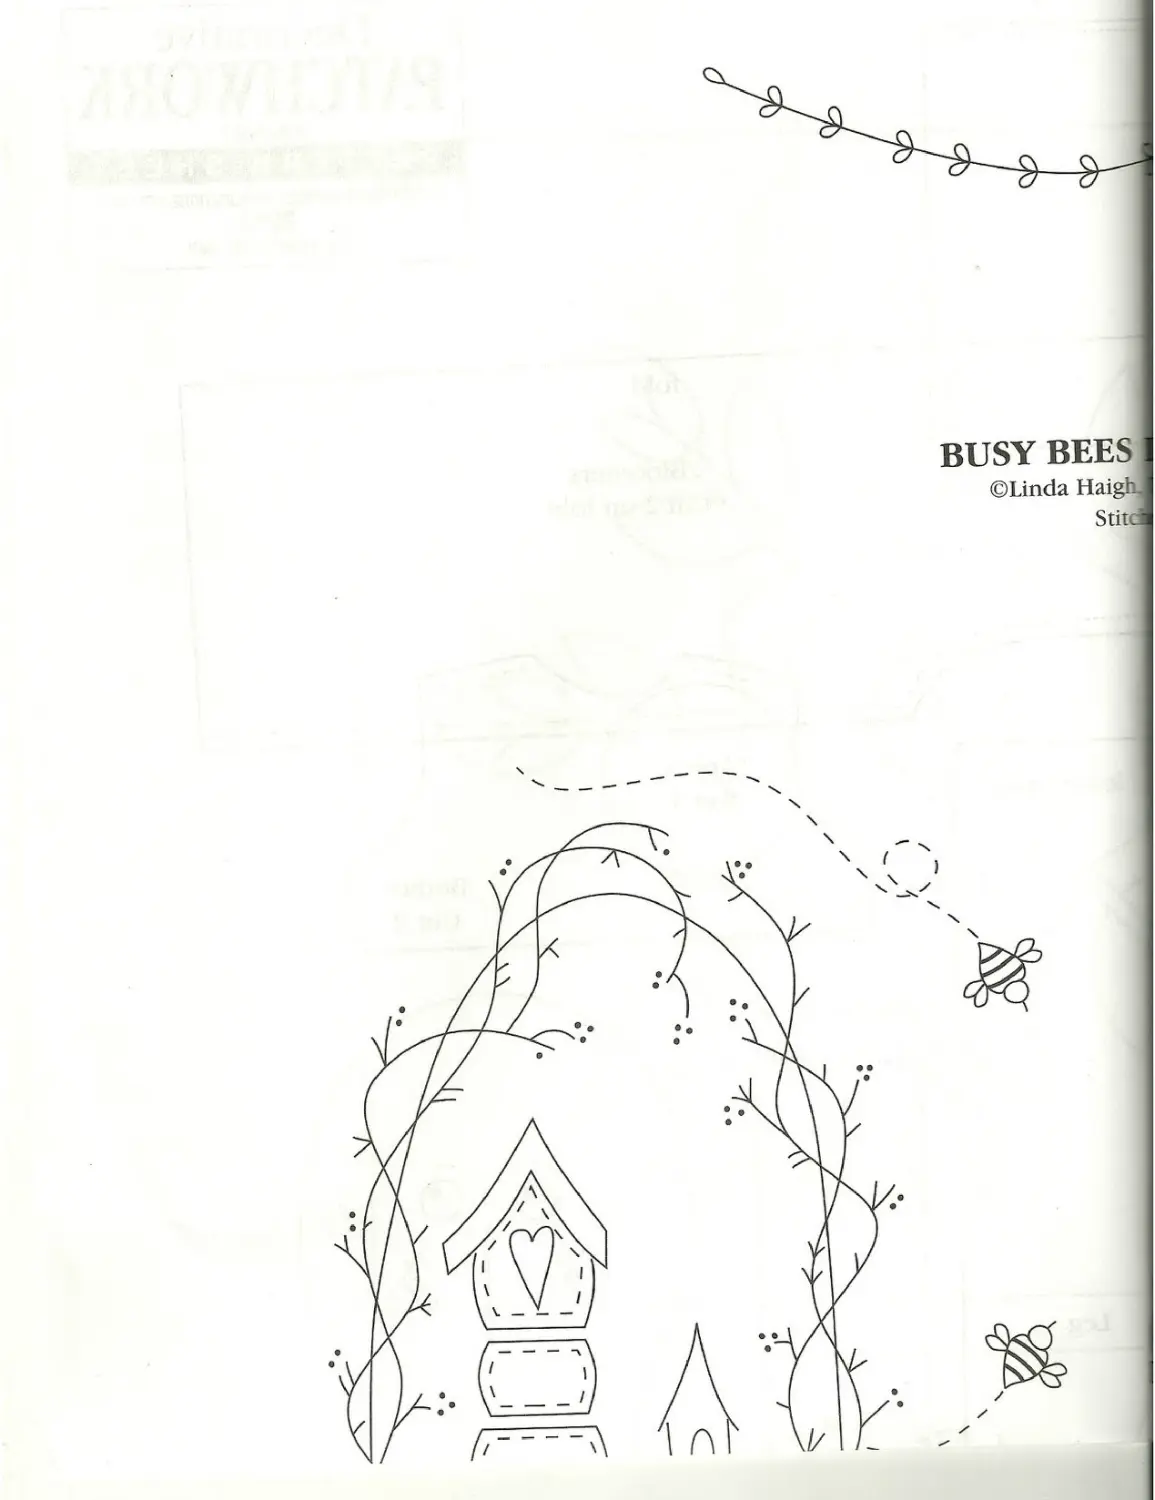
BUSY BEES
Stit<
- one circle for the yo-yo - two sleeves.
From, the natural seeded homespun, cut: - four collars.
Body
Trace one body, two arms and two legs onto folded tea-dyed calico with a pencil ensuring there is 3/<in between the shapes as the traced line is the stitching line. Using a shorter than
normal stitch length, sew on the lines leaving openings where indicated on the pattern. Cut around the shapes with a scant 'Ain seam allowance. Clip the curves and turn them right side out.
Firmly pack the arms and legs with polyester filling to the lines marked on the pattern, using a stuffing tool or chopstick, then stitch across them. Fill the head and main body well, turn in
a narrow hem along the body opening and pin the legs inside with the toes pointing to the front ensuring they are equal in length. Stitch the body closed securing the legs at the same time. Stitch the arms firmly to the shoulders.
Mark the shoe lines on the legs with a pencil and paint them with the folk art paint using the paintbrush. When they are dry stitch on the laces using the small doll needle and the crochet cotton following diagram 1.
Bloomers
Turn up a '/fin hem along the bottom edge and stitch the lace in place. With right sides facing stitch the crotch seam then open it out, match the crotch seams and pin the inner leg seam from ankle to ankle. Stitch the seam, then turn the pants right side out and press under a 'Ain hem around the waist. Using matching sewing thread, running-stitch around the waist, then place the bloomers on the doll and pull up the gathers to fit her waist and secure the thread.
Dress 1
With right sides facing stitch the shoulir seams of the bodice then machine-sew two rows of gathering across the top ot the sleeves. Pull up the gathers and pin them to the armholes of the bodice and adjust the gathers to fit then stitch them
26
www.CraftLovers.com
Turn up a 'Ain hem on the bottom -r me sleeves and sew the lace along me edge.
Fold the two 4in x 21'Ain small rose pant strips in half lengthwise with s~:ng sides facing and iron them, then 3peat this step for the two 1 'Ain x 21 m dark apricot strips. Place the dark qncot strips on top of the small rose pmt strips with the raw edges even men with right sides facing sew them to me bottom of the two skirts. Iron the in rder’s strips down then topstitch just >cve the seamline.
?.fadbine-stitch two rows of gathering Kross the waist of the skirts then pull X the threads and gather them to fit
e waistline of the bodice. Even out me gathers then pin in place and stitch ae waist seam.
With right sides together stitch from Be wrist, along the sleeve, under the sz. and down to the hem of the dress.
Clip the underarms and turn it right side out.
Using six strands of apricot embroidery thread, running-stitch 3Ain from the edge of each sleeve leaving the ends loose for tying off later.
Place the dress on the doll, pull up the embroidery thread around the sleeves, tie them in a knot to secure the gathers and finish them in a bow.
Collar
Slightly gather the lace and pin it around the lower edge of two collar pieces with the raw edges even, then with right sides facing place the other collar pieces on top and stitch around them leaving an opening where indicated on the pattern. Turn them right side out and press them, then slip-stitch the opening closed. Position the collar around the neck, overlap it at the back and glue or stitch it in place. Sew a few stitches at the front to hold it together.
Running-stitch around the edge of the yo-yo circle and pull up the thread to form tight gathers in the centre, then lay it flat and stitch the apricot button to the centre of it to cover the raw edges. Glue it to the front of the collar at the neckline.
Hair
Wrap the hair 25 times around two fingers and tie it in the middle. Make 30 bundles then hot-glue them to the head starting at the front and going down the sides along the seamline. Glue them close together to fill the whole head.
Make a bow from the 1 'Ain x 12in small rose strip and glue it to the front of the head just below the hair.
Draw the eyes, mouth and nose on the face with the brown pen and place a small white dot in the eyes using the white paint and a toothpick, then blush the cheeks. T
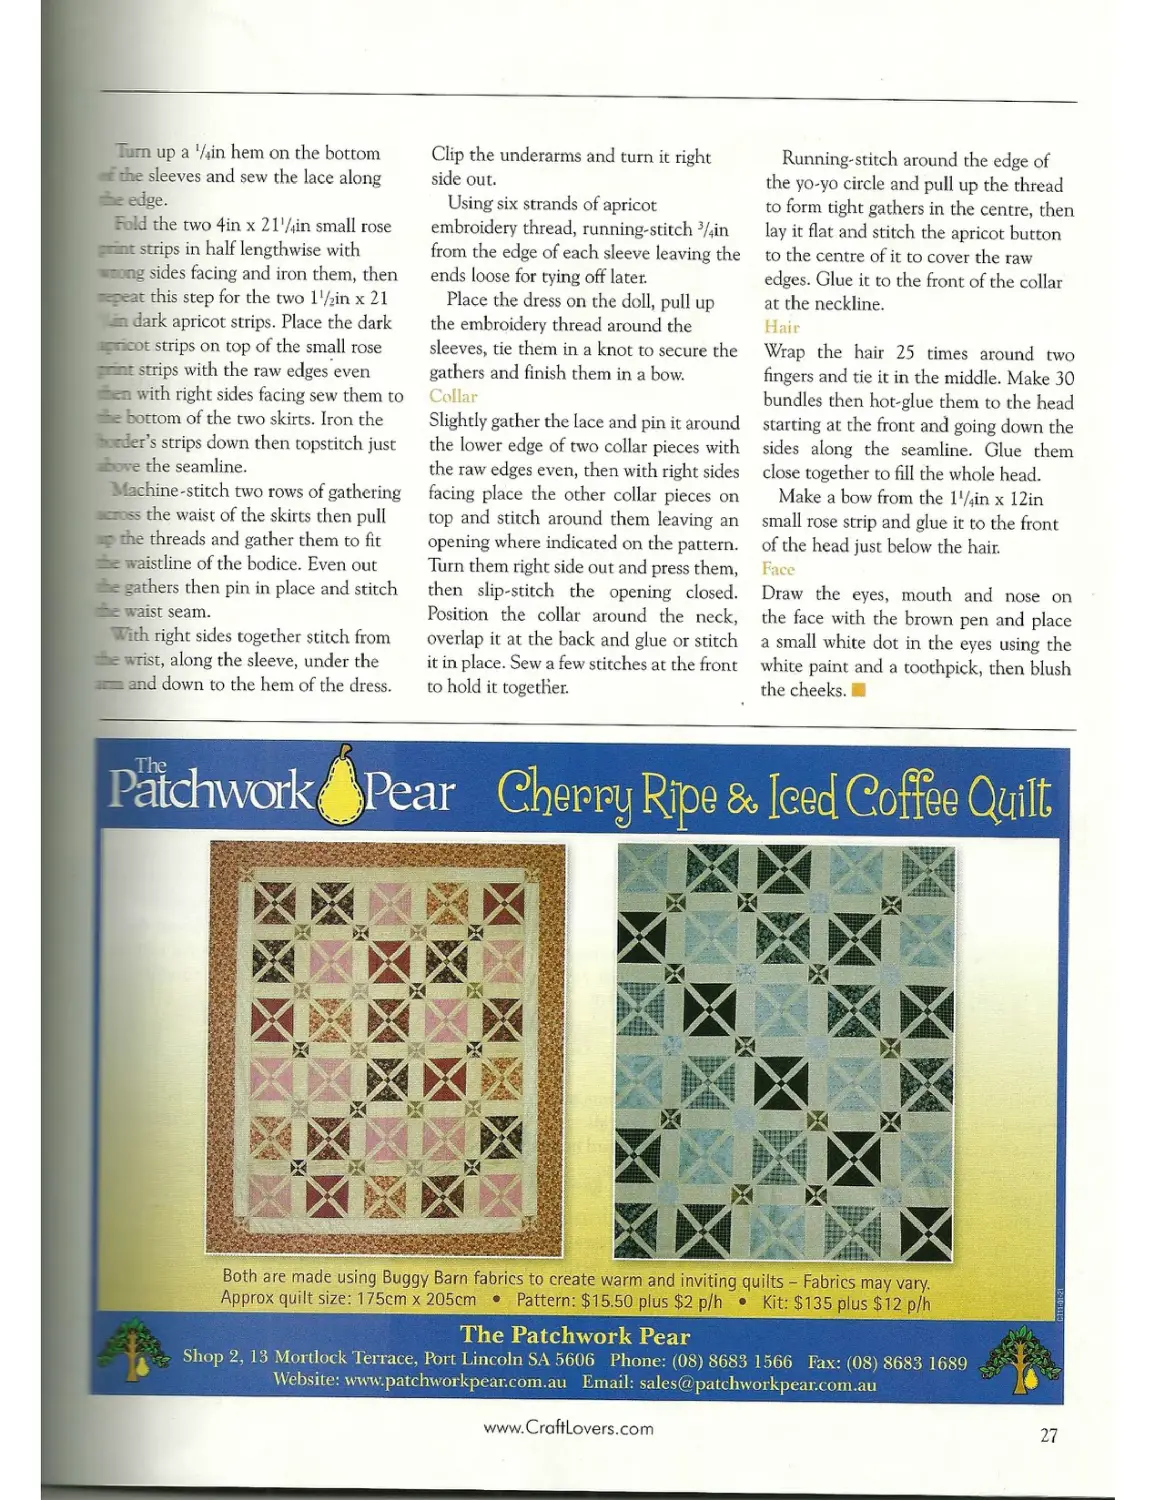
Both are made using Buggy Barn fabrics to create warm and inviting quilts - Fabrics may vary. Approx quilt size: 175cm x 205cm • Pattern: $15.50 plus $2 p/h • Kit: $135 plus $12 p/h
The Patchwork Pear
.' Shop 2, 13 Mortlock Terrace, Port Lincoln SA 5606 Phone: (08) 8683 1566 Fax: (08) 8683 1689 Website: www.patchworkpear.com.au Email: sales@patchworkpear.com.au
www.CroftLovers.com
27
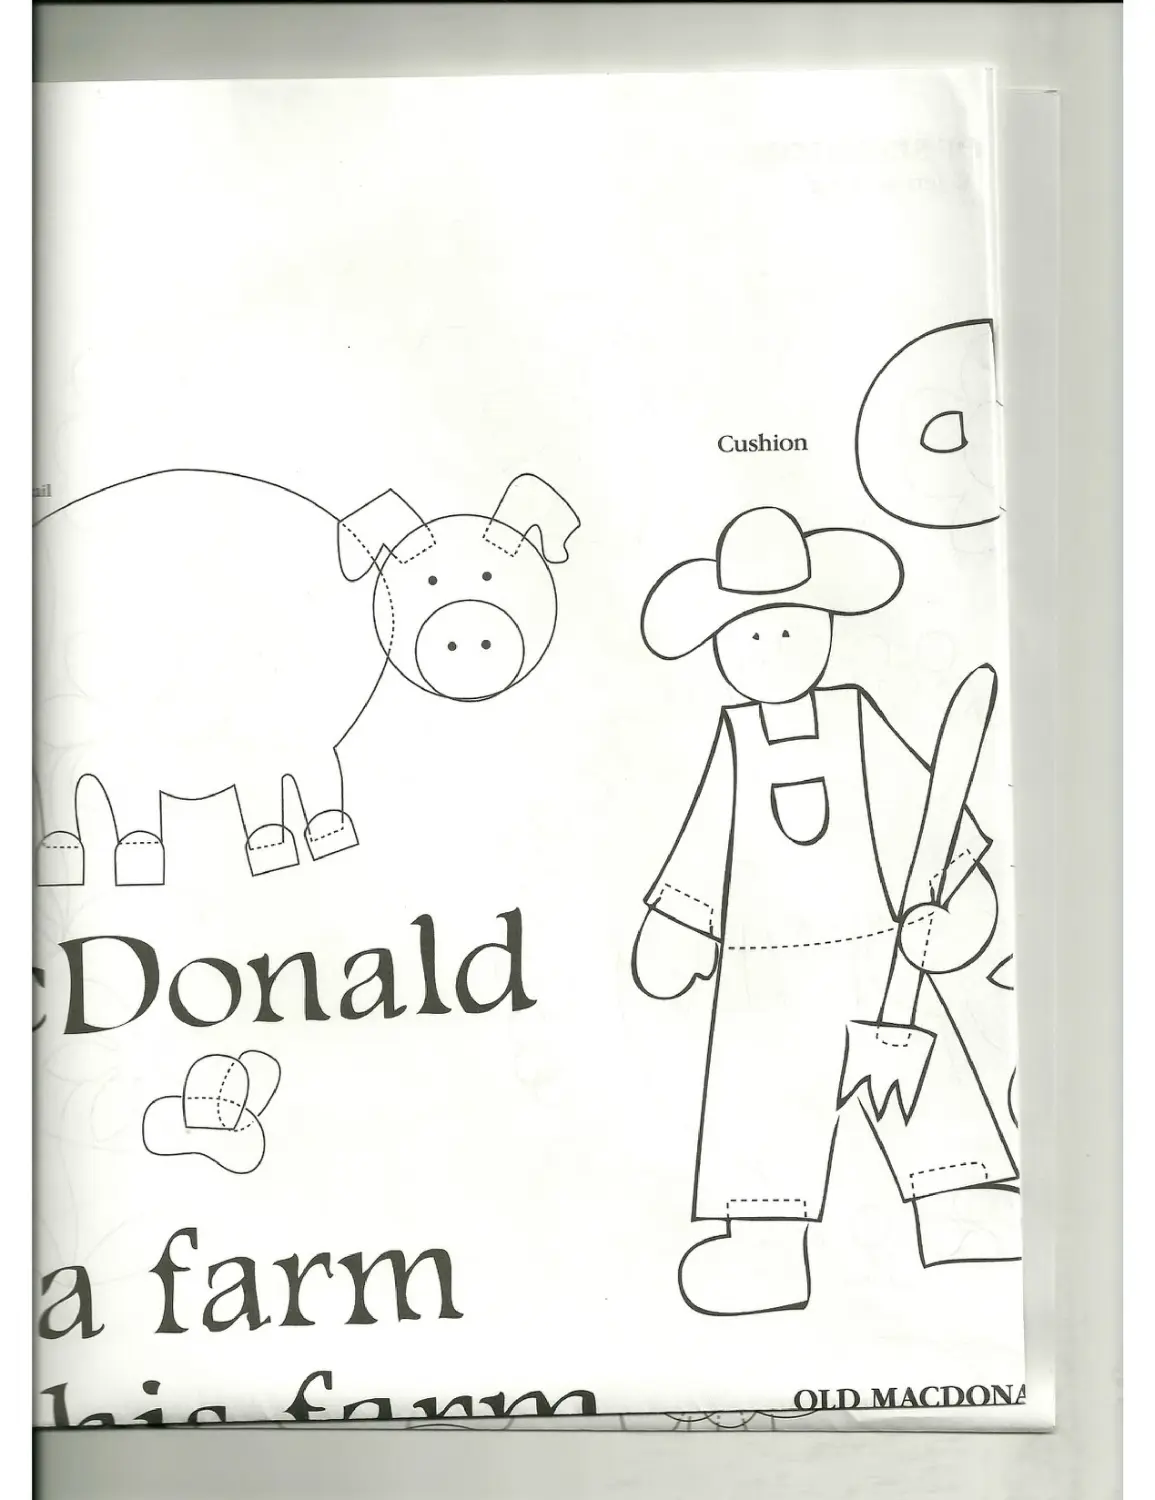
Old MacDonald
Teach your little ones the classic nursery rhyme about farm animals and their calls. Designed by Anna Jarman, this quilt and cushion is sure to be a hit with the kids
Cot Quilt
* 55cm (5/eyd) yellow homespun for the panels
• 30cm (’Ayd) red/yellow check print for the sashing
• 25cm (’Ayd) gingham print for the borders
• 45cm fAyd) mustard homespun for the bindings
• 1.4m (1 ’Ayd) backing fabric
• Scraps of fabric for the applique
• 40cm x 45cm (1 6in x 1 Sin) fusible webbing
• DMC Perle No 8 cotton: black (310)
• 90cm x 130cm (35'Ain x 51 in) batting
• HB pencil
• Baking paper
• Fabrica Fabric Pens: mustard and beige
• General sewing supplies
Materials
Stitches used
Blanket stitch, French knots, straight stitch, running stitch, backstitch
Finished quilt size:
82cm x 123cm (32in x 48'Ain)
Cushion
• 38cm x 41cm (15in x 16'Ain) yellow homespun
• Scraps of fabric for the applique
• 78cm x 51cm (31 in x 20in)
navy homespun
• 3, 17cm. x 6cm (бУ^п x 2'Ain) strips of assorted patchwork fabrics
• 1,1 7cm x 5cm (63Ain x 2in) strip of patchwork fabric
• 2, 1 7cm x 4cm (63Ain x 1 ’Ain) strips of assorted patchwork fabrics
• Fusible webbing
• DMC Perle No 8 thread: one skein of black (310)
• 2, 1.5cm (Vein) blue buttons
• 40cm (1 6in) cushion insert
Stitches used
Blanket stitch, French knots, runnirg stitch, straight stitch
Finished Cushion Size:
47cm (IS'Ain) square
Note: It is recommended that foo* be 100 per cent cotton, pre-wcsm and well ironed. Requirements ок based on fabrics 112cm (44in wide with a useable width of 107cm (42in). Cut all strips acrag the fabric width. Unless otherwise stated, the 6mm (’Ain) seam allowance used throughout the piecing is included in the cutting Read the instructions carefully before beginning.
Cutting
From the yellow homespun, cut:
- one lOin strip and crosscut four lOin squares
— one 8in strip and crosscut one 73Ain x 21in rectangle and one 6in x 21in rectangle from the rest.
From the red/yellow check print, cut:
- three 2in strips and crosscut two 2in x lOin strips and five Zin x 21 in strips
- two Zin strips.
From the gingham print, cut:
- four 4’Ain strips.
From the mustard homespun, cut: - five din strips.
Construction
Following the placement diagram and with right sides facing, stitch a Zin x lOin red/yellow check print strip between two lOin yellow homespun squares. Repeat this with the other lOin
yellow homespun squares, and press til seams towards the strips. With right sides facing sew a Zin x 21 in red/yeUoal check strip between the two panels, then a 2in x 21 in red/yellow check se^J to the top and bottom of this and press the seams as before.
With right sides facing stitch the ~ л x 21in yellow homespun rectangle tc bottom of the panel, then a Zin x 21m red/yellow check strip followed by the
28
www. CroftLo ve rs. com
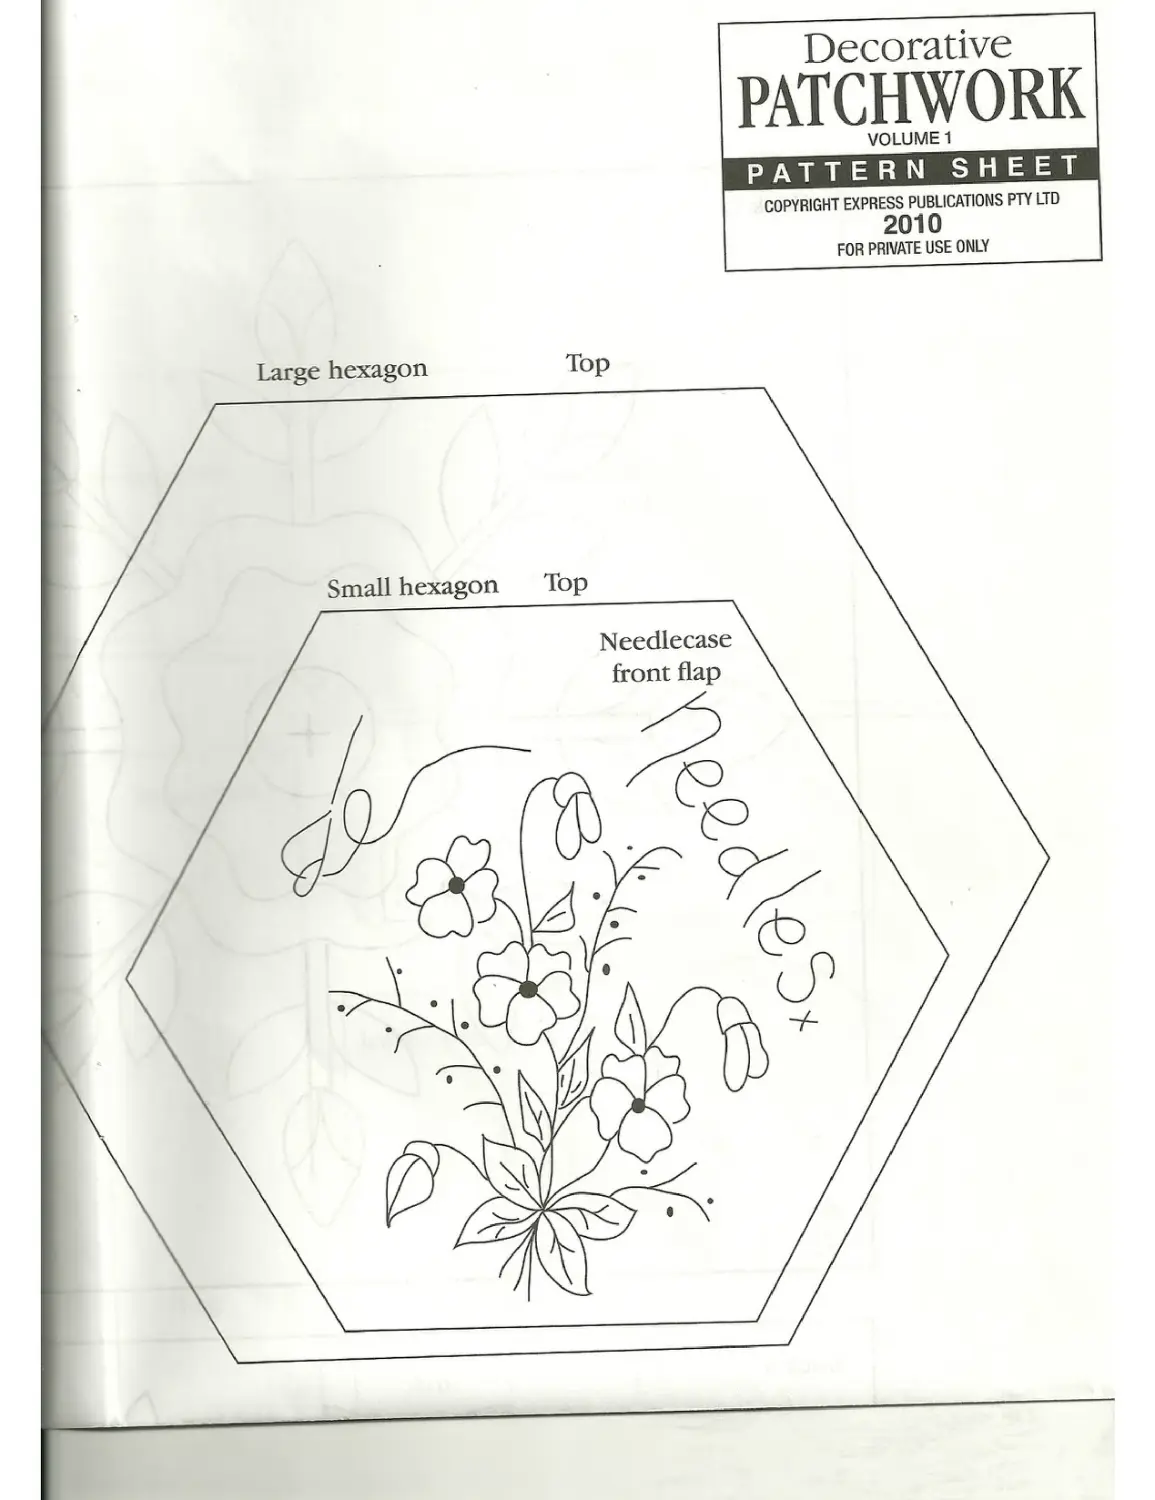
Large hexagon Top
Decorative
PATCHWORK
VOLUME 1
PATTERN SHEET
COPYRIGHT EXPRESS PUBLICATIONS PTY LTD
2010
FOR PRIVATE USE ONLY
—
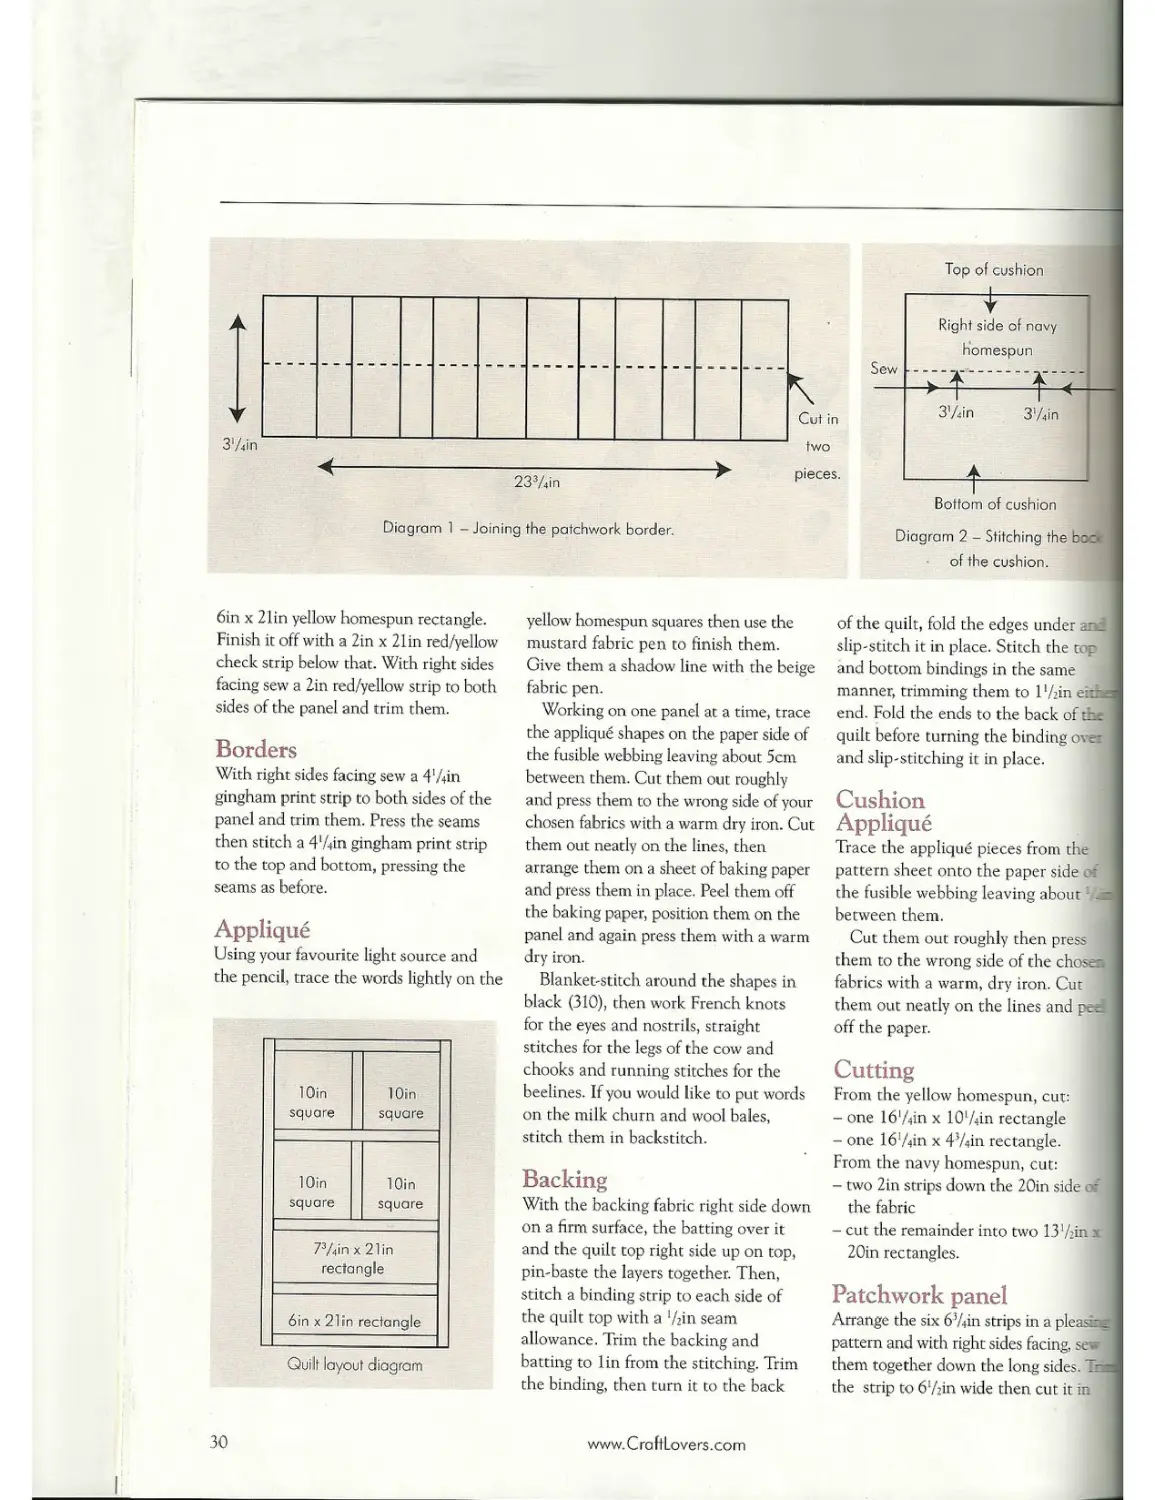
Diagram 1 - Joining the patchwork border.
Top of cushion
Ф
Right side of navy homespun ----> f f 4 3%in 3'Ain
--------f--------------
Bottom of cushion
Diagram 2 - Stitching the bi of the cushion.
6in x 2lin yellow homespun rectangle. Finish it off with a 2in x 21in red/yellow check strip below that. With right sides facing sew a 2in red/yellow strip to both sides of the panel and trim them.
Borders
With right sides facing sew a 4‘Ain gingham print strip to both sides of the panel and trim them. Press the seams then stitch a 4lAin gingham print strip to the top and bottom, pressing the seams as before.
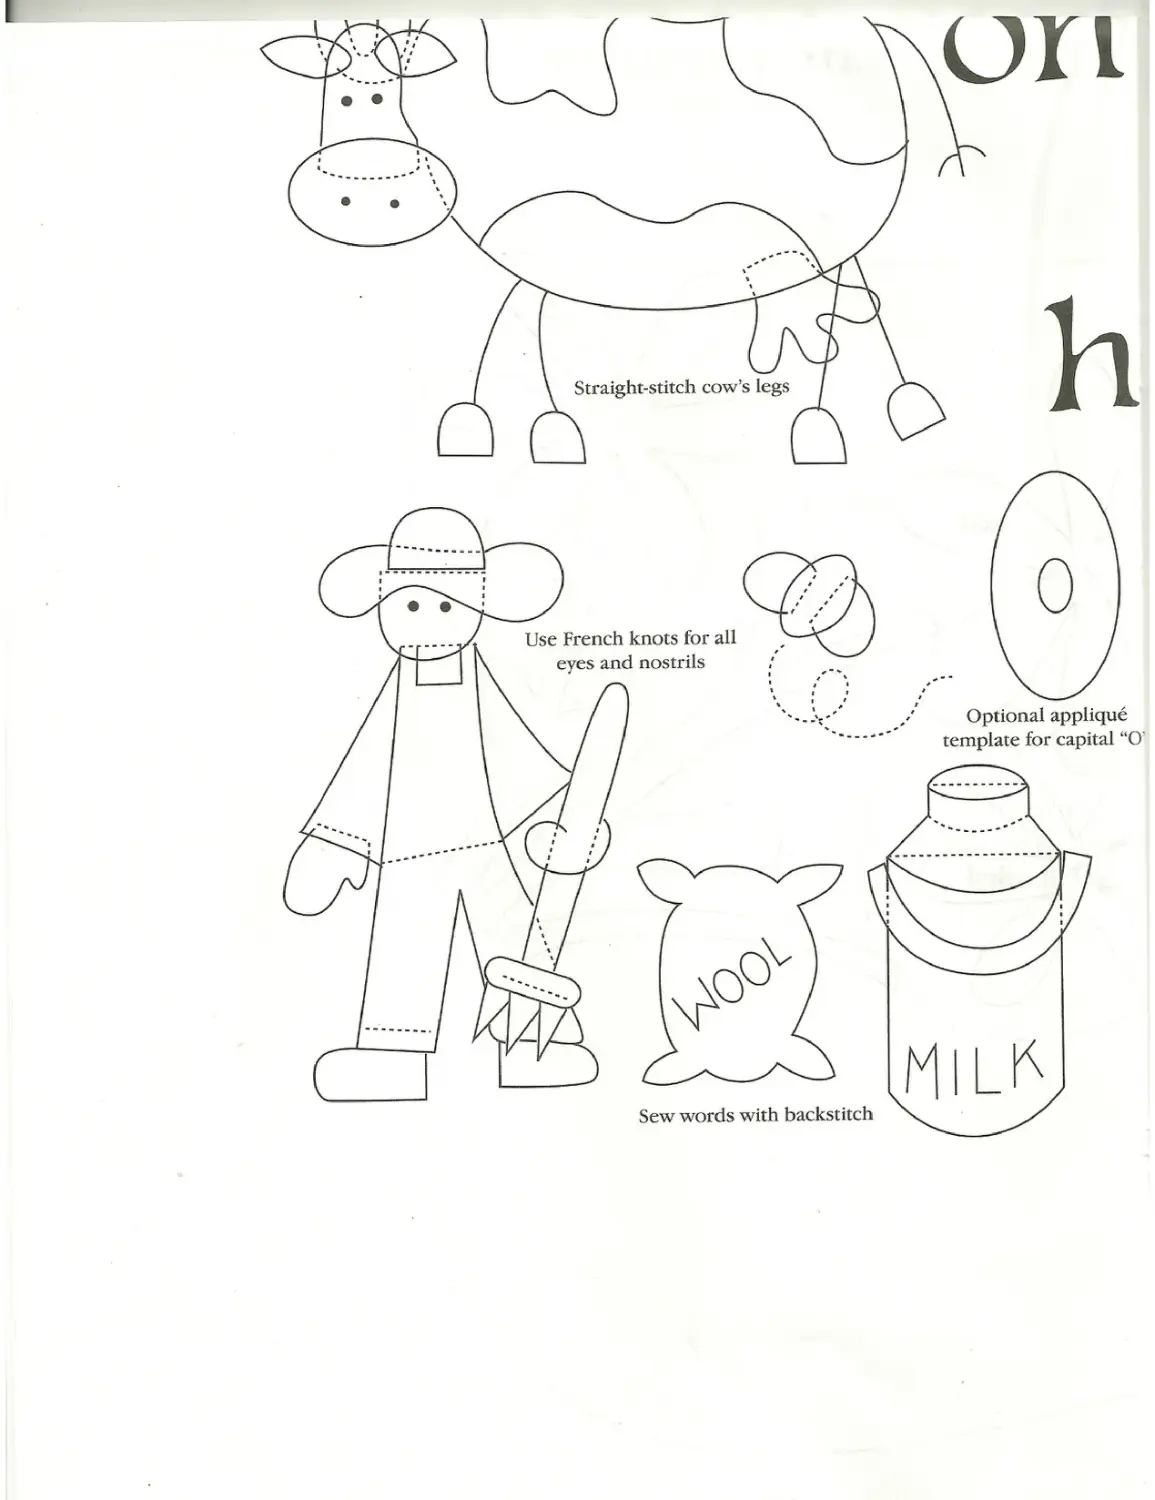
Applique
Using your favourite light source and the pencil, trace the words lightly on the
10in square 1 Oin square
1 Oin square Win square
73/«in x 21 in rectangle
6in x 21 in rectangle
Quilt loyout diagram
yellow homespun squares then use the mustard fabric pen to finish them. Give them a shadow line with the beige fabric pen.
Working on one panel at a time, trace the applique shapes on the paper side of the fusible webbing leaving about 5cm between them. Cut them out roughly and press them to the wrong side of your chosen fabrics with a warm dry iron. Cut them out neatly on the lines, then arrange them on a sheet of baking paper and press them in place. Peel them off the baking paper, position them on the panel and again press them with a warm dry iron.
Blanket-stitch around the shapes in black (310), then work French knots for the eyes and nostrils, straight stitches for the legs of the cow and chooks and running stitches for the beelines. If you would like to put words on the milk churn and wool bales, stitch them in backstitch.
Backing
With the backing fabric right side down on a firm surface, the batting over it and the quilt top right side up on top, pin-baste the layers together. Then, stitch a binding strip to each side of the quilt top with a ‘Ain seam allowance. Trim the backing and batting to lin from the stitching. Trim the binding, then turn it to the back
of the quilt, fold the edges under and slip-stitch it in place. Stitch the top and bottom bindings in the same manner, trimming them to 1‘Ain eithr end. Fold the ends to the back of the quilt before turning the binding over and slip-stitching it in place.
Cushion Applique Trace the applique pieces from the pattern sheet onto the paper side of the fusible webbing leaving about1 j between them.
Cut them out roughly then press them to the wrong side of the chose: fabrics with a warm, dry iron. Cut them out neatly on the lines and peel off the paper.
Cutting
From the yellow homespun, cut: - one 16‘Ain x 10‘Ain rectangle - one 16‘Ain x 47rin rectangle. From the navy homespun, cut: - two 2in strips down the 20in side of the fabric
- cut the remainder into two 13 ‘Ain x 20in rectangles.
Patchwork panel
Arrange the six 63Ain strips in a pleasfc» pattern and with right sides facing, sew them together down the long sides. Tn the strip to 6‘Ain wide then cut it in
30
www.CroftLovers.com
Leave open
-,i;s farm: he 'had a
his f®r,n he had®
Q..- his fam he had a
@lcl MacDonald had a farm
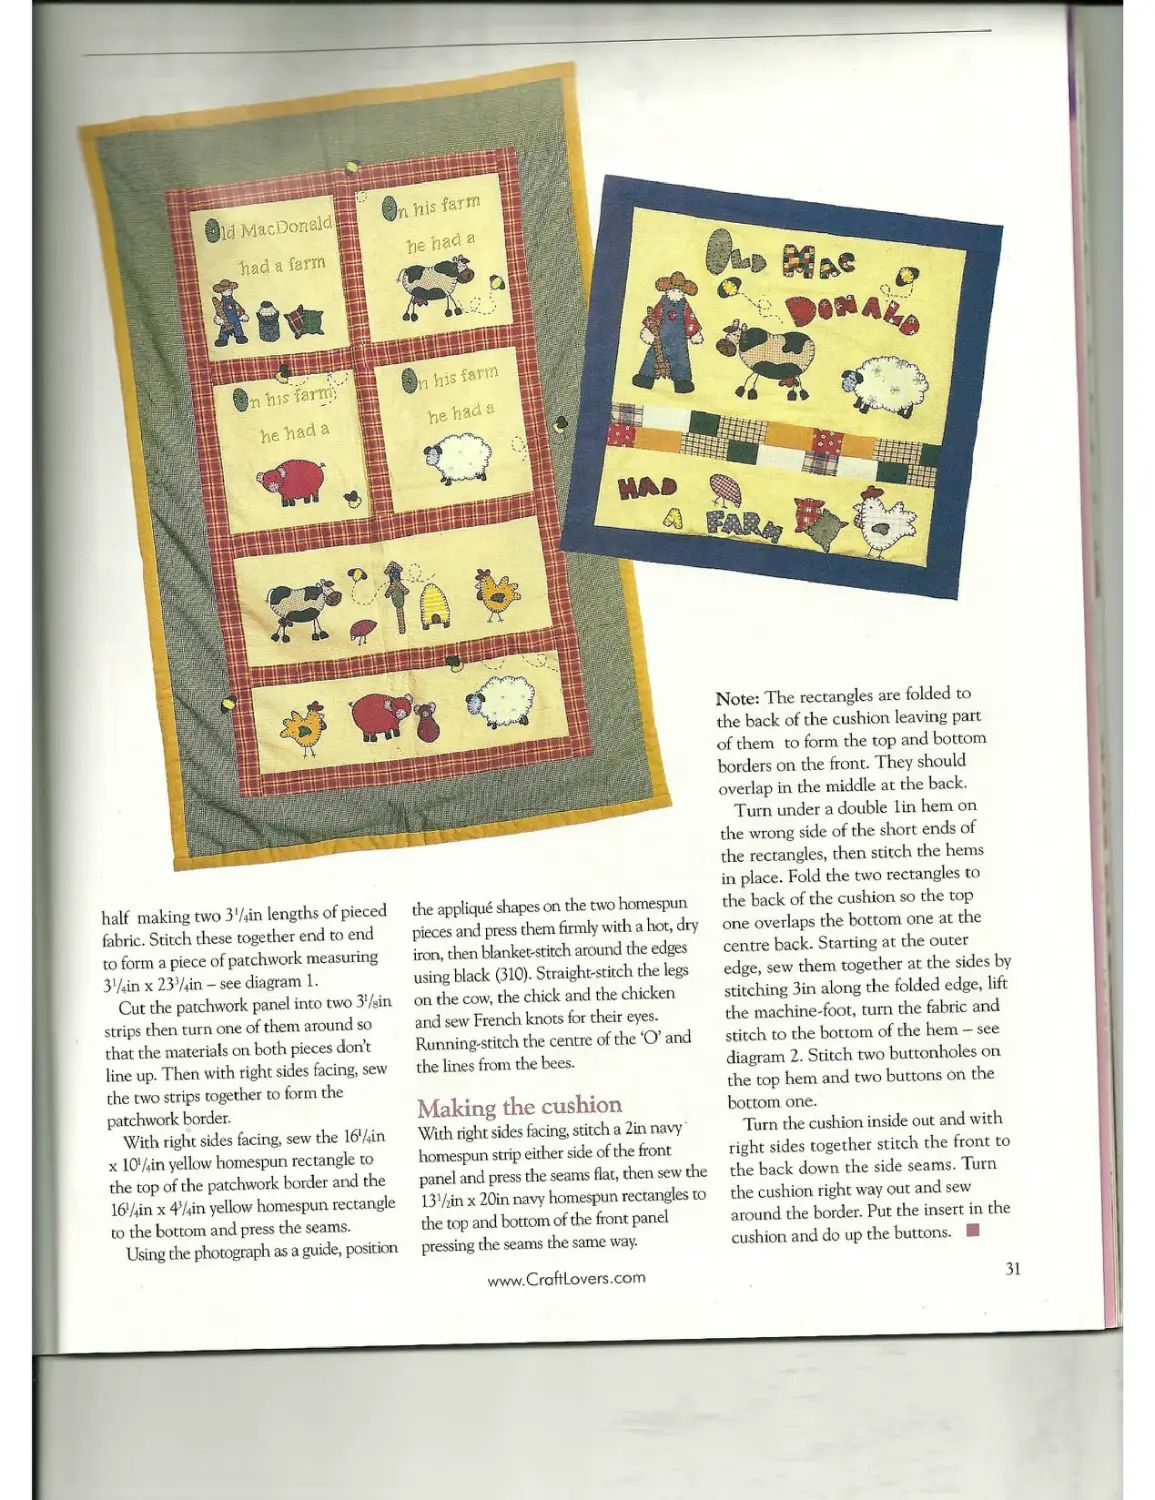
half making two З'/dn lengths of pieced fabric. Stitch these together end to end to fonn a piece of patchwork measuring 3’Ain x 233/+in - see diagram 1.
Cut the patchwork panel into two 3*/ein strips then turn one of them around so that the materials on both pieces don’t line up. Then with right sides facing, sew the two strips together to form the patchwork border.
With right sides facing, sew the 16'/Jn x 10' Ain yellow homespun rectangle to the top of the patchwork border and the 16‘/.|in x 47>in yellow homespun rectangle to the bottom and press the seams.
Using the photograph as a guide, position
the applique shapes on the two homespun pieces and press them firmly with a hot, dry iron, then blanket-stitch around the edges using black (310), Straight-stitch the legs on the cow, the chick and the chicken and sew French knots for their eyes. Running-stitch the centre of the ‘O’ and the lines from the bees.
Making the cushion
With right sides facing, stitch a 2in navy homespun strip either side of the front panel and press the seams flat, then sew the 13Vzin x 20in navy homespun rectangles to the top and bottom of the front panel pressing the seams the same way.
Note: The rectangles are folded to the back of the cushion leaving part of them to form the top and bottom borders on the front. They should overlap in the middle at the back.
Turn under a double lin hem on the wrong side of the short ends of the rectangles, then stitch the hems
in place. Fold the two rectangles to
the back of rhe cushion so the top one overlaps the bottom one at the centre back. Starting at the outer edge, sew them together at the sides by stitching 3in along the folded edge, lift the machine-foot, turn the fabric and stitch to the bottom of the hem — see diagram 2. Stitch two buttonholes on the top hem and two buttons on the bottom one.
Turn the cushion inside out and with right sides together stitch the front to the back down the side seams. Turn the cushion right way out and sew around the border. Put the insert in the cushion and do up the buttons.
www. CraftLove rs. co m
31
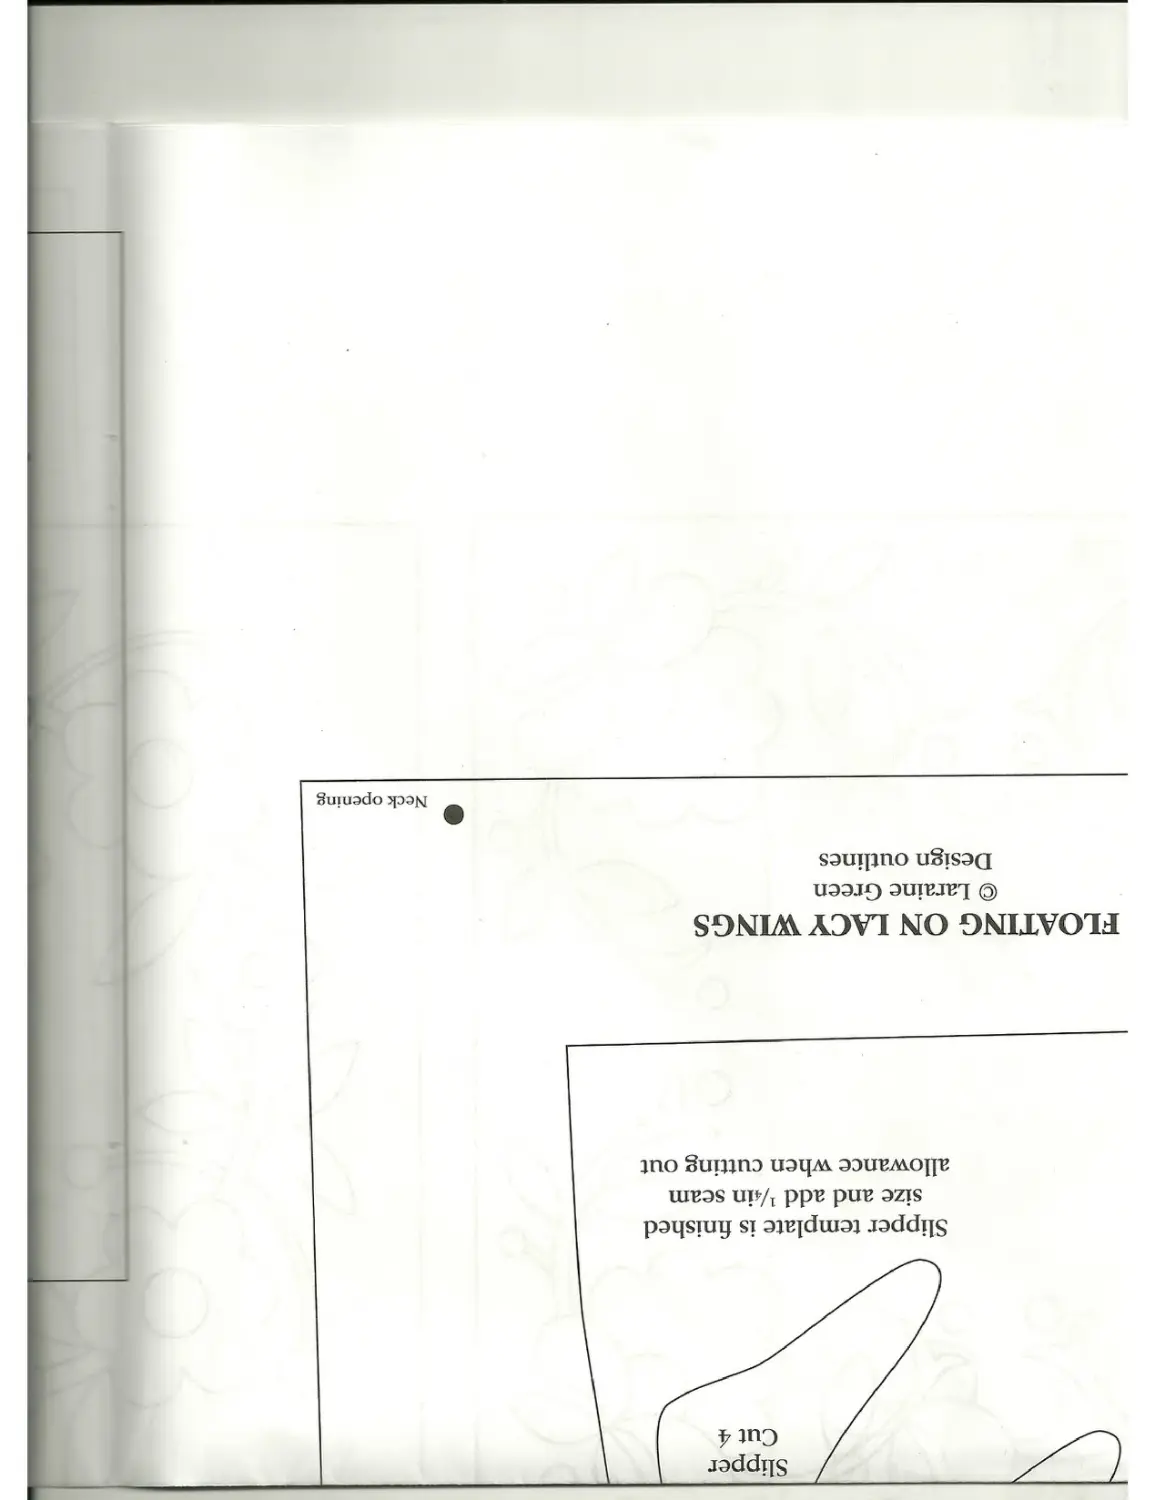
Slipper
Cut 4
Slipper template is finished size and add Vdn seam allowance when cutting out
FLOATING ON LACY WINGS
© Laraine Green Design outlines
Neck opening
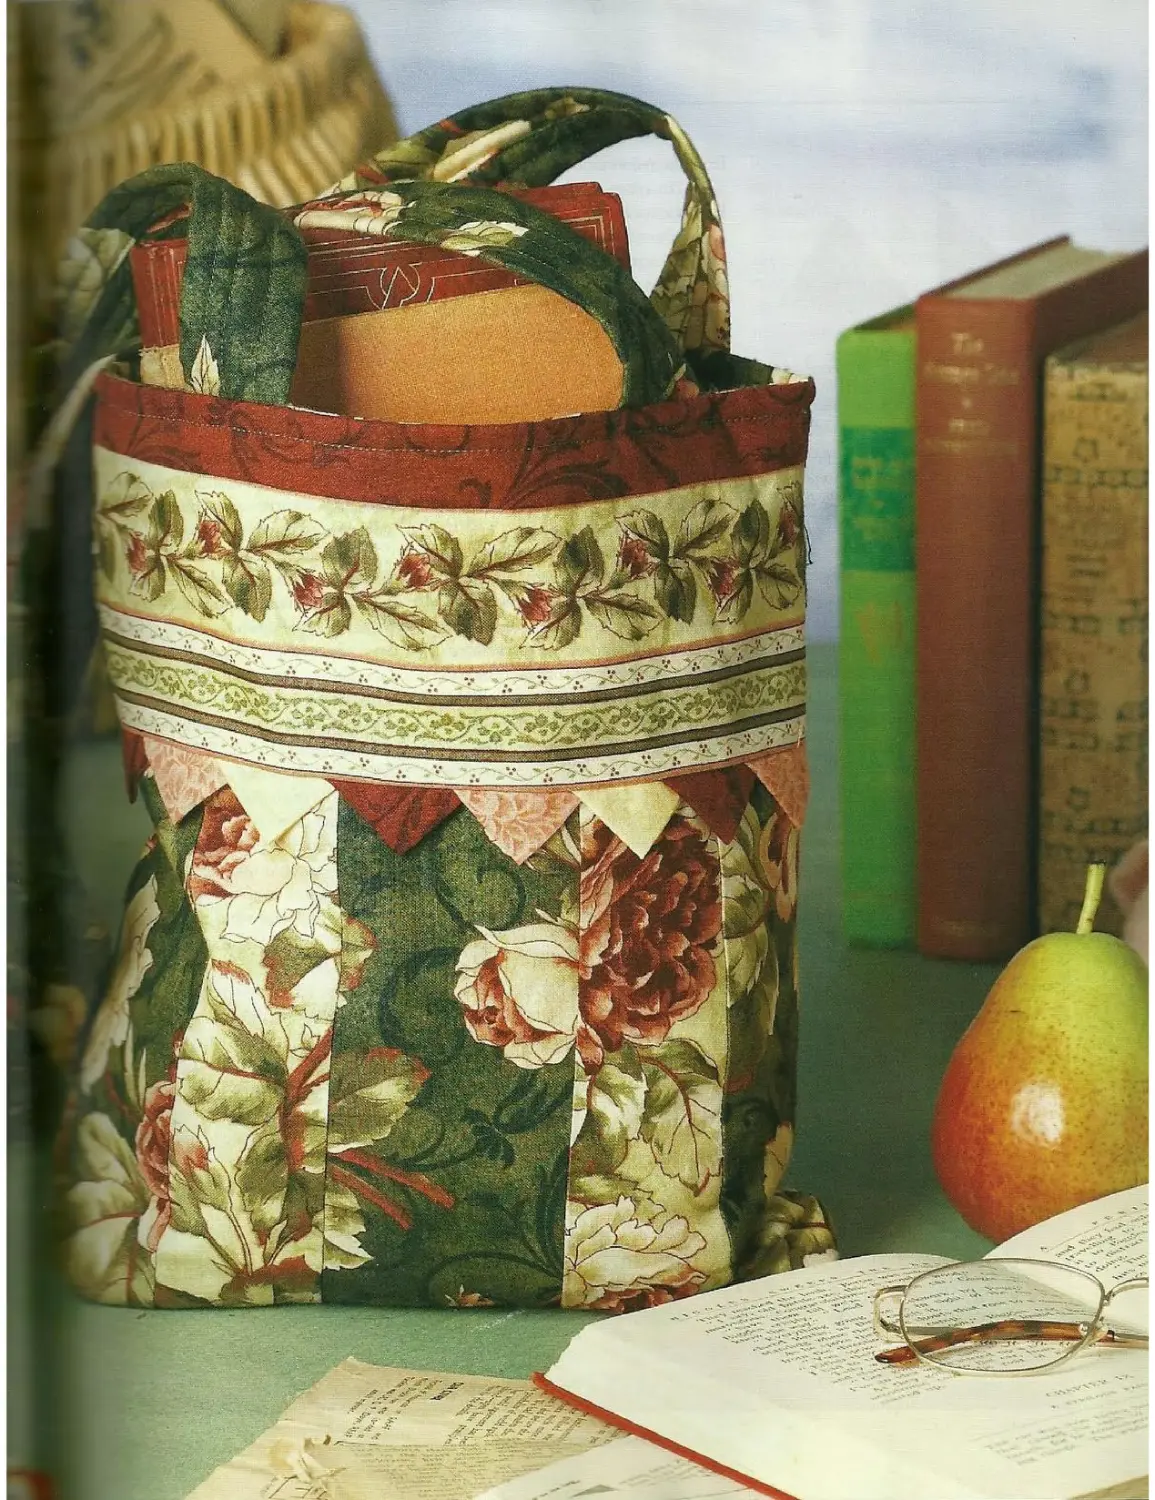
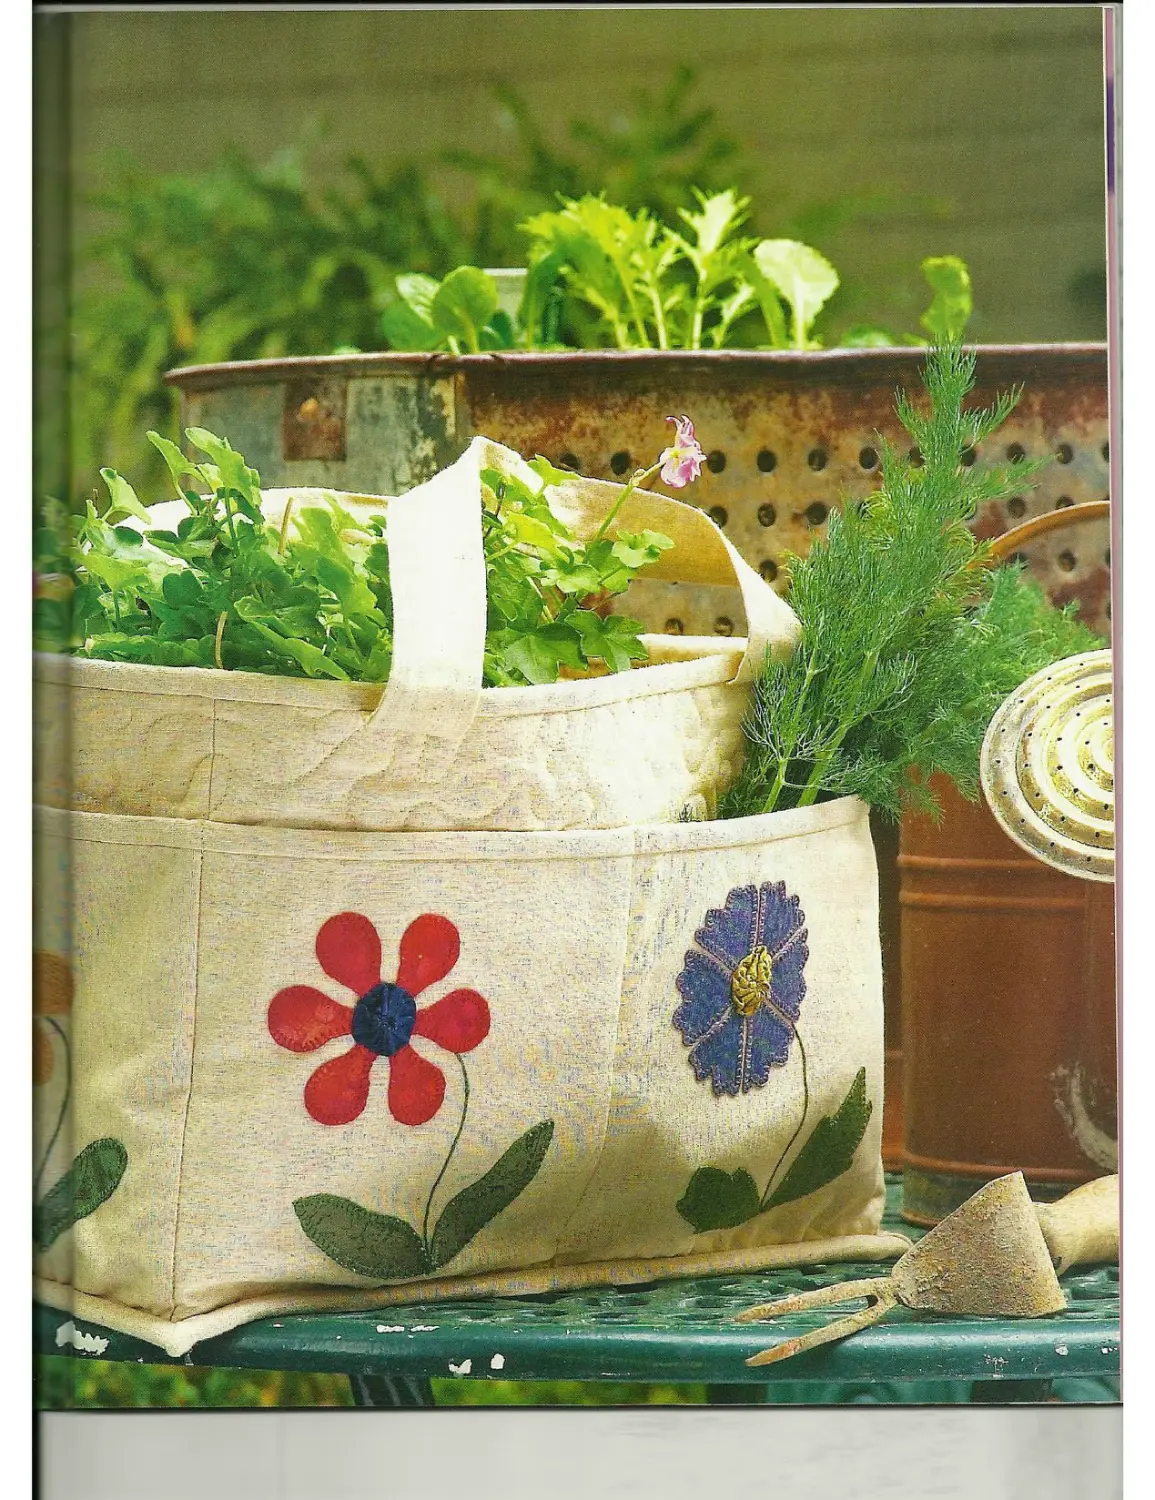
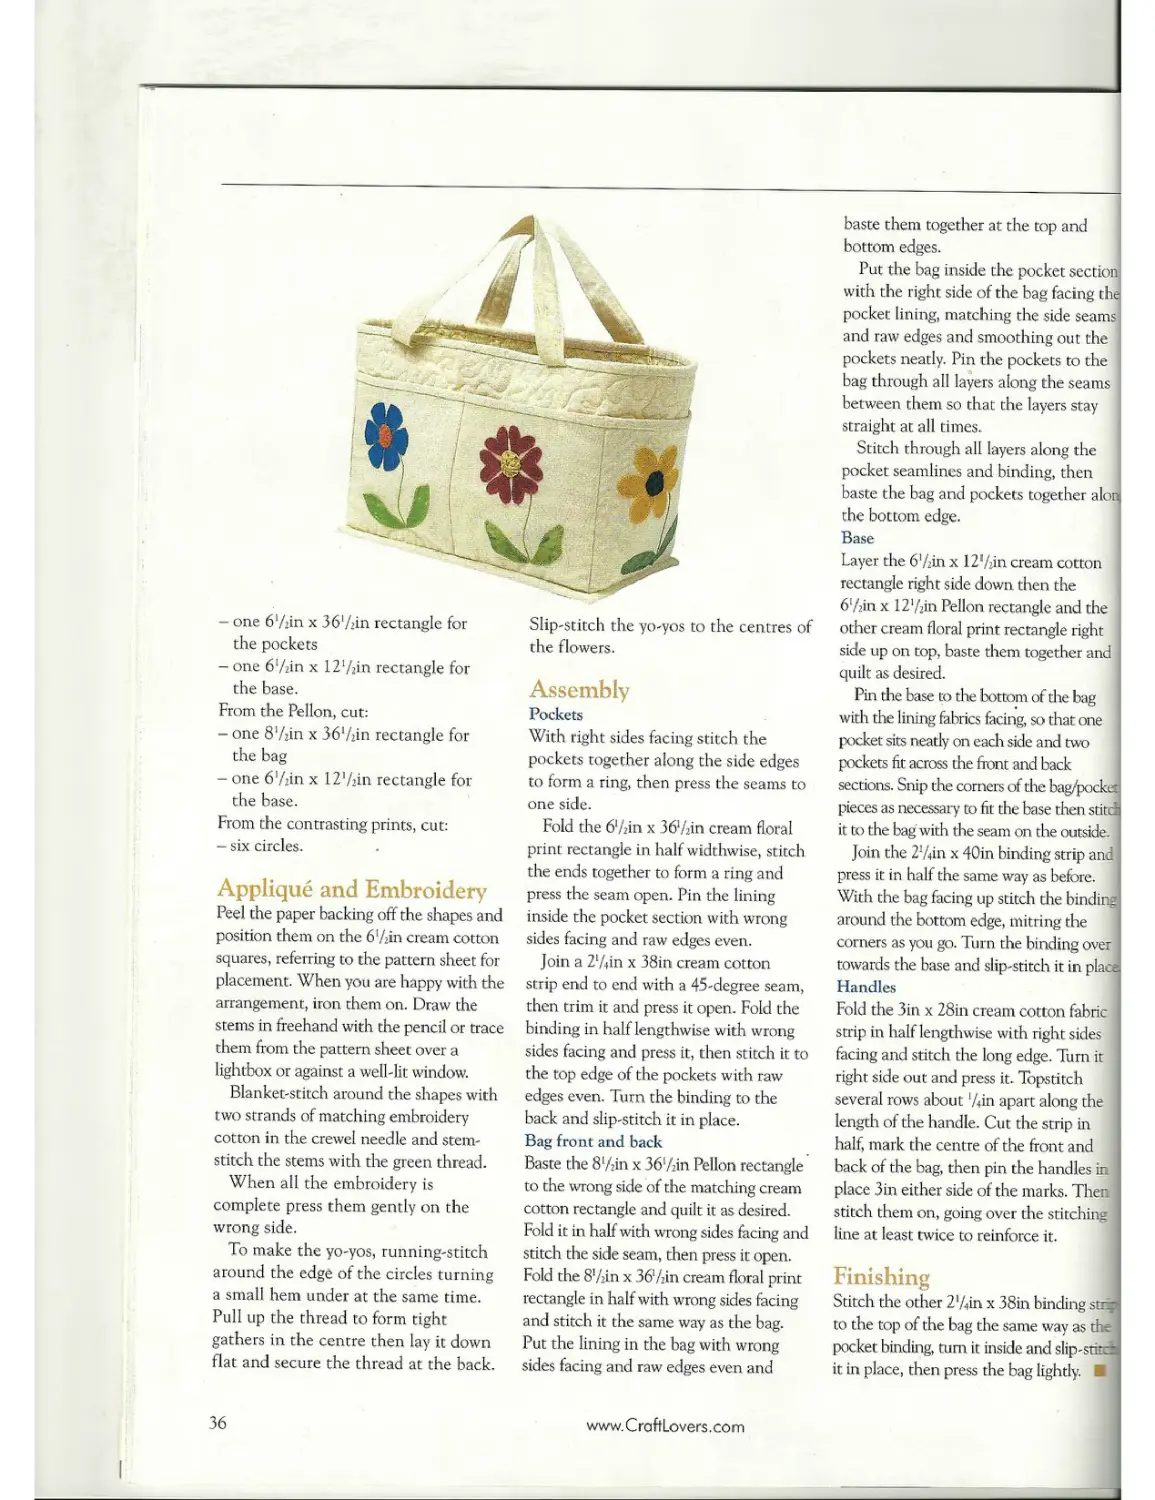
Gardener’s Tote
Designed by Heather Waldron this roomy bag has pockets all around it to hold gloves, tools, seeds and so on - and it’s pretty too!
Materials
• 80cm (Vsyd) cream cotton fabric
* 60cm (%yd) cream floral print
• 60cm (Vsyd) Pelion
• 10cm (4in) square each of red, blue, orange, yellow, purple and pink prints for the flowers
• Scraps of contrasting prints for the flower centres and assorted green prints for the leaves
• 20cm (2Ayd) fusible webbing
* Stranded embroidery cotton to match the appliqud fabrics
* No 9 crewel needle
• Neutral thread for piecing
• Quilt-basting spray (optional)
* Template plastic
• Pencil
• Rotary cutter, mat and ruler
• Lightbox (optional)
• General sewing supplies
Finished Size: 15cm x 21.5cm x 30cm (6in x S'/jin x 12in)
Stitches used:
Blanket stitch, stem stitch
Preparation
Read all the instructions before beginning this project. It is recommended that fabrics be 100 per cent cotton, pre-washed and well ironed. Requirements are based on fabric 112cm (44in) wide. The 5mm (’Ain) seam allowance used throughout is included in the cutting directions.
Trace the applique shapes from the pattern sheet onto the fusible webbing with the pencil leaving a small space between them. Cut them out roughly then fuse them to the wrong side of the chosen fabrics and cut them out on the lines.
Trace the circle from the pattern sheet
onto the template plastic with the pencil and cut it out on the line.
Cutting
From the cream cotton fabric, cut:
— one 8’Ain x Зб’Лт rectangle for
the bag
- one 6'Ain x 12l/2in rectangle for the base
- six 6’/2in squares for the pockets
- two 2’Ain x 38in strips for the top and pocket bindings
- one 2'/.,in x 40in strip for the
base binding
- one 3in x 28in strip for the handles.
From the cream floral print, cut:
- one 8’Ain x Зб’Лт rectangle for
the bag
34
www.CraftLovers.com
SPRING GARDEN JOURNAL © Ann Francene Dimmer
Front panel
Slipper
Cut 4
Slipper template is finished size and add ydn seam allowance when cutting out
FLOATING ON LACY WINGS © Laraine Green Design outlines
Neck opening
- one 6'/2in x 36'Ain rectangle for the pockets
— one 67;in x ll’/jin rectangle for the base.
From the Pelion, cut:
- one 8'Ain x 36‘frin rectangle for the bag
- one 6'Ain x 12'Ziin rectangle for the base.
From the contrasting prints, cut: - six circles.
Applique and Embroidery Peel the paper backing off the shapes and position them on the 6*/2in cream cotton squares, referring to the pattern sheet for placement. When you are happy with the arrangement, iron them on. Draw the stems in freehand with the pencil or trace them from the pattern sheet over a lightbox or against a well-lit window.
Blanket-stitch around the shapes with two strands of matching embroidery cotton in the crewel needle and stemstitch the stems with the green thread.
When all the embroidery is complete press them gently on the wrong side.
To make the yo-yos, running-stitch around the edge of the circles turning a small hem under at the same time. Pull up the thread to form tight gathers in the centre then lay it down flat and secure the thread at the back.
Slip-stitch the yo-yos to the centres of the flowers.
Assembly
Pockets
With right sides facing stitch the pockets together along the side edges to form a ring, then press the seams to one side.
Fold the 6'/;in x 3<?/2in cream floral print rectangle in half widthwise, stitch the ends together to form a ring and press the seam open. Pin the lining inside the pocket section with wrong sides facing and raw edges even.
Join a 2'/4in x 38in cream cotton strip end to end with a 45-degree seam, then trim it and press it open. Fold the binding in half lengthwise with wrong sides facing and press it, then stitch it to the top edge of the pockets with raw edges even. Turn the binding to the back and slip-stitch it in place.
Bag front and back
Baste the 8'/;in x 36'/>in Pelion rectangle to the wrong side of the matching cream cotton rectangle and quilt it as desired. Fold it in half with wrong sides facing and stitch the side seam, then press it open. Fold the 8Viin x 36'Ain cream floral print rectangle in half with wrong sides facing and stitch it the same way as the bag. Put the lining in the bag with wrong sides facing and raw edges even and
baste them together at the top and bottom edges.
Put the bag inside the pocket section with the right side of the bag facing the pocket lining, matching the side seams and raw edges and smoothing out the pockets neatly. Pin the pockets to the bag through all layers along the seams between them so that the layers stay straight at all times.
Stitch through all layers along the pocket seamlines and binding, then baste the bag and pockets together alon the bottom edge.
Base
Layer the б'Лш x 12'/;in cream cotton rectangle right side down then the б’/да x 12'/2in Pelion rectangle and the other cream floral print rectangle right side up on top, baste them together and quilt as desired.
Pin the base to the bottom of the bag with the lining fabrics feeing, so that one pocket sits neatly on each side and two pockets fit across the front and back sections. Snip the comers of the bag/pocker pieces as necessary to fit the base then stitd it to the bag with the seam on the outside.
Join the 2'/(in x 40in binding strip and press it in half the same way as before. With the bag facing up stitch the binding around the bottom edge, mitring the comers as you go. Turn the binding over towards the base and slip-stitch it in place Handles
Fold the 3in x 28in cream cotton fabric strip in half lengthwise with right sides facing and stitch the long edge. Turn it right side out and press it. ’Tbpstitch several rows about '/«in apart along the length of the handle. Cut the strip in half, mark the centre of the front and back of the bag, then pin the handles in place 3in either side of the marks. Then stitch them on, going over die stitching line at least twice to reinforce it.
Finishing
Stitch the other 2'/«in x 38in binding strm to the top of the bag the same way as the pocket binding, turn it inside and slip-stitd it in place, then press the bag lightly.
36
www.CroftLovers.com
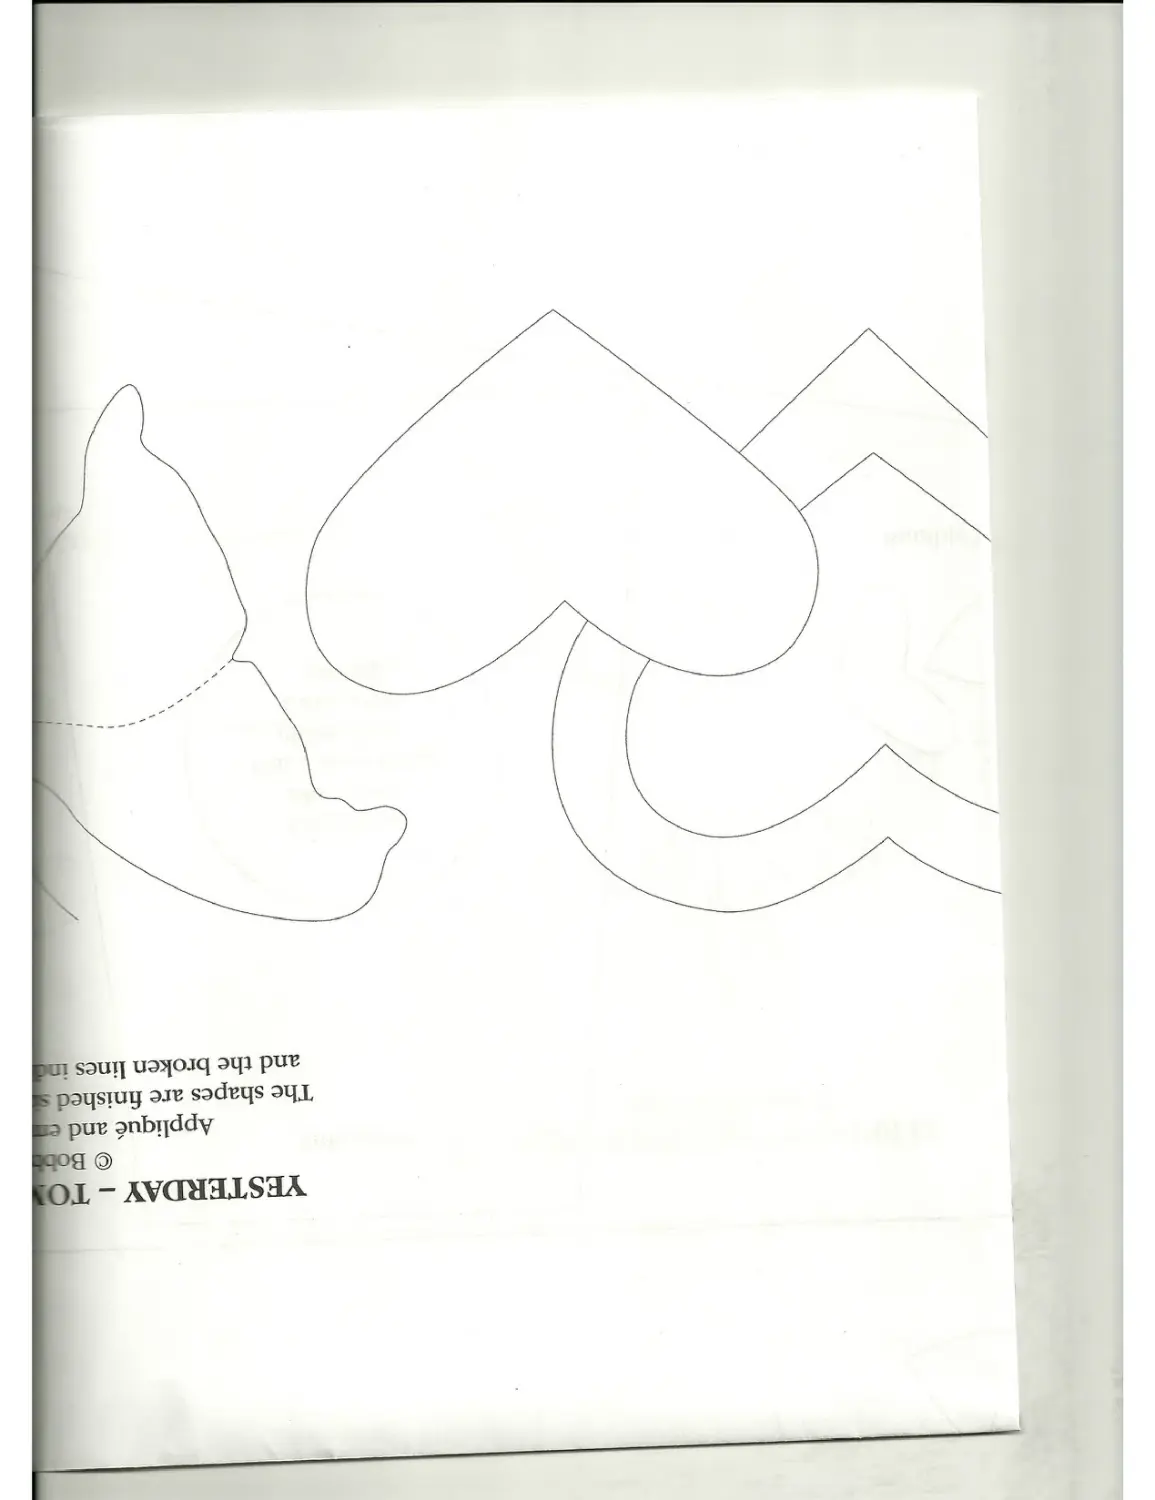
yesterday - то:
© Bob
Applique and ei The shapes are finished ‘ and the broken lines ia
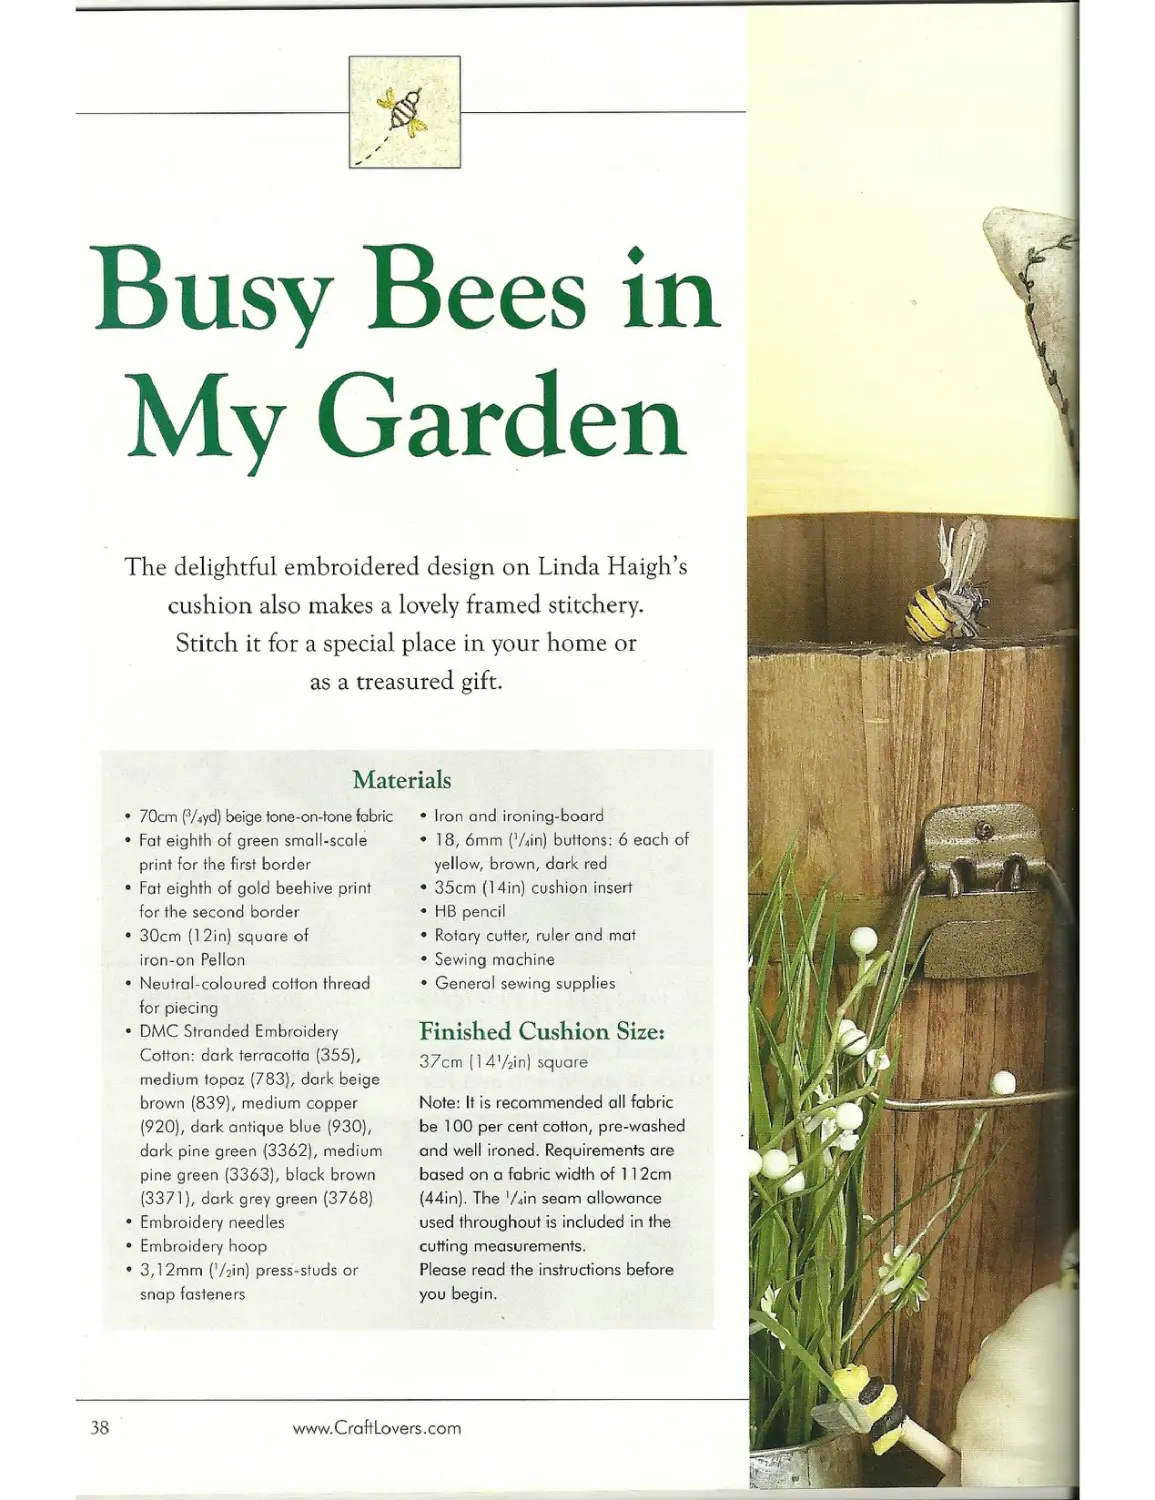
Busy Bees in My Garden
The delightful embroidered design on Linda Haigh’s cushion also makes a lovely framed stitchery. Stitch it for a special place in your home or as a treasured gift.
Materials
• 70cm (3Ayd) beige tone-on-tone fabric
• Fat eighth of green small-scale print for the first border
• Fat eighth of gold beehive print for the second border
• 30cm (12in) square of iron-on Pelion
• Neutral-coloured cotton thread for piecing
• DMC Stranded Embroidery Cotton: dark terracotta (355), medium topaz (783), dark beige brown (839), medium copper (920), dark antique blue (930), dark pine green (3362), medium pine green (3363), black brown (3371), dark grey green (3768)
• Embroidery needles
• Embroidery hoop
• 3,12mm (’/jin) press-studs or snap fasteners
• Iron and ironing-board
• 18, 6mm (’Ain) buttons: 6 each of yellow, brown, dark red
* 35cm (14in) cushion insert
• HB pencil
* Rotary cutter, ruler and mat
* Sewing machine
• General sewing supplies
Finished Cushion Size:
37cm (14’/3in) square
Note: It Is recommended all fabric be 100 per cent cotton, pre-washed and well ironed. Requirements are based on a fabric width of 112cm (44in), The l/din seam allowance used throughout is included in the cutting measurements.
Please read the instructions before you begin.
38
www.CraftLovers.com
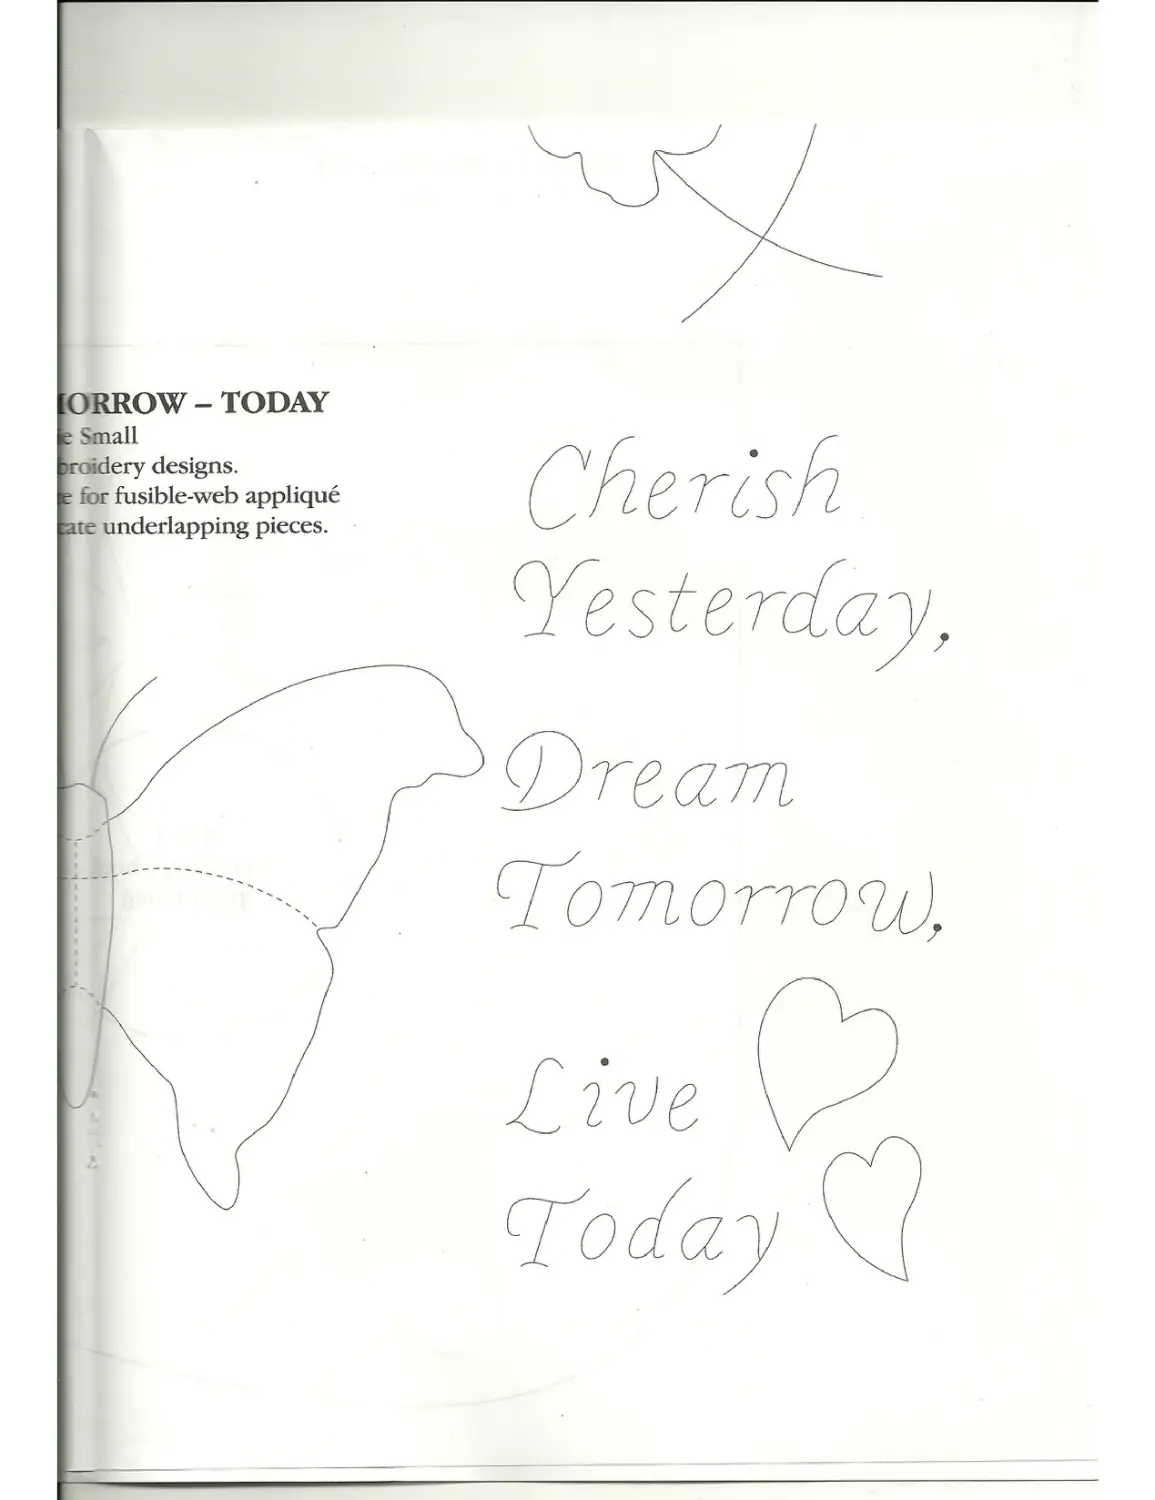
ORROW - TODAY : Small jroidery designs. ; for fusible-web applique are underlapping pieces. —-— / s j X Ch e rcsh Cesterdcry ^фтеатп LdO 771 о rro cuX Live LoLay \l
Decorative
PATCHWORK
VOLUME 1
PATTERN SHEET
COPYRIGHT EXPRESS PUBLICATIONS PTY LTD
2010
FOR PRIVATE USE ONLY
Cutting
From the beige tone-on-tone fabric, cut:
- one 1 lin square
— two 2‘Ain x 11 ‘Ain strips and two
2’Ain x 15in strips for the third border - one 15in strip and crosscut one
15in square for the stitchery lining and two 9‘Ain x 15in rectangles for the back.
From the green small-scale print, cut:
- two lin x 8'Ain strips and two lin x
9'Ain strips for the first border.
From the gold beehive print, cut:
— two 1‘Ain x 9‘Ain strips and two
I'/zin x 11‘Ain strips for the second border.
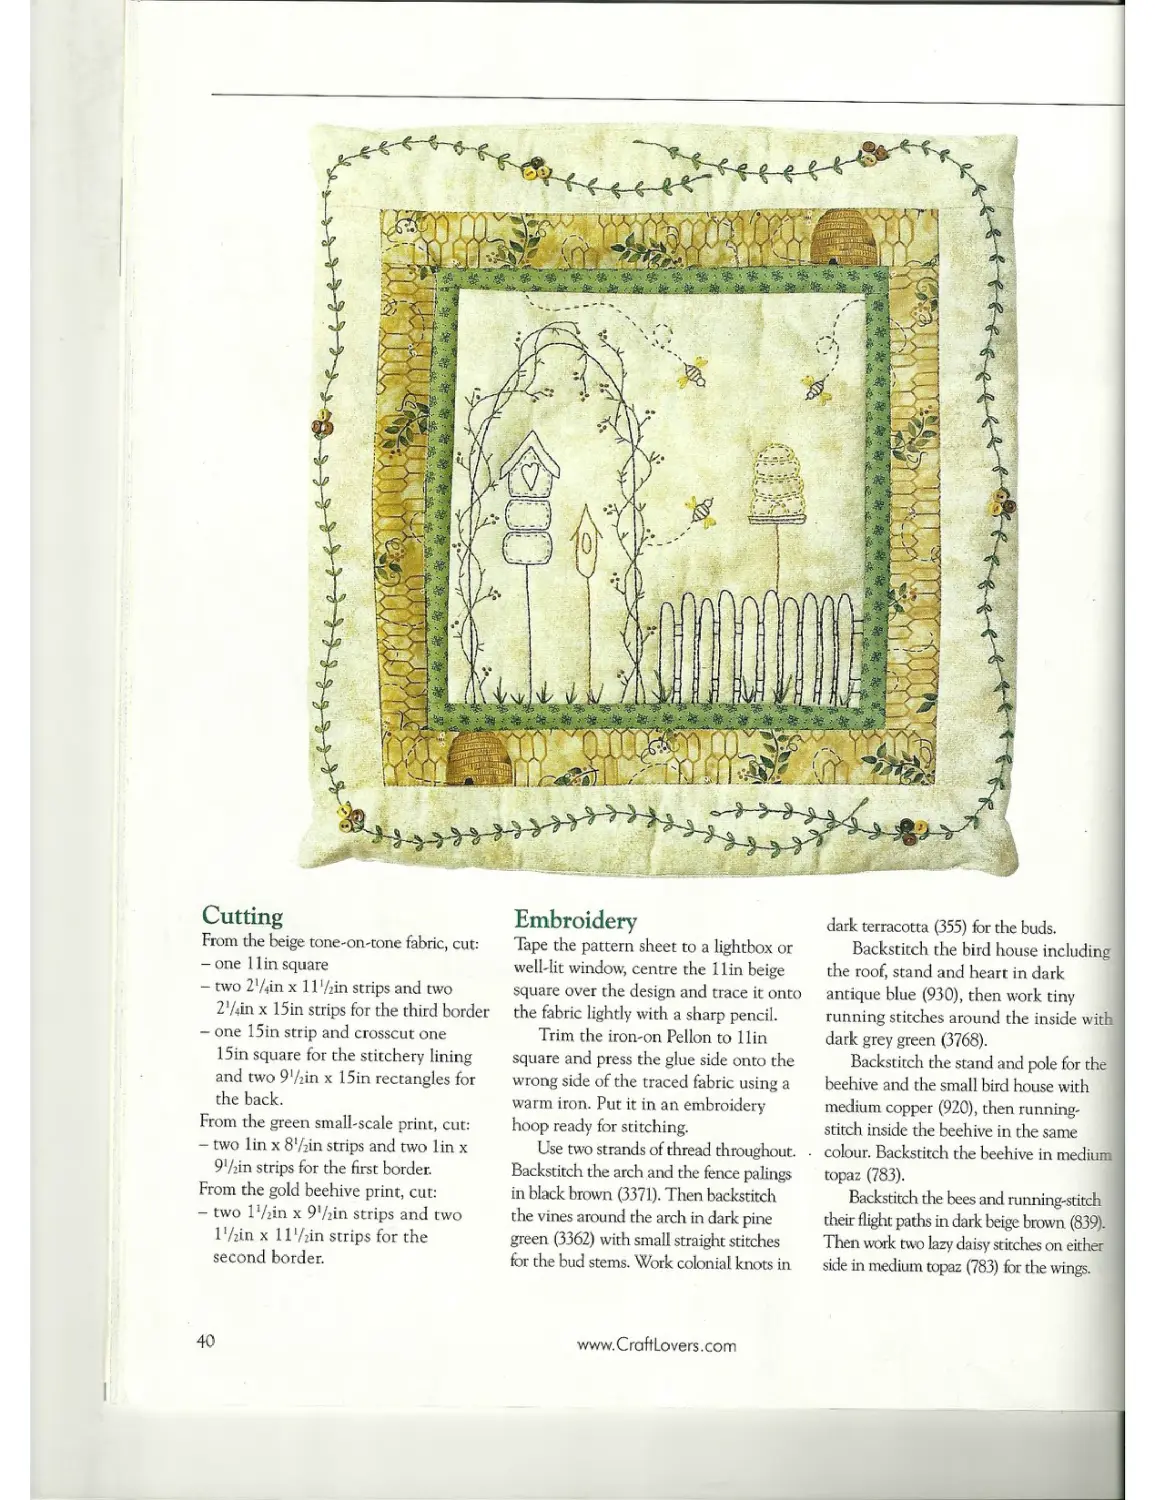
Embroidery
Tape the pattern sheet to a lightbox or well-lit window, centre the 1 lin beige square over the design and trace it onto the fabric lightly with a sharp pencil.
Trim the iron-on Pelion to Ilin square and press the glue side onto the wrong side of the traced fabric using a warm iron. Put it in an embroidery hoop ready for stitching.
Use two strands of thread throughout. Backstitch the arch and die fence palings in black brown (3371). Then backstitch the vines around the arch in dark pine green (3362) with small straight stitches for the bud stems. Work colonial knots in
dark terracotta (355) for the buds.
Backstitch the bird house including the roof, stand and heart in dark antique blue (930), then work tiny running stitches around the inside with dark grey green (3768).
Backstitch the stand and pole for the beehive and the small bird house with medium copper (920), then runningstitch inside the beehive in the same colour. Backstitch the beehive in medium topaz (783).
Backstitch the bees and running-stitch their flight paths in dark beige brown (839). Then work two lazy daisy stitches on either side in medium topaz (783) for the wings.
40
www.CraftLovers.com
лл
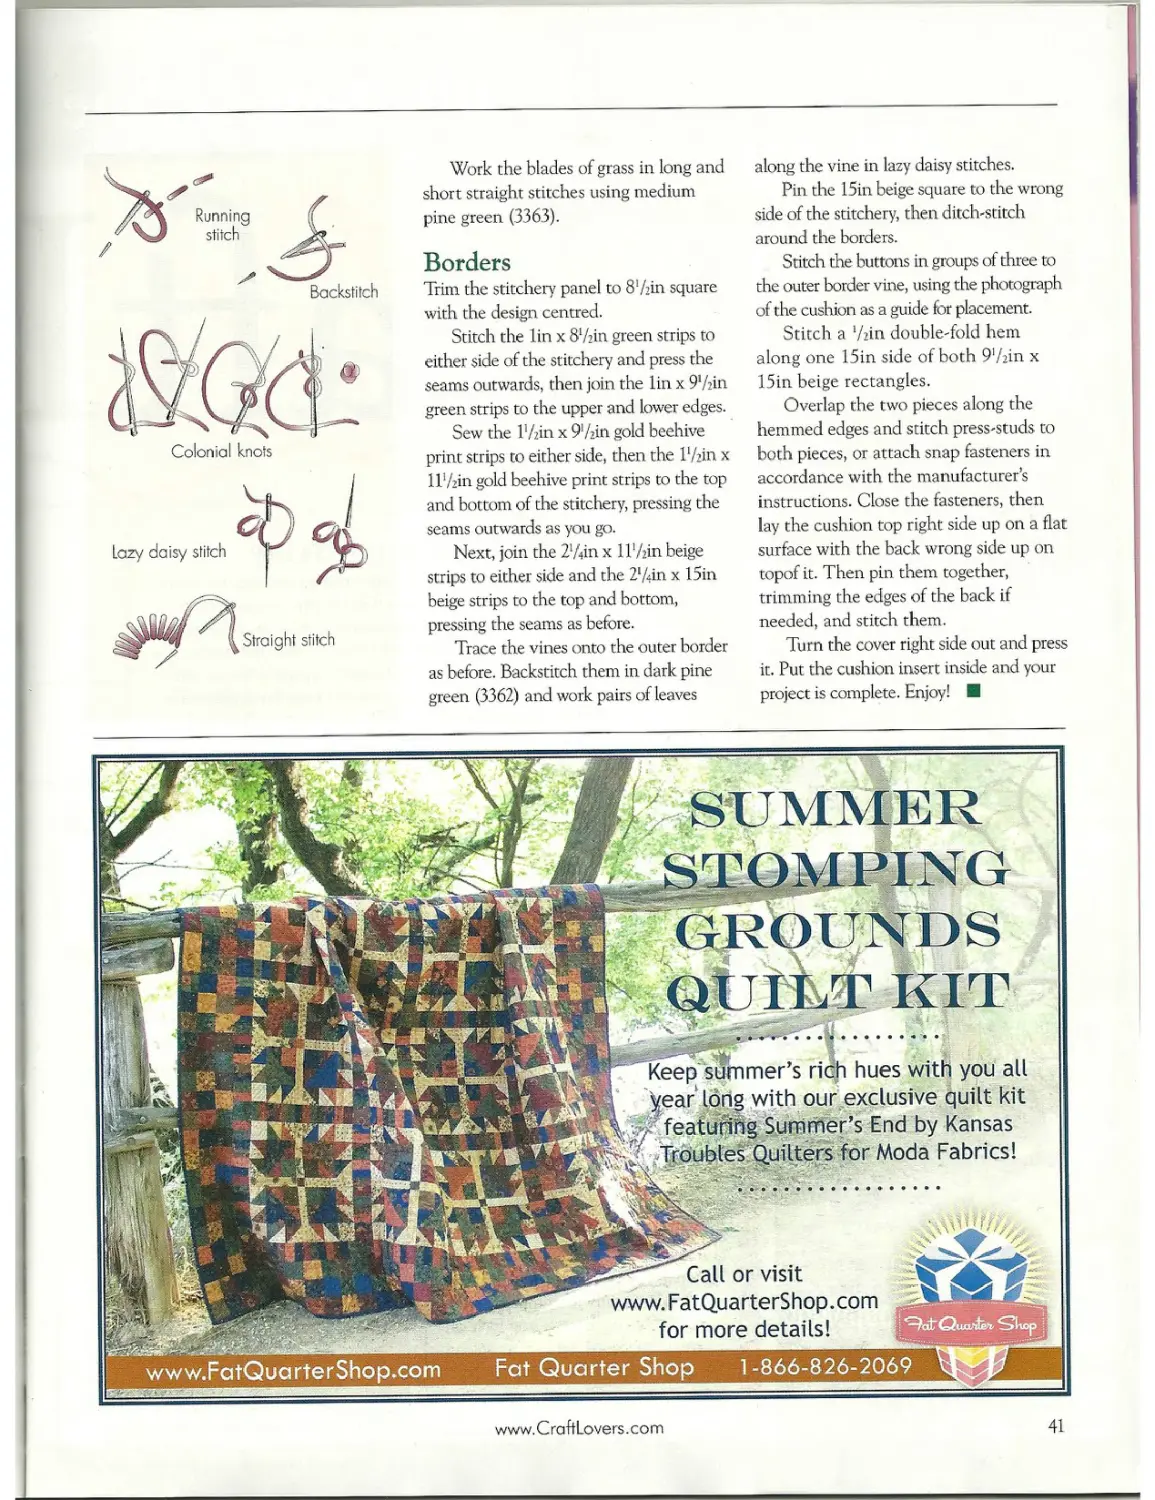
Work the blades of grass in long and short straight stitches using medium pine green (3363).
Borders
Trim the stitchery panel to 87,’in square with the design centred.
Stitch the lin x 87гin green strips to either side of the stitchery and press the seams outwards, then join the lin x 9lAin green strips to the upper and lower edges.
Sew the I'/dn x 97zin gold beehive print strips to either side, then the IV.’in x 11’/zin gold beehive print strips to the top and bottom of the stitchery, pressing the seams outwards as you go.
Next, join the 2l/4in x 1Г Ain beige strips to either side and the 2‘/4n x 15in beige strips to the top and bottom, pressing the seams as before.
Trace the vines onto the outer border as before. Backstitch them in dark pine green (3362) and work pairs of leaves
along the vine in lazy daisy stitches.
Pin the 15in beige square to the wrong side of the stitchery, then ditch-stitch around the borders.
Stitch the buttons in groups of three to the outer border vine, using the photograph of tire cushion as a guide for placement.
Stitch a ‘Ain double-fold hem along one 15in side of both 97jin x 15in beige rectangles.
Overlap the two pieces along the hemmed edges and stitch press-studs to both pieces, or attach snap fasteners in accordance with the manufacturer’s instructions. Close the fasteners, then lay the cushion top right side up on a flat surface with the back wrong side up on topof it. Then pin them together, trimming the edges of the back if needed, and stitch them.
Turn the cover right side out and press it. Put the cushion insert inside and your project is complete. Enjoy!
Keep summer’s rich hues with you all year long with our exclusive quilt kit featuring Summer’s End by Kansas Troubles Quilters for Moda Fabrics!
STOMPING GROUNDS QITI/Г KIT
Call or visit www.FatQuarterShop.com for more details!
www.FatQuarterShop.com Fat Quarter Shop 1 -866-826-2069
www.CraftLovers.com
41
Cushion
I LIS LcXL lit
© Anna Jarman
e had a
Sew words with backstitch