


Теги: needlework embroidery


Текст
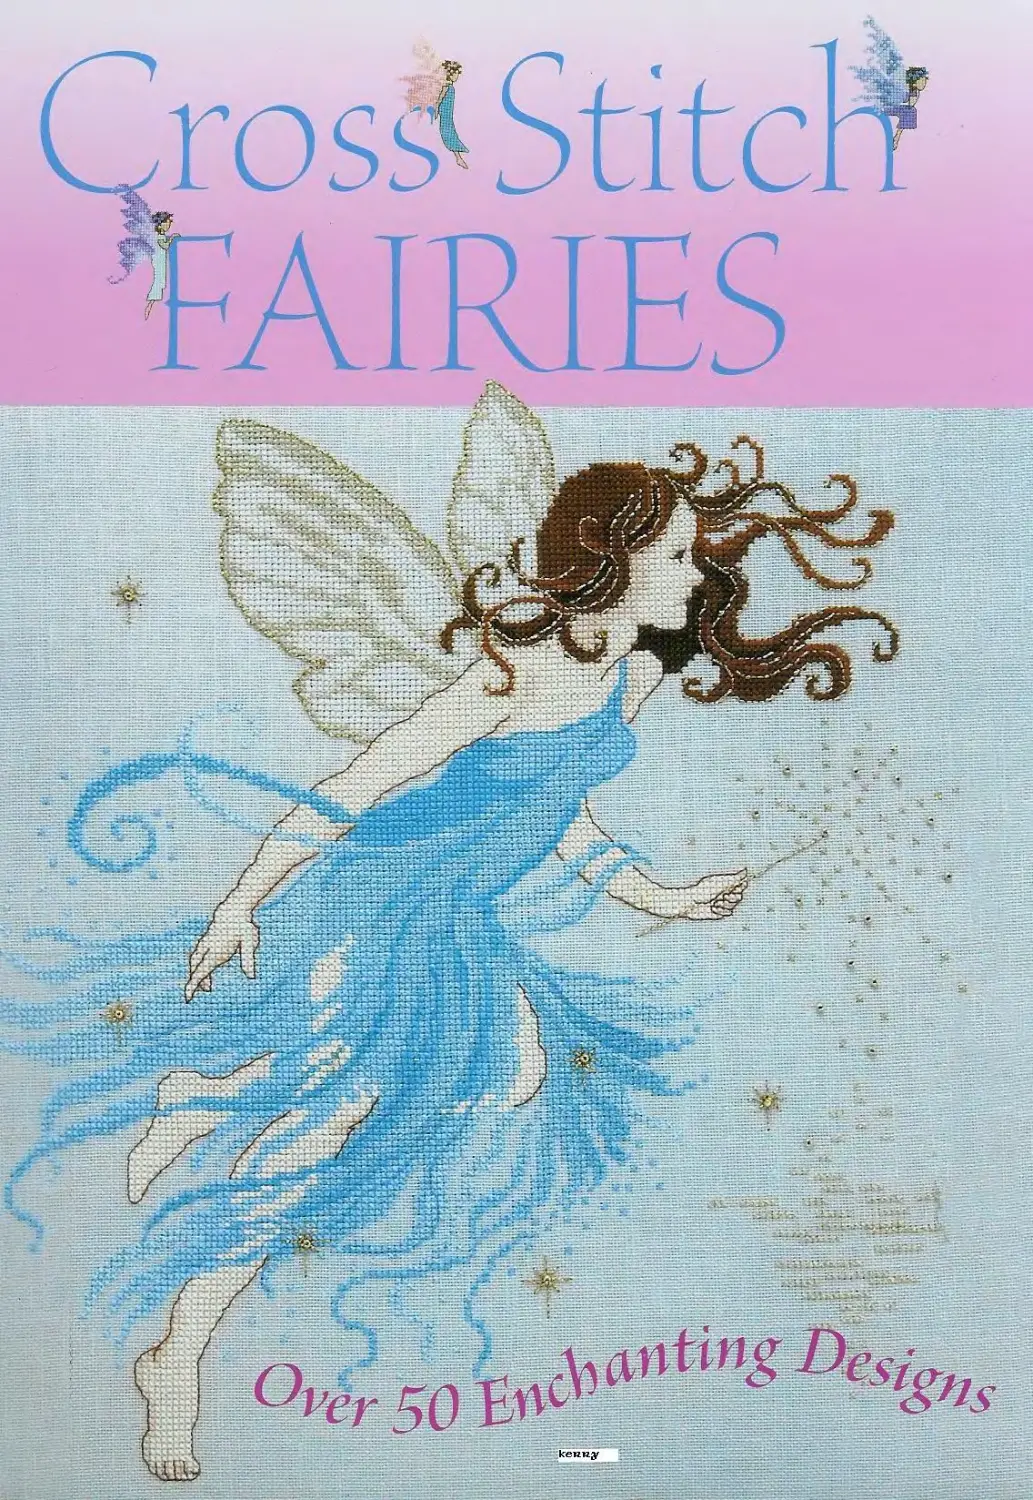
Garden Fairies
This wonderful hanging was inspired by the poem "The Fairies' by Rose Fyleman that begins, "There are fairies at the bottom of our garden Haese cute winged sprites embody many of our beliefs in fairies - their small size, their closeness with nature, their ability to remain hidden in plain sight. Folk tales say fairyland
impinges on our world but is rarely seen, and entry to this magical place is only achieved under Special circumstances or by the use of magical objects or herbs.
That fairies are close
Stitch this fabulous design and enter the fairy realm with these delightful little pixies peeping from colourful flowers and leaves.
by in our gardens, sheltering under foxgloves and primroses and playing with butterflies is a fascinating idea and one that has been explored by many writers and artists, for example, Cicely Mary Barkers images of flower fairies.
6
[keuuy
Ч-kZkZ kA-А

Garden Fairies Wall Hanging
This delightful design uses whole and three-quarter cross stitch, backstitch and French knots, with a liberal sprinkling of beads and metallic threads for magical sparkle. It has been made up as a wall hanging but could be framed instead to make a wonderful picture.
Stitch count
225x168
Design size
40.8 x 30.5cm (16 x 12in)
Materials
14-count flax Aida (DMC code 738) 53 x 43cm (21 x 17in)
★
Tapestry needle size 24 and a beading needle ★
DMC stranded cotton (floss) as listed in chart key ★
KreinikVery Fine #4 Braid: 001 HL silver: 5003 dragonfly and 009 emerald (3 spools) ★
Kreinik Fine #8 Braid 022 brown
★
Kreinik Blending Filament 032 pearl (2 spools) ★
Mill Hill glass seed beads: 00374 rainbow: 02010 ice and 02017 crystal aqua ★
Mill Hill antique glass beads 03047 blue iris
1 Prepare for work, referring to Techniques (page 99) if necessary.
Find and mark the centre of the fabric and circle the centre of the chart with a pen. Use an embroidery frame if you wish.
2Start stitching from the centre of the chart and fabric, using two strands of stranded cotton (floss) for full and three-quarter cross stitches. Use one strand for all KreinikVery Fine #4 Braid cross stitches. Use one strand of Kreinik Fine #8 Braid 022 wrapped once around the needle for the French knots in the lettering. Use one strand of KreinikVery Fine #4 braid wrapped once around the needle for 5003 and 002 French knots. Following the colour changes on the chart, use one strand of stranded cotton (floss) wrapped twice around the needle for all other French knots.
Making Up Background fabric 0.5m (Vfcyd) ★
Fusible fleece and fusible web 0.5m (1/2yd) each
★
Iron-on interfacing or thin wadding (batting) 0.5m (1/2yd)
★
Decorative braid 2m (2yd)
★
Four decorative flowers or buttons ★
Permanent fabric glue ★
Wooden dowel 2.5cm (1 in) diameter x 47cm (1 81£in) long ★
Matching sewing thread
3Work the backstitches in the colours indicated in the chart key. Backstitch the fairies wings using one strand of Kreinik Very Fine #4 Braid 001 HL and one strand of DMC 938 together in the needle. Use one strand of stranded cotton (floss), Kreinik #4 or Kreinik #8 braids for all other backstitches.
4The fairy wings have the addition of metallic blending filament. Working in one direction in half cross stitch, overstitch the completed DMC blanc, 677 and 3811 cross stitches in all the wings with one strand of Kreinik Blending Filament #032. Finally, attach the beads where indicated on the chart using a beading needle and matching thread (seeTechniques page 100).
One fairy came in violet, And one wore indigo; In blue, green, yellow, orange, red, They made a pretty row.
From 'The Rainbow Fairies' by Robert Graves (1895-1985)
Inspiration Stitch just a single pixie for a charming little card.
Making Up as a Hanging
UOnce the stitching is complete, make J/up the wall hanging as follows: cut two 54.5 x 44.5cm (2116 x 171/6in) pieces of background fabric plus three 15 x 10cm (6 x 4in) pieces for tabs.
6Cut a 54.5 x 44.5cm (21 % x 1716in) piece of fusible fleece and fuse this to the wrong side of one of the fabric pieces, following the manufacturer's instructions. Position the embroidery on the right side of the fleece-lined fabric, sewing or fusing it on as follows: Sewing the embroidery to fabric: Use the fabric weave as a guide to trim to within twelve rows of the design. Fold the edges over by eight rows, leaving four showing. Press folds into place. To avoid the background fabric showing through the embroidery, cut wadding (batting) or felt the same size as the design and place behind the embroidery before stitching it down. Place the design and wadding on the fabric and machine or hand stitch it in place close to the edge, using the fabric weave as a guide.
Fusing the embroidery to fabric: Trim and fold the finished embroidery as before. To avoid the background fabric showing through, cut a piece of mediumweight iron-on interfacing the same size as the design and insert it behind the embroidery. Use a press cloth to iron and fuse the pieces together from the wrong side, keeping the folded edges in place. Cut a piece of fusible web the same size as the prepared embroidery. Sandwich the web between the right side of the background fabric and the embroidery, making sure that no edges of fusible web are visible, trimming it if necessary. Pin or tack (baste) in place. Using a press cloth, fuse the layers according to the manufacturer's instructions.
7Stitch or glue the length of decorative braid around the outer edge of the embroidery, starting and ending at the centre bottom, attaching one of the flowers or buttons where the ends meet.
8To make the tabs, fold each piece of 15 x 10cm (6 x 4in) fabric in half
lengthwise, right sides together. Sew a 1.25cm (16in) seam down the length and across one short end. Trim the seam,
turn right side out and
press. Now pin the tabs evenly across the top of the hanging with sewn ends pointing towards the centre and raw edges matching
9 Place the second piece of background fabric on top, right side facing, and stitch a 1.25cm (16in) seam all around leaving a gap for turning. Turn right side out, press and slipstitch the gap. Bring the loose ends of the tabs to the front and sew a decorative flower or button on each end. Paint the dowel to complement the embroidery and when dry insert it through the tabs, ready for hanging.
Inspiration
Choose two smaller areas of the main design to create two delighful little framed pictures, ideal to adorn the nursery wall.

Garden Fairies
DMC stranded cotton
Cross stitch
0208	□ 818
0209	@830
1211	 831
0340	0832
0341	□ 833
□ 350	0938
El 352	| 1945
El 433	□ 951
0435	□ 976
□ 436	0977
A|437	_3688
И 470	03689
0471	□ 3746
1472	3811
□ 597	□ 3813
>598	03820
□ 677	03822
0739	□ 3827
□ 798	t-13840
□ 799	Ш 3852
 817	• blanc
□ Kreinik #4 001 HL
@ Kreinik #4 009
Q Kreinik #4 5003
Backstitch
— 938
3813
____DMC 938 + 'Kreinik #4 001 HL
—	Kreinik #4 009
—	Kreinik #4 5003
— Kreinik #8 022
French knots
О 472
• 938
О Kreinik #4 5003
® Kreinik #8 022
Mill Hill seed beads
О 00374 rainbow
О 02010 ice
0 02017 crystal aqua
0 03047 blue iris
(antique glass beads)
Use Kreinik blending filament 032 pearl to work half cross stitches on all wings over the blanc, 677 and 3811 cross stitches
In emerald tufts, flowers purple, blue and white, Like sapphire, pearl and rich embroidery, Buckled belowfair knighthoods bending knee. Fairies use flowers for their charadtery.
From The Merry Wives of Windsor by William Shakespeare (1564-1616)
Garden Fairies
DMC stranded cotton Cross stitch
H 208 П818 □ 209 /3 830
211	EJ831
[o[340 [¥[832 □ 341 В 833 Ц 350 0938 [zj 352 П 945 0433 B951 В 435 И 976 □ 436 В 977 [А 437 В3688 0470 V 3689 >471 03746
472 Д3811 С 597 В3813 □ 598 | 3820 □ 677 [0 3822 □ 739 LL.3827 Щ 798 F 3840 J799 П3852 0817 «;Ыапс
| | Kreinik #4 001HL
Q Kreinik #4 009
3 Kreinik #4 5003
Backstitch — 938
3813
DMC 938 +
Kreinik #4 001 HL
—	Kreinik #4 009
—	Kreinik #4 5003
— Kreinik #8 022
French knots
О 472
@ 938
О Kreinik #4 5003
@ Kreinik #8 022
Mill Hill seed beads
О 00374 rainbow (G 02010 ice
C 02017 crystal aqua
C 03047 blue iris (antique glass beads)
Use Kreinik blending filament 032 pearl to work half cross stitches on all wings over the blanc, 677 and 3811 cross stitches

Birthday
Fairies
Music and dancing are said to be favourite pastimes of fairies, and folk tales, literature and art are
full of references to fairies dancing and playing instruments. Fairy rings - circles of mushrooms or bright green grass that appear on lawns and
meadows - are said to reveal the places where fairies have Spent the night dancing. Fairy music is unbearably sweet and compelling, able to draw humans into the
These lovely cards are perfect for birthdays and are versatile too - omit the month and insert a personal message instead for a really Special card.
magical ring and so into fairyland to dance all night - maybe never to return.
The dancing fairy designs in this chapter are certainly very inviting. They have been designed as birthday cards to personify each month of the year, and are worked in stranded cotton (floss) with some metallic threads to create additional sparkle.
14

Fairy Cards
These delightful fairies are simple to stitch usingjustfull and three-quarter cross stitch, backstitch and some French knots. They have been stitched on 14-count Aida fabrics but you could use 2S-count evenweaves instead if you prefer, stitching over two fabric threads instead of one block. The designs have been mounted into ready-
made cards (from Craft Creations, see Suppliers) but you could easily make you own cards - seepage 30. Stitch the designs for birthdays or create a memorable keepsake by inserting a message of your own using an alphabet of your choice or the one on page 31. Alternatively, mount and frame the fairies as little pictures.
January
This elegant ballerinafairy of snowy white and icy mauve, stitched on navy Aida perfectly represents the cold first month of the year. The design would also make an attractive New Year card.
Stitch count 61 x 45 Design size 11 x 8cm (4% x 314in)
Materials 14-count navy Aida 25 x 25cm (10 x lOin) ★
Tapestry needle size 24-26
★
DMC stranded cotton (floss) as listed in chart key ★
Lilac double-fold card blank with 12.2 x 9.6cm (4% x 33%in) oval aperture ★
Double-sided adhesive tape
French knots
О blanc
January
DMC stranded cotton
Cross stitch
Backstitch — 3740
Prepare your fabric for work, mark the centre and begin stitching from the centre of the fabric and chart. Work over one block, using three strands of stranded cotton (floss) for cross stitch and French knots and one strand for backstitch. If you wish, you could personalize the design using the alphabet on page 31. Make a card (described on page 30) or buy a ready-made card and mount your embroidery in it (page 30).
3832
5283 metallic
February
This fairy is dressed in cool, frosty blues with an icicle skirt, colours that not only reflect this chilly month but also suit the watery star sign of Aquarius.
Stitch count
62x43
Design size
11.2 x 7.8cm (41/2 x 3in)
Materials 14-count white Aida 25 x 25cm (10 x 10in) ★
Tapestry needle size 24-26 ★
DMC stranded cotton (floss) as listed in chart key ★
Silver double-fold card blank

with 12.2 x 9.6cm
(4% x 3%in) aperture ★ Double-sided adhesive tape
February
DMC stranded cotton
Cross stitch
П 436
□ 747
j 3325
। 3756
i_J 3770
L 1 5283 metallic
Backstitch
807
— 930
— 3832
Prepare your fabric for work, mark the centre and begin stitching from the centre of the fabric and chart. Work over one block, using two strands of stranded cotton (floss) for cross stitch and one strand for backstitch. If you wish, you could personalize the design using the alphabet on page 31. Make a card (described on page 30) or buy a readymade card and mount your embroidery in it (page 30).
March
This fairy is all in frothy spring greens, her skirts ruffed up like a cancan dancer. The shamrock leaf is a reminder that St Patricks Day occurs in this month.
Stitch count 58x44 Design size 10.5 x 8cm (4’/s x 31/sin)
Materials 14-count cream Aida 25 x 25cm (10 x lOin) ★
Tapestry needle size 24-26 ★
DMC stranded cotton (floss) as listed in chart key ★
Lime double-fold card blank with 12.2 x 9.6cm (4% x 3%in) aperture ★
Double-sided adhesive tape
March
DMC stranded cotton
Cross stitch
□ 702
□ 704
□ ?72
| 950
I 3348
□ 3776
Backstitch — 505 — 3832 — 3857
Prepare your fabric for work, mark the centre and begin stitching from the centre of the fabric and chart. Work over one block, using two strands of stranded cotton (floss) for cross stitch and one strand for backstitch. If you wish, you could personalize the design using the alphabet on page 31. Make a card (described on page 30) or buy a readymade card and mount your embroidery in it (page 30).
April
An exuberantfairy in refreshing yellow dances through the spring showers of this month. This design would also be suitable for an Easter card, replacing the month with "Happy Eatter’.
Stitch count
52x54
Design size
9.4 x 9.8cm (334 x 3%in)
Materials 14-count ice blue Aida 25 x 25cm (10 x lOin) ★
Tapestry needle size 24-26 ★
DMC stranded cotton (floss) as listed in chart key ★
Gold single-fold card blank 14.5 x 19.8cm (5% x 7%in) ★
Double-sided adhesive tape
Prepare your fabric for work, mark the centre and begin stitching from the centre of the fabric and chart. Work over one block, using two strands of stranded cotton (floss) for cross stitch and one strand for backstitch. If you wish, you could personalize the design using the alphabet on page 31. Once the stitching is complete, fray the edges of the embroidery and stick it to the front of the card with double-sided adhesive .
- - tape (see page 31). Alternatively, make a double-fold card (described on page 30) and mount the design in it.
April
DMC stranded cotton Cross Stitch
435
437
743
744
746
3078
3770
5284 metallic
Backstitch — 741
— 975
5284 metallic
May
This fairy princess dances in the pretty lilacs and blues of late spring. The design would be perfect to congratulate a young girl on a task, well done - simply replace the month with her name.
Stitch count 61 x 46 Design size 11 x 8.3cm (4% x 314 in)
Materials 14-count cream Aida 25 x 25cm (10 x lOin) ★
Tapestry needle size 24-26
★
DMC stranded cotton (floss) as listed in chart key ★
Pale blue double-fold card blank with 12.2 x 9.6cm (4% x 3%in) aperture ★
Double-sided adhesive tape
May
DMC stranded cotton
Cross stitch
□ 164
□ 210
' 211
0746
Zj 841
О948
П 3756
J 3841
5282 metallic
Backstitch
— 155
— 666
— 3857
5282 metallic
French knots
О 5282 metallic
Prepare your fabric for work, mark the centre and begin stitching from the centre of the fabric and chart. Work over one block, using two strands of stranded cotton (floss) for cross stitch and French knots and one strand for backstitch. If you wish, you could personalize the design using the alphabet on page 31. Make a card (described on page 30) or buy a ready-made card and mount your embroidery in it (page 30).
A demure little fairy in the floral pinks of early summer makes a lovely June birthday card but could also be used on a bridesmaid’s gift such as a little keepsake bag.
Stitch count 46x51 Design size 8.3 x 9.2cm (3% x 3%in)
Prepare your fabric for work, mark the centre and begin stitching from the centre of the fabric and chart. Work over one block, using two strands of stranded
cotton (floss) for cross stitch and French knots and one strand for backstitch. If you wish, you could personalize the design using the alphabet
on page 31. Make a card (described on page 30) or buy a ready-made card and mount your embroidery in it (page 30).
June
DMC stranded cotton
Cross stitch
□ 164
J 211
□ 437
• ) 819
2] 962
963
/] 989
3770
Backstitch 962
= 3740
— 3832
French knots
О 3078
Materials 14-count white Aida 25 x 25cm (10 x lOin) ★
Tapestry needle size 24-26
★
DMC stranded cotton (floss) as listed in chart key ★
Lilac double-fold card blank with 9.6 x 12.2cm (3% x 4%in) oval aperture ★
Double-sided adhesive tape
July
In her red, white and blue costume, this fairy dancer celebrates American Independence Day on 4 July. This sunny month is represented by the yellow Aida and gold metallic thread.
Stitch count
61 x 44
Design size
11 x 8cm (4% x 3'/gin)
Materials
14-count lemon Aida
25 x 25cm (10 x lOin)
★
Tapestry needle size 24-26
★
DMC stranded cotton (floss) as listed in chart key
★
Dark blue double-fold card blank with 12.2 x 9.6cm
(4% x 3%in) aperture
★
Double-sided adhesive tape
____________________________J
Prepare your fabric for work, mark the centre and begin stitching from the centre of the fabric and chart. Work over one block, using two strands of stranded cotton (floss) for cross stitch and one strand for backstitch. If you wish, you could personalize the design using the alphabet on page 31. Make a card (described on page 30) or buy a readymade card and mount your embroidery in it (page 30).
July
DMC stranded cotton Cross stitch
• blanc
□ 352
И 666
I 1762  798 □ 799
 S41
J 948
'| 5284 metallic
Backstitch
— 666
— 779
5284 metallic
August
This fairy is dressed ready far a day at the beach under the clear blue of a summer sky - perfect far a birthday in this cloudless month. The design would also make a great beach party invitation.
Stitch count
61 x 38
Design size
11 x 7cm (4% x 2%in)
Materials
14-count white Aida
25 x 25cm (10 x 10in)
★
Tapestry needle size 24-26 ★
DMC stranded cotton (floss) as listed in chart key ★
Pale blue double-fold card blank
with 12.2 x 9.6cm
(4% x 3%in) oval aperture ★
Double-sided adhesive tape
Prepare your fabric for work, mark the centre and begin stitching from the centre of the fabric and chart. Work over one block, using two strands of stranded cotton (floss) for cross stitch and one strand for backstitch. If you wish, you could personalize the design using the alphabet on page 31. Make a card (described on page 30) or buy a readymade card and mount your embroidery in it (page 30).
August
DMC stranded cotton
Cross stitch
• blanc
□ ?47
□ 762
| 807
j 950
] 3325
§ 3776
~ I 5283 metallic
Backstitch 807
— 930
— 3832
September
This fairy’s costume, with its cute sunflower-petal skirt, perfectly captures early autumn with all of its warm gold, orange and russet colours.
Stitch count 62x50 Design size 11.2 x 9cm (4/2 x 314in)
Materials 14-count ecru Aida 25 x 25cm (10 x lOin) ★
Tapestry needle size 24-26 ★
DMC stranded cotton (floss) as listed in chart key ★
Gold double-fold card blank with 12.2 x 9.6cm (4% x 3%in) aperture ★
Double-sided adhesive tape

Prepare your fabric for work, mark the centre and begin stitching from the centre of the fabric and chart. Work over one block, using two strands of stranded cotton (floss) for cross stitch and French knots and one strand for backstitch. If you wish, you could personalize the design using the alphabet on page 31. Make a card (described on page 30) or buy a ready-made card and mount your embroidery in it (page 30).
April
DMC stranded cotton
Cross stitch	Backstitch
]	742	— 666
□	743	“ 741
•	746	~3857
| j	950	French knots
3078	* 3776
3776
October
With her costume of autumn foliage, this fairy celebrates an
October birthday with exuberance, scattering leaves as she dances. Work the design on black Aida for a dramatic Hallowe’en card.
October
DMC stranded cotton Cross stitch
437	Q 989
|/|677	|_ J 3348
J 834	| 13770
Backstitch — 3832
— 3857
5284 metallic
Prepare your fabric for work, mark the centre and begin stitching from the centre of the fabric and chart. Work over one block, using three strands of stranded cotton (floss) for cross stitch and one strand for backstitch. If you wish, you could personalize the design using the alphabet on page 31. Make a card (described on page 30) or buy a ready-made card and mount your embroidery in it (page 30).
November
This fairy dancer in orange, red and black is as exciting as a bonfire. The design would also make a very atmospheric fireworks party invitation.
Stitch count 61 x 50 Design size 11 x 9cm (4% x 3%in)
Materials 14-count antique green Aida 25 x 25cm (10 x 10in)
★
Tapestry needle size 24-26
★
DMC stranded cotton (floss) as listed in chart key ★
Orange double-fold card blank with 12.2 x 9.6cm (4% x 3%in) aperture ★
Double-sided adhesive tape
November
Prepare your fabric for work, mark the centre and begin stitching from the centre of the fabric and chart. Work over one block, using three strands of stranded cotton (floss) for cross stitch and one strand for backstitch. If you wish, you could personalize the design using the alphabet on page 31. Make a card (described on page 30) or buy a readymade card and mount your embroidery in it (page 30).
DMC stranded cotton Cross stitch
310
437
741
779
947
3770
5282 metallic
Backstitch
— 779
— 947
— 3832
5282 metallic
December
This lovely fairy in Christmas red and sprigs of festive holly
is stitched on a very dark green Aida and would be perfect for a December birthday or a pretty Christmas card.
with 12.2 x 9.6cm
(4% x 3%in) aperture ★ Double-sided adhesive tape
-------------------
Stitch count
63x47
Design size
11.5 x 8.5cm (4’/2 x 33/ain)
Materials 14-count moss green Aida 25 x 25cm (10 x 10in) ★
Tapestry needle size 24-26 ★
DMC stranded cotton (floss) as listed in chart key ★
Red double-fold card blank
Prepare your fabric for work, mark the centre and begin stitching from the centre of the fabric and chart. Work over one block, using three strands of stranded cotton (floss) for cross stitch and French knots and one strand for backstitch. If you wish, you could personalize the design using the alphabet on page 31. Make a card (described on page 30) or buy a ready-made card and mount your embroidery in it (page 30).
December
DMC stranded cotton
Cross stitch
blanc
□ 164
□ 437
И 498
И 666
Г i 948
П989
□ 5283 metallic
Backstitch — 3857 — 666
5283 metallic
French knots • 666
Making an Aperture Card
1 Choose a card colour to complement your embroidery and cut a rectangle 15.9 x 43.3cm (6% x 18%in), as shown in the diagram on page 31. On the wrong side of the card, draw two lines dividing it into three sections of 15.9cm (614in). Score gently along each line with the back of a craft knife to make folding easier.
2In the centre section, mark an aperture slightly smaller than your embroidery, leaving a border of 2.2cm (%in) on all sides. Cut out the aperture with a sharp craft knife, carefully cutting into the corners neatly. (You could use a decorative cutter if you wish.) Trim the left edge of the first section by 2mm (’/sin) so that it lies flat when folded over to the inside of the card. This will cover the back of the stitching. Fold the left and then the right section on the scored lines.
Mounting an Embroidery into a Double-Fold Card
ILay the card right side up on top of the embroidered design so the stitching is in the middle of the aperture. Place a pin in each corner and remove the card. Trim the fabric to within about 1.5cm (%in) so it fits into the card.
2On the wrong side of the card, stick double-sided tape around the aperture and peel off the backing tape. Place the card over the design, using the pins as a
guide to position. Press down firmly so the fabric is stuck securely to the card.
3On the wrong side of the card, stick more double-sided tape around the edge of the middle section. Peel off the backing tape, fold the left section in to cover the back of the stitching and press down firmly.
If you wish to add wadding (batting) to give a padded look to your embroidery, stick a piece into position, on the back of the embroidery, before pressing the middle card section into place.
If you see a faery ring In afield of grass, Very lightly step around, Tip-toe as you pass, Last night faeries frolicked there And they’re sleeping somewhere near. 'If You See a Fairy Ring' by William Shakespeare (1564-1616)
2.2cm	2.2cm
Mounting Embroidery into a Single-Fold Card
To mount your embroidery on a single-fold card (see April, right), simply trim your embroidery to the size required, leaving two or three extra rows all round if you want a fringe. Pull away the outer fabric threads to form the fringe and use doublesided tape on the back of the embroidery to attach it to the font of your card.
43.3cm (18%in)
Personalize your cards with this alphabet or another of your choice - see page 63 for advice
Fairy Princess
In Western childrens stories, fairies are often portrayed as tiny, winged creatures, such as Tinkerbell in Peter Pan, and Thumbelina in the Hans Christian Andersen story. However, across cultures their appearance varies widely Fairies are described as having many diverse shapes and sizes: some are as tiny as insects, others as large as giants; some are invisible while others can change shape or disguise themselves.
This fairy is the epitome of sweet delicacy and beauty, with a touch of royalty about her. The concept of an alluring fairy queen, such as Shakespeare's Titania, has persisted for centuries in the popular imagination and this fairy design echoes that idea beautifully.
This lovely fairy princess gleaming with shiny metallic threads and glass beads is sure to bring a romantic touch to any room.
Жад,,
kenuy
Fairy Princess Picture
This beautiful and romantic design of a fairy princess is sure to give much pleasure as you stitch it. It uses whole and three-quarter cross stitch, backstitch and long stitch with the addition of glittering metallic blending filaments and glass beads. The design could also be worked on a 14-count Aida fabric.
Stitch count 178x160 Design size 32 x 29cm (12% x 1114-in)
Materials
28-count Quaker evenweave linen in Colonial blue, 46 x 41cm (18 x 16in)
Tapestry needle size 24-26 ★
DMC stranded cotton (floss) as listed in chart key ★
Kreinik Blending Filament (BF), sky blue 014
Kreinik Very Fine (#4) Braid: white 100; gold dust 210; gold 002 and gold 002HL ★
Mill Hill glass seed beads, 00557 gold ★
Mount board, approx 46 x 41cm (18 x 16in)
. ★
Wadding (batting), approx 46 x 41cm (18 x 16in) ★
Double-sided adhesive tape ★
Pins ★ Crochet cotton or strong thread ★
Suitable picture frame
1 Prepare the fabric for work, finding and marking the centre (see page 99).
Mount the fabric in an embroidery frame if you wish. Begin stitching from the centre of the fabric and the centre of the chart.
2 Work over two linen threads (or one block of Aida) using two strands of stranded cotton (floss) for full and three-quarter cross stitches and one strand for backstitches. Where the chart requires blending filament, use one strand of cotton and one strand of blending filament together in the needle. Use one strand of Very Fine (#4) Braid for the whole cross stitches and backstitches on the wings. Complete all cross stitches before working backstitches, long stitches and beading. Because of the number of colour changes it is a good idea to keep several needles threaded with different colours.
3Work long stitches for the stars in one strand of Very Fine (#4) Braid gold 002HL. Use the same thread to attach beads with half cross stitches (page 100).
When all the stitching is complete, remove from the embroidery frame.
Press the work wrong side down on thick towels with a cool iron, taking extra care with the metallic threads and beads.
Framing the Picture
5 Cut your mount board to the size of the picture frame aperture. Cut a piece of wadding (batting) the same size and secure it to the mount board with strips of double-sided adhesive tape.
6 Lay your embroidery face up on the wadding (batting) and when you are happy with the position, push a line of pins down each side into the board. Check the stitching is straight then trim the fabric to leave 5cm (2in) all round.
7 Fold the excess fabric to the back.
Thread a needle with a long length of crochet cotton or strong thread, knot the end and lace the two opposite sides together on the back, starting at one end and working in an under-and-over motion, pulling the lacing tight. When you reach the other end, adjust the laced threads one by one before finishing off. Repeat this process on the two remaining edges.
8 Fold down the corners at the back and stitch neatly in place. Remove the pins and assemble your work in its frame.
Inspiration
The fairy princess would make a lovely nightdress case. You could either attach it as a patch to a plain case or stitch the design on the top third of a piece of Aida or linen, which can then be made up as a simple flap bag.
I met a lady in the meads
Full beautiful, a fairy's child
Her hair was long
Her foot was light And her eyes were wild.
From 'La Belle Dame Sans Merci' by John Keats (1795-1821)

Fairy Princess
DMC stranded cotton Cross stitch
3766
3770
3774
DMC 747 +
Kreinik BF 014
DMC 3761 +
Kreinik BF 014
I I DMC 3776 +
!—I Kreinik BF 014
I Kreinik #4 Braid
1—1 100 white
Kreinik #4 Braid
002HL gold
Kreinik #4 Braid
210 gold dust
Backstitch	Long stitch stars
—- 807	Kreinik #4 Braid
_ 975	002HL gold
Kreinik #4 Braid
002 gold
— Kreinik #4 Braid
002HLgold
Mill Hill seed beads 0 00557 gold

Fairy Princess
DMC stranded cotton Cross stitch
0	300	°	3766
c	301		3770
Й	400		3774
г	975		DMC 747 + Kreinik BF 014
Ш	3761		DMC 3761 + Kreinik BF 014
1 DMC 3776 +
I— Kreinik BF 014
I Kreinik #4 Braid - 1 100 white
Kreinik #4 Braid 002HLgold
I Kreinik #4 Braid 210 gold dust
Backstitch	Long stitch stars
— 807	----Kreinik #4 Braid
_ 975	002HL gold
Kreinik #4 Braid 002 gold
•— Kreinik #4 Braid 002HL gold
Mill Hill seed beads 0 00557 gold
Fairy Alphabet
In the past it was considered unlucky to use a fairy's name because this could be considered a summons or even a challenge, and although in foildore many fairies were helpful to humans, often bringing gifts or doing housework, they were also easily offended.
Brownies - solitary fairies who attached themselves to a family and worked around the house - often went off in a huff if offered
What better way to make a feature of a loved ones name or initial than with this charming fairy alphabet? Some of the letters are made up here as a card, picture and pot.
any reward. Accordingly, fairies
were referred to by respectful names such as the good people, the wee folk, the hidden people, the hill folk or even just 'them' or ‘themselves.’ These little fairies are so sweet however, were sure they won’t mind at all if you use their delightful designs to create your own names and messages.

Fairies A to Z
This adorable fairy alphabet is simple to stitch using whole cross stitches, backstitches and French knots, yet creates such a pretty effect, as shown by this picture, card and trinket pot (overleaf). See how many more items and gifts you can grace with these delightful little fairies.
" -iA
Stitch count Each letter 53 x 49 max
Design size Each letter 9.6 x 8.4cm (3% x 31/2in) max
Materials for each letter 14-count Aida or 28-count linen in antique white, at least 20 x 18cm (8 x 7in) ★
Tapestry needle size 26 ★
DMC stranded cotton (floss) as listed in chart key
1 Prepare the fabric for work and mark the centre (see page 99). Mount the fabric in an embroidery hoop or frame if you wish and start stitching from the centre of the fabric and the centre of the chart (pages 45-51). Please note: a single key has been used for the whole alphabet but you will not need all the colours for every letter - check before you start.
2 Work over one block of Aida or over two linen threads, using two strands of stranded cotton (floss) for cross stitches and one for backstitches. Work the French knots with two strands wound twice around the needle. If stitching several fairies to create a name, it is best to plan the complete design on graph paper first so you can decide exactly where to place each letter, making sure the bottoms of the letters are level.
ЗОпсе all the stitching is complete, take it out of the hoop if you have used one and press gently on the wrong side on a thick towel. The embroidery is now ready to be framed (see page 34), made up into a card (page 30) or mounted into a trinket pot lid (page 44).
Inspiration
Use the fairy alphabet to create a pretty gift bag. Stitch an initial on evenweave fabric, hem the edges and sew on to a readymade bag, perhaps adding braid or twisted cord around the edges of the embroidery.
Some to the sun, their insect-wings unfold, Weft on the breeze, or sink in clouds of gold, Transparent forms, too fine for mortal sight, Their fluid bodies half dissolved in light.
From 'The Rape of the Lock' by Alexander Pope (1688-1744)
Making Up as a Picture
There is a wide variety of interesting and attractive readymade frames and mounts available today, from all sorts of retail outlets. Detailed instructions for mounting embroidery into a picture frame can be found on page 34. For a totally individual look, you could customize your frame to suit your fairy picture: there are now paints with pearlescent, metallic or textured finishes and others that contain glitter.
Making Up into a Card
Ready-made cards are widely available from needlecraft shops and mail-order companies so it should be easy to choose one that complements your fairy design. If you are using a dark card colour and a light fabric, stick a piece of white paper to the left-hand flap of the card to stop the dark card showing through the embroidery.
To mount the embroidery into a card, first trim the embroidery so it is slightly larger than the card aperture and then use strips of double-sided adhesive tape to secure the fabric on to the card (see page 30 for more detailed instructions). For an extra special look you could decorate your card with ribbon, braid or paint effects.
Mounting in a Trinket Pot
Trinket pots or boxes are perfect for displaying small embroideries like these and make lovely gifts (see Suppliers on page 103 for some addresses). Cut the embroidery to fit the trinket pot lid and assemble following the manufacturer's instructions, adding a piece of wadding (batting) under the embroidery to create a nice padded effect.
A little fairy comes at night, Her eyes are blue, her hair is brown, With silver spots upon her wings, And from the moon she flutters down. 'Dream Fairy' by Thomas Hood (1799-1845)
Inspiration
Use the fairy alphabet to create a lovely pillow for a girl's bedroom, stitching her name on either 14-count Aida or 28-count linen. Add a pretty fabric border around the embroidery and frothy, gathered lace around the edges when making up the pillow.
Inspiration Stitch a fairy initial using gleaming metallic blending filaments combined with stranded cotton (floss) for an extra special sparkle, and then make up into a heart-shaped sachet filled with sweetsmelling pot-pourri.
Do you believe in fairies? Say quick that you believe! If you believe, clap your hands.
From Peter Pan by Sir James M. Barrie (1860-1937)
Fairy Alphabet А, В, C, D
DMC stranded cotton
Cross stitch

i ' I I i I	|	•	"	।
. ш г	I -

± ГЛ .	: . I	•	• •	' ।	1
Ш_Н. I	hr	’ ’ ’

• • •
j | 7~T|	JLL_	• •• I	'

_Ш_Ь_Ц - _lx Ь. -• • •
i. ...	1 rffli ‘‘	'

- ! Ч X L J гк/ • •	• •
1	- X - X xJ/rajfe • * • -	—
 !	'J—	' -1— L Hh, * ‘ • •
П . h1 liO . .	Z7 •	 ”
1 . ZZTT | ill M . xST
। 1 1 Г 1 i	_|_LS3 • •	_•	_1_
।	, ।	1 1 ! i	!	\ • • • ... • -l-i-

• •
₽	7	•	«
. .  ПТi - , I -U. , 1	• -i- • • • •
1 1	1	• • •
1
I .	1 i 1 - । | । ।	1 J FT -1

I 	_J	 II/	1

, i. | . iJ . lt to :J. о  : i 1
7 rr 1 n»r 07+ AZ-0 , I ; I 1

1 1 n । । 1 № 1 ' । ПТ X -! О' '  -	11


T	FTT -tE2	Jc X HI ПТТ
| J । .x/r У	1 1	1 । |

1 1 1 1 1 Trr-	7 1
ТШТГ"	/1	44#
J-Ц- Ц-Ц-	a	7 Г

LLilLLuj .txT; jl_ _			-tH  ь
kj-151
j_j208
/!209
0211
L J 341 О 433 [ J 598 О 793
0422 Ц597 jCj747 — 818
[ J 950
L| 3354
I‘J 3747
French knots Backstitch
О 208	— 838
0 597
0 793
03354
Fairy Alphabet E, F, G, H
DMC stranded cotton
Cross stitch
0151 0209 О 341 И 433 | j 598
0208 О 211 □ 422 0597	° , 747
0793
- 818
0950 0 03354
3747
French knots Backstitch
0 208
0 597 0793
О 3354
— 838
keuny
V
Fairy Alphabet I, J, K, L
DMC stranded cotton
Cross stitch
lJi51	/ 209	О 341	О 433	0.598	Ol793
П2О8	I J 211	[ 1422	Q597	о 747	-jsi8
О 950 О 3747
J 3354
French knots Backstitch
О 208 ©597 0 793 03354
— 838
Fairy Alphabet M, N, О, P
DMC stranded cotton
Cross stitch
[t_jl51	L/1209 0341 [0433 [ 1598
008 Q 211 I ] 422 | 1597 Го] 747
[~| 793 j 950 71 3747
0818
J 3354
French knots Backstitch
О 208	— 838
О 597
0 793
0 3354
kentzy
793
0 208 О 597 0793 0 3354
French knots Backstitch 838
 aaa^aa
Fairy Alphabet Q, R, S, T
DMC stranded cotton
Cross stitch
DMC stranded cotton
Cross stitch
French knots Backstitch
— 838
151
208
0209 0341
5 211 | 1422
I 598
О 747
050
[•_ 3747
0818 03354
0 208
О 597 0 793 03354
Fairy Alphabet Y, Z
DMC stranded cotton
Cross stitch
[0 151 0209 2I341 |433
0208 '____]211 [0422 | 1597
keuuy
French knots Backstitch
598 IЙ 793 Г 1950	• 3747 О 208	— 838
i	'•	0 597
747	— ]818 |_ ,3354	O 793
03354
What sounds are those that gatherfrom the shores, The voice of nymphs that haunt the sylvan bowers, Thefair-hair'd dryads of the shady wood Or azure daughters of the silver food?
From the Odyssey by Homer (c. 9th century вс)
Nursery
Fairies
Its hard to imagine a nursery or child's room today that doesn’t feature characters from fairy tales and nursery rhymes. Tales
of magic and enchantment became immensely
popular during the Victorian era as an educational
tool, particularly Aesop's fables and the stories of Hans Christian Andersen and the Grimm brothers, ensuring that generations of children came to know and love the
Bring fairy tale magic into the nursery with four delightful designs -a birth sampler, album, card and a pillow that is sure to invite the mysterious tooth fairy to visit.
little mermaid, Rapunzel, Tom
Thumb, Hansel and Gretel and many more.
For more than 80 years film studios have brought other stories to magical life, such as Snow White and the Seven Dwarfs, The Wizard of Oz, Peter Pan and The Lord of the Rings. The designs in this chapter feature toy-like fairies reminiscent of those old stories but with a modern twist.

Fairy Birth Sampler
This delightful sampler with its cheeky fairies and elves would make a wonderful memento of the birth of a baby. The lovely quotation is from that eternal favourite Peter Pan. The sampler is simplicity itself to stitch, using cross stitch, backstitch and French knots. It could also be worked over two threads of a 28-count evenweave.
Stitch count 140x98 Finished size 25.5 x 18cm (10 x 7in)
Materials 14-count white Aida 40 x 33cm (16 x 1 Sin) ★ Tapestry needle size 24-26 ★ DMC stranded cotton (floss) as listed in chart key ★ Lightweight iron-on interfacing, approx 40 x 33cm (16 x 13in) ★ Double-sided adhesive tape ★ Self-adhesive mount board, approx 29 x 21.5cm (11 % x 8^in)
When the first baby laughed for the first time, the laugh broke into a thousand pieces and they all went skipping about, and that was the beginning of fairies.
From Peter Pan by Sir James M. Barrie (1860-1937)
1 Prepare the fabric for work, finding and marking the centre (see page 99).
Mount the fabric in an embroidery frame if you wish. Begin stitching from the centre of the fabric and chart on pages 58-59.
2Work over one block of Aida, using two strands of stranded cotton (floss) for cross stitch and French knots and one strand for backstitch.
3To personalize the design, follow the instructions on page 63.
4When all the stitching is complete, apply lightweight iroh-on interfacing to the back of the embroidery, fusing in place with a medium iron. Remove the backing from the adhesive mount board, carefully centre the sampler on the board and press down firmly. Fold over the excess fabric and secure to the back of the board using double-sided tape or masking tape.
Your birth sampler is now ready for mounting and framing (see the
instructions on page 34).
New Baby Card
This adorable little fairy, with her magic wand bringing good fortune and precious gifts, is perfect for a card to welcome a new baby. The design would also make a lovely door hanger for the nursery — simply replace the words with the baby’s name.
Stitch count 37x56 Finished size 6.7 x 10cm (25/s x 4in)
Materials 14-count white Aida 16.5 x 20cm (б’/г x Sin) ★ Tapestry needle size 24-26 ★ DMC stranded cotton (floss) as listed in chart key ★
Lightweight iron-on interfacing, approx 33 x 40cm (13 x 16in) ★
Double-sided adhesive tape
★
Optional piece of thin wadding (batting) ★
Double-fold white card with 7.5 x 10cm (3 x 4in) aperture
1 Prepare the Aida fabric for work, finding and marking the centre (see page 99). Begin cross stitching from the centre of the fabric and the centre of the chart on page 60.
2Work over one block of Aida, using two strands of stranded cotton (floss) for
3When all the stitching is complete, apply lightweight iron-on interfacing to the back of the embroidery, fusing in place with a medium iron. Mount into the card blank following the instructions on page 30.
cross stitch and one strand for backstitch.
Good luck befriend thee, son;for, at thy birth, Thefairery ladies danced upon the hearth;
The drowsy nurse hath sworn she did them spie
Inspiration
The joyful fairy designs in the birth sampler and card could be used on many small items - perhaps on a Good Luck card to wish exam success or on the cover of a teenager's study notebook.
Come tripping to the room, where thou didst lie, And, sweetly singing round about thy bed Strew all their blessings on thy sleeping head. From 'Vacation Exercise’ by John Milton (1608-74)
Memories Album
Preserve all your wonderful memories of a baby’s early days in a photograph album covered with this sweet design. If desired, you could easily change the colouring of the border and the word Baby.
Stitch count
74 x 100 Finished size 13.5 x 18cm (5% x 71/fein)
Materials 14-count white Aida 24 x 28cm (91/г x 11 in) ★
Tapestry needle size 24-26 ★
DMC stranded cotton (floss) as listed in chart key ★
Lightweight iron-on interfacing, approx 33 x 40cm (13 x 16in) ★
Double-sided adhesive tape ★
Photograph album at least 15 x 20cm (6 x Sin), ready covered or covered in fabric of your choice
1 Prepare the fabric for work, finding and marking the centre (see page 99).
Begin stitching from the centre of the fabric and chart on page 62.
2Work over one block of Aida, using two strands of stranded cotton (floss) for cross stitch and French knots and then one strand for backstitch.
3When all the stitching is complete, apply lightweight iron-on interfacing to the back of the embroidery to prevent fraying, fusing in place with a medium iron. Trim the embroidery to within four squares of the Aida on all sides and attach it centrally to the front of your photograph album using strips of double-sided tape. Add a ribbon trim if desired.
Children born of fairy stock Never need for shirt or frock, Never want for food or fire, Always get their hearts’ desire. From Td Love to be a Fairy's Child' by Robert Graves (1895-1985)
Inspiration
Work the album design as a door plaque, stitching a name using either the backstitch alphabet on page 63 or letters from the fairy alphabet pages 45-51. (If the name is a long one, extend the edges of the border and move the stars further left.) Use double-sided tape to stick the embroidery to stiff card, folding the edges to the back and fixing in place with tape. Stitch a ribbon loop to the top for a hanger.
Tooth Fairy Pillow
The Tooth Fairy is said to leave a silver coin under a child’s pillow in exchange for a shed milk tooth. This charming pillow has a little pocket all ready for the tooth - the perfect place for the fairy’ to leave a coin in return.
Stitch count 80x80 Finished size of design 14.5 x 14.5cm (5% x 5%in) Finished size of pillow 16.5 x 16.5cm (6У2 x 6J*in) approx, excluding trim
Materials 14-count white Aida 25.5 x 25.5cm (10 x 10in) for pillow front ★
14-count white Aida 12.7 x 12.7cm
(5 x Sin) for tooth pocket ★
Tapestry needle size 24-26 ★
DMC stranded cotton (floss) as listed in chart key
★
Lightweight iron-on interfacing, approx 40 x 33cm (16 x 13in)
Matching fabric for pillow back, approx 25.5 x 25.5cm (10 x 10in) ★
Double-sided adhesive tape ★
Lightweight iron-on interfacing ★
White ribbon for a hanging loop, approx 1m (1yd)
★
White lace or broderie anglaise for a frill, approx 1m (1yd)
★
Wadding (batting) for padding
1 Prepare the fabric for work, finding and marking the centre (see page 99).
Begin stitching the main design on the larger piece of Aida, from the centre of the fabric and the centre of the chart on page 61. Work over one block of Aida, using two strands of stranded cotton (floss) for cross stitch and French knots and one strand for backstitch. Work the pocket design in the centre of the smaller Aida piece.
2When all the stitching is complete, apply lightweight iron-on interfacing to the back of both stitched pieces to prevent fraying, pressing with a medium iron to fuse into place.
3Trim the tooth pocket to within three blocks of Aida along the left, right and bottom edges and to within six blocks across the top edge. Fold over the top edge by three blocks and press lightly. Attach the pocket to the pillow front in the position shown on the chart, using backstitch with white thread.
Making Up the Pillow
4Make up the pillow by first using a sewing machine or backstitch to sew the lace frill (facing inwards) on the right side of the pillow front, positioning it about 2.5cm (1 in) away from the design border.
To make the hanging loop, tack (baste) the ends of the ribbon to the right side top edge of the design 4cm (1Vzin) in from
each side. Place the Aida pillow front and backing fabric right sides together and sew together using a sewing machine or backstitch, following the same line of stitching used to attach the frill. Leave the middle of the bottom edge open and turn the pillow right way out. Pad the pillow with wadding (batting) and then oversew the open bottom edge. Snip the ribbon loop in half and tie in a bow.
Child of the pure unclouded brow and dreaming eyes of wonder, Though time be feet, and I and thou are half a life asunder, Thy loving smile will surely hail the love-gift of a fairy-tale.
From Through the Looking Glass by Lewis Carroll (1832-98)
58 Nursery Fairies
		L						4		| I			1 1								! । !. |

J. 1	1	1					H	1 I	1 1	т-ft	Illi	П 11		। । । ।	1	1 1		: ! i	1 1		1 1 1	fill	1
													...			..

									—1—
											L11
															t +			-LI		~4T
							/				tm				Л
															П k. 1			X. if			1 1
							r-t				1 ft\ i			iXxf
															J
				kl —	•			- —1 —										-4
					—	—	— — П										_J .
					•	—								• ft
					—		•														J
																									1

									L L												d ft Г
		-ft	4	X												4	-Ш-
			4													!	1xi			ж i
			_L														|T

									44											। ft'"1!.--
		\							pp
—										1	ftyft	——	—L		~I4 p^,						4L 12					1
—							—	-1—1—				—ft	1—г			——L	IT	1 1 j			fl ifl;	S—I—1—			z
—			4				—		fll	- S	I ГЧ1										ft	x			-
										•s.	jj |N i
			4								К ।									xJX!
			4								N			1 A						i Sc
			J 1					II	_J	.	r4				Sjx	J					III
c			*	J							-H +	-'4±Ц	г		t±L		44+	J—L—			1	JZ |4
			L	J 1			—	ГТ				-'  ft				Il		-l—ft	-—ft	s	J 44	-ftftftL				±
				1				x		1 1		L_: ।									LI ।
			Jj							I zt		.:				1—I				ГХ.1
			I.									ZL.						tt
ss			_ 1							_ - .	1			-	1 \t			=4.			Ft	TJ——		_
				1 I												1		. z
			J 1					1	—fl
				1									я								ТП
														1 lx!											i
				1											J
					1															TT
															ГП	J	L					-L ft
	_r	J									1			_|__1	1 1_			xr:				T fl-
L_L	1 S'					X											-ft1 I-			1					X
							s													1T					*
	1L
	!							—			—	_ —1		ft	III			fl			—I—Lt
—	4		—				——	-	-					1 ft							II " fl
															—					xft
															• -i-l-
I													1 I	л	L — — P -	i—	—
															— -Ф
												[Г		• т j >4						. . .
1 .••>.(																					1 1 1
							^4.
												' i it	fl			* —				rT
±-									TT		--H—к	—1—1	1—L	-ftp	-	4	l—L					I t
1								4-		"1 й	'4-44	-ft ft	-f—F-		i——г	-t—r				-ftft -	ft|—L
								±						<jX;>q
									ztr		10 .Io		CX|>	<Ьйг1 1				-ft-
											10’0 • 0 0	к \ У	rxL	Fl XI 1
											0	\ XS		_ L						u
										1 4	0 • • • •		<Z~							Sr	X
										i 4	0 0 • ♦, 0	- MXIxlx!	o|	lu ;						-	L
											• ♦ o| 0	OiSLLM^BJBi						fx		/
L											к о 0|* .</	HB^SE	9^1	^ава						s
											"'"XL c/	•_XL-j4	/X		..	Iх!	x X|>	<1 x	X	XiXi X
										ix	f	XI	- -H 1 /	IX		Х|Х[5ф<|		|xj .			J x
									E3BS			ЮВЛВЕ	<	1	x x|xj	T-L	I ! <
ft			1				_ZL	1"	s;  ' i	i x			Jx >	c,x			1	-—I—		- .	—I— -
		1			-					Ж . 1  :	 ьмьдли E3E2E		: nllss	ZTSL	k X XIX	|X II.. !х|х|х
											T'BBB'J	ЗНЯИ8	S'	X	!x|x X!X| ;>		eix X >	XI		I x -	у
										lBBI	IIH	ПНПГ.'	I	jlEEICZ	IBLESQSr			i ।		X
	1					•			XT		1 Lr«-	:. not's	i—	]S®ESj	I3BBI	" T				у x	x
				к •							M*i° rj~	□LBHk4	<		IBBSI	Й5					*4
					•			1 1		r	 о | о у -J/	Qt^ei i
										T" о	о • Л JX’ o	Вез cat	•	izv							Е:.лаВ1
										• »	• •<00	ВЕЗ; КкЧ	5 0<							И *	s T [
										!o ♦	. . . 0 J		Xi	1							у
										<< 0	• 0 0 o/c		lol	1
										i о TS	о Xx			./ T	г И
											of X X										Lnr

								—			f.xt J				I тг						J———L
—									-	T	b	. T			IL	1 fl		Tfl			flr	1 LL
													_ 4								1 T
									—	—			1		4	1111~	J	ft1-	L	fl	ТГ		. 		Д TT
												1—г			Ц I 	ГТТ		1 1 i	1 1		I 1 1	 г.
						IE					'ПТ			TT		f
																	1
New Baby Card
DMC stranded cotton Cross stitch
0225	I ]951
□ 334	□ 3731
 420	03733
□ 422	□ 3755
0677	□ 3821
□ 761	□ 3822
0945	□ blanc
Backstitch — 3799 — 3804 3822
The faery beam upon you,
The stars to glisten on you, A moon of light In the noon of night, Till the firedrake hath o’er gone you.
From 'The Faery Beam Upon You’ by Benjamin Jonson (1572-1637)
Tooth Fairy Pillow DMC stranded cotton
Cross stitch		Backstitch
о 225	0951	— 3799
10334	Й3731	— 3804
 420	] 3733	3822
Д 422	~ ] 3755
0677	03821	French kn<
□ 761	03822	• 3799
□ 945	0 Ыапс
Pocket
62 Nursery Fairi
Birth Sampler alphabets and numerals
DMC stranded cotton
Backstitch
— 3799 (or colour of your choice)
French knots
• 3799 (or colour of your choice)
Personalizing Designs
Many of the designs in this book can be easily personalized by adding names and dates, or even other messages using the alphabets and numbers here or a favourite alphabet of your own.
To personalize the Fairy Birth Sampler on page 54, use the small alphabet above to draw out the name and date on graph paper, making sure the letters and numbers will fit the heart-shaped space available. Stitch the text centrally within the space.
If desired, you could use the larger backstitch alphabet to stitch a completely different poem for the sampler, planning it out carefully on graph paper first. There are many lovely fairy poems featured throughout this book.
In a utilitarian age, of all other times, it is a matter oj grave importance that fairy tales should be rejected.
Charles Dickens (1812-70)
Fairy Godmother
In folklore, fairies are frequently portrayed as helpful to humans, particularly the fairy godmother, who often brought useful advice
and good fortune with her. The fairy godmother is a relatively recent introduction, emerging in the 18lh century with the publication
of the first fairy tales in England. This benevolent character now features in many tales, often appearing at the birth of a child to
Making dreams and wishes come true is the chief function of the fairy godmother and this delightful lady and her little pixies are here to help.
predict its future or bestow gifts
upon it, as in The Sleeping Beauty. She also appears at marriages to bring good fortune, or in the case of Cinderella, to make dreams of love come true. Perhaps the real magic of the fairy godmother is showing people their hidden talents and abilities. What dreams can she help you achieve?
kenuy
Fairy Godmother Picture
This fun fairy godmother is worked using whole and three-quarter cross stitch, backstitch, long stitch and French knots. The cross stitches on the wings are worked with the addition of a glittering blending filament, while four different colours of seed beads bring an extra magical twinkle to the design.
Stitch count 141 x186 Design size 25.5 x 33.7cm (10 x 13T4in) ★
Materials 14-count antique white Aida 38 x 46cm (15 x 18in) ★
Tapestry needle size 24 and a beading needle
DMC stranded cotton (floss) as listed in chart key
★
Kreinik Blending Filament 032 pearl (2 spools)
★
Kreinik Fine #8 Braid 005 black ★
Kreinik Very Fine #4 Braid: 028 citron (3 spools) and 102 Vatican (2 spools)
★
Mill Hill glass seed beads: 00557 gold; 02010 ice;
02024 heather mauve and 03021 royal pearl
1 Prepare for work, referring to page 99 for Techniques if necessary. Find and mark the centre of the fabric and the centre of the chart. You could mount the fabric in an embroidery frame if you wish.
2Start stitching from the centre of the
chart and fabric, using two strands of stranded cotton (floss) for full and three-quarter cross stitches. Use one strand of Kreinik 005 wrapped twice around the needle for French knots in the lettering and the fairy godmother's eyes. Use one strand of DMC 3371 wrapped once around the needle for the French knots for little pixies' eyes. Following the colour changes on the chart, use one strand wrapped twice around the needle for all other French knots. Use two strands
of Kreinik 028 for the fairy godmother's glasses. Use one strand for all other backstitch and the long stitches in the lettering and the wands.
3Working in one direction and in half cross stitch, overstitch the completed DMC blanc, 747 and 3756 cross stitches in all the wings with one strand of the pearl Kreinik Blending Filament 032 to create extra glitter. Attach all the different beads where indicated on the chart using a beading needle and matching thread (seeTechniques page 100).
4Once the embroidery is complete, check for missed stitches and then finish your picture by mounting and framing (see page 34).
Inspiration
Choose a 12-count Aida or 24-count linen band with a
decorative edge and stitch the narrow side borders from the main chart to create two pretty bookmarks. Omit the beads or work French knots instead.
Hem the top and bottom of the band neatly to finish.
I do wander everywhere, Swifter than the moone’s sphere; And I serve the fairy queen, To dew her orbs upon the green. From A Midsummer-Night's Dream by William Shakespeare (1564-1616)
Pixie Sachet
This scented sachet features a pixie from the main chart, stitched on 14-count navy Aida, following the stitching instructions opposite.
Once complete, trim the embroidery to the required size, with matching backing fabric. With right sides facing, stitch the two pieces together, leaving a gap for turning at the top. Turn through to the right side and stuff with pot-pourri. Insert a loop of cord in the gap and sew in place. Slipstitch decorative cord all around the edges starting at the gap. Tuck the ends into the gap and slipstitch closed. Stitch on two star buttons to finish.
Inspiration Work just one of the little pixies on 14-count Aida or 28-count linen and mount into a ready-made or homemade card (see page 30 for making cards).
68 Fairy Godmother
Fairy Godmother
DMC stranded cotton
Cross stitch
□ 153
Ш 156
□	318
□	341
В 349
Z 351
□ 415
Q 501
H 502
□	503
□	677
□	747
□	762
	791
@ 817
	830
|n| 831
□	832
□	833
□	945
□	951
□	3346
□	3347
Щ 3348
□	3687
У	3688
□ 3689
/ 3747
x 3756
Fairy Godmother 69
□ 3771
□ 3820
О 3822
 3835
□ 3836
И 3852
*1 blanc
н Kreinik #4 102
И Kreinik #4 028
Щ Kreinik #8 005
Backstitch ... 831 looses & eyebrows) — 3346 — 3371
Kreinik #4 102 — Kreinik #4 028 — Kreinik #8 005
French knots
© 3346
О 3687
О 3835
О 3852
• Kreinik #8 005
Mill Hill seed beads
0 00557 gold
Q 02010 ice
0 02024 heather
0 03021 pearl
Use Kreinik blending filament 032 pearl to work half cross stitches on all wings over the blanc, 747 and 3756 cross stitches
70 Fairy Godmott
Fairy Godmother
DMC stranded cotton
Cross stitch
	153
s	156
	318
□	341
	349
IU 351
	415
	501
	502
	503
□	677
□	747
о	762
	791
	817
	830
[f\ |	831
I I	832
I-	833
	945
□	951
	3346
[H	| 3347
1 3348 □ 3687 V 3688 [ | 3689 Zj 3747 x j3756

03771
П 3820 03822
И 3835 03836 □ 3852 □ blanc
[И Kreinik #4 102
[M] Kreinik #4 028
Щ Kreinik #8 005
Backstitch
»=« 831 (noses & eyebrows) — 3346
— 3371
___Kreinik #4 102
___Kreinik #4 028
— Kreinik #8 005
French knots
•	3346
© 3687
О 3835
О 3852
•	Kreinik #8 005
Mill Hill seed beads
О 00557 gold
Q) 02010 ice
Q) 02024 heather 0 03021 pearl
Use Kreinik blending filament 032 pearl to work half cross stitches on all wings over the blanc, 747 and 3756 cross stitches
Fairy Seasons
Fairies can be seen in all seasons by those who know their haunts or the magic phrases to call them forth, and this delightful collection of collage-style motifs reveals some of their hiding places. In spring, fairies play among meadow flowers, ringing
bluebells as a call to play and taking refuge under foxgloves from spring showers. In summer, water nymphs cavort in seas, rivers
Dozens of seasonal fairy motifs in a versatile collage style allow you to mix and match designs and create a wonderful array of projects.
and ponds, riding fish and
dragonflies and sleeping in cozy water lilies. In autumn, dryads dance in woodland glades, dining on berries, riding snails and resting on toadstools. In winter, fairy sprites in festive green and red shelter from snowflakes under holly and
ivy and give gifts at Yule time - just like Father Christmas's elves.


Spring Fairies
Meadow fairies dressed in spring green revel in daffodils, snowdrops, bluebells, violets and faxgloves and decorate a sachet, bowl, bell pud and card. Fairy wings are given a magical glitter with Glissen Gloss thread. Refer to the Spring Fairy charts overleaf and Suppliers on page 103 far sources of items used.
Stitch count 41 x 46 Finished size of motif 7.5 x 8.3cm (3 x 3%in)
Materials 28-count antique white Cashel linen 14 x 14cm (5Уг x 5T4in) ★
Tapestry needle size 24-26
★
DMC stranded cotton (floss) as listed in chart key ★
Madeira Glissen Gloss thread, 300 rainbow and
Anchor Reflects thread, 0300 gold
★
Backing fabric to tone with embroidery, 12.5 x 12.5cm (5 x 5in) ★
Polyester filling
★
Narrow ribbon, approx 15cm (6in) long
★
Narrow decorative cord, approx 51cm (20in) long ★
Tassel (bought or homemade)
Sachet
1 Stitch the design in the centre of the linen over two threads, using two strands of stranded cotton (floss) for cross stitch and one for backstitch. Cross stitch the wings with one strand of blanc and one of Glissen Gloss together in the needle.
2Trim the embroidery to 12.5cm (5in) square, to match the backing fabric. Using matching
Stitch count 35x37 Finished size of motif 6.3 x 6.7cm (2Уг x 25/sin)
Materials 28-count antique white Cashel linen 11 x 11 cm (414 x 414in) ★ Tapestry needle size 24-26 ★
DMC stranded cotton (floss) as listed in chart key ★
Madeira Glissen Gloss thread, 300 rainbow and
Anchor Reflecta thread, 0300 gold
★
Blue ceramic bowl 9cm (3Vzin) diameter (Framecraft)
thread stitch a 1.25cm (16in) seam all around, leaving a gap for turning at the top. Turn through to the right side and stuff with polyester filling.
3Slipstitch the decorative cord all around the edges of the sachet, starting at the gap and tucking the ends into the gap. Fold the ribbon
in half, insert it into the gap and slipstitch closed. Stitch on a tassel at the bottom centre to finish (see page 101 for making a simple tassel).
Bluebell Bowl
1 Stitch the design in the centre of the linen over two threads, working cross stitch with two strands of stranded cotton (floss). Cross stitch the wings with one strand of blanc and one of Glissen Gloss together. Work backstitches in one strand.
2Mount into the bowl lid following the manufacturer's instructions.
Stitch count 91 x 37 Finished size of motif 16.5cm x 6.7cm (6% x 25/ein)
Materials
28-count off-white linen band with chevron edge (Viking Loom) 26cm (10in) long x 11cm (4in) wide ★
Tapestry needle size 24-26
★
DMC stranded cotton (floss) as listed in chart key ★
Madeira Glissen Gloss thread, 300 rainbow and
Anchor Reflecta thread, 0300 gold
★
Wooden bell-pull ends, cut to size
★
Iron-on interfacing
★
Cord or ribbon for hanging, approx 20cm (Sin)
Bell Pull
1 Oversew the raw edges of the linen band. Work from the centre of the motif and the centre of the band, outwards over two threads, using two strands of stranded cotton (floss) for cross stitch and one for backstitch. Cross stitch the wings with one strand of blanc and one of Glissen Gloss together.
2Iron interfacing on the back of the band. Turn 2.5cm (1 in) under at both ends and slipstitch in place, leaving the sides open to slide the bell pull ends through. Attach cord or ribbon for hanging.
Their life all pleasure, and their task all play, All spring their age, and sunshine all their day. From 'To Mrs Priestley with some drawings of Birds and Insects' by Anna Laetitia Barbauld (1743-1825)
Stitch count 22x37 Finished size of motif
4 x 6.7cm (1У2 x 2%in)
Materials 14-count white Aida 8 x 11cm (3 x 41/2in) ★
Tapestry needle size 24-26
★
DMC stranded cotton (floss) as listed in chart key ★
Madeira Glissen Gloss thread, 300 rainbow and
Anchor Reflecta thread, 0300 gold
★
Double-fold card with oblong aperture to fit embroidery motif
Card for a double mount
★
Double-sided adhesive tape
Spring Card
1 Stitch the design in the centre of the Aida over one block, working cross stitch with two strands of stranded cotton (floss). Cross stitch the wings with one strand of blanc and one of Glissen Gloss together. Work backstitches in one strand.
2Make a double-mount card as shown on page 30 (or buy a ready-made card) and mount your embroidery in the card. To add a second mount in a contrasting colour, as shown here, cut a piece of card with a smaller aperture than the main card and use tape to stick it in place behind the larger aperture.
7G Fairy Seasons
Spring Fairies
DMC stranded cotton Cross stitch
x 156 □ l64 Пзю Еззз □ 340 ! ]б76
Г 704
□ 718  720
П 727 □ 729 □ 742 о 743 □ 745
819  869  905
Шэоб 0915 [+|з078 □ 3607 □ 3608 □ 3747 [ 3823 < 13828 □ blanc
—1 blanc (1 strand) + '—1 Madeira Glissen
Gloss 300 rainbow (1 strand)
Backstitch — 350 — 869 - Anchor Reflecta 0300 gold
Summer Fairies
At the height of summer, water nymphs play among creatures of the sea, river and pond. The watery motifs have been used to create a towel band, a gift tag and large and small drawstring bags. Fairy wings are given a lovely shimmer with Glissen Gloss thread. Refer to the Summer Fairy charts overleaf and Suppliers on page 103 for sources of the items used.
Stitch count (excluding zigzag border) 24x28 Finished size of motif (excluding zigzag border) 4.4 x 5cm (1% x 2in) ★
Materials Small guest or hand towel ★
14-count white Aida fabric 8cm (314in) wide x width of the towel plus 1.5cm (1/2in) for turnings on all edges ★
Tapestry needle size 24-26
★
DMC stranded cotton (floss) as listed in chart key ★
Madeira Glissen Gloss thread, 300 rainbow and
Anchor Reflecta thread, 312 blue
Towel Band
1 Stitch the design from the centre of
the Aida over one block, working cross stitch with two strands of stranded cotton (floss). Cross stitch the wings with one strand of blanc and one of Glissen Gloss together. Work backstitches with one strand. Work the zigzag border along the band, two squares below the motif at the bottom and one square above at the top.
2When stitching is finished turn all
edges under by 1.5cm (16in). Find the centre of the towel and the centre of the band and pin the band 4cm (1 tein) from the base of the towel. Slipstitch or machine stitch into place and remove pins.
Stitch count 17x39 Finished size of motif 3 x 7cm (1 'A x 2%in)
Materials 14-count pale aqua Aida 7 x 11cm (2% x 4!4in) ★
Tapestry needle size 24-26
★
DMC stranded cotton (floss) as listed in chart key
★
Stiff card for the tag
★
Double-sided adhesive tape
★
Short length of narrow ribbon
She rides upon her little boat, her swans swim through the starry sheet
Rowing her into Fairyland
The lovely-eyed Evangeline.
From 'The Night Swans’ by
Walter de la Mare (1873-1953)
1 Stitch from the centre of the Aida over one block, using two strands of stranded cotton (floss) for cross stitch and French knots and one for backstitch.
2Trim the stitching to the required size, fray the edges and secure to the card with double-sided tape. Punch a hole in the card and add the ribbon tie to finish.
Stitch count 51 x 53 Finished size of motif 9.2 x 9.6cm (35/s x 3% in)
Materials
14-count pale aqua Aida 18 x 18cm (7 x 7in) ★
Tapestry needle size 24-26 *
DMC stranded cotton (floss) as listed in chart key ★
Madeira Glissen Gloss thread, 300 rainbow and
Anchor Reflecta thread, 312 blue ★
Two pieces of fabric for the bag, at least 46 x 25cm (18 x lOin) each ★
Ribbon or cord for a drawstring ★
Four decorative buttons
Large Drawstring Bag
IWork from the centre of the Aida over one block, using two strands of stranded cotton (floss) for cross stitch and one for backstitch. Cross stitch the wings with one strand of blanc and one of Glissen Gloss together.
2Pin the Aida patch on to one of the bag fabric pieces, centrally and about 4cm (11/2in) from the bottom. Using matching thread, stitch in place 6mm ('Ain) in from the edges to allow for a fringe. Stitch the buttons in the corners, adding further decorative stitching if you wish, and then fray the edges of the patch.
ЗМаке up the bag by placing the bag pieces right sides together. Leaving
12.5cm (Sin) open at the top on both sides, stitch 1.5cm ('/zin) from the raw edges down one side, along the bottom and up the other side. Trim bottom corners diagonally and press seams open. Turn the top edge over about 11.5cm (4'/zin) to make a hem and channel for the
drawstring, and machine stitch a line 2.5cm (1 in) from the folded edge and another about 6.5cm (2'/zin) further down.
Z Thread a length of ribbon through the /casing for the drawstring, join the ends together and conceal in the casing.
Stitch count 46x38 Finished size of motif 8.3 x 7cm (3% x 2%in)
Materials
Two pieces of 14-count pale aqua Aida, at least 30 x 20cm (12 x 8in) ★
Tapestry needle size 24-26
★
DMC stranded cotton (floss) as listed in chart key ★
Madeira Glissen Gloss thread, 300 rainbow and
Anchor Reflecta thread, 312 blue
★
Ribbon or cord for a drawstring
Small Drawstring Bag
IThe motif is stitched directly on to one of the pieces of Aida; for a different sized bag simply make the pieces larger or smaller. Work from the centre of one of the Aida pieces over one block, using two strands of stranded cotton (floss) for cross stitch and one for
the two pieces right sides together and, leaving a 5cm (2in) opening at the top on both sides, stitch 1.5cm (14in) from the
raw edges down one side, along the bottom and up the other side. Trim
the bottom corners diagonally and
press side seams open. Turn the top edge over about 3.5cm (1 !4in) to make a hem and channel for the
backstitch. Cross stitch the wings with one strand of blanc and one of Glissen Gloss together.
2When stitching is complete trim
the fabric pieces to
size and oversew all raw edges. Place
drawstring, and machine stitch a line 2cm (TA in) from the folded edge and another about 2cm (%in) further down.
3Thread a length of ribbon or cord through the casing for a drawstring, join
the ends and conceal the
join in the casing.
I'll give thee fairies to attend on thee;
And they shadfetch thee jewelsfот the deep, And sing, while thou on pressed flowers doth sleep. From A Midsummer-Night's Dream by William Shakespeare (1564-1616)
Summer Fairies
DMC stranded cotton
Cross stitch
Пзю
И 517
□ 518
□ 519
□'728
□ ?29
|782
□ 819
□ 828
□ 912
0954
J 955
0962
□ 963
03078
О 3326
□ 3819
[03853
□ 3854
03855
- blanc (1 strand) +
—1 Madeira Glissen Gloss 300 rainbow (1 strand)
Anchor Reflects ' ' 312 blue (1 strand)
Backstitch
— 801
— 3328
Anchor Reflects 312 blue
French knots О 912
Autumn Fairies
In these designs woodland dryads dressed in autumnal colours cavort amongfallen leaves and late corn and gather their own harvest of berries. These motifs are used to adorn a notebook, pencil holder, purse and bookmark. Refer to the Autumn Fairy charts overleaf and Suppliers on page 103 for sources of items used.
Stitch count 36 x 66 excluding border Finished size of motif 6.5 x 12cm (2% x 4%in).
Materials
14-count cream Aida band 10cm (4in) wide x width of your book ★
Tapestry needle size 24-26
★
DMC stranded cotton (floss) as listed in chart key ★ Iron-on interfacing ★
Notebook of your choice
★
Double-sided adhesive tape
Decorated Notebook
ICut a length of Aida band the width of your book plus 5cm (2in) each side for turnings.
2Work from the centre of the band over one block, using two strands of stranded cotton (floss) for cross stitch and one for backstitch, completing each motif with a whole leaf. Repeat as necessary. Add a border top and bottom of the band if you wish.
3When stitching is complete fuse iron-on interfacing to the back of the band. Fix the band in place on the book with doublesided tape. Turn the ends of the band over to the inside of
the book and fix using more tape. To neaten the inside cover, cut a piece of card and tape into position.
Stitch counts 40 x 35 max Finished size of motifs 7.25 x 6.3cm (2% x 2%in) max
Materials
Two pieces of 14-count cream Aida 13 x 13cm (5 x Sin) ★
Tapestry needle size 24-26
★
DMC stranded cotton (floss) as listed in chart key ★
Pencil holder (Framecraft)
Pencil Holder
IWork the designs from the centre of
the Aida pieces over one block, using two strands of stranded cotton (floss) for cross stitch and one for backstitch.
2Trim the embroideries to fit the pencil holder and mount according to the manufacturer’s instructions.
Stitch count 35 x 16 Finished size of motif 6.3 x 3cm (2% x 1 '/sin)
Materials
Two pieces of 28-count cream linen, approx 18 x 18cm (7 x 7in)
★
Tapestry needle size 24-26
★
DMC stranded cotton (floss) as listed in chart key ★
Two pieces of cream silk or lining fabric, approx 18 x 18cm (7 x 7in) ★
Purse clasp (Viking Loom LCSG27) ★
Glass beads to match clasp
Small Purse
ITack (baste) the outline of the bag template provided on page 104 on to both linen pieces. Repeat with the lining fabric, using the smaller lining template.
2Stitch the design just below the centre of one of the linen pieces, working over two threads and using two strands of stranded cotton (floss) for cross stitch and French knots and one for backstitch.
3To make up the purse bag, pin the linen pieces, right sides together, leaving top edges open and 3cm (1%in) at either side. Using tacking (basting) lines as a guide, machine sew the pieces together. Repeat with the lining fabric.
4Remove tacking except along the top (for a guide when hemming the
top edge). Repeat with the lining. Press seams and cut V-shaped notches around the corners before turning right side out. Press and notch the lining but leave this right sides together.
5Place the lining inside the purse bag, matching side openings. Starting with
the front, begin to turn the raw edges under so they are sandwiched between the lining and the front, using the tacking (basting) as a guide. Pin in position and repeat with the back. Slipstitch the front and back openings in place, then position the bag to fit inside the purse frame and secure with backstitch.
6Complete the purse by sewing the beads into the holes at the front of the purse clasp, using two strands of matching cotton (floss) and cross stitch.
Stitch count 49x25 Finished size of motif
9 x 4.5cm (З’/г x 1%in)
Materials
14-count cream Aida band with decorated border (Willow Fabrics) 20.5cm (Sin) long x 6.3cm (216in) wide
★
Tapestry needle size 24-26
★
DMC stranded cotton (floss) as listed in chart key ★
Double-sided adhesive tape
★
Tassel (bought or homemade)
★
Iron-on interfacing
Bookmark
1 Begin stitching from the base of the design, twenty-four stitches from the bottom of the band, matching the centre of the motif with the centre of the band width. Work over one block, using two strands of stranded cotton (floss) for cross stitch and one for backstitch. To form a decorative point, work cross stitches in DMC 3830 from each side of the band, starting seven rows down from the stitched motif.
2Fold the bottom edge of the band under, angling each side to create a point and catching at the back with slipstitches. Fold the top over and secure with slipstitches or double-sided tape. Sew the tassel on to the point (see page 101 for making a tassel). To finish, cut a strip of iron-on interfacing and fuse in place at the back of the bookmark.

Autumn Fairies DMC stranded cotton Cross stitch
L 1225  зоо
Изю
И 327 □ 349 и 351
Oj435
И437
И 471
IJ 553
Я732 х 734 □ 746 □ 754 и 780 822
□ 832 +J 834
Q 918 £ 3046
О3047 □ 3778 g]3830
И 3346 □ 3853 >]3854 □ blanc
Backstitch — 300 — 310 — 349
French knots • 310 ® 327
Winter Fairies
Among twinkling snowflakes, holly and ivy, winter fairies enjoy the season. These festive motifs have been used to create a Christmas card and holder, a pot and a napkin and holder. Fairy wings are given the glisten of frost with Glissen Gloss thread. Refer to the Winter Fairy charts overleaf and Suppliers on page 103 for sources of items used.
Stitch count 34x39 Finished size of motif
6 x 7cm (2% x 2%in)
Materials 14-count white Aida 15 x 15cm (6 x Gin) ★
Tapestry needle size 24-26
★
DMC stranded cotton (floss) as listed in chart key ★
Madeira Glissen Gloss thread, 300 rainbow and
Anchor Reflects thread, 0300 gold
★
Two pieces of stiff card 15 x 15cm (6 x Gin) ★
Wadding (batting) 15 x 15cm (6 x Gin)
★
Cotton Christmas fabric to tone with embroidery 20 x 20cm (8 x Sin) ★
Double-sided adhesive tape
★
Red satin ribbon 2.5cm (1 in) wide x 1m (1yd) ★
Small brass ring
Christmas
Card Holder
and the cotton fabric over the wadding.
Fold the edges to the back and fix with tape.
1 Stitch the design in the centre of the Aida over one block, working cross stitch with two strands of stranded cotton (floss) and backstitch with one. Cross stitch the wings with one strand of blanc and one of Glissen Gloss together.
2Trim the embroidery to 10cm (4in) square. Place wadding (batting) on top of a 15cm (Gin) square of card
Stitch count 39x38 Finished size of motif 7 x 7cm (2% x 2%in)
Materials 14-count white Aida 15 x 15cm (6 x Gin) ★
Tapestry needle size 24-26
★
DMC stranded cotton (floss) as listed in chart key ★
Madeira Glissen Gloss thread, 300 rainbow and
Anchor Reflecta thread, 0300 gold
★
Ceramic pot 9cm (31/fein) diameter (Framecraft)
For a hanger, sew a short length of ribbon ? to the top of the holder, * passing it through a brass ring and stitching in place at the back of the holder. Stitch the remaining length of ribbon centrally to the bottom. Neaten the back by fixing a square of card in place with doublesided tape.
IWork the design in the centre of the Aida over one block, working cross stitch with two strands of stranded cotton (floss) and backstitch with one. Cross stitch the wings with one strand of blanc and one of Glissen Gloss together.
2Mount into the pot lid following the manufacturer's instructions.
Stitch counts
Napkin: 16 x 15
Holder: 24 x 30
Finished sizes of motifs
Napkin: 3 x 2.7cm (1 Vb x 1 in) Holder: 4.3 x 5.5cm (1 % x 2Vsin) for one repeat, including border
Materials for one napkin and holder 14-count white linen
30 x 30cm (12 x 12in) for napkin 16.5 x 9.5cm (6% x 3%in) for holder
★
Tapestry needle size 24-26
★
DMC stranded cotton (floss) as listed in chart key ★
Iron-on interfacing
★
Popper fastener or a small piece of Velcro
Napkin and Holder
ITo stitch the napkin, hem the linen by 1cm (%in) all round. Mitre the corners, machine stitch in place and press hems.
2Work the motif in one corner, twelve squares from the edges, working over two fabric threads and using two strands of stranded cotton (floss) for cross stitch and one for backstitch.
3To stitch the holder, zigzag stitch or oversew the linen edges. Working from the centre of the strip and over two threads, stitch two repeats of the motif along the band, using two strands for cross stitch and one for backstitch.
4Turn a small hem along the top and bottom of the linen strip. Turn over both ends and fuse all folds into place with iron-on interfacing. Sew on a popper fastener or piece of Velcro to fasten the holder around the napkin.
Stitch count 69x47 Finished size of motif 12.5 x 8.5cm (5 x 3%in)
Materials 14-count white Aida 20 x 15cm (8 x 6in) ★
Tapestry needle size 24-26
★
DMC stranded cotton (floss) as listed in chart key
Madeira Glissen Gloss thread, 300 rainbow and
Anchor Reflects thread, 0300 gold
★
Double-fold cream card with 14 x 9cm (514 x 314in) aperture ★
Double-sided adhesive tape
Christmas Card
IWork from the centre of the Aida over one block, using two strands of stranded cotton (floss) for cross stitch and then one for backstitch. Cross stitch the wings with one strand of blanc and one of Glissen Gloss together in the needle.
2When stitching is complete, mount the embroidery in the card (see page 30). Page 30 also has instructions for making your own cards.
The iron tongue of midnight hath told twelve; lovers to bed; ’tis almost fairy time.
From A Midsummer-Nights Dream by William Shakespeare (1564-1616)
Winter Fairies
DMC stranded cotton
Cross stitch
Изю
В 347
□ зб9
П 505
И 666
О 680
□ 704
□ 728
□ 746
□ 761
[ 819
В 869
И 905
□ 3756
Г 3801
□ Ыапс
- blanc (1 strand) +
' Madeira Glissen Gloss 300 rainbow (1 strand)
I Anchor Reflecta 0300 gold (1 strand)
Backstitch
— 310
— 869
— 905
— 3801
— Anchor Reflecta 0300 gold
Fairy Silhouettes
airy silhouettes create most attractive designs, as can be seen by this beautiful desk set, where fairies troop in a
procession through woodland. Trooping fairies are aristocratic sprites of English folklore who gather to form courts, ruled over by a king and queen, and who sometimes ride
out in formal procession. These designs show the
closeness of fairies with
An elegant desk set of paperweight, coaster, bowl, card and journal cover would grace any study while the black on cream colours will suit any decor.
nature, particularly trees, many
of which are sacred to them. The elder is said to
offer protection for fairies from evil night spirits. The oak, too, is prized; its acorns can be made into fairy talismans when found by the light of a full moon. Traditionally, the hawthorn was the tree of the Fairy Queen and it was considered unlucky to bring its blossom into the home.
90

Silhouette Desk Set
Lively fairy designs in dramatic black on cream fabric are perfect for decorating useful office items. The use of the variegated charcoal thread suggests the variable colours of leaves and creates additional depth. The colours can easily be changed, perhaps to dark red on white. See pages 95-97for the charts and Suppliers on page 103 for details of the items used.
Stitch count 36x38 Design size 6.5 x 7cm (214 x 2%in)
Materials 14-count cream Aida 18 x 18cm (7 x 7in) ★
Tapestry needle size 24-26
★
DMC stranded cotton (floss), as listed in chart key ★
Lightweight iron-on interfacing
★
Paperweight 76cm (Sin) diameter (Framecraft PW3)
Paperweight
IWork the design from the centre of the chart and fabric over one block, using two strands of stranded cotton (floss) for full and three-quarter cross stitch and one strand for backstitch.
2When stitching is complete, back the embroidery by ironing on interfacing to prevent fraying. Trim to fit and mount according to the manufacturer's instructions.
Stitch count 40x39 Design size 7.2 x 7cm (2% x 2%in)
Materials
14-count cream Aida
18 x 18cm (7 x 7in)
★
Tapestry needle size 24-26
★
DMC stranded cotton (floss), as listed in chart key ★
Lightweight iron-on interfacing
★
Plastic coaster 8.2cm (3%in) diameter (Framecraft CO31)
Coaster
IWork the design from the centre of the chart and the centre of the Aida over one block, using two strands of stranded cotton (floss) for full and three-quarter ' cross stitch and one strand for backstitch.
2When all stitching is complete, back the embroidery by ironing on interfacing to prevent fraying. Trim the embroidery to fit the coaster aperture and mount in the coaster according to the manufacturer's instructions.
Stitch count 38x43 Design size
7 x 7.8cm (2% x Sin)
Materials
14-count cream Aida 18 x 18cm (7 x 7in) ★
Tapestry needle size 24-26 ★
DMC stranded cotton (floss), as listed in chart key ★
Lightweight iron-on interfacing ★
Elm bowl 9cm (31/2in) diameter (Framecraft W4E)
Trinket Bowl
IWork from the centre of the chart and fabric over one block, using two strands of stranded cotton (floss) for full and three quarter cross stitch and then one strand for backstitch.
2Back the embroidery by ironing on the interfacing. Trim to fit the lid and mount according to the manufacturer's instructions.
By the moone we sport and play, With the night begins our day;
As we daunce, the dew doth fall;
Trip it little urchins all,
From A Midsummer-Night's Dream by William Shakespeare (1564-1616)
Stitch count 41 x 34 Design size 7.4 x 6.2cm (3 x 21/г!п)
Materials
14-count cream Aida 18 x 18cm (7 x 7in) ★
Tapestry needle size 24-26 ★
DMC stranded cotton (floss), as listed in chart key ★
Optional thin wadding (batting) ★ ..
Double-sided adhesive tape ★
Lightweight iron-on interfacing ★ Double-fold cream card with 8cm (314 in) aperture
Greetings Card
IWork from the centre of the chart and fabric over one block, using two strands of stranded cotton (floss) for all cross stitches and one for backstitch.
2Back the embroidery with interfacing, and trim so it is slightly larger than the card aperture. Fix in place with doublesided tape. For a slightly padded look, tape a piece of wadding (batting) behind the embroidery before sealing the card down (see page 30). See page 30 for making your own cards.
Stitch count 100x157 Design size 18 x 28.5cm (7!/a x 111Ain)
Materials 28-count cream evenweave 33 x 43cm (13 x 17in)
Tapestry needle size 24-26 ★
Journal Cover
IWork the design from the centre of the chart and fabric over two threads, using two strands of stranded cotton (floss) for full and three-quarter cross stitch and one strand for backstitch.
2Iron interfacing on to the back of the embroidery. Trim the fabric to within 2cm (%in) of the border and stick doublesided tape on the back to the edges of the
fabric and from corner to corner. Remove the tape backing and stick the embroidery on to the centre front of your journal.
3 Using more tape, apply velvet ribbon or other trimming over the edges of the embroidery and to the edges of the book, mitring corners neatly. Tuck a small piece of ribbon into the spine of the book to make a matching bookmark.
DMC stranded cotton (floss), as listed in chart key ★
Lightweight iron-on interfacing
★
A4-size book or journal 29.7 x 21cm (11 V2 x 8Znn) ready-covered or covered in a fabric of your choice
★
Velvet ribbon for trimming, 1.5cm (Viin) wide x 1.5m (1 УгуЬ) approx ★
Double-sided adhesive tape
Inspiration The large fairy scene would make a delightful framed picture.Try stitching it on a pastel-coloured evenweave or Aida, or one with a metallic sparkle in the weave.
Inspiration
Make a set of placemats using the paperweight design.
Stitch on 36-count linen, S repeating the design along the =- side or top edge, turning the =r motif to create different shapes. = Hem the mat or sew a line ==	2.5cm (1 in) inside the edges
= and fray the edges.

Fairy Silhouettes
DMC stranded cotton
Cross stitch	Backstitch
H 3799	—310
L. 53 variegated
In the waning summer light Which the hearts of mortals love, 'Tis the hour for elphin sprite, Through theflow’ry mead to rove.
From 'Charlie Among the Elves’ by Edward Knatchbull-Hugessen (1829-93)


Making Up
The designs in this book have been made up in many different ways, as described in the project instructions. There are also many 'Inspirations' throughout for other ways to use the versatile designs and display your work to best effect.
Making cards and mounting in cards -see page 30 and 31.
Mounting work as a framed picture -see page 34.
Making up a wall hanging -see page 9.
Making up as a drawstring bag -see page 79.
Making up as a sachet -see pages 67 or 74.
Making a Tassel
Cut a rectangular piece of stiff card, about 1.5cm (14in) longer than the desired size of the tassel. Choose a thread colour to match your project and wrap thread around the card to the desired thickness. Slide the threads off the card, slip a length of thread through the top and tie in a knot. Bind the top third of the tassel with another length of thread and trim all the tassel ends to the same length.
Perfect Stitching
Organize your threads before you start a project as this will help to avoid confusion later.
Put threads on an organizer (available from craft shops) and always include the manufacturer's name and the shade number.
★
Separate the strands on a skein of stranded cotton (floss) before taking the number you need, realigning them and threading your needle.
★
When stitching with metallic threads, work with shorter lengths, about 30cm (12in) to avoid tangling and excessive wear on the thread.
★
If using a frame, avoid placing a hoop over the design area as it will stretch the fabric and leave a mark that may be difficult to remove.
★
Plan your route carefully around a chart, counting over short distances wherever possible to avoid making mistakes.
★
Work your cross stitch in two directions in a sewing movement -half cross stitch in one direction and then cover those original stitches with the second row. This forms vertical lines on the back and gives somewhere to finish off raw ends tidily. For neat work the top stitches should all face the same direction.
★
If adding a backstitch outline, always add it after the cross stitch has been completed to prevent the solid line being broken.