


Теги: needlework embroidery
Год: 1995


Текст
Trista
Trista
Trlsta
'A's
Triski
ks irniyi io, kiqs
Irlstd
Trisfd
Trista
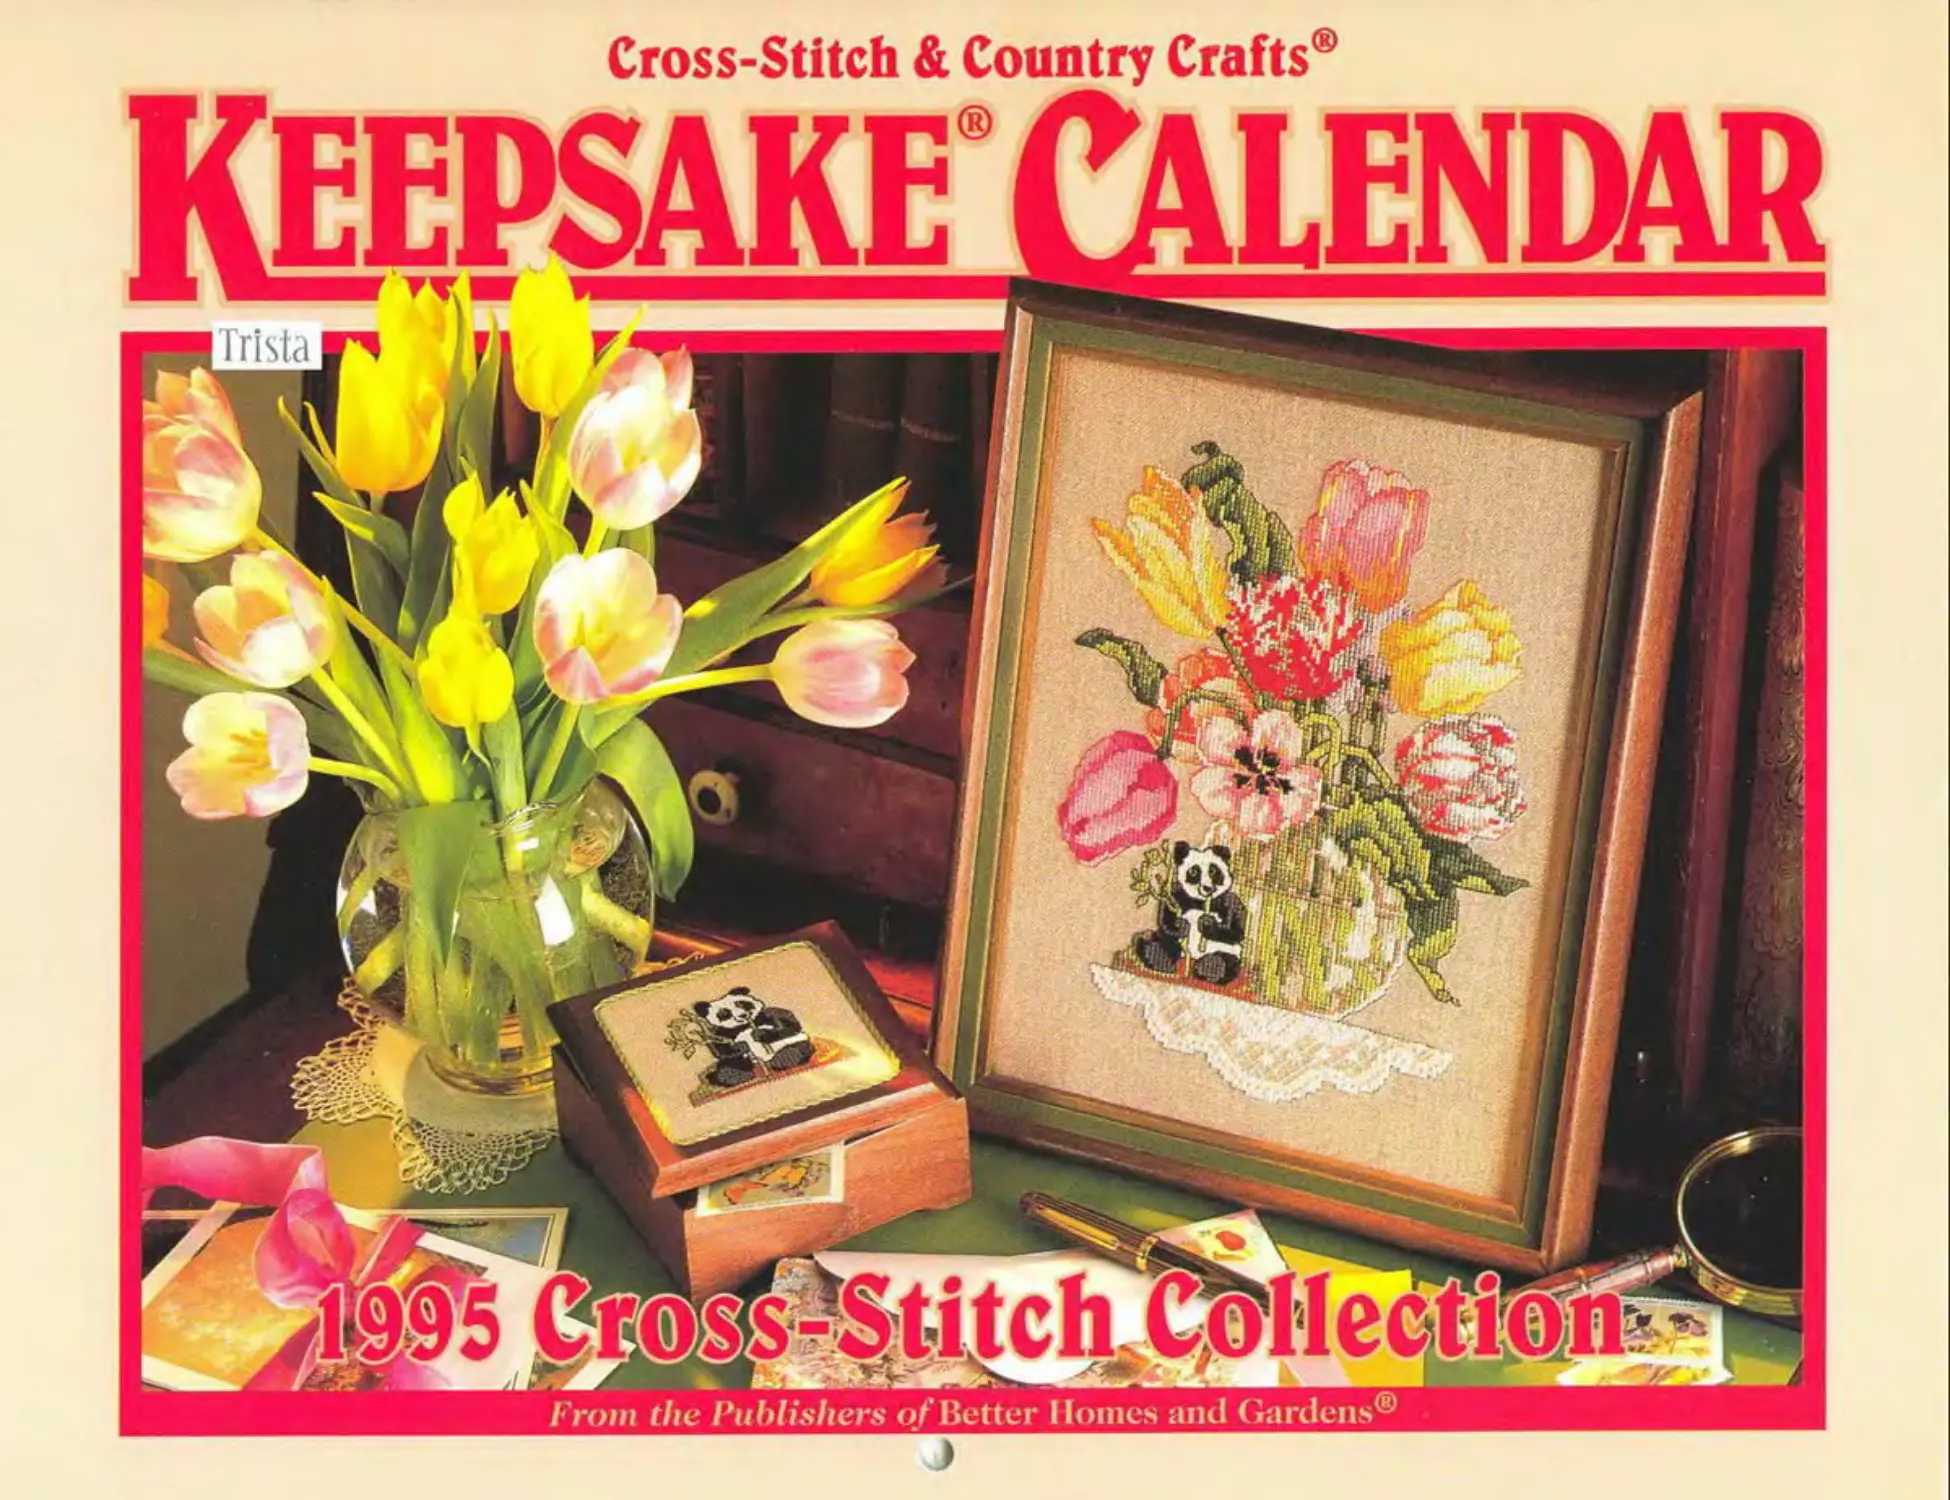
Dear Stitcher, From tulips to teddy bears, bunnies to berries. the 12 designs in this year's Keepsake Calendar are adorable. charming and.
often, unabashedly romantic. Among the 47 different projects you'll find many to tempt you. whether you're in the mood to stitch a quick little gift or an heirloom-quality picture.
You'll notice right away that the charts have a colorful new look. Were sure you'll find their beauty is more than skin deep—our unique combination of colors and symbols
makes them much easier to follow. And a feature of this year's calendar is the Buyer's Guide on page 41. which will help you locate everything you
need to duplicate our projects.
As we send this calendar to talented stitchers all over the country, we hope each of you will find pleasure in every moment you stitch with us.
Cordially,
Carol Dahlstom. Editor Cross-Stitch & Country Crafts
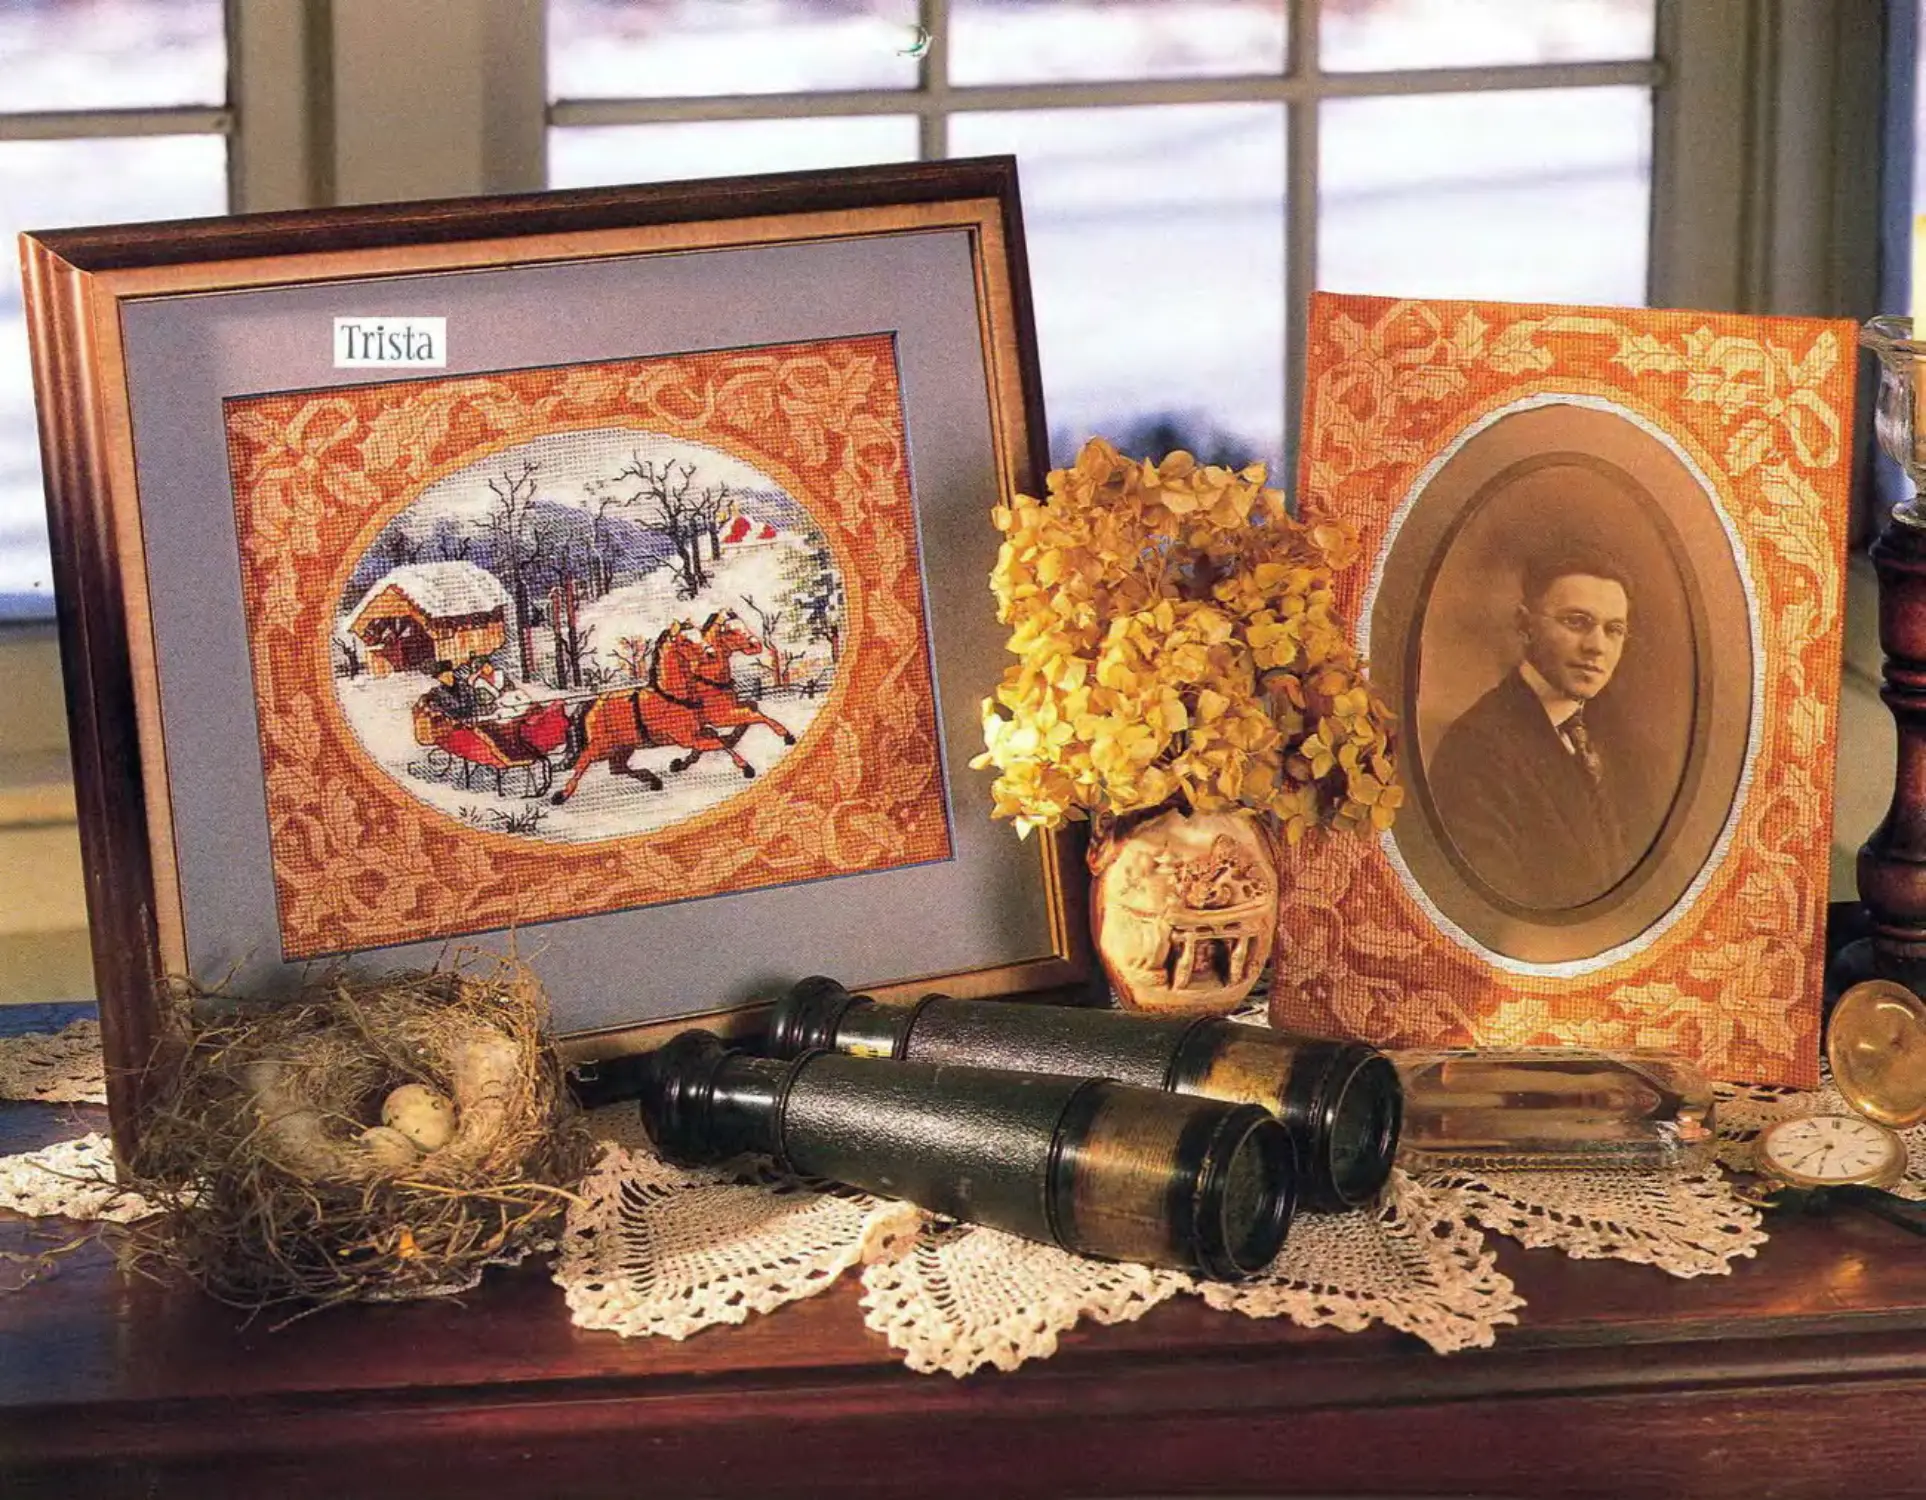
JANUARY
Chan on page 3
FOR FRAMED PIECE, you need: design centered on 16" x 13" White linen (Charles Craft. 28-ct., stitched over 2 threads): frame and mat as desired.
Finished stitched design is 9Я" wide x 1'/" high on suggested fabric.
MODEL: 3 strands of floss used for cross-stitch; additional floss skeins needed—434 (2), 435 (1). 436(1). 842(1).
FOR PHOTO-FRAME, you need: design* centered on 10" x 13" White linen (Charles Craft. 28-ct., stitched over 2 threads); 2 pieces cardboard. TA" x 9X" and ft/" x 9K"; taupe photo-mat with ЗИ" x 5И” oval opening; craft knife; Tacky glue.
* Stitch tan border from Winter
Sleigh Ride chart, omitting center scene.
MODEL: 3 strands of Hoss used for cross-stitch; additional floss skeins needed—434 (2). 435 (I). 436 (1). 842 (I).
1. Make a paper pattern for an oval that is %" smaller all around than the unstitched center oval on fabric. Center pattern on larger piece of cardboard, trace and cut out oval center.
2. Center stitched design over cut-out board; pull fabric edges to back of board, mitering corners, and glue to back.
3. Cut away unstitched center oval of fabric 7-" inside edge of cut-out on board. Clip curves almost to edge of board. Fold fabric to back of board and glue.
4. Glue smaller cardboard to back of photo-frame on three sides, leaving one side open. Slip mat and photo between boards.
Contents
You'll find the project ins RUCTIONS ON THE PAGES BELOW;
I January 2 July 7
Winter Sleigh Ride February 4 Teddy Bears’ Picnic August 7
Folk Valentine March 5 Summer's Berries September 9
Tulip Time April 5 Back-to-School Alphabet October 9
Basket of Bunnies May 5 Feline Halloween November 35
Mother and Child June 5 Harvest Home Sampler December 35
Year of Celebrations Antique Santas
>(>KS)
Designs:
Pholography: Photo Styling. Text: Book/Cover Design: Charts: Model Preparation:
Kooler Design Studio Bruce McCandless Dorinda Beaumont Howard R. Roberts Phoebe Adams Gaughan Barbara Seslok
Every effort has been made to ensure that the contents of this publication are accurate. We regret that we cannot be responsible for human error, printing mistakes or variations in individual workmanship. If you have any questions about the content, contact Meredith Press. 150 E. 52nd Street, NY. NY 10022.
All finished items herein are protected by copyright and may not be reproduced for any commercial use whatsoever without prior consent of Craftways® Corporation. No part of this calendar may be reproduced or used in any form without written consent of Craftways® Corporation.
© 1994. Better Homes and Gardens® Books. Des Moines. IA 50309-3023. All rights reserved. Canadian GST Reg. SRI 24987165. Printed in USA.
January Winter Sleigh Ride
Anchor DMC
9 Ц coral 351
13 dk. coral 349
20 dk. rust-red 3777
347 £7 It. rust 402
349 Q- rust 301
942 [/] It. beige 739
376 & 361 |~. mixed It. tans 842x2 8 437x1
362 8 376 [+] mixed med. tans 436x2 8 842x1
363 8 378 |x] mixed dk. tans 435x2 8 841x1
370 [ц| It. brown 434
353 |Q] med. brown 801
381 [•] dk. brown 938
858 It. gray-green 524
859 pf] med. gray-green 523
244 Щ leaf green 987
922 Д dk. gray-blue 930
176 [Ц med. blue 793
Produced by Meredith Press® New York City
235 |x| med. gray 414
273 |q| dk. warm gray 535
236 •] dk. cool gray 3799
403 g| black 310
01 | . I white
Half-cross (2-ply)
274 [x| palegray-aqua 928
848 |+| It. gray-aqua 927
850 |Oi metl- IW'aqua 926
176 [g| med. blue 793 Backstitch (2-ply)
381 / dk. brown 938
370 / It. brown 434
01 / white
403 / black 310
273 dk. warm gray 535
848 It. gray-aqua 927
Stitch count: 136 wide x 102 high
from page 2
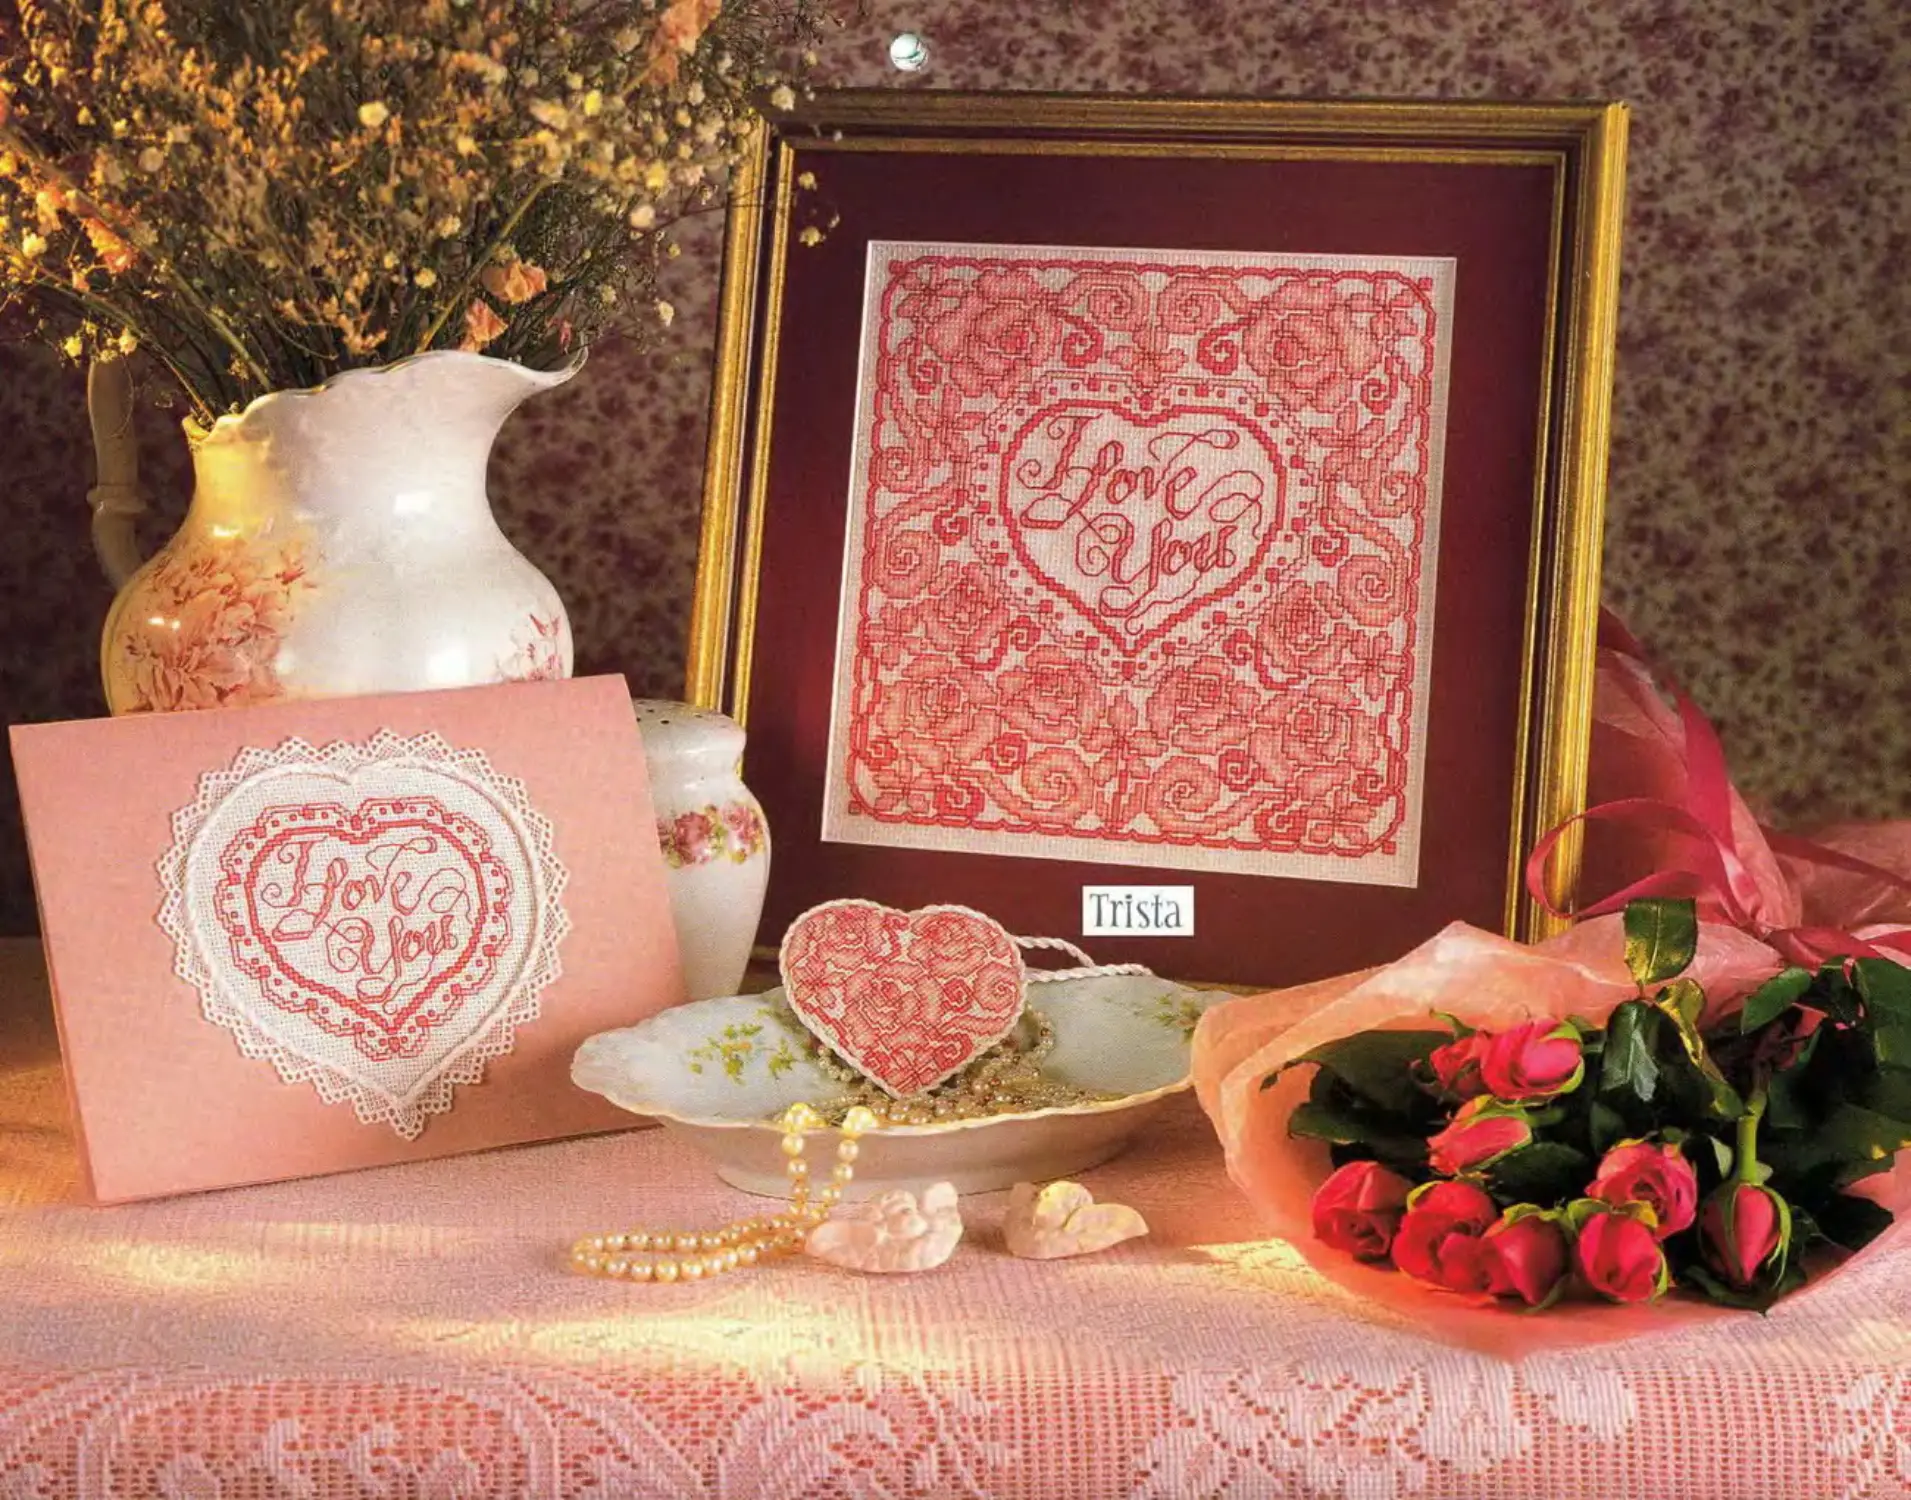
FEBRUARY
Chari below
FOR FRAMED PIECE, you need: design centered on !4"-sq. Antique White Aida 14 (Zweigart); frame and mat as desired.
Finished stitched design is 7%"-sq. on suggested fabric.
MODEL: 3 strands of floss used for cross-stitch: additional floss skeins needed—818 (2).
white lace edging; 14" of % "-dia. white twisted cord: craft knife: Tacky glue.
* Stitch center heart with scalloped border from Folk Valentine chart.
MODEL: 2 strands of floss used for cross-stitch.
1. Make a paper pattern that is the same heart shape as the stitched design and '/" larger all around. Center pattern on front of card, trace and cut out heart.
2. Center design under cut-out heart: trim excess fabric to make a neat rectangle and glue
3. Beginning at center top. glue lace to card around edge of cutout. Glue cord ends to
prevent fraying; glue cord around cutout on top of inner edge of lace.
(Zweigart); 5"-sq. lightweight fusible interfacing: 2X”-wide heart charm kit (Pal and Pam): 45" of %"-dia. white twisted cord; Tacky glue.* Stitch lower left quarter from Folk Valentine chart, omitting center heart with scalloped border as well as outer scalloped border.
1. Fuse interfacing to back of design fabric, following manufacturer's instructions.
2. Assemble heart charm following kit instructions and placing design fabric diagonally so that corner of chart is al point of
3. Cut 9” of cord and glue ends to prevent
fraying. Beginning at center top, glue cord
3326 (4). 899 (2).
FOR CARD, you need: design* centered on
around charm edge.
MARCH
Chart on page 6
FOR FRAMED PIECE, you need: design centered on 13" x 16" Light Mocha Quaker Cloth (Zweigart. 28-ct.. stitched over 2 threads); frame as desired.
Finished stitched design is TA" wide x 9'A" high on suggested fabric.
MODEL: 3 strands of floss used for cross-stitch.
FOR PANDA BOX, you need: design* centered on 7"-sq. Light Mocha Quaker Cloth (Zweigart, 28-ct., stitched over 2 threads); 4'Z"-sq. walnut box with 3K"-sq. design area (Sudbury House); 4"-sq. each of polyester fleece and medium-weight cardboard; 14" of %"-dia. sage-green twisted cord; glazier points; Tacky glue.
* Stitch panda on rock from Tulip Time chart. MODEL: 3 strands of floss used for cross-stitch.
1. Remove backing board from box lid. Trim fleece and cardboard the same size as backing board. Glue fleece to cardboard.
2. Center design over fleece; pull fabric edges to back of cardboard and glue.
3. Insert design unit and backing board in lid and secure with glazier points.
4. Glue cord ends to prevent fraying. Beginning at center top, glue cord around inner edge of design area on lid.
APRIL
Chart on page 8
FOR FRAMED PIECE, you need: design centered on 15"-sq. Antique White Jubilee (Zweigart, 28-ct. stitched over 2 threads); frame and mat as desired.
Finished stitched design is TA" sq. on suggested fabric.
MODEL: .3 strands of floss used for cross-stitch; additional floss skeins needed—ecru (I), 543(1), 842(1).
FOR PILLOW, you need: design centered on 12"-sq. Antique White Edinborough linen (Zweigart, 36-ct. stitched over 2 threads); % yd. unbleached muslin fabric; I l"-sq. polyester fleece: I 'A yds. It. blue fabric-covered cording; polyester fiberfill; sewing thread. MODEL: 2 strands of floss used for cross-stitch.
USE %" SEAM ALLOWANCE.
1. Trim design fabric to 11 "-sq. Baste fleece to wrong side of design fabric. From muslin cut an 11 "-sq. pillow back and 2 strips 6" x 40" for ruffle.
2. Pin and baste cording around right side of design fabric, with raw edges facing in the same direction, stitching line of cording just inside seam allowance, and ends of cord overlapping al bottom edge.
3. With right sides together, sew short ends of ruffle strips together to make a circle. Fold in half lengthwise, wrong sides together, and press.
4. Sew two rows of gathering stitches in seam allowance of ruffle. Fold into quarters and mark with pins.
5. With right sides together and raw edges aligned, pin ruffle to pillow front, matching marker pins to pillow comers. Gather ruffle evenly to fit sides of pillow, pushing some extra fullness to each comer to prevent corners from cupping. Pin ruffle toward pillow center to keep it out of scam. Baste ruffle to pillow front.
6. Pin pillow front to back with right sides together. Sew around all sides, leaving a 5" opening on one side. Turn pillow right side out.
7. Stuff firmly with fiberfill. Turn in raw edges on opening and slipstitch closed.
MAY
Chart on page 34
FOR FRAMED PIECE, you need: design centered on 11" x 13" Cream Pastel linen (Zweigart, 28-ct. stitched over 2 threads); 8” x 10" oval frame (Hickory Mountain) as desired. Finished stitched design is 6Z" wide x 814" high on suggested fabric.
MODEL: 3 strands of floss used for cross-stitch; additional floss skein needed—white (I).
Center child's name and birthdate in space provided on Mother and Child chart; work white cross-stitches of mother's apron to within 2 threads of lettering.
JUNE
Chart on page 36
GENERAL DIRECTIONS FOR PERSONALIZED GIFTS:
Refer to June photo for ideas for designs and color combinations. With pencil and graph paper, make a chart of words, names, numbers and motifs from Year of Celebrations chart. Find and mark horizontal and vertical center of your chart. Count stitches to determine the finished size of the design when stitched on your intended fabric. Use the following directions as a guide for your project.
FOR GRADUATION BOX, you need: design centered on 7"-sq. Cream Quaker Cloth (Zweigart, 28-ct., stitched over 2 threads); 5"-sq. oak box with ЗИ''-sq. design area (Sudbury House); 4"-sq. each of polyester fleece and medium-weight cardboard; glazier points; Tacky glue.
MODEL: 3 strands of floss used for cross-stitch. Follow directions for March Panda Box, above left.
FOR FABRIC LABEL, you need: design centered on 5"-sq. Ivory Aida 18 (Zweigart); I ball Ecru #8 pearl cotton (DMC).
MODEL: 2 strands of floss used for cross-stitch. Trim fabric into a rectangle, cutting 6 squares outside design area. With pearl cotton, work buttonhole stitch over outer 3 squares on all 4 sides of label.
FOR ALBUM COVER, you need: design centered on 7" x 5'A" Pink Aida 14 (Charles Craft); 7" x 5" photo album; 13" each /"-wide white lace edging and /"-wide pink novelty
braid; 1 piece cardboard 4" x TA"\ Tacky glue. MODEL: 3 strands of floss used for cross-stitch. Trim excess fabric and center design over cardboard; pull fabric edges to back of cardboard and glue. Glue design unit to center of album cover. Glue lace around design unit; glue braid around design unit on top of inner edge of lace.
FOR PLANT POKE, you need: design centered on ready-made Ivory linen oval (Daniel Enterprises. 28-ct., stitched over 2 threads); cardboard oval of same size; large bamboo skewer; Tacky glue.
MODEL: 3 strands of floss used for cross-stitch.
Glue stitched oval to front of cardboard and glue skewer to back.
FOR BABY PINCUSHION, you need: design centered on 5"-sq. White Aida 14 (Charles Craft); 5"-sq. white fabric; 13" of /"-wide white lace edging: polyester fiberfill; sewing thread.
MODEL: 3 strands of floss used for cross-stitch.
Trim design fabric and backing fabric to У/"-sq. Baste lace to design fabric with straight edge just inside %" seam allowance. Right sides together, sew front and back together on all sides, leaving a 1'/" opening on one side. Turn right side out, stuff firmly and slipstitch closed.
FOR KEY RING, you need: design centered on 5"-sq. White Aida 14 (Charles Craft); plastic key ring (Fond Memories).
MODEL: 3 strands of floss used for cross-stitch.
Follow manufacturer's instructions to assemble1 key ring.
FOR FRIENDSHIP PINCUSHION, you need: design centered on 7" x 4" Tea-dyed linen (Charles Craft, 28-ct.. stitched over 2 threads); 6/" x УА" med. blue fabric; 8" of /"-wide blue ribbon; polyester fiberfill; sewing thread.
MODEL: 3 strands of floss used for cross-stitch.
Trim design fabric to 6/“ x У/". Right sides together, sew front and back together on all sides, making a %" scam allowance and leaving a Iopening. Turn right side out. stuff firmly and slipstitch closed. Make ribbon bow and tack to center top.
FOR GIFT TAG, you need: design centered on scrap of 14-ct. fabric or perforated paper; scrap of cardboard: 8” of /"-wide ribbon; hole punch; Tacky glue.
MODEL: .3 strands of floss used for cross-stitch.
Glue design to cardboard and cut out tag close to stitching, shaping left edge in point, as shown. Punch hole near point and add ribbon tie.
FOR GREETING CARD, you need: design centered on 7" x 5" White linen (Charles Craft. 28-ct., stitched over 2 threads); greeting card with rectangular opening (Country Cross-Stitch): Tacky glue.
MODEL: 3 strands of floss used for cross-stitch. Center design in card opening and glue to inside.
to page 7
JULY
Chart on page 39
FOR BASKET COVER, you need: design centered on 9" x 7И" White Aida 14 (Zweigart); basket with handle, approximately 11" long x 7" wide x 7" deep; Xyd. red checked fabric; X yd. polyester fleece; I % yd. each 1 "-wide white pre-pleated or ruffled trim and white single-fold seam binding: И yd. red piping; 3 yds. of И''-wide red grosgrain ribbon; sewing thread.
Finished stitched design is 5%" wide x 4И” high on suggested fabric.
MODEL: 3 strands of floss used for cross-stitch.
USE И" HEM ALLOWANCE.
1. Make pattern for cover: Center the basket on a large piece of paper. Measure and mark a rectangle on each of the 4 sides of the basket that will just reach its top edge when folded up. Connect the outer corners on adjacent sides with diagonal lines (see diagram). Add '/" hem on all outside edges.
2. Cut pattern from checked fabric. Trim hem allowance from pattern and cut away the four triangular wedges at each corner. Cut the newly-shaped pattern from fleece. Center fleece on wrong side of fabric and baste.
3. Hem all edges of cover. Cut one piece each of pleated edging and seam binding to fit each straight side of the cover. Pin edging to wrong side of each hem. cover raw edges with seam binding and stitch close to both edges of seam binding to form a casing for ribbon.
4. Cut a rectangle of fleece the same size as design area on stitchery and baste to wrong side. Pin and baste piping around right side of design fabric, with raw edges facing in the same direction, stitching line on piping 3
tnreaos outsioe sincnea area, ana enas ot piping overlapping on bottom side: stitch. Turn raw edges of piping and fabric to wrong side and press.
5. Center applique on front of basket cover and stitch through all layers just inside piping. Cut ribbon into 4 pieces and insert in casings. Center basket on wrong side of cover and fold sides up. lucking corners in. Tie ribbon in a bow at each corner and trim ends.
FOR CAN COOLER, you need: design* centered on 12" x 6" White Aida 14 (Zweigart): Red Stitch-A-Cooler (Daniel Enterprises): -X yd. of И''-widc red grosgrain ribbon; Tacky glue.
* Stitch bottom half of Teddy Bears’ Picnic chart, omitting all partial images from the top half of the chart that extend below the center line. MODEL: 3 strands of floss used for cross-stitch.
Follow manufacturer's instructions to assemble cooler.
FOR PLACE MAT POCKET, you need: design* centered on 6" x 9” White Aida 14 (Zweigart); ready-made quilted red place mat; 1% yds. of /"-wide red grosgrain ribbon; red sewing thread.
* Stitch Bear with Magnifying Glass from Teddy Bears’ Picnic chart.
MODEL: 3 strands of floss used for cross-stitch.
1. Make a 1 "-deep hem on top of pocket, having fold of hem I %" above top of stitched design. Top-stitch It” from fold.
2. Keeping stitched design vertically centered, press raw edges to wrong side on remaining 3 sides to make a rectangle 4” x 6". Trim excess fabric'/" from folds.
3. Pin pocket to left side of place mat and topstitch around the sides and bottom 2 threads inside the edge.
4. Sew center of ribbon to wrong side of place mat at center of right-hand edge.
f UK l.l.NLD AINU 1 KltVllVlE-U BAMtf. 1. you need: design* centered on ready-made 4"-wide Aida 14 oval (Daniel Enterprises): basket with handle, approximately 8" long x 6" wide x 6" deep; yd. red checked fabric; И yd. polyester fleece; 1 yd. each 1 "-wide white prepleated or ruffled trim and white single-fold seam binding; 1 % yds. of И''-wide red grosgrain ribbon; sewing thread; Tacky glue. * Stitch Bear with Cake from Teddy Bears’ Picnic chart.
MODEL: 3 strands of floss used for cross-stitch. 1. Cut 2 rectangles of fleece to line basket, one to fit bottom and the other to wrap sides: glue inside basket. Line basket with fabric, pleating excess fullness evenly and trim the fabric so it extends 1" above edge of basket. Fold fabric around top edge of basket and glue to outside rim.
2. Fold seam binding around straight edge of pleated trim, enclosing raw edge: stitch. Glue prepared trim around outer rim of basket, concealing raw edges of fabric. Center ribbon on seam binding and glue so that ends overlap at center front of basket. Make a bow from remaining ribbon and glue to center front to cover join.
3. Cut a piece of fleece to match fabric center of stitched oval. Glue fleece to back of oval, then glue to front of basket.
AUGUST
Chart on page 38
FOR FRAMED PIECE, you need: design* centered on 14" x 10" Cream linen (Charles Craft, 28-ct., stitched over 2 threads); frame and mat as desired. Finished stitched design is 10” wide x 5X" high on suggested fabric.
* Position Cable Border from small chart 2 threads (one stitch) outside of finished Summer's Berries design. Repeat border to enclose design on all 4 sides.
MODEL: 3 strands of floss used for cross-stitch.
March Tulip Time
Anchor CMC
73 0 IL pink 963
52 |z] med. pink 957
54 [+| dk. pink 956
47 • red 321
38 [x| It. rose 899
77 |O] med. rose 961
42 [□] dk. rose 309
19 [] dk. red 304
20 • burgundy 816
60 [Z] It. sugar pink 605
66 |+| med. sugar pink 604
62 И dk. sugar pink 603
778 П pale peach 948
8 p| It. peach 353
328 [+] med. peach 3341
332 |Q| orange 946
335 Щ red-orange 606
275 |~T| cream 746
300 p] Pa,e yellow 745
301 Щ It. yellow 744
302 [x[ med. yellow 743
303 [O] dk. yellow 742
314 p] yellow-orange 741
313 [X] It. caramel 977
309 Щ med. caramel 976
355 • dk. caramel 975
264 [7] 9,een 3348
843 IZl 9'ay-green 3364
262 [□] me<l- gray-green 3363
862 [gj dk. green 934
869 p| It. gray-lavender 3743
870 |-P] med. gray-lavender 3042
871 |O| dk. gray-lavender 3041
88 [□] It. magenta 718
89 |<] magenta 915
830 |Z| Pa,e beige 822
388 It. taupe 3033
903 [g] med. taupe 3032
900 |x] pale warm gray 3024
8581 |O] It. warm gray 647
273 •] med. warm gray 646
236 [g] dk. cool gray 413
403 [] black 310
01 |T| white
Backstitch (2-ply)
44 P| maroon 814
59 p| rose-red 326
335 И red-orange 606
302 | | med. yellow 743
862 / dk. green 934
273 Z dk. warm gray 645
309 / med. caramel 976
403 / black 310
88 / color 917
01 white
Stitch count: 102 wide x 136 high
FOR RECIPE HOLDER, you need: design* centered on 5"-sq. Cream linen (Charles Craft. 28-ct.. stitched over 2 threads); heart-shaped tin recipe holder (Colonial Tinworks); 12” It. green piping: 4"-sq. each polyester fleece and cardboard; Tacky glue: sandpaper: hot glue gun.
* Stitch 2 left-hand strawberries with adjacent large 3-leaflet leaf and one flower from Summer's Berries chart.
MODEL: 3 strands of floss used for cross-stitch.
1. Make a paper pattern by tracing around inner flat area of tin heart. Use pattern to cut heart from fleece and cardboard. Center pattern on stitched design and cut out И" outside pattern.
2. Use Tacky glue to glue fleece to cardboard. Center design fabric on fleece and fold edges to back, clipping curves as
to page 9
April Basket of Bunnies
Anchor DMC
25 I •, II. pink 776
31 [/] med. pink 3708
54 [□] dk. pink 956
302 [3 yellow 743
264 [7] It. yellow-green 3348
256 p~| yellow-green 704
267 i+| med. yellow-green 3347
269 [] dk. yellow-green 3345
206 |Xj It. true green 955
204 ]Q] med. true green 913
230 [•] dk. true green 911
158 [Tj pale blue 775
144 |x| It. blue 800
130 [□] med. blue 799
131 dk. blue 798
108 0 lavender 210
86 |±j 3608
111 Bl violet 208
942 0 beige 739
372 l+l II. tan 738
361 lx| tan 437
363 [Ql dk. tan 435
It. brown 975
387 П pale taupe 543
391 [/| It. taupe 842
392 0 taupe 841
832 Щ dk. taupe 840
393 [>] taupe-brown 839
905 Д dk. taupe-brown 838
387 [Q| ecru
933 [". | parchment 951
376 [+| pale rose-brown 950
379 И- rose-brown 3064
936 Д med. rose-brown 632
391 |/| It. taupe 842
392 [x] taupe 841
01 T white
341 Ц dk.rust 918
339 |jgj rust 920
403 Д black 310
Backstitch (2-ply)
102 / purple 550
59 / red 326
246 / forest green 895
132 / royal blue 797
905 / dk. taupe-brown 838
403 / black 310
Stitch count: 102 wide x 102 high
necessary for a smooth edge. Glue fabric edges to back of cardboard.
3. Beginning and ending at lop of heart, glue piping to edge of fabric-covered heart.
4. Roughen center of tin heart with sandpaper. Hot-glue design unit to tin.
FOR NAPKIN, you need: design* centered 17" inside one corner of l9"-sq. Cream linen (Charles Craft, 28-ct.. stitched over 2 threads); cream sewing thread.
* Stitch 4 left-hand raspberries with adjacent leaves from Summer's Berries chart.
MODEL: 3 strands of floss used for cross-stitch.
1. Prepare napkin before working design: Machine stitch along a thread I" from edge of fabric on all 4 sides. Pull a thread 7" outside stitching on all 4 sides and trim fabric along pulled thread. Pull remaining threads up to stitching to make fringe.
2. Check design placement and work cross-stitch.
FOR JAR LID. you need: design* centered on 5"-sq. Cream linen (Charles Craft, 28-ct., stitched over 2 threads); canning jar with screw-band lid: 3"-sq. polyester fleece: 10” It. green /"-wide ribbon; Tacky glue.
* Stitch leaves and 2 gooseberries from upper right corner of Summer's Berries chart.
MODEL: 3 strands of Hoss used for cross-stitch. 1. Cut fleece into a circle the size of the inside of the opening of the lid band and glue to the center of the flat lid.
2. Apply glue to the outside edge of the flat lid that is not covered by the fleece, center the design fabric over the lid and press in place around the edge. Trim fabric even with edge of lid. 3. Glue ribbon around rim of screw-band.
FOR TOWEL, you need: design* centered on Ecru terry tea towel with Aida 14 band (Charles Craft).
* Stitch strawberries from Summer's Berries chart.
MODEL: 3 strands of Hoss used for cross-stitch.
FOR RECIPE BOOK, you need: design* centered on ready-made Ivory 4"-wide Aida 14 oval (Daniel Enterprises); fabric-covered recipe organizer; 5"-sq. fusible interfacing; I yd. of %"-dia. twisted cord: Tacky glue.
* Stitch blackberries from Summer's Berries chart.
MODEL: 3 strands of Hoss used for cross-stitch. 1. Cut an oval of interfacing the same size as fabric center of design oval and fuse to back of
2. Beginning at center bottom, lace cord through holes in lace edge of oval. Tie cord in bow and knot ends to prevent fraying.
3. Glue back of design unit to front of recipe book, leaving lace edge free.
SEPTEMBER
Chan on page 40
FOR ALPHABET SAMPLER, you need: design centered on 15” x 12" White Aida 14 (Zweigart); I yd. red cotton fabric: % yd. each green anil yellow cotton fabric: 20" x 16"
yds. of /"-wide green ribbon; 22"-long X"-dia. wood dowel; yellow, pink, green and black acrylic paint; craft knife, sandpaper, paint brush; sewing thread.
Finished stitched design is 954" wide x 714" high on suggested fabric.
MODEL: 3 strands of Hoss used for cross-stitch.
USE SEAM ALLOWANCE.
1. Keeping design centered, trim design fabric to 10/" x 13". From yellow fabric, cut two 2” x 1054" and two 2" x 15" strips. From green fabric, cut two 2" x 12/" and two 2" x 17" strips. From red fabric, cut two 254” x 14/" and two 277' x 19/" strips. From red fabric, cut a 17" x 19/" rectangle for backing and а 454" x 28" strip for hanging tabs. From Неесе, cut a rectangle 17" x 19/".
2. With right sides together, pin and sew the 2 shorter yellow strips to opposite sides of design fabric and press seams away from center. In the same way. join the 2 longer yellow strips to the top and bottom of design fabric. Then join the shorter green strips to sides of the design unit, the longer green strips to the top and bottom. Finally join the shorter red strips to sides, the longer red strips to the top and bottom.
3. Baste the fleece rectangle to the wrong side of the design unit. With right sides together, fold the tab strip in half lengthwise and sew the long edges together. Turn right side out and press with scam at center back. Cut into 4 tabs each 7"-long and fold each in half crosswise with seam on inside.
4. Pin the labs to the right side of the top edge of the design unit, having raw edges matching and folds of tabs facing in toward center of design. Place the outer 2 tabs I54" from side edges of the piece (outer edges aligned with outer edges of green strips) and 2 tabs spaced evenly between.
5. With right sides together pin backing to design unit on all edges. Beginning 3" from center bottom, sew around through all layers /" from raw edges and ending 3" before center bottom. Clip comers diagonally and trim fleece 54" from scam.
6. Turn right side out and push corners out. Press. Turn in seam allowance on 6" opening and slipstitch closed. Sew a button centered in the red strip below each tab.
7. Carve one end of the dowel into a pencil point and sand smooth. Paint dowel to resemble a yellow pencil with a pink eraser, a black lead and green stripes at the eraser end. as shown in photo.
8. Slip pencil through tabs and hang from green ribbon.
FOR HAT, you need: design* centered on 4"-sq. While Aida 18 (Zweigart); cap; 3/" x 2/ " oval cut from lightweight cardboard; 12" red 54"-dia. cord; Tacky glue; sewing thread.
* Stitch 2 initials from Back-to-School Alphabet. MODEL: 2 strands of Hoss used for cross-stitch. I. Center design fabric on cardboard and fold edges to back, clipping curves as necessary for a smooth edge. Glue fabric edges to back of cardboard.
2. Slipstitch design unit to center front of hat.
3. Glue ends of cord to prevent fraying; slipstitch cord around edge of design unit.
run you neeu: uesign
centered on 4"-wide ready-made White Aida 14 oval (Daniel Enterprises); canvas lunch bag (Paintable by Janlynn); 14" purple !4"-dia. cord; Yellow fabric dye (available at supermarkets): Tacky glue.
* Stitch 2 initials from Back-to-School Alphabet.
MODEL: .3 strands of Hoss used for cross-stitch.
1. Follow manufacturer’s instructions to dye lunch bag with yellow dye.
2. Glue design unit to center front of bag.
3. Glue ends ofcord to prevent fraying: glue cord around edge of design unit.
FOR PENCIL CASE, you need: design* centered on 8" x 4" White Aida 18 (Zweigart): zippered case; 8" x 4" rectangle each lightweight cardboard and red felt; Tacky glue. * Stitch name from Back-to-School Alphabet. MODEL: 2 strands of floss used for cross-stitch. 1. Cut cardboard into a rectangle 6 threads larger on all sides than the finished stitched area. Round the corners.
2. Center design fabric on cardboard and fold edges to back, clipping curves as necessary for a smooth edge. Glue fabric edges to back of cardboard.
3. Glue design unit to center of felt. Trim felt 77' larger than design unit.
4. Glue fell-backed design unit to pencil case.
FOR NOTEBOOK, you need: design* centered on 9" x 6" White Aida 18 (Zweigart); looseleaf notebook; 9" x 6" rectangle lightweight cardboard: 24" each red and purple 54"-dia. cord: Tacky glue.
* Stitch 2-line motto or name from Back-to-School Alphabet.
MODEL: 2 strands of Hoss used for cross-stitch. 1. Cut cardboard into a rectangle 9 threads larger on all sides than the finished stitched area. Round the corners.
2. Center design fabric on cardboard and fold edges to back, clipping curves as necessary for a smooth edge. Glue fabric edges to back of cardboard.
3. Glue design unit to front of notebook.
4. Glue ends of cords to prevent fraying. Glue red cord around design unit; then glue purple cord around red cord.
FOR PENCIL CADDY, you need: design* centered on 12" x 6" White Aida 14 (Zweigart); Create-A-Caddy (Eagle Affiliates): Tacky glue.
* Stitch "A" through "F" of Back-to-School Alphabet chart, arranging the letters to ascend and descend so they occupy the entire height of the caddy design area.
MODEL: 3 strands of floss used for cross-stitch. Follow manufacturer's instructions to assemble caddy.
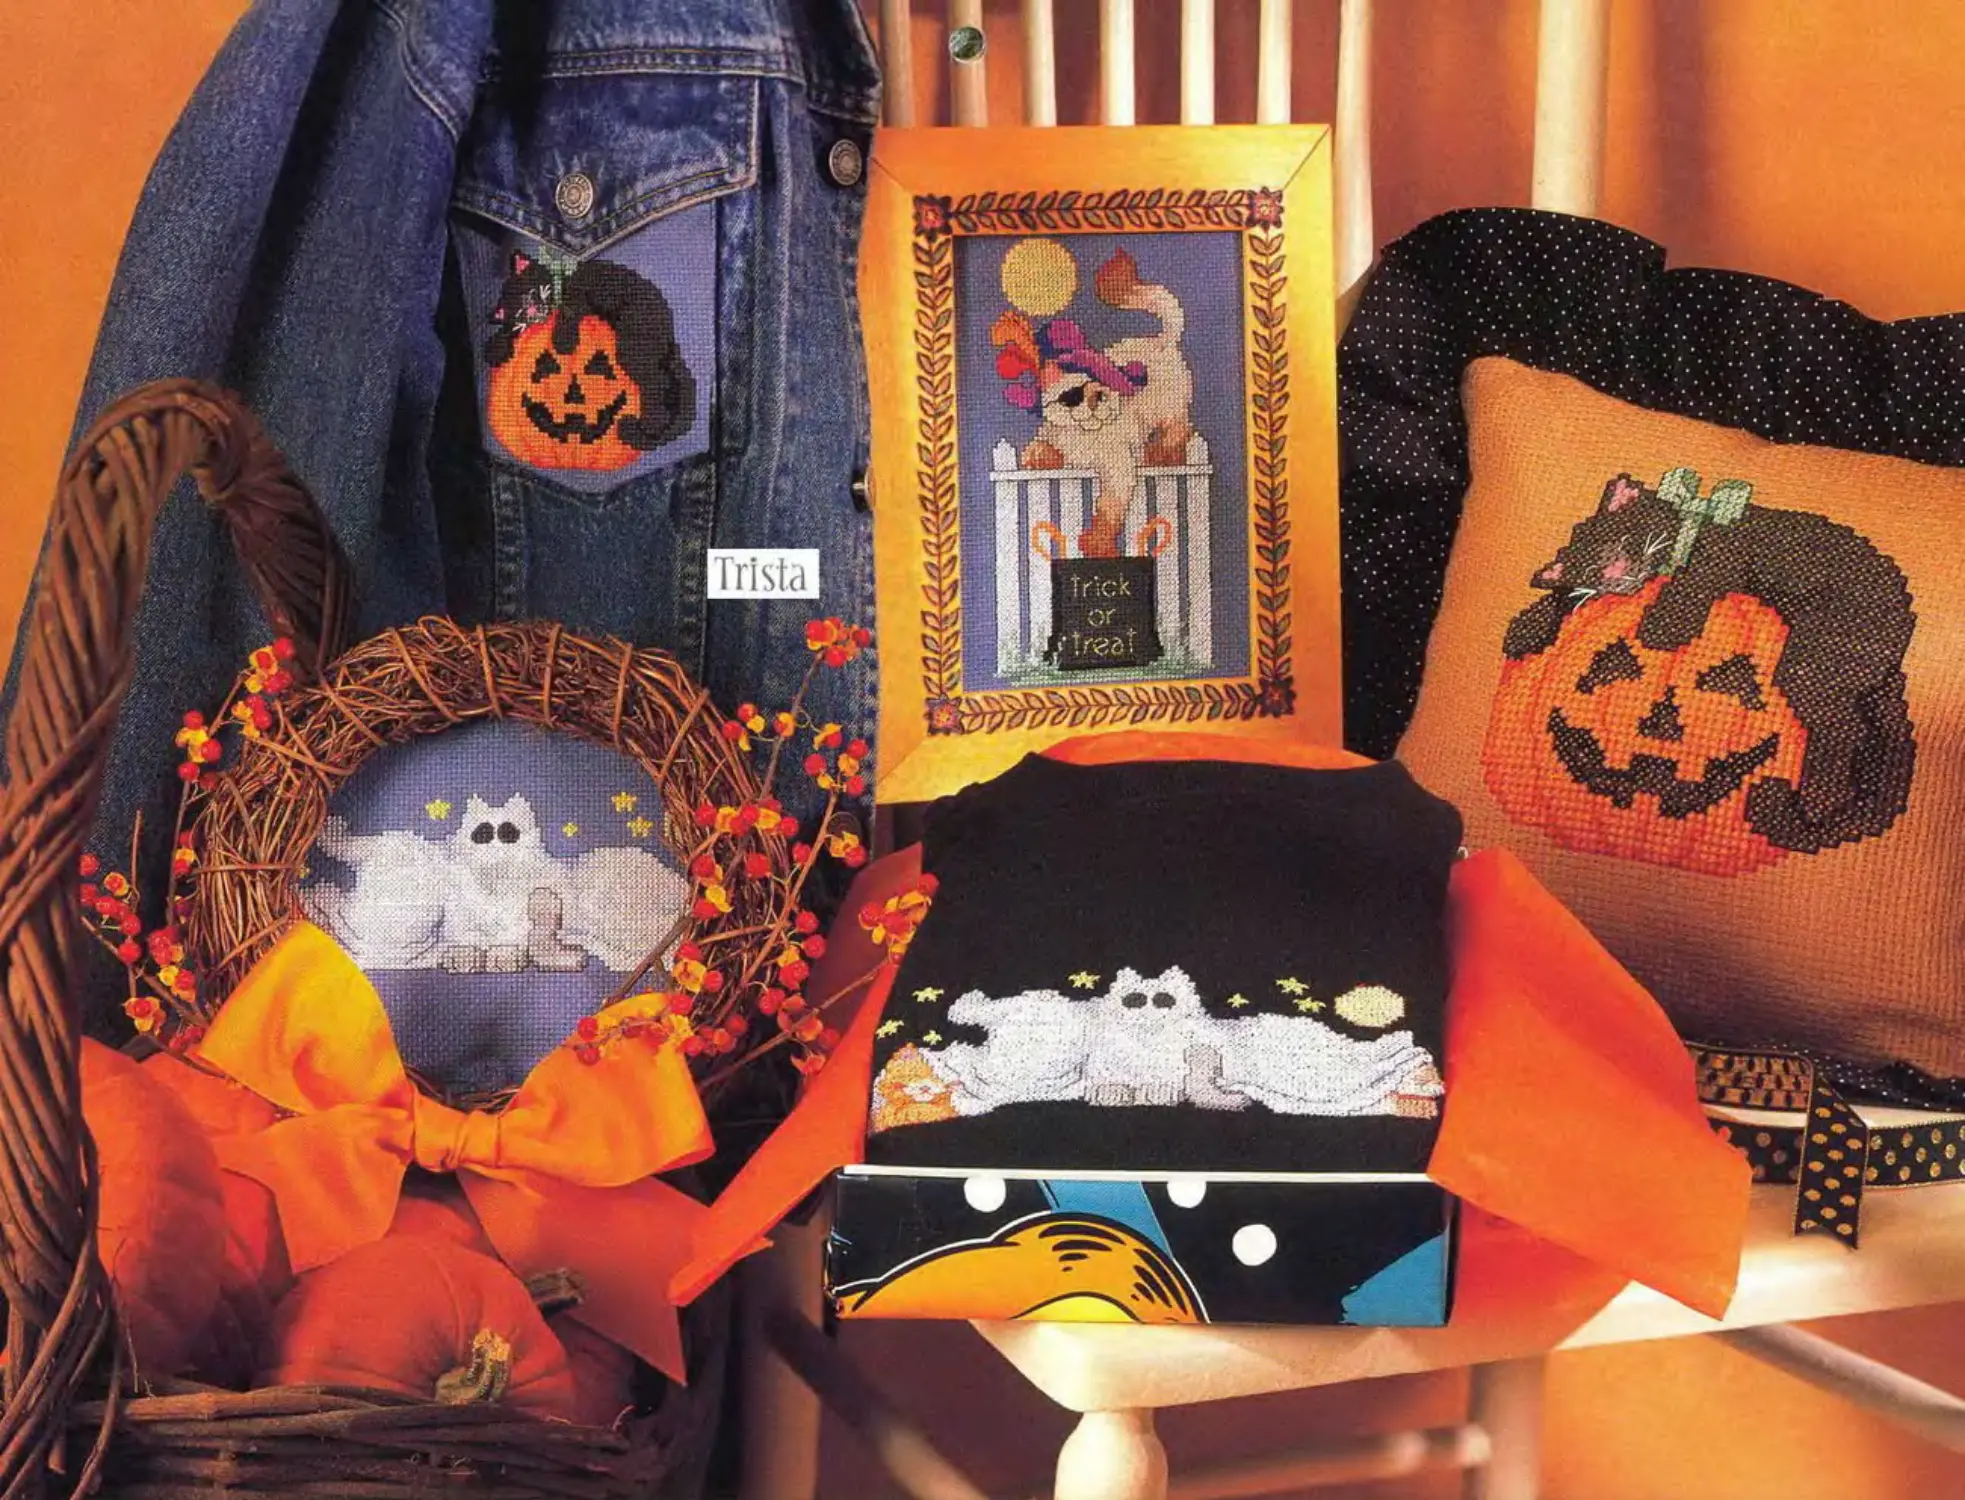
OCTOBER
Chart on page 36-37
FOR FRAMED PIECE, you need: design* centered on 8" x 10" Denim Blue Aida 14 (Wichelt); frame as desired.
to page 35
from page 9
Finished stitched design is ЗИ" wide x 6Я" high on suggested fabric.* Stitch Pirate Cat from Feline Halloween chart.
MODEL: 3 strands of floss used for cross-stitch; additional floss skein needed—white (1).
FOR PILLOW, you need: design* centered on ready-made Tan pillow with black-and-white pin-dot ruffle (Adam Original, 7-ct.). * Stitch Pumpkin Cat from Feline Halloween chart.
MODEL: 6 strands of floss used for cross-stitch; additional floss skeins needed—310(1), 722 (2), 3799 (2).
FOR SWEATSHIRT, you need: design* centered on 9" x 4" Blue Line waste canvas (Zweigart. 14-ct.); black sweatshirt.
* Stitch Ghost Cats from Feline Halloween chart.
MODEL: 3 strands of floss used for cross-stitch; additional floss skein needed—white (1). 1. Center waste canvas on chest of sweatshirt and baste in place.
2. Stitch design.
3. Remove basting threads. Follow manufacturer's instructions to remove waste canvas.
FOR WREATH, you need: design* centered on 1 l"-sq. Denim Blue Aida 14 (Wichelt); 9"-dia. embroidery hoop; grapevine wreath with inside dia. of 9"; 1 yd. of 2Z"-wide orange ribbon; a few sprays of bittersweet or other dried material; Tacky glue.
Finished stitched design is 7" wide x 2'/" high on suggested fabric.
* Stitch Ghost Cats from Feline Halloween chart.
MODEL: 3 strands of floss used for cross-stitch; additional floss skein needed—white (1). 1. Center design in the hoop and glue edge of hoop to back of wreath.
2. Make a ribbon bow, notch ends and glue to center bottom of wreath.
3. Insert sprigs of bittersweet or other decorative material.
FOR POCKET EMBLEM, you need: design* centered on 7"-sq. Denim Blue Aida 14 (Wichelt); sewing thread.
May Mother and Child 204 med. green
Anchor 0MC 928 и It. aqua
73 □ pale pink 963 186 и aqua
75 0 pink 3354 187 s teal
76 s rose 962 158 и pale blue
69 dk.rose 3350 144 ЕЕ It. blue
778 pale flesh 948 978 s med. blue
6 0 flesh 754 979 • dk. blue
868 s tan 758 342 □ It. lilac
275 It. yellow 746 110 0 lilac
300 0 yellow 745 98 0 dk. lilac
887 l+l It. gold 676 881 в peach
206 0 It. green 955 347 I3 It. rust
339 S rust
913 352 s dk. brown 300
747 400 и gray 317
959 403 SI black 310
958 01 • white
775 Backstitch (2-ply)
3325 69 / dk. rose 3350
322 187 / teal 958
312 212 / green 561
211 978 / med. blue 322
209 352 / dk. brown 300
553 936 / rose-brown 632
945 400 / gray 317
922 403 / black 310
920 Stitch count: 92 wide x 120 high
Finished stitched design is ЗИ" sq. on suggested fabric.
* Stitch Pumpkin Cat from Feline Halloween chart.
MODEL: 3 strands of floss used for cross-stitch; additional floss skeins needed—722 (1), 3799(1).
1. Make a paper pattern the same shape as, but smaller than, the jacket pocket. Center pattern on design fabric, pin in place and cut out emblem%" outside pattern.
2. Fold fabric to wrong side along edges of pattern and press. Remove pattern.
3. Slipstitch emblem to pocket.
NOVEMBER
Chart on page 42
FOR FRAMED PIECE, you need: design centered on 10" x 14" Ivory Aida 14 (Zweigart); mat and frame as desired.
Finished stitched design is 5И" wide x 9J4" high on suggested fabric.
MODEL: 3 strands of floss used for cross-stitch.
FOR POTHOLDER, you need: design* centered on top half of Ecru Kitchen Mate potholder (Charles Craft).
* Stitch top band (jam jars) from Harvest Home Sampler chart.
MODEL: 3 strands of floss used for cross-stitch.
FOR TOWEL, you need: design* centered on Aida 14 insert band of Ecru Estate Towel (Charles Craft).
* Stitch bottom band (com) from Harvest Home Sampler chart, centering bowl of popcorn with 2 ears of com on either side. MODEL: 3 strands of floss used for cross-stitch.
FOR CONTAINER COVER, you need: design* centered on Aida 10 insert band of Lt. Blue Stripe small container cover (Adam Original).
* Stitch acorn-and-squirrel band from Harvest Home Sampler chart.
MODEL: 4 strands of floss used for cross-stitch.
FOR NAPKIN TIE, you need: design* centered on scrap Ivory Aida 14 (Zweigart); scrap red felt; И yd. of %"-wide green grosgrain ribbon; scrap fusible paper-backed web.
* Stitch 2 individual apples from Harvest Home Sampler chart, spacing them 1" apart on fabric.
MODEL: 3 strands of Hoss used for cross-stitch. 1. Fuse web to back of design fabric, following manufacturer's instructions.
2. Remove paper backing. Sandwich each end of the ribbon between a design unit and a scrap of felt; fuse.
3. Trim fabric and felt close to stitching.
DECEMBER
Chart on page 43
FOR FRAMED PIECE, you need: design centered on 14" x 12" Tea-dyed linen (Charles Craft, 28-ct., stitched over 2 threads); mat and frame as desired.
Finished stitched design is 9J4" wide x 7%" high on suggested fabric.
MODEL: 3 strands of floss used for cross-stitch.
FOR ORNAMENTS, you need: design* centered on 8"-sq. Tea-dyed linen (Charles Craft. 28-ct„ stitched over 2 threads); 8"-sq. red felt; 1 additional skein red floss; 1 yd. gold metallic thread; 6" red %"-wide ribbon; approx. % yd. of %"-dia. Christmas novelty cord; 8"-sq. paper-backed fusible web: Tacky glue.
* Stitch one of the 7 largest santas from die Antique Santas chart.
MODEL: 3 strands of floss used for cross-stitch. 1. Make an appropriately-shaped (round, oval, triangle, tear-drop, arch-shape, pentagon, etc.) pattern that is '/•" larger on all sides than the finished stitched design. Cut pattern from fusible web.
2. Center paper-backed web on wrong side of design unit and fuse according to manufacturer's instructions. Trim excess fabric from design unit %" outside web. Remove paper backing; turn and fuse %" of fabric to wrong side on all edges.
3. Make one tassel for center bottom (or 2 tassels for bottom comers): Remove bands from floss skein and cut off one (or 2) 6" lengths. Tie top (and bottom) of skein with 6" pieces and bind tassel(s) with gold diread '/>" below tie. Cut skein in half and trim tassels to approx. 2".
4. Position tassels at lower edge of design unit and center unit on felt with tassel ties sandwiched between the two layers. Fuse design unit in place.
5. Apply glue to wrong side of edges of design unit and glue to felt. Glue ends of cord to prevent fraying and glue cord to felt around design unit. Trim felt to shape %" outside cord. Make a ribbon loop and glue ends to back of ornament at center top.
35
Trlsta
June Year of Celebrations
Anchor DMC
25 j-~] pink 776
38 Ш <lk-P'nk 899
47 i^| red 321
22 dk.red 815
323 It. orange 722
324 |O] med. orange 721
326 [Й| dk. orange 720
295 QU yellow 726
307 [/] Sold 783
242 X] med. green 989
246 Щ dk. green 986
168 |/| aqua 519
169 |O] med. teal 518
170 Щ teat 517
129 It. blue 809
131 И med. blue 798
132 g| royal blue 797
108 0 lavender 210
110 ixj lilac 209
69 iQ] raspberry 3350
881 |^| pale peach 945
868 It. salmon 758
9575 [0] salmon 356
5975 И sienna 355
361 0 tan 437
370 |O| brown 434
900 0 It. gray 648
273 [O] med. gray 645
382 [] dk. brown 3371
01 И white
Backstitch. Lazy Daisy (2-ply)
22 / dk. rod 815
307 gold 783
246 /Р dk. green 986
132 / royal blue 797
170 /Р teal 517
111 /Р purple 208
69 /Р raspberry 3350
5975 ^sienna 355
273 /Р med. gray 645
382 / dk. brown 3371
French knots
25 pink 776
38 • dk.pink 899
01 white
Anchor ОМС
26 [T| pink 894
11 g coral 350
19 |Q] dk. red 304
323 [/| II. orange 722
324 |+] orange 721
300 [/] II. yellow 745
209 0 II. green 563
210 Щ green 562
158 p| It. blue 775
177 |e| royal blue 792
96 И lavender 554
98 violet 553
276 0 oil-white 3770
376 0 It. taupe 842
379 |+] taupe 840
936 0 brown 632
231 p| It. gray 453
236 Щ dk. gray 3799
403 [jj] black 310
01 |~- | white
Backstitch (2-ply)
349 / rust 301
209 / It. green 563
150 / navy 336
380 / dk. brown 838
403 / black 310
301 yellow 744
Stitch count: 49 wide x 93 high
October Feline Halloween—Pumpltin Cat
Anchor DMC
26 p| pink 894
323 El II. orange 722
В
339
209
210
400
403
med. gray dk. gray black
orange
26 pink
339 / rust
Anchor DMC
26 0 pink 894
347 p] It. rust 402
338 |Q] med. rust 922
275 p~| cream 746
300 0 It. yellow 745
301 Щ yellow 744
158 0 It. blue 775
129 Щ med. blue 809
276 0 off-white 3770
378 [Q] taupe 841
936 [Xj brown 632
398 p It. gray 415
235 [x] med. gray 414
236 |«| dk. gray 3799
Backstitch (2-ply)
352 / dk. rust 300
979 / indigo blue 312
360 / dk. brown 839
236 / dk.gray 3799
Stitch count: 99 wide x 35 high
i
I s s s 8 ? j . I i Hui-° s -° ° ° s \\\\\s
i I s a h d
s S s i d s
□SfflHSS
§ a § £ a s s?
Й ’ °
i t
July Teddy Bears’ Picnic
Anchor
60
It. pink
54
bright pink
S? S io 3 s
9046
300
302
206
256
239
Diagram for Basket Cover
246
□ и □
0 s
bright red
It. yellow
yellow
It. green
666
745
yellow-green 704
01
□
dk. green
pale blue
168
It. sea-blue
986
519
130
med. blue
169
med. sea-blue518
979
denim blue
312
86
101
H
red-violet
violet
3608
398 [7] II. gray 415
235 [+] med. gray 414
403 [] black 310
933 □ it. flesh 951
347 [O] tan 402
338 [□] It. rust 922
942 [/] ivory 739
905 I#] taupe-brown 839
360 [] dk. brown 898
378 [x] taupe 841
Backstitch (2-ply)
352 / dk. rust 300
236 / dk. gray 413
42 / rose 309
239 / green 702
101 / violet 552
979 / denim blue 312
403 / black 310
360 / dk. brown 898
Stitch count: 82 wide x 65 high
39
1
E
e
e
E
E
s
8 ?
§S
December Antique Santas
Anchor № ffl
DMC
351
13
897
72
4146
881
895
926
886
887
907
343
dk. coral
dk. red
347
221
BUYER'S GUIDE
Ask your needlework retailer to contact the following manufacturers to order the items you want.
□ □ElgJLI
816
921
s □ 0 ffi в 0 ffl 0 0 El 0
deep wine
flesh
dk. flesh
salmon
parchment
pale gold
med. gold dk. gold
It. gray-blue
denim blue
282
900
902
945
3773
3712
712
677
676
680
932
3750
S S
S
8581
273
832
Adam Original
7471 Lamar Avenue South Cottage Grove. MN 55016 612-459-6793
Anchor Division of Coats and Clark Consumer Service
P.O. Box 27067
Greenville. SC 29616 803-281-5533
Charles Craft Consumer Service P.O. Box 1049 Laurinburg, SC 28353 910-844-3521
Colonial Tin Works P.O. Box 8827 Greensboro, NC 27419 800-433-5054
med. gray-blue 931 pale blue
3753
□ 0 E 0
В H 0 ffl 01
0 и
It. gray
648
med. gray dk. gray
646
645
612
Country Cross-Stitch 1937 Raymond Diehl Road Tallahassee, FL 32308 904-385-9538
DMC Corporation 10 Port Kearny Bui Idina South Kearny. NJ 07032 201-589-0606
I
382
3371
dk. brown
a S
I i !
\ >< • + о \insig
S 8
3
i
a
889
209
dk. tan
It. green
610
563
§ Я
S
210
212
879
med. green
dk. green
pine green
562
561
500
Daniel Enterprises P.O. Box 1105 Laurinburg, SC 28352 910-277-7441
8
S
8
362
370
It. brown
med. brown
chocolate
436
434
801
Eagle Affiliates 505 Manor Avenue Harrison, NJ 07029 201-482-1222
I f
|
264
S
ИМЕН»
242
244
Backstitch (2-ply)
382
E
3
8
887
879
E
o§.S.= =S.E^S
\ + \ • \ X I: •
§ § о
It. yellow-green 3348
It. leaf green
989
med. leaf green 987
Fond Memories 1 Terminal Way Norwich. CT 16360 203-887-4789
dk. brown
med. gold
pine green
3371
676
500
Straight Stitch. Lazy Daisy
210 (x2) plus 879 (xl) /£> mixed greens 562 (x2) plus 500 (x1)
382 dk. brown
French Knots
13 ф dk. coral
01 white
382 ф dk. brown
Stitch count: 136 wide x 102 high
3371
347
3371
Hickory Mountain Frames
P.O. Box 278
Reidsville. NC 27323 910-349-2500
Janlynn Corporation
P.O. Box 51848
Indian Orchard. MA 01151
800-445-5565
Pat and Pam
P.O. Box 5008
Lubbock, TX 79408 806-792-0844
Sudbury House P.O. Box 895 Old Lyme. CT 06371 203-739-6951
Wichclt Imports RR I
Stoddard. WI 54658
608-788-4600
ZweigartZIoan Toggilt. Ltd. 2 Riverview Drive Somerset, NJ 08873 908-271-1949
41
Home Sampler
i H
DMC
pink 893
335 Щ orange-red
9046 |j§| red
9Й dk-red
301 [_-j yellow 744
264 [/| It. green 3348
267 [+] med. green 3347
[•I dk. green 3345
169 It. sea-blue 518
170 med. sea-blue 517
148 • dk. sea-blue 311
975 Щ palegray-blue 3756
343 It. gray-blue 3753
920 Д med. gray-blue 932
921 Wedgewood blue 931 10 3 med. coral 351
13 Щ dk. coral 349
313 |/| It. butterscotch 977
309 |x[ med. butterscotch 976
351 [®| dk.rust 400
347 g| It. rust 922
339 |Q| med. rust 920
14] burnt orange 900
403 [] black 310
01 p | white
Backstitch (2-ply)
13 / dk. coral 349
43 / dk. red 498
309 / med. butterscotch 976 269 / dk. green 3345
922 / dk. gray-blue 930
351 / dk. rust 400
148 / dk. sea-blue 311
403 / black 310
Stitch count: 76 wide x 136 high
42
Trista
MEREDITH PRESS
150 East 52 Street • New York, NY 10022 • (212)715-8680
Dear Stitcher,
Welcome to the 1995 edition of the Keepsake® Calendar! We hope you'll enjoy stitching every delightful design and that the calendar itself will warm your home and your heart every month of the new year.
Below you will find a list of clarifications. Unfortunately, this year’s calendar went to press without receiving our final stamp of approval. To make sure your cross-stitched works of art are fun to stitch and turn out picture perfect, we have listed all corrections below. Should you have any further questions, please contact us at the above address.
Thank you for purchasing the 1995 Keepsake Calendar. We hope the beautiful designs inspire you to start stitching right away!
JANUARY
On the key; The symbol for light gray-green should be a laige black dot; the symbols for the half-cross-stitches should be in white, not tinted, squares.
On the chart; In the greenery at the right, the small dot shown in two green squares should be stitched in white. For the woman’s hair, the small dot shown in white squares should be stitched in mixed light tan.
MARCH
On the key; The burgundy is not used in the stitched piece. The symbol for light green should be an X, not a small dot; the symbol for medium warm gray should be a +, not a large black dot; the backstitch identified as “color” is medium plum.
On the chart; Around the base of the panda, the circle symbol shown in pale gray squares should be stitched in medium warm gray.
APRIL
On the chart: Inside the left loop of the bow, the square black symbol shown beneath the purple backstitches should be stitched in violet. Black square symbol to right of bow knot should be deleted. The blue tint four squares to the right should also be deleted, adjusting backstitch. White square symbol in middle of left blue ribbon should be deleted. In the middle of the basket handle, the lower right petals of the violet should be separated with three purple backstitches: one diagonal, one horizontal, one diagonal. On the left-hand bunny, the circle symbol on the middle violet should be stitched in lavender. Between the bunnies, under the lapped ear, the squares shown with a circle symbol (ecru) should not be stitched. White X symbols in lower right comer should be deleted.
MAY
On the chart; To the right of the woman’s arm, the small dot symbol shown in blue and gray squares should be stitched in white. On her dress, the / symbol shown in white squares should be stitched in pale blue.The small dot symbol shown in green squares should be stitched in light green, as should the light green squares printed without symbols. On the В in the alphabet, the four vertical + symbols should be completely enclosed with backstitches; the other + symbols should be deleted.
JUNE
On the chart: On the aqua balloon, all X symbols should be stitched in medium teal. On cake, all blue small dots should be stitched in aqua. On the firecracker, the circle symbol shown in blue squares should be stitched in royal blue. On the wreath, the circle symbol shown in green squares should be stitched in medium green and the large dot in the white square should be stitched in dark red. On the floral motifs at far right, the lazy daisy petals are
optional. The ghost and pumpkin design is not shown in photograph.
JULY
On the chart; Any blue squares printed without symbols should be stitched in pale blue. For the baby bear in the pink shirt, the small dot symbol shown in pink squares should be stitched in light pink; the left ear in light flesh, not white. In the greenery at the upper left, the square black symbol shown in two green squares should be stitched in dark green; the two green-tinted squares without symbols in yellow-green. For the dress of the lower left bear, the / symbol shown in pink squares should be stitched in yellow.
AUGUST
On the chart: On the blackberries, the + symbol should be stitched in gray-blue. On the black raspberries, the + symbol should be stitched in gray-lavender; on the red raspberries the circle symbol should be stitched in rose-red. Refer to the photo to dot the blackberries and black raspberries with white French knots. Use the brown floss to backstitch the cable border, the rose-brown floss to backstitch the blueberry, raspberry and gooseberry stems.
SEPTEMBER
On the chart; For the A, the small dot symbol shown in yellow squares should be stitched in orange-red. For the B, the circle symbol should be stitched in wine. For the D, the X symbol at the top of the inner column of square symbols should be stitched in medium green. For the E, follow the chart for the bottom “arm” to stitch the top “arm.” For the F, all circle symbols should be stitched in red; all X symbols should be stitched in black. For the H, the two blue X symbols on lower right leg should be stitched in medium blue. For the I, the backstitched square inside the tip should not be stitched. For the J, stitch the blank squares in the top in light blue. For the L, the backstitch shown in green should be stitched in dark brown. For the M, omit the second and fourth lines of backstitches inside the left “leg.” For the N, the green X symbols and blue circle symbols on left leg should be backstitched in dark gray. For the O, the small dot symbols in the top should be stitched in white. For the P, stitch the blank squares in white. For the Q, the small dot symbol shown in a tan square should be stitched as a white half-cross-stitch. For the S, the white X symbol should be stitched in yellow-green.
OCTOBER
GHOST CATS:
On the key; The symbol for white was omitted; it should be a small dot in a white square.
On the chart; The small dot symbol shown in white squares should be stitched in white.
PIRATE CAT:
Qn the chart; The small dot symbol shown in two white squares to the left of the rear leg should be deleted.
NOVEMBER
On the chart: For the jars, all the small dot symbols in the jam label should be stitched in white. For the pumpkins, the + symbol should be stitched in burnt orange; the circle symbol should be stitched in orange-red; the / symbol in pumpkin (Anchor 314, DMC 970). For the leaf on the apple core, the circle symbol should be stitched in dark green. For the com, the second ear from the left should be stitched the same as the other ears.
DECEMBER
On the key; The symbol for white was omitted; it should be a small dot in a white square.
On the chart; The small dot symbol shown in white squares should be stitched in white. All square black symbols should be stitched in black. AU blank white squares within a santa should be stitched in white. Refer to the photo to add a white French knot to each hoUy berry. Complete the backstitch outlines on the center upright posts, around the star santa’s mustache and within the lower right santa’s beard.
THE SUPPLIER’S LIST
Charles Craft and Daniel Enterprises are in North Carolina, their addresses are otherwise correct.