


Текст
50
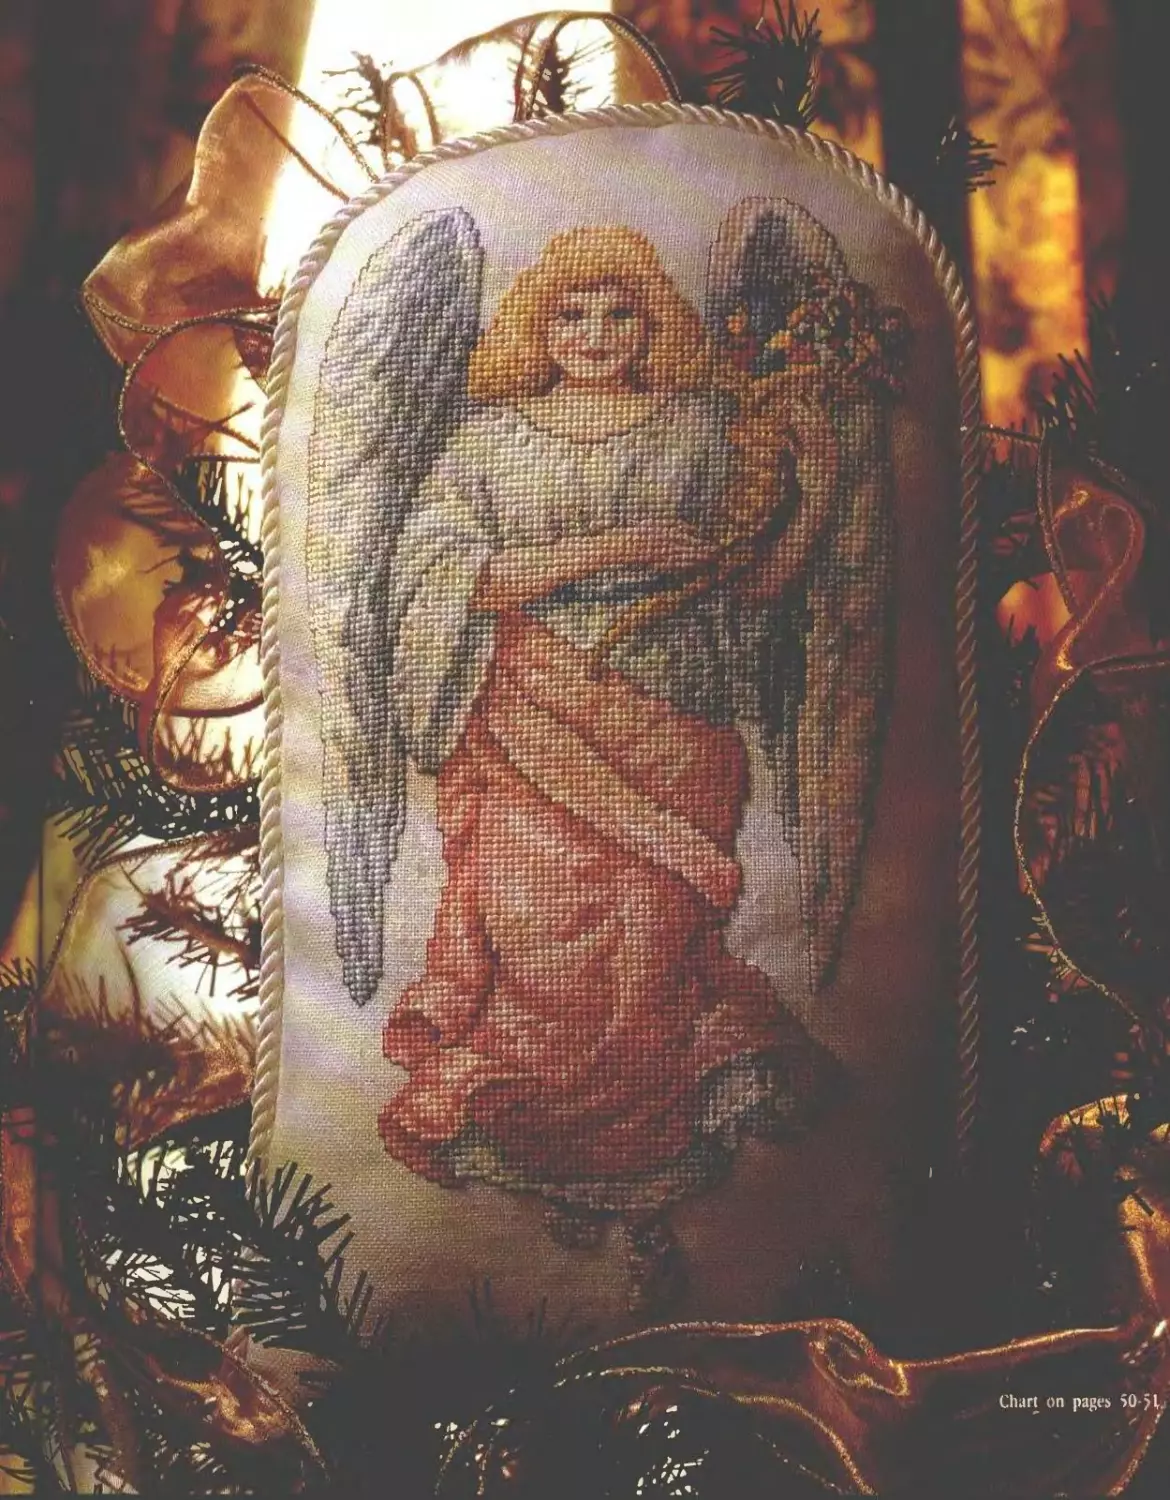
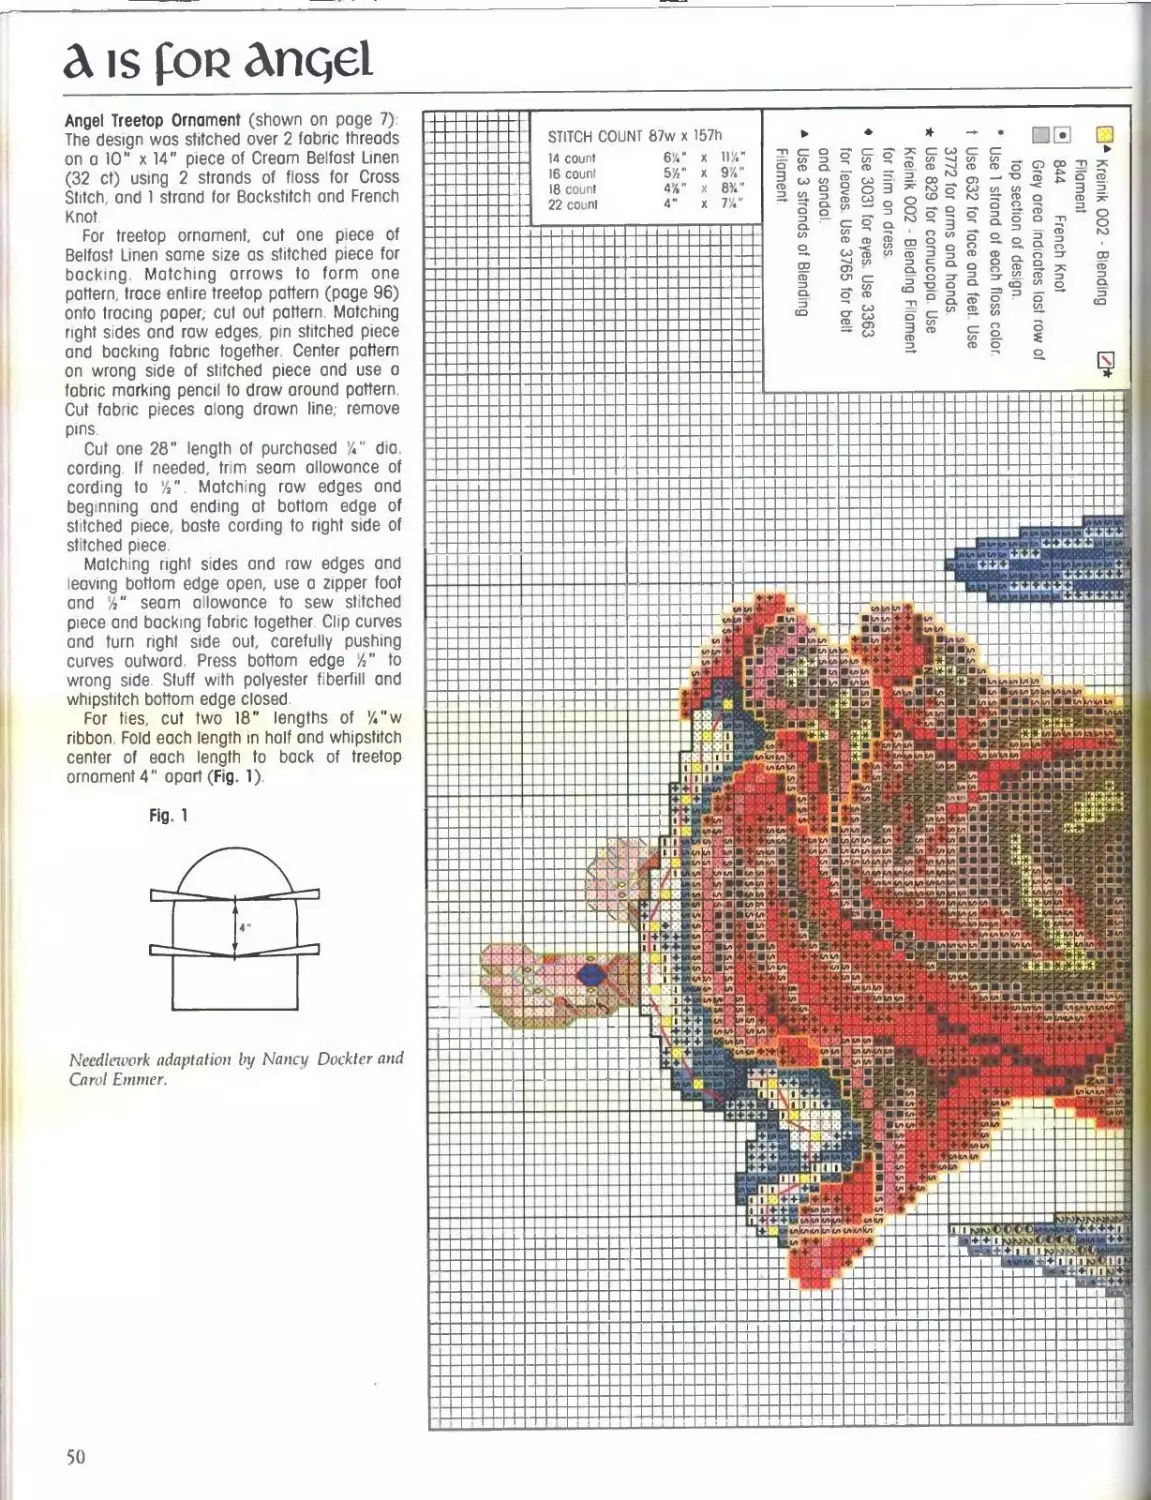
Angel Treetop Ornament
57
57
60
17
18
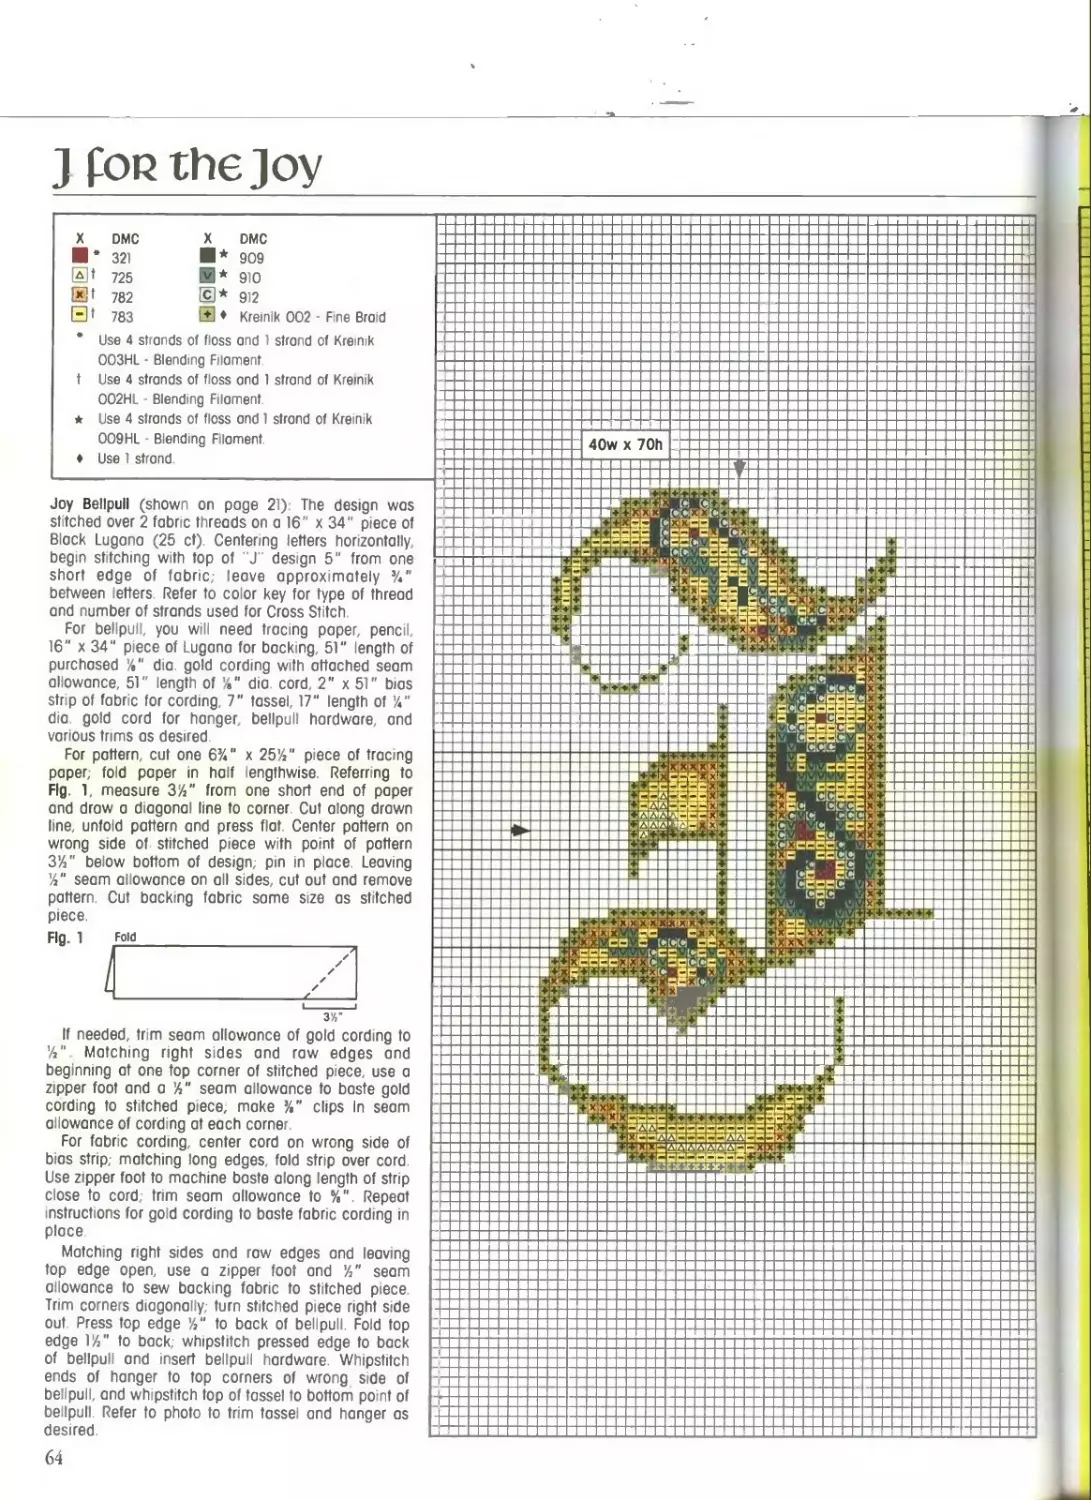
64
21
66
23
58
58
58
14
14
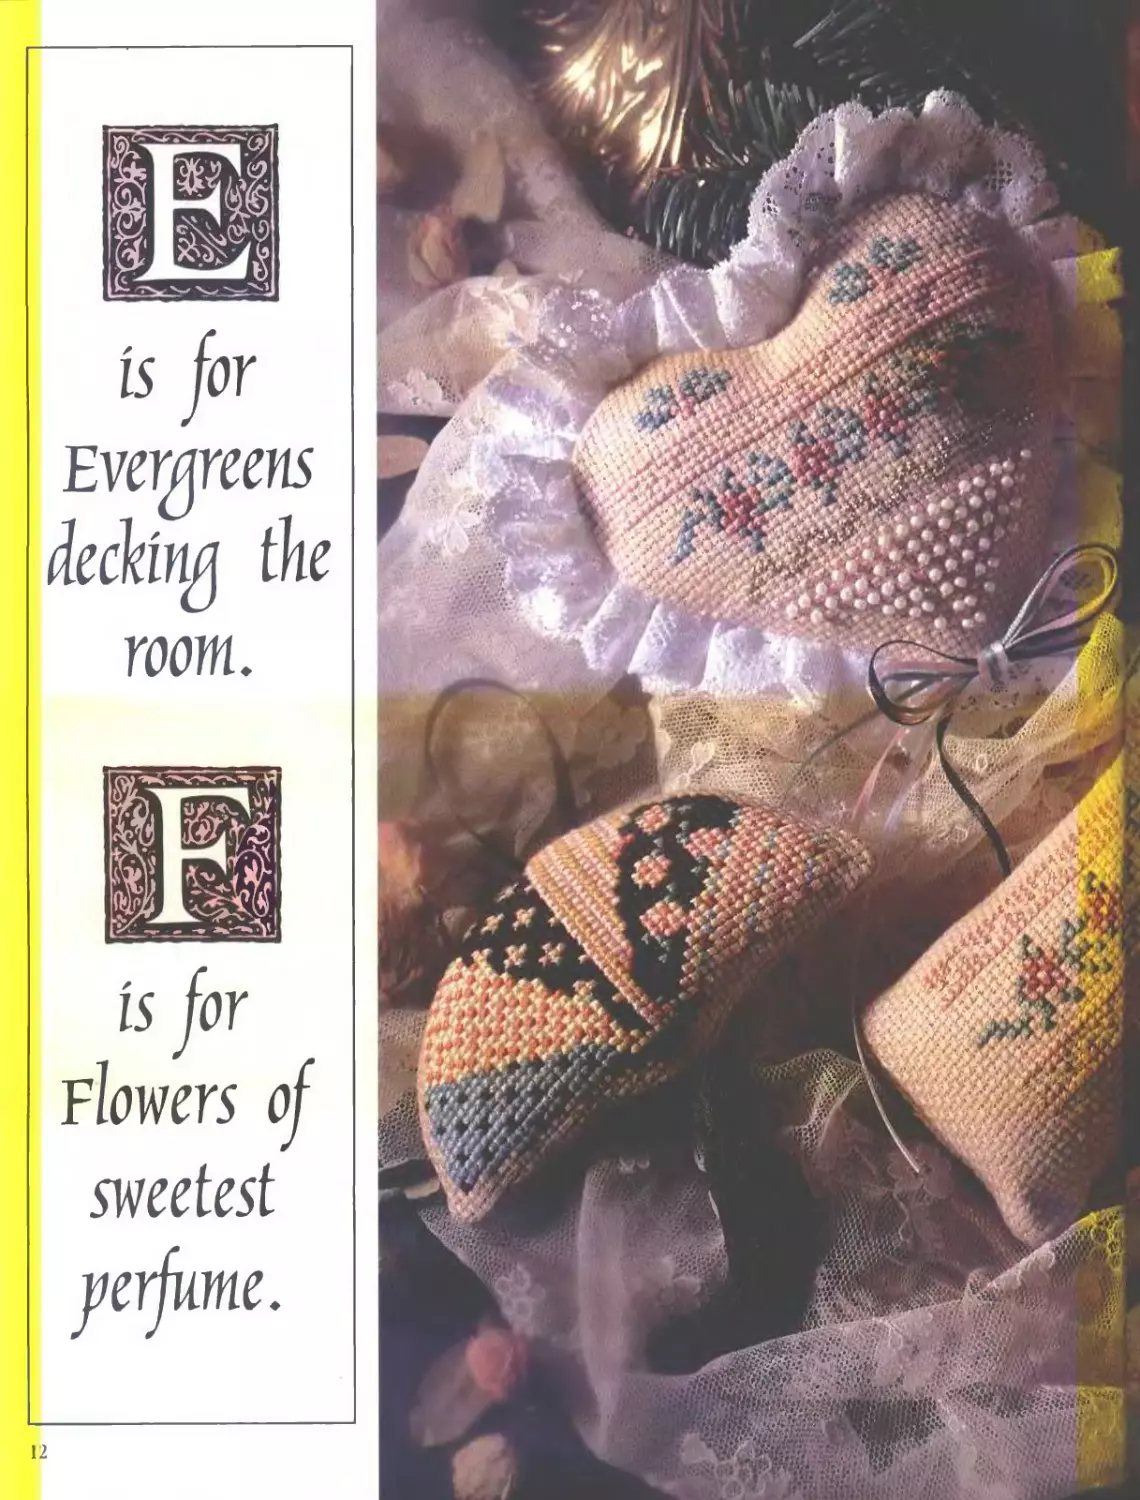
12
12
13
13
13
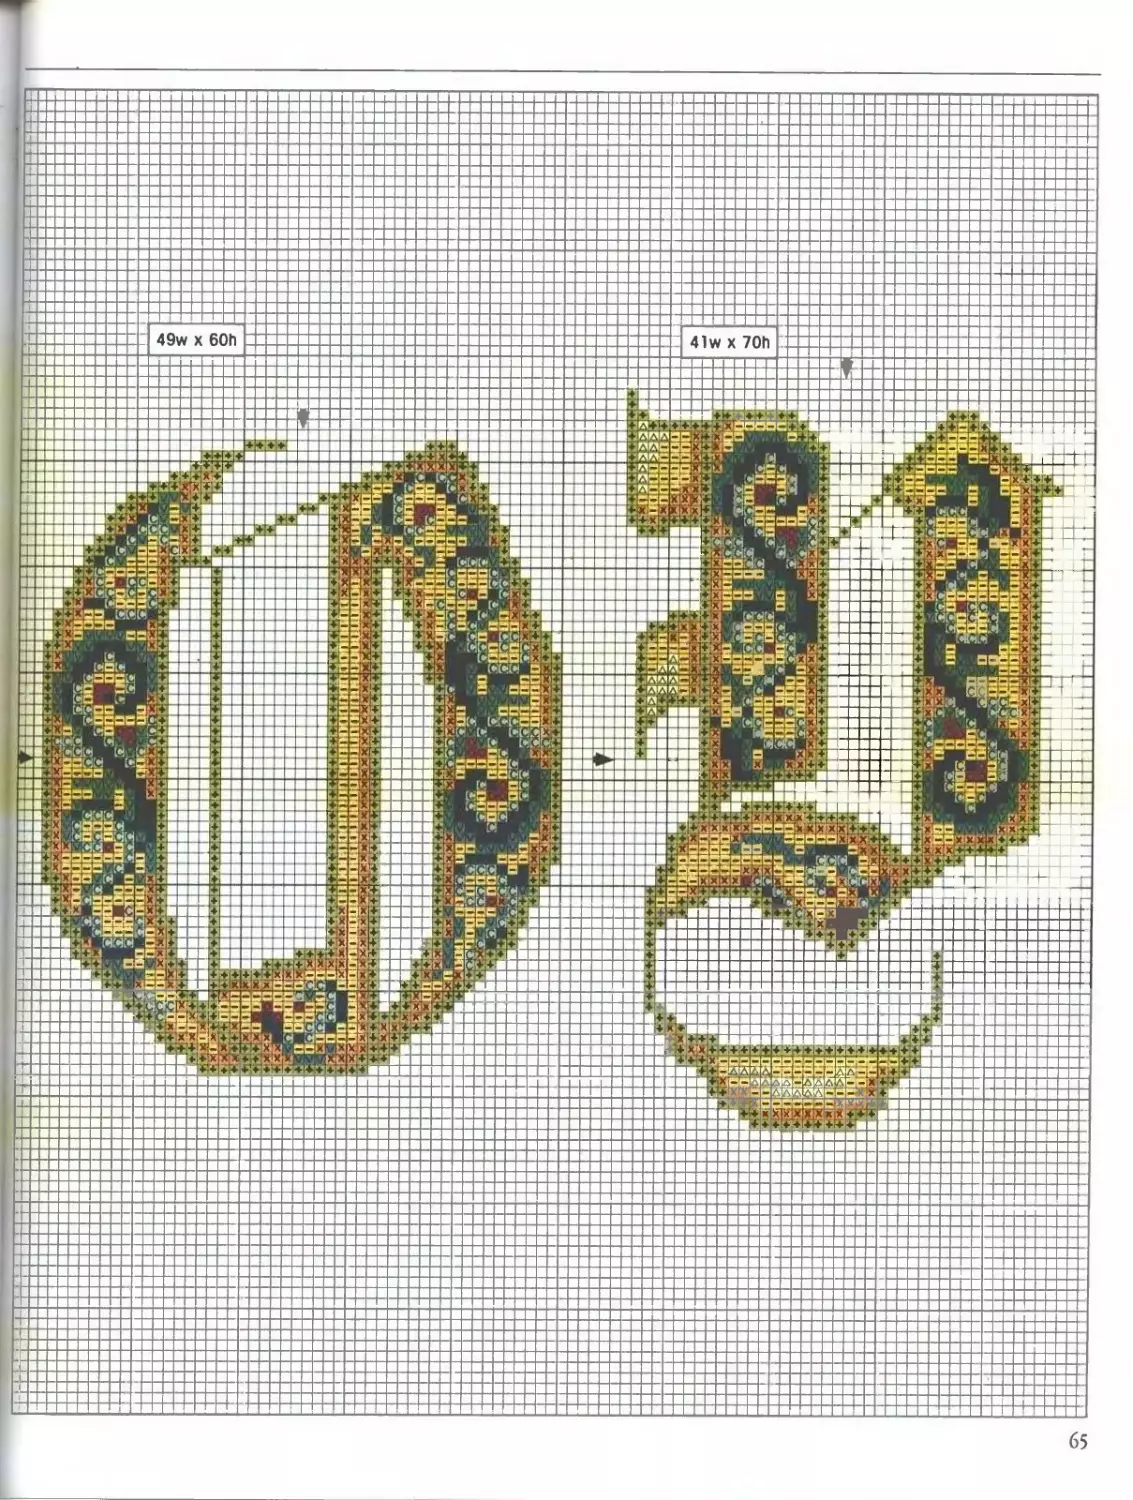
J FOR THE JOY
Joy Bellpull....
I IS FOR ICE
Ice Ornaments
HJSFORHOLLY_
Holly Santa Pillow
В IS FOR BELLS
Jingle Bell Afghan
CIS FOR CANDY
DISFORDREAMS
Children Dreaming in Frame
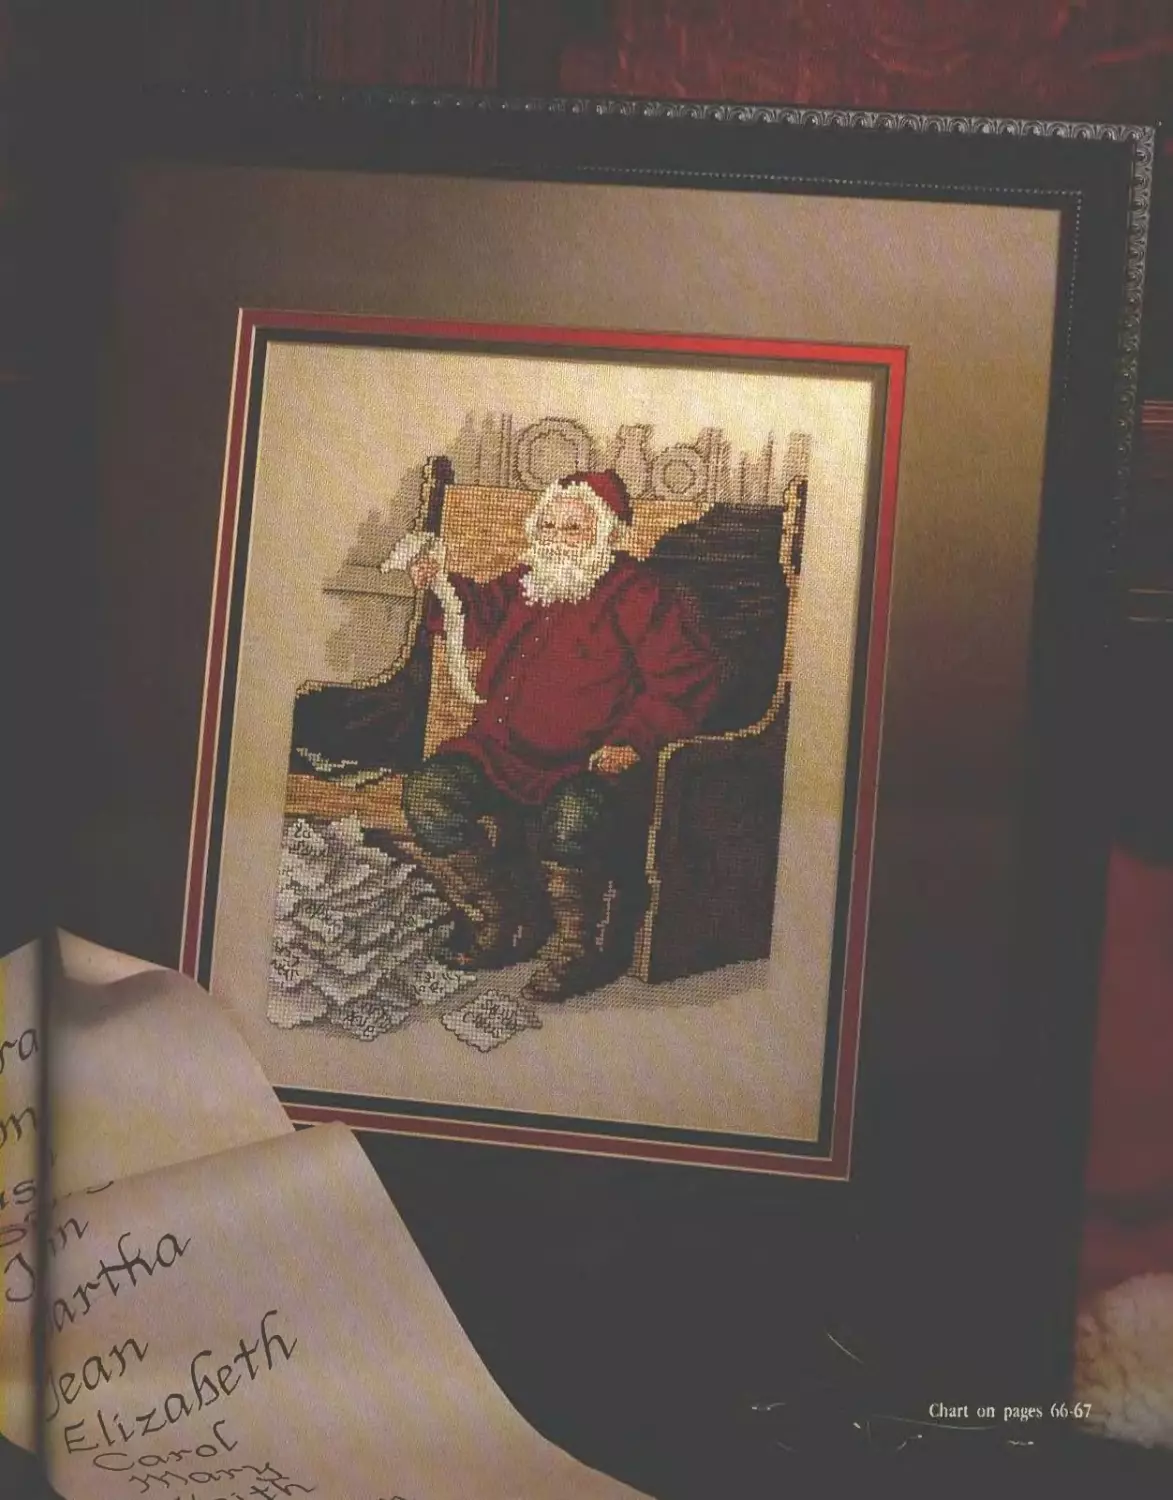
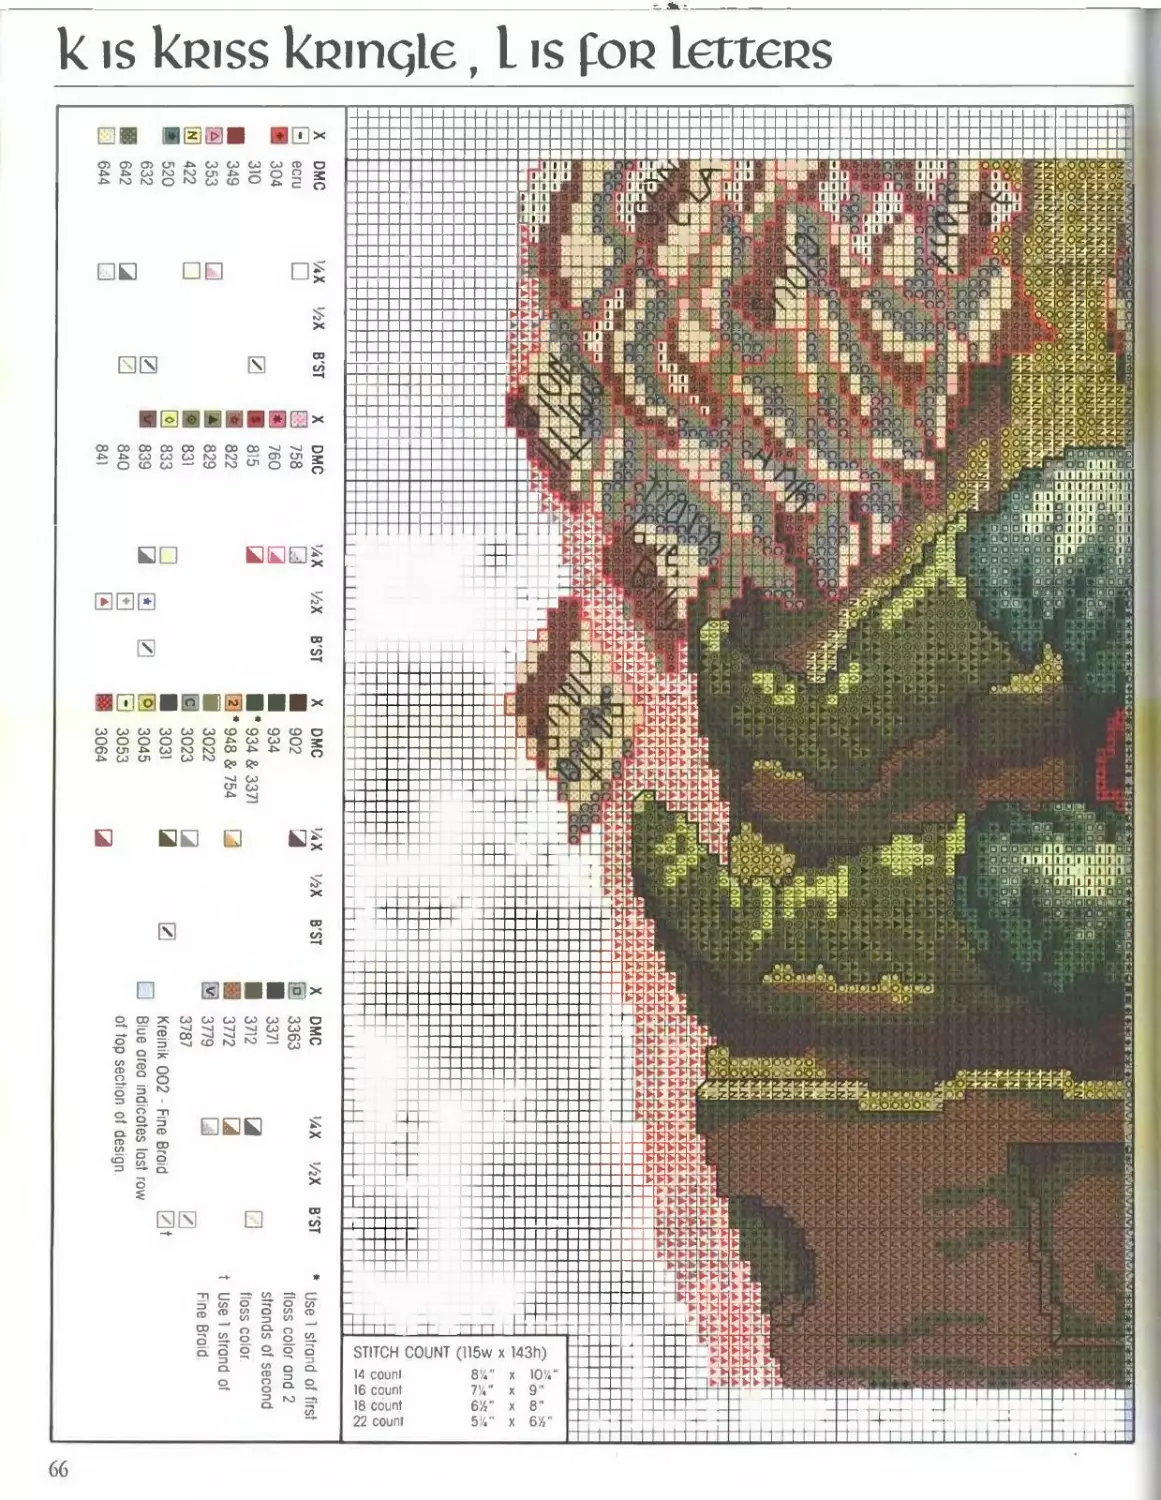
К IS KRISS KRINGLE
L IS FOR LETTERS
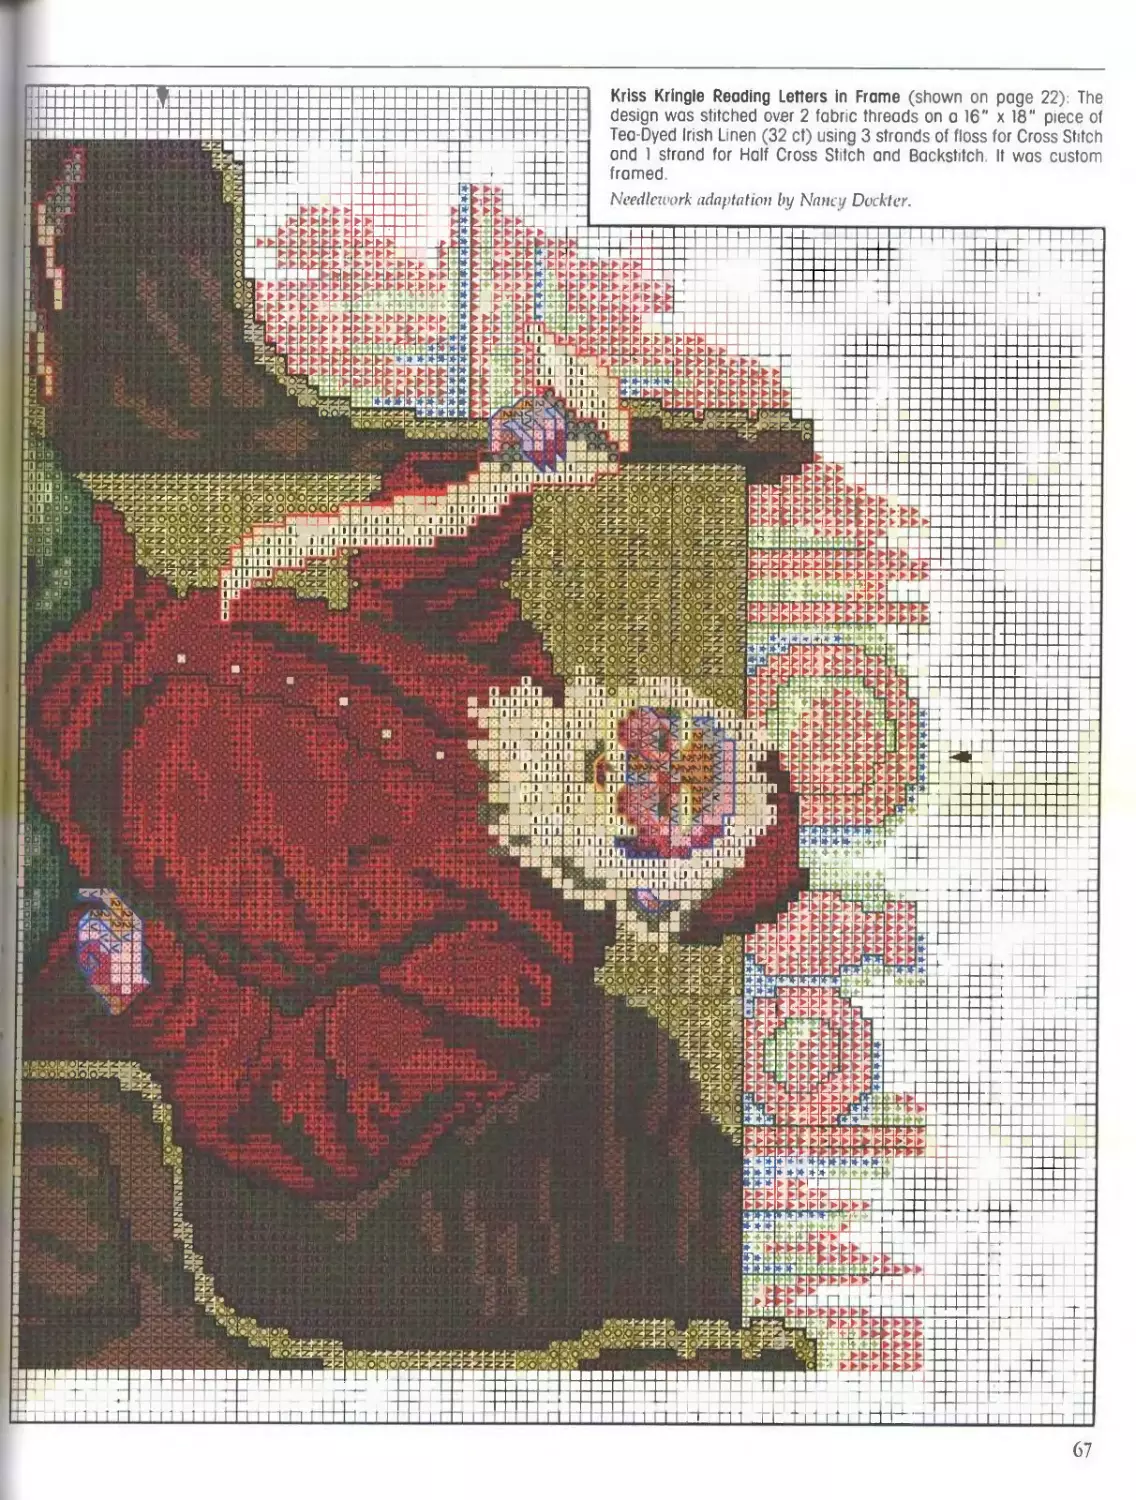
Kriss Kringle Reading Letters in Frame
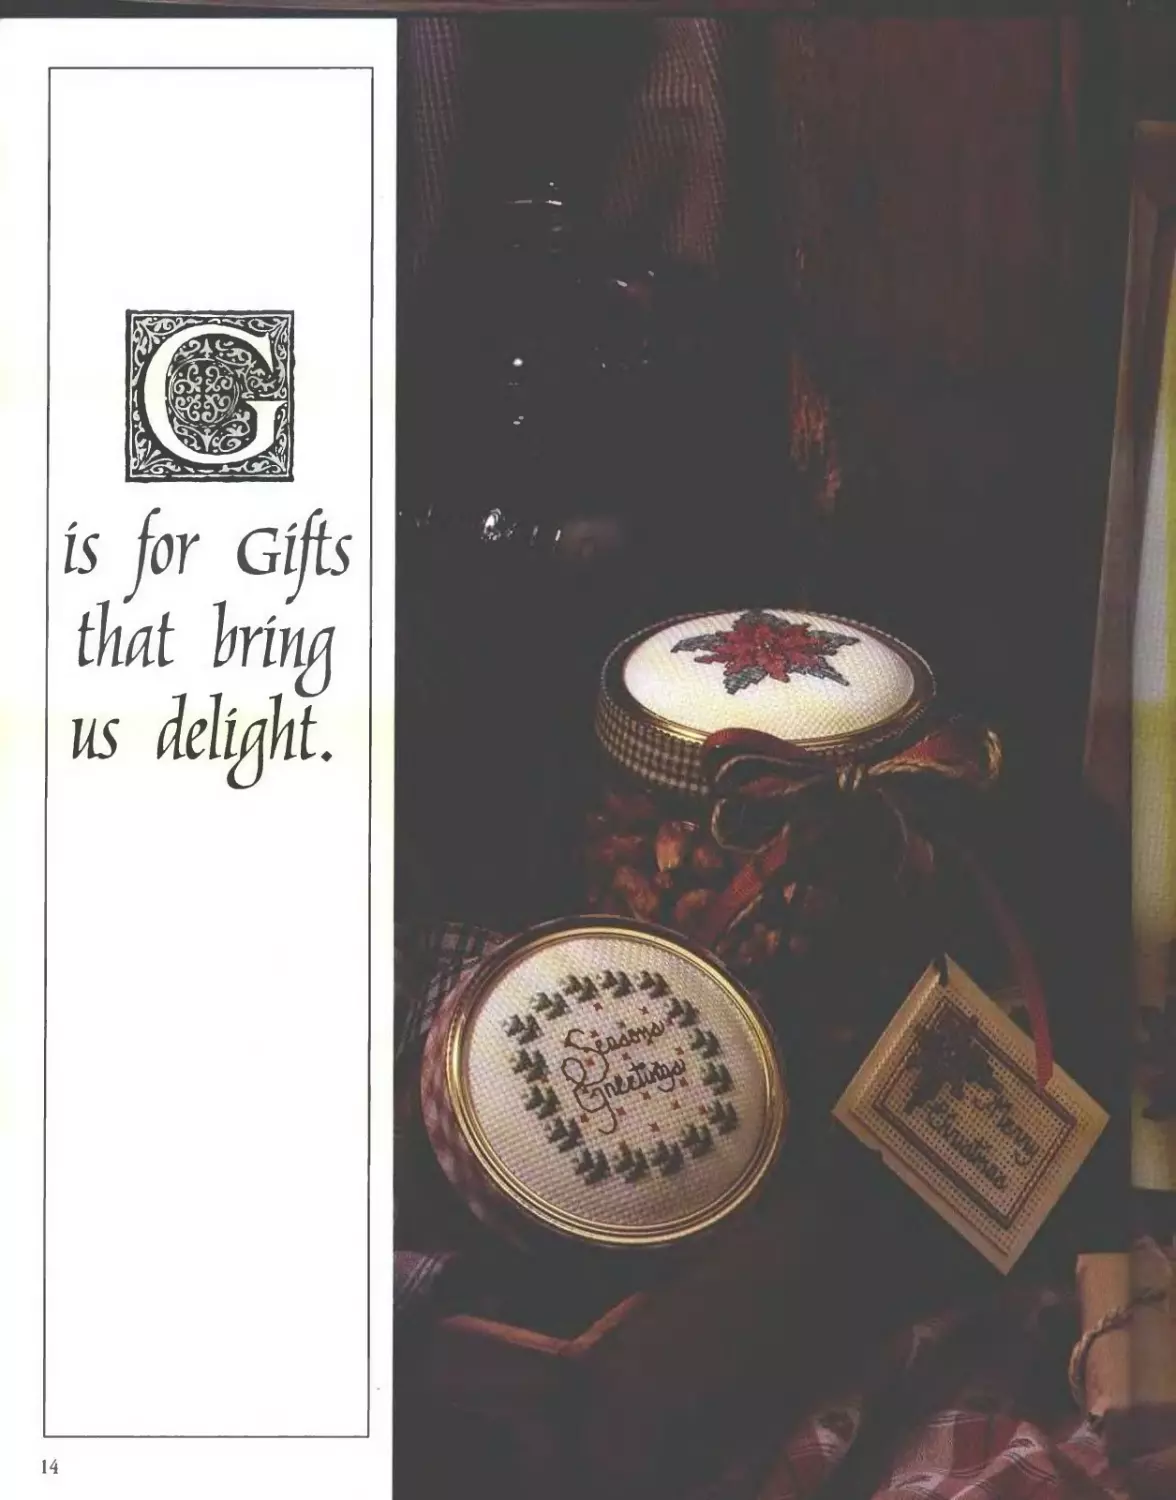
G IS FOR GIFTS
Jar Lids.................
Gift Tags................
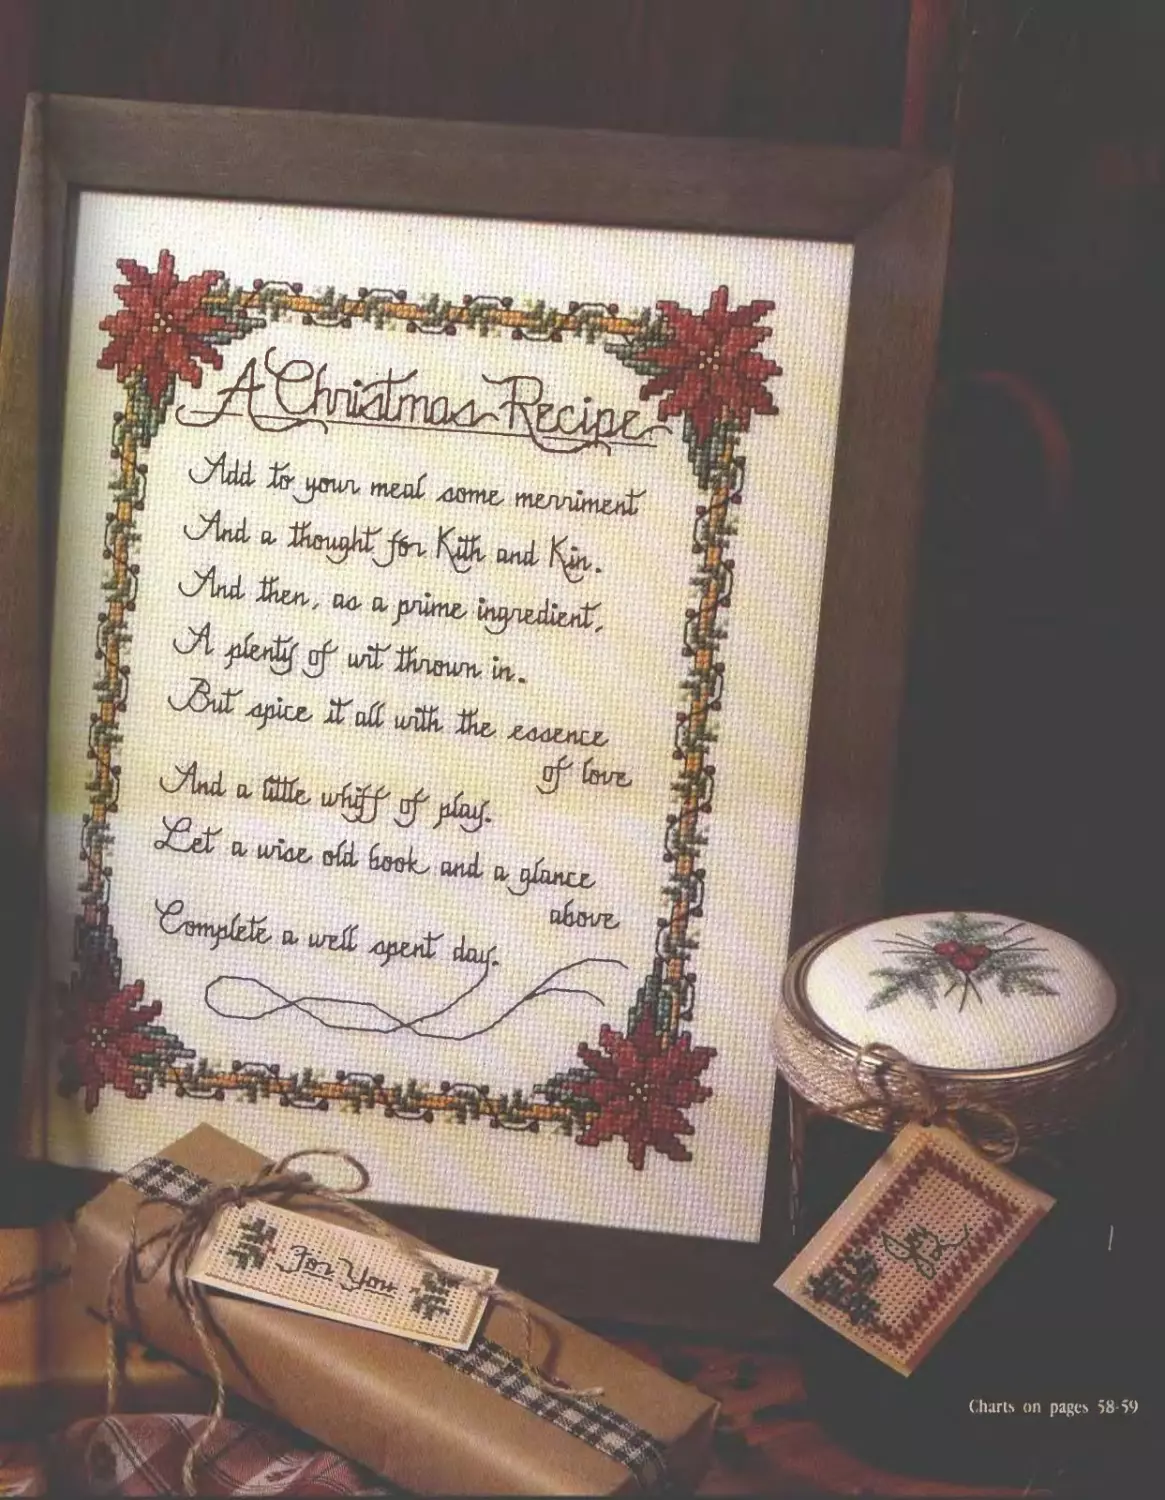
Christmas Recipe in Frame
PHOTO CHART
A IS FOR ANGEL
£ IS FOR EVERGREENS
FIS FOR FLOWERS
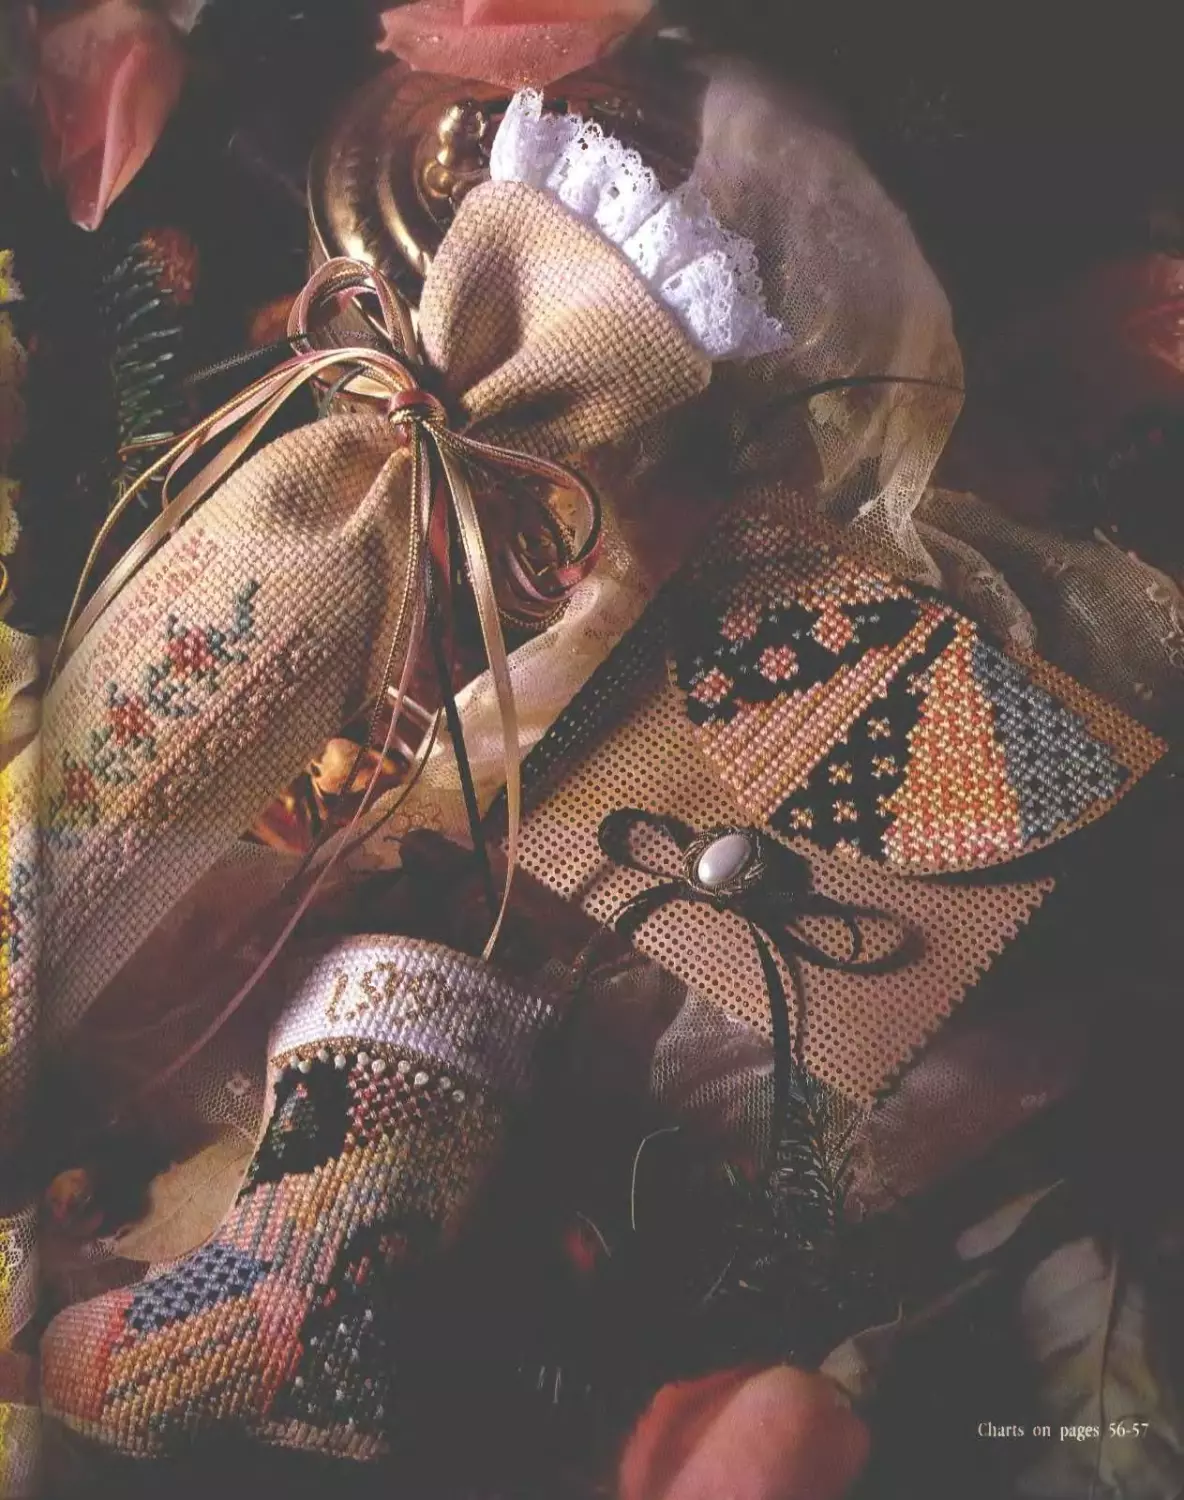
Heart-Shaped Sachet Ornament
Fan-Shaped Sachet Ornament..
Stocking Ornament........
Lavender Bag Ornament....
Purse Ornament...........
M IS FOR MISTLETOE
Mistletoe Kissing Ball
PHOTO CHART
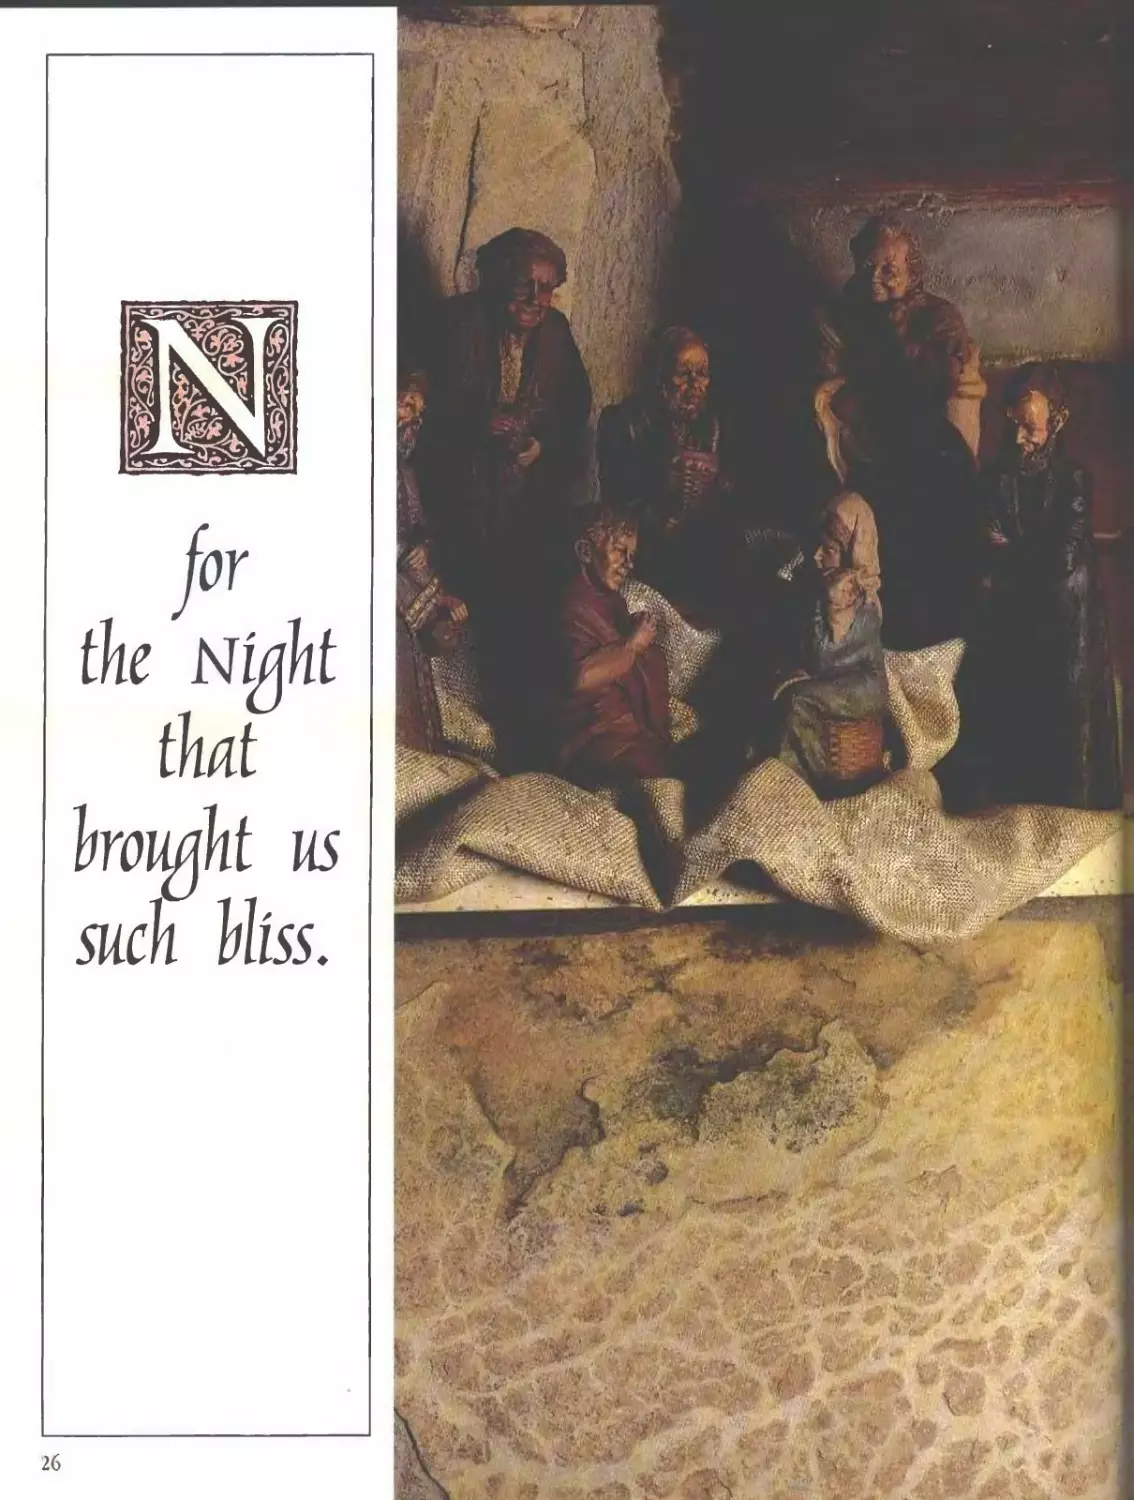
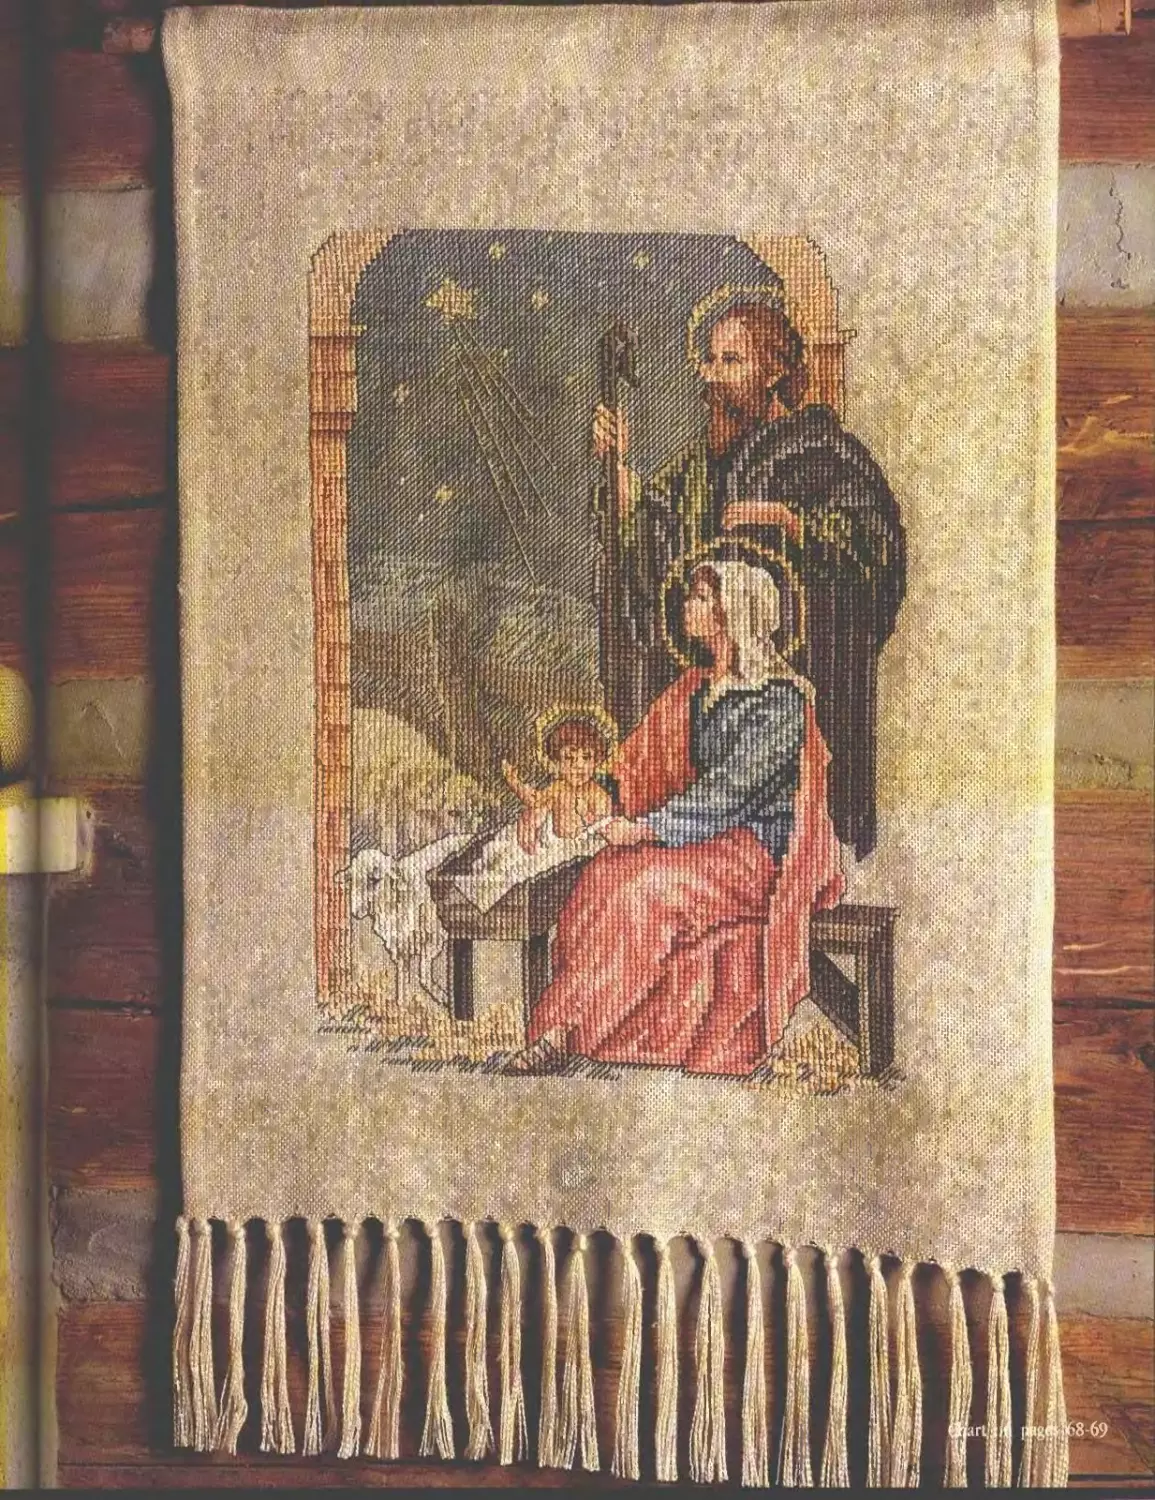
NFOR THE NIGHT________________________________________________
Nativity Wall Hanging.........................27...........68
О IS FOR ORNAMENTS____________________________________________
Heart-Shaped Santa Ornaments..................28...........70
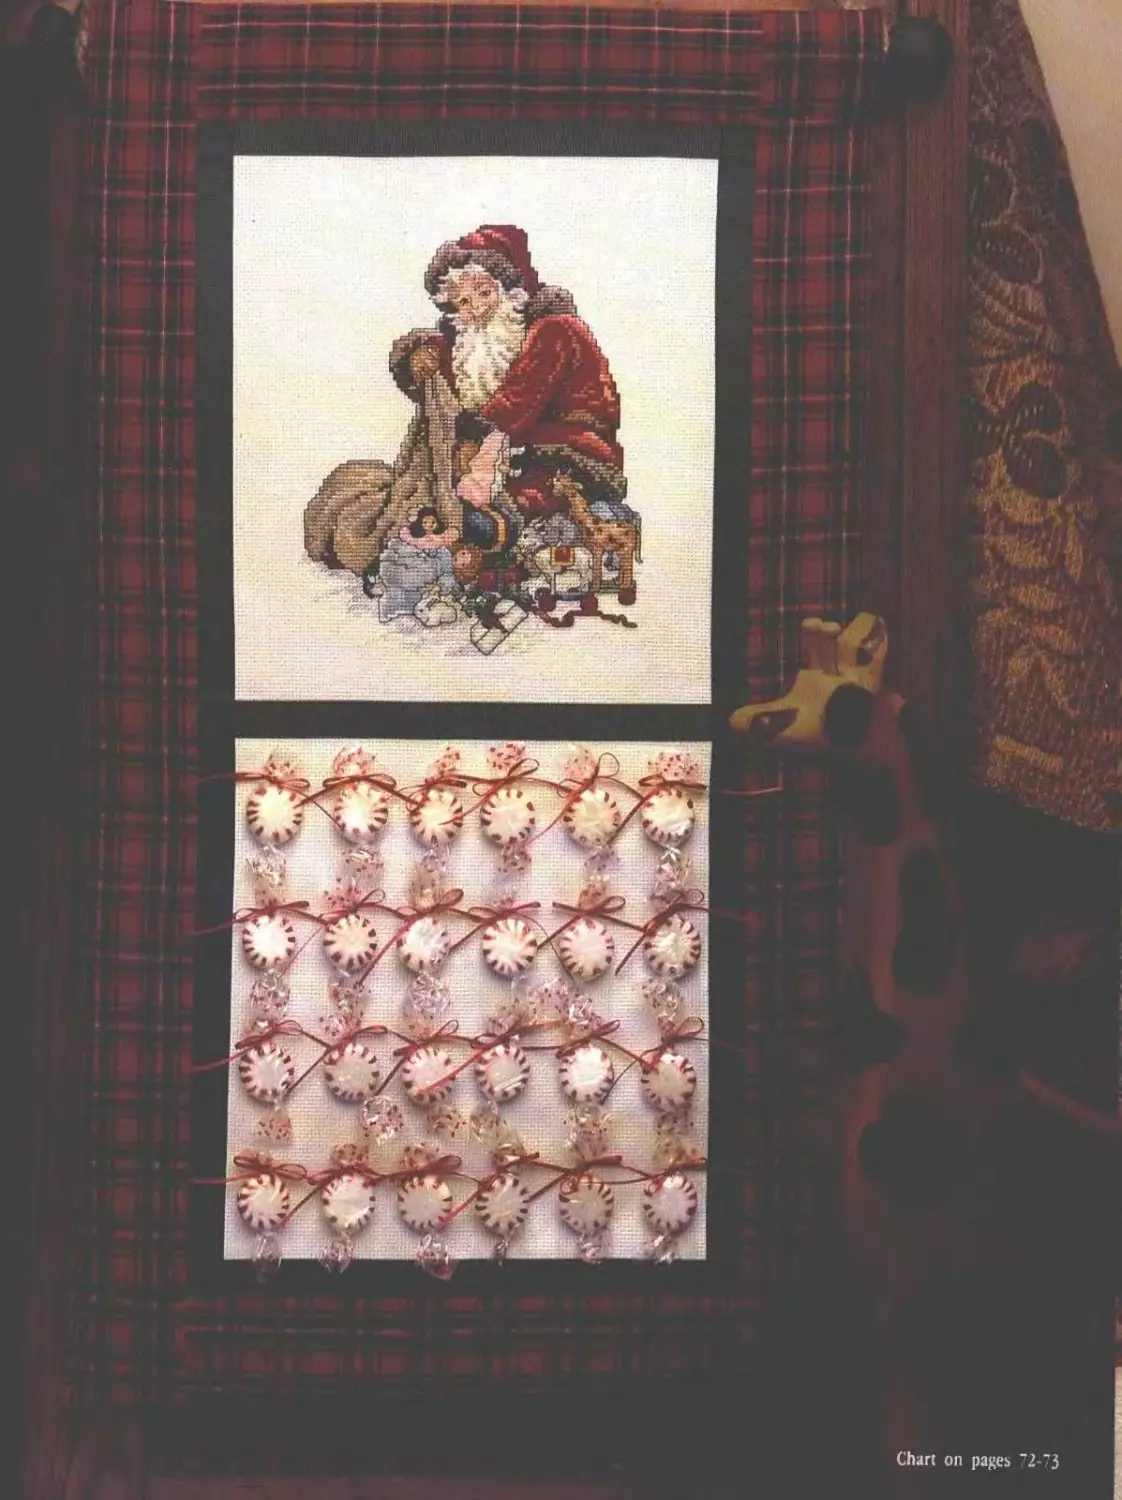
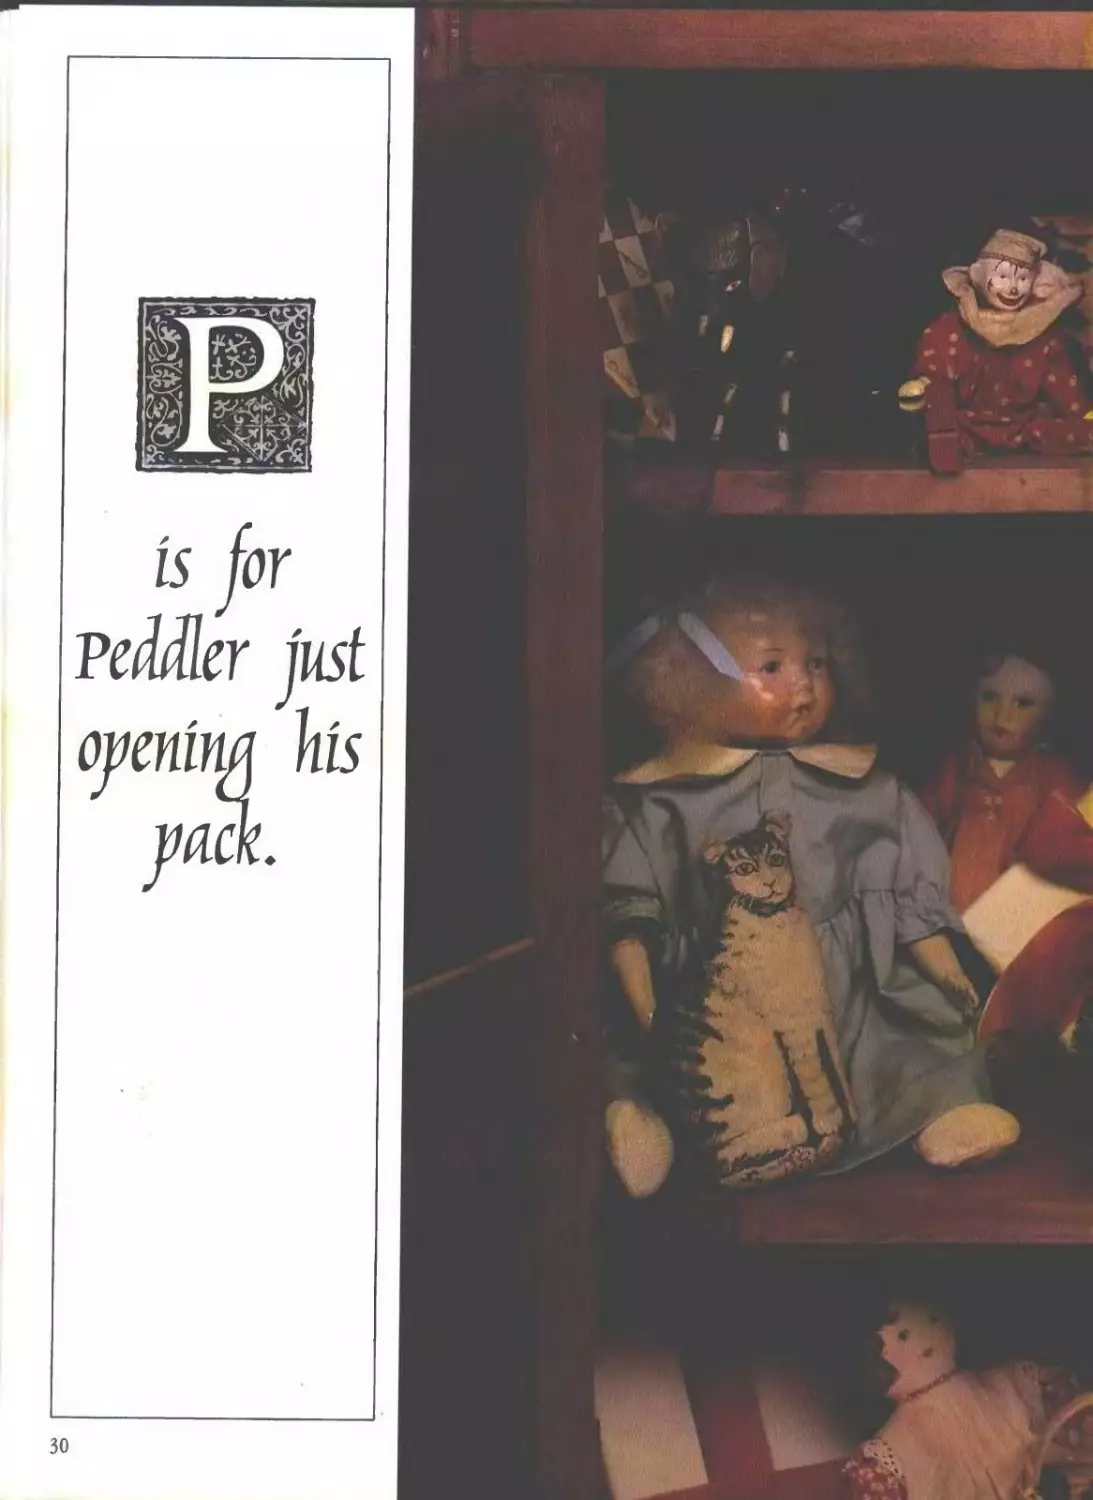
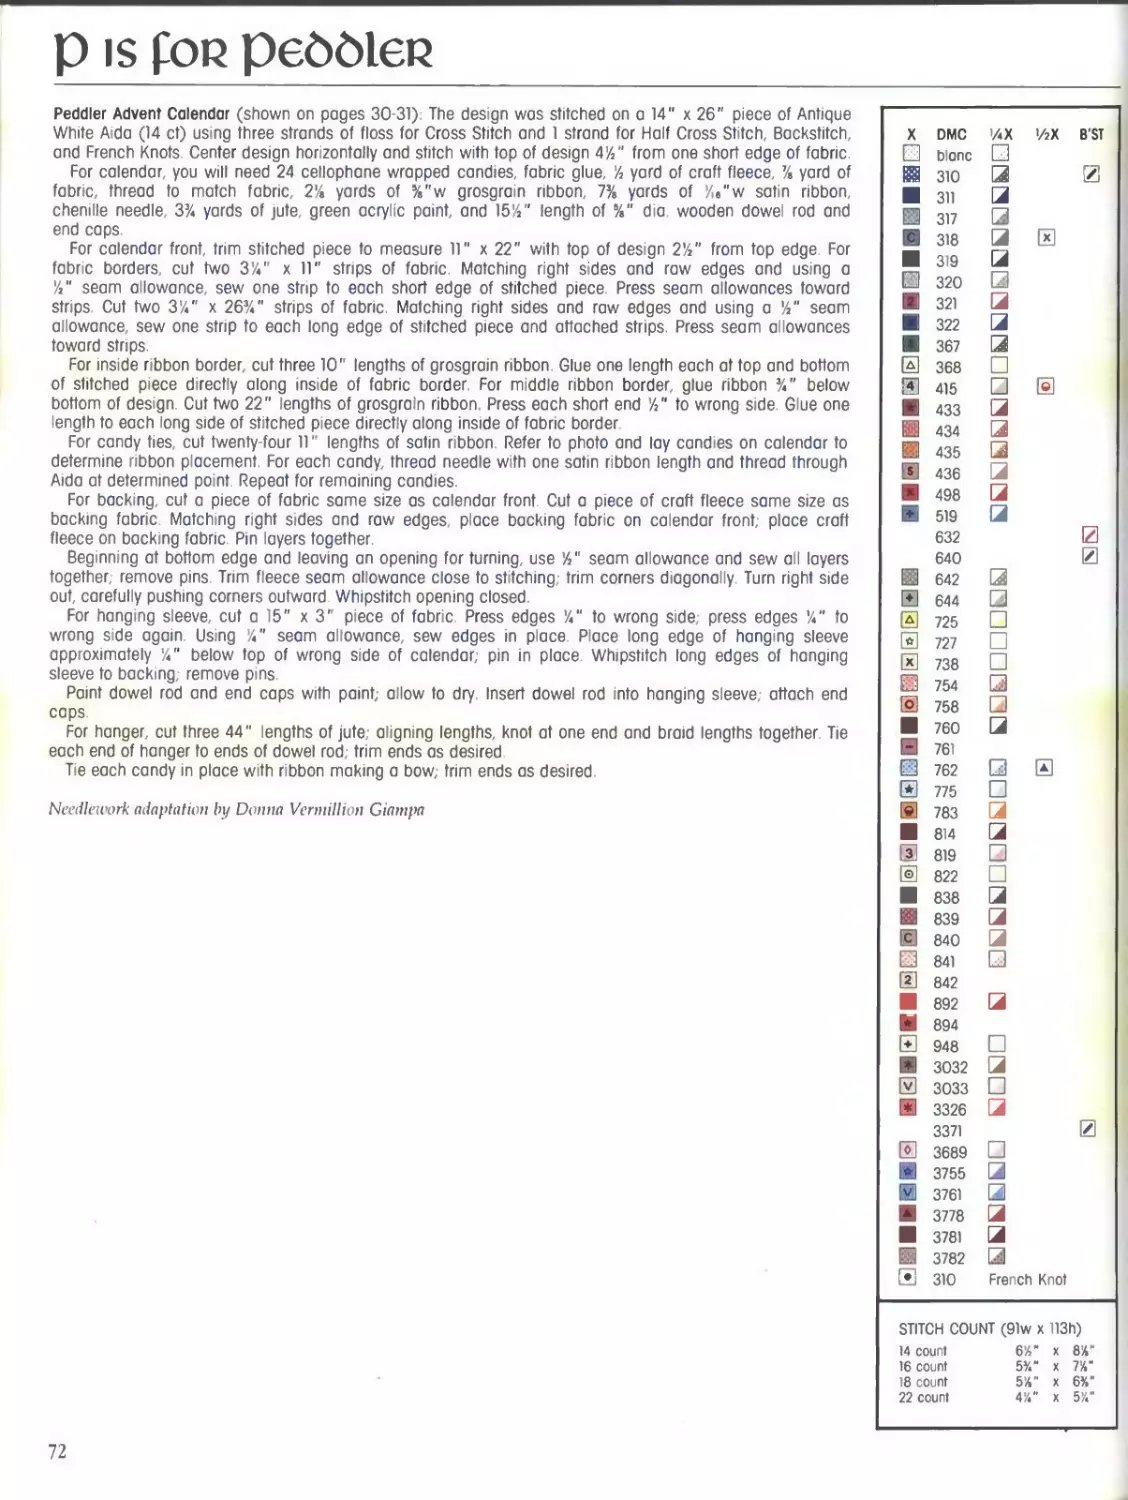
P IS FOR PEDDLER
Peddler Advent Calendar.......................31...........72
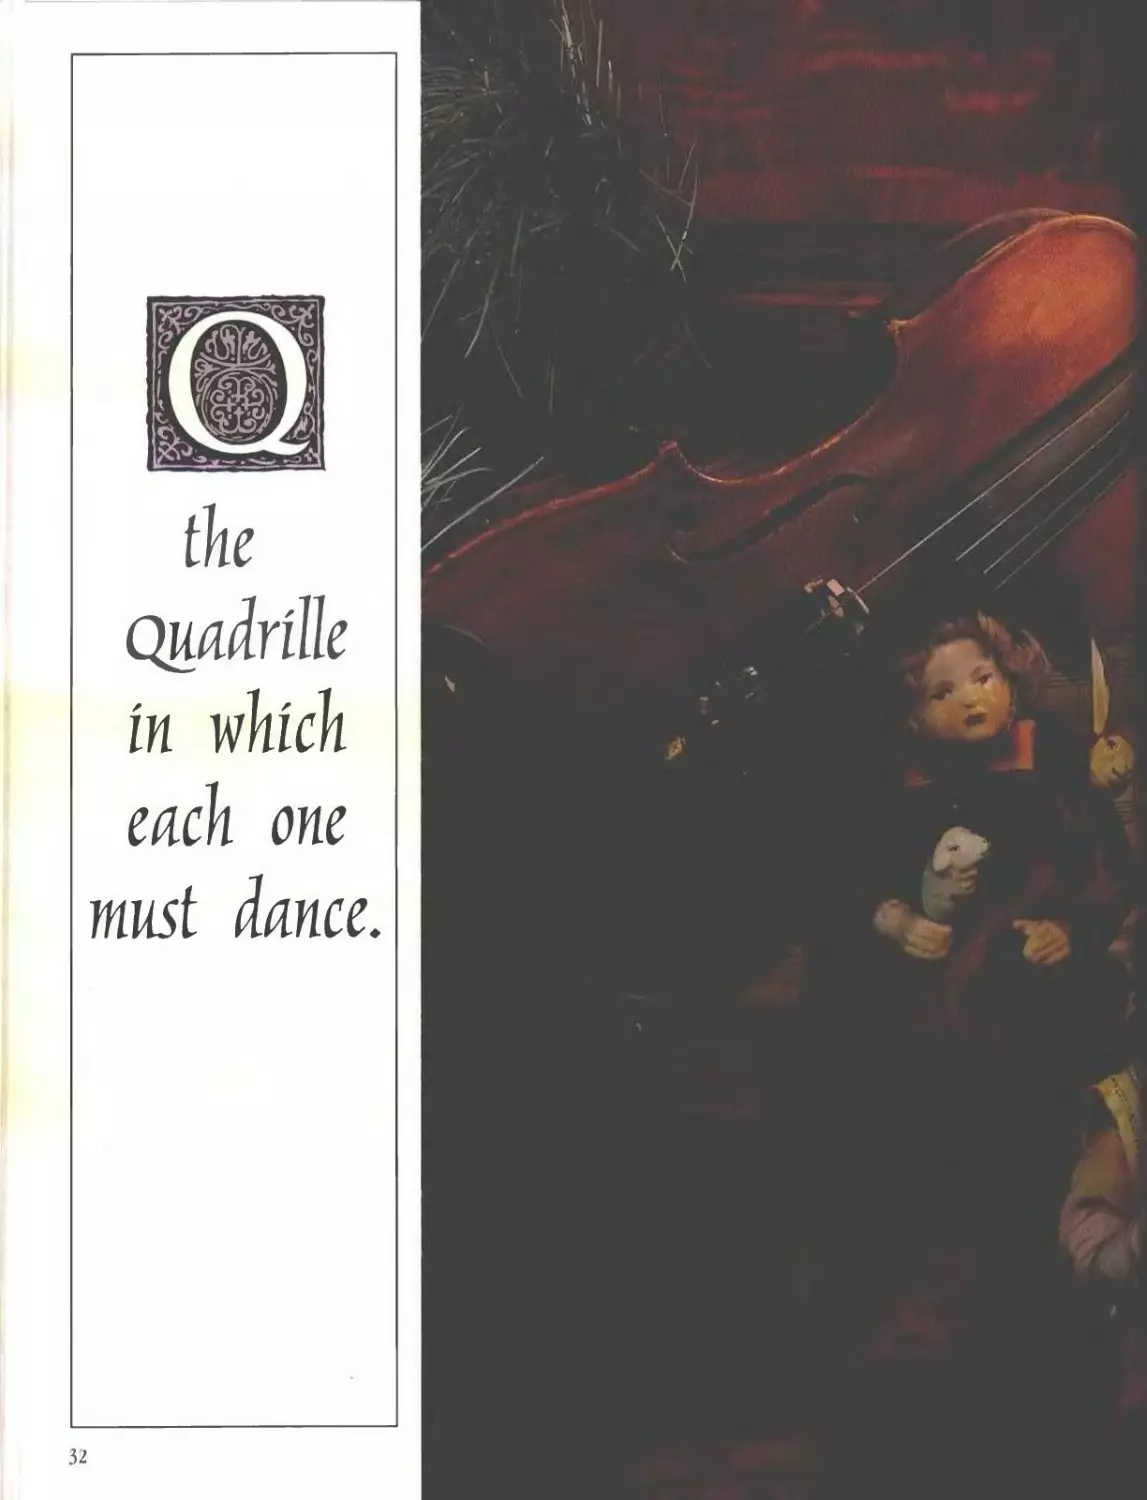
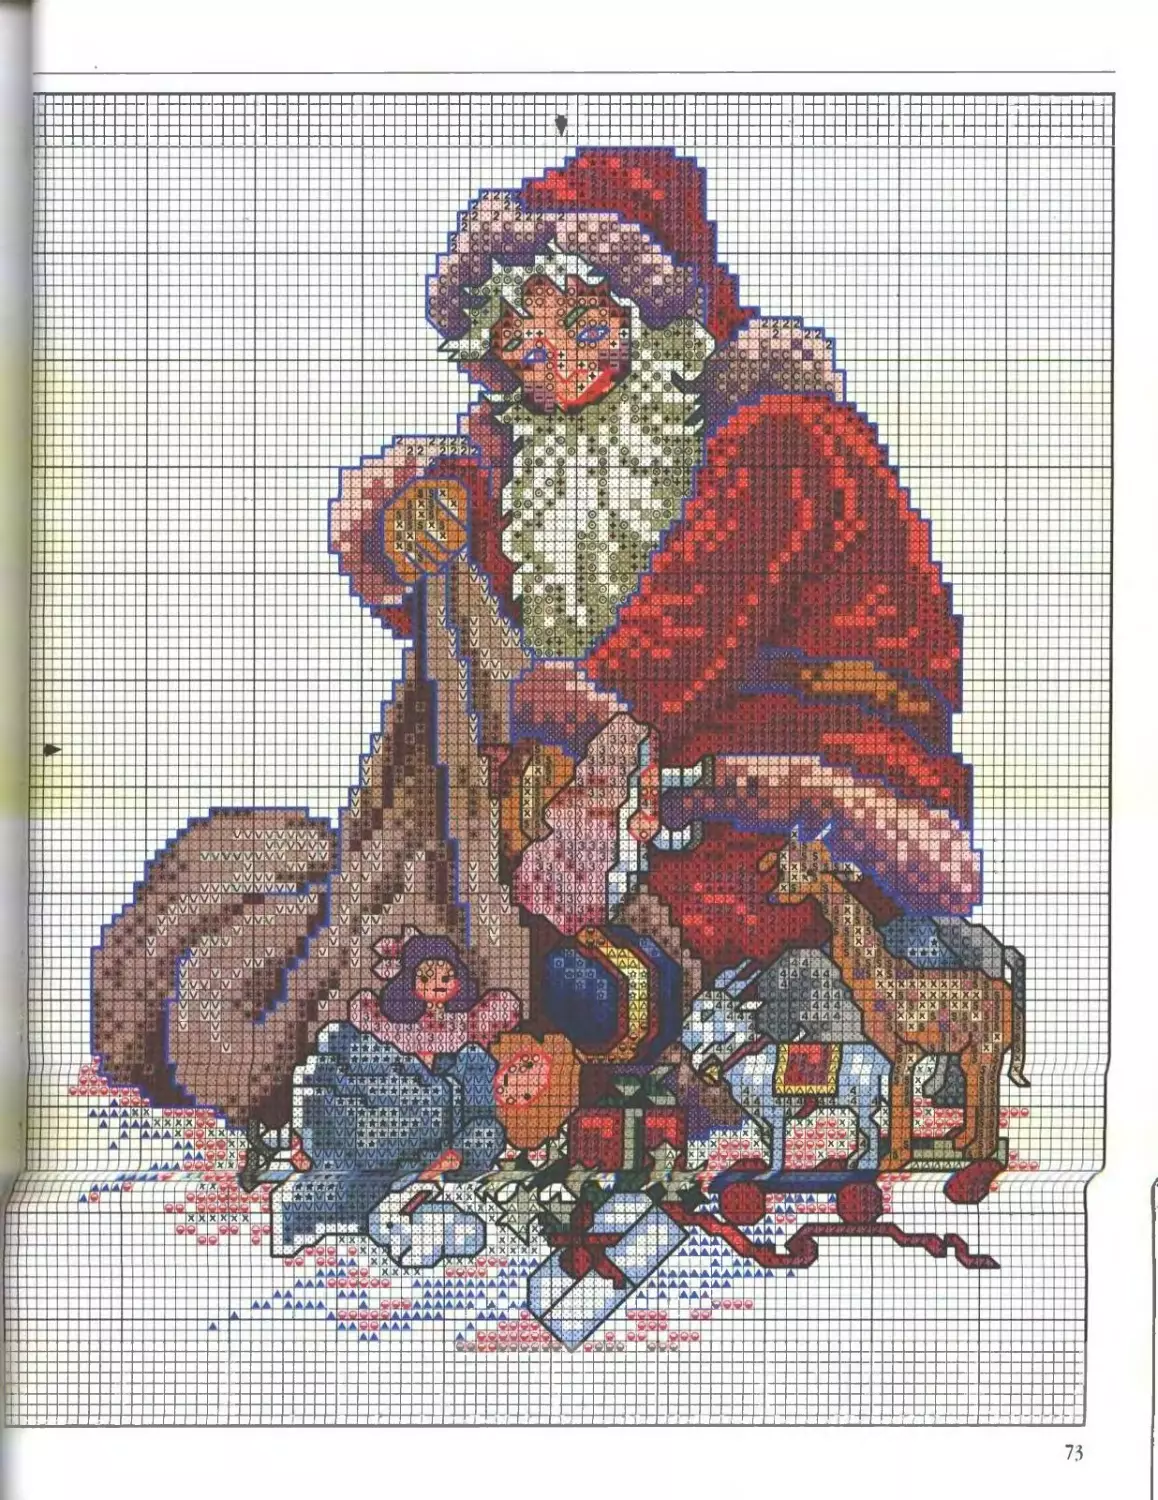
Q THE QUADRILLE_______________________________________________
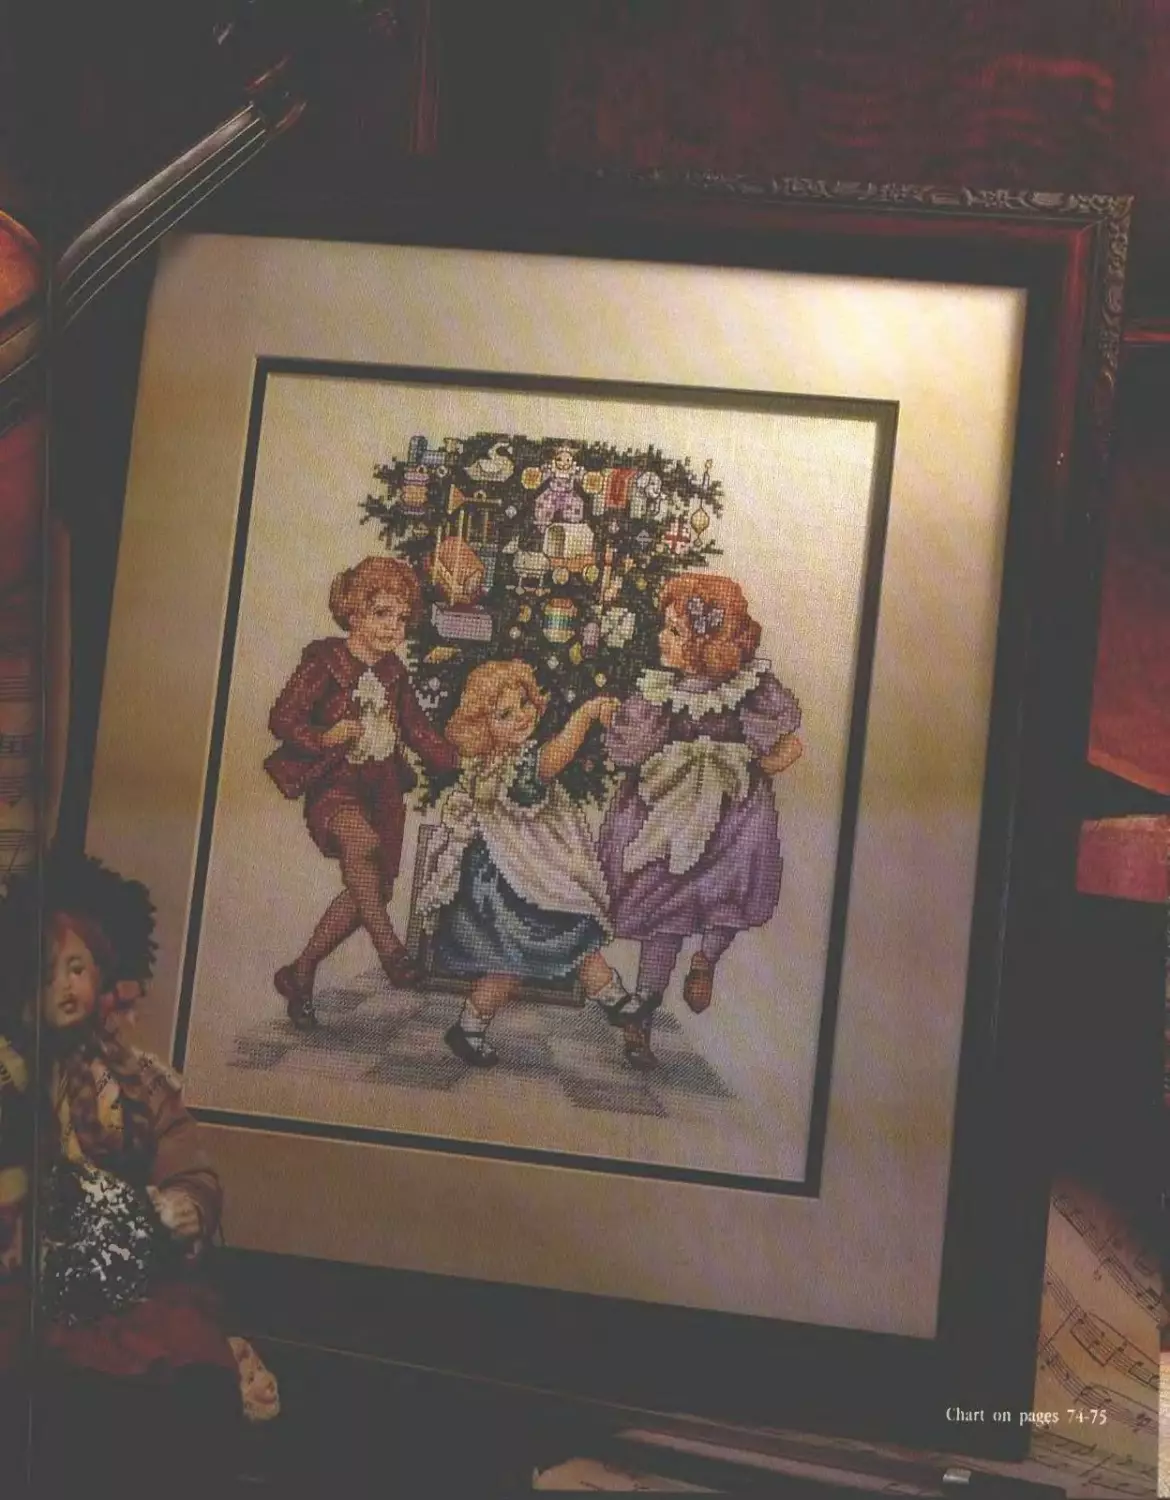
Quadrille in Frame............................33...........74
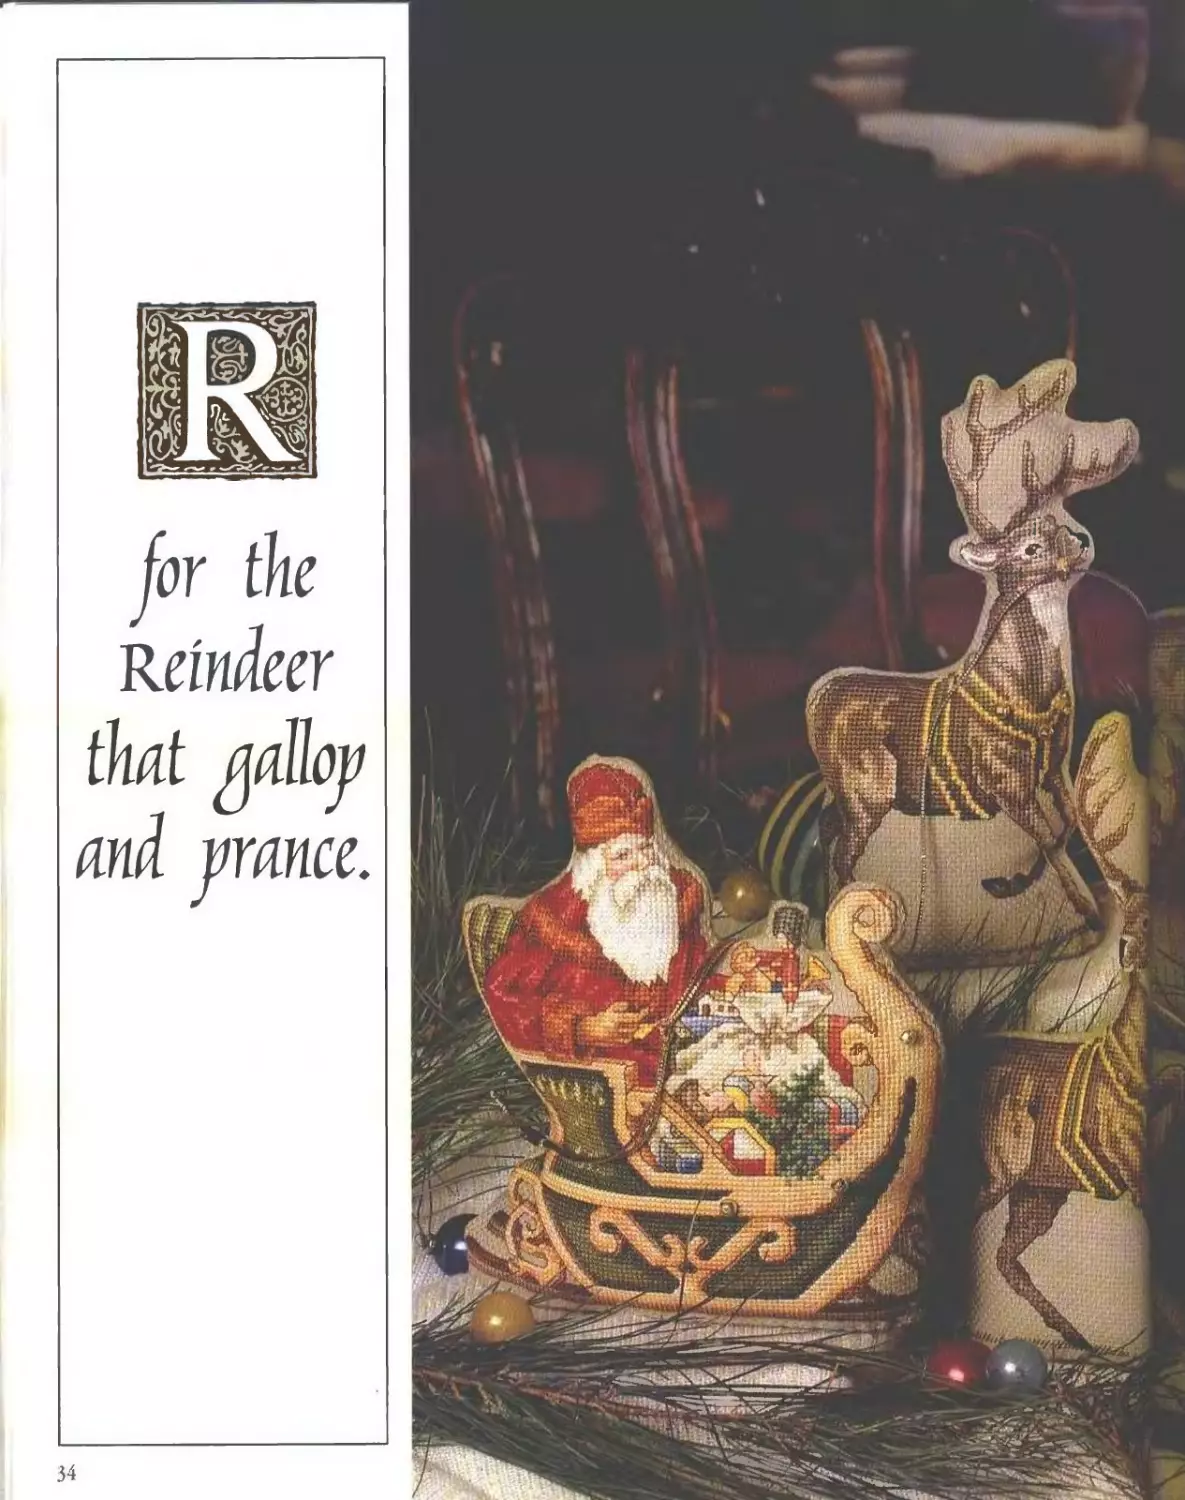
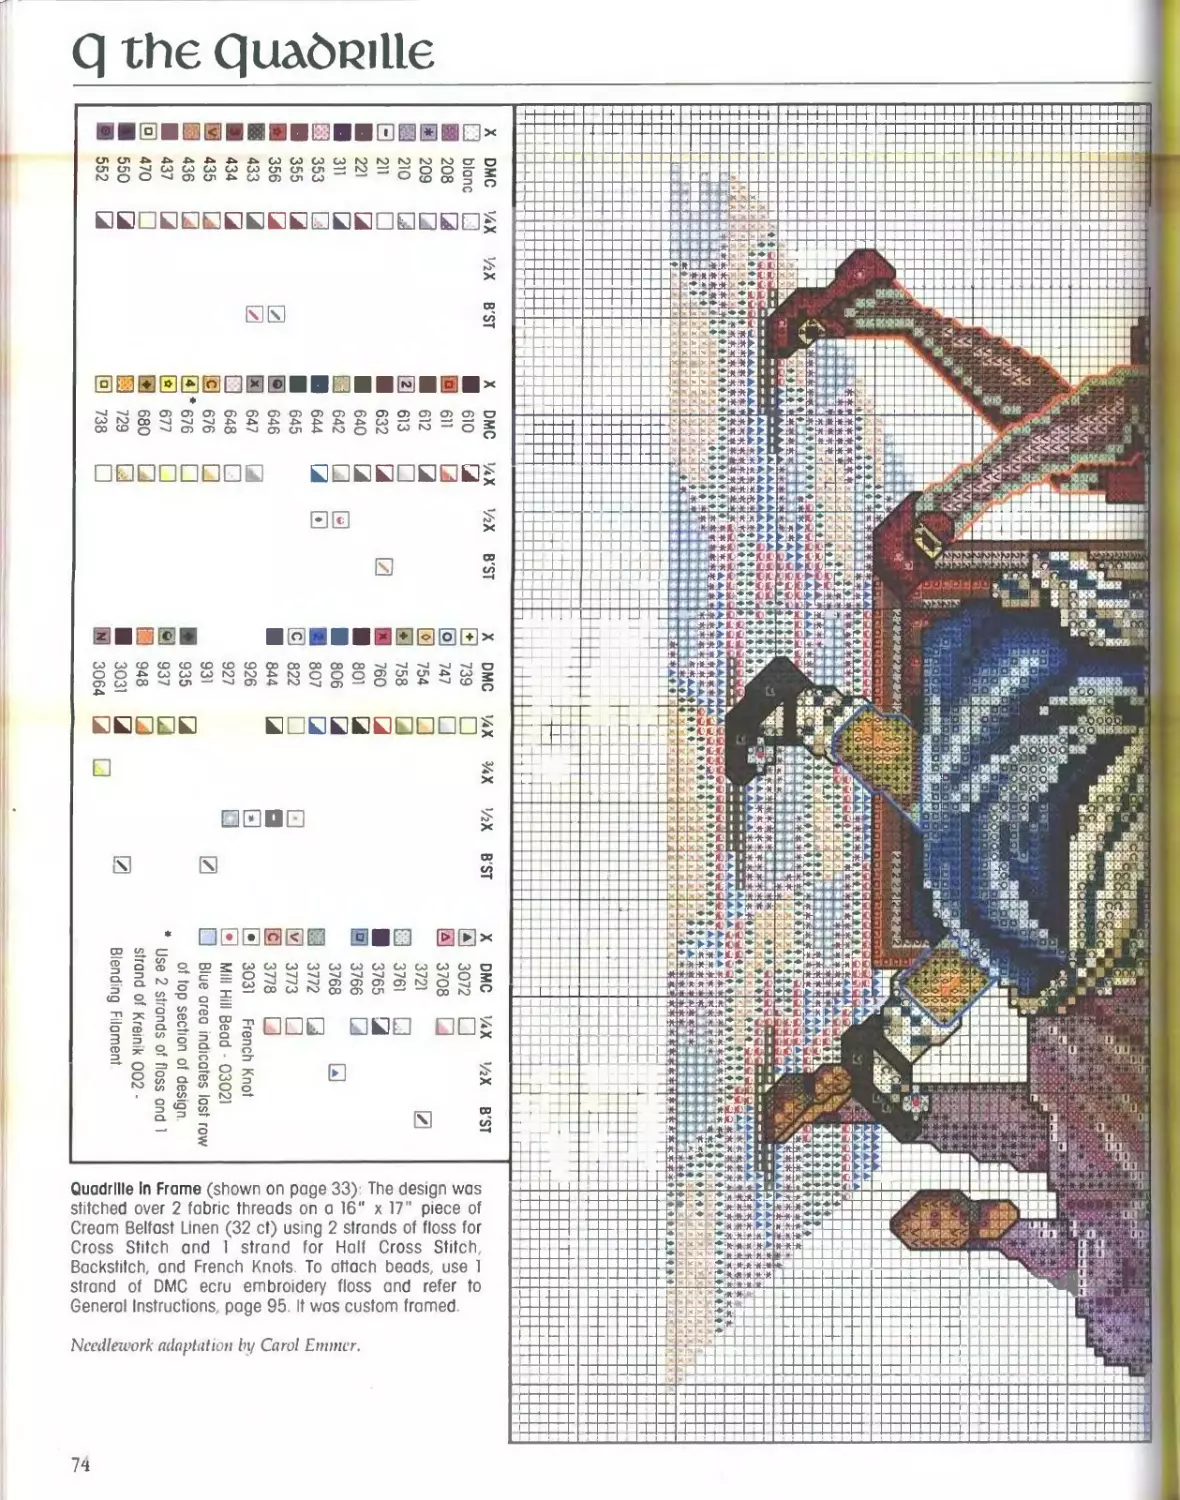
R FOR THE REINDEER____________________________________________
Santa and Reindeer Standing Figures...........34...........76
SIS FOR SNOW__________________________________________________
Snow Family Stuffed Shapes....................36...........80
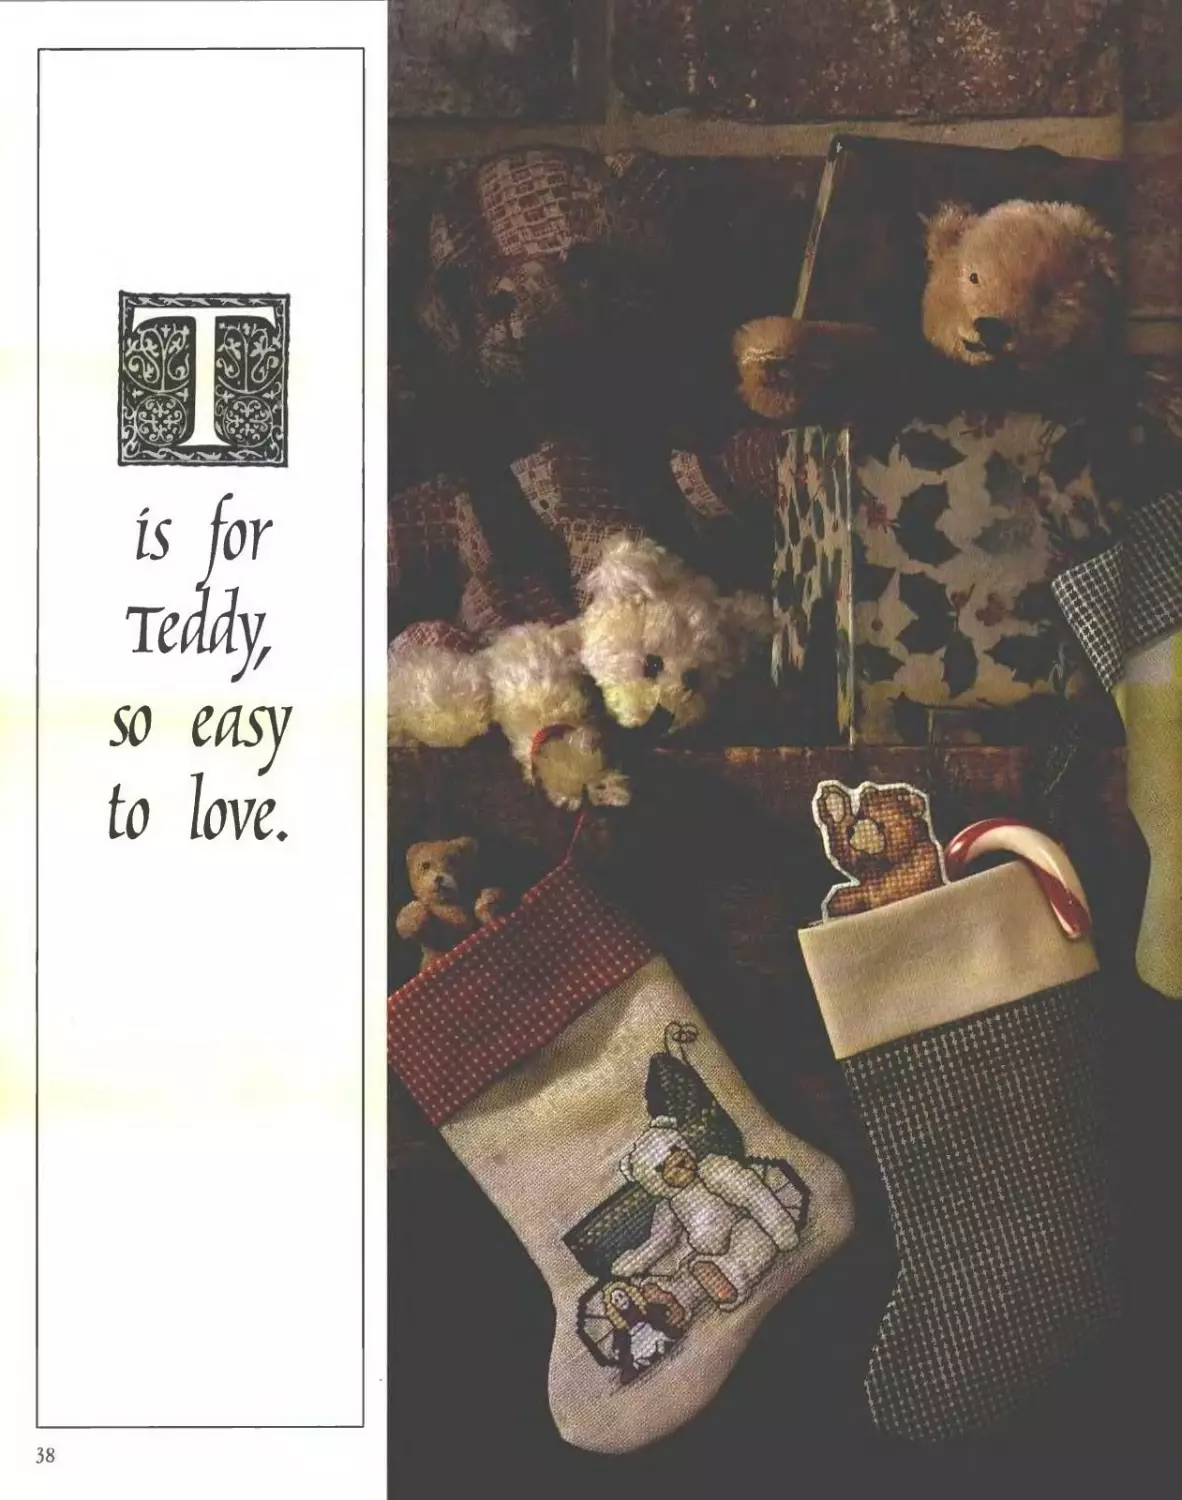
TIS FOR TEDDY_________________________________________________
Teddy Stockings...............................38...........82
VIS FOR UPROAR________________________________________________
Uproar Clock..................................41...........84
VIS FOR VOICES________________________________________________
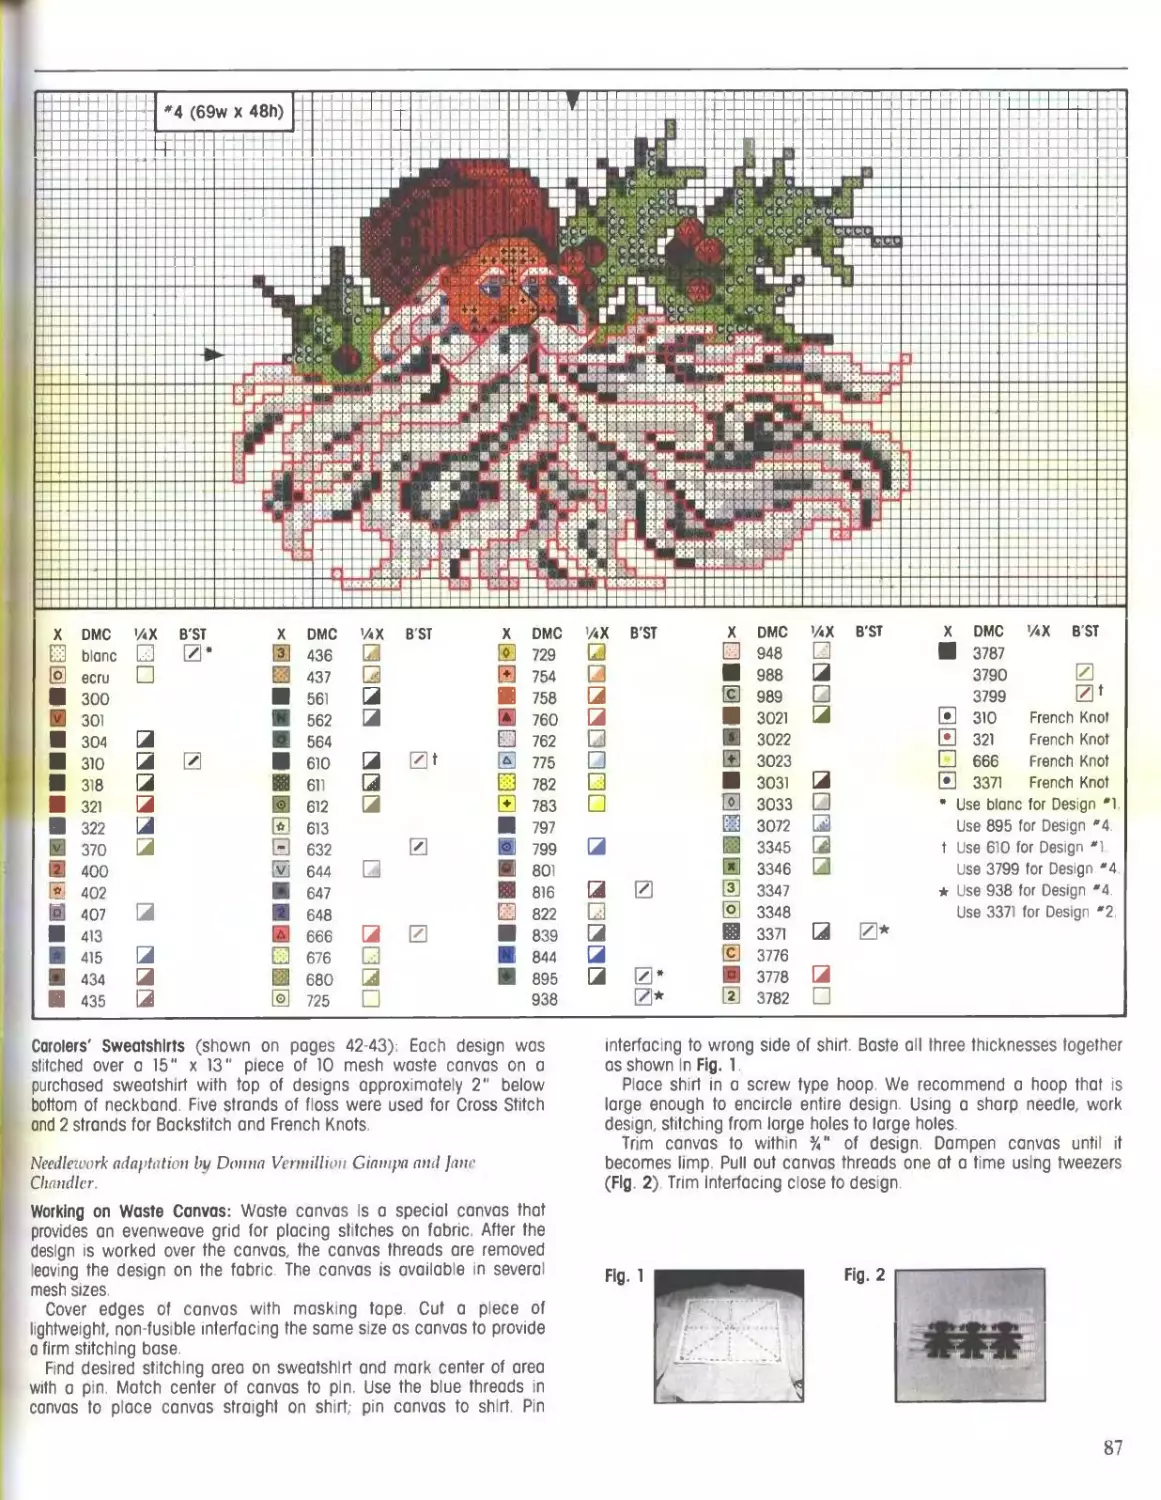
Carolers’ Sweatshirts.........................42...........86
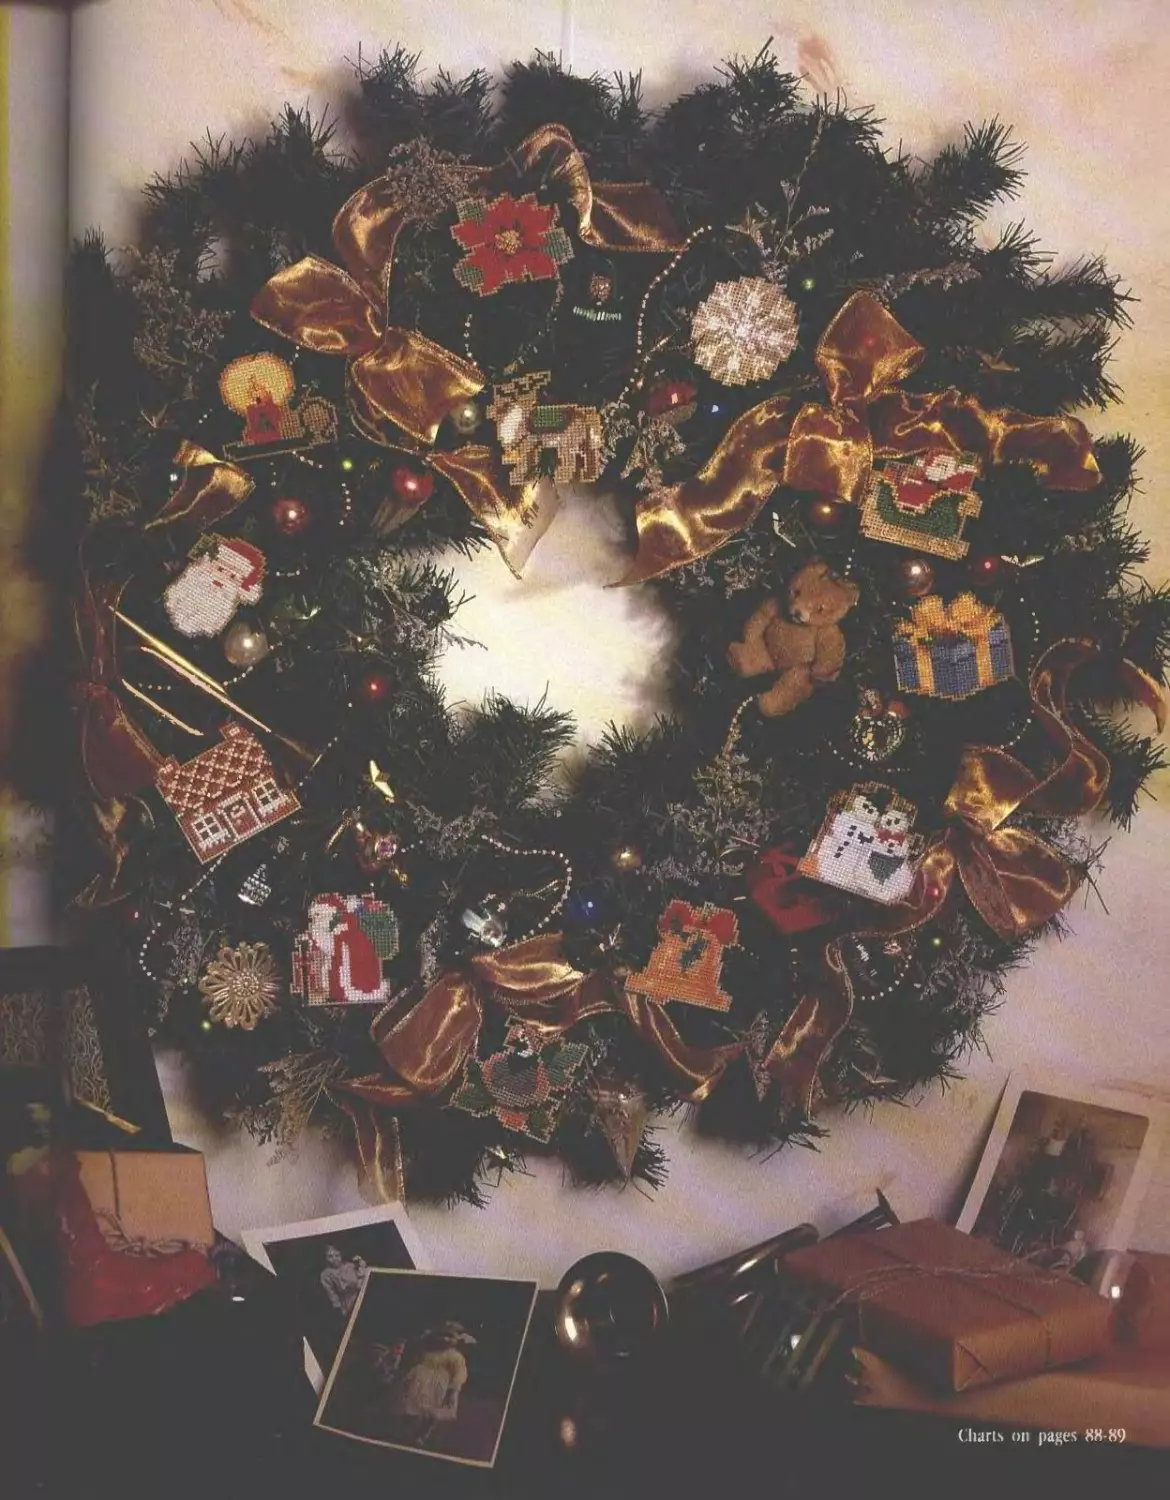
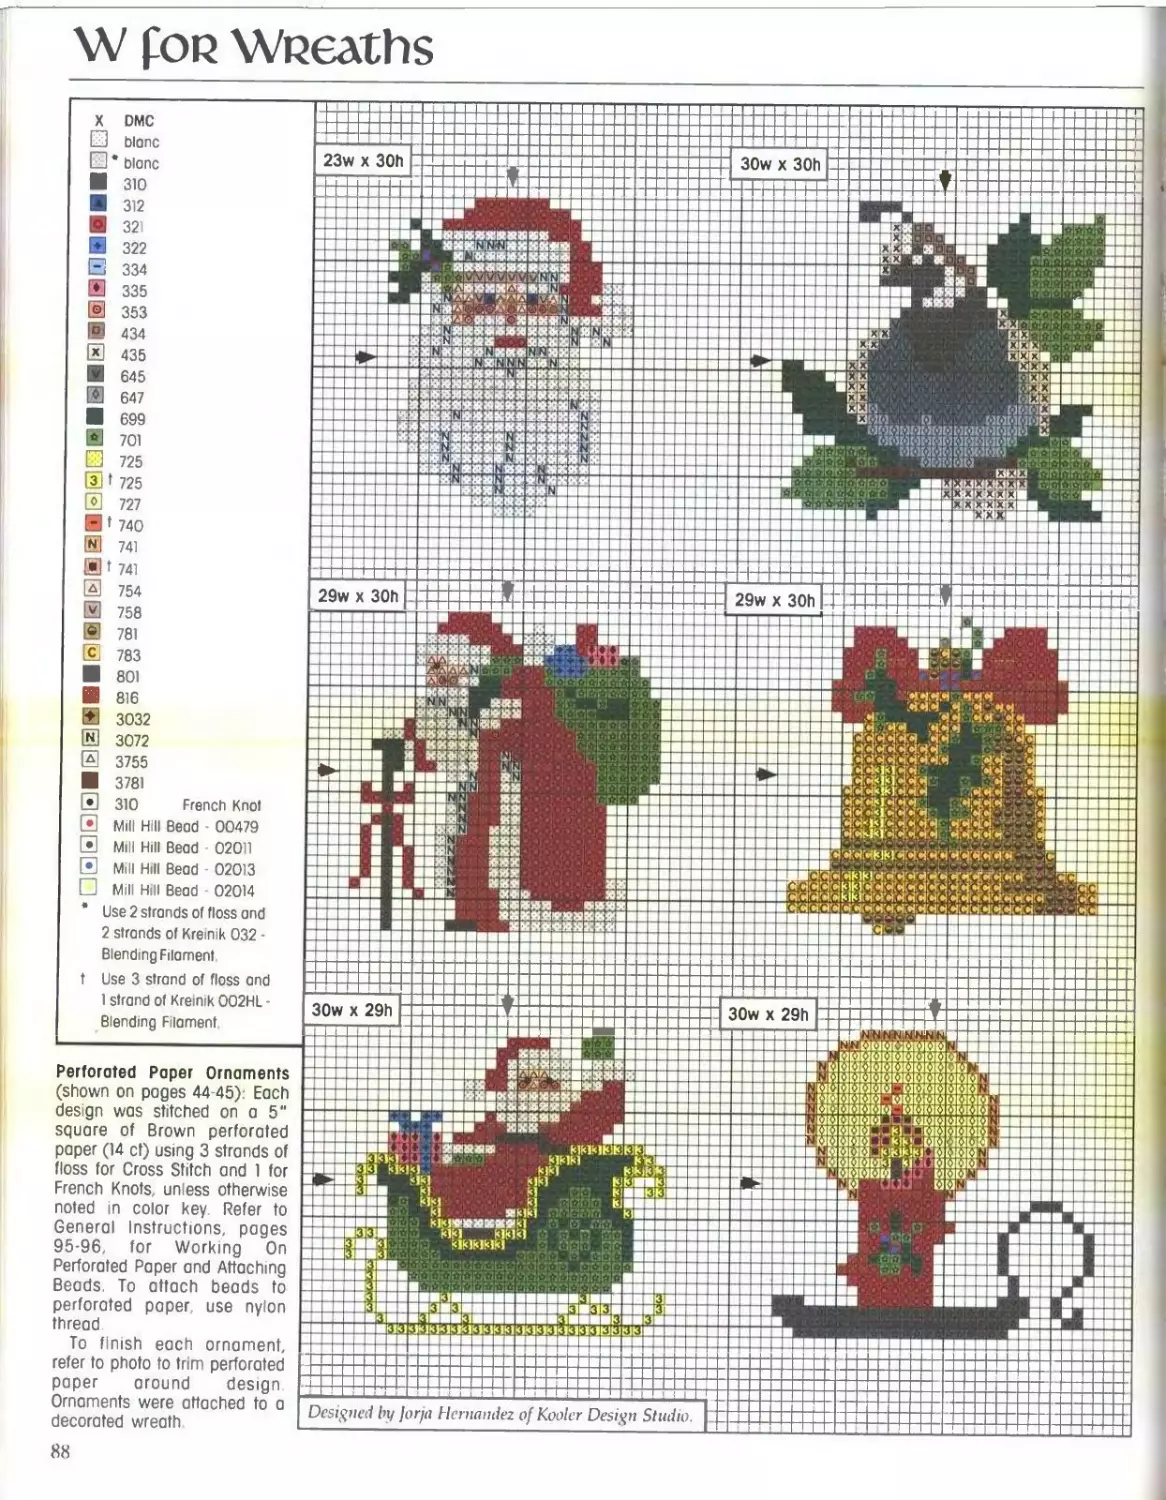
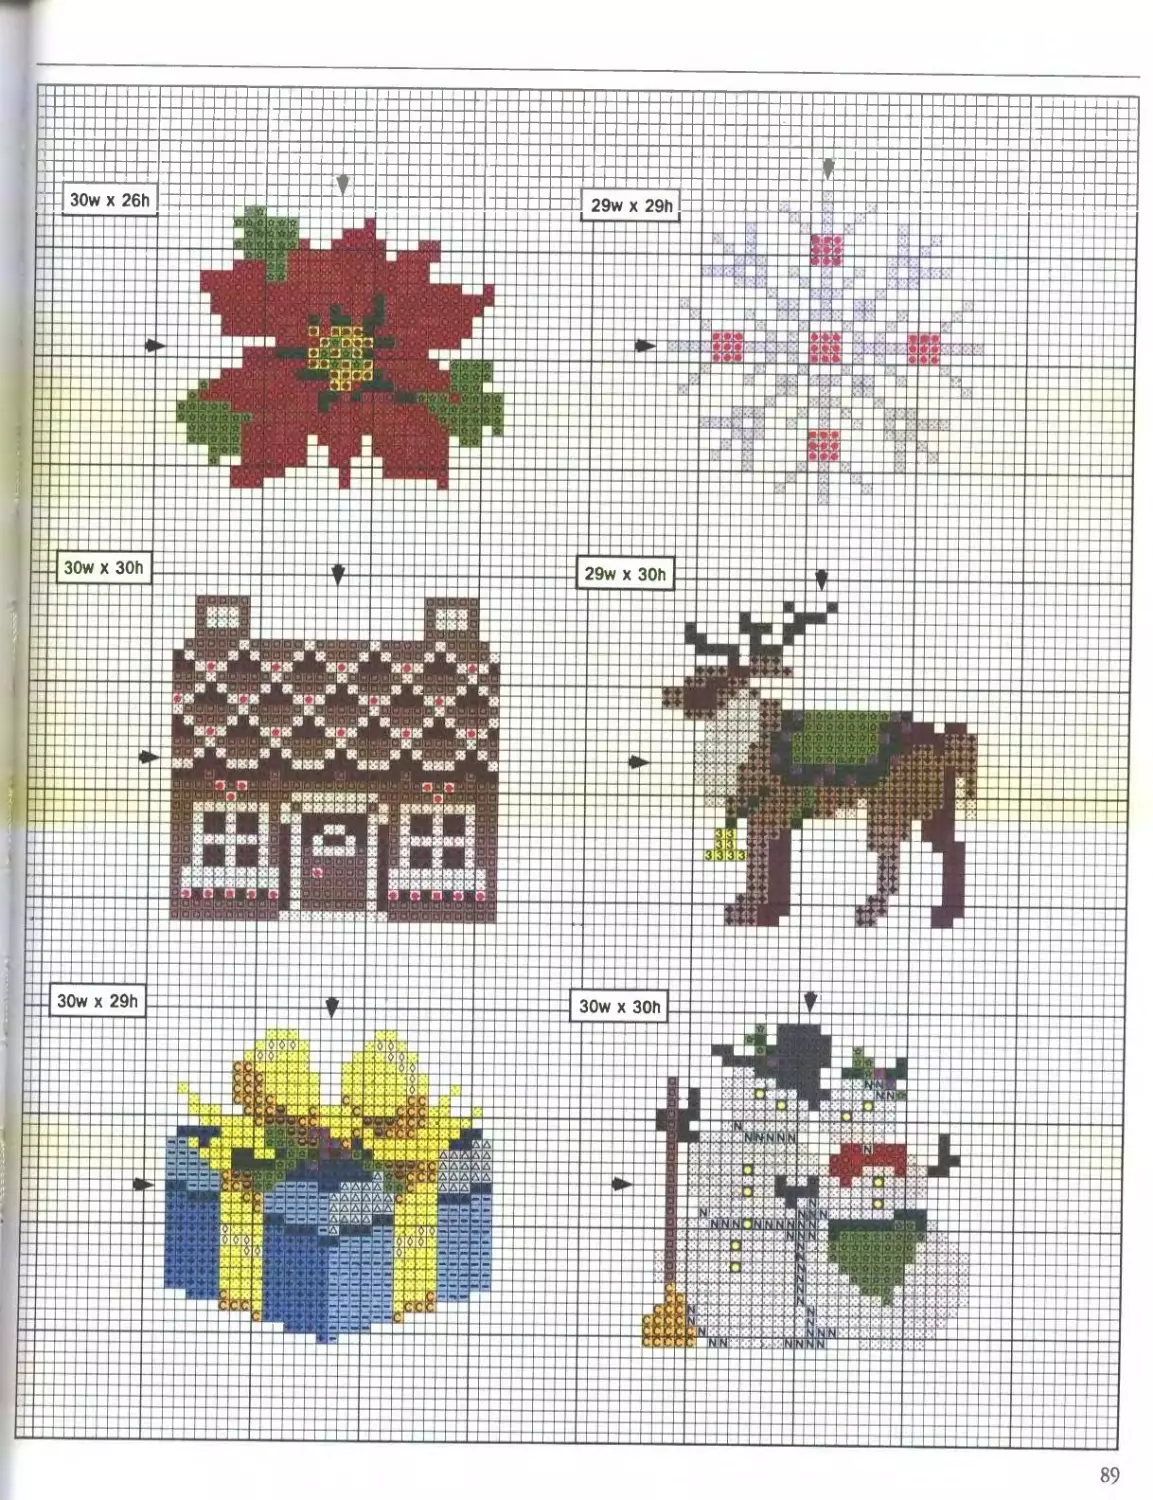
WFOR WREATHS__________________________________________________
Perforated Paper Ornaments....................45...........88
XIS FOR XMAS__________________________________________________
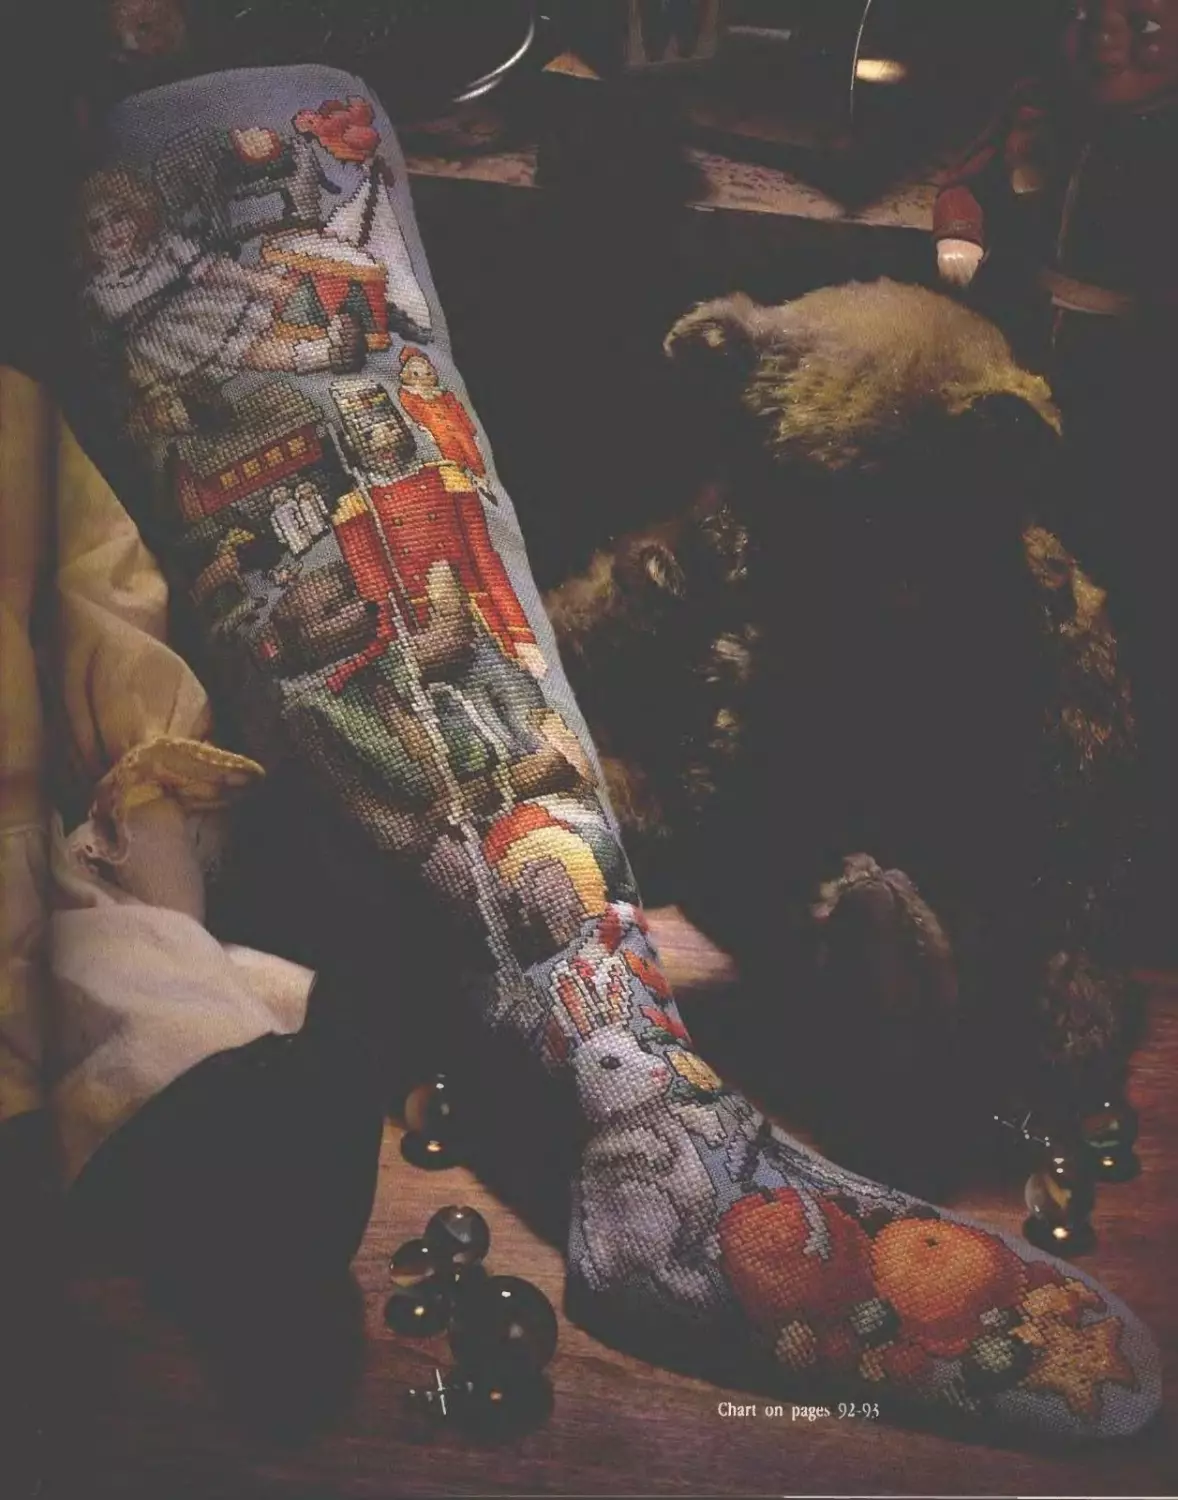
Stocking......................................47...........92
Y IS FOR YULE-LOG
Z IS FOR ZEST_________________________________________________
Boys on Sled in Frame.........................49.................90
General Instructions
-
V is for Voices that carol' a [ay.
' up on the wall'.
IJN ;T|R]pjD|U|c|T| I |O|N[
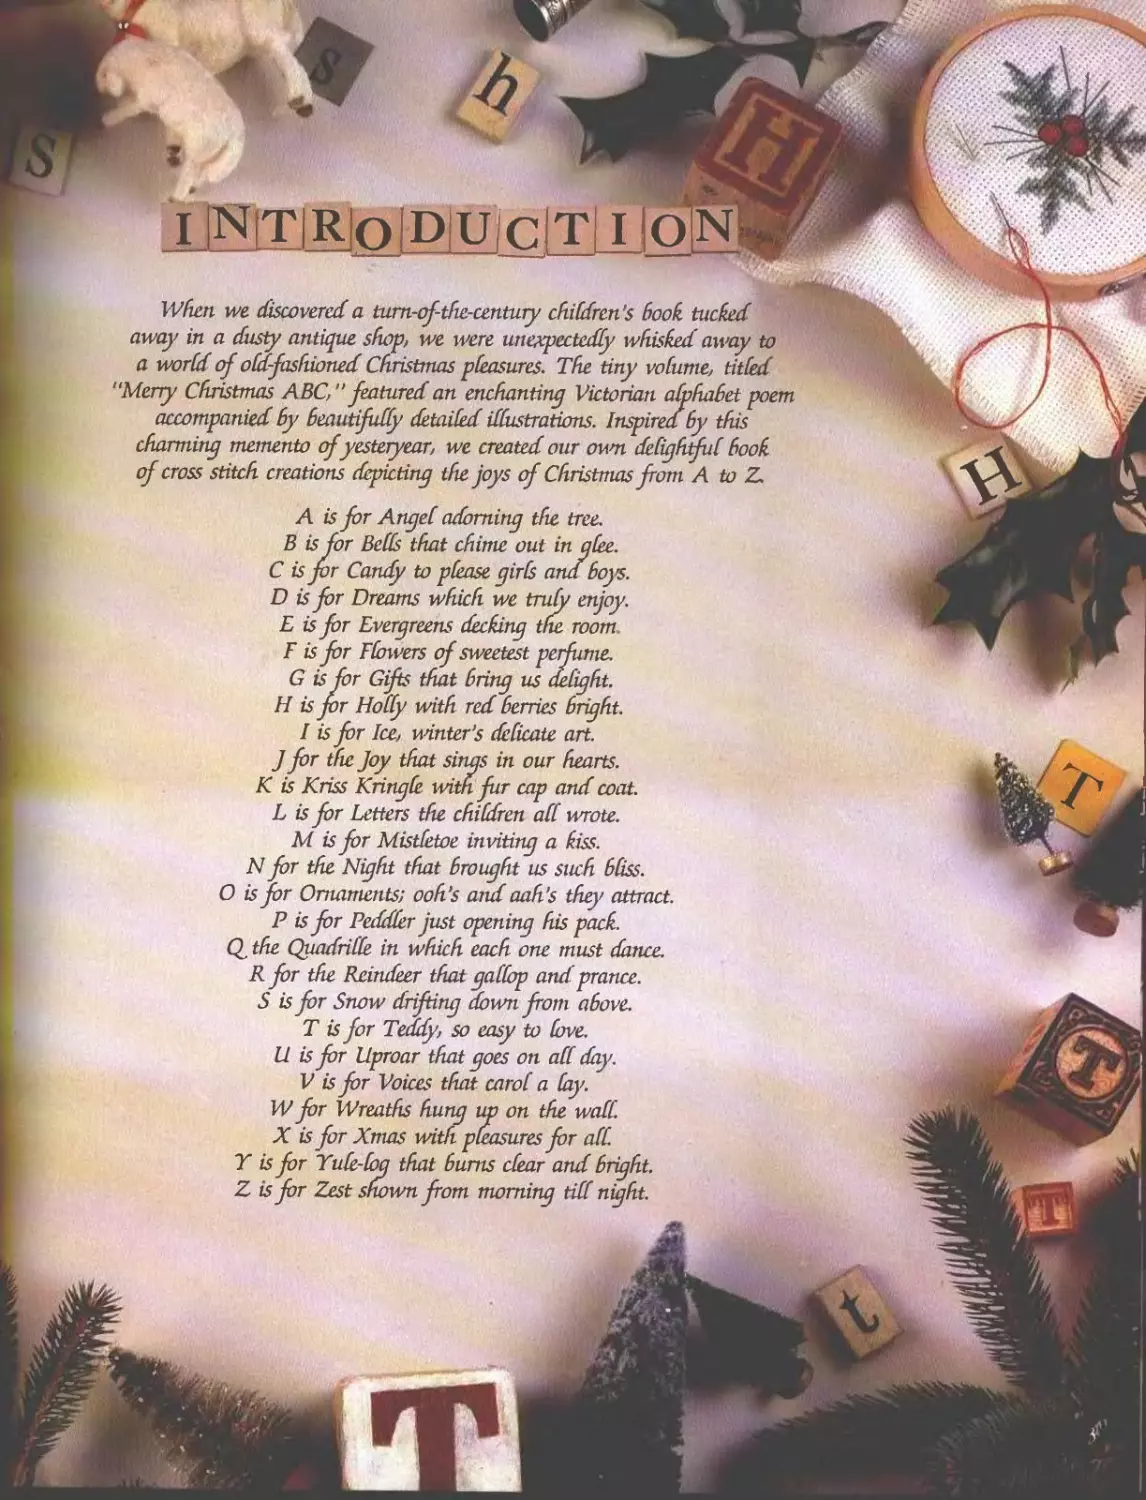
When we discovered a turn-ofthe-century children’s book tucked
away in a dusty antique shop, we were unexpectedly whisked away to
a world of old-fashioned Christmas pleasures. The tiny volume, titled
“Meny Christmas ABC," featured an enchanting Victorian alphahet poem
accompanied by beautifully detailed illustrations. Inspired by this
charming memento of yesteryear, we created our own delightful book
of cross stitch creations depicting the joys of Christmas from A to Z.
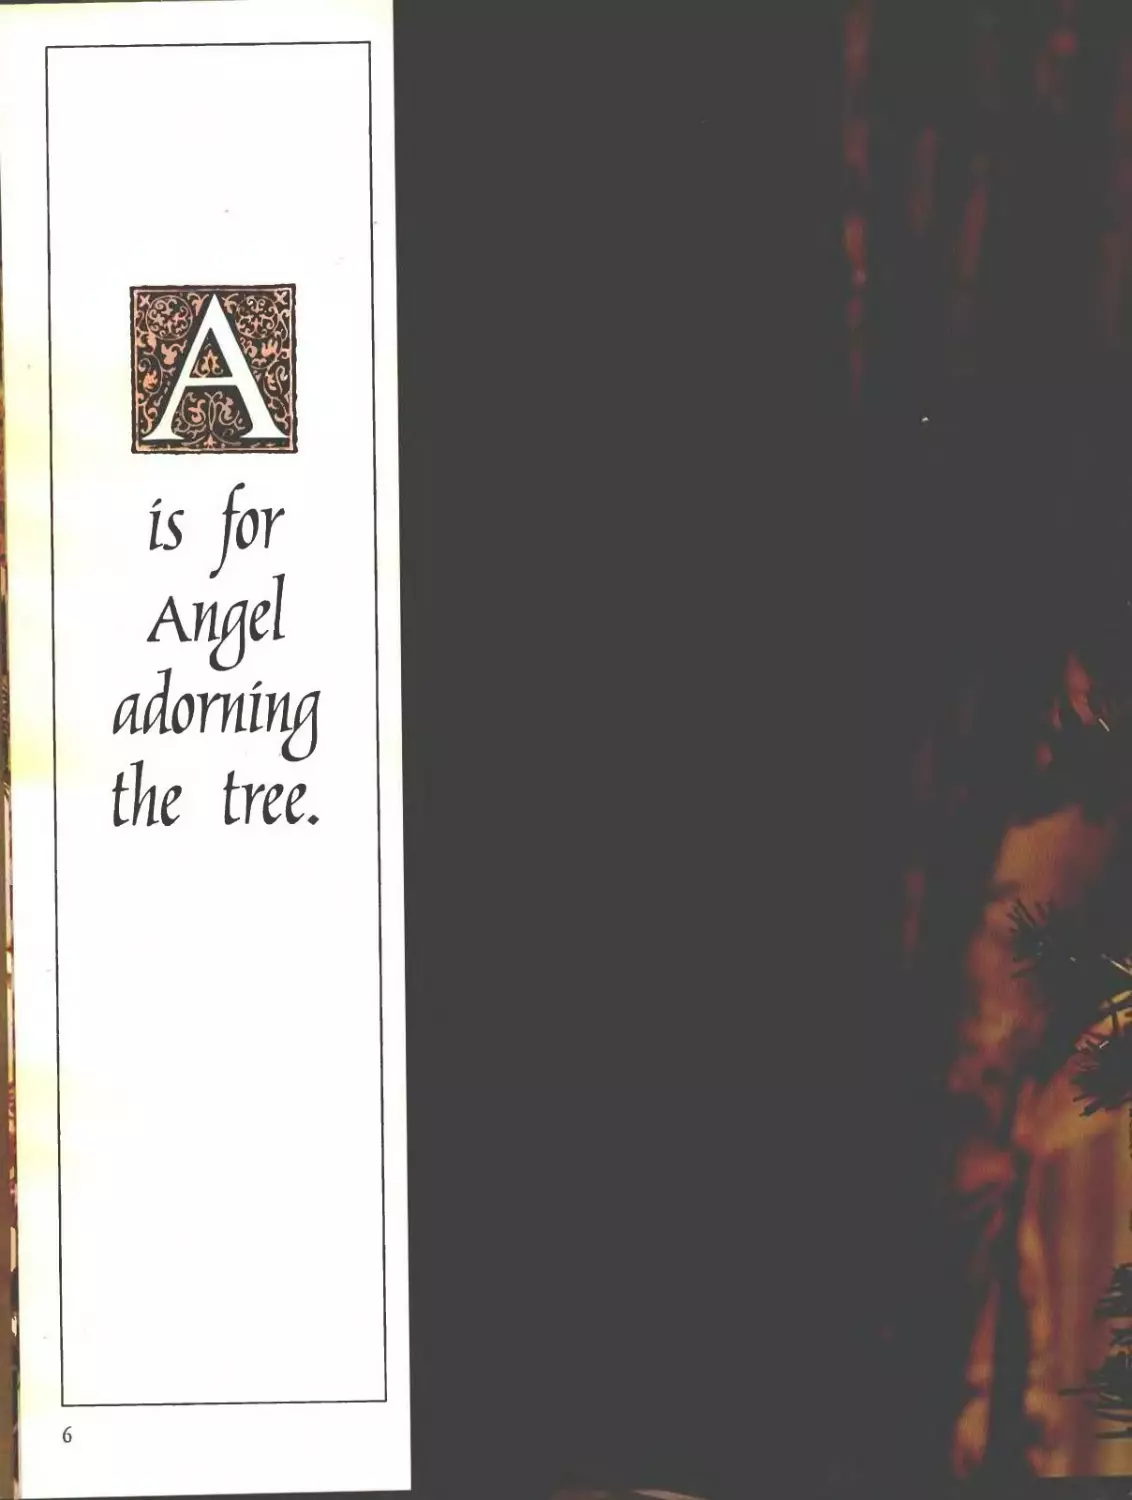
A is for Angel adorning the tree.
C is jor candy to please qirls and boys.
D is for Dreams which we truly enjoy.
E is for Evergreens decking the room.
F is for Flowers of sweetest perfume.
G is for Gifts that bring us delight.
H is for Holly with red berries bright.
I is for Ice, winter’s delicate art.
J for the Joy that sings in our hearts.
К is Kriss Kringle with fur cap and coat.
L is for Letters the children all wrote.
M is for Mistletoe inviting a kiss.
N for the Night that brought us such bliss.
О is for Ornaments; ooh’s and aah’s they attract.
P is for Peddler just opening his pack.
Q the Quadrille in which each one must dance.
Rfor the Reindeer that gallop and prance.
S is for Snow drifting down from above.
T is for Teddy, so easy to love.
LI is for Uproar that goes on all day.
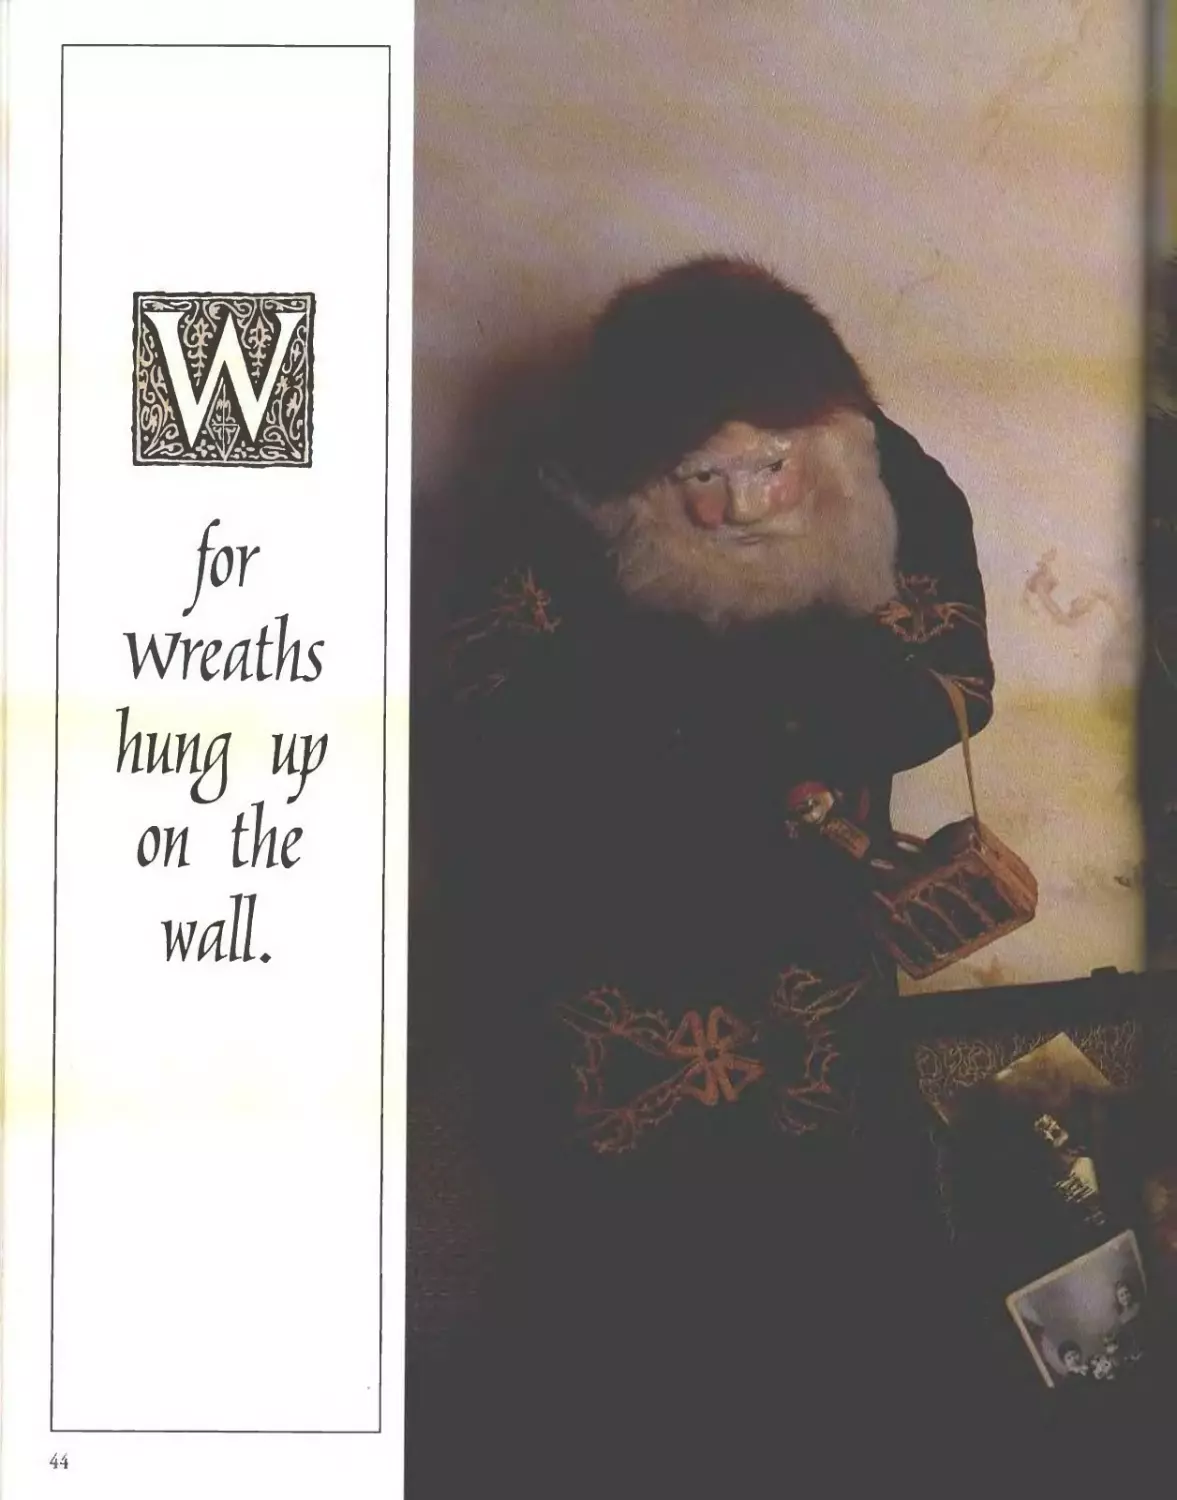
W for Wreaths hung
X is for Xmas with ].
Y is for Yule-log that bums clear and bright.
is for Bells
that chime
out in
fyee.
is tor
Candy to
указе flirts
and boys.
Dreams
which we
truly enjoy.
10
is for
Evergreens
decking the
room.
is for
Flowers of
sweetest
perfume.
is for Gifts
that hrina
ns delight.
14
<7uui лнсгр, cup cvjyume/ u
04 of unt'Uvwunv
is for
Holty with
red berries
hriflht.
('harts on page 6.
joy that
sings in our
hearts.
20
is Kriss
Kringle
with fur
CM aid
coat.
Letters the
children all
wrote.
22
%
is for
Mistletoe
inviting
a kiss.
№8-69
is for
ornaments;
ooh's and
aah's they
attract.
30
the
Quadrille
in which
each one
must Hance.
for the
Reindeer
that flalloy
and prance.
Charts on pages '6-79
(’Jiarb on pig©» ЯО xl
э
uproar
that floes
on all day.
< * -’’nW, г
:urb.';
: .:?Г1
к *
^’n^’rSn’/^HrSifrhi>'^r’r\n’rr< r7 ’п7 '<f/-'1
42
.. L й. * J»
for
wreaths
huna up
on the
wall.
44
7
Charts on pages 88-89
is for
Xmas with
pleasures
for all.
is for
yule-fog
that hums
clear and
bright.
is for zest
shown from
mornina
till night.
48
a is fop anqel
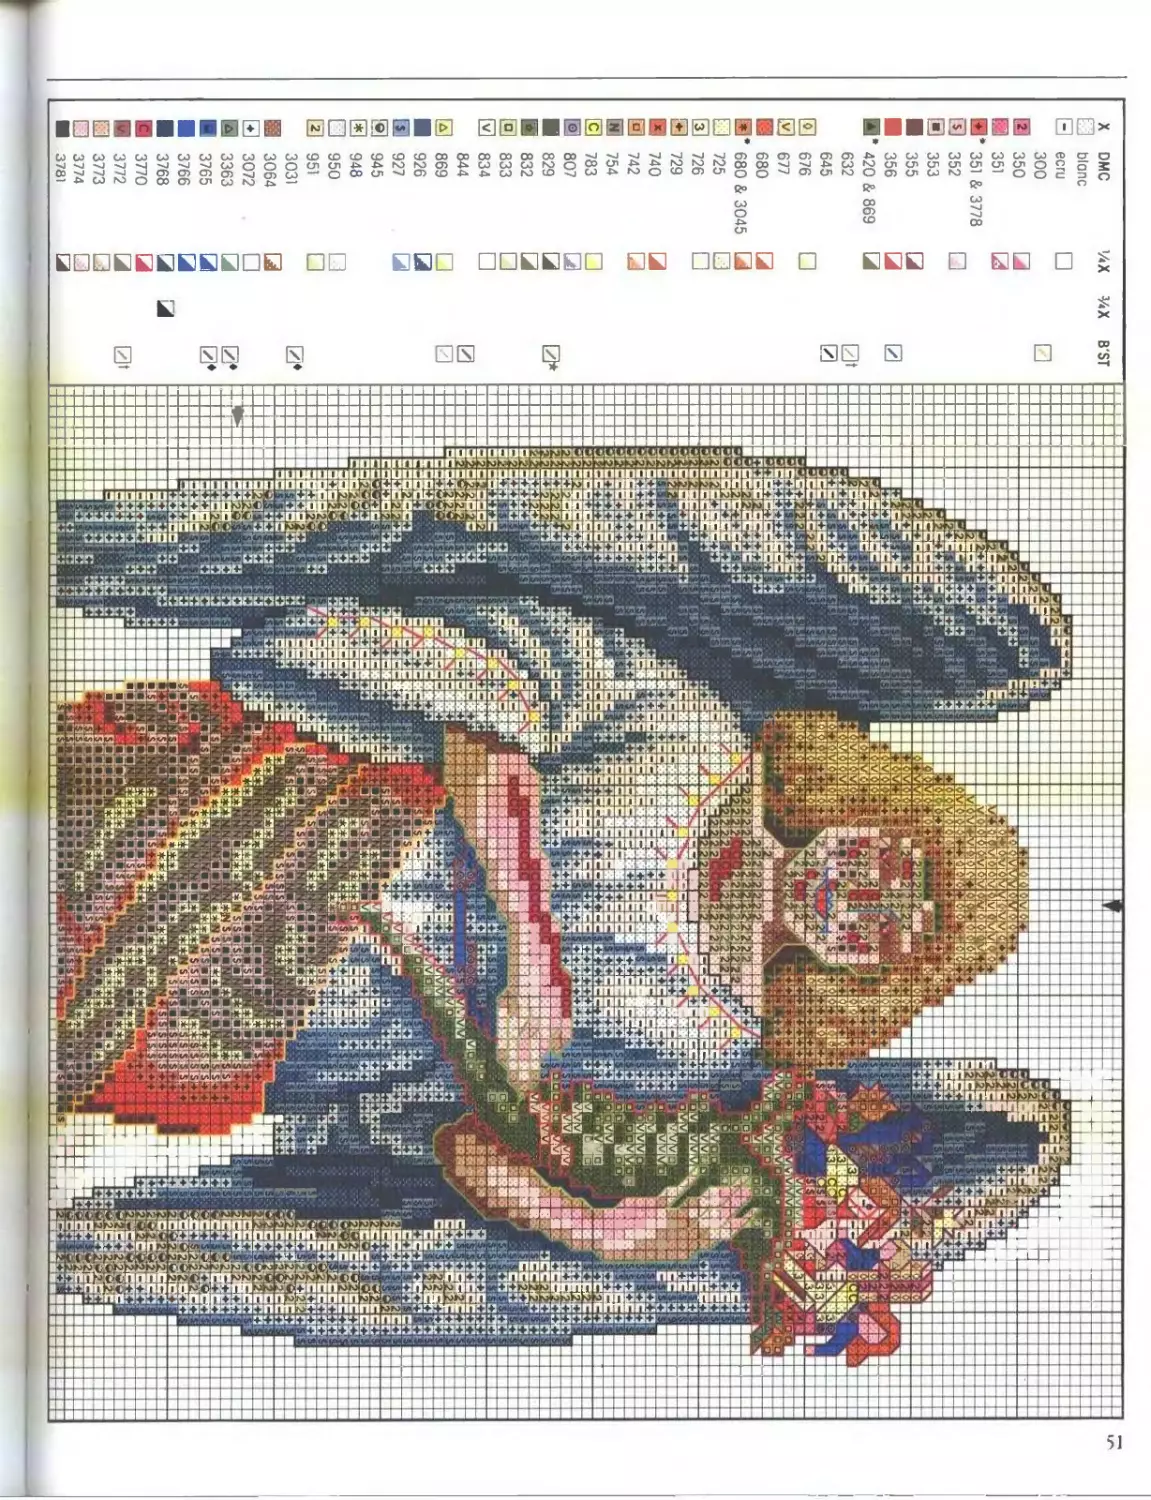
Angel Treetop Ornament (shown on page 7)
The design wos stitched over 2 fabric threads
on a 10” x 14" piece of Cream Belfast Linen
(32 ct) using 2 strands of floss for Cross
Stitch and 1 strand for Backstitch and French
Knot
For treetop ornament, cut one piece of
Belfast Linen same size as stitched piece for
backing Matching arrows to form one
pattern, trace entire treetop pattern (page 96)
onto tracing paper; cut out pattern Matching
right sides and raw edges, pin stitched piece
and backing fabric together Center pattern
on wrong side of stitched piece and use a
fabric marking pencil to draw around pattern.
Cut fabric pieces along drawn line; remove
pins
Cut one 28" length of purchased ’A" dia
cording If needed, trim seam allowance of
cording to '//' Matching raw edges and
beginning and ending at bottom edge of
stitched piece baste cording to right side of
stitched piece
Matching right sides and raw edges and
leaving bottom edge open, use a zipper foot
and %" seam allowance to sew stitched
piece and backing fabric together Clip curves
and turn right side out, carefully pushing
curves outward Press bottom edge A" to
wrong side Stuff with polyester fiberfill and
whipstitch bottom edge closed
For ties, cut two 18" lengths of '//'w
ribbon Fold each length in half and whipstitch
center of each length to back of treetop
ornament 4" apart (Fig. 1)
Fig. 1
Needlework adaptation by Nancy Dockter and
Caro! Emnier.
50
X DMC ’ /4> %x B'ST
0 blanc
- ecru
300 LZj^
2 350
К 351
E * 351 & 3778
L5J 352
353
355 3
356 3 0
* 420 & 869
632
645
[У 676
677
680 3
V * 680 & 3045 jl
725 □
3 726 □
729
« 740
о 742
¥ 754
[C 783
Го 807
829 4 [/)*
832
[° 833
[y 834
844 /
[Z 869
926 a
К 927 a
{© 945
* 948
950 □
2 951 □
3031 0*
3064 3
E 3072
A 3363 7*
3765 4 Z*
3766
3768 3 3
3770 3
3772 0t
Kv 3773 □
I* 3774
3781
iv
Sjd
♦J2S’
ла»
%N S S S S
Ц.М ДО S S
» -
N $T$‘« *>*’S
Ж N SS SlSjrN
!* *N S s S SI«N .
ИГ#*ДГ3 5 < *
MNN*N$ 5 $
йиса.
flf4tt0B
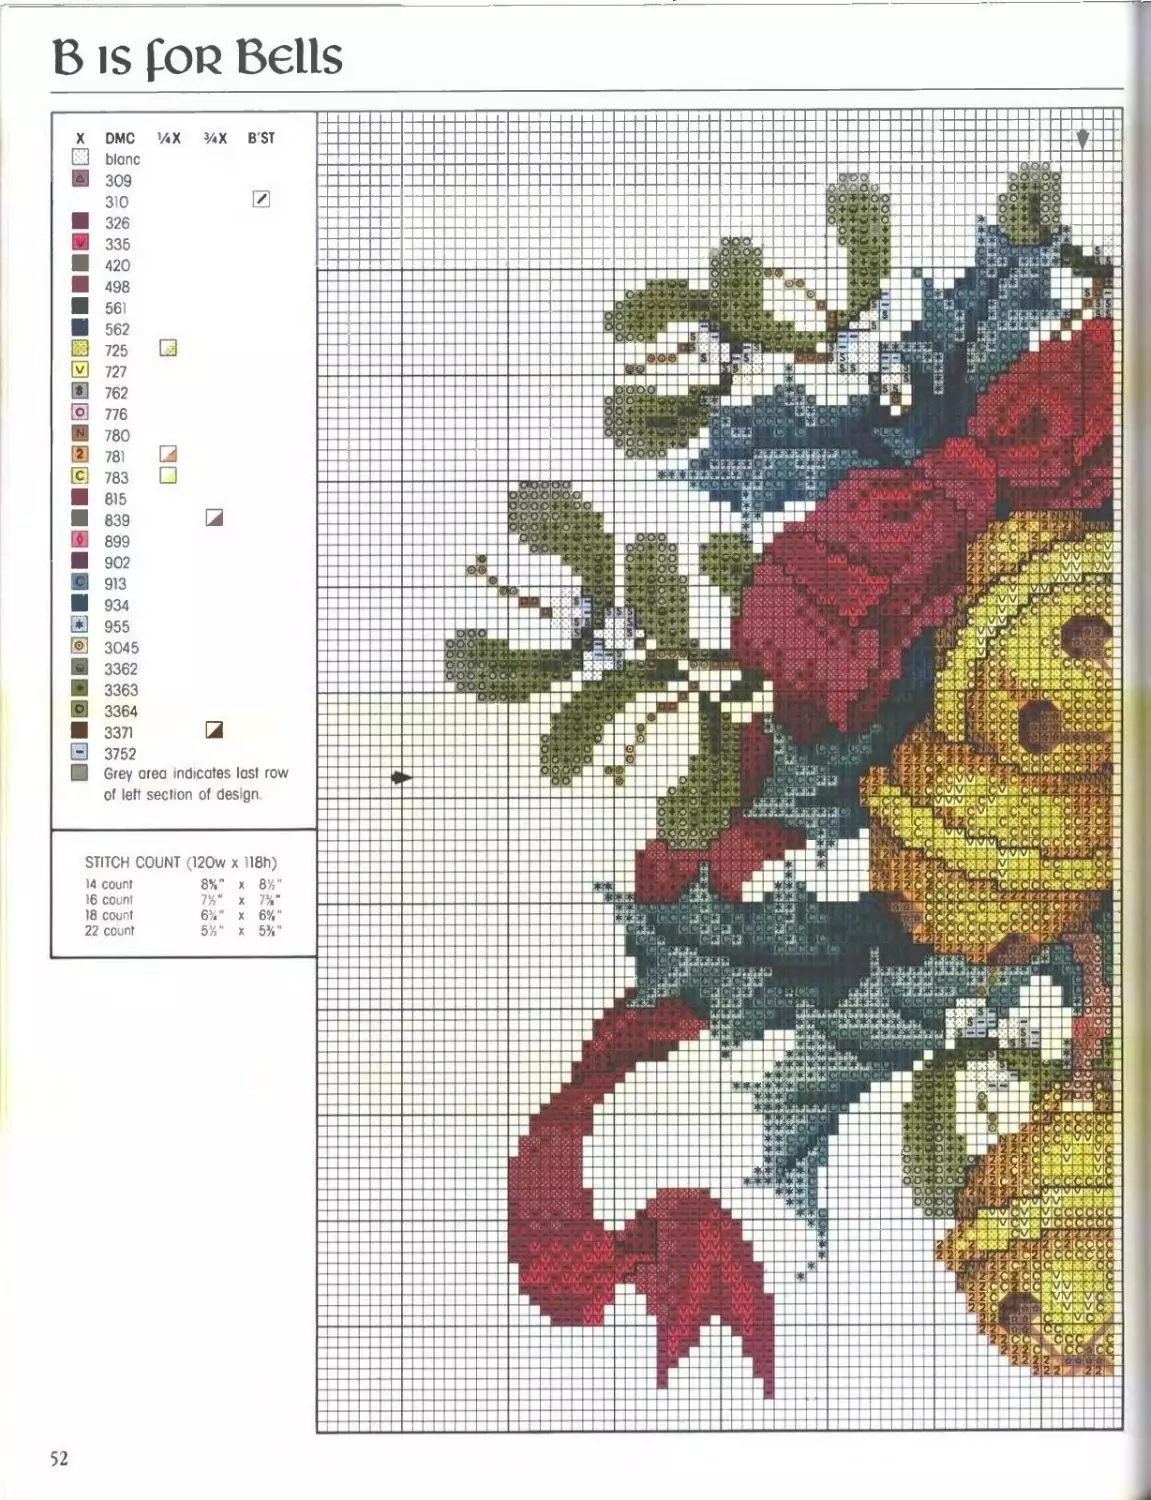
Б is fop Bells
X DMC ( 3/4) ( B'ST
blonc
309
310 0
326
335
420
498
561
562
£ 725
0 727
E 762
[o 776
N 780
[2 781
E 783
815
839 a
Ф 899
902
913
I 934
* 955
© 3045
3362
3363
3364
3371 3
[~J 3752
Grey area indicates last row
of left section of design
STITCH COUNT (12Ow x 118h)
14 count 8%" X 8'A
16 count TA" X 7%'
18 count 6V X 6%
22 count 5'A" X 5%
52
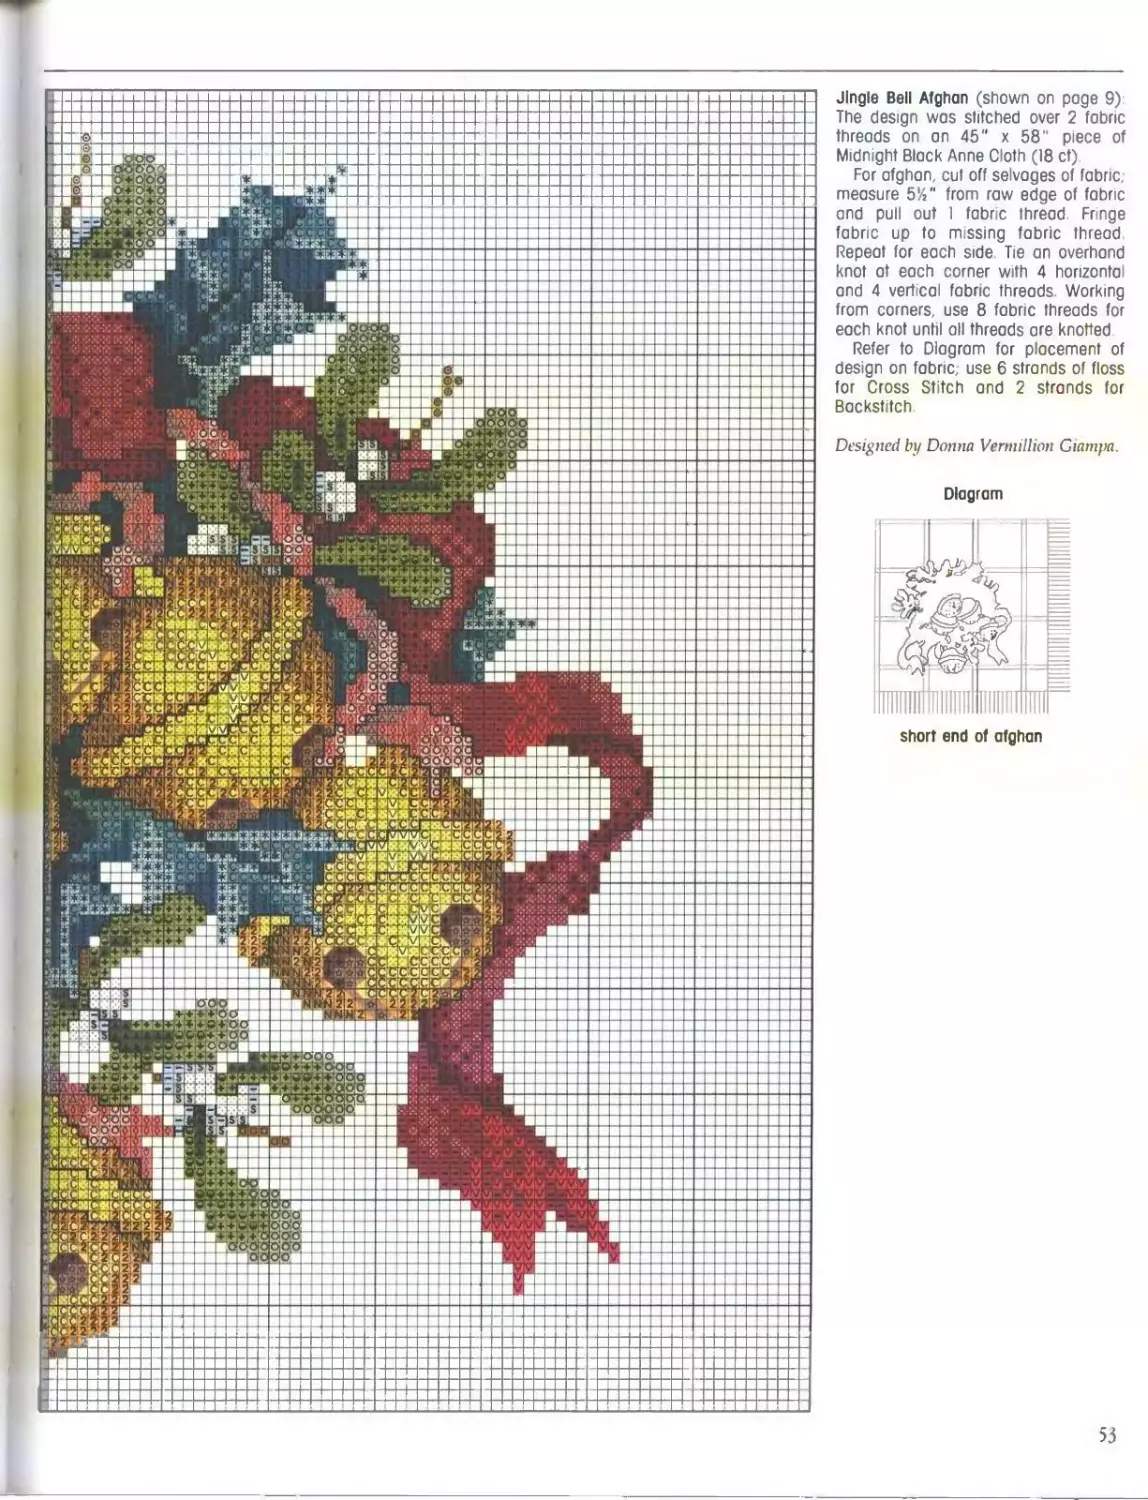
Jingle Bell Afghan (shown on page 9)
The design was stitched over 2 fabric
threads on an 45" x 58” piece of
Midnight Block Anne Cloth (18 ct).
For afghan, cut off selvages of fabric,
measure 5'Л" from raw edge of fabric
and pull out 1 fabric thread. Fringe
fabric up to missing fabric thread
Repeat for each side. Tie an overhand
knot at each corner with 4 horizontal
and 4 vertical fabric threads Working
from corners, use 8 fabric threads for
each knot until all threads are knotted
Refer to Diagram for placement of
design on fabric; use 6 strands of floss
for Cross Stitch and 2 strands for
Backstitch
Designed by Donna Vermillion Giatnpa.
Diagram
short end of afghan
53
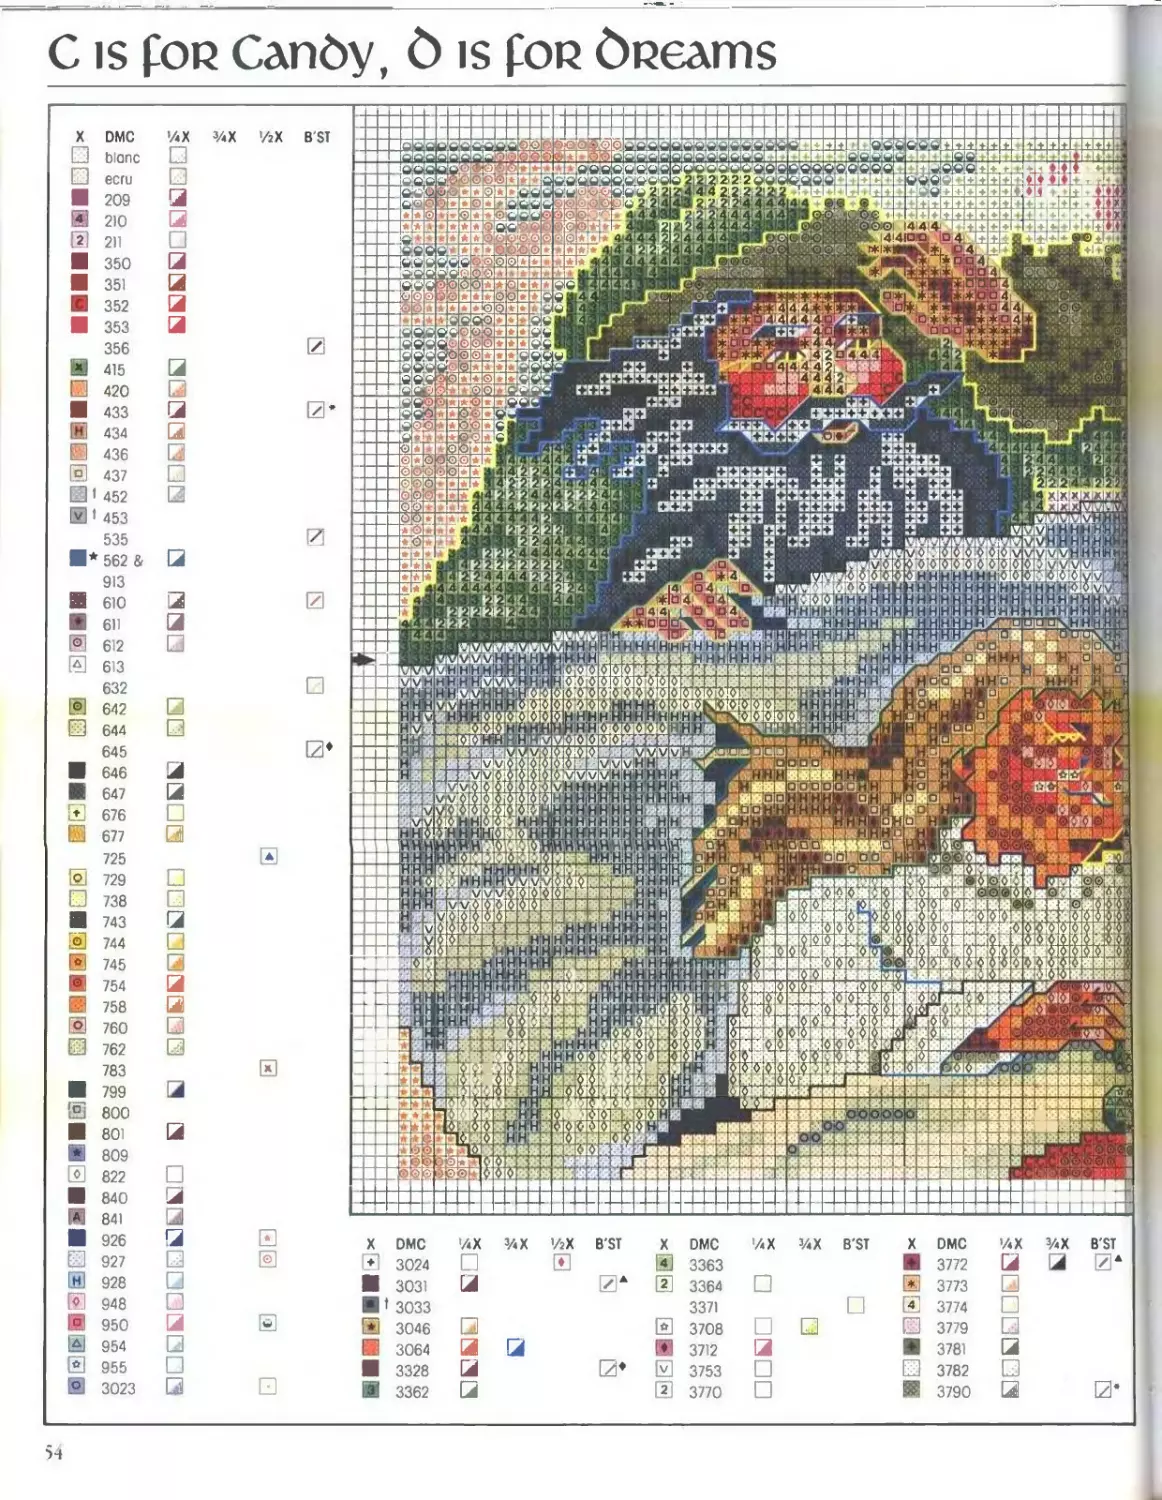
C is For Candy, d is For dReams
X DMC /дХ
blanc
ecru —
209
210 a
и 211 ~l
350
351
352
353 J
356
X 415 3
£ 420 □
433
[и 434 3
436 Д 1 t
|o] 437
1 452 a
f 453
535
* 562 &
913
610 3
611 3
612 3
0 613
з/дХ ’/zX B'ST
632
° 642 □
*3 644 □
645
646 3
647 3
* 676
El 677 з
725
0 729
E 738
743 3
[o 744
I* 745 —
754
758 3
760 □
762
783
799 3
[° 800
801 ~3
* 809
[У 822 □
840 3
841 3
926 3
927 3
Ih 928
E 948
|o 950 3
954 □
955 □
3023
E E 0 E □ 1 E 0 И 1 ♦
X
r*l*i
*,* Cru 4
40i
* ttfp1
4 4
IWHjHHIH
‘Янн
-oW
ЯВИ
v’HlHlH
□ oooq’o
HHM HH
'□Lol
v v
H
HMH’H
hh:
hH'RIHH
H'H’
H]H H'H
- M ►—
;O0© 141414
№t 14'410®» I
HHHM'H
ihhhh
....HWH
H'Hh'HIHH
?
Г b FTT h'h[h
^rTHiHiHRIi
HujH'HiHiHHiHHtHI
КН-Н H'H H H
Н'Н'НИ
ИННИН
H’HIH
H'H!
T ,:.Л? н;нй
Гч $ !0 HHiH'Hhm
Инн H H
М’оГ
r3i“T-
VH H H нЪц
VHHHH'HH
yivy’H HhIh.
5а.ъь<Я1ал«?
IMK4
МЙЯ«ГЛ'Л1 «
t
DMC
3024
3031
3033
3046
3064
3328
3362
’/дХ
3
з/дХ ’ЛХ
[Я
B'ST
X
2
DMC
3363
3364
3371
3708
3712
3753
3770
’/дХ УдХ B'ST
X
DMC
3772
3773
3774
3779
3781
3782
3790
’/дХ
з/дХ B'ST
□ Purple area indicates last row
ot right section of design
* Use 433 for girl’s hair Use
3790 for fairies' wings
t Use 2 strands of floss and 1 strand
of Kremik 032 - Blending F lamenl
* Use 1 strand of each floss color
* Use 3328 for fairies and girls
mouths Use 645 tor all other.
A Use 3031 for Santa's eyes Use
3772 for fairies’ faces and arms
STITCH COUNT (150w x 89h)
14 count 10%" X 6%"
16 count 9У." X 5%"
18 count 8 V X 5"
22 count 67." X 47,"
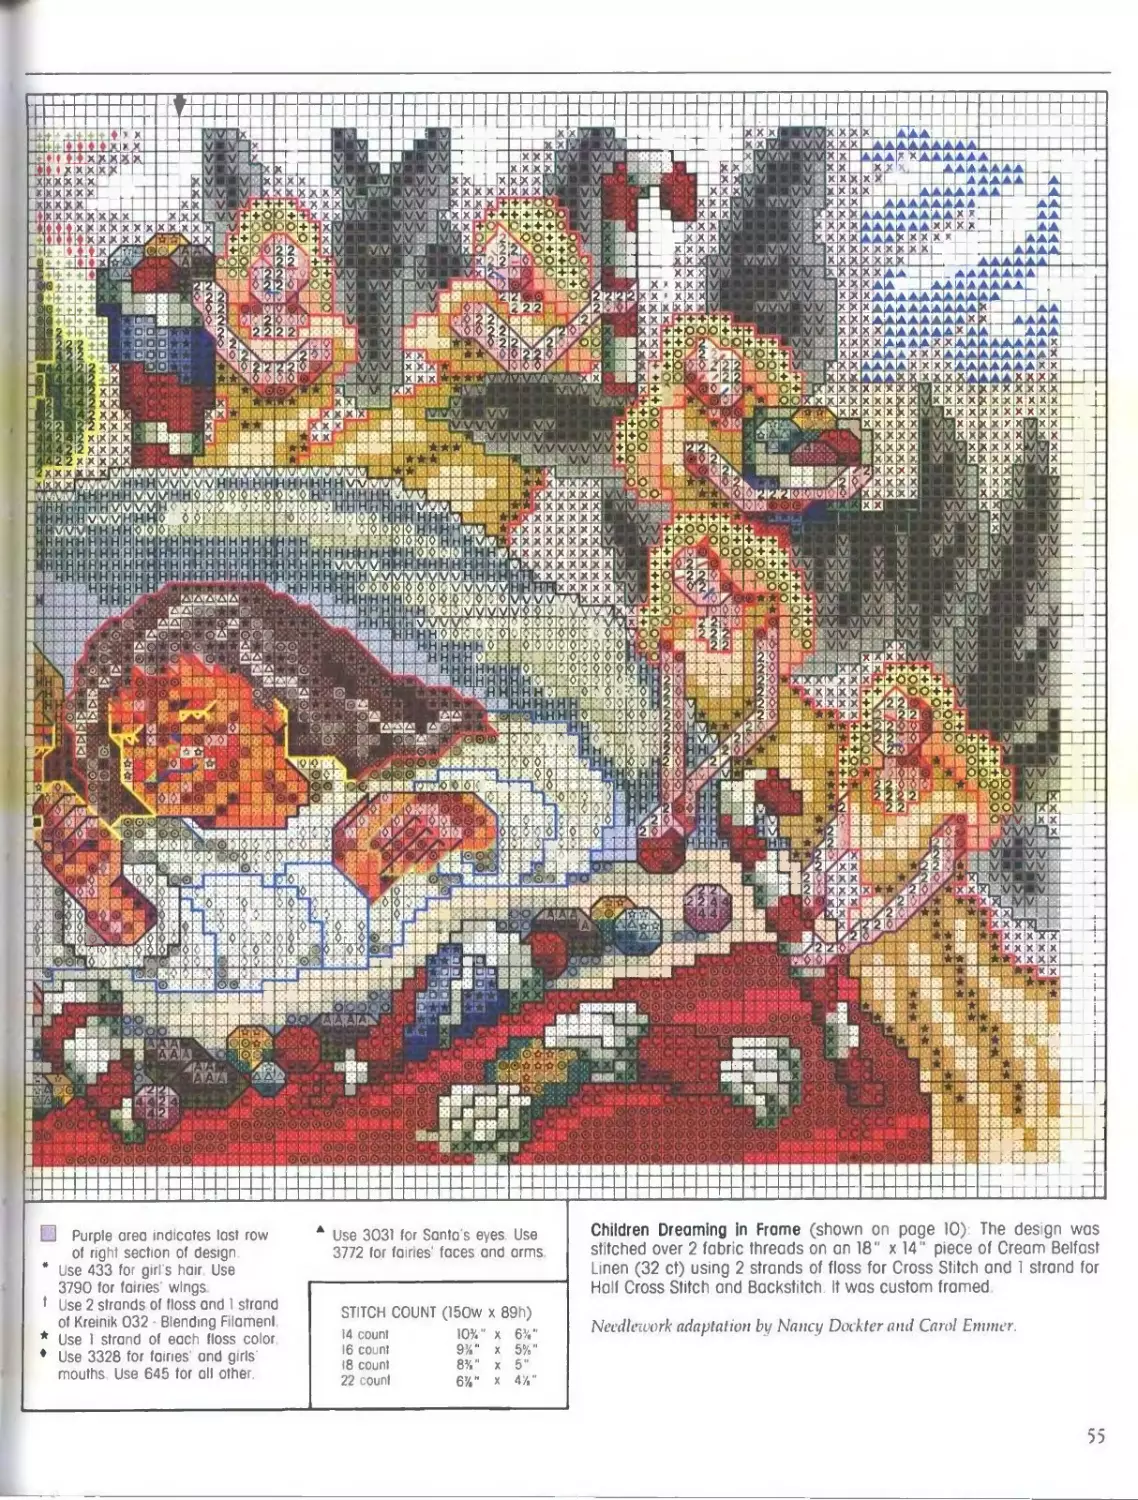
Children Dreaming In Frame (shown on page 10) The desgn was
stitched over 2 fabric threads on an 18" x 14" piece of Cream Belfast
Linen (32 ct) using 2 strands of floss for Cross Stitch and 1 strand for
Half Cross Stitch and Backstitch. It was custom framed
Needlework adaptation In/ Nancy Dockter and Carol Emnier.
55
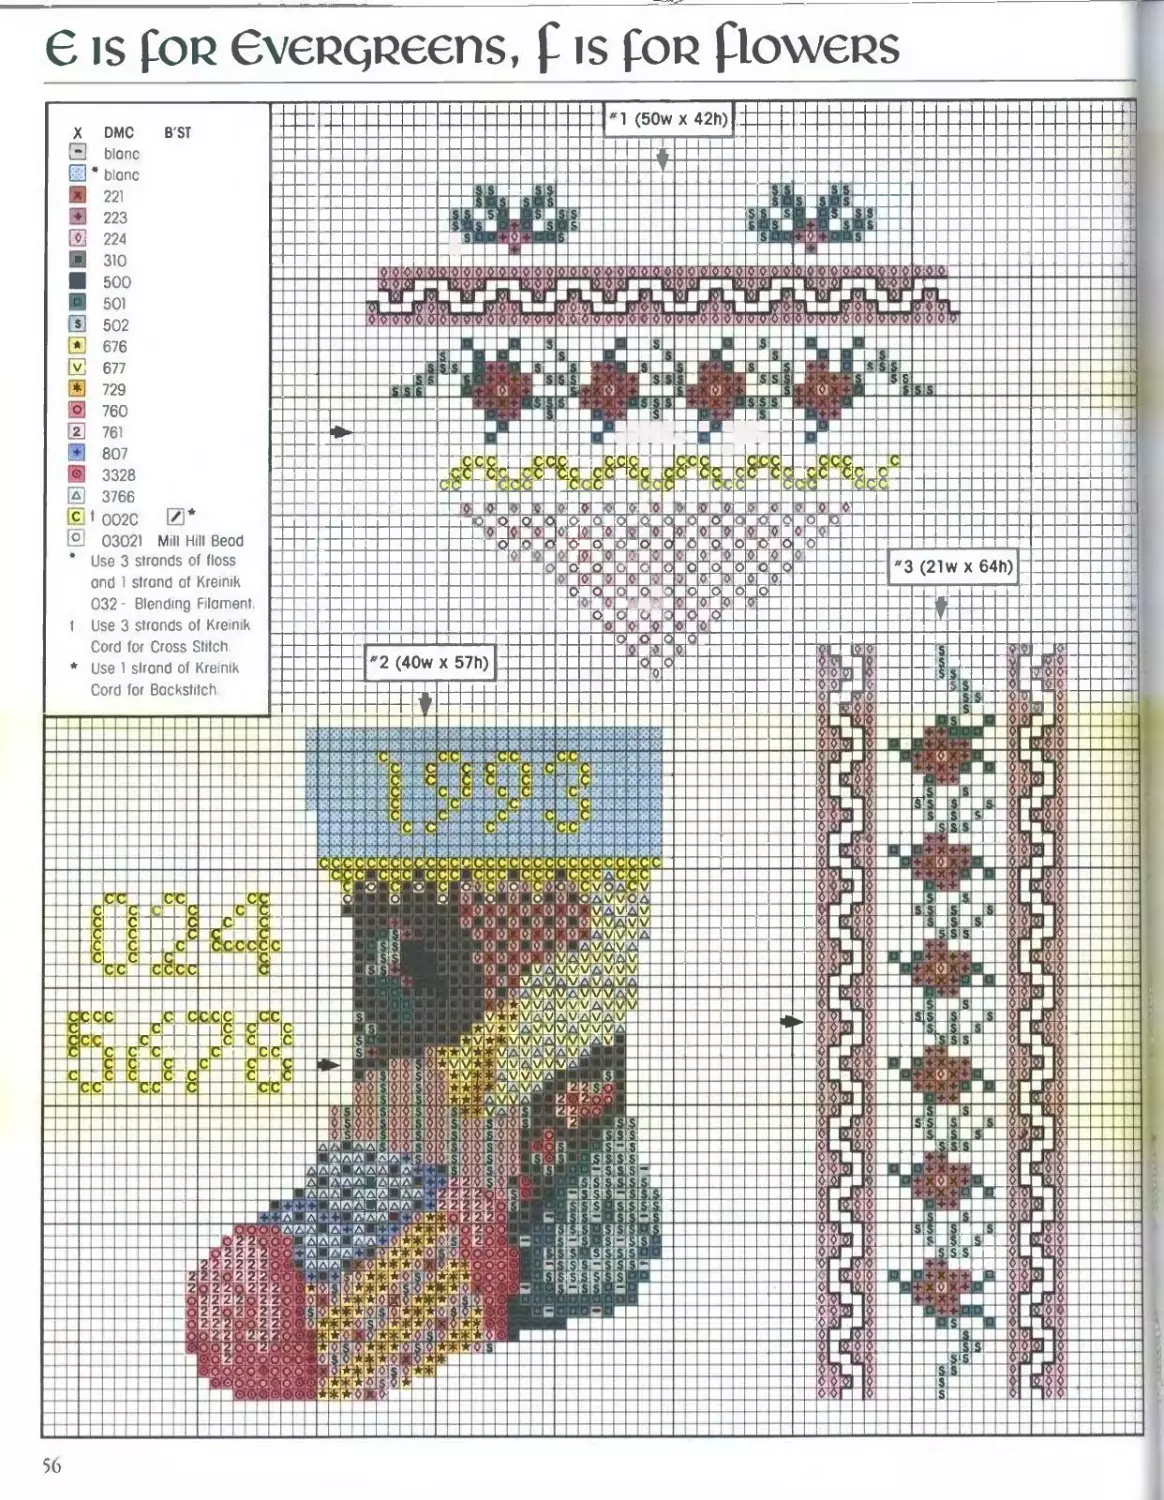
e is fop Слак',peens, f is fop floweRS
’ *1 (50w X 42h) 1 i ll
X DMC B'ST — — — — - — —f-U
Fl blonc — - — — - —.— — — — :_d± Ж-zJz - — — — —
010ПС । ▼
221 JS4, S$ 'sis IE 1H
~Tll|ifi liWt in -I*
223 S 5 5 ** 05 $ S rS j № ^s
LZJ $Я1ЛИИ^И5. '+H—FT + r8P 1 :: B! 1 1 I
E 224 ] *1
1 ® 310 i । H 1 П'I 1 1 H~ III it ±“
ввииэииииииииийииыыс" иыь •1ИИ 0.0015:0 oi® i q
500 t’H’jc >К-Л' h'luc; чме.] мыс 1ВМЫИВ ibbmbb Ео® lT
501 " ia • вв 71b 2 bb7i ib >1 а вв я вв ?j вв 1 !"‘‘i
u MB wftw BeBjy W BBB ?JWl' i JL’K'J HiBl k'jBaBM 0 Y _ __ V 0 5
E 502 аыыыыдааыыыыаиыыыыаыс IOIOIQIOIOI OTO 9'Q'Q OTO 9 VJC no ro 0 ;o v 10 0 А Л л^Д ГД Л Л и'
± -BBBBBBBBBBBBBBBBBBBI TTri П f I I 1 _ Т _EL -
• 676 ± _ _JB ] .8 Л ;даЕ . ’ Ji rl И . 4
• & Bl II , . s. . _L,bZ ZtZL
677 SSS ИЫВ_5 , s tjs. . S, I 4$ ’♦1? 3
ah читанк sal H ifsl да я+i* 11 Ts a , . I 1 I
I*] 729 $55 П BBB<3 1
'O1 760 г *ИИв$ s s 1 ( U 1? IB Im 4' LjZl HL — 1
— —4 Ji “^J- 1 * J№2X-- Ml — — — —♦ - —
t2 761 r+_ 1 T WL:z: qz: b^^’ t —1^' > в —4—L — M
♦ 807 г i r? I IT t 1 T 1
jzzz_z cccmjGcte j CP- _ jQ ,c . ,
efl 3328 —i————•- Til 1 и JvC CC CcL’gC c$ C^C 1 41
—dcH ccC cc coc. 1 J
3766 П I г rfeWJo sro TO
s £_ «г so * Oi 0 <0 ~r
c * 0020 1 £ ' ZS О Q Cl ip по®Л л < 0 16 a 1
О 1 5L 5 O' 51Z
UJUZl Mill hill 0600 -u-i- , OqJ *or 0, Q <5* 0 6 ZOi. 5us
« Use 3 stronds of floss 0 5 5? p gj_
JO OZ s 8 io 0 < _ . 3 (21W X Ь4П)
onri 1 ctrnnri of Krninik V 15 i jO 101 Rt 5 О. у
4. Ml ft IQl- Э Ou. °7h ? 1
032- Blendmo Filament _l5 po 7' st -
Oj M Jft 0 Q § J ’Г
1 Use 3 stronds ot Kremik У 0 lo 0 1
III J_ ST 5ZM 1
L-oro юг L-ross ariren 5 0 £ [2 i_ d- J
Use 1 slrond of Kremik *2 (40w X 57h) . 0,0" -1 L Jo 0
0 iS. •X E
Cnrrl (nr Rnrkctitrh "ZuX^ "Tii ' oij .slsi . L i£ 0
1 Й...
▼ 0 0i II IT s. 0 0 j
IBBBBBBBBBBBBBBBBBBBI 1 i T“i i _J 1 L HBB or
Hl»»»* 1ЯЯЙЯЯЯВВВВВВ в BBBIC
ввввявяи гяяяяяявввввв BUB в ill 1BB V BBW1C
— »»»? I8888S8BBBBBB 1 в 5S5!‘
—Г tz ?KKXX»»BBBBBB muIbb !U. В . SS"!*
j f— — |ВВ»»Ш »шав№ав>вимвшввмвввв(« >»В»1»Г«»!01ЛП1№ЯЯ1ЧЙ[*вК«1«4 Ж8К888ВВВВВВ 44j . . 1ИМВ 5S5!!
BBBB»3»t ;к81с»»хаввввв ад7 5. BBBM
t_± ВВВВЯ&ОД 'KM8KKKBBBBBB it IBBBI1
»»Ж«Я1*®.*ЯЯЯЯ1*ЙЯЙЯ»Л«Й шмавдохвввввв v v iv!
BBBBB3K* :«М8М8«ввввав 0 ofj — 5, If
—f маввздяг №КК«ШМЯЯМЯЯЯЯЯЯЯ»»1&1 WMWWWWBBBBBB 5 об ♦!< 1 1 г i
—p X 4 IWMVMWVBBBBBB 0 E EE <±*C- 1ЫМВ . . -
—г ICiCa ^№M№M№(*BBBBBB ix EQ. Pj±k. MF 4(0
>:< ►w ими waw ама йл«я wi« CaC cc. . . . ж 0 ” + 0B
Zr" J BBBBBBv i s Ъ а и этхдоддодогш SviPACy . . . HE c >
ic -i88S8BW.' ч и к К w к ?з 5 ► A vfvo A i 2Г1 L It ? X
ci C L. > < C : ss :> !•] И W С‘1 Н ЛГ.'ПМПВВВВВВВ sis. s. . s 1V T , z
Й £ : • £ □ Ц ЬЙ J М М И W м ь >Уд15;у . . . “i“” $ .+5:ЛЛ To7| r L
iS c - - : £ :—ГГ Zl и w а а а а Иу/УА . . . &is; ,
• d c C‘ c {C’C-C cc PH [] ё] w U п ' ivAi . . : 2I?L Ill ** L_
KjJs c J;c;< □ Г4 ? рр к м w идас IV л&2 ' V VAV. . . u ( Iy' 0 D ***o 1 I > 1 0 ' —Llia I
zr ~~ cc CC 1 4=44-4 гТд yy V Jo; g + xZ Jk . в At г Ц.
[-1 йМДГЛ®^ jVAMA o]2i -til SlI £_t
W им&слзи ,УУ;АУ . . • - ачу>4 ; Г. 7Т4- IVAV ПТ X 5]Ц i □
1'4 ~f В в Г 0 *V\/i£JVVV Ev. S □.si , ffl L
cc cjcr~ TXT < :gcc i Got ZE - ., • . , . шву * S VIAM^VZ 1? . sjs. s s
£ #Ti c ® fc : Я $Ж®И®ИВИИ*'1Х/ * v лА' VIV/JV $ п * а а ш « а а ★ V** vwuJvvvj УУА 1 . Kt Lysl Д4»
cc cH 'C . c c |C. ауи .: / ।: ?xfZ U.S
□c ci c fCi jc n_r ccr Tt * *v;* ♦'МД V ДлЯлу г л!»*' • .1 "J Й1-- to
C‘ c i 'CT ' c nc Art * • "ЯТоТзО ууау1\Лу2л ото; D.*r> 0 IA EZL
c c cc c cjc? < : : c НУ 15 51$ 5 0 *\Л‘1*АУ v V 5;$h5 5 $ 5 • ★*: = *уаулИвТ2 o;y iq + x >> »w i Q tt L
< 4 cc; ; ’sc® . . . _l IQ 1 ♦ +11 3CJBT 0 ZL
,^$5 5'5.5 ; ★> V * 5202 QQ> . .
• =^ Y 1 Y Y 1 ? I Ilf! '-V^Y J>B MJ®» 1 > ‘OI jb L
®Ж$ W 5 J S# S,5f5 sB|B2] Й5. 1 $$. S. . S
□ZL ZI$t $•5 15j5j 5 5 $15 $75 5 ЙПЫ . .JsJi . . 01 E АГ . J. S..S. KJt’JB
zzl Agl IjA л J <5J 5 f $ 5 5 si yf Jl-.S • 14S;-S! . : 2Ж ( 1 Jj LS_S
.a Wk AkiSri Ls 5 5^ 5 5 g $ф $ Wig i д^дДь+ 4JB$ 5 5 S 5 • • ^.S,S,SL^ . V VI $• w. -fS ГП to'
rlsitsl-f. . . E В o+if JO
ТТЛ TT дЫди .дЖаГуЯ* * 2 2 5 $ 5 a .• а стд 5 iSt545 S.S. , О vl r. L РОД v
=йа |’дад8'л3 222 гьртя^И^ s дЖл. . «14 222 22*q sieWsIs Si SIS- У г. »ТЙ 14|оГщ Q
' T ~ 1 1 * 1 1 г 1 T sHs S S S 0 0 ЁН I ‘
• лМ*о * ♦ьтг 2 2 §' S -jSss,-s “Xi - жИГ
llOf 5 * + * tfs Q 2 ОойЧиГ-1 \ ♦.«^ j * s 5 Oppp 01ВП SjS $ C в£$5й& ' 1 V г л1тп f ;j>. .3 5 rJ?
p$^< BS.“ swl . . . E us. 70 1 uO
^22 Cs.s.s ЙИ1 - Ua yS!Sl_L_ L ц
2.2 2 2ГоИ№ИаЕа1| 1X ** ★ o x 5 * i oo-o-eo$ 5 s ПТ** *0 s v *•* *000oeadsisis MSISIIM 0 1 70 4.-1 g $ 7 _i
“l l‘i г&2 P2 2.' 2o;0;®l*4+] is&sn ... о Й 5 0' В П+:’ t|4'f £ 0 1иив; 0
l 52 2fi2 2 2pi3* ’ 2 2рЯ$|0? 0 £0 ₽f,Sj Ф'ЛЯ
01 1 1 4 4 1 4* 4-4-
5 212 O'2 th 2 20 >$ 0 *4 2 2q«0**^ 2 2 qWI* *< г* 5 $ E* + * о $ о 4ofc-Itfrfr ж-***1 хЬ*^»ИГ“ oto® E 1 Ж iBs 4 4-
44" 1- ' 1 5 22 >p2 2p? ^|| ~d - M ;o Я II .
1 2p6. It” • • ЭД*5'1,Т*>|« IE . t № i? о Д or
>-4—1-4— Io 20,01 55fc5p< —-I— - - T?- s!s! . »U: . . Fv 0 444
— | 1 - i 4Ф4 I I —1 1 1— ~j j "~*k - 1::: J г FFF 0 1 ’ A Л* 1 . . .
Г Г +"• T ~T" t Jzb” ziz JJ LL _LL
L_±L±J LL_LL_.il ±. —
56
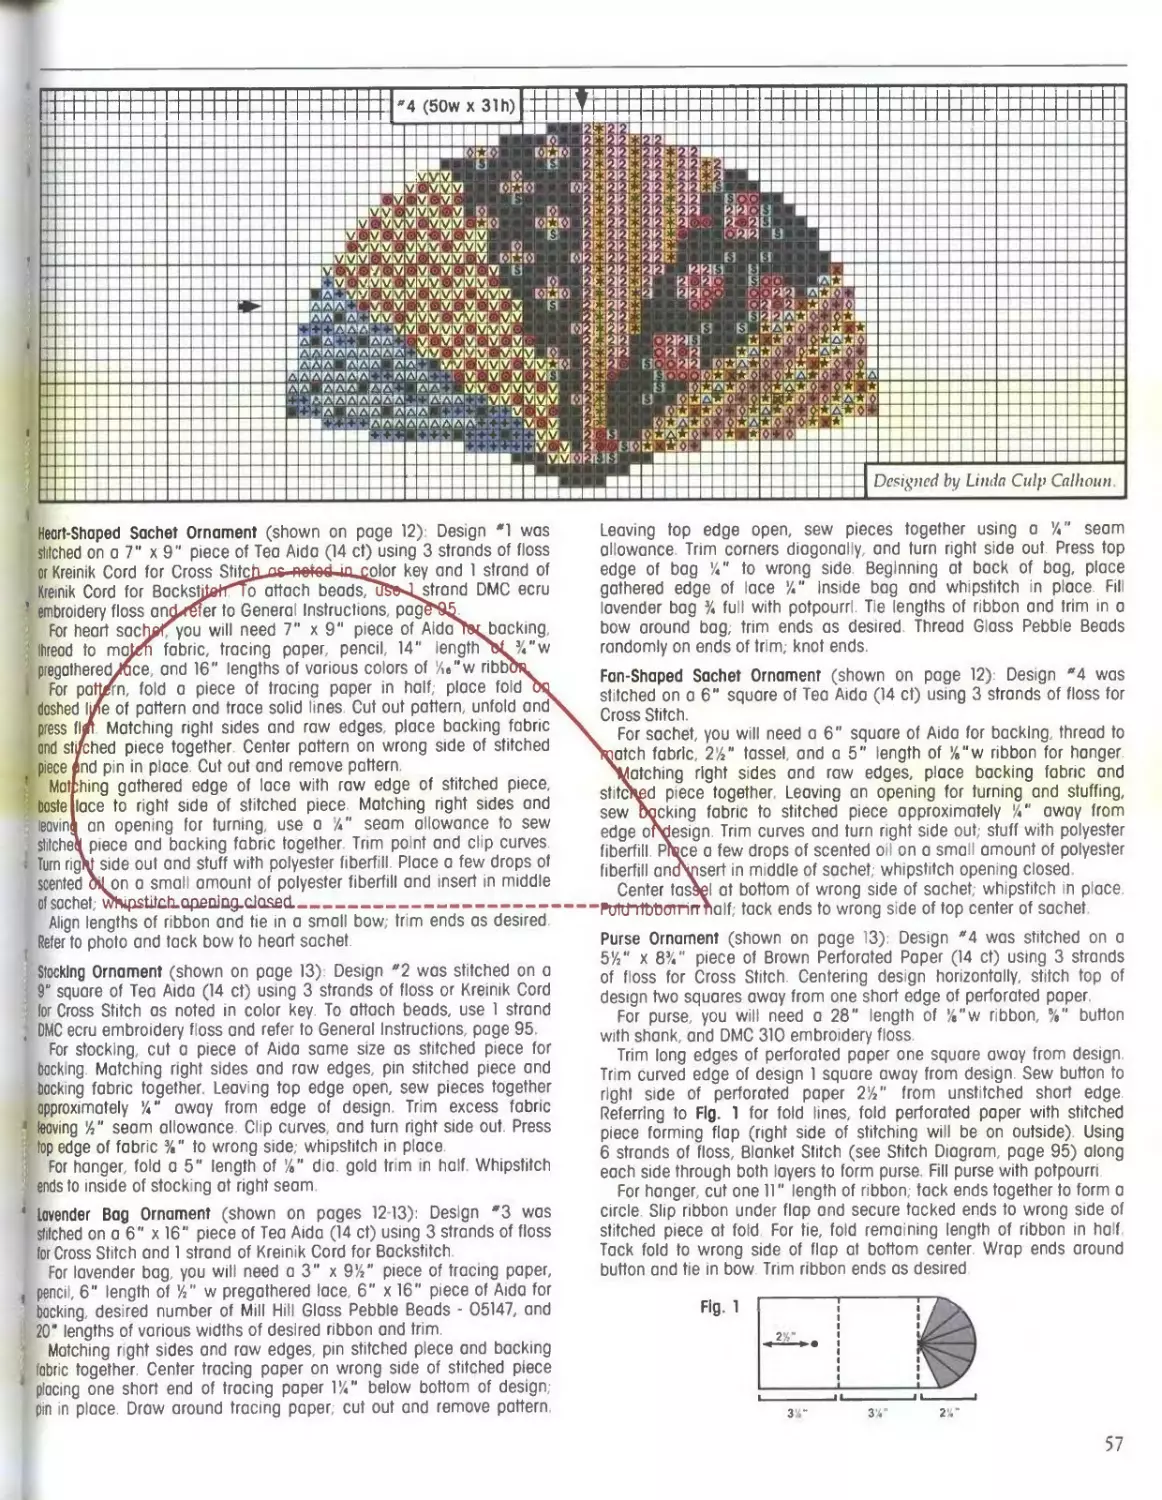
Heart-Shaped Sachet Ornament (shown on page 12) Design *1 was
stitched on a 7" x 9" piece of Tea Aida (14 ct) using 3 strands of floss
or Kremik Cord for Cross Stitciuns гижш inj^lor key and 1 strand of
Kremik Cord for BackshJeK^fo attach beadJuSe^strand DMC ecru
’ embroidery floss andZner to General Instructions, pag£S5
For heart sachpfyou will need 7" x 9" piece of Aidarstbacking,
thread to ma^m fabric, tracing paper, pencil, 14" length dL У/’w
pregatheredJace, and 16" lengths of various colors of 7i«"w ribbbji
For pattern, fold a piece of tracing paper in half, place fold
dashed life of pattern and trace solid lines Cut out pattern, unfold and
press fir Matching right sides and raw edges, place backing fabric
and stdrched piece together Center pattern on wrong side of stitched
piece /nd pin in place. Cut out and remove pattern.
Malching gathered edge of lace with raw edge of stitched piece,
bosteflace to right side of stitched piece Matching right sides and
eavna an opening for turning, use a /*" seam allowance to sew
sfifcheflt piece and backing fabric together Trim point and clip curves
. Turn ngm side out and stuff with polyester fiberfill Place a few drops of
scented cWon a small amount of polyester fiberfill and insert in middle
of sachet wbApsWcb-QpeDjng-dased._____________________________________
Align lengths of ribbon and tie in a small bow, trim ends as desired
Refer to photo and tack bow to heart sachet
Stocking Ornament (shown on page 13) Design *2 was stitched on a
9“ square of Tea Aida (14 ct) using 3 strands of floss or Kremik Cord
lor Cross Stitch as noted in color key. To attach beads, use 1 strand
’ DMC ecru embroidery floss and refer to General Instructions, page 95
For stocking cut a piece of Aida same size as stitched piece for
backing Matching right sides and raw edges, pm stitched piece and
I Cocking fabric together. Leaving top edge open, sew pieces together
approximately 'A" away from edge of design. Trim excess fabric
1 leaving ’A" seam allowance Cl p curves, and turn right side out Press
top edge of fabric %” to wrong side; whipstitch in place.
For hanger, fold a 5” length of ’/•” da. gold trim in half Whipstitch
ends to inside of stocking at right seam
* Lavender Bag Ornament (shown on pages 12-13): Design *3 was
stitched on a 6" x 16" piece of Tea Aida (14 ct) using 3 strands of floss
for Cross Stitch and 1 strand of Kremik Cord for Backstitch
For lavender bag, you will need a 3" x 97»" piece of tracing paper,
। pencil, 6" length of ’Л" w pregathered lace, 6" x 16" piece of Aida for
backing, desired number of Mill Hill Glass Pebble Beads - 05147, and
20* lengths of various widths of desired ribbon and trim
Matching right sides and raw edges, pm stitched piece and backing
fabric together Center tracing paper on wrong side of stitched piece
1 placing one short end of tracing paper ГЛ" below bottom of design;
pin in place Draw around tracing paper, cut out and remove pattern
Leaving top edge open, sew pieces together using a 'A" seam
allowance Trim corners diagonally, and turn right side out Press top
edge of bag ’/«” to wrong side Beginning at back of bag, place
gathered edge of lace 7«" inside bag and whipstitch in place Fill
lavender bag % full with potpourri. Tie lengths of ribbon and trim in a
bow around bag, trim ends as desired Thread Glass Pebble Beads
randomly on ends of trim, knot ends
Fan-Shaped Sachet Ornament (shown on page 12): Design *4 was
st tched on a 6" square of Tea Aida (14 ct) using 3 strands of floss for
Cross Stitch
For sachet, you will need a 6" square of Aida for backing, thread to
Scotch fabric, 214" tassel, and a 5" length of 7e"w ribbon for hanger
^Hatching right sides and raw edges, place backing fabric and
stitc £d piece together Leaving an opening for turning and stuffing,
sew Docking fabric to stitched piece approximately 'A" away from
edge oftdesign. Trim curves and turn right side out; stuff with polyester
fiberfill иbee a few drops of scented oil on a small amount of polyester
fiberfill anaSnsert in middle of sachet; whipstitch opening closed
Center tassel at bottom of wrong side of sachet; whipstitch in place
‘PatttTfbttOTrirr half; tack ends to wrong side of top center of sachet
Purse Ornament (shown on page 13) Design *4 was stitched on a
57г" x 8%" piece of Brown Perforated Paper (14 ct) using 3 strands
of floss for Cross Stitch Centering design horizontally, stitch top of
design two squares away from one short edge of perforated paper
For purse, you will need a 28" length of 7e"w ribbon, %" button
with shank, and DMC 310 embroidery floss.
Trim long edges of perforated paper one square away from design
Trim curved edge of design 1 square away from design. Sew button to
right sde of perforated paper 27»" from unstitched short edge
Referring to Fig. 1 for fold lines, fold perforated paper with stitched
piece forming flap (right side of stitching will be on outside) Using
6 strands of floss, Blanket Stitch (see Stitch Diagram, page 95) along
each side through both layers to form purse Fill purse with potpourri
For hanger, cut one 11" length of ribbon; tack ends together to form a
circle Slip ribbon under flap and secure tacked ends to wrong side of
stitched piece at fold For tie, fold remaining length of ribbon in half
Tack fold to wrong side of flap al bottom center. Wrap ends around
button and tie in bow Trim ribbon ends as desired
57
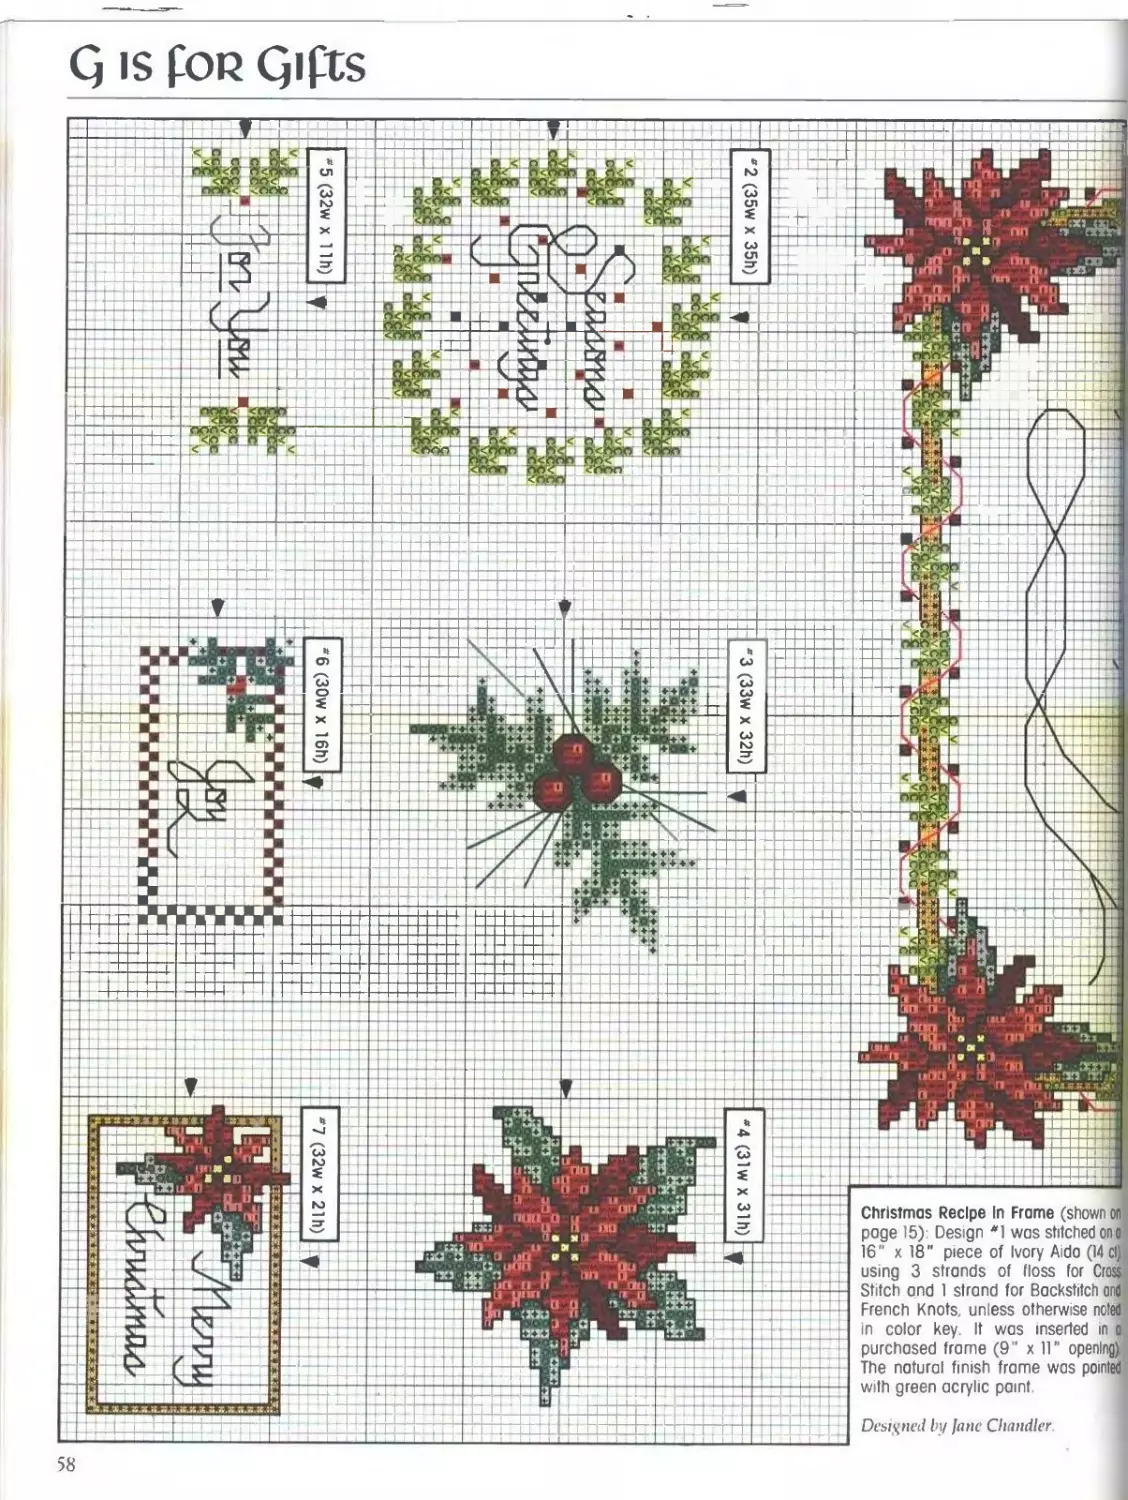
Q IS fOR QlftS
»?nlr>n
MCRT
|m -m!
Christmas Recipe In Frame (shown on
page 15)- Design *1 was stitched one
16" x 18" piece of Ivory Aido (14 cl’
using 3 strands of floss for Crosi
Stitch and 1 strand for Backstitch one
French Knots, unless otherwise noted
in color key It was inserted in <
purchased frame (9" x 11" openngX
The natural finish frame was pointer
with green acrylic paint
•<«*W
or>’<
r>»lfp
l*k“>
£
uft<
—г г i
r
E+ffi r- J ’J
—|—1-1-4- 1L и 141 IL
58
4-
Kofijn
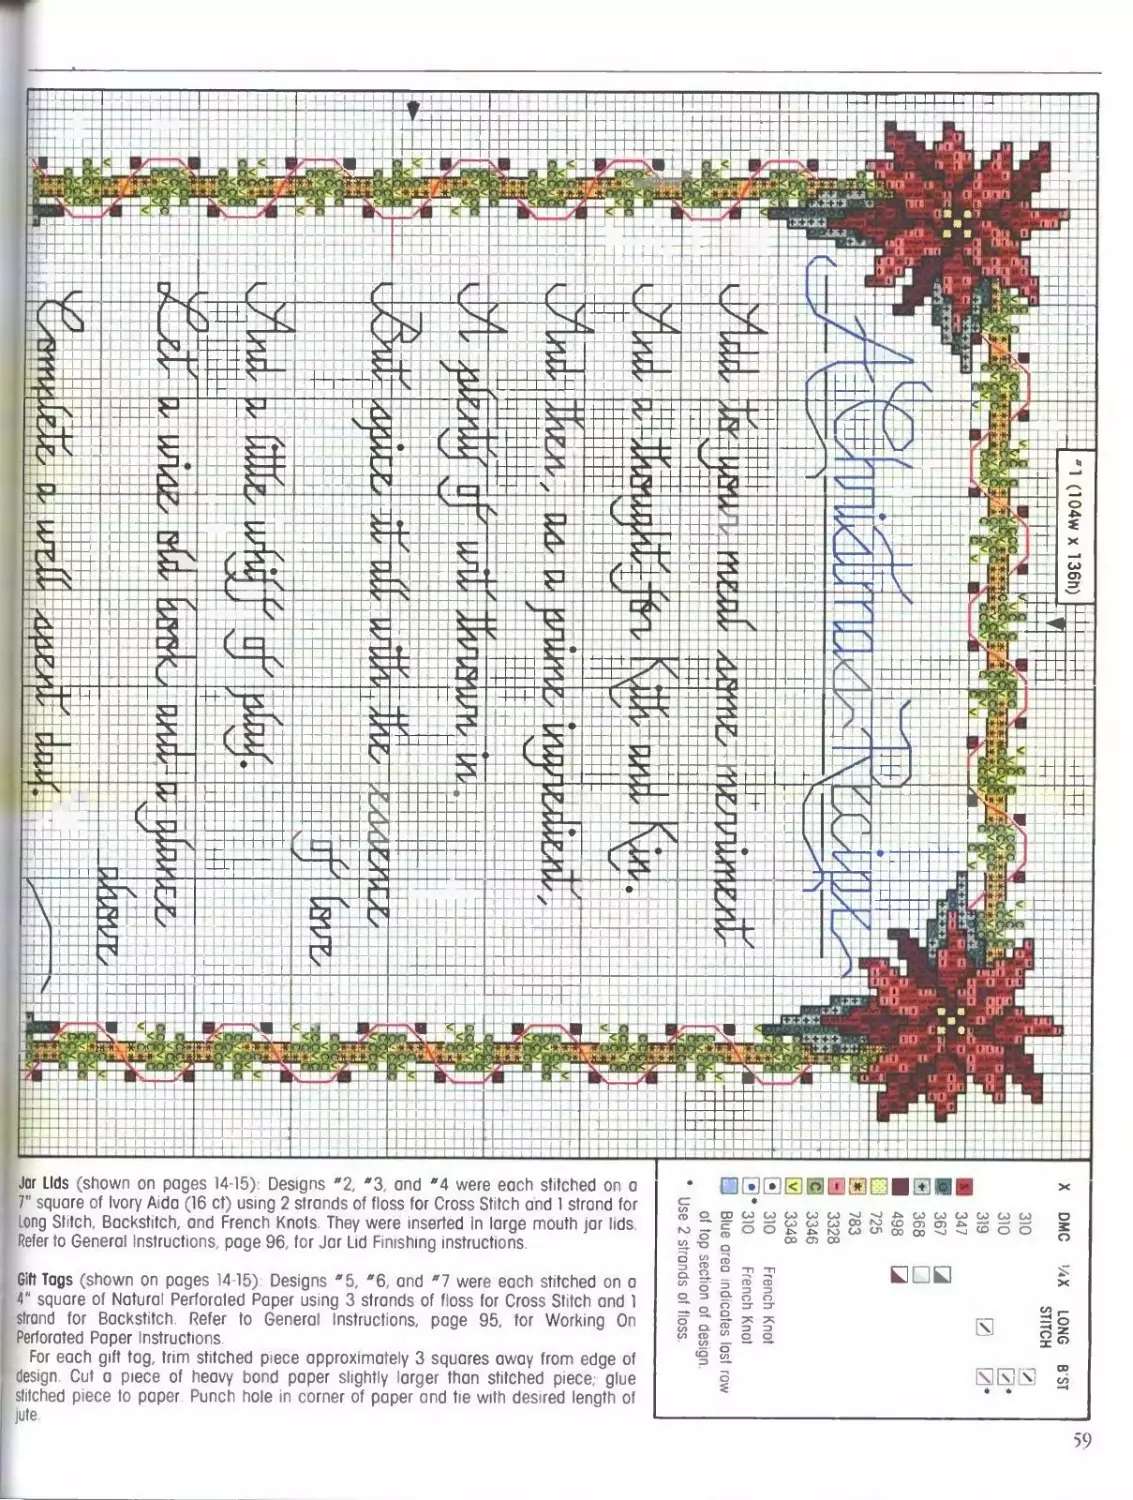
Jar Lids (shown on pages 14-15): Designs *2, "3, and *4 were each stitched on a
7" square of Ivory Aida (16 ct) using 2 strands of floss for Cross Stitch and 1 strand for
Long Stitch, Backstitch, and French Knots They were inserted In large mouth jar lids
Refer to General Instructions, page 96, for Jar Lid Finishing instructions.
Gift Tags (shown on pages 14-15) Designs *5, *6, and *7 were each stitched on a
4“ square of Natural Perforated Paper using 3 strands of floss for Cross Stitch and 1
strand for Backstitch. Refer to General Instructions, page 95, for Working On
Perforated Paper Instructions
For each gift tag, trim stitched p ece approximately 3 squares away from edge of
design Cut a piece of heavy bond paper slightly larger than stitched piece; glue
stitched piece to paper Punch hole in corner of paper and tie with desired length of
о
о
о
сл
CO
co
co
CD
CD
CO
CO
□ЭЕ0ЙЕШ13Я1
co
CD
CD
co
GO 00
ro GO
co
co co
CDC
о
CD
СЛ
о
c/>
59
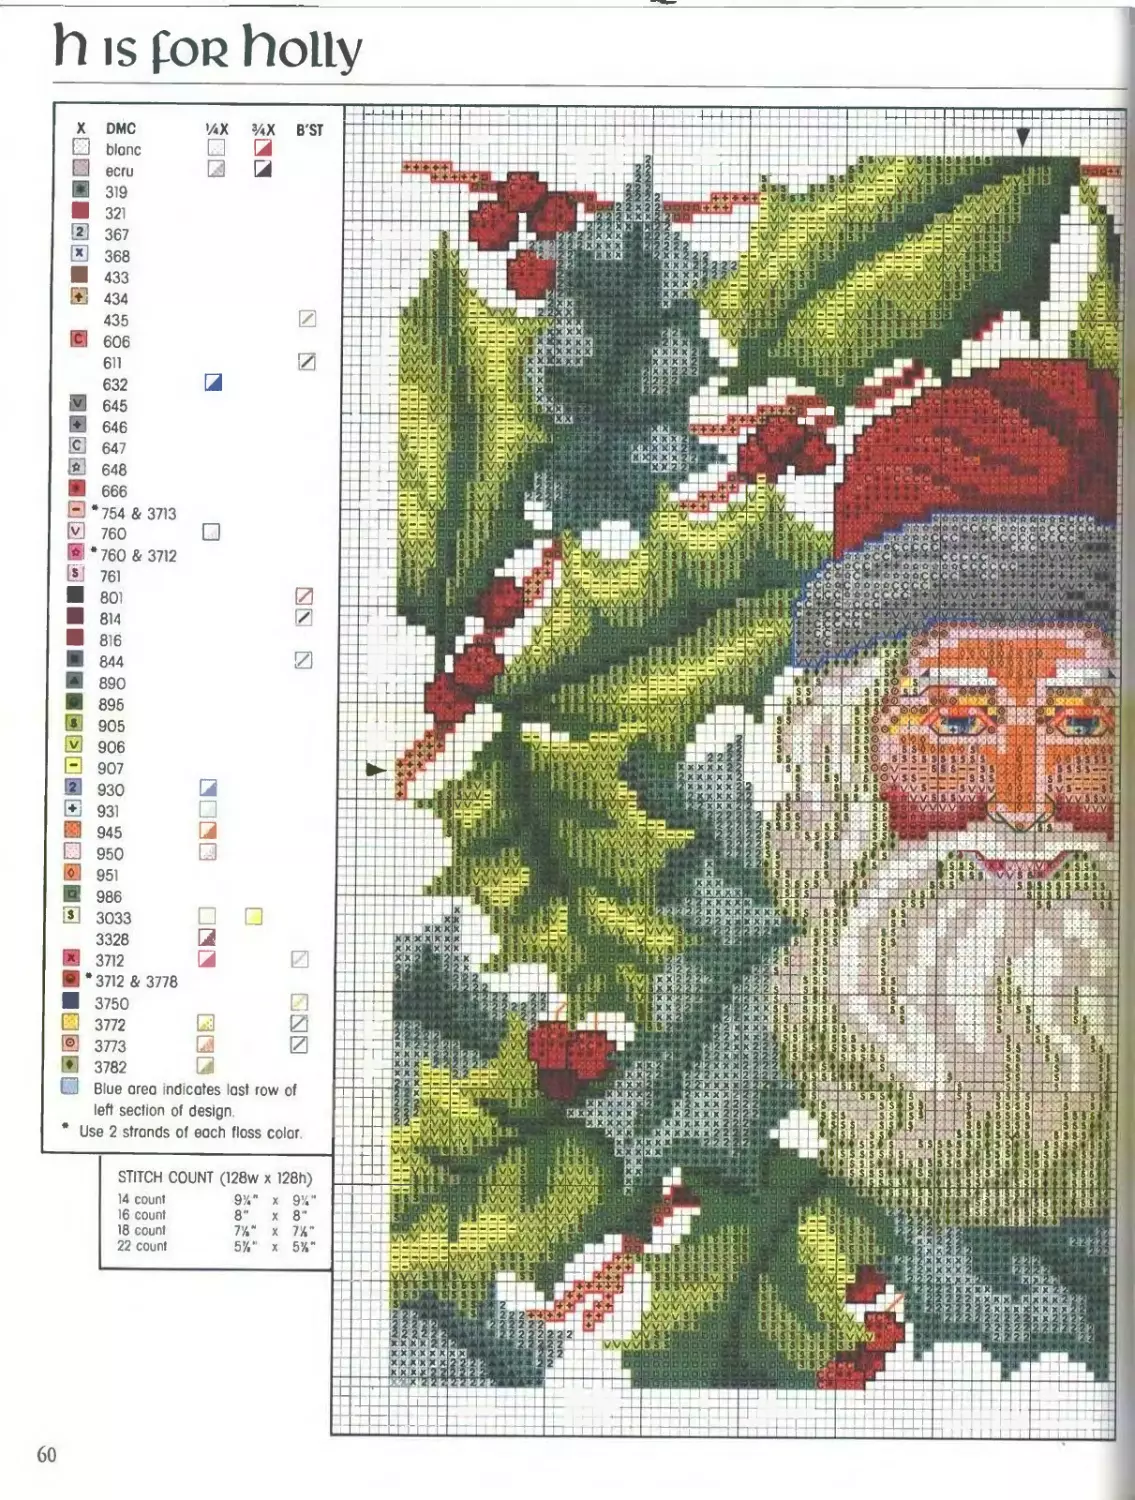
11 is fop holly
X DMC %X 3/4x B'ST blonc ] Lsi ecru Q [jj ffi 319 321 2 367 x 368 433 S 434 435 0 !C| 606 611 0 632 3 v 645 ♦ 646 C 647 * 648 666 “ *754 & 3713 v 760 □ * * 760 & 3712 s 761 801 0 814 0 816 844 0 890 895 » 905 v 906 “ 907 2 930 Q ♦ 931 945 3 950 о 951 ° 986 S 3033 □ □ 3328 3 3712 3 0 * 3712 & 3778 3750 □ □ 3772 □ 0 G 3773 □ 0 ♦ 3782 C Blue area indicates last row of
left section of design
* Use 2 strands of each floss color
STITCH COUNT (128w x 128h)
14 count 9У." x 9’/.
16 count 8" x 8"
10 count 7’4“ x 74'
22 count 57." x 5’4
1IJIS
5 liy v
V'8 S $
Yw
5 $ ss
SJvyvvV
x x[2
V Wl
law v|
W vv
wV-l
vyv-*
-
x x x 2
x x'x x
lx X X ?
м x'x V
2 2 2V+I+ +
2 2'2 2 2П^
22222222
x x
XX
X X
«2 x x *
[xx x x 2
lx x'x x 2
x x2 2 2
Bxlxxx
XXX xf
;X К J# * 4
x xiflIW
[x x xxx
x'x'x'x'x
[xx'x’x x
IV - Vv2
9 v-VJj
5 W5 01
tvV Д
yy'ylvVv.S
vvvvv8 5
Vwv.S 9 .1 a
xix xlx
x xlx xlx
XIX XX
VW 5
vyyjr
v*v 5
\/V $
CC+ + + wt>.
t>t>o ^CCCc *
**с:с;с£л+у
lv«;»frs'
yvvviv
x x2 ♦
x 2'2 2
X 2’2 2
2 222
2 2 2 2
-V9$V
ysLsIsyyiv ;
Sj issvv’y
SffiOllS S.V?
x x x 2
[x'XxZ
|x x'x 2
X'X.2’2
v-.yjv
v- v w v v
v--vvV
уул-1
v'-yV
• ’«*:*>»2 2x
**>»TT2 2x
* 2» --Ь\л 2 2 к x
2 ♦if 4?Zx x x
2 * ,4 ? 2 2 x x x
а>т'Д 2 2~x x x x _ .
ИрГТ'х x x1>t 2 2*!
•x 2 x x x 2 2 2 i
№|к2xxx 22 2!
W x x x x x x’2 2 23
x x xx x x 2 2 2 21
“*“22 2221
* x22
X X X X
X X -
xxx-
S9GO-,
5 SG
3
5 SO S 9 $ S S
SGOv-----5
S SGy SS--
5 9 SG.frVV 8-
- W‘*
-VFx
W8 x
vTx x
Vfx x
V» x x
V» Sx
vrsx
Jy v'vwvvv
$}58vvwv
difll $.8,8 lyvvi
alm J5 J tw
lTZSSJS*'
T 8 89 HI
8389411
SS$$»I1
5SS«« И 9|
x x x x x 2
2 x x'x x x
Jxxxxx
* x x.x X
2 x xxx
2 xix x x
222 xx
Is 5 8
8 98
$85
8 8 $
yiv vy v S 8'5 v !
S/WV 89 8 8 S<
ivv 3 8 8 $:
errsiif 1 I
5 3 3 8 I Г
x xx x
IX X x X
x к >
x x z 2
x к x 2
x x x x
x x 2 2
w
5 У
- v v-vK/VlS
>-V-l-'yS[S"S
V vv 8iSjaBR
x x к к 2 2
XX XXX X J
X XX xxx :
««
60
2 2:2 2
V.VV
y.v
J 2‘2 2’2
MV
1S.S.9,
BLS.»!
га'гг-г
112:2:21
QQS.S 9
vvafo
VVk/,V
.V.V’“.
|Vvy,
2’2 x’x'X
2i2 2]2'2
VvB|S£
Ivy 9'5 53
LyVMji
r-v'tfl
1“Ш1
k--V.V
L' 9® 9
feyib
WVVS 5 5
S 9 s
3'5 5 5
Mi
IVW s Si
»Vvv s s o
»;jivvlv. J s
S S|vvv 4 s
S 5 9X x'x x x
У>;0Ж*2.
i I S.S'K *;**2
TT x^xXXX'XX
S;S S vvvvvx’x
x x
5.VVV
5v V V
$ INV
xix 2'2
2'2 2'2
2 2'2'2'
_ 2 2'2»
2 2у2,2 2Й|
2-2 2’2'2'5jTFx
2’2 2 x x x xx
TSlxx'xxx
'2’2lx xixxik
ill ’2'25’x’x'x:x
[xxx
XXX
x x'x
xixjxl
,x |X|^ X
|X|XjX X
V v/VV.VVVvvol
IT --VV.VV.VVfV.V
"I" "V.VVMV
yv “VW
2x>.2i
.2 2'x7
2 2;22
-2‘WB
Йр к xK
2 x xx x’x
2'x x x x x
2’212’xx®
21222 2Я
v vVy
№**i
"X'XiXI
!X|XlX|
dj'x'x
2£|2?МУ
VMVV V$
vyv$2 Svv-“
'vv.s.s SV v v-
~ vL4itVV 7 "
fvVy SlSViVV-
K-vlvv IvwV
MVy.Vy.VWV
•f X x .*>
JTx'xjx.x
x x'xix x
x xx.x.x
XX» £ЛЛ.ХМ
-----X X X X X
Х.Х X(X X
x x xx 2
MBS S 5
Тжм 9 9
V.v V.Si'S’S
/vmvv V
vvyw
Sls:sUMS!21
Holly Santa Pillow (shown on page 17): The des gn was stitched
over 2 fabric threads on a 13" square of Black Lugano (25 ct)
using 4 strands of floss for Cross Stitch and 1 strand for
Backstitch.
For pillow, you will need four 2" x 13" fabric strips for borders,
13" square of Black Lugano for backing fabric, ruler, marking
pencil, 54" length of '/?" dia gold cording with attached seam
allowance, and polyester fiberfill
Note: Use !4" seam allowance throughout (unless otherwise
noted) and backstitch at beginning and end of each seam.
For pillow front, trim stitched piece /2" larger than design on
all sides. For each fabric border, center one fabric strip on one
side of stitched piece matching right sides and raw edges.
Beginning and ending y2" from each corner of stitched piece,
sew fabrics together
To miter corners, match right sides and short ends of borders
and pm borders together at corners. Use a ruler and draw a
diagonal line from end of seam to outside corner of borders
(Fig. 1). This will be stitching line.
Pin borders together along drawn line, making sure seams on
stitched piece match exactly Sew directly on drawn line; remove
pins Turn mitered corner right side up. Make sure that border
seams match; check to see that there is not a gap at the inner
end of the seam and that corners do not pucker. Trim seam
allowances to V and press seam allowances open
If needed, trim seam allowance of cording to ’/2" Start
2" from end of cording; beginning and ending at bottom center
of pillow front, baste cording to right side of fabric border
making %" clips in seam allowance of cording at each corner.
Ends of cording should overlap 4"; turn overlapped ends of
cording toward outside edge of pillow front. Baste across
overlapped cording as shown in Fig. 2.
Fig. 2
Matching right sides and raw edges and leaving an opening
for turning, use a zipper foot and sew pillow front and backing
fabric together; trim seam allowances diagonally at corners
Trim excess cording and turn pillow right side out, carefully
pushing corners outward Stuff pillow with polyester fiberfill and
whipstitch opening closed.
Needlework adaptation by Nancy Dockter.
61
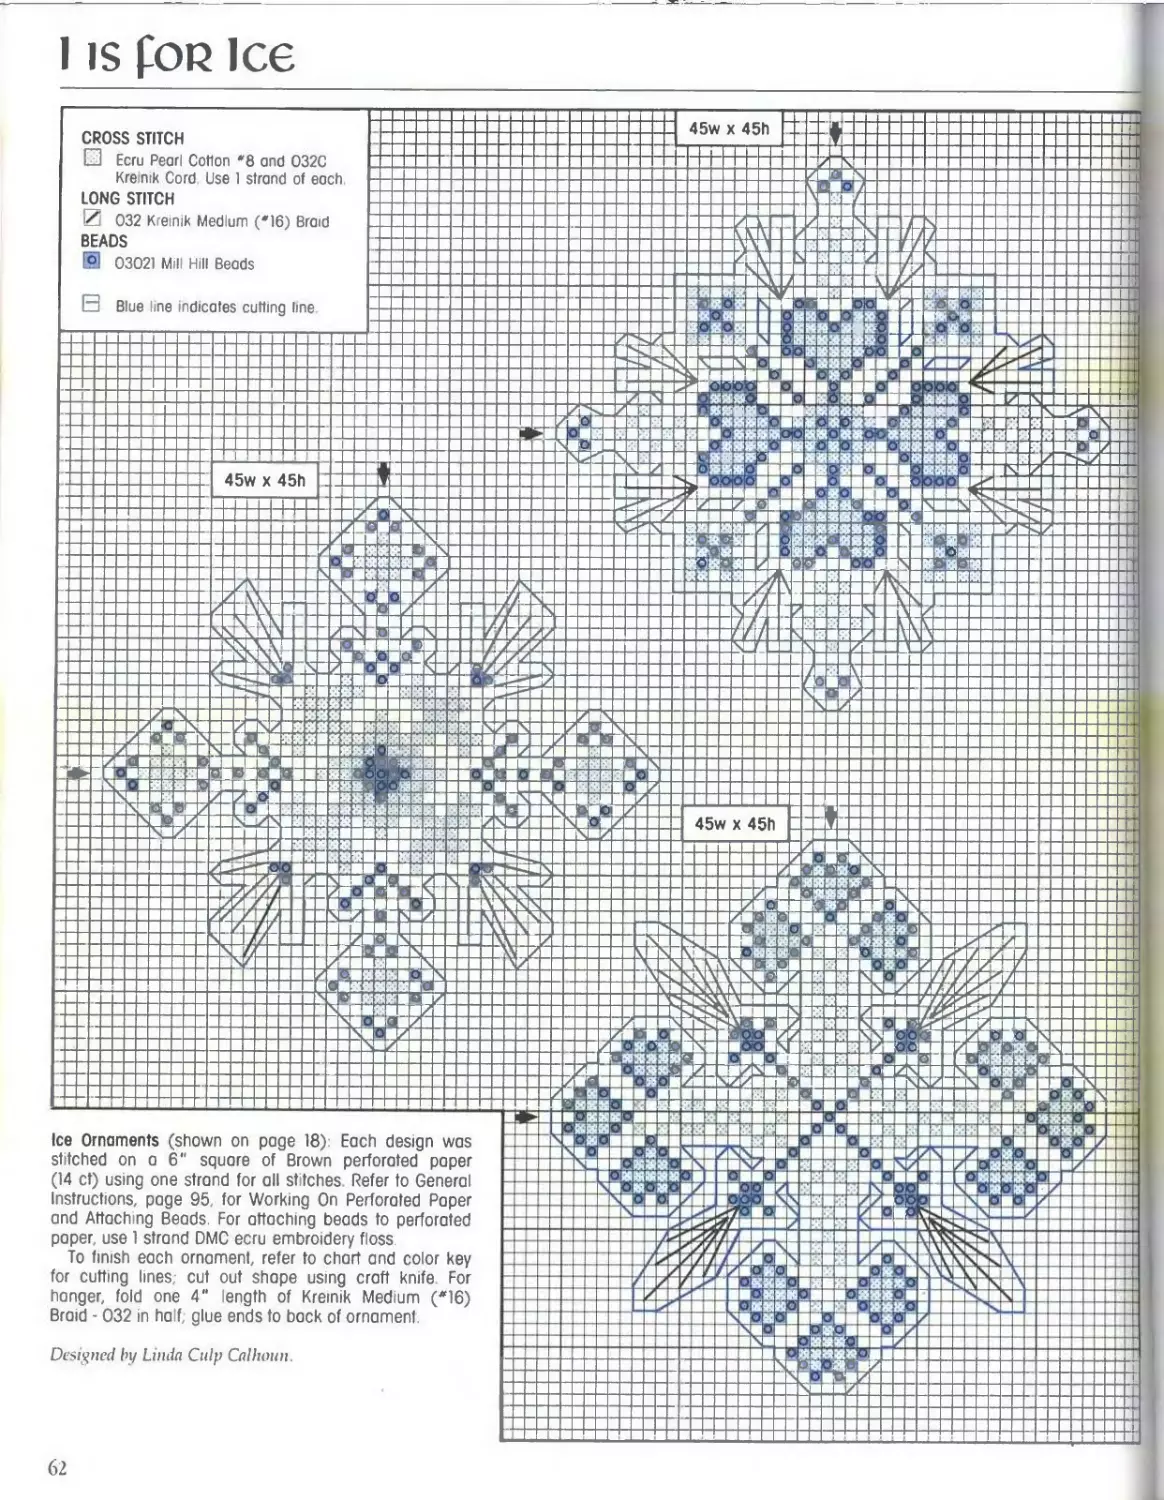
45w x 45h
Designed by Linda Culp Calhoun.
in
ВЯ
v^l
45w x 45h
Ice Ornaments (shown on page 18) Each design was
stitched on a 6" square of Brown perforated paper
(14 ct) using one strand for all stitches Refer to General
Instructions, page 95, for Working On Perforated Paper
and Attaching Beads. For attaching beads to perforated
paper, use 1 strand DMC ecru embroidery floss.
To finish each ornament, refer to chart and color key
for cutting lines, cut out shape using craft knife For
hanger, fold one 4” length of Kremik Medium (*16)
Braid - 032 in half glue ends to bock of ornament
62
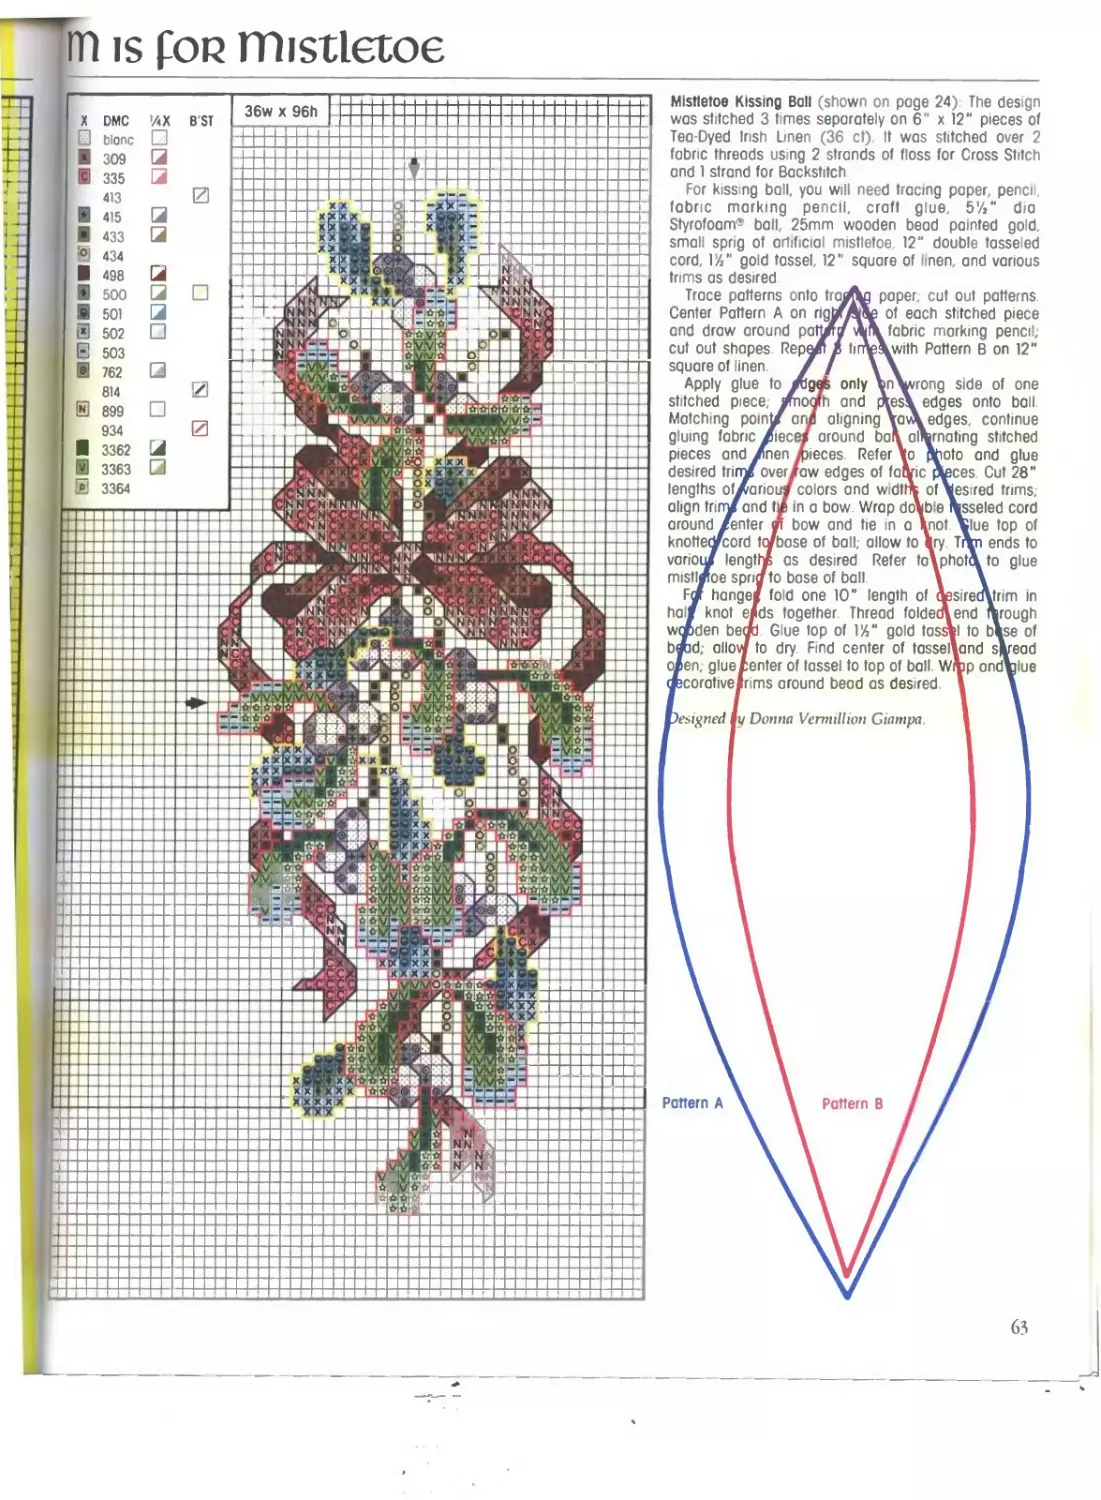
m is fop mistletoe
Mistletoe Kissing Boll (shown on роде 24) The design
was stitched 3 times separately on 6" x 12" pieces of
Tea-Dyed Irish Linen (36 ct) It was stitched over 2
fabric threads using 2 strands of floss for Cross Stitch
and 1 strand for Backstitch
For kissing ball, you will need tracing paper, pencil.
fabric marking pencil, craft glue, 5'/i" dia
Styrofoam* ball 25mm wooden bead painted gold,
small sprig of artificial mistletoe, 12" double tasseled
cord, I’//' gold tassel, 12" square of linen, and various
trims as desired
rong side of one
edges, continue
sire
Pattern A
Pattern В
corativetrims around bead as desired
n
a
nen
wccden be
bow and he in a
to base of ball
only
and
leces Refer io
of
ble
not
ry
Trace patterns onto tra
Center Pattern A on ng
and draw around pa
cut out shapes. Rep
square of linen
Apply glue to
stitched piece;
Matching poin
gluing fabric /iece
pieces and
desired tri
lengths of/^ariouf colors and widt
align tri
around
knottedfcord t
vorio
mistl
F
hal
paper, cut out patterns,
of each stitched piece
fabric marking pencil,
with Pattern В on 12"
aligning
es\ edges onto ball
around bal\ alternating stitched
over taw edges of faqric
and til in a bow. wrap do
base of ball; allow to
lengt
oe spn
hange
as desired Refer toiphot
fold one 10 length of
oto and glue
ces. Cut 28“
esired trims,
sseled cord
lue top of
ends to
to glue
knot elds together Thread folded! end
. Glue top of ГА” gold tasswl to
trm in
rough
blse of
o^en, glue Renter of tassel to top of ball W$p ondlglue
esigned
v Donna Vermillion Giampa
63
J fop thejoy
X DMC X DMC
*321 * 909
0* 725 v* 910
Ef 782 S* 912
EP 783 3* Kreinik 002 - Fine Braid
* Use 4 strands of floss and 1 strand of Kreinik
003HL • Blending Filament
t Use 4 strands of floss and 1 strand of Kreinik
002HL - Blending Filament.
* Use 4 strands of floss and 1 strand of Kreinik
009HL - Blending Filament.
♦ Use 1 strand.
Joy Bellpull (shown on page 21) The design was
stitched over 2 fabric threads on a 16" x 34" piece of
Block Lugana (25 ct). Centering letters horizontally,
begin stitching with top of "J" design 5" from one
short edge of fabric; leave approximately %”
between letters. Refer to color key for type of thread
and number of strands used for Cross Stitch
For bellpull, you will need tracing paper, pencil,
16" x 34" piece of Lugano for backing, 51" length of
purchased ’A" dia. gold cording with attached seam
allowance, 51" length of ’4" dia. cord, 2" x 51" bios
strip of fabric for cording, 7" tassel, 17“ length of ’A"
dia. gold cord for hanger, bellpull hardware, and
various trims as desired.
For pattern, cut one 6%" x 2514" piece of tracing
paper,- fold paper in half lengthwise. Referring to
Fig. 1, measure 314" from one short end of paper
and draw a diagonal line to corner. Cut along drown
line, unfold pattern and press flat. Center pattern on
wrong side of stitched piece with point of pattern
314" below bottom of design; pin in place. Leaving
14" seam allowance on all sides, cut out and remove
pattern. Cut backing fabric same size as stitched
piece.
Fig. 1 Fold
3’4 ’
If needed, trim seam allowance of gold cording to
’A". Matching right sides and raw edges and
beginning at one top corner of stitched piece, use a
zipper foot and a 14" seam allowance to baste gold
cording to stitched piece; moke %" clips In seam
allowance of cording at each corner.
For fabric cording, center cord on wrong side of
bios strip; matching long edges, fold strip over cord.
Use zipper foot to machine baste along length of strip
close to cord; trim seam allowance to %". Repeat
instructions for gold cording to baste fabric cording in
place.
Matching rght sides and row edges and leaving
top edge open, use a zipper foot and ’A" seam
allowance to sew backing fabric to stitched piece.
Trim corners diagonally; turn stitched piece right side
out. Press top edge ’A" to back of bellpull. Fold top
edge 1!4” to back; whipstitch pressed edge to back
of bellpull and insert bellpull hardware. Whipstitch
ends of hanger to top corners of wrong side of
bellpull, and whipstitch top of tassel to bottom point of
bellpull. Refer to photo to trim tassel and hanger as
desired.
64
$9
•МЙ.Ж
XSwclkxj
ям
..'c;N.bLR4
N.NKKNJSi.
C£
C.CC
HN.KN.N.h
р,РД,Р «ЙИ
t»~ П □ O" □
ЙЧИЯИ
ИЯГ
RWR
2ИХУ l»«
UODSKIv
л * : А» х
. G А.фОд?1 J^A
“1 - л A A
qTU A A » A A
- -Ъ’ол^Ьйкш
-оосрЭДК^
' A
S9B|
3
ю
co
2 2 2? cm
. г-
2 СП CO CD
X К X X
X
DMC
ecru
304
310
349
353
422
520
632
642
644
7«X
>/2X
B'ST
X
DMC
758
760
815
822
829
831
833
839
840
841
’ДХ
’/гХ B'ST
X DMC
902
934
* 934 & 3371
2 * 948 & 754
3022
3023
3031
3045
3053
3064
V4X ’ЛХ B'ST
X
□
’ЛХ
’/zX
DMC
3363
3371
3712
3772
3779
3787
Kreinik 002 - Fine Braid
Blue orea indicates lost row
of top section of design
B'ST
t
Use 1 strand of first
floss color and 2
strands of second
floss color
Use 1 strand of
Fine Braid
Ю Jztz
ЦП
«ОЮ'кЦ
Kriss Kringle Reading Letters in Frame (shown on page 22): The
design was stitched over 2 fabric threads on a 16” x 18" pece of
Tea-Dyed Irish Linen (32 ct) using 3 strands of floss for Cross Stitch
and 1 strand for Half Cross Stitch and Backstitch If was custom
framed.
Needlework adaptation by Nancy Dockter.
гзга
3UU
UUUUUUUU!
□CtJIJIJljnJbl
i : ______.
67
П fop the fliqht
«□ЕЕНЯНВЕП SD*
• •
— XJXXW>J'J>?CDCOCOWWGOCjncnQ2
OOqiM—'OCO'JOiaija.WOW^
о
£ ЕШПСССЙШС □§
00
СЛ
E ® 0 □ El □ □
• —►*•• •
оэсо^'^-^-'Л'Лслаэозспста)
rO\)O)O)UiU'CJ'J^f>^i>-Cb
Ю Ю — 003-^COO)Xi^M\)0
□□&□□□□ Б C
ВБ
ss
SS
О C3 05 СП О
“ w ю й 2
со
СЛ
Е E3E00L° >"11ЁЯ1@11*
*
GJCJCJCJWWCOWWWWCOCDCDCDCDCDC
^j^jGooOOOOOOO-^OJWWGOWse
r>oONJa5X>.Ji*bJa»*bC0C000^JCnN3 — On
^OOCOXb-JCDCnrO — — —
ЁБШ ПК КПЕББЙК§
□ □□ □
co
СЛ
- * п <1*][ё] ввв*
Q CZ Q С C
pc Ф pc rt> л tg от
Ф ю S O) to g *5
5 y> :□ a> о o о о a S О О =з ° о О О. о О. О. й со у <Л W о. о о о о О О W £ ' = 1 ~ 8 О О О о о -3 rn S й ° й й $ 0 Q О Q ZJ Z3 СО CL d ~ N5 *ь О СО <0 < О S ° => z> _» О d о СО co TD
toy®
lo;p’6*»
00
p p
J,PE
и°&
p*"|P
[pcokop ‘p
fn'vi'p'p D P
pp«X|p Q(D 0
;p]p;x X'
MX ХЙ
X X
7
to».-
IX»;
»'•
CCl Лк
’> <’ >
1*.»ИИ1
,£SS®1B
Жхк«к4:
л v ii
wM^K>waSz
<•;:• asSMb
. ,w ->аа-. аала
- ЛАА 1 4- >. > —
ю©©с
ее©
!???
©О©
М)©© '
|К 4
STITCH COUNT (100w х 144h)
14 count 7/‘ X 10%'
16 count 67.' X 9"
18 count 5%” X 8"
22 count 4 V X 6 V
Nativity Wall Hanging (shown on pages 26-27) The
design was stitched over 2 fabric threads on a
21" x 39'Л" piece of Cracked Wheat Ragusa
(14 ct) using six strands of floss for Cross Sttch
and 2 strands for Half Cross Stitch and Backstitch,
unless otherwise noted in color key.
Center design horizontally and stitch with top of
design 7’/г" from one short edge of fabric Measure
68
ДИР.
»>•.
B£fl
ьаййй
£l£i£i№£
t£ICti
i«a«»xxx
•♦♦♦•♦XXX
♦ ♦♦♦ хххх
£*&ЙСИ»»»
♦♦♦♦♦♦♦♦•
•»*»«мх хх
♦♦♦♦♦♦ XXX
♦♦♦♦♦XX м
♦♦♦♦♦♦♦X X
♦♦♦♦♦♦♦хх х X
♦♦♦♦♦♦ХХХХ X ж
♦♦♦♦♦♦ХХХХХХ х
♦♦♦♦♦♦ХХмХХХх
X X XX хххххххх
♦♦хххххххххххх
♦♦♦♦хх XXX х XXXX
♦♦ххххх
♦♦♦XX X
хХХХХХХХ XX X
мХХХХХХч »ххх
ХХХХХХХХ хХХХХ
ЫхХХХхХмхХХХ
хххх
♦жХххх
♦♦♦ХХХХ
♦♦♦XXX
ХХМ
3" from bottom of design and pull out one fabric thread Fringe up to
missing fabric thread On each long edge turn fabric under ’A" and
press, turn fabric under ’A" again and hem To finish bottom, start at
left s de and tie an overhand knot using approximately 8 fabric threads
Continue across m same manner until all threads are knotted Trim
fringe to 5" For casing at top edge, turn fabric under ’A" and press,
turn fabric under 2" and hem Insert stick in casing
Needlework adaptation by Carol Eiiimer.
69
O is fop Opnaments
X DMC blanc /41 < ’/2X B'ST 0
300
301
318
321
322
334 ♦
336 в □
I"—- 402
413 [/]
о 415 3 z
433 [z]
498 3
500 [/]
v 561 a
E 562 □
642
644 3 (
E 676
* 677
725 2 E
E 726 И
729
E 741 I ]
□ 754
[? 758
760 J
761 a
E 762 □
5 775
0 780 3 в
E 782 3 в
814 3 0
° 822 □
X 839 3
а 840 E
♦ 841
891
926 в
♦ 927 о
О 928 u
934 Q
938 3 □
3021 z]
3041 в
3042 E
3064 3
3362 □
[ft 3363 E
X 3364 □
3772 4 0
2 3774
v 3776
3790 z
1 * Kremik E
002 • Fine Braid
Blue area indicates last
row of right section of design,
* Use I strand of Fine Braid
67w X 78h
В В В !
+ 7
'60'
t*ki
Co 7
« *
Tfi' -rr
i'e '
4’4’e i
»4._.
tt В V t
чв«
огот«»«
оа&оэса
70
67w х 78h
9 M
Л»
Гдд
Sil s #J*>-'*'.‘S1
*99.М
vttp.'Q.QiQw,
№*Jfc^S,.9D
'Я*Л«
АААЭДШ31
IHHHisi;
••••••Il
•••••••si
a:::::::r
I—»» Hill «
* >•>>>№>'
i I 1
Needlework adaptation by Donna Vermillion Giampa.
67w x 78h
t±
1T
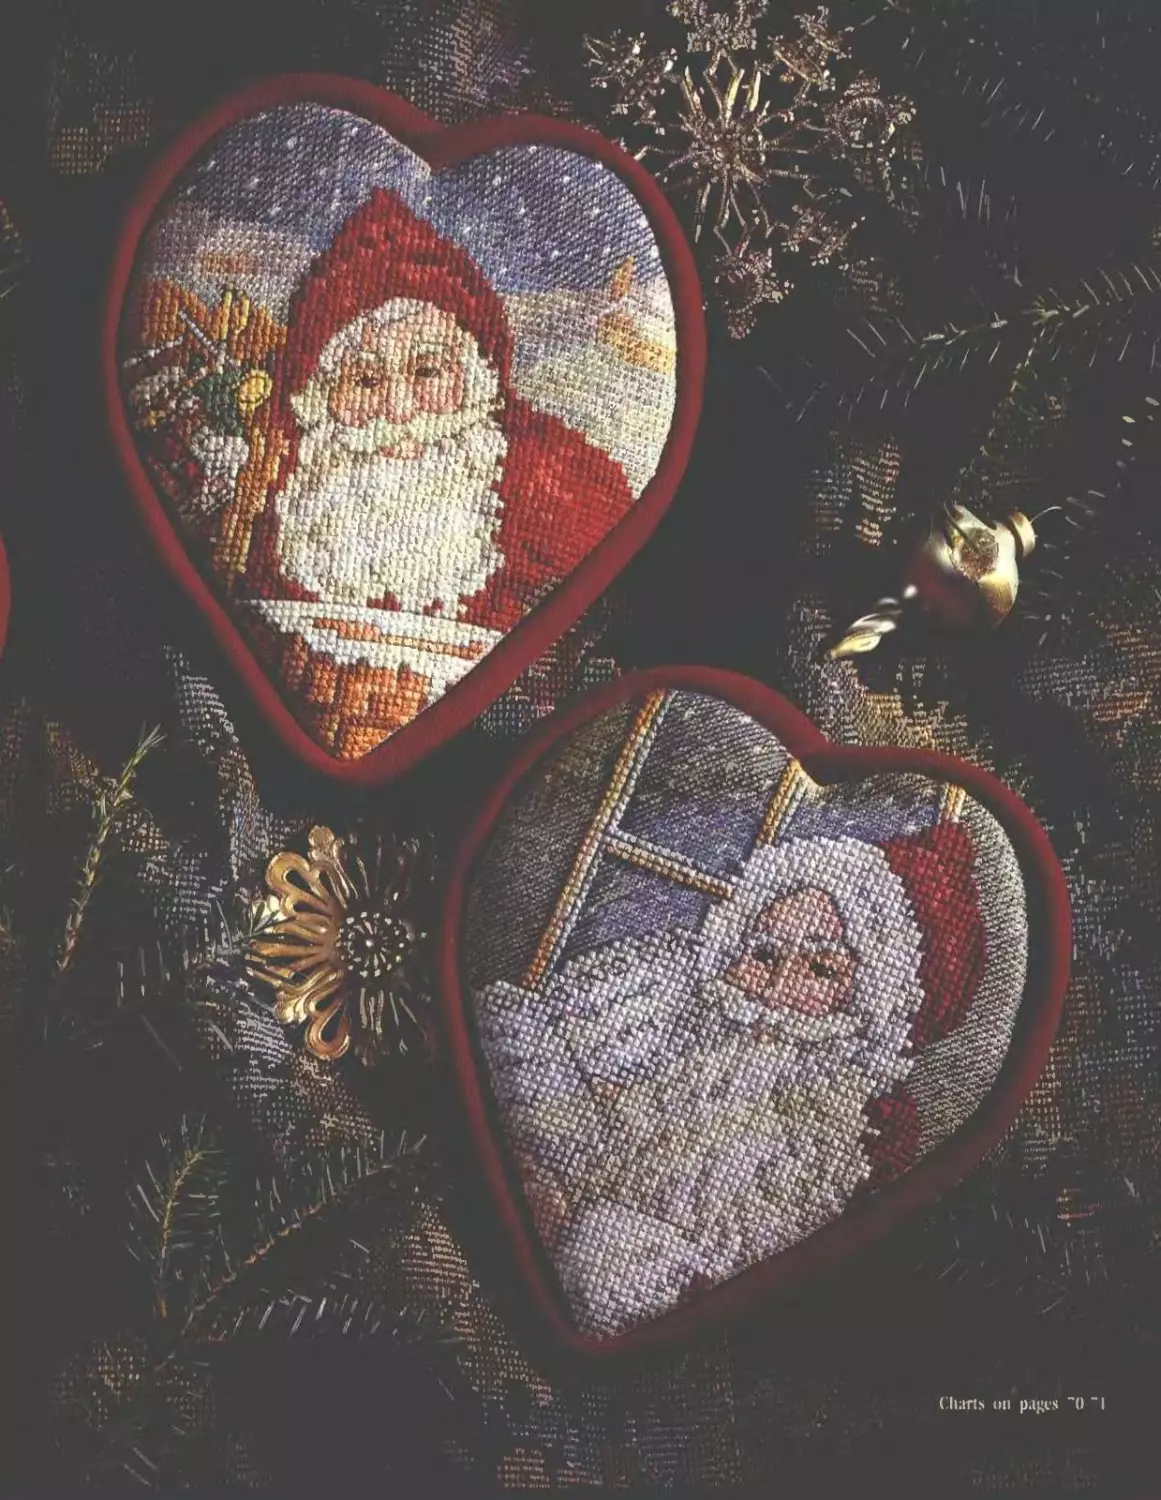
Heart-Shaped Santa Ornaments (shown on pages 28 29) Each design was stitched over
2 fabric threads on an 8" square of Natural Irish Linen (36 ct) using 2 strands of floss for
Cross Stitch and 1 strand for Half Cross Stitch, Backstitch, and French Knots.
For each ornament, you will need tracing paper, pencil, 8" square of linen for backing,
10" x 5" piece of adhesive mounting board, 10" x 5" piece of batting, 17" length of %"
dia. cord, 2" x 17" bias fabric strip, thread to match fabric, and craft glue.
For heart pattern, fold tracing paper in half and place fold on dashed line of pattern;
trace pattern onto tracing paper Cut out nattem, qnfnlri nnri press flat Draw around
pattern twice on adhesive board and twiceatHrttflFrig; cut out Remtfr&sagper from each
adhesive board piece and press one batjiir^piece onto each adhesive boara>qce
Bee; pin in place. Adding a 1" seam allowable, trim
size as stitched piece X
sdges of stitched piece at Й" intervals Center
adhesive board piece; turn edges to back of board
ig fabric and remaining adhesive board piece fqr
1
ide of bias fabric str p; matching long edges, fold
v along length of strip close to cord, trim seam
/
nt pece, refer to photo for placement and g/e
of ornament front, trim excess cording as needed
back together. J?
p is fop peddlep
Peddler Advent Calendar (shown on pages 30-31) The design was stitched on a 14" x 26" piece of Antique
White Aida (14 ct) using three strands of floss for Cross Stitch and 1 strand for Half Cross Stitch, Backstitch,
and French Knots Center design horizontally and stitch with top of design 4%" from one short edge of fabric.
For calendar, you will need 24 cellophane wrapped candies, fabric glue, % yard of craft fleece, 78 yard of
fabric, thread to match fabric, 2% yards of %"w grosgrain ribbon, 7% yards of %e"w satin ribbon,
chenille needle, 3% yards of jute, green acrylic paint, and 15%" length of %" dia wooden dowel rod and
end caps.
For calendar front, trim stitched piece to measure 11" x 22" with top of design 2%" from top edge For
fabric borders, cut two 3’//' x 11" strips of fabric. Matching right sides and raw edges and using a
%" seam allowance, sew one strip to each short edge of stitched piece. Press seam allowances toward
strips. Cut two 3%" x 263/4h strips of fabric. Matching right sides and raw edges and using a %” seam
allowance, sew one strip to each long edge of stitched piece and attached strips. Press seam allowances
toward strips.
For inside ribbon border, cut three 10" lengths of grosgrain ribbon Glue one length each at top and bottom
of stitched piece directly along inside of fabric border. For middle ribbon border, glue ribbon %" below
bottom of design. Cut two 22" lengths of grosgrain ribbon Press each short end Уз" to wrong side. Glue one
length to each long s de of stitched piece directly along inside of fabric border.
For candy ties, cut twenty-four 11" lengths of satin ribbon. Refer to photo and lay candies on calendar to
determine ribbon placement. For each candy, thread needle with one satin ribbon length and thread through
Aida at determined point. Repeat for remaining candies.
For backing, cut a piece of fabric same size as calendar front. Cut a piece of craft fleece same size as
backing fabric Matching right sides and raw edges, place backing fabric on calendar front; place craft
fleece on backing fabric. Pm layers together.
Beginning at bottom edge and leaving an opening for turning, use %" seam allowance and sew all layers
together, remove pins Trim fleece seam allowance close to stitching; trim corners diagonally. Turn right side
out, carefully pushing corners outward Wh pstitch opening closed.
For hanging sleeve, cut a 15" x 3" piece of fabric. Press edges ’Л" to wrong side; press edges 'A" to
wrong side again. Using 'A" seam allowance, sew edges in place. Place long edge of hanging sleeve
approximately A" below top of wrong side of calendar; pin in place. Whipstitch long edges of hanging
sleeve to backing; remove pins.
Paint dowel rod and end caps with paint; allow to dry Insert dowel rod into hanging sleeve; attach end
caps.
For hanger, cut three 44" lengths of jute; aligning lengths, knot at one end and braid lengths together. Tie
each end of hanger to ends of dowel rod; trim ends as desired
Tie each candy in place with ribbon making a bow; trim ends os desired.
Needlework adaptation by Donna Vermillion Ciamya
X DMC 1/4 X »/2X B’ST □ blonc □ И зю Q 311 3 E3 317 □ [9 318 3 E 319 3 □ 320 □ 321 3 322 3 367 Li 0 368 □ S 415 □ 0 433 Li ffi 434 Li S3 435 3 ® 436 Li 498 Li 519 3 632 0 640 0 642 3 S 644 □ 0 725 □ 0 727 В 738 □ £3 754 □ 0 758 □ 760 Li H 761 £3 762 □ 0 В 775 □ ® 783 Li 814 Li 3 819 □ [© 822 □ 838 Li 839 3 [c 840 Li E3 841 □ 2 842 892 3 И 894 ♦ 948 □ 3032 Li 0 3033 □ ® 3326 Li 3371 0 E 3689 □ 3755 Li У 3761 U 3778 Li 3781 3 H 3782 3 • 1 310 French Knot
STITCH COUNT (91w x 113h) 14 count 6'A" x 814" 16 count 5У«" x 714" 18 count 514" x 6Г 22 count 4V x 5'4“
72
!+G‘4
v\7iv
юх
M«
ЯЯ
*S5»M
«ай
«ХФ
ЮХ
Я ЙУ
ЗЯ
। a
XX
яал
»»x
№M»
Л
ШКЛ
a a
ПЛПЛ
«»««»
ППП
hJC^LlL
иИЙт*^1
^ЗЮГ.
од
№0
Пни
пае •:•
I1ИХЛ
ira .* '>
FT I»’j
a»
я я
••* -f?
Г' •
я
1ОД
I ИИ
ях:
X’’ ЯЯ|
яла
ия -,,
F.KW/0
' м^ гнивж
«в К ««•;❖
ЯЛ v ih3i? a?=
law-----. ₽«яи
лмйо Я’ Л--
:<Л»Я »'••* “ ----------
г; Д! ;й 4й< U
зля
Й;‘И<Я
Mt к а .дя
и <3
________ XMW
S L>
Ви1
«влй
*aMQ«Q0'^
east 'Sfcл
*v,» ДГ^
л ХОД >п:чл
яка яяна
яа ая^м.'
и а
зада
г
««мяаюам
я эе
*ам
sfflfsr
- ’ яо •’Wji
е eoiMM* б т
/.HKHKF
;;'\алл«
И ОДЙЯ!
;ВЛ1
» хй«>
ЯК«бО
хяя«ияг
iquqc ада
- ‘ПГАиНГ
t Г<4 .Г *
7.3
q the quadpille
0 □ El □ И E3 S И □ x
СЛСЛДДДАДДСО
mcn^wwwwwai
ГООО^ОЭСЛ-исООЭ
COCOCOhObObOtOtOcr
O’O’xS^zJXOOq
СЛ CO ° CO OO 3
о
ввоссисвввоввпвсвп§
ss
о
z
о
03
сл
0^*1000П^ЙНИЕ]НН0НВН>
>I>JO>0>0>0>OO>O>
WMOO'-Jvjvjh.^.fi
OOCOq-^JOOOO-^JOJ
O> 0> O> О 0>
> .tb > .> CO
Си -b> to о to
□□□□□□□в
сивипвис§
2 2 2 2 °
w м = о 5
о
03
сл
со со со со со со с©
О О со со со го
О СО 00 ~о сл —•
и —
BBCDB
впвввввапп§
ЕЗВПИ
03
СЛ
□ ВНЭ0ЕЗ
0Е*
5□ □□ ПВО □□§
Z3
о
zr
т
СЛ
Quadrille In Frame (shown on page 33) The design was
stitched over 2 fabric threads on a 16" x 17" piece of
Cream Belfast Linen (32 ct) using 2 strands of floss for
Cross Stitch and I strand for Halt Cross Stitch,
Backstitch, and French Knots. To attach beads, use 1
strand of DMC ecru embroidery floss and refer to
General Instructions, page 95. It was custom framed
Needlework adaptation by Carol Emnier.
74
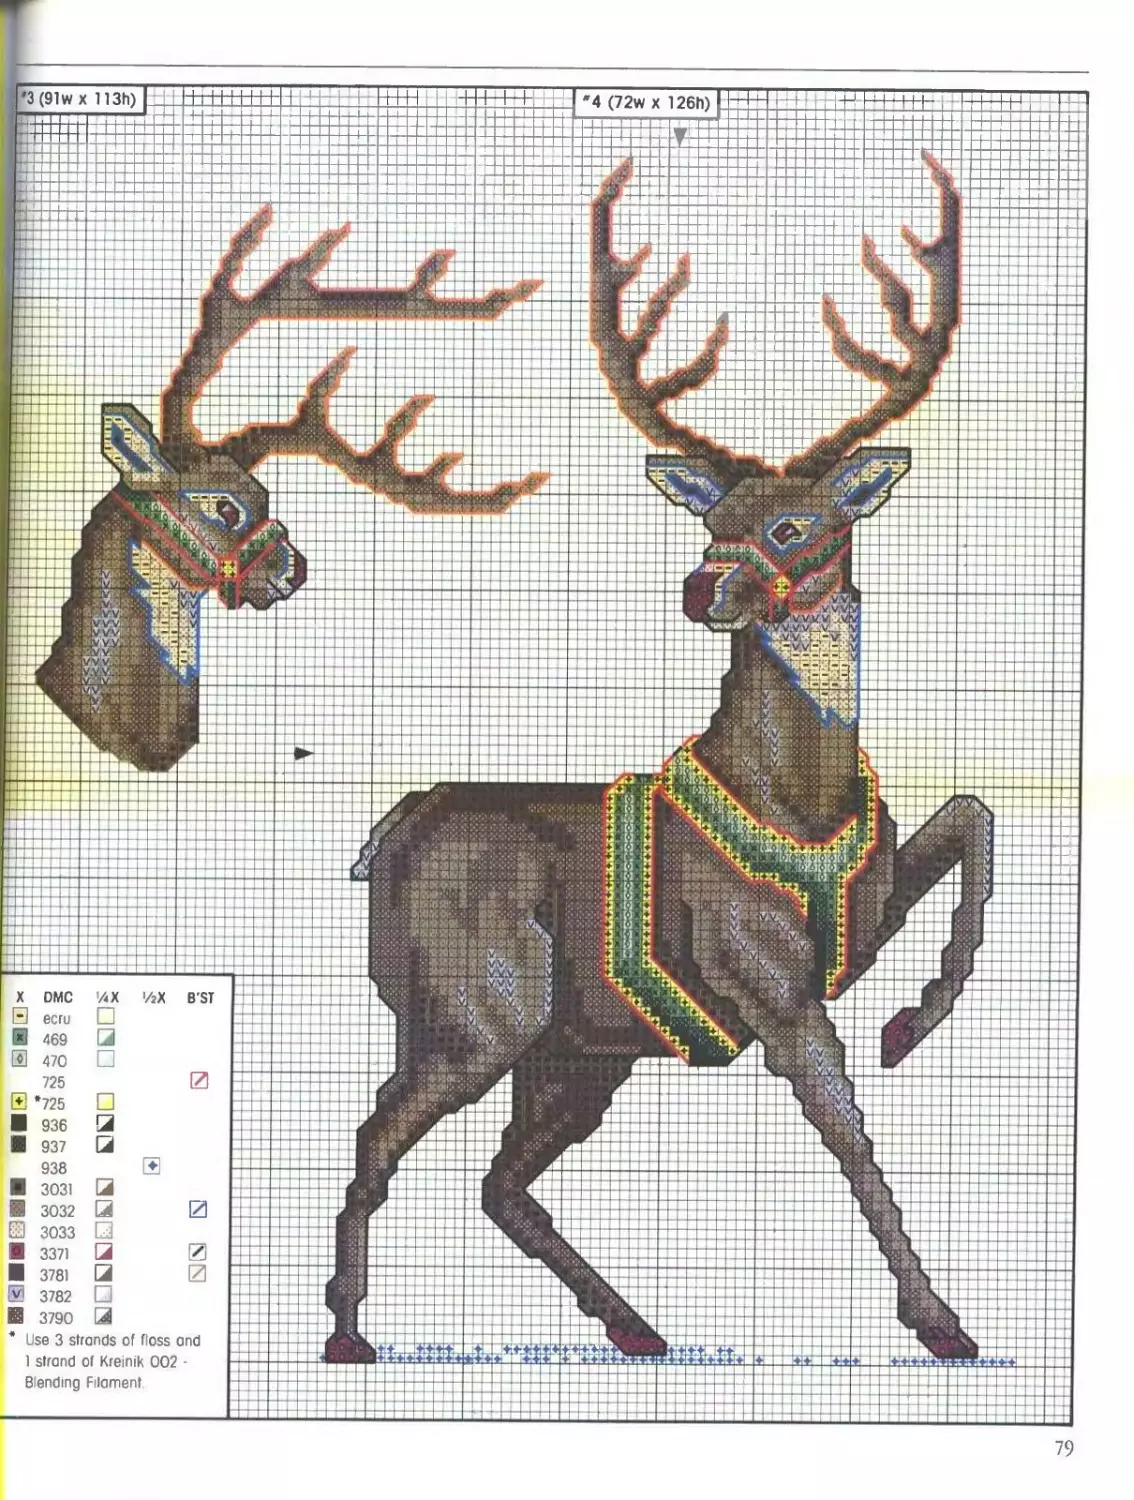
R fop The Reindeep
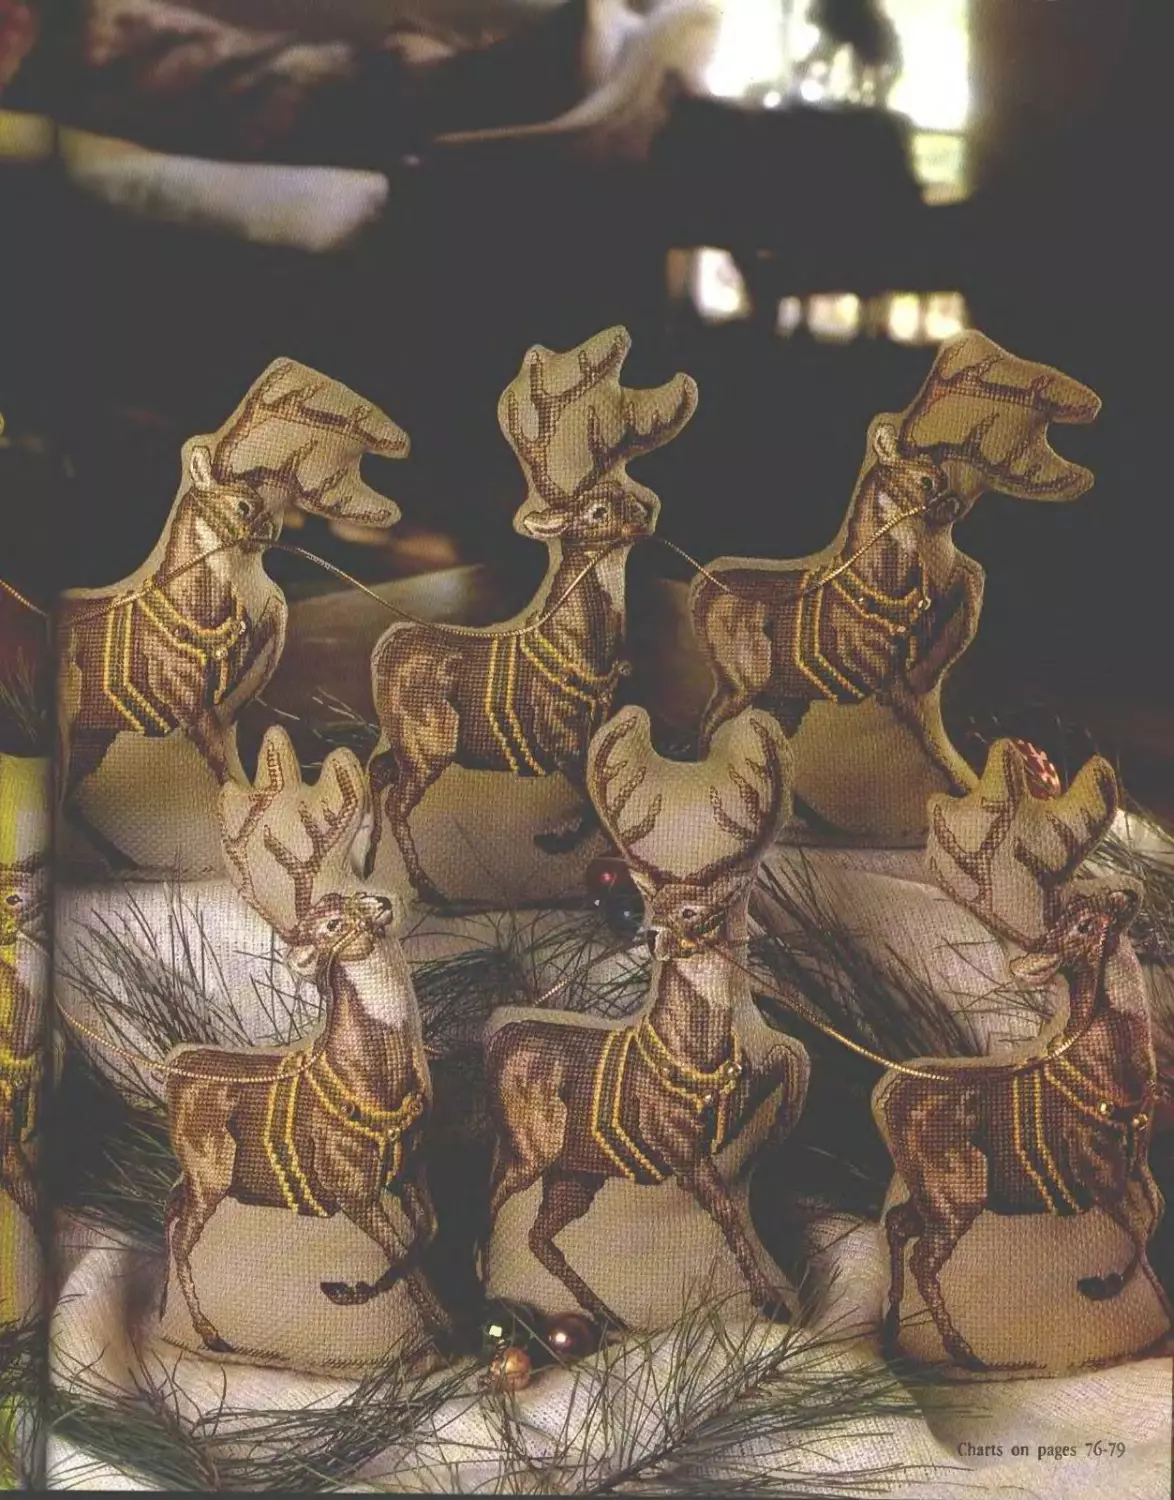
Santa and Reindeer Standing Figures (shown on
pages 34-35, Reindeer charts on pages 78-79):
Each design was stitched on Drty Aida (14 ct)
using three strands of floss for Cross Stitch and
1 strand for Half Cross Stitch, Backstitch, and
French Knots, unless otherwise noted in color key
Refer to photo for placement of 6mm jingle
bells Attach bells using 1 strand DMC 469
embroidery floss
For each stuffed figure, cut a piece of Aida same
size as stitched piece for backing Matching right
sides and raw edges and leaving bottom edge
open, sew stitched piece and backing together
2 squares from design as shown in Fig. 1 Leaving
a ’A” seam allowance, cut out figure. Clip seam
allowances at curves; turn figure right side out and
carefully push curves outward. Trim bottom edges
of figure ’A" from bottom of design Press raw
edges ’A" to wrong side; stuff figure with
polyester fiberfill up to 1A" from opening
Fig. 1
For base, set figure on tracing paper and draw
around base of figure Add a 'A" seam allowance
to pattern; cut out Place pattern on a piece of
Aida Use fabric marking pencil to draw around
pattern; cut out along drawn line Baste around
base piece 'A" from raw edge; press raw edges
to wrong side along basting line
To weight bottom of figure, fill a plastic
sandwich bog with a small amount of aquarium
gravel Place bag of gravel into opening of figure
Pin wrong side of base piece over opening.
Whipstitch in place, adding polyester fiberfill as
necessary to fill bottom of figure. Remove basting
thread
Using ’Ae" dia gold cord for reins, refer to
photo for placement and tack in place
Designed In/ Carol Emnier.
76
DMC
Wane
ecru
300
301
309
319
335
353
356
400
433
434
435
436
437
469
470
471
498
610
611
612
632
640
642
644
645
646
725
725
726
738
754
758
781
783
a
j
QI
Q
a
at
□
□
3/4X
Qi
BST X DMC /4Х 3/4 X B'ST
813
815 QI
822 □
825
826
827
844
898 a и
♦ 899
902 a
931 □
934 a
936 Я
937 a
948
987
- 989 ~д
3031 | x]
c 3064
0 3326 □
3706 3
ly 3708
И 3772 3 3
3776 □
3790 •
Kreinik 002 - Blending 0t
Filament
3031 French Knot
7''! Blue area Indicates last
row of left section of
design
• Use 2 strands of floss and
1 strand of Kreinik 002 -
Blending Filament.
t Use 2 strands of Blending
Filament
STITCH COUNT (106w x 108h)
14 count 7 V x 7%“
16 count 6%’ X 6’4'’
18 count 6" x 6”
22 count 4’/," x 5"
7“
R fop the Remdeep
1 (73w x 125h)
2 (68w x 126h)
W.VZV!
Reindeer Standing Figures (shown
on pages 34-35): Each des gn was
stitched on a 14" x 16" pece of
Dirty Aida (14 ct) using 3 strands
of floss for Cross Stitch and 1
strand for Half Cross Stitch and
Backstitch. (See page 76 for
Standing Figure finish ng
instructions.)
Design *1 may be substituted for
the head in Design *2. Design *3
may be substituted for the head in
Design *4. The neck of the
substituted head will fit exactly in
reindeer collar
аквя* •
Л
78
’3(91wx 113h)
B'ST
VW.
v.ViV:
w,
vw
wv
vw
DMC
ecru
3031 LJ
3032 Й 12
3033 □
3371 U 2
3781 Q 12
3782
3790
Use 3 strands of floss and
1 strand of Kreinik 002 •
Blending Filament
jflJjay vv
Я vsw' v v vl
FwwIUx
V.iW.-.V..!
W.^n-V;
*1
79
1 1" 111111" 1111111.. ИНН. 1 1— ГТТТ1Т1ТГТТыа*~ Z-2Z-2Z : JT-z-zz .1 xi РИНГ-- ' 1 1 L. 1 L 1 1 -zffl
n~
LL ill 1 ...j г
M — . , 1 L
4 4 I П 1 Г i ’ 1 1
1 - Hi 1 i LL Л к
zt 1 . II ООО oopplopjol . L
—< • II Г I > OOtOOjil 1 oo-1 joppp-ojoo ,_1.1 1—
if k> io otepo o| 1 OOrP I jp I ptolpool
I,, |||| 55 i osoioH j'.zL :.<i 11 PMo i of 1 Г-Р011,0 1 00(1 kX ‘ M 1 11. L 1 н
1 / 1!i ii r gE-ooMi o: i O 1 O*O11 ; 1 1 11 1,1 1 1 1 1 OO 1 pool
Fi J ij|oi!Q;iW>,i |i 1 PMk>i^ 1 fl M1 I 1 III 1 l ojopp^L 4»2?4-
«i mxttg > a •Ma i x Xi • O’’5’
i i v i i ZZH' о i i _L . 1 o|fr 1 poll 1 i 1 _-:•<}: 1,1 i III ofe . r« «»И>
jei й OiOOjOjOlO 1 A 1 * J*' * * l o|fp 1I001 fl ioi<
I ZL *Qf> 0-0| 1 £>1 1 *> 1 9 I / 1 1 XsJ 1 !O 1 . ..:• igEio^ifet a :U::>4Zrilifc йц_-._41
a>x6p io 1 1 1 j! «4- 1 /:i/ jJ J I lit । jJI ^14° k±U ez z zl4 zjj L 1.1. * »i ioM 1 1 :-'i: ’!
э x xoo 1 Jr iteRfot UlH-PJLZ'.’t F 'П4: • ^{©P1 - -r
—— —j _ , . . . . 0Qo4+|x<> i i;; t.y nil l «JK» i1-: < tZ4 iNi « 1 ISF 1 ’ of ; :•:>:< :< < flfkl 1' ‘[-fl 1 0*0 >10
_L _j j I | | I t xDOb'+lpi# iTA ЯПсвк1.:.;- • _ 111 !I!I ; .'itS-fiPol {' ; . 4:1 ’.t.t t:' .-Uli bHfe’zu'L
J 1 □*> * « । 3- ? f A 3-.j 'Li 0Ш0ИИ1 ii 111 j o-oo 000-i ifi 1 ill 1 о - {•(.< $,L1 :1 0 I Ofc-O-1 p|
х£)ООоД++ i t;< U^;:L: I taiMofrjMM? ijo IlLI ri | |tl,l oboolfo 1 £-TEtv-Ejs
*> х" ДЮ JB4-+O •-Lt i L. 1 «ooJfrooafi i i । i ц 4_. •Г2П*о' TTyW > ° 1 !»У 2Ц
- . x 4L<SUiStJ+b 144 J j J J •Ф-огХ>ЭеП III 1 Ii : . .УЛ'Я^,1 -1 l^Fl 1 1 p]
О кИВОГ'й*вГГТТТТТ «jPI <№оПТГг«:-1 iii^o • 1M
—« —’ Q В s 0- § Ti | >/ J1 !JAJl’i'Ai o i 11i J i^fe L-lpaJfc! rl-LLZH-U 01 op f 1 0
’ • ШМЭ + * o[i4il / ri !iMiMH4:-4>T i;Ha t: 1 i 0 oj i । 101 H . t , I 1 1 r°flpi • 11 °
-П VQIX + 4- Sliti ifo Г i Ту i\ Т[/ oil i I 1' 1 pIbp} ; 111 1 : Hf-л .t-.t- А:-: л-: 11 [•
ZL- ZZX— Г 1 ' abx + oSbhll I • i \ '#r”i i :-ti L• Im. QE»i»pe • >14x a a- a 14 ><«fO , r 1
xz ' * + Rojo i o*> F i * I i ч r i о i i 1 L .14 1 J-'JJ oojo 1 [ : ;: p 1 I—
1 ’<* 1 Jlx хЭЬ 04Г 1 III oi :••• 41U-sir*'sa > ••<•>:: >-l f <--iioiio< >4lLl. «2
- <O 0 K . . L1 а44[о|| Пё i .i . !: IK-JI 0B1 !бЫГ: Ii I: : 1 -’• 1 >1 Ii 11 i 1 PjoK fc> 1 10*0
1 : X -41141Ш Efr4>• M • L . 4L<>2E
> —1— . . . Hili l ip^-.l QM> 1 1 о 1 PKP;-p 1 l 1 1 1 l 1 hp 1 1 op-poj
1 H СП ... . . Ц ^11 1 iUMF>i .1 lolepp 1 oj 111 oi 1 jo p | optop'oT I 1
• co I . 2± x jL :.. 11 opbo 1 0! 1 о-0 1 oo|ooJox>joj“ . 1 |_Ц --
I 1 T H l Г'1 <><> 11 ob-P 00 0 ofoT
q j . >•. H • < ? 1 ooKopbb -^ г 44 L !_
। । ; ; ' i । i ! 1 ! . >k>ok: ‘PH
—.—.—.—1 .—1 1—.— —i——— — .?. j । 1» • “1—।—i— • ।— J .□4444 1 Г ZL _}_!_ L 1—L L L ——— - L—
' 1 . A - -
I 1 3 r.
1 11
ESSoo r
— —I—
—1— —I— |oo,o 11Г ? ГН H иР^И - —. . . 4
Е>П i : : :< :•:{: l 1Ц1: Hi iRio ol
+ “++ jo^i izt4 f it <411 Ip l '1 Ko o| foioJok
1 fob i r i i i i i 1 211ololwrioloioo oto -►orootO.c
i • t zt "ZZ^QIh t.t .. I^io^og OiWieliPO OxiwOOOOjO; 1 1 I OOl 1 oto'o. 1 0
zL 1 № 44 -< 11 j My lojoJpSoiP о | ООО 1 o4 1 1 Ф OfO 1 1 1 1 _1±1 1 <>o„ ..JJ_H.
Zj>n l X i oolMoSo opjo o<> i o' 1 | о О I 1 k>io 1' 1 II I 1(1 III 1 ill ГТ
|p| 1 |l Р^врЬо ОО 1 11 'O 1 1 1 11 1 1 1 1 11:11111 II III j , , 4Ж,
Z J _ ST I I о *5>!SSIo i bb i j Ю1 |Ti “i i I ft7 i i ’ii Г. I i Г •: n:< :TjEc>.
1 X 1ip*f5 popi ijcxi.i i i i H.Ji !• ‘4T: .11111 Г. :’: :• <TT
Д^И₽рО^к>| WUkMPOP 1 1 i ib i|i ,i i Ш4414 411114:44. •:• 44 ЬД1- JJSlSz^oJz + .. г
Rpo illopHLo^o i 1.it ,t|, .,»;. ! ;
Bk>pl Pig». l^> HF-oio 1 | j о < j > П4-- 4 44IIIJ • _H • 4± <• •:••:• •: Ll. . .4 --4 »;>,i>:|« 1—r—1—1— —
- * гФуР Ретт- । । i^jjfei Tm н Г ze h 4 -4- 4 - r - , I ; Пг . ’ f .4 - * i . _L_ . ..... ... 1; lLL -1, i ilia - - - —r—I I I
gpi нzf t> 1» ' 3 f L >• ' T ...
- - zt F й'«-4ОД ГИГ J_ V H'4>i ; , •:•<•>ZLi4 E-llMW 4111114 tl 44 : •:!< X L. Ко .'X - 444-
|_ < : Л ' 1 il > гf-4 TT^r •£• < - •:-t-j.'.t-± •-k-k-k> > л > ? .,1 J. i.- . л-
*ipOX-W*1* > i ’ i оМвоЛЧы^Г'ЕЗИк10 r ri^r*
Lz’1 MIL : •- • ♦. -I- : 1 .’ .x fl Ob '- - мГ>:'о яГ>>г? 441 :'Г i t г
.aFwUmJ* 1 r>t t '•] ’ ’ ’!’ J • - •" т> 'll’’ <^г яИИ1 Г
HJJ-lZZE/:!'кИоДо r : T1 : , Л?:. 1 ।
Kx • f ' /il l 19ИО ? H l .!.-' bzMlifetZ ЙЙЙВЬ i; H >Й11 ?
ыд м M i: -. ‘.; I-. 1 ~:!1 ^Er»!» * , ’ H 1 ' I :. * Bp -P© 444 •
MB Olw ** ! EJ ? '. f1!^ У |Я^1| - 4 1 : ’ ' : 1 4444 П СГ I? 1 *• r ; L. 'QjZzlS “A- -*- I
Ко Г f I t 1 oo<4j|^< i po 1 ; 1 » 1 j- ;• j t < <'XX4<Xi4l- j-AZ-A A- 414. ZiZ: ®4’: - .2 k-l , - 1 1
T- - xz ... э Ик>о cuoioiooBRlfgo i I f11 11 . I i t : ' . .] F' 44 JX J T: .-il- Bto 0 ~T~ ~1
- r4 4 МИИКЫоо! НЬ>оЖ>о i too i i i i i i i П: “ <•'•{.м-’Т':••-!••• '-f-I'-A- !. A-. : .-|:[•.• •. J* <J -1-
Joi i °Ядо Qjol । -o', i & I II l Г Г Д11 J ' I' 11 | • . |.- i ,: ~j | i ]• :4i:-: :;•:Ml i i.Z- 2 . 1 1—1—
X MM* i oMWoopo i I oo iiii ; 1 1 1111.11 1 :-n-itк31t-A 1 •'<i :•:№• । >: Z 1 - г1 |p : - 00 1
% b> i 111so-i11111111111ii i i i Hi 111 il I I 11 i l ll* К> о-с-Г | _L _i L_ -
r> Г III oo3SHw>o<> ooofcj ii I ToO;o<> о-о} i 111 ok>! I I 1 l Г I' I 1 1 ill 1 jj
ijoii ? о I оо*озИ| И* •pOOpOOO 0000(00 1 O I 0 О 11 (ox>; i<gR> 1 ....
ДЛ ^Zl?te 1 1. . 1 1 ' joj.151_.ESOOo-c^o*<>~o i < *£>£,2^°
. loj.i -::к-ь 1 1 1 O I 1 Ok> Op* • ll ' k>OOs >b-obo -4 k! !
_ _ . . . । Т» , к I fxi 44L B4-_- । 1 । Exptz ГГ T 4 -44—Г 4
1 ^0^00 iT44:-H !<>'1 oj - Г T ИТГ L- 4
” гр~ г 1”1 I- ’ ' ' ’ V>K>’i 1 ir'i 1 1*00 . ztz T H T ztzt 4
oo-<> oof 4 I 4444=
I I 1 II J 1 1 I 1 1 . ‘Лм^ТГ П "T 1 1 . i _
i .L . ..... . A “ - - : I ' "1ТГП Г 4= -
4—
TT^^ lit- 1 Г 1
1 - 1 1 1 1 ill I J-Ь- r H- -4- 1 1 ‘ 1 1. 1 1
1 । । । _.jz ± ztztEzrizzt JJ Lu ! ! ' 4 1 j 1 1 I j _ j II | ' I I I I I I I I ^-4-
ZT ZL ZE X XJXzLr 44- -Ц-Ц4- — ГГ । 1 M 1 i -tXEZtZL 44T J-4 L-4 ГТ. .
1 . I 4м 4 1 1 I 1 1 1 1 . - ( -H. j—i~h -*- . _. LIL
x 44h
ж*ж
•1ИЕ
низа
UUHI
ИИОЕ^^.Я
иооЖая
мои
□и
X
Уд X B'ST
X DMC ’ДХ BST
S 762
0* 822 □
838 0
839
♦ 844
X DMC
El blanc
2? blanc
3* ecru
312
322
27w X 50h
27w
Ci
□ 0
□I
X DMC ’ДХ B'ST
336 0
347
415
* 644
645
760
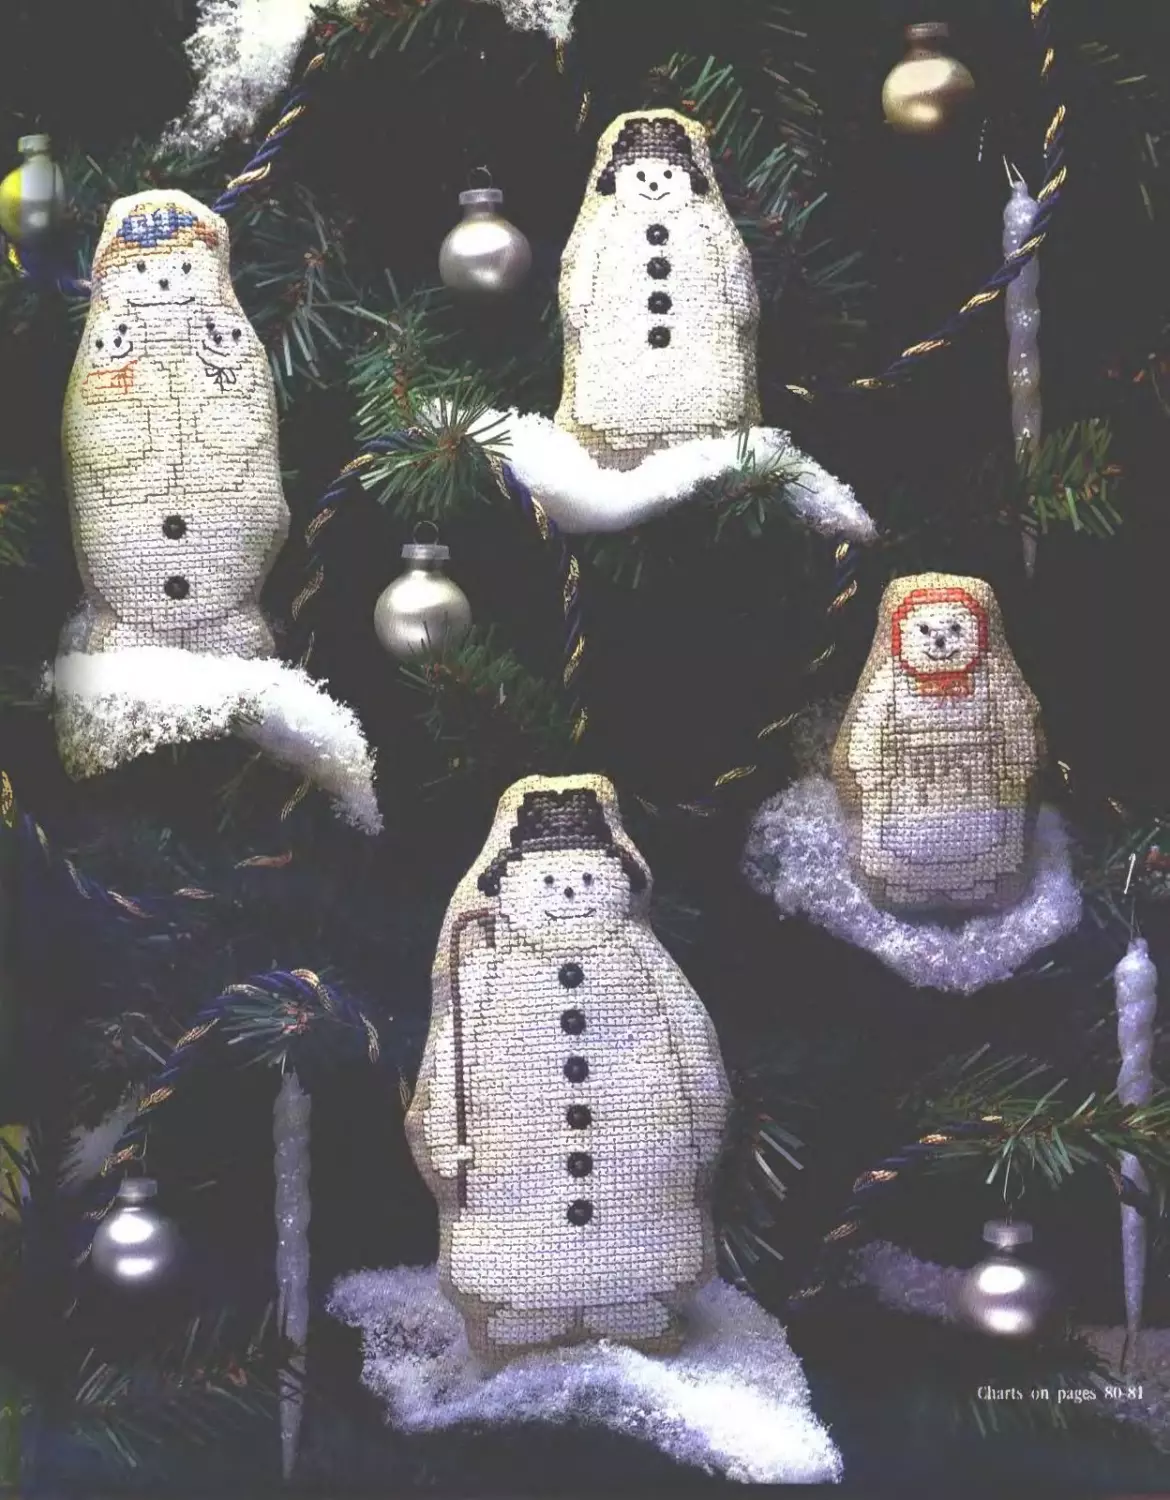
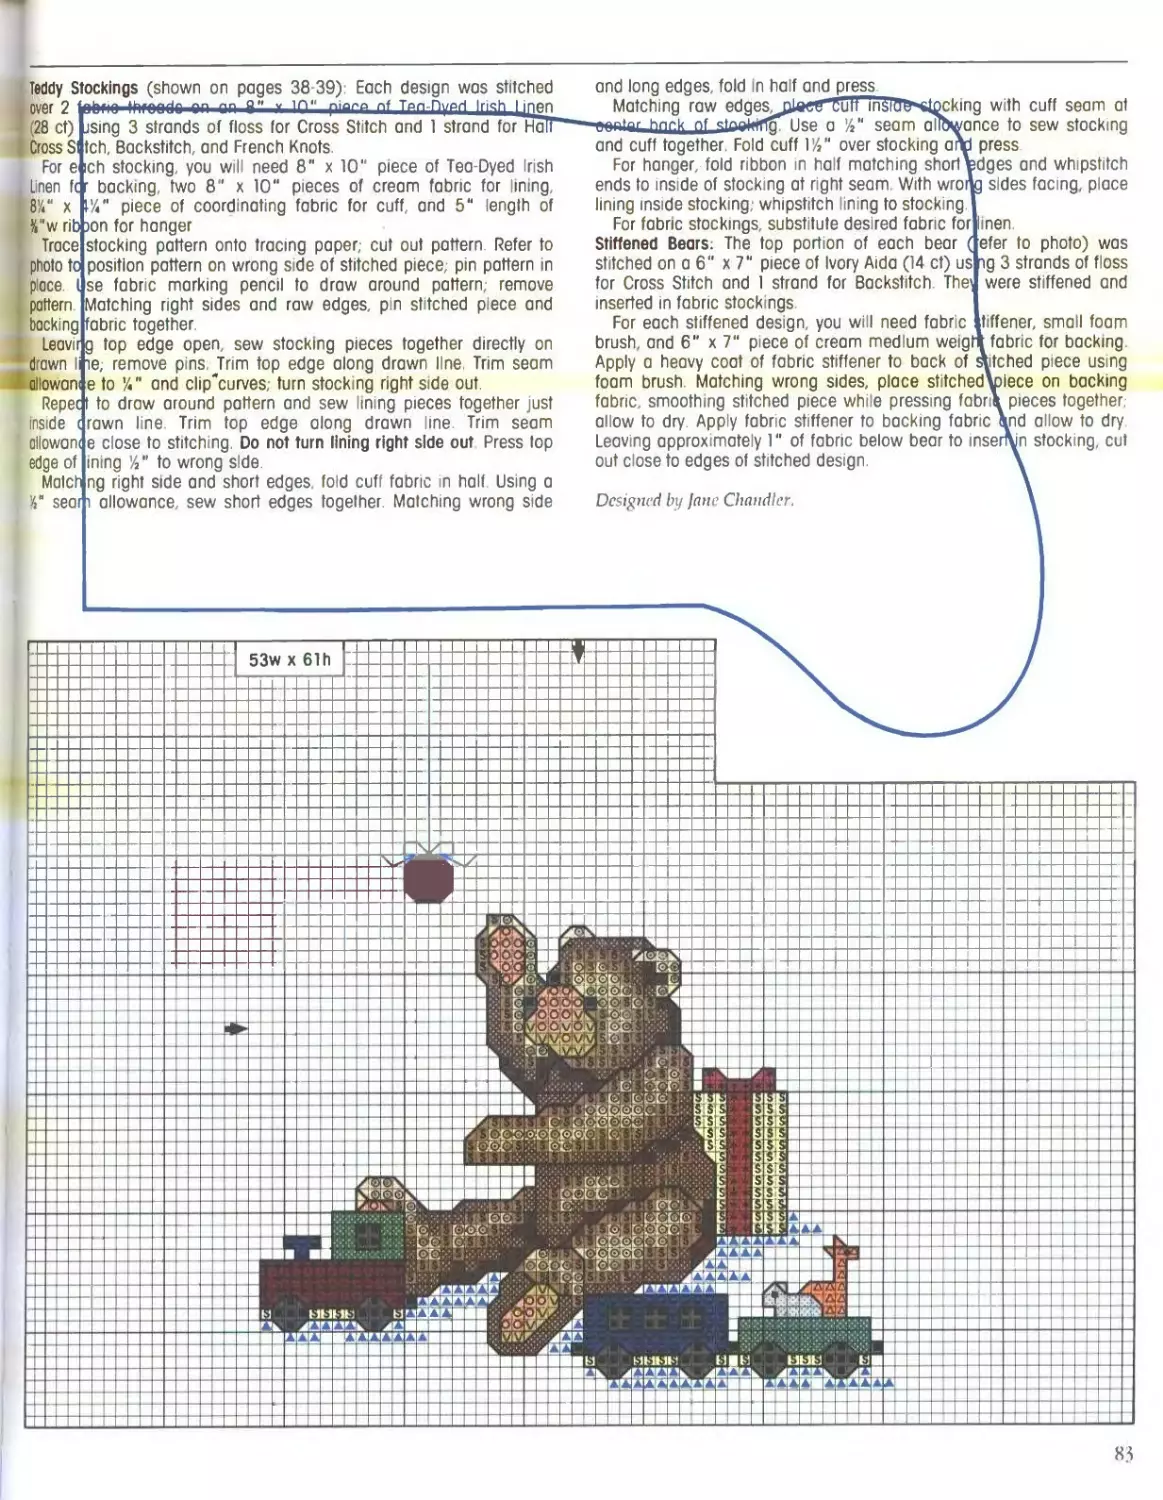
Snow Family Stuffed Shapes (shown on pages 36-37): Each design was
stitched on a 7" x 9" piece of Dirty Aida (14 ct) using 3 strands of floss
for Cross Stitch and 1 strand for Backstitch and Lazy Daisy Stitches. To
attach beads, use 1 strand DMC 310 embroidery floss
For each stuffed shape, cut a piece of Aida same size as stitched
piece for backing. Matching right sides and raw edges, pin stitched
piece and backing fabric together Leaving an opening for turning and
lQJ
ol
DMC ’/дХ B'ST
869
3045
3046 E
3325 E
3328
3787 /
X DMC %X B'ST
И 3328 Lazy Daisy
03001 Mill Hill Bead
* Use 3 strands of floss
and 1 strand of Kreinik 032 -
Blending Filameni
stuffing, sew pieces togelher //' away from edge of design Trim
excess fabric leaving ’/«" seam allowance. Trim corners diagonally,
clip curves, and turn r ght side out Stuff shape with polyester fiberfill
and whipstitch opening closed
Needlework adaptation by jane Chandler
81
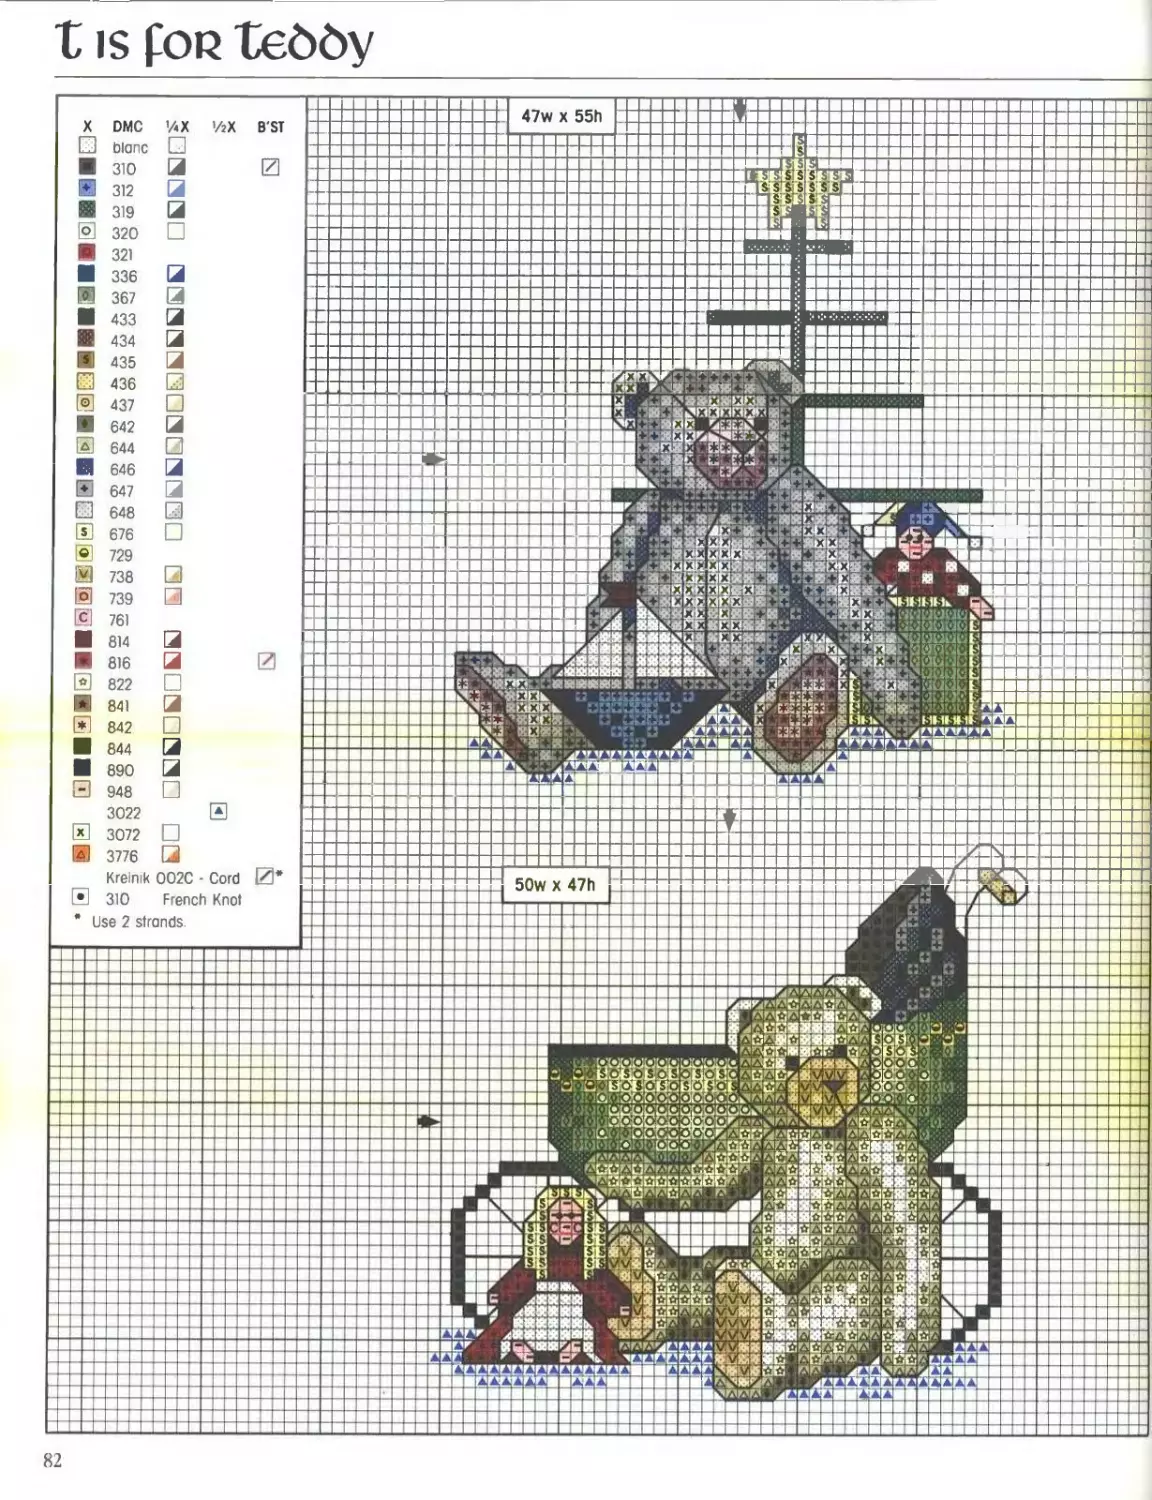
t is fop Teddy
OS
olsto’s
<г л
№uex; u
VDI
^яша
47w x 55h
50w x 47h
X DMC AX ’ЛХ BST
] blanc
1 310 J 0
1 312
1 319
[O 320
1 321
1 336 a
1 367 Q
1 433 a
434
1 435
I».". 436
[0 437
Ф 642
Д 644 □
И 646 J
ffi 647 3
648
S 676 —
® 729
V 738 \
ib 739
C 761
814
816 jj [7]
0 822 □
841
♦ 842 □
844
890 J
948
3022 E
s 3072 2]
'A' 3776 22
Kreinik 002C - Cord 0*
В 310 French Knot
* Use 2 strands
$
_JS 3 s s 3
s Ts s s srs sis s s
s
s s$ s
s sms
1
82
and long edges, fold in half and press
ни я" у ]л» р|ЙГр nf трп-ПурИ Irish Linen Matching raw edges,
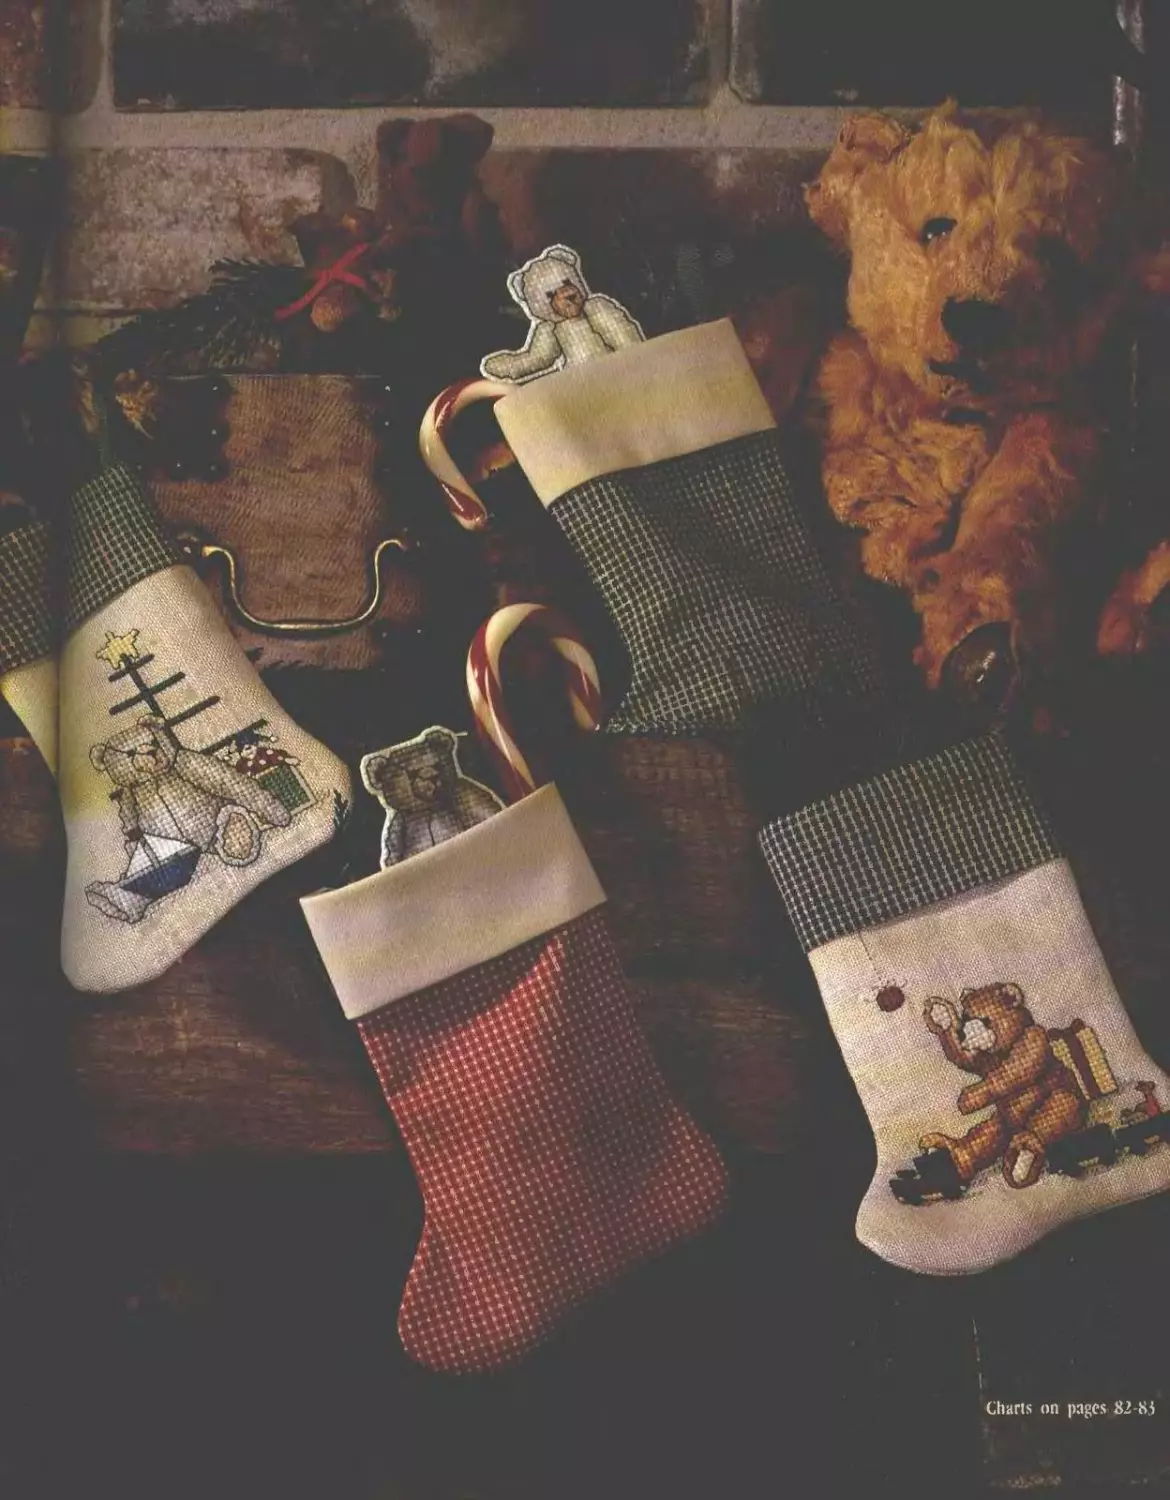
• Teddy Stockings (shown on pages 38-39): Each design was stitched
lover 2
I (28 ct)
I Cross S
For e
I Linen fdr back ng, two 8" x 10
i 8Г x
I Fw rib
Trace
photo to
I place. I
I pattern.
I backing
Leavir
‘ drawn liie; remove pins Trim top edge along drawn line Trim seam
ollowani e to 'A" and clip-curves; turn stocking right side out.
Repec I to draw around pattern and sew lining pieces together just
! inside (
' ollowani
edge of
M Ich
, Г sear 1 allowance, sew short edges together. Malching wrong side
jsing 3 strands of floss for Cross Stitch and 1 strand for Ha
tch. Backstitch, and French Knots.
ich stocking, you will need 8" x 10" piece of Tea-Dyed Irish
pieces of cream fabric for Im ng,
I’A" piece of coordinating fabric for cuff, and 5" length of
jon for hanger
stocking pattern onto tracing paper; cut out pattern Refer to
pos tion pattern on wrong side of stitched piece; pin pattern in
se fabric marking pencil to draw around pattern, remove
Matching right sides and raw edges, pin stitched piece and
fabric together
g top edge open, sew stocking pieces together directly on
in
eking with cuff seam at
e to 'A" and clip curves; turn stocking right side out.
rawn line. Trim top edge along drawn line Trim seam
e close to stitching. Do not turn lining right side out Press lop
mmg 'A" to wrong side.
ng right side and short edges, fold cuff fabric in half Using a
ftg Use a 'A" seam al ance to sew stocking
and cuff together Fold cuff VA" over stocking a press.
For hanger, fold ribbon in half matching shortages and whipstitch
ends to inside of stocking at right seam With wro
lining inside stocking, whipstitch lining to stocking.
For fabric stockings, substitute desired fabric for
Stiffened Bears: The top portion of each bear (jefer to photo) was
stitched on a 6" x 7" piece of Ivory Aida (14 ct) us
for Cross Stitch and 1 strand for Backstitch. The^
inserted in fabric stockings
For each stiffened design, you will need fabric
brush, and 6" x 7“ piece of cream medium weig
Apply a heavy coat of fabric stiffener to back of
foam brush. Matching wrong sides, place stitched\piece on backing
fabric, smoothing stitched piece while pressing fabri
allow to dry. Apply fabric stiffener to backing fabric
Leaving approximately 1" of fabric below bear to mse
out close to edges of stitched design.
Designed by Jane Chandler.
sides facing, place
men.
ig 3 strands of floss
were stiffened and
tiffener, small foam
fabric for backing
itched piece using
pieces together,
nd allow to dry
n stocking, cut
83
U IS fOR UpROaR
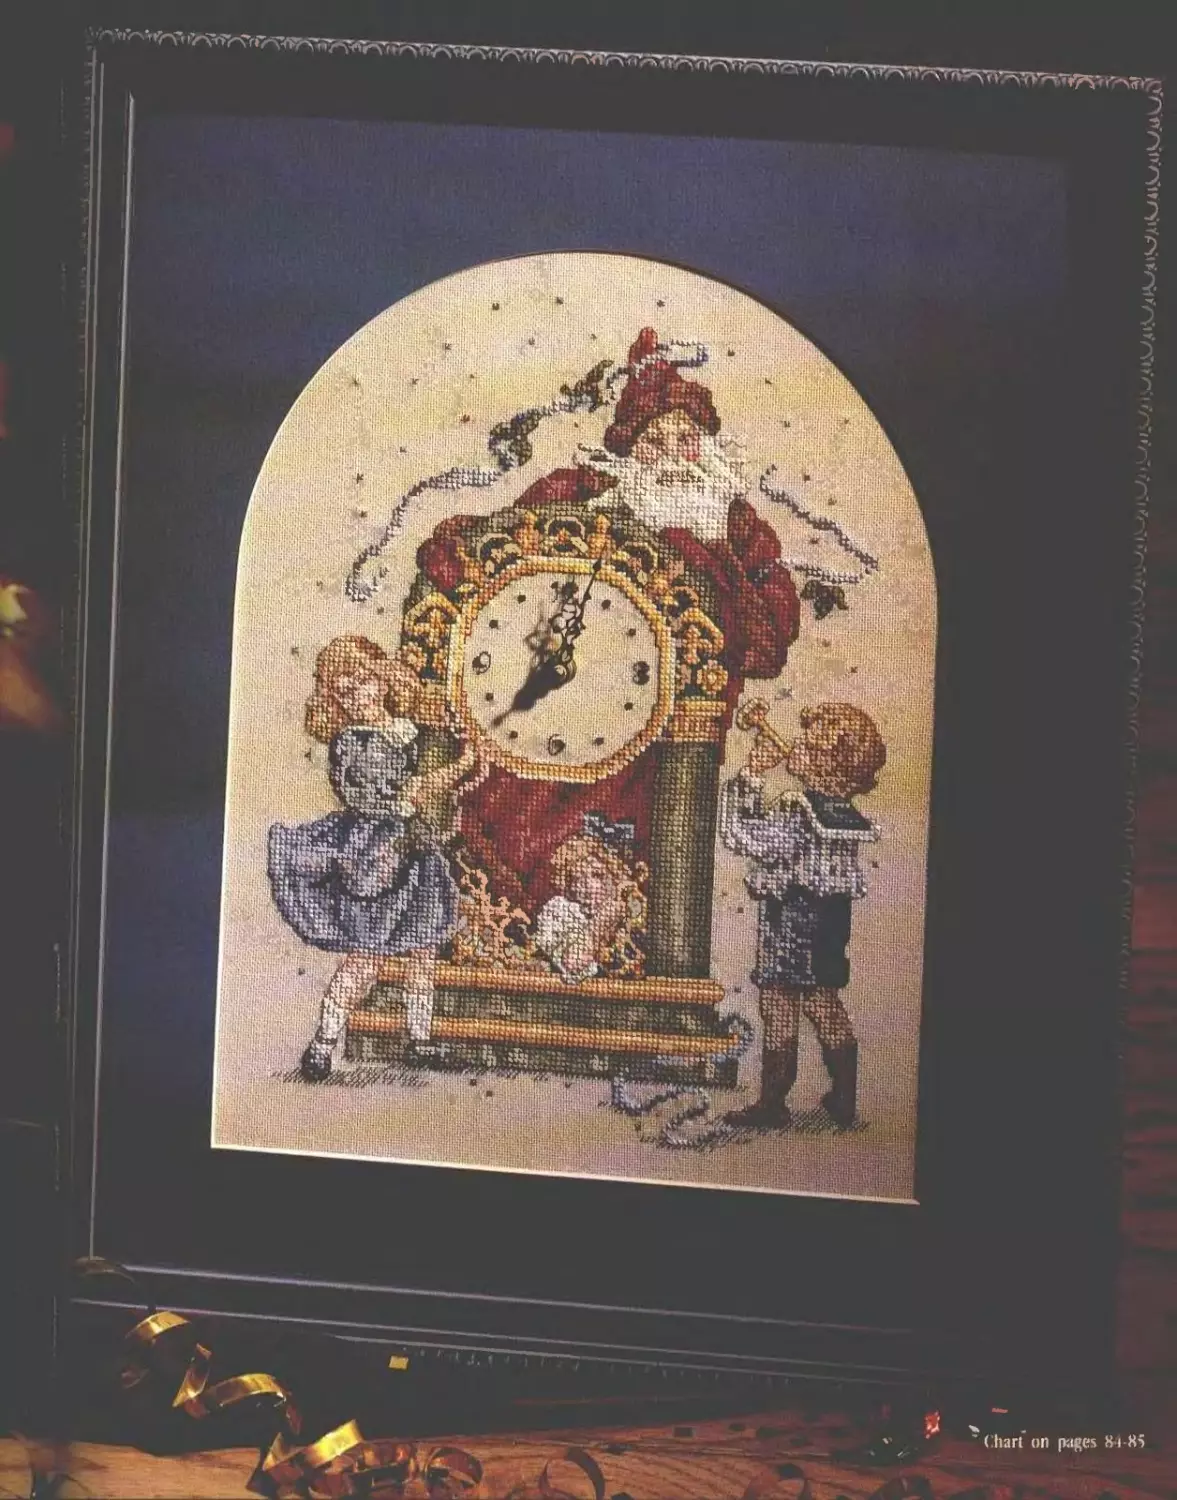
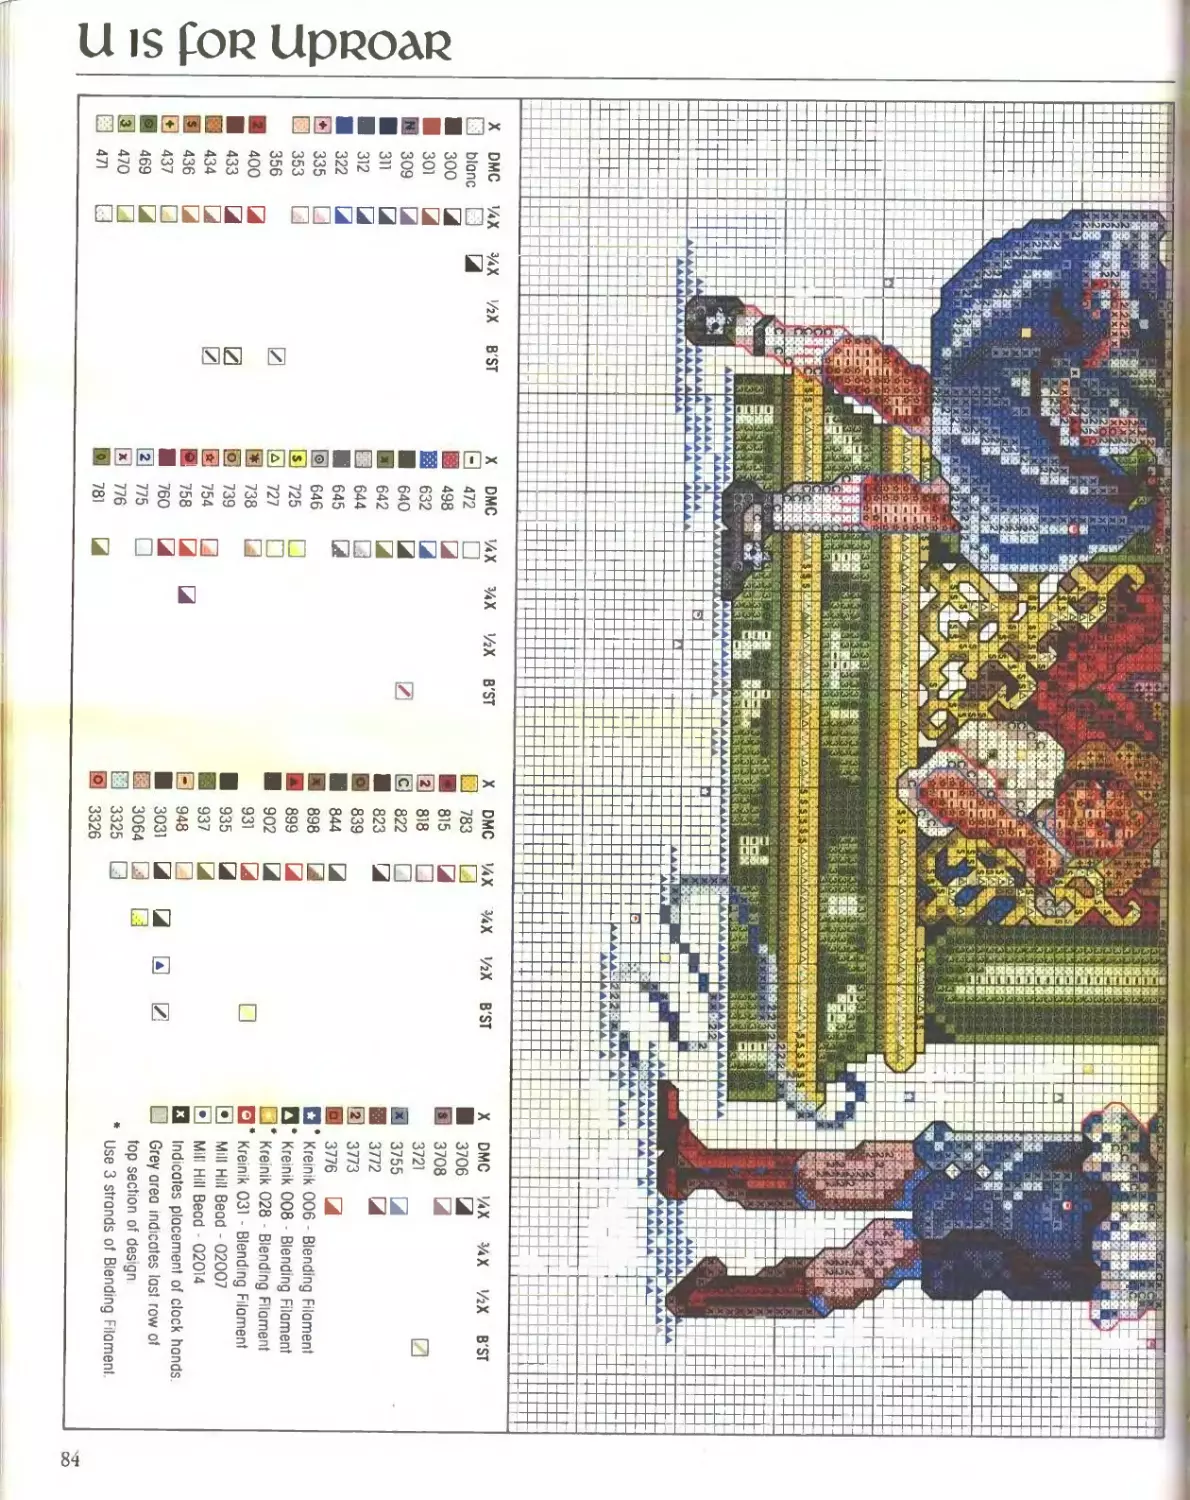
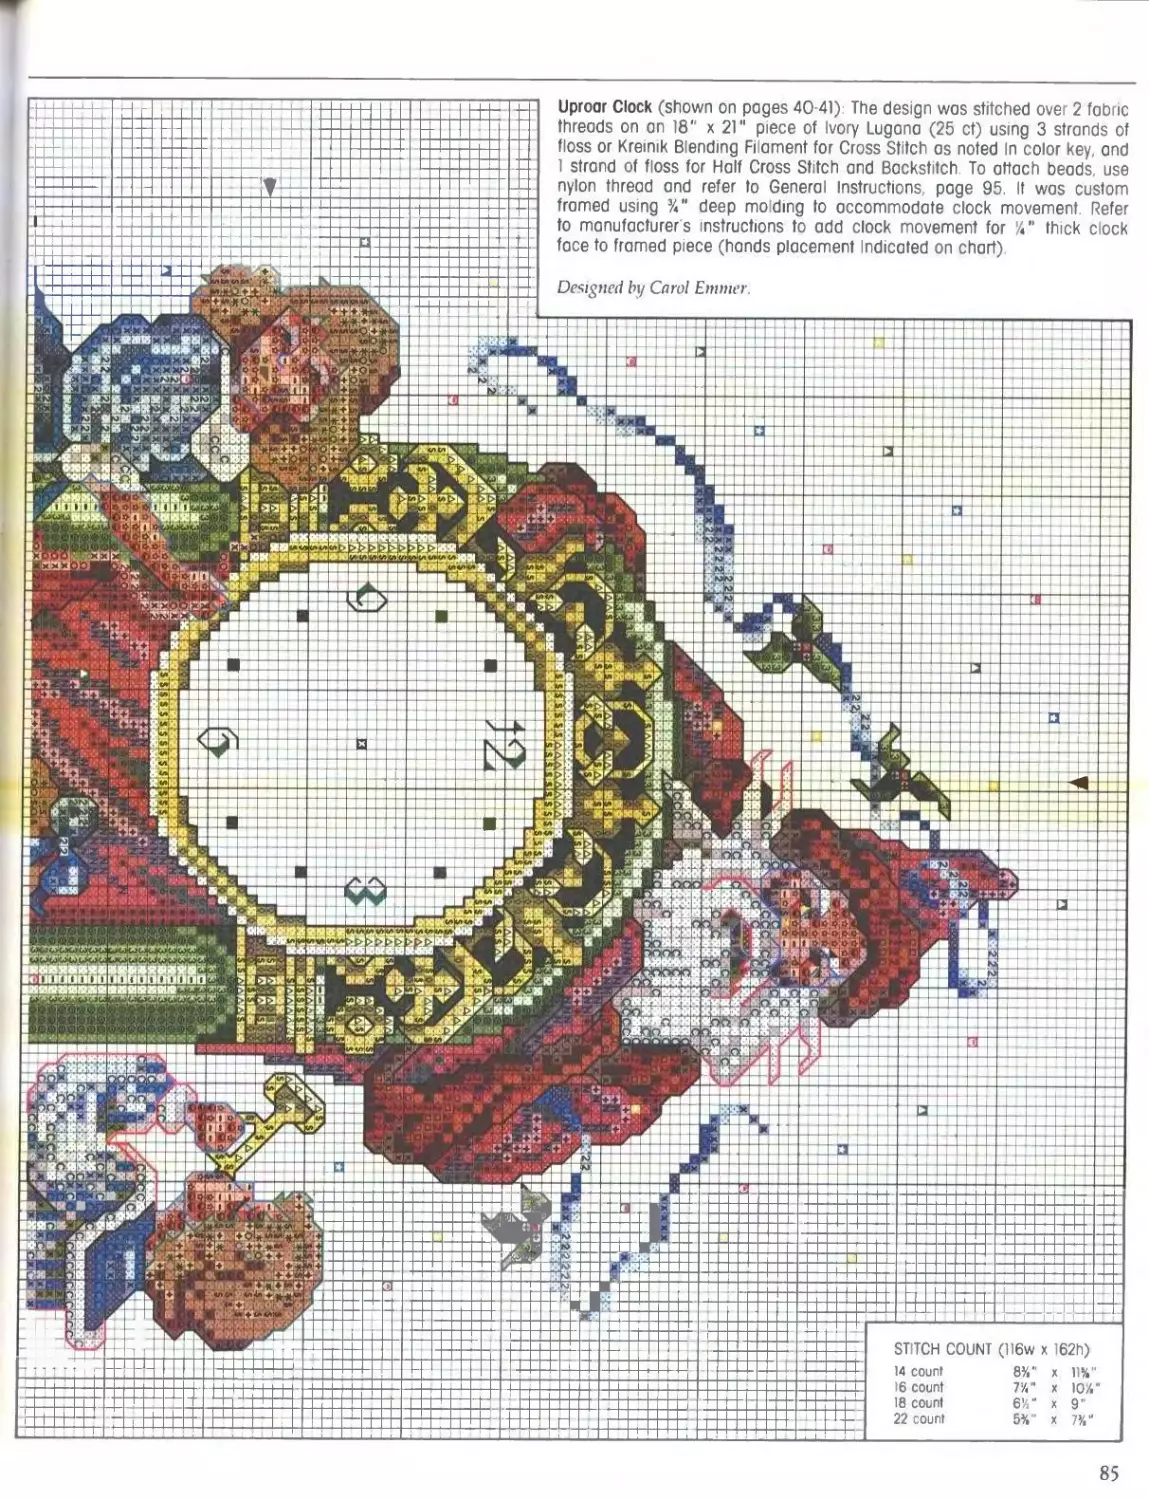
Uproar Clock (shown on pages 40 41). The design was stitched over 2 fabric
threads on an 18" x 21" piece of Ivory Lugano (25 ct) using 3 strands of
floss or Kre nik Blending Filament for Cross Stitch as noted In color key and
1 strand of floss for Half Cross St tch and Backstitch To attach beads, use
£№3* •
X**»*>L
|»6V:. .
M»» i i
nylon thread and refer to General Instructions, page 95. It was custom
framed using %” deep molding to accommodate clock movement. Refer
to manufacturers instructions to add clock movement for V thick clock
face to framed piece (hands placement Indicated on chart).
STITCH COUNT (116w x 162h)
14 count 8%" x 11%
16 count 7V x ЮЛ
18 count 64” x 9"
22 count 5%" x 7%‘
'iJi i
r. *
x. 1_ J 1 LL . LL J
r+±±+4r_nJ.IJ ^±+4L4 T” ’ -I- —f— — — — —«
1
85
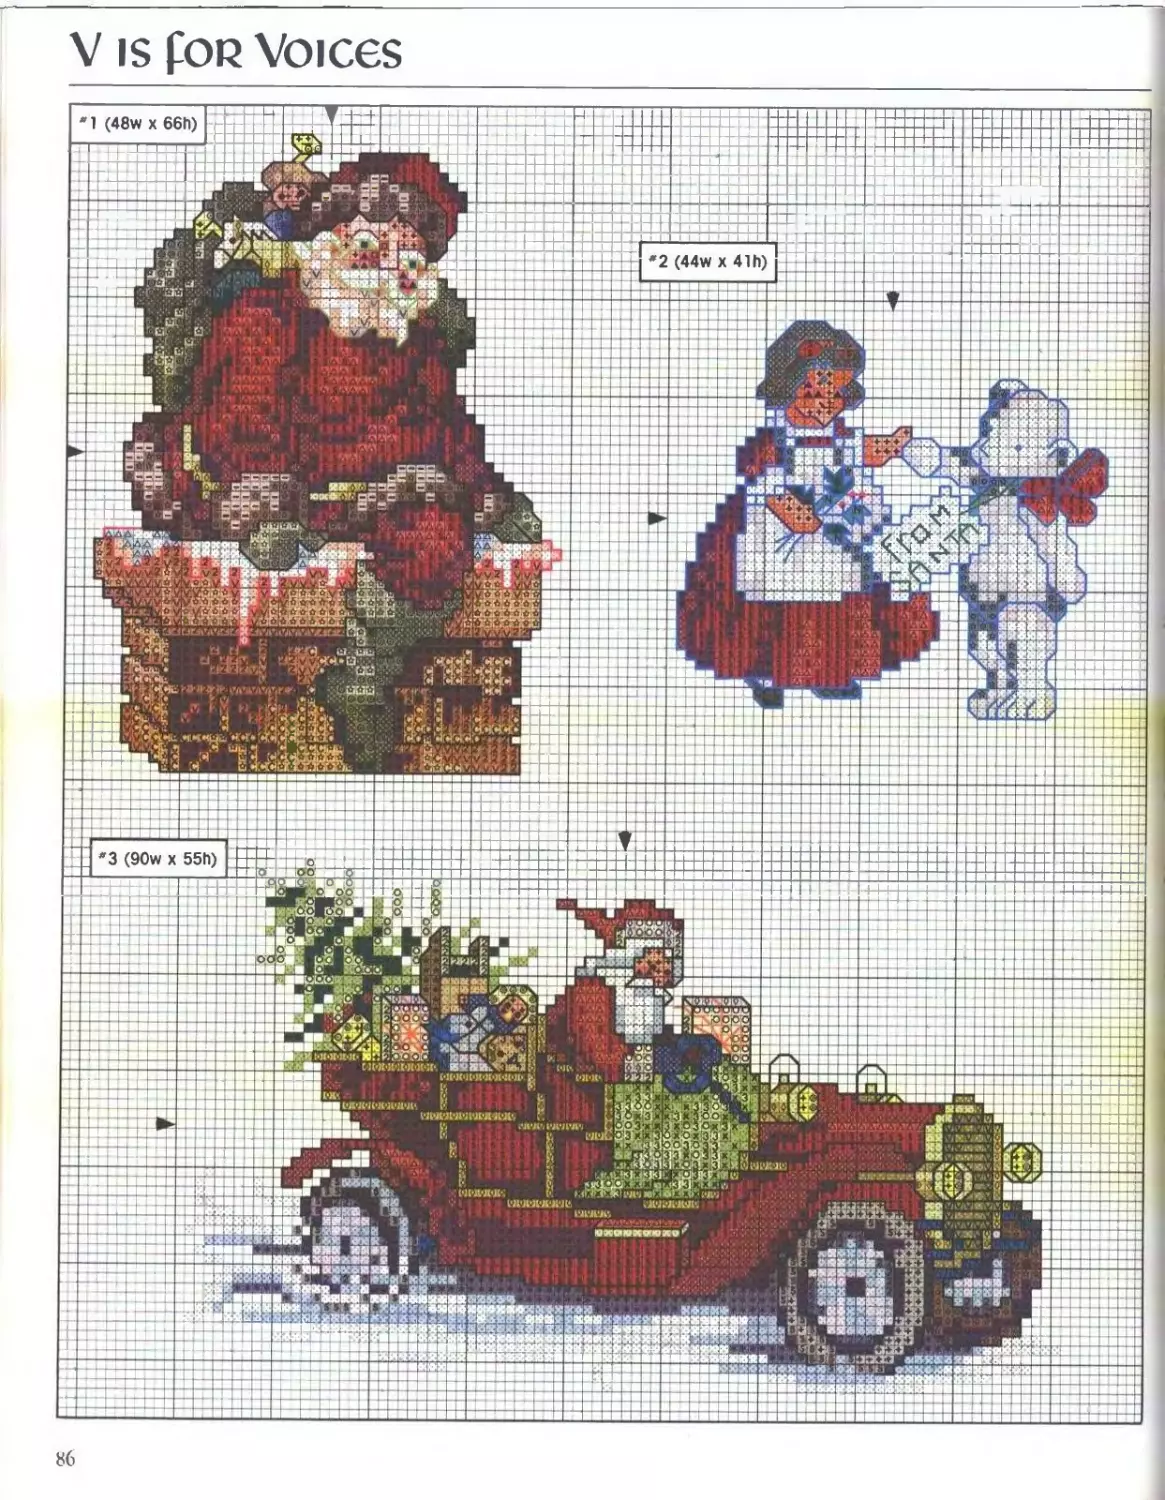
v is fop Voices
S6
X DMC AX B'ST X DMC AX B'ST X DMC 1 AX B'ST X DMC AX B'ST X DMC ’AX B'ST
E3 blanc n 436 E 729 948 3 3787
[0 ecru % 437 ♦ 754 988 3790 z
300 561 3 758 3 989 3799 z|t
301 562 л И 760 3021 T 310 French Knot
304 3 564 762 3022 321 French Knot
310 [zl 610 0t 0 775 ♦ 3023 666 French Knot
318 J 611 3 782 3 3031 • 3371 French Knot
321 ^1 I 612 3 ♦ 783 Zl 3033 □ • Use blanc for Design *1
322 3 1*1 613 797 3072 Use 895 for Design *4.
370 3 □ 632 [z] 799 3 i 3345 3 t Use 610 for Design *1
400 S 644 801 A 3346 3 Use 3799 for Design *4
E 402 647 816 [7] 0 3347 * Use 938 for Design *4.
407 3 648 I 822 3 о 3348 Use 3371 for Design *2
413 666 3 |z] 839 3371 j тйг
415 3 676 844 3 C 3776
434 H 680 3 895 3 z * 3778
435 3 и 725 1 938 z* 2 3782 □
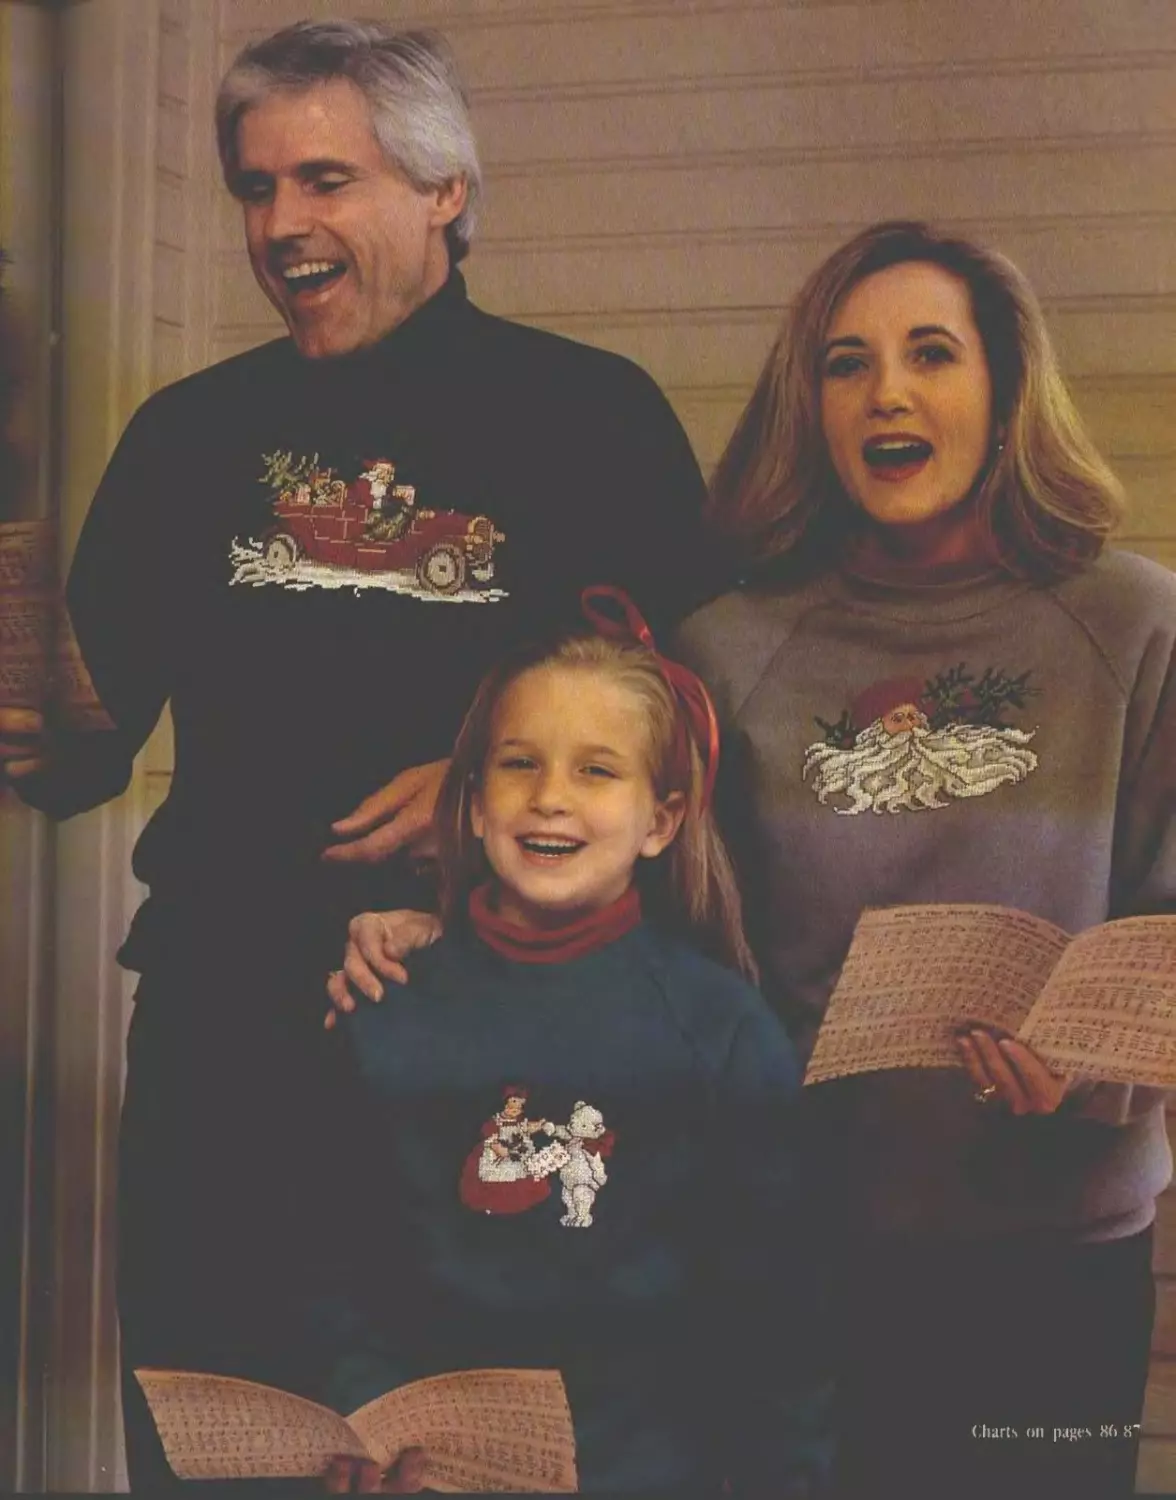
Carolers' Sweatshirts (shown on pages 42-43); Each design was
stitched over a 15" x 13" piece of 10 mesh waste canvas on a
purchased sweatshirt with top of designs approximately 2" below
bottom of neckband. Five strands of floss were used for Cross Stitch
ond 2 strands for Backstitch and French Knots
Needlework adaptation by Donna Vermillion Giampa and Jane
Chandler.
Working on Waste Canvas: Waste canvas Is a special canvas that
provides an evenweave grid for placing stitches on fabric. After the
design is worked over the canvas, the canvas threads are removed
leaving the design on the fabric. The canvas is available in several
mesh sizes.
Cover edges of canvas with masking tape. Cut a piece of
lightweight, non-fusible interfacing the same size as canvas to provide
о firm stitching base.
Find desired stitching area on sweatshirt and mark center of area
with a pin. Match center of canvas to pin. Use the blue threads in
canvas to place canvas straight on shirt; pin canvas to shirt Pin
interfacing to wrong side of shirt. Baste all three thicknesses together
as shown In Fig. 1.
Place shirt in a screw type hoop. We recommend a hoop that is
large enough to encircle entire design Using a sharp needle, work
design, stitching from large holes to large holes.
Trim canvas to within %" of design. Dampen canvas until it
becomes limp. Pull out canvas threads one at a time using tweezers
(Fig. 2). Trim interfacing close to design
87
W fop Wpeaths
Perforated Paper and Attaching
Beads, To attach beads to
perforated paper, use nylon
thread
To finish each ornament
refer to photo to trim perforated
paper around design
Ornaments were attached to a
decorated wreath
88
irizb±z±±±±++±++: TEETEZZ5zzzz5I: - -4- _i L TZ Г I- ЕТЕ 1 ффф—:::
. f - —г-
п г 1 1 zti zti
it "г z i
~zt it" ~ —zt —zt zz ii ” — — — j J
г t __t “J- _L
_ г | 1 । i 11 I _ IBBBMBBBBBBBBBBBaBBI ii “I112 i i ’ iBSSSm'ii'imm и h h hBi 1 — 1 1 ,.L, Цв 1 1 t i-Ji J
z : Z=F4+— —ri i MO !1Щ2Ю»ХК«#№№Я1^Н HKKWM ыяк-мвяааавяязг' ннккИ |3рвяяяаамяяя: w н ь вЙ1 &iKSSBS»ten дея:амвяяшаммяя авв! SttA2»ХМЯ«»»ЯКК« »! «<: вяаамвяяааа ваш аж яяааа«вякаа Sl2H2H2l№B»HKB««l»M BBBI вТв. . аавяяяаа. bbbi Сй » ХМЯДОМХаВВ SBBI ?« NK•»»»«« BBBI ?» я» ааамяяяав bbbi ЖКМВЯ»»•««««» BBBI ЯКвавЯЯЯбШФКВ BBBI вваааюяяаааявв bbbi ИвяшйУ ®»ХИ BBBI <«в«»мк«а:» - — — - — - 1 । тг ! 11 zz I в 1 X • V j - -L-J- • zzzzzzzt
4-X - <<— :zz: • l" -—+ — —u i- -Ч4Н f . 1 »11:1 [ 1 III ll ill Г1 :н j: 1 В-4 1 гггя IF * F^ F F1 -j— -J— —r~ j —1 p
Жлф IS ЯЯКЯ Ям яявам □вв s«s»x as ЯМЯ5ЯЯ « ХКЙ ВЯВЯФВВВ !« «««! iSSKIIII тш. ..: в ::::::::::::: is::::::::::: iiii iiiiiiiii в "l" "" i ii।iB :- i i i iTb: ЗГ*. jl’i -iii" || ЕЕ ЕЕ п* W я ХСН ЕС ii- i : я 1 1 1 > OBIC » t Lii мг>н< мкс ав« CKBI в» ям t- 1—4 8вя ««вв 1: — zzzzt zzzlzzz::: zzzzzzzz::i zzzz z: I _zz_zz_z:i
- — I ~T OB Х±:й Нй п * в*с>м* < . <4*. • * гзЗГГиИо. i4 - — • _1— — ii* — — — 4 _ - J —.— II £*"z ±z: 1 1 "1"" ztz 1111111
:z^tt±zz±zzzzzzzzzzzzz: •irH—1 г+ ЧОЕ х МОЕ J — >— — — —i~ i 1 1 чбз х мое:+
-Ц—fc- zbiztiiii- TfT Т “ "Т- 1“T — 1 zzJJ zE_:
z_zti ±j _ г —— :zt _ _ zt:
—f——•> — i- —-4 *—к — • -> - - * I ' - —|— —I— ——I— —4— L—— - — - —♦— — — • L
•: •; : —— — — — 4 — -±±
IIlLLLl JILL! zLL : 1 ii- -S;± Th Ж- 4 ” ' 4 4 : z : KF —г — -4 1 ’ - - :z: L — BBB U MX ЯЯ я « M X я BBBBB niVjTi^T, «7iT|r»irz‘1'Zi KffittWM 1 вяяка и**** u "SS к« i яа в я а N Я я • ж вв ха S ЯЯ ня BBI r,7f.' тян j MB ЯМ1 яа» !SS5 В i t В в а «к? RM Я ВИЯ BBBI яхке ЯЯЖ4 I i" аа« I • [ вввв xi яяям * X яяя jM*|4 |p»j| И £ 1 zzzzztz::: i i" jy,
ям lzx яшдщвяр zzti-b-b —i— zzz|z|zzzzzzzzzzzzzzzzzz: 3r . -Ep~ — - :zz: — -i- - — • - - - - - a a X XL J Й a 1 к X RLJ Я В вв u c яяа « a а я а я к яик я а а я а я а яяа 1э яяя в ЯЯ я а иа а а яс; я а а а ввва :::: вввв а а я я а а я в вв вв s я X иа л s в a св 4 BBI BBI ::: вяа а я »“ BLJR а я R В М IBBB IBBB L ЯЯ я я LJR а и я. в а :.а а ® в* ввв 1 вк в д В 1 я в Я а в я я;;а а я а в RFJB а а аа । аа в в в ”1 kJ а в в в в : : ——Ll-— J--- ZzzzzzZ: Ej zzzjz zz::c
_z z ztz _ : •11 5 i±i - — 1 ZLL-±___
A, -—1— 1 -г — —— —
:ZeZZZEZZZCZ ЧОЕ X M6C ЧОЕ х MUt
и—rri 1—г i zt z _ zt 1 Г 1 1 III II T Z JJ J
_ _ _
z__±±_ztzzz_zzz±zzzt—: .J LJ LJ_. — — — --
“=Й=ф“=="~==-Ё-: :zgzzztzzzzzzzzzzzz: 4— ” " 1 —1 ——4— т 1 — — И . - —
XJ-ч L^..-r :z=z|=z:zz|zzzz-*|Bzz;: :z±zzzzzzz±zzzz±^ziziE " H + J- ~j~'**r7^~ -ii ic_L_i_iz ШШПШ wi 4 ‘ -ft-4 t.l-4 4—- — — • p • - — — 1 1 “ — 1— BBB BB в в вв вв вв в V; Я в в" в 8е Bl 1 1 1 & IBBB в т; t в в вввв —_ - —— i -Z-^. Li-—j—- zzzzzzz::: —
ЗИЙШ!ШЙ Ш - -Я t i i "ЗЕЙ---- г Д и 1 — 4--|- - — — - - • — в в в G -8 g& и j □ ГЙЕЕ в IB в I I —1 Lj zzzz: ii - ' — "zzziiz:
iiii—-—-I-—; Г1 1 r I 1 * ’ 1 " _L "I — и^тт,чв'р В O.‘S 0JS >— 1 —
H i 111 It. li ! tnl ,.lr lj чегхмбгг 1 гг 1 “ 1 — zt: - и -4-4- 493 х МОЕ ±t
I I" " " " J
। Г 1 Дг
_ 1.
_J__ _
1
* 1 1
г
—t r 1 t г “ 1 I ! i
У is fop yule-loq, Z is foR Zest
□□ Я1010Н ЙИОХ
сли^^ллии^соиммслслМпчг
&ooQui£>\)\j^Jcni>.cjMoa)w_*=□ 2!
□□EDQEBraCDE BD§
X
ЕП© ° S№ * □lp]Ex
GO GJ GJ CD CO CO CO CO CO 00 00 CO 00 00 00 О
000'&COGJCOCOO^OC5-ft‘tON3005a,4E
—'-f^OOCJiNJ — OhjOOCD^GJNJ —< О CO =
□^□□cncccccccncnns
О CD GO COGOGOGOGOGOGOCOCOGOO
— с О C0'S>J'J'i!>!G0OOO^
'-' о
£ 3
ЬУУЕВВВ ВВЕЩ
§ CL 2 o’ 5 О
8 “ о о => сл ™ S- CD СЛ £
a> GO TO o X
Q* о о
СЛ •n О о со 3 CD Ci CD 3 CD •s- CD iX|</> —t
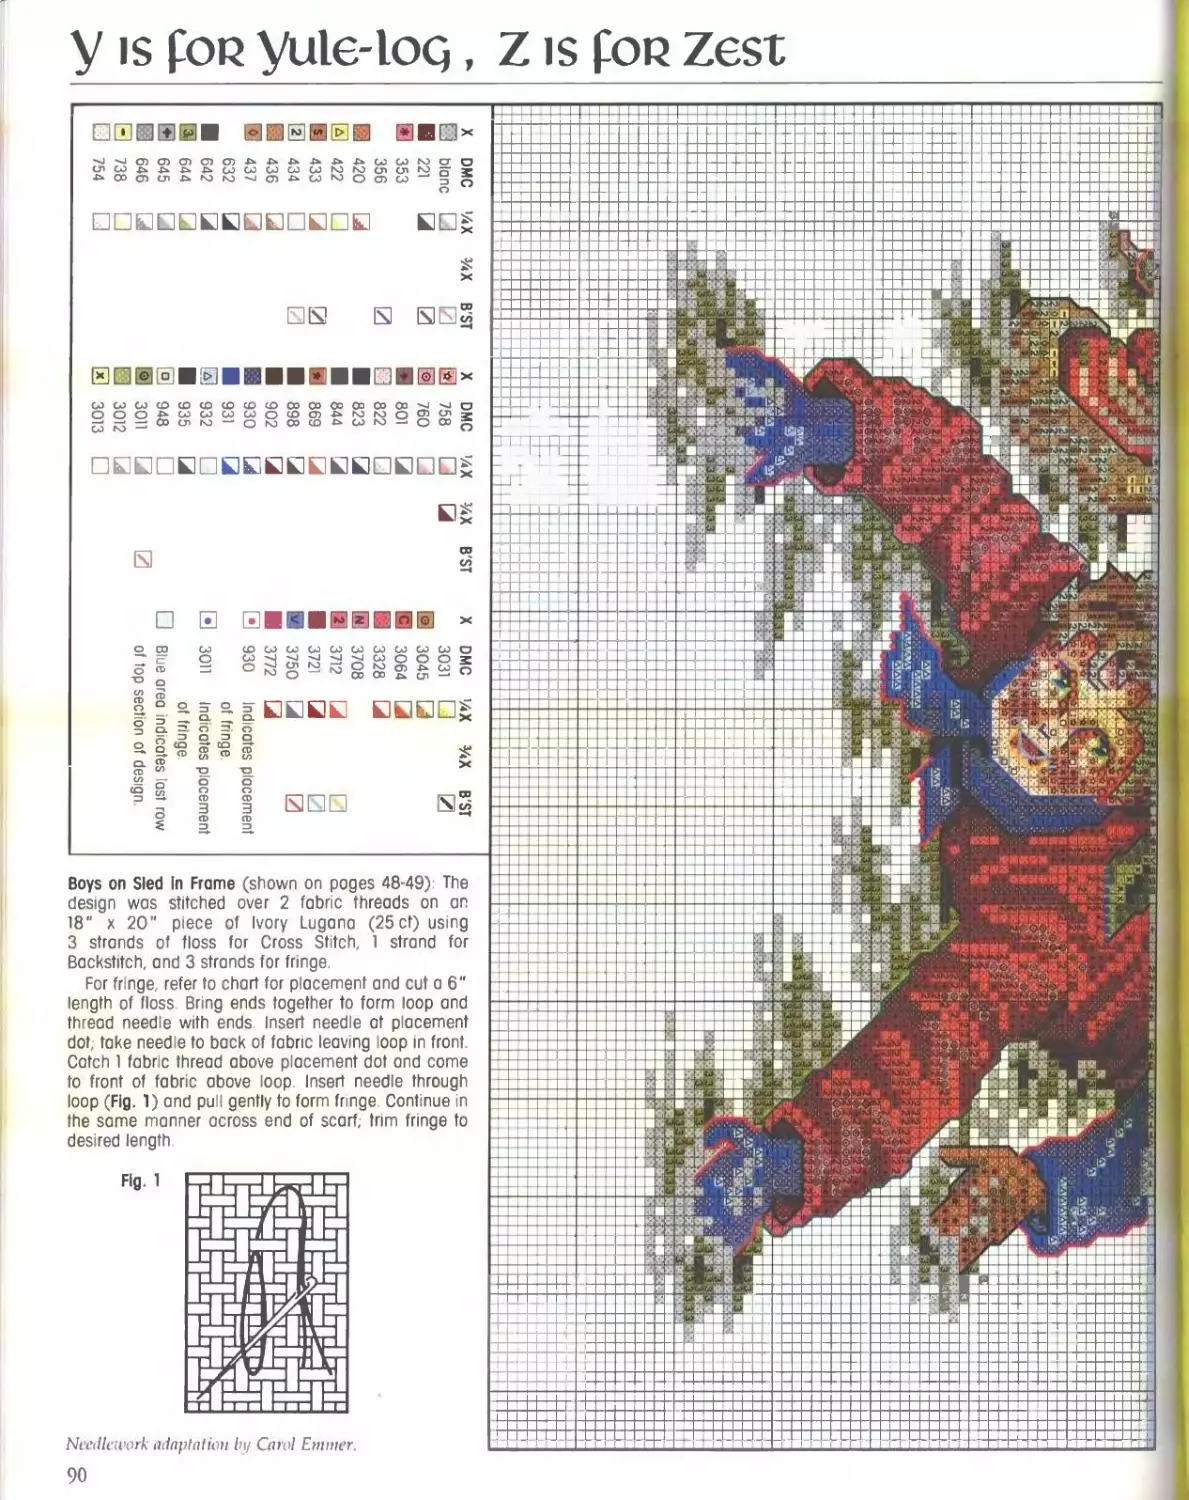
Boys on Sled in Frame (shown on pages 48-49): The
design was stitched over 2 fabric threads on an
18" x 20" piece of Ivory Lugana (25 ct) using
3 strands of floss for Cross Stitch, 1 strand for
Backstitch, and 3 strands for fringe.
For fringe, refer to chart for placement and cut a 6"
length of floss. Bring ends together to form loop and
thread needle with ends. Insert needle at placement
dot; take needle to back of fabric leaving loop in front.
Catch 1 fabric thread above placement dot and come
to front of fabric above loop. Insert needle through
loop (Fig. 1) and pull gently to form fringe. Continue in
the same manner across end of scarf; trim fringe to
desired length
Needlework adaptation by Carol Emnier.
90
STITCH COUNT
(116w x 148h)
:OO
’tJtfW
О Op I
Wj-;
14 COUnt
16 count
18 count
22 count
«NrJNNN
Jpb Л.
XIX Я
91
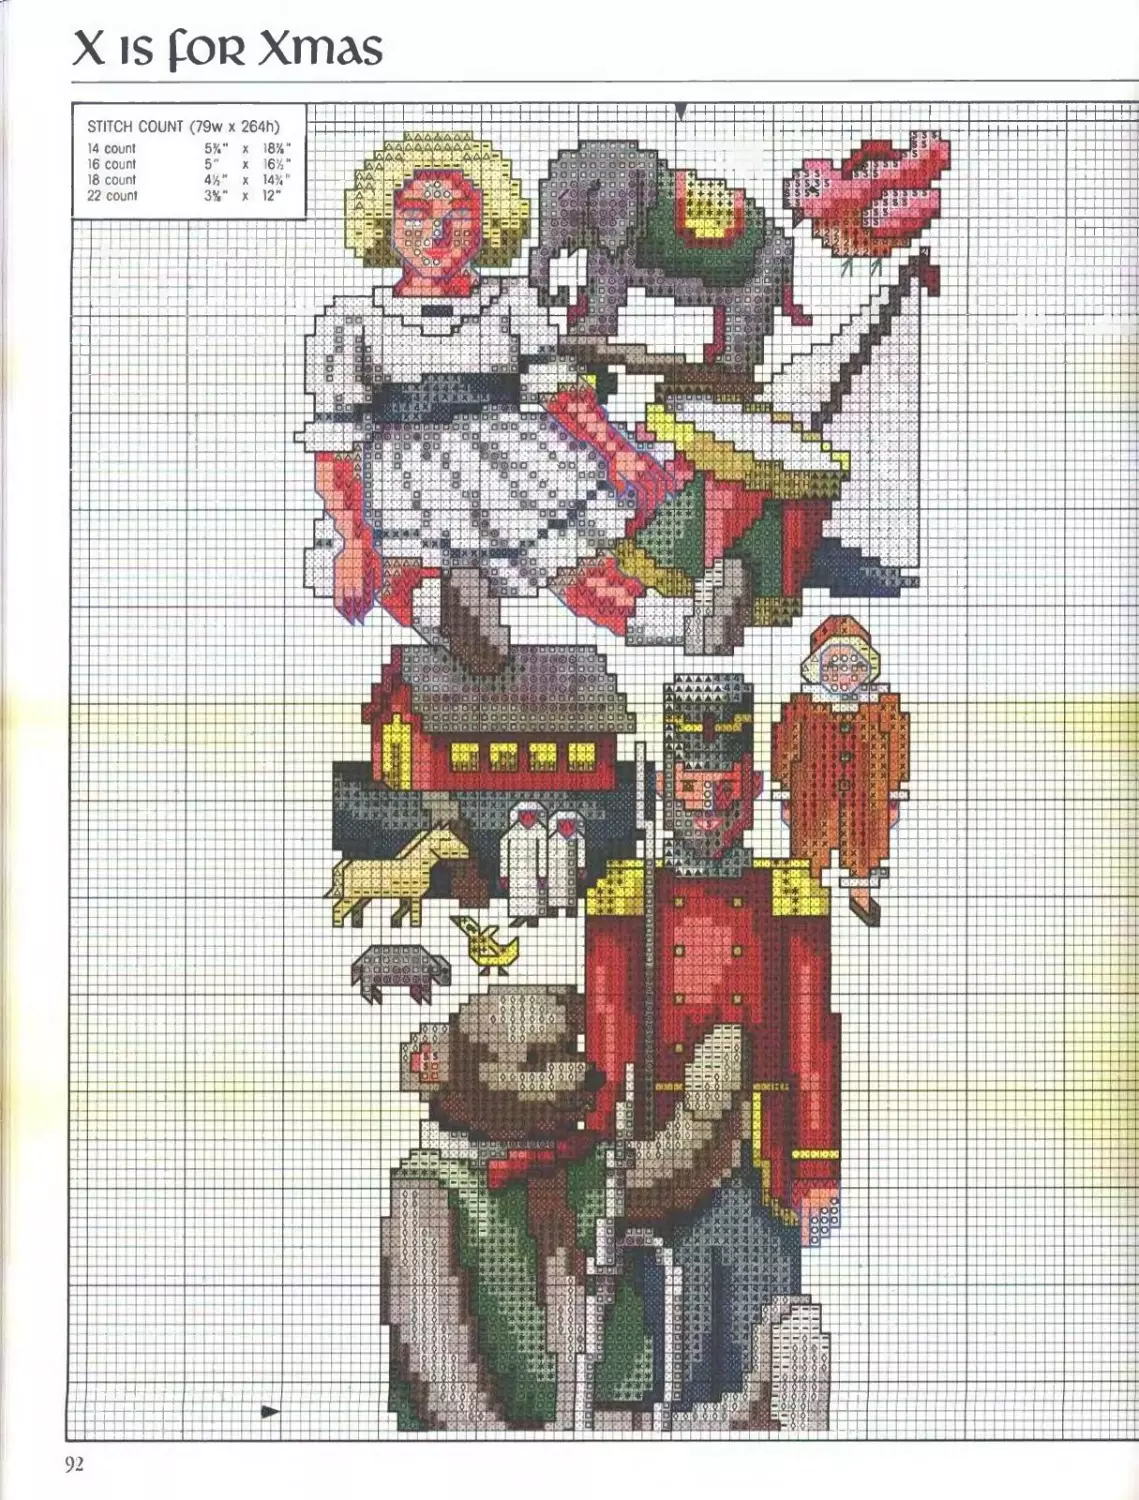
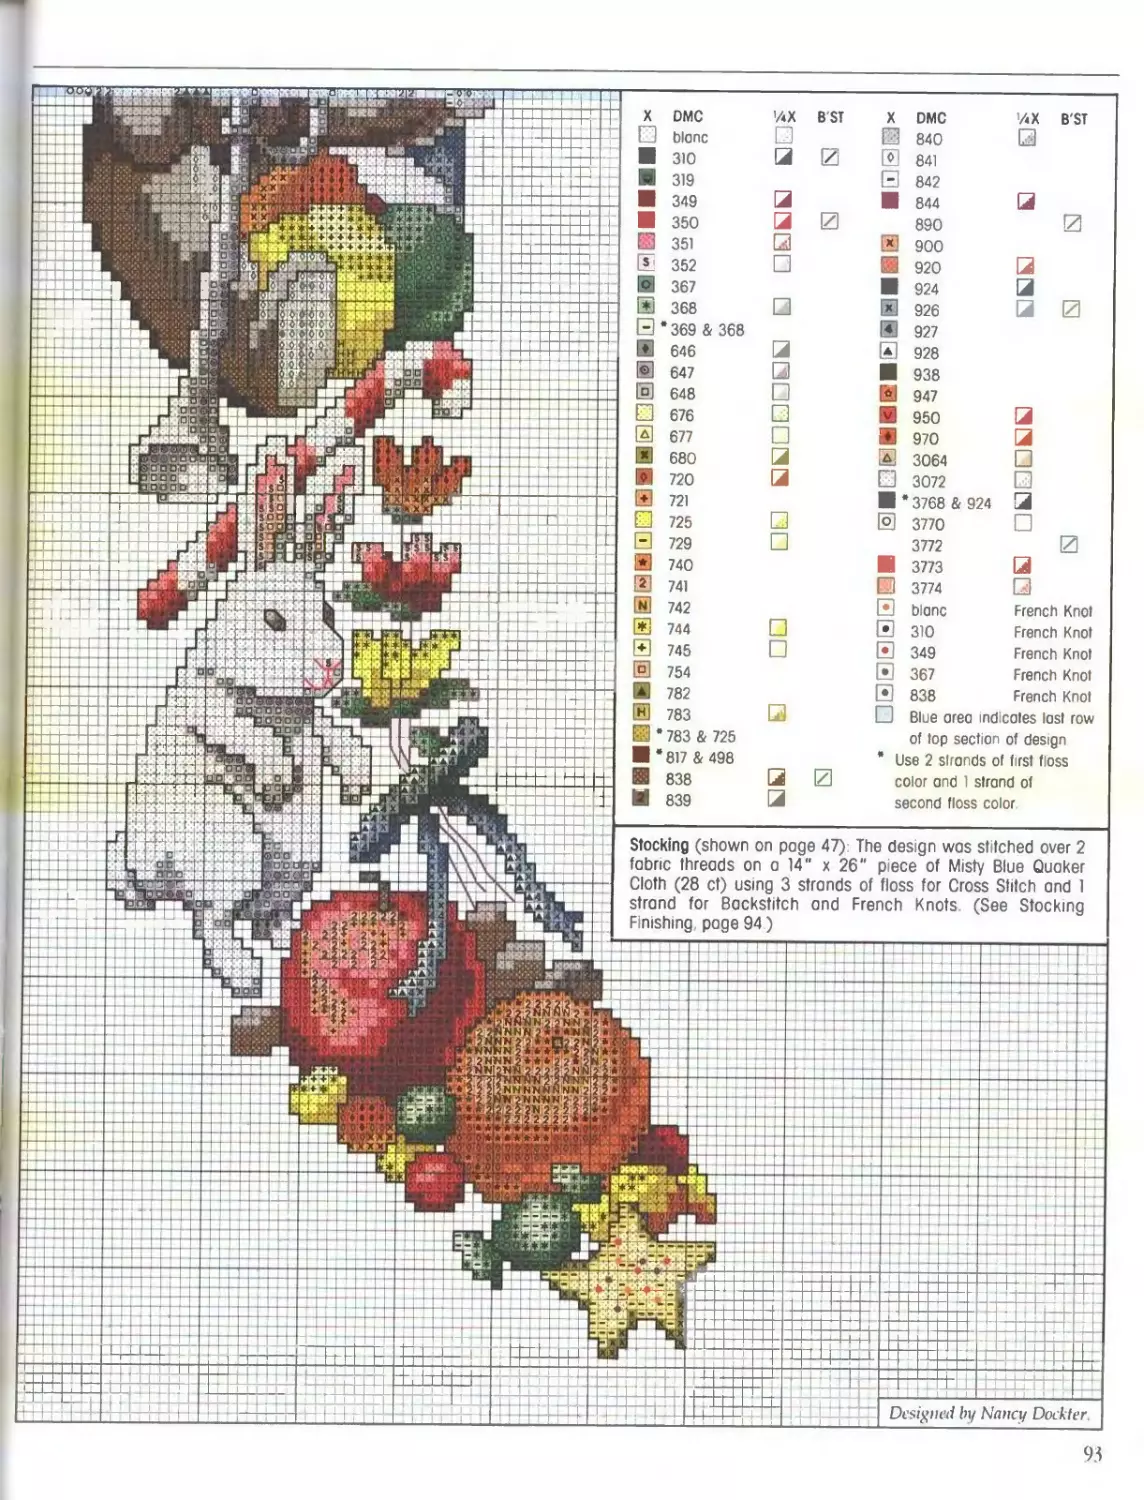
X is fop Xmas
92
^эниянвшпаииипииигядаи'яяиииипх DMC blanc 310 1 319 349 350 351 352 367 368 * 369 & 368 646 647 648 676 677 680 720 721 725 729 740 741 742 744 745 754 782 783 * 783 & 725 *817 & 498 838 839 /4- □ a □ □ □ □ j j z □ □ К B'ST E 0 0 1 0 6 1 0 0 G 1 e i i а [c • « 0 < DMC V 3 840 [ > 841 3 842 1 844 L 890 ‘ 900 3 920 C 1 924 L П 926 1 927 > 928 1 938 61 947 f' 950 L 1 970 L 1 3064 J 3072 1 * 3768 & 924 S D 3770 [ 3772 1 3773 L ] 3774 iX B'ST 3
2 i i i я E
blanc French Knot ] 310 French Knot 349 French Knot 1 367 French Knot 838 French Knot ] Blue area indicates last row of top section of design Use 2 strands of first floss color and 1 strand of
л second floss color
Stocking (shown on page 47) The design was stitched over 2 fabric threads on a 14" x 26" piece of Misty Blue Quaker Cloth (28 ct) using 3 strands of floss for Cross Stitch and 1 strand for Backstitch and French Knots (See Stocking Finishing page 94)
L—. 1 _ L_ XL -r
—1—L 4-4-1 • I-. H H—
93
XI s for Xmas
Stocking chart on pages 92-93
STOCKING FINISHING
For stocking, you will need tracing paper, 14" x 26" piece of Quaker
Cloth for backing, two 14" x 26“ pieces of coordinating fabric for lining,
thread to match fabric, fabric marking pencil, and a 2" x 5” piece of
Quaker Cloth for hanger.
Matching arrows to form one pattern, trace entire stocking pattern
onto tracing paper; cut out pattern. Center pattern on wrong side of
stitched piece; draw around pattern. Matching right sides and raw
edges, pin stitched piece and backing fabric together
Leaving top edge open, sew stitched piece and backing fabric
together directly on drawn line; remove pins Trm top edge along
drawn line. Trim seam allowance to 'Л" and clip curves; turn stocking
right side out. Press top edge of stocking ’//' to wrong side.
For lining, match right sides and raw edges of lining fabric; pin in
place. Center pattern on wrong side of fabric; draw around pattern,
Leaving top edge open, sew slightly inside drawn line,- remove pins.
Trim top edge along drawn line; trim seam allowance close to stitching.
Do not turn lining inside out. Press top edge of lining %" to wrong side]
For hanger, press each long edge of fabric strip У3" to center
Matching long edges, fold strip in half and sew close to folded edges.
Matching short edges, fold hanger in half and whipsttch to Inside oft
stocking at left seam.
With wrong sides facing, place lining inside stocking; whipstitch
lining to stocking
94
GENERAL INSTRUCTIONS
WORKING WITH CHARTS
How to Read Charts: Each of the designs is
shown in chart form. Each colored square on
the chart represents one Cross Stitch or one
Half Cross Stitch Each colored triangle on
the chart represents one One-Quarter Stitch
or one Three-Quarter Stitch Black or colored
dots represent French Knots Colored ovals
represent Lazy Daisy Stitches The black or
colored straight lines on the chart indicate
Backstitch When a French Knot, Lazy Daisy
Stitch, or Backstitch covers a square, the
symbol is omitted
IEoch chart is accompanied by a color key
This key indicates the color of floss to use for
each stitch on the chart The headings on the
color key are for Cross Stitch (X), DMC color
number (DMC), Quarter Stitch (’ЛХ),
Three-Quarter Stitch (3/4X), Half Cross
Stitch (’/2X), and Backstitch (B'ST) Color
key columns should be read vertically and
horizontally to determine type of stitch and
floss color
Where to Start: The horizontal and vertical
centers of each charted design ore shown
by arrows You may start at any point on the
charted design, but be sure the design will
be centered on the fabric. Locate the center
of fabric by folding in half, top to bottom and
again left to right On the charted design,
count the number of squares (stitches) from
the center of the chart to where you wish to
start Then from the fabric's center, find your
storting point by counting out the same
number of fabric threads (stitches)
Quarter Stitch (’ЛХ and 3/дХ) Quarter
Stitches are denoted by triangular shapes of
color on the chart and on the color key.
Come up at 1 (Fig. 5); then split fabric
thread to go down at 2 When stitches 1-4
are worked in the same color, the resulting
stitch is called a Three-Quarter Stitch (3/дХ).
Fig. 6 shows the technique for Quarter Stitch
when working over two fabric threads
Lazy Daisy Stitch: Bring needle up at 1 and
moke a loop Go down at 1 and come up at
2, keeping floss below point of needle
(Fig. 12) Pull needle through and go down
at 2 to anchor loop completing stitch (Note
To support stitches, it may be helpful to go
down in edge of next fabric thread when
anchoring loop.)
Fig. 5
Fig. 6
Fig. 12
Half Cross Stitch (V2X): This stitch is one
journey of the Cross Stitch and is worked
from lower left to upper right as shown in
Fig. 7 When working over two fabric
threads, work Half Cross Stitch as shown in
Fig. 8
Fig. 7
Blanket Stitch: Bring needle up at 1, go down
at 2 and come up at 3, keeping the floss
below the point of the needle (Fig. 13).
Continue working in this manner, going
down at even numbers and coming up at
odd numbers (Fig. 14).
Fig. 8
STITCH DIAGRAMS
Counted Cross Stitch (X): Work one Cross
Stitch to correspond to each colored square
on the chart. For horizontal rows, work
stitches in two journeys (Fig. 1) For vertical
rows, complete each stitch as shown
(Fig. 2) When working over two fabric
threads, work Cross Stitch as shown in
Fig. 3 When the chart shows a Backstitch
crossing a colored square (Fig. 4), a Cross
Stitch should be worked first, then the
Bockstitch (Fig. 9 or 10) should be worked
on top of the Cross Stitch
Backstitch (B'ST): For outline detail,
Backstitch (shown on chart and on color key
by black or colored straight lines) should be
worked offer the design has been
completed (Fig. 9) When working over two
fabric threads, work Backstitch as shown in
Fig 10
Fig. 9
Fig. 10
Flfl. 1
Fig. 2
French Knot: Bring needle up at 1 Wrap floss
once around needle and insert needle at 2,
holding end of floss with non-stitching
fingers (Fig. 11) Tighten knot then pull
needle through fabric, holding floss until it
must be released For larger knot, use more
strands, wrap only once
Fig. 3
Fig. 11
Fig. 13
о
OOOOCo
00000
0001Ю
Fig. 14
OOOOOOl
OOOOOOl
oo<
O'
Attaching Beads: Refer to chart for bead
placement and sew bead in place using a
fine needle that will pass through bead
Bring needle up at I, go down at 2 making a
Half Cross Stitch (Fig. 15). Secure floss on
back or move to next bead When working
on perforated paper, sew bead in place as
shown in Fig. 16
Fig. 15
Fig 16
Continued on page 96
95
STITCHING TIPS
Working Over Two Fabric Threads: Use the
sewing method instead of the stab method
when working over two fabric threads To
use the sewing method, keep your stitching
hand on the right side of the fabric (instead
pick up the needle). With the
3 you take the needle down
of stnhhmg the fnhric with the needle and
taking yoif stitching hand to the back of the
fabric to i pick up the needle). With the
sewing m
and up with one stroke instead of two To
add support to stitches, it is important that
the first Cross Stitch is placed on the fabric
witlj slitul I'Z’bsghnitiig und"CTidiiiy wlicio и
vertical abric thread crosses over a
hort^iel«fabric thread (Fig. 17). When the
first* stitch }s in the correct position, the entire
design wit be placed properly, with vertical
fobjic thr^ids supporting each stitch
i
Working on Perforated Paper: Perforated
paper has a right side and a wrong side
The right side is smoother and stitching
should be done on this side To find the
center do not fold paper, use a ruler and
mark lightly with a pencil or count holes
Perforated paper will tear if handled
roughly, lheiel'uie' I'io'IJ ТТ1В>цоег flat while
stitching and do not use a hoop S^oin and
end stitching by running floss undersh^ral
stitches on back; never tie knots. Use Inb
stab method when stitching and keep
stitching tension consistent Thread pulled
too- tightly-ffloy-lear-lhO' paper, Couy-fleeS'
across back as little as possible
JAR LID FINISHING
For Jar lid use outer edge of jar lid for
pattern and draw a circle on adhesive
mounting board. Cutting slightly inside
drawn line, cut out circle Using opening of
jar lid for pattern, cut a circle of batting.
Remove paper from adhesive board; center
batting on adhesive board and press in
place. Center stitched piece on batting and
press edges onto adhesive board, cut edges
close to board Glue board inside jar lid.
Refer to photo to trim jar lid edge as
desired
i
i
i
i
i
i
i
i
i
i
i
i
i
i
i
i
i
i
i
i
i
i
i
i
i
i
i
i
i
i
i
i
i
i
i
i
i
i
i
i
i
i
i
i
i
i
i
Nancy Conden, Marilyn
Instructions tested and ph )to Items made by Janet
Akins, Debbie Bashaw Iflarsha Besancon, Vicky
Bishop Cecilia Carswell,
Fendley Chrys Harvey, Mbnel Hicks, Pat Johnson,
Velda Leaders, Terri Low i, Wes Nuckolls, Martha
Nolan, Sara Olds, Dave
Phinney, Sandy Pigue Li; Pounders Susan Sego,
Karen Sisco, Opal Steen,
Jane Walker, and Mane Williford
Ann Pennington, Mary
Karen Tyler, Tr sh Vines,
96