/


Автор: Williamson Judith L Smith Gretchen
Теги: knitting magazine handicrafts primitive quilter and projects
ISBN: 2165-610X
Год: 2023


Текст
ENTER TO WIN A CUTIE TABLETOP FABRIC FRAME FROM THE GRACE COMPANY
details on page 80
Summer 2023
d
e
l
g
n
a
p
S
r
a
S t su e !
s
I
4 PATRIOTIC
PROJECTS
PIECE
SUMMERY
STRAWBERRY
BLOCKS
RUG-PUNCH A
joyful
PILLOW
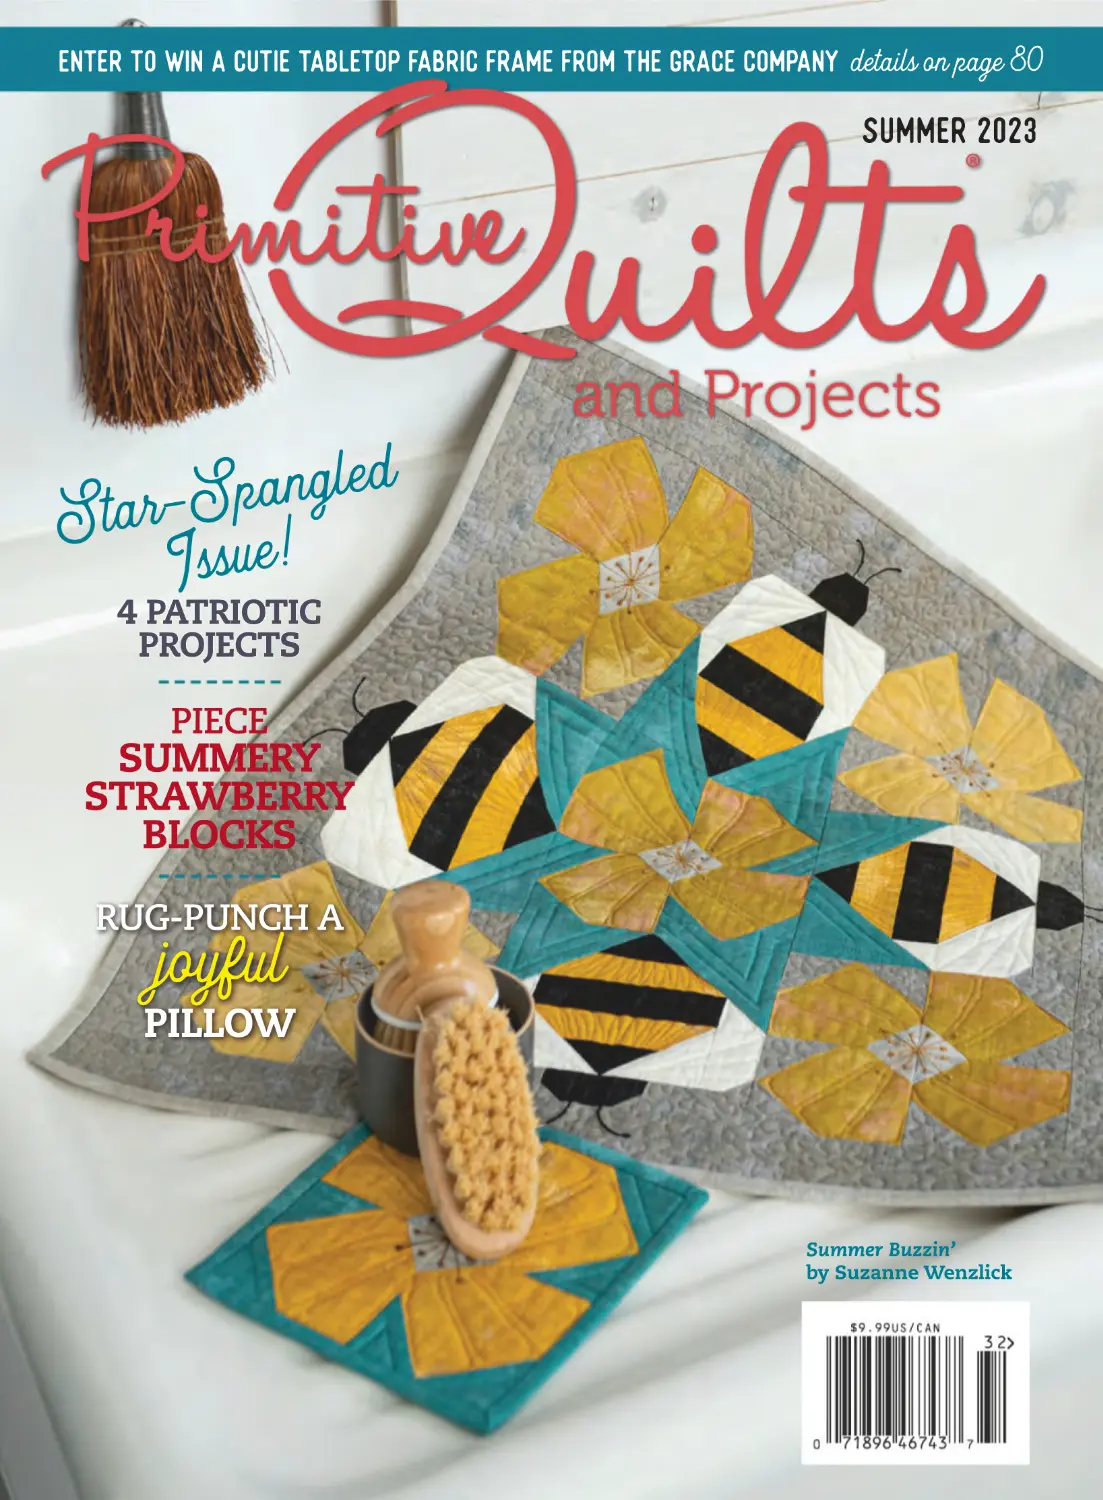
Summer Buzzin’
by Suzanne Wenzlick
7KH'RUU0LOO6WRUH
3OHDVHYLVLWRXUUHWDLOVWRUHLQWKH
EHDXWLIXO/DNH6XQDSHHUHJLRQRI
1HZ+DPSVKLUH,I\RXDUH
XQDEOHWRYLVLWEHVXUHWRFKHFN
RXWRXUZHEVLWH
:HDUHKDSS\WRVHQGDFWXDO
VDPSOHVRIDQ\IDEULFV\RXDUH
LQWHUHVWHGLQDWQRFKDUJH
/HPRQ'HOLJKW3HDFRFN3UHWW\,Q3LQN6XJDU0DSOH
+DQG'\HG%XQGOHV
)LYHKDQGG\HGWH[WXUHVZRROHDFKSLHFHLVDSSUR[LPDWHO\µ[µ
EXQGOHLV
/RRQ
7KLVQHHGOHIHOWLQJNLWFRPHVZLWK
LQVWUXFWLRQVSUHVNHWFKHGGHVLJQRQIHOWHG
PDWQHHGOHVDQGQHHGOLQJERDUG7KHILQ
LVKHGVL]HLVDSSUR[LPDWHO\µ[µ
+DOH6W32%R[
5HWDLO6WRUH
0RQ6DW
0DLO2UGHU0RQ)UL
*XLOG1+
ZZZGRUUPLOOVWRUHFRPFRQWDFW#GRUUPLOOVWRUHFRP
and Projects
Volume 13, Issue 2
primitivequiltsandprojects.com
Phone 800-361-8058
Canada 515-237-3657 Fax 775-243-1537
Readers may access their subscription record
and make changes by choosing Magazine
then Subscription Services on our website or
by emailing pqpcustserv@cdsfulfillment.com.
Publishing Director Judith L. Williamson
Creative Director Jenifer Gaston
Editorial Director Gretchen Smith
Contributing Editor Elizabeth Beese
Art Director Sandra Salamony
Graphic Designers Erin Ellison, Ellen Rooney
Photographer Keri Seevers
Photo Stylist Tonya Robey
Contributing Illustrator Roxanne LeMoine
Technical Editor Deanna Hodson
Printing Fry Communications
Newsstand and Subscription
Circulation Department
NPS Media Group
Advertising and Wholesale Information
Gretchen Smith
gretchen@primitivequiltsandprojects.com
Website Order Customer Service
info@primitivequiltsandprojects.com
Project Submission Guidelines
jeni@primitivequiltsandprojects.com
Thank you, Mom, for
teaching us how to quilt!
Primitive Quilts & Projects (ISSN 2165-610X and USPS 6130)
is published quarterly by Good Harbor Media LLC, 52 Golf Oval,
Summerfield NJ 07081-2504. Periodicals postage paid at
Union, New Jersey and additional mailing offices. Subscriptions
are available by mail, $35.00 for one year within the U.S.
For Canadian address, add $20.00 per year, and for all other
countries outside the U.S. add $40 per year. Please allow 6 to
10 weeks for delivery of the first issue. POSTMASTER: Please
send address changes to Primitive Quilts & Projects, PO Box
5120, Harlan, IA 51593-0620. Return undeliverable Canadian
addresses to: IMEX Global Solutions, PO Box 25542, London, ON
Canada N6C 6B2. Copyright ©2023 Good Harbor Media LLC.
Connect with us!
Warm Homespun
s
g
n
i
t
e
e
Gr
We can’t lie—we miss Mom.
Mother’s Day is around the
corner and memories of her
keep popping up with each
family gathering, the smiles
on her great grandchildren’s
faces, selecting or cutting
fabric, and every time we
finish a quilt and want to
show her our work.
Thank goodness for
memories—the summer
calendar highlights many dates for
remembering veterans, fallen soldiers,
loved ones, and so on. Memories of
summer vacations and playing outside
evoke childlike wonderment to this day, no
matter our age.
Primitive-style designs neatly bind an artist’s past and
present, while depicting life and surroundings, representing
special moments, and bringing warm memories to the artist’s
mind. Be sure to read Designer Notes to explore the beauty this
art brings. Charitable Causes honors first responders, while our
Do-Si-Do quilt gives a big nod to mother nature. Visiting With
features a shop steeped in history from its historic location to
the owner’s love for vintage quilts.
Our wish for you as spring turns to summer is that you
cherish everything in your life today, knowing that each new
experience becomes a beautiful memory.
Judy, Jeni, and Gretchen
(AKA J, J, and G)
“What we have once enjoyed we can never
lose. A sunset, a mountain bathed in
moonlight, the ocean in calm and in
storm—we see these, love their beauty, hold
the vision to our hearts. All that we love
deeply becomes a part of us.”
1957, The Open Door by Helen Keller,
Quote Page 131, Doubleday & Company, Garden City, New York
SUMMER 2023
primitivequiltsandprojects.com
1
s
t
n
e
t
Con
Summer 2023
40
31
24
52
Projects
Butterfly Table Mat
Carrie Buck .....................
Grand Ole Flag
Missie Carpenter .............
Tattered and Torn
Mardi Niles ......................
Strawberry Ridge
Deb Eggers .......................
Seasonal Sentiments:
Summer’s Joy
Deanna Hodson ..............
Cherry Blossoms
Kay Harmon ....................
10
2
primitivequiltsandprojects.com
SUMMER 2023
Suzanne Wenzlick ..........
Summer Cabins
14
Julie Hendricksen ............
20
Summer Splendor
Wool Mat
Katie Solberg ...................
24
Country Blues
Julie Porter .......................
31
Spangled Stars
Mini Pillows
Karen Yaffe ......................
36
Grandpa’s Stars
Julie Letvin .......................
Sweet Medley
Katie Hebblewhite
and Kim Zenk ..................
Summer Buzzin’
40
45
52
58
62
68
72
On on
Locati
72
In Each Issue
Warm Homespun
Greetings ..............................
On Location ..........................
Tada! ......................................
Ask Jeni .................................
Book Nook ............................
Stitchin’ Marketplace ..........
Do-Si-Do................................
Designer Notes ....................
Charitable Causes ...............
About the Projects ..............
Visiting With ........................
1
3
4
6
8
79
81
85
92
94
96
For the photographs in this issue, we visited a house in the
small quaint village of Beverly, in Southeastern Ohio. Built
in 1875, April and Mark Sams’ white two-story home with
tall black handcrafted doors that beg you to come inside,
sits atop a hill overlooking the village.
We were welcomed by the smell of freshly baked bread
and the handsome family dog, Archie. I quickly fell in
love with all the perfectly aged primitives, the rusted tin
bedroom ceiling, the cast iron clawfoot tub, and single
apron kitchen sink. April’s favorite part of her home is the
original wavy glass windows that let the bright light come
in, lifting your spirits. April has a talent for finding and
selling the most perfect hand-picked primitive wares. Her
business name is, of course, My 1875 Farmhouse.
The couple purchased their home in 2019 from
the 70-year-old great nieces of the town’s dentist, Mr.
Armstrong and his wife, Delia, who
taught in the one-room schoolhouse
down the road. April and Mark love
the story of the friendship between Dr.
Armstrong and Buffalo Bill Cody, along
with the buffalo coat Cody gave the
Doctor, which is now on display in the
village museum. One can only imagine
the stories and adventures they shared
in their farmhouse while Wild Bill Cody
wintered his animals from the Wild
West show in an old red barn in the
Village.
—Tonya Robey, Stylist
primitivequiltsandprojects.com
3
Tada!
OUR
NOTeS FROM
R EADERS
Stitching Therapy
My friend Boydie made Potter’s Charm from your
Spring 2016 issue, and I took a picture. Boydie really
enjoyed making it through her convalescence from
hip surgery. She is doing well!
—Debbie Wick
Spring Fling
I just finished another
project from your latest
Primitive Quilts and Projects
magazine (What’s Up,
Buttercup? by Jerome
Thomas). I look forward to
every issue; just love the
projects, and the instruction
is very user friendly. I’m
working on Kansas Migration
now in queen size. Thank
you for such a wonderful
magazine.
—Diana L’Hote
We Love to HEar from Our Readers
Please send us photos of your projects made from
this magazine or your thoughts on our magazine
and primitive fiber arts. We can’t guarantee that
we will publish all submisssions, but we will do
our best to capture your voices. Your notes may be
edited for style, space, and clarity. Send them to
judy@primitivequiltsandprojects.com.
4
primitivequiltsandprojects.com
SUMMER 2023
Beautiful Bouquets
I made this wall hanging from your
Winter 2021 issue, Winter Wonderland
Bouquet by Jerome Thomas. I love working
with wool. The bird caught my eye and I
had to make one using my scraps. Keep
the patterns and magazine coming.
—Jo-Ann Whitesell
Here is my first wool project, adapted
for Valentine’s Day. The pattern is from
Primitive Quilts and Projects magazine, your
Winter 2021 issue. The clerk at the thrift
store didn’t need to know I planned to
cut up and wash the huge red wool coat
(in order to felt it)!
—Rebecca Spencer
i
n
e
J
k
s
A
Beginner Tips
for embroidery
Dear Jeni,
I plan to join a sew along that includes blocks with
embroidery. I am new to embroidery and wonder if
you have any tips for transferring the design to get
me started.
Thank you,
Sylvia
Dear Sylvia,
Embroidery is one of my favorite things to do,
especially when mixed in with a quilt design! It
is one of the first things I learned as a young girl.
I sure wish I had my first little project I made. I
think it was from a kit, and of course the design
was already transferred onto the fabric, so I didn’t
learn how to transfer until much later.
There are some great products that you can use
to make this task simple. The best tool I have—
and love—is a light desk. I used several over the
years, including my daughter’s Barbie Light Desk
when she was little and a Crayola children’s
light desk that you can still purchase today!
It’s big enough to transfer 8½" x 11" designs, is
lightweight, can slip down in your tote bag, and
uses a battery to operate. I have had other light
JENI GASTON is one of the three founding sisters of
Primitive Quilts and Projects. Throughout her life, Jeni
has practiced fiber arts, and she built a career as a designer
and quilt shop proprietor. With her sister Gretchen, she
launched the online Rug Hooking Store and the Woolen
Willow quilt shop. Since closing the shop, she launched
woolenwillowdesigns.com, her online pattern shop. She
has created hundreds of original projects and published a
book with Martingale Publishing. Jeni enjoys dyeing wool;
designing quilts, hooked rugs and other wool projects; and
spending time with her family.
6
primitivequiltsandprojects.com
SUMMER 2023
desks not meant for children, and a few years ago
my husband bought me a larger flat LED light pad,
which is pictured here! I absolutely love it! (Judy
borrowed it for her Do-Si-Do quilt, page 81.)
If you don’t have or don’t want to purchase a
light desk, you can use tape and your window—
just tape the pattern to the glass, and then tape
your fabric over it. Or if the ink is dark enough,
you can just lay the design on a white surface, put
Questions?
Whether you are a new quilter or seasoned
sewer, we all encounter challenges during
the creative process. Send your questions to
jeni@primitivequiltsandprojects.com, and
longtime quilter and rug hooker Jeni Gaston
might address them in a future issue. Letters
may be edited for style, space, and clarity.
FAVORITE TOOLS
The Cutter Pillar Glow
pad makes it easy to see
the embroidery pattern
under the fabric.
A brown Micron Pigma pen
makes a very fine line.
Kim Diehl’s freezer paper is
printable and helps stabilize
the fabric while you trace.
your fabric on top of it, and you may be able to
see through it enough to trace, depending on the
thickness of your fabric.
Several brands, such as Clover, Dritz, and
Sewline from Moda, make light or dark transfer
pencils or markers. But I have used just a plain
old pencil with a light touch. There are also
heat-erase and water-erase tools. My favorite is
a brown Pigma Micron pen. It’s so fine and the
thread covers it up. You just have to be really
careful not to mess up while tracing, because it is
permanent.
Before transferring the design, I like to press
a piece of freezer paper onto the back of the
fabric to stabilize it while tracing. There are also
packages of freezer paper to fit in a copier that
you can print the design onto. Then you can press
that onto your fabric to trace.
Once you have the design transferred, you are
ready to embroider. One of the things I used to
have a little trouble with was keeping an even
tension on my stitches to prevent the fabric from
puckering. But I have found a great stabilizer
product called Shape-Flex that is cotton and
fuses to the back of your fabric. It doesn’t make
it too thick for stitching through and it also hides
threads on the back from showing through. One
thing to remember though, is that if you are going
to use it, you will want to press it onto your fabric
before using a transfer tool that uses heat to
erase, and you may need to darken the ink on the
design to see through both layers for transferring.
But if you use a permanent ink to transfer the
design, you won’t need to worry about it, and you
can add the Shape-Flex after.
I hope these tips help you to get started! Thank
you and happy stitching!
Jeni
SUMMER 2023
primitivequiltsandprojects.com
7
k
o
o
B Nook
Featured Summer Reads
The Complete Manual
of Sewing
120 Visual Lessons for Beginners
By Marie Claire Editions
www.ctpub.com; $29.95
Designed for beginner sewists
and those who already have the
basics, this book is an essential
guide to learning how to sew by
hand or machine. This visual
guide will teach you how to
sew by hand or machine with
120 comprehensive lessons. It provides the basics and beyond,
from supplies and first steps to sewing collars, sleeves, pockets,
and more. It also includes tips and tricks to solve pesky sewing
issues. Sew confidently with this thorough guide for beginner
and advanced sewists alike!
Quilt As-You-Go
for Scrap Lovers
By Judy Gauthier
www.ctpub.com; $29.95
Stack your fabric stash on your
worktable—it’s time to create
scrap quilts! Turn fabric stashes
into unique scrap quilts with
Judy Gauthier’s quilt-as-you-go
(QAYG) method. You will find
yourself using scraps that you
never thought you would use
again while discovering several
QAYG techniques and projects. The ultimate DIY
technique, quilt-as-you-go means you control the
whole process from the first stitch to the last. If
you’re someone who has several WIPs (works in
progress), or you need time-saving quilting hacks,
this book of fast and easy QAYG is for you.
8
primitivequiltsandprojects.com
SUMMER 2023
Barn Star Sampler
20 Starry Blocks and
7 Spectacular Quilts
By Shelley Cavanna
www.ctpub.com; $27.95
Inspired by painted and
wood quilt blocks that
adorn barns, author Shelley
Cavanna shares 20 starry
and spectacular blocks
and seven quilt designs,
including the beloved Barn
Star Sampler quilt.
Sew fan-favorite star
blocks like the Carpenter
Star, Sawtooth Star,
Christmas Star, Pinwheel
Star, Peony Star, and more!
Make charming projects
for the home, including
lap quilts, wall hangings,
and even a table runner
designed to use up leftover
triangle trimmings. Find
helpful tutorials for blocks
frequently used in the book
with guidance on the stitchand-flip assembly method.
Dear Reader
Do you know of a book that might be of interest to
our readers? Contact Primitive Quilts and Projects’
Judy Williamson at judy@primitivequiltsandprojects.
com. Due to space constraints, we cannot guarantee
we will feature every recommendation we receive.
A Destination Quilt Shop
Fabric + Wool + Cross Stitch + Notions + Patterns + Classes + Events
3680 NE Akin Dr +Suite 108
Lee’s Summit +MO 64064
816-525-8955 +quiltersstation.com
REGULAR SHOP HOURS:
Mon.– Fri. 9:30 – 5:00
Sat. 9:30 – 4:00
Sun. Closed
Project Level
of Difficulty
Beginner
Carrie drew upon memories of sitting
on her front porch overlooking the yard
where unmown perimeters were left to
naturalize and become a sanctuary for
birds, bees, and butterflies. Those simple
pleasures really come to life in your
design, Carrie!
Material Requirements
13" square light tan wool for background
2" x 3" grey wool for butterfly body
6" x 7" black wool for butterfly wings
4" x 5" yellow-orange wool for flowers
4" square green wool for leaves
Thread to match appliqué
Size 8 perle cotton in yellow, white, green,
and black
13" square of flannel or fabric of choice
for backing
1
⁄3 yard cream solid for bias binding
Fabric pencil or marking tool
Freezer paper
10
primitivequiltsandprojects.com
SUMMER 2023
Appliqué Preparation
and Cutting Instructions
See Page 95 for general appliqué preparation
instructions.
To make a complete circle template, trace the
quarter circle outline on a 13" square of freezer
paper four times.
From light tan wool, cut:
• 1 of complete circle template for background
From grey wool, cut:
• 4 of Template A for butterfly bodies
From black wool, cut:
• 4 of Template B for butterfly wings
Sewing Instructions
From yellow-orange wool, cut:
• 24 of Template C for flowers
1. Referring to the project photo and diagram,
position the butterflies, flowers and leaves on the
light tan wool background and affix in place. Take
care to keep shapes at least ½" from the outer
edge of the mat.
From green wool, cut:
• 12 of Template D for leaves
From cream solid, cut:
• 45" total of 2¼" bias strips for binding
the
circle diagram in
r
te
ar
u
q
e
h
T
:
TIP
to
can be traced on
Template Insert
with
en used to assist
th
,
er
ap
p
g
in
ac
tr
pliqué motifs.
ap
e
th
f
o
t
en
m
place
Kit Information
$20 (plus shipping) fabric kit includes wool
for background and motifs, and cotton bias
binding.
$10 (plus shipping) thread kit includes wool
thread for whipstitching appliqué motifs and
perle cotton for embroidery.
carrie@carriedawaydesigns.net
216-334-6187
2. Using coordinating thread, whipstitch the
shapes to the background.
3. Using a fabric pencil, draw a guideline for each
flower stem.
4. Referring to the embroidery chart, embellish
each motif as described.
Finishing the Mat
Butterflies
always create
s!
s
e
n
i
p
p
a
h
d
n
a
s
e
l
i
sm
—J, J, and G
1. Press the freezer paper complete circle template
onto the backing fabric, then cut out around the
template to make the backing circle.
2. Layer the backing and completed mat wrong
sides together.
3. Bind around the perimeter with the 2¼"-wide
bias binding to finish the mat.
12
primitivequiltsandprojects.com
SUMMER 2023
Color
Motif
Stitch
Green
Stems
Chain stitch
White
Butterfly wings
Chain stitch veins with French knots at edges
Black
Antenna
Straight stitch
Yellow
Flowers
Lazy daisy stitches from center to edge
White
Flowers
French knots in the center
Black
Clusters
Three French knots on the background as pictured
CARRIE BUCK began sewing as a child making clothes for her dolls and as a teenager made much of her own
clothing, sometimes embellishing with embroidery or appliqué. After graduating from Ohio University with a
degree in studio arts, concentrating in ceramics, drawing, and fiber, Carrie joined the art fair circuit selling a line of
hand painted clothing. After starting a family and choosing to stay home, she pursued a career in watercolors by
taking classes at the Cleveland Institute of Art. She began selling her work and in 2002 she designed a line of Ohio
Bicentennial Barn stationery. Carrie returned to the world of fiber and art shows in 2006 by selling wool appliqué
purses, tote bags, and patterns featuring her own hand-dyed wool. Carrie enjoys hiking, which often serves as a
source of inspiration for her designs. She is currently enjoying life in Columbus, Ohio.
SUMMER 2023
primitivequiltsandprojects.com
13
The inspiration for this design came
from an antique quilt block. Missie
added a twist by using wool and
adding the pineapple and stars for that
primitive touch. This would be lovely
repeated to make a larger quilt!
Material Requirements
⁄3 yard tan print for background
¼ yard navy print for border
¼ yard red print for border
1
⁄8 yard gold print for border corners
11" x 15" ivory wool for flag stripes and
diamonds
9" x 11" red wool for flags and arches
10" x 12" navy wool for flags, arches, and corner
and center stars
9" x 16" yellow wool for pineapples, diamonds,
and corner and center stars
6" square gold wool for pineapple stars
7" x 12" green wool for top and base of
pineapples
3" x 11" black wool for flagpoles and their tops
1¼ yards fabric of choice for binding and
backing
8 – ½" star buttons
Threads to match appliqué
Freezer paper
Glue stick
2
SUMMER 2023
primitivequiltsandprojects.com
15
Appliqué Preparation
and Cutting Instructions
We love this
patriotic design!
—J, J, and G
See Page 95 for general appliqué preparation
instructions.
From tan print, cut:
• 1 – 22" square for background
From navy print, cut:
• 2 – 2" x WOF strips, then sub-cut into:
4 – 2" x 20½" strips for border
Sewing Instructions
From red print, cut:
• 2 – 2" x WOF strips, then sub-cut into:
4 – 2" x 20½" strips for border
1. Fold the 22" tan background square in half both
vertically and horizontally and lightly press to
create guidelines.
From gold print, cut:
• 4 – 3½" squares for border corners
2. Draw a 20" chalk square centered within the
background square to ensure all appliqué is within
the actual size once trimmed.
From ivory wool, cut:
• 16 of Template E for border diamonds
• 4 each of Templates P–T for center curved
diamonds
• 4 each of Templates V, V reversed, W, and
W reversed for flag stripes
3. Referring to the diagram below, position the red
N arches so their outer points meet at the folds.
O
From red wool, cut:
• 4 each of Templates A and C for flags
• 4 of Template N for arches
N
From navy wool, cut:
• 4 each of Templates B and D for flags
• 4 of Template O for arches
• 5 of Template K for corner and center stars
P
Q
From yellow wool, cut:
• 4 of Template M for pineapples
• 16 of Template F for border diamonds
• 5 of Template L for corner and center stars
R
ST
From gold wool, cut:
• 4 of Template U for pineapple stars
From green wool, cut:
• 4 each of Templates G and H for top and base
of pineapples
From black wool, cut:
• 8 each of Templates I and J for flagpoles and
their tops
From binding fabric, cut:
• 3 – 2¼" x WOF strips for binding
4. Add the blue O arches, then position the
diamond shapes on top in order as lettered in the
diagram. A glue stick can be helpful to keep all
shapes in place for appliqué.
5. Arrange the center star, pineapples with their
leaves and stars, and flags with their stripes and
poles and affix in place using the glue stick.
6. Appliqué each motif to the background using a
blanket stitch and matching thread.
7. When appliqué is complete, trim the tan
background to 20½" square, taking care that the
design is centered.
16
primitivequiltsandprojects.com
SUMMER 2023
Completing the Quilt
1. Sew a 2" x 20½" red print border strip to a
2" x 20½" blue print border strip to make an outer
border strip measuring 3½" x 20½". Repeat to make
a total of four outer border strips.
2. Arrange four ivory E diamonds on a border unit
from Step 1, then add the yellow F diamonds.
Using the glue stick, affix these in place. Appliqué
with matching thread and a blanket stitch. Repeat
to appliqué the diamond shapes to the remaining
three border strips.
3. Position and appliqué a blue and a yellow corner
star to each of the four 3½" gold print squares.
4. Sew appliquéd border strips from Step 2 to the
sides of the quilt center, taking care to keep the
red print on the inside.
5. Sew two appliquéd gold print squares from Step
3 to a remaining appliquéd border strip to make
the top border strip, taking care with star position
and red print strip. Sew to the top of the quilt.
Repeat to make the bottom border strip and sew to
the bottom of the quilt top.
6. Sandwich the quilt top, batting, and backing;
baste. Quilt as desired, then bind.
QUILT ASSEMBLY DIAGRAM
Kit Information
$59.90 (plus shipping) kit includes star buttons, cotton
and wool fabrics for quilt top, backing and binding.
Thread kits available for $6 plus shipping. All effort will
be made to match the fabrics shown, but substitutions
may need to be made. Feel free to contact Missie if you
have questions about substitutions.
18
primitivequiltsandprojects.com
SUMMER 2023
MISSIE CARPENTER’s design style is traditional with a touch of primitive and she has a unique way
of using many cottons, textures and wools to create quilts, wall hangings and other projects. Designing
fabric has been a dream of recent years and she is very excited to make her visions come true with Blank
Quilting Corporation, creating fabrics of traditional style with that touch of primitive that she loves. She
has had quilts published in Primitive Quilts and Projects, Quiltmania, Simply Vintage, Quilts & More
as well as the AQS Engagement Calendar. She was also a guest on The Quilt Show with Ricky Tims and
Alex Anderson. She teaches Wool and Cotton Appliqué and English Paper Piecing at many special events.
TPQuilts@gmail.com
515-321-3163
www.traditionalprimitives.com
traditionalprimitives.blogspot.com
SUMMER 2023
primitivequiltsandprojects.com
19
Designed by Mardi Niles
Finished size: 18½" x 21½"
Project Level
of Difficulty
beginner
Mardi has a special place in her heart for American
flags. Always finding charming ways to design rugs,
she sketched this sweet flag to share with other rug
hookers. Your design speaks historical volumes,
Mardi—very special!
Material Requirements
30" square of rug warp, monks cloth, or linen
for foundation
1
⁄8 yard of two dark blue textured wools for the
upper left corner of the flag
1
⁄8 yard each of 3–4 medium/dark red textured
wools for flag stripes and heart
1
⁄8 yard each of 3–4 light/medium neutral
white, cream, and tan textured wools for flag
stripes
1
⁄16 yard medium gold textured wool for stars
½ yard each of 3–4 light/medium beige/ecru
textured wools for background
¼ yard each of 3–4 dark teal, black, and navyblue textured wools for border
1 small skein of ecru wool embroidery yarn
for French knot stars
⁄8 yard dark brown textured wool for lettering
1 skein medium weight dark navy-blue wool
yarn for binding or finishing method of choice
Black permanent marker
Red dot tracing paper or tulle netting
Hook
Hooking frame or hoop
Wool cutter (optional)
1
Cutting Instructions
Referring to the wool colors listed, cut wool strips
6
/32" wide. (If you are using a wool cutter, you
will need a size 6.) Cut strips from dark brown
textured wool in both size 6 and size 7.
SUMMER 2023
primitivequiltsandprojects.com
21
Hooking Instructions
1. Using a ruler and permanent marker, draw an
18½" x 21½" outline on your foundation, making
sure your lines are drawn straight on the grain.
2. Measuring 1¼" inside this outer line on each
side and the bottom, draw another line ensuring it
too is drawn straight on the grain. Measuring 1½"
down from the top, draw another line straight on
the grain. This will give you a 1½" border at the
top with side and bottom borders measuring 1¼".
3. To prevent fraying, sew a zigzag stitch or serge
around the edge of your foundation.
4. Using the Red Dot tracer or tulle netting,
transfer the designs from the Template Insert to
your foundation referring to the project photo as a
placement guide.
5. Begin by hooking the letters first with the larger,
size 7 wool strips as a place holder for the letters.
(These will be removed and replaced with the size
6 strips after background hooking is complete.)
6. Referring to the photo for color cues, hook your
rug starting from the center motifs (outlining
them first, then filling them in), followed by the
background. Hook inside the lines of your design
and border to keep them from growing. Because
this is a rough-edged design, Mardi did not outline
the areas of the flag and recommends working on
the blue field of the flag first.
7. The loops should be as high as they are wide.
Bring each loop higher than the last, making sure
the wool is flat/straight and not twisted, then pull
it back down next to the last loop. Pull your hook
back toward the last loop you hooked to avoid
pulling it out. If you get worked in an area and
need to go the other way, it is faster and easier to
cut and start again rather than fight a small turn.
8. When hooking is complete, remove the size 7
dark brown letter strips and replace them with
the size 6 strips. This will make the lettering much
more precise.
9. Using the ecru wool embroidery yarn, add
French knot stars to the blue field of the flag.
10. After hooking is complete, use a steam iron
and wet cloth to press the back and front of the
rug. Dry flat.
11. Cut off the excess foundation around the
hooked piece, cutting outside the hooked edge
about one inch. Fold the edge toward the loops
twice leaving ¼" backing beyond the loops, then
bind with the dark navy-blue yarn.
This design really tells
the story, doesn’t it?
—J, J, and G
22
primitivequiltsandprojects.com
SUMMER 2023
After years of designing and making quilts, the love of working with wool lured
MARDI NILES into the magical art of rug hooking. She has been designing and
making rugs in primitive style for several years. Mardi’s family has been the
recipients of her charming rugs and hope to get many more.
mardiniles53@gmail.com
SUMMER 2023
primitivequiltsandprojects.com
23
Designed by deb eggers
Finished quilt size: 54" square
Finished block size: 22" square
Project Level
of Difficulty
beginner
Deb loves summertime and says there is nothing like
freshly picked strawberries, warm right from the bed,
dripping with sweet flavor and red juices running down
your chin. You paint a very yummy picture, Deb!
Material Requirements
⁄3 yard each of 4 reds with small prints for
strawberries
5
⁄8 yard each of 4 green tonals for stems,
leaves, and borders
1
⁄3 yard each of 4 tan tonals for backgrounds
¼ yard white tonal for flowers
1
⁄6 yard gold tonal for flower centers
½ yard dark green print for binding
3½ yards fabric of choice for backing
Threads to match appliqué
Freezer paper
½" bias strip tool
1
TIP: Deb recommends labeli
ng the first two
reds for strawberries #1 an
d #3, and the
second set of reds for straw
berries #2 and #4.
Labeling the background pr
ints #1 for the top
left block, #2 for the top rig
ht block, #3 for the
bottom left, and #4 for the
bottom right will
also be of great help. These
labels will assist
with placement within the
blocks and within
the quilt top.
SUMMER 2023
primitivequiltsandprojects.com
25
Appliqué Preparation and
Cutting Instructions
This might be the fi
time we’ve seen str rst
a
blocks in PQP, and wberry
we
love them!
—J, J, and G
See Page 95 for general appliqué preparation
instructions. Templates in the Template Insert do
not include seam allowance. It will be very helpful
to keep all the different shapes from each color
together as you assemble the blocks.
From each of 2 red prints, cut:
• 1 – 6½" x WOF strip, then sub-cut into:
4 – 6½" x 8½" rectangles for strawberries
• 1 – 1½" x WOF strip, then sub-cut into:
24 – 1½" squares for strawberry tops
• 4 – 2½" squares for borders
From each of the remaining 2 red prints, cut:
• 1 – 6½" x WOF strip, then sub-cut into:
4 – 5½" x 6½" rectangles for strawberries
3 – 1½" by remaining length of fabric, then
sub-cut into:
24 – 1½" squares for strawberry tops
• 1 – 3½" x WOF strip, then sub-cut into:
8 – 3½" squares for strawberries
4 – 2½" squares for borders
From green #1 cut:
• 4 – 2½" x WOF strips, then sub-cut into:
16 – 2" x 2½" rectangles for stems
46 – 2½" squares for outer borders
• 1 – 5½" x WOF strip, then sub-cut into:
3 – 5½" squares, then cut twice diagonally
from corner to corner to make 12 QST units
• 24 of Template A for leaves
From green #2 cut:
• 5 – 2½" x WOF strips, then sub-cut into:
32 – 1½" x 2½" rectangles for strawberry tops
46 – 2½" squares for outer borders
• 1 – 5½" x WOF strip, then sub-cut into:
3 – 5½" squares, then cut twice diagonally
from corner to corner to make 12 QST units
From green #3 cut:
• 1 – 9" x WOF strip, the sub-cut into:
16 – 11⁄8" bias strips for vines
• 3 – 2½" x WOF strips, then sub-cut into:
46 – 2½" squares for outer borders
• 1 – 5½" x WOF strip, then sub-cut into:
3 – 5½" squares, then cut twice diagonally
from corner to corner to make 12 QST units
From green #4 cut:
• 1 – 5½" x WOF strip, then sub-cut into:
3 – 5½" squares, then cut twice diagonally
from corner to corner to make 12 QST units
• 3 – 2½" x WOF strips, then sub-cut into:
46 – 2½" squares for outer borders
• 24 of Template A for leaves
From each of 4 tan tonals, cut:
• 1 – 8½" x WOF strip, then sub-cut into:
4 – 8½" squares for backgrounds
• 1 – 2½" x WOF strip, then sub-cut into:
8 – 2½" x 2¾" rectangles for stem row
backgrounds
8 – 1½" squares for strawberry top
backgrounds
From white tonal, cut:
• 16 of Template B for flowers
From gold tonal, cut:
• 16 of Template C for flower centers
From dark green print, cut:
• 6 – 2¼" x WOF strips for binding
26
primitivequiltsandprojects.com
SUMMER 2023
4. Draw a diagonal line from corner to corner on
the wrong side of 4 – 1½" red print #1 squares.
1
4
5. With right sides together, layer a marked red
print #1 square on top of a 1½" x 2½" green #2
rectangle. Sew on the drawn line, cut ¼" from the
drawn line, then press back the resulting triangle.
2
3
6. With right sides together, layer a marked red
print #1 square on top of the other end of the
unit from Step 5. Sew on the drawn line, cut ¼"
from the drawn line, then press back the resulting
triangle to make a Flying Geese unit.
Sewing Instructions
Strawberry Blocks
1. Draw a diagonal line from corner to corner
on the wrong side of 2 – 3½" red print #2 and #4
squares.
2. With right sides together, layer a marked red
print #2 square on top of the bottom right of a
6½" x 8½" red print #1 rectangle. Sew on the drawn
line, cut ¼" from the drawn line, then press back
the resulting triangle. With right sides together,
layer a marked red print #4 square on top of the
bottom left of the red print #1 rectangle. Sew on
the drawn line, cut ¼" from the drawn line, then
press back the resulting triangle.
1
2
1
2
8. Repeating the technique used in Steps 5 and 6,
sew a 1½" background print #1 square to the top of
the far left and right corners to make the cap row
of the strawberry.
1
4
9. Repeat Steps 4–8 to make the strawberry cap
row with red prints #2, #3, and #4.
3. Repeat Step 2 with the remaining marked 3½"
red print #2 and #4 squares and a 6½" x 8½" red
print #3 rectangle. Be sure to position red print #2
and #4 squares in opposite corners from Step 2 as
shown.
3
7. Repeat Steps 5 and 6 to make a total of two
Flying Geese units. Sew together the two Flying
Geese units with a 1½" red print #1 square at
each end.
3
10. Sew together 2 – 2½" x 2¾" background print
#1 pieces with a 2" x 2½" green #1 piece between
to make the stem row. Make a total of four stem
rows.
3
4
SUMMER 2023
primitivequiltsandprojects.com
27
11. Sew a cap row with red print #1 units to
the top of the red print #1 strawberry. Then sew
a stem row to the top of the unit to complete
strawberry #1.
16. Sew the left and right rows from Step 15 to
each side of the center row from Step 14, taking
care to position the strawberries correctly, to
complete a strawberry block measuring 22½"
square.
12. Repeat Step 11 to complete strawberry #3.
13. Sew the remaining strawberry cap rows from
Step 9 to the tops of 5½" x 6½" red print #2 and #4
pieces, taking care to match up the reds. Sew stem
rows to the top of the two units.
14. Sew strawberries #1 and #3 together to make
the center row of the block.
15. Sew 8½" background print #1 squares to the
sides of strawberries #2 and #4 to make the left
and right rows of the block.
28
primitivequiltsandprojects.com
17. Repeat Steps 1–16 to make three more
strawberry blocks using the background prints #2,
#3, and #4.
SUMMER 2023
Appliqué
Completing the Quilt
1. Make four ½" bias vines using the 11⁄8"-wide
green #3 strips.
1. Sew together four rows of
21 – 2½" green squares and 2 – 2½"
red squares for the side borders.
Refer to the Quilt Assembly
Diagram and project photo to see how the red
squares are scattered throughout the borders.
2. Position the vines, flowers with centers, and
leaves on the block background and baste or
glue-baste to the background. Using your favorite
method for appliqué, stitch in place.
3. Repeat Steps 1 and 2 to appliqué the vines,
flowers, and leaves to the four Strawberry Blocks.
4. Deb suggests using a seam ripper to slightly
open the stem seam just enough to tuck the end
of the vine underneath, then stitch the opening
closed.
Sashing
1. Joining the short edges of the triangles as
shown, sew together two rows of 12 triangles each.
Trim each row to measure 2½" x 22½" to make
short sashing strips.
2. Sew two rows from Step 1 together to make a
side border measuring 4½" x 46½". Repeat to make
a total of two side borders, then sew them to the
sides of the quilt center.
3. Sew together four rows of 25 – 2½" green
squares and 2 – 2½" red squares for the top and
bottom borders.
4. Sew two rows from Step 3 together to make a
top border measuring 4½" x 54½". Repeat to make
a bottom border. Sew the border units to the top
and bottom of the quilt top.
5. Sandwich the quilt top, batting, and backing;
baste. Quilt as desired, then bind.
2. Lay out the four strawberry blocks
as in the project photo, rotating to
scatter the strawberry colors. When
pleased with the arrangement, sew
a short sashing strip from Step 1
between each row of strawberry
blocks.
3. Joining the short edges of the
triangles as before, sew together a
row of 24 triangles. Trim the row to
measure 2½" x 46½" to make a long
sashing strip.
4. Sew the long sashing strip from
Step 3 between the quilt rows from
Step 2 to complete the quilt center
measuring 46½" square.
QUILT ASSEMBLY DIAGRAM
SUMMER 2023
primitivequiltsandprojects.com
29
DEB EGGERS has been quilting since the 1990s and has
enjoyed many aspects of the industry. From beginner to shop
owner to pattern designer, she feels there is still so much
more she can learn. “Shy away from something new or
challenging? Never, well, maybe hesitate at times. But
always willing to give it a chance,” says Deb. “What’s the
worst that can happen?”
Cottagerose60@gmail.com
www.cottagerosequiltshop.com
319-310-0635
30
primitivequiltsandprojects.com
SUMMER 2023
Kit Available
$85 + shipping
Kit includes
everything for quilt
top and binding.
Designed by Deanna Hodson
Finished size: 20" square
:
s
t
n
e
m
i
t
n
e
S
l
a
n
o
s
a
e
S
Part
two
O
f F
our
Project Level
of Difficulty
Beginner
In this seasonal design the word Joy has a double focus.
Deanna says her Aunt Joy, a special treasure in her
life, simply exuded the joy of the Lord every day and
was always a joy to be with. She truly lived her name.
Beautiful inspiration, Deanna!
Material Requirements
Punching Instructions
½ yard dark pink cotton print for pillow sleeve
28" square dark pink plaid wool for backing
and flange border
22" square monks cloth for foundation
Size 13 regular Oxford Punch Needle
Gripper frame
Red dot tracer or light box
Sharpie marker
DMC size 5 perle cotton to match plaid wool
Chenille Needle
14" pillow
7 skeins hand-dyed, worsted weight, 3-ply
yarn as follows:
1 skein deep pink yarn for flowers, buds,
and letter outline (2 ounces)
1 skein medium pink for flowers and
letters (1 ounce)
1 skein yellow yarn for flowers (1 ounce)
1 skein moss green for leaves and outer
border (2¾ ounces)
1 skein dark green for stems and calyxes
(1 ounce)
2 skeins natural/cream yarn for
background (5.6 ounces)
If you’ve never tried rug punch, Deanna highly
recommends watching Amy Oxford’s Pear Project
Tutorials 1–4 at amyoxford.com.
ul hand-dyed
s! The amount
yarns from Whakadoo Yarn
punch more
used can vary as some may
commends
densely than others. She re
ensure you have
one skein of each color to
some left for
plenty for the project, with
year. (Actual
a surprise project later this
amount used is listed.)
5. Continue with the deep pink and six stitches per
inch to punch on the line of each letter in the word
Joy. When you look at this from the front/loop side
it will look quite messy. When the letters are filled
in and the background is added the letters will
take shape. You may need to do some tweaking,
moving loops into position with the point of small
scissors, to make the design more exact.
TIP: Deanna used beautif
1. Using a ruler and permanent marker, draw a
14" square outline at the center of the monks
cloth, making sure the lines are drawn straight
on the grain.
2. Using the red dot tracer or light box, transfer
the design from the Template Insert to your
foundation, taking care to ensure the word is
reversed. The design is reversed for rug punch.
The drawn side of the foundation will be the back
of the punched design.
3. To prevent fraying, sew a zigzag stitch or serge
around the edge of the monks cloth.
4. Referring to the photo for color cues, punch
your pillow cover beginning with the outer border.
Punch two rows with moss green yarn and six
stitches per inch. Be sure to punch with the tool
perpendicular to the fabric and with the channel
opening facing the direction you are punching.
Also take care to ensure the wood part of the
punch touches the fabric before bringing it back up
for the next stitch.
6. Using medium pink and four stitches per inch,
fill in the letters.
32
primitivequiltsandprojects.com
SUMMER 2023
7. Using the photo for color cues, punch
the flowers, stems, leaves, and
calyxes.
8. Fill in the background using
a meandering or echoing
technique rather than
straight lines. This will
give your project a hand
rather than a machinestitched look.
9. Trim all yarn ends
even with the loops.
When punching is
complete, use a wet
cloth and steam iron to
block the pillow cover
from both the back and
the front. This will help
all to lay flat.
10. Use the tip of small
scissors to make any small
adjustments to yarn loops on
the front of the design that may
have strayed into the next color. This
will be very helpful to make the letters
look more precise.
11. Amy Oxford recommends using a sweater
pill remover over the top of the blocked project
to remove yarn “hairs.” It is amazing how much
more brightly the colors shine when this step
is completed.
Finishing the Pillow
1. The pillow top should measure 14" square.
Note: With the yarns at the perimeter lapping over
the edge, it could measure about 14½" square.
We love the be
a
colors in this utiful
piece.
—J, J, and G
5. Arrange the two units so they overlap
approximately 4" at the center and measure
15" square.
2. From the cotton backing fabric, cut two
rectangles 103⁄8" x 15¾".
3. On one long side of each unit from Step 2, fold
¼" to the back, then fold ¼" again to the back and
topstitch to make a clean edge hem.
4. Fold the remaining three sides over 3⁄8" to the
back and press.
SUMMER 2023
primitivequiltsandprojects.com
33
6. Position the pillow back from Step 5 at the
center of the 28" square of pink wool with both
facing up. Pin in place, topstitch around the
perimeter of the pillow back, then set aside.
11. Carefully tuck the wool close to the yarn
stitches to cover the monks cloth and pin the
border through all layers from corner to corner.
12. Repeat Steps 10 and 11 with the
remaining sides.
13. Using the chenille needle, the DMC size 5
perle cotton (one strand), and a running stitch,
sew down the wool border through all layers from
corner to corner. The stitches should be at the edge
of the wool border right next to the yarn loops. The
yarn loops will hide this stitching. We’ve oversized
the pillow back a bit so you should be stitching
through it as well.
14. Repeat Step 13 to sew down the remaining
three sides.
7. To prepare the pillow top, trim the monks cloth
around the punched design, leaving 2½" around
the perimeter of the pillow design, for a total
measurement of 19" square.
15. To miter the corners, hold the corner you see
in Diagram 1 up at a right angle with the table,
then trim with scissors to leave a 3⁄8" to ½" seam
allowance as you see in Diagram 2.
8. Position the pillow top faceup at the center of
the facedown wool with attached pillow back.
Match the punched corners with the corners of the
pillow back stitching to assist with centering. Pin
the two together at the corners.
DIAGRAM 1
9. Trim the wool, leaving 3" around the perimeter
of the design/monks cloth unit.
10. Beginning with the right side, fold the wool
over the top of the monks cloth to meet the edge
of the pillow top. We’ve left the monks cloth to add
stability to the pillow’s flange border.
DIAGRAM 2
16. Fold in one side and turn under the seam
allowance on the other side as in Diagram 3, then
whipstitch the mitered seam closed.
3" around perimeter
21/2" around perimeter
DIAGRAM 3
17. Repeat to miter each corner.
18. Insert the pillow form to complete your
Summer’s Joy pillow.
34
primitivequiltsandprojects.com
SUMMER 2023
DEANNA HODSON and her husband live in Olathe, Kansas. Deanna had no quilting
aspirations until shortly after she inherited her mother’s collection of lovely handkerchiefs.
While traveling in 2001, Deanna came across a quilt in a home decorating magazine with
sashed appliqué bouquets. At that moment she knew what to do with her mom’s hankies.
She has been quilting ever since! Deanna then discovered wool appliqué at an AQS show
and enjoys the versatility and dimension this kind of appliqué offers. She has designed
many patterns, taught classes and workshops, and held guild presentations across,
Kansas, Nebraska, and Missouri. As a natural progression from pattern writing, Deanna
has been working for Primitive Quilts and Projects as technical editor since 2016.
Deanna@rosecottagequilts.com
SUMMER 2023
primitivequiltsandprojects.com
35
Designed by Kay Harmon
Quilted by Darlene Szabo
of Sew Graceful Quilting
Finished quilt size: 63" x 72"
Finished block size: 9" square
Project Level
of Difficulty
Beginner
Kay chose homespun
fabrics from Diamond
Textiles to make
this quilt. She was
intentional in designing
a piece that is simple
and quick to create so
you can easily make
one for each season.
Very sweet, Kay!
36
primitivequiltsandprojects.com
SUMMER 2023
lly
a
e
r
s
c
i
br
a
f
Homespun project warm
make this !
y
l
d
d
u
c
G
d
n
d
a
n
a
,
J
,
J
—
7. Now take the top three 2½" x 7½" bottom strips
and move them to the bottom of their stack. Each
layer of the stack will now be different.
From coordinating print, cut:
• 7 – 2¼" x WOF strips for binding
Sewing Instructions
1. Sew the top 7½" square to the top right
2½" x 7½" strip. Press the seams toward the strip.
Material Requirements
56 – 10" squares of assorted prints for blocks
or a total of 4 yards of assorted prints
½ yard coordinating print for binding
4½ yards fabric of choice for backing
2. Sew the remaining 2½" x 7½" strip from the top
of the stack to the top 2½" square. Press the seam
toward the strip.
3. Sew the units from Steps 1 and 2 together,
nesting the seams, to complete a block measuring
9½" square.
Cutting and Sorting Instructions:
4. Repeat Steps 1–3 to make a total of 56 blocks.
1. If you are not using pre-cut 10" squares, cut
56 – 10" squares of assorted prints.
5. Arrange the blocks in eight rows of seven blocks
each. When pleased with the arrangement, sew
the seven blocks in each row together, then sew
the eight rows together to complete the quilt top.
Take care when pressing each row so the seams
will nest when adding the next row.
2. Organize the 56 – 10" squares of assorted prints
into 14 groups of 4 squares each.
3. Stack a group of squares very carefully for
cutting all four in the group at one time.
4. Referring to the diagram below, cut a 2½" strip
horizontally, then cut a 2½" strip vertically. This
will give you:
6. Sandwich the quilt top, batting, and backing;
baste. Quilt as desired, then bind.
• 1 – 7½" square
• 2 – 2½" x 7½" strips
• 1 – 2½" square
1
71/2" square 2 /2"
x
71/2"
21/2" x 71/2"
21/2"
square
5. To make each block unique, Kay devised a way
to jumble the pieces. First take the top 2½" x 7½"
strip from the right side and move it to the bottom
of the stack.
6. Then take the top two 2½" squares and move
them to the bottom of the stack.
38
primitivequiltsandprojects.com
SUMMER 2023
QUILT ASSEMBLY DIAGRAM
KAY HARMON’s earliest memories of sewing are
watching her mother make the family’s clothing on
her treadle sewing machine. She learned to sew on
that machine and still has it. In 1999, she took her
first quilting class after retiring from 21 years in the
Air Force, but it wasn’t until she learned to appliqué
that she really embraced quilting. Most of her quilts
are appliquéd with a bit of piecing. Kay and her
husband live in Springdale, Arkansas.
Kit Information
To order a kit for $74.95 (plus
shipping), contact Darlene at Sew
Graceful Quilting, 479-372-7403;
www.sewgracefulquilting.com or info@
sewgracefulquilting.com. Kit includes
homespun fabric for quilt and binding.
SUMMER 2023
primitivequiltsandprojects.com
39
Designed by Katie Hebblewhite
and Kim Zenk
Finished size: 11½" x 15½"
Project Level
of Difficulty
beginner
When they close their eyes and imagine summer, Katie and
Kim see cheerful bold blooms and hear the sweet medley of
songbirds. It is their hope that as you spend time with this
project, every stitch brings you joy, and you feel the beauty of
summer. We love the gorgeous colors in this one, ladies!
Material Requirements
13" x 19" black wool for background
2½" x 3½" orange houndstooth wool
for flowers
3" x 4¾" gold variegated twinkle wool
for flowers
1½" x 3½" light brown wool for bird backs
1½" x 2" medium brown wool for wing bases
1½" square dark brown wool for wings
2" square oatmeal wool for bird breasts
3¾" x 6¼" fuchsia wool for flowers
2½" x 4¼" grass green wool for leaves
4¾" x 7¾" green variegated wool for
large leaves
2½" x 5" dark green wool for small leaves
14" x 18" woven cotton for backing
Valdani size 12 perle cotton in Orange (65),
Gold (1313), Grass (O560), Black (1), Green (M79),
Purple, (V16) and Brown (P9)
Press’n Seal wrap for embroidery and layout
transfer
Heat ’n Bond lite or fusible web of choice
Fray Check (optional)
Freezer paper
Fine tip permanent marker
Pressing Affair pressing sheet
Appliqué Preparation and
Cutting Instructions
See Page 95 for general appliqué preparation
instructions. Templates in the Template Insert have
been reversed for use with fusible web.
1. Fold a 13" x 19" rectangle of freezer paper in
half, then fold in half again to create four quarters.
Unfold, then trace the quarter scallop template
from the Template Insert on the paper side of one
quadrant of the freezer paper.
2. Refold, then cut on the drawn line through
all four layers. Unfold for a perfect scalloped
oval template.
3. Iron the freezer paper template to the black
background wool (shiny side to wool) using a hot,
dry iron.
4. Cut out the background shape and remove the
freezer paper template.
From orange houndstooth wool, cut:
• 1 each of Templates 12A–17A for flowers
From gold variegated twinkle wool, cut:
• 1 each of Templates 12–17 for flowers
From light brown wool, cut:
• 1 each of Templates 22 and 23 for bird backs
ll
ded to press a
n
e
m
m
o
c
re
is
TIP: It
and Pressing
n
o
ir
t
o
h
a
g
in
wool us
nt
sheet to preve
Affair pressing
any
nd to remove
iron damage, a
ill aid
rinkles. This w
w
d
n
a
s
e
s
a
re
c
liqué motifs.
p
p
a
e
is
c
re
p
g
in creatin
From medium brown wool, cut:
• 1 each of Templates 22B and 23B for wing bases
From dark brown wool, cut:
• 1 each of Templates 22C and 23C for wings
From oatmeal wool, cut:
• 1 each of Templates 22A and 23A for bird breasts
SUMMER 2023
primitivequiltsandprojects.com
41
From fuchsia wool, cut:
• 1 each of Templates 2–4, 6, 7, and 9–11 for flowers
• 15 teardrop shapes for buds
From grass green wool, cut:
• 1 each of Templates 12B–12E, 13B–13C, 14B–14D,
15B–15C, 16B–16F, and 17B–17D for leaves
From green variegated wool, cut:
• 1 each of Templates 1, 5, and
8 for large leaves
From dark green wool, cut:
• 1 each of Templates 18,
18A–18G, 19, 19A–19D, 20,
20A–20H, 21, and 21A–21E
for small leaves
ASSEMBLY DIAGRAM
Sewing Instructions
1. Trace the combined oval Layout Diagrams A and
B from the Template Insert onto the non-tacky
side of Press’n Seal wrap.
2. Position the Press’n Seal drawing on the black
wool background and finger-press to secure.
3. Embroider through the Press’n Seal wrap to the
black background using the following stitches and
thread colors.
5. Using the stitching lines as a guide, arrange the
flowers, leaves, and birds on the black background.
Remove the paper backing, then press with a hot
steam iron, using the Pressing Affair pressing
sheet to prevent damage to the iron and to
prevent scorching the appliqué motifs.
6. Referring to the Embroidery Chart, appliqué
each motif using the color and stitch indicated.
• Solid lines: Stem stitch using grass green
perle cotton.
• Dotted lines: Chain-stitch using grass green
perle cotton.
• Dashed lines: Stitch a basting stitch,
which will be used for positioning the large
leaf shapes.
4. When the stitching is complete, gently remove
the Press’n Seal wrap.
42
primitivequiltsandprojects.com
SUMMER 2023
We love how every bi
t
of
the background is
with beautiful colorcovered
—full
of summer joy!
—J, J, and G
Motif
Color
Stitch
Matching
Whipstitch with single strand of floss.
P9 Brown
Straight stitch at base of tail for feather detail.
Matching
Whipstitch with single strand of floss.
P9 Brown
Add tiny straight stitches for breast detail.
Matching
Whipstitch with single strand of floss.
P9 Brown
Straight stitch at base of wing for feather detail.
P9 Brown
Blanket-stitch around the wing, create feather detail with some
double blanket stitch variations.
P9 Brown
Stem stitch eye and beak detail, add a colonial knot for the eye.
M79 Green
Backstitch veins through the center of each small leaf.
1313 Gold
Blanket-stitch around each shape.
65 Orange
Add lazy daisy stitches extending from the space between petals.
65 Orange
Blanket-stitch around each shape.
O560 Grass
Blanket-stitch around each shape.
M79 Green
Whipstitch around each leaf, back stitch vein detail.
V16 Purple
Blanket-stitch around each flower with stitches radiating from
edge to petal center, then chain-stitch around the perimeter.
1313 Gold
Add a cluster of colonial knots at the center of each flower.
V16 Purple
Blanket-stitch around each bud with stitches radiating from edge
to petal center, then chain-stitch around the perimeter.
M79 Green
Stem stitch stems and add lazy daisy stitches at the base to
connect the buds to the stems.
Songbirds
22, 23
22A, 23A
22B, 23B
22C, 23C
Leaves
18 - 20
Blooms
12–17
12A–17A
Leaves
12B–17D
Leaves
1, 5, and 8
Flowers
2–11
Buds
Completing the Mat
1. Steam-press the mat facedown on a pressing
mat to block for finishing.
2. Trace the mat outline on the fusible web of
your choice, then cut out the fusible web’s
scalloped shape.
3. Press the fusible web’s scalloped shape from
Step 2 to the back side of the mat with a hot, dry
iron, then remove the paper backing.
4. With a hot steam iron, adhere the woven cotton
backing fabric to the back of the mat.
5. Trim closely around the perimeter of the mat
and apply a thin line of Fray Check around the
edge to prevent the backing from fraying.
6. Blanket-stitch around the perimeter of the mat
with black perle cotton.
7. To finish, place the mat facedown on a thick
towel and steam to block flat. You will be thrilled
with how beautifully your stitches pop off the
background when you complete this step!
SUMMER 2023
primitivequiltsandprojects.com
43
KATIE HEBBLEWHITE AND KIM ZENK of Granny’s Legacy Patterns are a mother/daughter duo
with a passion for textiles. Between appliqué and quilting, not a day goes by that their hands
aren’t busy stitching on something. Granny, the company namesake, was their grandmother who
instilled this love for creating with their hands. It is to Granny’s honor that they do what they do!
Granny’s Legacy Patterns
2610 YH Hanson Ave, Suite 109
Albert Lea, MN 56007
507-377-0771
info@grannyslegacypatterns.com
www.GrannysLegacyPatterns.com
Kit Available
Wool kit
($29.50 plus shipping)
Thread kit
($33 plus shipping)
includes six balls of #12
Valdani perle cotton.
44
primitivequiltsandprojects.com
SUMMER 2023
Designed by Suzanne Wenzlick
Finished quilt size: 21" square
Finished block size: 6" square
Project Level
of Difficulty
Beginner
This quilt was inspired by the large
bumblebees flying among Suzanne’s
yellow-flowered senna trees.
When the bumblebees are in the
flowers they make a very loud
Y
SU
ZA
NN
E
W
EN
ZL
ICK
buzzing sound, with their wings
vibrating against the yellow
flower petals. She loves to watch
the butterflies and bees fly in
and out of the flowers. Suzanne
suggests making a single block
of the flower or the bee into a little
quilt for a gift! Great idea, Suzanne!
P
HO
TO
B
Material Requirements
Cutting Instructions
Suzanne chose Moda Grunge fabric for this project.
Color names listed in parentheses refer to this line.
From grey print, cut:
• 4 – 2" x WOF strips, then sub-cut into:
32 – 2" squares for flower background (Set
aside remaining 2" x WOF strips for border.)
• 1 – 1½" x WOF strip, then sub-cut into:
8 – 1½" x 2½" strips for bee backgrounds
16 – 1" squares for bee backgrounds
⁄8 yard of grey print (Grey Couture) for
background and border
¼ yard teal print (Cabana) for quilt center star
¼ yard gold print (Husk) for flowers
1
⁄8 yard light gold print (Ginger Ale) for flowers
1
⁄8 yard bright gold print (Mustard) for bee
stripes
1
⁄8 yard black print (Iron) for bee head and
stripes
¼ yard cream print (Cream) for bee’s wings
3
⁄8 yard light grey print (Gris) for flower centers
and binding
¾ yard fabric of choice for backing
Valdani size 12 perle cotton in black for bees’
antennas, variegated gold (P5) for flower
centers, and variegated bronze (P9) for single
flower quilt center
Frixion (heat-soluble) marking pen
3
46
primitivequiltsandprojects.com
From teal print, cut:
• 1 – 3½" x WOF strip, then sub-cut into:
8 – 3½" squares for quilt center star
8 – 2" squares for center flower background
From gold print, cut:
• 1 – 3½" x WOF strip, then sub-cut into:
12 – 3½" squares for gold flowers
From light gold print, cut:
• 1 – 3½" x WOF strip, then sub-cut into:
8 – 3½" squares for light gold flowers
From bright gold print, cut:
• 2 – 1½" x WOF strips, then sub-cut into:
4 – 1½" x 4½" strips for bee stripes
4 – 1½" x 6½" strips for bee stripes
SUMMER 2023
From black print, cut:
• 2 – 1½" x WOF strips, then sub-cut into:
4 – 1½" x 2½" strips for bee heads
8 – 1½" x 4½" strips for bee stripes
4 – 1½" x 6½" strips for bee stripes
From cream print, cut:
• 1 – 2½" x WOF strip, then sub-cut into:
8 – 2½" squares for bee’s wings
• 1 – 1½" x WOF strip, then sub-cut into:
8 – 1½" x 3½" strips for bee’s wings
d
n
a
s
k
oc
Adorable bliration!
great insp —J, J, and G
From light grey print, cut:
• 1 – 1½" x WOF strip, then sub-cut into:
20 – 1½" squares for flower centers
• 3 – 2¼" x WOF strips for binding
Sewing Instructions
MAKE 2
MAKE 2
MAKE 1
Flower Blocks
1. Draw a diagonal line from corner to corner on the wrong side
16 – 2" grey squares and 8 – 1½" light grey squares.
2. With right sides together, layer a marked grey square at the top left
of a 3½" gold square. Sew on the drawn line, cut ¼" from the drawn
line, then press back the resulting triangle.
3. With right sides together, layer a marked grey square at the top
right of the unit from Step 2. Sew on the drawn line, cut ¼" from the
drawn line, then press back the resulting triangle.
SUMMER 2023
primitivequiltsandprojects.com
47
4. Repeat Step 3 to add a marked 1½" light grey
square at the bottom right of the unit from Step 3
to complete a flower petal.
7. Repeat Step 6 to make a total of two gold
Flower blocks.
8. Repeat Steps 1–7 to make a total of two light
gold Flower blocks.
9. Repeat Steps 1–7 with 8 – 2" teal squares, 4 – 1½"
light grey squares, and 4 – 3½" gold print squares
to make one gold/teal center Flower block.
5. Repeat Steps 1–4 to make a total
of eight flower petals. Trim each to
3½" square.
6. Arrange four flower petals with all the
light grey centers touching. Sew the top
petals together, then press to the right.
Sew the bottom petals together, then
press to the left. Sew units together to
complete a Flower block measuring
6½" square.
48
primitivequiltsandprojects.com
SUMMER 2023
Bee Blocks
1. Referring to the technique used in Steps 1–3 of the Flower block,
mark 16 – 1" grey squares, then sew one to each top corner of the
4 – 1½" x 2½" black bee heads. Set the remaining eight aside.
2. Sew a unit from Step 1 between 2 – 1½" x 2½" grey strips for
the top row of the Bee block. Repeat to make a total of four bee
head rows.
3. Sew a 1½" x 4½" gold strip between 2 – 1½" x 4½" black strips for a
bee body. Repeat to make a total of four bee bodies.
4. Again referring to the technique used in Steps 1–3 of the Flower
block, mark 8 – 2½" cream squares and sew them to top corners of
the units from Step 3.
5. Sew the 1½" x 3½" cream strips to each side of the units from Step
4. Again referring to the technique used in Steps 1–3 of the Flower
block, sew marked 1" grey squares to the outer top corners.
6. Sew the 1½" x 6½" gold and black strips together, then sew them
to the bottom of the units from Step 5.
7. Repeating the technique for adding triangle corners, mark and sew
3½" teal squares to the bottom corners of the units from Step 6.
8. Sew the bee head rows from Step 2 to the top of the units from
Step 7 to complete a total of four Bee blocks measuring 6½" square.
SUMMER 2023
primitivequiltsandprojects.com
49
Quilt Assembly
Completing the Quilt
Before making the border strips, see if your quilt
center matches the measurements below. If not, make
any necessary adjustments.
1. Using a Frixion pen, lightly draw the bees’
antennas and flower center pistils.
1. Referring to the Quilt Assembly Diagram,
arrange the blocks with the teal backgrounds in
the center to form a star.
2. Sew the three blocks in each row together, then
sew the three rows together to complete the quilt
center measuring 18½" square.
3. Cut 2 — 2" x 18½" grey top and bottom border
strips. Referring to the Quilt Assembly Diagram,
sew those two strips to the top and bottom of the
quilt center.
2. Referring to the stitching diagram, stitch the
bees’ antennas in place using the black perle
cotton and a backstitch. Suzanne recommends
going over the last backstitch a second time to
make the end of the antenna thicker.
3. Using the variegated gold perle cotton,
backstitch to create the flower pistils with a French
knot at the end of each stem.
4. Cut 2 — 2" x 21½" grey side border strips, then
sew those to the sides of the quilt top.
4. When stitching is complete, sandwich the quilt
top, batting, and backing; baste. Quilt as desired,
then bind.
5. Refer to the quilt photo to see how Suzanne
chose to show off the angles of each shape with
quilting, giving them dimension, then added a
simple stipple to the background.
Suzanne has shared a simple version of the
center flower block or bee block to give as
great quick gifts for family and friends. She
says they will BEE so happy to receive one.
For a Flower mug rug cut:
• Flower color gold: 4 – 3½" squares
• Background: 8 – 2" squares
• Center of flower: 4 – 1½" squares
• Fabric of choice for backing and binding
For a Bee mug rug cut:
• Background: 2 – 3½" squares;
2 – 1½" x 2½" strips; 4 – 1" squares
• Cream wings: 2 – 2½" squares and
2 – 1½" x 3½" strips
• Black body: 1 – 1½" x 6½" strip;
2 – 1½" x 4½" strips; 1 – 1½" x 2½" strip
• Gold body: 1 – 1½" x 6½" strip and
1 – 1½" x 4½" strip
• Fabric of choice for backing and binding
50
primitivequiltsandprojects.com
SUMMER 2023
QUILT ASSEMBLY DIAGRAM
SUZANNE WENZLICK started sewing when she was a child
with the guidance of her mother, who sewed her family’s clothes.
Loving sewing, she got her first sewing machine when she was
seven years old. She continued her journey of creativity when she
graduated college with two degrees, one in fashion design and
merchandizing and the other in art. She has since evolved into a
successful quilt designer. Suzanne started her pattern company,
Suzanne’s Art House, in 2000 out of her home in sunny California.
She enjoys spending time outdoors, where she draws inspiration
from nature and incorporates it into her patterns.
SUMMER 2023
Kits available
at SuzannesArtHouse.com
primitivequiltsandprojects.com
51
Log Cabin quilts have always been
one of Julie’s favorites. When these
wonderful woven solids arrived in
her store, a vintage quilt with uneven
logs became the inspiration for this
quilt. Simple but terrific use of this
beautiful fabric, Julie!
Material Requirements
Note: Julie has been very generous with fabric and the
number of strips cut to accomplish this very scrappy
quilt. The quantity of each piece cut is accurate.
12⁄3 yards cream solid for blocks
½ yard each of 15 solid colors for blocks
5
⁄8 yard navy solid for binding
4 yards fabric of choice for backing fabric
(pieced horizontally)
52
primitivequiltsandprojects.com
SUMMER 2023
Project Level
of Difficulty
Beginner
Cutting Instructions
From cream solid, cut:
• 50 – 1" x WOF strips, then sub-cut into:
120 – 1" x 5½" strips for round three top
and bottom
120 – 1" x 4½" strips for round three sides
120 – 1" x 3½" strips for round one top
and bottom
120 – 1" x 2½" strips for round one sides
From each of the 15 solid colors, cut:
• 1 – 2½" x WOF strip, then sub-cut into:
5 – 2½" squares for all block centers
2 – 2" x 2½" rectangles for round one of
Block One
• 5 – 2" x WOF strips, then sub-cut into:
12 – 2" x 5½" rectangles
10 – 2" x 8½" rectangles
• 2 – 1" x WOF strips, then sub-cut into:
8 – 1" x 3½" strips for Block Two, round
two sides
8 – 1" x 4½" strips for Block Two, round
two top and bottom
From the navy solid, cut:
• 7 – 2¼" x WOF strips for binding
2. Sew a 2" x 2½" rectangle to each side of a 2½"
square, then sew a 2" x 5½" rectangle to the top
and bottom of the square.
3. Add a 2" x 5½" rectangle to each side of the unit
from Step 2, then sew a 2" x 8½" rectangle to the
top and bottom to finish the block measuring 8½"
square.
4. Repeat Steps 2 and 3 to make a total of 15 blocks.
Block Two – Make 60
1. For each block you will need the following solid
color pieces: one 2½" center square, a matching
set of two 1" x 3½" and two 1" x 4½" strips, and
a matching set of two 2" x 5½" and two 2" x 8½"
rectangles. You will also need the following cream
strips: two 1" x 2½", two 1" x 3½", two 1" x 4½",
and two 1" x 5½".
Sewing Instructions
TIP: Julie suggests laying out the 60
Block
Two blocks using three different sol
id
colors plus the cream per block. Eac
h of the
15 solid colors will be repeated in
each of
the three rounds of the block four
times.
Block One – Make 15
1. For each block you will need the following solid
color pieces: one 2½" center square, a matching
set of two 2" x 2½" rectangles and two 2" x 5½"
rectangles, and a matching set of two 2" x 5½" and
two 2" x 8½" rectangles.
15
ds you lay out the
en
m
m
co
re
lie
Ju
TIP:
ing three different
Block One blocks us
ng pieces needed
lli
pu
By
.
ch
ea
rs
lo
co
lid colors and laying
from each of the so
sure
wing, you’ll make
them out before se
the 15 solid colors
of
ch
ea
g
in
us
e
ar
you
.
e Log Cabin blocks
in each round of th
54
primitivequiltsandprojects.com
2. Sew a 1" x 2½" cream strip to each side of a 2½"
solid color square, then sew a 1" x 3½" cream strip
to the top and bottom of the unit.
3. Sew a 1" x 3½" solid color strip to each side of
the unit from Step 2, then add a 1" x 4½" solid
color strip to the top and bottom.
4. Sew a 1" x 4½" cream strip to each side of the
unit from Step 3, then add a 1" x 5½" cream strip
to the top and bottom of the unit.
SUMMER 2023
a
e
k
i
l
g
n
i
t
h
l
i
ot
u
n
q
s
There’ og Cabin
G
good Lr book!
d
n
a
,
in ou
—J, J
5. Sew a 2" x 5½" solid color rectangle to each side
of the unit from Step 4, then finish the block by
adding a 2" x 8½" rectangle to the top and bottom
to complete the block measuring 8½" square.
6. Repeat Steps 2–5 to make a total of 60 blocks.
Assembling the Quilt
1. Referring to the Quilt Assembly Diagram and
project photo, arrange the blocks into nine rows of
eight blocks each. You will have three extra blocks.
These will make a great table runner.
2. Julie rotated every other block within each row
so you will not need to match the seams. Start
the odd number rows with a 2" x 8½" rectangle
positioned horizontally. Start the even number rows
with a 2" x 8½" rectangle positioned vertically.
QUILT ASSEMBLY DIAGRAM
3. Sew the blocks together in each row.
4. Join the rows, pressing seam allowances to the
right on the odd number rows and to the left on
the even number rows.
5. Sandwich the quilt top, batting, and backing;
baste. Quilt as desired, then bind. Julie chose an
allover meander design for her machine quilting.
Kit Information
$129.95 kit (plus $17.50
shipping) includes fabric for
quilt top and binding.
JJ Stitches
221 East Main Street
Sun Prairie, WI 53590
608-837-2266
www.jjstitches.com
56
primitivequiltsandprojects.com
SUMMER 2023
Quilting since the early 1980s, JULIE HENDRICKSEN is an author, fabric
designer for Windham Fabrics and owner of JJ Stitches in Sun Prairie, WI.
She has a love for both vintage and reproduction quilts. Fabrics and patterns
from the late 1800s continue to be an inspiration when designing.
SUMMER 2023
primitivequiltsandprojects.com
57
Designed by Katie Solberg
Finished size: 16½" x 22"
Project Level
of Difficulty
beginner
t
a
M
l
o
o
W
Fireworks and geraniums are two of Katie’s favorite things
about summer. The dark blue plaid border really sets off all
the festive colors in the center. This mat is perfect for the
4th of July or all summer long! So cute, Katie!
Material Requirements
16" x 21" beige wool for background
18" x 23" blue plaid wool for background frame
4" x 8" each of two red wools for geraniums
4" square gold wool for stars
6" square navy blue wool for stars
4" square blue plaid wool for stars
5" square medium blue textured wool for
firecrackers
4" x 5" cream wool for firecrackers
1½" x 55" green wool for vines
½ yard fabric of choice for backing
Valdani size 12 perle cotton in dark blue (M91),
gold (M81), tan (P3), cream (P1), olive green
(822), and blue (O578)
Red embroidery floss or thread
Soft Fuse or other fusible of your choice
Freezer paper
Appliqué Preparation
and Cutting Instructions
2. Cut out the oval about ¼" outside of the
drawn line, iron onto the beige background wool,
and trim on the drawn line. Do not remove the
paper yet.
3. Repeat Steps 1 and 2 to make a template using
the larger template oval, then prepare the blue
plaid background. Do not remove the paper yet.
4. Adhere fusible web to the back of the green
wool, then cut out ¼"- wide strips for a total of
110" in length.
From each of two red wools, cut:
• 34 of Template B for a total of 68 geranium
petals
From gold wool, cut:
• 4 of Template C for stars
From navy blue wool, cut:
• 4 of Template E for large stars
From blue plaid wool, cut
• 4 of Template C for star tops
See Page 95 for general appliqué preparation
instructions. Do not add fusible to the red geranium
wool—trace their shapes on freezer paper instead.
From medium blue textured wool, cut:
• 4 of Template A for firecrackers
• 16 of Template D for firecracker stripes
1. Prepare your mat background by tracing the
smaller oval background shape onto fusible web.
Start by taping the two mat template pieces
together, taking care to line up the horizontal and
vertical dashed lines. This template piece equals
one quarter of the complete background. Using
this quarter oval plus the reverse of this, trace a
complete oval onto fusible web.
From cream wool, cut:
• 4 of Template A for firecrackers
• 4 of Template F for embellishing blue
firecrackers
SUMMER 2023
primitivequiltsandprojects.com
59
Sewing Instructions
1. Trace the vine pattern to the beige background
wool, then carefully fuse the green vine strips over
the drawn lines. The strips will curve beautifully
by taking it slow, using an iron with steam.
2. Referring to the project photo as a guide,
position and remove paper backing, then fuse the
firecrackers with their embellishing stripes and
stars in place.
3. You can now remove the paper from the back of
the beige oval background.
4. Appliqué each motif in place using matching
threads and a buttonhole stitch.
5. Add embellishing stitches as desired. Katie
used a chain stitch on top of the vine and a stem
stitch to decorate the firecrackers and to add their
fuses. She also added straight stitches to make the
firecrackers “pop.”
A great take on a
patriotic summer
project !
—J, J, and G
6. Position the geranium petals in bunches, using
the project photo as a guide. Stitch them in place
with a French knot in the center of each petal
using embroidery floss or thread.
7. Once stitching is complete, fuse the appliquéd
mat onto the plaid frame background. Remove the
paper from the back and stitch the two together
with a buttonhole stitch.
8. Position the completed mat from Step 7
faceup on the facedown backing fabric and
fuse them together.
9. Trim away the excess backing
fabric using the edge of the wool
mat frame as a guide.
F
10. Buttonhole stitch around
the perimeter to finish this
festive holiday mat.
C
E
C
D
A
F
primitivequiltsandprojects.com
B
C
ASSEMBLY DIAGRAM
SUMMER 2023
B
E
A
60
A
A D
C
Kits Available
$39.99 (plus postage) fabric kit
includes all wool for appliqué
and backing fabric.
$33 (plus postage) thread kit
includes six balls of Valdani
perle cotton size 12.
KATIE SOLBERG learned to quilt in 2006 when her mom decided to open a quilt shop in Fox River
Grove, Illinois. She quickly grew to love scrappy quilts with primitive designs and anything with
wool appliqué. Katie is now the owner of Pieceful Gathering Quilt Shop, which has been featured
in Quilt Sampler magazine. Katie loves to design patterns and teaches classes at her store and at
local guilds. Katie lives in Crystal Lake, Illinois, with her husband and three small children.
Pieceful Gathering Quilt Shop
106 Northwest Hwy.
Fox River Grove, IL
847-516-7911
katie@piecefulgathering.com
www.piecefulgathering.com
SUMMER 2023
primitivequiltsandprojects.com
61
Part
TWO
r
O f Fo u
Designed by Julie Porter
Finished quilt size: 48" x 64"
Project Level
of Difficulty
Beginner
Julie’s daily trip into town takes her and her dog down country roads, passing by an
old cabin with its crumbling chimney, a farm with a sheep she affectionately calls
Wooley, and cows…plentiful and curious. She said she could sit and watch them
all day with their young, so playful and never too far from mom. Your words evoke
calmness—we can feel that warm breeze now!
Material Requirements
Note: These yardages are the same as listed in the
Spring 2023 issue for Part One of Country Blues with
the exception of the bolded corrections.
2 yards green solid for backgrounds, HST units,
and borders
¾ yard light stripe for backgrounds, chimney,
dog flower stem, and leaves
Fat quarter light green check for backgrounds
Fat quarter light blue stripe brushed cotton for
crow block, pumpkin sections, chicken waddle,
dog flower petals, and cow flower center
2
⁄3 yard light cream print for HST units, bias
vines, bee skep, cabin roof, and sheep body
Fat quarter each of five light prints for HST
units and assorted motifs
Fat quarter each of seven dark blue prints for
Star blocks, house star, door and windows,
chicken, fish, flag, cow flower, pumpkin star,
and large flower
¼ yard cream woven for house stripes, flagpole,
and right pumpkin section
Fat eighth each of 4 medium blue prints for
stars, house stripes, flowers, and berries
Fat eighth each of medium blue in brushed
cotton, brushed cotton stripe, and homespun
for house roof, small flower, and cabin front
Fat eighth each of light blue print and stripe
homespun for flag field, bird’s wing, flower
petals and center, and pumpkin section
3
⁄8 yard total of assorted green brushed cottons
and prints for tree, leaves, and flower stem
9" square black stripe brushed cotton for crow
and bees
12" x 15" cream wool for bee wings, flag
stripes, fish stripes, chicken star and beak,
bird’s beak, and dog patches
9" x 12" white wool for dog, sheep’s head, tail
and feet, cow patches and tail
SUMMER 2023
primitivequiltsandprojects.com
63
9" x 12" tan wool for bee skep top and cow
Scraps of medium blue wool for bird, patch on
sheep’s head, sheep’s nose, and flower center
4" x 5" green wool for small flower stem
and leaves
3" x 4" dark blue wool for chicken feet and comb
3½" square dark green wool for pumpkin’s stem
Scraps of light brown wool for sheep patches
Scrap of black wool for door on bee skep
½ yard blue print for binding
Threads to match appliqué
DMC floss in black and ecru
Freezer paper or fusible web (your preference)
Appliqué Preparation
and Cutting Instructions
See Page 95 for general appliqué preparation
instructions. Templates in the Template Insert do
not contain seam allowance. Cutting instructions for
backgrounds and borders are listed in the Spring 2023
issue. The remaining fabric can be used for appliqué
motifs.
try
e the Coun
t
u
c
w
o
h
Look
red
t is with a
il
u
q
s
e
lu
B
ins made
g
u
H
ll
Ji
.
d
backgroun
or
and blue f
d
e
r
in
t
il
the qu
try Quilts.
n
u
o
C
d
n
a
Gr
From light cream print, cut:
• 1 –¾" x 12" strip, then sub-cut into:
1 –¾" x 4¾" strip for top right of cabin roof
1 –¾" x 5½" strip for top left of cabin roof
(overlaps top right unit)
• 1 of Template 3A for sheep body
From light stripe, cut:
• 1 of Template 4B for chimney
From light green check, cut:
• 1 –½" x 12" bias strip for cow block flower stem
From assorted (5) light prints, cut:
• 1 – 1½" x 3½" rectangle for cabin door
• 1 of Template 1C for large flower center
From the assorted (7) dark blue prints, cut:
• 1 each of Templates 1A and 2G for flowers
From assorted (4) medium blue prints, cut:
• 1 – 1" x 2" rectangle for cabin window
• 1 each of Templates 1B and 2F for flowers
• 3 of Template 3H for stars
From assorted green brushed cottons, cut:
• 1 –½" x 9" strip for large flower stem
• 1 each of Template 1D and 1D reversed for
leaves
• 2 of Template 2H for leaves
• 1 of Template 4C for tree
From white wool, cut:
• 1 each of Templates 3B and 3C for sheep’s head
and tail
• 2 of Template 3D for sheep’s feet
• 1 each of Templates 2C, 2D, 2E, and 2B for cow
patches and tail
From tan wool, cut:
• 1 of Template 2A for cow
From medium blue homespun, cut:
• 1 of Template 4A for cabin front
From scraps of light brown wool, cut:
• 1 each of Templates 3F and 3G for sheep patches
From light blue stripe brushed cotton, cut:
• 1 of Template 2I for flower center
From scrap of medium blue wool, cut:
• 1 each of Templates 3E and 3I for patch on
sheep’s head and sheep’s nose
64
primitivequiltsandprojects.com
SUMMER 2023
sewing instructions
3H
3H
1B
3E
1A
1C
3H
3F
3B
3A
3I
1D
3C
3G
3D
3D
1D
Sheep Block
Large Flower Block
1. Arrange the sheep with tail and patches, and
the three stars on the 12½" green solid background
square and affix in place.
1. Arrange the flower layers, stem, and leaves on
the 8½" x 14½" light stripe background rectangle
and affix in place.
2. Stitch the motifs to the background using your
favorite method for appliqué.
2. Stitch the motifs to the background using your
favorite method for appliqué.
4C
2G
2F
2I
2H
4A 4B
2C
2B
2D
2A
2E
2H
Cabin Block
1. Arrange the tree and cabin with roof, door,
window, and chimney on the 9½" x 12½" green
solid background rectangle and affix in place.
Cow Block
1. Arrange the cow with tail and patches, flower
layers, stem, and leaves on the 14½" x 16½" green
solid background rectangle and affix in place.
2. Stitch the motifs to the background using your
favorite method for appliqué.
2. Stitch the motifs to the background using your
favorite method for appliqué.
3. Sew together four HST units as in the diagram,
taking care with the angle and position of color.
(These were stitched and set aside when making
HST units in the Spring 2023 issue.)
4. Sew this strip to the left side of the cabin block
from Step 2.
SUMMER 2023
primitivequiltsandprojects.com
65
This is a charming
picture of simple
country goodness!
—J, J, and G
Summer Section Assembly
1. Sew the Cow block to the right side of the Large
Flower block.
2. Sew the Cabin block to the right side of the
Sheep block.
3. Sew the unit from Step 1 to the top of the unit
from Step 2 to complete the Summer section of
Country Blues.
Kits available
from Sew Treasured Quilt Shop
sewtreasured@stquiltshop.com
(951) 304-9787
66
primitivequiltsandprojects.com
SUMMER 2023
JULIE PORTER began quilting as a young mom, learning from primitive quilters and being
inspired by the old primitive quilts of the past. Julie has taught quilting for many years in her
hometown in California while raising five kids. A few years back, Julie started her pattern
company, Farmhouse Cottons. Her patterns are a whimsical collection of quilts that remind
her of a longed-for simpler way of life. Julie has always expressed her love of decorating and
creating images of a more simple, peaceful life with quilts.
www.etsy.com/shop/FarmhouseCottons
facebook.com/FarmhouseCottons
farmhousecottonsquilts@gmail.com
SUMMER 2023
primitivequiltsandprojects.com
67
Designed by Karen Yaffe
Finished sizes: 4" x 7" and 5" square
Project Level
of Difficulty
beginner
M
s
w
o
l
l
i
P
i
in
The 4th of July holiday is all about celebrating our country’s
Independence Day. Karen reminisced about her neighborhood
barbecues filled with fun, laughter, sparklers and fireworks,
where everyone was welcome and it was so much fun.
Sounds wonderful, Karen!
Material Requirements
¼ yard red solid for pillow background
¼ yard cream print for pillow background
¼ yard red/blue stripe for pillow background
4½" x 5½" red wool for USA banner and star
pillow stripe
4½" x 5½" blue wool for USA banner, stars, and
the number 4
3½" x 5½" white wool for USA banner, stars,
and star pillow stripe
1" x 4" black wool for banner poles
Valdani size 12 perle cotton in Black (1), Natural
(6), Black Midnight (M91), and Turkey Red (O775)
Seed beads (Karen chose clear, silver-lined #11
Czech beads.)
Fusible web
Fabric marking pen of choice
Fray Check (optional)
Pillow filling of choice
Appliqué Preparation
and Cutting Instructions
See Page 95 for general appliqué preparation
instructions.
From red solid, cut:
• 1 – 5½" square for pillow back
• 1 – 6½" square for pillow front
From cream print, cut:
• 1 – 5½" square for pillow back
• 1 – 6½" square for pillow front
From red/blue stripe, cut:
• 1 – 4½" x 7½" rectangle for pillow back
• 1 – 5½" x 8½" rectangle for pillow front
From red wool, cut:
• 1 each of Templates A, C, and J for star pillow
stripe and USA banner
From blue wool, cut:
• 1 each of Templates D, F, C, L, and H, for stars,
USA banner, and the number 4
From white wool, cut:
• 1 each of Templates B, C, and K for star pillow
stripe and USA banner
• 2 each of Templates E and G for stars
From black wool, cut:
• 2 each of Templates I and M for banner poles
These would be great as
bowl fillers as your
holiday centerpiece!
—J, J, and G
SUMMER 2023
primitivequiltsandprojects.com
69
ng Fray
i
s
u
s
t
s
ge
ren sug e edges of the
TIP: Ka
h
round t
aying
Check a s to prevent fr
op
pillow t
stitch.
as you
Sewing Instructions
1. Using the Layout Diagrams provided in the
Template Insert, arrange the stars and number 4
on the 6½" red solid square. Position a star and
the USA banner with letters and poles on the
5½" x 8½" striped rectangle and the stars and wave
on the 6½" cream print square. Fuse the appliqué
motifs to their backgrounds.
2. Blanket-stitch the star wave and banner
pennants with the Natural, Turkey Red, or Black
Midnight Perle Cotton as in the project photos.
3. Whipstitch all stars, the letters USA, and the
number 4 in place with Natural, Black Midnight,
or Turkey Red perle cotton as shown.
4. Couch the banner poles with black perle cotton,
then add a wagon wheel stitch to the pole tops.
6. Add beads to the ends of the confetti strands
without curls.
7. When the appliqué is complete, trim the
6½" squares to 5½", and the 5½" x 8½" rectangle
to 4½" x 7½".
8. With right sides together lay the pillow tops on
top of the coordinating backing pieces, right sides
together.
9. Backstitching at the beginning and end, sew
each pillow top and backing together around the
outer perimeter, leaving a 3" opening at one side
for turning right side out.
10. Turn the pillow covers right side out, fill
with your choice of stuffing, then whipstitch the
openings shut.
5. Stem stitch the writing, banner line between
poles, and confetti strands with Natural, Black
Midnight, or Turkey Red perle cotton as shown.
70
primitivequiltsandprojects.com
SUMMER 2023
Kits Available
Fabric Kit: $19.99 (plus postage)
includes all wool for three pillow tops
plus cotton fabric for fronts and backs.
Thread Kit: $22 (plus postage) may be
available, which includes four balls of
Valdani perle cotton.
KAREN YAFFE learned to sew from her mother, who she remembers was always
making clothes for her and her siblings. She took her first beginning appliqué class
in 2010 and was hooked. She loved the colors and textures of wool and how you
use hand stitching throughout to complete the project. In 2020 she tried her hand at
making her own patterns and hasn’t looked back. She and her husband have two
grown boys and live in Minneola, Florida.
Pieceful Gathering Quilt Shop
106 Northwest Hwy.
Fox River Grove, IL
Kayaf8@gmail.com
www.piecefulgathering.com
SUMMER 2023
primitivequiltsandprojects.com
71
⁄8"
7
Project Level
of Difficulty
Beginner
Julie loves to incorporate family history into her fabric
collections. The latest is called Grandpa’s Journal and
reflects the life of her maternal grandfather, a military
veteran who enjoyed working in his flower garden. Julie
created a patriotic design using this fabric and added
a bunch of his flowers—this project has such special
meaning to her!
Material Requirements
½ yard light tan print for setting triangles
and appliqué background
¼ yard red star print for blocks
¼ yard dark tan print for blocks
1
⁄8 yard red stripe for inner border
1½ yards blue star print for outer border,
binding, and backing
3½" x 8" solid red wool for flowers and
flag stripes
3" x 4" dark blue wool for flower and flag field
72
primitivequiltsandprojects.com
SUMMER 2023
2½" x 3½" light blue check wool for flowers
5" x 6½" solid cream wool for flag and star
5" x 6" brown check wool for flowerpot
1" x 12" solid brown wool for flagpole
3" x 4" brown stripe wool for flowers
3" x 4" gold heather wool for flowers
3½" x 7" dark green plaid wool for stems
and leaves
3" x 3½" light green solid wool for leaves
Valdani size 12 perle cotton to match wool
Lite Steam-A-Seam 2
Appliqué Preparation
and Cutting Instructions
See Page 95 for general appliqué preparation
instructions. Templates in the Template Insert have
been reversed for use with fusible web.
From light tan print, cut:
• 1 – 9" x WOF strip, then sub-cut into:
1 – 9" x 19" rectangle for appliqué background
2 – 7" squares, cut twice diagonally from
corner to corner for setting triangles (2 extra)
• 1 – 4½" x WOF strip, then sub-cut into:
2 – 4½" squares for setting blocks
2 – 3¾" squares, cut once diagonally from
corner to corner for corner triangles
From red star print, cut:
• 1 – 2½" x WOF strip, then sub-cut into:
6 – 2½" squares for block centers
• 2 – 1½" x WOF strips, then sub-cut into:
48 – 1½" squares for Flying Geese units
From dark tan print, cut:
• 1 – 1½" x WOF strip, then sub-cut into:
24 – 1½" squares for block corners
• 1 – 2½" x WOF strip, then sub-cut into:
24 – 1½" x 2½" rectangles for Flying
Geese units
From brown solid wool, cut:
• 1 of Template J for flagpole top
• 1 – ½" x 12" strip for flagpole
From brown stripe wool, cut:
• 1 each of Templates D and I for flower center
and flower
From blue star print, cut:
• 3 – 3½" x WOF strips for outer border
• 3 – 2¼" x WOF strips for binding
From red solid wool, cut:
• 2 of Template B for flowers
• 1 each of Templates C, K–M for flower center
and flag stripes
From dark blue wool, cut:
• 1 each of Templates B and N for flower and
flag field
From light blue check wool, cut:
• 1 each of Templates D and I for flower center
and flower
primitivequiltsandprojects.com
From solid cream wool, cut:
• 1 each of Templates E and H for star and flag
From brown check wool, cut:
• 1 of Template A for flowerpot
From red stripe, cut:
• 2 – 1" x WOF strips for inner border
74
We just love ion
your inspirat t—it came
for this projecrfully!
e
d
won
r
e
h
t
e
g
to
—J, J, and G
From gold heather wool, cut:
• 1 each of Templates C and D for flower centers
From dark green plaid wool, cut:
• 6 of Template F for leaf tops
• 8 of Template G for leaf bottoms
• 5 – ¼" x 7" strips for stems
From light green solid wool, cut:
• 8 of Template F for leaf tops
• 6 of Template G for leaf bottoms
SUMMER 2023
Sewing Instructions
Star Block
1. Draw a diagonal line from corner to corner on the wrong
side of 8 – 1½" red print squares.
2. With right sides together, layer a marked red print square
on top of a 1½" x 2½" dark tan print rectangle. Sew on the
drawn line, cut ¼" from the drawn line, then press back the
resulting triangle.
3. With right sides together, layer a marked red print square
on top of the other end of the unit from Step 2. Sew on the
drawn line, cut ¼" from the drawn line, then press back the
resulting triangle to complete the Flying Geese unit.
4. Repeat Steps 2 and 3 to make a total of four Flying
Geese units.
SUMMER 2023
primitivequiltsandprojects.com
75
5. Arrange the four Flying Geese units, 4 – 1½" dark tan
squares, and a 2½" red print square as shown.
6. Sew the three units in each row together, then sew the
three rows together to complete a Star block measuring
4½" square.
TIP: Julie recom
mends placing
a paper towel bet
ween the wool
appliqué motifs
and your iron
when pressing th
em in place. This
prevents pencil
lines and fusible
web residue from
transferring to
the bottom of th
e iron.
7. Repeat Steps 1–6 to make a total of six Star blocks.
J
Wool Appliqué
N
1. Using your favorite marking tool, draw a 7" x 17½" rectangle
on the 9" x 19" light tan print background rectangle.
E
2. Arrange the flowerpot, flagpole and flag, stems, and flowers
on the background, taking care to ensure they are at least ½"
away from the drawn line. Julie prefers to appliqué the bottom
layer of motifs first. The leaves will be added after these are
stitched in place.
L
K
M
3. Blanket-stitch around each motif with coordinating thread.
B
G
D
4. Fuse the larger bottom layer of leaves in place and blanketstitch them to the background.
5. Add the leaf tops, fuse, then using a few straight stitches
down the center, sew them to the bottom leaves.
H
F
I
D
B
C
F
6. When appliqué is complete, trim the background to 7" x 17½".
Quilt Assembly
1. The quilt’s patchwork portion will be assembled in diagonal
rows. Lay out the corner and setting triangles, Star Blocks, and
center setting squares as shown.
2. Sew a light tan corner triangle to the top of a Star block, then
sew two setting triangles to the sides, taking care with position.
3. Continue to sew the remaining diagonal rows together.
76
primitivequiltsandprojects.com
SUMMER 2023
B
D
A
C
I
G
4. Sew the four rows of the quilt center together.
Completing the Quilt
5. The corner and setting triangles were cut a
bit generous. Trim the Star block section of the
quilt center to 117⁄8" x 17½", taking care to allow
a ¼" seam allowance at the Star block corners.
Before making the border strips, see if your quilt
center matches the measurements below. If not,
make any necessary adjustments.
6. Sew the appliqué section of the quilt to the left
side of the Star block section to complete the quilt
center measuring 17½" x 183⁄8".
1. Cut 2 – 1" x 17½" red stripe side inner border
strips. Referring to the Quilt Assembly Diagram,
sew those two strips to the sides of the quilt
center.
2. Cut 2 – 1" x 193⁄8" red stripe top and bottom
inner border strips, then sew those to the top and
bottom of the quilt top.
3. Cut 2 – 3½" x 18½" blue star print side outer
border strips, then sew those to the sides of the
quilt top.
4. Cut 2 – 3½" x 253⁄8" blue star print top and
bottom outer border strips, then sew those to the
top and bottom of the quilt top.
5. Sandwich the quilt top, batting and backing;
baste. Quilt as desired, then bind.
QUILT ASSEMBLY DIAGRAM
SUMMER 2023
primitivequiltsandprojects.com
77
JULIE LETVIN was born and raised in Iowa and still lives there with her husband,
Greg, and their many pets. She started quilting in 1999, and a few years later found
that she was drawn to quilts with lots of small pieces. This eventually led to making
tiny paper-pieced quilt jewelry. In 2009, she started her business, Me & My Stitches,
and has since made thousands of tiny (¾" to 1½") paper pieced earrings, pins,
pendants, scissor fobs, and Christmas ornaments. Me & My Stitches now
offers many other products, including numerous shapes and sizes of
ruler boxes (made by Greg), quilt patterns, and fabric.
Julie Letvin
Me & My Stitches
319-931-0711
julie@MeAndMyStitches.com
www.MeAndMyStitches.com
78
primitivequiltsandprojects.com
Kit Information
$47.95 (plus shipping)
kit includes wool and cotton
for the top, plus binding.
Backing not included.
SUMMER 2023
Fun kits, patterns and
products from our friends!
Stitchin'
Find order information beneath each listing, or view our Stitchin’ Marketplace
online at www.primitivequiltsandprojects.com
e
c
a
l
p
t
e
Mark
Strawberry Runner – 12" x 34"
$12 Pattern • $44 Kit
Libbey – 24" Americana Girl
$6 Pattern
This wool on fabric block is part of a combined project
offered by Stitching Among Friends facebook group.
Wool applique on a wool background with decorative
embroidery and a cotton binding.
By Sparkles ‘n’ Spirit Doll Pattern Company
Pattern includes step by step instructions,
supply list, and color photo.
yellowcreekquiltdesigns.com
carriedawaydesigns.net
sparklesnspirit.com
SAVE 90% on an all-access membership
to We Like Sewing. Only $5 for one year!
Valdani Perle Cotton
1-Year Subscription to
Rug Hooking Magazine for $19.95
Bonnie and the Butterfly – 9" x 11"
$21.95 Kit and Pattern
Exclusive sewing and quilting patterns, tutorials, tips
and tricks. Everything you need to sew quilts, home
décor, purses and bags, and more. The all-access Gold
Club includes all digital issues and pattern collections,
plus access to our library of video tutorials.
welikesewing.com/PQP
Basket of Spring
13" x 17"
Huge Assortment Available
Discover stunning inspiration for primitive, fine cut,
and punch needle projects, expert rug hooking tips
and dyeing techniques, step-by-step tutorials, and a
FREE, EXCLUSIVE pull-out pattern in every issue!
grannyslegacypatterns.com
rughookingmagazine.com/PQP23
Liberty Lane – 17" x 36"
$10.50 Digital Pattern
Advertise
with us
woolenwillowdesigns.com
Digital download.
cottagerosequiltshop.com
SUMMER 2023
If you have a product or project
you would like to advertise in our
Stitchin’ Marketplace, please contact
our advertising department at
gretchen@primitivequiltsandprojects.com
primitivequiltsandprojects.com
79
ENTER TO WIN A CUTIE TABLETOP FABRIC FRAME FROM THE GRACE COMPANY
r
e
t
n
E
y!
a
d
To
One lucky subscriber will win this Cutie Tabletop Fabric Frame!
All you need is a table or desk and your home sewing machine
to become a quilting pro! You’ll love the versatility, portability,
and simplicity of this adorable little frame.
Retail Value: $1,199.99
Enter Today!
Subscribe
with entry to
Hurry—your entry must be
received online by July 15, 2023.
SAVE
up to 40%!
Enter our Primitive Quilt Contest and order a subscription
to Primitive Quilts and Projects magazine at:
PrimitiveQuiltsAndProjects.com/Contest
One entry per household, please. No purchase necessary. Full contest rules
at primitivequiltsandprojects.com/contest.
80
primitivequiltsandprojects.com
SUMMER 2023
By Judy Williamson
The quilt in this round of Do-Si-Do is for the
West Virginia Rivers Coalition fundraising
campaign. The coalition is a 501(c)(3)
nonprofit organization and a state affiliate
of the National Wildlife Federation, valuing
clean water as the foundation of life. Their
mission is to conserve and restore West
Virginia’s exceptional rivers and streams.
Millions of people in the states surrounding
West Virginia depend upon these headwater
streams for clean, fresh drinking water. I’m
motivated to do all I can to keep our water safe
and clean.
I chose Kaaren Johnston’s A Vintage Christmas
pattern from our Winter 2014 issue. For me it
was love at first sight when we received Kaaren’s
quilt for our photo shoot. I never considered
making it due to its complexity (a three-crow
difficulty rating) and size (70" x 76"). But for the
benefit of West Virginia rivers and streams, I’m
up to the task.
From
Winter
2014
SUMMER 2023
primitivequiltsandprojects.com
81
The details on fundraising
with the quilt are in the works.
Stay in touch by reading our
newsletter for updates.
For more information,
visit www.wvrivers.org.
ig help
Jeni was a b
ct.
on this proje
The quilt’s design and color scheme lend itself
to a transformation from Christmas to Mother
Nature. I chose batiks in blues, greens, golds, and
browns, with prints of natural elements you’d find
in and around rivers: leaves, flowers, dragonflies,
and wavy flowy colors. For the embroidery and
appliqué, I sketched images of native West
Virginia flora and fauna with the endangered
candy darter fish, and a hellbender salamander
coming top of mind. I created the logo by placing
shapes on a dark blue background and stitching
them down with bias strips.
82
primitivequiltsandprojects.com
SUMMER 2023
This is Jeni’s
husband, Gle
n, with
their dog Ch
ester trying
to play
with my silly
Roxy.
SUMMER 2023
primitivequiltsandprojects.com
83
I had fun recreating West
Virginia Rivers’ logo with
shapes and bias strips.
My biggest challenge was coming up with
wildlife sketches to embroider. I made a list of
West Virginia’s flora and fauna, some that are
iconic to our native state, and some that are
also endangered. I then looked for pictures and
drawings of these creatures, sketched them out,
scanned my drawings, and finessed those on
my laptop. As much as I love sketching, it was
a big deal for me because I wanted to do a good
job. Then I borrowed Jeni’s light desk to trace
the designs onto my fabric. The next step was to
practice embroidery stitches; I also reached out
to Kathy Schmitz (kathyschmitz.com) for tips on
using colored pencils with embroidery. I asked
Jeni to embroider some of the blocks, particularly
the ones with lettering because I knew she’d do a
nice, neat job.
I’ll be sad to part with the quilt, but happy to
help with such an important cause. Who knows?
Maybe I’ll make a second one to keep for myself!
84
primitivequiltsandprojects.com
SUMMER 2023
r
e
n
g
i
s
e
D NOTeS
Memories and Nature
How do your memories, family history, and
nature influence your designs? What are some
memorable ways you’ve used your creations
in the great outdoors?
Carrie Buck
Some of my favorite designs have been
inspired by a lifetime of memories of walks
in nature. Sugar Hill is a quilt design based
on memories of walks through the woods
of Southern Vermont with my grandmother.
She was very knowledgeable in the field of
flora and fauna, and this is where I saw my
first Indian pipe weed. What a funny flower!
For another quilt design, Around the Lake,
inspiration came from over two decades
of walks around a lake located close to
home. The path along the banks of the
lake provided views of sunbathing turtles,
herons poised to catch a meal, and sunfish
swimming just below the surface of the
water.
Inspiration for Arthropods, my current
block of the month, came from walks
around the property of a home where I once
lived. The perimeters were left unmowed,
creating a sanctuary for bees, butterflies,
caterpillars and spiders among the grasses
and wildflowers that grew.
ask away!
Do you have a question for our designers?
Send it to judy@primitivequiltsandprojects.com
and it may appear in a future issue.
SUMMER 2023
primitivequiltsandprojects.com
85
Julie Porter
Country Blues reflects my daily drive into town. I love the
feeling of simplicity that country life exudes. Laundry lines,
old dogs, birds on a fence post, old barns, etc. It’s all perfect
and deserving of its place in our quilts.
Quilting has been passed down through generations of
women. A craft that started out of necessity and has now
been reborn out of a necessity to reconnect with that creative
spirit that lives within us. Working with our hands. Creating.
It allows us to reconnect with past generations.
I find joy in quilting and using the quilts in my everyday
life gives them purpose. They bring beauty to an old picnic
table or a softness to a rocking chair. They make me happy.
Suzanne Wenzlick
Nature is a big inspiration
for me because I grew up
camping, hiking, fishing, and
loving the outdoors. My dad
was the director of the camp
counselors for handicapped
children of the YMCA camp in
the Redwoods every summer
for six years. My mom was
the outdoor science teacher
for the students during the
summer. So every summer
my parents, my three siblings,
and I stayed in a one-bedroom
cabin in the Redwoods—we
loved it! I have always loved
bugs and butterflies, and
many of my quilts are inspired
by them. I am also inspired by
the wonderful colors I see in
nature, like the turning of the
leaves in the fall or vibrant
flowers and fruit trees in our
yard. My latest quilt is inspired
by the big bumblebees flying
around my yellow butterfly
trees. Not much is better to me
than going outside and seeing
the beauty in nature and
feeling peace. The outdoors is
my happy place when I need
a rest.
86
Julie Hendricksen
My quilt shop, JJ Stitches, is located in an historic downtown. Both
reproduction fabrics and patterns designed from vintage quilts
almost always find their way into our designs and fit perfectly
into the area we live and call home. Vintage textiles found at flea
markets in Wisconsin, Minnesota, and Illinois are both wonderful
ways to spend an afternoon and be inspired.
Quilts are used for impromptu picnics, snuggling either on the
screened porch or by the firepit on a cool evening.
primitivequiltsandprojects.com
SUMMER 2023
Mardi Niles
Deb Eggers
My Strawberry Ridge quilt in this issue
reminds me of my mother. She has tried
several times to get that perfect strawberry
patch. When she was able to get a good
crop, my three sisters and I would always
eat them before she could get a good bowl
full to do anything with. She lives in a
condo now but still every year tries her
hand at a small patch. Now she is the one
eating the few strawberries she gets before
she has enough to do anything with.
There is nothing as sweet as the taste of
a ripe strawberry warmed by the sun. I am
going to use my quilt either on my table or
as a picnic blanket when I get it back.
I grew up in the Bennington Battlefield area
between Vermont and New York. It is very rural
and beautiful. There is a lot of war history from
my hometown and the surrounding areas. We
have family members who have served and are
still serving. I am proud of each and every one.
American flags have always made me pause and
remember. As years go by and times change, the
flag to me is steadfast. Through battle and war
and peace times, the flag has waved high and
even when “tattered and torn,” deep in the heart
of our country it is still “loved and worn.”
I don’t really use my creations outdoors. I do,
however, use the great outdoors for inspiration
in many things that I have done. Trees find their
way into many of my “art” forms. I loved quilting
for many years and created several tree-themed
quilts. I try to create heartfelt things, so anything
in nature warms my soul.
Deanna Hodson
My How Great Thou Art quilt, featured on the cover
of Primitive Quilts and Projects Summer 2021 issue,
is a collage of motifs replicating treasures in our
home. The top banner of a rose-covered picket
fence represents a headboard my daughter asked
her dad to build for her. Roses are my favorite
flower and being from Santa Rosa, California
(home of Luther Burbank gardens, where we have
an annual Rose Parade), I believe I
come by it naturally.
The bunny block in the bottom
right of the quilt is actually a
milk pitcher my daughter gave
me as a Mother’s Day gift. The
little beehive is a set of nesting
measuring cups. My daughter
and I so enjoyed browsing the
local antique stores and collecting
vintage items for repurposing. The
center vase of roses, called Roses for
Amy, again highlights my love of roses and uses
her celadon vase. The embroidery design is from
the embossed design on the vase.
Each block represents many memories shared
with my daughter, now in heaven, along with our
love of God’s amazing creation; thus, the name
and banner embroidery, How Great Thou Art!
SUMMER 2023
primitivequiltsandprojects.com
87
Missie Carpenter
I don’t use my creations
in the great outdoors. But
some of my creations are
inspired by things in the
great outdoors whether they
be flowers, bees, animals,
or views of the outdoors.
They are often filled with
memories of loved ones I
was with at the moment
the inspiration hit me. For
example, my grandson and I
were walking by the lakeside
and I happened to see an
interesting little four-petaled
bloom I’d never seen before.
I discovered it was called
the Bunchberry or Dogwood
Groundcover. Thus, a quilt
I was making at the time
that had a floral shape with
four petals is now called
Bunchberry Blooms. And I
think of my grandson each
time I take time to look at
the quilt! This quilt was on
the cover of Primitive Quilts
and Projects in the Spring
2017 issue—another great
memory every time I see it.
Another great example is
my Life in the Midwest quilt,
which is filled with many
things from the outdoors
about my life learning about
agriculture. My husband
worked in the agriculture
industry and I knew nothing
about it. He taught me many
wonderful things about
agriculture over the years.
This ended up being our 25th
wedding anniversary quilt.
Read more about the quilt at
TraditionalPrimitives.com on
the pattern listing page.
88
primitivequiltsandprojects.com
SUMMER 2023
Granny’s Legacy
(Kim Zenk and Katie Hebblewhite)
Our mother/grandmother is an avid
bird-watcher and gardener, as were her
ancestors, and she has passed this love
on to us. Each year we watch for the first
spring robin and listen for the lovely song
of the wren suggesting it’s time to start
preparing the ground for planting. We fill
our days with birds, flowers, and the joy
they bring, while breathing deeply the
fresh air and soaking in the glorious sun.
During a past Granny’s VIP (Granny’s
Legacy’s Very Important People Club)
party, we presented virtually live on a
summer evening, near the chicken coop
and bee yard at Katie’s 120-year-old
farmstead. A table was adorned with a
quilt and lemonade was served, while
the family hens scratched and wandered
around our “set.” It was such a special,
whimsical gathering, softened and
personalized with a quilt.
Karen Yaffe
I think I get a lot of inspiration from nature
and family memories. Growing up in upstate
New York, we had all four seasons and lived
out in the countryside where houses were far
apart, so we were surrounded by woods and
wildlife. Home For Christmas was based on us
kids walking up to Sherwood’s Pond to go ice
skating.
I also have memories of both of my
grandmothers: Grandma Wormuth had
beautiful violets in all colors—she must have
had a grouping of at least 20 plants. Grandma
Holecek was from Czechoslovakia and had
the most beautiful gardens, but what I loved
the most was watching her scratch eggs.
My Enchanted design is loosely based on the
flowers she designed. Another memory is my
Aunt Sue who collects crocks, which was the
inspiration for Bowl of Blooms.
I haven’t really used any of my designs
to display or use outside, but I feel like I’m
bringing nature inside instead.
SUMMER 2023
primitivequiltsandprojects.com
89
This quilt,
called Navy
Days, is my
current
favorite (it’s
a revolving
door), and
I love the
photo take
n at Crapo
Park in Gra
ndpa’s
hometown
of Burlingto
n,
Iowa, by ph
otographer
Aaron Leim
kuehler.
Julie Letvin
I love to include personal details in my quilts. My
dad once gave me a wool suit that he no longer
wore—what a treasure! I include a piece of it in
as many of my wool appliqué projects as I can. It
made a perfect birdhouse in a quilt. In the same
quilt, I also added some of our cats and dogs and
a beehive and bees (because my husband is a
beekeeper). Fun!
I don’t really use my quilts much outdoors,
but I design fabric for Robert Kaufman, and
each collection is based around memories of my
family. Often the photography for the quilts is
done outside in locations that correspond to the
fabric collection. For example, my first line was
in memory of my dad and about our family farm
and most of the pictures were taken on the farm.
Each new collection starts with a family member,
and then just kind of goes from there. The process
brings back so many memories, which evolve
into quilt designs. Grandpa’s Journal is the newest
collection and is in memory of my maternal
Grandfather, who was in the Navy for eight years.
Katie Solberg
One of my favorite designs is my Grandpa’s Porch project, which was inspired by my
grandfather and featured in the Spring 2022 issue of Primitive Quilts and Projects. I have
many fond memories of time spent in my grandparents’ backyard when I was a kid. They
had beautiful gardens and tons of potted geraniums along their patio. The Fourth of July
was an extra special occasion because my grandfather was the most patriotic man you’ll
ever meet. We always celebrated by attending the local parade in the morning followed by
time at the pool and then fireworks. The design was inspired by my memories of the little
flags we’d collect at the parade and Grandpa’s beautiful potted geraniums.
90
primitivequiltsandprojects.com
SUMMER 2023
Kay Harmon
Growing up as a child in northwest Arkansas, I was surrounded by nature.
Being the oldest of five children with parents who were self-employed,
I often found myself thinking of creative ways to entertain my siblings
using the outdoors as a built-in entertainment service. Some of my fondest
memories are running in the yard playing Land of the Giants.
My designs often incorporate vegetation and animals. My most popular
series of nature-themed quilts was published during 2013: Daylily Days,
Springtime Frolic, Pumpkin Spice, and Pomegranates and Holly. Although the quilt
I designed for this issue doesn’t have nature-themed appliqué, the beautiful
fabrics provided by Diamond Textiles brought to mind the cherry blossoms I
remember as a child.
f
o
e
m
o
H
d
e
y
d
d
n
ha
wool
Dawn@SewCherished.com • (352) 459-3825 • www.SewCherished.com
Wholesale inquiries welcome
SUMMER 2023
primitivequiltsandprojects.com
91
Quilts for Cops
For over 20 years, Bobbie Bebereia served as a 911
dispatcher at Oregon’s second largest PSAP 911
center. Her husband was a deputy sheriff, and
recently retired after 25 years with a large metro
area sheriff’s department. Bobbie was always
grateful he returned home safe at the end of
every shift, and was well aware many are not so
lucky. She combined her love of quilting with her
appreciation for all those not so fortunate.
In 2016, Bobbie founded Quilts for Cops with
the intention of providing some kind of comfort,
via handmade quilts, to law enforcement officers,
first responders (fire fighters, EMTs, and 911
dispatchers), and K9s who are injured in the
line of duty. Quilts for Cops is a registered 501c3
foundation.
The effort began in Oregon, with small groups
meeting regularly to make quilts, and some
individuals who would pick up kits, make the
tops, and drop them off. The cause has grown,
with folks all over the country helping to make
and quilt the quilts.
Since its founding, the number of beautiful
handmade quilts sent across the nation to first
responders and law enforcement officers who
have been injured in the line of duty grows daily.
In 2016, 31 quilts were made and distributed.
Since then that number has grown to almost 800
each year, as shown below. And as of January 31,
2023, 82 quilts were made and delivered already.
Quilts sent by year
720
790
627
WHAT's YOUR cAUSE?
We want to hear about your charitable
efforts. Send your information to
judy@primitivequiltsandprojects.com.
primitivequiltsandprojects.com
312
330
2017
2018
2019
31
2016
92
311
SUMMER 2023
2020
2021
2022
In February this year, Quilts for Cops was
presented with a Certificate of Appreciation
by Daughters of the American Revolution for
Excellence in Community. The group is honored to
receive this award as only two are given each year.
If you would like to help, monetary donations
are greatly appreciated and needed. Two to four
officers are injured each day. 100% of donations go
toward the purchase of top-quality fabrics, thread,
batting, backing, shipping and maintaining the
website. All of the quilts are pieced and quilted
with volunteer hours. All donations are tax
deductible and receive a 501c3 receipt, and your
name or business will be listed on the group’s
“Donor Wall.” Checks may be mailed to Quilts for
Cops, PO Box 402, Newberg, Oregon 97132. You can
also make quilts or quilt tops, or provide quilting
services.
For more information, visit quiltsforcops.com,
or their Facebook page, Quilts for Cops.
SUMMER 2023
primitivequiltsandprojects.com
93
About The
s
t
c
e
j
o
r
P
Stitch Tips,
appliqué
tricks, and
more
Templates
You will notice the format of the templates varies from project to
project. The primitive style is all about personal expression and
individuality, and whenever possible, we have used the original handdrawn artwork of our project designers to preserve its primitive charm.
The templates in the template insert do not include a seam
allowance. If doing fusible web appliqué, you may need to reverse any
necessary pieces. Because felted wool does not fray, there is no need to
turn under the edges of the appliqué pieces.
General Guidelines
Before starting each project, keep these basics in mind:
• Yardage requirements are based on 43/44"-wide 100% cotton fabric
• Sew with a ¼" seam allowance unless otherwise noted
• Sew with right sides together unless otherwise noted
Project Level of Difficulty
Our technical editor has assigned each project
a level of difficulty—beginner, intermediate
or advanced. Our handy “crow” system will
help you decide which project best suits your
particular skill level.
Project Level
of Difficulty
Beginner
Corrections
No one is perfect. Although we tested and proofread the projects
multiple times, mistakes do happen. Before beginning a project, visit
primitivequiltsandprojects.com/corrections for any corrections.
Design Notes
Some of the fabric swatches used as text backdrops and page design
elements in this issue are by Moda Fabrics, Andover Fabrics and Marcus
Fabrics. The wool swatches were hand-dyed by Jeni Gaston.
Common Acronyms:
thank
d like to
ASSISTANCE We woul
Blueprint for
at Marietta
Jennifer and Sheila
rns
ing and testing patte
assisting us in enlarg
em
rt. We have given th
in our template inse
they
r magazines so that
a complete set of ou
y
e any of the necessar
can help you enlarg
templates.
int
act: Marietta Bluepr
For assistance, cont
arietta, OH 45750
309 Putnam St., LL, M
.–5 p.m.
Monday–Friday 8 a.m
/fax)
740-373-6312 (phone
ail.com
mariettablueprint@gm
94
primitivequiltsandprojects.com
WOF - Width of Fabric
LOF - Length of Fabric
HST - Half Square Triangle
QST - Quarter Square Triangle
Results
We believe the instructions for the projects are
accurate. The projects have been proofread by our
technical editor. Because materials, equipment, and
individuals vary, your results may differ slightly from
what is shown for each project. We cannot guarantee
results or assume liability for unexpected results.
SUMMER 2023
A
special Stitches
E
A
G
C
F
E
A
D
C
E
B
D
B
C
Blanket Stitch
Backstitch
C
B
C
D
F
B
A
Chain Stitch
Couching Stitch
Feather Stitch
B
D
AC
A
E
DC
BA
B
A
Fern Stitch
B
French Knot
Appliqué Methods
Freezer Paper Method for Wool Appliqué
1. Trace the templates in the template insert
the number of times noted in the cutting
instructions, onto the dull side of freezer
paper, leaving approximately ¼" between
tracings.
2. Cut out each shape just outside the
drawn lines.
3. Using the wool setting of your iron,
press the shiny side of the freezer-paper
templates onto the right side of the
appropriate-colored wools,
4. Cut out each shape on the drawn lines,
then remove the freezer paper.
Lazy Daisy Stitch
2. Cut out each shape just outside the
drawn lines.
3. Following the manufacturer’s instructions,
press the fusible web templates onto the
wrong side of the appropriate-colored wools.
4. Cut out each shape on the drawn lines,
then remove the fusible web backing.
Press’n SeaL Tracing Method
Place Press’n Seal over the template design
and trace desired lines. Peel off the Press’n
Seal, place it onto the wool piece where
you want the stitching to be and smooth
it out. Stitch. Peel off the Press’n Seal after
you have finished stitching, very carefully
pulling down towards yourself, not up/away.
Stem Stitch
Needle & Thread Chart
Purpose
Big-stitch quilting
Needle
Thread
#7 Embroidery or
12 Wt. perle cotton
wool appliqué needle
Hand-quilting
Size 11 quilting
thread
needles
Cotton appliqué
Needleturn appliqué
Size 11 appliqué
needle
Size 11 milliner
100 Wt. silk
60 Wt. cotton
Embroidery
#7, #9, or #10
Embroidery needle
Wool appliqué
needle
#24 Chenille needle
12 Wt. perle cotton
50 Wt. cotton
floss
Embroidery floss,
with 2 strands
Piecing by hand
Embroidery needle
long enough to hold
a lot of stitches
#9 is good length
50 Wt. cotton
Piecing by machine
#80 Sewing machine
needle
50 Wt. cotton
Shirring,
standing wool
Shirring needle 5-6"
Heavy-duty thread
Whipstitch
edge of rug
Jumbo tapestry
needle
Yarn
Wool, wool appliqué
(on cotton and on
wool)
#22, #24 Chenille
needle
#7 - #9 Embroidery
or wool appliqué
needle
Large-eye
embroidery needle
8 or 12 Wt.
perle cotton
6-Strand floss,
using 2 strands
2-Strand floss or
wool thread
Any thickness
Fusible Method for Wool Appliqué
1. Trace the templates in the template insert
the number of times noted in the cutting
instructions, onto the paper side of fusible
web, leaving approximately ¼" between
tracings.
Running Stitch
SUMMER 2023
primitivequiltsandprojects.com
95
g
n
i
t
i
s
i
V th
Wi
JJ Stitches
A cozy and inviting quilt shop, JJ Stitches is
nestled in Sun Prairie, Wisconsin. Sun Prairie
(original home of artist Georgia O’Keefe) has
become known in the region for its high quality
of life, historic downtown, and a destination for
quilters. There are multiple quilt shops in the
area, enabling each store to specialize, support
one another, and send customers each other’s
way. JJ Stitches specializes in reproduction fabrics,
flannels, homespuns, woven cottons, and wool.
The store opened in 1975, with both of the
original owners’ names starting with the letter J.
When Julie’s son was born, she’d take him to
daycare, and hang out at JJ Stitches. She began
working there as manager in 1982, and in keeping
with the ‘JJ’ theme, became known as “Just Julie.”
She purchased the business in 2000 and began
designing quilts. Two years later, Julie began
designing fabric for Windham.
At any given time, you’ll find 40–50 finished
quilts as samples with kits. Atop the bolts of fabric
collections sit vintage cake pans with coordinating
fat quarters to make it easy for customers to
choose fabrics and walk around the store to find
matching possibilities. The back room is full of
d employees
Julie (second from left) an
e, Deb Breunig
(from left) Marilyn Lecces
the store running.
and Jean Jacobson keep
96
primitivequiltsandprojects.com
SUMMER 2023
flannels for baby quilts; customers love the old
roasting pans filled with one-yard bundles of baby
flannel. Pick two and make a receiving blanket.
JJ Stitches also carries 150–200 bolts of wool—
washed, felted, and cut into 1⁄8-yard pieces.
Everybody knows everybody and their families
from way back. By now, the grandchildren of
the original customers are now customers. The
building JJ Stitches is in has been owned by the
same family since the late 1880s.
Collecting and reproducing vintage quilts has
been a passion of Julie’s for over 40 years. This
love has led to additional opportunities within
the quilting industry, including designing fabric,
authoring two books with Martingale Publishing,
and designing projects and offering kits for
several magazines, including American Patchwork
& Quilting, McCalls, and our very own Primitive
Quilts and Projects. The store was chosen as a
“top ten shop” by Quilt Sampler magazine in 2001.
Occasionally Julie will hit the road (within driving
distance) with a trunk show of her 100–150
vintage quilts.
Julie says it’s wonderful to go to the store
every day and still love what she does after all
these years. She welcomes you to shop online,
visit on Facebook and Instagram, and if you
find yourself in Wisconsin, she would love to
meet you in person. For more information, visit
www.jjstitches.com.
Summer 2023
Permission is granted to photocopy
this page for personal use only
B
Butterfly Table Mat
A
Carrie Buck
C
D
(Pages 10–13)
Page 1 of 1
Summer 2023
Permission is granted to photocopy
this page for personal use only
A
B
W
G
V
C
D
F
E
Grand Ole Flag
Missie Carpenter
(Pages 14-19)
Page 1 of 2
I
H
J
Summer 2023
Permission is granted to photocopy
this page for personal use only
K
L
M
U
Grand Ole Flag
Missie Carpenter
(Pages 14-19)
Page 2 of 2
N
O
P
Q
R
S
T
Summer 2023
Tattered and Torn
Mardi Niles
(Pages 20–23)
Permission is granted to photocopy
this page for personal use only
Page 1 of 3
Join patterns here
Summer 2023
Tattered and Torn
Mardi Niles
Permission is granted to photocopy
this page for personal use only
(Pages 20–23)
Page 2 of 3
Join patterns here
Summer 2023
Permission is granted to photocopy
this page for personal use only
Tattered and Torn
Mardi Niles
(Pages 20–23)
Page 3 of 3
Summer 2023
Permission is granted to photocopy
this page for personal use only
C
B
A
Strawberry Ridge
Deb Eggers
(Pages 24-30)
Page 1 of 1
Summer 2023
Seasonal Sentiments
Summer’s Joy
Deanna Hodson
(Pages 31-35)
Page 1 of 4
Permission is granted to photocopy
this page for personal use only
Join patterns
1 here
Join patterns
2 here
Summer 2023
Seasonal Sentiments
Summer’s Joy
Deanna Hodson
(Pages 31-35)
Page 2 of 4
Permission is granted to photocopy
this page for personal use only
Join patterns
1 here
Join patterns
4 here
Summer 2023
Seasonal Sentiments
Summer’s Joy
Deanna Hodson
(Pages 31-35)
Page 3 of 4
Permission is granted to photocopy
this page for personal use only
Join patterns
2 here
Join patterns
3 here
Summer 2023
Seasonal Sentiments
Summer’s Joy
Deanna Hodson
(Pages 31-35)
Page 4 of 4
Permission is granted to photocopy
this page for personal use only
Join patterns
4 here
Join patterns
3 here
Sweet Medley
Katie Hebblewhite
and Kim Zenk
(Pages 40-44)
5
Grass 21/2" x 41/4"
14D
16E
16C
18
F 20
B
21
21
Dark Green 21/2" x 5"
E
18
C
18
13B
A
B
18
20
19
18
C
19
A
19
B 0F
19 2
16D
17B
17C
21
C
Permission is granted to photocopy
this page for personal use only
Summer 2023
G
20
20
E
17D
12E
16B
14B
15B
12B
21A
21
D
12D
16F
14C
15C
12C
22
23
Light Brown
11/2" x 31/2"
20
A
21E
20
D
20
C
18
D
18
B
18
G
20 19D
H
13C
Page 1 of 5
1
8
Green Variegated 43/4" x 73/4"
Orange Houndstooth 21/2" x 31/2"
4
2
15A
14A
16A
3
10
12A
13A 17A
Sweet Medley
23A
9
Katie Hebblewhite
11
and Kim Zenk
(Pages 40-44)
22A
Page 2 of 5
Oatmeal 2" x 2"
6
7
23C
22C
Fuchsia 33/4" x 61/4"
Dark Brown
11/2" x 11/2"
13
14
15
Medium Brown
11/2" x 2"
22B
17
23B
12
16
Summer 2023
Gold Variegated Twinkle 3" x 43/4"
Permission is granted to photocopy
this page for personal use only
Summer 2023
Sweet Medley
Katie Hebblewhite
and Kim Zenk
(Pages 40-44)
Page 3 of 5
Permission is granted to photocopy
this page for personal use only
Diagram A
Join patterns
here
Sweet Medley
Katie Hebblewhite
and Kim Zenk
(Pages 40-44)
Page 4 of 5
Dashed lines:
Basting stitch for
shape layout.
Dotted lines:
Chain stitch using
grass green perle cotton.
Solid lines:
Stem stitch using
grass green perle cotton.
Summer 2023
Permission is granted to photocopy
this page for personal use only
Diagram B
Sweet Medley
Join
patterns
here
Katie Hebblewhite
and Kim Zenk
(Pages 40-44)
Page 5 of 5
Summer 2023
Permission is granted to photocopy
this page for personal use only
Summer 2023
Permission is granted to photocopy
this page for personal use only
Summer Splendor
Wool Mat
Katie Solberg
(Pages 58-61)
Join patterns here
to create quarter pattern
Page 1 of 2
F
D
A
B
E
C
Summer 2023
Summer Splendor
Wool Mat
Katie Solberg
(Pages 58-61)
Join patterns here
to create quarter pattern
Permission is granted to photocopy
this page for personal use only
Page 2 of 2
Summer 2023
Country Blues
Julie Porter
(Pages 62-67)
Page 1 of 6
Permission is granted to photocopy
this page for personal use only
1A
1C
1B
1D
Permission is granted to photocopy
this page for personal use only
2A
2E
Summer 2023
Country Blues
Julie Porter
(Pages 62-67)
2B
2D
Join patterns
here
2C
Page 2 of 6
Summer 2023
Country Blues
Julie Porter
(Pages 62-67)
Page 3 of 6
Permission is granted to photocopy
this page for personal use only
2F
2G
2H
2A
Join patterns
here
2I
3E
3H
3B
3I
Summer 2023
Permission is granted to photocopy
this page for personal use only
3D
3C
3A
3G
Country Blues
Julie Porter
(Pages 62-67)
Page 4 of 6
3F
Summer 2023
Permission is granted to photocopy
this page for personal use only
Country Blues
Julie Porter
(Pages 62-67)
Page 5 of 6
4A
4B
Summer 2023
Permission is granted to photocopy
this page for personal use only
Country Blues
Julie Porter
(Pages 62-67)
Page 6 of 6
4C
G
B
E
D
A
F
C
M
K
J
H
L
I
Summer 2023
Spangled Stars
Mini Pillows
Karen Yaffe
(Pages 68-71)
Permission is granted to photocopy
this page for personal use only
M
Page 1 of 2
M
G
C
J
C
I
K
C
L
I
H
G
Spangled Stars
Mini Pillows
Karen Yaffe
(Pages 68-71)
Page 2 of 2
D
B
F
A
Summer 2023
Permission is granted to photocopy
this page for personal use only
E
E
Summer 2023
Grandpa’s Stars
Julie Letvin
(Pages 72-78)
Permission is granted to photocopy
this page for personal use only
Page 1 of 2
J
K
L
G
F
M
N
H
Summer 2023
Grandpa’s Stars
Julie Letvin
(Pages 72-78)
Page 2 of 2
Permission is granted to photocopy
this page for personal use only
E
B
I
C
D
A