/


Текст
T
here has never been a better time to own, or be thinking of owning, a Nikon
digital camera. A digital camera has a simple function; it captures light that,
in turn, creates the kind of images we all see and enjoy. This capturing of light
is such a rewarding experience for beginner and professional alike and the
camera you choose is the key to unleashing the kind of photographer you want
to be. The popularity of digital cameras has increased over recent years and if
you want to be both a technically accomplished and creative photographer, then
a camera system with manual controls, plus the option to swap out different
lenses, should still be your first choice. The range of Nikon cameras, lenses and
accessories available to photographers is nothing short of staggering. For those
looking to delve into photography for the first time, or are looking to upgrade,
the amount of choice can be a little overwhelming. The aim of this manual is to
give you a concise overview of the range of equipment available.
We also have a number of guides that can show you how to get the very best
out of it and have a lot of fun as you learn how to master your Nikon.
CONTENTS
GEAR UP WITH NIKON
8 Get to know your camera
12 The Nikon KeyMission range
14 KeyMission accessories
16 Digital compact cameras
20 Nikon DX-format DSLRs
22 Nikon FX-format DSLRs
24 The Nikon Z series mirrorless system
26 NIKKOR DX-format lenses
30 NIKKOR FX-format lenses
36 NIKKOR Z series lenses and accessories
38 Nikon Speedlights
SHARPEN YOUR
KNOWLEDGE
42 Shooting modes
44 Focusing
46 Shutter speed and camera shake
48 Aperture and depth of field
50 Focal length and zoom
52 Exposure and metering
4
www.bdmpublications.com
TOP TIPS & PROJECTS
54 We understand you have to start
somewhere, but in the fullness of
time, when you find yourself hitting
a wall and wondering
what is required to
help you improve,
seeking out some
handy hints and
tips can give you that
important jump-start
into some next
level photography.
NIKON CREATIVE
66 Pet photography
68 Neutral density grads
70 Assignment: circus
80 Wildlife at the zoo
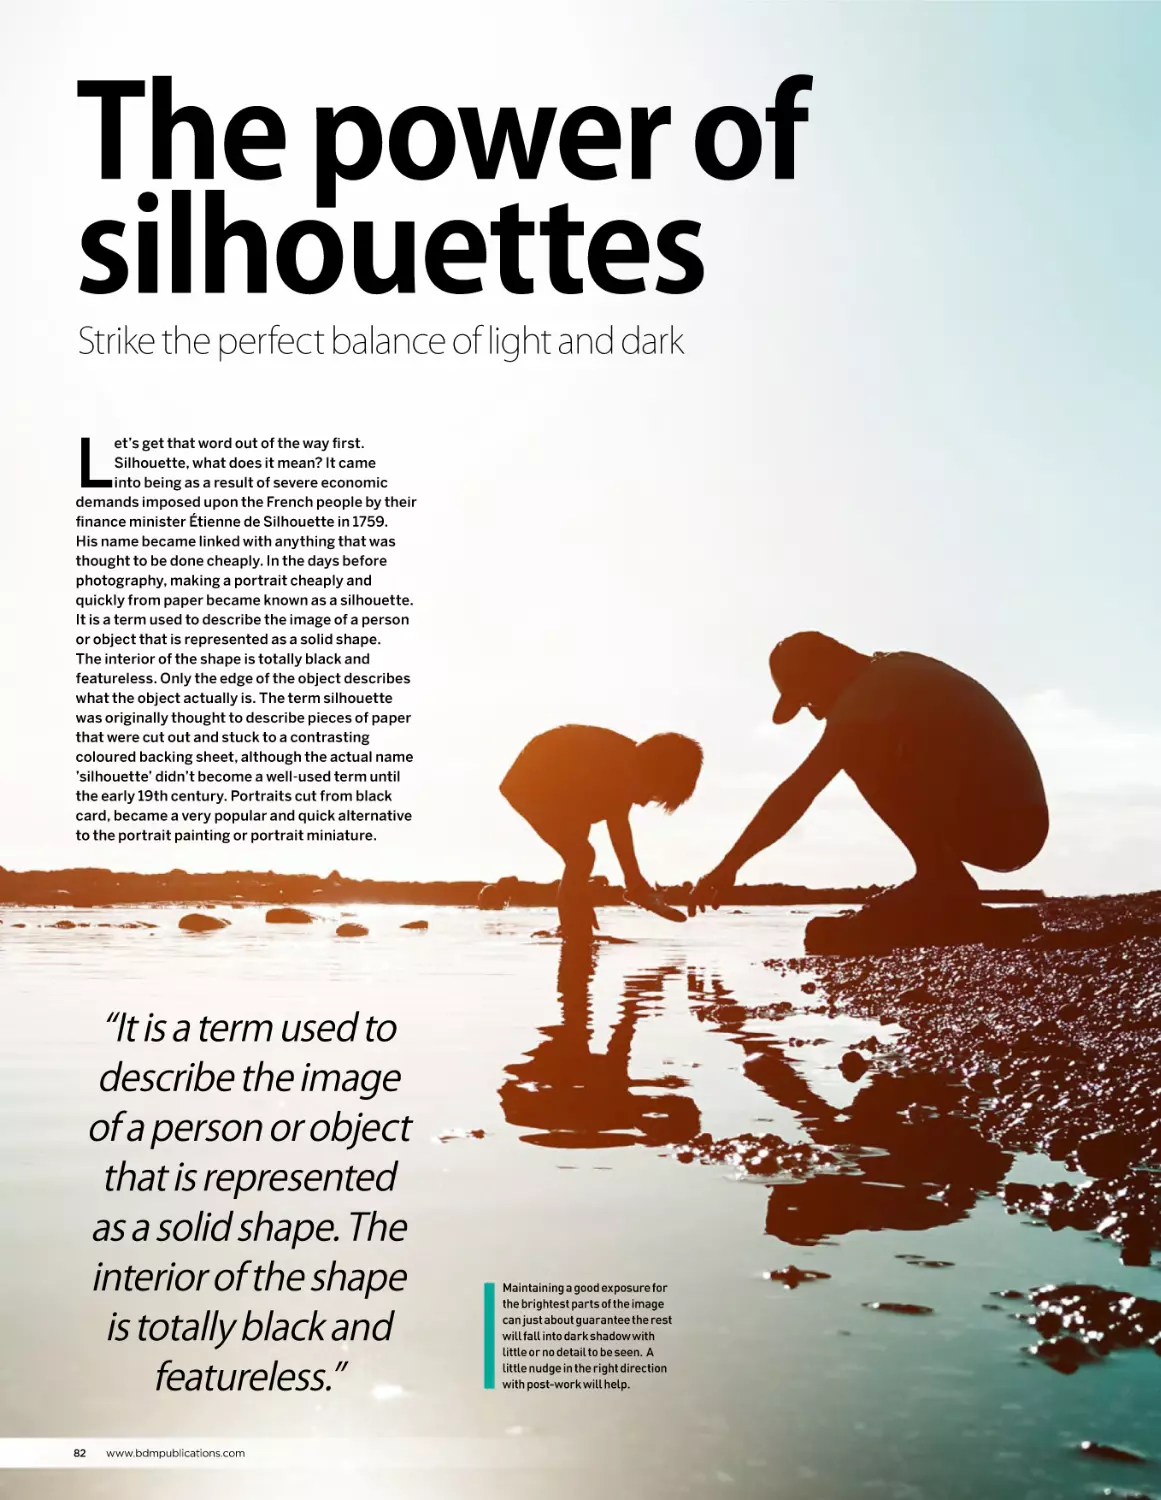
82 The power of silhouettes
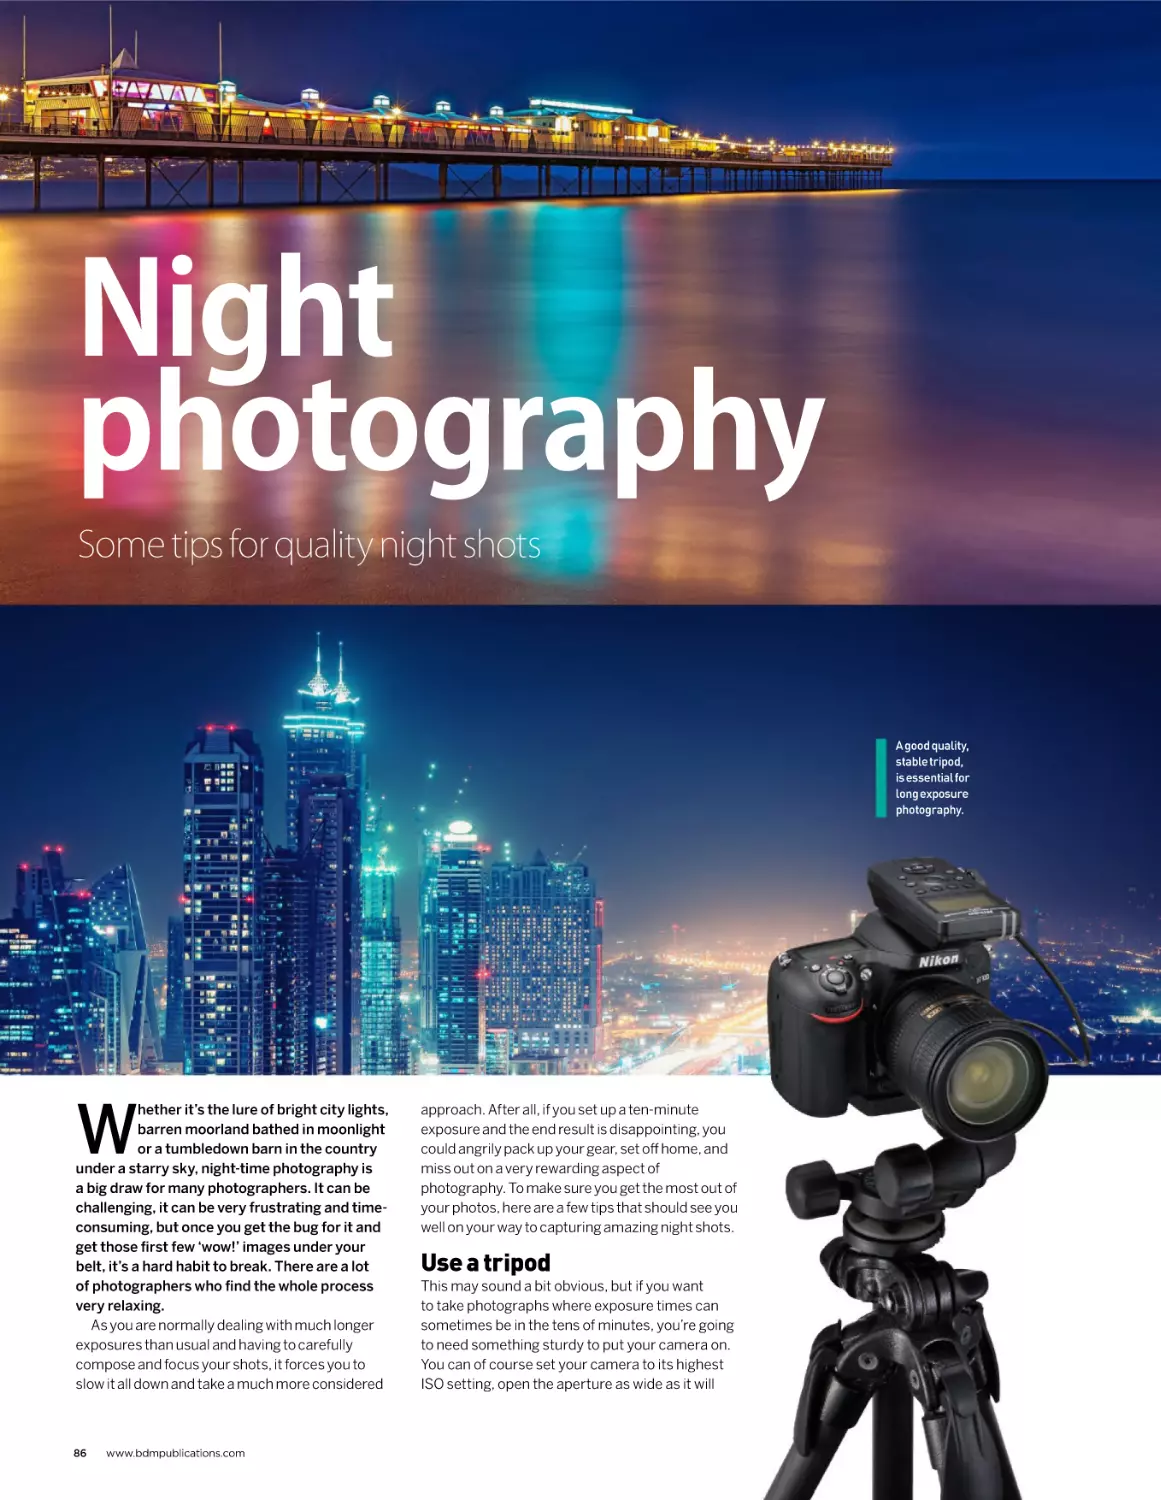
86 Night photography
90 Assignment: happy colours
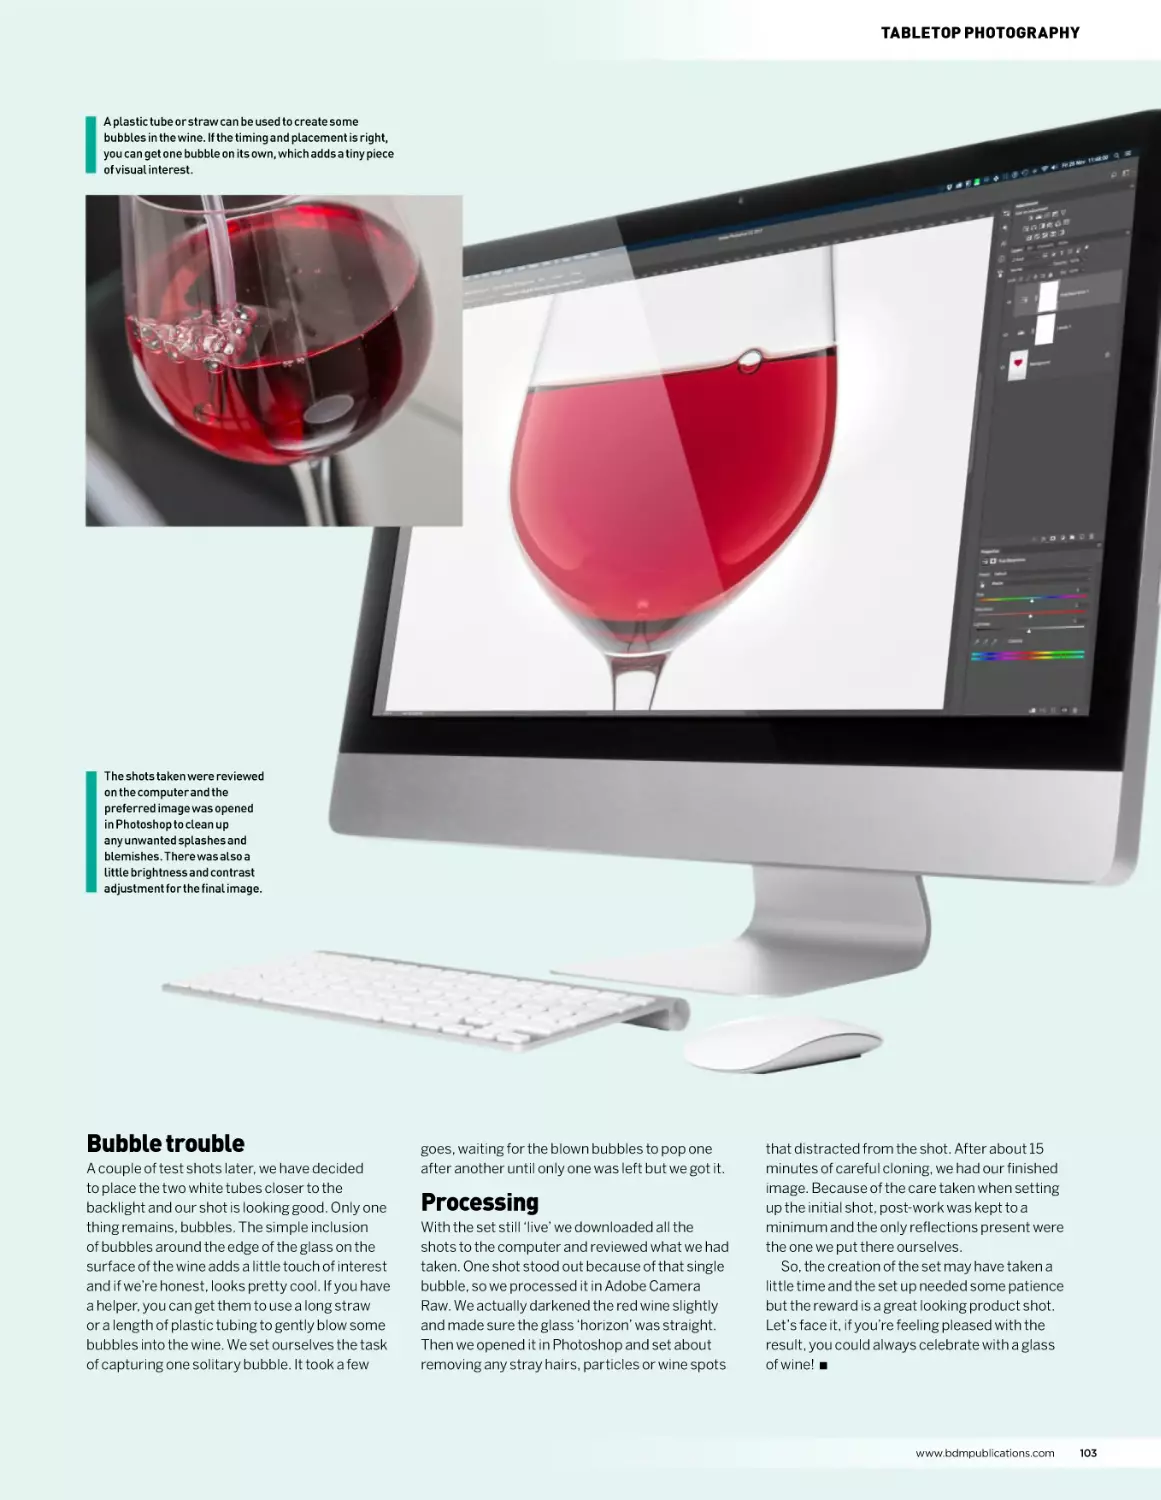
98 Tabletop photography
104 Fireworks photography
110 The fisheye lens
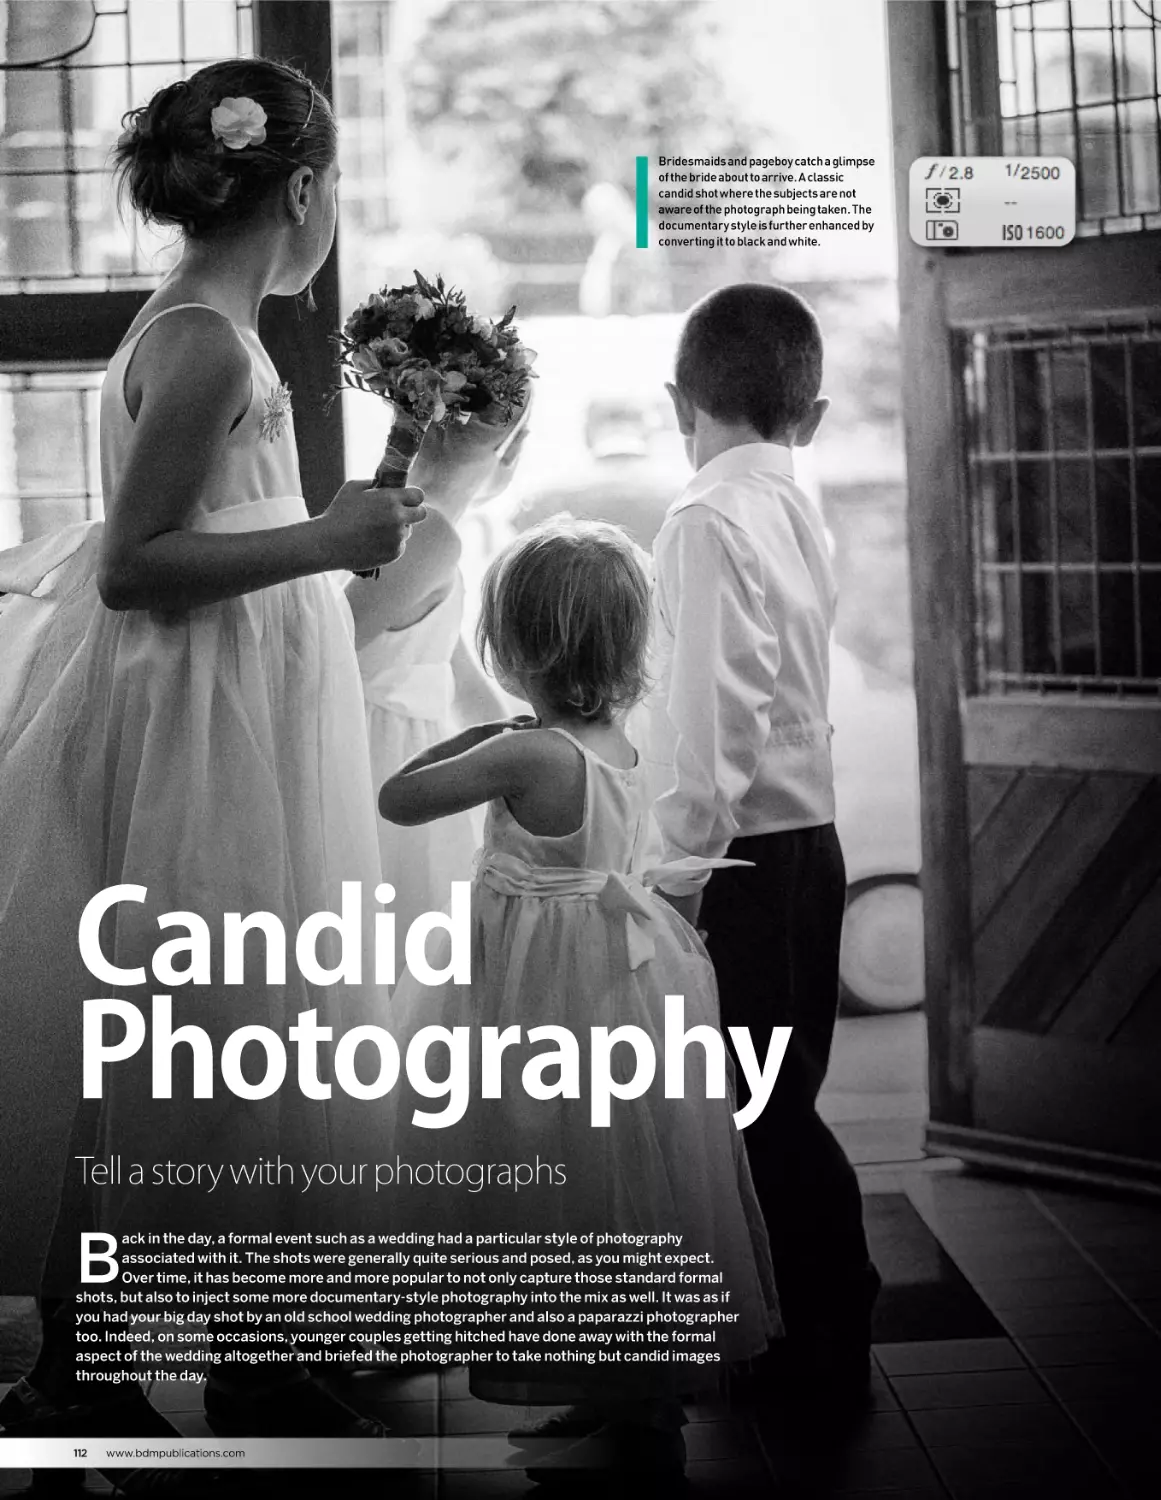
112 Candid photography
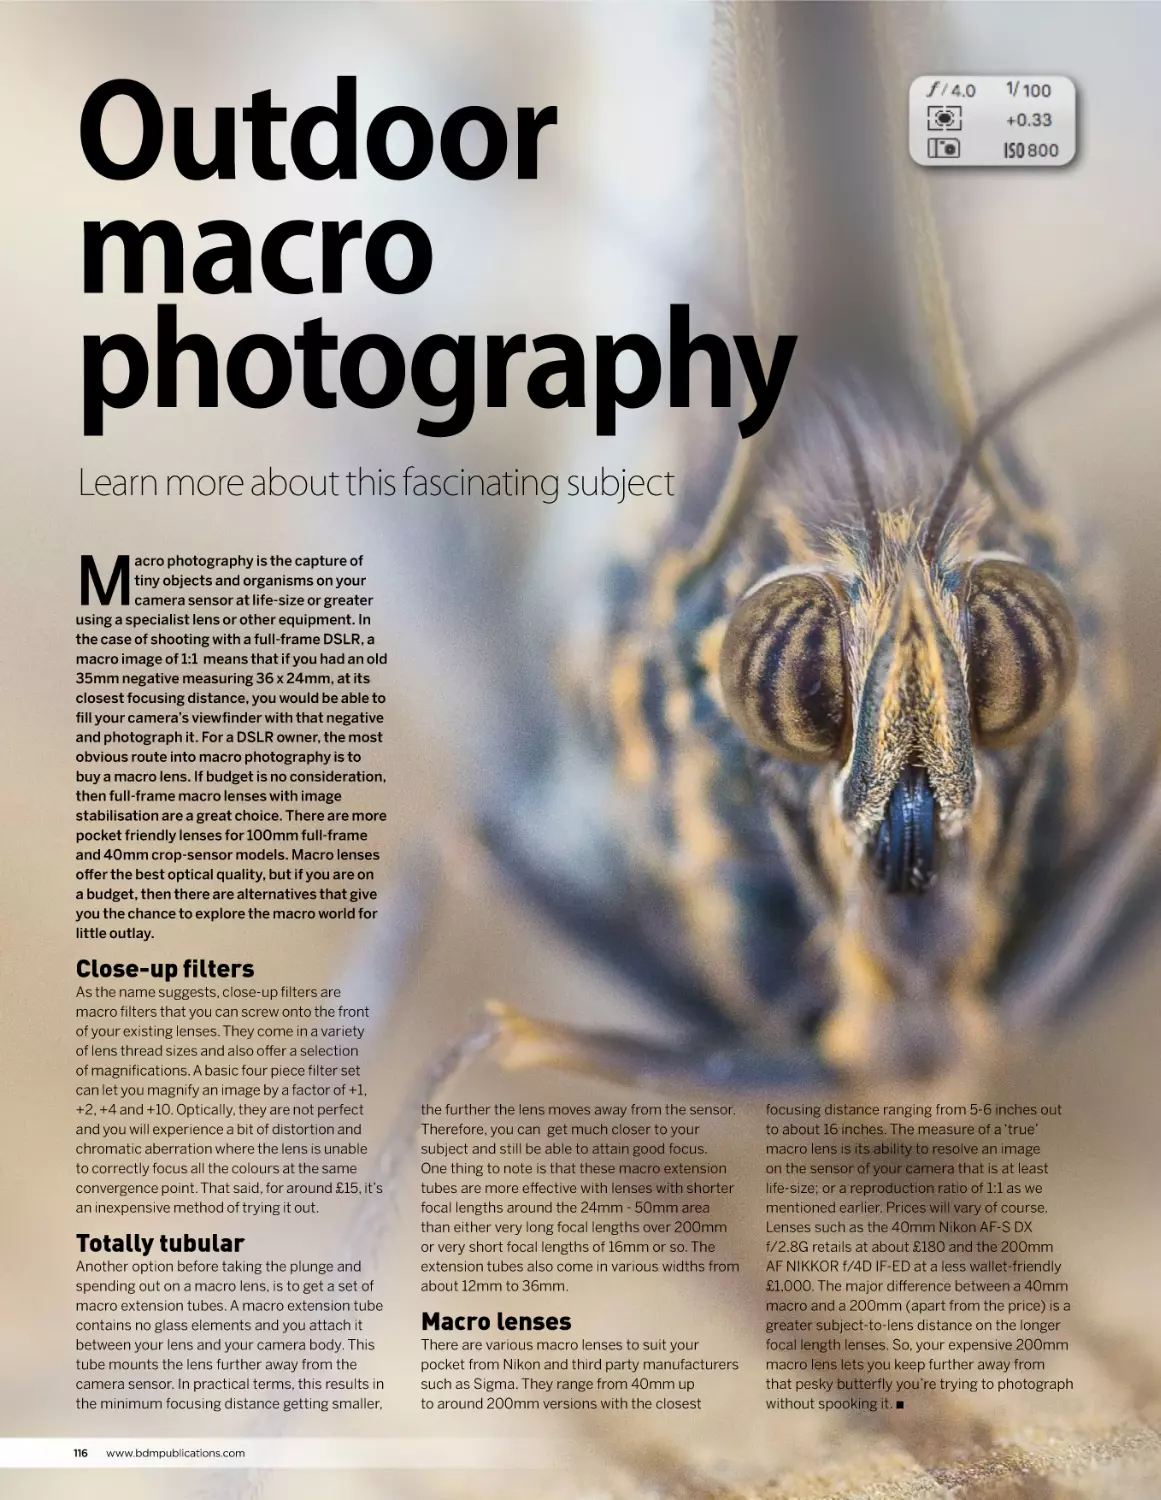
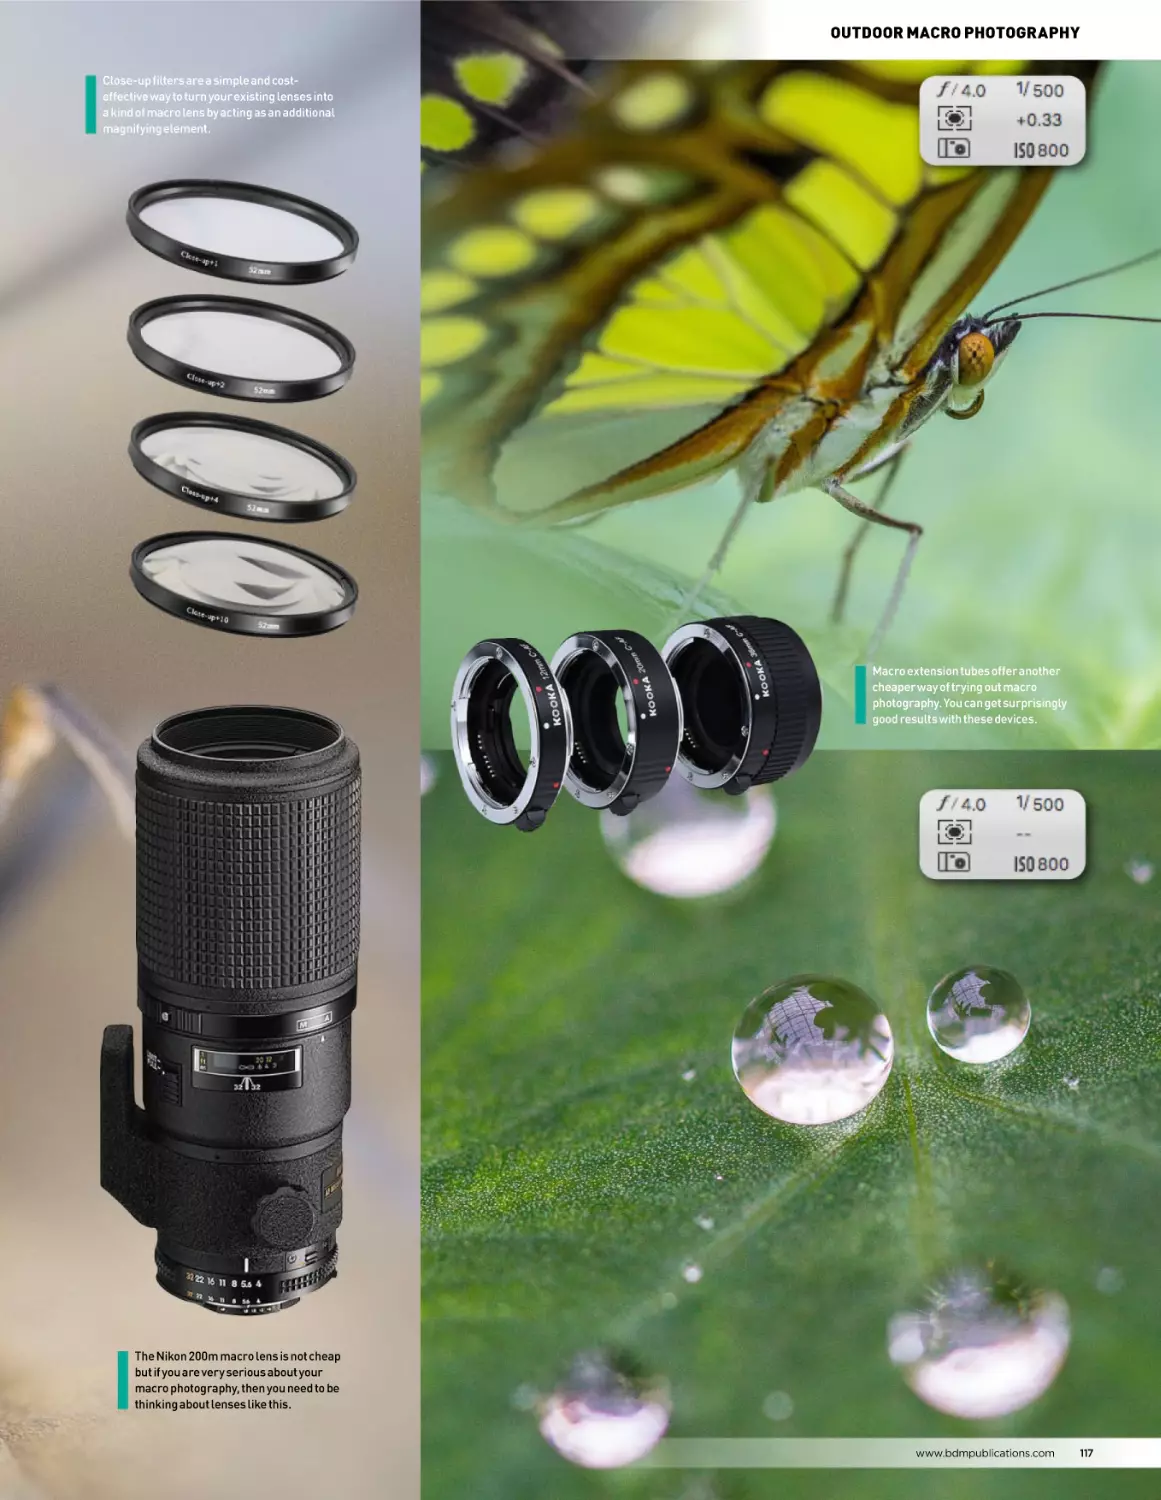
116 Outdoor macro photography
118 Shallow depth of field
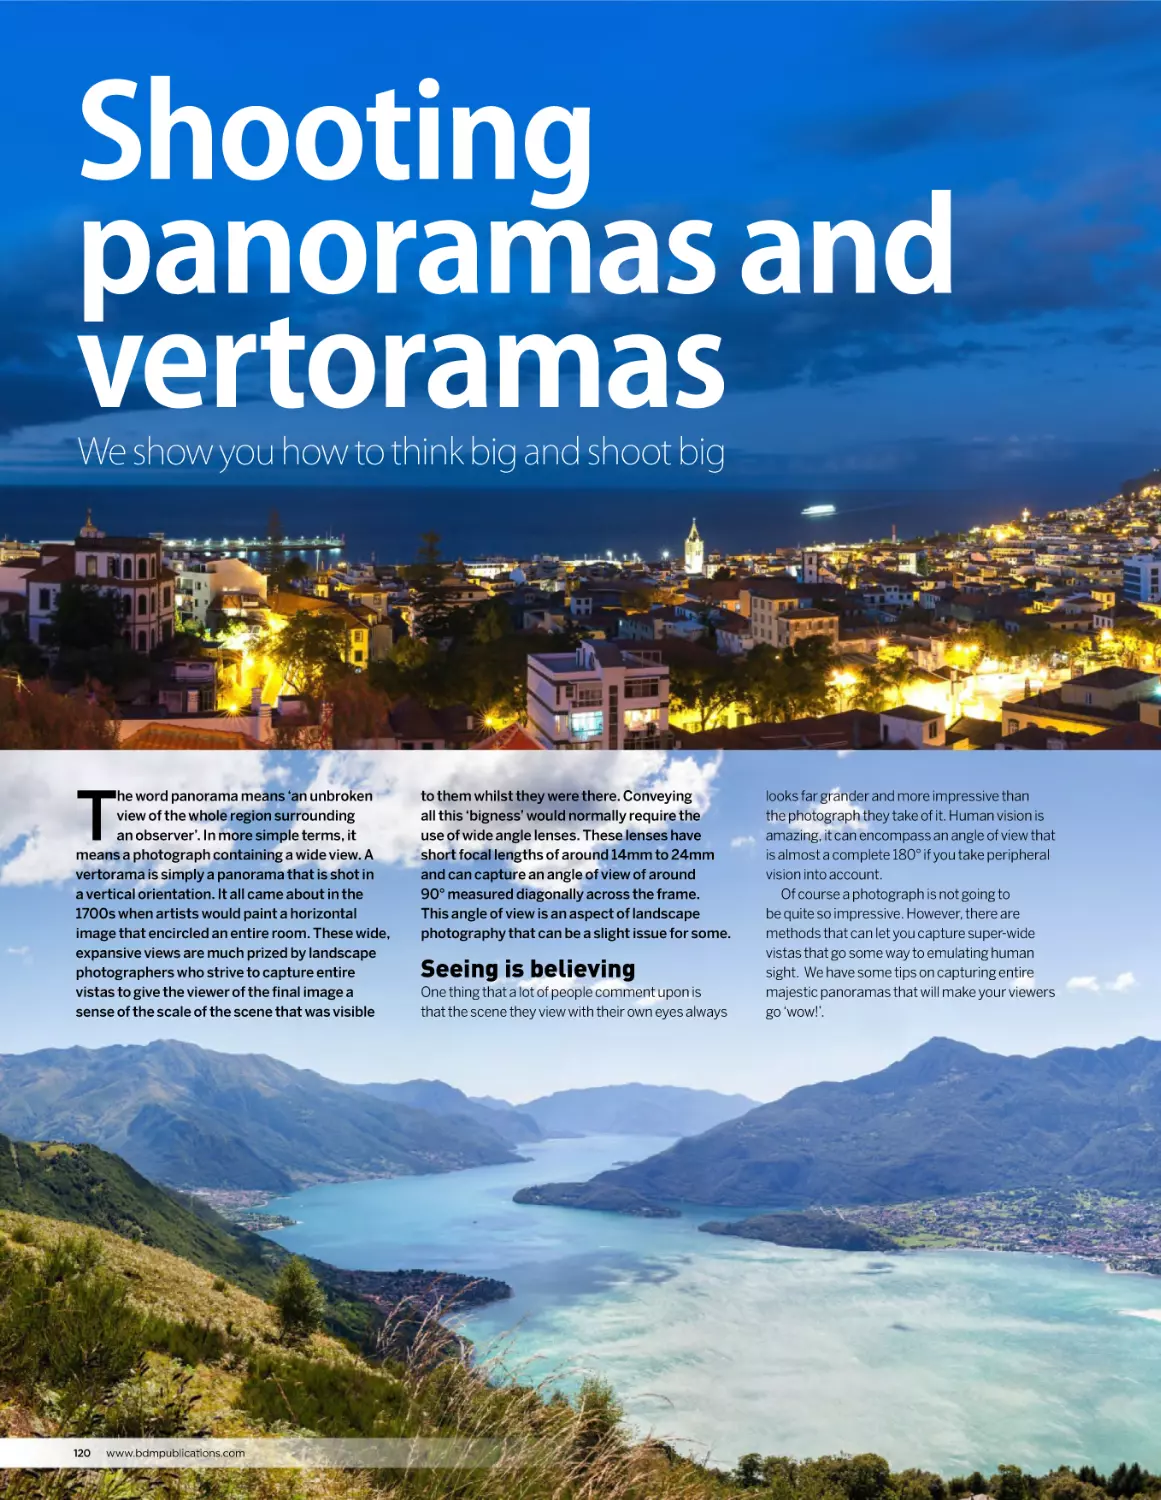
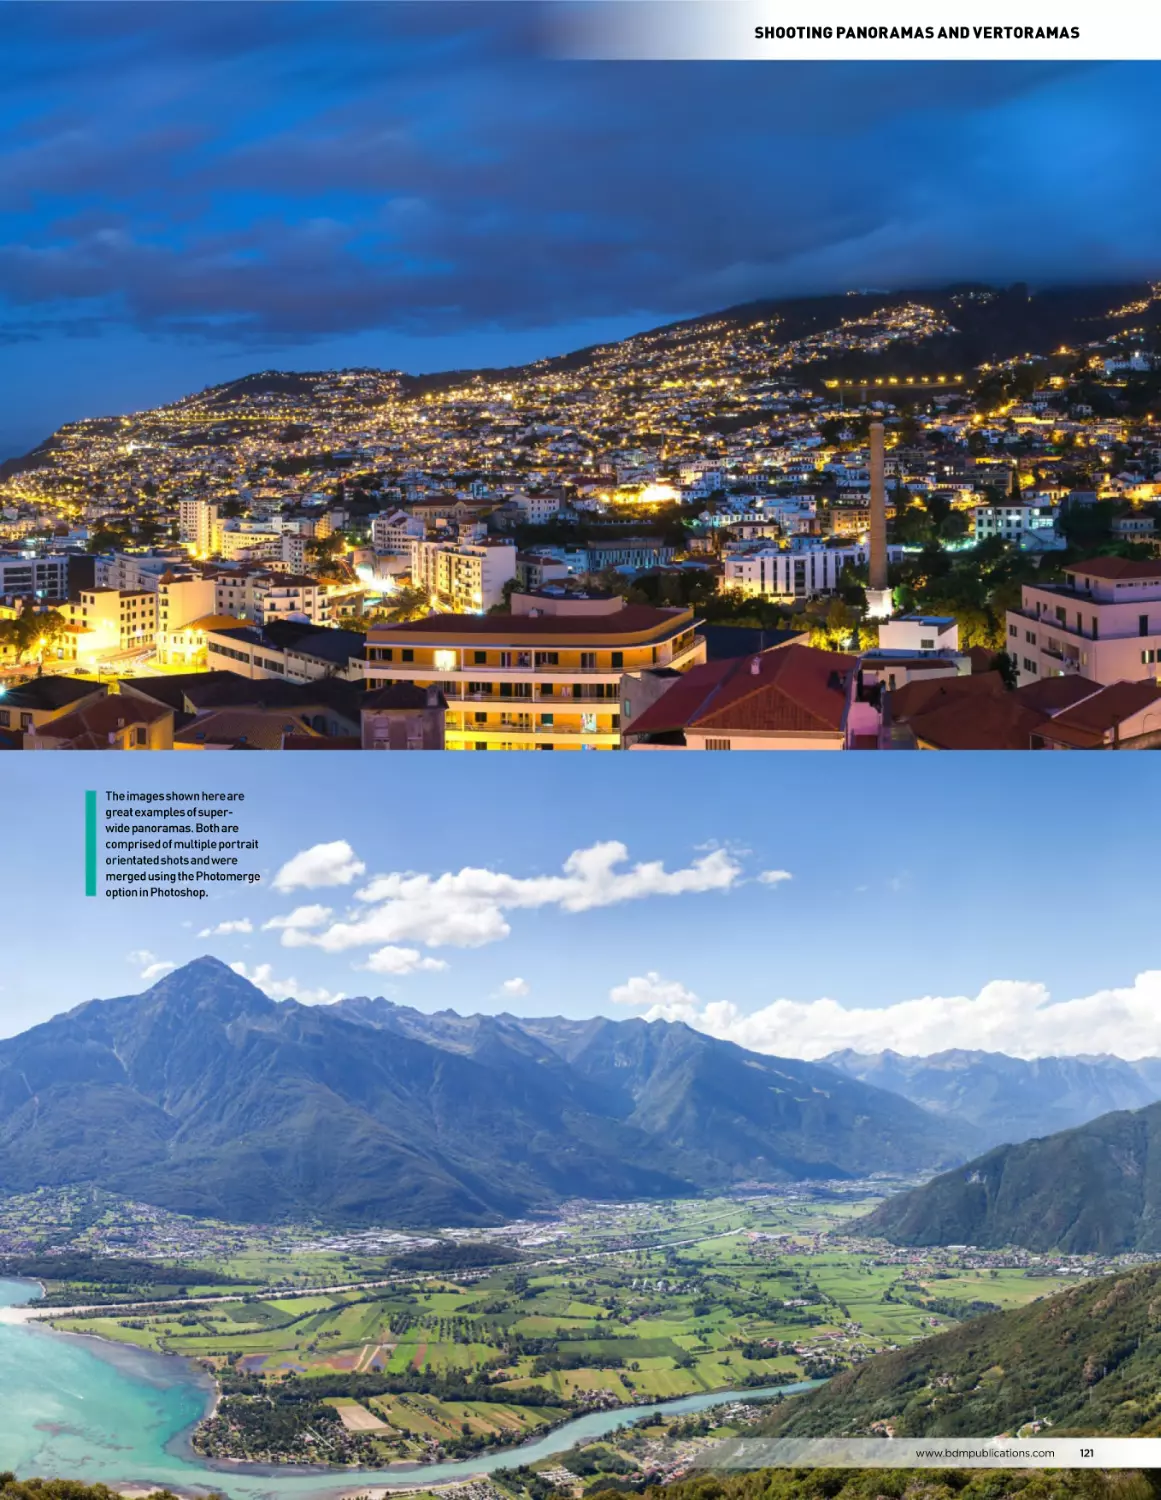
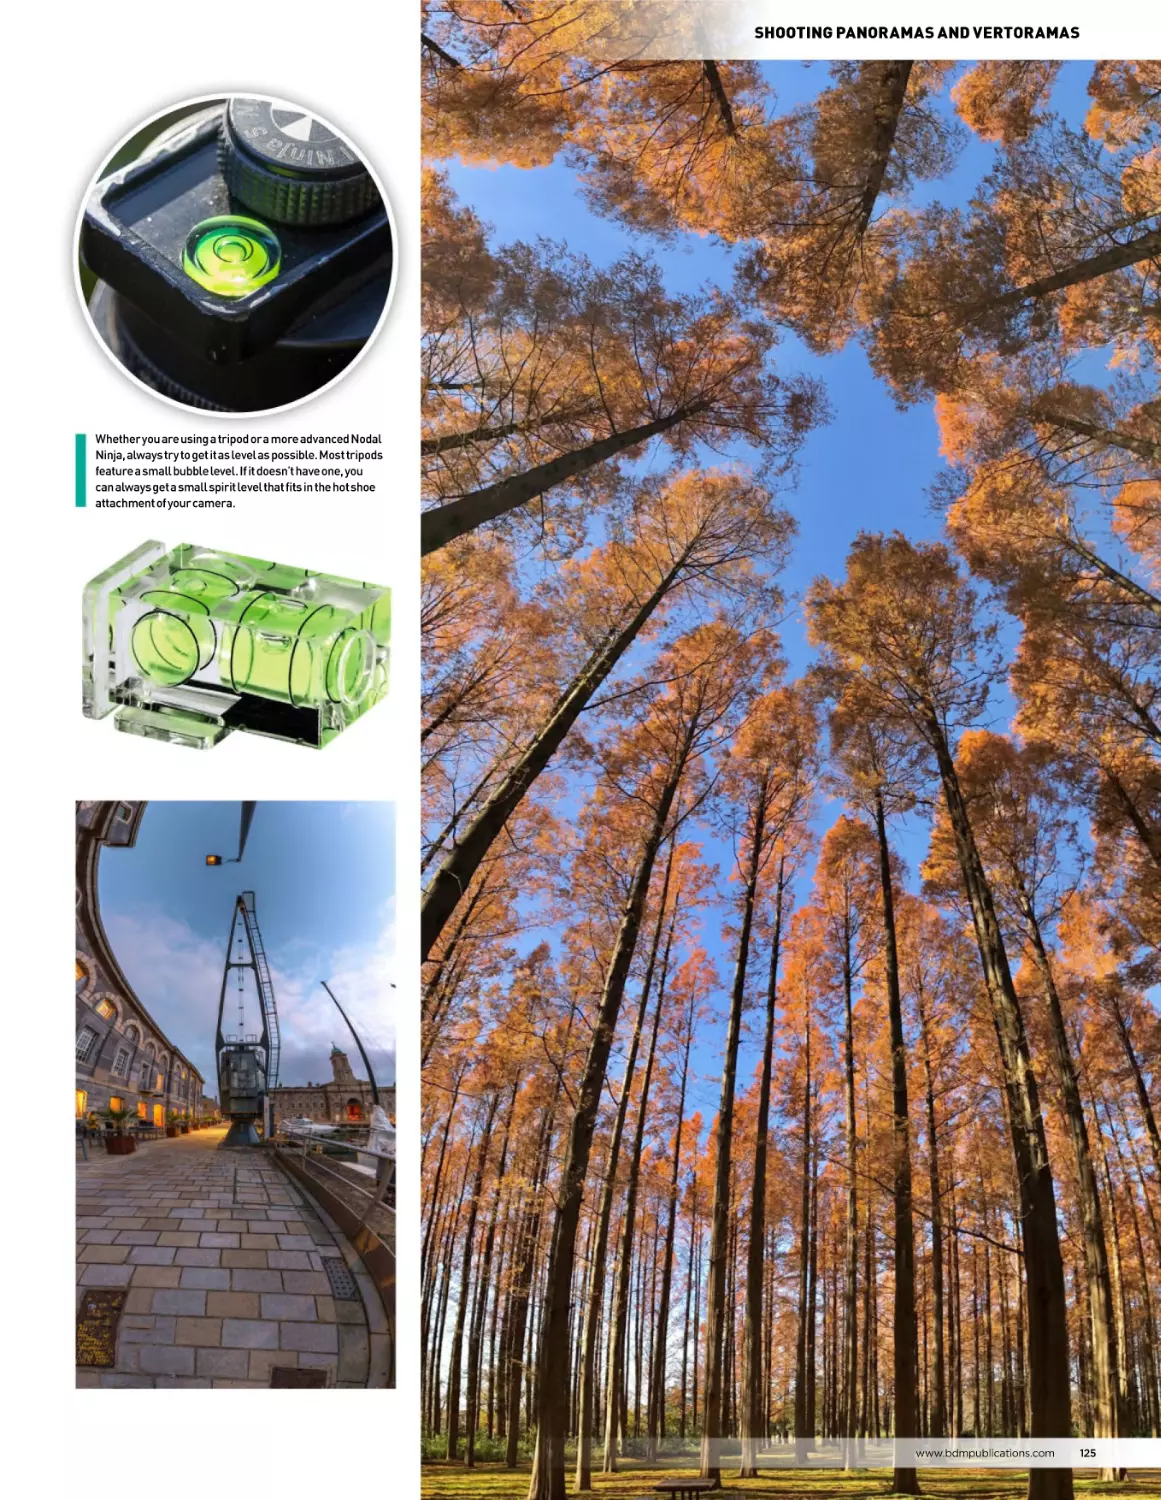
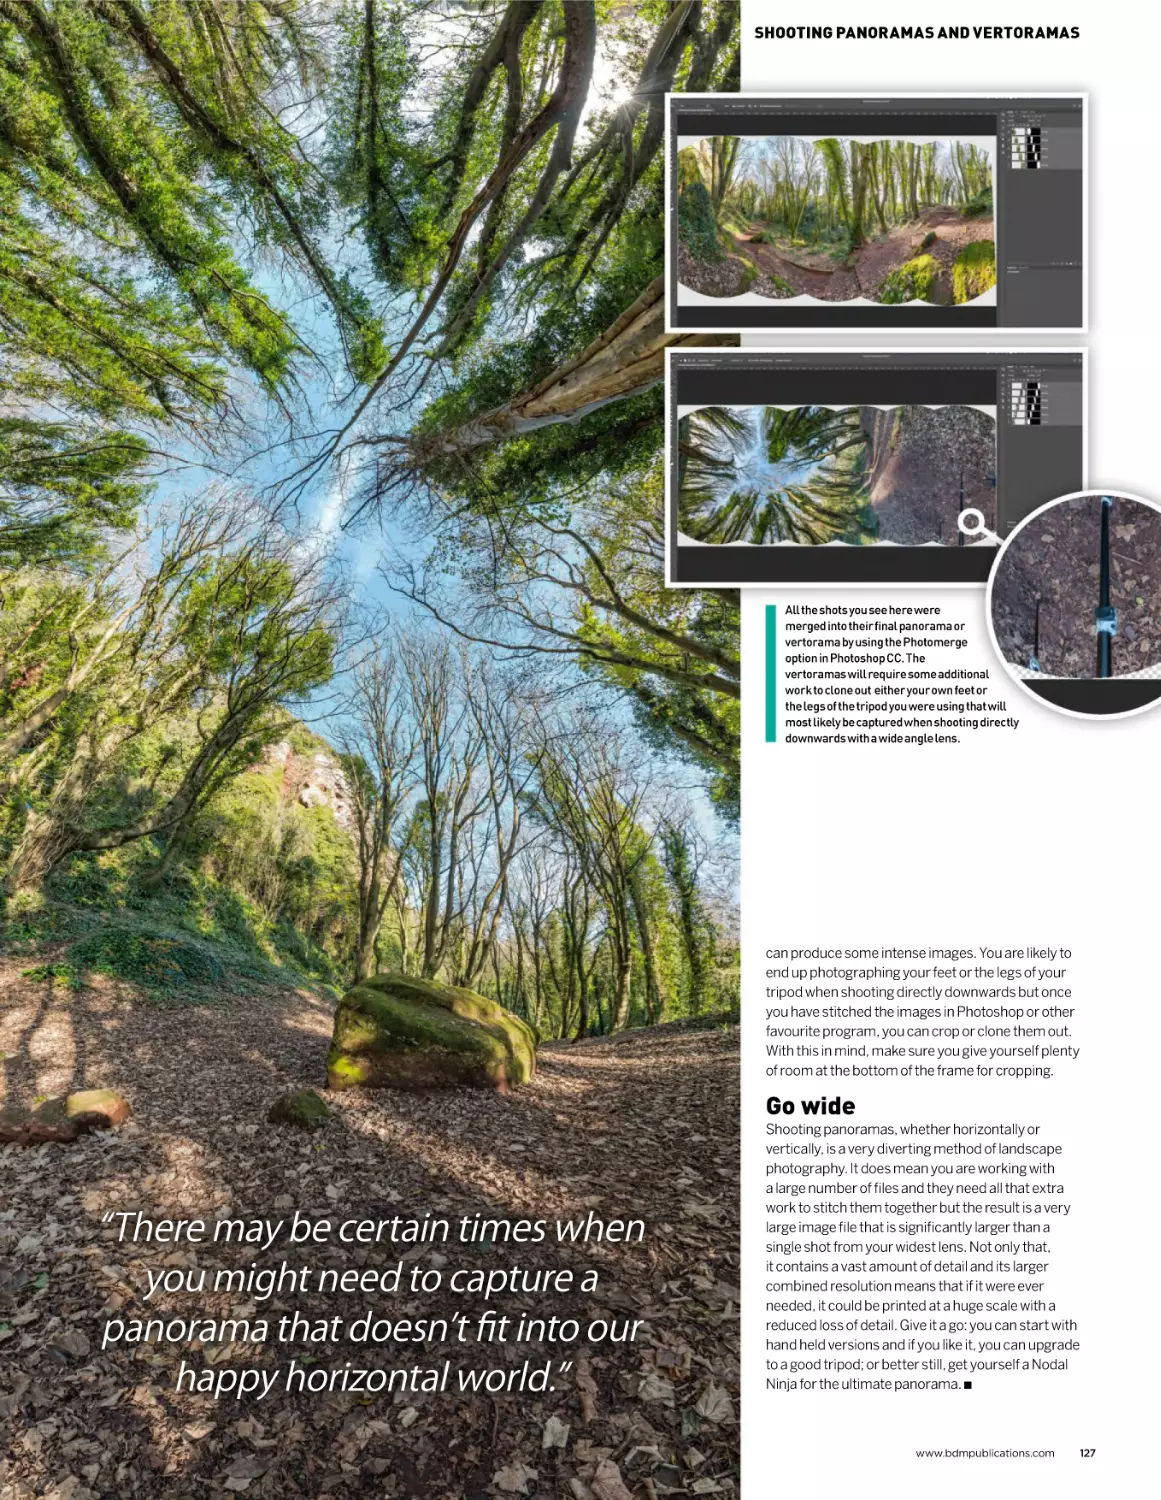
120 Shooting panoramas and vertoramas
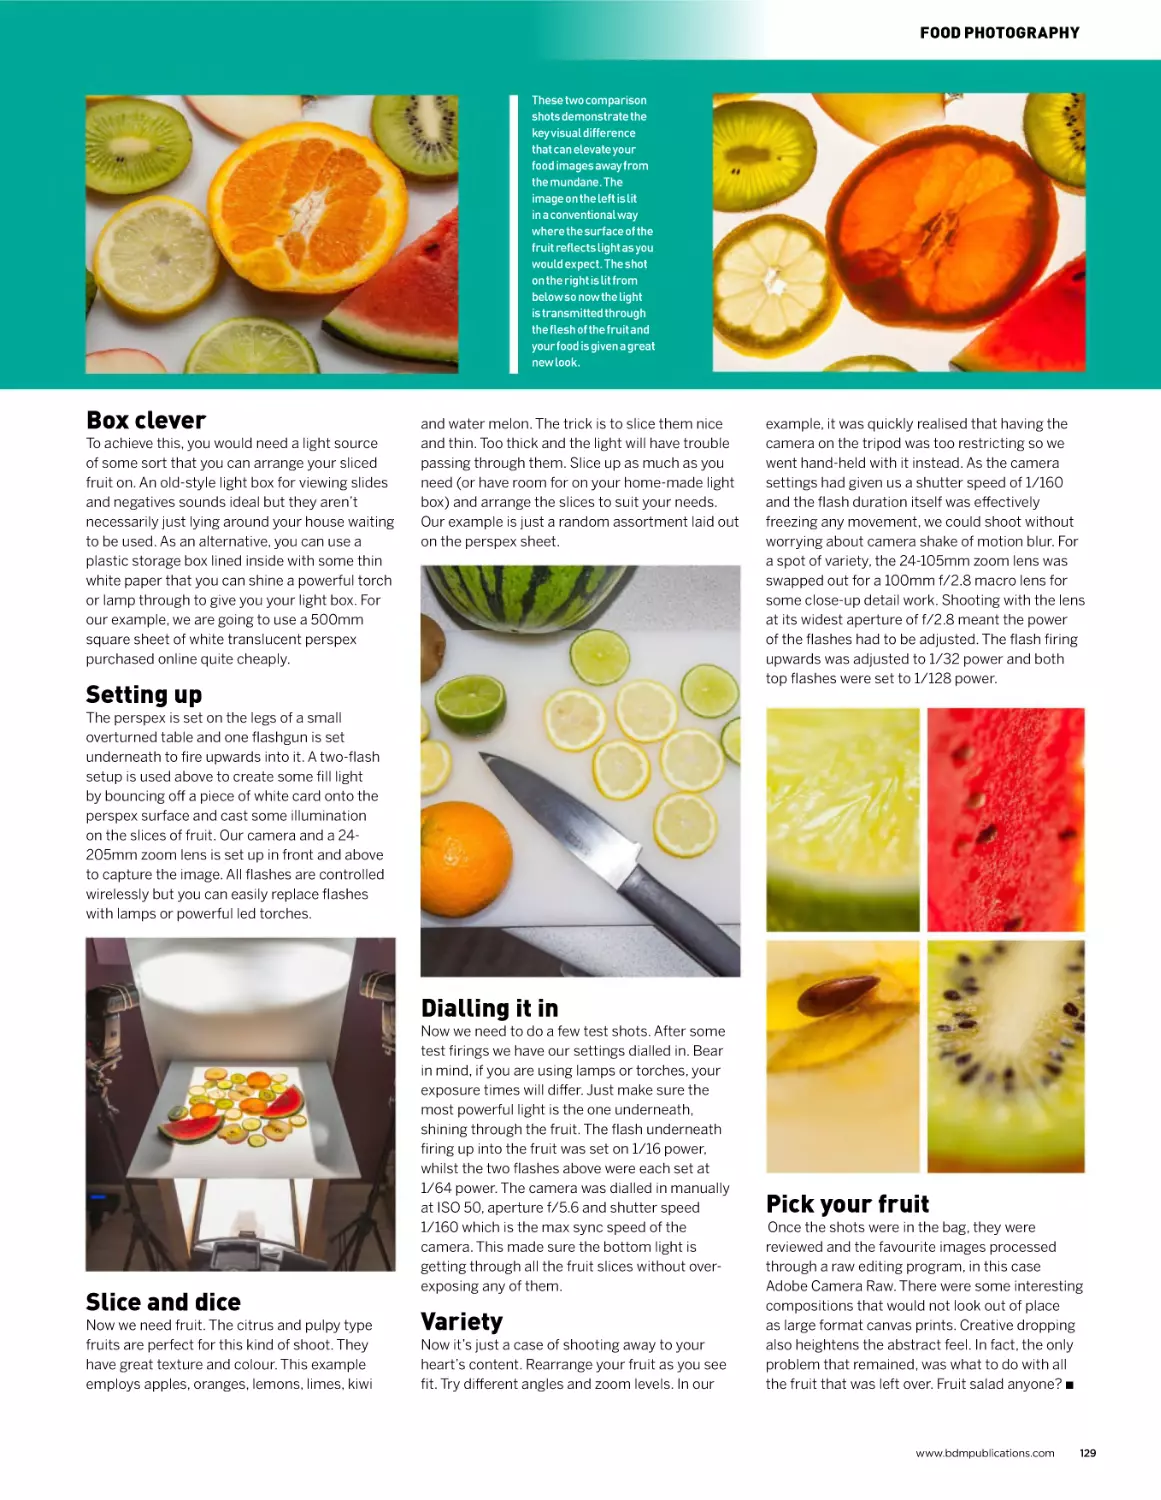
128 Food photography
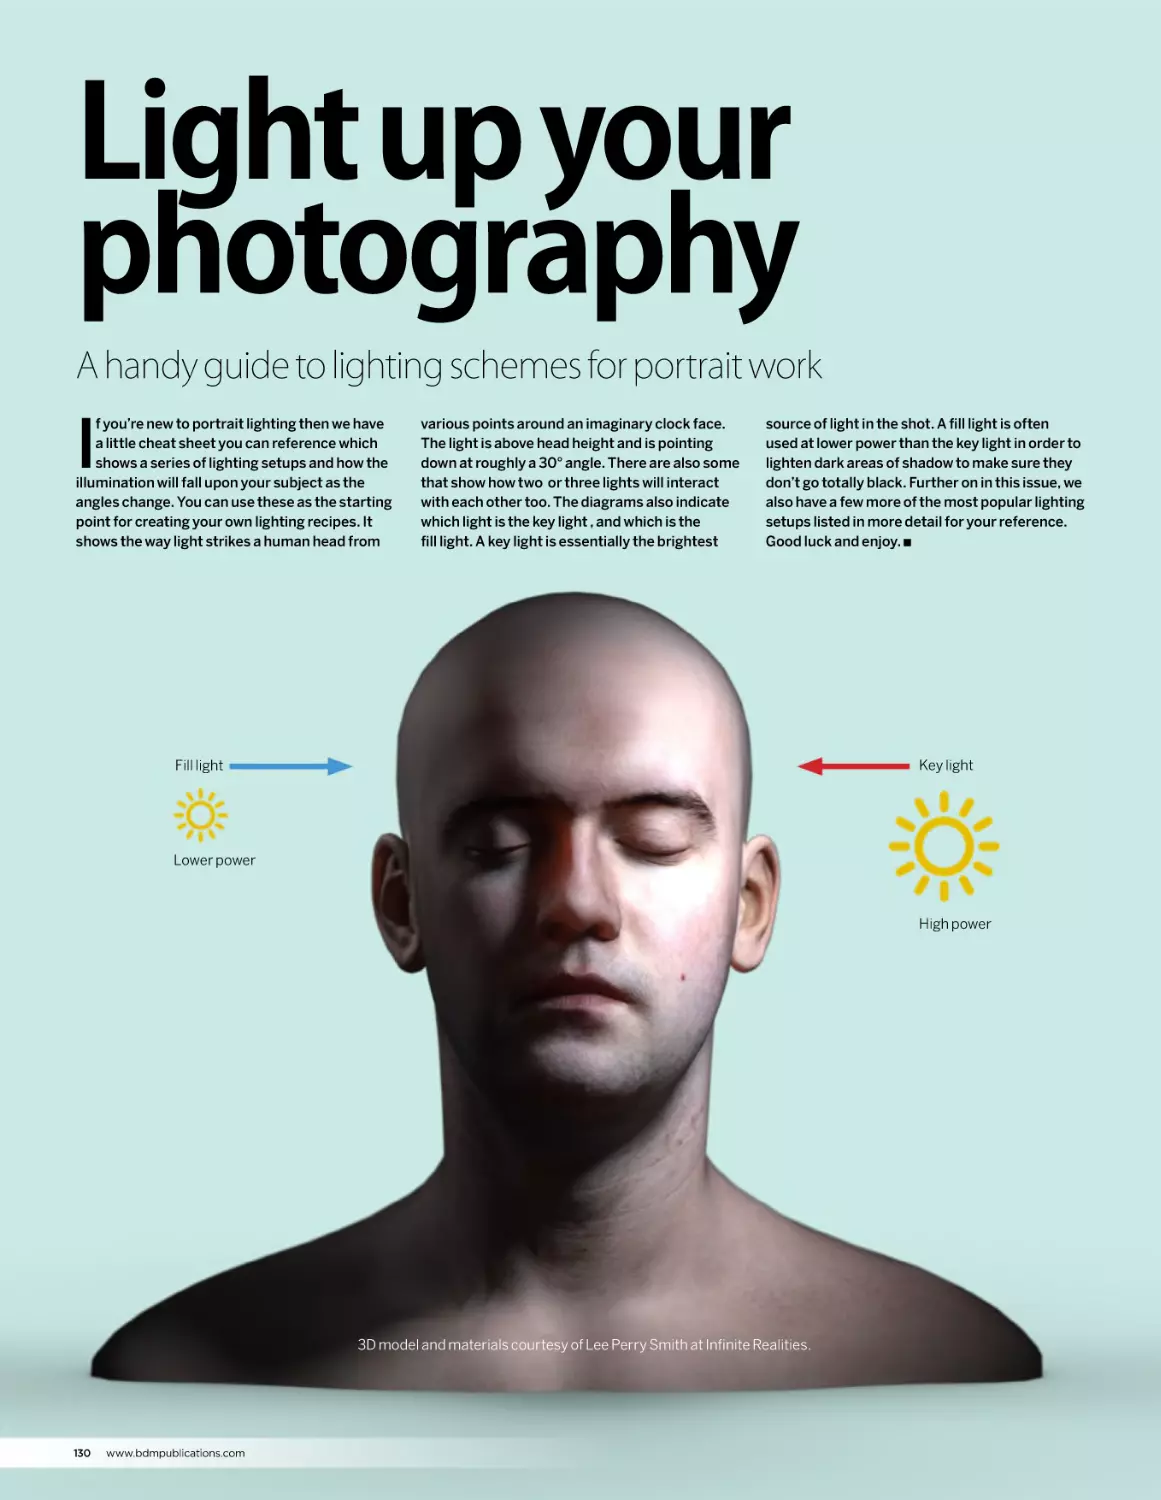
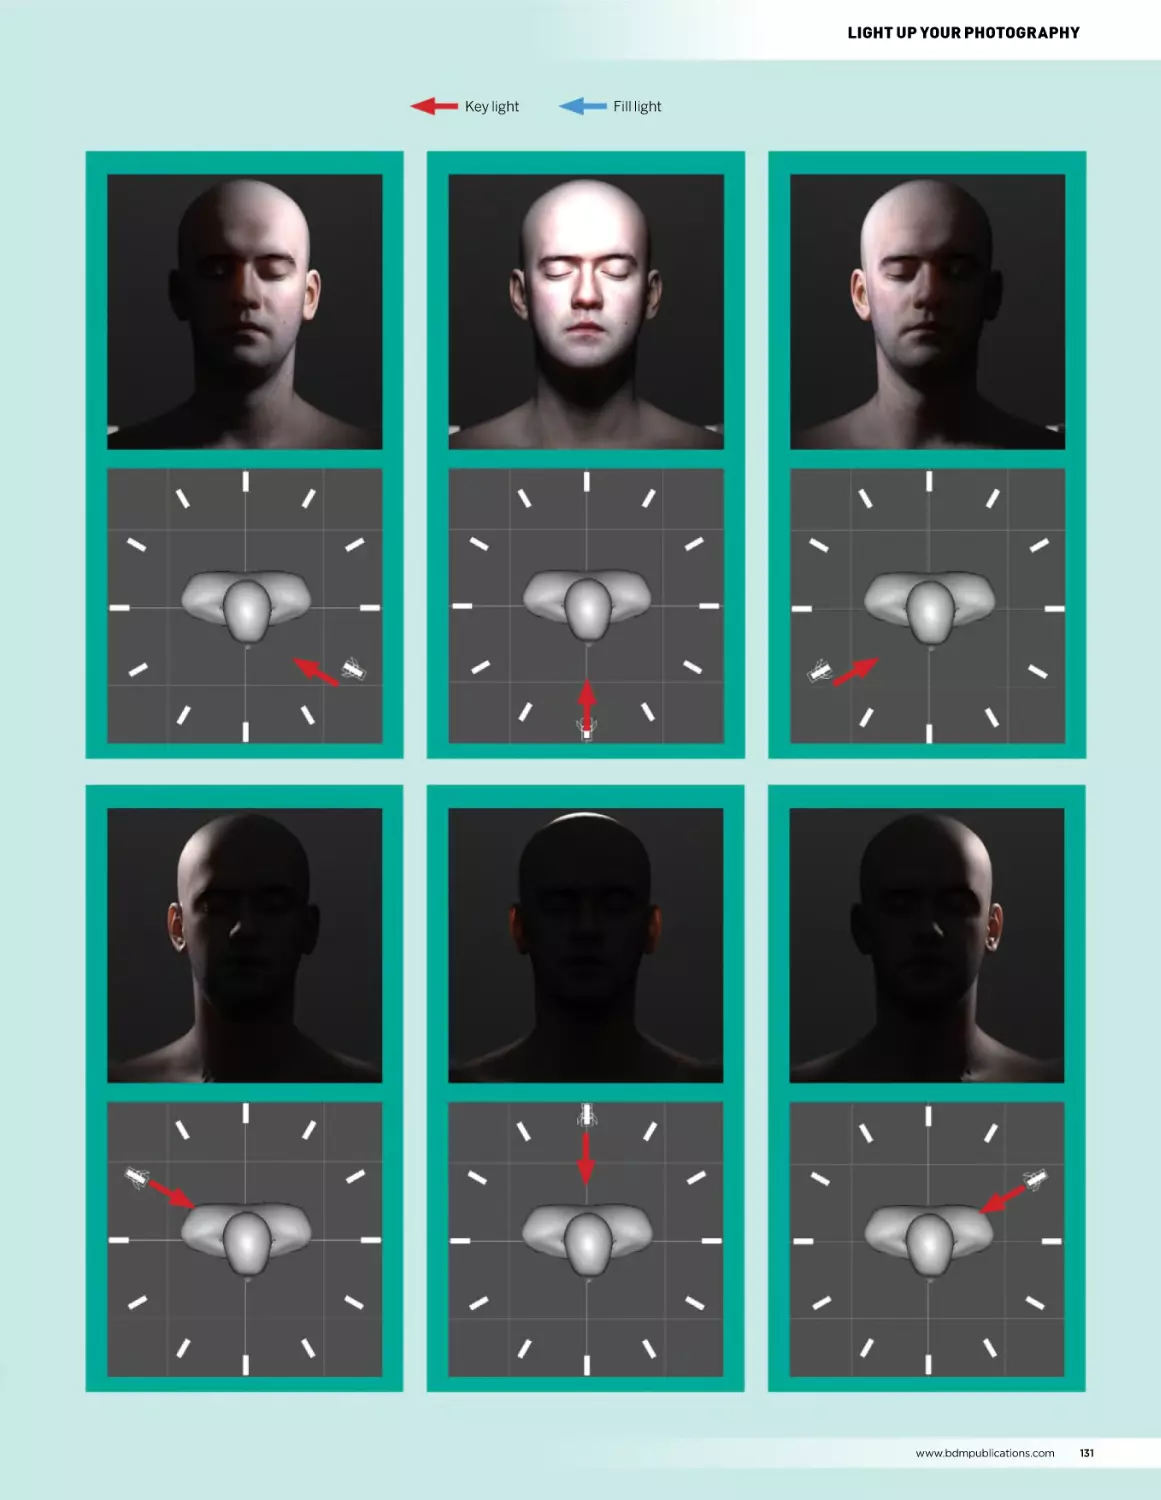
130 Light up your photography
134 Long exposure photography
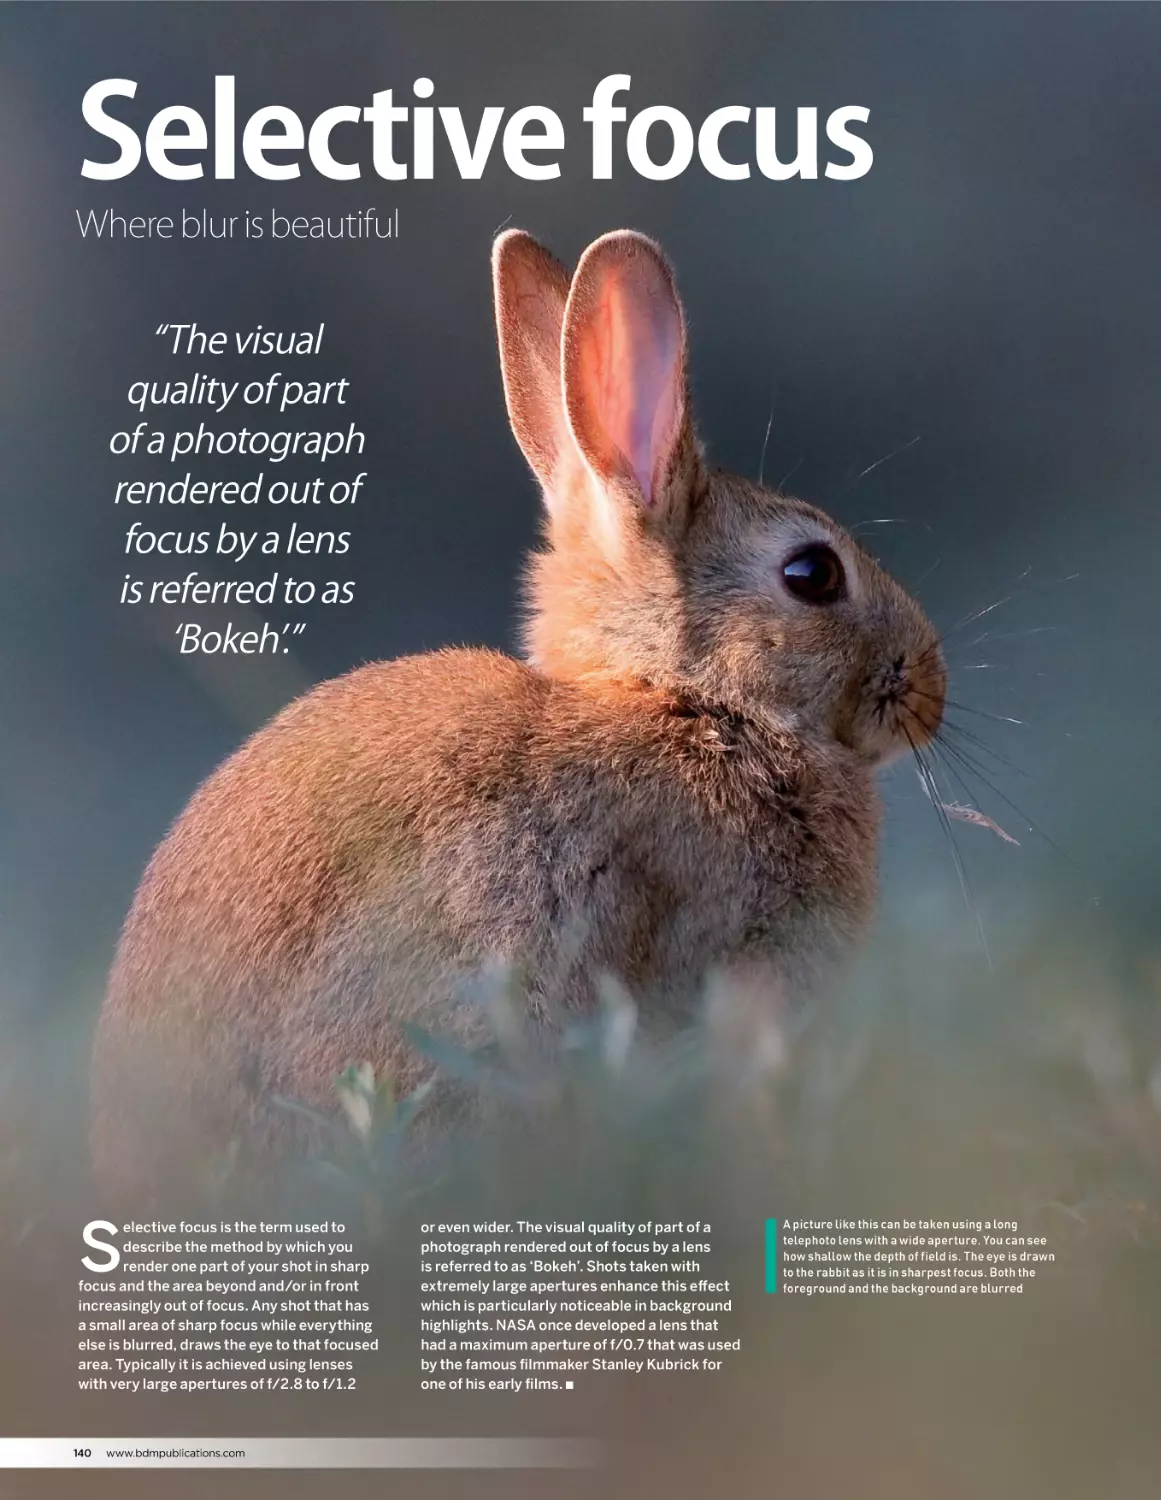
140 Selective focus
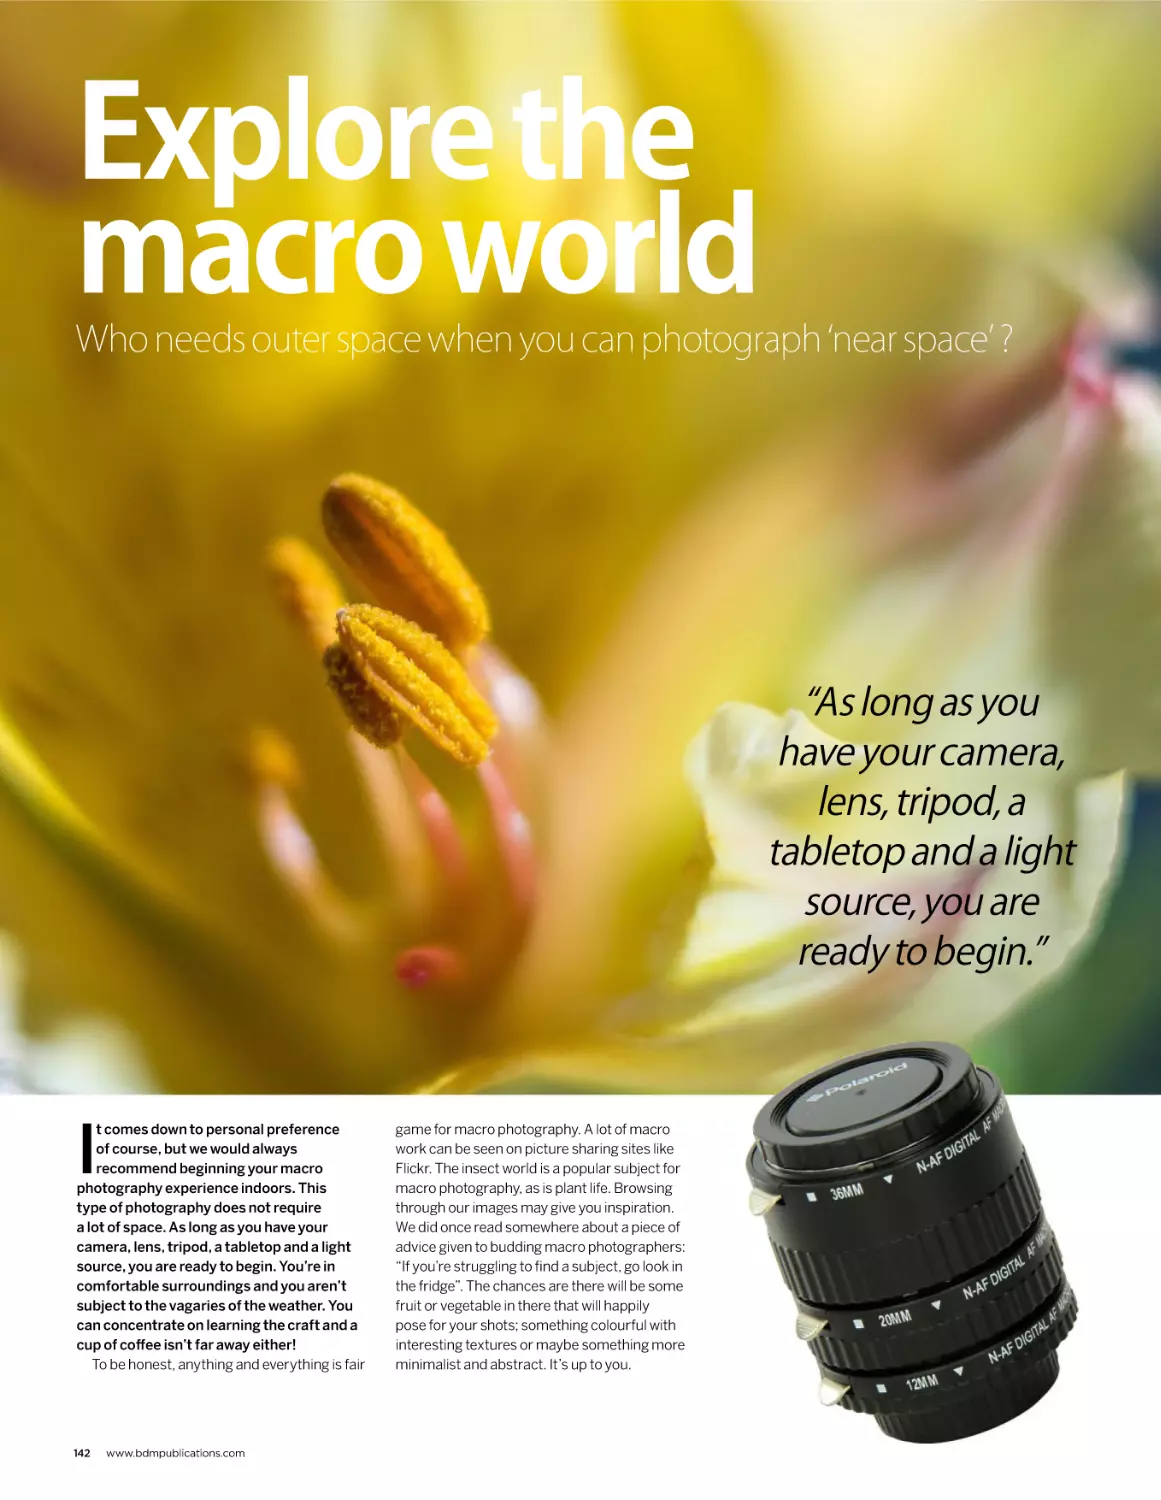
142 Explore the macro world
www.bdmpublications.com
5
GEAR UP
WITH NIKON
Discover Nikon cameras,
lenses and accessories
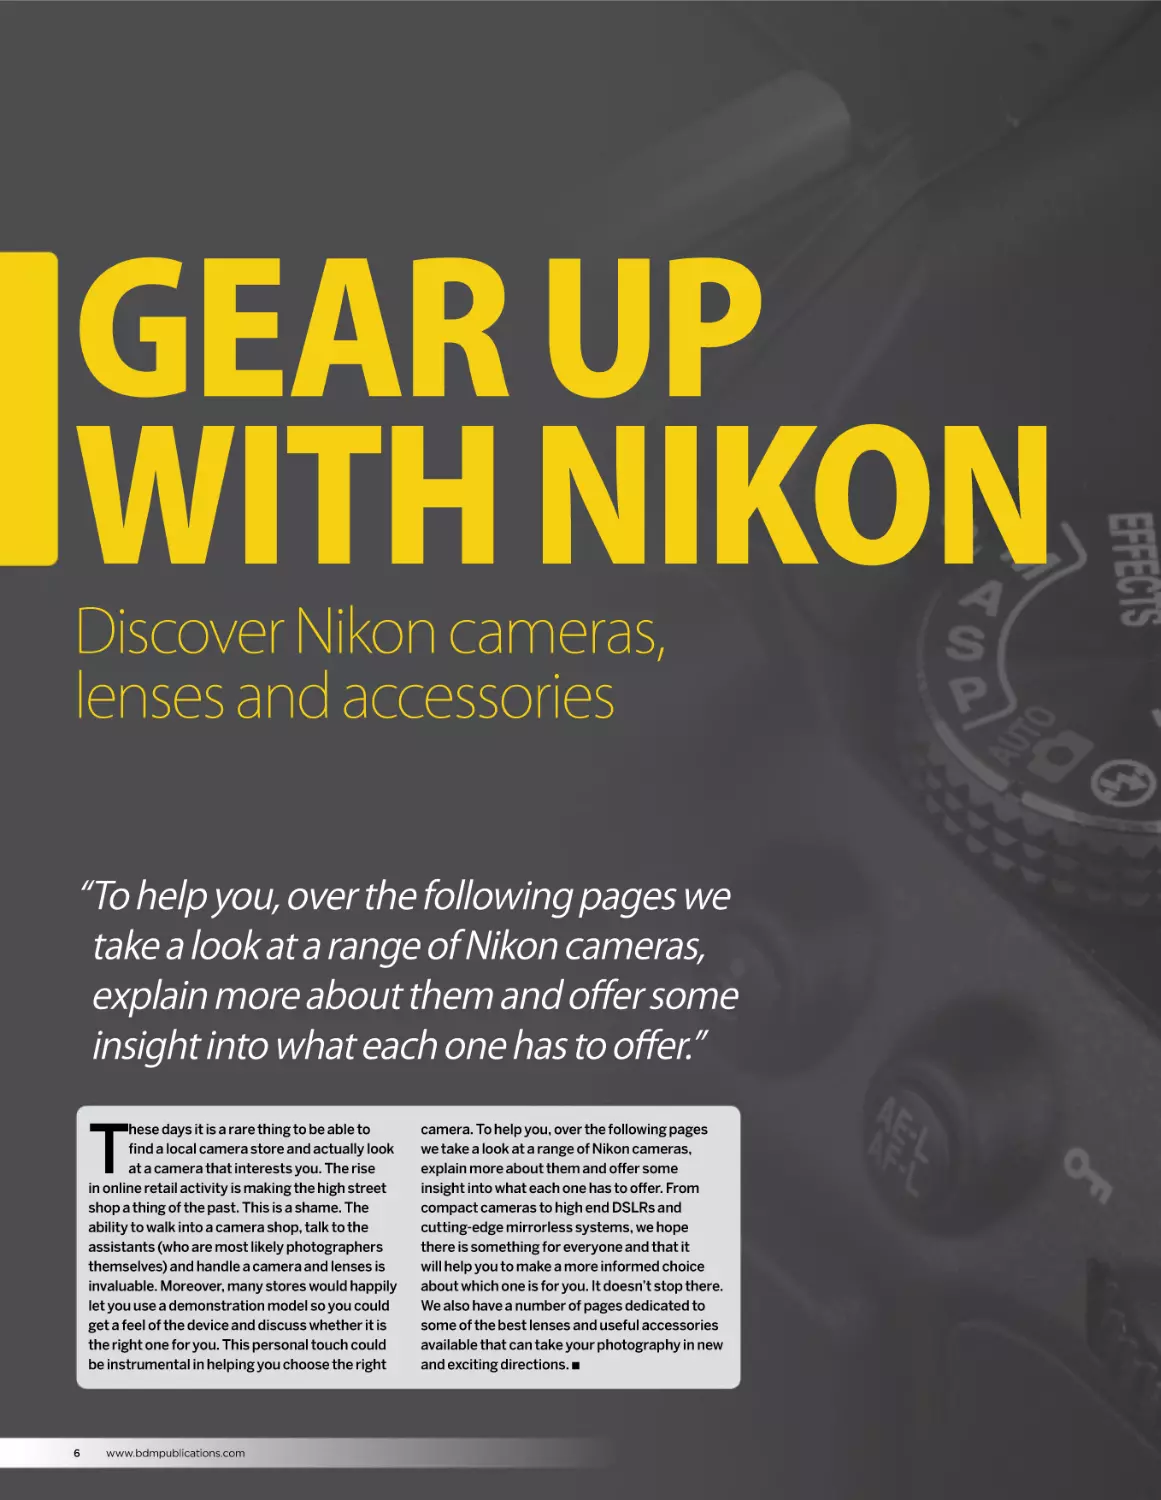
“To help you, over the following pages we
take a look at a range of Nikon cameras,
explain more about them and offer some
insight into what each one has to offer.”
T
hese days it is a rare thing to be able to
find a local camera store and actually look
at a camera that interests you. The rise
in online retail activity is making the high street
shop a thing of the past. This is a shame. The
ability to walk into a camera shop, talk to the
assistants (who are most likely photographers
themselves) and handle a camera and lenses is
invaluable. Moreover, many stores would happily
let you use a demonstration model so you could
get a feel of the device and discuss whether it is
the right one for you. This personal touch could
be instrumental in helping you choose the right
6
www.bdmpublications.com
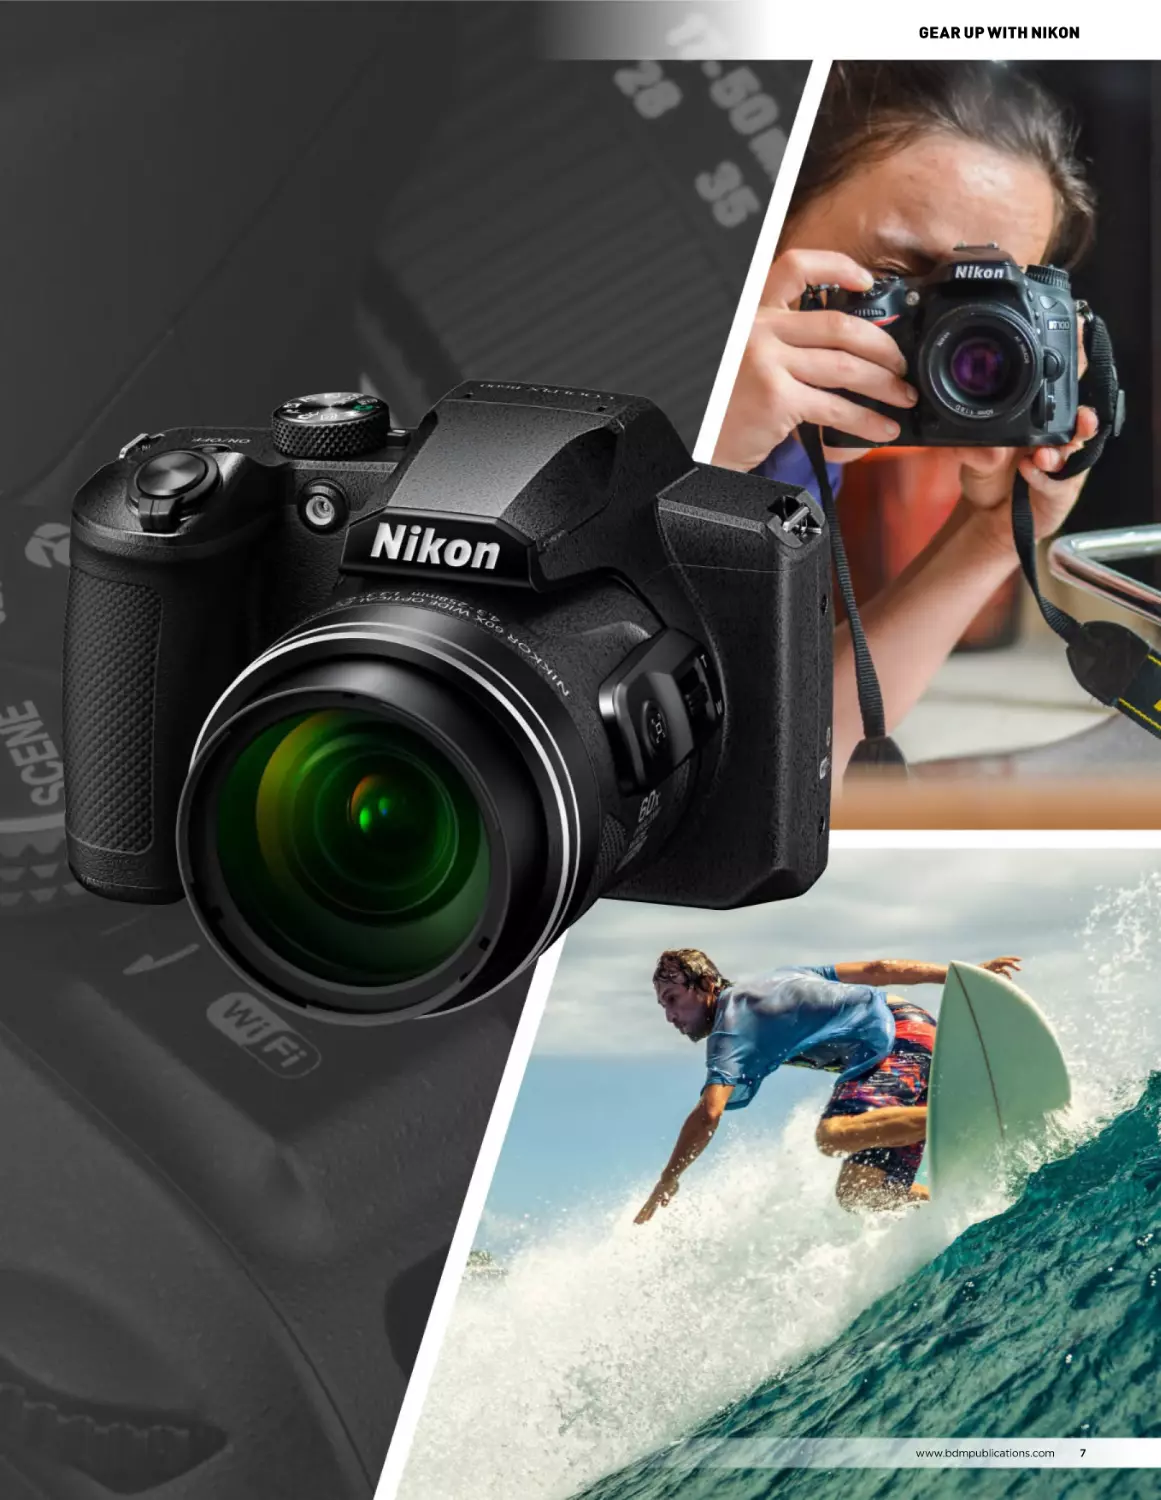
camera. To help you, over the following pages
we take a look at a range of Nikon cameras,
explain more about them and offer some
insight into what each one has to offer. From
compact cameras to high end DSLRs and
cutting-edge mirrorless systems, we hope
there is something for everyone and that it
will help you to make a more informed choice
about which one is for you. It doesn’t stop there.
We also have a number of pages dedicated to
some of the best lenses and useful accessories
available that can take your photography in new
and exciting directions. Q
GEAR UP WITH NIKON
www.bdmpublications.com
7
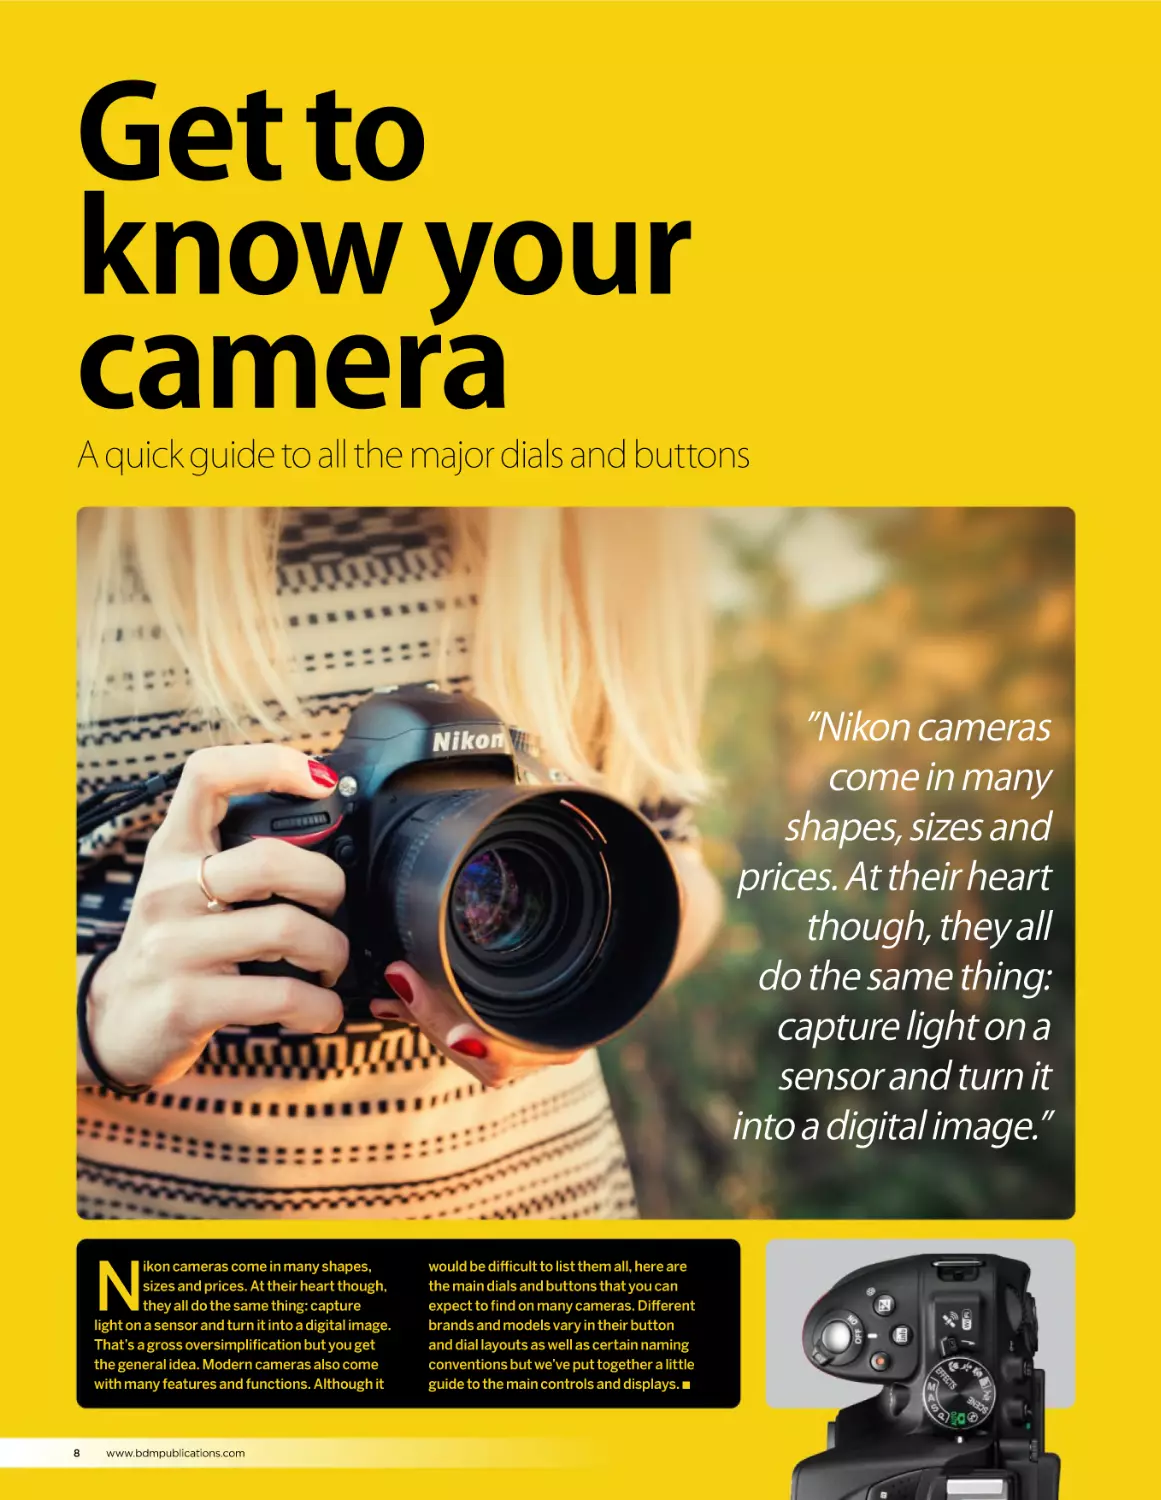
Get to
know your
camera
A quick guide to all the major dials and buttons
”Nikon cameras
come in many
shapes, sizes and
prices. At their heart
though, they all
do the same thing:
capture light on a
sensor and turn it
into a digital image.”
N
ikon cameras come in many shapes,
sizes and prices. At their heart though,
they all do the same thing: capture
light on a sensor and turn it into a digital image.
That’s a gross oversimplification but you get
the general idea. Modern cameras also come
with many features and functions. Although it
8
www.bdmpublications.com
would be difficult to list them all, here are
the main dials and buttons that you can
expect to find on many cameras. Different
brands and models vary in their button
and dial layouts as well as certain naming
conventions but we’ve put together a little
guide to the main controls and displays. Q
GET TO KNOW YOUR CAMERA
THE FRONT OF THE CAMERA
7
6
8
4
5
3
2
1
9
10
12
1
AF-Assist illuminator
If your subject is poorly lit, the AF-Assist
illuminator lights up to help with focusing.
2
Power switch
A simple lever you can rotate to turn the
camera on and off.
3
Shutter release button
This is a typical two-stage button. Press
halfway to focus, then fully depress to take
a photo.
4
Aperture/Exposure Compensation
Pressing this button lets you alter either the
aperture or exposure compensation value.
11
5
Movie record button
This button is pressed to begin video recording and
pressed again to stop recording.
6
Live view switch
Click the live view switch in order to display the view
through the lens on the camera’s LCD screen.
7
Mode dial
Rotate this dial to choose which shooting mode to
use such as Aperture, Priority or Manual mode.
8
Pop-up flash
A small built in flash that can be used to help
illuminate poorly lit or backlit subjects.
9
Flash modes and flash compensation
This button allows the choice of different flash
modes such as Red-eye reduction and control of
output power.
10 Function button
You can assign a preferred function to this button
that activates when you hold it.
11 Lens release button
Push this button in order to release an attached
lens from the camera’s lens mount.
12 Infrared receiver (front)
You can activate your camera remotely by using a
controller pointed at this receiver.
www.bdmpublications.com
9
1
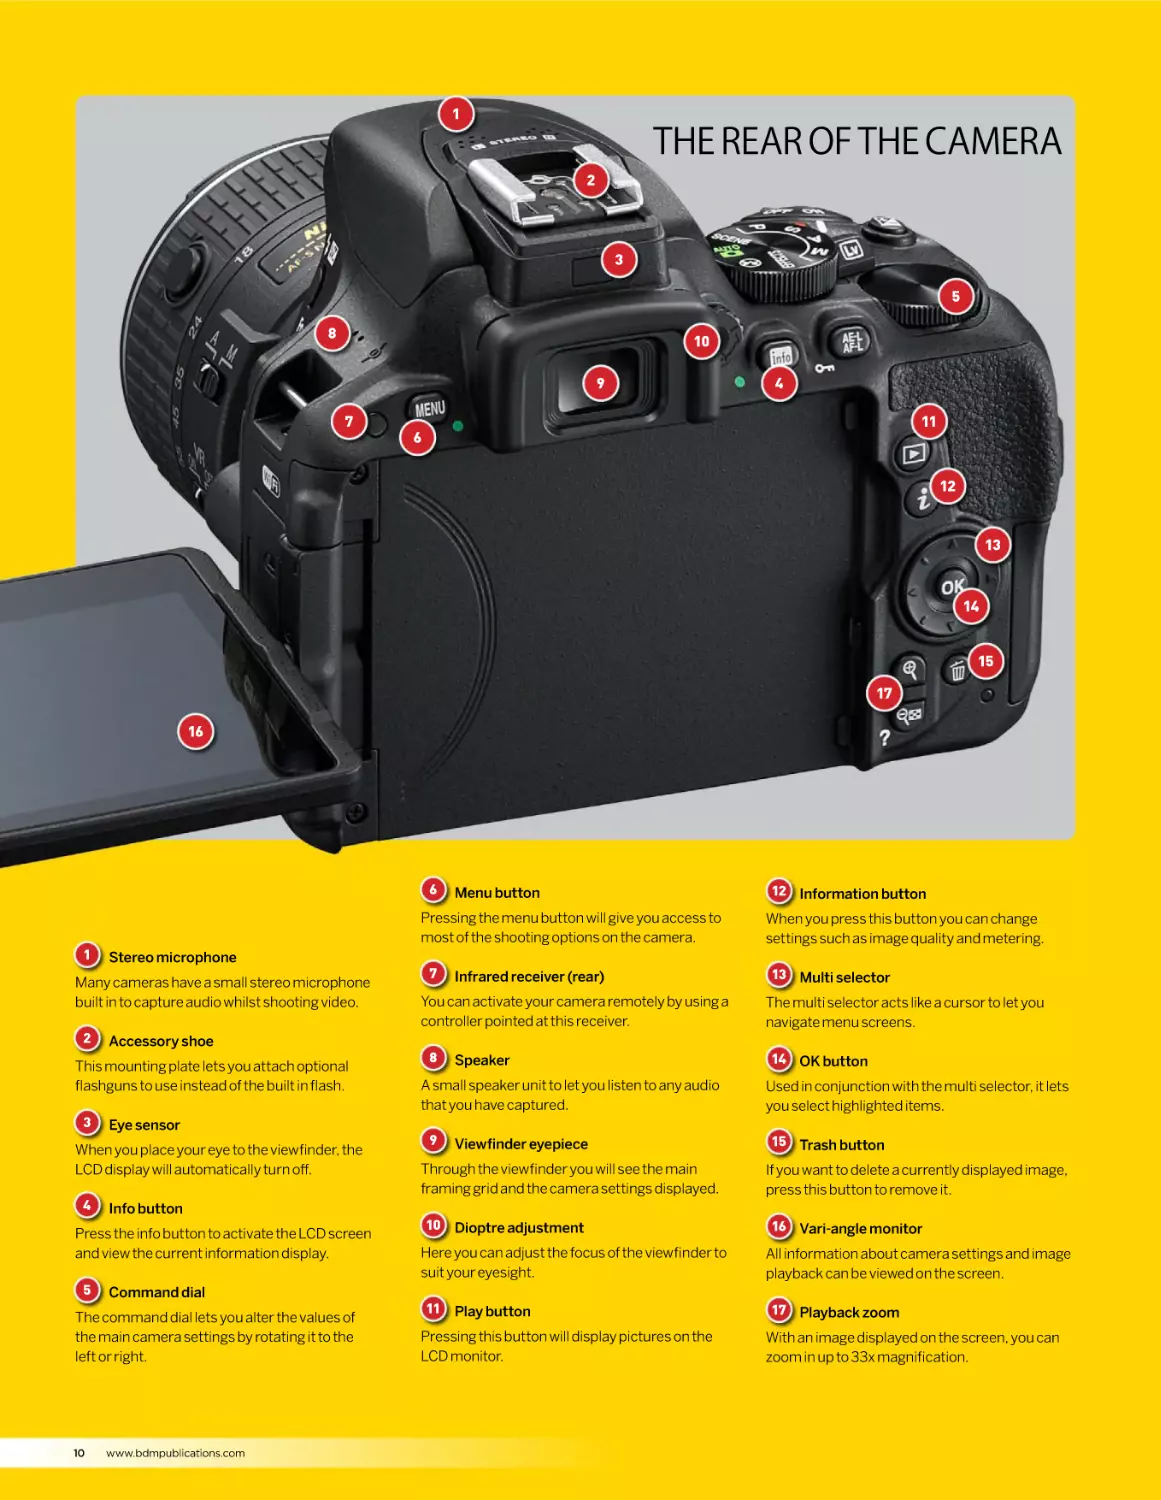
THE REAR OF THE CAMERA
2
3
5
8
10
9
7
4
11
6
12
13
14
15
17
16
6
1
Pressing the menu button will give you access to
most of the shooting options on the camera.
Stereo microphone
Many cameras have a small stereo microphone
built in to capture audio whilst shooting video.
2
Accessory shoe
This mounting plate lets you attach optional
flashguns to use instead of the built in flash.
3
Eye sensor
When you place your eye to the viewfinder, the
LCD display will automatically turn off.
4
Info button
Press the info button to activate the LCD screen
and view the current information display.
5
Command dial
The command dial lets you alter the values of
the main camera settings by rotating it to the
left or right.
10
Menu button
www.bdmpublications.com
7
Infrared receiver (rear)
You can activate your camera remotely by using a
controller pointed at this receiver.
8
Speaker
A small speaker unit to let you listen to any audio
that you have captured.
9
Viewfinder eyepiece
Through the viewfinder you will see the main
framing grid and the camera settings displayed.
10 Dioptre adjustment
Here you can adjust the focus of the viewfinder to
suit your eyesight.
11 Play button
Pressing this button will display pictures on the
LCD monitor.
12 Information button
When you press this button you can change
settings such as image quality and metering.
13 Multi selector
The multi selector acts like a cursor to let you
navigate menu screens.
14 OK button
Used in conjunction with the multi selector, it lets
you select highlighted items.
15 Trash button
If you want to delete a currently displayed image,
press this button to remove it.
16 Vari-angle monitor
All information about camera settings and image
playback can be viewed on the screen.
17 Playback zoom
With an image displayed on the screen, you can
zoom in up to 33x magnification.
GET TO KNOW YOUR CAMERA
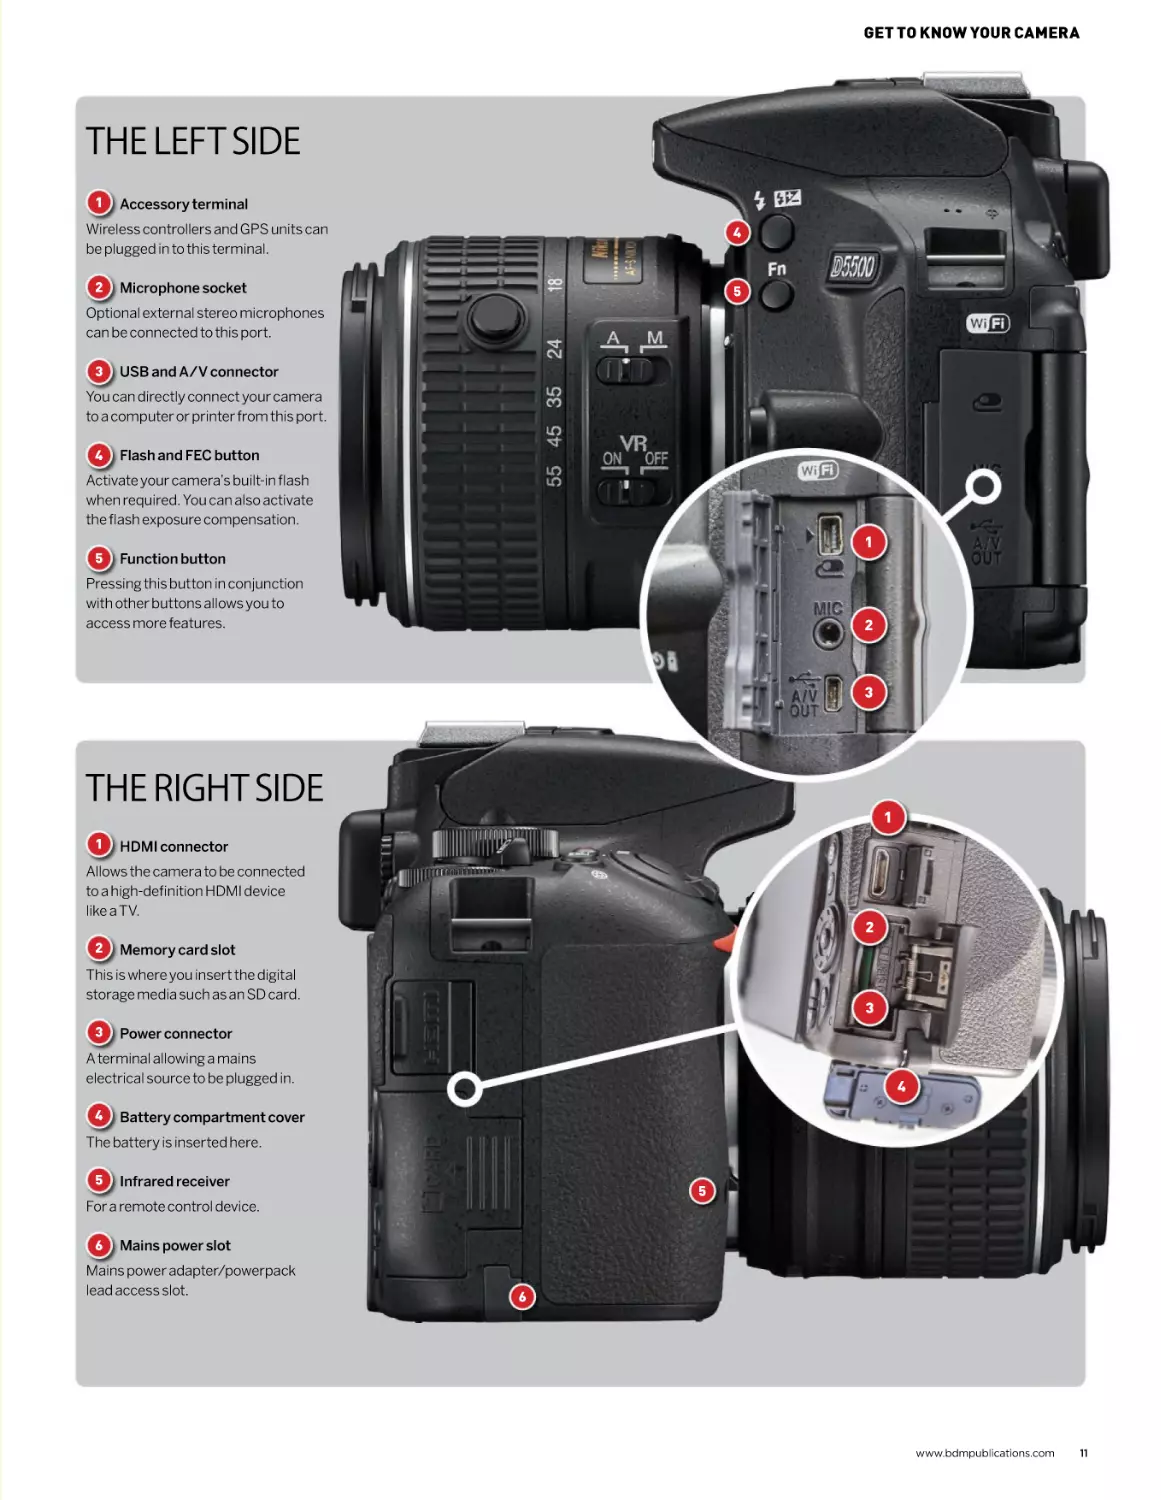
THE LEFT SIDE
1
Accessory terminal
4
Wireless controllers and GPS units can
be plugged in to this terminal.
2
5
Microphone socket
Optional external stereo microphones
can be connected to this port.
3
USB and A/V connector
You can directly connect your camera
to a computer or printer from this port.
4
Flash and FEC button
Activate your camera’s built-in flash
when required. You can also activate
the flash exposure compensation.
5
1
Function button
Pressing this button in conjunction
with other buttons allows you to
access more features.
2
3
THE RIGHT SIDE
1
1
HDMI connector
Allows the camera to be connected
to a high-definition HDMI device
like a TV.
2
2
Memory card slot
This is where you insert the digital
storage media such as an SD card.
3
3
Power connector
A terminal allowing a mains
electrical source to be plugged in.
4
4
Battery compartment cover
The battery is inserted here.
5
Infrared receiver
5
For a remote control device.
6
Mains power slot
Mains power adapter/powerpack
lead access slot.
6
www.bdmpublications.com
11
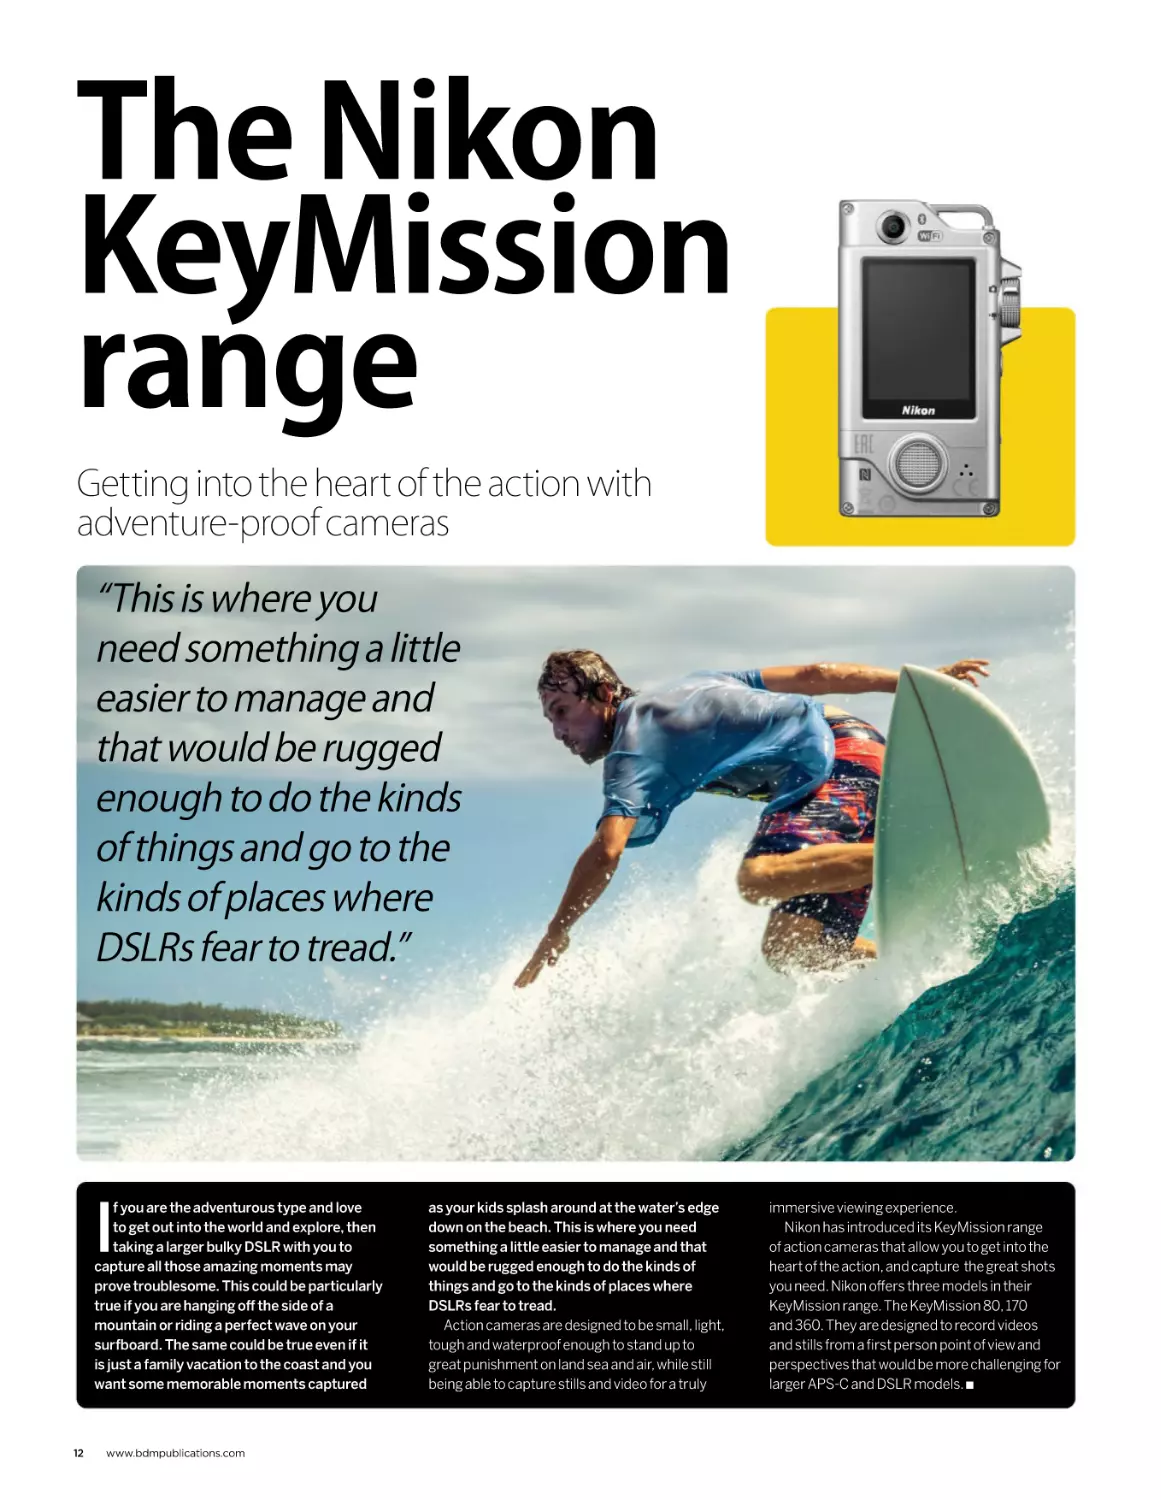
The Nikon
KeyMission
range
Getting into the heart of the action with
adventure-proof cameras
“This is where you
need something a little
easier to manage and
that would be rugged
enough to do the kinds
of things and go to the
kinds of places where
DSLRs fear to tread.”
I
f you are the adventurous type and love
to get out into the world and explore, then
taking a larger bulky DSLR with you to
capture all those amazing moments may
prove troublesome. This could be particularly
true if you are hanging off the side of a
mountain or riding a perfect wave on your
surfboard. The same could be true even if it
is just a family vacation to the coast and you
want some memorable moments captured
12
www.bdmpublications.com
as your kids splash around at the water’s edge
down on the beach. This is where you need
something a little easier to manage and that
would be rugged enough to do the kinds of
things and go to the kinds of places where
DSLRs fear to tread.
Action cameras are designed to be small, light,
tough and waterproof enough to stand up to
great punishment on land sea and air, while still
being able to capture stills and video for a truly
immersive viewing experience.
Nikon has introduced its KeyMission range
of action cameras that allow you to get into the
heart of the action, and capture the great shots
you need. Nikon offers three models in their
KeyMission range. The KeyMission 80, 170
and 360. They are designed to record videos
and stills from a first person point of view and
perspectives that would be more challenging for
larger APS-C and DSLR models. Q
THE NIKON KEYMISSION RANGE
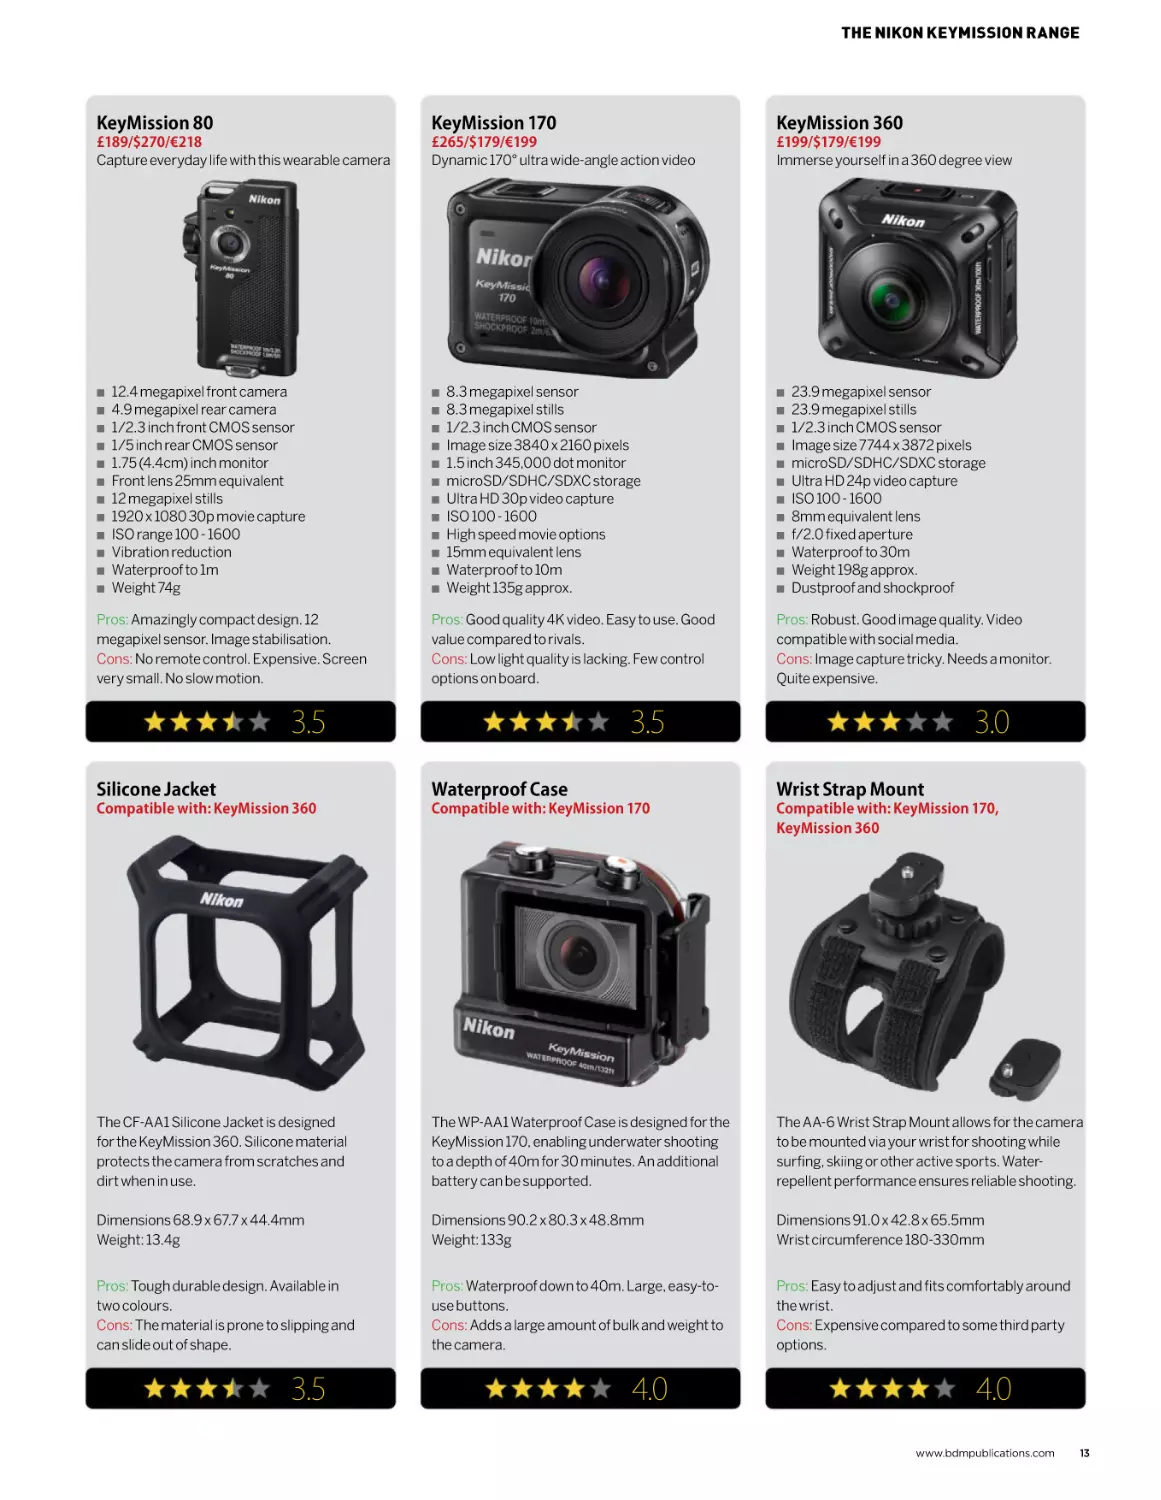
KeyMission 80
KeyMission 170
KeyMission 360
£189/$270/€218
Capture everyday life with this wearable camera
£265/$179/€199
Dynamic 170° ultra wide-angle action video
£199/$179/€199
Immerse yourself in a 360 degree view
Q
Q
Q
Q
Q
Q
Q
Q
Q
Q
Q
Q
12.4 megapixel front camera
4.9 megapixel rear camera
1/2.3 inch front CMOS sensor
1/5 inch rear CMOS sensor
1.75 (4.4cm) inch monitor
Front lens 25mm equivalent
12 megapixel stills
1920 x 1080 30p movie capture
ISO range 100 - 1600
Vibration reduction
Waterproof to 1m
Weight 74g
Pros: Amazingly compact design. 12
megapixel sensor. Image stabilisation.
Cons: No remote control. Expensive. Screen
very small. No slow motion.
Q
Q
Q
Q
Q
Q
Q
Q
Q
Q
Q
Q
8.3 megapixel sensor
8.3 megapixel stills
1/2.3 inch CMOS sensor
Image size 3840 x 2160 pixels
1.5 inch 345,000 dot monitor
microSD/SDHC/SDXC storage
Ultra HD 30p video capture
ISO 100 - 1600
High speed movie options
15mm equivalent lens
Waterproof to 10m
Weight 135g approx.
Pros: Good quality 4K video. Easy to use. Good
value compared to rivals.
Cons: Low light quality is lacking. Few control
options on board.
3.5
Q
Q
Q
Q
Q
Q
Q
Q
Q
Q
Q
Q
23.9 megapixel sensor
23.9 megapixel stills
1/2.3 inch CMOS sensor
Image size 7744 x 3872 pixels
microSD/SDHC/SDXC storage
Ultra HD 24p video capture
ISO 100 - 1600
8mm equivalent lens
f/2.0 fixed aperture
Waterproof to 30m
Weight 198g approx.
Dustproof and shockproof
Pros: Robust. Good image quality. Video
compatible with social media.
Cons: Image capture tricky. Needs a monitor.
Quite expensive.
3.5
3.0
Silicone Jacket
Waterproof Case
Wrist Strap Mount
Compatible with: KeyMission 360
Compatible with: KeyMission 170
Compatible with: KeyMission 170,
KeyMission 360
The CF-AA1 Silicone Jacket is designed
for the KeyMission 360. Silicone material
protects the camera from scratches and
dirt when in use.
The WP-AA1 Waterproof Case is designed for the
KeyMission 170, enabling underwater shooting
to a depth of 40m for 30 minutes. An additional
battery can be supported.
The AA-6 Wrist Strap Mount allows for the camera
to be mounted via your wrist for shooting while
surfing, skiing or other active sports. Waterrepellent performance ensures reliable shooting.
Dimensions 68.9 x 67.7 x 44.4mm
Weight: 13.4g
Dimensions 90.2 x 80.3 x 48.8mm
Weight: 133g
Dimensions 91.0 x 42.8 x 65.5mm
Wrist circumference 180-330mm
Pros: Tough durable design. Available in
two colours.
Cons: The material is prone to slipping and
can slide out of shape.
Pros: Waterproof down to 40m. Large, easy-touse buttons.
Cons: Adds a large amount of bulk and weight to
the camera.
Pros: Easy to adjust and fits comfortably around
the wrist.
Cons: Expensive compared to some third party
options.
3.5
4.0
4.0
www.bdmpublications.com
13
KeyMission
accessories
Gear up, mount up, and get shooting
“Any action camera
system will stand
or fall depending
on its mount
system and what is
available for it.”
A
ny action camera system will stand
or fall depending on its mount
system and what is available for it.
Since the KeyMission range is a relative
newcomer to the action cam market, its
range of accessories is not yet as large
or as varied as its main competitor, the
GoPro range of action cameras. That said,
there are still enough options to extend the
capabilities of your KeyMission devices,
with extra batteries, remote controls,
underwater housings and mounting
options. To get you started, here is a brief
list of some on offer. Q
14
www.bdmpublications.com
Soft Case System
Compatible with: KeyMission 80,
KeyMission 170, KeyMission 360
The KeyMission Soft System Case is a
soft case designed for easy transport of
your KeyMission 360, KeyMission 170 or
KeyMission 80 camera and accessories.
Pros: Compact and lightweight. Decent
materials used.
Cons: A little expensive. There have been
reports of zips breaking.
2.5
KEYMISSION ACCESSORIES
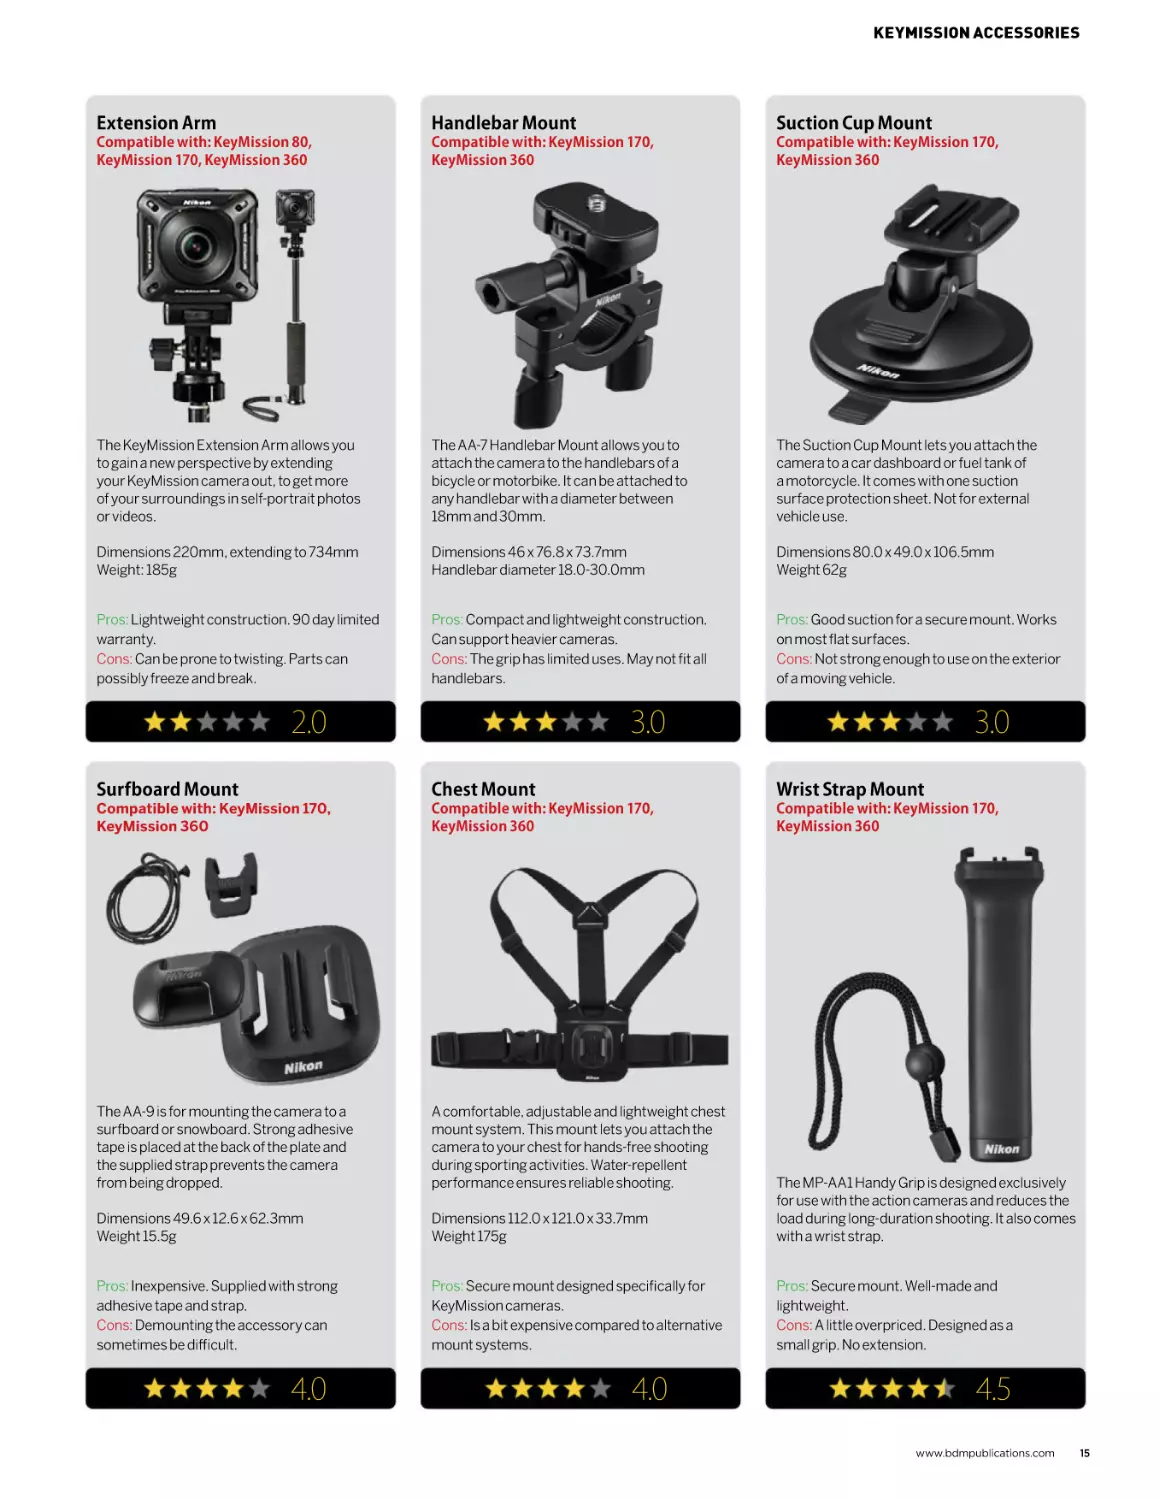
Extension Arm
Handlebar Mount
Suction Cup Mount
Compatible with: KeyMission 80,
KeyMission 170, KeyMission 360
Compatible with: KeyMission 170,
KeyMission 360
Compatible with: KeyMission 170,
KeyMission 360
The KeyMission Extension Arm allows you
to gain a new perspective by extending
your KeyMission camera out, to get more
of your surroundings in self-portrait photos
or videos.
The AA-7 Handlebar Mount allows you to
attach the camera to the handlebars of a
bicycle or motorbike. It can be attached to
any handlebar with a diameter between
18mm and 30mm.
The Suction Cup Mount lets you attach the
camera to a car dashboard or fuel tank of
a motorcycle. It comes with one suction
surface protection sheet. Not for external
vehicle use.
Dimensions 220mm, extending to 734mm
Weight: 185g
Dimensions 46 x 76.8 x 73.7mm
Handlebar diameter 18.0-30.0mm
Dimensions 80.0 x 49.0 x 106.5mm
Weight 62g
Pros: Lightweight construction. 90 day limited
warranty.
Cons: Can be prone to twisting. Parts can
possibly freeze and break.
Pros: Compact and lightweight construction.
Can support heavier cameras.
Cons: The grip has limited uses. May not fit all
handlebars.
Pros: Good suction for a secure mount. Works
on most flat surfaces.
Cons: Not strong enough to use on the exterior
of a moving vehicle.
2.0
3.0
3.0
Surfboard Mount
Chest Mount
Wrist Strap Mount
Compatible with: KeyMission 170,
KeyMission 360
Compatible with: KeyMission 170,
KeyMission 360
Compatible with: KeyMission 170,
KeyMission 360
The AA-9 is for mounting the camera to a
surfboard or snowboard. Strong adhesive
tape is placed at the back of the plate and
the supplied strap prevents the camera
from being dropped.
A comfortable, adjustable and lightweight chest
mount system. This mount lets you attach the
camera to your chest for hands-free shooting
during sporting activities. Water-repellent
performance ensures reliable shooting.
Dimensions 49.6 x 12.6 x 62.3mm
Weight 15.5g
Dimensions 112.0 x 121.0 x 33.7mm
Weight 175g
The MP-AA1 Handy Grip is designed exclusively
for use with the action cameras and reduces the
load during long-duration shooting. It also comes
with a wrist strap.
Pros: Inexpensive. Supplied with strong
adhesive tape and strap.
Cons: Demounting the accessory can
sometimes be difficult.
Pros: Secure mount designed specifically for
KeyMission cameras.
Cons: Is a bit expensive compared to alternative
mount systems.
Pros: Secure mount. Well-made and
lightweight.
Cons: A little overpriced. Designed as a
small grip. No extension.
4.0
4.0
4.5
www.bdmpublications.com
15
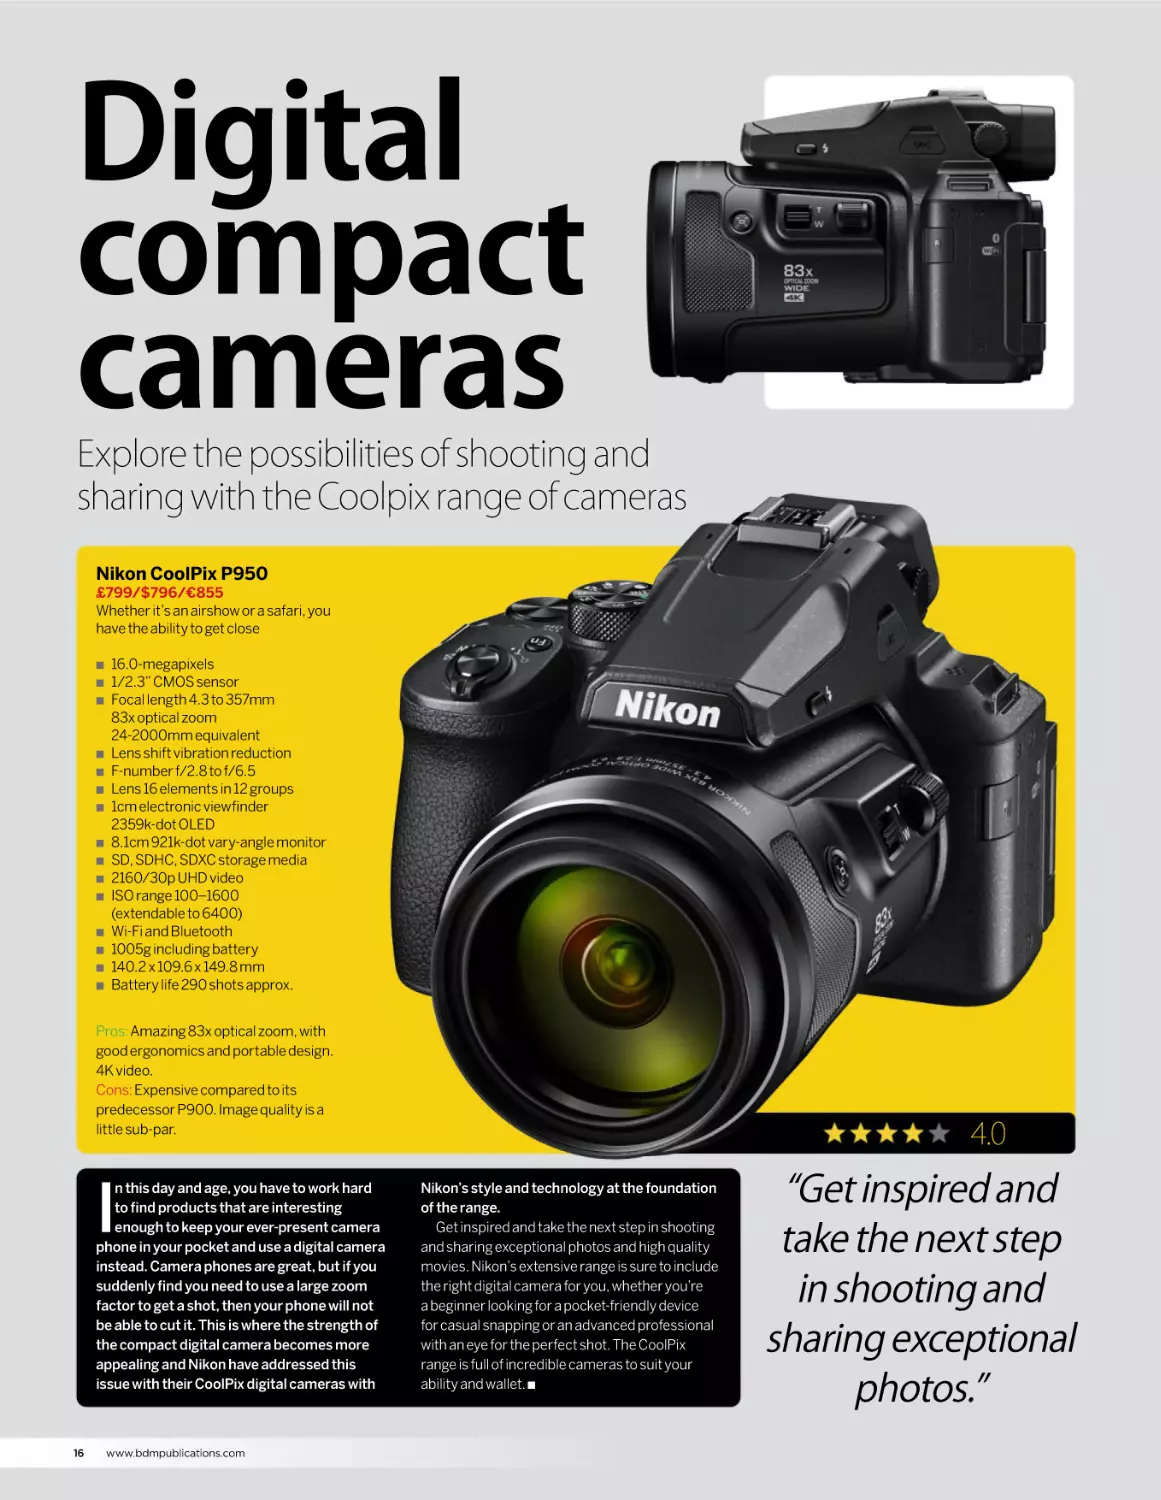
Digital
compact
cameras
Explore the possibilities of shooting and
sharing with the Coolpix range of cameras
Nikon CoolPix P950
£799/$796/€855
Whether it’s an airshow or a safari, you
have the ability to get close
Q
Q
Q
Q
Q
Q
Q
Q
Q
Q
Q
Q
Q
Q
Q
16.0-megapixels
1/2.3” CMOS sensor
Focal length 4.3 to 357mm
83x optical zoom
24-2000mm equivalent
Lens shift vibration reduction
F-number f/2.8 to f/6.5
Lens 16 elements in 12 groups
1cm electronic viewfinder
2359k-dot OLED
8.1cm 921k-dot vary-angle monitor
SD, SDHC, SDXC storage media
2160/30p UHD video
ISO range 100–1600
(extendable to 6400)
Wi-Fi and Bluetooth
1005g including battery
140.2 x 109.6 x 149.8 mm
Battery life 290 shots approx.
Pros: Amazing 83x optical zoom, with
good ergonomics and portable design.
4K video.
Cons: Expensive compared to its
predecessor P900. Image quality is a
little sub-par.
I
n this day and age, you have to work hard
to find products that are interesting
enough to keep your ever-present camera
phone in your pocket and use a digital camera
instead. Camera phones are great, but if you
suddenly find you need to use a large zoom
factor to get a shot, then your phone will not
be able to cut it. This is where the strength of
the compact digital camera becomes more
appealing and Nikon have addressed this
issue with their CoolPix digital cameras with
16
www.bdmpublications.com
4.0
Nikon’s style and technology at the foundation
of the range.
Get inspired and take the next step in shooting
and sharing exceptional photos and high quality
movies. Nikon’s extensive range is sure to include
the right digital camera for you, whether you’re
a beginner looking for a pocket-friendly device
for casual snapping or an advanced professional
with an eye for the perfect shot. The CoolPix
range is full of incredible cameras to suit your
ability and wallet. Q
“Get inspired and
take the next step
in shooting and
sharing exceptional
photos.”
DIGITAL COMPACT CAMERAS
Nikon CoolPix A10
Nikon CoolPix A100
Nikon CoolPix A1000
£69/$86/€79
Makes photography intuitive and fun
£79/$95/€89
An easy to use stylish compact
£399/$475/€429
A high-powered all-round zoom
Q
Q
Q
Q
Q
Q
Q
Q
Q
Q
2.7” 230k-dot, TFT LCD
16.1 megapixel CCD sensor
5x optical zoom
26-130mm equivalent focal length
f/3.2 to f/6.5
SD, SDHC, SDXC storage media
720p movies
Lightweight 160g construction
Motion blur reduction
Max ISO 80 - 1600
Pros: Very cost-effective. Compact and easy to
use. Creative effects.
Cons: Only 720p movie capture. Noisy images.
Slow to focus in poor light.
Q
Q
Q
Q
Q
Q
Q
Q
Q
Q
2.7” 230k-dot TFT LCD
20.1 megapixel CCD sensor
5x optical zoom
26-130mm equivalent focal length
Long battery life
SD, SDHC, SDXC storage media
720p movies
Lightweight 160g construction
Scene auto selector
Max ISO 80 - 3200
Pros: Compact and easy to use. Creative effects.
Good exposure and colour.
Cons: Only 720p movie capture. No vibration
reduction. Noisy images.
4.0
Q
Q
Q
Q
Q
Q
Q
Q
Q
Q
35x optical zoom
1166k-dot equivalent LCD viewfinder
3.0” 1036k-dot tilt screen
16.0 megapixel CMOS sensor
24-840mm equivalent focal length
SD, SDHC, SDXC storage media
4K/UHD movies at 30fps
Raw format shooting
High performance vibration reduction
Max ISO 100 - 6400
Pros: 4K UHD video capture mode. Huge optical
zoom range. Raw capture.
Cons: Image quality below par. Small electronic
viewfinder. High price.
3.5
4.5
Nikon CoolPix B600
Nikon CoolPix W150
Nikon Coolpix P1000
£329/$326/€349
A powerful all-round bridge camera
£149/$176/€145
Robust reliability with user-friendly features
£1,049/$996/€1,099
World’s biggest
zoom camera
Q
13.2 megapixel effective pixels
1/3.1 inch CMOS sensor
Q Equivalent to 30 - 90mm lens
Q Aperture from f/3.3 to f/5.9
Q 109.5 x 67.0 x 38.0mm, 177 g
Q Waterproof to 10m
Q Shockproof to 1.8m
Q ISO 125 to 1600
Q Wi-Fi and Bluetooth built-in
Q Full HD movies
Q
Q
Q
Pros: Easy to use with lots of filters. Wi-Fi and
Bluetooth. Good macro mode.
Cons: Noisy in low light. No manual control.
Slow shooting.
Pros: Incredible 24-3000mm zoom. Good image
quality. Raw support.
Cons: Slow aperture at long focal lengths. No
touchscreen. Not weather sealed.
Q
Q
Q
Q
Q
Q
Q
Q
Q
Q
Optical viewfinder
3.0” 921k-dot monitor
16.0 megapixel CMOS sensor
60x optical zoom
24-1440mm equivalent focal length
SD, SDHC, SDXC storage media
HD movies at 30fps
Always-on SnapBridge connection
DSLR-style ergonomics
Max ISO 125 - 6400
Pros: Huge zoom range. Built-in wireless. Image
stabilization.
Cons: Only HD movie capture. No Raw shooting.
No touchscreen.
4.5
3.5
Q
Q
Q
Q
Q
Q
Q
Q
16 megapixel 1/2.3” sensor
Bright f/2.8 to f/8 NIKKOR lens
Backside illuminated CMOS sensor
Shoot action up to 7fps
125x optical zoom
250x dynamic fine zoom
High definition 2,360k electronic viewfinder
4K/UHD movies
Nikon vibration reduction
921k LCD monitor
4.0
www.bdmpublications.com
17
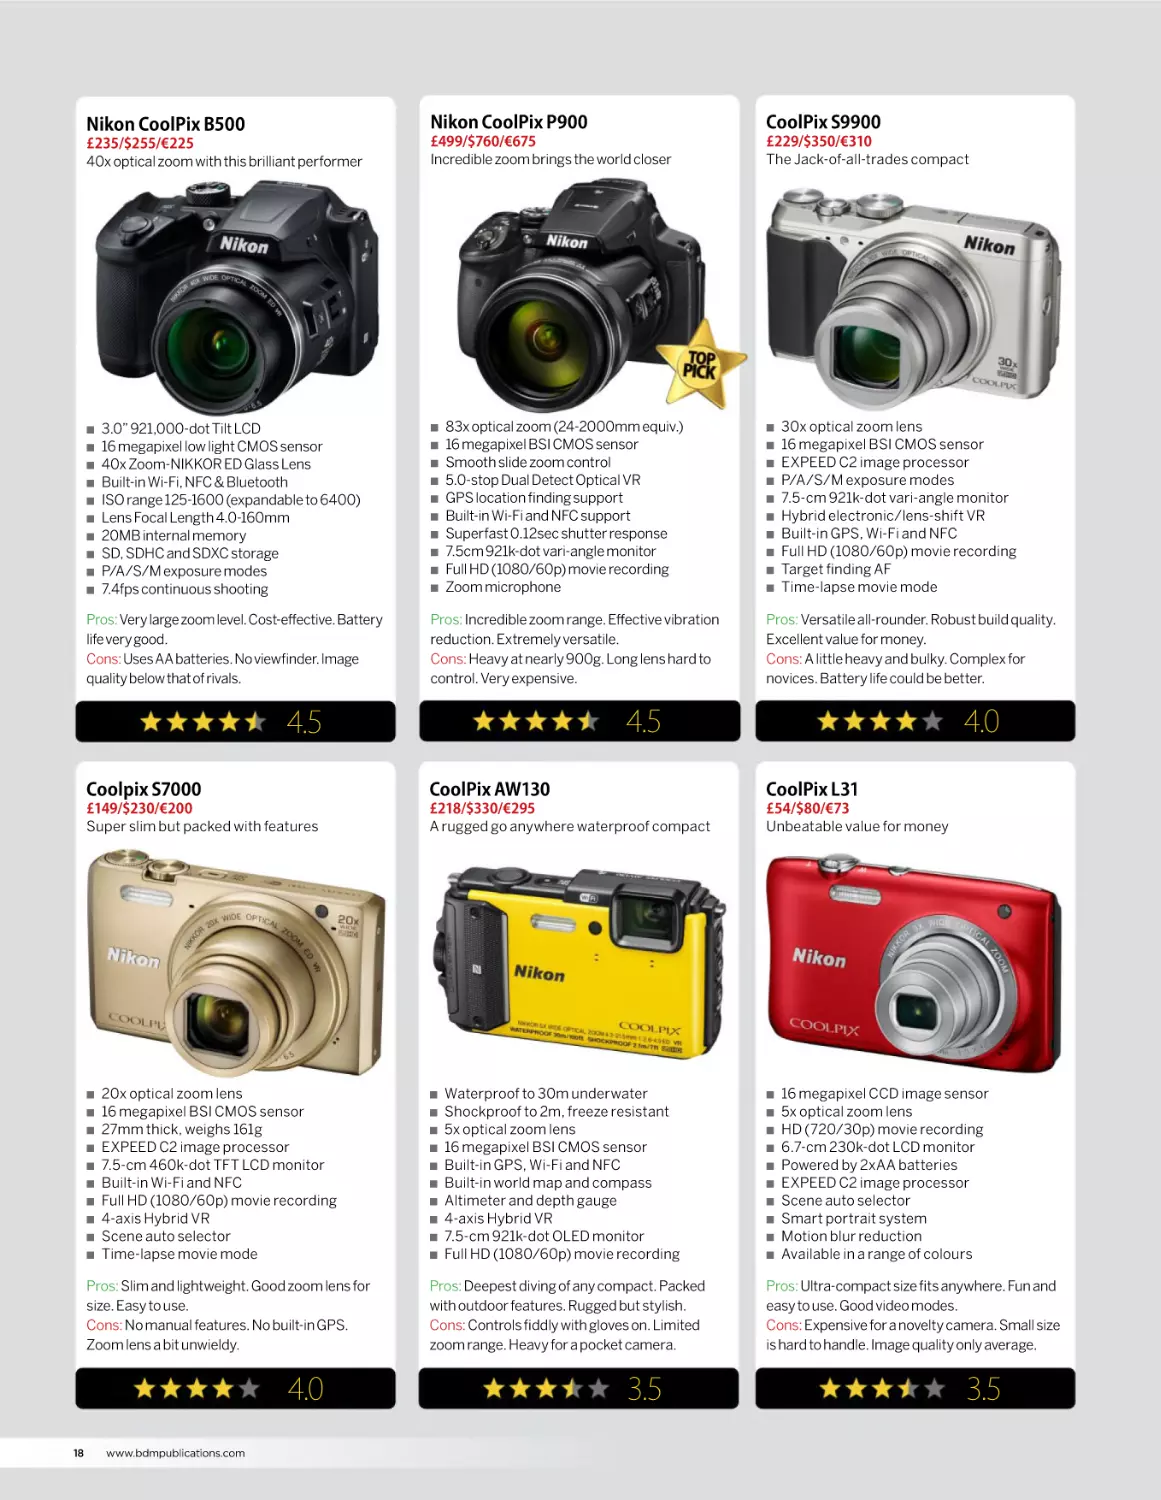
Nikon CoolPix B500
Nikon CoolPix P900
CoolPix S9900
£235/$255/€225
40x optical zoom with this brilliant performer
£499/$760/€675
Incredible zoom brings the world closer
£229/$350/€310
The Jack-of-all-trades compact
Q
Q
Q
Q
Q
Q
Q
Q
Q
Q
3.0” 921,000-dot Tilt LCD
16 megapixel low light CMOS sensor
40x Zoom-NIKKOR ED Glass Lens
Built-in Wi-Fi, NFC & Bluetooth
ISO range 125-1600 (expandable to 6400)
Lens Focal Length 4.0-160mm
20MB internal memory
SD, SDHC and SDXC storage
P/A/S/M exposure modes
7.4fps continuous shooting
Pros: Very large zoom level. Cost-effective. Battery
life very good.
Cons: Uses AA batteries. No viewfinder. Image
quality below that of rivals.
Q
Q
Q
Q
Q
Q
Q
Q
Q
Q
83x optical zoom (24-2000mm equiv.)
16 megapixel BSI CMOS sensor
Smooth slide zoom control
5.0-stop Dual Detect Optical VR
GPS location finding support
Built-in Wi-Fi and NFC support
Superfast 0.12sec shutter response
7.5cm 921k-dot vari-angle monitor
Full HD (1080/60p) movie recording
Zoom microphone
Pros: Incredible zoom range. Effective vibration
reduction. Extremely versatile.
Cons: Heavy at nearly 900g. Long lens hard to
control. Very expensive.
Q
Q
Q
Q
Q
Q
Q
Q
Q
30x optical zoom lens
16 megapixel BSI CMOS sensor
EXPEED C2 image processor
P/A/S/M exposure modes
7.5-cm 921k-dot vari-angle monitor
Hybrid electronic/lens-shift VR
Built-in GPS, Wi-Fi and NFC
Full HD (1080/60p) movie recording
Target finding AF
Time-lapse movie mode
Pros: Versatile all-rounder. Robust build quality.
Excellent value for money.
Cons: A little heavy and bulky. Complex for
novices. Battery life could be better.
4.5
4.5
4.0
Coolpix S7000
CoolPix AW130
CoolPix L31
£149/$230/€200
Super slim but packed with features
£218/$330/€295
A rugged go anywhere waterproof compact
£54/$80/€73
Unbeatable value for money
Q
Q
Q
Q
Q
Q
Q
Q
Q
Q
20x optical zoom lens
16 megapixel BSI CMOS sensor
27mm thick, weighs 161g
EXPEED C2 image processor
7.5-cm 460k-dot TFT LCD monitor
Built-in Wi-Fi and NFC
Full HD (1080/60p) movie recording
4-axis Hybrid VR
Scene auto selector
Time-lapse movie mode
Pros: Slim and lightweight. Good zoom lens for
size. Easy to use.
Cons: No manual features. No built-in GPS.
Zoom lens a bit unwieldy.
4.0
18
Q
www.bdmpublications.com
Q
Q
Q
Q
Q
Q
Q
Q
Q
Q
Waterproof to 30m underwater
Shockproof to 2m, freeze resistant
5x optical zoom lens
16 megapixel BSI CMOS sensor
Built-in GPS, Wi-Fi and NFC
Built-in world map and compass
Altimeter and depth gauge
4-axis Hybrid VR
7.5-cm 921k-dot OLED monitor
Full HD (1080/60p) movie recording
Pros: Deepest diving of any compact. Packed
with outdoor features. Rugged but stylish.
Cons: Controls fiddly with gloves on. Limited
zoom range. Heavy for a pocket camera.
3.5
Q
Q
Q
Q
Q
Q
Q
Q
Q
Q
16 megapixel CCD image sensor
5x optical zoom lens
HD (720/30p) movie recording
6.7-cm 230k-dot LCD monitor
Powered by 2xAA batteries
EXPEED C2 image processor
Scene auto selector
Smart portrait system
Motion blur reduction
Available in a range of colours
Pros: Ultra-compact size fits anywhere. Fun and
easy to use. Good video modes.
Cons: Expensive for a novelty camera. Small size
is hard to handle. Image quality only average.
3.5
DIGITAL COMPACT CAMERAS
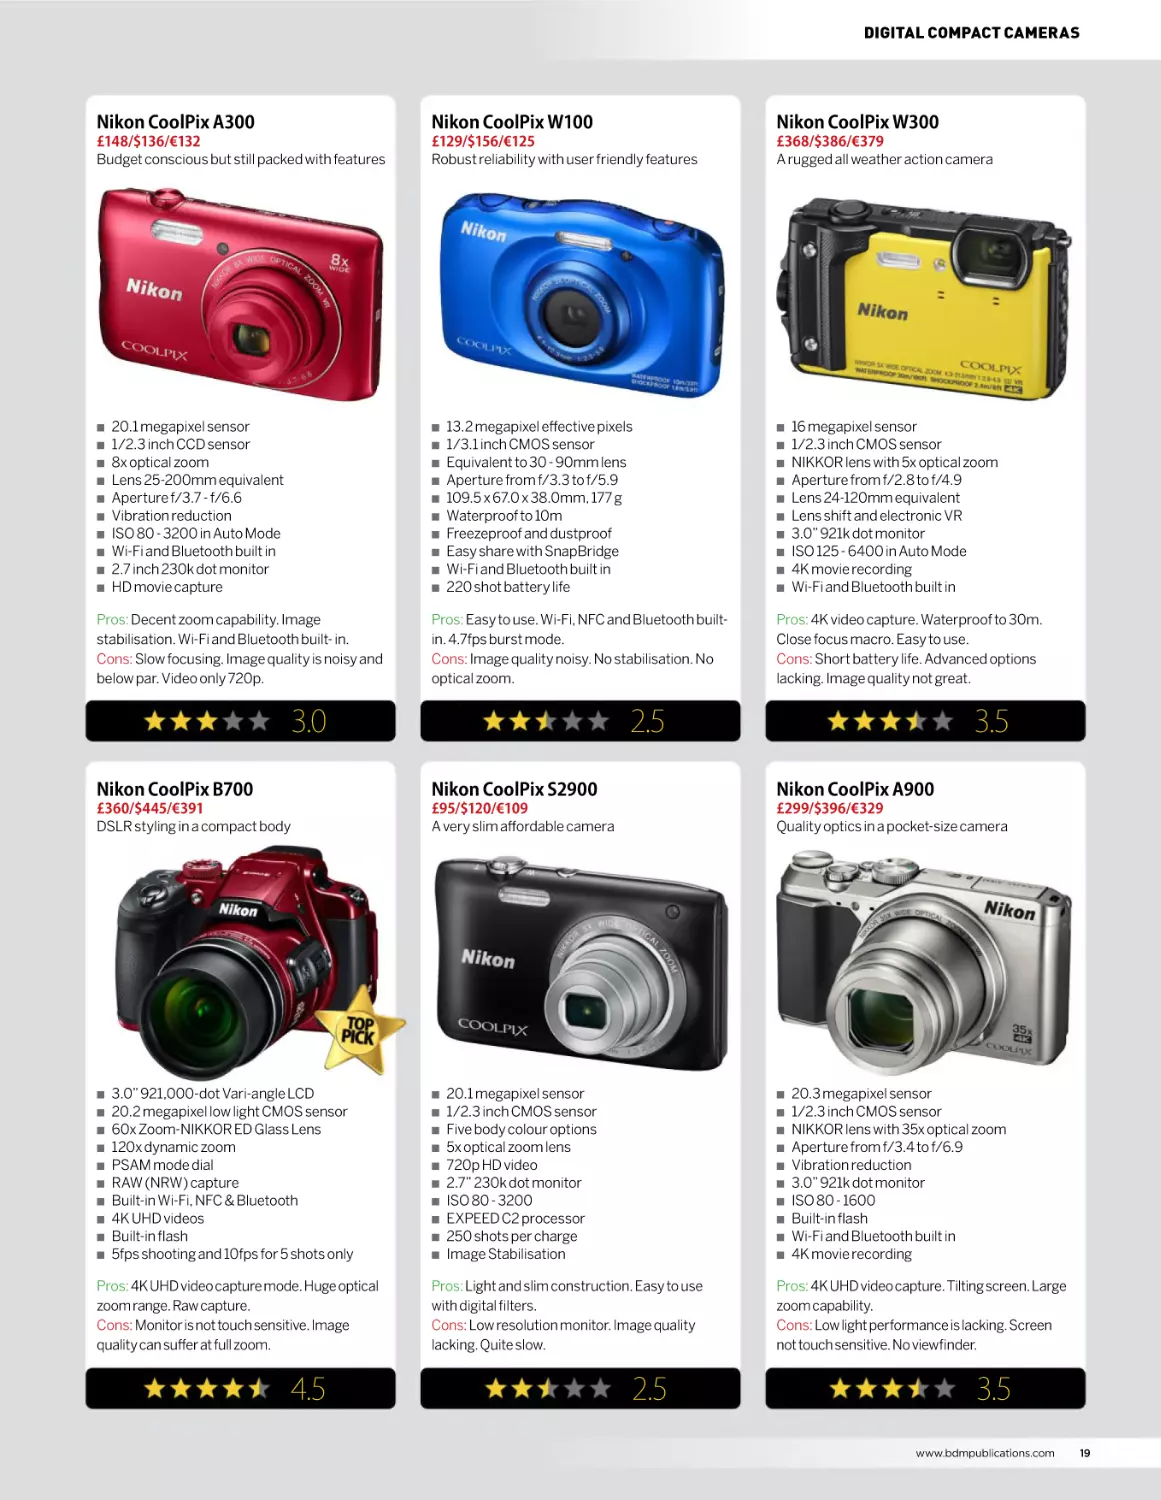
Nikon CoolPix A300
Nikon CoolPix W100
Nikon CoolPix W300
£148/$136/€132
Budget conscious but still packed with features
£129/$156/€125
Robust reliability with user friendly features
£368/$386/€379
A rugged all weather action camera
Q
Q
Q
Q
Q
Q
Q
Q
Q
Q
20.1 megapixel sensor
1/2.3 inch CCD sensor
8x optical zoom
Lens 25-200mm equivalent
Aperture f/3.7 - f/6.6
Vibration reduction
ISO 80 - 3200 in Auto Mode
Wi-Fi and Bluetooth built in
2.7 inch 230k dot monitor
HD movie capture
Q
Q
Q
Q
Q
Q
Q
Q
Q
Q
Pros: Decent zoom capability. Image
stabilisation. Wi-Fi and Bluetooth built- in.
Cons: Slow focusing. Image quality is noisy and
below par. Video only 720p.
13.2 megapixel effective pixels
1/3.1 inch CMOS sensor
Equivalent to 30 - 90mm lens
Aperture from f/3.3 to f/5.9
109.5 x 67.0 x 38.0mm, 177 g
Waterproof to 10m
Freezeproof and dustproof
Easy share with SnapBridge
Wi-Fi and Bluetooth built in
220 shot battery life
Pros: Easy to use. Wi-Fi, NFC and Bluetooth builtin. 4.7fps burst mode.
Cons: Image quality noisy. No stabilisation. No
optical zoom.
3.0
Q
Q
Q
Q
Q
Q
Q
Q
Q
Q
16 megapixel sensor
1/2.3 inch CMOS sensor
NIKKOR lens with 5x optical zoom
Aperture from f/2.8 to f/4.9
Lens 24-120mm equivalent
Lens shift and electronic VR
3.0” 921k dot monitor
ISO 125 - 6400 in Auto Mode
4K movie recording
Wi-Fi and Bluetooth built in
Pros: 4K video capture. Waterproof to 30m.
Close focus macro. Easy to use.
Cons: Short battery life. Advanced options
lacking. Image quality not great.
2.5
3.5
Nikon CoolPix B700
Nikon CoolPix S2900
Nikon CoolPix A900
£360/$445/€391
DSLR styling in a compact body
£95/$120/€109
A very slim affordable camera
£299/$396/€329
Quality optics in a pocket-size camera
Q
Q
Q
Q
Q
Q
Q
Q
Q
Q
3.0” 921,000-dot Vari-angle LCD
20.2 megapixel low light CMOS sensor
60x Zoom-NIKKOR ED Glass Lens
120x dynamic zoom
PSAM mode dial
RAW (NRW) capture
Built-in Wi-Fi, NFC & Bluetooth
4K UHD videos
Built-in flash
5fps shooting and 10fps for 5 shots only
Pros: 4K UHD video capture mode. Huge optical
zoom range. Raw capture.
Cons: Monitor is not touch sensitive. Image
quality can suffer at full zoom.
4.5
Q
Q
Q
Q
Q
Q
Q
Q
Q
Q
20.1 megapixel sensor
1/2.3 inch CMOS sensor
Five body colour options
5x optical zoom lens
720p HD video
2.7” 230k dot monitor
ISO 80 - 3200
EXPEED C2 processor
250 shots per charge
Image Stabilisation
Q
Q
Q
Q
Q
Q
Q
Q
Q
Q
Pros: Light and slim construction. Easy to use
with digital filters.
Cons: Low resolution monitor. Image quality
lacking. Quite slow.
2.5
20.3 megapixel sensor
1/2.3 inch CMOS sensor
NIKKOR lens with 35x optical zoom
Aperture from f/3.4 to f/6.9
Vibration reduction
3.0” 921k dot monitor
ISO 80 - 1600
Built-in flash
Wi-Fi and Bluetooth built in
4K movie recording
Pros: 4K UHD video capture. Tilting screen. Large
zoom capability.
Cons: Low light performance is lacking. Screen
not touch sensitive. No viewfinder.
3.5
www.bdmpublications.com
19
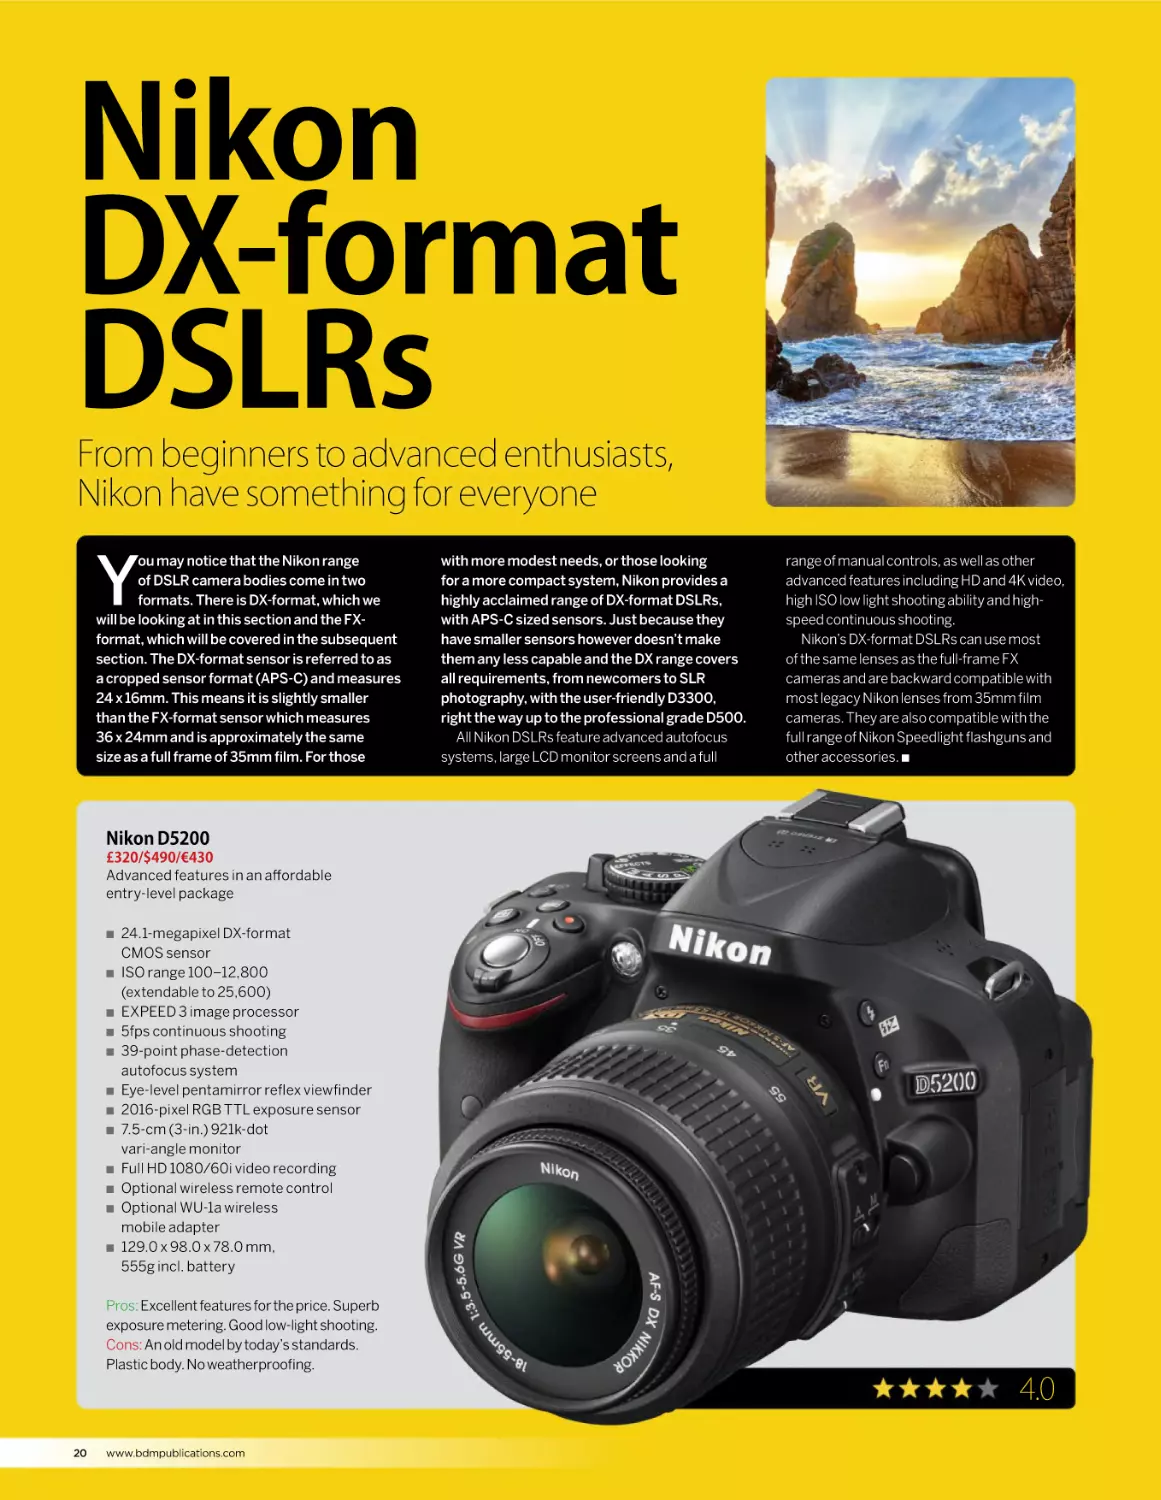
Nikon
DX-format
DSLRs
From beginners to advanced enthusiasts,
Nikon have something for everyone
Y
ou may notice that the Nikon range
of DSLR camera bodies come in two
formats. There is DX-format, which we
will be looking at in this section and the FXformat, which will be covered in the subsequent
section. The DX-format sensor is referred to as
a cropped sensor format (APS-C) and measures
24 x 16mm. This means it is slightly smaller
than the FX-format sensor which measures
36 x 24mm and is approximately the same
size as a full frame of 35mm film. For those
with more modest needs, or those looking
for a more compact system, Nikon provides a
highly acclaimed range of DX-format DSLRs,
with APS-C sized sensors. Just because they
have smaller sensors however doesn’t make
them any less capable and the DX range covers
all requirements, from newcomers to SLR
photography, with the user-friendly D3300,
right the way up to the professional grade D500.
All Nikon DSLRs feature advanced autofocus
systems, large LCD monitor screens and a full
range of manual controls, as well as other
advanced features including HD and 4K video,
high ISO low light shooting ability and highspeed continuous shooting.
Nikon’s DX-format DSLRs can use most
of the same lenses as the full-frame FX
cameras and are backward compatible with
most legacy Nikon lenses from 35mm film
cameras. They are also compatible with the
full range of Nikon Speedlight flashguns and
other accessories. Q
Nikon D5200
£320/$490/€430
Advanced features in an affordable
entry-level package
Q
Q
Q
Q
Q
Q
Q
Q
Q
Q
Q
Q
24.1-megapixel DX-format
CMOS sensor
ISO range 100–12,800
(extendable to 25,600)
EXPEED 3 image processor
5fps continuous shooting
39-point phase-detection
autofocus system
Eye-level pentamirror reflex viewfinder
2016-pixel RGB TTL exposure sensor
7.5-cm (3-in.) 921k-dot
vari-angle monitor
Full HD 1080/60i video recording
Optional wireless remote control
Optional WU-1a wireless
mobile adapter
129.0 x 98.0 x 78.0 mm,
555g incl. battery
Pros: Excellent features for the price. Superb
exposure metering. Good low-light shooting.
Cons: An old model by today’s standards.
Plastic body. No weatherproofing.
4.0
20
www.bdmpublications.com
NIKON DX-FORMAT DSLRs
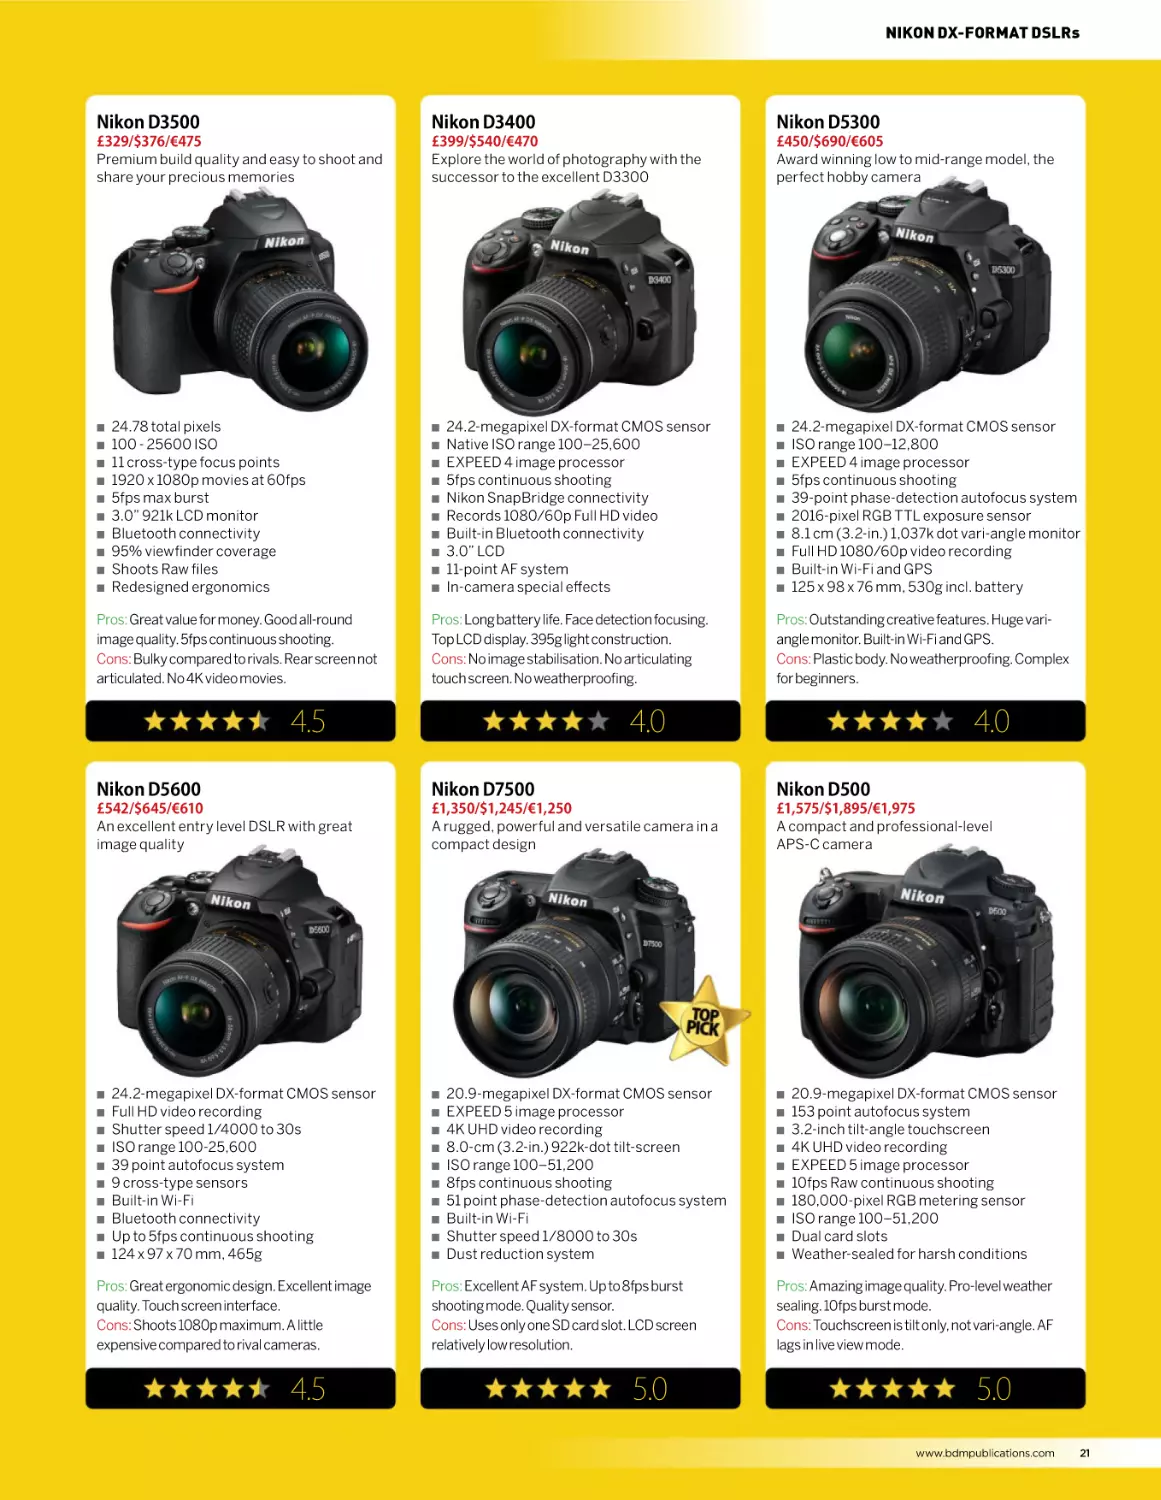
Nikon D3500
Nikon D3400
Nikon D5300
£329/$376/€475
Premium build quality and easy to shoot and
share your precious memories
£399/$540/€470
Explore the world of photography with the
successor to the excellent D3300
£450/$690/€605
Award winning low to mid-range model, the
perfect hobby camera
Q
Q
Q
Q
Q
Q
Q
Q
Q
Q
24.78 total pixels
100 - 25600 ISO
11 cross-type focus points
1920 x 1080p movies at 60fps
5fps max burst
3.0” 921k LCD monitor
Bluetooth connectivity
95% viewfinder coverage
Shoots Raw files
Redesigned ergonomics
Pros: Great value for money. Good all-round
image quality. 5fps continuous shooting.
Cons: Bulky compared to rivals. Rear screen not
articulated. No 4K video movies.
Q
Q
Q
Q
Q
Q
Q
Q
Q
Q
24.2-megapixel DX-format CMOS sensor
Native ISO range 100–25,600
EXPEED 4 image processor
5fps continuous shooting
Nikon SnapBridge connectivity
Records 1080/60p Full HD video
Built-in Bluetooth connectivity
3.0” LCD
11-point AF system
In-camera special effects
Pros: Long battery life. Face detection focusing.
Top LCD display. 395g light construction.
Cons: No image stabilisation. No articulating
touch screen. No weatherproofing.
4.5
Q
Q
Q
Q
Q
Q
Q
Q
Q
Q
24.2-megapixel DX-format CMOS sensor
ISO range 100–12,800
EXPEED 4 image processor
5fps continuous shooting
39-point phase-detection autofocus system
2016-pixel RGB TTL exposure sensor
8.1 cm (3.2-in.) 1,037k dot vari-angle monitor
Full HD 1080/60p video recording
Built-in Wi-Fi and GPS
125 x 98 x 76 mm, 530g incl. battery
Pros: Outstanding creative features. Huge variangle monitor. Built-in Wi-Fi and GPS.
Cons: Plastic body. No weatherproofing. Complex
for beginners.
4.0
4.0
Nikon D5600
Nikon D7500
Nikon D500
£542/$645/€610
An excellent entry level DSLR with great
image quality
£1,350/$1,245/€1,250
A rugged, powerful and versatile camera in a
compact design
£1,575/$1,895/€1,975
A compact and professional-level
APS-C camera
Q
Q
Q
Q
Q
Q
Q
Q
Q
Q
24.2-megapixel DX-format CMOS sensor
Full HD video recording
Shutter speed 1/4000 to 30s
ISO range 100-25,600
39 point autofocus system
9 cross-type sensors
Built-in Wi-Fi
Bluetooth connectivity
Up to 5fps continuous shooting
124 x 97 x 70 mm, 465g
Pros: Great ergonomic design. Excellent image
quality. Touch screen interface.
Cons: Shoots 1080p maximum. A little
expensive compared to rival cameras.
4.5
Q
Q
Q
Q
Q
Q
Q
Q
Q
Q
20.9-megapixel DX-format CMOS sensor
EXPEED 5 image processor
4K UHD video recording
8.0-cm (3.2-in.) 922k-dot tilt-screen
ISO range 100–51,200
8fps continuous shooting
51 point phase-detection autofocus system
Built-in Wi-Fi
Shutter speed 1/8000 to 30s
Dust reduction system
Pros: Excellent AF system. Up to 8fps burst
shooting mode. Quality sensor.
Cons: Uses only one SD card slot. LCD screen
relatively low resolution.
5.0
Q
Q
Q
Q
Q
Q
Q
Q
Q
Q
20.9-megapixel DX-format CMOS sensor
153 point autofocus system
3.2-inch tilt-angle touchscreen
4K UHD video recording
EXPEED 5 image processor
10fps Raw continuous shooting
180,000-pixel RGB metering sensor
ISO range 100–51,200
Dual card slots
Weather-sealed for harsh conditions
Pros: Amazing image quality. Pro-level weather
sealing. 10fps burst mode.
Cons: Touchscreen is tilt only, not vari-angle. AF
lags in live view mode.
5.0
www.bdmpublications.com
21
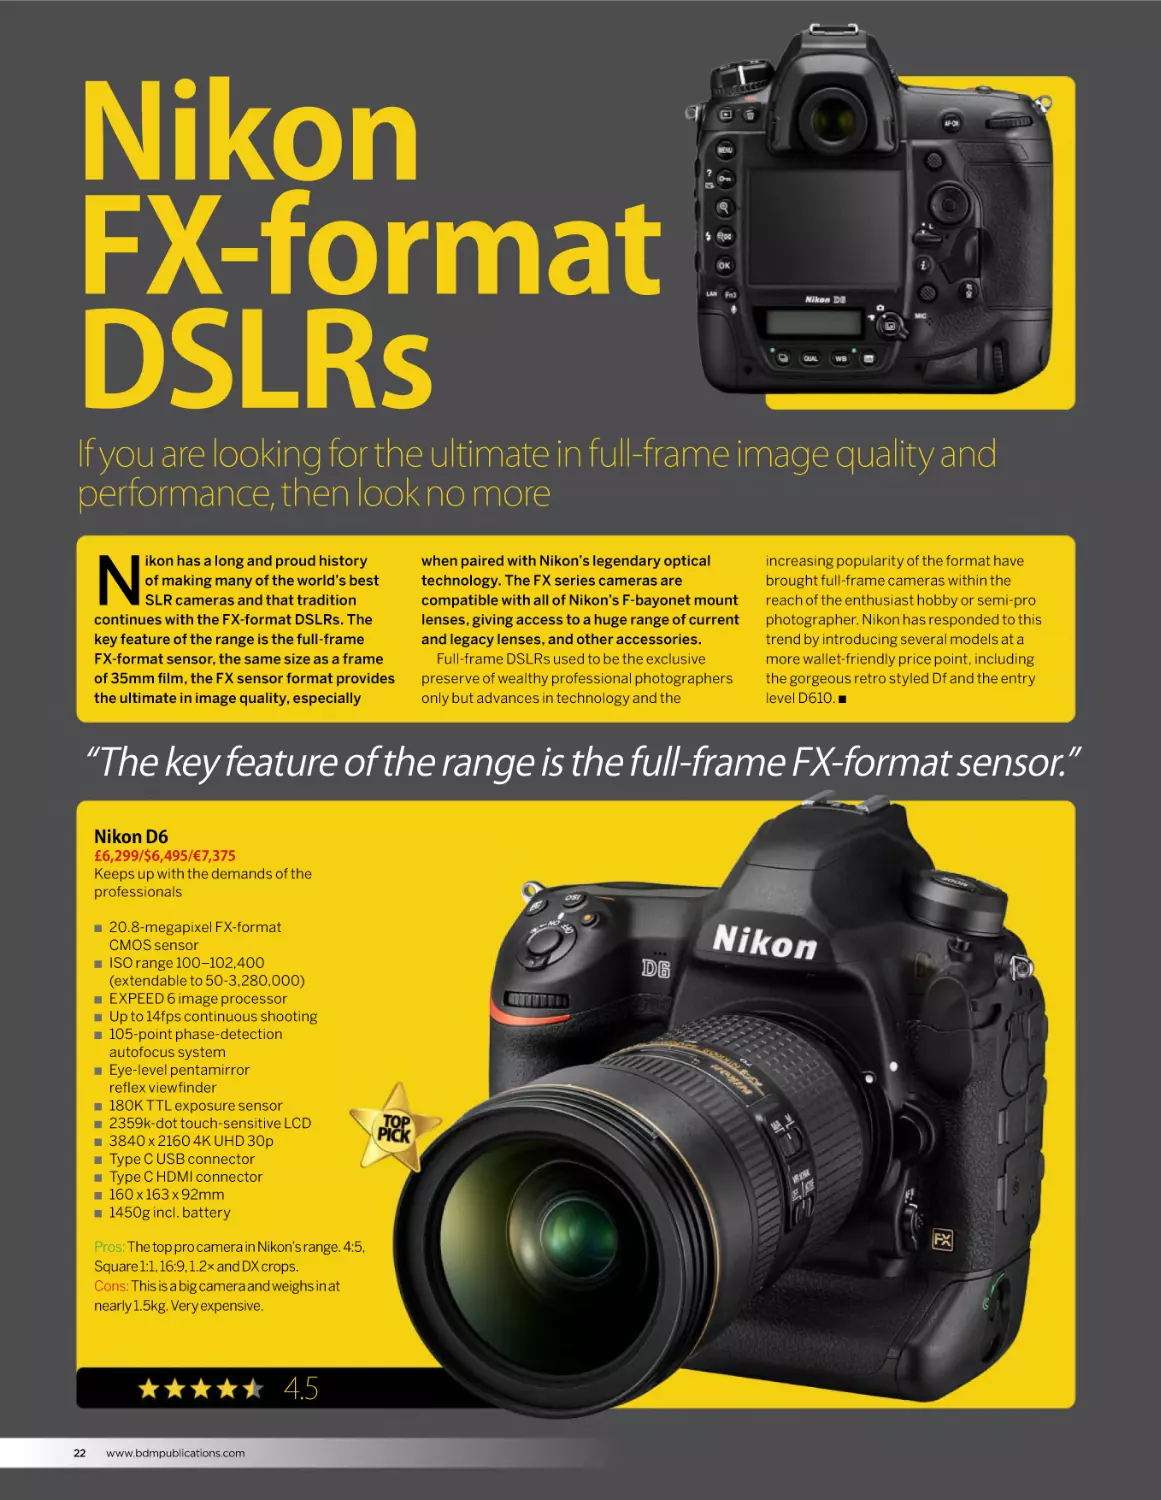
Nikon
FX-format
DSLRs
If you are looking for the ultimate in full-frame image quality and
performance, then look no more
N
ikon has a long and proud history
of making many of the world’s best
SLR cameras and that tradition
continues with the FX-format DSLRs. The
key feature of the range is the full-frame
FX-format sensor, the same size as a frame
of 35mm film, the FX sensor format provides
the ultimate in image quality, especially
when paired with Nikon’s legendary optical
technology. The FX series cameras are
compatible with all of Nikon’s F-bayonet mount
lenses, giving access to a huge range of current
and legacy lenses, and other accessories.
Full-frame DSLRs used to be the exclusive
preserve of wealthy professional photographers
only but advances in technology and the
increasing popularity of the format have
brought full-frame cameras within the
reach of the enthusiast hobby or semi-pro
photographer. Nikon has responded to this
trend by introducing several models at a
more wallet-friendly price point, including
the gorgeous retro styled Df and the entry
level D610. Q
“The key feature of the range is the full-frame FX-format sensor.”
Nikon D6
£6,299/$6,495/€7,375
Keeps up with the demands of the
professionals
Q
Q
Q
Q
Q
Q
Q
Q
Q
Q
Q
Q
Q
20.8-megapixel FX-format
CMOS sensor
ISO range 100–102,400
(extendable to 50-3,280,000)
EXPEED 6 image processor
Up to 14fps continuous shooting
105-point phase-detection
autofocus system
Eye-level pentamirror
reflex viewfinder
180K TTL exposure sensor
2359k-dot touch-sensitive LCD
3840 x 2160 4K UHD 30p
Type C USB connector
Type C HDMI connector
160 x 163 x 92mm
1450g incl. battery
Pros: The top pro camera in Nikon’s range. 4:5,
Square 1:1, 16:9, 1.2× and DX crops.
Cons: This is a big camera and weighs in at
nearly 1.5kg. Very expensive.
4.5
22
www.bdmpublications.com
NIKON FX-FORMAT DSLRs
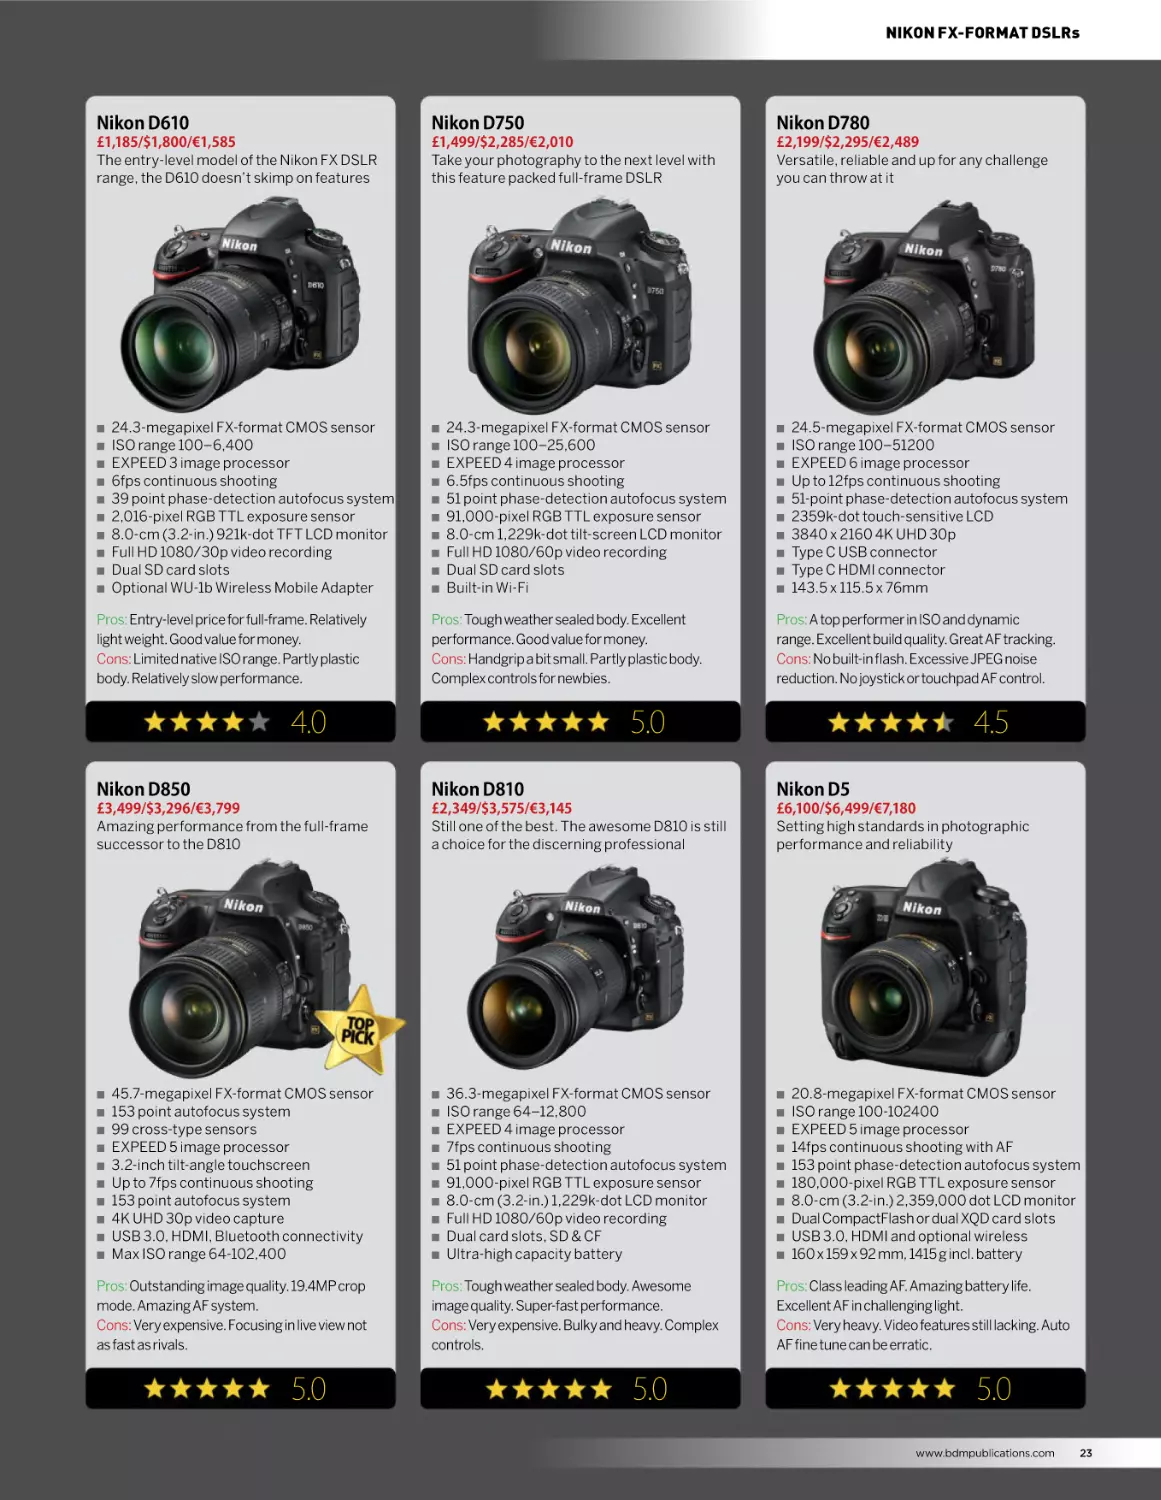
Nikon D610
Nikon D750
Nikon D780
£1,185/$1,800/€1,585
The entry-level model of the Nikon FX DSLR
range, the D610 doesn’t skimp on features
£1,499/$2,285/€2,010
Take your photography to the next level with
this feature packed full-frame DSLR
£2,199/$2,295/€2,489
Versatile, reliable and up for any challenge
you can throw at it
Q
Q
Q
Q
Q
Q
Q
Q
Q
Q
24.3-megapixel FX-format CMOS sensor
ISO range 100–6,400
EXPEED 3 image processor
6fps continuous shooting
39 point phase-detection autofocus system
2,016-pixel RGB TTL exposure sensor
8.0-cm (3.2-in.) 921k-dot TFT LCD monitor
Full HD 1080/30p video recording
Dual SD card slots
Optional WU-1b Wireless Mobile Adapter
Pros: Entry-level price for full-frame. Relatively
light weight. Good value for money.
Cons: Limited native ISO range. Partly plastic
body. Relatively slow performance.
Q
Q
Q
Q
Q
Q
Q
Q
Q
Q
24.3-megapixel FX-format CMOS sensor
ISO range 100–25,600
EXPEED 4 image processor
6.5fps continuous shooting
51 point phase-detection autofocus system
91,000-pixel RGB TTL exposure sensor
8.0-cm 1,229k-dot tilt-screen LCD monitor
Full HD 1080/60p video recording
Dual SD card slots
Built-in Wi-Fi
Pros: Tough weather sealed body. Excellent
performance. Good value for money.
Cons: Handgrip a bit small. Partly plastic body.
Complex controls for newbies.
4.0
Q
Q
Q
Q
Q
Q
Q
Q
Q
Q
24.5-megapixel FX-format CMOS sensor
ISO range 100–51200
EXPEED 6 image processor
Up to 12fps continuous shooting
51-point phase-detection autofocus system
2359k-dot touch-sensitive LCD
3840 x 2160 4K UHD 30p
Type C USB connector
Type C HDMI connector
143.5 x 115.5 x 76mm
Pros: A top performer in ISO and dynamic
range. Excellent build quality. Great AF tracking.
Cons: No built-in flash. Excessive JPEG noise
reduction. No joystick or touchpad AF control.
5.0
4.5
Nikon D850
Nikon D810
Nikon D5
£3,499/$3,296/€3,799
Amazing performance from the full-frame
successor to the D810
£2,349/$3,575/€3,145
Still one of the best. The awesome D810 is still
a choice for the discerning professional
£6,100/$6,499/€7,180
Setting high standards in photographic
performance and reliability
Q
Q
Q
Q
Q
Q
Q
Q
Q
Q
45.7-megapixel FX-format CMOS sensor
153 point autofocus system
99 cross-type sensors
EXPEED 5 image processor
3.2-inch tilt-angle touchscreen
Up to 7fps continuous shooting
153 point autofocus system
4K UHD 30p video capture
USB 3.0, HDMI, Bluetooth connectivity
Max ISO range 64-102,400
Pros: Outstanding image quality. 19.4MP crop
mode. Amazing AF system.
Cons: Very expensive. Focusing in live view not
as fast as rivals.
5.0
Q
Q
Q
Q
Q
Q
Q
Q
Q
Q
36.3-megapixel FX-format CMOS sensor
ISO range 64–12,800
EXPEED 4 image processor
7fps continuous shooting
51 point phase-detection autofocus system
91,000-pixel RGB TTL exposure sensor
8.0-cm (3.2-in.) 1,229k-dot LCD monitor
Full HD 1080/60p video recording
Dual card slots, SD & CF
Ultra-high capacity battery
Pros: Tough weather sealed body. Awesome
image quality. Super-fast performance.
Cons: Very expensive. Bulky and heavy. Complex
controls.
5.0
Q
Q
Q
Q
Q
Q
Q
Q
Q
Q
20.8-megapixel FX-format CMOS sensor
ISO range 100-102400
EXPEED 5 image processor
14fps continuous shooting with AF
153 point phase-detection autofocus system
180,000-pixel RGB TTL exposure sensor
8.0-cm (3.2-in.) 2,359,000 dot LCD monitor
Dual CompactFlash or dual XQD card slots
USB 3.0, HDMI and optional wireless
160 x 159 x 92 mm, 1415 g incl. battery
Pros: Class leading AF. Amazing battery life.
Excellent AF in challenging light.
Cons: Very heavy. Video features still lacking. Auto
AF fine tune can be erratic.
5.0
www.bdmpublications.com
23
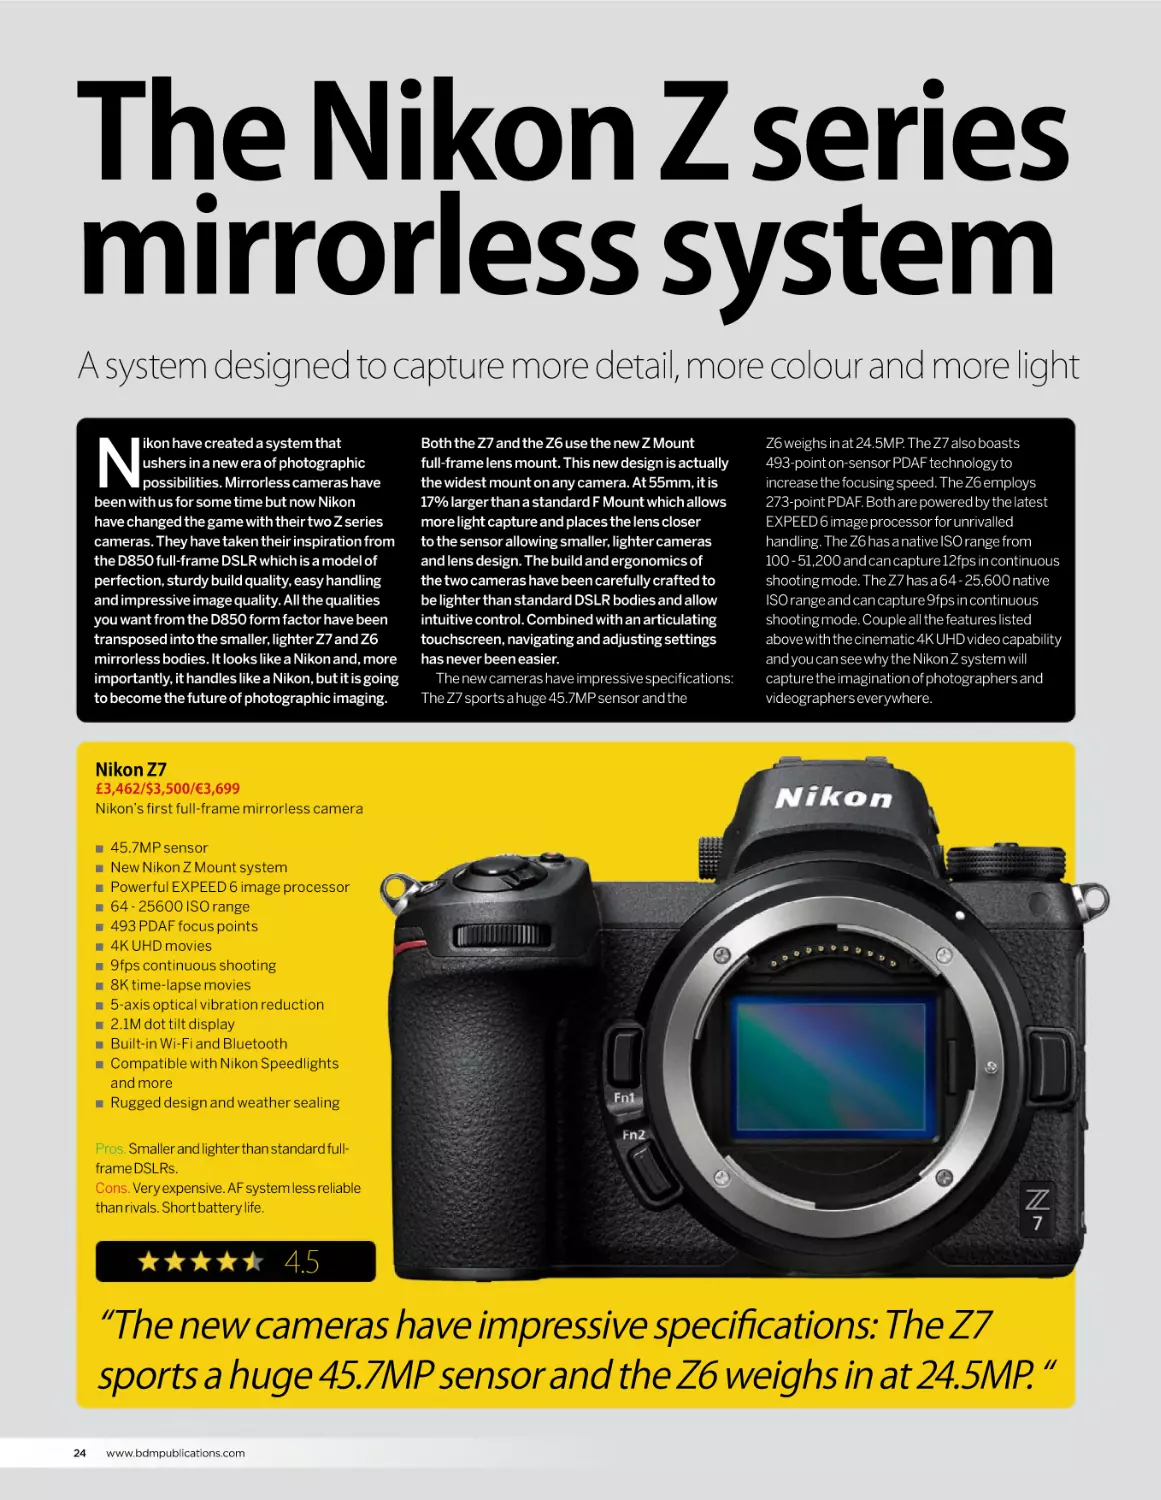
The Nikon Z series
mirrorless system
A system designed to capture more detail, more colour and more light
N
ikon have created a system that
ushers in a new era of photographic
possibilities. Mirrorless cameras have
been with us for some time but now Nikon
have changed the game with their two Z series
cameras. They have taken their inspiration from
the D850 full-frame DSLR which is a model of
perfection, sturdy build quality, easy handling
and impressive image quality. All the qualities
you want from the D850 form factor have been
transposed into the smaller, lighter Z7 and Z6
mirrorless bodies. It looks like a Nikon and, more
importantly, it handles like a Nikon, but it is going
to become the future of photographic imaging.
Both the Z7 and the Z6 use the new Z Mount
full-frame lens mount. This new design is actually
the widest mount on any camera. At 55mm, it is
17% larger than a standard F Mount which allows
more light capture and places the lens closer
to the sensor allowing smaller, lighter cameras
and lens design. The build and ergonomics of
the two cameras have been carefully crafted to
be lighter than standard DSLR bodies and allow
intuitive control. Combined with an articulating
touchscreen, navigating and adjusting settings
has never been easier.
The new cameras have impressive specifications:
The Z7 sports a huge 45.7MP sensor and the
Z6 weighs in at 24.5MP. The Z7 also boasts
493-point on-sensor PDAF technology to
increase the focusing speed. The Z6 employs
273-point PDAF. Both are powered by the latest
EXPEED 6 image processor for unrivalled
handling. The Z6 has a native ISO range from
100 - 51,200 and can capture 12fps in continuous
shooting mode. The Z7 has a 64 - 25,600 native
ISO range and can capture 9fps in continuous
shooting mode. Couple all the features listed
above with the cinematic 4K UHD video capability
and you can see why the Nikon Z system will
capture the imagination of photographers and
videographers everywhere.
Nikon Z7
£3,462/$3,500/€3,699
Nikon’s first full-frame mirrorless camera
Q
Q
Q
Q
Q
Q
Q
Q
Q
Q
Q
Q
Q
45.7MP sensor
New Nikon Z Mount system
Powerful EXPEED 6 image processor
64 - 25600 ISO range
493 PDAF focus points
4K UHD movies
9fps continuous shooting
8K time-lapse movies
5-axis optical vibration reduction
2.1M dot tilt display
Built-in Wi-Fi and Bluetooth
Compatible with Nikon Speedlights
and more
Rugged design and weather sealing
Pros. Smaller and lighter than standard fullframe DSLRs.
Cons. Very expensive. AF system less reliable
than rivals. Short battery life.
4.5
“The new cameras have impressive specifications: The Z7
sports a huge 45.7MP sensor and the Z6 weighs in at 24.5MP. “
24
www.bdmpublications.com
THE NIKON Z SERIES MIRRORLESS SYSTEM
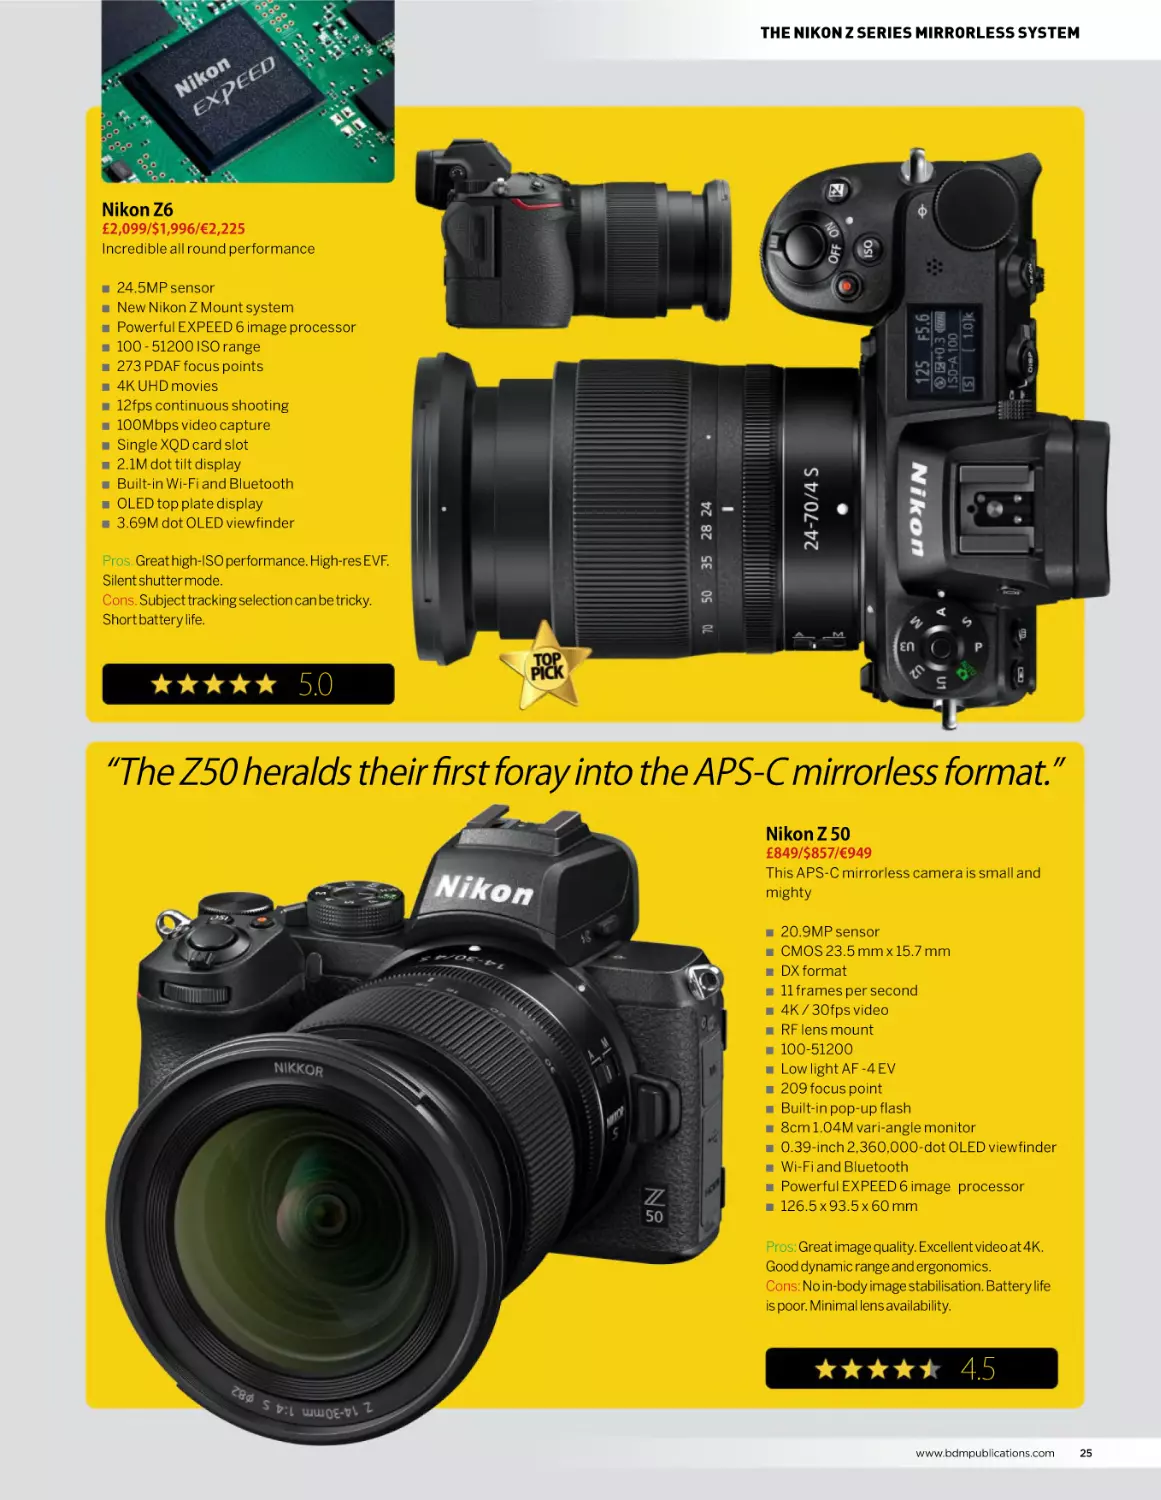
Nikon Z6
£2,099/$1,996/€2,225
Incredible all round performance
Q
Q
Q
Q
Q
Q
Q
Q
Q
Q
Q
Q
Q
24.5MP sensor
New Nikon Z Mount system
Powerful EXPEED 6 image processor
100 - 51200 ISO range
273 PDAF focus points
4K UHD movies
12fps continuous shooting
100Mbps video capture
Single XQD card slot
2.1M dot tilt display
Built-in Wi-Fi and Bluetooth
OLED top plate display
3.69M dot OLED viewfinder
Pros. Great high-ISO performance. High-res EVF.
Silent shutter mode.
Cons. Subject tracking selection can be tricky.
Short battery life.
5.0
“The Z50 heralds their first foray into the APS-C mirrorless format.”
Nikon Z 50
£849/$857/€949
This APS-C mirrorless camera is small and
mighty
Q
Q
Q
Q
Q
Q
Q
Q
Q
Q
Q
Q
Q
Q
Q
20.9MP sensor
CMOS 23.5 mm x 15.7 mm
DX format
11 frames per second
4K / 30fps video
RF lens mount
100-51200
Low light AF -4 EV
209 focus point
Built-in pop-up flash
8cm 1.04M vari-angle monitor
0.39-inch 2,360,000-dot OLED viewfinder
Wi-Fi and Bluetooth
Powerful EXPEED 6 image processor
126.5 x 93.5 x 60 mm
Pros: Great image quality. Excellent video at 4K.
Good dynamic range and ergonomics.
Cons: No in-body image stabilisation. Battery life
is poor. Minimal lens availability.
4.5
www.bdmpublications.com
25
NIKKOR
DX-format lenses
Expand your creativity and choose from a wide range of DX-format
lenses for your APS-C DSLR
“If you own a
Nikon DSLR with
a 24 x16mm
APS-C sensor,
this makes it
a DX-format
camera body.
These smaller
sensors allow for
the production
of lighter and
smaller camera
bodies.”
26
www.bdmpublications.com
W
hat exactly is a DX-format lens? A
DSLR camera’s format is based upon
the size of its sensor. If you own a
Nikon DSLR with a 24 x 16mm APS-C sensor,
this makes it a DX-format camera body. These
smaller sensors allow for the production of
lighter and smaller camera bodies. If you were
to use a normal full-frame lens on a new crop
sensor camera, it would project an image
that was too big for the sensor. A 100mm
full-frame lens for example, would project an
image that was about 1.5 times too large for
the smaller sensor. This meant that a new kind
of lens had to be created that could project an
image onto the smaller sensor and thus the
DX-format lens came into being.
Just as a side note, if you’ve ever wondered
what NIKKOR stands for, it is a westernised
name derived from the Nikko parent company
and was introduced in 1932. Nikon cameras
allow for the interchange of lenses between their
DX-format and FX-format camera bodies. If you
own a full-frame Nikon camera, you can still use
a DX-format lens on it. The camera detects that
a crop sensor lens is attached and automatically
crops the frame to suit the lens being used. Q
NIKKOR DX-FORMAT LENSES
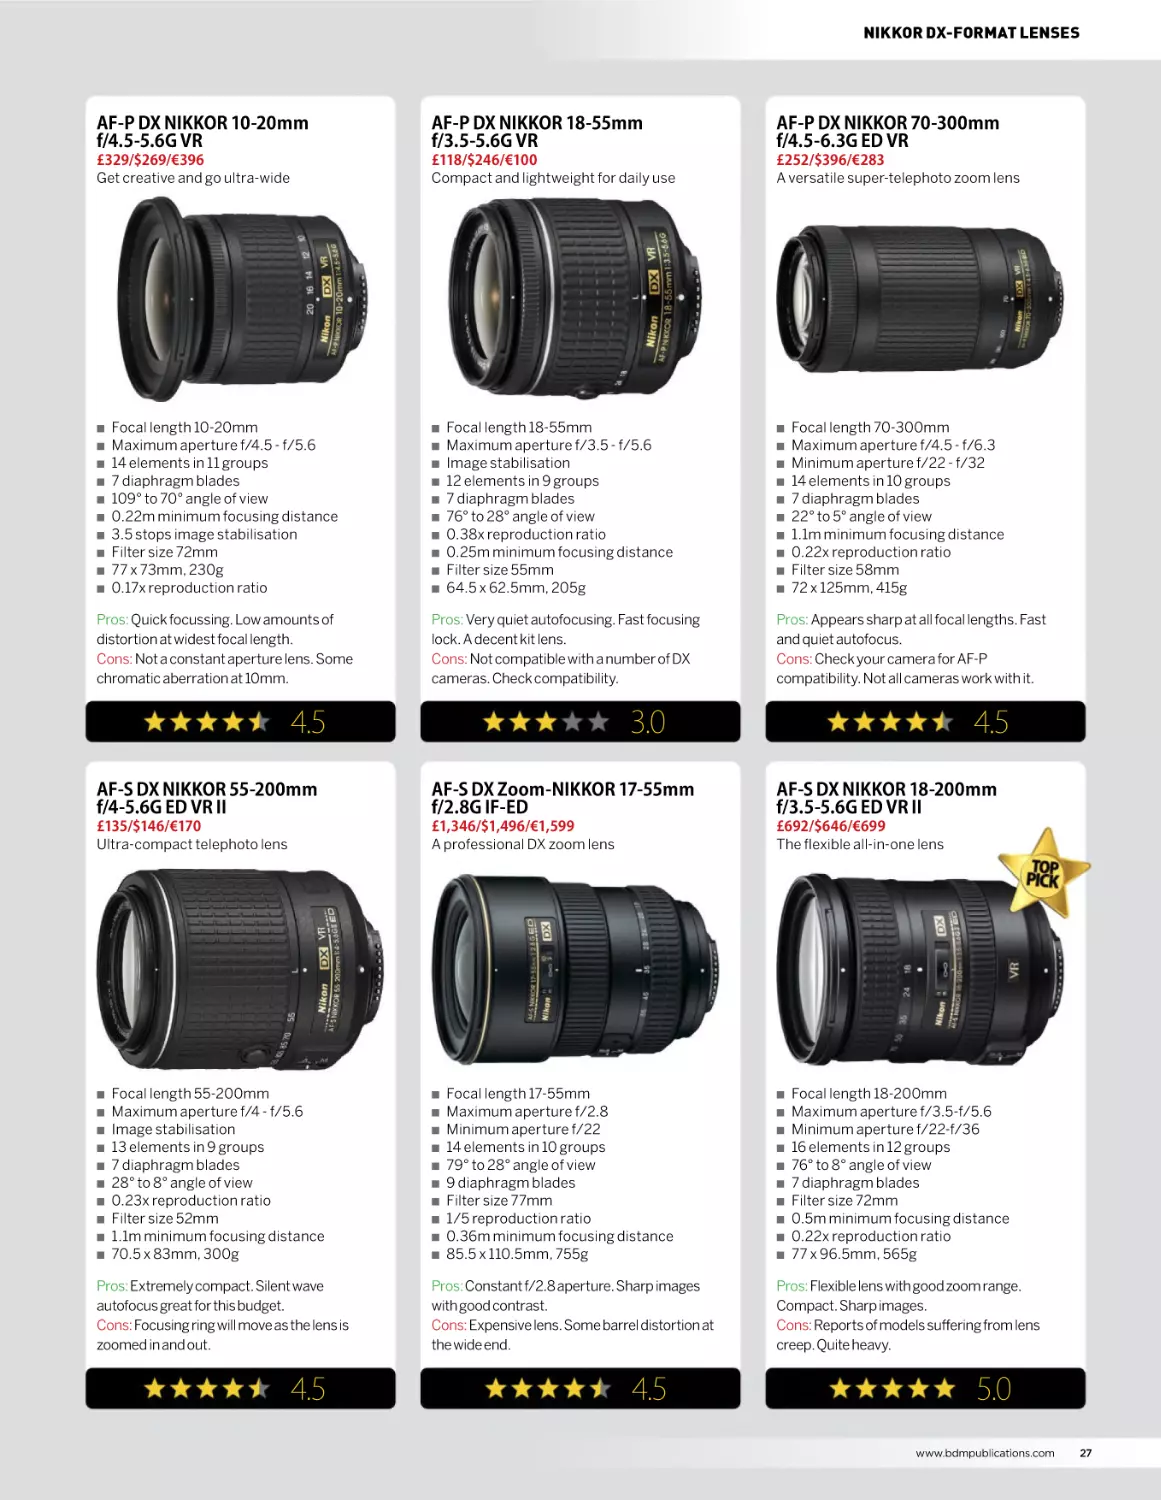
AF-P DX NIKKOR 10-20mm
f/4.5-5.6G VR
AF-P DX NIKKOR 18-55mm
f/3.5-5.6G VR
AF-P DX NIKKOR 70-300mm
f/4.5-6.3G ED VR
£329/$269/€396
Get creative and go ultra-wide
£118/$246/€100
Compact and lightweight for daily use
£252/$396/€283
A versatile super-telephoto zoom lens
Q
Q
Q
Q
Q
Q
Q
Q
Q
Q
Focal length 10-20mm
Maximum aperture f/4.5 - f/5.6
14 elements in 11 groups
7 diaphragm blades
109° to 70° angle of view
0.22m minimum focusing distance
3.5 stops image stabilisation
Filter size 72mm
77 x 73mm, 230g
0.17x reproduction ratio
Pros: Quick focussing. Low amounts of
distortion at widest focal length.
Cons: Not a constant aperture lens. Some
chromatic aberration at 10mm.
Q
Q
Q
Q
Q
Q
Q
Q
Q
Q
Focal length 18-55mm
Maximum aperture f/3.5 - f/5.6
Image stabilisation
12 elements in 9 groups
7 diaphragm blades
76° to 28° angle of view
0.38x reproduction ratio
0.25m minimum focusing distance
Filter size 55mm
64.5 x 62.5mm, 205g
Pros: Very quiet autofocusing. Fast focusing
lock. A decent kit lens.
Cons: Not compatible with a number of DX
cameras. Check compatibility.
4.5
Q
Q
Q
Q
Q
Q
Q
Q
Q
Q
Focal length 70-300mm
Maximum aperture f/4.5 - f/6.3
Minimum aperture f/22 - f/32
14 elements in 10 groups
7 diaphragm blades
22° to 5° angle of view
1.1m minimum focusing distance
0.22x reproduction ratio
Filter size 58mm
72 x 125mm, 415g
Pros: Appears sharp at all focal lengths. Fast
and quiet autofocus.
Cons: Check your camera for AF-P
compatibility. Not all cameras work with it.
3.0
4.5
AF-S DX NIKKOR 55-200mm
f/4-5.6G ED VR II
AF-S DX Zoom-NIKKOR 17-55mm
f/2.8G IF-ED
AF-S DX NIKKOR 18-200mm
f/3.5-5.6G ED VR II
£135/$146/€170
Ultra-compact telephoto lens
£1,346/$1,496/€1,599
A professional DX zoom lens
£692/$646/€699
The flexible all-in-one lens
Q
Q
Q
Q
Q
Q
Q
Q
Q
Q
Focal length 55-200mm
Maximum aperture f/4 - f/5.6
Image stabilisation
13 elements in 9 groups
7 diaphragm blades
28° to 8° angle of view
0.23x reproduction ratio
Filter size 52mm
1.1m minimum focusing distance
70.5 x 83mm, 300g
Pros: Extremely compact. Silent wave
autofocus great for this budget.
Cons: Focusing ring will move as the lens is
zoomed in and out.
4.5
Q
Q
Q
Q
Q
Q
Q
Q
Q
Q
Focal length 17-55mm
Maximum aperture f/2.8
Minimum aperture f/22
14 elements in 10 groups
79° to 28° angle of view
9 diaphragm blades
Filter size 77mm
1/5 reproduction ratio
0.36m minimum focusing distance
85.5 x 110.5mm, 755g
Pros: Constant f/2.8 aperture. Sharp images
with good contrast.
Cons: Expensive lens. Some barrel distortion at
the wide end.
4.5
Q
Q
Q
Q
Q
Q
Q
Q
Q
Q
Focal length 18-200mm
Maximum aperture f/3.5-f/5.6
Minimum aperture f/22-f/36
16 elements in 12 groups
76° to 8° angle of view
7 diaphragm blades
Filter size 72mm
0.5m minimum focusing distance
0.22x reproduction ratio
77 x 96.5mm, 565g
Pros: Flexible lens with good zoom range.
Compact. Sharp images.
Cons: Reports of models suffering from lens
creep. Quite heavy.
5.0
www.bdmpublications.com
27
AF-S 16-80mm
f/2.8-4E ED VR
AF-S 55-200mm
f/4-5.6G ED VR
AF-S 18‒55mm
f/3.5‒5.6G VR II
£629/$965/€845
High performance general purpose zoom
£130/$200/€175
Affordable compact telephoto zoom
£199/$305/€268
Versatile standard zoom lens
Q
Q
Q
Q
Q
Q
Q
Q
Q
Q
High performance 5x zoom lens
Compact and lightweight, just 480g
Optical vibration reduction
Fast maximum aperture, f/2.8 – f/4
Minimum focus distance 35cm
Silent Wave Motor for fast quiet autofocus
Electromagnetic diaphragm
Nano crystal coating reduces flare
72mm filter ring
Aperture range f/2.8 - f/32
Pros: Very good image quality. Good
sharpness throughout.
Cons: It is quite heavy and expensive. Noisy
focusing.
Q
Q
Q
Q
Q
Q
Q
Q
Q
Q
Telephoto zoom lens, great for travel
Optical vibration reduction
Retractable lens mechanism
Light and compact, 300g
Silent Wave Motor for fast quiet autofocus
Maximum aperture f/4 – f/5.6
One extra low dispersion glass element
Pairs well with 18–55mm f/3.5–5.6G VR II
Minimum focus distance 110cm
52mm filter ring
Pros: Useful zoom range. Decent build
quality for the price.
Cons: Not a constant aperture zoom lens.
Superseded by its VRII update.
4.0
Q
Q
Q
Q
Q
Q
Q
Q
Q
3x zoom lens for snaps and HD movies
Optical vibration reduction
Retractable lens mechanism
Silent Wave Motor for fast quiet autofocus
Light and compact, 195g
Aspherical lens element
Ideal standard zoom replacement
Pairs well with 55-200mm f4-5.6G ED VR II
Minimum focus distance 28cm
52mm filter ring
Pros: Very compact design. Good centre
sharpness across the zoom range.
Cons: Not a constant aperture zoom lens. Some
image softness at around 35mm.
4.0
3.5
AF-S 18‒300mm
f/3.5‒6.3G ED VR
AF-S 18-140
f/3.5-5.6G ED VR
AF-S 55-300mm
f/4.5-5.6G ED VR
£549/$845/€740
Multi-purpose wide telephoto
£429/$660/€580
Compact and versatile wide zoom
£269/$415/€363
Powerful super telephoto zoom lens
Q
Q
Q
Q
Q
Q
Q
Q
Q
Wide 16.7x zoom range ideal for HD video
Optical vibration reduction
Maximum aperture f/3.5 – f/6.3
Zoom-lock switch keeps the lens secure
Weather sealed mount
Silent Wave Motor for fast quiet autofocus
Minimum focus distance 48cm
99mm long and 550g
67mm filter ring
Pros: Very lightweight and compact. Fast
autofocus. Good zoom range.
Cons: Not as sharp as some others in this
range. No lens hood supplied.
3.5
28
Q
www.bdmpublications.com
Q
Q
Q
Q
Q
Q
Q
Q
Q
7.8x zoom lens ideal for general shots
Silent action ideal for video
Optical vibration reduction
Maximum aperture f/3.5 – f/5.6
Weather sealed mount
Silent Wave Motor for fast quiet autofocus
Minimum focus distance 45cm
490g and 97mm long
67mm filter ring
Pros: Decent optics for this price point. Good
build. Versatile zoom range.
Cons: Known to be noisy while focusing.
Possible drop in sharpness around 70mm.
4.0
Q
Q
Q
Q
Q
Q
Q
Q
Q
5.5x zoom ideal for wildlife and sports
35mm equivalent 82.5-450mm
Optical vibration reduction
Maximum aperture f/4.5 – f/5.6
Weather sealed mount
Silent Wave Motor for fast quiet autofocus
Minimum focus distance 140cm
530g and 123mm long
58mm filter ring
Pros: Good value. Great build. Good sharpness
around the mid-zoom range.
Cons: Images can be soft around 300mm.
Some may not like the telescoping body.
4.5
NIKKOR DX-FORMAT LENSES
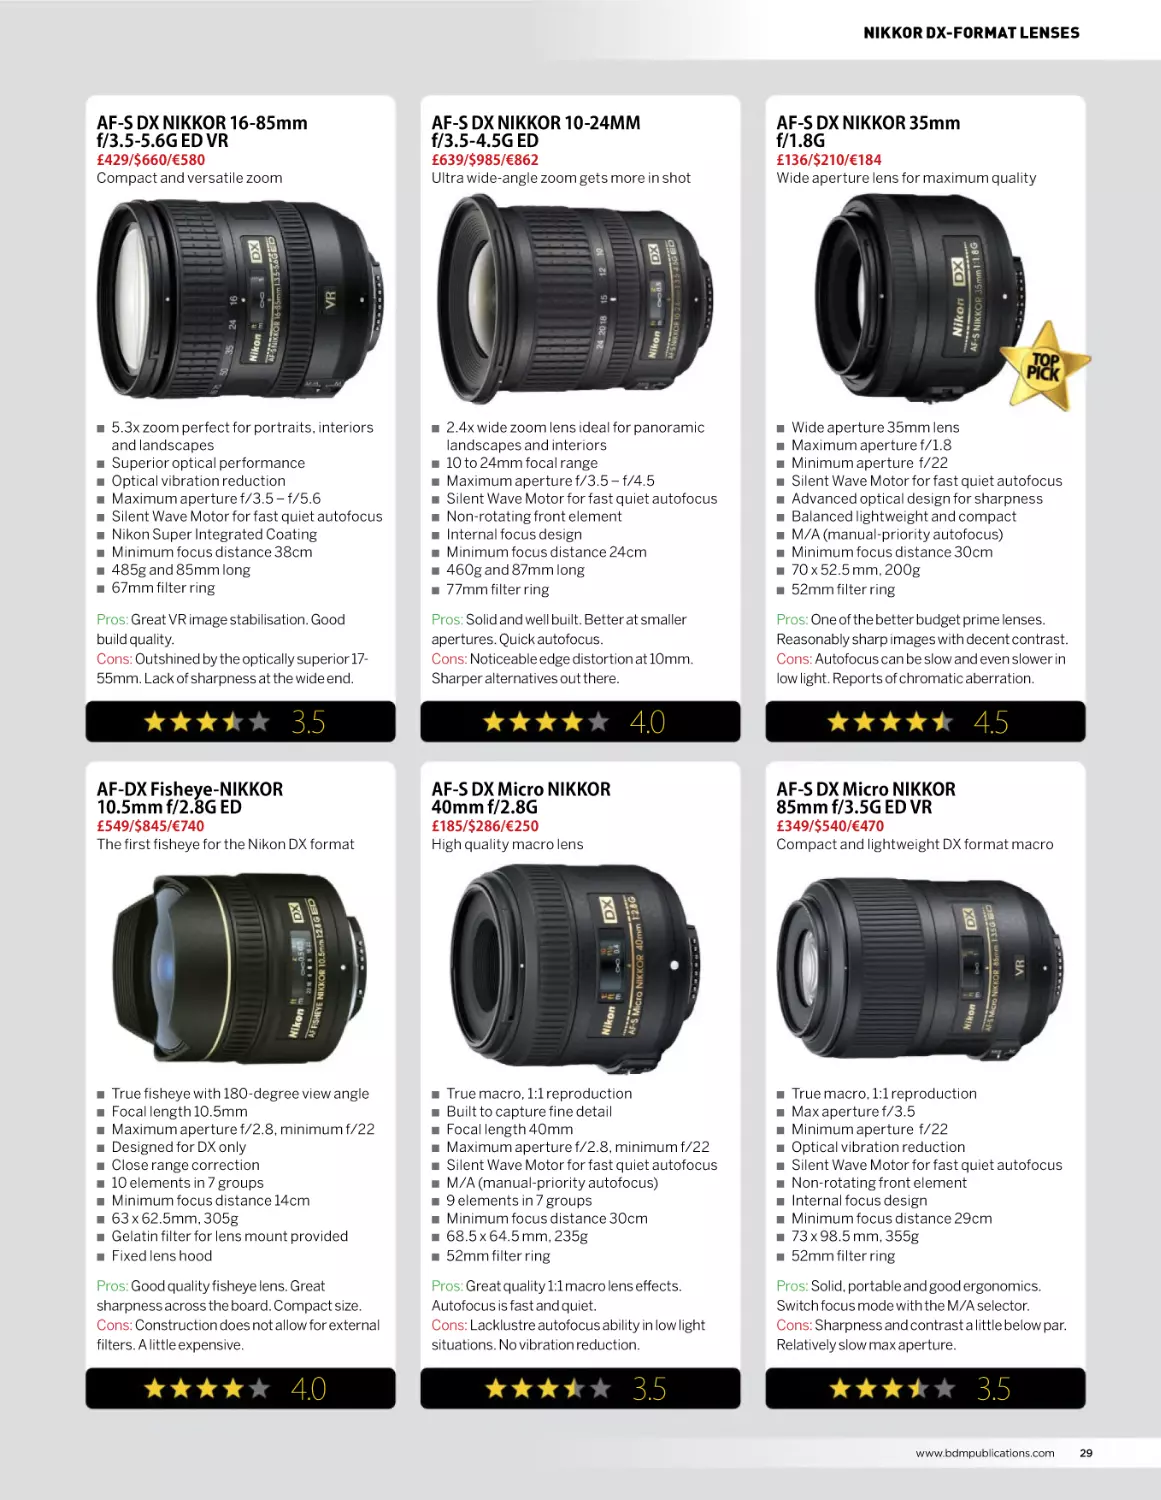
AF-S DX NIKKOR 16-85mm
f/3.5-5.6G ED VR
AF-S DX NIKKOR 10-24MM
f/3.5-4.5G ED
AF-S DX NIKKOR 35mm
f/1.8G
£429/$660/€580
Compact and versatile zoom
£639/$985/€862
Ultra wide-angle zoom gets more in shot
£136/$210/€184
Wide aperture lens for maximum quality
Q
Q
Q
Q
Q
Q
Q
Q
Q
5.3x zoom perfect for portraits, interiors
and landscapes
Superior optical performance
Optical vibration reduction
Maximum aperture f/3.5 – f/5.6
Silent Wave Motor for fast quiet autofocus
Nikon Super Integrated Coating
Minimum focus distance 38cm
485g and 85mm long
67mm filter ring
Pros: Great VR image stabilisation. Good
build quality.
Cons: Outshined by the optically superior 1755mm. Lack of sharpness at the wide end.
Q
Q
Q
Q
Q
Q
Q
Q
Q
2.4x wide zoom lens ideal for panoramic
landscapes and interiors
10 to 24mm focal range
Maximum aperture f/3.5 – f/4.5
Silent Wave Motor for fast quiet autofocus
Non-rotating front element
Internal focus design
Minimum focus distance 24cm
460g and 87mm long
77mm filter ring
Pros: Solid and well built. Better at smaller
apertures. Quick autofocus.
Cons: Noticeable edge distortion at 10mm.
Sharper alternatives out there.
3.5
Q
Q
Q
Q
Q
Q
Q
Q
Q
Q
Wide aperture 35mm lens
Maximum aperture f/1.8
Minimum aperture f/22
Silent Wave Motor for fast quiet autofocus
Advanced optical design for sharpness
Balanced lightweight and compact
M/A (manual-priority autofocus)
Minimum focus distance 30cm
70 x 52.5 mm, 200g
52mm filter ring
Pros: One of the better budget prime lenses.
Reasonably sharp images with decent contrast.
Cons: Autofocus can be slow and even slower in
low light. Reports of chromatic aberration.
4.0
4.5
AF-DX Fisheye-NIKKOR
10.5mm f/2.8G ED
AF-S DX Micro NIKKOR
40mm f/2.8G
AF-S DX Micro NIKKOR
85mm f/3.5G ED VR
£549/$845/€740
The first fisheye for the Nikon DX format
£185/$286/€250
High quality macro lens
£349/$540/€470
Compact and lightweight DX format macro
Q
Q
Q
Q
Q
Q
Q
Q
Q
Q
True fisheye with 180-degree view angle
Focal length 10.5mm
Maximum aperture f/2.8, minimum f/22
Designed for DX only
Close range correction
10 elements in 7 groups
Minimum focus distance 14cm
63 x 62.5mm, 305g
Gelatin filter for lens mount provided
Fixed lens hood
Pros: Good quality fisheye lens. Great
sharpness across the board. Compact size.
Cons: Construction does not allow for external
filters. A little expensive.
4.0
Q
Q
Q
Q
Q
Q
Q
Q
Q
Q
True macro, 1:1 reproduction
Built to capture fine detail
Focal length 40mm
Maximum aperture f/2.8, minimum f/22
Silent Wave Motor for fast quiet autofocus
M/A (manual-priority autofocus)
9 elements in 7 groups
Minimum focus distance 30cm
68.5 x 64.5 mm, 235g
52mm filter ring
Pros: Great quality 1:1 macro lens effects.
Autofocus is fast and quiet.
Cons: Lacklustre autofocus ability in low light
situations. No vibration reduction.
3.5
Q
Q
Q
Q
Q
Q
Q
Q
Q
Q
True macro, 1:1 reproduction
Max aperture f/3.5
Minimum aperture f/22
Optical vibration reduction
Silent Wave Motor for fast quiet autofocus
Non-rotating front element
Internal focus design
Minimum focus distance 29cm
73 x 98.5 mm, 355g
52mm filter ring
Pros: Solid, portable and good ergonomics.
Switch focus mode with the M/A selector.
Cons: Sharpness and contrast a little below par.
Relatively slow max aperture.
3.5
www.bdmpublications.com
29
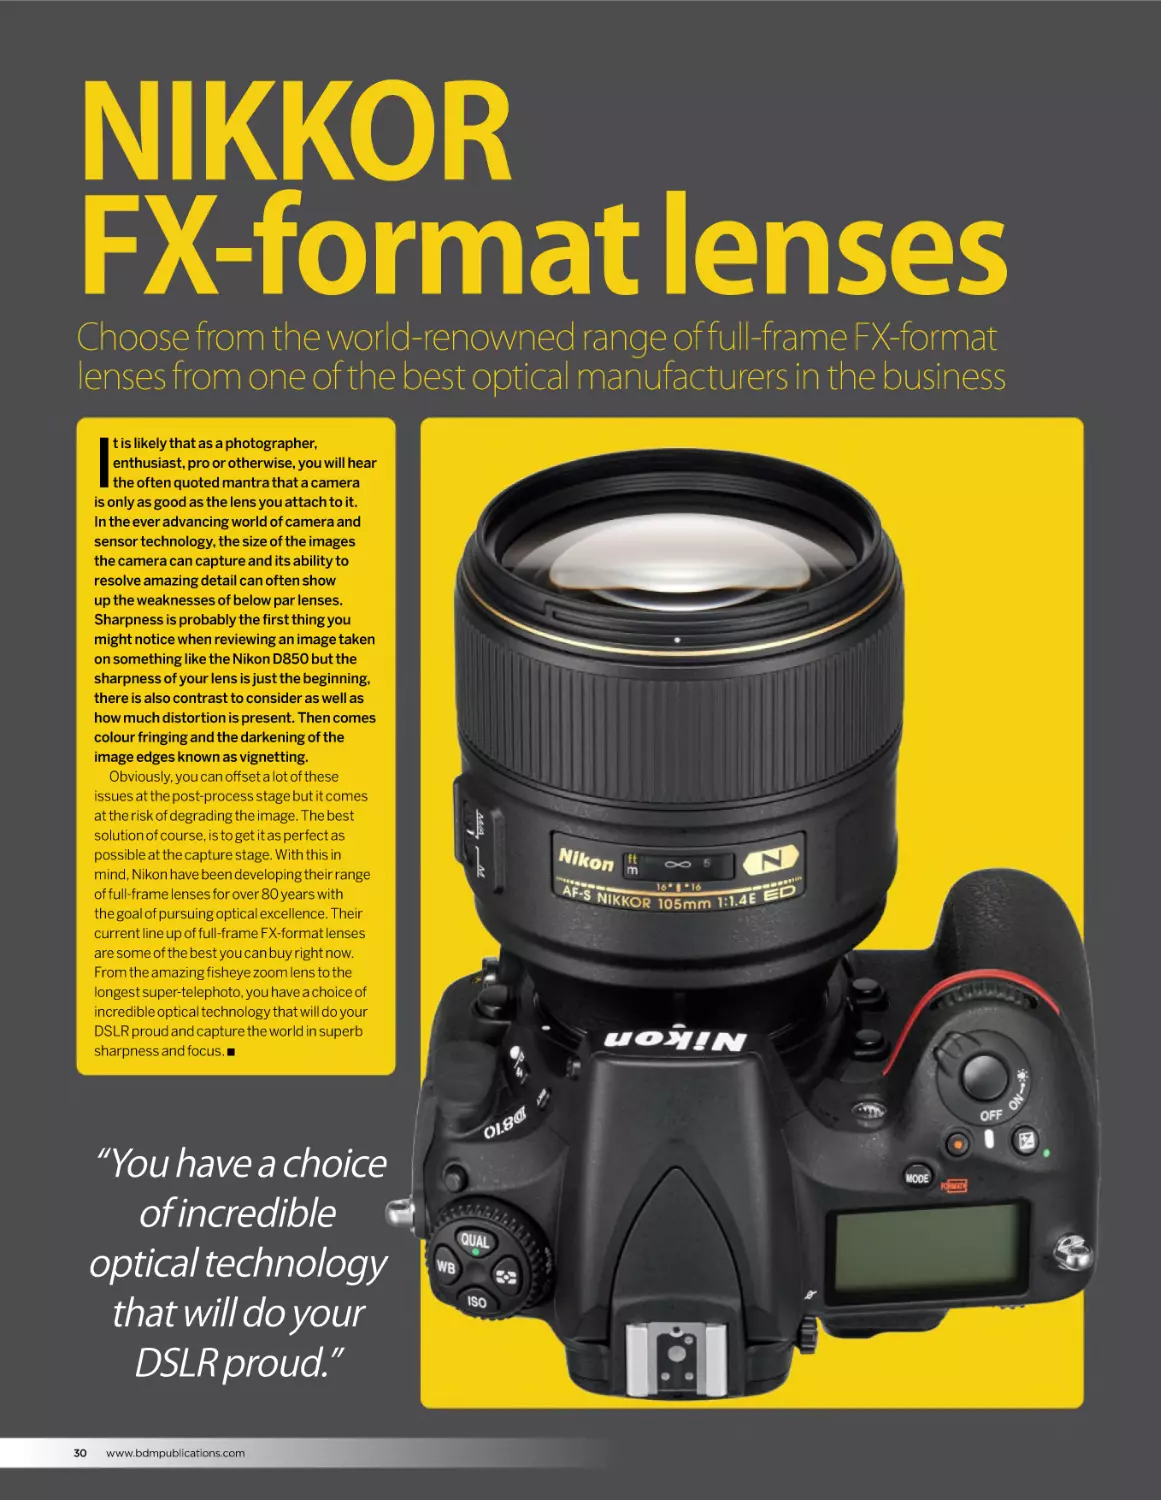
NIKKOR
FX-format lenses
Choose from the world-renowned range of full-frame FX-format
lenses from one of the best optical manufacturers in the business
I
t is likely that as a photographer,
enthusiast, pro or otherwise, you will hear
the often quoted mantra that a camera
is only as good as the lens you attach to it.
In the ever advancing world of camera and
sensor technology, the size of the images
the camera can capture and its ability to
resolve amazing detail can often show
up the weaknesses of below par lenses.
Sharpness is probably the first thing you
might notice when reviewing an image taken
on something like the Nikon D850 but the
sharpness of your lens is just the beginning,
there is also contrast to consider as well as
how much distortion is present. Then comes
colour fringing and the darkening of the
image edges known as vignetting.
Obviously, you can offset a lot of these
issues at the post-process stage but it comes
at the risk of degrading the image. The best
solution of course, is to get it as perfect as
possible at the capture stage. With this in
mind, Nikon have been developing their range
of full-frame lenses for over 80 years with
the goal of pursuing optical excellence. Their
current line up of full-frame FX-format lenses
are some of the best you can buy right now.
From the amazing fisheye zoom lens to the
longest super-telephoto, you have a choice of
incredible optical technology that will do your
DSLR proud and capture the world in superb
sharpness and focus. Q
“You have a choice
of incredible
optical technology
that will do your
DSLR proud.”
30
www.bdmpublications.com
NIKKOR FX-FORMAT LENSES
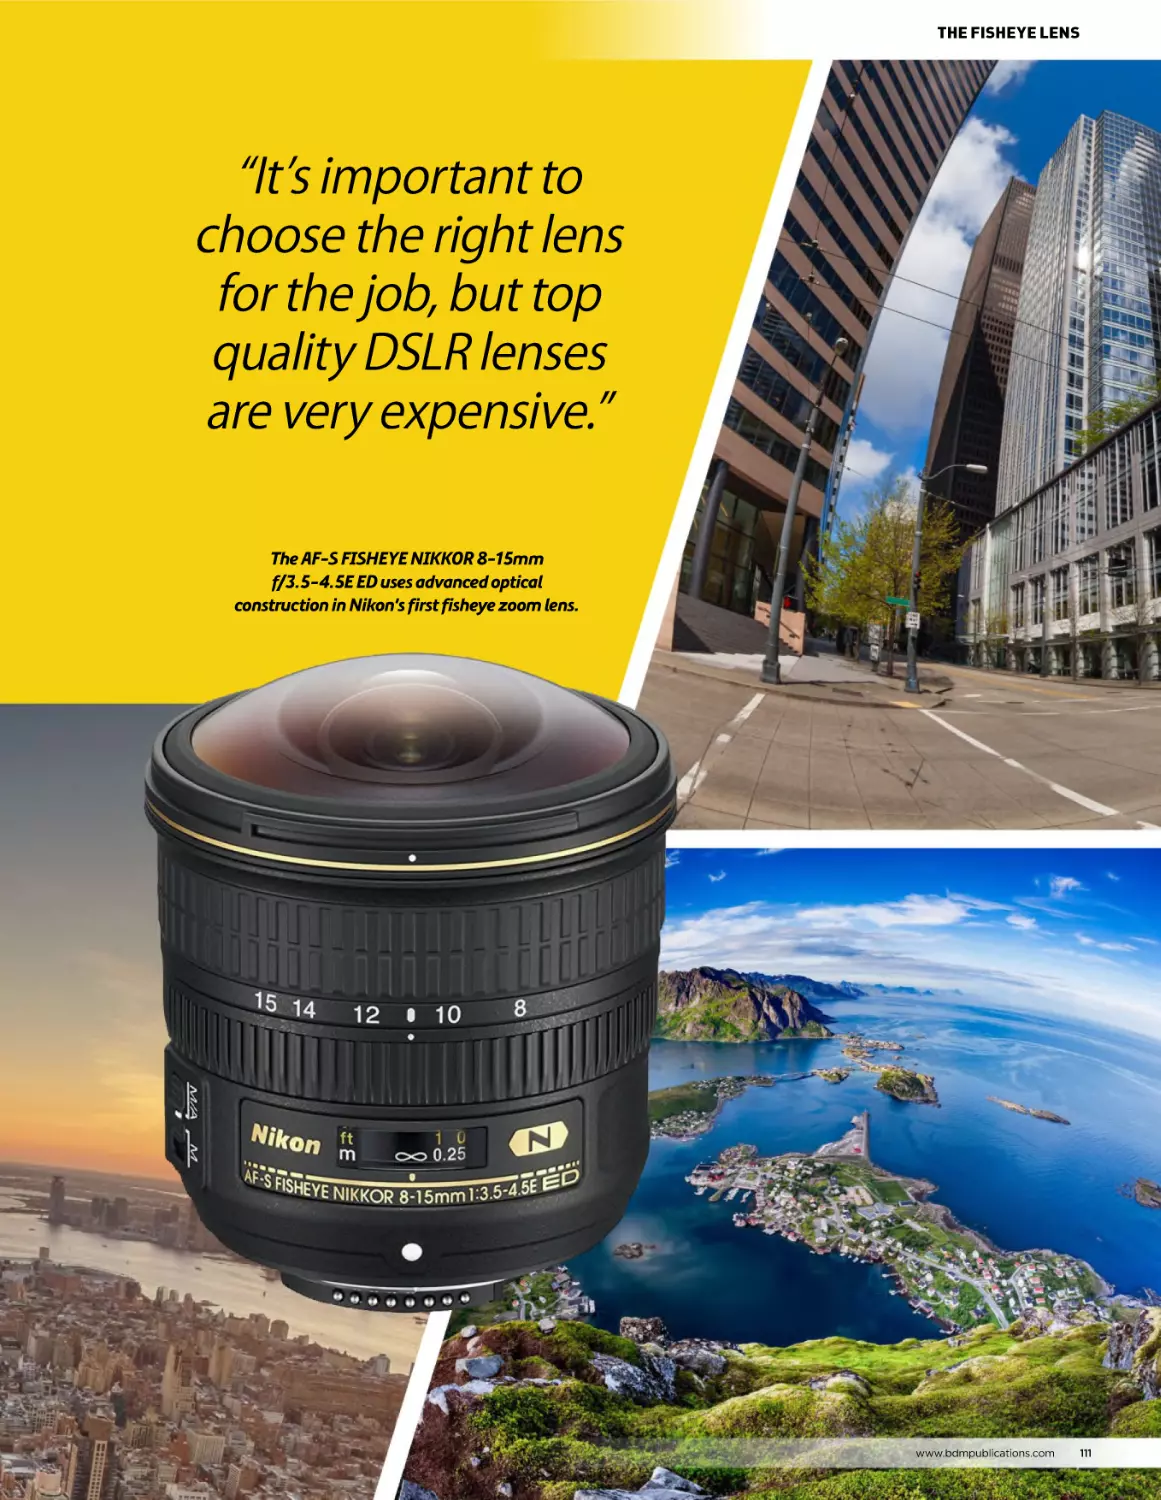
AF-S FISHEYE NIKKOR 8-15mm
f/3.5-4.5E ED
AF 14mm
f/2.8D ED
PC NIKKOR 19mm
f/4E ED
£1,250/$1,246/€1,549
Advanced optical construction in Nikon’s first
fisheye zoom lens
£1,199/$1,854/€1,637
High performance, ultra wide-angle lens for
photojournalism
£3,299/$3,396/€3,739
An ideal tilt-shift lens for architectural and
landscape photography
Q
Q
Q
Q
Q
Q
Q
Q
Q
Maximum aperture f/3.5-f/4.5
Minimum aperture f/22-f/29
7 diaphragm blades
15 elements in 13 groups
180° to 175° angle of view
29 x 27mm filter slot
0.34x reproduction ratio
0.16m minimum focusing distance
77.5 x 83mm, 485g
Pros: Ultra wide zoom and fisheye all in one.
Excellent image quality. Fast focus.
Cons: A very expensive purchase. Some may
find this has limited uses.
Q
Q
Q
Q
Q
Q
Q
Q
Q
Maximum aperture f/2.8, minimum f/22
RF (rear focusing) system
Hybrid aspherical lens elements
Silent Wave Motor for fast quiet autofocus
Seven diaphragm blades
14 elements in 12 groups
Minimum focus distance 20cm
87 x 86.5 mm, 670g
Built-in rear filter holder
Pros: Great lens for architectural photography.
One of the widest rectilinear lenses around.
Cons: Very niche lens. Front element is
spherical. The hood offers little protection.
4.5
Q
Q
Q
Q
Q
Q
Q
Q
Q
Maximum aperture f/4
17 elements in 13 groups
97° angle of view
9 diaphragm blades
No filter attachment possible
Shift ± 12mm
Tilt ± 7.5°
0.18x reproduction ratio
89 x 124mm, 885g
Pros: One of the best tilt-shift lenses for Nikon
around. Excellent image quality.
Cons: A very expensive lens compared to rivals.
Niche application for the price.
3.5
5.0
AF-S 14-24mm f/2.8G ED
AF-S 24-70mm f/2.8E ED VR
AF-S 24mm f/1.8G
£1,315/$2,035/€1,800
Wide-angle fast aperture zoom lens with a
revolutionary optical design
£1,199/$1,854/€1,637
The most widely used professional lens in the
NIKKOR range
£629/$973/€860
Compact and lightweight wide-angle lens with
close focusing
Q
Q
Q
Q
Q
Q
Q
Q
Q
Maximum aperture f/2.8
Weather sealed lens mount
Nano Crystal coating
Silent Wave Motor for fast quiet autofocus
Manual-priority autofocus and
manual focus
14 elements in 11 groups
Minimum focus distance 28cm
98 x 131.5 mm, 1,000g
Integrated lens hood
Pros: Superb image quality. Versatile ultrawide lens. Excellent optics.
Cons: Heavy. Expensive. Filters cannot be
used without special adapters.
5.0
Q
Q
Q
Q
Q
Q
Q
Q
Q
Maximum aperture f/2.8, minimum f/22
Optical vibration reduction
Nano Crystal and Fluorine coatings
Silent Wave Motor for fast quiet autofocus
Rugged and reliable construction
20 elements in 16 groups, 2 ED, 3
aspherical, 1 HRI
Minimum focus distance 38cm
88.0 × 154.5mm, 1,070g
82mm filter ring
Pros: Exceptionally sharp lens at either end of
the zoom range. Pro quality build.
Cons: Heavy. It is very bulky. Can suffer lens
flare. Possible zoom creep.
4.5
Q
Q
Q
Q
Q
Q
Q
Q
Q
Q
Fast aperture wide-angle lens
Maximum aperture f/1.
Minimum aperture f/16
Manual and auto focusing
Nano Crystal coating
Silent Wave Motor for fast quiet autofocus
Seven diaphragm blades
Minimum focus distance 23cm
77.5 × 83.0mm, 355g
72mm filter ring
Pros: Great low light capability with the f/1.8
aperture. Sharp from corner to corner.
Cons: Reports of autofocus issues. Not an ultrawide lens.
3.5
www.bdmpublications.com
31
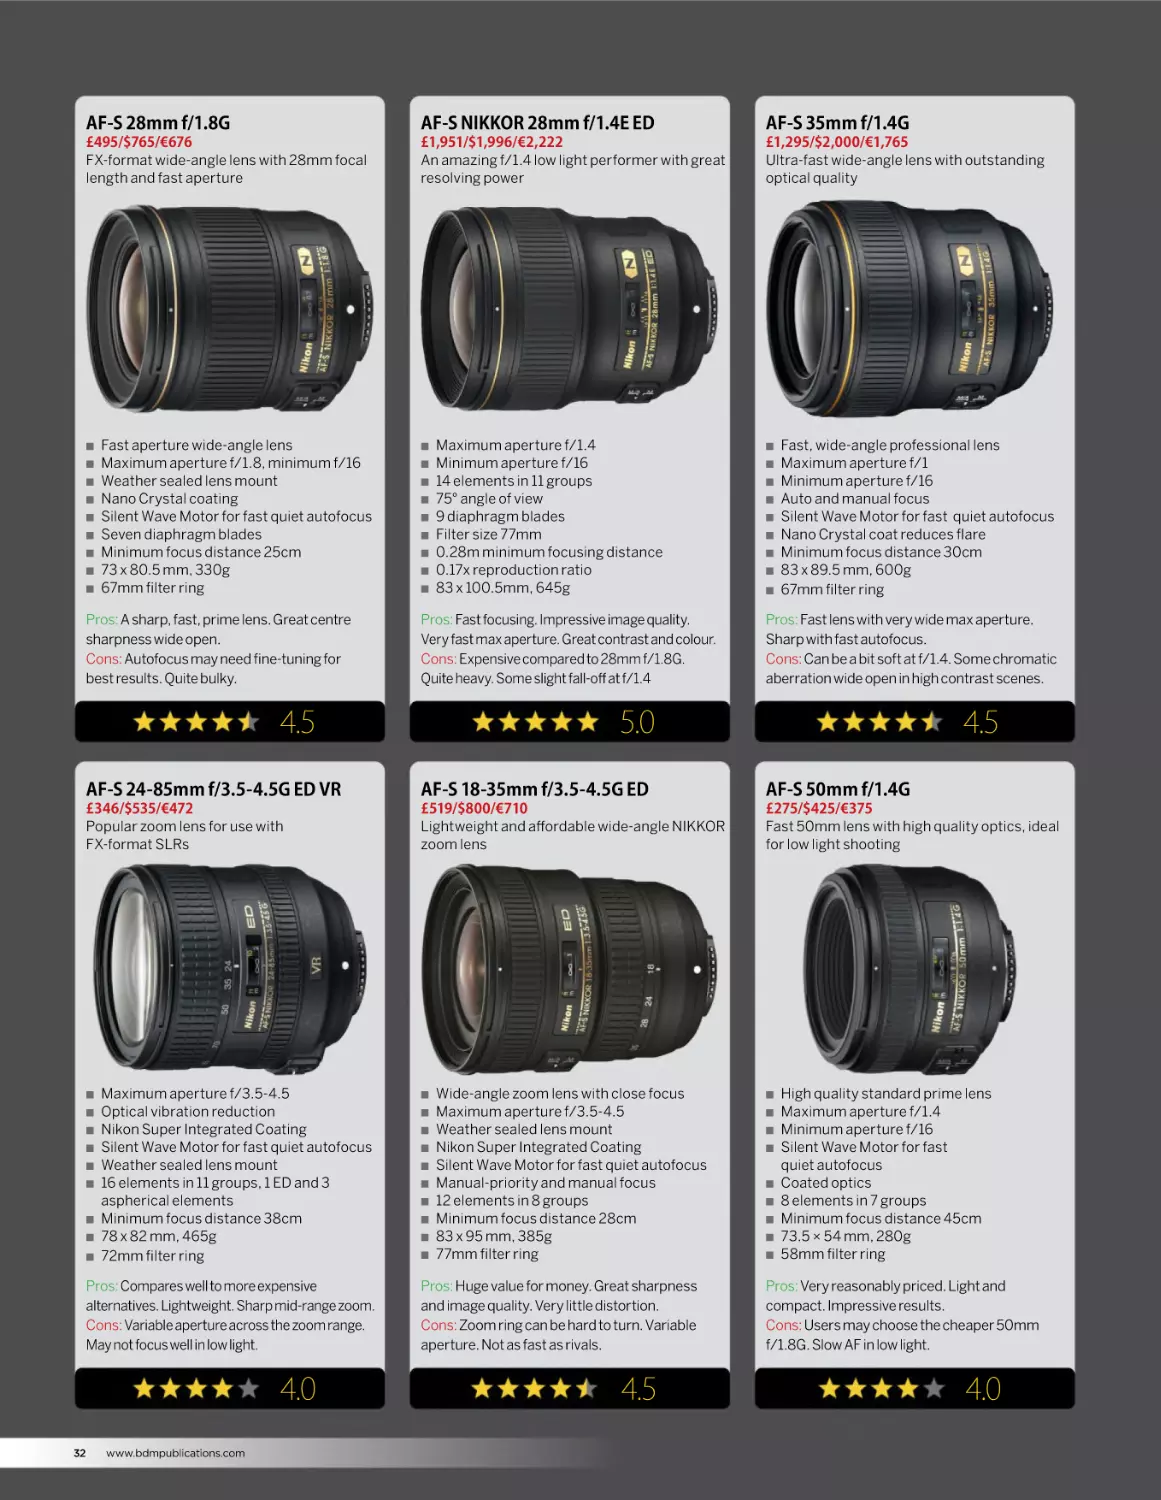
AF-S 28mm f/1.8G
AF-S NIKKOR 28mm f/1.4E ED
AF-S 35mm f/1.4G
£495/$765/€676
FX-format wide-angle lens with 28mm focal
length and fast aperture
£1,951/$1,996/€2,222
An amazing f/1.4 low light performer with great
resolving power
£1,295/$2,000/€1,765
Ultra-fast wide-angle lens with outstanding
optical quality
Q
Q
Q
Q
Q
Q
Q
Q
Q
Fast aperture wide-angle lens
Maximum aperture f/1.8, minimum f/16
Weather sealed lens mount
Nano Crystal coating
Silent Wave Motor for fast quiet autofocus
Seven diaphragm blades
Minimum focus distance 25cm
73 x 80.5 mm, 330g
67mm filter ring
Pros: A sharp, fast, prime lens. Great centre
sharpness wide open.
Cons: Autofocus may need fine-tuning for
best results. Quite bulky.
Q
Q
Q
Q
Q
Q
Q
Q
Q
Pros: Fast focusing. Impressive image quality.
Very fast max aperture. Great contrast and colour.
Cons: Expensive compared to 28mm f/1.8G.
Quite heavy. Some slight fall-off at f/1.4
4.5
Q
Q
Q
Q
Q
Q
Q
Q
Q
Fast, wide-angle professional lens
Maximum aperture f/1
Minimum aperture f/16
Auto and manual focus
Silent Wave Motor for fast quiet autofocus
Nano Crystal coat reduces flare
Minimum focus distance 30cm
83 x 89.5 mm, 600g
67mm filter ring
Pros: Fast lens with very wide max aperture.
Sharp with fast autofocus.
Cons: Can be a bit soft at f/1.4. Some chromatic
aberration wide open in high contrast scenes.
5.0
4.5
AF-S 24-85mm f/3.5-4.5G ED VR
AF-S 18-35mm f/3.5-4.5G ED
AF-S 50mm f/1.4G
£346/$535/€472
Popular zoom lens for use with
FX-format SLRs
£519/$800/€710
Lightweight and affordable wide-angle NIKKOR
zoom lens
£275/$425/€375
Fast 50mm lens with high quality optics, ideal
for low light shooting
Q
Q
Q
Q
Q
Q
Q
Q
Q
Maximum aperture f/3.5-4.5
Optical vibration reduction
Nikon Super Integrated Coating
Silent Wave Motor for fast quiet autofocus
Weather sealed lens mount
16 elements in 11 groups, 1 ED and 3
aspherical elements
Minimum focus distance 38cm
78 x 82 mm, 465g
72mm filter ring
Pros: Compares well to more expensive
alternatives. Lightweight. Sharp mid-range zoom.
Cons: Variable aperture across the zoom range.
May not focus well in low light.
4.0
32
Maximum aperture f/1.4
Minimum aperture f/16
14 elements in 11 groups
75° angle of view
9 diaphragm blades
Filter size 77mm
0.28m minimum focusing distance
0.17x reproduction ratio
83 x 100.5mm, 645g
www.bdmpublications.com
Q
Q
Q
Q
Q
Q
Q
Q
Q
Q
Wide-angle zoom lens with close focus
Maximum aperture f/3.5-4.5
Weather sealed lens mount
Nikon Super Integrated Coating
Silent Wave Motor for fast quiet autofocus
Manual-priority and manual focus
12 elements in 8 groups
Minimum focus distance 28cm
83 x 95 mm, 385g
77mm filter ring
Pros: Huge value for money. Great sharpness
and image quality. Very little distortion.
Cons: Zoom ring can be hard to turn. Variable
aperture. Not as fast as rivals.
4.5
Q
Q
Q
Q
Q
Q
Q
Q
Q
High quality standard prime lens
Maximum aperture f/1.4
Minimum aperture f/16
Silent Wave Motor for fast
quiet autofocus
Coated optics
8 elements in 7 groups
Minimum focus distance 45cm
73.5 × 54 mm, 280g
58mm filter ring
Pros: Very reasonably priced. Light and
compact. Impressive results.
Cons: Users may choose the cheaper 50mm
f/1.8G. Slow AF in low light.
4.0
NIKKOR FX-FORMAT LENSES
AF-S 50mm f/1.8G
AF-P 70-300mm f/4.5-5.6E ED VR
AF-S 70-200mm f/4G ED VR
£135/$208/€184
Compact, lightweight and affordable standard
prime lens
£700/$675/€849
Capture the action with this full-frame
telephoto zoom with SPORT VR mode
£859/$1,329/€1,174
High performance telephoto zoom lens for use
with FX-format SLRs
Q
Q
Q
Q
Q
Q
Q
Q
Affordable lightweight prime lens
Maximum aperture f/1.8
Minimum aperture f/16
Silent Wave Motor for fast
quiet autofocus
Weather sealed lens mount
Minimum focus distance 45cm
72 x 52.5 mm, 185g
58mm filter ring
Pros: Amazing quality for such a low price.
Great bokeh. Sharp and fast.
Cons: Can be noisy when focusing. Image
quality may suffer wide open.
Q
Q
Q
Q
Q
Q
Q
Q
Q
Maximum aperture f/4.5-f/5.6
Minimum aperture f/32-f/40
9 diaphragm blades
18 elements in 14 groups
Filter size 67mm
Image stabilisation
0.25x reproduction ratio
1.2m minimum focusing distance
80.5 x 146mm, 680g
Pros: Vibration reduction smooth and solid.
Fast focusing. Sharp with good contrast.
Cons: Autofocus can ‘hunt’ on occasion. May
be prone to some vignetting.
5.0
Q
Q
Q
Q
Q
Q
Q
Q
Q
Maximum aperture f/4, minimum f/32
Optical vibration reduction
Nano Crystal coating
Silent Wave Motor for fast quiet autofocus
Manual-priority autofocus
20 elements in 14 groups
Minimum focus distance 100cm
78 x 178.5 mm, 850g
52mm filter ring
Pros: Excellent centre sharpness with decent
edge sharpness above f/5.6. Relatively cheap.
Cons: Not as fast as its f/2.8 counterpart. Some
pincushion and barrel distortion.
4.5
4.5
AF-S NIKKOR 105mm f/1.4E ED
AF-S NIKKOR 500mm f/5.6E PF ED VR
AF-S 200-500mm f/5.6E ED VR
£1,786/$2,196/€2,107
Unbeatable wide-open performance
prime lens
£3,699/$3,596/€4,336
The new super-telephoto with a
compact build
£1,179/$1,824/€1,612
Versatile super telephoto zoom lens
for wildlife or sports
Q
Q
Q
Q
Q
Q
Q
Q
Q
Q
Maximum aperture f/1.4
Minimum aperture f/16
9 diaphragm blades
14 elements in 9 groups
Filter size 82mm
94.5 x 106mm, 985g
1m minimum focusing distance
Angle of view FX-format 23°
Angle of view DX-format 15°
0.13x reproduction ratio
Pros: Fairly sharp wide open. Even sharper
when you stop down. Improved AF speed.
Cons: Expensive. Some may miss the inclusion
of vibration reduction.
4.0
Q
Q
Q
Q
Q
Q
Q
Q
Q
Q
Maximum aperture f/5.6
Minimum aperture f/32
9 diaphragm blades
19 elements in 11 groups
Filter size 95mm
106 x 237mm, 1460g
Image stabilisation
3m minimum focusing distance
Angle of view FX-format 5°
Angle of view DX-format 3°
Pros: Super compact and lightweight supertelephoto. Quick autofocus. Sharp images.
Cons: Very expensive and niche lens. VR
reported to struggle at certain shutter speeds.
4.5
Q
Q
Q
Q
Q
Q
Q
Q
Q
Q
Constant-aperture telephoto zoom lens
Maximum aperture f/5.6, minimum f/32
Optical vibration reduction
Electromagnetic diaphragm
Silent Wave Motor for fast quiet autofocus
Manual-priority autofocus and manual focus
19 elements in 12 groups, 3 ED elements
Minimum focus distance 220cm
108 mm × 267.5 mm, 2,300g
95mm filter ring
Pros: Outstanding performer at a reasonable
price. Very sharp. VR is top notch.
Cons: Autofocus considered a bit sluggish. Not
well weather-sealed. Lot of zoom ring travel.
4.5
www.bdmpublications.com
33
AF Fisheye 16mm f/2.8D
AF-S Micro 60mm f/2.8G ED
AF-S 180-400mm f/4E TC1.4 FL ED VR
£625/$967/€854
Frame-filling fisheye lens for dramatic wideangle images
£369/$570/€504
Popular 60mm macro lens for use with Nikon
FX and DX format
£12,103/$12,396/€13,700
The new telephoto zoom lens benchmark with
built in teleconverter
Q
Q
Q
Q
Q
Q
Q
Q
Q
True fisheye, 180 degree angle of view
Maximum aperture f/2.8, minimum f/22
Close Range Correction (CRC) system
Seven blade diaphragm
Integral lens hood
Rear bayonet attachment for filters
8 elements in 5 groups
Minimum focus distance 25cm
63 x 57mm, 290g
Pros: Small, light and fairly quick to focus.
Nice clear images. Creative possibilities.
Cons: A niche lens with possible limited use.
Built down to a price.
Q
Q
Q
Q
Q
Q
Q
Q
Q
True macro lens, 1:1 reproduction
Maximum aperture f/2.8, minimum f/32
Non-rotating front element
Nine blade rounded diaphragm
Silent Wave Motor for fast quiet autofocus
12 elements in 9 groups
Minimum focus distance 18.5cm
73 x 89 mm, 425g
62mm filter ring
Pros: Top notch build quality. Sharp images. 1:1
macro or great portrait lens.
Cons: Some instances of a tight and abrasive
lens mount. Focus adjustment may be required.
4.0
Q
Q
Q
Q
Q
Q
Q
Q
Q
Focal length 262-560mm with teleconverter
9 diaphragm blades
27 elements in 19 groups
Filter size 40.5mm
128 x 362.5mm, 3500g
0.25x reproduction ratio at 400mm
Image stabilisation
Built-in 1.4x teleconverter
2.0m minimum focusing distance
Pros: Robust build. Sharp edge-to-edge wide open.
Fast, accurate focusing. Built in teleconverter.
Cons: Very expensive and designed for the pros.
Heavy. Some vignetting on FX bodies.
4.5
5.0
AF-S 400mm f/2.8E FL ED VR
AF-S 600mm f/4E
AF-S 800mm f/5.6E FL ED VR
£10,399/$16,100/€14,230
Professional FX-format telephoto prime lens
ideal for sports
£9,649/$14,945/€13,200
Professional FX-format super telephoto lens for
sports and wildlife
£12,995/$20,117/€17,766
An ultimate FX-format super telephoto lens for
sports and wildlife shooters
Q
Q
Q
Q
Q
Q
Q
Q
Q
Q
Fast-aperture telephoto lens
Maximum aperture f/2.8, minimum f/22
Optical vibration reduction
Nano Crystal and Fluorine coatings
Tripod mount ring with ergonomic handle
Silent Wave Motor for fast quiet autofocus
16 elements in 12 groups, 2 ED and 2
fluorite elements
Minimum focus distance 260cm
159.5 x 358 mm, 3,800g
40.5mm drop-in filters
Pros: Sharp images and immediate focusing
ability. Crisp with well saturated colours.
Cons: An extremely expensive lens. Some may
find its weight restrictive.
5.0
34
www.bdmpublications.com
Q
Q
Q
Q
Q
Q
Q
Q
Q
Q
Fast aperture super telephoto lens
Maximum aperture f/4, minimum f/22
Optical vibration reduction
Nano Crystal and Fluorine coatings
Tripod mount ring with ergonomic handle
Silent Wave Motor for fast quiet autofocus
16 elements in 12 groups, 4 ED and 2
fluorite elements
Minimum focus distance 440cm
166 x 432 mm, 3,810g
40.5mm drop-in filters
Pros: Sharp images from the superior optics.
Top-level VR image stabilisation.
Cons: A very expensive lens. Some may find
tuning is required. For pro shooters.
4.0
Q
Q
Q
Q
Q
Q
Q
Q
Q
Q
Fast-aperture super telephoto lens
Maximum aperture f/4, minimum f/22
Optical vibration reduction
Nano Crystal coating
Includes 1.25x teleconverter
Electromagnetic diaphragm mechanism
20 elements in 13 groups, 2 ED and 2
fluorite elements
Minimum focus distance 590cm
160 x 461 mm, 4,590g
52mm screw-in filters
Pros: Super fast and quiet autofocus. Razor
sharp images. Lighter than it looks.
Cons: A very expensive lens. There are cheaper
alternatives out there.
4.0
NIKKOR FX-FORMAT LENSES
AF Micro 200mm f/4D IF-ED
AF-S 300mm f/4E PF ED VR
AF-S NIKKOR 200mm F2G ED VRII
£1,179/$1,824/€1,612
Telephoto Micro lens for close-up and
nature photography
£1,500/$1,730/€1,799
Impressive performance and compact build for
sports and wildlife
£5,995/$5,695/€6,913
High performance telephoto zoom lens for use
with FX-format SLRs
Q
Q
Q
Q
Q
Q
Q
Q
Q
True macro lens, 1:1 reproduction
Maximum aperture f/4, minimum f/32
Close Range Correction (CRC) system
Nine blade rounded diaphragm
Optional lens hood HN-30
13 elements in 8 groups, 2 ED elements
Minimum focus distance 50cm
76 x 193mm, 1,190g
62mm filter ring
Pros: A truly great 1:1 macro performer. Superior
sharpness with little chromatic aberration.
Cons: Expensive macro lens. Autofocus can be
loud. Some may find it too long and heavy.
Q
Q
Q
Q
Q
Q
Q
Q
Q
Aperture range f/4 to 32
One Phase Fresnel and one ED Element
Nano Crystal and Super Integrated coating
Fluorine coated front lens element
Silent Wave Motor AF system
Nikon VR image stabilisation
Internal focus and manual focus override
Electromagnetic diaphragm mechanism
Lighter & more compact than predecessor
Pros: Lightweight construction. Compact
build and very sharp.
Cons: Some are reporting that, at moderate
shutter speeds, the VR is inconsistent.
5.0
Q
Q
Q
Q
Q
Q
Q
Q
Q
Fast f/2 aperture prime
F-Mount Lens/FX format
Aperture range f/2 to f/22
Three ED elements, One Super ED element
Nano Crystal & Super Integrated coatings
Silent Wave Motor AF system
VR II Image stabilisation
Detachable, rotating tripod collar
Rounded 9-blade diaphragm
Pros: Very fast aperture prime lens. Sharp,
with great colour rendition and contrast.
Cons: A very heavy lens for its size. Bulky
design. Very expensive.
4.0
4.5
AF-S NIKKOR 24-120mm f/4G ED VR
PC-E NIKKOR 24mm f/3.5D ED
AF NIKKOR 180mm f/2.8D IF-ED
£1,079/$1,099/€1,244
Great performance from a versatile lens
with a useful focal length range
£1,899/$2,196/€2,188
A perfect lens for architecture and
landscape photography
£748/$1,001/€1,612
Versatile super telephoto zoom lens.
For wildlife or sports
Q
Q
Q
Q
Q
Q
Q
Q
Q
Q
F-Mount Lens/FX format
Constant maximum aperture
Aperture range f/4 to f/22
Three aspherical and two ED elements
Nano Crystal & Super Integrated coatings
Silent Wave Motor AF system
VR II image stabilisation
Rounded 9-blade diaphragm
Weather-sealed design
Versatile ‘walking around’ lens
Pros: Great all-purpose zoom lens. VR II mode
is rock steady. Quick autofocus.
Cons: Bulky for smaller camera bodies. Some
vignetting and softness visible at 120mm.
4.0
Q
Q
Q
Q
Q
Q
Q
Q
Q
Q
F-Mount Lens/FX format
Aperture range f/3.5 to f/32
Three ED and three Aspherical elements
Nano Crystal & Super Integrated coatings
Maximum tilt: +/- 8.5°
Maximum shift: +/- 11.5mm
PC rotation capability: +/-90°
Close Range Correction system
Rounded 9-blade diaphragm
77mm filter size
Pros: Very sharp images from the ED optics.
Rugged and dependable.
Cons: Tilt and shift directions are tied together.
Be aware of trying to over tighten locking knobs.
4.5
Q
Q
Q
Q
Q
Q
Q
Q
Q
Q
Constant-aperture telephoto zoom lens
Maximum aperture f/5.6, minimum f/32
Optical vibration reduction
Electromagnetic diaphragm
Silent Wave Motor for fast quiet autofocus
Manual-priority autofocus and manual focus
19 elements in 12 groups, 3 ED elements
Minimum focus distance 220cm
108mm × 267.5mm, 2,300g
95mm filter ring
Pros: Sharp results from the superior optics.
Relatively inexpensive. Good second hand deals.
Cons: Older lens. Some may favour the more
versatile 70-200mm f/2.8.
4.0
www.bdmpublications.com
35
NIKKOR
Z series lenses
Amazing sharpness and light gathering capability with
the new NIKKOR Z lenses
T
he new Z Mount NIKKOR Z lenses are
no less impressive than the Z series
mirrorless cameras for which they
are designed. Their optical performance
takes photography to the next level and they
boast amazing specifications of their own.
They are comprehensively sealed to prevent
the ingress of dust and moisture yet are
still lightweight and well-balanced. At the
moment there are 4 lenses available with
more to be rolled out over the next two years .
They cover useful focal ranges such as the
14-30mm f/4 wide-angle and 24-70mm f/4.
36
www.bdmpublications.com
If you need fast primes, then having 35mm
and 50mm f/1.8 lenses gives you the ability
to shoot in darker scenarios and gather more
light. Soon to be added to the list is the 58mm
S Noct. This is the fastest NIKKOR lens in
production and boasts a maximum aperture
of f/0.95. This is a low-light performance
lens with incredible depth of field control and
amazing bokeh for portraits. If you already
own NIKKOR F Mount lenses, you can use the
FTZ mount adapter and still be able to use
all your favourite lenses on the new system
camera bodies. Q
“Their optical
performance takes
photography to the
next level and they
boast amazing
specifications.”
NIKKOR Z SERIES LENSES
NIKKOR Z
58mm f/0.95 S Noct
NIKKOR Z
14-30mm f/4 S
NIKKOR Z
24-70mm f/4 S
Coming soon
The fastest Nikon lens ever made
£1349/$1296/€1449
Compact build ultra-wide zoom
£999/$996/€1087
A great lens for every occasion
Q
Soon, Nikon will be unveiling the
NIKKOR Z 58mm f/0.95 S Noct. Noct
is short for Nocturne as a nod to its
undoubted low-light ability. It is a
reimagining of Nikon’s old 58mm f/1.2
lens from 1977. The Noct is slated for
a 2019 release and is a manual focus
lens designed to deliver the ultimate in
sharpness, amazing shallow depth of field
and image reproduction.
Pros: Very sharp images. Very solid design.
Supremely large maximum aperture.
Cons: Manual focus lens only. Will be very
expensive.
Q
Q
Q
Q
Q
Q
Q
Q
Q
Q
Nikon Z mount
14-30mm focal range
FX/35mm format
Maximum aperture f/4
Minimum aperture f/22
14 elements in 12 groups
7 diaphragm blades
Filter size 82mm
0.28mm focusing distance
Approx. 485g
Q
Q
Q
Q
Q
Q
Q
Q
Q
Q
Pros: Compact and lightweight. Retractable
design. Superb image quality.
Cons: Only an f/4 lens. No vibration reduction.
Cheaper f/2.8 options around.
4.5
Nikon Z mount
24-70mm focal range
FX/35mm format
Maximum aperture f/4
Minimum aperture f/22
14 elements in 11 groups
7 diaphragm blades
Filter size 72mm
0.3mm focusing distance
Approx. 500g
Pros: Perfect all-purpose lens. Sharp images.
Lightweight design. Quick focusing.
Cons: Some argue it is not as accomplished as
its F mount equivalent. Expensive.
4.0
4.0
NIKKOR Z
35mm f/1.8 S
NIKKOR Z
50mm f/1.8 S
FTZ
Nikon F Mount Adapter
£849/$846/€898
Amazing optical performance
£599/$596/€675
A new kind of fast prime lens
£269/$246/€298
Enjoy older lenses on your Z system camera
Q
Q
Q
Q
Q
Q
Q
Q
Q
Q
Nikon Z mount
35mm focal length
FX/35mm format
Maximum aperture f/1.8
Minimum aperture f/16
11 elements in 9 groups
9 diaphragm blades
Filter size 62mm
0.25mm focusing distance
Approx. 370g
Q
Q
Q
Q
Q
Q
Q
Q
Q
Q
Pros: Excellent image quality. Sharp images
with low distortion. Fast autofocus.
Cons: A little overpriced. Cannot be used on F
mount cameras.
5.0
Nikon Z mount
50mm focal length
FX/35mm format
Maximum aperture f/1.8
Minimum aperture f/16
12 elements in 9 groups
9 diaphragm blades
Filter size 62mm
0.4mm focusing distance
Approx. 415g
Q
Q
Q
Q
Pros: High quality. Great results across all
apertures. Silent, fast, autofocus.
Cons: A little overpriced. Noticeably large and
heavy. No focus distance indicator.
5.0
Use any F mount lens
No loss of quality
Seamless integration
Supplied with BF-18 body cap
Pros: Works with recent F mount lenses and
third party offerings.
Cons: Older lenses not supported. Limited to
this adapter only.
3.5
www.bdmpublications.com
37
Nikon Speedlights
A range of lighting equipment to brighten up your world
T
here’s nothing quite like being
able to bring light where it was
once dark. Whether you’re using
the Nikon 1 system or a full-frame
Nikon DSLR, a Speedlight flashgun can
light up your images, either mounted
on-camera or as part of an off-camera
lighting setup. Flashguns compatible
with the Nikon Creative Lighting
System can be operated wirelessly as
single or multiple units, when used with
any Nikon camera featuring a builtin flash commander mode. How you
control light is one of the key methods
that lets you excel as a creative
photographer. Ambient light will take
you so far but a Nikon Speedlight can
take you even further, whether it’s just
one compact flash unit or a whole army
of top of the range flashes, used as part
of a creative lighting system. Q
“Flashguns
compatible with
the Nikon Creative
Lighting System
can be operated
wirelessly as single
or multiple units.”
Speedlight SB-5000
Speedlight SB-910
£449/$599/€524
The first Nikon radio controlled Speedlight
engineered for professionals
£339/$525/€462
Professional i-TTL Speedlight for Nikon FX and
DX-format SLRs
Q
Q
Q
Q
Q
Q
Q
Q
Q
Guide number 34.5/113 (at 35 mm)
55/180 (at 200 mm)
90-degree tilt up/7-degree tilt down/
180-degree rotate head
Covers 24 to 135 mm focal-length range
Advanced Wireless Lighting
Auto FP high-speed sync
Approx. 1.8 s recycling time
External filter, auto detection available
73×137×103.5 mm, 420 g
Pros: Useful cooling system. Lightweight.
Smaller build but with plenty of power.
Cons: Arguably not much of an upgrade from
the SB-910. Tricky menu system.
4.0
38
www.bdmpublications.com
Q
Q
Q
Q
Q
Q
Q
Q
Q
Q
90-degree tilt/180-degree rotate head
Nikon CLS wireless control
2.3 second cycle time
Automatic detection of sensor format
AF-Assist illumination
17-200mm auto zoom range
Multiple illumination patterns
Automatic filter detection
Guide number 34/111.5 (ISO 100, m/ft)
78.5 x 145 x 113 mm, 510 g
Pros: Powerful flash with short recycle times.
Professional grade wireless control.
Cons: A little bulky and heavier than the
SB-5000 unit.
4.5
NIKON SPEEDLIGHTS
Speedlight SB-700
Speedlight SB-500
Speedlight SB-300
£229/$354/€312
Versatile, easy-to-use Speedlight for Nikon FX
and DX-format SLRs
£199/$307/€270
Easy-to-use Speedlight, compatible with Nikon
D-SLRs and some CoolPix models
£119/$184/€162
Simple and affordable Speedlight, for Nikon
D-SLRs and some CoolPix models
Q
Q
Q
Q
Q
Q
Q
Q
Q
Q
90-degree tilt/180-degree rotate head
Nikon CLS wireless control
2.5 second cycle time
AF-Assist illumination
Power zoom
Multiple illumination patterns
Automatic filter detection
Powered by 4xAA batteries
Guide number 28/92 (ISO 100, m/ft.)
71 x 126 x 104.5 mm, 360 g
Pros: Versatile flash system. Auto mode or
manual mode. Supports DX and FX cameras.
Cons: Pricey. Suited to professionals.
Cheaper third party options.
Q
Q
Q
Q
Q
Q
Q
Q
90-degree tilt/180-degree rotate head
Nikon CLS wireless control
i-TTL/Manual flash control
Built-in LED video light
Thermal cut-out, firmware
is updateable
Powered by 2xAA batteries
Guide number 24/78.7
(m/ft at ISO 100)
67 x 114.5 x 70.8 mm, 273g
Pros: Simple to use. Front LCD lights for macro
work. Works with Nikon Creative Lighting System.
Cons: Relatively low guide number. No flash
zoom. No RF capability.
4.5
Speedlight SB-N7
£129/$199/€176
Powerful Speedlight compatible with the
Nikon 1 system
Q
Q
Q
Q
Q
Q
Q
120-degree tilting head
Covers angle of view of 10 mm
lens (Nikon 1 format)
i-TTL/Manual flash control
Thermal cut-out, firmware
is updateable
Powered by 2xAAA batteries
Guide number 18/59
(ISO 100, m/ft)
58.4 x 68.4 x 62.3 mm, 114g
Pros: Decent guide number for this price point.
Swivel head useful.
Cons: A little overpriced. Two AAA batteries
will struggle to keep up.
3.0
Q
Q
Q
Q
Q
Q
Q
120-degree tilting head
Covers angle of view of
27 mm lens (FX format)
i-TTL/Manual flash control
Thermal cut-out, firmware
is updateable
Powered by 2xAAA batteries
Guide number 18/59
(ISO 100, m/ft)
57.4 x 65.4 x 62.3 mm, 120g
Pros: Lightweight. Small and easy to use.
Reasonable battery life.
Cons: Relatively low power. No high-speed sync.
Uses AAA batteries.
4.0
4.0
Speedlight
SB-R200
SU-800 Wireless
Speedlight Commander
£149/$199/€196
Compact but powerful wireless close-up unit
£291/$175/€329
Control every aspect of your lighting
Q
Q
Q
Q
Q
Q
Q
Compatible with Nikon CLS
For Remote use only
Adjustable head positioning
Lightweight and compact
Analogue dials for Groups
and Channels settings
AS-20 stand for
Remote lighting
Requires triggering via an i-TTL
camera with Commander mode
Pros: Can be teamed with multiple units for
macro work. Reliable illumination.
Cons: The SB-R200s require the R1C1
commander unit.
3.5
Q
Q
Q
Q
Q
Q
Q
Infrared transmission mode
Range up to 20m
Powered by one
CR123A battery
Four wireless
communication channels
Three wireless groups
60° lens coverage
68 x 96 x 58mm, 160g
Pros: Adds creative off-camera lighting
possibilities. Wireless and IR transmission modes.
Cons: There are cheaper third party substitutes
out there.
4.0
www.bdmpublications.com
39
SHARPEN
YOUR
KNOWLEDGE
A guide to some of the core
photographic skills
“Learning more about the basics of
photography and how each setting
impacts on the other is essential.”
I
n automatic mode, a camera will do most
of the heavy lifting for you. It will work out
the shutter speed, aperture and ISO values
to deliver what it thinks will be a well-exposed
image. There is no doubting just how marvellous
a digital camera is; a wonder of miniaturised
technology and optics. If you are new to
photography, using automatic is a quick and
easy way to get shooting and producing results,
but we would always advocate taking your
camera out of auto and learning how to exercise
more control over your camera. If you take a
40
www.bdmpublications.com
shot in auto, what were the decisions made to
give you the resulting picture? If it’s not coming
out how you want it, what do you do to remedy
the problem? Learning more about the basics of
photography and how each setting impacts on
the other is essential to taking better and more
creative photos. The following pages will help
you understand more about how it all works.
It’s not magic; it’s just the application of good
technical skills. Read on to discover more about
how that expensive gadget you bought actually
works and how you can master it. Q
SHARPEN YOUR KNOWLEDGE
www.bdmpublications.com
41
Shooting
modes
Choosing the best setting for the
correct shooting conditions
A
ll but the most basic budget
compact cameras have a selection
of shooting modes, usually chosen
by a dial on the top or back of the camera.
Easy-to-use, mainly automatic cameras
in the range will only have a few shooting
modes, while the more sophisticated
cameras such as the DSLR may have
as many as a dozen, including manual
Auto
The camera will analyse the scene
automatically and then it will choose all the
best settings for you.
exposure options and user-programmable
special settings.
As newer models appear in the range or
older models are updated, the shooting modes
available will be revised and possibly expanded.
Shown on this spread are some of the most often
used modes selected from the mode dial on the
top of the camera and in some cases, from the
menu screen on the back of the camera. Q
Auto (flash off)
The settings are the same as in full auto
mode but the flash will not be activated
when you start shooting.
Programmed AE
Programmed auto is recommended for
shots where there may not be time to adjust
camera settings.
P
Shutter Priority
Shutter speed is manually selected by the
camera operator to blur or freeze motion.
Aperture is set by the camera.
S
42
www.bdmpublications.com
Aperture Priority
Aperture is manually selected to blur or
bring background into focus. Camera
chooses shutter speed.
A
Manual Exposure
There is no automatic function in this mode.
The user will have to manually choose
shutter speed and aperture.
M
SHOOTING MODES
Bulb Mode
Allows you to take photos for as long as the
shutter button is held down for exposures
longer than 30 seconds.
B
Effects
Can be used to add filter effects to your
images when they have been shot. This is
all done in-camera.
Scene - Portrait
Helps to reduce the effect of distracting
backgrounds. The background will be blurred
to add a sense of depth to the composition.
EFFECTS
Scene - Landscape
Landscapes taken during the day will have
front to back sharpness. Colours will be
made more vivid.
Scene - Child
Skin kept soft and natural whilst clothes and
backgrounds are more saturated. Shutter
speeds will be faster to capture movement.
Scene - Sports
For dynamic sports and activities with fast
action. Shutter speeds will be high enough
to freeze the subject’s motion.
Scene - Close Up
For close up and macro shots of insects,
flowers and other small objects.
Backgrounds will be out of focus.
Scene - Night Portrait
Uses flash to create a natural balance
between your foreground subject and low
light backgrounds.
Scene - Night Landscape
Will reduce noise and any overly strong
colours such as street lights and neon for a
balanced image.
Scene - Party/Indoor
This is used for indoor scenes and other
social gatherings. Captures indoor
background lighting more effectively.
Scene - Beach/Snow
More accurately capture the brightness of
areas like snow or sand in bright daylight
and avoid underexposure.
Scene - Sunset
Alters saturation in the captured image to
maintain the rich colours and hues of the
sunrise or sunset.
Scene - Dusk/Dawn
Like the Sunset setting, but now the cooler
tones of dusk and dawn are maintained. No
flash is used.
Scene - Pet Portrait
Faster shutter speed is employed. No
AF assist light is used so as not to scare
the animal.
Scene - Candlelight
The deep orange and red tones of scenes
lit by candlelight are enhanced. No flash
is used.
www.bdmpublications.com
43
Focusing
Getting the best out of
your autofocus system
A
utofocus is so easy to use that the focus
switch on some of your lenses may
never have been moved to the manual
position. Most of the time autofocusing gives
excellent results. It is faster than manual
focusing, and often more accurate. However,
autofocusing operates by a series of rules
(algorithms). There may be times when these
do not give the results you want.
Nikon DSLRs use a multi-sensor autofocus
system called Multi-CAM, with up to 51 focus
points, including a number of highly sensitive
cross-type sensors. It is widely regarded as the
best current AF system. The sensor sits in the
base of the camera and a sub-mirror behind
the camera’s reflex mirror reflects light down
to the sensor. This light is split by a small lens
assembly to form two separate images. One
44
www.bdmpublications.com
image is formed on the first line sensor, the other
on the second line sensor. If there is no deviation
between the two images seen by the sensors, the
lens is focused. However, if the spacing of the two
images is not correct, a signal is sent to the lens
motor to bring the subject into sharp focus.
There are a couple of ways to help your
camera to focus quickly on a scene. Most digital
cameras have the option to select either single or
continuous autofocus. Your camera will normally
start to focus on the scene as soon as you halfpress the shutter button. In continuous focus
mode it will continue to update the focus if you
then move the camera, but in single AF mode it
will hold the same focus setting as long as you
hold down the button, until you actually take
the shot. You can use this to focus the camera
on low-detail targets by finding an object in the
scene that’s the same distance away as
your chosen subject, focusing on that, and
then holding the focus and re-framing the
shot. Similarly you can use it in reverse to
focus on objects that aren’t in the centre of
the frame.
Moving targets
Compact camera AF systems are usually
somewhat slower than those in DSLRs,
which means they can have a real problem
focusing on moving subjects. The way
around this is either to use continuous AF
or, if your camera has this option, to use
manual focus. If you can tell where your
subject is going to be, such as a car going
round a tight corner on a race track or a
child on a swing, you can pre-focus the
FOCUSING
camera on this point and wait to take the
picture at the right moment. This method
takes some practice and good reflexes, but it
can produce excellent results.
Close-ups
Different lenses have different minimum focusing
distances, but many modern zoom telephoto lenses also
have macro-focusing capabilities for close-ups.
All cameras and lenses have a minimum
focusing distance, a closest point beyond
which they cannot focus. For many compact
cameras this distance can be very small,
in some cases as little as 2cm (1in), but for
standard DSLR lenses the distances tend
to be longer. Most compact cameras have a
’macro’ setting, usually denoted by the symbol
of a flower. To get closer focusing with a DSLR
or CSC, special close-focus macro lenses have
to be used.
Depth of field is greatly reduced at very
A typical autofocus array taken from a Nikon digital SLR.
The centre AF points are the most sensitive. Some AF
systems also have extra intermediate focus points.
close focusing distances, and you may find that
your AF system doesn’t focus on the right part
of the subject, for example if you are trying to
photograph the centre of a flower, but the AF
focuses on the petals, because they’re closer. The
best option is to use a tripod, and manually set the
focus to the closest distance. Move the tripod until
the front of the subject comes into focus, then
carefully manually adjust the focus point to get
the right part of the flower to look sharp. Q
www.bdmpublications.com
45
Shutter
speed and
camera
shake
How shutter speed can make
or break your photos
T
he shutter of your camera is simply
a mechanical barrier that prevents
light from entering the camera until
it is needed, controlling when and for how
long light is allowed in to expose the sensor.
The latest digital cameras have high-speed
electro-mechanical shutters capable
of timing exposures with an accuracy
measured in fractions of a millisecond.
Along with the aperture setting and the
amplification control, shutter speed is one of
the three ways that photographic exposure
is adjusted. When a picture is taken, the
shutter is opened for a precisely measured
amount of time allowing light to pass through.
The duration of the exposure is set either
automatically by the camera’s light meter or
46
www.bdmpublications.com
manually by the photographer. The wider the
range of available shutter speeds, the greater
the creative versatility of the camera.
Modern Nikon DSLR cameras have a very
wide range of shutter speeds available,
usually ranging from 30 seconds to as high as
1/8,000th of a second, and most also have a
‘B’ setting, in which the shutter stays open for
as long as the shutter release is held down. The
‘B’ is from bulb; very old cameras commonly
used an air-bulb attachment as a remote
shutter release.
Shutter speed can be manually adjusted in
either full manual exposure mode or in shutter
priority mode, the latter usually denoted by an
‘S’ or ‘Tv’ on the exposure mode dial. Shutter
priority is a semi-automatic exposure mode
in which the photographer sets the desired
shutter speed, and the camera’s exposure
system adjusts the aperture accordingly to
produce the correct exposure.
In automatic and program exposure modes
the camera will set both the shutter speed and
aperture automatically. Under normal daylight
conditions, the shutter speed will usually be
set to between 1/125th and 1/1000th of a
second, since this is fast enough to freeze
most movement and to reduce the shot-ruining
effects of camera shake.
However in low light conditions the camera
may set a slower shutter speed, and with this
comes an increased risk of movement blur
caused by camera shake. Most cameras will
display some sort of warning if this occurs. Q
SHUTTER SPEED AND CAMERA SHAKE
“Modern Nikon DSLR cameras have a very
wide range of shutter speeds available.”
The misty water effect
Avoiding camera shake
When shooting hand-held and wishing to avoid
camera shake, as a rule of thumb you can safely
use a shutter speed roughly equivalent to the
reciprocal of the focal length you are using. For
example if you’re using a 100mm focal length
then you can take a sharp hand-held shot at a
shutter speed of 1/100th of a second or faster. If
you’re using a 35mm focal length then 1/35th of a
second is safe, and so on.
One of the most effective uses of long shutter
speed is photographing flowing water. It’s
a beautiful if slightly over-used effect, but it
is very easy to achieve. Any moving body of
water, flowing stream or waterfall will do,
as long as it has white splashing water. This
scene is Meadfoot beach down on the Torquay
coast in the south west of Devon.
Capturing movement
Freezing the action with a fast shutter speed
produces a nice sharp image, but sometimes
you might want to allow a controlled amount of
movement blur to show that the subject was in
motion. Below is a quick guide showing how this
can be accomplished quite easily.
Here’s an example shot taken hand-held at a focal length
of 105mm and a shutter speed of 1/125th of a second. As
you can see it’s sharp and shake free.
In this first example, the camera was tracking a dog
called Mabel who was running after her ball. She was
running fast from left to right and a shutter speed
of 1/1000th of a second was enough to freeze her
movement. Shutter speeds of this short duration are
often used in sport and various action events to capture a
very brief moment during a frenetic sequence.
Here’s the same hand-held shot at 1/10th of a second.
At this speed it’s virtually impossible to hold the camera
steady enough for a shake-free shot. As you can see, the
result is blurred.
If you just point the camera and shoot on
automatic, you’ll end up with something like the
top example. It looks nice enough, but it’s a bit
dull. It was shot with a shutter speed of 1/200s
and an aperture of f/5.6.
Fixing the camera on a tripod eliminates
camera shake. You now need to get the slowest
shutter speed you can. The image above
was taken from the same position as the top
example, but with the addition of a 10stop ND
filter to give a shutter speed of 4 seconds at the
same aperture of f/5.6.
This example shot was taken with a focal length of
105mm at 1/10th of a second as before, but this time the
image stabilisation (in this case a sensor-shift system) is
switched on. It has detected the vibration and corrected it
by moving the sensor to compensate, resulting in a much
sharper shot.
This image of Cash, who was trotting towards his owner,
uses deliberate motion blur. In this case, a shutter speed
of 1/60th of a second was used, but the camera was also
panned to match the speed and direction of travel of the
dog. This allows the background to blur but keeps the dog
relatively sharp.
www.bdmpublications.com
47
Aperture and
depth of field
With aperture you can control how much of
your picture is in focus
O
f the three main controls common to
nearly all cameras, shutter speed, focus
and aperture, it is aperture adjustment
that is the least well understood. This is because
it not only helps to control exposure, but
also affects something called Depth of Field.
Understanding the effects of aperture size is a
vital skill for any keen photographer.
At least there’s nothing mysterious about the
name. The aperture is literally a hole through which
light passes after it enters the lens. The diameter of
this hole can be altered, allowing a greater or smaller
amount of light to pass through on its way to the
sensor. In the early days of photography, aperture
was adjusted by slotting cards with different sized
holes cut in them into the body of the camera behind
the lens. These cards were known as ‘stops’, and
this is still part of photographic terminology today.
On modern cameras the aperture is controlled by
an arrangement of curved shutters inside the body
of the lens, which move to produce a continuously
variable aperture, however the aperture settings are
usually still referred to as ‘F-stops’.
Aperture adjustment is used in combination
with the shutter speed and ISO amplification to
control photographic exposure. However it is also
the primary means of controlling something called
depth of field, a slightly technical concept that may
need a bit of explanation.
If you take a photo of a subject at a distance of
about 3 metres with standard zoom lens, in good
light with the focal length set to about 30mm, as
long as the lens is focused correctly the subject
should appear nice and sharp in the image. However
you’ll usually find that objects about 1.5m in front of
the subject, and for about 4 or 5 metres behind the
subject, also appear sharp. This distance, from the
closest point of acceptable sharpness to the most
distant, is known as the depth of field.
By altering the size of the aperture it is possible
to control the extent of this depth of field, either
reducing it so that only the main subject is in sharp
focus, or expanding it so that an entire landscape
can appear to be
just as sharp.
If you have an older camera to hand, take a look at
the lens. It will have a ring for controlling the aperture
setting, labelled with numbers usually from about F2
to about F22. The focus control ring will have
distances usually calibrated in feet and metres, and
“Aperture
adjustment is used
in combination
with the shutter
speed and ISO
amplification
to control
photographic
exposure.”
48
www.bdmpublications.com
APERTURE AND DEPTH OF FIELD
alongside it you’ll usually find lines marked with the
same numbers as the aperture ring, arranged in
pairs either side of the focal distance mark with the
larger numbers toward the outside. The purpose of
this aperture scale is to help estimate the depth of
field at a particular distance for any given aperture
setting; with the focus set to a particular distance,
anything between the two lines for the selected
aperture setting should be acceptably sharp. Some
older zoom lenses have a series of curved lines
etched into the lens barrel for the same purpose. For
some reason this scale is missing from most
modern auto-focus, auto-aperture lenses, which
would make the whole concept of depth of field
much easier to understand.
How aperture works
Explaining exactly why altering the size of the lens
aperture alters the depth of field is a little complicated,
but a few simple diagrams should help to shed some
light on the matter. For a start, let’s clear up some
popular misconceptions about the difference between
focus and sharpness.
This is a highly simplified diagram of the
arrangement of lens, aperture and sensor inside a
modern digital camera. In this first diagram, three
subjects at different distances from the camera lens
are represented by the red, green and blue dots. The
lens is focused on the green spot, so light from it passes
through the aperture and the lens and appears sharply
focused on the sensor. Light from the red and blue spots
also passes through the aperture and lens, but light
from the red spot focuses a short distance in front of
the charged coupled device (CCD), while light from the
blue spot focuses a short distance behind it. The light
from these other spots still hits the CCD, but due to light
scattering it is unfocused and spread over a wide area.
What this means is that the red and blue spots will appear
as large blurred spots on the final image, while the green
spot will be sharp and in focus. The size of the blurred area of
the red and blue spots is called the ‘circle of confusion.’
Film or CCD
Apparent
diameter of
blue ‘circle of
confusion’
Aperture (wide)
Apparent
diameter of
red ‘circle of
confusion’
APERTURE RING
Lens
The diagram below shows the same arrangement of
camera and subjects, and the coloured spots are the
same distance from the lens, but this time the aperture
has been reduced to just a small hole. Again the lens is
focused on the green spot, and the red and blue spots
are out of focus. However the narrow aperture restricts
the light scattering and the relative angles of the light
paths, and as a result the ‘circles of confusion’ are much
smaller. This makes the red and blue spots in the final
image appear much sharper. They are still out of focus,
but the effect is not so noticeable. To make circles of
confusion as large as in the first image, the red and blue
spots would have to be much further away from the
green one.
Film or CCD
WIDE APERTURE
Aperture (narrow)
Apparent
diameter of
blue ‘circle of
confusion’
Apparent
diameter of
red ‘circle of
confusion’
NARROW APERTURE
Lens
www.bdmpublications.com
49
Focal length
and zoom
Understanding how focal length works
in composing shots
N
early all modern compact cameras
have zoom lenses, and most users
of digital SLRs or CSCs will also
have at least a couple of zooms in their kit.
Focal length is one of your primary tools
for adjusting composition. Selecting the
right focal length for the scene allows the
photographer to control perspective, angle
“Selecting the right
focal length for the
scene allows the
photographer to
control perspective,
angle of view and
magnification.”
50
www.bdmpublications.com
of view and magnification, and can radically
alter the mood and style of the photo. Some
focal lengths are more suited to particular
types of photo, and the properties of wideangle and telephoto lenses can be used to
produce particular effects. Understanding
how focal length works and how it affects
your photos is a vital photographic skill. Q
FOCAL LENGTH AND ZOOM
Lenses and focal length
There are basically two types of lens; those
with fixed focal lengths, also known as prime
lenses, and those with variable focal length,
or zoom lenses. They both have their own
advantages and disadvantages. Prime lenses
are usually smaller and lighter than zooms,
and also generally have much faster maximum
apertures than a zoom lens at equivalent focal
length. The optical quality of prime lenses is
also usually a little higher than the equivalent
zoom lens. Zoom lenses however are much
more convenient, allowing the photographer
to cover a wide range of focal lengths with just
one or two lenses, rather than carrying around
a bulky collection of prime lenses. There are
some fast zoom lenses, but they tend to be
extremely expensive.
The focal length of a lens is an expression
of its magnifying power, and is usually stated
in millimetres. If you look on the front of your
camera, usually inscribed around the front of
the lens you’ll find the focal length, or a range
of values for zoom lenses. For a typical DSLR
kit lens this will usually be around 18-55mm.
For digital cameras it is fairly usual to see two
figures quoted, both the actual focal length and
the ‘equivalent’ length. The reason for quoting
both is simply that more people are more
familiar with the sizes of 35mm lenses, so they
know that 28mm is wide angle and suitable for
panoramic shots, or that 200mm is a telephoto,
suitable for long-range subjects.
Real and equivalent focal lengths are
different because most digital camera sensors
are a lot smaller than a frame of 35mm film,
and are fitted much closer to the lens than the
film would be. Most consumer DSLRs use the
APS-C sensor format. Exact sizes vary from
one manufacturer to the next, but are typically
around 22.5 x 15 mm. A frame of 35mm film
measures 36 x 24mm, which means that the
edges are 1.6x longer, so the focal length of the
lens would need to be 1.6x greater to produce
the same image size and magnification. This
is usually referred to as the ‘conversion factor’
or ‘crop factor’. It means that a typical 1855mm DSLR zoom lens is roughly equivalent
to the popular 28-80mm zoom lens often
used on 35mm systems.
Compact camera sensors are even smaller
still. Because there are several different sizes
of sensor in common use it is more usual for
compact camera zoom lenses to be rated in
terms of their magnification power, such as
3x, 4x, 10x etc. This relates to the difference
between the minimum and maximum focal
lengths. A lens with a range of focal length
from 5.8mm to 17.4mm is called a 3x zoom,
because 17.4 = 3 x 5.8.
While in older prime lenses a 200mm lens
would literally be 20cm long, modern optical
systems use multiple lens elements working
in combination, which means that the light
path can be shortened while still maintaining
the same effective magnification. As a result
quite powerful telephoto and zoom lenses can
be relatively compact.
Wide-angle and telephoto are relative
terms. On a 35mm film SLR a 50mm
lens produces approximately the same
perspective and magnification as the human
eye, and has traditionally been the standard
lens for this type of camera. Anything longer
than 50mm is considered a telephoto, while
anything shorter is considered wide angle.
Digital SLRs tend to follow this rule too,
although considering the crop factor the midpoint is approximately 35mm. Q
Changing the angle of view can be used
to produce some interesting effects.
If we move closer to the subject while
shortening the focal length we can see
that although the subject fills roughly
the same area of the final image, in
a wide angle shot a lot more of the
background is included.
Shots in this set were taken
with lenses like the AF-S
24-70mm f2.8E ED VR and
AF-S 80-400mm f4.5-f/5.6G
ED VR seen here.
Magnification
The most obvious effect of altering focal length is
the change in magnification. Anyone who has ever
used a zoom lens will be familiar with this effect.
If you want to take a photo of something a long way
away, you zoom in and the subject appears closer.
25mm
400mm
Angle of view
25mm
250mm
www.bdmpublications.com
51
“What your
cameraʼs light
meter sees is
quite different.“
Exposure
and metering
Accurate exposure is the key to
good photography
U
nderstanding exposure and how it
affects your photographs is probably
the single most important technical skill
you can learn in photography. It’s certainly the
one that most people get wrong, and apart from
camera shake bad exposure probably ruins
more photos than any other single cause. The
main problem is over-reliance on automatic
metering.
Most modern cameras, even relatively cheap
compacts, have sophisticated built-in TTL
52
www.bdmpublications.com
multi-zone evaluative exposure meters that
measure light levels at dozens, in some cases
hundreds, of points within the frame, instantly
comparing the results with a built-in library of
exposure situations and automatically adjusting
the shutter speed and aperture to deal with
problems such as back-lighting, close-ups or
moving subjects.
In most cases these automatic exposure
systems are very good, and can reliably cope with
most common circumstances. However even the
best automatic meter can be fooled, resulting
in poorly exposed photos. By overriding the
camera’s automatic settings and adjusting
exposure manually we can avoid these
problems and take much better photos.
Fade to grey
What you see here is a nice scene of a sunlit
portrait, with a good tonal range, plenty of
colour and some nice crisp sunlight. What your
camera’s light meter sees is quite different.
EXPOSURE AND METERING
Aperture
ISO
Shutter speed
The photographer’s trinity. Aperture, ISO and shutter
speed. One has an effect on the others.
Try it out for yourself. Find any nice, average
snapshot scene, properly lit and with good
contrast. Start up your image editing software
and open your picture. Light meters only see
in black and white, so reduce the saturation
of the shot to zero. Your light meter doesn’t
see detail, so set your Gaussian blur filter to
maximum diameter and apply it a couple of
times. Use the eyedropper tool to measure
the RGB colour value of the resulting tone. You
should find that it averages out to a mid-tone
grey with an RGB value of around 127,127,127.
It’s an interesting and curious fact that
any average scene reflects 18% of the light
falling on it. Look out of your window, and
unless you live in Antarctica the scene you
see is reflecting exactly the same amount of
light as the scene out of my window. That 18%
reflection is exactly the same as a mid-tone
grey, mid-way between black and white.
Light meters are calibrated with this fact in
mind. When your camera takes a light reading,
the meter averages the scene and adjusts the
exposure to produce that mid-tone grey (or
12% luminance, but that’s another discussion
altogether). If you point the camera at a black
stage curtain, it will try to make the black into
a mid-tone grey, so it will over-expose. If you
point it at snow it will try to make the white into
grey, so it will under-expose.
Adjusting exposure
Let’s take a moment to explain how exposure
is controlled, and what is meant by some of the
terminology.
On all cameras, exposure is adjusted by
altering three basic settings; aperture, ISO and
shutter speed. Between them they control the
exposure of any shot.
Shutter speed is self- explanatory, it is simply
the amount of time that the sensor is exposed to
light. This is usually controlled by an electrically
operated mechanical shutter in front of the
sensor that opens and closes very quickly for a
precisely measured period of time, usually in the
order of a few hundredths of a second. Obviously
a shutter speed twice as long lets in twice as
much light, one half as long lets in half as much.
The aperture is literally just a hole through
which light passes on its way to the sensor. The
diameter of that hole can be adjusted to precisely
calibrated sizes. A smaller hole lets in less light,
and a larger hole lets in more.
These calibrated aperture sizes, for largely
historical reasons, are called stops, or f-stops. An
aperture setting one stop larger lets in twice as
much light. For reasons that are both historical
and mathematical, the standard full-stop
aperture settings that you are most likely to
encounter go f/1, f/1.4, f/2, f/2.8, f/4, f/5.6 f/8,
f/11, f/16 and f/22. The smaller numbers refer
to larger apertures, and the larger numbers to
smaller ones. Many cameras can set apertures in
increments of 1/3rd of a stop, but the whole-stop
numbers are the ones to remember.
ISO is the amplification of the image brightness
once captured by the sensor. A low ISO setting
means it is amplified less, producing very clean
images but with the result of needing longer
shutter speeds or wider apertures, whilst a
high ISO means it is amplified to a much greater
degree. The practical upshot of this is that you
can increase the ISO value to give you the
option of shorter shutter speeds and smaller
apertures, it is at the expense of a greater
amount of noise in the image.
Let’s consider an example. With your camera
set to automatic exposure point it at a scene and
take a light reading. For the sake of argument,
say the light meter sets an aperture of f8 and
1/200th of a second. You can produce the same
exposure by increasing the aperture by one stop
to f5.6 and halving the shutter speed to 1/400th
of a second, because this lets the same amount
of light through to the sensor. Similarly, reducing
the aperture to f11 and setting the shutter speed
to 1/100th of a second will also produce the
same exposure.
However by altering one setting without
altering the other you will change the exposure.
In our example, changing the aperture to f5.6
but leaving the shutter speed at 1/200th of a
second will increase the exposure by one stop,
or one exposure value (EV), making the picture
brighter. Decreasing the aperture to f11 will
reduce the exposure by one EV, making the
picture even darker.
Similarly, changing the shutter speed while
leaving the aperture alone will also change the
exposure. Double the shutter speed to 1/400th
at f8 and you reduce the exposure by one stop,
halve the speed to 1/100th and you increase the
exposure by one stop.
Once you grasp the concept that all these
factors are linked and that one will always
affect the other, you are well on your way to
understanding exposure and how to get much
more creative control of your images. Q
www.bdmpublications.com
53
TOP TIPS
& PROJECTS
Learn more about improving
your photography
“The list of tips weʼve compiled range from some of the simplest
technical insights, that can give your skills a quick boost, to
more in-depth knowledge.”
A
s we’ve mentioned, there is a bit more to photography than
‘full auto’ and simply snapping away to your heart’s content.
Part of the skill (and all of the enjoyment) of photography is the
knowledge that any shot you take was done so with you in full control.
We understand you have to start somewhere, but in the fullness of time,
when you find yourself hitting a wall and wondering what is required
54
www.bdmpublications.com
to help you improve, seeking out some handy hints and tips
can give you that important jump-start into some next-level
photography. The list of tips we’ve compiled range from some of
the simplest technical insights, that can give your skills a quick
boost, to more in-depth knowledge that can help deliver the
kind of images that rival those of the pros themselves. Q
TOP TIPS AND PROJECTS
www.bdmpublications.com
55
BUY A TRIPOD
The quickest way to improve your photography
is to invest in a decent tripod. For the best
combination of strength, rigidity and portability,
the ideal choice is carbon fibre. Carbon fibre
tripods start at around £120 ($175, €165)
and can cost ten times more, so if that’s too
expensive get a good quality aluminium one.
Features to look for include a ratcheted centre
column, portrait-format tilt and all-metal
construction. Avoid ones with plastic heads, as
they are seldom rigid enough to prevent camera
shake on long exposures.
EARLY BIRD
CHOOSE THE
RIGHT CAMERA
When you’re looking to buy a new camera
for your photography, make a list of your
requirements and set yourself a budget.
Don’t forget to allow for accessories such as
lenses, a tripod and cleaning kit if you need
them. Don’t fall in to the trap of thinking that
a more expensive camera will make you a
better photographer. You’re much more likely
to improve your technique by overcoming the
limitations of cheaper kit than by spending
more money than you need to.
56
www.bdmpublications.com
Shooting a landscape in bright midday sun is
fine but if you really want your shots to shine,
you’ll need to get up early and catch the light
available just before the sun rises, and as it
climbs above the horizon. The shadows are long,
giving definition to objects and the light has that
special golden ethereal quality. The same is true
at the opposite end of the day, at sunset. The period of time around sunrise and sunset is called
the golden hour. Simply switching the time you
take photos can have a dramatic improvement
on your shots.
CHOOSE THE RIGHT LENS
If you’re buying a compact system camera or
DSLR, it will probably come with a standard
telephoto lens that is ideal for general
photography and snapshots but there is a wide
variety of special lenses available for other types
of photography. If you like to shoot landscapes,
get a good wide-zoom lens but avoid super-wide
lenses as these will distort the image. If you want
to shoot wildlife, you’ll need a high quality fast
telephoto but this will be expensive.
TOP TIPS AND PROJECTS
VISUAL INTEREST
PICK A PRIME
THE HOLY TRINITY
The rule of thirds is a simple guide that can
help the composition of your shots and make
them much more visually appealing. When
framing a shot, you have to imagine that what
you can see through the viewfinder of your
camera is divided into thirds both vertically
and horizontally with lines, just like a noughts
and crosses game (or tic-tac-toe if you are
in the US). Placing your main subject on an
intersection where these lines meet is a simple
and quick way to improve composition.
Fast glass is much prized in the world of
portraiture. Fast glass has very large apertures,
letting in more light and offering faster shutter
speeds in low-light conditions. A good portrait
lens that has a maximum aperture of f/2.8 f/1.2 is fantastic at creating the background blur
so sought after by photographers. The quality
of defocused light this blurring produces is
referred to as bokeh. The ability to shoot at f/1.2,
for instance, means you can shoot more natural
light portraits, without the reliance on strobes.
ISO, aperture and shutter speed are the three
pillars of exposure. The main idea is that
altering one of these three settings has an
impact on exposure and therefore how your
image looks. One or both of the other settings
will have to be altered to maintain a balanced
exposure. As you develop as a photographer,
you will realise that once you are in control,
you can create images that look more as you
want, rather than what the camera thinks is
right when in full auto mode.
USE THE HISTOGRAM
DEPTH CUEING
A photograph only has two dimensions and any
indication of depth in a photograph is purely
optical. One of the simplest ways to add depth
is to use leading lines like the curve of sand
on a beach image or railway lines converging
towards the horizon. Another method is
atmospheric perspective where mist and fog
shroud distant objects making them lighter and
with less tonal contrast compared to darker
foreground objects.
A histogram is a graphic representation of
the tonal values in your shot and how they are
distributed. If the graph is bunched at the far
left, then your shot is very underexposed and
you risk the loss of a lot of detail to shadow
areas. If it is sliding off the right-hand side,
then it will be overexposed and detail will be
lost in the highlight areas. A good exposure
will have all the major tones in the middle of
the histogram.
STOP THE SHAKES
Camera shake is the unwanted
movement of the camera taking
the shot and of the subject of the
shot. Modern cameras offer image
stabilisation and it can work well up to
a point but the lower the light, the more
the likelihood is that your shots will
be blurry as you need longer shutter
speeds to gather enough light for a
balanced exposure. If you buy one thing
to go with your new camera, make it
a tripod. Use a robust tripod and your
images will be rock steady in all manner
of challenging shooting situations.
www.bdmpublications.com
57
MAXIMUM EXPOSURE
Consider using longer exposures in your
landscape shots. Photographers often
employ exposures that last seconds or
even tens of seconds, to show clouds
streaking across the sky rather than
looking static and puffy. Scenes shot
with a much longer exposure will turn
the water to a misty, milky fog. It is safe
to say that your tripod is the key to the
success of these shots.
58
ENHANCE YOUR PHOTOS
COMPENSATE
LEARN FROM OTHERS
If your camera has the option to let you shoot
Raw images, use it. A Raw image is the key to
much greater post-processing possibilities.
Raw images, as the name suggests, are just
unprocessed raw data straight from the
camera sensor with all the information you
need to bring out a beautiful photograph. The
act of cropping the shot into a more pleasing
aspect ratio can save an image, as can turning
it to black and white. The choices are endless,
even if it’s just contrast, saturation, brightness
and sharpness.
As good as cameras are, they will often
overexpose and underexpose your photos
in challenging lighting situations. That’s
where exposure compensation comes
in. It’s a common setting found on digital
cameras and it lets you override the camera
by making the image lighter or darker based
on how much positive or negative exposure
compensation you dial in. A lot of cameras will
let you preview the result on your LCD screen
and once you are happy with how it looks, you
can take the shot.
Even the best pros had to pick up a camera
for the first time. There are any number of
photography forums that you can join and
then get advice from other photographers.
Why not join a local photography club?
It’s a great way to meet fellow like-minded
photographers of varying skill levels. It’s is
also a good way of getting motivated to get
out and take more photos. You’re also more
likely to be able to chat with those who are
well versed in using software to post-process
their images.
www.bdmpublications.com
TOP TIPS AND PROJECTS
A SENSE OF PERSPECTIVE
FURTHER AFIELD
An average human, taking a photograph, is
viewing the world from their eye level of about
5 feet. Simply changing that viewing angle
can radically alter the shot. As a simple rule of
thumb, shoot from low down, shoot from high
up. Getting above or below your subject alters
how you present your subject and how they fit
in the world that’s around them. You can play
with wide angle shots or telephoto shots. You
have an amazing amount of choice. Anything
to break away from the eye level world that we
are used to.
Find a lovely location that you want to
photograph and research the area a little, then
get yourself out there. Plan to arrive before
dawn and get some amazing shots of the
golden hour. Explore the area and experiment
with composition and camera settings. In
fact, just go crazy and enjoy the experience.
That’s the key to photography. It’s there to be
enjoyed. Don’t worry about making mistakes;
keep those shots and review them when you
get home and figure out why they didn’t work,
it’s all part of the process.
BATTERIES
Your digital camera can’t operate without
power, so make sure you fully charge the
battery before taking it out for the day. If you’re
going away for a holiday remember to take
your battery charger and an adaptor for foreign
mains sockets; and maybe consider investing
in a spare battery or external battery pack in
case you can’t charge it for a while. There are
also several devices available that can charge
your battery using solar energy or from a hand
cranked mini-generator.
OUT OF THE SHADOWS
While a bright summer day may seem like the
perfect time to take photos, at midday every
scene will appear flat and featureless with
shadows sitting directly beneath every object.
The perfect weather for outdoor photography is
a clear day with a few white clouds to help diffuse
the light and take the edge off the shadows. The
perfect time is around sunrise and sunset with
long shadows defining the contours of the land.
WHATEVER THE WEATHER
Remember that the weather is part of the
landscape too. While a nice sunny day is perfect
for outdoor photography, natural weather effects
such as mist, clouds and even rain can be used
to create an attractive photo under the right
circumstances. Make the weather part of your
composition. Try capturing mist in early morning
light, or raindrops hitting puddles or the surface
of a lake. Cloud formations can add interest to
the composition of a panoramic landscape shot.
www.bdmpublications.com
59
LOW-LIGHT
When shooting in low light the most important
thing to remember is that your camera’s
exposure meter will try to brighten everything
up; this can cause problems with image noise
at higher ISO settings. To capture dimly lit
subjects against a dark night-time background,
try reducing your exposure by a couple of
stops. This will also help to reduce the blurring
caused by camera shake and moving subjects
during long exposures.
NATURAL LIGHT PORTRAIT
NIGHT PHOTOGRAPHY
You can capture amazing photos of the stars
on a clear night by setting your camera on
a tripod, setting the aperture to its widest
position and using the ‘B’ exposure setting and
a cable release to hold the shutter open for
five or six minutes. Make sure you’re well away
from any light sources such as street lights or
passing cars. If you point your camera towards
the Pole Star (or the Southern Cross) you’ll
capture the apparent circular motion of the
stars as the Earth rotates.
COLD CONDITIONS
Cold conditions can cause a few problems
for your digital camera, the main one being
its effect on batteries. You’ll find that even on
a cold morning after a clear summer night,
your battery will only last around half as long,
so keep a spare in a warm inside pocket and
swap them over when the first runs out. When
you take your camera back indoors, keep it in
a sealed plastic bag until it’s warmed up, to
avoid condensation problems.
Shoot portraits outdoors to take advantage
of natural light. Position your subject so that
their face is well-lit but don’t believe the old tip
about having the “sun over your shoulder”. You
should avoid having them face directly into the
sun, because this will cause them to squint.
The best option is to have them stand in bright
shade, or near a white wall or other object that
will reflect a flattering diffused light.
GROUP PORTRAITS
Try to find a location that lets you position
your subjects at different heights. A set of
broad steps, a low wall, a park bench or
even the trunk of a fallen tree make ideal
impromptu stages, and add interest to
what would otherwise be a fairly dull photo.
Position shorter people at the front of the
group or get those at the front to kneel, so
that everyone can be seen clearly in the shot.
PHOTO EDITING
Get the best out of your photos you’ll need
editing software. You can make simple edits
with the Photos app that comes with Windows
or with Photos on a Mac but for more accurate
and detailed work you’ll need something more
capable. The best is Adobe Photoshop but it
may be too expensive for most hobby users.
There are plenty of cheaper options, including
ACDSee, Corel PaintShop Pro, Corel AfterShot
Pro 3 and Adobe Photoshop Elements 2019.
LEADING LINES
There are many rules and guidelines for
photographic composition but one that applies
most often to landscape photography is the
concept of leading lines. When composing
your shot, try to find lines in the scene, such
as roads, rivers, railway lines or hedges. Frame
your shot so that these lines will lead the
viewer’s eye into and through the scene. They
will also help to give the scene a sense of scale
and perspective and this will also help with
your composition.
60
www.bdmpublications.com
TOP TIPS AND PROJECTS
HARMONY AND BALANCE
DEPTH OF FIELD
RAW MODE
There’s more to a good landscape
composition than just a snapshot of some
nice hills. Try to include foreground detail
such as old walls, rock formations or
plants. They will add depth and a sense
of perspective and scale to your picture,
and make for a much more interesting
composition. Try to balance foreground
detail with background detail to create a
harmonious balance to your composition.
Depth of field is the distance between
the nearest and most distant objects in a
scene that are in focus. It is controlled by a
combination of aperture and focal length and
is an important creative tool for improving
your photographs. Use a narrow depth of field
(wide aperture) to isolate subjects against a
blurred background or use a large depth of
field (narrow aperture) to capture an entire
scene in sharp detail.
Most high-end cameras have a feature called
Raw mode. This is the equivalent of the
negative in a film camera; you can take the
Raw image data and process it yourself using
image editing software such as Photoshop.
The advantage is that the Raw mode file
contains uncompressed data with more
colour information and tonal depth than the
processed JPEG image that your camera
usually produces, so you can do more with it.
TIME OF DAY
When shooting landscape shots, the time of day
is all-important. You can’t control the position
of the sun in the sky, so you’ll have to wait for
it to be in the right position to provide the best
lighting for your scene. Make a note of sunset
and sunrise times and try to visit the same
location several times at different times of day.
The favourite times for perfect lighting are an
hour after sunrise and an hour before sunset,
known as the ‘golden hour’.
BLACK AND WHITE
FOCAL LENGTH
There are many subjects that can look
great in black and white, particularly
portraits, rough textures like old stone,
and even landscape shots. However the
black and white mode on your camera
may not do the scene justice. You can
get much more creative control over
the final appearance of the image by
converting the photo to monochrome
using photo editing software. This is
especially true if you shoot in Raw mode,
with its much greater tonal range.
Focal length, or the zoom setting of
your lens, is one of your most important
creative tools. Longer focal lengths let
you get closer to distant subjects, whilst
wide angle settings let you capture
more of your surroundings. However,
most people only ever seem to use the
minimum and maximum settings. If
you do this you’re missing out on a lot
of creative potential. Use focal length
creatively to improve composition or to
focus attention on details in a scene.
www.bdmpublications.com
61
MORNING DEW
A clear and cold night can make for a lovely
dew-covered morning. Make a point of
capturing flowers and leaves covered in dew by
using a macro lens to get in very close to your
subject and reveal their beautiful and delicate
patterns. The light of the morning sun, low on
the horizon, can be used to illuminate your
subjects, casting shadows and causing bright
specular highlights on the reflective surfaces
and smattering of dew drops.
SHOOTING IN FOG
CITY AT NIGHT
The crisp, clean air of spring can often lead to
very clear nights. Take your favourite camera,
lens and tripod and go out and shoot some
night time urban scenes. If you are looking at
capturing a city skyline, you can actually shoot
after sunset whilst there is still some light in the
sky. This is known as the blue hour and cities
look amazing shot against the deep blue of
approaching darkness.
Learn how to control the underexposure issues
faced when shooting very bright fog-covered
scenes. Your camera’s metering system can
be confused by overly bright scenes and will
try to average the scene as 18 per cent grey,
or middle grey as it is known. By doing so, it
will underexpose your shot by as much as
1 or 2 stops. Use your camera’s exposure
compensation feature and set it to overexpose
by 1 stop or more to return the foggy scene to a
better, brighter exposure. You can check your
histogram too to confirm it isn’t too dark.
GET COMPOSED
LONG EXPOSURES
Another idea for a crisp, clear night is to shoot
a long exposure image that captures the
movement of the stars. You will be working in
the bulb exposure range from 30 seconds up
to tens of minutes. A robust tripod is essential
for theses ‘bulb’ shots. The shutter will be
open for a long time and you don’t want your
camera moving part way through and ruining
the shot. A programmable cable release is
also a great purchase so you don’t have to sit
there for ten minutes with your finger on the
shutter release button.
If you and a group of friends are out walking in
the woods and three of you are shooting away
with your cameras, there is every chance your
photos may all look quite similar. You need to
set yourself apart from the crowd by thinking
about making some bold compositional
choices that the others might not have
considered. Be brave and don’t worry about
making mistakes when it comes to your
shots. Not every photo you take is meant
to set the world on fire with its staggering
compositional strength. The shots that don’t
work should be there as a learning tool for
getting it right next time.
TIME TO GRADUATE
If your skies are full of pale grey clouds,
or it is just much brighter than the
ground, try using a graduated neutral
density (ND) filter to bring some detail
back into the sky. Cokin manufacture
many filters for landscape work and
the ND filter is probably one of the
most useful. A 2-stop ND filter for
instance, is dark at the top of the filter
and gradually fades to clear towards
the middle. When placed in front of your
camera lens, the top half of the image
is darkened by 2-stops and its effect is
reduced to zero in the middle.
62
www.bdmpublications.com
TOP TIPS AND PROJECTS
DRAMATIC CONDITIONS
SPRING CLEANING
During the year, there are always likely to be
periods with high winds. There are often some
dramatic photo opportunities to be had down
by the sea. Why not get down there at high tide
and check out the wave action? High tides and
windy conditions can create some epic crashing
waves. Whether they are crashing over a sea
wall or smashing into rocks and cliffs, they are
a sight to behold. It goes without saying, but we
will say it, always keep yourself safe. No shot is
worth getting washed out to sea for.
Why not spend some time removing
unwanted photos from your hard drive and
back them up to a portable USB drive. You’d
be amazed at how much space you can
recover on your computer by pruning out
all the unwanted shots you’ve accumulated
over time. We recently totalled up how much
space was being taken up on our hard drive
with photographs. It came to over 500GB.
We reckon that over 80 per cent of the shots
weren’t being used and that would save an
enormous amount of space. Moreover, we did
a grand total of everything currently backed
up and it came in at over six terabytes!
PHOTOSHOP MASTERY
BE SAFE
If you use Photoshop, Elements or Gimp etc.,
learn one new technique each month that
the pros use for improving a photograph, and
master it. As an example, Photoshop’s use of
adjustment layers is critical in eking out every
last pixel of detail from a landscape photo. It
is also a non-destructive method whereby
you do not alter the base image, so you can
always go back to the original if you need to.
Photoshop cannot make a badly composed,
blurry image better or save you from bad
technique but it can enhance a good shot and
make it a ‘wow’ shot if done well.
If you are thinking of trekking out into the great
outdoors, bear in mind that you need to plan
your day, wear the appropriate hiking gear and
make sure someone knows where you are going.
Keep your phone with you and maybe even a
GPS tracker. Dressing in layers is important but
remember it’s better to be too hot than freezing
cold. Make sure you have all the gear you need.
It would be pretty grim to arrive at an amazing
location only to find you’ve left your memory
cards behind, or your favourite wide-angle lens.
STILL LIFE
GO MONO
Take the time to photograph still life objects
indoors. You can start with something as basic
as a sheet of white or coloured paper and a
single lamp as your light source. Grab an object,
it can be a bowl of fruit (we won’t tell anyone,
we promise!) or bunch of flowers, and spend
time learning how the different positions of a
single light affect the look of your still life and the
shadows it creates. Then you can use pieces of
white card as reflectors and bounce light back
into the scene to fill in any dark shadows.
Stark landscapes and amazing weather
conditions are ideal materials for black
and white conversion. Indeed, many
photographers like to shoot black and white
images on dull days as a lot more detail can be
revealed in the image when converted to mono.
There are plenty of mono conversion methods
you can learn to do in Photoshop. YouTube has
countless tutorials that can aid you. We would
recommend a third party app called Silver Efex
Pro, which is part of the Google Nik collection.
It is now completely free and many pros swear
by it for their mono conversions.
www.bdmpublications.com
63
NIKON
CREATIVE
Guides, techniques and tips for
shooting like a pro
“There is great knowledge to be
gained from trying something new.
You never know, your true calling as
a photographer may be revealed.”
I
t’s time to get creative. It’s time to step out
with your equipment and look for the next
great photographic project that you can sink
your teeth into. You may have had your camera
for a while, been using it and getting some good
results. The question you might ask yourself is,
where next? If that is the case, you’re ready to
start learning more of the creative techniques
that professional photographers use to achieve
outstanding results time after time. By trying
new things and learning new techniques, you
can turn your photographs from well-taken
snapshots into creative masterpieces, of which
you can be proud. It begins with the desire to
64
www.bdmpublications.com
step outside your comfort zone and shoot the
kinds of photographic projects that will test your
skills and help you develop a signature look, or flair
for capturing a particular subject.
There is great knowledge to be gained from
trying something new. You never know, your
true calling as a photographer may be revealed
in the next project you try. There are many
more secrets and tricks in the field of creative
photography than we have room to cover in this
guide, but we can show you some great projects
that will hone your technical skills, creating a
solid foundation on which your passion can grow
as you to learn and experiment further. Q
NIKON CREATIVE
www.bdmpublications.com
65
Pet photography
Time to get our furry friends ready for their close up
W
e love our pets. In fact for most people
they are more than mere pets and
become more like family members,
the recipients of love, affection and lavish
attention. It is likely then that their owners, at
some point, are going to want photographs of
their furry friends (or scaly, feathery or
otherwise). We have a dog, and the number of
photos that include him specifically outnumber
those of all our other family members put
together. However, pet photography presents
its own special problems. Animals, as we all
know, can be unpredictable, lazy, aggressive,
hyperactive and downright cute. If you’re
thinking of trying pet photography, here are a
few pointers to get you started.
Pet personality profile
You don’t need to sit the pet in question on a
psychiatrist’s couch and ask it to tell you about
its mother, but before you start snapping away,
find out about your subject’s personality and
habits. Where does it snooze if the sun is out?
What is its favourite toy? Is it lazy, sleepy, or
does it like to perch on a garden fence or hide
66
www.bdmpublications.com
in the grass? Take time to chat with the owner
and observe your subject to gain some insight.
It’s also worth spending a little time getting to
know the animal yourself. Cats, dogs, horses,
they all have personality, and you need to ensure
they are comfortable being around you, and you
around them. Scaring a pet right at the outset
is not going to make for a particularly happy or
productive photo shoot.
Close quarters
Think about getting in close to your subject. If
the pet is comfortable with you, and if it isn’t too
skittish, fill the frame with the pet’s face. Get
the eyes nice and sharp. Just like humans, this
is a natural point of focus, although focusing on
the snout of a dog or cat can also make for an
interesting image in its own right. A good portrait
focuses on the subject and not the background.
Yes, there are times when shooting wide can
create a great environmental portrait, but make
sure you get a good selection of close-ups. A
macro lens is perfect for capturing details of the
pet, and shooting with a wide aperture keeps any
background distractions out of focus.
“Think about
getting in close to
your subject. If the
pet is comfortable
with you, and if it
isnʼt too skittish, fill
the frame with the
petʼs face.”
PET PHOTOGRAPHY
Capture funny ‘moments’.
Keep the eyes nice and sharp.
Get in close.
Try to keep background
distractions to a minimum.
Keep an eye out for interactions or displays of behaviour.
Obviously if the animal is not content to keep
still for more than a second, this can be a
challenge. Keep snapping away; try using your
camera’s continuous autofocus to track the
animal as it moves. If it’s proving too difficult,
let the animal play a while, and try again. Pets
have very short attention spans, so keep it
fun, break it up a bit if you have to and always
reward and fuss them when they do well.
On the level
Your average dog is a couple of feet tall, cats
even smaller. The average adult human is
about 5’ 7”. If you photograph a pet while you’re
standing up, all you’re going to see is the top of
their head and their backs, not what you want
for a portrait. Get down to their eye level, and
see the world from their perspective. If you
are able, get lower still. Try pre-focusing your
camera and just holding it at ground level so
you can look up at the pet. It’s worth a try just
for a new angle on things.
Lighting
When meeting a new animal, bring a flash and
with the owner’s permission, while greeting
or playing with the pet, fire a couple of test
flashes away from them to see their reaction. In
daylight particularly, they never seem to mind
the flash at all. If they do mind, then stick with
natural light and use a white or silver reflector
if you need to fill in any shadow areas. Indoors,
a bright continuous light may be preferable.
You can use a photoflood light that, rather
than using old tungsten bulbs, uses three
daylight-balanced energy saving bulbs. They
are housed in a 22” reflector that you can
cover with a diffuser to soften the light if need
be. You can also try placing your subject near
a window to use the natural light. If you’re
am using flash with a willing subject then you
can invariably use cross-lighting, avoiding
shooting a flash directly at them.
Be patient and carry on!
As they say, “memory is cheap, but memories
are priceless”. Pets are challenging subjects
so you’re just going to have to stay sharp
and keep shooting. The more you shoot,
the greater your chances are of getting that
perfect shot! Q
www.bdmpublications.com
67
Nikon gear master
The right tool for the job
ou are out and about happily taking
photographs, with gorgeous sunshine
to brighten the experience. Itʼs your
last day before venturing off home and
you happen upon a scene that you want to
capture. The sun is rising and its position is
creating a dramatic lighting effect. What can
you do to get the most from the opportunity?
The problem is that the dynamic range
of the scene before you is very extreme
because the sun itself is part of the shot. You
have options, of course. If you had the time
you could wait until the next day when the
sun is in a different part of the sky but then
you wouldnʼt have the drama of the sun
low to the horizon. You could bracket your
exposures if you had a tripod. You could
expose the shot so the sun and sky isnʼt
blown out, but then the rest of your shot
will be very underexposed if not totally in
silhouette. Conversely you could exposure
your foreground correctly and hope the sky
Y
doesnʼt blow out too much that you canʼt
recover any detail when you come to process
your shots.
All these methods will work to varying
degrees but many photographers also try to
get a balanced exposure first time ʻin cameraʼ.
This is where the use of some key filters can
prove to be essential.
The main image above was shot using a
2-stop graduated Neutral Density filter [1].
The filter is reducing the amount of incoming
light where it is darkest and letting more
light in as it fades to clear. There are various
filter manufacturers who all make specialist
holders able to be mounted to the front of
your camera that can allow you to use up to 3
filters in one go [2]. You slot it in and adjust it
so the darkest part is at the top and the point
it goes clear is roughly level with the horizon
as you look through the viewfinder [3] and
[4]. As it is a 2-stop filter, you can compose
your shot, take an average meter reading and
capture your image knowing that the filter
has balanced the tonal value of the scene
and lets you keep detail in the sky without
underexposing your foreground [5]. Many
filter types are available and itʼs definitely
worth having a couple in your camera bag. Q
1
neutral
density
grads
68
www.bdmpublications.com
NEUTRAL DENSITY GRADS
2
4
2-stop G
ra
3
duated
5
“You keep detail
in the sky without
underexposing your
foreground.”
www.bdmpublications.com
69
Assignment:
Circus
Hints and tips on how to plan a styled photoshoot
P
lanning a themed photo shoot is a great
way to explore your imagination and
get your creative juices flowing. Once
you have an idea, the prospect of planning and
preparing for it can be quite daunting if you
intend to start from scratch: sourcing your
props and materials and finding suitable venues
and models. However, the wealth of knowledge
you pick up when planning your shoot makes
the experience worth all the hard work; and the
unique images you will create bringing your
imagination to life makes it well worth taking
up the challenge. Before you decide upon the
nature of your shoot, it is a good idea to do a little
research, to help you decide on a theme that
interests you.
70
www.bdmpublications.com
On this occasion we decided to do a Circus Shoot,
since we have always been intrigued by the work of
Diane Arbus, a female American Photographer who
found beauty in people who would otherwise be
deemed too ugly or obscure by the rest of society
to be photographed. Many of her images were of
circus freaks and the images were shot in black and
white, making them stark and atmospheric. We
decided our shoot was not going to be done in the
same way, as we wanted a more modern style for
our images and resolved to use plenty of colour but
with a dark twist, to capture the personalities of our
models. With this in mind, we began making a list of
everything we were going to need. Three A4 pages
later we realised this was going to be a big challenge
but could not wait to get started!
ASSIGNMENT: CIRCUS
Sourcing a venue and props
For this shoot to succeed it was vital to find an
atmospheric venue that would allow for both
ambient light and the use of studio lighting. We
would also need plenty of space for the acts to
perform (preferably with a stage) and ideally
somewhere with a changing facilities where the
circus performers and makeup artists could
prepare. We were told about a new music and
arts based ‘Speakeasy’ style venue that had
opened called The Lucky 7 Club which sounded
perfect. We contacted the proprietors to ask if
they would consider allowing us to use the club.
With a minimal budget for the shoot we asked
if they would consider letting us use the
venue at no cost and they kindly agreed,
on the understanding that we would let
them have a few copies of the images
produced, to help promote their
establishment. Perfect! We now had
a fabulous venue. Collaborating
with other businesses is a great
way to source what you need for
your themed shoots and also a
great way to make new contacts
in your local community.
Next we needed props, so we
approached The Prop Factory,
a Devon based company run by
Carmen. She is a creative lady
who along with her team create
props for festivals, TV and all types
of events. We had seen on her
website that she had many circus
props and also collaborated with
photographers. Carmen kindly agreed
to get involved with our project and so
between us we set a date for the shoot.
www.bdmpublications.com
71
Models, makeup & costumes
Once you have established a venue you will need
to source suitable models and acts to feature in
your images. Sourcing models can be expensive
if you decide to go through modelling agencies,
so if you do not already have models that you
work with regularly, an alternative can be to
advertise on social media sites. This is not only
a great way to find models but also one of the
best ways to gain exposure for your images after
the shoot and encourage other models to work
with you. If you do not have your own page set
up already to advertise on, there are plenty of
Model & MUA Networking Groups on Facebook,
where models and makeup artists advertise
their services. Most of these people are trying
to build a portfolio and will offer their services
Behind the scenes shots
Taking photographs behind the scenes is a
great way to prepare your models for the shoot
before it happens. Getting used to the camera
pointing in their direction will help them get in to
character prior to the start. Walking around taking
shots of everything that is going on behind the
scenes breaks down barriers and encourages
communication between the photographer and
models. This is also a good opportunity to discuss
various ideas with individuals for poses and facial
expressions, so that they have some idea of what is
expected of them during their individual slot.
Taking behind the scenes shots makes a great
record of what is happening during the course of
your themed shoot and for future events, a great
reference to look back on to remind you of what
worked, what could have been done differently and
how your planning timed out.
in exchange for images to use in their portfolio.
On this occasion we used models and stylists
already known to us, as we needed models with
circus skills such as Hula Artists, Contortionists
and makeup artists with the skills to create the
looks we wanted to achieve for the shoot.
Many of the costumes were sourced from
eBay and charity shops and some were made for
us by family members; if you do know people who
can sew, then try and get them on-board. Having
unique exciting costumes will add volumes of
interest to your images.
Creating the team
To communicate, we created a Circus 2018
Facebook Group. All of the models, makeup
The 24.3MP Nikon D600 is the smallest and lightest
full frame camera created by Nikon. A quiet camera
which is a very popular alternative to the D800 at a
fraction of the price.
Long lens
Using a telephoto lens while obtaining behind
the scenes shots is a great way of keeping your
distance when capturing candid moments as they
naturally occur. For our circus shoot we used a
Nikon D600 and for the candid behind the scene
shots a Nikon AF–S NIKKOR 70-200mm f/2.8G
VR lens was added. The wide maximum shooting
at 2.8 meant we were able to take photos in poorly
lit areas of the dressing room without the use of
flash. This is a fast lens and along with the vibration
reduction we were able to use it without a tripod,
which would have been in the way with all the hustle
bustle of everybody getting ready.
An eye for details
We also made use of the time we had, while the
models prepared, to capture images of some of
the props, artwork and curiosities within the club.
Collating pictures of items that could be used
as layers, backgrounds or brushes meant that
later, during the editing process while creating
composite images, we had the tools to make
images that captured the atmosphere and details
of the place where we were shooting.
72
www.bdmpublications.com
The Nikon AF–S NIKKOR 70-200mm f/2.8G VR is
a popular all round lens suitable for a variety of
applications. The optical image stabilisation unit allows
for hand held precision of up to 3 stops lower than
normal, with very little sign of camera shake.
artists and stylists, in-fact anyone involved with
the shoot were added to the group, so that we had
a great platform to communicate on. This was
somewhere we could share times and schedules
for the actual day and also somewhere to discuss
the ideas for all the individual images. The group
formed a great community spirit with many of
the models themselves, sharing their own ideas
for the characters they were playing. Creating the
team is a vital part of any group shoot. If all the
participants are invited to project their ideas and
contribute, it creates a great community spirit
and breaks down any communication barriers.
Everyone involved in your project will feel part
of the team, encouraging new relationships
and bonds which will result in a great friendly
atmosphere on the big day.
ASSIGNMENT: CIRCUS
www.bdmpublications.com
73
Lighting our models
We decided that we would create a set of 20 images
covering a variety of circus characters. The first
of which would be Siamese Twins. This would be
a composite image, allowing us to use 2 different
images of our model Hayley’s head edited into
one final image in Photoshop. Using a selection of
props including a giant chair, a gramophone and
various children’s toys and curiosities we found
at The Lucky 7 Club, we set to work creating an
obscure setting that our unusual character would
look at home in. Our stylists Laura and Sammy set
to work creating two different looks for our model,
as we wanted both heads to have a different style
in each image so that they did not simply looked
duplicated; instead implying different personalities.
The corner of the room we had set up in was
fairly dark. With dark blue walls clad with wooden
panelling and parquet flooring, we did not want to
lose the atmosphere this environment created, so
we decided to use a hard directional light to make
shadows that would create drama and a sense of
mystery, and not flood the area with light. To do
this we used Elinchrom D-100 lights. These are
small but robust 100W flash units which will power
up again after one and a half seconds. The beauty
of these lights is that they are quite compact and
perfect for the area we were working in. These flash
heads are portable and easy to set up and another
benefit to this small light is that they are quite
inexpensive; this is always a good thing when you
are in a busy environment or out on location where
accidents can happen. Being a small light helps
create a harder light with shadows and is what
we wanted to achieve during this shoot to create
drama. If you want to achieve an even harder light,
use smaller lights. However, a D-Lite 100 system
will give you approximately twice the power of
using speedlites. To achieve the look we wanted,
we opted for a hard directional light, positioned
high; in fact as far up as we could get away with
while still capturing the highlights in the subjects
eyes, combined with a fairly narrow depth of field.
Using the elevated position of the light, similar to
butterfly lighting, we cast shadows in the right
places, i.e. under the cheekbones and the chin,
which helped to cast shadows and define the
models facial features. Using a light pointing in to
an umbrella (positioning the umbrella fairly close
to the bulb) and shooting forward to the subject,
will achieve a hard light similar to that used in
Hollywood lighting, and using the umbrella in
this ‘shoot through’ way helps to get rid of any
stark overly exposed areas, like a diffuser would.
We decided to use this modifier in preference to
using a soft box or beauty dish, which produces
a much smoother flatter light and in turn takes
away from the shape and definition of the face
made by the shadows.
Once our lighting was set we selected a
24-70 lens, which is a great all-rounder for wide
captures, portraits and everything in between,
that gave us flexibility in the type of images we
wanted to try.
Hayley is an experienced model so had no
problem understanding our requests. However,
many models are not so confident and so clear
concise direction from you the photographer is
paramount in achieving the photographs you are
visualising. For this image we needed a selection
of head positions ready for creating our Siamese
twins look during post production; and then
adjusted our light direction accordingly for each
new pose.
Clear concise direction will encourage your models’
confidence and help them understand what is expected
from them to achieve the images you wish to create.
74
www.bdmpublications.com
ASSIGNMENT: CIRCUS
Organising the shots
Prior to shoot date one of the things we had
discussed in our group was which characters we
would need and the finer details of our characters’
personalities. Discussing some of the personality
traits and expressions that the models could
inject into the roles of the characters, helped
make the images more believable and helped our
models relate to the role they were required to
play. The 20 images we decided on for the actual
day were based on our memories of visits to the
circus as children, as well as TV programmes and
films we had seen previously. The final choice of
images was:
1. Siamese Twins
2. Clowns – Happy/Angry
3. Ringmaster
4. Fortune Teller
5. Strong Man – or in our case strong woman
6. Circus Dog – photographed in dogs home
7. Dancer
8. Trapeze
9. Contortionist
10. Hula Girl
11. Candy Seller
12. Pierrot Clown
13. Ticket Seller
14. Man Putting on Makeup
15. Puppets
16. Ribbon Trapeze
17. Levitation – bed of nails
18. Knife Throwers
19. Performing Animals – photographed
at the zoo
20. Little People – we decided to use children
for this image and photograph it on a separate
occasion, so that the children were not
overwhelmed by the hectic surroundings of our
shoot day.
Given that we had 17 shoots to complete, 3
being photographed in separate venues, the time
management of our shoot was paramount. We
had use of the club from 9am until 5pm but had
to allow for a lunch break as well as time for the
models to get ready with the help of the stylists.
This allowed us approximately 6 hours to do 17
shoots or 20 minutes per shoot.
In order to stick to such a tight schedule a floor
manager was delegated (Rosie) who also doubled
as our ribbon trapeze artist. Her job was to plan
out a schedule that gave each of the models time
to have the hair, makeup and wardrobe done, and
a time for their shoot. It would be fair to say that
without Rosie making things run like clockwork
through the course of the day our shoot would
have been a disaster, so I would very much
recommend that you consider an assistant when
planning your themed shoot. This frees up your
time to concentrate on the creative side of things
like taking the pictures.
Working with stylists and makeup artists is much
like working with models: they are not mind readers
and require a certain amount of communication
on your part to achieve the looks you want them
to create. Discussion prior to the day, researching
looks and discussion ideas for the styling of each
of our models, meant that not only did our stylists
turn up knowing what was expected of them but
they also had plenty of time to source the materials
needed for specific make up styles. Any planning
for your shoot that can be done prior, should be
done in order to take away stress on the day.
Time management on the day is one of the most important
factors to take in to consideration when planning. It will
not only alleviate stress but structure the day, so that you
the photographer and models alike can work efficiently in
the time slots given.
www.bdmpublications.com
75
For most of our shoots we selected a 24-70mm 2.8 lens
which is a great all-rounder for wide captures, portraits
and anything in between and gave us the flexibility to try a
variety of ideas during a shoot.
Story telling images
The most successful images are ones that are
thought provoking and captivate the imagination
of the person viewing them. With this in mind we
wanted each of the images to not only be exciting
and colourful but also to tell a story, much like the
circus images by Diane Arbus that had inspired
us to do this themed shoot in the first place. The
images had to have depth that went past what you
see at a first glance. Therefore, a lot of time was
spent creating concepts and stories behind each
of our images. Each of the images we created tells
a story of its own.
The strong man
To give you an example of what we mean by a
story telling image let’s take the concept of the
‘Circus Strong Man’, historically portrayed as
76
www.bdmpublications.com
For wide angle portraits we selected a 12-24mm
Nikon lens. This is a fantastic addition to any
collection if you want to create dynamic portraits
like our clown, where the body remains in
proportion but the outstretched arm is enlarged.
a robust male character, very muscular and
often holding a glamorous assistant with one
arm up above his head. How could we create a
story telling image with a modern day slant, to
illustrate the same concept, without falling in to
this already portrayed image style? Firstly we
thought about the character itself and decided
the first change we would make was to use
female models instead of the stereotypical
man. We then thought about the word ‘strong’
itself and what it meant to us as a group. For the
most part we decided it was a word to describe
someone with physical attributes that made
them appear very fit and powerful, so we needed
to find a model who was physically fit and
preferably with a bodybuilder type physique. We
then discussed our concept further and went
on to discuss mental strength and a completely
different meaning of the word ‘strong’, such as
someone who needs to be strong to cope with
daily issues. We discussed different examples
of people who have been strong in their own
lives and who cope with a variety of different
circumstances, illnesses and social pressures.
We found our two perfect models: Carrie, a
fitness instructor with a strong independent
character and an incredible physique; also
Claire, a Pilates instructor with stage 3 breast
cancer, who shows strength on a daily basis
fighting her illness and maintaining a strong
mental attitude. We had found the story behind
our picture. A strong person isn’t just someone
who appears to be fit on the outside, a strong
person is someone who is coping and showing
bravery in the face of adversity too: someone
like Claire.
ASSIGNMENT: CIRCUS
www.bdmpublications.com
77
Expect the Unexpected
With all the planning and preparation in the
world, invariably there will always be a few things
on the day of your shoot that you did not see
coming. Learning to adapt and be flexible with
your arrangements is a great skill to have as a
photographer. When working with a large group of
models for instance there may be people on the
day who are unable to make it due to illness or
perhaps their childcare has let them down, so
having a plan B should these situations occur
will put you at an advantage. Sourcing versatile
models who are willing to step in to another’s role
is advantageous; and if you are not too bad at
hair and makeup, be prepared to roll your sleeves
up and get your hands dirty. Inevitably with lots
Post production
Learn from your mistakes
How you decide to edit your images post
production will determine the final appearance of
your images and as a photographer this may be
what sets you apart from others in the industry;
you may decide that a few simple tweaks to the
white balance is all that you want to do. However,
for our Circus 2018 shoot we decided to push
our creativity one step further and use creative
Photoshop techniques to enhance the images. For
this final challenge we decided to take our imagery
to a whole new level by creating a set of portraits
by applying prints to three dimensional casts of
our models faces. There are many great plug-ins
available on Photoshop that create artistic finishes
for your photographs and one of our favourites
is Nik Software, which can be downloaded free
of charge from Google. This has a selection of
applications including: Colour Efex Pro, Silver Efex
Pro and Analog Efex Pro. For the Circus images we
wanted to create a dated finish with muted colours
and so I adjusted the settings in Analog Efex Pro to
create the desired effects.
The best way to learn how to create the perfect
themed photoshoot is to have a go. There will
be ideas you had prior to the shoot that will not
go to plan and some of your greatest ideas will
come to you during the shoot, when you are
inspired by the people you are working with and
the environment you are photographing in. Learn
from your experiences, be encouraged by your
successes and do not be defeated by the things
that don’t go to plan. Learn from the experience
and plan another shoot. You are now armed
with the tools necessary to improve on your
first attempt and know what needs changing.
Remember there aren’t any rules to being
successful: preparation will help but ultimately
the success of the day will be down to how you
conduct the event. If you are enthusiastic, so
too will your models and stylists. If you have
a vision, and follow it through, you will create
images bespoke to you, as well as creating great
memories of a day that everyone involved will
remember for a long time to come. Q
78
www.bdmpublications.com
of different costumes being stretched in
to different poses and positions there may
be a few tears and burst buttons, so a little
emergency kit containing items such as
safety pins, cotton and thread, change for
the car parking meter and a list of models
and contact phone numbers will come in
very useful on the day.
ASSIGNMENT: CIRCUS
Credits
Many thanks to:
THE PROP FACTORY - www.propfactory.co.uk
THE LUCKY 7 CLUB - www.thelucky7club.com
ONYX - www.onyxaerialfitness.bco.uk
MUA: Estelle Cole - www.belush.co.uk
MUA: Jodie Boulter - Bronzed Beauty
MUA: Deb Miller & Holly Shears
HAIR: Sammy Bond
HAIR: Laura Lewsey - Hair Addiction
VIDEO: Nicky Simpson
COSTUME: Jan Drayton
DIRECTION: Rosie Cawthorne
ASSISTANT: Charli Miller
MODELS: Paula Valpy, Hayley Prescott,
Deb Miller, Rob Miller, Alana Miller,
Hannah Williams, Carrie Darby, Claire Street,
Rosie Cawthorne, Emma Green, Monika Haglundh,
Estelle Cole, Kyle Shorland, Shaun Rogers, Kim
Platts, Erin Collins, Holly Shears, Jodie Boulter,
Zoe, Bowden, Abi Woltman, Sarah Bell & Mark Bell.
www.bdmpublications.com
79
Nikon lens master
The right lens for the job
hile the top wildlife photographers jet
off to exotic locations to capture their
photos, for those of us of more modest
means, zoos and wildlife parks can provide
many opportunities to photograph animals
in more controlled and easily accessible
locations. Most wildlife parks try to ensure
that their animals are kept in surroundings
that closely match their natural environment.
Zoos and parks will usually actively encourage
photography, and often build their enclosures
to provide an unobstructed view of the
animals, so by careful use of a telephoto lens it
should be possible to exclude anything from
the shot that might give away the fact that it
was not shot in the wild.
Most zoo animals are accustomed to visitors,
they seem quite happy to pose for their photo,
giving the photographer time to compose the
shot. A wide aperture can reduce the depth
of field so that the background is out of focus,
W
using a higher ISO setting also helps to
provide a nice fast shutter speed to freeze
any unexpected movements or chance of
camera shake.
A long telephoto zoom lens magnifies the
view, allowing the photographer to crop out
the surroundings and concentrate on the
animals. Q
The AF-S NIKKOR 200-500mm f5.6E ED
VR image stabilised lens is a good choice for
wildlife. It is both versatile and affordable.
wildlife
at the
zoo
Seeing exotic animals in the wild is beyond most of
us. This is where one of Nikon’s powerful zoom lenses
comes into its own at the zoo for a close up view.
80
www.bdmpublications.com
“A wide aperture has reduced
the depth of field so that the
background is out of focus.”
If your wallet can take the hit, then the AF-S 800mm f/5.6E FL
ED VR represents one of the finest super-telephoto lenses out
there with huge reach provided by that 800mm focal length.
www.bdmpublications.com
81
The power of
silhouettes
Strike the perfect balance of light and dark
L
et’s get that word out of the way first.
Silhouette, what does it mean? It came
into being as a result of severe economic
demands imposed upon the French people by their
finance minister Étienne de Silhouette in 1759.
His name became linked with anything that was
thought to be done cheaply. In the days before
photography, making a portrait cheaply and
quickly from paper became known as a silhouette.
It is a term used to describe the image of a person
or object that is represented as a solid shape.
The interior of the shape is totally black and
featureless. Only the edge of the object describes
what the object actually is. The term silhouette
was originally thought to describe pieces of paper
that were cut out and stuck to a contrasting
coloured backing sheet, although the actual name
’silhouette’ didn’t become a well-used term until
the early 19th century. Portraits cut from black
card, became a very popular and quick alternative
to the portrait painting or portrait miniature.
“It is a term used to
describe the image
of a person or object
that is represented
as a solid shape. The
interior of the shape
is totally black and
featureless.”
82
www.bdmpublications.com
Maintaining a good exposure for
the brightest parts of the image
can just about guarantee the rest
will fall into dark shadow with
little or no detail to be seen. A
little nudge in the right direction
with post-work will help.
THE POWER OF SILHOUETTES
The basics of backlighting
Bright light source or
very bright scene.
Meter the scene for the
brightest part of the image,
but not the sun.
Don’t meter your
subject. If they are
correctly exposed, the
background will blow
out to white.
Subject is placed between light
source and camera.
Camera faces subject with light
source behind the subject.
From that original meaning, it has now become a
popular term to describe anything that appears as
a shape dark against a much brighter background.
The fields of architecture, moviemaking, fashion
and photography all use the word silhouette as a
descriptor for the form, shape and outline of an
object, person, building and so on. In photographic
terms at least, a silhouette is actually similar to
a black and white shot. A black and white image
relies on form, texture and composition since one
of the key ingredients, colour, has been removed.
Silhouettes are similar in the sense that they have
had most of their detail and texture removed. The
shot now relies on the composition, the form of the
subject and being able to convey a mood, or story
with the kind of presentation that is more akin to
shadow puppet theatre.
The pier is correctly exposed revealing too much
detail. The sky is too bright for a successful silhouette.
Basic ingredients
Metering the sky so it is correctly exposed will drop
the foreground subject into a silhouette.
So what do you need to make a silhouette happen?
First, you’ll need your subject to be backlit.
Backlighting is the term used to describe a lighting
technique whereby a strong light source such as the
sun, flashgun or even just a bright window in a dark
room is positioned in such a way that it is directly
facing the camera, or is at a slight angle to it. The
subject is then placed between the camera and the
bright source of light. Because of the strength of
the backlight, the subject is reduced to a dark shape
since they are in shadow. Depending on the angle
of the backlight, you can create a highlight on the
edges of your subject which is known as rim-lighting
or kick-lighting.
www.bdmpublications.com
83
Given the right conditions, even
night time shots can create
some cool silhouettes. With a
long enough exposure, a night
sky with stars and clouds can
still be brighter than an unlit
foreground object.
84
www.bdmpublications.com
THE POWER OF SILHOUETTES
Embrace the dark
Partial silhouettes are also
very effective. In this case,
rather that the light source
being directly behind the
subject, it is slightly off to
one side. This gives you
what is known as a rim light.
Shooting this technique requires you to throw away
the rulebook in a sense, to achieve the very specific
look that defines a silhouette. For a conventional
backlit portrait, you would use some additional
lighting from a flash or a reflector to make sure your
subject didn’t fall into completely dark shadow and
make sure detail is preserved. Now though, you
are going to reduce the subject to solid black or at
least as close as we can get to it without ruining the
rest of the shot. The basic premise here, is that you
are deliberately going to underexpose the shots
by a specific amount to correctly expose the very
brightest parts of the scene, which should then
render the subject totally dark.
Shooting silhouettes
Although the capture of silhouettes is fairly
straightforward, there are a few things to be aware
of to make sure you actually get what you are hoping
for. Modern cameras will always do their best to
meter the scene for the best overall exposure and
if you use a camera in fully automatic mode, then
you lose any input in the decision making process
when you take the shot. For the best control of the
situation, you should consider shooting in fully
manual mode. Now the decision making is yours
alone and you can fine tune your shots to make sure
they turn out as proper silhouettes. Q
www.bdmpublications.com
85
Night
photography
Some tips for quality night shots
A good quality,
stable tripod,
is essential for
long exposure
photography.
W
hether it’s the lure of bright city lights,
barren moorland bathed in moonlight
or a tumbledown barn in the country
under a starry sky, night-time photography is
a big draw for many photographers. It can be
challenging, it can be very frustrating and timeconsuming, but once you get the bug for it and
get those first few ‘wow!’ images under your
belt, it’s a hard habit to break. There are a lot
of photographers who find the whole process
very relaxing.
As you are normally dealing with much longer
exposures than usual and having to carefully
compose and focus your shots, it forces you to
slow it all down and take a much more considered
86
www.bdmpublications.com
approach. After all, if you set up a ten-minute
exposure and the end result is disappointing, you
could angrily pack up your gear, set off home, and
miss out on a very rewarding aspect of
photography. To make sure you get the most out of
your photos, here are a few tips that should see you
well on your way to capturing amazing night shots.
Use a tripod
This may sound a bit obvious, but if you want
to take photographs where exposure times can
sometimes be in the tens of minutes, you’re going
to need something sturdy to put your camera on.
You can of course set your camera to its highest
ISO setting, open the aperture as wide as it will
NIGHT PHOTOGRAPHY
go and shoot handheld, but to really do the
image justice you’re going to need a solid tripod.
One thing is worth mentioning; pay particular
attention to the surface on which you’re setting
your tripod. shooting at the water’s edge on
a beach is a good example. The tripod may
be pushed firmly into the sand and your long
exposure is under way. One larger-than-usual
wave and the feet of your tripod are swamped.
Not a big deal, but the water can soak into the
sand, which becomes soft, and the tripod can
start to list over to one side ruining the shot. An
attempt higher up the shoreline away from the
waves might be in order.
Keep the ISO low
Because you have your tripod keeping things
steady for the camera, you can use the lowest
ISO setting your camera will allow. This is a
big advantage from the point of view of image
quality. High ISO settings create a lot of image
noise, and can affect the sharpness of the shot,
detracting from the overall quality of the image.
Many modern cameras can produce fairly clean
shots at high ISO, and it may well be that you can
work in the 800-1000 ISO range if the situation
demands it, but generally the lower the ISO
setting, the better the result will be.
A lot of cameras also offer Long Exposure Noise
Reduction (LENR). This works by taking a second
exposure of just the sensor noise which is then
used to subtract the noise from your original shot.
What this means is that if you take a five-minute
exposure, it will then take another five-minute
LENR exposure. For any exposure longer than a
couple of minutes, the sensor may start to heat
up and this introduces noise artefacts. This is
what LENR is trying to remove. It’s just a
personal preference but many don’t use LENR.
Like a lot of recent DSLRs most cameras use a
CMOS sensor which isn’t as prone to
overheating, and you could take ten-minute
exposures without any noise issues. If you want
to try very long night-time images like star trails,
consider taking multiple exposures of 30
seconds each and stacking them in Photoshop.
For example, 30 exposures of 30 seconds each is
equivalent to one 15 minute exposure.
Shoot raw
Shooting in raw mode is a method that allows
you to extract the absolute last pixel of quality
from your image and process it any number
of creative ways non-destructively. You can
happily alter white balance settings, crossprocess, split raw and any number of effects
without losing your original image. Like using
low ISO, it’s another way of keeping the image
quality as high as possible.
Lenses: zoom or prime?
When you’re shooting at night there are any
number of light sources, such as street lights,
headlights, the moon, bright windows, neon
signs, all of which are capable of introducing
unwanted lens-flare that can ruin an otherwise
excellent shot. Lens flare is caused by unwanted
light scattered by the optical elements inside your
lens. Zoom lenses particularly suffer from flare
as they contain many more optical elements.
Your best chance of reducing lens flare is to use a
prime lens. A prime is a lens that only has one set
focal distance and therefore uses fewer internal
optical elements. Whether you use a zoom or
a prime, a lens hood is recommended for both.
Also, wherever possible, use a lens with as wide a
maximum aperture as possible, such as f/2.8. You
may well be shooting at smaller apertures than
this but the image in the viewfinder will be brighter
with a faster lens, helping you to see and set up
your composition.
Bulb mode
With most current DSLRs the longest shutter
speed you can use in normal operation is 30
seconds. However if you switch to Bulb mode
(“B”) on your camera, you can keep the shutter
open for much longer periods. “Bulb” in this
case is a reference to the old squeeze-bulb,
pneumatically activated shutter release systems
from the earliest days of photography. What you
don’t want to be doing though is standing there
with your finger on the shutter release button for
five minutes. Your finger is going to ache and you
are going to move the camera and spoil the shot.
Attaching a cable release instead is the answer.
A good quality lens,
whether prime or zoom,
is expensive, but it is
expensive for a reason.
The cable release makes
the process of shooting long
exposures much easier.
www.bdmpublications.com
87
This means you can activate the shutter and lock
it open for as long as you need. These vary from
the simplest ‘press to activate’ types to fully
programmable interval timers that can take
multiple shots with durations and intervals
between shots set by the user.
Take test shots at high ISO
Since most modern cameras offer very high ISO
settings, it makes sense, before committing to a
long exposure or a sequence of long exposures,
to ramp up the ISO to the max, take a shot and
have a look at the composition, framing and
exposure. However if you’ve just done your test
shot at 2000 ISO and it looks great, how does
that translate to shooting the same scene but at
a lower ISO setting to get the quality?
There is some maths involved but it’s not
88
www.bdmpublications.com
NIGHT PHOTOGRAPHY
complicated, especially if you have your mobile
phone with you.
The mathematical bit
At 2000 ISO your camera meter tells you that
for the aperture you have set, a shutter speed
of five seconds gives you a good exposure.
Now you need to know how that exposure will
change when you dial your ISO down to 100.
Divide your high ISO number by the target
low ISO number (2000/100 = 20), take your
answer (20) and multiply it by the high ISO
exposure value five seconds - this gets you
a final answer of 100 seconds (1.6 minutes).
Still with us? If you prefer, there are apps for
iOS and Android that can do the heavy lifting
for you. A popular one called Expositor, has a
nice user-interface that can quickly calculate
any combination of EV, ISO, F-stop and exposure
time you care to dial in. It’s great for quickly and
accurately working out the arithmetic without the
need to do the sums in your head.
Earth, sky and water
Use this to your advantage. It may have been done
to death, but a coastline shot taken with a long
exposure reduces the sea to that wonderful misty
blanket. If there are patches of clouds in the shot,
they appear to streak across the sky when your
exposures get up beyond 30 seconds or more.
Of course, who can forget traffic trails? They are
the staple of long exposure photography. The key
word here is experimentation.
Light painting
Seen in the photograph at the top of this page,
Expositor is a great app for helping you
calculate those tricky exposure times.
this refers to the technique of illuminating parts of
your scene with additional light sources other than
those in the shot. Light painting has become very
popular and ranges from simply using a flashlight
to illuminate a dark foreground subject, to using
all manner of light sources, such as strobes,
sparklers, coloured LED lights and even steel wool
set alight to create huge showers of sparks, all of
which create bizarre and abstract “light art”. It’s
worth looking into if you’re thinking of taking night
photography to a whole new place.
It’s dark out there. Go take some photographs.
What are you waiting for? Q
www.bdmpublications.com
89
Assignment:
Happy Colours
Hints and tips on how to plan a styled photoshoot
P
lanning and photographing a styled shoot
is a great way of exploring your creative
ideas using your portraiture skills,
combined with exciting colourful concepts you
wish to try out. The idea behind a styled shoot
is to collect ideas formed by a group of people
with different skills, bring them to the table and
create an elaborate concept, mock situation or
event. The images resulting from your styled
shoot can then be used by all involved for their
own purposes, without any payment exchanging
hands. Therefore a styled shoot is a great way of
not only exploring new concepts but also gaining
images which can be used for advertising and
90
www.bdmpublications.com
promotion. Styled shoots are a great way of
making new contacts and friendships within the
industry which may lead to future collaborations
and expand your knowledge in the theme of your
chosen genre.
In this assignment we will show you how to create
your own styled fashion Shoot, using our 4 simple
stages to guide you: Team, Theme, Location and
Preparation. Having previously met imaginative
display artist Hannah Taylor at previous events, we
arranged to work on a project together. This would
combine her beautiful handmade accessories
and colourful event decorating ideas with our
photography, to see what the results would look like.
The team
Once Hannah had agreed to work with us, the
next person we needed to find was a makeup
artist. You will find many makeup artists looking
to work on styled shoots, as it is a way for them
to expand their portfolio of work. Makeup
artists all offer different styles and looks and
many have been trained to apply special effects
makeup if you are searching for a particularly
adventurous look! For a more experienced
specialist MUA (makeup artist) you may need to
pay anywhere between £30 and £75 per hour
but it is money well spent as a professional can
create the look you wish to achieve.
ASSIGNMENT: HAPPY COLOURS
“In this
assignment we
will show you
how to create
your own styled
fashion Shoot.”
For this shoot stylist Hannah already knew
of a makeup artist she wanted to use. Billie
Edge is an established MUA in the South
West, who has the skills required to create
the look we were aiming to achieve. Then
we needed our models. We chose Monika
and Alana for this shoot as we wanted
blonde haired girls with blue eyes and a fair
complexion. Finally we needed clothing to
suit our theme. Days of Grace is a clothing
store specialising in vintage clothing; their
unique pieces were exactly what we were
looking for to complement our styled shoot
‘Happy Colours’.
www.bdmpublications.com
91
Theme - ‘Happy Colours’
The idea behind our styled shoot was mainly focused
on happy vibrant colours. Hannah wanted to create
strong statement decor and styling made up with
fabrics from her past and present projects and ideas.
Using a collection of bold and exciting materials,
mixing styles and eras, the textiles Hannah decided
to use in the bespoke decorations ranged from
antique embroidery to modern bright eccentric
print. The clothing we decided to use ranged from
100yr old silk oriental trousers through to ‘70s and
‘80s pieces; these were supplied to us by Days of
Grace. The main inspiration for the shoot came from
current catwalk fashion, including the eccentric
use of mixed patterns, laying fabrics and the use of
heavy embroidery.
Accessories and decor
Tablecloths were made up from fabric off cuts
and clothing that Hannah loved but no longer
fitted, along with favourite items from her own
personal collection. Handmade alternative
buttonholes and brooches were created for the
shoot, based on a pattern found on the tablecloth,
that complemented each other and added unique
detail. The place setting details were also made
Lenses for a styled shoot
One of our favourite portrait lenses, and often used
on styled shoots, is the Nikon Nikkor 85mm f/1.8.
It is a very sharp prime lens, which is perfect for
portrait work as it keeps the subject perfectly in
focus, while also creating Bokeh should you prefer
more depth in your images. Due to the exceptional
sharpness of this little lens, it is also ideal for
capturing details of the accessories and decor in the
surroundings and the clothes worn by the models.
The Nikon 24-70 is also a great lens for use on
a styled shoot. Due to its wide-angle it is great for
capturing an entire set in a fairly small setting. Often
in the case of styled shoots, the sets created are in
fairly small areas, so this is the perfect lens offering
full flexibility for such a setup.
An eye for details
It is a good idea to make use of the time
you have while the models get ready to
assess your theme surroundings and
set up the cameras with the correct
lenses and lighting you require for
your shoot.
The 24.3MP Nikon D600 is the
smallest and lightest full frame
camera created by Nikon. It is a
quiet camera and is a very popular
alternative to the D800 with similar
capabilities, at a fraction of the price.
92
www.bdmpublications.com
The Nikon Nikkor 85mm f/1.8 AF-S G
is a great portrait lens that makes
capturing detail easy and is fast
enough for shoots on the go.
from fabric bought on Hannah’s travels. With
a riot of colour and pattern it felt right to create
a bold bouquet which had a strong shape that
would stand out.
The vision
This came from Hannah’s favourite artist Henri
Matisse; the use of bold colours and patterns was
exactly what we were trying to achieve through
styled photography. We also decided that by
blending our models with some of the objects and
patterns in our setting, we could create vibrant
and interesting images.
ASSIGNMENT: HAPPY COLOURS
www.bdmpublications.com
93
Location
We decided that we would use natural light for this
shoot. We did not want any flash lighting altering
the colours or natural shadows in any way. Hannah
Taylor decided to create the setting in her own back
garden using an open sided out house, which had a
clear roof and open front, which let plenty of natural
light in. We would normally use a gold reflector in our
styled shoots to give the models skin a warm glow
but on this occasion, as we wanted the reflector to
eliminate shadows and not to enhance the skin, we
used a silver and white one, thus keeping the skin
tones cool. This in turn drew attention to the colours
and textures of our surroundings.
We spent a lot of time preparing the space by
putting up a selection of materials on the walls and
laying the table with a selection of the bespoke
decorations which had been prepared for our shoot.
Hannah then added a selection of rustic items
such as wooden ladders and old clay pots before
filling the location with an abundance of flowers
in the colours which would complement not only
the surrounding fabrics but also the clothing the
models were wearing. More time was taken to make
sure the details were positioned correctly, making
composition easier when setting up shots.
In the past when we have done styled shoots
the weather has been a very big factor to consider
when deciding on the location for the shoot. When
Positioning an elevated hard light, will create shadows
in the right places, creating drama in your image, as
well as accentuating your models facial features.
planning your own shoot outdoors, it is vital that you
discuss with the people you are collaborating with
how you are going to proceed should the weather be
bad. If you have spent weeks arranging an amazing
setting, money on MUA’s and then hours getting
your models ready, the last thing you want is to call
the whole thing off. Communicating with the others
involved is important. Always try and have a plan B in
place for possible bad weather.
When choosing your location, you will need to
make provisions for the stylists to prepare your
models for the shoot. Most makeup artists like to
use natural light, so you need to make sure this is
readily available at your shoot location. You will
also need to check that there are facilities if your
models have outfit changes during the shoot.
Hannah had set aside a large room for our models
and Billie the stylist.
Clear concise direction will encourage your models and
help understand what is expected from them so you can
achieve the images you wish to create.
94
www.bdmpublications.com
ASSIGNMENT: HAPPY COLOURS
During our shoot we selected a 24-70mm f/2.8 lens. This
is a great all-rounder for wide captures, portraits and
anything in between, giving the flexibility to try a variety of
ideas during a shoot.
For wide-angle portraits we selected the 12-24mm Nikon
lens. This is a great addition to any kit bag if you want to
create dynamic wide-angle portraits.
Preparation
On the morning of our shoot we arrived to find our
set in place. Our makeup artist was ready to start
work on the models who had been asked to arrive
with no makeup and with clean hair untreated with
products. This gave the stylists a blank canvas to
work with.
After quick introductions, we were ready to
get started. Our models Monika and Alana were
presented with a selection of garments both modern
and antique to try on. Stylist Hannah and MUA Billie
decided on looks which complemented each of
our models and then discussed suitable makeup.
The MUA was able to create subtle soft facial tones
which did not take away from the details in our
surroundings and the cleverly selected eye colours
enhanced the blues of the models’ eyes. The rich
colours of the lips complemented the fruits and
flowers in our setting.
We discussed ideas for our images, making
sure everyone had input and the concept for our
shoot was agreed upon. We wanted the feeling of
an eccentric tea party and as such we wanted to
introduce a few obscure poses, making use of the
dinner table, and ideas which would inject a modern
surreal twist into an otherwise antique style setting.
It is important on a styled shoot that you not only
capture interesting eye-catching images that appeal
to you the photographer but also to make sure you
are including as much of the set as possible. Your
team has collaborated with you in order to obtain
images that show off their work, so special attention
must be paid to make sure that you have captured
everyone’s contributions. It is always a great idea
to have an assistant if you can, as it frees you up to
concentrate on the photography.
www.bdmpublications.com
95
Explore your imagination
A styled shoot is your golden opportunity to
explore ideas that you might not have the chance
to photograph normally. Our theme contained
both new and old styles in the textures and
colours used, so we decided to use our props to
add further contrast to our images. An example
of this was having our model holding bright citrus
fruits, which against the muted colours of the
models’ dresses made interesting contrasts; as
did the smooth textures of the fruit against the
fussy ornate patterns in the background.
We encouraged solemn, serious expressions
on the models faces, to offset the bright and
uplifting colour scheme. We also decided that
removing areas of a model’s body in some
of our images, using Photoshop during post
production, and replacing with props and
backgrounds, would create modern surreal
images in contrast to our antique attire and
rustic props.
Post production
A styled shoot is mostly about giving you the
opportunity to work on a creative project and there
is no reason why you cannot take your images to
a new level using post production and create your
own photographic art. Creative portraits can be
created in Photoshop using masking layers and
blending modes to enhance the colours in the
models makeup and clothing. We used a selection
of paint splash Photoshop brushes, to lift out some
of the colours in our models outfits and makeup.
After the shoot
Once your shoot is over and you have finished
preparing your final images, you will need to share
them with the people who collaborated on the
shoot. However, you may have multiple images
96
www.bdmpublications.com
or some that are too large in file size to email;
therefore you will need another method to share
them. One is to use We Transfer, which is a free
website that allows you to share images with others
via the web. Alternatively a free Dropbox account
can be created that lets you create and share a
folder containing the images. Do be aware that
once you go over your free allowance, you will be
need to pay to upgrade your account.
If you are using the images to gain more
commercial exposure via social media, you
may want to make sure your images are clearly
watermarked with your name or logo. This will
not only raise your profile and possibly attract
prospective customers, it might also attract other
professionals who may be interested in working
with you on a styled shoot in the future.
ASSIGNMENT: HAPPY COLOURS
Credits
Many thanks to:
Design and decor:
HANNAH TAYLOR DECOR
www.hannahtaylor-decor.com
Clothes:
DAYS OF GRACE
www.daysofgracevintage.com
Photography:
VICKI-LEA BOULTER
www.vickiboulter.com
Hair & Makeup:
BILLIE EDGE
www.billieedge.com
Model:
ALANA MILLER & MONIKA HAGLUNDH
www.bdmpublications.com
97
Tabletop
photography
Combine fun and learning with
indoor photo projects
A project for you
Let’s get started with something that may sound
like an easy project at first. We are going to set
up and photograph a glass of wine. Rather than
just plonking it on a table and photographing
it in natural light, we are going to construct a
little tabletop studio to light the glass of wine
in a particular way in order to show it off to its
best effect. It is a technique used by product
photographers who have access to large,
expensive studio set ups; but fear not, you’ll be
surprised at what you can achieve with some
card, one light and a little patience.
A tricky situation
“You never know, you
may find a whole new
photographic genre
that gets you all fired
up again.”
T
here will always be days when the
weather is not conducive to outdoor
photography projects. Getting
enthusiastic about going out and tackling
an outdoor project when it’s raining or just
overcast can be a bit of a stretch sometimes.
Here in the UK, the weather is notorious for
having more rain than sunshine throughout
the year. If the weatherman says it’s going
98
www.bdmpublications.com
to be raining, remember that there’s
always something you can photograph.
Keep yourself motivated with some indoor
photography projects. It’s a chance to
try out new things and experiment. You
never know, you may find a whole new
photographic genre that gets you all fired up
again and keeps you happily engaged until
the sun comes out again.
Photographing a glass of wine is a good subject
to tackle as it will force you to consider a couple
of things about getting it to look good. First,
is the nature of how to light it and then how to
control the inevitable reflections. By its nature,
a glass is a round, highly reflective bowl but we
can use that to our advantage. Reflections can
make or break a shot like this. There will be the
requirement for reflections that you do actually
want in the shot and also reflections that you will
want to eradicate. To do this our tabletop set will
need a couple of things that let you control how
light falls on the subject.
Getting set up
The first step is to place a large sheet of black,
matte finish paper on the table [1]. Shiny paper
may cause extra unwanted reflections and light
bounces, so make sure it is non-reflective. Then
we placed a clear glass shelf atop two pots [2]
to raise it about 150mm above the black paper
base. It doesn’t have to be glass. It could be a
sheet of clear or even white translucent perspex.
You could even use a plastic storage box as
long as it’s clean. It needs to be a surface that
is reflective enough to show a mirror image of
the wine glass on its surface. If you are feeling
brave, you could use a mirrored surface. Next
you’ll need a wine glass. We have a large, good
quality glass that has been washed, dried and
given a good clean with a microfiber cloth [3].
Avoid holding it with bare hands as you will place
fingerprints all over it. Place the glass atop the
raised surface, in the centre.
TABLETOP PHOTOGRAPHY
4
1
A card trick
2
Next, we need to create a backdrop for the
glass, but one that has a particular effect on
the surface of the glass. For this you will need
two sheets of stiff black card that you can
place along the back edge of the glass and
leave a gap between them of about 200mm
[4]. This gap is where the light will shine
through from behind. Now the gap will need
to be covered with a sheet of white paper,
thin enough to let light through. You can
also use the lid of a plastic storage box if it is
translucent enough. Bear in mind that if the
gap between the two black cards is textured,
creased or dirty, you will most likely see this in
your final shots. We did try a thin white sheet
of packing foam initially, but the fine textured
surface showed up too much. We opted for
a 500mm square piece of white translucent
perspex [5] , the same material lightbox
surfaces are made from.
5
Lighting your set
3
This is going to be a single light setup. We
have a Nikon SB700 as our light source. If you
were to fire the flash at close range, the white
material between the black cards may be well
lit in the middle and darker at the edge. This
spotlight effect may be fine for you and there’s
no reason not to go for it. We were aiming for
a completely evenly lit white background.
You could move the flash further away but
too much stray spill light will illuminate areas
of the dining room where we had set up, and
create additional reflections. We put the flash
inside a small, foldable softbox called a Rogue
Flashbender. It is essentially a white sleeve
with a diffuser on the front [6]. The flash fires
up into the sleeve, illuminating it and the
white backing throws light forward through
the white diffuser. This turns the size of the
light source from 60mm x 35mm into a more
usable 320mm x 380mm. You do loose some
power from your flash but the bigger lighting
footprint is what we need here. The flash and
its softbox were placed behind our set, with
it facing the white perspex sheet that it was
going to illuminate in due course.
6
www.bdmpublications.com
99
Camera and lens
Next we set up the camera on a tripod in front
of our set. We were using a Nikon D5500 with
an old TwinLink wireless trigger. The wireless
receiver was attached to the flash via its hot
shoe connector. The lens for this project was
a Nikon AF-S 18-105mm f/3.5-5.6 zoom lens.
A decent little lens which would give us some
compositional options and framing choices
without having to worry about moving the
camera and tripod.
The TwinLink wireless
trigger system is one of many
cheap systems available
to do away with wired
connections to your flashes.
The Nikon SB700. A great
mid-range flash with
plenty of power for our
needs during the shoot.
The Nikon D5500. A great
little cropped-sensor
camera delivering crisp
24MP images.
The Nikon AF-S 18105mm f/3.5-5.6 zoom
lens meant we could
alter the framing of the
shot without having to
move the camera.
100
www.bdmpublications.com
Composition and settings
Our first priority was to get the scene framed
as we wanted it. Shot in portrait orientation,
the glass was put dead centre. The lens was
zoomed so the glass filled the frame. The two
black cards were moved apart so they weren’t in
the shot, leaving the white perspex sheet as its
background. The two pieces of black card either
side of the glass serve two functions, they help
reduce any glare from the flash behind the set,
and they also reflect along the outer edges of the
wine glass, giving it some definition. The camera
was set to manual focus and we used Live View
to get the front surface of the glass in sharp
focus. Next we dialled in some manual settings
on the camera. We used an aperture of f/11, a
shutter speed of 1/160, which was the maximum
sync speed the wireless triggers would allow
and an ISO of 100. At this point you need to
close curtains and draw shutters to darken your
room as much as you can and take a test shot.
The image should be completely black. This is
good, as it shows that no stray light sources in
the room are reflecting on the glass. With the
camera ready. The flash needed to be set up.
After a few trials, the flash was set manually to
1/4 power. The flash, inside the softbox, lights up
the perspex sheet nice and evenly, giving a crisp
look to the shot.
Bring on the wine
Now we can fill the glass. We used a small
bottle of very cheap red wine. A little trick to
note when shooting darker liquids like this is to
dilute it slightly with clean water. This makes it
more translucent and light will travel through
it to make it appear brighter. The wine was
gently poured from a jug into the glass. If you
wanted, you could use a small funnel to minimise
splashing. Once the glass was topped up to the
TABLETOP PHOTOGRAPHY
After getting the set assembled and the
camera and lighting sorted, this base test
image was shot. It showed us that so far, all
was working as hoped.
appropriate level, it was time to do a quick check
that there were no stray hairs, dust or particles
in the shot. Photoshop is great at removing
blemishes but the more you can clean off in the
first instance, the better it will be. Then it was
time for some more test shots to confirm the
lighting was all good and that the wine/water
mixture looked bright enough in the shot. You
can always siphon more water in if needed.
Backlighting technique
This method of lighting we used is called
backlighting. As the name suggests the light
comes from behind the subject as viewed by the
camera which is facing into the light. Because
the camera has been set to record no ambient
light, only the backlight has any influence on
the final shot. The black paper beneath our
subject and either side of the light source helped
to eliminate any unwanted reflections. Close
examination of the test shots also revealed that
A little tip when shooting red wine is to dilute
it with fresh water. This makes it more
translucent and more light can pass through
it, making it look brighter.
the camera and tripod were not reflected in the
glass either, although the pots the glass shelf are
resting on showed up very faintly, but we can cope
with that.
Add deliberate reflections
Yes, you did read the heading correctly. Why,
after spending all this time trying to eliminate
reflections are we going to add them back in?
Well, our wine glass is looking great, but we can
add a little extra modelling to the shot to enhance
the glass. This is done with two more pieces of
card, white this time and rolled into tall tubes, that
are placed either side of the wine glass. These
two tubes will reflect some of the backlight and
be picked up as reflections by the wine glass.
Where you place the tubes will dictate where the
reflections appear on the glass. If they are moved
closer to the backlight, the reflections will appear
very close to the edge of the glass. If the tubes
are brought closer to the camera, the reflections
will appear closer to the vertical centre of the
glass. The effect is subtle but it really adds a little
’something’ to the shot.
The two white tubes added
to the set up add a small
white highlight either
side of the glass for extra
modelling. You can dictate
where the reflections
appear in the sides of the
glass by moving the tubes
back and forth.
www.bdmpublications.com
101
This is our little tabletop photo
studio. The final shot at the start
of this article was created using
this setup.
This was the primary shot that was taken once the
settings were dialled in. No white reflectors were
used in this shot.
102
www.bdmpublications.com
The two white reflectors were placed closer to the
camera. This had the effect of placing the reflections
towards the middle of the glass.
The two white reflectors were placed directly either
side of the glass, further from the camera. This
keeps the reflections closer to the edge of the glass.
TABLETOP PHOTOGRAPHY
A plastic tube or straw can be used to create some
bubbles in the wine. If the timing and placement is right,
you can get one bubble on its own, which adds a tiny piece
of visual interest.
The shots taken were reviewed
on the computer and the
preferred image was opened
in Photoshop to clean up
any unwanted splashes and
blemishes. There was also a
little brightness and contrast
adjustment for the final image.
Bubble trouble
A couple of test shots later, we have decided
to place the two white tubes closer to the
backlight and our shot is looking good. Only one
thing remains, bubbles. The simple inclusion
of bubbles around the edge of the glass on the
surface of the wine adds a little touch of interest
and if we’re honest, looks pretty cool. If you have
a helper, you can get them to use a long straw
or a length of plastic tubing to gently blow some
bubbles into the wine. We set ourselves the task
of capturing one solitary bubble. It took a few
goes, waiting for the blown bubbles to pop one
after another until only one was left but we got it.
Processing
With the set still ‘live’ we downloaded all the
shots to the computer and reviewed what we had
taken. One shot stood out because of that single
bubble, so we processed it in Adobe Camera
Raw. We actually darkened the red wine slightly
and made sure the glass ‘horizon’ was straight.
Then we opened it in Photoshop and set about
removing any stray hairs, particles or wine spots
that distracted from the shot. After about 15
minutes of careful cloning, we had our finished
image. Because of the care taken when setting
up the initial shot, post-work was kept to a
minimum and the only reflections present were
the one we put there ourselves.
So, the creation of the set may have taken a
little time and the set up needed some patience
but the reward is a great looking product shot.
Let’s face it, if you’re feeling pleased with the
result, you could always celebrate with a glass
of wine! Q
www.bdmpublications.com
103
Fireworks
photography
How to capture all the explosive action
T
here was a time, and not even that long
ago, when fireworks in the UK really
only happened on Guy Fawkes night
on November 5th or as a climax to some
massive celebration or event. If you wanted
a chance to photograph a big display, you
were fairly limited and had to travel large
distances to find them, or buy your own and
set them off in your garden. These days it
would seem that firework displays happen
with a much greater frequency. Local towns
will often end staged events with a display
and there are even fireworks competitions
104
www.bdmpublications.com
where a number of teams with big budgets
will each stage 10-15 minute displays. These
competitions will often happen over a couple
of consecutive nights so you get a couple of
bites of the cherry so to speak. If you have
access to a local display, what is involved in
actually capturing the action? Photographing
fireworks is easy and great fun, although it
does require a little bit of preparation on the
part of the photographer, and if you’ve never
shot in full manual mode before, this is a good
time to give it a go. It’s not in the least bit
difficult and we can show you how.
“These days it
would seem that
firework displays
happen with a
much greater
frequency.”
FIREWORKS PHOTOGRAPHY
www.bdmpublications.com
105
The basics
Since this is a guide on shooting fireworks, you
are going to be working in the dark. This means
you will be dealing with longer exposures than
normal and so the first order of business is to
mention that all important tripod. Without the
tripod, you cannot fix your camera in place
in order to prevent unwanted image blurring
due to camera shake. A blurry image cannot
be rescued with post processing. Even a tiny
amount of movement can ruin a shot. Get your
camera locked down securely on a good, sturdy
tripod. You can also hang a heavy weight from the
tripod’s centre column in order to help minimise
any kind of movement.
Some people also think that if their camera has
image stabilisation (IS), turning it on will also help.
In fact, it can have the opposite effect. A camera
with IS turned on that is locked in place on a tripod,
can actually generate unwanted image blurring.
The effect is generally more noticeable at longer
focal lengths, but it is there. Remember then, turn
off IS when the camera is securely mounted.
lens has a focal length range perfect for this kind
of work. You will also be dealing with apertures
around the f/8-f/11 mark, so expensive f/1.4
lenses need not apply. Ultra wide-angle lenses
are possibly going to be less effective if you are
shooting from a distance, which is very likely given
that the display has to be a certain safe distance
from the crowds anyway.
From a simple cable release to activate the camera
without touching it, to more complex, programmable
intervalometers, you have plenty of affordable triggering
options for your DSLR.
Remote release
Since you’ve gone to all the trouble to secure your
camera and lens to a tripod, manually pressing
the shutter release button to capture your
shots is just reintroducing the possibility of
jogging the camera. To avoid this, you could
use a remote release which can connect to your
camera via a cable or by using a wireless version
to trigger the camera instead. Using a remote
Cameras and lenses
The great thing about this kind of photography is
that you don’t really need any specialist cameras
or lenses. You are more than likely going to be
dealing with exposures no longer than a few
seconds, so as long as you can set your camera
in manual mode and dial in a maximum exposure
of 10 seconds, you will be fine. In addition, if your
camera does have a setting for Bulb mode, which
allows the shutter to be kept open as long as the
shutter button is pressed, then this is also useful.
Lens choices are also not critical here. Even
a cheap point and shoot camera with a built-in
Even point and shoot cameras can provide you with some
great fireworks photos. They may not have ultra wide
lenses, but since you are likely to be at a distance, that is
not going to be an issue.
A sturdy tripod is
essential to eliminate
camera shake and
prevent blurry images.
106
www.bdmpublications.com
FIREWORKS PHOTOGRAPHY
release removes the possibility of nudging the
camera as you press the button. If your camera
doesn’t have this facility, but does have a selftimer, you can use this at a pinch. The downside
is that self-timers usually give you either a 10
second or 2 second countdown before firing. Even
a 2 second delay may be tricky when it comes to
trying to time the start of your exposures with the
fireworks as they are going off.
Focusing in the dark
Cheap but powerful LED head torches
are extremely useful in keeping your
hands free for camera operation and
button pressing.
Once you’re all set up, it’s time to figure out how
to focus in the dark. As a general rule, since you
are going to be some distance from the action,
you can set your lens to manual focus and set it
at infinity and leave it there. The infinity symbol,
which looks like the number eight on its side, will
be marked on your lens. If your lens doesn’t have
a focus distance window, you can always use a
torch to illuminate a point about one third of the
way into the scene or roughly 5m-10m. You can
then set manual focus on that spot.
Bring some light
Speaking of torches, it makes sense to bring one.
Better still, a head torch is great for keeping your
hands free to alter settings and operate the remote
release if you are using one. Head torches are
lightweight and cheap to buy. Their LED bulbs mean
that a set of batteries will last for ages and can
provide plenty of light to work by.
Setting up
Shooting from a distance means
you can set your lens to focus
on infinity and just leave it there
during the shoot.
It makes sense to get to your venue early in order to
nab the best spots to make the most of the display.
Arriving late and having a sea of heads in your
foreground, dominating the shot, is not going to
work unless you can raise your camera on its tripod
high above the crowd and use them to frame the
bottom of the shot. If you do this, you may need a
small stepladder or stool to get your head up to the
same height as your viewfinder.
As long as they are not too
intrusive, you can use foreground
crowds to frame the lower
portion of your shots.
www.bdmpublications.com
107
About Raw
Yes, once again we have to talk about Raw mode.
If your camera supports it, use it. You can glean so
much more data from a Raw file than an already
processed jpeg file. Besides, if you take all your
shots as jpegs and use the wrong white balance for
instance, all your jpegs will be processed with the
wrong white balance. With Raw, it doesn’t matter
what white balance you use, as you can alter it at
the post-process stage anyway.
Settings
Until the fireworks actually start, it will be difficult
to actually get your settings dialled in precisely. If
you were to try to get a decent exposure without the
light from the fireworks themselves, you may find
that the ambient light is much dimmer, requiring
a longer exposure. That longer exposure may
result in the much brighter fireworks being badly
overexposed and blown out to white. A very broad
rule of thumb is to try starting with an aperture of
f/11, a shutter speed of 2s and ISO 200. Once the
display starts, you can grab some test shots and
108
www.bdmpublications.com
analyse the images on your camera monitor
screen. If the images are blown out, you can
either reduce the amount of time the shutter
stays open, increase the aperture to f/16 or
drop the ISO to 100 or 50. Take another shot
and see how it affects your photos. Try altering
one setting at a time rather than making lots
of changes at once. Be aware that different
fireworks and their colours will have different
intensities too. If the fireworks look too dark, you
can increase the ISO gain, open up the aperture
to f/8 or increase the exposure time. One thing
to bear in mind is that longer exposure times will
create much longer light trails in your photos.
This comes down to personal choice of course,
but bear that in mind.
Take the shots
Now you can concentrate on getting the shots.
Firework displays have low-level and high-level
displays. The high-level fireworks generally give
the bigger explosions and are usually fairly easy
to spot as you can see the fired rockets climbing
much higher into the sky. It comes down to
timing to guess when the rockets will actually
explode, but keep your thumb on the remote
release and get ready to press. If you have a
decent sized memory card, just keep shooting.
There is actually a great little trick you can
employ once you are back at home to combine
some of the shots that have little going on in
them. Another option is to set your camera to
Bulb mode. Then you take a small piece of black
card and cover the lens with it. Be careful not to
bump the camera with it. Open the shutter and
keep it open using Bulb mode and only uncover
the lens when there is firework activity that you
want to capture. If the lens is covered, no light
is getting in, so you can keep the shutter open
as long as you want. Keep uncovering the lens
for each light trail you want captured. Once
you have amassed a few seconds worth of light
trials, you can close the shutter again. You can
experiment with different focal lengths to pick
out details from the display and also try shooting
in either landscape or portrait orientation.
FIREWORKS PHOTOGRAPHY
Merging multiple shots in
Photoshop means you can
create an image absolutely
bursting with light.
Post-processing
Once you have your shots in the bag, you can
process them using your favourite processing
software. You can recover quite a bit more from Raw
files than jpegs. A certain amount of the highlights
can be pulled back from overexposure and the
darkest shadows can be lifted too, before the image
starts to degrade. You can also merge a number
of the more empty looking shots in Photoshop to
create much more densely populated fireworks
images, if that’s what you want. Just load a number
of them into a document as a series of layers and set
all of their Blend modes to Lighten to combine their
brightness; crop it into a tighter composition and
save that out as a single image.
Firework photography is great fun and hopefully,
after reading this guide, you’ll realise that it is quite
easy to capture all the excitement and action from
your next local display and create some wonderful
images for yourself. Q
www.bdmpublications.com
109
Nikon lens master
The right lens for the job
igital SLR systems offer the greatest
versatility of any photographic
system, and represent the best
compromise between quality and
portability. The best CSC systems are still
some way behind, but are catching up fast.
There are lenses and other accessories
available to suit every type of photography,
both amateur and professional. It is worth
being aware that top quality DSLR lenses
like this also command top prices.
This photographer is using a very
specialist lens to get this shot of a rural
scene from a different perspective. The
extreme nature of the distortion and the
wide field of view this lens gives you is
apparent, as is the visible curvature of the
ground, adding to the scale and openness
of this scene.
The kind of lens that can do this is called a
fisheye. Whereas most lenses are trying hard
D
to eliminate distortion, the fisheye uses it to
its advantage to give you an unparalleled
angle of view that can encompass 180°.
In the case of the example lens shown
here, the NIKKOR 16mm-f-2.8D fisheye can
actually create such an image thanks to its
180° angle of view. Just be prepared to
shell out well over £600 for the privilege.
Beyond the standard fisheye prime
lens, you also have the option of using
Nikonʼs first fisheye zoom lens. Although
this is definitely a niche lens, it has a very
specific skill set that can produce some
amazing and mind-bending images. The
Nikkor 8-15 fisheye is Nikonʼs first zoom lens
capable of capturing not only traditional
180°fisheye images that fill the frame but
also completely circular 180°images. This
is an exciting and creative lens not only for
photographers but videographers who are
striving to create that ʻwowʼ shot. Q
the
fisheye
lens
A cityscape shot with a difference. Taken with a
16mm fisheye lens high above the ground looking
into the scene makes for an imposing image.
110
www.bdmpublications.com
The AF Fisheye-NIKKOR
16mm f2.8D lens has a full
180-degree angle of view for
a true fisheye effect.
THE FISHEYE LENS
“Itʼs important to
choose the right lens
for the job, but top
quality DSLR lenses
are very expensive.”
The AF-S FISHEYE NIKKOR 8-15mm
f/3.5-4.5E ED uses advanced optical
construction in Nikon’s first fisheye zoom lens.
www.bdmpublications.com
111
Bridesmaids and pageboy catch a glimpse
of the bride about to arrive. A classic
candid shot where the subjects are not
aware of the photograph being taken. The
documentary style is further enhanced by
converting it to black and white.
Candid
Photography
Tell a story with your photographs
B
ack in the day, a formal event such as a wedding had a particular style of photography
associated with it. The shots were generally quite serious and posed, as you might expect.
Over time, it has become more and more popular to not only capture those standard formal
shots, but also to inject some more documentary-style photography into the mix as well. It was as if
you had your big day shot by an old school wedding photographer and also a paparazzi photographer
too. Indeed, on some occasions, younger couples getting hitched have done away with the formal
aspect of the wedding altogether and briefed the photographer to take nothing but candid images
throughout the day.
112
www.bdmpublications.com
CANDID PHOTOGRAPHY
A young girl catches the bouquet at a
wedding. Although we were standing right
in the crowd with camera in hand, because
everyone was fixated on the moment, no
attention was paid to the photographer
who nabbed this natural shot.
www.bdmpublications.com
113
Candid shots capture their subjects in
more natural poses and exhibiting more
relaxed behaviour. This is the draw for a lot of
people who want to see a natural image, not
uncomfortable, posed shots.
Shooting this more naturalistic style is great
in colour, but it can be enhanced even more by
the use of black and white images. It lends an
even greater feel of reportage to the shots. Take
a look at any of the work of photo journalists
like Robert Capa and you’ll see the power of the
black and white image to tell a story is absolute.
Ok, we admit, a wedding or comic convention
is in no way the same as photographing the
Spanish Civil War or the Normandy Landings,
but there is a marked difference between
‘taking a photo’ and ‘telling a story’. Whether
you’re shooting for colour or black and white, we
have a few tips that can help you discover your
hidden documentary maker.
Eyes peeled
To capture good candid shots, you need to be
on the lookout for the kinds of interactions that
could lead to some interesting images. Try to
anticipate where people will be and position
yourself accordingly. At a wedding for instance,
you should be able to find out in advance where
the action will be as the day unfolds. Also, watch
for couples or groups interacting and get ready to
capture a spontaneous burst of laughter or some
silly behaviour.
Natural light
If you can possibly avoid it, don’t use flash for
your shots. Apart from the obvious ‘rabbit in
the headlights’ look that your subjects will have,
it kind of gives the game away that people are
being photographed every time the flash pops,
and it can really kill the mood. When people know
they’re under scrutiny, they tend to become more
Traditional DSLR lenses can be very expensive,
especially telephoto lenses with wide maximum
apertures. As an alternative, the Nikon Coolpix P900
has a staggering 83x optical zoom and an affordable
price that would make photographing subjects from
a distance quite easy.
114
www.bdmpublications.com
self-conscious. In these situations high ISO is
the order of the day. Don’t worry about high ISO
noise, just keep your images shake-free.
Fast glass, long lens
Using a traditional long lens for DSLRs such
as a 70-200mm f/2.8 has several distinct
advantages. Firstly, the maximum aperture of
f/2.8 means you can shoot in lower light with
slightly faster shutter speeds, although you will
probably want to use a monopod for support
if you’re shooting at the longer focal length to
reduce chances of camera shake. The shallow
depth of field also comes in handy to help
separate your subjects from any distracting
background. Primarily though, if you shoot with
a long lens it keeps you at a respectful distance
from your subjects who are less likely to be
aware they are about to be photographed and
will act naturally.
CANDID PHOTOGRAPHY
Before, during and after
Shoot with your camera set in continuous or
burst mode. This enables you to pick out your
subject, and if they are about to speak or act,
you can fire off a short sequence of 5 or 6 shots
over a few seconds. This means you can record
the before, during, and after of a moment and
choose the best image from that sequence.
This is quite handy if you capture someone
blinking, the next shot should have them with
their eyes open again. You may quickly rack
up the number of shots on your memory card,
but your chances of capturing a ‘moment’
increase. Photographers sometimes refer to
this technique in slang as ‘hosing it down’.
Group shot!
Be on the lookout for someone who may be
herding a bunch of people together for a group
shot. Keep yourself at a distance, off to one side,
with your long lens, and capture the moments
leading up to, and just after the group shot is
taken. The group will be focused on the other
photographer and you should be able to nab
some interesting behaviour as people get
themselves ready for the shot, and the possible
relief on some faces that the shot is done.
Point of view
Don’t be afraid to mix up your shooting angles.
If you are at a venue with any raised areas
or upper floors, shoot from those elevated
positions. One trick of street photographers is
to fit a wide-angle lens to their camera and just
let the camera hang down by their side, pointing
slight upwards, and taking random shots as
they walk through the crowds.
The wide-angle improves your chances of
getting more shots framed in useful ways, but
worth a go. Use foreground objects to frame
your subjects, get the camera down low, you
just need to keep experimenting.
Keep it with you
To be able to capture those spontaneous
moments, you’ll need your camera right? Of
course. To that end, always keep a camera with
you. It doesn’t have to be an expensive DSLR,
a good point-and-shoot with decent low light
capability will do the trick nicely. Just keep it with
you and have it ready for action. You never know
when you might need it. Q
www.bdmpublications.com
115
Outdoor
macro
photography
Learn more about this fascinating subject
M
acro photography is the capture of
tiny objects and organisms on your
camera sensor at life-size or greater
using a specialist lens or other equipment. In
the case of shooting with a full-frame DSLR, a
macro image of 1:1 means that if you had an old
35mm negative measuring 36 x 24mm, at its
closest focusing distance, you would be able to
fill your camera’s viewfinder with that negative
and photograph it. For a DSLR owner, the most
obvious route into macro photography is to
buy a macro lens. If budget is no consideration,
then full-frame macro lenses with image
stabilisation are a great choice. There are more
pocket friendly lenses for 100mm full-frame
and 40mm crop-sensor models. Macro lenses
offer the best optical quality, but if you are on
a budget, then there are alternatives that give
you the chance to explore the macro world for
little outlay.
Close-up filters
As the name suggests, close-up filters are
macro filters that you can screw onto the front
of your existing lenses. They come in a variety
of lens thread sizes and also offer a selection
of magnifications. A basic four piece filter set
can let you magnify an image by a factor of +1,
+2, +4 and +10. Optically, they are not perfect
and you will experience a bit of distortion and
chromatic aberration where the lens is unable
to correctly focus all the colours at the same
convergence point. That said, for around £15, it’s
an inexpensive method of trying it out.
Totally tubular
Another option before taking the plunge and
spending out on a macro lens, is to get a set of
macro extension tubes. A macro extension tube
contains no glass elements and you attach it
between your lens and your camera body. This
tube mounts the lens further away from the
camera sensor. In practical terms, this results in
the minimum focusing distance getting smaller,
116
www.bdmpublications.com
the further the lens moves away from the sensor.
Therefore, you can get much closer to your
subject and still be able to attain good focus.
One thing to note is that these macro extension
tubes are more effective with lenses with shorter
focal lengths around the 24mm - 50mm area
than either very long focal lengths over 200mm
or very short focal lengths of 16mm or so. The
extension tubes also come in various widths from
about 12mm to 36mm.
Macro lenses
There are various macro lenses to suit your
pocket from Nikon and third party manufacturers
such as Sigma. They range from 40mm up
to around 200mm versions with the closest
focusing distance ranging from 5-6 inches out
to about 16 inches. The measure of a ‘true’
macro lens is its ability to resolve an image
on the sensor of your camera that is at least
life-size; or a reproduction ratio of 1:1 as we
mentioned earlier. Prices will vary of course.
Lenses such as the 40mm Nikon AF-S DX
f/2.8G retails at about £180 and the 200mm
AF NIKKOR f/4D IF-ED at a less wallet-friendly
£1,000. The major difference between a 40mm
macro and a 200mm (apart from the price) is a
greater subject-to-lens distance on the longer
focal length lenses. So, your expensive 200mm
macro lens lets you keep further away from
that pesky butterfly you’re trying to photograph
without spooking it. Q
OUTDOOR MACRO PHOTOGRAPHY
Close-up filters are a simple and costeffective way to turn your existing lenses into
a kind of macro lens by acting as an additional
magnifying element.
Macro extension tubes offer another
cheaper way of trying out macro
photography. You can get surprisingly
good results with these devices.
The Nikon 200m macro lens is not cheap
but if you are very serious about your
macro photography, then you need to be
thinking about lenses like this.
www.bdmpublications.com
117
Nikon lens master
The right lens for the job
areful control of depth of field by
adjusting aperture and focal length
is one of the most striking creative
techniques available to the photographer,
and you donʼt need any special equipment to
do it, just your camera and a zoom lens.
For this striking portrait image, the
photographer has used a 100mm, fast ,
macro lens with a large maximum aperture
of f2.8. This has resulted in a narrow depth
of field but by carefully focusing on the
subjectʼs face the effect of this narrow plane
of focus is to isolate the subject against what
could otherwise be a busy and distracting
woodland background. One consideration
to bear in mind is that when working with
very shallow depth of field, precise focusing
is essential. The slightest movement and
your subject will shift out of focus, so a good
tripod is recommended to eliminate those
shot-spoiling effects.
C
The AF-S VR Micro-NIKKOR 105mm
f/2.8G IF-ED macro lens. Perfect for
macro shots at 100% magnification,
with the added bonus of image
stabilisation for more opportunities to
shoot handheld.
If background blur is your thing, then
the AF-S Nikkor 70-200mm f/2.8G ED VR II
is a magnificent piece of glass. It may be
considered a telephoto lens, but it is very
often used to shoot portraits. The longer
focal lengths coupled with that f/2.8
maximum aperture mean you can achieve
some amazing shallow depth of field
portraits if you choose. The most recent
version of this lens now incorporates an
image stabiliser for better sharpness when
working at slower shutter speeds. Q
shallow
depth
of field
If the background of your outdoor photo is
distracting, you can blur it out by using a wider
aperture to create a narrow depth of field.
118
www.bdmpublications.com
SHALLOW DEPTH OF FIELD
“Large focal length lenses
will demand higher shutter
speeds and a good tripod.”
The AF-S Nikkor 70-200mm f/2.8G ED VR II has amazing
picture quality and that f/2.8 maximum aperture will give
you superb soft focus backgrounds.
www.bdmpublications.com
119
Shooting
panoramas and
vertoramas
We show you how to think big and shoot big
T
he word panorama means ‘an unbroken
view of the whole region surrounding
an observer’. In more simple terms, it
means a photograph containing a wide view. A
vertorama is simply a panorama that is shot in
a vertical orientation. It all came about in the
1700s when artists would paint a horizontal
image that encircled an entire room. These wide,
expansive views are much prized by landscape
photographers who strive to capture entire
vistas to give the viewer of the final image a
sense of the scale of the scene that was visible
120
www.bdmpublications.com
to them whilst they were there. Conveying
all this ‘bigness’ would normally require the
use of wide angle lenses. These lenses have
short focal lengths of around 14mm to 24mm
and can capture an angle of view of around
90° measured diagonally across the frame.
This angle of view is an aspect of landscape
photography that can be a slight issue for some.
Seeing is believing
One thing that a lot of people comment upon is
that the scene they view with their own eyes always
looks far grander and more impressive than
the photograph they take of it. Human vision is
amazing, it can encompass an angle of view that
is almost a complete 180° if you take peripheral
vision into account.
Of course a photograph is not going to
be quite so impressive. However, there are
methods that can let you capture super-wide
vistas that go some way to emulating human
sight. We have some tips on capturing entire
majestic panoramas that will make your viewers
go ‘wow!’.
SHOOTING PANORAMAS AND VERTORAMAS
The images shown here are
great examples of superwide panoramas. Both are
comprised of multiple portrait
orientated shots and were
merged using the Photomerge
option in Photoshop.
www.bdmpublications.com
121
This coastal image was captured on a Nikon D810
using a 15-30mm Tamron ultra wide zoom lens.
Although the shot covers a roughly 100° angle of
view as measured diagonally across the frame,
there was still a lot more to be seen either side of
the image that couldn’t be captured in one go.
The Nikon 14-24mm f/2.8 wide
angle zoom at around £1800
The Nikon 8-15mm f/3.5 - f/4.5
fisheye zoom at £1200
the benefit of that 14mm focal length has been
lost. That said, even in a normal frame taken with a
wide angle lens, it is still only a relatively small part
of the bigger picture.
The lens option
Fisheye
We mentioned that the best guy for the landscape
photographer is the wide angle lens and those
serious about capturing extremely wide views
will be using a lens somewhere in the 14mm focal
length range. Lenses like this have roughly a 105°
angle of view, which is great. You can capture some
impressive scenes with a 14mm lens. The problem
for most budding photographers is that a major
brand name lens like that is going to cost upwards
of £1500 for a fixed focal length version. Step up to
a variable focal length 14-24mm wide angle zoom
lens and you can expect to pay a lot closer to £2000.
That is out of the reach of most photographers.
Manufacturers like Samyang do make a 14mm f/2.8
lens available in Nikon, Canon, Sony, Samsung and
Micro Four Thirds fits at a much more reasonable
£350. Be aware that a full-frame 14mm lens fitted to
an APS-C camera for instance will actually behave
like a 21mm lens, due to the smaller size of the sensor
the full-frame image is projected on to. In this sense,
Another option to capture large angles of view in
your shots is to use a fisheye lens. A 15mm fisheye
can capture an almost 180° angle of view image.
The effect of a lens of this type is the distortion.
Fisheye lenses are designed to actually show the
spherical distortion you would normally not want
to see in an image. The centre of the frame is quite
acceptable but as you get to the edges of the
image, you’ll see the curved outer corners produce
a goldfish bowl effect. For landscapes, this is not
usually a desirable effect. Yes, you can remove
the distortion at the post-process stage but that
involves enlarging and distorting the image still
further to remove the spherical view created by the
lens in the first place. Any views that have strong
horizontal or vertical lines in them will appear like
something you would see in a funhouse mirror, so
they are to be used with caution for landscapes.
This still doesn’t allow us to see the much broader
canvas that our eyes see.
122
www.bdmpublications.com
The Nikon AF NIKKOR 14mm f/2.8
wide angle prime for about £1100
The alternative
What happens if you do not have a wide angle lens
or a fisheye? What are your options then? A lot of
photographers who step up to a DSLR for the first
time, will probably purchase a camera with a kit lens.
A kit lens is a utilitarian jack-of-all-trades that can
get you started in the world of photography. If you
choose a cropped sensor camera such as a Nikon
D3500 or Nikon D5600, it invariably comes with a
kit lens in the 18-55mm focal length range. In 35mm
full-frame terms, the images you capture with it are
actually more like a 27-82mm lens. A scene shot
with this lens in landscape orientation is not going
to be terribly impressive. It isn’t a problem though
since you can use the multi-image approach instead.
Rather than take one landscape orientation shot,
you simply turn the camera to portrait orientation
and shoot a sequence of images for stitching together later. Let’s explain in a little more detail.
The process
Essentially you are going to take a number of stills.
Rotating the camera a few degrees left to right with
each shot taken, whilst allowing enough overlap from
image to image so that they can be stitched together.
This can be achieved with programs like Photoshop,
SHOOTING PANORAMAS AND VERTORAMAS
PT GUI or Hugin, that rely on features in
each shot being matched together to create
accurate stitching points; as a general rule,
shoot with a shorter focal length lens and
always try to overlap your images by 25% or
more. For example, look for features that are
right-most in your current shot like a car or
building (something that isn’t moving). For
the next shot you rotate yourself on the spot
so that those features are now left-most in
the frame. These matching features will help
your software to stitch the shots together
more accurately and avoid odd tearing and
mismatches that can spoil the image.
Another consideration is to try and avoid a
scene where a lot of objects are very close to
the camera. Unless you are using specialist
panoramic photographic equipment
and lenses, you will find that even slight
unwanted movement and rotation of the
camera (which is unavoidable if you shoot
handheld) will result in big parallax shift
errors in very near objects that even the best
software will not be able to put right. Parallax
shift describes how objects close to you
seem to move a greater distance relative to
those that are further away when you move
your head or camera.
The bigger picture
The benefits of shooting multi image
panoramas are twofold. You are of course
capturing a much wider view than is
possible with just a single shot; the other
benefit is that when the image is stitched
together, it creates a much larger file,
containing more detail than a single ultra
wide image. As an example, this scene was
captured with 5 portrait orientation shots,
each measuring 3333 pixels wide by 5000
pixels high. When the 5 shots were merged
in Photoshop, the resulting panorama,
once cropped, measured 9768 pixels wide
by 4676 pixels high. Roughly speaking, the
result is a 45MP image. Granted you do
need a reasonably powerful machine with
plenty of RAM to work with large files but
the results are quite impressive.
www.bdmpublications.com
123
Settings to use
To capture a basic panorama from left to right you
can set up your camera in the following way. First, set
your camera to portrait orientation and set focus to
manual. Select a point of focus roughly a third of the
way into your scene. This is an utterly basic rule of
thumb to quickly set yourself up to record as much
sharp focus in your scene as possible. Working out
the exact point into the scene that gives the best
overall focus based on your aperture, referred to as
the Hyperfocal Distance, is not to be approached
lightly. For our purposes the most basic approach
will do for now.
Your camera settings need to be set in such a way
as to produce as little noise as possible but keep a
fast enough shutter speed to avoid camera shake
or motion blur. Camera shake is a main concern if
you are going to choose to shoot hand-held and we
would always recommend using a tripod whenever
possible. For shot-to-shot colour and exposure
On the right are two approaches to getting more accurate
panoramas. The first is to attach your camera to a Nodal
Ninja so the camera rotates around the front lens element.
A quick method to emulate this piece of equipment is to
place your camera on a pole with the lens element as near
to the centre of rotation as possible.
consistency, it is always a good idea to shoot in
manual mode and use a preset White Balance
setting rather than Auto White Balance. If you shoot
in Raw format, this is less of a worry since you can
non-destructively alter the white balance of each
shot to match your favoured colour temperature.
With trial and error you can arrive at settings that
yield enough detail on the ground and the sky
without either losing detail in shadows or blown
out highlights. It is also a good idea to use a narrow
aperture of at least f/8 to ensure that your entire is a
sharp as possible from front to back.
More accuracy
We would always recommend the use of a tripod
when shooting panoramas. It creates a nice stable
platform with rotation that is easy to control in both
the horizontal and the vertical. You can level both the
tripod and then the camera on the tilt-head by using
a small spirit level that can attach to the hot-shoe of
the camera. For even greater stitching accuracy,
you can attempt to rotate the camera around its
nodal point. The nodal point is the point around
which the lens must rotate in order to completely
eliminate parallax shift. Without specialist
equipment it can be very difficult to achieve. The
hi-tech method for shooting accurate panoramas
is a device such as the Nodal Ninja. It is made from
metal and is very robust with an optional levelling
plate to provide a very quick way of getting things
on an even keel. You can quickly shoot accurate
and level panoramas with devices such as this.
There is a very low tech way you can do it yourself,
whereby you rest the camera lens barrel on a pole
or stick (even a sawn-off broom handle) so the
front lens is as near the pole’s centre of rotation as
possible. It will be up to you to keep the camera as
level as possible but it does help avoid those nasty
parallax shifts. Oh, and people will wonder why you
are rotating around a pole stuck in the ground!
Starting position at 0°
Rotate camera/body to 45°
The Nodal Ninja is perfect for capturing
accurate panoramas in horizontal or
portrait format. Once the camera’s
nodal point is established, you can
shoot full 360° pans if you want.
Rotate camera/body to 90°
Rotate camera/body to 135°
Rotate camera/body to 180°
124
www.bdmpublications.com
SHOOTING PANORAMAS AND VERTORAMAS
Whether you are using a tripod or a more advanced Nodal
Ninja, always try to get it as level as possible. Most tripods
feature a small bubble level. If it doesn’t have one, you
can always get a small spirit level that fits in the hot shoe
attachment of your camera.
www.bdmpublications.com
125
Go vertical
There may be certain times when you might need to
capture a panorama that doesn’t fit into our happy
horizontal world. Sometimes, you need to think
vertically. Vertical panoramas, or vertoramas as they
are called, can produce some very spectacular and
mind-bending images. The methods for shooting a
vertical panorama are the same for those you would
employ for a normal one. This time, you can actually
shoot with your camera in landscape orientation
but you pan from the ground and rotate the camera
upwards to the vertical, and even over the vertical
if you can stretch far enough (just don’t fall over).
Shooting a vertorama in the woods, city centre or
an enclosed space such as a church or cathedral
126
www.bdmpublications.com
SHOOTING PANORAMAS AND VERTORAMAS
All the shots you see here were
merged into their final panorama or
vertorama by using the Photomerge
option in Photoshop CC. The
vertoramas will require some additional
work to clone out either your own feet or
the legs of the tripod you were using that will
most likely be captured when shooting directly
downwards with a wide angle lens.
can produce some intense images. You are likely to
end up photographing your feet or the legs of your
tripod when shooting directly downwards but once
you have stitched the images in Photoshop or other
favourite program, you can crop or clone them out.
With this in mind, make sure you give yourself plenty
of room at the bottom of the frame for cropping.
Go wide
“There may be certain times when
you might need to capture a
panorama that doesnʼt fit into our
happy horizontal world.”
Shooting panoramas, whether horizontally or
vertically, is a very diverting method of landscape
photography. It does mean you are working with
a large number of files and they need all that extra
work to stitch them together but the result is a very
large image file that is significantly larger than a
single shot from your widest lens. Not only that,
it contains a vast amount of detail and its larger
combined resolution means that if it were ever
needed, it could be printed at a huge scale with a
reduced loss of detail. Give it a go: you can start with
hand held versions and if you like it, you can upgrade
to a good tripod; or better still, get yourself a Nodal
Ninja for the ultimate panorama. Q
www.bdmpublications.com
127
Food
photography
Get arty with some everyday food items
B
ack in the day, it was always something
of a cliché to shoot or paint a bowl of
fruit as an indoor still life project. It
doesn’t have to be that way, especially in the
world of digital photography. Using fruit as
your still life subject can be given a little twist
with this easy to setup tabletop project. Rather
than having a bunch of fruit in a bowl, how
128
www.bdmpublications.com
about something a little more creative?
Sliced fruit pieces are a lovely, translucent
material, in a range of great colours. All well and
good, but what if you shine a strong light through
them? Now things get interesting. Suddenly the
fruit glows and internal shapes and structure are
seen. This is not how you normally see fruit and
it sounds like a great image to capture.
FOOD PHOTOGRAPHY
These two comparison
shots demonstrate the
key visual difference
that can elevate your
food images away from
the mundane. The
image on the left is lit
in a conventional way
where the surface of the
fruit reflects light as you
would expect. The shot
on the right is lit from
below so now the light
is transmitted through
the flesh of the fruit and
your food is given a great
new look.
Box clever
To achieve this, you would need a light source
of some sort that you can arrange your sliced
fruit on. An old-style light box for viewing slides
and negatives sounds ideal but they aren’t
necessarily just lying around your house waiting
to be used. As an alternative, you can use a
plastic storage box lined inside with some thin
white paper that you can shine a powerful torch
or lamp through to give you your light box. For
our example, we are going to use a 500mm
square sheet of white translucent perspex
purchased online quite cheaply.
and water melon. The trick is to slice them nice
and thin. Too thick and the light will have trouble
passing through them. Slice up as much as you
need (or have room for on your home-made light
box) and arrange the slices to suit your needs.
Our example is just a random assortment laid out
on the perspex sheet.
Setting up
example, it was quickly realised that having the
camera on the tripod was too restricting so we
went hand-held with it instead. As the camera
settings had given us a shutter speed of 1/160
and the flash duration itself was effectively
freezing any movement, we could shoot without
worrying about camera shake of motion blur. For
a spot of variety, the 24-105mm zoom lens was
swapped out for a 100mm f/2.8 macro lens for
some close-up detail work. Shooting with the lens
at its widest aperture of f/2.8 meant the power
of the flashes had to be adjusted. The flash firing
upwards was adjusted to 1/32 power and both
top flashes were set to 1/128 power.
The perspex is set on the legs of a small
overturned table and one flashgun is set
underneath to fire upwards into it. A two-flash
setup is used above to create some fill light
by bouncing off a piece of white card onto the
perspex surface and cast some illumination
on the slices of fruit. Our camera and a 24205mm zoom lens is set up in front and above
to capture the image. All flashes are controlled
wirelessly but you can easily replace flashes
with lamps or powerful led torches.
Dialling it in
Slice and dice
Now we need fruit. The citrus and pulpy type
fruits are perfect for this kind of shoot. They
have great texture and colour. This example
employs apples, oranges, lemons, limes, kiwi
Now we need to do a few test shots. After some
test firings we have our settings dialled in. Bear
in mind, if you are using lamps or torches, your
exposure times will differ. Just make sure the
most powerful light is the one underneath,
shining through the fruit. The flash underneath
firing up into the fruit was set on 1/16 power,
whilst the two flashes above were each set at
1/64 power. The camera was dialled in manually
at ISO 50, aperture f/5.6 and shutter speed
1/160 which is the max sync speed of the
camera. This made sure the bottom light is
getting through all the fruit slices without overexposing any of them.
Variety
Now it’s just a case of shooting away to your
heart’s content. Rearrange your fruit as you see
fit. Try different angles and zoom levels. In our
Pick your fruit
Once the shots were in the bag, they were
reviewed and the favourite images processed
through a raw editing program, in this case
Adobe Camera Raw. There were some interesting
compositions that would not look out of place
as large format canvas prints. Creative dropping
also heightens the abstract feel. In fact, the only
problem that remained, was what to do with all
the fruit that was left over. Fruit salad anyone? Q
www.bdmpublications.com
129
Light up your
photography
A handy guide to lighting schemes for portrait work
I
f you’re new to portrait lighting then we have
a little cheat sheet you can reference which
shows a series of lighting setups and how the
illumination will fall upon your subject as the
angles change. You can use these as the starting
point for creating your own lighting recipes. It
shows the way light strikes a human head from
various points around an imaginary clock face.
The light is above head height and is pointing
down at roughly a 30° angle. There are also some
that show how two or three lights will interact
with each other too. The diagrams also indicate
which light is the key light , and which is the
fill light. A key light is essentially the brightest
source of light in the shot. A fill light is often
used at lower power than the key light in order to
lighten dark areas of shadow to make sure they
don’t go totally black. Further on in this issue, we
also have a few more of the most popular lighting
setups listed in more detail for your reference.
Good luck and enjoy. Q
Key light
Fill light
Lower power
High power
3D model and materials courtesy of Lee Perry Smith at Infinite Realities.
130
www.bdmpublications.com
LIGHT UP YOUR PHOTOGRAPHY
Key light
Fill light
www.bdmpublications.com
131
Key light
These images were lit with either a two or
three light configuration with a key light, a
fill light, and a light aimed at the backdrop to
create a spotlight.
132
www.bdmpublications.com
Fill light
LIGHT UP YOUR PHOTOGRAPHY
Key light
Fill light
www.bdmpublications.com
133
Long exposure
photography
Take your time and explore this fascinating subject
T
he human eye is a wonderful thing. An
organic marvel that is unparalleled in
its complexity. We see the world as it
happens in real-time but cameras allow us to
compress time or expand it to show us things in
whole new ways that our eyes cannot do. It has
been determined that our eyes, although not
governed in the same way as the moving parts
of a digital camera, can detect flashes of light
as short as 1/100s. Depending on the health
and age of the viewer it can in some cases be as
short as 1/200s.
Given the way our eyes and brain perceive and
process the things we see then, we have a natural
‘shutter speed’ of about 1/200s. This means that
we can turn to our cameras to create the kind of
images that reveal the world of motion beyond
what we see. The camera offers two options. Using
special lighting, you can capture things that literally
happen in the blink of an eye or you can go in the
opposite direction and delve into the fascinating
world of long exposure photography.
Long exposure photography is a very popular
subject for photographers of all skill levels. Take
a look on any image sharing site or in digital
photography magazines and you’ll see plenty
of examples of the genre. What is long exposure
photography all about?
134
www.bdmpublications.com
LONG EXPOSURE PHOTOGRAPHY
“We see the world as it happens in real-time but cameras allow
us to compress time or expand it to show us things in whole
new ways that our eyes cannot do.”
www.bdmpublications.com
135
1
Just as a matter of interest, compare image 1, to
image 2 on the left. You’ll see that the exposure time
of image 2 is almost three times longer than image 1. A
10-stop filter was added to drive up the exposure time
but given the speed of the moving water, any exposure
over a few seconds will generally look much the same
as a photo where the exposure is 30s. There may be a
little more smoothing of the water as it flows but this is
a good example of knowing how to gear the exposure
time to your subject matter. Sometimes less is more
than enough!
2
The technique
Although the name is self-explanatory, let’s
elaborate. A long exposure is usually defined
as being several seconds in duration or longer.
It is possible to have exposures that last
many minutes, even hours in extreme cases.
The camera is placed on a solid surface or
mounted on a tripod so it doesn’t move and
then the shutter is opened, and kept open, for a
predetermined period of time. Any static objects
in the scene are still captured sharply since the
camera is not moving but any object that is in
motion through the camera’s field of view, is
blurred as it moves within the frame. The amount
the object is blurred will depend on the length the
shutter is kept open and the speed of the moving
object in the shot. How you combine the two is a
matter of artistic preference but experimenting
is a lot of fun; but how do you get shutter speeds
so long?
Creating a long exposure
A long exposure relies on several important
factors in order to get your shutter speed down to
a duration that will yield the kind of blurred motion
you were hoping for. Your aperture can be set to
its minimum, which is around f/22. This reduces
the amount of light that can fall on your sensor
and requires the exposure to be longer to allow
the camera to gather more light but apertures
this narrow can lead to the optical phenomenon
136
www.bdmpublications.com
known as diffusion. Normally, you would be better
off using an aperture of about f/9 or f/11.
The settings
These kinds of shots would require you to set your
camera in manual (M) mode or Aperture Priority
(AV). This way, you have control over how the
camera reacts as you alter the parameters. Since
you don’t want to focus accidentally on the wrong
thing, we would also recommend you switch to
manual focus. This way you can compose your
shot, use live view to confirm you have the correct
point of interest in focus and since it’s in manual
focus mode, it will maintain focus with no further
input from you.
Next, you can set your camera’s ISO sensitivity
to its lowest value. The less sensitive your camera
is to light, the longer it needs to gather light for a
good exposure. Most camera’s offer a minimum
ISO of 100 but some will let you set ISO values
down to about 31. In combination, the aperture and
ISO values will affect your shutter speed durations,
requiring it to be a longer duration in order to
capture more light. The next factor you have to take
into account though, is just how bright the scene is
you are shooting.
Your first port of call when attempting to get exposure
times as long as possible, is to use apertures of f/16 or
narrower. Beware of diffraction when you use apertures
around the f/22 - f/32 area. You might suffer from soft
images even though everything is in focus. You can also
use the lowest ISO values your camera allows. The
Nikon D810 above, can use ISO 31 as its lowest value; this
enabled long exposures of the waterfall image on the far
left based on the ambient light available at the time.
Night time
At night, you will be dealing with longer shutter
durations as a matter of course since there is very
little ambient light. In fact, you may find that you
need to open up your aperture and even raise
your camera’s ISO sensitivity to stop the exposure
durations from being too long if you are in extreme
low-light conditions. A typical city street scene at
night, with your camera set to an aperture of f/9 and
ISO 100 would need a shutter speed of anywhere
between 2s to about 30s, which is perfectly
manageable. A scene lit only by the stars in the night
sky could take many minutes; as an example, a clear
starry night, with only the most minimal amount
of light from a nearby town would require a shutter
duration of about 60 minutes, if you were using the
same settings mentioned previously.
LONG EXPOSURE PHOTOGRAPHY
This is an example of the popular photographic
technique of shooting burning steel wool, which
has been placed inside a steel whisk and spun
around on a long tether, during the course of a long
exposure. It can create some amazing light art.
There are no shortage of apps for both iOS and Android
mobile devices that can calculate different exposure
times for you if you need them. The apps can also
allow for the use of ND filters and recalculate correct
exposures once they are added.
it is way too underexposed or if it’s all bunched
on the far right of the histogram, then it is too
overexposed and you will lose detail in the burnt
out highlights.
Night time subjects
Obviously, you need ensure that your
exposure settings are correct, it would be very
disheartening to spend an hour waiting for the
exposure to complete, only to find it is either
badly underexposed or overexposed. It is better
to shoot at a much wider aperture of f/2.8 and
a higher ISO, just so the exposures are shorter.
This lets you fine-tune your exposure, then you
can calculate the exposure time required when
you use lower ISO and narrower apertures.
There are plenty of apps for your mobile devices
that can calculate the alternative exposures
needed without the need for mental arithmetic.
Check you histogram too; if the histogram is
bunched too far to the left of the screen, then
To be honest, anything is fair game when it
comes down to what to shoot at night. The
classic traffic trails are always a good place to
start. Using an aperture of f/5.6 and an ISO of
100 as a starting point, you should be able to
get shutter durations of about 4s. From there,
you can alter ISO and aperture to get shorter
or longer shutter speeds. Fireworks are also a
popular subject to shoot with similar settings.
Then comes astrophotography. This is taking
photos of the night sky with short enough
exposures of about 20s so the stars show no
recorded movement; or actually deliberately
using much longer exposures of 60 minutes or
more, that reveal the movement of the stars
overhead. Another trick is to take a back-to-back
sequence of about 15-30 shorter exposures
and blend the resulting images in Photoshop
to create a star trail effect. Another popular
effect is to shoot flames or other pyrotechnics
with longer shutter durations. The path of a ball
of burning steel wool in a metal egg-whisk as
it is spun around on a tether can create some
intense and surreal images. Always take care
with fire and pyrotechnics of any kind though. It’s
not worth getting burnt for a photo.
A sturdy tripod is a must
for anyone serious
about doing long
exposure photography.
Use a tripod
It goes without saying (but yes, we’re going to say it
anyway), that these kinds of shots demand the use
of a tripod to stop camera shake from ruining the
shots you have patiently waited minutes or even
hours for. A good, sturdy tripod is essential and
there are plenty to choose from to suit your pocket.
Try to avoid cheaper, light travel tripods for this kind
of work, since they may not be as sturdy as you
would hope. Even a light breeze might be enough
to cause it to flex or vibrate just enough to ruin the
shot. If you are using a heavy DSLR, then the rule
for these shots is to use a heavy tripod too.
www.bdmpublications.com
137
The humble cable release has come a long way from
its simple squeeze bulb arrangement. Now they
are electronic devices that can be programmed in
multiple ways to shoot sequences with user-controlled
exposure times and intervals between shots.
Cable release
Be aware that most cameras can handle exposures
as long as 30s. For longer exposures, you will
need to set the camera in bulb (B) mode. In bulb
mode, the shutter remains open only as long as
the shutter button is depressed. Once you let it
go, the exposure will end. You could stand there
for the duration of the shot with your finder on the
button or you could use a cable release device that
you can either lock during the exposure and unlock
when the time is up, or use a programmable one
with a timer that will do it all for you. These devices
are called intervalometers and range from simple
cabled devices with a single push-button activation
to complex wireless versions that you can control
from a distance.
Too bright
During the day, the problem is much greater as
you might imagine. On a bright sunny day, even
with your camera at its lowest ISO and smallest
aperture, you would struggle to get exposures
any slower than about 1/125s. Even if you had a
lens that could stop down to f/32, you would still
be looking at a shutter speed of about 1/60s. By
comparison, a daytime scene like a woodland
waterfall shrouded by trees has a much lower
amount of ambient light. Camera settings of
aperture f/9 and ISO 100 would yield a shutter
138
www.bdmpublications.com
speed around 1/10s.
That’s better but still
not what we would call a
long exposure. How do you
overcome that problem?
Going dark
To achieve long enough exposures during daylight
hours, you will need to use a Neutral Density (ND)
filter. It is referred to as ‘Neutral’ since it is optically
neutral in colour and shouldn’t create any colour
cast in your final shot. Cheaper versions may
not be as neutral as they claim, so beware of bad
quality knock-offs. The filters also come in various
densities. A 2-stop ND filter for instance will block
enough light to make an example 1/500s exposure
become a 1/125s exposure. A 10-stop filter would
make the same example a 2s exposure. An ND filter
is a bit like a welder’s mask for your camera lens,
in that it blocks a large amount of light entering the
camera and requires the use of longer exposure
times. ND filters come in two varieties depending
on your preference or pocket. The first and
cheapest method is to buy a screw-on type. The
downside to these is that you need to buy a filter
that matches the filter size diameter of the lens you
Whether it is the simple screw-on variety of ND filter
or the filter holder system that you use, these different
density filters are what you need to take your daytime
shutter speeds from fractions of seconds down to
seconds or even minutes.
are using. If you want to use more than one lens
with different size diameters, you would need a
filter for each size.
The alternative is to use a filter holder system
that you can screw on the front of any lens you
have provided you use an adaptor ring for each
size of lens you want to use. The holder uses
square or rectangular filters that simply slide into
place and can hold two or even three filters in one
go. Manufacturers such as Lee and Cokin make
a number of filters and filter holders for various
sized camera bodies and lens types.
LONG EXPOSURE PHOTOGRAPHY
Compare the two shots of the North coast of Tresco
shown here. The inset image uses a normal exposure
based on the ambient light settings for a fast shutter
of 1/400s. Adding a 10-stop filter and narrowing the
aperture allowed us to reach a 2 minute exposure time
in the same lighting conditions.
Daytime subjects
Just as with the night time alternatives, daytime
subjects are down to creative choice. A popular
subject for landscape photographers is to
photograph streams, rivers and coastal scenes
during the day with a 10-stop filter in place. This
gives you shutter speeds of around 4s. If you
are lucky enough to own a camera that offers
lower ISO speeds down around the ISO 31 area,
you can achieve shutter durations as long as 15s
even on a sunny day. We have some examples
taken on the moors as the sun was getting near
the horizon. With the aperture set at f/22 and
the ISO down to 50, when the 10-stop filter was
put in place, the exposure was almost 3 minutes
long. The clouds that were visible became wispy
trails in the sky thanks to the longer exposure.
Even city street scenes captured during the day
take on an unusual quality when pedestrians and
moving cars are reduced to ghosts as they pass
by. Even fairground rides become surreal objects
and their apparent speed defies the sense of
what is normal.
If you have never tried it, we can heartily
recommend giving it a go. Even if you don’t have
ND filters, you can still venture out at dusk and
at night and experience the fun of capturing long
exposure images. Q
www.bdmpublications.com
139
Selective focus
Where blur is beautiful
“The visual
quality of part
of a photograph
rendered out of
focus by a lens
is referred to as
ʻBokehʼ.”
S
elective focus is the term used to
describe the method by which you
render one part of your shot in sharp
focus and the area beyond and/or in front
increasingly out of focus. Any shot that has
a small area of sharp focus while everything
else is blurred, draws the eye to that focused
area. Typically it is achieved using lenses
with very large apertures of f/2.8 to f/1.2
140
www.bdmpublications.com
or even wider. The visual quality of part of a
photograph rendered out of focus by a lens
is referred to as ‘Bokeh’. Shots taken with
extremely large apertures enhance this effect
which is particularly noticeable in background
highlights. NASA once developed a lens that
had a maximum aperture of f/0.7 that was used
by the famous filmmaker Stanley Kubrick for
one of his early films. Q
A picture like this can be taken using a long
telephoto lens with a wide aperture. You can see
how shallow the depth of field is. The eye is drawn
to the rabbit as it is in sharpest focus. Both the
foreground and the background are blurred
SELECTIVE FOCUS
Below are some Lensbaby image examples. The Lensbaby optics are set at f/5.6 with a 50mm field of
view. You will need to adjust your shutter speed and ISO accordingly to correctly expose your images. It is
up to you to manually operate the ‘bellows’ to pick your point of focus and move it around the frame.
As is the way in Photography, any lens that
incorporates ‘fast glass’ usually comes at a
price. Prices can range from £75 for a basic
50mm f/1.8 prime lens up to £1700 for an
85mm f/1.2 prime and a poverty-inducing
£8000 for a 400mm f/2.8 super-telephoto lens.
Another specialist lens that allows you to tinker
with focus in interesting ways is the tilt-shift
lens. It is made up of a special mechanism that
can let the lens tilt up and down by about 7º
and also shift left and right (or up and down
if the lens is rotated) by about 12mm in each
The Nikon PC-E 85mm f/2.8D.
A great tilt-shift telephoto lens
but hard to find!
direction. A typical
tilt-shift lens will set
you back £1800.
The so-called tiltshift effect creates
images that look
like miniatures and
has become very
popular of late.
There are a series
of lenses made
by the company
Lensbaby who
manufacture effects
lenses. One such lens
is the Lensbaby Spark
that behaves a little bit
like a tilt-shift lens. It is cheap,
made of plastic and is operated
manually by hand. The front element is
mounted on a plastic bellows that you have
to squeeze in and out to focus and then
bend up and down, left and right, to move
that focus point around the frame. At £50
it is perhaps sitting at the far opposite end
of the scale from a proper tilt-shift lens
and it does take some getting used to. Its
cheapness does make it accessible and it
can be good fun once you’ve mastered the
slightly odd focus system.
In terms of the image quality, if you set
your expectations low enough, it will yield
Although not a true tilt-shift lens and with image quality
that can’t match up to a good prime lens, the Lensbaby
Spark is a fun effects lens that gives a great hands-on
experience when exploring the world of shallow depth of
field and selective focus photography.
some decent results. The effect it produces
could be described as ‘lo-fi meets tilt-shift’. You
could argue that the effect could be produced
in Photoshop, and you would be right, but it is a
very hands-on way of experiencing how selective
focus works. Q
www.bdmpublications.com
141
Explore the
macro world
Who needs outer space when you can photograph ʻnear spaceʼ ?
“As long as you
have your camera,
lens, tripod, a
tabletop and a light
source, you are
ready to begin.”
I
t comes down to personal preference
of course, but we would always
recommend beginning your macro
photography experience indoors. This
type of photography does not require
a lot of space. As long as you have your
camera, lens, tripod, a tabletop and a light
source, you are ready to begin. You’re in
comfortable surroundings and you aren’t
subject to the vagaries of the weather. You
can concentrate on learning the craft and a
cup of coffee isn’t far away either!
To be honest, anything and everything is fair
142
www.bdmpublications.com
game for macro photography. A lot of macro
work can be seen on picture sharing sites like
Flickr. The insect world is a popular subject for
macro photography, as is plant life. Browsing
through our images may give you inspiration.
We did once read somewhere about a piece of
advice given to budding macro photographers:
“If you’re struggling to find a subject, go look in
the fridge”. The chances are there will be some
fruit or vegetable in there that will happily
pose for your shots; something colourful with
interesting textures or maybe something more
minimalist and abstract. It’s up to you.
EXPLORE THE MACRO WORLD
www.bdmpublications.com
143
“Looking through the
viewfinder, it is now
a case of finding the
point of focus, the point
of greatest interest.”
All the images in this macro
guide were shot on a Nikon
D5500 with an AF-S 35mm
f/1.8 lens using a 12mm macro
extension tube.
144
www.bdmpublications.com
EXPLORE THE MACRO WORLD
1
2
3
4
Setting up
In the case of our example, we set up the camera
with a AF-S 35mm f/1.8 lens and 12mm macro
extension tube [1] on a tripod next to the dining
table. We had white card which was placed behind
it and set up two flashes controlled by a wireless
trigger [2], one directed at the subject and set
manually to 1/128 power [3], the other pointed
at the card to bounce some light from behind.
This one was set at 1/128 power. If you don’t have
off-camera flashes you could work on your kitchen
table with a desk lamp or by a bright window.
The camera was set in manual mode at 1/160th
of a second with an aperture of f/1.8 and an ISO
setting of 100 [4]. The macro lens is set to manual
focus. The combination of shutter speed and low
power flash meant that we could eliminate any
possible camera shake or movement in the subject.
A shutter-release cable is also a wise addition as it
means you don’t have to touch the camera and risk
it moving. At these magnifications, the slightest
movement will be noticeable.
For these particular shots we wanted to have
very shallow depth of field. We wanted to pick out
a very small area of focus and just concentrate on
that. You could go the other way, of course, and
set your aperture at f/16 or greater to resolve a
larger area of focus. After a bit of fiddling around
with the light positions, subject-to-lens distance
and composition of the flower, we could make a
start on the macro project.
Focus
Just to reiterate: make sure your lens is set to
manual focus. If left in auto-focus mode it may
struggle to lock on to your subject or may actually
decide to focus on to another area. Looking
through the viewfinder, it is now a case of finding
the point of focus, the point of greatest interest.
Since we are dealing with very shallow depth of
field, it is quite important to spend some time
getting this right. To help us, we used a very
bright torch to illuminate the subject so it can
be seen very clearly and manually fine-tune the
focus. It is always good practice to check your
focus after every shot because something might
5
have moved, albeit a tiny amount. At this kind of
magnification and at such a shallow depth of field,
that could ruin the shot.
Since you’re at home, you can download the
shots you’ve done so far and review them. We did
the same with the first set of shots taken. They
were OK, but not great. Something was missing,
some little detail to lift the shots. Staring out the
window, we noticed it was raining. Rain! There was
a lightbulb moment and we raided the cupboard
under the sink for an ancient, empty bottle of
detergent with a spray nozzle. We cleaned it out
and filled it with fresh water, set up another flower
and sprayed it liberally with water. As we sprayed,
the liquid started to ‘bead up’ forming globules
that clung to the petals and leaves of the flowers
[5]. Some dripped to the edges of the petals
and hung there. This is where it really took off.
Suddenly the flowers were looking much more
visually appealing. So we sprayed and clicked
away quite happily. At the end of the shoot, we
had a great collection of macro shots and a very
wet dining room floor! Q
www.bdmpublications.com
145
! )
' '!
)''!
$
#!
"$"
!
$
"$
#$ #
$$ # $! !#$ $
#
www.bdmpublications.com
!'')
(%(
)#$")
Creative Black & White
Action & Sports
Macro Masterclass
Pet & Animal Portraits
Stunning Beach Scenes
'
' '!
(&)
#$(("
G
G
G
G
!
#$$!!#
$!#!
"
#
!
$#"$
#" #$
#"
#" #"$#
!
$$!"
"
#"$$ $ "
#
PLUS
'
)' &)
(&#")
(&%$&%
$&)(#)" &)# )%()(#
(&%
)&$" $%%$
,19:98<>>?<39<?955?9227?986?7;/<+9:>?+=55?+;:(?;8?>*>:-?*>:7=;8?;/
&66=<=;895?=09,>7?4;8<9=8>6?+=<3=8?<3=7?21.5=49<=;8?9:>?
6>*=4>)? <?:>09=87?<3>?21:4397>:7?7;5>?:>72;87=.=5=<-?<;?6><>:0=8>
:>2:;614>6?186>:?5=4>84>?/:;0?
31<<>:7<;4()
<3>?71=<9.=5=<-?;/?<3=7?.;;(?986?=<7?4;8<>8<?/;:?+39<>*>:?21:2;7>)?
&8-?=09,>7?:>2:;614>6?;8?<3>?/:;8<?4;*>:?9:>?7;5>5-?/;:?6>7=,8
%!?##
##
>?96*=7>?955?2;<>8<=95?.1->:7?<;?43>4(?5=7<=8,?2:=;:?<;?21:4397>
21:2;7>7?986?9:>?8;<?:>2:>7>8<9<=*>?;/?4;8<>8<)
/;:?4;8/=:09<=;8?;/?94<195?4;8<>8<)?&55?>6=<;:=95?;2=8=;8?3>:>=8?=7
&55?
?986?.594(?6;,?5;,;7?986?.:986=8,?9:>??"
""?594(?
;,
1.5=73>6?.-!? 92>:41<?$=0=<>6?
<39<?;/?<3>?:>*=>+>:?#?97?98?=86=*=6195?#?986?=7?8;<?:>2:>7>8<9<=*>?;/
>6=9?$=0=<>6?986?:>2:;614>6?+=<3?2>:0=77=;8)
=,=<95?6=7<:=.1<=;8?.-!?=8=;)4;0???????????????????????????????????????????????????????????????????????????????????????????????????????????????????????????????????????????????????????????????????????????????????????
<3>?21.5=73>:?;:?98-?;/?=<7?9//=5=9<>7)?3>:>/;:>?<3>?21.5=73>:?3;567
:=4>7'?=8<>:89<=;895?9*9=59.=5=<-'?:9<=8,7'?<=<5>7?986?4;8<>8<?9:>?
?"
""? 92>:41<?$=0=<>6?&55?:=,3<7?:>7>:*>6)?%;?29:<?;/?<3=7?
8;?:>72;87=.=5=<-?=8?:>,9:6?<;?>6=<;:=95?;2=8=;8?986?4;8<>8<)
71. >4<?<;?4398,>)
21.5=49<=;8?09-?.>?:>2:;614>6?=8?98-?/;:0'?7<;:>6?=8?9?:><:=>*95
3=7?=7?98?=86>2>86>8<?21.5=49<=;8?986?97?7143?6;>7?8;<?
&55?=8/;:09<=;8?+97?4;::>4<?9<?<=0>?;/?21.5=49<=;8)?
;0>?4;8<>8<
7-7<>0?;:?=8<>,:9<>6?=8<;?98-?;<3>:?21.5=49<=;8'?69<9.97>?;:?
8>4>779:=5-?:>/5>4<?<3>?*=>+7?;:?;2=8=;87?;/?<3>?2:;614>:7?;/?
09-?39*>?.>>8?2:>*=;175-?21.5=73>6?=8?;<3>:?*;510>7?;:?<=<5>7)
4;00>:4=95?2:;,:907?+=<3;1<?<3>?> 2:>77?+:=<<>8?2>:0=77=;8?;/
9227?;:?2:;614<7?4;8<9=8>6?+=<3=8)?3=7?21.5=49<=;8?=7?8;<
<3>?21.5=73>:)?86>:?8;?4=:4107<984>7?73;156?<3=7?21.5=49<=;8?986
>86;:7>6?;:?977;4=9<>6?=8?98-?+9-?+=<3?%=(;8?;:?98-?977;4=9<>?
=<7?4;8<>8<7?.>?:>7;56'?5;98>6?;1<?;:?17>6?=8?98-?/;:0?.-?+9-?;/
;:?9//=5=9<>?4;0298-?;:?98-?;<3>:?23;<;,:923=4?> 1=20>8<?
>,=7<>:>6?=8?8,5986??95>7?%;!?
<:96>?+=<3;1<?<3>?21.5=73>:7?+:=<<>8?2>:0=77=;8)?3=5>?+>?2:=6>?
0981/94<1:>:)?&55?4;2-:=,3<7'?<:96>09:(7?986?:>,=7<>:>6?<:96>09:(7
;1:7>5*>7?;8?<3>? 195=<-?;/?<3>?=8/;:09<=;8?+>?2:;*=6>'? 92>:41<
/;:?<3>?:>72>4<=*>?4;021<>:?7;/<+9:>?986?39:6+9:>?4;0298=>7?9:>
%%& %&$?$ %
%?? 92>:41<?$=0=<>6?397?098-?,:>9<
$=0=<>6?:>7>:*>7?<3>?:=,3<?8;<?<;?.>?3>56?:>72;87=.5>?/;:?98-?
94(8;+5>6,>6)?>5>*98<?,:923=4?=09,>:-?:>2:;614>6?+=<3?
21.5=49<=;87?986?955?9:>?9*9=59.5>?/;:?5=4>87=8,?+;:56+=6>)?;:?0;:>
0=7<9(>7?;:?=89441:94=>7?/;186?+=<3=8?<3>?<> <?;/?<3=7?21.5=49<=;8)
4;1:<>7-?;/?.:9867?986?2:;614<7)?
=8/;:09<=;8?>09=5!? 90>7.6021.5=49<=;87)4;0
1>?<;?<3>?89<1:>?;/?<3>?<>43?=8617<:-'?<3>?21.5=73>:?4988;<?
7?;025><>?98195?
>:=>7!