/


Автор: Morrall J.H.
Теги: magazine crochet magazine homespun crochet
ISBN: 978-1-922510-07-5
Год: 2023


Текст
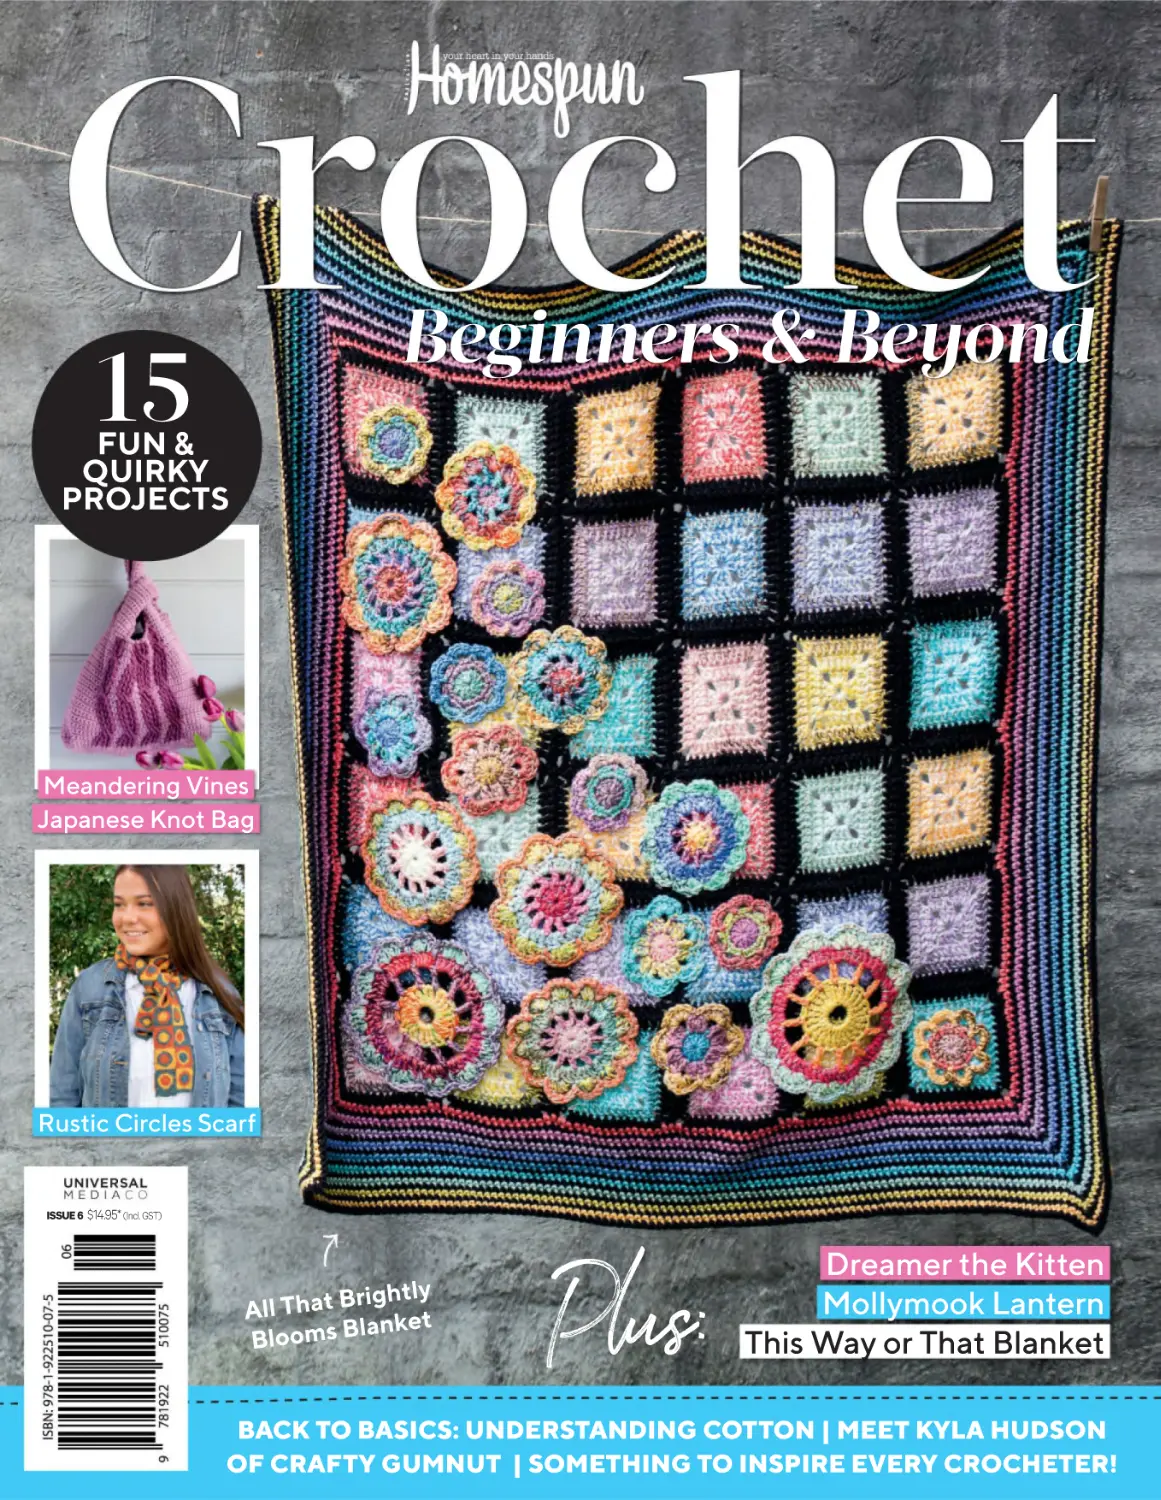
                    Beginners & Beyond

15

FUN &
QUIRKY
PROJECTS

Meandering Vines
Japanese Knot Bag

Rustic Circles Scarf

ISSUE 6

$14.95* (Incl. GST)

rightly
All That B
lanket
Blooms B

Plus:

Dreamer the Kitten
Mollymook Lantern
This Way or That Blanket

BACK TO BASICS: UNDERSTANDING COTTON | MEET KYLA HUDSON
OF CRAFTY GUMNUT | SOMETHING TO INSPIRE EVERY CROCHETER!

Let’s Get Hooking
At Crochet Australia we love helping you with your crochet journey –
choosing your colours, kitting you up with the right tools and learning new skills.
LEARN THE BASICS
OF CROCHET

LEARN NEW SKILLS
& TECHNIQUES

SHOP OUR RANGE

WIDE SELECTION OF
YARN & THREAD
metallic, cotton, silk,
rayon, wool and more
EXTENSIVE RANGE
OF TOOLS:
crochet hooks, tatting
shuttles, knitting needles
and accessories
PATTERN BOOKS:
crochet, knitting, tatting,
hardanger, candlewicking
and macrame
WORKSHOPS, LESSONS
AND PATTERN HELP

ses
nline Clas
Monthly O

Annual Le
arn-a-long

Crochet Retreats
- QLD sold out

Crochet Australia
Events in 2024
www.crochetaustralia.com.au
Deliveries

ID
AUSTRALIA W
Order online,
phone, mail
or call in!

E

07 5472 8586
info@crochetaustralia.com.au
1563 Yandina-Coolum Rd Yandina, QLD
www.crochetaustralia.com.au
Open Monday-Friday 9.00am - 3.00pm
1st Saturday of each month 9.00am - midday
1

Popular Kits in 2023 New ones coming
in 2024

Crochet
Beginners and Beyond

Hello from Jess
Hello and welcome to Homespun Crochet Beginners & Beyond issue #6!
I can’t believe that this is my third issue as Editor already! Where has that
time gone?

Managing Editor Jessica Harlow Morrall
Technical Editor Tegan Shepherdson
Proofreader Megan Fisher
Designer Kate Atkinson
Photography Ken Brass, Getty Images
Stylist Sandra Hinton
Advertising
Rob Jordan (NSW and Qld) ph: (02) 9887 0359,
fax: (02) 9805 0714, mob: 0411 424 196
Advertising Production Stephanie Brais
Associate Publisher Emma Perera
Subscriptions & Mail Orders 1300 303 414 or +61 2 9887 0317
Editorial Enquiries jhmorrall@umco.com.au
Advertising Enquiries rjordan@umco.com.au
Homespun Crochet, Beginners and Beyond is published by Universal Media Co.
Unit 5, 6-8 Byfield Street, North Ryde NSW 2113.

Since working on the magazine, I’ve met lots of amazing designers and
some truly incredible people. What a talented bunch we have in our
crochet community!
There is a mix of projects for you to make in this issue, including bags, a hat
holder and sunglasses case, gorgeous blankets and a stunning crochet
lantern! There are also projects for bubs and kids, including a mix of adorable
amigurumi, softies and more!
If you’re an Australian crochet designer and would be interested in
submitting your own pattern to our magazine, please get in touch. We also
love mail, so if you’ve created one of the projects from any of our issues, or
just want to have a yarn (get it?), email me at jhmorrall@umco.com.au
You can find me at Knits by Jessica Jade
@knitsbyjessicajade on Instagram,
Facebook and TikTok
www.knitsbyjessicajade.com
Happy crocheting,

Jess x

Phone: (02) 9805 0399, Fax: (02) 9805 0714.
Melbourne office, Unit 4, Level 1, 150 Albert Road, South Melbourne Vic 3205.
Phone: (03) 9694 6444, Fax: (03) 9699 7890.
Printed by: Times Printers, in Singapore.

Chairman/CEO Prema Perera
Publisher Janice Williams
Chief Financial Officer Vicky Mahadeva
Associate Publisher Emma Perera
Circulation Business Development Manager Mark McTaggart
Distributed by: Gordon and Gotch: 1300 650 666
NZ Distributors:
Needlecraft: 0800 909 600
Website: www.needlecraft.co.nz
Gordon and Gotch New Zealand: (09) 979 3018
UK Distributors:
Manor House Magazines: +44 (0) 167 251 4288,
info@manorhousemagazines.co.uk
USA Distributors:
Brewer Quilting & Sewing Supplies
Phone: 630 820 5695 / 800 676 6543
Email: info@brewersewing.com
Subscriptions phone 1300 303 414
This book is copyright. Apart from any fair dealing for the purpose of private study,
research, criticism or review as permitted under the Copyright Act, no part may be
reproduced by any process without written permission. Enquiries should be addressed
to the publishers. The publishers believe all the information supplied in this book to be
correct at the time of printing. They are not, however, in a position to make a guarantee
to this effect and accept no liability in the event of any information proving inaccurate.
Prices, addresses and phone numbers were, after investigation, and to the best of
our knowledge and belief, up to date at the time of printing, but the shifting sands of
time may change them in some cases. It is not possible for the publishers to ensure
that advertisements which appear in this publication comply with the Competition
and Consumer Act 2010 (Cth) and the Australian Consumer Law. The responsibility
must therefore be on the person, company or advertising agency submitting the
advertisements for publication. While every endeavour has been made to ensure
complete accuracy, the publishers cannot be held responsible for any errors or omissions.
*Recommended retail price
ISBN 978-1-922510-07-5
Copyright © Universal Magazines MMXXIII
ACN 003 026 944
www.umco.com.au
Please pass on or recycle this magazine.

a u s t r a l i a n

We are a member of:

4 | HOMESPUN Crochet

omespun
your heart in your hands

Banksia Yarns
SINCE 2012

OPEN MON-FRI 9:30AM-5PM
SAT 9
9:30AM-1PM
30AM 1PM
CL
LO
OS
SED S
SUN AND PUB HOL
Groups and
d bus
bu tours welcome – by appointment

www.banksiayarns.com.au
3c East Market St, Richmond, NSW, 2753
T: 02 4505 1615 E: shoponline@banksiayarns.com.au

CONTENTS

14

Mollymook Lantern

22

Bobble Bag

30

Rustic Circles Scarf

OJECTS

EASY PR
ERE WITH OUR
H
T
R
A
ST
S
R
E
N
BEGIN
EASY

EASY

ADVANCED BEGINNER ADVANCED BEGINNER

82

112 A Little Bunny
Named Beau

60

Dashi Bag Keeper

6 | HOMESPUN Crochet

Strawberries &
Cream Tic Tac Toe

68

This Way or
That Blanket

36

Meandering Vines
Japanese Knot Bag

44

Dreamer the Kitten

52

Hat Holder and
Sunglasses Case

90

Customised Christmas
Decorations

96

All That Brightly
Blooms Blanket

102 Patches the Dog

ARTICLES
8
76
119
132
134
135
136
108 Crocheted Market Bag

124 Rainbow Unicorn Hugs

Crochet Guild
Australia Inc
Understanding
Cotton
Getting to Know:
Kyla Hudson
Yarn Weights
Common Crochet
Stitches
Common
Terminology
Crochet Hook
Conversion Chart

HOMESPUN Crochet | 7

Learn,
Create, Inspire,
Connect,
Teach

AUSTRALIA INC
WORDS BY JESSICA HARLOW MORRALL

8 | HOMESPUN Crochet

Participants in Dedri Uys classes
(Ayu Srimoyo Photography)

Crochet Guild Australia Inc started as a
flicker of an idea in 2018 between four avid
crocheters and business women. They got
together and decided that Australia needs
to collectively grow, record crochet history
and promote the art of crochet. Following
the Crochet Guild of America, the ladies
created a framework for an Australian
Guild, which formally became a non-forprofit by late 2019. Covid disrupted their
first planned conference, so the group only
physically connected in 2021 at their first
official conference on the Sunshine Coast
in Queensland.
The Guild aims to help Australian
crocheters learn more about their craft
by inspiring, connecting, educating and
sharing knowledge within Australia’s
crochet community. Their ‘Teachers
Training’ both online and in person has
given crocheters the opportunity to take
that next step into teaching themselves.
“It’s not a course to teach others how to
crochet, but how to guide with all things
teaching in the craft, such as how to plan a
lesson in person, online or to children with
a learning disability, left vs right handers,
how to get that professional finish, setting

“With our AGM in August, there are
some fresh new faces to the team
for planning next years’ events.
Look out for advertising on our
Facebook and Instagram pages
@crochetguildau as well as the chat
group for state based events and
connections – see you there!”

HOMESPUN Crochet | 9

Yarn from a stall holder at the 2023
conference (Ayu Srimoyo Photography)

a safe, inviting environment, planning, and
writing beginner projects,” President, Lynley
Buckley, explains. Their education team is
currently formulating new advanced classes
and exciting content for coming years.
The Guild holds a monthly online ‘Show
and Share’ for members from beginners
to advanced levels where they connect,
show their work and help each other
with whatever they need. “They are so
much fun! We have members in the USA,
Nealand, Switzerland and Canada joining
in for a laugh and chat with friends,” Lynley
says. The group also holds interviews with
‘Crochet Rockstars’ (as they like to call
them), which have included Jenny King,
Erinna Lee, Abbeymade, Shelley Husband,
Dedri Uys, Petra Creutziger and the Editor
of Simply Crochet, Sara Hutchinson, in

10 | HOMESPUN Crochet

the UK. “Our YouTube channel, mostly
private for member access only, has all our
interviews for members who were unable
to attend. Our website has members only
free patterns, past newsletters to read and
download, events and access to members
only videos,” Lynley adds.
Their recent and first National Crochet
Conference was a huge success! There
were over 35 workshops including hosts
Wendy Thompson from Zigz Mosaic,
Shelley Husband, Susannah Kate from
Peppergoose, Petra Creutziger from
Black Sheep Crochet, Abbeymade,
Jenny King and the fabulous Dedri
Uys from Look at What I Made. There
were 28 speaker presentations, a yarn
hall filled with yummy squishy yarn, a
great welcome drinks event hosted by

premier sponsor, Crochet Australia, and
a gala dinner and fashion show! “It was
truly memorable and our members will
continue to benefit from this with speaker
presentations being uploaded to our
members YouTube channel,” Lynley says.

Teachers Training in
Sydney - enjoying
the connection and
class content

ABOVE: Members taking advantage of the skein
winding area at the National Crochet Conference 2023

ABOVE: Jenny King, and in equally bright colours, Barbara Weber on the
left wearing a Jenny King original design at the 2023 conference

ABOVE: Zigz crochet class

HOMESPUN Crochet | 11

Wendy Thompson from Zigz
Crochet with one of her classes

ABOVE: 2023 Conference Organiser, Samantha
MacNally, with President, Lynley Buckley
ABOVE: President, Lynley Buckley, with amigurumi
designer, Erinna Lee, from The Little Hook Crochet

The Guild is all about inspiring the younger
generations. They have been working
on some new content and have reduced
membership prices to encourage juniors
and students to join, as well as reaching
into schools for some activities and
competitions. “We also love promoting new
crochet designers because, let’s face it,
we love seeing what our tribe are doing all
around the world and in our own backyard,
beautiful Australia,” Lynley adds.

12 | HOMESPUN Crochet

WANTING TO JOIN?
crochetguildaustralia.org.au/join-us
Website: crochetguildaustralia.org.au
Facebook and Instagram: @crochetguildau
Community Chat: www.facebook.com/groups/212483094281482
Email: contact@crochetguildaustralia.org.au

www.foxscottage.co.nz

Quilting and Wool

Shop 5, Southern Cross Complex
State Highway One, Foxton 4814
cnr Purcell St & S.H.1
(06) 363 5880
shop@foxscottage.co.nz

14 | HOMESPUN Crochet

PROJECT

01

INTERMEDIATE

Mollymook

LANTERN

LOUISE KENDALL (RED HAIRED AMAZONA CROCHETS)

“This beautiful boho lantern is named after my favourite summer
destination, Mollymook, on the NSW South Coast. Fill your summer
evenings with colour and light. Hang this gorgeous lantern out in the
garden, under the trees, on a garden patio or indoors to add a spritz
of colour. Add a battery operated tealight inside and enjoy the soft
glow as the night sets in.
This colourful, hexagon lantern can be crocheted using the
suggested colour combination, your own favourite bright colours or
in soothing neutral shades.” – Louise

Instagram: @red.haired.amazona.crochets | Website: redhairedamazona.blogspot.com.au

HOMESPUN Crochet | 15

16 | HOMESPUN Crochet

YARN

NOTES
ES

• Scheepjes Catona 4 ply 100% mercerised
cotton 50g/125m: 3 balls Snow White
(106), 1 ball each of colours Lemon
Chiffon (100), Hot Red (115), Tulip (222),
Powder Pink (238), Capri Blue (261),
Crystalline (385), Rich Coral (410), Jade
(514), Freesia (519)
• Milford Metallic polyester yarn
20g/170m: 1 ball of Gold

This lantern
ntern is constructed with 20
whole hexagons, 4 lacey hexagons
and 8 half hexagons.
Make 4 of each colourway of
hexagons
ons 1-5 as ‘whole hexagons’ =
20 in total.
otal.
Make 2 of each colourway of
hexagons
ons 1-4 as ‘half hexagons’ = 8
in total (see Table 1).
Make 4 lacy hexagons. These are
crocheted
ted in Snow White for all
except rnd 4, instead make one each
with Rich
ch Coral, Jade, Crystalline
and Freesia.
eesia. (see Table 2).

EQUIPMENT
•
•
•
•
•
•

3mm crochet hook
3.5mm crochet hook
Darning needle
200mm Arbee galvanised metal ring
Stitch markers
Battery operated tealight (optional)

CROCHET
CHET TERMS
beg – beginning
blo – back
ack loop only
ch – chain
ain
dc – double
ouble crochet
fo – fasten
ten off
htr – half
alf treble crochet
mr - magic
agic ring
rep – repeat
epeat
rnd/s – round/s
sk – skip
p stitch
sl st – slip
lip stitch
sm – stitch
itch marker
st/s – stitch/es
titch/es
tr – treble
ble crochet

TENSION/GAUGE
Each hexagon should measure 9.5-10cm
across at the widest points

FINISHED MEASUREMENTS
Approx. 61cm long x 20cm wide

STITCH PATTERN
spiked htr: yo, insert hook between 2 tr
st cluster in rnd 2, pull up a loop, yo, pull
through all loops.

Table 1
Hexagon 1

Hexagon 2

Hexagon 3

Hexagon 4

Hexagon 5

Round 1

Capri Blue

Lemon Chiffon

Powder Pink

Freesia

Hot Red

Round 2

Lemon Chiffon

Powder Pink

Crystalline

Rich Coral

Tulip

Round 3

Tulip

Rich Coral

Jade

Powder Pink

Lemon Chiffon

Round 4

Rich Coral

Hot Red

Gold

Crystalline

Jade

Round 5

Snow White

Snow White

Snow White

Snow White

Snow White

Table 2
Lacy Hexagons
Round 1

Snow White

Round 2

Snow White

Round 3

Snow White

Round 4

Rich Coral, Jade, Crystalline, Freesia

Round 5

Snow White

HOMESPUN Crochet | 17

18 | HOMESPUN Crochet

Photo 1

Photo 2

Photo 4

PATTERN
WHOLE HEXAGONS
Make a mr and ch 3 (counts as tr)
Round 1: 11 tr into ring, sl st to top of ch 3, fo
(12 tr) See Photo 1.
Round 2: join next colour to any tr, ch 3, tr
in same st, 2 tr in each st around, sl st to top
of ch 3, fo (24 tr) See Photo 2.
Round 3: join next colour between last tr
and ch 3 of rnd 2, ch 3, 2 tr in same space,
*sk 2 sts, 3 tr between next 2 sts, rep from *
11 times. Sk 2 sts, sl st to top of ch 3, fo (36 tr)
See Photo 3.
Round 4: join next colour in first tr of
any 3 tr cluster, ch 1, dc in same st, dc in next
2 sts, *spike htr between 2 tr cluster in rnd 2,
dc in next 3 sts, rep from * 11 times. Spike htr,
sl st to dc, fo (48 sts) See Photo 4.
Round 5: join next colour in any spike htr,
ch 3, *ch 2, tr in same st, tr in next 8 sts, rep
from * 5 times, ch 2, tr in same st, tr in next
7 sts, sl st to top of ch 3, fo and weave in all
ends (66 sts) See Photo 5.

Photo 3

Photo 5

HALF HEXAGONS

LACY HEXAGONS

Make a mr and ch 3 (counts as tr)
Row 1: 4 tr into ring, fo (5 tr)
Row 2: join next colour to top of ch 3 of row
1, ch 3, tr in same st, 2 tr in each st, fo (10 tr)
Row 3: join next colour to top of ch 3 of row
2, ch 3, tr in same st, sk 1 st, *3 tr between
next 2 sts, sk 2 sts, rep from * 4 times. Sk 1 st,
2 tr in top of last st, fo (16 tr)
Row 4: join next colour to same st as ch 3
of row 3, ch 3, dc in top of ch 3 of row 3, dc
in next st *spike htr in between 2 tr cluster
in row 2, dc in next 3 sts, rep from * 4 times.
Spike htr, dc in next st, spike htr to last st of
row 3, fo (21 sts)
Row 5: join next colour to first st of row 4,
ch 3, tr in same st, tr in next 7 sts, ch 2, tr in
same st, tr in next 8 sts, ch 2, tr in same st, tr
in next 6 sts, tr in same st, fo and weave in all
ends (30 sts)

Make a mr and ch 3 (counts as tr)
Round 1: 11 tr into ring, sl st to top of ch 3
(12 tr)
Round 2: ch 4 (counts as tr and ch 1), *tr, ch
1, rep from * 11 times. Sl st to 3rd ch of ch 4
(24 sts)
Round 3: ch 3, 2 tr in same st, *sk ch 1 sp, 3
tr in next st, rep from * 11 times. Sk ch 1 sp, sl
st to top of ch 3, fo (36 sts)
Round 4: join next colour in first tr of any
3 tr cluster, ch 1, dc in same st, 2 dc, *spike
htr into the ch 1 sp in rnd 2, dc in next 3
sts, rep from * 11 times. Spike htr, sl st to
dc, fo (48 sts)
Round 5: join next colour in any spike htr,
ch 5 (counts as tr and ch 2), tr in same st,
**ch 1, *sk st, tr in next st, ch 1, rep from * 3
times. Sk st, [tr, ch 2, tr] in same st, rep from
** 5 times. Ch 1, *sk st, tr in next st, ch 1, rep
from * 3 times. Sl st to top of ch 3, fo and
weave in all ends (66 sts)

HOMESPUN Crochet | 19

FRINGE
Cut 2 pieces of yarn 8cm long for each st
around the bottom. This will create a 3.5cm
fringe with allowance for trimming. Place
the lantern so that the wrong side is facing
(right side is down). Insert hook from the
wrong side of st. Fold 2 pieces of yarn in
half, place the loop over the hook, and pull
through approx. halfway. Pull the yarn ends
through the loop and carefully pull the
tails down in the direction they will hang
until the knot is firm. Continue for each st
around. Hang and if necessary, trim ends
evenly. See Photo 7.

Template

HANGING CHAINS
The hanger is made of 2 long chains.
Each end of the chain is attached to four
sides of the top ring. Measure 4 points
equidistant from each other and mark with
a sm. With the 3mm crochet hook, attach
Snow White at the point of one of the
sm and ch 51. Add sm in 51st ch, then ch
50. Join with a sl st to the st where you’ve
added a sm on the opposite side of the
metal ring, fo. Turn your ring 90 degrees
and rep for the other sm.

Photo 6

TEALIGHT HOLDER
(OPTIONAL)

Photo 7

TO MAKE UP
Stitch hexagons and half hexagons together
in the rectangle grid pattern. See Template.
Whip stitch the two short ends of the
rectangle together using Snow White.
Decide which open end you would prefer to
be the ‘top’ end and with a 3.5mm hook, dc
evenly around for one rnd. Do not fo.

20 | HOMESPUN Crochet

To attach the 200mm metal ring to the
top end, ch 1, then attach the metal ring
by crocheting dc around the metal ring in
each st around. Once you have crocheted
around, sl st to beg st, fo and weave in
ends. See Photo 6. Now work on the
‘bottom’ end of the lantern and dc evenly
around for two rnds, fo.

Using Snow White make a mr.
Round 1: 6 dc into ring (6 dc)
Round 2: 2 dc in each st around (12 dc)
Round 3: *2 dc in next st, dc in next st, rep
from * until end of rnd (18 dc)
Round 4: *2 dc in next st, dc in next 2 sts,
rep from * until end of rnd (24 dc)
Round 5: *2 dc in next st, dc in next 3 sts,
rep from * until end of rnd (30 dc)
Round 6: working blo, dc in each st around
(30 st)
Rounds 7-12: dc in each st around, fo at
end of rnd 12 (30 sts).
Mark 4 places equally around the edge of
the cup with sm. Starting at 1st sm, join yarn
and ch 50, fo leaving a 10cm tail. Rep for
each sm.
With the cup inside the lantern, tie each tail
end to the same place where each ch of the
hanger starts from. Once tied securely, sew
in all your ends.
If your project is a little wrinkled, hang
and use a handheld steamer to help you
smooth it out. Only use battery operated
tea lights. Do not use anything that has an
open flame, or all your hard work will quickly
go up in smoke!

Fibre Frolic is a boutique yarn shop located in Kurrajong Village,
NSW, where you will ȴnd a beautiful selection of Australian
hand-dyed yarns, quality commercial yarns, knit and crochet
accessories, and giftware.
We also run classes, Saturday Crafternoons and Knit Nights
with local cafes.
We look forward to welcoming you in store or you can shop online.

fibrefrolic@gmail.com | www.fibrefrolic.com.au |

@fibrefrolic

22 | HOMESPUN Crochet

PROJECT

02
INTERMEDIATE

Bobble

BAG

JAY CRITCHLEY (J MADE CREATIONS)

“The fun and functional bobble bag is a quick whip up in a bulky
yarn. If you don’t have bulky yarn, two strands of chunky yarn work
just as well, as shown in the pink and magenta bag. This sturdy
creation is not only fun to make but is a great piece for you to take
on a night out. Share your makes by tagging me on Instagram
@jmadecreations, I would love to see your bobble bag!” – Jay

Instagram: @jmadecreations | Website: www.jmadecreations.com.au | Email: info@jmadecreations.com.au

HOMESPUN Crochet | 23

24 | HOMESPUN Crochet

YARN
• Sirdar Bigga super
chunky 50% acrylic 50%
wool 100g/40m: 5 balls
each of colour Light
Purple (054)
OR
• Fiddlesticks Superb big
chunky 100% anti pilling
acrylic 100g/80m: 6
balls of colour Bright
Pink (70812) or Fuchsia
(70813)

EQUIPMENT
•
•
•
•
•
•
•

•

8mm crochet hook
10mm crochet hook
6 locking stitch markers
Large eye darning or
wool needle
Felt for pocket and lining
Needle and thread to
match felt lining
1m (or up to 120cm)
of handbag chains or
leather from any good
craft store, depending
on your handle length
preference
38mm snap circle
or solid rings from
hardware or craft stores

FINISHED
MEASUREMENTS
Approx. 18cm wide x 32cm
long x 17cm high

NOTES
The bobble bag is made in
one piece and then lined
with good quality felt, which
is hand sewn in. For the
purple bag, as the yarn is
super bulky, one strand is
used, and for the pink and

fuchsia bags, two strands
are used to create the
textured bobble. Ensure
the fabric for the bag is
robust enough to carry
those essential items. Chain
loosely for the foundation
chain as you will be creating
the bobble in the chain,
which sets the pattern. If it’s
easier, use a 12mm hook to
work the foundation chain
and then change to the
10mm hook. Hunt around
for bag hardware suppliers
to find a unique handle you
love, or repurpose handle
from old bags or shop finds.
You could even make a
Romanian handbag cord as
your handle.

STITCH PATTERN
bobble 5 stitch: yo hook,
insert hook into st and pull
up a loop, yo, pull through
2 loops, rep in the same
st until you have 5 loops
on your hook, yo, pull
through all 5 loops.

CROCHET TERMS
bo – bobble 5 stitch
ch – chain
dc – double crochet
dc2tog – double crochet
2 sts together
dc3tog – double crochet
3 sts together
fo – fasten off
rep – repeat
rnd/s – rounds
sl – slip stitch
st/s – stitch/es
yo – yarn over

HOMESPUN Crochet | 25

26 | HOMESPUN Crochet

PATTERN

EDGING

Using a 10mm hook, loosely ch 19 (if using
Fiddlesticks yarn, hold 2 strands)
Row 1: *bo in the 2nd ch from hook, dc in
next 3 sts, rep from * 3 times, bo in last st, sl
in same st, ch 1 and turn (18 sts)
Row 2: dc in each st across, ch 1 and turn
(18 sts)
Row 3: dc in next 2 sts, bo in next st, *dc in
next 3 sts, bo, rep from * 3 times, dc in next
3 sts, ch 1 and turn (18 sts)
Row 4: rep row 2 (18 sts)
Row 5: *bo, dc in next 3 sts, rep from * 4
times, bo, dc in next 2 sts, ch 1 and turn (18 sts)
Row 6: rep row 2 (18 sts)
Note: Every even numbered row is dc in
each st across, ch 1 and turn (18 sts).
Keeping pattern correct, rep rows 3–5 until
the work measures approx. 62cm from the
start of the work, ending with a row 5. Do
not ch 1 and turn. Do not cut yarn.
Place stitch markers at each end of rows 10,
20 and 30 as these provide a guide for the
base of where to fold during construction
of the bag.

With wrong side facing, dc around the edge
of the bag as follows: going back on your
short row, dc 3 in same st (this forms the
corners of your bag). dc in next 16 sts, dc 3
in corner. Working along the long side of
the bag, dc 51 sts. Note: it’s okay to have 1 or
2 more sts here, as long as you are framing
your work and edging your bag nicely.
Having 5 or more sts will give your bag a
ruffled edge that will not sit flat. dc 3 in next
corner, dc in next 16 sts, dc 3 in corner, dc 51
sts along the last length of your bag, neatly
finishing off the edging. You should have
146 sts or so around your bag.

TRIANGLE SIDES (MAKE 2)
Using an 8mm hook, ch 15 (if using
Fiddlesticks yarn, hold 2 strands)
Row 1: dc in 2nd ch from hook and in each
ch across, ch 1 and turn (14 sts)
Row 2: dc2tog, dc in next 10 sts, dc2tog,
ch 1 and turn (12 sts)
Row 3: dc2tog, dc in next 8 sts, dc2tog, ch 1
and turn (10 sts)

HOMESPUN Crochet | 27

Photo 1

Row 4: dc2tog, dc in next 6 sts, dc2tog, ch 1
and turn (8 sts)
Row 5: dc2tog, dc in next 4 sts, dc2tog, ch 1
and turn (6 sts)
Row 6: dc in next 6 sts, ch 1 and turn (6 sts)
Row 7: dc2tog, dc in next 2 sts, dc2tog, ch 1
and turn (4 sts)
Row 8: dc in next 4 sts, ch 1 and turn (4 sts)
Row 9: dc2tog twice, ch 1 and turn (2 sts)
Row 10: dc2tog and tie off leaving a tail to
sew neatly in when attached to the bag (2 sts)

Photo 2

your felt. Stitches closer together will
ensure longevity of the lining. If you wish
to have a pocket, cut another piece of felt
22cm x 12cm to sew into your bag approx.
24cm below your front bag flap. This
placement will depend on your personal
preference. This is a quick lining that is
flexible for the bag, however, experienced
sewists may wish to line their bag with a
more robust lining and interfacing.

CONSTRUCTION
LINING
Using a good quality felt, cut a piece 62cm
x 28cm for the wool (if using Fiddlesticks
yarn, cut a piece 62cm x 27cm), measuring
that it will fit on the inside border of your
edging. With the wrong side facing, hand
sew a blanket, running, back or needle turn
appliqué stitch with thread that matches

28 | HOMESPUN Crochet

The easiest way to construct your bag is to
choose your favourite edge that you want
on the outside flap. Use your triangles as
a guide to fold the end you want on the
inside of your bag to the top of your triangle
and to the bottom base edge of your bag.
Use locking stitch markers to hold the
triangles in place whilst you crochet the

bag together. See Photo 1 and 2.
Using an 8mm hook (if using Fiddlesticks
yarn, hold 2 strands), starting at the base and
working through both loops of your edging
of your bag and the left side of the triangle,
dc 2 in the corner and dc 11 around the edge
evenly to the top of the triangle/edge of the
bag. At the next corner, dc in corner, then dc
on the longer side of your bag. Then work
evenly down to the base of the bag, dc 11
around the edge, dc 2 in next corner, dc 14
sts evenly along the base, sl to join (42 sts).
Rep for the other side of the bag. Securely
sew in the ends.
Attach or sew rings to the top corners of
the bag and attach handles securely. You
could possibly add a magnetic attachment
or closure if you wanted to secure your
goodies in your bag. Enjoy!

QUALITY AUSTRALIAN
USTRALIAN
& IMPORTED
ED YARNS
HABERDASHERY
RY | EXTENSIVE
RANGE OF KNITTING
TING & CROCHET
PATTERNS AND BOOKS

Stocking an extensive range of quality Australian and
imported yarns (wool, blends, cottons, acrylics, alpaca,
mohair etc). Large variety of haberdashery including
Guthermann threads, zips, buttons. Stocking DMC stranded
cotton and Perle, DMC tapesty wool, Appleton crewel wool,
Madeira silks, Aida cloth, linen, canvas, tapestry, crosstitch
and embroidery kits. A large variety of brands in needles,
hooks, circulars, bags, cases and other accessories.

Free domestic freight on order over $100

MAIL & PHONE ORDERS (08) 9335 4455
ADDRESS 3/19 Collie Street, Fremantle
OPEN Monday-Saturday 10am-5pm

EMAIL sales@woolshop.com.au

www.woolshop.com.au

30 | HOMESPUN Crochet

PROJECT

3

INTERMEDIATE

Rustic Circles

SCARF

JULIE HARRISON (LITTLE WOOLLIE MAKES)

This soft and cosy crocheted scarf worked
in genuine Irish Donegal wool will keep the
winter chills out on long country walks.

Website: littlewoolliemakes.com.au | Instagram: @littlewoollie

HOMESPUN Crochet | 31

32 | HOMESPUN Crochet

YARN
• Calor Yarns Soft Donegal 100% merino
100g/380m: 50g each of colours Goldilocks
(5568) Colour 1, Firefly (5569) Colour 2, and
75g of Neagh (5506) Colour 3
OR
• Any lace weight yarn in 3 colours of your
choice

EQUIPMENT
• 3.5mm crochet hook
• Yarn needle

MODEL
Eloise Segaert

CROCHET TERMS
blo - back loops only
ch – chain
dc – double crochet
dtr – double treble crochet
fo - fasten off
htr – half treble crochet
rep - repeat
rnd/s - round/s
sl/st – slip stitch
st/s – stitch/es
tr – treble crochet

BASIC SQUARE PATTERN
Round 1: using Colour 1, ch 3, 12 tr into 1st
ch; join with a sl st to form a circle (12 sts in
the rnd)
Round 2: using Colour 2, join the new
colour to any st, ch 1, 2 dc in the same st, 2
dc in each st of the previous rnd. Join with
sl st to 1st dc of this rnd to complete. Fo (24
sts in the rnd)
Round 3: using Colour 3 working in blo. Join
new colour to any st, ch 1, *1 dc in the same st,
1 htr in the next st, (1 tr, 1 dtr) in the next st, (1
dr, 1 tr) in the next st, 1 htr in the next st, 1 dc in
the next st *. Rep from * to * 3 more times.
Join with a sl st to 1st dc. Fo. Weave in the
ends as you go. Crocheting over the ends
while making the squares will reduce the
number of ends you have to deal with at
the end.

Colour Combination

Round 1

Round 2

Round 3

A

Colour 1

Colour 2

Colour 3

B

Colour 1

Colour 3

Colour 2

C

Colour 2

Colour 1

Colour 3

D

Colour 2

Colour 3

Colour 1

SCARF

E

Colour 3

Colour 1

Colour 2

F

Colour 3

Colour 2

Colour 1

Make 96 squares using the Basic Square
Pattern and the colour combinations
shown in the table. Make 16 squares in each
colour combination.

Table

HOMESPUN Crochet | 33

Photo 1

ASSEMBLY
Arrange the squares in three rows of 32
squares each. You can place the different
coloured squares randomly or in a pattern
of your own devising. Julie used a block
of 18 squares as shown in Photo 1, and
repeated it 5 times, with a partial block
at the end. Once you have an array of
colours that you like, join the squares in
each row together using your favourite
joining stitch. Julie used a simple ladder
stitch through the two back loops, working
with squares right sides together. Join the
rows together in the same manner.

EDGING
Round 1: join Colour 3 to any corner st of
your scarf. Crochet 1 dc in each st around
the outside edge of the scarf, sl st to 1st dc.
Round 2: ch 1, dc in each st around the
scarf, making a picot stitch (ch 3, sl st into
1st ch) at regular intervals — Julie worked
1 picot for each square along each side of
the scarf. Join with a sl st to 1st dc. Fo and
weave in the ends.
As seen in Homespun

34 | HOMESPUN Crochet

Crochet Australia
Crochet mandala umbrella installation
After many hours
of planning and
work, Crochet
Australia were
excited to unveil
their latest crochet
installation in June 2023
– a beautiful crochet mandala umbrella!
Made with the stunning colour selection of
Fiddlesticks Wren 8 ply cotton and over 150
colourful crocheted mandalas of varying
sizes. Crochet Australia supplied all of the
cotton required, and they were honoured to
have approximately 30 ladies, most of them
Sunshine Coast locals, volunteer their time
to crochet the mandalas.
Over a period of 14 months, these mandalas
accumulated through several working
bees held at Crochet Australia. This was a
wonderful way to bring fellow crocheters
together to learn the art of making mandalas
by learning new stitches, working in the
round and following various patterns, while
others made the patterns up as they went.
The mandalas were then joined together,
and as you can imagine this was a timeconsuming task that took approximately
6 months to complete! The outcome…. on
worldwide Knit and Crochet in Public Day in
June 2023, the umbrella was unveiled at a
special event held at Crochet Australia.
Each of the beautiful mandalas are unique,
even though some of the designs were
repeated, the colour combinations for each
were never repeated so you would never
know they were the same design.

If you would like to see this artistic and
colourful crochet mandala umbrella, then
you can visit Crochet Australia to see it
on display. On sunny days the umbrella is
put up for all who drop in to admire, take a
photo with, and enjoy.
Lynda told us, “with the delightfully
shaded space it provides, our regular
Tuesday classes enjoy the ambience it
brings on days we can sit outside and be
truly inspired by its beauty as they work on
their crochet projects for the morning.”
So, make sure you put it on your list to
visit Crochet Australia and be inspired,
motivated or just admire the sense of
peace and beauty their crochet mandala
umbrella brings to the store.

CONTACT
CROCHET AUSTRA
AUSTRALIA
1563 Yandina-Coolum Road,
Yandina, Qld 4561
For their full range of products,
classes and events, visit
www.crochetaustralia.com.au
Sign up for the Crochet Australia
newsletter and follow them on social
media to hear about upcoming
events and new products in store!
Instagram and Facebook:
@crochetaustralia
YouTube: @CrochetAustraliaOnline

HOMESPUN Crochet | 35

36 | HOMESPUN Crochet

PROJECT

04
INTERMEDIATE

Meandering Vines Japanese

KNOT BAG
LYNDA TOMKINS (CROCHET AUSTRALIA)

“The Japanese knot bag is an open tote bag with one handle longer
than the other. You put the long handle through the short one to
close the top of the bag and then you can wear it over your wrist –
great for days out or even for your next project bag! This version
features meandering cables, a great way to master your cabling
skills. The meandering cables are a variation of the ‘drunken cables’
found in the book, ‘63 Cable Stitches’ by Darla Sims.” – Lynda

Instagram and Facebook: @crochetaustralia | Website: www.crochetaustralia.com.au

HOMESPUN Crochet | 37

38 | HOMESPUN Crochet

YARN
• Fiddlesticks Finch 10 ply cotton
71g/109m: 3 balls of Lilac (main colour),
1 ball of Mulberry (contrast colour)

EQUIPMENT
• 4.5mm crochet hook
• Darning needle
• Stitch markers

FINISHED MEASUREMENTS
Bag is approx. 20cm x 20cm (without
handles)

foundation cord chain (fcc): leaving a
long tail (approx. 1m) make a slip knot. ch 1,
wrap the tail over the hook (front to back)
then yo with the working end and pull
through the two ‘loops’ on the hook - first
foundation cord chain made. Continue in
this manner for the number of ch needed.
linked treble (ltr): insert the hook
through the diagonal bar of the treble
just completed, yo and pull through the
diagonal bar. Put your hook through the
top of the next st, yo and pull through the
st. Yo, pull through 2 loops twice.

NOTES
Split the ball of cc into 2 balls – both balls will
be kept ‘live’ – one for each side of the bag.
The m you place in rnd 1 marks the
beginning of the other side of the bag.
Move this up each rnd to clearly identify
the middle of the bag for working the
handles. After completing the base of the
bag, turn your work at the end of each rnd.
When changing colours, replace the last
step of the stitch being made with new
colour where indicated.
When making the cable sides, the unused
colour is carried along the top and the sts
are worked over that colour.

CROCHET TERMS
cc – contrast colour
ch – chain
cs – crab stitch
cs2tog – crab stitch 2 sts together
dc – double crochet
dc2tog – double crochet 2 sts together
fcc – foundation cord chain
fo – fasten off
fptr – front post treble crochet
fpdtr – front post double treble crochet
htr – half treble crochet
ltr – linked treble crochet
m – marker
mc – main colour
rep – repeat
rnd/s – round/s
sk – skip stitch
sl st – slip stitch
st/s – stitch/es
tr – treble crochet
yo – yarn over

HOMESPUN Crochet | 39

40 | HOMESPUN Crochet

PATTERN
BASE
Round 1: using mc, make 35 fcc. Pull a loop
up to the height of a tr, ch 1, tr in 1st ch, 2 ltr
in same ch, ltr in next 33 ch, 5 ltr in last ch,
place m in 3rd ltr. Working the opposite
side of the fcc and being careful not to
twist, ltr in next 33 ch, 2 ltr in same st as 1st
tr, sl st to top of 1st tr (75 ltr, 1 tr)
Round 2: pull a loop up to the height of a tr,
ch 1, tr in same st as sl st, 2 ltr in next 2 sts, ltr
in each st until 2 sts before m, 2 ltr in next 2
sts, ltr in m st, 2 ltr in next 2 sts, ltr in each st
until 2 sts before end, 2 ltr in next 2 sts, sl st
to top of 1st tr (83 ltr, 1 tr)
Round 3: pull a loop up to the height of a tr,
ch 1, tr in same st as sl st, 2 ltr in next 3 sts, ltr
in each st until 3 sts before m, 2 ltr in next 3
sts, ltr in m st, 2 ltr in next 3 sts, ltr in each st
until 3 sts before end, 2 ltr in next 3 sts, sl st
to top of 1st tr (95 ltr, 1 tr)
Round 4: pull a loop up to the height of a
htr, ch 1, htr in same st as sl st, htr in each st
around, sl st to top of 1st htr (96 htr)

SIDES
Every rnd now has 96 sts. Dcs are made in
the top of each dc of the rnd below in mc,
while fptrs are made around the posts of
sts 2 rows below in cc. After making your
fptrs, skip the dcs from the row below that
sit behind these sts to keep your st count
correct.
Round 5: ch 1, dc in each st around, sl st to
top of 1st dc
Round 6: ch 1, dc in next 11 sts, change to
1st ball of cc, *fptr around next 2 htr from
rnd 4, change to mc, 1 dc in next st, change
to cc, fptr around next 2 htr from rnd 4,
change to mc**, dc in next 2 sts, change to
cc*. Rep from * and * 3 more times ending
last rep at **. Drop colour cc, dc in next
22 sts. Rep from * and * 4 times using the
second ball of cc, ending last rep at **. Drop
colour cc, dc in next 11 sts, sl st into the top
of first dc, turn
Round 7: ch 1, dc in each st around,
carrying cc along the top of the sts on each
side so that cc is back at the beginning
of the post sts ready to begin the colour
change in the next rnd, sl st into the top of
first dc, turn
Round 8: ch 1, dc in next 10 sts, change to
cc. *fptr around 2 fptrs from rnd 6, change
to mc, dc in next st, change to cc, fptr
around next 2 fptrs from rnd 6, change to
mc**, dc in next 2 sts, change to cc*. Rep

between * and * 3 more times ending last
rep at **. Drop colour cc and dc into the
next 22 st of rnd 7. Rep between * and * 4
times ending last rep at **. Drop colour cc
and dc into the next 12 sts, sl st into the top
of the first dc, turn
Round 9: rep rnd 7
Round 10: ch 1, dc in next 9 sts, change to
cc, *fptr around 2 fptrs from rnd 8, change
to mc, dc in next st, change to cc, fptr
around next 2 fptrs from rnd 8, change to
mc*, dc in next 2 sts, change to cc*. Rep
between * and * 3 more times ending last
rep at **. Drop colour cc, dc in next 22 sts.
Rep between * and * 4 times ending last rep
at **. Drop colour cc, dc in next 13 sts, sl st in
top of first dc, turn
Round 11: rep rnd 7
Round 12: ch 1, dc in next 9 sts, change to
cc, *sk next 2 fptr, fpdtr around next 2 fptrs
from rnd 10, change to mc, dc in next st,
change to cc, fpdtr around sk fptrs from rnd
10, change to mc**, dc in next 2 sts, change
to cc*. Rep between * and * 3 more times
ending last rep at **. Drop colour cc, dc in
next 22 sts. Rep between * and * 4 times
ending last rep at **. Drop colour cc and dc
into the next 13 st of rnd 11, sl st into the top
of the first dc, turn
Round 13: rep rnd 7

Round 14: rep rnd 8, working the
fptr
he
e fp
around the fpdtr of rnd 12
Round 15: rep rnd 7
Round 16: rep rnd 6, working the fptr
around the fptr of rnd 14
Round 17: rep rnd 7
Round 18: ch 1, dc in next 12 sts, change to
the cc, *fptr around 2 fptrs from round 16,
change to mc, dc in next st, change to cc,
fptr around next 2 fptrs from rnd 16, change
to mc**, dc in next 2 sts, change to cc*. Rep
between * and * 3 more times ending last
rep at **. Drop colour cc, dc in next 22 sts.
Rep between * and * 4 times ending last rep
at **. Drop colour cc, dc in next 10 sts, sl st
to top of first dc, turn
Round 19: rep rnd 7
Round 20: ch 1, dc in next 13 sts, change to
cc, *fptr around 2 fptrs from rnd 18, change
to mc, dc in next st, change to cc, fptr
around next 2 fptrs from rnd 18, change to
mc**, dc in next 2 sts, change to cc*. Rep
between * and * 3 more times ending last
rep at **. Drop colour cc, dc in next 22 sts.
Rep between * and * 4 times ending last rep
at **. Drop colour cc, dc in next 9 sts, sl st in
top of first dc, turn
Round 21: rep rnd 7
Round 22: ch 1, dc in next 14 sts, change to
cc, *fptr around 2 fptrs from rnd 20, change

HOMESPUN Crochet | 41

Round 39: rep rnd 7
Round 40: rep rnd 6, working the fptr
around the fptr of rnd 38. Do not turn (you
should be on the right side)

LONG HANDLE
Row 1: sl st in next st, ch 1, dc in next 9 sts,
dc2tog across next 2 sts, turn (10 dc)
Row 2: ch 1, dc in same st, dc in next 9 sts,
turn (10 dc).
Rep row 2, 28 times. Fo and begin the
second side of the long handle.
Row 1: with rs facing, join with a sl st in last
fptr made on rnd 40, ch 1, dc in next 9 sts,
dc2tog across next 2 sts, turn (10 dc)
Row 2: ch 1, dc in same st, dc in next 9 sts,
turn (10 dc).
Rep row 2, 28 times. Join the handle by
holding the front and back of the handle
pieces with right sides together, sl st by
working through the back loop of the piece
facing you, and the front loop of the piece
at the back, fo.

SHORT HANDLE

to mc, dc in next st, change to cc, fptr
around next 2 fptrs from rnd 20, change to
mc**, dc in next 2 sts, change to cc*. Rep
between * and * 3 more times ending last
rep at **. Drop colour cc, dc in next 22 sts.
Rep between * and * 4 times ending last rep
at **. Drop colour cc, dc in next 8 sts, sl st in
top of first dc, turn
Round 23: rep rnd 7
Round 24: ch 1, dc in next 14 sts, change to
cc, *sk next 2 fptr, fpdtr around next 2 fptrs
from rnd 22, change to mc, dc in next st,
change to cc, fpdtr around sk fptrs from rnd
22, change to mc**, dc in next 2 sts, change
to cc*. Rep between * and * 3 more times
ending last rep at **. Drop colour cc, dc in
next 22 sts. Rep between * and * 4 times
ending last rep at **. Drop colour cc, dc in
next 8 sts, sl st in top of first dc, turn
Round 25: rep rnd 7

42 | HOMESPUN Crochet

Round 26: rep rnd 20, working fptr around
the fpdtr of rnd 24
Round 27: rep rnd 7
Round 28: rep rnd 18, working fptr around
the fptr of rnd 26
Round 29: rep rnd 7
Round 30: rep rnd 6, working fptr around
the fptr of rnd 28
Round 31: rep rnd 7
Round 32: rep rnd 8, working fptr around
the fptr of rnd 30
Round 33: rep rnd 7
Round 34: rep rnd 10, working fptr around
the fptr of rnd 32
Round 35: rep rnd 7
Round 36: rep rnd 12, working the fpdtr
around the fptr of rnd 34
Round 37: rep rnd 7
Round 38: rep rnd 8, working the fptr
around the fpdtr of rnd 36

Row 1: with rs facing, join with a sl st into
the first st after the m on the other end of
the bag, ch 1, dc in next 11 sts, dc2tog across
next 2 sts, turn (12 dc)
Row 2: ch1, dc in same st, dc in next 11 sts,
turn (12 dc).
Rep row 2, 15 times. Fo and begin the
second side of the short handle.
Row 1: with rs facing, join with a sl st in 15th
st before m, ch 1, dc in next 11 sts, dc2tog
across next 2 sts, turn (12 dc)
Row 2: ch 1, dc in same st, dc in next 11 sts,
turn (12 dc).
Rep row 2, 15 times. Join the handle by
holding the front and back of the handle
pieces with right sides together, sl st by
working through the back loop of the
pieces facing you, and the front loop of the
pieces at the back. Fo and sew in all ends.

EDGING
Rejoining the yarn at the bottom of the
outer edge of a handle, ch 1 and cs2tog
around the outer edge of the handle, sl st
to the first cs. Rep on the other handle. Fo
and sew in the ends. Rejoin the yarn in any
corner of the inner edge, ch 1 and cs2tog
around the inner edge of the bag and
handle, sl st to the first cs. Fo and sew in
the ends.

Tool
KIT

YARN CUTTER PENDANT
Yarn can be cut using any of
the grooves on these Yarn
Cutter Pendants. A rotary
cutting blade is integrated

within the pendant, making it
safe to use. It’s an easy-to-use
yarn cutter that can be hung
around the neck via a loop.

POM-POM MAKER SET
Clover Pom-Pom Makers have
never been easier to use, making
them an ideal starter kit for any
budding crafter regardless of
age. Now available in a set of
four, pom-pom making gives
quick and very satisfying results
and generates a lot of fun in
the process. They are a great
introduction to yarn crafts
for children and adults alike.
Each Clover pom-pom maker
incorporates a special measuring
scale on the arch, making it really
easy to create multi-coloured

pom-poms where a degree of
accuracy is called for. Knowing
exactly where to switch colours
adds to the enjoyment and
ensures consistency when
making several pom-poms in the
same style. Now you can change
yarn colours with precision when
using two or more colours for
making toys and other items.
These well-designed pom-pom
makers also include triangular
markings on the arch which help
in keeping it stable and secure
during use.

CONTACT
CLOVER MFG. CO. LTD.
Email: int-info@clover.co.jp
Website: www.clover-mfg.com
Facebook & Instagram: @clovermfg

HOMESPUN Crochet | 43

44 | HOMESPUN Crochet

PROJECT

05
INTERMEDIATE

Dreamer the

KITTEN

KRISTY PRASHANTH (HEY FREYA CROCHET)

“You will usually find Dreamer sitting in the sun gazing at clouds.
In his spare time, he enjoys making daisy chains. Dreamer is
suitable for makers with some experience in amigurumi making.
Dreamer is the colour of the bright blue sky on a sunny day he
so enjoys, but perhaps your Dreamer loves watching the clouds
at sunset. You may choose to make him in pinks and oranges. It’s
up to you, the sky’s the limit!” – Kristy

Instagram: @hey_freya_crochet

HOMESPUN Crochet | 45

46 | HOMESPUN Crochet

YARN
• Bendigo Woollen Mills 4 ply cotton
200g/485m: approx. 40g of Ice, 10g
of Daffodil, 5g of Snow and 5g of
Peppermint

EQUIPMENT
•
•
•
•
•
•
•
•
•

2.5mm crochet hook
Stitch marker
Darning needle
Embroidery needle
Pearl head pins
6mm black safety eyes
Polyfill
Scissors
DMC embroidery thread in colours
Black (310), Light Salmon (761), Dark
Cranberry (601)

FINISHED MEASUREMENTS
If made with the indicated yarn and
crochet hook, the toy will stand 20cm tall

NOTES
Gauge is not crucial with amigurumi. Your
choice of yarn and size of crochet hook will
affect the final size of the toy. Match your
yarn choice and hook size. The sts should
be tight enough that the stuffing does not
show. If your sts are too loose, try changing
your tension or using a smaller hook. Stuff
firmly to retain the shape. When changing
colour, pull through the new colour on the
st previous to the colour change. Do not
join at the end of each rnd. Move the marker
to the st made at the end of each rnd.

CROCHET TERMS
ch – chain
dc – double crochet
dec – decrease (2 sts together)
fo – fasten off
htr – half treble crochet
inc – increase (2 dc in same st)
mr - magic ring
pm – place marker
rep – repeat
rnd/s – round/s
sk – skip
sl st – slip stitch
st/s – stitch/es
tr – treble crochet

HOMESPUN Crochet | 47

48 | HOMESPUN Crochet

PATTERN
LEGS (MAKE 2)
Round 1: using Daffodil, make a mr, 4 dc
into mr, pm in last st (4 dc)
Round 2: inc in each st around (8 dc)
Round 3: *dc in next st, inc in next st, rep
from * 3 times (12 dc)
Round 4: *dc in next 2 sts, inc in next st, rep
from * 3 times (16 dc)
Round 5: *dc in next 3 sts, inc in next st, rep
from * 3 times (20 dc)
Rounds 6-7: dc in each st around (20 dc).
Change to Ice. Cut Daffodil and weave in
the ends.
Rounds 8-11: dc in each st around (20 dc).
Sl st to next st. Cut yarn and fo. Weave in
the yarn ends. Do not sl st or cut the yarn
on the second leg. Continue to crochet the
body from here.

BODY
Continue in Ice left attached to leg 2.
Position the legs so the colour change is on
the inner aspect of the legs.
Round 1: join leg 2 to leg 1 with a dc. Dc in
next 19 sts around leg 1, dc in next 20 sts
around leg 2, pm in last st (40 dc)
Round 2: *dc in next 9 sts, inc in next st, rep
from * 3 times (44 dc)
Round 3: *dc in next 10 sts, inc in next st,
rep from * 3 times (48 dc)
Round 4: * dc in next 11 sts, inc in next st,
rep from * 3 times (52 dc)
Round 5: dc into next 6 sts, inc in next st, dc
into next 12 sts, inc in next st, dc into next 6
sts, inc in next st, dc in next 18 sts, inc in next
st, dc in next 6 sts (56 dc)
Round 6: *dc in next 13 sts, inc in next st, dc
in next 7 sts, inc in next st, rep from * once
more, dc in next 12 sts (60 dc)
Stuff the legs very firmly, filling out the
feet with Polyfill to provide Dreamer with a
stable base to stand. Dreamer stands by the
formation of a tripod with the two legs and
tail. Continue stuffing the body as you go.
Rounds 7-21: dc in each st around (60 dc)
Round 22: *dc in next 13 sts, dec, rep from *
3 times (56 dc)
Rounds 23-24: dc in each st around (56 dc)
Round 25: dc in next 6 sts, dec, *dc in next
12 sts, dec, rep from * 2 times, dc in next 6
sts (52 dc)
Round 26: dc in each st around (52 dc)
Round 27: *dc in next 11 sts, dec, rep from *
3 times (48 dc)
Round 28: dc in each st around (48 dc)

Round 29: dc in next 5 sts, dec, *dc in next
10 sts, dec, rep from * 2 times, dc in next 5
sts (44 dc)
Round 30: dc in each st around (44 dc)
Round 31: *dc in next 9 sts, dec, rep from *
3 times (40 dc)
Round 32: dc in each st around (40 dc)
Round 33: dc in next 4 sts, dec, *dc in next
8 sts, dec, rep from * 2 times, dc in next 4 sts
(36 dc)
Round 34: dc in each st around (36 dc)
Round 35: *dc in next 7 sts, dec, rep from *
3 times (32 dc)
Rounds 36-38: dc in each st around (32 dc)
Sl st to next st. Cut yarn and fo. Weave in
the ends.

HEAD
Round 1: using Ice, make a mr, 8 dc into mr,
pm in last st (8 dc)
Round 2: inc in each st around (16 dc)
Round 3: *dc in next st, inc in next st, rep
from * 7 times (24 dc)
Round 4: dc in next st, inc in next st, *dc in
next 2 sts, inc in next st, rep from * 6 times,
dc in next st (32 dc)
Round 5: *dc in next 3 sts, inc in next st, rep
from * 7 times (40 dc)
Round 6: dc in next 2 sts, inc in next st,
*dc in next 4 sts, inc in next st, rep from * 6
times, dc in next 2 sts (48 dc)
Round 7: *dc in next 5 sts, inc in next st, rep
from * 7 times (56 dc)
Rounds 8-11: dc in each st around (56 dc)
Round 12: dc in next 3 sts, inc in next st.
*dc in next 6 sts, inc in next st, rep from * 6
times, dc in next 3 sts (64 dc)
Rounds 13-16: dc in each st around (64 dc)
Round 17: *dc in next 7 sts, inc in next st,
rep from * 7 times (72 dc)
Rounds 18-21: dc in each st around (72 dc)
Round 22: sc in next 4 sts, dec, *dc in next
7 sts, dec, rep from * 6 times, dc in next 3 sts
(64 dc)
Rounds 23-24: dc in each st around (64 dc)
Round 25: *dc in next 6 sts, dec, rep from *
7 times (56 dc)
Rounds 26-27: dc in each st around (56 dc).
Place the safety eyes between rnds 16-17,
14 sts apart. Using 2 strands of DMC Black,
embroider 4 eyelashes around each eye.
Using 6 strands of DMC Light Salmon,
embroider a triangular shaped nose using
satin stitch over rnds 17-21. The base of the
triangle (the top of the nose) is 4 sts wide,
with 5 sts between the nose and eyes on
either side. Use back stitch to embroider

Photo sample of the Daisy
Chain Necklace sitting in the
centre with the large daisy
sitting between the paws.
curved lips. Using 6 strands of DMC Dark
Cranberry, embroider an accent colour
across the top of the nose. Embroider 3
French knots on each cheek for the whiskers.
Round 28: dc in next 3 sts, dec, *dc in next
5 sts, dec, rep from * 6 times, dc in next 2 sts
(48 dc)
Round 29: *dc in next 4 sts, dec, rep from *
7 times (40 dc)
Round 30: dc in next 2 sts, dec, *dc in next
3 sts, dec, rep from * 6 times, dc in next st
(32 dc).
Sl st to next st. Fo and leave a long tail for
sewing. Stuff head.

ARMS (MAKE 2)
Round 1: using Daffodil, make a mr, 4 dc
into mr, pm in last st (4 dc)
Round 2: inc in each st around (8 dc)
Round 3: *dc in next st, inc in next st, rep
from * 3 times (12 dc)
Rounds 4-6: dc in each st around (12 dc).
Change to Ice. Cut Daffodil and weave in
the ends.

HOMESPUN Crochet | 49

Rounds 7-14: dc in each st around (12 dc)
Round 15: flatten the arm in half. Do not
stuff. dc in next 6 sts through both layers to
close the opening (6 dc).
Fo and leave a long tail for sewing.

EARS (MAKE 2)
Round 1: using Daffodil, make a mr, 6 dc
into mr, pm in last st (6 dc)
Round 2: *dc in next st, inc in next st, rep
from * 2 times (9 dc)
Round 3: *dc in next 2 sts, inc in next st, rep
from * 2 times (12 dc)
Round 4: dc in each st around (12 dc)
Round 5: *dc in next 3 sts, inc in next st, rep
from * 2 times (15 dc)
Round 6: *dc in next 4 sts, inc in next st, rep
from * 2 times (18 dc)
Rounds 7-8: dc in each st around (18 dc)
Round 9: flatten the ear in half. Do not stuff.
dc in next 9 sts through both layers to close
the opening (9 dc).
Fo and leave a long tail for sewing.

TAIL
Round 1: using Daffodil, make a mr, 4 dc
into mr, pm in last st (4 dc)
Round 2: *dc in next st, inc in next st, rep
from * once (6 dc)
Round 3: dc in each st around (6 dc)
Round 4: *dc in next 2 sts, inc in next st, rep
from * once (8 dc)
Round 5: dc in each st around (8 dc)
Round 6: *dc in next 3 sts, inc in next st, rep
from * once (10 dc)
Round 7: dc in each st around (10 dc)
Round 8: *dc in next 4 sts, inc in next st, rep
from * once (12 dc)
Rounds 9-10: dc in each st around (12 dc)
Round 11: *dc in next 5 sts, inc in next st,
rep from * once (14 dc)
Round 12: dc in each st around (14 dc)
Round 13: *dc in next 6 sts, inc in next st,
rep from * once (16 dc)
Rounds 14-18: dc in each st around (16 dc).
Sl st to next st. Fo and leave a long yarn tail
for sewing. Stuff the tail very firmly.

CLOUD
Using Snow, ch 12. You will now crochet
around the foundation chain.
Round 1: dc in 2nd ch from hook, dc in next
9 chs, inc in last ch. Turn the work to work

50 | HOMESPUN Crochet

into the opposite side of the ch. dc in next
10 chs, inc in last ch, pm in last st (24 dc)
Round 2: *inc in next st, dc in next 10 sts,
inc in next st, rep from * once (28 dc)
Round 3: dc in next 2 sts, 5 tr in next st, htr
in next st, dc in next st, * 5 tr in next st, sk
next st, 5 tr in next st, sk 2 sts, dc in next st,
rep from * once. 5 tr in next st, sk next st,
dc in next st, 5 tr in next st, sk next st, 5 tr in
next st, sk 2 sts, htr in next st, dc in next st, 3
tr in next st (52 sts)
Round 4: sk 1 st, dc in next st, slst to next st.
Fo and leave a long tail for sewing. Weave in
the starting yarn tail to fill in any gaps left in
the foundation chain.

headband with a greater number of chs.
Fo leaving a yarn tail.

SMALL DAISY (MAKE 3)

ARMS

Round 1: using Daffodil, make a mr, leaving
a yarn tail, 4 dc into mr, pm in last st (4 dc)
Round 2: *dc in next st, inc in next st, rep
from * once (6 dc).
Change to Snow. Cut Daffodil leaving a
yarn tail.
Round 3: *sl st, htr, tr, htr in next st, rep from
* 5 times (25 sts).
Sl st to next st. Cut yarn, fo and weave in the
Snow ends only.

Note: to count the rnds of the body, first
count 11 rnds of the legs, then count the
next rnd as the first rnd of the body. Sew the
arms vertically onto the body between rnds
22-28. The arms should wrap over the belly
with 3 sts between the paws. Place a st on the
underside of each paw to hold them in place.

ASSEMBLY
Pin all pieces before sewing to ensure
correct placement.

HEAD AND BODY
Sew the head to the body. Before closing
completely, insert extra Polyfill as required.

EARS
Sew the ears to the head so each ear sits
across rnds 3-10. Curve the bottom edges
of the ears forward a little.

CLOUD
Sew the cloud onto the belly, between rnds
5-18 of the body.

LARGE DAISY (MAKE 2)
Round 1: using Daffodil, make a mr, leaving
a yarn tail, 6 dc into mr, pm in last st (6 dc)
Round 2: inc in each st around (12 dc).
Change to Snow. Cut Daffodil leaving a
yarn tail.
Round 3: *slst in next st, htr, tr, tr, htr in next
st, rep from * 5 times (30 sts).
Sl st to next st. Cut yarn, fo and weave in the
Snow ends only.

TAIL
Sew the tail onto the body over rnds
5-9. The tail should touch the ground so
Dreamer can stand freely. Adjust the tail
position if required.

DAISY CHAIN NECKLACE

Row 1: using Peppermint, ch 50, sk first ch,
sl st in each loop across on the reverse side
of ch (49 sl st).
Fo leaving a yarn tail.

Attach the arge daisy onto the midpoint of
the necklace, using the Daffodil tails to tie it
in place. Attach 1 small daisy on either side
of the large one, leaving a gap of 2-3 sts.
Place the necklace around Dreamer’s neck
and sew the ends together. The large daisy
should sit between the paws, but it can be
styled however you like (see photo sample).

HEADBAND

DAISY CHAIN HEADBAND

Round 1: using Peppermint, ch 63, sk first
ch, sl st in each ring across on the reverse
side of ch (62 sl st).
Ensure your tension is not too tight when
crocheting the sl sts, as this will shorten the
length of the headband. If you think your sl
st tension will be too tight, you can start the

Attach large daisy slightly to the right of the
mid-point of headband, using Daffodil tails to
tie in place. Attach a small daisy to the right
of the large. Wrap the headband around the
head and sew the ends together. Use the
yarn tail to secure the headband to the head
in several places.

NECKLACE

Yarns on Coie
Yarns on Collie is a well-established craft
shop that has been sitting in the heart
of Fremantle in Western Australia for
over 17 years. Caroline is currently the
proud owner of the business. She was
born in Holland and comes from very
crafty parents. “I pretty well do anything
to keep these hands busy. I learnt to knit
and sew around 4 years of age and started
designing and making my own clothing
in my early teens, both knitted and sewn.
I would go to boutiques (which were in
those days, very expensive) try some
clothing on, have a good look at it, buy
some fabrics or yarns at the local markets
and go home to make them myself - no
patterns needed! In my late teens I started
taking orders from friends and family and
made all sorts of custom clothing to earn
a few extra dollars. When my kids were

Just for fun! If the fibre arts
community didn’t exist, what
would be your choice of
creative medium?
“Oh gosh that would be terrible!
I might have a house and garden
full of handmade woodwork or
maybe even metal works, I do
love drawing and painting as
well and love gardening… but it
doesn’t matter how much effort
I put into it I don’t get the love
back from my plants as sadly
they don’t survive in my care. But
definitely without fibre craft
I think I’ll go nuts!”

small I made all of their clothing as well.
Both of my parents were part organisers
of a local youth organisation for most of
their life doing country camps and craft
workshops, so I automatically went along
and learnt all sorts of papercraft, macramé,
knit, crochet, woodwork, needlework,
mosaics etc. I’ve also designed and made
in the past my own wooden furniture and
accessories, but sadly I don’t have the time
for that now,” Caroline explains.
After 12 years of owning and operating
her own sign writing business in the north
west of WA, it was time for a sea change
and a break from climbing on to roofs and
scaffolding. The ‘Woolshop’ was up for sale
and she jumped at the opportunity to buy
it. “Putting balls of yarn on shelves is a lot
easier on my body!” Caroline adds.
Yarns on Collie offer a large variety of
yarns to suit every need from laceweight
to chunky and everything in between,
including merino wool, alpaca, silk,
cashmere, mohair, hand dyed, cotton and
acrylic blends. “You name it, we got it…
and if not, we try our best to get in it in for

our customers in a price range to fit any
budget,” Caroline explains. They also stock a
large variety of crochet and Tunisian hooks,
knitting needles and accessories, including
cases, bags, yarn bowls and blocking boards.
They also cater to needle workers with a full
range of DMC stranded cotton, tapestry
wools, madeira silks, perle, cebelia, appleton
crewel wool, embroidery and cross stitch
kits and a haberdashery section with lots
of options for sewers. Throughout the year
they offer both crochet and knitting classes
and during most school holidays, they also
teach kids how to knit.

CONTACT
Yarns on Collie
3/19 Collie Street,
Fremantle, WA 6160
Phone: (08) 9335 4455
Email: sales@woolshop.com.au
Website: www.woolshop.com.au
Instagram: @yarnsoncollie
Facebook: @Yarns on Collie

HOMESPUN Crochet | 51

52 | HOMESPUN Crochet

PROJECT

06
INTERMEDIATE

Feather Stitch Hat Holder
and Sunglasses Case
AMANDA ALLPORT (LITTLE MISS BEAN CREATIONS)

“A great intermediate project that is both stylish and practical.
Perfect for keeping your hat and sunglasses safe from being
damaged and in an easy to find place. Crocheted in feather stitch to
add bulk and padding for extra protection. This hat holder will make
a beautiful addition to your home and both are great to give as a
gift. Make both to complete your summer set!” - Amanda

Facebook: @LittleMissBeanCreations | Etsy: @MissBeanCreations

HOMESPUN Crochet | 53

54 | HOMESPUN Crochet

YARN

STITCH PATTERN

• Bendigo Woollen Mills 100% cotton 8 ply,
50g: 4 balls hand dyed with botanical dye
in colourway Marigold by Sue Connor at
Playing with Fibre (playingwithfibre.com)

foundation half treble crochet: with a slip
knot on the hook, ch 2, yo, insert the hook
in 1st ch, pull up a loop, yo, pull through 1
loop (this creates a ch 1), yo, pull through all
3 loops, first fhtr made. To make more, yo,
insert hook in ch 1 from previous st, pull up
a loop, yo, pull through 1 loop (this creates a
ch 1), yo, pull through all 3 loops on the hook.
Continue until you have the desired number
of fhtr.
feather stitch: yo, insert the hook in 1st ch
1 space, pull up a loop, yo, pull up a loop in
sk st 2 rows below, yo, pull up a loop in the
next ch space, yo, pull through all 7 loops, ch
1 to close. To begin the next feather stitch,
insert the hook in same ch 1 space the last fs
ended in.
first feather stitch: yo, insert the hook in
the same st as sl st, pull up a loop, yo, pull
up a loop in fhtr from rnd below, yo, pull up
a loop in next ch space, yo, pull through all 7
loops, ch 1 to close. Note: to begin the next
feather stitch, insert the hook in the same
ch 1 space the last fs ended in.
eighth feather stitch: yo, insert the hook
in the same ch 1 space, pull up a loop, yo,
pull up a loop in fhtr from rnd below, yo,
pull up a loop in the next ch space, yo, pull
through all 7 loops, ch 1 to close. To begin
the next feather stitch, insert the hook in
the same ch 1 space the last fs ended in.

EQUIPMENT
• 4mm crochet hook
• 5cm wooden or metal ring (to hang the
hat holder on the wall)
• Darning needle

FINISHED MEASUREMENTS
Hat Holder approx. 55cm x 8cm
Sunglasses Case approx. 18cm x 9cm

CROCHET TERMS
ch – chain
dc – double crochet
fhtr – foundation half treble crochet
fo – fasten off
fs – feather stitch
htr – half treble crochet
pm – place marker
rep – repeat
sk – skip stitch
sl st – slip stitch
st/s – stitch/es
yo – yarn over

HOMESPUN Crochet | 55

56 | HOMESPUN Crochet

Photo 1

Photo 2

Row 1: standing htr, 3 fs across, htr in last st,
ch 1 and turn (2 htr, 3 fs)
Row 2: htr in 1st st, ch 1, 3 fs across, htr in
top of standing htr, ch 1 and turn (2 htr, 3 fs)
Row 3: htr in 1st st, ch 1, 3 fs across, htr in
last st, ch 1 and turn (2 htr, 3 fs).
Rep row 3 until leg measures approx. 35cm,
ensuring it matches the first leg ending on
the outside edge. Do not fo.
Next row (joining row): htr in 1st st, ch 1, 3 fs
across, now tuck second leg behind first leg
so last ch 1 space of second leg lines up with
first ch 1 space on first leg, ignoring the 2 htr
from both legs, continue on by 3 fs across
(joining the legs by starting the feather
stitch in the overlapping ch space and going
through both layers, making sure there are
no twists), htr in last st, ch 1 and turn.
Next row: htr in 1st st, ch 1, 6 fs across, htr in
last st, ch 1 and turn (2 htr, 6 fs).
Rep until work measures 55cm from
beginning.

FINISHING
There are a few ways to attach the hat
holder to the ring. You can either: ch 1, turn
and dc onto the wooden ring, then fo OR
fo and hand stitch the hat holder to the
ring. Weave in all ends, move on to optional
fringe.
Photo 3

Photo 4

OPTIONAL FRINGE
There are a range of ways to jazz up your
hat holder with a fringe. Here are a few
ideas you can try or get creative with your
own. See Photos 1, 2, 3 and 4.

FIRST LEG
HAT HOLDER
PATTERN
Using a 4mm crochet hook, fhtr 15 sts, ch 1
and turn
Row 1: dc in 1st st, *ch 1, sk 1, dc in next st,
rep from * 7 times, ch 1 and turn
Row 2: htr in 1st st, ch 1, 6 fs across, htr in
last st, ch 1 and turn (2 htr, 6 fs)
Row 3: rep row 2 until work measures 10cm.
Now we are going to make the opening
where the hat will sit, you will be
crocheting 2 ‘legs’.

Row 1: htr in 1st st, ch 1, 3 fs across, htr in
same space of last fs, ch 1 and turn (2 htr,
3 fs)
Row 2: htr in 1st st, ch 1, 3 fs across, htr in
last st, ch 1 and turn (2 htr, 3 fs).
Rep row 2 until the leg measures approx.
35cm ending on an uneven row (on the
inside of the leg), fo.

SECOND LEG
Now we are going to join the yarn with a
standing htr in same space the first legs first
row ended in.

SUNGLASSES CASE
PATTERN
Using a 4mm hook, fhtr 13 sts, ch 1 and turn.
Round 1: dc in 1st st, *ch 1, sk 1, dc in next st,
rep from * 6 times, ch 1 and rotate your work
so you are working on the opposite side of
the fhtr to create a rnd, dc into next fhtr, rep
from * 6 times, sl st to top of 1st dc (28 sts)
Round 2: ch 1, 1st fs, 6 fs across, 8th fs, 6 fs
across, sl st to top of 1st fs, ch 1 and turn (14 fs)
Round 3: 14 fs across, sl st to top of 1st fs, ch
1 and turn (14 fs).

HOMESPUN Crochet | 57

Rep rnd 3 until work measures approx. 17cm
or desired length of your case. Next, we will
begin making a flat piece that will form the
envelope closure, worked in rows.
Row 1: htr in 1st st, ch 1, 7 fs across, htr in last
st, ch 1 and turn (7 fs, 2 htr)
Row 2: htr in 1st st, ch 1, 7 fs across, htr in
last st, ch 1 and turn (7 fs, 2 htr).
Rep row 2 until envelope flap measures
approx. 6cm. Fo, leaving a long tail to seam
up the sides.

FINISHING
To make the envelope flap, measure 5cm
down from the opening on both edges and
pm. Fold the flap over away from the opening
so the right side of the flap is touching the
right side of the sunglasses case and the end
of the flap lines up with the pm on either side.
Take the tail and thread a darning needle,
seam the edges together on both sides
(cutting the yarn and rejoining for the second
edge, or if enough tail, weave through work
to the other side). When finished flip the flap
over the opening to create the envelope
closure. Sew in ends.

Wagtail
Wagtail Yarns use the term ‘ply’ to refer to
the metres/weight of the finished yarn, not
the number of single ends or folds twisted
together to make it. They twist two ends
together, not ply two ends together. They
use the terms single end/fold to refer to
the single end that is plied to make the
yarn. These single ends vary in weight and
thickness according to the final yarn that’s
made. In determining the thickness of the
single end, consideration is given to how

58 | HOMESPUN Crochet

many times the end will be plied and what
approximate weight of yarn they want. They
use different cogs to change the thickness
of the single ends.
They take a single end and ply it four times
and make a yarn that is a 4 ply 4 fold. The style
of 4 ply they make most often is made from
two ends of a thicker single end. This yarn is
labelled 4 ply 2 fold. Both of these 4 ply yarns
will weigh the same per metre and can be

knit or crocheted with the same needles. The
differences is the 4 fold will result in a slightly
more defined stitch and be less inclined
to split but will take a lot longer to spin and
therefore cost more. The ply number they
assign will be based on meterage to weight
and fibre used. The easiest way to get an
idea of the weight/gauge of the yarn you
are looking at is the number of metres per
weight. This will give you an approximate
thickness and a starting place for hook and
needle size, but the fibre used and the design
of the yarn will also affect this. Weight of the
yarn changes according to moisture levels
in the atmosphere and distance is subject to
stretch. They measure their yarn by weight
and distance to ensure customers are getting
all of the yarn ordered. “Hopefully we have
added a little extra so that you win at yarn
chicken!” www.wagtailyarns.com.au

COLLECT THEM ALL!
COLL
VISIT UNIVERSALSHOP.COM.AU/PROGRESS-PUZZLE-BOOKS NOW

60 | HOMESPUN Crochet

PROJECT

07

ADVANCED
BEGINNER

Strawberries & Cream

TIC TAC TOE
PAMELA WONG (MON AMI CROCHET)

“This waffle board tic tac toe is a fun and simple game for
the little ones, and because the board doubles up as a travel
pouch, you can bring this set out and it’s easy to clean up.
Best of all, it looks so delicious!” – Pamela

Instagram: @mon.ami.crochet | Facebook: @mon.ami.crochets
Ravelry: @monamicrochet | Etsy: @MonAmiCrochetAU

HOMESPUN Crochet | 61

62 | HOMESPUN Crochet

YARN
• 4 Seasons Spot Saver USA Style 10 ply
acrylic yarn 200g/312m: 1 ball each of
colours Pumpkin, Mallard, Dark Pink or
Pink, White and Yellow

EQUIPMENT
•
•
•
•
•

4mm crochet hook
Darning needle
Stitch markers
Scissors
Polyfill

FINISHED MEASUREMENTS
The pouch is 23cm wide x 25cm tall

NOTES
To create the horizontal waffle lines,
crochet in the 3rd loop as indicated in
certain rnds.

Photo 1

Pam’s pattern is versatile and can be
made using different yarn types. Pam has
provided examples of other yarns used
(all photographed in opening sample
photo), such as 4 Seasons Marvel 8 ply
(smaller waffle pouch and strawberries),
and Premier Parfait Chunky (stuffed waffle
pouch with optional face and chunky
strawberry).

CROCHET TERMS
blo - back loop only
ch – chain
dc – double crochet
dc2tog – double crochet 2 sts together
dec - double crochet invisible decrease
fo – fasten off
fptr - front post double crochet (See
Photos 2 and 3)
inc - increase (2 dc in same st)
mr - magic ring
rep – repeat
rnd/s – rounds
st/s – stitch/es
slst - slip stitch
tltr - third loop treble crochet (See Photo
1 - blue marker shows third loop)
tr - treble crochet

Photo 2

Photo 3

HOMESPUN Crochet | 63

64 | HOMESPUN Crochet

STRAWBERRY (MAKE 5)
Using Dark Pink or Pink
Round 1: make a mr, 6 dc into ring (6 dc)
Round 2: *dc in next st, inc in next st, rep
from * 3 times (9 dc)
Round 3: *dc in next 2 sts, inc in next st, rep
from * 3 times (12 dc)
Round 4: dc in each st around (12 dc)
Round 5: *dc in next 3 sts, inc in next st, rep
from * 3 times (15 dc)
Round 6: dc in each st around (15 dc)
Round 7: *dc in next 4 sts, inc in next st, rep
from * 3 times (18 dc)
Rounds 8-9: dc in each st around (18 dc)
Round 10: *dc in next st, dec next st, rep
from * 6 times (12 dc).
Stuff strawberry firmly.
Round 11: dec 6 times (6 dc). Fo, finish
stuffing and sew closed.

STRAWBERRY LEAVES
(MAKE 5)
Photo 4

PATTERN
WAFFLE POUCH
Using Pumpkin
Round 1: ch 38, tr in 3rd ch from hook (ch 2
counts as st), tr in next 35 ch, turn, tr in the
other side of ch and in next 35 ch, slst to top
of ch 2 (72 tr)
Rounds 2-6: ch 2, *tr in next 11 sts, fptr next
st, rep from * 6 times, slst to top of ch 2 (66
tr, 6 fptr)
Round 7: ch 2, *tltr in next 11 sts, fptr next
st, rep from * 6 times, slst to top of ch 2 (66
tltr, 6 fptr)
Rounds 8-12: rep rnds 2-6 (66 tr, 6 fptr)
Round 13: rep rnd 7 (66 tltr, 6 fptr)
Rounds 14-18: rep rnds 2-6 (66 tr, 6 fptr)

Round 19: rep rnd 7 (66 tltr, 6 fptr)
Rounds 20-21: ch 2, tr in each st across, slst
to top of ch 2 (72 tr)
Round 22: ch 2, *tr in next 2 sts, ch 2, skip 2
sts of rnd 22, rep from * 18 times (36 tr, 18 ch
2 spaces)
Rounds 23-24: ch 2, tr in each st across,
slst to top of ch 2 (72 tr).
Fo and weave tail in.

DRAWSTRING
Using Yellow
Row 1: ch 120 (or longer if you prefer). Fo
and tie secure knots on both ends.
Starting from the centre of the pouch, pass
the drawstring in and out through the ch 2
spaces. See Photo 4.

Using Mallard
Round 1: make a mr, 6 dc into ring (6 dc)
Round 2: *slst in next st of rnd 1, ch 3, dc in
2nd ch from hook, dc in next ch, rep from *
6 times (6 leaves of 2 dc each). Fo, leaving a
long tail for sewing.
Sew the leaves to the strawberries. Using a
length of Yellow yarn, sew seeds onto the
strawberries.

WHIPPED CREAM (MAKE 5)
Using White. All rows are worked in blo.
Row 1: ch 15, inc in 2nd ch from hook, dc in
next 11 ch, dc2tog, turn (14 dc)
Row 2: ch 1, dc2tog, dc in next 11 sts, inc in
last st, turn (14 dc)
Row 3: ch 1, inc, dc in next 11 sts, dc2tog,
turn (14 dc).
Rep rows 2 and 3 another 5 times.
Row 4: ch 1, dc2tog, dc in next 11 sts, inc
in last dc (14 dc). Fo, leaving a long tail for
sewing.

HOMESPUN Crochet | 65

66 | HOMESPUN Crochet

Photo 5

Photo 6

Photo 7

Photo 8

Photo 9

Photo 10

FINISHING
Fold the bottom left and top right edges
of the parallelogram inwards. See Photos
5 and 6. Use the tail to whip stitch them
together to create a tube. See Photo 7. Do
not cut the tail. Next, starting with the edge
of the tube that is closest, weave the tail
in and out every alternate row. See Photos
8 and 9. Pull tightly to close the opening.
This will create a swirl effect. Pass the tail
through the centre to the other end of
the tube and rep weaving on this edge.
Stuff lightly before pulling closed to form
a swirled puff. See Photo 10. Lastly, pass
the tail straight through the centre from
the top to the bottom of the puff and pull
tightly to flatten it a little. Tie a knot and
hide the remaining tail in the work.

Yummy Yarn and co is your destination yarn store in regional
NSW where you will find a beautiful and eclectic store filled
with natural fibres from Australia and around the world.
Shop owner, Robyn, has a passion for crochet and knitting
and loves welcoming visitors to her store. Make your next
yarn shop visit a regional one or you can always shop online.

yummyyarnandco@gmail.com | www.yummyyarnandco.com.au |

@yummyyarnandco
HOMESPUN Crochet | 67

68 | HOMESPUN Crochet

PROJECT

08
ADVANCED
BEGINNER

This Way or That

BLANKET
AMY ZIEHN (CRAFTY BRIT ABROAD)

“A beautiful advanced beginner project with
added texture that can be created in one or
multiple colours.” – Amy

Instagram: @craftybritabroad

HOMESPUN Crochet | 69

70 | HOMESPUN Crochet

YARN
• Maykr Aran and Eve 10 ply 100% acrylic
200g/250m: 1 ball each of colours Creme
Brulee (04), Cake Pop (05), Parfait (50)
and 3 balls of colour Pavlova (26)
Pavlova – colour A
Cake Pop – colour B
Parfait – colour C
Creme Brulee – colour D

EQUIPMENT
• 5.5mm crochet hook
• 6mm crochet hook (for starting chain only)
• Darning needle

TENSION/GAUGE
11 tr sts x 7 rows = 10cm using st pattern

FINISHED MEASUREMENTS
Approx. 110cm x 96cm

NOTES
Ch 2 at the beginning of a row counts as a
st each time.

STITCH PATTERN
puff stitch: *yo, insert hook in st, pull up a
loop, rep from * 3 times, yo. There will be 7
loops on the hook. Yo, pull through 6 loops,
yo and pull through last 2 loops.
standing double crochet: create a sl st
and place on hook (becomes first loop),
insert hook in st, pull up a loop, yo and pull
through 2 loops.

CROCHET TERMS
ch – chain
dc – double crochet
fo – fasten off
pm – place marker
ps – puff stitch
rep – repeat
rm – remove marker
rs – right side
sdc – standing double crochet
sk- skip stitch
sl st – slip stitch
st/s - stitch/es
tr – treble crochet
ws – wrong side
yo – yarn over

HOMESPUN Crochet | 71

72 | HOMESPUN Crochet

PATTERN
Using colour B and a 6mm hook, ch 104.
pm in last ch. Change to a 5.5mm hook.
Row 1: tr in 4th ch from hook, tr in each ch
across, turn (102 tr)
Row 2: ch 2 (counts as tr here and
throughout), *sk st, tr in next st, ps in sk st,
rep from * until the end of the row, tr in top
of ch 3, turn (50 puff, 52 tr)
Row 3: ch 2, tr in st across, tr in top of ch 2,
turn, fo and cut yarn (102 tr)
Row 4: using colour A, join the yarn to the
beginning of row, ch 2, tr in each st across,
tr in top of ch 2, turn (102 tr)
Row 5: ch 2, *sk st, tr in next tr, ps in sk st,
rep from * until the end of the row, tr in top
of ch 3, turn (50 puff, 52 tr)
Row 6: ch 2, tr in each st across, tr in top of
ch 2, turn, fo and cut yarn (102 tr)
Rows 7-69: rep rows 4-6 another 21 times,
following the colour sequence C, A, D then
(A, B, A, C, A, D) 3 times. 23 colour stripes
completed in total.

HOMESPUN Crochet | 73

74 | HOMESPUN Crochet

BORDER
Round 1: using colour A and rs facing, sdc
in marked st, rm, dc in each st until the
corner, 3 dc in top of ch 3, dc 114 evenly
along the long edge until the corner, 3 dc
in top of ch 2 of row 69, dc in each st until
corner, 3 dc in top of ch 2, dc 144 evenly
along the edge until the corner, 2 dc in
same st as sdc, sl st to join (440 dc)
Round 2: ch 2 (does not count as a st)
*sk st, tr in next st, ps in sk st, rep from * 51
times, 3 tr in corner st, tr in each st across,
3 tr in corner st, *sk st, tr in next st, ps in sk
st, rep from * 51 times, 3 tr in corner st, tr in
each st across, 3 tr in corner st, sl st to join
(102 puff, 346 dc). Fo and cut yarn.
Round 3: using colour C and rs facing, sdc
in any corner st, 2 dc in same st as sdc, dc in
each st around with 3 dc in each corner st,
sl st to join (1 sdc, 477 dc). Fo, cut yarn and
weave in the ends.

Fibre
Fibre Frolic is a boutique yarn shop
located in the beautiful Kurrajong
Village in the Hawkesbury area of
NSW. Sharon, the owner, learnt to
knit and crochet from her beautiful
grandmother when she was young.
She trained as a chef after leaving
school and worked in various positions
in the hospitality industry, but owning
a yarn shop had always been a dream
of hers. “When you finally find what
you consider to be the ideal location
after many years of looking and your
husband says, “Go for it”, I didn’t wait for
him to change his mind so a lease was
signed and Fibre Frolic’s doors opened
in August 2020.”
Fibre Frolic showcases a selection
of hand-dyed yarns from indie

dyers around Australia, beautiful
commercial yarns, patterns,
accessories and handcrafted items.
They regularly run classes and
workshops in store, some with guest
tutors to teach everyone their area
of expertise. “We recently held
our first Sip and Crochet event, we
run a Crafternoon every Saturday
where you can come along and
join others for some fun social
knitting and crochet time, and once
a month we hold a knit night at a
local restaurant/café as we love to
encourage people to be out and
about with their latest project. We
also organised our first Fibre Frolic
Festival which was held in October
2023. Dates for our 2024 event will
be coming soon!”

CONTACT
FIBRE FROLIC
70B Old Bells Line of Road, Kurrajong, NSW
Phone: 0400 036 833
Email: fibrefrolic@gmail.com
Website: www.fibrefrolic.com.au
Instagram and Facebook: @fibrefrolic

HOMESPUN Crochet | 75

Back
to
Basics

UNDERSTANDING
Your guide to the
different types of
cotton yarns
WORDS BY LYNDA TOMKINS
(CROCHET AUSTRALIA)

76 | HOMESPUN Crochet

HOMESPUN Crochet | 77

GASSED

When people say they crochet with
cotton, many people associate this with
using thread and making traditional items
such as doilies and tablecloths. While
these are still popular, there has been a
significant development in cotton, which
is now used in many crocheted and
knitted projects.
As a natural plant-based fibre, cotton
is soft, breathable and extremely
absorbent. It conducts heat away from
the body making cotton the perfect
fibre for use in summer garments. It’s
also highly durable and with the ability
to absorb up to 27 times its own weight,
it’s the perfect yarn for household items.
When blended with other fibres, it brings
a layer of warmth, extending its use into
garments for the cooler weather. As a
soft fibre, cotton is quite often used for
babies and is a great alternative for those
with allergies to wool.
However, there are many different types
of cotton yarns out there, and the words
used on the labels aren’t always selfexplanatory – so we are going to try and
demystify these terms!

78 | HOMESPUN Crochet

PERLE

MERCERIZED

EGYPTIAN AND PIMA COTTON
Egyptian and Pima cotton is a type of
cotton in which the individual fibres are
extra-long and silkier. This makes the
cotton softer, stronger and longer lasting.
This super soft and smooth cotton is
considered more luxurious and a better
quality than other cottons. It makes up
approx. 10% of the cotton grown around
the world. Pima cotton is primarily grown in
the USA, while Egyptian cotton is primarily
grown in the Nile River Valley. But beware,
there are many cottons labelled ‘Egyptian
cotton’ because they come from Egypt,
which is not necessarily the high-quality
Egyptian cotton referred to above!

MERCERISED COTTON
Mercerisation is a chemical process applied
to yarn after it’s spun but before it’s dyed.
The yarn is dipped in a sodium hydroxide
bath followed by an acid bath, which
neutralises the chemicals. This causes
the fibres to expand and untwist, which
increases the strength, lustre and ability to
absorb dye. This means that the colours are
often brighter, it has a silky finish, it’s more
resistant to mildew, less likely to shrink when
washed, and it’s less likely for the dye to run.

D
UNMERCERIZE

GASSED COTTON
This is a second process generally
applied to mercerised cotton
thread before it’s dyed. The
thread, once mercericed, is
passed over an open flame. This
incinerates any stray fibres or lint
that exists, improving even further
its ability to absorb dye. This
makes for an even brighter and
smoother thread.

ORGANIC COTTON
Organic cotton refers to the way in
which the cotton has been grown.
This means it was grown without
the use of synthetic fertilisers and
pesticides, making it an option
that’s kinder to the environment.
The dyes used in these cottons are
also generally chemical free.

HOMESPUN Crochet | 79

UNMERCERISED
COTTON
This cotton hasn’t been treated to
a finishing process and is therefore
more natural. While it’s super
absorbent, it absorbs dye differently
so the colours are often more
muted than mercerised cotton,
and it has a matte finish. It generally
has a slight ‘furry’ appearance.
Any cotton blends such as cotton
and bamboo, cotton and acrylic,
cotton and wool or cotton and
silk will use unmercerised cotton.
The label will not state that it’s
unmercerised, therefore if it
doesn’t state mercerised it’s always
unmercericed. Due to the moisture
absorbency, unmercerised cotton is
best for dishcloths.

80 | HOMESPUN Crochet

PERLE COTTON

Lynda is the owner and manager
of Crochet Australia, an online
store based in the Sunshine
Coast, Qld, dedicated to all
things crochet. Lynda gets to
play with yarn and crochet tools
every day! Her favourite thing to
crochet with is cotton and she
sells a wide range of cottons at
her store, teaches crochet and
runs regular crochet workshops
– both in store and online.

This is also a 100% mercericed cotton, with
a high sheen and tightly twisted thread. It’s
also a non-divisable thread meaning you
can’t separate it into its threads to use which
you often do with embroidery thread - doing

so will weaken the cotton. As a non-divisible
thread, it remains strong and often adds
texture in embroidery, but produces a very
soft and lustrous crocheted or knitted item.
So which cotton will you be using next?

CROCHET AUSTRALIA
1563 Yandina-Coolum Road, Yandina, Qld 4561
For their full range of products, classes and events, visit www.crochetaustralia.com.au
Sign up for the Crochet Australia newsletter and follow them on social media to hear
about upcoming events and new products in store!
Instagram and Facebook: @crochetaustralia
YouTube: @CrochetAustraliaOnline

HOMESPUN Crochet | 81

82 | HOMESPUN Crochet

PROJECT

09
EASY

Dashi Bag

KEEPER

MARIA FRESTA (MARIA ANGELINA CREATIONS)

“This dachshund inspired bag keeper is a quirky and fun destination
for all your reusable bags. Perfect to hang anywhere in the house
for all the family to use. This bag is also cute enough to mind smaller
toys for the children’s bedrooms and encourage clean up.” – Maria

Instagram: @mariaangelinacreations | Facebook, Tik Tok, YouTube: @MariaAngelinaCreations
Etsy: @MACreationsAU

HOMESPUN Crochet | 83

84 | HOMESPUN Crochet

YARN
• 4 Seasons Spot Saver USA Style 100%
acrylic 200g/312m: 1 ball of colour Aqua,
small amounts of colours Sky and Black

EQUIPMENT
•
•
•
•
•

5mm crochet hook
Scissors
Darning needle
Stuffing
Stitch markers

TENSION/GAUGE
Not essential for this project. Try a smaller
hook size for the muzzle for tighter
stitching so the stuffing doesn’t show
through.

FINISHED MEASUREMENTS
Approx. 43cm long (top of head to bottom
of bag) x 19cm wide (width of mesh body)

CROCHET TERMS
beg - beginning
ch – chain
dc – double crochet
dc2tog – double crochet 2 sts together
fo – fasten off
mr - magic ring
rep – repeat
rnd/s - round/s
sk – skip stitch
st/s – stitch/es
sl st – slip stitch
tr – treble crochet

HOMESPUN Crochet | 85

86 | HOMESPUN Crochet

PATTERN
HEAD
Work in continuous rnds
Round 1: ch 11, dc into 2nd ch from hook, dc
in next 9 ch, ch 1, working the other side of
the ch dc in next 10 ch, ch 1 (20 dc, 2 ch)
Round 2: do not work in ch, 2 dc in next st,
2 dc in next st, dc in next 7 sts, *2 dc in next
st, rep from * 3 times, dc in next 7 sts, 2 dc in
last st (26 dc)
Round 3: 2 dc in next st, *2 dc in next st, rep
from * 2 times, dc in next 9 sts, *2 dc in next
st, rep from * 4 times, dc in next 9 sts, 2 dc in
last st (34 dc)
Round 4: dc in next st, *2 dc in next st, rep
from * 3 times, dc in next 14 sts, *2 dc in
next st, rep from * 3 times, dc in last 13 sts
(40 dc)
Rounds 5-24: dc in each st around (40 dc)
Round 25: dc in next 13 sts, ch 20, sk next
14 sts, dc in next st, dc in last 12 sts (26 dc,
20 ch)
Round 26: dc in each st around including
each ch (45 dc)
Round 27: dc in each st around, sl st to 1st
st (45 dc)

BODY
Work in rnds
Round 28: ch 4, *sk st, tr in next st, ch 2, rep
from * to end of rnd, sl st to 2nd ch of ch 4
(23 tr)
Round 29: ch 4, sk ch 2, tr in next st, *ch 2,
sk ch 2, tr in next st, rep from * end of rnd,
ch 2, sl st to 2nd ch of ch 4 (23 tr)
Rounds 30-42: rep rnd 29
Round 43: ch 2, *2 tr in 2 ch space, tr in next
st, rep from * to end of rnd, 2 tr in last 2 ch
space, join with a sl st in 2nd ch (69 tr)
Round 44: ch 2, tr in each tr to end, sl st to
join (69 tr)

Round 45: ch 3, *skip next st, tr, ch 1* rep to
end, join with a sl st in 2nd ch (35 tr)
Round 46: ch 2, *tr in ch st, tr in tr* rep to
end, sl st in second ch to join (70 tr)
Round 47: ch 2, tr in each st to end, sl st to
join, fo (70 tr)

TAIL/RIBBON
Tail will be the ribbon to tie the bottom up
Row 1: ch 60, dc in 2nd ch from hook, dc in
each ch across, ch 1 and turn (59 dc)
Row 2: dc in next 20 sts, sl st in last st, ch 1
and turn (20 dc)
Rows 3-4: sl st in sl st, dc in next 13 sts, sl st
in last st, ch 1 and turn (13 dc)
Row 5: sl st in each st across, ch 1, rotate
work, sl st on short end 2 times, ch 1, rotate
work, sl st in each st across, fo (44 sl st)

EARS (MAKE 2)
Row 1: leaving a long tail, ch 5, dc in 2nd ch
from hook, dc in next 3 chs, ch 1 and turn
(4 dc)
Row 2: 2 dc in next st, dc in next 2 sts, 2 dc
in last st, ch 1 and turn (6 dc)
Row 3: 2 dc in next st, dc in next 4 sts, 2 dc
in last st, ch 1 and turn (8 dc)
Rows 4-11: dc in each st across, ch 1 and
turn (8 dc)
Row 12: dc2tog, dc in next 4 sts, dc2tog, ch
1 and turn (6 sts)
Row 13: dc2tog, dc in next 2 sts, dc2tog, ch
1 and turn (4 sts)
Row 14: *dc2tog, rep from * once, ch 1 and
turn (2 sts)
Row 15: dc2tog, fo (1 st)

LEGS (MAKE 4)
Work in continuous rnds
Round 1: make a mr, ch 1, 5 dc into ring, pull
yarn tail tight to close circle (5 dc)
Round 2: 2 dc in each st around (10 dc)

Rounds 3-5: dc in each st around (10 dc)
Round 6: *dc2tog, rep from * 5 times (5
sts). Flatten foot and work through both
sides, working in rows.
Row 7: ch 1, dc in each st across, ch 1 and
turn (2 dc)
Rows 8-13: dc in each st across, ch 1 and
turn, leave a long tail after row 13, fo (2 dc)

MUZZLE
Work in continuous rnds
Round 1: make a mr, ch 1, 5 dc into ring (5 dc)
Round 2: 2 dc in each st around (10 dc)
Round 3: dc in each st around (10 dc)
Round 4: *dc in next 3 sts, 2 dc in next st,
rep from * to last 2 sts, dc in last 2 sts (12 dc)
Round 5: *dc in next 3 sts, 2 dc in next st,
rep from * to end (15 dc)
Rounds 6-7: dc in each st around (15 dc)
Round 8: *dc in next 3 sts, 2 dc in next st,
rep from * to last 3 sts, dc in last 3 sts (18 dc)
Rounds 9-10: dc in each st around (18 dc)
Round 11: dc in next 18 sts, sl st in next st, fo,
leaving a long tail for sewing (18 dc)

NOSE
Row 1: using Black, ch 2, 2 dc in 2nd ch
from hook, ch 1 and turn (2 dc)
Row 2-3: dc in each st across, fo leaving a
long tail for sewing (2 dc)

EYES (MAKE 2)
Row 1: using Sky, ch 4, dc in 2nd ch from
hook, dc in next 2 chs (3 dc)
Round 2: working the other side of ch, dc
in next 2 chs, 2 dc in next 2 chs, dc in next 4
sts (10 dc)
Round 3: dc in each st around, sl st in next
st, fo, leaving a long tail for sewing (10 dc)
Row 1: using Black for the pupil, ch 3, dc in
2nd ch from hook, dc in next ch, fo leaving a
long tail for sewing (2 dc)

HOMESPUN Crochet | 87

ASSEMBLY
LEGS
Lay the body flat with the mouth opening
facing up. Working on the folded edge.
Sew the front legs with whip stitch along
the side of the treble four rows down. Sew
the back legs along the side of the treble
three rows up from the bottom.

NOSE
Stuff the muzzle firmly. Line it up to the
centre top of the mouth opening using pins
to keep it in place. Sew it to the head with
whip stitch. Sew the nose onto the tip of
the muzzle.

EARS
Working on the folded sides of the head,
five rnds down, line up the centre of the
wider edge of the ear with the centre
folded edge. Using stitch markers to keep
the ear in place, whip stitch the ear and
body together.

EYES
Line up the eyes between the muzzle and
the top of the head, spacing them out to
look nice. Using stitch markers to keep the
eyes in place, whip stitch the eyes to the
head. Sew the pupils onto the eyes.

TAIL/RIBBON
On row 45 of the bag bottom, weave the
skinny end of the ribbon in and out of the
tr, ch 1 spaces. Be careful not to twist the
ribbon. Tie the ends together just above
the thick tail.

LOOP
Ch 50, fo. Find the centre top of the head
by folding it in half. Pull the ends of the ch
into the head on either side of centre mark
with a crochet hook. Flip the mouth opening
out to line up with the ch loop evenly.
Holding both strands, knot together. The
loop can be adjusted shorter or longer by
reknotting the knot higher or lower. Weave
all the ends in.

88 | HOMESPUN Crochet

People’s
Choice Award
winning socks

ABOVE: Some of the lovely Pink Angels helped out on the opening night of the
festival. They are all volunteers and do such an amazing job of fundraising!

Yummy Yarn and co
Yummy Yarn and co is a regional based
yarn shop in Dubbo, NSW. Owner, Robyn
Hicks, organised the Inaugural Yummy
Yarn and co Winter Sockstice Festival
Competition which took place in June
2023. What is a Winter Sockstice? It’s a
time of the year, happening on or around
the Winter Solstice, where knitters and
crocheters celebrate the handmade sock
to showcase their creativity and personality.

• 77 pairs of socks were on
display!
• There were prizes in five
categories as well as the
People’s Choice Award and the
Packer’s Prize!
• Over $3,000 was raised
for local not-for-profit
organisation, Pink Angels Inc!

The opening night was held on Friday 23
June 2023, and it was an absolute blast!
Around 40 people attended the opening
night in the YYC upstairs workshop area
where the winners were announced. The
shop was also open over the weekend so
that people could pop in and vote for the
People’s Choice Award.
The money was raised in the form of
ticket sales for the opening night, gold
coin donations to view the socks over the
weekend plus money raised from the sale
of some of the socks. When entering the
competition, makers can have their socks
returned or offer them up for sale with all
proceeds going to the local Pink Angels Inc
breast cancer organisation.
Robyn hopes that more crafters will help
her grow the event for next year so that she
can reach her goal of 100 pairs of socks on
display. Wouldn’t that be sock-tastic!

CONTACT

Stripy/scrappy
sock section
winners

Yummy Yarn and co
29 Talbragar St, Dubbo, NSW 2830
Email: yummyyarnandco@gmail.com
Website: www.yummyyarnandco.com.au
Instagram: @yummyyarnandco
Facebook: @Yummyyarnandco

HOMESPUN Crochet | 89

90 | HOMESPUN Crochet

PROJECT

10
EASY

Customised Christmas

DECORATIONS
CARINA REGO (CARINA’S CRAFTS)

“A great beginner project that can be made using your leftover
scraps. Decorations can be personalised or can be made generic
with festive terms. These are a quick make, so no excuse not to
make one for each family member!” – Carina

Instagram: @carinascrafts | Website: www.carinascrafts.wordpress.com

HOMESPUN Crochet | 91

92 | HOMESPUN Crochet

YARN
• Acrylic yarn 8 ply in the colour of your
choice (Carina used white for the bauble
and grey for the cap)

EQUIPMENT
•
•
•
•
•
•
•
•

5mm crochet hook
Darning needle
Pin
Fabric erasable pen
Hobby fill
Cardstock circle (diameter of cap)
Embroidery floss
String/ribbon (optional)

FINISHED MEASUREMENTS
Bauble approx. 10cm

NOTES
Attach crochet chain, string or ribbon
to the cap to turn your ornament into a
hanging decoration.

CROCHET TERMS
blo – back loop only
ch – chain
dc – double crochet
dc2tog – double crochet 2 sts together
fo – fasten off
mr – magic ring
rnd/s - round/s
sl st – slip stitch
tr – treble crochet
rep - repeat

HOMESPUN Crochet | 93

94 | HOMESPUN Crochet

Template

PATTERN
BAUBLE
Using your main colour, work in the rnd and
do not join
Round 1: make a mr, 6 dc into the ring (6 dc)
Round 2: 2 dc in each st around (12 dc)
Round 3: *dc in next st, 2 dc in next st, rep
from * 6 times (18 dc)
Round 4: dc in next st, 2 dc in next st, *dc in
next 2 sts, 2 dc in next st, rep from * 5 times,
dc in last st (24 dc)
Round 5: *dc in next 3 sts, 2 dc in next st,
rep from * 6 times (30 dc)
Round 6: dc in next 2 sts, 2 dc in next st,
*dc in next 4 sts, 2 dc in next st, rep from * 5
times, dc in next 2 sts (36 dc)
Round 7: *dc in next 5 sts, 2 dc in next st,
rep from * 6 times (42 dc)
Round 8: dc in next 3 sts, 2 dc in next st,
*dc in next 6 sts, 2 dc in next st, rep from * 5
times, dc in next 3 sts (48 dc)
Round 9-11: dc in each st around (48 dc)
Round 12: *dc in next 7 sts, 2 dc in next st,
rep from * 6 times (54 dc)

Round
13: dc in each st around (54 dc)
Ro
Round 14: *dc in next 7 sts, dc2tog, rep
from * 6 times (48 dc)
Round 15-17: dc in each st around (48 dc)
Round 18: dc in next 3 sts, dc2tog, *dc in
next 6 sts, dc2tog, rep from * 5 times, dc in
next 3 sts (42 dc)
Round 19: *dc in next 5 sts, dc2tog, rep
from * 6 times (36 dc)
Round 20: dc in next 2 sts, dc2tog, *dc in
next 4 sts, dc2tog, rep from * 5 times, dc in
next 2 sts (30 dc)
Round 21: *dc in next 3 sts, dc2tog, rep
from * 6 times (24 dc).
Fill with Hobby Fill.
Round 22: dc in next st, dc2tog, *dc in next
2 sts, dc2tog, rep from * 5 times, dc in last
st (18 dc)
Round 23: *dc in next st, dc2tog, rep from
* 6 times (12 dc).
Fill with more Hobby Fill if necessary.
Round 24: dc2tog around (6 dc).
With a yarn needle and yarn tail, weave in
the blo of the 6 dc. Pull tightly to secure
and fo.

METAL CAP
Using contrast colour
Round 1: make a mr, 6 dc into the ring (6 dc)
Round 2: 2 dc in each st around (12 dc)
Round 3: *dc in next st, 2 dc in next st, rep
from * 6 times (18 dc)
Round 4: dc in next st, 2 dc in next st, *dc in
next 2 sts, 2 dc in next st, reo from * 5 times,
dc in last st (24 dc)
Round 5: ch 2, tr blo in each st around, sl st
to top of ch 2 to join (24 tr)
Round 6: ch 1, dc in each st around, sl st to
top of ch 1 to join (24 dc).
Fo leaving a tail.
Optional - insert a circle of cardstock in the
cap before filling the cap. Fill the cap with a
little Hobby Fill, attach the cap to the bauble
by centring the cap on the bauble with a
pin. With a yarn needle and yarn tail, sew the
cap to the top of the bauble. To personalise,
trace or draw a name or word (refer to
Template) with an erasable fabric erasable
pen on the widest part of the bauble.
Backstitch letters with embroidery floss.

HOMESPUN Crochet | 95

96 | HOMESPUN Crochet

PROJECT

11

INTERMEDIATE

All That Brightly Blooms

BLANKET
SUE PINNER

You’ve got to hand it to Sue Pinner – she knows just how to
indulge the need for abundance. Her glorious crochet rug
is not only a colour celebration, but she brings her tactile
flowers to life in flourishing 3D form.

HOMESPUN Crochet | 97

98 | HOMESPUN Crochet

YARN
• 8 ply (DK) 100g yarn: 1 ball each of colours
Red, Black, Lilac, Lavender, Blue, Jade, Green,
Yellow, Yellow/Orange or 9 different colours of
your choice
• 4 ply 50g of cream sock yarn
• 4 ply 50-75g of sock yarn in assorted colours
• 10 ply (Aran) 450g: 1 ball of Black
• Small amounts of extra yarn colours

EQUIPMENT
• 5mm crochet hook
• Yarn needles

TENSION
7 sts x 8 rows = 5cm in dc

FINISHED MEASUREMENTS

GRANNY SQUARES

• 90cm square

NOTE
Sue used wool/acrylic blend yarns for her rug,
mostly 30% wool and 70% acrylic. Any sock yarn
can be used, but preferably not too dark and in
colours to coordinate with the 8 ply yarns. The
size of this rug can easily be increased or reduced
by adding or subtracting rows of squares in any
direction. The rug is constructed using the joinas-you-go method, meaning that you crochet the
first 3 rnds of all squares first and then join them as
you crochet the last rnds.
If your tension differs, you can change your hook
size. Sue prefers crocheted rugs to be worked at a
tighter than usual tension as they wash and wear
better with less stretch, so she has specified a
5mm hook. A 6mm hook can be used instead but
will result in a slightly bigger rug.

For the first 2 rnds, use 1 of the 8 ply yarns
and the cream 4 ply yarn together.
Begin with a mr so that you can fully close
the centre hole. (Alternatively, ch 4, join
with a sl st and work into the ring, but this
will leave a slightly open hole in the middle).
Round 1: ch 2 as the first tr, 2 tr, ch 3, *3 tr, ch
3*. Rep from * to * twice more. Sl st into the
top ch at the start to complete the rnd.
Round 2: ch 2 as the first tr, 1 tr into the next
2 sts, 2 tr, ch 3, 2 tr in the corner sp, * 1 tr in
the next 3 sts, 2 tr, ch 3, 2 tr in the corner
sp*. Rep from * to * twice more. Sl st to
complete the rnd. Cut the yarn and weave
in the ends.
Change to a mix of the same 8 ply yarn
and work them as one yarn to give a darker
edge to the coloured square.

CROCHET TERMS
ch – chain
dc – double crochet
dtr – double treble crochet
fo - fasten off
mr - magic ring
rem – remainder
rep – repeat
rnd/s - round/s
sl st – slip stitch
sp – space
st/s – stitch/es
tr – teble crochet

Granny square

HOMESPUN Crochet | 99

Large 12-petal flower

Round 3: beginning in a corner sp, attach
the darker yarn mix, ch 2 as the first dc,
1 tr, ch 3, 2 tr into the same corner sp. 1 tr
in the next 7 sts, *2 tr, ch 3, 2 tr in the next
corner sp, 1 tr in the next 7 sts*. Rep from * to
* twice more and sl st to complete the rnd.
Cut the yarn and weave in the ends.
Make 4 squares in each of the 9 colours –
36 in total – and lay them out in 6 rows of 6
squares in the order to be joined.
Round 4: using Black 10 ply yarn only, attach
the yarn to one of the corner squares in a
corner sp, ch 5 as the first tr and ch 3 sp, tr
in the same corner sp, 1 tr in the next 11 sts,
*1 tr, ch 3, 1 tr in the corner sp, 1 tr in the next
11 sts*. Rep from * to * twice more. Sl st into
the 3rd ch to complete the rnd, cut yarn and
weave in ends. For all remaining squares,
join as you go to the adjacent square/s in
every st. Join the yarn and crochet along
the first side of the next square as for rnd 4.
When you get to the next corner, work 1 tr
in the corner sp, ch 1, sl st into the corner ch
3 sp of the adjacent square, ch 1, tr in same
corner sp. Sl st into next st of the adjacent
square between every tr of the square you
are working on. Work the next corner as
the previous one, then crochet around the
rest of that square as for rnd 4. On the 2nd
and subsequent rows of squares, you will
be joining along two sides and crocheting
around the other two. On the front of the
rug, there should be a neat, slightly raised
join and on the back the join is smooth.

100 | HOMESPUN Crochet

Medium 12-spoke flower

Alternatively, the squares can be whip
stitched together with black yarn if you
prefer.

RAINBOW BORDER
Round 1: using Red, dc in every st, 1 dc, ch
3, 1 dc in each corner sp (380 sts - 95 sts
each side). Fo and weave in ends.
Round 2: using Black, rep rnd 1, inc each
side by 2 sts (388 sts - 97 sts each side)
Round 3: using Black, rep rnd 2 (396 sts 99 sts each side)
Round 4: using Black, rep rnd 2 (404 sts 101 sts each side)
Round 5: using Lilac, rep rnd 2 (412 sts 103 sts each side)
Round 6: using Black, rep rnd 2 (420 sts 105 sts each side)
Round 7: using Lavender, rep rnd 2 (428 sts
- 107 sts each side)
Round 8: using Black, rep rnd 2 (436 sts 109 sts each side)
Round 9: using Blue, rep rnd 2 (444 sts - 111
sts each side)
Round 10: using Black, rep rnd 2 (452 sts 113 sts each side)
Round 11: using Jade, rep rnd 2 (460 sts 115 sts each side)
Round 12: using Black, rep rnd 2 (468 sts 117 sts each side)
Round 13: using Green, rep rnd 2 (468 sts 119 sts each side),
Round 14: using Black, rep rnd 2 (484 sts 121 sts each side)

9-petal flower

Round 15: using Yellow, rep rnd 2 (492 sts 123 sts each side)
Round 16: using Black, rep rnd 2 (500 sts 125 each side)
Round 17: using Yellow/Orange, rep rnd 2
(508 sts - 127 sts each side)
Round 18: using Black, rep rnd 2 (516 sts 129 sts each side)
Fo Black and weave in the ends.

FLOWERS
Work each rnd of the flowers in a different
coloured 8 ply yarn with either a random
coloured sock yarn or cream 4 ply yarn held
together as one yarn. Sue suggests using
sock yarn in a similar colour to the 8 ply yarn
for a more subtle effect.

LARGE 12-PETAL FLOWER
(MAKE 2)
Begin with a three-finger size four-wrap
circle.
Round 1: ch 3 as first dtr, 24 dtr into the
circle, sl st into top of ch 3 to complete the
rnd. Fo yarn and weave in the ends.
Round 2: attach the next yarn in any st, ch
6 as first dtr and ch 3 sp, *miss a st, dtr in the
next st, ch 3*. Rep from * to * 10 more times,
sl st to complete rnd.
Fo yarn and weave in the ends.
Round 3: attach yarn in any 3 ch sp, ch 2
as first tr, 4 tr more in same sp, 5 tr in next 3
ch sp, rep in each 3 ch sp. Sl st to complete
rnd. Fo yarn and weave in the ends.

Simple 9-petal flower

Small 8-petal flower

Small 6-petal flower

Round 4: shell st: attach yarn in a sp above
a spoke. Miss 2 sts, 5 tr in next st, miss 2 sts,
sl st in the sp above the spoke. Rep shells
until all 12 are complete, sl st to complete
rnd. Fo and weave in the ends.

Round 1: 12 tr into the ring. Sl st to complete
the rnd. Fo and weave in the ends.
Round 2: attach a new yarn in any st, ch 4
as the first tr and 2 ch sp; tr, ch 2 in every st;
sl st to complete the rnd, cut off the yarn
and weave in the ends.
Round 3: attach another yarn in any ch sp,
3 tr in each ch sp. Sl st to complete the rnd.
Fo and weave in the ends.
Round 4: attach another yarn in the sp
above a spoke, miss a st, *5 tr into next st,
miss a st, sl st into next st, miss a st*. Rep
from * to * 8 more times. Fo and weave in
the ends.
Round 5: attach another yarn over the top
of a sl st of rnd 4, *dc in next 2 sts, 2 dc in
next st, dc in next 2 sts, dc over the next sl st
of rnd 4*. Rep from * to * 8 more times, sl st
to complete the rnd. Fo and weave in
the ends.

Round 3: attach yarn in any st, ch 5, miss
2 sts, sl st in next st. Rep 7 more times and
leave the yarn attached.
Round 4: without changing colour, 6 dc in
each ch sp, sl st over the sl st in rnd 3. Rep
for all 8 petals, sl st to complete the rnd. Fo
and weave in the ends.

SIMPLE 9-PETAL FLOWER
(MAKE 3)

FINISHING

MEDIUM 12-SPOKE FLOWER
(MAKE 2)
Make a mr
Round 1: 12 tr into the ring, sl st to
complete the rnd. Fo and weave in
the ends.
Round 2: attach a new yarn in any st, ch 4
as the first tr and 2 ch sp; tr, ch 2 in every st,
sl st to complete the rnd. Fo and weave in
the ends.
Round 3: attach another yarn in any ch sp,
4 tr in every ch 2 sp. Sl st to complete the
rnd. Fo and weave in the ends.
Round 4: attach another yarn in a sp above
a spoke, miss a st, 3 tr into the next st, miss a
st, sl st into the sp above a spoke. Rep until
12 shells are complete, sl st to complete the
rnd. Fo and weave in the ends.
Round 5: attach another yarn in the sp above
a spoke, * make a long st (spike st) into the
row before, dc into the next 2 sts, 2 dc in the
next st, dc in the next two sts*.
Rep from * to * for all 12 petals, sl st to
complete the rnd. Fo and weave in
the ends.

9-PETAL FLOWER (MAKE 2)
Make a mr

Work rnds 1-4 of the 9-petal flower,
omitting rnd 5.

SMALL 8-PETAL FLOWER
(MAKE 6)
Make a mr
Round 1: 12 tr into the ring, sl st to complete
the rnd. Fo and weave in the ends.
Round 2: attach a new yarn in any st, 2 dc
in each st, sl st to complete the rnd. Fo and
weave in the ends.

SMALL 6-PETAL FLOWER
(MAKE 4)
Make a mr
Round 1: 12 tr into ring, sl st to complete the
rnd. Fo and weave in the ends.
Round 2: attach a new yarn in any st, 2 tr in
the first 2 sts, ch 3. Rep five more times, sl st
to complete the rnd. Fo and weave in ends.
Round 3: attach another yarn between two
sets of 2 tr, 6 dc into the 3 ch sp, sl st between
the next set of 4 tr. Rep 5 more times, sl st to
complete the rnd. Fo and weave in the ends.

You should have a total of 19 crocheted
flowers. Arrange them randomly over one
diagonal half of the granny square area of
your rug and stitch them in place around
the edges. If the stitching is done carefully,
you can bury the stitches in the main blanket
and you won’t see any stitches on the back
of the rug.
As seen in Homespun

HOMESPUN Crochet | 101

102 | HOMESPUN Crochet

PROJECT

12

INTERMEDIATE

Patches the

DOG

JESS MIKECZ (ONE DESIGN AT A TIME)

“Patches the Dog is a great intermediate project that can be made in
multiple colours. If this is the first time you’re trying out amigurumi or
making a 3D object in crochet, Patches is a simple way to start. He’s great to
cuddle and will keep you company for all future yarn projects.” – Jess

Instagram: @jessdoescrochet | Facebook: @OneDesignAtATimeAust | Etsy: @onedesignatatimeaust

HOMESPUN Crochet | 103

104 | HOMESPUN Crochet

YARN

NOTES

• 4 Seasons Marvel 8 ply 100% acrylic
100g/283m: 1 ball each of colours Light
Grey (1022), Pink (1012), Black (1002) and
Cream (1004)

Use the ‘yarn under’ method to get a nice
tight st. This will stop the stuffing showing
through the sts. Using invisible decreases
will help stop the stuffing showing through.
Apart from the start of the head, work in
continuous rnds with no sl st at the end
of each rnd, but it’s a good idea to insert a
stitch marker in the last st of each rnd so
you don’t lose your place. Don’t overstuff
Patches, especially the head and body.
He should still be squishy. If you squish
the head or body and can see the stuffing
poking through as the yarn stretches, you
may have stuffed too much.

EQUIPMENT
• 4.5mm crochet hook
• Darning needle for sewing and
embroidery
• 2 x 12mm dark brown safety eyes
• 1 x 25mm safety nose
• Fibrefill for stuffing

FINISHED MEASUREMENTS
Approx. 20cm tall x 20cm wide in a seated
position and 30cm long from the tip of his
nose to the tip of his tail. Note: by using a
different sized crochet hook, Patches’ size
will change slightly.

PATTERN
EYEPATCH
Using Cream, make a mr.
Round 1: 5 dc into ring (5 dc)
Round 2: inc in each st around (10 dc)
Round 3: *dc in next st, inc in next st, rep
from * 3 times (15 dc).
Fo and leave a long tail.

TONGUE
Using Pink, make a magic loop
Round 1: 4 dc into ring (4 dc)
Round 2: htr in next st only (1 htr)
Fo and leave a tail.

HEAD
Using Light Grey, ch 12.
Round 1: dc in 2nd ch from hook, dc in next
8 chs, 3 dc in last ch. Continue working on
the other side of ch, dc in next 10 sts, 3 dc in
next st, sl st to join (26 dc)

CROCHET TERMS
ch – chain
dc – double crochet
dec – decrease (work 2 sts together)
fo – fasten off
htr – half treble crochet
inc – increase (work 2 sts in same st)
mr - magic ring
rep – repeat
rnd/s – rounds
sl st – slip stitch
st/s – stitch/es

Crochet in continuous rnds from here on.
Round 2: *dc in next 10 sts, inc in next 3 sts,
rep from * 1 more time (32 dc)
Round 3: *dc in next 11 sts, inc in next st, dc
in next 3 sts, inc in next st, rep from * 1 more
time (36 dc)
Round 4: *dc in next 5 sts, inc in next st, rep
from * 6 times (42 dc)
Rounds 5-7: dc in each st around (42 dc)
Round 8: dc in next 16 sts, dec, dc in next 19
sts, dec, dc in next 3 sts (40 dc)
Round 9: *dc in next 8 sts, dec, rep from * 4
times (36 dc)
Round 10: dc in next 6 sts only to reach
the middle st of long side of the nose
(oval) shape
Round 11: *dc in next 5 sts, inc in next st,
rep from * 5 times, dc in next 6 sts (41 dc)
Round 12: *dc in next 6 sts, inc in next st,
rep from * 5 times, dc in next 6 sts (46 dc)
Round 13: *dc in next 7 sts, inc in next st,
rep from * 5 times, dc in next 6 sts (51 dc)

Rounds 14-16: dc in each st around (51 dc)
Round 17: *dc in next 7 sts, dec, rep from * 5
times, dc in next 6 sts (46 dc)
Round 18: *dc in next 6 sts, dec, rep from *
5 times, dc in next 6 sts (41 dc)
Round 19: *dc in next 5 sts, dec, rep from *
5 times, dc in next 6 sts (36 dc)
Round 20: dc in each st around (36 dc).
The shape of the head should have a flattish
chin/neck and a higher forehead. Sew the
eye patch on rnds 9-15 on the right eye by
using back-stitch through the loops so that
you can’t see the joins. Insert the safety nose
on rnd 2 and the safety eyes between rnds
10-11 with 8 sts between them. The right eye
should be inserted through the stitched-on
eye patch. Under the nose, embroider a
dog’s mouth (like an anchor). Stitch on the
pink tongue in the point of the dog’s mouth.
Using Cream and a simple cross stitch,
embroider 3 crosses on either side of the
nose and mouth.

HOMESPUN Crochet | 105

Round 21: *dc in next 4 sts, dec, rep from *
6 times (30 dc)
Round 22: *dc in next 3 sts, dec, rep from *
6 times (24 dc).
Start to stuff the head and just fill the last
gaps before you close.
Round 23: *dc in next 2 sts, dec, rep from *
6 times (18 dc)
Round 24: *dc in next st, dec, rep from * 6
times (12 dc)
Round 25: dec 6 times around (6 dc)
Fo then weave the tail under the top loop
(loop facing outwards) of each of the 6
sts. Pull tightly to really close the hole.
Jess finds it’s a good idea to fo again once
you’ve pulled it tight. Weave in the ends.

EARS (MAKE 2)
Using Black, make a mr
Round 1: 3 dc into ring (3 dc)
Round 2: inc in each st around (6 dc)
Round 3: *dc in next st, inc in next st, rep
from * 2 times (9 dc)
Round 4: *dc in next 2 sts, inc in next st, rep
from * 2 times (12 dc)

106 | HOMESPUN Crochet

Round 5: *dc in next 3 sts, inc in next st, rep
from * 2 times (15 dc)
Round 6: *dc in next 4 sts, inc in next st, rep
from * 2 times (18 dc)
Rounds 7-22: dc in each st around (18 dc).
Fo and close the ear flat and then dc
through both loops across the top to close.
Fo again and leave a tail for sewing on. Do
not stuff the ears.

BODY
Using Light Grey, make a mr
Round 1: 8 dc into ring (8 dc)
Round 2: inc in each st around (16 dc)
Round 3: *dc in next st, inc in next st, rep
from * 7 times (24 dc)
Round 4: *dc in next 2 sts, inc in next st, rep
from * 7 times (32 dc)
Round 5: *dc in next 3 sts, inc in next st, rep
from * 7 times (40 dc)
Rounds 6-17: dc in each st around
(40 dc)
Round 18: *dc in next 3 sts, dec, rep from * 7
times (32 dc)
Rounds 19-26: dc in each st around (32 dc)

Round 27: *dc in next 2 sts, dec, rep from *
7 times (24 dc)
Fill the body with stuffing. Stuff well and fill
the gaps before you close.
Round 28: *dc in next st, dec, rep from * 7
times (16 dc)
Round 29: dec 8 times around (8 dc).
Fo then weave the tail under the top loop
(loop facing outwards) of each of the 8
sts and pull tightly to really close the hole.
Jess finds it’s a good idea to fo again once
you’ve pulled it tight. Make sure to leave a
long tail for sewing.

LEGS (MAKE 4)
Make 1 front leg with a black sock by using
Black for rnds 1–13 and then continue the
rest of the rnds in Light Grey. Make a mr
Round 1: 6 dc into ring (6 dc)
Round 2: inc in each st around (12 dc)
Round 3: *dc in next st, inc in next, rep from
* 5 times (18 dc)
Round 4: *dc in next 2 sts, inc in next st, rep
from * 5 times (24 dc)
Rounds 5–6: dc in each st around (24 dc)

Round 7: dc in next 12 sts, *dc in next 2 sts,
dec, rep from * 2 times (21 dc)
Round 8: dc in next 12 sts, *dc in next st,
dec, rep from * 2 times (18 dc)
Round 9: dc in next 12 sts, dec 3 times (15 dc)
Rounds 10–23: dc in each st around (15 dc)
Stuff the legs tightly at the foot and ankle,
but much more lightly in the top part of the
leg. If you stuff the legs too tightly at the
top, the legs will push away from the body
and make it hard for Patches to sit.
To close the front legs, flatten the top and
dc across the top to close in the direction of
heel to toe. Leave a tail for sewing onto the
body (at least 25cm).
To close the back legs, flatten the top and
dc across the top to close from side to side
across. Leave a tail for sewing onto the
body (at least 25cm).

Rounds 12-26: dc in each st around (12 dc)
Round 27: dc in next 5 sts, 2 dc in next 7 sts
(19 dc).
Fo and leave a tail for sewing onto the
body. Stuff the tail just before you sew it on.
Sew three-quarters of the tail on first and
then add more stuffing to the body before
sewing the rest.

ASSEMBLY
Stitch the ears onto the head on rnds
16-22 on a diagonal above the eyes. Sew
the body onto the head, directly on top of
the smaller end of the body, at the close
of the head, slightly angled downwards.

To get a really tight join, stitch around the
head on the body 2-3 times. Stitch the
front legs around the side of the chest/
shoulder area, approx. rnds 18-24, on a
slight diagonal. Stitch the back legs on
under the base of the body, approx. rnds
2-3, on a slight diagonal. You want the
front legs to sit within the back legs as
Patches sits up on his own. Stitch the tail
on with the thicker part of the tail facing
the bottom (the sts with 2 dc in each st).
Place the tail starting approx. rnd 7 on the
base of the body and ensure it lines up
with the middle of the back and back of
the head.

TAIL
Using Black, make a mr
Round 1: 3 dc into ring (3 dc)
Round 2: inc in each st around (6 dc)
Round 3: *dc in next st, inc in next st,
rep from * 2 times (9 dc)
Round 4: *dc in the next 2 sts, inc in next st,
rep from * 2 times (12 dc)
Rounds 5-11: dc in each st around (12 dc).
Change to Light Grey.

HOMESPUN Crochet | 107

108 | HOMESPUN Crochet

PROJECT

13

INTERMEDIATE

Crocheted
Market Bag
CATHERINE BOYS (KNOT KNITTING)

Grab your crochet hook and a roll of recyled cotton
and start hooking! This market bag consists of just four
crochet stitches, and makes up in very little time.

Website: knotknitting.com.au | Instagram and Facebook: @knotknitting

HOMESPUN Crochet | 109

110 | HOMESPUN Crochet

YARN
• Knot Knitting 1.5mm recycled
cotton: 1kg roll in the colour of
your choice (this amount can
make 2 bags)

EQUIPMENT
• 10mm crochet hook
• Yarn needle

FINISHED
MEASUREMENTS
Approx. 32 x 32cm

CROCHET TERMS
US/UK
ch - chain
fo - fasten off
hdc/htr - half double
crochet/half treble crochet
mr - magic ring
rep - repeat
rnd/s - round/s
sc/dc - single crochet/
double crochet
sl st - slip stitch
st/s - stitch/es

NOTE
The pattern is written in US
crochet terms — see crochet
terms. You may sell the finished
product with credit to Knot
Knitting for the pattern.

PATTERN
The 1st 2 ch at the start of each rnd counts
as the last hdc of the rnd. Be careful
not to miss the 1st st of the rnd as it can
sometimes be hidden next to the 2 ch. A
good way to be sure is to check your st
count at the end of each rnd.
Make a mr
Round 1: 2 ch (counts as first hdc), 9 hdc
into ring, sl st into the top of the 2 ch at the
start (10 hdc)
Round 2: 2 ch (this counts as the last hdc of
the rnd) 2 hdc into each st around until you
get to the last st, which is just 1 hdc as the
1st 2 ch count as the last st, sl st into the top
of the 2 ch (20 hdc)
Round 3: 2 ch, * 1 hdc into the next st, 2 hdc
into the next st. Rep from * until you get to
the last st. 1 hdc into the same st as the 2 ch.
Sl st into the top of the 2 ch (30 hdc)
Round 4: 2 ch, * 1 hdc into the next 2 sts, 2
hdc into the next st. Rep from * until you
get to the last st. 1 hdc into the same st as
the 2 ch. Sl st into the top of the 2 ch (40
hdc)
Round 5: 2 ch, *1 hdc into the next 3 sts, 2
hdc into the next st. Rep from * until you
get to the last st. 1 hdc into the same st as
the 2 ch. Sl st into the top of the 2 ch (50
hdc)
Round 6: 2 ch, * 1 hdc into the next 4 sts,
2 hdc into the next st. Rep from * until you
get to the last st. 1 hdc into the same st as
the 2 ch. Sl st into the top of the 2 ch (60
hdc)
Round 7: 1 ch, 1 sc into each st, sl st into the
1st sc (60 sc)
Rounds 8 and 9: rep rnd 7
Round 10: 2 ch, 1 hdc into each st around.
Sl st into the top of the 2 ch (60 hdc)
Rounds 11–14: rep rnd 10
Round 15: 1 ch, 1 sc into each st, sl st into
the 1st sc (60 sc)

Rounds 16 and 17: rep rnd 15
Round 18: 2 ch, 1 hdc into each st around. Sl
st into the top of the 2 ch (60 hdc)
Rounds 19–22: rep rnd 18
Round 23: 1 ch, 1 sc into each st, sl st into
the top of the 2 ch (60 sc)
Round 24: rep rnd 23
Round 25: 1 ch, *1 sc into the next 8 sts, sc
tog the next 2 sts. Rep from * around.
Sl st into the 1st sc of the rnd (50 sc)
Now it’s time to do the handle. Do NOT fo.

HANDLES
1 ch, 1 sc into the next 3 sts. *1 ch. Turn your
work and 1 sc into each of the 3 sts.
Rep from * until your handle is your desired
length. Catherine worked 60 rows for her
handle.
Note: Your handle will stretch slightly with
use once the bag has had weight in it.
Attach the handle to the other side using
your preferred method. There will be 22 sts
between each side of the handle.
Fo and sew in the ends.
As seen in Homespun

HOMESPUN Crochet | 111

112 | HOMESPUN Crochet

PROJECT

14
EASY

A Little Bunny

NAMED BEAU
JACQUI WHITE (BLUSHING ROSE)

“It’s time you all met a little bunny named Beau! A great beginner
project that can be made in multiple colours to create the perfect
forever keepsake for any special little one in your life.” - Jacqui

Instagram: @blushingroseshop | Etsy: @BlushingRoseShop

HOMESPUN Crochet | 113

114 | HOMESPUN Crochet

YARN
• Fiddlesticks Posie 4 ply yarn 100%
combed cotton 50g/170m: 1 ball each of
colours Stone and Black
OR
• Any 4 ply cotton yarn in your desired
colour

EQUIPMENT
•
•
•
•
•
•

65mm beechwood teething ring
22mm rattle insert
2.5mm crochet hook
Darning needle
Stitch marker
Polyester
filling
y
g

FINISHED
NISHED MEASUREMENTS

PATTERN

Completed
mpleted baby rattle will measure
approx.
rox. 14cm

Work in continuous rnds. Do not join or
turn if not instructed to in the pattern. Use
a stitch marker by placing it at the first st
of the rnd and move it up when working
(always to the first st of the rnd).

CROCHET
OCHET TERMS
ch – chain
dc – double crochet
dc2tog
tog – double crochet 2 sts together
fo – fasten off
mr – magic ring
rep – repeat
rnd/s
/s – round/s
sl – slip stitch
st/s – stitch/es

HEAD
Round 1: make a mr and 6 dc into ring (6
dc)
Round 2: 2 dc in each st around (12 dc)
Round 3: *dc in next st, 2 dc in next st, rep
from * 6 times (18 dc)
Round 4: *dc in next 2 sts, 2 dc in next st,
rep from * 6 times (24 dc)
Round 5: *dc in next 3 sts, 2 dc in next st,
rep from * 6 times (30 dc)
Round 6: *dc in next 4 sts, 2 dc in next st,
rep from * 6 times (36 dc).
Weave in the starting yarn tail to make sure
your mr won’t open later.
Round 7: *dc in next 11 sts, 2 dc in next st,
rep from * 3 times (39 dc)

HOMESPUN Crochet | 115

Photo 1

Photo 2

Photo 3

Photo 4

Round 8: *dc in next 12 sts, 2 dc in next st,
rep from * 3 times (42 dc)
Rounds 9-13: dc in each st around (42 dc)
Round 14: *dc in next 5 sts, dc2tog, rep
from * 6 times (36 dc)
Round 15: *dc in next 4 sts, dc2tog, rep
from * 6 times (30 dc)
Round 16: *dc in next 3 sts, dc2tog, rep
from * 6 times (24 dc).
Half fill the head firmly with polyester filling
and place the rattle inside the head.
Round 17: *dc in next 2 sts, dc2tog, rep
from * 6 times (18 dc)

116 | HOMESPUN Crochet

Round 18: *dc in next st, dc2tog, rep from *
6 times (12 dc)
Round 19: *dc2tog, rep from * 6 times (6 dc)
Fo (sl in next st). Cut the yarn leaving a tail
for sewing. Finish filling the head firmly
with polyester filling. Embroider the face
of the bunny.

EARS (MAKE 2)
Round 1: make a mr and 6 dc into ring
(6 dc)
Round 2: dc in each st around (12 dc).
Weave in the starting yarn tail to make sure
your mr won’t open later.
Rounds 3-9: dc in each st around (12 dc)
Round 10: *dc in next st, dc2tog, rep from
*4 times (8 dc).
Fo (sl in next st). Cut the yarn leaving a tail
for sewing. Sew the ears on top of the head
close to rnd 1 of the head. See Photo 1.

TEETHER RING
Row 1: ch 26, dc in 2nd ch from hook
(counts as dc), dc in each ch across, ch 1
and turn (25 dc)
Rows 2-13: dc in each st across, ch 1 and
turn (25 dc)
Fo, cut the yarn leaving a tail for sewing.
See Photo 2.
Weave in the starting yarn to ensure
the work doesn’t come undone later.
Using the yarn tail end and a fine darning
needle, sew the rectangle panel around
the teething ring, as shown in Photo 3.
Ensure there is a tight seam to close the
joining edge. Fix the end of the yarn to
ensure joining edge won’t open later.

FINISHING
Sew the head to the teether ring.
See Photo 4.

Designer

PROFILE

GETTING TO KNOW

CRAFTY GUMNUT
HOMESPUN Knitting | 117

TELL US ABOUT YOURSELF.
WHERE ARE YOU FROM AND
WHAT DO YOU DO FOR WORK?
Hi, I’m Kyla, the face behind Crafty Gumnut.
I live halfway between Brisbane and the
Gold Coast. When I’m not crocheting, I’m
busy being a full-time mum to a seven and
five-year-old, looking after hubby, two dogs,
two spiky leaf insects and 1 bee hive. In the
past I’ve also been a speech pathologist, a
computer programmer and a teacher’s aide
… I guess you could say I like variety!

WHAT SPARKED YOUR
INTEREST IN BECOMING A
CROCHET DESIGNER?
My crochet has evolved massively over
time. I certainly never set out to be a crochet
designer! I began crocheting during a
long infertility journey, then continued for
some precious “me time” as a new mum. I
originally made mostly blankets, but began
amigurumi when I wanted to make toys for
my children. From there, I began selling
readymade amigurumi a few years later,
and eventually started to design my own
amigurumi patterns.

HAVE YOU ALWAYS
BEEN CREATIVE?
Yes, always! My mum is very crafty and
creative, and before her my grandmother,
so I guess you could say it’s in my blood.
As a child my favourite craft was probably
cross stitch, but I also remember card
making, knitting and sewing projects
across the years.

WHAT WAS THE FIRST
CROCHET ITEM YOU
EVER MADE?
My first project was a plain blue scarf in
single crochet stitches. I think I still have it
somewhere in the back of my cupboard.

WHAT INFLUENCES YOUR
CREATIVITY THE MOST?
My main source of inspiration is definitely
my children. Many of my early designs
were playsets for my children (such as
my ice creams and butterfly life cycles).
Nowadays, I love ideas sparked from all
sorts of sources - the books my children
read and their favourite animals and
pastimes, my own favourites, colours

118 | HOMESPUN Crochet

HOMESPUN Crochet | 119

found in nature, and art from across many
media. My main aim is to make all my
designs fun, quirky and brightly coloured.

WHAT ARE YOUR FAVOURITE
MATERIALS TO USE? DO YOU
HAVE A FAVOURITE YARN?
8 ply cotton, along with my trusty 3mm
hook are my favourites for making
amigurumi. I don’t really have a favourite
brand of yarn, but Innergreen is my
favourite brand for toy stuffing – it’s an
eco-friendly toy stuffing derived from corn
and they also have a version made from
recycled plastic bottles.

TELL US ABOUT YOUR
BUSINESS, CRAFTY GUMNUT
Crafty Gumnut was born out of the first
Covid lockdown. I had been planning a
small market stall at my local community

120 | HOMESPUN Crochet

garden, but the market was cancelled. I
decided to try my luck opening an Etsy
store and Crafty Gumnut took off from
there. Sometimes, a little nudge to take
the very first step is all you need to realise
that it’s not as scary as you might think.
Overcoming the fear of taking the first step
is often the most challenging part.

JUST FOR FUN … IF CROCHET
DIDN’T EXIST, WHAT WOULD
BE YOUR CHOICE OF
CREATIVE MEDIUM?
I would love to try metal stamped
jewellery making and have also always
wanted to get into woodwork. Pottery
would be another one. If only there were
more hours in each day …

WHAT ACCOMPLISHMENT
ARE YOU MOST PROUD OF?
This is a hard one. Each time I complete
a new design it tends to become my new
favourite. Probably my all-time favourite
design, and the one I am most proud of,
is my Rainbow Smooch Pooch. Having
my Penny Pot Plant design included in
the last issue of Homespun Crochet was
also a massive thrill! It was my first time in
a magazine and I’m super excited that we
have an Aussie crochet magazine now.

CONTACT
Instagram and Facebook:
@craftygumnut
Etsy:
www.craftygumnut.etsy.com

HOMESPUN Crochet | 121

122 | HOMESPUN Crochet

PROJECT

15

INTERMEDIATE

Rainbow

UNICORN HUGS
KYLA HUDSON (CRAFTY GUMNUT)

“Make these unicorns in every colour of the rainbow! Charge up the little
heart with unicorn love, then pop it in your pocket to take unicorn hugs
with you wherever you go. Whisper your worries into the heart before
bed, and let unicorn magic help those worries disappear overnight. A
bright, colourful project sure to bring a smile to your face. Perfect for
kids or for all unicorn lovers who are young at heart.” – Kyla

Instagram and Facebook: @craftygumnut | Etsy: www.craftygumnut.etsy.com

HOMESPUN Crochet | 123

124 | HOMESPUN Crochet

YARN
• Stylecraft Naturals Organic Cotton 8 ply
50g/105m: 1 ball each of colours Mauve
(7184), Blush (7177) and Jade (7191)
• Maykr Clear As Cotton 8 ply 100g/235m:
1 ball each of colours Canola (13),
Cornflower (22), Callistemon (09),
Lion’s Tail (12)

EQUIPMENT
•
•
•
•
•
•

3mm crochet hook
Darning needle
Toy stuffing
7mm safety eyes
Scissors
Stiff cardboard (optional)

FINISHED MEASUREMENTS

PATTERN
SNOUT
Round 1: using Mauve (Blush, Jade) make a
mr, 6 dc into ring (6 dc)
Round 2: 2 dc in each st around (12 dc)
Round 3: *dc in next st, 2 dc in next st, rep
from * 5 times (18 dc)
Round 4: *dc in next st, 2 dc in next st, dc in
next st, rep from * 5 times (24 dc)
Round 5: *dc in next 3 sts, 2 dc in next st,
rep from * 5 times (30 dc)
Rounds 6-8: dc in each st around (30 dc)
Round 9: *dc in next 3 sts, dc2tog, rep from
* 5 times (24 dc).
Fo, leaving a long tail for sewing.

Approx. 16cm tall x 12cm wide

BODY AND HEAD
NOTES
Work in continuous rnds. Instructions
are for making the unicorn in Mauve,
with instructions for the Blush and Jade
unicorns
nicorns given in brackets.

CROCHET TERMS
blo
o – back loop only
ch
h – chain
dc
c – double crochet
dc2tog
c2tog – double crochet 2 sts together
flo
o – front loop only
fo
o – fasten off
mrr – magic ring
rep
ep – repeat
rnd/s
nd/s – round/s
st/s
/s – stitch/es

Round 1: using Mauve (Blush, Jade) make a
mr, 6 dc into ring (6 dc)
Round 2: 2 dc in each st around (12 dc)
Round 3: *dc in next st, 2 dc in next st, rep
from * 5 times (18 dc)
Round
Rou 4: *dc in next st, 2 dc in next st, dc in
next
nex st, rep from * 5 times (24 dc)
Round
Rou 5: *dc in next 3 sts, 2 dc in next st,
rep from * 5 times (30 dc)
Round
Rou 6: *dc in next 2 sts, 2 dc in next st, dc
in next
2 sts, rep from * 5 times (36 dc)
n
Round
Rou 7: *dc in next 5 sts, 2 dc in next st,
rep from * 5 times (42 dc)
Round
Rou 8: *dc in next 3 sts, 2 dc in next st, dc
in next
3 sts, rep from * 5 times (48 dc)
n
Round
Rou 9: dc blo in each st around (48 dc)
Rounds
10-13: dc in each st around (48 dc).
Rou
Optional
– cut a piece of stiff cardboard the
Opt
same
sam size as the base. Insert the cardboard
inside
insid your unicorn to help it sit flat.
Round
Rou 14: *dc in next 3 sts, dc2tog, dc in
next
nex 3 sts, rep from * 5 times (42 dc)
Rounds
15-16: dc in each st around (42 dc)
Rou
Round
Rou 17: *dc in next 5 sts, dc2tog, rep
from * 5 times (36 dc)
Rounds
18-19: dc in each st around (36 dc)
Rou
Round
Rou 20: *dc in next 2 sts, dc2tog, dc in
next
nex 2 sts, rep from * 5 times (30 dc)
Rounds
21-22: dc in each st around (30 dc)
Rou
Round
Rou 23: *dc in next 3 sts, dc2tog, rep
from * 5 times (24 dc)
Rounds
24-25: dc in each st around (24 dc)
Rou
Round
Rou 26: *dc in next 4 sts, dc2tog, rep
from * 4 times (20 dc)
Round
Rou 27: dc in each st around (20 dc)
Round
Rou 28: *dc in next 8 sts, dc2tog, rep
from * once (18 dc)
Do not fo. Stuff the body firmly. You will join
the body and snout in the next rnd.

HOMESPUN Crochet | 125

Round 37: *dc in next 2 sts, dc2tog, rep
from * 5 times (18 dc)
Round 38: dc in each st around (18 dc)
Round 39: dc in next st, dc2tog, rep from *
5 times (12 dc)
Round 40: *dc2tog, rep from * 5 times (6 dc).
Fo and finish stuffing the snout and head.
Using a darning needle, weave the yarn tail
through flo of each remaining st and pull
tightly to close. Weave in the ends.

EARS (MAKE 2)
Round 1: using Mauve (Blush, Jade) make a
mr, 6 dc into ring (6 dc)
Round 2: *dc in next st, 2 dc in next st, rep
from * 2 times (9 dc)
Round 3: dc in each st around (9 dc)
Round 4: *dc in next 2 sts, 2 dc in next st,
rep from * 2 times (12 dc)
Round 5: dc in each st around (12 dc)
Round 6: *dc in next 3 sts, 2 dc in next st,
rep from * 2 times (15 dc)
Round 7: dc in each st around (15 dc)
Round 8: flatten ear in half, dc 7 times
through both layers of sts to close the
opening (7 dc).
Fo, leaving a long tail for sewing.

LOWER LEGS (MAKE 2)

Round 29: dc in nex
next 9 sts on body, insert
the h
hookk iinto
th
t the
th first st after your fo on
snout, dc in next 24 sts on snout, dc in
remaining 9 sts on body (42 dc)
Round 30: dc in next 8 sts, dc2tog, dc in
next 22 sts, dc2tog, dc in next 8 sts (40 dc).
Use the tyarn tail from the snout to sew close
the hole left under the chin from joining the
body and snout.
Round 31: dc in next 8 sts, dc2tog, dc in
next 10 sts, dc2tog, dc in next 8 sts, dc2tog,
dc in next 6 sts, dc2tog (36 dc)
Round 32: *dc in next 2 sts, dc2tog, dc in
next 2 sts, rep from * 5 times (30 dc)
Rounds 33-34: dc in each st around (30 dc)
Round 35: *dc in next 3 sts, dc2tog, rep
from * 5 times (24 dc)
Round 36: dc in each st around (24 dc).
Begin stuffing the snout and head and
continue to stuff as you go. Insert the safety
eyes between rnds 32 and 33 on either side
of the head.

126 | HOMESPUN Crochet

Round 1: using Blush (Jade, Mauve) make a
mr, 8 dc into ring (8 dc)
Round 2: 2 dc in each st around (16 dc)
Round 3: dc blo in each st around (16 dc)
Rounds 4-5: dc in each st around (16 dc)
Change to Mauve (Blush, Jade)
Rounds 6-10: dc in each st around (16 dc)
Fo, leaving a long tail for sewing. Stuff the
leg firmly.

UPPER LEGS (MAKE 2)
Round 1: using Blush (Jade, Mauve) make a
mr, 5 dc into ring (5 dc)
Round 2: 2 dc in each st around (10 dc)
Round 3: dc blo in each st around (10 dc)
Round 4: dc in each st around (10 dc)
Change to Mauve (Jade, Blush)
Rounds 5-7: dc in each st around (10 dc).
Fo, leaving a long tail for sewing. Stuff leg
firmly.

HORN
Round 1: using Canola, make a mr, 4 dc into
ring (4 dc)
Round 2: *dc in next st, 2 dc in next st, rep
from * once (6 dc)
Round 3: dc in each st around (6 dc)
Round 4: *dc in next 2 sts, 2 dc in next st,
rep from * once (8 dc)
Round 5: dc in each st around (8 dc)

Round 6: *dc in next 3 sts, 2 dc in next st,
rep from * once (10 dc)
Round 7: dc in each st around (10 dc).
Fo, leaving a long tail for sewing. Stuff the
horn lightly.

HEART (PIECE 1 AND 2)
Round 1: using Callistemon (Cornflower,
Lion’s Tail) make a mr, 6 dc into ring (6 dc)
Round 2: 2 dc in each st around (12 dc)
Rounds 3-4: dc in each st around (12 dc)
Piece 1: fo, leaving a long tail for sewing
Piece 2: rep instructions for rnds 1-4 to
make heart piece 2, but do not fo. You will
join the two heart pieces in the next rnd.
Round 5: dc in next 6 sts on heart piece 2,
insert the hook into the first st after your fo
on heart piece 1, dc in next 12 sts on heart
piece 1, dc in remaining 6 sts on heart piece
2 (24 dc)
Round 6: dc in each st around (24 dc).
Use the yarn tail from heart piece 1 to sew
closed the hole left from joining the heart
pieces.
Round 7: *dc in next 2 sts, dc2tog, rep from
* 5 times (18 dc)
Round 8: dc in each st around (18 dc)
Round 9: *dc in next st, dc2tog, rep from *
5 times (12 dc)
Round 10: dc in each st around (12 dc).
Begin stuffing the heart and continue to
stuff as you go.

Round 11: *dc in next 2 sts, dc2tog, rep
from * 2 times (9 dc)
Round 12: dc in each st around (9 dc)
Round 13: *dc in next st, dc2tog, rep from *
2 times (6 dc).
Fo and finish stuffing. Using a darning
needle, weave the yarn tail through flo of
each remaining st and pull tightly to close.
Weave in the yarn end.

ASSEMBLY

a similar angle to the lower legs, but closer
together, with approx. 4-5 sts between
them. The heart should easily sit balanced
on the upper legs. Kyla has left the heart as
a separate piece so that it can be used as a
“hug” carried in your pocket, but you can sew
the heart in place if you wish.

HORN

MANE AND TAIL

Sew the horn in the centre of the head,
approx. 2-3 rnds from the top.

Using Callistemon (Cornflower, Lion’s Tail),
cut approx. 30 strands of yarn measuring
10-12cm in length. Starting just behind the
horn, insert your hook underneath a single
st and with one strand of yarn around your
hook, pull through a loop, then remove
your hook. Take the 2 tails of your strand
and pull through the loop then tighten to
form a knot. Trim the yarn tails to approx.
1-2cm to form a mane piece. Rep this
process making a straight line down the
back of the unicorn’s neck approx. 10-12
times. Use the same process to make the
tail at the bottom of your unicorn, behind
the lower leg and in line with the mane. Use
approx. 20 strands to form the tail, this time
working through sts in a small cluster or
circle. Trim the tail to the desired length.
Read more about this designer on page 119!

EARS
Sew the ears on either side of the horn,
positioned slightly behind the horn.

LOWER LEGS
Place the unicorn with its snout facing to one
side. You can choose to have your unicorn
facing in either direction. Sew the lower legs
at the very bottom of your unicorn, with
approx. 8 sts between the legs. The legs are
angled out so that the unicorn is in a seated
position, with the snout still facing to the side.

UPPER LEGS AND HEART
Sew the upper legs approx. 4 rnds above
the lower legs. The upper legs should be at

HOMESPUN Crochet | 127

Join the experts and a like-minded group
on these wonderful Quilting and Yarn Tours
Visit the Royal School of Needlework, William
Marris Gallery, the York Castle Museum and
enjoy afternoon tea at the Pump Room in
Bath. We also visit many Quilting shops.

Join Deborah Segaert
Editor of Quilters Companion Magazine
on a wonderful tour of the

Including the
Birmingham
Festival of Quilts

United Kingdom

21 Jul to 9 Aug 2024
York
Manchester
Birmingham

London

Bath

Start
End

Winchester

Travel on A-Rosa Sena river boat for 7 nights,
visit Bruges Lace Centre, Royal Delft Factory,
sightseeing tours of the UNESCO world
heritage cities of Luxemburg and Bruges. Work
on unique projects designed by Natalie Bird.

Join Natalie Bird for

Patchwork
on the Rhine

11 to 29 Sep 2024

visit
Quilt Week
in Alsace

Amsterdam
Rotterdam
Antwerp
Bruges

Cologne
Frankfurt

Luxemburg

Start
End

Obernai

Visiting markets, yarn shops and museums,
dyeing workshops at Yamamoto Roketsu Dyeing
Studio and Shibori studio. Tour members will
work on an original project designed by Robyn.

31 Oct to 17 Nov 2024
Start
End

2 NIGHTS
Kanazwa
3 NIGHTS
Takayama

5 NIGHTS
Kyoto

2 NIGHTS
Kawaguchiko

3 NIGHTS
Tokyo

Join Robyn Hicks on a

Yarn tour of Japan

Travelrite International

E: balwyn@travelrite.com.au www.travelrite.com.au

Join Michelle Marvig on these great Quilting Tours

Netherlands, Belgium and France
Visiting Pour l’Amore du Fils Show in Nantes
5 to 23 Apr 2024
Amsterdam

Bruges

Bayeux

Bayeux, Paris, Bruges, Nantes and Amsterdam.

Spain

Paris

Start
End

Nantes

visiting Stiges Quilting Festival in Barcelona

13 Mar to 1 Apr 2024
Barcelona
Madrid
Valencia

Enjoy sightseeing tours of Barcelona, Valencia, Granada, Cordoba,
Seville and Madrid. Visit the Mosque Cathedral in Cordoba, the
Alhambra in Granada and the Flamenco Dance Museum in Seville.

Cordoba
Seville

Start
End

Granada

Italy and the Greek Islands
Includes 10-night cruise on Celebrity Equinox
5 nights Siena visiting gorgeous Tuscan villages, cruise aboard
Celebrity Equinox, visit Gaudi’s unusual cathedral, Sagrada Familia.
Visit many fabric shops, work on unique
projects designed by Michelle Marvig.

8 to 27 Sep 2024
Start
End
Barcelona

Siena
Rome
Athens
Katakolon
Valletta

Santorini

Mykonos

Ephesus

Please call for a brochure

Toll
Free

1800 630 343

Tours only available through Travelrite International
ATAS accreditation #A10538

a u s t r a l i a n

Shop our Beginners and Beyond series

Homespun Knitting Beginners and Beyond

A LL

$14.9
5
each

Homespun Knitting for Beginners and Beyond helps you
either start or continue your passion for knitting. There
are special projects by the designers you know and love
from Homespun, as well as some new on-trend creatives.
The projects are bright, bold and diversely designed to
delight, with something for all knitters.

Visit universalshop.com.au/Books/craft-books to buy

Homespun Crochet Beginners and Beyond

Homespun Crochet Beginners and Beyond
will give you some great projects to get your
crocheting started once you have learned the basic
techniques. Inside are informative features that will
give you the foundation you need to ignite your
love for crocheting.

Visit universalshop.com.au/Books/craft-books to buy

Yarn

WEIGHTS
Source: Craft Yarn Council | Website: craftyarncouncil.com/standards

LACE YARN (2 ply)

0

• Knitting needles: 1.5 to 2.25mm, or sizes 000 to 1
• Crochet hooks: steel hooks that are 1.4 to 1.6mm or a regular
hook that is 2.25mm , or size B-1. (Steel hooks are sized
differently from regular hooks – the higher the number, the
smaller the hook, which is the reverse of regular hook sizing)
• Suggested gauge: 33 to 40 knit sts; 32 to 42 crochet sts (Lace
weight yarns are usually knitted or crocheted on larger needles
and hooks to create lacy, openwork patterns. Accordingly, a
gauge range is difficult to determine. Always follow the gauge
stated in your pattern).
• Types of lace yarn: fingering, 10-count crochet thread
• Common uses: lace work

SUPER FINE YARN (3 ply )

1

•
•
•
•
•

Knitting needles: 2.25 to 3.25mm, or sizes 1 to 3
Crochet hooks: 2.25 to 3.5mm, or sizes B-1 to E-4
Suggested gauge: 27 to 32 knit sts; 21 to 32 crochet sts
Types of super fine yarn: sock, fingering, baby
Common uses: socks, baby clothes and other garments

FINE YARN (4-5 ply)

2
132 | HOMESPUN Crochet

•
•
•
•
•

Knitting needles: 3.25 to 3.75mm, or sizes 3 to 5
Crochet hooks: 3.5 to 4.5mm, or sizes E-4 to 7
Suggested gauge: 23 to 26 knit sts; 16 to 20 crochet sts
Types of fine yarn: sport, baby
Common uses: baby clothes and other fine garments

LIGHT YARN (8 ply)

3

4

•
•
•
•
•

Knitting needles: 3.75 to 4.5mm, or sizes 3 to 5
Crochet hooks: 4.5 to 5.5mm, or sizes 7 to I-9
Suggested gauge: 21 to 24 knit sts; 12 to 17 crochet sts
Types of light yarn: DK, light worsted
Common uses: cardigans, light garments, amigurumi, blankets

MEDIUM COMMONLY CALLED WORSTED
YARN (10 ply)
•
•
•
•
•

Knitting needles: 4.5 to 5.5mm, or sizes 7 to 9
Crochet hooks: 5.5 to 6.5mm, or sizes I–9 to K–101⁄2
Suggested gauge: 16 to 20 knit sts; 11 to 14 crochet sts
Types of medium yarn: worsted, afghan, aran
Common uses: blankets, bags, amigurumi, hats

CHUNKY YARN (12-14 ply)

5

•
•
•
•
•

Knitting needles: 5.5 to 8mm, or sizes 9 to 11
Crochet hooks: 6.5 to 9mm, or sizes K–101⁄2 to M–13
Suggested gauge: 12 to 15 knit sts; 8 to 11 crochet sts
Types of bulky yarn: chunky, craft, rug
Common uses: rugs, blankets, amigurumi, home decor

SUPER CHUNKY YARN (16 ply)

6

•
•
•
•
•

Knitting needles: 8 to 12.75mm, or sizes 11 to 17
Crochet hooks: 9 to 15mm, or sizes M–13 to Q
Suggested gauge: 7 to 11 knit sts; 7 to 9 crochet sts
Types of super bulky yarn: super bulky, roving
Common uses: rugs, heavy blankets, jackets, weaving

JUMBO YARN/ROVING (16 ply)

7

•
•
•
•
•

Knitting needles: 12.75mm and larger, or sizes 17 and larger
Crochet hooks: 15mm and larger, or sizes Q and larger
Suggested gauge: 6 knit sts and fewer; 6 crochet sts and fewer
Types of jumbo yarn: jumbo, roving
Common uses: rugs, heavy blankets, home decor

HOMESPUN Crochet | 133

Common

CROCHET
STITCHES
AUS/UK/Homespun

USA

ch

chain

ch

chain

Yarn over and pull up a loop.

sl st

slip stitch

sl st

slip stitch

Insert hook in stitch, yarn over and
draw the loop through the stitch
and the loop on the hook.

dc

double crochet

sc

single crochet

Insert hook in stitch, yarn over,
draw through 1 loop. Yarn over,
draw through 2 loops.

htr

half treble crochet

hdc

half double crochet

Yarn over, insert hook in stitch,
yarn over and pull up a loop (3 loops
on hook), yarn over and pull through
all 3 loops.

tr

treble crochet

dc

double crochet

Yarn over, insert hook in stitch,
yarn over and pull up a loop (3 loops
on hook). Yarn over and pull through
2 loops twice.

dtr

double treble

tr

treble

Yarn over twice, insert hook in
stitch, yarn over and pull up a loop
(4 loops on hook). Yarn over and pull
through 2 loops 3 times.

ttr

triple treble

dtr

double treble

Yarn over 3 times, insert hook in
stitch, yarn over and pull up a loop
(5 loops on hook). Yarn over and pull
through 2 loops 4 times.

134 | HOMESPUN Crochet

Symbol

How To Make

Common

TERMINOLOGY
USED IN CROCHET PATTERNS

Abbreviation

Meaning

Abbreviation

Meaning

sk

skip

tog

together

bp

back post

prev

previous

fp

front post

dc2tog/dc3tog

double crochet 2/3 together

flo

front loop only

rs

right side

blo

back loop only

ws

wrong side

sp

space

yo

yarn over (means the same as yarn
over hook or yarn round hook)

beg

beginning
*

bet

between

repeat the instructions after the
asterisks the stated number of times

pm

place marker

()

rep

repeat

repeat instructions between
brackets in the same place (stated
in the pattern)

Project Difficulty

Meaning

Turning Chains

Easy

Projects that use basic stitches and simple repeats

double crochet

1 chain

extended double crochet

2 chains

half treble crochet

2 chains

treble crochet

3 chains

double treble crochet

4 chains

triple treble crochet

5 chains

Advanced
Beginner

Projects that include simple stitch patterns, repeats,
colour work, or shaping

Intermediate

Projects that include involved stitch patterns, techniques,
colour work, or shaping

Advanced

Projects that include complex stitch patterns, detailed
colour work, and shaping using a variety of techniques

HOMESPUN Crochet | 135

CROCHET
HOOK
CONVERSION CHART

Metric Hook Sizes

UK

Canada/US

Metric Hook Sizes

UK

Canada/US

2.0mm

14

0

6.5mm

3

K-101⁄2

2.25mm

13

B-1

7.0mm

2

10.75

2.75mm

12

C-2

7.5mm

1

-

3.0mm

11

C-2

8.0mm

0

L-11

3.25mm

10

D-3

9.0mm

00

M-13

3.5mm

–

E-4

10.0mm

000

N-15

3.75mm

9

F-5

11.0mm

–

O-17

4mm

8

G-6

12.0mm

–

P-19

4.5mm

7

7

15.0mm

–

Q-19

5.0mm

6

H-8

16.0mm

–

S-35

5.5mm

5

I-9

19.0mm

–

50

6.0mm

4

J-10

25.0mm

–

-

136 | HOMESPUN Crochet

CRAFT PATTERNS AND CLASSES DELIVERED STRAIGHT TO YOUR INBOX

Bird Walk Cushion

Come Fly With Me
Photo Album Cover

cosyproject.com
Baby Bear Doll

QU ILTING | SEW ING
EM BR
BRO ID ERY | K NITTIN G
CROCHETING
C
RO C H
| TUTORIALS

STOCKISTS
Banksia Yarns
www.banksiayarns.com.au
(02) 4505 1615
Clover
www.clover-mfg.com

Travelrite International
www.travelrite.com.au
1800 630 343
Wagtail Yarns
www.wagtailyarns.com.au
(07) 4126 7167

Crochet Australia
www.crochetaustralia.com.au
(07) 5472 8586

Yarns on Collie
llie
www.woolshop.com.au
op.com.au
(08) 9335 4455
455

Fibre Frolic
www.fibrefrolic.com.au
0400 036 833

Yummy Yarn
n and co
www.yummyyarnandco.com.au
yyarnandco.com.au
0431 754 909
9

Fox’s Cottage Quilting and Wool
foxscottage.co.nz

138 | HOMESPUN Crochet

Farming goats under the great Australian sun since 1979 | Spinning and dyeing yarn on the farm in Australia since 1995

GROWN, SPUN & DYED IN OVER 100 BRILLIANT COLOURS ON WALLUM DOWNS IN RURAL QUEENSLAND

100% Kid Mohair Yarns | Mohair & Wool Blend Yarns | Mohair Cords | Lace to Aran Weight | 25gm hanks to 400gm cones | Patterns to suit

PHONE 07 4126 7167 EMAIL info@wagtailyarns.com.au WEBSITE wagtailyarns.com.au