/


Теги: magazine crochet handmade handicrafts crocheting magazine inside crochet
Год: 2023


Текст
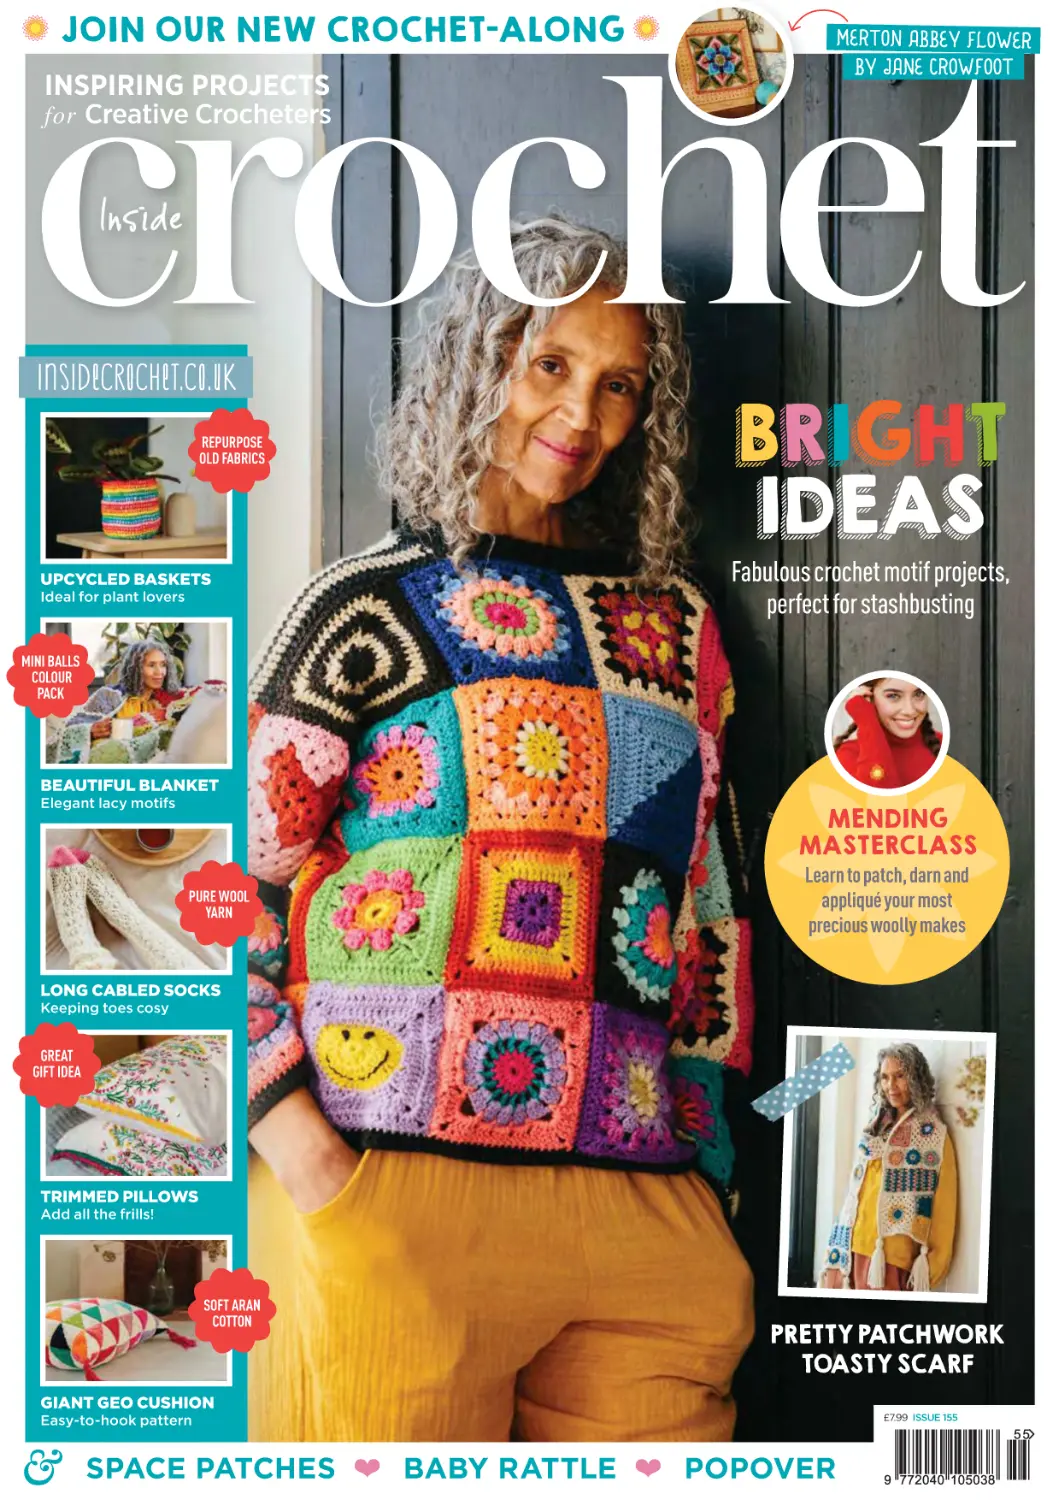
JOIN OUR NEW CROCHET-ALONG
INSPIRING PROJECTS
for Creative Crocheters
MERTON ABBEY FLOWER
BY JANE CROWFOOT
insidecrocheTT .co.uk
insidecroche
REPURPOSE
OLD FABRICS
UPCYCLED BASKETS
Ideal for plant lovers
BRIGHT
IDEAS
Fabulous crochet motif projects,
perfect for stashbusting
MINI BALLS
COLOUR
PACK
BEAUTIFUL BLANKET
Elegant lacy motifs
MENDING
MASTERCLASS
PURE WOOL
YARN
Learn to patch, darn and
appliqué your most
precious woolly makes
LONG CABLED SOCKS
Keeping toes cosy
GREAT
GIFT IDEA
TRIMMED PILLOWS
Add all the frills!
SOFT ARAN
COTTON
PRETTY PATCHWORK
TOASTY SCARF
GIANT GEO CUSHION
Easy-to-hook pattern
SPACE PATCHES ❤ BABY RATTLE ❤ POPOVER
£7.99 ISSUE 155
Pattern 5943
Slate Blue
Fuchsia
01756 703 670 kingcole.com
Carnation
Gold
enquiries@kingcole.com
Sage
Aran
TURN TO PAGE 34
FOR OUR SPIRIT
OF FLORA CAL BY
JANE CROWFOOT
PO Box 6337, Bournemouth BH1 9EH
Subscription enquiries
t. +44 (0)1202 586848
chris@tailormadepublishing.co.uk
Me e t th e te am
Managing Editor
Sarah Moran
sarah@selectps.com
Deputy Editor
Lindsey Harrad
Styling & Photoshoot Editor
Claire Montgomerie
Pattern Editor
Rhian Drinkwater
Sub Editor
Suzanne Juby
Technical Editors
Jane Czaja, Rachel Vowles
Art Editor
Stephanie Peat
steph@tailormadepublishing.co.uk
Contributors
Helen Anderson, Yessabett Bueno,
Jane Crowfoot, Simone Francis,
Lindsey Harrad, Victoria Kairis,
Millie Masterton, Claire Montgomerie,
Helda Panagary, Cassie Ward, Kath Webber
Models
Miranda Cortese, Linda Malcolm
Photography
Leanne Jade, Kirsten Mavric
Stock art
Shutterstock
Make-up and hair styling
Sophie Chivers, Nicki Henbrey
Ad Production
Leila Schmitz
Main cover image
Leanne Jade
Small cover images
Leanne Jade, Kirsten Mavric
Publis h in g
Publisher
Tim Harris
Partnerships Manager
Jennie Ayres
jennie@selectps.com
Advertising Manager
Cassie Ward
cassie@tailormadepublishing.co.uk
t. +44 (0)7734 952626
Circulation Manager
Tim Harris
Production Manager
John Beare
IT Manager
Vince Jones
Subscriptions Manager
Chris Wigg
(See page 41 for subscription details)
Published by
Tailor Made Publishing Ltd
PO Box 6337, Bournemouth BH1 9EH
t. +44 (0)1202 586848
Printed by
MRC Print Ltd, Summit Business Centre,
The Old Police Station, Water Street,
Newcastle Under Lyme, Staffordshire, ST5 1HN
www.mrcprintltd.co.uk
t. +44 (0)1245 403330
We lco m e
I hope you were enticed by this issue’s br ight, happy
colours and the prospect of cosy, stashbusting m akes to
keep your hands busy and m inds calm this month.
Like m any of you, I’ve been tr ying to move towards a
more sustainable way of living, to leave a sm aller footpr int
and embrace a slightly slower, more thoughtful way of
being – not always easy with two teenagers and a large
hair y dog! With this in m ind, we’ve dedicated this issue to projects that will be easy
to pick up and put down, m ake at a rhythm ic pace, and with endless possibilities
for swapping-in your own stash of yarn.
Projects such as Claire Montgomer ie’s beautifully tonal Patchwork J acket and
our cover star, the Happy Motif Sweater by Cassie Ward, raise the classic crochet
motif to a whole new level whilst still giving you the satisfaction of creating cr isp
piles of meditative squares. And there are lots of sm aller motif projects, with
simpler constr uction techniques, if time is not on your side. Kath Webber’s take on
a m ix-and-m atch scar f is a great learning project and super-toasty to wear, whilst
we also have a giant floor cushion and stunning lacy throw to brighten up the home.
Our Crochet Masterclass in visible mending m ight sound like just more chores,
but take a look at our guide to restor ing and revitalising much-loved garments with
crochet and you m ight just become hooked!
And we’ve been thr illed with your response to our 20 23 crochet-along, Spir it of
Flora. It’s been just lovely dipping into the Facebook com munity. This month’s
Mer ton Abbey Flower is simply stunning. It isn’t too late to join in…
S
©Tailor Made Publishing Ltd 2023
All rights reserved. No part of this magazine, or digital versions of the
magazine, may be used, reproduced, copied or resold without written
permission of the publisher. All information and prices, as far as we
are aware, are correct at the time of going to press but are subject to
change. Tailor Made Publishing Ltd cannot accept any responsibility
for errors or inaccuracies in such information. Unsolicited artwork,
manuscripts or designs are accepted on the understanding that
Tailor Made Publishing Ltd incur no liability for their storage or return.
Any free gifts are available only with print editions, not with digital
editions of the magazines. Tailor Made Publishing Ltd accepts no
liability for products and services offered by third parties.
BE PART OF OUR FRIENDLY
COMMUNITY OF MAKERS
www.instagram.com/
insidecrochet
www.facebook.com/insidecrochet
@insidecrochet
www.insidecrochet.co.uk 03
8
9
ISSUE 155
74
65
CALMING
CROCHET
Meet designer
Cassie Ward
PAGE 114
NEWS & REVIEWS
FEATURES
06 IN THE LOOP
14 CROCHET MASTERCLASS
J oin the yarn celebration at Unravel, learn
new crochet skills at a Black Sheep Wools
workshop, and check out the latest patterns
for Pokémon and picnics! Plus we meet
Danish yarn entrepreneur Pia Bojer Larsen.
In our new series, Claire Montgomerie
shows how to mend holes in your favourite
garments with traditional darning and
pretty embellishments using Scheepjes yarn.
7
34 SPIRIT OF FLORA
09 YARN REVIEWS
Get fresh with DK yarns in on-trend spring
greens, from avocado to pear.
13 BOOK REVIEWS
Combining crochet and embroidery,
a beginner’s how-to guide, colourwork inspo
and advice, plus adorable baby patterns.
04 Inside Crochet
J oin us for Part Two of J ane Crowfoot’s
beautiful Stylecraft blanket crochet-along,
to create the Merton Abbey Flower m otif.
114 MINDFUL MAKING
Inside Crochet designer Cassie Ward on
how the calming effects of crochet have
helped manage her anxiety.
13
MENDING
MASTERCLASS
How to darn and
embellish your
cherished garments
PAGE 14
Make it
46 Happy Motif
Sweater
56 Cycles
Poncho
Patterns
in this
issue
60 Patchwork
Jacket
SPIRIT OF FLORA
65 Toasty Scarf
JOIN PART TWO OF OUR
CROCHET-ALONG WITH
JANE CROWFOOT
70 Landscape
Sweater
PAGE 34
74 Step Into
Spring Trainers
8
78 Cabled
Long Socks
82 Stashbusting
Scarf
10
86 Pillowcase
Edging
88 Terrazzo
Blanket
92 Plarn Plantpot
Holder
94 Chill Right Out
Floor Cushion
REGULARS
41 SUBSCRIPTIONS
Never miss an issue with an
Inside Crochet subscription.
73 BACK ISSUES
Complete your collection today!
105 NEXT ISSUE
Leap into spring with floral
accessories and cute Easter makes.
On sale 16 March 20 23.
SUBSCRIBE TODAY
Save money every issue with
a subscription, delivered
direct to your door!
For special 2023 CAL offers
turn to page 41
106 YARN MARKET
Stock up on gorgeous yarns and
crochet accessories from our
selection of top independent stores.
107 CROCHET BASICS
Turn here for crochet abbreviations,
conversions and chart symbols.
102 Monkey
100 Space
Appliqué Patches
Rattle
www.insidecrochet.co.uk 05
News
etc
IN THE LOOP
BLOGS | BOOKS | REVIEWS | EVENTS | INTERVIEWS
F U LL CI RCLE
➻ A fab new fuss-free yarn to try
is Caron O’Go, which comes in a
circular, tangle-free format. The O’Go
‘doughnut’ also gives you the option
of using the yarn as it comes off the
ball, either for self-striping projects
or for separating the colours to make
your own combinations. The O’Go
is available in either Simply Soft or
Colorama Halo.
www.woolwarehouse.co.uk
SPIRIT OF FLORA
JOIN OUR CREATIVE,
COLOURFUL CAL COMMUNITY
➻ Have you joined our Spirit of Flora
crochet-along yet? It’s certainly not
too late to join our friendly, supportive
community as they make this beautiful
project created by designer Jane
Crowfoot using Stylecraft yarns,
inspired by the Arts & Crafts ceramic
designs of William De Morgan. With
Part One of the CAL launched in the
last issue (154), you’ll find Part Two on
page 34, where we reveal the stunning
Merton Abbey block.
We’ve been blown away by the
support for this CAL, and it’s been
FESTIVAL FUN
➻ Unravel is a celebration of
all things yarn, taking place
24–26 February at Farnham
Maltings in Farnham, Surrey. The
event showcases independent
producers, plus an inspiring
programme of bookable
workshops led by expert tutors.
Buy advance tickets and book
workshops online.
farnhammaltings.com/events/
unravel-2023
06 Inside Crochet
wonderful to see so many of you
sharing your progress and technique
tips in our Spirit of Flora Facebook
group. If you’re joining the CAL and
haven’t discovered the group yet, then
please do join the gang at www.
facebook.com/groups/spiritofflora.
One of the unique aspects of
this CAL is that we are actively
encouraging creative freedom. With
all 12 motifs the same dimensions,
it’s possible to use any colourways
and layouts to create your own
unique finished design. In fact, Jane
recommends not joining any motifs
at this stage, to see how your design
evolves first.
Here we reveal some of the
colourways we’ve seen shared in
the Facebook group to give you
inspiration – and to show you the first
two beautiful motifs if you missed the
last issue.
We have a special subscription offer
so you can ensure you get every copy
of Inside Crochet featuring the CAL,
including the first instalment.
Go to page 41 for all the details.
➻
IN THE LOOP
News etc
IN THE SPOTLIGHT
Fun projects to brighten
your home, together with
handy accessories.
FLOCK TO IT
NEW SHADES FOR EXMOOR SOCK COLLECTION
➻ Exmoor Sock is a versatile 4-ply
yarn from John Arbon Textiles, and
the collection now has four beautiful
new colours added to the range. With
all the shades inspired by the Exmoor
landscape and names derived from
traditional local dialect, the new
colours are: Peggles (Berries), bright
red; Fuzzpig (Hedgehog), khaki olive;
Plashes (Puddles), bright blue; and Fairy
Thimble (Foxglove), pale pink.
Exmoor Sock yarn has the durable
character and bounce typical of the
fibre from Exmoor Blueface sheep, with
added Devon Zwartbles for extra bounce,
plus Falklands Corriedale for softness.
Perfect for socks, of course, Exmoor
Sock also suits items that require a
hard-wearing, machine-washable yarn,
and the 50g skeins are ideal for stripes
or colourwork.
www.jarbon.com
✽ GORGEOUS GREENERY
Crochet your own on-trend hanging
houseplants with this digital
download pattern for five trailing vine
plants and macramé hanger.
www.keeleyscrochet.etsy.com
✽ BOX IT UP
W E LOVE …
the beautiful new ochre shade of the Marra
project bag, a handmade limited-edition bag
collection designed with an exclusive paisleyprint lining, water-resistant exterior, handy
internal pockets and inner drawstring closure.
£120, www.thefibreco.com
This yarn box from Lykke is such a
lovely way to keep your yarn under
control as you work, and has a handy
lid too. Made in sustainably sourced
Indian rosewood.
www.yarnworx.com
✽ SUNNY DAYS
HOT NEW YARNS
➻ Be transported to warm subtropical
grasslands with Stylecraft’s first new
yarn of the season, Savannah. This
aran-weight yarn is made using 100%
cotton, making it perfect for sensitive
skins and for hooking light summer
pieces. Savannah is a self-striping yarn
in saturated colours grounded with
neutrals, which comes in 100g mini
spiral cakes. There are six shades to
choose from: Tundra, Pampas,
Steppe, Prairie, Desert and Canyon.
Stylecraft has also launched a
supporting collection of patterns, all
with a festival vibe. Designs include
cute summer tops, cool crochet bags
and hotpants.
Savannah is available from
Stylecraft stockists now.
Dream of summer as you sip a
warming hot cuppa and enjoy
your crochet time with this rustic
stoneware sunflower mug.
www.sophieallport.com
✽ APPLE APPEAL
These cute apples are such a fun make
– perfect as a toy or decorative item.
Created by TiffyHappyCrafts, using
Schachenmayr Catonia yarns.
www.lovecrafts.com
www.insidecrochet.co.uk 07
➻
IN THE LOOP
POKÉMON CROCHET
➻ Crochet designer Sabrina Somers
has created an officially licensed kit to
make your own Pokémon amigurumi.
The Pokémon Crochet Eevee Kit
(David & Charles, £19.99) includes all
the yarn, tools and materials you need
to make Eevee, and includes a 48-page
book with clear step-by-step instructions
(using US terminology) that will enable
crocheters of any skill level to make the
toy. The book also includes instructions
to crochet five other Pokémon
amigurumis – Pikachu, Pichu, Wobbuffet,
Meowth and Jolteon – so you can
crochet a set of Pokémon plushies.
ENTREPRENEUR
WE LOVE
PIA BOJER LARSEN
Instagram @kaosyarn
Tell us a bit about yourself…
I live in Gedsted, a small village
in the northern part of Jutland in
Denmark, with my husband and our
three daughters, plus one big dog
and two cats.
What’s the story behind Kaos Yarn?
I develop and design yarns and
colours for my own brand of
yarns in close collaboration with a
spinning mill. But I’m the one behind
everything here – graphics, website,
marketing, customer service, order
packing and everything else. It’s
been a lot of work and I’ve now
been able to outsource the website
design and have recently launched
my new site.
What do you like to crochet?
I primarily knit now, but crochet has
been my primary yarn craft for
SUMMER DREAMS
➻ If you’re in the mood for making
something colourful with warmer
weather in mind, check out the
vibrant Day Tripper Picnic Blanket.
Originally designed by Katie
Jones and inspired by the pop art
of Peter Blake and The Beatles’
Yellow Submarine, this beginnerfriendly pattern is available as a
free download from Sirdar –
perfect for trips to the beach!
www.sirdar.com
08 Inside Crochet
years. I mostly make hats, stuffed
animals, blankets, bags and interior
accessories, but it was crochet
that made me fall in love with yarn
and led me to knitting. I still make
some crochet pieces, especially
for presents.
What inspires your vibrant
colour palette?
I like to have a palette that
embraces all colours, and for all
the colours to be different to the
others – not just the same colour
in different shades. All my colours
have a name and a story inspired
by their psychological meaning,
and I love to find colours that have
different character traits.
Which are your most popular yarns?
Charismatic (hot pink) is my most
sought-after colour, but Zealous
(grass green) is also very popular.
I offer three yarn types at the
moment – Organic Soft Merino,
Organic Brushed Alpaca, and
Chunky Andean Wool, which all
complement each other well. I feel
very lucky that there is plenty of
demand for all of them.
What achievements are you
most proud of?
Allowing myself to think much
bigger and do way more than I
thought I could. It has opened
my eyes to seeing that I can do
CASCADE YARNS 220
SUPERWASH
ROWAN FELTED
TWEED
KING COLE
MERINO BLEND
DK
WEST YORKSHIRE
SPINNERS
COLOURLAB DK
FYBERSPATES
VIVACIOUS DK
SPRING GREENS
whatever I wish to do – and I
hope this is an inspiration to my
daughters too.
What do you like most about
running your yarn business?
The best part is in the little things:
getting a sweet comment on
Instagram, seeing that a colour
story I posted made someone think
of themselves in a more loving way;
going to the retailers and telling
their customers about colour
psychology and seeing them find
the courage to use a colour that
has been calling to them; getting a
shipment of new yarn and seeing
the colours in kilos and tonnes, not
just a little tassel of test-dyed yarn.
Having an endless supply of yarn in
the colours I like, so I can design and
make as much as I like, is a huge joy!
Any advice for aspiring
entrepreneurs?
Don’t look at what everyone else is
doing, just do what works best for
you. Work as little as possible – life
is so much more than work. Plus,
you get so much better at your work
when you have input from other
things. You also need to take care of
yourself. There’s room for it all.
Buy Kaos Yarns in the UK from
Tribe Yarns, London, and Tangled
Yarn, Stockport, or online at
www.kaosyarn.dk.
Square 7 motif taken from 150 Favourite Crochet Motifs by Yoko Hatta (Tuttle Publishing, £13.99)
Add some sharp, on-trend green to your hooking this month
and embrace the new shoots of spring.
West Yorkshire Spinners ColourLab DK
100% wool • 100g/225m/245yds • £6.95 from www.wyspinners.com
‘Reared, sheared and spun in Britain’, this gorgeously bouncy DK with its solid, vibrant dye is
a great choice for easy-to-wear warm knits and has a great British heritage. Available in 22
uplifting solid shades with seven fabulous self-striping sister yarns, we love this zingy Pear Green.
Cascade Yarns 220 Superwash
100% wool • 100g/200m/220yds • £8.99 from www.woolwarehouse.co.uk
This great-value DK-weight yarn comes in a huge array of shades, is easy to care for and
crochets up really smoothly. Add to that the generous meterage per ball, and this could be
your next go-to yarn for garments or blanket projects. This 886 green pops with spring fever.
Fyberspates Vivacious DK
100% Merino wool • 115g/230m/252yds • £16.60 from www.purlescence.com
A hand-dyed gem, the 100% Merino makes for great stitch definition, while the resulting fabric
has a beautiful sheen as well as gorgeous tonal colour changes. Try this yummy Avocado.
King Cole Merino Blend DK
100% wool • 50g/112m/123yds • £3.70 from www.laughinghens.com
A good workhorse of a DK yarn with its superwash properties and ‘anti-tickle’ reputation, this
is an ideal choice for transitional layers or homeware projects. We tried the Thyme colourway.
Rowan Felted Tweed
50% wool/25% alpaca/25% viscose • 50g/175m/191yds • £7.99 from www.blacksheepwools.com
The 54 inspired-by-nature shades of Felted Tweed will have colour addicts twitching with joy.
The tweedy flecks give a superb depth to your fabric and the slight halo has a proper wool
feel. This delicious 161 Avocado is a soft treat of a yarn.
@ananasi.crochet
Congratulations to Anita Nánási, who
made the Mosaic Jumper designed by
Sandra Gutierrez for issue 129.
Anita wins a 12-issue digital subscription!
To be in with a chance of winning, share
your recent makes from
the magazine on Instagram using the
hashtag #myinsidecrochet and
tag us @insidecrochet.
www.insidecrochet.co.uk 09
➻
IN THE LOOP
YA R N W I S H L I S T
Fluffy to chunky, bright to
neutral, these yarns will keep
you going until spring.
CRAFTY COURSES
✽ LUXE LOOK
Zakami’s Fluffy Lace, made from
baby Suri alpaca and Mulberry
silk, is perfect for a small luxurious
accessory or garment.
www.loopknitting.com
BUILD YOUR SKILLS
➻ Black Sheep Wools has a fabulous
programme of yarny workshops coming
up this spring, offering opportunities
to learn new skills and try different
techniques to improve your craft in a
fun, friendly group setting. Workshops
include beautiful motif-making in the
African Flowers crochet workshop
(10 March), crochet edgings and joinings
(10 March) and learning to crochet
(21 April), all led by Sophia Reed,
while Inside Crochet designer Claire
Montgomerie will be teaching tapestry
crochet for beginners (31 March) and
crochet finishing techniques (1 April). If
you fancy trying other crafts, there’s a
range of techniques on offer, including
macramé, knitting, spinning and even
learning to hand-dye yarn (21 April).
www.blacksheepwools.com
✽ RICH TEXTURES
The new bulky Noventa yarn comes
in Malabrigo’s single-ply twist, giving
it an irregular texture that works well
for textured stitches.
www.malabrigoyarn.com
A D D TO TH E S TA S H …
For a lovely accessory project, Eden Cottage
Yarns has yarn and pattern packs available for the
Jane Crowfoot Magic Circles scarf, a motif-based
design with two beautiful colourways to choose.
www.edencottageyarns.co.uk
✽ SNUGGLE UP
Hobbii Friends Kid Silk is a soft
combination of kid mohair, silk and
wool. Warm yet super-lightweight, it
comes in a gorgeous array of shades.
www.hobbii.co.uk
✽ THINK PINK
Botanical Yarn’s Viva Magenta is a
shade that comes in a variety of yarn
bases, as well as a fade set of Merino
sock, DK and sparkle yarns.
www.botanicalyarn.com
10 Inside Crochet
HELDA’S READING CORNER
➻ Many of us grew up with the charming Mr Men
and Little Miss tales by Roger Hargreaves,
and love sharing these stories with the next
generation. New to the collection is the
Discover You series, which uses favourite
Mr Men and Little Miss characters to explore
feelings and emotions.
With titles including Try Again and Worries,
these books encourage the development of
resilience, tolerance and emotional intelligence, helping children navigate
complex issues and feelings through the context of a fun and relatable
story. We particularly like Be Kind, in which Mr Happy and Little Miss Giggles
team up to help Mr Mean learn that small acts of kindness bring much
happiness to the people around him.
These books contain engaging questions to encourage conversations and
some helpful tips from favourite characters too.
We sell exclusive Dorset button kits,
books and patterns, luxury yarns,
hand-dyed threads, tools, and materials
for the discerning crafter.
We run button and fibre craft workshops
from beginner to advanced.
Tel: 01264 748070
www.beakerbutton.co.uk info@beakerbutton.co.uk
Plant Dyed Yarns
www.nellieandeve.com
➻
IN THE LOOP
News etc
BOOKS
WE REVIEW NEW AND EXCITING RELEASES
W E ARE
ALS O R E AD IN G...
Colour Crochet Unlocked
Jane Howorth and Dawn Curran
Search Press • £12.99 • UK terminology
➻ For those looking to up
their colourwork game,
this book is packed with
inspiration, including a
comprehensive guide to
choosing and using colour,
a collection of 40 vibrant colour stitch
patterns and the authors’ own innovative
“smart” charting method. It also includes
a guide to popular colourwork techniques
such as intarsia, mosaic, Fair Isle and
tapestry crochet, and features illustrated
step-by-steps, with 10 projects to try.
Learn to Crochet in
10 Easy Lessons
Salena Baca • Stackpole Books
£18.99 • US terminology
➻ Experienced crochet
Embroidered Crochet
Anna Nikipirowicz • Search Press, £12.99 • UK terminology
➻ We’re very excited about this beautiful new book from
regular Inside Crochet designer Anna Nikipirowicz, which
combines crochet with embroidery. Crochet fabric made
using double crochet creates a firm, dense base for surface
stitching, enabling you to embellish home accessories with
striking designs that still have the tactile quality of crochet.
Anna provides a basic introduction to the materials, tools
and techniques you’ll need for both crochet and embroidery, before launching
into the fun part – 10 gorgeous projects to make. Each project starts with the
crochet pattern, and is followed by detailed instructions for the embroidery
design, including a transfer or chart. Transfers can simply be cut out and ironed
on to your crochet, just as you would for embroidery on fabric.
There are so many must-make projects in this book. From a practical
shopping bag hooked in a super-chunky yarn with chevron stripes worked on
top in equally chunky embroidery, to the whimsical Wild Garden Pillow Set
embellished with delicate floral motifs and finished with corner pompoms.
Decorations include the Wildflower Wall Hanging and the Woodland Pennant
Garland featuring on-trend toadstools and forest creatures in cross-stitch
crochet, and a Roses Basket Set adorned with blooms that could be used for
everything from yarn storage to plants.
Embroidered Crochet is an exquisite collection of projects that will bring an
exciting new dimension to your crochet.
teacher Salena Baca has
created an accessible book
for beginners, on how to
create the basic stitches and
put them together to make
simple but beautiful projects in 10 easy
lessons. Discover how to work in rows and
rounds, understanding charts, combining
stitches, changing colours and other
essential skills. Salena has also created 28
fun and easy beginner-friendly patterns,
including wraps, scarves, totes, baskets,
table runners, beanie hats and blankets.
Sweet Pea Crochet
Sue Rawlinson • Search Press
£12.99 • UK terminology
➻ A treasure trove of
adorable gift projects
inspired by the pieces the
author crocheted for her
own three daughters, this
is a beautiful collection of
contemporary baby patterns. You’ll find a
range of blanket designs along with small
toys, nursery decor and accessories that
can be made individually or combined to
create a bundle of coordinated gifts. Quickhook accessories include baby bobble hats,
bootees and mittens, while the cute first
toys will be hard to resist!
www.insidecrochet.co.uk 13
I N A S S O C I AT I O N W I T H S C H E E PJ E S
N E W C O LU M N
Crochet Masterclass
MAKE DO AND MEND
Claire Montgomerie is a textiles teacher
and designer specialising in knit and
crochet. Find out more on Instagram
@clairemontyknits.
Over the past few years, as I’ve become
more and more aware of the impr int we all
have on the ear th and our environ ment,
I’ve been consciously taking steps towards
a slower, more intentional and m indful
way of living. I spend a lot of time in my
garden with my children, growing from
seed and m aking compost, as my own way
of feeling more con nected to the Ear th,
tr ying to m ake sm all but seem ingly
increasingly radical and impor tant
changes in these scar y times of clim ate
uncer tainty. At the same time, I’ve been
making a conscious effort to buy less and
to m ake and mend more, for myself and
my fam ily, all while noticing a hear ten ing
increase in the number of other people
doing the same. Mass consumer ism is
proving that it’s not sustainable to
continually am ass clothing and clutter
and, as time goes on, we’ll have to live
more like our ancestors – investing in
better quality item s or hand-m aking,
reusing, recycling and repair ing most of
our household item s. This is where having
the knowledge of a craft like crochet is
becoming increasingly beneficial.
14 Inside Crochet
I love to darn and mend. I find time
working on my mending pile is one of the
most relaxing ways to spend an even ing
and, while mending is m indful and
therefore the per fect accompan iment to
some music or the radio, it can also easily
be done in front of the TV or alongside an
audiobook. The most wonder ful thing
about mending is the love and care
involved in the process. You can rescue
much-loved items from landfill with a
timely stitch, saving them for use for m any
more years. Plus, the time spent mending
or upcycling can in fuse a m ass-produced
item with all the love and care of a
handm ade one. As Sonya and Nina
Montenegro state in their book, Mending
Life: “Many people believe that handm ade
and mended item s are in fused with the
love and care the m aker or mender put into
the object. In Korea, there is a beautiful
textile tradition known as jogakbo. Sm all
scraps of cloth are pieced together in an
irregular way and the resulting wrap
(bojagi) is used to carr y ever ything from
food to clothing. Given as gifts, the cloth
wraps are believed to br ing good luck,
because when m aking the jogakbo the
sewer wishes the recipients good for tune
and wellbeing.”
The lovely thing about crochet is that
it can be effectively utilised to mend and
patch fabr ics, so if you can’t darn, it’s a
great way to fix or cover a hole or stain.
Here, I aim to show you a few different
ways to mend your kn its, but the
techn iques could also be applied to woven
pieces too.
Before star ting to show you how to
mend these pretty large holes in some of
my favour ite kn it pieces, I must say that a
great tip is to not wait for a hole to appear.
It will be far easier to rein force threadbare
elbows or cuffs with a quick darn or patch,
than to mend a m assive hole neatly. You
can use these darn ing and patching
techn iques over a threadbare section,
which will save your sweater from ever
getting a hole in the first place. Of course,
as you can see from these pictures, I often
don’t listen to my own advice and end up
with far more work to do!
When working these mends, I used the
Scheepjes Metropolis colour pack, which is
so useful for this job as it has a large array
of colours in super-cute m in i balls, giving
you just the r ight amount of yarn in just
the r ight gauge for mending holes neatly.
I also always have my gorgeous handturned wooden darn ing disc handy (from
SilvanWoodturn ing on Etsy) which adds to
the beautiful, tactile nature of mending.
Add to this a crochet hook and a darn ing
needle and that is all the equipment you
need. I love Clover darn ing needles with
a cur ved tip, to help guide your needle
easily through the fabr ic, though any
darn ing needle will do.
T R A DITIONA L WOV EN DA R N
The first way I will show you how to mend a
hole is using the traditional woven darn.
Darning is being utilised by so many
designers and artists like Hikaru Noguchi
and Celia Pym, and in creative and beautiful
contemporary ways.
When choosing yarn, try to match the
tension of your sweater if you can, or at least,
try not to use a yarn that’s too much
chunkier. With the colour, you can be much
freer – choose a close match for a seamless
mend, or you could have fun picking a
contrast shade or shades for a visible mend
which is very fashionable right now.
Continue in lines of running stitch, covering
the hole where it appears until you are about
1cm/½in to the left of the hole.
Insert the needle up through the back to the
front of the fabric, about a centimetre from
the bottom right edge of the hole. Pull the
yarn through, leaving a tail of yarn at the
back and work a neat running stitch directly
up along the side of the hole.
Before beginning any of these mends, try
to tidy your hole a little by snipping away any
loose ends that might get in the way.
Place your darning disc or mushroom
behind your hole to create some tension in
your mend. I like to keep this in place with
a rubber band to avoid movement of the disc
and maintain the correct tension in the
fabric. Be careful not to stretch the fabric too
much however, or your mend will distort it.
When you have reached about 1cm/½in
above the hole, change the direction of the
running stitch and work down again. Here,
I have spaced the lines out a little to make it
easier to see the technique, but ideally you
would keep your warp and weft threads
closer together for a more hardwearing
mend, as shown in the finished items here.
Keep going up and down alongside the
hole in running stitch, with vertical rows
close together, leaving no gap between them
(here I am trying to show what you are
doing, so the gaps are quite large), until you
meet the hole.
When you reach the hole, draw the yarn
across it so that it spans the hole, in a taut
tension, but not so tight that it distorts the
hole. Then continue the running stitch on
the opposite side.
With the same shade, or a contrast shade
for an interesting woven effect, begin to
work in the same way horizontally, from the
bottom right of your work, about 1cm away
from the hole. When you reach the hole,
begin weaving the yarn horizontally over
and under the vertical stitches.
Eventually, the woven yarns should
completely fill the hole. Continue to work in
a running stitch for 1cm/½in above the hole,
then pass your yarn through to the back of
the work to finish.
If your darn is a bit gappy over the hole,
feel free to add in more vertical or horizontal
woven lines in the same way to fill it more.
www.insidecrochet.co.uk 15
MATERIALS
● Scheepjes Metropolis Colour
Pack (80 x 10g balls),
75% Merino wool/
25% nylon, 10g/40m/44yds
Yarn A: Naples 43 x 1 ball
(dc fill stitch)
Yarn B: Sevilla 76 x 1 ball
(dc fill stitch)
Yarn C: Monterrey 38 x 1 ball
(dc fill stitch)
Yarn D: Liverpool 65 x 1 ball
(traditional oval and small
patches)
Yarn E: Leeds 46 x 1 ball
(star patches)
Yarn F: Abu Dhabi 32 x 1 ball
(small patches)
Yarn G: Toulouse 30 x 1 ball
(small patches)
Yarn H: Sydney 48 x 1 ball
(small patches)
Yarn I: Tehran 36 x 1 ball
(small patches)
● 2.5mm hook
● Stitch marker
PATCH ES & MEN DS
BY C L A I R E MON TG OM ER I E
These simple patches can hide stains, mend
holes or simply embellish, upcycle or refresh an
old garment, while the crochet fill is a quick and
DOUBLE
CROCHET
FILL STITCH
Double crochet (dc) can be used
to effectively fill in a hole as it
is quite a short, squat stitch,
providing a dense, hardwearing
fabric. It is also great for edging,
so can be attached around the
edge of the hole with ease.
START
With 2.5mm hook, attach
yarn A to any point around
hole with a sl st, then begin to
work neatly around the hole in
dc. In the example shown, we
have used 30 sts, as a multiple
of 6 sts is a good number to
aim for, to make decreasing on
following rounds easier.
TENSION
Exact tension is not essential
for this design, but try to
crochet tightly to ensure there
are no gaps.
MEASUREMENTS
Traditional oval patches are
10cm/4in long and 7cm/2¾in
wide, but adjustable for your
sweater/cardigan.
Star patches are approximately
8cm/3¼in in diameter.
When you get back to the
beginning of the round, join
with a sl st.
simple way to fix any small circular hole.
SPECIAL STITCHES
3trCl: *Yrh, insert hook in stitch
or space, yrh and pull up a loop
(3 loops on hook), yrh and pull
through 2 loops; rep from *
twice more in same stitch or
space, yrh and pull through
remaining loops.
PATTERN NOTES
1ch at start of a round does not
count as a st.
2ch at start of a round counts
as 1htr.
3ch at start of a round counts
as 1tr.
16 Inside Crochet
You will now begin filling in the
hole by working decreases at
intervals around.
Rnd 1: Work (3dc, dc2tog)
six times, continue in a spiral,
without joining rounds.
Note: For smaller or larger
patches, adjust the number of
dc worked before the decrease
so that it fits evenly.
Change to yarn B.
Rnd 2: (2dc, dc2tog) around.
Rnd 3: (1dc, dc2tog) around.
Change to yarn C.
Rnd 4: Dc2tog around.
TRADITIONAL OVAL
ELBOW PATCH
These simple patches create a
traditional, hardwearing reinforcement for
your sweater or cardigan, but worked in a
contrast colour will add a contemporary,
striking detail.
Do not join rounds unless indicted, but work
in a spiral, placing marker at beg of round and
moving up each round.
START
At this point, the hole should be
filled, with only a small hole left
at the centre.
Fasten off yarn leaving a tail,
thread in and out of rem sts,
then pull tightly to close the hole.
Pass yarn to back of
work and weave in neatly.
END
With 2.5mm hook and yarn D, make 16ch.
Rnd 1: 3dc in second ch from hook, 1dc in
each of next 13ch, 3dc in last ch, rotate work
180 degrees and work 1dc in unworked bottom
loop of each ch, do not join rnd but PM for
working in spirals in continuous rnds – 32dc.
Rnd 2: 2dc in each of first 3dc, 13dc, 2dc in
each of next 3dc, 13dc – 38dc.
Rnd 3: 2dc in first dc, (1dc, 2dc in next dc)
three times, 12dc, 2dc in next dc, PM in first
of these 2 dc, (1dc, 2dc in next dc) three times,
12dc – 46dc.
Rnd 4: 2dc in first dc, (2dc, 2dc in next dc)
three times, dc to next marker, 2dc in next dc,
moving marker up, (2dc, 2dc in next dc) three
times, dc to end – 54dc.
Rnd 5: 2dc in first dc, (3dc, 2dc in next dc)
three times, dc to next marker, 2dc in next dc,
moving marker up, (3dc, 2dc in next dc) three
times, dc to end – 62dc.
Rnd 6: 2dc in first dc, (4dc, 2dc in next dc)
three times, dc to next marker, 2dc in next dc,
moving marker up, (4dc, 2dc in next dc) three
times, dc to end – 70dc.
Cont in this way until patch is large enough
to cover your hole/elbow. Sample shown is
worked to ten rows.
Join last rnd with sl st and fasten off yarn.
Weave in ends and attach to elbow over worn
patch or hole.
You may need to secure the hole before you
sew the patch on top. A great way of doing
this is to work around the hole in
END
double crochet, as per the first round
of double crochet fill stitch mend.
STAR PATCH
If you want something a little more
fun and colourful for your elbow
patch, why not try a different shape, like this
cute star?
START
With 2.5mm hook and yarn E, make 4ch.
Rnd 1: [2tr, (2ch, 3tr) four times] all in fourth
ch from hook (missed 3ch at start counts as
first tr), 2ch, join rnd with sl st – 5x 3tr groups.
Rnd 2: 1ch, [1dc in second tr of 3tr group,
(2htr, 1tr, 2ch, 1tr, 2htr) all in next 2ch-sp]
around, join rnd with sl st.
Rnd 3: Sl st to next 2ch-sp, 2ch, (1htr, 2ch,
2htr) in 2ch-sp, 2htr, *dc3tog across next htr,
dc and htr, 2htr, (2htr, 2ch, 2htr) in 2ch-sp,
dc3tog across next htr, dc and htr, 2htr; rep
from * around, ending last rep at **, join rnd
with sl st.
Rnd 4: Sl st to next 2ch-sp, 2ch, (1htr, 2ch, 2htr)
in 2ch-sp, 3htr, *dc3tog, 3htr, (2htr, 2ch, 2htr)
in 2ch-sp, dc3tog, 3htr; rep from * around,
ending last rep at **, join rnd with sl st.
Rnd 5: Sl st to next 2ch-sp, 2ch, (1htr, 2ch, 2htr)
in 2ch-sp, 4htr, *dc3tog, 4htr, (2htr, 2ch, 2htr)
in 2ch-sp, dc3tog, 4htr; rep from * around,
ending last rep at **, join rnd with sl st.
Fasten off.
Weave in ends and attach to elbow over
worn patch or hole.
You may need to secure the hole before you
sew the patch on top.
A great way of doing this is to work around
the hole in double crochet, as per the
END
first round of double crochet fill
stitch mend.
www.insidecrochet.co.uk 17
SMALL PATCHES
Moths are increasingly
becoming a problem
for our knitwear and a great
way of hiding a multitude
of teeny holes is with teeny
patches. Little flowers are a
great way to cover a hole,
making it seem like a planned
embellishment rather than a
repair job! You can even layer
these up to hide larger stains,
holes and threadbare areas.
START
TINY FLOWER
With 2.5mm hook and yarn F,
make 2ch.
Rnd 1: 5dc in second ch from
hook, join rnd with sl st – 5dc.
Fasten off yarn F. Join yarn C to
any dc around.
Rnd 2: 1ch, (1dc, 1htr, 1tr,
1htr, 1dc) in each dc around
– 5 petals.
Fasten off.
18 Inside Crochet
MEDIUM FLOWER
With 2.5mm hook and yarn G,
make 2ch.
Rnd 1: 6dc in second ch from
hook, join rnd with sl st – 6dc.
Fasten off yarn G. Join yarn H to
any dc around.
Rnd 2: 1ch, 2dc in each dc
around – 12dc.
Fasten off yarn H. Join yarn D to
any dc around.
Rnd 3: 1ch, (1dc, 1htr, 1tr,
1htr, 1dc) in each dc around
– 12 petals.
Fasten off.
LARGE FLOWER
With 2.5mm hook and yarn I,
make 2ch.
Rnd 1: 6dc in second ch from
hook, join rnd with sl st – 6dc.
Fasten off yarn I. Join yarn F to
any dc around.
Rnd 2: 3ch (counts as first tr),
(3trCl (see Special Stitches), 3ch)
in each dc around – 6x 3trCl.
Fasten off yarn F. Join yarn H to
any ch-sp around.
Rnd 3: 2ch, (1htr, 1tr, 2ch, 1tr,
2htr) in first ch-sp, 1dc in next
Cl, *(2htr, 1htr, 2ch, 1tr, 2htr) in
next ch-sp, 1dc in next Cl; rep
from * around – 6 petals.
Fasten off.
GRANNY MOTIF
With 2.5mm hook and yarn I,
make 4ch.
Rnd 1: 2tr in fourth ch from
hook (missed 3ch at start
counts as first tr), 3ch, (3tr, 3ch)
three times in same ch as first
2 tr, join rnd with sl st to top of
first ch.
Fasten off yarn I. Join yarn G in
any 3ch-sp.
Rnd 2: 1ch, *(2dc, 2ch, 2dc) in
corner 3ch-sp, 3dc; rep from *
around, join rnd with sl st to top
of first ch. Fasten off.
SQUARE MOTIF
With 2.5mm hook and yarn D,
make 2ch.
Rnd 1: 8dc in second ch from
hook, join rnd with sl st – 8dc.
Fasten off yarn D. Join yarn H to
any dc around.
Rnd 2: 3ch, (1tr, 3ch, 1tr) in
next dc, *1tr in next dc, (1tr,
3ch, 1tr) in next dc; rep from
* around, join rnd with sl st to
third of beg 3ch.
Fasten off yarn H. Join yarn F to
any corner 3ch-sp.
Rnd 3: 1ch, *(2dc, 2ch, 2dc) in
corner 3ch-sp, 3dc; rep from *
around, join rnd with sl st to top
of first ch. Fasten off.
FINISHING
Weave in ends and attach over
patch or hole.
Pile up lots of assorted
small motifs for a pretty, END
embellished look.
Gorgeous knitting, crochet, embroidery supplies
LOOPKNITTING.COM
@LOOPLONDONLOVES
METTE MEHLSEN ‘FLOWER POWER’ FOR LOOP
& handmade treasure
Patch happy
Fill your wardrobe with stashbusting projects
you’ll treasure for years to com e.
PHOTOGRAPHS LEANNE JADE AND KIRSTEN MAVRIC STYLING CLAIRE MONTGOMERIE
HAIR AND MAKE-UP SOPHIE CHIVERS AND NICKI HENBREY
Ally Blouse and Parade cropped trousers from www.mhulot.co.uk
Laurel wide leg trousers (overleaf) from www.thewalkerandwalker.co.uk
Toasty Scarf by Kath Webber Using Drops Air Pattern page 65
20 Inside Crochet
www.insidecrochet.co.uk 21
PATC H H A P P Y
BELOW
Happy Motif Sweater by Cassie Ward Using Cascade 220 Pattern page 46
RIGHT
Stashbusting Scarf by Helda Panagary Using Scheepjes Softfun Pattern page 82
22 Inside Crochet
www.insidecrochet.co.uk 23
PATC H H A P P Y
24 Inside Crochet
BELOW
Cycles Poncho by Yessabett Bueno Using Scheepjes Softfun Pattern page 56
LEFT
Patchwork Jacket by Claire Montgomerie Using Eden Cottage Yarns Milburn DK Pattern page 60
www.insidecrochet.co.uk 25
PATC H H A P P Y
Cabled Long Socks by Simone Francis Using West Yorkshire Spinners Signature 4ply Pattern page 78
26 Inside Crochet
A chunky yarn perfect for quick crochet
projects in a selection of autumnal shades
Member of the UK Hand Knitting Association
For all our latest patterns & yarns visit www.stylecraft-yarns.co.uk
For your nearest stockist telephone 01484 848435
50 COLOURS | 100% ACRYLIC
ARAN WEIGHT | NO DYE LOTS
NOW AVAILABLE FROM
WOOL WAREHOUSE | READICUT
YARNS AND PATTERNS.CO.UK
Bright & beautiful
Colourful hom ewares, cheery clothes patches
and fun fam ily m akes.
PHOTOGRAPHS LEANNE JADE STYLING CLAIRE MONTGOMERIE
Chill Right Out Floor Cushion by Cassie Ward
Using Sugar n Cream Solids
Pattern page 94
www.insidecrochet.co.uk 29
BRIGHT & BEAUTIFUL
BELOW (LEFT-RIGHT)
Monkey Rattle by Victoria Kairis Using King Cole Cottonsoft DK Pattern page 102
Space Appliqué Patches by Victoria Kairis Using Rico Design Creative Ricorumi DK Pattern page 100
30 Inside Crochet
ABOVE (LEFT-RIGHT)
Terrazzo Blanket by Helda Panagary Using Scheepjes Terrazzo Pattern page 88
Plarn Plantpot Holder by Millie Masterton Using Paintbox Yarns Cotton DK Pattern page 92
www.insidecrochet.co.uk 31
BRIGHT & BEAUTIFUL
BELOW
Pillowcase Edging by Millie Masterton Using Rico Design Essentials Cotton DK Pattern page 86
32 Inside Crochet
ABOVE (LEFT-RIGHT)
Step Into Spring Trainers by Helen Anderson Using DMC Stranded Cotton Thread Pattern page 74
Landscape Sweater by Yarnspirations Design Team Using Caron Simply Soft Pattern page 70
www.insidecrochet.co.uk 33
34 Inside Crochet
✷✷✷
Pa r t Tw o
Me r to n Abbe y
Flo w e r m o tif
✷✷✷
JANE CROWFOOT
S p i r it o f F lo r a
2 0 2 3 Cr o c h e t-a lo n g
Welcom e to the th ird m otif in J ane Crowfoot’s stun n ing Spir it of Flora crochetalong. If you are just join ing us on your CAL jour ney, then all the details of how to
get your hands on the first two beautiful block patterns are on page 41 of this issue.
I’m thrilled that so many of you have joined the dedicated Facebook group and
are embracing your creativity by playing with your colourways and introducing
stash yarns as well. We’ve been delighted to see your crocheted squares coming to
life, like the spring bulbs we’re all so desperate to see in flower!
Each issue will feature a main colourway for the featured block, but will also
show you other combinations using Jane’s starter pack of beautiful Stylecraft
yarns. And as we progress through the months together, we’ll be showing you
different suggested layouts for your tiles and even alternative projects.
Whether you follow Jane’s initial blanket layout, in the main colourway, or have
decided to embrace your existing stash pile and chosen your favourite shades and
tile patterns, we’re excited to see where your creative journey takes you and we
hope you enjoy the very special Merton Abbey Flower motif this month.
S
www.insidecrochet.co.uk 35
36 Inside Crochet
MATERIALS
● Stylecraft Life DK,
75% acrylic/25% wool,
100g/298m/326yds
Yarn A: Aqua 2357
Yarn B: Caramel 2446
Yarn C: Cascade 2308
Yarn D: Cranberry 2319
Yarn E: French Blue 2447
Yarn F: Olive 2302
Yarn G: Parchment 2445
● Stylecraft ReCreate DK,
40% wool/30% acrylic/
30% polyester (all recycled),
100g/350m/382yds
Yarn H: Avocado 3189
Yarn I: Blush 3458
Yarn J: Rose 1945
● 4mm hook
● Yarn needle
● Stitch markers
Me r to n Abb e y Flo w e r
BY JANE CROWFOOT
In 1882 William De Morgan outgrew his first kiln at his parents’
home, and moved his business to Merton, near Wimbledon.
At his peak, De Morgan employed around 40 people here to
work the kilns, paint ceramics and throw pots.
TENSION
You need to check that your
motifs are not coming up any
bigger or a lot smaller than my
pieces. A big difference in tension
could mean that your project
is different to mine in terms of
shape, size and drape, and if
you achieve a looser tension this
could mean that you may need
more yarn. The measurement of
each motif is given throughout
the pattern for you to check your
tension against; if your motif is
larger try using a finer hook, if it
is smaller, try using a larger hook.
The measurements given are for
the pre-blocked motif – please
note that most yarns will stretch
when blocked.
MEASUREMENTS
Pre-blocked measurement:
Approximately 17 x 17cm/
6¾ x 6¾in.
SPECIAL STITCHES
Spike double crochet (SPdc):
Insert the hook in indicated stitch,
draw up a loop to the height
of the stitches of the working
row/round, yarn over, pull yarn
through both loops on hook.
PATTERN NOTES
When working slip stitches at
end of rounds, either work into
www.insidecrochet.co.uk 37
top of the next stitch or (for
treble crochet) in third of beg
3ch unless stated otherwise.
stitch markers and by pinning
it out on a blocking board or
thick towel from time to time.
You will achieve a much neater
colour change if you complete
rounds and fasten off the yarn,
rather than joining mid-stitch.
When fastening off a yarn at
the end of a round, the sl st
made for the join can look like a
stitch when you are working the
following round, so make sure
you count correctly and do not
count the sl st as a stitch when
working subsequent rounds.
Instructions for re-joining yarn
are given at the beginning of
each round or row.
MOTIF
Make four
Work with RS facing
throughout.
Using yarn H and 4mm hook,
4ch, sl st to first ch to form
a ring.
Foundation Rnd: (RS) 3ch
(counts as 1tr), 15tr in ring, sl st
to join – 16 sts.
Fasten off yarn H.
Rnd 1: (RS) Join yarn G in sp
between any 2 tr with 1ch (does
not count as a st), 1dc in same
sp, 1dc in sp between each tr
around, sl st to join.
Fasten off yarn H.
Sewing in yarn ends as you
go along makes the finishing
process much easier and means
you are less likely to lose stitches
or make errors with tension.
The flower and leaves within
this motif are made by working
in the round. The frame is made
separately by working a chain
and foundation round. Once
you have done this, when you
work the next round of the
frame, you will join everything
together by working through
the stitches on the leaves and
the corresponding stitches on
the frame.
It is really important that your
frame comes up at the right
tension otherwise it could
be too big or too small to fit
your flower. If you find that
your motif is not coming up to
the size and either looks over
stretched or wavy then you may
need to change your hook size.
Although I made my frame on
the same size hook a couple of
our test crocheters found they
needed to change hook size for
the frame.
Crochet loves to curl and you
will find that the corner leaves
do so until you add the border
on. You may find it easier to
keep track of this piece by using
38 Inside Crochet
START
Rnd 2: (RS) Join yarn E in any st
by working 1ch + 2ch (counts as
1tr), *3tr in next st, 1tr in next
st, 3ch, miss next st, 1tr in next
st; rep from * to end omitting
1tr on final rep, sl st to join
– 20 sts, 4 ch-sps.
Fasten off yarn E.
miss 3ch-sp, 1dc in next tr; rep
from * to end omitting 1dc on
final rep, sl st to join – 36 sts,
4x ch-sps.
Fasten off yarn C.
Pre-blocked measurement:
Approximately 6cm/2⅜in across
widest point.
in same st, 1dc in next st, 2dc in
next st, 1dc in next st, SPdc (see
Special Stitches) in st at base
of next dc, miss st covered by
SPdc, 3ch, miss 3ch, SPdc in st
at base of next st; rep from * to
end omitting 1SPdc on final rep,
sl st to join – 52 sts, 4x ch-sps,
4 picots.
Fasten off yarn A.
Pre-blocked measurement:
Approximately 10cm/4in
diagonally from picot to picot.
Rnd 3: (RS) Join yarn C in top
of first tr of any 5tr group by
working 1ch (does not count
as a st), 1dc in same st, *1htr
in next st, 5tr in next st, 1htr in
next st, 1dc in next st, 3ch,
Rnd 4: (RS) Join yarn A in st at
base of first dc on any petal (this
is the top of tr made on Rnd 2)
by working 1ch (draw yarn up to
replicate SPdc), *miss st covered
by SPdc, [1dc in next st, 2dc in
next st] twice, 3ch, sl st in st at
base of 3ch (to make picot), 1dc
Rnd 5: (RS) Working behind the
petal join yarn D in missed st on
Rnd 2 (yarn E) by working 1ch
(does not count as a st), 1dc in
same st, *6ch, working back
along ch just made, miss next
ch, 1dc in each of next 5ch, 1dc
in (same) st at base of stem, 5ch
behind next petal, 1dc in next
missed st on Rnd 2 (yarn E); rep
from * to end omitting 1dc on
final rep, sl st to join – 4x ch-sps,
four stems made.
Fasten off yarn D.
Push the four stems through
corresponding ch-sps made on
Rnd 2 (yarn E) so they come to
the front.
Rnd 6: (RS) Working behind the
flower but keeping RS facing,
join yarn I in ch-sp made on
previous rnd behind any petal
by working 1ch + 2ch (counts
as 1tr), * miss dc at base of next
stem and 2 sts on next stem,
working along side of stem 2dtr
in next st, 2tr in next st, 1htr
in next st, 3dc in next missed
ch, 1htr in next st, 2tr in next
st, 2dtr in next st, 1tr in next
ch-sp (yarn D); rep from * to end
omitting 1tr on final rep, sl st to
join – 4 petals.
Fasten off yarn I.
Note: Don’t worry if your work
is curling at this point.
Rnd 8: (RS) Join yarn F in ch-sp
between any two petals by
working 1ch (does not count
as a st), 1dc in same ch-sp,
*11ch, working back along ch
just made miss next ch, 1dc in
each of next 8ch, 8ch, working
back along ch just made miss
next ch, 1dc in each of next 7ch,
9ch, working back along ch just
made miss next ch, 1dc in each
of next 8ch, miss all leaf stems,
1dc in each of next 2 ch at base
of all three stems, 1dc in (same)
ch-sp at base of all stems, 4ch
behind next petal, 1dc in ch-sp
made on Rnd 4 (yarn A), 4ch,
1dc in next ch-sp made on
previous rnd; rep from * to end
omitting 1dc on final rep, sl st to
join – 8x ch-sps, 12 stems.
Fasten off yarn F.
Rnd 9: (RS) Join yarn H in centre
of any picot made on Rnd 7
(yarn J) by working 1ch (does
not count as a st), 1dc in same
place, 2dc in missed ch at top
of next leaf stem, *working
along same leaf stem 1htr in
next st, 1tr in next st, 2tr in next
st, 1tr in next st, 1htr in next st,
1dc in next st, sl st in next st,
**miss next st on same stem,
1dc in centre of picot at tip of
next petal (yarn A) and sp made
at centre of all three stems at
same time (first leaf of three-leaf
group complete).
Working along next stem sl st
in next st, 1dc in next st, 1htr in
next st, 1tr in next st, 2tr in next
st, 1tr in next st, 1htr in next st,
3dc in next missed ch; rep from
* to ** , 1dc in centre of picot
at tip of (same) petal (yarn A)
and (same) sp made at centre
of all three stems at same time,
(second leaf of three-leaf
group complete).
Miss first st on next stem, sl st
in next st, 1dc in next st, 1htr in
next st, 1tr in next st, 2tr in next
st, 1tr in next st, 1htr in next st,
2dc in next missed ch, (third
leaf of three-leaf group
complete)***, 1dc in centre
of next picot made on Rnd 7
(yarn J), 2dc in missed ch at top
of next leaf stem.
Work as set from first * to create
three more sets of three leaves,
ending last rep at ***, sl st to
join – 12 leaves.
Fasten off yarn H.
PM in central st of 3dc group
made at tip of all four corner
leaves.
Pre-blocked measurement:
Approximately 20cm/8in leaf
tip to leaf tip.
Rnd 7: (RS) Join yarn J in top
of dtr made at beg of any petal
by working 1ch (does not count
as a st), 1dc in same st, *1dc in
each of next 3 sts, 2dc in next
st, 1dc in next st, 2dc in next st,
3ch, sl st in st at base of 3ch (to
make picot), 1dc in same st, 1dc
in next st, 2dc in next st, 1dc in
each of next 4 sts, 1ch, 1dc in
dtr on next petal; rep from * to
end omitting 1dc on final rep,
sl st to join – 4x ch-sps, four
petals, four picots.
Fasten off yarn J.
Sew in yarn ends.
Pre-blocked measurement:
Approximately 15cm/6in petal
tip to petal tip.
www.insidecrochet.co.uk 39
4 x 4in using 4mm hook, or
size required to obtain tension.
Using yarn G and 4mm hook
make 104ch, join with sl st to
form a large ring being careful
not to twist the ch.
Foundation Rnd: (RS) 1ch
(does not count as a st), [1dc in
each of next 25ch, 3dc in next
ch] four times, sl st to join
– 112 sts.
Fasten off yarn G.
PM in central st of 3dc groups
made at each of the four
corners, counting 27 sts
between each marker.
FRAME
Note: You are now going to
make a separate frame for
your flower. You will attach
the flower to the frame on
Rnd 1. It is important that your
frame fits quite snugly so keep
an eye on your tension. If the
frame looks too big you could
change down a hook size.
Refer to tension measurements
throughout.
Reminder of dc tension:
Work 20/21dc and 24 rows
to measure 10 x 10cm/
40 Inside Crochet
Rnd 1: (RS) Join yarn B in back
loop of marked st on any leaf
and any marked corner st at
the same time by working 1ch
(does not count as a st), 3dc
in same place, * 1dc in blo of
next 3 sts on same leaf and
next 3 sts on frame at same
time, 1dc in each of next 6 sts
on frame, miss sl st and 5 sts
on next leaf, 1dc in blo of next
4 sts of leaf and next 4 sts on
frame at same time, 1dc in next
st at top of picot and next st on
frame at same time, 1dc in blo
of next 4 sts on next leaf and
next 4 sts on frame at same
time, 1dc in each of next 6 sts
on frame, miss sl st and next
5 sts on next leaf, 1dc in blo of
next 3 sts on leaf and next 3 sts
on frame at same time, 3dc in
blo of next marked st on leaf
and next marked st on frame at
same time; rep from * to end
omitting 3dc on final rep, sl st
to join – 120 sts.
Fasten off.
PM in central st of 3dc groups
made at each of four corners,
counting 29 sts between
each marker.
Rnd 2: (RS) Join yarn I in any
marked st by working 1ch +
1ch (counts as 1htr), 1htr in
same st, PM in st just made,
*29dc, 2htr in next marked st,
PM in st just made; rep from
* to end omitting 2htr on
final rep, sl st to join – 124 sts
(30 sts between each marker).
Fasten off yarn I.
Weave in yarn ends.
Make three more to match.
FINISHING
I suggest you do not block
the motifs at this point.
Washing and blocking
guidance is given at the end
of the pattern.
Pre-blocked
measurement:
Approximately
17 x 17cm/6¾ x 6¾in.
END
Pre-blocked measurement:
Approximately 16cm/6¼in
wide along each side edge of
frame and 1.5cm/⅝in deep.
Note: Unfortunately we printed the wrong number of
balls of Stylecraft Life DK in Olive in the last issue. If you
choose to make the blanket exactly as per Jane’s original
layout, you should only need two balls of Olive, not three.
subscribe today
Ta ke ad va n tage o f o u r s p e cia l
Spir it o f Flo ra cro ch e t-a lo n g s u bs criptio n
offers and receive every issue in 2023!
✷✷✷
Ne w d ig ita l e d itio n
offer only £29.99
(get issue 154 free!)
Visit www. pktmags.com/floracal
Valid from 9 February
✷✷✷
✷✷✷
If you prefer paper
copies, a year’s UK
subscription is only £54.95,
delivered straight to your
door! Start your print
subscription with issue 154
to join our CAL.
✷✷✷
Visit www.insidecrochet.co.uk
or call +44(0)1202 586848 for more details
s
STOCKISTS
Member of the UK Hand Knitting Association
10 Chinns Ct, Market Pl, Warminster BA12 9AN
Visit us
online or
in-store for
all your
crochet
needs!
Craft supplies & subscriptions
Shop our amazing kits, bundles of yarn and all the crafty accessories
you could wish for! Our subscription boxes are complete with all the
materials, guides and tools you need to get your craft on and a few
extra Stitch Kit goodies.
www.stitchkit.co.uk
facebook.com/thinkoutsidetheboxwarminster
Unit 9, Carmondean Business Units, Livingston EH54 8PT
Be spoke gift s,
pe rsona lise d
e m broide r y,
fa bric s a nd
ha be rda she r y.
We sell many branded products including
Stylecraft, with many of our own unique products,
accessories and lots more.
www.craftytrading.com
ING
ST OCK AFT
CR
ST Y LE
AN Y
AN D M !
M ORE
w w w.just se w sim ple .c o.uk
LARGE VARIETY OF STYLECRAFT YARNS
AND PATTERNS AVAILABLE
Unit 1(d) Park Office, Monument Business Park,Chalgrove,
Watlington, Oxfordshire OX44 7RW
The Knitting Market
Stylecraft, King Cole, Sirdar.
We are a Fabric Shop in Newmarket, Suffolk stocking gorgeous yarns,
beautiful 100% Cotton quilting fabrics, threads and haberdashery.
Please also visit us online at
Crochet kits available online or in-store.
The Birmingham Rag Market, 104 Edgbaston St, Birmingham B5 4RB
www.andsewwebegin.co.uk
www.theknittingmarket.com
8a Old Station Road, Newmarket, Suffolk, CB8 8DN
ojects in a selection of autumnal shades
STOCKISTS
Member of the UK Hand Knitting Association
Situated on Alban Square, Aberaeron,
West Wales, we cater for all your crochet,
knitting and cross stitch needs.
Great for all your knitting and crochet needs!
www.rosemaryswoolshop.co.uk
5 Balcony Parade, Corporation Street, Corby NN17 1NL 01536 267344
Facebook - Bellaknit Email: bellaknit@live.co.uk
Jules Delights is located in Pewsey,
Wiltshire. We stock a large range
of wool, fabric and haberdashery
items, and much more.
The Craft Basket is a small shop in Queens Square Haverhill
offering a wide range of Stylecraft yarns and much more.
Find us on Facebook
<< Visit us in our new home
The Old Cottage, 17 The Broadway, Cheam, Sutton SM3 8BH T: 0208 643 3211
We are a small independent supplier for many of the popular yarns,
patterns and haberdashery. We also sell handmade garments, knitted
and crocheted, from premature baby clothes right through to adult
clothing which can be custom-made to suit everyone’s needs.
Stocking the Starter pack for the Jane Crowfoot
Spirit of Flora Crochet Along
www.woolandmuchmuchmore.com
www.whichcraftwools.co.uk
www.uniqueknitandsew.co.uk
Unique Knit and Sew: your one-stop
crochet, knitting and craft shop
providing all the latest acrylic yarns
and wools from the leading brands
Stylecraft, King Cole, Patons, Sirdar
and James Brett. You can enjoy
shopping with us online or pay us a
visit and browse our retail yarn and
craft shop in Bognor Regis.
Friendly yarn shop near Evesham
Stockists of King Cole, Stylecraft and others
Workshops, accessories, lessons
Free Crochet & Chat twice a week
Free parking
er Busines
w
505
@unravel_unwind
@unravelandunwind
Unravel & Unwind C.I.C
Yarns, tools and handmade gifts from artists in Medway.
www.shop.unravelandunwind.co.uk
Craft & Chat Sessions - Free
Weekly on Wed, Thu, Fri mornings - 10am to Midday
Weekly Crochet Groups - £8pp/session
Mon or Wed - 7pm to 9pm
Tue - 1pm to 3pm, Thu & Sat - 2pm to 4pm
Fortnightly Knitting Group - £8pp/session
Mon - 3.30pm to 5.30pm
Now stocking Cygnet Chunky in all colours, Ricorumi and JCB Marble Chunky.
We stock James C Brett, Wendy, Peter Pan, King Cole, Opal sock yarns, Hand-dyed yarns from indie
designer Chimera Crafting and more. Also a variety of fabrics and haberdashery items.
Unravel & Unwind C.I.C. 57 Green Street, Gillingham, Kent, ME7 1AE
Opening times
Mon to Sat 9.30 til 4
UNDER NEW MANAGEMENT
Sundays & Bank Holidays Closed
16 Benedicts Court, Huntingdon PE29 3PN
01480 700890
contact@patcheshaberdashery.co.uk
www.patcheshaberdashery.co.uk
SEWING DAZE HAS NOW JOINED
THE PATCHES FAMILY
YARNS
FABRICS
HABERDASHERY
HANDMADE
ITEMS
SOCIAL
CRAFTING
GROUP
Make iit
YOUR PATTERN INSTRUCTIONS START HERE
BEGINNER
EASY
INTERMEDIATE
ADVANCED
H appy Mo tif
Sw e ate r
Cycle s
Po n ch o
Patch w o rk
Jacke t
To as ty
Scarf
Lan ds cape
Sw e ate r
Cassie Ward
Page 46
Yessabett Bueno
Page 56
Claire Montgomerie
Page 60
Kath Webber
Page 65
Yarnspirations Design Team
Page 70
Sprin g
Train e rs
Cable d
Lo n g So cks
Stas h bu s tin g
Scarf
Pillo w cas e
Edgin g
Te rrazzo
Blan ke t
Helen Anderson
Page 74
Simone Francis
Page 78
Helda Panagary
Page 82
Millie Masterton
Page 86
Helda Panagary
Page 88
Plarn Plan tpo t
H o lde r
Ch ill Righ t Ou t
Flo o r Cu s h io n
Space Appliqu é
Patch e s
Mo n ke y
Rattle
Millie Masterton
Page 92
Cassie Ward
Page 94
Victoria Kairis
Page 100
Victoria Kairis
Page 102
www.insidecrochet.co.uk 45
➻
MAKE IT
MATERIALS
● Cascade 220,
100% wool,
100g/200m/218yds
Yarn A: Natural 8010 x 2 (2,
2, 3) balls
Yarn B: Jet 4002 x 2 (2, 2,
3, 3) balls
Yarn C: Summer Sky 7815
x 1 ball
Yarn D: Stratosphere 9484
x 1 ball
Yarn E: Peony 1057 x 1 ball
Yarn F: Citron 8910 x 1 ball
Yarn G: Hot Pink 9469
x 1 ball
Yarn H: Neon Yellow 7828
x 1 ball
Yarn I: Deep Lavender 8762
x 1 ball
Yarn J: Caribbean 8907
x 1 ball
Yarn K: Blaze 9542 x 1 ball
Yarn L: Desert Flower 9682
x 1 ball
Yarn M: Tutu 9477 x 1 ball
Yarn N: Christmas Red 8895
x 1 ball
Yarn O: Purple Hyacinth
7808 x 1 ball
Yarn P: Water Sprout 1073
x 1 ball
Yarn Q: Cotton Candy 9478
x 1 ball
Yarn R: Shrimp 7804
x 1 ball
Yarn S: Lilac Mist 8912
x 1 ball
● 4.5mm hook
● Yarn needle
H appy Motif Swe ater
BY CASSIE WARD
This lively happy jumper is so much fun to make! Mix and
match the different squares and colours and create your
very own combinations. Back and fronts are made the
same so you can wear it two ways.
ADD TO THE STASH
Buy this pure wool yarn from
www.woolwarehouse.co.uk
46 Inside Crochet
YARN ALTERNATIVES
You can use any aran-weight
yarn that works to the same
tension for this design.
TENSION
Work each motif to measure
12.5 (13.5, 14.5, 15.5, 15.5)cm/
5 (5¼, 5¾, 6, 6)in square using
4.5mm hook, or size required
to obtain tension.
MEASUREMENTS
To make garment longer or
shorter adjust the number of
rows of squares around the
bottom edge.
PAT T E R N I N ST R U C T I O N S
DESIGNER BIOGRAPHY
Cassie absolutely loves creating
projects with motifs – they are
such a relaxing make, perfect
for moments to reflect.
SPECIAL STITCHES
Puff: *Yrh, insert hook in stitch
or space indicated, yrh and pull
up a loop; rep from * twice
more, (7 loops on hook), yrh,
pull through all 7 loops, 1ch
to close.
Beginning Puff (BegPuff):
3ch, *yrh, insert hook in stitch
or space indicated, yrh and
pull up a loop; rep from * once
more (5 loops on hook), yrh,
pull through all 5 loops, 1ch
to close.
PATTERN NOTES
All motif charts show Small
size only. Work extra rounds in
dc as indicated for your size in
written instructions.
Make all sleeve motifs in size M
for all sizes.
Yarn shades aren’t given for
each motif as this garment
is designed to use up yarns
from your stash. If you like
the colour combos Cassie has
used, use the photos as a guide
in choosing your shades. As
Cassie has done, choose one
shade for widening rows (where
appropriate), welt, cuffs and
neck to give your garment an
overall cohesive look.
DAISY MOTIF
Make six: four in
your size for Body
and two in size M for Sleeves
Turn at end of each rnd
throughout.
With 4.5mm hook, and first
shade 4ch, sl st to form a ring.
Rnd 1: 3ch (counts as 1tr here
and throughout), 11tr in ring, sl st
to top of 3ch to join, turn – 12tr.
Fasten off. Join next shade in
top of any tr.
Rnd 2: 1Beg puff (see Special
Stitches), 2ch, [1Puff in next
DAISY MOTIF
DAI SY MOTI F
4
5
2
3
1
START
tr
Puff
sl st
ch
Beg Puff
www.insidecrochet.co.uk 47
➻
MAKE IT
tr (see Special Stitches), 2ch]
around, sl st to top of 3ch of
Beg puff, turn.
Fasten off. Join next shade in
any 2ch-sp.
Rnd 3: 3ch, (2tr, 2ch, 3tr) in same
2ch-sp, 3tr in each of next two
2ch-sps, *(3tr, 2ch, 3tr) in next
2ch-sp, 3tr in each of next two
2ch-sps; rep from * twice more,
sl st to top of 3ch to join, turn.
Fasten off, join next shade in
any corner 2ch-sp.
Rnd 4: 3ch, (2tr, 2ch, 3tr) in
same 2ch-sp, 3tr in each space
between 3tr groups to corner
space, *(3tr, 2ch, 3tr) in corner
2ch-sp, 3tr in each space
between 3tr groups to corner;
rep from * twice more, sl st to
joint, turn.
Fasten off. Join next shade in
any corner 2ch-sp.
Rnd 5: Rep Rnd 4.
twice, 8ch, sl st in same 1ch-sp;
rep from * twice more, 8ch,
sl st in next 1ch-sp, 8ch, sl st
in same place as join.
Fasten off. Join next shade in
any corner 8ch loop.
Rnd 6: 4ch (counts as 1dtr),
(2tr, 1dc, 2ch, 1dc, 2tr, 1dtr) in
same 8ch loop, 3tr in each of
next two 8ch loops, *(1dtr, 2tr,
1dc, 2ch, 1dc, 2tr, 1dtr) in corner
8ch-sp, 3tr in each of next two
8ch loops; rep from * twice
more, sl st in top of beg 4ch.
Size S fasten off.
HEART SQUARE
Make five: three in your size
for Body and two in size M
for Sleeves
With 4.5mm hook and first
yarn shade, 4ch, sl st to join.
Rnd 1: 3ch, 2tr in ring, 2ch, (3tr,
2ch) three times in ring, sl st to
top of beg 3ch to join, turn .
Rnd 2: Sl st to first 2ch-sp,
(3ch, 2tr, 2ch, 3tr) in same 2chsp, (3tr, 2ch, 3tr) in each corner
2ch-sp around, sl st to top of
beg 3ch to join, turn.
Rnd 3: Sl st to first corner 2chsp, (3ch, 2tr, 2ch, 3tr) in same
2ch-sp, 3tr in space before next
3tr group joining in second
shade on last pull through
of last st, (cut off first shade
leaving a length to weave in),
using second shade (3tr, 2ch,
3tr) in corner 2ch-sp, pull up
first shade in last loop of last tr,
3tr in space before next 3tr, pull
up second shade in last loop of
final tr, cut first shade (3tr, 2ch,
3tr) in corner 2ch-sp cut second
shade, join first shade in loop of
last st, 3tr in space before next
3tr, (3tr, 2ch, 3tr) in corner 2chsp, pull up second shade, 3tr in
space before next 3tr, do not
cut first shade, sl st to join, turn.
Sizes M, L, XL and 2XL only
Next Rnd: Work 1dc in each
st and (1dc, 2ch, 1dc) in each
corner st around, sl st to join.
Rep last rnd - (-, once, twice,
twice) more.
Fasten off.
FLOWER MOTIF
Make five: three in your size
for Body and two in size M
for Sleeves
Using first yarn shade and
4.5mm hook, 6ch, sl st to first
ch to form ring.
Rnd 1: 1ch (does not count as
a st), 16dc in 6ch-sp, turn.
Fasten off. Join next shade in
any dc.
Rnd 2: Loosely work 1dc in
each dc around, turn.
Rnd 3: [3ch, miss next dc, 1dc in
next st] to end, turn – 8ch-sps.
Fasten off. Join next shade in
any 3ch-sp.
Rnd 4: (1dc, 1htr, 2tr, 1htr, 1dc,
1ch) in each 3ch-sp to end, join
with sl st.
Fasten off. Join next shade in chsp before sl st at end of Rnd 4.
Rnd 5: 8ch, sl st in same sp as
join, *[8ch, sl st in next 1ch-sp]
48 Inside Crochet
Size S fasten off.
Sizes M, L, XL and 2XL only
Next Rnd: Work 1dc in each
st and (1dc, 2ch, 1dc) in each
corner st around, sl st to join.
Rep last rnd - (-, once, twice,
twice) more.
Fasten off.
FLOWER MOTI FFLOWER MOTIF
5
6
4
2
1
3
ch
dtr
tr
htr
dc
54 (58, 62, 66, 66)cm
21¼ (23, 24½, 26, 26)in
PAT T E R N I N ST R U C T I O N S
43cm/ 17in
All sizes
100 (108, 116, 124, 130)cm
39½ (42½, 45½, 49, 51¼)in
Rnd 4: With second shade 3ch,
2tr in same space, 3tr in next
space, cut second shade, pull
up first shade (3tr, 2ch, 3tr) in
corner sp, 3tr in next sp, pull up
second shade, 3tr in next sp,
(3tr, 2ch, 3tr) in corner sp, 3tr
in next two sp, (3tr, 2ch, 3tr) in
corner sp, 3tr in next sp, pull up
first shade, 3tr in next sp, (3tr,
2ch, 3tr) in final corner sp, sl st
to join, turn.
Rnd 5: Join second shade in
any corner 2ch-sp, (3ch, 2tr,
2ch, 3tr) in corner, 3tr in sp
between each 3tr group to next
corner, *(3tr, 2ch, 3tr) in corner
sp, 3tr in sp between each 3tr
group to next corner; rep from
* twice more, sl st to join, turn.
Rnd 6: 3ch, 2tr in sp between
each 3tr group to next corner,
*(3tr, 2ch, 3tr) in corner sp, 3tr
in sp between each 3tr group
to next corner; rep from *
twice, sl st to join.
Size S fasten off.
Sizes M, L, XL and 2XL only
Next Rnd: Work 1dc in each
st and (1dc, 2ch, 1dc) in each
corner st around, sl st to join.
Rep last rnd - (-, once, twice,
twice) more.
Fasten off.
OPEN CIRCLE MOTIF
Make six: four in your size
for Body and two in size M
for Sleeves
Using first yarn shade and
4.5mm hook, 6ch, sl st to
form ring.
Rnd 1: 3ch (counts as 1tr), 15tr
in ring, sl st to top of 3ch, turn
– 16tr.
Fasten off. Join next shade to
top of any tr.
Rnd 2: 5ch (counts as 1tr, 2ch),
(1tr, 2ch) in each tr around, sl st
to join, turn.
Fasten off. Join next shade in
any 2ch-sp,
Rnd 3: (3ch, 2tr) in same 2ch-sp,
1ch, (3tr, 1ch) in each rem 2chsp around, sl st to join, turn.
Fasten off. Join next shade with
sl st in any 1ch-sp,
Rnd 4: *[3ch, 1dc in next ch-sp]
three times, 6ch, 1dc in next
ch-sp, rep from * three times,
sl st to join, turn.
Rnd 5: Sl st in corner 6ch-sp,
4ch (counts as 1dtr), (4dtr, 2ch,
5dtr) in same 6ch-sp, 3tr in
next 3ch-sp, 3htr in next 3chsp, 3tr in next 3ch-sp, *(5dtr,
2ch, 5dtr) in corner 6ch-sp,
3tr in next 3ch-sp, 3htr in next
3ch-sp, 3tr in next 3ch-sp; rep
HEART SQUARE
HEART SQUARE
4
5
6
3
2
1
www.insidecrochet.co.uk 49
➻
MAKE IT
OPEN CIRCLE MOTIF
5
4
3
2
1
from * twice more, sl st to join.
Size S fasten off.
Sizes M, L, XL and 2XL only
Next Rnd: Work 1dc in each
st and (1dc, 2ch, 1dc) in each
corner st around, sl st to join.
Rep last rnd - (-, once, twice,
twice) more.
Fasten off.
GRANNY SQUARE
Make six: four in your size
for Body and two in size M
for Sleeves
Change shade at end of each
rnd on last pull through of last
st in previous shade.
With 4.5mm hook and first shade
4ch, sl st to first ch to form ring.
Rnd 1: (RS) 3ch (counts as 1tr
here and throughout), 2tr in
GRANNY SQUARE
GRANNY SQUARE
6
4
5
2
3
1
50 Inside Crochet
ring, 2ch, (3tr, 2ch) three times
in ring, join with sl st to top of
3ch, turn. Change shade.
Rnd 2: (WS) 3ch, (2tr, 2ch, 3tr)
in same 2ch-sp, (3tr, 2ch, 3tr) in
each 2ch-sp, sl st to join, turn.
Change shade.
Rnd 3: 3ch, 2tr in sp between
between 3tr groups, (3tr, 2ch,
3tr) in next 2ch-sp, *3tr in next
sp, (3tr, 2ch, 3tr) in next 2ch-sp;
rep from * twice more, sl st to
top of 3ch, turn. Change shade.
Rnd 4: 3ch, 2tr in sp between
3tr groups, (3tr, 2ch, 3tr) in
next 2ch-sp, *3tr in each sp to
next corner 2ch-sp, (3tr, 2ch,
3tr) in 2ch-sp; rep from * twice
more, 3tr in next sp, sl st to top
of 3ch, turn. Change shade.
Rnd 5: 3ch, 2tr in same sp, (3tr,
2ch, 3tr) in next ch-sp, *3tr in
PAT T E R N I N ST R U C T I O N S
DIAGONAL SQUARE
DI AGONAL SQUARE
5
4
3
2
1
each sp to next corner 2ch-sp,
(3tr, 2ch, 3tr) in 2ch-sp; rep
from * twice more, 3tr in each
sp to end, sl st to top of 3ch,
turn. Change shade.
Rnd 6: As Rnd 5.
Size S fasten off.
Sizes M, L, XL and 2XL only
Next Rnd: Work 1dc in each
st and (1dc, 2ch, 1dc) in each
corner st around, sl st to join.
Rep last rnd - (-, once, twice,
twice) more. Fasten off.
DIAGONAL SQUARE
Make six: four in your size
for Body and two in size M
for Sleeves
Turn at end of each rnd.
Using 4.5mm hook and first
PLAIN COLOURED MOTIF
DI AGONAL SQUARE
5
3
4
1
2
shade, 4ch, sl st to first st to
form a ring.
Rnd 1: 3ch (counts as 1tr here
and throughout), (2tr, 2ch, 3tr)
in ring, 1ch, join in second shade
(do not fasten off), 1ch, (3tr,
2ch, 3tr), 2ch, sl st to join, turn.
Rnd 2: Sl st in corner ch-sp,
3ch, 1tr in same corner ch-sp,
3tr, (2tr, 2ch, 2tr) in next corner
2ch-sp, 3tr, 2tr in next corner
2ch-sp, 1ch, change to first
shade, drop second shade ready
to pick up on next rnd (do not
work over it), 1ch, 2tr in same
corner 2ch-sp, 3tr, (2tr, 2ch, 2tr)
in next corner 2ch-sp, 3tr, 2tr in
first corner 2ch-sp, 2ch, sl st in
third of beg 3ch to join, turn.
Rnd 3: Sl st in corner ch-sp,
3ch, 1tr in same corner ch-sp,
1tr in each tr to next corner
2ch-sp, (2tr, 2ch, 2tr) in 2ch-sp,
1tr in each tr to next corner
2ch-sp, 2tr in 2ch-sp, 1ch,
change yarn dropping yarn
ready to pick up on next rnd
(do not work over it), 1ch, 2tr
in same 2ch-sp, 1tr in each tr
to next corner 2ch-sp, (2tr, 2ch,
2tr) in 2ch-sp, 1tr in each tr to
original 2ch-sp, 2tr in 2ch-sp,
2ch, sl st in third of beg 3ch to
join, turn.
Rnd 4: Sl st in corner ch-sp,
3ch, 1tr in same corner ch-sp,
1tr in each tr to next corner
2ch-sp, (2tr, 2ch, 2tr) in 2ch-sp,
1tr in each tr to next corner
2ch-sp, 2tr in 2ch-sp, 1ch,
change yarn, 1ch, 2tr in same
2ch-sp, 1tr in each tr to next
corner 2ch-sp, (2tr, 2ch, 2tr) in
2ch-sp, 1tr in each tr to original
2ch-sp, 2tr in 2ch-sp, 2ch, sl st
in third of beg 3ch to join, turn.
Rnd 5: Sl st in corner ch-sp,
2ch, 1htr in same corner ch-sp,
1htr in each tr to next corner
2ch-sp, (2htr, 2ch, 2htr) in
2ch-sp, 1tr in each tr to next
corner 2ch-sp, 2tr in 2ch-sp,
1ch, change yarn dropping yarn
ready to pick up on next rnd
(do not work over it), 1ch, 2htr
in same 2ch-sp, 1tr in each tr to
next corner 2ch-sp, (2htr, 2ch,
2htr) in 2ch-sp, 1htr in each
htr to original 2ch-sp, 2htr in
2ch-sp, 2ch, sl st in third of beg
3ch to join, turn.
Size S fasten off.
Sizes M, L, XL and 2XL only
Next Rnd: Work 1dc in each
st and (1dc, 2ch, 1dc) in each
corner st around, sl st to join.
Rep last rnd - (-, once, twice,
twice) more. Fasten off.
PLAIN COLOURED MOTIF
Make five: three in your size
for Body and two in size M
for Sleeves
Change shade on each round
as desired.
Using first shade and 4.5mm
hook, 4ch, sl st to form a ring.
Rnd 1: 3ch (counts as 1tr here
and throughout), 2tr in ring,
2ch, (3tr, 2ch) three times in
ring, sl st to top of 3ch, turn.
Fasten off, join next shade in
any 2ch-sp.
Rnd 2: (3ch, 1tr, 2ch, 2tr) in
2ch-sp, 3tr, [(2tr, 2ch, 2tr) in
next 2ch-sp, 3tr] three times,
sl st to top of 3ch, turn.
Fasten off, join next shade in
any corner 2ch-sp.
Rnd 3: (3ch, 1tr, 2ch, 2tr) in
2ch-sp, 7tr, [(2tr, 2ch, 2tr) in
corner 2ch-sp, 7tr] three times,
sl st to top of 3ch, turn.
Fasten off, join next shade in
any corner 2ch-sp.
Rnd 4: (3ch, 1tr, 2ch, 2tr) in
2ch-sp, 11tr, * [(2tr, 2ch,2tr) in
next 2ch-sp, 11tr] three times,
sl st to top of 3ch, turn.
Fasten off, join next shade in
any corner 2ch-sp.
Rnd 5: (1ch, 1htr, 2ch, 2htr) in
2ch-sp, 1tr in each tr to corner
space, [(2htr, 2ch,2htr) in next
2ch-sp, 1htr in each tr to corner
ch-sp] three times, sl st to top
of 3ch.
Size S fasten off.
Sizes M, L, XL and 2XL only
Next Rnd: Work 1dc in each
st and (1dc, 2ch, 1dc) in each
corner st around, sl st to join.
Rep last rnd - (-, once, twice,
twice) more. Fasten off.
www.insidecrochet.co.uk 51
➻
MAKE IT
SMILEY MOTIF
3
6
5
4
2
1
STARBURST MOTIF
STARBURST MOTI F
Steph – this is the Open Circle Motif, please
could you swap it with photo on previous page?
Thanks, Rhian
5
4
3
2
1
BegPuff
tr3tog
tr4tog
Puff
tr5tog
52 Inside Crochet
SMILEY MOTIF
Make six: four in your size
for Body and two in size M
for Sleeves
Using first yarn and 4.5mm
hook, 4ch, sl st to form a ring.
Rnd 1: 3ch (counts as 1tr), 11tr
in ring, sl st to join, turn.
Rnd 2: 3ch, 1tr in same tr,
2tr in each tr around, sl st to
join, turn.
Rnd 3: 3ch, 1tr in same tr, 1tr,
[2tr in next tr, 1tr] around, sl st
to join, turn.
Fasten off. Join second shade
in any st.
Rnd 4: 3ch, 1dtr in same st,
2ch, (1dtr, 1tr) in next st, 1tr,
1htr, 3dc, 1htr, 1tr, (1tr, 1dtr) in
same st, 2ch, (1dtr, 1tr) in next
st, 1tr, 1htr, 3dc, 1htr, 1tr, sl st
to join, turn.
Rnds 5 & 6: 3ch (counts as first
tr), work 1tr in each tr and (2tr,
2ch, 2tr) in each corner 2ch-sp,
around, sl st to join.
Size S fasten off. Embroider
face using yarn B, using photo
for guidance.
Sizes M, L, XL and 2XL only
Next Rnd: Work 1dc in each
PAT T E R N I N ST R U C T I O N S
NECK EDGE
NECK EDGE
Neck Edge
Neck Edge
Diagonal
Heart
Flower
Plain Starburst
Coloured
Granny
Smiley
Open
Circle
Open
Circle
Diagonal
Heart
Flower
Plain
Coloured
Flower
Granny
Smiley
Open
Circle
Daisy
Smiley
Daisy
Starburst
Plain
Coloured
Smiley
Diagonal
Daisy
Diagonal
Heart
Open
Circle
Daisy
Flower
Flower
Plain
Coloured
Starburst
Granny
Granny
Smiley
Open
Circle
Daisy
Open
Circle
Diagonal
Heart
Cuff Edge
STARBURST MOTIF
Make five: three in your size
for Body and two in size M
for Sleeves
Using first yarn and 4.5mm
hook, 4ch, sl st to form a ring.
Rnd 1: 3ch (counts as 1tr), 15tr
in ring, sl st to top of 3ch, turn
– 16tr.
Fasten off. Join second shade
in any st.
Rnd 2: 1BegPuff, 2ch, [1Puff,
2ch] around, sl st to join, turn.
Smiley
Plain
Starburst
Coloured
Fasten off. Join next yarn in
any ch-sp.
Rnd 3: (2ch, tr3tog) in same
ch-sp, [2ch, tr4tog in next chsp] around, sl st to join, turn.
Fasten off. Join next yarn in
any 2ch-sp.
Rnd 4: (2ch, tr4tog) in same
sp, [3ch, tr5tog in next 2ch-sp]
around, sl st to join, turn.
Fasten off. Join next yarn in
any 3ch-sp.
Rnd 5: 4ch (counts as 1 dtr)
(2dtr, 3ch, 3dtr) in same sp, 3tr
in next sp, 3htr in next sp, 3tr
in next sp, *(2dtr, 3ch, 3dtr) in
next sp, 3tr in next sp, 3htr in
next sp, 3tr in next sp; rep
from * twice more sl st to
join, turn.
Granny
Diagonal
Heart
Starburst
Daisy
Cuff Edge
CUFF EDGE
st and (1dc, 2ch, 1dc) in each
corner st around, sl st to join.
Rep last rnd - (-, once, twice,
twice) more. Fasten off.
Embroider face using yarn B,
using photo for guidance.
Granny
CUFF EDGE
Size S fasten off.
Sizes M, L, XL and 2XL only
Next Rnd: Work 1dc in each
st and (2dc, 2ch, 2dc) in each
corner st around, sl st to join.
Rep last rnd - (-, once, twice,
twice) more. Fasten off.
JOINING
Join squares as shown above.
Size 2XL only
BODY WIDENING ROWS
Join yarn B at corner of one
Body section at point indicated
with red cross on Diagram.
Row 1: 3ch, (counts as 1tr), 1tr
in each st and corner ch-sp to
end, turn.
Change to yarn A.
Row 2: 3ch, tr to end.
Fasten off.
Rep on opposite side starting
at blue cross.
Fasten off.
Repeat on second Body
section.
Sizes L, XL & 2XL only
SLEEVE WIDENING ROWS
Join yarn B at corner of one
Sleeve section at point indicated
with red cross on Diagram.
Row 1: 3ch (counts as 1tr), 1tr
in each st and corner ch-sp to
end, turn.
Change to yarn A.
Row 2: 3ch, tr to end.
Fasten off.
www.insidecrochet.co.uk 53
➻
MAKE IT
Repeat on second Sleeve.
All sizes
SHOULDER SHAPING
Note: To fully customise your
jumper and widen or shorten
your neck opening, work more
or fewer sts at each shoulder
edge being sure to work the
same amount on each side.
FIRST SIDE
With RS facing join yarn B to
first Body section in top right
hand corner (ie in ch-sp of
Flower/Smiley square on sizes
S, M, L & XL and under last tr
row end on size 2XL.
Sizes S, M, L & XL only
Row 1: (RS) 3ch (counts as
first tr), 1tr in each of next
24 (28, 32, 36, -) sts (including
corner ch-sps), tr2tog, 1tr, turn
– 27 (31, 35, 39, -) sts.
Size 2XL only
Row 1: (RS) 3ch (counts as first
tr) 1tr under same row end, 2tr
under next row end, 1tr in each
of next 37 sts (including corner
ch-sps), tr2tog, 1tr, turn – 40 sts.
All sizes
Change to yarn A.
Row 2: (WS) 3ch, 26 (30, 34,
38, 339)tr to end, turn.
Change to yarn B.
Row 3: Rep Row 2.
Change to yarn A.
Row 4: Rep Row 2.
Fasten off.
SECOND SIDE
Counting two row ends at left
hand side of piece as 4 sts on
size 2XL only, rejoin yarn B in
28th (32nd, 36th, 40th, 41st) st
(including ch-sps) in from edge.
Row 1: 3ch (counts as 1tr),
tr2tog, tr to end, working 2tr in
each widening row end on size
2XL, turn.
Change to yarn A.
Row 2: (WS) 3ch, 26 (28, 30,
32, 36)tr to end, turn.
Change to yarn B.
Row 3: Rep Row 2.
Change to yarn A.
54 Inside Crochet
Row 4: Rep Row 2.
Fasten off.
Repeat on second Body section.
MAKING UP
Sew Body sections together
along shoulder edge sts.
Fold sleeve in half matching
halfway point to shoulder seam.
Sew sleeve in position, then
sew side and sleeve seams.
RIBBED NECKBAND
Foundation Rnd: Join yarn B
at neck edge shoulder seam
and work 1 row in dc around
neck opening working 1dc in
each st and ch-sp and 2dc in
each tr row end, sl st to join.
Row 1: 6ch, 1dc in second ch
ACTUAL BUST
LENGTH
SLEEVE LENGTH
from hook and in each ch to
end, sl st in each of next 2dc on
foundation rnd, turn.
Row 2: 1dc blo in each dc to
end, turn.
Row 3: 1dc blo in each dc to
end, sl st in each of next 2dc on
foundation rnd, turn.
Rep Rows 2 & 3 around neck
opening until all foundation rnd
sts are used.
Sl st short edges together and
fasten off.
end on size 2XL, around entire
bottom edge, sl st to join.
Rows 2–4: 1ch, dc around,
sl st to join.
Fasten off.
WELT EDGING
Join yarn B at one side seam of
bottom edge of garment.
Rows 2–4: 1ch, dc around,
sl st to join. Fasten off.
CUFF
Join yarn B at bottom edge of
sleeve in seam.
Working 1dc in each st and
ch-sp, and 2dc in each row
end on size 2XL, around entire
bottom edge, sl st to join.
FINISHING
Weave in any
loose ends.
Working 1dc in each st and
ch-sp, and 2dc in each row
END
S
M
L
XL
2XL
100
108
116
124
130
cm
39½
42½
45½
49
51¼
in
54
58
62
66
66
cm
21¼
23
24½
26
26
in
43
43
43
43
43
cm
17
17
17
17
17
in
Family Owned
Since 1987
Serene Shawl
by Kristen Stoltzfus Clay
Free Pattern DK729
www.cascadeyarns.com
➻
MAKE IT
56 Inside Crochet
PAT T E R N I N ST R U C T I O N S
MATERIALS
● Scheepjes Softfun,
60% cotton/40% acrylic,
50g/140m/153yds
Yarn A: Clay 2431 x 4 (5,
6) balls
Yarn B: Tortilla 2632 x 6 (7,
8) balls
Yarn C: Black 2408 x 2 (2,
3) balls
Yarn D: Olive 2531 x 2 (3,
4) balls
● 3mm hook
YARN ALTERNATIVES
You can use any DK weight
cotton to achieve a similar
effect.
TENSION
Work 19tr and 7 rows to
measure 10 x 10cm/4 x 4in
using 3mm hook, or size
required to obtain tension.
DESIGNER BIOGRAPHY
Yessabett loves crochet
and fibres and is passionate
about searching for new
techniques. Find her on Ravelry
as Yessabett-Bueno or on
Instagram @creaciones.ananda.
Cycle s Poncho
BY YESSABETT BUENO
This is a colourful design ideal for those leftover skeins
that you can’t bear to part with but that aren’t enough for
a complete garment!
ADD TO THE STASH
Buy this cotton-blend yarn from
www.blacksheepwools.com
SPECIAL STITCHES
Cluster st (CL): Yarn twice
around hook, insert hook in
next st, yrh, pull through st
(four loops on hook), [yrh,
pull through 2 loops on hook]
twice, *yarn twice around
hook, insert hook in same
st, yrh, pull through st, [yrh,
pull through 2 loops on hook]
twice; rep from * twice more,
yrh, pull through all five loops
on hook.
LS: Leave a strand about
15cm/6in long.
PATTERN NOTES
This design is worked vertically
in small sections each using
different techniques.
Start each row on the right and
end on the left (if you are lefthanded, start on the left and
end on the right).
www.insidecrochet.co.uk 57
➻
MAKE IT
13
12
11
10
9
Leave a strand of about
15cm/6in long before starting to
work the row, this will be part
of the fringe. At the end of each
row end, cut and leave a strand
about 15cm/6in long.
8
7
6
The filet crochet section is
excluded, as you must work
through RS and WS in each row.
5
4
3
For the mosaic overlay, always
work in the back loop.
2
1
21
20
19
18
17
16
15
14
58 Inside Crochet
For a longer poncho, the
multiple to work with is
8 sts + 5.
PONCHO
Using Chart One
as a guide:
With yarn B, 125 (141, 152)ch.
Row 1: (RS) With yarn B, LS
(see Special Stitches), 125 (141,
152)dc, fasten off, LS – 125
(141, 152)dc.
Row 2: (RS) With yarn A, LS,
125 (141, 152)dc blo, fasten
off, LS.
Row 3: (RS) With yarn B, LS,
1dc blo, [1dc blo, 1tr in flo of dc
in Row 1 below] to last 2 sts,
2dc blo, fasten off, LS.
Row 4: (RS) With yarn A, LS,
1dc blo, [1tr in flo of dc in
Row 2 below, 1dc blo in next tr]
to end, fasten off, LS.
Row 5: (RS) With yarn B, LS,
dc blo to end, fasten off, LS.
Row 6: (RS) With yarn C, LS,
dc blo to end, fasten off, LS.
Row 7: (RS) With yarn B,
LS, [1dc blo, 3dc flo in Row
5 below] to last st, 1dc blo,
fasten off, LS.
Row 8: (RS) With yarn C, LS,
1dc blo, [3dc blo, 1tr flo in dc
in Row 6 below] to last 4 sts,
4dc blo, fasten off, LS.
Row 9: (RS) With yarn B, LS,
2dc blo, [1tr in flo in tr in Row
7 below, 3dc blo] to last 3 sts,
1tr flo in tr in row 7 below,
2dc blo, fasten off, LS.
Row 10: (RS) With yarn C, LS,
1dc blo, 1tr flo in dc in Row 8
below, *1dc blo, 1tr flo in dc
from Row 8 below, 1tr flo in tr
from Row 8 below, 1tr flo in dc
START
49 (63, 75)cm
19¼ (24¾, 29½)in
from Row 8 below; rep from *
to last 3 sts, 1dc blo in tr, 1tr flo
in dc from Row 8 below, 1dc
blo in last st, fasten off, LS.
Row 11: (RS) With yarn A, LS,
dc blo to end, fasten off, LS.
Row 12: (RS) With yarn D, LS,
1dc blo, 7ch, miss 5 sts, *1CL
(see Special Stitches) in next st,
9ch, miss 7 sts; rep from * to last
7 sts, 1CL in next st, 7ch, miss
5 sts, 1dc blo, fasten off, LS.
Row 13: (RS) With yarn A, LS,
1dc blo, 1tr in each of next 5dc
in Row 11 below leaving ch sts
on WS, *1dc blo in CL, 7tr in
Row 11 below leaving ch sts
on WS; rep from * to last 7 sts,
1dc blo, 5tr in Row 11 below
leaving ch sts on WS, 1dc blo in
last st, turn.
Using Chart Two as a guide
for filet section, cont in
yarn A only:
Row 14: (WS) 2ch (counts as
1tr here and throughout), 1tr,
[1ch, miss 1 st, 7tr] to last 3 sts,
1ch, miss 1 st, 2tr, turn.
Row 15: (RS) 2ch, 1tr, [1tr in
ch-sp, 1ch, miss 1tr, 5tr, 1ch,
miss 1tr] to last 3 sts, 1tr in
ch-sp, 2tr, turn.
Row 16: (WS) 2ch, 2tr, [1tr in
48 (52, 55)cm
19 (20½, 21¾)in
PAT T E R N I N ST R U C T I O N S
ch-sp, 1ch, miss 1tr, 3tr, 1ch,
miss 1tr, 1tr in ch-sp, 1tr] to last
2 sts, 2tr, turn.
Row 17: (RS) 2ch, [3tr, 1tr in
ch-sp, 1ch, miss 1tr, 1tr, 1ch,
miss 1tr, 1tr in ch-sp] to last
4 sts, 4tr, turn.
Row 18: (WS) 2ch, [4tr, 1tr in
ch-sp, 1ch, miss 1tr, 1tr in ch-sp,
1tr] to last 4 sts, 4tr, fasten off,
LS, turn.
Row 19: (RS) With yarn D, LS,
1dc blo, 2ch, miss 1 st, [1CL in
next st, 9ch, miss 7 sts] to last
3 sts, 1CL in next st, 2ch, miss
1 st, 1dc blo in last st, fasten
off, LS.
Row 20: (RS) With yarn B, LS,
1dc blo, 1tr in st from Row 18
below leaving ch sts on WS,
[1dc blo in CL, 7tr in Row 18
below leaving ch sts on WS] to
last 3 sts, 1dc blo in CL, 1tr in st
from Row 18 below, 1dc blo in
last st, fasten off, LS.
Rows 1–20 form pattern and
are repeated
Note: From hereon Row 1 of
patt rep is worked in blo.
Rows 21–54 (74, 94): Work
in patt.
At end of Row 54 (74, 94) place
markers as folls to denote neck
opening: PM1 in centre stitch,
count 17 sts to the right, PM2,
count 17 sts to the left, PM3
(35 sts for opening). Make sure
your head fits this opening,
if not, leave more than 35 sts
between PM2 and PM3.
Row 55 (75, 95): Work in patt
as set, at first marker work
35ch (or number required) and
continue working in patt from
third marker.
ACTUAL BUST
LENGTH
Row 56 (76, 96): Work in patt
as set working into each ch
from previous row.
Rows 57 (77, 97)–110 (150,
190): Cont in patt as set.
Fasten off.
FINISHING
Add threads as fringes to the
filet crochet area to complete
all the fringed edges, leaving
them all 15cm/6in
END
long. Weave in ends
and block.
M
2XL
5XL
98
126
150
cm
38½
49½
59
in
48
52
55
cm
19
20½
22¾
in
www.insidecrochet.co.uk 59
➻
MAKE IT
MATERIALS
● Eden Cottage Yarns
Milburn DK, 85% Bluefaced
Leicester/15% silk,
50g/112m/122yds
Yarn A: Rust x 2 (2, 3) balls
Yarn B: Thyme x 3 (4, 4) balls
Yarn C: Compost x 2 (2,
3) balls
Yarn D: Catmint x 2 (2,
3) balls
Yarn E: Black Tulip x 2 (2,
3) balls
Yarn F: Bramble x 2 (2, 3) balls
Yarn G: Althea x 3 (4, 4) balls
Yarn H: Wicker x 3 (4, 4) balls
Yarn I: Tea Rose x 3 (4,
4) balls
Yarn J: Natural x 4 (4, 5) balls
● 3.5mm hook
YARN ALTERNATIVES
Any DK weight yarn will work
here. This silk mix lends a
beautiful sheen, which should
be considered if substituting.
TENSION
Work each motif to measure
5 x 5cm/2 x 2in using 3.5mm
hook, or size required to obtain
correct tension.
DESIGNER BIOGRAPHY
Claire is a textiles teacher,
author and designer specialising
in knit and crochet. Find out
more on Instagram
@clairemontyknits
Patchwork Jacke t
BY CLAIRE MONTGOMERIE
Inspired by beautiful handmade quilted patchwork jackets,
this garment is easy to hook as it is constructed from simple
granny squares, which can be arranged in a myriad of
different patchwork inspired patterns.
ADD TO THE STASH
Buy this silk-blend yarn from
www.edencottageyarns.co.uk
60 Inside Crochet
PATTERN NOTES
Due to the oversized shape of
this Jacket, each size spans a
wide range of measurements
as it can be worn with varying
degrees of positive ease.
You can make the sleeves
longer or shorter by adding or
subtracting a row of motifs; the
body length can be made longer
or shorter in the same way.
In sample shown, each motif
uses only one or two of the main
shades, in an assortment of plain
and half & half blocks. Play with
the colours and motifs or simply
make the jacket in one shade
for a more understated look.
¾
¾
35cm/ 14in
40cm/ 15¾in
45cm/ 17¾in
SLEEVE LENGTH
www.insidecrochet.co.uk 61
½
½
½
Cuff to Cuff 220cm/86½in
Cuff to Cuff 200cm/79in
Cuff to Cuff 180cm/71in
BACK
110cm/ 43½in
100cm/ 39½in
90cm/ 35½in
Centre Back Neck
Join collar from this
point
Pocket
Size 3
Size 2
Size 1
Yarn J: Natural
Yarn I: Tea Rose
Yarn H: Wicker
Yarn G: Althea
Yarn F: Bramble
Yarn E: Black Tulip
Yarn D: Catmint
Yarn C: Compost
Join at Back Neck
COLLAR
Make double thickness
Join to body where indicated
FRONT
Yarn B: Thyme
Yarn A: Rust
PAT T E R N I N ST R U C T I O N S
Join to body where indicated
➻
MAKE IT
PLAIN MOTIF
HALF & HALF MOTIF
PLAI N MOTI F
HALF AND HALF MOTI F
2
ch, 3tr, *(2tr, 3ch, 2tr) in next
corner sp, 2tr, 3tr in last st.
Fasten off.
TRIANGLE MOTIF
TRI ANGLE MOTI F
2
1
1
1
ch
sl st
2
3ch at beg of round counts
as 1tr.
When joining, use any
remaining yarn from making
motifs, if you have a selection
left, choose the yarns that will
be least likely to show up
when joined.
62 Inside Crochet
PLAIN MOTIF
Work 4ch.
Rnd 1: 2tr in fourth
ch from hook, 3ch, (3tr, 3ch)
three times in same ch as first
2 tr, sl st to join.
Rnd 2: 3ch, 2tr, (2tr, 3ch, 2tr)
in corner 3ch-sp, *3tr, (2tr, 3ch,
2tr) in next corner 3ch-sp; rep
START
tr
from * to end of rnd, sl st to
top of beg 3ch to join.
Fasten off.
TRIANGLE MOTIF
Work 4ch.
Row 1: (2tr, 3ch, 3tr) all in
fourth ch from hook, turn.
Row 2: 3ch, 1tr in bottom of
HALF & HALF MOTIF
Work 4ch.
Rnd 1: (2tr, 3ch, 3tr) all in
fourth ch from hook, changing
to contrast shade in last step
of last tr, continuing with new
shade, but trapping unused
yarn as you go, work 3ch, (3tr,
3ch, 3tr) in same ch as before,
changing to original yarn in last
step of last tr, 3ch, join rnd with
sl st to top of first ch.
Rnd 2: 3ch, 2tr, (2tr, 3ch, 2tr)
in next corner sp, 3tr, 2tr in
next corner 3ch-sp, change to
contrast shade in last step of
last st, 3ch, 2tr in same corner
3ch-sp, (2tr, 3ch, 2tr) in next
corner 3ch-sp, 3tr, 2tr in next
PAT T E R N I N ST R U C T I O N S
corner 3ch-sp changing to
original colour in last step of
last st, 3ch, 2tr in same corner
3ch-sp, sl st to top of first ch
to join.
Fasten off.
SLEEVE
Make 63 (88, 117) plain motifs
for each Sleeve, using all
assorted shades except for
yarn J. Join in random colour
order to create seven (eight,
nine) rows of 9 (11, 13) motifs.
FRONTS
Make 66 (84, 104) plain
motifs for each Front, using
all assorted shades except for
yarn J. Join in random colour
order to create 11 (12, 13) rows
of six (seven, eight) motifs.
BACK
PANEL
Make eight Plain Motifs in yarn J
and four each in yarns E and H.
Make eight Half & Half Motifs
using yarns F and H.
Make 16 Half & Half Motifs
using yarns G and J.
Make 24 Half & Half Motifs
using yarns I and J.
Block and arrange these 56
motifs to create pattern as
shown in diagram.
Make 116 (156, 200) Plain
Motifs, using all assorted
shades excluding yarn J.
Join around back panel as
per diagram.
COLLAR
Make 96 (104, 112) Half & Half
motifs in the colours shown
and join together according
to the diagram. The collar is
made double thickness to help
the collar stand up and to give
structure.
POCKETS (OPTIONAL)
Make six plain motifs and three
triangle motifs for each pocket,
using all assorted shades
except for yarn J and join in
random colour order as shown
in diagram.
FINISHING
Pin out and block all motifs
to shape.
back, aligning to outside edges,
with a sl st join with right
side facing.
JOINING
Join each section as per the
assembly instructions in relevant
diagrams, using a slip stitch join
on the reverse. Place two motifs
tog with RS facing and sl st in
outside (non-touching) loops
only of both motifs.
Join sleeves to body; longer side
should fit centrally against the
outside edge
Join fronts panels to back,
attaching short edges to top of
TO FIT BUST
BACK WIDTH AT HEM EDGE
CUFF TO CUFF
LENGTH FROM SHOULDER
SLEEVE LENGTH
Join collar around neck edge,
fitting centre back of collar to
centre back of neck motifs
and joining motif for motif
around neck.
Fold collar in half and stitch
neatly to inside edge of collar.
Place patch pockets into
position as shown on diagram.
FINISHING
Weave in all ends and block
lightly to shape.
If you want a more quilted
effect, try lining your jacket
with fabric – this will also
mean you won’t
END
have to sew in all
of your ends!
S
M
L
76–100
101–130
131–160
cm
30–39
39–51
50–62
in
90
100
110
cm
35½
39½
43½
in
180
200
220
cm
70
78¾
86½
in
52.5
57.5
62.5
cm
20½
22½
24½
in
35
40
45
cm
14
15¾
17¾
in
www.insidecrochet.co.uk 63
Stocking: Laine and Pom Pom,
Yarnologie magazine publications
Wool brands: Katia, West Yorkshire Spinners,
Cygnet, Rico Design and Sirdar
Hand dyed yarns: by Siobhans Crafts and Dystopic Fibre
Accessories: Cocoknits, Muud, Alex Byrd and Loome products
www.amodernyarn.co.uk
39 Chapel Lane, Formby, Merseyside L37 4DL
Brigg Wool Shop is a family run wool shop in Brigg, North Lincolnshire. Run by a mother and
daughter team, Pam & Sian. Pam & Sian opened the doors in September 2019 after years of
dreaming and planning. They put quality at the heart of the shop, quality wool, quality classes
and quality customer service! If you want is not already on the shelf then Brigg Wool Shop will do
their best to get it!
Specialists in Kniting, Crochet, Embroidery, Felting, Spinning and Weaving.
Fantastic range of products - Friendly Social Groups every day - Classes available in all listed crafts.
4 Market Place, Brigg DN10 8HA
01652 408632
www.briggwoolshop.co.uk
Discover our range of bright and bold modern crochet kits & patterns
Save 15% at www.thelefthookery.co.uk with code INSIDECROCHET
Find us @thelefthookery
Offer ends 31 January 2023
To advertise here
Contact Cassie on
cassie@tailormadepublishing.co.uk
PAT T E R N I N ST R U C T I O N S
MATERIALS
● Drops Air, 65% alpaca/
28% polyamide/7% wool,
50g/150m/164yds
Yarn A: Wheat 02 x 3 balls
Yarn B: Peacock Blue 11
x 1 ball
Yarn C: Sea Green 27 x 1 ball
Yarn D: Yellow 22 x 1 ball
Yarn E: Blush 32 x 1 ball
Yarn F: Sweet Orchid 41
x 1 ball
● 4.5mm hook
TENSION
Exact tension is not critical for
this design.
MEASUREMENTS
Finished scarf is 22 x 225cm/
8½ x 88½in.
DESIGNER BIOGRAPHY
Kath lives with her three
children in the city of Norwich.
She has been a crochet designer
for more than ten years and
absolutely loves a stashbuster
project. Kath’s perfect
crochet accompaniments are
Gilmore Girls on Netflix and
a nice cuppa.
To as ty Scarf
BY KATH WEBBER
Both a cosy stashbuster and a fun exploration of stitch
and pattern, this patchwork scarf is a warm and stylish
trans-seasonal accessory.
ADD TO THE STASH
Buy this alpaca-blend yarn from
www.woolwarehouse.co.uk
SPECIAL STITCHES
Popcorn (pop): Make 5tr in
one st or space, remove hook
from loop on last st and insert
under loop of first treble made,
catch loop of last treble made
and pull through to close.
Puff: (Yrh, insert hook under
stitch, yrh, pull a loop back
through st) three times, yrh and
pull though all loops to close.
Cluster (Cl): (Yrh, insert hook
under stitch, yrh, pull a loop
back through st, yrh hook, pull
through two loops on hook)
three times, yrh, pull through
all loops to close.
PATTERN NOTES
This toasty scarf is a striking
combination of different
textural stitches and sizes of
squares to create a charmingly
wonky design.
Use stash yarns of similar
weights to achieve the same
www.insidecrochet.co.uk 65
➻
MAKE IT
look, choosing a base colour
that unites them all – a soft
oatmeal in this sample. Or
try using two strands of finer
yarn with some mohair for a
fluffy halo effect with some
DK or aran weight yarns to mix
things up and get the most
from your stash.
Alternatively, make more
than seven panels and stitch
together to form a beautifully
unique blanket or throw.
POPCORN
FLOWER SQUARE
Make 21
in different colour
combinations
Using first yarn shade, make
4ch, join with sl st to make a
ring.
Rnd 1: 3ch (counts as 1tr), 11tr
in ring, sl st to third of beg 3ch
– 12 sts.
START
66 Inside Crochet
Fasten off.
Change to next yarn shade.
Rnd 2: 2ch (does not count as
st), (1Pop (see Special Stitches),
2ch) in each st around, sl st to
first Pop to join – 36 sts.
Fasten off.
Change to next yarn shade.
Rnd 3: 3ch (counts as 1tr), 2tr
in same ch-sp, 3tr in next ch-sp,
*(2tr, 1dtr, 2ch, 1dtr, 2tr) in next
ch-sp, 3tr in each of next two
ch-sps; rep from * twice more,
(2tr, 1dtr, 2ch, 1dtr, 2tr) in next
ch-sp, join with sl st to third of
beg 3ch.
Fasten off, leaving a 20cm/8in
tail for sewing up later.
SUNBURST SQUARE
Make seven in different
colour combinations
Using first yarn shade, make
4ch, join with sl st to make
a ring.
Rnd 1: 3ch (counts as 1tr), 11tr
in ring, join with sl st to third
of beg 3ch – 12 sts.
Fasten off.
Join next yarn shade in any tr.
Rnd 2: 2ch (does not count as
st), (1Puff (see Special Stitches),
1ch) in each st around, sl st to
beg 2ch.
Fasten off.
Join next yarn shade in any ch-sp.
Rnd 3: 2ch (does not count as
st), (1Cl (see Special Stitches),
2ch) in each ch-sp around, sl st
to beg 2ch.
Fasten off.
Join yarn A in any 2ch-sp.
Rnd 4: 3ch (counts as 1tr), (2tr,
2ch, 3tr) in same ch-sp, 1ch,
(3tr, 1ch) in each of next two
2ch-sps, *(3tr, 2ch, 3tr) in next
corner 2ch-sp, 1ch, (3tr, 1ch) in
each of next two 2ch-sps; rep
from * twice more, sl st to third
of beg 3ch.
Rnd 5: Sl st in each of next
2tr into corner ch-sp, (3ch, 2tr,
2ch, 3tr) in corner 2ch-sp, 1ch,
(3tr, 1ch) in each of next three
2ch-sps, *(3tr, 2ch, 3tr) in next
corner 2ch-sp, 1ch, (3tr, 1ch) in
each of next three 2ch-sps; rep
from * twice more, sl st to third
of beg 3ch.
Rnd 6: Sl st in each of next
2tr into corner ch-sp, (3ch, 2tr,
2ch, 3tr) in corner 2ch-sp, 1ch,
(3tr, 1ch) in each of next four
2ch-sps, *(3tr, 2ch, 3tr) in next
corner 2ch-sp, 1ch, (3tr, 1ch) in
each of next four 2ch-sps; rep
from * twice more, sl st to third
of beg 3ch.
Fasten off leaving a 20cm/8in
tail for sewing up.
PUFF STRIPE SECTION
Make seven in different
colour combinations
Make 14ch.
PAT T E R N I N ST R U C T I O N S
SUNBURST SQUARE
SOLID GRANNY SQUARE
3
2
6
5
1
3
2
4
1
ch
dc
tr
CORNER GRANNY SQUARE
CORNER GRANNY SQUARE
POPCORN FLOWER SQUARE
POPCORN FLOWER SQUARE
dtr
3
4
2
Cl
1
2
Pop
1
Puff
sl st
3
Row 1: 1Puff in fourth ch
from hook, (1ch, miss 1 ch,
1Puff in next ch) four times,
1ch, 1tr in next ch, turn.
Drop yarn, do not fasten off.
Join in next yarn shade.
Row 2: 3ch, (1Puff in next
ch-sp, 1ch, miss 1Puff) five
times, 1tr in third of 4ch at
beg of Row 1, turn.
Drop yarn, do not fasten off.
Join in next yarn shade.
Row 3: Rep Row 2.
Row 4: Pick up yarn from end
of Row 1, rep Row 2.
Row 5: Pick up yarn from end
of Row 2, rep Row 2.
Row 6: Pick up yarn from end
of Row 3, rep Row 2.
Rep Rows 4–6 five times
more.
Fasten off and weave in ends.
SOLID GRANNY
SQUARE
Make seven in different
yarn shades
Make 4ch, join with sl st to
make a ring.
Rnd 1: 3ch (counts as 1tr
throughout), 2tr in ring, 2ch,
(3tr, 2ch) three times, sl st to
top of beg 3ch.
Rnd 2: 3ch, 1tr in each of next
2tr, *(2tr, 2ch, 2tr) in ch-sp,
3tr; rep from * twice more,
(2tr, 2ch, 2tr) in next ch-sp,
sl st to top of beg 3ch.
Rnd 3: 3ch, 1tr in each of next
4tr, *(2tr, 2ch, 2tr) in ch-sp,
7tr; rep from * twice more,
(2tr, 2ch, 2tr) in next ch-sp,
2tr, sl st to top of beg 3ch.
Fasten off leaving a long tail
for sewing up.
CORNER GRANNY
SQUARE
Make seven in different
yarn shade combinations
Make 4ch, join with sl st to
make a ring.
Rnd 1: 3ch (counts as 1tr
throughout), 2tr in ring, 2ch,
(3tr, 2ch) three times, sl st to
top of beg 3ch, turn.
Rnd 2: 3ch, (1tr, 1ch) in ch-sp,
miss 3tr, (3tr, 2ch, 3tr, 1ch) in
next 2ch-sp, miss 3 tr, 2tr in
next 2ch-sp, turn.
Rnd 3: 4ch, miss 1tr, (3tr, 1ch)
in next ch-sp, (3tr, 2ch, 3tr,
1ch) in corner 2ch-sp, (3tr, 1ch)
in next ch-sp, miss 3tr, 1tr in
next 2ch-sp, 1tr in top of 3ch
changing to next yarn shade
on last pull through, turn.
Fasten off first yarn shade.
Rnd 4: 3ch, miss 1tr, (3tr, 1ch)
in each of next two ch-sps,
(3tr, 2ch, 3tr) in corner 2ch-sp,
(1ch, 3tr) in each of next
two ch-sps, 1ch, 1tr in top
of 3ch.
Fasten off leaving long tail
for sewing up.
www.insidecrochet.co.uk 67
➻
MAKE IT
PANEL
Puff
Flower
Square
Puff
Flower
Square
Puff
Stripe
Row of 38tr
Puff
Flower
Square
Corner
Granny
Square
Solid
Granny
Square
Sunburst
Flower
Square
MAKING UP
Using diagram as a guide join
into seven large panels as folls:
Stitch three Puff Flower Squares
together, then stitch to other
side of Puff Stripe.
Join one Solid Granny Square
to one Corner Granny Square
using the oversew method
and the tails of the yarn from
each square.
Make another six panels the
same.
Oversew this rectangle to
one edge of a Sunburst
Flower Square.
EDGING
Join yarn A in corner space of
one long edge.
Edging Rnd: 3ch, (1tr, 2ch,
2tr) in same ch-sp, 360tr evenly
across long edge, (2tr, 2ch, 2tr)
in corner ch-sp, 36tr evenly
along short edge, (2tr, 2ch, 2tr)
in corner ch-sp, 360tr evenly
along long edge, (2tr, 2ch, 2tr)
in corner ch-sp, 36tr across to
end, sl st to beg 3ch.
Fasten off.
Join yarn A to either one
corner of Sunburst Square or
the Corner Granny Square end
(alternating how panels are
placed for a natural, organic
look), work 38tr evenly along
top of this new piece. Cut yarn
leaving a long tail.
Place Puff Stripe horizontally
along this new tr edge,
oversew together.
68 Inside Crochet
Now join all seven panels
together end to end.
FINISHING
Weave in all ends.
END
*Covermount gifts not available with digital versions
D igita l s u bs crip tio n s s ta rt fro m a s
little a s £ 19 .9 9 fo r s ix m o n th s
➻
MAKE IT
MATERIALS
● Caron Simply Soft,
100% acrylic,
170g/288m/315yds
Yarn A: Soft Pink 39719
x 1 (1, 1, 2, 2, 2) ball(s)
Yarn B: Soft Blue 97003
x 3 (4, 4, 4, 5, 5) balls
Yarn C: Gold 39782 x 1 ball
Yarn D: Persimmon 39754
x 1 (1, 2, 2, 2, 2) ball(s)
● 4.5mm & 5mm hooks
● Stitch markers
● Yarn needle
TENSION
Work 13htr and 10 rows to
measure 10 x 10cm/4 x 4in
using 5mm hook, or size
required to obtain tension.
Landscape
Swe ater
PATTERN NOTES
When working from chart use
intarsia technique. Wind small
balls of the colours to be used,
one for each separate area of
colour in the design.
When changing yarn colours,
work htr to last 3 loops on
hook of first colour. Draw new
colour through last 3 loops
and proceed in new colour,
leaving old colour at WS
of work.
2ch at beg of rows counts as
htr throughout.
FRONT
**RIBBING
With yarn A and
4.5mm hook, 11ch.
Row 1: (RS) 1dc in second ch
from hook, 1dc in each ch to
end, turn – 10dc.
Row 2: 1ch, 1dc blo in each st
to end of row, turn.
Rep last row until Ribbing,
when slightly stretched,
measures 56 (61, 66, 71, 76,
81.5)cm/22 (24, 26, 28, 30,
32)in, ending on a RS row.
START
BY YARNSPIRATIONS DESIGN TEAM
This stunning intarsia jumper is just the thing
to keep you warm through springtime.
Rotate to work across side edge
of ribbing.
Row 1: (RS) 1ch, work 72 (78,
86, 92, 98, 104)dc evenly
across side edge of Ribbing,
do not turn.
Fasten off.**
70 Inside Crochet
With RS facing and 5mm hook,
join yarn B with sl st to first dc.
PLACE CHART
Row 1: (RS) 2ch (counts as
1htr), work Row 1 of Chart in
htr, turn.
Cont to work Chart in htr until
40 rows of Chart are complete,
reading RS rows from right
to left and WS rows from left
to right. Break all colours but
yarn B.
With yarn B only, cont even in
htr until work from lower edge
(including ribbing) measures
49.5 (49.5, 54.5, 54.5, 58.5,
58.5)cm/19½ (19½, 21½, 21½,
23, 23)in, ending on a WS row.
SHAPE LEFT NECK
Row 1: (RS) 2ch, 23 (26, 29, 32,
34, 37)htr, htr2tog, 1htr, turn,
leaving rem sts unworked
– 26 (29, 32, 35, 37, 40) sts.
Row 2: 2ch, htr2tog, htr to
end, turn.
Row 3: 2ch, htr to last 3 sts,
htr2tog, 1htr, turn.
Row 4: 2ch, htr2tog, htr to
end, turn – 23 (26, 29, 32, 34,
37) sts.
Rows 5 & 6: 2ch, htr to end,
turn.
Fasten off.
SHAPE RIGHT NECK
With RS facing, miss next
18 (18, 20, 20, 22, 22)
unworked sts of Front.
Join yarn B with sl st to next htr.
Row 1: (RS) 2ch, htr2tog, htr to
end, turn – 26 (29, 32, 35, 37,
40) sts.
Row 2: 2ch, htr to last 3 sts,
htr2tog, 1htr, turn.
Row 3: 2ch, htr2tog, htr to
end, turn.
Row 4: As Row 2 – 23 (26, 29,
32, 34, 37) sts.
Rows 5 & 6: 2ch, htr to end,
turn.
Fasten off.
BACK
Work from ** to ** as given
for Front.
With RS facing and 5mm hook,
Start here
XL 2/3 4/5
XL XL
join yarn B with sl st to first dc.
Row 1: (RS) 2ch, htr to end,
turn.
Rep last row until Back from
lower edge (including ribbing)
measures same length as Front
to shoulder, ending on a
WS row.
Fasten off.
S
M
L
39
37
35
33
31
29
27
25
23
21
19
17
15
13
11
9
7
5
3
1
PAT T E R N I N ST R U C T I O N S
=A
=B
=C
=D
Key
SLEEVES
RIBBING
With yarn D and 4.5mm hook,
11ch.
Row 1: (RS) 1dc in second ch
from hook, 1dc in each ch to
end, turn – 10dc.
Row 2: 1ch, 1dc blo in each st
to end, turn.
Rep last row until Ribbing when
slightly stretched measures
23 (23, 25.5, 25.5, 28, 28)cm/
9 (9, 10, 10, 11, 11)in, ending
on a RS row.
Rotate to work across side edge
of ribbing.
Row 1: (RS) 1ch, work 30 (30,
34, 34, 36, 36)dc evenly across
side edge of Ribbing.
Break yarn D.
Join yarn B, turn.
Sizes XS/S & M only
Next 3 Rows: 2ch, htr to end,
turn.
Next Row: (Inc row) (RS)
2ch, 2htr in next st, htr to last
2 sts, 2htr in next st, 1htr, turn
– 2 sts inc’d.
Rep last four rows five times
more – 52 sts.
40
38
36
34
32
30
28
26
24
22
20
18
16
14
12
10
8
6
4
2
4/5 2/3 XL
XL XL
L
M
S
Change to 5mm hook.
Row 2: (WS) With yarn B, 2ch,
htr to end, turn.
Row 3: (Inc) 2ch, 2htr in next
st, htr to last 2 sts, 2 htr in next
st, 1htr, turn – 2 sts inc’d.
Rep last two rows 4 (4, 12, 12,
12, 12) times more – 40 (40, 60,
60, 62, 62) sts.
All sizes
52 (52, 60, 60, 62, 62) sts.
Next Row: 2ch, htr to end,
turn.
Rep last row until Sleeve from
lower edge (including Ribbing)
www.insidecrochet.co.uk 71
➻
MAKE IT
measures 47 (44.5, 43, 40.5,
39.5, 38)cm/18½ (17½, 17, 16,
15½, 15)in, ending on a
WS row.
Fasten off.
FINISHING
Sew shoulder seams.
NECK EDGING
With RS facing and 4.5mm
hook, join yarn B with sl st to
neck edge at right shoulder
seam.
Rnd 1: 1ch, work dc evenly
around neck edge, join with
sl st to first dc.
Fasten off.
t
o
Front and Back
11
11
12
12
13
13
3
40.5 (40.5, 45.5, 45.5, 48, 48)cm
16
16 -18,
18 18,
- 1819,
- 1919)in
- 19
16-(16,
56 -(61,
81)cm
22
24 -66,
2671,
- 2876,
- 30
- 32
ACTUAL CHEST
LENGTH
72 Inside Crochet
15½
14½
14
13
12½
12
3
Place markers on each side
edge of Front and Back
20.5 (20.5, 23, 23, 24, 24)cm/
8 (8, 9, 9, 9½, 9½)in down
from shoulder seams.
Sew in Sleeves between
markers.
END
Sew side and
sleeve seams.
23 (23,
28, 11
28)cm
9 - 925.5,
- 10-25.5,
10- 119 (9, 10, 10, 11, 11)in
22 (24, 26, 28, 30, 32)in
TO FIT CHEST
Sleeve
18½
17½
17
16
15½
15
39.5 (37, 35.5, 33, 32, 30.5)cm 7.5cm
15½ (14½, 14, 13, 12½, 12)in 3in
.
c
22
22
24
24
25½
25½
8
8
9
9
9½
9½
47 (44.5, 43, 40.5, 39.5, 38)cm
18½ (17½, 17, 16, 15½, 15)in
.
56 (56, 61, 61, 65, 65)cm
22 (22, 24, 24, 25½, 25½)in
(RS). Ch 2.
hdc in each
.
7 - 8 - 8¾
8 - 8 - 8½
9¾ - 10½ - 11½ 8½ - 9 - 9
NECKBAND
With yarn A and 4.5mm
hook, 8ch.
Row 1: (RS) 1dc in second ch
from hook, 1dc in each ch to
end, turn – 7dc.
Row 2: 1ch, dc blo to end,
turn.
Rep last row until Neckband
measures length to fit around
neck edge, when slightly
stretched.
Sew long edge of Neckband
to neck edging, beg at right
shoulder seam.
Sew ends of Neckband tog.
XS/S
M
L
XL
2/3XL
4/5XL
71–86.5
91.5–96.5
101.5–106.5
112–117
122–137
142–157.5
cm
28–34
36–38
40–42
44–46
48–54
56–62
in
112
122
132
142
152.5
162.5
cm
44
48
52
56
60
64
in
56
56
61
61
65
65
cm
22
22
24
24
25½
25½
in
back issues
LOOKING FOR THAT PERFECT PROJECT?
Search www.insidecrochet.co.uk for all our past designs and then
call 01202 586848 or visit www.selectmagazines.co.uk to buy the issue!
Issue
141
PLUS
Sweet
soft toy
pattern
collection
Issue
BIGGEST ISSUE! 116 PAGES OF FRESH, ON-TREND IDEAS
135
FLORAL MANDALA!
INSPIRING PROJECTS
for Creative Crocheters
insidecrocheTT .co.uk
insidecroche
LEARN NEW
SKILLS!
25
CONTEMPORARY
PATTERNS
MANDALA GARLAND
Pretty doily motifs
Mindful makes
MASTERCLASS
TUTORIAL
Soothing stitches and
beautiful designs
to cherish
SEA TILES BLANKET
Brioche crochet squares
PLUS
Stitch markers
& extra
pattern
EASY TO
HOOK
SERENE MIRROR
Quick, thrifty homewares
COTTON &
LINEN YARNS
COMFY CUSHIONS
Stunning on-trend designs
XXXXX
TASSELS & BOBBLES!
STUNNING
TEXTURED SHAWL
CUTE BEADED BAG
Handmade summer style
£7.99 ISSUE 135
EVERY ISSUE IS
ALSO AVAILABLE AS A
HANDY DIGITAL DOWNLOAD
EMBROIDERED JUMPER ❤ BLOSSOM WALLHANGING ❤ ZEN CAT
That’s on average more
than 20 stunning patterns
for at least £2 less than
the print version!
Issue
128
Visit www.pocketmags.com
to find out more
PLUS
Faux leather
tags for your
crochet
➻
MAKE IT
MATERIALS
● DMC Stranded Cotton Thread,
100% cotton, 8m/8¾yds
Yarn A: 368 x 1 skein
Yarn B: 973 x 1 skein
Yarn C: 996 x 1 skein
Yarn D: 603 x 1 skein
Yarn E: 310 x 1 skein
Yarn F: 340 x 1 skein
● 2.5mm hook
● Pair of trainers
● Yarn needle
● Scissors
YARN ALTERNATIVES
You can use any embroidery
cotton to achieve a similar effect.
TENSION
Exact tension is not essential
for this project.
DESIGNER BIOGRAPHY
Helen is a crochet designer and
crafter from the UK. She loves
experimenting with colour and
texture to create playful and
exciting designs. You can find her
on Instagram @made.by.hem.
Step Into Spring
Trainers
BY HELEN ANDERSON
Take the opportunity to upcycle a pair of existing pumps or
treat yourself to a new pair – either way this is a great way to
put your own unique stamp on your shoes!
EMBROIDERY STITCHES
Chain stitch (used to create
flower stems): Bring needle up
onto RS, *take needle down into
fabric in the same hole as the
needle was brought up, leave a
small loop on RS of fabric, bring
needle back up inside loop and
pull gently to tighten; rep from
* to desired length. To finish
the chain, bring the needle back
down through the fabric over
the top of the last loop created.
French Knot (used to create
mini flower clusters): Bring
working thread to RS. Hold thread
2.5–5cm/1–2in from where it
exited the fabric to create tension.
Place needle against non-working
thread, holding needle hand still
wrap thread around needle twice.
Insert needle next to original exit
point continuing to hold working
thread to create tension. Pull
needle through and release.
PATTERN NOTES
Grass, flower stems (chain st) and
mini flower clusters (French
74 Inside Crochet
PAT T E R N I N ST R U C T I O N S
FIG 1
FIG 2
FIG 3
FIG 4
FIG 5
FIG 6
FIG 7
FIG 8
FIG 9
FIG 10
FIG 11
FIG 12
knots) are worked directly onto
the shoe. Each large flower is
worked separately and attached
on completion.
The pattern area is defined as
the outer section of each shoe,
starting at the centre back and
working around the outside of
the shoe to where the laces begin
(approximately 12cm/4¾in).
BLADES OF
GRASS & FLOWER
STEMS
Work the following in yarn A.
Step 1: Working from the centre
back of the shoe, around the
START
base of the pattern area, make
four small vertical sts (0.5–1cm/
¼–½in tall) to create the blades
of grass. (Figs 1 & 2)
Step 2: Using chain st (see
Embroidery Stitches) and
working from the base of the
pattern area upwards, work
one 2.5cm/1in tall flower stem
approximately 3cm/1⅛in from
the centre back. (Figs 3–12)
Step 3: Continue working
blades of grass around the
pattern area interspersing a
further three flower stems, each
approximately 1–2.5cm/½–1in
tall. Fasten off. (Fig 13)
FIG 13
www.insidecrochet.co.uk 75
➻
MAKE IT
FIG 14
FIG 15
FIG 16
FIG 17
FIG 18
FIG 19
MINI FLOWER CLUSTERS
Three separate mini flower
head clusters will be created
at the tips of the smallest
flower stem and the two tallest
grass blades. Pick a different
colour flower head for each
stem/blade.
Step 1: With yarn B, work two
or three French knots (see
Embroidery Stitches) in a cluster
at the tip of the stem or blade.
Rep Step 1 with yarns D & F.
(Figs 14–20)
FIG 20
CIRCULAR FLOWER
Step 1: With yarn B, 10ch
leaving a 20cm/8in yarn tail.
Rnd 1: (1dc, 1tr) in second ch
from hook, (1dc, 1tr) in each
FIG 21
76 Inside Crochet
FIG 22
FIG 23
rem ch – 9dc, 9tr. Fasten off.
Step 2: Allow the flower to
curl around. Using the yarn
tail left at the beginning, sew
through the crochet layers at
the base of the flower head
to secure.
Step 3: Cut a 15cm/6in piece
of yarn E and tie a double
knot in the centre. Fold in half,
sew through the centre of the
flower and secure at the back.
Step 4: Attach the circular
flower using starting yarn tail.
Starting at the flower stem,
sew through the shoe
working around the outer
petals to secure.
Rep Steps 1–4 making flowers
in yarns C & D. (Figs 21–28)
PAT T E R N I N ST R U C T I O N S
FIG 24
FIG 25
FIG 26
FIG 27
FIG 28
FIG 29
FIG 30
FIG 31
FIG 32
TALL FLOWER
Step 1: With yarn F, 10ch
leaving a 20cm/8in yarn tail.
Row 1: 3dc in second chain
from hook, 3dc in each rem ch
– 27dc. Fasten off.
Step 2: Attach the tall flower
using the starting yarn tail. Sew
through the shoe to attach the
base of the flower to the top
of the stem, continue sewing
up the flower placing stitches
between spirals. (Figs 29–32)
FINISHING
Ensure that all yarns are
securely fastened off,
then pop your shoes
END
straight on and
enjoy them!
www.insidecrochet.co.uk 77
➻
MAKE IT
MATERIALS
● West Yorkshire Spinners
Signature 4ply,
75% wool/25% nylon,
100g/400m/437yds
Yarn A: Milk Bottle 1848
x 2 balls
Yarn B: Honeysuckle 1601
x 1 ball
● 3mm hook
● Two stitch markers
● Yarn needle
● Shirring elastic (optional)
YARN ALTERNATIVES
You can use any sock weight
4ply yarn to achieve a
similar effect.
TENSION
Work 23tr and 13 rounds
to measure 10 x 10cm/
4 x 4in using 3mm hook, or
size required to obtain tension.
MEASUREMENTS
Socks are designed for
approximate shoe sizes 4–5
(6–7, 8–9), and can be made to
a custom fit with options given
for foot length and calf width.
Ball of foot circumference:
18cm/7in before stretch.
Foot circumference:
19cm/7½in before stretch.
Calf: 24cm/9½in before stretch
(customisable).
Knee: 27cm/10½in before
stretch (customisable).
Cable d Long So cks
BY SIMONE FRANCIS
Hook theses adorable, cosy socks with
an intricate cable and bobble pattern.
ADD TO THE STASH
Buy this wool-blend yarn from
www.wyspinners.com
78 Inside Crochet
DESIGNER BIOGRAPHY
Simone enjoys the whole
process of design and pattern
writing. Find more at www.
simonefrancis.etsy.com or
www.ravelry.com/designers/
simonefrancis.
SPECIAL STITCHES
Bobble (Front Post 4 Double
Treble Bobble): *Yrh twice,
insert hook around the post of
the st from left to right and pull
up a loop, [yrh, pull through
2 loops] twice, leave remaining
loop on hoop; rep from *
three more times, yrh, pull
through 5 loops on hook
– 1 Bobble made.
PAT T E R N I N ST R U C T I O N S
Crossed tr: Crossed tr sts are
worked to pull cables across and
fill in st gaps, they are referred
to as crossed tr sts and not just
grouped in with normal tr sts as
they are not always completely
visible when crocheting the
main cables. When the pattern
references a crossed tr, it is to
ensure that the st is worked into
and not missed which will make
the pattern more fluid and less
confusing.
Raised double treble front
(rdtrf): Yrh twice, insert hook
from front to back to front
around upright post of next
stitch, yrh and pull through to
front of st (4 loops on hook),
(yrh and pull through 2 loops)
three times.
Raised double treble back
(rdtrb): Yrh twice, insert hook
from back to front to back
around upright post of next
stitch, yrh and pull through to
front of st (4 loops on hook),
(yrh and pull through 2 loops)
three times.
Twisted Cable to Left
(1twLeft): Miss one raised st,
2rdtrf, 1rdtrf around missed st.
Twisted Cable to Right
(1twRight): Miss two raised
sts, 1rdtrf around next st,
reach behind raised st just
worked and at front of work,
make 1rdtrf around first missed
st, 1rdtrf around second
missed st.
PATTERN NOTES
The socks are worked from the
toe up, increases are made to
ensure a cosy fit across the top
of the foot.
An afterthought heel is worked
to keep the cable pattern
uninterrupted and continuous.
Calf shaping is worked at each
side of the cable to ensure a
uniform look and good fit for
any size calf.
Chart is always worked from
right to left.
START
SOCK
Make two
TOE
With yarn B, 8ch.
Rnd 1: 2dc in second ch from
hook (mark first of these 2 dc
with SM to mark beginning of
rnd), 5dc, 3dc in last ch, (mark
second of these 3 dc with SM),
turn and work along opposite
side of ch, 5dc, 1dc in base of
first st in rnd – 16 sts.
Continue working in a spiral
as follows:
Rnd 2: 2dc in first st, move SM
up into first st, dc to next SM
st, 3dc in SM st, move SM up
to second of these 3 dc, dc to
end, work 1dc into base of first
st in rnd – 20 sts.
Continue to work as Rnd 2,
increasing 4 sts in each rnd
until you have 40 sts.
Remove second SM if required.
Work six rnds without shaping,
then sl st in first st in rnd and
change to yarn A.
FOOT
The Cable Pattern is worked
over 21 sts, the sole is worked
over 19 sts.
Foundation Rnd 1: 3ch, 1tr in
each st around, sl st in first st in
rnd – 40 sts.
www.insidecrochet.co.uk 79
➻
MAKE IT
Foundation Rnd 2: 1ch (not
counted as st), 3rdtrf, 2tr,
3rdtrf, 2tr, Bobble (see Special
Stitches) around next st, 2tr,
3rdtrf, 2tr, 3rdtrf, 19tr, sl st in
first st in rnd.
Rnd 1: 1twLeft (see Special
Stitches), 2tr, miss 3 raised
sts, 1tr in next st (this st will
be referred to as a crossed
tr (see Special Stitches) in
subsequent rnds), rdtrf (see
Special Stitches) around the
missed 3 raised sts, 1tr, rdtrf
around Bobble, 1tr in next st,
miss 1tr (this st will be referred
to as a crossed tr in subsequent
rnds), 3rdtrf, 1tr into missed st
at back work, 2tr, 1twRight
(see Special Stitches), 19tr, sl st
in first st in rnd.
Rnd 2: 1ch, 3rdtrf, 2tr, 1tr in
crossed st, miss 3 raised sts,
1tr in next st, rdtrf around
first 2 missed sts, miss 3 sts,
80 Inside Crochet
rdtrf around next raised st
from left group, rdtrb (see
Special Stitches) around centre
raised st, 1rdtrf around missed
raised st on right group, rdtrf
around next 2 raised sts from
left group, 1tr in missed tr st
at back of work, 1tr in next
crossed st, 2tr, 3rdtrf, 19tr, sl st
in first st in rnd.
Rnd 3: 1twLeft, 2tr, Bobble,
1tr in crossed st, 2rdtrf, 1rdtrf
around crossed dtr st under
work, 1tr in next st, 3rdtrf, 1tr
in next crossed st, Bobble, 2tr,
1twRight, 19tr, sl st in first st
in rnd.
Rnd 4: 1ch, 3rdtrf, 2tr, rdtrf
around Bobble, miss 1tr, 3rdtrf,
at back of work tr into missed
st, 1tr in next st, miss 3 raised
sts, 1tr in next st, rdtrf around
3 missed sts, rdtrf around
Bobble, 2tr, 3rdtrf, 19 tr, sl st
in first st in rnd.
Rnd 5: 1twLeft, 2tr, miss next
st, 3rdtrf, at back of work 1tr
in missed st, 1tr in crossed st,
Bobble, 1tr in next crossed st,
miss 3 raised sts, 1tr in next
st, 1rdtrf around in each of
3 missed sts, 2tr, 1twRight,
19tr, sl st in first st in rnd.
Rnd 6: 1ch, 3rdtrf, 2tr, miss 3
raised sts, 1tr in next crossed
st, 1rdtrf around 3 missed
raised sts, 1tr, 1rdtrf around
Bobble, 1tr in next st, miss
crossed tr, 3rdtrf, at back of
work tr in missed st, 2tr, 3rdtrf,
19tr, sl st in first st in rnd.
Rnd 7: 1twLeft, 2tr, 1tr in
crossed st, miss 3 raised sts,
1tr, rdtrf around first 2 missed
sts, miss next raised st, miss
3 sts, rdtrf around next raised
st from left group, rdtrb around
centre raised st, rdtrf around
missed raised st on right group,
rdtrf around next 2 raised sts
from left group, at back of
work make 1tr into missed tr
st at back of work, 1tr in next
crossed st, 2tr, 1twRight, 19tr,
sl st in first st in rnd.
Rnd 8: 1ch, 3rdtrf, 2tr, Bobble,
1tr in crossed st, 2rdtrf, 1rdtrf
around crossed dtr st, 1tr in
next st, 3rdtrf, 1tr in crossed st,
Bobble, 2tr, 3rdtrf, 19tr, sl st in
first st in rnd.
Rnd 9: 1twLeft, 2tr, 1rdtrf
around Bobble, miss 1tr,
3rdtrf, at back of work 1tr into
missed st, 1tr, miss 3 raised
sts, 1tr, 1rdtrf around in each
of 3 missed sts, 1rdtrf around
Bobble, 2tr, 1twRight, 19tr,
sl st in first st in rnd.
Rnd 10: 1ch, 3rdtrf, 2tr, miss
next st, 3rdtrf, at back of work
1tr in missed st, 1tr in crossed
st, Bobble, 1tr in crossed st,
miss 3 raised sts, 1tr, rdtrf
around in each of 3 missed sts,
PAT T E R N I N ST R U C T I O N S
2tr, 3rdtrf, 19tr, sl st in first st
in rnd.
Rnds 1–10 form Cable Pattern.
Continue following Rnds 1–10
across Cable pattern and tr
across stitches of sole.
Rnd 10
Rnd 9
Rnd 8
Rnd 11: Repeat Rnd 1.
Rnd 12: (Inc) 1ch, 3rdtrf, 2tr,
tr in crossed st, miss 3 raised
sts, 1tr, rdtrf around first 2
missed sts, miss next raised st,
miss Bobble and following tr
st, 1rdtrf around next raised st
from left group, 1rdtrb around
Bobble, 1rdtrf around missed
raised st on right group, rdtrf
into next 2 raised sts from left
group, at back of work 1tr into
missed tr st after Bobble, 1tr
in crossed st, 2tr, 3rdtrf, 3tr in
next tr, 17tr, 3tr in last st, sl st
in first st in rnd – 44 sts.
Rnd 13: As Rnd 3, working
23 tr for sole.
Rnd 14: 1ch, 3rdtrf, 2tr, rdtrf
around Bobble, miss 1tr, 3rdtrf,
at back of work 1tr into missed
st, 1tr, miss 3 raised sts, 1tr,
rdtrf around missed sts, 1rdtrf
around Bobble, 2tr, 3rdtrf, 3tr in
next tr, 1tr to last tr, 3tr in last
st, sl st in first st in rnd – 48 sts.
Now take a note of which
number Pattern Rnd you are on.
Rnd 7
Rnd 6
Rnd 5
Rnd 4
Rnd 3
Rnd 2
Rnd 1
Foundation 2
Foundation 1
Shoe size 6–7 only
Work one round as Cable
Pattern Rnd 5 with 23tr
for sole.
Shoe size 8–9 only
Work two rounds as Cable
Pattern Rnds 5 & 6 with 23tr
for sole.
All sizes
HEEL PLACEMENT
Rnd 1: Work in correct Pattern
Rnd across Cable sts, 2tr, miss
23 sts, 23ch, 1tr in each of
last 2 tr on sole, sl st in first
st in rnd.
Rnd 2: Work in correct Pattern
Rnd across Cable sts, 1tr in
each of next 2 sts, 1tr into each
of 23 ch, 1tr in each of next
2 sts, sl st in first st in rnd.
Work 14 more rnds in pattern,
refers to crossed sts at back of work
trying sock on or until calf
shaping is required.
CALF SHAPING
Work across Cable pattern,
3tr in next st, 1tr to last tr, 3tr
in last tr, sl st in first st in rnd
– 21 Cable sts, 31tr.
Work four rounds in pattern.
*Work across Cable pattern,
3tr in next st, tr to last tr, 3tr
in last tr, sl st in first st in rnd
– 21 Cable sts, 35tr.
Work one round in pattern.
Rep from * three more times
– 21 Cable sts, 47tr.
Work 16 more rnds in pattern,
or until sock is 2.5cm/1in less
than required length.
RIB
Rnd 1: 1ch (does not count as
st), [1rtrf, 1rtrb] around, sl st in
top first st in rnd – 68 sts.
Rep Rnd 1 four times.
Fasten off.
before SM, dc2tog, dc in next
3 sts] twice – 48 sts.
Rnd 3: 1dc in each st around.
Rep Rnds 2 & 3 until 20 sts
remain.
Fasten off.
AFTERTHOUGHT HEEL
Join yarn B to first missed tr st
on sole with a sl st.
Rnd 1: 1ch, 1dc in same st,
22dc, 1dc in corner, 1dc in row
end (pm), 1dc in corner, dc into
23 ch sts, 1dc in corner, 1dc
in row end (pm), 1dc in corner
– 52 sts.
Continue working in a spiral,
moving SM up as you work.
Rnd 2: [Dc2tog, dc to 3 sts
FINISHING
Turn sock inside out and sew
heel seam across width of heel.
Finish all ends neatly.
Block work, pin out or place on
sock blocker and leave
flat to dry.
Shirring elastic can be sewn/
woven into the wrong side of
the Rib in each sock
END
for more elasticity
if desired.
www.insidecrochet.co.uk 81
➻
MAKE IT
82 Inside Crochet
PAT T E R N I N ST R U C T I O N S
MATERIALS
● Scheepjes Softfun Minis
Colour Pack in Pastel,
12 x 20g balls,
60% cotton/40% acrylic,
20g/56m/61yds
Yarn A: Banana 2496 x 1 ball
Yarn B: Glacial Mist 2646
x 1 ball
Yarn C: Mint 2640 x 1 ball
Yarn D: Lavender 2658
x 1 ball
Yarn E: Orchid 2657 x 1 ball
Yarn F: Light Rose 2513
x 1 ball
Yarn G: Rose 2514 x 1 ball
Yarn H: Peach 2466 x 1 ball
Yarn I: Starfish 2620 x 1 ball
Yarn J: Green Tea 2639
x 1 ball
Yarn K: Canary 2518 x 1 ball
● 3.75mm hook
YARN ALTERNATIVES
Use any DK weight yarn to
achieve a similar effect.
TENSION
Exact tension is not critical for
this design.
MEASUREMENTS
Scarf can be made to desired
width and length.
DESIGNER BIOGRAPHY
Helda is a passionate and
creative crochet designer who
can be found on Instagram at
@heldap123.
Stashbu s ting
Scarf
BY HELDA PANAGARY
A pattern to help use up your stash! Begin one long length
of crochet, then join as many strips as you wish.
PATTERN NOTES
Sample used colour sequence as
given above, or create your own
sequence using your stash yarn.
This block repeat pattern is
simple but can take a bit of
practice to get right when
working the row join. Use
the chart as a guide.
SCARF
Row 1: Step 1:
With yarn A, 6ch, 1tr
in third ch from hook and in
each of next 2ch, 3ch, sl st to
last ch (one block made).
Step 2: 3ch, turn, now working
START
www.insidecrochet.co.uk 83
MAKE IT
Bl
oc
k
4
St
Bl ep
oc 1
k
1
S
Bl t ep
oc 2
k
2
Ro
w
1
Ro
w
2
S
Bl t ep
oc 3
k
3
Bl
oc
k
5
➻
ch
tr
sl st
Row 1
Row 2
Remove hook and
Remove hook and
insert through 3ch-sp
insert through
of previous row, pick
3ch-sp of previous
up working loop and
row, pick up
continue
working loop and
continue
into side of previous 3ch work
2tr, 3ch, sl st in same 3ch-sp.
*Step 3: 3ch, turn, working
under previous 3ch work 2tr,
3ch, sl st in same 3ch-sp; rep
from * until there are 131 blocks
in total – there should be approx
3g of yarn left to make tassel.
Fasten off.
Row 2: With yarn B, 6ch, 1tr
in third ch from hook and in
each of next 2ch, 3ch, sl st to
last ch (one block made), 3ch,
remove hook and place through
3ch-sp of Step 3 of previous
row (see photo below left),
pick up working loop and work
2tr under previous 3ch of first
block of Row 2, 3ch, sl st in
same 3ch-sp, *3ch, turn, 2tr
under last 3ch-sp, 3ch, sl st in
same 3ch-sp, 3ch, turn, remove
hook, insert hook through
next 3ch-sp of next block on
previous row, pick up working
loop and work 2tr under
previous 3ch of Row 2, 3ch,
sl st in same 3ch-sp; rep from *
along until all blocks are joined.
Changing yarn shade on each
row, repeat Row 2 until scarf is
desired width.
FINISHING
Weave in loose ends. Make
tassels using leftover
END
yarn and join to ends
of scarf as desired.
84 Inside Crochet
Marra Pouch
Handmade Limited Edition
Bags For Makers By Makers
YA R N F O R P R O J E C T S Y O U ’ R E P R O U D O F
www.TheFibreCo.com/Marra-Collection
➻
MAKE IT
MATERIALS
● Rico Design Essentials
Cotton DK, 100% cotton,
50g/120m/131yds
Yarn A: Banana 63 x 1 ball
Yarn B: Dark Green 67
x 1 ball
Yarn C: Berry 15 x 1 ball
● 3.5mm hook
● Two pillowcases, 50 x 75cm/
20 x 30in
TENSION
Exact tension is not critical for
this design.
Sample edgings were worked
to following tensions.
Edging One: Work 7tr to
measure 3 x 2cm/1⅛ x ¾in
using 3.5mm hook.
Edging Two: Work 4htr to
measure 2 x 2cm/¾ x ¾in using
3.5mm hook.
MEASUREMENTS
Edgings are worked to fit edge
of pillowcases.
DESIGNER BIOGRAPHY
Millie is the designer behind
Ruby & Custard, creating
gorgeous items ranging from
quirky hats to fun bags and
vintage-style homewares.
She’s also the author of Ruby &
Custard’s Crochet. Follow her
on Instagram @milliemasterton.
SPECIAL STITCHES
Picot: 3ch, sl st in third ch
from hook.
Pillowcas e Edging
BY MILLIE MASTERTON
Add a personal touch to your favourite homewares
with this pretty edging.
ADD TO THE STASH
Buy this pure cotton yarn from
www.woolwarehouse.co.uk
PATTERN NOTES
The edgings are worked in rows
around the opening edge of the
pillowcase.
Mark up the opening edge of
both pillowcases with 1cm/
⅜in increments, 1cm/⅜in in
from the edge. This will be
your stitch guide for the
blanket stitch.
EDGING ONE
Using yarn A, work
blanket stitch along
the open side edge of the
pillowcase – 50 blanket sts, or
number to fit edge of case.
START
86 Inside Crochet
PAT T E R N I N ST R U C T I O N S
Row 1: Using yarn A, 1ch
(counts as 1dc), 2dc in same
first blanket stitch, 2dc in each
blanket st to last st, 3dc in last
blanket stitch – 102dc.
Fasten off and weave in ends.
Row 2: Rejoin yarn A in first dc
of Row 1, 3ch (counts as first tr),
miss 2 sts, 4tr in next st, miss
2 sts, 1sl st, [miss 2 sts, 5tr in
next st, miss 2 sts, 1sl st] across
to end – 17 scallops.
END
Fasten off and
weave in ends.
EDGING TWO
Using yarn B, work
blanket stitch along
the open side edge of the
pillowcase – 50 blanket sts,
or number to fit edge
of case.
Row 1: Using yarn B, 1ch
START
(counts as 1dc), 1dc in same
first blanket stitch, 2dc in each
blanket st to end – 100dc.
Fasten off and weave in ends.
Row 2: Rejoin yarn B in first
dc of Row 1, 4ch (counts as
1htr, 2ch), miss 2 sts, 1htr,
[2ch, miss 2 sts, 1htr] across
to end – 25x 2ch-sps.
Fasten off and weave in ends.
Row 3: Join yarn C in second of
4ch at start of Row 2, 1ch, (1htr
in same second st from hook,
1ch, 1htr, 1picot (see Special
Stitches), 1htr, 1ch, 1htr), miss
next st, sl st in next st, [(miss
next st, 1htr in next st, 1ch,
1htr, 1picot, 1htr, 1ch, 1htr),
miss next st, sl st in next st]
across to end.
END
Fasten off and
weave in ends.
www.insidecrochet.co.uk 87
➻
MAKE IT
MATERIALS
● Scheepjes Terrazzo Colour
Pack (60 x 10g balls),
70% wool/30% viscose,
10g/35m/38yds
Shade: Colour Pack x 1 pack
● Scheepjes Terrazzo,
70% wool/30% viscose,
50g/175m/191yds
Shade: Pergamena 745
x 5 balls
● 3.5mm hook
TENSION
Exact tension is not critical for
this design.
Work each blocked square
to measure approximately
19cm/7½in across at end of
Rnd 7 using 3.5mm hook, or
size required to obtain tension.
MEASUREMENTS
Finished blanket measures
approximately 120 x 196cm/
47¼ x 77¼in.
DESIGNER BIOGRAPHY
Helda is a passionate and
creative crochet designer who
can be found on Instagram at
@heldap123.
SPECIAL STITCHES
Standing treble (St tr): Start
with slip knot on hook, yrh,
hold on to both yarn ends to
stop the slip knot spinning
around the hook, insert hook
in stitch or space, yrh and pull
up a loop, (yrh, pull through
two loops) twice.
Terrazzo Blan ke t
BY HELDA PANAGARY
Every colour on the blanket is reminiscent of spices and
vegetation found in a sensuous spice market, from black salt
to turmeric, rose petals, lavender and verdant green leaves.
ADD TO THE STASH
Buy these colourful yarns from
www.woolwarehouse.co.uk
88 Inside Crochet
MOTIF
Make 60, one in
each yarn shade
from colour pack
With 3.5mm hook, 4ch, sl st to
first ch to form a ring.
Rnd 1: 7ch (counts as 1tr, 4ch),
(4tr, 4ch) three times in ring,
3tr, sl st to third of beg 7ch
to join.
Rnd 2: 3ch (counts as first tr
here and throughout), (3tr,
4ch, 4tr) in same corner 4ch-sp,
2ch, miss 4tr, *(4tr, 4ch, 4tr) in
corner 4ch-sp, 2ch, miss 4tr;
rep from * twice more, sl st to
START
PAT T E R N I N ST R U C T I O N S
ch
7
tr
6
tr3tog
5
tr4tog
4
sl st
3
joining point
2
1
Border
Round
top of beg 3ch to join.
Rnd 3: 3ch, 1tr in each of next
3tr, 2ch, (1tr, 4ch, 1tr) in corner
4ch-sp, *2ch, 4tr, 2ch, miss
2ch-sp, 4tr, 2ch (1tr, 4ch, 1tr) in
corner 4ch-sp; rep from * twice
more, 4tr, 2ch, sl st to top of
beg 3ch to join.
Rnd 4: 3ch, tr3tog (counts as
tr4tog), 4ch, (4tr, 4ch, 4tr) in
corner 4ch-sp, *[4ch, tr4tog]
twice, 4ch, (4tr, 4ch, 4tr) in
corner 4ch-sp; rep from * twice
more, 4ch, tr4tog, 1ch, work
1tr in top of beg tr3tog (thus
hook sits halfway along this
last “ch-sp”).
Rnd 5: 4ch (counts as 1tr,
1ch), 1tr under 1tr (to create
V-st), 4ch, miss tr4tog and next
4ch-sp, 4tr, 2ch, *(1tr, 4ch, 1tr)
in corner 4ch-sp, 2ch, 4tr, 4ch,
miss next 4ch-sp, (1tr, 1ch, 1tr)
in next 4ch-sp, 4ch, miss next
4ch-sp, 4tr, 2ch; rep from *
twice more, *(1tr, 4ch, 1tr) in
next corner 4ch-sp, 4tr, 4ch,
sl st to third of beg 4ch, sl st in
next 1ch-sp.
www.insidecrochet.co.uk 89
➻
MAKE IT
Rnd 6: 4ch (counts as 1tr, 1ch),
[(1tr, 1ch) twice, 1tr] all in
same 1ch-sp, 4ch, miss 4ch-sp,
tr4tog, 4ch, miss 2ch-sp, (4tr,
4ch, 4tr) in corner 4ch-sp, *4ch,
miss 2ch-sp, tr4tog, 4ch, miss
4ch-sp, [(1tr, 1ch) three times,
1tr] all in next 1ch-sp, 4ch,
miss 4ch-sp, tr4tog, 4ch, miss
2ch-sp, (4tr, 4ch, 4tr) in corner
4ch-sp; rep from * twice more,
4ch, miss 2ch-sp, tr4tog, 4ch,
sl st to third of beg 4ch to join.
Fasten off and weave in ends.
JOINING
Lay out motifs according to
diagram and using yarn B, join
motifs together as folls:
MOTIF ONE
Joining Rnd: Starting in any
corner 4ch-sp work 1St tr (see
Special Stitches), (3tr, 4ch, 4tr)
in same 4ch-sp, 1ch, (4tr, 1ch)
in each 4ch-sp around.
MOTIFS TWO AND
ONWARDS
Using yarn B work as for joining
rnd but joining each tr to tr on
previous motif through back
90 Inside Crochet
loop and working (2ch, sl st to
adjoining corner 4ch-sp, 2ch)
in each corner 4ch-sp.
711
750
Liquirizia Muschio
702
Limone
ROW 10
701
Girasole
ROW 9
ROW 8
BORDER
Rnd 1: Join yarn B in any corner
4ch-sp, (3ch, 3tr, 4ch, 4tr) in
same corner 4ch-sp, work *4tr
in gap between each 4tr group
and 2tr in each corner ch-sp of
each motif along entire edge of
blanket, (4tr, 4ch, 4tr) in corner
4ch-sp; rep from * twice more,
4tr in gap between each 4tr
group and 2tr in each corner
ch-sp of each motif along final
edge of blanket, sl st to top of
bet 3ch to join, turn.
Rnd 2: Starting with 3ch for
first tr, work 4tr in each gap
between 4tr groups and (4tr,
4ch, 4tr) in each corner space
around, sl st to top of beg 3ch
to join, turn.
Rnd 3: Rep Rnd 2.
Fasten off.
713
Corallo
715
716
717
718
714
Salmone Mandarino Mogador Espresso Scarlatto
719
Cremisi
720
721
722
Sangria Lampone Anguria
END
703
Oro
707
Olivia
706
Paglia
Crisoberillo
704
Acero
709
708
Primavera Pistachio
Continue until all motifs
are joined.
FINISHING
Weave in loose ends.
705
710
Pera
723
Rosa
724
Garofano
ROW 7
712
Sassolino
725
Argilla
726
Malva
727
Cardo
729
Prugna
Melanzana
728
UVA
731
Millennio
732
Acciaio
733
Zaffiro
739
Oceano
734
Opale
ROW 5
735
Fontana
738
Lago
737
736
Bolle
740
Piuma
741
Cenera
ROW 4
742
Pietra
ROW 3
755
Ciano
ROW 2
Mediterraneo
747
Tortora
745
744
Pergama Prosecco
760
Giungla
759
756
758
757
Verde
Guscio
Bottiglia Asparago Canaletto D'Uovo
754
Verde
Inglese
753
Pavane
752
Laguna
746
748
Sabbia Cioccolato
751
Reale
730
749
743
Cafe Nero Ardesia
ROW 6
ROW 1
i n s p i r e d d é c o r • v i n tag e c h a r m • s a lvag e t r e n d s • a n t i q u e c h i c
ECO, SALVAGE, VINTAGE, UPCYCLED & CREATIVE HOMES & IDEAS
DIGITAL
SUBSCRIPTIONS
START AT
I s su e Seve n t y- E i g h t
£2.92
PER ISSUE
transforming the traditional
Refresh
with salvage
WIN
A SET OF SIX
ORNAMENTAL PLATES
WORTH £210
Kind to the planet
(and your pocket)
SUBSCRIBE
ECO, SALVAGE, VINTAGE, UPCYCLED & CREATIVE HOMES & IDEAS
I s s u e S t y- S e v e n
SAVE 14%
AND RECEIVE A
FREE COPY OF THE JOY OF
LIVING WITH PLANTS
transforming the traditional
Ring the
changes
Open, welcoming
homes that
celebrate friends
and family
Plus
£5.99
WIN
AN OPALINE
PENDANT LIGHT
WORTH £195
BEDROOM BLISS
6 7
7 8
Smart decor to
create a sanctuary
THE NEW
HERITAGE
Plus
£4.99
I S S U E
I S S U E
UPCYCLING ROCKS!
GET ON BOARD WITH US
HOW TO MAKE PLANNING
RULES WORK FOR YOU
HOW TO STYLE, MAINTAIN
& INSTALL PERIOD FEATURES
THE UK’S BEST TV LOCATIONS
A bold take on bygone
design, from Victorian
kitchens to art deco
PLANTS FOR WINTER | MAKE A PARTY BAR | PRETTY TABLESCAPES
A N T I Q U E L A C E A R T • T H E P E O P L E ’S PA N T RY • R E L OV E YO U R H O M E
On sale now
Available in supermarkets and newsagents
To subscribe call 01202 586848 or visit selectmagazines.co.uk
Visit us on Instagram @reclaimmag
Find your digital copy of reclaim on
www.reclaimmagazine.uk
facebook.com/reclaimmagazine
twitter.com/RECLAIMmagazine
➻
MAKE IT
GET CREATIVE
You can crochet over
torn plastic bags,
old sheets or rope…
repurposing becomes
addictive!
Plarn Plantpot
Holder
BY MILLIE MASTERTON
Brighten up your home with these colourful planters,
made using plastic “plarn”!
ADD TO THE STASH
Buy this pure cotton yarn from
www.lovecrafts.com
MATERIALS
● Paintbox Yarns Cotton
DK, 100% cotton,
50g/125m/137yds
Yarn A: Bubblegum Pink 451
x 1 ball
Yarn B: Kingfisher Blue 435
x 1 ball
Yarn C: Grass Green 430
x 1 ball
Yarn D: Buttercup Yellow
423 x 1 ball
Yarn E: Blood Orange 420
x 1 ball
Yarn F: Pillar Red 415 x 1 ball
● 3.5mm hook
● White plastic tablecloth,
120 x 120cm/48 x 48in
● Stitch marker
● Wide plant pot,13cm/5in
TENSION
Work 8dc and 6 rows to
measure 5 x 5cm/2 x 2in using
3.5mm hook, or size required
to obtain tension.
92 Inside Crochet
PAT T E R N I N ST R U C T I O N S
MEASUREMENTS
Finished size: Approximately
15 x 14cm/6 x 5½in.
DESIGNER BIOGRAPHY
Millie is the designer of many
gorgeous items ranging from
quirky hats to fun bags and
vintage-style homewares.
Follow her on Instagram
@milliemasterton.
PATTERN NOTES
Cut tablecloth into 8cm/3in
strips and join strips together to
create a long length of ‘plarn’.
In this pattern you will be
working over the tablecloth
plarn throughout in a continuous
spiral. A stitch marker can be
helpful to track the number of
stitches in each round.
START
PLANT HOLDER
Using yarn A, make
an adjustable ring.
Rnd 1: 2ch (counts as first dc,
1ch), [1dc, 1ch] in the ring five
times, pull ring tight but do not
join ring, place SM in last st
– 6x 1ch-sps.
Fasten off yarn A and join yarn B.
Now work sts in ch-sps of prev
rnd, moving SM up each rnd.
Rnd 2: Using yarn B, [(1dc,
1ch, 1dc, 1ch) in next ch-sp] six
times – 12x 1ch-sps.
Fasten off yarn B and join
yarn C.
Rnd 3: Using yarn C, *(1dc,
1ch, 1dc, 1ch) in next ch-sp,
(1dc, 1ch) in next ch-sp; rep
from *, six times – 18x 1ch-sps.
Fasten off yarn C and join
yarn D.
Rnd 4: Using yarn D, *(1dc, 1ch,
1dc, 1ch) in next ch-sp, [1dc in
next ch-sp, 1ch] twice; rep from
* six times – 24x 1ch-sps.
Fasten off yarn D and join yarn E.
Rnd 5: Using yarn E, *(1dc, 1ch,
1dc, 1ch) in next ch-sp, [1dc in
next ch-sp, 1ch] three times; rep
from * six times – 30x 1ch-sps.
Fasten off yarn E and join yarn F.
Rnd 6: Using yarn F, *(1dc, 1ch,
1dc, 1ch) in next ch-sp, [1dc in
next ch-sp, 1ch] four times; rep
from * six times – 36x 1ch-sps.
Fasten off yarn F and join
yarn A.
Rnd 7: Using yarn A, *(1dc,
1ch, 1dc, 1ch) in next ch-sp,
[1dc in next ch-sp, 1ch] five
times; rep from * six times
– 42x 1ch-sps.
Fasten off yarn A and join
yarn B.
Rnd 8: Using yarn B, *(1dc, 1ch,
1dc, 1ch) in next ch-sp, [1dc in
next ch-sp, 1ch] six times; rep
from * six times – 48x 1ch-sps.
Fasten off yarn B and join
yarn C.
Rnd 9: Using yarn C, *(1dc, 1ch,
1dc, 1ch) in next ch-sp, [1dc in
next ch-sp, 1ch] seven times; rep
from * six times – 54x 1ch-sps.
Fasten off yarn C and join
yarn D.
Rnd 10: Using yarn D, *(1dc,
1ch, 1dc, 1ch) in next ch-sp,
[1dc in next ch-sp, 1ch] eight
times; rep from * six times
– 60x 1ch-sps.
Fasten off yarn D and join
yarn E.
Rnd 11: Using yarn E, *(1dc,
1ch, 1dc, 1ch) in next ch-sp,
[1dc in next ch-sp, 1ch] nine
times; rep from * six times
– 66x 1ch-sps.
Fasten off yarn E and join
yarn F.
Rnd 12: Using yarn F, 1dc in
each of next 66 ch-sps around.
Rep Rnd 12, changing colours
through yarns A–F on each
round twice.
Fasten off and weave
in ends.
END
www.insidecrochet.co.uk 93
➻
MAKE IT
94 Inside Crochet
PAT T E R N I N ST R U C T I O N S
Ch ill Right Out
Flo or Cu sh ion
BY CASSIE WARD
Create a cosy spot to sit with this colourful motif design.
ADD TO THE STASH
Buy this pure cotton yarn from
ww.woolwarehouse.co.uk
MATERIALS
● Sugar n Cream Solids,
100% cotton,
70.9g/109m/119yds
Yarn A: Ecru 00004
x 12 balls
Yarn B: Black 00002
x 1 ball
Yarn C: Soft Violet 00093
x 1 ball
Yarn D: Hot Pink 01740
x 1 ball
Yarn E: Rose Pink 00046
x 1 ball
Yarn F: Country Red 01530
x 1 ball
Yarn G: Tangerine 01669
x 1 ball
Yarn H: Hot Orange 01628
x 1 ball
Yarn I: Sunshine 00073
x 1 ball
Yarn J: Dazzle Blue 01131
x 1 ball
Yarn K: Mod Green 01223
x 1 ball
Yarn L: Robins Egg 01215
x 1 ball
Yarn M: Hot Green 01712
x 1 ball
● 4.5mm hook
● Cushion filler, 90 x 90cm/
35½ x 35½in
YARN ALTERNATIVES
You can use any aran-weight
yarn that works to the same
tension for this design.
TENSION
Work one Motif to measure
15 x 15cm/6 x 6in using 4.5mm
hook, or size required to
obtain tension.
MEASUREMENTS
Finished cushion:
90 x 90cm/35½ x 35½in.
DESIGNER BIOGRAPHY
Cassie absolutely loves creating
projects with motifs – they are
such a relaxing make, perfect
for moments to reflect.
MOTIF
Make 66, six using
yarns B–H and five
using yarns I–M
START
www.insidecrochet.co.uk 95
➻
MAKE IT
FULL MOTIF
Turn at end of each round.
Using 4.5mm hook and yarn A,
4ch, sl st to first st to form a ring.
Rnd 1: 3ch (counts as 1tr here
and throughout), (2tr, 2ch,
3tr) in ring, 1ch, join in second
colour (do not fasten off
yarn A), 1ch, (3tr, 2ch, 3tr) in
ring, 2ch, sl st to join, turn.
Rnd 2: Sl st in corner ch-sp,
3ch, 1tr in same corner ch-sp,
3tr, (2tr, 2ch, 2tr) in next corner
2ch-sp, 3tr, 2tr in next corner
2ch-sp, 1ch, change to yarn A,
drop second yarn ready to pick
up on next rnd (do not work
over it), 1ch, 2tr in same corner
2ch-sp, 3tr, (2tr, 2ch, 2tr) in
next corner 2ch-sp, 3tr, 2tr in
first corner 2ch-sp, 2ch, sl st in
third of beg 3ch to join, turn.
Rnd 3: Sl st in corner ch-sp,
3ch, 1tr in same corner ch-sp,
1tr in each tr to next corner
2ch-sp, (2tr, 2ch, 2tr) in 2ch-sp,
1tr in each tr to next corner
2ch-sp, 2tr in 2ch-sp, 1ch,
change yarn dropping yarn A
ready to pick up on next rnd
(do not work over it), 1ch, 2tr
in same 2ch-sp, 1tr in each tr
to next corner 2ch-sp, (2tr, 2ch,
2tr) in 2ch-sp, 1tr in each tr to
original 2ch-sp, 2tr in 2ch-sp,
2ch, sl st in third of beg 3ch to
join, turn.
Rnd 4: Sl st in corner ch-sp,
3ch, 1tr in same corner ch-sp,
1tr in each tr to next corner
2ch-sp, (2tr, 2ch, 2tr) in 2ch-sp,
1tr in each tr to next corner
2ch-sp, 2tr in 2ch-sp, 1ch,
change to yarn A, 1ch, 2tr in
same 2ch-sp, 1tr in each tr to
next corner 2ch-sp, (2tr, 2ch,
2tr) in 2ch-sp, 1tr in each tr to
original 2ch-sp, 2tr in 2ch-sp,
2ch, sl st in third of beg 3ch to
join, turn.
Rnd 5: As Rnd 3.
JOINING
Lightly block motifs and
sew together as shown on
schematic.
Weave in all loose ends.
96 Inside Crochet
Yarn B: Black
Yarn C: Soft Violet
Yarn D: Hot Pink
Yarn E: Rose Pink
Yarn F: Country Red
Yarn G: Tangerine
Yarn H: Hot Orange
Yarn I : Sunshine
Yarn J: Dazzle Blue
Yarn K: Mod Green
Yarn L: Robins Egg
Yarn M: Hot Green
MAKING UP
Sew together Front and Back
along three edges using a neat
whip st.
Insert cushion pad and neatly
sew up remaining side.
TASSELS
Make four tassels using leftover
yarn of choice.
Step 1: Wrap yarn 75 times
around a 25cm/10in length
piece of card.
Step 2: Thread a 20cm/8in
piece of yarn through and
tie at top.
Step 3: Cut along bottom
of card.
Step 4: Tie another length of
yarn about 1cm/½in from initial
tie at top.
Step 5: Trim tassels evenly.
Step 6: Straighten yarn in
tassel on a low heat iron.
Attach one tassel
END
to each corner
of cushion.
yarn
£4.99
100% Wool
needles & hooks
£6.49
£7.29
per 100g ball
King Cole
ole Wiildwood Chunky
patterns & books
per 100g ball
ll
pe r 50g ba
ool DK
Rowann N10orrww0%egiaWnooWl
WYSS Retre
etreatat Ch
Chunky
100% Wool
£2.89
£3.59
per 50g ball
£8.49
per 100g ball
per 50g ball
Sirdar Stories DK
60% Cotton, 40% Acrylic
Norroo Kureyonol AAran
100% Wo
Cygnet Colour Rush DK
100% Acrylic
.99
£1r2
227g ball
pe
£5.79
per 200g ball
Caron ColoramNyalonH, al11o%OPo’Glyeo ster
71% Acrylic, 18%
K
FREE URY
DELIVdEers
on orr £ 25
ove
Jameess C Brett Croftlan
a d Aran
80% Acrylic, 20% Wool
£3.99
per 100g ball
Stylecraft ReCreate Chunk
Chunky
40% Wool, 30% Acrylic, 30% Polyester
Order online: www.woolwarehouse.co.uk
No minimum o rde r. £2.95 de live ry c harg e fo r UK o rde rs unde r £25.
knit & c ro c he t a c c e sso rie s
fa b ric
ha b e rd a she ry & a c c e sso rie s
b utto ns
rib b o ns
All the crochet supplies you’ll ever need...all under one roof!
Get
10 %
O FF EVER
YTHING ! *
£10.99
Discount code:
pe r 280g ball
IC155
‘Look At What I Made’
k Scheepjes yarn packs
make the Sophie’s Dream Blanket and more!
£1.99
pe r 100g ba ll
Bernat Fore
orevver
er Fleece Super Chunky
100% Polyester
£2.95
pe r 100g ball
Yarnsmiths
hs Creeatatee Supeer Chunky
100% Acrylic
Scheepjes
cheepjes Scrumptious DK
50% Acrylic, 50% Polyester
ROP S A
ro p
s d e sig n
sso
r
en
Co
m
eD
et
tm
pl
t
w
Yarn packs to make your own
Attic24 projects, including
the NEW Springfrost CAL!
m
w
w
.d
.c
o
™
We’re proud to stock all these leading brands
Ca ll us: 01926 882818 o r 0800 505 3300 | Ema il us: he llo @ wo o lwa re ho use .c o .uk
* Disc o unt c o de no t va lid o n ya rn p a c ks, sa le ite ms, Lo p i a nd King Co le KC p ro duc ts.
➻
MAKE IT
MATERIALS
● Rico Design Creative
Ricorumi DK, 100% cotton,
25g/57m/62yds
Yarn A: Tangerine 026
x 1 ball
Yarn B: Grass Green 044
x 1 ball
Yarn C: Blue 032 x 1 ball
Yarn D: Orange 027 x 1 ball
Yarn E: Red 028 x 1 ball
● 2.75mm hook
● Yarn needle
YARN ALTERNATIVES
Any DK weight yarn will work
well for this design. Use thicker
yarns to make bigger patches.
TENSION
Exact tension is not critical
for this project.
MEASUREMENTS
Rocket: 12cm/4¾in.
Planet: 9cm/3½in.
Star: 7cm/2¾in.
DESIGNER BIOGRAPHY
Victoria is the designer behind
Smiley Crochet Things.
Find her on Facebook and
Instagram@smileycrochetthings
and Etsy www.smileycrochet
things.etsy.com.
ROCKET
With yarn A, 2ch.
Row 1: (WS) 2dc in
second ch from hook, turn
– 2 sts.
Row 2: 1ch (does not count as
a st here and throughout),
2dc in each st, turn – 4 sts.
Row 3: 1ch, 4dc, turn.
Row 4: 1ch, 2dc in next st, 2dc,
2dc in next st, turn – 6 sts.
Row 5: 1ch, 6dc, turn.
Change to yarn B.
Row 6: 1ch, 2dc in next st, 4dc,
2dc in next st, turn – 8 sts.
Rows 7–9: 1ch, 8dc, turn.
Row 10: 1ch, 2dc in next st,
6dc, 2dc in next st, turn
– 10 sts.
Rows 11–16: 1ch, 10dc, turn.
Row 17: 1ch, dc2tog, 6dc,
dc2tog, turn – 8 sts.
Rows 18 & 19: 1ch, 8dc, turn.
START
Space Appliqué
Patche s
BY VICTORIA KAIRIS
Dip into the yarn stash to decorate clothes and
accessories with these fun space-themed patches.
ADD TO THE STASH
Buy this pure cotton yarn from
www.woolwarehouse.co.uk
100 Inside Crochet
PAT T E R N I N ST R U C T I O N S
STAR
With yarn A, make an
adjustable ring.
Rnd 1: (WS) 5dc in ring, join
rnd with sl st, turn – 5 sts.
Rnd 2: 1ch (does not count as
a st here and throughout), 2dc
in each st around, join rnd with
sl st, turn – 10 sts.
Rnd 3: 1ch, [1dc, 2dc in next
st] five times, join rnd with sl st,
turn – 15 sts.
Rnd 4: 1ch, [2dc, 2dc in next
st] five times, join rnd with sl st,
turn – 20 sts.
Rnd 5: 1ch, [3dc, 2dc in next
st] five times, join rnd with sl st,
turn – 25 sts.
Do not fasten off, continue to
Spike One.
Row 20: 1ch, dc2tog, 4dc,
dc2tog, turn – 6 sts.
Row 21: 1ch, 6dc, turn.
Change to yarn C.
Rows 22 & 23: 1ch, 6dc, turn.
Change to yarn D.
Row 24: 1ch, 2dc in next st,
4dc, 2dc in next st, turn
– 8 sts.
Row 25: 1ch, 2dc in next st,
6dc, 2dc in next st, turn
– 10 sts.
Row 26: 1ch, 3dc, turn,
leaving rem 7 sts unworked
– 3 sts
Row 27: 1ch, dc2tog, 1dc,
turn – 2 sts.
Row 28: 1ch, dc2tog.
Fasten off and weave in ends.
SECOND FLAME
Join yarn D to next unworked st
of Row 25 of Rocket.
Row 1: (RS) 4dc, turn, leaving
rem sts unworked – 4 sts.
Row 2: 1ch, [dc2tog] twice,
turn – 2 sts.
Row 3: 1ch, dc2tog.
Fasten off and wave in ends.
THIRD FLAME
With yarn D, join to next
unworked st of Row 25 of
Rocket.
Row 1: (RS) 3dc, turn – 3 sts.
Row 2: 1ch, 1dc, dc2tog, turn
– 2 sts.
Row 3: 1ch, dc2tog.
Fasten off and weave in ends.
WINGS
Make two
With yarn E, 3ch.
Row 1: (RS) 1dc in second ch
from hook and in next ch, turn
– 2 sts.
Row 2: 1ch, 1dc, 2dc in next st,
turn – 3 sts.
Row 3: 1ch, 3dc, turn.
Row 4: 1ch, 2sl st, 2dc in next
st – 4 sts.
Fasten off leaving a long tail.
Sew one wing to each side of
Rocket, one with RS up and the
other with WS up.
WINDOW
With yarn C, make an
adjustable ring.
Rnd 1: 6dc in ring, join rnd
with sl st, turn – 6 sts.
Rnd 2: 1ch, 2dc in each st
around, join rnd with sl st
– 12 sts.
Fasten off leaving a long tail.
Sew Window to Rocket.
PLANET
With yarn C, make an
adjustable ring.
Rnd 1: (WS) 6dc in ring, join
rnd with sl st, turn – 6 sts.
Rnd 2: 1ch (does not count as
a st here and throughout), 2dc
in each st around, join rnd with
sl st, turn – 12 sts.
Rnd 3: 1ch, [1dc, 2dc in next
st] six times, join rnd with sl st,
turn – 18 sts.
Rnd 4: 1ch, [2dc, 2dc in next
st] six times, join rnd with sl st,
turn – 24 sts.
Rnd 5: 1ch, [3dc, 2dc in next
st] six times, join rnd with sl st,
turn – 30 sts.
Rnd 6: 1ch, [4dc, 2dc in next
st] six times, join rnd with sl st,
turn – 36 sts.
Rnd 7: 1ch, [5dc, 2dc in next
st] six times, join rnd with sl st,
turn – 42 sts.
Rnd 8: 1ch, [6dc, 2dc in next
st] six times, join rnd with sl st
– 48 sts.
Fasten off and weave in ends.
RING
With yarn D, 25ch.
Row 1: (WS) 1dc in second
ch from hook, 2dc in each of
next 3 sts, 16dc, 2dc in each
of next 3 sts, 1dc, turn
– 30 sts.
Row 2: 1ch, 5sl sts, 2dc in
next st, 18dc, 2dc in next st,
5sl sts – 32 sts.
Fasten off leaving a long tail.
Sew Ring to Planet so that
ends of Ring sit behind Planet.
SPIKE ONE
Row 6: 1ch, dc in sl st, 5dc,
turn, leaving rem sts unworked
– 6 sts.
Row 7: 1ch, 6dc, turn.
Row 8: 1ch, dc2tog, 2dc,
dc2tog, turn – 4 sts.
Row 9: 1ch, [dc2tog] twice,
turn – 2 sts.
Row 10: 1ch, dc2tog, turn
– 1 st.
Row 11: 1ch, 1dc.
Fasten off and weave in ends.
SPIKES TWO–FIVE
Make four
Join yarn A to same st of Rnd 5
as last st of Rnd 6.
Row 1: 6dc, turn – 6 sts.
Rows 2–6: Rep Rows 7–11
of Spike One.
END
Fasten off and
weave in ends.
SPOTS
Make six, two in each of
yarns A, B & E
Make an adjustable ring.
Rnd 1: 6dc in ring, join rnd
with sl st – 6 sts.
Fasten off leaving a long tail.
Sew Spots to Planet.
www.insidecrochet.co.uk 101
➻
MAKE IT
MATERIALS
● King Cole Cottonsoft DK,
100% cotton,
100g/210m/229yds
Yarn A: Antique Gold 3461
x 1 ball
Yarn B: Lime 1601 x 1 ball
Yarn C: Azure 3366 x 1 ball
Yarn D: Clementine 3464
x 1 ball
Yarn E: Powder 1932 x 1 ball
● 2.75mm hook
● Stitch marker
● Yarn needle
● Toy stuffing
● 25mm/1in toy rattle box
● Black stranded cotton
YARN ALTERNATIVES
Any DK weight yarn suitable for
young children will work well
for this design.
TENSION
Exact tension is not critical for
this project, but a tight tension
is required to stop the stuffing
showing through and it may
affect the size of the finished toy.
MEASUREMENTS
Finished rattle is 18cm/
7in high.
DESIGNER BIOGRAPHY
Victoria is the designer behind
Smiley Crochet Things. Find her
on Facebook and Instagram
@smileycrochetthings and
Etsy www.smileycrochetthings.
etsy.com.
Mon ke y Rattle
BY VICTORIA KAIRIS
Use up scraps of DK yarn to make this fun, striped
baby rattle with a monkey face.
ADD TO THE STASH
Buy this pure cotton yarn from
www.theknittingnetwork.co.uk
102 Inside Crochet
SPECIAL STITCHES
Invisible Decrease (invdc2tog): Insert hook in front
loop of first st to be decreased,
insert hook in front loop of
second st to be decreased,
yrh, pull through 2 loops, yrh
and pull through both loops
on hook.
PATTERN NOTES
Most of this pattern uses the
amigurumi method, working
in continuous spirals (unless
stated otherwise). There is a
right side and a wrong side,
the right side will be on the
PAT T E R N I N ST R U C T I O N S
Rnd 5: [3dc, 2dc in next st] six
times – 30 sts.
Rnd 6: [4dc, 2dc in next st] six
times – 36 sts.
Rnd 7: [5dc, 2dc in next st] six
times – 42 sts.
Fasten off leaving a long tail.
Row 8: Miss next 14 sts, join
yarn E to next st, beginning in
same st, 13dc, turn – 13 sts.
Row 9: 1ch, dc2tog, 9dc,
dc2tog, turn – 11 sts.
Row 10: 1ch, [dc2tog] twice,
3dc, [dc2tog] twice – 7 sts.
Fasten off and weave in ends.
Using the tail, sew Face to
Head.
outside when working in a
clockwise direction. Use a
stitch marker or a small length
of yarn, placed in the last
stitch of every round to keep
track of beginning and ends
of rounds.
HEAD
With yarn A, make an
adjustable ring.
Rnd 1: 6dc in ring – 6 sts.
Rnd 2: 2dc in each st around
– 12 sts.
Rnd 3: [1dc, 2dc in next st] six
times – 18 sts.
Rnd 4: [2dc, 2dc in next st] six
times – 24 sts.
Change to yarn B.
Rnd 5: [3dc, 2dc in next st] six
times – 30 sts.
Rnd 6: [4dc, 2dc in next st] six
times – 36 sts.
Rnd 7: [5dc, 2dc in next st] six
times – 42 sts.
Change to yarn C.
Rnd 8: [6dc, 2dc in next st] six
times – 48 sts.
Rnd 9: [7dc, 2dc in next st] six
times – 54 sts.
Rnd 10: Dc around.
Change to yarn D.
Rnds 11–13: Dc around.
Change to yarn A.
Rnds 14–16: Dc around.
Change to yarn B.
Rnds 17 & 18: Dc around.
Rnd 19: [7dc, inv-dc2tog (see
Special Stitches)] six times
– 48 sts.
Change to yarn C.
Rnd 20: [6dc, inv-dc2tog] six
times – 42 sts.
Rnd 21: [5dc, inv-dc2tog] six
times – 36 sts.
Rnd 22: [4dc, inv-dc2tog] six
times – 30 sts.
Rnd 23: [3dc, inv-dc2tog] six
times – 24 sts.
Change to yarn D.
Rnd 24: [2dc, inv-dc2tog] six
times – 18 sts.
Stuff the Head inserting
rattle box.
Rnd 25: [1dc, inv-dc2tog] six
times – 12 sts.
Rnd 26: [Inv-dc2tog] six times
– 6 sts.
Fasten off and weave in ends.
START
HANDLE
With yarn A, make an
adjustable ring.
Rnd 1: 6dc in ring – 6 sts.
Rnd 2: 2dc in each st around
– 12 sts.
Rnd 3: [1dc, 2dc in next st] six
times – 18 sts.
Rnd 4: [2dc, 2dc in next st] six
times – 24 sts.
Change to yarn D.
Rnd 5: [7dc, 2dc in next st]
three times – 27 sts.
Rnds 6 & 7: Dc around.
Change to yarn C.
Rnds 8–10: Dc around.
Change to yarn B.
Rnds 11–13: Dc around.
Change to yarn A.
Rnds 14–16: Dc around.
Change to yarn D.
Rnds 17–19: Dc around.
Change to yarn C.
Rnds 20–22: Dc around.
Change to yarn B.
Rnds 23–25: Dc around.
Change to yarn A.
Rnds 26–28: Dc around.
Change to yarn D.
Rnd 29: [8dc, 2dc in next st]
three times – 30 sts.
Fasten off leaving a long tail.
Stuff the Handle and Head,
then sew to base of Head.
FACE
With yarn E, make an
adjustable ring.
Rnd 1: 6dc in ring – 6 sts.
Rnd 2: 2dc in each st around
– 12 sts.
Rnd 3: [1dc, 2dc in next st] six
times – 18 sts.
Rnd 4: [2dc, 2dc in next st] six
times – 24 sts.
Change to yarn B.
EARS
Make two
With yarn C, make an
adjustable ring.
Rnd 1: 6dc in ring – 6 sts.
Rnd 2: 2dc in each st around
– 12 sts.
Rnd 3: [1dc, 2dc in next st] six
times – 18 sts.
Change to yarn D.
Rnd 4: Dc around.
Rnd 5: [2dc, 2dc in next st] six
times – 24 sts.
Change to yarn A.
Rnds 6 & 7: Dc around.
Change to yarn B.
Rnd 8: Dc around.
Rnd 9: [2dc, inv-dc2tog] six
times – 18 sts.
Fasten off leaving a long tail.
INNER EAR
Make two
With yarn E, make an
adjustable ring.
Row 1: 3dc in ring, turn – 3 sts.
Row 2: 1ch (does not count
as a st), 2dc in each st across,
turn – 6 sts.
Row 3: 1ch, [1dc, 2dc in next
st] three times, turn – 9 sts.
Row 4: 1ch, [2dc, 2dc in next
st] three times – 12 sts.
Fasten off leaving a long tail.
FINISHING
Sew Inner Ear to Ear, then sew
one Ear to each side of Head.
Embroider on eyes,
END
nose and mouth using
black stranded cotton.
www.insidecrochet.co.uk 103
-*-
CELEBRATING
DYED-BY-HAND THE ART OF
ARTISAN YARN
S
hand dyed boutique
Hand-dyed natural fibre yarns
www.watercoloursandlace.co.uk
U S E YA R N 5 F O R 5 % O F F
Dark Omen Yarn,
y yarns hand-dyed
Suppliers of beautiful hand dyed
yarns from around the world.
Exclusive UK importers of Emma’s Yarn,
an incredible brand from Florida.
01473 316936
W W W.YA R N W O R X . C O M
in Italy
@darkomenyarn
We supply yarn hand dyed with
Slavic soul, suitable for all your
knitting and crocheting needs.
Follow us
slavicayarns.pl
Beautiful hand
dyed yarns
www.fruitfulfusion.co.uk
IN off Get
S w
at IDE ith 10%
ch CR co
ec OC de
ko H :
ut ET
!
ISSUE 156
ON SALE
16 MARCH 2023
next month
The homestead issue
BEAUTIFUL TRANSITIONAL GARMENTS
FLORAL-INSPIRED ACCESSORIES
EGG-CITING EASTER FRIENDS
& DON’T MISS
SPIRIT OF FLORA CROCHET-ALONG
MOTIF FOUR
EXCLUSIVELY IN INSIDE CROCHET
SUBSCRIBE TODAY AND NEVER MISS AN ISSUE
AVAILABLE IN PRINT & DIGITAL VERSIONS. SEE PAGE 41 FOR SPECIAL SUBS OFFER
Yarn Market
SARAH MORAN, COMMISSIONING EDITOR, WRITES:
Sewing and Craft Shop in Cambridge
www.sewknitcraft.co.uk
01223 350691
Handmade by
Maryport
Situated on the edge of the Lake District we stock a wide range of
yarns including Stylecraft, Rico, King Cole, Sirdar and many more with
knitting and crochet accessories and patterns available too.
Email: handmadebymaryport@gmail.com Telephone: 07501 541961
/ HandmadeByMaryport
www.hookandeyeonline.com
hookandeye3
1 Biddicks Court, Saint Austell,
Cornwall PL25 5EW Tel: 01726 75385
Email: sewandfabric@yahoo.co.uk
U SE CODE H ELLO1 0 FOR 1 0 % OFF
“Exc e lle nt se rvic e , m y ne w
‘g o to ’ ya rn se lle r!”
Lynn fro m Truro , C o rnwa ll
www.Se c re tYa rnSta sh.c o .uk
Our range of crafts include yarns, threads, haberdashery,
gifts and much more. We really do offer a one stop shop for both
Dancers and Crafters.
AN OFFICIAL STYLECRAFT STOCKIST
3 Crown Street, St Ives, Cambridgeshire PE27 5EB
Call us on 01480 716014 Email: elaine@stardancewear.co.uk
www.stardancewear.co.uk
To advertise
here contact
Cassie on
cassie@tailormadepublishing.co.uk
➻
HOW TO CROCHET
Howto
Crochet
I have always believed
that anyone can learn to
crochet, so long as you
follow one simple rule:
don’t try to run before you
can chain! The chain is the
most simple of stitches
and therefore ideal for
practising the all-important hold, which helps create
the perfect tension for forming all the following
stitches. When my mother taught me to crochet,
she followed her grandmother’s lead and helped
me to hook metre upon metre of chain before
I was shown any further stitches. It was a fantastic
foundation for learning the more difficult
techniques. Once your chains are looking even
and feel comfortable to create, then progressing
on to the stitches becomes much easier.
If at any point you feel as if you have lost your
hold, simply go back to those comforting lengths
of chain until your confidence returns. My biggest
tip is to remember that this wonderful craft is well
known for being relaxing and fun, so find a comfy
chair, some free time and just enjoy it!
Happy crocheting…
This gorgeously cosy
Riley Jumper by
Rosina Northcott (issue 144)
is worked up in the beautiful
West Yorkshire Spinners
Re:Treat yarn which helps
support the charity Mind with
a percentage of sales.
TEACH
YOURSELF
How to hold the work,
chains, double
& treble crochet,
slip stitch
TURN THE PAGE FOR ALL
YOU NEED TO GET STARTED
www.insidecrochet.co.uk 107
GETTING STARTED
THE BASICS
To crochet smoothly and efficiently, you must hold the hook
and yarn in a relaxed, comfortable and consistent fashion. This
will also ensure that your tension is even and accurate. There
are two main ways of holding the hook and two main ways
to tension the yarn. You can choose whichever combination
feels more natural for you, or a variation on these.
SLIPKNOT
CHAIN
A slipknot creates the first
loop on the hook.
Most crochet projects begin
with a length of chain. This is
the perfect stitch to practise
your hold and tension with.
HOLDING THE HOOK
KNIFE GRIP
PENCIL GRIP
Hold the hook in your
dominant hand as you
would a knife.
Hold the hook in your
dominant hand as you
would a pencil.
1 Make a loop in the yarn
around 10–20cm/4–8in from
the end. Insert hook through
loop, catch the back strand
of yarn and pull it through to
the front.
HOLDING THE YARN
FOREFINGER
METHOD
MIDDLE-FINGER
METHOD
Wrap the ball end of the yarn
around the little finger of
your opposite hand, under
the next two fingers and over
the forefinger. Hold the work
steady with your middle
finger and thumb, then
raise your forefinger when
working to create tension.
Wrap the ball end of the
yarn around the little finger
of your opposite hand and
over the other fingers. Hold
the work steady with your
forefinger and thumb, then
raise your middle finger
while you are crocheting to
create tension.
To croch e t le ft-h and ed,
simply do the opp osit e to
.
the righ t-h and ed hol ds
Hold a mirror up to any
to
p ic ture in this gu ide
see how to wor k.
108 Inside Crochet
It doesn’t ma t te r
if your
sti tch es te nd tow
ar ds
be in g sli gh tly tig
ht or
ev en a lit tle loose;
you ar e
ai mi ng for an ev
en te nsion
th roughout to ac
hi ev e a
pr of ession al fin ish
.
1 Holding just the hook with
point up in your dominant
hand, and the yarn in the
other, grip the slipknot with
the yarn-holding hand.
Work a yarn round hook
(yrh or yoh) by passing the
hook in front of the yarn,
under and around it.
2 Pull the ends of the yarn to
secure the knot around the
hook, but not too tightly or
it will be hard to pull the first
loop of chain through.
2 Roll the hook round in
your fingers towards you
to catch the yarn and pull
through loop on hook.
One chain made.
The action of working
stitches causes a
constan t rolling of the
hook in your fingers;
hold the hook pointin g
up when performing
the yrh, then roll it
round towards you
to point down when
pulling through the
loops so that you
don’t catch the hook
in the stitches.
3 Ensuring the stitches
are even – not too loose
or tight – repeat to make
a length of chain.
➻
HOW TO CROCHET
THE MAIN STITCHES
SLIP STITCH
(sl st)
A slip stitch is usually used to
join one stitch to another, or to
join a stitch to another point.
It is generally made by picking
up two strands of a stitch but
when used all over, you usually
only pick up the back loop.
Do uble cro chet stitches
are perfect fo r m akin g
am igurum i, w hile treble
cro chets are used to
create the classic gran n y
square design
This cheery
Floral Friends Vase by
Matt Farci (issue 127)
uses simple dc
stitches to create
solid blocks of
adorable colour!
DOUBLE CROCHET (dc)
The smallest stitch, creating a dense fabric perfect for amigurumi.
1 Insert hook into stitch or
chain required. Yarn over hook,
as when you make a chain. Pull
a loop through all stitches/
loops/work on hook to finish
slip stitch.
1 Insert hook into
chain or stitch, front to
back. Yarn over hook
and draw through
stitch to front, leaving
you with two loops
on the hook. Yarn
round hook.
2 Draw through both
loops to finish the
stitch. Double
crochet completed.
COUNTING
A CHAIN
The right side of your chain is
the one that looks like a little
plait of “v” shapes. Each “v” is
a stitch and must be counted.
When you are working the
chain, you do not count the
slipknot, but begin to count
your chain when you pull
through the first loop. To count
the chain afterwards you
count the slipknot as the first
stitch, but not the loop on the
hook, or “working” loop.
HALF TREBLE CROCHET (htr)
Slightly taller than a double crochet stitch, with a softer drape to the resulting fabric.
1 Yarn over hook, insert
hook into stitch from
front to back and draw
loop through stitch
only. This gives you
three loops on the
hook. Yarn round hook.
2 Draw yarn through
three remaining loops
on the hook together
to complete half treble.
www.insidecrochet.co.uk 109
Top crochet websites
TREBLE CROCHET
(tr)
The tallest of the basic
stitches, great for using within
more complex patterns.
www.cypresstextiles.net
➻ Inside Crochet designer Rachele Carmona
offers plenty of colourful inspiration on her
site, which includes stitch guides, techniques
and links to her wonderful patterns.
1 Yarn round hook, insert hook
into stitch from front to back
and draw loop through stitch
only. This gives you three loops
on the hook. Yarn round hook.
FASTEN OFF
Pull up the final loop of the last stitch to make it
bigger and cut the yarn, leaving enough of an
end to weave in. Pull the end through the loop,
and pull up tightly to secure.
COUNTING STITCHES
Count the post or “stem” of each stitch from the
side of your work. Each post counts as one stitch.
Double crochet
www.janiecrow.com
➻ Enjoy Jane Crowfoot’s inspirational blog,
plus browse her stunning designs. There’s
also a brilliant library of crochet techniques.
2 Pull loop through two loops.
Two loops on hook. Yarn
round hook.
Treble crochet
www.toftuk.com
➻ Kerry Lord of Toft is well known for her
stunning amigurumi, from dolls and animals
to birds and dinosaurs, and they sell wool too!
www.theloopystitch.com
➻ Packed with inspiration and shining with
a real love for crochet, visit Emily’s site
for YouTube tutorials and a huge selection
of colourful homeware designs.
www.coastalcrochet.com
➻ Constantly inspired by her seaside home,
Eleonora shares a host of gorgeous designs,
the most popular of which are her stunning
blanket crochet-alongs.
110 Inside Crochet
3 Pull loop through the
remaining two loops to
complete treble, repeat to
end of row.
Try t o coun t your st it ches a t regu
lar
int erva ls, usua lly a t the end of
ever y,
or ever y othe r, row and esp ecia lly
a f t er an incr ea se or decr ea se row.
It is b est t o try t o ca t ch any mist
ake s
a s q uick ly a s p ossib le, a s this will
mak e them muc h ea sier t o rect i fy!
➻
HOW TO CROCHET
SHAPING, COLOURWORK & TENSION
Once you’ve learned simple shaping stitches, you can create almost any garment – and add
in different colours as you go with our simple technique. Make sure to check your tension first
though, or your finished piece could be completely the wrong size!
INCREASING
JOINING IN
A NEW COLOUR
TENSION/GAUGE
To join in a new colour (or a new ball
of the same colour), you can simply
fasten off the old yarn and then attach
the new colour with a slip stitch into the
top of the last stitch made. However,
for a neater join, you can also work the
colour change as follows:
To work an extra stitch, you simply
need to work into the same stitch more
than once. Work one stitch as normal.
Insert hook into same stitch you’ve just
worked and complete another stitch.
One stitch increased.
Work the last stitch in the colour you
are using first, up to the final step, so
that the stitch is unfinished. Pull the
new colour through the loops on your
hook, completing the stitch and joining
the new colour at the same time.
DECREASING
To decrease a stitch, you need to work
into two stitches without finishing
them, then work them together.
For a double crochet (above), insert hook
into next stitch, yarn over hook and draw
a loop through the stitch, but do not finish
the double crochet stitch as usual. Insert
hook into following stitch, yarn over hook
and draw a loop through the next stitch,
so there are three loops on the hook in
total. Yarn over hook and draw the loop
through all loops on hook, drawing two
stitches together. One stitch decreased.
For a treble crochet, work a treble into the
next stitch until the last step of the stitch,
two loops on hook. Do the same into the
following stitch, three loops on hook. Draw
through all three loops on hook to draw the
two trebles together. One stitch decreased.
Working a new colour over
double crochet
Working a new colour over
treble crochet
Once you have joined in the new yarn,
you can weave in the ends of both
yarns as you go, by holding them on
top of your stitches and working round
them as you work into the following
stitches. Do this for at least 5cm/2in
then cut the remaining ends.
A tension swatch is used to
ensure that you are working
at the tension called for in the
pattern. It is essential to check this,
otherwise your finished garment
is likely to be the wrong size!
Crochet a small square of just over
10 x 10cm/4 x 4in in the main yarn
and stitch used in the pattern, then
count and calculate the average
amount of stitches per centimetre.
Chain a few more stitches and
work more rows than the tension
in the pattern suggests you’ll
need for this size. Once you have
completed the swatch, use a
measuring tape or ruler, place
some pins at 0 and 10 and take
some average measurements
– count how many stitches and
rows to 10cm at different points
over the swatch.
If you find you have more stitches
per centimetre than indicated in
the pattern, then your tension is
too tight and you need to work
more loosely. The best way to do
this is to increase the size of hook
you’re using by a quarter or half
millimetre until the tension is as
close as you can get it. If there are
fewer stitches than required, then
you are crocheting too loosely,
and you need to decrease the size
of hook used in the same way.
TURN THE PAGE FOR MAGIC LOOPS, TIPS AND A FULL GLOSSARY
OF CROCHET ABBREVIATIONS, UK VERSUS US TERMS AND HOOK SIZES
www.insidecrochet.co.uk 111
Beginner
books we
recommend
The
Learn to Crochet
Project
BY Joanne Scrace and Kat Goldin of
The Crochet Project
WORKING IN THE ROUND
When working in the round, instead of working backwards and forwards along the work,
turning at the end of each round, you simply work with the right side facing you at all times
and you do not turn. When working in the round, you generally begin one of three ways:
WORKING
AROUND A RING
WORKING INTO
A SHORT CHAIN
ADJUSTABLE
RING
This method of working in
the round creates a large
hole at the centre of your
work. Its size is dependent
on the length of chain used.
You can create a smaller
hole in the centre of your
work by working into a
chain as short as 2ch long.
This method is also referred
to as the magic loop or ring,
as it creates a round with
no hole at the centre. Here
it is demonstrated with
double crochet.
THE LEARN TO
CROCHET PROJECT
Joanne Scrace & Kat Goldin
(The Crochet Project, £12)
Joanne and Kat share their
knowledge and expertise in
a beginners’ guide brimming
with tips and techniques, plus
gorgeous wearable designs.
Make a length of chain as
required, then insert your
hook into the first chain stitch
you made. Yarn round hook.
For double crochets, as in this
example, work 2ch. For htr
you would work 3ch and for
trebles, 4ch.
Make a loop in your yarn, at
least 15cm/6in from the tail
end. Insert hook through the
loop from front to back.
Insert hook into the top loop
of the first chain as shown.
Yarn round hook.
CROCHETED HOME
Kate Eastwood
(CICO Books, £12.99)
Packed with beginnerfriendly patterns to fill your
home, from blankets to
cushions, chunky bathmats,
coasters, peg bags and more.
Work a slip stitch to join,
creating a ring, and then
work your turning chain
dependent on which stitch
you will be working into the
ring. Insert hook into the
centre of the ring and work
the first stitch into this ring.
Complete the first stitch in the
chain as shown (illustrations
show dc, but can be any stitch).
Work the required number of
stitches into the centre of the
ring and join round with a slip
stitch. Do not turn, but continue
the next row around the last.
Now work the required amount
of stitches into the same chain.
The sheer amount of stitches
worked into one place will
cause them to fan out into a
round. Now join this round
with a slip stitch and continue
with the pattern.
YOU WILL BE ABLE TO
CROCHET BY THE END
OF THIS BOOK
Zoe Bateman
(Octopus, £14.99)
A contemporary crochet
textbook infused with a love
of our craft and packed with
inspiring photography.
112 Inside Crochet
Pull the yarn through to the
front of the loop and complete
the stitch around the loop and
the tail end of yarn held double.
Work all the following stitches
into the ring in the same way,
over the two strands of yarn
in the loop. Once all stitches
have been worked, pull the
loose tail end of the yarn to
close the ring and join the
round with a slip stitch.
➻
HOW TO CROCHET
A note
on... Hook sizes
ABBREVIATIONS
Note: Inside Crochet uses UK terms throughout
alt · alternate
bef · before
beg · begin(s); beginning
bet · between
blo · back loop only
ch(s) · chain(s)
ch-sp(s) · chain space(s)
cl(s) · cluster(s)
cm · centimetre(s)
cont · continue(s);
continuing
dc · double crochet
dc2tog · work two dc
together
dec(s) · decrease(s);
decreasing; decreased
dtr · double treble crochet
dtr2tog · work two dtr
together
ea · each
ech · extended chain
edc · extended double
crochet
prev · previous
rem · remain(s); remaining
rep(s) · repeat(s)
rev dc · reverse double
crochet
rnd(s) · round(s)
RS · right side
rtrf · raised treble front
rtrb · raised treble back
sl · slip
sl st · slip stitch
sp(s) · space(es)
st(s) · stitch(es)
t-ch(s) · turning chain(s)
tog · together
tr · treble crochet
tr2tog · work two trebles
together
trtr · triple treble
WS · wrong side
yd(s) · yard(s)
yoh · yarn over hook
yrh · yarn round hook
est · established
etr · extended treble
fdc · foundation double
crochet
flo · front loop only
foll · follows; following
ftr · foundation treble
crochet
g · gram(s)
gp(s) · group(s)
hk · hook
htr · half treble crochet
htr2tog · work two htr
together
in · inch(es)
inc(s) · increase(s);
increasing; increased
lp(s) · loop(s)
m · stitch marker
mm · millimetre(s)
nc · not closed
patt · pattern
pm · place marker
BREAKING THE LANGUAGE BARRIER
UK and US terms have differing meanings which can create difficulty for the
crocheter. Here’s a handy reference guide to overcome any misunderstandings.
UK TERMS
US TERMS
Chain
Miss
Slip stitch
Double crochet
Half treble crochet
Treble crochet
Double treble crochet
Triple treble crochet
Raised treble back/front
Chain
Skip
Slip stitch
Single crochet
Half double crochet
Double crochet
Treble crochet
Double treble crochet
Back/front post dc
➻ Hook sizes and their designations vary
from country to country. When following
the recommendations in a pattern or on
a ball band, make sure to check which
size convention is being used.
CROCHET HOOK SIZES
Metric (mm)
UK
US
0.6
14
0.75
12
1
11
1.25
7
1.5
6
1.75
2
5
14
2.25
2.5
B/1
12
2.75
3
C/2
10
3.25
3.5
D/3
9
3.75
E/4
F/5
4
8
G/6
4.5
7
7
5
6
H/8
5.5
5
I/9
6
4
J/10
6.5
3
K-/101/2
7
2
8
0
L/11
9
00
M /13
10
000
N/15
11.5
O
12
P
15
Q
20
S
tr2tog
3-tr cl
tr3tog
popcorn
puff
linked tr
CHARTS KEY
adjustable ring
fl only
sl st
dc
ch
fdc
bl only
htr
tr
rtrf
dtr
rtrb
trtr
dc2tog
www.insidecrochet.co.uk 113
➻
MINDFUL MAKING
KEEP CALM
AND CROCHET
Our new series focuses on the
wellbeing benefits of craft.
Here, regular Inside Crochet
designer Cassie Ward shares
how crochet helped manage
her anxiety.
Tell us about
yourself...
I live in a sleepy little
Cam bridgeshire village
right in the heart of
the Fens with m y twin
boys, who are pretty
m uch grown up now.
Why did you first take up crochet?
I first tried crochet in 2011 as I’d suffered with
anxiety for a long tim e and had found card
m aking to be a great distraction. I was at the
Clothes Show Live where I visited the UK Hand
Knitting stand and m et a wom an who said she
could teach anyone to crochet – and she was
right! I quickly learned the stitches and soon
began creating m y own designs. I had no idea
what I was doing so I had to learn backwards,
and took lessons with Helen Free at Rainbow
Valley to build m y skills.
What do you find so special
about crochet?
"I found the coun ting of stitches very therapeutic,
and it quickly calmed my anxiety. I love that you
can't go too wrong with crochet"
up a lot of time, but I try to pick up my hook as
much as I can as it helps me relax.
I loved crochet from the start. I found the
counting of stitches very therapeutic, and it
quickly calmed my anxiety. I love that you can’t
go too wrong with it and that you can quickly
rectify m istakes one stitch at a tim e. I like that
it works up quickly and that the fabric lends
itself so well to bright colours.
Do you find crochet soothing or stressful at times?
Do you prefer to crochet calmly and
quietly, or on the hop?
When life gets busy, how do you make
space and time for yourself?
I crochet any time I can fit it in – I have a beautiful
studio that I don’t use! I’m more of a relax-andwatch-TV-in-my-joggers type of crocheter, and
love to crochet along to a good box set.
Crochet still feels like a hobby to me as it’s
tricky to m ake a living from it – I have three
jobs alongside my crochet design work. I’ve
never been one to relax m uch, but I love to
unwind by m eeting friends and fam ily to eat
out – I’m a total foodie.
Has crochet helped you through
difficult times?
Definitely. Crochet has been a saviour for me.
I’m finding it harder to crochet at the moment as
my dad’s not been well and caring for him takes
114 Inside Crochet
The crocheting part is so soothing, but the
pattern-writing process is slightly more
stressful. Getting the m aths right for grading
all the different sizes is my least favourite part
of designing.
How do you balance work and home life
as a freelance designer?
I’m still waiting to master this! I have all the best
intentions for a Zen lifestyle, but there are balls of
wool everywhere, including all over my bedroom!
I wouldn’t have it any other way, though.
Which of your designs should we
make first?
I love m y Kaleidoscope Cardigan. I get so
m any com plim ents when I wear m ine and the
colourways are endless – you can go to town
with bright shades, or opt for a m uted look.
What's on your hook right now?
I’m currently working on a collection for West
Yorkshire Spinners using their Elem ents
yarn, so a beautiful dress for their collection
is currently on my hook. Then next up will be
designs for my new book, which I’m superexcited about! It’s only in the early stages, but
I’m so thrilled to be publishing a second title.
Follow Cassie on Instagram
@themissingyarn
Discover our 60 shade range and find
your local stockist at wyspinners.com
01535 664500
Winter Warmers
FOUR COSY JUMPERS TO KEEP YOU SNUG
2
Inside Crochet
Welcome
Whether it’s your first-ever crocheted garment, or you’re a veteran at hooking your
own wardrobe, there’s nothing quite like the feeling of saying, “I made it,” when
you get a compliment on your new jumper. While smaller accessories offer more
instant gratification, there’s something so satisfying about playing the longer
game, enjoying the soothing sight of stitches forming beautiful textures in your
fabric and seeing the different elements of a garment take shape on your hook.
At this time of year, keeping our minds and hands busy with our favourite craft
can have such a positive effect on our wellbeing too. In this pattern collection,
you’ll find four beautiful jumpers to make and wear, including Cassie Ward’s
retro-inspired Utopia Jumper, and Ali Campbell’s Rainbow Jumper with its
colourful stripes and slouchy fit. The fresh blue-and-white stripes of the Glenna
Jumper created by Rhian Drinkwater are inspired by traditional Cornish pottery,
while Claire Montgomerie’s simple Charlotte Sweater works up fast in a chunky
yarn, while gentle waist-shaping ensures a flattering fit.
Stay cosy!
L ds
LINDSEY HARRAD, COMMISSIONING EDITOR
Managing Editor: Sarah Moran • Art Editor: Stephanie Peat • Deputy Editor: Lindsey Harrad • Sub Editor: Suzanne Juby
Pattern Editor: Rhian Drinkwater • Technical Editors: Charles Voth, Rachel Vowles • Additional artwork: Shutterstock
Styling & Photoshoot Editor: Claire Montgomerie • Photographers: Leanne Jade, Kirsten Mavric, Britt Spring
©Tailor Made Publishing Ltd 2023. All rights reserved. No part of this coverbook, or digital versions
of the coverbook, may be used, reproduced, copied or resold without written permission of the publisher.
www.insidecrochet.co.uk
3
DIFFICULTY LEVEL
ADD TO THE STASH
Buy this silk-blend yarn from
www.edencottageyarns.com
Cornish Jumper
Inspired by Cornish pottery, this classic top is a simple
make in a gorgeous lightweight yarn.
by RHIAN DRINKWATER
MATERIALS
● Eden Cottage Yarns Milburn 4ply,
85% Bluefaced Leicester wool/15% silk,
50g/200m/218yds
Yarn A: Estuary x 4 (4, 5, 5) balls
Yarn B: Natural x 4 (4, 5, 5) balls
● 3.5mm hook
TENSION
Work 9½ V-sts and 13 rows to measure
10 x 10cm/4 x 4in using 3.5mm hook,
or size required to obtain tension.
pattern is worked with approximately
5cm/2in negative ease.
BACK
With yarn B and 3.5mm hook,
110 (122, 137, 152)ch.
Row 1: 1tr in fifth ch from hook (t-ch
counts as 1tr, 1ch), *miss 2ch, V-st (see
Special Stitches) in next ch; rep from * to
end, turn – 36 (40, 45, 50) V-sts.
Rows 2–4: 4ch (counts as 1tr, 1ch), tr in
ch-sp, *V-st in next ch-sp; rep from * to
end, turn.
START
DESIGNER BIOGRAPHY
Rhian is a crochet and knitting designer,
and the pattern editor of Inside Crochet.
She likes practical projects that fit into
your wardrobe, and tries to design
garments and accessories that can be
worn every day.
SPECIAL STITCHES
Raised treble front (rtrf): Insert hook
around post of next st from front to back
to front, yoh, pull through loop, complete
tr as normal.
Raised treble back (rtrb): Insert hook
around post of next st from back to front
to back, yoh, pull through loop, complete
tr as normal.
V-st: (1tr, 1ch, 1tr) in same st or ch-sp.
PATTERN NOTES
When changing colours, fasten off old
colour at end of row and begin next row
with new colour.
The V-st fabric is quite stretchy, and the
4
Inside Crochet
Change to yarn A.
Row 5: 3ch (counts as 1tr), tr in ch-sp,
*V-st in next ch-sp; rep from * to end, turn.
Row 6: 3ch (counts as 1tr), tr in ch-sp,
*V-st in next ch-sp; rep from * to last 2tr,
1tr in next tr, turn.
Row 7: 3ch (counts as 1tr), *V-st in next
ch-sp; rep from * to last 2tr, 1tr in next tr,
turn.
Row 8: 3ch (counts as 1tr), *V-st in next
ch-sp; rep from * to last tr, 1tr in last tr, turn.
Change to yarn B.
Continue to change colours every four rows
throughout.
Row 9: 4ch (counts as 1tr, 1ch), tr in next
V-st ch-sp, *V-st in next ch-sp; rep from *
to end, turn.
Row 10: 4ch (counts as 1tr, 1ch), tr in
ch-sp, *V-st in next ch-sp; rep from * to
end, turn.
Rep Rows 5–10, keeping colour changes in
pattern as set – 32 (36, 41, 46) V-sts.
Rows 17–22: 4ch (counts as 1tr, 1ch), tr
in ch-sp, *V-st in next ch-sp; rep from * to
end, turn.
Row 23: 3ch (counts as 1tr), V-st in ch-sp,
*V-st in next ch-sp; rep from * to end, 1tr
in final ch-sp, turn.
Row 24: 3ch (counts as 1tr), V-st in ch-sp,
*V-st in next ch-sp; rep from * to end,
1tr in sp between last V-st and t-ch of
previous row, turn.
Rows 25 & 26: As Row 24.
Row 27: 3ch (counts as 1tr), 1tr in sp
between V-st and final tr of previous row,
*V-st in next ch-sp; rep from * to end,
2tr between last V-st and t-ch of previous
row, turn.
Row 28: 3ch (counts as 1tr), 1tr in sp
between final 2 tr of previous row, *V-st in
next ch-sp; rep from * to end, 2tr between
last tr and t-ch of previous row, turn.
Rows 29 & 30: As Row 28.
Row 31: 4ch (counts as 1tr, 1ch), 1tr in sp
between final 2 tr of previous row, *V-st
in next ch-sp; rep from * to end, V-st in
sp between last tr and t-ch of previous
row, turn.
Row 32: 4ch (counts as 1tr, 1ch), tr in
ch-sp, *V-st in next ch-sp; rep from * to
end, turn.
Rows 33 & 34: As Row 32.
Rep Rows 23–32 – 36 (40, 45, 50) V-sts.
ARMHOLE SHAPING
Join yarn in third (fourth, fourth, fifth) ch-sp
from edge, 4ch, 1tr in same ch-sp, work in
V-st across to 2 (3, 3, 4) ch-sps from end,
turn – 32 (34, 39, 42) V-sts.
www.insidecrochet.co.uk
5
18.5 (19.5, 21, 22)cm
7¼ (7¾, 8¼, 8¾)in
58.5 (59.5, 61, 62)cm
23 (23½, 24, 24½)in
76 (86.5, 96.5, 106.5)cm
30 (34, 38, 42) in
40cm
15¾in
Next Row: 3ch, 1tr in same ch-sp, work
in V-st across to last ch-sp, 2tr in last
ch-sp, turn.
Next Row: 3ch, V-st in next ch-sp, work
in V-st across to last ch-sp, 1tr in last
ch-sp, turn.
Next Row: 4ch (counts as 1tr, 1ch), tr in
ch-sp, *V-st in next ch-sp; rep from * to
end, turn – 30 (32, 37, 40) V-sts.
Rep last three rows zero (zero, one, two)
more time(s) – 30 (32, 35, 36) V-sts. **
Continue to work straight until Back
measures 18.5 (19.5, 21, 22)cm/7¼ (7¾,
8¼, 8¾)in from beginning of armhole
shaping, ending with a WS row.
NECK SHAPING
Next Row: 3ch, 1tr in same ch-sp, 8 (8, 9,
9) V-sts, 1tr in next ch-sp, turn.
Next Row: 3ch, 1tr in next ch-sp, 7 (7, 8,
8) V-sts, 1tr in last ch-sp.
Fasten off.
Rejoin yarn to 10th (10th, 11th, 11th) ch-sp
from end with same side facing.
Next Row: 3ch, V-st in next ch-sp, 7 (7, 8,
8) V-sts, 2tr in last ch-sp, turn.
Next Row: 3ch, V-st in next ch-sp,
6 (6, 7, 7) V-sts, 1tr in next ch-sp, 1tr
in turning ch-sp.
Fasten off.
FRONT
Work as for Back to **.
Continue to work straight until Front
measures 11 (12, 13.5, 14.5)cm/4¼ (4¾,
5¼, 5¾)in from beginning of armhole
shaping, ending with a WS row.
NECK SHAPING
Row 1: 4ch (counts as 1tr, 1ch), 1tr in
ch-sp, (V-st in next ch-sp) 10 (10, 11, 11)
times, 1tr in next ch-sp, turn.
Row 2: 4ch (counts as 1tr, 1ch), tr in ch-sp
of first V-st, *V-st in next ch-sp; rep from *
to end, turn.
Row 3: 4ch (counts as 1tr, 1ch), 1tr in
ch-sp, (V-st in next ch-sp) nine (nine, ten,
ten) times, 1tr in next ch-sp, turn.
Row 4: 4ch (counts as 1tr, 1ch), tr in ch-sp
of first V-st, *V-st in next ch-sp; rep from *
to end, turn.
Row 5: 4ch (counts as 1tr, 1ch), 1tr in
ch-sp, (V-st in next ch-sp) eight (eight, nine,
nine) times, 1tr in next ch-sp, turn.
Row 6: 4ch (counts as 1tr, 1ch), tr in ch-sp
of first V-st, *V-st in next ch-sp; rep from *
to end, turn.
Row 7: 4ch (counts as 1tr, 1ch), 1tr in
6
Inside Crochet
ch-sp, (V-st in next ch-sp) eight (eight, nine,
nine) times, turn.
Row 8: 4ch (counts as 1tr, 1ch), tr in ch-sp,
*V-st in next ch-sp; rep from * to end, turn.
Row 9: 4ch (counts as 1tr, 1ch), 1tr in
ch-sp, (V-st in next ch-sp) eight (eight, nine,
nine) times, turn.
Row 10: 4ch (counts as 1tr, 1ch), tr in
ch-sp, *V-st in next ch-sp; rep from * to
end, turn.
Row 11: 4ch (counts as 1tr, 1ch), 1tr in
ch-sp, (V-st in next ch-sp) eight (eight, nine,
nine) times, turn.
Row 12: 3ch (counts as 1tr), V-st in ch-sp
of second V-st, (V-st in next ch-sp) six (six,
seven, seven) times, 1tr in last ch-sp, turn.
Fasten off.
With RS facing, rejoin yarn to last row
before Neck Shaping, leaving a gap of 6 (8,
9, 10) unworked V-sts.
Row 1: 3ch (counts as 1tr), (V-st in next
ch-sp) 11 (11, 12, 12) times, turn.
Row 2: 4ch (counts as 1tr, 1ch), 1tr in
ch-sp, (V-st in next ch-sp) 10 (10, 11, 11)
times, turn.
Row 3: 3ch (counts as 1tr), V-st in ch-sp of
second V-st, (V-st in next ch-sp) nine (nine,
ten, ten) times, turn.
Row 4: 4ch (counts as 1tr, 1ch), 1tr in
ch-sp, (V-st in next ch-sp) nine (nine, ten,
ten) times, turn.
Row 5: 3ch (counts as 1tr), V-st in ch-sp of
second V-st, (V-st in next ch-sp) nine (nine,
ten, ten) times, turn.
Row 6: 4ch (counts as 1tr, 1ch), 1tr in
ch-sp, (V-st in next ch-sp) eight (eight, nine,
nine) times, turn.
Row 7: 4ch (counts as 1tr, 1ch), 1tr in
ch-sp, (V-st in next ch-sp) eight (eight, nine,
nine) times, turn.
Row 8: 4ch (counts as 1tr, 1ch), 1tr in
ch-sp, (V-st in next ch-sp) eight (eight, nine,
nine) times, turn.
Row 9: 4ch (counts as 1tr, 1ch), 1tr in
ch-sp, (V-st in next ch-sp) eight (eight, nine,
nine) times, turn.
Row 10: 4ch (counts as 1tr, 1ch), 1tr in
ch-sp, (V-st in next ch-sp) eight (eight, nine,
nine) times, turn.
Row 11: 4ch (counts as 1tr, 1ch), 1tr in
ch-sp, (V-st in next ch-sp) eight (eight, nine,
nine) times, turn.
Row 12: 3ch (counts as 1tr), V-st in ch-sp
of second V-st, (V-st in next ch-sp) six (six,
seven, seven) times, 1tr in final ch-sp.
Fasten off.
With RS together, seam Front and Back
together at sides using yarn A and dc sts.
Seam shoulders together with yarn used for
final row of shoulders and dc sts.
Turn RS out.
SLEEVES
Make two
Rejoin yarn A to top of armhole, two
rows to right of shoulder seam, with
RS facing.
Row 1: 4ch (counts as 1tr, 1ch), 1tr in
same row end, (V-st in next row end)
three times, turn.
Row 2: 4ch (counts as 1tr, 1ch), 1tr in
ch-sp, *V-st in next ch-sp; rep from *
to end, yoh, put hook through t-ch of
previous row and through next row end,
yoh, complete tr as normal, 1ch, 1tr in
next row end (V-st formed), turn.
Repeat Row 2 until all row ends are
worked, taking in two rows of the armhole
with each row of cap, and changing colour
every four rows – approximately 28 (29,
31, 32) V-sts.
Note: The number of V-sts here will
depend on how many rows you worked
for the armhole – do not worry about
getting the exact amount given.
Next Row: As Row 2, then work V-sts in
V-sts of previous row in last row of Body
before armhole shaping to seam, turn.
Next Row: 3ch (does not count as st),
1tr in ch-sp, 1ch, 1tr in next ch-sp (V-st
formed, 1 st decreased), work as Row 2,
then work V-sts in V-sts of previous row in
last row of Body before armhole shaping,
sl st to first V-stitch of row to join, turn
– approximately 31 (34, 36, 39) V-sts.
Dec Rnd: Sl st in ch-sp, 4ch (counts as 1tr,
1ch), 1tr in next ch-sp (V-st formed, 1 st
decreased), *V-st in next ch-sp; rep from
* to end, sl st to 4ch to join, turn – 30 (33,
35, 38) V-sts.
Rep Dec Rnd until you have 24 (27, 30, 32)
V-sts around.
Plain Rnd: Sl st in ch-sp, 4ch (counts as
1tr, 1ch), 1tr in same ch-sp (V-st formed),
*V-st in next ch-sp; rep from * to end, sl st
to 4ch to join, turn.
Work Dec Rnd.
Work Plain Rnd four times.
Work Dec Rnd – 22 (25, 28, 30) V-sts.
Work as Plain Rnd until Sleeve measures
8cm/3¼in shorter than desired length.
Work Dec Rnd followed by three Plain
Rnds, twice.
Fasten off.
WAISTBAND
This is worked down from the seamed
body of the jumper.
Join yarn A to bottom of Body at one of
the side seams.
Rnd 1: 3ch (counts as first tr), work in
tr around working approximately 1tr in
bottom of each V-st and 2tr in between,
sl st to first st to join, do not turn.
Rnd 2: 3ch (counts as first tr), rtrb, (rtrf,
rtrb) around, sl st to first st to join, do
not turn.
Rep Rnd 2 two more times.
Fasten off.
CUFF
Join in yarn A.
Rnd 1: 3ch (counts as first tr), *miss
ch-sp, 2tr; rep from * around finishing miss
ch-sp, 1tr, sl st to first st to join, do not turn.
Rnd 2: 3ch (counts as first tr), rtrb (see
Special Stitches), (rtrf (see Special Stitches),
rtrb) around, sl st to first st to join, do
not turn.
Rep Rnd 2 two more times.
Fasten off.
TO FIT BUST
ACTUAL BUST
LENGTH
NECKBAND
Join yarn A to right shoulder seam.
Rnd 1: 3ch (counts as first tr), work in tr
evenly around neck opening, sl st to first
st to join, do not turn.
Rnd 2: 3ch (counts as first tr), rtrb,
(rtrf, rtrb) around, sl st to
END
first st to join.
Fasten off.
S
M
L
XL
81.5
91.5
101.5
112
cm
32
36
40
44
in
76
86.5
96.5
106.5
cm
30
34
38
42
in
58.5
59.5
61
62
cm
23
23½
24
24½
in
www.insidecrochet.co.uk
7
DIFFICULTY LEVEL
ADD TO THE STASH
Buy this pure cotton yarn from
www.lindehobby.co.uk
Utopia Jumper
Granny squares are used to create this bright and
cheerful patchwork jumper.
by CASSIE WARD
MATERIALS
● Yarn and Colors Must Have 4ply,
100% cotton, 50g/125m/137yds
Yarn A: Black 100 x 7 (8, 9, 10) balls
Yarn B: Mustard 015 x 1 ball
Yarn C: Sunflower 014 x 1 ball
Yarn D: Lavender 056 x 1 ball
Yarn E: Pistachio 084 x 1 ball
Yarn F: Cotton Candy 037 x 1 ball
Yarn G: Girly Pink 035 x 1 ball
Yarn H: Sunset 021 x 1 ball
Yarn I: Cantaloupe 016 x 1 ball
Yarn J: Fuchsia 049 x 1 ball
Yarn K: Turquoise 065 x 1 ball
Yarn L: Sapphire 068 x 1 ball
Yarn M: Orchid 052 x 1 ball
● 3.5mm hook
YARN ALTERNATIVES
Any 4ply weight yarn would be a suitable
substitute for this design.
START
LARGE GRANNY SQUARE
SQUARE ONE
Make 11
Rnd 1: Yarn B.
Rnd 2: Yarn C.
Rnd 3: Yarn A.
Rnd 4: Yarn D.
Rnd 5: Yarn E.
Rnd 6: Yarn F.
Rnd 7: Yarn G.
Rnd 8: Yarn A.
SQUARE TWO
Make 11
Rnd 1: Yarn H.
Rnd 2: Yarn I.
Rnd 3: Yarn A.
Rnd 4: Yarn J.
Rnd 5: Yarn K.
Rnd 6: Yarn L.
Rnd 7: Yarn M.
Rnd 8: Yarn A.
TENSION
Work Small Granny Square to measure
4 x 4cm/1½ x 1½in, Medium Granny to
measure 8 x 8cm/3¼ x 3¼in and
Large Back Granny Square to measure
16 x 16cm/6¼ x 6¼in, all using 3.5mm
hook or size required to obtain tension.
DESIGNER BIOGRAPHY
Cassie absolutely loves creating projects
with the beloved granny square – they are
so simple, bold and fun!
8
Inside Crochet
Using yarn as indicated and 3.5mm hook,
4ch, sl st to first ch to form ring.
Rnd 1: (RS) 3ch (counts as 1tr here and
throughout), 2tr in ring, 2ch, (3tr, 2ch)
three times in ring, join with sl st to top
of 3ch, turn.
Change to next yarn.
Rnd 2: (WS) 3ch, (2tr, 2ch, 3tr) in same
2ch-sp, (3tr, 2ch, 3tr) in each 2ch-sp
around, sl st to join, turn.
Change to next yarn.
Rnd 3: 3ch, 2tr in sp between 3tr
groups, (3tr, 2ch, 3tr) in next 2ch-sp,
*3tr in next sp, (3tr, 2ch, 3tr) in next
2ch-sp; rep from * twice more, sl st to
top of 3ch, turn.
Change to next yarn.
Rnd 4: 3ch, 2tr in sp between 3tr
groups, (3tr, 2ch, 3tr) in next 2ch-sp,
*3tr in each sp to next corner 2ch-sp,
(3tr, 2ch, 3tr) in 2ch-sp; rep from *
twice more, 3tr in next sp, sl st to top
of 3ch, turn.
Change to next yarn.
Rnd 5: 3ch, 2tr in same sp, 3tr in each
sp to next corner, (3tr, 2ch, 3tr) in next
ch-sp, *3tr in each sp to next corner
2ch-sp, (3tr, 2ch, 3tr) in 2ch-sp, rep; from
* twice more, 3tr in each sp to end, sl st
to top of 3ch, turn.
Change to next yarn.
Rnd 6: As Rnd 5.
Change to next yarn.
Rnd 7: As Rnd 5.
Change to next yarn.
Rnd 8: As Rnd 5 (can be worked as above
or using the continual joining method).
MEDIUM GRANNY SQUARES
SQUARE ONE
Make 11
Rnd 1: Yarn G.
Rnd 2: Yarn E.
Rnd 3: Yarn B.
Rnd 4: Yarn A.
www.insidecrochet.co.uk
www.insidecrochet.co.uk 9
Left Sleeve
Cuff
66cm
26in
Cuff
Shoulder
Shoulder
Right Sleeve
43cm
17in
Small Squares - make 4 in each shade
112 ( 118, 124, 130, 136) cm
44 ( 46½, 48¾, 51¼, 53½) in
½
Small Squares - make 4 in each shade
¾
¼
½
Large Square One - make 11
Medium Square Three - make 9
Medium Square Two - make 12
Large Square Two - make 11
Medium Square One - make 11
SQUARE TWO
SMALL GRANNY SQUARE
Make 12
Rnd 1: Yarn K.
Rnd 2: Yarn J.
Rnd 3: Yarn H.
Rnd 4: Yarn A.
Make 48, four in each colour
With suggested yarn and 3.5mm hook,
4ch, sl st to first ch to form ring.
Rnd 1: (RS) 3ch (counts as 1tr here and
throughout), 2tr in ring, 2ch, (3tr, 2ch)
three times in ring, join with sl st to top
of 3ch, turn.
Change to yarn A.
Rnd 2: (WS) 2ch, (2htr, 2ch, 3htr) in same
2ch-sp, (3htr, 2ch, 3htr) in each 2ch-sp,
sl st to join, turn.
Rnd 3 can be worked as above or
using the continual joining method,
remembering to do htr instead of tr sts.
SQUARE THREE
Make nine
Rnd 1: Yarn C.
Rnd 2: Yarn I.
Rnd 3: Yarn L.
Rnd 4: Yarn A.
These can be joined by working in blo
of each of sts or using continual joining
method in Rnd 4.
Follow patt for Rnds 1–3 of Large Granny
Square working number of squares in
colour combinations as set.
Rnd 4: Using yarn A, work as Large
Granny Square working htr instead of tr
(or use the continual joining method).
Inside Crochet
FRONT TOP EDGING
With RS facing, join yarn A at top
edge corner.
Row 1: 1ch (does not count as a st),
evenly work 88 (92, 96, 100,104)dc along,
turn.
Row 2: 3ch (counts as 1tr), tr to end, turn.
Row 3: Rep Row 2.
FINISHING
SHAPE NECK
If you haven’t used the continual joining
method, sew together squares using
the schematic as a guide for Front, Back
and Sleeves.
Row 1: 3ch, 30 (32, 34, 36, 38)tr, turn.
Row 2: 3tr, tr to end.
Fasten off.
WIDENING ROWS (SIZES M-XL ONLY)
With yarn A, rejoin yarn at top left corner
of Front/Back (see red cross), 3ch,
10
(counts as first tr) work 87tr down long
edge, turn.
Work - (zero, one, two, three) more row(s).
Fasten off.
Repeat along second edge joining yarn
at green cross.
With RS facing rejoin yarn A 31 (33, 35. 37,
39) sts in from other side, 3ch, tr to end.
Row 2: 3ch, tr to end.
Fasten off.
BACK TOP EDGING
With RS facing, join yarn A at top edge
corner.
Row 1: 1ch (does not count as a st), evenly
work 88 (92, 96, 100,104)dc along, turn.
Rows 2–4: 3ch (counts as first tr), tr to
end, turn.
Fasten off.
NECKBAND EDGING
Join Front to Back at shoulders.
Join yarn A at centre back neck, work two
rnds in dc around entire neck edge.
Fasten off.
(counts as 1tr), evenly distribute 49tr along
top of sleeve, turn.
Work extra rows as tr as desired to widen.
shoulder seam. Sew sleeve to body.
Sew side and sleeve seams with a neat
whip stitch.
CUFFS
BOTTOM EDGING
With 3mm hook, join yarn A to cuff edge.
Row 1: 1ch (does not count as a st), dc to
end of cuff edge, turn.
Rows 2 & 3: As Row 1.
Fasten off.
With 3mm hook, join yarn A at bottom
left side seam.
Rnd 1: 1ch (does not count as a st), dc
around, sl st to join, turn.
Rnds 2–4: As Rnd 1.
MAKING UP
FINISHING
Fold sleeve in half placing fold in line with
Weave in ends.
S
SLEEVES
To lengthen or widen sleeves (optional),
work as follows:
To lengthen, rejoin yarn A to top of
shoulder edge, 3ch (counts as 1tr) tr to
end of row, turn.
Work extra rows as tr as desired to
lengthen.
To widen, rejoin yarn A to cuff edge, 3ch
ACTUAL BUST
LENGTH TO SHOULDER
SLEEVE LENGTH
M
L
END
XL
2XL
112
118
124
130
136
cm
44
46½
48¾
51¼
53½
in
66
66
66
66
66
cm
26
26
26
26
26
in
43
43
43
43
43
cm
17
17
17
17
17
in
www.insidecrochet.co.uk
11
DIFFICULTY LEVEL
Charlotte Sweater
This simple sweater works up super-fast due to the bulky yarn used, but
some gentle waist shaping ensures it remains flattering.
by CLAIRE MONTGOMERIE
MATERIALS
● Twilleys Freedom Wool, 100% wool,
50g/50m/55yds
Shade: Oyster Grey 1122 x 10 (10, 11,
13, 15, 17) balls
● 10mm hook
YARN ALTERNATIVES
Unfortunately this yarn is now
discontinued. A bulky weight yarn will
substitute well here. Twilleys Freedom
Wool is a lightweight and soft roving yarn,
so look out for those properties.
TENSION
Work 6.5htr and 4 rows to measure
10 x 10cm/4 x 4in using 10mm hook,
or size required to obtain correct tension.
DESIGNER BIOGRAPHY
Claire is a textiles teacher and designer
specialising in knit and crochet. Find out
more at www.montyknits.blogspot.com.
SPECIAL STITCHES
Raised Treble Front (rtrf): Insert hook
around post of next st from front to back
to front, yoh, pull through loop, complete
tr as normal.
PATTERN NOTES
This sweater is worked top down in one
piece, working in the round.
Slight funnel neck can be worn up, or
12
Inside Crochet
folded over to the inside and stitched
neatly into place with whip stitch to create
a sandwich edge.
YOKE
With 10mm hook, make 26 (28,
30, 32, 36, 38)ch and join into
a ring with sl st to first ch, being careful
not to twist chain.
Rnd 1: 2ch (counts as 1htr here and
throughout), 1htr in each ch around, join
rnd with sl st – 26 (28, 30, 32, 36, 38)htr.
Rnds 2 & 3: 2ch, 1htr in each st around, join
rnd with sl st – 26 (28, 30, 32, 36, 38)htr.
Rnd 4: 2ch, 3 (3, 4, 4, 5, 6)htr, * 2htr in
next st, (1ch, 1htr, 1ch) in next st, [2htr in
next st] twice, (1ch, 1htr, 1ch) in next st,
2htr in next st, 7 (8, 9, 10, 12, 12)htr; rep
from * ending with 3 (4, 4, 5, 6, 7)htr,
join rnd with sl st – 34 (36, 38, 40, 44,
46)htr.
START
Rnd 5: 2ch, *1htr in each st to st before
1ch-sp, 2htr in next st, 1ch, miss 1ch-sp,
1rtrf (see Special Stitches) in next st, 1ch,
miss 1ch-sp, 2htr in next st; rep from * three
more times, 1htr in each htr to end, join rnd
with sl st – 42 (44, 46, 48, 52, 54)htr.
Rnds 6–9 (9, 10, 11, 11, 11): As Rnd 5,
increasing 8htr every rnd until there are
74 (76, 86, 96, 100, 102)htr.
Size XS only
Rnd 10: 2ch, *1htr in each st to 1ch-sp,
1ch, miss 1ch-sp, 1rtrf in next st, miss
1ch-sp, 1ch; rep from * three more times,
1htr in each st to end – 74htr.
Size S only
Rnd 10: 2ch, 2htr in first st, **1htr in
each st to 1ch-sp, 1ch, miss 1ch-sp, 1rtrf
in next st, 1ch, miss 1ch-sp, 2htr in next
st, 1htr in each htr to st before 1ch-sp,
2htr in next st, 1ch, miss 1ch-sp, 1rtrf in
next st, miss 1ch-sp, 1ch,** 1htr in each
htr to centre front, 2 sts in next st; rep
between ** and ** once more, 1htr in
each st to end, join rnd with sl st – 82htr.
Size 2XL only
Rnd 12: 2ch, *1htr in each st to 2 sts
before 1ch-sp, 2htr in each of next 2 sts,
1ch, miss 1ch-sp, 1rtrf in next st, miss
1ch-sp, 1ch, 2htr in next st, 1htr in each
st to st before 1ch-sp, 2htr in next st, 1ch,
miss 1ch-sp, 1rtrf in next st, miss 1ch-sp,
1ch, 2htr in each of next 2 sts; rep from
* once more, 1htr in each htr to end, join
rnd with sl st – 114htr.
BODY
Divide for armholes as follows:
Size XS only
Rnd 1: 2ch, *1htr in each st to next
1ch-sp, 1htr in 1ch-sp, 1htr in rtrf, miss
1ch-sp, 1ch, miss next 14htr for sleeve,
miss next 1ch-sp, 1htr in rtrf, 1htr in next
1ch-sp; rep from * once more, 1htr in
each st to end, join rnd with sl st
– 50htr.
www.insidecrochet.co.uk
13
54 (55, 55, 57, 57, 60)cm
21¼ (21¾, 21¾, 22½, 22½, 23¾)in
80 (92, 101, 110, 120, 132)cm
31½ (36¼, 40, 43¼, 47¼, 52)in
40 (40, 40, 41, 41, 45)cm
16 (16, 16, 16¼, 16¼, 17¾)in
62 (68, 76, 86, 96, 107)cm
24½ (26¾, 30, 34, 38, 42)in
80 (92, 101, 110, 120, 132)cm
31½ (36¼, 40, 43¼, 47¼, 52)in
Sizes S, M, L, XL & 2XL only
Rnd 1: 2ch, *1htr in each st to next
1ch-sp, 1htr in 1ch-sp, 1htr in rtrf, 1htr
in next 1ch-sp, - (1, 2, 2, 3, 2)ch, miss next
- (16, 16, 18, 18, 20)htr for sleeve, 1htr in
1ch-sp, 1htr in rtrf, 1htr in next 1ch-sp;
rep from * once more, 1htr in each st to
end, join rnd with sl st – - (58, 62, 68, 72,
82)htr.
All sizes
Rnd 2: 2ch, [1htr in each st to ch-sp, 1htr
in each of next 1 (1, 2, 2, 3, 2)ch] twice,
1htr in each htr to end, join rnd with sl st
– 52 (60, 66, 72, 78, 86)htr.
Rnds 3–5: 2ch, 1htr in each st around, join
rnd with sl st – 52 (60, 66, 72, 78, 86)htr.
17)htr, htr2tog, htr to end, join rnd with
sl st – 40 (48, 54, 60, 66, 74)htr.
Size XS only
Rnd 9: 2ch, 1htr in each st around, join
rnd with sl st – 40htr.
Sizes S, M, L, XL & 2XL only
Rnd 9: 2ch, 3 (4, 4, 5, 6)htr, htr2tog,
10 (11, 13, 14, 16)htr, htr2tog, 10 (12, 13,
15, 17)htr, htr2tog, 10 (11, 13, 14, 16)htr,
htr2tog, htr to end, join rnd with sl st
– 44 (50, 56, 62, 70)htr.
Rnd 10: 2ch, 1htr in each st around, join
rnd with sl st – 44 (50, 56, 62, 70)htr.
All Sizes
HIP SHAPING
WAIST SHAPING
Rnd 6: 2ch, 5 (6, 7, 7, 8, 9)htr, htr2tog,
11 (13, 14, 16, 17, 19)htr, htr2tog, 11 (13,
15, 16, 18, 20)htr, htr2tog, 11 (13, 14, 16,
17, 19)htr, htr2tog, htr to end, join rnd
with sl st – 48 (56, 62, 68, 74, 82)htr.
Rnd 7: 2ch, 4 (5, 6, 6, 7, 8)htr, htr2tog,
10 (12, 13, 15, 16, 18)htr, htr2tog, 10 (12,
14, 15, 17, 19)htr, htr2tog, 10 (12, 13, 15,
16, 18)htr, htr2tog, htr to end, join rnd
with sl st – 44 (52, 58, 64, 70, 78)htr.
Rnd 8: 2ch, 3 (4, 5, 5, 6, 7)htr, htr2tog,
9 (11, 12, 14, 15, 17)htr, htr2tog, 9 (11, 13,
14, 16, 18)htr, htr2tog, 9 (11, 12, 14, 15,
14
Inside Crochet
Rnd 1: 2ch, 3 (3, 4, 4, 5, 6)htr, 2htr in
next st, 9 (10, 11, 13, 14, 16)htr, 2htr in
next st, 9 (10, 12, 13, 15, 17)htr, 2htr in
next st, 9 (10, 11, 13, 14, 16)htr, 2htr in
next st, htr to end, join rnd with sl st
– 44 (48, 54, 60, 66, 74)htr.
Rnd 2: 2ch, 4 (4, 5, 5, 6, 7)htr, 2htr in
next st, 10 (11, 12, 14, 15, 17)htr, 2htr in
next st, 10 (11, 13, 14, 16, 18)htr, 2htr in
next st, 10 (11, 12, 14, 15, 17)htr, 2htr in
next st, htr to end, join rnd with sl st
– 48 (52, 58, 64, 70, 78)htr.
Rnd 3: 2ch, 5 (5, 6, 6, 7, 8)htr, 2htr in
next st, 11 (12, 13, 15, 16, 18) htr, 2htr in
next st, 11 (12, 14, 15, 17, 19)htr, 2htr in
next st, 11 (12, 13, 15, 16, 18) htr, 2htr in
next st, htr to end, join rnd with sl st
– 52 (56, 62, 68, 74, 82)htr.
Size XS only
Rnds 4–6: 2ch, 1htr in each st around,
join rnd with sl st – 52htr.
Sizes S, M, L, XL & 2XL only
Rnd 4: 2ch, 6 (7, 7, 8, 9)htr, 2htr in next
st, 13 (14, 16, 17, 19)htr, 2htr in next st,
13 (15, 16, 18, 20)htr, 2htr in next st,
13 (14, 16, 17, 19)htr, 2htr in next st, htr
to end, join rnd with sl st – 60 (66, 72,
78, 86)htr.
Rnd 5: 2ch, 1htr in each st around, join
rnd with sl st – 60 (66, 72, 78, 86)htr.
Fasten off, or work a few extra rounds
straight to desired length.
SLEEVES
Rejoin yarn to underarm, in unworked
bottom loop of first of 1 (2, 2, 3, 2)ch.
Rnd 1: 2ch, 1htr in next ch, 2htr along
post of htr from Body, 1htr in each of
next 14 (16, 16, 18, 18, 20)htr sleeve sts,
2htr along post of htr from body, join
rnd with sl st – 20 (22, 22, 24, 24, 26)htr.
Rnds 2–5: 2ch, 1htr in each st around,
join rnd with sl st – 20 (20, 22, 24, 24,
26)htr.
Rnd 6: 2ch, htr2tog, htr in each st to
last 2 sts, htr2tog, join rnd with sl st
– 18 (18, 20, 22, 22, 24)htr.
Rnds 7–9: 2ch, 1htr in each st around,
join rnd with sl st.
Rnd 10: 2ch, htr2tog, htr in each st to
last 2 sts, htr2tog, join rnd with sl st
– 16 (16, 18, 20, 20, 22)htr.
Rep last four rnds once more – 14 (14,
16, 18, 18, 20)htr.
Rnd 15: 2ch, 1htr in each st around, join
rnd with sl st.
TO FIT BUST
ACTUAL BUST
WAIST
HIPS
LENGTH
SLEEVE LENGTH
Sizes XS, S & M only
Rnd 16: 2ch, 1htr in each st around, join
rnd with sl st.
Fasten off.
Size 2XL only
Rnd 16: 2ch, 1htr in each st around, join
rnd with sl st.
Rnd 17: 2ch, htr2tog, htr in each st to last
2 sts, htr2tog, join rnd with sl st – 18htr.
Rnd 18: 2ch, 1htr in each st around, join
rnd with sl st.
Fasten off.
Sizes L & XL only
Rnd 16: 2ch, htr2tog, htr in each st to
last 2 sts, htr2tog, join rnd with sl st
– 16 (16)htr.
Rnd 17: 2ch, 1htr in each st around, join
rnd with sl st.
Fasten off.
FINISHING
Weave in all ends and block
lightly to shape.
END
XS
S
M
L
XL
2XL
71–76
81–86
91–96
101–106
111–116
121–126
cm
28–30
32–34
36–38
40–42
44–46
48–50
in
80
92
101
110
120
132
cm
31½
36¼
40
43¼
47¼
52
in
62
68
76
86
96
107
cm
24½
26¾
30
34
38
42
in
80
92
101
110
120
132
cm
31½
36¼
40
43¼
47¼
52
in
54
55
55
57
57
60
cm
21¼
21¾
21¾
22½
22½
23¾
in
40
40
40
41
41
42.5
cm
16
16
16
16¼
16¼
16¾
in
www.insidecrochet.co.uk
15
DIFFICULTY LEVEL
Rainbow Jumper
This oversized jumper is perfect for beginners, and just the
thing to use up all your scraps of yarn!
by ALI CAMPBELL
MATERIALS
● Rowan Pure Wool DK,
100% wool, 50g/130m/142yds
Remnants of various shades, equivalent
to 14 (15, 16) balls in total
● 4mm & 5mm hooks
● Stitch markers
● Yarn needle
YARN ALTERNATIVES
Unfortunately this yarn is now
discontinued. You can use any DK weight
wool or yarn for a similar effect.
TENSION
Work 15htr and 11 rows to measure
10 x 10cm/4 x 4in using a 4mm hook,
or size required to obtain tension.
Raised Half Treble Front (rhtrf): Work
htr around next st as follows: yoh, insert
hook from front in gap before next st,
return hook to front in gap after st, yoh,
pull up lp, yoh, draw through all 3 lps.
Raised Half Treble Back (rhtrb): Work
htr around next st as follows: yoh, insert
hook from back in gap before next st,
return hook to back in gap after st, yoh,
pull up lp, yoh, draw through all 3 lps.
SPECIAL STITCHES
Front Raised 2 Half Treble together
(2rhtrftog): [Yoh, insert hook from front
in gap before next st, return hook to front
in gap after st, yoh, pull up lp] twice, yoh,
draw through all 5 lps.
Foundation Treble Crochet (ftr): 3ch
(counts as tr), yoh, insert into the third
chain from hook and pull a loop through,
3 loops on hook, yoh and draw through
first loop only to create “1ch” (3 loops on
hook), [yoh and pull through 2 loops]
twice. Foundation treble crochet stitch
Reverse Double Crochet (rdc): Work
a row of dc in the opposite direction to
normal. Insert your hook in the next stitch
to the right and yoh, draw a loop through
to the front and twist your hook so that you
can grab the yarn again, yoh and draw
DESIGNER BIOGRAPHY
Ali loves teaching crochet and designing
unique crochet patterns.
16
completed (2ftr in total including the first
ch). *Yoh, insert hook into the “1ch” of the
last stitch and pull a loop through (3 lps on
hook), yoh and draw through first loop only
to create “1ch” (3 loops on hook), [yoh and
pull through 2 loops] twice; rep from * until
you have the desired amount of stitches.
Inside Crochet
through both twisted loops to complete
the stitch.
PATTERN NOTES
This oversized jumper is made in one piece.
The model is wearing the medium size with
25cm/10in of ease. Work the stitches using
colours of your choice and changing
colours randomly.
JUMPER
Row 1: With 4mm hook,
90 (98, 108)ftr (see
Special Stitches).
Row 2: 2ch (counts as 1tr here and
throughout), *1rtrf (see Special Stitches),
1rtrb (see Special Stitches); rep from * to
end, turn – 90 (98, 106) sts.
Row 3: 2ch, *1rtrf, 1rtrb; rep from * to
end, turn.
Rows 4–40 (40, 38): 1ch (counts as 1htr
here and throughout), htr to end, turn.
Row 41 (41, 39): 1ch, htr to end. Do not
fasten off.
START
Change to 5mm hook, 52 (60,
68)ch, turn – 142 (158, 176) sts.
Row 42 (42, 40): With 4mm hook, 1ch, htr
to end. Do not fasten off. Put loop on a
stitch marker. With another piece of the
www.insidecrochet.co.uk
www.insidecrochet.co.uk 17
38 (43, 48)cm
15 (17, 19)in
same colour yarn and sl st, join to turning
ch of prev row. With 5mm hook, 52 (60,
68)ch, fasten off. Now return to the loop
on the stitch marker, with 4mm hook, htr
to end, turn – 194 (218, 244) sts.
Rows 43 (43, 41)–62: 1ch, htr to end, turn.
Row 63: 1ch, 69 (81, 94)htr, change to
5mm hook, 56ch, change to 4mm hook,
miss 56 sts, htr to end, turn.
Row 64: 1ch, htr to end including each ch
of the 56ch, turn – 194 (218, 244) sts.
Rows 65–83 (83, 85): 1ch, htr to end,
turn. Fasten off.
Row 84 (84, 86): Miss 52 (60, 68) sts, join
yarn with sl st, 1ch, 1htr in same st as join,
htr in next 89 (97,105) sts.
Rows 85 (85, 87)–121: 1ch, htr to end,
turn – 90 (98, 106) sts.
Row 122: 1ch, dc to end, turn.
18
Inside Crochet
59 cm / 23in
NECK OPENING
122 (132, 142)cm
48 (52, 56)in
Row 123 & 124: 2ch, *1rtrf, 1rtrb; rep
from * to end, turn.
Fasten off but do not sew in end.
SEAM
Fold the jumper into shape placing the
ribbed edges together and pin along the
seams. With working yarn, dc evenly along
the side of the jumper, joining WS tog for
an exposed seam, work 2dc in the corner of
the underarm, then continue to dc evenly
along the arm to the cuff. Fasten off. Join
same yarn to the opposite side starting at
the ribbed hem and repeat.
With a colour of your choice and using
4mm hook, join yarn at one end of the
neck opening.
Row 1: 2ch. Mark this stitch and the stitch
at the opposite end of the opening. Rhtrf in
each st around the opening to 2 sts before
marked st, rhtrf2tog (see Special Stitches)
over next 2 sts, rhtrf in marked st, rhtrf2tog
over next 2 sts, rhtrf in each st around to
TO FIT BUST
CUFFS
With a colour of your choice and using
4mm hook, join yarn at sleeve seam. 2ch,
60 (60, 68)htr evenly around to end, join
with a sl st to 2ch.
Next 2 Rows: 2ch, *1rhtrf (see Special
Stitches), 1rhtrb (see Special Stitches); rep
from * to end.
Fasten off. Repeat on the other cuff.
2 sts before marked st, rhtrf2tog over next
2 sts, join with a sl st to 2ch.
Rows 2–5: Rep Row 1, changing colour at
Row 3 if desired.
Do not fasten off.
Row 6: 1ch, rdc (see Special Stitches)
to end. Fasten off.
NECK
ACTUAL BUST
SLEEVE SEAM
LENGTH
END
FINISHING
Weave in all ends.
S
M
L
81–91
93–98
102–108
cm
32–36
38–39
40–44
in
122
132
142
cm
48
52
56
in
38
43
48
cm
15
17
19
in
59
59
59
cm
23
23
23
in
www.insidecrochet.co.uk
19