/


Теги: small arms military
Год: 1942

Текст
NOT TO BE PUBLISHED
The information given in (his йосинип»
is not to be (.•ommunkaled. either dirictij
or indirt-Ltfy, to the Press nr to an\ person
not hn!d!ng an official position in His
Majesty Xervico.
Small Arms Training
Volume I, Pamphlet No. 12
Bayonet
1942
(This Pamphlet supersedes the 1937 Edison»
Crown Copyright Reserved
Jlv Command ef 'he Army im>,
Тнй War Office,
1 Oth /une, 1942.
ii
DISTRIBUTION
Scab-
All Arms and training establishments .. ... P
S.A.S. Hythe wing ... ... . ... ... 140
S.A.S Netheravon wing ... .. ... ... ... 50
<
CONTENTS
Page
Central ... ... . ... ... . 1
Lesson I. .On guard, hip firing, and cot.trolb : charge. -
Lesson 2. Th'- points ... ... ... ... .. ;
Lesson 3. The-training stick end > If d .-fence- ...
1 essmt 4. The assault pt.iCt-a •• . .....
1
GENERAL
1. Object.—The sole object of weapon training is to teach
all ranks the most efficient way of handling their weapons
in order to kill the enemy. Instructors will always bear this
fact in mind and will continually impress it upon those whom
they instruct.
2. It is as impossible to drill men into becoming good
bayonet fighters as it is undesirable for those of different
physique to adopt exactly the same style. Words of com-
mand will, therefore, be reduced to a minimum, and men
will be encouraged to develop a style suitable to their size
and build, provided that the methods laid down are followed.
3. By his own example the instructor must instil a spirit
of energy and determination in his squad. During bayonet
training all movements of individuals or squads, unless
otherwise specified, will be carried out at the double. In the
assault, troops will normally be encouraged to shout, to raise
their own morale and to intimidate the enemy. There will
be occasions, however, when a silent assault will be necessary
in order to gain surprise. Words of command should be
replaced by quick signs or signals, preceded by such caution
as is necessary. The squad will thus be quickened up to
work by eye and ear as rapidly as possible.
4. Instructors must appreciate that, while the lessons are
designed to be taught in one period, more time will be neces-
sary in order to permit of sufficient practice to obtain
proficiency.
5. The trained soldier should be exercised by means of
the training stick and on the bayonet assault course. Some
periods on the bayonet assault course should be held in
conditions of fog or smoke, and also at night.
6. When considered necessary, the scabbard should be
tied on by a loop of string to the scabbard stud and tied
round the foresight protectors.
Bayonets may be damaged if they are not sharp or not
drawn clear of the dummy enemy when advancing. The
dummy enemy should be placed on soft ground.
The rifle should be carried in the most convenient position
and when moving in close formation, the point of the bayonet
will be held well up in order not to endanger one’s own
comrades.
7. Dress for all bayonet training will be battle order.
2
8. Competitions.—Bayonet training lends itself to com-
petitions. When opportunity occurs, these should be arranged
for both individuals and sections.
In framing them, the use of the bullet, including firing
from the hip, should not be lost sight of, and it may some-
times be possible to employ the portable equipment, i.e
dummy enemy, etc., in conjunction with a 30 yds. range.
Equipment can also be improvised.
9. Improvisation.—-Should normal training stores not be
available, the standing and ground dummy enemy can be
improvised by filling a sandbag, etc. tightly with grass. A
stone should be placed in each corner of the sandbag and the
four comers tied tightly to a bundle of faggots.
The sandbag can either be tied to a tree or post or laid on
the ground. A training stick can be improvised by cutting
a forked stick about 5| ft. long from a hedgerow or tree and
by trimming as necessary. A piece of string, if required,
can be tied across the jaws of the fork to complete the ring
Rags, etc., can be used to form the pad at the other end.
10. Preliminary arrangements and safety precautions.—At
the commencement of all bayonet training lessons the in-
structor will inspect rifles, pouches, and drill cartridges.
Slings will be loosened. The instructor will order " Without
drill cartridges—load.” Safety catches will be left forward.
LESSON I. ON GUARD, HIP FIRING, AND
CONTROLLED CHARGE
Instructor's Notes.—Before teaching this lesson the squad
must have been raught Lesson 7, Pamphlet No. 3.
Stores.—Standing Dummy Enemy.
Preliminary arrangements—see General, para. 10.
Open squad to two ranks eight paces apart, and with five
paces interval. Scabbards off.
1. Explain.—The bayonet is still one of the primary
weapons of the infantryman, since experience has shown that
even in mechanized warfare the time almost invariably
arrives when hand to hand fighting develops. Such con-
ditions often occur when dealing with airborne troops, or
when the enemy’s foremost positions have been penetrated,
and in unexpected encounters with small parties in woods,
villages, and confined spaces, and at night. For this type
of fighting, the bayonet, in the hands of a skilled and deter-
mined fighter, is often the decisive weapon.
The rifle should be carried in the most convenient position
according to the country being traversed.
3
The object of bayonet training is, firstly, to make the man
confident in his own ability to kill with the bayonet, and
secondly, by means of collective exercises, to train the section
or platoon to work together as a team.
2. On guard
i. Explain : Assaulting infantry will bring the rifle to the
" on guard ” position when nearing the enemy.
ii. Explain and demonstrate, squad imitating :—
Take a full pace forward with the left foot and at the
same time bring the rifle up to a natural fighting position.
The main points to remember are as follows :—
Grip the rifle firmly, with the left hand about the
Fig. 1.—On Guard
outer band and the right hand on the small of the butt
clear of the cocking piece. The butt of the rifle must
be held firmly against the side of the body, in order that
the man’s whole weight is used in making the point.
Concentrate on the opponent and adopt a threatening
attitude (see Fig. 1). When ordered to “ rest ” place
the butt between the feet.
lii. Practise squad by word of command and signal.
4
iv. With squad in single rank and two paces interval,
practise at the walk and double over rough ground.
3. Hip firing
i. Explain, with squad on right of the dummy enemy, that
during an advance and when a.bout 10 yds. from the enemy,
it may be advisable to fire a bullet. Such action enables
the attackers to deliver an effective blow before getting close
enough to kill with the bayonet.
ii. Explain and demonstrate :—
Instructor comes “ on guard ” 10 yds. from dummy'
enemy. When in the “ on guard ” position the muzzle
will already be pointing at the opponent, and if about
to fire the finger will be on the trigger. There is, however,
a tendency' to shoot high ; therefore, to fire the round,
bring the butt up underneath the right armpit, and then
press the trigger. Instantly reload, and return " on
guard.”
iii. Form squad in two ranks, 10 yds. from and facing the
dummy enemy. Each file covers off a dummy enemy.
Practise by' word of command as follows :—
“ On guard ”—“ Fire ”.
iv. Practise squad at the walk and double.
4. The controlled charge
Squad in single rank extended two paces.
i. Explain :—The object of this exercise is to train men to
work together as a team. Briefly explain the exercise and
stress :—
(«) In order to maintain control whilst approaching the
enemy, the advance will be carried out at a steady
double, every man keeping touch with the man on
his right.
(£>) When crossing an obstacle the point of the bayonet
will be kept well up to prevent accidents. (Demon-
strate.)
(tj Dash and determination during the last 20 yds.
(7) Every man must instinctively select a good fire
position and must be prepared to open fire after
completion of the charge.
ii. By pre-arranged signal, squad advances at a steady
double, rifles at the trail, towards the instructor, who places
himself about 80 yds. in front.
5
iii. When about 20 yds. from the instructor, squad assumes
the " on guard ’’ and charges.
iv. Instructor halts squad behind cover and gives a fire
order.
Note.—This exercise must be modified to suit the ground.
It will be carried out whenever time permits during subsequent
periods, and as progress is made, it will be made more difficult
by introducing obstacles such as trenches, low walls, etc.
LESSON 2. THE POINTS
Instructor’s Notes
Stores :—
Standing and ground dummy enemy.
Preliminary arrangements. (See General, para. 10.)
1. The point advancing rear foot
i. With squad assembled on right of the dummy enemy,
explain that the point will generally be made on the move
when about four or five feet from an opponent.
ii. Explain and demonstrate :—
Point advancing rear foot :—
(a) Grasping the rifle firmly, vigorously thrust the bayonet
into the enemy, putting the weight of the body
behind it and bringing the rear foot forward as the
point is delivered.
(b) To withdraw, draw the rifle straight back until the
bayonet is clear. (See Fig. 2.) Then punch forward
“ on guard ” and pass through.
iii. Form squad in two ranks about 10 yds. from and facing
the dummy enemy. Scabbards off. Practise squad as
follows :—
" Front (rear) rank—On guard—ready ”.
Rank place themselves in front of the dummy enemy,
instructor checks distance.
“ At the dummy enemy—point ”.
2. The point at the walk or double
i. With squad on right of the dummy enemy, explain and
demonstrate point at the walk, bringing out that the point
of the bayonet is kept on the opponent, and that the point
should be delivered with either foot leading, or by jumping
in naturally.
ii. Practise squad at walk and double as follows :—
" Front (rear) rank—On guard—one point—at the walk
(double)—point ”.
Fjc. 2.—The Withdrawal from the Point
7
3. 'Гию points
i. With squad on right of the dummy enemy, explain that
occasions may arise when two opponents may be met in
quick succession.
ii. Explain and demonstrate :—
Two points at the walk :—
Deliver the first point as already taught. Having with-
drawn, direct the point of the bayonet on to the second
enemy, step in and deliver the point from the with-
drawal position, withdraw and pass through.
iii. Practise squad at walk and double as follows :—
" Front (rear) rank—on guard--two points—at the walk
(double)—point ”.
Fig. 3.—The W ithdrawal (using Foot)
4. Pointing at ground dummy enemy.
i. With squad on right of ths dummy enemy, explain and
demonstrate point at lying dummy enemy, advancing rear
foot, emphasizing that the feet must be clear of the enemy
when the point is delivered, and, to assist withdrawal, the
left foot will be placed on the enemy body close to the
bayonet. (See Fig. 3.)
ii. Practise squad advancing rear foot and at the walk.
8
5. Further practice
Practise squad at the double at lying and standing dummy
enemy, placed at irregular intervals and so arranged as to
represent a variety of targets, the relative position of the
dummy enemy being frequently changed. Occasionally intro-
duce the use of the bullet.
LESSON 3. THE TRAINING STICK AND SELF
DEFENCE
Instructor’s Notes
Stores :—
Training sticks.
Preliminary arrangements. (See General, para. 10.)
Scabbards tied on.
The training stick, efficient instruction in which forms an
important part of bayonet training, should always be used
with vigour. The individual using the stick will act as
“ master ” and the individual using the bayonet as “ pupil ”.
The value of the practice to the pupil depends entirely on the
energy displayed by the master.
For exercising trained soldiers or for quickening up at any
period of instruction after the training stick has been intro-
duced, the instructor, by forming his squad round him in a
circle, can exercise each man in turn in points and parries,
as he wishes.
The training stick should be light and the pad and ring so
made as to ensure no damage being done to the rifle.
1. The training stick. (See Fig. 4.)
i. With squad in single rank instructor explains :—
At one end of the training stick there is a pad which
represents the point of an opponent’s bayonet. Whenever
this is directed towards the man he will immediately
assume the " on guard ” position.
At the other end there is a ring which represents a part
..................5' 9 "
t
Rod,2"diatn. made o/piece
oZcanvas, 5to/Zed with'
shredcfed sacking and
wired into groove cut in stick
A wire ring 3"diam
covered with strincr
or thin rope. °
Fig. 4.—The Training Stick
9
of a man’s body. This will always be so presented that
the man makes an advancing point at it.
ii. With squad extended to four paces, instructor explains
and demonstrates, squad imitating :—
To hold the stick, grasp it with the left hand about the
centre, and the' right hand about one foot from the ring,
and assume the “ on guard ” position, padded end to the
front. (See Fig. 5.)
iii. To present the ring on the right side for a point, with-
draw the left arm close to the body, at the same time place
the ring upright to the right. (See Fig. 6.) If two points are
required, when the withdrawal of the first one has been com-
pleted, take a pace to the rear. To pass through, lower the
pad to the ground. To present the ring on the left, with-
draw the left arm as before, at the same time step back with
the left foot. Pivot on the feet and place the ring upright
on the left of the body. Again, if two points are required
when the withdrawal of the first one has been completed,
step or jump forward a pace. To pass through, lower pad
to ground.
iv. Practise squad in using training stick. •>
2. i. Instructor with training stick, man with rifle and
bayonet, both in “on guard’’ position. Instructor explains
and demonstrates method of using stick for man to make a
point and two points on right and left.
ii. Practise the point and two points in pairs as master and
pupil, on right and left. Instructor exercises any individual
he may select.
3. Self defence—left parry, butt stroke and kill
i. With squad in single rank, instructor explains and
emphasizes that when a man has defended himself against
an opponent’s attack, he must immediately adopt the
offensive.
ii. Instructor with rifle and bayonet—explain that left
parry must be made fairly wide to beat off opponent’s weapon ;
therefore opponent is inside man’s guard. Man cannot use
his bayonet ; therefore the butt must be used first, then kill
with the bayonet.
iii. Explain and demonstrate :—
From the " on guard ’’ position punch the rifle far
enough to the left to beat off the opponent’s weapon,
advance the rear foot and swing the rifle round horizon-
tally to hit the opponent’s chin with the toe of the butt
Fig. 5.—Use of the Training Stick
Fig. 6—Use of Training Stick
12
(see Fig. 7), direct the bayonet on to the opponent,
deliver the point, withdraw, return " on guard " and
pass through,
iv. Instructor with stick outside man’s guard, man with
rifle and bayonet both in “on guard ” position. Instructor
makes a point, not stepping in; man parries off to the left—
makes a butt stroke. Instructor places ring for the kill. (See
Fig. 8.) Man points, withdraws, returns “ on guard ” and
passes through.
v. Explain that should an opponent attack on the right, it
will be necessary to parry to the right and point.
Fig. 7.—The Butt Stroke
4. i. Explain use of training stick. Man with rifle and
bayonet, instructor with stick.
(a) Pad must be held outside man’s guard. (See Fig. 5.)
(b) Thrust with stick must be straight and vigorous.
(c) Man using stick must not step in.
(d) Pad will not be placed in position for butt stroke.
(c) Ring placed in correct position for kill. (See Fig. 8.)
ii. Practise squad in pairs as master and pupil, instructor
exercises any man he may select.
13
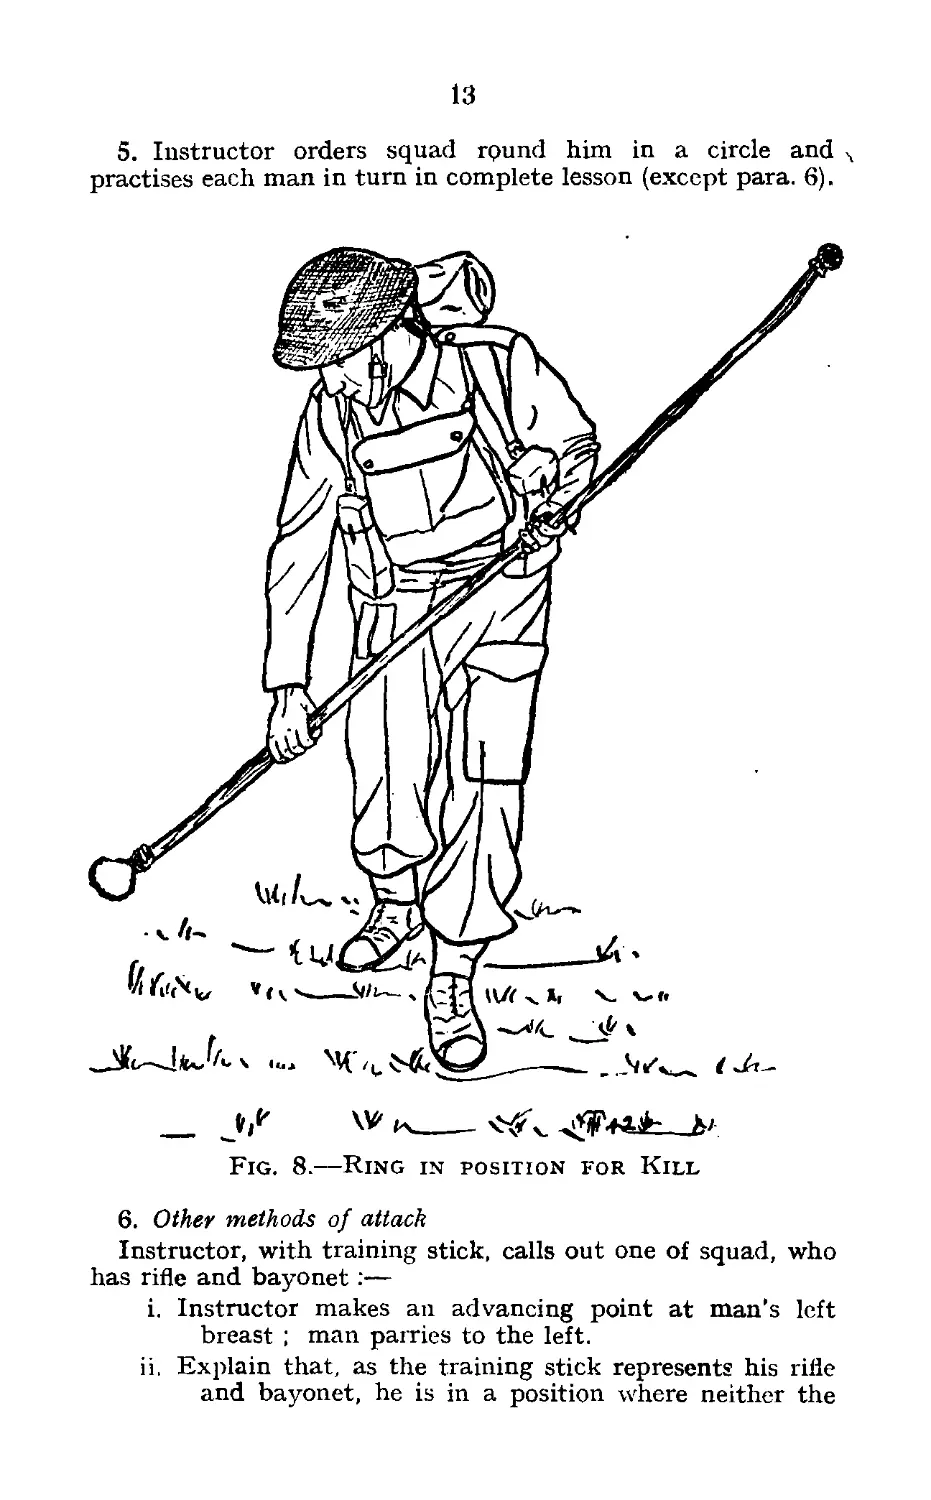
5. Instructor orders squad round him in a circle and
practises each man in turn in complete lesson (except para. 6).
W к________- X'
Fig. 8.—Ring in position for Kill
6. Other methods of attack
Instructor, with training stick, calls out one of squad, who
has rifle and bayonet:—
i. Instructor makes an advancing point at man’s left
breast ; man parries to the left.
ii. Explain that, as the training stick represents his rifle
and bayonet, he is in a position where neither the
14
bayonet nor the butt can be used. Both opponents
are now inside each other’s guard. Some kind of
offensive action is necessary, and the exact nature
of this will depend on the openings offered by the
opponent ; but, whatever action is taken, it must
be instinctive, rapid, and energetic. Instructor will
suggest the following : closing with the opponent
and strangling him, striking him with the fists,
tripping and pushing him over, kicking him with
either foot or knee, etc. These measures will not be
practised.
LESSON 4. ASSAULT PRACTICE
1. The assault practice will approximate as nearly7 as possible
to the conditions of actual fighting. It should be carried
out over rough ground, the start normally being made froni
behind some natural or artificial piece of cover. It is a good
plan, if possible, for it to end on a range or area which permits
of the actual firing of ball ammunition.
There is no standard layout of assault course. Standing
and ground dummy enemy should be placed as desired. The
course should include trenches (shallow ones only are required)
to jump over and shell holes with dummy enemy. Surprise
targets requiring the use of the bullet should be introduced.
Obstacles, such as walls, will be included (see Fig. 9).
2. In carrying out the assault practice the following points
will be observed :—
i. Fire should invariably precede and follow movement.
ii. All members of the assaulting party7 will leave the
trench, or rise from cover, simultaneously7.
iii. The first stage of the advance will be at a steady
double. Each man as he advances should select
an enemy to kill and should act with determination
to do so.
3. Such an advance has a decided moral effect on the enemy
and ensures a degree of cohesion on contact. If, on the other
hand, the final rush is allowed to develop without control,
the enemy will be given time to dispose of our troops in detail.
As soon as the enemy position has been captured, the pursuit
by fire and repulse of a counter-attack will be practised, with
or without ammunition, according to the type of assault
course.
BAYONET ASSAULT COURSE
(Course commences on the bank near “ A ”)
A = Shallow trench 2 ft. deep and 7 ft. wide, covered with loosely pegged down jumble of barbed wire.
В = Excavation (roughly piled up) from shallow trench at A.
C = Long stout pole 6 ft. above ground resting in timber forks at each end.
D = Bank sufficiently high to permit an almost vertical drop of 7 ft.
E = Concertina wire 2 coils wide at foot of 7 ft. drop ; alternative—a jumble of barbed w-ire 7 ft. high.
F = Tree trunks lying horizontal across a pond and about 2 to 3 ft. above water and 20 to 30 ft. long.
G = Two poles let into ground and about 6 yds. apart, like goal posts, with horizontal lengths of tree
branches fastened across to form a timber wall 10 ft. high. Space between branches to be
insufficient to give ladder foothold. Immediately on far side of wall a large jumble of tree
branches lying loosely on ground.
H — Position for firing ball ammunition at end of assault course.
Printed under the Authority of HIS MAJESTY’S STATIONERY OFFICE
by Keliher, Hudson & Reams, Ltd., London, S.E.l.
(16887) G, 766 380,000 6/42 Gp. 8/7