/


Текст
Oracle Database 10g:
Administration Workshop
Student Guide
D17092GC20
Edition 2.0
May 2004
D39448
ORACLE
Authors
Copyright ©2004, Oracle. All rights reserved.
Janet Stern
James Womack
Technical Contributors
and Reviewers
Lothar Auert
Dairy Chan
Gerlinde Frenzen
Joel Goodman
Christine Jeal
Martin Jensen
Susan Jang
Donna Keesling
Wolfgang Krueger
Roman Niehoff
Srinivas Putrevu
Andreas Reinliardt
Dr. Sabine Teuber
Chandru Venkatesan
John Watson
Editor
Atanu Raychaudhuri
This documentation contains proprietary information of Oracle Corporation. It is
provided under a license agreement containing restrictions on use and disclosure and
is also protected by copyright law. Reverse engineering of the software is prohibited.
If this documentation is delivered to a U.S. Government Agency of the Department of
Defense, then it is delivered with Restricted Rights and the following legend is
applicable:
Restricted Rights Legend
Use, duplication or disclosure by the Government is subject to restrictions for
commercial computer software and shall be deemed to be Restricted Rights software
under Federal law, as set forth in subparagraph (c)(1)(ii) of DFARS 252.227-7013,
Rights in Technical Data and Computer Software (October 1988).
This material or any portion of it may not be copied in any form or by any means
without the express prior written permission of Oracle Corporation. Any other copying
is a violation of copyright law and may result in civil and/or criminal penalties.
If this documentation is delivered to a U.S. Government Agency not within the
Department of Defense, then it is delivered with "Restricted Rights," as defined in
FAR 52.227-14, Rights in Data-General, including Alternate III (June 1987).
The information in this document is subject to change without notice. If you find any
problems in the documentation, please report them in writing to Education Products,
Oracle Corporation, 500 Oracle Parkway, Redwood Shores, CA 94065. Oracle
Corporation does not warrant that this document is error-free.
Oracle and all references to Oracle Products are trademarks or registered trademarks
of Oracle Corporation.
All other products or company names are used for identification purposes only, and
may be trademarks of their respective owners.
Publisher
Poomima G
Contents
Preface
1 Introduction
Course Objectives 1-2
How DBAs Spend Their Time 1-3
Oracle Database 10g Manageability Goals 1-4
Database Management Challenges 1-5
Oracle Database 10gSolution: Self-Managing Database 1-6
How Oracle Database 10gDBAs Spend Their Time 1-7
Student Preface 1-8
2 Using Globalization Support
Objectives 2-2
Globalization Support Features 2-3
Encoding Schemes 2-4
Database Character Sets and National Character Sets 2-7
Datetimes with Timezones 2-9
Configuring the Database Local Timezone 2-10
Configuring Datetime Formats 2-11
Using Timezones 2-12
Specifying Language-Dependent Behavior 2-13
Specifying Language-Dependent Behavior for the Server 2-14
Language and Territory Dependent Parameters 2-15
Other NLS Server Parameters 2-17
Specifying Language-Dependent Behavior for the Session 2-18
Locale Variants 2-21
Using NLS Parameters in SQL Functions 2-22
Linguistic Sorting 2-25
Using Linguistic Sorting 2-27
Sorts That Are Not Case or Accent Sensitive 2-29
Linguistic Comparisons 2-30
Linguistic Index Support 2-31
Customizing Linguistic Sorting 2-32
Oracle Locale Builder 2-33
Character Set Scanner Utilities 2-34
Data Conversion Between Client and Server Character Sets 2-36
NLS Data Conversion with Oracle Utilities 2-37
NLS Data Conversion with Data Pump 2-39
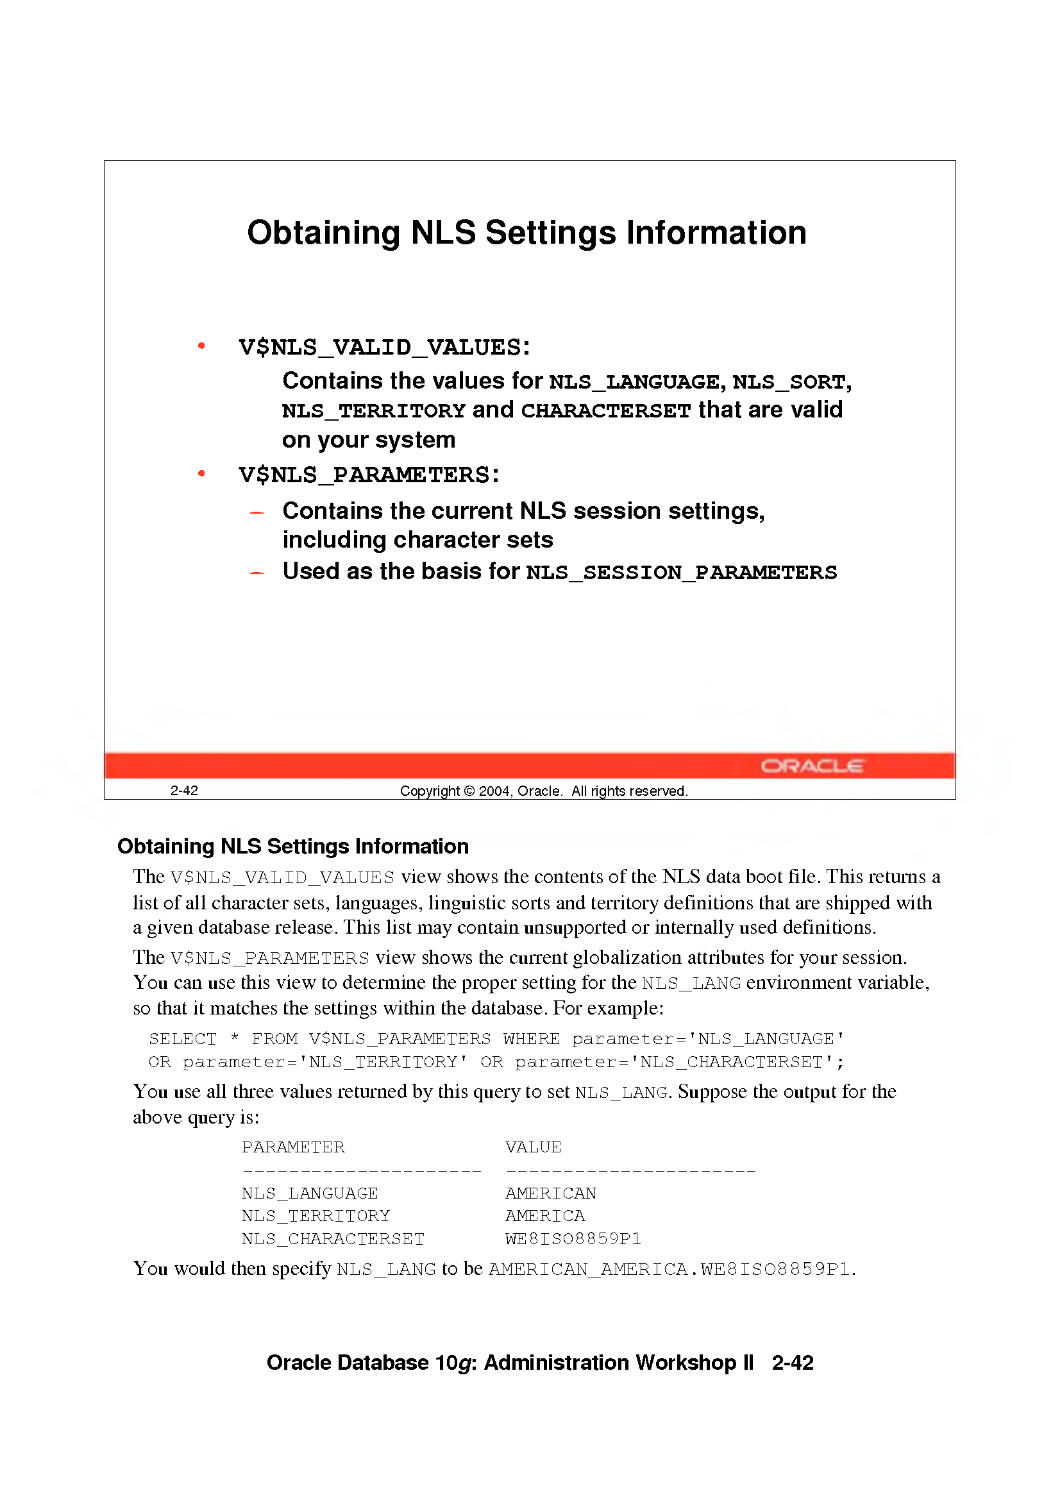
Obtaining Character Set Information 2-40
Obtaining NLS Parameter Information 2-41
Summary 2-43
Practice 2 Overview: Using Globalization Support Features 2-44
Practice 2: Using Globalization Support Features 2-45
Practice 2: Globalization Support 2-46
in
3 Controlling Access to the Oracle Listener
Objectives 3-2
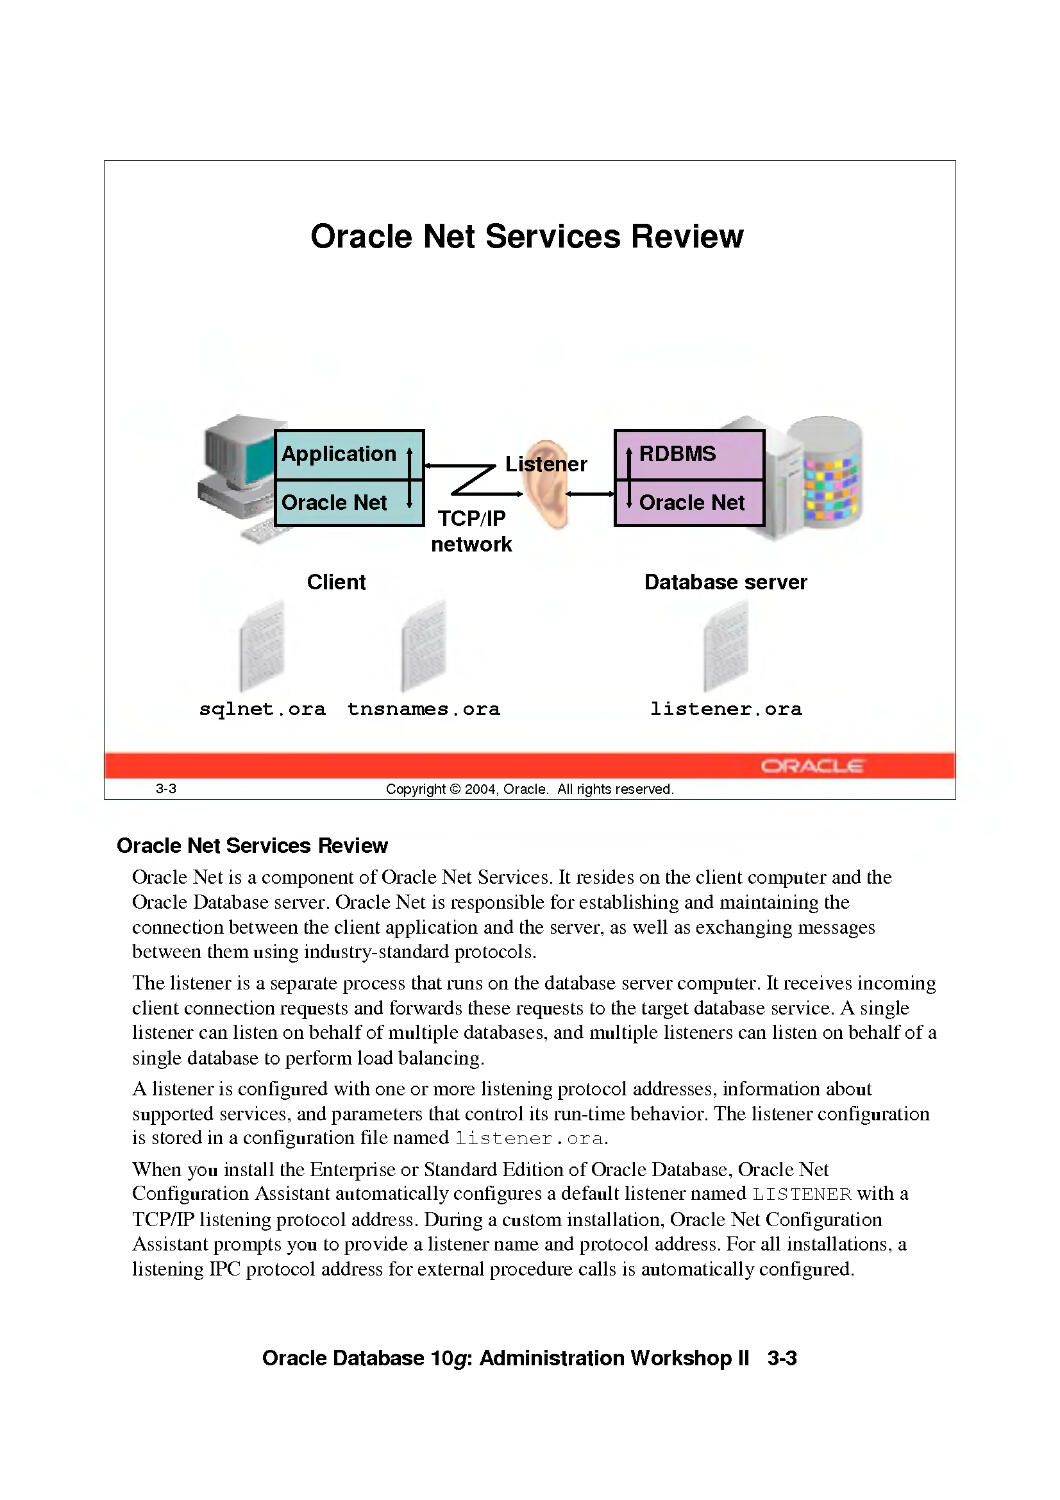
Oracle Net Services Review 3-3
Listener Password Authentication 3-4
Setting Listener Password 3-5
Setting Listener Password with Net Manager 3-6
Set Password with isnrcti Utility 3-7
Controlling Database Access 3-8
Oracle Net Services External Procedures 3-9
Overview of the extproc Agent 3-10
PL/SQL Calling a C External Procedure 3-11
Default Configuration for External Procedure Calls 3-12
Modifying the Configuration for External Procedure Calls 3-14
Remove Default extproc Entry 3-15
Configure a Dedicated Listener for External Procedure Calls 3-17
Summary 3-21
Practice 3 Overview: Controlling Access to the Listener 3-22
4 Configuring Recovery Manager
Objectives 4-2
Recovery Manager Features 4-3
Recovery Manager Components 4-5
Media Management 4-7
Using a Flash Recovery Area with RMAN 4-9
Setting Parameters for RMAN 4-10
RMAN Usage Considerations 4-12
Connection Types with RMAN 4-13
Starting RMAN 4-14
Additional RMAN Command Line Arguments 4-15
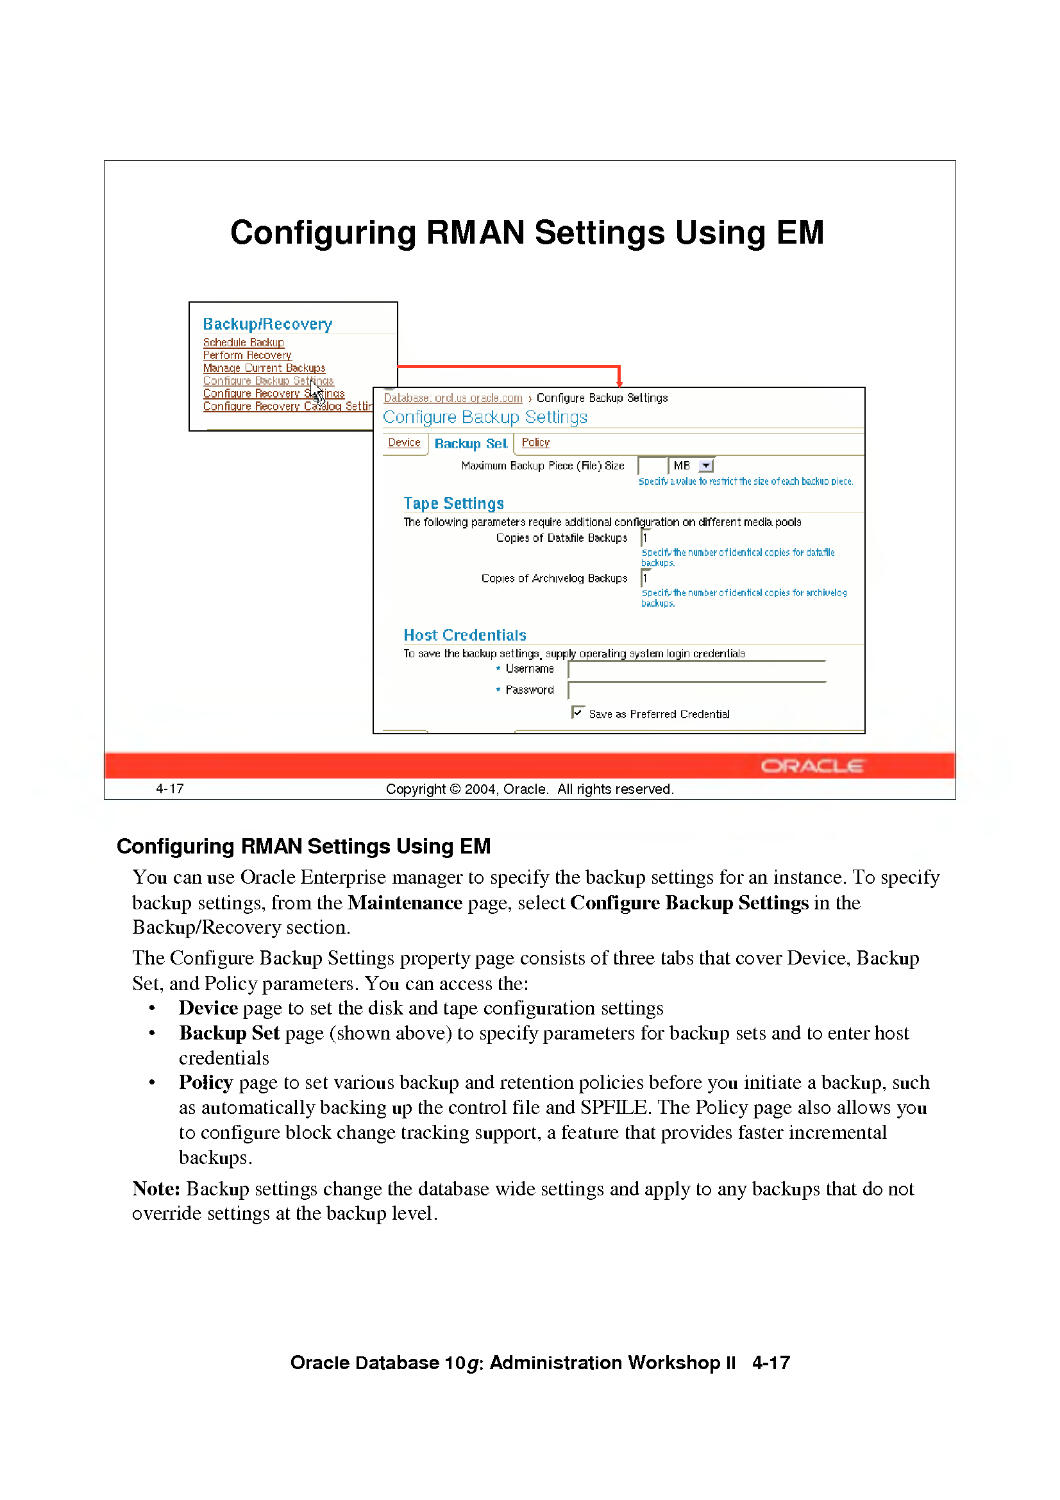
Configuring Persistent Settings for RMAN 4-16
Configuring RMAN Settings Using EM 4-17
Control File Autobackups 4-18
Retention Policies 4-20
Managing Persistent Settings 4-21
Channel Allocation 4-22
Automatic and Manual Channel Allocation 4-23
Channel Control Options 4-24
Summary 4-26
Practice 4 Overview: Configuring RMAN 4-27
5 Using Recovery Manager
Objectives 5-2
Issuing Recovery Manager Commands 5-3
RMAN Command Overview 5-5
RMAN Commands 5-6
Job Command: Example 5-7
IV
The backup Command 5-8
Backup Constraints 5-9
Parallelization of Backup Sets 5-10
Compressed Backups 5-12
Image Copy 5-13
Tags for Backups and Image Copies 5-15
backup Options 5-16
Backing Up Archived Redo Logs 5-18
Copying the Whole Database 5-19
Making Incremental Backups 5-20
Incremental Backup: Example 5-22
Block Change Tracking 5-23
Enabling Block Change Tracking 5-24
Incrementally Updating Backups 5-25
list Command Operations 5-26
The report Command 5-27
The report need backup Command 5-28
report need backup: Examples 5-29
REPORT OBSOLETE and DELETE OBSOLETE 5-30
Managing Backups with EM 5-31
RMAN Dynamic Views 5-32
Monitoring RMAN Backups 5-34
Summary 5-36
Practice 5 Overview: Using RMAN 5-37
6 Diagnostic Sources
Objectives 6-2
Diagnostic Files 6-3
The Alert Log 6-4
What Is in the alert. log File 6-5
Viewing Recent Alert Log Entries 6-6
Alert Models Architecture 6-7
Server-Generated Alert Types 6-8
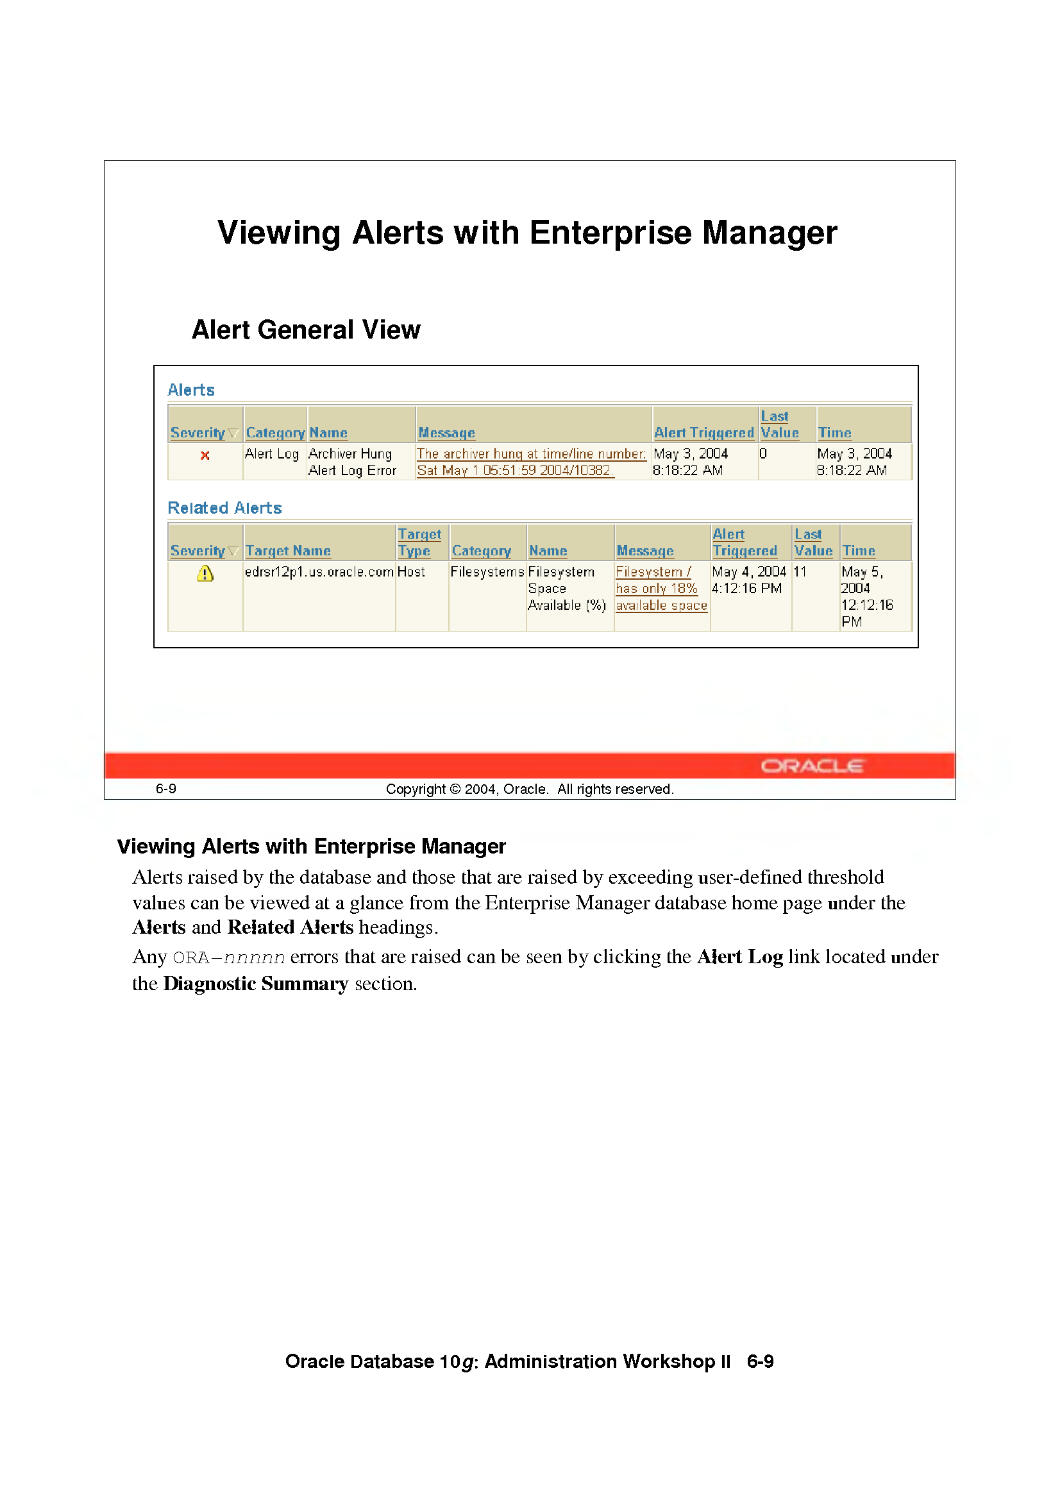
Viewing Alerts with Enterprise Manager 6-9
Alerts Notification 6-11
Alert Log Monitoring Configuration 6-12
Editing Thresholds 6-13
Viewing Initialization Parameters 6-14
Trace Files 6-15
Specifying the Location of Trace Files 6-16
Controlling Trace File Size 6-17
Controlling Trace File Writes 6-18
Using Enterprise Manager to Enable and View SQL Tracing 6-19
System Log Files 6-20
Summary 6-21
Practice 6 Overview: Diagnosing Problems 6-22
v
7 Recovering from Noncritical Losses
Objectives 7-2
Recovery of Noncritical Files 7-3
Creating New Temporary Tablespace 7-4
Re-creating Redo Log Files 7-5
Recovering an Index Tablespace 7-8
Re-creating Indexes 7-9
Read-only Tablespace Recovery 7-10
Read-only Tablespace Recovery Issues 7-11
Authentication Methods for Database Administrators 7-13
Loss of Password Authentication File 7-14
Summary 7-16
Practice 7 Overview: Re-creating a Temporary Tablespace 7-17
Practice 7: Re-creating the Temp Tablespace 7-18
8 Database Recovery
Objectives 8-2
Recovery Steps 8-3
Server Managed Recovery: restore and recover Commands 8-4
User-Managed Recovery Procedures:RECOVER Command 8-5
Recovering a Control File Autobackup 8-6
Creating a New Control File 8-8
Incomplete Recovery Overview 8-10
Situations Requiring Incomplete Recovery 8-11
Types of Incomplete Recovery 8-12
Incomplete Recovery Best Practices 8-14
Using recover for Incomplete Recovery 8-16
until time Recovery Example 8-17
until time Recovery Steps 8-18
Cancel-Based Recovery: Example 8-20
Incomplete Recovery and the Alert Log 8-22
Incomplete Recovery of a Database Using RMAN 8-23
RMAN Incomplete Recovery until time: Example 8-24
RMAN Incomplete Recovery until sequence: Example 8-26
Recovery Using Enterprise Manager 8-27
Simplified Recovery Through resetlogs 8-33
Recovery Through resetlogs: Changes 8-34
Summary 8-36
Practice 8 Overview: Incomplete Recovery 8-37
9 Flashback Database
Objectives 9-2
Flashback Any Error 9-3
Flashback Technology Benefits 9-4
When to Use Flashback Technology 9-5
Flashback Database Overview 9-6
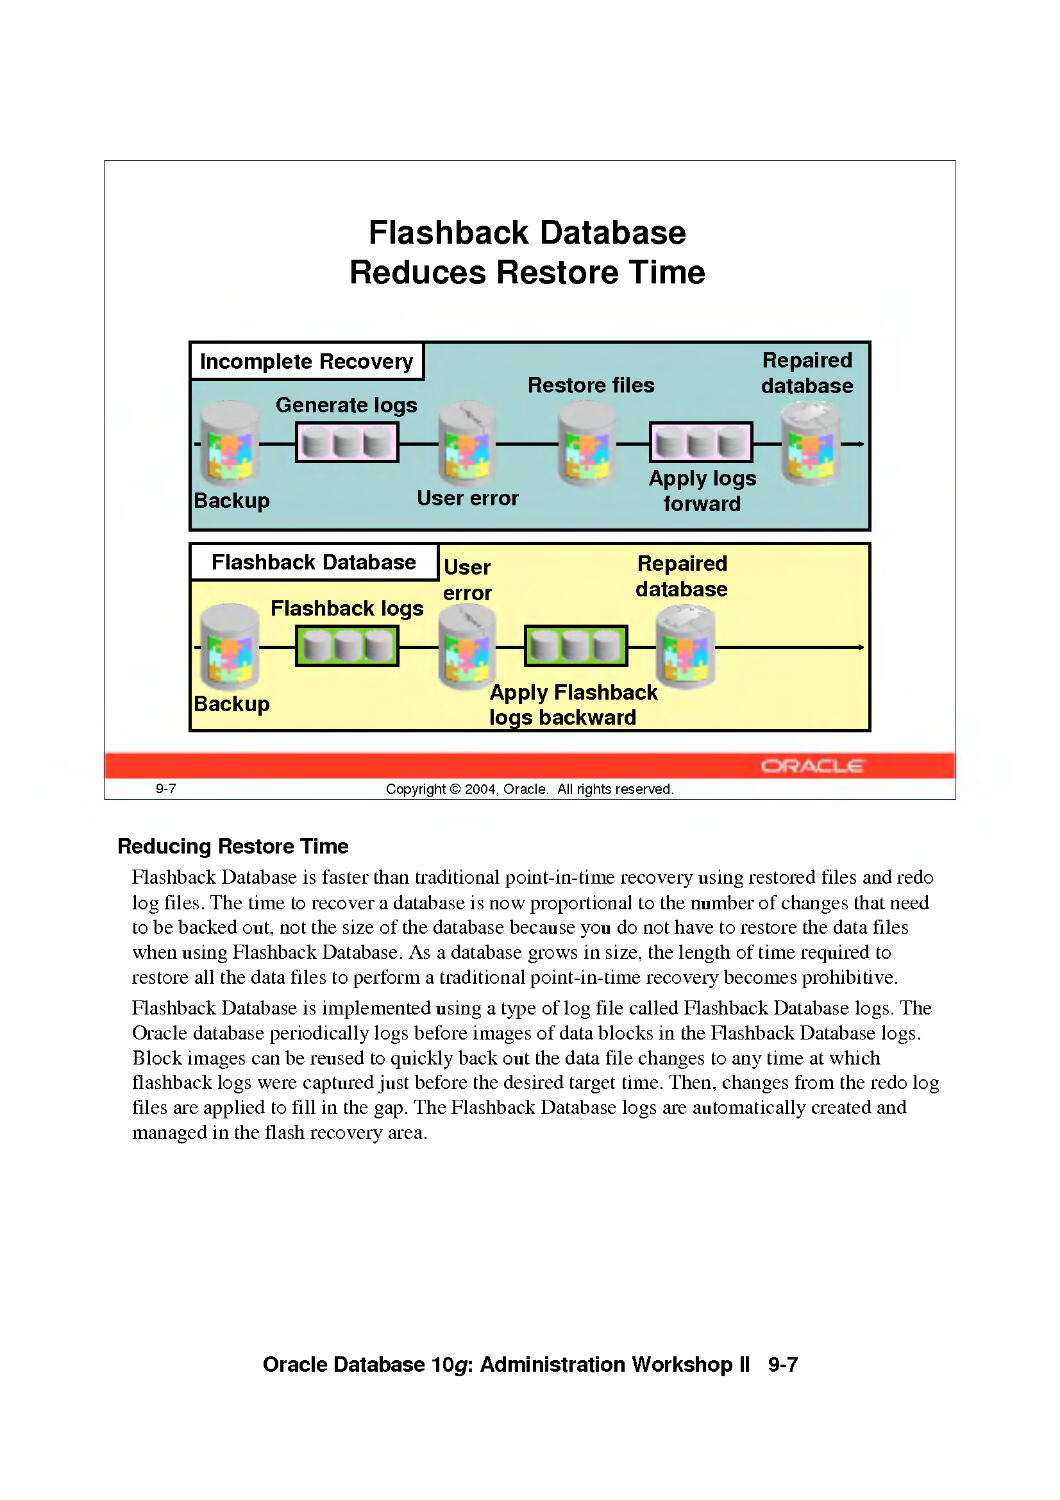
Flashback Database Reduces Restore Time 9-7
VI
Flashback Database Architecture 9-8
Configuring Flashback Database 9-9
Configure Flashback Database with EM 9-10
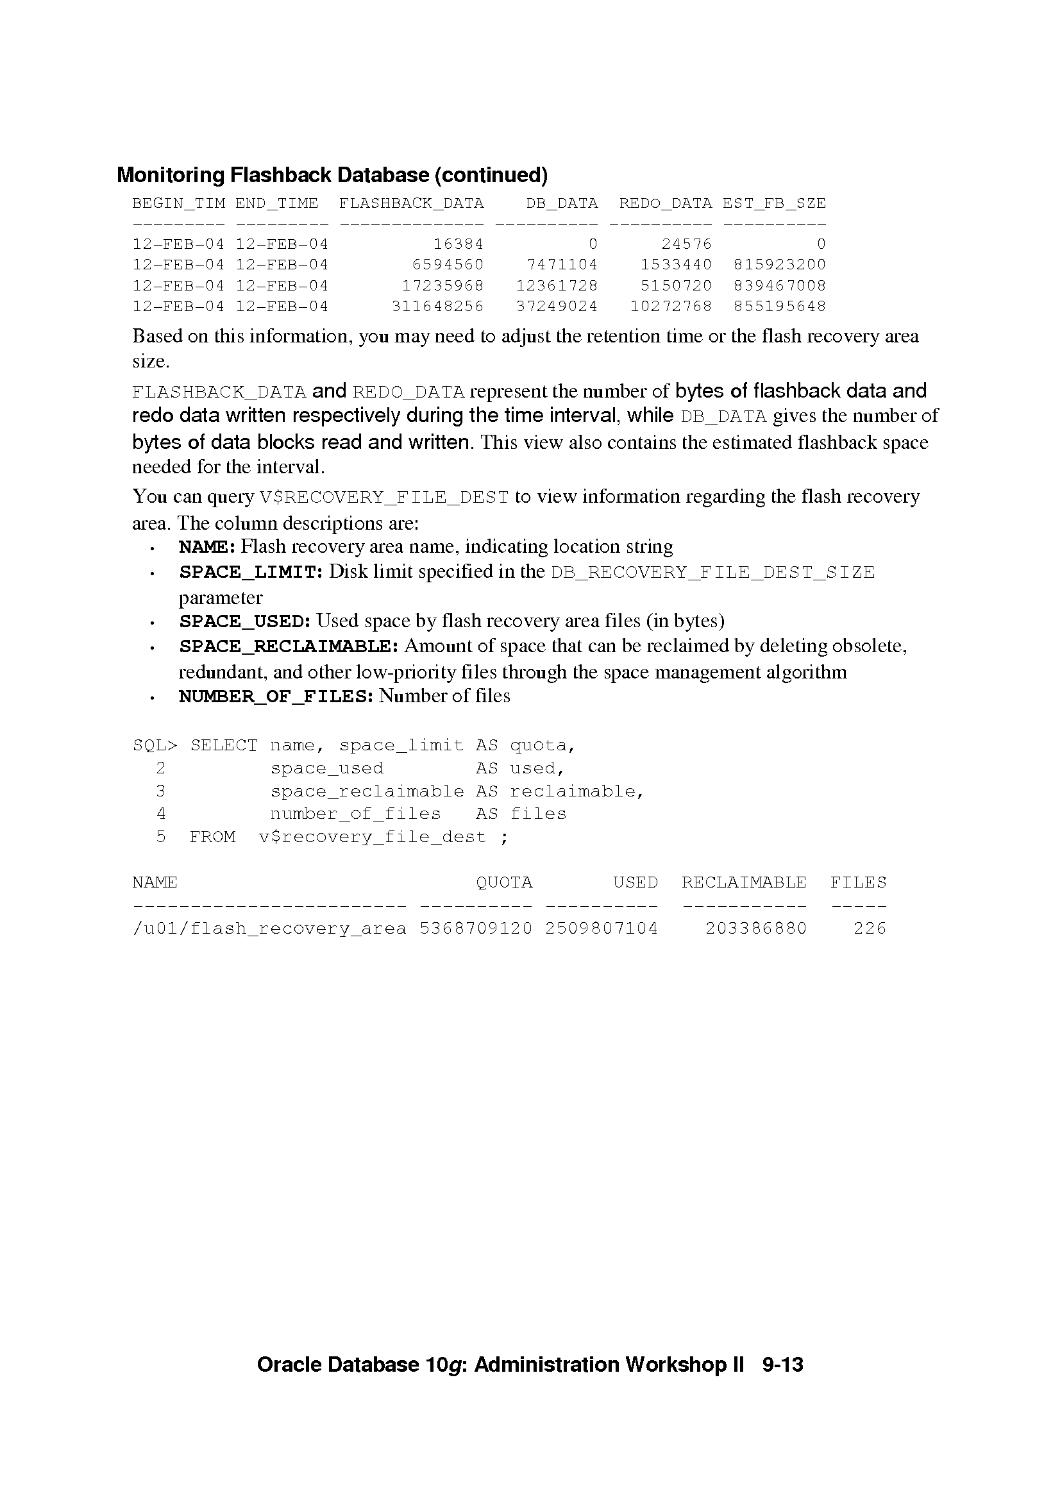
Monitoring Flashback Database 9-12
Monitoring Flashback Database with EM 9-14
Best Practices for the Database and Flash Recovery Area 9-16
Backing Up the Flash Recovery Area 9-17
Flash Recovery Area Space Usage 9-18
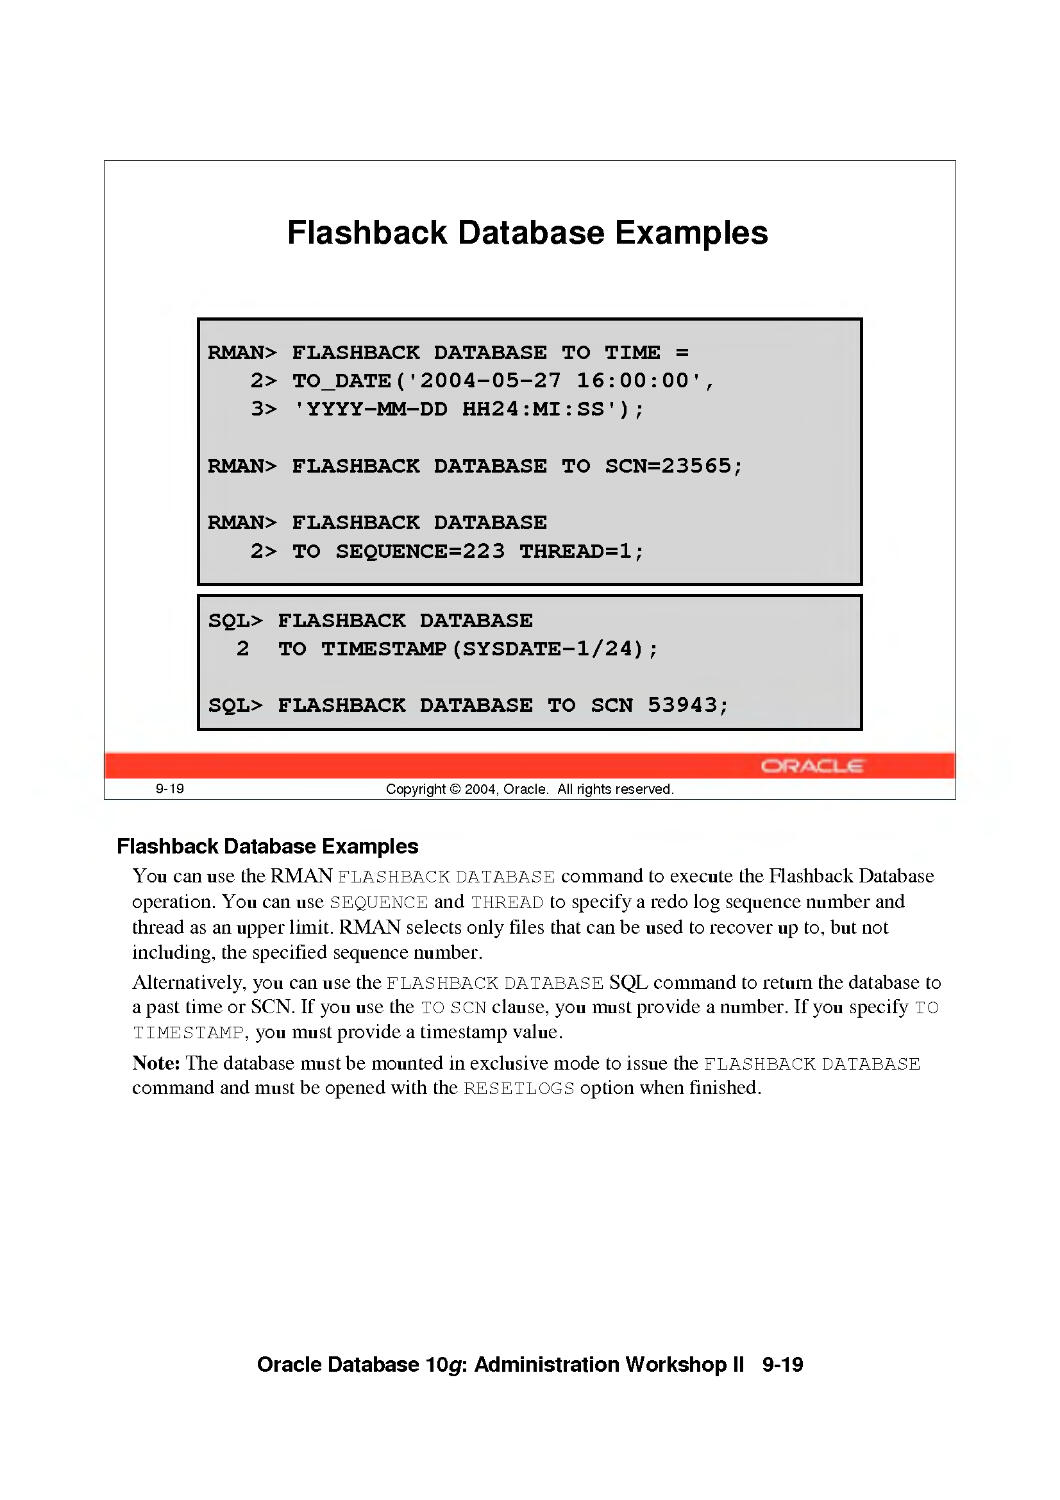
Flashback Database Examples 9-19
Flashback Database with EM 9-20
Excluding Tablespaces from Flashback Database 9-23
Flashback Database Considerations 9-24
Summary 9-25
Practice 9 Overview: Flashback Database 9-26
10 Recovering from User Errors
Objectives 10-2
Flashback Time Navigation 10-3
Flashback Drop Overview 10-4
Recycle Bin 10-5
Querying the Recycle Bin 10-6
Flashback Dropped Tables Using EM 10-8
Restoring Objects from the Recycle Bin 10-9
Recycle Bin Automatic Space Reclamation 10-10
Recycle Bin Manual Space Reclamation 10-12
Bypassing the Recycle Bin 10-14
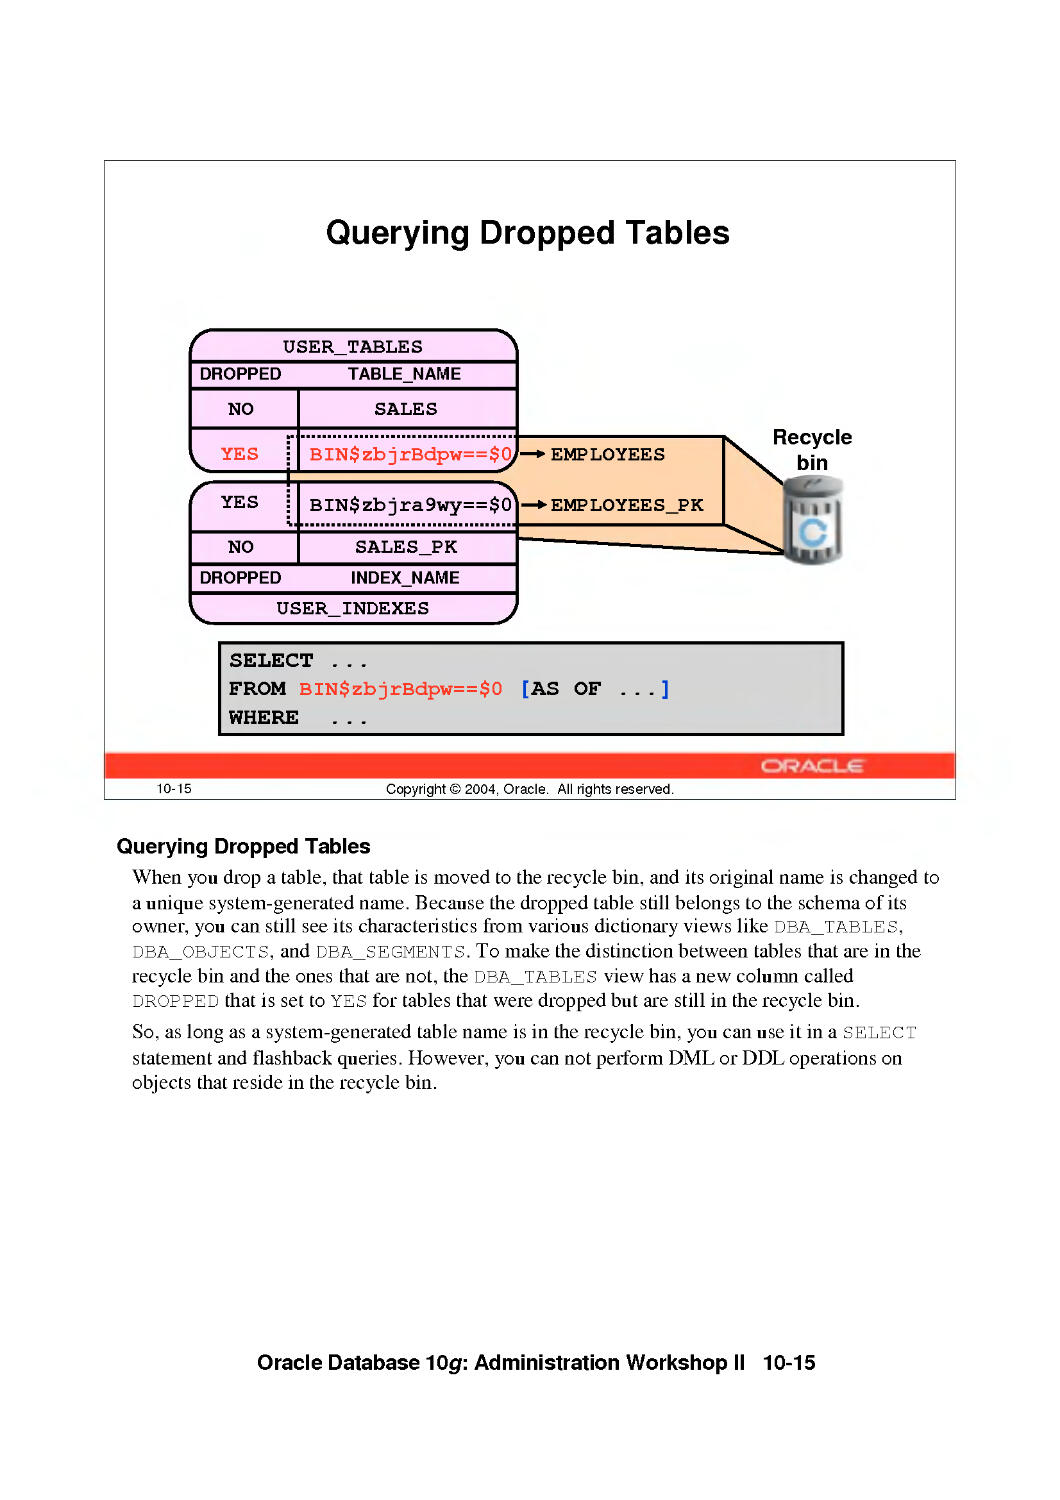
Querying Dropped Tables 10-15
Flashback Drop Considerations 10-16
Flashback Versions Query Overview 10-17
Flashback Versions Query Using EM 10-18
Flashback Versions Query Syntax 10-19
Flashback Versions Query Example 10-20
Flashback Versions Query Considerations 10-21
Flashback Transaction Query Overview 10-22
Querying flashback_transaction_query 10-23
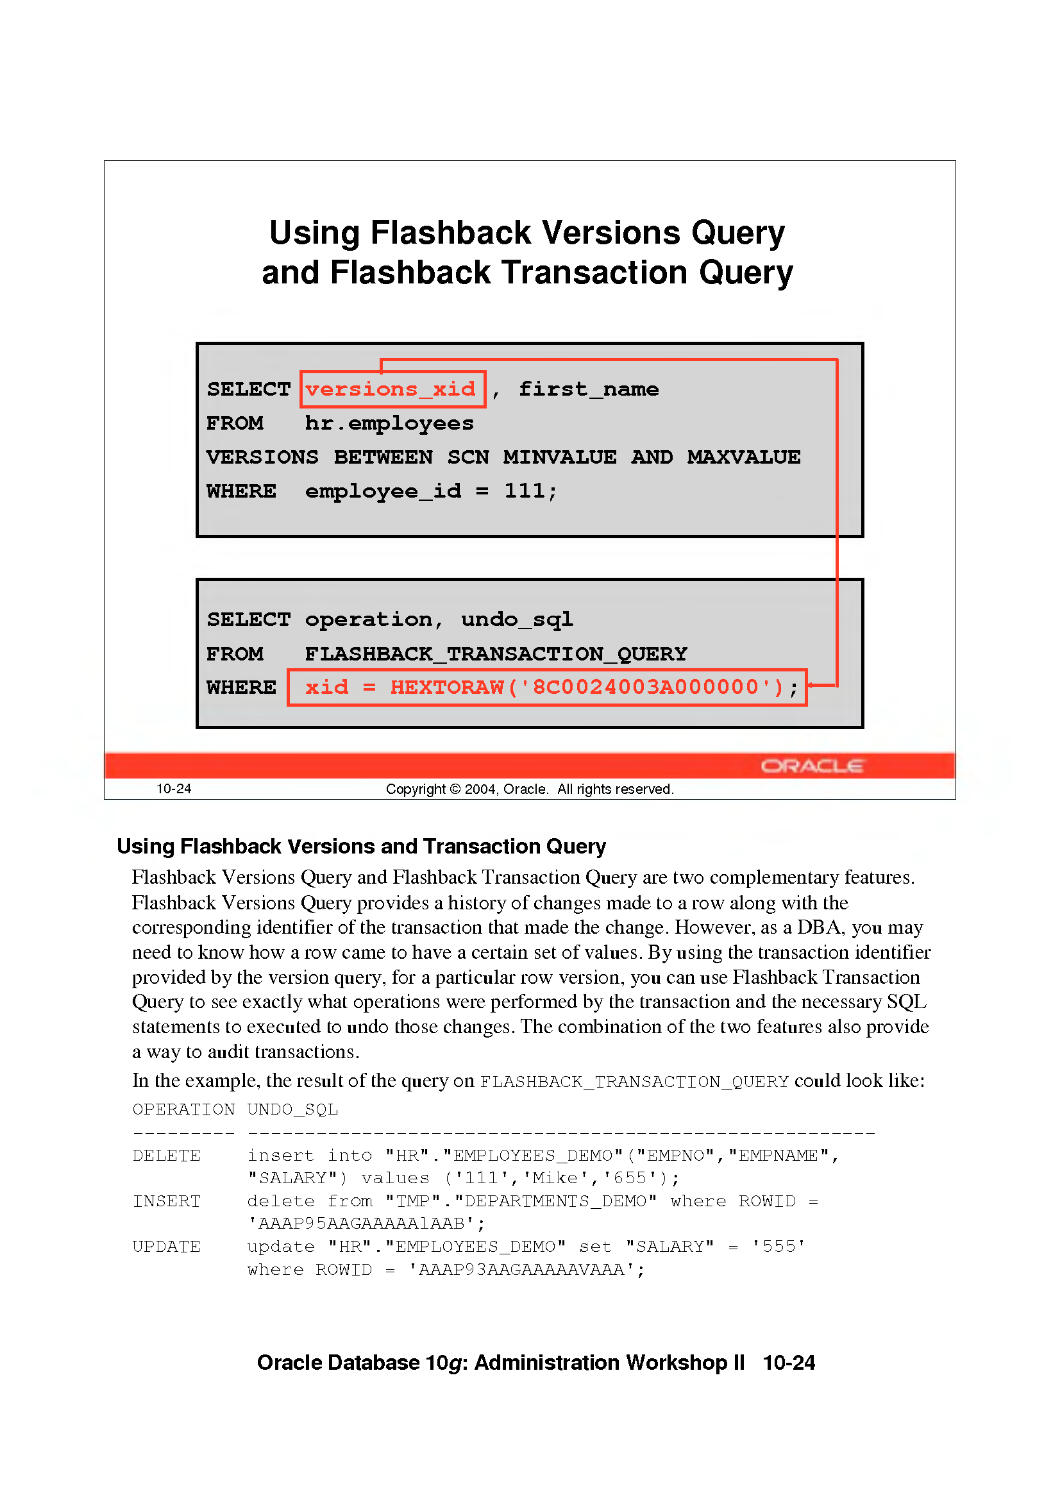
Using Flashback Versions Query and Flashback Transaction Query 10-24
Flashback Transaction Query Using EM 10-25
Flashback Transaction Query Considerations 10-26
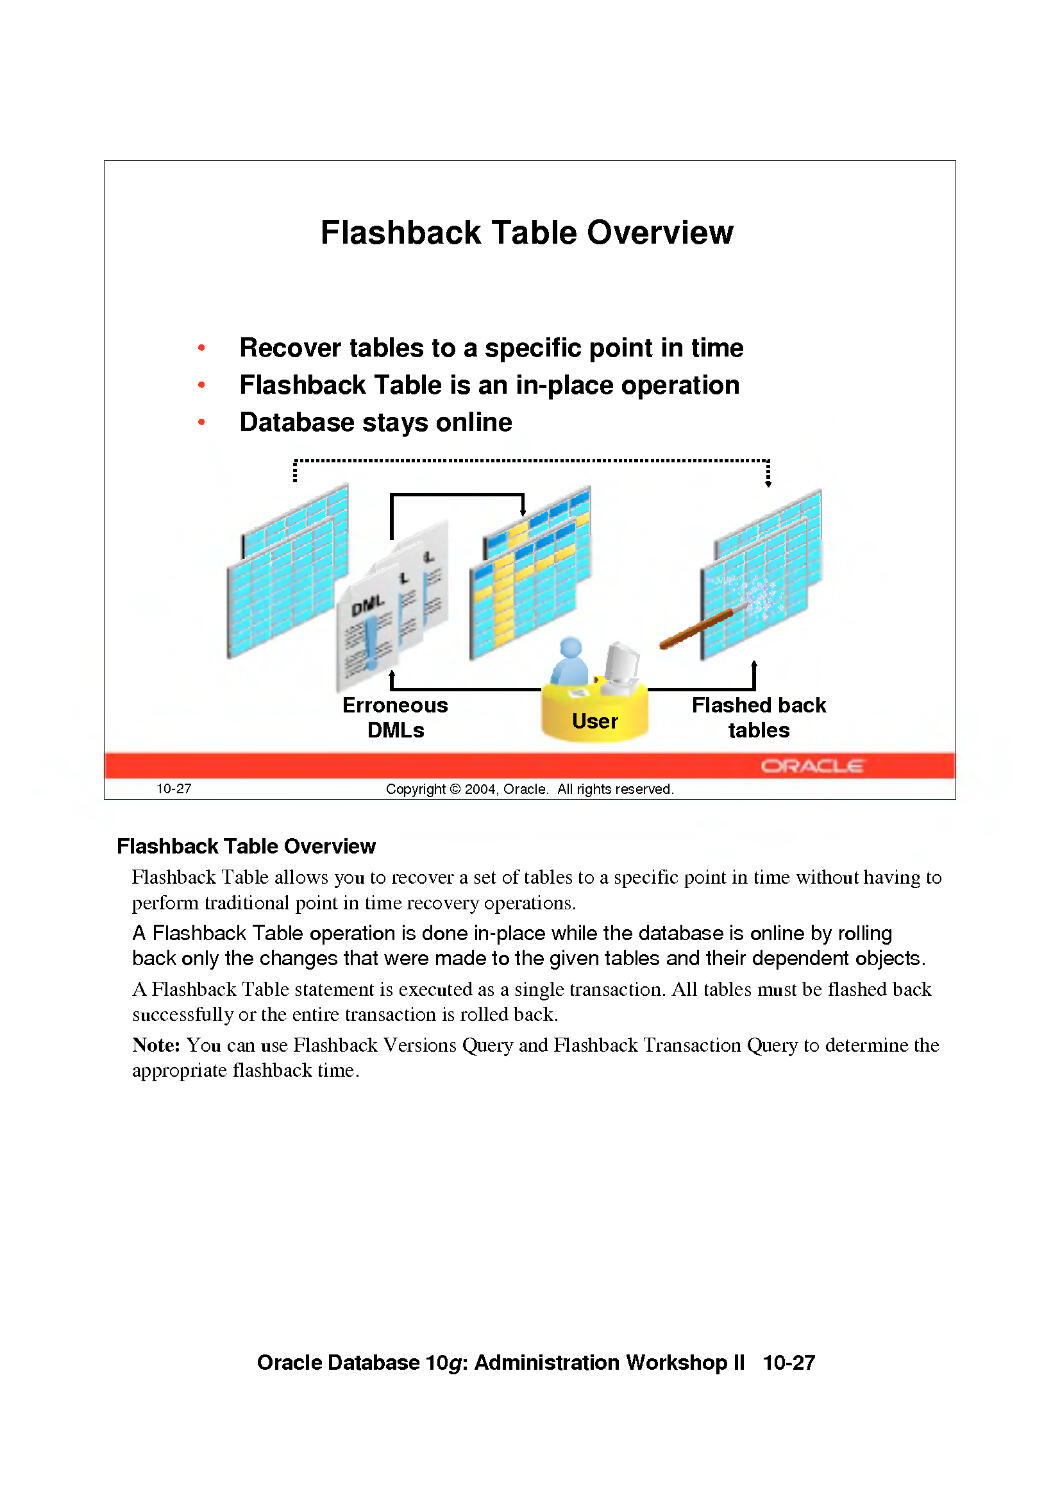
Flashback Table Overview 10-27
Using EM to Flashback Tables 10-28
Flashback Table Example 10-29
Rolling Back a Flashback Table Operation 10-30
Flashback Table Considerations 10-31
Guaranteed Undo Retention 10-32
SCN and Time Mapping Enhancements 10-33
Summary 10-34
Practice 10 Overview: Recovering from User Errors 10-35
VII
11 Dealing with Database Corruption
Objectives 11-2
What Is Block Corruption? 11 -3
Block Corruption Symptoms: ORA-1578 11-4
dbverify Utility 11-5
Interpreting dbverify 11-6
The analyze Command 11 -8
Initialization Parameter db_block_checking 11-9
How to Handle Corruptions 11-10
Using Flashback for Logical Corruption 11-12
The dbms_repair Package 11-13
Using dbms_repair 11-14
Block Media Recovery (BMR) 11-18
The blockrecover Command 11-19
RMAN BMR Interface 11-20
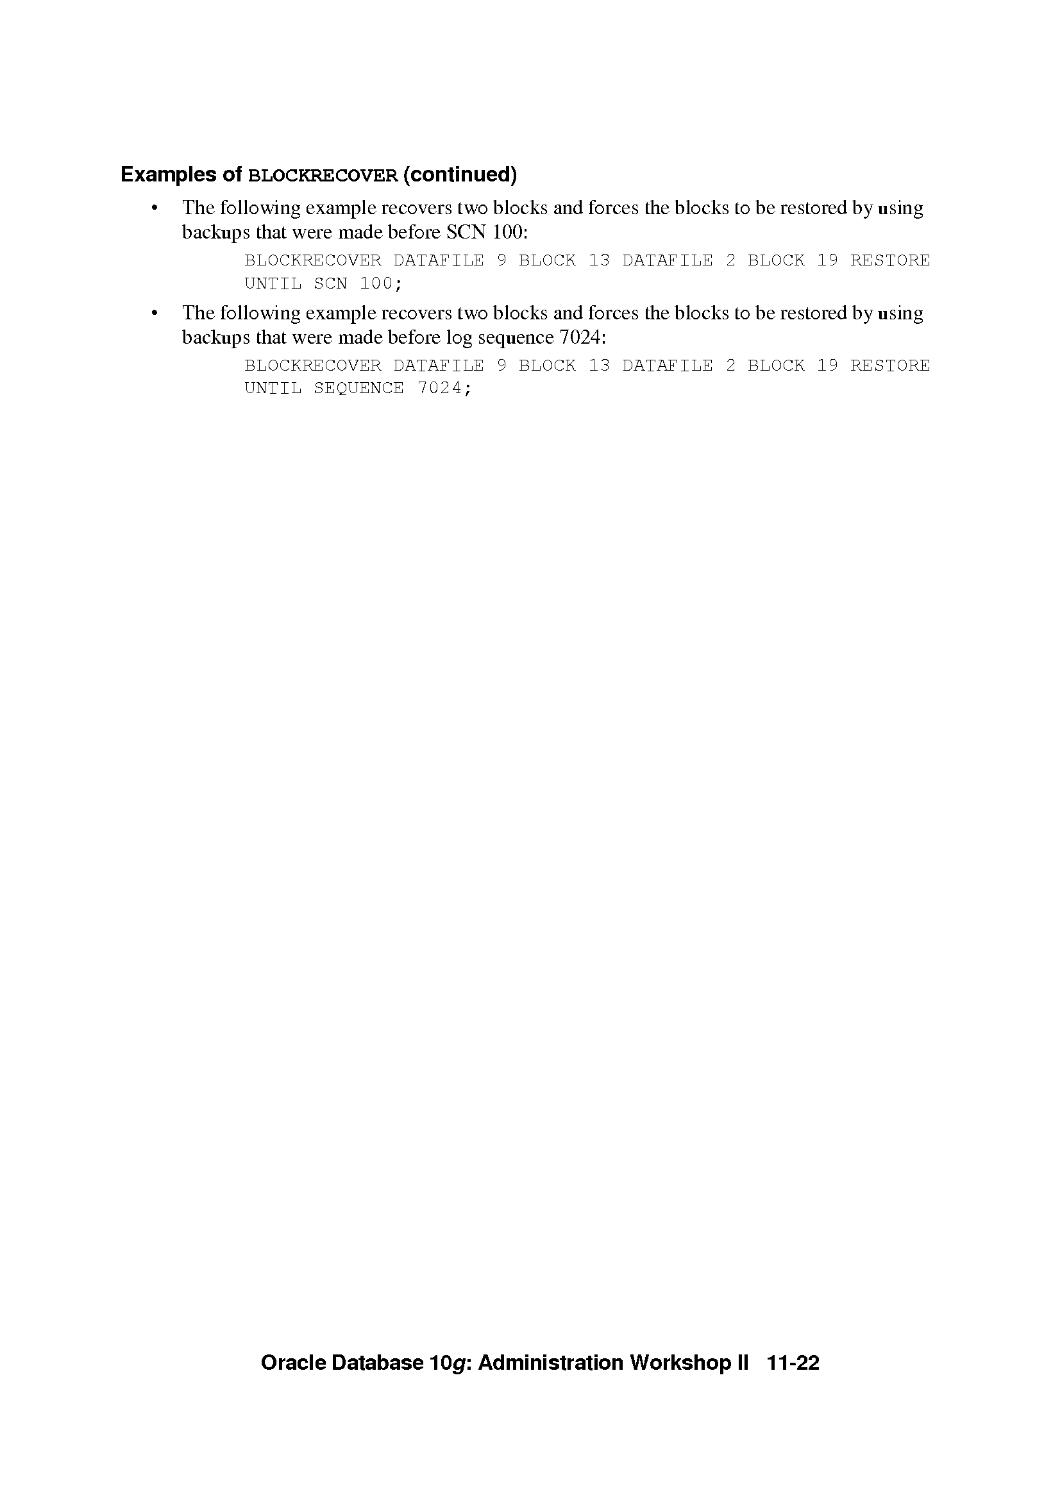
Examples of blockrecover 11-21
Which Object Is Corrupted? 11 -23
Summary 11-24
Practice 11 Overview: Dealing with Database Corruption 11-25
12 Automatic Management 12-1
Objectives 12-2
Oracle Wait Events 12-3
System Statistics 12-4
Displaying Session-Related Statistics 12-6
Troubleshooting and Tuning Views 12-7
Statistics Collection 12-8
Automatic Optimizer Statistics Collection: Overview 12-9
Dictionary and Special Views 12-11
Statspack 12-12
Workload Repository 12-13
AWR Snapshot Baselines 12-14
Advisory Framework Overview 12-15
Database Control and Advisors 12-17
Typical Advisor Tuning Session 12-18
Manually Invoking ADDM 12-19
Application Tuning Challenges 12-20
SQL Tuning Advisor Overview 12-21
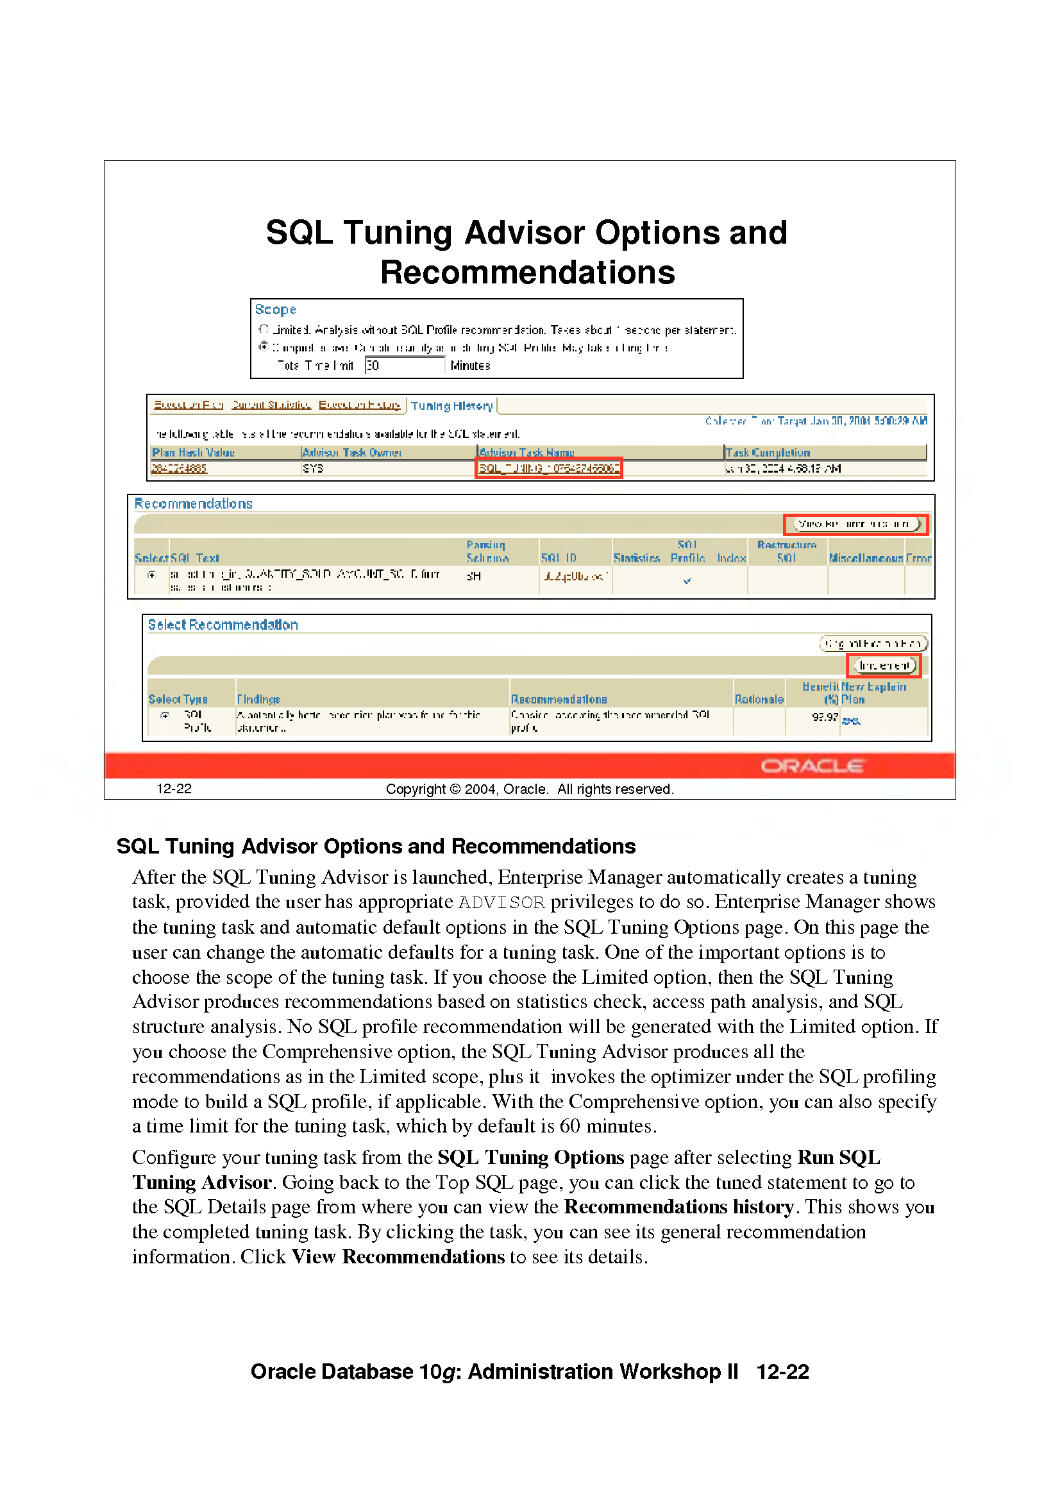
SQL Tuning Advisor Options and Recommendations 12-22
Using the SQL Tuning Advisor 12-23
Using the SQL Tuning Advisor: Example 12-24
Using the SQL Access Advisor 12-25
The Undo Management Page 12-27
Automatic Undo Retention Tuning 12-28
The Undo Advisor Page 12-29
Summary 12-30
Practice 12 Overview: Optimizing Database Performance 12-31
VIII
13 Monitoring and Managing Storage
Objectives 13-2
Online Redo Log File Configuration 13-3
Redo Logfile Sizing Advisor 13-5
Increasing the Performance of Archiving 13-6
Resumable Statements 13-7
Using Resumable Space Allocation 13-8
Resuming Suspended Statements 13-10
Proactive Tablespace Monitoring Overview 13-12
Tablespace Space Usage Monitoring 13-13
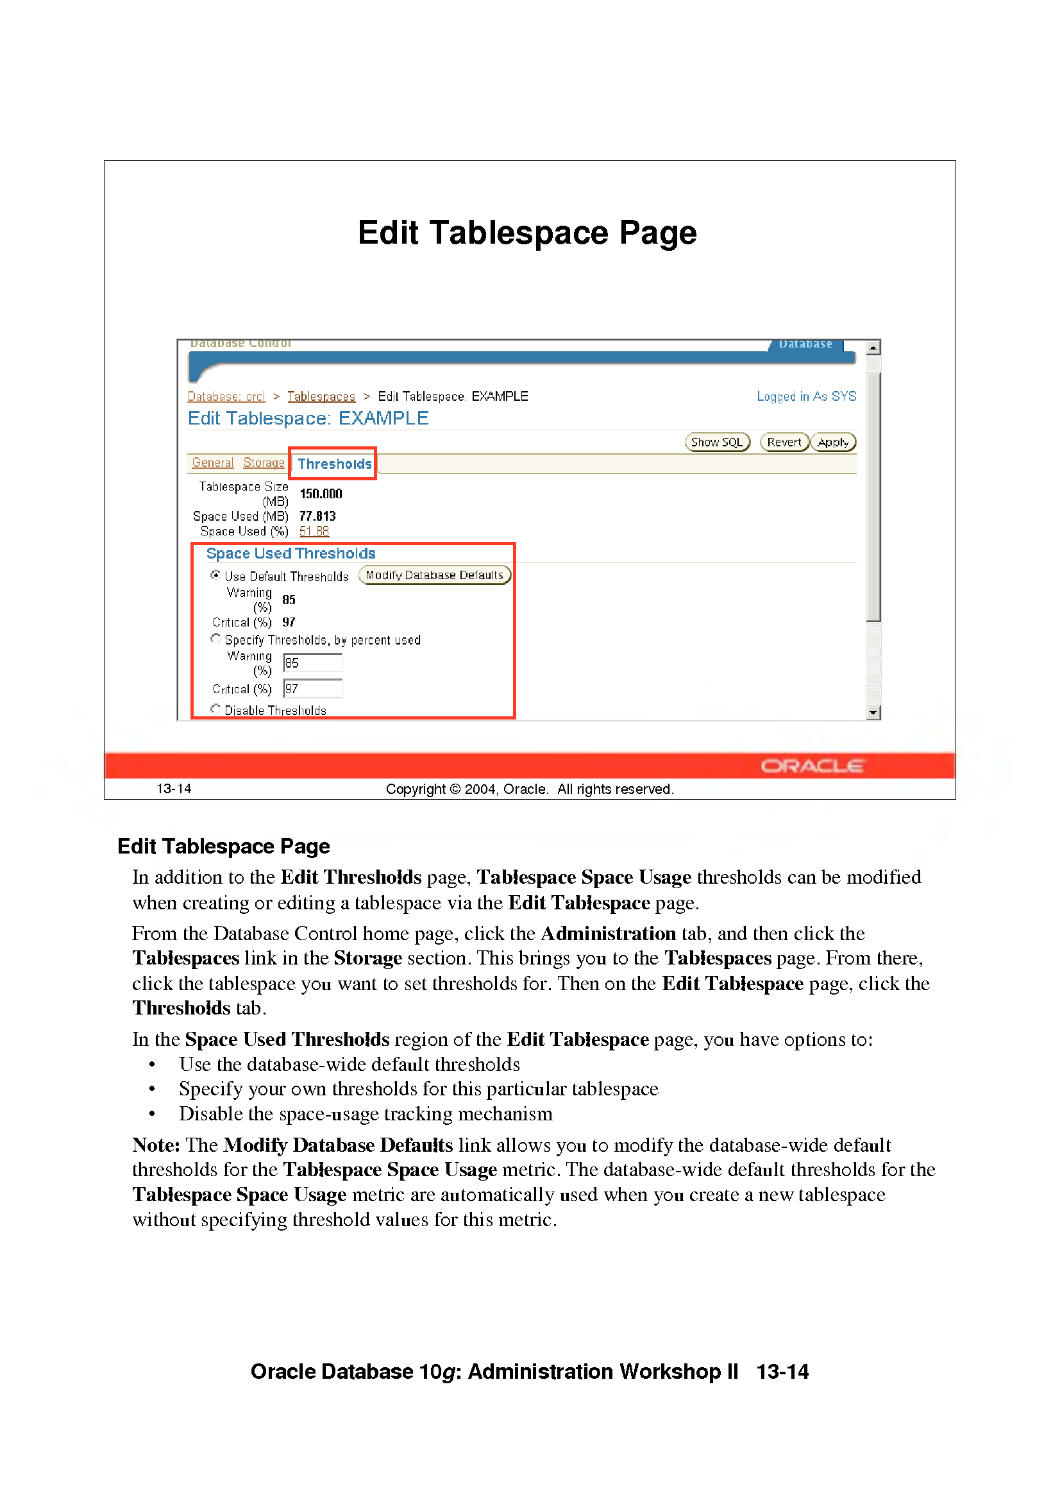
Edit Tablespace Page 13-14
Segment Advisor Overview 13-15
Shrinking Segments: Overview 13-16
Shrinking Segments: Considerations 13-17
Database Control and Segment Shrink 13-18
Accessing the Segment Advisor 13-19
Segment Advisor 13-20
Shrinking Segments Using SQL 13-21
Segment Shrink: Execution Considerations 13-22
Segment Resource Estimation 13-23
Growth Trend Report 13-24
Monitoring Index Space 13-25
Monitoring Index Space Usage 13-26
Deciding Whether to Rebuild or Coalesce an Index 13-27
Identifying Unused Indexes 13-28
Index-Organized Tables 13-29
Index-Organized Tables and Heap Tables 13-30
Creating Index-Organized Tables 13-32
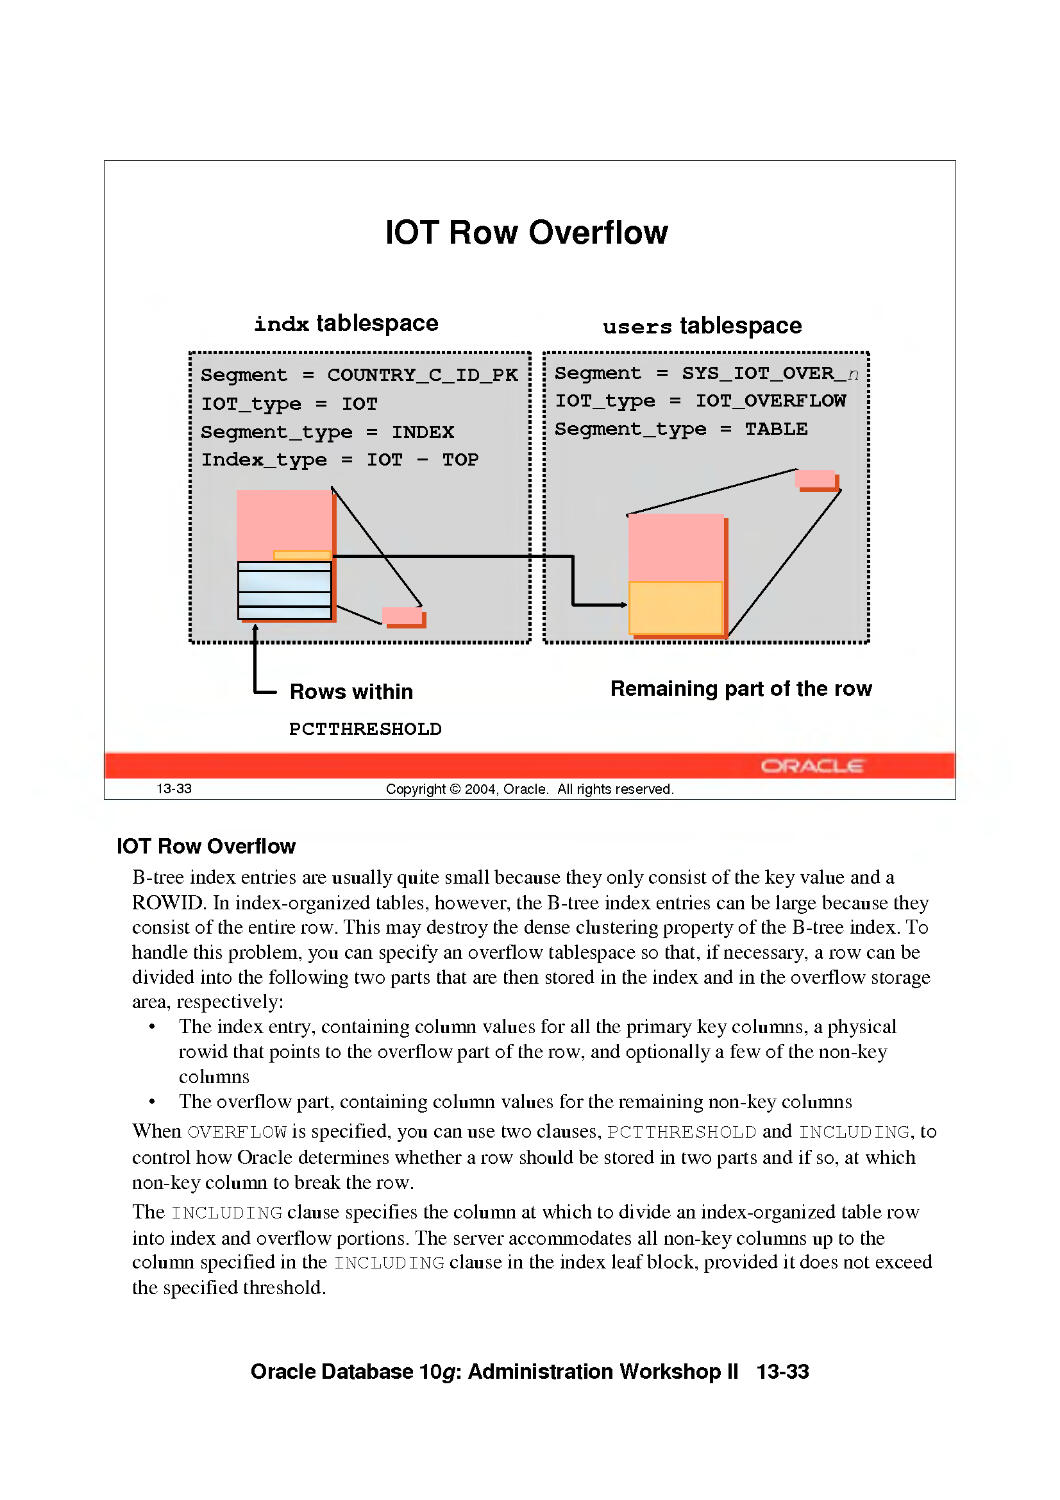
lOT Row Overflow 13-33
Querying dba_tables for lOT Information 13-35
Querying dba_indexes and dba_segments for lOT information 13-36
Using a Mapping Table 13-37
Maintaining a Mapping Table 13-38
Clusters 13-39
Cluster Types 13-40
Situations Where Clusters Are Useful 13-42
Sorted Hash Cluster: Example 13-43
Summary 13-44
Practice 13 Overview: Managing Storage 13-45
14 Automatic Storage Management
Objectives 14--2
What Is Automatic Storage Management? 14-3
ASM Key Features and Benefits 14-4
ASM Concepts 14-5
ASM General Architecture 14-6
ASM Instance Functionalities 14-8
IX
ASM Instance Creation 14-9
ASM Instance Initialization Parameters 14-10
Accessing an ASM Instance 14-11
Dynamic Performance View Additions 14-12
ASM Home Page 14-14
ASM Performance Page 14-15
ASM Configuration Page 14-16
Starting Up an ASM Instance 14-17
Shutting Down an ASM Instance 14-18
ASM Disk Groups 14-19
Failure Group 14-20
Disk Group Mirroring 14-21
Disk Group Dynamic Rebalancing 14-22
ASM Administration Page 14-23
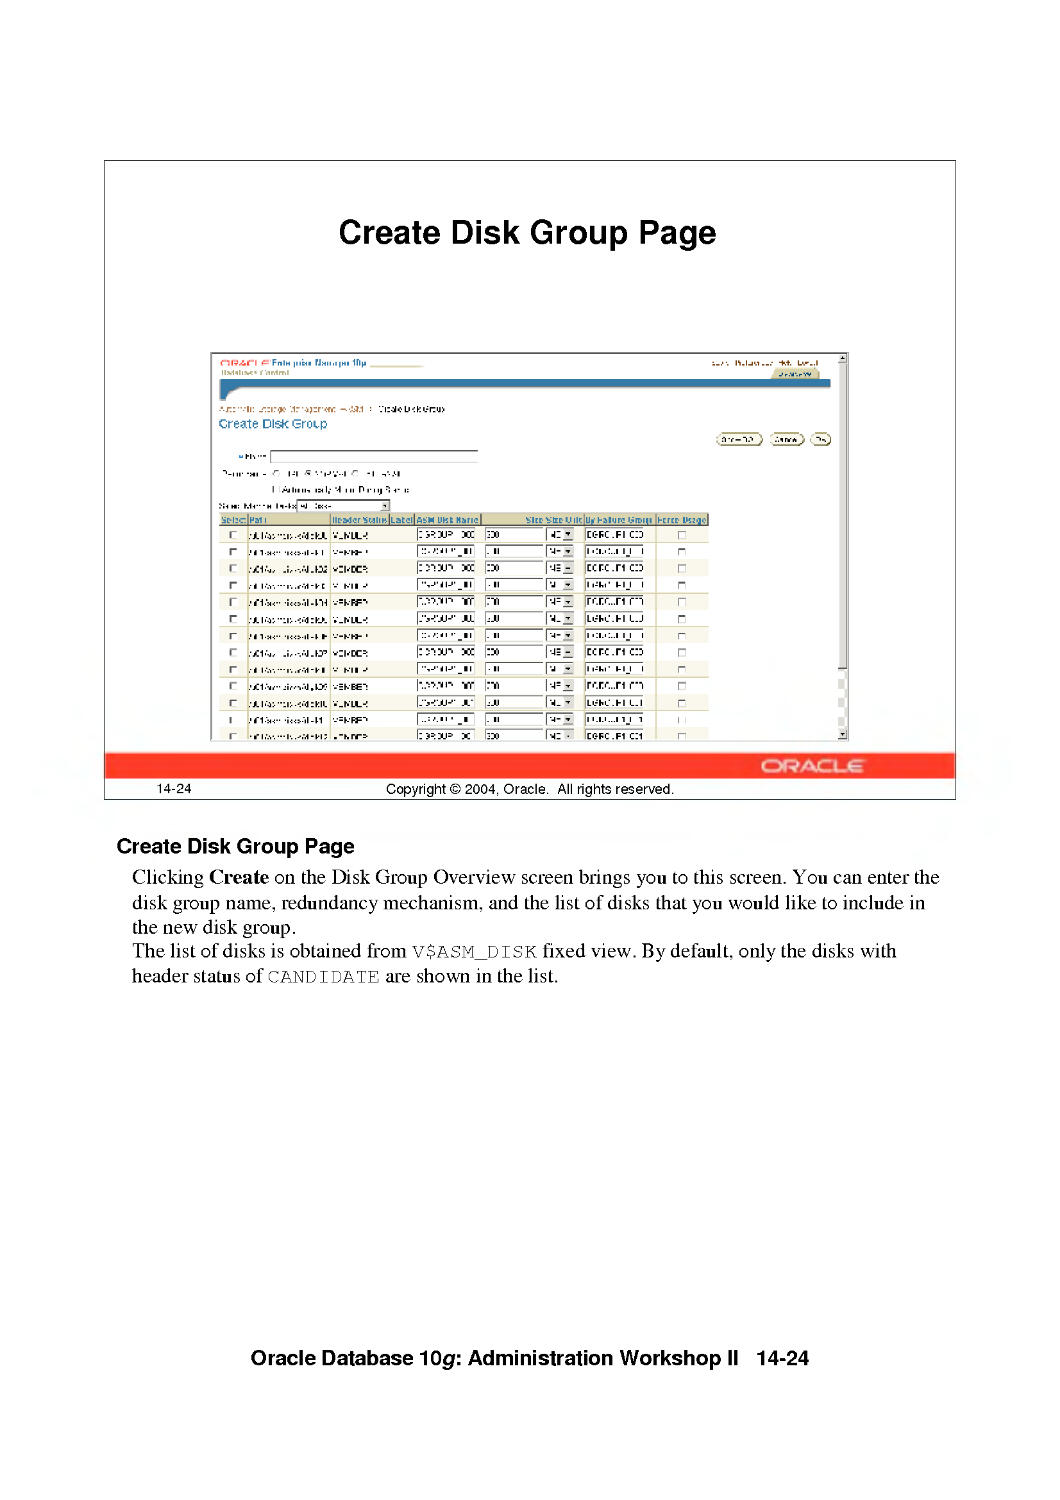
Create Disk Group Page 14-24
Create or Delete Disk Groups 14-25
Adding Disks to Disk Groups 14-26
Miscellaneous Alter Commands 14-27
Monitoring Long-Running Operations Using v$asm_operation 14-29
ASM Files 14-30
ASM Filenames 14-31
ASM File Name Syntax 14-32
ASM File Name Mapping 14-34
ASM File Templates 14-35
Template and Alias Examples 14-36
Retrieving Aliases 14-37
SQL Commands and File Naming 14-38
DBCA and Storage Options 14-39
Database Instance Parameter Changes 14-40
Migrating Your Database to ASM Storage 14-41
Summary 14-42
Practice 14 Overview: Using ASM 14-43
15 Monitoring and Managing Memory
Objectives 15-2
Oracle Memory Structures 15-3
Oracle Memory Structures Buffer Cache 15-5
Using Multiple Buffer Pools 15-7
Shared Pool 15-9
Large Pool 15-10
UGA and Oracle Shared Server 15-11
Java Pool 15-12
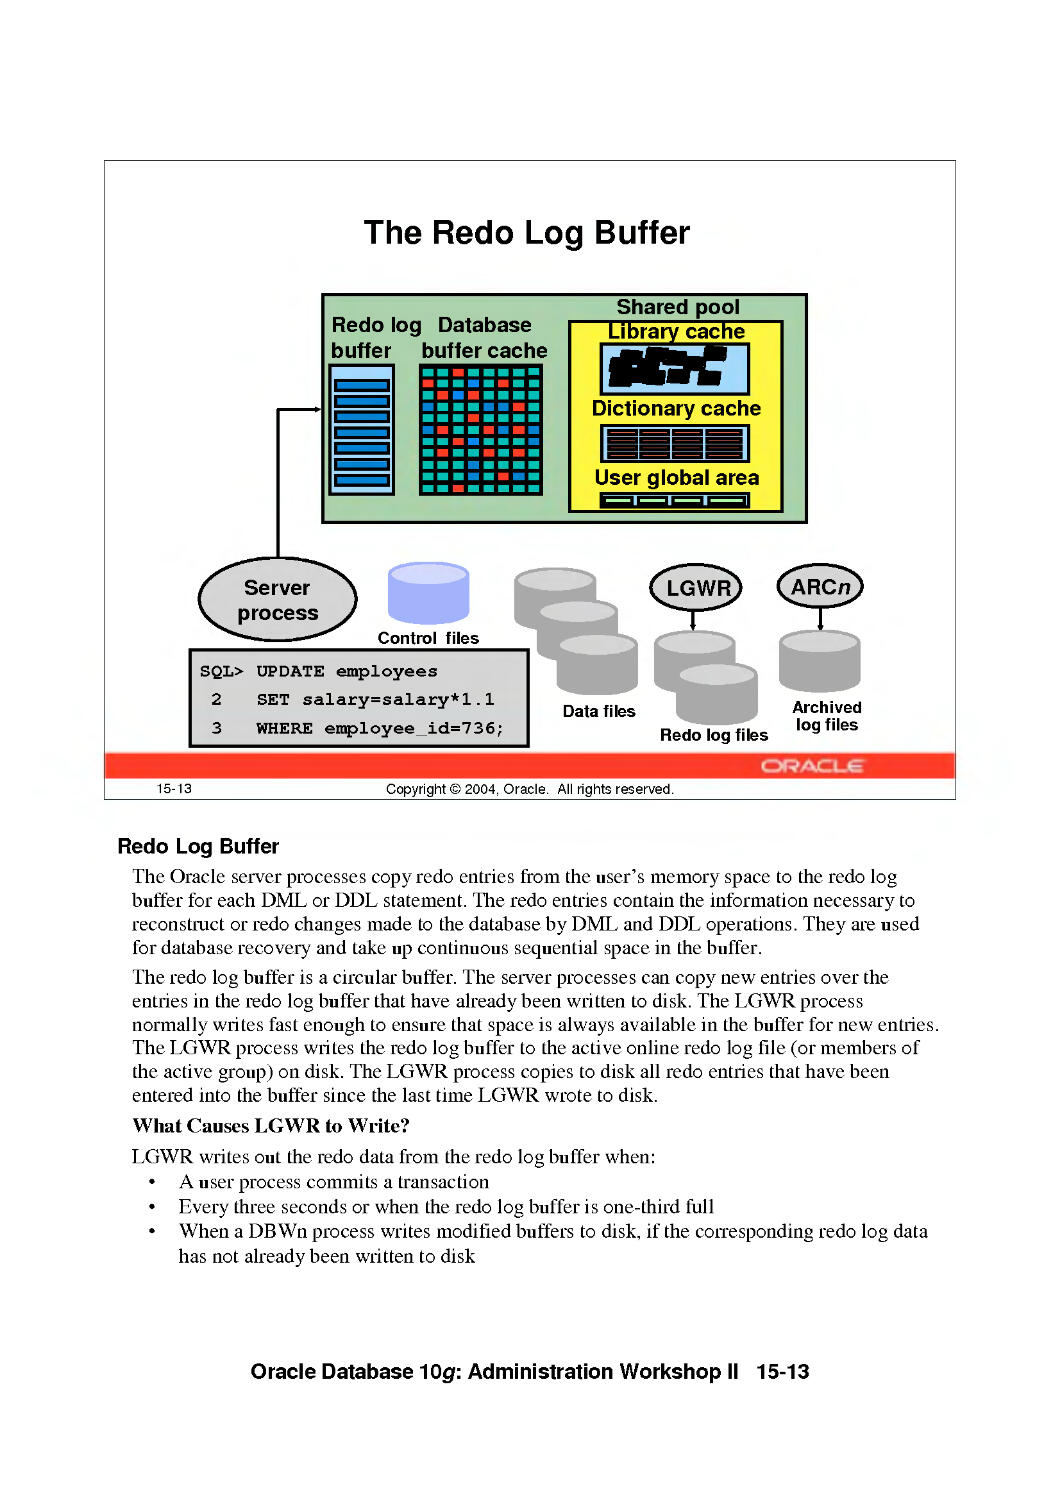
The Redo Log Buffer 15-13
Automatic Shared Memory Management: Overview 15-14
Benefits of Automatic Shared Memory Management 15-15
SGA Tuning Principles 15-16
x
Database Control and Automatic Shared Memory Management 15
Manual Configuration 15-18
Behavior of Auto-Tuned SGA Parameters 15-19
Behavior of Manually Tuned SGA Parameters 15-20
Using the v$parameter View 15-21
Resizing sga_target 15-22
Disabling Automatic Shared Memory Management 15-23
Manually Resizing Dynamic SGA Parameters 15-24
Program Global Area (PGA) 15-25
Automatic PGA Memory Management 15-27
PGA Management Resources 15-28
Using the Memory Advisor 15-29
Summary 15-30
Practice 15 Overview: Automatic Shared Memory Management 15
16 Managing Resources
Objectives 16-2
Overview 16-3
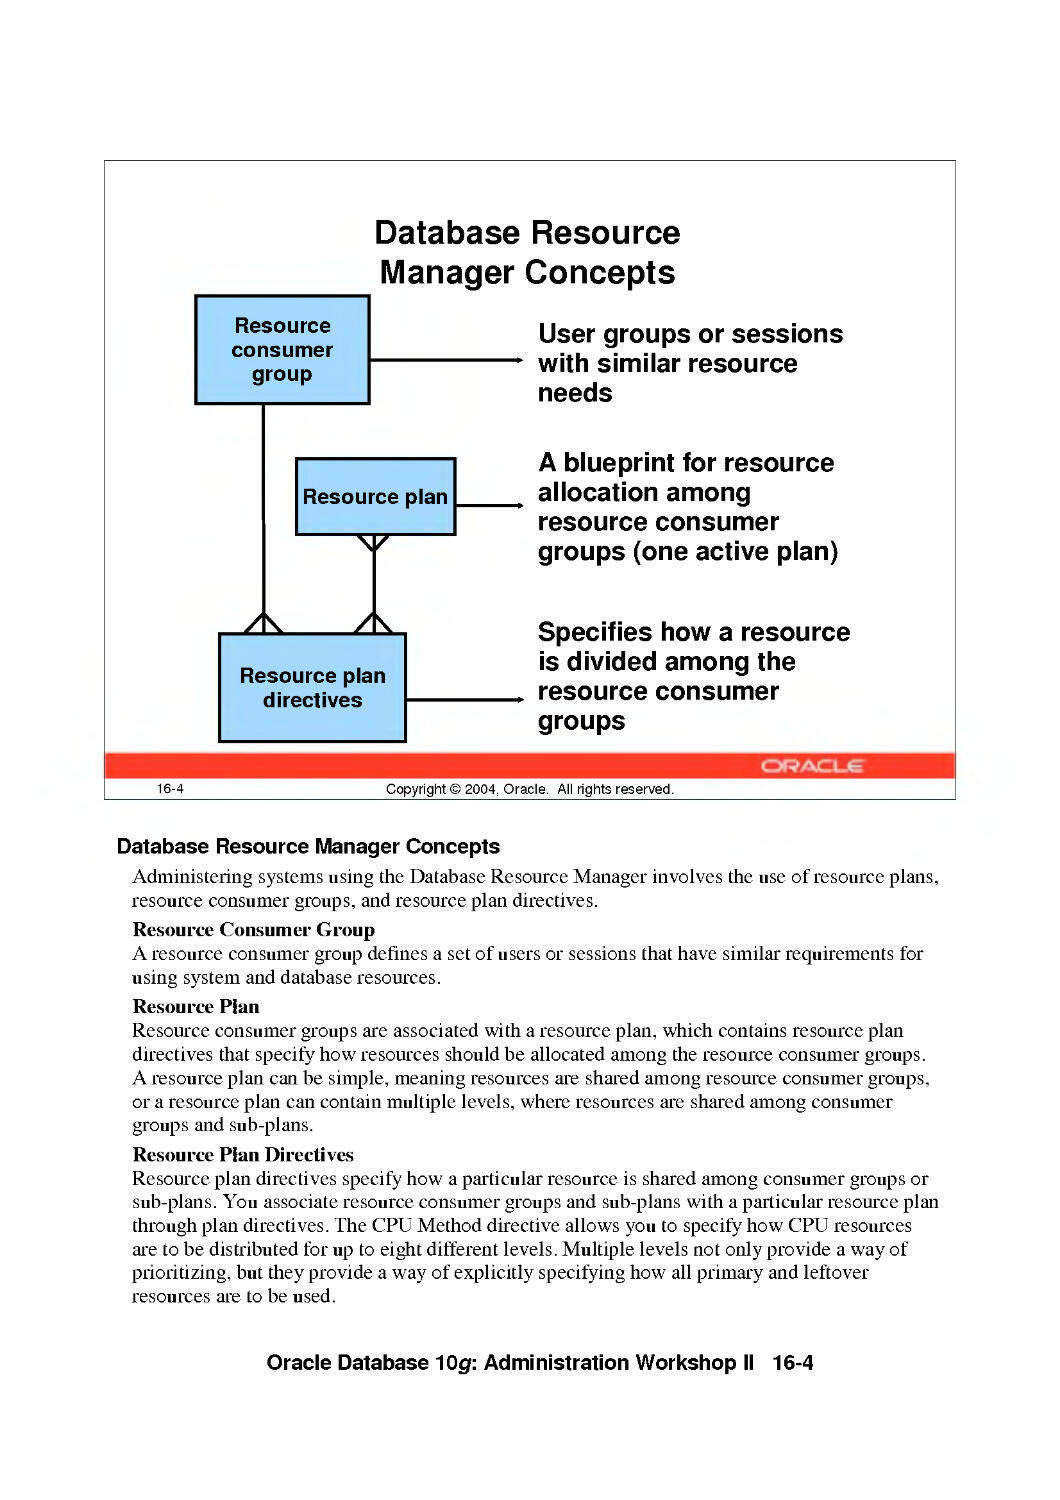
Database Resource Manager Concepts 16-4
Resource Manager Configurations 16-5
The Initial Plan: system_plan 16-7
Creating a New Resource Plan 16-8
Creating a Simple Plan 16-10
Oracle Enterprise Manager: Resource Manager 16-11
Active Session Pool Mechanism 16-12
Setting the Active Session Pool 16-13
Maximum Estimated Execution Time 16-15
Setting Idle Timeouts 16-16
Switching Back to the Initial Consumer Group at End of Call 16-17
Creating Resource Consumer Groups 16-18
Assigning Users to Consumer Groups 16-20
Automatic Consumer Group Switching 16-21
Configuring Consumer Group Switching 16-24
Adaptive Consumer Group Mapping 16-25
Creating a Mapping Using dbms_resource_manager 16-26
Assigning Priorities Using dbms_resource_manager 16-27
Using Sub-Plans to Limit CPU Utilization 16-28
Limiting CPU Utilization: Example 16-30
Creating a Complex Plan 16-31
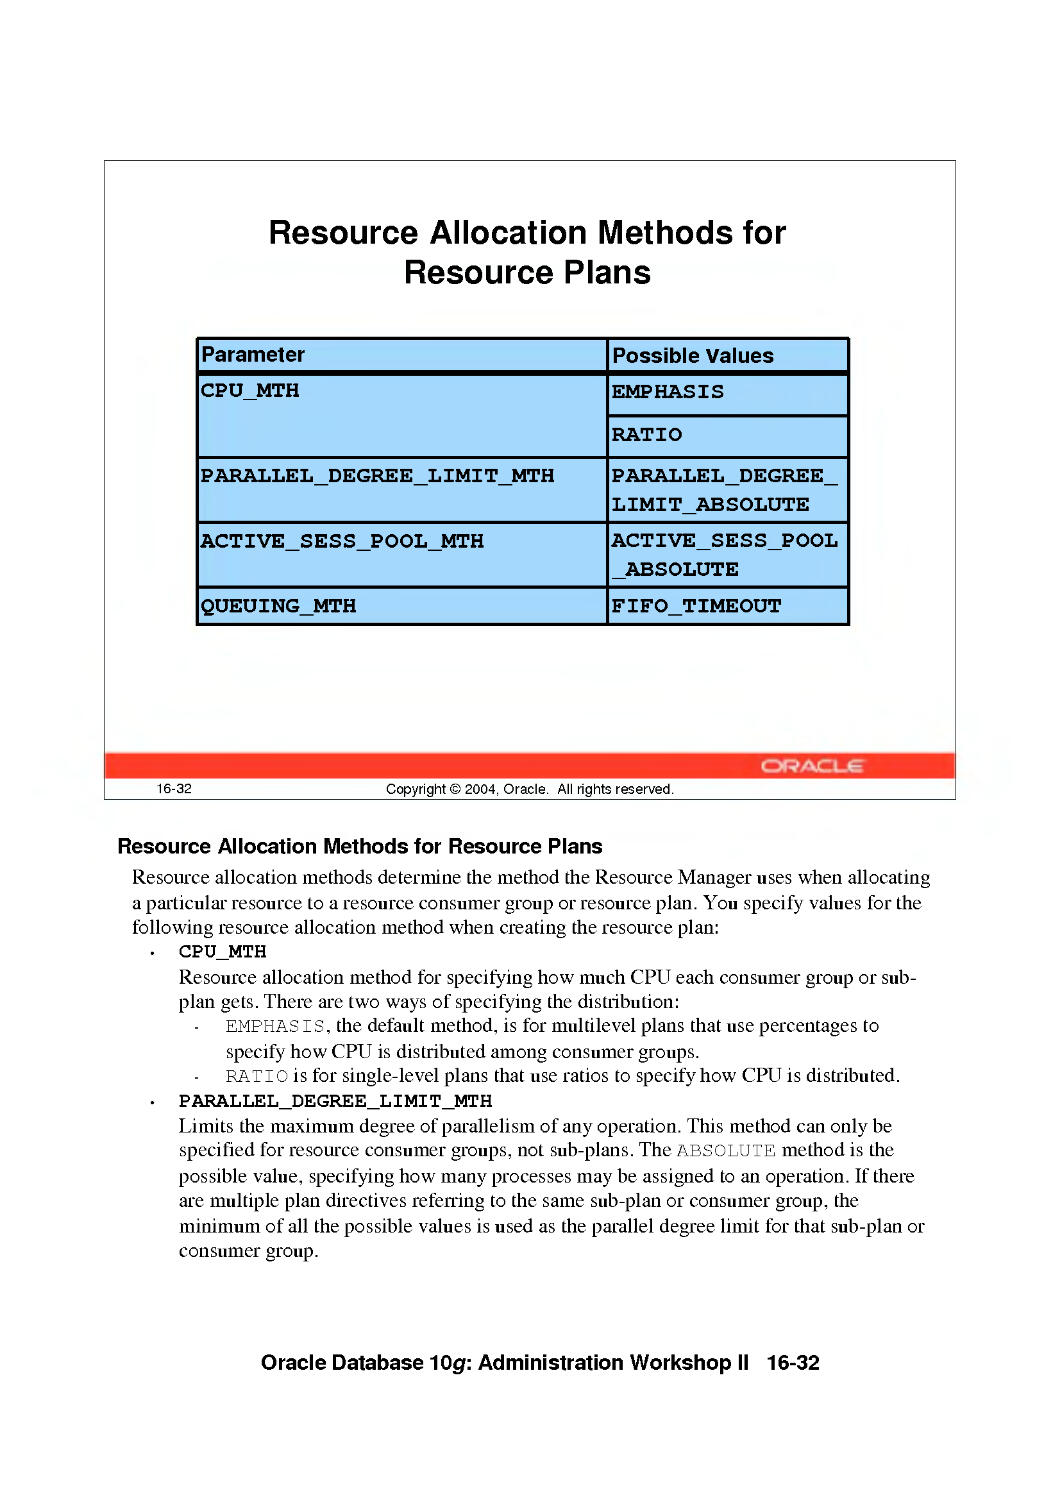
Resource Allocation Methods for Resource Plans 16-32
Comparison of emphasis and ratio 16-34
Resource Allocation Methods for Consumer Groups 16-36
Administering the Resource Manager 16-37
Assigning Resource Manager Privileges 16-38
Setting the Resource Plan for an Instance 16-39
Viewing Resource Consumer Groups 16-40
XI
Changing a Consumer Group Within a Session 16-41
Changing Consumer Groups for Sessions 16-42
Database Resource Manager Information 16-43
Resource Plan Directives 16-44
Monitoring the Resource Manager 16-46
Summary 16-49
Practice 16 Overview: Using the Resource Manager 16-50
17 Automating Tasks with the Scheduler
Objectives 17-2
Scheduling Needs 17-3
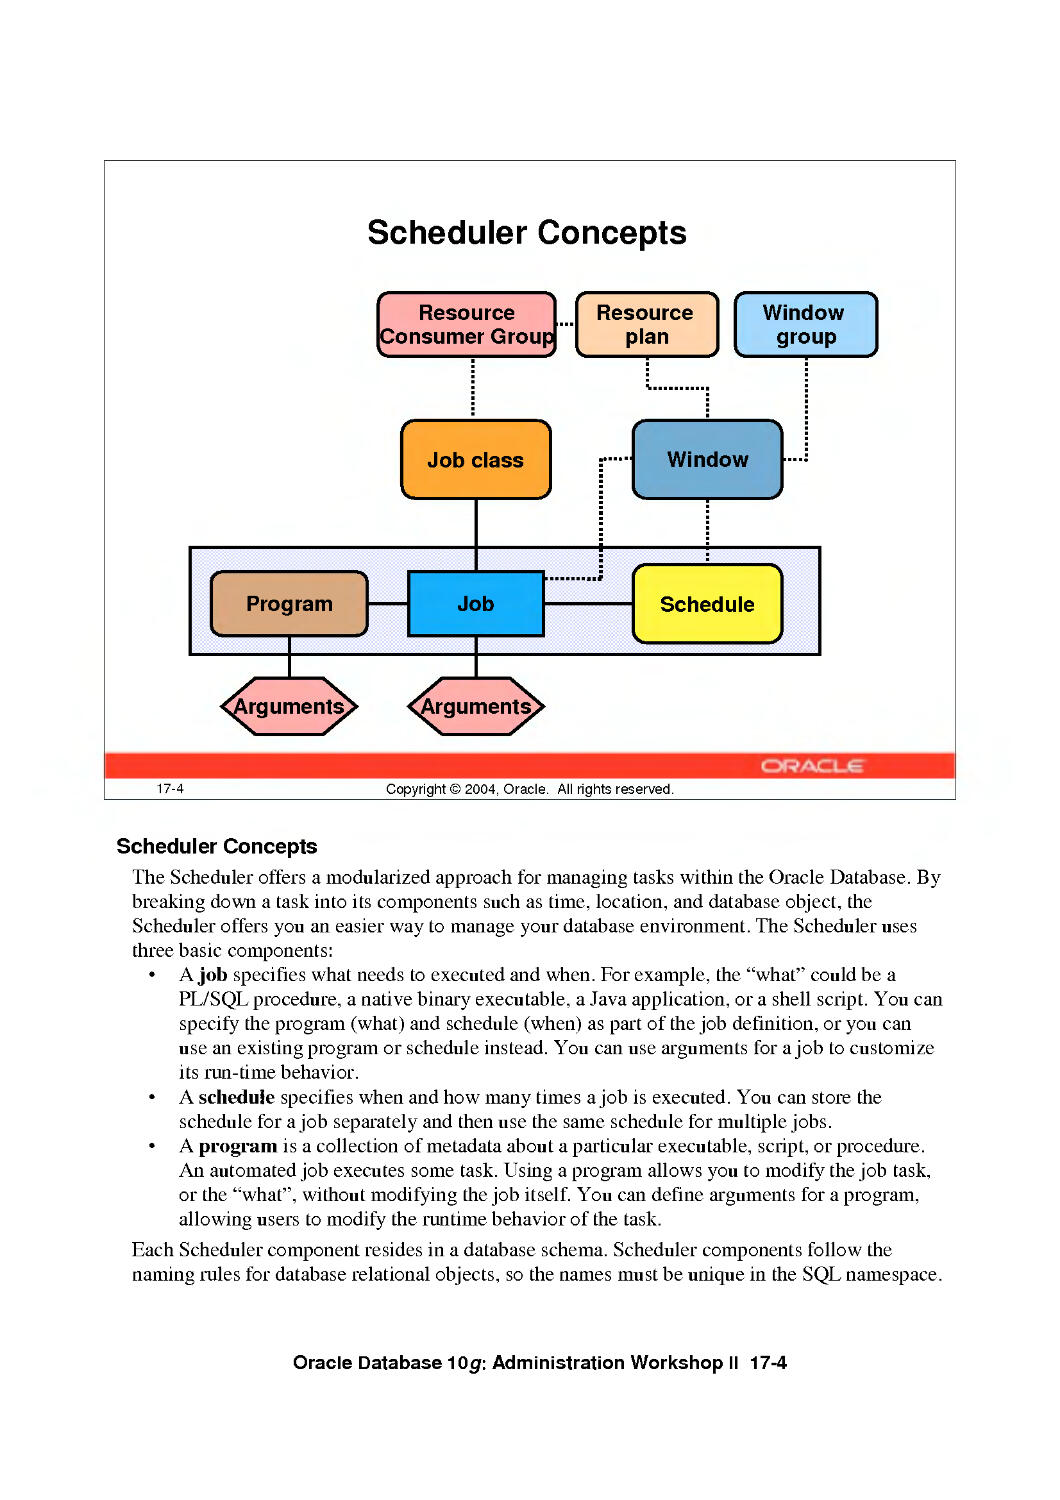
Scheduler Concepts 17-4
Privileges for Scheduler Components 17-6
Creating a Scheduler Job 17-8
Creating a Scheduler Job: Example 17-9
Setting the Repeat Interval for a Job 17-10
Calendaring Expressions 17-11
Using Scheduler Programs 17-12
Creating a Program Using EM 17-13
Specifying Schedules for a Job 17-14
Creating and Using Schedules 17-15
Using EM to Create Schedules 17-16
Advanced Scheduler Concepts 17-17
Creating a Job Class 17-18
Job Logging 17-20
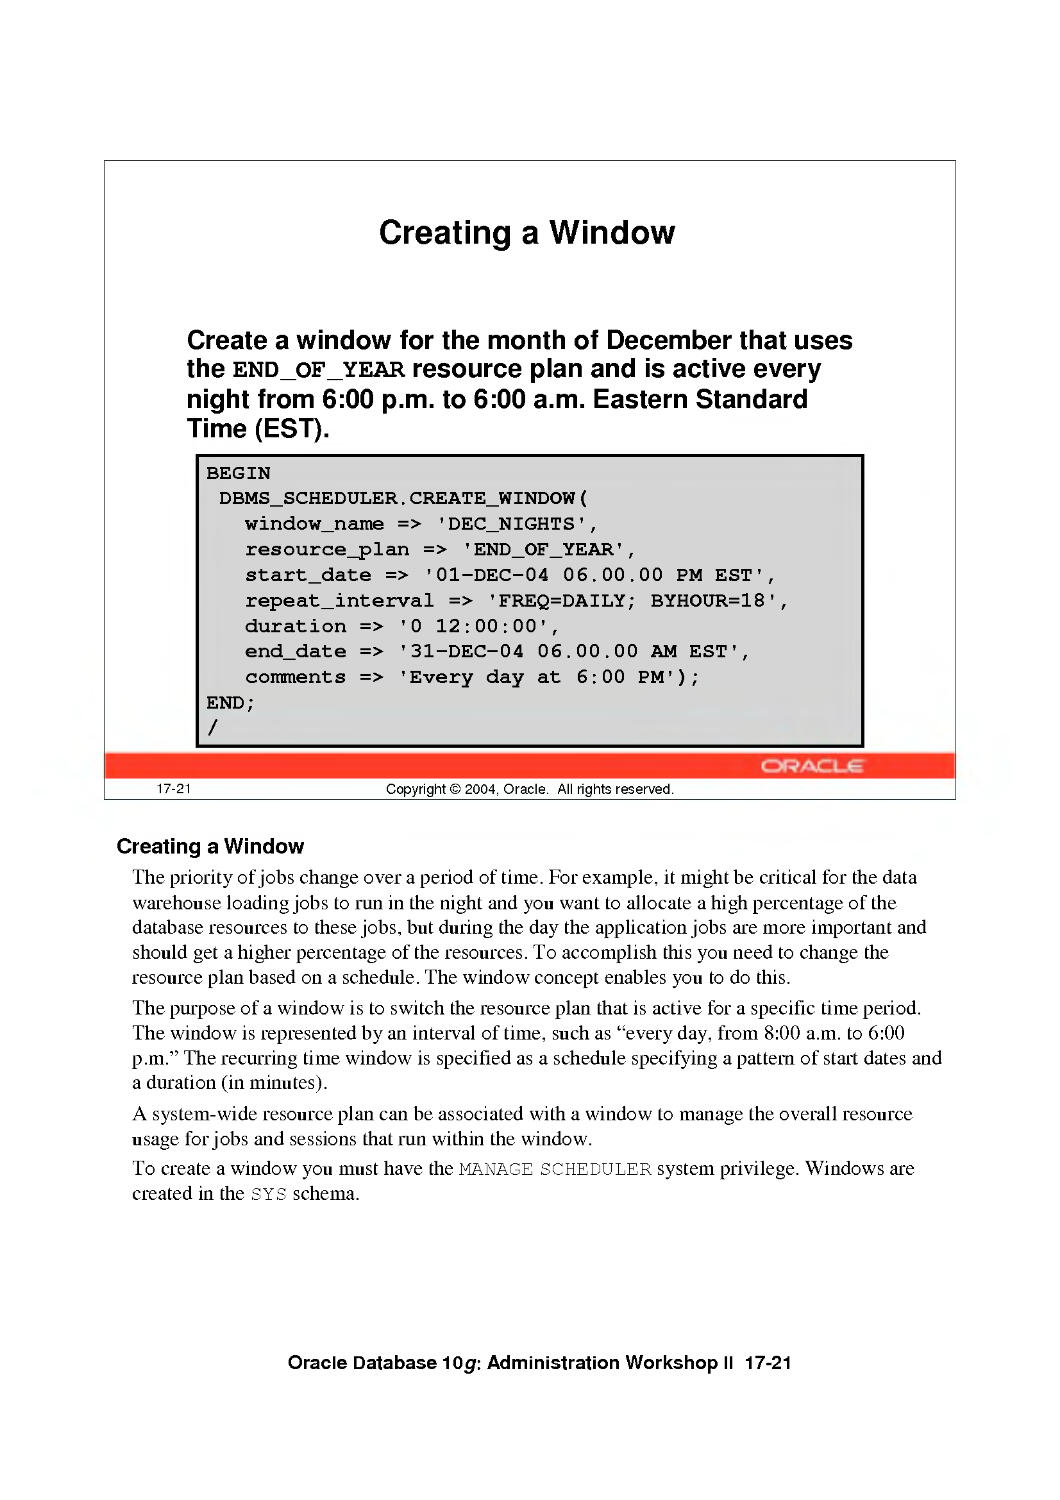
Creating a Window 17-21
Prioritizing Jobs Within a Window 17-23
Enabling and Disabling Scheduler Components 17-25
Managing Jobs 17-26
Managing Programs 17-27
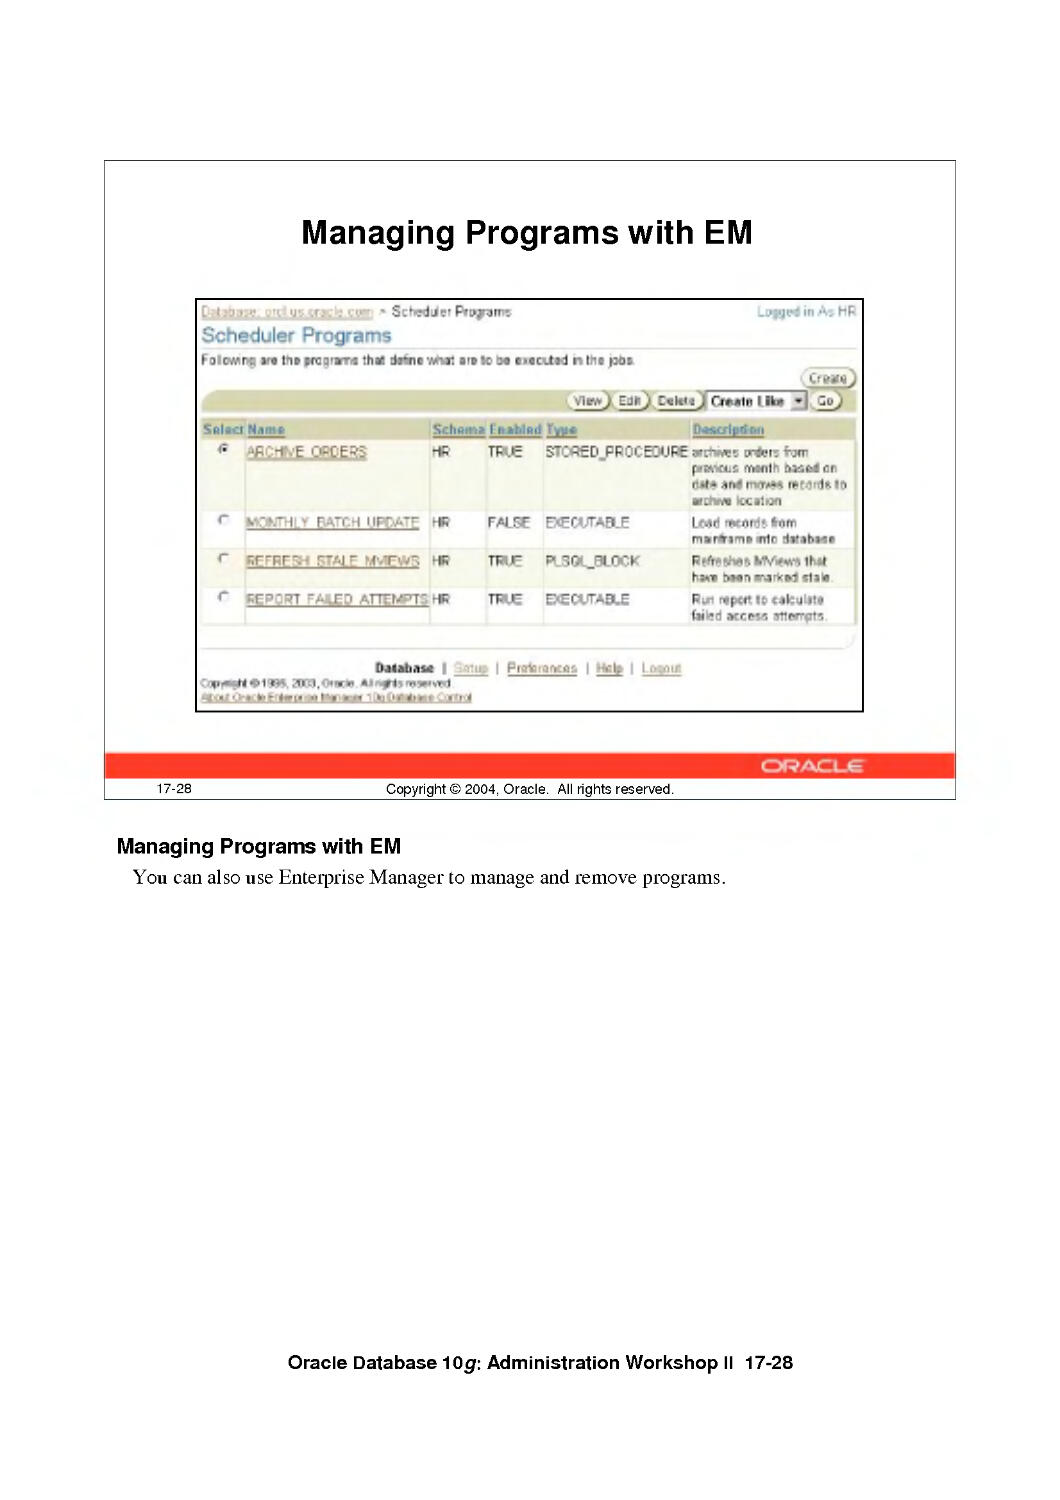
Managing Programs with EM 17-28
Managing Schedules 17-29
Managing Windows 17-30
Window Priority 17-32
Managing Attributes of Scheduler Components 17-33
Managing Attributes of the Scheduler 17-35
Viewing Job Execution Details 17-36
Viewing Job Logs 17-37
Purging Job Logs 17-38
Data Dictionary Views 17-40
Summary 17-41
Practice 17 Overview: Automating Tasks with the Scheduler 17-42
Practice 17: Using the Scheduler 17-43
XII
18 Workshop
Objectives 18-2
Workshop Methodology 18-3
Business Requirements 18-5
Database Configuration 18-6
Simulated Application 18-7
Method for Resolving Database Issues 18-8
Summary 18-10
Practice 18 Overview: Workshop Setup 18-11
Practice 18 Workshop Setup 18-12
Workshop Scenario 1 18-15
Appendix A: Solutions
Appendix B: Basic Linux and vi Commands
Appendix C: Acronyms and Terms
XIII
Introduction
Copyright © 2004, Oracle. All rights reserved.
Course Objectives
In this course, you will gain hands-on experience with:
• Advanced backup and recovery concepts
Implementing a backup and recovery strategy
Employing database monitoring practices
• Basic database tuning
• Scheduling of tasks
1-2 Copyright © 2004, Oracle. All rights reserved.
Oracle Database 10g: Administration Workshop II 1-2
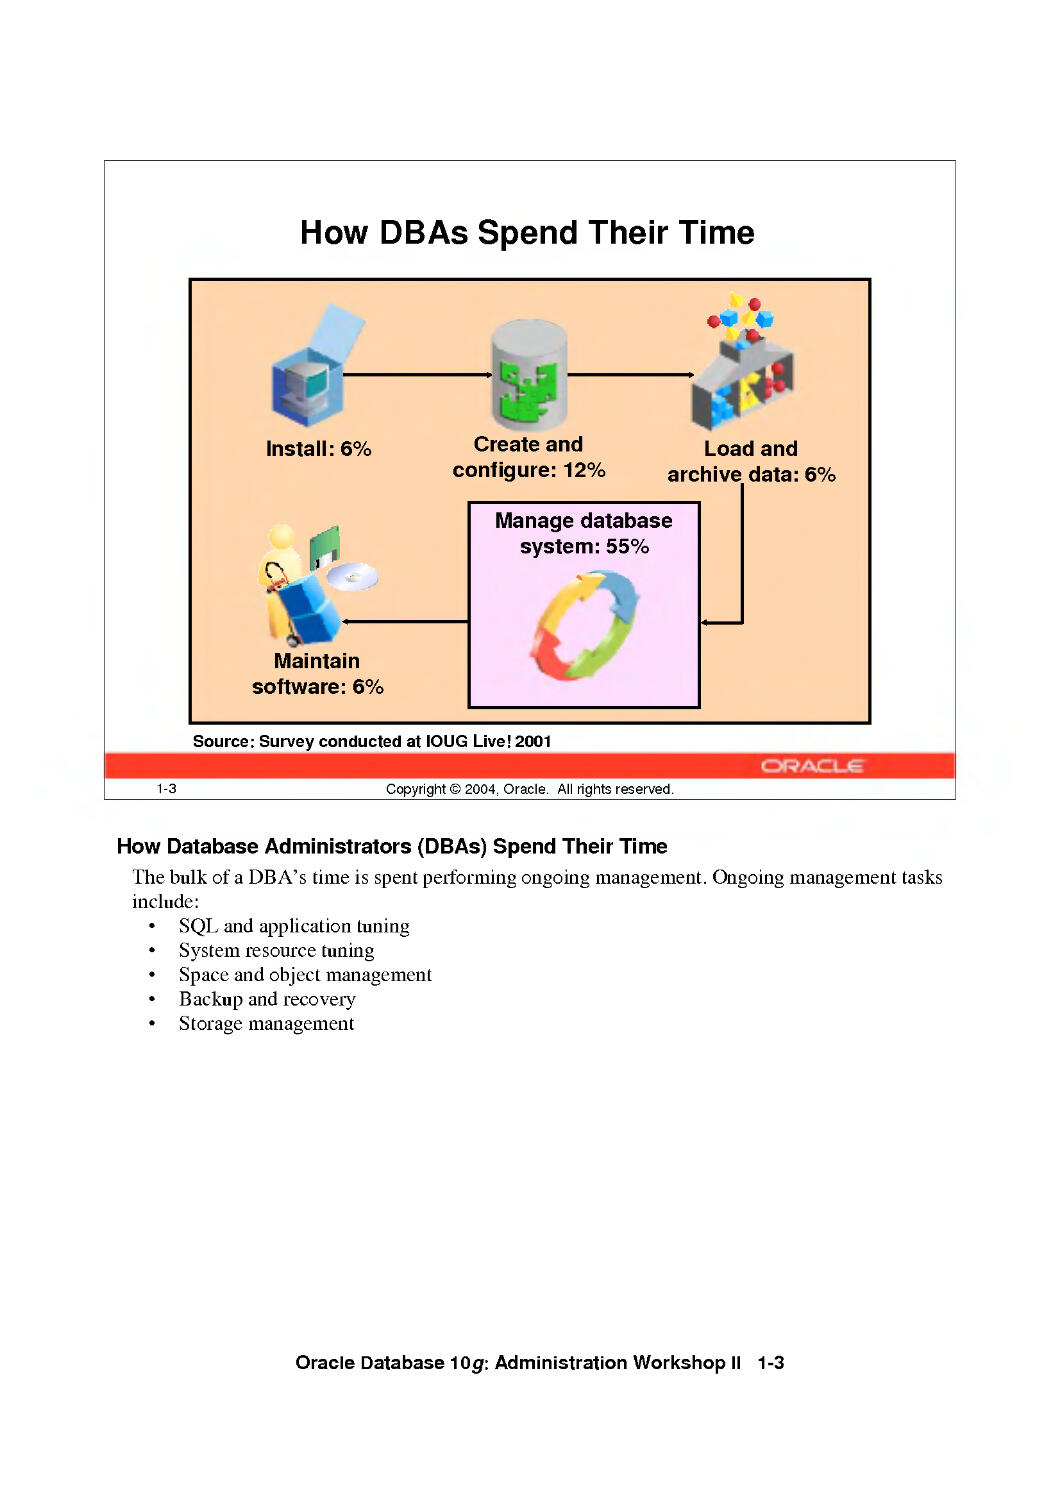
How DBAs Spend Their Time
Install: 6%
n
Maintain
software: 6%
•£&
Create and
configure: 12%
Load and
archive data: 6%
Manage database
system: 55%
Source: Survey conducted at IOUG Live! 2001
1-3
Copyright © 2004, Oracle. All rights reserved.
How Database Administrators (DBAs) Spend Their Time
The bulk of a DBA's time is spent performing ongoing management. Ongoing management tasks
include:
• SQL and application tuning
• System resource tuning
• Space and object management
• Backup and recovery
• Storage management
Oracle Database 10g: Administration Workshop II 1-3
Oracle Database 10g Manageability Goals
•
•
•
•
•
•
1-4
Reduce administration costs J^>
Automatic versus manual ^HB#
ntelligence versus data ^H^v
Reduce capital expenditures J^>
Adaptive versus oversized
ntegrated versus third-party
Reduce failure costs ^^>
Dreventive versus corrective
Act-and-succeed versus trial-and-error
Copyright © 2004, Oracle. All rights reserved.
Oracle Database 10g Manageability Goals
Oracle Database 10g is a giant step toward the Oracle vision of creating a self-aware, self-
learning, and completely self-managing database. A huge development effort has gone into
simplifying every aspect of Oracle Database lOg administration with the dual objectives of
enhancing administrator productivity and reducing operational costs.
Oracle Database 10g: Administration Workshop II 1-4
Database Management Challenges
1-5
Copyright © 2004, Oracle. All rights reserved.
Database Management Challenges
With previous releases of the Oracle Database, a good portion of a DBA's time was spent on
monitoring database system health, identifying bottlenecks, and improving system performance.
Some of the tasks included:
• Application and SQL management: Creating indexes and collecting optimizer statistics
• System resource management: Monitoring CPU utilization and sizing the various
database buffers
• Space management: Sizing the various database files and monitoring space utilization
within segments
• Backup and recovery management: Monitoring the mean time to recover the database,
planning for disaster recovery, and backing up the database
• Storage management: Configuring disks, monitoring I/O bandwidth, and determining the
stripe size
Oracle Database 10g: Administration Workshop II 1-5
Oracle Database 10g Solution: Self-Managing Database
Oracle Database 10g can now automatically inform you of performance and resource allocation
problems. In addition to providing suggestions for fixing these problems, Oracle Database lOg
can also automatically fix the problems for you.
The second part of Oracle Corporation's manageability strategy focuses on making the
management of data centers easier, scalable, and more effective. Oracle Enterprise Manager lOg
provides this solution. Enterprise Manager is a single, integrated solution for administering and
monitoring all applications and systems based on the Oracle technology stack. The next-
generation, HTML-based Enterprise Manager lOg provides the ability to seamlessly manage
hundreds of systems located across organizational and geographical boundaries from a single
point of control. Built with robust functionality for managing both small and large sets of
systems, Enterprise Manager lOg automates critical operations to reduce task time and the risk of
errors, which increases as the number of systems goes up. Its robust grouping and task-
automation functionalities provide core features that enable reliable, rapid, and secure
automation of traditionally time-consuming, error-prone tasks, such as application performance
management, policy-based standardization, and system provisioning.
Oracle Database 10g: Administration Workshop II 1-6
How Oracle Database 10g DBAs
Spend Their Time
Proactive
and strategic
planning:
45+%
Scale to the Grid
Install: 3%
Create and
configure: 6%
3h
Maintain
software: 3%
Manage database
system: 25%
Load data: 3%
1-7
Copyright © 2004, Oracle. All rights reserved.
How Oracle Database 10g DBAs Spend Their Time
As the demand for database uptime continues to increase, so does the rate of growth in the
average database size. These trends result in what some experts are calling the "management
gap." The doubling of both disk density and database size every few years is not being matched
by a doubling of DBA staff in the same time period.
Therefore, DBAs are being asked to manage more (and larger) databases with the same staff. For
this reason, they need tools that enable them to work more efficiently and manage more with
fewer resources. With Oracle Database lOg, DBAs:
• Think and act more proactively and strategically
• Are application-aware and business-sensitive
• Support larger databases with more users for more mission-critical applications
• Can consolidate, centralize, and globalize
• Require and provide more education
• Are even more important and valuable
Oracle Database 10g: Administration Workshop II 1-7
Student Preface
Even if topics might not seem to be relevant to you
now, your job functions may change due to:
New products or methods
Changes in your employment
• Changes in corporate structure
Enhancements in applications
1-8 Copyright© 2004, Oracle. All rights reserved.
Student Preface
As you progress through this course, you may encounter a number of topics that do not seem
relevant for you at the present time. However, you should remember that information technology
is an industry in which about 50 percent of your skills and knowledge today will be obsolete in a
year or so. Features that are not of current interest could become valuable to you for a number of
reasons:
• Your company introduces a new product or business method that requires new database
functionality.
• You choose to advance your career by moving to a different group or company that
requires you to use unfamiliar features.
• Your company business changes due to a merger or acquisition.
• A maintenance window for an old application allows developers to incorporate features
that were not available when the application was first written.
The goal for this course is to teach you database administration skills that take you beyond basic
configuration and monitoring tasks. This course covers a variety of features and techniques that
you can employ to optimize database performance, increase data availability, and enhance your
own productivity.
Oracle Database 10g: Administration Workshop II 1-8
Using GlobalizHbn Support
Copyright © 2004, Oracle. All rights reserved.
Objectives
After completing this lesson, you should be able to:
• Customize language-dependent behavior for the
database and individual sessions
• Specify different linguistic sorts for queries
• Retrieve data that matches a search string
ignoring case or accent differences
• Obtain Globalization support configuration
information
2-2 Copyright © 2004, Oracle. All rights reserved.
Oracle Database 10g: Administration Workshop II 2-2
Globalization Support Features
Language support
Territory support
Character set support
Linguistic sorting
Message support
Date and time formats
Numeric formats
Monetary formats
2-3
Copyright © 2004, Oracle. All rights reserved.
Globalization Support Features
Different countries and geographies dictate different cultural conventions that directly affect data
formats. Globalization Support ensures that utilities and error messages, sort order, date, time,
monetary, numeric, and calendar conventions automatically adapt to the native language. Users
can interact, store, process, and retrieve data in their native languages and formats:
• Time zones can be used to support daylight savings time.
• National calendars such as Gregorian, Japanese, Imperial, and Thai Buddha are supported.
• Currency symbols reflect the local economy and ISO conventions. Credit and debit
symbols also differ from location to location.
Oracle Database currently supports 63 languages, 92 territories, 64 linguistic sorts (51
monolingual and 13 multilingual), and 257 encoded character sets (41 Asian, 162 European, 50
Middle Eastern, and 4 Universal).
The language-dependent operations are controlled by a number of parameters and environment
variables on both the client and the server sides. The server and the client may run in the same or
different locations. When the client and the server use different character sets, the Oracle
Database handles character set conversion automatically.
Oracle Database 10g: Administration Workshop II 2-3
Encoding Schemes
Oracle Database supports different classes of
character encoding schemes:
• Single-byte character sets
- 7-bit
- 8-bit
Fixed-width multibyte character sets
• Varying-width multibyte character sets
• Universal character sets, such as Unicode
2-4 Copyright © 2004, Oracle. All rights reserved.
Encoding Schemes
When computer systems process characters, they use numeric codes instead of the graphical
representation of the character. An encoded character set maps numeric codes to characters that
a computer or terminal can display and receive. Oracle Database supports most national,
international, and vendor-specific encoded character set standards.
Different character sets support different character repertoires. Because character sets are
typically based on a particular writing script, they can support more than one language. However,
script-based character sets are restricted in the sense that they are limited to groups of languages
based on similar scripts. Universal character sets encompass most major scripts of the modem
world and provide a more useful solution to multilingual support.
Oracle Database provides different classes of encoding schemes:
• Single-byte
• Fixed-width multibyte
• Varying-width multibyte
• Universal
Oracle Database 10g: Administration Workshop II 2-4
Encoding Schemes (continued)
Single-byte character sets
In a single-byte character set, each character occupies one byte. Single-byte 7-bit encoding
schemes can define up to 128 (27) characters; single-byte 8-bit encoding schemes can define up
to 256 (28) characters.
Examples of single-byte schemes
7-bit character set:
• American Standard Code for Information Interchange (ASCII) 7-bit American
(US7ASCII)
• ASCII 7-bit Yugoslavian (YUG7AS CI I)
• DEC VT100 7-bit French (F7DEC)
8-bit character set:
• International Organization for Standards (ISO) 8859-1 West European (WE8IS08859P1)
• DEC 8-bit West European (WE 8 DEC)
• Extended Binary Coded Decimal Interchange Code (EBCDIC) Code Page 1144 8-bit
Italian(l8EBCDICll4 4)
Note: ASCII-based character sets are supported only on ASCII-based platforms. Similarly,
you can use an EBCDIC-based character set only on EBCDIC-based platforms.
Fixed-width multibyte character sets
In a fixed-width multibyte encoding scheme, each character is represented by a fixed number of
bytes. The number of bytes is at least two in a multibyte encoding scheme.
Only one fixed-width multibyte character set is supported and it is the Unicode 3.2 UTF-16
Universal character set (AL16UTF16).
Varying-width multibyte character sets
A varying-width multibyte character set is represented by one or more bytes per character.
Multibyte character sets are commonly used for Asian language support. Some multibyte
encoding schemes use the value of the most significant bit to indicate if a byte represents a single
byte or is part of a series of bytes representing a character. However, other character encoding
schemes differentiate single-byte from multibyte characters. A shift-out control code, sent by a
device, indicates that any successive bytes are double-byte characters until a shift-in code is
encountered. Shift-sensitive encoding schemes are used primarily on IBM platforms.
Examples of varying-width multibyte schemes
• Shift-JIS 16-bit Japanese (JA16SJIS)
• HP CCDC 16-bit Traditional Chinese (ZHT16CCDC)
• MS Windows Code Page 950 with Hong Kong Supplementary Character Set HKSCS-2001
(ZHT16HKSCS)
• Unicode 3.2 UTF-8 Universal character set (AL32UTF8)
Oracle Database 10g: Administration Workshop II 2-5
Encoding Schemes (continued)
Unicode character set
Unicode is a universal encoded character set that enables information from any language to be
stored using a single character set. Unicode provides a unique code value for every character,
regardless of the platform, program, or language. The Unicode standard has been adopted by
many software and hardware vendors. Many operating systems and browsers now support
Unicode.
Unicode 3.2 uses two 16-bit code points, called supplementary characters, to represent a single
character. This enables an over one million characters to be defined. The Unicode 3.2 standard
defines 45,960 supplementary characters.
Unicode 3.2 encodes characters in different ways:
• UTF-8 is the variable-width, 8-bit encoding of Unicode. One Unicode character can be 1
byte, 2 bytes, 3 bytes, or 4 bytes in UTF-8 encoding. UTF-8 is the Unicode encoding
supported on UNIX platforms and used for HTML and most Internet browsers.
• UCS-2 is a fixed-width, 16-bit encoding. Each character is 2 bytes. UCS-2 is the Unicode
encoding used by Java and Microsoft Windows NT 4.0. UCS-2 supports characters defined
for Unicode 3.0, so there is no support for supplementary characters.
• UTF-16 encoding is the 16-bit encoding of Unicode. UTF-16 is an extension of UCS-2
because it supports the supplementary characters that are defined in Unicode 3.2 by using
two UCS-2 code points for each supplementary character. One character can be either 2
bytes or 4 bytes in UTF-16. UTF-16 is the main Unicode encoding used by Microsoft
Windows 2000.
The advantage of UTF-8 based character sets is that they include ASCII using the same single-
byte encoding. Because UTF8 is a superset of ASCII, database character set migration is easier
when upgrading ASCII-based characters sets to Unicode.
Oracle Database provides AL32UTF8, UTF8, and UTFE as database character sets and
AL16UTF16 and UTF8 as national character sets.
Note: Notice above that UTF-16 and UTF-8, with hyphens, refer to the Unicode Standard
encodings, while UTF8, AL32UTF8, and AL16UTF16, without hyphens, refer to Oracle
Database character sets based on the Unicode Standard.
Oracle Database 10g: Administration Workshop II 2-6
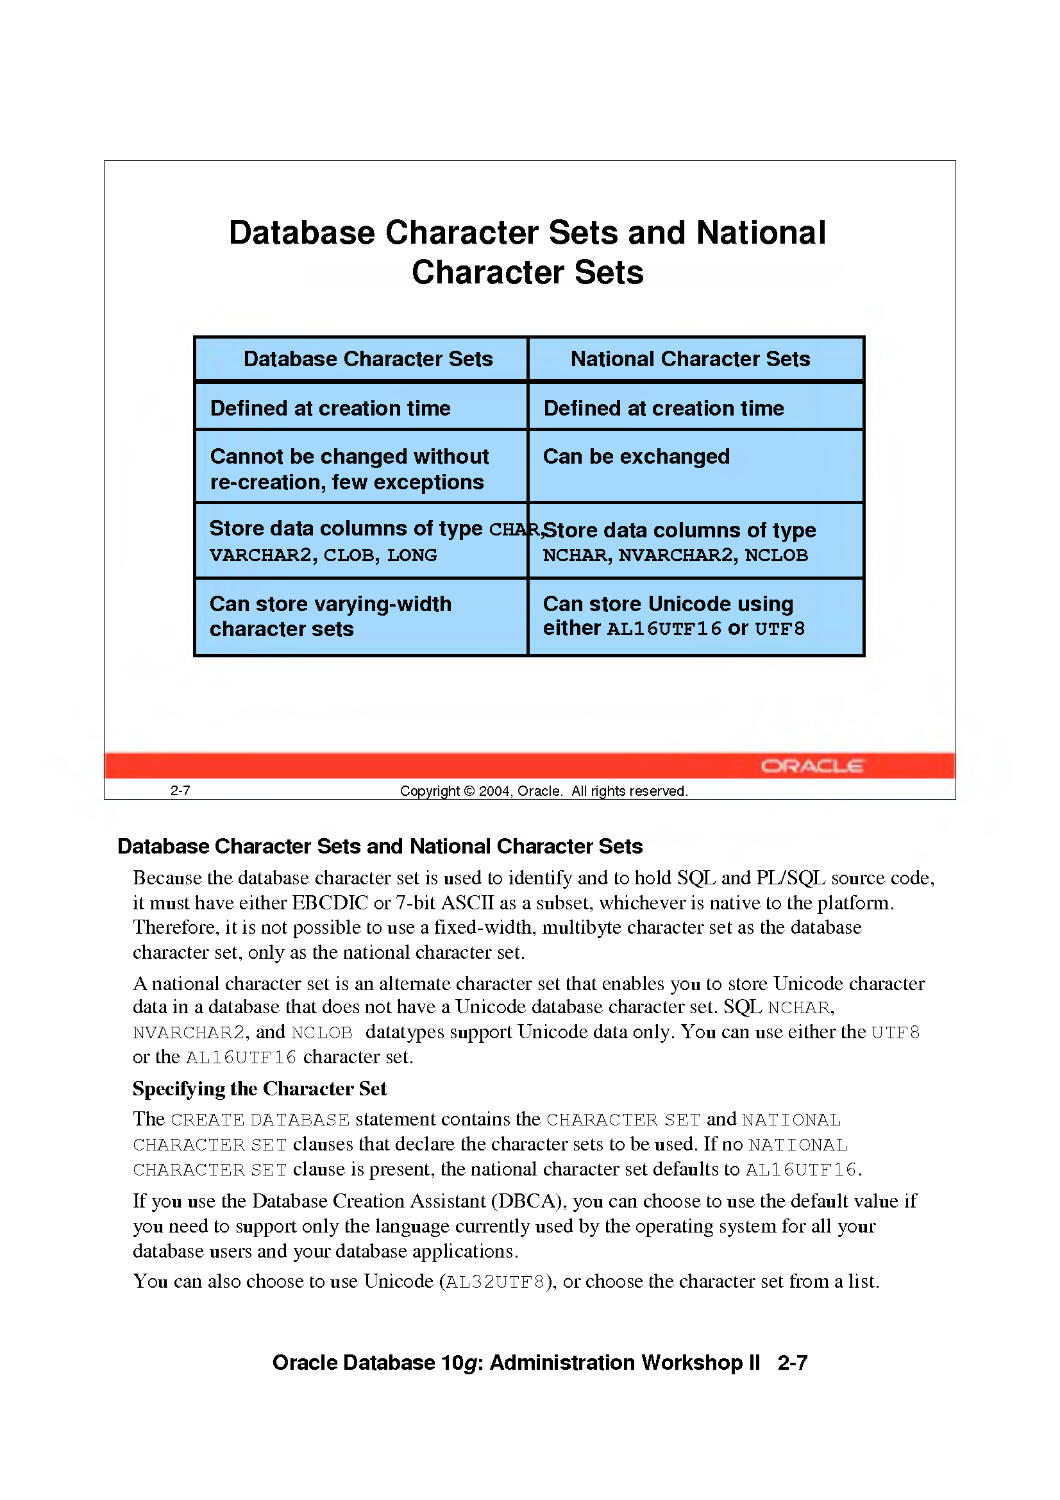
2-7
Database Character Sets and National
Character Sets
Database Character Sets
Defined at creation time
Cannot be changed without
re-creation, few exceptions
Store data columns of type cha
VARCHAR2, CLOB, LONG
Can store varying-width
character sets
National Character Sets
Defined at creation time
Can be exchanged
*$tore data columns of type
NCHAR, NVARCHAR2, NCLOB
Can store Unicode using
either AL16UTF16 or utfs
Copyright © 2004, Oracle. All rights reserved.
Database Character Sets and National Character Sets
Because the database character set is used to identify and to hold SQL and PL/SQL source code,
it must have either EBCDIC or 7-bit ASCII as a subset, whichever is native to the platform.
Therefore, it is not possible to use a fixed-width, multibyte character set as the database
character set, only as the national character set.
A national character set is an alternate character set that enables you to store Unicode character
data in a database that does not have a Unicode database character set. SQL NCHAR,
NVARCHAR2, and NCLOB datatypes support Unicode data only. You can use either the UTF8
or the AL16UTF16 character set.
Specifying the Character Set
The CREATE DATABASE statement contains the CHARACTER SET and NATIONAL
CHARACTER SET clauses that declare the character sets to be used. If no NATIONAL
CHARACTER SET clause is present, the national character set defaults to AL16UTF16.
If you use the Database Creation Assistant (DBCA), you can choose to use the default value if
you need to support only the language currently used by the operating system for all your
database users and your database applications.
You can also choose to use Unicode (AL32UTF8), or choose the character set from a list.
Oracle Database 10g: Administration Workshop II 2-7
Database Character Sets and National Character Sets (continued)
Changing the Character Set After Database Creation
If, and only if, the new character set is a strict superset of the current character set, then it is
possible to use the ALTER DATABASE CHARACTER SET statement to change the database
character set. Otherwise, you need to do a full export/import to properly convert all data to the
new character set. To convert the national character set between UTF8 and AL16UTF16, use
the ALTER DATABASE NATIONAL CHARACTER SET Statement.
Oracle Database 10g: Administration Workshop II 2-8
Datetimes with Timezones
Datetime Field
YEAR
MONTH
DAY
HOUR
MINUTE
SECOND
TIMEZONEJHOUR
TIMEZONE_MINUTE
TIMEZONE_REGION
Valid Values
-4712 to 9999 (excluding 0)
01 to 12
01 to 31
00 to 23
00 to 59
00 to 59.9 (N) - N indicates precision
-12 to 14
00 to 59
Valid value in V$TIMEZONE NAMES
TIMESTAMP '2004-01-31 09:26:56.66 +02:00
2-9 Copyright © 2004, Oracle. All rights reserved.
Datetimes with Timezones
Businesses conduct transactions across time zones. Oracle Database's datetime and interval
datatypes and time zone support make it possible to store consistent information about the time
of events and transactions.
The datetime datatypes are DATE, TIMESTAMP, TIMESTAMP WITH TIME ZONE, and
TIMESTAMP WITH LOCAL TIME ZONE. Datetime datatypes are made up of fields. The
values of these fields determine the value of the datatype. The fields that apply to all Oracle
datetime datatypes are:
• YEAR, MONTH, DAY
• HOUR, MINUTE, SECOND and fractions of seconds
TIMESTAMP WITH TIME ZONE also includes these fields:
• TEVIEZONE_HOUR
• TIMEZONEJVIINUTE
• TEVIEZONE_REGION or TEVIEZONE_OFFSET
• TEVIEZONE_ABBR
TIMESTAMP WITH LOCAL TIME ZONE does not store time zone information, but you can
see local time zone information in output if you use the TZH: TZMor TZR: TZD format elements.
Oracle Database 10g: Administration Workshop II 2-9
2-10
Configuring the Database Local Timezone
• At the session level:
ALTER SESSION SET time_zone = 'Europe/London';
ALTER SESSION SET time_zone = LOCAL;
Using an environment variable:
$ export ORA_SDTZ = 'DB_TZ'
• At the database level:
CREATE DATABASE . . .
SET TIME_ZONE='UTC ...
ALTER DATABASE SET TIME_ZONE='-01:00';
Copyright © 2004, Oracle. All rights reserved.
Configuring the Database Local Timezone
You can use the TIME_ZONE parameter to change the default timezone for your session. Use
the ALTER SESSION SET time_zone command, and supply one of the following values:
• Absolute offset: [ + I - ] hh : mm
• Timezone region: The desired timezone specified by name instead of using an offset.
LOCAL: The operating system local timezone
DBTIMEZONE: The database local timezone
ORA_SDTZ is an operating system environment variable which maybe used to set the default
time zone for a session. It may be set to:
• Absolute offset or timezone region
OS_TZ: The operating system local timezone
DB_TZ: The database local timezone
You can specify a region or absolute offset for the timezone of the database, either during
database creation or later, using an ALTER DATABASE command. The database time zone is
only relevant for TIME STAMP WITH LOCAL TIME ZONE columns. If you do not specify a
timezone when creating the database, the operating system's timezone offset is used. If you alter
the timezone for a database after the database has been created, you must shutdown and restart
the instance for the change to take effect.
Oracle Database 10g: Administration Workshop II 2-10
2-11
Configuring Datetime Formats
• NLS_TIMESTAMP_FORMAT
• NLS_TIMESTAMP_TZ_FORMAT
Format Element
FF
TZH
TZM
TZR
TZD
Definition
Fractional seconds
Timezone hour
Timezone minutes
Timezone region name
Timezone Daylight savings time
ALTER SESSION SET NLS_TIMESTAMP_TZ_FORMAT =
'YYYY-MM-DD HH:MI:SS.FF TZR TZD';
Copyright © 2004, Oracle. All rights reserved.
Configuring Datetime Formats
The default date format for the TIMESTAMP WITH TIME ZONE datatype is determined by
the value of the NLS_TIMESTAMP_TZ_FORMAT initialization parameter. This parameter can
be set at the database level, for a session, or as an environment variable.
If you specify the timezone by its name or region, then the Oracle database automatically
determines whether daylight savings is in effect for that region and returns local time values
based accordingly. The datetime value is sufficient for the Oracle database to determine whether
daylight savings time is in effect for a given region in all cases except boundary cases, which
occur during the period when daylight savings begins or ends.
To eliminate the ambiguity of boundary cases when the time switches from Standard Time to
Daylight Saving Time, use both the TZR format element and the corresponding TZD format
element. The TZD format element is an abbreviation of the time zone region name with Daylight
Saving Time information included. Examples are PST for US/Pacific standard time and PDT for
US/Pacific daylight time.The following specification ensures that a Daylight Saving Time value
is returned:
TIMESTAMP '2004-10-29 01:30:00 US/Pacific PDT'
If you do not add the TZD format element, and the datetime value is ambiguous, then the
database returns an error if you have the ERROR_ON_OVERLAP_T IME session parameter set to
TRUE. By default, the Oracle Database assumes Standard Time for ambiguous dates.
Oracle Database 10g: Administration Workshop II 2-11
Using Timezones
01-31-04 09:30:00.00 America/New_York
01-31-04 13:30:00.00 -01:00
CREATE TABLE orders ( ...
orderdate2 TIMESTAMP(3) WITH TIME ZONE ...);
INSERT INTO orders VALUES (...,
'28-OCT-04 11:24:54.000 PM America/New_York',
2-12 Copyright © 2004, Oracle. All rights reserved.
Using Timezones
TIMESTAMP WITH TIME ZONE includes a time zone displacement or time zone region in its
value. The time zone displacement is the difference (in hours and minutes) between local time
and UTC (Coordinated Universal Time—formerly Greenwich Mean Time). You specify the
TIMESTAMP WITH TIME ZONE datatype as follows:
TIMESTAMP [(fractional_seconds_precision)] WITH TIME ZONE
where fractional_seconds_precision optionally specifies the number of digits in the
fractional part of the SECOND datetime field and can be a number in the range 0 to 9. The
default is 6.
Two TIMESTAMP WITH TIME ZONE values are considered identical if they represent the
same instant in UTC, regardless of the T IME ZONE offsets stored in the data. For example, 8:00
a.m. Pacific Standard Time is the same as 11:00 a.m. Eastern Standard Time.
TIMESTAMP WITH LOCAL TIME ZONE differs from TIMESTAMP WITH TIME ZONE in
that data stored in the database is normalized to the database time zone, and the time zone
displacement is not stored as part of the column data. When users retrieve the data, it is returned
in the users' local session time zone. The time zone displacement is the difference (in hours and
minutes) between local time and UTC.
Oracle Database 10g: Administration Workshop II 2-12
Specifying Language-Dependent Behavior
Initialization parameter
Environment variable
ALTER SESSION
command
SQL function
SELECT sysdate FROM dual;
2-13 Copyright © 2004, Oracle. All rights reserved.
Specifying Language-Dependent Behavior
Beyond storing and retrieving data for most contemporary languages in a database, additional
support is available for a subset of the languages. The database can display dates using local date
and time formats and can sort text data according to cultural conventions. The database also
supports cultural conventions that are specific to geographical locations, or territories, such as
numeric and monetary conventions.
NLS parameters determine the locale-specific behavior on both the client and the server. There
are four ways to specify National Language Support (NLS) parameters:
• As initialization parameters on the server side to specify the default server environment.
(These default settings have no effect on the client side.)
• As environment variables for the client to specify locale-dependent behavior overriding the
defaults set for the server
• Using the ALTER SESSION command to override the defaults set for the client and the
server
• In SQL functions, to explicitly to hardcode NLS behavior for an application or query
overriding the default values that are set for the server and client, as well as any values
specified with an ALTER SESSION statement
Oracle Database 10g: Administration Workshop II 2-13
Specifying Language-Dependent Behavior
for the Server
• nls_language specifies:
- The language for database messages
- Day and month names
- Symbols for A.D., B.C., a.m., p.m.
- The default sorting mechanism
- Affirmative and negative response strings
• nls_territory specifies:
- Day and week numbering
- Credit and debit symbols
- Default date format, decimal character,
group separator, list separator and the default ISO,
dual and local currency symbols
2-14 Copyright © 2004, Oracle. All rights reserved.
Specifying Language-Dependent Behavior for the Server
NLS initialization parameters
The NLS_LANGUAGE initialization parameter defines the default value for language-dependent
conventions, such as:
• Language used for database messages
• Language used for day and month names and their abbreviations
• Symbols used for language-equivalents of a.m., p.m., A.D., and B.C.
• Sorting sequence of character data
The NLS_TERRITORY initialization parameter defines default values for territory-dependent
conventions, which include:
• Date format, week start day, and ISO week number calculation
• Decimal character and numeric group separators (for example, V or ',')
• List separator
• Local, Dual, and ISO currency symbols
• Credit and debit symbols
Note: When the territory name contains a space, as in The Netherlands, the territory name
should be enclosed in double quotes, for example "The Netherlands."
Oracle Database 10g: Administration Workshop II 2-14
Language and Territory Dependent
Parameters
Parameter
NLS_LANGUAGE
NLS_DATE_LANGUAGE
NLS_SORT
NLS_TERRITORY
NLS_CURRENCY
NLS_DUAL_CURRENCY
NLS_ISO_CURRENCY
NLS_DATE_FORMAT
NLS_NUMERIC_CHARACTERS
NLS_TIMESTAMP_FORMAT
NLS_TIMESTAMP_TZ_FORMAT
Default Values
AMERICAN
AMERICAN
BINARY
AMERICA
$
$
AMERICA
DD-MON-RR
■ i
DD-MON-RRHH.MI.SSXFF AM
DD-MON-RRHH.MI.SSXFF AM TZR
2-15 Copyright © 2004, Oracle. All rights reserved.
Language and Territory Dependent Parameters
Setting the NLS_LANGUAGE and NLS_TERRITORY initialization parameters determines the
default values that should be used by the Oracle database. You can override these default values
by explicitly setting the values for those initialization parameters whose default values depend
on the settings of NLS_LANGUAGE and NLS_TERRITORY.
NLS_LANGUAGE initialization parameter
The NLS_LANGUAGE initialization parameter determines the default values of the following
parameters:
Column
NL S_DAT E_LANGUAGE
NLS_SORT
Description
Determines the language for day and month
names and abbreviations and spelled values
of other date format elements
Changes the linguistic sort sequence that the
Oracle database uses to sort character values.
(The sort value must be the name of a
linguistic sort sequence.)
Oracle Database 10g: Administration Workshop II 2-15
Language and Territory Dependent Parameters (continued)
NLS_TERRITORY initialization parameter
NLS_TERRITORY determines the default values for the following initialization parameters:
Column
NLS_CURRENCY
NLS_DAIE_FORMAI
NLS_DUAL_CURRENCY
NLS_ISO_CURRENCY
NLS_NUMERIC_CHARACTERS
NLS_TIME S TAMP_FORMAT
NLS_TIMESTAMP_TZ_FORMAT
Description
Specifies the local currency symbol
Specifies the date format. (The value must be a
date format model.)
Defines a secondary currency symbol for a
given territory.
Indicates the territory whose ISO currency
symbol should be used
Explicitly specifies a new decimal character
and group separator
Defines the default date format for the
TIMESTAMP and TIMESTAMP WITH
LOCAL TIME ZONE datatypes. Must have
NLS_LANG set
Defines the default date format for the
TIMESTAMP and TIMESTAMP WITH
LOCAL TIME ZONE datatypes used with the
TO_CHAR and TO_TIMESTAMP_TZ
functions. Must have NLS_LANG set.
Dual Currency Support
Setting NLS_TERRITORY to correspond to a country in the European Monetary Union (Austria,
Belgium, Finland, France, Germany, Greece, Ireland, Italy, Luxembourg, the Netherlands,
Portugal, and Spain) results in the default values for NLS_CURRENCY and
NLS_DUAL_CURRENCY being set to EUR. The value of NLS_ISO_CURRENCY results in the
ISO currency symbol being set to EUR for European Monetary Union member countries that use
the euro.
Customers who must retain their obsolete local currency symbol can override the default for
NLS_DUAL_CURRENCY or NLS_CURRENCY by defining them as parameters in the
initialization file on the server and as environment variables on the client. It is not possible to
override the ISO currency symbol that results from the value of NLS_ISO_CURRENCY.
Oracle Database 10g: Administration Workshop II 2-16
2-17
Other NLS Server Parameters
Parameter
NLS_CALENDAR
NLS_COMP
NLS_LENGTH_SEMANTICS
NLS_NCHAR_CONV_EXCP
Default Value
Gregorian
BINARY
BYTE
FALSE
Copyright © 2004, Oracle. All rights reserved.
Other NLS Server Parameters
The following NLS initialization parameters are independent of the values for NLS_LANGUAGE
and NLS TERRITORY.
Column
NLS_CALENDAR
NLS_COMP
NLS_LENGTH_SEMANTICS
NLS_NCHAR_CONV_EXCP
Description
Specifies which calendar system is used by the
Oracle database.
Can be set to ANSI or BINARY. When
NLS_COMP is set to ANSI, SQL operations
perform a linguistic comparison based on the value
ofNLS_SORT.
Enables you to create CHAR, VARCHAR2, and
LONG columns using either byte or character
length semantics.
Determines whether an error is reported when
there is data loss during an implicit or explicit
character type conversion between
NCHAR/NVARCHAR data and CHAR/VARCHAR2
data.
Oracle Database 10g: Administration Workshop II 2-17
Specifying Language-Dependent Behavior
for the Session
* Specify the locale behavior with the nls_lang
environment variable:
- Language
- Territory
- Character set
NLS LANG=FRENCH CANADA.WE8IS08859P1
* Set other NLS environment variables to:
- Override database initialization parameter settings
for all sessions
- Customize the locale behavior
- Change the default location of the NLS library files
2-18 Copyright © 2004, Oracle. All rights reserved.
Specifying Language-Dependent Behavior for the Session
The environment variable NLS_LANG
A locale is a linguistic and cultural environment in which a system or program is running.
Setting the NLS_LANG environment parameter is the simplest way to specify locale behavior for
Oracle Database software. It sets the language and territory used by the client application and the
database server. It also sets the the character set for data entered or displayed by a client program.
The value of NLS_LANG overrides any values of the NLS initialization parameters.
Each component controls a subset of NLS features:
NLS_LANG=<language>_<territory>.<charset>
Language is used to overrides the value of NLS_LANGUAGE . Territory overrides the value
of NLS_TERRITORY. Char set specifies the character encoding scheme used by client
application (usually that of the user's terminal).
All components of the NLS_LANG definition are optional; any item that is not specified uses its
default value. If you specify territory or character set, then you must include the preceding
delimiter [underscore (_) for territory, period (.) for character set]. For example:
NLS_LANG = _JAPAN
NLS_LANG = .US7ASCII
Oracle Database 10g: Administration Workshop II 2-18
Specifying Language-Dependent Behavior for the Session (continued)
Additional environment variables
The following NLS initialization parameters can also be set as environment variables, making it
possible to specify individual NLS characteristics for each client:
• NLS_CURRENCY
• NLS_DAIE_FORMAI
• NLS_DATE_LANGUAGE
• NLS_DUAL_CURRENCY
• NLS_ISO_CURRENCY
• NLS_NUMERIC_CHARACTERS
• NLS_TIMESTAMP_FORMAT
• NLS TIMESTAMP TZ FORMAT
The following variables can be set only in the client environment:
Variable
NLS_CREDIT
NLS_DEBIT
NLS_LANG
NLS_LIST_SEPARATOR
NLS_MONETARY_CHARACTERS
Description
Sets the symbol that displays a credit in financial
reports
Sets the symbol that displays a debit in financial
reports
Specifies locale behavior for the Oracle database
Specifies the character to use to separate values
in a list of values (usually , or . or ; or :)
Specifies the character that separates groups of
numbers in monetary expressions
In addition, NLS_CALENDAR can be used to specify which calendar system the Oracle server
uses; for example, Gregorian, Persian, or Thai Buddha.
The ORA_NLS10 Environment Variable
Oracle Database's globalization support is implemented with the Oracle NLS Runtime Library
(NLSRTL). The NLS Runtime Library provides a comprehensive suite of language-independent
functions that allow proper text and character processing and language convention manipulations.
Behavior of these functions for a specific language and territory is governed by a set of locale-
specific data that is identified and loaded at runtime.
The ORA_NLS 10 environment variable should be defined only when you need to change the
default directory location for the locale-specific data files, for example when the system has
multiple Oracle homes that share a single copy of the locale-specific data files. If this variable is
set to a non-existent directory, you will not be able to create the database with a character set
other thanUS7ASCII.
Oracle Database 10g: Administration Workshop II 2-19
2-20
Specifying Language-Dependent Behavior
for the Session
ALTER SESSION SET
NLS_DATE_FORMAT='DD.MM.YYYY';
DBMS_SESSION.SET_NLS('NLS_DATE_FORMAT',
* * 'DD.MM.YYYY' ' ') ;
Copyright © 2004, Oracle. All rights reserved.
Specifying Language-Dependent Behavior for the Session (continued)
You can change individual NLS characteristics for a session with the ALTER SESSION
command. The first example shown above use the ALTER SESSION command to change the
date format for the current session.
All environment variables that can be set on both the client and server sides can also be modified
by issuing the ALTER SESSION command. You can also use an ALTER SESSION command
to change the values for the following initialization parameters:
• NLS_LANGUAGE
• NLS_LENGTH_SEMANTICS
• NLS_NCHAR_CONV_EXCP
• NLS_TERRITORY
In addition to explicitly issuing ALTER SESS ION commands, you can use the
DBMS_SESSION . SET_NLS database procedure, specifying the name of the parameter to
change and the new value of the parameter. The second example shown above performs the
same action as the first example, but uses the DBMS_SES S ION package.
Client utilities such as zSQL*Plus, SQL*Plus, or SQL*Loader read the environment variables set
on the client and issue the corresponding ALTER SESS ION command once connected to the
database.
Oracle Database 10g: Administration Workshop II 2-20
2-21
Bonjour
Locale Variants
Belgium
Copy
guten Morgen
ight© 2004, Oracle. All rights
Goede
ochtend
reserved.
Locale Variants
Before Oracle Database 10g Release 1 (10.1), the database defined language and territory
definitions separately. This resulted in the definition of a territory being independent of the
language setting of the user. In Oracle Database lOg Release 1 (10.1), some territories can have
different date, time, number, and monetary formats based on the language setting of a user. This
type of language-dependent territory definition is called a locale variant.
For example, in Belgium, French, German and Dutch are all spoken languages. Thus Belgium
has three locale variants.
For the variant to work properly, both NLS_TERRITORY and NLS_LANGUAGE must be
specified. Forexample, if NLS_LANGUAGE is specified as DUTCH and NLS_TERRITORY is
not set, then the territory behavior is THE NETHERLANDS. If NLS_TERRITORY is set to
BELGIUM and NLS_LANGUAGE is not set or it is set to DUTCH, then date, time, number, and
monetary formats are based on DUTCH behavior. By contrast, if NLS_TERRITORY is set to
BELGIUM and NLS_LANGUAGE is set to FRENCH, then date, time, number, and monetary
formats are based on FRENCH behavior.
Locale variants exist for the following territories: Belgium, Canada, Djibouti, Finland, Hong
Kong, India, Luxembourg, Singapore, and Switzerland.
Oracle Database 10g: Administration Workshop II 2-21
2-22
Using NLS Parameters in SQL Functions
SELECT TO_CHAR(hire_date,'DD.Mon.YYYY',
*NLS_DATE_LANGUAGE=FRENCH')
FROM employees
WHERE hire_date > '01-JAN-2000';
SELECT last_name, first_name,
TO_CHAR(salary,'99G999D99',
'NLS_NUMERIC_CHARACTERS=* * , . * * * )
FROM employees;
Copyright © 2004, Oracle. All rights reserved.
Using NLS Parameters in SQL Functions
SQL character functions support single-byte and multibyte characters.
Some SQL functions require NLS parameters to be specified explicitly as part of their parameter
list. Therefore SQL functions can override the behavior specified by the environment.
Examples
SQL> SELECT TO_CHAR(hire_date, 'DD.Mon.YYYY' ,
2 ,NLS_DATE_LANGUAGE=FRENCH') AS "Hire Date"
3 FROM employees
4 WHERE hiredate > '01-JAN-2000';
Hire Date
08.Mars .2000
06.Fevr..2000
2 9.Janv..2000
2 4.Janv..2000
23.Fevr..2000
Oracle Database 10g: Administration Workshop II 2-22
Using NLS Parameters in SQL Functions (continued)
Examples (continued)
SQL> SELECT last_name,
2 TO_CHAR(salary,'99G999D99',
3 ,NLS_NUMERIC_CHARACTERS=' ' , . ' ' ' )
4 FROM employees;
LAST_NAME TO_CHAR(SALA
King 2 4.000,0
Kochhar 17.000,0
De Haan 17.000,0
Hunold 9.000,0
Ernst 6.000,0
Austin 4.800, 0
Pataballa 4.800,0
Lorentz 4.200,0
Greenberg 12.000,0
Faviet 9. 000,0
Chen 8.200,0
Sciarra 7.700,0.
Urman 7.800,0'
Popp 6.900,0i
Raphaely 11.000,0'
Khoo 3.100,0i
Baida 2.900,0'
Tobias 2. 800,0'
Himuro 2.6 00,0'
Colmenares 2 . 500,0i
Weiss 8.000,0'
Fripp 8.200,0i
Oracle Database 10g: Administration Workshop II 2-23
Using NLS Parameters in SQL Functions
Function
TO_DATE
TO_NUMBER
TO_CHAR, TO_NCHAR
NLS_UPPER, NLS_LOWER,
NLS_INITCAP, NLSSORT
NLS Parameter
NLS_DATE_LANGUAGE
NLS_CALENDAR
NLS_NUMERIC_CHARACTERS
NLS_CURRENCY
NLS_[ISO|DUAL]_CURRENCY
NLS_DATE_LANGUAGE
NLS_NUMERIC_CHARACTERS
NLS_CURRENCY
NLS_[ISO|DUAL]_CURRENCY
NLS_CALENDAR
NLS_SORT
2-24 Copyright © 2004, Oracle. All rights reserved.
Using NLS Parameters in SQL Functions (continued)
Several format mask elements have been defined for functions such as TO_CHAR, TO_DATE,
and TO_NUMBER.
Number format mask elements
• "D" for decimal separator
• "G" for group (thousands) separator
• "L" for local currency symbol
• "C" for local ISO currency symbol
• "U" for the dual currency symbol, used for the euro
Date format mask elements
• "RM, rm" for Roman month number
• "IW" for ISO week number
• "IYYY, IYY, IY," and "I" for ISO year
Oracle Database 10g: Administration Workshop II 2-24
Linguistic Sorting
Sort order can be affected by:
• Case sensitivity
• Diacritics or accent characters
• Combination characters that are treated as a
single character
• Phonetics or character appearance
• Cultural preferences ^
2-25 Copyright © 2004, Oracle. All rights reserved.
Linguistic Sorting
Different languages have different sort orders. In addition, different cultures or countries that use
the same alphabets may sort words differently. For example, in Danish, JE is after Z, while Y and
U are considered to be variants of the same letter. Sort order can:
• Be case-sensitive or case-insensitive
• Ignore or consider diacritics (a mark near or through a character or combination of
characters that indicates a different sound than the sound of the character without the
diacritic)
• Be phonetic or it can be based on the appearance of the character (such as the number of
strokes in East Asian ideographs)
Another common sorting issue is combining letters into a single character. For example, in
traditional Spanish, ch is a distinct character that comes after c, which means that the correct
order is: cerveza, Colorado, cheremoya. This means that the letter c cannot be sorted until the
database has checked whether the next letter is an h.
To produce a sort sequence that matches the alphabetic sequence of characters, another sort
technique must be used that sorts characters independently of their numeric values in the
character encoding scheme. This technique is called a linguistic sort. A linguistic sort operates
by replacing characters with numeric values that reflect each character's proper linguistic order.
Oracle Database 10g: Administration Workshop II 2-25
Linguistic Sorting
Three types of sorting:
Binary sorting:
- Sorted according to the binary values of the
encoded characters
Monolingual linguistic sorting:
- A two pass sort based on a character's assigned
major and minor values
Multilingual linguistic sorting
- Based on the ISO standard (ISO 14651), and the
Unicode 3.2 Standard for multilingual collation
- Ordered by the number of strokes, PinYin, or
radicals for Chinese characters
2-26 Copyright © 2004, Oracle. All rights reserved.
Linguistic Sorting (continued)
A binary sort is a conventional sorting mechanism by which letters are sorted according to the
binary values used to encode the characters. Binary sorts are the fastest type of sort. They
produce reasonable results for the English alphabet because the ASCII and EBCDIC standards
define the letters A to Z in ascending numeric value. When characters used in other languages
are present, a binary sort usually does not produce reasonable results.
For monolingual sorting, Oracle Database uses major and minor values to compare characters.
Usually, letters with the same appearance will have the same major value. For example, A, a and
a. Oracle Database defines letters with diacritic and case differences as having the same major
value but different minor values.
In a monolingual sort, the database makes two passes when comparing strings in monolingual
sorts. The first pass is to compare the major value of entire string from the major table and the
second pass is to compare the minor value from the minor table. Although this provides better
sorting than binary, it is still limited.
Multilingual sorts allow you to sort data in more than one language in a single sort. This is useful
for regions or languages that have complex sorting rules.
Refer to the Oracle Database Globalization Support Guide for more information on the
supported linguistic sorts.
Oracle Database 10g: Administration Workshop II 2-26
Using Linguistic Sorting
You can specify the type of sort used for character
data with the:
• nls_sort parameter
- Default value is derived from the nls_lang
environment variable, if set
- Can be specified for the session, client, or server
• nlssort function
- Defines the sorting method at the query level
2-27 Copyright © 2004, Oracle. All rights reserved.
Using Linguistic Sorting
To overcome the limitations of binary sorting, you can specify linguistic sorts by setting the
NLS_SORT parameter or by using NLSSORT in your query.
The NLS_SORT Parameter
Consider the following words stored in a database using the WE8IS08 8 5 9PI character set:
gelee
gele
gele
gelez
If NLS_SORT is set to BINARY gelez is sorted before gele. This occurs because e has a
binary value lower than e in the WE8IS08859P1 character encoding.
If NLS_SORT is set to the FRENCH monolingual sort, the word gele is sorted before gelez
and gele, which still does not satisfy all the nuances of the French language. For example, in
the French language letters are sorted from left to right and accents from right to left.
When NLS_SORT is set to the FRENCH_M multilingual sort, both the characters and the
diacritics are sorted properly.
Oracle Database 10g: Administration Workshop II 2-27
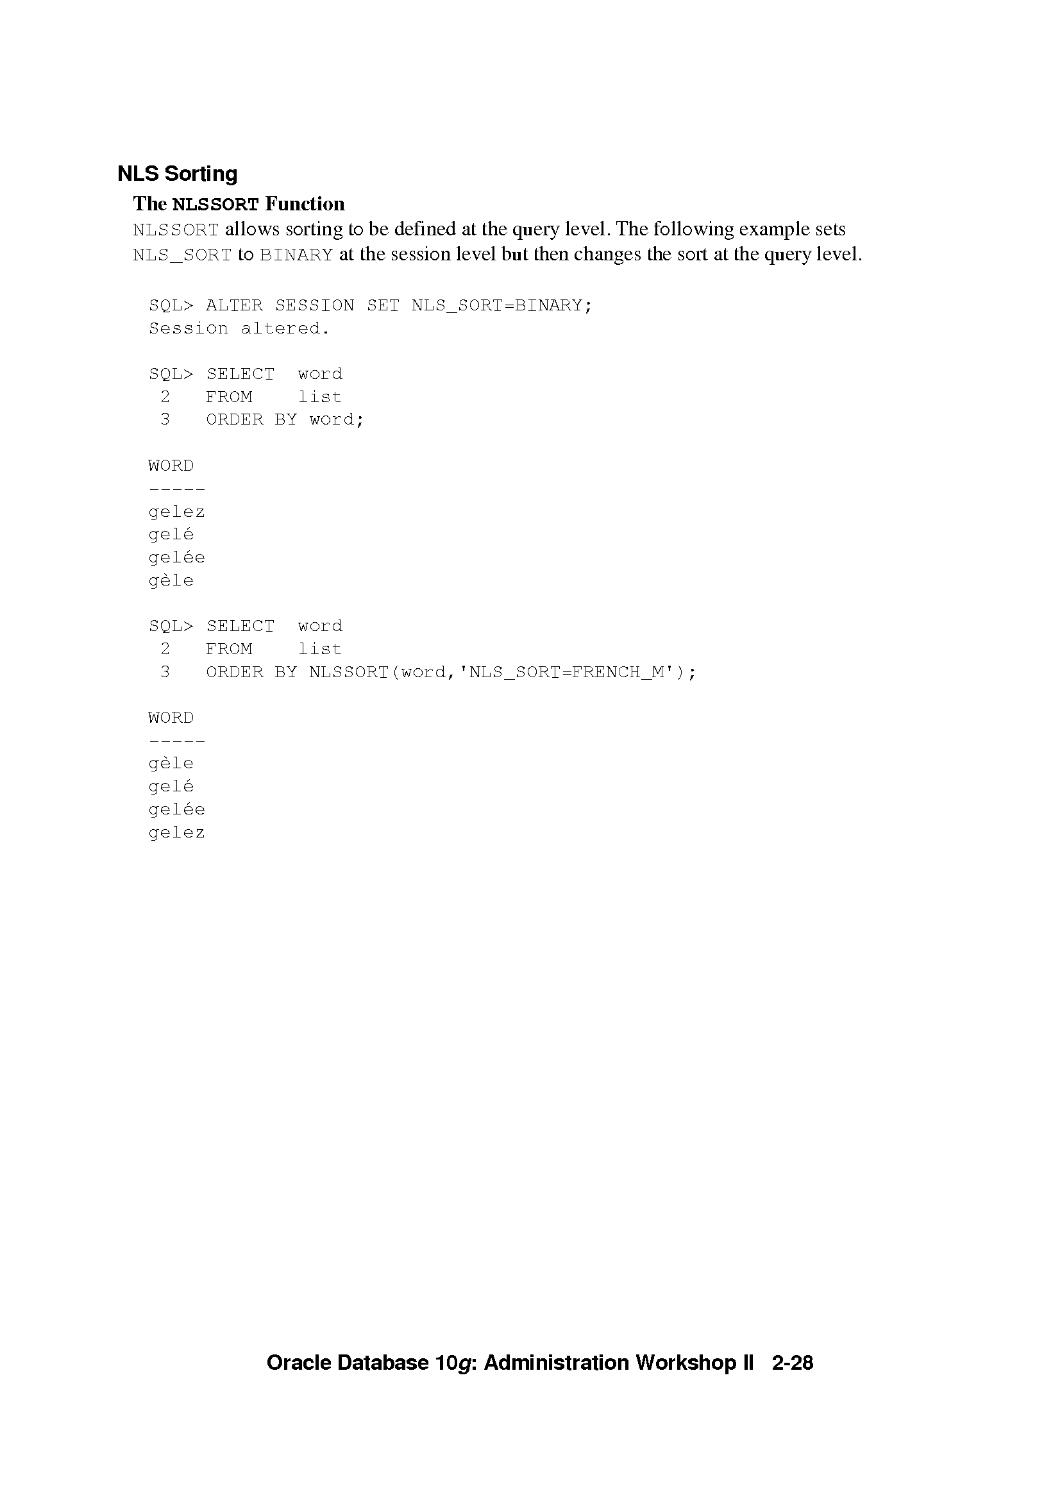
NLS Sorting
The NLSSORT Function
NLSSORT allows sorting to be defined at the query level. The following example sets
NLS_SORT to BINARY at the session level but then changes the sort at the query level.
SQL> ALTER SESSION SET NLS_SORT=BINARY;
Session altered.
SQL> SELECT word
2 FROM list
3 ORDER BY word;
WORD
gelez
gele
gelee
gele
SQL> SELECT word
2 FROM list
3 ORDER BY NLSSORT(word,'NLS_SORT=FRENCH_M');
WORD
gele
gele
gelee
gelez
Oracle Database 10g: Administration Workshop II 2-28
2-29
Sorts That Are Not Case or
Accent Sensitive
SELECT cust_last_name FROM oe.customers
WHERE cust_last_name = 'de Funes';
SELECT cust_last_name FROM oe.customers
WHERE cust_last_name = NLS_UPPER('de Funes');
ALTER SESSION SET NLS_COMP=ANSI;
ALTER SESSION SET
NLS_SORT=GENERIC_BASELETTER;
SELECT cust_last_name FROM oe.customers
WHERE cust_last_name = 'De Funes';
Copyright © 2004, Oracle. All rights reserved.
Sorts That Are Not Case or Accent Sensitive
Operations inside an Oracle database are always sensitive to the case and the accents (diacritics)
of the characters. Sometimes you may need to perform case-insensitive or accent-insensitive
comparisons and sorts. For example, you might want the following names to be considered
equivalent: deLuis, DELUIS, DeLuis, and Deluis.
Case-insensitive queries can be achieved by using the NLS_UPPER and NLS_LOWER SQL
functions. These functions change the case of strings based on a specific linguistic sort definition.
This enables you to perform case-insensitive searches regardless of the language being used.
The GENERIC_BASELETTER sort groups all characters together based on their base letter
values. This is achieved by ignoring their case and diacritic differences.
You can use the NLS_COMP parameter to indicate that the comparisons in a WHERE clause or in
PL/SQL blocks must be linguistic according to the NLS_SORT session parameter.
To retrieve the four names listed previously on this page with a single query, use:
ALTER SESSION SET NLS_COMP=ANSI;
ALTER SESSION SET NLS_SORT=GENERIC_BASELETTER;
SELECT cust_last_name FROM oe.customers
WHERE cust_last_name = NLS_UPPER('DeLuis');
Oracle Database 10g: Administration Workshop II 2-29
2-30
Linguistic Comparisons
• Use the nls_comp parameter to:
- Perform linguistic comparisons instead of binary
comparisons
- Avoid cumbersome statements involving the
NLSSORT function
• nls_comp can be set to:
- BINARY
- ANSI
SELECT word FROM list
WHERE word > 'gf';
Copyright © 2004, Oracle. All rights reserved.
Linguistic Comparisons
Normally, SQL comparisons are performed in binary mode even if you set NLS_SORT to a
linguistic sort. To alter the comparison method, you can eitheruse the NLSSORT function, or set
the NLS_COMP parameter. The value of the database parameter NLS_COMP affects the
following SQL operations:
WHERE
START WITH
IN
OUT
BETWEEN
CASE WHEN
HAVING
ORDER BY
By default, NLS_COMP is set to BINARY mode. If you set NLS_COMP to ANSI, SQL
operations perform data comparisons using the linguistic method specified by the NLS_SORT
parameter. In the sample query shown in the slide, the query returns one row if NLS_COMP is set
to BINARY ('gele') and no rows if NLS_COMP is set to ANSI for a session with NLS_SORT set
to FRENCH_M.
Using linguistic indexes improves the performance of non-binary linguistic comparisons.
Oracle Database 10g: Administration Workshop II 2-30
Linguistic Index Support
Create an index on linguistically sorted values
• Rapidly query data without having to specify
order by clause and nlssort:
CREATE
list
SELECT
INDEX list_word
ON
(NLSSORT(word, 'NLS_
word FROM list;
_SORT=
=French_
_M
));
• Set the nls_Sort parameter to match the
linguistic definition you want to use for the
linguistic sort when creating the index
2-31 Copyright © 2004, Oracle. All rights reserved.
Linguistic Index Support
Linguistic sorting is language-specific. When data in multiple languages is stored in the database,
you may want to sort the data in different ways depending on the language. Creating a linguistic
index for columns to be sorted greatly improves the performance of queries requiring linguistic
sorting, although it can slow down inserts and updates.
Functional indexes are used to create linguistically sorted indexes. The SQL function NLSSORT
returns the string of bytes used to sort the first parameter in the given linguistic sorting sequence.
In the example shown above, an index is created on WORD that is sorted according to the
FRENCH_M sorting order. This enables you to perform index-based queries on data that is sorted
according to the rules of each language.
You can also build a single linguistic index for all languages using one of the multilingual
linguistic sorts such as GENERIC_MorFRENCH_M. Or, for a small set of languages, use a
language column to be used as a parameter of the NLSSORT function. The language column
contains the NLS_LANGUAGE values for the data in the indexed column.
CREATE INDEX 12 on list (NLSSORT(word, 'NLS_SORT=GENERIC_M'));
CREATE INDEX word_all_idx ON
list (NLSSORT(word, ,NLS_SORT=' || LANG_COL));
See the Oracle Database Globalization Support Guide for details on creating linguistic indexes.
Oracle Database 10g: Administration Workshop II 2-31
Customizing Linguistic Sorting
You can customize linguistic sorting for:
Ignorable characters
Contracting or expanding characters
Special combination letters or special letters
Expanding characters or special letters
Special uppercase and lowercase letters
Context-sensitive characters
Reverse secondary sorting
Canonical equivalence
A
2-32
Copyright © 2004, Oracle. All rights reserved.
Customizing Linguistic Sorting
Linguistic sorting has many features. Many of these features are customizable, so you can
retrieve the desired results from your data. For example:
• Now you can also specify a sort or query on the base letters only (accent insensitive) or on
the base letter and the accents (case insensitive).
• You can specify that the dash punctuation character should be ignored so that e-mail can
be treated the same as email.
• The expanding character 6 sorts as if it were oe, after od and before of.
• Properly sorting Japanese prolonged sound marks
• Making a equivalent to its base letter, a, and an umlaut, " , so that a and a " are
considered equal.
• The placing of a character with a diacritic before or after its unmarked variant.
• Whether or not in Thai and Lao, some characters first change places with the following
character before sorting.
• The mapping of lowercase letters to multiple uppercase letters, such as the German S> to
SS and the mapping of uppercase letters to multiple lowercase letters, such as the Turkish
I becoming a small, dotless i: l.
To create custom linguistic sorts, you need to use the Oracle Locale Builder utility.
Oracle Database 10g: Administration Workshop II 2-32
2-33
Oracle Locale Builder
^^^^^^^^^^^^^^^^^^^^^^^MIEdI
^^^^^^^H I ,ITI T ll ^^^^^^^^^^^^^^^^^^^^^^^^^^^^^^^^^^^^^^^^^^^^^^^^^^^^^^^^^^^^^^^^^K^M
Wm
lBl
1|A| 1
lul
1^1
1*1
l%l
1 *? 1
PUrs: ^^^^^^^^^^H|
^^^^^I^^^^^Q
Sicw C^l^lr q I Erf ihlons. . |
| ■ L/WJUlL.'-L HiUIW4±\Lz ■iKtYthit izuJNjAM" ■bX-'V >
B^^^^^^^^^^^^^l^i^
| inji. ii w ,l(li:i
ilDrresojn^hqnie Name l::Ji: .
^ L'nen ) l Unse )
Copyright © 2004, Oracle. All rights reserved.
Oracle Locale Builder
The Oracle Database provides an extensive set of locale definitions including languages,
territories, character sets, and linguistic sorts. If you must customize any of these existing locale
definitions, or create a new one, the Oracle Locale Builder provides a graphical user interface
through which you can easily view, modify, and define locale-specific data.
The Oracle Locale Builder manages four types of locale definitions: language, territory,
character set, and linguistic sort. It also supports user-defined characters and customized
linguistic rules. You can view definitions in existing text and binary definition files and make
changes to them or create your own definitions.
Refer to the Oracle Database Globalization Support Guide for more information on using the
Oracle Locale Builder.
Oracle Database 10g: Administration Workshop II 2-33
Character Set Scanner Utilities
• Character Set Scanner:
- Scans the database to determine whether the
character set can be changed
- Provides reports that detail possible problems and
fixes
• Language and Character Set File Scanner:
- Determines the language and character set for
unknown file text
- Uses probabilities to identify the dominant
language and character set
2-34 Copyright © 2004, Oracle. All rights reserved.
Oracle Character Set Scanner
The character set scanner utilities are tools for detecting and verifying valid and invalid data.
The Language and Character Set File Scanner supports text files, while the Database Character
Set Scanner scans data inside the database.
Database Character Set Seamier
The Database Character Set Scanner assesses the feasibility of migrating an Oracle database to a
new database character set. The Database Character Set Scanner checks all character data in the
database and tests for the effects and problems of changing the character set encoding. A
summary report is generated at the end of the scan that shows the scope of work required to
convert the database to a new character set. The character set scanner should be used prior to any
character set conversion.
Language and Character Set File Seamier
The Language and Character Set File Scanner (LCS SCAN) is a statistic-based utility for
determining the language and character set for unknown file text. It can automatically identify a
wide variety of language and character set pairs. With each text, the language and character set
detection engine sets up a series of probabilities, each probability corresponding to a language
and character set pair. The most statistically probable pair identifies the dominant language and
character set.
Oracle Database 10g: Administration Workshop II 2-34
Oracle Character Set Scanner (continued)
Language and Character Set File Seamier (continued)
Only plain text files are accepted, so markup tags must be stripped before using LCSSCAN.
Documents that contain a mix of languages or character sets or text like addresses, phone
numbers, or programming language code may yield poor results. For example, if a document has
both French and German embedded, then the accuracy of guessing either language successfully
is statistically reduced. If a document has a lot of numeric data like addresses and telephone
numbers, then the accuracy of guessing is compromised.
Oracle Database 10g: Administration Workshop II 2-35
Data Conversion Between Client and
Server Character Sets
CREATE DATABASE ...
CHARACTER SET
WE8IS08859P1
NATIONAL CHARACTER SET
UTF8
% export NLS_LANG=
American America.US7ASCII
C:/> set NLS_LANG=
German_Germany.WE8DEC
2-36
Copyright © 2004, Oracle. All rights reserved.
Data Conversion Between Client and Server Character Sets
NLS_LANG defines a client terminal's character encoding scheme. Different clients can use
different encoding schemes. Data passed between the client and the server is converted
automatically between the two encoding schemes. The database encoding scheme should be a
superset, or equivalent, of all the client encoding schemes. The conversion is transparent to the
client application.
When the database character set and the client character set are the same, the database assumes
that the data being sent or received is of the same character set, so no validations or conversions
are performed. Although the benefit of this scenario is better performance, misuse can lead to
possible data inconsistency problems, such as storing data from another character set that is
different from the database character set.
For example, your database character set is US 7AS C11 and you are using Simplified Chinese
Windows as your client terminal. By setting NLS_LANG to SIMPLIFIED
CHINESE_HONGKONG.US7ASCII as the client character set, it is possible for you to store
multibyte Simplified Chinese characters inside a single byte database. This means that the
database will treat these characters as single-byte US7ASCII characters, and therefore, all SQL
string manipulation functions such as SUBS IR or LENGTH will be based on bytes rather than
characters. All of your non-ASCII characters could be lost following an export and import into
another database.
Oracle Database 10g: Administration Workshop II 2-36
NLS Data Conversion with Oracle Utilities
Multiple data conversions can take place when
data is exported from one database and imported
into another if the same character sets are not
used.
External tables use the NLS settings on the server
for determining the data character set.
• SQL*Loader:
- Conventional Path: Data is converted into the
session character set specified by nls_lang.
- Direct Path: Data is converted using client-side
directives.
2-37 Copyright © 2004, Oracle. All rights reserved.
NLS Data Conversion with Oracle Utilities
Globalization Support for Export and Import
The Export utility always saves the data, including Unicode data, in the same character sets as
the database from which the taken was exported. When exporting data definition language
(DDL), Export writes export files using the character set specified in the NLS_LANG
environment variable for the user session. A character set conversion is performed if the value of
NLS_LANG differs from the database character set.
When importing user data, if the character sets of the source database (and the export dump file)
are different from the character sets of the import database, a single conversion is performed to
automatically convert the data to the character sets of the target database.
During the import of DDL, the data is automatically converted from the character set of the
export file to the character set of the import user session. Import can only perform this
conversion for single-byte character sets. This means that for multibyte character sets, the import
file's character set must be identical to the export file's character set. If the character set used by
the import user session is different from the target database's character set, a final character set
conversion is performed.
Globalization Support for Externa! Tables
The NLS environment variable settings on the server determine the character set and date masks
for the table.
Oracle Database 10g: Administration Workshop II 2-37
NLS Data Conversion with Oracle Utilities (continued)
Globalization Support for SQL*Loader
SQL*Loader supports four character sets:
• Client character set (NLS_LANG of the client SQL*Loader process)
• Datafile character set (usually the same as the client character set)
• Database character set
• Database national character set
Performance is optimized if all character sets are the same.
SQL*Loader has the capability to convert data from the data file character set to the database
character set. The character set of the data file can be set up by using the NL S_LANG parameter
or by specifying the CHARACTERSET parameter in the SQL*Loader control file:
LOAD DATA
CHARACTERSET UTF16
INFILE ulcasell.dat
REPLACE ...
The SQL*Loader control file itself is assumed to be in the character set specified for your
session by the NLS_LANG parameter. If the control file character set is different from the data
file character set, delimiters and comparison clause values specified in the SQL*Loader control
file as character strings are converted from the control file character set to the data file character
set before any comparisons are made. To ensure that the specifications are correct, you may
prefer to specify hexadecimal strings, rather than character string values.
If the character set specified with the NLS_LANG parameter for your session is different from
the character set of the data file, character strings in the control file are converted to the character
set of the data file. This is done before SQL*Loader checks for the default record terminator.
The character set specified with the CHARACTERSET parameter does not apply to data in the
control file (specified with INFILE). To load data in a character set other than the one specified
for your session by the NLS_LANG parameter, you must place the data in a separate data file.
You can use SQL*Loader to load data using one of three methods: conventional path, direct path,
or external table. During conventional path data loads, data is converted into the session
character set specified by the NLS_LANG parameter for that session.
During a direct path load, data conversion occurs on the client side rather than on the server side.
This means that NLS parameters in the initialization parameter file will not be used. To override
this behavior, you can specify a format mask in the SQL*Loader control file that is equivalent to
the setting of the NLS parameter in the initialization parameter file, or set the appropriate
environment variable.
If the target character set for the SQL*Loader data is not a superset of the source data file
character set, characters that have no equivalent in the target character set are converted to
replacement characters, such as a question mark, resulting in loss of data.
Oracle Database 10g: Administration Workshop II 2-38
NLS Data Conversion with Data Pump
Data Pump Export always saves data in the same
character set as the database from which the data
originates.
Data Pump Import converts the data to the
character set of the target database, if needed.
The Data Pump log file is written in the language
specified by nls lang for the session that started
Data Pump.
2-39 Copyright © 2004, Oracle. All rights reserved.
NLS Data Conversion with Data Pump
The NLS parameter settings used by the session that initiated Data Pump are used within the
Data Pump job. The client NLS_LANG settings are only used for messages returned by the Data
Pump utilities, such as impdp or expdp.
During the execution of a job, a log file will be optionally written. The log file summarizes the
progress of the job and any errors that were encountered along the way. Data Pump writes the
log file using the NLS_LANG setting of the client. For example, setting NLS_LANG to
French. WE 8DEC causes all messages for the job to be displayed in French, even if the job is
restarted from an American. WE 8DEC client.
If you use a parameter file (PARFILE) with Data Pump, the parameter file is assumed to be in
the client's character set. The Data Pump utility translates the text strings in the parameter files
into the database character set. If the parameter file is in a different character set than the client
is currently using, then you must alter the NLS settings of the client to ensure a proper
translation.
Oracle Database 10g: Administration Workshop II 2-39
Obtaining Character Set Information
SQL> SELECT parameter, value
2 FROM nls_database_parameters
3 WHERE parameter LIKE '%CHARACTERSET%';
PARAMETER
NLS_
NLS_
_CHARACTERSET
_NCHAR_CHARACTERSET
2 rows selected.
VALUE
WE8IS08859P1
AL16UTF16
2-40 Copyright © 2004, Oracle. All rights reserved.
Obtaining Character Set Information
Use the NLS_DATABASE_PARAMETERS view to display the permanent NLS settings for the
database, including the database and national character set. This view contains the explicitly set
values, as well as the default values used by the database.
Oracle Database 10g: Administration Workshop II 2-40
Obtaining NLS Parameter Information
SQL>
ALTER
SESSION
Session altered.
SQL>
2
SELECT * FROM
WHERE
PARAMETER
NLS_
SQL>
2
SET
nls_
NLS_ISO_CURRENCY=FRANCE;
_instance_parameters
parameter LIKE '%ISO%';
ISO_CURRENCY
SELECT * FROM
WHERE
PARAMETER
NLS_
nls_
VALUE
AMERICA
_session_parameters
parameter LIKE '%ISO%';
ISO_CURRENCY
VALUE
FRANCE
2-41 Copyright © 2004, Oracle. All rights reserved.
Obtaining NLS Parameter Information
The NLS_INSTANCE_PARAMETERS view displays the values for:
Parameters that have been explicitly set in the init<S ID> . ora file
• NLS_LANGUAGE and NLS_TERRITORY
• NLS_LENGTH_SEMANTICS
• NLS_NCHAR_CONV_EXCP
This view does not indicate that a parameter value made have been overridden at the session
level. It also does not show the default values used by the other parameters.
The NLS_SESS ION_PARAMETERS view shows the NLS settings for the current session, which
include any changes made through ALTER SES S ION commands.
In the example above, the NLS_ISO_CURRENCY parameter is set to AMERICA in the
initialization parameter file. In the current session, the value is changed to FRANCE. The first
query shows the default server setting, the second query shows the actual value being used by the
session.
Oracle Database 10g: Administration Workshop II 2-41
Obtaining NLS Settings Information
V$NLS_VALID_VALUES:
Contains the values for nls_language, nls_sort,
nls_territory and characterset that are valid
on your system
V$NLS_PARAMETERS:
- Contains the current NLS session settings,
including character sets
- Used as the basis for nls session parameters
2-42 Copyright © 2004, Oracle. All rights reserved.
Obtaining NLS Settings Information
The V$NLS_VALID_VALUES view shows the contents of the NLS data boot file. This retums a
list of all character sets, languages, linguistic sorts and territory definitions that are shipped with
a given database release. This list may contain unsupported or internally used definitions.
The V$NLS_PARAMETERS view shows the current globalization attributes for your session.
You can use this view to determine the proper setting for the NLS_LANG environment variable,
so that it matches the settings within the database. For example:
SELECT * FROM V$NLS_PARAMETERS WHERE parameter='NLS_LANGUAGE'
OR parameter='NLS_TERRITORY' OR parameter='NLS_CHARACIERSEI';
You use all three values returned by this query to set nls_lang. Suppose the output for the
above query is:
PARAMETER VALUE
NLS_LANGUAGE AMERICAN
NLS_TERRITORY AMERICA
NLS_CHARACTERSET WE8IS08 859P1
You would then specify NLS_LANG to be AMERICAN_AMERICA. WE8IS08 85 9P1.
Oracle Database 10g: Administration Workshop II 2-42
Summary
In this lesson, you should have learned how to:
• Customize language-dependent behavior for the
database and individual sessions
• Specify different linguistic sorts for queries
• Retrieve data that matches a search string
ignoring case or accent differences
• Obtain Globalization support configuration
information
2-43 Copyright © 2004, Oracle. All rights reserved.
Oracle Database 10g: Administration Workshop II 2-43
Practice 2 Overview:
Using Globalization Support Features
This practice covers the following topics:
• Checking the database and national character set
Identifying valid NLS values
• Setting NLS parameters
2-44 Copyright © 2004, Oracle. All rights reserved.
Practice 2 Overview
Note: For this practice you will be using zSQL*Plus.
Oracle Database 10g: Administration Workshop II 2-44
Practice 2: Using Globalization Support Features
In this practice, you will use some of the Globalization Support features of the database. You
will use the zSQL*Plus application for this practice.
1. Start zSQL*Plus by opening your browser and entering the following URL:
http: //hostname : 556 O/isqlplus. If there is no response, start the zSQL*Plus
instance by running the following command at the OS command prompt:
isqlplusctl start
Login in with a usemame of SYSTEM and a password of ORACLE.
2. Determine the database and the national character set.
3. Select the current date. If the year is not displayed using a four-digit year, then alter your
session (or database) so four digits appear when you select the date again.
Change nls_language to French and query the current time and date. What string is
now displayed for the date?
4. Use different nls_sort settings to sort data in the proper linguistic manner.
a. Execute the shell script lab_02_04 . sh to create a table named LIST in the
SYSTEM schema that contains four French words. Use the following command at the
OS prompt:
$ cd $HOME
$ ./lab_02_04.sh
b. Use zSQL*Plus to display the contents of the table ordered by the value of the WORD
column. In what order are the numbers in the NUM column displayed?
c. Set nls_sort to binary for your session. Select the table contents and order the
results by the WORD column. In what order are the numbers in the NUM column
displayed?
d. Next, set nls_sort to French. Select the table contents and order the results by the
WORD column. In what order are the numbers in the NUM column displayed?
e. Set NLS_SORT to French_M. Select the table contents and order the results by the
WORD column. In what order are the numbers in the NUM column displayed?
5. Set nls_sort to binary. Now retrieve the table contents in the same order the last query
in Step 3, without using another alter session command.
6. Close the open browser window. Shutdown the zSQL*Plus instance by running the
following command at the OS command prompt:
$ isqlplusctl stop
Oracle Database 10g: Administration Workshop II 2-45
Controlling Access t^Fie Oracle Listener
Copyright © 2004, Oracle. All rights reserved.
Objectives
After completing this lesson, you should be able to do
the following:
• Secure the listener
Enable TCP valid node checking
Remove default extproc entry
• Add a separate listener to handle external
procedure calls
3-2 Copyright © 2004, Oracle. All rights reserved.
Oracle Database 10g: Administration Workshop II 3-2
Oracle Net Services Review
Application
^B^i",rflr|p NpT
TCP/IP
network
Client
^ ^
sqlnet.ora tnsnames.ora
3-3 Copyright © 2004, Oracle. All rights
|RDBMS
1 Oracle Net
Database server
^L
listener.ora
reserved.
Oracle Net Services Review
Oracle Net is a component of Oracle Net Services. It resides on the client computer and the
Oracle Database server. Oracle Net is responsible for establishing and maintaining the
connection between the client application and the server, as well as exchanging messages
between them using industry-standard protocols.
The listener is a separate process that runs on the database server computer. It receives incoming
client connection requests and forwards these requests to the target database service. A single
listener can listen on behalf of multiple databases, and multiple listeners can listen on behalf of a
single database to perform load balancing.
A listener is configured with one or more listening protocol addresses, information about
supported services, and parameters that control its run-time behavior. The listener configuration
is stored in a configuration file named listener . ora.
When you install the Enterprise or Standard Edition of Oracle Database, Oracle Net
Configuration Assistant automatically configures a default listener named LISTENER with a
TCP/IP listening protocol address. During a custom installation, Oracle Net Configuration
Assistant prompts you to provide a listener name and protocol address. For all installations, a
listening IPC protocol address for external procedure calls is automatically configured.
Oracle Database 10g: Administration Workshop II 3-3
Listener Password Authentication
• In Oracle Database 10g, the listener is secure by
default.
• Operating system authentication is used.
• Listener passwords are still supported if needed.
- Use listener control utility isnrctl
- Use EM Database Control
- Use Oracle Net Manager
3-4 Copyright © 2004, Oracle. All rights reserved.
Listener Password Authentication
In Oracle Database 10g, the listener is secure out of the box and there should not be a need in
most cases to set a listener password as in older versions of the listener. The Oracle Database 10g
listener now uses local operating system authentication. As long as Isnrctl is run as the same
user that started the listener they will be able to fully administer it without providing the
password. This security feature is enabled by default and can be identified at listener startup, or
when issuing a Isnrctl status command, as follows:
$ Isnrctl status
Security ON: Password or Local OS Authentication
In cases where the oracle account is shared and you need extra protection, a listener password
can be set. Use the listener control utility's CHANGE_PAS SWORD command, EM Database
Control home page, or Oracle Net Manager to set or modify an encrypted password indicated by
the PASSVIORDS_listener_name parameter in the listener . ora file.
Oracle Database 10g: Administration Workshop II 3-4
Set Listener Password with EM
To set or modify an encrypted password using Enterprise Manager, follow the instructions
below:
1. Click on the Listener link located in the General region of the Database Control home
page.
2. Click on the Net Services Administration link located under Related Links.
3. Click on the Go button to the right of the Administer Listeners pull down list.
4. Click on the Authentication tab.
5. Click on the Require a password... button and type in the new password and click on the
OK button to finish.
Oracle Database 10g: Administration Workshop II 3-5
Setting Listener Password with Net
Manager
3-6 Copyright © 2004, Oracle. All rights reserved.
Set Listener Password with Net Manager
To set or modify an encrypted password with Enterprise Manager, do the following:
From an operating system prompt type netmgr to start Net Manager:
$ netmgr
1. Select Listeners from the Administer list, and then select the Oracle Home that contains
the location of the configuration files.
2. Click Go. The Listeners page will appear. Select a listener and then select General
Parameters from the pull down list.
3. Click on the Authentication tab and then click the Require a password for listener
operations button.
4. Enter the password you have selected and then type the password a second time to confirm.
5. After completing this, choose Save Network Configuration from the File menu.
Oracle Database 10g: Administration Workshop II 3-6
Set Password with lsnrcti Utility
Using the lsnrcti change_p as sword command:
3-7
$ lsnrcti
LSNRCTL> CHANGE_PASSWORD
Old password: *******
New Password: ItsaSafel
Reenter new password: ItsaSafel
LSNRCTL> SAVE_CONFIG
Copyright © 2004, Oracle. All rights reserved.
Set Password with lsnrcti utility
To set a new encrypted password with the CHANGE_PAS SWORD command, issue the following
commands from the listener control utility:
LSNRCTL> CHANGE_PASSWORD
Old password:
New password: ItsaSafel
Reenter new password: ItsaSafel
Connecting to
(DESCRIPTION(ADDRESS=(PROIOCOL=tpc)(HOSI=myhost)(PORT=1521)))
Password changed for LISTENER
The command completed successfully
LSNRCTL> SAVE_CONFIG
Connecting to
DESCRIPTIONS AD DRESS=(PROTOCOL=TCP) (HOST=myhost) (PORT = 1521) ) )
Saved LISTENER configuration parameters.
Listener Parameter File /10g/oracle/network/admin/listener.ora
Old Parameter File /10g/oracle/network/admin/listener.bak
The command completed successfully
Oracle Database 10g: Administration Workshop II 3-7
Controlling Database Access
3-8 Copyright © 2004, Oracle. All rights reserved.
Controlling Database Access
Sometimes you may wish to exercise more control over who may access your database than
provided by firewalls alone. It is possible to restrict database access to clients within your
intranet using the sqlnet. or a parameters TCP . VALIDNODE_CHECKING and
TCP.EXCLUDED_NODES. If the TCP . VALIDNODE_CHECKING field is selected, the
parameters TCP .EXCLUDED_NODES or TCP . INVITED_NODES are checked to determine
which clients to allow access to the database. Use TCP . INVITED_NODES when the list of
restricted users exceeds the size of welcome clients. If TCP .VALIDNODE_CHECKING is
deselected, then incoming client requests for a database connection are not checked.
To configure database access control, start Net Manager. From an operating system prompt type
netmgr:
$ netmgr
In the navigator pane, expand Local then Profile. From the list in the right pane, select General
then click the Access Rights tab. Select the Check TCP/IP client access rights option. In the
Clients excluded from access and Clients allowed to access fields, enter either a host name or
an IP address for a client that you wish to include or exclude, using commas to delimit entries
placed on the same line.
Oracle Database 10g: Administration Workshop II 3-8
Oracle Net Services External Procedures
External procedures that are called from a
program, but are written in a different language
The listener must be configured to listen for
external procedure calls
Listener starts an external procedure agent
Default agent name is extproc
3-9 Copyright © 2004, Oracle. All rights reserved.
Oracle Net Services External Procedures
An external procedure is a procedure that is called from another program, and is written in a
different language. For example, you may write a PL/SQL procedure that calls one or more C
routines to perform specialized processing.
You can configure the listener to listen for external procedure calls. When an application calls an
external procedure, the listener starts an external procedure agent named extproc. Using the
network connection established by the listener, the application passes the following information
to the agent:
• DLL or shared library name
• External procedure name
• Any parameters
The agent then loads the DLL, runs the external procedure, and passes back any values returned
by the external procedure to the application.
After the external routine completes, extproc remains active throughout your Oracle session;
when you log off, extproc is terminated. Consequently, you incur the cost of launching
extproc only once, no matter how many calls you make. Still, you should call an external routine
only when the computational benefits outweigh the cost.
Oracle Database 10g: Administration Workshop II 3-9
Overview of the extproc Agent
It services execution of external procedures for
the duration of the session until the user logs off.
Each session uses a different extproc agent to
execute external procedures.
The listener must be configured to allow the
server to be associated with the extproc agent.
The listener must be on the same machine as the
server.
3-10 Copyright© 2004, Oracle. All rights reserved.
Overview of the extproc Agent
The EXTPROC agent performs the following actions:
• Converts PL/SQL calls to C calls
• Loads the shared library
• Executes the external procedures:
Raises exceptions if necessary
- Converts C code back to PL/SQL
Sends arguments or exceptions back to the server process
The external procedure agent can only load DLLs from $ ORACLE_HOME /1 ib on UNIX
operating systems and ORACLE_HOME\bin on Windows platforms unless the
listener . ora environment variable EXTPROC_DLLS variable is set. Specify the
EXTPROC_DLLS environment variable to restrict the DLLs that extproc is allowed to load. This
is done by specifying the locations in a colon-seperated list as shown below:
"EXTPROC_DLLS=/home/xyz/mylib.so:/home/abc/urlib.so"
Oracle Database 10g: Administration Workshop II 3-10
PL/SQL Calling a C External Procedure
The steps below outline the process by which a PL/SQL program calls an external procedure
written inC:
1. The user process invokes a PL/SQL program.
2. The server process executes a PL/SQL subprogram, which looks up the alias library.
3. The PL/SQL subprogram passes the request to the listener.
4. The listener process spawns the EXTPROC agent. The EXTPROC agent remains active
throughout the Oracle session.
5. The EXTPROC agent loads the shared library.
6. The EXTPROC agent executes the external procedure.
7. The data status is returned to the server.
Oracle Database 10g: Administration Workshop II 3-11
3-12
Default Configuration for External
Procedure Calls
• Listener is configured to accept requests for
external procedures by Oracle Net Configuration
Assistant during installation.
• A net service name is configured in the
tnsnames. ora file.
EXTPROC_CONNECTION_DATA=
(DESCRIPTION
(ADDRESS=(PROTOCOL=ipc)(KEY=extproc))
(CONNE CT_D ATA=
(SID=plsextproc)))
Copyright © 2004, Oracle. All rights reserved.
Default Configuration for External Procedure Calls
The Oracle Net Configuration Assistant configures the default listener to accept connections to
external procedures during database server installation. In addition, Oracle Net Configuration
Assistant configures a net service name for the external procedures in the tnsnames . ora file
on the database server. The external procedure agent will only be able to load DLLs from
$ORACLE_HOME/lib on UNIX and ORACLE_HOME\bin on Windows.
The example below shows the default configuration in the tnsnames . ora file:
EXTPROC_CONNECTION_DATA.US.ORACLE.COM =
(DESCRIPTION =
(ADDRESS_LISI =
(ADDRESS = (PROTOCOL = IPC)(KEY = EXTPROC)))
(CONNECT_DATA =
(SID = PLSExtProc)
(PRESENTATION = RO)))
Oracle Database 10g: Administration Workshop II 3-12
Default Configuration for External Procedure Calls (continued)
The Windows example below shows the default configuration in the listener . or a file:
# LISTENER.ORA Network Configuration File:
D : \oracle\ora92\network\admin\listener.ora
# Generated by Oracle configuration tools .
LISTENER =
(DESCRIPTION_LIST =
(DESCRIPTION =
(ADDRESS_LIST =
(ADDRESS = (PROTOCOL = IPC)(KEY = EXTPROCO))
(ADDRESS_LIST =
(ADDRESS = (PROTOCOL = TCP)(HOST = anyuser-lap)(PORT = 1521)))
)
)
SID_LIST_LISTENER =
(SID_LIST =
(SID_DESC =
(SID_NAME = PLSExtProc)
(ORACLE_HOME = /uOl/app/oracle/product/10.1.0
(PROGRAM = extproc)))
You can use the Isnrctl services command to obtain detailed information about the
database services to which the listener forwards client connection requests. In this UNIX
example, you can see the default configuration for the external procedure agent.
$ Isnrctl services
LSNRCTL for Linux: Version 10.1.0.2.0 - Production on 16-JAN-2004 09:07:51
Copyright (c) 1991, 2003, Oracle. All rights reserved.
Connecting to (ADDRESS=(PROTOCOL=tcp)(PORT=1521))
Services Summary...
Service "PLSExtProc" has 1 instance(s).
Instance "PLSExtProc", status UNKNOWN, has 1 handler(s) for this service...
Handler(s):
Service "orcl.us.oracle.com" has 1 instance(s).
Instance "orcl", status READY, has 1 handler(s) for this service...
Handler(s):
"DEDICATED" established:341 refused:0 state:ready
LOCAL SERVER
Service "orclXDB.us.oracle.com" has 1 instance(s).
Instance "orcl", status READY, has 1 handler(s) for this service...
The command completed successfully
Oracle Database 10g: Administration Workshop II 3-13
Modifying the Configuration for
External Procedure Calls
1. Remove the external procedure entries for the
default listener.
2. Configure a separate listener dedicated to
servicing external procedures.
3. Configure listener to run with privileges lower than
those of the listener for the database.
4. Restrict the DLLs that the extproc agent can load.
3-14 Copyright© 2004, Oracle. All rights reserved.
Modifying the Configuration for External Procedure Calls
To achieve a higher level of security in a production environment, modify the default
configuration by performing the following tasks:
1. Remove the external procedure entries for the default listener.
2. Configure a separate listener dedicated to servicing external procedure calls.
3. The extproc agent spawned by the listener inherits the operating system privileges of the
listener. Therefore, configure this listener to run with operating system privileges lower
than those of the listener for the database.
4. Restrict the DLLs that can be loaded by the EXTPROC agent by listing them explicitly in
the listener . ora file.
Oracle Database 10g: Administration Workshop II 3-14
Remove Default extproc Entry
Using Enterprise Manager:
Listener: LISTENER EDRSR12P1.ua oracle.com > Edit Listener: LISTENER
Edit Listener: LISTENER
General
Addresses
If address is changed, listener will be stopped before applying changes.
0
TCP/IP
Host EDRSR12P1.us.oracle.com
Port 1521
General
3-15
Copyright © 2004, Oracle. All rights reserved.
Remove Default extproc Entry Using EM
Before you can create a listener to listen specifically for EXTPROC calls, you must remove
the EXTPROC entry from the default listener configuration. To do this using Enterprise
Manager, perform the instructions outlined below:
1. Click on the Listener link located in the General section of the Database Control home
page.
2. Click on the Net Services Administration link located under Related Links.
3. Click on the Go button to the right of Administer Listeners pull down list. Provide Host
login credentials (username/password).
4. Click on the Listener link to the right of the Select button. Select the EXTPROC entry by
clicking on the IPC radio button.
5. Click on the Remove button to complete the operation.
Oracle Database 10g: Administration Workshop II 3-15
Remove Default extproc Entry
Using Net Manager
3-16 Copyright© 2004, Oracle. All rights reserved.
Remove Default extproc Entry Using Net Manager
It is also possible to remove the default EXTPROC entry using the Net Manager utility. To
do this, follow the instructions outlined below:
From an operating system prompt, start Net Manager:
$ netmgr
1. In the left hand navigation pane, expand Listeners in the Net Configuration directory tree
and select LISTENER.
2. Select Other Services from the pull down list and select the EXTPROC tab.
3. Click on the Remove Service button below the Services folder.
4. Select Save Network Configuration from the File menu to finish.
Oracle Database 10g: Administration Workshop II 3-16
Configure a Dedicated Listener for
External Procedure Calls
Using Enterprise Manager
3-17 Copyright© 2004, Oracle. All rights reserved.
Configure a Dedicated Listener Using EM
You can use Enterprise Manager to configure a dedicated listener for external procedure
calls by following the instructions below:
1. Click on the Listener link located in the General section of the database home page and
then click on the Net Services Administration link located under Related Links.
2. Click on the Go button to the right of Administer Listeners pull down list.
3. Next, provide Host login credentials (usemame/password).
4. Click on the Create button near the top right of the window. Enter a descriptive listener
name like LISTENEREXTPROC or other suitable name.
Oracle Database 10g: Administration Workshop II 3-17
Configure a Dedicated Listener for
External Procedure Calls
Using Enterprise Manager
3-18 Copyright© 2004, Oracle. All rights reserved.
Configure a Dedicated Listener Using EM (continued)
5. Click on the Add button located under Addresses.
6. Select IPC from the Services pull down list and provide a Key value like EXTPROC in
the Key field and click on the OK button.
7. Click on the Go button to the right of Administer Listeners pull down list. Select the
Other Services link under the General section of the page.
8. Enter extproc for the Program Name and Service Name and provide the location of the
ORACLE_HOME in the Oracle Home Directoiy field. Click on the OK button to continue.
9. Click on the OK button at the bottom of the Create Listener page to finish.
Oracle Database 10g: Administration Workshop II 3-18
Configure a Dedicated Listener for
External Procedure Calls
Using Net Manager
3-19 Copyright© 2004, Oracle. All rights reserved.
Configure a Dedicated Listener Using Net Manager
You can use Oracle Net Manager to configure a dedicated listener for external procedure calls by
following the steps below:
1. Expand Local and select Listeners in the navigation pane.
2. Click + (plus) from the toolbar or select Create from the Edit menu. The Choose Listener
Name dialog box appears.
3. Enter a unique listener name, such as LISTENEREXTPROC, in the Listener Name field
and click the OK button.
4. Configure an IPC protocol address:
a. Select the newly created listener.
b. Select Listening Locations from the list in the right pane.
c. Click Add Address. A new Address tab appears.
d. Select IPC from the Protocol list, and enter a value in the Key field. Oracle
Corporation recommends a key value of extproc.
Oracle Database 10g: Administration Workshop II 3-19
Configure a Dedicated Listener Using Net Manager (continued)
Note: Each listener must specify a unique KEY. If the computer has more than one Oracle Home
or listener, you can use unique names such as extprocl and extproc2.
5. Configure service information for extproc:
a. Select Other Services from the list in the right pane.
b. Click Add Service. A new Service tab appears.
c. Enter extproc in the Program Name field, a system identifier such as extproc in
the SID field, and the Oracle Home location where the extproc executable resides
in the Oracle Home Directory field.
6. Select Choose File then Save Network Configuration. The listener . or a file is
updated with the information for external procedures.
Note: You should start the listener for external procedures from a user account with lower
privileges than the oracle user. Ensure that this user account does not have general access to
oracle-owned files. Specifically, this user should not have permission to read or write to database
files or to the Oracle server address space. In addition, this user should have read access to the
listener . ora file, but must not have write access to it. Executing the listener with lower
privileges also prevents you from using Listener Control utility SET commands to alter the
configuration of this listener in the listener .ora file. For this reason, Oracle Corporation
recommends that you complete listener . ora file configuration before starting the listener.
listener . ora Example
LISTENEREXTPROC=
(DESCRIPTION
(ADDRESS=
(PROTOCOL=ipc)(KEY=extproc)))
SID_LIST_LISTENEREXTPROC=
(SID_LIST=
(SID_DESC=
(PROGRAM=extproc)
(ENVS=
"EXTPROC_DLLS=ONLY:/home/xyz/mylib.so:/home/abc/urlib.so,
LD_LIBRARY_PATH=/private/xpm/lib:/private/mylibs,
MYPATH=/usr/ucb:/usr/local/packages,
APL_ENV_FILE=/apl/conf/env.txt"
)
(SID_NAME=extproc)
(ORACLE_HOME=/u01/app/oracle/product/10.1.0)))
Oracle Database 10g: Administration Workshop II 3-20
Summary
In this lesson, you should have learned how to:
• Secure the listener
Enable TCP valid node checking
Remove default extproc entry
• Add a separate listener to handle external
procedure calls
3-21 Copyright © 2004, Oracle. All rights reserved.
Oracle Database 10g: Administration Workshop II 3-21
Practice 3 Overview: Controlling Access to
the Listener
This practice covers the following topics:
• Password protecting listener management tasks
Removing the default extproc listener service
• Creating a dedicated listener for external
procedures
• Controlling database access
3-22 Copyright © 2004, Oracle. All rights reserved.
Oracle Database 10g: Administration Workshop II 3-22
Practice 3: Controlling Access to the Listener
Exercise 1: Password Protecting the Listener
This exercise covers the process of password protecting your listener using Enterprise Manager.
In your web browser address field, type:
http://your_host_name:55 0 0/em
Login as sys/oracle AS SYSDBA unless noted otherwise. If this is your first time running
EM as the SYS user, you will need to click I agree on the License Agreement screen.
1. From the Net Services page of Enterprise Manager, set an encrypted password to protect
listener operations.
2. Login at the OS level as the user sales with a password of oracle and verify listener
password protection is in effect.
3. Exit the sales user session and log back in as the oracle user.
Exercise 2: Securing the EXTPROC Service Entry
This exercise covers the removal of the default EXTPROC service entry for your listener and the
addition of a listener dedicated to external procedure requests.
1. From the Net Services page of Enterprise Manager, remove the default EXTPROC service.
2. View the listener . or a file to verify that the entry has been removed.
Hint: If you see a line like: (ADDRESS= (PROTOCOL=IPC) (KEY=EXTPROC) then the
operation was not successful
3. From the Net Services page of Enterprise Manager, add a new listener dedicated to
servicing external procedure requests.
Oracle Database 10g: Administration Workshop II 3-23
Configuring Recovery Manager
Copyright © 2004, Oracle. All rights reserved.
Objectives
After completing this lesson, you should be able to do
the following:
Describe the RMAN repository and recovery
catalog
Describe the Media Management Library interface
• Configure database parameters that affect RMAN
operations
• Change RMAN default settings with configure
4-2 Copyright © 2004, Oracle. All rights reserved.
Objectives
Recovery Manager (RMAN) is the component of the Oracle Database lOg used to perform
backup and recovery operations. Enterprise Manager (EM) supplies a graphical interface to the
most commonly used RMAN functionality.
The Oracle Database lOg: Administration Workshop /class demonstrated basic RMAN
operations using the EM Database Control Console, so the graphical interface to RMAN will not
be covered in detail in this lesson.
Oracle Database 10g: Administration Workshop II 4-2
Recovery Manager Features
RMAN provides a flexible way to:
• Back up the database, tablespaces, data files,
control files, and archived redo logs
• Manage backup and recovery tasks
Perform incremental block-level backup and
block-level media recovery
• Detect corrupted blocks during backup
Use binary compression when creating backups
4-3 Copyright © 2004, Oracle. All rights reserved.
Recovery Manager Features
RMAN is an Oracle utility that you use to manage the backup, restore, and recovery operations
on Oracle databases. RMAN has a powerful command language that is independent of the
operating system.
Recovery Manager has a command-line interface. Oracle Enterprise Manager also provides a
graphical user interface for the Recovery Manager. Recovery Manager cannot be used on
Oracle7 Databases.
RMAN provides several features not available when you make user-managed backups with
operating system commands.
• You can store frequently executed operations as scripts in the database.
• With block change tracking enabled in the database RMAN can limit incremental backups
to recording only those blocks that have changed since the previous backup. This improves
the performance of backups and may also reduce the time it takes to perform recovery
operations in ARCHIVELOG mode.
• You can use RMAN to manage the size of backup pieces and save time by parallelizing the
backup operation.
• RMAN can recover an individual corrupt data block or set of data blocks within a data file
rather than restoring and recovering the entire data file.
Oracle Database 10g: Administration Workshop II 4-3
Recovery Manager Features (continued)
• RMAN operations can be integrated with the Oracle Database Scheduler to automate
backup operations.
• You can use RMAN to detect block corruption. The information relating to the block
corruption that is detected during backup can be obtained by using the
V$BACKUP_CORRUPTION and v$COPY_CORRUPTION dynamic views.
• RMAN provides performance enhancements such as:
Automatic parallelization of backup, restore, and recovery operations
No generation of extra redo during online database backups
Backups that are restricted to limit reads per file, per second to avoid interfering with
OLTP work
Prevention of flooding of any one file with reads and writes while still keeping a tape
drive streaming, using multiplexing
• RMAN has a media management API to work seamlessly with third-party media
management tools interfacing with storage devices providing increased speed and
reliability.
• Under the user-managed method you need to keep track of all database files and backups.
In a recovery situation you must locate backups for each data file, copy them to the correct
place using operating system commands, and choose which redo log files to apply. RMAN
manages these tasks automatically. The advantages of using RMAN are even greater if you
use Oracle Managed Files or the Flash Recovery Area.
Note
Not all of these features are covered within this course. For more information on:
• RMAN and its abilities, see the Oracle Database Backup and Recovery Basics and Oracle
Database Backup and Recovery Advanced User's Guide documentation
• The syntax of RMAN commands, refer to the Oracle Database Recovery Manager
Reference manual
Oracle Database 10g: Administration Workshop II 4-4
Recovery Manager Components
Recovery
Manager
(RMAN)
Enterprise
Manager
Flash Recovery
Area
Recovery
catalog
database
4-5
Copyright © 2004, Oracle. All rights reserved.
Recovery Manager Components
Recovery Manager Executable: The Recovery Manager command-line interface is invoked
through the RMAN client application. RMAN interprets user commands and appropriately
invokes server sessions to perform the desired tasks.
Enterprise Manager: The Enterprise Manager Database Control Console supplies a graphical
interface to the most commonly used RMAN functionality.
Server Sessions: The server processes (UNIX) or threads (Windows NT/2000) invoked by
RMAN connect to the target database to perform the backup, restore, and recovery functions
through a PL/SQL interface. These sessions read or write files to or from disk, tape, or the Flash
Recovery Area, a storage location specified as the default storage area for files related to
database recovery.
Target Database: The database for which backup and recovery operations are being performed
using RMAN is called the target database. The control file of the target database contains
information about its physical structure, such as the size and location of data files, online and
archived redo log files, and control files. This information is used by the server sessions invoked
by RMAN in backup and recovery operations.
Auxiliary Database: An auxiliary database is used when creating a duplicate database or
performing tablespace point-in-time recovery (TSPITR). An auxiliary database can reside on the
same host as its parent or on a different host.
Oracle Database 10g: Administration Workshop II 4-5
Recovery Manager Components (continued)
Channel: To perform and record backup and recovery operations, RMAN requires a link to the
target database. This link is referred to as a channel. You can allocate channels manually or
preconfigure channels using automatic channel allocation.
RMAN Repository: RMAN maintains metadata about the target database and its backup and
recovery operations in the RMAN repository. Among other things, RMAN stores information
about its own configuration settings, the target database schema, archived redo logs, and all
backup files on disk or tape. RMAN repository data is always stored in the control file of the
target database.
Recovery Catalog: The RMAN repository data can optionally be kept in a recovery catalog, a
separate database that keeps historical data concerning backup activities much longer than the
control file and preserves backup information if the control file is lost. A single recovery catalog
is able to store information for multiple target databases. The recovery catalog can also hold
RMAN stored scripts, which are sequences of RMAN commands for common backup tasks.
Centralized storage of scripts in the recovery catalog can be more convenient than working with
command files. Usage of a separate recovery catalog database is not recommended for small
businesses where installation and administration of a separate recovery catalog database would
be burdensome.
Media Management Libraiy: The media management library (MML) is used by RMAN when
writing to or reading from tapes. The additional media management software required for using
the tape medium is provided by media and storage system vendors.
Oracle Database 10g: Administration Workshop II 4-6
4-7
Recovery
Manager
Media I
i/lanagement
/* Server ^SV
session
V^channeM^
Media
Management
Library
Copyright © 2004, Oracle. All rights reserved.
Media
management
server software
^A
Media Management
To use tape storage for your database backups, RMAN requires a media manager. A media
manager is a utility that loads, labels, and unloads sequential media, such as tape drives for the
purpose of backing up, restoring, and recovering data. The Oracle Database calls MML software
routines to back up and restore data files to and from media that is controlled by the media
manager.
Some media management products can manage the entire data movement between Oracle data
files and the backup devices. Some products that use high-speed connections between storage
and media subsystems can reduce much of the backup load from the primary database server.
Note that the Oracle Database does not need to connect to the media management library (MML)
software when it backs up to disk.
The Oracle Backup Solutions Program (BSP) provides a range of media management products
that are compliant with Oracle's MML specification. Software that is compliant with the MML
interface enables an Oracle database session to back up data to a media manager and request the
media manager to restore backups. Check with your media vendor to determine whether it is a
member of the Oracle BSP.
Oracle Database 10g: Administration Workshop II 4-7
Media Management (continued)
Before you can begin using RMAN with a media manager, you must install the media manager
software and make sure that RMAN can communicate with it. Instructions for this procedure
should be available in the media manager vendor's software documentation.
Depending on the product that you are installing, the following basic steps apply:
1. Install and configure the media management software on the target host or production
network. No RMAN integration is required at this stage.
2. Ensure that you can make non-RMAN backups of operating system files on the target
database host. This step makes it easier to troubleshoot problems at a later time. Refer to
your media management documentation to learn how to back up files to the media manager.
3. Obtain and install the third-party media management module for integration with the
Oracle Database. This module must contain the library loaded by the Oracle Database
when accessing the media manager.
For instructions on configuring the LEGATO® NetWorker, Single-Server Version (LSSV)
software that is included with the Oracle Database lOg software, visit
http://www.legato.com/lssv/lssvig 7.1 .pdf
Backup and Restore Operations Using a Media Manager
The following Recovery Manager script performs a data file backup to a tape drive controlled by
a media manager:
run {
# Allocating a channel of type 'sbt' for serial device
ALLOCATE CHANNEL chl DEVICE TYPE sbt;
BACKUP DATAFILE 3;
}
When Recovery Manager executes this command, it sends the backup request to the Oracle
database session performing the backup. The Oracle database session identifies the output
channel as a media management device and requests the media manager to load a tape and write
the output.
The media manager labels and keeps track of the tape and the names of the files on each tape.
The media manager also handles restore operations. When you restore a file, the following steps
occur:
1. The Oracle Database requests the restoration of a particular file.
2. The media manager identifies the tape containing the file and reads the tape.
3. The media manager passes the information back to the Oracle database session.
4. The Oracle Database writes the file to disk.
Oracle Database 10g: Administration Workshop II 4-8
Using a Flash Recovery Area with RMAN
RMAN backup
process
Database area Flash Recovery Area
4-9 Copyright © 2004, Oracle. All rights reserved.
Using a Flash Recovery Area with RMAN
The Flash Backup and Recovery feature simplifies managing disk space and files related to
backup and recovery, by managing all backup and recovery related files in a Flash Recovery
Area. You do not need to specify the file names for the backup files, as RMAN generates the file
names automatically. When the Flash Recovery Area is used, RMAN automatically uses Oracle
Managed Files (OMF) for its backup files.
Each time RMAN creates a file in the Flash Recovery Area, the Oracle Database updates the list
of files that are no longer required on disk. When a file needs to be written into the Flash
Recovery Area and space is not available for that file, the Oracle Database deletes a file that is
on the obsolete files list and writes a notification to the alert log.
When the Hash Recovery Area experiences space pressure or is low on free space because there
are no files that can be deleted from the Hash Recovery Area, a warning is issued. To resolve the
problem you can add disk space, back up your files to a tertiary device, delete the files from the
Flash Recovery Area using RMAN, or change the RMAN retention policy.
By default, RMAN automatically places backup files into a Flash Recovery Area when you set
the DB_RECOVERY_FILE_DEST initialization parameter.
Note: A Flash Recovery Area can be located in an Automated Storage Management (ASM)
instance. A Flash Recovery Area can also be used with Oracle Cluster File Storage (CFS) or any
local storage.
Oracle Database 10g: Administration Workshop II 4-9
Setting Parameters for RMAN
Database initialization parameters:
- CONTROL_FILE_RECORD_KEEP_TIME
- DB_RECOVERY_FILE_DEST and
DB_RECOVERY_FILE_DEST_SIZE
Environment variables:
- NLS_DATE_FORMAT
- NLS LANG
4-10 Copyright© 2004, Oracle. All rights reserved.
Setting Parameters for RMAN
RMAN stores information about the target database and its backup and recovery operations in
the RMAN repository. The amount of information stored can increase depending on the
frequency of backups, the number of archived redo log files that are generated, and the retention
period for RMAN records.
The CONTROL_FILE_RECORD_KEEP_TIME parameter specifies the minimum number of
days RMAN information is stored in the control file before being overwritten. A low value
results in information being overwritten more frequently, thus minimizing control file growth. If
a recovery catalog is used, a lower value should be chosen. The default is seven days.
You set the Flash Recovery Area size and location, using the DB_RECOVERY_FILE_DEST and
DB_RECOVERY_FILE_DEST_S IZE initialization parameters. You also specify a retention
policy that dictates when backups may be discarded. RMAN then manages your backup storage,
deleting obsolete backups and backups already copied to tape when space is needed, but keeping
as many backups on disk as space permits. This minimizes restores from tape during data
recovery operations to shorten restore and recovery times.
The NLS_DATE_FORMAT and NLS_LANG environment variables determine the format used for
the time parameters in RMAN commands such as RESTORE, RECOVER, and REPORT.
Oracle Database 10g: Administration Workshop II 4-10
Setting Parameters for RMAN (continued)
A database that is not mounted assumes the default character set, which is US 7ASC11. If your
character set is different from the default, then set NLS_LANG appropriately. For example, if the
character set is WE8DEC, you can set the NLS_LANG parameter as follows:
NLS LANG=amerlean america.we8dec
Oracle Database 10g: Administration Workshop II 4-11
RMAN Usage Considerations
Resources: Shared memory, more processes
Privileges given to users
- Database: SYSDBA
- Operating System: Access to devices
Remote operations
- Set up the password file
- Ensure that the password file is backed up
4-12 Copyright© 2004, Oracle. All rights reserved.
RMAN Usage Considerations
Before Recovery Manager is used, consider the following points:
• Shared resources on the system: Most of RMAN's work is performed through Oracle
Database processes. The operations can also be performed in parallel to increase
throughput. This implies that the PROCES SES database parameter must be sufficiently
high. For the operating system resources, this means that shared memory and semaphore
settings may need to be increased.
• Users performing privileged operations: You must decide which users will be able to
perform privileged operations. Then grant the necessary privileges to the users' accounts at
the operating system level and within the Oracle database. For example, to start up and shut
down a database, a user should have the SYSDBA privilege.
• Remote Operations: You need to use a password file to connect to the target database
over Oracle Net to perform privileged operations, such as startup and shutdown, from a
remote machine.
• Use of the Recovery Catalog: When you use a recovery catalog, RMAN can perform a
wider variety of automated backup and recovery functions. Use of the recovery catalog
involves storage space and maintenance efforts. You should decide whether to have a
database dedicated to maintaining the recovery catalogs of several target databases.
Oracle Database 10g: Administration Workshop II 4-12
Connection Types with RMAN
Target
database
Recovery
catalog DB
Auxiliary
database
Recovery
Manager
4-13
Copyright © 2004, Oracle. All rights reserved.
Database Connection Types with RMAN
You can use Recovery Manager to connect to the following types of databases:
• Target database: You are connected to the target database with the SYS DBA privilege.
You must have this privilege for the connection to succeed. The target database is the
instance where you want to perform typical RMAN operations.
• Recovery catalog database: This is an optional database which is configured for the
RMAN repository. You connect to the recovery catalog database when you want to retrieve
information stored within it, such as backup information or stored scripts.
• Auxiliary database: An auxiliary database can be a database that is:
- Created using the RMAN DUPLICATE command
A temporary database that is used during tablespace point-in-time recovery (TSPITR)
A standby database, or copy of your production database that can be used for disaster
recovery.
Oracle Database 10g: Administration Workshop II 4-13
4-14
Starting RMAN
• Starting RMAN locally
UNIX: $ ORACLE_SID=DB01; export ORACLE_SID
$ rman target system/manager
Windows NT: C:\> set ORACLE_SID=DB01
C:\> rman target /
• Starting RMAN remotely
rman target sys/password@DB01
Copyright © 2004, Oracle. All rights reserved.
Connecting to the Target Database Without a Catalog
Local Connection
For a local RMAN connection, at an operating system prompt, enter the following:
UNIX: $ ORACLE_SID=DB01; export ORACLE_SID
$ rman target /
Windows: C:\> SET ORACLE_SID=DB01
C:\> rman target /
If you do not specify a user ID or password when connecting to the target database, then a
forward slash establishes a connection as user SYS by using operating system authentication.
Optionally, you can specify the keyword NOCATALOG as follows:
$ rman target / nocatalog
NOCATALOG is the default mode and is used to indicate that you are using RMAN without a
recovery catalog.
Remote Connection
To connect from another server, use the Oracle Net service name for the target database:
$ rman target sys/target_pwd@DB01
Oracle Database 10g: Administration Workshop II 4-14
4-15
•
$
•
$
•
Additional RMAN Command
Line Arguments
Writing RMAN output to a log file:
rman TARGET sys/oracle
LOG $HOME/oradata/u03/rman.log APPEND
Executing a command file when RMAN is invoked:
rman TARGET sys/oracle
CMDFILE='$HOME/scripts/my_rman_script.rev'
Establishing database connections on RMAN
startup:
$ rman TARGET SYS/sys_pwd@orcl CATALOG
rman/rman@rcat AUXILIARY sys/aux_pwd@auxl
Copyright © 2004, Oracle. All rights reserved.
RMAN Command Line Arguments
The LOG = ' filename ' argument specifies the file where RMAN output will be recorded. If
not specified, then RMAN writes its message log file to standard output.
The APPEND keyword specifies that new output should be appended to the end of the message
log file.
You can use the CMDFILE = 'filename ' to run a file containing RMAN commands. You
can omit the quotes around the filename, if the first character of the filename is alphabetic.
RMAN terminates after running the command file.
You can specify connection options for RMAN, such as:
AUXILIARY: Specifies a connect string to an auxiliary database
CATALOG: Specifies a connect string to the database containing the recovery catalog
NOCATALOG: Indicates that you are using RMAN without a recovery catalog.
TARGET: Specifies a connect string to the target database
When you use the SCRIPT clause, after you are connected to the target database and recovery
catalog (specified using the TARGET and CATALOG clauses), RMAN runs the named stored
script from the recovery catalog against the target database.
Oracle Database 10g: Administration Workshop II 4-15
Configuring Persistent Settings for RMAN
RMAN is preset with default configuration settings
Use the configure command to:
- Configure automatic channels
- Specify the backup retention policy
- Specify the number of backup copies to be created
- Set the default backup type to backup set or copy
- Limit the size of backup sets
- Exempt a tablespace from backup
- Enable and disable backup optimization
- Configure automatic backups of control files
4-16 Copyright© 2004, Oracle. All rights reserved.
Configuring Persistent Settings for RMAN
To simplify ongoing use of RMAN for backup and recovery, the RMAN lets you set a number of
persistent configuration settings for each target database. These settings control many aspects of
RMAN's behavior when working with that database. You can save persistent configuration
information such as channel parameters, parallelism, and the default device type in the RMAN
repository.
These settings have default values, which allow you to use RMAN immediately. However, as
you develop a more advanced backup and recovery strategy, you will have to change these
settings to implement that strategy. You can use the CONFIGURE command to configure
persistent settings for RMAN backup, restore, duplication, and maintenance jobs. These settings
are in effect for any RMAN session until the configuration is cleared or changed.
Oracle Database 10g: Administration Workshop II 4-16
Configuring RMAN Settings Using EM
Backup/Recovery
Schedule Backup
Perform Recovery
Manage Current Backups
Configure Backup Settings
Configure Recovery"s^NrTos
Configure Recovery "Catalog Settir
Database: orcl.us oracle.com > Configure Backup Beltings
Configure Backup Settings
Device Backup Sel Folic1/
Maximum Backup Piece (File) Size MB ^
specify 5.U&1 ue to restrict the size of efcch backup Piece.
Tape Settings
The following parameters require additional configuration on different media poola
Copies of Datafile Backups [l
specifylhe number of identical copies for dafefile
backups.
Copies of Archivelog Backups [l
specify 1he number of identical copies for archiuelog
backups.
Host Credentials
To save the backup settings, supply operating system login credentials
* Username
Password
r Save as Preferred Credential
4-17
Copyright © 2004, Oracle. All rights reserved.
Configuring RMAN Settings Using EM
You can use Oracle Enterprise manager to specify the backup settings for an instance. To specify
backup settings, from the Maintenance page, select Configure Backup Settings in the
Backup/Recovery section.
The Configure Backup Settings property page consists of three tabs that cover Device, Backup
Set, and Policy parameters. You can access the:
• Device page to set the disk and tape configuration settings
• Backup Set page (shown above) to specify parameters for backup sets and to enter host
credentials
• Policy page to set various backup and retention policies before you initiate a backup, such
as automatically backing up the control file and SPFILE. The Policy page also allows you
to configure block change tracking support, a feature that provides faster incremental
backups.
Note: Backup settings change the database wide settings and apply to any backups that do not
override settings at the backup level.
Oracle Database "\0g\ Administration Workshop II 4-17
Control File Autobackups
RMAN> CONFIGURE CONTROLFILE AUTOBACKUP ON;
Database: orcl.us oracle corn > Configure Backup Settings
Configure Backup Settings
Policy
Backup Policy
E Automatically backup the control file and server parameter file (SPFILE) with every backup and
database structural chance
Aulobackup Disk Localion
An existing directory or diskgroup name where the control tile and server parameter tile
willbebackeclup.lt you do not specify a location, the files will be backed up to the flash
recovery area location.
4-18
Copyright © 2004, Oracle. All rights reserved.
Control File Autobackups
To avoid losing a copy of the current control file, you should configure RMAN to take automatic
backups of the control file. The automatic backup of the control file occurs independently of any
backup of the current control file explicitly requested as part of your backup command.
To configure control file autobackup, modify the backup policy for your database using
Enterprise Manager or use the RMAN command:
CONFIGURE CONTROLFILE AUTOBACKUP ON;
By default, control file autobackups are turned off. If you enable control file autobackups, then
RMAN automatically backs up the control file and the current server parameter file (if used to
start up the database) in one of two circumstances:
• A successful backup must be recorded in the RMAN repository
• A structural change to the database affects the contents of the control file which therefore
must be backed up
Oracle Database 10g: Administration Workshop II 4-18
Control File Autobackups (continued)
The control file autobackup filename has a default format of %F for all device types, so that
RMAN can guess the file location and restore it without a repository. This variable format
translates into c-IIIIIIIIII-YYYYMMDD-QQ, where:
• Illlllllll stands for the DBID.
YYYYMMDD is a time stamp of the day the backup is generated.
QQ is the hex sequence that starts with 0 0 and has a maximum of FF.
You can change the default format by using the CONFIGURE CONTROLFILE AUTOBACKUP
FORMAT FOR DEVICE TYPE type TO 'string ' command. The value of string must
contain the substitution variable %F and cannot contain other substitution variables. For example:
CONFIGURE CONTROLFILE AUTOBACKUP FORMAT
FOR DEVICE TYPE DISK TO '/u01/oradata/cf_ORCL_auto_%F';
Control file autobackups are stored in the flash recovery area, if configured.
With a control file autobackup, RMAN can recover the database even if the current control file,
recovery catalog, and server parameter file are inaccessible. Because the path used to store the
autobackup follows a well-known format, RMAN can search for and restore the server parameter
file or control file from that autobackup.
Oracle Database 10g: Administration Workshop II 4-19
Retention Policies
• A retention policy describes which backups will be
kept and for how long.
• There are two types of retention policies:
- Recovery window: Establishes a period of time
within which point-in-time recovery must be
possible
- Redundancy: Establishes a fixed number of
backups that must be kept (Backups that are in
excess of this can be deleted.)
• These policies are mutually exclusive and can be
set with the configure command.
4-20 Copyright © 2004, Oracle. All rights reserved.
Retention Policies
A retention policy describes which backups will be kept and for how long. The value of the
retention policy is set by the CONF IGURE command. The best practice is to establish a period of
time during which it will be possible to discover logical errors and fix the affected objects by
doing a point-in-time recovery to just before the error occurred. This period of time is called the
recovery window. This policy is specified in number of days. For each data file, there must
always exist one backup which satisfies the condition:
SYSDATE - checkpoint_time <= recovery_window
For example, if the policy were to be set as follows:
RMAN> CONFIGURE RETENTION POLICY
2 TO RECOVERY WINDOW OF 7 DAYS;
Then for each file there must be a backup that satisfies:
SYSDATE - (SELECT checkpoint_time
FROM V$DATAFILE WHERE file#= ...) >= 7
If you require a certain number of backups to be retained, you can set the retention policy based
on the redundancy option. This option requires that a specified number of backups be cataloged
before any backup is identified as obsolete. The default retention policy has a redundancy of 1,
which means that only one backup of a file must exist at any given time. A backup is deemed
obsolete when a more recent version of the same files has been backed up.
Oracle Database 10g: Administration Workshop II 4-20
4-21
Managing Persistent Settings
Use the show command to list current settings:
RMAN> SHOW CONTROLFILE AUTOBACKUP FORMAT;
RMAN> SHOW EXCLUDE;
RMAN> SHOW ALL;
Use the clear command to reset any persistent
setting to its default value:
RMAN> CONFIGURE BACKUP OPTIMIZATION CLEAR;
RMAN> CONFIGURE MAXSETSIZE CLEAR;
RMAN> CONFIGURE DEFAULT DEVICE TYPE CLEAR;
Copyright © 2004, Oracle. All rights reserved.
Managing Persistent Settings
The RMAN SHOW command allows you to view the RMAN configuration settings. If SHOW
ALL is executed when connected to a target database, only node-specific configurations and
database configurations are displayed.
You can return to the default value for any CONF IGURE command by running the same
command with the CLEAR option.
Oracle Database 10g: Administration Workshop II 4-21
Channel Allocation
I Server
^Session
f Server
| Session
Channel
(DISK)
Channel
(SBT)
DM AM
BACKUP
RESTORE
RECOVER
4-22
Copyright © 2004, Oracle. All rights reserved.
Channel Allocation
A channel represents one stream of data to a device type. A channel must be allocated before you
execute backup and recovery commands. Each allocated channel establishes a connection from
the RMAN executable to a target database instance. An Oracle Database process for the target
database is created for every channel allocated.
Every BACKUP, COPY, RESTORE, or RECOVER command issued in Recovery Manager
requires at least one channel. The type of media desired determines the type of channel allocated.
The number of channels allocated is the maximum degree of parallelization that is used during
backup, restore, or recovery.
You can also use the ALLOCATE CHANNEL FOR MAINTENANCE command to manually
allocate a channel in preparation for issuing a CHANGE, DELETE,or CROSSCHECK command.
Note that if you use CONFIGURE to set up automatic channels, then RMAN can use these
automatic channels for maintenance operations; you do not have to manually allocate them.
Manually allocated maintenance channels cannot be used for any other I/O operation, such as
backup or copy.
You can query the V$BACKUP_DEVICE view to determine supported device types.
Each channel usually corresponds to one output device, unless your MML is capable of
duplexing. Multiplexing RMAN channels to a single output device is not recommended.
Oracle Database 10g: Administration Workshop II 4-22
4-23
Automatic and Manual Channel Allocation
• Change the default device type for automatic
channel allocation:
RMAN> CONFIGURE DEFAULT DEVICE TYPE TO sbt;
Manually allocate a channel
RMAN> RUN {
2> ALLOCATE CHANNEL cl DEVICE TYPE disk;
3> BACKUP DATAFILE ' /uOl/oradata/userOl. dbf ' ;
4> }
Copyright © 2004, Oracle. All rights reserved.
Automatic and Manual Channel Allocation
Use the CONFIGURE command to preconfigure channels for use in all RMAN sessions using
automatic channel allocation. Automatic channels apply to any RMANjob in which you do not
manually allocate channels.
By default, RMAN has preconfigured a disk channel so that you can back up to disk without
doing any manual configuration. Hence, if you are backing up to disk rather than to a media
manager, you can immediately begin backing up to disk.
The ALLOCATE CHANNEL command with a RUN command and the ALLOCATE CHANNEL
FOR MAINTENANCE command issued at the RMAN prompt are used to allocate a channel
manually. Manual channel allocation overrides automatic allocation.
The automatic channel feature is mutually exclusive with the manual channel feature: RMAN
uses one or the other for every job.
Oracle Database "\0g\ Administration Workshop II 4-23
4-24
Channel Control Options
Configure parallelism:
RMAN> CONFIGURE DEVICE TYPE DISK PARALLELISM 3;
• Specify the maximum backup piece size:
RMAN> CONFIGURE CHANNEL DEVICE TYPE DISK
2> MAXPIECESIZE 2G;
Format the name of generated backup files:
RMAN> RUN {
2> ALLOCATE CHANNEL dl DEVICE TYPE DISK
3> FORMAT '/diskl/backups/%U';
4> BACKUP DATABASE PLUS ARCHIVELOG; }
Copyright © 2004, Oracle. All rights reserved.
Channel Control Options
You can specify control options for the allocated channel to change its default behavior. The
configurable control options for manually and automatically allocated channels are:
CONNECT: The connect string for the target instance
FORMAT: The format to use for backup piece names created on this channel
MAXOPENFILES: The maximum number of input files that a BACKUP command can have
open at any given time (the default is 8)
MAXPIECESIZE: The maximum size of each backup piece created on this channel,
specified in bytes (default), kilobytes (K), megabytes (M), or gigabytes(G).
DURATION: Specifies the amount of time to run the backup job, defined in hours and
minutes. The duration can be further specified as:
PARTIAL: No error is signaled if the backup is not complete at the end of the
specified duration.
MINIMIZE TIME: The backup runs at full speed, possibly finishing the backup
under the allotted time.
MINIMIZE LOAD: RMAN monitors the backup speed and automatically reduces the
processing speed if it detects that the backup will complete in less than the allotted
time. This option is not allowed when writing to tape, as it is desirable to drive the
tapes as fast as possible.
Oracle Database 10g: Administration Workshop II 4-24
Channel Control Options (continued)
If the channel device type is SBT or SBT_TAPE, you can also specify:
PARMS="ENV (...) " : Set environment variables for the server session corresponding to
this RMAN client
PARMS="SBT_LIBRARY=..." : Specify the location of the media management library to
be used by the channel
For automatic channels, you can also configure the default parallelism level and the default
backup type for disk or tape backups to BACKUPSET, COMPRESSED BACKUPSET or COPY.
Oracle Database 10g: Administration Workshop II 4-25
Summary
In this lesson, you should have learned how to:
Describe the RMAN repository and recovery
catalog
• Change RMAN default settings with configure
Implement automatic channel allocation
4-26 Copyright © 2004, Oracle. All rights reserved.
Oracle Database 10g: Administration Workshop II 4-26
Practice 4 Overview: Configuring RMAN
This practice covers the following topics:
• Using Recovery Manager to connect to a target
database in default nocatalog mode
Displaying the default RMAN configuration
settings
• Configuring control file autobackups
• Altering the backup retention policy for a database
4-27 Copyright © 2004, Oracle. All rights reserved.
Oracle Database 10g: Administration Workshop II 4-27
Practice 4: Configuring Recovery Manager
In this exercise you will become familiar with configuring RMAN and viewing the current
configuration.
1. Connect to your database as the target database in the default NOCATALOG mode as the
SYSTEM user.
2. Use the RMAN SHOW ALL command to generate a listing of the RMAN configuration
settings.
3. Configure RMAN to automatically back up the control file and SPFILE whenever a backup
of the database or data files is taken.
4. Use the Enterprise Manager Database Control Console to set the backup retention policy to
a recovery window of 2 days. Log in to the Database Control Console as the SYSTEM user.
If this is your first time logging in to EM as the SYSTEM user, you will need to click "I
agree" on the License Agreement screen
5. Verify the backup retention policy setting using the RMAN utility and the SHOW command.
Oracle Database 10g: Administration Workshop II 4-28
Using Recovery Manager
Copyright © 2004, Oracle. All rights reserved.
Objectives
After completing this lesson, you should be able to do
the following:
Use the RMAN backup command to create backup
sets and image copies
• Manage the backups and image copies taken with
RMAN
5-2 Copyright © 2004, Oracle. All rights reserved.
Objectives
Recovery Manager (RMAN) is the component of the Oracle Database lOg used to perform
backup and recovery operations. Enterprise Manager (EM) supplies a graphical interface to the
most commonly used RMAN functionality.
The Oracle Database lOg: Administration Workshop /class demonstrated basic RMAN
operations using the EM Database Control Console, so the graphical interface to RMAN will not
be covered in detail in this lesson.
Oracle Database 10g: Administration Workshop II 5-2
Issuing Recovery Manager Commands
Interactive client
- Type commands at RMAN prompt
- Use when doing analysis, running reports or stored
scripts
Batch mode
- Use with automated jobs
- Specify a command file when starting RMAN
- Set the log file to obtain information
• Pipe interface
- Specify the pipe command line argument
- Use to communicate data between sessions or
between RMAN and an external application
5-3 Copyright © 2004, Oracle. All rights reserved.
Issuing Recovery Manager Commands
Recovery Manager has its own command language. There are multiple ways of entering
commands for RMAN using the command-line interface (CLI).
To run RMAN commands interactively, start RMAN and then type commands into the
command-line interface. For example:
$ rman TARGET sys/sys_pwd@dbl
RMAN> BACKUP DATABASE;
You can enter RMAN commands into a file, and then run the command file by specifying its
name on the command line. This is referred to as batch mode processing. The contents of the
command file should be identical to commands entered at the command line. For example:
C:\> rman TARGET SYS/sys_pwd@prodl @'/oracle/backup_all_10.rev'
When running in batch mode, RMAN reads input from a command file and writes output
messages to a log file (if specified). RMAN parses the command file in its entirety before
compiling or executing any commands. There is no need to place an exit command in the file
because RMAN will terminate when the end of the file is reached.
The RMAN pipe interface is an alternative method for issuing commands to RMAN and
receiving the output from those commands. RMAN obtains commands and sends output by using
the DBMS_PIPE PL/SQL package.
Oracle Database 10g: Administration Workshop II 5-3
Issuing Recovery Manager Commands (continued)
The pipe interface is invoked by using the PIPE command-line parameter. RMAN uses two
private pipes: one for receiving commands and the other for sending output. The names of the
pipes are derived from the value of the PIPE parameter.
For example:
% rman PIPE abc TARGET SYS/pwd@trgt
RMAN opens the two pipes in the target database: ORA$RMAN_ABC_IN, which RMAN uses to
receive user commands, and ORA$RMAN_ABC_OUT, which RMAN uses to send all output back
to RMAN. All messages on both the input and output pipes are of type VARCHAR2.
When the pipe interface is used, RMAN does not read or write any data using the operating
system shell. You can use pipes communicate with another session in the same instance or to a
waiting application such as a UNIX program. By using this interface, it is possible to write a
portable programmatic interface to RMAN.
See the Oracle Database Backup and Recovery Advanced User's Guide for more information on
using pipes with RMAN.
Refer to the PL/SQL Packages and Types Reference for more information on the DBMSPIPE
package and creating pipes within the Oracle Database.
Oracle Database 10g: Administration Workshop II 5-4
RMAN Command Overview
Restore/Recover/Flashback
Backup
SPFILE
Target
database
Catalog maintenance
CROSSCHECK
DELETE...EXPIRED
LIST
CHANGE
Enterprise
Manager
REPORT
LIST
5-5
Copyright © 2004, Oracle. All rights reserved.
RMAN Command Overview
The typical RMAN commands that you run against the target database include:
BACKUP to back up a database, tablespace, data file (current or copy), control file (current
or copy), SPFILE, archived log, or backup set for a target or standby database. Backing up
backup set is an easy way to move a backup from disk to tape.
DUPLICATE to create a clone database or a standby database from backups (backup sets
or image copies) of the target database.
FLASHBACK to perform a Flashback Database operation, returning the database to (or to
just before) target time, as specified by time, SCN or log sequence number.
RECOVER to recover and RES TORE to restore files from backups or image copies.
The RMAN reporting commands include:
LIST for querying the recovery catalog or control file and producing a list of the backups,
copies, archived redo logs, and database incarnations recorded there.
REPORT for performing detailed analyses of the recovery catalog or control file.
RMAN provides the following command sets for catalog maintenance:
CROSSCHECK checks the status of a backup or a copy on disk or tape.
DELETE lists specified backup objects and prompts for confirmation to remove them.
CHANGE is used to alter the status of backup objects in the repository.
• LIST shows what CROSSCHECK/DELETE EXPIRED will process.
Oracle Database 10g: Administration Workshop II 5-5
RMAN Commands
RMAN commands are of the following types:
• Stand-alone
- Executed individually at the RMAN prompt
- Cannot appear as subcommands within run
• Job
- Must be within the brackets of run
- Executed as a group
• Stand-alone or job
- Can be executed at the RMAN prompt and run
individually
- Can be run within the brackets of run and executed
within a group
5-6 Copyright © 2004, Oracle. All rights reserved.
RMAN Commands
RMAN has two basic types of commands: stand-alone and job commands.
Stand-alone commands are executed at the RMAN prompt and are generally self-contained.
Some of the stand-alone commands are:
• CHANGE
• CONNECT
• CREATE CATALOG,RESYNC CATALOG
• CREATE SCRIPT,DELETE SCRIPT,REPLACE SCRIPT
Job commands are usually grouped and executed sequentially inside of a command block. If any
command within the block fails, RMAN ceases processing; no further commands within the
block are executed.
There are some commands that can be issued either at the prompt or within a RUN command
block, such as BACKUP DATABASE. If you issue stand-alone commands, RMAN allocates any
needed channels using the automatic channel allocation feature.
You can execute the commands in interactive mode or batch mode.
Oracle Database 10g: Administration Workshop II 5-6
Job Command: Example
run command:
RMAN> RUN {
2> BACKUP AS BACKUPSET
3> FORMAT '/u01/db01/backup/%d_%s_%p'
4> DURATION 10:00 MINIMIZE LOAD
5> (DATABASE) ;
6> SQL 'alter system archive log current';
7> }
5-7 Copyright © 2004, Oracle. All rights reserved.
Job Commands
Unlike stand-alone commands, job commands must appear within the brackets of a RUN
command. Following are examples of job commands:
• ALLOCATE CHANNEL
• SWITCH
RMAN executes the job commands inside of a RUN command block sequentially. If any
command within the block fails, then RMAN ceases processing; no further commands within the
block are executed. In effect, the RUN command defines a unit of command execution. When the
last command within a RUN block completes, the Oracle database releases any server-side
resources such as I/O buffers or I/O slave processes allocated within the block.
Oracle Database 10g: Administration Workshop II 5-7
The backup Command
RMAN>
2>
3>
BACKUP AS BACKUP SET
FORMAT '/BACKUP/df_%d_%s_%p.bus'
TABLESPACE hr_data;
^j^^ jSgnfje
Tablespace
HR DATA
DafOle
DataLife
Backup
set
5-8
Copyright © 2004, Oracle. All rights reserved.
The backup Command
A backup is a copy of data from your database that can be used to reconstruct that data. The
results of an backup created through RMAN can be either image copies or backup sets. An
image copy is a bit-for-bit identical copy of a database file. RMAN can also store its backups in
an RMAN-exclusive format called a backup set. A backup set is a collection of files called
backup pieces, each of which may contain one or more database file backups.
When performing a backup using RMAN, you can specify:
• The type of backup to be performed. You can perform backups of the entire database
(FULL) or incremental backups (INCREMENTAL). If CONFIGURE CONIROLFILE
AUIOBACKUP is enabled, RMAN automatically backs up the control file and the current
server parameter file after BACKUP commands.
• What to backup. Valid values are DATABASE, DATAFILE, TABLESPACE,
ARCHIVELOG, CURRENT CONIROLFILE, or SPFILE.
Whether an image copy (AS COPY) or backup set (AS BACKUPSET) is created.
The file name format and location for backup pieces (FORMAT).
Which data files or archived redo logs should be excluded from the backup set (SKIP).
Amaximum size for a backup set (MAXSEISIZE).
That the input files should be deleted upon the successful creation of the backup set
(DELETE INPUT).
Oracle Database 10g: Administration Workshop II 5-8
Backup Constraints
The database must be mounted or open.
Online redo log backups are not supported.
Only "clean" backups are usable in
noarchivelog mode.
Only "current" data file backups are usable in
archivelog mode.
5-9 Copyright © 2004, Oracle. All rights reserved.
Backup Constraints
When performing a backup using Recovery Manager, you must be aware of the following:
• The target database must be mounted for Recovery Manager to connect.
• Backups of online redo logs are not supported.
• If the target database is in NOARCHIVELOG mode, only "clean" tablespace and data file
backups can be taken (that is, backups of "offline normal" or "read only" tablespaces).
Database backups can be taken only if the database has first been shut down cleanly and
restarted in MOUNT mode.
• If the target database is in ARCHIVELOG mode, only "current" data files can be backed up
(restored data files are made current by recovery).
• If a recovery catalog is used, the recovery catalog database must be open.
Oracle Database 10g: Administration Workshop II 5-9
Parallelization of Backup Sets
You can configure parallel backups by setting the PARALLEL I SM option of the CONF IGURE
command to greater than 1 or manually allocate multiple channels. RMAN parallelizes its
operation and writes multiple backup sets in parallel. The server sessions divide the work of
backing up the specified files.
Example
RMAN> RUN {
2> ALLOCATE CHANNEL cl DEVICE TYPE sbt;
3> ALLOCATE CHANNEL c2 DEVICE TYPE sbt;
4> ALLOCATE CHANNEL c3 DEVICE TYPE sbt;
5> BACKUP
6> INCREMENTAL LEVEL = 0
7> FORMAT ,/diskl/backup/df_%d_%s_%p.bak'
8> (DATAFILE 1,4,5 CHANNEL cl)
9> (DATAFILE 2,3,9 CHANNEL c2)
10> (DATAFILE 6,7,8 CHANNEL c3);
11> ALTER SYSTEM ARCHIVE LOG CURRENT;
12> }
Oracle Database 10g: Administration Workshop II 5-10
Parallelization of Backup Sets (continued)
When backing up data files, you can specify the files to be backed up by either their path name,
or their file number. For example, the following two commands perform the same action:
BACKUP DEVICE TYPE sbt DATAFILE '/home/oracle/systemOl.dbf';
BACKUP DEVICE TYPE sbt DATAFILE 1;
When you create multiple backup sets and allocate multiple channels, RMAN automatically
parallelizes its operation and writes multiple backup sets in parallel. The allocated server
sessions share the work of backing up the specified data files, control files, and archived redo
logs. You cannot stripe a single backup set across multiple channels.
Parallelization of backup sets is achieved by:
• Configuring PARALLELISM to greater than 1 or allocating multiple channels
• Specifying many files to back up
Example
• There are nine files that need to be backed up (data files 1 through 9).
• Assign the data files to a backup set so that each set has approximately the same number of
data blocks to back up (for efficiency).
Data files 1, 4, and 5 are assigned to backup set 1.
Data files 2, 3, and 9 are assigned to backup set 2.
Data files 6, 7, and 8 are assigned to backup set 3.
Note: You can also use the FILESPERSET parameter to limit the number of data files that are
included in a backup set.
Oracle Database 10g: Administration Workshop II 5-11
Database file
5-12
Compressed Backups
RMAN> BACKUP AS
2> COMPRESSED BACKUPSET
3> DATABASE;
;s
RMAN> CONFIGURE DEVICE TYPE
2> DISK PARALLELISM 2
3> BACKUP TYPE TO
4> COMPRESSED BACKUPSET;
Copyright © 2004, Oracle. All rights reserved.
-a
Compressed
backup files
Compressed Backups
Compressed backups reduce the amount of space required for storing backup sets.
You create a compressed backup of a database by using the command:
RMAN> BACKUP AS COMPRESSED BACKUPSET DATABASE;
The compressed backup set feature cannot be used with pre-Oracle Database lOg databases. The
compatibility database initialization parameter must be set to at least 10.0.0.0. The
compression applies only to backup sets, not image copies.
You can configure RMAN to automatically make compressed backup sets with the configure
device type command:
RMAN> CONFIGURE DEVICE TYPE DISK PARALLELISM 2
2> BACKUP TYPE TO COMPRESSED BACKUPSET;
By default compression is disabled.
Oracle Database 10g: Administration Workshop II 5-12
Image Copy
RMAN>
2>
3>
RMAN>
4>
5>
BACKUP AS COPY
DATAFILE ' /ORADATA/users_01_db01. dbf '
FORMAT '/BACKUP/usersOl.dbf' tag=DF3;
BACKUP AS COPY
ARCHIVELOG LIKE 'arch_1060.arc'
FORMAT 'arch_1060.bak';
Copy of data file 3
Copy of archived log
5-13
Copyright © 2004, Oracle. All rights reserved.
Characteristics of an Image Copy
An image copy is a clone of a single data file, archived redo log, or control file. An image copy
can be created with the BACKUP AS COPY command or with an OS command.
When you create the image copy with the RMAN BACKUP AS COPY command, the server
session validates the blocks in the file and records the copy in the control file.
An image copy has the following characteristics:
• An image copy can be written only to disk. When large files are being considered, copying
may take a long time, but restoration time is reduced considerably because the copy is
available on the disk.
• If files are stored on disk, they can be used immediately by using the SWITCH command in
Recovery Manager, which is equivalent to the ALTER DATABASE RENAME FILE SQL
statement.
• In an image copy all blocks are copied, whether they contain data or not, because an Oracle
Database process copies the file and performs additional actions such as checking for
corrupt blocks and registering the copy in the control file. To speed up the process of
copying, you can use the NOCHECKSUM parameter.
• Image copy can be part of a full or incremental level 0 backup, because a file copy always
includes all blocks. You must use the level 0 option if the copy will be used in conjunction
with an incremental backup set.
Oracle Database 10g: Administration Workshop II 5-13
Image Copy Example
The example in the slide creates two image copies:
• Acopy of the users 0l_db0l .dbf data file, renamed to usersOl.dbf, and stored in the
BACKUP directory. The image copy is marked with the tag DF3.
• A copy of the archived log with sequence number 1060.
The example assumes that you are using automatic channel allocation. If you are manually
allocating channels, you must include the COPY command within the RUN statement as follows:
RMAN> RUN {
2> ALLOCATE CHANNEL cl type disk;
3> COPY
4> DATAFILE '/ORADATA/users_01_db01.dbf' to
5> '/BACKUP/usersOl.dbf' tag=DF3,
6> ARCHIVELOG 'arch_1060.arc' to
7> 'arch_106 0.bak' ;
8> }
Oracle Database 10g: Administration Workshop II 5-14
Tags for Backups and Image Copies
A tag is a logical name assigned to a backup set or
image copy.
month_full_backup week_full_backup Wednesday_l_backup
DatErfftes
Backup set
DSfcrfrte
Backup set
Backup set
5-15
Copyright © 2004, Oracle. All rights reserved.
Tags for Backups and Image Copies
A tag is a meaningful name that you can assign to a backup set or image copy. The advantages of
user tags are as follows:
• Tags provide a useful reference to a collection of file copies or a backup set.
• Tags can be used in the LIST command to locate backed up files easily.
• Tags can be used in the RESTORE and SWITCH commands.
• The same tag can be used for multiple backup sets or file copies.
If a non-unique tag references more than one data file, then RMAN chooses the most current
available file.
Example
• Each month, a full backup of data files 1, 2, 3, and 4 is performed. The tag in the control
file for this backup is month_f ull_backup, even though the physical filename generated
isdf_DB0 0_86 3_l .dbf.
• Each week, a full backup of data files 3 and 4 is performed. The tag name for this backup is
week_full_backup.
Oracle Database 10g: Administration Workshop II 5-15
backup Options
Check for physical block corruptions
• Scan for logical corruptions in addition to physical
corruptions
• Set a threshold on the number of detected
corruptions allowed before aborting
• Validate the target input files before performing a
backup operation
• Duplex the backup set
• Overwrite an existing backup set or image copy
Pass control over the data transfer between
storage devices and the data files on disk to the
media management layer
5-16 Copyright© 2004, Oracle. All rights reserved.
backup Command Options
During the backup operation, an Oracle Database process computes a checksum for each block
to detect corruption. RMAN verifies the checksum when restoring the copy. This is referred to as
physical corruption detection. You can use the NOCHECKSUM option to suppress the checksum
operation and speed up the backup process. If the database is already maintaining block
checksums, then this option has no effect.
You can use the CHECK LOGICAL option to test data and index blocks that pass physical
corruption checks for logical corruption, for example, corruption of a row piece or index entry. If
logical corruption is detected, the block is logged in the alert log and trace file of the server
process. You can set a threshold for the allowed number of logical and physical corruptions with
the MAXCORRUPT parameter. As long as the sum of physical and logical corruptions that is
detected for a file remain below this value, the RMAN backup operation completes and Oracle
Database populates the V$DATABASE_BLOCK_CORRUPTION view with the corrupt block
ranges. If MAXCORRUPT is exceeded, then the operation terminates without populating the view.
You can use the VALIDATE option to check for physical and logical errors in database files.
When using the BACKUP command with the VALIDATE option, RMAN scans the specified files
and verifies their contents, testing whether this file can be backed up. This command does not
actually backup up the specified files.
Oracle Database 10g: Administration Workshop II 5-16
backup Command Options (continued)
You can create up to four identical copies of each backup piece by duplexing the backup set. Use
any of the following commands to produce a duplexed backup set:
• BACKUP COPIES
• SET BACKUP COPIES
• CONFIGURE . . . BACKUP COPIES
RMAN does not produce multiple backup sets, but produces identical copies of each backup
piece in the set. You cannot use this option with the BACKUP AS COPY command to create
multiple image copies.
If you specify REUSE, you enable RMAN to overwrite an already existing backup set or image
copy with the same filename as the file that BACKUP is currently creating.
The PROXY copy functionality backs up the specified files by giving the media management
software control over the data transfer between storage devices and the data files on disk. The
media manager—not RMAN—decides how and when to move data. When you run BACKUP
with the PROXY option, RMAN performs these steps:
1. Searches for a channel of the specified device type that is proxy-capable. If no such
channel is found, then RMAN issues a warning and attempts a a conventional (that is, non-
proxy) backup of the specified files.
2. If RMAN locates a proxy-capable channel, it calls the media manager to check if it can
proxy copy the files. If the media manager cannot proxy copy, then RMAN uses
conventional backup sets to back up the files.
If you do not want RMAN to try a conventional copy when a proxy copy fails, use the ONLY
option.
Because image copies are written only to disk, you cannot use the PROXY option with the
BACKUP AS COPY command.
Note: If you specify PROXY, then the %p variable must be included in the FORMAT string either
explicitly or implicitly within %U.
Oracle Database 10g: Administration Workshop II 5-17
Backing Up Archived Redo Logs
Online redo log file switch is automatic.
• Archived log failover is performed.
• You can specify a range of archived redo logs to
back up.
Backup sets include only archived redo log files.
RMAN>
2>
3>
4>
BACKUP
FORMAT '/diskl/backup/ar_%t_%s_
ARCHIVELOG FROM SEQUENCE=234
DELETE INPUT;
-%P'
5-18 Copyright© 2004, Oracle. All rights reserved.
Archived Redo Log File Backup Sets
A common problem experienced by DBAs is not knowing whether an archived log has been
completely copied out to the archive log destination before attempting to back it up. Recovery
Manager has access to control file or recovery catalog information, so it knows which logs have
been archived and can be restored during recovery.
You can back up archived redo log files with the BACKUP ARCHIVELOG command or include
them when backing up data files and control files with the BACKUP ... PLUS ARCHIVELOG
command. If you only want to back up certain archived log files, you can specify the range of
archived logs to backup.
You can also use the NOT BACKED UP integer TIMES clause of the BACKUP ARCHIVELOG
command to back up only those logs that have not been backed up at least number of times
specified. This is a convenient way to back up archived logs on specified media (for example,
you want to keep at least three copies of each log on tape).
RMAN performs archived log failover. If any corrupt blocks are detected in an archived redo log
file, RMAN searches other archiving destinations for a file without corrupt blocks
The example shown on the slide backs up all archived redo logs with a sequence number of 234
or higher to a backup set. After the archived logs are copied, they are deleted from disk and
marked as deleted in the V$ARCHIVED_LOG view.
Oracle Database 10g: Administration Workshop II 5-18
Copying the Whole Database
RMAN> BACKUP DATABASE
PLUS ARCHIVELOG;
Control
file
Archl^Vlog
file copies
SPFILE
L______________________J
5-19
Copyright © 2004, Oracle. All rights reserved.
How to Make an Image Copy of the Whole Database
Using Recovery Manager to make an image copy of all the database files is a easy as mounting
the database, starting RMAN and entering the BACKUP command shown above.
This is possible if you have already issued the following configure commands:
• CONFIGURE DEFAULT DEVICE TYPE TO disk;
• CONFIGURE DEVICE TYPE DISK BACKUP TYPE TO COPY;
• CONFIGURE CONIROLFILE AUIOBACKUP ON;
You can also create a backup (either a backupset or image copies) of previous image copies of
all data files and control files in the database by using the following command:
RMAN> BACKUP COPY OF DATABASE;
By default, RMAN executes each BACKUP command serially. However, you can parallelize the
copy operation by:
• Using the CONFIGURE DEVICE TYPE DISK PARALLELISM n, where n is the desired
degree of parallelism
• Allocating multiple channels
• Specifying one BACKUP AS COPY command and listing multiple files
Note: A high degree of parallelism requires more machine resources, but can save time.
Oracle Database "\0g\ Administration Workshop II 5-19
Making Incremental Backups
• A level 0 incremental backup,
similar to a full backup,
contains all data file blocks.
• A cumulative level 1
Incremental backup contains
only blocks modified since the
last level 0 incremental
backup.
• A differential level 1
Incremental backup contains
only blocks modified since the
last incremental backup.
5-20 Copyright © 2004, Oracle. All rights reserved.
RMAN Backup Types
Fuii Backups
A full backup is different from a whole database backup, which is a backup of all data files and
the current control file. A full data file backup is a backup that includes every used data block in
the file. RMAN copies all blocks into the backup set or image copy, skipping only data file
blocks that have never been used. For a full image copy, the entire file contents are reproduced
exactly. A full backup cannot be part of an incremental backup strategy; it cannot be the parent
for a subsequent incremental backup.
Incremental Backups
An incremental backup is either a level 0 backup, which includes every block in the data files
except blocks that have never been used, or a level 1 backup, which includes only those blocks
that have been changed since a previous backup was taken. A level 0 incremental backup is
physically identical to a full backup. The only difference is that the level 0 backup can be used as
the base for a level 1 backup, but a full backup will never be used as the base for a level 1
backup.
Incremental backups are specified through the INCREMENTAL keyword of the BACKUP
command. You specify INCREMENTAL LEVEL = [0 | 1].
Full backup
Cumulative
incremental backup
Differential
incremental backup
Oracle Database 10g: Administration Workshop II 5-20
RMAN Backup Types (continued)
Incremental Backups (continued)
RMAN can create multilevel incremental backups as follows:
• Differentia!: The default type of incremental backup which backs up all blocks changed
after the most recent incremental backup at either level 1 or level 0.
• Cumulative: Backs up all blocks changed after the most recent backup at level 0.
Differential backups require less space and complete faster than cumulative backups, because
they do not have to duplicate the work done by previous backups at the same level. Cumulative
backups are preferable to differential backups when recovery time is more important than disk
space, because they ensure that you need to apply only one incremental backup from each level
during recovery.
Examples
• To perform an incremental backup at level 0, use the following command:
RMAN> BACKUP INCREMENTAL LEVEL 0 DATABASE;
• To perform a differential incremental backup, use the following command:
RMAN> BACKUP INCREMENTAL LEVEL 1 DATABASE;
• To perform a cumulative incremental backup, use the following command:
RMAN> BACKUP INCREMENTAL LEVEL 1 CUMULATIVE DATABASE;
RMAN makes full backups by default if neither FULL nor INCREMENTAL is specified. Unused
block compression causes never-written blocks to be skipped when backing up data files to
backup sets, even for full backups.
A full backup has no effect on subsequent incremental backups, and is not considered a part of
any incremental backup strategy (although a full image copy backup can be incrementally
updated by applying incremental backups with the RECOVER command).
Oracle Database 10g: Administration Workshop II 5-21
Incremental Backup: Example
• A differential incremental backup contains all
blocks changed since the last incremental backup
• A cumulative incremental backup contains all
blocks changed since the last level 0 incremental
backup
Level 0 . Level 0
Lvl o 1 1 1c 1 1c 1 0
Day Sun Mon Tue Wed Thu Fri Sat Sun
5-22 Copyright © 2004, Oracle. All rights reserved.
Cumulative Incremental Backups: Example
Cumulative incremental backups duplicate changes already copied by the previous non-
cumulative incremental backups at the same level. Therefore, if an incremental level 1 backup is
taken, then the following cumulative level 1 backs up all newly modified blocks plus those
backed up by the incremental level 1. This means that only one incremental backup of the same
level is needed to completely recover.
Comparison of incremental and cumulative backups:
• Differential incremental backups are faster, write out fewer blocks, and produce smaller
backup files. Incremental backups provide faster backups, but during recovery, RMAN has
to retrieve each incremental backup and apply it.
• Cumulative incremental backups may take longer, write out more blocks, and produce
larger backup files. Cumulative backups are provided for recovery speed, because fewer
backups must be applied when recovering.
In the graphic shown above, a company has decided on a backup strategy that uses both
incremental and cumulative backups. Every Sunday a level 0 incremental backup is taken. Twice
a week, on Wednesday and Friday, a cumulative backup is taken to reduce the recovery time of
the database. On other days, an incremental backup is taken to reduce the backup time and
storage requirements.
Oracle Database 10g: Administration Workshop II 5-22
Block Change Tracking
Records changed blocks in a change tracking file
Is used automatically by RMAN if enabled
Optimizes incremental backups by avoiding full
data file scans during backup
!•
List of changed
blocks
SGA
Redo
generation
1011001010110
0001110100101
1010101110011
Change
tracking
file
Redo log
5-23
Copyright © 2004, Oracle. All rights reserved.
Fast Incremental Backups with Block Change Tracking
The goal of an incremental backup is to back up only those data blocks that have changed since a
previous backup. The entire data file is read during each incremental backup, even if just a very
small part of that file has changed since the last incremental backup.
The block change tracking feature uses the change tracking writer (CTWR) background process to
record the physical location of all database changes in a new type of file called the change
tracking file. After enabling change tracking, the first level 0 incremental backup still has to scan
the entire data file, as the change tracking file does not yet reflect the status of the blocks. For
subsequent incremental backups, RMAN uses the change tracking data to determine which
blocks to read during an incremental backup, improving performance by eliminating the need to
read the entire data file.
You use the same commands to perform incremental backups if block change tracking is enabled,
and the change tracking files themselves generally require little maintenance after initial
configuration. The size of the block change tracking file is proportional to:
• Database size in bytes and the number of enabled threads in a RAC environment
• The number of old backups maintained by the block change tracking file
Oracle Database 10g: Administration Workshop II 5-23
Enabling Block Change Tracking
SQL> ALTER DATABASE ENABLE
2> BLOCK CHANGE TRACKING
3> USING FILE '/mydir/rman_change_track.f'
4> REUSE;
ORACLE Enterprise ManagEr 10p
IJ:-il;itM!-a: (jinh ill
D.-ilvh.v.r -■ i—.I ir. nrir -s :r v ■ r;-iiv"-|i r: f\,: :\; \y< i\<~t\ ■i^f,
Configure Backup Settings
pel icy ^^^^^^^^^^^^^^^^^^^^^^^^^^^^^^^^^^^^
Backup Policy
• ''.jL.uiriiLiL jlly L.il -.i.^ .t j I'unLul II1 .11 J jl •:.,\ | 1 r_■ r 11 ■_■ I_■ 1 111■_ i^MHLti v .1 l'a1; L jl -.lim irm l jI jL j1..■ jLi jl.l\ ■.'iinijj
aii :*=is. ij JtLkr li J^jh-l id-is Jfl wall t jjiru ' t & iJiwvd' Lt-tmuUi lis -.ri h* ysu&w *-l. "yu- vu iJ.ii.tL "jul
• JlfPt ^iirtLJVzTV d'W I.L&I LI .
IZ Uiihni ■!! I ; .-.• 11 ; I;. ;.-i;j ;i; h;.i:hii| I ■: ;l; :i[ 11: iiii:i:jiiw;H 1I1;; ; 111 h 1; 1 ;;j I iirily :.nr 1 irn; r jl 1I1I1;; I il h k ; 11 :r h 11 :h:il 1 :i
E?Erab a jlo:k charge 1 ;;k i£ fo ■ fas-l sr ir Moment; bac-a js
-III 1 :l; <.'■[ ir ji: i;ji ;n ij - |
f.tiiip- c. rrrrrn ■ivJilri.i-lh-i-v rt-. iii"i-i:rr ircnTrfih«•.■ Ih-irr-rfra hlhf: -\-tctr.pf: -i-rc
Tablespace3 Excluded From Whole Database Backup
Pl jl .il _■ .li j .mLIl1 ■>iLi II il I jL .".'ji jl j yuu v,jn. I j j.i jIl Jl Irjrii l viliuli1 mil jL jl j j-. jkjp. LIjl1 LI .■ AlIl L jI.li lu jl J .i jIl j[. jlj-j Ll
5-24
Copyright © 2004, Oracle. All rights reserved.
Enabling Block Change Tracking
You enable block change tracking from the Maintenance page of Enterprise Manager (EM).
Click the Configure Backup Settings link and then click the Policy tab. You must supply the
operating system login credentials to save this backup setting.
The minimum size for the block change tracking file is 10 MB, and new space is allocated in 10
MB increments. You do not have to specify a name for the block change tracking file if the
parameter db_create_f ile_dest is set.
You can use the following commands to configure fast incremental backup manually:
SQL> ALTER DATABASE ENABLE BLOCK CHANGE TRACKING;
SQL> ALTER DATABASE DISABLE BLOCK CHANGE TRACKING;
If the db_create_f ile_dest parameter is not configured, use the USING FILE clause to
specify a user-defined directory location and file name for the tracking file.
You can view details for the current block change tracking configuration by querying the view
V$BLOCK_CHANGE_TRACKING.
Change tracking is disabled by default, because it does introduce some minimal performance
overhead on your database during normal operations.
Oracle Database 10g: Administration Workshop II 5-24
Incrementally Updating Backups
sss
sss
Incremental
backup files
RMAN> RECOVER COPY OF
2> DATAFILE {n|'file_name'}
3> WITH TAG 'incr_upd_df1';
Image copy of data file
updated to a more
recent state
Recovered data file
5-25 Copyright © 2004, Oracle. All rights reserved.
Incrementally Updating Backups
With the Incrementally Updated Backups feature in Oracle Database 10g, you can use RMAN to
apply incremental backups to data file image copies. With this recovery method, RMAN can
recover a copy of a data file, or roll forward the image copy, to the specified point in time by
applying the incremental backups. The image copy is updated with all changes up through the
SCN at which the incremental backup was taken.
RMAN can use the resulting updated image copy in media recovery just as it would use a full
image copy taken at that SCN, without the overhead of performing a full image copy of the
database or data file every day.
Incrementally updating backups requires two different commands:
• Apply any incremental backups to a set of data file copies with the same tag using the
RECOVER COPY . . .WITH TAG ... If there is no incremental backup or no data file copy,
the command generates a message but does not generate an error.
• Create incremental backups that can be incrementally updated with the BACKUP
INCREMENTAL LEVEL 1 .. .FOR RECOVER OF COPY WITH TAG ... form of the
BACKUP command. If an incremental level 0 backup does not already exist, then executing
this command creates a level 0 backup with the specified tag.
Tags must be used to identify the incremental backups and data file copies created for use in this
strategy, so that they do not interfere with other backup strategies you implement.
Image copy
of data file
M
Oracle Database 10g: Administration Workshop II 5-25
5-26
list Command Operations
• List backup sets and copies of data files
RMAN> LIST BACKUP OF DATABASE;
RMAN> LIST BACKUP OF DATAFILE
2> n/db01/ORADATA/u03/users01.dbf";
• Lists backup sets and copies of any data file for a
specified tablespace
RMAN> LIST COPY OF TABLESPACE "SYSTEM";
• Lists backup sets and copies containing archive
logs for a specified range
RMAN> LIST COPY OF DATABASE ARCHIVELOG
2> FROM TIME='SYSDATE-7';
Copyright © 2004, Oracle. All rights reserved.
The list Command
Use the RMAN LIST command to display information about backup sets, proxy copies, and
image copies recorded in the repository. Use this command to list:
• Backups and copies that do not have the status AVAILABLE in the RMAN repository
• Backups and copies of data files that are available and can possibly be used in a restore
operation
• Backup sets and copies that contain a backup of a specified list of data files or specified
tablespaces
• Backup sets and copies that contain a backup of any archived logs with a specified name or
range
• Backup sets and copies restricted by tag, completion time, recoverability, or device
• Incarnations of a specified database or of all databases known to the repository
• Stored scripts in the recovery catalog
To use the LIST command you must be connected to the target database. If you are connected in
NOCATALOG mode, then the target database must be mounted. If you connect using a recovery
catalog, then the target instance must be started, but does not need to be mounted.
You can control how the output is organized (BY BACKUP or BY F ILE) as well as the level of
detail in the output (VERBOSE or SUMMARY).
Oracle Database 10g: Administration Workshop II 5-26
The report Command
Produces a detailed analysis of
the repository
Produces reports to answer:
- Which files need a backup?
- Which backups can be deleted?
- Which files are unrecoverable?
5-27 Copyright © 2004, Oracle. All rights reserved.
The report Command
This command helps you analyze information in the RMAN repository in more detail.
Reports can be produced for a variety of questions, such as:
• What is the structure of the database?
RMAN> REPORT SCHEMA;
• Which files need to be backed up?
RMAN> REPORT NEED BACKUP ...;
• Which backups can be deleted (that is, are obsolete)?
RMAN> REPORT OBSOLETE;
• Which files are not recoverable because of unrecoverable operations?
RMAN> REPORT UNRECOVERABLE . ..;
Oracle Database 10g: Administration Workshop II 5-27
The report need backup Command
Lists all data files that require a backup
Assumes the most recent backup is used during a
restore
Provides four options:
- Incremental
- Days
- Redundancy
- Recovery window
Uses the current retention policy configuration if
no options are specified
5-28 Copyright © 2004, Oracle. All rights reserved.
The report need backup Command
The REPORT NEED BACKUP command is used to identify all data files that need a backup. The
report assumes that the most recent backup would be used in the event of a restore.
There are four options:
• Incremental: An integer that specifies the maximum number of incremental backups that
should be restored during recovery. If complete recovery of a data file requires more than
the specified number of incremental backups, then the data file requires a new full backup.
For example, to report files needing three or more incremental backups for recovery:
RMAN > REPORT NEED BACKUP incremental 3 database;
• Days: An integer that specifies the maximum number of days since the last full or
incremental backup of a file. The file needs a backup if the most recent backup is equal to
or greater than this number.
For example, to report what system files have not been backed up for three days:
RMAN > REPORT NEED BACKUP days 3 tablespace system;
• Redundancy: An integer that specifies the minimum level of redundancy considered
necessary. For example, redundancy level two requires a backup if there are not two or
more backups.
• Recovery window: A time window in which RMAN should be able to recover the
database.
Oracle Database 10g: Administration Workshop II 5-28
5-29
report need backup: Examples
Files needing three or more incremental backups
for recovery:
RMAN> REPORT NEED BACKUP incremental 3;
Files have not been backed up for three days:
RMAN> REPORT NEED BACKUP days 3;
Backup needed if there are not two or more:
RMAN> REPORT NEED BACKUP redundancy 2;
• Backup needed to recover 3 days past:
RMAN> REPORT NEED BACKUP
2> recovery window of 3 days;
Copyright © 2004, Oracle. All rights reserved.
Oracle Database 10g: Administration Workshop II 5-29
5-30
REPORT OBSOLETE and DELETE OBSOLETE
Find all obsolete recovery files using the current
retention policy settings:
RMAN> REPORT OBSOLETE;
List the obsolete recovery files, if no more than
two backup copies are needed:
RMAN> REPORT OBSOLETE REDUNANCY 2;
• Delete the backup set with a backup set key of 4:
RMAN> DELETE BACKUPSET 4;
• Delete the recovery files considered obsolete,
because they have more than two backups:
RMAN> DELETE OBSOLETE REDUNDANCY 2;
Copyright © 2004, Oracle. All rights reserved.
REPORT OBSOLETE and DELETE OBSOLETE
An obsolete backup is not the same as an expired backup. An obsolete backup is no longer
needed according to the user's retention policy. An expired backup is a backup that the
CROSSCHECK command fails to find on the specified media device.
The REPORT OBSOLETE command lets you identify files which are no longer needed to satisfy
backup retention policies. By default, the REPORT OBSOLETE command reports which files are
obsolete under the currently configured retention policy. You can generate reports of files which
are obsolete according to different retention policies by using REDUNDANCY or RECOVERY
WINDOW retention policy options with the REPORT OBSOLETE command.
If you run REPORT OBSOLETE with no options and no retention policy is configured, then
RMAN issues an error message.
The DELETE command can remove any file that the LIST and CROSSCHECK commands can
operate on. For example, you can delete backup sets, archived redo logs, and data file copies.
The DELETE command removes both the physical file and the catalog record for the file. The
DELETE OBSOLETE command deletes backups that are no longer needed. It uses the same
REDUNDANCY and RECOVERY WINDOW Options as REPORT OBSOLETE.
If you delete backups without using RMAN, you can use the CROSSCHECK or UNCATALOG
commands to remove the files from the recovery catalog.
Oracle Database 10g: Administration Workshop II 5-30
Managing Backups with EM
ORACUE" Enterprise Manager 10g
Database Control
Database: orcl.ue.oracle.torn > Manage Current Backups
Manage Current Backups
Logged in A3 SVS
^Catalog Additional FileT) ^Crosscheck All^ ^Delete All Obsolete^ ^Delete All Expired^
This backup data was retrieved from the database control file.
Backup Sets [ Image Copies ~
Search
Statue | Available ^
Contents p" Datafile F Archived Redo Log F SPFILE F Control Rle
Completion Time I Within a month | C'-'^J
Results
5-31
Copyright © 2004, Oracle. All rights reserved.
Managing Backups with EM
You can manage your backup records through Enterprise Manager. Backup maintenance
functions provided in Enterprise Manager include the following:
• Viewing lists of backups (backup sets and image copies) recorded in the RMAN repository
• Crosschecking your repository:
Verifying that the backups listed in the repository exist and are accessible
Marking as expired any backups not accessible at the time of the crosscheck
• Deleting the record of expired backups from your RMAN repository
• Deleting obsolete backups from the repository and from disk
You can access the Manage Current Backups page in Enterprise Manager by clicking Manage
Current Backups in the Backup/Recovery region of the Maintenance page. The Manage
Current Backups page has two property pages: Backup Set (the initial view) and Image Copy.
Each serves a similar purpose, listing the backups as recorded in the Recovery Manager
repository.
Note: If you use a Flash Recovery Area for your backup storage, many maintenance activities
are reduced or eliminated because of the Flash Recovery Area's automatic management of disk
space and file retention based on the retention policy.
Oracle Database 10g: Administration Workshop II 5-31
RMAN Dynamic Views
• V$ARCHIVED_LOG ^^j
• V$ BACKUP_CORRUP TION
• V$BACKUP_DEVICE
• V$BACKUP_FILES
• V$BACKUP_PIECE
• V$BACKUP_REDOLOG
• V$BACKUP_SET
• V$BACKUP_SPFILE
• V$COPY_CORRUPTION
• V$RMAN_CONFIGURATION
5-32 Copyright © 2004, Oracle. All rights reserved.
RMAN Dynamic Views
You can use the following views to obtain RMAN information stored in the control file:
V$ARCHIVED_LOG shows which archives have been created, backed up, and cleared in
the database.
• V$BACKUP_CORRUPTION shows which blocks have been found corrupt during a backup
of a backup set.
V$BACKUP_DATAF ILE is useful for creating equal-sized backup sets by determining the
number of blocks in each data file. It can also help you find the number of corrupt blocks
for the data file.
V$BACKUP_DEVICE displays information about supported backup devices. The special
device type DISK is not returned by this view because it is always available.
V$BACKUP_FILES displays backup sets and the corresponding backup files (archived
logs, control files, data files, and server parameter files) and backup pieces. It does not list
copies, archived logs, and proxy copies.
V$BACKUP_PIECE shows backup pieces created for backup sets.
• V$BACKUP_REDOLOG shows archived logs stored in backup sets.
• V$BACKUP_SEI shows backup sets that have been created.
V$BACKUP_SPFILE displays information about server parameter files in backup sets
V$COPY_CORRUPIION shows which blocks have been found corrupt during an image
copy.
Oracle Database 10g: Administration Workshop II 5-32
RMAN Dynamic Views (continued)
• V$RMAN_CONF IGURAT ION lists information about RMAN persistent configuration
settings.
If you use proxy settings for RMAN, you can query:
• V$PROXY_ARCHIVEDLOG
• V$PROXY_DAIAFILE
For backup performance statistics, you can query:
• V$BACKUP_ASYNC_IO
• V$BACKUP_SYNC_IO
Oracle Database 104: Administration Workshop II 5-33
Monitoring RMAN Backups
Correlate server sessions with channels using the
set command id command.
Query v$process and v$session to determine
which sessions correspond to which RMAN
channels.
Query v$session_longops to monitor the
progress of backups and copies.
Use an operating system utility to monitor the
process or threads.
5-34 Copyright © 2004, Oracle. All rights reserved.
Monitoring RMAN Backups
To correlate a process with a channel during a backup:
1. Start Recovery Manager and connect to the target database and, optionally, the recovery
catalog.
2. Set the command id parameter after allocating the channels and then copy the desired
object. The string specified by the set command id command is entered into the
v$session.clieni_info column of all allocated channels.
run {
allocate channel tl type disk;
set command id to 'rman';
backup datafile 1;
release channel tl;}
3. Query the v$process and v$session views to get the session identifier (sid) and the
operating system process identifier (spid) for the channels using the previously specified
COMMAND ID String.
SELECT sid, spid, client_info
FROM v$process p, v$session s
WHERE p.addr = s.paddr
AND client info LIKE ,%id=rman%';
Oracle Database 10g: Administration Workshop II 5-34
Monitoring RMAN Backups (continued)
4. Query the v$session_longops view to get the status of the copy.
SELECT sid, serial#, context, sofar, totalwork,
round(sofar/totalwork*100,2) "% Complete"
FROM V$SESSION_LONGOPS
WHERE opname LIKE 'RMAN:%'
AND opname NOT LIKE 'RMAN: aggregate%'
AND totalwork != 0;
5. If using a channel of type sbt and the copy process appears to be hanging, query
v$session_waii using the SID obtained in Step 3 to determine if RMANis waiting for a
media manager function call to complete.
SELECT * FROM V$SESSION_WAIT WHERE event LIKE '%sbt%';
Note: For monitoring the copy process, you must query the target database, and hence, the target
database should be in OPEN or MOUNT state.
Oracle Database "\0g\ Administration Workshop II 5-35
Summary
In this lesson, you should have learned how to:
Use the RMAN backup command to create backup
sets and image copies
• Manage the backups and image copies taken with
RMAN
5-36 Copyright © 2004, Oracle. All rights reserved.
Oracle Database 10g: Administration Workshop II 5-36
Practice 5 Overview: Using RMAN
This practice covers the following topics:
Enabling archival of redo logs for a database
• Using RMAN to display the database structure
• Using Recovery Manager to back up data files and
the control file
Using Recovery Manager to make image copies of
data files
• Creating a compressed backup of a database
• Scheduling a backup job
5-37 Copyright © 2004, Oracle. All rights reserved.
Oracle Database 10g: Administration Workshop II 5-37
Practice 5: Using Recovery Manager
In this exercise you will become familiar with using the Recovery Manager utility to perform
and manage backups.
1. Using SQL*Plus or the EM Database Control Console, verify the database is in
ARCHIVELOG mode. If not, alter the database to enable archiving of the online redo logs.
2. Connect to your database using RMAN in the default NOCATALOG mode as the SYSTEM
user.
3. Use the RMAN REPORT command to generate a listing of your database structure.
4. Obtain a listing of all database backup sets that currently exist.
5. Use RMAN to back up the data files belonging to the EXAMPLE and USERS tablespaces.
Be sure you also make a copy of the current control file and server parameter file. Your
backups should be placed in the $HOME/DONTTOUCH/ directory and should use the
format df_%d_%s_%p .bak for the file names..
6. Create an image copy of two data files. Use the following information:
Copy the SYS TEM tablespace and name the copy sys 01. cpy with a tag of
SYSTEMOl
Copy the SYSAUX tablespace and name the copy sysauxOl. cpy with a tag of
SYSAUXOl
The files should be written to the Flash Recovery Area.
7. Obtain a listing of all database files that have not been backed up.
8. Take a full backup of the database, including archived logs. Use as little space as possible
to store the backup.
9. Create a database backup job that runs every morning at 2:00 a.m. to backup the entire
database.
Oracle Database 10g: Administration Workshop II 5-38
Diagnostic Sources
Copyright © 2004, Oracle. All rights reserved.
Objectives
After completing this lesson, you should be able to do
the following:
Use various files for diagnostic purposes
- Alert Log
- Trace files
- Core files
- System logs
Use Enterprise Manager to view alerts
• Adjust thresholds for tracked metrics
Control the size and location of trace files
6-2 Copyright © 2004, Oracle. All rights reserved.
Oracle Database 10g: Administration Workshop II 6-2
Diagnostic Files
• The alert. log file
• Trace files
• Core dump files
• System log files
6-3 Copyright © 2004
Oracle. All rights reserved.
Diagnostic Files
Generally speaking most diagnostic efforts should begin with a look at the alert. log file.
Often, simple problems become difficult ones because this step has been omitted. Errors written
to the alert .log file might possibly point the user to look at specific trace files for more
detailed information.
On some operating systems, abnormally terminated processes will leave a core file. This core file
can sometimes provide valuable insight when viewed with the platform debugger. On Solaris
platforms for example, adb is the debugger used for this purpose.
Note that a core file is useless without the executable that generated the core file. If a usable
trace file (with a call stack) is available, core files will not supply additional useful information.
However, when a trace file is missing, a call stack can be generated from the core file using a
debugger at the operating system level.
Note: Depending on the problem, one or more of the files listed in the slide may not exist.
Oracle Database 10g: Administration Workshop II 6-3
The Alert Log
The Alert Log contains:
• All internal errors
• Administrative operations, such as create, alter,
and drop statements
• Shared server errors
Materialized view refresh errors
Initialization parameter values
6-4 Copyright © 2004, Oracle. All rights reserved.
The Alert Log
Each server and background process can write to an associated trace file. When an internal error
is detected by a process, it dumps information about the error to its trace file. The alert file, or
alert log, is a special trace file. The alert file of a database is a chronological log of messages and
errors, which includes the following:
• All internal errors (ORA-6 0 0), block corruption errors (ORA-l 5 7 8), and deadlock errors
(ORA-6 0) that occur
• Administrative operations, such as CREATE, ALTER, and DROP statements and STARTUP,
SHUTDOWN, and ARCHIVELOG statements
• Several messages and errors relating to the functions of shared server and dispatcher
processes
• Errors occurring during the automatic refresh of a materialized view
• The values of all initialization parameters at the time the database and instance start
The Oracle Database uses the alert file to keep a log of these special operations as an alternative
to displaying such information on an operator's console. If an operation is successful, a
"completed" message is written in the alert file, along with a timestamp.
Oracle Database 10g: Administration Workshop II 6-4
What Is in the alert. log File
Every instance generates a file called alert. log,
which logs the following information:
• Diagnostic data from background and foreground
processes
• Summary information regarding errors and
pointers to trace files for detailed information
Information since database creation (unless
purged) that might be useful in backtracking a
problem
6-5 Copyright © 2004, Oracle. All rights reserved.
The alert.log File
The alert.log file is written in the BACKGROUND_DUMP_DEST directory and follows the
naming convention alert_ORACLE_SID. log. Here are excerpts from an example
alert.log:
Wed Jan 21 05:48:20 2004
Starting ORACLE instance (normal)
LICENSE_MAX_SESSION = 0
LICENSE_SESSIONS_WARNING = 0
Shared memory segment for instance monitoring created
Picked latch-free SCN scheme 2
Starting up ORACLE RDBMS Version: 10.1.0.2.0.
System parameters with non-default values:
processes = 150
shared_pool_size = 83886080
WARNING: Files may exists in db_recovery_file_dest that are not known to the
database. Use the RMAN command CATALOG RECOVERY AREA to re-catalog any such
files. One of the following events caused this:
1. A backup controlfile was restored.
2. A standby controlfile was restored.
3 . The controlfile was re-created.
4. db_recovery_file_dest had previously been enabled and then disabled.
Oracle Database 10g: Administration Workshop II 6-5
Viewing Recent Alert Log Entries
Most Recent Alert Log Entri
This shows the last 100,000 bytes ef the aler
the most recent leg entries.
Number of Lines Displayed 1,769
ORA-ee312: online log 3 thiead 1: '/u01/app/ciacle/cia
Mori May 3 OS 14:51 2004
ARC1: Evaluating archive log 3 thiead I sequence 03.
Mori May 3 OS 14:51 2004
ciol; ARO'I: Beginning to aichive leg 3 thread 1 sequen
Mori May 3 OS 14:51 2004
Eriors in file Aj01/app/ciacle/admin/orcl/bdump/cicl_ar( _
ORA-19815 WARNING db_recoi/ery_lile_desi_size cl 2147483048 byies is 00.70% used,
Yoj ha«e Ihe lolloping choices lo Iree jp space fiom
flash recovery area:
1. Considei changing ycui RMAN relention policy
II you aie using dataguard. then considei ch RMAN aiohivelog deletion policy.
2. Backup files tc tertiary device such as tape using Ihe
RMAN command BACKUP RECOVERY AREA.
3. Add disk space and increase the db_reco-irery_file_desi_size
para mete i to iefleot the new space.
4. Delele unncessary Hies using Ihe RMAN DELETE command
If an DS oemmand was used to delete files, then use
RMAN CROSSCHECK and DELETE EXPIRED commands
6-6 Copyright © 2004, Oracle. All rights reserved.
Viewing Recent Alert Log Entries
Recent alert log entries can be easily viewed using Enterprise Manager instead of resorting to
operating system utilities like vi or more. From the database home page, select the Alert Log
Content link from the Related Links area at the bottom of the page. The default action of this
page is to display or "tail" the most recent 100,000 bytes of the alert. log file. Note that the
data displayed will contain all the data mentioned previously such as administrative actions,
startup and shutdown information, etc., not just raised alerts. If you wish to view alerts only, go
to the bottom of the database home page for a list of current alerts and events triggered by
exceeding pre-configured thresholds.
You can also view entries in the Alert Log that contain ORA- errors by clicking the Alert Log
link in the Diagnostic Summary region of the Database Control Console Home page.
Oracle Database 10g: Administration Workshop II 6-6
Alert Models Architecture
Enterprise Manager
#
Subscribing
clients
Metric exceeds
threshold
AWR
6-7
Copyright © 2004, Oracle. All rights reserved.
Alert Models Architecture
Oracle Database 10g provides alerts about problems to the administrator via the Enterprise
Manager Database Console. An alert condition discovery is based on some internally determined
or customer-defined threshold, or when certain events occur. The Oracle Database automatically
collects a significant number of metrics which used to be computed by Enterprise Manager (EM).
Early notification of potential problems allows you to respond quickly, and often resolve issues
before users even notice them.
The metrics computation and threshold validations are performed by the MMON process or by the
EM Agent, which checks for the monitored condition using a polling-based mechanism.
Server-generated alerts are queued into the predefined persistent queue ALERT_QUE owned by
SYS. EM Database Control Console is the main consumer of the ALERT_QUE. Depending on
the Database Control Console setup, you are notified via e-mail or pager. Server-generated alerts
are always displayed on the Database Control home page.
The ALERT_QUE is a multi-consumer queue. So, as a third-party client, you can subscribe to
that queue using the CREATE_AQ_AGENT and ADD_SUBSCRIBER procedures of the
DBMS_AQADM package. An alert is not purged until all subscribers have dequeued it. If you
dequeued it, you do not see it anymore but other subscribers do.
Note: If an alert cannot be written to the alert queue, a message about the alert is written to the
Oracle Database alert log file.
Oracle Database 10g: Administration Workshop II 6-7
Server-Generated Alert Types
Threshold
(stateful)
alerts
Metric-based
97% Critical
85% Warning
(mmon)
Cleared
Cleared
DBA OUTSTANDING ALERTS
- DBA ALERT HISTORY
Snapshot
Too Old
Nonthreshold
(stateless)
alerts A|ert
Resumable
Session
Suspended
Recovery Area
Low On
Free Space
Event-based
6-8
Copyright © 2004, Oracle. All rights reserved.
Server-Generated Alert Types
There are two kinds of server-generated alerts: threshold and nonthreshold. Most server-
generated alerts are configured by setting a warning and critical threshold values on database
metrics. You can define thresholds for more than 120 metrics. For example:
• Physical Reads Per Sec
• User Commits Per Sec
• SQL Service Response Time
Except for the Tablespace Space Usage metric, which is database related, the other metrics are
instance related. Threshold alerts are also referred to as stateful alerts. These alerts are
automatically cleared when an alert condition clears. When the severity level of an outstanding
alert is updated, a new alert message is sent out. When the problem condition is cleared, the
outstanding alert is moved to the alert history. Alert history is purged according to workload
repository snapshot purging policy.
Other server-generated alerts correspond to specific database events such as Snapshot Too Old
errors and Recovery Area Low On Free Space. These are non-threshold-based alerts, also
referred to as stateless alerts. Stateless alerts go directly to the history table. Clearing a stateless
alert makes sense only in the Database Control environment, because Database Control stores
stateless alerts in its own repository.
Oracle Database 10g: Administration Workshop II 6-8
Viewing Alerts with Enterprise Manager
Alert General View
Alerts
Related Alerts
6-9
Copyright © 2004, Oracle. All rights reserved.
Viewing Alerts with Enterprise Manager
Alerts raised by the database and those that are raised by exceeding user-defined threshold
values can be viewed at a glance from the Enterprise Manager database home page under the
Alerts and Related Alerts headings.
Any ORA-nnnnn errors that are raised can be seen by clicking the Alert Log link located under
the Diagnostic Summary section.
Oracle Database 10g: Administration Workshop II 6-9
Viewing Alerts with Enterprise Manager
Alert Details
Filesvstern Space Available (%}: Mount Point /
LjI.-j. Djk Jill.-i-liJF-vriftrj.-l Hjyg.aH 1:31fl1 PM
■!\?r* Jdli- | Lr::. *i IlLLTJ H
statistics Tor Last 24 Hours Metric value. From Repository
A3ISpSvSlLS 1!M
Hi-iVUll 15
■ Wllliy Tlfsl'L K 2U
■ filif..:! "■iTiflr < F
T¥%f. k ^jvurjnvtt 1
Alert History for Last 24 Houra
C-i-Tin^-Tl t- Hi si 'ucff \fr
6-10
Copyright © 2004, Oracle. All rights reserved.
Viewing Alerts with Enterprise Manager (continued)
Alerts raised and displayed on the Enterprise Manager database home page under the Alerts and
Related Alerts headings can be drilled down to view details about alerts of interest to you. By
clicking on the Fiiesystem / has only 18% available space link, in the Message column of the
Related Alerts table, the detail page shown above is displayed.
In addition to providing threshold statistics, a timeline is provided to track graphically the
activity for a 24 hour period surrounding the alert. The graph also uses colored sections to
indicate the warning threshold and the critical threshold values. In the graphic shown above, the
disk space utilization is operating within the warning threshold limits, but has not yet reached
critical levels.
Oracle Database 10g: Administration Workshop II 6-10
Alerts Notification
ORAjQ-JF Enterprise Manager10g
Database Control
Preferences
Setup Preferences help Logout
o—»
Properties Targets Availability Melrics directs Methods
Edit Notificalion Rule Database Availability and Crilical States: Metrics
Select the metrics and their severities for which you would like to receive notifications.
Severity States
Step 4 of 7
Select the seventy states for which you would like to receive notification.
0 Critical
□ Warning
□ Clear
Metrics
Seventy slales apply la all selecled melrics
Available Metrics
Selected Metrics
IArchrvei Hung Alert Log Eiror
Audiled Usei
Average File Read Time (cenli-seconds)
Average File Write Time (cenh-seconds)
Average Users Waiting Count
BG Checkpoints (per second)
We All
iProcess Limit Usage (%)
|Session Limit Usage (%)
Hocking Session Count
lArchwei Hung Alert Log Error Slalus
lDala Block Corruption Alert Log Error
iGeneric Alert Log Error Status
6-11
Copyright © 2004, Oracle. All rights reserved.
Alerts Notification
The notification mechanism is based on the concept of a notification rule that establishes the
appropriate notification mechanism for a set of upcoming alerts.
Using Database Control, you can edit the notification rules. From the home page, click the
Preferences link. This takes you to the General page, where you can specify your email for
notifications. From there, click the Rules link in the Notification section. Select the Database
Availability and Critical States rule, and then click the Edit button. This takes you to the Edit
Notification Rule Database Availability and Critical States wizard page, where you can select
the metrics (and their severities) for which you would like to receive notifications.
Oracle Database 10g: Administration Workshop II 6-11
Alert Log Monitoring Configuration
Generic Alert Log Error Monitoring Configuration
uracle b n art: lee Marage-:ar raise ar fr aiLug -\x- alar t'?fci J 51 r ?1 ^equeite r'Jl.A- erro'e ri ■id^ in :r ? f E-rt Ic3 _1h?r? a-e ulia.-eTiirs
cc^Lmrjir I if iter. 39 :ra: srojld icrcsrtntjlelj dalabeae aler:-s, jsel-ie - tar t>:peesiaMc -s-nF-eea the ei-ro^s i^e-y di*t ict f.'l J>.- an-orhat is
ra: -"Itaradvdlli-asjh is eaosata Alert -cgEn-ar sle-1
Alert Log Filtering
f I :i i: 11 MR'-.. 1 1 11 11 : iiiinj ii |- : ;j :M li j | h;. ;n i I nil I ■ i m: 1 :i :il i ."■? :i :ii ,">. i:l I ij -11 ■ i :;.n I- : lilhM 1 11 il I * : i:i| * iij i = ll :i
E.ifj'L jviLn VV'iLri Lil OF.1--, lw Jl.nl fully r .iIl"il'j 1'ii1; .•.'jy. jvIld, I'll -k' Er .Lr|jr jv V.im jl'i o I -mill ih.1 I'"-1'- itl- l-M rvly.
.■■■k-r. .njl-ilk- z.'jil jlili |."V-!« ."■hill 1 *J|1'^tJJ'J.1 t |
tf III1 ITse^pr?^e an tjsI te? I ar-al^l? -egjlareipra-sssn ardcilj1 an a:<a:1 nal?r dI:he pfrtar-UM -si-iprasa
bnarnplB lo-ralc-i ^^UUiiJU: intanal arm cade, a-^jn-iarts csit^-arci__l ,[ ,[|.ll II II |J" j5l n ;rt £'.-a
Trepsltan "CPACIffil ."■Jqenfatur^.p;"
AlBrt TrireBholdE
V'rii rin r iHify -I—: r Tl i—il .■: -ir >^r n-| -hi t-.r ■inlir. fri Mr Rr lfir -. Ahr nr. I~ r-ir -ilrM
Orf -.i:l Thii^r lnlr f-ir fV ii;r -. Ahr Ar. I" tiiti | |
Artir iu llr^iuk Iji Utm .-«l-i. _ur b-uiy |jk-VLribU_ rT Jfc>RU-'.UU-'J.|U-'J. i| "U-J| |
ff III' INs esaraas 01 tl si be ? I an- si ? a -ajjlaresarassoi anc ?ny ace Jirar ;a 31 he p5:lam
-"aurd ir 11a arore:sc-: :scansdarad:c be s rnal;h.
[x ample "j rarci'O^IKIO: hlamaleiar cedent Jiants 't-efererci I'I, f I, II II I
".f'.fr ;r ininl-ir^-r^^l-fin fT"nr *(r|f I'-.Tf-fl-^m1
Nnte Tia Alen Lch Cnor Tihe ■ slsc affecre lha Sareic Ae1 Loq Irt GlsrLsaart.
Hntfl Tt nr-|-V rir^jJ'ili; fif ^1 r~he ■ AleM rj fmr *If U -ikh 11* ~r f Mcrir Th¥=.hr -k /laf.*
6-12 Copyright© 2004, Oracle. All rights reserved.
Alert Log Monitoring Configuration
Enterprise Manager provides an alert filter configuration page that can be found by clicking on
the Alert Log Errors link located under the Diagnostic Summaiy section of the database home
page and then choosing the Generic Alert Log Monitoring Configuration link. The DBA can
filter out any errors not to be considered generic alerts by using standard Unix regular
expressions. In the slide example, the expression
M . *ORA-0* (54|ll42|ll46)\D.*" prevents ORA-00 054 (resource busy ...), ORA-
0ll42 (cannot end online backup - none of the files are in backup), and ORA- 0114 6 (cannot
start online backup - file is already in backup) errors from being displayed under Alerts and
Related Alerts section on the Database Control home page.
In addition, this page allows you to edit the "critical" and "warning" thresholds for the alert log
errors that are displayed on the database home page thereby controlling when these generic alerts
are raised. Other alert log error thresholds can be modified by selecting the Alert Log Errors
link and then clicking on the Edit Metrics Thresholds link.
Oracle Database 10g: Administration Workshop II 6-12
Editing Thresholds
Other alert thresholds can be modified by clicking on the Alert Log Errors link located under
the Diagnostic Summaiy section of the database home page and then choosing the Edit Metrics
Thresholds link. Here, you can select any metric tracked by the database and set the warning
threshold and critical threshold values for that metric. Additionally, you may specify a command
or script to be executed when the alert is raised in the Response Action column.
For certain metrics it is possible to specify multiple thresholds. For example, the Tablespace
Space Usage metric can be set for individual tablespaces.
Oracle Database 10g: Administration Workshop II 6-13
Viewing Initialization Parameters
The alert log shows initialization parameters of the database when started as mentioned earlier.
You can view initialization parameters using Enterprise Manager by following these steps:
1. Navigate to the database home page.
2. In the Instance section on the Administration page, click Aii Initialization Parameters.
Enterprise Manager displays the Initialization Parameters page comprised of a table listing
the current value of each initialization parameter as seen by the database instance.
3. You make your changes to the parameters as necessary and then click Save to File.
Oracle Database 10g: Administration Workshop II 6-14
Trace Files
Every server process, on encountering an
exception, writes diagnostic data to a trace file
The trace file header contains the following
information:
- OS and version
- Oracle version and options installed
- Instance name
- Process ID
6-15 Copyright© 2004, Oracle. All rights reserved.
Trace Files
Here is a sample trace file containing a logged error:
Dump file /u01/app/oracle/admin/orcl/udump/orcl_ora_2 3 042.trc
Oracle Database 10g Enterprise Edition Release 10.1.0.2.0
With the Partitioning, OLAP and Data Mining options
ORACLE_HOME = /u01/app/oracle/product/l0.1.0
System name: Linux
Node name: EDCDR12P1
Release: 2.4.9-e.25
Machine: 16 86
Instance name: orcl
Redo thread mounted by this instance: 1
Oracle process number: 35
Unix process pid: 23042, image: oracle@EDCDR12Pl (TNS V1-V3)
*** ACTION NAME:(0000023 STARTED16) 2004-01-16 13:35:42.282
*** MODULE NAME:(backup full datafile: ORA_DISK_l) 2004-01-16
13 :35:42.282
*** SERVICE NAME:(SYS$USERS) 2004-01-16 13:35:42.282
*** SESSION ID:(131.47) 2004-01-16 13:35:42.282
clsssinit: Unable to access OCR device in OCR in it.PROC-2 6: Error
while accessing the physical storage
kgxgncin: CLSS in it failed with status 21
Oracle Database 10g: Administration Workshop II 6-15
Specifying the Location of Trace Files
Initialization parameters controlling the location and
size of trace files include:
• BACKGROUND_DUMP_DEST
• USER_DUMP_DEST
• MAX DUMP FILE SIZE
6-16 Copyright© 2004, Oracle. All rights reserved.
Specifying the Location of Trace Files
All trace files for background processes and the alert log are written to the destination directory
specified by the initialization parameter BACKGROUND_DUMP_DES T. In most cases, these
parameters are set when the database is created initially, although the locations can be changed
later if desired. All trace files for server processes are written to the destination directory
specified by the initialization parameter USER_DUMP_DEST. The names of trace files are
operating system specific, but each file usually includes the name of the process writing the file
(such as LGWR and RECO).
Initialization parameters controlling the location and size of trace files are:
• BACKGROUND_DUMP_DE S T
• USER_DUMP_DEST
• MAX DUMP FILE SIZE
Oracle Database 10g: Administration Workshop II 6-16
Controlling Trace File Size
Using Enterprise Manager
"ijifjthj!^*- "ir_. ii? -ira-.h fir - hrijtli~j;r 11 P^r^r^'Ar^
Initialization Parameters
\r\-\t« i 1 — =. P;'—T
The pjmn =rti= « 1 ^f. ifl^il inn nn r. in^nl ■■ 1 ?^i I* rift nrr n-\ \rfmiirm.=iip'i Yii -.ar _.hn lift =.-n-i". f 4 vimFMrc h IFrih mrr =1
-IL-i [w^Tluvt ^K
na >■ srarii a wllr -iir*
6-17
Copyright © 2004, Oracle. All rights reserved.
Controlling Trace File Size
You can control the maximum size of all trace files (excluding the alert file) using the
initialization parameter MAX_DUMP_F ILE_S IZE. This limit is set as a number of operating
system blocks. To control the size of an alert file, you must manually delete the file when you no
longer need it; otherwise Oracle continues to append to the file. You can safely delete the alert
file while the instance is running, although you might want to make an archived copy of it first.
To change the value of MAX_DUMP_FILE_SIZE and make it permanent, execute the following
SQL statement:
SQL> ALTER SYSTEM SET max_dump_file_size = "10m" scope = both
To adjust the size of trace files using Enterprise Manager, select the Administration folder tab.
Under Instance, click on the All Initialization Parameters link. The parameter list is rather
large, so typeMAX_DUMP_FILE_SIZE in the filter window and click on the Go button. The
default value for the parameter is unlimited. Type in the value that you deem sufficient in the
Value field and click on the Apply button. This will change the parameter in memory only. To
make the change persistent, click on the SPFile tab and set the value there also.
Oracle Database 10g: Administration Workshop II 6-17
6-18
Controlling Trace File Writes
• Trace files are usually generated by a server
process upon encountering an error.
• Some background processes like ARCn, have
parameters that control the amount and type of
trace information generated.
• In some instances, trace files can be generated for
server processes at user request.
SQL> ALTER SESSION SET SQL_TRACE TRUE;
Copyright © 2004, Oracle. All rights reserved.
Controlling Trace File Writes
Background processes always write to a trace file when appropriate. In the case of the ARCn
background process, it is possible, through an initialization parameter, to control the amount and
type of trace information that is produced. Other background processes do not have this
flexibility. Trace files are written on behalf of server processes whenever internal errors occur.
For example, setting the initialization parameter SQL_TRACE = TRUE causes the SQL trace
facility to generate performance statistics for the processing of all SQL statements for an
instance and write them to the USER_DUMP_DEST directory.
Trace files can be generated for server processes at user request. Regardless of the current value
of the SQL_TRACE initialization parameter, each session can enable or disable trace logging on
behalf of the associated server process by using the SQL statement ALTER SESSION SET
SQL_TRACE. This example enables the SQL trace facility for the current session:
SQL> ALTER SESSION SET SQL_TRACE TRUE;
Oracle Database 10g: Administration Workshop II 6-18
Using Enterprise Manager to View Enabled Traces
You can enable, disable and view SQL tracing on the Top Modules, Top Actions, and Top Client
pages. You navigate to these pages from the Database Control home page and click the
Performance tab. You then select Top Consumers from the Additional Monitoring link, and
choose Top Services, Top Modules, Top Actions, Top Clients, and Top Sessions.
You can query DBA_ENABLED_IRACES view to determine the traces enabled. The
DBA_ENABLED_IRACES view contains the following columns:
• trace_type: Type of trace: CLIENI_ID, SESSION, SERVICE, SERVICE_MODULE,
SERVICE_MODULE_ACIION
primary_id: Primary qualifier, such as specific client identifier or service name
qualif ier_idl: Secondary qualifier, such as specific module name
qualifier_id2: Additional qualifier, such as specific action name
waits: TRUE if waits are traced
binds: TRUE if binds are traced
instance_name: Instance name for tracing restricted to named instances
Oracle Database 10g: Administration Workshop II 6-19
System Log Files
System log files capture error messages and
exceptions encountered at the OS level
These would be useful if a hardware or OS
problem is suspected
6-20 Copyright © 2004, Oracle. All rights reserved.
System Log Files
Operating system log file locations vary depending on the specific platform. On Solaris, for
example, look at the /var/adm/messages file for system error messages. Check with the
product line or the operating system vendor for the location and name of the operating system
message file. Some typical examples of errors at the OS level are paging failures, I/O errors,
network errors, and swapping errors.
Example of a /var/adm/messages file
Sep 14 10:52:33 stc-sun02 unix: NOTICE: quota_ufs: Warning: over disk limit
(pid 1 5606, uid 19113, inum 37358, fs /home)
Sep 14 10:55:42 stc-sun02 inetd[1294]: printer/tcp: bind: Address already in
use
Sep 14 11:16:08 stc-sun02 inetd[1294]: printer/tcp: bind: Address already in
use
Sep 14 11:16:46 stc-sun02 unix: NOTICE: quota_ufs: Warning: over disk limit
(pid 1 8298, uid 34915, inum 1272507, fs /home)
Sep 14 11:46:48 stc-sun02 inetd[1294]: printer/tcp: bind: Address already in
use
Sep 14 11:53:03 stc-sun02 unix: NOTICE: quota_ufs: over disk and time limit
(pid 2 4428, uid 13952, inum 1542289, fs /home)
Sep 14 11:56:58 stc-sun02 inetd[1294]: printer/tcp: bind: Address already in
use
Sep 14 12:10:25 stc-sun02 unix: NOTICE: quota_ufs: over disk and time limit
(pid 2 4401, uid 13952, inum 1542526, fs /home)
Oracle Database 10g: Administration Workshop II 6-20
Summary
In this lesson, you should have learned how to:
Use various files for diagnostic purposes
- Alert Log
- Trace files
- Core files
- System logs
Use Enterprise Manager to view alerts
• Adjust thresholds for tracked metrics
Control the size and location of trace files
6-21 Copyright © 2004, Oracle. All rights reserved.
Oracle Database 10g: Administration Workshop II 6-21
Practice 6 Overview: Diagnosing Problems
These practices cover the following topics:
• Setup server-generated alerts
Monitor server-generated alerts
6-22 Copyright © 2004, Oracle. All rights reserved.
Oracle Database 10g: Administration Workshop II 6-22
Practice 6: Diagnosing Problems
This practice will familiarize you with the setting of thresholds for warning alerts and critical
alerts.
1. Connect as SYSDBA through SQL*Plus. Check that you do not have any outstanding
alerts for the User Commits Per Sec metric, and then look at your alert history. Then run
the lab_0 6_01. sql script. This script sets the User Commits Per Sec metric with a
warning threshold of 3, and a critical threshold of 6. When done, check that the metrics
thresholds have been set correctly.
2. Connect as SYSDBA through the EM Database Control Console and look at the
corresponding User Commits (per second) metric graphic rate. Set the View Data threshold
check to a 30 second interval. Execute the lab_06_02 . sql script. This script creates a
new table and inserts one row. Observe the change in the metrics graphic rate.
3. In the system terminal window running SQL*Plus, execute the lab_06_03 . sql script.
This script generates a commit rate between three and six commits per second for one
minute. After the script finishes executing, observe the User Commits (per second) metric
graph using the Database Control Console. After a minute or two, look at your outstanding
alerts and alert history. What are your conclusions?
4. While connected as SYSDBA, execute the lab_06_04 . sql script. This script generates
a commit rate of five commits per second for three minutes on your system. As the script is
executing, observe the metrics graphic rate using the Database Control Console. After the
script finishes its execution, examine your outstanding alerts and alert history using the
Database Control Console. What are your conclusions?
5. While connected as SYSDBA, execute the lab_06_05 . sql script. This script generates
a commit rate of eight commits per second for three minutes on your system. As the script
is executing, observe the metrics graphic rate using the Database Control Console. After
the script finishes its execution, examine your outstanding alerts and alert history using the
Database Control Console. What are your conclusions?
6. Wait three more minutes and look at your outstanding alerts and the alert history again.
What are your conclusions?
7. Using the Database Control Console, change the 30 second threshold check for the User
Commits (per second) metric back to the default value (Last 24 hours). Execute the
lab_0 6_cleanup . sql script to cleanup your environment.
Oracle Database 10g: Administration Workshop II 6-23
Recovering from Ncpcritical Losses
Copyright © 2004, Oracle. All rights reserved.
Objectives
After completing this lesson, you should be able to
• Recover temporary tablespaces
• Recover a redo log group member
• Recover index tablespaces
• Recover read-only tablespaces
• Re-create the password file
7-2 Copyright © 2004, Oracle. All rights reserved.
Oracle Database lOg: Database Administration Workshop II 7-2
Recovery of Noncritical Files
Create a new file
Rebuild the file
Recover the lost or damaged files
7-3 Copyright © 2004, Oracle. All rights reserved.
Recovery of Noncritical Files
A noncritical file is one that the database and most applications can operate without. For
example, if the database loses one multiplexed control file, there are still other control files that
can be used to keep the database operating.
Although the loss of a noncritical file does not cause the database to crash, it can impair the
functioning of the database. For example:
• The loss of an index tablespace can cause applications and queries to run much slower, or
even make the application unusable, if the indexes were used to enforce constraints.
• The loss of an online redo log group, as long as it is not the current online log group, can
cause database operations to be suspended until new log files are generated.
• The loss of a temporary tablespace can prevent users from running queries or creating
indexes until they have been assigned to a new temporary tablespace.
Oracle Database 10g: Database Administration Workshop II 7-3
Creating New Temporary Tablespace
SQL>
2>
3>
CREATE TEMPORARY
TEMPFILE
SIZE 25M;
'/oradat
TABLESPACE
a/temp2_
_oi
temp 2
.tmp'
7-4 Copyright © 2004, Oracle. All rights reserved.
Creating New Temporary Tablespace
Sometimes the fastest recovery method may be to drop the damaged or lost file, and create a new
one. This is especially true for temporary data files, which do not store any permanent data. The
Oracle database can start up with a missing temporary file. If a temporary file does not exist
when the database is started, then the database writer process writes to a trace file indicating the
temporary file was not found, but the database opens normally.
For example, to recover the database when the temp_01. tmp data file belonging to the default
temporary tablespace TEMP has been deleted at the OS level:
SQL> CREATE TEMPORARY TABLESPACE temp2
2> TEMPFILE '/oradata/orcl/temp2_01.tmp' SIZE 5G;
Tablespace created.
SQL> ALTER DATABASE DEFAULT TEMPORARY TABLESPACE temp2;
Database altered.
SQL> DROP TABLESPACE temp INCLUDING CONTENTS AND DATAFILES;
Tablespace dropped.
Oracle Database 10g: Database Administration Workshop II 7-4
Re-creating Redo Log Files
SQL>
2>
SQL>
SQL>
2>
3>
ALTER DATABASE DROP LOGFILE MEMBER
'/oradata/redoOlb.log';
!rm /oradata/redoOlb.log
ALTER DATABASE ADD LOGFILE MEMBER
'/oradata/redoOlb.log'
TO GROUP 1;
7-5
Copyright © 2004, Oracle. All rights reserved.
Re-creating Redo Log Files
In some cases, you may want to drop an entire group of redo log members, or you may want to
drop one or more specific redo log members. For example, if a disk failure occurs, you may need
to drop all the redo log files on the failed disk so that the database does not try to write to the
inaccessible files.
To drop a redo log group, you must have the ALTER DATABASE system privilege. Before
dropping a redo log group, consider the following restrictions and precautions:
• An instance requires at least two groups of redo log files, regardless of the number of
members in the groups.
• You can drop a redo log group or group member only if it is inactive.
• A redo log group should be archived (if archiving is enabled) before dropping it. To see
whether this has happened, use the V$LOG view.
SELECT GROUP#, ARCHIVED, STATUS FROM V$LOG;
GROUP# ARC STATUS
1 YES ACTIVE
2 NO CURRENT
3 YES INACTIVE
Oracle Database 10g: Database Administration Workshop II 7-5
Re-creating Redo Log Files (continued)
Drop a redo log group by using the ALTER DATABASE SQL statement with the DROP
LOGFILE clause. The following statement drops redo log group number 3:
ALTER DATABASE DROP LOGFILE GROUP 3;
To drop a redo log member, you must have the ALTER DATABASE system privilege. Consider
these restrictions and precautions before dropping individual redo log members:
• You can drop redo log files so that a multiplexed redo log becomes temporarily asymmetric.
For example, if you use duplexed groups of redo log files, you can drop one member of one
group, even though all other groups have two members each. However, you should rectify
this situation immediately so that all groups have at least two members, thus eliminating
the single point of failure possible for the redo log.
• An instance always requires at least two valid groups of redo log files, regardless of the
number of members in the groups.
• You can drop a redo log member only if it is not part of an active or current group. If you
want to drop a member of an active group, first force a log switch to occur.
• Make sure the group to which a redo log member belongs is archived (if archiving is
enabled) before dropping the member. To see whether this has happened, query the V$LOG
view.
To drop specific inactive redo log members, use the ALTER DATABASE statement with the
DROP LOGFILE MEMBER clause. The following statement drops the redo log
/oradata/redo0 2b.log:
ALTER DATABASE DROP LOGFILE MEMBER '/oradata/redo02b.log';
When a redo log group or redo log member is dropped from the database, and you are not using
the Oracle Managed Files (OMF) feature, the operating system files are not deleted from disk;
only the control file is updated. After dropping a redo log group or redo log member, make sure
that the drop completed successfully, and then use the appropriate operating system command to
delete the dropped redo log files.
When using Oracle Managed Files, the cleanup of operating systems files is done automatically
for you.
Oracle Database 10g: Database Administration Workshop II 7-6
Re-creating Redo Log Files
The Database Control Console allows you to create or edit information about the redo log groups
associated with the current database. From the Administration page, select Redo Log Groups
in the Storage region.
The Redo Log Groups page (not shown) displays the Group Number, Thread (for cluster
databases only), File Size, and Status for the redo log group. Select an individual redo log group
and click View. The Redo Log Members table lists the files and directories that comprise the
members of the redo log group. You can add or delete members from the group by clicking Edit.
Oracle Database 10g: Database Administration Workshop II 7-7
Recovering an Index Tablespace
When an index tablespace requires recovery, you should compare the time it would take to
rebuild all the indexes in the tablespace to the time it would take to restore and recover the data
files. If the indexes can be easily re-created using a script, export dump, or manual CREATE
INDEX statements, then perform the following steps:
1. Determine which indexes you need to re-create.
2. Drop the index tablespace:
DROP TABLESPACE index_tbs INCLUDING CONTENTS AND DATAFILES;
3. Re-create the tablespace:
CREATE TABLESPACE index_tbs
DATAFILE '/oradata/indxOl.dbf' SIZE 10m;
4. Re-create all indexes in it.
5. Gather statistics for all the indexes.
If the index tablespace cannot be easily re-created, then you must restore the lost data file from a
valid backup and perform media recovery on it. You must perform a complete recovery of the
index tablespace. You cannot use tablespace point-in-time recovery for the index tablespace
because of the dependency relationship between a table and its indexes.
While the indexes are unavailable, application queries will suffer greatly in performance. Index
monitoring, if previously configured, can help you prioritize index creation.
Oracle Database 10g: Database Administration Workshop II 7-8
Re-creating Indexes
Use options to reduce the time it takes to create the
index:
• PARALLEL
• NOLOGGING
SQL> CREATE INDEX rname_idx
2 ON hr.regions (regionname)
3 PARALLEL 4;
>
7-9 Copyright © 2004, Oracle. All rights reserved.
Re-creating Indexes
When creating or re-creating an index, you can use the following keywords to reduce the
creation time:
• PARALLEL (NOPARALLEL is the default): Multiple processes can work together
simultaneously to create an index. By dividing the work necessary to create an index
among multiple server processes, the Oracle server can create the index more quickly than
if a single server process created the index sequentially. The table is randomly sampled and
a set of index keys is found that equally divides the index into the same number of pieces
as the specified degree of parallelism. A first set of query processes scans the table, extracts
key, rowid pairs, and sends each pair to a process in a second set of query processes based
on key. Each process in the second set sorts the keys and builds an index in the usual
fashion. After all index pieces are built, the parallel coordinator concatenates the pieces
(which are ordered) to form the final index.
NOLOGGING: Makes index creation faster because it does not write any redo log entries
during the index lifetime until NOLOGGING is changed to LOGGING. This is a permanent
attribute and thus appears in the data dictionary. It can be updated with the ALTER INDEX
NOLOGGING/LOGGING command at any time.
Oracle Database 10g: Database Administration Workshop II 7-9
Read-only Tablespace Recovery
I
Case 1
Read-only
Case 2
Read-only
r-
Case 3
Read/write
1—
Backup 1
Backup 2
Recovery
7-10
Copyright © 2004, Oracle. All rights reserved.
Read-only Tablespace Recovery
Making a tablespace read-only prevents write operations on the data files in the tablespace,
regardless of a user's update privilege level. The primary purpose of read-only tablespaces is to
eliminate the need to perform backup and recovery of large, static portions of a database.
Readonly tablespaces also provide a way to protecting historical data so that users cannot modify it.
Because read-only tablespaces can never be updated, they can reside on CD-ROM or WORM
(write once, read many) devices.
The method of recovering a read-only tablespace depends on the backups that are available and
whether the tablespace was altered to read/write or read-only within the recovery period.
Case 1: The tablespace being recovered is read-only, and was read-only when the last backup
occurred. In this case, you can simply restore the tablespace from the backup. There is no need to
apply any redo information.
Case 2: The tablespace being recovered is read/write, but was read-only when the last backup
occurred. In this case, you need to restore the tablespace from the backup and apply the redo
information from the point when the tablespace was made read/write.
Case 3: The tablespace being recovered is read-only, but was read/write when the last backup
occurred. You should always back up a tablespace after making it read-only to avoid this
situation. However, if this does occur, you must restore the tablespace from the backup and
recover up to the time that the tablespace was made read-only.
Oracle Database 10g: Database Administration Workshop II 7-10
Read-only Tablespace Recovery Issues
Special considerations must be taken for read-only
tablespaces when:
Re-creating a control file
Renaming data files
• Using a backup control file
7-11 Copyright© 2004, Oracle. All rights reserved.
Read-only Tablespaces Recovery Issues
Re-creating a Control File
If you need to re-create a control file with the CREATE CONTROL FILE command and your
database has read-only tablespaces, you must follow special procedures. The steps are listed in
the trace file that is generated by the ALTER DATABASE BACKUP CONTROLFILE TO TRACE
command. Because the tablespace is read-only, there are no changes being made to it, and thus it
is assumed no recovery is needed. The tablespace data files are not included in the control file
and are added to the database after recovery has ended.
ALTER DATABASE RENAME FILE 'MISSINGO0005'
TO '/u01/app/oracle/oradata/orcl/example01.dbf';
ALTER TABLESPACE "EXAMPLE" ONLINE;
Renaming Data Files
If you cannot restore a copy of the data files in a read-only tablespace to the correct destination,
you can use the ALTER DATABASE RENAME command to place the files in a new location.
Backup Control File
If you have a read-only tablespace on read-only media, then you may encounter errors or poor
performance when recovering with the USING BACKUP CONTROLFILE option.
Oracle Database 10g: Database Administration Workshop II 7-11
Read-only Tablespaces Recovery Issues (continued)
Backup Control File (continued)
This situation occurs when the backup control file indicates that a tablespace was read/write
when the control file was backed up. In this case, media recovery may attempt to write to the
files. For read-only media, the database issues an error saying that it cannot write to the files.
Following are alternatives you can use to recover read-only media when using a backup control
file:
• Take data files from read-only tablespaces offline before doing recovery with a backup
control file, and then bring the files online at the end of media recovery.
• Use the correct version of the control file for the recovery. If the tablespace will be
readonly when recovery completes, then the control file backup must be from a time when the
tablespace was read-only. Similarly, if the tablespace will be read/write at the end of
recovery, then the control file must be from a time when the tablespace was read/write.
Oracle Database 10g: Database Administration Workshop II 7-12
Authentication Methods
for Database Administrators
Remote database Local database
administration administration
^r x,. Yes ^^^ N. Yes
S Do you \ Svo you want\.
/ have a secure \ ,X^ to use OS ^
xX^onnection?/'^ ^^authentication^^
7-13
No
No
Copyright © 2004, Oracle
All rights reserved.
Use OS
authentication
Use a
password file
Authentication Methods for Database Administrators
Depending on whether you want to administer your database locally on the same machine on
which the database resides or to administer many different database servers from a single remote
client, you can choose either operating system or password file authentication to authenticate
database administrators:
• If the database has a password file and you have been granted the SYSDBA or SYSOPER
system privilege, then you can be authenticated by a password file.
• If the server is not using a password file, or if you have not been granted SYSDBA or
SYSOPER privileges and are therefore not in the password file, you can use operating
system authentication. On most operating systems, authentication for database
administrators involves placing the operating system usemame of the database
administrator in a special group, generically referred to as OSDBA. Users in that group are
granted SYSDBA privileges. A similar group, OSOPER, is used to grant SYSOPER
privileges to users.
Operating system authentication takes precedence over password file authentication. Specifically,
if you are a member of the OSDBA or OSOPER group for the operating system, and you connect
as SYSDBA or SYSOPER, you will be connected with associated administrative privileges
regardless of the usemame/password that you specify.
Oracle Database 10g: Database Administration Workshop II 7-13
1.
2.
3.
$
4.
5.
6.
7-14
Loss of Password Authentication File
Log in to the database using OS authentication.
Set the remote_login_passwordfile parameter
to none and restart the database.
Re-create the password file using orapwd.
orapwd file=$ORACLE_HOME/dbs/orapwORCL
password=admin entries=5
Set REMOTE_LOGIN_PASSWORDFILE tO EXCLUSIVE
Add users to the password file and assign
appropriate privileges to each user.
Restart the instance.
Copyright © 2004, Oracle. All rights reserved.
Using Password File Authentication
Oracle provides a password utility, orapwd, to create a password file. When you connect using
SYSDBA privilege, you are connecting as SYS schema and not the schema associated with your
usemame. For SYSOPER, you are connected to the PUBLIC schema. Access to the database
using the password file is provided by special GRANT commands issued by privileged users.
Typically, the password file is not included in backups, because, in almost all situations, the
password file can be re-created as a last resort. If you lose the password file, to re-create it
requires that you shut down and restart the database at least once. To avoid unneccessary down
time, you should include the password file in your backups.
It is critically important to the security of your system that you protect your password file and the
environment variables that identify the location of the password file. Any user with access to
these could potentially compromise the security of the connection.
Note: Do not remove or modify the password file if you have a database or instance mounted
using REMOTE_LOGIN_PASSWORDFILE=EXCLUSIVE (or SHARED). If you do, you will be
unable to reconnect remotely using the password file. Even if you replace it, you cannot use the
new password file, because the timestamps and checksums will be wrong.
Oracle Database 10g: Database Administration Workshop II 7-14
Using Password File Authentication (continued)
Using a Password File
1. Create the password file using the password utility orapwd.
orapwd file=filename password=password entries=max_users
where:
filename is the name of the password file (mandatory),
password is the password for SYSOPER and SYSDBA (mandatory).
Entries is the maximum number of distinct users allowed to connect as SYSDBA
or SYSOPER. If you exceed this number, you must create a new password file. It is
safer to have a larger number. There are no spaces around the equal-to (=) character.
Example: orapwd file = $ORACLE_HOME/dbs/orapwUl5
password=admin entries=5
2. Set the REMOTE_LOGIN_PASSWORDFILE parameter to EXCLUSIVE
where:
EXCLUSIVE indicates that only one instance can use the password file and that the
password file contains names other than SYS. By using an EXCLUSIVE password
file, you can grant SYSDBA or SYSOPER privileges to individual users.
3. Connect to the database using the password file created above.
CONNECT sys/admin AS SYSDBA
Password File Locations
UNIX: $ORACLE_HOME/dbs
NT:%ORACLE_HOME%/database
Maintaining the Password File
Delete the existing password file using operating system commands, and create a new
password file by using the password utility.
Oracle Database 10g: Database Administration Workshop II 7-15
Summary
In this lesson, you should have learned how to:
• Recover temporary tablespaces
• Recover a redo log group member
• Recover index tablespaces
• Recover read-only tablespaces
• Re-create the password file
7-16 Copyright© 2004, Oracle. All rights reserved.
Oracle Database 10g: Database Administration Workshop II 7-16
Practice 7 Overview: Re-creating a
Temporary Tablespace
This practice covers the following topics:
• Starting the database with a missing temp file
• Creating a new temporary tablespace
• Altering the default temporary tablespace for a
database
7-17 Copyright© 2004, Oracle. All rights reserved.
Oracle Database 10g: Database Administration Workshop II 7-17
Practice 7: Re-creating a Temporary Tablespace
In this practice, you will remove the temporary tablespace data file from disk, restart the
database, and determine that the file is missing. When the missing file is discovered, you will
restore database functionality by creating a new temporary tablespace.
1. Obtain the name of the default temporary tablespace from the DATABASE_PROPERTIES
view and the data files associated with this tablespace from DBA_TEMP_FILES.
2. Delete the temporary tablespace data files at the operating system level.
3. Connect to the database as a SYSDBA user, shut down the instance, and restart it.
4. Perform a query against a table in the database that involves sorting of data. What happens?
5. Attempt to take the temporary tablespace offline before recovering it. What happens?
6. Drop the temporary tablespace. What happens?
7. Create a new temporary tablespace named TEMPI, which contains a single data file named
tempi . dbf that is 10 MB.
8. Change the database default temporary tablespace to TEMPI.
9. Retry your query that involved a sort operation. What happens now?
10. Drop the temporary tablespace with the missing data files and remove the files at the OS
level, if any remain. What happens now?
Oracle Database 10g: Database Administration Workshop II 7-18
Database Recovery
Copyright © 2004, Oracle. All rights reserved.
Objectives
After completing this lesson, you should be able to:
Recover the control file
Explain reasons for incomplete recovery
Describe incomplete recovery methodology
• Recover the database to a specific point in time
using:
- User-managed backups
- RMAN-managed backups
- Enterprise Manager Database Control Console
8-2 Copyright © 2004, Oracle. All rights reserved.
Oracle Database 10g: Administration Workshop II 8-2
Recovery Steps
1. Damaged or missing files are restored from a backup.
2. Changes from incremental backups, archived redo log files, and online redo log files are
applied as necessary. The redo log changes are applied to the data files until the current
online log is reached and the most recent transactions have been re-entered. Undo blocks
are generated during this entire process. This is referred to as rolling forward or cache
recovery.
3. The restored data files may now contain committed and uncommitted changes.
4. The undo blocks are used to roll back any uncommitted changes. This is known as rolling
back, or transaction recovery.
5. The data files are now in a recovered state and consistent with the other data files in the
database.
Oracle Database 10g: Administration Workshop II 8-3
8-4
Server Managed Recovery:
restore and recover Commands
run{
sql "ALTER TABLESPACE indx_tbs OFFLINE IMMEDIATE";
RESTORE TABLESPACE indx_tbs;
RECOVER TABLESPACE indx_tbs DELETE ARCHIVELOG;
sql "ALTER TABLESPACE indx_tbs ONLINE";
}
Copyright © 2004, Oracle. All rights reserved.
Server Managed Recovery: restore and recover Commands
You can also perform media recovery of individual tablespaces using RMAN. RMAN will
restore from backup any archived redo logs required during the recovery operation. If backups
are stored on a media manager, channels must be configured or allocated for use in accessing
backups stored there.
Reconstructing the contents of all or part of a database from a backup typically involves two
phases: retrieving a copy of the data file from a backup, and reapplying changes to the file since
the backup from the archived and online redo logs, to bring the database to the desired SCN
(usually the most recent one). The RESTORE command retrieves the data file onto disk from a
backup location on tape, disk or other media, and makes it available to the database server. The
RECOVER command takes the restored copy of the data file and applies changes recorded in the
database's redo logs to the file.
One very useful option in managing disk space associated with these restored files is the
DELETE ARCHIVELOG option, which causes the deletion of restored archived redo logs from
disk once they are no longer needed for the RECOVER operation.
If RMAN restores archived redo log files to the flash recovery area to perform a RECOVER
operation, the restored logs are automatically deleted after they are applied to the data files, even
if you do not use the DELETE ARCHIVELOG option.
Oracle Database 10g: Administration Workshop II 8-4
8-5
User-Managed Recovery Procedures:
recover Command
• Restore all database files from backup and
recover the database:
SQL> RECOVER DATABASE
• Restore the damaged data files from a backup and
recover the data files:
SQL> RECOVER TABLESPACE index_tbs
Or
SQL> RECOVER DATAFILE
2> '/oradata/indxOl.dbf'
Copyright © 2004, Oracle. All rights reserved.
User-Managed Recovery Procedures: recover Commands
The first step in performing media recovery is to manually restore the data files by copying them
from a backup. If you do not restore the data file to its original location, you must update the
control file with the new location using an ALTER DATABASE RENAME FILE command. You
must also restore any archived logs files needed to recover the restored data files. For RMAN
restorations, you would use the SET NEWNAME command to specify the new location for that file.
You can use one of the following commands to recover the database or data file:
• RECOVER [AUTOMATIC] DATABASE
This command can only be used for a closed database recovery.
• RECOVER [AUTOMATIC] TABLESPACE <NUMBER> | <NAME>
This command can only be used for an open database recovery.
• RECOVER [AUTOMATIC] DATAFILE <'filename'> | <NAME>
This command can be used for both an open and closed database recovery.
The AUTOMAT IC keyword instructs the Oracle database to automatically apply the archived and
redo log files as needed to the data file being recovered.
Oracle Database 10g: Administration Workshop II 8-5
Recovering a Control File Autobackup
RMAN> RESTORE SPFILE TO
2> '/oradata/spfile.bak' FROM AUTOBACKUP;
m
sh Recovery
Area
RECOVER DATABASE;
ALTER DATABASE OPEN
RESETLOGS;
ALTER TABLESPACE temp ADD
TEMPFILE...;
8-6 Copyright © 2004, Oracle. All rights reserved.
Recovering a Control File Autobackup
If you are not using a recovery catalog, you should have autobackup of the control file
configured, so you will be able to quickly restore the control file if needed. The commands used
for restoring your control file are the same, whether or not you are using a flash recovery area.
However, if you are using a flash recovery area, RMAN implicitly crosschecks backups and
image copies listed in the control file, and catalogs any files in the flash recovery area not
recorded in the restored control file, improving the usefulness of the restored control file in the
restoration of the rest of your database.
Note: Tape backups are not automatically crosschecked after the restore of a control file. If you
are using tape backups, then after restoring the control file and mounting the database you must
crosscheck the backups on tape
To restore the control file from an autobackup, the database must be in a NOMOUNT state. You
need the database ID (DBID) to retrieve the autobackups. Your DBID should be recorded along
with other basic information about your database. If you do not have a record of the DBID of
your database, there are two places you can easily find it:
• From the formatted name of a control file autobackup.
• From a RMAN session log file. The DBID is displayed by the RMAN client when it starts
up and connects to your database.
Recovery
Manager
(RMAN)
T
Fla
Control
File
Database
Oracle Database 10g: Administration Workshop II 8-6
Recovering a Control File Autobackup (continued)
To restore the control file from an autobackup, you must first set the DBID for your database,
and then use the RESTORE CONTROLFILE FROM AUTOBACKUP command:
RMAN> SHUTDOWN IMMEDIATE;
RMAN> SET DBID 320066378;
RMAN> RUN {
SET CONTROLFILE AUTOBACKUP FORMAT
FOR DEVICE TYPE DISK TO 'autobackup_format';
RESTORE CONTROLFILE FROM AUTOBACKUP;
}
RMAN uses the autobackup format and DBID to determine where to hunt for the control file
autobackup. If one is found, RMAN restores the control file from that backup to all of the control
file locations listed in the CONTROL_FILES initialization parameter.
If you have a recovery catalog, you do not have to set the DBID or use the control file
autobackup to restore the control file. You can use the RESTORE CONTROLFILE command
with no arguments:
RMAN> RESTORE CONTROLFILE;
The instance must be in NOMOUNT state when you perform this operation, and RMAN must be
connected to the recovery catalog. The restored control file will be written to all locations listed
in the CONTROL_FILES initialization parameter.
If you have also lost the SPFILE for the database and need to restore it from the autobackup, the
procedure is similar to restoring the control file from autobackup. You must first set the DBID
for your database, and then use the RESTORE SPFILE FROM AUTOBACKUP command.
After you have started the instance with the restored server parameter file, RMAN can restore
the control file from the autobackup. After you restore and mount the control file, you have the
backup information necessary to restore and recover the database.
Limitations of Restoring the Control File
• After restoring the control files of your database from backup, you must perform complete
media recovery and then open your database with the RESETLOGS option.
• After restoring a backup control file, entries for tempfiles in locally-managed temporary
tablespaces are removed. Hence, you must add new tempfiles to these tablespaces after you
OPEN RESETLOGS.
Oracle Database 10g: Administration Workshop II 8-7
Creating a New Control File
If you have autobackup of the control file configured, you should rarely, if ever, need to recreate
your control file.
The ALTER DATABASE BACKUP CONTROLFILE TO TRACE command generates a user trace
file that contains the SQL command to recreate the control file. Copy the trace file to a script file,
such as new_control. sql, delete the trace header information prior to the words STARTUP
NOMOUNT, and make any other desired changes, such as increasing MAXDATAFILES,
MAXLOGFILES, and so on. Run the script to create a new control file.
You must use this command while the database is mounted or open and while you are connected
as a user with DBA privileges.
If you use RMAN for your database backups, and do not have a recovery catalog configured, log
history and RMAN metadata will be lost when you recreate the control file. You will also need
to recreate the TEMPFILEs used by temporary tablespaces.
Oracle Database 10g: Administration Workshop II 8-8
Creating a New Control File (continued)
The Database Control Console allows you to manage the control files used by your database.
From the Administration page, select Controlfiles in the Storage section.
You can use the Controlfile General page to view the control file mirror images and their
locations. Use Backup to Trace to create a trace file for the control file.
You can also write your own CREATE CONTROLF ILE command, but you will need to supply
the full path names and sizes for:
• The redo log files.
• All the data files associated with the database, including the data files for SYSTEM and
SYSAUX.
Oracle Database 10g: Administration Workshop II 8-9
Incomplete Recovery Overview
Incomplete recovery, or point-in-time recovery, uses a backup to produce a noncurrent version of
the database. In other words, you do not apply all of the redo records generated after the most
recent backup. Perform this type recovery only when absolutely necessary. To perform
incomplete recovery, you need:
• A valid offline or online backup of all of the data files made before the recovery point
• All archived logs from the time of the backup until the specified time of recovery
Point-in-time recovery is the only option if you must perform a recovery and discover that you
are missing an archived log containing transactions that occurred sometime between the time of
the backup you are restoring from and the target recovery SCN. Without the missing log, you
have no record of the updates to your data files during that period. Your only choice is to recover
the database from the point in time of the restored backup, as far as the unbroken series of
archived logs permits, then open the database with the RESETLOGS option. All changes in or
after the missing redo log file will be lost.
Oracle Database 10g: Administration Workshop II 8-10
Situations Requiring Incomplete Recovery
• Complete recovery fails because of a missing
archived log file
One or more unarchived redo log files and a data
file are lost
• A backup of the control file is used to open or
recover the database
8-11 Copyright© 2004, Oracle. All rights reserved.
Situations Requiring Incomplete Recovery
You usually perform incomplete recovery of the whole database in the following situations:
• Loss of redo logs: Redo logs were not mirrored and you lost a redo log before it was
archived, along with a data file. Recovery cannot continue past the lost redo log.
• Missing archive: A complete recovery operation fails because of a bad or missing
archived log. Recovery can only be completed to a time in the past, prior to applying the
archived log.
• Backup control file: A backup of the control file is used to open the database instead of
the current copy. You may need to use a control file backup if:
All control files are lost, the control file cannot be re-created, and a binary backup of
the control file exists. Mirroring the control file (onto different disks) and keeping a
current text version of the CREATE CONTROLFILE statement reduces the chances of
using this method.
You are recovering a database to a previous point in time, and the restored database
has a different structure than the current database.
You must specify the USING BACKUP CONTORFILE clause in the RECOVER DATABASE
command when using an old copy of the control file for recovery or to open the database.
Oracle Database 10g: Administration Workshop II 8-11
Types of Incomplete Recovery
There are four types of incomplete recovery:
• Time-based recovery
• Cancel-based recovery
• Change-based recovery
• Log sequence recovery
8-12 Copyright© 2004, Oracle. All rights reserved.
Types of Incomplete Recovery
Time-Based Recovery
Using the UNTIL TIME clause, you specify the previous point in time to which the database
should be recovered. Recovery terminates after all changes up to the specified time are
committed. Use this approach when a user makes unwanted changes to data or drops important
tables, and the approximate time of the error is known. Recovery time and data loss will be
minimized if you are notified immediately. Well tested programs, security, and procedures
should prevent the need for this type of recovery.
Cancel-Based Recovery
During the recovery process, you enter CANCEL at the recovery prompt (instead of a log file
name) to terminate recovery. Use this approach when:
• A current redo log file or group is damaged and is not available for recovery. Mirroring
should prevent the need for this type of recovery.
• An archived redo log file needed for recovery is lost. Frequent backups and multiple
archive destinations should prevent the need for this type of recovery.
Oracle Database 10g: Administration Workshop II 8-12
Types of Incomplete Recovery (continued)
Change-Based Recovery
Using the UNTIL CHANGE clause for user-managed backups and the UNTIL SCN clause for
RMAN-managed backups, you specify the system change number (SCN) of the last committed
change to be recovered. Recovery terminates after all changes up to the specified SCN are
committed. Use this approach when recovering databases in a distributed environment.
Log Sequence Recovery
With RMAN-managed backups you can specify the last log sequence number to be used for
database recovery with the UNTIL SEQUENCE clause. Once all log files up to but not including
the specified log file have been applied, recovery terminates.
Oracle Database 10g: Administration Workshop II 8-13
Incomplete Recovery Best Practices
Follow all steps carefully.
Take whole database backups before and after
recovery.
Always verify that the recovery was successful.
Back up and remove archived logs.
8-14 Copyright© 2004, Oracle. All rights reserved.
Incomplete Recovery Best Practices
• It is important to follow all recovery steps carefully, because most incomplete recovery
problems are caused by a DBA error during the recovery process.
• During database recovery, transaction activity can only be rolled forward to the desired time,
not back to the desired time. This is the reason why all data files must be restored for the
database to be taken back in time. Failure to restore all data files prevents the
(unsynchronized) database from opening.
• Before starting incomplete recovery, perform a whole closed database backup (including
control files and redo logs). This is helpful in the following ways:
It allows you to recover from error. If your recovery fails (for example, you recover
past the desired point of recovery), redo logs and control files cannot be used for the
next recovery unless there is a backup of these files.
It saves time if the recovery fails. In this situation, you can restore the data files from
the new backup, rather than from a previous backup which needs archives applied.
Note: If a whole backup is not performed, at least archive the current redo log
SQL> ALTER SYSTEM ARCHIVE LOG CURRENT
and back up the control file.
SQL> ALTER DATABASE BACKUP CONTROLFILE TO
'/uOl/data/backup.ctl';
Oracle Database 10g: Administration Workshop II 8-14
Incomplete Recovery Best Practices (continued)
• Perform a whole closed backup after successful recovery. This can save many hours if
another recovery is required before completion of the next scheduled backup. If using
Oracle Database lOg, this step is now optional.
• Always verify that the problem has been corrected before allowing users to access the
system, in case the recovery failed and needs to be performed again.
• Back up (and later remove) archived logs from the system to prevent mixing archives from
different database incarnations.
Consider the following example:
• A database at log sequence 14 has archived logs from sequence 2 (arch_2 . rdo) to
sequence 13 (arch_l3 . rdo).
• After performing incomplete recovery, a new database incarnation is created, setting the
database log seq to 0.
• Archived logs arch_2 . rdo to arch_l3 . rdo are now part of the old database
incarnation.
• After a few log switches, the archived log ar ch_2 . rdo will be overwritten, and is
backed up with all other archives (including the old archived logs arch_3 . rdo to
arch_l3 . rdo ).
• At a later stage, if recovery requires arch_6 . rdo , you need to make sure that the
archived log restored from the backup is for the correct database incarnation, otherwise an
error will result.
To prevent confusion you can use the %r format option of the log_ar chive_f ormat
database initialization parameter to:
• Automatically incorporate the database resetlogs ID into the archived log file names.
• Ensure unique names are constructed for the archived log files across multiple incarnations
of the database.
Oracle Database 10g: Administration Workshop II 8-15
8-16
Using recover for Incomplete Recovery
• Recover a database until time:
SQL> RECOVER DATABASE UNTIL
2 TIME '2003-12-14:12:10:03';
• Recover a database until cancel:
SQL> RECOVER DATABASE UNTIL CANCEL;
Recover using backup control file:
SQL> RECOVER DATABASE
2 UNTIL TIME '2003-12-14:12:10:03'
3 USING BACKUP CONTROLFILE;
Copyright © 2004, Oracle. All rights reserved.
Using recover for Incomplete Recovery
The following command is used to perform incomplete recovery:
RECOVER [AUTOMATIC] DATABASE option
where:
AUTOMATIC: Automatically applies archived and redo log files.
option: UNTIL TIME 'YYYY-MM-DD:HH2 4:MI:SS'
UNTIL CANCEL
UNTIL CHANGE <integer>
USING BACKUP CONTROLFILE
Note: To apply redo log files automatically during recovery, you can use the SQL*Plus SET
AUTORECOVERY ON command, enter AUTO at the recovery prompt, or use the RECOVER
AUTOMATIC command.
Oracle Database 10g: Administration Workshop II 8-16
until time Recovery Example
146
146
146
146
146
X
145
OE.ORDERS
Database
OE.ORDERS
Recovered Database
Q) Shut down and back up
(2) Restore all data files
(3) Mount the database
144
^46^
files
146
144
144
145
OE. ORDERS
Restored Database
Open With Resetlogs
(q) Back up the database
3-17
Copyright © 2004, Oracle. All rights reserved.
until time Recovery Example
Let's look at a typical scenario employing UNTIL TIME recovery. Assume the following facts:
• The current time is 12:00 p.m. on May 28, 2004.
• The OE . ORDERS table has been dropped.
• The table was dropped at approximately 11:45 a.m.
• Database activity is minimal because most staff are currently in a meeting. The table must
be recovered.
Oracle Database 10g: Administration Workshop II 8-17
until time Recovery Steps
1. Shutdown database
2. Restore data files
3. Mount the database
4. Recover the database
5. Open database with resetlogs option
6. Backup the database
SQL>
$ cp
SQL>
SQL>
SQL>
SQL>
$ cp
shutdown immediate
/BACKUP/* /uOl/dbOl/ORADATA
startup mount
recover database until time ' 2004-05-28 :11: 44 : 00 ' ;
alter database open resetlogs;
shutdown;
/u0l/db0l/ORADATA/* /BACKUP
8-18
Copyright © 2004, Oracle. All rights reserved.
until time Recovery Steps
Because the approximate time of the failure is known and the database structure has not changed
since 11:44 a.m., you can use the UNTIL TIME method:
1. If the database is open, shut it down by using either the NORMAL, IMMEDIATE, or
TRANSACTIONAL options.
2. Restore all data files from backup (the most recent if possible). You may also need to
restore archived logs. If there is enough space available, restore to the
LOG_ARCHIVE_DEST location or use the ALTER SYSTEM ARCHIVE LOG START
TO <LOCATION> command or the SET LOGSOURCE <LOCATION> command to
change the location.
3. Mount the database.
4. Recover the database:
SQL> recover database until time '2 004-05-2 8:11:44:00'
ORA-00279: change 148448 ... 05/27/04 17:04:20 needed for
thread ...
Media recovery complete.
Oracle Database 10g: Administration Workshop II 8-18
until time Recovery Steps (continued)
5. To synchronize data files with control files and redo logs, open the database by using the
resetlogs option:
SQL> alter database open resetlogs;
SQL> archive log list
Oldest online log sequence 0
Next log sequence to archive 1
Current log sequence 1
6. Before performing the whole closed database backup, query the OE . ORDERS table to
make sure it exists.
When recovery is successful and the backup has completed, notify users that the database is
available for use, and any data entered after the recovery time (11:44 a.m.) will need to be
reentered.
Oracle Database 10g: Administration Workshop II 8-19
Cancel-Based Recovery: Example
Scenario:
• The current time is 12:00 p.m. on May 28, 2004.
• The orders table was dropped while someone
was trying to fix corrupted data blocks.
Log files exist on the same disk as the data files.
• The table was dropped at approximately 11:45 a.m.
• Staff are currently in a meeting.
8-20 Copyright © 2004, Oracle. All rights reserved.
Incomplete Recovery Using until cancel
You are concerned about block corruption in the ORDERS table resulting from disk error.
Because the redo log files are contained on the same disk as the data file in which the orders
table resides, you decide to check the status of the redo log and archived log files:
SQL> SELECT group#, status, member FROM v$logfile;
GROUP# STATUS MEMBER
2 /u01/oral0i/ORADATA/log2a.rdo
1 /u01/oral0i/ORADATA/logla.rdo
SQL> ALTER SESSION SET nls_date_format='YYYY-MM-DD:HH24:MI:SS';
Session altered.
SQL> SELECT * FROM v$log;
GROUP# ... SEQ# BYTES MEMBERS ARC STATUS ... FIRST_TIME
1 ... 49 15360 1 NO CURRENT ... 2004-05-28:11:55
2 ... 48 15360 1 NO INACTIVE... 2004-05-28:11:34
Oracle Database 10g: Administration Workshop II 8-20
Cancel-Based Recovery: Example
Findings:
• Redo logs are not multiplexed.
One of the online redo logs is missing.
• The missing redo log is not archived.
• The redo log contained information from
11:34 a.m.
• Twenty-six minutes of data will be lost.
• Users can recover their data.
8-21 Copyright © 2004, Oracle. All rights reserved.
Incomplete Recovery Using until cancel (continued)
After searching through the /uO l / oral Oi/ORAD AT A directory, you notice that redo log
log2 a. rdo cannot be located and has not been archived. Therefore, you cannot recover past
this point.
Querying V$LOG_H I STORY confirms the absence of archived log sequence 48 (log2a.rdo):
SQL> SELECT * FROM v$log_history;
RECID STAMP . . . FIRST CHANGE FIRST TIME
1 318531466 ... 88330 04-05-15:12:43
47 319512880 ... 309067 04-05-28:11:26
Because this is an OLTP system, the output from V$LOG shows that an extra 10 minutes of work
will be lost if the database is recovered before applying log2a. rdo. Users are not happy about
losing work, but can recover that work.
Recover the database as follows:
1. Shut down the database.
2. Restore all data files from the most recent backup.
3. You already have a valid backup, so mount the database.
Oracle Database 10g: Administration Workshop II 8-21
Incomplete Recovery and the Alert Log
Check the alert log before and after recovery
Look for error information, hints, and SCNs
Confirm steps in the recovery process were
successful
8-22 Copyright © 2004, Oracle. All rights reserved.
The Alert Log
During recovery, progress information is stored in the alert log. This file should always be
checked before and after recovery. Here is a sample entry in the alert .log file:
$ vi /diskl/BDUMP/alert_DB00.1og
Media Recovery Log
ORA-279 ... RECOVER database until time *2003...
Tue Dec 09 11:55:13 2003
RECOVER DA1ABASE CON1INUE DEFAUL1
Media Recovery Log /u01/oral0i/ORADAlA /arch_34.rdo
Incomplete recovery done UNTIL CHANGE 309121
Media Recovery Complete
Completed: RECOVER DATABASE CONTINUE DEFAULT
Tue Dec 09 11:55:13 2003
alter database open resetlogs
Oracle Database 10g: Administration Workshop II 8-22
1.
2.
3.
4.
5.
6.
8-23
Incomplete Recovery of a Database
Using RMAN
Mount the database.
Allocate multiple channels for parallelization.
Restore all data files.
Recover the database by using until time,
UNTIL SEQUENCE, or UNTIL SCN.
Open the database by using resetlogs.
Perform a whole database backup.
Copyright © 2004, Oracle. All rights reserved.
Incomplete Recovery Using RMAN
RMAN can perform recovery of the database to a past time, SCN, or log sequence number. This
is called incomplete recovery because it does not use all of the available redo. Incomplete
database recovery is also called database point-in-time recovery (DBPITR).
Incomplete recovery of the database requires you to open the database with the RESETLOGS
option. This option gives the online redo logs a new time stamp and SCN, thus eliminating the
possibility of corrupting data files by the application of obsolete archived redo logs. You cannot
recover some data files to a time before the RESETLOGS and others to a time after the
RESETLOGS. You must recover all data files to the same SCN. The only exception is if the data
file is offline normal or read-only. You can bring files in read-only or offline normal tablespaces
online after the RESETLOGS because there are no transactional changes for these files stored in
the redo logs.
Note: You can use RMAN to restore the data files only if the backups were taken or registered
with RMAN.
Oracle Database 10g: Administration Workshop II 8-23
8-24
RMAN Incomplete Recovery
until time: Example
RMAN> RUN {
2> SET UNTIL TIME = '2004-05-28:11:44:00';
3> RESTORE DATABASE;
4> RECOVER DATABASE;
5> ALTER DATABASE OPEN RESETLOGS; }
Copyright © 2004, Oracle. All rights reserved.
RMAN Incomplete Recovery until time: Example
At 12:00 p.m. on Tuesday, May 28, 2004, you determine that the OE . ORDERS table was
dropped in error. The approximate time of failure is known and the database structure has not
changed since 11:44 a.m. You can use the UNI IL TIME method:
1. If the target database is open, perform a clean shutdown.
2. Mount the target database. Do not back up the database during the recovery.
3. Insure that NLS_LANG and NLS_DAIE_FORMAI environment variables are set
appropriately:
$NLS_LANG=american_america.we8iso8859pl5
$NLS_DATE_FORMAT='YYYY-MM-DD:HH2 4:MI:SS'
4. Start Recovery Manager and connect to the target database.
$rman target rman/rman@ORCL
5. You can allocate multiple channels to improve the performance:
RMAN> run {allocate channel cl type DISK;
2> allocate channel c2 type DISK;
Oracle Database 10g: Administration Workshop II 8-24
RMAN Incomplete Recovery until time: Example (continued)
6. Specify the time for recovery and restore all data files from a backup with RMAN
commands. RMAN chooses the correct files based on the set until command:
RMAN> ... set until time = '2004-05-2 8:11:44:00';
RMAN> ... restore database;
Note: If you need to restore archived redo log files to a new location use the RMAN SET
ARCHIVELOG DESTINATION TO <location> command.
7. Recover the database to the time specified in the set until command:
RMAN> ... recover database;
8. Open the database by using the resetlogs option:
RMAN> ... alter database open resetlogs; }
9. Check that the table exists and perform a backup.
10. Notify users that the database is available for use, and that they should reenter any data that
was not committed before the system failure occurred.
Oracle Database 10g: Administration Workshop II 8-25
8-26
RMAN Incomplete Recovery
until sequence: Example
RMAN> RUN {
2> SET UNTIL SEQUENCE 120 THREAD 1;
3> ALTER DATABASE MOUNT;
4> RESTORE DATABASE;
5> RECOVER DATABASE; # recovers through log 119
6> ALTER DATABASE OPEN RESESTLOGS;
7> }
Copyright © 2004, Oracle. All rights reserved.
RMAN Incomplete Recovery until sequence: Example
The UNTIL SEQUENCE clause specifies a redo log sequence number and thread as an upper
limit. RMAN selects only files that can be used to recover up to but not including the specified
log sequence number. This example assumes that log sequence 120 was lost due to a disk crash
and the database needs to be recovered using the available archived redo logs.
Oracle Database 10g: Administration Workshop II 8-26
Recovery Using Enterprise Manager
Log in as a user with the SYSDBA privilege.
ORAjJZL-JE" Enterprise Manager IDg
Database Control
Login to Database:orcl.us.oracle.com
* User Maine
* Password
Connect As
|sys
1
|SYSDBA
i
J
Copyright © 1996,2004, Oracle. All rights reserved.
8-27
Copyright © 2004, Oracle. All rights reserved.
Log In as a User with the sysdba Privilege
Incomplete recovery can also be performed using the Recovery Wizard available through the
Enterprise Manager Database Control Console. On the Login page, log in as a user with the
SYSDBA privilege. In the example, the user SYS is used. After clicking Login you will see the
Database summary page.
Oracle Database 10g: Administration Workshop II 8-27
Recovery Using Enterprise Manager
Click on the Maintenance tab.
8-28
ORACLlF Fnfpriirfcp Manager 1llg ^^^=^^^=
Datahase Control
Database: orcl.us.oracle.com
Home ^^^^^^^^^^^^^^^^^^^^^^^^^^^^^^M
U^ Page ReTr
General
]■■■ Status Up
TT UP Since Feb 12- 2004 2:20:58 PM
Time Zone PST
Availability (%) 100
(Last 21 hours)
Instance Name orcl
Version 10.1.0.2.0
Copyright © 2004, Oracle. All rights reserved.
The Maintenance Folder Tab
From the Database Summary page, click on the Mainteuance tab. The Maintenance page
provides the user with various backup, restore, and recovery options.
Oracle Database 10g: Administration Workshop II 8-28
Recovery Using Enterprise Manager
Select Perform Recovery.
Database: orcl.us.oracle.com
Utilities
Export to Files
Import from Files 1
Import from Database
Load Data from File
Gather Statistics
Reorqanize Objects
Make Tablespace Locally
Manaqed
Related Links
AHwknr rpntral
^^M Maintenance ^^H
Backup/Recovery
Perform Recovery I
fvlanacierjf^rrent backups
ContiqureMackup Settinqs
Confiqure Recovery Settinqs
Confiqure Recovery Cataloq
Settinqs
^^H Maintenance ^^H
Alert Hktnnr
D<
Pa
Ck
Vie
Co
St;
Me
Ms
Alert l
8-29
Copyright © 2004, Oracle. All rights reserved.
Select Perform Recovery
From the Maintenance page, click Perform Recoveiy. You should see the Recovery Options
page next.
Oracle Database 10g: Administration Workshop II 8-29
Recovery Using Enterprise Manager
Select Whole Database
and enter OS login
credentials.
i;.l ill. ;i: i n:l ;.i: :i nr
Perform Recovery: Type
Type
nhjfi-.- "vr** | ^l--ib "i-f=il--=.ft ■
0(..'\ .iji S ^i./.^! \j hr .urti. .nr i •.■ a f.w-n Yjml-iir.iir i
J"Jt L^ldlfci 'i ILwrjJwtJ Ili Jit d.t¥. i-¥±lt yw.-:jy as i *u itU.
C =,i:: i r : J il;.l;ili ::;
Nct-dlo sptiilv inc. ;'.Ncrfci seq.ien:e rc-lw:K.f:S«rid a
, <i .1. ..1 ill :-.-i :■ t-i 1
C N-LL-J?I I'LNI JltV iSz
Host Credentials
Tr .-irif-in-ft rri-t-.r-; ;.i p.tlv vtml ni
■j itsk tu ijh.^-IiI^-z
^i,\mM\ \m. n fiM r-.iti.: *
* i.^runA L" u .' |
■ Pa?£xr rl 1 |
0-;.-.:;. : Pii "■
i :il "i mIi n i;.l
8-30
Copyright © 2004, Oracle. All rights reserved.
Select Whole Database
Assuming your intention is to recover the entire database, select Whole Database from the pull
down options. Other choices include table spaces, individual data files, archive logs, and
database tables. All are viable choices determined by your recovery needs. Select Recover to the
current time ... operation. Make sure you provide operating system login credentials for a
database user. The oracle user is shown in this example. Click Next to continue.
Oracle Database 10g: Administration Workshop II 8-30
Recovery Using Enterprise Manager
Select data files.
8-31
Copyrig
it © 2004, Oracle. All rights reserved.
Select Data Files
You must select the data files you want to recover. Click Select All above the data file table and
then click Next to continue. The next screen allows you to move the restored files to a location
other than the default location. Unless you have a valid reason to move the files, like a full file
system or suspected media corruption, select No, Restore the files... and then click Next to
proceed.
Oracle Database 10g: Administration Workshop II 8-31
Recovery Using Enterprise Manager
Final review
8-32
Copyright © 2004, Oracle. All rights reserved.
Final Review
You now have an opportunity to review the details associated with your recovery. You can
confirm the target database, the backups that will be used, as well as the point-in-time the
recovery will be performed to. Notice the RMAN script that will be executed to perform
recovery is shown under the RMAN Script heading. You have the ability to modify the script if
needed. Finally, at the bottom of the page, the affected data files are listed. When everything
meets your approval, click Submit. You will be notified if your job executes correctly or if any
errors are encountered.
Oracle Database 10g: Administration Workshop II 8-32
Simplified Recovery Through resetlogs
The database can be opened immediately after
resetlogs. (No longer need to take a full backup)
No changes are required to existing scripts.
Recovery through resetlogs can be used for:
- Incomplete recovery
- Recovery using a backup control file
t2 t3 t4 t5
Incomplete ^^^^M ^^^^K^T
Backup recovery 0pen with ^^^^ Recovery
taken performed resetlogs Full backup needed
8-33 Copyright © 2004, Oracle. All rights reserved.
Simplified Recovery Through resetlogs
RMAN simplifies recovery operations using backups taken from an earlier database incarnation
so that it is as easy as recovering a backup from the same incarnation. This simplified recovery
with the RESETLOGS feature is an enhancement that allows previous incarnation backups to be
used for the recovery of the current database incarnation.
You use this feature when you have performed an incomplete recovery (or a recovery using a
backup control file) and opened the database with the RESETLOGS option. You can use a
backup taken before these recovery scenarios to perform a current recovery. You do not need to
take a full backup after the RESETLOGS operation before you open the database for production
use.
You do not need to change any backup scripts, because there are no changes to the recovery
commands to take advantage of this functionality. When you use RMAN, you can take
incremental backups based on full backups of a previous incarnation. Block media recovery can
restore blocks from parent incarnation backups and recover the corrupted blocks through a
RESETLOGS operation. In Oracle Database lOg, the ALTER DATABASE OPEN RESETLOGS
statement is modified so that the database now archives the current online redo logs (if possible)
before clearing the logs.
Note: This feature is available when you use RMAN or user-managed backups.
Oracle Database 10g: Administration Workshop II 8-33
8-34
Recovery Through resetlogs: Changes
LOG_ARCHIVE_FORMAT= " LOG% t_% s_[%rl arc "
SQL> SELECT
2
3 FROM
recid, thread#, sequence!,
resetlogs_change#, resetlogs_time
v$log_history;
SQL> SELECT
2
3 FROM
recid, file#,
resetlogs_change#, resetlogs_time
v$offline_range;
SQL> SELECT
2
3 FROM
incarnation#, resetlogs_id,
prior_incarnation#, status
v$database_incarnation;
Copyright © 2004, Oracle. All rights reserved.
Recovery Through resetlogs: Changes
Previously, you did not need to be concerned about the archived redo log files created in an
earlier incarnation of the database because you would not be able to use them. Now, with the
introduction of simplified recovery with RESETLOGS, the archived redo log files can be used.
A new format specification for archived redo log files is introduced to avoid overwriting
archived redo log files with the same sequence number across these incarnations. It also ensures
that unique names are constructed for the archived redo log files during RMAN RESTORE and
SQL*Plus AUTORECOVERY mode. The format specification is %r and represents the
RESETLOGS identifier. It is included in the default format for the LOG_ARCHIVE_FORMAT
initialization parameter. For example, the default format for LOG_ARCHIVE_FORMAT on
UNIX is LOG%t_% s_%r . dbf.
Two new columns (RESETLOGS_CHANGE# and RESETLOGS_TIME) are added to the
V$LOG_HISTORY and V$OFFLINE_RANGE views to indicate the database incarnation to
which the records belong. These records are not cleared during a RESETLOGS operation.
The underlying table of the V$ARCHIVED_LOG view is not cleared after standby activation so
that RMAN is able to back up archived log files for the parent incarnation.
Oracle Database 10g: Administration Workshop II 8-34
Recovery Through resetlogs: Changes (continued)
V$DATABASE view also has the following additional columns:
• RESETLOGS_CHANGE#
• RESETLOGS_TIME
• PRIOR_RESETLOGS_CHANGE#
• PRIOR RESETLOGS TIME
Oracle Database 10g: Administration Workshop II 8-35
Summary
In this lesson, you should have learned how to:
• Recognize a situation that requires incomplete
recovery
Describe the incomplete recovery methodology
• Recover the database to a specific point in time
using:
- User-managed backups
- RMAN-managed backups
- Enterprise Manager Database Control Console
8-36 Copyright © 2004, Oracle. All rights reserved.
Oracle Database 10g: Administration Workshop II 8-36
Practice 8 Overview: Incomplete Recovery
This practice covers the following topics:
Point-in-time recovery using RMAN
• Database recovery using the EM Database Control
Console
8-37 Copyright © 2004, Oracle. All rights reserved.
Oracle Database 10g: Administration Workshop II 8-37
Practice 8: Incomplete Recovery
Exercise 1: Point-in-Time Recovery
This exercise simulates the need to recover a database to a point in the past because of the
introduction of questionable data.
1. As user system/manager create the table HR. DEPARTMENTS2 by selecting all rows
from the HR. DEPARTMENTS table. Confirm that the table exists, and record the total
number of rows in the table. View the active log by querying V$LOG. Perform a log
switch when finished
2. Check and record the system time and date.
3. Query V$LOG again to confirm the switch and then insert three lines into the
DEPARTMENTS2 table and commit. Confirm the number of rows in the table. These
inserts represent the introduction of "questionable" data into the table.
4. Shutdown the database, and restart it in mount mode.
5. Using RMAN, recover the database to a point in time before the new data was introduced
using the information you recorded before the inserts were performed.
6. Open the database with the RESETLOGS option and confirm the recovery. Always perform
a database reset and a backup after opening the database with the RESETLOGS option.
Finally, bounce the database.
Exercise 2: Recovery Using Log Sequence and Enterprise Manager
This exercise simulates the recovery to a point in the past using the EM interface to RMAN.
1. Determine the current log sequence and write it down.
2. Verify the row count for the HR. DEPARTMENTS 2 table.
3. Force a log switch and verify the switch has taken place. Perform several inserts into the
HR. DEPARTMENTS 2 table and commit the changes. Verify the new row count.
4. Using Enterprise Manager, recover the database to the log sequence you wrote down
previously.
5. Verify that the recovery was successful. Perform a backup when finished.
Oracle Database 10g: Administration Workshop II 8-38
Flashback Database
Copyright © 2004, Oracle. All rights reserved.
Objectives
After completing this lesson, you should be able to
Describe Flashback Database architecture
Enable and disable the Flashback Database
Monitor the Flashback Database
Use the Enterprise Manager Recovery Wizard
9-2 Copyright © 2004, Oracle. All rights reserved.
Oracle Database 10g: Administration Workshop II 9-2
Flashback Any Error
Flashback Database brings the database to a prior
point in time by undoing all changes made since
that time.
Flashback Table recovers a table to a point in time
in the past without restoring a backup.
Flashback Drop restores accidentally dropped
tables.
9-3 Copyright © 2004, Oracle. All rights reserved.
Flashback Any Error
Oracle Database 10g introduces expanded database Flashback capabilities. If a major error
occurs, such as a batch job being run twice in succession, the database administrator can request
a Flashback operation that quickly recovers the entire database to a previous point in time,
eliminating the need to restore backups and do a point-in-time recovery. In addition to flashback
operations at the database level, it is also possible to flash back an entire table, or recover a table
dropped in error.
Oracle Database 10g: Administration Workshop II 9-3
Flashback Technology Benefits
Flashback technology is a revolutionary advance
in recovery
• Traditional recovery techniques are slow
- Entire database or file has to be restored, not just
the incorrect data
- Every change in the database log must be examined
Flashback is fast
- Changes are indexed by row and by transaction
- Only the changed data is restored
Flashback commands are easy
- No complex multi-step procedures
9-4 Copyright © 2004, Oracle. All rights reserved.
Flashback Technology Benefits
The Oracle Database 10g architecture leverages the unique technological advances in the area of
database recovery due to human errors. Flashback technology provides a set of new features to
view and rewind data back and forth in time.
Flashback technology revolutionizes recovery by just operating on the changed data. The time it
takes to recover the error is now equal to the same amount of time it took to make the mistake.
When applicable, Flashback technology provides significant benefits over media recovery in
terms of ease of use, availability and restoration time by using undo data.
Oracle Database 10g: Administration Workshop II 9-4
When to Use Flashback Technology
Object
Level
Database
Table
Tx
Scenario
Drop User
Truncate Table
Batch job: partial changes
Drop Table
Update with wrong WHERE
clause
Comparing current data
against the data at some time
in the past
Batch Job runs twice, but not
really sure of the objects
affected
Flashback Technology
Flashback Database
Flashback Database
Flashback Database
Flashback Drop
Flashback Table
Flashback Query
Flashback Query
9-5 Copyright © 2004, Oracle. All rights reserved.
When to Use Flashback
Flashback technology should be used when a logical corruption occurs in the Oracle database,
and you need to recover quickly and easily. As with human errors, it is difficult to identify the
objects and rows that were affected by an erroneous transaction. Hashback technology aids you
in the diagnosis of how errors were introduced into the database so you can repair the damage
and prevent it from happening again. Oracle Database lOg allows a DBA to audit database
transactions quickly and easily down to the second they were committed. The above table shows
typical uses of Flashback technology.
Oracle Database 10g: Administration Workshop II 9-5
Flashback Database Overview
The Flashback Database operation:
• Works like a rewind button for the database.
• Can be used in cases of logical data corruptions
made by users.
Users ~ . Press the
-"•- sr; rewindbu"°n Da,re
errors
rewound
9-6 Copyright © 2004, Oracle. All rights reserved.
Overview
Flashback Database lets you quickly bring your database to a prior point in time by undoing all
the changes that have taken place since that time. This operation is fast, because you do not need
to restore the backups. You can use this feature to back out changes that have resulted in logical
data corruptions.
If you have experienced physical corruption in your database or a loss of media, you must use
traditional recovery methods.
Oracle Database 10g: Administration Workshop II 9-6
Flashback Database
Reduces Restore Time
Incomplete Recovery
Generate logs
Restore files
Repaired
database
Backup
User error
Apply logs
forward
Flashback Database
— Flashback logs
—
Backup
User
error
Apr.
log:
>ly Flashbi
5 backwar
Repaired
database
ack
d
9-7
Copyright © 2004, Oracle. All rights reserved.
Reducing Restore Time
Flashback Database is faster than traditional point-in-time recovery using restored files and redo
log files. The time to recover a database is now proportional to the number of changes that need
to be backed out, not the size of the database because you do not have to restore the data files
when using Flashback Database. As a database grows in size, the length of time required to
restore all the data files to perform a traditional point-in-time recovery becomes prohibitive.
Flashback Database is implemented using a type of log file called Flashback Database logs. The
Oracle database periodically logs before images of data blocks in the Flashback Database logs.
Block images can be reused to quickly back out the data file changes to any time at which
flashback logs were captured just before the desired target time. Then, changes from the redo log
files are applied to fill in the gap. The Flashback Database logs are automatically created and
managed in the flash recovery area.
Oracle Database 10g: Administration Workshop II 9-7
Flashback Database Architecture
16Mb
SGA
8Mb
Flashback
Buffer
Not every
change!
Buffer Cache
Redo Log
Buffer
Every I
change
Log block
before
>.t Apply images
\directioni periodically
Write
directio
Back out changes Forward media^^
(l) to database recovery (2)
1 without restore
I
Apply
direction
9-8
Copyright © 2004, Oracle. All rights reserved.
Flashback Database Architecture
When you enable Flashback Database, the new RVWR background process is started. This
background process sequentially writes Flashback Database data from the flashback buffer to the
Flashback Database logs, which are circularly reused. The overhead of enabling Flashback
Database depends on the read-write mix of the database workload. Because queries do not need
to log any flashback data, the more write intensive is the workload, the higher the overhead of
turning on Flashback Database.
Note: Flashback Database logs are not archived.
Oracle Database 10g: Administration Workshop II 9-8
Configuring Flashback Database
1. Configure the 2. Set the retention 3. Enable Flashback
flash recovery area target Database
SQL> ALTER SYSTEM SET
2 DB_FLASHBACK_RETENTION_TARGET=2 8 8 0
3 SCOPE=BOTH;
SQL> ALTER DATABASE FLASHBACK ON;
9-9
Copyright © 2004, Oracle. All rights reserved.
Configuring Flashback Database
You can configure Hashback Database as follows:
1. Configure the flash recovery area.
2. Set the retention target with the DB_FLASHBACK_RETENTION_TARGET initialization
parameter. You can specify an upper limit, in minutes, on how far back you want to be able
to flash back the database. The example uses 2880 minutes which is equivalent to two
days. This parameter is only a target and does not provide any guarantee. Your flashback
time interval depends on how much flashback data has been kept in the flash recovery area.
3. Enable Flashback Database with the following command:
ALTER DATABASE FLASHBACK ON;
Before you can issue the command to enable Flashback Database, the database must be
configured for archiving and started in MOUNT EXCLUSIVE mode.
You can determine whether Flashback Database is enabled with the following query:
SELECT flashback_on FROM v$database;
You can disable Flashback Database with the ALTER DATABASE FLASHBACK OFF
command. As a result, all existing Flashback Database logs are deleted automatically.
Note: You can enable Hashback Database only when the database is mounted in exclusive
mode, not open.
Oracle Database 10g: Administration Workshop II 9-9
Configure Flashback Database with EM
Make sure the database is in archivelog mode.
Media Recovery
The database is currently in ARCHIVELOG mode. In ARCHIVELOG mode, ho
space for logs. If you change the database to ARCHIVELOG mode, you shou
cold backups and data may be lost in the event of database corruption.
E ARCHIVELOG Mode*
Log Archive Filename Format* %t_%s_%r.dbf
The naming convention for the archived log files. %s: loci sequence number; %t: threat
9-10
Copyright © 2004, Oracle. All rights reserved.
Ensure Database Is in archivelog Mode
Log in to Enterprise Manager Database Console. From the Maintenance page, select
Backup/Recoveiy, then choose Configure Recoveiy Settings. Make sure that your database is
ARCHIVELOG mode. If not, check ARCHIVELOG Mode and then click Continue. You will
need to shutdown and restart the instance for your changes to take effect.
Oracle Database 10g: Administration Workshop II 9-10
Configure Flashback Database with EM
Enable Flashback logging and specify flash recovery
area
10
|USE DB RECOVERY FILE DEST
n/a
VAUD
f&TIP It is recommended that archive loci files be written to multiple locations spread across the differer
disks
B?TIP You can specify up lo 10 archive log deslinalions
Flash Recovery Area
It is highly recommended thai you use Hash recovery area to automate your disk backup management.
Flash Recovery Area Localion |/u01/app/oracle/Hasri_recovery_area |
Flash Recovery Area Size [2 | |_GE[_U
Flash Recovery Area Size must be set when the locetion is set
Used Flash Recovery Area Size (MB) 124.195
E Enable flashback logging for fast database point-in-time recovery* |
to a piior point-in-lime without resloring ules. Flashback is I he preiened poinl-in-time iscovery method in the lecovery wizard when
appropriate.
Specify how far back you wish to flash the database in the future
Flashback Retention Time \2A | |_Hours__[J
9-11 Copyright© 2004, Oracle. All rights reserved.
Enable Flashback Logging
When you are certain the database is in ARCHIVELOG mode, return to the Recovery Settings
page and scroll down to the Media Recovery and Flash Recovery Area regions to observe the
new settings. When the flash recovery area and archiving are configured,
USE_DB_RECOVERY_FILE_DEST is configured for archive log destination 10. Enable
flashback logging by selecting Enable Flashback Logging. You also have the ability to set the
flashback retention time, and you can view important information regarding your flashback
database window.
Review the Flash Recovery Area location. The flash recovery area is a unified storage location
for all recovery related files and activities in an Oracle database. All files that are needed to
completely recover a database from a media failure are part of the flash recovery area. The
recovery related files that can be created in the flash recovery area include: archived redo log
files, control files, backups created by Recovery Manager (RMAN), flashback logs, and the
change tracking file. By allocating a storage location and unifying recovery related files within a
specific area, the Oracle database server relieves the database administrator from having to
manage the disk files created by these components. The default location for the flash recovery
area is $ORACLE_BASE. If you would like it in a different location, change it now. Scroll down
to the bottom of the Recovery Settings page and click Apply.
Oracle Database 10g: Administration Workshop II 9-11
9-12
Monitoring Flashback Database
• Adjust the flash recovery area disk quota:
SQL> SELECT estimated_flashback_size,
2 flashbacksize
3 FROM V$FLASHBACK_DATABASE_LOG;
Determine the current flashback window:
SQL> SELECT oldest_flashback_scn,
2 oldest_flashback_time
3 FROM V$FLASHBACK_DATABASE_LOG;
• Monitor logging in the Flashback Database logs:
SQL> SELECT *
2 FROM V$FLASHBACK_DATABASE_STAT;
Copyright © 2004, Oracle. All rights reserved.
Monitoring Flashback Database
Use the V$FLASHBACK_DATABASE_LOG view to monitor the Hashback Database retention
target:
• ESTIMATED_FLASHBACK_S IZE uses previously logged flashback data to provide an
estimate of how much disk space is needed in the flash recovery area for flashback logs to
meet the current flashback retention target. The estimate is based on the workload since the
instance was started, or during the most recent time interval equal to the flashback retention
target, whichever is shorter.
FLASHBACK_S IZE gives you the current size in bytes of the flashback data.
• OLDEST_FLASHBACK_SCN and OLDEST_FLASHBACK_TIME display the approximate
lowest SCN and time to which you can flash back your database. CURRENT_SCN in
V$DATABASE gives you the current database SCN.
Use the V$FLASHBACK_DATABASE_STAT view to monitor the overhead of logging flashback
data in the Flashback Database logs. This view contains 24 hours of information, with each row
representing a one-hour time interval. You can use this view to determine rate changes in the
flashback data generation.
SQL> SELECT begin_time, end_time, flashback_data, db_data,
2 redo_data, estimated_flashback_size AS EST_FB_SZE
3 FROM V$FLASHBACK_DATABASE_STAT;
Oracle Database 10g: Administration Workshop II 9-12
Monitoring Flashback Database (continued)
BEGIN_TIM END_TIME FLASHBACK_DATA DB_DATA REDO_DATA EST_FB_SZE
12-FEB-04 12-FEB-04 16384 0 24576 0
12-FEB-04 12-FEB-04 6594560 7471104 1533440 815923200
12-FEB-04 12-FEB-04 17235968 12361728 5150720 839467008
12-FEB-04 12-FEB-04 311648256 37249024 10272768 855195648
Based on this information, you may need to adjust the retention time or the flash recovery area
size.
flashback_data and redo_data represent the number of bytes of flashback data and
redo data written respectively during the time interval, while db_data gives the number of
bytes of data blocks read and written. This view also contains the estimated flashback space
needed for the interval.
You can query V$RECOVERY_FILE_DEST to view information regarding the flash recovery
area. The column descriptions are:
NAME: Flash recovery area name, indicating location string
• SPACE_LIMIT: Disk limit specified in the DB_RECOVERY_FILE_DEST_SIZE
parameter
SPACE_USED: Used space by flash recovery area files (in bytes)
SPACE_RECLAIMABLE: Amount of space that can be reclaimed by deleting obsolete,
redundant, and other low-priority files through the space management algorithm
• NUMBER_OF_FILES: Number of files
SQL> SELECT name, space_limit AS quota,
2 space_used AS used,
3 space_reclaimable AS reclaimable,
4 number_of_flies AS files
5 FROM v$recovery_file_dest ;
NAME QUOTA USED RECLAIMABLE FILES
/u01/flash_recovery_area 5368709120 2509807104 203386880 226
Oracle Database 10g: Administration Workshop II 9-13
Monitoring Flashback Database with EM
Flash Recovery Area
11 is highly recommended that you use flash recovery area to automate your disk backup management.
Flash Recovery Area Location l/u01/aprVoracle/flash_recovery_area
Flash Recovery Area Size |2_
~™M
Flash Recovery Area Size must be set when the location is set
Used Flash Recovery Area Size (MB) 124.195
E Enable flashback logging for fast database point-in-time recovery*
The flash recovery area must be set to enable flashbach logging. When using llashback logs, you may recover your entire database
to a prior point -in-time without restoring tiles. Flashback is the preferred point-m-time recovery method in the recovery wizard when
appropriate.
Specify how far back you wish to flash the database in the future
Flashback Retention Time 24
Hours
■
Current size of the flashback logs(GB) n/a
Lowest SCN in the flashback data n/a
Time of the lowest SCN in the flashback data n/a
9-14
Copyright © 2004, Oracle. All rights reserved.
Monitoring Flashback Database with EM
Most of the Hashback Database statistics mentioned on preceding pages can be viewed from the
Configure Recoveiy Settings page. These metrics include the current flashback log size, the
lowest SCN and the time of the lowest SCN in the flashback data.
Oracle Database 10g: Administration Workshop II 9-14
Monitoring Flash Recovery Area with EM
|D?:?ia^?: or?I.Js.orac?.c3n > A Melicj > - = 'Xt-:'E -v AREA
T orcl. us
►Alert
►■Alert
►Alert
►Dl
►Effic
Recovery Area Free Space (%): Recovery Area RECOVERY AREA
Pecrer; A-ea RE COVEUY ArtEA
Statistics for Last 24 Hours
Las: "'.icf-!i Value £.53
''■■xi!i m: : V ilm 1 J) 1
lli£i Value OJO
I ii'> V ilm II
Ys'anirgTIiresiok Not Defiiad
■_": i .ii 11 I Mi ."jiuIij N ui. L'L'liii L'i.1
Tlirs&iok C:cjir3i:es No data
I il :: ;l TJ:. ;j L~=i ill :i :l :i" F i n T;. iqi Fi:li 17, fllflt »:n?:?S ftffl
Metric Value, From Repository
6.0
io: :u i: t-a :
Teb 1?. 2^04
10 12 .aM
17
or: lie on: 3.01-r
►invalid Obiects
\i
nvalid CibjeclT by Schema
► Recovery
fc>Pflfinnnflfl
/^ea
►SGAPool Wastaqe
►SQL Response Time
9-15
Copyright © 2004, Oracle. All rights reserved.
Monitoring Flash Recovery Area with EM
Real time flash recovery area related metrics can also be viewed through the EM Database
Control Console. From the Mainteuance page, scroll down to Related links and select All
Metrics. Scan the list and click on Recovery Area.
The displayed page shows the Recovery Area Free Space (%) metric, which represents the
recovery area free space as a percentage.
Oracle Database 10g: Administration Workshop II 9-15
Best Practices for the Database and
Flash Recovery Area
Use the flash recovery area for recovery-related files:
• Simplifies location of database backups
• Automatically manages the disk space allocated
for recovery files
• Does not require changes to existing scripts
• Puts database backups, archive logs, and control
file backups in the flash recovery area
9-16 Copyright© 2004, Oracle. All rights reserved.
Best Practices for the Database and Flash Recovery Area
Using a flash recovery area for all recovery-related files simplifies the ongoing administration of
your database, depending on the setting of the initialization parameters
DB_RECOVERY_FILE_DEST_SIZE and DB_RECOVERY_FILE_DEST. Oracle Corporation
recommends the use of the flash recovery area for all recovery-related files.
Oracle Database 10g: Administration Workshop II 9-16
Backing Up the Flash Recovery Area
Of^ACLELiYlcr prise Haruyc-r lU:n |
DtiluhtHU OjiiIiuI
D":bo;:: : :l.u; :■ "I? ::n-
Schedule Backup: Strategy
Dried :>■ icu d ik ■inifir iii :c toi .rclis■, ?rac c profile: rr iu:«-i:t:c bo: .up '/ or?
=„:- FriMiMj5|;.,K„„^i 1
■jb«: l>:c C'.MuvDa.d:^
C Uonine-j
"I..- P •{*&—*
I'. itt-.'i-Kitp
ftij Hhi: -.hi-,-Fi-x i
l-.-.r *-ji .luJ.i u'.'r
. _>f." UP.' U j . Uj_
■.-■ J I.. II I. If.. .*!.■. .",■ -JU.1JW If. I
Moat Credentials
-, |m-f." ,Ih.» |. K..|.= ly ■!MMlhjl.yltH" iii|riiml-i^
"■AlVPfft |...J.k
E ::-r.i- :1;-: I'-ihih-iI '-h-iiIi,
RMAN> BACKUP RECOVERY FILES;
9-17
Copyright © 2004, Oracle. All rights reserved.
Backing Up the Flash Recovery Area
Because of the importance of the data it contains, you should backup the files in the flash
recovery area on a regular basis. To do this, navigate to the Maintenance folder tab. From there,
click the Schedule Backup link in the Backup/Recoveiy region. Select Customized from the
Backup Strategy pull down list, and then select the Aii Recoveiy Fiies on Disk option. You can
also use RMAN BACKUP commands to backup the flash recovery area.
• RMAN> BACKUP RECOVERY AREA;
This command backs up all flash recovery files created in the current flash recovery area
destinations that have not previously been backed up. Files that fall into this category are
full and incremental backup sets, control file autobackups, archive logs, and data file
copies. Other files such as flashback logs, incremental bitmaps, current control file, and
online redo log files are not backed up.
• RMAN> BACKUP RECOVERY FILES;
This command backs up all recovery files on disk that have not previously been backed up.
The files that fall into this category are full and incremental backup sets, control file
autobackups, archive logs, and data file copies.
Oracle Database 10g: Administration Workshop II 9-17
Flash Recovery Area Space Usage
Configure the retention policy to the minimum
value appropriate for your database
Backup the archive log files regularly and delete
the files upon completion of the backup
Use the RMAN report obsolete and delete
obsolete commands to remove unneeded
backups and file copies
9-18 Copyright© 2004, Oracle. All rights reserved.
Flash Recovery Area Space Usage
To avoid running out of space in the Flash Recovery Area, you should never store user-managed
files in this area. You should also perform the following steps as needed or appropriate:
• Delete unneeded files from the recovery area using RMAN
• Take frequent backups of the recovery area using RMAN
• Change the RMAN retention policy to retain backups for a smaller period of time
• Change the RMAN archived log deletion policy
• Add disk space and increase the value of the DB_RECOVERY_FILE_DEST_S IZE
database initialization parameter if you are frequently running out of space
For example, to backup the archived log files in the recovery area and then delete the files after
they have been successfully backed up, you would use the RMAN command:
BACKUP ARCHIVELOG ALL DELETE ALL INPUT;
If you use a backup solution other than RMAN, you still have to use RMAN to remove the files
from the Flash Recovery Area. After the archived log files have been backed up and removed
from disk, use the RMAN CROSSCHECK and DELETE commands to remove the reclaim the
archived log space from the flash recovery area. You should do this on a regular basis, or after
every backup.
Oracle Database 10g: Administration Workshop II 9-18
Flashback Database Examples
RMAN> FLASHBACK DATABASE TO TIME =
2> TO_DATE('2004-05-27 16:00:00',
3> 'YYYY-MM-DD HH24:MI:SS');
RMAN> FLASHBACK DATABASE TO SCN=23565;
RMAN> FLASHBACK DATABASE
2> TO SEQUENCE=223 THREAD=1;
SQL> FLASHBACK DATABASE
2 TO TIMESTAMP(SYSDATE-1/24);
SQL> FLASHBACK DATABASE TO SCN 53943;
9-19 Copyright© 2004, Oracle. All rights reserved.
Flashback Database Examples
You can use the RMAN FLASHBACK DATABASE command to execute the Hashback Database
operation. You can use SEQUENCE and THREAD to specify a redo log sequence number and
thread as an upper limit. RMAN selects only files that can be used to recover up to, but not
including, the specified sequence number.
Alternatively, you can use the FLASHBACK DATABASE SQL command to return the database to
a past timeor SCN. If you use the TO SCN clause, you must provide a number. If you specify TO
TIMESTAMP, you must provide a timestamp value.
Note: The database must be mounted in exclusive mode to issue the FLASHBACK DATABASE
command and must be opened with the RESETLOGS option when finished.
Oracle Database 10g: Administration Workshop II 9-19
Flashback Database with EM
Select object and
operation type
Perform Recovery: Type
Type
Object Type Whole Dal il i J
Operation ® Recover to the current time or a previous point-in-tirnH
Type Datafiles will be restored from the latest usable backup as required.
O Restore all dalafiles
Need to specify Time, SCN or log sequence. The backup laken al or
prior to that time will be used.
O Recover from previously restored dalafiles
Host Credentials
To perform recovery, supply operating system login credentials.
* Usernatne oracle
9-20
Copyright © 2004, Oracle. All rights reserved.
Select Operation Type
From the Maintenance page, choose Perform Recovery. From the Object Type pull down
menu, select Whole Database. Next, select Recover to current time or a previous point-in-
time under Operation Type. Finally, provide the operating system credentials for a database
user, that is, one who belongs to the dba group. When these steps are completed, click Continue
to proceed to the next step in the Flashback Database operation.
Oracle Database 10g: Administration Workshop II 9-20
Flashback Database with EM
Launching Recovery Wizard
ORACLE" Enterprise Manager 10 p
Database Control
Database: orcl.us.oracle.com
Recovery Wizard
The database will be shutdown and started/mounted. Please wait some time for this
operation to complete and click 'Refresh' You will be redirected to a page to go
through the recovery wizard.
Database | Setup | Preferences | Help | Logout
Copyright © 1996, 2004, Oracle All rights reserved.
Abtjul Oracle Enterprise Manager 10ci Database Control
9-21
Copyright © 2004, Oracle. All rights reserved.
Launching Recovery Wizard
After the recovery operation type has been chosen, the Recovery Wizard is launched. You are
informed that the database will be shutdown and restarted in mount mode. This operation will
take several minutes and you will be informed of the delay. After waiting an appropriate amount
of time, you are then prompted to click on Refresh to continue with the operation.
Oracle Database 10g: Administration Workshop II 9-21
Flashback Database Using EM
ORACLE Enterprise Manager10g
Data I] as g Control
Point-ln-time FiashBack Rename Review
Perform Recovery: Review
Step 4 of 4
Database orcl
Object Type Whole Database
Operation Type Restore and Recover
Point-in-time Recover to a prior point-in-lime
SCM 2683418
Click on the 'Edit RMAN Script1 button to view or edit trie RMAM script before submitting the operation.
RMAN Script
RMAN Script
run [flashback database to sen 2603419;
alter database open resell ogs; ]
Retuin to Recoveiy Type Selection
Step 4 of4
9-22
Copyright © 2004, Oracle. All rights reserved.
Flashback Database Using EM
The Recovery Wizard is now started. At this stage, the database is shut down and started in
mount mode. Click Refresh.
This brings you to the Perform Recovery: Point-in-time page. On this page, select the Recover
to a prior point-in-time option, and then specify either a date or an SCN. Then click Next
The Perform Recovery: Flashback page appears next, and you can choose to perform either
recovery using flashback or regular recovery. Choose the corresponding option, and then click
Next.
This brings you directly to the Perform Recovery: Review page that is shown on the slide. Click
Submit to flash back the database.
Oracle Database 10g: Administration Workshop II 9-22
9-23
Excluding Tablespaces from Flashback
Database
ALTER TABLESPACE <ts_name> FLASHBACK {ON|OFF}
SQL> SELECT tablespacename, flashbackon
2 FROM v$tablespace;
• Take the tablespace offline before you perform the
Flashback Database recovery.
Drop the tablespace or recover the offline files
with traditional point-in-time recovery.
Copyright © 2004, Oracle. All rights reserved.
Excluding Tablespaces
You may have a tablespace for which you do not want to log Flashback Database data. You can
use the ALTER TABLESPACE command to exclude a tablespace from participating in flashback
of the database. This attribute can also be specified when a tablespace is created. The default
value is ON.
You must take this tablespace offline prior to flashing back the database. You can then drop the
tablespace or recover the offline data files using traditional point-in-time recovery methods. You
can query the V$TABLESPACE view to determine the flashback status for a tablespace.
Note: If you re-create the control file, all tablespaces are placed in FLASHBACK ON mode. You
must repeat the ALTER TABLESPACE commands to ensure the tablespaces are excluded from
Flashback Database operations.
Oracle Database 10g: Administration Workshop II 9-23
Flashback Database Considerations
• When the Flashback Database operation
completes, open the database:
- In read-only mode to verify that the correct target
time or SCN was used
- With a resetlogs operation to allow for updates
• The opposite of flashback is recover
• You cannot use Flashback Database in the
following situations:
- The control file has been restored or re-created.
- A tablespace has been dropped.
- A data file has been shrunk.
- You want to flashback before resetlogs operation.
9-24 Copyright © 2004, Oracle. All rights reserved.
Flashback Database Considerations
In situations where you cannot use the Flashback Database feature, you should use an incomplete
recovery operation to return the database to a specific time. After the Flashback Database
operation is complete, you can open the database in read-only mode to verify that the correct
target time or SCN was used. If not, you can flash back the database again, or perform a recovery
to roll forward the database. So, to undo a Flashback Database operation, you should recover the
database forward.
You cannot use Flashback Database to recover a data file that was dropped during the span of
time you are flashing back. The dropped data file is added to the control file and marked offline,
but it is not flashed back. Flashback Database cannot flash back a data file to a time after its
creation and before the resize operation. If a file was resized during the span of time to which
you are going to flash back the database, you should take the file offline before beginning the
Flashback Database operation. This is applicable for files that are shrunk rather than expanded.
You can use Flashback Database with data files that you have configured for automatic
extension.
Note: The flashback retention target is not an absolute guarantee that flashback will be
available. If space is needed for required files in the flash recovery area, flashback logs
may be deleted automatically.
Oracle Database 10g: Administration Workshop II 9-24
Summary
In this lesson, you should have learned how to:
Describe Flashback Database architecture
Enable and disable Flashback Database
Monitor Flashback Database
Use the Enterprise Manager Recovery Wizard
9-25 Copyright © 2004, Oracle. All rights reserved.
Oracle Database 10g: Administration Workshop II 9-25
Practice 9 Overview: Flashback Database
These practices cover the following topics:
Configuration of Flashback Database
Using the Flashback Database RMAN interface
Using Flashback Database through the EM
Database Control Console
Managing and monitoring Flashback Database
operations
9-26 Copyright © 2004, Oracle. All rights reserved.
Oracle Database 10g: Administration Workshop II 9-26
Practice 9: Flashback Database
This practice covers the configuration and basic functions of Flashback Database. Unless
specified otherwise, you should be logging in as sys/oracle as SYSDBA either through the
Database Control Console or SQL*Plus.
Exercise 1: Configuring Flashback Database
This exercise covers the configuration and basic functions of Flashback Database.
1. Flashback Database requires that the database be in ARCHIVELOG mode. Use EM to
configure this, if needed.
2. Configure Flashback Database from the Configure Recovery Settings page. Set the flash
recovery area size to 4 GB. Enable Flashback logging and set the
DB_FLASHBACK_RETENTION_TARGET parameter to 1 day.
Exercise 2: Using the Flashback Database RMAN interface
This exercise will familiarize you with the Flashback Database RMAN interface.
1. Confirm the row count for the HR. DEPARTMENTS 2 table and then record the system time.
Write down the current time for your system.
2. Delete several rows from the HR. DEPARTMENTS2 table.
3. Commit the changes and then confirm the row count.
4. Using the Flashback Database RMAN interface, flash the database back to reflect its
condition before the data was dropped.
5. From a SQL*Plus session, connect as SYS and open the database with the RESETLOGS
option. Get a row count from the HR. DEPARTMENTS2 table to confirm that the flashback
was successful. Then take a new backup of the database.
Exercise 3: Using the Flashback Database EM Interface
This exercise will familiarize you with the Flashback Database EM interface.
1. Confirm the row count for the HR. DEPARTMENTS 2 table and then record the current SCN
by querying V$DATABASE. Record this value here: .
2. Delete several rows from the HR. DEPARTMENTS 2 table. Commit the changes and get
another row count.
3. Query V$DATABASE and be certain the SCN has been incremented.
4. Using EM, flashback the database to the SCN recorded before the rows were deleted.
Review the RMAN commands used for the flashback operation before submitting your
request.
5. Verify the flashback operation was successful. Perform a backup when finished.
Exercise 4: Managing and Monitoring Flashback Database
This exercise will familiarize you with the dictionary views used to manage and monitor
Flashback Database.
1. Query the V$FLASHBACK_DATABASE_LOG view and determine the lowest SCN that the
database can be flashbacked to. Record your answer here:
2. View the overhead associated with flashback logging and related operations by querying
V$FLASHBACK_DATABASE_STAT.
3. Determine the current size of stored flashback data by querying
V$FLASHBACK_DATABASE_LOG. Record your answer here:
Oracle Database 10g: Administration Workshop II 9-27
Recovering from User Errors
Copyright © 2004, Oracle. All rights reserved.
Objectives
After completing this lesson, you should be able to:
Perform Flashback table operation
Manage the recycle bin
Recover from user errors using Flashback
versions query
Perform transaction level recovery using
Flashback Transaction query
10-2 Copyright© 2004, Oracle. All rights reserved.
Oracle Database 10g: Administration Workshop II 10-2
Flashback Time Navigation
Flashback Query
- Query all data at a specified point in time
Flashback Versions Query
- See all versions of a row between two times
- See the transactions that changed the row
Flashback Transaction Query
- See all changes
Time
made by a
transaction
GjX/"""-
<BX777777,
Q&m
Flashback
10-3
Copyright © 2004, Oracle. All rights reserved.
Flashback Time Navigation
Flashback Technology offers the capability to query past versions of schema objects, query
historical data, perform change analysis. Every transaction logically generates a new version of
the database. With Flashback Technology, you can navigate through these versions to find an
error and its cause:
• Flashback Query: Query all data for a point in time
• Flashback Versions Query: See all versions of rows between two times and the
transactions that changed the row
• Flashback Transaction Query: See all changes made by a transaction
Oracle Database 10g: Administration Workshop II 10-3
10-4
Flashback Drop Overview
DROP TABLE employees;
Mistake wasl
™d# f A.
Copyright © 2004, Ora
*
;le. All r
FLASHBACK TABLE
employee s
TO BEFORE DROP;
grits reserved.
Flashback Drop Overview
In prior releases of the Oracle Database, if you mistakenly dropped a table, you had to recover
the database to a prior time to recover the dropped table. This procedure was often time
consuming and resulted in the loss of the work of other transactions.
The flashback drop feature that allows you to undo the effects of a DROP TABLE statement
without resorting to traditional point-in-time recovery.
Oracle Database 10g: Administration Workshop II 10-4
Recycle Bin
When you dropped a table in previous releases of the Oracle database, the space associated with
the table and its dependent objects was immediately reclaimable.
When you drop a table with Oracle Database lOg, the space associated with the table and its
dependent objects is not immediately reclaimable although it appears in DBA_FREE_SPACE.
Instead, the dropped objects are temporarily placed in the recycle bin and still belong to their
owner. The space used by recycle bin objects is never reclaimed unless there is space pressure.
This allows you to recover recycle bin objects for the maximum possible duration.
When a dropped table is moved to the recycle bin, it and its associated objects and constraints
are renamed. This is necessary to avoid name conflicts that may arise if you later create a new
table with the same name.
The recycle bin itself is a data dictionary table that maintains the relationships between the
original names of dropped objects and their system-generated names. You can query the content
of the recycle bin by using the DBA_RECYCLEBIN view.
Oracle Database 10g: Administration Workshop II 10-5
10-6
Querying the Recycle Bin
SELECT owner, original_name, object_name,
type, ts_name, droptime, related, space
FROM dba_recyclebin
WHERE can_undrop = 'YES';
SELECT original_name, object_name,
type, ts_name, droptime, related, space
FROM user_recyclebin
WHERE can_undrop = 'YES';
SQL> SHOW RECYCLEBIN
Copyright © 2004, Oracle. All rights reserved.
Querying the Recycle Bin
You can view all of the objects that you have dropped by querying USER_RECYCLEBIN or
RECYCLEBIN.
DBA_RECYCLEBIN shows you all the objects that have been dropped by all users and that are
still in the recycle bin.
You can also use the SQL*Plus SHOW RECYCLEBIN command. This command shows you only
those objects that can be un-dropped.
The examples above show you how to extract important information from the recycle bin:
ORIGINAL_NAME is the name of object before it has been dropped.
OBJECI_NAME is the system-generated name of the object after it was dropped.
TYPE is the object's type.
IS_NAME is the name of the tablespace to which the object belongs to.
DROP TIME is the date at which the object was dropped.
RELATED is the object identifier of the dropped object.
SPACE is the number of blocks currently used by the object.
Oracle Database 10g: Administration Workshop II 10-6
Querying the Recycle Bin (continued)
You can also see the content of the recycle bin by using EM Database Control Console.
SQL> drop table hr.employees;
Table dropped.
SQL> select original_name, owner, operation from dba_recyclebin;
ORIGINAL_NAME OWNER OPERATION
EMPLOYEES HR DROP
Oracle Database 10g: Administration Workshop II 10-7
10-8
Flashback Dropped Tables Using EM
Perform Recovery: Dropped Objects Selection
^^^^ Step of 3 ^^^
Object Type Tables
Operation Type Flashback Dropped Tables
Select the tables from the Recycle Bin that you would like to recover. The Results table shows
dependent objects that will also be recovered when the selected tables are recovered
Search
Schema Name Table
|hr ,^ ^h
Results
Select All | Select None | Eitpand All Collapse All
Copyright © 2004, Oracle. All rights reserved.
Flashback Dropped Tables Using EM
To flashback dropped tables with the Database Control Console, from the Maintenance page,
select Perform Recoveiy in the Backup/Recoveiy region. Select Tables for the Object Type
in the Type region, and choose Flashback Dropped Tables in the Operation Type section.
Once done, click Continue.
You should now see the Recoveiy: Dropped Objects Selection page from where you can select
dropped tables from the recycle bin. You can also query the content of dropped tables by
clicking View Content. Select the tables you want to recover and click Next.
The next step is the Recoveiy: Rename page, where you can rename the table if one with the
same name currently exists in the same schema. Click Next to continue. On the Perform
Recoveiy: Review page, you can review the details of your operation as well as display the
corresponding SQL statements. Once you are ready, click Submit. You should now see the
Confirmation page. Click OK to go back to the Maintenance page.
Note: You can also flashback dropped tables from the Tables link of the Schema section of the
Administration page. On the Tables page, click the Recycle Bin button.
Oracle Database 10g: Administration Workshop II 10-8
Restoring Objects from the Recycle Bin
Use the flashback table ... command to
restore dropped tables and dependent objects.
If multiple recycle bin entries have the same
original name:
- Use unique system-generated names to restore a
particular version.
- When using original names, restored table is LIFO.
Rename the original name if that name is currently
used.
FLASHBACK
TO
BEFORE
TABLE
DROP
<table_
[RENAME
_name>
TO
<new_
_name>]
10-9 Copyright© 2004, Oracle. All rights reserved.
Restoring Objects from the Recycle Bin
Use the FLASHBACK TABLE ... TO BEFORE DROP command to recover a table and all of
its dependent objects from the recycle bin. You can specify either the original name of the table
or the system-generated name assigned to the object when it was dropped.
If you specify the original name, and if the recycle bin contains more than one object of that
name, then the object that was moved to the recycle bin most recently is recovered first (Last In
First Out). If you want to retrieve an older version of the table, you can specify the system-
generated name of the table you want to retrieve, or issue additional FLASHBACK TABLE . . .
TO BEFORE DROP statements until you retrieve the table you want.
If a new table of the original same name has been created in the same schema since the original
table was dropped, then an error is returned unless you also specify the RENAME TO clause.
Note: When you flashback a dropped table, the recovered indexes, triggers, and constraints keep
their recycle bin names. Therefore it is advisable to query the recycle bin and
DBA_CONSTRAINTS before flashing back a dropped table. That way you can rename the
recovered indexes, triggers, and constraints to more usable names.
Oracle Database 10g: Administration Workshop II 10-9
Automatic Space Reclamation
As long as the space used by recycle bin objects is not reclaimed, you can recover those objects
by using the flashback drop feature. There are two ways in which objects from the recycle bin
get reclaimed:
• Manual cleanup when you explicitly issue a PURGE command.
• Automatic cleanup under space pressure: While objects are in the recycle bin, their
corresponding space is also reported in DBA_FREE_SPACE because their space is
automatically reclaimable. The free space in a particular tablespace is then consumed in the
following order:
Free space not corresponding to recycle bin objects.
Free space corresponding to recycle bin objects. In this case, recycle bin objects are
automatically purged from the recycle bin using a FIFO algorithm.
Free space automatically allocated if the tablespace is auto extensible.
Assume that you create a new table inside tablespace TBS l. If there is free space allocated to
this tablespace that does not correspond to a recycle bin object, then this free space is used as a
first step. If this is not enough, then free space corresponding to recycle bin objects, that reside
inside TBSl, is used.
Oracle Database 10g: Administration Workshop II 10-10
Automatic Space Reclamation (continued)
If the free space of some recycle bin objects is used, these objects get purged automatically from
the recycle bin. At that time, you can no longer recover those objects by using the flashback drop
feature. As a last resort, if space requirement is not satisfied yet, tablespace TBS l is extended if
possible.
Oracle Database 10g: Administration Workshop II 10-11
Recycle Bin Manual Space Reclamation
PURGE {TABLE <table_name>|INDEX <index_name>}
PURGE TABLESPACE <ts_name> [USER <user_name>]
PURGE [USER_|DBA_]RECYCLEBIN
Recycle Bin
--■'fn j'nii A-tifi =Mahi= ::rs(il= H"pa rivl irrirAArislely raA ;irn IKa ?na-: = ;=£AAi;f=r v.ilh \'f hM* ■ )■*- a [il;-pa \Vf l;N4 v- ;ry s*sv alArt AhfAl? in Na~:-"Ia Ki'
..t'.-n in ( b: :i? :-ij c «,:o', dnjp>:: n tnzr, n cr :: ?:c-v \d il -i-Mjrck Lrcp; :l : -rlcr: ■■:.
Search
Results
«/l
~M:
10-12
Copyright © 2004, Oracle. All rights reserved.
Manual Space Reclamation
Use the PURGE command to permanently remove objects from the recycle bin. When an object
is purged from the recycle bin, it and its dependant objects are permanently removed from the
database. As a consequence, objects purged from the recycle bin are no longer recoverable by
using the flashback drop feature.
The following PURGE operations are available:
• PURGE TABLE purges the specified table.
• PURGE INDEX purges the specified index.
PURGE TABLESPACE purges all the objects residing in the specified tablespace. In
addition, objects residing in other tablespaces may get purged if they are dependent.
Optionally, you can also specify the USER clause to purge only those objects that belong to
the specified user. This option is useful when a particular user is running low on disk quota
for the specified tablespace.
• PURGE RECYCLEBIN purges all the objects that belong to the current user.
RECYCLEBIN and USER_RECYCLEBIN are synonymous.
• PURGE DBA_RECYCLEBIN purges all the objects in the recycle bin. You must have
enough system privileges or the SYSDBA system privilege to issue this command.
Oracle Database 10g: Administration Workshop II 10-12
Manual Space Reclamation (continued)
For the PURGE TABLE and PURGE INDEX commands, if you specify an original name and the
recycle bin contains more than one object of that name, then the object that has been in the
recycle bin the longest is purged first (First In First Out).
Oracle Database 10g: Administration Workshop II 10-13
10-14
Bypassing the Recycle Bin
DROP TABLE <table_name> [PURGE] ;
DROP TABLESPACE <ts_name>
[INCLUDING CONTENTS] ;
DROP USER <user_name> [CASCADE] ;
Copyright © 2004, Oracle. All rights reserved.
Bypassing the Recycle Bin
You can use the DROP TABLE PURGE command to permanently drop a table and its dependent
objects from the database. When you use this command, the corresponding objects are not
moved to the recycle bin. This command provides the same functionality that the DROP TABLE
command provided in prior releases.
When you issue the DROP TABLESPACE ... INCLUDING CONTENTS command, the objects in
the tablespace are not placed in the recycle bin. Moreover, objects in the recycle bin belonging to
the tablespace are purged. When you issue the same command without the INCLUDING
CONTENTS clause, the tablespace must be empty for the command to succeed. However, there
can be objects belonging to the tablespace in the recycle bin. In this case, these objects are
purged.
When you issue the DROP USER ... CASCADE command, the user and all of the objects owned
by the user are permanently dropped from the database. Any objects in the recycle bin belonging
to the dropped user are purged.
Oracle Database 10g: Administration Workshop II 10-14
Querying Dropped Tables
r USER_TABLES A
DROPPED TABLE_NAME
NO
I YES !
YES i
NO
SALES
BIN$zbjrBdpw==$a
BIN$zbjra9wy==$0
SALES_PK
DROPPED INDEX_NAME
^ USER_INDEXES J
10-15
—+EMPLOYEES
—► EMP LO YEE S_P K
s. Recycle
\ bin
SELECT ...
FROM BIN$zbjrBdpw==$0 [AS OF . . . ]
WHERE
Copyright © 2004, Oracle. All rights reserved.
Querying Dropped Tables
When you drop a table, that table is moved to the recycle bin, and its original name is changed to
a unique system-generated name. Because the dropped table still belongs to the schema of its
owner, you can still see its characteristics from various dictionary views like DBA_TABLES,
DBA_OBJECTS, and DBA_SEGMENTS. To make the distinction between tables that are in the
recycle bin and the ones that are not, the DBA_TABLES view has a new column called
DROPPED that is set to YES for tables that were dropped but are still in the recycle bin.
So, as long as a system-generated table name is in the recycle bin, you can use it in a SELECT
statement and flashback queries. However, you can not perform DML or DDL operations on
objects that reside in the recycle bin.
Oracle Database 10g: Administration Workshop II 10-15
Flashback Drop Considerations
• Protected tables:
- Are non-SYSTEM tablespace tables
- Are stored in locally managed tablespaces
- Do not use fine-grained auditing or virtual private
database
• The following dependencies are not protected:
- Bitmap-join indexes
- Materialized view logs
- Referential integrity constraints
- Indexes dropped before tables
• Purged tables cannot be flashed back
10-16 Copyright© 2004, Oracle. All rights reserved.
Flashback Drop Considerations
The recycle bin exists only for tables in non-SYSTEM locally managed tablespaces. However,
dependent objects that reside in dictionary managed tablespaces are protected by the recycle bin.
Tables with fine-grained auditing (FGA) or virtual private database (VPD) policies defined over
them do not go into the recycle bin.
When you drop a table that is protected by the recycle bin, its dependent objects are also
protected by the recycle bin except for bitmap join indexes, referential integrity constraints, and
materialized view logs. These objects cannot be flashed back along with the corresponding table.
You cannot flashback a dropped table if it has been purged, either by a user or by an automatic
space reclamation operation.
Note: If you drop an index before its associated table, recovery of the index is not supported
when you flashback the dropped table.
Oracle Database 10g: Administration Workshop II 10-16
Flashback Versions Query Overview
TrO ■
■■■ Fox
ii
10-17
I
I
Employees
Tx1
I
I
Tr2
Employees
Employees
SELECT versions_xid, salary FROM employees
VERSIONS BETWEEN TIMESTAMP tl and t2
WHERE last name = 'Fox';
I
|TrO| |Trl| |Tr2|
Copyright © 2004, Oracle. All rights reserved.
t2
■►■
Versions Query Overview
With the Flashback Query feature, you can perform queries on the database as of a certain time
or user-specified system change number (SCN). The Flashback Versions Query feature allows
you to use the VERS IONS clause to retrieve all of the versions of the rows that exist between
two points in time, or two SCNs.
The rows returned by the Flashback Versions Query represent a history of changes for the rows
across transactions. The Flashback Versions Query retrieves only committed occurrences of the
rows. Uncommitted row versions within a transaction are not shown. The rows returned include
deleted and subsequently reinserted versions of the rows.
You can use Flashback Versions Query to retrieve row history. It provides you with a way to
audit the rows of a table and retrieve information about the transactions that changed the rows.
You can then use the transaction identifier obtained from Flashback Versions Query to perform
transaction mining using LogMiner.
Note: In the example, VERS IONS_XID is a new pseudo-column that returns the transaction
identifier of the corresponding version of a row.
Oracle Database 10g: Administration Workshop II 10-17
Flashback Versions Query Using EM
Flashback Versions Query can also be performed through EM. From the Maintenance page,
select Perform Recovery.
On the Perform Recovery page, select Table for the Object Type and select Flashback Existing
Tables for the Operation Type. On the Perform Recovery: Point-in-Time page choose to
'Evaluate row changes and transactions to decide on a point in time' and specify the name of
the target table.
Select the columns you wish to view in the Available Columns box, then enter a search clause
in the Bind The Row Value box. Select Show all row history and then click Next.
Oracle Database 10g: Administration Workshop II 10-18
Flashback Versions Query Syntax
SELECT [Pseudocolumns]...
FROM ...
VERSIONS BETWEEN
{SCN | TIMESTAMP {expr |MINVALUE } AND
{ expr | MAXVALUE } }
[AS OF {SCN | TIMESTAMP expr}]
WHERE [Pseudocolumns...]...
Pseudocolumn
VERSIONS_STARTTIME
VERSIONS_STARTSCN
VERSIONS_ENDTIME
VERSIONS_ENDSCN
VERSIONS_XID
VERSIONS_OPERATION
Description
Version validity range lower bound
Version validity range upper bound
Transaction that created the version
Operation that produced the version
10-19
Copyright © 2004, Oracle. All rights reserved.
Flashback Versions Query Syntax
When you specify the VERSIONS clause in a query, Oracle Database 10g retrieves multiple
versions of the rows returned by the query. MINVALUE and MAXVALUE resolve to the SCN or
timestamp of the oldest and most recent data available respectively. When both VERS IONS and
AS OF clauses are used together, the VERS IONS clause determines the versions of the rows
starting with the AS OF point. You can also use the following pseudocolumns in the SELECT list
or the WHERE clause of the flashback versions query:
VERSIONS_STARTSCN: SCN at which this version of the row was created.
VERSIONS_STARTTIME: Timestamp at which this version of the row was created.
VERSIONS_ENDSCN: SCN at which this version of the row expired.
VERSIONS_ENDTIME: Timestamp at which this version of the row expired.
VERSIONS_XID: Transaction identifier that created this version of the row.
VERSIONS_OPERATION: Operation done by this transaction.
VERS IONS_SIARISCN or VERS IONS_SIARII IME are NULL if the version of the
corresponding row was created before the lower bound of the interval, or before the
UNDO_REIENIION time. VERSIONS_ENDSCN or VERSIONS_ENDIIME are NULL in the
following cases:
• The version of the row is still alive as of the query time.
• This is a deleted version of the row.
Oracle Database 10g: Administration Workshop II 10-19
10-20
Flashback Versions Query Example
SELECT versions_xid AS XID,
versions_startscn AS START_SCN,
versions_endscn AS END_SCN,
versions_operation AS OPERATION, first_name
FROM employees
VERSIONS BETWEEN SCN MINVALUE AND MAXVALUE
AS OF SCN 5525300
WHERE employee_id = 111;
XID START_SCN END_SCN 0 First_NAME
8C0025003A000000 5525293 I Tom
8C0024003A000000 5525291 D Mike
8C0022003A000000 5525277 5525291 I Mike
Copyright © 2004, Oracle. All rights reserved.
Versions Query Example
This example retrieves the change history for employee number 111. The period of the past is
determined by the oldest SCN available, and the read SCN of the query (5525300). The rows
returned include deleted and reinserted versions of the specified rows.
The query results indicate the following:
• The third row corresponds to the time when employee 111 was inserted. So, employee 111
was inserted by transaction 8C0022003A000000 at SCN 5525277. The life time of this
particular version of the row ended at SCN 5525291.
• The second row corresponds to a transaction that deleted employee 111. So, transaction
8C0024003A000000 deleted employee 111 at SCN 5525291. The fact that the
VERS IONS_ENDSCN value for this row is NULL means that this version of the row no
longer exists because it was deleted.
• The first row corresponds to a new version of the row that was inserted by transaction
8C0025003A000000 at SCN 5525293. The fact the VERS IONS_ENDSCN value is NULL
means that this version of the row still exists at SCN 5525300.
Note: If the AS OF clause is not used, the data are retrieved as of the current transaction, or
specified SCNs, or specified times.
Oracle Database 10g: Administration Workshop II 10-20
Flashback Versions Query Considerations
• The versions clause cannot be used to query:
- External tables
- Temporary tables
- Fixed tables
- Views
• The versions clause cannot span DDL
commands.
• Segment shrink operations are filtered out.
10-21 Copyright© 2004, Oracle. All rights reserved.
Versions Query Considerations
The VERS IONS clause cannot be used to query the following special tables:
• External tables
• Temporary tables
• Fixed tables.
You cannot use the VERSIONS clause to query a view. However, a view definition can use the
VERSIONS clause.
The VERS IONS clause in a SELECT statement cannot produce versions of rows across the DDL
statements that change the structure of the corresponding tables. This means that the query stops
producing rows once it hits a time in the past when the table was changed.
Certain maintenance operations like a segment shrink may move table rows across blocks. In this
case, the version query filters out such phantom versions because the row data remains the same.
Oracle Database 10g: Administration Workshop II 10-21
Flashback Transaction Query Overview
Erroneo
DML
10-22
FLASHBACK TRANSACTION QUERY
1 AM ^
DBA
us
Undo
SQL
AM ^_J
USER T
^
Copyright © 2004, Oracle. All rights reserved.
Flashback Transaction Query Overview
Flashback Transaction Query is a diagnostic tool you can use to view changes made to the
database at the transaction level. This allows you to diagnose problems in your database and
perform analysis and audits of transactions.
You can use the FLASHBACK_TRANSACTION_QUERY view to determine all of the necessary
SQL statements that can be used to undo the changes made by a specific transaction, or during a
specific period of time.
Oracle Database 10g: Administration Workshop II 10-22
Querying
FLASHBACK_TRANSACTION_QUERY
SELECT
FROM
operation,
FLASHBACK.
undo.
_sql,
.TRANSACTION.
table.
.QUERY;
.name
SELECT operation, undo
_sql,
FROM FLASHBACK_TRANSACTION_
WHERE
ORDER
xid = HEXTORAW('
BY undo_change#;
table.
.QUERY
.name
8C0024003A0000001)
SELECT
ope rat ion, undo_
sql,
FROM FLASHBACK_TRANSACTION_
WHERE start_timestamp >
('2003-
-10-21 11:00:00',
AND commit_timestamp <=
('2003-
-10-21 11:30:00',
table_name
.QUERY
= TO_TIME STAMP
'YYYY-MM-DD
TO.
HH
.TIME STAMP
'YYYY-MM-DD
HH
MI
MI
SS
SS
)
);
10-23 Copyright © 2004, Oracle. All rights reserved.
Querying flashback_transaction_query
A query on the FLASHBACK_TRANSACTION_QUERY view can be issued without any filters,
or can be issued with a filter incorporating a transaction identifier, or a time range.
• The first example returns information about all transactions, both active and committed, in
all undo segments in the database.
• The second example returns information relevant to the transaction whose identifier is
specified in the where clause. Note that a transaction may modify multiple rows within
different statements. So, if you want to recover those changes you need to apply the undo
SQL statements, returned by the query, in the right order.
• The third example returns information about all transactions that began and committed
within an half hour interval.
FLASHBACK_TRANSACTION_QUERY contains the following data for each row:
• START_SCN and corresponding START_TIMESTAMP
• COMMIT_SCN and COMMIT_TIMESTAMP: NULL for active transaction.
• LOGON_USER
• TABLE_OWNER
• ROW_ID
Note: You need the SELECT ANY TRANSACTION system privilege to be able to issue a query
against FLASHBACK_TRANSACTION_QUERY.
Oracle Database 10g: Administration Workshop II 10-23
Using Flashback Versions Query
and Flashback Transaction Query
SELECT
FROM
X
versions xid
first_name
hr.employees
VERSIONS BETWEEN SCN MINVALUE AND MAXVALUE
WHERE employee_id = 111;
SELECT operation, undosql
FROM FLASHBACK_TRANSACTION_QUERY
WHERE
xid = HEXTORAW('8C0024003A000000');
10-24
Copyright © 2004, Oracle. All rights reserved.
Using Flashback Versions and Transaction Query
Flashback Versions Query and Flashback Transaction Query are two complementary features.
Flashback Versions Query provides a history of changes made to a row along with the
corresponding identifier of the transaction that made the change. However, as a DBA, you may
need to know how a row came to have a certain set of values. By using the transaction identifier
provided by the version query, for a particular row version, you can use Flashback Transaction
Query to see exactly what operations were performed by the transaction and the necessary SQL
statements to executed to undo those changes. The combination of the two features also provide
a way to audit transactions.
In the example, the result of the query on flashback_transaction_query could look like:
OPERATION UNDO_SQL
DELETE insert into "HR"."EMPLOYEES_DEMO"("EMPNO","EMPNAME",
"SALARY") values (' 111 \ 'Mike','655') ;
INSERT delete from "IMP"."DEPARTMENTS_DEMO" where ROWID =
'AAAP9 5AAGAAAAA1AAB' ;
UPDATE update "HR"."EMPLOYEES_DEMO" set "SALARY" = '555'
where ROWID = 'AAAP9 3AAGAAAAAVAAA';
Oracle Database 10g: Administration Workshop II 10-24
Flashback Transaction Query Using EM
10-25 Copyright© 2004, Oracle. All rights reserved.
Flashback Transaction Query Using EM
This feature is used in conjunction with the Hashback Versions Query feature from the Perform
Recoveiy wizard. On the Perform Recoveiy: Choose SCN page, click the corresponding
Transaction ID link in the Flashback Versions Query Result section.
Oracle Database 10g: Administration Workshop II 10-25
10-26
Flashback Transaction Query
Considerations
• DDLs are seen as dictionary updates.
• Dropped objects appear as object numbers.
• Dropped users appear as user identifiers.
Minimal supplemental logging may be needed:
ALTER DATABASE ADD SUPPLEMENTAL LOG DATA;
Copyright © 2004, Oracle. All rights reserved.
Flashback Transaction Query Considerations
• Within the database, DDLs are nothing but a series of space management operations and
changes to the data dictionary. Flashback Transaction Query on a transaction underlying a
DDL displays the changes made to the data dictionary.
• When Flashback Transaction Query involves tables that have been dropped from the
database, the table names are not reflected. Instead, object numbers are used.
• If the user who executed a transaction is dropped, Flashback Transaction Query of that
transaction displays the corresponding userid only, and not the user name.
• Minimal supplemental logging ensures that Flashback Transaction Query has sufficient
information to support chained rows and various storage arrangements such as cluster
tables.
Note: When there is not enough undo data for a specific transaction, a row with a value of
UNKNOWN in the OPERATION column of FLASHBACK_TRANSACTION_QUERY is returned.
Oracle Database 10g: Administration Workshop II 10-26
Flashback Table Overview
Flashback Table allows you to recover a set of tables to a specific point in time without having to
perform traditional point in time recovery operations.
A Flashback Table operation is done in-place while the database is online by rolling
back only the changes that were made to the given tables and their dependent objects.
A Flashback Table statement is executed as a single transaction. All tables must be flashed back
successfully or the entire transaction is rolled back.
Note: You can use Flashback Versions Query and Hashback Transaction Query to determine the
appropriate flashback time.
Oracle Database 10g: Administration Workshop II 10-27
Using EM to Flashback Tables
10-28 Copyright © 2004, Oracle. All rights reserved.
Using EM to Flashback Tables
To flashback a table with the Database Control Console, from the Maintenance page, click
Perform Recovery in the Backup/Recovery section.
Select Tables for the Object Type and then select Flashback Existing Tables for the Operation
Type. Once done, click Continue and the wizard guides you through the whole process.
To enable row movement, go to the Administration page, and choose Table in the Schema
section. From there, select your table and click Edit. Then, click the Options tab and select Yes
in the Enable Row Movement field. Click Apply.
Note: You can also flashback tables from the Tables link of the Schema section of the
Administration page.
Oracle Database 10g: Administration Workshop II 10-28
10-29
Flashback Table Example
ALTER TABLE employees ENABLE ROW MOVEMENT;
FLASHBACK TABLE employees
TO TIMESTAMP (SYSDATE-1);
ALTER TABLE employees ENABLE ROW MOVEMENT;
ALTER TABLE departments ENABLE ROW MOVEMENT;
FLASHBACK TABLE employees, departments
TO SCN 5525293 ENABLE TRIGGERS;
Copyright © 2004, Oracle. All rights reserved.
Flashback Table Example
Use the FLASHBACK TABLE command to flashback one or more tables to a specified SCN or
point in time. Because Flashback Table technology uses DML operations to restore the
rows in changed blocks of tables, Flashback Table does not preserve the rowids. Before
issuing a flashback table command, it is therefore necessary to enable row
movement on the impacted tables.
The first example uses a timestamp to determine the point in time to which to flashback the
EMPLOYEES table. The second example uses an SCN instead of a timestamp, and because both
tables EMPLOYEES and DEPARTMENTS are linked by a referential integrity constraint, the
FLASHBACK TABLE statement is grouping both tables together.
In the default operation mode, triggers currently enabled on the tables being flashed back are
disabled for the duration of the flashback operation, and brought back to the enabled state after
completion of the flashback operation. That is why you can use the ENABLE TRIGGERS clause
in the FLASHBACK TABLE statement to override the default, and enable user-defined triggers
that are currently enabled to stay enabled during the Flashback Table operation. The internal
system triggers for materialized views stay enabled.
Note: The order in which the tables are specified in the Flashback Table statement, or the order
in which tables are flashed back does not matter.
Oracle Database 10g: Administration Workshop II 10-29
Rolling Back a Flashback Table Operation
10:25 10:42 11:29
HR.JOBS
11:30
11:35
10-30
11:30 11:35
SCN =5525354
FLASHBACK TABLE jobs
TO TIMESTAMP to_timestamp('10:42','hh24:mi');
FLASHBACK TABLE jobs
TO SCN 5525354;
Copyright © 2004, Oracle. All
rights reserved.
Rolling Back a Flashback Table Operation
The FLASHBACK TABLE statement is executed as a single transaction, and cannot be part of
any other transaction. This means you cannot use a ROLLBACK statement to bring back the
tables to their prior states. However the effects of a FLASHBACK TABLE statement can be
reverted by executing another FLASHBACK TABLE statement that specifies the SCN which
corresponds to the onejustbefore the first FLASHBACK TABLE statement. It is therefore
recommended to make a copy of the current SCN before issuing FLASHBACK TABLE
statements.
In the example, the table JOBS is flashed back at 11:30 to its state at 10:42. Before executing the
FLASHBACK TABLE command, you retrieve the current SCN of the database at 11:29. Let us
suppose that its value is 5525354. After flashing back JOBS, you realize that this is not the
correct state. So, at 11:35, you decide to revert the effects of your FLASHBACK TABLE
statement by executing another FLASHBACK TABLE statement to retrieve the JOBS table as it
was at SCN 5525354.
Note: You can query the CURRENT_SCN column in V$DATABASE to obtain the current SCN.
Oracle Database 10g: Administration Workshop II 10-30
Flashback Table Considerations
• The flashback table command executes as a
single transaction, acquiring exclusive DML locks.
• Statistics are not flashed back.
• Current indexes and dependent objects are
maintained.
• Flashback Table operations:
- Cannot be performed on system tables
- Cannot span DDL operations
- Are written to the alert log file
10-31 Copyright© 2004, Oracle. All rights reserved.
Flashback Table Considerations
• The entire FLASHBACK TABLE statement is executed within a single transaction. All the
specified tables are updated or none are.
• It acquires exclusive DML locks on all the tables specified in the statement over the period
of time the operation is in progress.
• Statistics of impacted objects are not be flashed back.
• All existing indexes are maintained. Dropped indexes are not recreated. Dependent on-
commit materialized views are also maintained automatically.
• A Flashback Table statement is written to the alert log file.
• Tables specified in the FLASHBACK TABLE statement are flashed back provided none of
the table constraints are violated. If any constraints are violated during flashback execution,
the operation is aborted and the tables are left in the same state as they were just prior to
the FLASHBACK TABLE statement invocation.
• Flashback Table to a particular time which is older than a DDL operation that has altered
the structure of, or shrunk a table involved in the operation, cannot be performed. This
restriction does not apply to DDL statements that only change storage attributes of
the tables.
• Flashback Table cannot be performed on system tables, remote tables, and fixed tables.
Oracle Database 10g: Administration Workshop II 10-31
Guaranteed Undo Retention
SQL> CREATE UNDO TABLESPACE undotbsl
2 DATAFILE 'undotbsOl.dbf'
3 SIZE 100M AUTOEXTEND ON
4 RETENTION GUARANTEE ;
SQL> SELECT tablespace_name, RETENTION
2 FROM dba_tablespace s;
TABLESPACE NAME RETENTION
UNDOTBS1 GUARANTEE
SQL> ALTER TABLESPACE undotbsl
2> RETENTION NOGUARANTEE;
10-32 Copyright © 2004, Oracle. All rights reserved.
Guaranteed Undo Retention
Most Flashback features rely on undo information to reconstruct a situation in the past. For an
undo tablespace, you can now use the tablespace retention clause to control preservation of
unexpired undo data. RETENTION GUARANTEE specifies that unexpired undo data should be
retained in all undo segments in the tablespace even if operations that need to generate undo in
those segments fail. The default value for RETENTION is NO GUARANTEE. This clause can also
be specified in the CREATE DATABASE command for the undo tablespace.
You can use the DBA_TABLESPACES view to determine the retention value for the tablespace.
The RETENTION column has a value of GUARANTEE when the tablespace is configured with
RETENTION GUARANTEE. The column has a value of NOGUARANTEE when the tablespace is
configured with RETENTION GUARANTEE . If the tablespace is not configured for retention,
the RETENTION column value defaults to NOT APPLY.
Note: Because many of the Flashback features depend on theUNDO_RETENTION initialization
parameter, you should change its default value of 900 seconds to a bigger value, if you want to
flashback to a later point in time.
Oracle Database 10g: Administration Workshop II 10-32
SCN and Time Mapping Enhancements
• The mapping granularity is three seconds.
• The mapping is retained for
Max(five days, undo_retention)
• Access the mapping by using the following SQL
functions:
- SCN_TO_TIMESTAMP
- TIMESTAMP_TO_SCN
SELECT current_scn, SCN_TO_TIMESTAMP(current_scn)
FROM v$database;
CURRENT_SCN SCN_TO_TIMESTAMP(CURRENT_SCN)
3274940 23-SEP-03 02.56.03.000000000 AM
10-33 Copyright © 2004, Oracle. All rights reserved.
SCN and Time Mapping Enhancements
With most flashback features, you have the possibility to enable the flashback operation at a
certain time, or SCN. Because the database time is represented by SCNs, this implies that there is
a mapping between SCN numbers and corresponding times. In previous releases, when you
triggered a flashback operation using a time, the database chose an SCN that was generated
within five minutes of the time specified. Also, this mapping was retained for a maximum of five
days of server uptime.
With Oracle Database lOg, this mapping granularity is now down to three seconds instead of five
minutes. That gives you much more precision when using times. In addition, the mapping can be
retained for more than five days of server uptime by setting the UNDO_RE TENT I ON
initialization parameter to a bigger value.
Whenever you want to access the maintained mapping, you have to use the new built-in
functions:
• SCN_TO_TIMESTAMP converts an SCN to a corresponding TIMESTAMP value.
• TIMESTAMP_TO_SCN converts a TIMESTAMP value to a corresponding SCN.
Note: TIMESTAMP_TO_SCN is the inverse function of SCN_TO_TIMESTAMP but not vice
versa. This means that given any SCN SCNx, the following will always be true:
SCNx = TIMESTAMP_TO_SCN(SCN_TO_TIMESTAMP(SCNx))
Oracle Database 10g: Administration Workshop II 10-33
Summary
In this lesson, you should have learned how to:
Perform Flashback table operation
Manage the recycle bin
Recover from user errors using Flashback
versions query
Perform transaction level recovery using FB
Transaction query
10-34 Copyright© 2004, Oracle. All rights reserved.
Oracle Database 10g: Administration Workshop II 10-34
Practice 10 Overview: Recovering from
User Errors
This practice covers the following topics:
• Using Flashback to recover a dropped table
• Managing the recycle bin space
Performing a Flashback Version Query
10-35 Copyright© 2004, Oracle. All rights reserved.
Oracle Database 10g: Administration Workshop II 10-35
Practice 10: Recovering from User Errors
Exercise 1: Performing Flashback Drop
This exercise will familiarize you with the Flashback Drop feature.
1. Get a row count from the HR. DEPARTMENTS 2 table.
2. Drop the HR. DEPARTMENT S 2 table, then verify that it has indeed been dropped.
3. Determine the object name, undrop status and other related information by querying
DBA_RECYCLEBIN
4. Use the SQL FLASHBACK TABLE command to restore the table.
Exercise 2: Performing Flashback Versions Query Using Enterprise Manager
This exercise is intended to demonstrate the Flashback Versions Query using Enterprise Manager
Database Control Console.
1. Insert 3 rows into the HR. DEPARTMENTS2 table using three separate transactions.
Commit after each insert. Confirm that the inserts were successful.
2. Use Enterprise Manager to view the row history of the HR. DEPARTMENTS 2 table.
3. Use Enterprise Manager to flashback the middle insert.
Oracle Database 10g: Administration Workshop II 10-36
Dealing with Database Corruption
Copyright © 2004, Oracle. All rights reserved.
Objectives
After completing this lesson, you should be able to:
• Describe causes of database corruption:
- Hardware
- Software
• Detect database corruption using:
- ANALYZE
- dbverify
- DB_BLOCK_CHECKING
- DBMS_REPAIR
Repair corruptions using RMAN
11-2 Copyright© 2004, Oracle. All rights reserved.
Oracle Database 10g: Administration Workshop II 11-2
What Is Block Corruption?
• Whenever a block is read or written, a consistency
check is performed:
- Block version
- DBA (data block address) value in cache as
compared to the DBA value in the block buffer
- Block-checksum, if enabled
• There are two types of block corruption:
- Media corrupt
- Soft corrupt
11-3 Copyright© 2004, Oracle. All rights reserved.
Block Corruption
A corrupted data block is a block that is not in a recognized Oracle format, or whose contents are
not internally consistent. Typically, corruptions are caused by faulty hardware or operating
system problems. The Oracle database identifies corrupt blocks as either software or logically
corrupt (an Oracle internal error) or media corrupt (the block format is not correct). If a block is
media corrupt, the information in the block does not make any sense after the read from disk.
Software corrupt blocks are marked corrupt by the database after detecting an inconsistency.
You can repair a media corrupt block by recovering the block and/or dropping the database
object that contains the corrupt block. If media corruption is due to faulty hardware, the problem
will not be completely resolved until the hardware fault is corrected.
Oracle Database 10g: Administration Workshop II 11-3
Block Corruption Symptoms: ORA-1578
ORA-01578: "ORACLE data block corrupted
(file # %s, block # %s) "
• This error is generated when a corrupted data
block is found.
• The error always returns the absolute file number
and block number.
• Check the alert. log file.
11-4 Copyright© 2004, Oracle. All rights reserved.
Symptoms: ORA-1578
Usually, the ORA-1578 error is the result of a hardware problem. If the ORA-1578 error always
comes back with the same arguments, it is most likely a media corrupt block.
If the arguments change each time, there may be a hardware problem, and the customer should
have the memory and page space checked, and the I/O subsystem checked for bad controllers.
Oracle Database 10g: Administration Workshop II 11-4
11-5
dbverify Utility
Only works on data files; redo log files cannot be
checked.
Checks block consistency.
• Can be used while the database is open.
$ dbv file=/u01/oradata/users01.dbf \
blocksize=8192
Copyright © 2004, Oracle. All rights reserved.
dbverify Utility
DBVERIFY is an external command-line utility that performs a physical data structure integrity
check on an offline database. It can be used against backup files and online files (or pieces of
files). Use DBVERIFY primarily when you need to insure that a backup database (or data file) is
valid before it is restored or as a diagnostic aid when you have encountered data corruption
problems. Because DBVERIFY can be run against an offline database, integrity checks are
significantly faster.
Limitations of DBVERIFY include:
DBVERIFY cannot detect problems such as INDEX versus TABLE mismatches which can
be detected by the ANALYZE TABLE .. VALIDATE STRUCTURE CASCADE
command.
DBVERIFY will not verify redo log files nor control files.
DBVERIFY only checks a block in isolation, it does not know if the block is part of an
existing object or not.
• For raw devices you should use the END parameter to avoid scanning blocks past the end of
the data file space:
dbv FILE=/dev/rdsk/rl.dbf END=last data block#
Oracle Database 10g: Administration Workshop II 11-5
Interpreting dbverify
Page number is the block number in the data file.
If head and tail do not match, dbverify re-reads
the block. If they match, an influx block is reported,
otherwise a corruption is signaled.
DBVERIFY - Verification complete
Total
Total
Total
Total
Total
Total
Total
Total
Pages Examined
Pages Processed
Pages Failing
Pages Processed
Pages Failing
Pages Empty
(Data)
(Data)
(Index)
(Index)
Pages Marked Corrupt
Pages Influx
640
88
0
18
0
406
0
0
11-6
Copyright © 2004, Oracle. All rights reserved.
Interpreting dbverify
Influx blocks are split blocks. If DBVERIFY does not report corruption it means that when it
read the block the first time, DBWn was writing a new version and it caught part of the old and
part of the new version of this block. DBVERIFY only checks for logical corruption. Therefore,
it is possible for corruption to occur above the high-water mark. A sample DBVERIFY check is
shown below:
$ dbv file=/u01/oradata/users01.dbf blocksize=8192
DBVERIFY: Release 10.1.0.2.0 - Production on lue Jan 6 2 0 04
Copyright (c) 1982, 2003, Oracle. All rights reserved.
DBVERIFY - Verification starting : FILE =/u01/oradata/users01.dbf
DBVERIFY - Verification complete
Total Pages Examined
Total Pages Processed (Data)
Total Pages Failing (Data)
Total Pages Processed (Index]
Total Pages Failing (Index]
Oracle Database 10g: Administration Workshop II 11-6
Interpreting dbverify (continued)
Total Pages Processed (Other)
Total Pages Processed (Seg)
Total Pages Failing (Seg)
Total Pages Empty
Total Pages Marked Corrupt
Total Pages Influx
Oracle Database 10g: Administration Workshop II 11-7
The analyze Command
Performs a logical block check
• Does not mark blocks as soft corrupt; only reports
them
• Validates index and table entries
SQL>
2
SQL>
2
ANALYZE
TABLE
table_
STRUCTURE CASCADE;
ANALYZE
INDEX
STRUCTURE;
i n dex_
_name
_name
VALIDATE
VALIDATE
11-8 Copyright© 2004, Oracle. All rights reserved.
The analyze Command
Use the ANALYZE command to validate the structure of a table or table partitions, and index or
index partitions. The object to be analyzed must be local and it must be in your own schema or
you must have the ANALYZE ANY system privilege. The cascade option validates an object,
including all related objects. The advantage of this option is that you can run it in a SQL*Plus
session on a specific object, to do an integrity check and to determine if an error is persistent, by
running the same analyze command a number of times.
For partitioned tables, ANALYZE also verifies that the row belongs to the correct partition. If the
row does not collate correctly, the rowid is inserted into the INVALID_ROWS table.
SQL> ANALYZE TABLE part itioned_table PARTITION (pi)
2 VALIDATE STRUCTURE INTO invalid_rows;
A simple select statement (SELECT * FROM table) does a full table scan, which means that
it reads all the data blocks up to the high-water mark of the table. You could use this to perform a
quick check for corruptions in your current table data.
Note: ANALYZE will validate bitmap information for ASSM (auto segment space management)
segments but will not account for unformatted blocks under the high water mark in ASSM
segments.
Oracle Database 10g: Administration Workshop II 11-8
•
•
•
•
11-9
Initialization Parameter
DB_BLOCK_CHECKING
Can be set by using the alter session or alter
system deferred command
Controls whether the database performs block
checking for data blocks
Default value is false
Is helpful in preventing memory and data
corruption
Copyright © 2004, Oracle. All rights reserved.
Initialization Parameter: db_block_checking
The DB_BLOCK_CHECKING initialization parameter invokes the same checks as events 10210,
10211, and 10212. The default setting is FALSE and is provided for compatibility with earlier
releases where block checking is disabled as a default. However, block checking for the
SYSTEM tablespace is always turned on.
When this parameter is set to TRUE, Oracle Database performs block checking for all data
blocks. Oracle Database checks a block by reading the data on the block and making sure it is
self-consistent. Block checking can often prevent memory and data corruption. Block checking
typically causes 1% to 10% overhead, depending on workload. The more updates or inserts in a
workload, the more expensive it is to turn on block checking. You should set
DB_BLOCK_CHECKING to TRUE if the performance overhead is acceptable.
If DB_BLOCK_CHECKSUM is set to TRUE, the DBWn process and the direct loader calculate a
checksum and store it in the cache header of every data block when writing it to disk. A
checksum is a number calculated from all the bytes stored in the block. When the block is
subsequently read, the checksum is recomputed and the stored value is checked with this
computed value. Because checksums allow the database to detect corruption caused by
underlying disks, storage systems, or I/O systems with only a 1% to 2% overhead, Oracle
Corporation recommends that you set DB_BLOCK_CHECKSUM to TRUE.
Oracle Database 10g: Administration Workshop II 11-9
How to Handle Corruptions
Check the alert log and operating system log file.
Use available diagnostic tools to find out the type
of corruption.
Determine whether the error persists by running
checks multiple times.
Recover data from the corrupted object if
necessary.
11-10 Copyright© 2004, Oracle. All rights reserved.
How to Handle Corruptions
Always try to find out if the error is permanent. Run the analyze command multiple times or, if
possible, perform a shutdown and a startup and try again to perform the operation that failed
earlier.
Find out if there are more corruptions. If you encounter one, there may be other corrupted blocks,
as well. Use tools like DBVERIFY to handle such a situation.
Oracle Database 10g: Administration Workshop II 11-10
How to Handle Corruptions
Resolve any hardware issues:
- Memory boards
- Disk controllers
- Disks
Recover or restore data from the corrupt object
if necessary.
11-11 Copyright© 2004, Oracle. All rights reserved.
How to Handle Corruptions (continued)
There is no point in continuing to work if there are hardware failures. When you encounter
hardware problems, the vendor should be contacted and the machine should be checked and
fixed before continuing. A full hardware diagnostics should be run.
Many types of hardware failures are possible:
• Faulty I/O hardware or firmware
• Operating system I/O or caching problem
• Memory or paging problems
• Disk repair utilities
Oracle Database 10g: Administration Workshop II 11-11
Using Flashback for Logical Corruption
VII
Flashback
Versions ~
Query
DBA
Corrupt
data found
USER
Flashback
Transaction
Query
-t-
Undo SQL
or
Flashback
Table
11-12
Copyright © 2004, Oracle. All rights reserved.
Using Flashback for Logical Corruption
After a physical corruption has been ruled out, you can use a combination of the flashback
features to determine when a logical corruption occurred. For example, you can first use
Flashback Versions Query to view the values of a row over a period of time. Flashback Versions
Query can also return the transaction ID. When you have the transaction ID, you can view all
objects affected by the same transaction.
To undo the data corruption, you can use the information returned in the UNDO_SQL column to
fix the error, or you can flashback the table to the time(SCN) before the transaction was issued.
Oracle Database 10g: Administration Workshop II 11-12
The dbms_repair Package
Available procedures:
CHECK_OBJECT
FIX_CORRUP T_BLOCKS
DUMP_ORPHAN_KEYS
REBUILD_FREELISTS
SEGMENT_FIX_STATUS
SKIP_CORRUPT_BLOCKS
ADMIN TABLES
11-13
Copyright © 2004, Oracle. All rights reserved.
The dbms_repair Package
Another way to manage data block corruption is to use the DBMS_REPAIR package. You can
use DBMS_REPAIR to detect and repair corrupt blocks in tables and indexes. Using this
approach, you can address corruptions where possible, and also continue to use objects while you
attempt to rebuild or repair them. The procedures contained in the package include:
CHECK_OBJECT: Detects and reports corruptions in a table or index
FIX_CORRUPT_BLOCKS: Marks blocks that were previously identified by
the CHECK_OBJECT procedure as software corrupt
DUMP_ORPHAN_KEYS: Reports index entries into an orphan key table that point to rows
in corrupt data blocks
REBUILD_FREELISTS: Rebuilds an object's free lists
SEGMENT_FIX_STATUS: Provides the capability to fix the corrupted state of a bitmap
entry when segment space management is AUTO
SKIP_CORRUPT_BLOCKS: Ignores blocks marked corrupt during table and index scans.
If not used, you get error ORA-1578 when encountering blocks marked corrupt.
ADMIN_TABLES: Provides administrative functions (create, drop, purge) for repair or
orphan key tables. These tables are always created in the SYS schema.
Oracle Database 10g: Administration Workshop II 11-13
Using dbms_repair
1. Detect and report corruptions.
SET SERVEROUTPUT ON
DECLARE num_corrupt INT;
BEGIN
num_corrupt := 0;
DBMS_REPAIR.CHECK_OBJECT (
schema_name => *HR',
object_name => 'DEPARTMENTS',
repair_table_name =>
corrupt_count => num_
END;
' REPAIR_
.corrupt)
TABLE',
i
2. Evaluate the costs and benefits of dbms repair
11-14
Copyright © 2004, Oracle. All rights reserved.
Using dbms_repair
Your first task, before using DBMS_REPAIR, should be the detection and reporting of
corruptions. Reporting not only indicates what is wrong with a block, but also identifies the
associated repair directive. You have several options, in addition to DBMS_REPAIR, for
detecting corruptions like DBVERIFY, ANALYZE and DB_BLOCK_CHECKING. The
CHECK_OBJECT procedure checks the specified objects, and populates the repair table with
information about corruptions and repair directives. Before executing any of the DBMS_REPAIR
procedures, you must build the repair table using the ADMIN_TABLES procedure:
BEGIN
DBMS_REPAIR.ADMIN_TABLE S (
table_name => 'REPAIR_TABLE',
table_type => DBMS_REPAIR.REPAIR_TABLE,
action => DBMS_REPAIR.CREATE_ACTION,
tablespace => 'USERS');
END;
Before using DBMS_REPAIR you must weigh the benefits of its use in relation to the liabilities.
You should also examine other options available for addressing corrupt objects.
Oracle Database 10g: Administration Workshop II 11-14
Using dbms_repair (continued)
A first step is to answer the following questions:
• What is the extent of the corruption? To determine if there are corruptions and repair
actions, execute the CHECK_OBJECT procedure, and query the repair table.
• What other options are available for addressing block corruptions?
• What logical corruptions or side effects are introduced when using DBMS_REPAIR to
make an object usable? Can these be addressed satisfactorily?
• If repair involves loss of data, can this data be retrieved?
You can retrieve data from the index when a data block is marked corrupt. The
DUMP_ORPHAN_KEYS procedure can help you retrieve this information. Of course, retrieving
data in this manner depends on the amount of redundancy between the indexes and the table. The
example below illustrates the creation of an oiphan key table for the USERS tablespace.
BEGIN
DBMS_REPAIR.ADMIN_TABLE S (
table_name => 'ORPHAN_KEY_IABLE',
table_type => DBMS_REPAIR.ORPHAN_TABLE,
action => DBMS_REPAIR.CREATE_ACTION,
tablespace => 'USERS');
END;
Oracle Database 10g: Administration Workshop II 11-15
Using dbms_repair
3. Make objects usable.
SET SERVEROUTPUT ON
DECLARE num_fix INT;
BEGIN
num_fix := 0;
DBMS_REPAIR.FIX_CORRUPT_BLOCKS (
schema_name => 'HR',
object_name => 'DEPARTMENTS',
object_type => DBMS_REPAIR.TABLE_OBJECT,
repair_table_name => 'REPAIR_TABLE',
fix_count => num_fix);
END;
11-16 Copyright© 2004, Oracle. All rights reserved.
Using dbms_repair (continued)
DBMS_REPAIR makes the object usable by ignoring corruptions during table and index scans.
By using the FIX_CORRUPT_BLOCKS and SKIP_CORRUPT_BLOCKS procedures you can
make a corrupt object usable by establishing an environment that skips corruptions that remain
outside the repair capabilities scope of DBMS_REPAIR.
If corruptions involve a loss of data, such as a bad row in a data block, all such blocks are
marked comiptby the FIX_CORRUPT_BLOCKS procedure. Then, you can run the
SKIP_CORRUPT_BLOCKS procedure, which skips blocks marked corrupt for the object. When
skip is set, table and index scans skip all blocks marked corrupt. This applies to both media and
software corrupt blocks.
If an index and table are out of sync, then a SET TRANSACTION READ ONLY transaction can
be inconsistent in situations where one query probes only the index, and then a subsequent query
probes both the index and the table. If the table block is marked corrupt, then the two queries
return different results, thereby breaking the rules of a read-only transaction. One way to
approach this is to not skip corruptions when in a SET TRANSACTION READ ONLY transaction.
Oracle Database 10g: Administration Workshop II 11-16
Using dbms_repair
11-17
4. Repair corruptions and rebuild lost data.
SET SERVEROUTPUT ON
DECLARE num_orphans INT;
BEGIN
num_orphans := 0;
DBMS_REPAIR.DUMP_ORPHAN_KEYS (
schema_naine => ' SCOTT ' ,
object_name => 'PK_DEPT',
object_type => DBMS_REPAIR.INDEX_OBJECT,
repair_table_name => 'REPAIR_TABLE',
orphan_table_name => 'ORPHAN_KEY_TABLE',
key_count => num_orphans);
DBMS_OUTPUT.PUT_LINE('orphan key count: ' ||
TO_CHAR(num_orphans));
END;
Copyright © 2004, Oracle. All rights reserved.
Using dbms_repair (continued)
After making an object usable, you can recover data using the DUMP_ORPHAN_KEYS
procedures. This procedure reports on index entries that point to rows in corrupt data blocks. All
such index entries are inserted into an oiphan key table that stores the key and rowid of the
corruption. The oiphan key table must have been previously created.
After the index entry information has been retrieved, you can rebuild the index using the ALTER
INDEX ... REBUILD ONLINE statement.
Oracle Database 10g: Administration Workshop II 11-17
Block Media Recovery (BMR)
BMR lowers the mean time to recover (MTTR).
BMR increases availability during media recovery.
- The data file remains online during recovery
- Only blocks being recovered are inaccessible
BMR is invoked through RMAN via the
blockrecover command.
- Restores individual blocks from available backups
- Coordinates with the server to have them recovered
□ □□□
□ □□□
annn
nana
Tape
11-18 Copyright© 2004, Oracle. All rights reserved.
Block Media Recovery
BMR reduces the smallest recoverable unit of media recovery from a data file to a block. When a
small number of blocks in the database are known to require media recovery, it is more efficient
to selectively restore and recover just those blocks. Only blocks that are being recovered need to
be unavailable, allowing continuous availability of the rest of the database during recovery.
BMR provides two main benefits over file-level recovery:
• Lowers the mean time to recover (MTTR)
• Allows increased availability of data during media recovery because the data file that is
being recovered remains online.
BMR uses existing recovery mechanisms to apply changes from the redo stream to block
versions that are restored from suitable backups. RMAN must be used to perform BMR. RMAN
restores individual data blocks from available backups and coordinates with the Oracle server
process to have them recovered. Without block-level recovery, if even a single block is corrupt,
the entire file must be restored and all redo changes must be generated for that file because
backup must be applied. The reduction in MTTR that is realized by using block-level recovery
includes both restore and recovery time. Note that only complete recovery is possible.
Incomplete recovery would render the database logically inconsistent.
Oracle Database 10g: Administration Workshop II 11-18
The blockrecover Command
BMR is implemented through the RMAN
blockrecover command.
blockrecover identifies the backups containing
the blocks to recover.
The command reads the backups and
accumulates requested blocks into in-memory
buffers.
blockrecover manages the block media recovery
session by reading the archive logs from backup if
necessary.
RMAN> BLOCKRECOVER DATAFILE 6 BLOCK 3;
11-19 Copyright© 2004, Oracle. All rights reserved.
The RMAN blockrecover Command
RMAN supports BMR by means of the BLOCKRECOVER command. When the user encounters a
block corruption, the error message or the trace files indicate which block is causing problems.
The DBA can then invoke this command to restore only the block in question, thus saving an
enormous amount of down time and data unavailability.
The BLOCKRECOVER command does the following:
• Identifies the backups from which to obtain the blocks to recover.
• Reads the backups and accumulates requested blocks into in-memory buffers. If any of the
desired blocks are corrupt (either media or logical corruption), RMAN reads the next oldest
backup of that file, looking for a good copy of the block. The UNTIL option limits
selection to backup sets or file copies that are taken at or before the specified time, SCN, or
log sequence; this forces BLOCKRECOVER to use an older backup instead of the most
recent one.
• Starts and manages the block media recovery session, reading the archive logs from backup
if necessary.
• Always does a complete recovery. No point-in-time recovery is possible by using the
BLOCKRECOVER command.
Oracle Database 10g: Administration Workshop II 11-19
11-20
RMAN BMR Interface
• The list of corrupted database blocks is stored in
the V$DATABASE_BLOCK_CORRUPTION view.
• The corruption list clause specifies the
recovery of all blocks that are listed in this view.
RMAN> BLOCKRECOVER CORRUPTION LIST
2> RESTORE UNTIL TIME 'sysdate -10';
RMAN lists corruptions in backup sets and proxy
copies in two views:
- V$BACKUP_CORRUPTION
- V$COPY_CORRUPTION
Copyright © 2004, Oracle. All rights reserved.
RMAN BMR Interface
By using the CORRUPTION LIST clause, you can recover blocks that are listed in
V$DATABASE_BLOCK_CORRUPTION. After a block has been repaired through block media
recovery (or normal media recovery), V$DATABASE_BLOCK_CORRUPTION will notbe
updated until you take a new backup. The UNI IL clause specifies that only backups and copies
that are created before the specified time, SCN, or log sequence number should be restored and
used for the recovery.
Two types of corruption result in rows that are being added to V$BACKUP_CORRUPIION and
V$COPY_CORRUPIION by the BACKUP and COPY commands respectively:
• Physical corrupt ion (sometimes called media corruption): The Oracle server does not
recognize the block at all: the checksum is invalid, the block contains all zeros, or the
header and footer of the block do not match. Physical corruption checking is ON by default,
and can be turned off with the NOCHECKSUM option.
• Logical corruption: The block has a valid checksum, the header and footer match, and so
forth, but the contents are logically inconsistent. Logical checking is OFF by default, and
can be turned on with the CHECK LOGICAL option.
Oracle Database 10g: Administration Workshop II 11-20
Examples of blockrecover
• Recovering a group of corrupt blocks
Limiting block media recovery by type of restore
• Limiting block media recovery by backup tag
Limiting block media recovery by time, SCN, or log
sequence
11-21 Copyright© 2004, Oracle. All rights reserved.
Examples of blockrecover
• Recovering a group of corrupt blocks
BLOCKRECOVER DATAFILE 2 BLOCK 12, 13
DATAFILE 7 BLOCK 5, 98, 99 DATAFILE 9 BLOCK 19;
• This example recovers a series of blocks and restores only from data file copies:
{
BLOCKRECOVER DATAFILE 3 BLOCK 1,2,3,4,5
TABLESPACE sales DBA 4194405, 4194409, 4194412
FROM DATAFILE COPY;
}
Note: DBA is data block address.
• Limiting BMR by backup tag
BLOCKRECOVER TABLESPACE SYSTEM DBA 4194404, 4194405
FROM TAG "weekly_backup";
• The following example recovers two blocks in the SYSTEM tablespace and forces the
blocks to be restored from backups that were created at least two days ago:
BLOCKRECOVER TABLESPACE SYSTEM DBA 4194404, 4194405 RESTORE
UNTIL TIME 'SYSDAIE-2';
Oracle Database 10g: Administration Workshop II 11-21
Examples of blockrecover (continued)
• The following example recovers two blocks and forces the blocks to be restored by using
backups that were made before SCN 100:
BLOCKRECOVER DATAFILE 9 BLOCK 13 DATAFILE 2 BLOCK 19 RESTORE
UNTIL SCN 100;
• The following example recovers two blocks and forces the blocks to be restored by using
backups that were made before log sequence 7024:
BLOCKRECOVER DATAFILE 9 BLOCK 13 DATAFILE 2 BLOCK 19 RESTORE
UNTIL SEQUENCE 7024;
Oracle Database 10g: Administration Workshop II 11-22
Which Object Is Corrupted?
Table: The data in the corrupted block is lost
- Drop the table and re-create it, and import data from
an export dump
- Use SQL or PL/SQL to pull data out of the table into
a newly created table
Index: Drop and recreate the index
11-23 Copyright© 2004, Oracle. All rights reserved.
Which Object Is Corrupted?
If you do not plan to restore data files and recover, use the following statement to determine
which object has corrupted blocks.
The absolute file number (for example, 5) and block number (for example, 2) can be found in the
error message; for example:
ORA-01578: ORACLE data block corrupted (file #5, block# 2)
Run the following command:
SQL> SELECT segment_name, segment_type, relative_fno
2 FROM dba_extents
3 WHERE file_id = 5
4 AND 2 BETWEEN block_id AND block_id + blocks - 1;
SEGMENT NAME SEGMENT TYPE RELATIVE FNO
EXAMPLE TABLE PARTITION 5
Oracle Database 10g: Administration Workshop II 11-23
Summary
In this lesson, you should have learned how to:
•
•
•
11-24
Describe causes of database corruption:
- Hardware
- Software
Detect database corruption using:
- ANALYZE
— dbverify
- DB_BLOCK_CHECKING
- DBMS_REPAIR
Repair corruptions using RMAN
Copyright © 2004, Oracle. All rights reserved.
Oracle Database 10g: Administration Workshop II 11-24
Practice 11 Overview:
Dealing with Database Corruption
This practice covers the following topics:
• Using dbverify to detect database corruption
Performing block media recovery with RMAN
11-25 Copyright© 2004, Oracle. All rights reserved.
Oracle Database 10g: Administration Workshop II 11-25
Practice 11: Dealing with Database Corruption
Exercise 1: Detecting Database Corruptions
This exercise covers the use of DBVERIFY to find database corruptions.
1. Perform a full backup using Enterprise Manager. From the Database Control home page,
select the Maintenance tab and then Schedule Backup under Backup/Recovery. From the
Backup Strategy pull down list, select Customized and then click the Whole Database
button. Provide oracle/oracle for the host credentials. Click Next to proceed.
2. Introduce a corruption into the block on which the DEPARTMENTS table resides by
querying the DBA_EXTENTS table to find the file and block id. Find the file name of the
file id returned above. Make sure you have write privileges on the data file. If not, use the
chmod command as root to correct this.
3. Run the 1 ab_l l_01_0 3 . sh script using the information gathered above to corrupt the
block. This script requires the file name, block number, and database block size as
arguments. Shutdown and restart the database to clear the buffer cache.
4. Run the dbv command and inspect the output.
Exercise 2: Using RMAN to Repair Corrupt Blocks
This exercise introduces the RMAN BLOCKRECOVER command
1. Query the DEPARTMENTS table using a SELECT command. What is the error that is
returned?
2. Perform block media recovery using RMAN. Use the DBVERIFY output from the previous
exercise to determine the blocks that need recovering.
3. Verify that the block recovery is successful.
Oracle Database 10g: Administration Workshop II 11-26
1k ^
AutorHic Managwent
Copyright © 2004, Oracle. All rights reserved.
Objectives
After completing this lesson, you should be able to:
• Describe the various tools used to diagnose
database performance issues
• Access the database advisors
• Use the SQL Tuning Advisor to improve database
performance
12-2 Copyright© 2004, Oracle. All rights reserved.
Oracle Database 10g: Administration Workshop II 12-2
Oracle Wait Events
Wait events are statistics that are incremented by a server process or thread to indicate that it had
to wait for an event to complete before being able to continue processing. Wait event data
reveals various symptoms of problems that might be impacting performance, such as latch
contention, buffer contention, and I/O contention. Remember that these are only symptoms of
problems, not the actual causes.
Wait events are grouped into classes. The wait event classes include: Administrative,
Application, Cluster, Commit, Concurrency, Configuration, Idle, Network, Other, Scheduler,
System I/O, and User I/O.
There are about 290 wait events in the Oracle9z Database, and over 800 in Oracle Database lOg,
including Free Buffer Wait, Latch Free, Buffer Busy Waits, Db File Sequential Read, and Db
File Scattered Read.
You can view wait events using EM by going to the Performance page and viewing the
Sessions: Waiting and Working graph, as shown above. By clicking the link for a particular
wait event class, you can drill down to the specific wait events using the Top Sessions interface.
In this example, the most significant wait events were file reads.
For a list of the most common Oracle events, refer to Oracle Database Reference Wg Release 1
(10.1), 'Appendix C," Part Number B10755-01.
Oracle Database 10g: Administration Workshop II 12-3
System Statistics
V$SYSSTAT
• statistic#
• name
• class'
• value
stat id
r:
V$SYSTEM_WAIT_CLASS
• wait_class_id
wait_class#
wait_class
total_waits
time waited
V$SGASTAT
• pool
• name
• bytes
V$EVENT_NAME
• event_number
• event_id
• name <
parameter1
parameter2
parameter3
wait class
V$SYSTEM_EVENT
- • event
• total_waits
• total_timeouts
• time_waited
• average_wait
• time waited micro
12-4
Copyright © 2004, Oracle. All rights reserved.
System Statistics
To effectively diagnose performance problems, statistics must be available. Oracle generates
many types of cumulative statistics for the system, sessions, and individual SQL statements.
Oracle also tracks cumulative statistics on segments and services. When analyzing a
performance problem in any of these scopes, you typically look at the change in statistics (delta
value) over the period of time you are interested in.
Wait Events Statistics
All the possible wait events are cataloged in the V$EVENT_NAME view: about 290 events are
available for the Oracled database, and over 800 for Oracle Database lOg.
Cumulative statistics for all sessions are stored in V$SYS TEM_EVENT, which shows the total
waits for a particular event since instance startup.
When you are troubleshooting, you need to know if a process has waited for any resource.
Systemwide Statistics
All the systemwide statistics are cataloged in the V$STATNAME view: about 330 statistics are
available in Oracle Database lOg.
The server displays all calculated system statistics in the V$SYSSTAT view. You can query this
view to find cumulative totals since the instance started.
Oracle Database 10g: Administration Workshop II 12-4
System Statistics (continued)
Displaying Systemwide Statistics
For example:
SQL> SELECT name, class, value FROM v$sysstat;
NAME CLASS VALUE
table scans (short tables) 64 135116
table scans (long tables) 64 250
table scans(rowidranges) 64 0
table scans (cache partitions) 64 3
table scans (direct read) 64 0
table scan rows gotten 64 14789836
table scan blocks gotten 64 558542
Systemwide statistics are classified by the tuning topic and the debugging puipose. The classes
include general instance activity, redo log buffer activity, locking, database buffer cache activity,
and so on.
You can also view all wait events for a particular wait class by querying
V$SYSTEM_WAIT_CLASS. For example (with formatting applied):
SQL> SELECT * FROM V$SYSTEM_WAIT_CLASS
2 WHERE wait_class LIKE '%I/0%';
CLASS_ID CLASS# WAIT_CLASS TOTAL_WAITS TIME_WAITED
1740759767 8 User I/O 1119152 39038
4108307767 9 System I/O 296959 27929
SGA Giobai Statistics
The server displays all calculated memory statistics in the V$SGASTAT view. You can query
this view to find cumulative totals of detailed SGA usage since the instance started. For example:
SQL> SELECT * FROM v$sgastat;
POOL NAME BYTES
fixed_sga 778036'
buffer_cache 2 516 5 82'
log_buffer 26214'
shared pool sessions 128464'
shared pool sql area 2237687(
The results shown are only a partial display of the output.
Oracle Database 10g: Administration Workshop II 12-5
Displaying Session-Related Statistics
V$STATNAME
• statistics
• name
• class
V$SESSION_EVENT
sid •«
V$SESSTAT
sid*"
statistics
value
event*
total_waits
total_timeouts
time_waited
ave rage_wa i t
max_wait
time_waited_micro
event id- i
V$EVENT_NAME
t** event #
name i
parameterl
parameter2
parameter3
V$SESSION
*•• sid
• serialft
• username
• command
• osuser
• seq#
• event#
*• event
• pl/2/3text
• pl/2/3
• pl/2/3raw
• wait_class
• wait_time
• seconds_in_wait
• state
12-6
Copyright © 2004, Oracle. All rights reserved.
Session-Related Statistics
You can display current session information for each user logged on by querying V$SESSION.
For example, you can use V$SESS ION to determine whether a session represents a user session,
or was created by a database server process (BACKGROUND).
You can query either V$SESS ION or V$SESSION_WAII to determine the resources or events
for which active sessions are waiting.
The Oracle server displays user session statistics in the V$SESSIAI view. The
V$SESSION_EVENI view lists information on waits for an event by a session.
Cumulative values for statistics are generally available through dynamic performance views,
such as the V$SESSIAI andV$SYSSIAI views. Note that the cumulative values in dynamic
views are reset when the database instance is shut down.
The V$MYSIAI view displays the statistics of the current session.
You can also query the V$SESSMEIRIC view to display the performance metric values for all
active sessions. This view lists performance metrics such as CPU usage, number of physical
reads, number of hard parses, and the logical read ratio.
Oracle Database 10g: Administration Workshop II 12-6
12-7
Troubleshooting and Tuning Views
Instance/Database
V$DATABASE
V$INSTANCE
V$PARAMETER
V$SPPARAMETER
V$SYSTEM_PARAMETER
V$PROCESS
V$BGPROCESS
V$PX_PROCESS_SYSSTAT
V$SYSTEM_EVENT
Memory
V$BUFFER_POOL_STATISTICS
V$LIBRARYCACHE
V$SGAINFO
V$PGASTAT
Copyright © 2004, Ora
:le.
Disk
V$DATAFILE
V$FILESTAT
V$LOG
V$LOG_HISTORY
V$DBFILE
V$TEMPFILE
V$ TEMP SEG_USAGE
V$SEGMENT_STATISTICS
Contention
V$LOCK
V$UNDOSTAT
V$WAITSTAT
V$LATCH
All rights reserved.
Troubleshooting and Tuning Views
The slide lists some of the views you might access to determine the cause of performance
problems or analyze the current status of your database.
For a complete description of these views, refer to the Oracle Database Reference Manual.
Oracle Database 10g: Administration Workshop II 12-7
Statistics Collection
• There are different types of statistics:
- Optimizer statistics
- System statistics
• There are different methods of collecting statistics:
- Automatically through gather_stats_job
- Manually with the dbms_stats package
- By setting database initialization parameters
- Importing statistics from another database
12-8 Copyright© 2004, Oracle. All rights reserved.
Statistics Collection
Optimizer statistics are collections of data that describe more details about the database and the
objects in the database. These statistics are used by the query optimizer to choose the best
execution plan for each SQL statement.
The recommended approach to gathering optimizer statistics is to allow Oracle to automatically
gather the statistics. The GATHER_STATS_JOB job is created automatically at database
creation time and is managed by the Scheduler. It gathers statistics on all objects in the database
that have either missing or stale optimizer statistics.
System statistics describe the system's hardware characteristics, such as I/O and CPU
performance and utilization, to the query optimizer. When choosing an execution plan, the
optimizer estimates the I/O and CPU resources required for each query. System statistics enable
the query optimizer to more accurately estimate I/O and CPU costs, and thereby choose a better
execution plan. System statistics are collected using the
DBMS_STATS . GATHER_SYSTEM_STATS procedure. When Oracle gathers system statistics,
it analyzes system activity in a specified period of time. System statistics are not automatically
gathered. Oracle Corporation highly recommends that you use the DBMS_STATS package to
gather system statistics.
Oracle Database 10g: Administration Workshop II 12-8
Automatic Optimizer Statistics Collection:
Overview
Oracle8/ Database provides dbms_stats package:
- DBA determines how to gather statistics.
- DBA determines when to gather statistics.
• Oracle9/ Database determines how to gather
statistics:
- Statistics can be gathered using a single command.
- DBA determines when to gather statistics.
• Oracle Database 10gr fully automates statistics
gathering:
- DBA no longer needs to gather statistics.
- Table monitoring is used by default.
12-9 Copyright© 2004, Oracle. All rights reserved.
Automatic Optimizer Statistics Collection: Overview
For the query optimizer to generate optimal execution plans, it must have valid statistics on the
objects. In the past, statistics collection (or setting up jobs to do so) typically was a DBA
responsibility. In addition, it was necessary to keep track of changes to objects to determine
whether statistics collection was necessary. If an object had stale statistics or no statistics,
inefficient SQL execution plans would be generated.
With Oracle9z Database (assuming that monitoring is used), the following single DBMS_STATS
command can be used to gather the relevant statistics:
dbms_stats.gather_schema_stats(schema_name,options=>
'GATHER AUTO');
This command gathered optimizer statistics, including histograms, for those objects for which
the current statistics were considered stale. However, you must enable monitoring and schedule
this command on a regular basis.
In Oracle Database lOg, Automatic Optimizer Statistics Collection automates these tasks and
relieves you of the necessity of gathering statistics. This feature reduces the likelihood of poorly
performing SQL statements due to stale or invalid statistics and enhances SQL execution
performance by providing optimal input to the query optimizer.
Oracle Database 10g: Administration Workshop II 12-9
Automatic Optimizer Statistics Collection: Overview (continued)
If you choose not to use automatic statistics gathering, then you must manually collect statistics
in all schemas, including system schemas. If the data in your database changes regularly, you
also need to gather statistics regularly to ensure that the statistics accurately represent
characteristics of your database objects. To manually collect statistics, use the DBMS_STATS
package.This PL/SQL package package is also used to modify, view, export, import, and delete
statistics.
You can also manage optimizer and system statistics collection through database initialization
parameters. For example:
• The OPT IMI ZER_DYNAMIC_SAMPL ING parameter controls the level of dynamic
sampling performed by the optimizer. You can use dynamic sampling to estimate statistics
for tables and relevant indexes when they are not available or are too out of date to trust.
Dynamic sampling also estimates single-table predicate selectivities when collected
statistics cannot be used or are likely to lead to significant errors in estimation.
• The STATISTICS_LEVEL parameter controls all major statistics collections or advisories
in the database and sets the statistics collection level for the database. The values for this
parameter are BASIC, TYPICAL, and ALL.
• The TIMED_STASTICS parameter directs the Oracle server to gather wait time for events,
in addition to wait counts already available. This data is useful for comparing the total wait
time for an event to the total elapsed time between the performance data collections.
• The TIMED_OS_STATISTICS parameter specifies the interval (in seconds) at which
Oracle collects operating system statistics when a request is made from the client to the
server or when a request completes.
Timed system statistics are automatically collected for the database if the
STATISTICS_LEVEL initialization parameter is set to TYPICAL or ALL. If
STATISTICS_LEVEL is set to BASIC, then you must set TIMED_STATISTICS to TRUE to
enablecollectionof timed statistics. Note that setting STAT 1ST ICS_LEVEL to BASIC disables
many automatic features and is not recommended.
If you explicitly set TIMED_STATISTICS, or TIMED_OS_STATISTICS, either in the
initialization parameter file or by using the ALTER SYSTEM or ALTER SESSION commands,
the explicitly set value overrides the value derived from STATISTICS_LEVEL.
You can query the V$STATISTICS_LEVEL view to determine which parameters are affected
by the STATISTICAL_LEVEL parameter.
Oracle Database 10g: Administration Workshop II 12-10
Dictionary and Special Views
The following dictionary and special views provide
useful statistics after using the dbms_stats
package:
- DBA_TABLES, DBA_TAB_COLUMNS
- DBA_CLUSTERS
- DBA_INDEXES, INDEX_STATS
- INDEX_HISTOGRAM, DBA_TAB_HISTOGRAMS
This statistical information is static until you
reexecute the appropriate procedures in
DBMS STATS.
12-11 Copyright© 2004, Oracle. All rights reserved.
Dictionary and Special Views
When you need to look at data storage in detail, use the DBMS_STATS package, which collects
statistics and populates columns in some DBA_xxx views.
DBMS_STATS populates columns in the views concerned with:
• Table data storage within extents and blocks:
- DBA_TABLES
- DBA_TAB_COLUMNS
• Cluster data storage within extents and blocks:
DBA_CLUSTERS
• Index data storage within extents and blocks, and indexation usefulness:
- DBA_INDEXES
- INDEX_STATS
• Non-indexed and indexed columns data distribution:
- DBA_TAB_HIS TOGRAMS
- INDEX_HISTOGRAM
For more information on using the DBMS_STATS package, refer to the Oracle Database
Performance Tuning Guide.
Oracle Database 10g: Administration Workshop II 12-11
Statspack
• Execute statspack. snap to collect statistics.
• Automate the collection of statistics using the
spauto. sql script.
• Produce a report using the spreport. sql script.
• Set timed_statistics to true to collect timing
information.
STATSPACK report. Cor
DB Name DB Id Instance
ORCL 995156390 orcl
Snap Id Snap Time
Begin Snap:
End Snap:
Elapsed:
Inst Num Release
1 9.2.0.1.0
Sessions Curs/Sess
1 30-Jul-02 15:14
2 30-Jul-02 16:01
Cluster Host
NO EDT3R4P1
Comment
22 7 5.0
23 7 5.9
47.02 [Mills)
12-12 Copyright© 2004, Oracle. All rights reserved.
Statspack
The Statspack package has been available with the Oracle Database from version 8.1.6.
Installing the Statspack utility creates the perf st at user, who owns all PL/SQL code and
database objects created (including the Statspack tables, the constraints, and the Statspack
package).
To take a snapshot of performance data, log on to SQL*Plus as the perf stat user, and then
execute the statspack . snap procedure. This stores the current performance statistics in the
Statspack tables, which can be used as a baseline snapshot for comparison with another snapshot
taken at a later time.
To compare performance at different times, there must be multiple snapshots taken over the
target time period. The best method to gather snapshots is to automate the collection at regular
time intervals. The spauto . sql script makes use of the DBMS_JOB package to automate the
collection of statistics. The supplied script schedules a snapshot every hour, on the hour. This
can be changed to suit the requirements of the system.
To examine the change in statistics between two time periods, execute the spreport. sql file
while connected to the database as the perf stat user. You are shown a list of collection
periods. Select a start and end period. The difference between the statistics at each end point is
then calculated and put into the file you specified.
Oracle Database 10g: Administration Workshop II 12-12
Workload Repository
f MMON J
ADDM finds
top problems
SGA
9:
In-memory
statistics
30 a.m.
■
AM
SYSAUX
6:00 a.m.1
i
7:00 a.m.i
8:00 a.m.j
9:00 a.m.i
^^SnapshotJ
>—Snapshotg^^
> Snapshots
■ Snapshot^
12-13
Copyright © 2004, Oracle. All rights reserved.
Workload Repository
The workload repository is a collection of persistent system performance statistics owned by
SYS. The workload repository resides in the SYSAUX tablespace.
A snapshot is a set of performance statistics captured at a certain time. Snapshots are used for
computing the rate of change of a statistic. Each snapshot is identified by a snapshot sequence
number (snap_id) that is unique in the AWR.
By default, snapshots are generated every 60 minutes. You can adjust this frequency by changing
the snapshot INTERVAL parameter. Because the database advisors rely on these snapshots, be
aware that adjustment of the interval setting can affect diagnostic precision. For example, if the
INTERVAL is set to 4 hours, you may miss spikes that occur within 60-minute intervals.
You can take manual snapshots by using Database Control. Taking manual snapshots is
supported in conjunction with the automatic snapshots that the system generates. Manual
snapshots are expected to be used when you want to capture the system behavior at two specific
points in time that do not coincide with the automatic schedule.
Statspack users should switch to using the workload repository in Oracle Database lOg. However,
there is no supported path to migrate Statspack data into the workload repository. Also, the
workload repository is not backward compatible with the Statspack schema.
Oracle Database 10g: Administration Workshop II 12-13
AWR Snapshot Baselines
Relevant period
in the past
L _
DBMS.
.WORKLOAD.
start.
end_s
basel
.REPOSITORY
_snap_id
nap_id
ine_name
IN
IN
IN
CREATE,
NUMBER
NUMBER
.BASELINE
i
i
VARCHAR2) ;
( "
12-14
Copyright © 2004, Oracle. All rights reserved.
AWR Snapshot Baselines
Baseline is the mechanism for you to tag sets of snapshot data for important periods. A baseline
is defined on a pair of snapshots; the snapshots are identified by their snapshot sequence
numbers (snap_id). Each baseline corresponds to one and only one pair of snapshots.
A baseline can be identified by either a user-supplied name or a system-generated identifier. You
create a baseline by executing the DBMS_WORKLOAD_REPOSITORY.CREATE_BASELINE
procedure and specifying a name and a pair of snapshot identifiers. A baseline identifier is
assigned to the newly created baseline. Baseline identifiers are unique for the life of a database.
Baselines are used to retain snapshot data. Therefore snapshots belonging to baselines are
retained until the baselines are dropped.
Usually you set up baselines from some representative periods in the past, to be used for
comparisons with current system behavior. You can also set up threshold-based alerts using
baselines from Database Control.
You can get the s nap_ids directly from DBA_H I ST_S NAP SHOT, or Database Control.
Note: For more information about the DBMS_WORKLOAD_REPOS I TORY package, see the
Oracle Database PL/SQL Packages and Types Reference Guide.
Oracle Database 10g: Administration Workshop II 12-14
>
\d
t
ADDM
visory Fr
SQL Tuning
Advisor
Memory
SQL Access
Advisor
amework Overview
*■■! :
*■
12-1
5
Space
Copyright © 2
004
■ Or
PGA
SGA
PGA Advisor
Buffer Cache
Advisor
Library Cache
Advisor
* Segment Advisor
Undo Advisor
acle. All rights reserved.
Advisory Framework Overview
Advisors are server components that provide you with useful feedback about resource utilization
and performance for its respective component. The advisors use all the resources previously
discussed, and more. Following is the list of available advisors:
• Automatic Database Diagnostic Monitor (ADDM): Does a top-down instance analysis,
identifies problems and potential causes, and gives recommendations for fixing the
problems. ADDM can potentially call other advisors.
• SQL Tuning Advisor: Provides tuning advice for SQL statements
• SQL Access Advisor: Deals with schema issues and determines optimal data access paths
like indexes and materialized views
• PGA Advisor: Gives detailed statistics for the work areas, and provides recommendations
about optimal usage of Program Global Area (PGA) memory based on workload
characteristics
• SGA Advisor: Is responsible for tuning and recommending System Global Area (SGA)
size depending on pattern of access for the various components within the SGA
• Segment Advisor: Monitors object space issues and analyzes growth trends
• Undo Advisor: Suggests parameter values and the amount of additional space that is
needed to support flashback for a specified time
Oracle Database 10g: Administration Workshop II 12-15
Advisory Framework Overview (continued)
The major benefits provided by the advisor infrastructure are:
• It uses a uniform interface for all advisors.
• All advisors are invoked and report results in a consistent manner.
Oracle Database 10g: Administration Workshop II 12-16
Database Control and Advisors
The Advisor Central page is the main page for all advisors. You can reach this page by clicking
the Advisor Central link in the Related Links region of the Database page. However, this is not
the only place inside the Database Control Console where advisors can be invoked.
On the Advisor Central page, you can list all the advisor tasks that were registered in the
Automatic Workload Repository (AWR). You can also filter this list by advisor type and for
predefined time periods.
Oracle Database 10g: Administration Workshop II 12-17
12-18
Typical Advisor Tuning Session
Create an advisor task.
Adjust task parameters.
Implement
recommendations.
Copyright © 2004, Or
Perform analysis.
^S^ Accept ^^
fcl'Nsw results? ^^
No \! \y^
| Yes
acle
All right
;reserved.
Typical Advisor Tuning Session
A typical tuning session comprises the following steps:
1. Create an advisor task.
An advisor task is an executable data area in the advisor repository that manages your
tuning efforts.
2. Adjust appropriate task parameters.
Parameters are set in the main advisor task. They control the advisor's behavior.
3. Perform an analysis.
The execution of the task is a synchronous operation; control is not returned until the
operation has completed or a user interruption is detected. At any time, you can interrupt
the operation and review the results up to that point in the analysis process. If not satisfied,
you can resume the execution for further recommendations, or the task data can be adjusted
and execution be restarted.
4. Review the results.
The results of the analysis can be reviewed using the built-in views or the procedure shown
above. You have the option of accepting, rejecting, or ignoring the recommendations. If a
recommendation is rejected, you may want to rerun an analysis using the rejected
recommendation as advice for the next analysis operation.
Oracle Database 10g: Administration Workshop II 12-18
Manually Invoking ADDM
CKACLlEI invpiHr Ujnayrr 111.! ^^^^^H
THlnb^hH Tjinlnil
Create AC DM Task
SnBDBliot Ranee
fi-i-u p-
v r-ii
.[i
■j !*
:.[■
:: 1
■--\r.Wjl 'J I'W
i I :■; ,il "i-H i ~hii- =n- Tiih :-::-i:l-lln-H i
xi ly ,,:-:-!-,: - - ll,-„,:■„ :.:-,:■:■ :h:-1, if' - lli-
■n,nT"iiCi ThIi it. jam ?:m:nr pm
k
rr n I i?--m I ■ ■ I r. (.
i a a iV dbr e*rftr >£ ti *r
s a__i, ■■'■■* ju^jh-.-v-..-.
:■:■■
H- 1
-i
"
.ft'
1 r
rs
n
*' «f
h„: | "-
"n-ii
in
A1
-IH-I
"■*!■■• PiwWj--t _i^ "JJi H
h'::]:--.™:-.:: hUMU, Li.U+r:>iij:iurt ^^^ H
-h 1 1 x-l-i: lli-lii- I- Hm- h- ■■ n li: 1- -n-.|
=m- li-H'Qi ThIi ir. aiM!i:nnHnpr.i
1
1 1 I.7.-.M 1 _ _ 1 _ 1'. ?
IB
a iff £ a a a a if *
- 1 -1: 1 .j ..
■ -U
■ AJ
■ :■■■■
1 1
12-19
Copyright © 2004, Oracle. All rights reserved.
Manually Invoking ADDM
By default, ADDM tasks are run for every Oracle database snapshot that is stored in the AWR.
However, you can create a custom ADDM task to analyze a period of time that you identify with
a starting snapshot and an ending snapshot. To create an ADDM task, perform the following
steps:
1. Navigate to the Database home page. In the Related Links section, click Advisor Central.
2. Under Advisors, choose ADDM.
3. Select the Period Start Time option and then click the snapshot that you want to use as the
starting point of the period of time. Then select the End Time option and click the
snapshot to use as the terminating point of the time period.
4. Use the ADDM Task Page to view the results of a selected ADDM task.
Oracle Database 10g: Administration Workshop II 12-19
Application Tuning Challenges
The process of identifying high-load SQL statements and tuning them is very challenging even
for an expert. SQL tuning is not only one of the most critical aspects in managing the
performance of a database server, but it is also one of the most difficult tasks to accomplish.
With Oracle Database lOg, the task of identifying high load SQL statements has been automated
by ADDM. Even though the number of high-load SQL statements identified by ADDM may
represent a very small percentage of the total SQL workload, the task of tuning them is still
highly complex and requires a high level of expertise.
Also, the SQL tuning activity is a continuous task because the SQL workload can change
relatively often when new application modules are deployed.
The SQL Tuning Advisor is a new feature of Oracle Database lOg, designed to replace the
manual tuning of SQL statements. SQL statements that are consuming high resources, such as
CPU, I/O, and temporary space, are good candidates for the SQL Tuning Advisor. The advisor
receives one or more SQL statements as input and provides advice on how to optimize their
execution plan. The advisor also gives rationale for the advice, its estimated performance benefit,
as well as the actual command to implement the advice. The user can choose to accept the advice,
and the database implements the commands to tune the SQL statements. With the introduction of
SQL Tuning Advisor, you can now have the Oracle optimizer tune the SQL code for you.
Oracle Database 10g: Administration Workshop II 12-20
SQL Tuning Advisor Overview
Automatic Tuning Optimizer
Comprehensive SQL Tuning
Statistics Check
Optimization Mode
Plan Tuning
Optimization Mode
Access Analysis
Optimization Mode
SQL Analysis
Optimization Mode
SQL Tuning
Advisor
Detect Stale/Missing
Statistics
Plan Tuning
(SQL Profile)
Add Missing Index
Run Access Advisor
Restructure SQL
12-21
Copyright © 2004, Oracle. All rights reserved.
SQL Tuning Advisor Overview
The SQL Tuning Advisor is the primary driver of the tuning process. It calls the Automatic
Tuning Optimizer (ATO) to perform four specific types of analyses:
• Statistics Analysis: The Automatic Tuning Optimizer checks each query object for
missing or stale statistics, and makes recommendations to gather relevant statistics.
• SQL Profiling: The ATO verifies its own estimates and collects auxiliary information to
remove estimation errors. It builds a SQL profile using the auxiliary information and makes
a recommendation to create it. When a SQL profile is created it enables the query
optimizer to generate a well-tuned plan.
• Access Path Analysis: The ATO explores whether a new index can be used to significantly
improve access to each table in the query and, when appropriate, makes recommendations
to create such indexes.
• SQL Structure Analysis: The ATO tries to identify SQL statements that use bad plans and
makes relevant suggestions to restructure them. The suggested changes can be syntactic as
well as semantic.
Oracle Database 10g: Administration Workshop II 12-21
SQL Tuning Advisor Options and Recommendations
After the SQL Tuning Advisor is launched, Enterprise Manager automatically creates a tuning
task, provided the user has appropriate ADVISOR privileges to do so. Enterprise Manager shows
the tuning task and automatic default options in the SQL Tuning Options page. On this page the
user can change the automatic defaults for a tuning task. One of the important options is to
choose the scope of the tuning task. If you choose the Limited option, then the SQL Tuning
Advisor produces recommendations based on statistics check, access path analysis, and SQL
structure analysis. No SQL profile recommendation will be generated with the Limited option. If
you choose the Comprehensive option, the SQL Tuning Advisor produces all the
recommendations as in the Limited scope, plus it invokes the optimizer under the SQL profiling
mode to build a SQL profile, if applicable. With the Comprehensive option, you can also specify
a time limit for the tuning task, which by default is 60 minutes.
Configure your tuning task from the SQL Tuning Options page after selecting Run SQL
Tuning Advisor. Going back to the Top SQL page, you can click the tuned statement to go to
the SQL Details page from where you can view the Recommendations history. This shows you
the completed tuning task. By clicking the task, you can see its general recommendation
information. Click View Recommendations to see its details.
Oracle Database 10g: Administration Workshop II 12-22
Using the SQL Tuning Advisor
Use the SQL Tuning Advisor to analyze SQL
statements and obtain performance
recommendations.
Sources for SQL Tuning Advisor to analyze:
- Top SQL: Analyzes the top SQL statements
currently active
- SQL Tuning Sets: Analyzes a set of SQL statements
you provide
- Snapshots: Analyzes a snapshot
- Baselines: Analyzes a baseline
12-23 Copyright © 2004, Oracle. All rights reserved.
Using the SQL Tuning Advisor
You can use the SQL Tuning Advisor to analyze SQL statements and obtain performance
recommendations. Typically, you run this advisor as an ADDM performance finding action.
Additionally, you can run the SQL Tuning Advisor when you want to analyze the top SQL
statements consuming the most CPU time, I/O, and memory.
Oracle Database 10g: Administration Workshop II 12-23
Using the SQL Tuning Advisor: Example
12-24 Copyright© 2004, Oracle. All rights reserved.
Using the SQL Tuning Advisor: Example
You can invoke the SQL Tuning Advisor by performing the following steps:
1. Click Advisor Central in the Related Links region on the Database home page.
2. Click SQL Tuning Advisor. The SQL Tuning Advisor Links page appears.
The advisor can be run on one of the following sources:
Top SQL: Analyzes the top SQL statements currently active
SQL Tuning Sets: Analyzes a set of SQL statements you provide
Snapshots: Analyzes a snapshot
Baselines: Analyzes a baseline
3. Select Top SQL. Select a five minute interval to analyze by dragging the shaded box over
the target time period. Select one or more statements to analyze during the selected period.
4. Click Run SQL Tuning Advisor. The SQL Tuning Options page appears showing the
SQL statements in the interval. Give your task a name and description, select
Comprehensive as the scope, and select Immediately for start time. Click OK.
5. Navigate back to the Advisor Central page. The status of Advisor Tasks is listed under this
heading in the results region. Wait until your task status is completed. Check the status by
clicking Refresh in your browser. Select your task and click View Result. The SQL
Tuning Result page appears.
6. Select the SQL statement and click View Recommendations.
Oracle Database 10g: Administration Workshop II 12-24
Using the SQL Access Advisor
12-25 Copyright© 2004, Oracle. All rights reserved.
Using the SQL Access Advisor
You can use the SQL Access Advisor to tune your schema and improve your query performance.
This advisor requires that you identify a SQL workload, which is a representative set of SQL
statements that access the schema. You can select your workload from different sources
including current and recent SQL activity, a SQL repository, or a user-defined workload such as
from a development environment.
The SQL Access Advisor may make recommendations such as creating indexes or materialized
views to improve your query performance for the given workload.
You can invoke the SQL Access Advisor by performing the following steps:
1. Click Advisor Central in the Related Links region on the Database home page.
2. Click SQL Access to begin a wizard. The SQL Access Advisor: Workload Source page
appears.
3. Specify your workload source and click Next. The SQL Access Advisor: Recommendation
Options page appears.
4. Specify whether you want the advisor to recommend indexes, materialized views or both.
5. Specify limited or comprehensive mode. Limited mode runs faster by concentrating on
highest cost statements.
Oracle Database 10g: Administration Workshop II 12-25
Using the SQL Access Advisor (continued)
6. Click Next. The SQL Access Advisor: Schedule page appears. Accept the default of
immediate execution or schedule execution for a later time.
7. Click Next. The SQL Access Advisor: Review page appears.
8. Review the options you have selected and click Submit to start your job.
Results are posted on the Advisor Central page. The SQL Access Advisor
recommendations are ordered by cost benefit. For example, a recommendation might
consist of a a SQL script with one or more create index statements, which you can
implement by clicking Schedule Implementation.
Oracle Database 10g: Administration Workshop II 12-26
The Undo Management Page
nTiVI t-'l~n'Ti|ihT Udnugvi 1U[r
Ualahaw Ucmrrnl
4 r-i h i
h*
Ral^i.wv ir.l ■■ .Irvh Vs uf^ri^rr
Undo Management
C&nflguraBon
Auc-IuiscIUkc RsHsiloi :ni lutss}
I V-.TT rr lrlr I. lHr Firfr vlir *
II Tl Mil !! j
Ji ij j I—!■_L_■ i Lui 'Jui ■iri.L."
Recommendations
UkoTa^las-iacs U-nnTRP
■VjI j ti.l.-n-. b _■ Tun
Clii-j^t Ih^ .it j f.^i i. J Lhi-. b^L r^i-rv^'il^ LI■■= ujilfi sl.w> I j vA lr ^ r«?L.rr t tf'iu^.ivr i k1 j'iuu i^l ^il ut
le-igh 51c jrd3 :at ?spa?e sue
r^hrfAr A-i^ly? =. me F=iirl 1/J7.1M 1(1:1111 AM 1'JH.IH 1F| Lhwte G*n*rMi.>H Hu-* uid riMttput Una*
F "i1 h"i1.j F rI■ =11=. Hit Prnlilnni Fniiurl
Fi'i:i--i v i-1": ir.--iii■ ■ -. Hit Rnnrimiunnrinlifiii
System Activity and Tnhl* ipse* IJiig*
Nit i^Liiritr J*l j\vz *r* iia'i^J jii syi.fii n.\.-i./ -i\ J L-iik
Lji^sI I-jiii r j 7 J¥i\ lift .■ur J1*! ~iA 1
A^rs^e JrHo '.'.*r?if:i*r I.ale i/i/hnue: /O
Ma:<nn.ii Jrdo ;*r^s:i*r Hale i'€.friiiLt*; 1D0G.0
fr- Jl u* Tin: jIi
12-27
Copyright © 2004, Oracle. All rights reserved.
The Undo Management Page
You can access the Undo Management page (shown on the slide) from the database
Administration page by selecting Undo Management under the Instance heading.
Use the Undo Management page to set the parameters for the undo management area. You can
change the undo tablespace, edit the undo tablespace, and solicit recommendations for the undo
retention length and undo tablespace size for a specified period of time.
You can also access the Undo Advisor to set the time period for which the undo tablespace
should retain data and to analyze the impact of new undo retention settings.
The Undo Management page offers detailed statistics about the undo activity on your system for
the designated period of time.
You can also view the Undo Generation Rate and Tablespace Usage graph, which shows you
over a period of time the undo activity in terms of Active, Unexpired, and Free undo extents, as
well as the Undo Generation Rate.
Oracle Database 10g: Administration Workshop II 12-27
Automatic Undo Retention Tuning
Proactive tuning:
- Undo retention is tuned for longest-running query.
- Query duration information is collected every 30
seconds.
• Reactive tuning:
- Undo retention is gradually lowered under space
pressure.
- Oldest unexpired extents are used first.
- Undo retention never goes below either
undo_retention or 15 minutes (whichever is less).
• Enabled by default
12-28 Copyright © 2004, Oracle. All rights reserved.
Automatic Undo Retention Tuning
By default, Oracle Database 10g automatically tunes undo retention by collecting database
statistics such as the longest-running query and the undo generation rate. These statistics are
collected on a regular basis to determine the best possible value for undo retention.
Automatic undo retention tuning enables you to efficiently use the space in the undo tablespace
by dynamically adapting to the workload. As you run your application against the database, the
system learns how long the application requires the undo to be retained, either for read
consistency or flashback operations. This information is used to control how big the undo
tablespace should grow to accommodate the retention of undo information.
The value of the UNDO_RETENT ION parameter has an impact on automatic undo tuning. The
default value for this parameter is 900 seconds. If you do not specify a value, or if you specify
zero, then Oracle Database lOg automatically tunes undo retention for the current undo
tablespace, using 900 as the minimum value. If you set UNDO_RE TENT ION to a value other
than zero, Oracle Database lOg continues to auto-tune the undo retention, using the specified
value of UNDO_RETENTION as the minimum value.
If you always have enough undo space, then this feature reduces the occurrences of "Snapshot
too old" errors for your long-running queries.
Oracle Database 10g: Administration Workshop II 12-28
The Undo Advisor Page
Undo Advisor
-i-j r"1-11 J I■'h11= rrrh- -in -;r* ir-'-!i IJI ^^^^^p ^^^B ^H
L-i ul -j. villi vn i¥ ^Lljnalival'- .uiivil Ly .u sysltri lj' iLLLtiilul vuir f.Miuii i_I Iuiim tjii r j; ^jjijs L-rtL wlti 1 Lr i u. 1. ■ ij-Jj^ii Ltlu— L-u \j;- Irrd^'ui: v? Lt
iSMm'tu i .'i^unilv itLf i.ij'i pum1 :.^'t> .hv i^u L-zt .hi^ li^u^ 1. d^^^^^ lht j-iJj li-LI^VMy.'^ ^i-" f^i - "i^^ ".rijl '^Iti 1 li i:..hj anil Lj iv\ ru Ij> V ■^^■ij :
■ylj.1 I> Li ll '.'.viiliuii. V'jj i'uii i-kr^L .In1 ''jUyvij Tn l =.'ijJ K ... J Tviu 1 ju ■. -■ '-'^-i -^ ami r.'-'J'Mii li lUli1'. j.ij.'J ijm ,.y.\."i ucliii.y fvi .u. Lru piivil.
Advisor
HAh"
12-
*!''.'.V Jll'J'.'F'.L.'l.ij-| |l~I IllilJ.'.".: ■
■ li en hIi -h:i-ii: t-d :n-1 r-,i-c -li :■ :■■,-, )-■
Ari^'iy?!* Hire '=i|-|-H l.'/WlH 11111 fit IfllMH 11:1111 AM
:h l-.-Jy
Ftwquir-i
i- ".'li
Pi
E j;.ri
Si
H
B.
"■ - Tl
i, ..'. r
9
a - ":u
STir ;i.<
d Tabl*ip aesSias by Unda Retention L«na1ti
i i R-T-n rr :' 'j
i i
i i ^Jr^
1 ^r^
i _j^r^
-I.':-! IrifJ-i 1 - -i-- ^*" 1 ^(^■■'.■■|>':
ni rr :' '. 1' \ | \—^^ \
i
i
i
Recommendations
Undo Retention (minutes) No Recommendation
Required Tablespace Size (MB) No Recommendation
1 ^^^ ' ' '
'^f^ i i i
.'<JJ l.:r.^ i.S-t j,1Jl ;.:-lb j.t:u x'Ul
llitdn Ftwimrlriifc (ml niir*c)
!.■ h \>vvi. Lr \w .,,d,j,i -vi! uHalt .liv !■ :■.■.■ Li ll "^.ti 1 li it'll
29 Copyright © 2004, Oracle. All rights reserved.
The Undo Advisor Page
Use the Undo Advisor page to set the time period for which the undo tablespace should retain
data and to analyze the impact of your new undo retention setting. The Undo Advisor assists in
correctly sizing the undo tablespace.
The graph on the Undo Advisor page displays the calculation of the space required in megabytes
based on the length of time you designate for undo retention. Change the values in the New
Undo Retention field and the Analysis Time Period field, and then select Update Analysis and
Graph to view the new analysis of your settings.
You can use the Required Tablespace Size by Undo Retention Length graph to interactively
model the relationship between retention period and undo tablespace size. Clicking a point on
the graph updates the New Undo Retention field.
You can access the Undo Advisor page from the Undo Management page by clicking the Undo
Advisor button.
For the chosen analysis period, if Snapshot Too Old errors have been detected, the Undo
Advisor also provides recommendations regarding the undo retention as well as the required
undo tablespace size to avoid those errors. This is automatically reflected on the graph with an
additional sticker for the recommended values.
Oracle Database 10g: Administration Workshop II 12-29
Summary
In this lesson, you should have learned how to:
Describe the various tools used to diagnose
database performance issues
• Access the database advisors
• Use the SQL Tuning Advisor to improve database
performance
12-30 Copyright © 2004, Oracle. All rights reserved.
Oracle Database 10g: Administration Workshop II 12-30
Practice 12 Overview:
Optimizing Database Performance
This practice covers proactively tuning your database
using ADDM.
12-31 Copyright© 2004, Oracle. All rights reserved.
Oracle Database 10g: Administration Workshop II 12-31
Practice 12: Optimizing Database Performance
Unless specified otherwise, you should be logging in as SYS DBA either through Database
Control or SQL*Plus.
1. Use the Database Control Console to create a new tablespace called TBSADDM. This
tablespace should have only one 50 MB file and must be locally managed. Also, make sure
that TBSADDM does not use automatic segment space management.
2. Using the Database Control Console, create a new user called ADDM identified by ADDM.
Make sure that the ADDM user has TBSADDM as its default tablespace, and TEMP as its
temporary tablespace. When done, grant the following roles to the ADDM user: CONNECT,
RESOURCE, DBA.
3 . Connected as ADDM in SQL*Plus, and execute the lab_l2_03 . sql script from the labs
directory.
4. Connect as user oracle from your terminal emulator and execute the lab_l2_0 4 . sh
script from your labs directory.
5. From the Database Control Console home page, select the Performance tab. On the
Performance page, make sure that the View Data field is set to Real Time: 15 Seconds
Refresh. After a while, you should see a spike on the Sessions: Waiting and Working
graph. After the spike is finished, execute the lab_l2_0 5 . sql script. This script forces
the creation of a new snapshot. Looking at the graph, you can already determine that this
instance is suffering concurrency problems.
Note: If you see a popup screen asking you to accept or decline the SVG Viewer
agreement, type in A to accept. Using the SVG Viewer enhances the graphical
displays of Enterprise Manager.
6. Return to the Database home page. Because the ADDM data is not refreshed too
frequently on the console, you may not see the latest ADDM result in the Diagnostic
Summary region. Retrieve the latest ADDM findings, and determine the cause of the
problem.
7. To fix the problem, create a new tablespace called TBSADDM2, and execute the
1 ab_l 2_0 7 . s ql script from your labs directory. This script drops the ADDM table, and
re-creates it in the new tablespace. It also gathers statistics on the table and takes a new
snapshot.
8. Connect as user oracle and execute the lab_l2_04 . sh script again from your labs
directory. From the Database Control Console home page, go to the Performance page
and make sure that the View Data field is set to Real Time: 15 Seconds Refresh. After a
while, you should see a spike on the Sessions: Waiting and Working graph. When the
spike is finished, execute the lab_l2_0 8 . sql script. This script forces the creation of a
new snapshot. From the Database Control Console home page, go to Advisor Central and
look at the latest snapshot. Has the situation improved?
9. To clean up your environment, execute the lab_l2_cleanup . sql script.
Oracle Database 10g: Administration Workshop II 12-32
Monitorinc^Bd Manage Storage
13
Copyright © 2004, Oracle. All rights reserved.
Objectives
After completing this lesson, you should be able to:
• Tune redo writing and archiving operations
• Issue statements that can be suspended when
encountering space condition errors
• Reduce space-related error conditions through
proactively managing tablespace space usage
Reclaim wasted space from tables and indexes
using the segment-shrink functionality
Estimate the size of new tables and indexes
• Use different storage options to improve
performance of queries
Rebuild indexes online
13-2 Copyright© 2004, Oracle. All rights reserved.
Oracle Database 10g: Administration Workshop II 13-2
Online Redo Log File Configuration
Size redo log files to minimize contention.
Provide enough groups to prevent waiting.
Store redo log files on separate, fast devices.
Monitor the redo log file configuration with:
- V$LOGFILE
- V$LOG
- V$INSTANCE_RECOVERY
13-3 Copyright© 2004, Oracle. All rights reserved.
Online Redo Log File Configuration
Improperly configured redo logs can cause serious performance problems for an Oracle database.
If the redo logs are too small, system checkpoints can continuously put a high load on the buffer
cache and I/O system. If there are too few redo logs, then the archive process cannot keep up
with LGWR, and the database will shut down until the archive process indicates an online redo
log can be overwritten.
To improve the rate of redo writes, redo log files in the same group should ideally be on separate,
fast devices because LGWR writes to them almost continuously. Properly size your redo log files
to minimize contention and frequency of log switches—as a guide, a redo log file should be able
to contain at least 20 minutes of redo data. You can use the redo size system statistic to help
determine the proper size for your redo log files.
You can query the V$LOGFILE and V$LOG dynamic performance views to obtain information
about the name, location, size, and status of the online redo log files. Any waits for Log File
Parallel Write in V$SYSTEM_EVENT indicate a possible I/O problem with the log files. If the
FAST_START_MTTR_TARGET parameter is set to limit the instance recovery time, the optimal
size for the redo logs can be obtained by querying the OPTIMAL_LOGFILE_SIZE column
from the V$ INSTANCE_RECOVERY view. You can also obtain sizing advice on the Redo Log
Groups page of the Oracle Enterprise Manager Database Control Console.
Oracle Database 10g: Administration Workshop II 13-3
Online Redo Log File Configuration (continued)
Monitoring Redo Log File Information
The Oracle server does not provide a means of monitoring redo disk I/Os, so you must use
operating system disk monitoring commands. On most UNIX systems, sar (system activity
reporter) is useful for this purpose.
# sar -d 1 1
SunOS stc-sunlOl 5.6 Generic_105181-16 sun4u 02/01/01
22:30:03 device %busy avque r+w/s blks/s avwait avserv
22 :3
sdO
sdO, a
sd0,b
sdO, c
sdl
sdl, c
sdl,h
sd6
93
93
0
0
0
0
0
0
0
0
0
0
0
0
0
0
9
9
0
0
0
0
0
0
179
179
0
0
0
0
0
0
657
657
0
0
0
0
0
0
0
0
0
0
0
0
0
0
0
0
0
0
0
0
0
0
5
5
0
0
0
0
0
0
2
%busy is the percentage of time the device was busy during the polling period.
avque is the average queue size.
r+w/s and blks/s are reads and writes per second and blocks per second, respectively.
avwait is the average wait time per request.
avserv is the number of milliseconds per average seek.
The s ar command can be set up to record historical system information, making it even more
useful to the DBA.
Another useful UNIX utility for monitoring disk activity is iostat. The output of iostat is
simpler than that of sar:
# iostat -D
sdO sdl sd6 nfsi
rps wps util rps wps util rps wps util rps wps util
2 11.4 7 26.0 0 00.0 0 00.0
rps and wps are reads per second and writes per second, respectively, and util is the
percentage of disk utilization.
Oracle Database 10g: Administration Workshop II 13-4
Redo Logfile Sizing Advisor
13-5
Copyright © 2004, Oracle. All rights reserved.
Redo Logfile Sizing Advisor
Using the Database Control home page, you can obtain redo log file sizing advice by accessing
the Administration tab. Click the Redo Log Groups link in the Storage section. On the Redo
Log Groups page, select the redo log group for which you want size advice, and then select the
Sizing advice option from the Actions drop-down list. Click the Go button to obtain the advice.
A new column is added to V$ INS TANCE_RECOVERY. This column shows the redo log file size
(in megabytes) that is considered to be optimal based on the current
FAST_START_MTTR_TARGET setting. It is recommended that you set all online redo log files
to at least this value.
Oracle Database 10g: Administration Workshop II 13-5
Increasing the Performance of Archiving
• Allow the lgwr process to write to a disk different
from the one the ARCn process is reading.
• Share the archiving work during a temporary
increase in workload:
ALTER SYSTEM ARCHIVE LOG ALL
TO <log_archive_dest>
Increase the number of archive processes.
• Change archiving speed:
- LOG_ARCHIVE_MAX_PROCESSES
- LOG_ARCHIVE_DEST_n
13-6 Copyright© 2004, Oracle. All rights reserved.
Increasing the Performance of Archiving
Archive Log File Configuration
If you choose to archive, it is even more important to have more than two redo log groups. When
a group switches to another group, the DBWn process must checkpoint as usual, and one file
must be archived. You must allow time for both of these operations before the LGWR process
needs to overwrite the file again.
Obtaining Information About Archived Log Files and Their Location
You can query the V$ARCHIVED_LOG dynamic performance view to display archived log
information from the control file, including archive log names. An archive log record is inserted
after the online redo log is successfully archived or cleared (the name column is null if the log
was cleared).
The V$ARCHIVE_DEST dynamic performance view describes, for the current instance, all the
archive log destinations, as well as their current values, modes, and statuses.
Oracle Database 10g: Administration Workshop II 13-6
Resumable Statements
A resumable statement:
• Allows you to suspend large operations instead of
receiving an error
Gives you a chance to fix the problem while the
operation is suspended, rather than starting over
Is suspended for the following conditions:
- Out of space
- Maximum extents reached
- Space quota exceeded
13-7 Copyright© 2004, Oracle. All rights reserved.
Resumable Statements
Oracle Database provides a means for suspending, and later resuming, the execution of large
database operations in the event of space allocation failures. This enables you to take corrective
action instead of the Oracle database server returning an error to the user. After the error
condition is corrected, the suspended operation automatically resumes. This feature is called
resumable space allocation. The statements that are affected are called resumable statements.
A statement executes in resumable mode only when the resumable statement feature has been
enabled for the system or session.
Suspending a statement automatically results in suspending the transaction. Thus all
transactional resources are held through the suspension and resuming of a SQL statement. When
the error condition disappears (for example, as a result of user intervention or perhaps sort space
released by other queries), the suspended statement automatically resumes execution.
A suspension time-out interval is associated with resumable statements. A resumable statement
that is suspended for the time-out interval (the default is two hours) wakes up and returns the
exception to the user. A resumable statement can be suspended and resumed multiple times
during execution.
Oracle Database 10g: Administration Workshop II 13-7
Using Resumable Space Allocation
Queries, DML operations, and certain DDL
operations can be resumed if they encounter an
out-of-space error.
• A resumable statement can be issued through
SQL, PL/SQL, SQL*Loader, or the Oracle Call
Interface (OCI).
• To run a resumable statement, you must first
enable resumable statements for your session.
ALTER
SESSION
ENABLE RESUMABLE;
INSERT INTO sales_new
ALTER
SESSION
DISABLE
SELECT * FROM
RESUMABLE;
sh
sales;
13-8 Copyright© 2004, Oracle. All rights reserved.
Using Resumable Space Allocation
Resumable space allocation is possible only when statements are executed within a session that
has resumable mode enabled. There are two means of enabling and disabling resumable space
allocation:
• Issue the ALTER SESSION ENABLE RESUMABLE command.
• Set the RESUMABLE_TIMEOUT initialization parameter to a non-zero value with an
ALTER SESSION or ALTER SYSTEM Statement.
When enabling resumable mode for a session or the database, you can specify a time-out period,
after which a suspended statement errors out if no intervention has taken place. The
RESUMABLE_TIMEOUT initialization parameter indicates the number of seconds before a
timeout occurs. You can also specify the time-out period with the command:
ALTER SESSION ENABLE RESUMABLE TIMEOUT 3600;
The value of TIMEOUT remains in effect until it is changed by another ALTER SESSION
ENABLE RESUMABLE statement, it is changed by another means, or the session ends. The
default time-out interval when using the ENABLE RESUMABLE TIMEOUT clause to enable
resumable mode is 7200 seconds, or 2 hours.
Oracle Database 10g: Administration Workshop II 13-8
Using Resumable Space Allocation (continued)
You can also give a name to resumable statements. For example:
ALTER SESSION ENABLE RESUMABLE TIMEOUT 3600
NAME 'multitab insert';
The name of the statement is used to identify the resumable statement in the DBA_RESUMABLE
and USER_RESUMABLE views.
For example:
SELECT name, sql_text FROM user_resumable;
NAME SQL_TEXT
multitab insert INSERT INTO oldsales SELECT * FROM sh.sales;
To automatically configure resumable statement settings for individual sessions you can create
and register a database level LOGON trigger that alters a user's session. The trigger issues
commands to enable resumable statements for the session, specifies a time-out period, and
associates a name with the resumable statements issued by the session.
Because suspended statements can hold up some system resources, users must be granted the
RESUMABLE system privilege before they are allowed to enable resumable space allocation and
execute resumable statements.
Oracle Database 10g: Administration Workshop II 13-9
Resuming Suspended Statements
SQL statement
"j employees table
Suspended
Used block
Free space
Continue
SQL
operation
employees table
K&&£K&*£K&!
SfiflGSflBSPflflSS
AFTER
SUSPEND
trigger
Abort
13-10
Copyright © 2004, Oracle. All rights reserved.
Resuming Suspending Statements
Detecting a Suspended Statement
When a resumable statement is suspended, the error is not raised to the client. In order for
corrective action to be taken, the Oracle database provides alternative methods for notifying
users of the error and for providing information about the circumstances.
When a resumable statement encounters a correctable error, the system internally generates the
AFTER SUSPEND system event. Users can register triggers for this event at both the database
and schema level. If a user registers a trigger to handle this system event, the trigger is executed
after a SQL statement has been suspended. SQL statements executed within an AFTER
SUSPEND trigger are always nonresumable and are always autonomous. Transactions started
within the trigger use the SYSTEM rollback segment. These conditions are imposed to overcome
deadlocks and reduce the chance of the trigger experiencing the same error condition as the
statement.
Within the trigger code, you can use the USER_RESUMABLE or DBA_RESUMABLE views, or
the DBMS_RESUMABLE . SPACE_ERROR_INFO function to get information about the
resumable statements.
Oracle Database 10g: Administration Workshop II 13-10
Resuming Suspended Statements (continued)
When a resumable statement is suspended:
• The session invoking the statement is put into a wait state. A row is inserted into
V$SESSION_WAIT for the session with the EVENT column containing "statement
suspended, wait error to be cleared".
• An operation-suspended alert is issued on the object that needs addition resources for the
suspended statement to complete.
Ending a Suspended Statement
When the error condition is resolved (for example, as a result of DBA intervention or perhaps
sort space released by other queries), the suspended statement automatically resumes execution
and the "resumable session suspended" alert is cleared.
A suspended statement can be forced to throw the SERVERERROR exception using the
DBMS_RESUMABLE . ABORT () procedure. This procedure can be called by a DBA, or by the
user who issued the statement. If the suspension time out interval associated with the resumable
statement is reached, the statement aborts automatically and an error is returned to the user.
Oracle Database 10g: Administration Workshop II 13-11
Proactive Tablespace Monitoring Overview
Server-generated alerts inform you that:
- Tablespaces are running low on available space
- Segments are running out of space
Data gathering and reporting provides:
- Historical tablespace disk space usage
- Segment growth trend analysis
13-12 Copyright© 2004, Oracle. All rights reserved.
Proactive Tablespace Monitoring Overview
With Oracle Database 10g, tablespace disk space usage is proactively managed by the database.
This feature manages tablespace disk space usage in the following ways:
• Through the use of database alerts, you are informed when a tablespace runs low on
available disk space as well as when particular segments are running out of space. You can
then provide the tablespace with more disk space, thus avoiding out-of-space conditions.
• Information gathered is stored in the Automatic Workload Repository (AWR) and used to
do growth trend analysis and capacity planning of the database.
Oracle Database 10g: Administration Workshop II 13-12
Tablespace Space Usage Monitoring
1^
1^\
Check every 10 min.
97% Critical
85% Warning
Cleared
Cleared
Read-only and offline tablespaces: Do not set up alerts.
Temporary tablespace: Threshold corresponds to
space currently used by sessions.
Undo tablespace: Threshold corresponds to space
used by active and unexpired extents.
Tablespaces that can extend automatically: Threshold
is based on the maximum file size.
13-13
Copyright © 2004, Oracle. All rights reserved.
Tablespace Space Usage Monitoring
Tablespace thresholds are defined in terms of a percentage of the tablespace size. You can
specify the critical and warning threshold values. If a threshold value is not specified, then the
following behavior applies:
• The defaults are 85% for warning and 97% for critical thresholds.
• In an upgraded database, the alert is turned off by default. Thus, the threshold values will
be NULL. The database-wide default can be reset when desired.
The database tracks space utilization while performing regular space management activities.
This information is aggregated every 10 minutes. An alert is triggered when the threshold for a
tablespace has been reached or cleared.
• Alerts should not be flagged on tablespaces that are in read-only mode, or tablespaces that
were taken offline, because there is not much to do for them.
• In temporary tablespaces, the threshold value has to be defined as a limit on the used space
in the tablespace.
• For undo tablespaces, an extent is reusable if it does not contain active or unexpired undo.
For the computation of threshold violation, the sum of active and unexpired extents is
considered as used space.
• For tablespaces with autoextensible files, the thresholds are computed according to the
maximum file size you specified, or the maximum OS file size.
Oracle Database 10g: Administration Workshop II 13-13
Edit Tabiespace Page
Database: orcl > Tablespaces > Edil Tabiespace. EXAMPLE
Edit Tabiespace: EXAMPLE
Logged in As SYS
Tabiespace Size .cn nnn
(MB) 15D-0DO
Space Used (MB) 77.813
Space Used (%) 51.88
Space Used Thresholds
S Use Default Thresholds
Warning „.
(%) a3
Critical (%) 97
C Specify Thresholds, by percent used
Warning [£7 1
Critical (%) |97 |
O Disable Thresholds
13-14
Copyright © 2004, Oracle. All rights reserved.
Edit Tabiespace Page
In addition to the Edit Thresholds page, Tabiespace Space Usage thresholds can be modified
when creating or editing a tabiespace via the Edit Tabiespace page.
From the Database Control home page, click the Administration tab, and then click the
Tablespaces link in the Storage section. This brings you to the Tablespaces page. From there,
click the tabiespace you want to set thresholds for. Then on the Edit Tabiespace page, click the
Thresholds tab.
In the Space Used Thresholds region of the Edit Tabiespace page, you have options to:
• Use the database-wide default thresholds
• Specify your own thresholds for this particular tabiespace
• Disable the space-usage tracking mechanism
Note: The Modify Database Defaults link allows you to modify the database-wide default
thresholds for the Tabiespace Space Usage metric. The database-wide default thresholds for the
Tabiespace Space Usage metric are automatically used when you create a new tabiespace
without specifying threshold values for this metric.
Oracle Database 10g: Administration Workshop II 13-14
Segment Advisor Overview
Database: Qrcl.us.Qracle.com > Advisor Central > Segment Advisor
Segment Advisor
You can get advice on shrinking segments for individual schema objects or entire
tablespaces.
©Tablespaces
O Schema Objects
Advisor Mode
® Complete Analysis of All Segments (Comprehensive)
In the absence of available statistics, the advisor will sample selected objects as
needed, and generate more complete recommendations. The analysis may take a
long time to finish.
O Analysis Based on Available Statistics (Limited)
The analysis will be based on statistics collected on the segment. In the absence
of statistics, no recommendations will be generated.
13-15 Copyright© 2004, Oracle. All rights reserved.
Segment Advisor Overview
The Segment Advisor determines whether an object is a good candidate for a shrink operation. It
makes recommendations based on the amount of unused space that can be released, and takes
into consideration estimated future space requirements using criteria from the gathered
information on segment growth trends.
After the recommendations are made, you can then choose to implement the recommendations.
The shrink advisor can be invoked at the segment or tablespace level.
The EM Database Control Console is the interface to the Segment Advisor. It provides the
option to select various inputs and schedule a job that calls the Segment Advisor to get shrink
advice. The Segment Advisor Wizard can be invoked with no context, in the context of a
tablespace, or in the context of a schema object.
The Segment Advisor makes recommendation based on:
• Sampled analysis
• Historical information
• Future growth trends
Oracle Database 10g: Administration Workshop II 13-15
Shrinking Segments: Overview
mi
Unused
space
Unused
space
HWM
H::i::i::i
Shrink
operation
I
HWM
13-16
Copyright © 2004, Oracle. All rights reserved.
Shrinking Segments: Overview
The upper part of the diagram shows you a sparsely populated segment. As you can see, there is
some unused space both above and below the segment's high-water mark (HWM).
Shrinking a sparsely populated segment improves the performance of scan and DML operations
on that segment because there are fewer blocks to look at after the segment has been shrunk.
This is especially true for:
• Full table scans (fewer and denser blocks)
• Better index access (fewer I/Os on range ROWID scans due to a more compact tree)
By shrinking sparsely populated segments, you enhance efficiency of space utilization inside the
database because more free space is made available for objects in need.
With previous releases, space, after being allocated below the segment's HWM, could only be
freed by moving or redefining the segment. With Oracle Database lOg, you can now shrink
segments. When a segment is shrunk, its data is compacted, its HWM is pushed down, and
unused space is released back to the tablespace containing the segment.
There are two phases of a table shrink operation. The first phase is compaction. During this
phase, rows are moved to the left part of the segment as much as possible. After the rows have
been moved, the second phase of the shrink operation is started. During this phase, the HWM is
adjusted, and the unused space is released.
Oracle Database 10g: Administration Workshop II 13-16
Shrinking Segments: Considerations
Online and in-place operation
• Applicable only to segments residing in ASSM
tablespaces
• Candidate segment types:
- Heap-organized tables and index-organized tables
- Indexes
- Partitions and subpartitions
- Materialized views and materialized view logs
Indexes are maintained.
• Triggers are not fired.
13-17 Copyright© 2004, Oracle. All rights reserved.
Shrinking Segments: Considerations
• A shrink operation is an online and in-place operation because it does not need extra
database space to be executed.
• You cannot execute a shrink operation on segments managed by free lists. Only segments
in Automatic Segment Space Managed (ASSM) tablespaces can be shrunk. However, the
following objects stored in ASSM tablespaces cannot be shrunk:
Tables in clusters
Tables with LONG columns
Tables with on-commit materialized views
Tables with ROW ID-based materialized views
LOB segments
IOT mapping tables
IOT overflow segments
Tables with function-based indexes
Heap-organized segments without ROW MOVEMENT enabled
• Index dependency is taken care of during the segment shrink operation. The indexes are in
a usable state after shrinking the corresponding table.
• The actual shrink operation is handled internally as INSERT and DELETE operations.
However, DML triggers are not fired because the data itself is not changed.
Oracle Database 10g: Administration Workshop II 13-17
Database Control and Segment Shrink
Shrink Segment: Options
r!ff,11',l,r NH.rriPi nrrrrs
r.h =irf ~\~a Tallin
Till "hi ik ft|.-irilir 1 -.mi- ir.l". -"nfi v-snl^f r|iir i .iir, "inf "ir.:
:.n I ■.-ill h : »•} !i'ii :r :i: :. j11h
Shrlnh Options
', -■<■■:?, -V ■-. -,p,:-.r ir fil- irk- r .in .if ir vll -,: .11 -.rmr I rrs
Sr.iri.i,::1 !~-si|nr Ylfi ■: ir fi-!h,:f,-! "~|:irr:
Hkv-I h ■-: ^rr-a;t1lis ■:«-nsrl* -vd Inn t«M lisrKcvsisJipsM :3 H-« -.-Jtli ■!■->*£*. U J rg In sicripa^ w(«*skIism snv
iji |.:nlH>niij III :.:■>!:■ h d 11 :h :.' b i- n.-J Ml-I x il T>i-c i ill H»yi4 J i: iJJI nifci f Ih I
Q i". in.in_.1 (""iflnr ilfi
Lc-.j-*c1--■-■.■ Ice --j*d }9£ire-i:t.ai:!tY-iT:iciv: e«SHi£l isr5cc-.-ssJips« -".He co i-j-sclr- H-« ^-s.He ■eoi^nK i-wcsc-j-iIm
pi ±H--1-J-c,:-H d I ■,■ i. I dij .1iiM j fl.L- -,!:■-, ■: F"i-k-:,-:H:"::C,i:H
Segment Selection
^■£irr-:HnEM"LOVEE£ur^
C" fc-nr ■. iHbM-LJVzbl: i nJ VJI Ui.p--i Jrr. =>lji-ht.-_
Papandant Sagmgntg
13-18
Copyright © 2004, Oracle. All rights reserved.
Database Control and Segment Shrink
Using Database Control, you can shrink individual segments. For example, from the Database
Control home page, click the Tables link in the Storage section. On the Tables page, select your
table, and then select Shrink Segment in the Actions field. Then click the Go button. This
brings you to the Shrink Segment page, where you can choose the dependent segments to shrink.
You have the opportunity to compact only or to compact and release the space. You can also
choose the CASCADE option.
When done, click the Continue link. This submits the shrink statements as a scheduled job.
Note: Before shrinking a heap-organized table, you must enable row movement on that table.
You can do this with Database Control from the Options tab on the Edit Table page.
Oracle Database 10g: Administration Workshop II 13-18
Accessing the Segment Advisor
Database orcl us oracls.com > Advisor Central Logged in As SYS
Advisor Central
Page Refreshed Apr 24, 2004 12:39:57 PM
Advisors
ADDM
lemorv Advisor
SQL Tuning Advisor MTTR Advisor
SQL Access Advisor
Segment Advisor
undo Management
O TEMP
TEMPORARY LOCAL
MANUAL
Add Dalafile
m
Add Datafile
Creale Like
Generate DDL
Make Locally Managed
Make Readonly
Make Writable
Place Online
Reorganize
I Show Dependencies
ONLINE
20 000
Run Sen merit Advisor
Take Offline
^r
85.00
13-19
Copyright © 2004, Oracle. All rights reserved.
Accessing the Segment Advisor
You can access the Segment Advisor from several places within EM:
• Advisor Central page
• Tablespaces page
• Schema object pages
Oracle Database 10g: Administration Workshop II 13-19
Segment Advisor
ORACLE Enterprise Manager 10g
Database Control
Seluo Preferences Hem Logout
Tabiespaces Options Schedule Review
Segment Advisor: Review
Database orcl
Task Name
Task Description
Advisor Mode
Time Limit for Analysis (sees)
Advisory Results Retention
(days)
Selected Objects
SHRINKJ272154
Get shrink advice based on object growth trend
Complete Analysis of All Segments (Comprehensive)
Unlimited
3D
13-20
Copyright © 2004, Oracle. All rights reserved.
Segment Advisor
From the Administration page, select Tabiespaces in the Storage section. On the Tabiespaces
page, select the tablespace on which you want to perform the shrink analysis, and then select
Run Segment Advisor in the Actions field. Click Go to open the Segment Advisor initial page.
You must choose Comprehensive or Limited analysis mode. In Comprehensive mode, the
analysis is longer because the advisor is sampling the segments to identify the right targets.
Keep clicking Continue to answer the various questions of the advisor. You end up on the
Segment Advisor: Review page where you can review the details of your analysis. The Segment
Advisor analysis is run as a scheduled job, so you can review the scheduled task from the
Advisor Central page. When completed, you can review the advisor's recommendations.
Note: In the Segment Advisor, you can specify the duration of the analysis. This enables you to
limit the time the advisor takes to produce recommendations. Generally speaking, a longer
analysis period produces more comprehensive results. The results are stored in the Automatic
Workload Repository (AWR) and can be viewed later. Use the "Number of days to retain"
option to instruct the Oracle database how long these results should be preserved before being
purged from the AWR.
Oracle Database 10g: Administration Workshop II 13-20
13-21
I
Shrinking Segments Using SQL
ALTER ... SHRINK SPACE [COMPACT] [CASCADE]
I
TABLE
I
INDEX
I
MATERIALIZED VIEW
c
MODIFY PARTITION
MATERIALIZED VIEW LOG
MODIFY SUBPARTITION
ALTER TABLE employees ENABLE ROW MOVEMENT; ff\
ALTER TABLE employees SHRINK SPACE CASCADE;^)
Copyright © 2004, Oracle. All rights reserved.
Shrinking Segments Using SQL
Because a shrink operation may cause ROWIDs to change in heap-organized segments, you must
enable row movement on the corresponding segment before executing a shrink operation on that
segment. Row movement by default is disabled at the segment level. To enable row movement,
the ENABLE ROW MOVEMENT clause of the CREATE TABLE or ALTER TABLE commands is
used. This is illustrated in the first example above.
The ALTER command is used to invoke segment shrink on an object. The object's type can be
one of the following: table (heap- or index-organized), partition, subpartition, index, materialized
view, or materialized view log. The SHRINK SPACE clause is used to shrink space in a segment.
If CASCADE is specified, the shrink behavior is cascaded to all the dependent segments that
support a shrink operation, except materialized views, LOB indexes, IOT mapping tables, and
overflow segments.
During a shrink operation, you can indicate that only the compaction phase be executed by
specifying the SHRINK SPACE COMPACT clause. If COMPACT is not specified, the segment
space is compacted, and at the end of the compaction phase, the HWM is adjusted and the
unused space is released.
Note: For more information, see the Oracle Database SQL Reference Guide.
Oracle Database 10g: Administration Workshop II 13-21
Segment Shrink:
Execution Considerations
Use compaction only:
- To avoid unnecessary cursor invalidation
- During peak hours
DML operations and queries can be issued during
compaction.
DML operations are blocked when the HWM is
adjusted.
13-22 Copyright © 2004, Oracle. All rights reserved.
Segment Shrink: Execution Considerations
The compaction phase of a segment shrink operation is done online. So, conventional DML
operations as well as queries can coexist with a segment shrink operation.
During the compaction phase, locks are held on individual rows containing the data. This causes
concurrent DML operations such as updates and deletes to serialize on these locks. However,
only packets of rows are locked at one time to avoid the locking of the entire segment. Similarly,
conventional DML operations can block the progress of the compaction phase until they commit.
The COMPACT clause is useful if you have long-running queries that might span the shrink
operation and attempt to read from blocks that have been reclaimed. When you specify the
SHRINK SPACE COMPACT clause, the progress of the shrink operation is saved in the bitmap
blocks of the corresponding segment. This means that the next time a shrink operation is
executed on the same segment, the Oracle database remembers what has been done already. You
can then reissue the SHRINK SPACE clause without the COMPACT clause during off-peak hours
to complete the second phase.
To adjust the HWM of a segment during a shrink operation, the object is locked in exclusive
mode. The lock is held for a very short duration and does not significantly affect the availability
of the segment. However, dependent cursors are invalidated.
Oracle Database 10g: Administration Workshop II 13-22
Segment Resource Estimation
Create Table
General
■Name EMP
Schema JFV
Tablespace EXAMPLE
Organization Standard, Heap Organized
Coll
Estimate Table Size
k kA :. i jl.-l-i .L' ujLiTiuLun k ■ Ihiu liz.' ul I hi1 l.iLIu i II kiblu ljIlti-i1. mil "j.u-ii^l' fjururi uIjij i j1. . jl u.'Iii .■■: 11 .■ _"..irii .ili jI
■\--. -,-ii\r r rr if hvjf n+i -"-illroHi^ H.v.: :r inr < ill -w.ifs-,, r.nlii in f.iT-sr, "nr n.i,:-.r (F ."!-rfi J I- i-l -ti— hfir vi.vir 1 ". if!f
:c cakjl*:elie saz-e i ncalon impart or 1 le c jns il y *e sc:eJ :^jle=.pace
r"o?c:ed -jv. Ccjr:
-XX
Reault of Creating Table in Tablespace EXAMPLE
_s-1iiv5lec Table GizsfY-J 3.D1
yr.JL.'.^JIu.^.L'J 'I kulLJ|.JLJI.VzJ I.UU
iTIPTh? EeI ral?c at ? Si;? do?s ml in?kde ?1 ?s:in?:e fc-IXz.lu Cr^-flo^ Msj1?c
lajlt L- I =11 .ll JI ^-l--| ^1 .■:
IPHONE NUMBER
IVARCHAR2 M
20
13-23
Copyright © 2004, Oracle. All rights reserved.
Segment Resource Estimation
The new segment resource estimation feature enables you to estimate the amount of resources
the creation of a new segment would require. Based on the structure of a table or index, and
number of estimated rows in the table, the Oracle database estimates the amount of disk space
likely to be consumed by the object.
For example, the estimation of a table size is based on the following data: column data types,
column sizes, and PCTFREE. Extent information is also used to calculate the space allocation
impact on the currently selected tablespace.
To access this feature for tables, from the Administration page select Tables in the Storage
section, and then click Create to create the new table. You can also use the "Create like"
functionality. In the Create Table page, specify the column data types in the Columns section.
Also specify in which tablespace to create the new table, and then click Estimate Table Size to
open the Estimate Table Size page where you can specify the Projected Row Count. Then click
the Estimate Table Size button to get both the Estimate Table Size and the corresponding Space
Allocated in Tablespace.
Oracle Database 10g: Administration Workshop II 13-23
Growth Trend Report
Used by the Segment Advisor
Space usage statistics are collected into AWR
Space Usage Trend For Table JFV.TEST
13-24
Copyright © 2004, Oracle. All rights reserved.
Growth Trend Report
Segment growth reporting makes critical growth data available for advisories and reporting tools
such as the Segment Advisor and the Growth Trend Report graph.
Some characteristics of the growth trend report feature include:
• Automatic Workload Repository data analysis. The workload repository collects the
persistent space usage statistics and stores it in a system-defined schema. These statistics
are captured at snapshot creation, and when alerts are triggered.
• Indications of past growth trend and predictions of future growth patterns
• Support for locally managed tablespaces only
The growth trend report consists of two components: growth history and growth forecast. The
growth history charts past space usage data. The growth forecast predicts future space
requirements using history information and straight-line projection.
With Database Control, you can access the growth trend report from the Schema section of the
Administration page. For example, select the Tables link in the Schema section, choose your
table from the Tables page, and look under the Segments tab for the edited table. The screen shot
shows you such a report. You can choose the analysis period, and from the calculated graph, you
can see the point in time at which you may have to allocate more space to your segment.
Oracle Database 10g: Administration Workshop II 13-24
13-25
Monitoring Index Space
• To collect usage statistics regarding an index:
SQL> EXECUTE dbms_stats.gather_index_stats -
> ('OE', 'CUSTOMERS_PK') ;
• To view statistics collected:
SQL> SELECT name,
2 (DEL_LF_ROWS_LEN/LF_ROWS_LEN) * 100 AS wastage
3 FROM index_stats;
• Rebuild indexes with wastage greater than 20%:
SQL> ALTER INDEX oe.customers_pk REBUILD;
* To coalesce indexes (alternative to rebuild):
SQL> ALTER INDEX oe.customers_pk COALESCE;
Copyright © 2004, Oracle. All rights reserved.
Monitoring Index Space
You can monitor the space that indexes use with the DBMS_S TATS package, or by viewing the
Growth Trend Report for an index.
After gathering statistics you can query the INDEX_STATS view to obtain the following values:
lf_rows Number of values currently in the index
lf_rows_len Sum of all the length of values, in bytes
del_lf_rows Number of values deleted from the index
del_lf_rows_len Length of all deleted values
Note: The INDEX_STATS view contains the last analyzed index. The view is session-specific.
If you connect to another session under the same user, the view is populated with the index
analyzed by the session querying the view.
Oracle Database 10g: Administration Workshop II 13-25
Monitoring Index Space Usage
Dependent Segments
'TIP Select a segment and click the 'Refresh' button to see the Space Usage Trend.
Space Usage Trend For Index HR.EMP_ID_NO
From 4/21/04
To 5/26/04
30000
25000
20000
3 15000
10000
5000
0
Actual Predicted
21 24 26 28 30 2 4 6
April 2004 May
22 24 26
KB Allocated
KB Used
13-26
Copyright © 2004, Oracle. All rights reserved.
Monitoring Index Space Usage
You can also view the index space usage information and predict future growth by using EM and
the growth trend report. Using the Database Control home page, you can obtain index sizing
information by accessing the Administration tab. Click the Indexes link in the Schema region.
On the Indexes page, enter your search query (for example, the name of a schema) and click Go.
Click the name of the index you want to analyze. On the Edit Index page, click the Segments tab.
On the Segments property page, select the segment name for your target index, adjust the
analysis dates as needed, and click Refresh. To view future growth predictions, enter a future
date and click Refresh.
The information on this page also indicates the current storage statistics for the index. The
example shown above indicates that this index has almost 40% wasted space, so it would be a
good candidate for rebuilding.
You cannot view index-organized table (IOT) overflow segment, IOT mapping table segment, or
LOB index segments using this interface because they are not supported.
Oracle Database 10g: Administration Workshop II 13-26
Deciding Whether to Rebuild
or Coalesce an Index
Rebuild
Quickly moves index to
another tablespace
Higher costs: Requires more
disk space
Creates new tree, shrinks
height if applicable
Enables you to quickly change
storage and tablespace
parameters without having to
drop the original index
Coalesce
Cannot move index to
another tablespace
Lower costs: Does not
require more disk space
Coalesces leaf blocks within
same branch of tree
Quickly frees up index
leaf blocks for use
13-27 Copyright© 2004, Oracle. All rights reserved.
Rebuilding Indexes
You may decide to rebuild an index if the deleted entries represent 20% or more of the current
entries, although this depends on your application and priorities. You can use the query shown
previously to find the wastage ratio. Use the ALTER INDEX REBUILD statement to reorganize
or compact an existing index, or to change its storage characteristics. The REBUILD statement
uses the existing index as the basis for the new index. All index storage commands are supported,
such as STORAGE (for extent allocation), TABLESPACE (to move the index to a new
tablespace), and IN I TRANS (to change the initial number of concurrent transaction entries
allocated within each data block allocated to the index).
ALTER INDEX REBUILD is usually faster than dropping and re-creating an index because it
uses the fast full scan feature. It thus reads all the index blocks, using multiple block I/O, then
discards the branch blocks. The Oracle database allows the creation of an index or the re-creation
of an existing index while allowing concurrent operations on the base table. This helps achieve
demanding availability goals by allowing maintenance operations to be performed online with no
down time.
Oracle Database 10g: Administration Workshop II 13-27
Identifying Unused Indexes
Use index monitoring to determine whether an index is
being used:
1. Enable index monitoring, and clear out any
existing index use information.
13-28
SQL> ALTER INDEX emp_job_ix MONITORING USAGE;
2. Continue normal database operations.
3. Query the v$ob ject_usage view for usage
information.
SQL> SELECT index_name, used FROM V$OBJECT_USAGE;
4. Disable index monitoring at the end of evaluation.
SQL> ALTER INDEX emp_job_ix NOMONITORING USAGE;
Copyright © 2004, Oracle. All rights reserved.
Identifying Unused Indexes
The statistics about the usage of an index can be gathered and displayed in V$OBJECT_USAGE.
If the information gathered indicates that an index is never used, the index can be dropped. In
addition, eliminating unused indexes cuts down on the overhead for DML operations, thus
improving performance. Each time the MONITORING USAGE clause is specified,
V$OBJECI_USAGE is reset for the specified index. The previous information is cleared and a
new start time is recorded.
V$OBJECT_USAGE Columns
index_name The index name
table_name The corresponding table
monitoring Indicates whether monitoring is "On or Off
used Indicates (Yes or No) the index has been used during
the monitoring time
start_monitoring Time at which monitoring began on index
stop_monitoring Time at which monitoring stopped on index
Oracle Database 10g: Administration Workshop II 13-28
13-29
Index-Organized Tables
Regular table access
mW Table access
by ROWID
IOT access
LlMon-key columns
Key column
Row header
Copyright © 2004, Oracle. All rights reserved.
Index-Organized Tables
Unlike an ordinary (heap-organized) table whose data is stored as an unordered collection (heap),
data for an index-organized table (IOT) is stored in a B-tree index structure in a primary key-
sorted manner. Besides storing the primary key column values, each index entry in the IOT B-
tree stores the non-key column values as well.
Index-organized tables have full table functionality. They support features such as constraints,
triggers, LOB and object columns, partitioning, parallel operations, online reorganization, and
replication. You can even create indexes on an index-organized table.
Index-organized tables are ideal for OLTP applications, which require fast primary key access
and high availability. Queries and DML on an orders table used in online order processing are
predominantly primary-key based, and heavy volume causes fragmentation that results in a
frequent need to reorganize. Because an index-organized table can be reorganized online and
without invalidating its secondary indexes, the window of unavailability is greatly reduced or
eliminated.
An index-organized table is an alternative to:
• A table indexed on the primary key by using the CREATE INDEX statement
• A cluster table stored in an indexed cluster that has been created using the CREATE
CLUS TER statement that maps the primary key for the table to the cluster key
Oracle Database 10g: Administration Workshop II 13-29
Index-Organized Tables
and Heap Tables
• Compared to heap tables, lOTs have:
- Faster key-based access to table data
- Do not duplicate the storage of primary key values
- Require less storage
- Use secondary indexes and logical rowids
- Have higher availability, as table reorganization
does not invalidate secondary indexes
lOTs have the following restrictions:
- Must have a primary key that is not deferrable
- Cannot be clustered
- Cannot use composite partitioning
- Cannot contain a column of type row id or long
13-30 Copyright © 2004, Oracle. All rights reserved.
Index-Organized Tables and Logical Rowids
Index-organized tables do not have regular (physical) rowids, but use logical rowids instead.
Logical rowids give the fastest possible access to rows in IOTs by using two methods:
• A physical guess whose access time is equal to that of physical rowids
• Access without the guess (or after an incorrect guess); this performs a primary key access
ofthelOT
The guess is based on knowledge of the file and block that a row resides in. The latter
information is accurate when the index is created, but changes if the leaf block splits. If the guess
is wrong and the row no longer resides in the specified block, then the remaining portion of the
logical rowid entry, the primary key, is used to get the row.
Oracle constructs secondary indexes on index-organized tables by using logical rowids that are
based on the table's primary key. Because rows in index-organized tables do not have permanent
physical addresses, the physical guesses can become stale when rows are moved to new blocks.
To obtain fresh guesses, you can rebuild the secondary index. Note that rebuilding a secondary
index on an index-organized table involves reading the base table, unlike rebuilding an index on
an ordinary table.
Oracle Database 10g: Administration Workshop II 13-30
Index-Organized Tables and Logical Rowids (continued)
A quicker, more lightweight means of fixing the guesses is to use the ALTER INDEX . . .
UPDATE BLOCK REFERENCES statement. This statement is performed online, while DML is
still allowed on the underlying index-organized table.
After you rebuild a secondary index, or otherwise update the block references in the guesses,
collect index statistics again.
The UROWID data type enables applications to use logical rowids in the same way they use
physical rowids, for example, selecting rowids for later update or as part of a cursor. UROWID
can also be used to store rowids from other databases, accessed through gateways. The UROWID
type can also be used to reference physical rowids.
Oracle Database 10g: Administration Workshop II 13-31
13-32
SQL>
2
3
4
5
6
7
8
9
10
11
12
13
14
Creating Index-Organized Tables
CREATE TABLE country
( country_id CHAR(2)
CONSTRAINT country_id_nn NOT NULL,
country_name VARCHAR2(40) ,
currency_name VARCHAR2(25) ,
currency_symbol VARCHAR2(3),
map BLOB,
flag BLOB,
CONSTRAINT country_c_id_pk
PRIMARY KEY (country_id))
ORGANIZATION INDEX
TABLESPACE indx
PCTTHRESHOLD 20
OVERFLOW TABLESPACE users;
Copyright © 2004, Oracle. All rights reserved.
Creating Index-Organized Tables
Regular B-tree index entries are usually small. They consist of only the primary key value and a
rowid value for each row. Many of these small index entries can be stored in a leaf block. This is
not necessarily the case for index-organized tables because they store full rows.
Storing large entries in index leaf blocks slows down index searches and scans. You can specify
that the rows go into an overflow area by setting a threshold value that represents a percentage of
block size.
The primary key column must always be stored in the IOT index blocks as a basis for searching.
But you can place non-key values in a separate area, the row overflow area, so that the B-tree
itself remains densely clustered.
Index-organized tables differ from ordinary tables only in physical organization. Logically, they
are manipulated in the same manner as ordinary tables. You can specify an index-organized table
just as you would specify a regular table in INSERT, SELECT, DELETE, and UPDATE
statements.
All of the alter options available for ordinary tables are available for index-organized tables. This
includes ADD, MODIFY, and DROP COLUMNS and CONSTRAINTS. However, the primary key
constraint for an index-organized table cannot be dropped, deferred, or disabled.
Oracle Database 10g: Administration Workshop II 13-32
IOT Row Overflow
indx tablespace
Segment = COUNTRY_C_ID_PK
IOT_type = IOT
Segment_type = INDEX
Index_type = IOT - TOP
users tablespace
Segment = SYS_IOT_OVER_/i
IOT_type = IOT_OVERFLOW
Segment_type = TABLE
Rows within
PCTTHRESHOLD
Remaining part of the row
13-33
Copyright © 2004, Oracle. All rights reserved.
IOT Row Overflow
B-tree index entries are usually quite small because they only consist of the key value and a
ROWID. In index-organized tables, however, the B-tree index entries can be large because they
consist of the entire row. This may destroy the dense clustering property of the B-tree index. To
handle this problem, you can specify an overflow tablespace so that, if necessary, a row can be
divided into the following two parts that are then stored in the index and in the overflow storage
area, respectively:
• The index entry, containing column values for all the primary key columns, a physical
rowid that points to the overflow part of the row, and optionally a few of the non-key
columns
• The overflow part, containing column values for the remaining non-key columns
When OVERFLOW is specified, you can use two clauses, PCTTHRESHOLD and INCLUDING, to
control how Oracle determines whether a row should be stored in two parts and if so, at which
non-key column to break the row.
The INCLUDING clause specifies the column at which to divide an index-organized table row
into index and overflow portions. The server accommodates all non-key columns up to the
column specified in the INCLUDING clause in the index leaf block, provided it does not exceed
the specified threshold.
Oracle Database 10g: Administration Workshop II 13-33
IOT Row Overflow (continued)
The PCTTHRESHOLD clause specifies the percentage of space reserved in the index block for an
index-organized table row. If a row exceeds the size calculated based on this value, all columns
after the column named in the INCLUDING clause are moved to the overflow segment. If
OVERFLOW is not specified, then rows exceeding the threshold are rejected. PCTTHRESHOLD
defaults to 50 and must be a value from 0 to 50.
The overflow data is placed in a data segment in the tablespace specified by the OVERFLOW
clause. You can also specify other attributes of the overflow storage, such as segment and block
utilization parameters.
Oracle Database 10g: Administration Workshop II 13-34
Querying dba_tables for lOT Information
SQL> SELECT table_name, iot_
2 FROM DBA_TABLES;
TABLE_NAME IOT_NAME
COUNTRY
SYS_IOT_OVER_2268 COUNTRY
.name, iot_type
IOT_TYPE
IOT
IOT_OVERFLOW
13-35
Copyright © 2004, Oracle. All rights reserved.
The dba_tables Dictionary View
The iot_type and iot_name columns of the DBA_TABLES view provide information about
index-organized tables.
If there is no overflow area for an IOT, then there is only a single dictionary entry per IOT. The
value of iot_type is IOT and the iot_name field is blank.
If an overflow area has been specified, then its name appears as an additional new table in the
list of table names. The overflow table is called sys_±ot_over_nnnn (where nnnn is the
object ID of the table segment) in dba_tables . The iot_type column is set to
IOT_Over f low for this table and iot_name is set to the name of the index-organized table
to which it belongs.
Oracle Database 10g: Administration Workshop II 13-35
Querying dba_indexes
and dba segments for IOT information
SQL> SELECT index_name, index_type,
2 tablespace_name, table_name
2 FROM DBA_INDEXES;
INDEX NAME INDEX TYPE TABLESPACE TABLE NAME
COUNTRY C ID PK IOT - TOP INDX COUNTRY
SQL> SELECT segment.
2 segment_type
_name, tablespace_
3 FROM DBA_SEGMENTS;
SEGMENT_NAME
SYS_IOT_OVER_2268
COUNTRY_C_ID_PK
TABLESPACE_NAME
USER
INDX
_name,
SEGMENT_TYPE
TABLE
INDEX
13-36 Copyright © 2004, Oracle. All rights reserved.
Querying dba_indexes and dba_segments for IOT information
In DBA_INDEXES, the IOT table name listed is the same as that used in the CREATE TABLE
command, but an index name is also listed for the table, with a default name of
sy s_iot_top_ii nnn.
In DBA_SEGMENTS, the name of the overflow segment is listed here with the same name as
mentioned above, sys_±ot_top_nnnn. The table itself is listed as sys_±ot_top_nnnn.
Oracle Database 10g: Administration Workshop II 13-36
13-37
Using a Mapping Table
SQL> CREATE TABLE country
2 ( country_id CHAR(2)
3 CONSTRAINT country_id_nn NOT NULL
4 , country_name VARCHAR2(40)
5 , currency_name VARCHAR2(25)
6 , currency_symbol VARCHAR2(3)
7 , CONSTRAINT country_c_id_pk
8 PRIMARY KEY (country_id))
9 ORGANIZATION INDEX
10 MAPPING TABLE TABLESPACE users;
Copyright © 2004, Oracle. All rights reserved.
Using a Mapping Table
The Oracle database allows a bitmap index to be built on an IOT, providing that there is a
mapping table. The mapping table is a heap-organized table that stores logical rowids of the
index-organized table. Specifically, each mapping table row stores one logical rowid for the
corresponding index-organized table row.
A bitmap index on an IOT is similar to a bitmap index on a heap table, except that the rowids
used in the bitmap index on an IOT are those of a mapping table and not the base table. The
mapping table provides one-to-one mapping between logical rowids of the IOT rows and
physical rowids of the mapping table rows. There is one mapping table per IOT and it is used by
all the bitmap indexes created on that IOT.
In a heap-organized base table, a bitmap index is accessed by using a search key. If the key is
found, the bitmap entry is converted to a physical rowid. For an IOT, a bitmap index is also
accessed using a search key. If the key is found, the bitmap entry is converted to a physical
rowid used to access the mapping table. The access to the mapping table yields a logical rowid.
This logical rowid is used to access the IOT.
The movement of rows in an IOT does not leave the bitmap indexes built on that index-
organized table unusable. The movement of rows in the IOT invalidates the physical guess in
some of the mapping table's logical rowid entries. However, the IOT can still be accessed using
the primary key.
Oracle Database 10g: Administration Workshop II 13-37
Maintaining a Mapping Table
• Collect statistics on a mapping table by analyzing
the IOT.
Query the dba_indexes view to determine the
percentage accuracy of the mapping table.
SQL> SELECT index_name, pct_direct_access
2 FROM DBA_INDEXES
3 WHERE pct_direct_access IS NOT NULL;
• Rebuild the mapping table if required, using the
alter table command.
Use the compress clause of create table or
alter table for the mapping table.
13-38 Copyright © 2004, Oracle. All rights reserved.
Maintaining a Mapping Table
Examine the pct_direct_access column of the DBA_INDEXES view. The value in this
column is an indication of the percentage of rows with a valid guess for a secondary index on an
IOT. This column is populated when the IOT is analyzed.
To rebuild the mapping table, it must be dropped and re-created. The following command will
drop the mapping table associated with the COUNTRIES index-organized table:
SQL> ALTER TABLE countries MOVE NOMAPPING;
Note: To drop a mapping table there must be no bitmap indexes on the IOT.
To create a mapping table on the COUNTRIES index-organized table, use the following
command:
SQL> ALTER TABLE countries MOVE MAPPING TABLE;
Use the COMPRESS clause to enable key compression for the mapping table, which eliminates
repeated occurrence of primary key column values in index-organized tables. You specify an
integer indicating the number of prefix columns to compress. Key compression in index-
organized tables can be disabled with the NOCOMPRES S clause. By default, key compression of
index-organized tables is disabled.
Oracle Database 10g: Administration Workshop II 13-38
Clusters
ORD_NO
101
102
102
102
101
101
PROD
A4102
A2091
G7830
N9587
A5675
W0824
QTY
20
11
20
26
19
10
A2091 11
G7830 20
N9587 26
Cluster Key
(ORD_NO)
101 ORD DT
CUST CD
0 5-JAN-97
PROD
A4102
A5675
W0824
ORD DT
07-JAN-97
PROD
R01
OTY
20
19
10
CUST CD
N45
OTY
Unclustered orders and
order item tables
Clustered orders and
order item tables
13-39
Copyright © 2004, Oracle. All rights reserved.
Definition of Clusters
A cluster is a group of one or more tables that share the same data blocks because they share
common columns and are often used together in join queries. Storing tables in clusters offers the
DBA a method to denormalize data. If you implement clustered tables in your database, you do
not need to change any application code that accesses the tables. Clusters are transparent to the
end user and programmer.
Performance Benefits of Clusters
• Disk I/O is reduced and access time improved for joins of clustered tables.
• Each cluster key value is stored only once for all the rows of the same key value; it
therefore uses less storage space.
Performance Consideration
Full table scans are generally slower on clustered tables than on nonclustered tables.
Oracle Database 10g: Administration Workshop II 13-39
Cluster Types
Index cluster
Hash
cluster
Sorted hash
cluster
Hash function
Hash function
13-40
Copyright © 2004, Oracle. All rights reserved.
Cluster Types
Index Clusters
An index cluster uses an index, known as the cluster index, to maintain the data within the
cluster. The cluster index must be available to store, access, or maintain data in an index cluster.
The cluster index is used to point to the block that contains the rows with a given key value. The
structure of a cluster index is similar to that of a normal index.
Although a normal index does not store null key values, cluster indexes store null keys. There is
only one entry for each key value in the cluster index. Therefore, a cluster index is likely to be
smaller than a normal index on the same set of key values.
Hash Clusters
A hash cluster uses a hash algorithm (either user-defined or system-generated) to calculate the
location of a row, both for retrieval and for DML operations.
For equality searches that use the cluster key, a hash cluster can provide greater performance
gains than an index cluster, because there is only one segment to scan (no index access is
needed).
Oracle Database 10g: Administration Workshop II 13-40
Cluster Types (continued)
Sorted Hash Clusters
Inside a sorted hash cluster, the rows are organized in lists of sorted rows. Each list corresponds
to a particular value of the hash key columns defined by the corresponding sorted hash cluster.
Within each list, the rows are stored in the order specified by the sort key columns that are
defined by the corresponding sorted hash cluster. This is also the default return order when
querying a sorted hash cluster table using the hash key columns in the predicate.
Sorted hash clusters offer the benefit of eliminating the CPU time and private memory needed to
sort the data for queries that require a guaranteed returned order between SQL statements.
Oracle Database 10g: Administration Workshop II 13-41
Situations Where Clusters Are Useful
Criterion
Uniform key distribution
Evenly distributed key values
Rarely updated key
Often joined master-detail tables
Predictable number of key values
Queries using equality predicate
on key
Data is retrieved in the order it
was inserted
Index
X
X
X
Hash
X
X
X
X
X
Sorted
hash
X
X
X
X
X
X
13-42 Copyright© 2004, Oracle. All rights reserved.
Situations Where Clusters Are Useful
When Not to Use Clusters
• If the application uses queries joining tables only occasionally or modifies their common
column values frequently. Modifying a row's cluster key value takes longer than modifying
the value in an unclustered table because Oracle might need to migrate the modified row to
another block to maintain the cluster.
• If a full scan is executed often on only one of the clustered tables. This table is stored on
more blocks than if it had been created alone.
• If the data for all rows of a cluster key value exceeds one or two Oracle blocks. To access
an individual row in a clustered key table, the Oracle server reads all blocks containing
rows with the same value.
When Not to Use Hash Clusters
• If the table is constantly growing or if the application frequently modifies the cluster key
values
• If your application often performs full table scans and you must allocate a great deal of
space to the hash cluster in anticipation of the table growing
Hash and index clusters require a lot of planning before being used. There maybe more
performance overhead involved for major operations such as bulk (direct path) inserts and
rebuilds.
Oracle Database 10g: Administration Workshop II 13-42
Sorted Hash Cluster: Example
CREATE CLUSTER calls_cluster
, call_timestamp NUMBER SORT | r*—. i
, call_duration NUMBER SORT)J
HASHKEYS 10000
SINGLE TABLE HASH IS origin_number
SIZE 50;
CREATE TABLE calls
( origin_number NUMBER
, call_timestamp NUMBER
, call_duration NUMBER
, other_info VARCHAR2(30))
CLUSTER calls_cluster(
origin_number,call_timestamp,call_duration
);
13-43 Copyright© 2004, Oracle. All rights reserved.
Sorted Hash Cluster: Example
The way you define sorted hash clusters is very similar to the way you create hash clusters.
First, you create the sorted hash cluster. The most important difference from a traditional hash
cluster is defining the sort key columns in addition to the cluster key columns. Here, the cluster
key is ORIGIN_NUMBER, and the sort key columns are CALL_TIMESTAMP and
CALL_DURATION. Another difference is that for sorted hash clusters, the SIZE parameter
specifies how many metadata entries to store for a particular hash key value. The size of a
metadata entry is mainly determined by the size of the cluster key columns.
In the second step, you create the actual table specifying the link to the sorted hash cluster with
the CLUSTER clause. You must specify the cluster key columns in the correct order followed by
the sort key columns in the correct order.
The example in the slide represents the following scenario: A telecommunications company
needs to store call records for a fixed number of originating telephone numbers going through a
particular switch. From each originating telephone number, there can be an unlimited number of
telephone calls. Calls are stored as they are made and processed later in first-in, first-out order
when bills are generated for each originating telephone number. Each call is identified by a time-
stamp number.
Note: Although the example uses a single table, you can store more than one table in a cluster.
Oracle Database 10g: Administration Workshop II 13-43
Summary
In this lesson, you should have learned how to:
• Tune redo writing and archiving operations
• Issue statements that can be suspended when
encountering space condition errors
• Reduce space-related error conditions through
proactively managing tablespace space usage
Reclaim wasted space from tables and indexes
using the segment shrink functionality
Estimate the size of new tables and indexes
• Use sorted hash clusters
Rebuild indexes online
13-44 Copyright© 2004, Oracle. All rights reserved.
Oracle Database 10g: Administration Workshop II 13-44
Practice 13 Overview:
Managing Storage
This practice covers the following topics:
Monitoring index space usage and rebuilding
indexes if needed
• Using the Segment Advisor to shrink the space
allocated to a table
• Using the Segment Space Estimator to determine
the amount of space required to create a new table.
13-45 Copyright© 2004, Oracle. All rights reserved.
Oracle Database 10g: Administration Workshop II 13-45
Practice 13: Managing Storage
Exercise 1: Monitoring and Rebuilding Indexes
1. Configure the Automatic Workload Repository to take snapshots every 10 minutes.
2. Run the lab_i3_01_01. sql script to create the HR. EMP table, create the
HR. EMP_ID_NO index, and populate the table with data.
Create table emp as select * from hr.employees;
Create index emp_id_no on emp(employee_id);
Insert into emp select * from emp;
Insert into emp select * from emp;
Insert into emp select * from emp;
Insert into emp select * from emp;
Insert into emp select * from emp;
Insert into emp select * from emp;
Insert into emp select * from emp;
Insert into emp select * from emp;
Commit;
3. Use the EM Database Control Console to view the space used by the EMP_ID_NO index
and whether it is using the space efficiently.
4. Rebuild the EMP_ID_NO index using a method that keeps the index available for
application users. Rebuild the index in the current tablespace and then update the optimizer
statistics for the index using an estimate of 30% of the index data. The index should be
rebuilt immediately.
5. After submitting the index rebuild job, verify that the job completed successfully.
6. Review the index segment usage statistics again to determine whether the index rebuild
improved space usage.
Oracle Database 10g: Administration Workshop II 13-46
Practice 13: Managing Storage (continued)
Exercise 2: Using the Segment Advisor
1. Run the lab_l3_0 2_0l. sql script to perform DML operations on the HR.EMP table.
connect hr/hr
delete from emp;
insert into emp select * from employees;
commit;
2. Go to the Advisor Central page and run the Segment Advisor for the HR. EMP table. Note
the amount of space currently used by the HR. EMP table and the HR. EMP_ID_NO index.
3. Perform a complete analysis of the HR. EMP table and its index, EMP_ID_NO. Because the
table is relatively small, do not set a time limit for the analysis. For the schedule, use the
standard schedule, which runs the job immediately and does not repeat.
4. After you submit the job, verify that it completed successfully.
5. If the Segment Advisor recommends shrinking the segment, schedule the task to run
immediately, and indicate that the recovered space should be released.
6. After the job has been scheduled, click the Job History tab to verify that the job completed
successfully.
7. Go the the Automatic Workload Repository and wait until a new snapshot has been taken.
8. Review the table and index storage usage. How much space was reclaimed?
Oracle Database 10g: Administration Workshop II 13-47
Practice 13: Managing Storage (continued)
Exercise 3: Using the Segment Space Estimator
1. Using Enteiprise Manager Database Control Console, go to the Create Table page for a
standard, heap-organized table.
2. Specify a name of PRINT_DOCS, the PM schema, and the EXAMPLE tablespace for the
table. Estimate the size of the table containing 250,000 rows that will be created using the
following definition:
CREATE TABLE print_docs
product_id
ad_id
ad_composite
ad_sourcetext
ad_finaltext
ad_fltextn
ad_photo
ad_graphic
ad_header
NUMBER(6)
NUMBER(6)
BLOB
CLOB
CLOB
NCLOB
BLOB
BFILE
pm.adheader_typ
);
Oracle Database 10g: Administration Workshop II 13-48
Automatic Storage Management
Copyright © 2004, Oracle. All rights reserved.
Objectives
After completing this lesson, you should be able to:
• Describe the concepts of Automatic Storage
Management (ASM)
• Set up initialization parameter files for ASM and
database instances
Execute SQL commands with ASM file names
• Start up and shut down ASM instances
• Administer ASM disk groups
Use RMAN to migrate your database to ASM
14-2 Copyright© 2004, Oracle. All rights reserved.
Oracle Database 10g: Administration Workshop II 14-2
What Is Automatic Storage Management?
Portable and high performance
cluster file system
Manages Oracle database files
Data is spread across disks
to balance load
Integrated mirroring across
disks
Solves many storage
management challenges
Application
Database
File
System
Volume
Manager
ASM
Operating System
14-3
Copyright © 2004, Oracle. All rights reserved.
What Is Automatic Storage Management?
Automatic Storage Management (ASM) provides a vertical integration of the file system and the
volume manager that is specifically built for the Oracle database files. ASM can provide
management for single SMP machines, or across multiple nodes of a cluster for Oracle Real
Application Clusters (RAC) support.
ASM distributes I/O load across all available resources to optimize performance while removing
the need for manual I/O tuning. ASM helps DBAs to manage a dynamic database environment
by allowing them to grow the database size without having to shutdown the database to adjust
the storage allocation.
ASM can maintain redundant copies of data to provide fault tolerance, or it can be built on top of
vendor supplied reliable storage mechanisms. Data management is done by selecting the desired
reliability and performance characteristics for classes of data rather than with human interaction
on a per file basis.
ASM capabilities save DBAs time by automating manual storage and thereby increasing their
ability to manage larger databases and more of them with increased efficiency.
Oracle Database 10g: Administration Workshop II 14-3
ASM Key Features and Benefits
Stripes files, not logical volumes
Online disk reconfiguration and dynamic
rebalancing
Adjustable rebalancing speed
Provide redundancy on a file basis
ASM only supports Oracle database files
Cluster aware
Automatically installed
14-4 Copyright© 2004, Oracle. All rights reserved.
ASM Key Features and Benefits
ASM divides files into extents, and spreads the extents for each file evenly across all of the disks.
ASM uses an index technique to track the placement of each extent. When your storage capacity
changes, ASM does not re-stripe all of the data, but moves an amount of data proportional to the
amount of storage added or removed to evenly redistribute the files and maintain a balanced load
across the disks. This is done while the database is active.
You can increase the speed of a rebalance operation, or lower it to reduce the impact on the I/O
subsystem. ASM provides mirroring protection without the need to purchase a third-party
Logical Volume Manager. One unique advantage of ASM is that the mirroring is applied on a
file basis, rather than on a volume basis. Hence, the same disk group can contain a combination
of files protected by mirroring, or not protected at all.
ASM supports data files, log files, control files, archive logs, RMAN backup sets, and other
Oracle database file types. ASM supports Real Application Clusters and eliminate the need for a
Cluster Logical Volume Manager or a Cluster File System.
Oracle Database 10g: Administration Workshop II 14-4
ASM Concepts
Database
X
>•---
Tablespace
Segment
X
Extent
Oracle
block
Data file
File System
File
or
Raw Device
ASM
Disk Group
X
ASM File
X
ASM Disk
Ji.
Allocation Unit
i
Physical
Block
14-5
Copyright © 2004, Oracle. All rights reserved.
ASM Concepts
ASM does not eliminate any preexisting database functionality. Existing databases are able to
operate as they always have. New files may be created as ASM files while existing ones are
administered in the old way, or can be migrated to ASM. The diagram depicts the relationships
that exists between the various storage components inside an Oracle database. On the left and
central parts of the diagram are the relationships that exists in previous releases. On the right are
the new concepts introduced by ASM.
Database files can now be stored as ASM files. At the top of the new hierarchy are ASM disk
groups. Any single ASM file is contained in only one disk group. However, a disk group may
contain files belonging to several databases, and a single database may use storage from multiple
disk groups. As you can see, one disk group is made up of ASM disks, and each ASM disk
belongs to only one disk group. ASM files are always spread across all the ASM disks in the disk
group. ASM disks are partitioned in allocation units (AU) of one megabyte each. An allocation
unit is the smallest contiguous disk space that ASM allocates. ASM does not allow blocks to be
split across allocation units.
Note: The graphic only deals with one type of ASM file: data file. However ASM can be used to
store other database file types.
Oracle Database 10g: Administration Workshop II 14-5
ASM General Architecture
\Node1
Group Services
tom=ant
Group Services
tom=bee
dick=bee
harry=bee
Node2\
DB
Instance
SI D=sales
(fg)—I (rba^—
ASM DiskgroupTom
ASM Diskgroup Dick
ASM Diskgroup Harry
14-6
Copyright © 2004, Oracle. All rights reserved.
ASM General Architecture
To use ASM, you must start a special instance, called an ASM instance, before you start your
database instance. ASM instances do not mount databases, but instead manage the metadata
needed to make ASM files available to ordinary database instances. Both ASM instances and
database instances have access to some common set of disks called disk groups. Database
instances access the contents of ASM files directly, communicating with an ASM instance only
to get information about the layout of these files.
An ASM instance contains two new background processes. One coordinates rebalance activity
for disk groups. It is called RBAL. The second one performs the actual rebalance data extent
movements. There can be many of these at a time, and they are called ARBO, ARBl, and so forth.
An ASM instance also has most of the same background processes as a database instance (SMON,
PMON, LGWR, and so on).
Each database instance using ASM has two new background processes called ASMB and RBAL.
RBAL performs global opens of the disks in the disk groups. At database instance startup, ASMB
connects as a foreground process into the ASM instance. Communication between the database
and the ASM instance is performed via this bridge. This includes physical file changes such as
data file creation and deletion. Over this connection, periodic messages are exchanged to update
statistics and to verify that both instances are healthy.
Oracle Database 10g: Administration Workshop II 14-6
ASM General Architecture (continued)
When an ASM instance mounts a disk group, it registers the disk group and connect string with
Group Services. The database instance knows the name of the disk group, and can therefore use
it to lookup connect information for the correct ASM instance.
Oracle Database 10g: Administration Workshop II 14-7
ASM Instance Functionalities
CREATE DISKGROUP
ALTER SYSTEM RESTRICTED SESSION
ASM
instance
Database
instance
ALTER DISKGROUP
DROP DISKGROUP
14-8
Copyright © 2004, Oracle. All rights reserved.
ASM Instance Functionalities
The main goal of an ASM instance is to manage disk groups and protect their data. ASM
instances also communicate file layout to database instances. In this way, database instances can
directly access files stored in disk groups.
There are several new disk group administrative commands. They all require the SYSDBA
privilege and must be issued from an ASM instance.
You can add new disk groups. You can also modify existing disk groups to add new disks,
remove existing ones, and many other operations. You can remove existing disk groups.
Finally, you can prevent database instances from connecting to an ASM instance. When the
commandALTER SYSTEM ENABLE RESTRICTED SESS ION is issued to an ASM instance,
database instances cannot connect to that ASM instance. Conversely, ALTER SYSTEM
DISABLE RESTRICTED SESS ION enables connections from database instances. This
command permits an ASM instance to start up and mount disk groups for purposes of
maintenance without allowing database instances to access the disk groups.
Oracle Database 10g: Administration Workshop II 14-8
ASM Instance Creation
Gvlti'l Ji^ sluirijt ri^nar ■in «n ■>uik- lik* .j .lift (tr J :■ Jal*i. Hit.
t: I" Hi: I"'-:". I HI'"I
Use me r leG^te-nforDsilatsge alci-age
| jf/jL J. -ii ji- = J. -L i- ■■ Hi r jiiLfiLr . t'-m? |
^^^^7irJ^^^Tr^^P^!7^^^^!^!fa£ r.j;-*.1!^? ^ =.1ir; \h
:\|A jtc Vilnl^lrv -n *rc. r.vl TiIt^?
,■■.-IL i v,i .v-1 ki
r
■. .wia-lvJv
■n .y.v
1
. ... I
■.vj =iv ■.■",-*' r- ■"■■■
CEttx-ll il^ .rviU. mil '.Li I .i.'ASfc r jIji i-v./JUm
Til '"-r.l 'i :l:ir :i m ! ij'Iim: ;t j :j'i 'm:. i j :h i]'i j:m
1i hr i. mc.:". ilinjr Iri vii.i "J■"■ I-~L" i;.r
14-9
Copyright © 2004, Oracle. All rights reserved.
ASM Instance Creation
While creating an ASM-enabled database, Database Configuration Assistant (DBCA) determines
if an ASM instance already exists on your host. If ASM instance discovery returns an empty list,
DBCA creates a new ASM instance. As part of the ASM instance creation process, DBCA
automatically creates an entry into the oratab file. This entry is used for discovery purposes.
On Windows platform where a services mechanism is used, DBCA automatically creates an
Oracle Service and the appropriate registry entry to facilitate the discovery of ASM instances.
When an ASM instance is configured, DBCA creates an ASM instance parameter file and an
ASM instance password file.
Note: The footprint of an ASM instance is around 100MB.
Oracle Database 10g: Administration Workshop II 14-9
14-10
ASM Instance Initialization Parameters
INSTANCE_TYPE = ASM
DB_UNIQUE_NAME = +ASM
ASM_POWER_LIMIT = 1
ASM_DISKSTRING = '/dev/rdsk/*s2', '/dev/rdsk/cl*'
ASM_DISKGROUPS = dgroupA, dgroupB
LARGE_POOL_SIZE = 8MB
Copyright © 2004, Oracle. All rights reserved.
ASM Instance Initialization Parameters
• INSTANCE_TYPE should be set to ASM for ASM instances.
DB_UNIQUE_NAME specifies the service provider name for which this ASM instance
manages disk groups.The default value of +ASM should be valid for you. It needs to be
modified only if you run multiple ASM instances on the same node.
ASM_POWER_L IMI T controls the speed for a rebalance operation. Values range from 1 to
11, with 11 being the fastest. If omitted, this value defaults to 1. The number of slaves is
derived from the parallelization level specified in a manual rebalance command (POWER),
or by the ASM_POWER_L IMI I parameter.
• ASM_DISKSIRING is an operating system dependent value used by ASM to limit the set
of disks considered for discovery.
• ASM_DISK_GROUPS is the list of names of disk groups to be mounted by an ASM
instanceat startup, or when the ALTER DISKGROUP ALL MOUNT command is used.
The parameter INS TANCE_TYPE is the only parameter that you must define. All other ASM
parameters have default values that are suitable for most environments.
Note: If the ASM environment has been created using the command line instead of EM, then the
disk groups must be created before they can be mounted.
Oracle Database 10g: Administration Workshop II 14-10
Accessing an ASM Instance
AS SYSDBA
ASM
instance
AS SYSOPER
All operations
Nondestructive
operations
Disk group
Disk group
Storage system
14-11
Copyright © 2004, Oracle. All rights reserved.
Accessing an ASM Instance
ASM instances do not have a data dictionary, so the only way to connect to one is by using OS
authentication, that is, SYSDBA or SYSOPER. To connect remotely, a password file must be
used. Normally, the SYSDBA privilege is granted through the use of an operating system group.
On Unix, this is typically the dba group. By default, members of the dba group have SYSDBA
privilege on all instances on the node, including the ASM instance. Users who connect to the
ASM instance with the SYSDBA privilege have administrative access to all disk groups in the
system. The SYSOPER privilege is supported in ASM instances and limits the set of allowable
SQL commands to the minimum required for basic operation of an already-configured system.
The following commands are available to SYSOPER users:
STARTUP/SHUTDOWN
ALTER DISKGROUP MOUNT/DISMOUNT
ALTER DISKGROUP ONLINE/OFFLINE DISK
ALTER DISKGROUP REBALANCE
ALTER DISKGROUP CHECK
• access to all V$ASM_* views
All other commands, such as CREATE DISKGROUP, ADD/DROP/RESIZE DISK, and soon,
require the SYSDBA privilege and are not allowed with the SYSOPER privilege.
Oracle Database 10g: Administration Workshop II 14-11
Dynamic Performance View Additions
V$ASM_CLIENT
V$ASM_TEMPLATE
V$ASM_DISKGROUP
V$ASM_FILE~
V$ASM_ALIAS
Disk group A
Disk group B
Storage system %^
— 2St^"
V$ASM_DISK
V$ASM_OPERATION
14-12
Copyright © 2004, Oracle. All rights reserved.
Dynamic Performance View Additions
View
V$ASM_CLIENT
V$ASM_DISKGROUP
V$ASM_TEMPLATE
V$ASM_DISK
ASM
one row for every database
instance using a disk group in
the ASM instance
one row for every discovered
disk group
one row for every template
present in every mounted disk
group
one row for every discovered
disk, including disks which are
not part of any disk group
Database
one row for each disk
group with the database
and ASM instance name
a row for all disk groups
mounted or dismounted
rows for all templates in
mounted disk groups
rows for disks in the
disk groups in use by
the database instance
Oracle Database 10g: Administration Workshop II 14-12
Dynamic Performance View Additions (continued)
View
V$ASM_OPERATION
V$ASM_FILE
V$ASM_ALIAS
ASM
one row for every active ASM
long-running operation
executing in the ASM instance
one row for every ASM file in
every disk group mounted by
the ASM instance
one row for every alias present
in every disk group mounted by
the ASM instance
Database
contains no rows
contains no rows
contains no rows
Oracle Database 10g: Administration Workshop II 14-13
ASM Home Page
14-14 Copyright© 2004, Oracle. All rights reserved.
ASM Home Page
Enterprise Manager provides a user friendly graphical interface to the Oracle database
management, administration and monitoring tasks. Oracle Database lOg extends the existing
functionality to transparently support the management, administration and monitoring of Oracle
databases that use ASM storage. It also adds support for the new management tasks required for
administration of ASM instance and ASM Disk Groups.
This page shows the status of the ASM instance along with the metrics and alerts generated by
the collection mechanisms. This screen also provides the startup and shutdown functionality.
Clicking the Alert link takes the user to an alert details page. The DiskGroup Usage chart
shows space used by each client database along with free space.
Oracle Database 10g: Administration Workshop II 14-14
ASM Performance Page
ORACLE I iilmprfcfl MjtiiJin.hr 1lh;j
I li-iT:-ih:-c=3=i (jnnrml
iCLi =nfra-:t5 Jife LiU
.-■ rnmahf::---ran.fi f-'?rsr:m=-" ia.1- h'
Automatic Storage Management: +ASM
Performance
:-dn hv< h-.t i. -.1.»-11. ■! Hi. -r.rJ- -VI-- V liv L"D Sur r-i.i-v ■ ¥jjiR.'. r. K'i ili I PlIil-.I
Disk Group ifO Rttpcns: Tim*
Dick Group VO Operations
e
£ -LU
t
1 jlu
£ ?nn
* inn
—
/
/
/
f
disk Group Throughput
T3 L.J.
Mill.- MUL J:^U
.l.ii J.?nfM
Disk Group HO Cumulative Statiaticg
-anH.ZUM
^2. J:^U
ij:i:lin-| I:h1 h|1 I- IV* I iHCTjalla Mfi
ill; .:=i= A
14-15
Copyright © 2004, Oracle. All rights reserved.
ASM Performance Page
The Performance tab of the Automatic Storage Management page shows the I/O response time
and throughput for each disk group. You can further drill down to view disk-level performance
metrics.
Oracle Database 10g: Administration Workshop II 14-15
ASM Configuration Page
t~H^/if\ |F~ hiirnrprlnn Uannqitr 1Mg
LI ui.kjhutb *Jlirill ul
iZLj ^yzK-irZ^ btj ^&A
.^j.uirt-LL. 3.ijit-|.t VtaiiiiyvirtrL i.^Sh'
Automatic Storage Management: +-ASM
| Carifiguratian
C anil gui-atlon Para m rt&rs
Di« Dis.v^-,- r>Li I/jq ;4',irtj',|;'rf-
5F III1 _r I: .l|H itL i.i| ij I :>.:: Ui.MIKlJiiHiJ lui JiL.L-.tl- v-llWII :? IdY- ijl::-. If ailllH Lj a L ik :jl..:. Ill" Ll*k *LtiJ] vliuulj
"id.i'h L'l? pall .'.■Hfciuk ■ _. Ih ■= Jr^-.uiv .-■.di'irj.- .lie tiuk. rvi ds.:riipld ■" J ^■.■." ■ J ^ k ■"".
Auk \1vunl Ii'sh Itjjjs |[ i-FOLF'
NwLialdUd I L.-'.f
Of III1 '= £l vhA I: £k :>i in narrf? -itani itaiI f- "hA -V.1- -1 Al =i-ai1 ; v.1.":' Al I hi. i -',<'.'. y.'X. ' Al I M::.J-J I
. .-IIMJIIlJ I* LitL.
Gf IIH ."■-fad? _hA tfpet — 1st. y mi i [i r= ■; ^rnni] I dp ..il i^ i i >. h r-- =i L'i i h ^ ri rl -.n H11" ill r.AirrltflF =m ; ■■= Yirr=
■; rkly "".v^- -¥il na rsi ?i= ^-^ ?■■-= -a fa-^ hi-|v -l r i ?i= p?? ■:: '5",.vilM V? i f? -=iiyi l-rirr ' 1r "
I Carifiguratian
-}-|3=.3 | ■iTMp KrPtar: ■:: | I =r I Aijrtlll
■ ji:-,T f .■■-t--; .11 ■; :*,id- ,Jii:I1xi-»-".-iI
Jjt jIUmli = Ij.il ul.1 ji j-u UK Lj-j.jh ft il-j
14-16
Copyright © 2004, Oracle. All rights reserved.
ASM Configuration Page
The Configuration tab of the Automatic Storage Management page lets you view or modify the
initialization parameters of the ASM instance.
Oracle Database 10g: Administration Workshop II 14-16
Starting Up an ASM Instance
$ sqlplus /nolog
SQL> CONNECT / AS sysdba
Connected to an idle instance.
SQL> STARTUP;
ASM instance started
Total System Global Area 147936196 bytes
Fixed Size 324548 bytes
Variable Size 96468992 bytes
Database Buffers 50331648 bytes
Redo Buffers 811008 bytes
ASM diskgroups mounted
14-17 Copyright© 2004, Oracle. All rights reserved.
Starting Up an ASM Instance
ASM instances are started similarly to database instances except that the initialization parameter
file contains an entry like INSTANCE_TYPE=ASM. When this parameter is set to the value ASM,
it informs the Oracle executable that an ASM instance is starting, not a database instance.
Furthermore, for ASM instances, the mount option during startup tries to mount the disk groups
specified by the ASM_DISKGROUPS initialization parameter. No database is mounted in this
case.
Other STARTUP clauses have comparable interpretation for ASM instances as they do for
database instances. For example, RESTRICT prevents database instances from connecting to
this ASM instance. OPEN is invalid for an ASM instance. NOMOUNT startups ASM instance
without mounting any disk group.
Oracle Database 10g: Administration Workshop II 14-17
Shutting Down an ASM Instance
Database Instance A
Database Instance B
©
r
ASM Instance
©
©
SHUTDOWN NORMAL
©
14-18
Copyright © 2004, Oracle. All rights reserved.
Shutting Down an ASM Instance
Upon receiving the shutdown command, the ASM instance forwards the shutdown command
with the same shutdown mode (NORMAL, IMMEDIATE, TRANSACTIONAL) to all database
instances dependent on the ASM instance. Except for the case of SHUTDOWN ABORT issued to
ASM, the ASM instance waits for all dependent databases to complete their shutdown before
ASM shuts down. In the case of ASM SHUTDOWN ABORT, the ASM instance immediately
aborts operation. As a result of ASM aborting it will immediately terminate any open
connections, and all dependent databases will immediately abort as a consequence.
In a single ASM instance configuration, if the ASM instance fails while disk groups are open for
update, then after the ASM instance re-initializes, it reads the disk group's log and recovers all
transient changes. With multiple ASM instances sharing disk groups, if one ASM instance
should fail, another ASM instance automatically recovers transient ASM metadata changes
caused by the failed instance. The failure of a database instance does not affect ASM instances.
The ASM instance should be started automatically whenever the host is rebooted. ASM instance
is expected to use the auto startup mechanism supported by the underlying operating system.
Please note that file system failure usually crashes a node.
Oracle Database 10g: Administration Workshop II 14-18
ASM Disk Groups
• A pool of disks managed as ASM
a logical unit Instance
• Partitions total disk space into «-*
uniform sized units
• Spreads each file evenly
across all disks
• Uses coarse or fine grain
striping based on file type
• Administer disk groups not
files
Disk Group
14-19 Copyright© 2004, Oracle. All rights reserved.
ASM Disk Groups
A disk group is a collection of disks managed as a logical unit. Storage is added and removed
from disk groups in units of ASM disks. Every ASM disk has an ASM disk name which is a
name common to all nodes in a cluster. The ASM disk name abstraction is required because
different hosts can use different names to refer to the same disk.
ASM always evenly spreads files in 1MB allocation unit chunks across all of the disks in a disk
group. This is called coarse striping. That way, ASM eliminates the need for manual disk tuning
However, disks in a disk group should have similar size and performance characteristics to
obtain optimal I/O. For most installations there is only a small number of disk groups. For
instance, one disk group for a work area, and one for a recovery area. For files, such as log files,
that require low latency, ASM provides fine-grained (128K) striping. Fine striping stripes each
allocation unit. Fine striping breaks up medium-sized I/O operations, into multiple smaller I/O
operations that execute in parallel. While the number of files, and disks increase, you only have
to manage a constant number of disk groups. From a database perspective, disk groups can be
specified as the default location for files created in the database.
Note: Each disk group is self-describing, containing its own file directory, disk directory, and
other directories.
Oracle Database 10g: Administration Workshop II 14-19
Failure Group
Controller 1
Controller 2
rnrnmn
Controller 3
Failure group 1
Failure group 2
Failure group 3
Disk group A
14-20
Copyright © 2004, Oracle. All rights reserved.
Failure Group
A failure group is a set of disks, inside one particular disk group, sharing a common resource
whose failure needs to be tolerated. An example of a failure group is a string of SCSI disks
connected to a common SCSI controller. A failure of the controller leads to all of the disks on its
SCSI bus becoming unavailable, although each of the individual disks is still functional.
What constitutes a failure group is site-specific. It is largely based upon failure modes that a site
is willing to tolerate. By default, ASM assigns each disk to its own failure group. When creating
a disk group or adding a disk to a disk group, administrators may specify their own grouping of
disks into failure groups. After failure groups are identified, ASM can optimize file layout to
reduce the unavailability of data due to the failure of a shared resource.
Oracle Database 10g: Administration Workshop II 14-20
Disk Group Mirroring
Mirror at extent level ^
Mix primary and mirror
extents on each disk
External redundancy: *
Defers to hardware r
mirroring
Normal redundancy:
- Two-way mirroring
- At least two failure groups
High redundancy:
- Three-way mirroring
- At least three failure groups
14-21 Copyright© 2004, Oracle. All rights reserved.
Disk Group Mirroring
ASM has three disk group types that support different types of mirroring:
• External redundancy: Do not provide mirroring. Use an external-redundancy disk group
if you use hardware mirroring or if you can tolerate data loss as the result of a disk failure.
Failure groups are not used with these types of disk groups.
• Normal-redundancy: Support two-way mirroring
• High-redundancy: Provide triple mirroring
ASM does not mirror disks; rather, it mirrors extents. As a result, you only need spare capacity in
your disk group. When a disk fails, ASM automatically reconstructs the contents of the failed
disk on the surviving disks in the disk group by reading the mirrored contents from the surviving
disks. This spreads the I/O hit from a disk failure across several disks.
When ASM allocates a primary extent of a file to one disk in a disk group, it allocates a mirror
copy of that extent to another disk in the disk group. Primary extents on a given disk can have
their mirror copies on one of several partner disks in the disk group. ASM ensures that a primary
extent and its mirror copy never reside in the same failure group. If you define failure groups for
your disk group, ASM can tolerate the simultaneous failure of multiple disks in a single failure
group.
Oracle Database 10g: Administration Workshop II 14-21
Disk Group Dynamic Rebalancing
Automatic online
rebalance whenever
storage configuration
changes
Only move data
proportional to
storage added
No need for manual
I/O tuning
Online migration to
new storage
14-22
Copyright © 2004, Oracle. All rights reserved.
Disk Group Dynamic Rebalancing
• With ASM, the rebalance process is very easy and happens without any intervention from
the DBA or system administrator. ASM automatically rebalances a disk group whenever
disks are added or dropped.
• By using index techniques to spread extents on the available disks, ASM does not need to
res tripe all of the data, but instead only needs to move an amount of data proportional to
the amount of storage added or removed to evenly redistribute the files and maintain a
balanced I/O load across the disks in a disk group.
• With the I/O balanced whenever files are allocated and whenever the storage configuration
changes, the DBA never needs to search for hot spots in a disk group and manually move
data to restore a balanced I/O load.
• It is more efficient to add or drop multiple disks at the same time so that they are
rebalanced as a single operation. This avoids unnecessary movement of data. With this
technique it is easy to achieve online migration of your data. All you need to do is add the
new disks in one operation and drop the old ones in one operation.
Oracle Database 10g: Administration Workshop II 14-22
1
14-23
ASM Administration Page
I
Copyright © 2004, Oracle. All rights reserved.
ASM Administration Page
Administration tab of the Automatic Storage Management page shows the the disk groups listed
in the V$ASM_DISKGROUP view. On this screen, you can create, edit, or drop a disk group.
You can also perform disk group operations like mount, dismount, rebalance, check, and repair
on a selected disk group.
Oracle Database 10g: Administration Workshop II 14-23
Create Disk Group Page
r>G>£f7t FFnlH mihi IJh hi iri|i
llivliliiw rnnlml
■j::■■li: _-r:i:flo Mr-ijirorr -.-iM :
Create DlsK GroLp
-hh-|
"■-in--Hii - o i-i h ■i-'v-i f: -
1 IAi nl,- H hi Pi-
4 h: Mc'-h li-kj "J :£■:■:-
4
r I.1 i 1-H-C-- -■■C-C3--II-■■ ■ --h-H- "
r Li l\v. — i-..■'■'ri-kc -■ Ml -■
C [jLI^^"i^i.J:KJ.|v-ML-:
C [jCL-j, .i,-..-j.hj'|v:kDC^
C ['jCI-^f ■;if-.\l.u|-EKEE-!
1 Lfl.'m- -i«j-"il-H ■-=K-FF"'
Vi:ol* U
i| ^ h- i:
g
kijnuj
|: j=du=-
!::--■:-■ ■
|:r>DU">
| ■,,-,,dl-'
I ■.."!■*."• I"1
I-'j-VjU-1
1 ::-■■:*■ ■
|:;"!3U"»
I ■■-.-■■ i\->
| -..-: ■> .-* n
i.'j-ijj-1
:i:i(::ii
■ i| |. ii
IC^IIii
■ i| |ii
JUj |;JU
.,!..,
wj |:»
.,■..,
yt] \:t\
jlHjJU
:•:■::•:!
ME9 \i&£<UltM
I'-i-H
1-1
1. ri
Fl
h-l
I--J
h=l
I. M
1-1=■
l-l
i--ri
|i <:i.<:..i i i i |
|:i:n:.n i::n|
|i i-i,.■ i-i i i |
|rr.ix..n nj
ILl-Hl'.H L.J |
li <:i.<:..i i i iH
IccFc.n c:j 1
li 1-1,1 ■ i-i i iH
|rr.rr...n ft 1
In-hi- i-i i iH
|i 1.1.1...1 ill |
Id:-fc.fi c:il
■
n
n
D
n
n
11
:->: Ih.ljM...- -K+. La*..I
14-24
Copyright © 2004, Oracle. All rights reserved.
Create Disk Group Page
Clicking Create on the Disk Group Overview screen brings you to this screen. You can enter the
disk group name, redundancy mechanism, and the list of disks that you would like to include in
the new disk group.
Thelist of disks is obtained from V$ASM_DISK fixed view. By default, only the disks with
header status of CANDIDATE are shown in the list.
Oracle Database 10g: Administration Workshop II 14-24
Create or Delete Disk Groups
CREATE DISKGROUP dgroupA NORMAL REDUNDANCY
FAILGROUP controllerl DISK
'/devices/Al' NAME diskAl SIZE 120G FORCE,
'/devices/A2',
'/devices/A3'
FAILGROUP controlled DISK
'/devices/Bl' ,
'/devices/B2',
'/devices/B3';
DROP DISKGROUP dgroupA INCLUDING CONTENTS;
14-25 Copyright© 2004, Oracle. All rights reserved.
Create or Delete Disk Groups
Assume that ASM disk discovery identified the following disks in the /devices directory :
Al, A2, A3, Bl, B2, and B3. Suppose that disks Al, A2, and A3 are on a separate SCSI
controller from disks Bl, B2, and B3. The first example illustrates how to configure a disk group
called DGROUPA with two failure groups: CONTROLLERl and CONTROLLER2.
The example also uses the default redundancy characteristic, NORMAL REDUNDANCY, for the
disk group. You can optionally provide a disk name and size for the disk. If you do not supply
this information, ASM creates a default name and attempts to determine the size of the disk. If
the size cannot be determined, an error is returned. FORCE indicates that a specified disk should
be added to the specified disk group even though the disk is already formatted as a member of an
ASM disk group. Using the FORCE option for a disk that is not formatted as a member of an
ASM disk group returns an error.
As shown by the second statement, you can delete a disk group along with all its files. To avoid
accidental deletions, the INCLUDING CONTENTS option must be specified if the disk group
still contains any files besides internal ASM metadata. The disk group must be mounted in order
to drop it. After ensuring that none of the disk group files are open, the group and all its drives
are removed from the disk group. Then the header of each disk is overwritten to eliminate the
ASM formatting information.
Oracle Database 10g: Administration Workshop II 14-25
14-26
Adding Disks to Disk Groups
ALTER DISKGROUP dgroupA ADD DISK
'/dev/rdsk/c0t4d0s2' NAME A5,
'/dev/rdsk/c0t5d0s2' NAME A6,
'/dev/rdsk/c0t6d0s2' NAME A7,
'/dev/rdsk/c0t7d0s2' NAME A8;
ALTER DISKGROUP dgroupA ADD DISK '/devices/A*';
( Disk formatting J
( Disk group rebalancing )
Copyright © 2004, Oracle. All rights reserved.
Adding Disks to Disk Groups
This example shows how to add disks to a disk group. You execute an ALTER DISKGROUP
ADD DISK command to add the disks. The first statement adds four new disks to the DGROUPA
disk group.
The second statement demonstrates the interactions of discovery strings. Consider the following
configuration:
/devices/Al is a member of disk group DGROUPA.
/devices/A2 is a member of disk group DGROUPA.
/devices/A3 is a member of disk group DGROUPA.
/devices /A4 is a candidate disk.
The second command adds A4 to the DGROUPA disk group. It ignores the other disks, even
though they match the discovery string, because they are already part of the DGROUPA disk
group. As shown by the diagram, when you add a disk to a disk group, the ASM instance ensures
that the disk is addressable and usable. The disk is then formatted and rebalanced. The rebalance
process is time-consuming as it moves extents from every file onto the new disk.
Note: Rebalance does not block any database operations. The main impact that rebalance has is
on the I/O load on the system. The higher the power of the rebalance, the more I/O load it puts
on the system. Thus less I/O bandwidth is available for database I/Os.
Oracle Database 10g: Administration Workshop II 14-26
Miscellaneous Alter Commands
ALTER DISKGROUP dgroupA DROP DISK A5;
ALTER DISKGROUP dgroupA
DROP DISK A6
ADD FAILGROUP fred
DISK '/dev/rdsk/c0t8d0s2' NAME A9;
ALTER DISKGROUP dgroupA UNDROP DISKS;
ALTER DISKGROUP dgroupB REBALANCE POWER 5;
ALTER DISKGROUP dgroupA DISMOUNT;
ALTER DISKGROUP dgroupA CHECK ALL;
14-27 Copyright© 2004, Oracle. All rights reserved.
Miscellaneous Alter Commands
The first statement shows how to remove one of the disks from disk group DGROUPA. The
second statement shows how you can add and drop a disk in a single command. The big
advantage in this case is that rebalancing is not started until the command completes. The third
statement shows how to cancel the drop of the disk dropped in a previous example. The UNDROP
command operates only on pending drops of disks, not after drop completion.
The fourth statement rebalances disk group DGROUPB if necessary. This command is generally
not necessary because it is automatically done as disks are added, dropped, or resized. However,
it is useful if you want to use the POWER clause to override the default and maximum speed
defined by the initialization parameter ASM_POWER_LIMIT. You can change the power level
of an ongoing rebalance operation by reentering the command with a new level. A power level of
zero causes rebalancing to halt until the command is either implicitly or explicitly reinvoked.
The fifth statement dismounts DGROUPA. The MOUNT and DISMOUNT options allow you to
make one or more disk groups available or unavailable to the database instances.
Oracle Database 10g: Administration Workshop II 14-27
Miscellaneous Alter Commands (continued)
The sixth statement shows how to verify the internal consistency of disk group metadata and to
repair any error found. It is also possible to use the NOREPAIR clause if you just want to be
alerted about errors. While the example requests a check across all disks in the disk group,
checking can be specified on a file or an individual disk. This command requires that the disk
group be mounted. If any error is found, a summary error message is displayed and the details of
the detected error are reported in the alert log.
Note: Except for the last two statements, the examples trigger a disk group rebalancing.
Oracle Database 10g: Administration Workshop II 14-28
Monitoring Long-Running Operations
Using v$asm_operation
Column
GROUP_NUMBER
OPERATION
STATE
POWER
ACTUAL
SOFAR
EST_WORK
EST_RATE
EST_MINUTES
Description
Disk group
Type of operation: REBAL
State of operation: QUEUED or RUNNING
Power requested for this operation
Power allocated to this operation
Number of allocation units moved so far
Estimated number of remaining allocation units
Estimated number of allocation units moved
per minute
Estimated amount of time (in minutes) for
operation termination
14-29 Copyright© 2004, Oracle. All rights reserved.
Monitoring Long-Running Operations Using v$asm_operation
The ALTER DISKGROUP DROP, RESIZE, and REBALANCE commands return before the
operation is complete. To monitor progress of these long-running operations, you can query the
V$ASM_OPERAIION fixed view. This view is described in the table in this slide.
Oracle Database 10g: Administration Workshop II 14-29
ASM Files
CREATE TABLESPACE sample DATAFILE '+dgroupA';
Database File
mviMn
■T
■
|
1
^
14-30
:
1
2
3
4
Automatic
ASM file
Creation
(=)(=
JC
=)G
j
3
ASM File automatically spread inside Disk Group dgroupA
Copyright © 2004, Oracle. All rights reserved.
ASM Files
ASM files are Oracle database files stored in ASM disk groups. When a file is created, certain
file attributes are permanently set. Among these are its protection policy, and its striping policy.
ASM files are Oracle Managed Files. Any file that is created by ASM is automatically deleted
when it is no longer needed. However, ASM files that are created by specifying a user alias are
not considered Oracle Managed Files. These files are not automatically deleted. All
circumstances where a database must create a new file allow for the specification of a disk group
for automatically generating a unique file name. ASM files are similar to Oracle Managed Files.
Like Oracle Managed Files, any file that is created in this way will be automatically deleted
when it is no longer needed. A partially created file will be deleted if the creation fails.
With ASM, file operations are specified in terms of database objects. Administration of
databases never requires knowing the name of a file, though the name of the file is exposed
through some data dictionary views, or the ALTER DATABASE BACKUP CONTROLFILE TO
TRACE command. Because each file in a disk group is physically spread across all disks in the
disk group, a backup of a single disk is not useful. Database backups of ASM files must be made
with RMAN.
Note: ASM does not manage binaries, alert logs, trace files, password files.
Oracle Database 10g: Administration Workshop II 14-30
ASM Filenames
Reference
Fully-
qualified
Numeric
ASM
Filename
T~
Single-
Creati
Alias .
|
file
on
Multiple-file
Creation
s
J
Jias with
emplate
Incomplete
ncomplete
with
template
14-31
Copyright © 2004, Oracle. All rights reserved.
ASM Filenames
ASM filenames can take several forms:
Fully qualified
Numeric
Alias
Alias with template
Incomplete
Incomplete with template
The correct form to use for a particular situation is dependent on the context of how the filename
is used. There are three such contexts:
• When an existing file is being referenced.
• When a single file is about to be created.
• When multiple files are about o be created.
As shown in the above graphic, each context has possible filename form choices.
Note: ASM files that are created by specifying a user alias are not considered Oracle Managed
Files. The files are not automatically deleted.
Oracle Database 10g: Administration Workshop II 14-31
1.
2.
3.
4.
5.
6.
14-32
ASM File Name Syntax
+<group>/<dbname>/<file_type>/<tag>.<file#>.<incarnation#>
+<group>.<file#>.<incarnation#>
+<group>/<directoryi>/.../<directoryn>/<f ile name>
+<group>/<directoryi>/.../<directoryn>/<f ile name> (<temp>)
+<group>
+<group>(<temp>)
Copyright © 2004, Oracle. All rights reserved.
ASM File Name Syntax
These examples show the syntax that you can use to refer to ASM files:
1. The fully qualified name is automatically generated for every ASM file when it is created,
even if the file is created via an alias. Because ASM assigns the name as part of file
creation, fully qualified names cannot be used for file creation. All of the information in the
name is automatically derived by ASM.
Fully qualified ASM file names are used for referencing existing ASM files. The names
can be found in the same hierarchical directory structure as alias names. Fully qualified
ASM file names are also called system aliases, implying that these aliases are created and
maintained by ASM. The end users cannot modify them.
A fully qualified name has the following form:
+<group>/<dbname>/<file type>/<tag>.<file>.<incarnation>
<group> is the disk group name
<dbname> is the database name to which the file belongs
<file type> is the Oracle file type (CONIROLFILE, DAIAFILE, and so on)
<tag> is type-specific information about the file (like the tablespace name for a data
file)
<file>.<incarnation> is the file/incarnation number pair, used to ensure
uniqueness
For example, +dgroupA/dbl/controlf ile/CF . 257 . 86 753 09
Oracle Database 10g: Administration Workshop II 14-32
ASM file name Syntax (continued)
2. Numeric ASM file names are used for referencing existing ASM files. They specify a disk
group name, a file number, and an incarnation number. Because ASM assigns the file and
incarnation numbers as part of creation, numeric ASM file names cannot be used for file
creation. These names do not appear in the ASM directory hierarchy, but are derived from
the fully qualified name. These names are never reported by ASM, but can be used in any
interface that needs the name of an existing file.
An example of a numeric ASM file name is +dgroupA. 257.86 75309
3. Alias ASM file names are used both for referencing existing ASM files and for creating
new ASM files. Alias names specify a disk group name, but instead of a file and
incarnation number, they include a user-friendly name string. For example,
+dgroupA/myfiles/control_filel +dgroupA/LoNg and WeiRd
name/for a file. Alias ASM file names are distinguished from fully qualified or
numeric names because they do not end in a dotted pair of numbers. If you attempt to
create an alias that ends with a dotted pair of numbers an error is signalled. Alias file names
are provided to allow administrators to reference ASM files with human-understandable
names. Alias file names are implemented using a hierarchical directory structure, with the
slash (/) separating name components. Name components are in UTF-8 format and may be
up to 48 bytes in length, but must not contain a slash. This implies a 48 character limit in a
single-byte language but a lower limit in a multibyte language depending upon how many
multibyte characters are present in the string. The total length of the alias file name,
including all components and all separators, is limited to 256 bytes. The components of
alias file names can have space between sets of characters, but the space should not be the
first or last character of a component. Alias ASM file names are case-insensitive.
Every ASM file is given a fully qualified name during file creation based upon its attributes.
An administrator may create an additional alias for each file during file creation, or an alias
can be created for an existing file using the ALTER DISKGROUP ADD ALIAS command.
An alias ASM file name is normally used in the CONTROL_FILES initialization
parameter. An administrator may create directory structures as needed to support whatever
naming convention is desired, subject to the 256-byte limit.
4. Alias ASM file names with templates are used only for ASM file creation operations. They
specify a disk group name, an alias name, and a file creation template name:
+dgroupA/conf igl ( spf ile). If an alias ASM file name with template is specified,
and the alias portion refers to an existing file, then the template specification is ignored.
5. Incomplete ASM file names are used only for file creation operations. They consist of a
disk group name only: +dgr oupA. ASM uses a default template for incomplete ASM file
names as defined by their file type.
6. Incomplete ASM file names with templates are used only for file creation operations. They
consist of a disk group name and a template name: +dgroupA (dataf ile). The
template name determines the file creation attributes of the file.
Oracle Database 10g: Administration Workshop II 14-33
ASM File Name Mapping
Oracle File Type
Control files
Data files
Online logs
Archive logs
Temp files
Data file backup pieces
Data file incremental
backup pieces
Arch log backup piece
Data file copy
Initialization parameters
Broker configurations
Flashback logs
Change tracking bitmaps
Auto backup
Data Pump dump set
Cross-platform
converted data files
<File Typo
controlfile
datafile
onlinejog
archivejog
temp
backupset
backupset
backupset
datafile
init
drc
rlog
CTB
AutoBackup
Dumpset
<Tag>
CF/BCF
<ts_name>_<file#>
log_<thread#>
parameter
<ts_name>_<file#>
Client Specified
Client Specified
Client Specified
<ts_name>_<file#>
spfile
drc
< thr ead#>_<dog#>
BITMAP
Client Specified
dump
Def Template
CONTROLFILE
DATAFILE
ONLINELOG
ARCHIVELOG
TEMPFILE
BACKUPSET
BACKUPSET
BACKUPSET
DATAFILE
PARAMETERFILE
DATAGUARDCONFIG
FLASHBACK
CHANGETRACKING
AUTOBACKUP
DUMPSET
XTRANSPORT
14-34 Copyright© 2004, Oracle. All rights reserved.
ASM File Name Mapping
ASM supports most file types required by the database. However, certain classes of file types,
such as operating system executables, are not supported by ASM. Each file type is associated
with a default template name. The table above specifies ASM supported file types with their
corresponding naming conventions.
When ASM creates a data file for a permanent table space, or a temporary file for a temporary
table space, the data file is set to auto-extensible with an unlimited maximum size and 100 MB
default size. An AUTOEXTEND clause may override this default. ASM applies attributes to the
files it creates as specified by the corresponding system default template.
Oracle Database 10g: Administration Workshop II 14-34
ASM File Templates
System Template
CONTROLFILE
DATAFILE
ONLINELOG
ARCHIVELOG
TEMPFILE
BACKUPSET
XTRANSPORT
PARAMETERFILE
DATAGUARDCONFIG
FLASHBACK
CHANGETRACKING
AUTOBACKUP
DUMPSET
External
u
n
P
r
o
t
e
c
t
e
d
Normal
2
w
a
y
M
i
r
r
o
r
High
3
w
a
y
M
i
r
r
o
r
Striped
fine
coarse
fine
coarse
coarse
coarse
coarse
coarse
coarse
fine
coarse
coarse
coarse
14-35 Copyright© 2004, Oracle. All rights reserved.
ASM File Templates
ASM file templates are named collections of attributes applied to files during file creation.
Templates simplify file creation by mapping complex file-attribute specifications onto a single
name. Templates, while applied to files, are associated with a disk group.
When a disk group is created, ASM establishes a set of initial system default templates
associated with that disk group. These templates contain the default attributes for the various
Oracle database file types. Attributes of the default templates may be changed by the
administrator. Additionally, administrators may add their own unique templates as required. This
enables you to specify the appropriate file creation attributes as a template for less sophisticated
administrators to use. System default templates cannot be deleted.
If you need to change an ASM file attribute after the file has been created, you must copy the file
via RMAN into a new file with the new attributes.
Depending on the defined disk group redundancy characteristics, the system templates are
created with the attributes shown.
When defining or altering a template, you can specify whether the files should be mirrored and
whether files created under that template are COARSE or FINE striped.
Note: The redundancy and striping attributes used for ASM metadata files are predetermined by
ASM and are not changeable by the template mechanism.
Oracle Database 10g: Administration Workshop II 14-35
Template and Alias Examples
ALTER
ALTER
DISKGROUP
dgroupA
ADD TEMPLATE reliable
DISKGROUP
dgroupA
DROP
ATTRIBUTES
TEMPLATE
(MIRROR) ;
reliable;
ALTER DISKGROUP dgroupA
DROP FILE '+dgroupA.268.8675309';
ALTER DISKGROUP dgroupA
ADD DIRECTORY '+dgroupA/mydir';
ALTER DISKGROUP dgroupA
ADD ALIAS '+dgroupA/mydir/datafile.dbf'
FOR '+dgroupA.274.38745';
ALTER DISKGROUP dgroupA
DROP ALIAS '+dgroupA/mydir/datafile.dbf';
14-36 Copyright© 2004, Oracle. All rights reserved.
Template and Alias Examples
The first statement shows how to add a new template to a disk group. In this example, the
RELIABLE template is created in disk group DGROUPA that is two-way mirrored. The second
statement shows how you can remove the previously defined template.
The third statement shows you how a file might be removed from a disk group.
The fourth statement creates a user directory called MYDIR. The parent directory must exist
before attempting to create a subdirectory or alias in that directory. Then, the example creates an
alias for file +dgr oupA .274.38745. The same code example shows you how to delete the
alias. You also have the possibility to drop a directory by using the ALTER DISKGROUP DROP
DIRECTORY command. Using the same kind of commands, you can also rename an alias or a
directory using the ALTER DISKGROUP RENAME commands.
Oracle Database 10g: Administration Workshop II 14-36
14-37
Retrieving
SELECT reference_index INTO
FROM V$ASM_ALIAS
WHERE name = '+dgroupA';
SELECT reference_index INTO
FROM V$ASM_ALIAS
WHERE parent_index = :alias_
SELECT name
FROM V$ASM_ALIAS
WHERE parent_index = :alias_
Copyright © 2004, Oracle.
Aliases
:alias_id
:alias_id
_id AND name = 'mydir';
_id;
All rights reserved.
Retrieving Aliases
Suppose that you want to retrieve all aliases that are defined inside the previously defined
directory +dgroupA/mydir. You can traverse the directory tree, as shown in the example.
The REFERENCE_INDEX number is usable only for entries that are directory entries in the alias
directory. For nondirectory entries, the reference index is set to zero. The example retrieves
REFERENCE_INDEX numbers for each subdirectory and uses the last REFERENCE_INDEX as
the PARENT INDEX of needed aliases.
Oracle Database 10g: Administration Workshop II 14-37
SQL Commands and File Naming
CREATE CONTROLFILE DATABASE sample
RESETLOGS ARCHIVELOG
MAXLOGFILES 5 MAXLOGHISTORY 100
MAXDATAFILES 10 MAXINSTANCES 2
LOGFILE GROUP 1 ('+dgroupA','+dgroupB') SIZE 100M,
GROUP 2 ('+dgroupA','+dgroupB') SIZE 100M
DATAFILE '+dgroupA.261.12345678' SIZE 100M
DATAFILE '+dgroupA.262.87654321' SIZE 100M;
14-38 Copyright© 2004, Oracle. All rights reserved.
SQL Commands and File Naming
ASM file names are accepted in SQL commands wherever file names are legal. For most
commands there is an alternate method for identifying the file, a file number for example, so that
the name need not be typed. Since one of the principal design objective of ASM is to eliminate
the need for specifying filenames, you are discouraged to use ASM file names as much as
possible. However, certain commands must have file names as parameters. For example, data
files and log files stored in an ASM disk group should be passed to the CREATE
CONTROLFILE command by using the file reference context form. However, the use of the
RESETLOGS option requires the use of file creation context form for the specification of the log
files.
Oracle Database 10g: Administration Workshop II 14-38
DBCA and Storage Options
Select line storage mechanism you would like to use (oi the database
#File System
Use the File System for Database storage.
^Automatic Storage Management (ASM)
Automatic Storage Management simplifies database storage administration and optimizes
database layout for liQ performance. To use this option you must either specify a set of disks to
create an ASM disk group or specify an existing ASM diskgioup
#Raw Devices
Raw partitions or volumes can provide the required shared storage ror Real Application
Clusters (RAG) databases if you do not use Automatic Storage Management and a Cluster File
System is not available You need to have created one raw device for each dalafie, control fie,
and log flie you are planning to create in the database
D specify Raw Devices Mapping File
X
Help
SjD
14-39
Copyright © 2004, Oracle. All rights reserved.
DBCA and Storage Options
In order to support ASM as a storage option, a new screen is added to the Database
Configuration Assistant (DBCA). This allows you to choose the storage options: file system,
ASM, or raw devices.
Oracle Database 10g: Administration Workshop II 14-39
Database Instance Parameter Changes
INSTANCE_TYPE = RDBMS
LOG_ARCHIVE_FORMAT
DB_BLOCK_SIZE
DB_CREATE_ONLINE_LOG_DEST_n
DB_CREATE_FILE_DEST
DB_RECOVERY_FILE_DEST
CONTROL_FILES
LOG_ARCHIVE_DEST_/i
LOG_ARCHIVE_DEST
STANDBY_ARCHIVE_DEST
LARGE_POOL_SIZE = 8MB
14-40 Copyright© 2004, Oracle. All rights reserved.
Database Instance Parameter Changes
INSTANCE_TYPE defaults to RDBMS and specifies that this instance is an RDBMS instance.
LOG_ARCHIVE_FORMAT is ignored if LOG_ARCHIVE_DEST is set to an incomplete ASM
filename, such as +dGroupA. If LOG_ARCHIVE_DEST is set to an ASM directory (for
example, +dGroupA/myarchlogdir/), then LOG_ARCHIVE_FORMAT is used and the files
are non-OMF. Unique file names for archived logs are automatically created by the Oracle
database.
The following parameters accept the multifile creation context form of ASM file names as a
destination:
• DB_CREATE_ONLINE_LOG_DEST_n
• DB_CREATE_FILE_DES T
• DB_RECOVERY_FILE_DEST
• CONTROL_FILES
• LOG_ARCHIVE_DEST_n
• LOG_ARCHIVE_DEST
• S TAN D BY_ARCHIVE_D EST
Note: Because extent maps for ASM files are allocated from the LARGE_POOL, you must set
the LARGE_POOL_S IZE initialization parameter to at least 8 MB, preferably higher.
Oracle Database 10g: Administration Workshop II 14-40
Migrating Your Database to ASM Storage
1. Shut down your database cleanly
2. Shutdown the database and modify your server
parameter file to use Oracle Managed Files (OMF)
3. Edit and execute the following RMAN script:
STARTUP NOMOUNT;
RESTORE CONTROLFILE FROM '/ul/cl.ctl';
ALTER DATABASE MOUNT;
BACKUP AS COPY DATABASE FORMAT '+dgroupl';
SWITCH DATABASE TO COPY;
SQL "ALTER DATABASE RENAME '/ul/logl' TO '+dgroupl' '
# Repeat RENAME command for al1 online redo log
members ...
ALTER DATABASE OPEN RESETLOGS;
SQL "ALTER DATABASE TEMPFILE '/ul/templ' DROP";
14-41 Copyright© 2004, Oracle. All rights reserved.
Migrating Your Database to ASM Storage
Because ASM files cannot be accessed through normal operating system interfaces, RMAN is
the only means for copying ASM files. Although files in a tablespace may be both ASM files and
non-ASM files as a result of the tablespace history, RMAN commands enable non-ASM files to
be relocated to an ASM disk group. You can use the following procedure to relocate your entire
database to an ASM disk group. It is assumed that you are using a server parameter file:
1. Obtain the file names of the current control files and online redo logs using
V$CONTROLFILE and V$LOGFILE.
2. Shut down the database consistently. Modify the server parameter file of your database as
follows:
Set the necessary OMF destination parameters to the desired ASM disk group.
- Remove the CONTROL_FILES parameter.
3. Edit and run the RMAN command file, which backs up the database, switches the current
data files to the backups, and renames the online redo logs. You can move only tablespaces
or data files using the BACKUP AS COPY command.
4. Delete the old database files.
Note: If you create an OMF control file, and if there is a server parameter file, then a
CONTROL_FILES initialization parameter entry is created in the server parameter file.
Oracle Database 10g: Administration Workshop II 14-41
Summary
In this lesson, you should have learned how to:
• Describe the concepts of Automatic Storage
Management (ASM)
• Set up initialization parameter files for ASM and
database instances
Execute SQL commands with ASM file names
• Start up and shut down ASM instances
• Administer ASM disk groups
Use RMAN to migrate your database to ASM
14-42 Copyright© 2004, Oracle. All rights reserved.
Oracle Database 10g: Administration Workshop II 14-42
Practice 14 Overview:
Using ASM
This practice covers the following topics:
Creating an ASM instance
• Creating tablespaces that use ASM storage
• Viewing ASM information
• Migrating a tablespace to use ASM storage
14-43 Copyright© 2004, Oracle. All rights reserved.
Oracle Database 10g: Administration Workshop II 14-43
Practice 14: Setting Up an ASM Instance
Exercise 1: Configuring and Using ASM
In this practice you will create an ASM instance, configure the ASM initialization parameters,
create disk groups, and create a tablespace using ASM storage.
1. Use DBCA to create the ASM instance on your machine. Implement the following
configuration within DBCA:
• Change the default values for the ASM initialization parameter disk discovery string to
/u02/asmdisks/*
• Create one disk group called DGROUP1 that uses the following four ASM disks:
/u02/asmdisks/disk0
/u02/asmdisks/diskl
/u02/asmdisks/disk2
/u02/asmdisks/disk3
• Specify that DGROUP1 is using normal redundancy.
2. After the ASM instance and the disk group are created, you can exit DBCA. Do not create
a database.
3. Connect as oracle in your terminal emulator window and start your ASM instance. List the
processes associated with it.
4. Review the ASM processes and query V$ASM_D ISKGROUP to view the disk group
characteristics.
5. Connect to the orcl instance and create a new tablespace called TBSASM that is stored
inside the ASM disk group DGROUP1. The tablespace should have one 200MB data file.
Oracle Database 10g: Administration Workshop II 14-44
Practice 14: Setting Up an ASM Instance
Exercise 2: Migrating Tablespaces to ASM Storage
In this practice you will migrate a tablespace to use ASM storage.
1. Using SQL*Plus, connect to your database instance as a SYS DBA user and create a new
tablespace called TBSASMMIG. This tablespace should contain only one 10MB file stored
in your file system (not using ASM).
2. Create a table called 12 stored in the new tablespace TBSASMMIG. Insert one row inside
12. Commit your work.
3. Migrate TBSASMMIG to ASM storage. When done, check that the migration was
successful and the table within the tablespace is intact.
4. Cleanup your environment by dropping tablespace TBSASMMIG including its contents and
the data file. Do the same with tablespace TBSASM. Also, remove the standard file system
file that was created in Step 1 to store the TBSASMMIG tablespace.
5. Use SHUTDOWN to stop the ASM instance. You may have to wait three minutes for the
instance to shutdown. Afterwards, make sure to reset the ORACLE_SID to orcl.
Oracle Database 10g: Administration Workshop II 14-45
Monitoring and Managing Memory
Copyright © 2004, Oracle. All rights reserved.
Objectives
After completing this lesson, you should be able to
Describe the memory components in the SGA
Implement Automatic Shared Memory
Management
Manually configure SGA parameters
Use automatic PGA memory management
15-2 Copyright© 2004, Oracle. All rights reserved.
Oracle Database 10g: Administration Workshop II 15-2
Oracle Memory Structures
Server
process
1
PGA
Server
process
2
PGA
Background
process
PGA
SGA
Shared pool
Streams pool
Large pool
Java pool
Database
buffer cache
Redo log
buffer
Keep buffer
cache
Recycle
buffer cache
nK Block Size
buffer caches
15-3
Copyright © 2004, Oracle. All rights reserved.
Oracle Memory Structures
The basic memory structures associated with an Oracle instance include:
• System Global Area (SGA): Shared by all server and background processes
• Program Global Area (PGA): Private to each server and background process; there is one
PGA for each process.
The System Global Area (SGA) is a shared memory area that contains data and control
information for the instance.
The SGA includes the following data structures:
• Database buffer cache: Caches blocks of data retrieved from the database
• Redo log buffer: Caches redo information until it can be written to disk
• Shared pool: Caches various constructs that can be shared among users
• Large pool: Optional area used for buffering large I/O requests
• Java pool: Used for all session-specific Java code and data within the Java Virtual
Machine (JVM)
• Streams pool: Used by Oracle Streams
• Keep buffer Cache: Used to keep data in the buffer cache
• Recycle buffer Cache: Holds data that is quickly aged out of the buffer cache
• hK Block Size Buffer Caches: Caches data blocks that are of a different size than the
default database block size; used to support transportable tablespaces
Oracle Database 10g: Administration Workshop II 15-3
Oracle Memory Structures (continued)
With the dynamic SGA infrastructure, the size of the database buffer cache, shared pool,
large pool, and Java pool changes without shutting down the instance.
The preconfigured database has been pretuned with adequate settings for the memory
parameters. However, as your database usage expands you may find it necessary to alter the
settings of the memory parameters.
Oracle provides alerts and advisors to identify memory sizing problems and to help you
determine appropriate values for memory parameters.
A Program Global Area (PGA) is a memory region that contains data and control
information for each server process. A server process is a process that services a client's
requests. Each server process has its own private PGA area that is created when the server
process is started. Access to it is exclusive to that server process, and is read and written
only by Oracle code acting on behalf of it.
The amount of PGA memory used and its contents depend on whether the instance is
configured in shared server mode. Generally, the PGA contains the following:
• Private SQL area: Contains data such as bind information and run-time memory
structures. Each session that issues a SQL statement has a private SQL area.
• Session memory: Memory allocated to hold session variables and other information
related to the session.
Oracle Database 10g: Administration Workshop II 15-4
Buffer Cache
SGA
LRU Checkpoint
lists queue DB buffer cache
DB_BLOCK_SIZE
DB_CACHE_SIZE
DB_RECYCLE_CACHE_SIZE
DB KEEP CACHE SIZE
15-5 Copyright© 2004, Oracle. All rights reserved.
Buffer Cache Characteristics
You can configure the buffer cache by specifying a value for the DB_CACHE_S I ZE parameter.
The buffer cache holds copies of the DB_BLOCK_S I ZE data blocks from the data files. The
buffer cache is a part of the SGA; so all users can share these blocks. The server processes read
data from the data files into the buffer cache. To improve performance, the server process
sometimes reads multiple blocks in a single read. The DBWn process writes data from the buffer
cache into the data files. To improve performance, DBWn writes multiple blocks in a single write.
At any given time, the buffer cache may hold multiple copies of a single database block. Only
one current copy of the block exists, but to satisfy queries server processes may need to construct
read-con sis tent copies from past image information (a CR block).
The least recently used (LRU) list monitors the usage of buffers. The buffers are sorted in
accordance with the number of times that they are used. Thus, buffers that are frequently used
will be found at the most recently used end, whereas those buffers that are least used are found at
the least recently used end. Incoming blocks are copied to a buffer from the least recently used
end, which is then moved to the middle of the list. From here the buffer will work its way up or
down the list depending on usage.
Server
Data files
DBWn
Oracle Database 10g: Administration Workshop II 15-5
Buffer Cache Characteristics (continued)
Buffers in the buffer cache can be in one of four states:
• Pinned: Multiple sessions are kept from writing to the same block at the same time. Other
sessions wait to access the block.
• Clean: The buffer is now unpinned and is a candidate for immediate aging out if the
current contents (data block) are not referenced again. The contents are either in synch with
disk or the buffer contains a CR snapshot of a block.
• Free/unused: The buffer is empty because the instance just started. This state is very
similar to the clean state, except that the buffer has not been used.
• Dirty: The buffer is no longer pinned but the contents (data block) have changed and must
be flushed to disk by DBWn before it can be aged out.
Server processes use the buffers in the buffer cache, but the DBWn process makes buffers in the
cache available by writing changed buffers back to the data files.
Oracle supports multiple block sizes in a database. The standard block size is used for the
SYSTEM tablespace. You specify the standard block size by setting the initialization parameter
DB_BLOCK_S IZE. Legitimate values are from 2K to 32K. The cache sizes of non-standard
block size buffers are specified by the following parameters:
• DB_2K_CACHE_SIZE
• DB_4K_CACHE_SIZE
• DB_8K_CACHE_SIZE
• DB_16K_CACHE_SIZE
• DB_3 2K_CACHE_SIZE
The DB_/iK_CACHE_SIZE parameters cannot be used to size the cache for the standard block
size. If the value of DB_BLOCK_SIZE is riK, it is illegal to set DB_nK_CACHE_SIZE. The
size of the cache for the standard block size is always determined from the value of
DB_CACHE_SIZE.
Each buffer cache has a limited size, so not all the data on disk can fit in the cache. When the
cache is full, subsequent cache misses cause the Oracle database to write dirty data already in the
cache to disk to make room for the new data. (If a buffer is not dirty, it does not need to be
written to disk before a new block can be read into the buffer.) Subsequent access to any data
that was written to disk results in additional cache misses.
The size of the cache affects the likelihood that a request for data results in a cache hit. If the
cache is large, it is more likely to contain the data that is requested. Increasing the size of a cache
increases the percentage of data requests that result in cache hits.
Oracle Database 10g: Administration Workshop II 15-6
Using Multiple Buffer Pools
Recycle pool
Keep pool
Default pool
SGA
DB buffer caches
1 1 1 1 1 1 1 1 1 1 1 1 1 1 1 1
it :
zti: _ :
15-7 Copyright© 2004, Oracle. All rights reserved.
Multiple Buffer Pools
The DBA may be able to improve the performance of the database buffer cache by creating
multiple buffer pools. You assign objects to a buffer pool depending on how the objects are
accessed. There are three buffer pools:
• Keep: This pool is used to retain objects in memory that are likely to be reused. Keeping
these objects in memory reduces I/O operations. Buffers are kept in this pool by ensuring
the pool is sized larger than the total size of the segments assigned to the pool. This means
that buffers do not have to be aged out. The keep pool is configured by specifying a value
for the DB_KEEP_CACHE_SIZE parameter.
• Recycle: This pool is used for blocks in memory that have little chance of being reused.
The recycle pool is sized smaller than the total size of the segments assigned to the pool.
This means that blocks read into the pool will often have to age out a buffer. The recycle
pool is configured by specifying a value for the DB_RECYCLE_CACHE_S IZE parameter.
• Default: This pool always exists. It is equivalent to the buffer cache of an instance without
a keep or a recycle pool and is configured with the DB_CACHE_S IZE parameter.
Oracle Database 10g: Administration Workshop II 15-7
15-8
Using Multiple Buffer Pools
CREATE INDEX cust_idx ...
STORAGE (BUFFER_POOL KEEP ...) ;
ALTER TABLE oe.customers
STORAGE (BUFFER_POOL RECYCLE);
ALTER INDEX oe.cust_lname_ix
STORAGE (BUFFER_POOL KEEP);
Copyright © 2004, Oracle. All rights reserved.
Using Multiple Buffer Pools
The BUFFER_POOL clause is used to define the default buffer pool for an object. It is part of the
STORAGE clause and is valid for CREATE and ALTER table, cluster, and index statements. The
blocks from an object without an explicitly set buffer pool go into the default buffer pool.
The syntax is BUFFER_POOL [KEEP | RECYCLE | DEFAULT].
When the default buffer pool of an object is changed using the AL TER statement, blocks that are
already cached remain in their current buffers until they are flushed out by the normal cache
management activity. Blocks read from disk will be placed into the newly specified buffer pool
for the segment.
Because buffer pools are assigned to a segment, objects with multiple segments can have blocks
in multiple buffer pools. For example, an index-organized table can have different pools defined
on both the index and the overflow segment.
Oracle Database 10g: Administration Workshop II 15-8
Shared Pool
Defined by shared_pool_size
Library cache contains statement text, parsed
code, and execution plan.
Data dictionary cache contains definitions for
tables, columns, and privileges from the data
dictionary tables.
UGA contains session information for Oracle
Shared Server users when a large pool is not
configured. ^
Shared pool
Shared pool
Library
cache
Data
dictionary
cache
UGA
15-9
Copyright © 2004, Oracle. All rights reserved.
Shared Pool
You can specify the size of the shared pool with the SHARED_POOL_S I ZE initialization
parameter. The shared pool is a memory area that stores information shared by multiple sessions.
It contains different types of data, as shown in the graphic above.
Library Cache
The library cache contains shared SQL and PL/SQL areas—the fully parsed or compiled
representations of PL/SQL blocks and SQL statements.
PL/SQL blocks include:
• Procedures and functions
• Packages
• Triggers
• Anonymous PL/SQL blocks
Data Dictionary Cache
The data dictionary cache holds definitions of dictionary objects in memory.
User Global Area
The UGA contains the session information for the Oracle shared server. The UGA is located in
the shared pool when using a shared server session and if the large pool is not configured.
Oracle Database 10g: Administration Workshop II 15-9
Large Pool
Can be configured as a separate memory area in
the SGA
Is sized by the large_pool_size parameter
Is used to store data in memory for:
- Backup and restore operations
- Session data for the shared servers
- Parallel query messaging
Redo log Database
buffer buffer cache
Shared pool
Library cache
Dictionary cache
User global area
Large pool
15-10
Copyright © 2004, Oracle. All rights reserved.
Large Pool
Existence of the Large Pool
The large pool must be explicitly configured. The memory of the large pool does not come out of
the shared pool, but directly out of the SGA, thus adding to the amount of shared memory the
Oracle server needs for an instance at startup.
Advantages of the Large Pool
The large pool is used to provide large allocations of session memory for:
• I/O server processes
• Backup and restore operations
• Oracle shared server processes and the Oracle XA interface (used where transactions
interact with more than one database)
By allocating session memory from the large pool for the Oracle shared server, the Oracle
database can use the shared pool primarily for caching shared SQL and suffer fewer contention
problems due to a lack of memory resources.
Oracle Database 10g: Administration Workshop II 15-10
UGA and Oracle Shared Server
Dedicated server configuration
PGA
Shared pool
r
Stack
space
UGA
User
session
data
Cursor
state
Shared server configuration
Shared pool
or
large pool
UGA
User
session
data
Cursor
state
PGA
Stack
space
15-11
Copyright © 2004, Oracle. All rights reserved.
The User Global Area
When using a dedicated server configuration the User Global Area (UGA) does not use any
memory within the SGA. If you use the Oracle Shared Server, then the UGA (which includes the
user session and cursor state information) is stored in the shared pool instead of in private user
memory. If a large pool has not been configured, then the UGA is stored in the shared pool. Sort
areas and private SQL areas are included in the session information. This is because shared
servers work on a per-call basis, so any server process may need access to any user's information.
The total memory requirement for the Oracle shared server is no larger than if you use dedicated
servers. You may need to increase the SHARED_POOL_S IZE parameter but your private user
memory is lower.
If you are using shared servers, configure the large pool for better shared pool performance.
Oracle Database 10g: Administration Workshop II 15-11
Java Pool
Can be configured as a separate memory area in
the SGA
Is sized by the java_pool_size parameter
Is used to store data in memory for all session-
specific Java code and data within the JVM
Redo log Database
buffer buffer cache
Shared pool
Library cache
Dictionary cache
User global area
Large pool
15-12
Copyright © 2004, Oracle. All rights reserved.
Memory Usage for Java Applications
The Java pool is a structure in the SGA that is used for all session-specific Java code and data
within the Java engine.
Shared Pool
Shared pool memory is used by the class loader within the JVM. The class loader uses about 8
KB per loaded class. The shared pool is also used when compiling Java source code in the
database or when using Java resource objects in the database. Shared pool memory is also
consumed when you create call specifications and as the system tracks dynamically loaded Java
classes at run time.
Java Pool
The OracleJVM memory manager allocates all other Java states during run-time execution from
the Java pool, including the shared in-memory representation of Java method and class
definitions, as well as the Java objects migrated to session space at end-of-call.
Java pool memory is used in different ways, depending on whether the Oracle database server is
using shared servers or not.
For more information on Java pool memory usage, refer to the Oracle Database Java
Developer's Guide.
Oracle Database 10g: Administration Workshop II 15-12
The Redo Log Buffer
Redo log Database
buffer buffer cache
Shared pool
Library cache
Dictionary cache
User global area
Control files
SQL> UPDATE employees
2 SET salary=salary*l.1
3 WHERE employee_id=736;
Data files
Redo log files
Archived
log files
15-13
Copyright © 2004, Oracle. All rights reserved.
Redo Log Buffer
The Oracle server processes copy redo entries from the user's memory space to the redo log
buffer for each DML or DDL statement. The redo entries contain the information necessary to
reconstruct or redo changes made to the database by DML and DDL operations. They are used
for database recovery and take up continuous sequential space in the buffer.
The redo log buffer is a circular buffer. The server processes can copy new entries over the
entries in the redo log buffer that have already been written to disk. The LGWR process
normally writes fast enough to ensure that space is always available in the buffer for new entries.
The LGWR process writes the redo log buffer to the active online redo log file (or members of
the active group) on disk. The LGWR process copies to disk all redo entries that have been
entered into the buffer since the last time LGWR wrote to disk.
What Causes LGWR to Write?
LGWR writes out the redo data from the redo log buffer when:
• A user process commits a transaction
• Every three seconds or when the redo log buffer is one-third full
• When a DBWn process writes modified buffers to disk, if the corresponding redo log data
has not already been written to disk
Oracle Database 10g: Administration Workshop II 15-13
Automatic Shared Memory Management
Overview
• Automatically adapts to workload changes
Maximizes memory utilization
Helps eliminate out-of-memory errors
Buffer cache
Large pool
Shared pool
Java pool
Online users
Buffer cache
Large pool
Shared pool
Java pool
Batch jobs
15-14
Copyright © 2004, Oracle. All rights reserved.
Automatic Shared Memory Management: Overview
Automatic Shared Memory Management is another self-management key enhancement in Oracle
Database lOg. This functionality automates the management of the most important shared
memory structures used by an Oracle database instance, and relieves you of having to configure
these components manually. Besides making more effective use of available memory and
thereby reducing the cost incurred for acquiring additional hardware memory resources, the
Automatic Shared Memory Management feature significantly simplifies Oracle database
administration by introducing a more dynamic, flexible, and adaptive memory management
scheme.
For example, in a system that runs large online transactional processing (OLTP) jobs during the
day (requiring a large buffer cache) and runs parallel batch jobs at night (requiring a large value
for the large pool), you would have to simultaneously configure both the buffer cache and the
large pool to accommodate your peak requirements.
With Automatic Shared Memory Management, when the OLTP job runs, the buffer cache grabs
most of the memory to allow for good I/O performance. When the data analysis and reporting
batch job starts up later, the memory is automatically migrated to the large pool so that it can be
used by parallel query operations without producing memory overflow errors.
Oracle Database 10g: Administration Workshop II 15-14
Benefits of Automatic Shared Memory
Management
DB_CACHE_SIZE A A
SHARED_POOL_SIZE ^^^T
LARGE_POOL_SIZE ^^^^
JAVA_POOL_SIZE W ^
15-15
Copyrigh
Total SGA size
SGA_TARGET
© 2004, Oracle. All rights
reserved.
Benefits of Automatic Shared Memory Management
Automatic Shared Memory Management simplifies the configuration of the System Global Area
(SGA). In the past, you needed to manually specify the amount of memory to be allocated for the
database buffer cache, shared pool, Java pool, and large pool. It is often a challenge to size these
components optimally. Undersizing can lead to poor performance and out-of-memory errors
(ORA-4 031), whereas oversizing can waste memory.
This feature enables you to specify a total memory amount to be used for all SGA components.
The Oracle database periodically redistributes memory between the components in the slide
according to workload requirements.
In earlier releases, you did not have exact control over the total size of the SGA because memory
was allocated for the fixed SGA and for other internal metadata allocations over and above the
total size of the user-specified SGA parameters. This additional memory was usually between 10
and 20 MB.
The new SGA size initialization parameter (SGA_TARGET) now includes all memory in the
SGA, including the automatically sized components, the manually sized components, and any
internal allocations during startup.
Oracle Database 10g: Administration Workshop II 15-15
SGA Tuning Principles
Based on workload information, mman captures
statistics periodically in the background.
mman uses the different memory advisories.
Memory is moved to where it is most needed.
Using an spfile is recommended:
- Component sizes saved across shutdowns
- Saved values used to bootstrap component sizes
- Avoids having to relearn optimal values
15-16 Copyright© 2004, Oracle. All rights reserved.
SGA Tuning Principles
The Automatic Shared Memory Management feature uses a new background process named
Memory Manager (MMAN). MMAN serves as the SGA memory broker and coordinates the sizing
of the memory components. The SGA memory broker keeps track of the sizes of the components
and pending resize operations.
The SGA memory broker observes the system and workload in order to determine the ideal
distribution of memory. It is never complacent and performs this check every few minutes so
that memory can always be present where needed. In the absence of Automatic Shared Memory
Management, components had to be sized to anticipate their individual worst-case memory
requirements.
Based on workload information, automatic shared memory management:
• Captures statistics periodically in the background
• Uses the different memory advisories
• Performs what-if analysis to determine the best distribution of the memory
• Moves memory to where it is most needed
• Saves component sizes across shutdown if an SPFILE is used (the sizes can be resurrected
from before the last shutdown)
Oracle Database 10g: Administration Workshop II 15-16
Database Control and
Automatic Shared Memory Management
F
Memory Parameters
Ha\e hA-=?hv Dncll, JlliniiiUMIirtM
Ti- -;,:■: h-i .":| In Ai-:h ifi".-.: :■: :( _,■ |i ■■'-Im-i- -1- ■>- - ■ h m:-: I :h :-:iU, ,iiiI i: rlnl - T ■---■-■ ■■-■ i - .' H il, ,hnn- -;,:■: H" "■ „ :-;|-.-. i-
r ■■ :nr *■,■>■« a ■ "jm: *■ dvrLa:.: n^: ■<* ■: -i-l-ilcd
.'■.tin-iri: .ih-i m Vcmo y ■Iri-igiron: Ulsahlc-il
-■hihI - nl^J- \tjFW
Liij-I: -r.:h:-|ljj |m_B
HMjH^„i|a |r--F|
.r.j-':.:.! K | r.'l_ ■
:■ h-r ;y-.ii
nix -i"!A "d="i1M
B.r=-LUC ■(■.." L:W
.-iva h" = = i u;l=i d!«
tth: niCi 3V.
Maui mum SGASize
-H Mm: ■■i=i.-^=i.M^:n:n.> hir, -i i:h ii--i r; i- <ll i:hh- vH m-i i- -hih-ioiii < ,■< F lf: n *:i-i iy Hih -.H-=in ■■ -r-.*-,.._.
: -in:: llV. itmjiMi: mm ;:r:.i:(-d:h: ::::! ^l;V-mz(- foil nc: (-.:(-oi :■: I*a::nuTi !»'.-■■■ !ii(-i.
Mr.I Ti.i" LlV. -iz:' "i1_i IIL4
15-17 Copyright© 2004, Oracle. All rights reserved.
Database Control and Automatic Shared Memory Management
You can use Database Control to configure Automatic Shared Memory Management as follows:
1. Click the Administration tab.
2. Select Memory Parameters under the Instance heading.
3. Click the SGA tab.
4. Click the Enable button for Automatic Shared Memory Management, and then enter the
total SGA size (in MB).
Note: When you click the Enable button, you can enter a value for SGA_TARGET.
Oracle Database 10g: Administration Workshop II 15-17
Manual Configuration
Auto-tuned
Auto-tuned
1 char0H nnni ■ ' Database i
i Shared pool ■ ■ . „ ■_ i
' j v buffer cacne !
i Java pool |
k *
Auto-tuned
Fixed SGA
Redo log
buffer
■ i
■ Large pool i
Auto-tuned
Total SGA size = 8 GB
Streams
pool
Keep
buffer pool
SGA TARGET = 8G
STATISTICS LEVEL = TYPICAL
15-18
Copyright © 2004, Oracle. All rights reserved.
Manual Configuration
You configure Automatic Shared Memory Management by using the SGA_TARGET
initialization parameter. By default, SGA_TARGET is set to 0, which means that Automatic
Shared Memory Management is disabled and you must manually configure the database memory.
If you specify a non-zero value for SGA_TARGET, the following four memory pools are
automatically sized: Database buffer cache (default pool), shared pool, large pool, and the Java
pool.
The parameters used to configure these memory pools (for example, SHARED_POOL_SIZE)
are now referred to as auto-tuned parameters.
The following buffers are now referred to as manually sized components:
• Log buffer
• Other buffer caches (KEEP/RECYCLE, non-default block size)
• Streams pool (new in Oracle Database lOg)
• Fixed SGA and other internal allocations
Note: Automatic Shared Memory Management requires that STATISTICS_LEVEL be set to
TYPICAL or ALL.
Oracle Database 10g: Administration Workshop II 15-18
Behavior of Auto-Tuned
SGA Parameters
• When sga_target is not set or is set to zero:
- Auto-tuned parameters behave as previously.
- shared_pool_size may need to be increased
from settings used on earlier database versions.
SELECT SUM(bytes)/1024/1024 FROM v$sgastat
WHERE pool = 'shared pool';
• When sga_target is set to a non-zero value:
- Default value of auto-tuned parameters is zero.
- If set to a non-zero value, the specified value is
used as a minimum size.
SELECT component,current_size/1024/1024||'M'
FROM v$sga_dynamic_components;
15-19 Copyright© 2004, Oracle. All rights reserved.
Behavior of Auto-Tuned SGA Parameters
When SGA_TARGET is not set or is equal to zero, auto-tuned SGA parameters behave as in
previous releases, and specify the actual size of those components. For the shared pool, internal
overhead allocations for metadata (such as for data structures for processes, sessions, and so on)
are now included in the value of the SHARED_POOL_S IZE parameter. As a result, you may
need to increase the value of your setting for SHARED_POOL_SIZE when upgrading to Oracle
Database lOg to account for these allocations. For example, if you were using a
SHARED_POOL_S I ZE value of of 256M in a prior release, and if the value of the internal
allocations was 16M, then you need to set SHARED_POOL_SIZE to 272M with Oracle
Database lOg to get the same size shared pool. The first query shown on the slide computes the
total value of the shared pool including this internal overhead. You should run this query prior to
upgrading to determine the new value for SHARED_POOL_SIZE in Oracle Database lOg.
When Automatic Shared Memory Management is enabled, you can still specify values for the
auto-tuned SGA parameters. If you set any of the auto-tuned parameters to a non-zero value, the
specified value is used as a lower bound by the auto-tuning algorithm. For example, if
SGA_TARGET is set to 8G and SHARED_POOL_S IZE is set to 1G, the Automatic Shared
Memory Management algorithm will not shrink the shared pool to below 1G. Use the second
query to determine the actual size of the auto-tuned components in the SGA.
Oracle Database 10g: Administration Workshop II 15-19
Behavior of Manually Tuned
SGA Parameters
• Some components are not auto-tuned.
- keep and recycle buffer caches
- Multiple block size caches
- Log buffer
- Streams pool
• These components must be manually configured
using database parameters.
• The memory used by these components reduces
the amount of memory available for auto-tuning
the SGA.
15-20 Copyright© 2004, Oracle. All rights reserved.
Behavior of Manually Tuned SGA Parameters
The manually tuned SGA parameters are:
• DB_KEEP_CACHE_SIZE
• DB_RECYCLE_CACHE_SIZE
• DB_rcK_CACHE_SIZE (n = 2, 4, 8, 16, 32)
• LOG_BUFFER
• STREAMS_POOL_SIZE
If you want to use memory components that are not auto-tuned, you must configure the
appropriate parameters. The values specified for these parameters precisely control the sizes of
the memory components.
When SGA_TARGET is set, the total size of manual SGA size parameters is subtracted from the
SGA_TARGET value, and the balance is given to the auto-tuned SGA components.
For example, if SGA_TARGET is set to 8Gand STREAMS_POOL_SIZE is set to 1G, then the
total size of the four auto-tuned components (shared pool, Java pool, default buffer cache, and
large pool) is limited to 7G. The 7G size includes the fixed SGA and log buffer, and only after
those have been allocated is the rest of the memory divided between the auto-tuned components.
The size of the streams pool is 1G, as specified by the parameter.
Oracle Database 10g: Administration Workshop II 15-20
15-21
Using the v$parameter View
SGA_TARGET = 8G
SELECT name, value, isdefault
FROM v$parameter
WHERE name LIKE '%size';
DB_CACHE_SIZE = 0
JAVA_POOL_SIZE = 0
LARGE_POOL_SIZE = 0
SHARED_POOL_SIZE = 0
Copyright © 2004, Oracle. All rights reserved.
Using the v$parameter view
When you specify a non-zero value for SGA_TARGET and do not specify a value for an auto-
tuned SGA parameter, the values of the auto-tuned SGA parameters in the V$PARAMETER view
areO, and the value of the ISDEFAULT column is TRUE.
If you have specified a value for any of the auto-tuned SGA parameters, the value displayed
when you query V$PARAMETER is the value that you specified for the parameter.
Oracle Database 10g: Administration Workshop II 15-21
Resizing sga_target
The SGA_target initialization parameter:
- Is dynamic
- Can be increased up to sga_max_size
- Can be reduced until all components reach their
minimum size
A change in the value of sga_target affects only
automatically sized components.
15-22 Copyright© 2004, Oracle. All rights reserved.
Resizing sga_target
SGA_TARGET is a dynamic parameter and can be changed through Database Control or with the
ALTER SYSTEM command.
SGA_TARGET can be increased up to the value of SGA_MAX_S IZE. It can be reduced until any
one of the auto-tuned components reaches its minimum size: either a user-specified minimum or
an internally determined minimum.
• If you increase the value of SGA_TARGET, the additional memory is distributed according
to the auto-tuning policy across the auto-tuned components.
• If you reduce the value of SGA_TARGET, the memory is taken away by the auto-tuning
policy from one or more of the auto-tuned components.
Suppose that SGA_MAX_SIZE is set to 10G and SGA_TARGET is set to 8G. If
DB_KEEP_CACHE_SIZE is set to IG and you increase SGA_TARGET to 9G, then the
additional IG is distributed only among the components controlled by SGA_TARGET. The value
of DB_KEEP_CACHE_SIZE is not affected. Likewise, if SGA_TARGET is reduced to 7G, then
the IG is taken from only those components controlled by SGA_TARGET. This decrease does
not affect the settings of manually controlled parameters such as DB_KEEP_CACHE_S IZE.
Oracle Database 10g: Administration Workshop II 15-22
Disabling Automatic Shared Memory
Management
Setting sga_target
Auto parameters are
SGA size as a whole
to zero disables auto-tuning,
set to their current sizes,
is unaffected.
SGA size = 8GB
Parameters:
sga_target = 8G
shared_pool_size=lG
Original values
f
SGA size = 8GB
*
Parameters:
sga_target = 0
db_cache_s i ze = 4G
shared_pool_size = 2G
large_pool_size = 512M
java_pool_size = 512M
v
7
15-23
Copyright © 2004, Oracle. All rights reserved.
Disabling Automatic Shared Memory Management
You can dynamically choose to disable automatic shared memory management by setting
SGA_TARGET to zero. In this case, the values of all the auto-tuned parameters are set to the
current sizes of the corresponding components, even if the user had earlier specified a different
non-zero value for an auto-tuned parameter.
In the example in the slide, the value of SGA_TARGET is 8G and the value of
SHARED_POOL_SIZE is IG. If the system has internally adjusted the size of the shared pool
component to 2G, then setting SGA_TARGET to zero results in SHARED_POOL_SIZE being set
to 2G, thereby overriding the original user-specified value.
Oracle Database 10g: Administration Workshop II 15-23
Manually Resizing Dynamic SGA
Parameters
For auto-tuned parameters, manual resizing:
- Results in immediate component resize if the new
value is greater than the current size
- Changes the minimum size if the new value is
smaller than the current size
Manually tuned parameter resizing affects only the
tunable portion of the SGA.
15-24 Copyright© 2004, Oracle. All rights reserved.
Manually Resizing Dynamic SGA Parameters
When an auto-tuned parameter is resized and SGA_TARGET is set, the resize results in an
immediate change to the size of the component only if the new value is larger than the current
size of the component. For example, if you set SGA_TARGET to 8Gand set
SHARED_POOL_S IZE to 2G, you ensure that the shared pool has at least 2G at all times to
accommodate the necessary memory allocations. After this, adjusting the value of
SHARED_POOL_S I ZE to 1G has no immediate effect on the size of the shared pool. It allows
the automatic memory tuning algorithm to later reduce the shared pool size to 1G if it needs to.
On the other hand, if the size of the shared pool is 1G to begin with, then adjusting the value of
SHARED_POOL_S I ZE to 2G results in the shared pool component growing immediately to a
size of 2G. The memory used in this resize operation is taken away from one or more auto-tuned
components, and the sizes of the manual components are not affected.
Parameters for manually sized components can be dynamically altered as well, but the difference
is that the value of the parameter specifies the precise size of that component immediately.
Therefore, if the size of a manual component is increased, extra memory is taken away from one
or more automatically sized components. If the size of a manual component is decreased, the
memory that is released is given to the automatically sized components.
Oracle Database 10g: Administration Workshop II 15-24
Program Global Area (PGA)
PGA
Server
process
PGA
Dedicated
connections
Private
SQL
areas
Cursor
and SQL
area
Session
memory
Work
area
Shared
server
Shared server
connections
Shared pool
or
large pool
PGA
15-25
Copyright © 2004, Oracle. All rights reserved.
The Program Global Area
A Program Global Area (PGA) is a memory region that contains data and control information for
a server process. It is a nonshared memory created by Oracle when a server process is started.
Access to it is exclusive to that server process and is read and written only by Oracle code acting
on behalf of it. The total PGA memory allocated by each server process attached to an Oracle
instance is also referred to as the aggregated PGA memory allocated by the instance.
Part of the PGA can be located in the SGA when using shared servers.
PGA memory typically contains the following:
Private SQL Area
A private SQL area contains data such as bind information and run-time memory structures.
Each session that issues a SQL statement has a private SQL area. Each user that submits the
same SQL statement has his or her own private SQL area that uses a single shared SQL area.
Thus, many private SQL areas can be associated with the same shared SQL area. The location of
a private SQL area depends on the type of connection established for a session. If a session is
connected through a dedicated server, private SQL areas are located in the server process's PGA.
However, if a session is connected through a shared server, part of the private SQL area is kept
in the SGA.
Oracle Database 10g: Administration Workshop II 15-25
The Program Global Area (continued)
Cursor and SQL Areas
The application developer of an Oracle precompiler program or OCI program can explicitly open
cursors, or handles to specific private SQL areas, and use them as a named resource throughout
the execution of the program. Recursive cursors that Oracle issues implicitly for some SQL
statements also use shared SQL areas.
Work Area
For complex queries (for example, decision support queries), a big portion of the PGA is
dedicated to work areas allocated by memory-in tensive operators, such as:
• Sort-based operators, such as ORDER BY, GROUP BY, ROLLUP, and window functions
• Hash-join
• Bitmap merge
• Bitmap create
• Write buffers used by bulk load operations
A sort operator uses a work area (the sort area) to perform the in-memory sort of a set of rows.
Similarly, a hash-join operator uses a work area (the hash area) to build a hash table from its left
input.
The size of a work area can be controlled and tuned. Generally, bigger work areas can
significantly improve the performance of a particular operator at the cost of higher memory
consumption.
Session Memory
Session memory is the memory allocated to hold a session's variables (logon information) and
other information related to the session. For a shared server, the session memory is shared and
not private.
Oracle Database 10g: Administration Workshop II 15-26
Automatic PGA Memory Management
Dynamically adjusts the amount of PGA memory
dedicated to work areas
Memory allocated to work areas is derived from
the pga_aggregate_target parameter
Helps to maximize the performance of all the
memory-intensive SQL operations
Enabled by default
15-27 Copyright© 2004, Oracle. All rights reserved.
Automatic PGA Memory Management
Ideally, the size of a work area is big enough that it can accommodate the input data and
auxiliary memory structures allocated by its associated SQL operator. This is known as the
optimal size of a work area. When the size of the work area is smaller than optimal, the response
time increases, because an extra pass is performed over part of the input data.
Automatic PGA memory management simplifies and improves the way PGA memory is
allocated. By default, PGA memory management is enabled. In this mode, Oracle dynamically
adjusts the size of the portion of the PGA memory dedicated to work areas, based on 20% of the
SGA memory size. The minimum value is 10MB.
When running in automatic PGA memory management mode, sizing of work areas for all
sessions becomes automatic and the *_AREA_S IZE parameters (such as SORT_AREA_S IZE)
are ignored by all sessions running in that mode. At any given time, the total amount of PGA
memory available to active work areas in the instance is automatically derived from the
PGA_AGGREGATE_TARGET initialization parameter. This amount is set to the value of
PGA_AGGREGATE_TARGET minus the amount of PGA memory allocated by other components
of the system (for example, PGA memory allocated by sessions). The resulting PGA memory is
then assigned to individual active work areas, based on their specific memory requirements.
Oracle Database 10g: Administration Workshop II 15-27
PGA Management Resources
• Statistics to manage the pga_aggregate_target
initialization parameter, such as pga cache hit
percentage
• Views for monitoring the PGA work area include:
— v$sql_workarea_histogram
— v$pgastat
— v$sql_workarea_active
— v$sql_workarea
— v$tempseg_usage
• Views to assist in sizing the PGA work area are:
— v$pga_target_advice
— v$pga_target_advice_histogram
15-28 Copyright© 2004, Oracle. All rights reserved.
PGA Management Resources
When configuring a new instance, it is difficult to know precisely the appropriate setting for
PGA_AGGREGATE_TARGET. You can determine this setting in three stages:
1. Make a first estimate for PGA_AGGREGATE_TARGET, based on a rule of thumb. By
default, Oracle uses 20% of the SGA size. However, this initial setting may be too low for
a large DSS system.
2. Run a representative workload on the instance and monitor performance, using PGA
statistics collected by Oracle, to see whether the maximum PGA size is under-configured
or over-configured.
3. Tune PGA_AGGREGATE_TARGET, using Oracle PGA advice statistics.
For backward compatibility, automatic PGA memory management can be disabled by setting the
value of the PGA_AGGREGATE_TARGET initialization parameter to 0. When automatic PGA
memory management is disabled, the maximum size of a work area can be sized with the
associated *_AREA_SIZE parameter, such as:
• SORT_AREA_SIZE
• HASH_AREA_SIZE
• BITMAP_MERGE_AREA_SIZ E
• CREATE BITMAP AREA SIZE
Oracle Database 10g: Administration Workshop II 15-28
Using the Memory Advisor
Dalabase: orcl us.oracle.com = Memory Parameters
Memory Parameters
The Program Global Area (PGA) is a memory buffer thai contains dala and
control information for a server process. A PGA is created by Oracle when a
server process is started
Aggregate PGA Target \2A
Current PGA Allocated (KB) 124406
■laHimum PGA Allocated (KB) 135012
(since startup)
Cache Hit Percentage (%) 99.52
tTIP The sum of PGA and SGA should be less than the total system
memory minus memory required by the operating syslem and ol
applications.
PGA Aggregate Target Advice
*"■>- r t i i
. i J I I
£1
i in
I Ed
FC.A TaiYi n [UK}
hli,-,r, v -7,-iL -.Ynr - t-t-,V. .' -.rg/Y
S11II1 "Vi rsr ■ in- nn l'= ": i-v^ r ~hA an;)' _n shI
15-29
Copyright © 2004, Oracle. All rights reserved.
Using the Memory Advisor
The Memory Advisor helps you tune the size of your memory structures. You can use this
advisor only when automatic memory tuning is disabled.
The Memory Advisor comprises three advisors that give you recommendations on the following
memory structures:
• Shared pool in the System Global Area (SGA)
• Buffer cache in the SGA
• Program Global Area (PGA)
You can invoke the Memory Advisors by performing the following steps:
1. Click Advisor Central in the Related Links region on the Database home page.
2. Click Memory Advisor on the Advisor Central page. The Memory Parameters page
appears. This page provides a breakdown of memory usage for the SGA.
Note: The Automatic Shared Memory Management setting should be disabled in
order to run the advisor.
3. Click Advice next to the Shared Pool value or Buffer Cache value to invoke the
respective advisors.
4. Click PGA to access the PGA property page. Click Advice to invoke the PGA Advisor.
Oracle Database 10g: Administration Workshop II 15-29
Summary
In this lesson, you should have learned how to:
Describe the memory components in the SGA
Implement Automatic Shared Memory
Management
Manually configure SGA parameters
Use automatic PGA memory management
15-30 Copyright© 2004, Oracle. All rights reserved.
Oracle Database 10g: Administration Workshop II 15-30
Practice 15 Overview:
Automatic Shared Memory Management
This practice covers using Automatic Shared Memory
Management to avoid long running query issues.
15-31 Copyright© 2004, Oracle. All rights reserved.
Oracle Database 10g: Administration Workshop II 15-31
Practice 15: Automatic Shared Memory Management
Unless specified otherwise, you should be logging in as SYSDBA either through Database
Control Console or SQL*Plus.
1. Use Database Control to shut down your instance, and start it up again using the
init_sgalab . or a initialization parameter file located in your labs directory. Before
doing this, make sure that the init_sgalab . or a parameter file can be used to start up
your instance.
2. Connect as SYSDBA through SQL*Plus and execute the lab_04_02_02 . sql script.
This script creates a new tablespace and a new table, and populates the table.
3. Use Database Control Console to check the size of the various SGA buffers of your
instance.
4. Connect as SYSDBA through SQL*Plus and execute the lab_04_02_04 . sql script.
This script executes a parallel query on the previously created table. What happens and
why?
5. Using Database Control only, how can you fix this problem? Implement your solution.
6. Connect as SYSDBA through SQL*Plus and determine the effects of the previous step on
the memory buffers. What are your conclusions?
7. Connect as SYSDBA through SQL*Plus and execute the lab_04_02_04 . sql script
again. This script executes a parallel query on the previously created table. Using Database
Control, and while the script is running, verify that your solution is working. What happens
and why?
8. If you use SQL*Plus instead of Database Control, what commands do you execute to
enable the Automatic Shared Memory Management feature after you started your instance
using the init_sqalab . ora file? Explain your decision. It is assumed that you want to
have a maximum of 256MB of SGA memory allocated.
9. Connect as SYSDBA through SQL*Plus and execute the lab_04_02_09 . sql script to
clean up your environment.
Oracle Database 10g: Administration Workshop II 15-32
Managing Resources
Copyright © 2004, Oracle. All rights reserved.
Objectives
After completing this lesson, you should be able to do
the following:
• Set up Database Resource Manager
• Assign users to Resource Manager groups
• Create resource plans within groups
16-2 Copyright© 2004, Oracle. All rights reserved.
Oracle Database 10g: Administration Workshop II 16-2
•
•
16-3
Overview
Manage mixed workload
Control system performance
AM
OLTP
user
AM
DSS
user
Database
resource manager j
OLTP
More resources
K V
DSS \
Less resources /
C
Dpyright © 2004, Oracle. All rights reserved
Oracle
Database
Overview
By using the Database Resource Manager, the database has more control over the allocation of
machine resources than is normally possible through operating system resource management
alone. If resource management decisions are made by operating system, it can lead to problems
such as:
• Excessive overhead resulting from operating system context switching of Oracle Database
server processes when the number of server processes is high
• Suspension of a database server processes that is holding a latch
• Unequal distribution of resources among all Oracle database processes, and an inability to
prioritize one task over another
• Inability to manage database-specific resources, such as parallel execution servers and
active sessions
With the Database Resource Manager, the database administrator (DBA) can guarantee groups
of users a minimum amount of processing resources regardless of the load on the system and the
number of users.
Oracle Database 10g: Administration Workshop II 16-3
Database Resource
Manager Concepts
Resource
consumer
group
Resource plan
A±
^F
A±
Resource plan
directives
User groups or sessions
with similar resource
needs
A blueprint for resource
allocation among
resource consumer
groups (one active plan)
Specifies how a resource
is divided among the
resource consumer
groups
16-4
Copyright © 2004, Oracle. All rights reserved.
Database Resource Manager Concepts
Administering systems using the Database Resource Manager involves the use of resource plans,
resource consumer groups, and resource plan directives.
Resource Consumer Group
A resource consumer group defines a set of users or sessions that have similar requirements for
using system and database resources.
Resource Plan
Resource consumer groups are associated with a resource plan, which contains resource plan
directives that specify how resources should be allocated among the resource consumer groups.
A resource plan can be simple, meaning resources are shared among resource consumer groups,
or a resource plan can contain multiple levels, where resources are shared among consumer
groups and sub-plans.
Resource Plan Directives
Resource plan directives specify how a particular resource is shared among consumer groups or
sub-plans. You associate resource consumer groups and sub-plans with a particular resource plan
through plan directives. The CPU Method directive allows you to specify how CPU resources
are to be distributed for up to eight different levels. Multiple levels not only provide a way of
prioritizing, but they provide a way of explicitly specifying how all primary and leftover
resources are to be used.
Oracle Database 10g: Administration Workshop II 16-4
Resource Manager Configurations
• You can manage database and operating system
resources, such as:
- CPU usage
- Number of active sessions
- Degree of parallelism
- Undo generation
- Operation execution time
- Idle time
• You can also specify criteria that, if met, causes
the automatic switching of sessions to another
consumer group.
16-5 Copyright© 2004, Oracle. All rights reserved.
Manageable Resources
How resources are allocated to resource consumer groups is specified in resource allocation
directives. The Database Resource Manager provides several means of allocating resources:
• CPU Method: Enables you to specify how CPU resources are allocated among consumer
groups and subplans.
• Active Session Pool with Queuing: Allows you to limit the number of concurrent active
sessions for a consumer group or subplan. If a group exceeds the maximum allowed
number of sessions, new sessions are placed in a queue where they wait for an active
session to complete. You can also specify a time limit on how long a session will wait
before exiting with an error.
• Degree of Parallelism Limit: Enables you to control the maximum degree of parallelism
for any operation within a consumer group.
• Execution Time Limit: Allows you to specify a maximum execution time allowed for an
operation. The Oracle database uses cost-based optimizer statistics to estimate how long an
operation will take. If it is longer than the maximum time allowed
(MAX_ESI_EXEC_I IME), the operation returns an error and is not started. If a resource
consumer group has more than one plan directive with MAX_ESI_EXEC_I IME specified,
the Resource Manager chooses the most restrictive of all incoming values.
Oracle Database 10g: Administration Workshop II 16-5
Manageable Resources (continued)
• Undo Pool: Lets you control the total amount of undo that can be generated by a consumer
group or subplan. Whenever the total undo space exceeds the amount specified by
UNDO_POOL, no further INSERT, UPDATE, or DELETE commands will be allowed until
undo space is freed by another session in the same group or the undo pool is increased for
the consumer group. If the consumer group's quota is exceeded during the execution of a
DML statement, the operation will abort and return an error. Queries are still allowed, even
if a consumer group has exceeded its undo threshold.
• Idle Time Limit: Enables you to specify an amount of time that a session can be idle, after
which it will be terminated (MAX_IDLE_T IME). You can further restrict Resource
Manager to only terminate sessions that are blocking other sessions
(MAX_IDLE_TIME_BLOCKER).
Oracle Database 10g: Administration Workshop II 16-6
The Initial Plan: system plan
Resource Consumer
Group
SYS_GROUP
OTHER_GROUPS
LOW_GROUP
Allocation Methods
CPU_P1
100%
0%
0%
CPU_P2
0%
100%
0%
CPU_P3
0%
0%
100%
16-7
Copyright © 2004, Oracle. All rights reserved.
The Initial Plan: system_plan
Oracle Database provides one default resource manager plan, SYSTEM_PLAN, which gives
priority to system sessions. SYSTEM_PLAN contains directives for the following provided
consumer groups:
• SYS_GROUP: The initial consumer group for the users SYS and SYSTEM.
OTHER_GROUPS: Used for all sessions who belong to consumer groups that are not part
of the active resource plan. There must be a plan directive for OTHER_GROUPS in any
active plan.
• LOW_GROUP: A group with lower priority than SYS_GROUP and OTHER_GROUPS in this
plan. You must decide which user sessions will be part of LOW_GROUP. Initially no user is
associated with this consumer group. The switch privilege is granted to PUBLIC for this
group.
The initial consumer group of a user is the consumer group to which any session created by that
user initially belongs. If you have not set the initial consumer group for a user, the user's initial
consumer group will automatically be the DEFAULT_CONSUMER_GROUP.
The SYSTEM_PLAN and associated resource consumer groups can be used, or not used, and can
be modified or deleted. You can use this simple database-supplied plan if it is appropriate for
your environment.
Oracle Database 10g: Administration Workshop II 16-7
Creating a New Resource Plan
There are three ways to create a new resource plan:
• Use Enterprise Manager
Use the create_simple_plan procedure of
DBMS_RE SOURCE_MANAGER
• Use the procedures in the
dbms_resource_manager package to create a
complex plan.
16-8 Copyright© 2004, Oracle. All rights reserved.
Creating a New Resource Plan
Using Enterprise Manager
To create a new plan, you need to configure several Resource Manager objects. The Enterprise
Manager Database Control Console provides an easy to use graphical interface for configuring
resource plans, consumer groups, and more.
Creating a Simple Plan
Using the CREATE_S IMPLE_PLAN procedure, you can quickly create a simple resource plan
that will be adequate for many situations. This procedure enables you to create consumer groups
and allocate resources to them by executing a single statement. Up to eight consumer groups can
be specified using this procedure and the only plan directive that can be specified is for CPU.
The plan uses the EMPHASIS CPU allocation policy and each consumer group uses the
ROUND_ROBIN scheduling policy. Each consumer group specified in the plan is allocated its
CPU percentage at level 2. Also included in the plan are SYS_GROUP (a system-defined group
that is the initial consumer group for the users SYS and SYSTEM) and OTHER_GROUPS.
Using this procedure, you are not required to invoke the procedures that are described in
succeeding sections for creating a pending area, creating each consumer group individually, and
specifying resource plan directives.
Oracle Database 10g: Administration Workshop II 16-8
Creating a New Resource Plan (continued)
Creating a Complex Plan
To create a complex plan, you must use several procedures in the
DBMS_RESOURCE_MANAGER package to create the various elements of a resource plan.
However, this method provides the greatest number of customization options when creating a
plan. A general outline of the steps you have to follow are:
• Create a pending area
• Create resource plans
• Create resource consumer groups
• Create plan directives
• Validate the pending area (optional)
• Submit the pending area (includes validation)
Oracle Database 10g: Administration Workshop II 16-9
16-10
Creating a Simple Plan
BEGIN
DBMS_RESOURCE_MANAGER. CREATE_SIMPLE_PLAN (
SIMPLE_PLAN => 'simple_planl',
CONSUMER_GROUPl => 'mygroupl',
GROUPl_CPU => 80,
CONSUMER_GROUP2 => 'mygroup2',
GROUP2_CPU => 20) ;
END;
Copyright © 2004, Oracle. All rights reserved.
Creating a Simple Plan
You can create a resource plan, resource consumer groups, and plan directives in a single step
using the CREATE_SIMPLE_PLAN procedure. The created plan is SIMPLE_PLANl. The
created consumer groups are MYGROUP1 and MYGROUP2.
• MYGROUPl gets 80% of the CPU resources at Level 2
• MYGROUP2 gets 20% of the CPU resources at Level 2
• SYS_GROUP gets 100% of the CPU resources at Level 1
• OTHER_GROUPS consumer group gets 100% of the CPU resources at Level 3
All other resources, for example, degree of parallelism or the number of active sessions, are not
limited.
Oracle Database 10g: Administration Workshop II 16-10
16-11
Oracle Enterprise Manager:
Resource Manager
Copyright © 2004, Oracle. All rights reserved.
Oracle Enterprise Manager: Resource Manager
Using the Oracle Enterprise Manager Database Control Console, a DBA can easily administer
resource plans, consumer groups, and resource consumer group mappings. First you define any
new resource consumer groups, then you create a resource plan or subplans that use the
consumer groups you created. While creating the resource plan, there are several property pages
you can use for specifying plan directives.
If you do not use Enterprise Manager to create the resource plan or resource consumer groups,
you will need to first create spending area. This is a scratch area allowing you to stage your
changes and to validate them before they are made active.
Oracle Database 10g: Administration Workshop II 16-11
Active Session Pool Mechanism
The active session pool feature allows the DBA to control the maximum number of concurrently
active sessions per resource consumer group. With this functionality, a DBA can indirectly
control the amount of resources that any resource consumer group uses because resource
consumption is proportional to the number of active sessions. Using an active session pool can
help to reduce the number of servers taking resources in the system, thus avoiding inefficient
paging, swapping, and other resource depletion (such as memory) resulting from attempting to
run too many jobs simultaneously.
After the active session pool is filled with active sessions, the Resource Manager queues all
subsequent sessions attempting to become active until other active sessions complete or become
inactive. An active session is one currently involved in a transaction, query or parallel operation.
Individual parallel slaves are not counted as sessions; the entire parallel operation counts as one
active session.
There is only one queue per resource consumer group and the queuing method is first in, first out
(FIFO) with a timeout. The queue is implemented as a memory structure and cannot be queried
directly.
Oracle Database 10g: Administration Workshop II 16-12
Setting the Active Session Pool
Database1 orcl.us.oracle.com > Resource Plans ■> Edit Resource Plan1 BUGDB_PLAN Logged in As SVS
Edit Resource Plan: BUGDB_PLAN
(show 50J_j (Revertj ^Applyj
GeneraJ Farallelisrn Session Pool Undo Pool Execution Time Group Switchiro Idle Time
BATCH GROUP
BUG MAINT GROUP
ONLINE GROUP
OTHER GROUPS
¥
(UNLIMITED
(UNLIMITED
(UNLIMITED
(600
UNLIMITED
(UNLIMITED
[UNLIMITED
General Farallelism 1 Session Pool [ Undo Pool Execution Time Group Switchiro Idle Time
16-13 Copyright© 2004, Oracle. All rights reserved.
Setting the Active Session Pool
You can easily configure the Active Session Pool settings for a resource plan using the EM
Database Control Console.
Oracle Database 10g: Administration Workshop II 16-13
Setting the Active Session Pool
Example:
GROUP
ONLINE
BATCH
ACTIVE SESSION POOL
No limits
ACTIVE_SESS_POOL_Pl = 5
QUEUEING_P1 = 600
• OLTP: Set no limit on concurrent active sessions
• BATCH: Set to limit concurrent active sessions to 5
• queueing_pi, set to 600, aborts all operations that
wait on the queue for more than ten minutes
16-14 Copyright© 2004, Oracle. All rights reserved.
Setting the Active Session Pool
The active session pool is defined by setting the parameters:
• ACTIVE_SESS_POOL_Pl
Identifies the number of active sessions that establishes the resource consumer
group's threshold, and thus its active session pool.
- Default is 1000000
• QUEUEING_P1
Optionally indicates how long, in seconds, any session will wait on the queue before
aborting the current operation
- Default is 1000000
In the example in the slide, the resource consumer group OLTP has no limit on the number of
concurrent active sessions because the ACTIVE_SESS_POOL_Pl parameter was not set. The
resource consumer group BATCH has an ACT I VE_SE S S_POOL_P l value of 5. The BATCH
group also has the QUEUEING_Pl parameter set to 600 (ten minutes). All BATCH sessions
waiting on the queue for more than ten minutes will abort with an error.
Oracle Database 10g: Administration Workshop II 16-14
Maximum Estimated Execution Time
• The Database Resource Manager can estimate the
execution time of an operation proactively.
• A DBA can specify a maximum estimated
execution time for an operation at the resource
consumer group level.
Operation will not start if the estimate is longer
than MAX_EST_EXEC_TIME.
• The benefit of this feature is the elimination of the
exceptionally large job that uses too many system
resources.
• The default is unlimited.
16-15 Copyright© 2004, Oracle. All rights reserved.
Maximum Estimated Execution Time
A DBA can define the maximum estimated execution time any operation can take at any given
time by setting the resource plan directive MAX_ES T_EXEC_T IME parameter. When this
parameter is set the Database Resource Manager estimates the time a specific job will take. If the
operation's estimate is more than MAX_EST_EXEC_TIME, then the operation will not start.
This eliminates any exceptionally large jobs that would utilize too many system resources.
If a resource consumer group has more than one plan directive referring to it, it may have more
than one MAX_EST_EXEC_TIME. The Database Resource Manager will then choose the most
restrictive of all incoming values.
The estimated execution time for a given statement is calculated using the statistics from the
cost-based optimizer.
Oracle Database 10g: Administration Workshop II 16-15
Setting Idle Timeouts
^£±£^^^^^^^^^^^^^
.'■■fo:«:: <■: .u:.ott:l:.:*": H:w.rc: -l:n: Lll h:m.k: -l:n U-.
Edit Resource Plan: DAY PLAN
=lrn DAT PLAN
L■:■:■: clizra 1
-L-}
1 ■
Ian L
■'■wjh Jii -■■-.-
B ^^B ^^1
o-i :=; g^ouf:
L'-jhi-::
UNUk TtD
Q«n<
liaii
DBMS_RESOURCE_MANAGER.CREATE_PLAN_DIRECTIVE
(PLAN => 'DAY_PLAN',
GROUP_OR_SUBPLAN => 'DSS_GROUP',
COMMENT => 'Limit Idle Time Example',
MAX_IDLE_TIME => 600,
MAX_IDLE_BLOCKER_TIME => 300);
16-16
Copyright © 2004, Oracle. All rights reserved.
Setting Idle Timeouts
You use the Resource Plan Idle Time page in Enterprise Manager to set the maximum idle
timeouts for a resource plan. The MAX_IDLE_T IME resource directive is set in seconds, and
specifies the maximum time that a session can be neither executing nor waiting for I/O. In
addition to limiting the maximum idle time for a session, you can also specify a separate limit on
the amount of time that an idle session can block another session. You impose this limit by
setting the MAX_IDLE_BLOCKER_TIME resource directive to the number of seconds to allow a
session to be idle while blocking another session.
The default value for the idle time parameters is NULL, which means unlimited. You can also
specify a value of UNLIMITED to indicate that no maximum time has been set.
When MAX_IDLE_IIME orMAX_IDLE_BLOCKER_IIME are set, PMON checks these limits
once a minute. If it finds a session that has exceeded one of the limits, it forcibly kills the session
and cleans up all its states.
In the above example, the PMON process kills sessions that are idle for longer than 600 seconds
and kills sessions that are idle for more than 300 seconds if they are blocking other sessions.
Note: You can also use a database profile to limit the idle time for a session. However, there you
cannot limit a blockers' idle time using profiles. See the Oracle Database SQL Reference.
Oracle Database 10g: Administration Workshop II 16-16
Switching Back to the Initial Consumer
Group at End of Call
CalM
DBMS_RESOURCE_MANAGER.CREATE_PLAN_DIRECTIVE
(PLAN => 'Day_Plan',
GROUP_OR_SUBPLAN => 'DSS_GROUP',
CPU_P1 => 100, CPU_P2 => 0,
SWITCH_GROUP => 'LONGRUN_GROUP',
SWITCH_TIME_IN_CALL => 600);
Call 2
DBMS_RESOURCE_MANAGER. CREATE_PLAN_DIRECTIVE
(PLAN => 'Day_Plan',
GROUP_OR_SUBPLAN => 'LONGRUN_GROUP',
CPU_P1 => 0, CPU_P2 => 100);
V^At call enjj
16-17 Copyright© 2004, Oracle. All rights reserved.
Switching Back to the Initial Consumer Group at End of Call
You can specify that at the end of every top call, a session is returned back to its initial consumer
group, meaning the group that it would be in had the session just logged in. The top call is
defined as treating an entire PL/SQL block as one call or, similarly, treating SQL statements that
are issued separately by the client as separate calls. The SWITCH_TIME_IN_CALL parameter
is mostly beneficial for three-tier applications where the middle-tier server is implementing
session pooling. In this case, the middle tier tends to do one call for an end user and then use the
same session for a call for a different end user. Therefore, the boundaries of work are really calls,
and the actions of a prior end user should not effect the next end user. For example, when a user
logs in, Resource Manager places the session in the DSS_GROUP consumer group due to its
initial consumer group mapping. The user then executes a query. When you set a value (in
seconds) for the SWITCH_TIME_IN_CALL parameter, you are setting a timer on the call
before an action is taken, dictated by the SWITCH_GROUP parameter. At the end of the top call,
Resource Manager automatically switches the user back to the initial consumer group.
You cannot specify both the SWITCH_TIME_IN_CALL and SWITCH_TIME parameters
within the same directive. The SWI TCH_T IME parameter is primarily intended for client/server
applications.
Oracle Database 10g: Administration Workshop II 16-17
Creating Resource Consumer Groups
You can use Oracle Enterprise Manager to manage groups of users, or sessions, that are grouped
together based on their processing needs. The Resource Consumer Groups property sheet allows
you to manage this list of resource consumer groups associated with the current database. You
can use the property sheet to create, delete and modify the settings of a resource consumer group.
To manage a resource consumer group, from the Administration page, in the Resource Manager
section, click Resource Consumer Groups. Choose the action you want to perform. You can
create a new resource consumer group or you can select a resource consumer group from the
results list and choose one of the actions from the Command drop-down list.
Use the Resource Consumer Groups page to create or edit the Consumer Group and description,
and to select users assigned to the group. You can add or delete members to the Selected Users
table.
The General property sheet (shown above) is one of the two pages that comprise the Create
Resource Consumer Group and Edit Resource Consumer Group pages. You can define or edit
which database roles are associated with the specified resource consumer group by moving to the
other property sheet (Roles).
Oracle Database 10g: Administration Workshop II 16-18
Creating Resource Consumer Groups (continued)
When you use Enterprise Manager to create a resource consumer group, it calls several
procedures. You can access the DDL for the operation by choosing Generate DDL from the
command drop down list on the Resource Consumer Groups page with the object for which you
are generating the code selected, and then clicking Go. An example DDL listing is shown here:
Database: orcl.us.oracle.corn > Resource Consumer Groups > Edit Resource Consumer Group: AB§ty4QATW£&JEpE\
DDL
BEGIN
dbms resource manager.clear pending area() ;
dbms_resource_manager.create_pending_area() ;
dbms_resource_manager . create consumer_group (consumer_group =>
'APPLICATION_DEVELOPER3T, comment => 'null');
dbms_resource_inanager . submit_pending_area() ;
BEGIN
dbms resource manager privs.grant switch consumer group(T JANET T,
'APPLICATION_DEVELOPER3T, false);
dbms_resource_manager_privs.grant_switch_consumer_group(T SCOTT T,
TAPPLICATION_DEVELOPER3T, false);
dbms resource manager privs.grant switch consumer group('CTXAPP T,
TAPPLICATION_DEVELOPER3T, false);
dbms_resource_manager_priv3.grant_switch_consumer group('JAVADEEUGPRIV7,
TAPPLICATION_DEVELOPER3T, false);
END;END;
J
Oracle Database 10g: Administration Workshop II 16-19
Assigning Users to Consumer Groups
Database: orcl.us.oracle.com > Users > Edit User: JANET
Logged in As SYS
Edit User: JANET
General ^^
Name JANET
Profile | DEFAULT J
Aulhentication |_Password_U
+ Enter Password |••'•••'••'••'••
* Confirm Password I■■•■■■•■■•■■•■■
n Expire Password nc
Default Tablespace |USERS
Temporary Tabli
16-20
Copyright © 2004, Oracle. All rights reserved.
Assigning Users to Groups
Before enabling the Database Resource Manager, users must be assigned to resource consumer
groups. The user's default consumer group is the one to which any session created by that user
initially belongs. If it is not set for a user, the user's initial consumer group will default to the
DEFAULT_CONSUMER_GROUP.
You must directly grant to the user, or to Public, the switch privilege to a consumer group before
it can be the user's default consumer group. The switch privilege cannot come from a role
granted to that user.
DBMS_RESOURCE_MANAGER.SET_INITIAL_CONSUMER_GROUP (
user => 'JANET', consumer_group => 'APPLICATION_DEV );
The DBMS_RESOURCE_MANAGER_PRIVS package contains the procedure to assign resource
consumer groups to users. Granting the switch privilege to a user enables the user to switch the
current consumer group.
DBMS_RESOURCE_MANAGER_PRIVS.GRANT_SWITCH_CONSUMER_GROUP (
grantee_name => 'JANET',
consumer_group => 'APPLICATION_DEV,
grant_option => FALSE );
You do not use a pending area for any of these procedures.
Oracle Database 10g: Administration Workshop II 16-20
Automatic Consumer Group Switching
fsessl) fsess2j
{ Sess3 *■
v •**
ONLINE Group
SWITCH_GROUP=ONLINE_GROUP
SWITCH_TIME=43200
SWITCH ESTIMATE=FALSE
3WITCH_GROUP=BATCH_GROUP
SWITCH_TIME_IN_CALL=180
SWITCH ESTIMATE=TRUE
fSess4)
...JL...
•*• ••,
Sess5
BATCH Group
16-21
Copyright © 2004, Oracle. All rights reserved.
Automatic Consumer Group Switching
You can also use resource plan directives to automatically switch a session's assigned resource
consumer group if certain conditions are met:
• If the session is active for more than SWITCH_TIME seconds, the Resource Manager
switches the session to the consumer group specified by SWITCH_GROUP. An active
session is one that is running and consuming resources, not waiting idly for user input or
CPU cycles. If, after being switched, the session becomes idle, it is switched back to its
original resource consumer group (the group the session would be assigned to had it just
logged in).
• SWITCH_TIME_IN_CALL is similar to SWITCH_TIME, but the session is switched back
to its original consumer group at the end of the top call. A top call is:
- In PL/SQL, an entire PL/SQL block.
In SQL, an individual SQL statement issued separately by the client.
You cannot specify both SWITCH_TIME and SWITCH_TIME_IN_CALL for the same resource
consumer group.
The parameter SWI TCH_T IME_IN_CALL is mostly useful for three-tier applications where the
mid-tier server is implementing session pooling. By using SWITCH_TIME_IN_CALL, the
resource usage of one client will not affect a future client that is executed within the same
session.
Oracle Database 10g: Administration Workshop II 16-21
Automatic Consumer Group Switching (continued)
• If SWITCH_ESTIMATE is set to TRUE, the Resource Manager uses a predicted estimate of
how long the operation will take to complete. If the database estimate is longer than the
value specified as the switch time, then the database switches the session before an
operation even starts running. If this parameter is not set, the operation runs within the
assigned consumer group and switches groups only if the other switch criteria are met.
Oracle Database 10g: Administration Workshop II 16-22
Automatic Consumer Group Switching
fsessl) fsess2)
C Sess3 V
ONLINE Group
SWITCH_GROUP='CANCEL_SQL'
SWITCH_TIME=300
SWITCH ESTIMATE=TRUE
16-23
Copyright © 2004, Oracle. All rights reserved.
Automatic Consumer Group Switching (continued)
You can also use automatic consumer group switching directives to cancel long-running SQL
queries or to terminate long-running sessions. You implement this functionality by specifying
CANCEL_SQL or KILL_SESS ION as the switch group:
• If the group name is ' CANCEL_SQL ', then the current call is canceled when other switch
criteria are met.
• If the group name is 'KILL_SESSION', then the session is killed when other switch
criteria are met.
In the example shown in the graphic above, a user starts a query in the ONLINE_GROUP
resource consumer group, but forgets to add the WHERE clause to the query. The resulting
Cartesian join would return over a million rows and consume many database resources. Because
of the configured resource plan directives, when the Resource Manager estimates the query will
take more than 300 seconds (5 minutes) to complete, the query is not allowed to start and an
error is returned to the user session.
Oracle Database 10g: Administration Workshop II 16-23
Configuring Consumer Group Switching
Database1 orcl us .oracle .corn > Resource Plans > Edit Resource Plan1 BUGDBPLAN
Edit Resource Plan: BUGDB PLAN
Logged in Ae SVS
("show SQL j ("Revert j ("ApplQ
General Parallelism Session Fool Undo Pool Execution Time GrOUl) SwitCllinu
Idle Time
BATCH GROUP
BUG MAINT GROUP
ONLINE GROUP
OTHER GROUPS
UNLIMITED
poo"
UNLIMITED
General Parallelism Session Fool
D at aba
CopsrigM 0 1995, 2005, Oracle. All rights resa
AboutOracle Enterprise Manager 10g Database
AUTO_TASK_CONSUMEB_GBOUP
BATCH_GROUP
BUGMAINTGFiOUP
DEFAULT_CONSUMER_GRQUP
DELIVERV_GFiOUP
L0W_GFi0UP
MAlLSOFiT.GFiOUP
ONLINE_GROUP
OTHEB_GROUPS
SVS GROUP
16-24
Copyright © 2004, Oracle. All rights reserved.
Configuring Consumer Group Switching
EM Database Control Console provides a graphical interface for configuring automatic
consumer group switching. You can configure this option when creating a new resource plan, or
by editing an existing plan.
Note
• You cannot set the SWITCH_GROUP to either CANCEL_SQL orKILL_SESSION using
Enterprise Manager Database Control Console.
• You cannot set SWI TCH_TIME_IN_CALL when using the Enterprise Manager interface.
You can set SWITCH_TIME, which is displayed as the Execution Time in the screenshot
on the slide.
Oracle Database 10g: Administration Workshop II 16-24
Adaptive Consumer Group Mapping
Prieriti&E
J^-H= ■ 1hA I =f t "i4f-ing^ 1n :=hI :t rnhfl^ K-'s
Artrlbucs Hipping s
SCP-
SER--
MCO
5ER--
i i -■■
i?IT
■i:c_-.i::ll£ ,-.ct dn |
i::= -1: c l le
.i.z i-^.-e *j:~ic ■
.Lz l-^.-z
i:e -.a-ie
: i- i.m-i.
. _i i.i i::i.«r-
11-; .1-;- >
. in--it:i ini
16-25
Copyright © 2004, Oracle. All rights reserved.
Adaptive Consumer Group Mapping
You can use Resource Manager to automatically assign sessions to specific consumer groups by
setting up mappings between consumer groups and session attributes of users, client programs,
modules, or services. The Adaptive Consumer Group Mapping feature makes it easier to use
Database Resource Manager without requiring any application changes. If session pooling is
implemented, whenever the client ID changes, Resource Manager reevaluates the mappings and
switches the session back to its initial consumer group. As a result, the new user's resource usage
is independent from the previous user's resource usage for the same session.
There are two types of session attributes:
• Login attributes: The login attributes are meaningful only at session login time, when the
Resource Manager determines the initial consumer group of the session.
• Run-time attributes: In contrast, a session that has already logged in can later be
reassigned to another consumer group based on its run-time attributes.
You use the SET_CONSUMER_GROUP_MAPPING and SET_CONSUMER_MAPPING_PRI
procedures to configure the automatic assigning of sessions to consumer groups. You must use a
pending area for these procedures. For an easier method of configuring consumer group
mappings and priorities, use the Enterprise Manager Database Control Console.
Oracle Database 10g: Administration Workshop II 16-25
Creating a Mapping Using
DBMS RESOURCE MANAGER
DBMS_RESOURCE_MANAGER. SET_
(DBMS_RE SOURCE.
'PDML' , 'DSS_
.CONSUMER.
.MANAGER. ORACLE.
_GROUP ' ) ;
DBMS_RESOURCE_MANAGER. SET_
(DBMS_RESOURCE_MANAGER .|(
' TP1', 'OLTP_GROUP') ;
DBMS_RESOURCE_MANAGER. SET_
(DBMS_RESOURCE_MANAGER Jc
' BILL ' , ' MANAGER_GROUI
_GROUP_
.USER,
.CONSUMER.
)RACLE_
_GROUP_
.USER, |
.CONSUMER.
:lient_
");
_os_
_GROUP_
.USER,
.MAPPING
.MAPPING
MAPPING
16-26
Copyright © 2004, Oracle. All rights reserved.
Creating a Mapping Using dbms_resource_manager
An example of such a mapping is to take any session whose Oracle database user name is PDML
and place it in the DS S_USERS consumer group. Since it is possible for a session to map to
different consumer groups based on different assigned attributes, Resource Manager uses the
priority levels for each attribute to help resolve any ambiguities.
In the example shown on the slide, when a session logs into the database, the following actions
occur:
• If the user name is PDML, then the Resource Manager assigns the session to the
DSS_USERS consumer group.
• If the user name is TPl, then the Resource Manager assigns the session to the
OTLP_USERS consumer group.
• If the client's OS user name is bill, then the Resource Manager assigns the session to the
MANAGER_GROUP consumer group.
However, if you log into the client machine as bill (attribute client_os_user) and then
connect to the database as the TPl user (attribute oracle_user), you create an ambiguity.
The default attribute priorities are set so that the Oracle user name takes precedence over the
client OS user name. Thus, in this scenario, Resource Manager assigns the session to the
OLTP_USERS consumer group.
Oracle Database 10g: Administration Workshop II 16-26
Assigning Priorities Using
DBMS RESOURCE MANAGER
DBMS_RESOURCE_MANAGER.SET_
CONSUMER_GROUP_MAPPING_PRI
(EXPLICIT => 1, — highest
SERVICE_MODULE => 2,
SERVICE_MODULE_ACTIONS =>
MODULE_NAME_ACTION => 4,
MODULE_NAME => 5,
SERVICE_NAME => 6,
ORACLE_USER =>| 9, |
CLIENT_PROGRAM => 8,
CLIENT_OS_USER =>| 7 ,|
CLIENT_MACHINE => 10); —
3,
lowest
16-27 Copyright© 2004, Oracle. All rights reserved.
Assigning Priorities Using dbms_resource_manager
Consider the following example: You now lower the ORACLE_USER priority attribute from its
default value of 7 to 9, and raise the CLIENT_OS_USER priority attribute to 7 from its default
value of 9. Now, if you log in to the client machine as bill and connect to the database as the
TP1 user, Resource Manager assigns your session to the MANAGER_GROUP consumer group
based on current session priorities, instead of the OLTP_GROUP consumer group used
previously. The modified group mapping priorities place a higher value on the client login
attribute than on the Oracle Database login attribute.
The MODULE_NAME and MODULE_NAME_ACT ION attributes are particularly useful for
middle-tier applications that use the same username for all clients but set their module and
actions consistently for different operations performed by the client end users. Different modules
and actions characterize the type of work performed by the end user, which are used by the
Resource Manager to decide the resource management policy through consumer group mappings.
Oracle Database 10g: Administration Workshop II 16-27
Using Sub-Plans to Limit CPU Utilization
16-2
|
30% @ L1
MAILDB
PLAN
100%@L1
100%
DELIVERY
Group
MYDB
PLAN
@L2
MAILSORT
Group
70% @ L1
BUGDB
PLAN
80% @ L1
100%@L3
I 1
OTHER
Groups
■ 1
20% @ L1
100%@L2
ONLINE
Group
BUG MAINT
Group
BATCH
Group
3 Copyright © 2004, Oracle. All rights reserved.
Using Sub-Plans to Limit CPU Utilization
The multiple levels of CPU resource allocation (up to eight levels) provide a means of
prioritizing CPU usage within a plan schema and also allow you to specify how all primary and
leftover resources should be used. Using a complex plan you can partition the resources for a
database at a high level among multiple applications and then repartition within an application. If
a given group within an application does not need all the resources it is assigned, then the
resource is only repartitioned within the same application.
If the MYDB resource plan were active and the CPU was experiencing a 100% demand, then the
MAILDB plan would be in effect 30% of the time (30% at level 1), whereas the BUGDB plan
would be in effect 70% of the time (70% at level 1). Each group may divide a resource at
different levels. In the above example the MYDB plan has only one level, whereas the BUGDB
plan has three levels. The levels provide a priority ranking within the plan: the needs of level 1
are met before level 2, and so on
If theMAILDBplan allocates 100% of its resources to the DELIVERY consumer group (at level
1), then users in the DELIVERY group get up to 30% (100% of 30%) of the CPU time. Similarly,
if the BUGDB plan allocates 80% of its resources to the ONLINE consumer group, users in the
ONLINE group get up to 56% (80% of 70%) of the CPU time.
It is possible for a sub-plan or consumer group to have more than one parent (owning plan), but
there cannot be any loops in a plan. For example, the OTHER consumer group has two owning
plans, MAILDB and ONLINE.
Oracle Database 10g: Administration Workshop II 16-28
Using Sub-Plans to Limit CPU Utilization (continued)
These limits are only imposed when the CPU is overloaded. If the CPU usage rate is not at 100%,
it is possible for a consumer group or subplan to use more than the specified maximum CPU
resource percentage.
For example, if there is only one user on the system and the user belongs to a resource consumer
group other than those listed in the resource plans, the user will be assigned to the OTHER
resource consumer group, yet still experience full CPU utilization. This is because excess CPU
resources are passed on to the lower levels. With only one user active within the database, the
BUGDB and MAILDB plans are not using their full CPU resources, so the excess (100% in this
example) is is made available for consumer groups at other levels.
Oracle Database 10g: Administration Workshop II 16-29
Limiting CPU
100%@L1
16-3
J30%@L1 \j
MA"Ab
^AN
1I0l|% @ L2
DELIVERY
^Group
^ 1
MAILSOrV
Group
Utilization:
MYDB
PLAN
Example
70% @ L1
00% @ L
I 1
OTHER
■Qroups
BUGDB
PLAN
80% @ L1
3
20% @ L1
100%@|_2
ONLINE
Group
BUG MAINT
Group
BATCH
Group
3 Copyright © 2004, Oracle. All rights reserved.
Limiting CPU Utilization: Example
Assume it is a holiday and mail is not being delivered today. This means there are no consumers
for the resources allocated to the MAILDB subplan. The CPU resources not being used by the
MAILDB subplan can be used instead by users associated with the BUGDB plan. Consumers can
use more resources than their maximum specified level, since there are extra resources available.
Maximum CPU Resource Allotments on a Loaded System
Group or plan
BUGDB
ONLINE
BATCH
Regular Day
70%
56%
14%
Holiday
100%
80%
20%
Oracle Database 10g: Administration Workshop II 16-30
Creating a Complex Plan
You can use Oracle Enterprise Manager to create resource plans for allocating resources among
consumer groups. The Resource Plans property sheet allows you to configure the many resource
allocations available with the Resource Manager, including specifying criteria that causes the
automatic switching of sessions to another consumer group. However, the EM interface will not
allow you to choose to cancel the SQL operation or terminate the session when the switch
condition occurs.
From the Administration page, click Resource Consumer Plans in the Resource Manager
section. Use the Resource Plan page to create or edit general information about a resource plan.
The General page lists the plan name and description along with the groups and subplans
associated with the current resource plan. You can add or remove plans and groups to this table
by clicking Modify.
To configure the Database Resource Manager, you must have the
ADMINISTER_RESOURCE_MANAGER system privilege or have been granted the DBA role.
Note: For cluster databases, the Resource Plan General page shows the instances for which the
resource plan is active. Click Edit to change the active instances for the plan.
Oracle Database 10g: Administration Workshop II 16-31
Resource Allocation Methods for
Resource Plans
Parameter
CPU_MTH
PARALLEL_DEGREE_LIMIT_MTH
ACTIVE_SESS_POOL_MTH
QUEUING_MTH
Possible Values
EMPHASIS
RATIO
PARALLEL_DEGREE_
LIMIT_ABSOLUTE
ACTIVE_SESS_POOL
_ABSOLUTE
FIFO_TIMEOUT
16-32 Copyright © 2004, Oracle. All rights reserved.
Resource Allocation Methods for Resource Plans
Resource allocation methods determine the method the Resource Manager uses when allocating
a particular resource to a resource consumer group or resource plan. You specify values for the
following resource allocation method when creating the resource plan:
• CPU_MTH
Resource allocation method for specifying how much CPU each consumer group or sub-
plan gets. There are two ways of specifying the distribution:
EMPHAS IS, the default method, is for multilevel plans that use percentages to
specify how CPU is distributed among consumer groups.
RATIO is for single-level plans that use ratios to specify how CPU is distributed.
• PARALLEL_DEGREE_LIMIT_MTH
Limits the maximum degree of parallelism of any operation. This method can only be
specified for resource consumer groups, not sub-plans. The ABSOLUTE method is the
possible value, specifying how many processes may be assigned to an operation. If there
are multiple plan directives referring to the same sub-plan or consumer group, the
minimum of all the possible values is used as the parallel degree limit for that sub-plan or
consumer group.
Oracle Database 10g: Administration Workshop II 16-32
Resource Allocation Methods for Resource Plans (continued)
• ACTIVE_SESS_POOL_MTH
Limits the number of active sessions. All other sessions are inactive and wait in a queue to
be activated. ACTIVE_SESS_POOL_ABSOLUTE is the default and only method available.
• QUEUING_MTH
Controls order in which queued inactive sessions will execute. FIFO_TIMEOUT is the
default and only method available.
Oracle Database 10g: Administration Workshop II 16-33
Comparison of emphasis and ratio
EMPHASIS
The value specifies the
maximum percentage of CPU
resources a consumer group
can use.
You can allocate resources
for up to 8 different levels.
The sum of percentages at
any given level must be less
than or equal to 100.
Default value is NULL.
RATIO
The value specifies a number that
indicates the ratio of CPU
resources to be allocated to the
consumer group.
You can only specify values for
one level.
You must use integer values, but
there is no limit on the sum of
values.
Default value is NULL.
16-34 Copyright© 2004, Oracle. All rights reserved.
Comparison of emphasis and ratio
The EMPHASIS CPU allocation method determines how much emphasis is given to sessions in
different consumer groups in a resource plan. CPU usage is assigned levels from 1 to 8, with
level 1 having the highest priority. Percentages specify how to allocate CPU to each consumer
group at each level.
The following rules apply for the EMPHASIS resource allocation method:
• CPU resources are distributed at a given level based on the specified percentages. The
percentage of CPU specified for a resource consumer group is a maximum for how much
that consumer group can use at a given level.
• Consumer resources that are not used at a given level are made available to consumer
groups at next level. For example, if the consumer groups at Level 1 use only 60% of the
available resources, the additional 40% is made available to consumer groups at Level 2.
• The sum of percentages at any given level must be less than or equal to 100.
• Any levels that have no plan directives explicitly specified have a default of 0% for all sub-
plans or consumer groups.
• The EMPHAS IS resource allocation method avoids starvation problems, where consumers
with lower priorities are not given the opportunity to run.
Oracle Database 10g: Administration Workshop II 16-34
Comparison of emphasis and ratio (continued)
The RATIO policy is a single-level CPU allocation method. Instead of percentages, you specify
numbers corresponding to the ratio of CPU you want to give to the consumer group. For example,
given three consumer groups OLTP_USERS, DSS_USERS, and BATCH_USERS, you can
specify the following ratios:
• OLTP_USERS: 4
• DSS_USERS: 3
• BATCH_USERS: 2
• OTHER: 1
This is similar to saying that OLTP users should get 40% of the resources, DSS users should get
30% of the resources, BATCH users should get 20% of the resources, and all other consumer
groups should get 10% of the available resources.
If there are no consumers in the OTHER or DSS_USERS consumer groups currently utilizing
CPU resources, then the OLTP_USERS consumer group would get two thirds of the available
resources and the BATCH_USERS consumer group would get the other third.
Oracle Database 10g: Administration Workshop II 16-35
Resource Allocation Methods for
Consumer Groups
Parameter
CPU_MTH
Possible Values
ROUND_ROBIN
RUN_TO_COMPLETION
16-36
Copyright © 2004, Oracle. All rights reserved.
Resource Allocation Methods for Consumer Groups
When you create a resource consumer group, you can specify the resource allocation method for
distributing CPU among sessions in the consumer group.
• ROUND_ROBIN
Uses a round-robin scheduler to ensure that sessions are fairly executed. This is the default
value.
• RUN_TO_COMPLETION
Specifies that sessions with the largest active time are scheduled ahead of other sessions.
Active time measures how long a session in a consumer group has been continuously
executing or waiting for I/O. It is calculated on a session basis and is determined internally.
Oracle Database 10g: Administration Workshop II 16-36
Administering the Resource Manager
• Grant privileges to administer the Resource
Manager to users
• Activate a plan for the database instance
• Switch the current group for users or sessions
with the package dbms_resource_manager or
DBMS_SESSION
Monitoring Resource Manager objects:
- Consumer groups
- Resource plans
- Resource plan directives
- Resource consumer group mappings
16-37 Copyright© 2004, Oracle. All rights reserved.
Administering the Database Resource Manager
To configure the Database Resource Manager, you must have the
ADMINISTER_RESOURCE_MANAGER system privilege or have been granted the DBA role.
DBMS_RESOURCE_MANAGER Procedures
CREATE_PLAN: Names a resource plan and specifies its allocation methods
UPDATE_PLAN: Updates a resource plan's comment
DELETE_PLAN: Deletes a resource plan and its directives
• DELETE_PLAN_CASCADE: Deletes a resource plan and all of its descendents
CREATE_CONSUMER_GROUP: Names a resource consumer group and specifies its
allocation method
• UPDATE_CONSUMER_GROUP: Updates a consumer group's comment
• DELETE_CONSUMER_GROUP: Deletes a consumer group
• CREATE_PLAN_DIRECTIVE: Specifies the resource plan directives that allocate
resources to resource consumer groups within a plan or among sub-plans in a multilevel
plan schema.
• UPDATE_PLAN_DIRECTIVE: Updates plan directives.
• DELETE_PLAN_DIRECTIVE: Deletes plan directives.
Oracle Database 10g: Administration Workshop II 16-37
Assigning Resource Manager Privileges
ORAjCUS" Enterprise Manager 10g
Database Control
Setup Preferences Help Logout
Database: orcl.us.oracle.com > Users > Edit User: JANET
Logged in As SYS
Modify System Privileges
i
Available System Privileges
ACCESS_ANY_WORKSPACE
ADMINISTER DATABASE TRIGGER
ADM METER RESOURCE MANAGER
I ADMINISTER SQL TUNING SET
ADVISOR
ALTER ANY CLUSTER
ALTER ANY DIMENSION
ALTER ANY EVALUATION CONTEXT
ALTER ANY INDEX
ALTER ANY INDEXTYPE
71
Selected System Privileges
Move
Move All
Remove
Remove
All
ADMINISTER ANY SQL TUNING SET
MANAGE SCHEDULER
SELECT ANY DICTIONARY
UNLIMITED TABLESPACE
16-38
Copyright © 2004, Oracle. All rights reserved.
Granting Privileges Needed to Administer Resources
The screenshot above shows how to grant the user JANE T the necessary privileges to manage
database resources.
The DBMS_RESOURCE_MANAGER_PRIVS . GRANT_SYSTEM_PRIVILEGE procedure is
used to grant the privilege to a user. The PRIVILEGE_NAME parameter defaults to
ADMINISTER RESOURCE MANAGER.
Oracle Database 10g: Administration Workshop II 16-38
Setting the Resource Plan for an Instance
Database: orcl.J3.oracle.com > Resource
Resource Plans
Search
To run an
u;ed in a
lesu
Plans Logged in As SVS
arne | ^Co_J
eKatrmiddi search orlo njn e.rsi" serisHii.1" search, doubln quote Hie search criteria,
double quote d se arch s+iing.
Its
r
r
r
r
r
<=■
BUGDB PLAN
INTERNAL PLAN
INTERNAL QUlESCE
MAILDB PLAN
MVDB PLAN
SYSTEM PLAN
Edit i ViewX Delete^^^H
ACTIVE
Resrouce plan for the bug i
The wildcard i'ii symbol tan slill be
( Create A
Activate ^Bf'xCu'H
Create Like ^^^^H
Deactivate ^^^^^
Generate nni 1
Default Plan
Plan to internally quiesce syslern
for mail delivery operations
Planning for running the post office database
Plan to give system sessions priority
16-39
Copyright © 2004, Oracle. All rights reserved.
Activating a Resource Plan for an Instance
You can use the Resource Plans page of Enterprise Manager to manage resource plans. To
activate a plan, select the plan you want to make active, choose Activate from the command
drop down list, and then click Go. The plan you selected is then made the current top plan for the
instance.
Using the RESOURCE_MANAGER_PLAN Initialization Parameter
The plan for an instance is defined using the RESOURCE_MANAGER_PLAN database
initialization parameter. This parameter specifies the top plan to be used for this instance. If no
plan is specified, the Resource Manager is not activated for the instance.
You can activate, deactivate, or change the current top plan by using an ALTER SYSTEM
statement. When changing the resource plan using this command, it takes effect instantly.
If the parameter is set in a parameter file, and the plan specified is not defined in the database,
then the database cannot be opened with that parameter file. The following error is returned:
ORA-07452: specified resource manager plan does not exist in
the data dictionary
If this error is encountered, the parameter must be modified to show a correct value before the
instance can be restarted.
Oracle Database 10g: Administration Workshop II 16-39
Viewing Resource Consumer Groups
SQL> SELECT
2 FROM
GRANTEE
BRUCE
DAVID
*
DBA.
_RSRC_CONSUMER_GROUP_PRIVS ;
GRANTED_GROUP
BATCH GROUP
ONLINE_GROUP
GRA
NO
YES
I
N
N
Database: orclus oracle.com > Resource Consumer Groups
Edit Resource Consumer Group1 BATCHGFiOUP
Edit Resource Consumer Group
BATCH
GROUP
Logged in
As SVS
("showSQL^ ("Revert) ("Apply)
General | Fides
Consumer Group BATCH GROUP
Description [for batch load operations
Selected Users
Remove
Select All Select None
r
r
r
r
r
r
DEFAULT CONSUMER GFiOUP
DEFAULT CONSUMEFi GFiOUF
16-40
Copyright © 2004, Oracle. All rights reserved.
Viewing Resource Consumer Groups
The query in the slide lists all resource consumer groups, and the users and roles assigned to
them. The columns shown have the following definitions:
grantee: The user or role receiving the grant
granted_group: The granted consumer group name
grant_option: Whether grant was with the GRANT option
initial_group: Whether consumer group is designated as the default for this user or
role
To view resource consumer groups and the users assigned to them using Enterprise Manager,
start with the Administration page. In the section titled Resource Manager, select Resource
Consumer Groups. Select the desired group and click View.
Oracle Database 10g: Administration Workshop II 16-40
Changing a Consumer Group
Within a Session
The user or the application can manually switch the
current consumer group.
DECLARE
old_grp VARCHAR2(32);
BEGIN
DBMS_SESSION.SWITCH_CURRENT_CONSUMER_GROUP (
new_consumer_group => 'ONLINE_GROUP',
old_consumer_group => old_grp,
initial_group_on_error => FALSE );
END;
/
16-41 Copyright© 2004, Oracle. All rights reserved.
Changing the Current Consumer Group
When logged in a session, a user can use the SWI TCH_CURRENT_CONSUMER_GROUP
procedure to switch to another resource consumer group. The new group must be one to which
the user has been specifically authorized to switch. If the caller is another procedure, then this
procedure enables users to switch to a consumer group for which the owner of that procedure has
switch privileges.
For example, an online application that wants to generate a report at the end of a user session
could execute the command shown above to enable the report to run at a different priority than
the rest of the application. The value for the old consumer group is returned to the calling
application. If necessary, the consumer group can be switched back to the user's initial group
within the application.
The third argument, if TRUE, sets the current consumer group of the invoker to the initial
consumer group in the event of an error.
If using consumer group mappings, there is an attribute named EXPLICIT with a default
priority of 1. If the EXPLICIT attribute has the highest priority, then the session always
switches consumer groups when it calls the SWITCH_CURRENT_CONSUMER_GROUP
procedure. However, if the EXPLICIT setting has the lowest priority, then the session only
switches consumer groups if none of the other session attributes match in the mappings.
Oracle Database 10g: Administration Workshop II 16-41
Changing Consumer Groups for Sessions
Can be set by DBA for a session
EXEC DBMS_RESOURCE_
FOR_
_SESS ( -
session.
session.
.MANAGER
_id => 7, -
.serial
consumer_group
=>
=>
13, -
SWITCH.
'ONLINE.
.CONSUMER.
_GROUP
>;
_GROUP_
Can be set by DBA for all sessions for a user
EXEC DBMS
FOR_
_USER
user
_RESOURCE_
( "
=>
consumer.
SCOTT
_group
.MANAGER
=>
'BUG_
SWITCH
_MAINT_
_CONSUMER_
GROUP
);
_GROUP_
16-42 Copyright© 2004, Oracle. All rights reserved.
Changing Consumer Groups
A database administrator can switch the consumer group for a session or for a user. These
changes take effect immediately. To switch the consumer group for a session, use the
SWITCH_CONSUMER_GROUP_FOR_SESS procedure and specify the SESSION_ID,
SESS ION_SERIAL number, and new CONSUMER_GROUP for the session. The user must have
been assigned the consumer group that is specified for this operation to succeed. To determine
the session ID and session serial number, query V$ SESS ION:
SQL> SELECT sid, serial#
2 FROM v$session
3 WHERE USERNAME = 'SCOTT';
SID SERIAL*
7 13
The SWITCH_CONSUMER_GROUP_FOR_USER procedure provides a convenient method for
the database administrator to switch all sessions for a given user that are to be switched into a
new consumer group. The usemame and the new consumer group are the parameters passed to
this procedure.
Note that both of these procedures will also change the consumer group of any parallel query
slave sessions associated with the coordinator's session.
Oracle Database 10g: Administration Workshop II 16-42
Database Resource Manager Information
View Name
DBA_RSRC_PLANS
DBA_RSRC_PLAN_DIRECTIVES
DBA_RSRC_CONSUMER_GROUPS
DBA_RSRC_CONSUMER_GROUP_PRIVS
DBA_USERS
DBA_RSRC_MANAGER_SYSTEM_PRIVS
Information
plans and status
plan directives
consumer groups
users/roles
column
initial_rsrc_
consumer_group
users/roles
16-43
Copyright © 2004, Oracle. All rights reserved.
Database Resource Manager Information
Several data dictionary views are available to check the resource plans, consumer groups, and
plan directives that are declared in the instance. This section discusses some useful information
that can be obtained from these views. For more detailed information about the contents of each
of these views, refer to the Oracle Database Reference manual.
Use the following query to obtain information on resource plans defined in the database:
SQL> SELECT plan, num_plan_directives, status, mandatory
2 FROM dba_rsrc_plans;
PLAN NUM PLAN DIRECTIVES STATUS MAN
SYSTEM_PLAN
INTERNAL_QUIESCE
INTERNAL_PLAN
BUGDB_PLAN
MAILDB_PLAN
MYDB PLAN
3
2
1
4
3
3
ACTIVE
ACTIVE
ACTIVE
ACTIVE
ACTIVE
ACTIVE
NO
YES
YES
NO
NO
NO
A status of ACTIVE indicates that the plan has been submitted and can be used, whereas a status
of PENDING shows that the plan has been created, but is still in the pending area.
If the mandatory column is assigned a value of YES, then the plan cannot be deleted.
Oracle Database 10g: Administration Workshop II 16-43
Resource Plan Directives
Database: orcl.us.oracle.com > Resource Flans ; Edit Resource Plan: MAILDB_PLAN
Edit Resource Plan: IvIAILDB PLAN
Logged in As SVS
(Show SQLj { Re veil J (Apply J
General Parallelism Session Pool Undo Pool Execulion Time Group Switching Idle Time
Plan MAILDB_PLAN
Description |for mail delivery operations
Activate this plan |
Selected Groups/Subplans
DELIVERY GROUP
MAILSORT GROUP
OTHER GROUPS
100
]
]
r
|i~ocT
r
r
r
|1D0
r
r
v~
r
r
r
r
r
r
(Modify]
r
r
r
r
r
r
General Parallelism Session Fool Undo Fool Execution Time Group Switching Idle Time
SQL> SELECT plan, group_or_subplan, cpu_pl, cpu_p2,
2 cpu_p3, parallel_degree_limit_pl, status
3 FROM DBA_RSRC_PLAN_DIRECTIVES;
16-44
Copyright © 2004, Oracle. All rights reserved.
Resource Plan Directives
Use Enterprise Manager or the above query to retrieve information on resource plan directives
defined in the database. The following are examples of queries and their output:
SQL> SELECT plan, group_or_subplan, cpu_pl, cpu_p2,
2 cpu_p3, parallel_degree_limit_pl, status
3 FROM DBA_RSRC_PLAN_DIRECTIVES;
PLAN
GROUP OR SUBPLA CPU PI CPU P2 CPU P3 PARALL STATUS
MYDB_PLAN
MAILDB_PLAN
BUGDB_PLAN
INTERNAL_PL
INTERNAL_QU
INTERNAL_QU
SYSTEM PLAN
BUGDB_PLAN
DELIVERY_GROUP
BATCH_GROUP
OTHER_GROUPS
OTHER_GROUPS
SYS_GROUP
LOW GROUP
20
ACTIVE
ACTIVE
ACTIVE
ACTIVE
ACTIVE
ACTIVE
ACTIVE
Oracle Database 10g: Administration Workshop II 16-44
Resource Consumer Groups and Privileges
SQL> SELECT consumer_group, status, mandatory
2 FROM DBA_RSRC_CONSUMER_GROUPS;
CONSUMER_GROUP STATUS MAN
OTHER_GROUPS
DEFAULT_CONSUMER_GROUP
SYS_GROUP
LOW_GROUP
AUTO_TASK_CONSUMER_GROUP
BATCH_GROUP
BUG_MAINT_GROUP
ONLINE_GROUP
DELIVERY_GROUP
MAILSORT_GROUP
APPLICATION_DEVELOPERS
The DBA_RSRC_MANAGER_S YS TEM_PRIVS view lists all the users and roles that have been
granted the ADMINISTER_RESOURCE_MANAGER system privilege :
SQL> SELECT *
2 FROM DBA_RSRC_MANAGER_SYSTEM_PRIVS;
GRANTEE PRIVILEGE ADM
ACTIVE
ACTIVE
ACTIVE
ACTIVE
ACTIVE
ACTIVE
ACTIVE
ACTIVE
ACTIVE
ACTIVE
ACTIVE
YES
YES
NO
NO
NO
NO
NO
NO
NO
NO
NO
DBA
SYS
WKSYS
E XP_F UL L_DATABAS E
IMP FULL DATABASE
ADMINISTER RESOURCE MANAGER YES
ADMINISTER RESOURCE MANAGER NO
ADMINISTER RESOURCE MANAGER NO
ADMINISTER RESOURCE MANAGER NO
ADMINISTER RESOURCE MANAGER NO
Initial Resource Consumer Group
The DBA_USERS view describes all users of the database and the
initial_rsrc_consumer_group used by the Resource Manager:
SQL> SELECT username, initial_rsrc_consumer_group
2 FROM DBA_USERS;
USERNAME INITIAL RSRC CONSUMER GROUP
CTXSYS
SYSMAN
XDB
WKPROXY
ORDPLUGINS
MGMT_VIEW
0LAPSYS
SCOTT
SYS
SYSTEM
OUTLN
HR
DEFAULT_CONSUMER_GROUP
DEFAULT_CONSUMER_GROUP
DEFAULT_CONSUMER_GROUP
DEFAULT_CONSUMER_GROUP
DEFAULT_CONSUMER_GROUP
DEFAULT_CONSUMER_GROUP
DEFAULT_CONSUMER_GROUP
APPLICATION_DEVELOPERS
SYS_GROUP
SYS_GROUP
DEFAULT_CONSUMER_GROUP
DEFAULT CONSUMER GROUP
Oracle Database 10g: Administration Workshop II 16-45
Monitoring the Resource Manager
16-46
Copyright © 2004, Oracle. All rights reserved.
Monitoring the Resource Manager
There are many different ways to manage and monitor the Resource Manager using the EM
Database Control Console. To view the Resource Monitors page, from the Administration page
select Resource Monitors in the section titled Resource Manager.
Use the Resource Monitors page to display a grouping of statistics and charts that depict the
current state of the active resource plan. You can view the statistics for the currently active plan,
and you can select a plan from the list and activate that plan. When you activate a plan using the
Resource Monitors page, you must exit the page and then choose Resource Monitors again to
update the page and view the statistics for the newly activated plan.
The Consumer Group Statistics table lists a series of statistics for the consumer groups that are
part of the current resource plan.
Oracle Database 10g: Administration Workshop II 16-46
Monitoring the Resource Manager
v$session: Contains the
resource_consumer_group column that
shows the current group for a session
v$rsrc_plan: A view that shows the active
resource plan
v$rsrc_consumer_group: A view that contains
statistics for all active groups
16-47 Copyright© 2004, Oracle. All rights reserved.
Monitoring the Resource Manager
CPU Utilization
There are at least three different views in the system that can provide you with information about
the CPU utilization inside the Oracle database:
• v$RSRC_CONSUMER_GROUP shows CPU utilization statistics on a per consumer group
basis, if you are running the Oracle Database Resource Manager. This view displays data
related to currently active resource consumer groups.
• V$SYSSTAT shows the Oracle database CPU usage for all sessions. The statistic "CPU
used by this session" shows the aggregate CPU used by all sessions.
V$SESSTAT shows the Oracle database CPU usage per session. You can use this view to
determine which particular session is using the most CPU.
The V$RSRC_CONSUMER_GROUP View
Here is a quick description of some of the columns in this view:
name: Name of the consumer group
active_sessions: Number of currently active sessions in this consumer group
execution_waiters: Number of active sessions waiting for a time slice
requests: Cumulative number of requests executed in this consumer group
cpu_wait_time: Cumulative amount of time that sessions waited for CPU
consumed_cpu_time: Cumulative amount of CPU time consumed by all sessions
Oracle Database 10g: Administration Workshop II 16-47
Monitoring the Resource Manager (continued)
There is no view that shows the active session pool queue directly, but you can get some
information from:
• V$SESSION: The column current_queue_duration shows how long a session has
been queued, or 0 (zero) if the session is not currently queued.
• V$RSRC_CONSUMER_GROUP: The column queue_length shows the number of
sessions currently queued per consumer group.
Oracle Database 10g: Administration Workshop II 16-48
Summary
In this lesson, you should have learned how to do the
following:
• Set up Database Resource Manager
• Assign users to Resource Manager groups
• Create resource plans within groups
16-49 Copyright© 2004, Oracle. All rights reserved.
Oracle Database 10g: Administration Workshop II 16-49
Practice 16 Overview: Using the Resource
Manager
This practice covers the following topics:
• Creating resource consumer groups
• Specifying CPU resource allocation directives for
consumer groups
• Associating users with a resource consumer
group using Adaptive Consumer Group Mapping
16-50 Copyright© 2004, Oracle. All rights reserved.
Practice 16 Overview
Note: This practice uses the Enterprise Manager Database Control Console.
Oracle Database 10g: Administration Workshop II 16-50
Practice 16: Using the Resource Manager
In this exercise, you will use Enterprise Manager Database Control Console to create resource
consumer groups and resource plans.
1. Login to the EM Database Control Console as the SYSTEM user.
2. Go to the Administration page.
3. Create the APPUSER resource consumer group using EM. Do not add any users to this
group.
4. Add the APPUSER resource consumer group to the SYS TEM_PLAN resource plan. Assign
to this group 60% of the CPU resources at level 3. Modify the LOW_GROUP group to
receive 40% of the CPU resources at level 3.
5. Configure Automatic Consumer Group Mappings as follows:
A user logged in to the database as the HR user should be assigned to the APPUSER
consumer group.
A user logged in to the database as the SCOTT user should be assigned to the
LOW_GROUP.
A user logged in at the operating system as the 'oracle' user should be assigned to the
SYS_GROUP.
If a user is logged in at the OS level as 'oracle' and at the database level as SCOTT,
the user should be placed in the LOW_GROUP.
6. Edit the HR, SCOTT, and PM users to assign them privileges for all resource consumer
groups to which they could be assigned.
- HR: APPUSER consumer group
- SCOTT: LOW_GROUP consumer group
- PM: LOW_GROUP, SYS_GROUP, and APPUSER consumer groups
7. Activate the SYSTEM_PLAN resource plan.
8. Run the script lab_l6_0 8 . sql to unlock all the accounts and set the passwords to
match the usemame.
9. Test the consumer group mappings by opening two SQL*Plus sessions. Connect as the HR
user in the first session, and connect as the SYSTEM user in the second session.
In the second session, as the SYSTEM user, query the V$SESSION data dictionary view to
determine which resource consumer group was assigned to the other session. Filter out
those sessions with a SCHEMANAME beginning with SYS%.
10. Repeat the test in Step 9 for the SCOTT and PM users. Write down your results in the
following table:
Database User
HR
SCOTT
PM
Resource Consumer Group
11. Deactivate the SYSTEM_PLAN resource plan.
Oracle Database 10g: Administration Workshop II 16-51
Automating ^Bks with tlwScheduler
ig Rks with th#S<
17
Copyright © 2004, Oracle. All rights reserved.
Objectives
After completing this lesson, you should be able to:
• Simplify management tasks by using the
Scheduler
• Create a job, program, schedule, and window
Reuse Scheduler components for similar tasks
• View information about job executions and job
instances
17-2 Copyright© 2004, Oracle. All rights reserved.
Oracle Database 10g: Administration Workshop II 17-2
17-3
Scheduling Needs
Compute table and
index statistics
twice a day
r >
Replicate table data
via materialized
view refreshes
f \
Run daily
job to backup
database
v J
f "N
Check for queued
events every
10 minutes
c
op
r n
Create month-end
report on the last
day of each month
V J
< >
Start the batch
load at 4:00 a.m.
/right© 2004, Oracle. All rights re
se
f \
Generate daily report
on invalid server
access attempts
k. J
rved.
Scheduling Needs
There are many features of the Oracle Database that need job-scheduling capabilities. Routine
database maintenance and application logic both require jobs to be scheduled and run
periodically. Business-to-business (B2B) applications require scheduling for their business
events. DBAs need to schedule regular maintenance jobs in specified time windows.
Oracle Database lOg provides advanced scheduling capabilities through the database Scheduler,
a collection of functions and procedures in the dbms_scheduler package. The Scheduler offers
far more functionality than the dbms_job package, which was the previous Oracle Database job
scheduler.
The Scheduler enables database administrators and application developers to control when and
where various tasks take place in the database environment. These tasks can be time consuming
and complicated, so using the Scheduler can help you to manage and plan these tasks.
Oracle Database "\0g\ Administration Workshop II 17-3
Scheduler Concepts
The Scheduler offers a modularized approach for managing tasks within the Oracle Database. By
breaking down a task into its components such as time, location, and database object, the
Scheduler offers you an easier way to manage your database environment. The Scheduler uses
three basic components:
• A job specifies what needs to executed and when. For example, the "what" could be a
PL/SQL procedure, a native binary executable, a Java application, or a shell script. You can
specify the program (what) and schedule (when) as part of the job definition, or you can
use an existing program or schedule instead. You can use arguments for a job to customize
its run-time behavior.
• A schedule specifies when and how many times a job is executed. You can store the
schedule for a job separately and then use the same schedule for multiple jobs.
• A program is a collection of metadata about a particular executable, script, or procedure.
An automated job executes some task. Using a program allows you to modify the job task,
or the "what", without modifying the job itself. You can define arguments for a program,
allowing users to modify the runtime behavior of the task.
Each Scheduler component resides in a database schema. Scheduler components follow the
naming rules for database relational objects, so the names must be unique in the SQL namespace.
Oracle Database 10g: Administration Workshop II 17-4
Scheduler Concepts (continued)
The Scheduler also has the following concepts that allow database administrators to control more
advanced aspects of scheduling, such as prioritizing jobs. These are used when you want to
ensure that limited resources are allocated appropriately among currently running jobs, thus
aligning job processing with your business needs:
• A job class defines a category of jobs that share common resource usage requirements and
other characteristics. At any given time, each job can belong to only a single job class. A
job class is a way of grouping jobs into larger entities.
• A resource consumer can be associated with a job class, or job classes, which allow
classification of a set of user sessions with common resource processing requirements. At
any given time, a user session or job class belongs to only one resource consumer group.
The resource consumer group associated with the job class determines the resources that
are allocated to the jobs in the job class. This provides the following functionality:
Provides a method for prioritizing jobs.
Gives you a method for setting job characteristics or behavior that must be the same
for a group of jobs, such as how long to retain the job history information.
• A resource plan enables users to prioritize resources (most notably CPU) among resource
consumer groups.
• A window is represented by an interval of time with a well-defined beginning and end,
such as "from 12a.m. to 6a.m." and is used to activate different resource plans at different
times. This means you can change resource allocation during a time period such as time of
day or time of the sales year. You can use a saved schedule to specify the interval of time
for a window.
• A window group represents a list of windows, and allows for easier management of
windows. You can use a window or window group as the schedule for a job to ensure that
the job runs only when a window and its associated resource plan are active. For example
the night window and the weekend window can be combined into the downtime
window group.
When a job is created, information about the job is placed in a job table in the data dictionary.
The Scheduler uses one job table for each database and one job coordinator for each instance.
The job coordinator is a background process (c j qNNN) that is automatically started when jobs
must be run, or windows must be opened. It goes to sleep automatically after a sustained period
of Scheduler inactivity.
When it is time for a job to be executed, the job coordinator notifies an available job slave
process, which then executes the job. You do not need to configure when the job coordinator
checks the job table; the system chooses the time frame automatically.
Oracle Database 10g: Administration Workshop II 17-5
Privileges for Scheduler Components
System and object privileges scheduler_admin role
CREATE [ANY] JOB
EXECUTE ANY PROGRAM
EXECUTE ANY CLASS
MANAGE SCHEDULER
EXECUTE ON
<program or class>
ALTER ON <job,
program, or schedule>
ALL ON <job, program,
schedule, or class>
17-6 Copyright© 2004, Oracle. All rights reserved.
Privileges for Scheduler Components
All privileges are granted using the regular SQL grant and revoke syntax.
Creation Privileges
To create a job, schedule, or program in your own schema, you must first be granted the create
job privilege. To be able to create windows, classes, or window groups, you must first be
granted the manage scheduler system privilege.
Usage Privileges
To grant another user the ability to use one of your Scheduler components, grant that user
execute on the Scheduler component. You can optionally specify the with grant option when
granting object privileges.
For example, to grant scon the right to use your calc_siais2 program in his or her job, you
would do the following:
GRANT EXECUTE ON CALC_STATS2 TO SCOTT;
To grant a user the ability to use any program in that user's jobs, grant the following system
privilege to the user:
EXECUTE ANY PROGRAM
CREATE JOB
CREATE ANY JOB
EXECUTE ANY PROGRAM
EXECUTE ANY CLASS
MANAGE SCHEDULER
Oracle Database 10g: Administration Workshop II 17-6
Privileges for Scheduler Components (continued)
Usage Privileges (continued)
To allow another user to modify your Scheduler components, grant that user the alter privilege
on the object. Granting alter on ajob allows a user to alter all attributes of that job except for
the following:
• It does not allow the user to modify the job's program attributes (pr ogram_name,
program_type, program_action, number_of_arguments).
• It does not allow the user to change the job's schedule to a PL/SQL date function.
Jobs, programs, and schedules are created in the schema of the current user. Job classes,
windows, and window groups are created in the SYS schema. When creating ajob, you do not
need any extra privileges to specify a schedule, a window, or window group for a job, other than
the create job privilege, but you do need to fully qualify the name of those components that
reside in the SYS schema. For example, to create a job that uses the window
appl_user_window for its schedule and the program update_report_TABS:
• You need the create job privilege.
• If the program does not reside in your schema, you need the execute privilege on the
update_report_TABS program or the execute any program system privilege.
• You have to fully qualify the window name:
schedule => 'SYS.APPL_USER_WINDOW
If you create ajob and want to assign it to a specific job class, you must have the execute
privilege for the desired job class or the execute any class system privilege.
Note: If you grant users the execute any class privilege, then it is possible for these users to
submit ajob under ajob class with higher privileges than they should. Use caution when
granting this system privilege.
Administrative Privileges
To properly manage Scheduler resources, a highly privileged user must be able to:
• Create, drop, and alter job classes, windows, and window groups
• Stop anyjob, possibly using the force option
• Start and stop windows prematurely
To grant all the necessary privileges to a user, you can simply grant the system privilege manage
scheduler. This privilege allows a user to perform all of the above Scheduler administration
tasks.
Also, although you can create a job class after you have been granted the manage scheduler
privilege, you still cannot create ajob in that job class unless you have execute privilege on the
job class.
The scheduler_admin role has been granted all the system privileges discussed previously
with the with admin option clause. This role is part of the DBA role by default.
Oracle Database 10g: Administration Workshop II 17-7
Creating a Scheduler Job
There are many ways to create a job:
• Specifying the components in-line as part of the
create_job procedure
• Specifying the task directly and using a saved
schedule
• Calling a saved program and a saved schedule
• Calling a saved program and specifying the
schedule directly
17-8 Copyright© 2004, Oracle. All rights reserved.
Oracle Database 10g: Administration Workshop II 17-8
Creating a Scheduler Job: Example
Create a job that calls a backup script every night at
23:00 (starting tonight).
BEGIN
DBMS_SCHEDULER.CREATE_JOB(
job_name=>'HR.DO_BACKUP' ,
job_type => 'EXECUTABLE',
job_action =>'/home/usr/dba/rman/nightly_incr. sh' ,
start_date=>TRUNC(SYSDATE)+23/24,
repeat_interval=>'TRUNC(SYSDATE+1)+23/24',
/* next night at 11:00 PM */
comments => 'Nightly incremental backups');
END;
/
17-9 Copyright© 2004, Oracle. All rights reserved.
Creating a Scheduler Job: Example
Use the create_job procedure of the dbms_scheduler package to create a job. Jobs are
created as disabled by default; they become active and scheduled only when they are explicitly
enabled. All job names are of the form [schema. ] name.
By the default, a job is created in the current schema. You can create a job in another schema by
specifying the name of the schema, as shown in the example above. The creator of a job is,
therefore, not necessarily the job owner. The job owner is the user in whose schema the job is
created, while the job creator is the user who created the job. Jobs are executed with the
privileges of the job owner. The National Language Support (NLS) environment of the job when
it runs is that which was present at the time the job was created.
The j ob_type parameter indicates the type of task to be performed by the job. The possible
values are:
plsql_block: An anonymous PL/SQL block.
stored_procedure: A named PL/SQL, Java, or external procedure.
executable: A command that can be executed from the command line.
The job_action parameter is either the name of the procedure to run, the name of a script or
operating system command, or an anonymous PL/SQL code block, depending on the value of the
job_type parameter.
Oracle Database 10g: Administration Workshop II 17-9
17-10
Setting the Repeat Interval for a Job
• Using a calendaring expression:
repeat_interval=> 'FREQ=HOURLY; INTERVAL=4'
repeat_interval=> 'FREQ=DAILY'
repeat_interval=> 'FREQ=MINUTELY; INTERVAL=15'
repeat_interval=> 'FREQ=YEARLY;
BYMONTH=MAR, JUN, SEP , DEC;
BYMONTHDAY=15'
• Using a datetime expression:
repeat_interval=> 'SYSDATE + 36/24'
repeat_interval=> 'SYSDATE + 1'
repeat_interval=> 'SYSDATE + 15/(24*60)'
Copyright © 2004, Oracle. All rights reserved.
Setting the Repeat Interval for a Job
When scheduling repeat intervals for a job, you can specify either a calendaring expression or a
datetime expression such as those shown in the slide. A datetime expression yields a value of one
of the datetime datatypes, such as date or timestamp with time zone.
In the examples above:
• freq=hourly; interval=4 indicates a repeat interval of every four hours
• freq=daily indicates a repeat interval of every day, at the same time as the start date of
the schedule
• freq=minutely; interval=15 indicates a repeat interval of every 15 minutes
• FREQ=YEARLY;BYMONTH=MAR, JUN, SEP, DEC ; BYMONTHDAY = 15 indicates a repeat
interval of every year on March 15, June 15, September 15, and December 15
When using a calendaring expression, the next start time for a job is calculated using the repeat
interval and the start date of the job. When using datetime expressions, the specified expression
determines the next time the job should run. If no repeat interval is specified, the job runs only
once on the specified start date.
Oracle Database 10g: Administration Workshop II 17-10
Calendaring Expressions
YEARLY
MONTHLY
WEEKLY
DAILY
HOURLY
MINUTELY
SECONDLY
INTERVAL
(1-999)
BYMONTH
BYWEEKNO
BYYEARDAY
BYMONTHDAY
BYDAY
BYHOUR
BYMINUTE
BYSECOND
Frequency Interval Specifiers
17-11 Copyright© 2004, Oracle. All rights reserved.
Calendaring Expressions
The primary method for setting how often a job repeats is by setting the repeat_interval
attribute with the Oracle calendaring expression. A calendaring expression has three main parts:
• Frequency (specifying a frequency is mandatory)
• Repeat interval
• Specifiers (which provide detailed information about when the job should be run)
If you want to create a job that runs every two weeks, every five minutes, or every second, you
use a combination of the frequency and interval. For example:
• Every two weeks: freq=weekly; interval=2
• Every five minutes: freq=minutely; interval=5
• Eveiy second: freq=secondly
If you need to specify more complex repeat intervals, such as the 15th day of the month, every
fourth week on Monday, or 6:23 a.m. every Tuesday, then use the BY* clauses to provide this
additional information. For example:
• 15th day of each month: freq=monthly; bymonthday=15
• Eveiy fourth week on Monday: freq=yearly; byweekno=4, 8,12,16, 20, 24,
28,32,36,40,44,48,52; BYDAY=MON
• 6:23 a.m. eveiy Tuesday: freq=weekly; byday=tue; byhour=6; byminute=2 3
Oracle Database 10g: Administration Workshop II 17-11
Using Scheduler Programs
BEGIN
DBMS_SCHEDULER.CREATE_PROGRAM(
program_name => 'CALC_STATS2',
program_action => 'HR.UPDATE_SCHEMA_STATS',
program_type => 'STORED_PROCEDURE',
enabled => TRUE);
DBMS_SCHEDULER.CREATE_JOB(
job name=>'HR.GET STATS2' ,
program_name=>'HR.CALC_STATS2',
start_date=>'20-DEC-04 07.00.00 AM Greenwich',
repeat_interval=> 'FREQ=HOURLY;INTERVAL=2',
end_date => '20-DEC-05 07.00.00 AM Greenwich',
comments => 'Explicitly scheduled job');
END;
/
17-12 Copyright© 2004, Oracle. All rights reserved.
Using Scheduler Programs
If you have a procedure called update_schema_stats that collects the statistics for a schema ,
you can create a program to call this procedure, as shown in the slide.
The sample code shown on the slide creates ajob that runs the calc_siais2 program every
two hours for one year, starting on December 20, 2004, at 7:00 a.m.
To create a job that uses a program in another schema, the user creating the job must first have
the privilege to access the program.
Oracle Database 10g: Administration Workshop II 17-12
Creating a Program Using EM
Schftdular
,h i:;
Sciec-ile^
FriflraiTi
,h -i i;li.
V;idcv?
e Manager10g
Database' orcl us.oracle.com > Scheduler Programs =■ Create Program
Create Program
* Name
Schema HR
Enabled O Yes ©Wo
Description I
Type |PLSQL_BLOCI< "fl
* Source
17-13
Copyright © 2004, Oracle. All rights reserved.
Creating a Program Using EM
From the Administration page, select Programs from the Scheduler region. In the Scheduler
Programs page, click Create to create a new program. Or, you can select a program from the list
and choose Create Like to clone the program. After you click Create, the Create Program page
shown above is displayed.
Oracle Database 10g: Administration Workshop II 17-13
Specifying Schedules for a Job
Repeating\ i
Start
time
End time
or limit
Example schedules:
• Wednesday, December 26, 2002, at 2:00 p.m.
Every fourth Thursday
• Every Monday at 8:00 a.m., starting on January 29,
2004, and ending on March 31, 2004
17-14
Copyright © 2004, Oracle. All rights reserved.
Specifying Schedules for a Job
The start and end times for a schedule are specified using the TIMESTAMP WITH TIME ZONE
data type. A schedule is only precise to a second. Although the TIMESTAMP WITH TIME ZONE
data type is more accurate, the Scheduler rounds off anything with a higher precision to the
nearest second. You can use the CREATE_SCHEDULE procedure of DBMS_SCHEDULER
package to save the schedule as a schema object. This allows the same schedule to be used by
multiple jobs or windows.
The repeat_interval for a schedule must be created using a calendaring expression. You
cannot use datetime expressions to indicate the repeat interval for a saved schedule.
The end_date for a saved schedule is the date after which the schedule is no longer valid.
The Scheduler fully supports all NLS functionality provided by the database. For example, you
canuseallNLS_TIMESTAMP_TZ_FORMAT settings, as well as TIMESTAMP WITH TIME
ZONE data types. As a result, the following time specifications are all valid:
1:00:00 p.m.
13:00:00 hrs
2003-04-15 8:00:00 US/Pacific
2
:-0l-3l
:26:50.12
Oracle Database 10g: Administration Workshop II 17-14
Creating and Using Schedules
BEGIN
DBMS_SCHEDULER.CREATE_SCHEDULE(
schedule_name => 'stats_schedule',
start_date => SYSTIMESTAMP,
end_date => SYSTIMESTAMP + 30,
repeat_interval => 'FREQ=HOURLY;INTERVAL=4',
comments => 'Every 4 hours');
DBMS_SCHEDULER.CREATE_JOB(
job_name => 'HR.GET_STATS',
program_name => 'HR.CALC_STATS2',
schedule_name => 'STATS_SCHEDULE');
END;
/
17-15 Copyright© 2004, Oracle. All rights reserved.
Creating and Using Schedules
Using a schedule (instead of specifying the execution times for a job within the job definition)
allows you to manage the scheduled execution of multiple jobs without having to update
multiple job definitions. If a schedule is modified, then each job that uses that schedule
automatically uses the new schedule.
Use the CREATE_SCHEDULE procedure in the DBMS_SCHEDULER PL/SQL package to create
a schedule.
The start_date represents the date on which the schedule becomes active. The schedule
cannot refer to any dates before this date. The schedule is not valid after the end_date.
You can schedule repeated executions by supplying a calendaring expression for
repeat_interval.This calendaring expression is used to generate the next date of the
schedule. Dates falling after the end_date time are not included in the schedule.
In the example shown above, a schedule named STATS_SCHEDULE is created, specifying a
repeat interval of every four hours, starting now, and continuing for 30 days. The schedule is
then used when creating the GET_STATS job, to determine when the job executes.
Oracle Database 10g: Administration Workshop II 17-15
Using EM to Create Schedules
17-16
Copyright © 2004, Oracle. All rights reserved.
Using EM to Create Schedules
From the Administration page, select Schedules from the Scheduler region. In the Scheduler
Schedules page, click Create to open the Create Schedule page.
At the bottom of the Create Schedule page is an easy-to-use interface for specifying calendaring
expressions.
Oracle Database 10g: Administration Workshop II 17-16
Advanced Scheduler Concepts
Resource
Consumer Group
Resource
plan
Window
group
Job class
Window
Program
Job
Schedule
^rgument^ ^rgument^
17-17
Copyright © 2004, Oracle. All rights reserved.
Advanced Scheduler Concepts
The advanced scheduler concepts allow you more advanced control of aspects of scheduling,
such as prioritizing jobs. The components are summarized below, and are discussed in detail in
the following section.
• A job class defines a category of jobs that share common resource usage requirements and
other characteristics. A job class groups jobs into larger entities.
• A resource consumer associated with the job class determines the resources that are
allocated to the jobs in the job class.
• A resource plan enables users to prioritize resources (most notably CPU) among resource
consumer groups.
• A window is represented by an interval of time with a well-defined beginning and end, and
is used to activate different resource plans at different times. This allows you to change
resource allocation during a time period such as time of day or time of the sales year.
• A window group represents a list of windows, and allows for easier management of
windows. You can use a window or window group as the schedule for a job to ensure that
the job runs only when a window and its associated resource plan are active.
Oracle Database 10g: Administration Workshop II 17-17
Creating a Job Class
ORACLC Enterprise Manager 10c;
Database Control
Help Logout
Database: Qrcl.us.Qracle.com > Scheduler Job Classes =■ Create Job Clasd_ogged in As HR
Create Job Class
* Name |ADMIN_JOB5
Description |
Logging Level | Log everything (FULL) J
Log Retention Period (Days)
Resource Consumer Group |DAYTIME_JQBS
Service Name I
J
17-18
Copyright © 2004, Oracle. All rights reserved.
Creating a Job Class Using Enterprise Manager
From the Administration page, select Job Classes from the Scheduler region. In the Scheduler
Job Classes page you can create or edit a job class. On the Edit Job Class or Create Job Class
page you must enter the Name of the job class. You can also enter the Resource Consumer
Group with which this job class is associated. You can locate an available resource consumer
group using the search function.
You can also assign the Logging Level for the job class by choosing to log everything, nothing,
or to log only job runs (default). You can also set the Log Retention Period by entering in the
number of days to retain the logs.
The service that a job class belongs to specifies that thejobs in this class will have affinity to the
particular service specified. In an Oracle Real Application Clusters (RAC) environment, this
means that the jobs in this class will only run on those database instances that are assigned to the
specific service. To balance the load on your system and for better performance, you can specify
the Service Name of the service where you want a job to run.
If no service is specified, the job class will have no service affinity and any one of the database
instances within the cluster might run the job. You can only specify service affinity for a job
class, not for individual jobs.
If a value is specified for the resource_consumer_group parameter, you cannot specify a
service (it must be NULL). Also, if a service is specified, resource_consumer_group must
be NULL.
Oracle Database 10g: Administration Workshop II 17-18
Xffesourc^
I Consumer
\Group^
17-19
Creating a Job Class
^ (Service ] /LogglngS /Log ^
j ^ervice i I Leve| J V History/
1
Job Class
EXECUTE DBMS_SCHEDULER.CREATE_JOB_CLASS( -
job_class_name => 'ADMIN_JOBS', -
resource_consumer_group => 'DAYTIME_JOBS', -
logging_level => DBMS_SCHEDULER.LOGGING_OFF);
Copyright © 2004, Oracle. All rights reserved.
Creating a Job Class
You can also use the CREATE_JOB_CLASS procedure of the DBMS_SCHEDULER package to
create a job class. A class always belongs to the SYS schema. Creating a class requires the
MANAGE SCHEDULER privilege.
Once a job class has been created, you can specify jobs as members of this job class when you
create the jobs, or after the jobs are created by using the SET_ATTRIBUTE procedure. It is not
practical to manage resource allocation at an individual job level; therefore, the Scheduler uses
the concept of job classes to manage resource allocation among jobs. You configure resource
allocation by mapping a job class to a consumer group. The consumer group that a job class
maps to can be specified when creating a job class or at a later time with the SET_ATTRIBUTE
procedure of DBMS_SCHEDULER.
There is a default job class named DEFAULT_JOB_CLASS that is created with the database. If
a job is not associated with a job class, then the job belongs to this default job class. The
DEFAULT_JOB_CLASS job class is associated with the DEFAULT_CONSUMER_GROUP
resource consumer group.
If a resource consumer group is not specified when a job class is created, the job class maps to
the DEFAULT_CONSUMER_GROUP resource consumer group. Jobs in the default job class or in
a job class associated with the default resource consumer group might not be allocated enough
resources to complete their tasks when the Resource Manager is enabled.
Oracle Database 10g: Administration Workshop II 17-19
Job Logging
• By default, all job runs are logged.
• The amount of information logged can be
controlled at the job class level.
EXECUTE DBMS_SCHEDULER
job_class_name
CREATE_JOB
=> 'ADMIN_JOBS',
_CLASS ( -
-
resource_consumer_group => 'DAYTIME_JOBS', -
logging_level =
log_history =>
=> DBMS.
30);
.SCHEDULER.
LOGGING_RUNS, -
17-20 Copyright© 2004, Oracle. All rights reserved.
Job Logging
By default, all job runs are logged. However, when creating a new class, you can specify
parameters that further control what information is logged and how long the logging information
is retained. The logging_level parameter for a class can be set to one of the following
constant values of the DBMS_SCHEDULER package:
• LOGGING_OFF: No logging is performed for any jobs in this class.
• LOGGING_RUNS: The scheduler writes detailed information to the job log for each run of
each job in this class.
• LOGGING_FULL: Besides recording every run in the job log, the scheduler also logs all
other operations performed on all jobs in this class, such as creating new jobs, enabling or
disabling jobs, and so on.
The DBA_SCHEDULER_JOB_LOG view stores a row for each job operation logged.
The 1 og_hi s t ory parameter specifies how many days a log entry remains in the log before it
is eligible for purging.
A PURGE_LOG job is created automatically. This job clears out old log entries once a day. Log
entries may also be cleared out manually by using the DBMS_SCHEDULER. PURGE_LOG
procedure.
Oracle Database 10g: Administration Workshop II 17-20
Creating a Window
Create a window for the month of December that uses
the end_of_year resource plan and is active every
night from 6:00 p.m. to 6:00 a.m. Eastern Standard
Time (EST).
BEGIN
DBMS_SCHEDULER.CREATE_WINDOW(
window_name => 'DEC_NIGHTS',
resource_plan => 'END_OF_YEAR',
start_date => '01-DEC-04 06.00.00 PM EST',
repeat_interval => 'FREQ=DAILY; BYHOUR=18',
duration => '0 12:00:00',
end_date => '31-DEC-04 06.00.00 AM EST',
comments => 'Every day at 6:00 PM');
END;
/
17-21 Copyright© 2004, Oracle. All rights reserved.
Creating a Window
The priority of jobs change over a period of time. For example, it might be critical for the data
warehouse loading jobs to run in the night and you want to allocate a high percentage of the
database resources to these jobs, but during the day the application jobs are more important and
should get a higher percentage of the resources. To accomplish this you need to change the
resource plan based on a schedule. The window concept enables you to do this.
The purpose of a window is to switch the resource plan that is active for a specific time period.
The window is represented by an interval of time, such as "every day, from 8:00 a.m. to 6:00
p.m." The recurring time window is specified as a schedule specifying a pattern of start dates and
a duration (in minutes).
A system-wide resource plan can be associated with a window to manage the overall resource
usage for jobs and sessions that run within the window.
To create a window you must have the MANAGE SCHEDULER system privilege. Windows are
created in the SYS schema.
Oracle Database 10g: Administration Workshop II 17-21
Creating a Window (continued)
A window is open if it is in effect. Only one window can be in effect at any given time. In the
example shown on the slide:
• The window opens (becomes active) at 6:00 p.m. on December 1, 2004.
• The duration argument specifies how long the window should remain open. In the
example above, the duration is a specified as an INTERVAL DAY TO SECOND datatype.
The value '0 12:00:00' represents 0 days, 12 hours, 0 minutes and 0 seconds. This means
the window closes at 6:00 a.m. on December 2, 2004.
• The next time the window opens is calculated using the value for REPEAT_INTERVAL,
which evaluates to 6:00 p.m. on December 2, 2004.
• At 6:00 a.m. on December 31, 2004 the window closes and is disabled. It does not open
again after that point.
While the DEC_NIGHTS window is open, the resources allocated to the jobs are determined by
the guidelines specified in the END_OF_YEAR resource plan. There is no priority specified for
this window (window_priority argument), so it defaults to LOW_PRIORITY.
Note: Window priority is only relevant when multiple windows overlap. This is discussed later
in this lesson.
Oracle Database "\0g\ Administration Workshop II 17-22
Prioritizing Jobs Within a Window
( "N
|Job1 | | Job2 |
I APPL_JOBS
f
| Job4 | | Job5
ADMIN_JOBS
Davtime W
J
in
do\
f
V
Job3
OTHER
j
Job
Job1
Job2
Job3
Job4
Job5
Priority
1
5
3
4
2
17-23
Copyright © 2004, Oracle. All rights reserved.
Prioritizing Jobs Within a Window
Job classes are used to categorize jobs. The job class maps to a resource consumer group. The
active resource plan for the database determines the resources allocated to each resource
consumer group, and thus to each job class.
When creating multiple jobs in a database, you need a way to align the job processing with your
business requirements and specify which jobs have the highest priority. For a particular window,
you may have several classes of jobs running, each with its own priority.
There are two levels at which jobs can be prioritized: At the class level and at the job level.
• The first prioritization is at the class level using resource plans. Prioritization among jobs
of different classes is done purely on a class resource allocation basis.
• The second prioritization is within the class using the job priority attribute of the job.
Prioritization levels are only relevant when two jobs within the same class are supposed to start
at the same time. The job with the higher priority starts first.
Prioritization is not guaranteed for jobs in different job classes. For example, a high priority job
in the APPL_JOBS job class might not get started before a low priority job in the ADMIN_JOBS
job class, even if they share the same schedule. If the APPL_JOBS job class has a lower level of
resource available, then the high priority job in that class has to wait for resources to become
available, even if there are resources available to lower priority jobs in a different job class.
Oracle Database 10g: Administration Workshop II 17-23
Prioritizing Jobs Within a Window (continued)
You specify job priorities by using the SET_ATTRIBUTE procedure. Job priorities must be in
the range 1 to 5 with 1 being the highest priority. For example, the following statement changes
the job priority for JOB3 to a setting of 2:
BEGIN
DBMS_SCHEDULER.SET_ATTRIBUTE (
name => 'job3',
attribute => 'job_priority',
value => 2) ;
END;
/
If no job priority is specified for a job, the default priority of 3 is assigned to it.
To display the current priorities for all jobs in the database, use the following query:
SELECT job_name, job_priority
FROM DBA_SCHEDULER_JOBS;
Oracle Database 10g: Administration Workshop II 17-24
Enabling and Disabling Scheduler
Components
Enable the calc_stats2 program:
EXEC DBMS_SCHEDULER.ENABLE('HR.CALC_STATS2');
Disable the get_stats job:
EXEC DBMS_SCHEDULER.DISABLE('HR.GET_STATS');
Database: orcl.us.oracle.coin > Scheduler Programs > Logged in As HR
Edit Program: HR.CALC_STATS2
Name CALC_STATS2
Schema HR
Enabled 0 Yes O No
17-25
Copyright © 2004, Oracle. All rights reserved.
Enabling and Disabling Scheduler Components
Call the ENABLE procedure to enable a Scheduler component, such as a program, job, or
window.
Use the DISABLE procedure to disable a Scheduler component, such as a program, job, window,
or window group.
You can also use Enterprise Manager to perform administrative actions for jobs, programs,
windows, and window groups.
Oracle Database 10g: Administration Workshop II 17-25
17-26
Managing Jobs
• Run a job:
DBMS_SCHEDULER.RUN_JOB( ' HR.JOBl');
• Stop a job:
DBMS_SCHEDULER.STOP_JOB('HR.JOB2');
Drop a job, even if it is currently running:
DBMS_SCHEDULER.DROP_JOB('HR.JOBl,HR.JOB2,
SYS.JOBCLASS1');
Copyright © 2004, Oracle. All rights reserved.
Managing Jobs
Once a job has been created, you can use the RUN_JOB procedure to run the job immediately in
your current session. The job runs within your user session instead of being picked up by the job
coordinator and executed by a job slave. If a job is running currently, you can use the stop_job
procedure to stop the job immediately. This procedure has two arguments:
job_name: Name of the job to be stopped
force: Determines the method by which a job is stopped. If set to FALSE (default value),
the Scheduler tries to terminate the job without signaling an error. If this fails, you have to
set force to TRUE to terminate the job. To use force, you must have the MANAGE
SCHEDULER system privilege.
Use the DROP_JOB procedure to drop a job. This procedure has two arguments:
job_name: Name of the job to be dropped
force: Whether the job should be stopped and dropped if it is currently running (default
value is FALSE)
If the DROP_JOB procedure is called and the job that is specified is currently running, the
command fails unless the force option is set to TRUE. If the force option is set to TRUE, any
instance of the job that is running is stopped and the job is dropped. If you specify a job class in
place of a job name in the DROP_JOB procedure, then the jobs in that job class are dropped but
not the job class itself.
Oracle Database 10g: Administration Workshop II 17-26
17-27
Managing Programs
• Enabling a program:
EXECUTE DBMS_SCHEDULER.ENABLE( -
'HR.PROGl,HR.PROG2');
• Disabling a program:
EXECUTE DBMS_SCHEDULER.DISABLE( -
'HR.PROGl,HR.PROG2');
• Dropping a program:
EXECUTE DBMS_SCHEDULER.DROP_PROGRAM( -
program_name => 'HR.PROGl', -
force => FALSE );
Copyright © 2004, Oracle. All rights reserved.
Managing Programs
Use the ENABLE or DISABLE procedure of DBMS_SCHEDULER to enable or disable a
Scheduler component. The ENABLE procedure cannot be used for job classes or schedules.
The DROP_PROGRAM procedure drops a program. The DROP_PROGRAM procedure takes two
arguments: program_name and force. If force is set to TRUE, all jobs referencing this
program are disabled before dropping the program. If the parameter force is set to the value
FALSE (default value), the program must not be referenced by any job if it is to be dropped
successfully.
When running the DROP_PROGRAM example shown above, if the HR. PROGl program is
referenced in another job, then an error is raised and the program is not dropped. If the
DROP_PROGRAM procedure is executed a second time (this time with force set to TRUE), the
HR. PROGl program is dropped and any jobs that reference it are disabled.
Oracle Database 10g: Administration Workshop II 17-27
17-28
Managing Programs with EM
Copyright © 2004, Oracle. All rights reserved.
Managing Programs with EM
You can also use Enterprise Manager to manage and remove programs.
Oracle Database 10g: Administration Workshop II 17-28
Managing Schedules
• CREATE_SCHEDULE
set_attribute (to alter a schedule)
• DROP SCHEDULE
EXEC DBMS_
name =>
attribut
value =>
SCHEDULER
'HR.STATS_
. SET_
.ATTRIBUTE( -
.SCHEDULE
e => 'START_DATE',
'01-JAN-2004
9:00
r
-
00
US/Pacific');
EXEC DBMS_SCHEDULER.DROP_SCHEDULE( -
schedule_name => 'HR.STATS_SCHEDULE');
17-29 Copyright© 2004, Oracle. All rights reserved.
Managing Schedules
You can alter the attributes of a saved schedule with the SET_ATTRIBUTE procedure.
You can also drop an existing schedule using the DROP_SCHEDULE procedure. If you do not
own the schedule, you must have the ALTER privilege on the schedule or the CREATE ANY
JOB system privilege.
You can also drop several schedules in one call by providing a comma-delimited list of schedule
names to the drop_schedule procedure call. For example:
BEGIN
DBMS_SCHEDULER.DROP_SCHEDULE(
'schedulel,schedule2,schedule3');
END;
/
If there are jobs or windows that use this schedule, the DROP_SCHEDULE call fails unless you
set force to TRUE. If you set force to TRUE, the jobs and windows that use this schedule are
disabled before the schedule is dropped.
Oracle Database "\0g\ Administration Workshop II 17-29
17-30
Managing Windows
DBMS_SCHEDULER.OPEN_WINDOW(
window_name =>'DEC_NIGHTS',
duration => '1 0:00:00');
DBMS_SCHEDULER.CLOSE_WINDOW('DEC_NIGHTS');
DBMS_SCHEDULER.DISABLE(
name => 'SYS.DEC_NIGHTS', force=>TRUE);
DBMS_SCHEDULER.DROP_WINDOW(
window_name =>'DEC_NIGHTS, DEC_DAYS',
force => TRUE);
Copyright © 2004, Oracle. All rights reserved.
Managing Windows
Only one window can be open at any given time. When the start time specified for a window is
reached, the window opens automatically.
If you wish to open a window prematurely, you can use the OPEN_WINDOW procedure. Opening
a window closes any other window that is open, even if the window being closed has a higher
priority, but only if the force attribute is set to TRUE. The window is opened immediately and
stays in effect for the number of minutes specified for the duration parameter. The next open
time of the window as specified by its interval is not altered when a window is opened manually.
The window automatically opens again at its next regularly scheduled interval.
You can open a window that is already open. If an open window is opened again, then the
duration of the window is extended by the specified duration. For example, suppose that the
DEC_NIGHTS window was started normally on December 1 with a duration of 30 days. If the
window is opened again on December 20 and a new duration is not specified, then the
DEC_NIGHTS window is open for another 30 days beyond December 20. If you specify a
duration of 30 minutes when you reopen the window, it closes in 30 minutes.
Oracle Database 10g: Administration Workshop II 17-30
Managing Windows (continued)
To close a window prematurely, use the CLOSE_WINDOW procedure. Running jobs are not
stopped when a window closes, unless the jobs were created with the attribute
stop_on_window_close set to TRUE. Because the resource plan that is in effect changes
when the window closes, the resources allocated to the running jobs may change.
By default, a window can only be disabled if it is not referenced by any job or if it is closed. To
disable an open window, you have to specify force = TRUE when calling the DISABLE
procedure. Setting force to TRUE means the open window does not open in the future but the
current session is not affected.
The DROP_WINDOW procedure drops a window. You can also drop several windows in one call
by providing a comma-delimited list of window names or window group names to the
DROP_WINDOW procedure. Dropping a window disables all jobs that use the window as a
schedule if you set force to TRUE. If a job is currently running and has a window as its
schedule, it continues to run and is disabled upon job completion unless
stop_on_window_close is set to TRUE. If the window is open, the DROP_WINDOW call
generates an error unless the force option is set to TRUE in the procedure call. If this is the
case, the window is closed and then dropped. When the window is closed, normal close window
rules apply.
When you drop a window, it is also removed from any window groups that it belongs to.
Windows always belong to the SYS schema, so a window name is of the form
[SYS . ] window_name. To open, close, disable, or drop a window, you must have the
MANAGE SCHEDULER system privilege.
Oracle Database 10g: Administration Workshop II 17-31
Window Priority
An order of precedence applies for when windows
overlap:
• The window with the highest priority opens first
If windows have same priority, then the window
that is active remains open
If at the end of a window there are multiple
windows defined, the window that has the highest
percentage of time remaining, opens
• An open window that is dropped is automatically
closed w] W2
W3
6 a.m 8 a.m 10 a.m 12 p.m. 2 p.m
17-32 Copyright© 2004, Oracle. All rights reserved.
Window Priority
The Scheduler does not validate the start_date or end_date of the window schedules, so
it is possible that you can create windows with overlapping schedules. Running jobs are not
stopped when a window closes, unless the jobs are specified when they were created with the
attribute stop_on_window_close to TRUE. The rules for overlapping windows can be
summarized as follows:
• If windows of the same priority overlap, the window that is active stays open. However, if
the overlap is with a window of higher priority, the lower priority window closes and the
window with the higher priority opens.
• If at the end of a window there are multiple windows defined, the window that has the
highest percentage of time remaining opens.
• If an open window is dropped, it is automatically closed. At that point, the window that has
the highest percentage of time remaining opens.
In the illustration shown above, if a job is executing inWl, and W2 has been created with a
higher priority, then Wl closes and W2 opens at time 8.a.m. However, as the resource plan that
is in effect at Wl changes when the window closes, then resources allocated to the running job
may change.
Note: Oracle Corporation does not recommend creating overlapping windows.
Oracle Database 10g: Administration Workshop II 17-32
17-33
Managing Attributes of Scheduler
Components
• Change an attribute for a job:
BEGIN
DBMS_SCHEDULER. SET_ATTRIBUTE (
name => ' HR.GET_STATS',
attribute => 'MAX_FAILURES',
value => 3);
END;
/
Remove a program comment by setting it to null:
EXEC DBMS_SCHEDULER.SET_ATTRIBUTE_NULL( -
*HR.CALC_STATS2','COMMENTS');
Copyright © 2004, Oracle. All rights reserved.
Managing Attributes of Scheduler Components
The SET_ATTRIBUTE procedure changes an attribute of a scheduler component. It is
overloaded to accept values of many different data types.
Each Scheduler component has different attributes that you can modify. For example, you can
set the PROGRAM_TYPE attribute for a program, but this attribute is not applicable to a job or
window. Similarly, you could set the JOB_CLAS S attribute for a job, but not for a program or
window.
To set an attribute to NULL, use the SET_ATTRIBUTE_NULL procedure. You can use this
procedure to unset attributes. For example you could use the SET_ATTRIBUTE_NULL
procedure to remove the COMMENTS for a program, as shown above.
When setting the attribute for a Scheduler component, if the component is enabled, it is disabled
before being altered and reenabled afterward. If the component cannot be reenabled, an error is
raised and the component is left in a disabled state.
Oracle Database 10g: Administration Workshop II 17-33
Managing Attributes of Scheduler
Components
Retrieve attribute values for the get_stats job
created by the hr user:
SELECT max_failures MAX_FAIL, job_priority,
schedule_limit SCHED_LIMIT,
logging_level
FROM user_scheduler_jobs
WHERE job_name = 'GET_STATS'
AND job_creator = 'HR';
MAX FAIL JOB PRIOR SCHED LIMIT LOGGING LEVEL
3 3 LOW
17-34 Copyright© 2004, Oracle. All rights reserved.
Managing Attributes of Scheduler Components (continued)
To retrieve the value of attributes for a Scheduler component, query the appropriate dictionary
view:
• *_SCHEDULER_JOBS
• *_SCHEDULER_PROGRAMS
[ALL | DBA]_SCHEDULER_SCHEDULES
[ALL | DBA]_SCHEDULER_WINDOWS
Oracle Database 10g: Administration Workshop II 17-34
Managing Attributes of the Scheduler
You can set three attribute values at the global level,
affecting all Scheduler components:
• default_timezone
max_job_slave_processes
log_history
EXEC DBMS_
attribute
value =>
SCHEDULER.
=>
'14
'log_h
);
SET_SCHEDULER_
Listory' , -
.ATTRIBUTE ( -
17-35 Copyright© 2004, Oracle. All rights reserved.
Managing Attributes of the Scheduler
Setting the value of a Scheduler attribute takes effect immediately, but the resulting changes may
not be seen immediately. The attributes you can set are:
default_timezone: Impacts the behavior of repeating jobs and windows thatuse the
calendaring syntax for their repeat intervals. This is normally retrieved from
start_date, but if no start_date is provided (which is notuncommon), the time
zone is retrieved from this Scheduler attribute. To make sure that daylight savings
adjustments are followed, it is strongly recommended to set this attribute to a region name
instead of an absolute time zone offset.
max_ job_slave_processes: Enables you to set a maximum number of slave
processes for a particular system configuration and load. Even though the Scheduler
automatically determines what the optimum number of slave processes is for a given
system configuration and load, you still might want to set a fixed limit on the Scheduler.
You can set this attribute to a value from 1 through 999. The default value is NULL.
log_history: Determines the number of days an entry is retained in the job or window
log before it becomes eligible for automatic purging. The default value is 30.
You can retrieve the value of a Scheduler attribute with the GET_SCHEDULER_ATTRIBUTE
procedure of DBMS_SCHEDULER.
Oracle Database 10g: Administration Workshop II 17-35
Viewing Job Execution Details
• The DBA_SCHEDULER_JOB_RUN_DETAILS view has
a row for each job instance.
Each row contains information about the job
execution for that instance.
SELECT job_name, status, errorf, run_duration
FROM USER_SCHEDULER_JOB_RUN_DETAILS;
JOB_NAME STATUS ERROR# RUN_DURATION
GATHER_STATS_JOB SUCCESS 0 +000 00:08:20
PART EXCHANGE JOB FAILURE 6576 +000 00:00:00
17-36 Copyright© 2004, Oracle. All rights reserved.
Viewing Job Execution Details
[DBA | ALL ] _SCHEDULER_JOB_RUN_DETAILS views have the following columns:
log_id: Unique identifier of the log entry
LOG_DATE: The time stamp of the log entry
• OWNER: The job owner
JOB_NAME: The j ob name
STATUS: The status of the job execution
ERROR#: The number of the first error encountered
• REQ START DATE: The time at which the job was scheduled to start
• ACTUAL_START_DATE: The time at which the job was actually started
• RUN_DURATION: The duration of job execution
INSTANCE_ID: The instance upon which the job ran
SESSION_ID: The session the job ran within
SLAVE_PID: The process ID of the slave process used to perform the job execution
• CPU_USED: Amount of CPU used for the job run
• ADDITIONAL_INFO: Additional information on the job run
Oracle Database 10g: Administration Workshop II 17-36
Viewing Job Logs
The dba_scheduler_job_log view has a row for each
job operation or modification.
SELECT job_
name, ope rat
ion, owner
FROM ALL_SCHEDULER_JOB_LOG;
JOB_NAME
GET_STATS2
TESTJOB
TESTJOB
TESTJOB
TESTJOB
COMPUTE_STATS
OPERATION
ALTER
RUN
RETRY_RUN
FAILED
DROP
CREATE
OWNER
HR
HR
HR
HR
HR
HR
17-37 Copyright© 2004, Oracle. All rights reserved.
Viewing Job Logs
Entries are created in this view if you have the logging_level parameter set to
DBMS_SCHEDULER . LOGGING_FULL or DBMS_SCHEDULER. LOGGING_RUNS at either the
job class level or the job level. For example, to turn on full logging on ajob named Test Job,
enter the command:
EXECUTE DBMS_SCHEDULER.SET_ATTRIBUTE ('TestJob', -
'logging_level', DBMS_SCHEDULER.logging_full);
The class-specific level is the minimum level at which a job's information is logged. This means
ajob creator can only turn on more logging for an individual job, not less. If you are a DBA and
are using job logging for auditing purposes, using the job class level as the minimum prevents a
user from turning off logging (and thus auditing) of a user's own jobs.
For example, if the class-specific level is set to record job runs and the job-specific logging is
turned off, the scheduler still logs the runs. If, on the other hand, the job creator turns on full
logging and the class-specific level is set to record runs only, all operations on this individual job
are logged.
You can also query the [ALL | DBA | USER] _SCHEDULER_JOB_RUN_DETAILS view for a
listing of all completed (failed or successful) job runs.
Oracle Database 10g: Administration Workshop II 17-37
Purging Job Logs
You can purge the job logs:
• Automatically, through the purge log job using
default values
• Using the purge_log job, but modifying the
conditions that determine when entries are purged
On demand, by calling the
dbms_scheduler.purge_log procedure
EXECUTE DBMS_SCHEDULER
log_
job_
_hi story
.name =>
=> 1, "
* TESTJOB
PURGE.
);
_LOG( -
17-38 Copyright© 2004, Oracle. All rights reserved.
Purging Job Logs
Both the job log and the window log must not grow indiscriminately. For this purpose the
scheduler has an attribute that specifies how much history (in days) to keep. Once a day the
PURGE_LOG job of the scheduler automatically purges all log entries from both the job log as
well as the window log that are older than the specified history. The default is 30 days. You do
not need to configure this job; it runs automatically as long as the Scheduler is active.
You can alter the retention time for job log entries by modifying the log_hi story attnbuteat
either the job class level or by setting it at the global level with the
DBMS_SCHEDULER. SET_SCHEDULER_ATTRIBUTE procedure. The range of valid values is
1 through 999. For example, to specify that log entries for the ADMIN_JOBS job class be
retained for 60 days, use the following command:
DBMS_SCHEDULER.SET_ATTRIBUTE
('ADMIN_JOBS', 'log_history', '60' ) ;
Oracle Database 10g: Administration Workshop II 17-38
Purging Job Logs (continued)
Besides having the Scheduler automatically purge the log once a day based on the various
settings of log_history, a DBA might also want to manually purge the log. For this puipose
you can use the DBMS_SCHEDULER. PURGE_LOG procedure:
log_history specifies how much history (in days) to keep. The valid range is 0 through
999. If this parameter is set to 0, all entries are purged.
which_log specifies the log (job or window) to purge. Valid values are JOB_LOG,
WINDOW_LOG, and JOB_AND_WINDOW_LOG.
job_name specifies which job-specific entries to purge from the job log. This can be a
comma-separated list of job names and job classes. If this parameter has a non-NULL value,
then the setting of which_log is ignored.
Examples
• To completely clear the job and window logs, use the following command:
EXECUTE DBMS_SCHEDULER.PURGE_LOG();
• To purge only job entries that are older than 10 days (not the window log entries), use the
following command:
EXECUTE DBMS_SCHEDULER.PURGE_LOG( -
log_history => 10, which_log => 'JOB_LOG');
• To purge all window entries older than 10 days and all job entries relating to either JOBl
or jobs in CLASS2 that are older than 10 days, use the following command:
EXECUTE DBMS_SCHEDULER.PURGE_LOG( -
log_history => 10, job_name => 'JOBl, JOBCLASS1');
Oracle Database 10g: Administration Workshop II 17-39
17-40
[DBA
[DBA
[DBA
[DBA
[DBA
[DBA
[DBA
[DBA
[DBA
[DBA
[DBA
[DBA
Data Dictionary Views
ALL
ALL
ALL
ALL
ALL
ALL
ALL
ALL
ALL]_
ALL ;
ALL ;
ALL ;
USER]_SCHEDULER_JOBS
USER]_SCHEDULER_JOB_ARGS
USER]_SCHEDULER_RUNNING_JOBS
USER]_SCHEDULER_JOB_LOG
USER]_SCHEDULER_JOB_RUN_DETAILS
USER]_SCHEDULER_PROGRAMS
USER]_SCHEDULER_PROGRAM_ARGS
USER]_SCHEDULER_SCHEDULES
_SCHEDULER_JOB_CLASSES
_SCHEDULER_WINDOWS
_SCHEDULER_WINDOW_DETAILS
_SCHEDULER_WINDOW_LOG
Copyright © 2004, Oracle. All rights reserved.
Data Dictionary Views
To view the status of and general information about your jobs, use the following query:
SELECT job_name, program_name, job_type, state
FROM USER_SCHEDULER_JOBS;
To determine which instance a job is running on, use the following query:
SELECT owner, job_name, running_instance,
resource_consumer_group
FROM DBA_SCHEDULER_RUNNING_JOBS;
To view all the job arguments defined for a job, use the following query:
SELECT value FROM ALL_SCHEDULER_JOB_ARGS
WHERE owner = 'SCHEMA'
AND job_name = 'J0B_NAME';
To audit job-management activities, use the following query:
SELECT owner, job_name, job_class, operation, status
FROM ALL_SCHEDULER_JOB_LOG;
To determine the status of your jobs and duration of execution, use the following query:
SELECT job_name, status, error#, run_duration, cpu_used
FROM USER_SCHEDULER_JOB_RUN_DETAILS;
To view general information about your programs, use the following query:
SELECT program_name, program_type, program_action
FROM DBA_SCHEDULER_PROGRAMS;
Oracle Database 10g: Administration Workshop II 17-40
Summary
In this lesson, you should have learned how to:
• Simplify management tasks by using the
Scheduler
• Create a job, program, schedule, and window
Reuse Scheduler components for similar tasks
• View information about job executions and job
instances
17-41 Copyright© 2004, Oracle. All rights reserved.
Oracle Database 10g: Administration Workshop II 17-41
Practice 17 Overview:
Automating Tasks with the Scheduler
This practice covers the following topics:
• Creating a job that runs a program outside of the
database
• Creating a program and a schedule
• Creating a job that uses a program and a schedule
• Altering the program and schedule for the job and
observing the behavior change of the job
Monitoring job runs
17-42 Copyright© 2004, Oracle. All rights reserved.
Practice 17 Overview
Note: This practice uses both the Enterprise Manager Database Control Console and SQL*Plus.
Oracle Database 10g: Administration Workshop II 17-42
Practice 17: Automating Tasks with the Scheduler
Exercise 1: Monitoring the Scheduler
In this exercise, you will use the EM Database Control Console to monitor and configure an
administrator for the Scheduler.
1. Log in to the Database Control Console as the SYSTEM user.
2. Grant the following privileges to the HRuser:
- SCHEDULER_ADMIN role
CREATE JOB system privilege
- SELECT ANY DICTIONARY privilege
- MGMTJJSERrole
3. Because you are going to use the HR user to administer jobs through Database Control, you
need to make sure that HR is registered as a possible Administrator.
a. On the Administration page, click Administrators in the upper right hand comer. On
the Administrator page, click the Create button.
b. On the Create Administrators: Properties page, enter HR in the Name, Password, and
Confirm Password fields. Do not enter a value for the email address.
c. Click the Finish button.
d. On the Create Administrator: Review page, click the Finish button.
e. Back to the Administrators page, click the Database tab.
4. Login to the Database Control Console as the HRuser
5. Click the Administration tab.
6. Click on the Jobs link in the Scheduler section, at the bottom right corner of the page.
7. Are there any existing jobs?
8. Are there any existing programs? (Hint: use the browser Back button)
9. Are there any existing schedules?
10. Are there any existing windows? What resource plan is associated with each window?
11. Are there any existing job classes? If so, what resource consumer group is associated with
each job class?
Oracle Database 10g: Administration Workshop II 17-43
Practice 17: Automating Tasks with the Scheduler (continued)
Exercise 2: Creating Scheduler Components
In this exercise, you will create Scheduler objects and use them to automate administrative tasks.
1. Log in to the Database Control Console as the HR user. Click the Administration tab.
Under the heading Scheduler, click Jobs. Click the Create button to open the Create Job
window.
Create a simple job that runs a SQL script:
General:
Name: create_log_table_job
Owner: HR
Description: Create the SESSIONHISTORY table for the next part of this exercise
Logging level: runs
Command type: In-line Program: Executable
Executable: /home/oracle/labs/lab_17_02_01. sh
Schedule:
Repeating: Do not Repeat
Start: Immediately
Options:
No special options
2. Click OK to create the job.
3. Click the Run History tab and verify that the job ran successfully.
4. Create a program called LOG_SES S_COUNT_PRGM that logs the current number of
database sessions into a table. Type in the following code or cut and paste the code into EM
from the file lab_l7_02_04 . sql:
DECLARE
sess_count NUMBER;
BEGIN
SELECT COUNT(*) INTO sess_count FROM V$SESSION;
INSERT INTO session_history VALUES (SYSTIMESTAMP,sess_count);
COMMIT;
END;
5. Create a schedule named SESS_UPDATE_SCHED owned by HR that executes every three
seconds. Because the Database Control Console only supports scheduled intervals of one
minute or larger, use SQL*Plus and the DBMS_SCHEDULER. CREATE_SCHEDULE
procedure to create the program.
Oracle Database 10g: Administration Workshop II 17-44
Practice 17: Automating Tasks with the Scheduler (continued)
Exercise 2: Creating Scheduler Components (continued)
6. Return to the Database Control Console, or log back in as the HR user and verify the
schedule was created.
Hint: You may have to refresh the page for the schedule to appear.
7. Using Database Control Console, create a job named LOG_SESSIONS_JOB that uses the
program LOG_SESS_COUNT_PRGM and the schedule SESS_UPDATE_SCHED. Make
sure the job uses FULL logging.
8. Check the HR. SESSION_HISTORY table for rows. If there are rows in the table, are the
timestamps 3 seconds apart?
9. Use the Database Control Console to alter the SESS_UPDATE_SCHED schedule from
every three seconds to every three minutes.
10. Using SQL*Plus, query the HR. SESSION_HI STORY table to verify the rows are being
added every three minutes now, instead of every three seconds.
11. Alter the table HR. SESSION_HISTORY to contain a new column,
BACKGROUND_COUNT of type NUMBER.
12. Alter the program LOG_SESS_COUNT_PRGM to log new information into the logging
table. Modify the code to look like the following text or copy the code from the script
lab_17_02_12.sql:
DECLARE
sess_count NUMBER;
back_count NUMBER;
BEGIN
SELECT COUNT(*) INTO sess_count FROM V$SESSION;
SELECT COUNT(*) INTO back_count
FROM V$SESSION
WHERE type = ''BACKGROUND'';
INSERT INTO session_history VALUES
(SYSTIMESTAMP, sess_count, back_count);
COMMIT;
END;
13. Run the job LOG_SESSIONS_JOB immediately, and verify the new information was
added to the HR. SESSIONS_HISTORY table.
14. Drop the job LOG_SESSIONS_JOB, the program LOG_SESS_COUNT_PRGM, and the
schedule SESS_UPDATE_SCHED.
IMPORTANT!!! Make sure you do not delete the wrong schedule.
Oracle Database 10g: Administration Workshop II 17-45
lo
Copyright © Oracle Corporation, 2004. All rights reserved.
Objectives
After completing this lesson, you should be able to do
the following:
• Document a database configuration by using a
Database Configuration Worksheet
Recover data while minimizing down time and data
loss
• Use database tools and features to monitor and
improve database performance
18-2 Copyright © Oracle Corporation, 2004. All rights reserved.
Oracle Database 10g: Administration Workshop II 18-2
Workshop Methodology
Team-oriented and interactive
Tools used to keep the database performance at
specified levels
Hands-on diagnosis and problem resolution for a
variety of failure scenarios
Multiple solutions possible for each scenario
Develop troubleshooting and administration skills
18-3 Copyright © Oracle Corporation, 2004. All rights reserved.
Workshop Methodology
Group-Oriented and Interactive Structure
The workshop is structured to allow individuals to work in groups to perform database backup,
restore, and recovery operations. Each group is encouraged to share its approach to resolving
database failures with other groups in the class.
Intensive Hands-On Diagnosis and Problem Resolution
The intent is to provide you with as much hands-on experience as possible to diagnose and work
through backup and recovery scenarios. Experience and knowledge gained from the course will
play a major role toward successfully completing the objectives of each session.
Using the Right Tools
Enterprise Manager Database Control for Oracle Database lOg provides a wealth of information
to the DBA. Filtering through the information to identify problems and knowing what tool to use
to resolve them can be a challenge. By simulating problems that are not known to you ahead of
time, you gain experience in locating problems and resolving them on your own.
Oracle Database 10g: Administration Workshop II 18-3
Workshop Methodology (continued)
Variety of Failure Scenarios
During this workshop, you will induce configuration errors by running a series of shell scripts.
Your objective is to diagnose the nature of the problem and to make the necessary corrections or
perform the appropriate recovery process. The types of failures that you may encounter include:
• Loss of a redo log group
• Media loss
• Data block corruption or incorrect data in application tables
• Loss of control files
• Loss of a table
Recovery Solutions
This workshop simulates a real-world environment in that exact solutions to problems may not
be readily available in the event of a database failure. Therefore, only cursory solutions are
provided in Appendix A for the workshop scenarios.
Oracle Database 10g: Administration Workshop II 18-4
Business Requirements
• Twenty-four hour availability
Peak usage varies across all time zones
• Daily backups are required
• Complete database recovery is required
18-5 Copyright © Oracle Corporation, 2004. All rights reserved.
Business Requirements
The following business requirements should be familiar to you when configuring your database
for backup and recovery.
Twenty-four hour availability: The database must be available 24 hours a day, 7 days a week.
An eight-hour period for maintenance is scheduled for the first Saturday of each month when the
instance can be shut down.
Peak usage varies across available time frame: This database is accessed globally, so it is used
throughout the 24-hour period of one day.
Daily backups: Full database backups are required on a daily basis.
Complete database recovery: This is a critical business application database and data loss
cannot be tolerated. A high number of transactions occur over the 24-hour time frame.
Oracle Database 10g: Administration Workshop II 18-5
Database Configuration
Archiving is enabled
Log files are mirrored and distributed across
multiple devices
Control files are mirrored and distributed across
multiple devices
Flashback Database is enabled
Database performance thresholds set to meet
business requirements
Full backup of the database exists, including
archive log files
18-6
Copyright © Oracle Corporation, 2004. All rights reserved.
Database Configuration
Because of the limitations of the servers used in the classroom, all the critical database files
reside on the same disk for this workshop.
Specific thresholds need to be set so warnings and alerts can be issued when the database is not
operating within the expected limits.
• Archive Area Used (%) should be less than 75% at all times. If it rises above 90% used,
this is of critical concern and immediate action needs to be taken.
• If any job breaks, the DBA needs to be notified immediately.
• A single transaction should not use up more than 60% of the CPU resources. If a
transaction uses more than 75% of the available CPU resources, a serious problem has
occurred and should be resolved immediately.
• Any ORA-1578 error indicating data block corruption in the alert log should generate an
alert.
• If a job fails for any reason, the DBA should be notified. More than 5 failures is considered
a critical problem.
• SQL statements should not take more than 200% the average time to respond.
• A transaction should not perform more than 2 long table scans.
• At least 80% of all sorts should be performed in memory. If less than 50% of sorts are
performed in memory, immediate action needs to be taken.
Oracle Database 10g: Administration Workshop II 18-6
Simulated Application
One or more jobs will be scheduled to simulate
application users.
The jobs will run queries and DML operations
against application tables.
Some scenarios may use sessions spawned
through shell scripts.
18-7 Copyright © Oracle Corporation, 2004. All rights reserved.
Simulated Application
To simulate application users, one or more scheduled jobs will be created on your database.
These jobs will query tables and perform various DML activities. When investigating the
database upon starting a new scenario, you will need to verify that the application users are
functioning correctly and are operating within the specified thresholds.
If you find a scheduled job is not executing correctly, you will need to determine the root cause
and fix it. If the job or user session causes database operational thresholds to be exceeded, you
will need to perform the necessary actions to bring database performance back into acceptable
limits.
Oracle Database 10g: Administration Workshop II 18-7
Method for Resolving Database Issues
Phase I: Diagnose the problem
Phase II: Determine the appropriate method to
resolve the problem
Phase III: Resolve the problem
Phase IV: Back up the database, if needed
18-8 Copyright © Oracle Corporation, 2004. All rights reserved.
Resolving Database Problems
The workshop is a hands-on exercise. For data failure scenarios, you can choose the restore and
recovery operation that you deem appropriate for the situation. Multiple failure and recovery
scenarios will be conducted during the workshop.
The instructor will not tell you which failure occurs in each scenario. To complete each task, use
the features and techniques learned in this course.
Phase I: Diagnose the Problem
1. The first phase is to research the nature of the problem. Use the EM Database Control
Console, data dictionary views, trace and log files, and basic operating system commands
to collect information.
2. Determine if the database instance is available and the database is open.
3. Attempt to start the instance.
4. Shut down the instance if a problem occurs while starting it or when opening the database.
5. Check the Database Alerts region in the Database home page. Also check the trace files
and the alert log file as needed.
6. Check the Job Activity section in the Database home page of the Database Control Console
to verify all application jobs are running without error. Investigate any execution problems.
Oracle Database 10g: Administration Workshop II 18-8
Resolving a Database Failure (continued)
Phase I: Diagnose the Problem (continued)
7. If recovery is needed, determine the appropriate recovery method
Complete recovery
Point-in-Time recovery
Flashback Database or other Flashback operation
Phase II: Decide on a Resolution Plan
Since each scenario can have multiple solutions, you should evaluate your options and decide on
the best method for resolving the problem. You can use group discussion to formulate your
resolution plan.
If your resolution plan involved data recovery, determine what files to restore and what state the
instance and database must be in to perform the recovery. Remember that the objective is to
minimize down time and loss of data, so do not restore a file or shut down the database unless
you must.
Phase III: Resolve the Problem
Implement your solution. For example, if resolving a data failure, restore the appropriate files
and initiate your recovery operation.
After completing the task, note any proactive measures that can be taken to prevent that type of
problem in the future.
Phase IV: Back Up the Database
Not all recovery operations require a database backup when they are complete. However,
determine whether your database needs to backed up after performing your chosen recovery
method, and if so, perform another backup.
Oracle Database 10g: Administration Workshop II 18-9
•
•
•
•
•
18-10
Summary
Instructor-facilitated workshop
Team-oriented
Hands-on approach
Use tools and diagnostics to:
- Monitor database performance
- Identify problems and potential problems
Minimize down time and data loss
Copyright © Oracle Corporation, 2004. All rights reserved.
Summary
Instructor-Facilitated Workshop
The instructor will facilitate the workshop by providing guidance and additional information as
appropriate.
Group-Oriented Emphasis
A strong emphasis is placed on teaming with other students in the workshop for purposes of
diagnosing and resolving failures. The ability to complete each scenario successfully is based on
the cumulative knowledge and problem resolution skills of each group.
Hands-On Approach
This is meant to be a hands-on workshop, providing you with the maximum allowable time to be
involved in a lab situation.
Oracle Database 10g: Administration Workshop II 18-10
Practice 18 Overview: Workshop Setup
This practice covers the following topics:
• Restore the database to a previous point in time
• Perform a physical investigation of the database:
- Use the Enterprise Manager Database Control
Console
- Use views and tools
- View command output and log files
- View trace files and the alert log
• Modify the database configuration to meet
business requirements
• Resolve typical database administrative issues
18-11 Copyright ©Oracle Corporation, 2004. All rights reserved.
Practice 18 Overview
For the practice exercise, you will restore the backup of the database taken in the first practice
exercise of this course. Once the database is restored, you will investigate the database, alter its
configuration to meet business requirements, and work through various scenarios to simulate
typical database administrator tasks.
Physical Investigation
Use the features of Oracle Database lOg, such as Enterprise Manager, SQL*Plus, the V$ views
and other data dictionary views, to derive information about your database environment. Keep
the business requirements in mind and note any deficiencies that you feel will need to be
corrected to support these requirements.
Database Configuration
Physically modify the database configuration to ensure that the business requirements can be met
Database Administration
Work through the scenarios, in any order, to gain experience in resolving typical database
administrative tasks and procedures.
Oracle Database 10g: Administration Workshop II 18-11
Practice 18: Workshop Setup
In this practice exercise, you will reset the database to its initial state. You will then investigate
the database to determine its current configuration. If needed, alter the database settings to
conform to the business requirements stated in this lesson.
1. Run the script lab_l8_0l. sql in your labs directory to reset the database to its initial
state. This script will also remove all trace files previously generated by the database. It
will take several minutes for this script to finish.
2. Start the database, if needed.
3. Verify the database is in ARCHIVELOG mode.
4. Use Enterprise Manager or connect to the database as SYSDBA. Use the data dictionary
views and SQL*Plus commands to complete the Database Configuration Checklist on the
next two pages. If any part of the configuration does not support the business requirements,
change it now.
5. Verify Flashback Database has been enabled.
6. Create a user-defined metric as follows:
a. From the Database Home page, in the Related Links region, click the User-Defined
Metrics link.
b. Click Create on the User-Defined Metrics page.
c. Specify the following:
Metric name: INVALID REDO LOG FILE COUNT
Metric Type: Number
SQL Query: SELECT count (*) FROM v$logfile
WHERE status = 'INVALID'
Database credentials: System user, password of oracle.
Thresholds: Comparison operator >
Critical 1
Schedule: Immediately after creation and then Repeat every 5 Minutes.
d. Click OK.
7. Execute the $HOME/labs/lab_l8_07 . sql script.
8. Use RMAN to make a whole database backup. Instruct RMAN to delete the archived log
files after they have been backed up.
9. Verify that a new backup exists and that regular backups are scheduled.
10. Ensure that your instance is started and your database is open, then begin the workshop
scenarios.
Oracle Database 10g: Administration Workshop II 18-12
Practice 18: Database Configuration Checklist
Tablespace and Data file Information
Tablespace Name
Data file Name (full path)
Online Redo Log File Information
Group #
Redo Log File Name (fuii path)
Size
Status
Control File Information
Control File Name (full path)
Operational Thresholds
Make sure the database thresholds are configured properly (refer to page 6 in this lesson).
Archive Area Used (%)
Broken Job Count
CPU Usage (per transaction)
Data Block Corruption Alert Log Error
Failed Job Count
SQL Response Time (%)
Scans on Long Tables (per transaction)
Sorts in Memory (%)
Oracle Database 10g: Administration Workshop II 18-13
Practice 18: Database Configuration Checklist (continued)
Initialization Parameters
Parameter Name
BACKGROUND_DUMP_DEST
CORE_DUMP_DEST
DB_BLOCK_CHECKING
DB_BLOCK_SIZE
DB_CACHE_SIZE
DB_FILES
DB_NAME
DB_RECOVERY_FILE_DEST
DB_RECOVERY_FILE_DEST_SIZE
LOG_ARCHIVE_DEST_i]
LOG_ARCHIVE_DEST_n_STATE
LOG_ARCHIVE_FORMAT
SGA_MAX_SIZE
SGA_TARGET
USE_RECOVER_FILE_DEST
USER_DUMP_DEST
Value
RMAN Backup Information
Full or Complete database backups
Control files and archive log files included
in backup sets?
Retention policy for backups
Backup schedule
Oracle Database 10g: Administration Workshop II 18-14
Workshop Scenario 1
This workshop scenario concerns database performance. To introduce the problem, run the shell
script $ HOME/workshops/wlab_01. sh as the oracle user from an operating system prompt
as shown below:
$ cd $HOME/workshops
$ ./wlab_01.sh
Start your investigation by going to the Enterprise Manager console and viewing the Database
Home page. Record the results of your investigation under "Observations". Once you have
determined the problem, formulate a plan to correct the problem. It is possible that there may be
more than one viable solution. Record all possible methods that will address the problem under
"Methodology".
It is your task to pick the best solution to solve your database problem. After applying your
solution, verify that the problem has been corrected. Record your results under "Results".
When finished, run the wlab_01_stop . sh script and then the wlab_01_cleanup . sh script to
clean up your database and environment.
Observations
Methodology
Results
Oracle Database 10g: Administration Workshop II 18-15
Workshop Scenario 2
This workshop scenario concerns the loss of data. To introduce the problem, first logout of
Enterprise Manager. Then, change directory to $HOME/workshops and use SQL*Plus to run
the script wlab_02 . sql as the SYSTEM user as shown below:
$ cd $HOME/workshops
sqlplus system/oracle
SQL> @wlab_02.sql
Start your investigation by going to the Enterprise Manager console and viewing the Database
page. Record the results of your investigation under "Observations". Once you have determined
the problem, formulate a plan to correct the problem. It is possible that there may be more than
one viable solution. Record all possible methods that will address the problem under
"Methodology".
It is your job to pick the best solution to solve your database problem. After applying your
solution, verify that the problem has been corrected. Record your results under "Results".
Observations
Methodology
Results
Oracle Database 10g: Administration Workshop II 18-16
Workshop Scenario 3
This workshop scenario pertains to user errors. To introduce the problem, change directory to
$HOME/workshops and run the script wlab_03 . sql as the SYSTEM user as shown below:
SQL> @wlab_03.sql
Start your investigation by going to the Enterprise Manager console and viewing the Database
page. If there are no current alert log entries listed in EM, check the actual alert log file itself.
Record the results of your investigation under "Observations". Once you have determined the
problem, formulate a plan to correct the problem. It is possible that there may be more than one
viable solution. Record all possible methods that will address the problem under "Methodology".
It is your job to pick the best solution to solve your database problem. After applying your
solution, verify that the problem has been corrected. Record your results under "Results".
Observations
Methodology
Results
Oracle Database 10g: Administration Workshop II 18-17
Workshop Scenario 4
This workshop scenario simulates loss of data. To introduce the problem, change directory to
$HOME/workshops and run the script wlab_04 . sql as the SYSTEM user as shown below:
SQL> @wlab_04.sql
Start your investigation by going to the Enterprise Manager console and viewing the Database
page. Record the results of your investigation under "Observations". Once you have determined
the problem, formulate a plan to correct the problem. It is possible that there may be more than
one viable solution. Record all possible methods that will address the problem under
"Methodology".
It is your job to pick the best solution to solve your database problem. After applying your
solution, verify that the problem has been corrected. Record your results under "Results".
Observations
Methodology
Results
Oracle Database 10g: Administration Workshop II 18-18
Workshop Scenario 5
This workshop scenario pertains to database availability. To introduce the problem, first logout
of Enterprise Manager. Then, change directory to $HOME/workshops and run the script
wlab_05 . sql as the SYSTEM user as shown below:
SQL> @wlab_05.sql
Start your investigation by going to the Enterprise Manager console and viewing the Database
page. Record the results of your investigation under "Observations". Once you have determined
the problem, formulate a plan to correct the problem. It is possible that there may be more than
one viable solution. Record all possible methods that will address the problem under
"Methodology".
It is your job to pick the best solution to solve your database problem. After applying your
solution, verify that the problem has been corrected. Record your results under "Results".
Observations
Methodology
Results
Oracle Database 10g: Administration Workshop II 18-19
Workshop Scenario 6
This workshop scenario pertains to database availability. To introduce the problem, first logout
of Enterprise Manager. Then, change directory to $HOME/workshops and run the script
wlab_06 . sql as the SYSTEM user as shown below:
SQL> @wlab_06.sql
Start your investigation by going to the Enterprise Manager console and viewing the Database
Home page. Then check the Tablespaces page. Record the results of your investigation under
"Observations". Once you have determined the problem, formulate a plan to correct the problem.
It is possible that there maybe more than one viable solution. Record all possible methods that
will address the problem under "Methodology".
It is your job to pick the best solution to solve your database problem. After applying your
solution, verify that the problem has been corrected. Record your results under "Results".
Observations
Methodology
Results
Oracle Database 10g: Administration Workshop II 18-20