/


Текст
SECOND EDITION
Scala Cookbook
Recipes for Object-Oriented and
Functional Programming
Alvin Alexander
Scala Cookbook
by Alvin Alexander
Copyright © 2021 Alvin Alexander. All rights reserved.
Printed in the United States of America.
Published by O’Reilly Media, Inc., 1005 Gravenstein Highway North, Sebastopol, CA 95472.
O’Reilly books may be purchased for educational, business, or sales promotional use. Online editions are
also available for most titles (http://oreilly.com). For more information, contact our corporate/institutional
sales department: 800-998-9938 or corporate@oreilly.com.
Acquisitions Editor: Suzanne McQuade
Development Editor: Jeff Bleiel
Production Editor: Christopher Faucher
Copyeditor: JM Olejarz
Proofreader: Athena Lakri
August 2013:
August 2021:
Indexer: Potomac Indexing, LLC
Interior Designer: David Futato
Cover Designer: Karen Montgomery
Illustrator: Kate Dullea
First Edition
Second Edition
Revision History for the Second Edition
2021-08-09:
First Release
See http://oreilly.com/catalog/errata.csp?isbn=9781492051541 for release details.
The O’Reilly logo is a registered trademark of O’Reilly Media, Inc. Scala Cookbook, the cover image, and
related trade dress are trademarks of O’Reilly Media, Inc.
The views expressed in this work are those of the author, and do not represent the publisher’s views.
While the publisher and the author have used good faith efforts to ensure that the information and
instructions contained in this work are accurate, the publisher and the author disclaim all responsibility
for errors or omissions, including without limitation responsibility for damages resulting from the use of
or reliance on this work. Use of the information and instructions contained in this work is at your own
risk. If any code samples or other technology this work contains or describes is subject to open source
licenses or the intellectual property rights of others, it is your responsibility to ensure that your use
thereof complies with such licenses and/or rights.
978-1-492-05154-1
[LSI]
To the Kirn family of Louisville, Kentucky. As in the movie, While You Were Sleeping, I
adopted them a long time ago, and my life has never been the same.
And also to my friends who passed away during the creation of this book:
Frank, Ben, Kenny, Bill, and Lori.
Table of Contents
Preface. . . . . . . . . . . . . . . . . . . . . . . . . . . . . . . . . . . . . . . . . . . . . . . . . . . . . . . . . . . . . . . . . . . . . . xiii
1. Command-Line Tasks. . . . . . . . . . . . . . . . . . . . . . . . . . . . . . . . . . . . . . . . . . . . . . . . . . . . . . . . 1
1.1 Getting Started with the Scala REPL
1.2 Loading Source Code and JAR Files into the REPL
1.3 Getting Started with the Ammonite REPL
1.4 Compiling with scalac and Running with scala
1.5 Disassembling and Decompiling Scala Code
1.6 Running JAR Files with Scala and Java
3
6
8
11
13
17
2. Strings. . . . . . . . . . . . . . . . . . . . . . . . . . . . . . . . . . . . . . . . . . . . . . . . . . . . . . . . . . . . . . . . . . . . 21
2.1 Testing String Equality
2.2 Creating Multiline Strings
2.3 Splitting Strings
2.4 Substituting Variables into Strings
2.5 Formatting String Output
2.6 Processing a String One Character at a Time
2.7 Finding Patterns in Strings
2.8 Replacing Patterns in Strings
2.9 Extracting Parts of a String That Match Patterns
2.10 Accessing a Character in a String
2.11 Creating Your Own String Interpolator
2.12 Creating Random Strings
24
26
27
29
32
36
41
43
44
46
47
50
v
3. Numbers and Dates. . . . . . . . . . . . . . . . . . . . . . . . . . . . . . . . . . . . . . . . . . . . . . . . . . . . . . . . . 53
3.1 Parsing a Number from a String
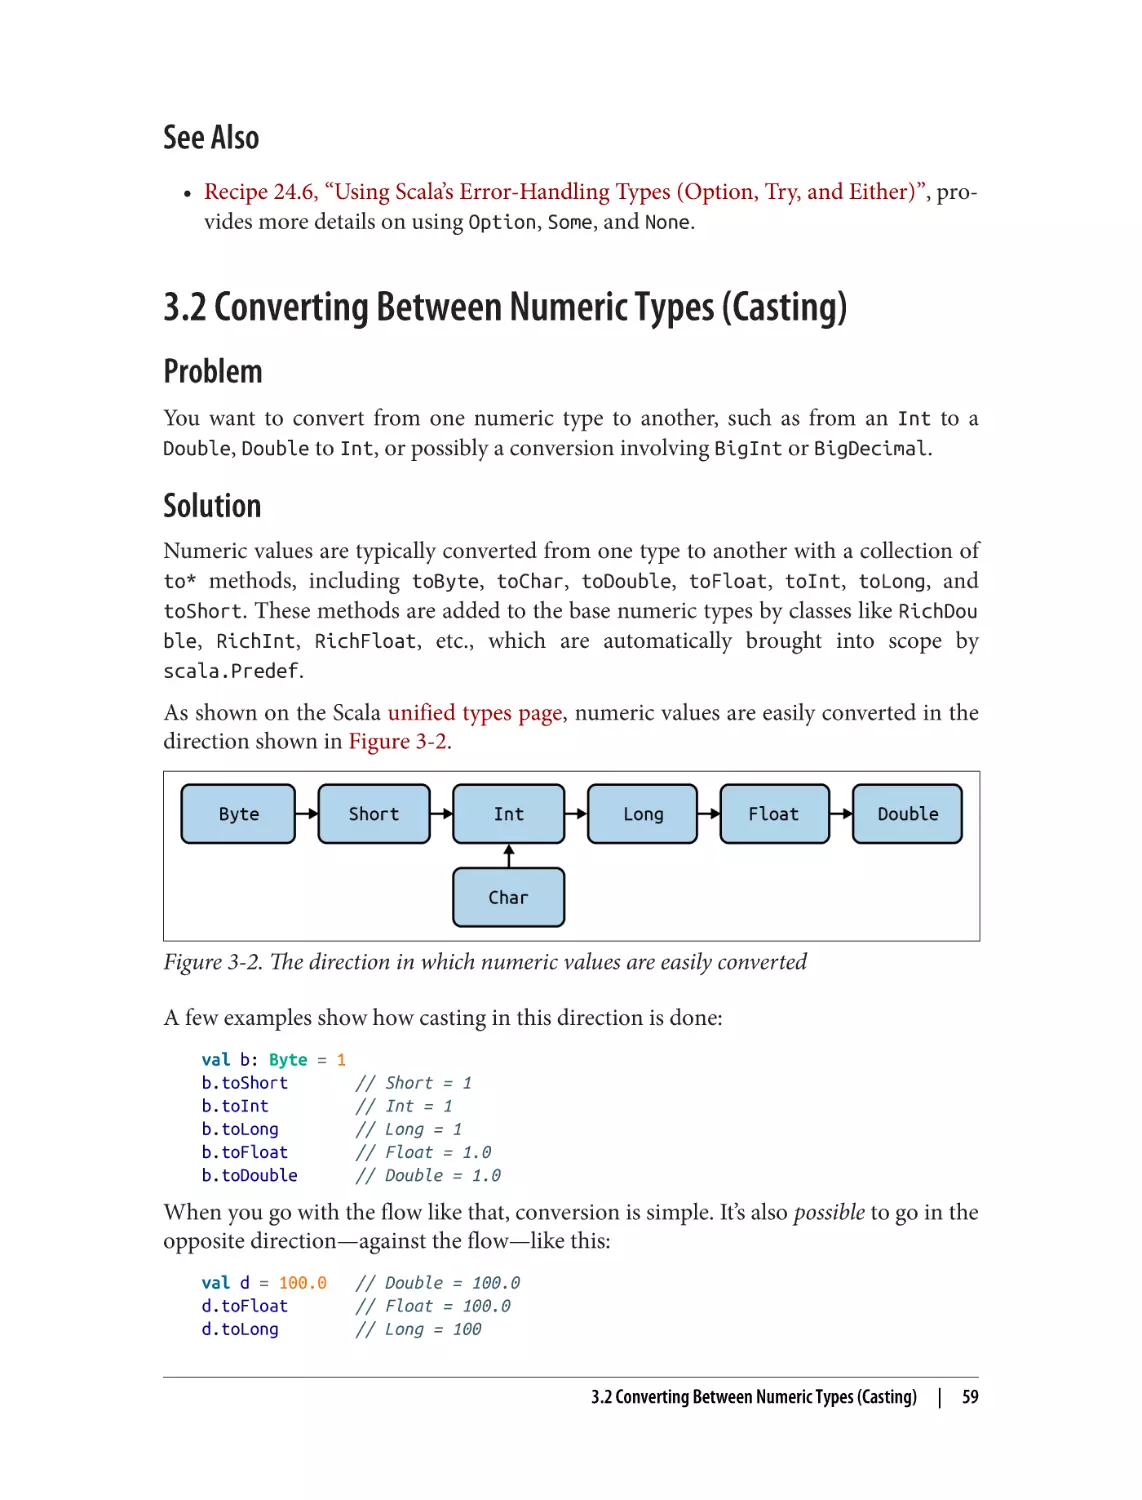
3.2 Converting Between Numeric Types (Casting)
3.3 Overriding the Default Numeric Type
3.4 Replacements for ++ and −−
3.5 Comparing Floating-Point Numbers
3.6 Handling Large Numbers
3.7 Generating Random Numbers
3.8 Formatting Numbers and Currency
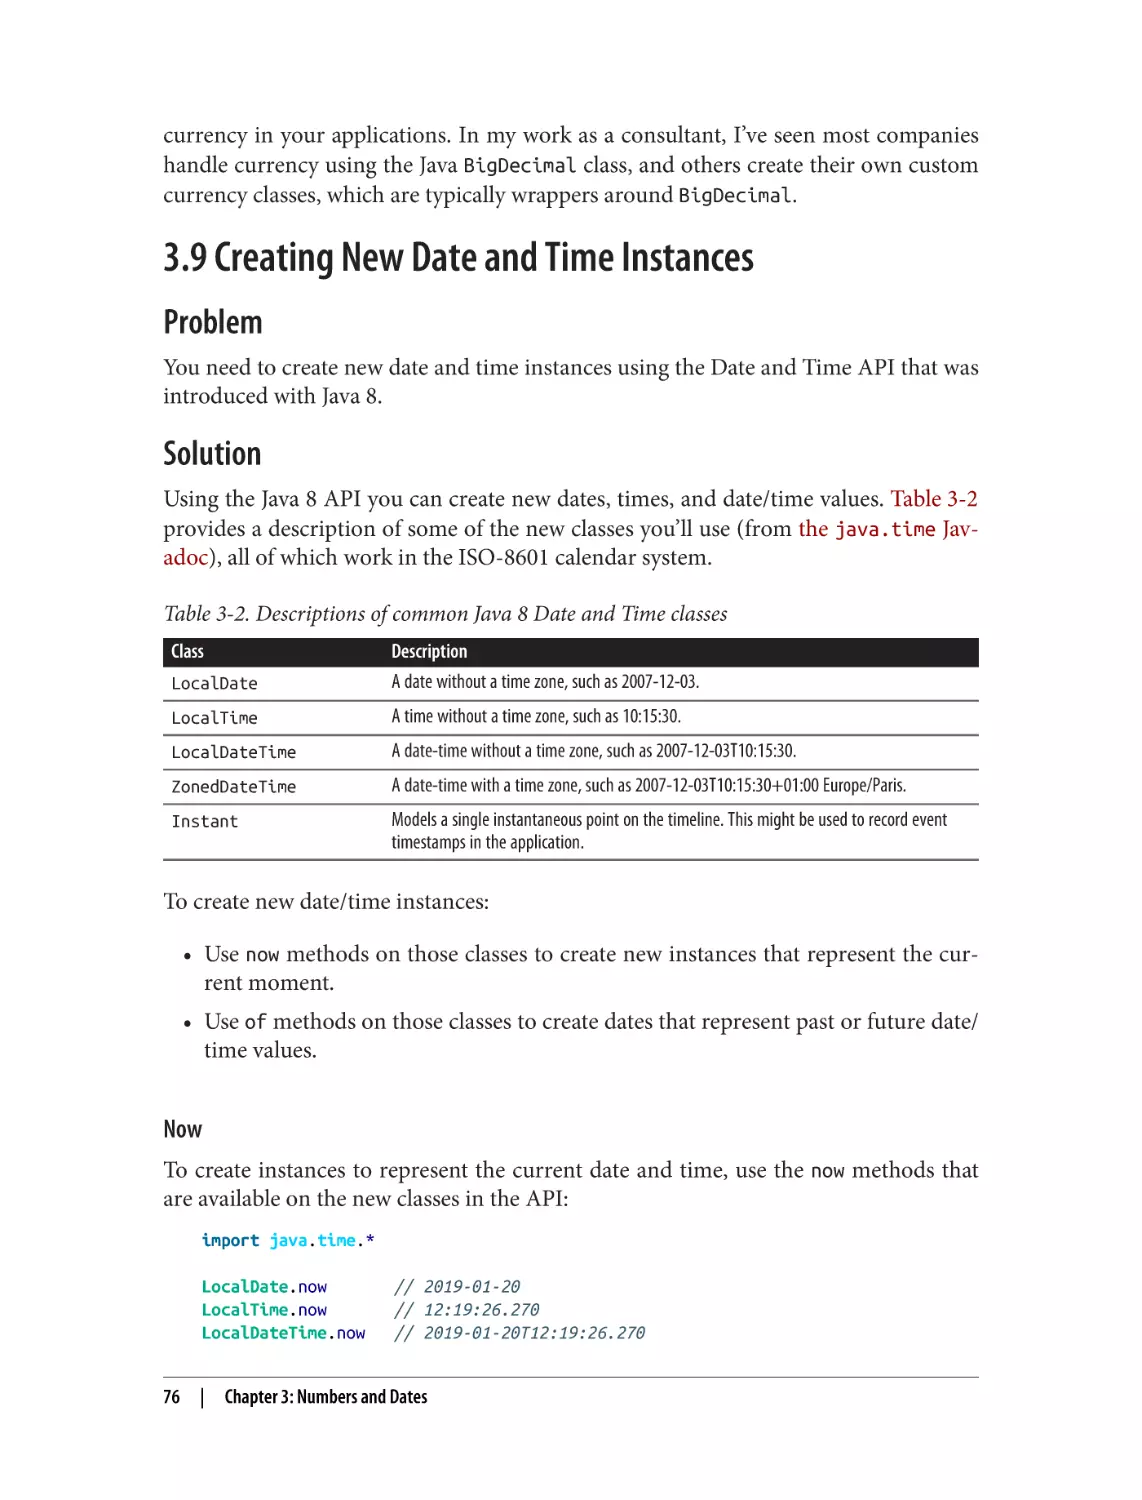
3.9 Creating New Date and Time Instances
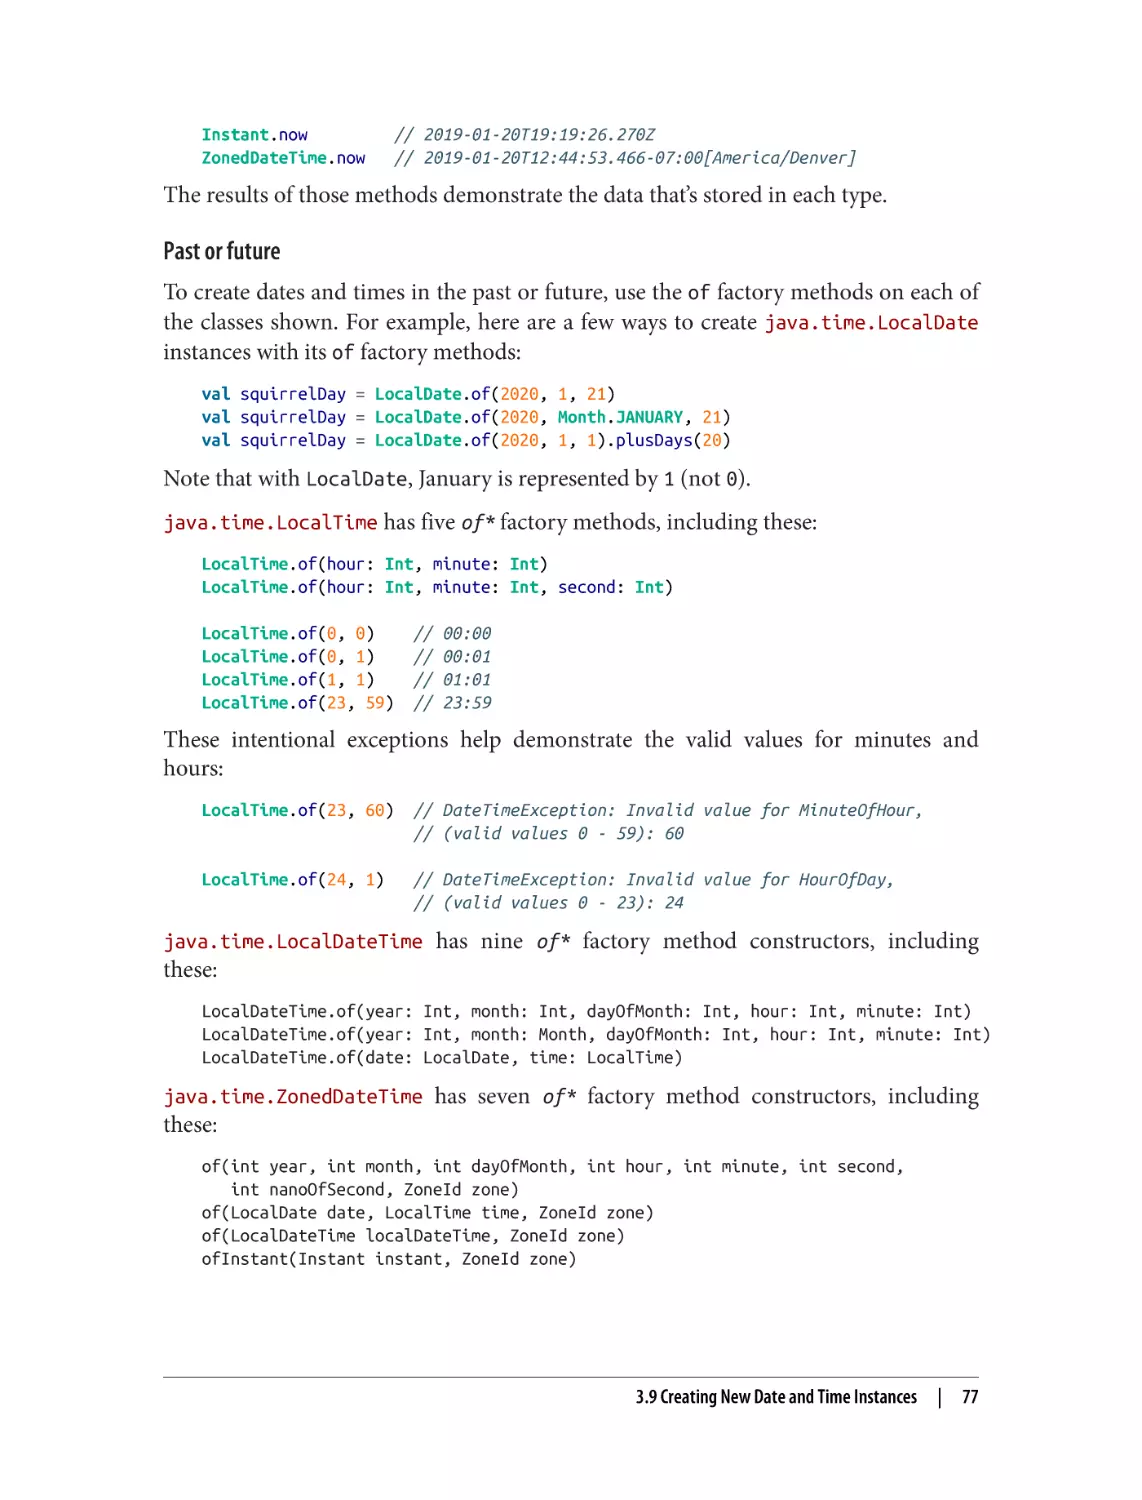
3.10 Calculating the Difference Between Two Dates
3.11 Formatting Dates
3.12 Parsing Strings into Dates
56
59
62
64
65
67
69
71
76
78
80
82
4. Control Structures. . . . . . . . . . . . . . . . . . . . . . . . . . . . . . . . . . . . . . . . . . . . . . . . . . . . . . . . . . 85
4.1 Looping over Data Structures with for
4.2 Using for Loops with Multiple Counters
4.3 Using a for Loop with Embedded if Statements (Guards)
4.4 Creating a New Collection from an Existing Collection with for/yield
4.5 Using the if Construct Like a Ternary Operator
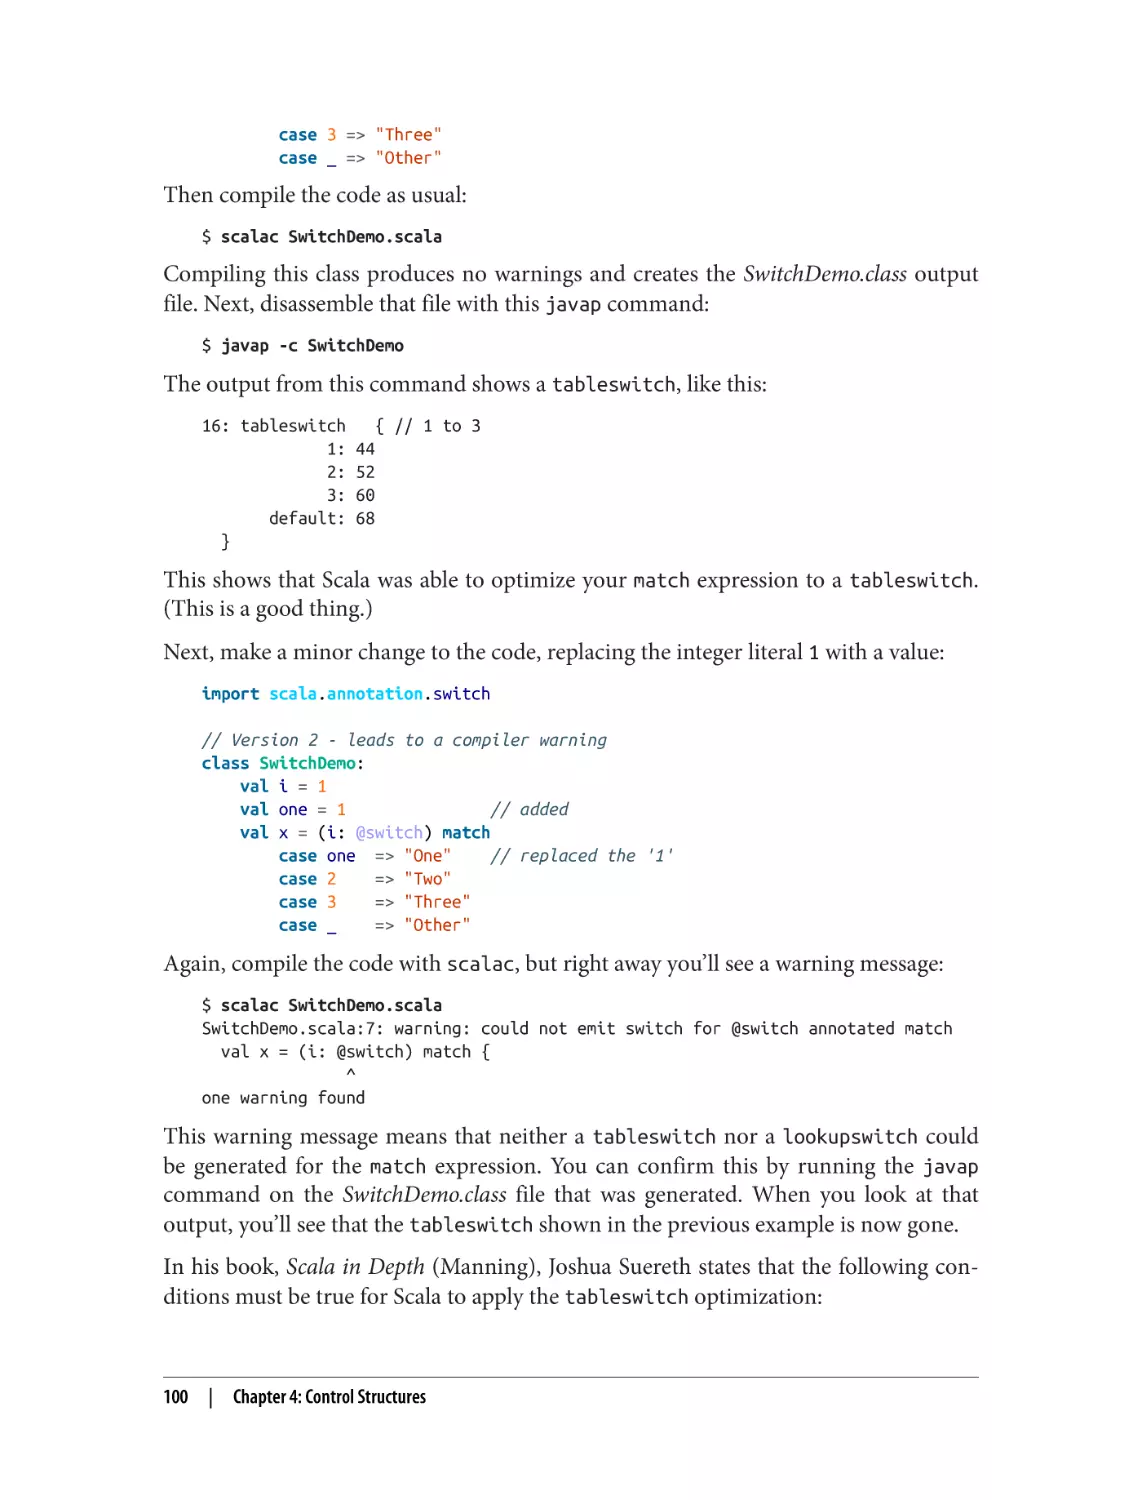
4.6 Using a Match Expression Like a switch Statement
4.7 Matching Multiple Conditions with One Case Statement
4.8 Assigning the Result of a Match Expression to a Variable
4.9 Accessing the Value of the Default Case in a Match Expression
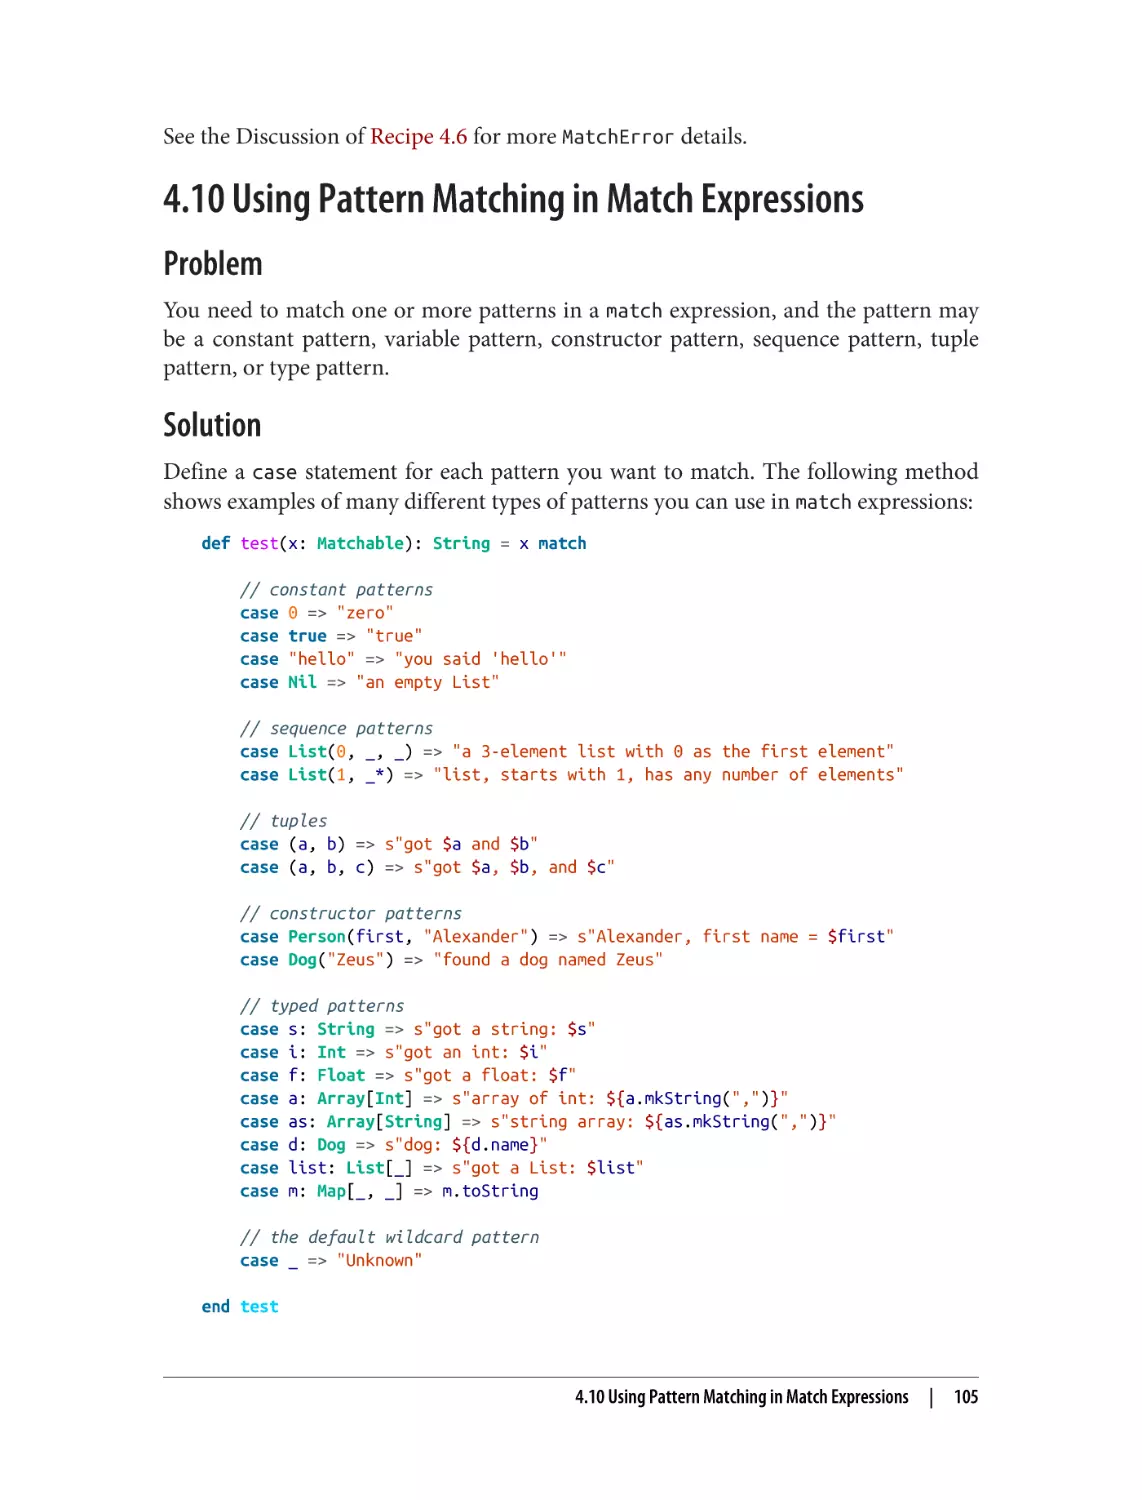
4.10 Using Pattern Matching in Match Expressions
4.11 Using Enums and Case Classes in match Expressions
4.12 Adding if Expressions (Guards) to Case Statements
4.13 Using a Match Expression Instead of isInstanceOf
4.14 Working with a List in a Match Expression
4.15 Matching One or More Exceptions with try/catch
4.16 Declaring a Variable Before Using It in a try/catch/finally Block
4.17 Creating Your Own Control Structures
88
92
93
95
97
98
102
103
104
105
111
112
114
117
120
123
125
5. Classes. . . . . . . . . . . . . . . . . . . . . . . . . . . . . . . . . . . . . . . . . . . . . . . . . . . . . . . . . . . . . . . . . . . 129
5.1 Choosing from Domain Modeling Options
5.2 Creating a Primary Constructor
5.3 Controlling the Visibility of Constructor Fields
5.4 Defining Auxiliary Constructors for Classes
5.5 Defining a Private Primary Constructor
vi
|
Table of Contents
131
137
140
144
146
5.6 Providing Default Values for Constructor Parameters
5.7 Handling Constructor Parameters When Extending a Class
5.8 Calling a Superclass Constructor
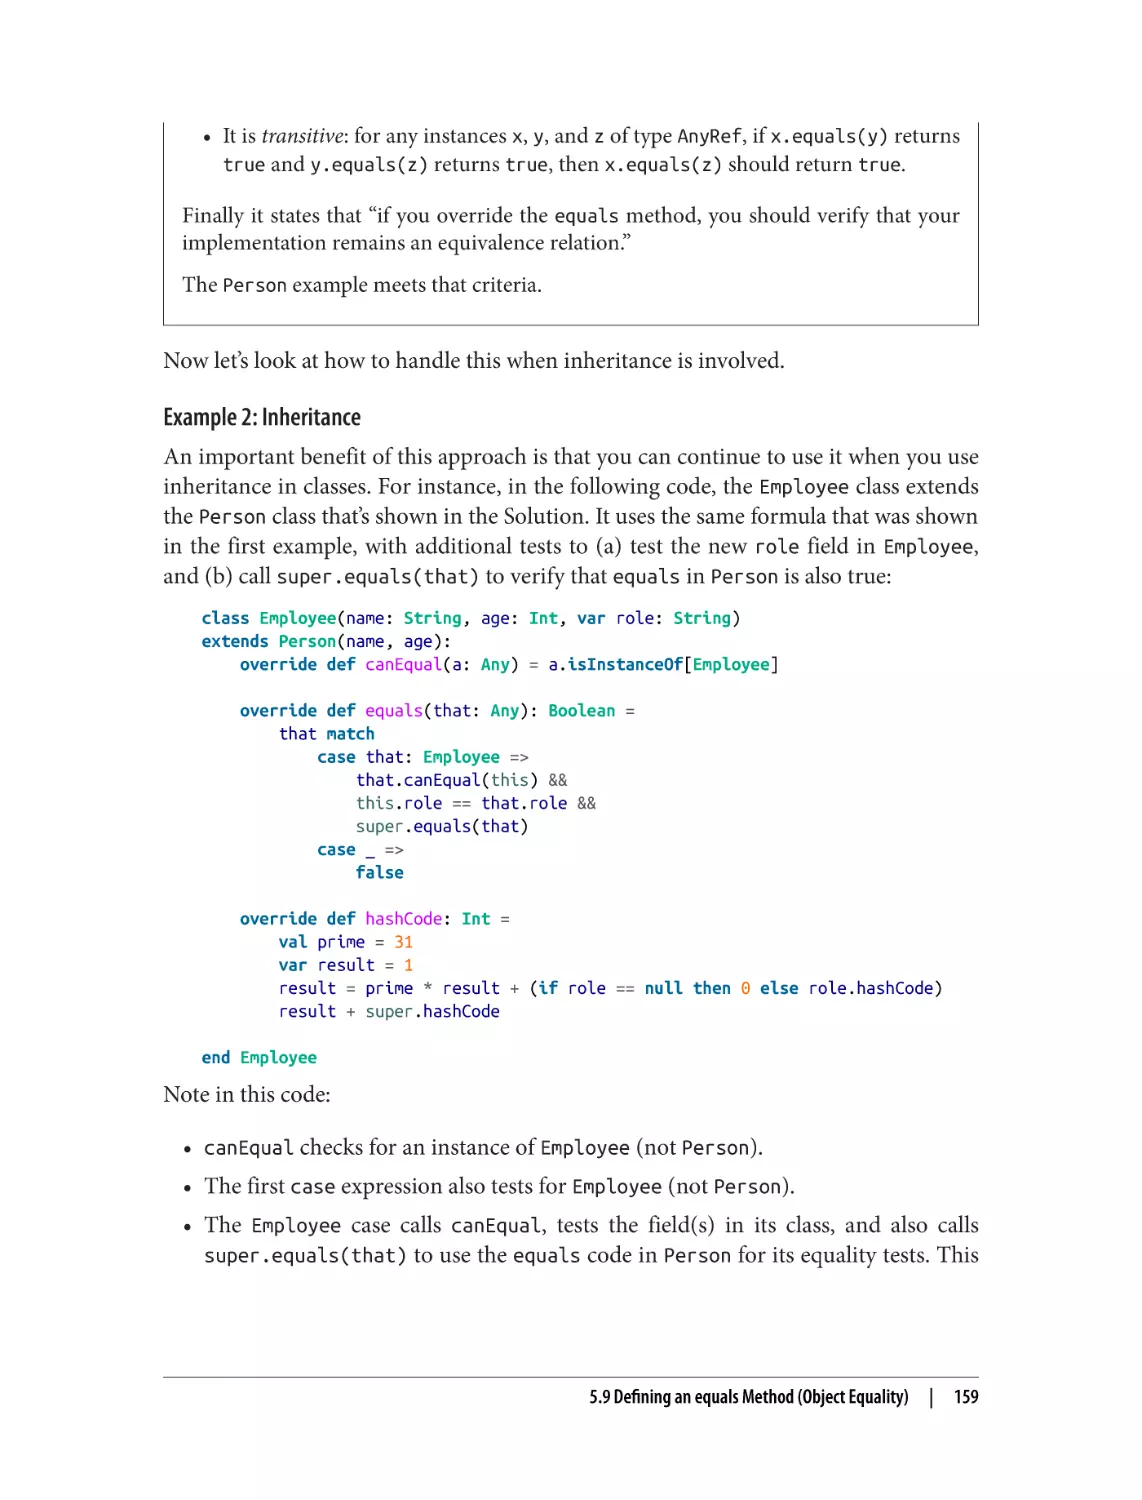
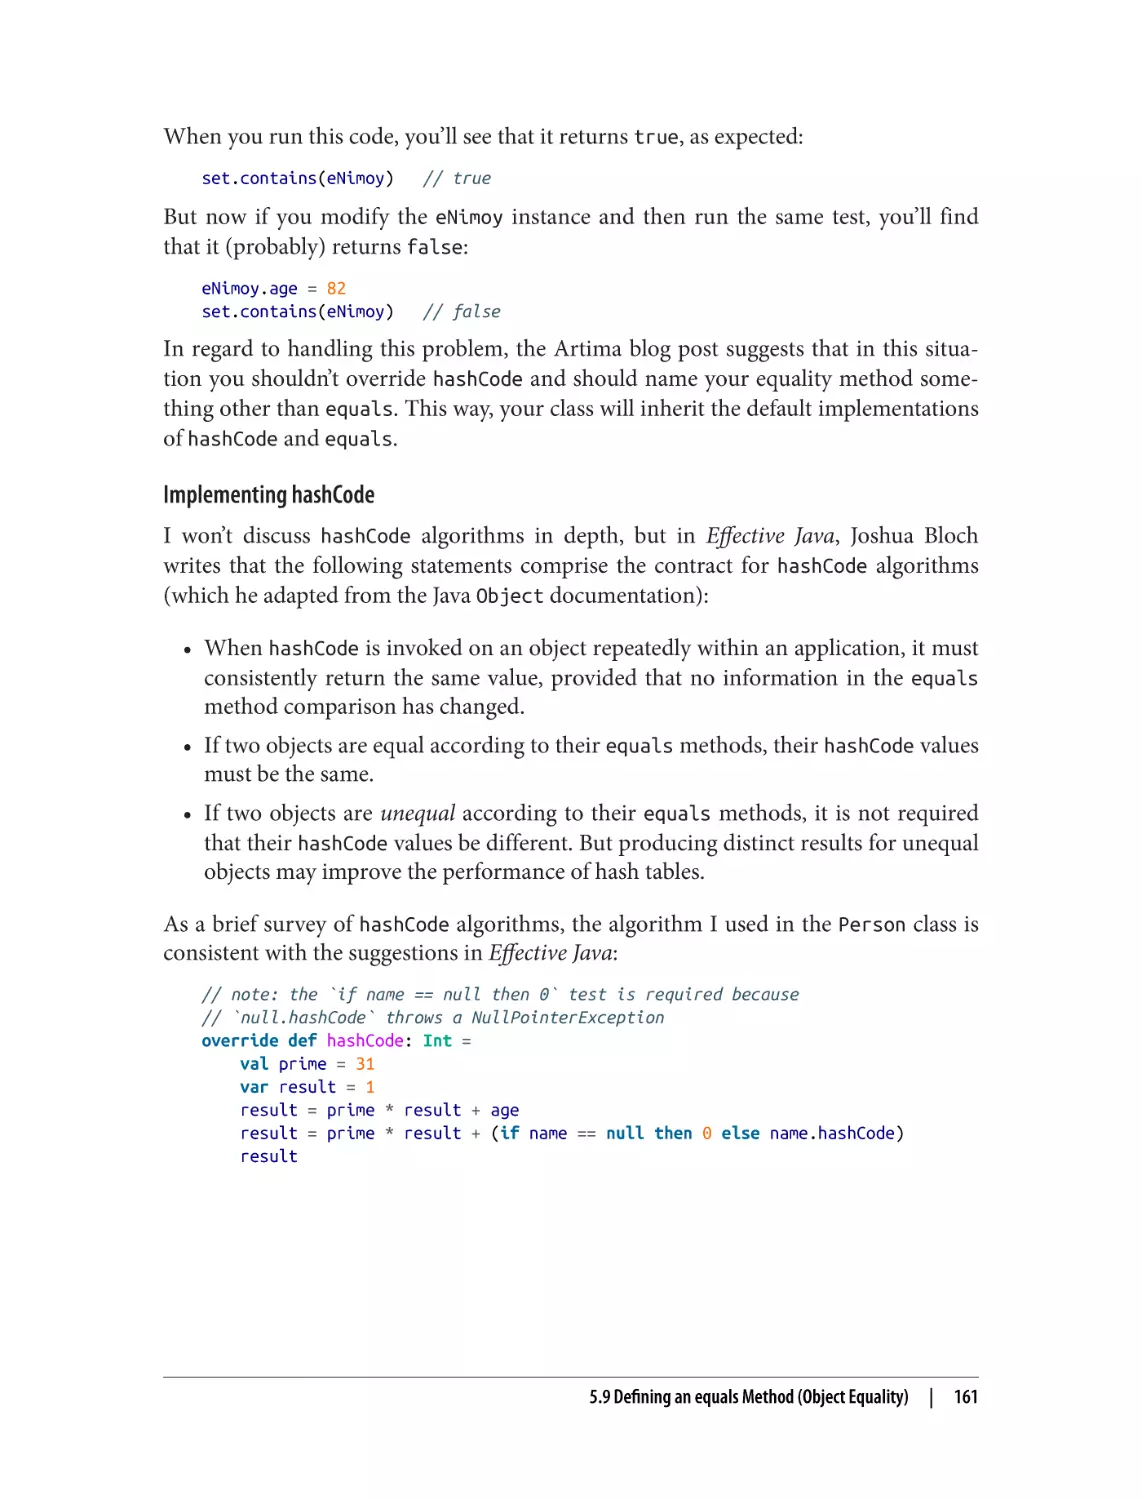
5.9 Defining an equals Method (Object Equality)
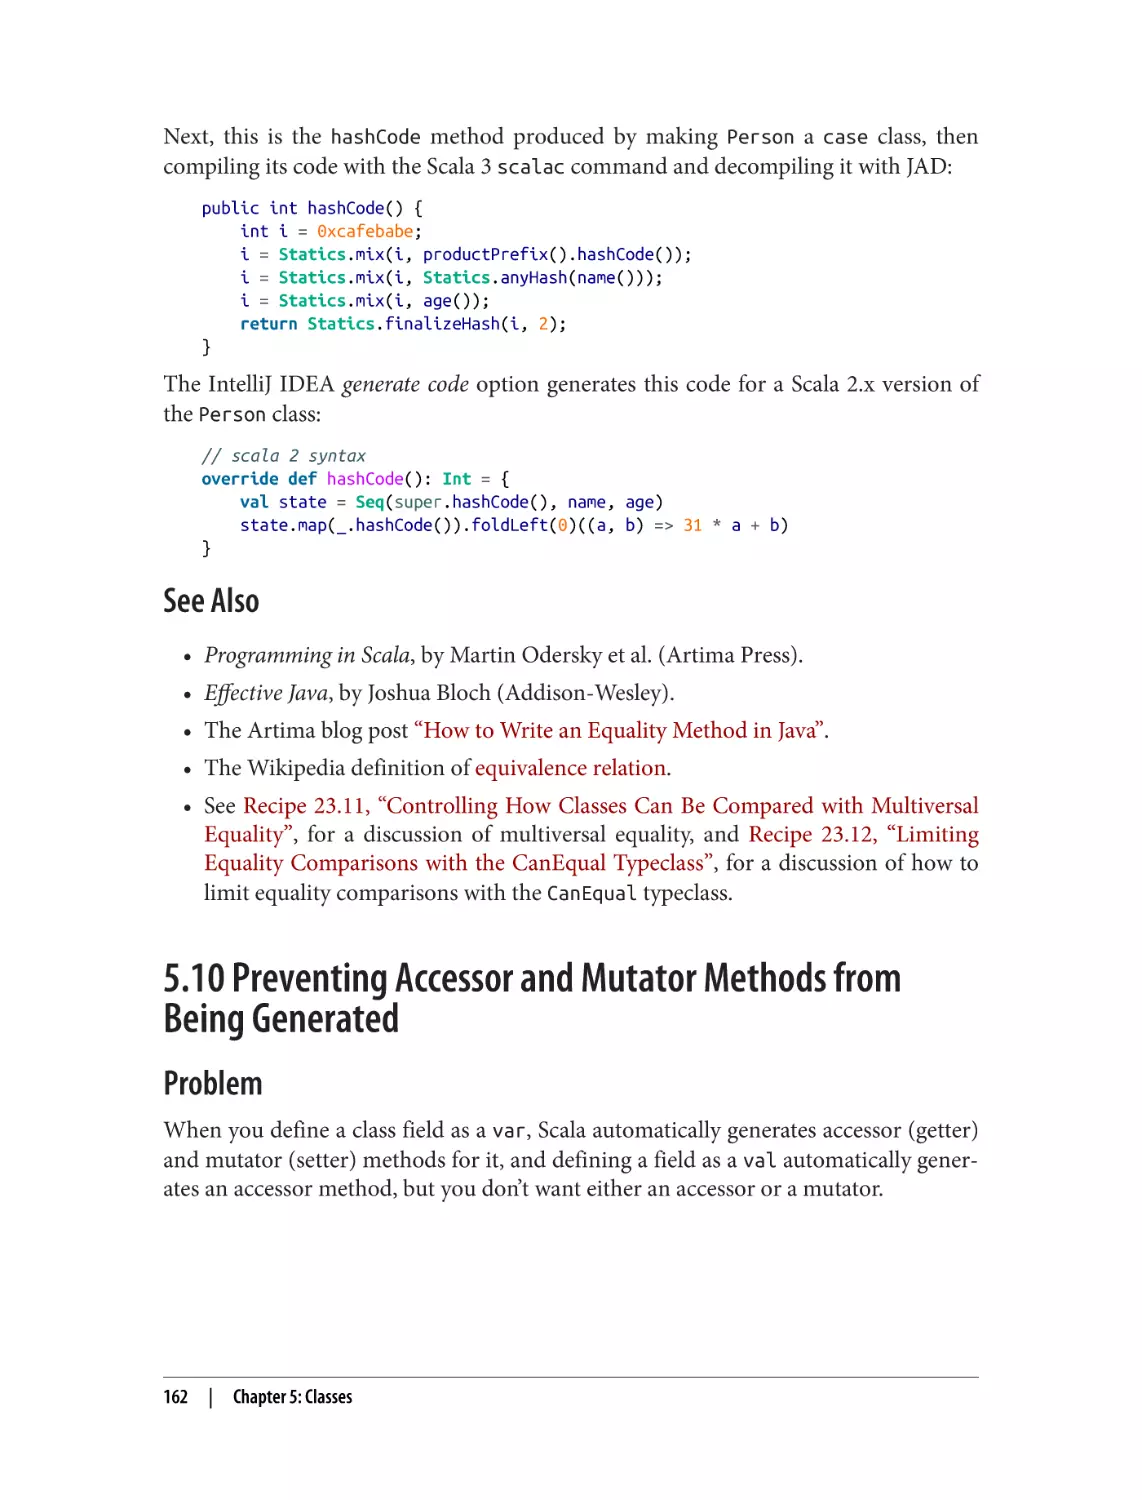
5.10 Preventing Accessor and Mutator Methods from Being Generated
5.11 Overriding Default Accessors and Mutators
5.12 Assigning a Block or Function to a (lazy) Field
5.13 Setting Uninitialized var Field Types
5.14 Generating Boilerplate Code with Case Classes
5.15 Defining Auxiliary Constructors for Case Classes
148
149
152
154
162
165
167
169
171
176
6. Traits and Enums. . . . . . . . . . . . . . . . . . . . . . . . . . . . . . . . . . . . . . . . . . . . . . . . . . . . . . . . . . 179
6.1 Using a Trait as an Interface
6.2 Defining Abstract Fields in Traits
6.3 Using a Trait Like an Abstract Class
6.4 Using Traits as Mixins
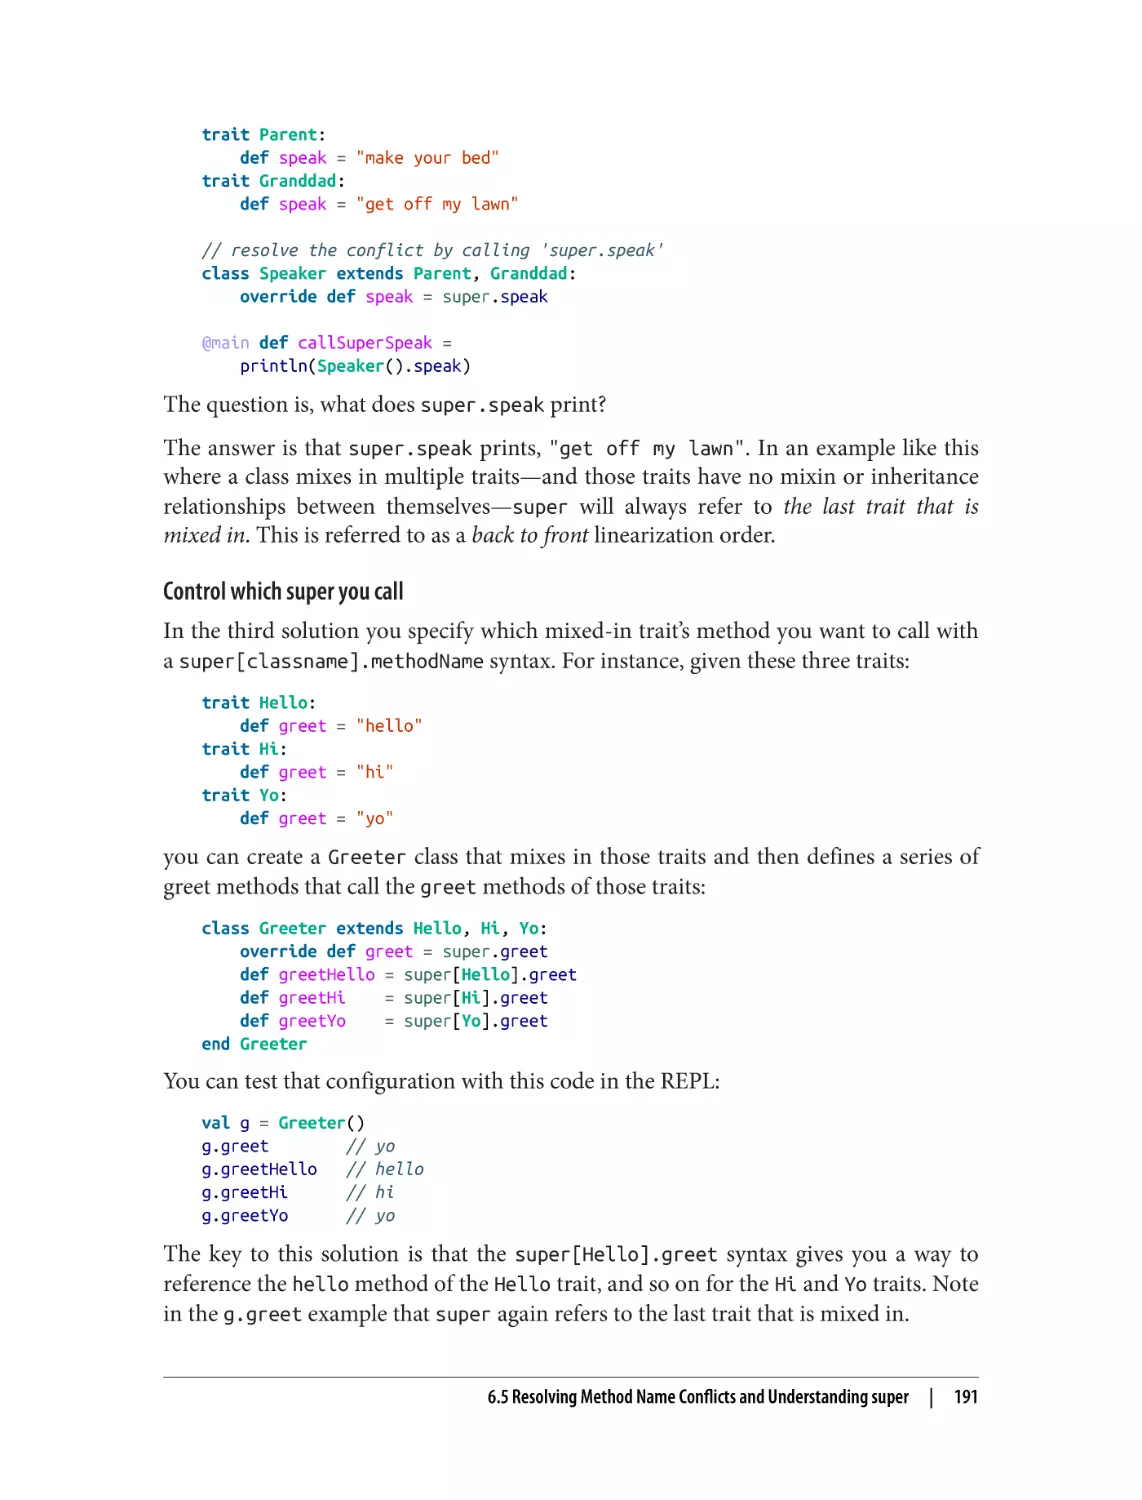
6.5 Resolving Method Name Conflicts and Understanding super
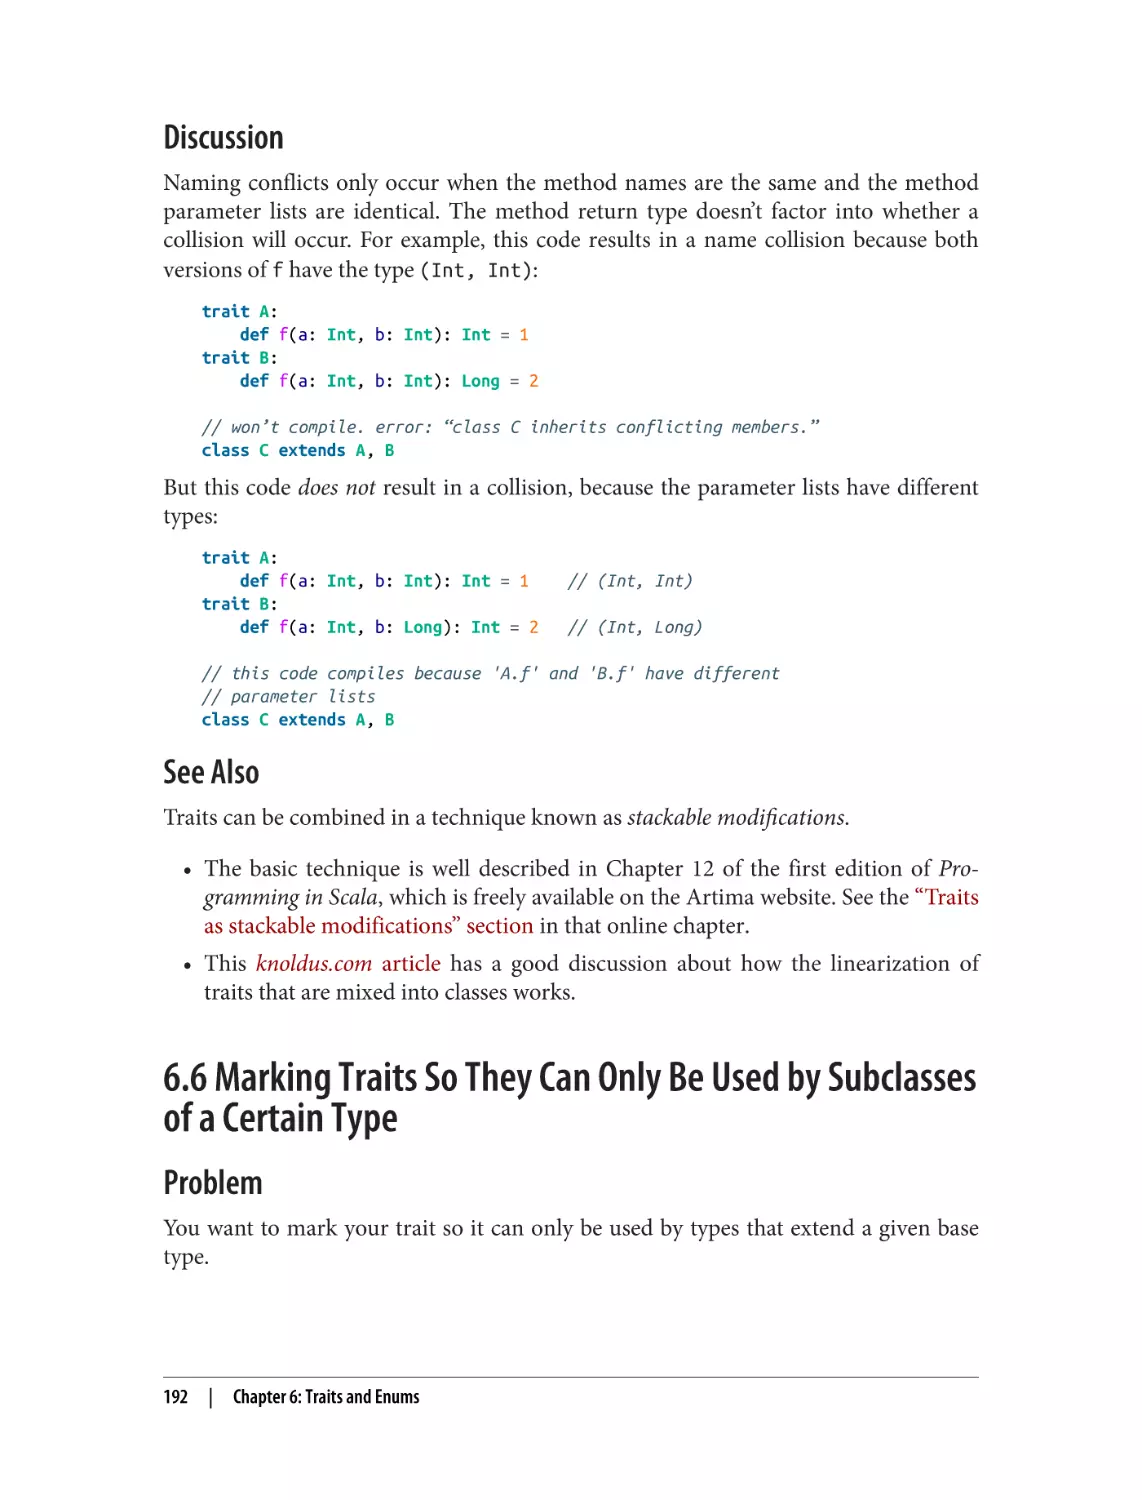
6.6 Marking Traits So They Can Only Be Used by Subclasses of a Certain Type
6.7 Ensuring a Trait Can Only Be Added to a Type That Has a Specific
Method
6.8 Limiting Which Classes Can Use a Trait by Inheritance
6.9 Working with Parameterized Traits
6.10 Using Trait Parameters
6.11 Using Traits to Create Modules
6.12 How to Create Sets of Named Values with Enums
6.13 Modeling Algebraic Data Types with Enums
181
183
185
186
189
192
196
197
198
200
204
210
213
7. Objects. . . . . . . . . . . . . . . . . . . . . . . . . . . . . . . . . . . . . . . . . . . . . . . . . . . . . . . . . . . . . . . . . . 217
7.1 Casting Objects
7.2 Passing a Class Type with the classOf Method
7.3 Creating Singletons with object
7.4 Creating Static Members with Companion Objects
7.5 Using apply Methods in Objects as Constructors
7.6 Implementing a Static Factory with apply
7.7 Reifying Traits as Objects
7.8 Implementing Pattern Matching with unapply
218
219
220
221
223
225
227
230
8. Methods. . . . . . . . . . . . . . . . . . . . . . . . . . . . . . . . . . . . . . . . . . . . . . . . . . . . . . . . . . . . . . . . . 233
8.1 Controlling Method Scope (Access Modifiers)
235
Table of Contents
|
vii
8.2 Calling a Method on a Superclass or Trait
8.3 Using Parameter Names When Calling a Method
8.4 Setting Default Values for Method Parameters
8.5 Creating Methods That Take Variable-Argument Fields
8.6 Forcing Callers to Leave Parentheses Off Accessor Methods
8.7 Declaring That a Method Can Throw an Exception
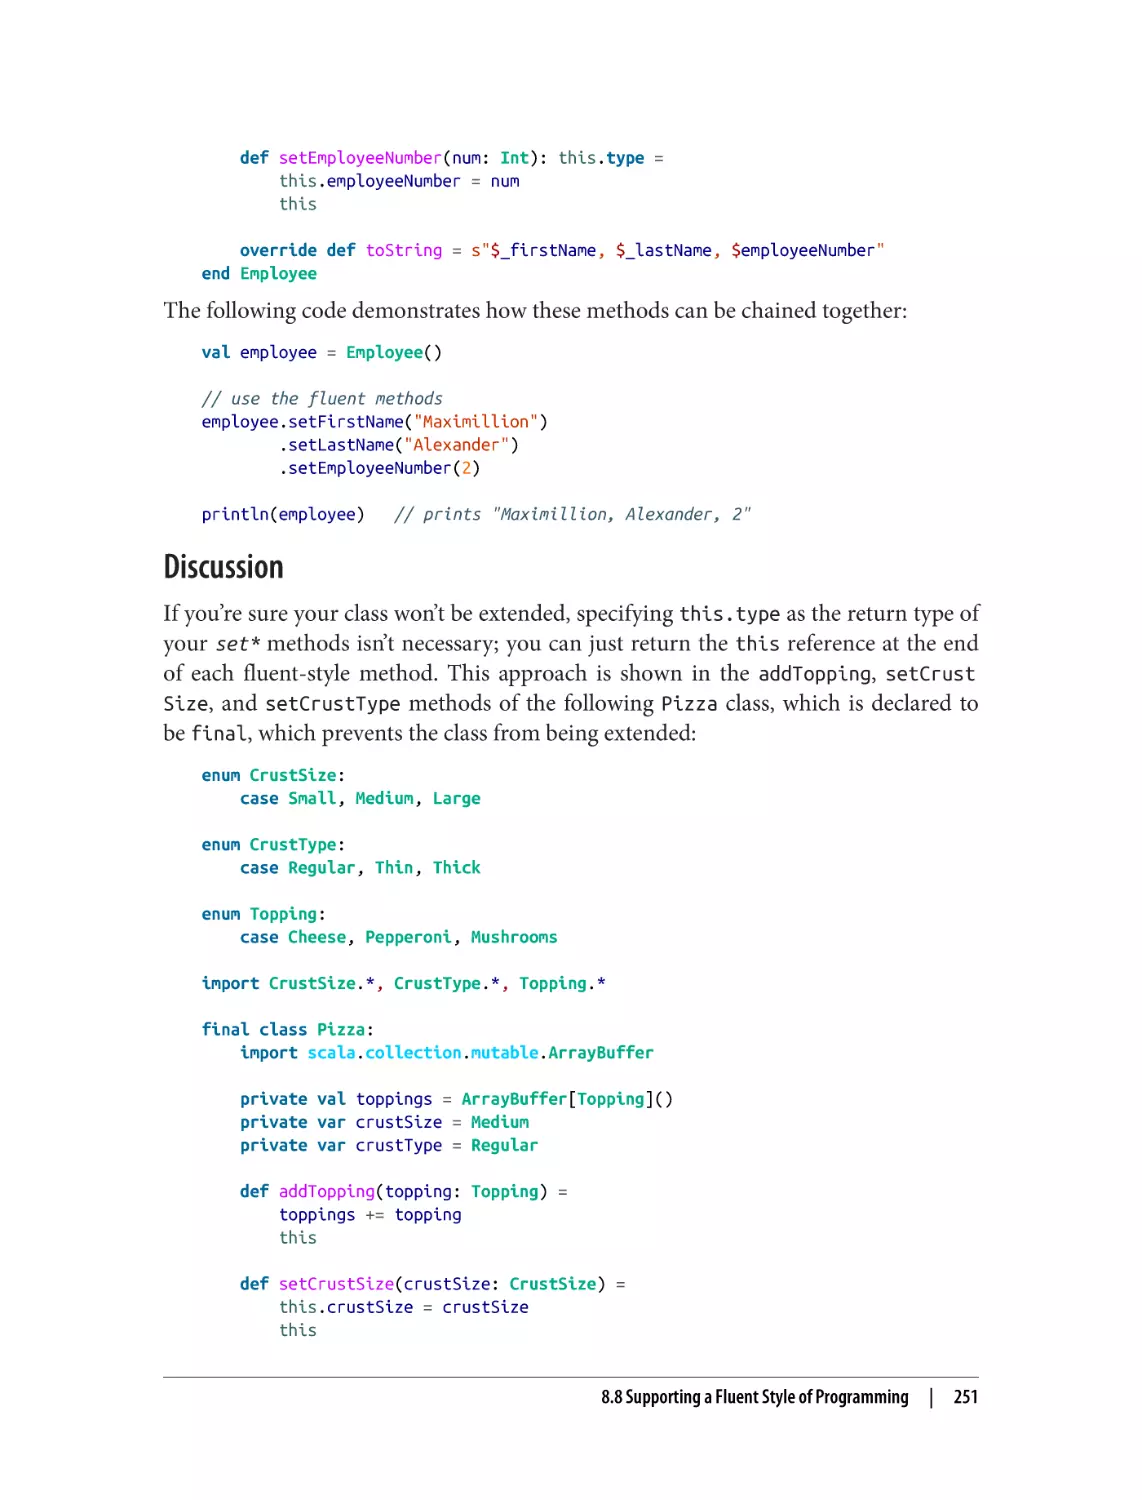
8.8 Supporting a Fluent Style of Programming
8.9 Adding New Methods to Closed Classes with Extension Methods
239
242
244
245
247
248
250
253
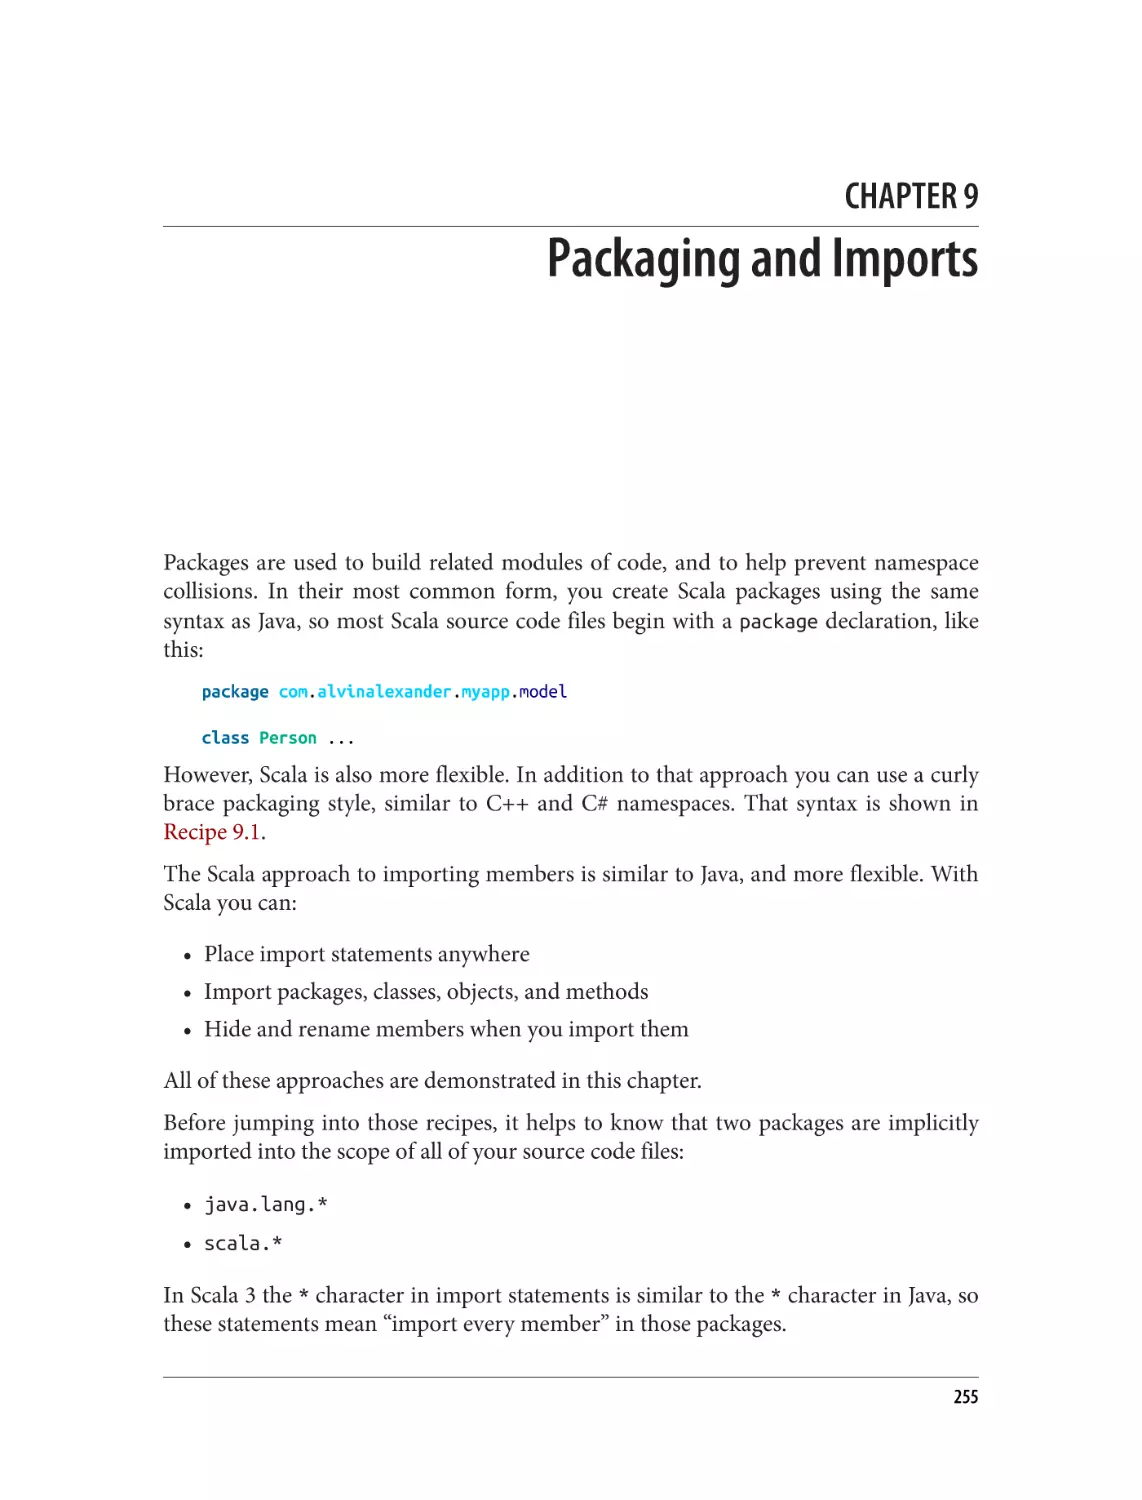
9. Packaging and Imports. . . . . . . . . . . . . . . . . . . . . . . . . . . . . . . . . . . . . . . . . . . . . . . . . . . . . 255
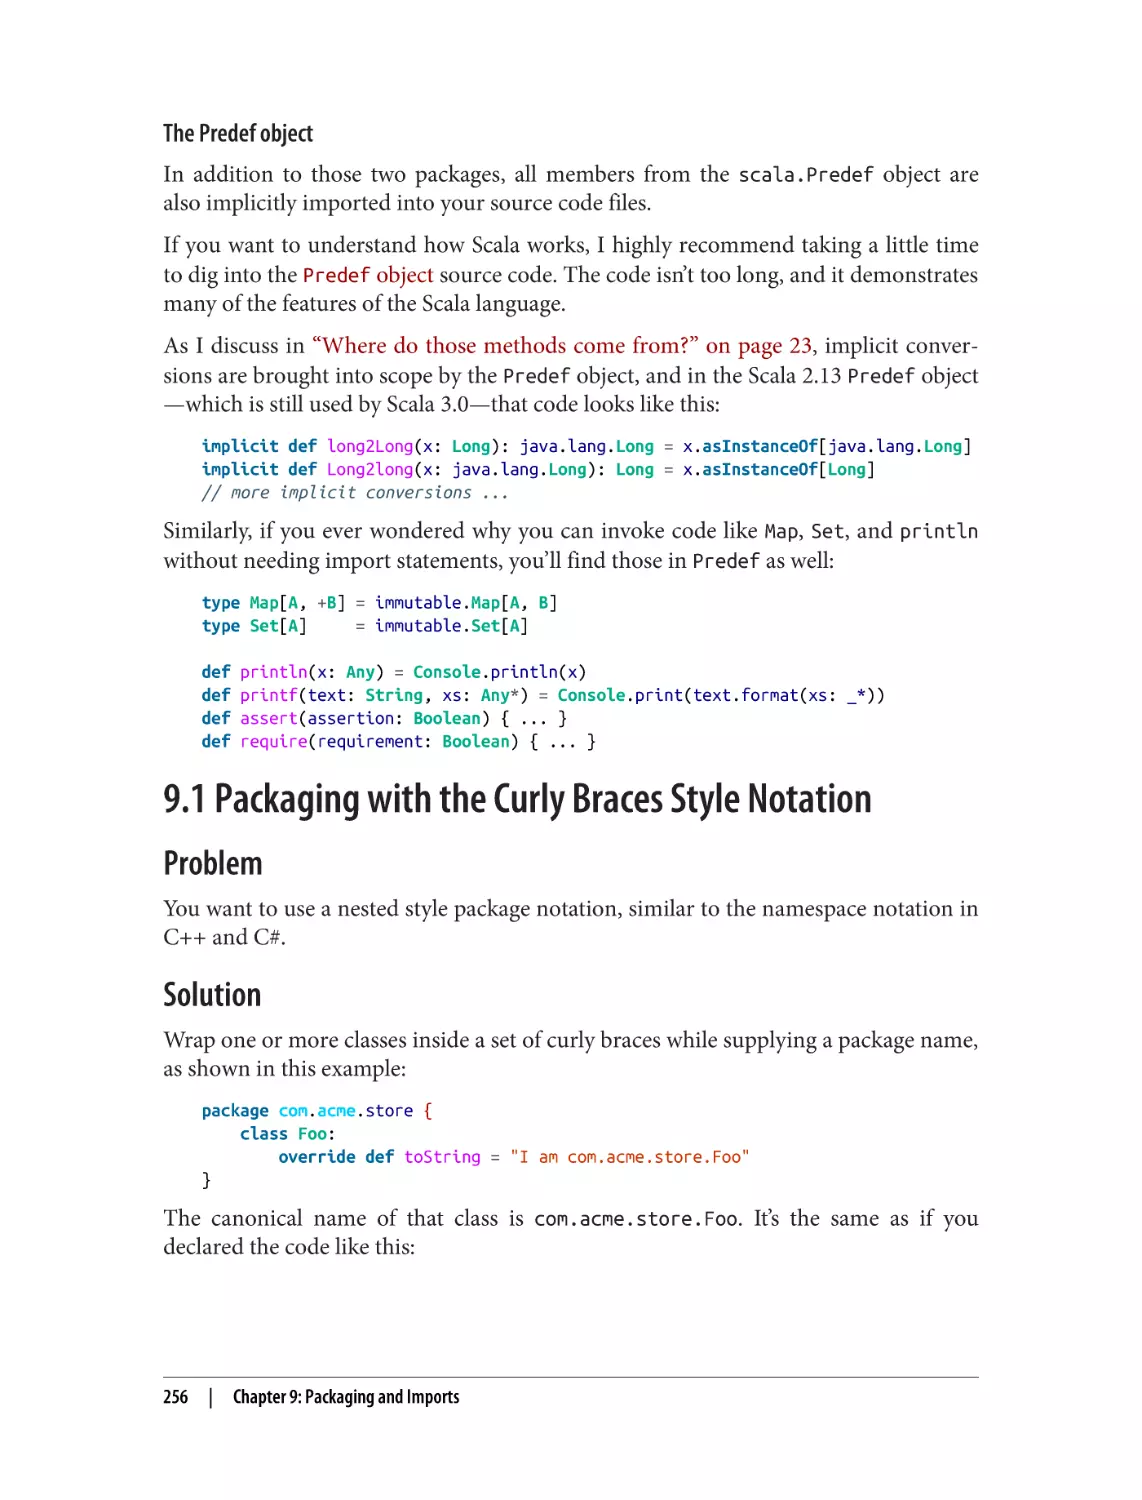
9.1 Packaging with the Curly Braces Style Notation
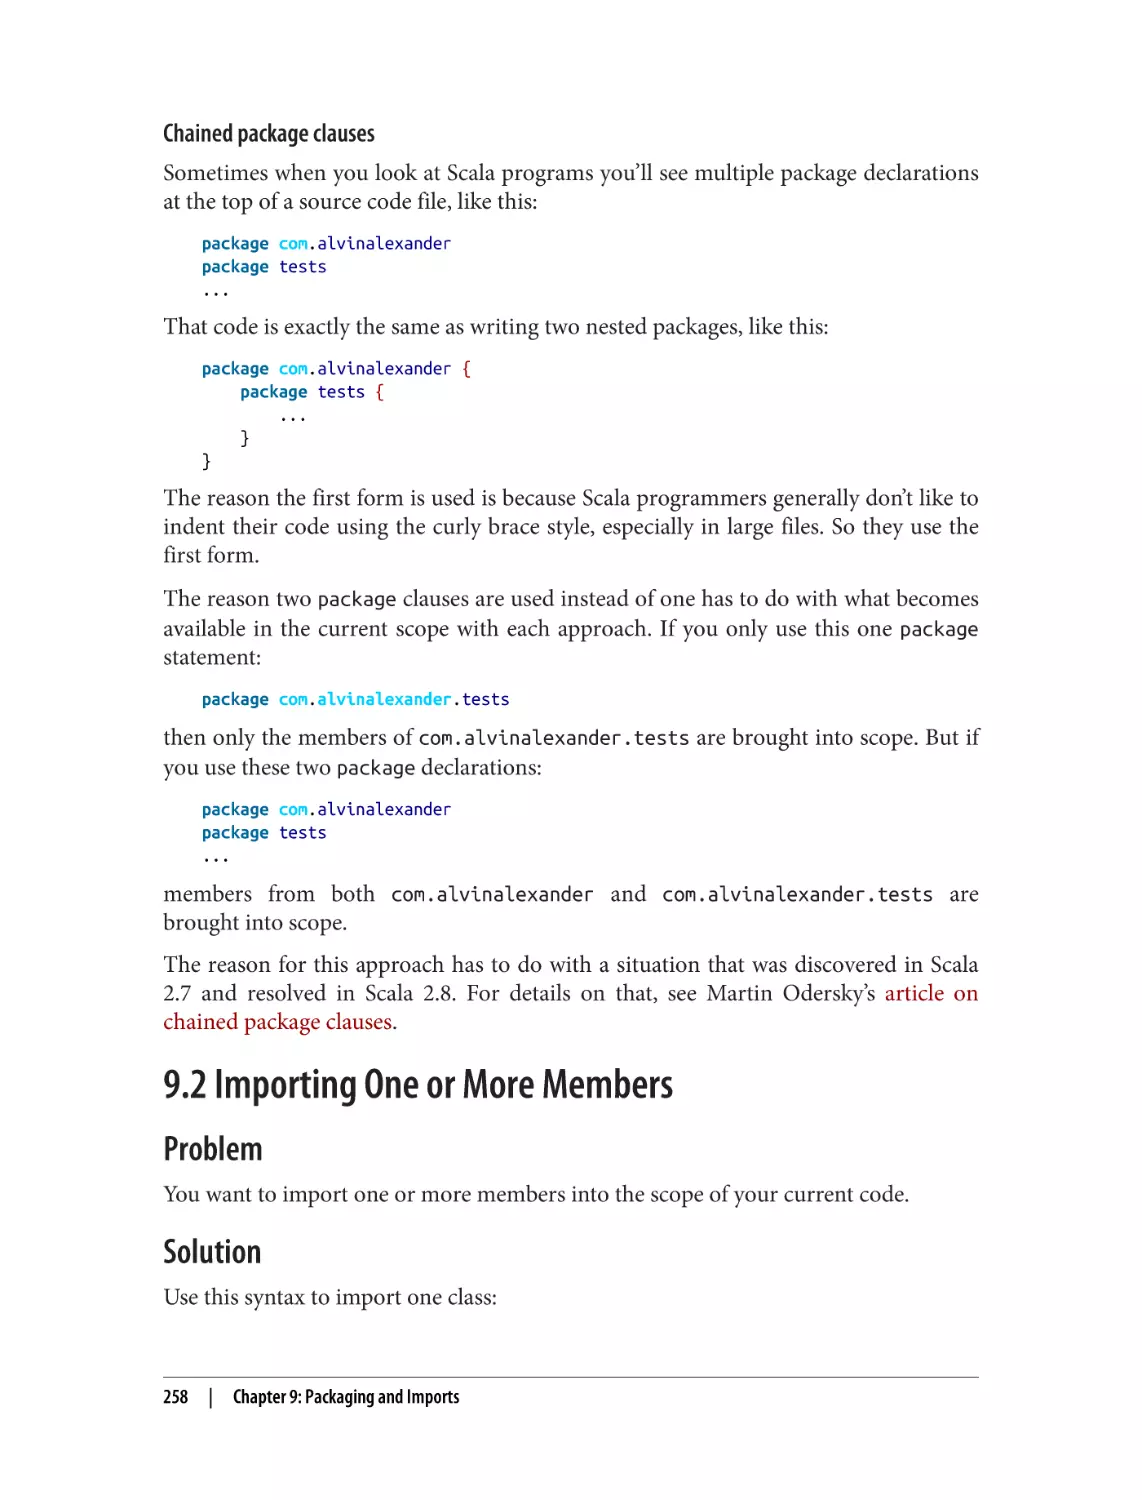
9.2 Importing One or More Members
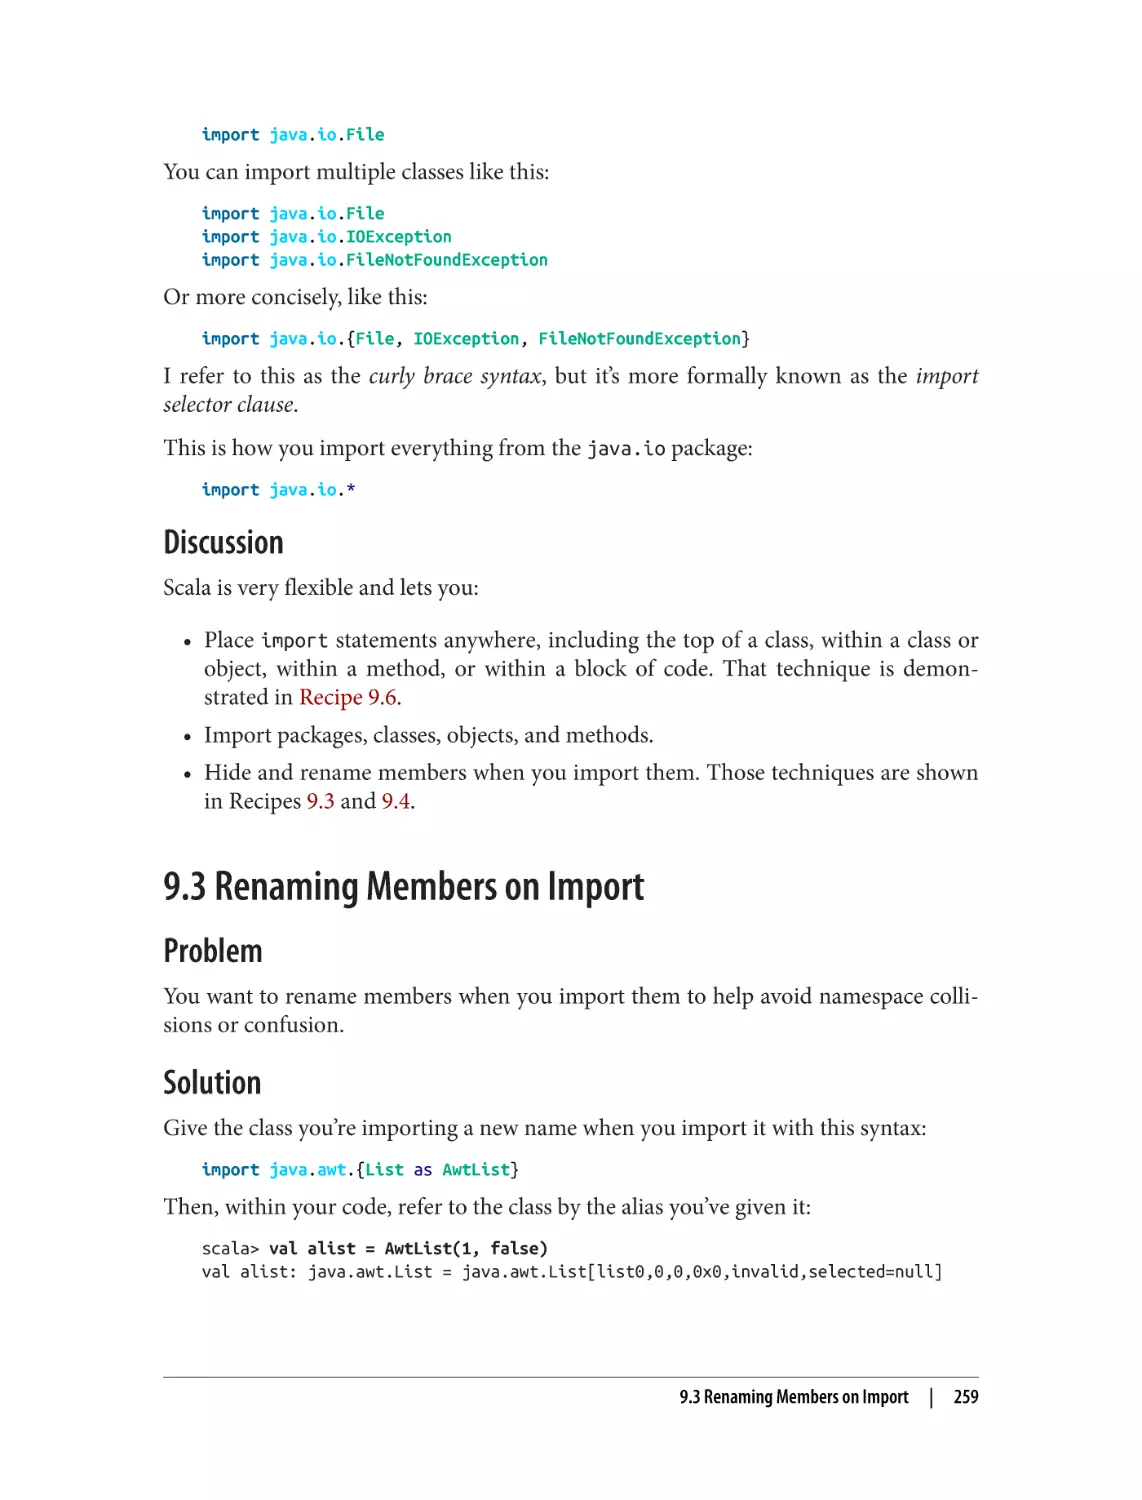
9.3 Renaming Members on Import
9.4 Hiding a Class During the Import Process
9.5 Importing Static Members
9.6 Using Import Statements Anywhere
9.7 Importing Givens
256
258
259
261
263
264
267
10. Functional Programming. . . . . . . . . . . . . . . . . . . . . . . . . . . . . . . . . . . . . . . . . . . . . . . . . . . 271
10.1 Using Function Literals (Anonymous Functions)
10.2 Passing Functions Around as Variables
10.3 Defining a Method That Accepts a Simple Function Parameter
10.4 Declaring More Complex Higher-Order Functions
10.5 Using Partially Applied Functions
10.6 Creating a Method That Returns a Function
10.7 Creating Partial Functions
10.8 Implementing Functional Error Handling
10.9 Real-World Example: Passing Functions Around in an Algorithm
10.10 Real-World Example: Functional Domain Modeling
279
281
287
289
292
295
298
303
305
308
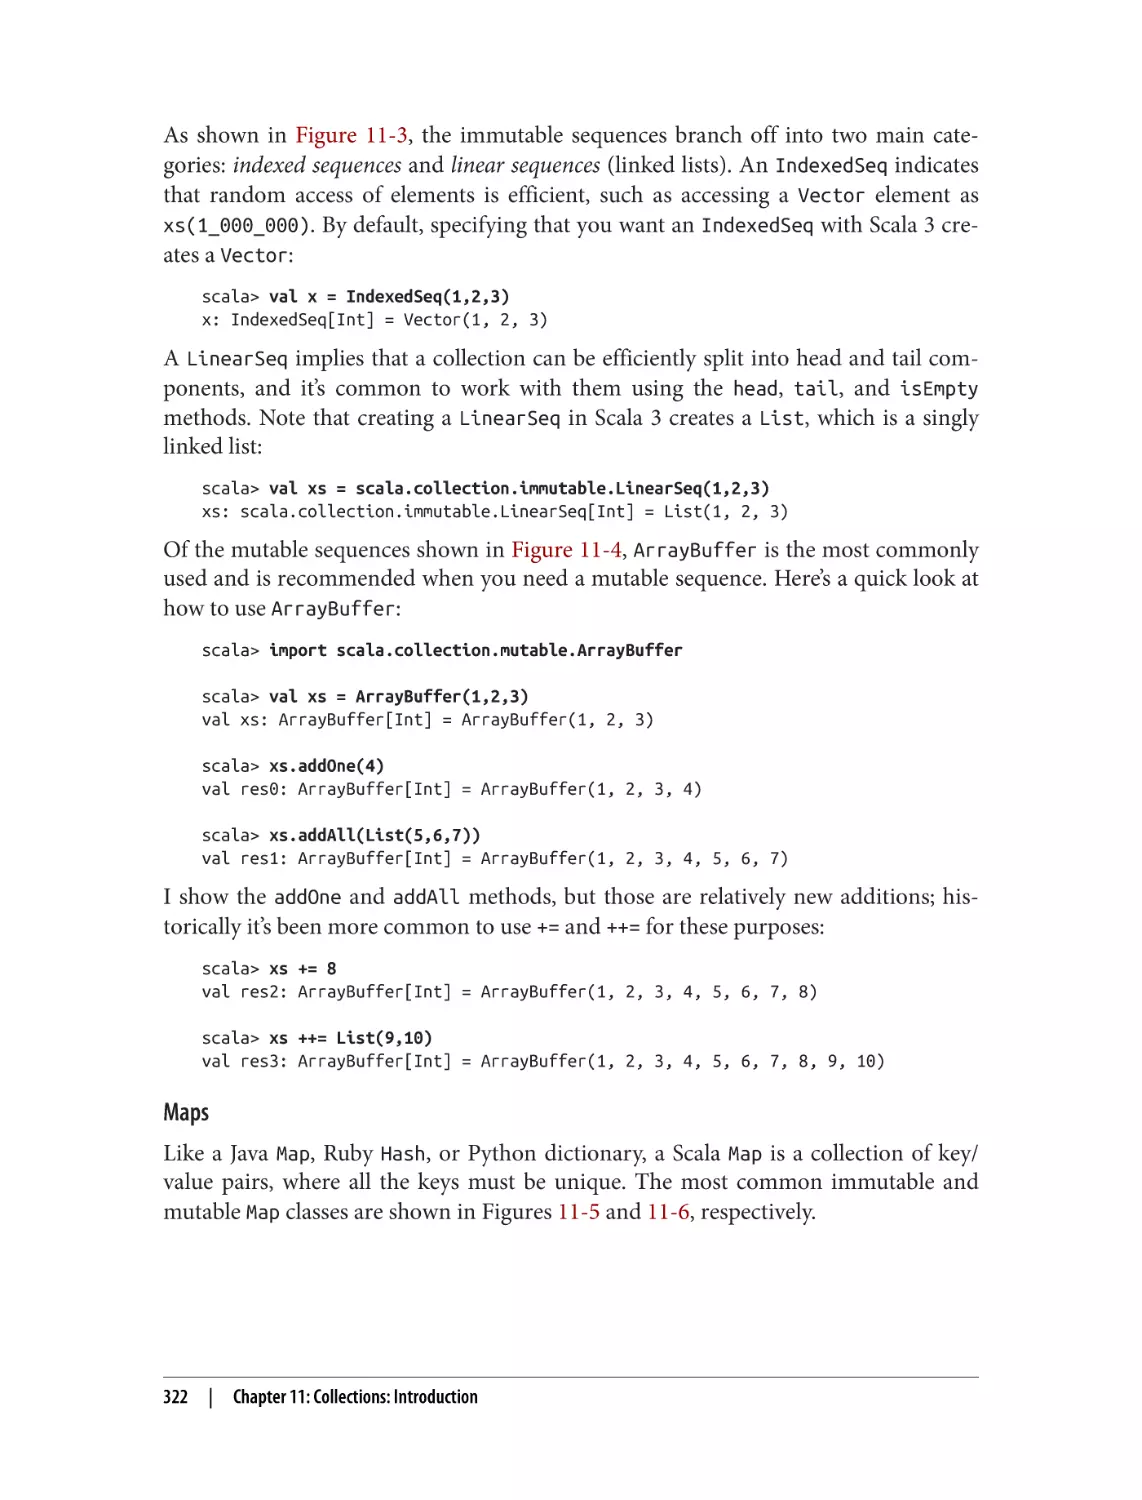
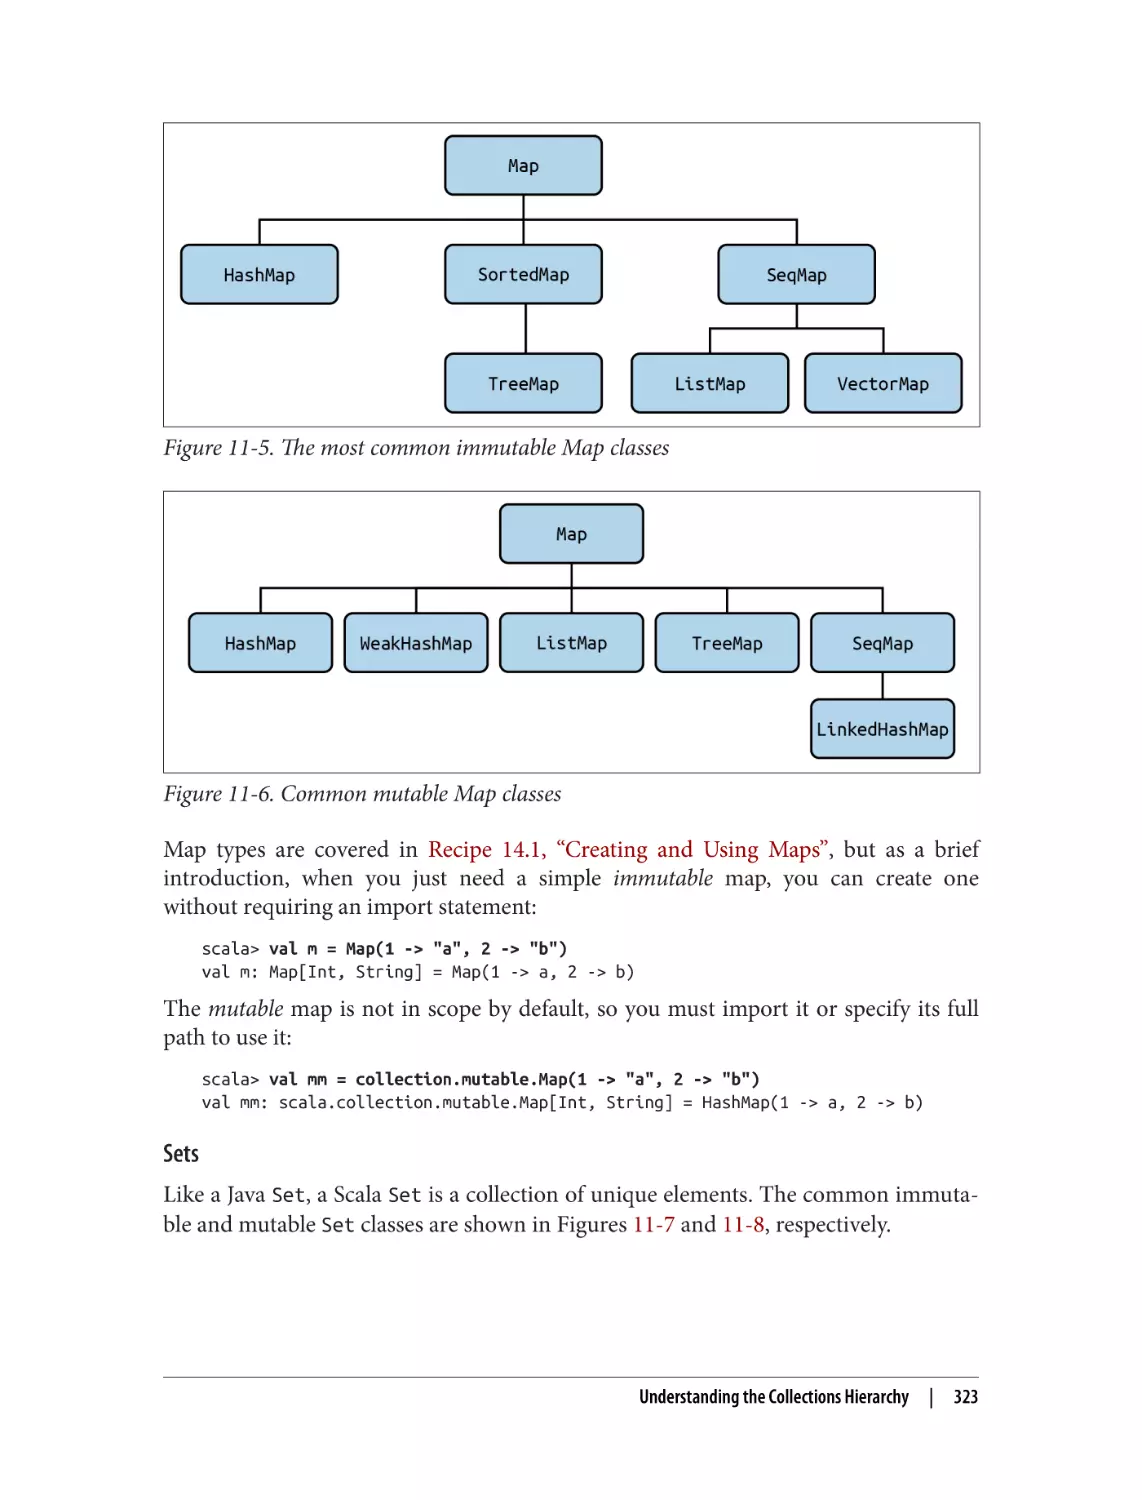
11. Collections: Introduction. . . . . . . . . . . . . . . . . . . . . . . . . . . . . . . . . . . . . . . . . . . . . . . . . . . 317
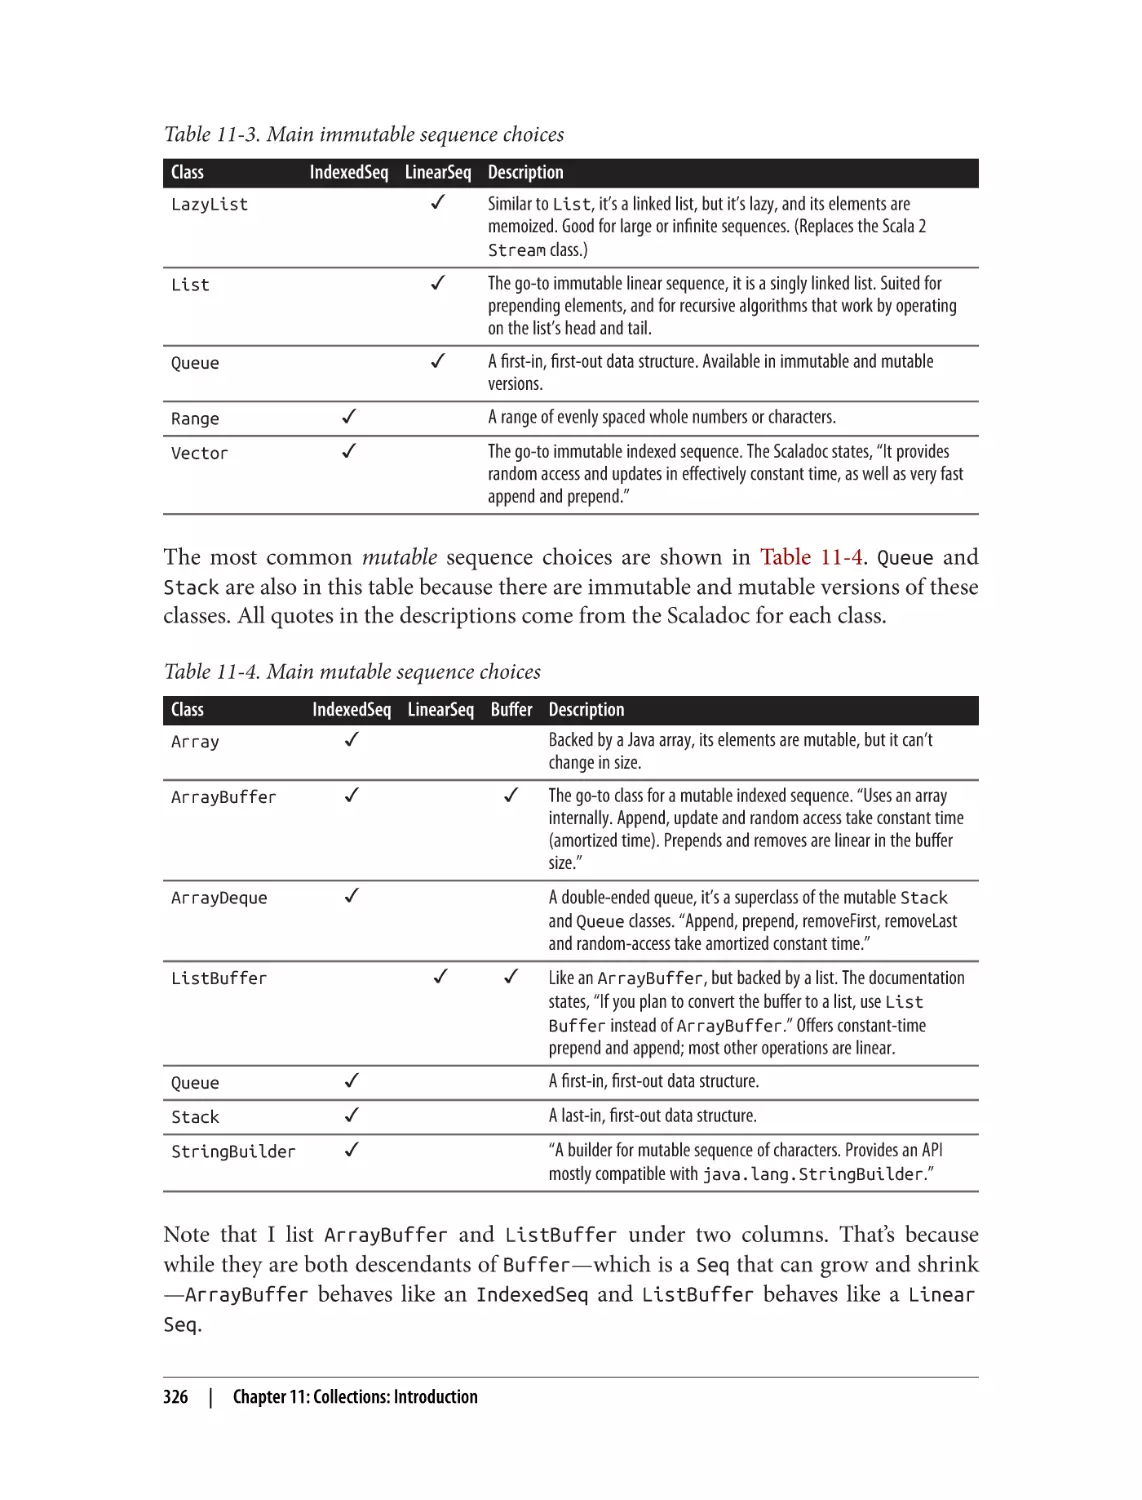
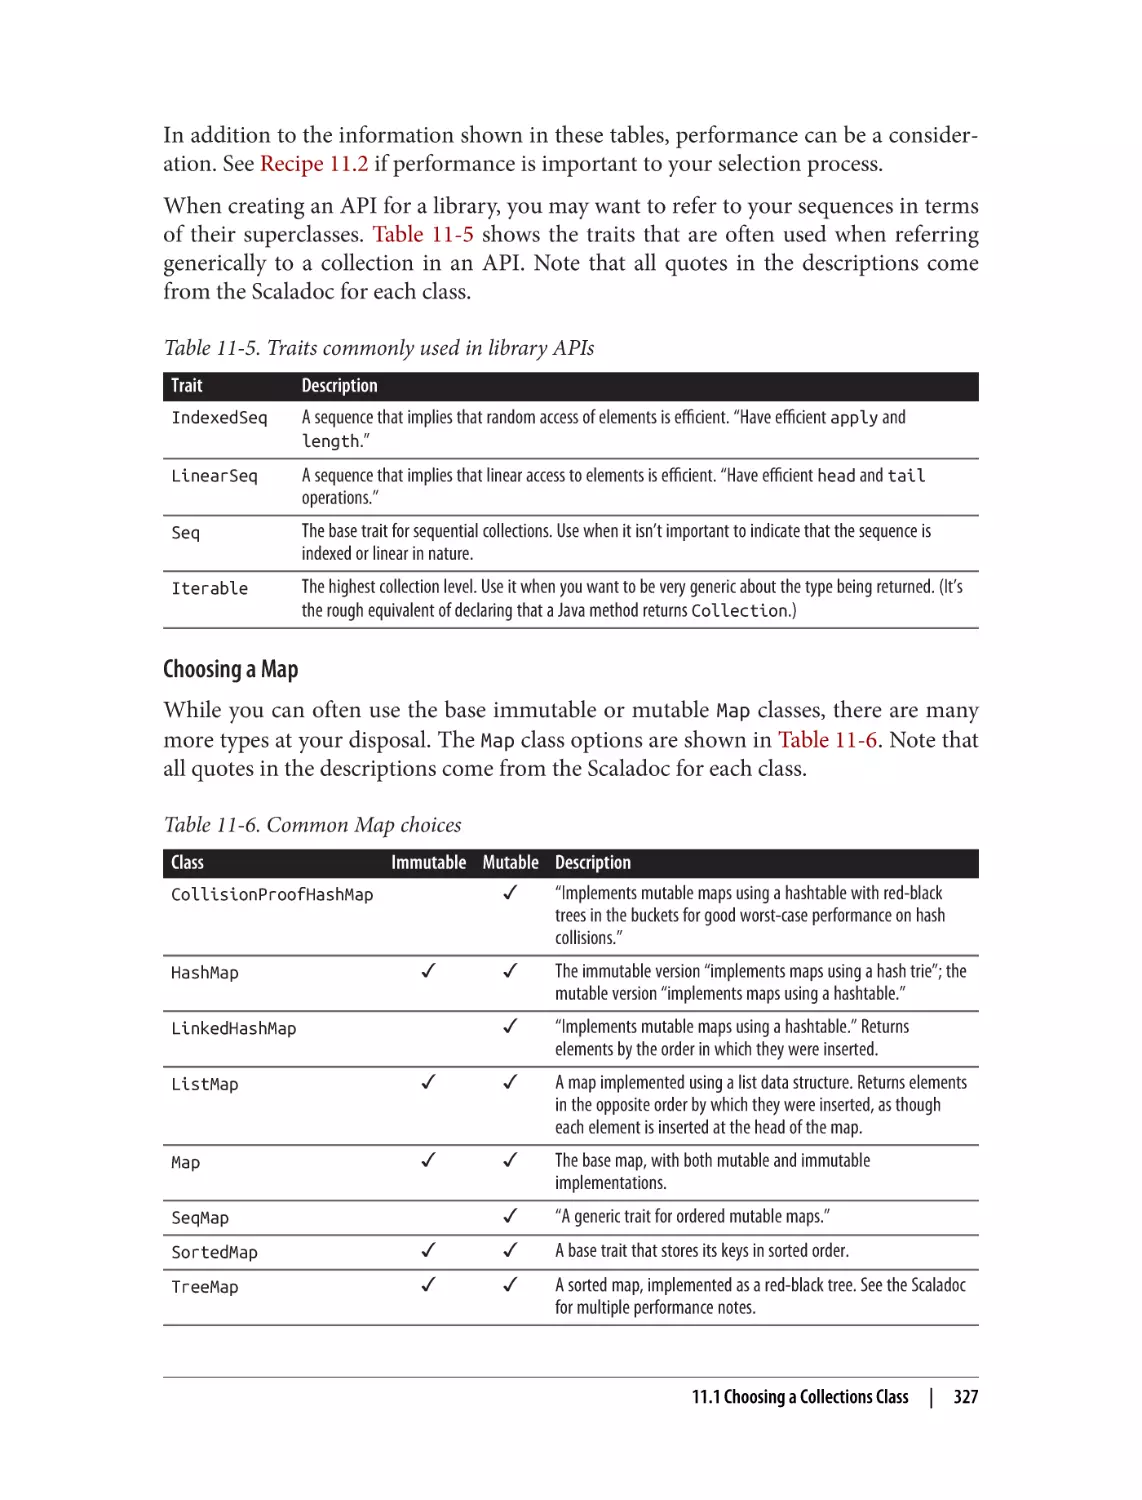
11.1 Choosing a Collections Class
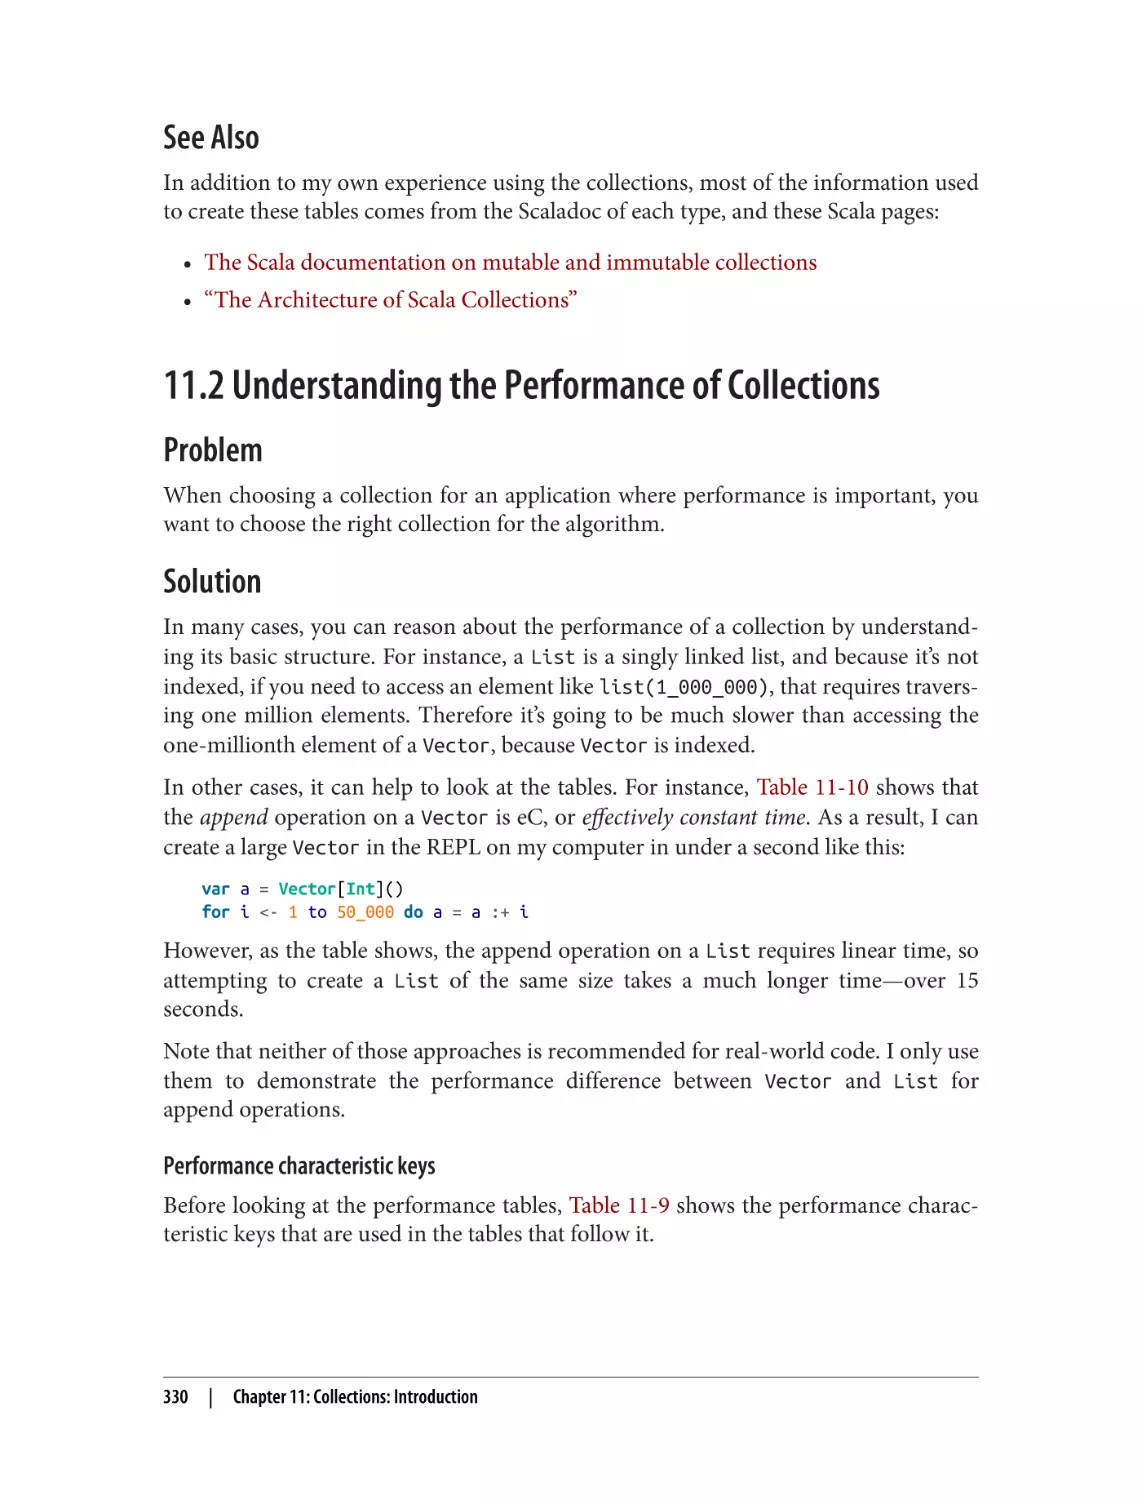
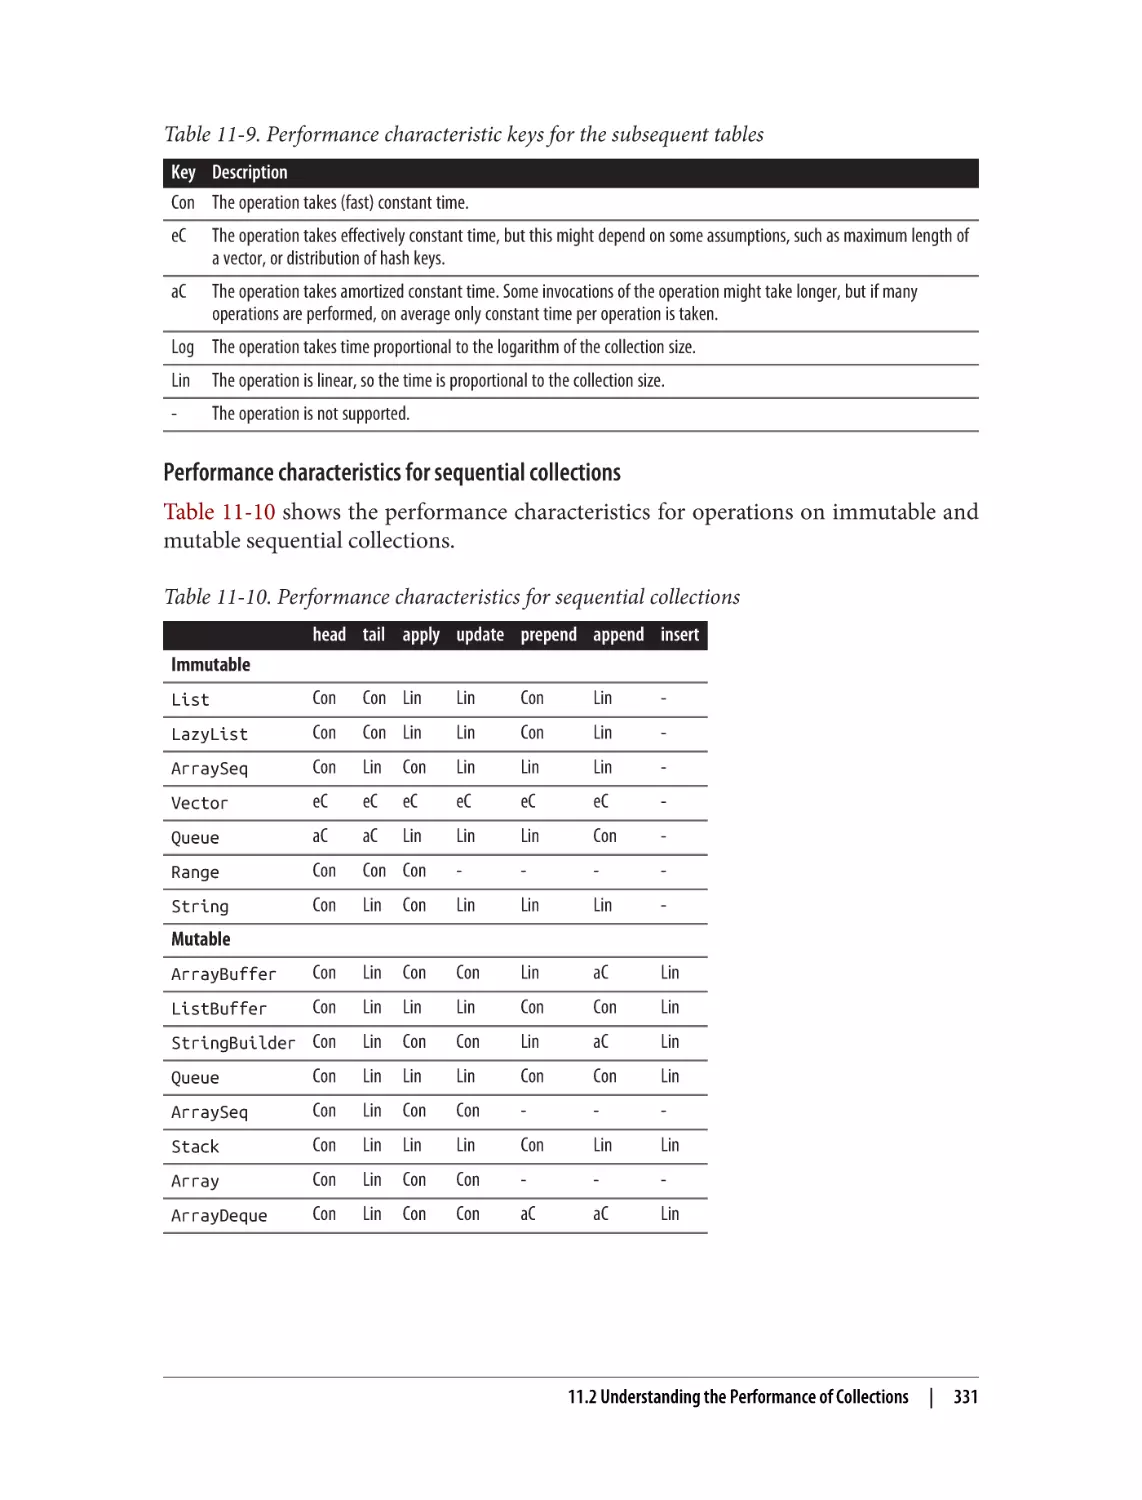
11.2 Understanding the Performance of Collections
11.3 Understanding Mutable Variables with Immutable Collections
11.4 Creating a Lazy View on a Collection
324
330
333
335
12. Collections: Common Sequence Classes. . . . . . . . . . . . . . . . . . . . . . . . . . . . . . . . . . . . . . . 339
12.1 Making Vector Your Go-To Immutable Sequence
12.2 Creating and Populating a List
viii
| Table of Contents
341
344
12.3 Adding Elements to a List
12.4 Deleting Elements from a List (or ListBuffer)
12.5 Creating a Mutable List with ListBuffer
12.6 Using LazyList, a Lazy Version of a List
12.7 Making ArrayBuffer Your Go-To Mutable Sequence
12.8 Deleting Array and ArrayBuffer Elements
12.9 Creating and Updating an Array
12.10 Creating Multidimensional Arrays
12.11 Sorting Arrays
346
349
351
352
355
357
359
362
365
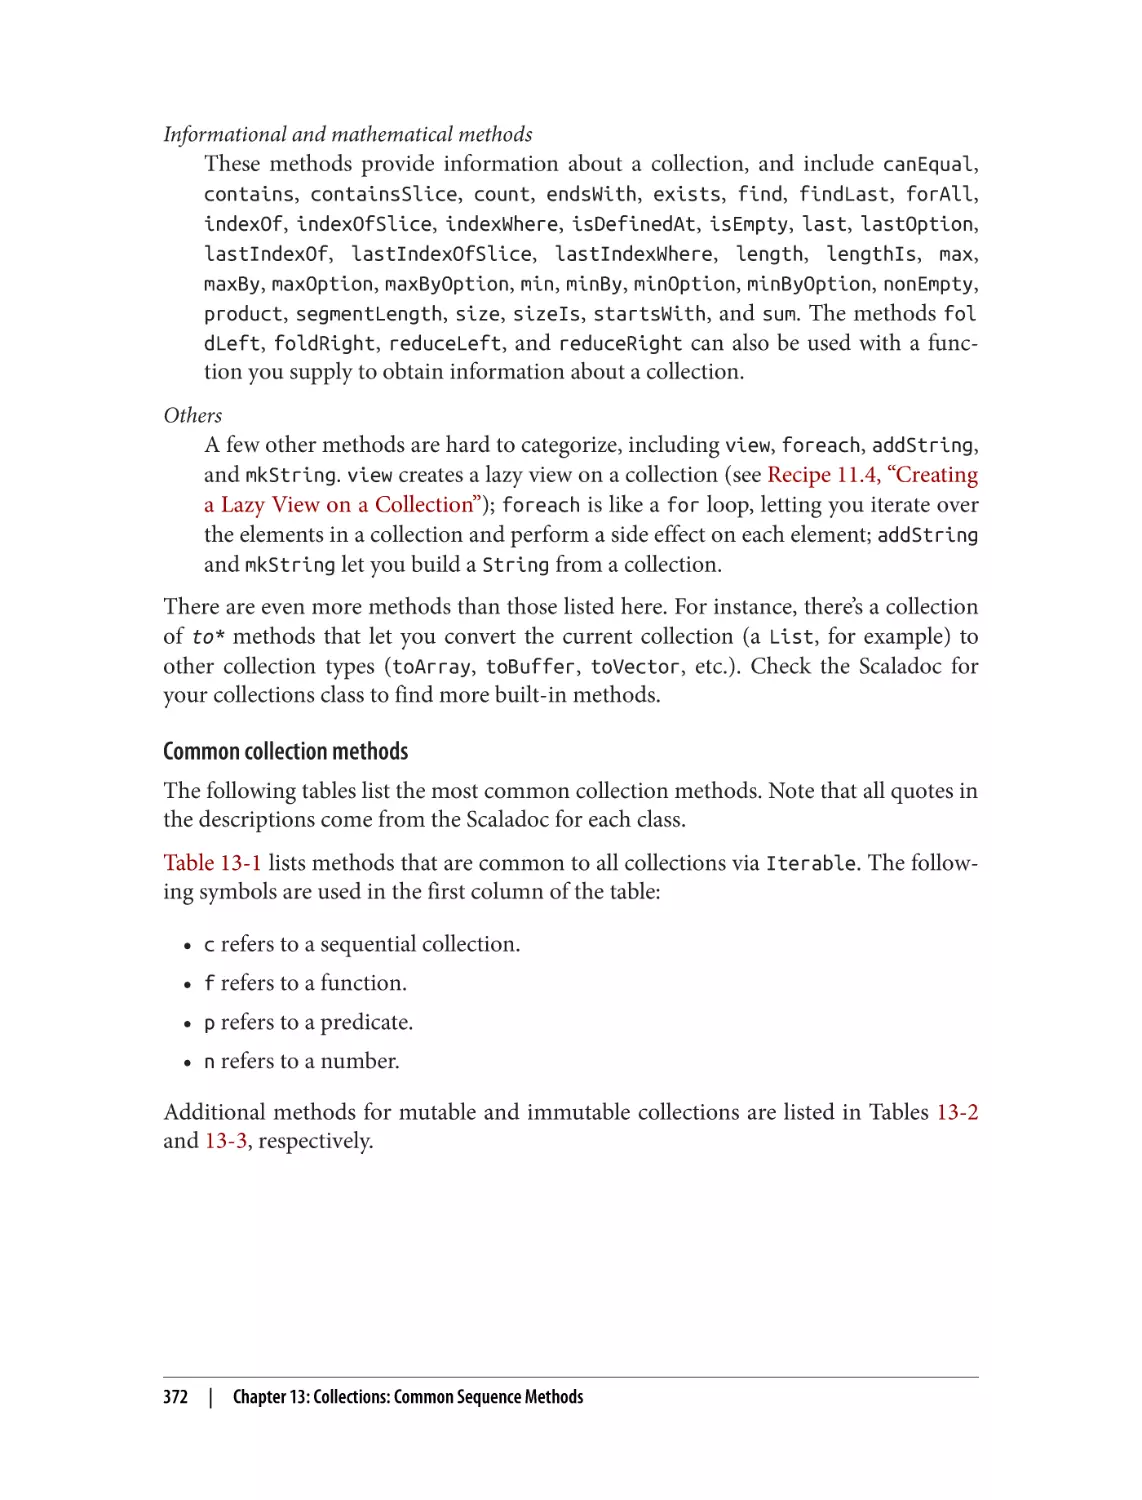
13. Collections: Common Sequence Methods. . . . . . . . . . . . . . . . . . . . . . . . . . . . . . . . . . . . . 369
13.1 Choosing a Collection Method to Solve a Problem
13.2 Looping Over a Collection with foreach
13.3 Using Iterators
13.4 Using zipWithIndex or zip to Create Loop Counters
13.5 Transforming One Collection to Another with map
13.6 Flattening a List of Lists with flatten
13.7 Using filter to Filter a Collection
13.8 Extracting a Sequence of Elements from a Collection
13.9 Splitting Sequences into Subsets
13.10 Walking Through a Collection with the reduce and fold Methods
13.11 Finding the Unique Elements in a Sequence
13.12 Merging Sequential Collections
13.13 Randomizing a Sequence
13.14 Sorting a Collection
13.15 Converting a Collection to a String with mkString and addString
371
378
381
385
387
390
392
395
397
400
405
406
409
410
415
14. Collections: Using Maps. . . . . . . . . . . . . . . . . . . . . . . . . . . . . . . . . . . . . . . . . . . . . . . . . . . . 419
14.1 Creating and Using Maps
14.2 Choosing a Map Implementation
14.3 Adding, Updating, and Removing Immutable Map Elements
14.4 Adding, Updating, and Removing Elements in Mutable Maps
14.5 Accessing Map Values (Without Exceptions)
14.6 Testing for the Existence of a Key or Value in a Map
14.7 Getting the Keys or Values from a Map
14.8 Finding the Largest (or Smallest) Key or Value in a Map
14.9 Traversing a Map
14.10 Sorting an Existing Map by Key or Value
14.11 Filtering a Map
Table of Contents
419
422
425
427
429
431
432
433
435
438
441
|
ix
15. Collections: Tuple, Range, Set, Stack, and Queue. . . . . . . . . . . . . . . . . . . . . . . . . . . . . . . 445
15.1 Creating Heterogeneous Lists with Tuples
15.2 Creating Ranges
15.3 Creating a Set and Adding Elements to It
15.4 Deleting Elements from Sets
15.5 Storing Values in a Set in Sorted Order
15.6 Creating and Using a Stack
15.7 Creating and Using a Queue
446
449
453
455
457
458
460
16. Files and Processes. . . . . . . . . . . . . . . . . . . . . . . . . . . . . . . . . . . . . . . . . . . . . . . . . . . . . . . . 463
16.1 Reading Text Files
16.2 Writing Text Files
16.3 Reading and Writing Binary Files
16.4 Pretending That a String Is a File
16.5 Serializing and Deserializing Objects to Files
16.6 Listing Files in a Directory
16.7 Executing External Commands
16.8 Executing External Commands and Reading Their STDOUT
16.9 Handling Both STDOUT and STDERR of Commands
16.10 Building a Pipeline of External Commands
464
468
470
472
473
475
477
480
483
485
17. Building Projects with sbt. . . . . . . . . . . . . . . . . . . . . . . . . . . . . . . . . . . . . . . . . . . . . . . . . . 487
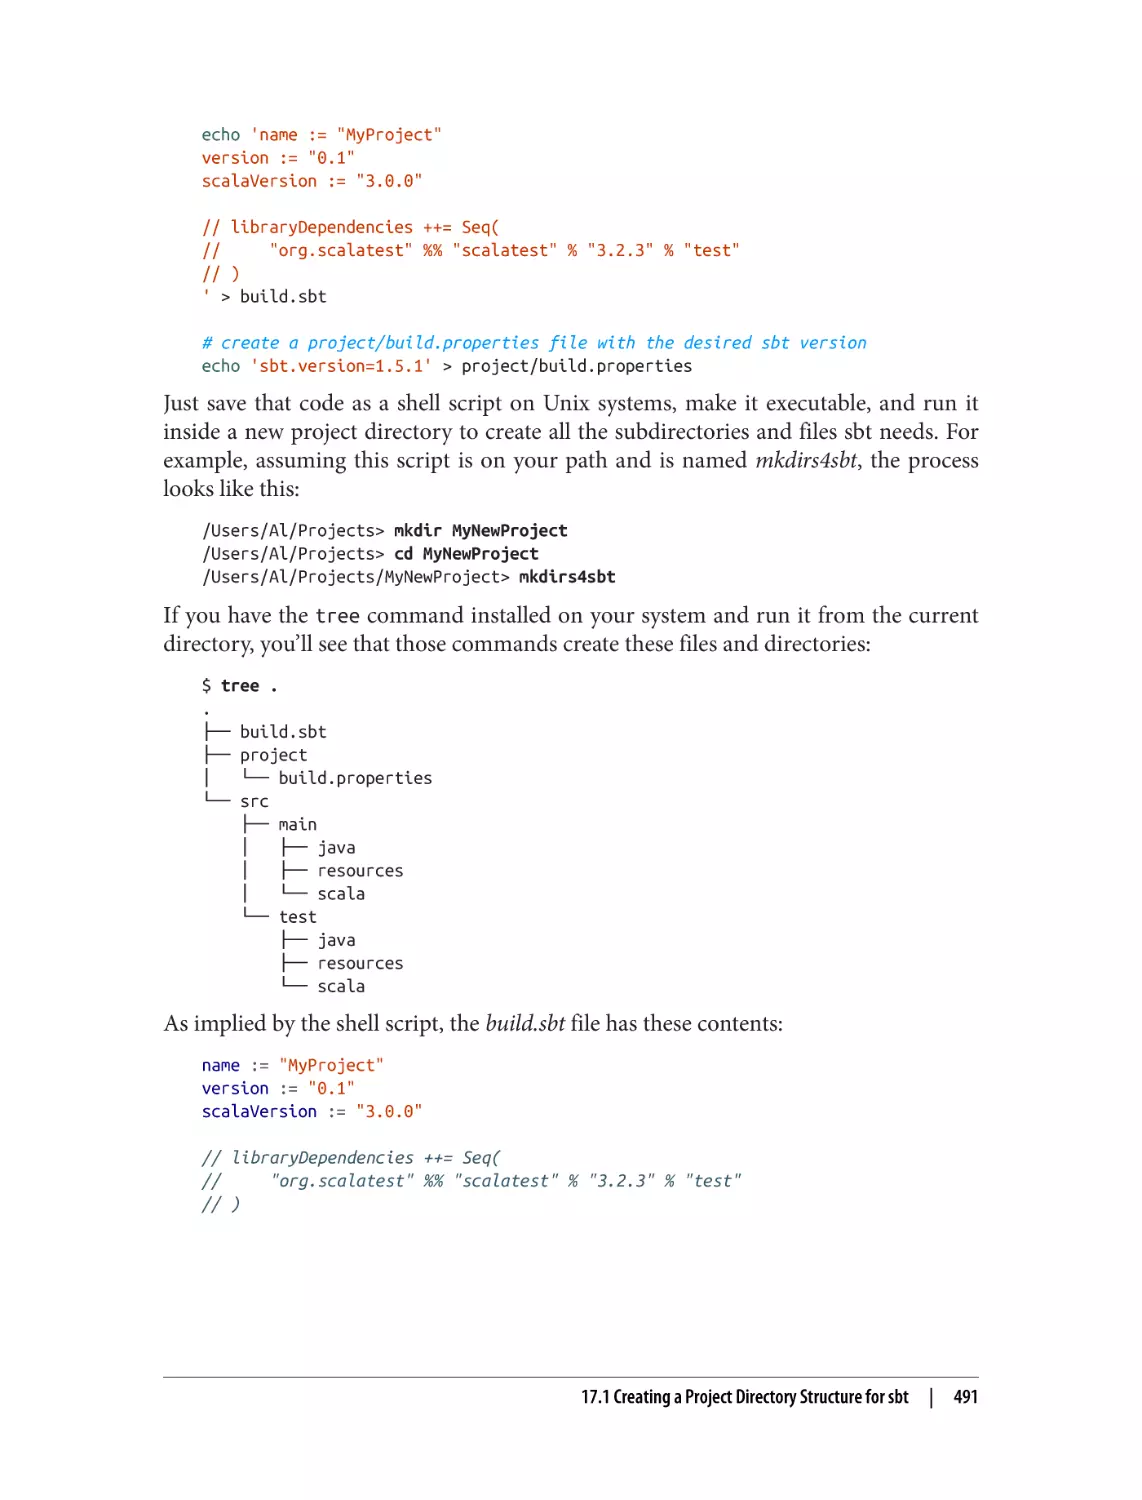
17.1 Creating a Project Directory Structure for sbt
17.2 Building Projects with the sbt Command
17.3 Understanding build.sbt Syntax Styles
17.4 Compiling, Running, and Packaging a Scala Project
17.5 Understanding Other sbt Commands
17.6 Continuous Compiling and Testing
17.7 Managing Dependencies with sbt
17.8 Controlling Which Version of a Managed Dependency Is Used
17.9 Generating Project API Documentation
17.10 Specifying a Main Class to Run with sbt
17.11 Deploying a Single Executable JAR File
17.12 Publishing Your Library
490
495
497
499
501
504
505
510
512
513
515
517
18. Concurrency with Scala Futures and Akka Actors. . . . . . . . . . . . . . . . . . . . . . . . . . . . . . . 521
18.1 Creating a Future
18.2 Using Callback and Transformation Methods with Futures
18.3 Writing Methods That Return Futures
x
|
Table of Contents
525
528
532
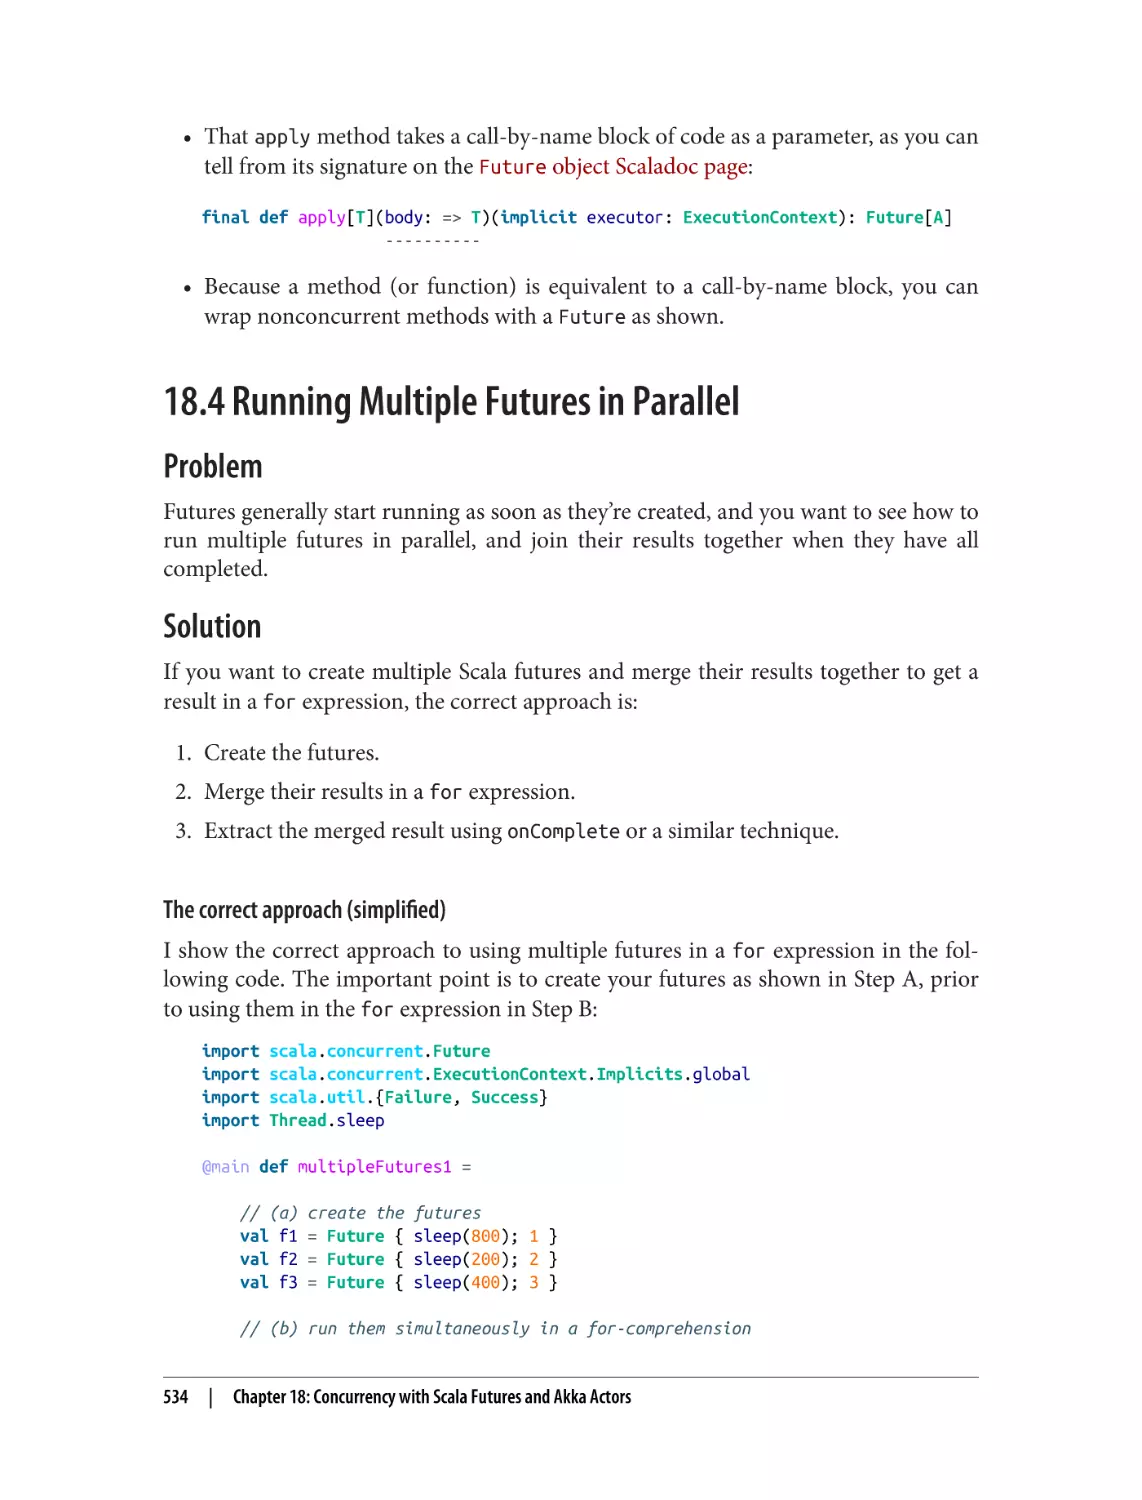
18.4 Running Multiple Futures in Parallel
18.5 Creating OOP-Style Actors
18.6 Creating FP-Style Actors
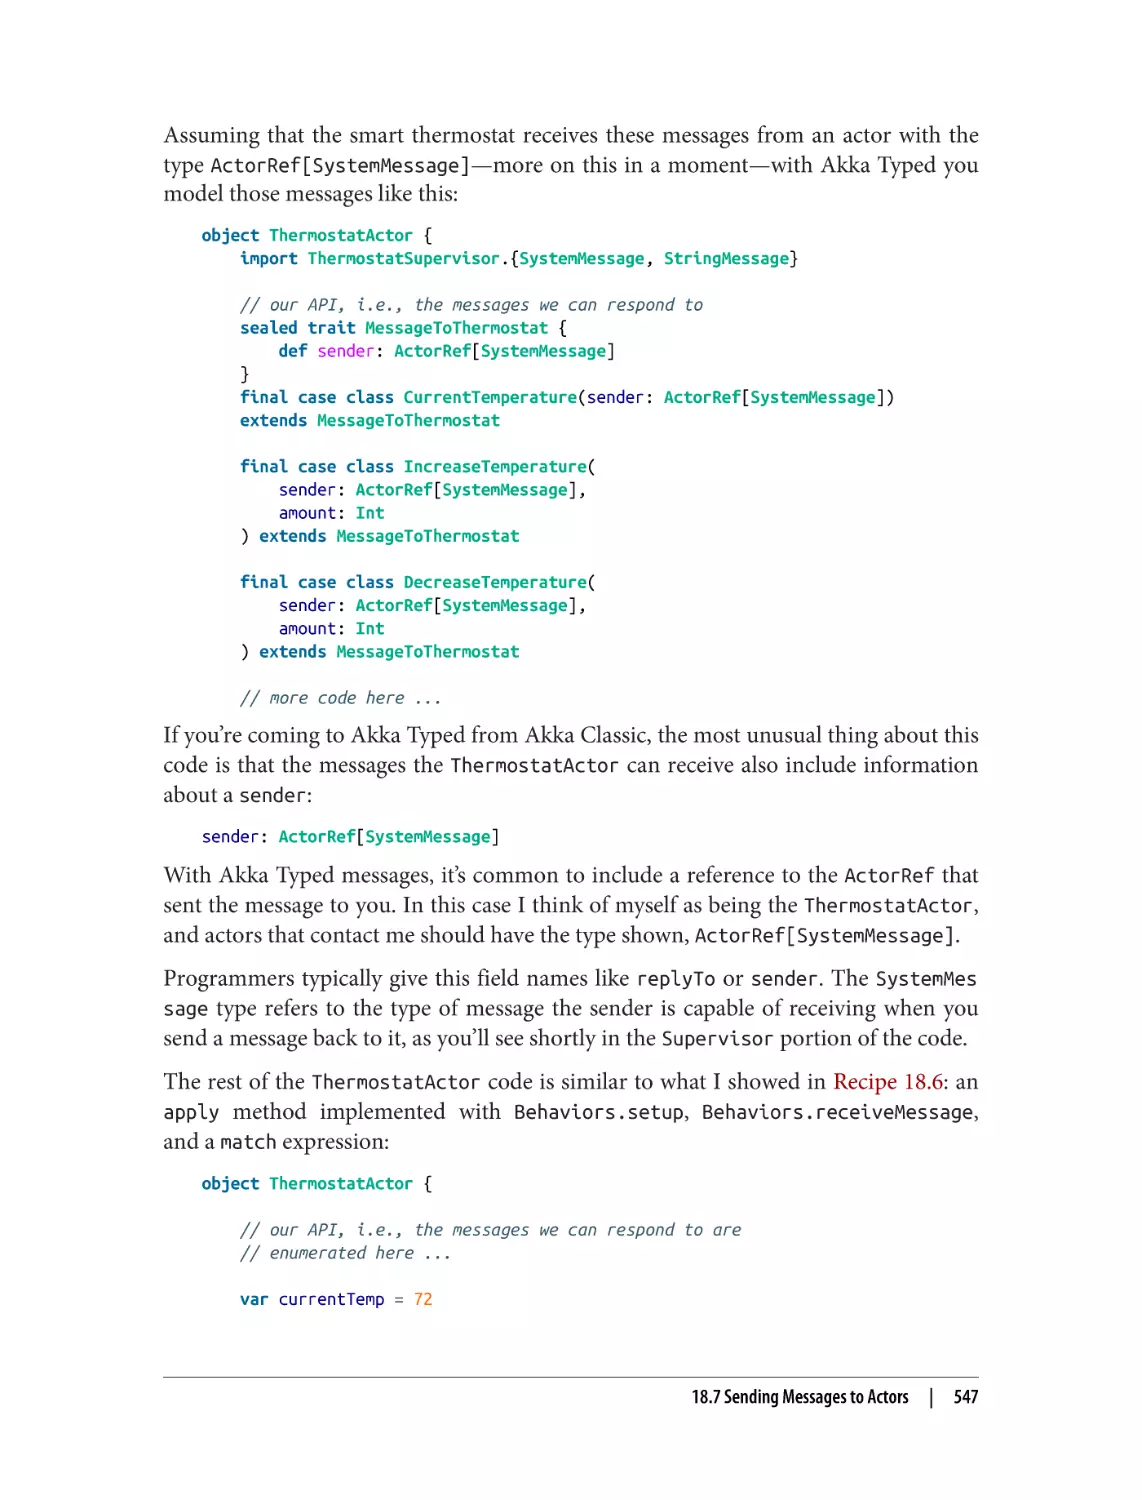
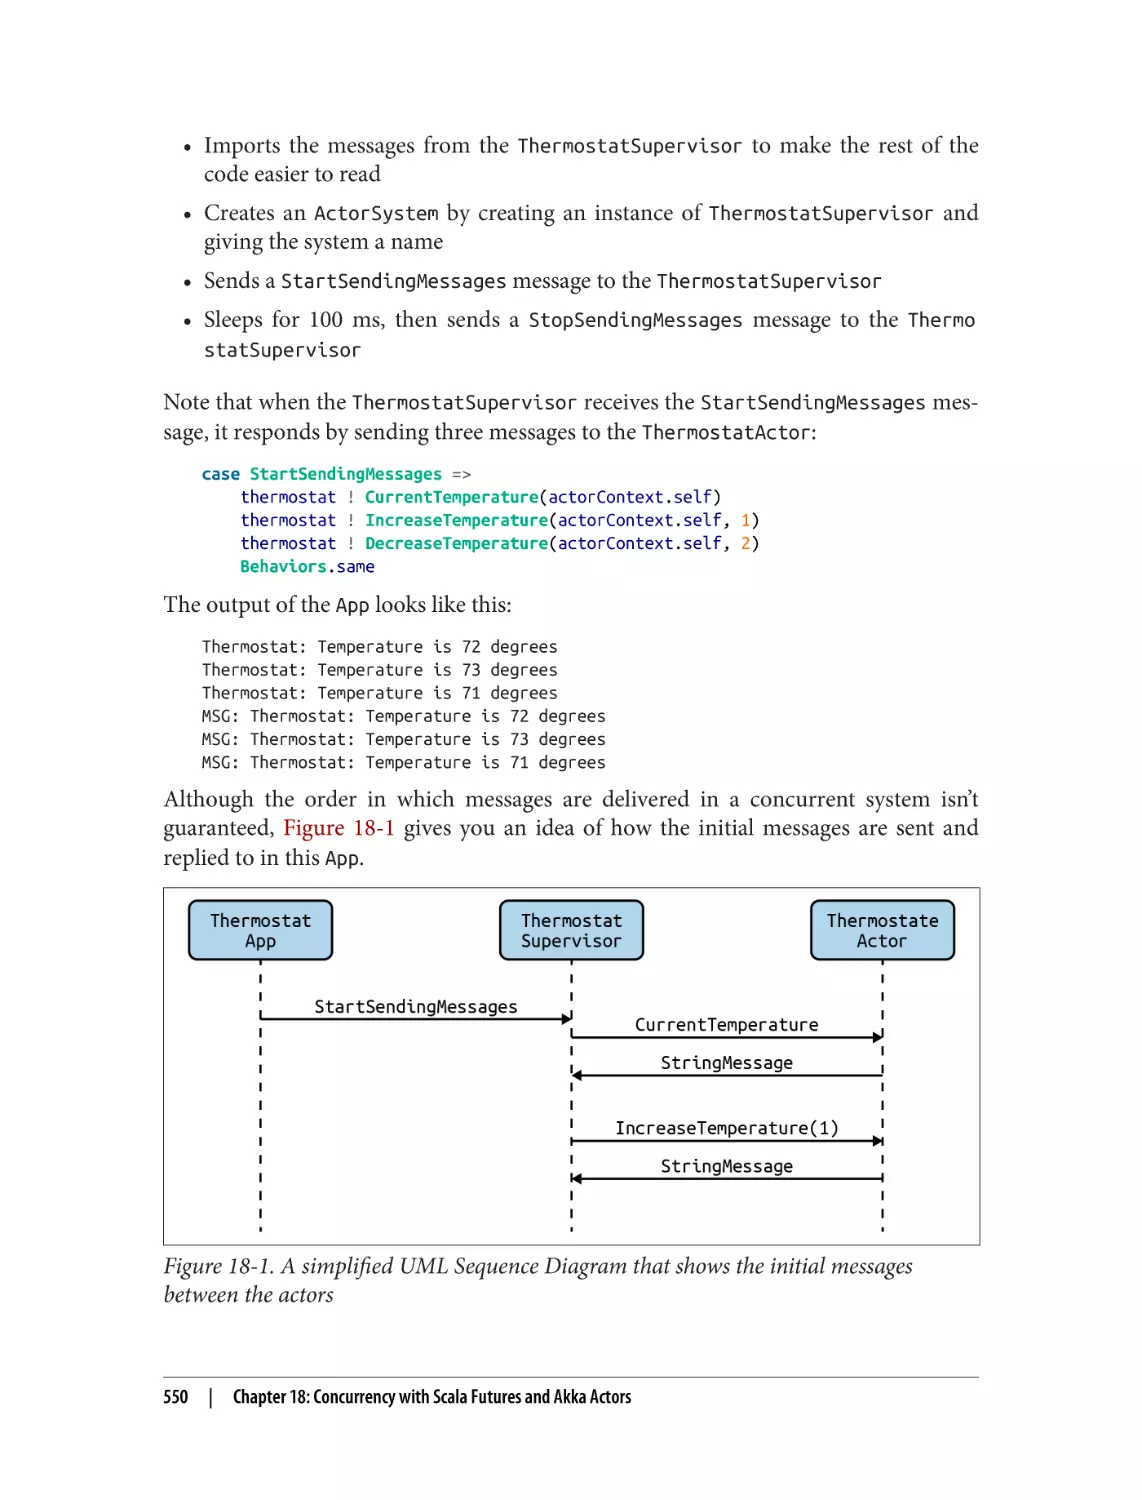
18.7 Sending Messages to Actors
18.8 Creating Actors That Have Multiple States (FSM)
534
538
543
546
552
19. Play Framework and Web Services. . . . . . . . . . . . . . . . . . . . . . . . . . . . . . . . . . . . . . . . . . . 557
19.1 Creating a Play Framework Project
19.2 Creating a New Play Framework Endpoint
19.3 Returning JSON from a GET Request with Play
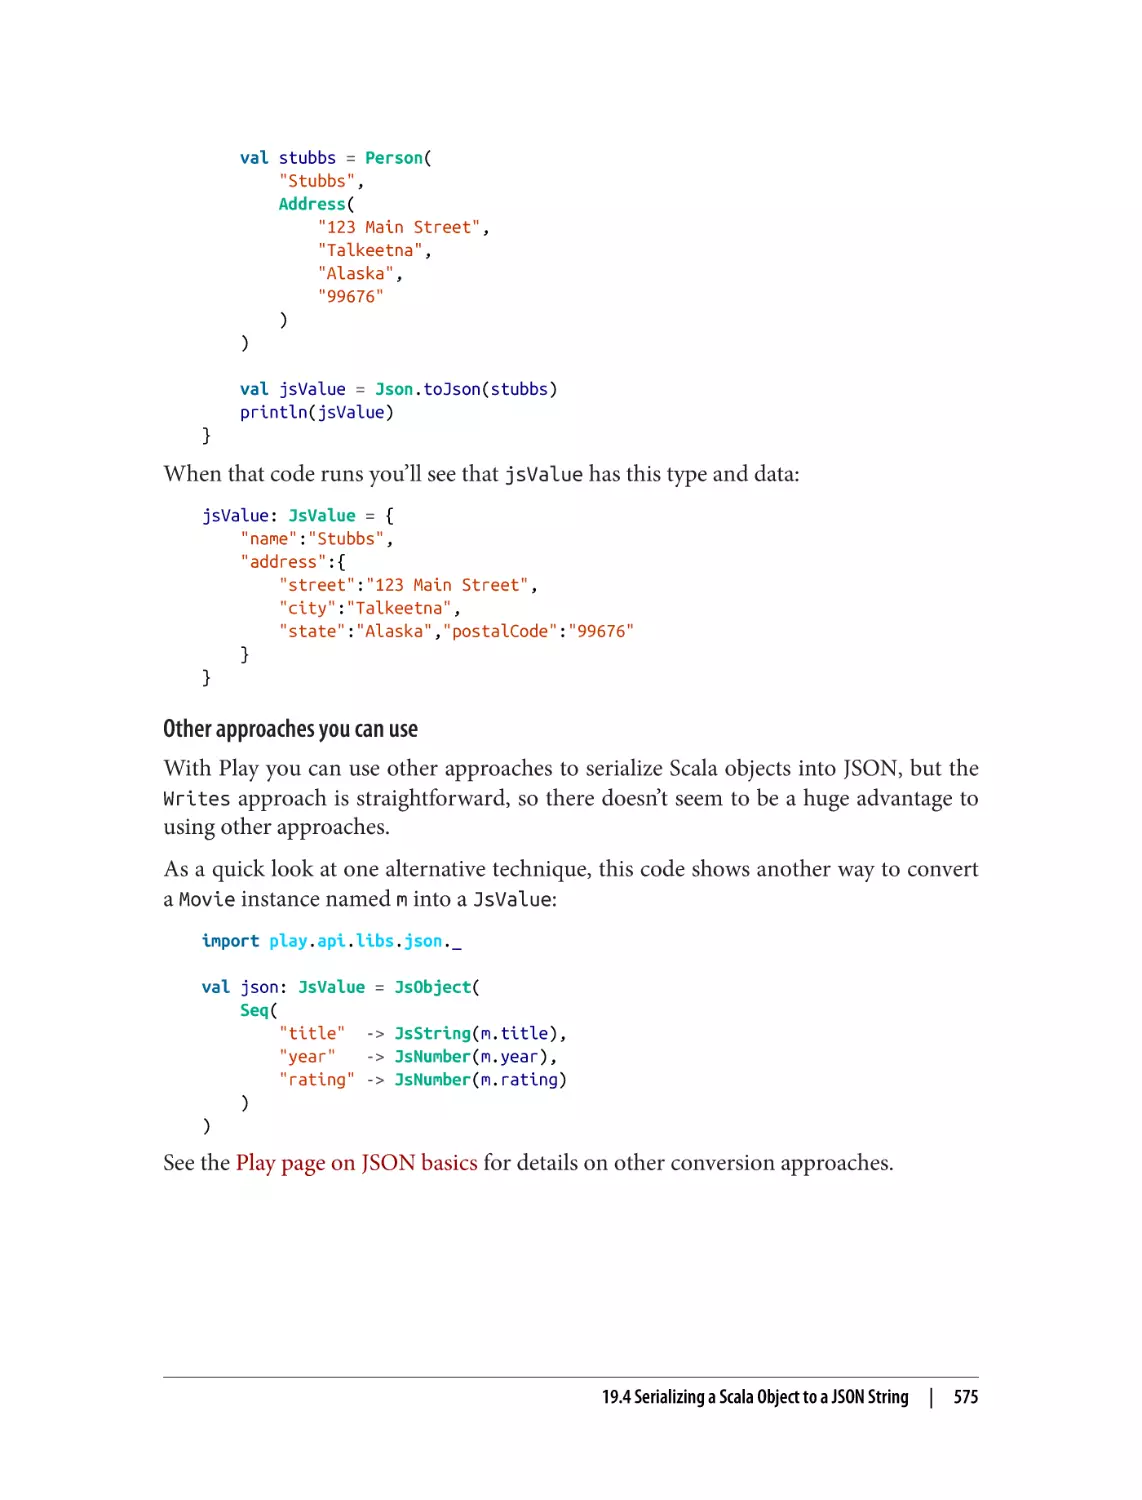
19.4 Serializing a Scala Object to a JSON String
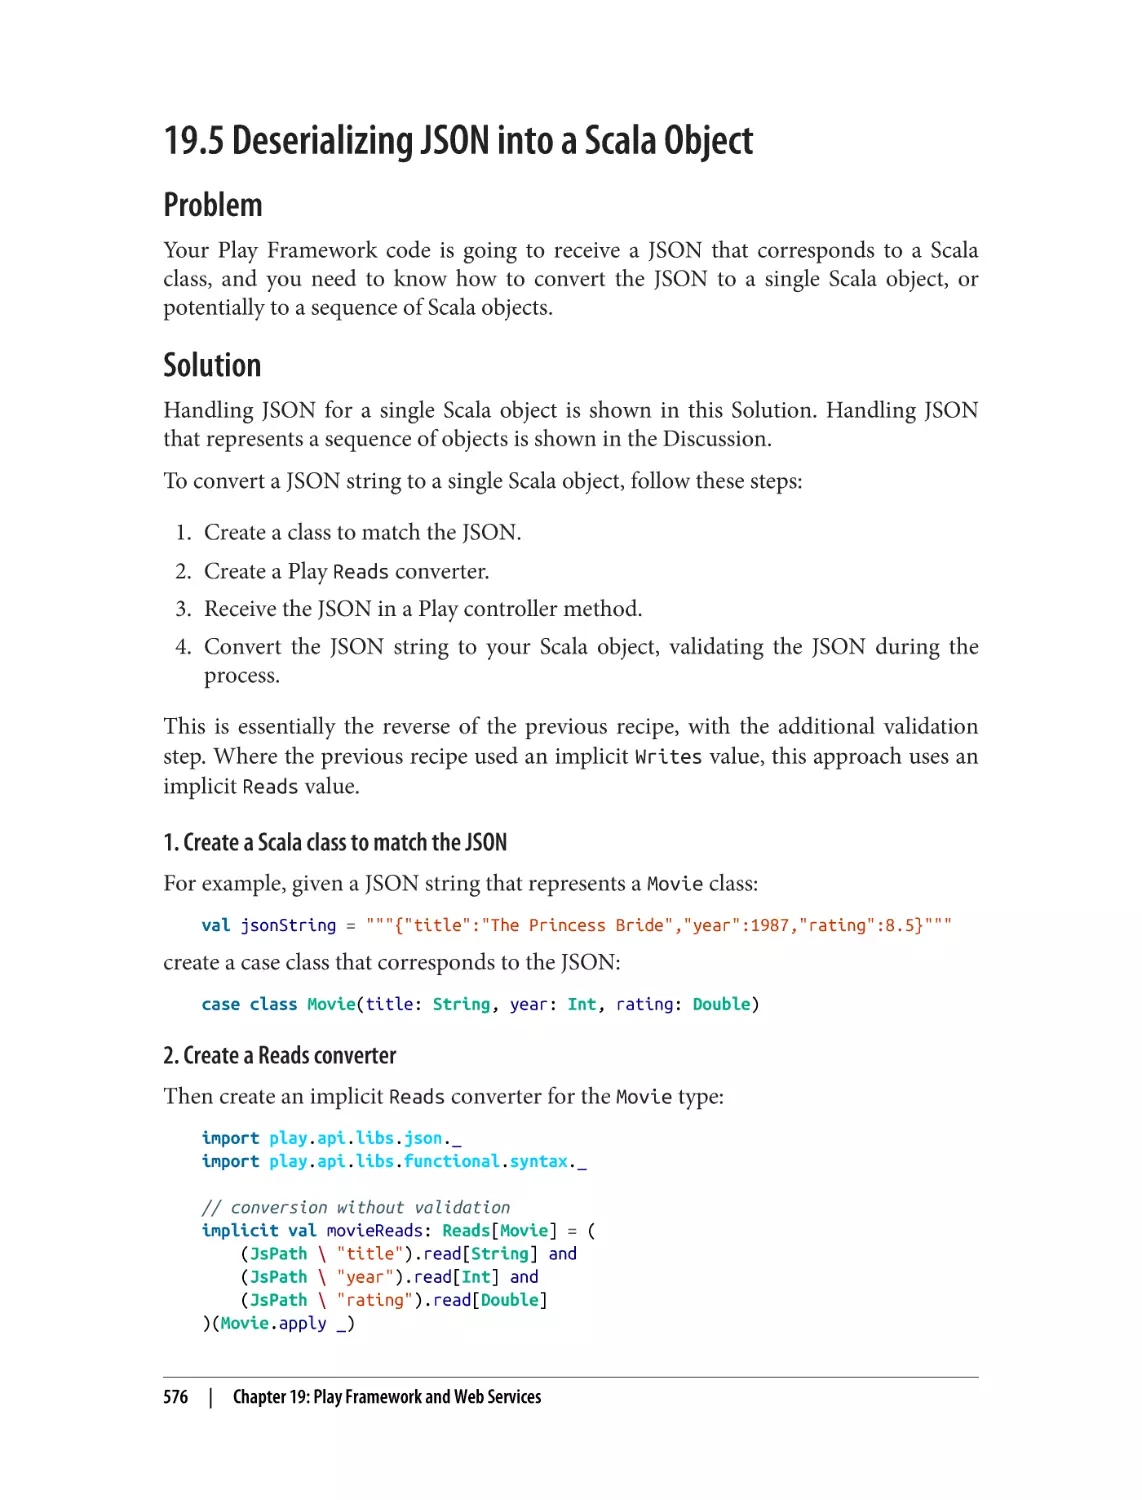
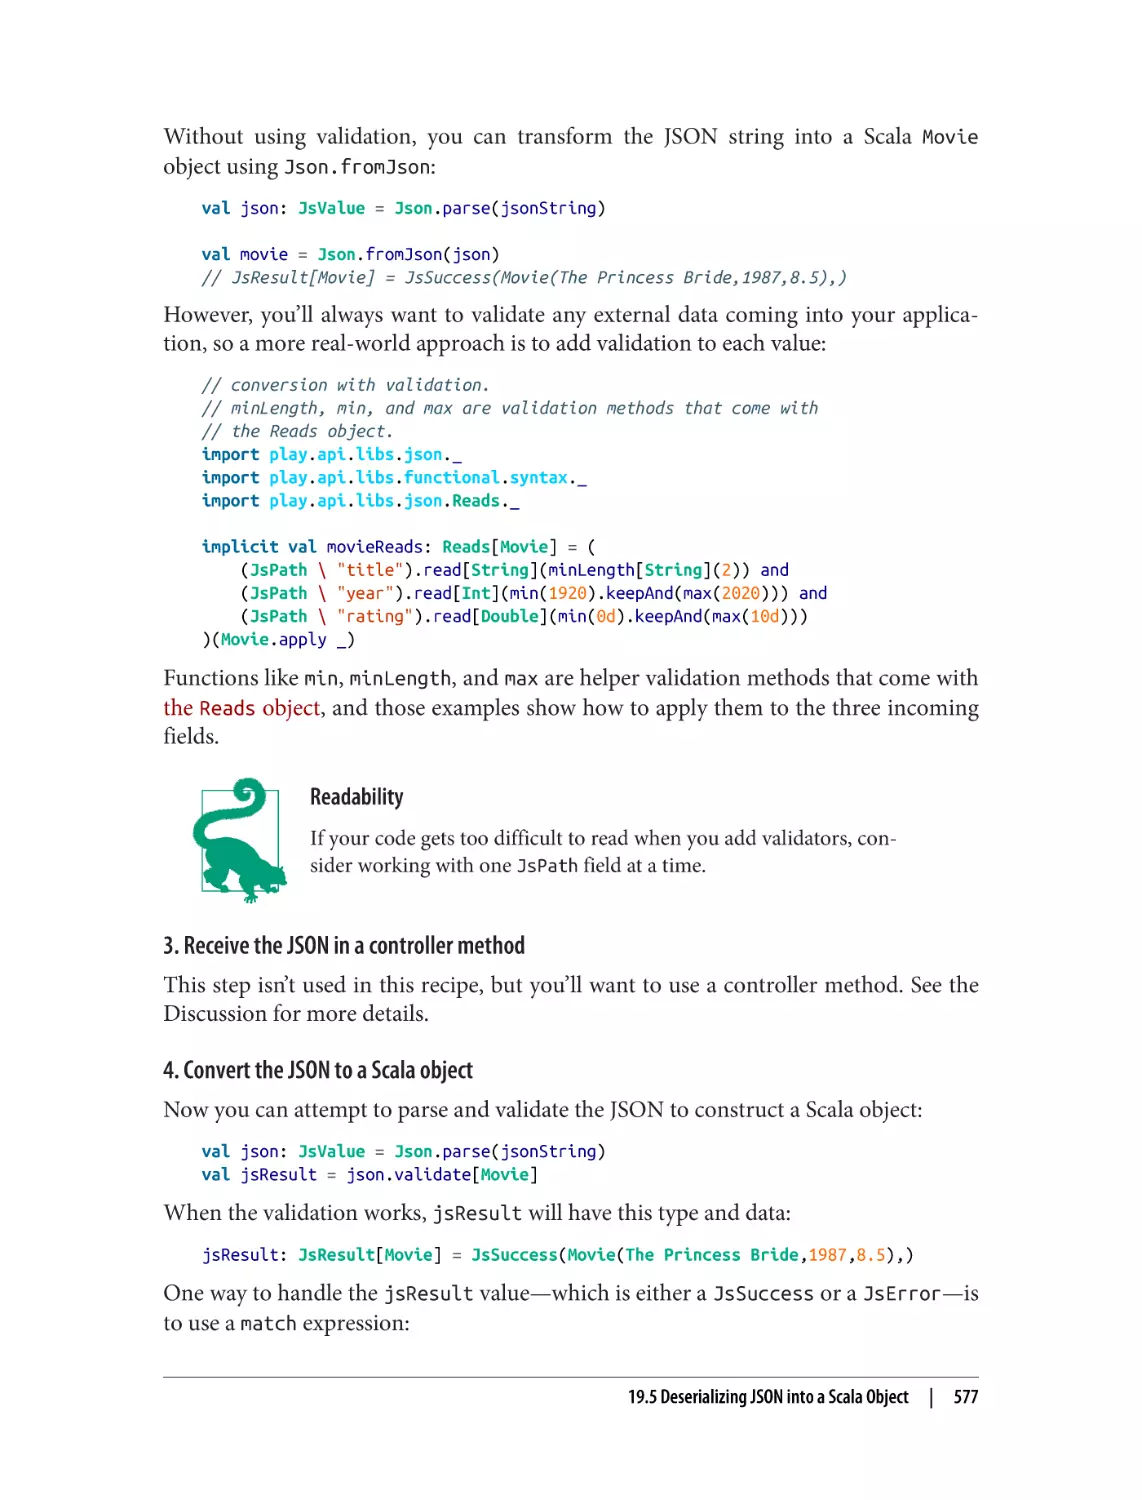
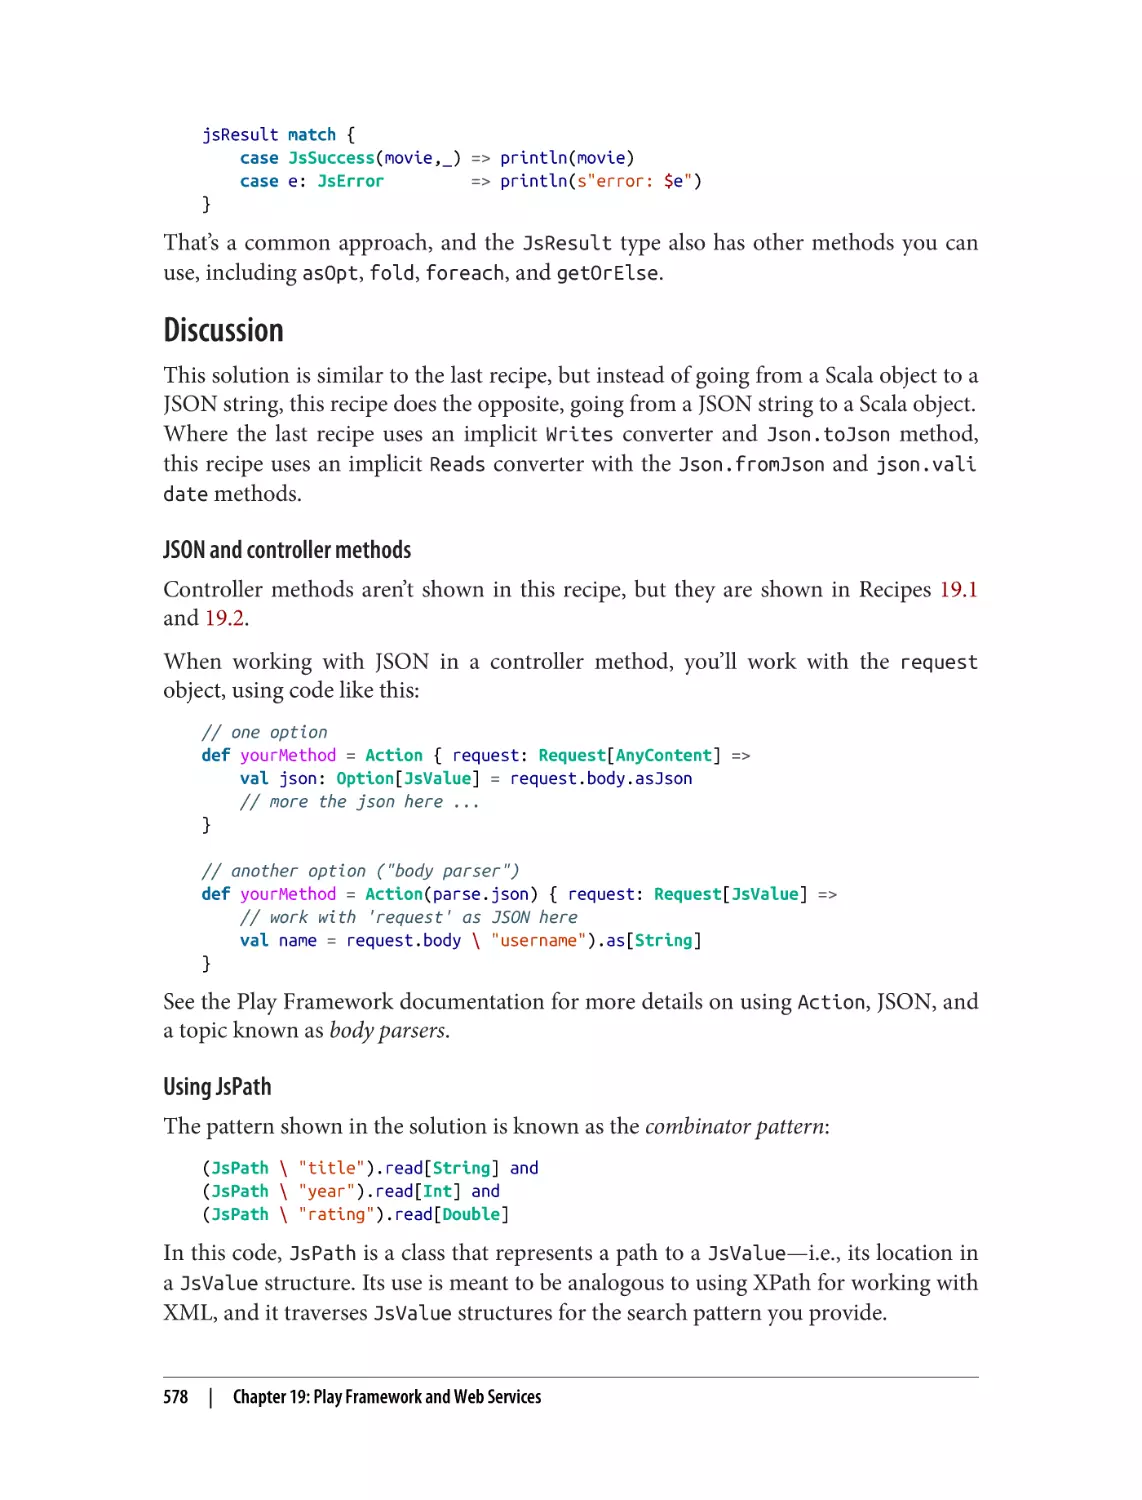
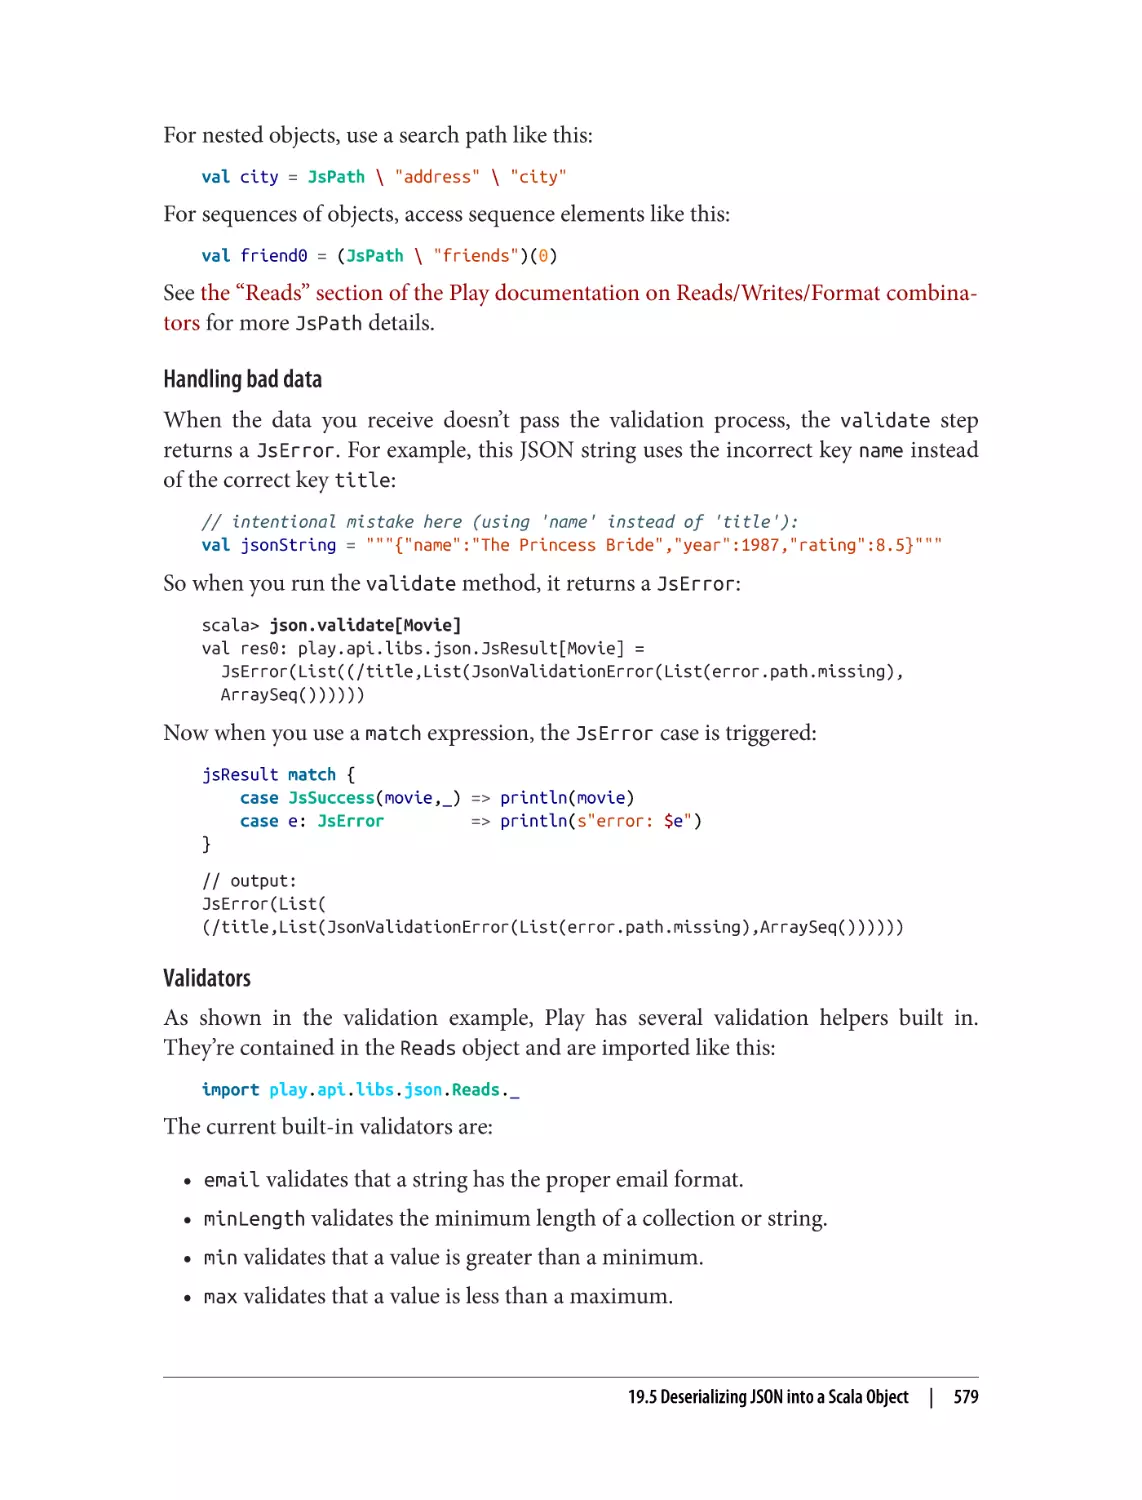
19.5 Deserializing JSON into a Scala Object
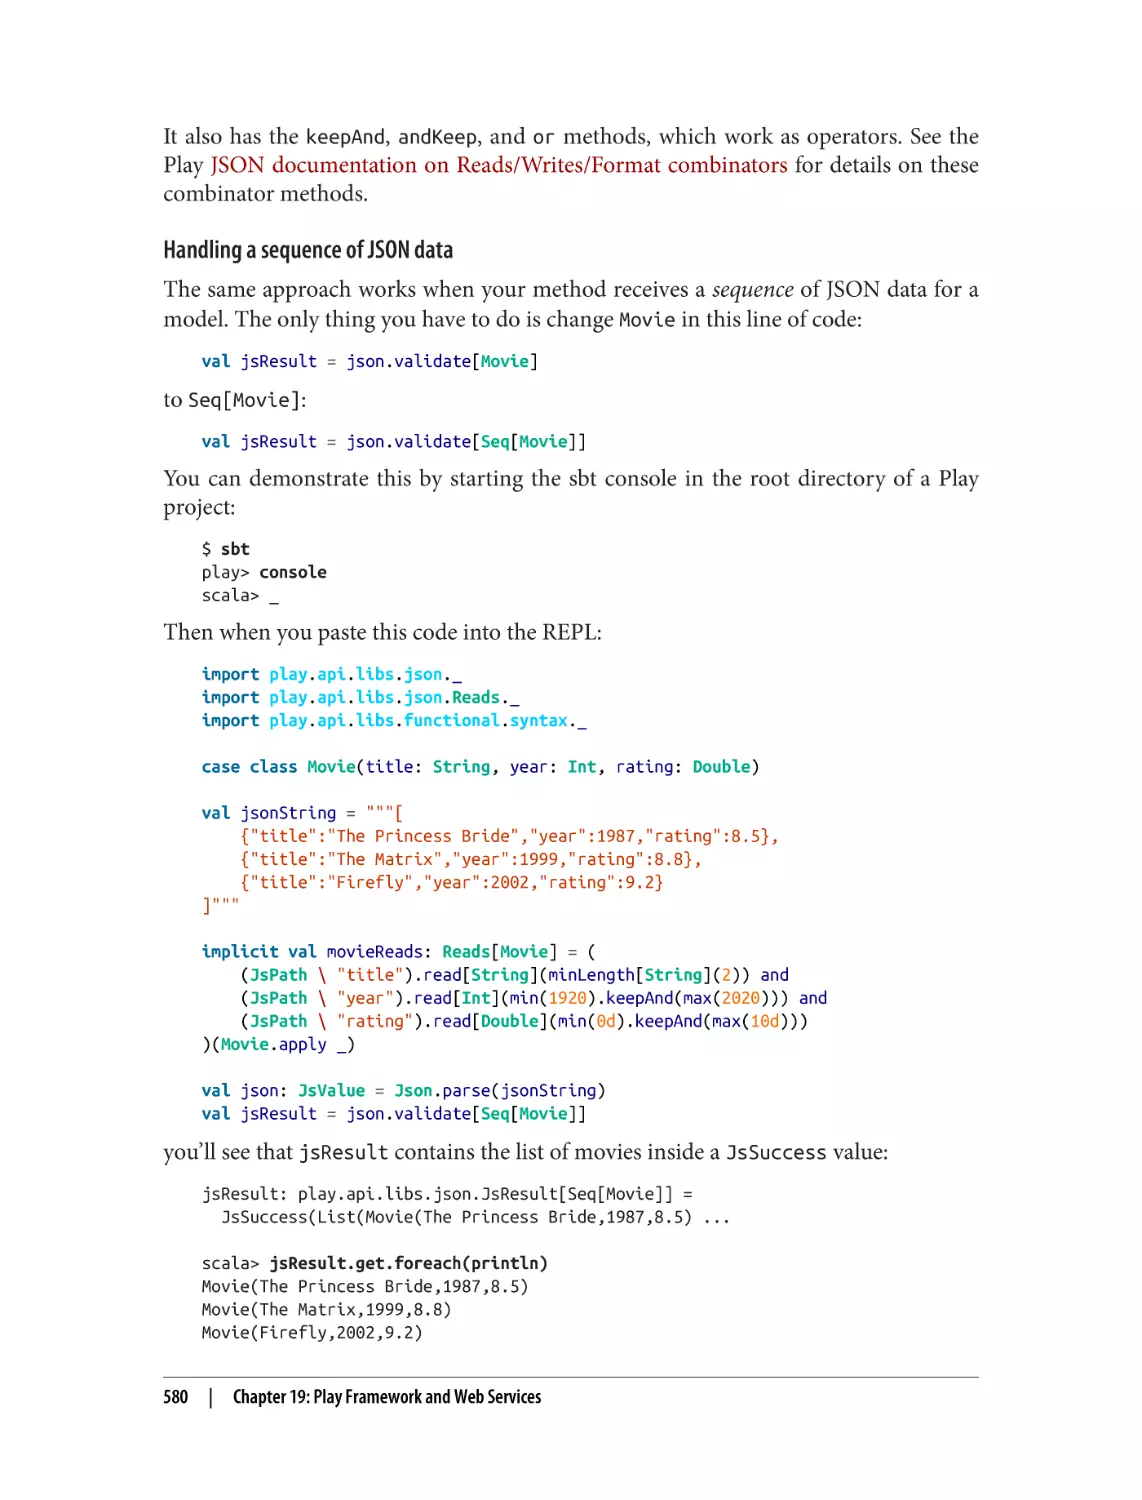
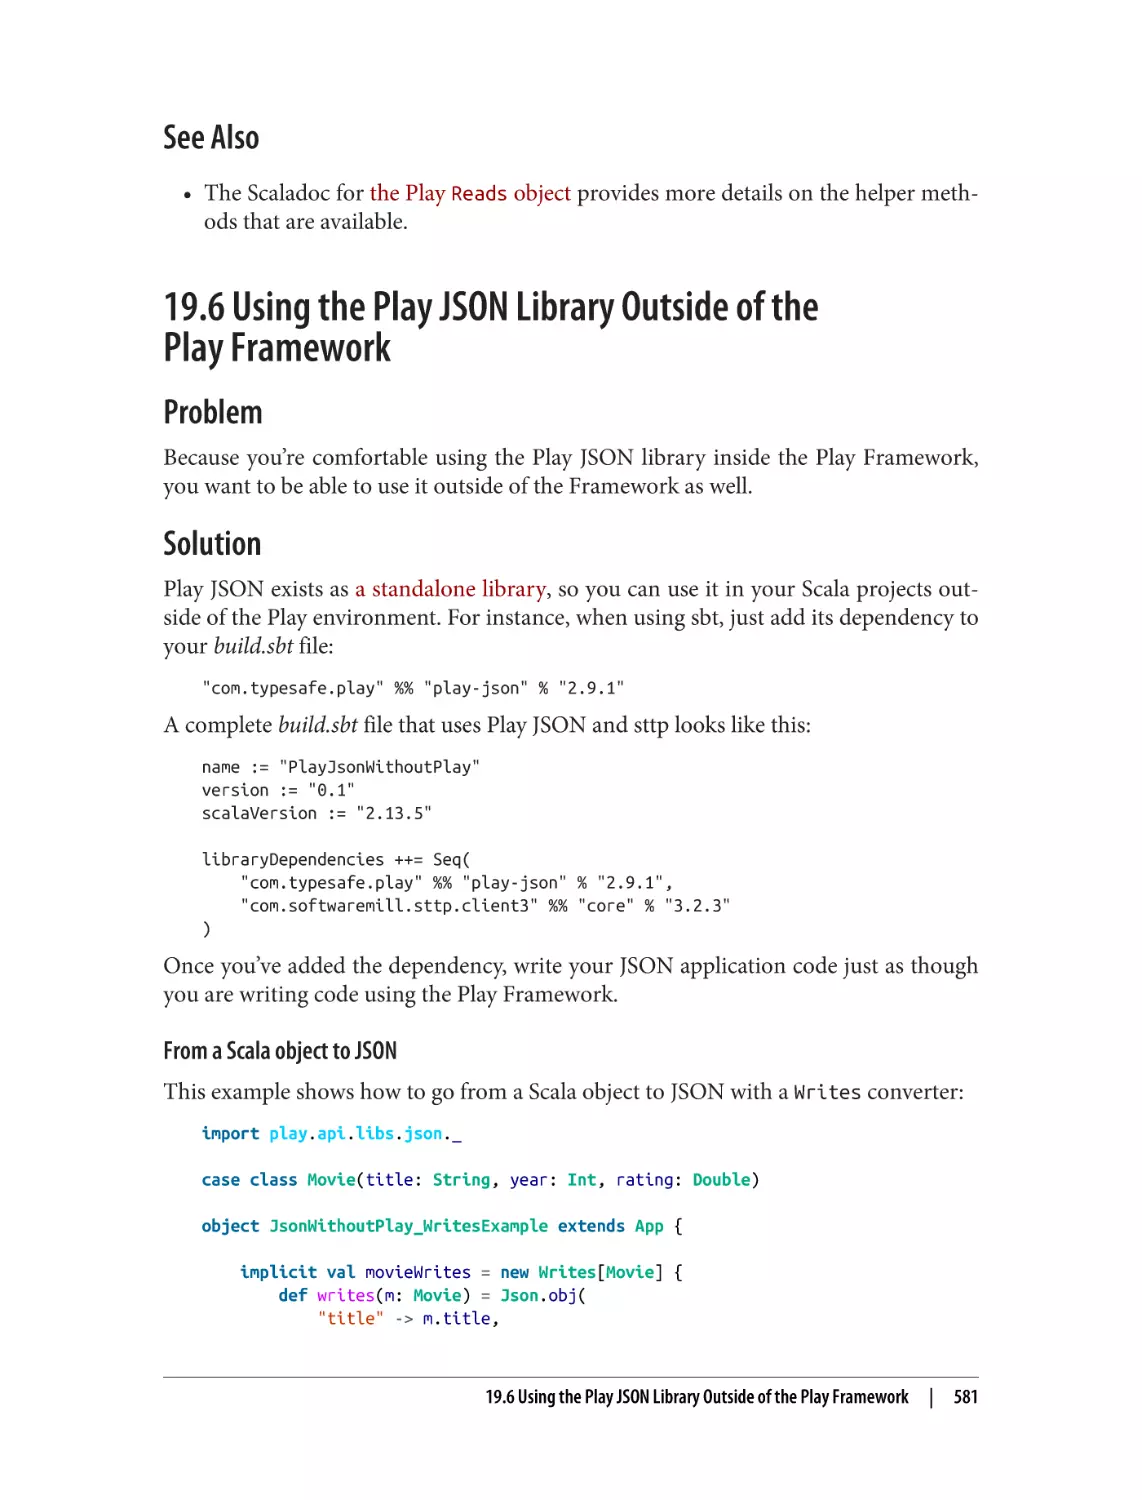
19.6 Using the Play JSON Library Outside of the Play Framework
19.7 Using the sttp HTTP Client
558
564
568
572
576
581
584
20. Apache Spark. . . . . . . . . . . . . . . . . . . . . . . . . . . . . . . . . . . . . . . . . . . . . . . . . . . . . . . . . . . . . 589
20.1 Getting Started with Spark
20.2 Reading a File into a Spark RDD
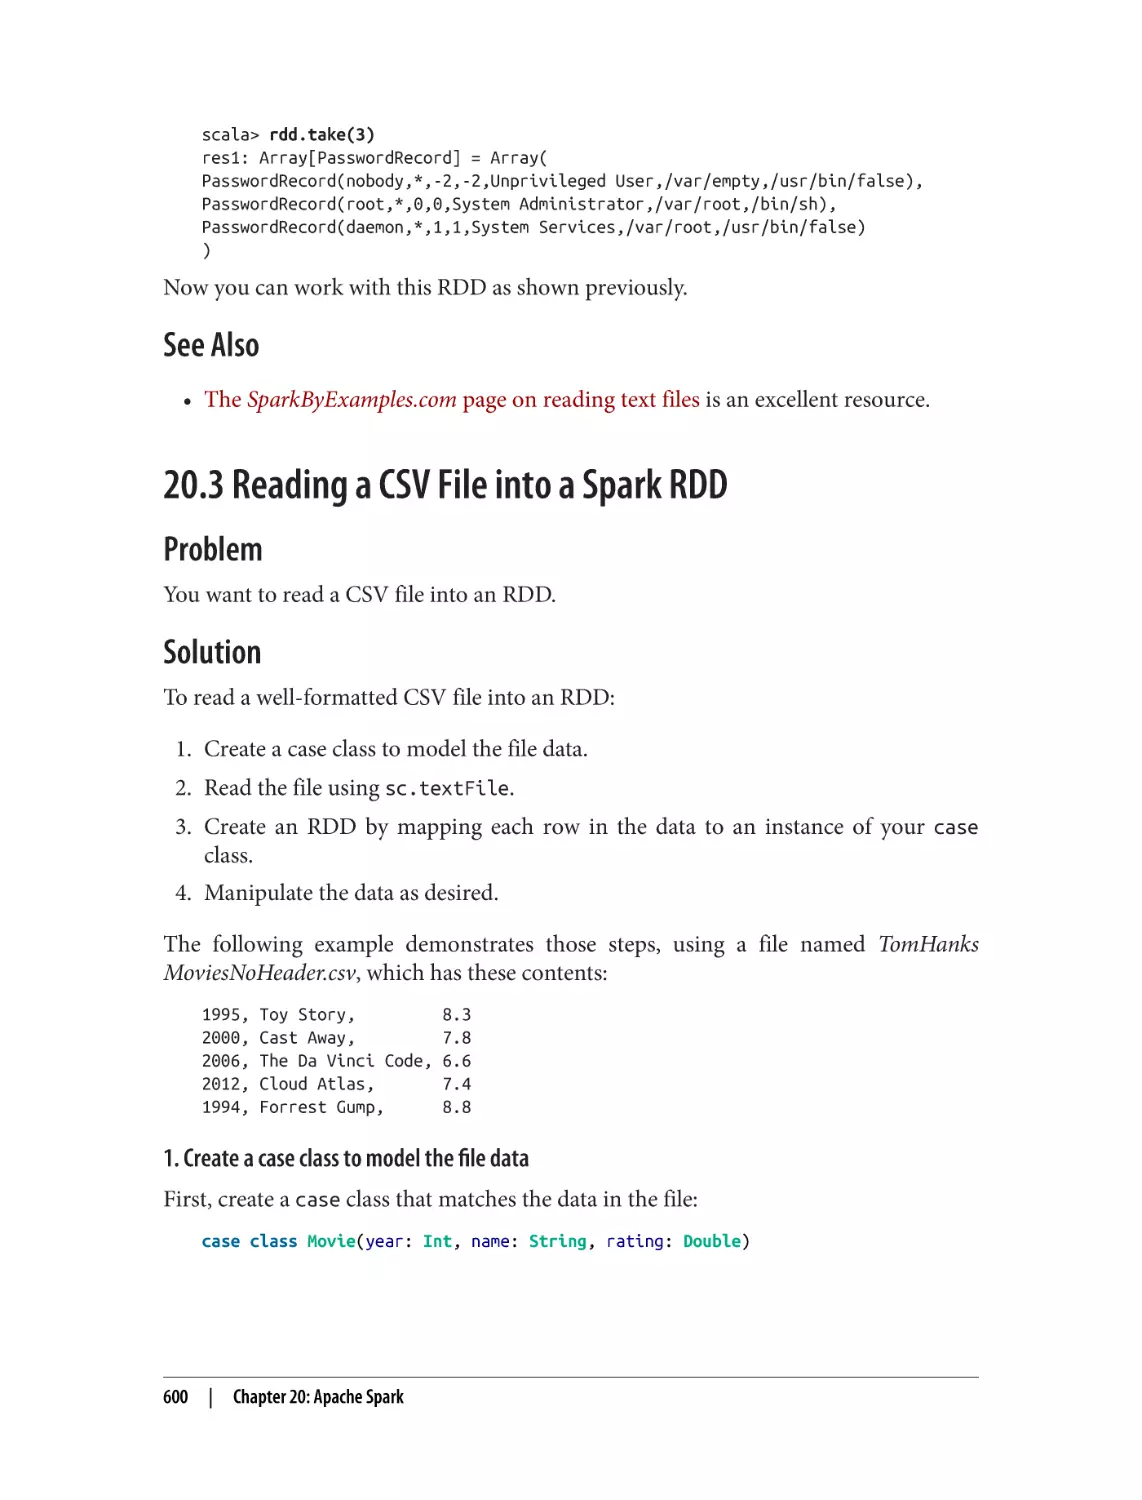
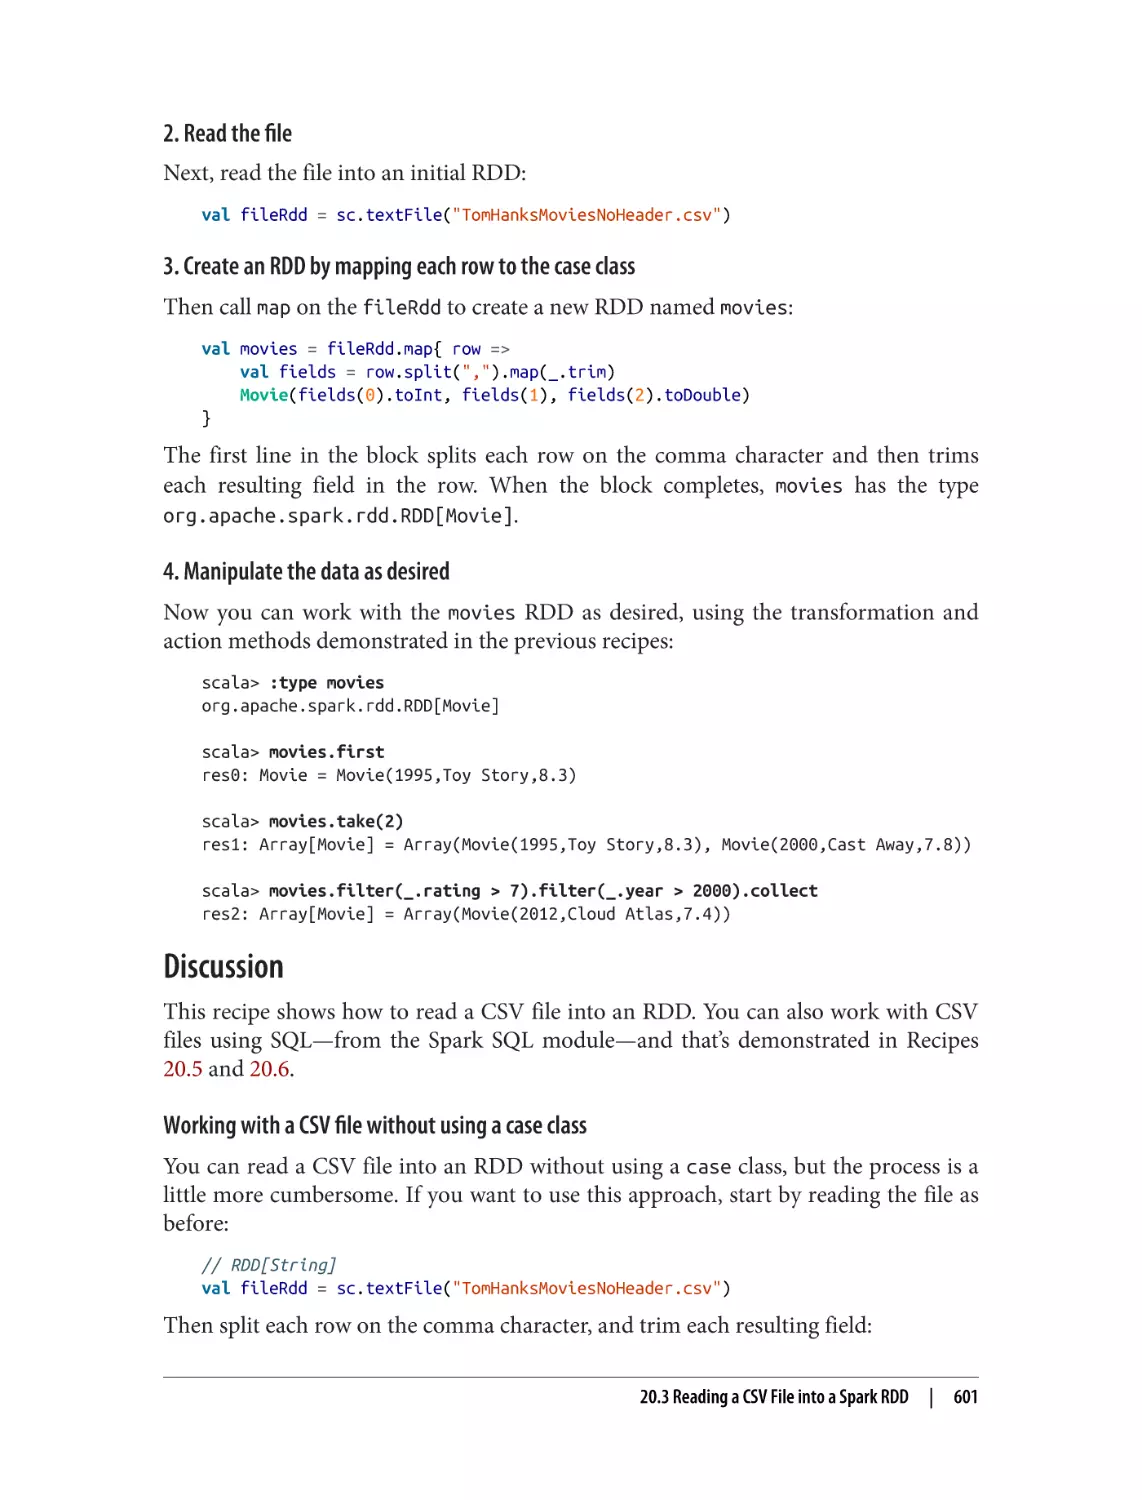
20.3 Reading a CSV File into a Spark RDD
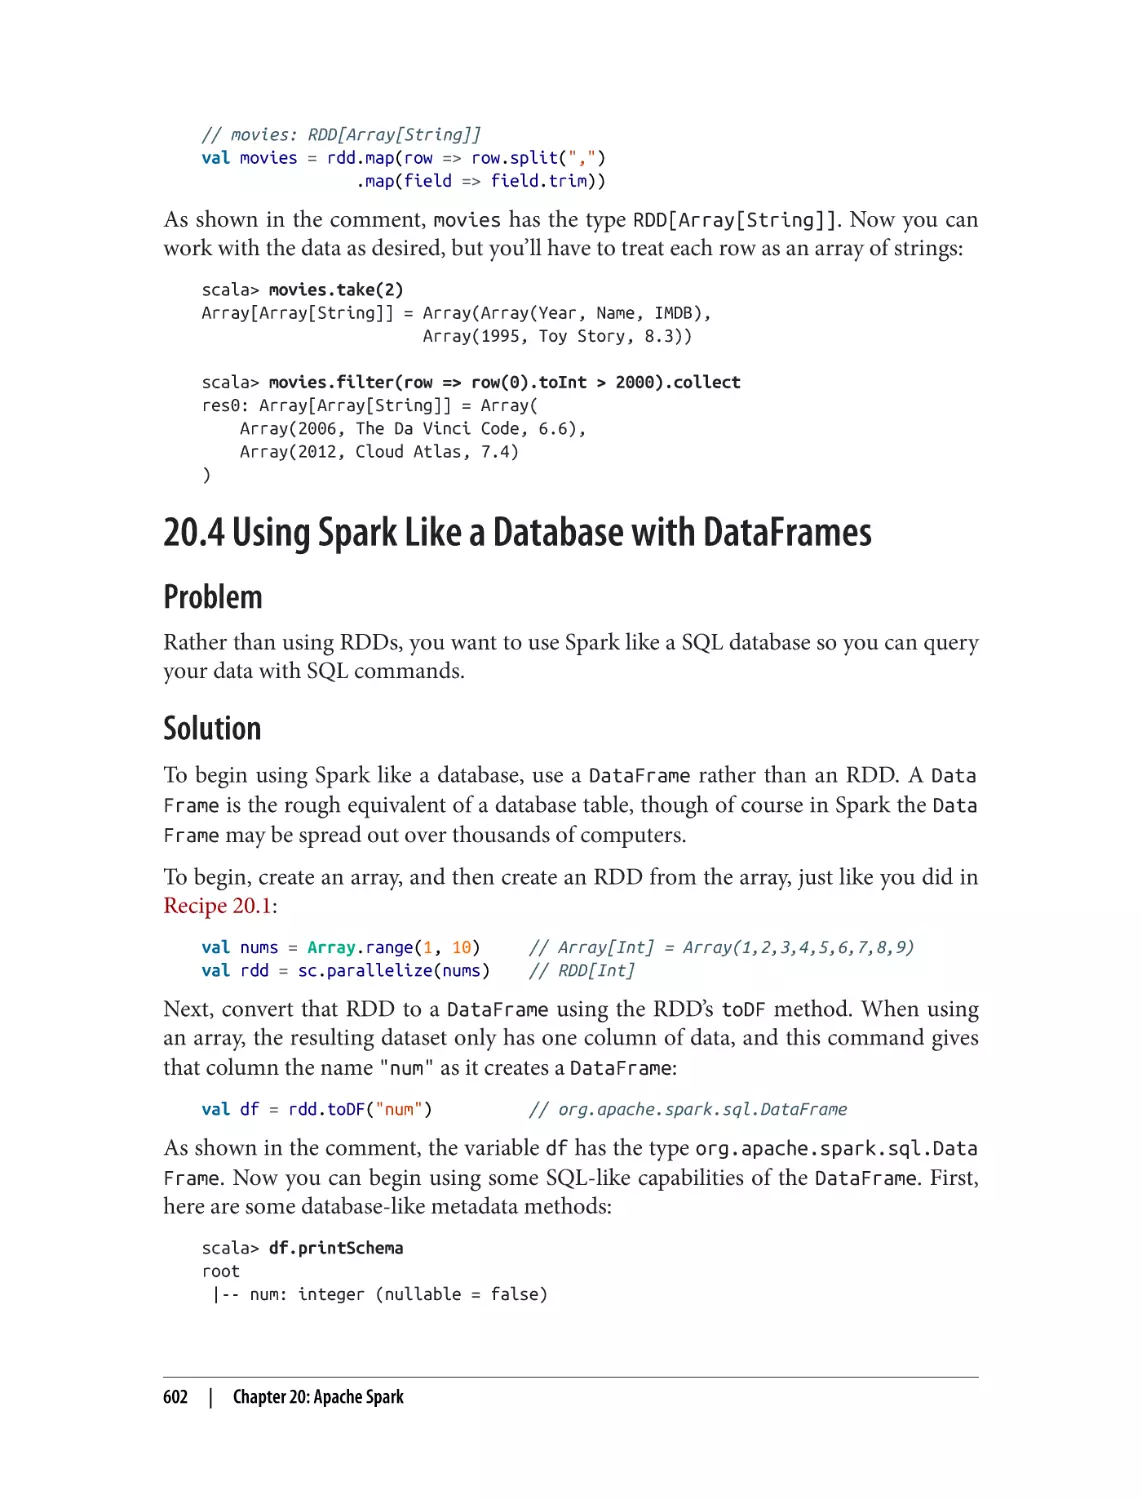
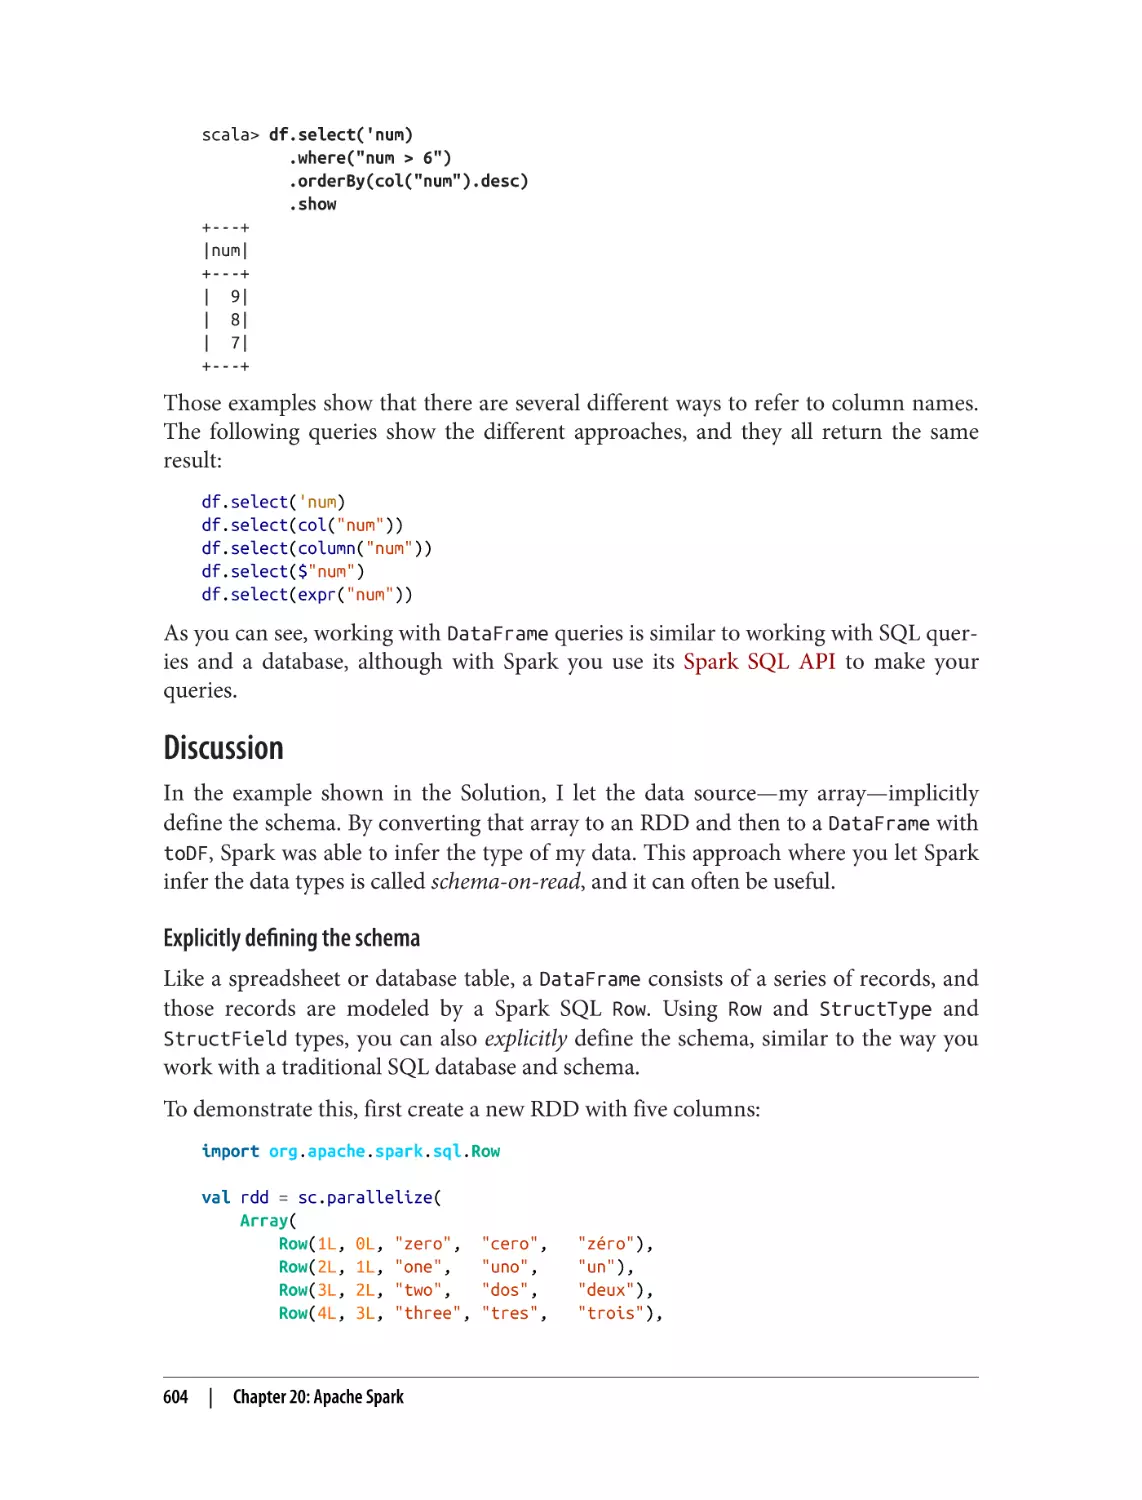
20.4 Using Spark Like a Database with DataFrames
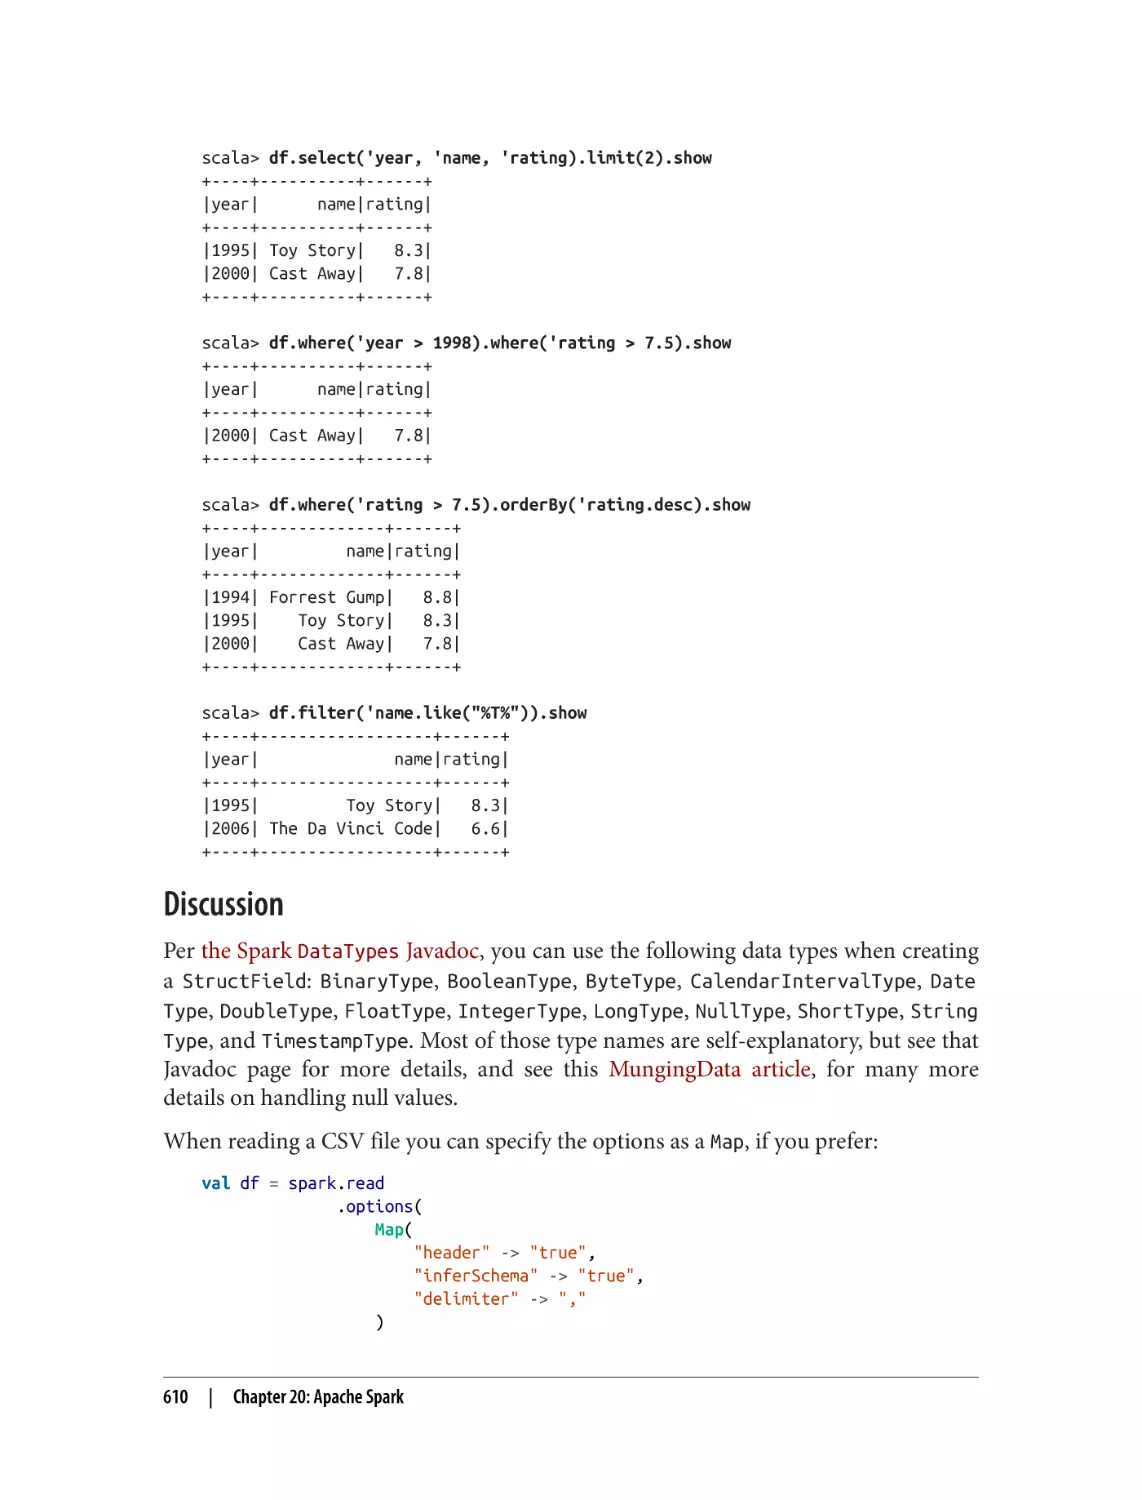
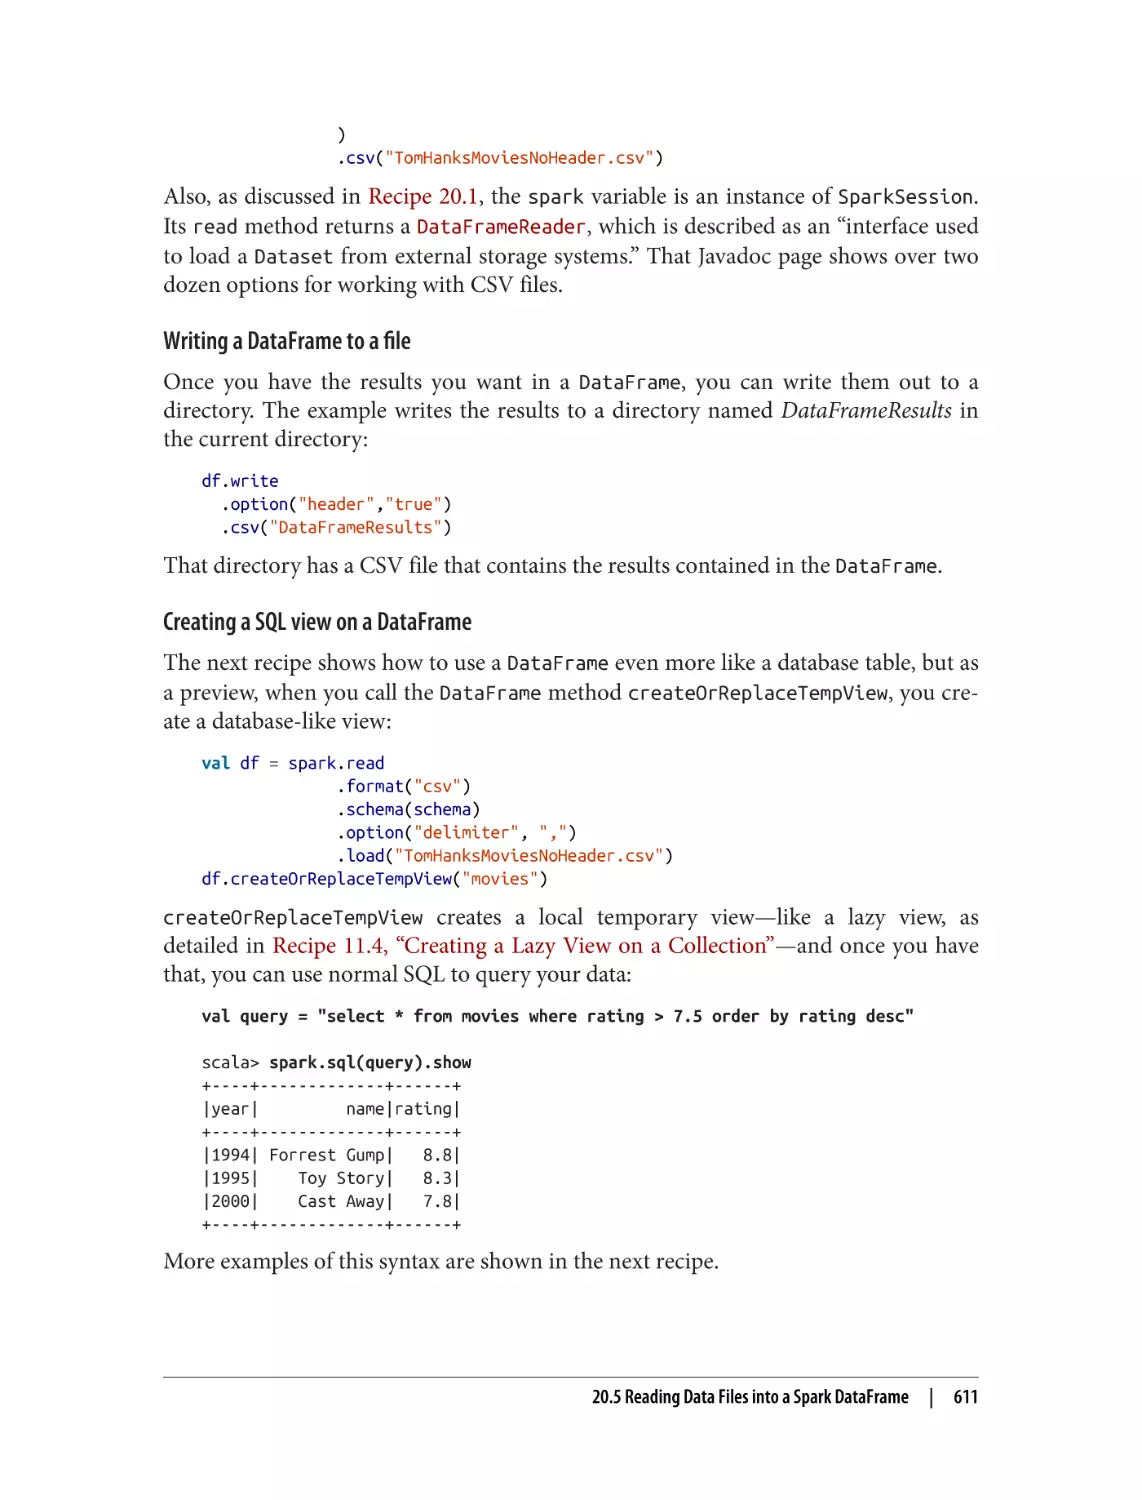
20.5 Reading Data Files into a Spark DataFrame
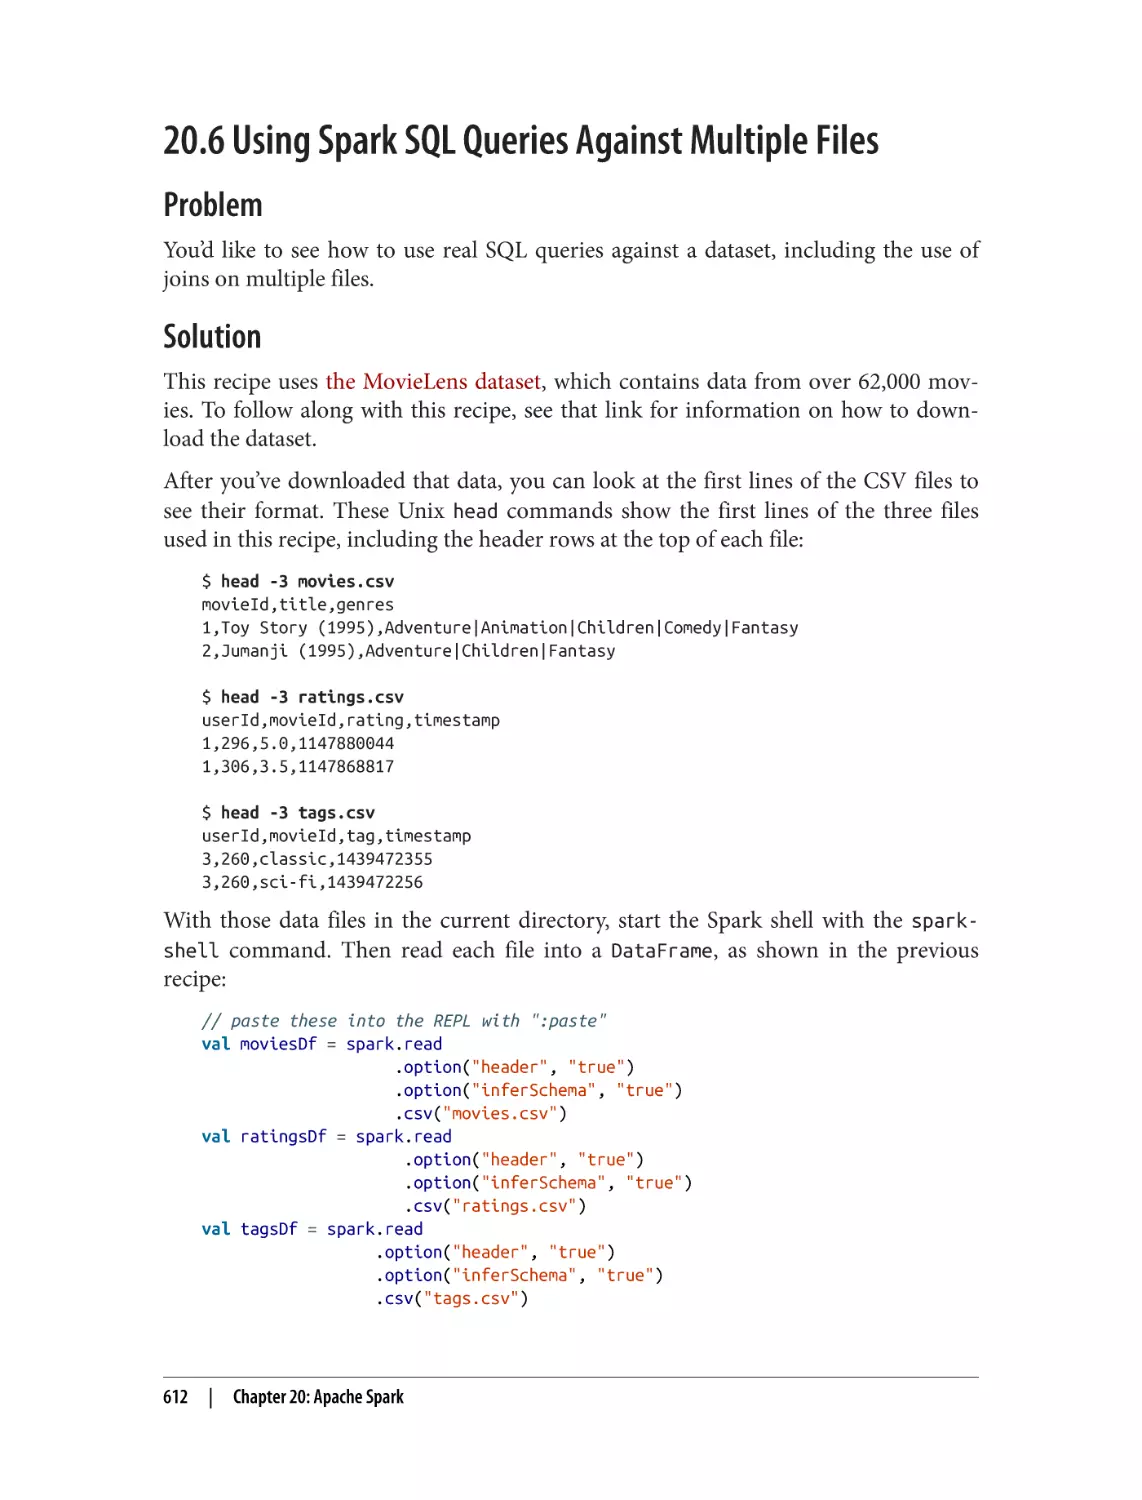
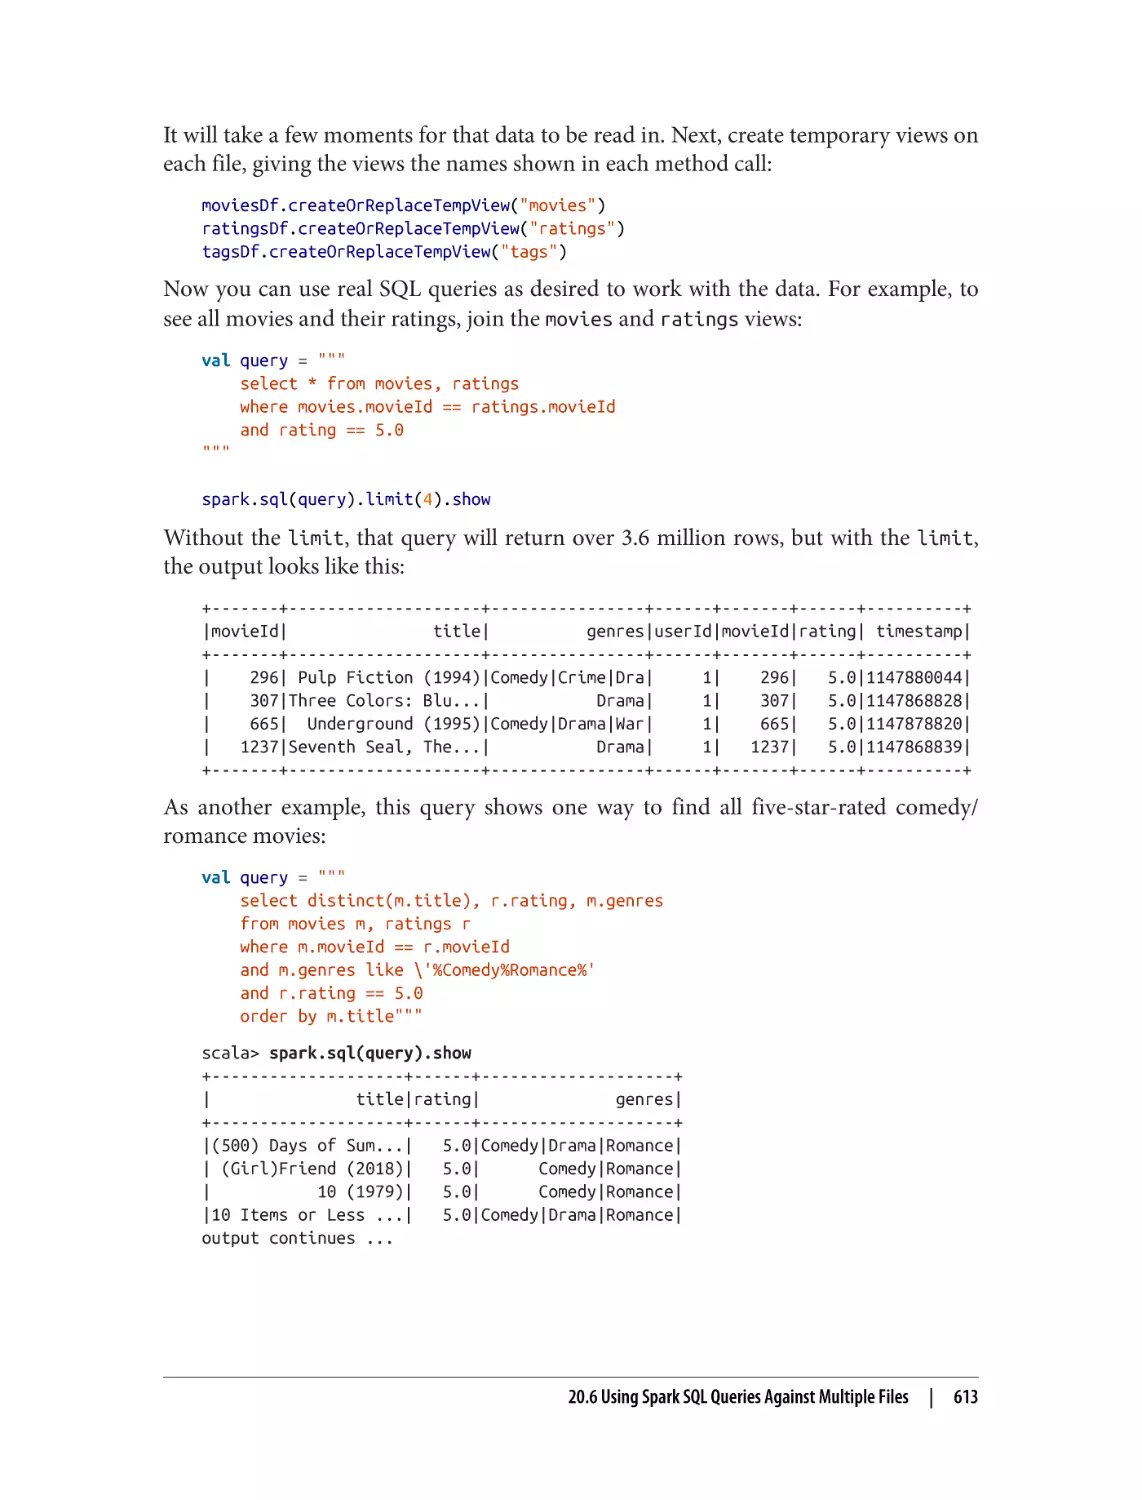
20.6 Using Spark SQL Queries Against Multiple Files
20.7 Creating a Spark Batch Application
591
595
600
602
608
612
616
21. Scala.js, GraalVM, and jpackage. . . . . . . . . . . . . . . . . . . . . . . . . . . . . . . . . . . . . . . . . . . . . 619
21.1 Getting Started with Scala.js
21.2 Responding to Events with Scala.js
21.3 Building Single-Page Applications with Scala.js
21.4 Building Native Executables with GraalVM
21.5 Bundling Your Application with jpackage
620
625
632
638
641
22. Integrating Scala with Java. . . . . . . . . . . . . . . . . . . . . . . . . . . . . . . . . . . . . . . . . . . . . . . . . 647
22.1 Using Java Collections in Scala
22.2 Using Scala Collections in Java
22.3 Using Java Optional Values in Scala
22.4 Using Scala Option Values in Java
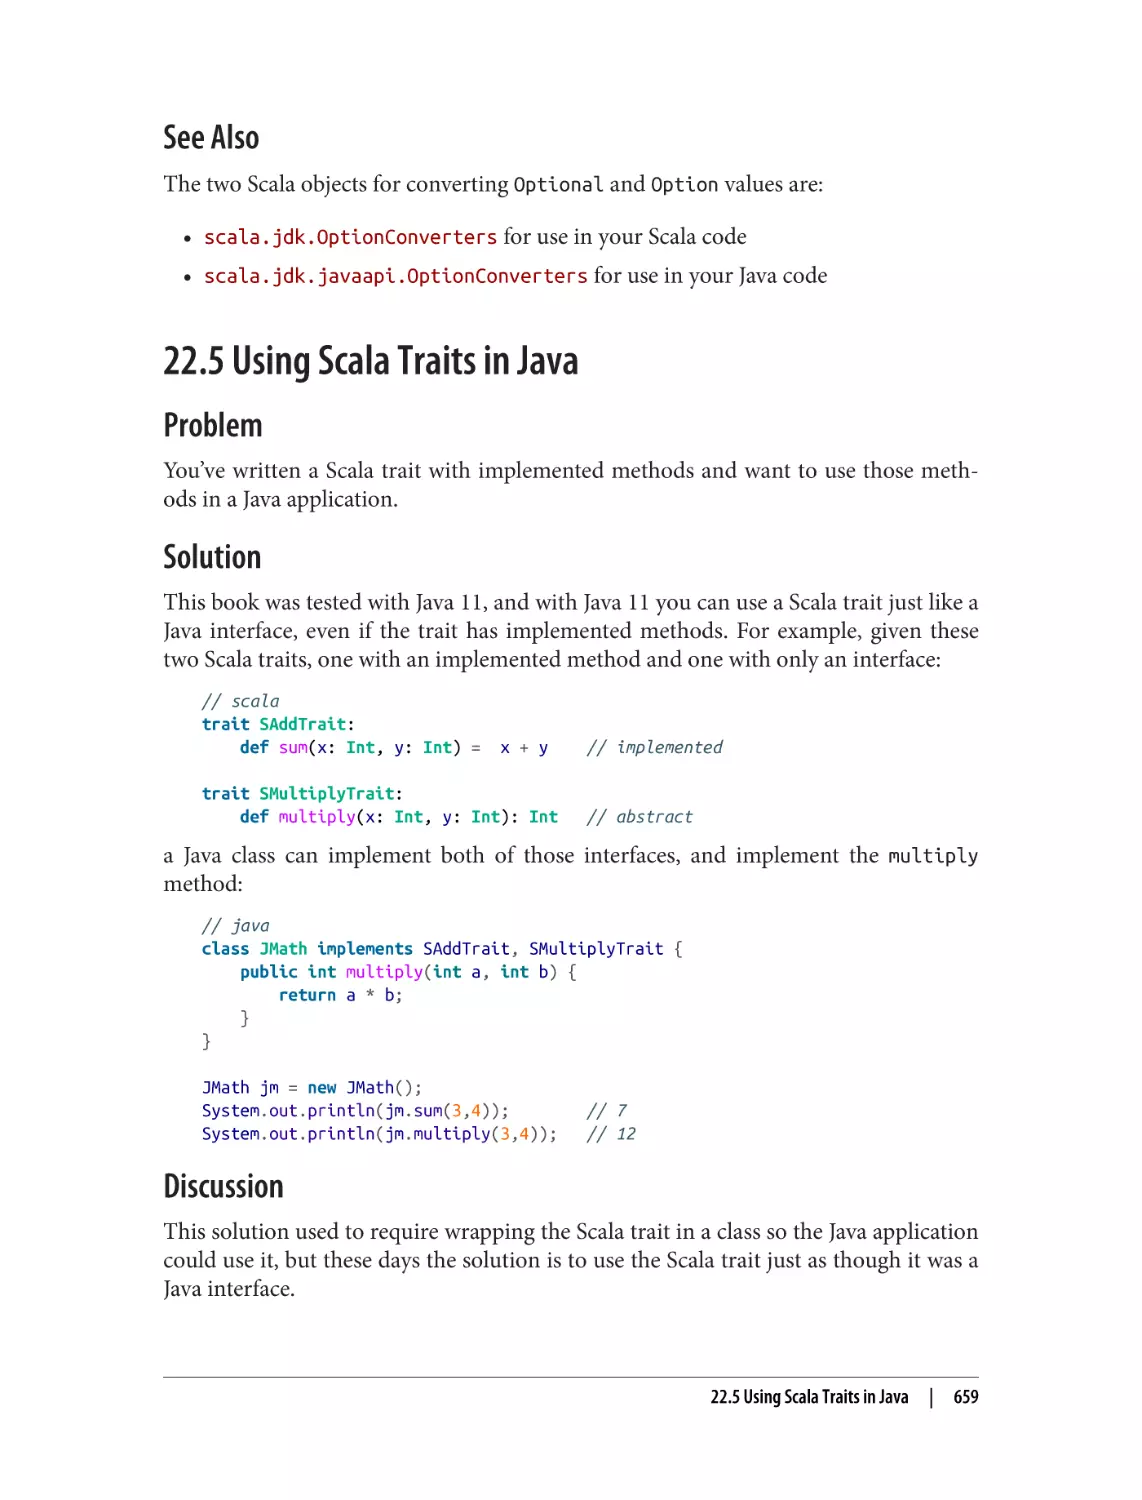
22.5 Using Scala Traits in Java
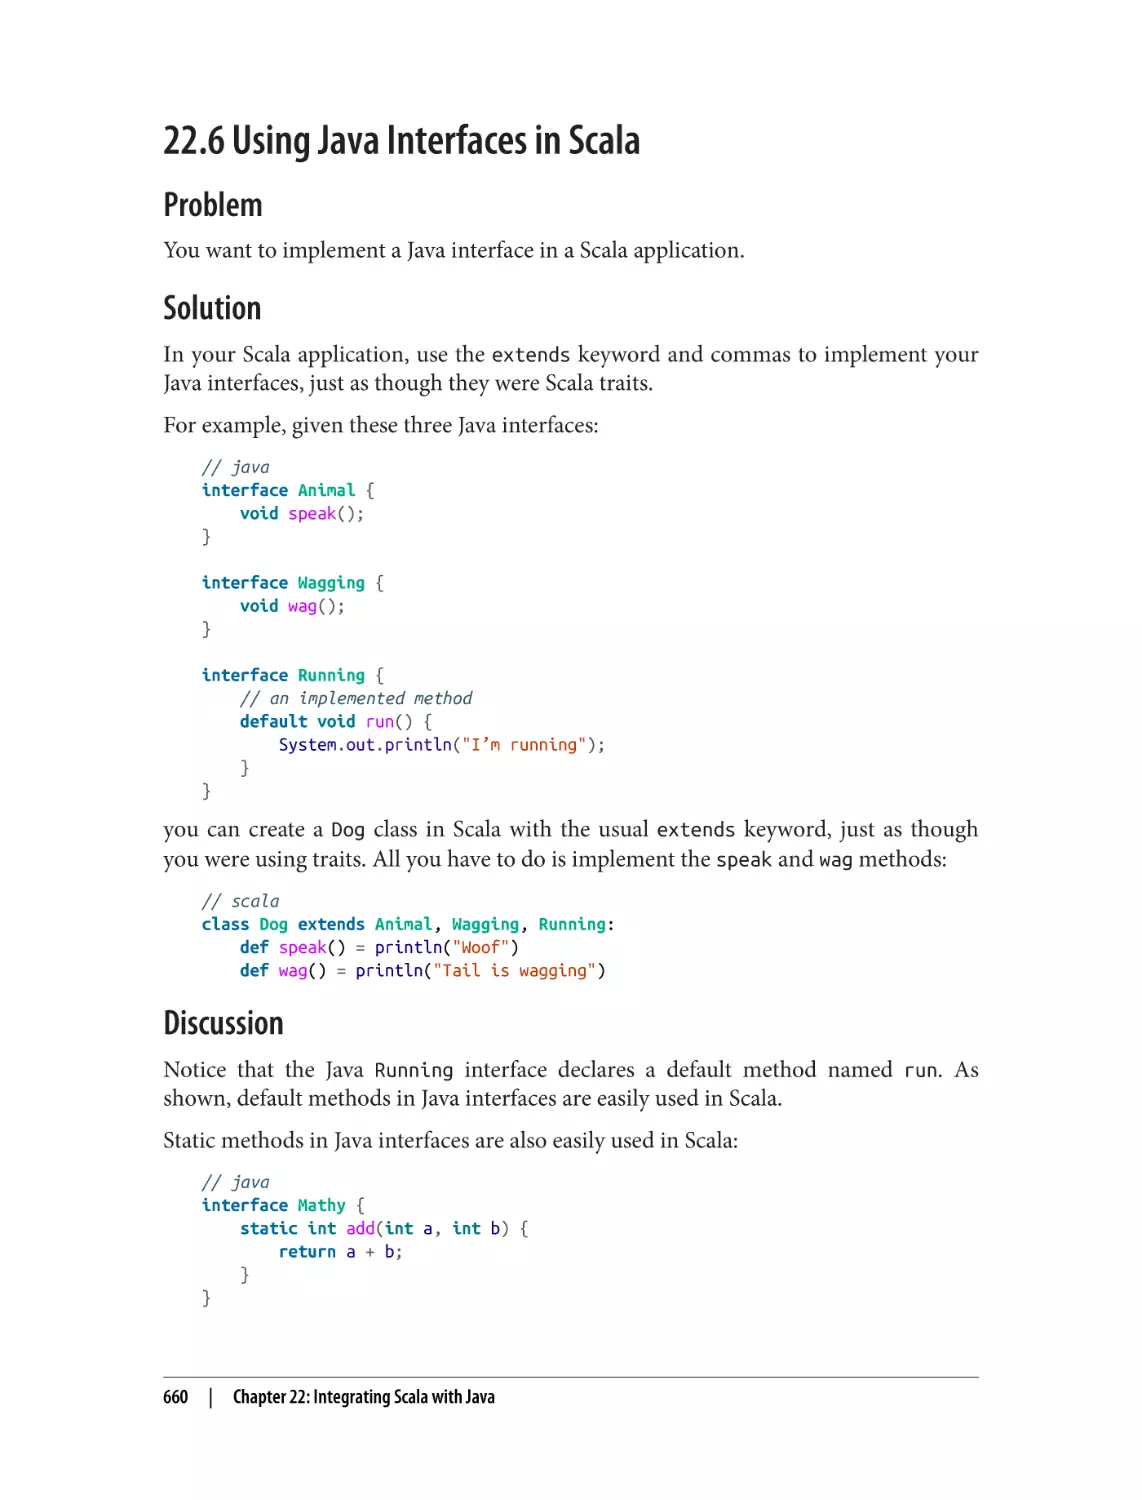
22.6 Using Java Interfaces in Scala
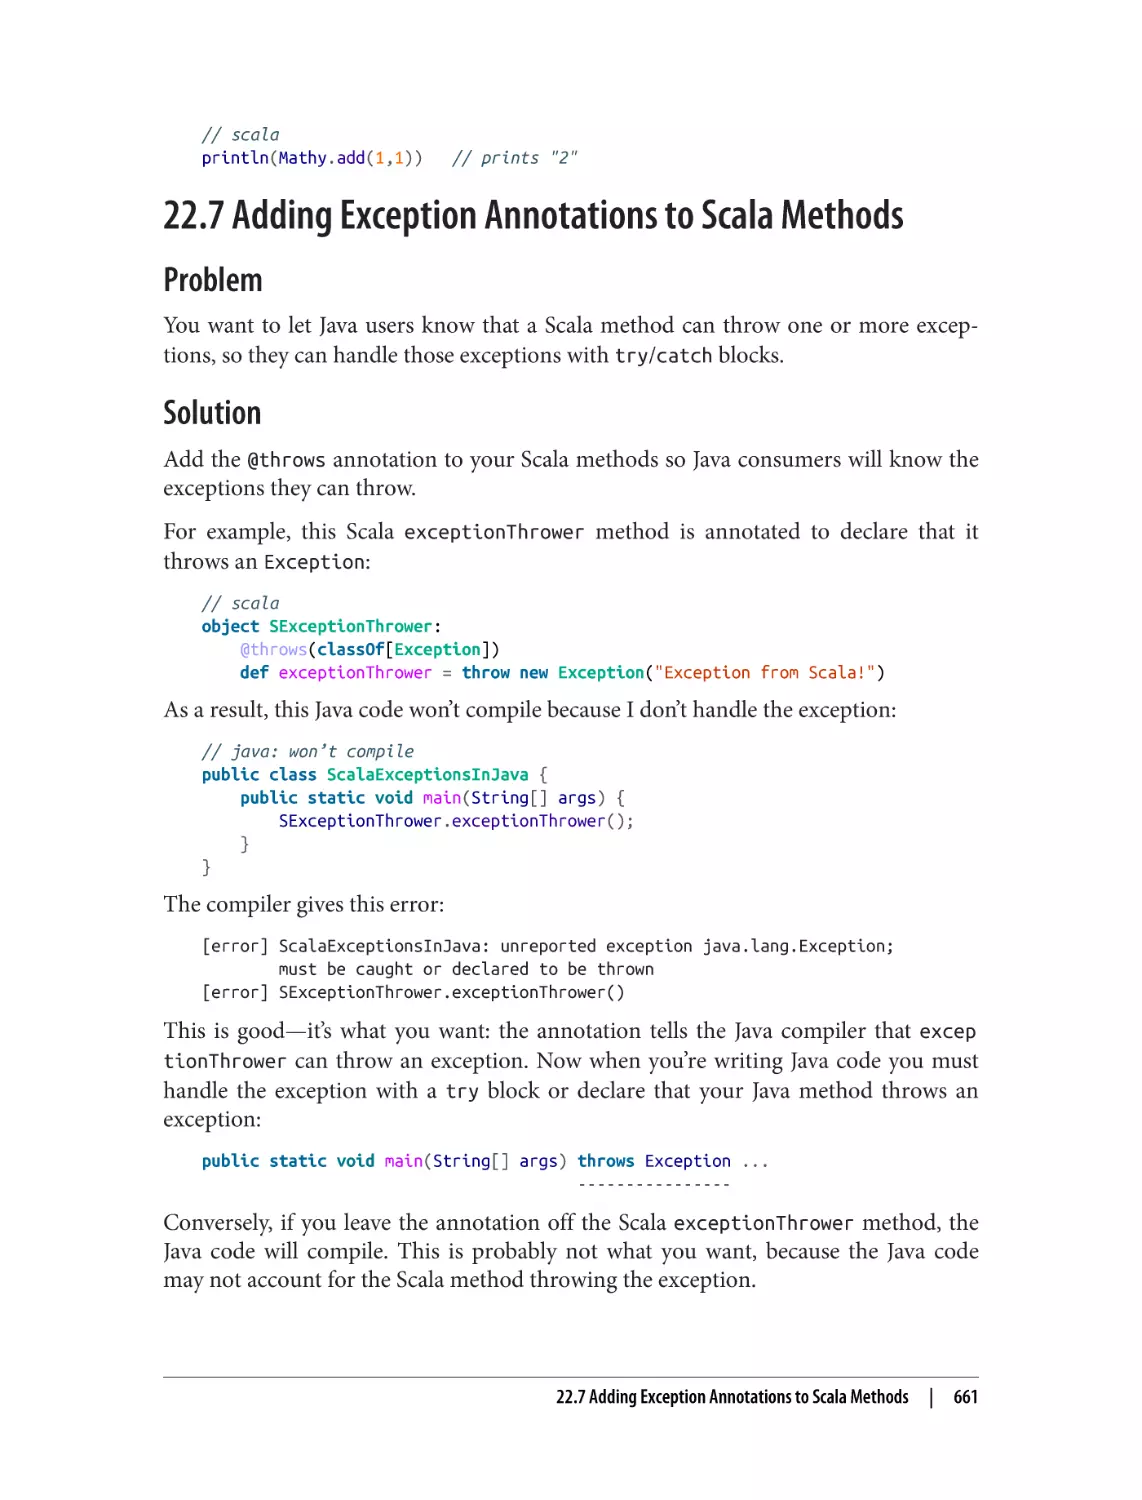
22.7 Adding Exception Annotations to Scala Methods
648
652
654
656
659
660
661
Table of Contents
|
xi
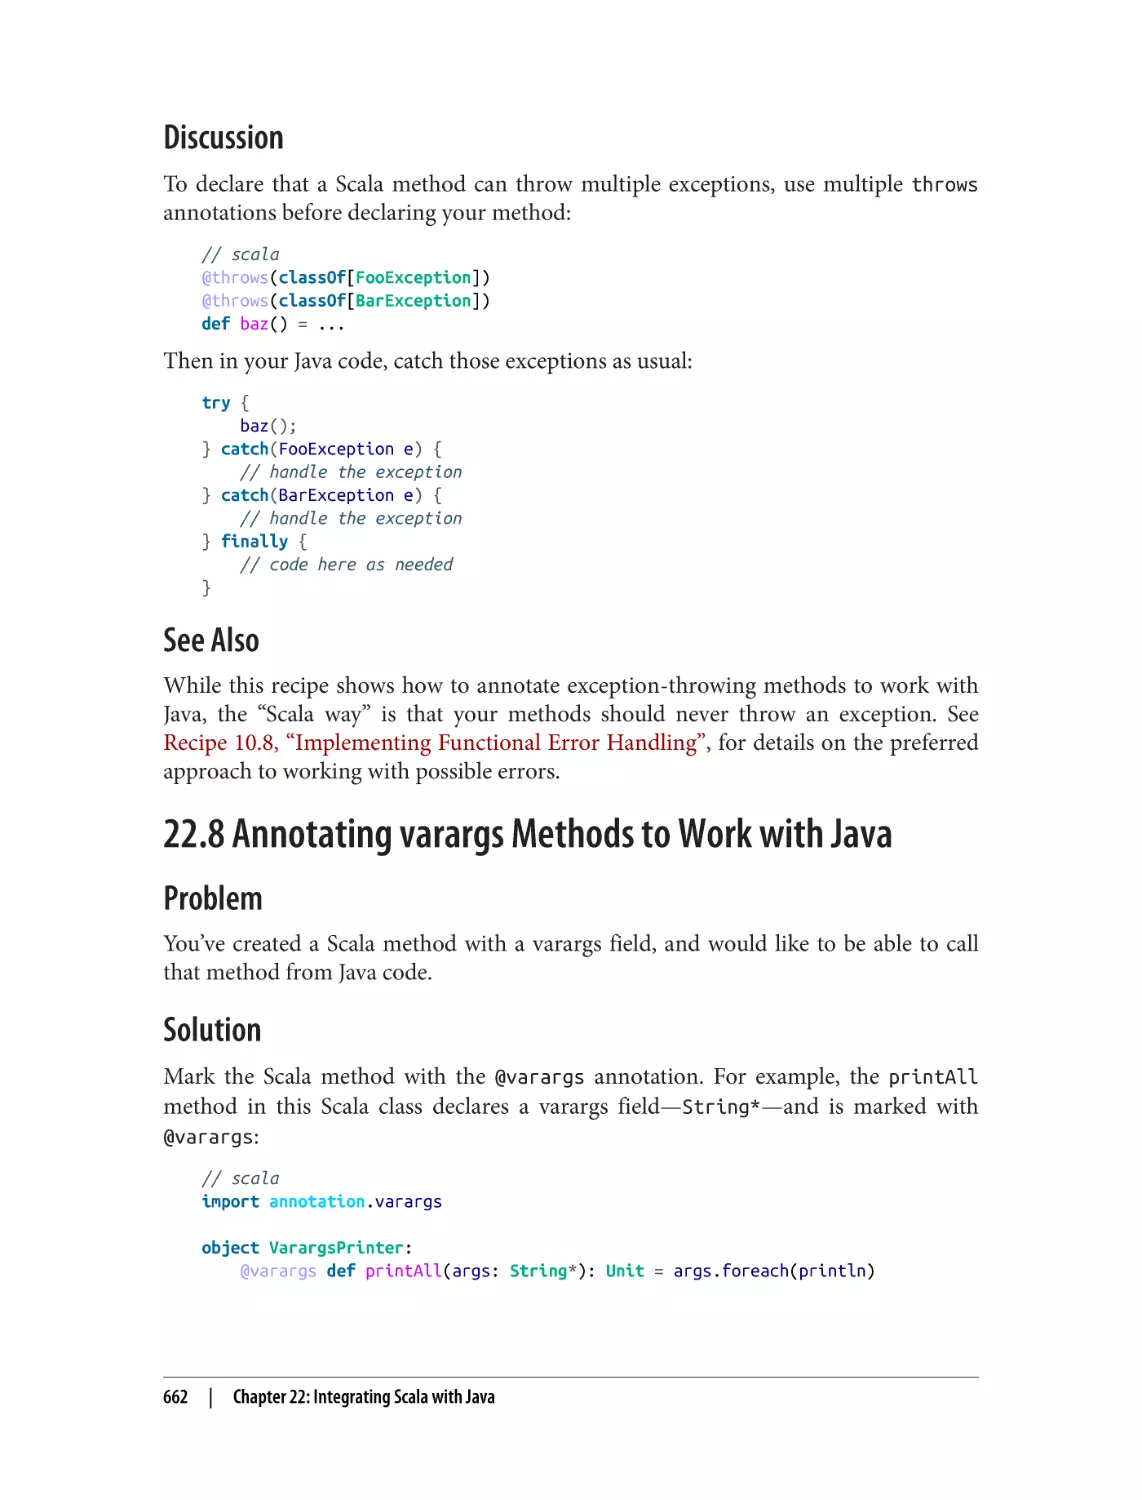
22.8 Annotating varargs Methods to Work with Java
22.9 Using @SerialVersionUID and Other Annotations
662
664
23. Types. . . . . . . . . . . . . . . . . . . . . . . . . . . . . . . . . . . . . . . . . . . . . . . . . . . . . . . . . . . . . . . . . . . . 667
23.1 Creating a Method That Takes a Simple Generic Type
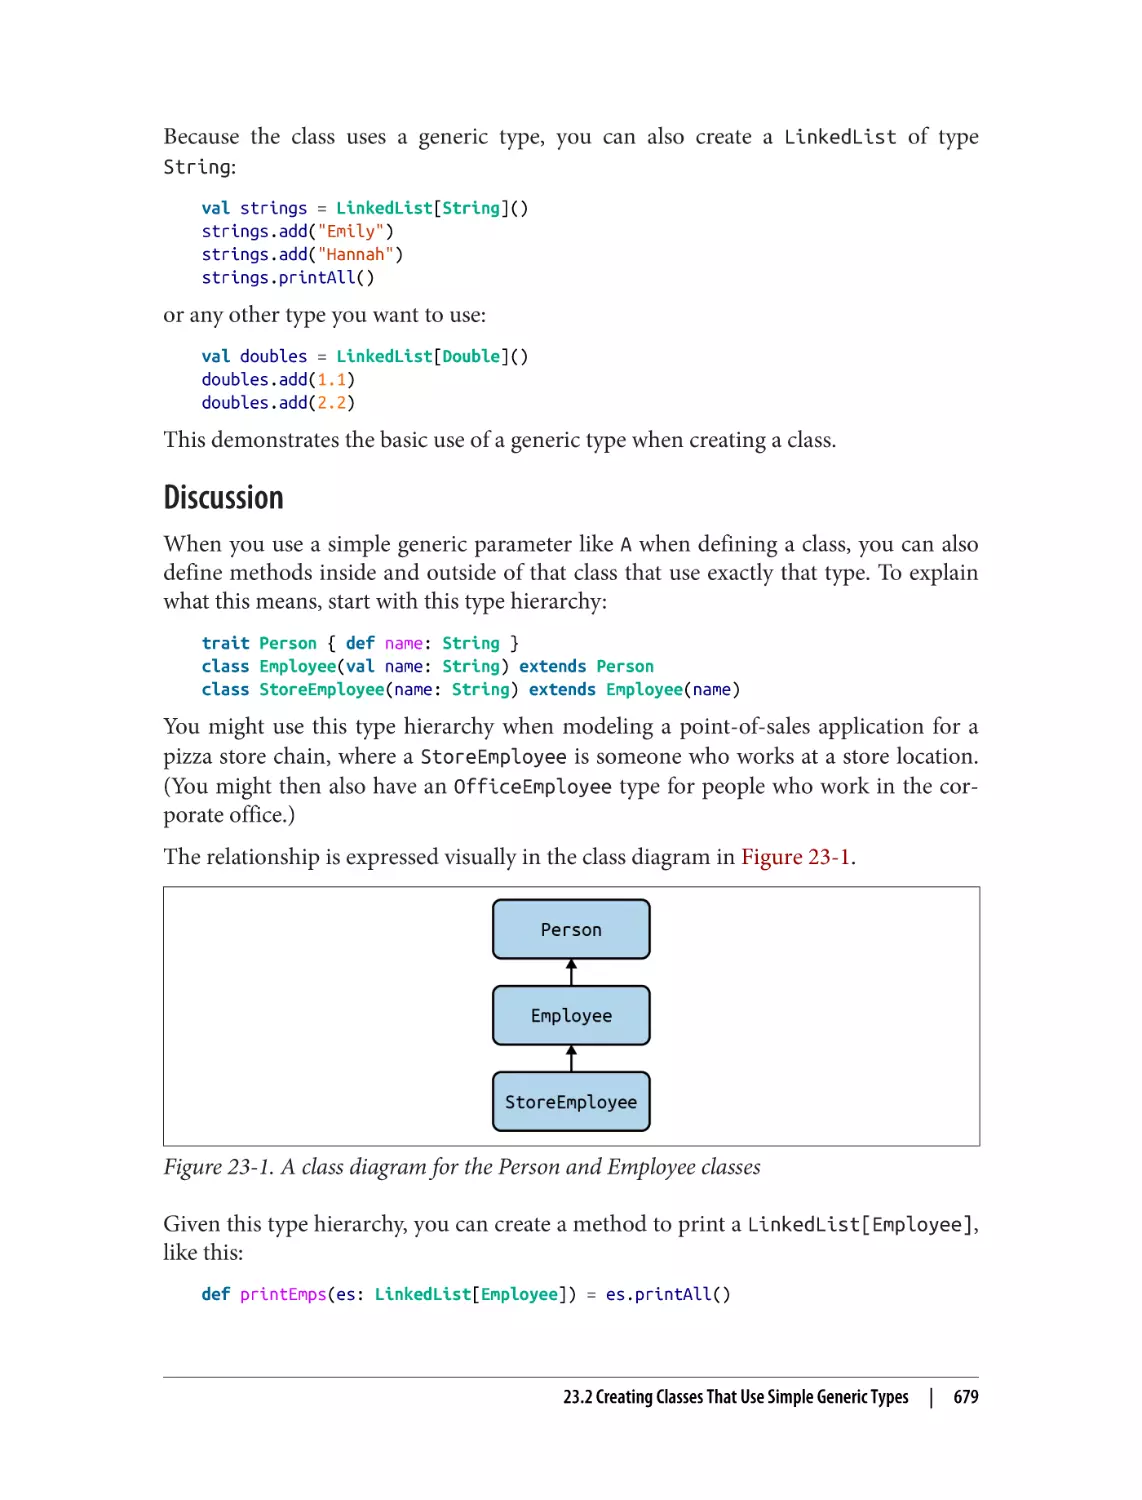
23.2 Creating Classes That Use Simple Generic Types
23.3 Making Immutable Generic Parameters Covariant
23.4 Creating a Class Whose Generic Elements Can Be Mutated
23.5 Creating a Class Whose Parameters Implement a Base Type
23.6 Using Duck Typing (Structural Types)
23.7 Creating Meaningful Type Names with Opaque Types
23.8 Using Term Inference with given and using
23.9 Simulating Dynamic Typing with Union Types
23.10 Declaring That a Value Is a Combination of Types
23.11 Controlling How Classes Can Be Compared with Multiversal Equality
23.12 Limiting Equality Comparisons with the CanEqual Typeclass
677
678
682
684
687
689
691
695
701
703
706
707
24. Best Practices. . . . . . . . . . . . . . . . . . . . . . . . . . . . . . . . . . . . . . . . . . . . . . . . . . . . . . . . . . . . . 711
24.1 Writing Pure Functions
24.2 Using Immutable Variables and Collections
24.3 Writing Expressions (Instead of Statements)
24.4 Using Match Expressions and Pattern Matching
24.5 Eliminating null Values from Your Code
24.6 Using Scala’s Error-Handling Types (Option, Try, and Either)
24.7 Building Modular Systems
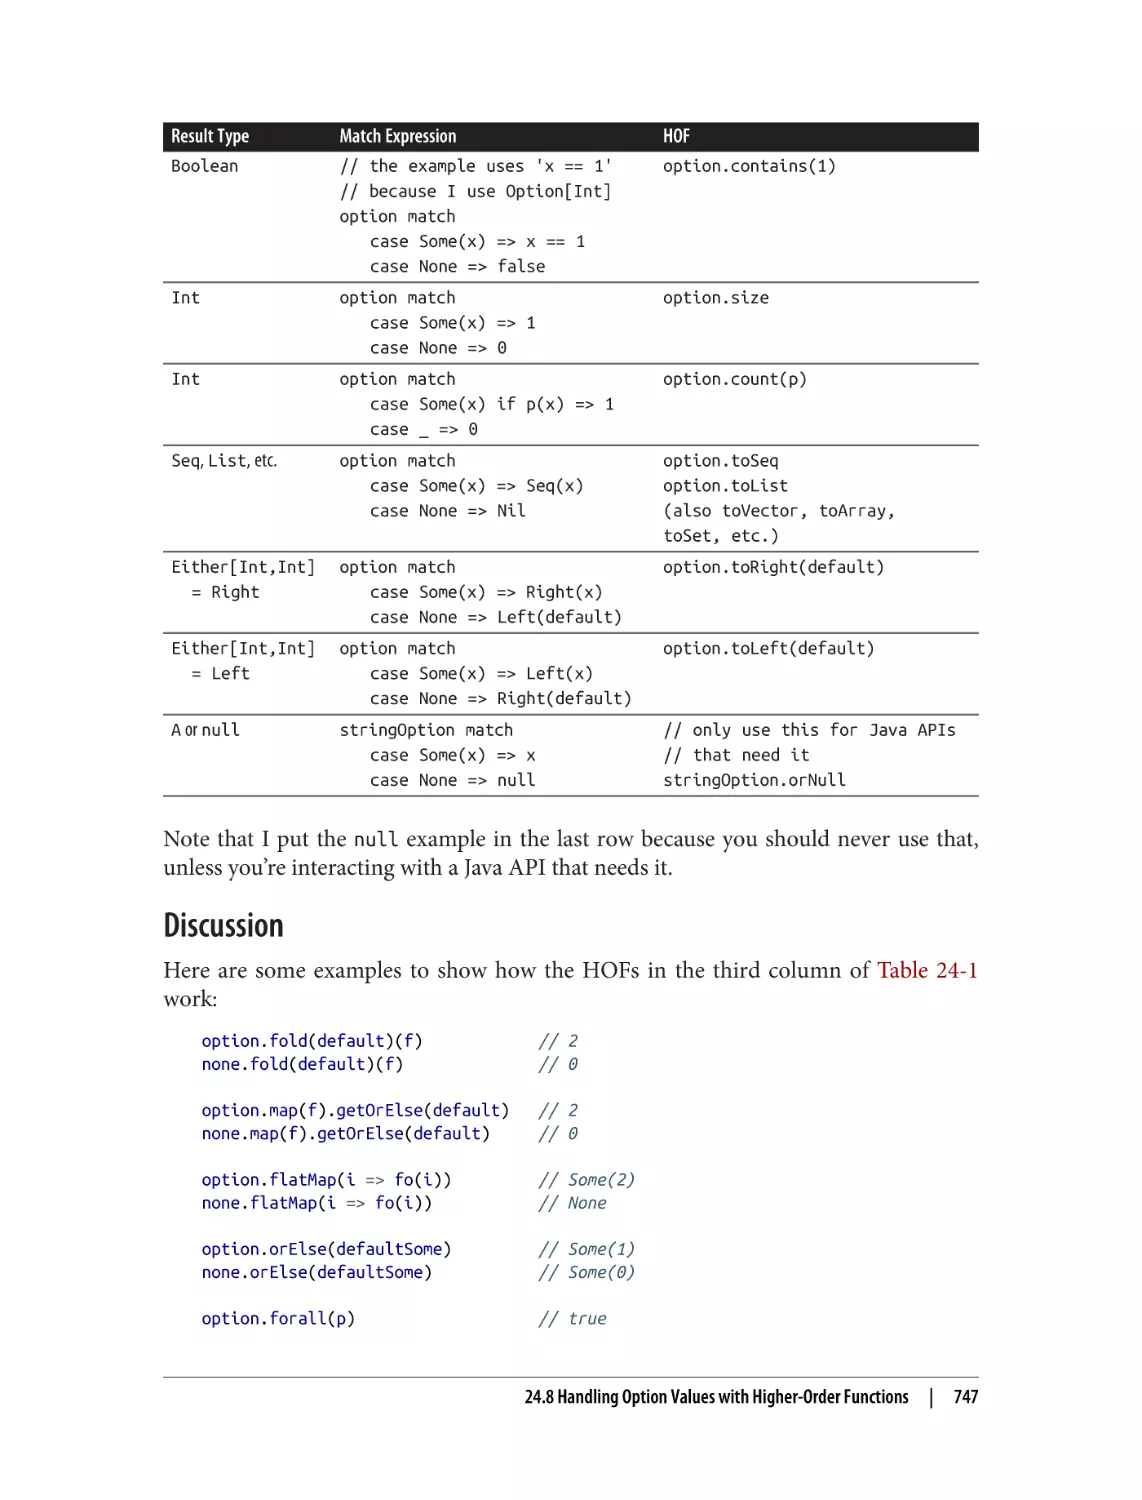
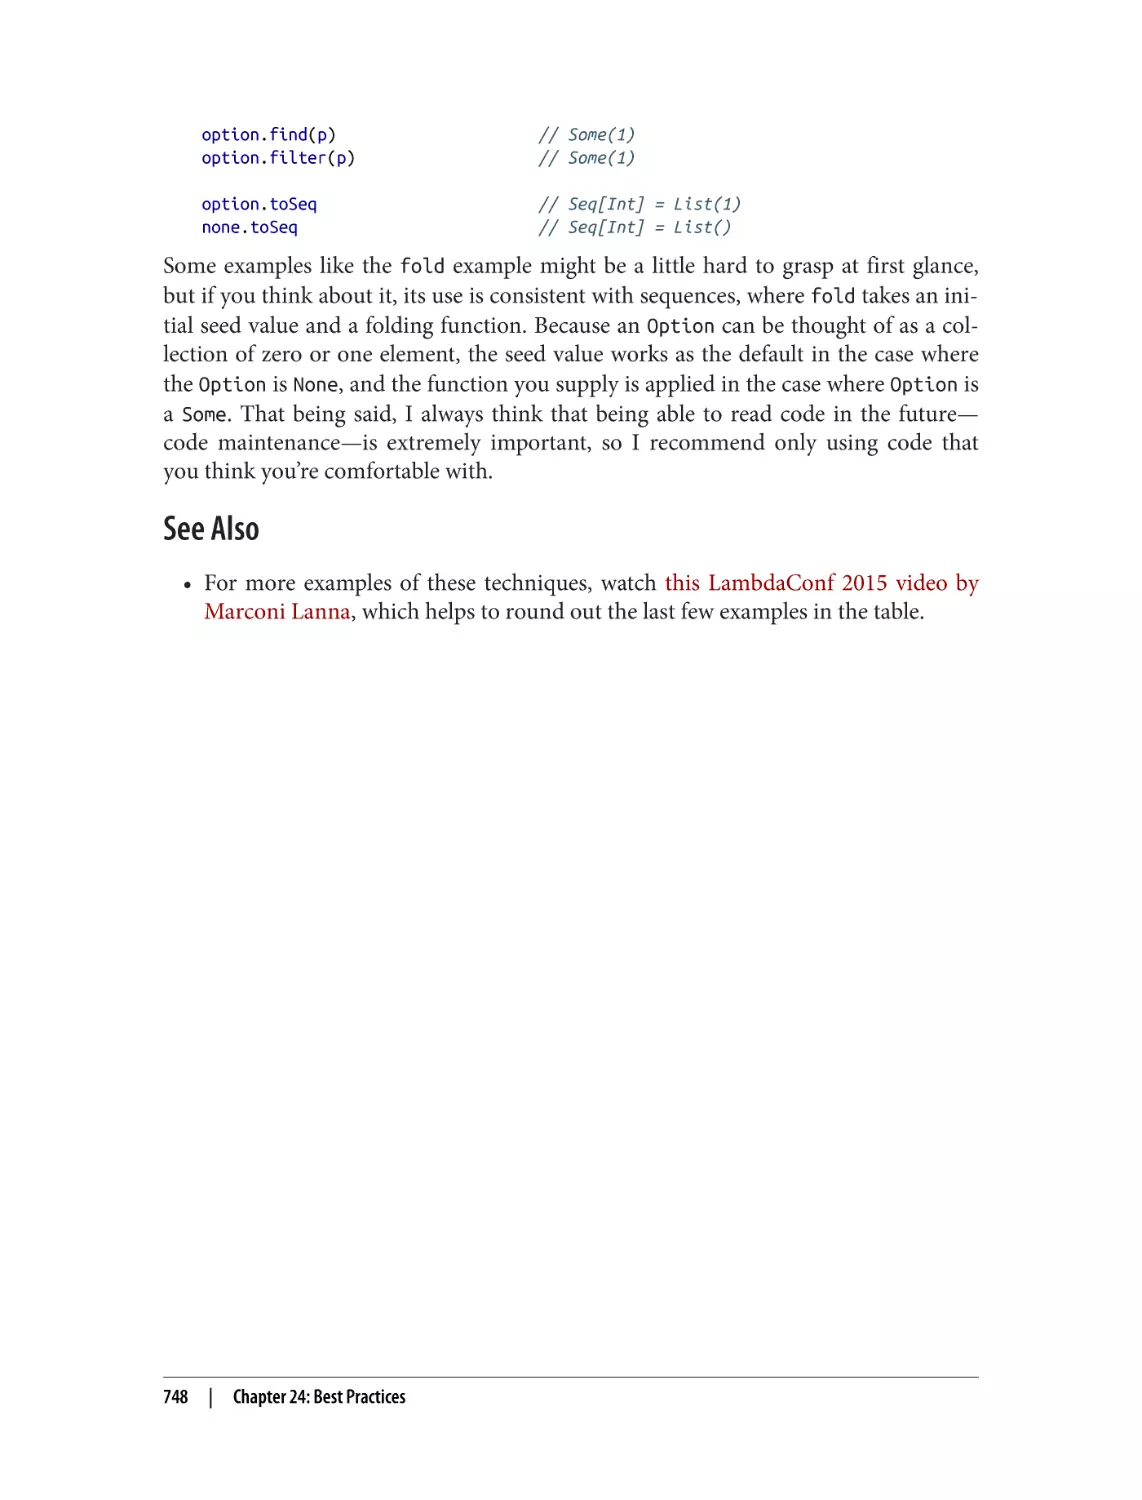
24.8 Handling Option Values with Higher-Order Functions
713
719
722
725
728
733
740
744
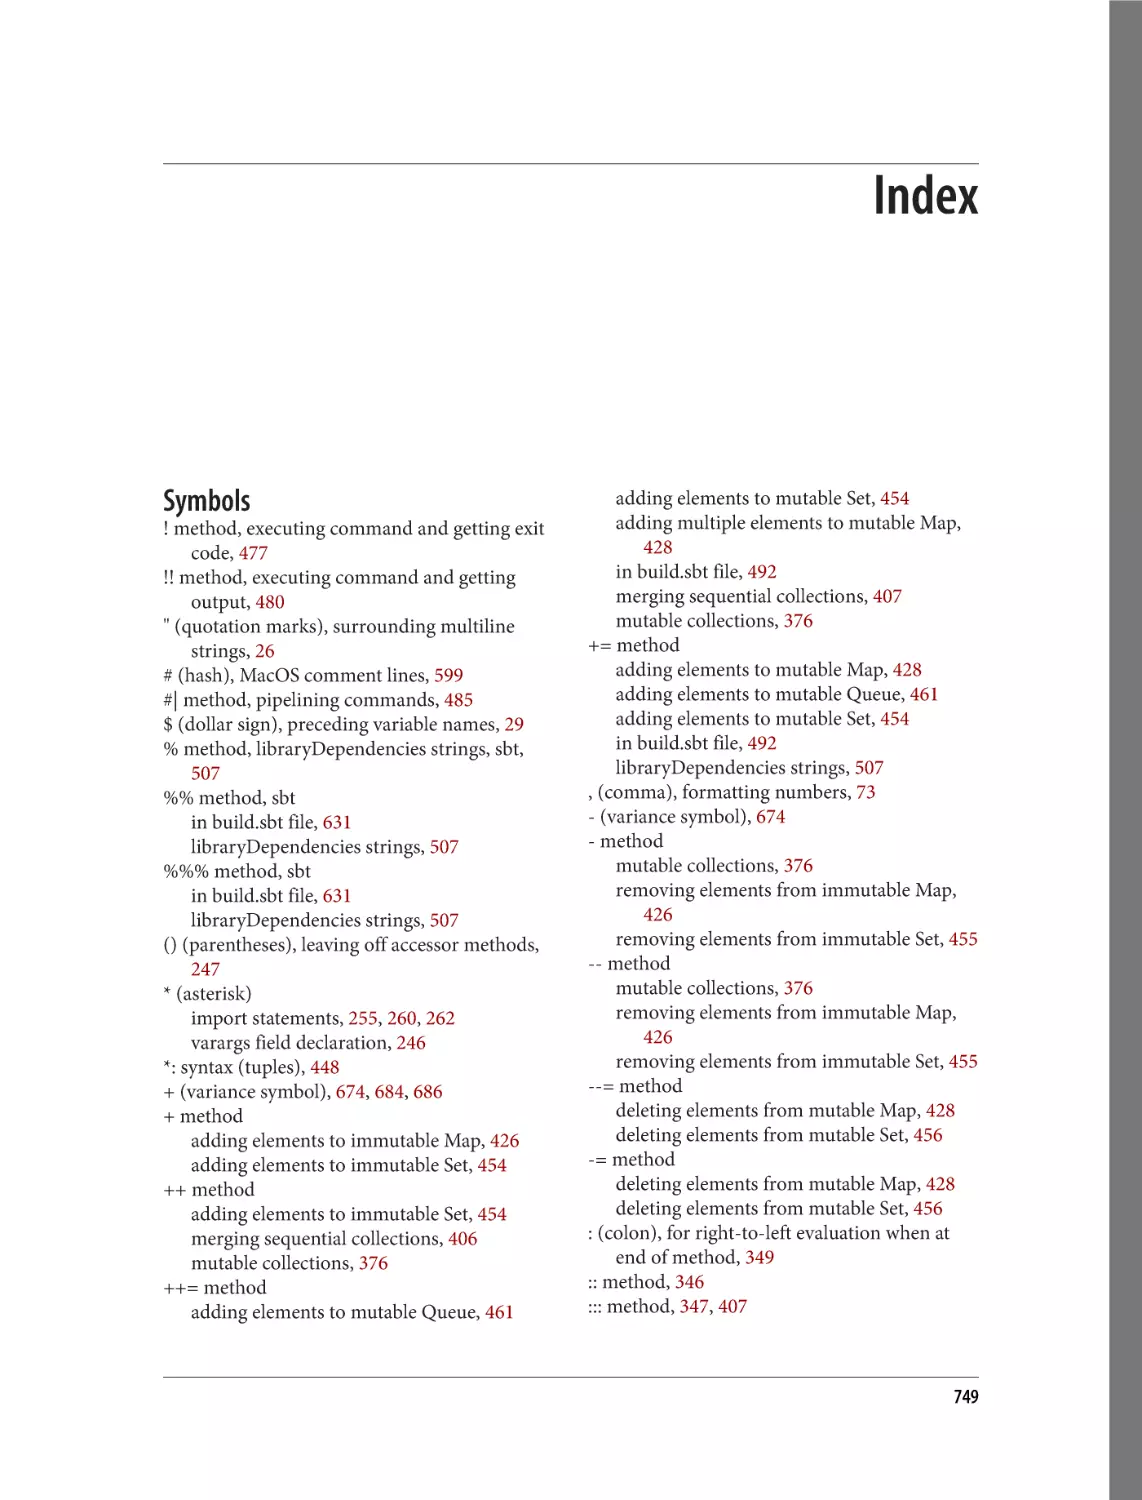
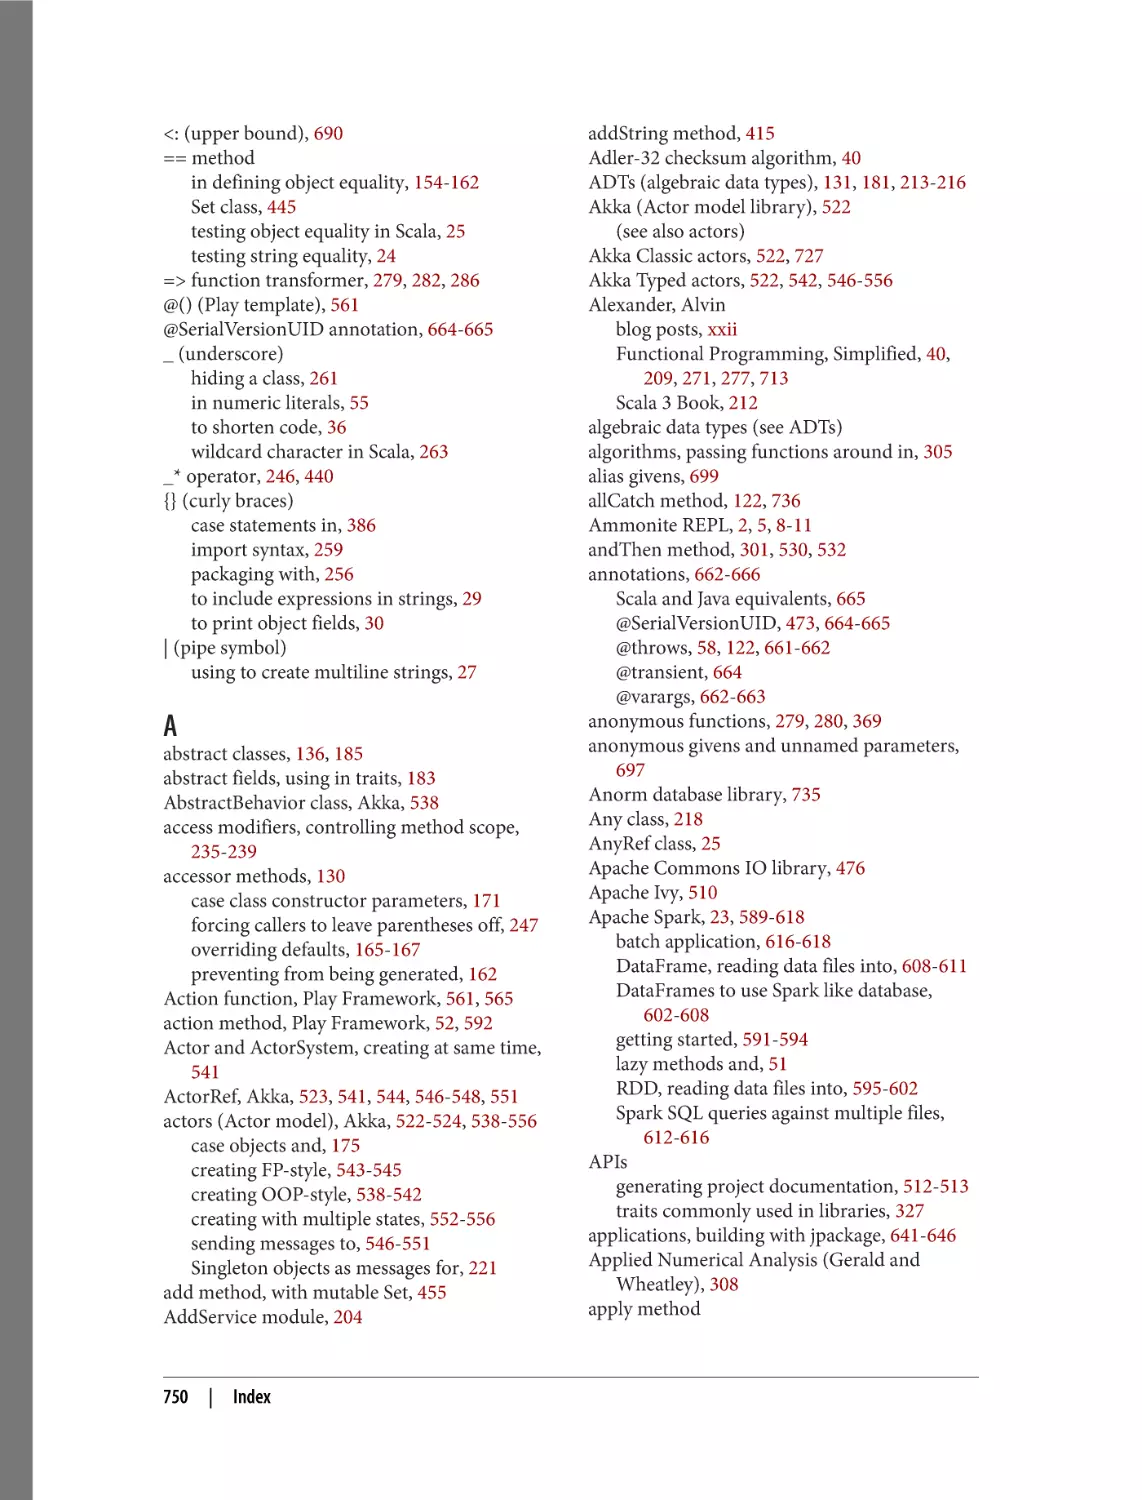
Index. . . . . . . . . . . . . . . . . . . . . . . . . . . . . . . . . . . . . . . . . . . . . . . . . . . . . . . . . . . . . . . . . . . . . . . 749
xii
| Table of Contents
Preface
This is a cookbook of problem-solving recipes about Scala 3, the most interesting
programming language I’ve ever used. The book contains solutions to more than two
hundred fifty common Scala programming problems, demonstrated with more than
one thousand examples.
Compared to other Scala 3 learning resources, there are several unique things about
this book:
• As a cookbook, it’s intended to save you time by providing solutions to the most
common problems you’ll encounter.
• The book covers not only the Scala language but also recipes on Scala tools and
libraries, including sbt, Spark, Scala.js, Akka actors, and JSON processing with
the Play Framework.
• The book takes a big dive into the Scala collections classes, using five chapters to
demonstrate their use.
• Output from the examples is shown either in the Scala interpreter or in com‐
ments after the code. As a result, whether you’re sitting by a computer, on a
plane, or reading in your favorite recliner, you get the benefit of seeing their exact
output. (Which often leads to, “Ah, so that’s how that works.”)
The Scala 3 Language
In the first edition of Scala Cookbook, I described Scala 2 as feeling like a combination
of Ruby and Java. Back then I wrote, “My (oversimplified) Scala elevator pitch is that
it’s a child of Ruby and Java: it’s light, concise, and readable like Ruby, but it compiles
to class files that you package as JAR files that run on the Java virtual machine (JVM);
it uses traits and mixins, and feels dynamic, but it’s statically typed.”
xiii
Since then, the Scala language features have been rethought and debated in an open,
public process, and with the release of Scala 3 in 2021, the language feels even lighter,
and now it seems like a combination of four terrific languages: Ruby and Java, com‐
bined with the lightweight and clean syntax of Python and Haskell.
Part of this even-lighter feel is thanks to the new optional braces syntax, which is also
known as a significant indentation style. With this one change, for loops that used to
look like this:
for (i <- 1 to 5) { println(i) }
now look like this:
for i <- 1 to 5 do println(i)
Similarly, if expressions and many other expressions also use less boilerplate syntax
and are easier to read:
val y = if (x == 1) { true } else { false }
val y = if x == 1 then true else false
// Scala 2
// Scala 3
While this new syntax is considered optional, it’s become the de facto standard and is
used in this book, the Scala 3 Book that I cowrote for the Scala documentation web‐
site, the official Scala 3 training classes on Coursera, the books Programming in Scala
by Martin Odersky et al. (Artima Press) and Programming Scala by Dean Wampler
(O’Reilly), and many more learning resources.
The new syntax isn’t the only change. Scala 3 has many new features, including:
• Enumerations
• Union and intersection types
• Top-level definitions (so your code no longer has to be contained inside classes,
traits, and objects)
• Simplified use of implicits with the new given and using syntax
• Greatly simplified syntax for extension methods and type classes
Even the syntax of traits and classes has been simplified to be more readable than ever
before:
trait Animal:
def speak(): Unit
trait HasTail:
def wagTail(): Unit
class Dog extends Animal, HasTail:
def speak() = println("Woof")
def wagTail() = println("⎞⎜⎛ ⎞⎜⎛")
xiv
| Preface
With the new syntax, every construct that creates unnecessary “noise” in your code
has been removed.
Scala Features
In addition to everything just stated, Scala provides a multitude of features that make
it a unique and truly modern programming language:
• It’s created by Martin Odersky—the “father” of javac—and influenced by Java,
Ruby, Smalltalk, ML, Haskell, Python, Erlang, and others.
• It’s a high-level programming language.
• It has a concise, readable syntax—we call it expressive.
• It’s statically typed—so you get to enjoy all the benefits of static type safety—but it
feels like a dynamic scripting language.
• It’s a pure object-oriented programming (OOP) language; every variable is an
object, and every operator is a method.
• It’s also a functional programming (FP) language, so you can pass functions
around as variables.
• Indeed, the essence of Scala is, as Mr. Odersky puts it, that it’s a fusion of FP and
OOP in a typed setting, with:
— Functions for the logic
— Objects for the modularity
• It runs on the JVM, and thanks to the Scala.js project, it’s also a type-safe Java‐
Script replacement.
• It interacts seamlessly with Java and other JVM libraries.
• Thanks to GraalVM and Scala Native, you can now create fast-starting native
executables from your Scala code.
• The innovative Scala collections library has dozens of prebuilt functional meth‐
ods to save you time and greatly reduces the need to write custom for loops and
algorithms.
• Programming best practices are built into Scala, which favors immutability,
anonymous functions, higher-order functions, pattern matching, classes that
cannot be extended by default, and much more.
• The Scala ecosystem offers the most modern FP libraries in the world.
One thing that I love about Scala is that if you’re familiar with Java, you can be pro‐
ductive with Scala on day 1—but the language is deep, so as you go along you’ll keep
learning and finding newer, better ways to write code. Scala will change the way you
think about programming—and that’s a good thing.
Preface
|
xv
Of all of Scala’s benefits, what I like best is that it lets you write concise, readable code.
The time a programmer spends reading code compared to the time spent writing
code is said to be at least a 10:1 ratio, so writing code that’s concise and readable is a
big deal.
Scala Feels Light and Dynamic
More than just being expressive, Scala feels like a light, dynamic scripting language.
For instance, Scala’s type inference system eliminates the need for the obvious. Rather
than always having to specify types, you simply assign your variables to their data:
val hello = "Hello, world"
val i = 1
val x = 1.0
// a String
// an Int
// a Double
Notice that there’s no need to declare that a variable is a String, Int, or Double. This
is Scala’s type inference system at work.
Creating your own custom types works in exactly the same way. Given a Person class:
class Person(val name: String)
you can create a single person:
val p = Person("Martin Odersky")
or multiple people in a list, with no unnecessary boilerplate code:
val scalaCenterFolks = List(
Person("Darja Jovanovic"),
Person("Julien Richard-Foy"),
Person("Sébastien Doeraene")
)
And even though I haven’t introduced for expressions yet, I suspect that any devel‐
oper with a little bit of experience can understand this code:
for
person <- scalaCenterFolks
if person.name.startsWith("D")
do
println(person.name)
And even though I haven’t introduced enums yet, the same developer likely knows
what this code means:
enum Topping:
case Cheese, Pepperoni, Mushrooms, Olives
Notice again that there’s no unnecessary boilerplate code here; the code is as “mini‐
malist” as possible, but still easily readable. Great care has been taken to continue Sca‐
la’s tradition of being an expressive language.
xvi
|
Preface
In all of these examples you can see Scala’s lightweight syntax, and how it feels like a
dynamic scripting language.
Audience
This book is intended for programmers who want to be able to quickly find solutions
to problems they’ll encounter when using Scala and its libraries and tools. I hope it
will also be a good tool for developers who want to learn Scala. I’m a big believer in
learning by example, and this book is chock-full of examples.
I generally assume that you have some experience with another programming lan‐
guage like C, C++, Java, Ruby, C#, PHP, Python, Haskell, and the like. My own experi‐
ence is with those languages, so I’m sure my writing is influenced by that background.
Another way to describe the audience for this book involves looking at different levels
of software developers. In this article on Scala levels, Martin Odersky defines the fol‐
lowing levels of computer programmers:
• Level A1: Beginning application programmer
• Level A2: Intermediate application programmer
• Level A3: Expert application programmer
• Level L1: Junior library designer
• Level L2: Senior library designer
• Level L3: Expert library designer
This book is primarily aimed at the application developers in the A1, A2, A3, and L1
categories. While helping those developers is my primary goal, I hope that L2 and L3
developers can also benefit from the many examples in this book―especially if they
have no prior experience with functional programming, or they want to quickly get
up to speed with Scala and its tools and libraries.
Contents of This Book
This book is all about solutions, and Chapter 1, Command-Line Tasks contains a col‐
lection of recipes centered around using Scala at the command line. It begins by
showing tips on how to use the Scala REPL, as well as the feature-packed Ammonite
REPL. It then shows how to use command-line tools like scalac and scala to com‐
pile and run your code, as well as the javap command to disassemble your Scala class
files. Finally, it shows how to run Scala-generated JAR files.
Preface
|
xvii
Chapter 2, Strings provides recipes for working with strings. Scala gets its basic
String functionality from Java, but with the power of implicit conversions, Scala
adds new functionality to strings, so you can also treat them as a sequence of charac‐
ters (Char values).
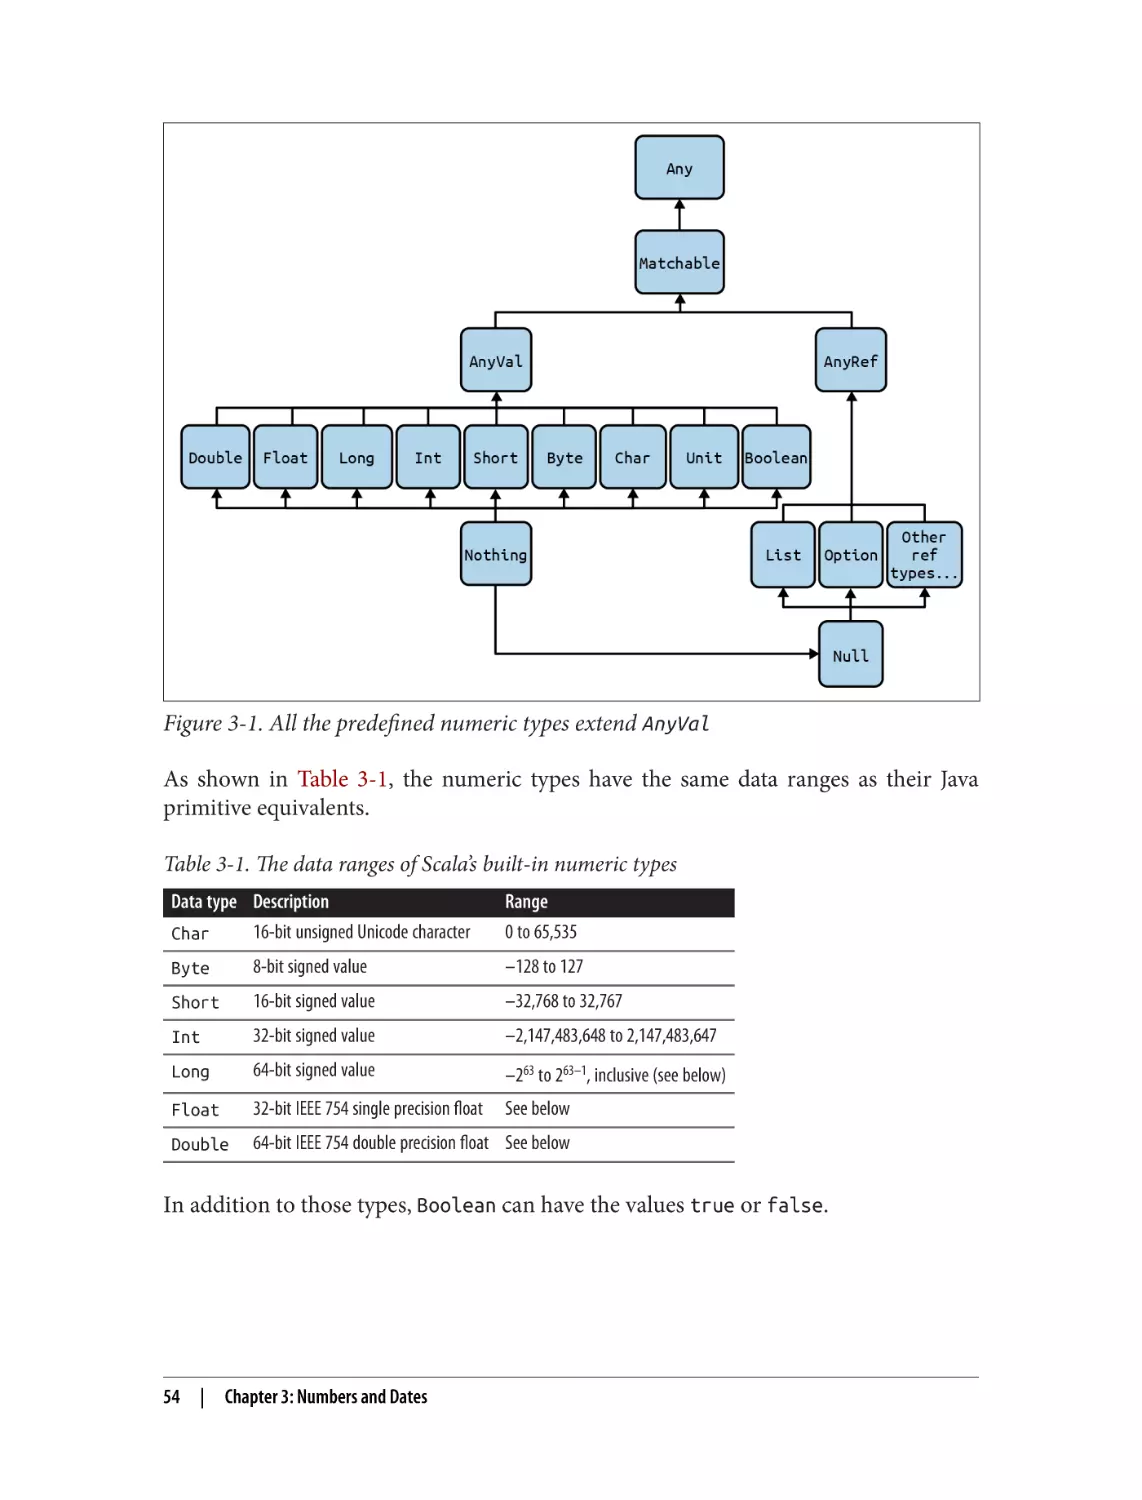
Chapter 3, Numbers and Dates provides recipes for working with Scala’s numeric
types, as well as the date classes that were introduced with Java 8. In the numeric rec‐
ipes, you’ll see that there are no ++ and –– operators for working with numbers; this
chapter explains why and demonstrates the other methods you can use. It also shows
how to handle large numbers, currency, and how to compare floating-point numbers.
The date recipes use the Java 8 date classes and also show how to work with legacy
dates.
Chapter 4, Control Structures demonstrates Scala’s built-in control structures, starting
with if/then statements and basic for loops, and then provides solutions for working
with for/yield loops (for comprehensions), and for expressions with embedded if
statements (guards). Because match expressions and pattern matching are so impor‐
tant to Scala, several recipes show how to use them to solve a variety of problems.
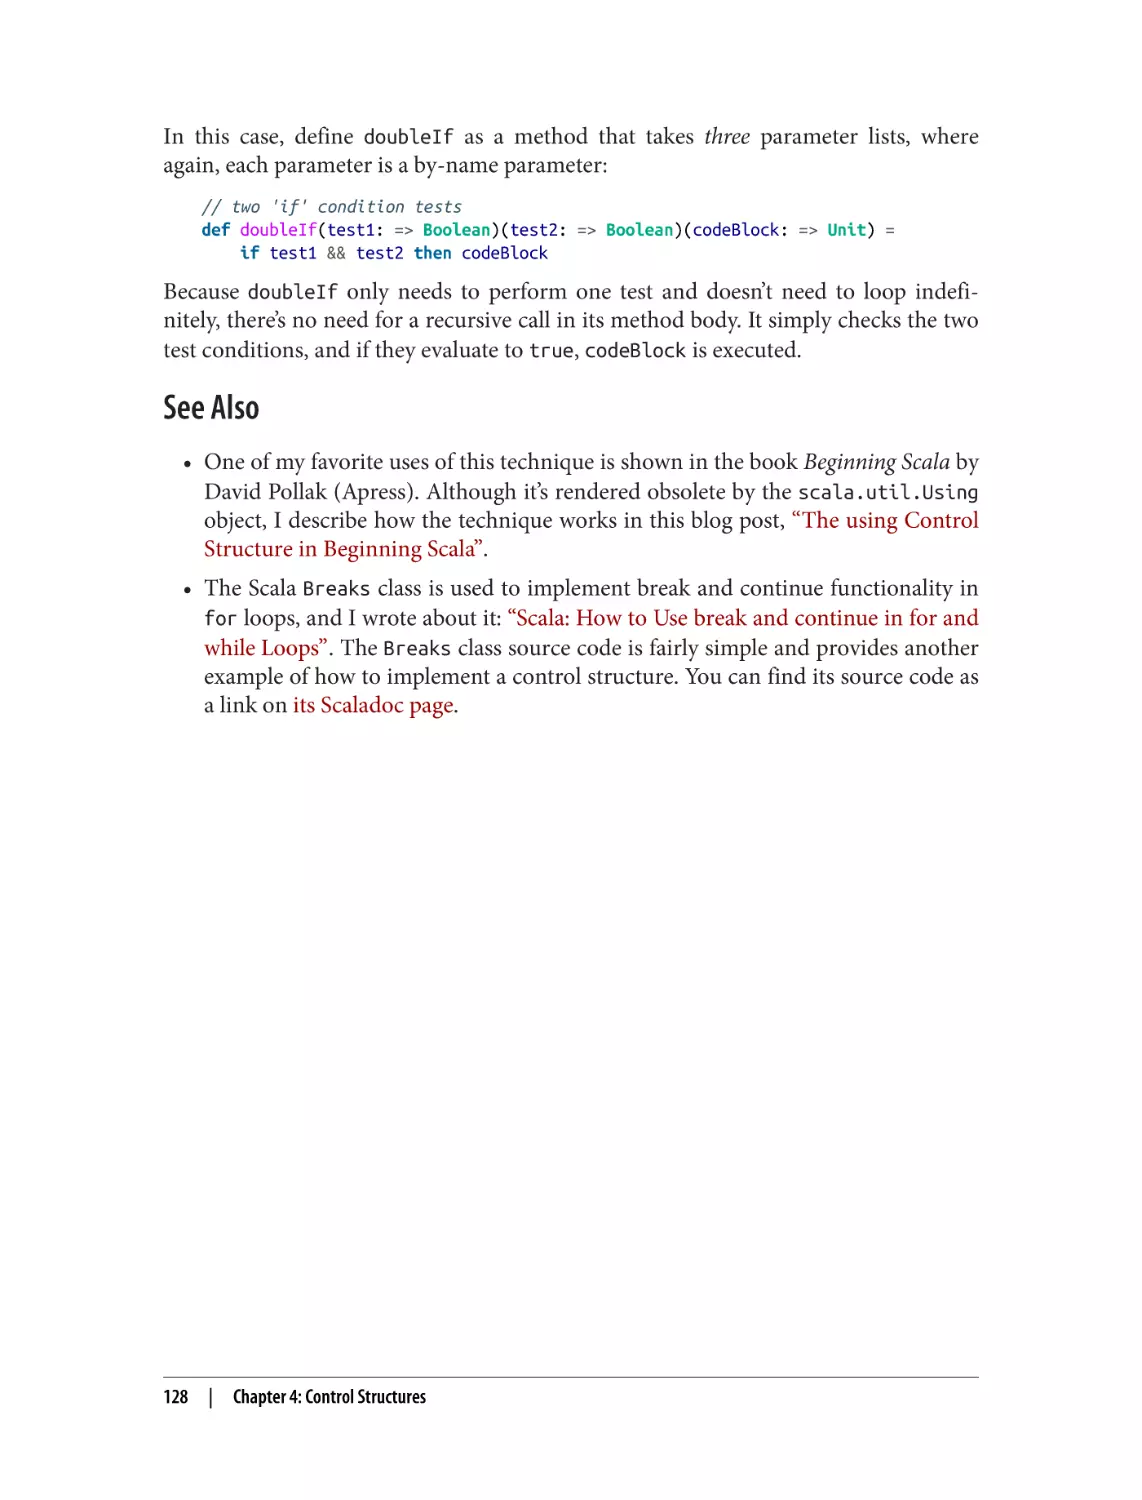
Chapter 5, Classes provides examples related to Scala classes, parameters, and fields.
Because Scala constructors are very different than Java constructors, several recipes
show the ins and outs of writing both primary and auxiliary constructors. Several rec‐
ipes show what case classes are and how to use them.
Chapter 6, Traits and Enums provides examples of the all-important Scala trait, as
well as the brand-new enum. The trait recipes begin by showing how to use a trait like
a Java interface, and then they dive into more advanced topics, such as how to use
traits as mixins, and how to limit which members a trait can be mixed into using a
variety of methods. The final two recipes demonstrate how to use enums in domain
modeling, including the creation of algebraic data types (ADTs).
Chapter 7, Objects contains recipes related to objects, including the meaning of an
object as an instance of a class, as well as everything related to the object keyword.
Chapter 8, Methods shows how to define methods to accept parameters, return val‐
ues, use parameter names when calling methods, set default values for method
parameters, create varargs fields, and write methods to support a fluent style of pro‐
gramming. The last recipe in the chapter demonstrates the all-new Scala 3 extension
methods.
Chapter 9, Packaging and Imports contains examples of Scala’s package and import
statements, which provide more capabilities than the same Java keywords. This
includes how to use the curly brace style for packaging, how to hide and rename
members when you import them, and more.
xviii
|
Preface
Although much of the book demonstrates FP techniques, Chapter 10, Functional Pro‐
gramming combines many FP recipes in one location. Solutions show how to define
anonymous functions (function literals) and use them in a variety of situations. Rec‐
ipes demonstrate how to define a method that accepts a function argument, partially
applied functions, and how to return a function from a function.
The Scala collections library is rich and deep, so Chapters 11 through 15 provide
hundreds of collection-related examples.
Recipes in Chapter 11, Collections: Introduction help you choose collections classes
for specific needs and then help you choose and use methods within a collection to
solve specific problems, such as transforming one collection into a new collection, fil‐
tering a collection, and creating subgroups of a collection.
Chapter 12, Collections: Common Sequence Classes demonstrates the most common
collections classes, including Vector, List, ArrayBuffer, Array, and LazyList. Rec‐
ipes demonstrate how to create each type, as well as adding, updating, and removing
elements.
Chapter 13, Collections: Common Sequence Methods then demonstrates how to use
the most common methods that are available for the Scala sequence classes. Recipes
show how to iterate over sequences, transform them, filter them, sort them, and
more.
In the same way that the previous chapter demonstrates common sequence methods,
Chapter 14, Collections: Using Maps demonstrates many of the same techniques for
use with Scala Map classes.
Lastly, Chapter 15, Collections: Tuple, Range, Set, Stack, and Queue provides coverage
of the other Scala collections classes, including tuples, ranges, sets, stacks, and queues.
Chapter 16, Files and Processes then shows how to work with files and processes. Rec‐
ipes demonstrate how to read and write files, obtain directory listings, and work with
serialization. Several recipes then demonstrate how to work with external processes
in a platform-independent manner.
Chapter 17, Building Projects with sbt is a comprehensive guide to the de facto build
tool for Scala applications. It starts by showing several ways to create an sbt project
directory structure, and then it shows how to include managed and unmanaged
dependencies, build your projects, generate Scaladoc for your projects, deploy your
projects, and more.
Preface
|
xix
Chapter 18, Concurrency with Scala Futures and Akka Actors provides solutions for
the wonderful world of building concurrent applications (and engaging those multi‐
core CPUs!) with futures and the Akka actors library. Recipes with futures show how
to build one-shot, short-lived pockets of concurrency, while the actors’ recipes
demonstrate how to create long-living parallel processes that may respond to billions
of requests in their lifetime.
Chapter 19, Play Framework and Web Services shows how to use Scala on both the
client and server sides of web services. On the server side it shows how to use the Play
Framework to develop RESTful web services. For both client and server code it shows
how to serialize and deserialize JSON, and how to work with HTTP headers.
Chapter 20, Apache Spark demonstrates the Apache Spark framework. Spark is one of
the applications that made Scala famous, and recipes demonstrate how to work with
large datasets as a Resilient Distributed Dataset (RDD), and also how to query them
using industry-standard SQL queries.
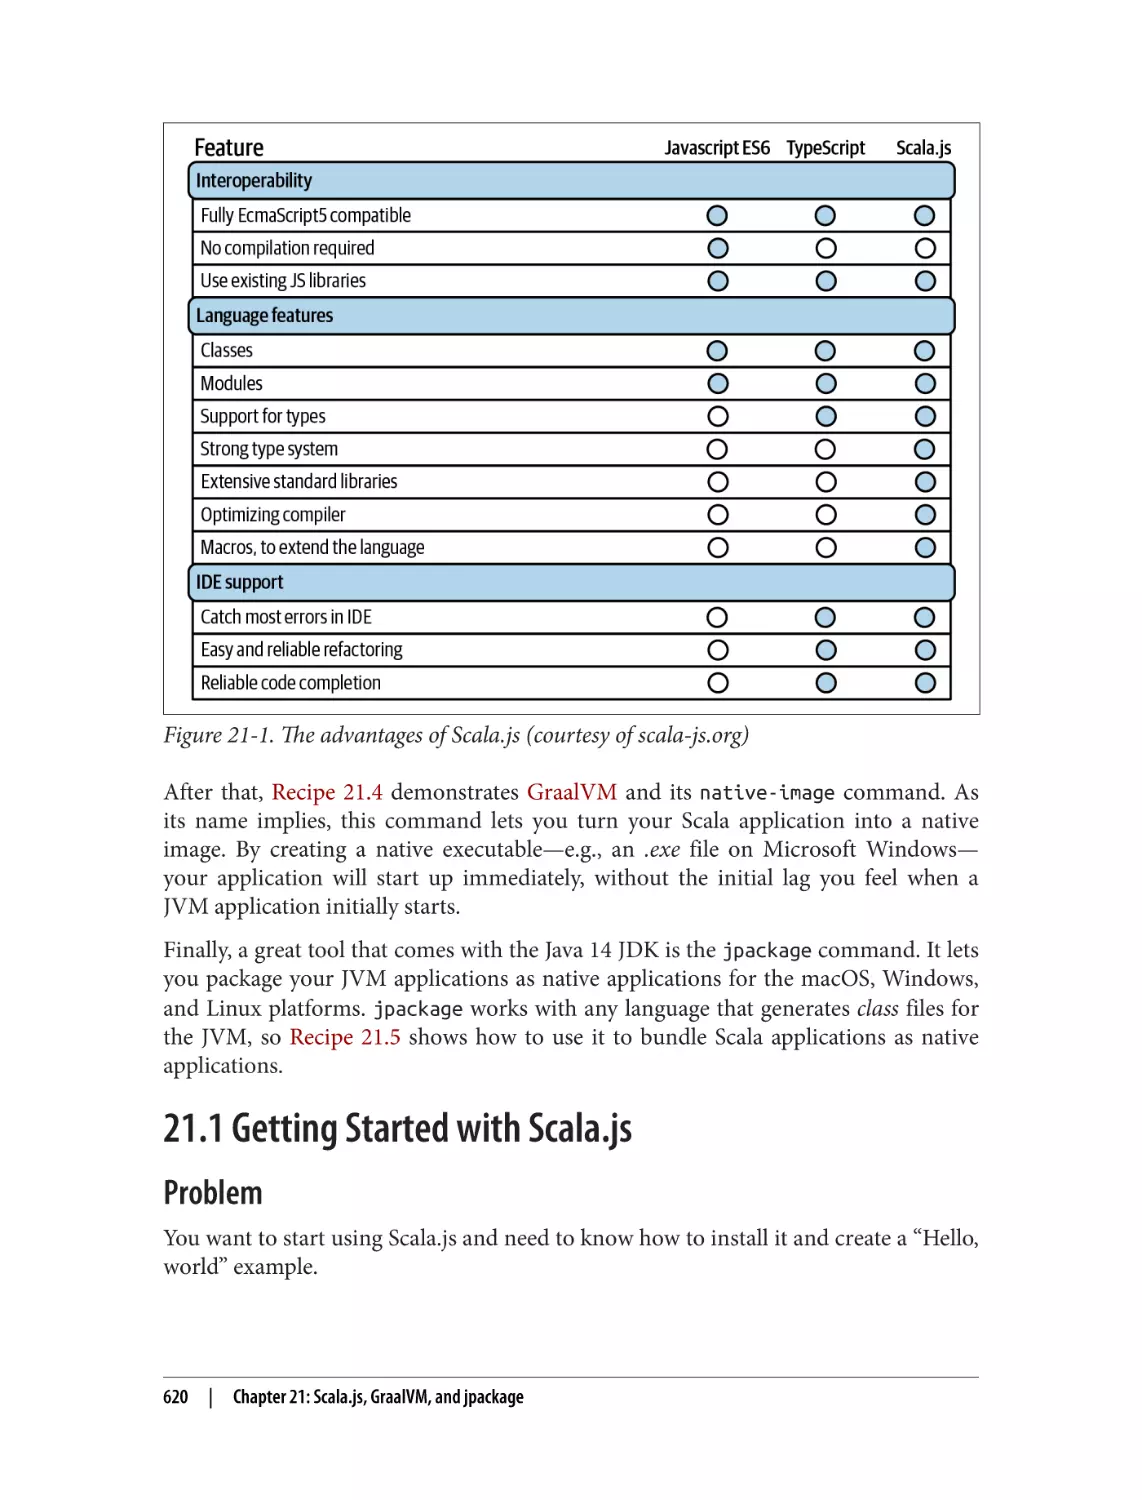
Chapter 21, Scala.js, GraalVM, and jpackage provides several recipes for libraries and
tools in the Scala and JVM worlds. The first several recipes demonstrate how to use
Scala.js as a type-safe JavaScript replacement. The final recipes show how to convert
your Scala code into a native executable using GraalVM, and then how to package
your Scala application as a native application using Java’s jpackage utility.
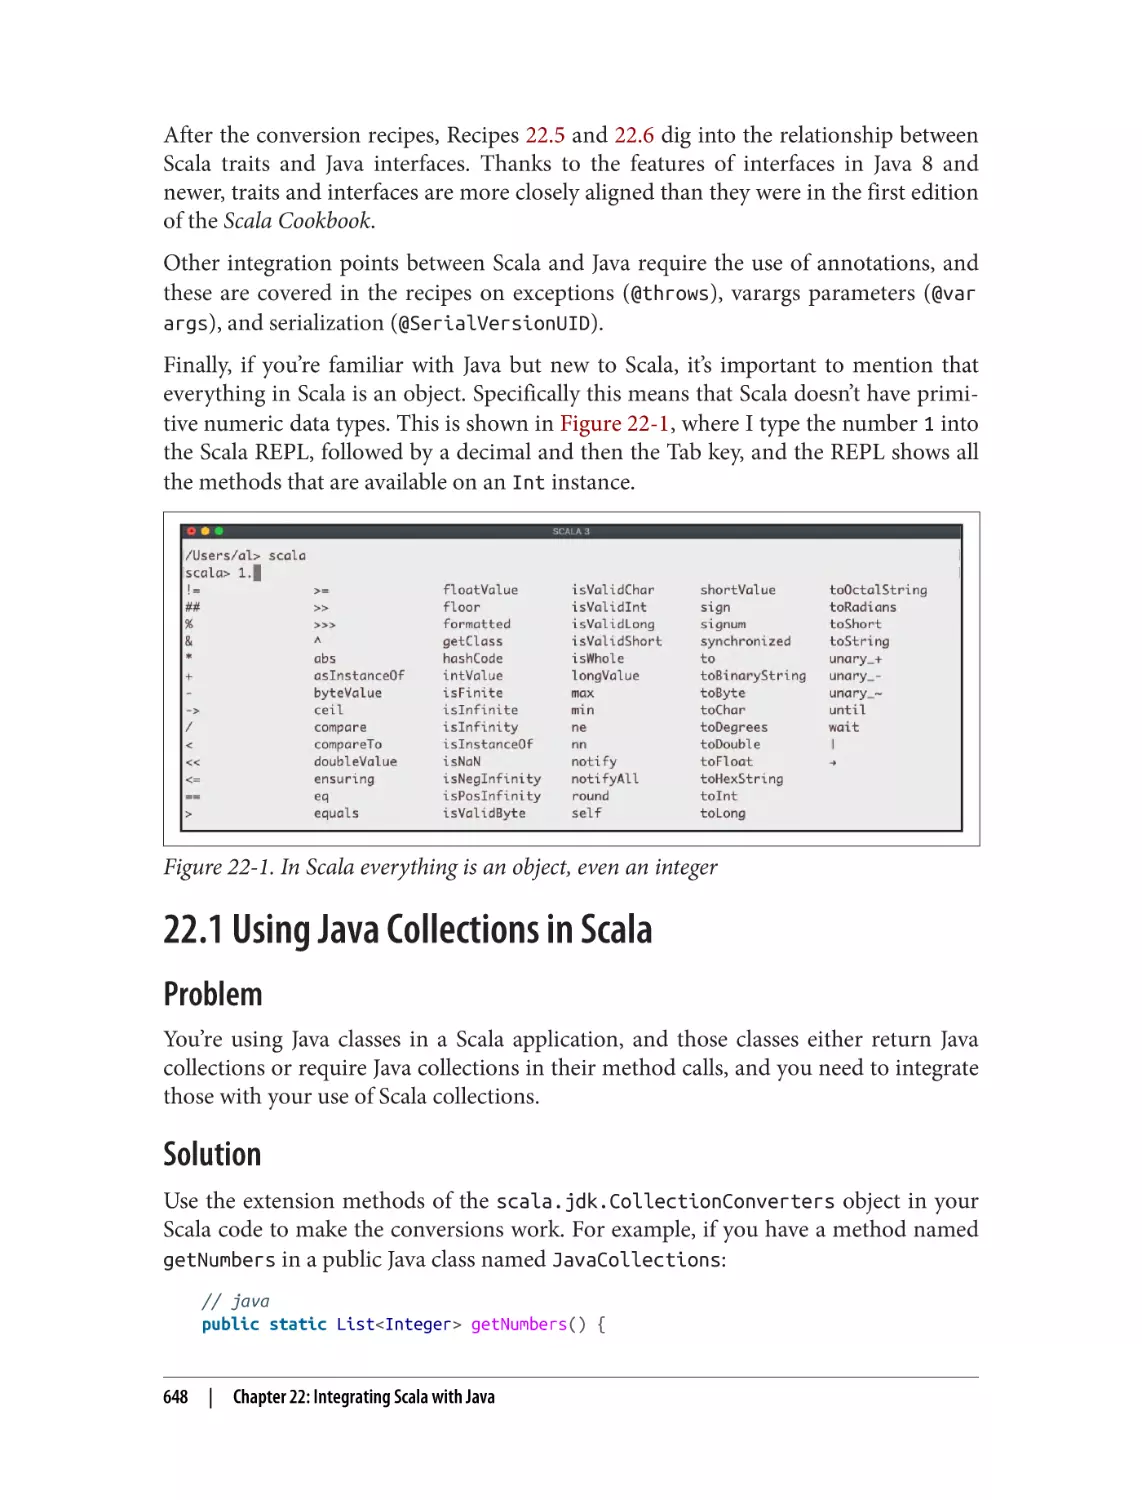
Chapter 22, Integrating Scala with Java shows how to solve the few problems you
might encounter when integrating Scala and Java code. While Scala code often just
works when interacting with Java, there are a few “gotchas.” This chapter shows how
to resolve problems related to the differences in the collections libraries, as well as
problems you can run into when calling Scala code from Java.
Chapter 23, Types provides recipes for working with Scala’s powerful type system.
Starting right from the introduction, concepts such as type variance, bounds, and
constraints are demonstrated by example. Recipes show how to declare generics in
class and method definitions, implement duck typing, and control which types your
traits can be mixed into. Then several all-new Scala 3 concepts are demonstrated with
opaque types, given`and `using values as a replacement for implicits, union and
intersection types, and two recipes related to the concept of equality when comparing
objects.
Chapter 24, Best Practices is unique for a cookbook, but because this is a book of solu‐
tions, I think it’s important to have a section dedicated to showing the best practices,
i.e., how to write code “the Scala way.” Recipes show how to create methods with no
side effects, how to work with immutable objects and collection types, how to think
in terms of expressions (rather than statements), how to use pattern matching, and
how to eliminate null values in your code.
xx
|
Preface
Installing Scala
You can install Scala 3 in several different ways, including Homebrew (on macOS),
Coursier, SDKMAN, and downloading and installing Scala manually. Coursier is
considered to be the “Scala installer,” and its use is covered in this “Getting Started
with Scala 3” page.
If you don’t want to install Scala just yet, you can also experiment with it in your
browser using these online tools:
• Scastie
• ScalaFiddle
Conventions in This Book
There are a few important points to know about the conventions I use in this book.
First, as mentioned, I use the optional braces (significant indentation) programming
style, which eliminates most need for parentheses and curly braces:
for i <- 1 to 5 do println(i)
for (i <- 1 to 5) { println(i) }
// use this style
// don’t use this style
Along with this style, I indent my code with four spaces. Currently there’s no indenta‐
tion standard, and developers seem to prefer two to four spaces.
Next, when I show examples, I often show the result of my examples in comments
after the examples. Therefore, my examples look like this:
(1 to 10 by 2).toList
(1 until 10 by 2).toList
('d' to 'h').toList
('d' until 'h').toList
//
//
//
//
List(1,
List(1,
List(d,
List(d,
3,
3,
e,
e,
5,
5,
f,
f,
7, 9)
7, 9)
g, h)
g)
Using this style helps me include many more examples in this book than I could fit in
the first edition.
Other coding standards used in this book are:
• I always define variables as val fields (which are like final in Java), unless there’s
a reason they need to be a var.
• When a method takes no parameters and has a side effect (such as printing to the
console), I define and call the method with empty parentheses, as ().
• While in many situations it’s not necessary to define data types, I always declare
the return type of public methods.
Preface
|
xxi
As an example of that last standard, you can define a method without declaring its
return type, like this:
def double(i: Int) = i * 2
However, most developers prefer to show the method return type:
def double(i: Int): Int = i * 2
For just a few more characters of typing now, it makes your code easier to read later.
Support
Many of the source code examples shown in this book are available in this GitHub
repository, which includes many complete sbt projects:
• github.com/alvinj/ScalaCookbook2Examples
The Scala Gitter channel is an excellent source of help, and you’ll occasionally see my
questions out there.
If you’re interested in proposals and debates about Scala features, the “Scala Contrib‐
utors” website is also a terrific resource.
Finally, you can find my latest blog posts at alvinalexander.com, and I often tweet
about Scala topics at twitter.com/alvinalexander.
Conventions Used in This Book
The following typographical conventions are used in this book:
Italic
Indicates new terms, URLs, email addresses, filenames, and file extensions.
Constant width
Used for program listings, as well as within paragraphs to refer to program ele‐
ments such as variable or function names, databases, data types, environment
variables, statements, and keywords.
Constant width italic
Shows text that should be replaced with user-supplied values or by values deter‐
mined by context.
This element signifies a tip or suggestion.
xxii
|
Preface
This element signifies a general note.
This element indicates a warning or caution.
Using Code Examples
Supplemental material (code examples, exercises, etc.) is available for download at
https://github.com/alvinj/ScalaCookbook2Examples.
If you have a technical question or a problem using the code examples, please send an
email to bookquestions@oreilly.com.
This book is here to help you get your job done. In general, if example code is offered
with this book, you may use it in your programs and documentation. You do not
need to contact us for permission unless you’re reproducing a significant portion of
the code. For example, writing a program that uses several chunks of code from this
book does not require permission. Selling or distributing examples from O’Reilly
books does require permission. Answering a question by citing this book and quoting
example code does not require permission. Incorporating a significant amount of
example code from this book into your product’s documentation does require
permission.
We appreciate, but generally do not require, attribution. An attribution usually
includes the title, author, publisher, and ISBN. For example: “Scala Cookbook by Alvin
Alexander (O’Reilly). Copyright 2021 Alvin Alexander, 978-1-492-05154-1.”
If you feel your use of code examples falls outside fair use or the permission given
above, feel free to contact us at permissions@oreilly.com.
Preface
|
xxiii
O’Reilly Online Learning
For more than 40 years, O’Reilly Media has provided technol‐
ogy and business training, knowledge, and insight to help
companies succeed.
Our unique network of experts and innovators share their knowledge and expertise
through books, articles, and our online learning platform. O’Reilly’s online learning
platform gives you on-demand access to live training courses, in-depth learning
paths, interactive coding environments, and a vast collection of text and video from
O’Reilly and 200+ other publishers. For more information, visit http://oreilly.com.
How to Contact Us
Please address comments and questions concerning this book to the publisher:
O’Reilly Media, Inc.
1005 Gravenstein Highway North
Sebastopol, CA 95472
800-998-9938 (in the United States or Canada)
707-829-0515 (international or local)
707-829-0104 (fax)
We have a web page for this book, where we list errata, examples, and any additional
information. You can access this page at https://oreil.ly/scala-cookbook-2e.
Email bookquestions@oreilly.com to comment or ask technical questions about this
book.
For news and information about our books and courses, visit https://oreilly.com.
Find us on Facebook: https://facebook.com/oreilly
Follow us on Twitter: https://twitter.com/oreillymedia
Watch us on YouTube: https://youtube.com/oreillymedia
xxiv
|
Preface
Acknowledgments
Writing a book this large takes a lot of work, and I’d like to thank my editor, Jeff
Bleiel, for his work throughout the creation of this book. We began working together
on the book in December 2018, and while Scala 3 kept changing through the commu‐
nity process, we continued working together on it until the book’s completion in
2021.
As I completed initial drafts of chapters, Jeff offered hundreds of suggestions on how
to improve them. This process continued on through the COVID-19 pandemic, and
as the book became more clear, Jeff (correctly) suggested the reorganization of several
chapters. He’s incredibly thorough, and I can tell you that when you see a book that’s
been edited by Jeff Bleiel, you can be assured that it’s well edited and thought out.
For this edition of the book, all the reviewers were helpful in different ways. Jason
Swartz was a “most valuable reviewer” candidate on the first edition of Scala Cook‐
book, and he did another stellar job on this edition with many solid suggestions.
Philip Schwarz joined us on this edition and offered a number of good insights, espe‐
cially on the early chapters of the book.
But for this edition, I owe a huge and special thanks to Hermann Hueck, who was the
most valuable reviewer for this edition. Hermann offered hundreds of suggestions,
both large and small, covering everything from the smallest line of code to the overall
organization of the book.
I can’t say enough about both Jeff and Hermann, but maybe the best way to say it is
that this book wouldn’t have been the same without them—thank you both!
I’d also like to thank Christopher Faucher, the production editor for this book. After
Jeff and I agreed that we were finished with the initial writing and editing process,
Chris came in and helped get the book to the finish line, as we worked through hun‐
dreds of comments and issues. If you know what it’s like to bring a large software
application to life, getting a big book like this past the finish line is exactly the same.
Thank you, Chris!
Finally, I’d like to thank Martin Odersky and his team for creating such an interesting
programming language. I first fell in love with Scala when I found his book Program‐
ming in Scala at a bookstore in Anchorage, Alaska, in 2010, and since then it’s been a
lovefest that continues through Scala 3 in 2021 and beyond.
All the best,
Al
Preface
|
xxv
CHAPTER 1
Command-Line Tasks
Most likely, one of the first steps on your Scala 3 journey will involve working at the
command line. For instance, after you install Scala as shown in “Installing Scala” on
page xxi, you might want to start the REPL—Scala’s Read/Eval/Print/Loop—by typing
scala at your operating system command line. Or you may want to create a little
one-file “Hello, world” project and then compile and run it. Because these commandline tasks are where many people will start working with Scala, they’re covered here
first.
The REPL is a command-line shell. It’s a playground area where you can run small
tests to see how Scala and its third-party libraries work. If you’re familiar with Java’s
JShell, Ruby’s irb, the Python shell or IPython, or Haskell’s ghci, Scala’s REPL is simi‐
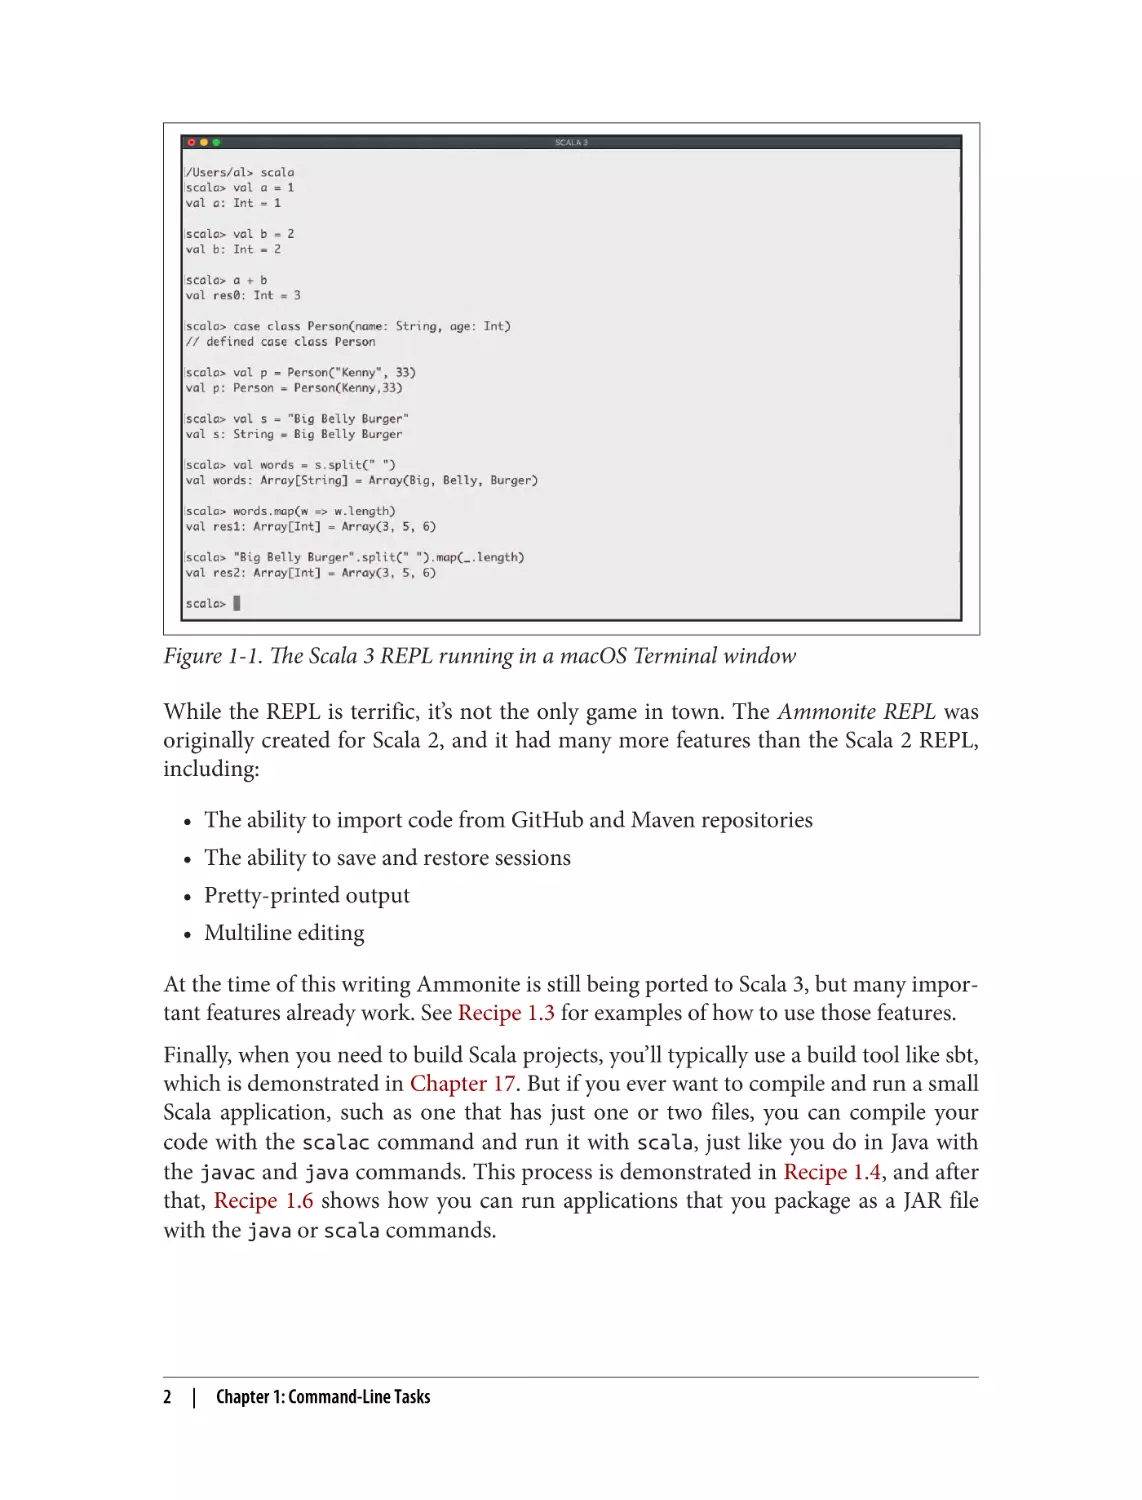
lar to all of these. As shown in Figure 1-1, just start the REPL by typing scala at your
operating system command line, then type in your Scala expressions, and they’ll be
evaluated in the shell.
Any time you want to test some Scala code, the REPL is a terrific playground environ‐
ment. There’s no need to create a full-blown project—just put your test code in the
REPL and experiment with it until you know it works. Because the REPL is such an
important tool, its most important features are demonstrated in the first two recipes
of this chapter.
1
Figure 1-1. The Scala 3 REPL running in a macOS Terminal window
While the REPL is terrific, it’s not the only game in town. The Ammonite REPL was
originally created for Scala 2, and it had many more features than the Scala 2 REPL,
including:
• The ability to import code from GitHub and Maven repositories
• The ability to save and restore sessions
• Pretty-printed output
• Multiline editing
At the time of this writing Ammonite is still being ported to Scala 3, but many impor‐
tant features already work. See Recipe 1.3 for examples of how to use those features.
Finally, when you need to build Scala projects, you’ll typically use a build tool like sbt,
which is demonstrated in Chapter 17. But if you ever want to compile and run a small
Scala application, such as one that has just one or two files, you can compile your
code with the scalac command and run it with scala, just like you do in Java with
the javac and java commands. This process is demonstrated in Recipe 1.4, and after
that, Recipe 1.6 shows how you can run applications that you package as a JAR file
with the java or scala commands.
2
|
Chapter 1: Command-Line Tasks
1.1 Getting Started with the Scala REPL
Problem
You want to get started using the Scala REPL, and start taking advantage of some of
its basic features.
Solution
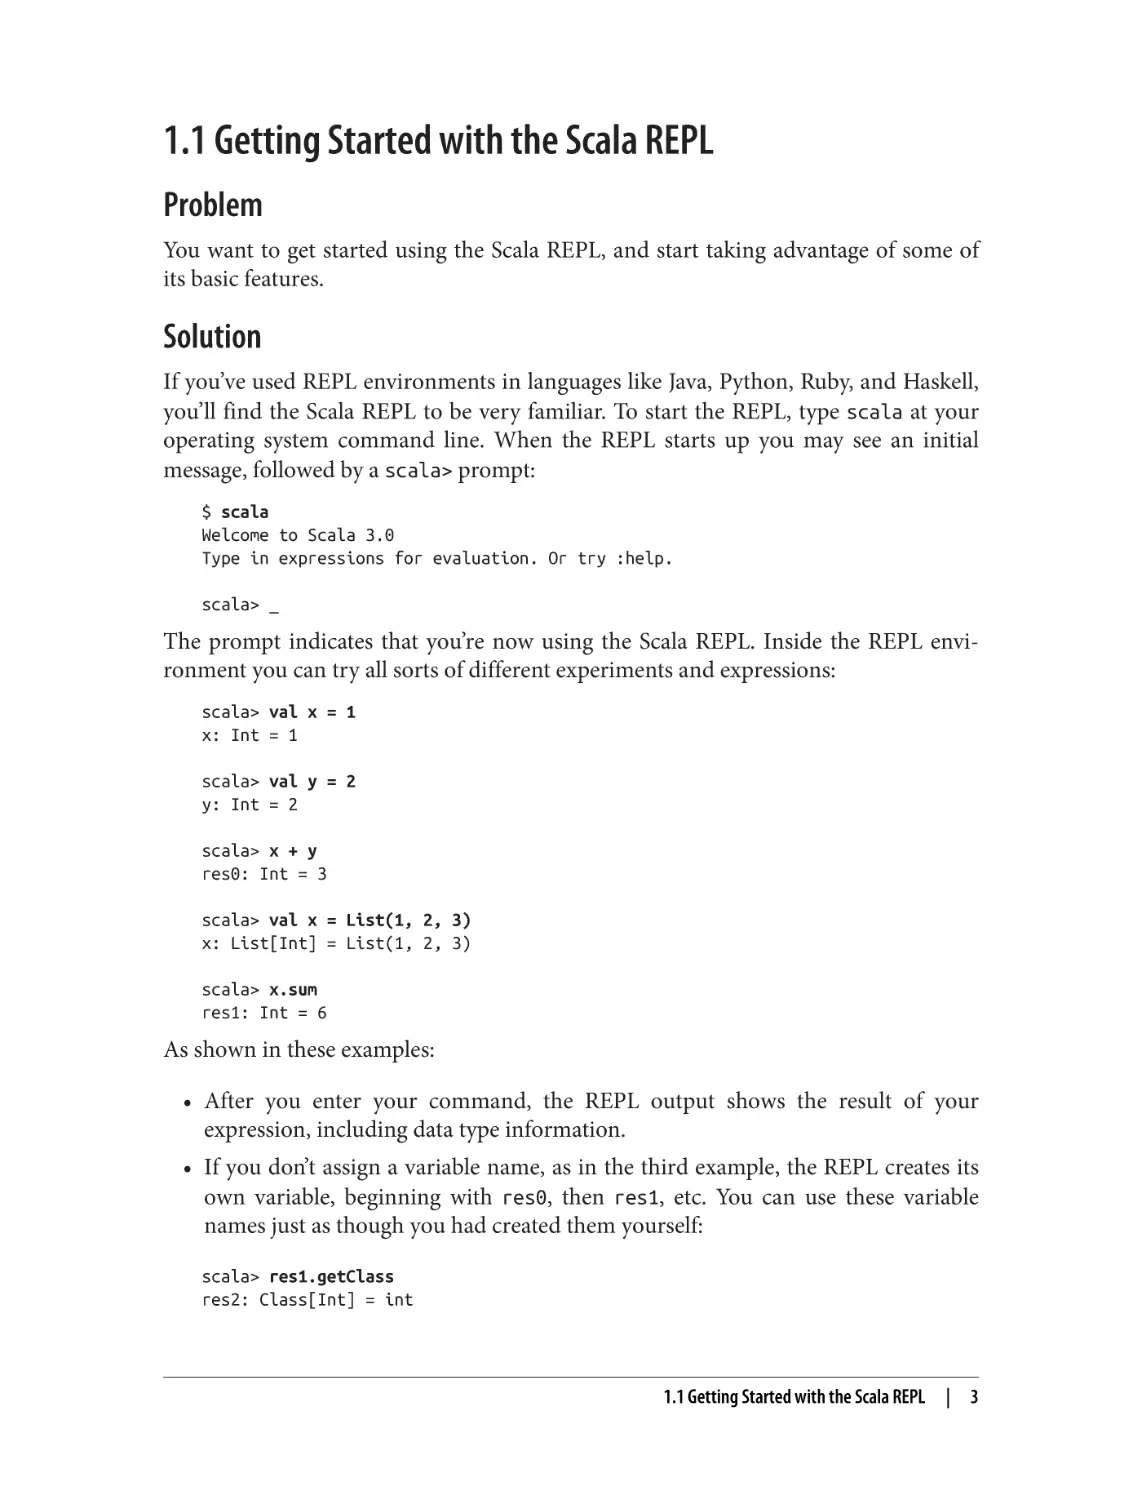
If you’ve used REPL environments in languages like Java, Python, Ruby, and Haskell,
you’ll find the Scala REPL to be very familiar. To start the REPL, type scala at your
operating system command line. When the REPL starts up you may see an initial
message, followed by a scala> prompt:
$ scala
Welcome to Scala 3.0
Type in expressions for evaluation. Or try :help.
scala> _
The prompt indicates that you’re now using the Scala REPL. Inside the REPL envi‐
ronment you can try all sorts of different experiments and expressions:
scala> val x = 1
x: Int = 1
scala> val y = 2
y: Int = 2
scala> x + y
res0: Int = 3
scala> val x = List(1, 2, 3)
x: List[Int] = List(1, 2, 3)
scala> x.sum
res1: Int = 6
As shown in these examples:
• After you enter your command, the REPL output shows the result of your
expression, including data type information.
• If you don’t assign a variable name, as in the third example, the REPL creates its
own variable, beginning with res0, then res1, etc. You can use these variable
names just as though you had created them yourself:
scala> res1.getClass
res2: Class[Int] = int
1.1 Getting Started with the Scala REPL
|
3
scala> res1 + 2
res3: Int = 8
Both beginning and experienced developers write code in the REPL every day to
quickly see how Scala features and their own algorithms work.
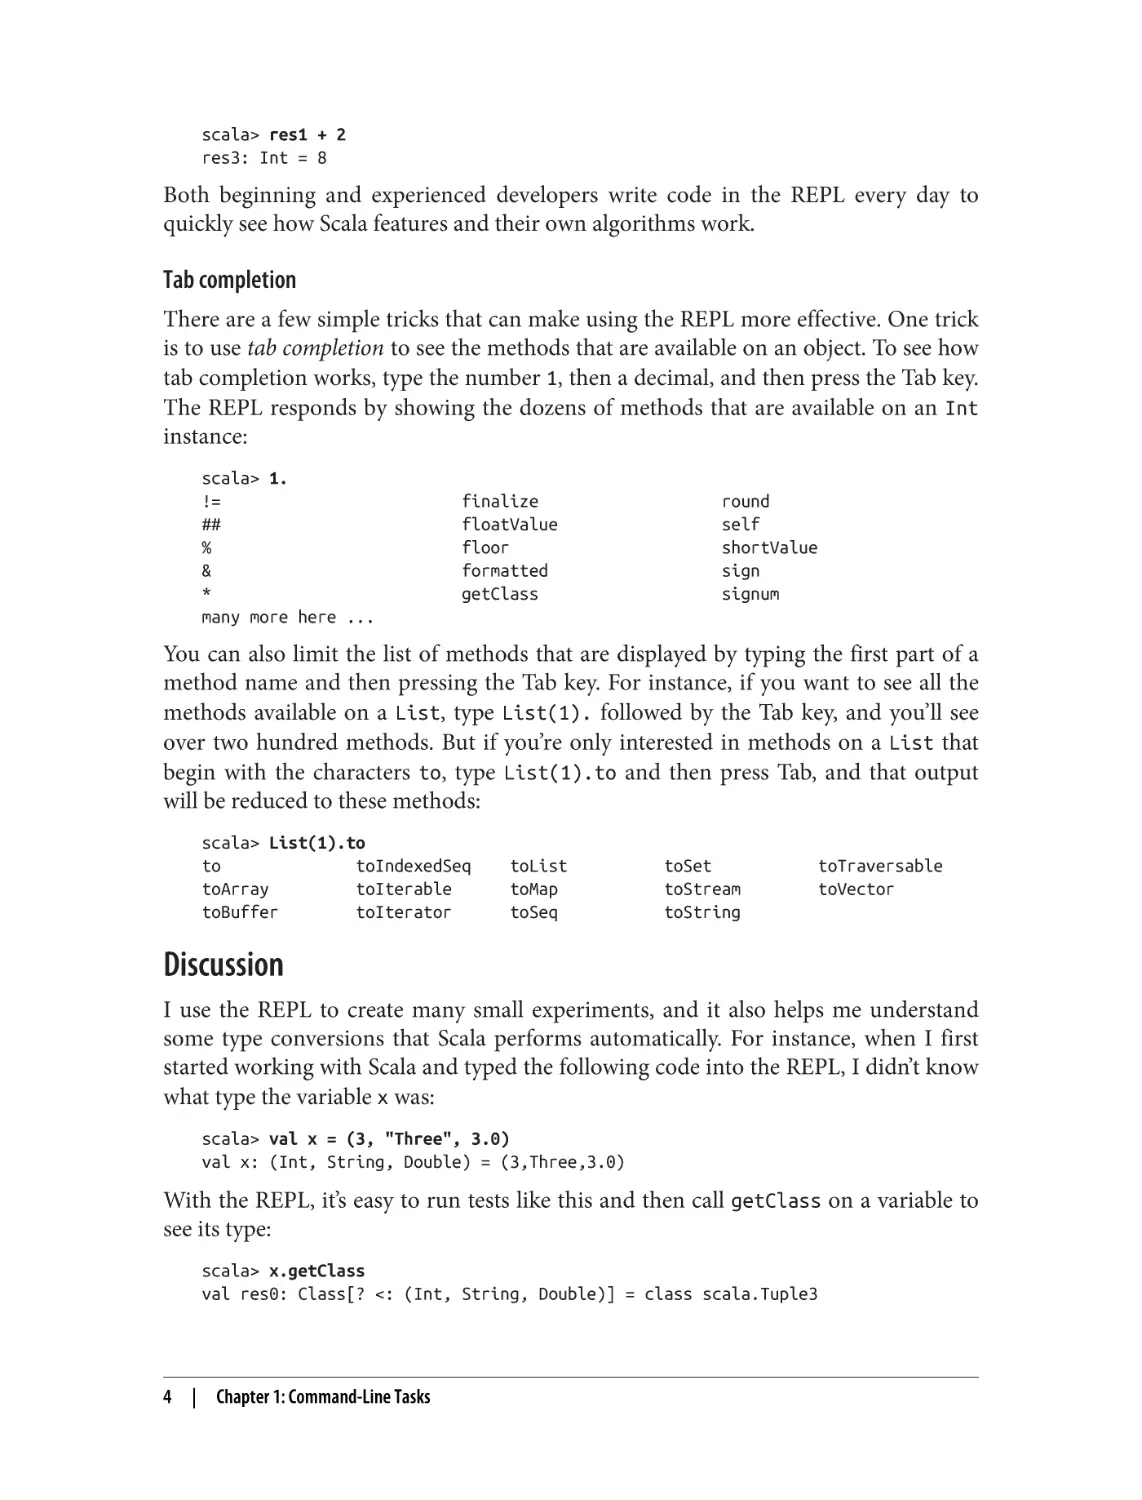
Tab completion
There are a few simple tricks that can make using the REPL more effective. One trick
is to use tab completion to see the methods that are available on an object. To see how
tab completion works, type the number 1, then a decimal, and then press the Tab key.
The REPL responds by showing the dozens of methods that are available on an Int
instance:
scala> 1.
!=
##
%
&
*
many more here ...
finalize
floatValue
floor
formatted
getClass
round
self
shortValue
sign
signum
You can also limit the list of methods that are displayed by typing the first part of a
method name and then pressing the Tab key. For instance, if you want to see all the
methods available on a List, type List(1). followed by the Tab key, and you’ll see
over two hundred methods. But if you’re only interested in methods on a List that
begin with the characters to, type List(1).to and then press Tab, and that output
will be reduced to these methods:
scala> List(1).to
to
toIndexedSeq
toArray
toIterable
toBuffer
toIterator
toList
toMap
toSeq
toSet
toStream
toString
toTraversable
toVector
Discussion
I use the REPL to create many small experiments, and it also helps me understand
some type conversions that Scala performs automatically. For instance, when I first
started working with Scala and typed the following code into the REPL, I didn’t know
what type the variable x was:
scala> val x = (3, "Three", 3.0)
val x: (Int, String, Double) = (3,Three,3.0)
With the REPL, it’s easy to run tests like this and then call getClass on a variable to
see its type:
scala> x.getClass
val res0: Class[? <: (Int, String, Double)] = class scala.Tuple3
4
|
Chapter 1: Command-Line Tasks
Although some of that result line is hard to read when you first start working with
Scala, the text on the right side of the = lets you know that the type is a Tuple3 class.
You can also use the REPL’s :type command to see similar information, though it
currently doesn’t show the Tuple3 name:
scala> :type x
(Int, String, Double)
However, it’s generally helpful in many other instances:
scala> :type 1 + 1.1
Double
scala> :type List(1,2,3).map(_ * 2.5)
List[Double]
Though these are simple examples, you’ll find that the REPL is extremely helpful
when you’re working with more complicated code and libraries you’re not familiar
with.
Starting the REPL Inside sbt
You can also start a Scala REPL session from inside the sbt shell. As
shown in Recipe 17.5, “Understanding Other sbt Commands”, just
start the sbt shell inside an sbt project:
$ sbt
MyProject> _
Then use either the console or the consoleQuick command from
there:
MyProject> console
scala> _
The console command compiles the source code files in the
project, puts them on the classpath, and starts the REPL. The conso
leQuick command starts the REPL with the project dependencies
on the classpath, but without compiling project source code files.
This second option is useful for times when your code isn’t compil‐
ing, or when you want to try some test code with your dependen‐
cies (libraries).
See Also
If you like the idea of a REPL environment but want to try alternatives to the default
REPL, there are several great free alternatives:
• The Ammonite REPL has more features than the REPL, and it’s demonstrated in
Recipe 1.3.
1.1 Getting Started with the Scala REPL
|
5
• Scastie is a web-based alternative to the REPL that supports sbt options and lets
you add external libraries into your environment.
• ScalaFiddle is also a web-based alternative.
• The IntelliJ IDEA and Visual Studio Code (VS Code) IDEs both have worksheets,
which are similar to the REPL.
1.2 Loading Source Code and JAR Files into the REPL
Problem
You have Scala code in a source code file and want to use that code in the REPL.
Solution
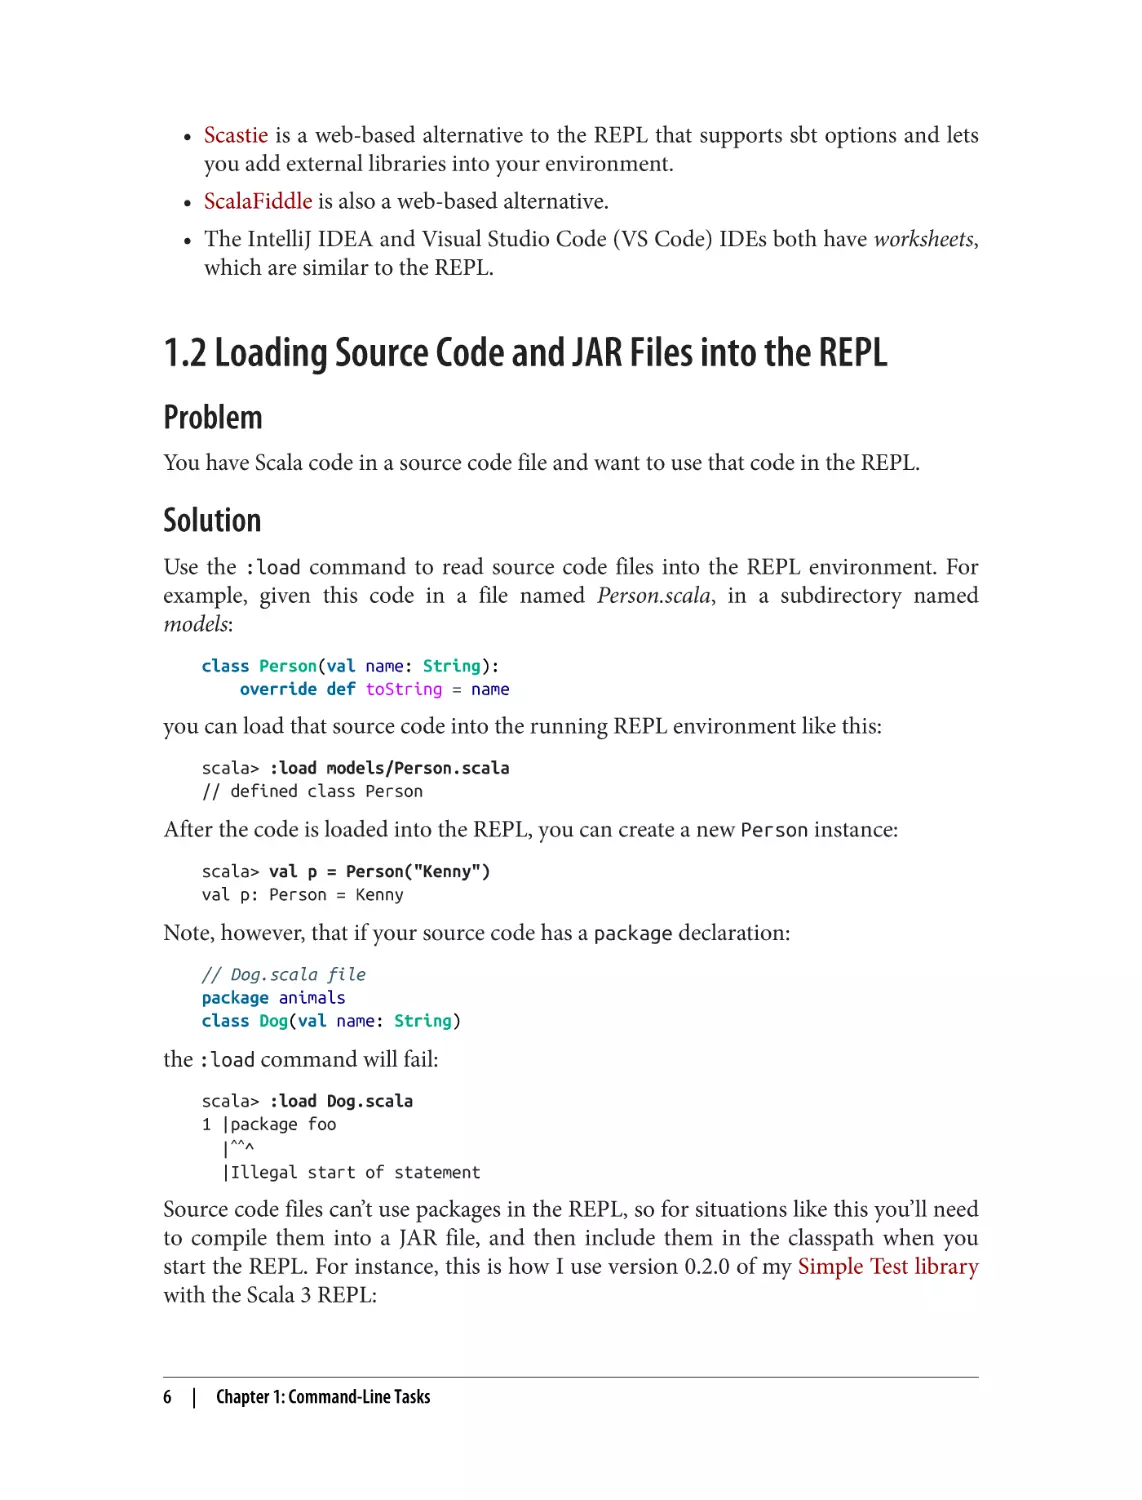
Use the :load command to read source code files into the REPL environment. For
example, given this code in a file named Person.scala, in a subdirectory named
models:
class Person(val name: String):
override def toString = name
you can load that source code into the running REPL environment like this:
scala> :load models/Person.scala
// defined class Person
After the code is loaded into the REPL, you can create a new Person instance:
scala> val p = Person("Kenny")
val p: Person = Kenny
Note, however, that if your source code has a package declaration:
// Dog.scala file
package animals
class Dog(val name: String)
the :load command will fail:
scala> :load Dog.scala
1 |package foo
|^^^
|Illegal start of statement
Source code files can’t use packages in the REPL, so for situations like this you’ll need
to compile them into a JAR file, and then include them in the classpath when you
start the REPL. For instance, this is how I use version 0.2.0 of my Simple Test library
with the Scala 3 REPL:
6
|
Chapter 1: Command-Line Tasks
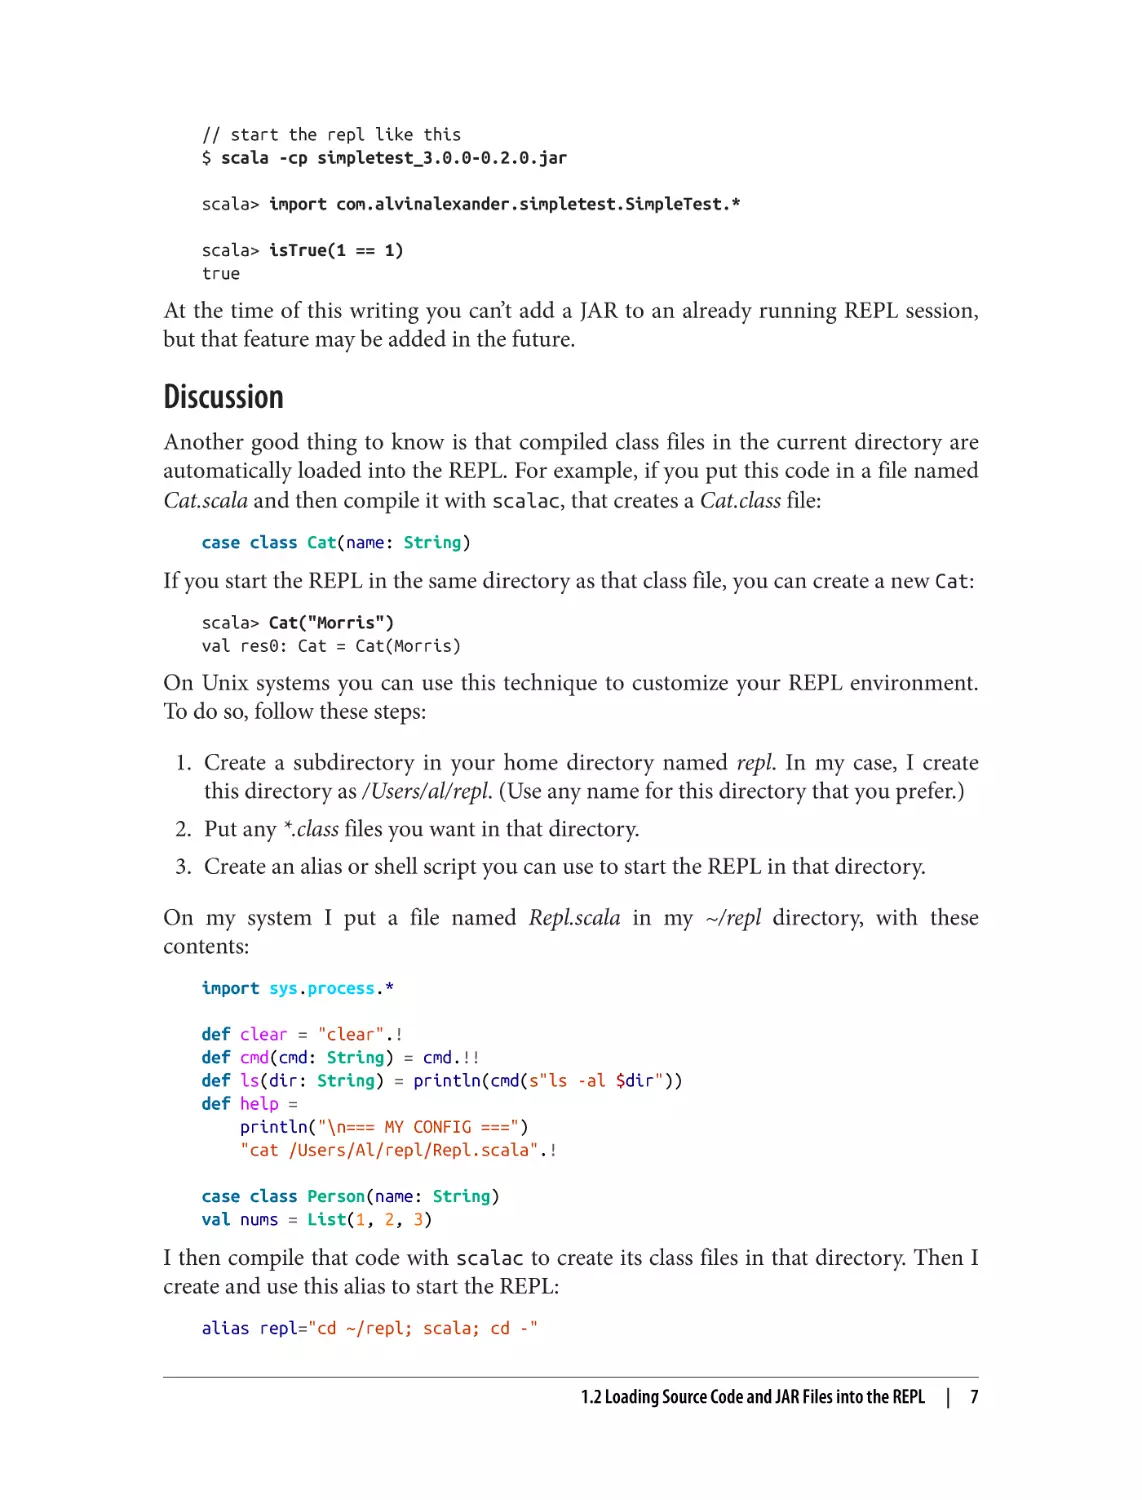
// start the repl like this
$ scala -cp simpletest_3.0.0-0.2.0.jar
scala> import com.alvinalexander.simpletest.SimpleTest.*
scala> isTrue(1 == 1)
true
At the time of this writing you can’t add a JAR to an already running REPL session,
but that feature may be added in the future.
Discussion
Another good thing to know is that compiled class files in the current directory are
automatically loaded into the REPL. For example, if you put this code in a file named
Cat.scala and then compile it with scalac, that creates a Cat.class file:
case class Cat(name: String)
If you start the REPL in the same directory as that class file, you can create a new Cat:
scala> Cat("Morris")
val res0: Cat = Cat(Morris)
On Unix systems you can use this technique to customize your REPL environment.
To do so, follow these steps:
1. Create a subdirectory in your home directory named repl. In my case, I create
this directory as /Users/al/repl. (Use any name for this directory that you prefer.)
2. Put any *.class files you want in that directory.
3. Create an alias or shell script you can use to start the REPL in that directory.
On my system I put a file named Repl.scala in my ~/repl directory, with these
contents:
import sys.process.*
def
def
def
def
clear = "clear".!
cmd(cmd: String) = cmd.!!
ls(dir: String) = println(cmd(s"ls -al $dir"))
help =
println("\n=== MY CONFIG ===")
"cat /Users/Al/repl/Repl.scala".!
case class Person(name: String)
val nums = List(1, 2, 3)
I then compile that code with scalac to create its class files in that directory. Then I
create and use this alias to start the REPL:
alias repl="cd ~/repl; scala; cd -"
1.2 Loading Source Code and JAR Files into the REPL
|
7
That alias moves me to the ~/repl directory, starts the REPL, and then returns me to
my current directory when I exit the REPL.
As another approach, you can create a shell script named repl, make it executable,
and place it in your ~/bin directory (or anywhere else on your PATH):
#!/bin/sh
cd ~/repl
scala
Because a shell script is run in a subprocess, you’ll be returned to your original direc‐
tory when you exit the REPL.
By using this approach, your custom methods will be loaded into the REPL when it
starts up, so you can use them inside the scala shell:
clear
cmd("ps")
ls(".")
help
//
//
//
//
clear the screen
run the 'ps' command
run 'ls' in the current directory
displays my Repl.scala file as a form of help
Use this technique to preload any other custom definitions you’d like to use in the
REPL.
1.3 Getting Started with the Ammonite REPL
Problem
You want to get started using the Ammonite REPL, including understanding some of
its basic features.
Solution
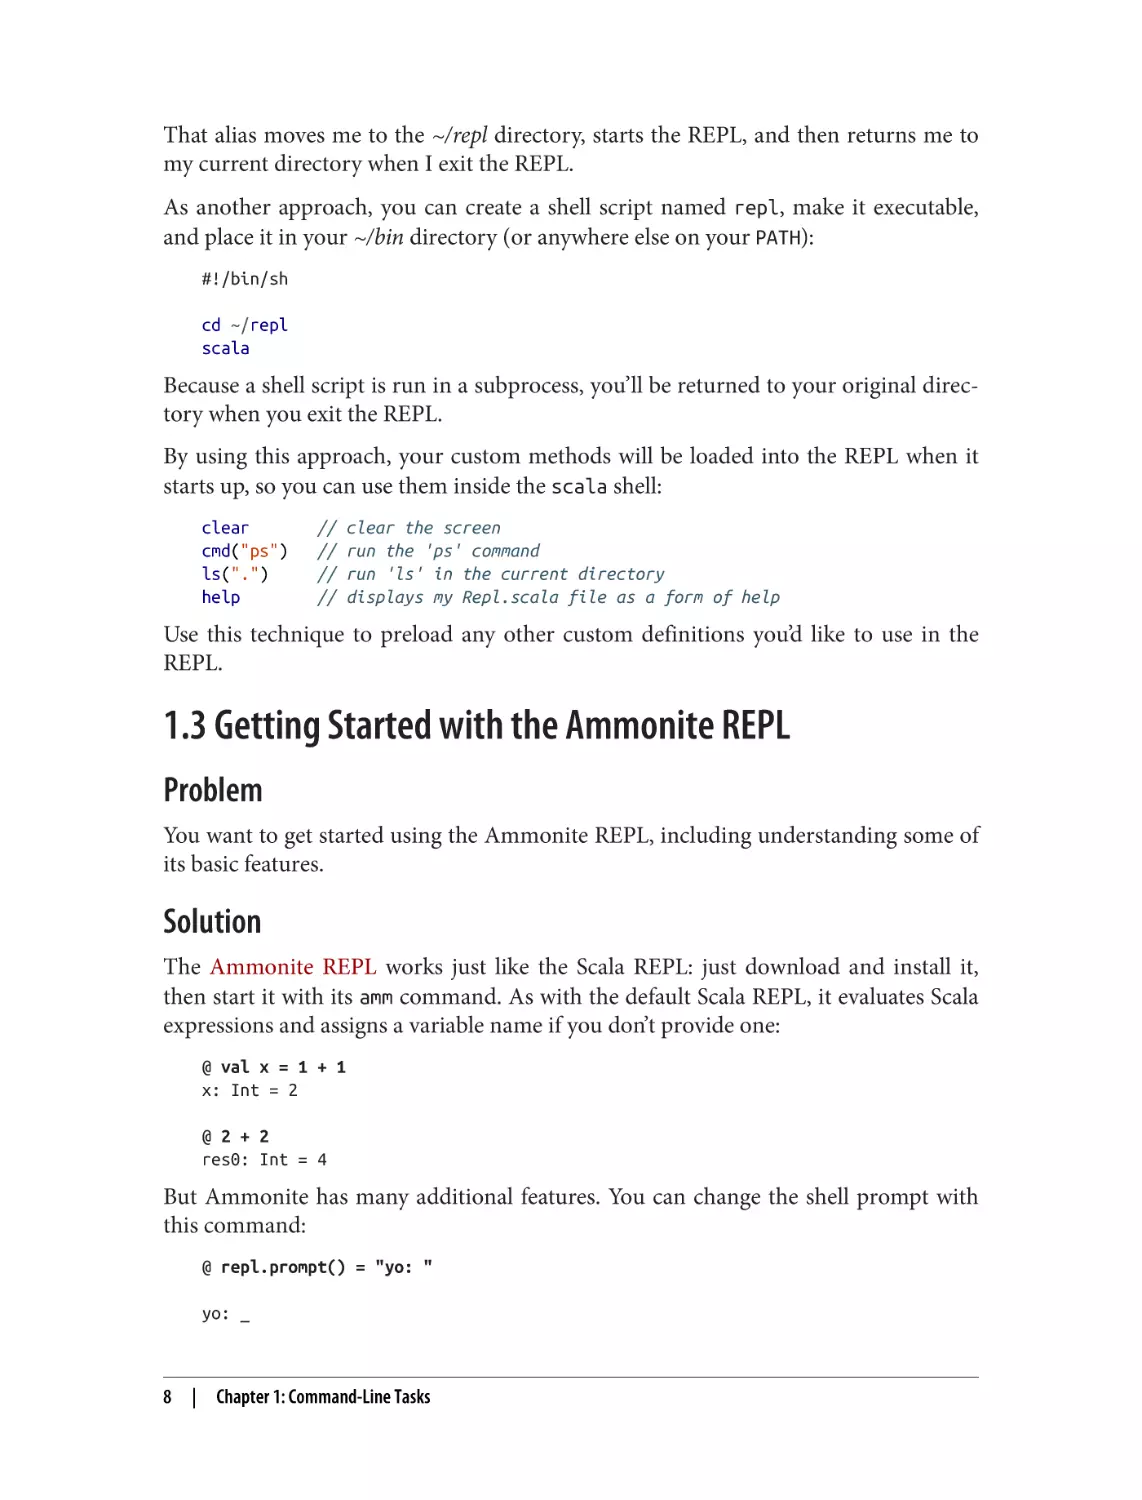
The Ammonite REPL works just like the Scala REPL: just download and install it,
then start it with its amm command. As with the default Scala REPL, it evaluates Scala
expressions and assigns a variable name if you don’t provide one:
@ val x = 1 + 1
x: Int = 2
@ 2 + 2
res0: Int = 4
But Ammonite has many additional features. You can change the shell prompt with
this command:
@ repl.prompt() = "yo: "
yo: _
8
|
Chapter 1: Command-Line Tasks
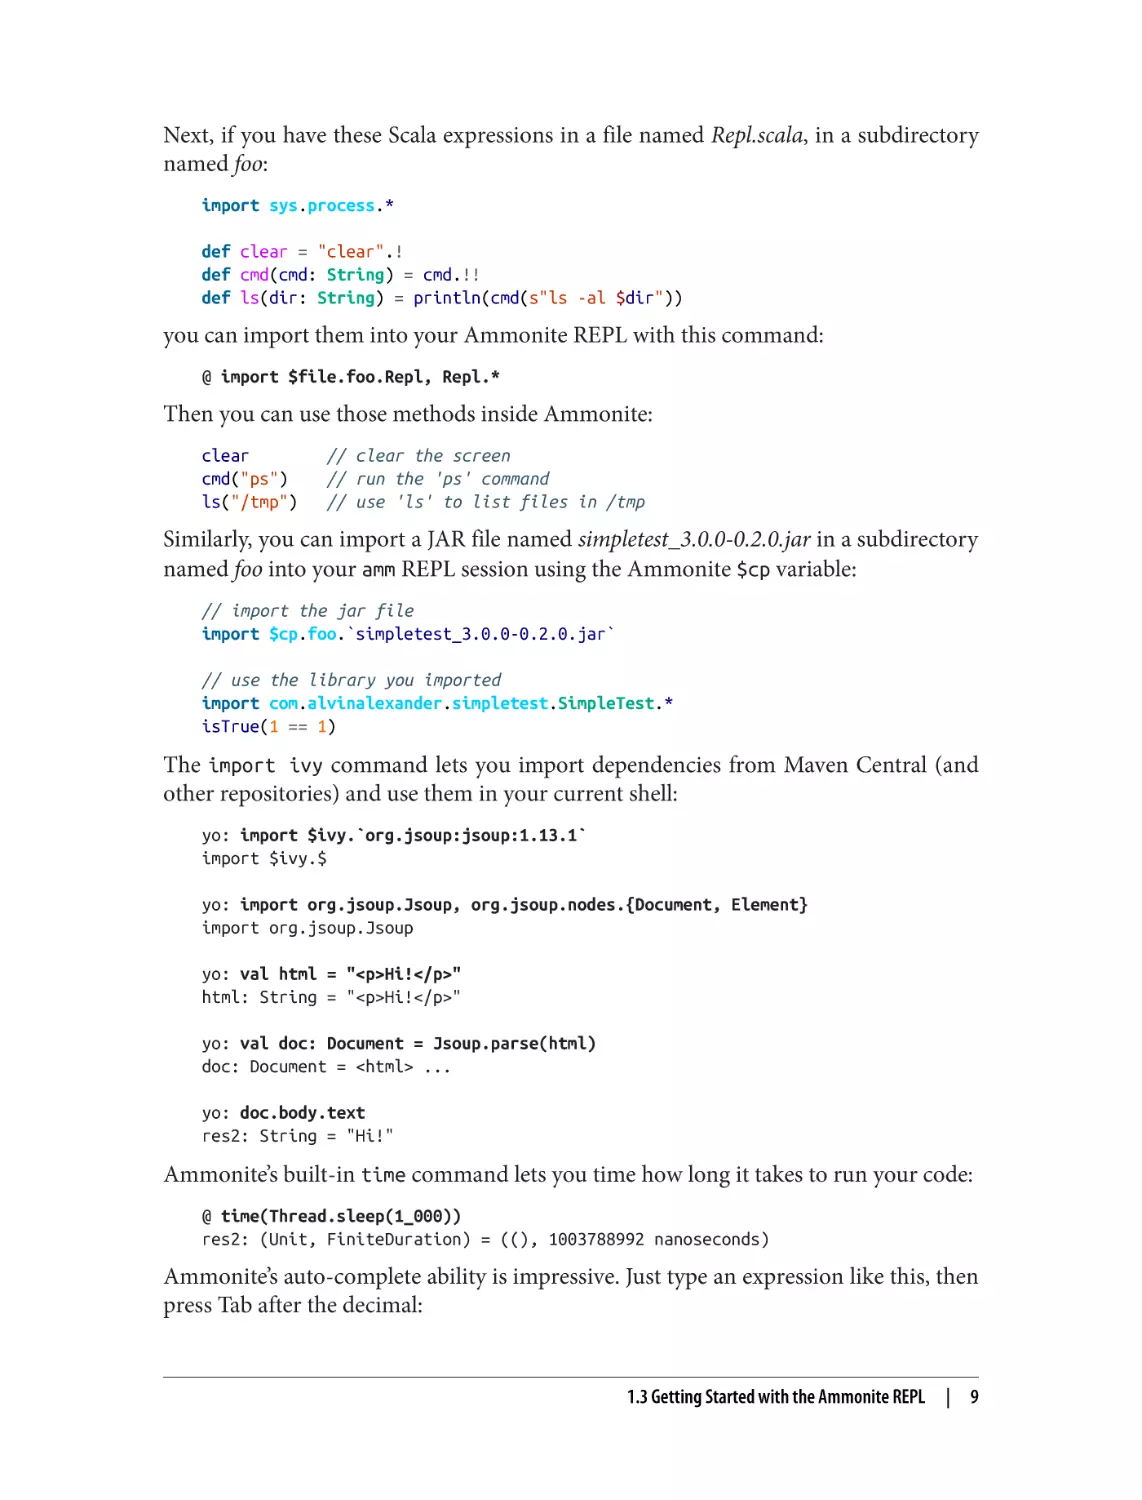
Next, if you have these Scala expressions in a file named Repl.scala, in a subdirectory
named foo:
import sys.process.*
def clear = "clear".!
def cmd(cmd: String) = cmd.!!
def ls(dir: String) = println(cmd(s"ls -al $dir"))
you can import them into your Ammonite REPL with this command:
@ import $file.foo.Repl, Repl.*
Then you can use those methods inside Ammonite:
clear
cmd("ps")
ls("/tmp")
// clear the screen
// run the 'ps' command
// use 'ls' to list files in /tmp
Similarly, you can import a JAR file named simpletest_3.0.0-0.2.0.jar in a subdirectory
named foo into your amm REPL session using the Ammonite $cp variable:
// import the jar file
import $cp.foo.`simpletest_3.0.0-0.2.0.jar`
// use the library you imported
import com.alvinalexander.simpletest.SimpleTest.*
isTrue(1 == 1)
The import ivy command lets you import dependencies from Maven Central (and
other repositories) and use them in your current shell:
yo: import $ivy.`org.jsoup:jsoup:1.13.1`
import $ivy.$
yo: import org.jsoup.Jsoup, org.jsoup.nodes.{Document, Element}
import org.jsoup.Jsoup
yo: val html = "<p>Hi!</p>"
html: String = "<p>Hi!</p>"
yo: val doc: Document = Jsoup.parse(html)
doc: Document = <html> ...
yo: doc.body.text
res2: String = "Hi!"
Ammonite’s built-in time command lets you time how long it takes to run your code:
@ time(Thread.sleep(1_000))
res2: (Unit, FiniteDuration) = ((), 1003788992 nanoseconds)
Ammonite’s auto-complete ability is impressive. Just type an expression like this, then
press Tab after the decimal:
1.3 Getting Started with the Ammonite REPL
|
9
@ Seq("a").map(x => x.
When you do so, Ammonite displays a long list of methods that are available on x—
which is a String—beginning with these methods:
def intern(): String
def charAt(x$0: Int): Char
def concat(x$0: String): String
much more output here ...
This is nice because it shows you not only the method names but also their input
parameters and return type.
Discussion
Ammonite’s list of features is long. Another great one is that you can use a startup
configuration file, just like using a Unix .bashrc or .bash_profile startup file. Just put
some expressions in a ~/.ammonite/predef.sc file:
import sys.process.*
repl.prompt() = "yo: "
def clear = "clear".!
def cmd(cmd: String) = cmd.!!
def ls(dir: String) = println(cmd(s"ls -al $dir"))
def reset = repl.sess.load() // similar to the scala repl ':reset' command
Then, when you start the Ammonite REPL, your prompt will be changed to yo:, and
those other methods will be available to you.
One more great feature is that you can save a REPL session, and it will save every‐
thing you’ve done to this point. To test this, create a variable in the REPL, and then
save your session:
val remember = 42
repl.sess.save()
Then create another variable:
val forget = 0
Now reload the session, and you’ll see that the remember variable is still available, but
the forget variable has been forgotten, as desired:
@ repl.sess.load()
res3: SessionChanged = SessionChanged(removedImports = Set('forget),
addedImports = Set(), removedJars = Set(), addedJars = Set())
@ remember
res4: Int = 42
@ forget
|val res5 = forget
10
|
Chapter 1: Command-Line Tasks
|
|
^^
Not found: forget
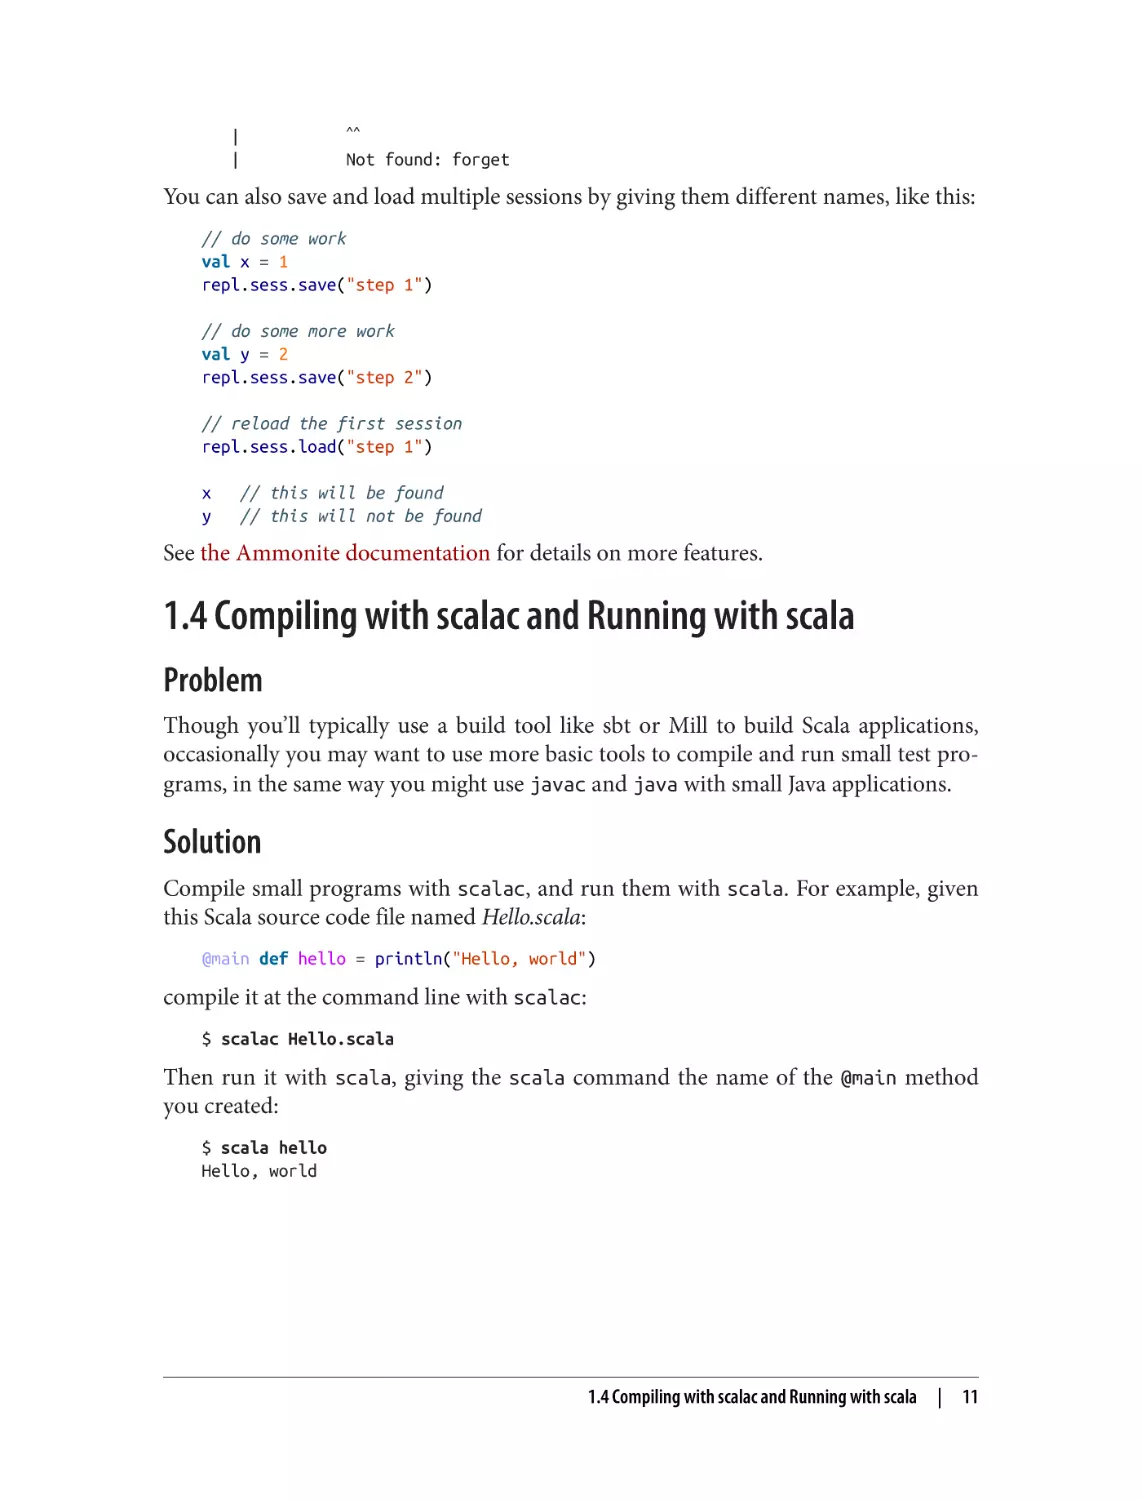
You can also save and load multiple sessions by giving them different names, like this:
// do some work
val x = 1
repl.sess.save("step 1")
// do some more work
val y = 2
repl.sess.save("step 2")
// reload the first session
repl.sess.load("step 1")
x
y
// this will be found
// this will not be found
See the Ammonite documentation for details on more features.
1.4 Compiling with scalac and Running with scala
Problem
Though you’ll typically use a build tool like sbt or Mill to build Scala applications,
occasionally you may want to use more basic tools to compile and run small test pro‐
grams, in the same way you might use javac and java with small Java applications.
Solution
Compile small programs with scalac, and run them with scala. For example, given
this Scala source code file named Hello.scala:
@main def hello = println("Hello, world")
compile it at the command line with scalac:
$ scalac Hello.scala
Then run it with scala, giving the scala command the name of the @main method
you created:
$ scala hello
Hello, world
1.4 Compiling with scalac and Running with scala
|
11
Discussion
Compiling and running classes is the same as Java, including concepts like the class‐
path. For instance, imagine that you have a class named Pizza in a file named
Pizza.scala, and that it depends on a Topping type:
class Pizza(val toppings: Topping*):
override def toString = toppings.toString
Assuming that Topping is defined like this:
enum Topping:
case Cheese, Mushrooms
and that it’s in a file named Topping.scala, and has been compiled to Topping.class in a
subdirectory named classes, compile Pizza.scala like this:
$ scalac -classpath classes Pizza.scala
Note that the scalac command has many additional options you can use. For
instance, if you add the -verbose option to the previous command, you’ll see hun‐
dreds of lines of additional output that show how scalac is working. These options
may change over time, so use the -help option to see additional information:
$ scalac -help
Usage: scalac <options> <source files>
where possible standard options include:
-P
Pass an option to a plugin, e.g. -P:<plugin>:<opt>
-X
Print a synopsis of advanced options.
-Y
Print a synopsis of private options.
-bootclasspath
Override location of bootstrap class files.
-classpath
Specify where to find user class files.
much more output here ...
Main methods
While we’re talking about compiling main methods, it helps to know that they can be
declared in two ways with Scala 3:
• Using the @main annotation on a method
• Declaring a main method with the proper signature in an object
As shown in the Solution, a simple @main method that takes no input parameters can
be declared like this:
@main def hello = println("Hello, world")
12
|
Chapter 1: Command-Line Tasks
You can also declare an @main method to take whatever parameters you want on the
command line, such as taking a String and Int in this example:
@main def hello(name: String, age: Int): Unit =
println(s"Hello, $name, I think you are $age years old.")
After that code is compiled with scalac, it can be run like this:
$ scala hello "Lori" 44
Hello, Lori, I think you are 44 years old.
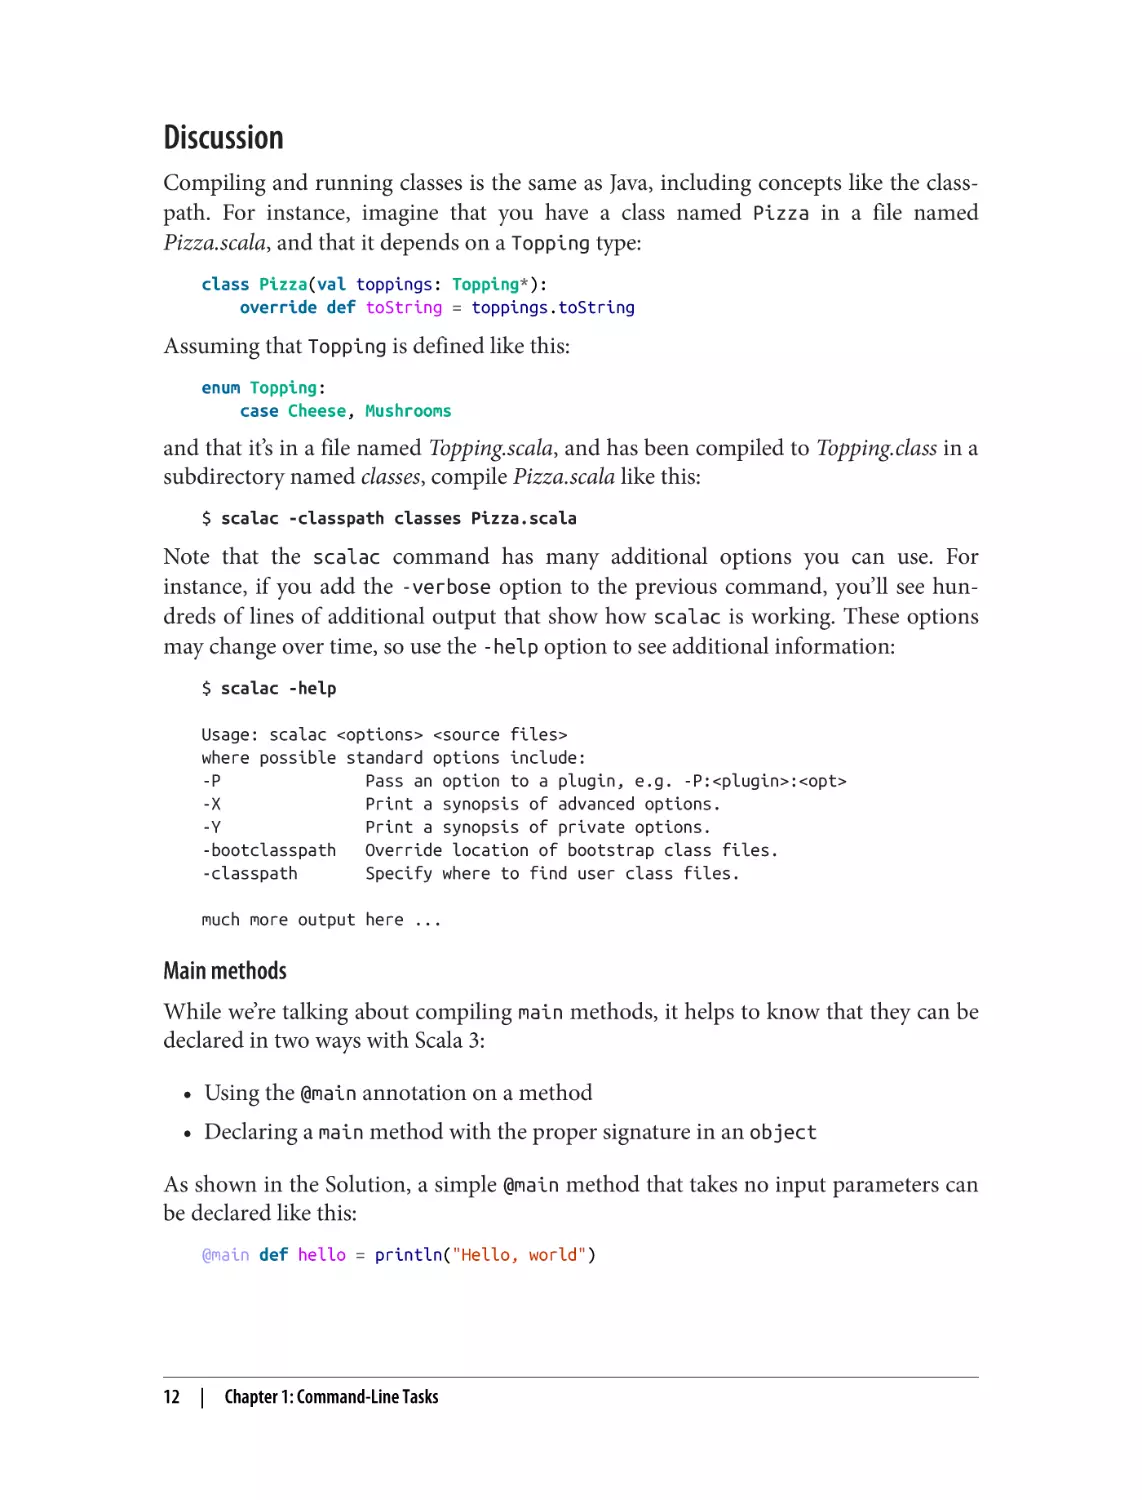
For the second approach, declaring a main method inside an object is just like
declaring a main method in Java, and the signature for the Scala main method must
look like this:
object YourObjectName:
// the method must take `Array[String]` and return `Unit`
def main(args: Array[String]): Unit =
// your code here
If you’re familiar with Java, that Scala code is analogous to this Java code:
public class YourObjectName {
public static void main(String[] args) {
// your code here
}
}
1.5 Disassembling and Decompiling Scala Code
Problem
In the process of learning how Scala code is compiled into class files, or trying to
understand a particular problem, you want to examine the bytecode the Scala com‐
piler generates from your source code.
Solution
The main way to disassemble Scala code is with the javap command. You may also be
able to use a decompiler to convert your class files back to Java source code, and this
option is shown in the Discussion.
Using javap
Because your Scala source code files are compiled into regular JVM class files, you
can use the javap command to disassemble them. For example, assume that you’ve
created a file named Person.scala that contains this source code:
class Person(var name: String, var age: Int)
1.5 Disassembling and Decompiling Scala Code
|
13
Next, compile that file with scalac:
$ scalac Person.scala
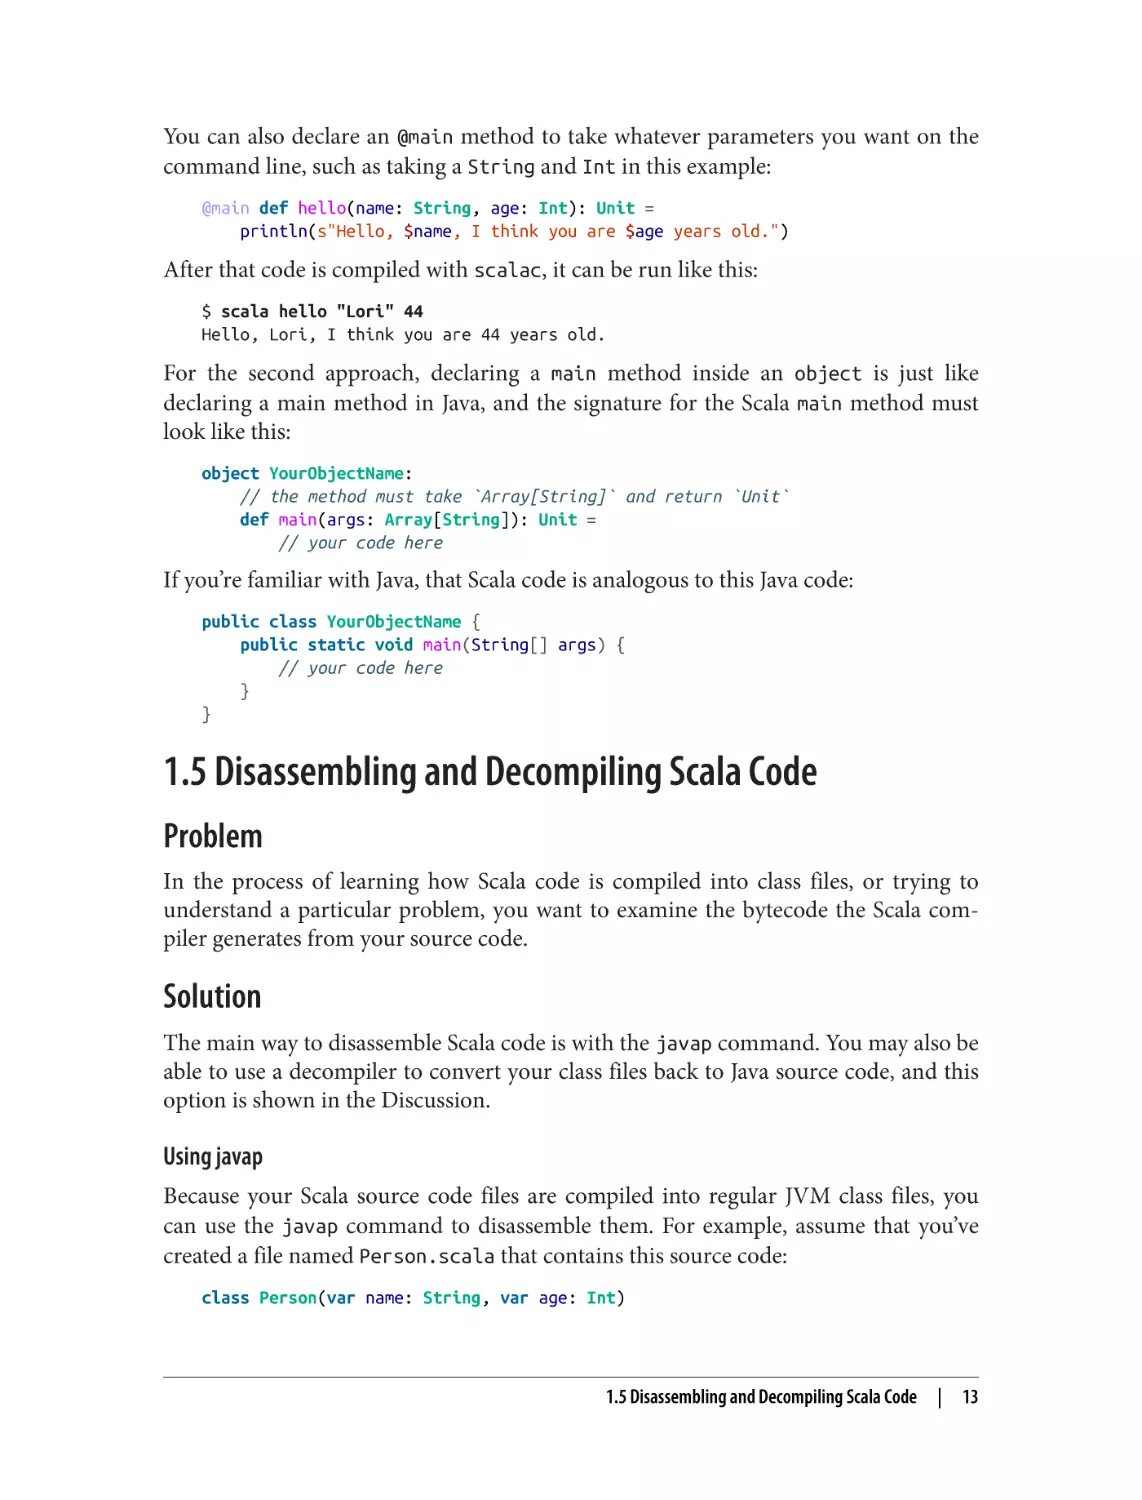
Now you can disassemble the resulting Person.class file into its signature using javap,
like this:
$ javap -public Person
Compiled from "Person.scala"
public class Person {
public Person(java.lang.String, int);
public java.lang.String name();
public void name_$eq(java.lang.String);
public int age();
public void age_$eq(int);
}
This shows the public signature of the Person class, which is its public API, or inter‐
face. Even in a simple example like this you can see the Scala compiler doing its work
for you, creating methods like name(), name_$eq, age(), and age_$eq. The Discus‐
sion shows more detailed examples.
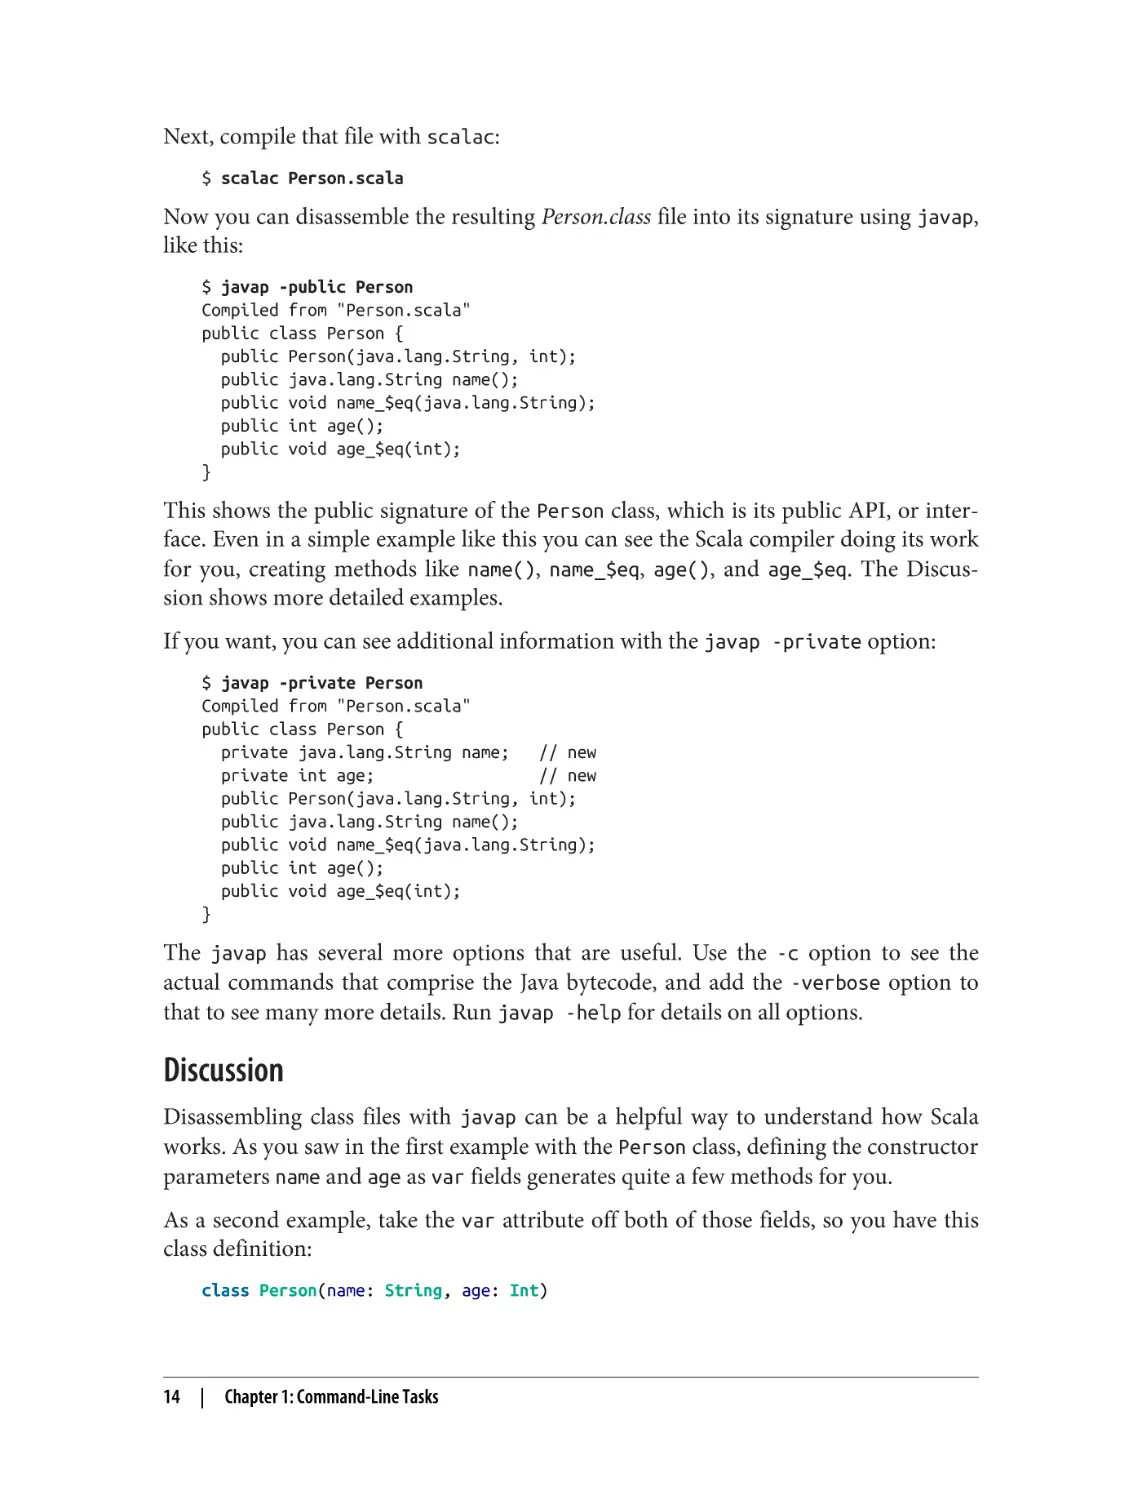
If you want, you can see additional information with the javap -private option:
$ javap -private Person
Compiled from "Person.scala"
public class Person {
private java.lang.String name;
// new
private int age;
// new
public Person(java.lang.String, int);
public java.lang.String name();
public void name_$eq(java.lang.String);
public int age();
public void age_$eq(int);
}
The javap has several more options that are useful. Use the -c option to see the
actual commands that comprise the Java bytecode, and add the -verbose option to
that to see many more details. Run javap -help for details on all options.
Discussion
Disassembling class files with javap can be a helpful way to understand how Scala
works. As you saw in the first example with the Person class, defining the constructor
parameters name and age as var fields generates quite a few methods for you.
As a second example, take the var attribute off both of those fields, so you have this
class definition:
class Person(name: String, age: Int)
14
|
Chapter 1: Command-Line Tasks
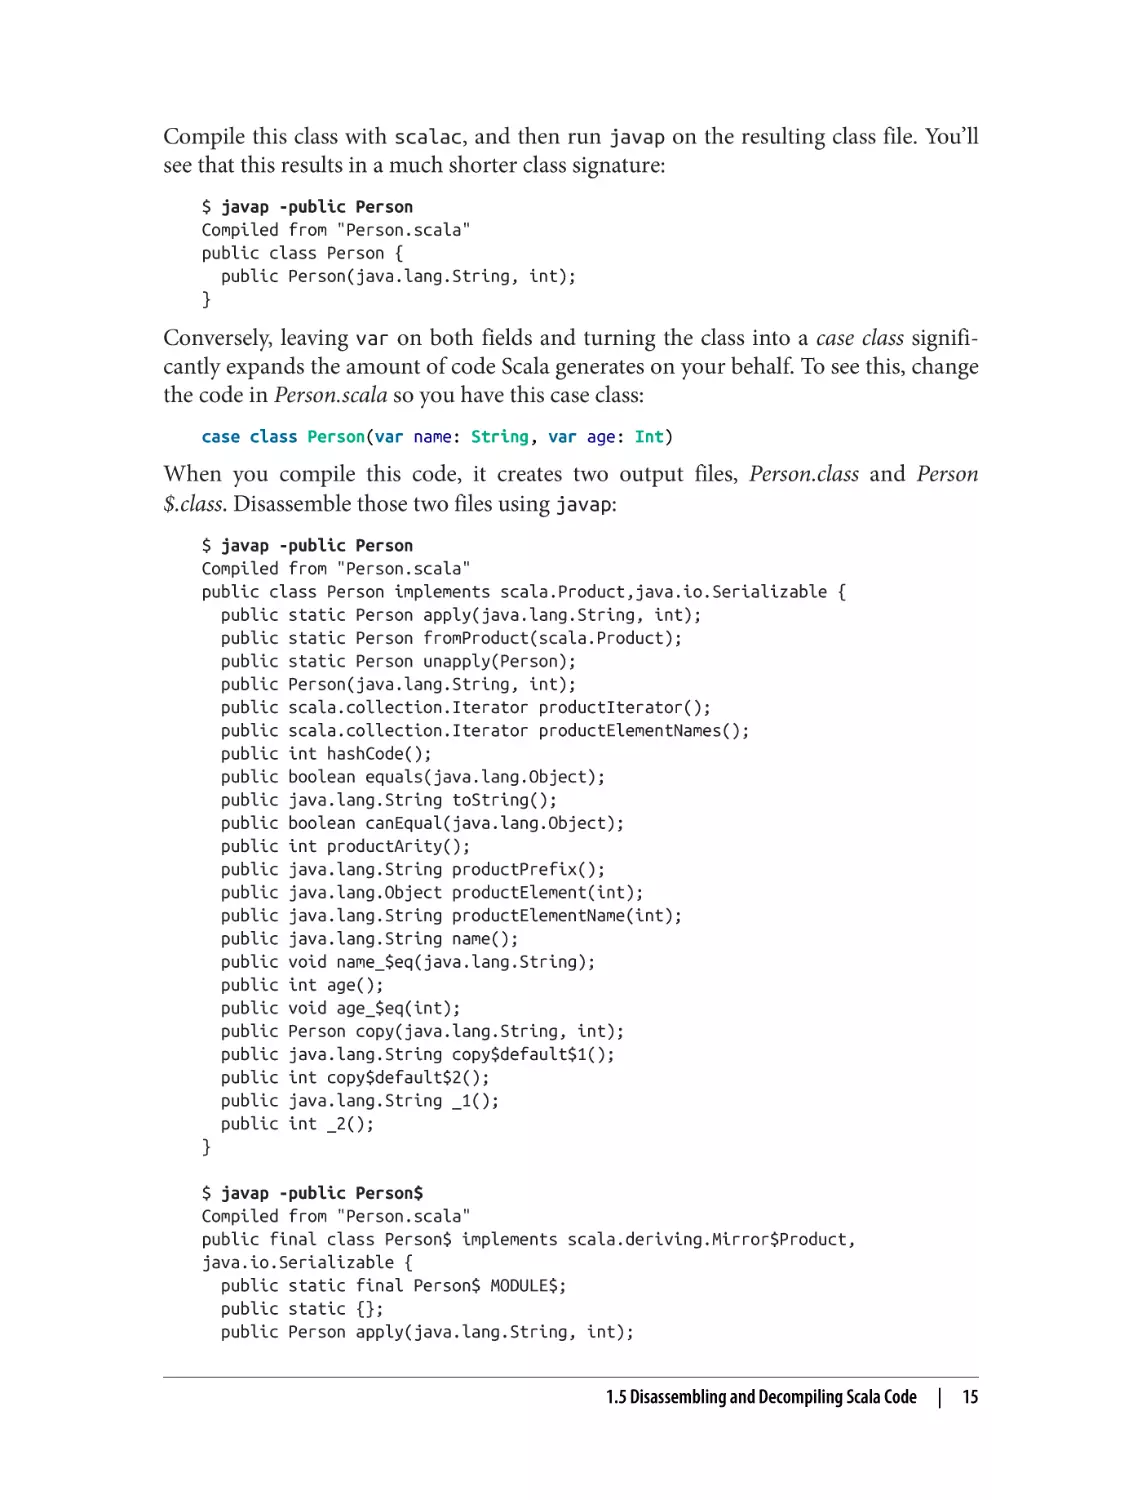
Compile this class with scalac, and then run javap on the resulting class file. You’ll
see that this results in a much shorter class signature:
$ javap -public Person
Compiled from "Person.scala"
public class Person {
public Person(java.lang.String, int);
}
Conversely, leaving var on both fields and turning the class into a case class signifi‐
cantly expands the amount of code Scala generates on your behalf. To see this, change
the code in Person.scala so you have this case class:
case class Person(var name: String, var age: Int)
When you compile this code, it creates two output files, Person.class and Person
$.class. Disassemble those two files using javap:
$ javap -public Person
Compiled from "Person.scala"
public class Person implements scala.Product,java.io.Serializable {
public static Person apply(java.lang.String, int);
public static Person fromProduct(scala.Product);
public static Person unapply(Person);
public Person(java.lang.String, int);
public scala.collection.Iterator productIterator();
public scala.collection.Iterator productElementNames();
public int hashCode();
public boolean equals(java.lang.Object);
public java.lang.String toString();
public boolean canEqual(java.lang.Object);
public int productArity();
public java.lang.String productPrefix();
public java.lang.Object productElement(int);
public java.lang.String productElementName(int);
public java.lang.String name();
public void name_$eq(java.lang.String);
public int age();
public void age_$eq(int);
public Person copy(java.lang.String, int);
public java.lang.String copy$default$1();
public int copy$default$2();
public java.lang.String _1();
public int _2();
}
$ javap -public Person$
Compiled from "Person.scala"
public final class Person$ implements scala.deriving.Mirror$Product,
java.io.Serializable {
public static final Person$ MODULE$;
public static {};
public Person apply(java.lang.String, int);
1.5 Disassembling and Decompiling Scala Code
|
15
public
public
public
public
Person unapply(Person);
java.lang.String toString();
Person fromProduct(scala.Product);
java.lang.Object fromProduct(scala.Product);
}
As shown, when you define a class as a case class, Scala generates a lot of code for
you, and this output shows the public signature for that code. See Recipe 5.14, “Gen‐
erating Boilerplate Code with Case Classes”, for a detailed discussion of this code.
About Those .tasty Files
You may have noticed that in addition to .class files, Scala 3 also
generates .tasty files during the compilation process. These files are
generated in what’s known as a TASTy format, where the acronym
TASTy comes from the term typed abstract syntax trees.
Regarding what these files are, the TASTy Inspection documenta‐
tion states, “TASTy files contain the full typed tree of a class includ‐
ing source positions and documentation. This is ideal for tools that
analyze or extract semantic information from the code.”
One of their uses is for integration between Scala 3 and Scala 2.13+.
As this Scala forward compatibility page states, “Scala 2.13 can read
these (TASTy) files to learn, for example, which terms, types and
implicits are defined in a given dependency, and what code needs
to be generated to use them correctly. The part of the compiler that
manages this is known as the Tasty Reader.”
See Also
• In my “How to Create Inline Methods in Scala 3” blog post, I show how to use
this technique to understand inline methods.
• You may also be able to use decompilers to convert .class files into Java code. I
occasionally use a tool named JAD, which was discontinued in 2001, but amaz‐
ingly it’s still able to at least partially decompile class files twenty years later. A
much more modern decompiler named CFR was also mentioned on the Scala
Gitter channel.
For more information on TASTy and .tasty files, see these resources:
• “Macros: the Plan for Scala 3”
• “Forward Compatibility for the Scala 3 Transition”
• “Scala 3 Migration Guide: Compatibility Reference”
16
|
Chapter 1: Command-Line Tasks
1.6 Running JAR Files with Scala and Java
Problem
You’ve created a JAR file from a Scala application and want to run it using the scala
or java commands.
Solution
First, create a basic sbt project, as shown in Recipe 17.1, “Creating a Project Directory
Structure for sbt”. Then add sbt-assembly into the project configuration by adding
this line to the project/plugins.sbt file:
// note: this version number changes several times a year
addSbtPlugin("com.eed3si9n" % "sbt-assembly" % "0.15.0")
Then put this Hello.scala source code file in the root directory of that project:
@main def hello = println("Hello, world")
Next, create a JAR file with either the assembly or show assembly command in the
sbt shell:
// option 1
sbt:RunJarFile> assembly
// option 2: shows the output file location
sbt:RunJarFile> show assembly
[info] target/scala-3.0.0/RunJarFile-assembly-0.1.0.jar
As shown, the output of the show assembly command prints the location where the
output JAR file is written. This file begins with the name RunJarFile because that’s the
value of the name field in my build.sbt file. Similarly, the 0.1.0 portion of the filename
comes from the version field in that file:
lazy val root = project
.in(file("."))
.settings(
name := "RunJarFile",
version := "0.1.0",
scalaVersion := "3.0.0"
)
Next, create an Example subdirectory, move into that directory, and copy the JAR file
into that directory:
$ mkdir Example
$ cd Example
$ cp ../target/scala-3.0.0/RunJarFile-assembly-0.1.0.jar .
1.6 Running JAR Files with Scala and Java
|
17
Because the sbt-assembly plugin packages everything you need into the JAR file, you
can run the hello main method with this scala command:
$ scala -cp "RunJarFile-assembly-0.1.0.jar" hello
Hello, world
Note that if your JAR file contains multiple @main methods in packages, you can run
them with similar commands, specifying the full path to the methods at the end of
the command:
scala -cp "RunJarFile-assembly-0.1.0.jar" com.alvinalexander.foo.mainMethod1
scala -cp "RunJarFile-assembly-0.1.0.jar" com.alvinalexander.bar.mainMethod2
Discussion
If you (a) attempt to run your JAR file with the java command, or (b) create the JAR
file with sbt package instead of sbt assembly, you’ll need to manually add your JAR
file dependencies to your classpath. For example, when running a JAR file with the
java command, you’ll need to use a command like this:
$ java -cp "~/bin/scala3/lib/scala-library.jar:my-packaged-jar-file.jar" ↵
foo.bar.Hello
Hello, world
Note that the entire java command should be on one line, including the
foo.bar.Hello portion at the end of the line.
For this approach you need to find the scala-library.jar file. In my case, because I
manage the Scala 3 distribution manually, I found it in the directory shown. If you’re
using a tool like Coursier to manage your Scala installation, the files it downloads can
be found under these directories:
• On macOS: ~/Library/Caches/Coursier/v1
• On Linux: ~/.cache/coursier/v1
• On Windows: %LOCALAPPDATA%\Coursier\Cache\v1, which, for a user
named Alvin, typically corresponds to C:\Users\Alvin\AppData\Local\Coursier
\Cache\v1
See the Coursier Cache page for up-to-date details on these directory locations.
Why use sbt-assembly?
Note that if your application uses managed or unmanaged dependencies and you use
sbt package instead of sbt assembly, you’ll have to understand all of those depen‐
dencies and their transitive dependencies, find those JAR files, and then include them
in the classpath setting. For that reason, the use of sbt assembly or a similar tool is
strongly recommended.
18
|
Chapter 1: Command-Line Tasks
See Also
• See Recipe 17.11, “Deploying a Single Executable JAR File”, for more details on
how to configure and use sbt-assembly.
1.6 Running JAR Files with Scala and Java
|
19
CHAPTER 2
Strings
As programmers, we deal with strings all the time—names, addresses, phone num‐
bers, and the like. Scala strings are great because they have all the features of Java
strings, and more. In this chapter you’ll see some of the shared features in the recipes
on string formatting and using regex patterns, while the other recipes demonstrate
features that are unique to Scala.
Because of the syntax of the Scala language, one major difference with Java is in how
Scala strings are declared. All Scala variables are declared as a val or var, so a string
variable is typically created like this:
val s = "Hello, world"
That expression is equivalent to this Java code:
final String s = "Hello, world"
In Scala the general rule of thumb is to always declare a variable as a val, unless
there’s a good reason to use a var. (Pure functional programming takes this further,
and strictly forbids the use of var fields.)
You can also explicitly declare a String type:
val s: String = "Hello, world"
------
// don’t do this
However, that isn’t recommended because it only makes your code unnecessarily ver‐
bose. Because Scala’s type inference is very powerful, the implicit syntax shown in the
first example is sufficient, and preferred. In fact, as a practical matter, the only time I
declare a type explicitly when creating a variable is when I call a method and it’s not
clear from the method name what its return type is:
val s: String = someObject.someMethod(42)
21
Scala String Features
Additional features that give power (superpower!) to Scala strings are:
• The ability to compare strings with ==
• Multiline strings
• String interpolators, which let you write code like println(s"Name: $name")
• Dozens of additional functional methods that let you treat a string as a sequence
of characters
The recipes in this chapter demonstrate all of these features.
Strings are a sequence of characters
An important point I just touched on is that Scala strings can be treated as a sequence
of characters, i.e., as a Seq[Char]. Because of this, given this example string:
val s = "Big Belly Burger"
these are just a few of the commonly used “sequence” methods you can call on it:
s.count(_ == 'B')
s.dropRight(3)
s.dropWhile(_ != ' ')
s.filter(_ != ' ')
s.sortWith(_ < _)
s.take(3)
s.takeRight(3)
s.takeWhile(_ != 'r')
//
//
//
//
//
//
//
//
3
"Big Belly Bur"
" Belly Burger"
"BigBellyBurger"
" BBBeeggillrruy"
"Big"
"ger"
"Big Belly Bu"
All of those methods are standard Seq methods, and they’re covered in depth in
Chapter 11.
Chaining Method Calls Together
Except for the foreach method—which returns Unit and is not “functional” accord‐
ing to some definitions—all the methods on a Seq are functional, meaning that they
don’t mutate the existing sequence but instead return a new value when they’re
applied. Because of this functional nature, you can call several methods in series on a
string:
scala> "scala".drop(2).take(2).capitalize
res0: String = Al
If you haven’t seen this technique before, here’s a brief description of how this exam‐
ple works: drop is a collection method that drops (discards) the number of elements
that are specified from the beginning of the collection, and it keeps the remaining ele‐
22
|
Chapter 2: Strings
ments. When it’s called on the string as drop(2), it drops the first two characters (sc)
from the string (scala) and returns the remaining elements:
scala> "scala".drop(2)
res0: String = ala
Next, the take(2) method retains the first two elements from the sequence it’s given
—the string "ala"—and discards the rest:
scala> "scala".drop(2).take(2)
res1: String = al
Finally, the capitalize method is called to get the end result:
scala> "scala".drop(2).take(2).capitalize
res2: String = Al
If you’re not familiar with chaining methods together like this, it’s known as a fluent
style of programming. See Recipe 8.8, “Supporting a Fluent Style of Programming”,
for more information. Code like this is very common in functional programming,
where every function is pure and returns a value. This style is popular with Rx tech‐
nologies like RxJava and RxScala and is also heavily used with Spark.
Where do those methods come from?
If you know Java, you may know that the Java String class doesn’t have a capitalize
method, so it can be a surprise that it’s available on a Scala string. Indeed, a Scala
string has dozens of additional methods on top of a Java string, all of which you can
see with the “code assist” feature in an IDE like Eclipse or IntelliJ IDEA.
Once you see all the methods that are available, it can be a surprise when you learn
that there is no Scala String class. How can a Scala string have all these methods if
there is no Scala String class?
The way this works is that Scala inherits the Java String class and then adds methods
to it through features known as implicit conversions and extension methods. Implicit
conversions were the way to add methods to closed classes in Scala 2, and extension
methods are how they’re added in Scala 3. See Recipe 8.9, “Adding New Methods to
Closed Classes with Extension Methods”, for details on how to create extension
methods.
While this may change over time, in Scala 3.0 many of the extra methods you’ll find
on a Scala String are defined in the StringOps class. Those methods are defined in
StringOps, and then they’re automatically imported into the scope of your code by
the scala.Predef object, which is implicitly imported into every Scala source code
file. In the Scala 2.13 Predef object—which is still used by Scala 3.0—you’ll find this
documentation and implicit conversion:
Strings
|
23
/** The `String` type in Scala has all the methods of the underlying
* `java.lang.String`, of which it is just an alias ... In addition,
* extension methods in scala.collection.StringOps
* are added implicitly through the conversion augmentString.
*/
@inline implicit def augmentString(x: String): StringOps = new StringOps(x)
augmentString converts a String into a StringOps type. The end result is that the
methods from the StringOps class are added to all Scala String instances. This
includes methods like drop, take, and filter that let you treat a string as a sequence
of characters.
Look at the Predef Source Code
If you’re first learning Scala, I encourage you to look at the source
code for the Scala 2.13 scala.Predef object. You can find a link to
the source code on that Scaladoc page, and it provides great exam‐
ples of many Scala programming features. You can also see how it
includes other types like StringOps and WrappedString.
2.1 Testing String Equality
Problem
You want to compare two strings to see if they’re equal, i.e., whether they contain the
same sequence of characters.
Solution
In Scala, you compare two String instances with the == operator. Given these strings:
val s1 = "Hello"
val s2 = "Hello"
val s3 = "H" + "ello"
you can test their equality like this:
s1 == s2
s1 == s3
// true
// true
A nice benefit of the == method is that it doesn’t throw a NullPointerException on a
basic test if a string is null:
val s4: String = null
s3 == s4
s4 == s3
24
| Chapter 2: Strings
// String = null
// false
// false
If you want to compare two strings in a case-insensitive manner, one approach is to
convert both strings to uppercase or lowercase and compare them with the ==
method:
val s1 = "Hello"
val s2 = "hello"
s1.toUpperCase == s2.toUpperCase
// Hello
// hello
// true
You can also use the equalsIgnoreCase method that comes along with the Java
String class:
val a = "Kimberly"
val b = "kimberly"
a.equalsIgnoreCase(b)
// true
Note that while an equality test on a null string doesn’t throw an exception, calling a
method on a null string will throw a NullPointerException:
val s1: String = null
val s2: String = null
scala> s1.toUpperCase == s2.toUpperCase
java.lang.NullPointerException // more output here ...
Discussion
In Scala you test object equality with the == method. This is different than Java, where
you use the equals method to compare two objects.
The == method is defined in the AnyRef class—the root class of all reference types—
and it first checks for null values and then calls the equals method on the first object
(i.e., this) to see if the two objects (this and that) are equal. As a result, you don’t
have to check for null values when comparing strings.
Better Yet, Don’t Use Null
In idiomatic Scala, you never use null values. The discussion in this recipe is
intended to help you understand how == works if you encounter a null value, pre‐
sumably from working with a Java library, or some other library where null values
were used.
If you’re coming from a language like Java, any time you feel like using a null, use an
Option instead. I find it helpful to imagine that Scala doesn’t even have a null key‐
word. See Recipe 24.6, “Using Scala’s Error-Handling Types (Option, Try,
and Either)”, for more information and examples.
2.1 Testing String Equality
|
25
In Scala 3 you can even change the type system so that any type that extends AnyRef—
i.e., types like String, List, Option, etc.—is non-nullable. By using the experimental Yexplicit-nulls compiler option, you actually change the Scala type hierarchy so
that this code won’t compile:
val s: String = null
// won’t compile with '-Yexplicit-nulls'
See the Scala explicit nulls page for more details.
See Also
For more information on == and defining equals methods, see Recipe 5.9, “Defining
an equals Method (Object Equality)”.
2.2 Creating Multiline Strings
Problem
You want to create multiline strings within your Scala source code, like you can with
the heredoc syntax of other languages.
Solution
In Scala, you create multiline strings by surrounding your text with three double
quotes:
val foo = """This is
a multiline
String"""
Although this works, the second and third lines in this example will end up with
whitespace at the beginning of their lines. When you print the string, it looks like this:
This is
a multiline
String
You can solve this problem in several different ways. The best solution is to add the
stripMargin method to the end of your multiline string and begin all lines after the
first line with the pipe symbol (|):
val speech = """Four score and
|seven years ago""".stripMargin
26
|
Chapter 2: Strings
If you don’t like using the | symbol, just specify the character you want to use when
calling stripMargin:
val speech = """Four score and
#seven years ago""".stripMargin('#')
You can also left-justify every line after the first line of your string:
val foo = """Four score and
seven years ago"""
All of these approaches yield the same result, a multiline string with each line of the
string left-justified:
Four score and
seven years ago
Those approaches result in a true multiline string, with a hidden \n character after
the end of each line. If you want to convert this multiline string into one continuous
line you can add a replaceAll method after the stripMargin call, replacing all new‐
line characters with blank spaces:
val speech = """Four score and
|seven years ago
|our fathers...""".stripMargin.replaceAll("\n", " ")
This yields:
Four score and seven years ago our fathers...
Discussion
Another great feature of Scala’s multiline string syntax is that you can include singleand double-quotes in a string without having to escape them:
val s = """This is known as a
|"multiline" string
|or 'heredoc' syntax.""". stripMargin.replaceAll("\n", " ")
This results in this string:
This is known as a "multiline" string or 'heredoc' syntax.
2.3 Splitting Strings
Problem
You want to split a string into parts based on a field separator, such as a string you get
from a comma-separated value (CSV) or pipe-delimited file.
2.3 Splitting Strings
|
27
Solution
Use one of the overridden split methods that are available on String objects:
scala> "hello world".split(" ")
res0: Array[String] = Array(hello, world)
The split method returns an array of strings, which you can work with as usual:
scala> "hello world".split(" ").foreach(println)
hello
world
Discussion
You can split a string on simple characters like a comma in a CSV file:
scala> val s = "eggs, milk, butter, Cocoa Puffs"
s: java.lang.String = eggs, milk, butter, Cocoa Puffs
// 1st attempt
scala> s.split(",")
res0: Array[String] = Array("eggs", " milk", " butter", " Cocoa Puffs")
Using this approach, it’s best to trim each string. Use the map method to call trim on
each string before returning the array:
// 2nd attempt, cleaned up
scala> s.split(",").map(_.trim)
res1: Array[String] = Array(eggs, milk, butter, Cocoa Puffs)
You can also split a string based on a regular expression. This example shows how to
split a string on whitespace characters:
scala> "Relax, nothing is under control".split("\\s+")
res0: Array[String] = Array(Relax,, nothing, is, under, control)
Not All CSV Files Are Created Equally
Note that some files that state they are CSV files may actually con‐
tain commas within their fields, typically enclosed in single or dou‐
ble quotation marks. Other files may also include newline charac‐
ters in their fields. An algorithm to process files like that will be
more complicated than the approach shown. See the Wikipedia
entry on CSV files for more information.
About that split method…
The split method is interesting in that it’s overloaded, with some versions of it com‐
ing from the Java String class and some coming from Scala’s StringOps class. For
28
|
Chapter 2: Strings
instance, if you call split with a Char argument instead of a String argument, you’re
using the split method from StringOps:
// split with a String argument (from Java)
"hello world".split(" ")
//Array(hello, world)
// split with a Char argument (from Scala)
"hello world".split(' ')
//Array(hello, world)
2.4 Substituting Variables into Strings
Problem
You want to perform variable substitution into a string, like you can do with other
languages, such as Perl, PHP, and Ruby.
Solution
To use basic string interpolation in Scala, precede your string with the letter s and
include your variables inside the string, with each variable name preceded by a $
character. This is shown in the println statement in the following example:
val name = "Fred"
val age = 33
val weight = 200.00
scala> println(s"$name is $age years old and weighs $weight pounds.")
Fred is 33 years old and weighs 200.0 pounds.
According to the official Scala string interpolation documentation, when you precede
your string with the letter s, you’re creating a processed string literal. This example
uses the “s string interpolator,” which lets you embed variables inside a string, where
the variables are replaced by their values.
Using expressions in string literals
In addition to putting simple variables inside strings, you can include expressions
inside a string by placing the expression inside curly braces. In the following example,
the value 1 is added to the variable age inside the processed string:
scala> println(s"Age next year: ${age + 1}")
Age next year: 34
This example shows that you can use an equality expression inside the curly braces:
scala> println(s"You are 33 years old: ${age == 33}")
You are 33 years old: true
2.4 Substituting Variables into Strings
|
29
You also need to use curly braces when printing object fields:
case class Student(name: String, score: Int)
val hannah = Student("Hannah", 95)
scala> println(s"${hannah.name} has a score of ${hannah.score}")
Hannah has a score of 95
Notice that attempting to print the values of object fields without wrapping them in
curly braces results in the wrong information being printed:
// error: this is intentionally wrong
scala> println(s"$hannah.name has a score of $hannah.score")
Student(Hannah,95).name has a score of Student(Hannah,95).score
Discussion
The s that’s placed before each string literal is actually a method. Though this seems
slightly less convenient than just putting variables inside of strings, there are at least
two benefits to this approach:
• Scala provides other interpolation functions to give you more power.
• Anyone can define their own string interpolation functions. For example, Scala
SQL libraries take advantage of this capability to let you write queries like
sql"SELECT * FROM USERS".
Let’s look at Scala’s two other built-in string interpolation methods.
The f string interpolator (printf style formatting)
In the example in the Solution, the weight was printed as 200.0. This is OK, but what
can you do if you want to add more decimal places to the weight, or remove them
entirely?
This simple desire leads to the “f string interpolator,” which lets you use printf style
formatting specifiers inside strings. The following examples show how to print the
weight, first with two decimal places:
scala> println(f"$name is $age years old and weighs $weight%.2f pounds.")
Fred is 33 years old and weighs 200.00 pounds.
and then with no decimal places:
scala> println(f"$name is $age years old and weighs $weight%.0f pounds.")
Fred is 33 years old and weighs 200 pounds.
30
|
Chapter 2: Strings
As demonstrated, to use this approach, just follow these steps:
1. Precede your string with the letter f
2. Use printf style formatting specifiers immediately after your variables
printf Formatting Specifiers
The most common printf format style specifiers are shown in
Recipe 2.5.
Though these examples use the println method, it’s important to note that you can
assign the result of a variable substitution to a new variable, similar to calling sprintf
in other languages:
scala> val s = f"$name, you weigh $weight%.0f pounds."
s: String = Fred, you weigh 200 pounds.
Now s is a normal string that you can use as desired.
The raw interpolator
In addition to the s and f string interpolators, Scala includes another interpolator
named raw. The raw interpolator doesn’t escape any literals within the string. The fol‐
lowing example shows how raw compares to the s interpolator:
scala> s"foo\nbar"
val res0: String = foo
bar
scala> raw"foo\nbar"
res1: String = foo\nbar
As shown, s treats \n as a newline character while raw doesn’t give it any special con‐
sideration and just passes it along.
Create Your Own Interpolator
In addition to the s, f, and raw interpolators, you can define your
own interpolators. See Recipe 2.11 for examples of how to create
your own interpolator.
2.4 Substituting Variables into Strings
|
31
See Also
• Recipe 2.5 lists many common string formatting characters.
• The Oracle Formatter class documentation has a complete list of formatting
characters that can be used.
• The official Scala string interpolation page shows a few more details about inter‐
polators.
• Recipe 2.11 demonstrates how to create your own string interpolator.
2.5 Formatting String Output
Problem
You want to format string output, including strings that contain integers, floats, dou‐
bles, and characters.
Solution
Use printf-style formatting strings with the f interpolator. Many configuration
options are shown in the following examples.
Date/time formatting
If you’re interested in date and time formatting, those topics are
covered in Recipe 3.11, “Formatting Dates”.
Formatting strings
Strings can be formatted with the %s format specifier. These examples show how to
format strings, including how to left- and right-justify them within a certain space:
val h = "Hello"
f"'$h%s'"
f"'$h%10s'"
f"'$h%-10s'"
// 'Hello'
// '
Hello'
// 'Hello
'
I find it easier to read formatted strings when the variable name is enclosed in curly
braces, so I’ll use this style for the rest of this recipe:
f"'${h}%s'"
f"'${h}%10s'"
f"'${h}%-10s'"
32
|
Chapter 2: Strings
// 'Hello'
// '
Hello'
// 'Hello
'
Formatting floating-point numbers
Floating-point numbers are printed with the %f format specifier. Here are several
examples that show the effects of formatting floating-point numbers, including
Double and Float values:
val a = 10.3456
val b = 101234567.3456
// a: Double = 10.3456
// b: Double = 1.012345673456E8
f"'${a}%.1f'"
f"'${a}%.2f'"
f"'${a}%8.2f'"
f"'${a}%8.4f'"
f"'${a}%08.2f'"
f"'${a}%-8.2f'"
//
//
//
//
//
//
'10.3'
'10.35'
'
10.35'
' 10.3456'
'00010.35'
'10.35
'
f"'${b}%-2.2f'"
f"'${b}%-8.2f'"
f"'${b}%-14.2f'"
// '101234567.35'
// '101234567.35'
// '101234567.35 '
Those examples demonstrate Double values, and the same syntax works with Float
values:
val c = 10.5f
f"'${c}%.1f'"
f"'${c}%.2f'"
// c: Float = 10.5
// '10.5'
// '10.50'
Integer formatting
Integers are printed with the %d format specifier. These examples show the effects of
padding and justification:
val ten = 10
f"'${ten}%d'"
f"'${ten}%5d'"
f"'${ten}%-5d'"
// '10'
// '
10'
// '10
'
val maxInt = Int.MaxValue
f"'${maxInt}%5d'"
// '2147483647'
val maxLong = Long.MaxValue
f"'${maxLong}%5d'"
// '9223372036854775807'
f"'${maxLong}%22d'"
// '
9223372036854775807'
Zero-fill integer options
These examples show the effects of zero-filling integer values:
val
val
val
val
val
zero = 0
one = 1
negTen = -10
bigPos = 12345
bigNeg = -12345
2.5 Formatting String Output
|
33
val maxInt = Int.MaxValue
// non-negative integers
f"${zero}%03d"
// 000
f"${one}%03d"
// 001
f"${bigPos}%03d"
// 12345
f"${bigPos}%08d"
// 00012345
f"${maxInt}%08d"
// 2147483647
f"${maxInt}%012d"
// 002147483647
// negative integers
f"${negTen}%03d"
//
f"${negTen}%05d"
//
f"${bigNeg}%03d"
//
f"${bigNeg}%08d"
//
-10
-0010
-12345
-0012345
Character formatting
Characters are printed with the %c format specifier. These examples show the effects
of padding and justification when formatting character output:
val s = 's'
f"|${s}%c|"
f"|${s}%5c|"
f"|${s}%-5c|"
// |s|
// |
// |s
s|
|
f works with multiline strings
It’s important to note that the f interpolator works with multiline strings, as shown in
this example:
val n = "Al"
val w = 200.0
val s = f"""Hi, my name is ${n}
|and I weigh ${w}%.1f pounds.
|""".stripMargin.replaceAll("\n", " ")
println(s)
That code results in the following output:
Hi, my name is Al and I weigh 200.0 pounds.
As noted in Recipe 2.2, you also don’t need to escape single and double quotation
marks when you use multiline strings.
Discussion
As a reference, Table 2-1 shows common printf style format specifiers.
34
|
Chapter 2: Strings
Table 2-1. Common printf style format specifiers
Format specifier Description
Character
%c
%d
Decimal number (integer, base 10)
%e
Exponential floating-point number
%f
Floating-point number
%i
Integer (base 10)
%o
Octal number (base 8)
%s
A string of characters
%u
Unsigned decimal (integer) number
%x
Hexadecimal number (base 16)
%%
Print a “percent” character
$$
Print a “dollar sign” character
To help demonstrate how these format specifiers work, these examples show how to
use %% and $$:
println(f"%%")
println(f"$$")
// prints %
// prints $
Table 2-2 shows special characters you can use when formatting strings.
Table 2-2. Character sequences that can be used in strings
Character sequence Description
backspace
\b
\f
form feed
\n
newline, or linefeed
\r
carriage return
\t
tab
\\
backslash
\"
double quote
\'
single quote
\u
beginning of a Unicode character
See Also
• The java.util.Formatter class documentation shows all the available format‐
ting characters.
2.5 Formatting String Output
|
35
2.6 Processing a String One Character at a Time
Problem
You want to iterate through each character in a string, performing an operation on
each character as you traverse the string.
Solution
If you need to transform the characters in a string to get a new result (as opposed to a
side effect), use a for expression, or higher-order functions (HOFs) like map and fil
ter. If you want to do something that has a side effect, such as printing output, use a
simple for loop or a method like foreach. If you need to treat the string as a
sequence of bytes, use the getBytes method.
Transformers
Here’s an example of a for expression—a for loop with yield—that transforms each
character in a string:
scala> val upper = for c <- "yo, adrian" yield c.toUpper
upper: String = YO, ADRIAN
Here’s an equivalent map method:
scala> val upper = "yo, adrian".map(c => c.toUpper)
upper: String = YO, ADRIAN
That code can be shortened with the magic of Scala’s underscore character:
scala> val upper = "yo, adrian".map(_.toUpper)
upper: String = YO, ADRIAN
A great thing about HOFs and pure transformation functions is that you can com‐
bine them in series to get a desired result. Here’s an example of calling filter and
then map:
"yo, adrian".filter(_ != 'a').map(_.toUpper)
// String = YO, DRIN
Side effects
When you need to perform a side effect—something like printing each character in a
string to STDOUT—you can use a simple for loop:
scala> for c <- "hello" do println(c)
h
e
l
l
o
36
|
Chapter 2: Strings
The foreach method can also be used:
scala> "hello".foreach(println)
h
e
l
l
o
Working on string bytes
If you need to work with a string as a sequence of bytes, you can also use the get
Bytes method. getBytes returns a sequential collection of bytes from a string:
scala> "hello".getBytes
res0: Array[Byte] = Array(104, 101, 108, 108, 111)
Adding foreach after getBytes shows one way to operate on each Byte value:
scala> "hello".getBytes.foreach(println)
104
101
108
108
111
Writing a Method to Work with map
To write a method that you can pass into map to operate on the
characters in a String, define it to take a single Char as input, then
perform the logic on that Char inside the method. When the logic
is complete, return whatever data type is needed for your algo‐
rithm. Though the following algorithm is short, it demonstrates
how to create a custom method and pass that method into map:
// write your own method that operates on a character
def toLower(c: Char): Char = (c.toByte+32).toChar
// use that method with map
"HELLO".map(toLower)
// String = hello
See the Eta Expansion discussion in Recipe 10.2, “Passing Func‐
tions Around as Variables”, for more details about how you’re able
to pass a method into another method that expects a function
parameter.
Discussion
Because Scala treats a String as a sequence of characters—a Seq[Char]—all of those
examples work naturally.
2.6 Processing a String One Character at a Time
|
37
for + yield
If you’re coming to Scala from an imperative language (Java, C, C#, etc.), using the
map method might not be comfortable at first. In this case you might prefer to write a
for expression like this:
val upper = for c <- "hello, world" yield c.toUpper
Adding yield to a for loop essentially places the result from each loop iteration into
a temporary holding area. When the loop completes, all the elements in the holding
area are returned as a single collection; you can say that they are yielded by the for
loop.
While I (strongly!) recommend getting comfortable with how map works, if you want
to write for expressions when you first start, it may help to know that this expression
that uses filter and map:
val result = "hello, world"
.filter(_ != 'l')
.map(_.toUpper)
is equivalent to this for expression:
val result = for
c <- "hello, world"
if c != 'l'
yield
c.toUpper
Custom for Loops Are Rarely Needed
As I wrote in the first edition of the Scala Book on the official Scala
website, a great strength of the Scala collections classes is that they
come with dozens of prebuilt methods. A great benefit of this is
that you no longer need to write custom for loops every time you
need to work on a collection. And if that doesn’t sound like enough
of a benefit, it also means that you no longer have to read custom
for loops written by other developers. ;)
More seriously, studies have shown that developers spend much
more time reading code than writing code, with reading/writing
ratios estimated to be as high as 20:1, and most certainly at least
10:1. Because we spend so much time reading code, it’s important
that code be both concise and readable—what Scala developers call
expressive.
38
|
Chapter 2: Strings
Transformer methods
But once you become comfortable with the “Scala way”—which involves taking
advantage of Scala’s built-in transformer functions so you don’t have to write custom
for loops—you’ll want to use a map method call. Both of these map expressions pro‐
duce the same result as that for expression:
val upper = "hello, world".map(c => c.toUpper)
val upper = "hello, world".map(_.toUpper)
A transformer method like map can take a simple one-line anonymous function like
the one shown, and it can also take a much larger algorithm. Here’s an example of map
that uses a multiline block of code:
val x = "HELLO".map { c =>
// 'c' represents each character from "HELLO" ('H', 'E', etc.)
// that’s passed one at a time into this algorithm
val i: Int = c.toByte + 32
i.toChar
}
// x: String = "hello"
Notice that this algorithm is enclosed in curly braces. Braces are required any time
you want to create a multiline block of code like this.
As you might guess from these examples, map has a loop built into it, and in that loop
it passes one Char at a time to the algorithm it’s given.
Before moving on, here are a few more examples of string transformer methods:
val f = "foo bar baz"
f.dropWhile(_ != ' ')
f.filter(_ != 'a')
f.takeWhile(_ != 'r')
// " bar baz"
// foo br bz
// foo ba
Side effect approaches
Where the map or for/yield approaches are used to transform one collection into
another, the foreach method is used to operate on each element without returning a
result, which you can tell because its method signature shows that it returns Unit:
def foreach[U](f: (A) => U): Unit
----
This tells us that foreach is useful for handling side effects, such as printing:
scala> "hello".foreach(println)
h
e
l
l
o
2.6 Processing a String One Character at a Time
|
39
A Complete Example
The following example demonstrates how to call getBytes on a string and then pass a
block of code into foreach to help calculate an Adler-32 checksum value on a string:
/**
* Calculate the Adler-32 checksum using Scala.
* @see https://en.wikipedia.org/wiki/Adler-32
*/
def adler32sum(s: String): Int =
val MOD_ADLER = 65521
var a = 1
var b = 0
// loop through each byte, updating `a` and `b`
s.getBytes.foreach{ byte =>
a = (byte + a) % MOD_ADLER
b = (b + a) % MOD_ADLER
}
// this is the return value.
// note that Int is 32 bits, which this requires.
b * 65536 + a
// or (b << 16) + a
@main def adler32Checksum =
val sum = adler32sum("Wikipedia")
println(f"checksum (int) = ${sum}%d")
println(f"checksum (hex) = ${sum.toHexString}%s")
The second println statement in the @main method prints the hex value 11e60398,
which matches the 0x11E60398 on the Adler-32 algorithm page.
Note that I use foreach in this example instead of map because the goal is to loop over
each byte in the string and then do something with each byte, but without returning
anything from the loop. Instead, the algorithm updates the mutable variables a and b.
See Also
• Under the covers, the Scala compiler translates a for loop into a foreach method
call. This gets more complicated if the loop has one or more if statements
(guards) or a yield expression. This is discussed in great detail in my book Func‐
tional Programming, Simplified (CreateSpace).
• The Adler code is based on Wikipedia’s discussion of the Adler-32 checksum
algorithm.
40
| Chapter 2: Strings
2.7 Finding Patterns in Strings
Problem
You need to search a String to see if it contains a regular expression pattern.
Solution
Create a Regex object by invoking the .r method on a String, and then use that pat‐
tern with findFirstIn when you’re looking for one match, and findAllIn when
looking for all matches.
To demonstrate this, first create a Regex for the pattern you want to search for, in this
case, a sequence of one or more numeric characters:
val numPattern = "[0-9]+".r
// scala.util.matching.Regex = [0-9]+
Next, create a sample string you can search:
val address = "123 Main Street Suite 101"
The findFirstIn method finds the first match:
scala> val match1 = numPattern.findFirstIn(address)
match1: Option[String] = Some(123)
Notice that this method returns an Option[String].
When looking for multiple matches, use the findAllIn method:
scala> val matches = numPattern.findAllIn(address)
val matches: scala.util.matching.Regex.MatchIterator = <iterator>
As shown, findAllIn returns an iterator, which lets you loop over the results:
scala> matches.foreach(println)
123
101
If findAllIn doesn’t find any results, an empty iterator is returned, so you can still
write your code just like that—you don’t need to check to see if the result is null.
If you’d rather have the results as a Vector, add the toVector method after the
findAllIn call:
scala> val matches = numPattern.findAllIn(address).toVector
val matches: Vector[String] = Vector(123, 101)
If there are no matches, this approach yields an empty vector. Other methods like
toList, toSeq, and toArray are also available.
2.7 Finding Patterns in Strings
|
41
Discussion
Using the .r method on a String is the easiest way to create a Regex object. Another
approach is to import the Regex class, create a Regex instance, and then use the
instance in the same way:
import scala.util.matching.Regex
val numPattern = Regex("[0-9]+")
val address = "123 Main Street Suite 101"
val match1 = numPattern.findFirstIn(address)
// Option[String] = Some(123)
Although this is a bit more work, it’s also more obvious. I’ve found that it can be easy
to overlook the .r at the end of a string (and then spend a few minutes wondering
how the code I was looking at could possibly work).
A brief discussion of the Option returned by findFirstIn
As mentioned in the Solution, the findFirstIn method finds the first match in the
example string and returns an Option[String]:
scala> val match1 = numPattern.findFirstIn(address)
match1: Option[String] = Some(123)
The Option/Some/None pattern is discussed in Recipe 24.6, “Using Scala’s ErrorHandling Types (Option, Try, and Either)”, so I won’t go into it in great detail here,
but a simple way to think about an Option is that it’s a container that holds either zero
or one values. In the case of findFirstIn, if it succeeds it returns the string "123"
wrapped in a Some, i.e., as a Some("123"). However, if it fails to find the pattern in the
string it’s searching, it returns a None:
scala> val address = "No address given"
address: String = No address given
scala> val match1 = numPattern.findFirstIn(address)
match1: Option[String] = None
In summary, any time a method is (a) defined to return an Option[String], (b) guar‐
anteed to not throw an exception, and (c) guaranteed to terminate (i.e., not to go into
an infinite loop), it will always return either a Some[String] or a None.
See Also
• See the Scala Regex class documentation for more ways to work with regular
expressions.
• See Recipe 24.6, “Using Scala’s Error-Handling Types (Option, Try, and Either)”,
for details on how to work with Option values.
42
|
Chapter 2: Strings
2.8 Replacing Patterns in Strings
Problem
You want to search for regular-expression patterns in a string and then replace them.
Solution
Because a string is immutable, you can’t perform find-and-replace operations directly
on it, but you can create a new string that contains the replaced contents. There are
several ways to do this.
You can call replaceAll on a string, assigning the result to a new variable:
scala> val address = "123 Main Street".replaceAll("[0-9]", "x")
address: String = xxx Main Street
You can create a regular expression and then call replaceAllIn on that expression,
again remembering to assign the result to a new string:
scala> val regex = "[0-9]".r
regex: scala.util.matching.Regex = [0-9]
scala> val newAddress = regex.replaceAllIn("123 Main Street", "x")
newAddress: String = xxx Main Street
To replace only the first occurrence of a pattern, use the replaceFirst method:
scala> val result = "123".replaceFirst("[0-9]", "x")
result: String = x23
You can also use replaceFirstIn with a Regex:
scala> val regex = "H".r
regex: scala.util.matching.Regex = H
scala> val result = regex.replaceFirstIn("Hello world", "J")
result: String = Jello world
See Also
• The scala.util.matching.Regex documentation shows more examples of creat‐
ing and using Regex instances.
2.8 Replacing Patterns in Strings
|
43
2.9 Extracting Parts of a String That Match Patterns
Problem
You want to extract one or more parts of a string that match the regular-expression
patterns you specify.
Solution
Define the regular-expression (regex) patterns you want to extract, placing parenthe‐
ses around them so you can extract them as regular-expression groups. First, define
the desired pattern:
val pattern = "([0-9]+) ([A-Za-z]+)".r
This creates pattern as an instance of the scala.util.matching.Regex class. The
regex that’s used can be read as, “One or more numbers, followed by a space, followed
by one or more alphanumeric characters.”
Next, this is how you extract the regex groups from the target string:
val pattern(count, fruit) = "100 Bananas"
// count: String = 100
// fruit: String = Bananas
As shown in the comments, this code extracts the numeric field and the alphanu‐
meric field from the given string as two separate variables, count and fruit.
Discussion
The syntax shown here may feel a little unusual because it seems like you’re defining
pattern as a val field twice, but this syntax is more convenient and readable in a
real-world example that uses a match expression.
Imagine you’re writing the code for a search engine like Google, and you want to let
people search for movies using a variety of phrases. To be really convenient, you’ll let
them type any of these phrases to get a listing of movies near Boulder, Colorado:
"movies near 80301"
"movies 80301"
"80301 movies"
"movie: 80301"
"movies: 80301"
"movies near boulder, co"
"movies near boulder, colorado"
44
|
Chapter 2: Strings
One way you can allow all these phrases to be used is to define a series of regularexpression patterns to match against them. Just define your expressions, and then
attempt to match whatever the user types against all the possible expressions you’re
willing to allow.
As a small example, imagine that you just want to allow these two patterns:
// match "movies 80301"
val MoviesZipRE = "movies (\\d{5})".r
// match "movies near boulder, co"
val MoviesNearCityStateRE = "movies near ([a-z]+), ([a-z]{2})".r
These patterns will match strings like this:
"movies
"movies
"movies
"movies
80301"
99676"
near boulder, co"
near talkeetna, ak"
Once you’ve defined regex patterns you want to allow, you can match them against
whatever text the user enters using a match expression. In this example, you call a fic‐
tional method named getSearchResults that returns an Option[List[String]]
when a match occurs:
val results = textUserTyped match
case MoviesZipRE(zip) => getSearchResults(zip)
case MoviesNearCityStateRE(city, state) => getSearchResults(city, state)
case _ => None
As shown, this syntax makes your match expressions very readable. For both patterns
you’re matching you call an overloaded version of the getSearchResults method,
passing it the zip field in the first case and the city and state fields in the second
case.
It’s important to note that with this technique, the regular expressions must match the
entire user input. With the regex patterns shown, the following strings will fail
because they have a blank space at the end of the line:
"movies 80301 "
"movies near boulder, co "
You can solve this problem by trimming the input string, or using a more compli‐
cated regular expression, which you’ll want to do anyway in the real world.
As you can imagine, you can use this same pattern-matching technique in many dif‐
ferent circumstances, including matching date and time formats, street addresses,
people’s names, and many other situations.
2.9 Extracting Parts of a String That Match Patterns
|
45
See Also
• See Recipe 4.6, “Using a Match Expression Like a switch Statement”, for more
match expression examples.
• In the match expression you can see that scala.util.matching.Regex is used as
an extractor. Extractors are discussed in Recipe 7.8, “Implementing Pattern
Matching with unapply”.
2.10 Accessing a Character in a String
Problem
You want to access a character at a specific position in a string.
Solution
Use Scala’s array notation to access a character by an index position, but be careful
you don’t go past the end of the string:
"hello"(0)
"hello"(1)
"hello"(99)
// Char = h
// Char = e
// throws java.lang.StringIndexOutOfBoundsException
Discussion
I include this recipe because in Java you use the charAt method for this purpose. You
can also use it in Scala, but this code is unnecessarily verbose:
"hello".charAt(0)
"hello".charAt(99)
// Char = h
// throws java.lang.StringIndexOutOfBoundsException
In Scala the preferred approach is to use the array notation shown in the Solution.
Array Notation Is Really a Method Call
The Scala array notation is a nice-looking and convenient way to
write code, but if you want to know how things work behind the
scenes, it’s interesting to know that this code, which is convenient
and easy for humans to read:
"hello"(1)
// 'e'
is translated by the Scala compiler into this code:
"hello".apply(1)
// 'e'
For more details, this little bit of syntactic sugar is explained in
Recipe 7.5, “Using apply Methods in Objects as Constructors”.
46
|
Chapter 2: Strings
2.11 Creating Your Own String Interpolator
Problem
You want to create your own string interpolator, like the s, f, and raw interpolators
that come with Scala.
Solution
To create your own string interpolator, you need to know that when a programmer
writes code like foo"a b c", that code is transformed into a foo method call on the
StringContext class. Specifically, when you write this code:
val a = "a"
foo"a = $a"
it’s translated into this:
StringContext("a = ", "").foo(a)
Therefore, to create a custom string interpolator, you need to create foo as a Scala 3
extension method on the StringContext class. There are a few additional details you
need to know, and I’ll show those in an example.
Suppose that you want to create a string interpolator named caps that capitalizes
every word in a string, like this:
caps"john c doe"
val b = "b"
caps"a $b c"
// "John C Doe"
// "A B C"
To create caps, define it as an extension method on StringContext. Because you’re
creating a string interpolator, you know that your method needs to return a String,
so you begin writing the solution like this:
extension(sc: StringContext)
def caps(?): String = ???
Because a preinterpolated string can contain multiple expressions of any type, caps
needs to be defined to take a varargs parameter of type Any, so you can further write
this:
extension(sc: StringContext)
def caps(args: Any*): String = ???
2.11 Creating Your Own String Interpolator
|
47
To define the body of caps, the next thing to know is that the original string comes to
you in the form of two different variables:
• sc, which is an instance of StringContext, and provides it data in an iterator
• args.iterator, which is an instance of Iterator[Any]
This code shows one way to use those iterators to rebuild a String with each word
capitalized:
extension(sc: StringContext)
def caps(args: Any*): String =
// [1] create variables for the iterators. note that for an
// input string "a b c", `strings` will be "a b c" at this
// point.
val strings: Iterator[String] = sc.parts.iterator
val expressions: Iterator[Any] = args.iterator
// [2] populate a StringBuilder from the values in the iterators
val sb = StringBuilder(strings.next.trim)
while strings.hasNext do
sb.append(expressions.next.toString)
sb.append(strings.next)
// [3] convert the StringBuilder back to a String,
// then apply an algorithm to capitalize each word in
// the string
sb.toString
.split(" ")
.map(_.trim)
.map(_.capitalize)
.mkString(" ")
end caps
end extension
Here’s a brief description of that code:
1. First, variables are created for the two iterators. The strings variable contains all
the string literals in the input string, and expressions contains values to repre‐
sent all of the expressions in the input string, such as a $a variable.
2. Next, I populate a StringBuilder by looping over the two iterators in the while
loop. This starts to put the string back together, including all of the string literals
and expressions.
3. Finally, the StringBuilder is converted back into a String, and then a series of
transformation functions are called to capitalize each word in the string.
48
|
Chapter 2: Strings
There are other ways to implement the body of that method, but I use this approach
to be clear about the steps involved, specifically that when an interpolator like caps"a
$b c ${d*e}" is created, you need to rebuild the string from the two iterators.
Discussion
To understand the solution it helps to understand how string interpolation works,
i.e., how the Scala code you type in your IDE is converted into other Scala code. With
string interpolation, the consumer of your method writes code like this:
id"text0${expr1}text1 ... ${exprN}textN"
In this code:
• id is the name of your string interpolation method, which is caps in my case.
• The textN pieces are string constants in the input (preinterpolated) string.
• The exprN pieces are the expressions in the input string that are written with the
$expr or ${expr} syntax.
When you compile the id code, the compiler translates it into code that looks like
this:
StringContext("text0", "text1", ..., "textN").id(expr1, ..., exprN)
As shown, the constant parts of the string—the string literals—are extracted and
passed as parameters to the StringContext constructor. The id method of the
StringContext instance—caps, in my example—is passed any expressions that are
included in the initial string.
As a concrete example of how this works, assume that you have an interpolator
named yo and this code:
val b = "b"
val d = "d"
yo"a $b c $d"
In the first step of the compilation phase the last line is converted into this:
val listOfFruits = StringContext("a ", " c ", "").yo(b, d)
Now the yo method needs to be written like the caps method shown in the solution,
handling these two iterators:
args.iterators contains:
"a ", " c ", ""
exprs.iterators contains: b, d
// String type
// Any type
2.11 Creating Your Own String Interpolator
|
49
More Interpolators
For more details, my GitHub project for this book shows several
examples of interpolators, including my Q interpolator, which con‐
verts this multiline string input:
val fruits = Q"""
apples
bananas
cherries
"""
into this resulting list:
List("apples", "bananas", "cherries")
See Also
• This recipe uses extension methods, which are discussed in Recipe 8.9, “Adding
New Methods to Closed Classes with Extension Methods”.
• The official Scala page on string interpolation.
2.12 Creating Random Strings
Problem
When you try to generate a random string using the nextString method of the Ran
dom class, you see a lot of unusual output or ? characters. The typical problem looks
like this:
scala> val r = scala.util.Random()
val r: scala.util.Random = scala.util.Random@360d41d0
scala> r.nextString(10)
res0: String = ??????????
Solution
What’s happening with nextString is that it returns Unicode characters, which may
or may not display well on your system. To generate only alphanumeric characters—
the letters [A-Za-z] and the numbers [0-9]—use this approach:
import scala.util.Random
// examples of two random alphanumeric strings
Random.alphanumeric.take(10).mkString
// 7qowB9jjPt
Random.alphanumeric.take(10).mkString // a0WylvJKmX
50
|
Chapter 2: Strings
Random.alphanumeric returns a LazyList, so I use take(10).mkString to get the
first ten characters from the stream. If you only call Random.alphanumeric.take(10),
you’ll get this result:
Random.alphanumeric.take(10)
// LazyList[Char] = LazyList(<not computed>)
Because LazyList is lazy—it computes its elements only when they’re needed—you
have to call a method like mkString to force a string result.
Discussion
Per the Random class Scaladoc, alphanumeric “returns a LazyList of pseudorandomly
chosen alphanumeric characters, equally chosen from A-Z, a-z, and 0-9.”
If you want a wider range of characters, the nextPrintableChar method returns val‐
ues in the ASCII range 33–126. This includes almost every simple character on your
keyboard, including letters, numbers, and characters like !, -, +, ], and >. For exam‐
ple, here’s a little algorithm that generates a random-length sequence of printable
characters:
val r = scala.util.Random
val randomSeq = for i <- 0 to r.nextInt(10) yield r.nextPrintableChar
Here are a few examples of the random sequence that’s created by that algorithm:
Vector(s, `, t, e, o, e, r, {, S)
Vector(X, i, M, ., H, x, h)
Vector(f, V, +, v)
Those can be converted into a String with mkString, as shown in this example:
randomSeq.mkString
randomSeq.mkString
// @Wvz#y#Rj\
//b0F:P&!WT$
See asciitable.com or a similar website for the complete list of characters in the ASCII
range 33–126.
Lazy methods
As described in Recipe 20.1, “Getting Started with Spark”, with Apache Spark you can
think of collections methods as being either transformation methods or action
methods:
• Transformation methods transform the elements in a collection. With immutable
classes like List, Vector, and LazyList, these methods transform the existing
elements to create a new collection. Just like Spark, when you use a Scala Lazy
List, these methods are lazily evaluated (also known as lazy or nonstrict).
Methods like map, filter, take, and many more are considered transformation
methods.
2.12 Creating Random Strings
|
51
• Action methods are methods that essentially force a result. They’re a way of stat‐
ing, “I want the result now.” Methods like foreach and mkString can be thought
of as action methods.
See Recipe 11.1, “Choosing a Collections Class” for more discussion and examples of
transformer methods.
See Also
• In my blog post “How to Create Random Strings in Scala (A Few Different
Examples)”, I show seven different methods for generating random strings,
including alpha and alphanumeric strings.
• In “Scala: A Function to Generate a Random-Length String with Blank Spaces” I
show how to generate a random string of random length, where the string also
contains blank spaces.
52
|
Chapter 2: Strings
CHAPTER 3
Numbers and Dates
This chapter covers recipes for working with Scala’s numeric types, and it also
includes recipes for working with the Date and Time API that was introduced with
Java 8.
In Scala, the types Byte, Short, Int, Long, and Char are known as integral types
because they are represented by integers, or whole numbers. The integral types along
with Double and Float comprise Scala’s numeric types. These numeric types extend
the AnyVal trait, as do the Boolean and Unit types. As discussed on the unified types
Scala page, these nine types are called the predefined value types, and they are nonnullable.
The relationship of the predefined value types to AnyVal and Any (as well as Nothing)
is shown in Figure 3-1. As shown in that image:
• All of the numeric types extend AnyVal.
• All other types in the Scala class hierarchy extend AnyRef.
53
Figure 3-1. All the predefined numeric types extend AnyVal
As shown in Table 3-1, the numeric types have the same data ranges as their Java
primitive equivalents.
Table 3-1. The data ranges of Scala’s built-in numeric types
Data type Description
16-bit unsigned Unicode character
Char
Range
0 to 65,535
Byte
8-bit signed value
–128 to 127
Short
16-bit signed value
–32,768 to 32,767
Int
32-bit signed value
–2,147,483,648 to 2,147,483,647
Long
64-bit signed value
–263 to 263–1, inclusive (see below)
Float
32-bit IEEE 754 single precision float
See below
Double
64-bit IEEE 754 double precision float See below
In addition to those types, Boolean can have the values true or false.
54
|
Chapter 3: Numbers and Dates
If you ever need to know the exact values of the data ranges and don’t have this book
handy, you can find them in the Scala REPL:
Char.MinValue.toInt
Char.MaxValue.toInt
Byte.MinValue
Byte.MaxValue
Short.MinValue
Short.MaxValue
Int.MinValue
Int.MaxValue
Long.MinValue
Long.MaxValue
Float.MinValue
Float.MaxValue
Double.MinValue
Double.MaxValue
//
//
//
//
//
//
//
//
//
//
//
//
//
//
0
65535
-128
+127
−32768
+32767
−2147483648
+2147483647
-9,223,372,036,854,775,808
+9,223,372,036,854,775,807
−3.4028235e38
+3.4028235e38
-1.7976931348623157e308
+1.7976931348623157e308
In addition to these basic numeric types, the BigInt and BigDecimal classes are also
covered in this chapter.
Underscores in Numeric Literals
Scala 2.13 introduced the ability to use underscores in numeric literal values:
// Int
val x = 1_000
val x = 100_000
val x = 1_000_000
// Long (can also use lowercase ‘L’, but I find that confusing)
val x = 1_000_000L
// Double
val x = 1_123.45
val x = 1_123.45D
val x = 1_123.45d
val x = 1_234e2
// 123400.0
// Float
val x = 3_456.7F
val x = 3_456.7f
val x = 1_234e2F
// BigInt and BigDecimal
val x: BigInt = 1_000_000
val x: BigDecimal = 1_234.56
Numeric literals with underscores can be used in all the usual places:
val x = 1_000 + 1
if x > 1_000 && x < 1_000_000 then println(x)
Numbers and Dates
|
55
x match
case 1_000 => println("got 1,000")
case _
=> println("got something else")
for
i <- 1 to 1_000
if i > 999
do
println(i)
One place where they can’t currently be used is in casting from String to numeric
types:
Integer.parseInt("1_000")
"1_000".toInt
// NumberFormatException
// NumberFormatException
Complex Numbers
If you need more powerful math classes than those that are included with the stan‐
dard Scala distribution, check out the Spire project, which includes classes like
Rational, Complex, Real, and more.
Dates and Times
The last several recipes in this chapter cover the Date and Time API that was intro‐
duced with Java 8, and they show how to work with new classes like LocalDate,
LocalTime, LocalDateTime, Instant, and ZonedDateTime.
3.1 Parsing a Number from a String
Problem
You want to convert a String to one of Scala’s numeric types.
Solution
Use the to* methods that are available on a String:
"1".toByte
"1".toShort
"1".toInt
"1".toLong
"1".toFloat
"1".toDouble
//
//
//
//
//
//
Byte = 1
Short = 1
Int = 1
Long = 1
Float = 1.0
Double = 1.0
Be careful, because these methods can throw a NumberFormatException:
"hello!".toInt
56
|
// java.lang.NumberFormatException
Chapter 3: Numbers and Dates
As a result, you may prefer to use the to*Option methods, which return a Some when
the conversion is successful, and a None when the conversion fails:
"1".toByteOption
"1".toShortOption
"1".toIntOption
"1".toLongOption
"1".toFloatOption
"1".toDoubleOption
"one".toIntOption
//
//
//
//
//
//
//
Option[Byte] = Some(1)
Option[Short] = Some(1)
Option[Int] = Some(1)
Option[Long] = Some(1)
Option[Float] = Some(1.0)
Option[Double] = Some(1.0)
Option[Int] = None
BigInt and BigDecimal instances can also be created directly from strings:
val b = BigInt("1")
val b = BigDecimal("1.234")
// BigInt = 1
// BigDecimal = 1.234
And they can also throw a NumberFormatException:
val b = BigInt("yo")
val b = BigDecimal("dude!")
// NumberFormatException
// NumberFormatException
Handling a base and radix with Int
If you need to perform calculations using bases other than 10, use the parseInt
method of the java.lang.Integer class, as shown in these examples:
Integer.parseInt("1", 2)
Integer.parseInt("10", 2)
Integer.parseInt("100", 2)
Integer.parseInt("1", 8)
Integer.parseInt("10", 8)
//
//
//
//
//
Int
Int
Int
Int
Int
=
=
=
=
=
1
2
4
1
8
Discussion
If you’ve used Java to convert a String to a numeric data type, then the NumberForma
tException is familiar. However, Scala doesn’t have checked exceptions, so you’ll
probably want to handle this situation differently.
A first thing to know is that you don’t have to declare that Scala methods can throw
an exception, so it’s perfectly legal to write a method like this:
// you're not required to declare "throws NumberFormatException"
def makeInt(s: String) = s.toInt
Writing a pure function
However, in functional programming (FP) you’d never do this. As written, this
method can short-circuit a caller’s code, and that’s something you never do in FP.
(You might think of it as something you’d never do to another developer, or want
another developer to do to you.) Instead, a pure function always returns the type that
its signature shows. Therefore, in FP you’d write this function like this instead:
3.1 Parsing a Number from a String
|
57
def makeInt(s: String): Option[Int] =
try
Some(s.toInt)
catch
case e: NumberFormatException => None
This function is declared to return Option[Int], meaning that if you give it a "10", it
will return a Some(10), and if you give it "Yo", it returns a None. This function is
equivalent to toIntOption, which was shown in the Solution, and introduced in Scala
2.13.
Shorter makeInt Functions
While that code shows a perfectly legitimate way to write a makeInt
function that returns Option[Int], you can write it shorter like
this:
import scala.util.Try
def makeInt(s: String): Option[Int] = Try(s.toInt).toOption
Both this function and the previous makeInt function always
return either Some[Int] or None:
makeInt("a")
makeInt("1")
makeInt("2147483647")
makeInt("2147483648")
//
//
//
//
None
Some(1)
Some(2147483647)
None
If you prefer to return Try from your function instead of Option, you can write it like
this:
import scala.util.{Try, Success, Failure}
def makeInt(s: String): Try[Int] = Try(s.toInt)
The advantage of using Try is that when things go wrong, it returns the reason for the
failure inside a Failure object:
makeInt("1") // Success(1)
makeInt("a") // Failure(java.lang.NumberFormatException: For input string: "a")
Document methods that throw exceptions
These days I don’t like methods that throw exceptions, but if for some reason they do,
I prefer that the behavior is documented. Therefore, if you’re going to allow an excep‐
tion to be thrown, consider adding an @throws Scaladoc comment to your method:
@throws(classOf[NumberFormatException])
def makeInt(s: String) = s.toInt
This approach is required if the method will be called from Java code, as described in
Recipe 22.7, “Adding Exception Annotations to Scala Methods”.
58
|
Chapter 3: Numbers and Dates
See Also
• Recipe 24.6, “Using Scala’s Error-Handling Types (Option, Try, and Either)”, pro‐
vides more details on using Option, Some, and None.
3.2 Converting Between Numeric Types (Casting)
Problem
You want to convert from one numeric type to another, such as from an Int to a
Double, Double to Int, or possibly a conversion involving BigInt or BigDecimal.
Solution
Numeric values are typically converted from one type to another with a collection of
to* methods, including toByte, toChar, toDouble, toFloat, toInt, toLong, and
toShort. These methods are added to the base numeric types by classes like RichDou
ble, RichInt, RichFloat, etc., which are automatically brought into scope by
scala.Predef.
As shown on the Scala unified types page, numeric values are easily converted in the
direction shown in Figure 3-2.
Figure 3-2. The direction in which numeric values are easily converted
A few examples show how casting in this direction is done:
val b: Byte = 1
b.toShort
// Short = 1
b.toInt
// Int = 1
b.toLong
// Long = 1
b.toFloat
// Float = 1.0
b.toDouble
// Double = 1.0
When you go with the flow like that, conversion is simple. It’s also possible to go in the
opposite direction—against the flow—like this:
val d = 100.0
d.toFloat
d.toLong
// Double = 100.0
// Float = 100.0
// Long = 100
3.2 Converting Between Numeric Types (Casting)
|
59
d.toInt
d.toShort
d.toByte
// Int = 100
// Short = 100
// Byte = 100
However, be aware that going in this direction can cause serious problems:
val d = Double.MaxValue
// intentional
d.toFloat
//
d.toLong
//
d.toInt
//
d.toShort
//
d.toByte
//
// 1.7976931348623157E308
error: don’t do these things
Float = Infinity
Long = 9223372036854775807
Int = 2147483647
Short = -1
Byte = -1
Therefore, before attempting to use those methods, you should always check to see if
the conversion attempt is valid:
val d: Double = 65_535.0
d.isValidByte
// false
d.isValidChar
// true
d.isValidShort
// false
d.isValidInt
// true
(Byte ranges from -128 to 127)
(Char ranges from 0 to 65,535)
(Short ranges from -32,768 to 32,767)
(Int ranges from -2,147,483,648 to 2,147,483,647)
Note that these methods are not available on Double values:
d.isValidFloat
d.isValidLong
// not a member of Double
// not a member of Double
Also note, as you might expect, when using this technique the Int/Short/Byte tests
will fail if the Double has a nonzero fractional part:
val d = 1.5
d.isValidInt
d.isValidShort
d.isValidByte
//
//
//
//
Double = 1.5
false
false
false
asInstanceOf
Depending on your needs you can also cast “with the flow” using asInstanceOf:
val b: Byte = 1
b.asInstanceOf[Short]
b.asInstanceOf[Int]
b.asInstanceOf[Long]
b.asInstanceOf[Float]
b.asInstanceOf[Double]
//
//
//
//
//
//
Byte = 1
Short = 1
Int = 1
Long = 1
Float = 1.0
Double = 1.0
Discussion
Because all of these numeric types are classes (and not primitive values), BigInt and
BigDecimal also work similarly. The following examples show how they work with
the numeric value types.
60
|
Chapter 3: Numbers and Dates
BigInt
The BigInt constructor is overloaded, giving you nine different ways to construct
one, including giving it an Int, Long, or String:
val i: Int = 101
val l: Long = 102
val s = "103"
val b1 = BigInt(i)
val b2 = BigInt(l)
val b3 = BigInt(s)
// BigInt = 101
// BigInt = 102
// BigInt = 103
BigInt also has isValid* and to* methods to help you cast a BigInt value to the
numeric types:
• isValidByte, toByte
• isValidChar, toChar
• isValidDouble, toDouble
• isValidFloat, toFloat
• isValidInt, toInt
• isValidLong, toLong
• isValidShort, toShort
BigDecimal
Similarly, BigDecimal can be constructed in many different ways, including these:
BigDecimal(100)
BigDecimal(100L)
BigDecimal(100.0)
BigDecimal(100F)
BigDecimal("100")
BigDecimal(BigInt(100))
BigDecimal has all the same isValid* and to* methods that the other types have. It
also has to*Exact methods that work like this:
BigDecimal(100).toBigIntExact
BigDecimal(100.5).toBigIntExact
// Some(100)
// None
BigDecimal(100).toIntExact
BigDecimal(100.5).toIntExact
//
//
//
//
//
//
BigDecimal(100.5).toLongExact
BigDecimal(100.5).toByteExact
BigDecimal(100.5).toShortExact
Int = 100
java.lang.ArithmeticException: ↵
(Rounding necessary)
java.lang.ArithmeticException
java.lang.ArithmeticException
java.lang.ArithmeticException
3.2 Converting Between Numeric Types (Casting)
|
61
See the BigInt Scaladoc and BigDecimal Scaladoc for even more methods.
3.3 Overriding the Default Numeric Type
Problem
When using an implicit type declaration style, Scala automatically assigns types based
on their numeric values, and you need to override the default type when you create a
numeric field.
Solution
If you assign 1 to a variable without explicitly declaring its type, Scala assigns it the
type Int:
scala> val a = 1
a: Int = 1
Therefore, when you need to control the type, explicitly declare it:
val
val
val
val
val
val
a:
a:
a:
a:
a:
a:
Byte = 1
Short = 1
Int = 1
Long = 1
Float = 1
Double = 1
//
//
//
//
//
//
Byte = 1
Short = 1
Int = 1
Long = 1
Float = 1.0
Double = 1.0
While I prefer that style, it’s also legal to specify the type at the end of the expression:
val
val
val
val
val
a
a
a
a
a
=
=
=
=
=
0:
0:
0:
0:
0:
Byte
Int
Short
Double
Float
For longs, doubles, and floats you can also use this style:
val
val
val
val
val
val
a
a
a
a
a
a
=
=
=
=
=
=
1l
1L
1d
1D
1f
1F
//
//
//
//
//
//
Long = 1
Long = 1
Double = 1.0
Double = 1.0
Float = 1.0
Float = 1.0
You can create hex values by preceding the number with a leading 0x or 0X, and you
can store them as an Int or Long:
val a = 0x20
val a = 0x20L
62
|
// Int = 32
// Long = 32
Chapter 3: Numbers and Dates
Discussion
It’s helpful to know about this approach when creating any object instance. The gen‐
eral syntax looks like this:
// general case
var [name]: [Type] = [initial value]
// example
var a: Short = 0
This form can be helpful when you need to initialize var fields in a class:
class Foo:
var a: Short = 0
var b: Short = _
var s: String = _
// specify a default value
// defaults to 0
// defaults to null
As shown, you can use the underscore character as a placeholder when assigning an
initial value. This works when creating class variables, but it doesn’t work in other
places, such as inside a method. For numeric types this isn’t an issue—you can just
assign the type the value zero—but with most other types, if you really want a null
value you can use this approach inside a method:
var name = null.asInstanceOf[String]
But the usual warning applies: don’t use null values. It’s better to use the Option/Some/
None pattern, which you’ll see in the best Scala libraries and frameworks, such as the
Play Framework. See Recipe 24.5, “Eliminating null Values from Your Code”, and
Recipe 24.6, “Using Scala’s Error-Handling Types (Option, Try, and Either)”, for more
discussion of this important topic.
Type Ascription
In some rare instances, you may need to take advantage of a technique called type
ascription, whose syntax looks like these examples. The Stack Overflow question
“What Is the Purpose of Type Ascriptions in Scala?” shows a case where it’s advanta‐
geous to upcast a String to an Object:
val s = "Hala"
val o = s: Object
// s: String = Hala
// o: Object = Hala
As shown, the syntax is similar to this recipe. This upcasting is known as type ascrip‐
tion, and the Scala style guide on types describes it as follows:
“Ascription is basically just an up-cast performed at compile time for the sake of the
type checker. Its use is not common, but it does happen on occasion. The most often
seen case of ascription is invoking a varargs method with a single Seq parameter. This
is done by ascribing the _* type.”
3.3 Overriding the Default Numeric Type
|
63
3.4 Replacements for ++ and −−
Problem
You want to increment or decrement numbers using operators like ++ and −− that are
available in other languages, but Scala doesn’t have these operators.
Solution
Because val fields are immutable, they can’t be incremented or decremented, but
var Int fields can be mutated with the += and −= methods:
var a = 1
a += 1
a −= 1
// a = 1
// a = 2
// a = 1
As an added benefit, you use similar methods for multiplication and division:
var i = 1
i *= 4
i /= 2
// i = 1
// i = 4
// i = 2
Attempting to use this approach with val fields results in a compile-time error:
scala> val x = 1
x: Int = 1
scala> x += 1
<console>:9: error: value += is not a member of Int
x += 1
^
Discussion
Another benefit of this approach is that you can use these operators on other numeric
types besides Int. For instance, the Double and Float classes can be used in the same
way:
64
var d = 1.2
d += 1
d *= 2
d /= 2
//
//
//
//
Double = 1.2
2.2
4.4
2.2
var f = 1.2F
f += 1
f *= 2
f /= 2
//
//
//
//
Float = 1.2
2.2
4.4
2.2
|
Chapter 3: Numbers and Dates
3.5 Comparing Floating-Point Numbers
Problem
You need to compare two floating-point numbers, but as in some other programming
languages, two floating-point numbers that should be equivalent may not be.
Solution
When you begin working with floating-point numbers, you quickly learn that 0.1
plus 0.1 is 0.2:
scala> 0.1 + 0.1
res0: Double = 0.2
But 0.1 plus 0.2 isn’t exactly 0.3:
scala> 0.1 + 0.2
res1: Double = 0.30000000000000004
This inaccuracy makes comparing two floating-point numbers a significant problem:
val a = 0.3
val b = 0.1 + 0.2
a == b
// Double = 0.3
// Double = 0.30000000000000004
// false
The solution to this problem is to write your own functions to compare floatingpoint numbers with a tolerance. The following approximately equals method demon‐
strates the approach:
import scala.annotation.targetName
@targetName("approxEqual")
def ~=(x: Double, y: Double, tolerance: Double): Boolean =
if (x - y).abs < tolerance then true else false
You can use this method like this:
val a
val b
~=(a,
~=(b,
= 0.3
= 0.1 + 0.2
b, 0.0001)
a, 0.0001)
//
//
//
//
0.3
0.30000000000000004
true
true
Discussion
In this solution the @targetName annotation is optional, but it’s recommended for
these reasons when you create a method that uses symbols:
• It helps interoperability with other languages that don’t support the use of sym‐
bolic method names.
3.5 Comparing Floating-Point Numbers
|
65
• It makes it easier to use stacktraces, where the target name you supply is used
instead of the symbolic name.
• It provides an alternative name for your symbolic method name in the documen‐
tation, showing the target name as an alias of the symbolic method name.
Extension methods
As shown in Recipe 8.9, “Adding New Methods to Closed Classes with
Extension Methods”, you can define this method as an extension method on the Dou
ble class. If you assume a tolerance of 0.5, you can create that extension method like
this:
extension (x: Double)
def ~=(y: Double): Boolean = (x - y).abs < 0.5
If you prefer, the method’s test condition can be expanded to this:
extension (x: Double)
def ~=(y: Double): Boolean =
if (x - y).abs < 0.5 then true else false
In either case, it can then be used with Double values like this:
if a ~= b then ...
That makes for very readable code. However, when you hardcode the tolerance, it’s
probably preferable to define the tolerance as a percentage of the given value x:
extension (x: Double)
def ~=(y: Double): Boolean =
// allow a +/- 10% variance
val xHigh = if x > 0 then x*1.1 else x*0.9
val xLow = if x > 0 then x*0.9 else x*1.1
if y >= xLow && y <= xHigh then true else false
Or, if you prefer to have the tolerance as a method parameter, define the extension
method like this:
extension (x: Double)
def ~=(y: Double, tolerance: Double): Boolean =
if (x - y).abs < tolerance then true else false
and then use it like this:
66
1.0 ~= (1.1, .2)
1.0 ~= (0.9, .2)
// true
// true
1.0 ~= (1.21, .2)
1.0 ~= (0.79, .2)
// false
// false
|
Chapter 3: Numbers and Dates
See Also
• “What Every Computer Scientist Should Know About Floating-Point Arith‐
metic”
• The “Accuracy problems” section of the Wikipedia floating-point accuracy arith‐
metic page
• The Wikipedia arbitrary-precision arithmetic page
3.6 Handling Large Numbers
Problem
You’re writing an application and need to use very large integer or decimal values.
Solution
If the Long and Double types aren’t large enough, use the Scala BigInt and BigDeci
mal classes:
val bi = BigInt(1234567890)
val bd = BigDecimal(123456.789)
// BigInt = 1234567890
// BigDecimal = 123456.789
// using underscores with numeric literals
val bi = BigInt(1_234_567_890)
// BigInt = 1234567890
val bd = BigDecimal(123_456.789)
// BigDecimal = 123456.789
BigInt and BigDecimal wrap the Java BigInteger and BigDecimal classes, and they
support all the operators you’re used to using with numeric types in Scala:
bi + bi
bi * bi
bi / BigInt(2)
// BigInt = 2469135780
// BigInt = 1524157875019052100
// BigInt = 617283945
You can convert them to other numeric types:
// bad conversions
bi.toByte
// -46
bi.toChar
// ˒
bi.toShort
// 722
// correct conversions
bi.toInt
// 1234567891
bi.toLong
// 1234567891
bi.toFloat
// 1.23456794E9
bi.toDouble
// 1.234567891E9
3.6 Handling Large Numbers
|
67
To avoid conversion errors, test them first:
bi.isValidByte
bi.isValidChar
bi.isValidShort
bi.isValidInt
bi.isValidLong
//
//
//
//
//
false
false
false
true
true
BigInt also converts to a byte array:
bi.toByteArray
// Array[Byte] = Array(73, -106, 2, -46)
Discussion
Before using BigInt or BigDecimal, you can check the minimum and maximum val‐
ues that Long and Double can handle:
Long.MinValue
Long.MaxValue
Double.MinValue
Double.MaxValue
//
//
//
//
-9,223,372,036,854,775,808
+9,223,372,036,854,775,807
-1.7976931348623157e308
+1.7976931348623157e308
Depending on your needs, you may also be able to use the PositiveInfinity and
NegativeInfinity of the standard numeric types:
scala> 1.7976931348623157E308 > Double.PositiveInfinity
res0: Boolean = false
BigDecimal Is Often Used for Currency
BigDecimal is often used to represent currency because it offers
control over rounding behavior. As shown in previous recipes,
adding $0.10 + $0.20 with a Double isn’t exactly $0.30:
0.10 + 0.20
// Double = 0.30000000000000004
But BigDecimal doesn’t suffer from that problem:
BigDecimal(0.10) + BigDecimal(0.20)
// BigDecimal = 0.3
That being said, you can still run into issues when using Double
values to construct BigDecimal values:
BigDecimal(0.1 + 0.2)
BigDecimal(.2 * .7)
// BigDecimal = 0.30000000000000004
// BigDecimal = 0.13999999999999999
Therefore, it’s recommended that you always use the String ver‐
sion of the BigDecimal constructor to get the precise results you’re
looking for:
BigDecimal("0.1") + BigDecimal("0.2")
BigDecimal("0.2") * BigDecimal("0.7")
// BigDecimal = 0.3
// BigDecimal = 0.14
As Joshua Bloch states in Effective Java (Addison-Wesley), “use Big
Decimal, int, or long for monetary calculations.”
68
|
Chapter 3: Numbers and Dates
See Also
• Baeldung’s “BigDecimal and BigInteger in Java” has a lot of details on the Java
classes that are wrapped by Scala’s BigDecimal and BigInt class.
• If you need to save these data types into a database, these pages may be helpful:
— The Stack Overflow page “How to Insert BigInteger in Prepared Statement
Java”
— The Stack Overflow page “Store BigInteger into MySql”
• The “Unpredictability of the BigDecimal(double) Constructor” Stack Overflow
page discusses the problem of passing a double to BigDecimal in Java.
3.7 Generating Random Numbers
Problem
You need to create random numbers, such as when testing an application, performing
a simulation, and many other situations.
Solution
Create random numbers with the scala.util.Random class. The following examples
show common random number use cases:
val r = scala.util.Random
// random integers
r.nextInt
// 455978773
r.nextInt
// -1837771511
// returns a value between 0.0 and 1.0
r.nextDouble
// 0.22095085955974536
r.nextDouble
// 0.3349793259700605
// returns a value between 0.0 and 1.0
r.nextFloat
// 0.34705013
r.nextFloat
// 0.79055405
// set a seed when creating a new Random
val r = scala.util.Random(31)
// update the seed after you already have a Random instance
r.setSeed(1_000L)
// limit the integers to a maximum value
r.nextInt(6)
// 0
3.7 Generating Random Numbers
|
69
r.nextInt(6)
r.nextInt(6)
// 5
// 1
When setting a maximum value on nextInt, the Int returned is between 0 (inclusive)
and the value you specify (exclusive), so specifying 100 returns an Int from 0 to 99.
Discussion
This section shows several other useful things you can do with the Random class.
Random length ranges
Scala makes it easy to create a random-length range of numbers, which is especially
useful for testing:
// random length ranges
0 to r.nextInt(10)
// Range 0 to 9
0 to r.nextInt(10)
// Range 0 to 3
0 to r.nextInt(10)
// Range 0 to 7
Remember that you can always convert a Range to a sequence if that’s what you need:
// the resulting list size will be random
(0 to r.nextInt(10)).toList
// List(0, 1, 2, 3, 4)
(0 to r.nextInt(10)).toList
// List(0, 1, 2)
// a random size LazyList
(0 to r.nextInt(1_000_000)).to(LazyList)
// result: LazyList[Int] = LazyList(<not computed>)
A for/yield loop gives you a nice way to modify the values in the sequence:
for i <- 0 to r.nextInt(10) yield i * 10
That approach yields sequences like these:
Vector(0, 10, 20, 30)
Vector(0, 10)
Vector(0, 10, 20, 30, 40, 50, 60, 70, 80)
Fixed-length ranges with random values
Another approach is to create a sequence of known length, filled with random
numbers:
val seq = for i <- 1 to 5 yield r.nextInt(100)
That approach yields sequences that contain five random integers, like these:
Vector(99, 6, 40, 77, 19)
Vector(1, 75, 87, 55, 39)
Vector(46, 40, 4, 82, 92)
You can do the same thing with nextFloat and nextDouble:
70
|
Chapter 3: Numbers and Dates
val floats = for i <- 1 to 5 yield r.nextFloat()
val doubles = for i <- 1 to 5 yield r.nextDouble()
Shuffling an existing sequence
Another common need is to “randomize” an existing sequence. To do that, use the
Random class shuffle method:
import scala.util.Random
val x = List(1, 2, 3)
Random.shuffle(x)
Random.shuffle(x)
// List(3, 1, 2)
// List(2, 3, 1)
Getting a random element from a sequence
If you have an existing sequence and want to get a single random element from it,
you can use this function:
import scala.util.Random
def getRandomElement[A](list: Seq[A], random: Random): A =
list(random.nextInt(list.length))
Here are a few examples of how to use this method:
val r = scala.util.Random
// integers
val ints = (1 to 100).toList
getRandomElement(ints, r)
// Int = 66
getRandomElement(ints, r)
// Int = 11
// strings
val names = List("Hala", "Helia", "Hannah", "Hope")
getRandomElement(names, r)
// Hala
getRandomElement(names, r)
// Hannah
3.8 Formatting Numbers and Currency
Problem
You want to format numbers or currency to control decimal places and separators
(commas and decimals), typically for printed output.
Solution
For basic number formatting, use the f string interpolator. For other needs, such as
adding commas and working with locales and currency, use instances of the
java.text.NumberFormat class:
3.8 Formatting Numbers and Currency
|
71
NumberFormat.getInstance
NumberFormat.getIntegerInstance
NumberFormat.getCurrencyInstance
NumberFormat.getPercentInstance
//
//
//
//
general-purpose numbers (floating-point)
integers
currency
percentages
The NumberFormat instances can also be customized for locales.
The f string interpolator
The f string interpolator, which is discussed in detail in Recipe 2.4, “Substituting
Variables into Strings”, provides simple number formatting capabilities:
val pi = scala.math.Pi
println(f"${pi}%1.5f")
// Double = 3.141592653589793
// 3.14159
A few more examples demonstrate the technique:
// floating-point
f"${pi}%1.2f"
//
f"${pi}%1.3f"
//
f"${pi}%1.5f"
//
f"${pi}%6.2f"
//
f"${pi}%06.2f"
//
String
String
String
String
String
// whole numbers
val x = 10_000
f"${x}%d"
f"${x}%2d"
f"${x}%8d"
f"${x}%-8d"
10000
10000
"
10000"
"10000
"
//
//
//
//
=
=
=
=
=
3.14
3.142
3.14159
" 3.14"
003.14
If you prefer the explicit use of the format method that’s available to strings, write the
code like this instead:
"%06.2f".format(pi)
// String = 003.14
Commas, locales, and integers
When you want to format integer values, such as by adding commas in a locale like
the United States, use NumberFormat’s getIntegerInstance method:
import java.text.NumberFormat
val formatter = NumberFormat.getIntegerInstance
formatter.format(10_000)
// String = 10,000
formatter.format(1_000_000)
// String = 1,000,000
That result shows commas because of my locale (near Denver, Colorado), but you can
set a locale with getIntegerInstance and the Locale class:
import java.text.NumberFormat
import java.util.Locale
val formatter = NumberFormat.getIntegerInstance(Locale.GERMANY)
formatter.format(1_000)
// 1.000
72
|
Chapter 3: Numbers and Dates
formatter.format(10_000)
formatter.format(1_000_000)
// 10.000
// 1.000.000
Commas, locales, and floating-point values
You can handle floating-point values with a formatter returned by getInstance:
val formatter = NumberFormat.getInstance
formatter.format(12.34)
// 12.34
formatter.format(1_234.56)
// 1,234.56
formatter.format(1_234_567.89)
// 1,234,567.89
You can also set a locale with getInstance:
val formatter = NumberFormat.getInstance(Locale.GERMANY)
formatter.format(12.34)
// 12,34
formatter.format(1_234.56)
// 1.234,56
formatter.format(1_234_567.89)
// 1.234.567,89
Currency
For currency output, use the getCurrencyInstance formatter. This is the default out‐
put in the United States:
val formatter = NumberFormat.getCurrencyInstance
formatter.format(123.456789)
// $123.46
formatter.format(12_345.6789)
// $12,345.68
formatter.format(1_234_567.89)
// $1,234,567.89
Use a Locale to format international currency:
import java.util.{Currency, Locale}
val deCurrency = Currency.getInstance(Locale.GERMANY)
val deFormatter = java.text.NumberFormat.getCurrencyInstance
deFormatter.setCurrency(deCurrency)
deFormatter.format(123.456789)
deFormatter.format(12_345.6789)
deFormatter.format(1_234_567.89)
// €123.46
// €12,345.68
// €1,234,567.89
If you don’t use a currency library you’ll probably want to use BigDecimal, which also
works with getCurrencyInstance. Here’s the default output in the United States:
3.8 Formatting Numbers and Currency
|
73
import java.text.NumberFormat
import scala.math.BigDecimal.RoundingMode
val a = BigDecimal("10000.995")
val b = a.setScale(2, RoundingMode.DOWN)
// BigDecimal = 10000.995
// BigDecimal = 10000.99
val formatter = NumberFormat.getCurrencyInstance
formatter.format(b)
// String = $10,000.99
Here are two examples of BigDecimal values that use a locale:
import java.text.NumberFormat
import java.util.Locale
import scala.math.BigDecimal.RoundingMode
val b = BigDecimal("1234567.891").setScale(2, RoundingMode.DOWN)
// result: BigDecimal = 1234567.89
val deFormatter = NumberFormat.getCurrencyInstance(Locale.GERMANY)
deFormatter.format(b)
// String = 1.234.567,89 €
val ukFormatter = NumberFormat.getCurrencyInstance(Locale.UK)
ukFormatter.format(b)
// String = £1,234,567.89
Custom formatting patterns
You can also create your own formatting patterns with the DecimalFormat class. Just
create the pattern you want, then apply the pattern to a number using the format
method, as shown in these examples:
import java.text.DecimalFormat
val df = DecimalFormat("0.##")
df.format(123.45)
//
df.format(123.4567890)
//
df.format(.1234567890)
//
df.format(1_234_567_890)
//
123.45 (type = String)
123.46
0.12
1234567890
val df = DecimalFormat("0.####")
df.format(.1234567890)
// 0.1235
df.format(1_234.567890)
// 1234.5679
df.format(1_234_567_890)
// 1234567890
val df = DecimalFormat("#,###,##0.00")
df.format(123)
// 123.00
df.format(123.4567890)
// 123.46
df.format(1_234.567890)
// 1,234.57
df.format(1_234_567_890)
// 1,234,567,890.00
See the Java DecimalFormat class for more formatting pattern characters (and a warn‐
ing that, in general, you shouldn’t create a direct instance of DecimalFormat).
74
| Chapter 3: Numbers and Dates
Locales
The java.util.Locale class has three constructors:
Locale(String language)
Locale(String language, String country)
Locale(String language, String country, String data)
It also includes more than a dozen static instances for locales like CANADA, CHINA,
FRANCE, GERMANY, JAPAN, UK, US, and more. For countries and languages that don’t
have Locale constants, you can still specify them using a language or a pair of lan‐
guage/country strings. For example, per Oracle’s JDK 10 and JRE 10 Supported
Locales page, locales in India can be specified like this:
Locale("hi-IN", "IN")
Locale("en-IN", "IN")
Here are a few other examples:
Locale("en-AU", "AU")
Locale("pt-BR", "BR")
Locale("es-ES", "ES")
// Australia
// Brazil
// Spain
These examples demonstrate how the first India locale is used:
// India
import java.util.{Currency, Locale}
val indiaLocale = Currency.getInstance(Locale("hi-IN", "IN"))
val formatter = java.text.NumberFormat.getCurrencyInstance
formatter.setCurrency(indiaLocale)
formatter.format(123.456789)
formatter.format(1_234.56789)
// ₹123.46
// ₹1,234.57
With all of the get*Instance methods of NumberFormat, you can also set a default
locale:
import java.text.NumberFormat
import java.util.Locale
val default = Locale.getDefault
val formatter = NumberFormat.getInstance(default)
formatter.format(12.34)
formatter.format(1_234.56)
formatter.format(1_234_567.89)
// 12.34
// 1,234.56
// 1,234,567.89
Discussion
This recipe falls back to the Java approach for printing currency and other formatted
numeric fields, though of course the currency solution depends on how you handle
3.8 Formatting Numbers and Currency
|
75
currency in your applications. In my work as a consultant, I’ve seen most companies
handle currency using the Java BigDecimal class, and others create their own custom
currency classes, which are typically wrappers around BigDecimal.
3.9 Creating New Date and Time Instances
Problem
You need to create new date and time instances using the Date and Time API that was
introduced with Java 8.
Solution
Using the Java 8 API you can create new dates, times, and date/time values. Table 3-2
provides a description of some of the new classes you’ll use (from the java.time Jav‐
adoc), all of which work in the ISO-8601 calendar system.
Table 3-2. Descriptions of common Java 8 Date and Time classes
Class
LocalDate
Description
A date without a time zone, such as 2007-12-03.
LocalTime
A time without a time zone, such as 10:15:30.
LocalDateTime
A date-time without a time zone, such as 2007-12-03T10:15:30.
ZonedDateTime
A date-time with a time zone, such as 2007-12-03T10:15:30+01:00 Europe/Paris.
Instant
Models a single instantaneous point on the timeline. This might be used to record event
timestamps in the application.
To create new date/time instances:
• Use now methods on those classes to create new instances that represent the cur‐
rent moment.
• Use of methods on those classes to create dates that represent past or future date/
time values.
Now
To create instances to represent the current date and time, use the now methods that
are available on the new classes in the API:
import java.time.*
LocalDate.now
LocalTime.now
LocalDateTime.now
76
// 2019-01-20
// 12:19:26.270
// 2019-01-20T12:19:26.270
| Chapter 3: Numbers and Dates
Instant.now
ZonedDateTime.now
// 2019-01-20T19:19:26.270Z
// 2019-01-20T12:44:53.466-07:00[America/Denver]
The results of those methods demonstrate the data that’s stored in each type.
Past or future
To create dates and times in the past or future, use the of factory methods on each of
the classes shown. For example, here are a few ways to create java.time.LocalDate
instances with its of factory methods:
val squirrelDay = LocalDate.of(2020, 1, 21)
val squirrelDay = LocalDate.of(2020, Month.JANUARY, 21)
val squirrelDay = LocalDate.of(2020, 1, 1).plusDays(20)
Note that with LocalDate, January is represented by 1 (not 0).
java.time.LocalTime has five of* factory methods, including these:
LocalTime.of(hour: Int, minute: Int)
LocalTime.of(hour: Int, minute: Int, second: Int)
LocalTime.of(0, 0)
LocalTime.of(0, 1)
LocalTime.of(1, 1)
LocalTime.of(23, 59)
//
//
//
//
00:00
00:01
01:01
23:59
These intentional exceptions help demonstrate the valid values for minutes and
hours:
LocalTime.of(23, 60)
// DateTimeException: Invalid value for MinuteOfHour,
// (valid values 0 - 59): 60
LocalTime.of(24, 1)
// DateTimeException: Invalid value for HourOfDay,
// (valid values 0 - 23): 24
java.time.LocalDateTime has nine of* factory method constructors, including
these:
LocalDateTime.of(year: Int, month: Int, dayOfMonth: Int, hour: Int, minute: Int)
LocalDateTime.of(year: Int, month: Month, dayOfMonth: Int, hour: Int, minute: Int)
LocalDateTime.of(date: LocalDate, time: LocalTime)
java.time.ZonedDateTime has seven of* factory method constructors, including
these:
of(int year, int month, int dayOfMonth, int hour, int minute, int second,
int nanoOfSecond, ZoneId zone)
of(LocalDate date, LocalTime time, ZoneId zone)
of(LocalDateTime localDateTime, ZoneId zone)
ofInstant(Instant instant, ZoneId zone)
3.9 Creating New Date and Time Instances
|
77
Here’s an example of the second method:
val zdt = ZonedDateTime.of(
LocalDate.now,
LocalTime.now,
ZoneId.of("America/New_York")
)
// result: 2021-01-01T20:38:57.590542-05:00[America/New_York]
While I’m in the neighborhood, a few other java.time.ZoneId values look like this:
ZoneId.of("Europe/Paris")
ZoneId.of("Asia/Tokyo")
ZoneId.of("America/New_York")
// java.time.ZoneId = Europe/Paris
// java.time.ZoneId = Asia/Tokyo
// java.time.ZoneId = America/New_York
// an offset from UTC (Greenwich) time
ZoneId.of("UTC+1")
// java.time.ZoneId = UTC+01:00
java.time.Instant has three of* factory methods:
Instant.ofEpochMilli(epochMilli: Long)
Instant.ofEpochSecond(epochSecond: Long)
Instant.ofEpochSecond(epochSecond: Long, nanoAdjustment: Long)
Instant.ofEpochMilli(100)
// Instant = 1970-01-01T00:00:00.100Z
The Instant class is nice for many reasons, including giving you the ability to calcu‐
late the time duration between two instants:
import java.time.{Instant, Duration}
val start = Instant.now
Thread.sleep(2_000)
val stop = Instant.now
val delta = Duration.between(start, stop)
delta.toMillis
delta.toNanos
// Instant = 2021-01-02T03:41:20.067769Z
//
//
//
//
Instant = 2021-01-02T03:41:22.072429Z
Duration = PT2.00466S
Long = 2004
Long = 2004660000
3.10 Calculating the Difference Between Two Dates
Problem
You need to determine the difference between two dates.
Solution
If you need to determine the number of days between two dates, the DAYS enum con‐
stant of the java.time.temporal.ChronoUnit class is the easiest solution:
import java.time.LocalDate
import java.time.temporal.ChronoUnit.DAYS
78
|
Chapter 3: Numbers and Dates
val now = LocalDate.of(2019, 1, 20)
val xmas = LocalDate.of(2019, 12, 25)
// 2019-01-20
// 2019-12-25
DAYS.between(now, xmas)
// Long = 339
If you need the number of years or months between two dates, you can use the YEARS
and MONTHS enum constants of ChronoUnit:
import java.time.LocalDate
import java.time.temporal.ChronoUnit.*
val now = LocalDate.of(2019, 1, 20)
val nextXmas = LocalDate.of(2020, 12, 25)
// 2019-01-20
// 2020-12-25
val years: Long = YEARS.between(now, nextXmas)
val months: Long = MONTHS.between(now, nextXmas)
val days: Long
= DAYS.between(now, nextXmas)
// 1
// 23
// 705
Using the same LocalDate values, you can also use the Period class, but notice the
significant difference in the output between the ChronoUnit and Period approaches:
import java.time.Period
val diff = Period.between(now, nextXmas)
diff.getYears
diff.getMonths
diff.getDays
//
//
//
//
P1Y11M5D
1
11
5
Discussion
The between method of the ChronoUnit class takes two Temporal arguments:
between(temporal1Inclusive: Temporal, temporal2Exclusive: Temporal)
Therefore, it works with all Temporal subclasses, including Instant, LocalDate,
LocalDateTime, LocalTime, ZonedDateTime, and more. Here’s a LocalDateTime
example:
import java.time.LocalDateTime
import java.time.temporal.ChronoUnit
// of(year, month, dayOfMonth, hour, minute)
val d1 = LocalDateTime.of(2020, 1, 1, 1, 1)
val d2 = LocalDateTime.of(2063, 4, 5, 1, 1)
ChronoUnit.DAYS.between(d1, d2)
ChronoUnit.YEARS.between(d1, d2)
ChronoUnit.MINUTES.between(d1, d2)
// Long = 15800
// Long = 43
// Long = 22752000
The ChronoUnit class has many other enum constants, including CENTURIES, DECA
DES, HOURS, MICROS, MILLIS, SECONDS, WEEKS, YEARS, and more.
3.10 Calculating the Difference Between Two Dates
|
79
3.11 Formatting Dates
Problem
You need to print dates in a desired format.
Solution
Use the java.time.format.DateTimeFormatter class. It provides three types of for‐
matters for printing date/time values:
• Predefined formatters
• Locale formatters
• The ability to create your own custom formatters
Predefined formatters
DateTimeFormatter provides 15 predefined formatters you can use. This example
shows how to use a formatter with a LocalDate:
import java.time.LocalDate
import java.time.format.DateTimeFormatter
val d = LocalDate.now
// 2021-02-04
val f = DateTimeFormatter.BASIC_ISO_DATE
f.format(d)
// 20210204
These examples show what the other date formatters look like:
ISO_LOCAL_DATE
ISO_DATE
BASIC_ISO_DATE
ISO_ORDINAL_DATE
ISO_WEEK_DATE
//
//
//
//
//
2021-02-04
2021-02-04
20210204
2021-035
2021-W05-4
Locale formatters
Create locale formatters using these static DateTimeFormatter methods:
• ofLocalizedDate
• ofLocalizedTime
• ofLocalizedDateTime
You also apply one of four java.time.format.FormatStyle values when creating a
localized date:
80
| Chapter 3: Numbers and Dates
• SHORT
• MEDIUM
• LONG
• FULL
This example demonstrates how to use ofLocalizedDate with a LocalDate and
FormatStyle.FULL:
import java.time.LocalDate
import java.time.format.{DateTimeFormatter, FormatStyle}
val d = LocalDate.of(2021, 1, 1)
val f = DateTimeFormatter.ofLocalizedDate(FormatStyle.FULL)
f.format(d)
// Friday, January 1, 2021
Using the same technique, this is what the four format styles look like:
SHORT
MEDIUM
LONG
FULL
//
//
//
//
1/1/21
Jan 1, 2021
January 1, 2021
Friday, January 1, 2021
Custom patterns with ofPattern
You can also create custom patterns by specifying your own formatting strings. Here’s
an example of the technique:
import java.time.LocalDate
import java.time.format.DateTimeFormatter
val d = LocalDate.now // 2021-01-01
val f = DateTimeFormatter.ofPattern("yyyy-MM-dd")
f.format(d)
// 2021-01-01
Here are a few other common patterns:
"MM/dd/yyyy"
"MMM dd, yyyy"
"E, MMM dd yyyy"
// 01/01/2021
// Jan 01, 2021
// Fri, Jan 01 2021
This example demonstrates how to format a LocalTime:
import java.time.LocalTime
import java.time.format.DateTimeFormatter
val t = LocalTime.now
val f1 = DateTimeFormatter.ofPattern("h:mm a")
f1.format(t)
// 6:48 PM
val f2 = DateTimeFormatter.ofPattern("HH:mm:ss a")
f2.format(t)
// 18:48:33 PM
3.11 Formatting Dates
|
81
With a LocalDateTime you can format both date and time output:
import java.time.LocalDateTime
import java.time.format.DateTimeFormatter
val t = LocalDateTime.now
val f = DateTimeFormatter.ofPattern("MMM dd, yyyy h:mm a")
f.format(t)
// Jan 01, 2021 6:48 PM
See the DateTimeFormatter class for a complete list of predefined formats and for‐
matting pattern characters that are available.
3.12 Parsing Strings into Dates
Problem
You need to parse a string into one of the date/time types introduced in Java 8.
Solution
If your string is in the expected format, pass it to the parse method of the desired
class. If the string is not in the expected (default) format, create a formatter to define
the format you want to accept.
LocalDate
This example shows the default format for java.time.LocalDate:
import java.time.LocalDate
val d = LocalDate.parse("2020-12-10")
// LocalDate = 2020-12-10
If you try to pass a string into parse with the wrong format, you’ll get an exception:
val d = LocalDate.parse("2020/12/10")
// java.time.format.DateTimeParseException
To accept a string in a different format, create a formatter for the desired pattern:
import java.time.format.DateTimeFormatter
val df = DateTimeFormatter.ofPattern("yyyy/MM/dd")
val d = LocalDate.parse("2020/12/10", df)
// LocalDate = 2020-12-10
LocalTime
These examples demonstrate the default format for java.time.LocalTime:
import java.time.LocalTime
val t = LocalTime.parse("01:02")
//01:02
val t = LocalTime.parse("13:02:03") //13:02:03
Notice that each field requires a leading 0:
82
| Chapter 3: Numbers and Dates
val t = LocalTime.parse("1:02")
val t = LocalTime.parse("1:02:03")
//java.time.format.DateTimeParseException
//java.time.format.DateTimeParseException
These examples demonstrate several ways of using formatters:
import java.time.format.DateTimeFormatter
LocalTime.parse("00:00", DateTimeFormatter.ISO_TIME)
// 00:00
LocalTime.parse("23:59", DateTimeFormatter.ISO_LOCAL_TIME)
// 23:59
LocalTime.parse("23 59 59", DateTimeFormatter.ofPattern("HH mm ss"))
// 23:59:59
LocalTime.parse("11 59 59 PM", DateTimeFormatter.ofPattern("hh mm ss a"))
// 23:59:59
LocalDateTime
This example demonstrates the default format for java.time.LocalDateTime:
import java.time.LocalDateTime
val s = "2021-01-01T12:13:14"
val ldt = LocalDateTime.parse(s)
// LocalDateTime = 2021-01-01T12:13:14
These examples demonstrate several ways of using formatters:
import java.time.LocalDateTime
import java.time.format.DateTimeFormatter
val s = "1999-12-31 23:59"
val f = DateTimeFormatter.ofPattern("yyyy-MM-dd HH:mm")
val ldt = LocalDateTime.parse(s, f)
// 1999-12-31T23:59
val s = "1999-12-31 11:59:59 PM"
val f = DateTimeFormatter.ofPattern("yyyy-MM-dd hh:mm:ss a")
val ldt = LocalDateTime.parse(s, f)
// 1999-12-31T23:59:59
Instant
java.time.Instant only has one parse method that requires a date/time stamp in
the proper format:
import java.time.Instant
Instant.parse("1970-01-01T00:01:02.00Z")
Instant.parse("2021-01-22T23:59:59.00Z")
// 1970-01-01T00:01:02Z
// 2021-01-22T23:59:59Z
3.12 Parsing Strings into Dates
|
83
ZonedDateTime
These examples demonstrate the default formats for java.time.ZonedDateTime:
import java.time.ZonedDateTime
ZonedDateTime.parse("2020-12-31T23:59:59-06:00")
// ZonedDateTime = 2020-12-31T23:59:59-06:00
ZonedDateTime.parse("2020-12-31T23:59:59-00:00[US/Mountain]")
// ZonedDateTime = 2020-12-31T16:59:59-07:00[US/Mountain]
These examples demonstrate several ways of using formatters with ZonedDateTime:
import java.time.ZonedDateTime
import java.time.format.DateTimeFormatter.*
val zdt = ZonedDateTime.parse("2021-01-01T01:02:03Z", ISO_ZONED_DATE_TIME)
// ZonedDateTime = 2021-01-01T01:02:03Z
ZonedDateTime.parse("2020-12-31T23:59:59+01:00", ISO_DATE_TIME)
// ZonedDateTime = 2020-12-31T23:59:59+01:00
ZonedDateTime.parse("2020-02-29T00:00:00-05:00", ISO_OFFSET_DATE_TIME)
// ZonedDateTime = 2020-02-29T00:00-05:00
ZonedDateTime.parse("Sat, 29 Feb 2020 00:01:02 GMT", RFC_1123_DATE_TIME)
// ZonedDateTime = 2020-02-29T00:01:02Z
Be aware that an improper date (or improperly formatted date) will throw an
exception:
ZonedDateTime.parse("2021-02-29T00:00:00-05:00", ISO_OFFSET_DATE_TIME)
// java.time.format.DateTimeParseException: Text '2021-02-29T00:00:00-05:00'
// could not be parsed: Invalid date 'February 29' as '2021' is not a leap year
ZonedDateTime.parse("Fri, 29 Feb 2020 00:01:02 GMT", RFC_1123_DATE_TIME)
// java.time.format.DateTimeParseException: Text
// 'Fri, 29 Feb 2020 00:01:02 GMT' could not be parsed: Conflict found:
// Field DayOfWeek 6 differs from DayOfWeek 5 derived from 2020-02-29
84
|
Chapter 3: Numbers and Dates
CHAPTER 4
Control Structures
As their name implies, control structures provide a way for programmers to control
the flow of a program. They’re a fundamental feature of programming languages that
let you handle decision making and looping tasks.
Prior to learning Scala back in 2010, I thought control structures like if/then state‐
ments, along with for and while loops, were relatively boring features of program‐
ming languages, but that was only because I didn’t know there was another way.
These days I know that they’re a defining feature of programming languages.
Scala’s control structures are:
• for loops and for expressions
• if/then/else if expressions
• match expressions (pattern matching)
• try/catch/finally blocks
• while loops
I’ll briefly introduce each of these next, and then the recipes will show you additional
details about how to use their features.
for Loops and for Expressions
In their most basic use, for loops provide a way to iterate over a collection to operate
on the collection’s elements:
for i <- List(1, 2, 3) do println(i)
85
But that’s just a basic use case. for loops can also have guards—embedded if
statements:
for
i <- 1 to 10
if i > 3
if i < 6
do
println(i)
With the use of the yield keyword, for loops also become for expressions—loops
that yield a result:
val listOfInts = for
i <- 1 to 10
if i > 3
if i < 6
yield
i * 10
After that loop runs, listOfInts is a Vector(40, 50). The guards inside the loop fil‐
ter out all of the values except 4 and 5, and then those values are multiplied by 10 in
the yield block.
Many more details about for loops and expressions are covered in the initial recipes
in this chapter.
if/then/else-if Expressions
While for loops and expressions let you traverse over a collection, if/then/else
expressions provide a way to make branching decisions. In Scala 3 the preferred syn‐
tax has changed, and now looks like this:
val absValue = if a < 0 then -a else a
def compare(a: Int, b: Int): Int =
if a < b then
-1
else if a == b then
0
else
1
end compare
As shown in both of those examples, an if expression truly is an expression that
returns a value. (Expressions are discussed in Recipe 4.5.)
86
|
Chapter 4: Control Structures
match Expressions and Pattern Matching
Next, match expressions and pattern matching are a defining feature of Scala, and
demonstrating their capabilities takes up the majority of this chapter. Like if expres‐
sions, match expressions return values, so you can use them as the body of a method.
As an example, this method is similar to the Perl programming language’s version of
things that are true and false:
def isTrue(a: Matchable): Boolean = a match
case false | 0 | "" => false
case _ => true
In that code, if isTrue receives a 0 or an empty string, it returns false, otherwise it
returns true. Ten recipes in this chapter are used to detail the features of match
expressions.
try/catch/finally Blocks
Next, Scala’s try/catch/finally blocks are similar to Java, but the syntax is slightly
different, primarily in that the catch block is consistent with a match expression:
try
// some exception-throwing code here
catch
case e1: Exception1Type => // handle that exception
case e2: Exception2Type => // handle that exception
finally
// close your resources and do anything else necessary here
Like if and match, try is an expression that returns a value, so you can write code
like this to transform a String into an Int:
def toInt(s: String): Option[Int] =
try
Some(s.toInt)
catch
case e: NumberFormatException => None
These examples show how toInt works:
toInt("1")
toInt("Yo")
// Option[Int] = Some(1)
// Option[Int] = None
Recipe 4.16 provides more information about try/catch blocks.
while Loops
When it comes to while loops, you’ll find that they’re rarely used in Scala. This is
because while loops are mostly used for side effects, such as updating mutable
match Expressions and Pattern Matching
|
87
variables and printing with println, and these are things you can also do with for
loops and the foreach method on collections. That being said, if you ever need to use
one, their syntax looks like this:
while
i < 10
do
println(i)
i += 1
while loops are briefly covered in Recipe 4.1.
Finally, because of a combination of several Scala features, you can create your own
control structures, and these capabilities are discussed in Recipe 4.17.
Control Structures as a Defining Feature of Programming
Languages
At the end of 2020 I was fortunate enough to cowrite the Scala 3 Book on the official
Scala Documentation website, including these three chapters:
• “Scala for Java Developers”
• “Scala for JavaScript Developers”
• “Scala for Python Developers”
When I said earlier that control structures are a “defining feature of programming
languages,” one of the things I meant is that after I wrote those chapters, I came to
realize the power of the features in this chapter, as well as how consistent Scala is com‐
pared to other programming languages. That consistency is one of the features that
makes Scala a joy to use.
4.1 Looping over Data Structures with for
Problem
You want to iterate over the elements in a collection in the manner of a traditional
for loop.
Solution
There are many ways to loop over Scala collections, including for loops, while loops,
and collection methods like foreach, map, flatMap, and more. This solution focuses
primarily on the for loop.
88
|
Chapter 4: Control Structures
Given a simple list:
val fruits = List("apple", "banana", "orange")
you can loop over the elements in the list and print them like this:
scala> for f <- fruits do println(f)
apple
banana
orange
That same approach works for all sequences, including List, Seq, Vector, Array,
ArrayBuffer, etc.
When your algorithm requires multiple lines, use the same for loop syntax, and per‐
form your work in a block inside curly braces:
scala> for f <- fruits do
|
// imagine this requires multiple lines
|
val s = f.toUpperCase
|
println(s)
APPLE
BANANA
ORANGE
for loop counters
If you need access to a counter inside a for loop, use one of the following approaches.
First, you can access the elements in a sequence with a counter like this:
for i <- 0 until fruits.length do
println(s"$i is ${fruits(i)}")
That loops yields this output:
0 is apple
1 is banana
2 is orange
You rarely need to access sequence elements by their index, but when you do, that is
one possible approach. Scala collections also offer a zipWithIndex method that you
can use to create a loop counter:
for (fruit, index) <- fruits.zipWithIndex do
println(s"$index is $fruit")
Its output is:
0 is apple
1 is banana
2 is orange
4.1 Looping over Data Structures with for
|
89
Generators
On a related note, the following example shows how to use a Range to execute a loop
three times:
scala> for i <- 1 to 3 do println(i)
1
2
3
The 1 to 3 portion of the loop creates a Range, as shown in the REPL:
scala> 1 to 3
res0: scala.collection.immutable.Range.Inclusive = Range(1, 2, 3)
Using a Range like this is known as using a generator. Recipe 4.2 demonstrates how to
use this technique to create multiple loop counters.
Looping over a Map
When iterating over keys and values in a Map, I find this to be the most concise and
readable for loop:
val names = Map(
"firstName" -> "Robert",
"lastName" -> "Goren"
)
for (k,v) <- names do println(s"key: $k, value: $v")
The REPL shows its output:
scala> for (k,v) <- names do println(s"key: $k, value: $v")
key: firstName, value: Robert
key: lastName, value: Goren
Discussion
Because I’ve switched to a functional programming style, I haven’t used a while loop
in several years, but the REPL demonstrates how it works:
scala> var i = 0
i: Int = 0
scala> while i < 3 do
|
println(i)
|
i += 1
0
1
2
90
|
Chapter 4: Control Structures
while loops are generally used for side effects, such as updating a mutable variable
like i and writing output to the outside world. As my code gets closer to pure func‐
tional programming—where there is no mutable state—I haven’t had any need for
them.
That being said, when you’re programming in an object-oriented programming style,
while loops are still frequently used, and that example demonstrates their syntax. A
while loop can also be written on multiple lines like this:
while
i < 10
do
println(i)
i += 1
Collection methods like foreach
In some ways Scala reminds me of the Perl slogan, “There’s more than one way to do
it,” and iterating over a collection provides some great examples of this. With the
wealth of methods that are available on collections, it’s important to note that a for
loop may not even be the best approach to a particular problem; the methods fore
ach, map, flatMap, collect, reduce, etc., can often be used to solve your problem
without requiring an explicit for loop.
For example, when you’re working with a collection, you can also iterate over each
element by calling the foreach method on the collection:
scala> fruits.foreach(println)
apple
banana
orange
When you have an algorithm you want to run on each element in the collection, just
pass the anonymous function into foreach:
scala> fruits.foreach(e => println(e.toUpperCase))
APPLE
BANANA
ORANGE
As with the for loop, if your algorithm requires multiple lines, perform your work in
a block:
scala> fruits.foreach { e =>
|
val s = e.toUpperCase
|
println(s)
| }
APPLE
BANANA
ORANGE
4.1 Looping over Data Structures with for
|
91
See Also
• For more examples of how to use zipWithIndex, see Recipe 13.4, “Using zipWi‐
thIndex or zip to Create Loop Counters”.
• For more examples of how to iterate over the elements in a Map, see Recipe 14.9,
“Traversing a Map”.
The theory behind how for loops work is very interesting, and knowing it can be
helpful as you progress. I wrote about it at length in these articles:
• “How to Make a Custom Sequence Work as a for Loop Generator”
• “How to Enable Filtering in a for Expression”
• “How to Enable the Use of Multiple Generators in a for Expression”
4.2 Using for Loops with Multiple Counters
Problem
You want to create a loop with multiple counters, such as when iterating over a multi‐
dimensional array.
Solution
You can create a for loop with two counters like this:
scala>
i = 1,
i = 1,
i = 2,
i = 2,
for
j =
j =
j =
j =
i <- 1 to 2; j <- 1 to 2 do println(s"i = $i, j = $j")
1
2
1
2
Notice that it sets i to 1, loops through the elements in j, then sets i to 2 and repeats
the process.
Using that approach works well with small examples, but when your code gets larger,
this is the preferred style:
for
i <- 1 to 3
j <- 1 to 5
k <- 1 to 10 by 2
do
println(s"i = $i, j = $j, k = $k")
This approach is useful when looping over a multidimensional array. Assuming you
create and populate a small two-dimensional array like this:
92
|
Chapter 4: Control Structures
val a =
a(0)(0)
a(0)(1)
a(1)(0)
a(1)(1)
Array.ofDim[Int](2,2)
= 0
= 1
= 2
= 3
you can print every array element like this:
scala>
|
|
|
|
(0)(0)
(0)(1)
(1)(0)
(1)(1)
for
i <- 0 to 1
j <- 0 to 1
do
println(s"($i)($j) = ${a(i)(j)}")
=
=
=
=
0
1
2
3
Discussion
As shown in Recipe 15.2, “Creating Ranges”, the 1 to 5 syntax creates a Range:
scala> 1 to 5
val res0: scala.collection.immutable.Range.Inclusive = Range 1 to 5
Ranges are great for many purposes, and ranges created with the <- symbol in for
loops are referred to as generators. As shown, you can easily use multiple generators
in one loop.
See Also
• The Scala style guide on formatting control structures
4.3 Using a for Loop with Embedded if Statements
(Guards)
Problem
You want to add one or more conditional clauses to a for loop, typically to filter out
some elements in a collection while working on the others.
Solution
Add one or more if statements after your generator, like this:
for
i <- 1 to 10
if i % 2 == 0
4.3 Using a for Loop with Embedded if Statements (Guards)
|
93
do
print(s"$i ")
// output: 2 4 6 8 10
These if statements are referred to as filters, filter expressions, or guards, and you
can use as many guards as needed for the problem at hand. This loop shows a hard
way to print the number 4:
for
i <if i
if i
if i
1
>
<
%
to 10
3
6
2 == 0
do
println(i)
Discussion
It’s still possible to write for loops with if expressions in an older style. For instance,
given this code:
import java.io.File
val dir = File(".")
val files: Array[java.io.File] = dir.listFiles()
you could, in theory, write a for loop in a style like this, which is reminiscent of C
and Java:
// a C/Java style of writing a 'for' loop
for (file <- files) {
if (file.isFile && file.getName.endsWith(".scala")) {
println(s"Scala file: $file")
}
}
However, once you become comfortable with Scala’s for loop syntax, I think you’ll
find that it makes the code more readable, because it separates the looping and filter‐
ing concerns from the business logic:
for
// loop and filter
file <- files
if file.isFile
if file.getName.endsWith(".scala")
do
// as much business logic here as needed
println(s"Scala file: $file")
Note that because guards are generally intended to filter collections, you may want to
use one of the many filtering methods that are available to collections—filter, take,
94
| Chapter 4: Control Structures
drop, etc.—instead of a for loop, depending on your needs. See Chapter 11 for exam‐
ples of those methods.
4.4 Creating a New Collection from an Existing Collection
with for/yield
Problem
You want to create a new collection from an existing collection by applying an algo‐
rithm (and potentially one or more guards) to each element in the original collection.
Solution
Use a yield statement with a for loop to create a new collection from an existing col‐
lection. For instance, given an array of lowercase strings:
scala> val names = List("chris", "ed", "maurice")
val names: List[String] = List(chris, ed, maurice)
you can create a new array of capitalized strings by combining yield with a for loop
and a simple algorithm:
scala> val capNames = for name <- names yield name.capitalize
val capNames: List[String] = List(Chris, Ed, Maurice)
Using a for loop with a yield statement is known as a for-comprehension.
If your algorithm requires multiple lines of code, perform the work in a block after
the yield keyword, manually specifying the type of the resulting variable, or not:
// [1] declare the type of `lengths`
val lengths: List[Int] = for name <- names yield
// imagine that this body requires multiple lines of code
name.length
// [2] don’t declare the type of `lengths`
val lengths = for name <- names yield
// imagine that this body requires multiple lines of code
name.length
Both approaches yield the same result:
List[Int] = List(5, 2, 7)
Both parts of your for comprehension (also known as a for expression) can be as
complicated as necessary. Here’s a larger example:
val xs = List(1,2,3)
val ys = List(4,5,6)
val zs = List(7,8,9)
4.4 Creating a New Collection from an Existing Collection with for/yield
|
95
val a = for
x <- xs
if x > 2
y <- ys
z <- zs
if y * z < 45
yield
val b = x + y
val c = b * z
c
That for comprehension yields the following result:
a: List[Int] = List(49, 56, 63, 56, 64, 63)
A for comprehension can even be the complete body of a method:
def between3and10(xs: List[Int]): List[Int] =
for
x <- xs
if x >= 3
if x <= 10
yield x
between3and10(List(1,3,7,11))
// List(3, 7)
Discussion
If you’re new to using yield with a for loop, it can help to think of the loop like this:
1. When it begins running, the for/yield loop immediately creates a new empty
collection that is of the same type as the input collection. For example, if the
input type is a Vector, the output type will also be a Vector. You can think of this
new collection as being like an empty bucket.
2. On each iteration of the for loop, a new output element may be created from the
current element of the input collection. When the output element is created, it’s
placed in the bucket.
3. When the loop finishes running, the entire contents of the bucket are returned.
That’s a simplification, but I find it helpful when explaining the process.
Note that writing a for expression without a guard is just like calling the map method
on a collection.
96
|
Chapter 4: Control Structures
For instance, the following for comprehension converts all the strings in the fruits
collection to uppercase:
scala> val namesUpper = for n <- names yield n.toUpperCase
val namesUpper: List[String] = List(CHRIS, ED, MAURICE)
Calling the map method on the collection does the same thing:
scala> val namesUpper = names.map(_.toUpperCase)
val namesUpper: List[String] = List(CHRIS, ED, MAURICE)
When I first started learning Scala, I wrote all of my code using for/yield expres‐
sions, until one day I realized that using for/yield without a guard was the same as
using map.
See Also
• Comparisons between for comprehensions and map are shown in more detail in
Recipe 13.5, “Transforming One Collection to Another with map”.
4.5 Using the if Construct Like a Ternary Operator
Problem
You’re familiar with Java’s special ternary operator syntax:
int absValue = (a < 0) ? -a : a;
and you’d like to know what the Scala equivalent is.
Solution
This is a bit of a trick problem, because unlike Java, in Scala there is no special ternary
operator; just use an if/else/then expression:
val a = 1
val absValue = if a < 0 then -a else a
Because an if expression returns a value, you can embed it into a print statement:
println(if a == 0 then "a" else "b")
You can also use it in another expression, such as this portion of a hashCode method:
hash = hash * prime + (if name == null then 0 else name.hashCode)
The fact that if/else expressions return a value also lets you write concise methods:
// Version 1: one-line style
def abs(x: Int) = if x >= 0 then x else -x
def max(a: Int, b: Int) = if a > b then a else b
4.5 Using the if Construct Like a Ternary Operator
|
97
// Version 2: the method body on a separate line, if you prefer
def abs(x: Int) =
if x >= 0 then x else -x
def max(a: Int, b: Int) =
if a > b then a else b
Discussion
The “Equality, Relational, and Conditional Operators” Java documentation page
states that the Java conditional operator ?: “is known as the ternary operator because
it uses three operands.”
Java requires a separate syntax here because the Java if/else construct is a statement;
it doesn’t have a return value, and is only used for side effects, such as updating muta‐
ble fields. Conversely, because Scala’s if/else/then truly is an expression, a special
operator isn’t needed. See Recipe 24.3, “Writing Expressions (Instead of Statements)”,
for more details on statements and expressions.
Arity
The word ternary has to do with the arity of functions. Wikipedia’s
“Arity” page states, “In logic, mathematics, and computer science,
the arity of a function or operation is the number of arguments or
operands that the function takes.” A unary operator takes one
operand, a binary operator takes two operands, and a ternary oper‐
ator takes three operands.
4.6 Using a Match Expression Like a switch Statement
Problem
You have a situation where you want to create something like a simple Java integerbased switch statement, such as matching the days in a week, the months in a year,
and other situations where an integer maps to a result.
Solution
To use a Scala match expression like a simple, integer-based switch statement, use
this approach:
import scala.annotation.switch
// `i` is an integer
(i: @switch) match
case 0 => println("Sunday")
98
|
Chapter 4: Control Structures
case 1 => println("Monday")
case 2 => println("Tuesday")
case 3 => println("Wednesday")
case 4 => println("Thursday")
case 5 => println("Friday")
case 6 => println("Saturday")
// catch the default with a variable so you can print it
case whoa => println(s"Unexpected case: ${whoa.toString}")
That example shows how to produce a side-effect action (println) based on a match.
A more functional approach is to return a value from a match expression:
import scala.annotation.switch
// `i` is an integer
val day = (i: @switch) match
case 0 => "Sunday"
case 1 => "Monday"
case 2 => "Tuesday"
case 3 => "Wednesday"
case 4 => "Thursday"
case 5 => "Friday"
case 6 => "Saturday"
case _ => "invalid day"
// the default, catch-all
The @switch annotation
When writing simple match expressions like this, it’s recommended to use the
@switch annotation, as shown. This annotation provides a warning at compile time if
the switch can’t be compiled to a tableswitch or lookupswitch. Compiling your
match expression to a tableswitch or lookupswitch is better for performance
because it results in a branch table rather than a decision tree. When a value is given
to the expression, it can jump directly to the result rather than working through the
decision tree.
The Scala @switch annotation documentation states:
If [this annotation is] present, the compiler will verify that the match has been com‐
piled to a tableswitch or lookupswitch, and issue an error if it instead compiles into a
series of conditional expressions
The effect of the @switch annotation is demonstrated with a simple example. First,
place the following code in a file named SwitchDemo.scala:
// Version 1 - compiles to a tableswitch
import scala.annotation.switch
class SwitchDemo:
val i = 1
val x = (i: @switch) match
case 1 => "One"
case 2 => "Two"
4.6 Using a Match Expression Like a switch Statement
|
99
case 3 => "Three"
case _ => "Other"
Then compile the code as usual:
$ scalac SwitchDemo.scala
Compiling this class produces no warnings and creates the SwitchDemo.class output
file. Next, disassemble that file with this javap command:
$ javap -c SwitchDemo
The output from this command shows a tableswitch, like this:
16: tableswitch
1:
2:
3:
default:
}
{ // 1 to 3
44
52
60
68
This shows that Scala was able to optimize your match expression to a tableswitch.
(This is a good thing.)
Next, make a minor change to the code, replacing the integer literal 1 with a value:
import scala.annotation.switch
// Version 2 - leads to a compiler warning
class SwitchDemo:
val i = 1
val one = 1
// added
val x = (i: @switch) match
case one => "One"
// replaced the '1'
case 2
=> "Two"
case 3
=> "Three"
case _
=> "Other"
Again, compile the code with scalac, but right away you’ll see a warning message:
$ scalac SwitchDemo.scala
SwitchDemo.scala:7: warning: could not emit switch for @switch annotated match
val x = (i: @switch) match {
^
one warning found
This warning message means that neither a tableswitch nor a lookupswitch could
be generated for the match expression. You can confirm this by running the javap
command on the SwitchDemo.class file that was generated. When you look at that
output, you’ll see that the tableswitch shown in the previous example is now gone.
In his book, Scala in Depth (Manning), Joshua Suereth states that the following con‐
ditions must be true for Scala to apply the tableswitch optimization:
100
|
Chapter 4: Control Structures
• The matched value must be a known integer.
• The matched expression must be “simple.” It can’t contain any type checks, if
statements, or extractors.
• The expression must have its value available at compile time.
• There should be more than two case statements.
Discussion
The examples in the Solution showed the two ways you can handle the default “catch
all” case. First, if you’re not concerned about the value of the default match, you can
catch it with the _ wildcard:
case _ => println("Got a default match")
Conversely, if you are interested in what fell down to the default match, assign a vari‐
able name to it. You can then use that variable on the right side of the expression:
case default => println(default)
Using a name like default often makes the most sense, but you can use any legal
name for the variable:
case oops => println(oops)
It’s important to know that you can generate a MatchError if you don’t handle the
default case. Given this match expression:
i match
case 0 => println("0 received")
case 1 => println("1 is good, too")
if i is a value other than 0 or 1, the expression throws a MatchError:
scala.MatchError: 42 (of class java.lang.Integer)
at .<init>(<console>:9)
at .<clinit>(<console>)
much more error output here ...
So unless you’re intentionally writing a partial function, you’ll want to handle the
default case.
Do you really need a match expression?
Note that you may not need a match expression for examples like this. For instance,
any time you’re just mapping one value to another, it may be preferable to use a Map:
val days = Map(
0 -> "Sunday",
1 -> "Monday",
4.6 Using a Match Expression Like a switch Statement
|
101
2
3
4
5
6
->
->
->
->
->
"Tuesday",
"Wednesday",
"Thursday",
"Friday",
"Saturday"
)
println(days(0))
// prints "Sunday"
See Also
• For more information on how JVM switches work, see the JVM spec on compil‐
ing switches.
• Regarding the difference between a lookupswitch and tableswitch, this Stack
Overflow page states, “The difference is that a lookupswitch uses a table with
keys and labels, yet a tableswitch uses a table with labels only.” Again, see the
“Compiling Switches” section of the Java Virtual Machine (JVM) specification for
more details.
• See Recipe 10.7, “Creating Partial Functions”, for more information on partial
functions.
4.7 Matching Multiple Conditions with
One Case Statement
Problem
You have a situation where several match conditions require that the same business
logic be executed, and rather than repeating your business logic for each case, you’d
like to use one copy of the business logic for the matching conditions.
Solution
Place the match conditions that invoke the same business logic on one line, separated
by the | (pipe) character:
// `i` is an Int
i match
case 1 | 3 | 5 | 7 | 9 => println("odd")
case 2 | 4 | 6 | 8 | 10 => println("even")
case _ => println("too big")
This same syntax works with strings and other types. Here’s an example based on a
String match:
102
|
Chapter 4: Control Structures
val cmd = "stop"
cmd match
case "start" | "go" => println("starting")
case "stop" | "quit" | "exit" => println("stopping")
case _ => println("doing nothing")
This example shows how to match multiple objects on each case statement:
enum Command:
case Start, Go, Stop, Whoa
import Command.*
def executeCommand(cmd: Command): Unit = cmd match
case Start | Go => println("start")
case Stop | Whoa => println("stop")
As demonstrated, the ability to define multiple possible matches for each case state‐
ment can simplify your code.
See Also
• See Recipe 4.12 for a related approach.
4.8 Assigning the Result of a Match Expression
to a Variable
Problem
You want to return a value from a match expression and assign it to a variable, or use
a match expression as the body of a method.
Solution
To assign the result of a match expression to a variable, insert the variable assignment
before the expression, as with the variable evenOrOdd in this example:
val someNumber = scala.util.Random.nextInt()
val evenOrOdd = someNumber match
case 1 | 3 | 5 | 7 | 9 => "odd"
case 2 | 4 | 6 | 8 | 10 => "even"
case _ => "other"
This approach is commonly used to create short methods or functions. For example,
the following method implements the Perl definitions of true and false:
def isTrue(a: Matchable): Boolean = a match
case false | 0 | "" => false
case _ => true
4.8 Assigning the Result of a Match Expression to a Variable
|
103
Discussion
You may hear that Scala is an expression-oriented programming (EOP) language. EOP
means that every construct is an expression, yields a value, and doesn’t have a side
effect. Unlike other languages, in Scala every construct like if, match, for, and try
returns a value. See Recipe 24.3, “Writing Expressions (Instead of Statements)”, for
more details.
4.9 Accessing the Value of the Default Case in a
Match Expression
Problem
You want to access the value of the default “catch all” case when using a match expres‐
sion, but you can’t access the value when you match it with the _ wildcard syntax.
Solution
Instead of using the _ wildcard character, assign a variable name to the default case:
i match
case 0 => println("1")
case 1 => println("2")
case default => println(s"You gave me: $default")
By giving the default match a variable name, you can access the variable on the right
side of the expression.
Discussion
The key to this recipe is in using a variable name for the default match instead of the
usual _ wildcard character. The name you assign can be any legal variable name, so
instead of naming it default, you can name it something else, such as what:
i match
case 0 => println("1")
case 1 => println("2")
case what => println(s"You gave me: $what" )
It’s important to provide a default match. Failure to do so can cause a MatchError:
scala> 3 match
|
case 1 => println("one")
|
case 2 => println("two")
|
// no default match
scala.MatchError: 3 (of class java.lang.Integer)
many more lines of output ...
104
|
Chapter 4: Control Structures
See the Discussion of Recipe 4.6 for more MatchError details.
4.10 Using Pattern Matching in Match Expressions
Problem
You need to match one or more patterns in a match expression, and the pattern may
be a constant pattern, variable pattern, constructor pattern, sequence pattern, tuple
pattern, or type pattern.
Solution
Define a case statement for each pattern you want to match. The following method
shows examples of many different types of patterns you can use in match expressions:
def test(x: Matchable): String = x match
// constant patterns
case 0 => "zero"
case true => "true"
case "hello" => "you said 'hello'"
case Nil => "an empty List"
// sequence patterns
case List(0, _, _) => "a 3-element list with 0 as the first element"
case List(1, _*) => "list, starts with 1, has any number of elements"
// tuples
case (a, b) => s"got $a and $b"
case (a, b, c) => s"got $a, $b, and $c"
// constructor patterns
case Person(first, "Alexander") => s"Alexander, first name = $first"
case Dog("Zeus") => "found a dog named Zeus"
// typed patterns
case s: String => s"got a string: $s"
case i: Int => s"got an int: $i"
case f: Float => s"got a float: $f"
case a: Array[Int] => s"array of int: ${a.mkString(",")}"
case as: Array[String] => s"string array: ${as.mkString(",")}"
case d: Dog => s"dog: ${d.name}"
case list: List[_] => s"got a List: $list"
case m: Map[_, _] => m.toString
// the default wildcard pattern
case _ => "Unknown"
end test
4.10 Using Pattern Matching in Match Expressions
|
105
The large match expression in this method shows the different categories of patterns
described in the book Programming in Scala, including constant patterns, sequence
patterns, tuple patterns, constructor patterns, and typed patterns.
The following code demonstrates all of the cases in the match expression, with the
output of each expression shown in the comments. Note that the println method is
renamed on import to make the examples more concise:
import System.out.{println => p}
case class Person(firstName: String, lastName: String)
case class Dog(name: String)
// trigger the constant patterns
p(test(0))
// zero
p(test(true))
// true
p(test("hello"))
// you said 'hello'
p(test(Nil))
// an empty List
// trigger the sequence patterns
p(test(List(0,1,2)))
// a 3-element list with 0 as the first element
p(test(List(1,2)))
// list, starts with 1, has any number of elements
p(test(List(1,2,3)))
// list, starts with 1, has any number of elements
p(test(Vector(1,2,3)))
// vector, starts w/ 1, has any number of elements
// trigger the tuple patterns
p(test((1,2)))
p(test((1,2,3)))
// got 1 and 2
// got 1, 2, and 3
// trigger the constructor patterns
p(test(Person("Melissa", "Alexander")))
p(test(Dog("Zeus")))
// Alexander, first name = Melissa
// found a dog named Zeus
// trigger the typed patterns
p(test("Hello, world"))
p(test(42))
p(test(42F))
p(test(Array(1,2,3)))
p(test(Array("coffee", "apple pie")))
p(test(Dog("Fido")))
p(test(List("apple", "banana")))
p(test(Map(1->"Al", 2->"Alexander")))
//
//
//
//
//
//
//
//
// trigger the wildcard pattern
p(test("33d"))
// you gave me this string: 33d
got a string: Hello, world
got an int: 42
got a float: 42.0
array of int: 1,2,3
string array: coffee,apple pie
dog: Fido
got a List: List(apple, banana)
Map(1 -> Al, 2 -> Alexander)
Note that in the match expression, the List and Map expressions that were written like
this:
case m: Map[_, _] => m.toString
case list: List[_] => s"thanks for the List: $list"
106
| Chapter 4: Control Structures
could have been written as this instead:
case m: Map[A, B] => m.toString
case list: List[X] => s"thanks for the List: $list"
I prefer the underscore syntax because it makes it clear that I’m not concerned about
what’s stored in the List or Map. Actually, there are times that I might be interested in
what’s stored in the List or Map, but because of type erasure in the JVM, that becomes
a difficult problem.
Type Erasure
When I first wrote this example, I wrote the List expression as
follows:
case l: List[Int] => "List"
If you’re familiar with type erasure on the Java platform, you may
know that this won’t work. The Scala compiler kindly lets you
know about this problem with this warning message:
Test1.scala:7: warning: non-variable type argument Int in
type pattern List[Int] is unchecked since it is eliminated
by erasure case l: List[Int] => "List[Int]"
^
If you’re not familiar with type erasure, I’ve included a link in the
See Also section of this recipe to a page that describes how it works
on the JVM.
Discussion
Typically, when using this technique, your method will expect an instance that inher‐
its from a base class or trait, and then your case statements will reference subtypes of
that base type. This was inferred in the test method, where every Scala type is a sub‐
type of Matchable. The following code shows a more obvious example.
In my Blue Parrot application, which either plays a sound file or “speaks” the text it’s
given at random time intervals, I have a method that looks like this:
import java.io.File
sealed trait RandomThing
case class RandomFile(f: File) extends RandomThing
case class RandomString(s: String) extends RandomThing
class RandomNoiseMaker:
def makeRandomNoise(thing: RandomThing) = thing match
case RandomFile(f) => playSoundFile(f)
case RandomString(s) => speakText(s)
4.10 Using Pattern Matching in Match Expressions
|
107
The makeRandomNoise method is declared to take a RandomThing type, and then the
match expression handles its two subtypes, RandomFile and RandomString.
Patterns
The large match expression in the Solution shows a variety of patterns that are
defined in the book Programming in Scala (which was cowritten by Martin Odersky,
the creator of the Scala language). The patterns include:
• Constant patterns
• Variable patterns
• Constructor patterns
• Sequence patterns
• Tuple patterns
• Typed patterns
• Variable-binding patterns
These patterns are briefly described in the following paragraphs.
Constant patterns
A constant pattern can only match itself. Any literal may be used as a constant. If
you specify a 0 as the literal, only an Int value of 0 will be matched. Examples
include:
case 0 => "zero"
case true => "true"
Variable patterns
This was not shown in the large match example in the Solution, but a variable
pattern matches any object, just like the _ wildcard character. Scala binds the
variable to whatever the object is, which lets you use the variable on the right side
of the case statement. For example, at the end of a match expression you can use
the _ wildcard character like this to catch anything else:
case _ => s"Hmm, you gave me something ..."
But with a variable pattern you can write this instead:
case foo => s"Hmm, you gave me a $foo"
See Recipe 4.9 for more information.
Constructor patterns
The constructor pattern lets you match a constructor in a case statement. As
shown in the examples, you can specify constants or variable patterns as needed
in the constructor pattern:
108
|
Chapter 4: Control Structures
case Person(first, "Alexander") => s"found an Alexander, first name = $first"
case Dog("Zeus") => "found a dog named Zeus"
Sequence patterns
You can match against sequences like List, Array, Vector, etc. Use the _ charac‐
ter to stand for one element in the sequence, and use _* to stand for zero or more
elements, as shown in the examples:
case List(0, _, _) => "a 3-element list with 0 as the first element"
case List(1, _*) => "list, starts with 1, has any number of elements"
case Vector(1, _*) => "vector, starts with 1, has any number of elements"
Tuple patterns
As shown in the examples, you can match tuple patterns and access the value of
each element in the tuple. You can also use the _ wildcard if you’re not interested
in the value of an element:
case (a, b, c) => s"3-elem tuple, with values $a, $b, and $c"
case (a, b, c, _) => s"4-elem tuple: got $a, $b, and $c"
Typed patterns
In the following example, str: String is a typed pattern, and str is a pattern
variable:
case str: String => s"you gave me this string: $str"
As shown in the examples, you can access the pattern variable on the right side of
the expression after declaring it.
Variable-binding patterns
At times you may want to add a variable to a pattern. You can do this with the
following general syntax:
case variableName @ pattern => ...
This is called a variable-binding pattern. When it’s used, the input variable to the
match expression is compared to the pattern, and if it matches, the input variable
is bound to variableName.
The usefulness of this is best shown by demonstrating the problem it solves. Sup‐
pose you had the List pattern that was shown earlier:
case List(1, _*) => "a list beginning with 1, having any number of elements"
As demonstrated, this lets you match a List whose first element is 1, but so far,
the List hasn’t been accessed on the right side of the expression. When accessing
a List, you know that you can do this:
case list: List[_] => s"thanks for the List: $list"
so it seems like you should try this with a sequence pattern:
4.10 Using Pattern Matching in Match Expressions
|
109
case list: List(1, _*) => s"thanks for the List: $list"
Unfortunately, this fails with the following compiler error:
Test2.scala:22: error: '=>' expected but '(' found.
case list: List(1, _*) => s"thanks for the List: $list"
^
one error found
The solution to this problem is to add a variable-binding pattern to the sequence
pattern:
case list @ List(1, _*) => s"$list"
This code compiles, and works as expected, giving you access to the List on the
right side of the statement.
The following code demonstrates this example and the usefulness of this
approach:
case class Person(firstName: String, lastName: String)
def matchType(x: Matchable): String = x match
//case x: List(1, _*) => s"$x"
// doesn’t compile
case x @ List(1, _*) => s"$x"
// prints the list
//case Some(_) => "got a Some"
//case Some(x) => s"$x"
case x @ Some(_) => s"$x"
// works, but can’t access the Some
// returns "foo"
// returns "Some(foo)"
case p @ Person(first, "Doe") => s"$p" // returns "Person(John,Doe)"
end matchType
@main def test2 =
println(matchType(List(1,2,3)))
println(matchType(Some("foo")))
println(matchType(Person("John", "Doe")))
// prints "List(1, 2, 3)"
// prints "Some(foo)"
// prints "Person(John,Doe)"
In the two List examples inside the match expression, the commented-out line
of code won’t compile, but the second line shows how to match the desired List
object and then bind that list to the variable x. When this line of code matches a
list like List(1,2,3), it results in the output List(1, 2, 3), as shown in the
output of the first println statement.
The first Some example shows that you can match a Some with the approach
shown, but you can’t access its information on the right side of the expression.
The second example shows how you can access the value inside the Some, and the
third example takes this a step further, giving you access to the Some object itself.
When it’s matched by the second println call, it prints Some(foo), demonstrat‐
ing that you now have access to the Some object.
110
| Chapter 4: Control Structures
Finally, this approach is used to match a Person whose last name is Doe. This syn‐
tax lets you assign the result of the pattern match to the variable p, and then
access that variable on the right side of the expression.
Using Some and None in match expressions
To round out these examples, you’ll often use Some and None with match expressions.
For instance, when you attempt to create a number from a string with a method like
toIntOption, you can handle the result in a match expression:
val s = "42"
// later in the code ...
s.toIntOption match
case Some(i) => println(i)
case None => println("That wasn't an Int")
Inside the match expression you just specify the Some and None cases as shown to han‐
dle the success and failure conditions. See Recipe 24.6, “Using Scala’s Error-Handling
Types (Option, Try, and Either)”, for more examples of using Option, Some, and None.
See Also
• A discussion of getting around type erasure when using match expressions on
Stack Overflow
• My Blue Parrot application
• The type erasure documentation
4.11 Using Enums and Case Classes in match Expressions
Problem
You want to match enums, case classes, or case objects in a match expression.
Solution
The following example demonstrates how to use patterns to match enums in different
ways, depending on what information you need on the right side of each case
statement. First, here’s an enum named Animal that has three instances, Dog, Cat, and
Woodpecker:
enum Animal:
case Dog(name: String)
case Cat(name: String)
case Woodpecker
4.11 Using Enums and Case Classes in match Expressions
|
111
Given that enum, this getInfo method shows the different ways you can match the
enum types in a match expression:
import Animal.*
def getInfo(a: Animal): String = a match
case Dog(moniker) => s"Got a Dog, name = $moniker"
case _: Cat
=> "Got a Cat (ignoring the name)"
case Woodpecker
=> "That was a Woodpecker"
These examples show how getInfo works when given a Dog, Cat, and Woodpecker:
println(getInfo(Dog("Fido")))
println(getInfo(Cat("Morris")))
println(getInfo(Woodpecker))
// Got a Dog, name = Fido
// Got a Cat (ignoring the name)
// That was a Woodpecker
In getInfo, if the Dog class is matched, its name is extracted and used to create the
string on the right side of the expression. To show that the variable name used when
extracting the name can be any legal variable name, I use the name moniker.
When matching a Cat I want to ignore the name, so I use the syntax shown to match
any Cat instance. Because Woodpecker isn’t created with a parameter, it’s also matched
as shown.
Discussion
In Scala 2, sealed traits were used with case classes and case objects to achieve the
same effect as the enum:
sealed trait Animal
case class Dog(name: String) extends Animal
case class Cat(name: String) extends Animal
case object Woodpecker extends Animal
As described in Recipe 6.12, “How to Create Sets of Named Values with Enums”, an
enum is a shortcut for defining (a) a sealed class or trait along with (b) values defined
as members of the class’s companion object. Both approaches can be used in the
match expression in getInfo because case classes have a built-in unapply method,
which lets them work in match expressions. I describe how this works in Recipe 7.8,
“Implementing Pattern Matching with unapply”.
4.12 Adding if Expressions (Guards) to Case Statements
Problem
You want to add qualifying logic to a case statement in a match expression, such as
allowing a range of numbers or matching a pattern, but only if that pattern matches
some additional criteria.
112
|
Chapter 4: Control Structures
Solution
Add an if guard to your case statement. Use it to match a range of numbers:
i match
case
case
case
case
a
b
c
_
if
if
if
=>
0 to 9 contains a => println("0-9 range: " + a)
10 to 19 contains b => println("10-19 range: " + b)
20 to 29 contains c => println("20-29 range: " + c)
println("Hmmm...")
Use it to match different values of an object:
i match
case x if x == 1 => println("one, a lonely number")
case x if (x == 2 || x == 3) => println(x)
case _ => println("some other value")
As long as your class has an unapply method, you can reference class fields in your if
guards. For instance, because a case class has an automatically generated unapply
method, given this Stock class and instance:
case class Stock(symbol: String, price: BigDecimal)
val stock = Stock("AAPL", BigDecimal(132.50))
you can use pattern matching and guard conditions with the class fields:
stock match
case s if s.symbol == "AAPL" && s.price < 140 => buy(s)
case s if s.symbol == "AAPL" && s.price > 160 => sell(s)
case _ => // do nothing
You can also extract fields from case classes—and classes that have properly imple‐
mented unapply methods—and use those in your guard conditions. For example, the
case statements in this match expression:
// extract the 'name' in the 'case' and then use that value
def speak(p: Person): Unit = p match
case Person(name) if name == "Fred" =>
println("Yabba dabba doo")
case Person(name) if name == "Bam Bam" =>
println("Bam bam!")
case _ =>
println("Watch the Flintstones!")
will work if Person is defined as a case class:
case class Person(aName: String)
or as a class with a properly implemented unapply method:
class Person(val aName: String)
object Person:
// 'unapply' deconstructs a Person. it’s also known as an
// extractor, and Person is an “extractor object.”
def unapply(p: Person): Option[String] = Some(p.aName)
4.12 Adding if Expressions (Guards) to Case Statements
|
113
See Recipe 7.8, “Implementing Pattern Matching with unapply”, for more details on
how to write unapply methods.
Discussion
You can use if expressions like this whenever you want to add boolean tests to the
left side of case statements (i.e., before the => symbol).
Note that all of these examples could be written by putting the if tests on the right
side of the expressions, like this:
case Person(name) =>
if name == "Fred" then println("Yabba dabba doo")
else if name == "Bam Bam" then println("Bam bam!")
However, for many situations, your code will be simpler and easier to read by joining
the if guard directly with the case statement; it helps to separate the guard from the
later business logic.
Also note that this Person example is a little contrived, because Scala’s patternmatching capabilities let you write the cases like this:
def speak(p: Person): Unit = p match
case Person("Fred") => println("Yabba dabba doo")
case Person("Bam Bam") => println("Bam bam!")
case _ => println("Watch the Flintstones!")
In this case, a guard would really be needed when Person is more complex and you
need to do something more than match against its parameters.
Also, as demonstrated in Recipe 4.10, instead of using this code that’s shown in the
Solution:
case x if (x == 2 || x == 3) => println(x)
another possible solution is to use a variable-binding pattern:
case x @ (2|3) => println(x)
This code can be read as, “If the match expression value (i) is 2 or 3, assign that value
to the variable x, then print x using println.”
4.13 Using a Match Expression Instead of isInstanceOf
Problem
You want to write a block of code to match one type, or multiple different types.
114
| Chapter 4: Control Structures
Solution
You can use the isInstanceOf method to test the type of an object:
if x.isInstanceOf[Foo] then ...
However, the “Scala way” is to prefer match expressions for this type of work, because
it’s generally much more powerful and convenient to use match than isInstanceOf.
For example, in a basic use case you may be given an object of unknown type and
want to determine if the object is an instance of a Person. This code shows how to
write a match expression that returns true if the type is Person, and false otherwise:
def isPerson(m: Matchable): Boolean = m match
case p: Person => true
case _ => false
A more common scenario is that you’ll have a model like this:
enum Shape:
case Circle(radius: Double)
case Square(length: Double)
and then you’ll want to write a method to calculate the area of a Shape. One solution
to this problem is to write area using pattern matching:
import Shape.*
def area(s: Shape): Double = s match
case Circle(r) => Math.PI * r * r
case Square(l) => l * l
// examples
area(Circle(2.0))
area(Square(2.0))
// 12.566370614359172
// 4.0
This is a common use, where area takes a parameter whose type is an immediate par‐
ent of the types that you deconstruct inside match.
Note that if Circle and Square took additional constructor parameters, and you only
needed to access their radius and length, respectively, the complete solution looks
like this:
enum Shape:
case Circle(x0: Double, y0: Double, radius: Double)
case Square(x0: Double, y0: Double, length: Double)
import Shape.*
def area(s: Shape): Double = s match
case Circle(_, _, r) => Math.PI * r * r
case Square(_, _, l) => l * l
4.13 Using a Match Expression Instead of isInstanceOf
|
115
// examples
area(Circle(0, 0, 2.0))
area(Square(0, 0, 2.0))
// 12.566370614359172
// 4.0
As shown in the case statements inside the match expression, just ignore the parame‐
ters you don’t need by referring to them with the _ character.
Discussion
As shown, a match expression lets you match multiple types, so using it to replace the
isInstanceOf method is just a natural use of the match/case syntax and the general
pattern-matching approach used in Scala applications.
For the most basic use cases, the isInstanceOf method can be a simpler approach to
determining whether one object matches a type:
if (o.isInstanceOf[Person]) { // handle this ...
However, for anything more complex than this, a match expression is more readable
than a long if/then/else if statement.
isInstanceOf in OOP
In object-oriented programming, the use of isInstanceOf can be a sign that you’re
not using inheritance properly. For example, someone may have written code like
this:
enum Animal:
case Cat, Dog, Ostrich
and if for some reason you find yourself writing isInstanceOf code like this, it can be
a sign that you’re doing something wrong:
if currentInstance.isInstanceOf[Ostrich] then ...
Instead, OOP code is intended to look like this:
val animal: Animal =
AnimalFactory.getAnimal("big flightless bird")
// some time later in your code ...
animal.walk()
or this:
val oz: Ostrich =
AnimalFactory.getAnimal(
"big flightless bird"
).asInstanceOf[Ostrich]
// some time later in your code ...
oz.tryToFly()
116
|
Chapter 4: Control Structures
If you write code like this to receive an Animal, the code shouldn’t care whether the
Animal you received is a Cat, Dog, or Ostrich, and if you immediately cast your object
instance to an Ostrich, you know you can call any additional methods it has. There‐
fore, in OOP you should only rarely need to test an instance with isInstanceOf.
Conversely, in functional programming code, pattern matching with match expres‐
sions is used all the time to work with types.
See Also
• Recipe 4.10 shows many more match techniques.
4.14 Working with a List in a Match Expression
Problem
You know that a List data structure is a little different than other sequential data
structures: it’s built from cons cells and ends in a Nil element. You want to use this to
your advantage when working with a match expression, such as when writing a recur‐
sive function.
Solution
You can create a List that contains the integers 1, 2, and 3 like this:
val xs = List(1, 2, 3)
or like this:
val ys = 1 :: 2 :: 3 :: Nil
As shown in the second example, a List ends with a Nil element, and you can take
advantage of that when writing match expressions to work on lists, especially when
writing recursive algorithms. For instance, in the following listToString method, if
the current element is not Nil, the method is called recursively with the remainder of
the List, but if the current element is Nil, the recursive calls are stopped and an
empty String is returned, at which point the recursive calls unwind:
def listToString(list: List[String]): String = list match
case s :: rest => s + " " + listToString(rest)
case Nil => ""
The REPL demonstrates how this method works:
scala> val fruits = "Apples" :: "Bananas" :: "Oranges" :: Nil
fruits: List[java.lang.String] = List(Apples, Bananas, Oranges)
4.14 Working with a List in a Match Expression
|
117
scala> listToString(fruits)
res0: String = "Apples Bananas Oranges "
The same approach can be used when dealing with lists of other types and different
algorithms. For instance, while you could just write List(1,2,3).sum, this example
shows how to write your own sum method using match and recursion:
def sum(list: List[Int]): Int = list match
case Nil => 0
case n :: rest => n + sum(rest)
Similarly, this is a product algorithm:
def product(list: List[Int]): Int = list match
case Nil => 1
case n :: rest => n * product(rest)
The REPL shows how these methods work:
scala> val nums = List(1,2,3,4,5)
nums: List[Int] = List(1, 2, 3, 4, 5)
scala> sum(nums)
res0: Int = 15
scala> product(nums)
res1: Int = 120
Don’t Forget reduce and fold
While recursion is great, Scala’s various reduce and fold methods on
the collections classes are built to let you traverse a collection while
applying an algorithm, and they often eliminate the need for recur‐
sion. For instance, you can write a sum algorithm using reduce in
either of these two forms:
// long form
def sum(list: List[Int]): Int = list.reduce((x,y) => x + y)
// short form
def sum(list: List[Int]): Int = list.reduce(_ + _)
See Recipe 13.10, “Walking Through a Collection with the reduce
and fold Methods”, for more details.
Discussion
As shown, recursion is a technique where a method calls itself in order to solve a
problem. In functional programming—where all variables are immutable—recursion
provides a way to iterate over the elements in a List to solve a problem, such as cal‐
culating the sum or product of all the elements in a List.
118
|
Chapter 4: Control Structures
A nice thing about working with the List class in particular is that a List ends with
the Nil element, so your recursive algorithms typically have this pattern:
def myTraversalMethod[A](xs: List[A]): B = xs match
case head :: tail =>
// do something with the head
// pass the tail of the list back to your method, i.e.,
// `myTraversalMethod(tail)`
case Nil =>
// end condition here (0 for sum, 1 for product, etc.)
// end the traversal
Variables in Functional Programming
In FP, we use the term variables, but since we only use immutable
variables, it may seem that this word doesn’t make sense, i.e., we
have a variable that can’t vary.
What’s going on here is that we really mean “variable” in the alge‐
braic sense, not in the computer programming sense. For instance,
in algebra we say that a, b, and c are variables when we write this
algebraic equation:
a = b * c
However, once they’re assigned, they can’t vary. The term variable
has the same meaning in functional programming.
See Also
I initially found recursion to be an unnecessarily hard topic to grasp, so I’ve written
quite a few blog posts about it:
• “Scala Recursion Examples (Recursive Programming)”
• “Recursive: How Recursive Function Calls Work”
• “Tail-Recursive Algorithms in Scala”
• “Recursion: Visualizing the Recursive sum Function”
• In “Recursion: Thinking Recursively”, I write about identity elements, including
how 0 is an identity element for the sum operation, 1 is an identity element for
the product operation, and "" (a blank string) is an identity element for working
with strings.
4.14 Working with a List in a Match Expression
|
119
4.15 Matching One or More Exceptions with try/catch
Problem
You want to catch one or more exceptions in a try/catch block.
Solution
The Scala try/catch/finally syntax is similar to Java, but it uses the match expres‐
sion approach in the catch block:
try
doSomething()
catch
case e: SomeException => e.printStackTrace
finally
// do your cleanup work
When you need to catch and handle multiple exceptions, just add the exception types
as different case statements:
try
openAndReadAFile(filename)
catch
case e: FileNotFoundException =>
println(s"Couldn’t find $filename.")
case e: IOException =>
println(s"Had an IOException trying to read $filename.")
120
|
Chapter 4: Control Structures
You can also write that code like this, if you prefer:
try
openAndReadAFile(filename)
catch
case e: (FileNotFoundException | IOException) =>
println(s"Had an IOException trying to read $filename")
Discussion
As shown, the Scala case syntax is used to match different possible exceptions. If
you’re not concerned about which specific exceptions might be thrown, and want to
catch them all and do something with them—such as log them—use this syntax:
try
openAndReadAFile(filename)
catch
case t: Throwable => logger.log(t)
If for some reason you don’t care about the value of the exception, you can also catch
them all and ignore them like this:
try
openAndReadAFile(filename)
catch
case _: Throwable => println("Nothing to worry about, just an exception")
Methods based on try/catch
As shown in this chapter’s introduction, a try/catch/finally block can return a
value and therefore be used as the body of a method. The following method returns
an Option[String]. It returns a Some that contains a String if the file is found, and a
None if there is a problem reading the file:
import scala.io.Source
import java.io.{FileNotFoundException, IOException}
def readFile(filename: String): Option[String] =
try
Some(Source.fromFile(filename).getLines.mkString)
catch
case _: (FileNotFoundException|IOException) => None
This shows one way to return a value from a try expression.
These days I rarely write methods that throw exceptions, but like Java, you can throw
an exception from a catch clause. However, because Scala doesn’t have checked
exceptions, you don’t need to specify that a method throws the exception. This is
demonstrated in the following example, where the method isn’t annotated in any way:
4.15 Matching One or More Exceptions with try/catch
|
121
// danger: this method doesn’t warn you that an exception can be thrown
def readFile(filename: String): String =
try
Source.fromFile(filename).getLines.mkString
catch
case t: Throwable => throw t
That’s actually a horribly dangerous method—don’t write code like this!
To declare that a method throws an exception, add the @throws annotation to your
method definition:
// better: this method warns others that an exception can be thrown
@throws(classOf[NumberFormatException])
def readFile(filename: String): String =
try
Source.fromFile(filename).getLines.mkString
catch
case t: Throwable => throw t
While that last method is better than the previous one, neither one is preferred. The
“Scala way” is to never throw exceptions. Instead, you should use Option, as shown
previously, or use the Try/Success/Failure or Either/Right/Left classes when you
want to return information about what failed. This example shows how to use Try:
import scala.io.Source
import java.io.{FileNotFoundException, IOException}
import scala.util.{Try,Success,Failure}
def readFile(filename: String): Try[String] =
try
Success(Source.fromFile(filename).getLines.mkString)
catch
case t: Throwable => Failure(t)
Whenever an exception message is involved, I always prefer using Try or Either
instead of Option, because they give you access to the message in Failure or Left,
where Option only returns None.
A concise way to catch everything
Another concise way to catch all exceptions is with the allCatch method of the
scala.util.control.Exception object. The following examples demonstrate how to
use allCatch, first showing the success case and then the failure case. The output of
each expression is shown after the comment on each line:
import scala.util.control.Exception.allCatch
// OPTION
allCatch.opt("42".toInt)
allCatch.opt("foo".toInt)
122
|
Chapter 4: Control Structures
// Option[Int] = Some(42)
// Option[Int] = None
// TRY
allCatch.toTry("42".toInt)
// Matchable = 42
allCatch.toTry("foo".toInt)
// Matchable = Failure(NumberFormatException: For input string: "foo")
// EITHER
allCatch.either("42".toInt)
// Either[Throwable, Int] = Right(42)
allCatch.either("foo".toInt)
// Either[Throwable, Int] =
// Left(NumberFormatException: For input string: "foo")
See Also
• See Recipe 8.7, “Declaring That a Method Can Throw an Exception”, for more
examples of declaring that a method can throw an exception.
• See Recipe 24.6, “Using Scala’s Error-Handling Types (Option, Try, and Either)”,
for more information on using Option/Some/None and Try/Success/Failure.
• See the scala.util.control.Exception Scaladoc page for more allCatch
information.
4.16 Declaring a Variable Before Using It in a
try/catch/finally Block
Problem
You want to use an object in a try block, and need to access it in the finally portion
of the block, such as when you need to call a close method on an object.
Solution
In general, declare your field as an Option before the try/catch block, then bind the
variable to a Some inside the try clause. This is shown in the following example,
where the sourceOption field is declared before the try/catch block, and assigned
inside the try clause:
import scala.io.Source
import java.io.*
var sourceOption: Option[Source] = None
try
sourceOption = Some(Source.fromFile("/etc/passwd"))
sourceOption.foreach { source =>
// do whatever you need to do with 'source' here ...
for line <- source.getLines do println(line.toUpperCase)
4.16 Declaring a Variable Before Using It in a try/catch/finally Block
|
123
}
catch
case ioe: IOException => ioe.printStackTrace
case fnf: FileNotFoundException => fnf.printStackTrace
finally
sourceOption match
case None =>
println("bufferedSource == None")
case Some(s) =>
println("closing the bufferedSource ...")
s.close
This is a contrived example—and Recipe 16.1, “Reading Text Files”, shows a much
better way to read files—but it does show the approach. First, define a var field as an
Option prior to the try block:
var sourceOption: Option[Source] = None
Then, inside the try clause, assign the variable to a Some value:
sourceOption = Some(Source.fromFile("/etc/passwd"))
When you have a resource to close, use a technique like the one shown (though
Recipe 16.1, “Reading Text Files”, also shows a much better way to close resources).
Note that if an exception is thrown in this code, sourceOption inside finally will be
a None value. If no exceptions are thrown, the Some branch of the match expression
will be evaluated.
Discussion
One key to this recipe is knowing the syntax for declaring Option fields that aren’t
initially populated:
var in: Option[FileInputStream] = None
var out: Option[FileOutputStream] = None
This second form can also be used, but the first form is preferred:
var in = None: Option[FileInputStream]
var out = None: Option[FileOutputStream]
Don’t use null
When I first started working with Scala, the only way I could think to write this code
was using null values. The following code demonstrates the approach I used in an
application that checks my email accounts. The store and inbox fields in this code
are declared as null fields that have the Store and Folder types (from the javax.mail
package):
124
|
Chapter 4: Control Structures
// (1) declare the null variables (don’t use null; this is just an example)
var store: Store = null
var inbox: Folder = null
try
// (2) use the variables/fields in the try block
store = session.getStore("imaps")
inbox = getFolder(store, "INBOX")
// rest of the code here ...
catch
case e: NoSuchProviderException => e.printStackTrace
case me: MessagingException => me.printStackTrace
finally
// (3) call close() on the objects in the finally clause
if (inbox != null) inbox.close
if (store != null) store.close
However, working in Scala gives you a chance to forget that null values even exist, so
this is not a recommended approach.
See Also
See these recipes for more details on (a) how not to use null values, and (b) how to
use Option, Try, and Either instead:
• Recipe 24.5, “Eliminating null Values from Your Code”
• Recipe 24.6, “Using Scala’s Error-Handling Types (Option, Try, and Either)”
• Recipe 24.8, “Handling Option Values with Higher-Order Functions”
Whenever you’re writing code that needs to open a resource when you start and close
the resource when you finish, it can be helpful to use the scala.util.Using object.
See Recipe 16.1, “Reading Text Files”, for an example of how to use this object and a
much better way to read a text file.
Also, Recipe 24.8, “Handling Option Values with Higher-Order Functions”, shows
other ways to work with Option values besides using a match expression.
4.17 Creating Your Own Control Structures
Problem
You want to define your own control structures to customize the Scala language, sim‐
plify your code, or create a domain-specific language (DSL).
4.17 Creating Your Own Control Structures
|
125
Solution
Thanks to features like multiple parameter lists, by-name parameters, extension
methods, higher-order functions, and more, you can create your own code that works
just like a control structure.
For example, imagine that Scala doesn’t have its own built-in while loop, and you
want to create your own custom whileTrue loop, which you can use like this:
var i = 0
whileTrue (i < 5) {
println(i)
i += 1
}
To create this whileTrue control structure, define a method named whileTrue that
takes two parameter lists. The first parameter list handles the test condition—in this
case, i < 5—and the second parameter list is the block of code the user wants to run,
i.e., the code in between the curly braces. Define both parameters to be by-name
parameters. Because whileTrue is only used for side effects, such as updating mutable
variables or printing to the console, declare it to return Unit. An initial sketch of the
method signature looks like this:
def whileTrue(testCondition: => Boolean)(codeBlock: => Unit): Unit = ???
One way to implement the body of the method is to write a recursive algorithm. This
code shows a complete solution:
import scala.annotation.tailrec
object WhileTrue:
@tailrec
def whileTrue(testCondition: => Boolean)(codeBlock: => Unit): Unit =
if (testCondition) then
codeBlock
whileTrue(testCondition)(codeBlock)
end if
end whileTrue
In this code, the testCondition is evaluated, and if the condition is true, codeBlock
is executed, and then whileTrue is called recursively. It keeps calling itself until test
Condition returns false.
To test this code, first import it:
import WhileTrue.whileTrue
Then run the whileTrue loop shown previously, and you’ll see that it works as
desired.
126
|
Chapter 4: Control Structures
Discussion
The creators of the Scala language made a conscious decision not to implement some
keywords in Scala, and instead they implemented functionality through Scala libra‐
ries. For instance, Scala doesn’t have built-in break and continue keywords. Instead
it implements them through a library, as I describe in my blog post “Scala: How to
Use break and continue in for and while Loops”.
As shown in the Solution, the ability to create your own control structures comes
from features like these:
• Multiple parameter lists let you do what I did with whileTrue: create one parame‐
ter group for the test condition, and a second group for the block of code.
• By-name parameters also let you do what I did with whileTrue: accept parame‐
ters that aren’t evaluated until they’re accessed inside your method.
Similarly, other features like infix notation, higher-order functions, extension meth‐
ods, and fluent interfaces let you create other custom control structures and DSLs.
By-name parameters
By-name parameters are an important part of the whileTrue control structure. In
Scala it’s important to know that when you define method parameters using the =>
syntax:
def whileTrue(testCondition: => Boolean)(codeBlock: => Unit) =
---------
you’re creating what’s known as a call-by-name or by-name parameter. A by-name
parameter is only evaluated when it’s accessed inside your method, so, as I write in
my blog posts “How to Use By-Name Parameters in Scala” and “Scala and Call-ByName Parameters”, a more accurate name for these parameters is evaluate when
accessed. That’s because that’s exactly how they work: they’re only evaluated when
they’re accessed inside your method. As I note in that second blog post, Rob Norris
makes the comparison that a by-name parameter is like receiving a def method.
Another example
In the whileTrue example, I used a recursive call to keep the loop running, but for
simpler control structures you don’t need recursion. For instance, assume that you
want a control structure that takes two test conditions, and if both evaluate to true,
you’ll run a block of code that’s supplied. An expression using that control structure
looks like this:
doubleIf(age > 18)(numAccidents == 0) { println("Discount!") }
4.17 Creating Your Own Control Structures
|
127
In this case, define doubleIf as a method that takes three parameter lists, where
again, each parameter is a by-name parameter:
// two 'if' condition tests
def doubleIf(test1: => Boolean)(test2: => Boolean)(codeBlock: => Unit) =
if test1 && test2 then codeBlock
Because doubleIf only needs to perform one test and doesn’t need to loop indefi‐
nitely, there’s no need for a recursive call in its method body. It simply checks the two
test conditions, and if they evaluate to true, codeBlock is executed.
See Also
• One of my favorite uses of this technique is shown in the book Beginning Scala by
David Pollak (Apress). Although it’s rendered obsolete by the scala.util.Using
object, I describe how the technique works in this blog post, “The using Control
Structure in Beginning Scala”.
• The Scala Breaks class is used to implement break and continue functionality in
for loops, and I wrote about it: “Scala: How to Use break and continue in for and
while Loops”. The Breaks class source code is fairly simple and provides another
example of how to implement a control structure. You can find its source code as
a link on its Scaladoc page.
128
|
Chapter 4: Control Structures
CHAPTER 5
Classes
This chapter begins a series of four chapters that cover the concept of domain model‐
ing in Scala 3. Domain modeling is how you use a programming language to model
the world around you, i.e., how you model concepts like people, cars, financial trans‐
actions, etc. Whether you’re writing code in a functional programming or objectoriented programming style, this means that you model the attributes and behaviors
of these things.
To provide flexibility to model the world around you, Scala 3 offers the following lan‐
guage constructs:
• Classes
• Case classes
• Traits
• Enums
• Objects and case objects
• Abstract classes
• Methods, which can be defined within all of those constructs
This is a lot of ground to cover, so to help manage that complexity, Recipe 5.1 shows
how to use these constructs when programming in the FP and OOP styles. After that,
classes and case classes are covered in this chapter, traits and enums are covered in
Chapter 6, objects are covered in Chapter 7, and recipes for methods are provided in
Chapter 8. Abstract classes aren’t used very often, so they’re touched upon in Recipe
5.1.
129
Classes and Case Classes
Although Scala and Java share many similarities, the syntax related to classes and con‐
structors represents some of the biggest differences between the two languages.
Whereas Java tends to be more verbose—but obvious—Scala is more concise, and the
code you write ends up generating other code. For example, this one-line Scala class
compiles to at least 29 lines of Java code, most of which is boilerplate accessor/muta‐
tor code:
class Employee(var name: String, var age: Int, var role: String)
Because classes and constructors are so important, they’re discussed in detail in the
initial recipes in this chapter.
Next, because the concept of what equals means is such an important programming
topic, Recipe 5.9 spends a lot of time demonstrating how to implement an equals
method in Scala.
Using Classes in match Expressions
When you want to use a class in a match expression, implement an
unapply method inside the companion object of a class. Because
this is something you do in an object, that topic is covered in
Recipe 7.8, “Implementing Pattern Matching with unapply”.
The concept of accessing class fields is important, so Recipe 5.10 demonstrates how to
prevent accessor and mutator methods from being generated. After that, Recipe 5.11
demonstrates how to override the default behaviors of accessor and mutator methods.
Accessors and Mutators
In Java, it seems correct to refer to accessor and mutator methods as
getter and setter methods, primarily because of the JavaBeans
get/set standard. In this chapter I use the terms interchangeably,
but to be clear, Scala doesn’t follow the JavaBeans naming conven‐
tion for accessor and mutator methods.
Next, two recipes demonstrate other techniques you’ll need to know related to
parameters and fields. First, Recipe 5.12 shows how to assign a block of code to a lazy
field in a class, and then Recipe 5.13 shows how to handle uninitialized var fields by
using the Option type.
Finally, as you saw a few paragraphs ago, the OOP-style Scala Employee class is equiv‐
alent to 29 lines of Java code. By comparison, this FP-style case class is equivalent to
well over one hundred lines of Java code:
130
|
Chapter 5: Classes
case class Employee(name: String, age: Int, role: String)
Because case classes generate so much boilerplate code for you, their uses and bene‐
fits are discussed in Recipe 5.14. Also, because case classes are different than the
default Scala class, constructors for case classes—they’re really factory methods—
are discussed in Recipe 5.15.
5.1 Choosing from Domain Modeling Options
Problem
Because Scala offers traits, enums, classes, case classes, objects, and abstract classes,
you want to understand how to choose from these domain modeling options when
designing your own code.
Solution
The solution depends on whether you’re using a functional programming or objectoriented programming style. Therefore, these two solutions are discussed in the fol‐
lowing sections. Examples are also provided in the Discussion, followed by a brief
look at when abstract classes should be used.
Functional programming modeling options
When programming in an FP style, you’ll primarily use these constructs:
• Traits
• Enums
• Case classes
• Objects
In the FP style you’ll use these constructs as follows:
Traits
Traits are used to create small, logically grouped units of behavior. They’re typi‐
cally written as def methods but can also be written as val functions if you pre‐
fer. Either way, they’re written as pure functions (as detailed in “Pure Functions”
on page 272). These traits will later be combined into concrete objects.
Enums
Use enums to create algebraic data types (ADTs, as shown in Recipe 6.13, “Mod‐
eling Algebraic Data Types with Enums”) as well as generalized ADTs (GADTs).
5.1 Choosing from Domain Modeling Options
|
131
Case classes
Use case classes to create objects with immutable fields (known as immutable
records in some languages, such as the record type in Java 14). Case classes were
created for the FP style, and they have several specialized methods that help in
this style, including: parameters that are val fields by default, copy methods for
when you want to simulate mutating values, built-in unapply methods for pat‐
tern matching, good default equals and hashCode methods, and more.
Objects
In FP you’ll typically use objects as a way to make one or more traits “real,” in a
process that’s technically known as reification.
In FP, when you don’t need all the features of case classes, you can also use the plain
class construct (as opposed to the case class construct). When you do this you’ll
define your parameters as val fields, and then you can manually implement other
behaviors, such as if you want to define an unapply extractor method for your class,
as detailed in Recipe 7.8, “Implementing Pattern Matching with unapply”.
Object-oriented programming modeling options
When programming in an OOP style, you’ll primarily use these constructs:
• Traits
• Enums
• Classes
• Objects
You’ll use these constructs in these ways:
Traits
Traits are primarily used as interfaces. If you’ve used Java, you can use Scala traits
just like interfaces in Java 8 and newer, with both abstract and concrete members.
Classes will later be used to implement these traits.
Enums
You’ll primarily use enums to create simple sets of constants, like the positions of
a display (top, bottom, left, and right).
132
|
Chapter 5: Classes
Classes
In OOP you’ll primarily use plain classes—not case classes. You’ll also define
their constructor parameters as var fields so they can be mutated. They’ll contain
methods based on those mutable fields. You’ll override the default accessor and
mutator methods (getters and setters) as needed.
Object
You’ll primarily use the object construct as a way to create the equivalent of
static methods in Java, like a StringUtils object that contains static methods
that operate on strings (as detailed in Recipe 7.4, “Creating Static Members with
Companion Objects”).
When you want many or all of the features that case classes provide (see Recipe 5.14),
you can use them instead of plain classes (though they’re primarily intended for cod‐
ing in an FP style).
Discussion
To discuss this solution I’ll demonstrate FP and OOP examples separately. But before
jumping into those individual examples, I’ll first show these enums, which are used
by both:
enum Topping:
case Cheese, Pepperoni, Sausage, Mushrooms, Onions
enum CrustSize:
case Small, Medium, Large
enum CrustType:
case Regular, Thin, Thick
Using enums like this—technically as ADTs, as detailed in Recipe 6.13, “Modeling
Algebraic Data Types with Enums”—shows some common ground between FP and
OOP domain modeling.
An FP-style example
The pizza store example in Recipe 10.10, “Real-World Example: Functional Domain
Modeling”, demonstrates the FP domain modeling approach in detail, so I’ll just
quickly review it here.
First, I use those enums to define a Pizza class, using the case class construct:
case class Pizza(
crustSize: CrustSize,
crustType: CrustType,
toppings: Seq[Topping]
)
5.1 Choosing from Domain Modeling Options
|
133
After that, I model additional classes as case classes:
case class Customer(
name: String,
phone: String,
address: Address
)
case class Address(
street1: String,
street2: Option[String],
city: String,
state: String,
postalCode: String
)
case class Order(
pizzas: Seq[Pizza],
customer: Customer
)
Case classes are preferred in FP because all the parameters are immutable, and case
classes offer built-in methods to make FP easier (as shown in Recipe 5.14). Also,
notice that these classes contain no methods; they’re just simple data structures.
Next, I write the methods that operate on those data structures as pure functions, and
I group the methods into small, logically organized traits, or just one trait in this case:
trait PizzaServiceInterface:
def addTopping(p: Pizza, t: Topping): Pizza
def removeTopping(p: Pizza, t: Topping): Pizza
def removeAllToppings(p: Pizza): Pizza
def updateCrustSize(p: Pizza, cs: CrustSize): Pizza
def updateCrustType(p: Pizza, ct: CrustType): Pizza
Then I implement those methods in other traits:
trait PizzaService extends PizzaServiceInterface:
def addTopping(p: Pizza, t: Topping): Pizza =
// the 'copy' method comes with a case class
val newToppings = p.toppings :+ t
p.copy(toppings = newToppings)
// there are about two lines of code for each of these
// methods, so all of that code is not repeated here:
def removeTopping(p: Pizza, t: Topping): Pizza = ???
def removeAllToppings(p: Pizza): Pizza = ???
def updateCrustSize(p: Pizza, cs: CrustSize): Pizza = ???
def updateCrustType(p: Pizza, ct: CrustType): Pizza = ???
end PizzaService
134
| Chapter 5: Classes
Notice in this trait that everything is immutable. Pizzas, toppings, and crust details
are passed into the methods, and they don’t mutate those values. Instead, they return
new values based on the values that are passed in.
Eventually I make my services “real” by reifying them as objects:
object PizzaService extends PizzaService
I only use one trait in this example, but in the real world you’ll often combine multi‐
ple traits into one object, like this:
object DogServices extend TailService, RubberyNoseService, PawService ...
As shown, this is how you combine multiple granular, single-purpose services into
one larger, complete service.
That’s all I’ll show of the pizza store example here, but for more details, see Recipe
10.10, “Real-World Example: Functional Domain Modeling”.
An OOP-style example
Next, I’ll create an OOP-style solution for this same problem. First, I create an OOPstyle pizza class using the class construct and mutable parameters:
class Pizza (
var crustSize: CrustSize,
var crustType: CrustType,
val toppings: ArrayBuffer[Topping]
):
def addTopping(t: Topping): Unit =
toppings += t
def removeTopping(t: Topping): Unit =
toppings -= t
def removeAllToppings(): Unit =
toppings.clear()
The first two constructor parameters are defined as var fields so they can be mutated,
and toppings is defined as an ArrayBuffer so its values can also be mutated.
Notice that whereas the FP-style case class contains attributes but no behaviors, with
the OOP approach, the pizza class contains both, including methods that work with
the mutable parameters. Each of those methods can be defined on one line, but I put
the body of every method on a separate line to make them easy to read. But if you
prefer, they can be written more concisely like this:
def addTopping(t: Topping): Unit = toppings += t
def removeTopping(t: Topping): Unit = toppings -= t
def removeAllToppings(): Unit = toppings.clear()
5.1 Choosing from Domain Modeling Options
|
135
If you were to continue going down this road, you’d create additional OOP-style
classes that encapsulate both attributes and behaviors. For instance, an Order class
might completely encapsulate the concept of a series of line items that make up an
Order:
class Order:
private lineItems = ArrayBuffer[Product]()
def addItem(p: Product): Unit = ???
def removeItem(p: Product): Unit = ???
def getItems(): Seq[Product] = ???
def getPrintableReceipt(): String = ???
def getTotalPrice(): Money = ???
end Order
// usage:
val o = Order()
o.addItem(Pizza(Small, Thin, ArrayBuffer(Cheese, Pepperoni)))
o.addItem(Cheesesticks)
This example assumes that you have a Product class hierarchy that looks like this:
// a Product may have methods to determine its cost, sales price,
// and other details
sealed trait Product
// each class may have additional attributes and methods
class Pizza extends Product
class Beverage extends Product
class Cheesesticks extends Product
I won’t go further with this example because I assume that most developers are famil‐
iar with the OOP style of encapsulating attributes and behaviors, with polymorphic
methods.
One more thing: When to use abstract classes
Because traits can now take parameters in Scala 3, and classes can only extend one
abstract class (while they can mix in multiple traits), the question comes up, “When
should I use abstract classes?”
The general answer is “rarely.” A more specific answer is:
• When using Scala code from Java, it’s easier to extend a class than a trait.
• When I asked this question at the Scala Center, Sébastien Doeraene, the creator
of Scala.js, wrote that “in Scala.js, a class can be imported from or exported to
JavaScript.”
136
|
Chapter 5: Classes
• In that same discussion, Julien Richard-Foy, the director of education at the Scala
Center, noted that abstract classes may have a slightly more efficient encoding
than a trait, because as a parent, a trait is dynamic, whereas it’s statically known
for an abstract class.
So my rule of thumb is to always use a trait and then fall back and use an abstract
class when it’s necessary for one of these conditions (or possibly other conditions we
didn’t think of).
See Also
In addition to helping you understand your domain modeling options, this recipe
also serves as a pointer toward many other recipes that provide more details on each
topic:
• Classes are discussed in many recipes, beginning with Recipe 5.2.
• Case classes are discussed in detail in Recipe 5.14.
• The concept of using a trait as an interface is discussed in Recipe 6.1, “Using a
Trait as an Interface”.
• Using a trait as an abstract class is discussed in Recipe 6.3, “Using a Trait Like an
Abstract Class”.
• The concept of reifying traits into modules is covered in Recipe 6.11, “Using
Traits to Create Modules”, and Recipe 7.7, “Reifying Traits as Objects”.
• The FP-style pizza store example is covered in more detail in Recipe 10.10, “RealWorld Example: Functional Domain Modeling”.
• Many other FP concepts are discussed in Chapter 10.
• If you’re interested in using Scala traits in your Java code, see Recipe 22.5, “Using
Scala Traits in Java”.
5.2 Creating a Primary Constructor
Problem
You want to create a primary constructor for a Scala class, and you quickly find that
the approach is different than Java (and other languages).
5.2 Creating a Primary Constructor
|
137
Solution
The primary constructor of a Scala class is a combination of:
• The constructor parameters
• Fields (variable assignments) in the body of the class
• Statements and expressions that are executed in the body of the class
The following class demonstrates constructor parameters, class fields, and statements
in the body of a class:
class Employee(var firstName: String, var lastName: String):
// a statement
println("the constructor begins ...")
// some class fields (variable assignments)
var age = 0
private var salary = 0d
// a method call
printEmployeeInfo()
// methods defined in the class
override def toString = s"$firstName $lastName is $age years old"
def printEmployeeInfo() = println(this) //uses toString
// any statement or field prior to the end of the class
// definition is part of the class constructor
println("the constructor ends")
// optional 'end' statement
end Employee
The constructor parameters, statements, and fields are all part of the class construc‐
tor. Notice that the methods are also in the body of the class, but they’re not part of
the constructor.
Because the method calls in the body of the class are part of the constructor, when an
instance of an Employee class is created, you’ll see the output from the println state‐
ments at the beginning and end of the class declaration, along with the call to the
printEmployeeInfo method:
scala> val e = Employee("Kim", "Carnes")
the constructor begins ...
Kim Carnes is 0 years old
the constructor ends
val e: Employee = Kim Carnes is 0 years old
138
|
Chapter 5: Classes
Discussion
If you’re coming to Scala from Java, you’ll find that the process of declaring a primary
constructor in Scala is quite different. In Java it’s fairly obvious when you’re in the
main constructor and when you’re not, but Scala blurs this distinction. However,
once you understand the approach, it helps to make your class declarations more
concise.
In the example shown, the two constructor arguments firstName and lastName are
defined as var fields, which means that they’re variable, or mutable: they can be
changed after they’re initially set. Because the fields are mutable—and also because
they have public access by default—Scala generates both accessor and mutator meth‐
ods for them. As a result, given an instance e of type Employee, you can change the
values like this:
e.firstName = "Xena"
e.lastName = "Princess Warrior"
and you can access them like this:
println(e.firstName)
println(e.lastName)
// Xena
// Princess Warrior
Because the age field is declared as a var—and like constructor parameters, class
members are public by default—it’s also visible and can be mutated and accessed:
e.age = 30
println(e.age)
Conversely, the salary field is declared to be private, so it can’t be accessed from
outside the class:
scala> e.salary
1 |e.salary
|^^^^
|variable salary cannot be accessed as a member of (e: Employee)
When you call a method in the body of the class—such as the call to the printEm
ployeeInfo method—that’s a statement, and it’s also part of the constructor. If you’re
curious, you can verify this by compiling the code to an Employee.class file with sca
lac and then decompiling it back into Java source code with a tool like the JAD
decompiler. After doing so, this is what the Employee constructor looks like when it’s
decompiled back into Java code:
public Employee(String firstName, String lastName) {
this.firstName = firstName;
this.lastName = lastName;
super();
Predef$.MODULE$.println("the constructor begins ...");
age = 0;
double salary = 0.0D;
5.2 Creating a Primary Constructor
|
139
printEmployeeInfo();
Predef$.MODULE$.println("the constructor ends");
}
This clearly shows the two println statements and the printEmployeeInfo method
call inside the Employee constructor, as well as the initial age and salary being set.
Primary Constructor Contents
In Scala, any statements, expressions, or variable assignments
within the body of a class are a part of the primary class
constructor.
As a final point of comparison, when you decompile the class file with JAD, and then
you count the number of lines of source code in the Scala and Java files—using the
same formatting style for each file—you’ll find that the Scala source code is nine lines
long and the Java source code is 38 lines long. It’s been said that developers spend 10
times as much time reading code than we do writing code, so this ability to create
code that’s concise and still readable—we call it expressive—is one thing that initially
drew me to Scala.
5.3 Controlling the Visibility of Constructor Fields
Problem
You want to control the visibility of fields that are used as constructor parameters in a
Scala class.
Solution
As shown in the following examples, the visibility of a constructor field in a Scala
class is controlled by whether the field is declared as val or var, without either val or
var, and whether private is added to the fields.
Here’s the short version of the solution:
• If a field is declared as a var, Scala generates both getter and setter methods for
that field.
• If the field is a val, Scala generates only a getter method for it.
• If a field doesn’t have a var or val modifier, Scala doesn’t generate a getter or a
setter method for the field; it becomes private to the class.
• Additionally, var and val fields can be modified with the private keyword,
which prevents public getters and setters from being generated.
140
|
Chapter 5: Classes
See the examples that follow for more details.
var fields
If a constructor parameter is declared as a var, the value of the field can be changed,
so Scala generates both getter and setter methods for that field. In this example, the
constructor parameter name is declared as a var, so the field can be accessed and
mutated:
scala> class Person(var name: String)
scala> val p = Person("Mark Sinclair Vincent")
// getter
scala> p.name
val res0: String = Mark Sinclair Vincent
// setter
scala> p.name = "Vin Diesel"
scala> p.name
val res1: String = Vin Diesel
If you’re familiar with Java, you can also see that Scala does not follow the JavaBean
getName/setName naming convention when generating accessor and mutator meth‐
ods. Instead, you simply access a field by its name.
val fields
If a constructor field is defined as a val, the value of the field can’t be changed once
it’s been set—it’s immutable, like final in Java. Therefore, it makes sense that it
should have an accessor method, and should not have a mutator method:
scala> class Person(val name: String)
defined class Person
scala> val p = Person("Jane Doe")
p: Person = Person@3f9f332b
// getter
scala> p.name
res0: String = Jane Doe
// attempt to use a setter
scala> p.name = "Wilma Flintstone"
1 |p.name = "Wilma Flintstone"
|^^^^^^^^^
|Reassignment to val name
The last example fails because a mutator method is not generated for a val field.
5.3 Controlling the Visibility of Constructor Fields
|
141
Fields without val or var
When neither val nor var is specified on constructor parameters, the field becomes
private to the class, and Scala doesn’t generate accessor or mutator methods. You can
see that when you create a class like this:
class SuperEncryptor(password: String):
// encrypt increments each Char in a String by 1
private def encrypt(s: String) = s.map(c => (c + 1).toChar)
def getEncryptedPassword = encrypt(password)
and then attempt to access the password field, which was declared without val or
var:
val e = SuperEncryptor("1234")
e.password
// error: value password cannot be accessed
e.getEncryptedPassword
// 2345
As shown, you can’t directly access the password field, but because the getEncrypted
Password method is a class member, it can access password. If you continue to
experiment with this code, you’ll see that declaring password without val or var is
equivalent to making it a private val.
In most cases I only use this syntax by accident—I forget to specify val or var for the
field—but it can make sense if you want to accept a constructor parameter and then
use that parameter within the class, but don’t want to make it directly available out‐
side the class.
Adding private to val or var
In addition to these three basic configurations, you can add the private keyword to a
val or var field. This prevents getter and setter methods from being generated, so the
field can only be accessed from within members of the class, as shown with the sal
ary field in this example:
enum Role:
case HumanResources, WorkerBee
import Role.*
class Employee(var name: String, private var salary: Double):
def getSalary(r: Role): Option[Double] = r match
case HumanResources => Some(salary)
case _ => None
In this code, getSalary can access the salary field because it’s defined inside the
class, but the salary field can’t be directly accessed from outside the class, as demon‐
strated in this example:
142
|
Chapter 5: Classes
val e = Employee("Steve Jobs", 1)
// to access the salary field
e.name
e.getSalary(WorkerBee)
e.getSalary(HumanResources)
e.salary
you have to use getSalary
// Steve Jobs
// None
// Some(1.0)
// error: variable salary in class Employee cannot be accessed
Discussion
If any of this is confusing, it helps to think about the choices the compiler has when
generating code for you. When a field is defined as a val, by definition its value can’t
be changed, so it makes sense to generate a getter, but no setter. Similarly, by defini‐
tion, the value of a var field can be changed, so generating both a getter and setter
makes sense for it.
The private setting on a constructor parameter gives you additional flexibility.
When it’s added to a val or var field, the getter and setter methods are generated as
before, but they’re marked private. If you don’t specify val or var on a constructor
parameter, no getter or setter methods are generated at all.
The accessors and mutators that are generated for you based on these settings are
summarized in Table 5-1.
Table 5-1. The effect of constructor parameter settings
Visibility
var
Accessor? Mutator?
Yes
Yes
val
Yes
No
Default visibility (no var or val)
No
No
Adding the private keyword to var or val No
No
Case classes
Parameters in the constructor of a case class differ from these rules in one way: case
class constructor parameters are val by default. So if you define a case class field
without adding val or var, like this:
case class Person(name: String)
you can still access the field, just as if it were defined as a val:
scala> val p = Person("Dale Cooper")
p: Person = Person(Dale Cooper)
scala> p.name
res0: String = Dale Cooper
5.3 Controlling the Visibility of Constructor Fields
|
143
Although this is different than a regular class, it’s a nice convenience and has to do
with the way case classes are intended to be used in functional programming, i.e., as
immutable records.
See Also
• See Recipe 5.11 for more information on manually adding your own accessor
and mutator methods, and Recipe 5.3 for more information on the private
modifier.
• See Recipe 5.14 for more information on how case classes work.
5.4 Defining Auxiliary Constructors for Classes
Problem
You want to define one or more auxiliary constructors for a class so that consumers
of the class can have multiple ways to create object instances.
Solution
Define the auxiliary constructors as methods in the class with the name this and the
proper signature. You can define multiple auxiliary constructors, but they must have
different signatures (parameter lists). Also, each constructor must call one of the pre‐
viously defined constructors.
To set up an example, here are two enum definitions that will be used in a Pizza class
that follows:
enum CrustSize:
case Small, Medium, Large
enum CrustType:
case Thin, Regular, Thick
Given those definitions, here’s a Pizza class with a primary constructor and three
auxiliary constructors:
import CrustSize.*, CrustType.*
// primary constructor
class Pizza (var crustSize: CrustSize, var crustType: CrustType):
// one-arg auxiliary constructor
def this(crustSize: CrustSize) =
this(crustSize, Pizza.DefaultCrustType)
144
|
Chapter 5: Classes
// one-arg auxiliary constructor
def this(crustType: CrustType) =
this(Pizza.DefaultCrustSize, crustType)
// zero-arg auxiliary constructor
def this() =
this(Pizza.DefaultCrustSize, Pizza.DefaultCrustType)
override def toString = s"A $crustSize pizza with a $crustType crust"
object Pizza:
val DefaultCrustSize = Medium
val DefaultCrustType = Regular
Given those constructors, the same pizza can now be created in the following ways:
import Pizza.{DefaultCrustSize, DefaultCrustType}
// use
val p1
val p2
val p3
val p4
the different constructors
= Pizza(DefaultCrustSize, DefaultCrustType)
= Pizza(DefaultCrustSize)
= Pizza(DefaultCrustType)
= Pizza
All of those definitions result in the same output:
A Medium pizza with a Regular crust
Discussion
There are several important points to this recipe:
• Auxiliary constructors are defined by creating methods named this.
• Each auxiliary constructor must begin with a call to a previously defined con‐
structor.
• Each constructor must have a different parameter list.
• One constructor calls another constructor using the method name this and
specifies the desired parameters.
In the example shown, all the auxiliary constructors call the primary constructor, but
this isn’t necessary; an auxiliary constructor just needs to call one of the previously
defined constructors. For instance, the auxiliary constructor that takes the crustType
parameter could have been written to call the CrustSize constructor:
def this(crustType: CrustType) =
this(Pizza.DefaultCrustSize)
this.crustType = Pizza.DefaultCrustType
5.4 Defining Auxiliary Constructors for Classes
|
145
Don’t Forget About Default Parameter Values
Although the approach shown in the Solution is perfectly valid,
before creating multiple class constructors like this, take a few
moments to read Recipe 5.6. Using default parameter values as
shown in that recipe can often eliminate the need for multiple con‐
structors. For instance, this approach has almost the same func‐
tionality as the class shown in the Solution:
class Pizza(
var crustSize: CrustSize = Pizza.DefaultCrustSize,
var crustType: CrustType = Pizza.DefaultCrustType
):
override def toString =
s"A $crustSize pizza with a $crustType crust"
5.5 Defining a Private Primary Constructor
Problem
You want to make the primary constructor of a class private, such as to enforce the
Singleton pattern.
Solution
To make the primary constructor private, insert the private keyword in between the
class name and any parameters the constructor accepts:
// a private one-arg primary constructor
class Person private (var name: String)
As shown in the REPL, this keeps you from being able to create an instance of the
class:
scala> class Person private(name: String)
defined class Person
scala> val p = Person("Mercedes")
1 |val p = Person("Mercedes")
^^
|
|method apply cannot be accessed as a member of Person.type
When I first saw this syntax I thought it was a little unusual, but if you read the code
out loud as you scan it, you’ll read it as, “This is a Person class with a private construc‐
tor…” I find that the words “private constructor” in that sentence help me remember
to put the private keyword immediately before the constructor parameters.
146
|
Chapter 5: Classes
Discussion
To enforce the Singleton pattern in Scala, make the primary constructor private, and
then create a getInstance method in the companion object of the class:
// a private constructor that takes no parameters
class Brain private:
override def toString = "This is the brain."
object Brain:
val brain = Brain()
def getInstance = brain
@main def singletonTest =
// this won’t compile because the constructor is private:
// val brain = Brain()
// this works:
val brain = Brain.getInstance
println(brain)
You don’t have to name the accessor method getInstance; it’s only used here because
of the Java convention. Name it whatever seems best to you.
Companion Objects
A companion object is simply an object that’s defined in the same
file as a class and that has the same name as the class. If you
declare a class named Foo in a file named Foo.scala, and then
declare an object named Foo in that same file, the Foo object is the
companion object of the Foo class.
A companion object can be used for several purposes, and one pur‐
pose is that any method declared in a companion object will appear
to be a static method on the object. See Recipe 7.4, “Creating Static
Members with Companion Objects”, for more information on cre‐
ating the equivalent of Java’s static methods, and Recipe 7.6,
“Implementing a Static Factory with apply”, for examples of how
(and why) to define apply methods in a companion object.
Utility classes
Depending on what you’re trying to accomplish, creating a private class constructor
may not be necessary at all. For instance, in Java you’d create a file utilities class by
defining static methods in a Java class, but in Scala you’d do the same thing by
putting the methods in a Scala object:
object FileUtils:
def readFile(filename: String): String = ???
def writeFile(filename: String, contents: String): Unit = ???
5.5 Defining a Private Primary Constructor
|
147
This lets consumers of your code call those methods without needing to create an
instance of the FileUtils class:
val contents = FileUtils.readFile("input.txt")
FileUtils.writeFile("output.txt", content)
In a case like this, there’s no need for a private class constructor; just don’t define a
class.
5.6 Providing Default Values for Constructor Parameters
Problem
You want to provide a default value for a constructor parameter, which gives consum‐
ers of your class the option of specifying that parameter when calling the constructor,
or not.
Solution
Give the parameter a default value in the constructor declaration. Here’s a declaration
of a Socket class with one constructor parameter named timeout that has a default
value of 10_000:
class Socket(val timeout: Int = 10_000)
Because the parameter is defined with a default value, you can call the constructor
without specifying a timeout value, in which case you get the default value:
val s = Socket()
s.timeout
// Int = 10000
You can also specify a desired timeout value when creating a new Socket:
val s = Socket(5_000)
s.timeout
// Int = 5000
Discussion
This recipe demonstrates a powerful feature that can eliminate the need for auxiliary
constructors. As shown in the Solution, the following single constructor is the equiv‐
alent of two constructors:
class Socket(val timeout: Int = 10_000)
val s = Socket()
val s = Socket(5_000)
If this feature didn’t exist, two constructors would be required to get the same func‐
tionality—a primary one-arg constructor and an auxiliary zero-arg constructor:
148
|
Chapter 5: Classes
class Socket(val timeout: Int):
def this() = this(10_000)
Multiple parameters
You can also provide default values for multiple constructor parameters:
class Socket(val timeout: Int = 1_000, val linger: Int = 2_000):
override def toString = s"timeout: $timeout, linger: $linger"
Though you’ve defined only one constructor, your class now appears to have three
constructors:
println(Socket())
println(Socket(3_000))
println(Socket(3_000, 4_000))
// timeout: 1000, linger: 2000
// timeout: 3000, linger: 2000
// timeout: 3000, linger: 4000
As shown in Recipe 8.3, “Using Parameter Names When Calling a Method”, if you
prefer, you can also provide the names of constructor parameters when creating class
instances:
Socket(timeout=3_000, linger=4_000)
Socket(linger=4_000, timeout=3_000)
Socket(timeout=3_000)
Socket(linger=4_000)
5.7 Handling Constructor Parameters When Extending a
Class
Problem
You want to extend a base class that has constructor parameters, and your new sub‐
class may take additional parameters.
Solution
In this section I cover the case of extending a class that has one or more val construc‐
tor parameters. The solution for handling constructor parameters that are defined as
var is more complicated and is handled in the Discussion.
Working with val constructor parameters
Assuming that your base class has only val constructor parameters, when you define
your subclass constructor, leave the val declaration off the fields that are common to
both classes. Then define new constructor parameters in the subclass as val (or var)
fields.
5.7 Handling Constructor Parameters When Extending a Class
|
149
To demonstrate this, first define a Person base class that has a val parameter named
name:
class Person(val name: String)
Next, define Employee as a subclass of Person, so that it takes the constructor param‐
eter name and a new parameter named age. The name parameter is common to the
parent Person class, so leave the val declaration off that field, but age is new, so
declare it as a val:
class Employee(name: String, val age: Int) extends Person(name):
override def toString = s"$name is $age years old"
Now you can create a new Employee:
scala> val joe = Employee("Joe", 33)
val joe: Employee = Joe is 33 years old
This works as desired, and because the fields are immutable, there are no other issues.
Discussion
When a constructor parameter in the base class is defined as a var field, the situtation
is more complicated. There are two possible solutions:
• Use a different name for the field in the subclass.
• Implement the subclass constructor as an apply method in a companion object.
Use a different name for the field in the subclass
The first approach is to use a different name for the common field in the subclass
constructor. For instance, in this example I use the name _name in the Employee con‐
structor, rather than using name:
class Person(var name: String)
// note the use of '_name' here
class Employee(_name: String, var age: Int) extends Person(_name):
override def toString = s"$name is $age"
The reason for this is that this constructor parameter in the Employee class (̲name)
ends up being generated as a field inside the Employee class. You can see this if you
disassemble the Employee .class file:
$ javap -private Employee
public class Employee extends Person {
private final java.lang.String _name;
// name field
private final int age;
// age field
public Employee(java.lang.String, int);
public int age();
150
|
Chapter 5: Classes
public java.lang.String toString();
}
If you had named this field name, this field in the Employee class would essentially
cover up the name field in the Person class. This causes problems, such as the incon‐
sistent results you see at the end of this example:
class Person(var name: String)
// i incorrectly use 'name' here, rather than '_name'
class Employee(name: String, var age: Int) extends Person(name):
override def toString = s"$name is $age years old"
// everything looks OK at first
val e = Employee("Joe", 33)
e
// Joe is 33 years old
// but problems show up when i update the 'name' field
e.name = "Fred"
e.age = 34
e
// "Joe is 34 years old" <-- error: this should be "Fred"
e.name
// "Fred"
<-- this is "Fred"
This happens in this example because I (incorrectly) name my field name in Employee,
and this name collides with the name in Person. So, when extending a class that has a
var constructor parameter, use a different name for that field in the subclass.
This Creates a private val Field
In this example, the approach shown creates a private val field
named _name in the Employee class. However, that field can’t be
accessed outside of this class, so this is a relatively minor issue. As
long as you don’t use that field, nobody else can use it.
Use an apply method in a companion object
Because that solution does create a private val field named _name in the Employee
class, you may prefer another solution.
Another way to solve the problem is:
• Make the Employee constructor private.
• Create an apply method in the Employee companion object to serve as a con‐
structor.
For example, given this Person class with a var parameter named name:
class Person(var name: String):
override def toString = s"$name"
5.7 Handling Constructor Parameters When Extending a Class
|
151
you can create the Employee class with a private constructor and an apply method in
its companion object, like this:
class Employee private extends Person(""):
var age = 0
println("Employee constructor called")
override def toString = s"$name is $age"
object Employee:
def apply(_name: String, _age: Int) =
val e = new Employee()
e.name = _name
e.age = _age
e
Now when you run these steps, everything will work as desired:
val e = Employee("Joe", 33)
e
// Joe is 33 years old
// update and verify the name and age fields
e.name = "Fred"
e.age = 34
e
// "Fred is 34 years old"
e.name
// "Fred"
This approach allows the Employee class to inherit the name field from the Person
class and doesn’t require the use of a _name field, as shown in the previous solution.
The trade-off is that this approach requires a little more code, though it’s a cleaner
approach.
In summary, if you’re extending a class that only has val constructor parameters, use
the approach shown in the Solution. However, if you’re extending a class that has var
constructor parameters, use one of these two solutions shown in the Discussion.
5.8 Calling a Superclass Constructor
Problem
You want to control the superclass constructor that’s called when you define con‐
structors in a subclass.
Solution
This is a bit of a trick question, because you can control the superclass constructor
that’s called by the primary constructor in a subclass, but you can’t control the super‐
class constructor that’s called by an auxiliary constructor in the subclass.
152
|
Chapter 5: Classes
When you define a subclass in Scala, you control the superclass constructor that’s
called by its primary constructor when you specify the extends portion of the sub‐
class declaration. For instance, in the following code, the primary constructor of the
Dog class calls the primary constructor of the Pet class, which is a one-arg constructor
that takes name as its parameter:
class Pet(var name: String)
class Dog(name: String) extends Pet(name)
Furthermore, if the Pet class has multiple constructors, the primary constructor of
the Dog class can call any one of those constructors. In this next example, the primary
constructor of the Dog class calls the one-arg auxiliary constructor of the Pet class by
specifying that constructor in its extends clause:
// (1) two-arg primary constructor
class Pet(var name: String, var age: Int):
// (2) one-arg auxiliary constructor
def this(name: String) = this(name, 0)
override def toString = s"$name is $age years old"
// calls the Pet one-arg constructor
class Dog(name: String) extends Pet(name)
Alternatively, it can call the two-arg primary constructor of the Pet class:
// call the two-arg constructor
class Dog(name: String) extends Pet(name, 0)
However, regarding auxiliary constructors, because the first line of an auxiliary con‐
structor must be a call to another constructor of the current class, there’s no way for
auxiliary constructors to call a superclass constructor.
Discussion
As shown in the following code, the primary constructor of the Employee class can
call any constructor in the Person class, but the auxiliary constructors of the
Employee class must call a previously defined constructor of its own class with the
this method as its first line:
case class Address(city: String, state: String)
case class Role(role: String)
class Person(var name: String, var address: Address):
// no way for Employee auxiliary constructors to call this constructor
def this(name: String) =
this(name, null)
address = null //don’t use null in the real world
class Employee(name: String, role: Role, address: Address)
extends Person(name, address):
5.8 Calling a Superclass Constructor
|
153
def this(name: String) =
this(name, null, null)
def this(name: String, role: Role) =
this(name, role, null)
def this(name: String, address: Address) =
this(name, null, address)
Therefore, there’s no direct way to control which superclass constructor is called from
an auxiliary constructor in a subclass. In fact, because each auxiliary constructor
must call a previously defined constructor in the same class, all auxiliary constructors
will eventually call the same superclass constructor that’s called from the subclass’s
primary constructor.
5.9 Defining an equals Method (Object Equality)
Problem
You want to define an equals method for a class so you can compare object instances
to each other.
Solution
This solution is easier to understand if I cover a bit of background, so first I’ll share
three things you need to know.
The first is that object instances are compared with the == symbol:
"foo" == "foo"
"foo" == "bar"
"foo" == null
null == "foo"
1 == 1
1 == 2
//
//
//
//
//
//
true
false
false
false
true
false
case class Person(name: String)
Person("Alex") == Person("Alvin")
// false
This is different than Java, which uses == for primitive values and equals for object
comparisons.
The second thing to know is that == is defined on the Any class, so (a) it’s inherited by
all other classes, and (b) it calls the equals method that’s defined for a class. What
happens is that when you write 1 == 2, that code is the same as writing 1.==(2), and
then that == method invokes the equals method on the 1 object, which is an instance
of Int in this example.
154
|
Chapter 5: Classes
The third thing to know is that properly writing an equals method turns out to be a
difficult problem, so much so that Programming in Scala takes 23 pages to discuss it,
and Effective Java takes 17 pages to cover object equality. Effective Java begins its
treatment with the statement, “Overriding the equals method seems simple, but
there are many ways to get it wrong, and the consequences can be dire.” Despite this
complexity, I’ll attempt to demonstrate a solid solution to the problem, and I’ll also
share references for further reading.
Don’t implement equals unless necessary
Before jumping into how to implement an equals method, it’s worth noting that
Effective Java states that not implementing an equals method is the correct solution
for the following situations:
• Each instance of a class is inherently unique. Instances of a Thread class are given
as an example.
• There is no need for the class to provide a logical equality test. The Java Pattern
class is given as an example; the designers didn’t think that people would want or
need this functionality, so it simply inherits its behavior from the Java Object
class.
• A superclass has already overridden equals, and its behavior is appropriate for
this class.
• The class is private or package-private (in Java), and you are certain its equals
method will never be invoked.
Those are four situations where you won’t want to write a custom equals method for
a Java class, and those rules make sense for Scala as well. The rest of this recipe focu‐
ses on how to properly implement an equals method.
A seven-step process
The fourth edition of Programming in Scala recommends a seven-step process for
implementing an equals method for nonfinal classes:
1. Create a canEqual method with the proper signature, taking an Any parameter
and returning a Boolean.
2. canEqual should return true if the argument passed into it is an instance of the
current class, false otherwise. (The current class is especially important with
inheritance.)
3. Implement the equals method with the proper signature, taking an Any parame‐
ter and returning a Boolean.
5.9 Defining an equals Method (Object Equality)
|
155
4. Write the body of equals as a single match expression.
5. The match expression should have two cases. As you’ll see in the following code,
the first case should be a typed pattern for the current class.
6. In the body of this first case, implement a series of logical “and” tests for all the
tests in this class that must be true. If this class extends anything other than Any
Ref, you’ll want to invoke your superclass equals method as part of these tests.
One of the “and” tests must also be a call to canEqual.
7. For the second case, just specify a wildcard pattern that yields false.
As a practical matter, any time you implement an equals method you should also
implement a hashCode method. This is shown as an optional eighth step in the exam‐
ple that follows.
I’ll show two examples in this recipe, one here, and another in the Discussion.
Example 1: Implementing equals for a single class
Here’s an example that demonstrates how to properly write an equals method for a
small Scala class. In this example I create a Person class with two var fields:
class Person(var name: String, var age: Int)
Given those two constructor parameters, here’s the complete source code for a Person
class that implements an equals method and a corresponding hashCode method. The
comments show which steps in the solution the code refers to:
class Person(var name: String, var age: Int):
// Step 1 - proper signature for `canEqual`
// Step 2 - compare `a` to the current class
// (isInstanceOf returns true or false)
def canEqual(a: Any) = a.isInstanceOf[Person]
// Step 3 - proper signature for `equals`
// Steps 4 thru 7 - implement a `match` expression
override def equals(that: Any): Boolean =
that match
case that: Person =>
that.canEqual(this) &&
this.name == that.name &&
this.age == that.age
case _ =>
false
// Step 8 (optional) - implement a corresponding hashCode method
override def hashCode: Int =
val prime = 31
var result = 1
156
|
Chapter 5: Classes
result = prime * result + age
result = prime * result + (if name == null then 0 else name.hashCode)
result
end Person
If you compare that code to the seven steps previously described, you’ll see that they
match those definitions. A key to the solution is this code inside the first case
statement:
case that: Person =>
that.canEqual(this) &&
this.name == that.name &&
this.age == that.age
This code tests to see whether that is an instance of Person:
case that: Person =>
If that is not a Person, the other case statement is executed.
Next, this line of code tests the opposite situation: that the current instance (this) is
an instance of the class of that:
that.canEqual(this) ...
This is particularly important when inheritance is involved, such as when Employee is
an instance of Person but Person is not an instance of Employee.
After that, the rest of the code after canEqual tests the equality of the individual fields
in the Person class.
With the equals method defined, you can compare instances of a Person with ==, as
demonstrated in the following ScalaTest unit tests:
import org.scalatest.funsuite.AnyFunSuite
class PersonTests extends AnyFunSuite:
// these first two instances should be equal
val nimoy
= Person("Leonard Nimoy", 82)
val nimoy2 = Person("Leonard Nimoy", 82)
val nimoy83 = Person("Leonard Nimoy", 83)
val shatner = Person("William Shatner", 82)
// [1] a basic test to start with
test("nimoy
!= null")
{ assert(nimoy != null) }
// [2] these reflexive and symmetric tests should all be true
// [2a] reflexive
test("nimoy
== nimoy")
{ assert(nimoy == nimoy) }
// [2b] symmetric
test("nimoy
== nimoy2") { assert(nimoy == nimoy2) }
5.9 Defining an equals Method (Object Equality)
|
157
test("nimoy2
== nimoy")
// [3] these should not be
test("nimoy
!= nimoy83")
test("nimoy
!= shatner")
test("shatner != nimoy")
{ assert(nimoy2 == nimoy) }
equal
{ assert(nimoy != nimoy83) }
{ assert(nimoy != shatner) }
{ assert(shatner != nimoy) }
All of these tests pass as desired. In the Discussion, the reflexive and symmetric com‐
ments are explained, and a second example shows how this formula works when an
Employee class extends Person.
IntelliJ IDEA
At the time of this writing, when given a Person class with name
and age fields, IntelliJ IDEA Version 2021.1.4 generates an equals
method that is almost identical to the code shown in this solution.
Discussion
The way == works in Scala is that when it’s invoked on a class instance, as in nimoy ==
shatner, the equals method on nimoy is called. In short, this code:
nimoy == shatner
is the same as this code:
nimoy.==(shatner)
which is the same as this code:
nimoy.equals(shatner)
As shown, the == method is like syntactic sugar for calling equals. You could write
nimoy.equals(shatner), but nobody does that because == is much easier for humans
to read.
The equals Contract
The Scaladoc for the equals method of the Any class essentially specifies the contract
for how equals methods should be implemented. It begins by stating that “any imple‐
mentation of this method should be an equivalence relation.” It further states that an
equivalence relation should have these three properties:
• It is reflexive: for any instance x of type Any, x.equals(x) should return true.
• It is symmetric: for any instances x and y of type Any, x.equals(y) should return
true if and only if y.equals(x) returns true.
158
|
Chapter 5: Classes
• It is transitive: for any instances x, y, and z of type AnyRef, if x.equals(y) returns
true and y.equals(z) returns true, then x.equals(z) should return true.
Finally it states that “if you override the equals method, you should verify that your
implementation remains an equivalence relation.”
The Person example meets that criteria.
Now let’s look at how to handle this when inheritance is involved.
Example 2: Inheritance
An important benefit of this approach is that you can continue to use it when you use
inheritance in classes. For instance, in the following code, the Employee class extends
the Person class that’s shown in the Solution. It uses the same formula that was shown
in the first example, with additional tests to (a) test the new role field in Employee,
and (b) call super.equals(that) to verify that equals in Person is also true:
class Employee(name: String, age: Int, var role: String)
extends Person(name, age):
override def canEqual(a: Any) = a.isInstanceOf[Employee]
override def equals(that: Any): Boolean =
that match
case that: Employee =>
that.canEqual(this) &&
this.role == that.role &&
super.equals(that)
case _ =>
false
override def hashCode: Int =
val prime = 31
var result = 1
result = prime * result + (if role == null then 0 else role.hashCode)
result + super.hashCode
end Employee
Note in this code:
• canEqual checks for an instance of Employee (not Person).
• The first case expression also tests for Employee (not Person).
• The Employee case calls canEqual, tests the field(s) in its class, and also calls
super.equals(that) to use the equals code in Person for its equality tests. This
5.9 Defining an equals Method (Object Equality)
|
159
ensures that the fields in Person as well as the new role field in Employee are all
equal.
The following ScalaTest unit tests verify that the equals method in Employee is
implemented correctly:
import org.scalatest.funsuite.AnyFunSuite
class EmployeeTests extends AnyFunSuite:
// these first two instance should be equal
val eNimoy1 = Employee("Leonard Nimoy", 82, "Actor")
val eNimoy2 = Employee("Leonard Nimoy", 82, "Actor")
val pNimoy = Person("Leonard Nimoy", 82)
val eShatner = Employee("William Shatner", 82, "Actor")
// equality tests (reflexive
test("eNimoy1 == eNimoy1") {
test("eNimoy1 == eNimoy2") {
test("eNimoy2 == eNimoy1") {
and symmetric)
assert(eNimoy1 == eNimoy1) }
assert(eNimoy1 == eNimoy2) }
assert(eNimoy2 == eNimoy1) }
// non-equality tests
test("eNimoy1 != pNimoy")
test("pNimoy
!= eNimoy1")
test("eNimoy1 != eShatner")
test("eShatner != eNimoy1")
{
{
{
{
assert(eNimoy1
assert(pNimoy
assert(eNimoy1
assert(eShatner
!=
!=
!=
!=
pNimoy) }
eNimoy1) }
eShatner) }
eNimoy1) }
All the tests pass, including the comparison of the eNimoy and pNimoy objects, which
are instances of the Employee and Person classes, respectively.
Beware equals methods with var fields and mutable collections
As a warning, while these examples demonstrate a solid formula for implementing
equals and hashCode methods, the Artima blog post “How to Write an Equality
Method in Java” explains that when equals and hashCode algorithms depend on
mutable state, i.e., var fields like name, age, and role, this can be a problem for users
in collections.
The basic problem is that if users of your class put mutable fields into collections, the
fields can change after they’re in the collection. Here’s a demonstration of this prob‐
lem. First, create an Employee instance like this:
val eNimoy = Employee("Leonard Nimoy", 81, "Actor")
Then add that instance to a Set:
val set = scala.collection.mutable.Set[Employee]()
set += eNimoy
160
| Chapter 5: Classes
When you run this code, you’ll see that it returns true, as expected:
set.contains(eNimoy)
// true
But now if you modify the eNimoy instance and then run the same test, you’ll find
that it (probably) returns false:
eNimoy.age = 82
set.contains(eNimoy)
// false
In regard to handling this problem, the Artima blog post suggests that in this situa‐
tion you shouldn’t override hashCode and should name your equality method some‐
thing other than equals. This way, your class will inherit the default implementations
of hashCode and equals.
Implementing hashCode
I won’t discuss hashCode algorithms in depth, but in Effective Java, Joshua Bloch
writes that the following statements comprise the contract for hashCode algorithms
(which he adapted from the Java Object documentation):
• When hashCode is invoked on an object repeatedly within an application, it must
consistently return the same value, provided that no information in the equals
method comparison has changed.
• If two objects are equal according to their equals methods, their hashCode values
must be the same.
• If two objects are unequal according to their equals methods, it is not required
that their hashCode values be different. But producing distinct results for unequal
objects may improve the performance of hash tables.
As a brief survey of hashCode algorithms, the algorithm I used in the Person class is
consistent with the suggestions in Effective Java:
// note: the `if name == null then 0` test is required because
// `null.hashCode` throws a NullPointerException
override def hashCode: Int =
val prime = 31
var result = 1
result = prime * result + age
result = prime * result + (if name == null then 0 else name.hashCode)
result
5.9 Defining an equals Method (Object Equality)
|
161
Next, this is the hashCode method produced by making Person a case class, then
compiling its code with the Scala 3 scalac command and decompiling it with JAD:
public int hashCode() {
int i = 0xcafebabe;
i = Statics.mix(i, productPrefix().hashCode());
i = Statics.mix(i, Statics.anyHash(name()));
i = Statics.mix(i, age());
return Statics.finalizeHash(i, 2);
}
The IntelliJ IDEA generate code option generates this code for a Scala 2.x version of
the Person class:
// scala 2 syntax
override def hashCode(): Int = {
val state = Seq(super.hashCode(), name, age)
state.map(_.hashCode()).foldLeft(0)((a, b) => 31 * a + b)
}
See Also
• Programming in Scala, by Martin Odersky et al. (Artima Press).
• Effective Java, by Joshua Bloch (Addison-Wesley).
• The Artima blog post “How to Write an Equality Method in Java”.
• The Wikipedia definition of equivalence relation.
• See Recipe 23.11, “Controlling How Classes Can Be Compared with Multiversal
Equality”, for a discussion of multiversal equality, and Recipe 23.12, “Limiting
Equality Comparisons with the CanEqual Typeclass”, for a discussion of how to
limit equality comparisons with the CanEqual typeclass.
5.10 Preventing Accessor and Mutator Methods from
Being Generated
Problem
When you define a class field as a var, Scala automatically generates accessor (getter)
and mutator (setter) methods for it, and defining a field as a val automatically gener‐
ates an accessor method, but you don’t want either an accessor or a mutator.
162
|
Chapter 5: Classes
Solution
The solution is to either:
• Add the private access modifier to the val or var declaration so it can only be
accessed by instances of the current class
• Add the protected access modifier so it can be accessed by classes that extend
the current class
The private modifier
As an example of how the private access modifier works, this Animal class declares
_numLegs as a private field. As a result, other non-Animal instances can’t access _num
Legs, but notice that the iHaveMoreLegs method can access the _numLegs field of
another Animal instance (as that._numLegs):
class Animal:
private var _numLegs = 2
def numLegs = _numLegs
def numLegs_=(numLegs: Int): Unit =
_numLegs = numLegs
// getter
// setter
// note that we can access the `_numLegs` field of
// another Animal instance (`that`)
def iHaveMoreLegs(that: Animal): Boolean =
this._numLegs > that._numLegs
Given that code, all the following ScalaTest assert tests pass:
val a = Animal()
assert(a.numLegs == 2)
// getter test
a.numLegs = 4
assert(a.numLegs == 4)
// setter test
// the default number of legs is 2, so this is true
val b = Animal()
assert(a.iHaveMoreLegs(b))
Also, if you attempt to access _numLegs from outside the class, you’ll see that this code
won’t compile:
//a._numLegs
// error, cannot be accessed (others cannot access _numLegs)
The protected modifier
If you change the _numLegs field in Animal from private to protected, you can then
create a new class that extends Animal, while overriding the _numLegs value:
5.10 Preventing Accessor and Mutator Methods from Being Generated
|
163
class Dog extends Animal:
_numLegs = 4
When you do this and then create two Dog instances, you’ll see that all of these tests
pass, just like the previous tests:
val a = Dog()
assert(a.numLegs == 4)
a.numLegs = 3
assert(a.numLegs == 3)
// the default number of legs is 4, so this is true
val b = Dog()
assert(b.iHaveMoreLegs(a))
Similarly, _numLegs still can’t be accessed from outside the class, so this line of code
won’t compile:
a._numLegs
// compiler error, cannot be accessed
Discussion
Scala constructor parameters and fields are publicly accessible by default, so when
you don’t want those fields to have an accessor or a mutator, defining the fields as
private or protected gives you the levels of control shown.
Disassemble Classes to See What the JVM Sees
As a reminder, whenever you want to know more about how Scala works, it can help
to create small tests and then decompile them with javap. For instance, here’s a class
with two val fields, where i is public and d is private:
class Foo(val i: Int, private val d: Double)
When you compile that class with scalac and then disassemble it with javap, you
can see what the JVM sees:
$ javap -private Foo
Compiled from "Foo.scala"
public class Foo {
public Foo(int, double);
private final int i;
public int i();
// i is private and has
// a public accessor method
private final double d;
private double d();
// d is private and has
// a private accessor method
}
164
|
Chapter 5: Classes
Note that I added comments to this code to explain its output, but the rest of it is
generated by the javap command. Type javap -help at your command line to see
other options that are available for disassembling class files.
5.11 Overriding Default Accessors and Mutators
Problem
You want to override the getter or setter methods that Scala generates for you.
Solution
This is a bit of a trick problem, because you can’t directly override the getter and set‐
ter methods Scala generates for you, at least not if you want to stick with the Scala
naming conventions. For instance, if you have a class named Person with a construc‐
tor parameter named name, and attempt to create getter and setter methods according
to the Scala conventions, your code won’t compile:
// error: this won’t work
class Person(private var name: String):
def name = name
def name_=(aName: String): Unit =
name = aName
Attempting to compile this code generates this error:
2 |
|
|
def name = name
^
Overloaded or recursive method name needs return type
I’ll examine these problems more in the Discussion, but the short answer is that both
the constructor parameter and the getter method are named name, and Scala won’t
allow that.
To solve this problem, change the name of the field you use in the class constructor so
it won’t collide with the name of the getter method you want to use. One approach is
to add a leading underscore to the parameter name, so if you want to manually create
a getter method called name, use the parameter name _name in the constructor, then
declare your getter and setter methods according to the Scala conventions:
class Person(private var _name: String):
def name = _name
def name_=(aName: String): Unit = _name = aName
// accessor
// mutator
Notice the constructor parameter is declared private and var. The private keyword
keeps Scala from exposing that field to other classes, and var lets the value of _name
be changed.
5.11 Overriding Default Accessors and Mutators
|
165
As you’ll see in the Discussion, creating a getter method named name and a setter
method named name_= conforms to the Scala convention for a field named name, and
it lets a consumer of your class write code like this:
val p = Person("Winston Bishop")
// setter
p.name = "Winnie the Bish"
// getter
println(p.name)
// prints "Winnie the Bish"
If you don’t want to follow this Scala naming convention for getters and setters, you
can use any other approach you want. For instance, you can name your methods get
Name and setName, following the JavaBeans style.
To summarize this, the recipe for overriding default getter and setter methods is:
1. Create a private var constructor parameter with a name you want to reference
from within your class. In this example, the field is named _name.
2. Define getter and setter method names that you want other classes to use. In the
example, the getter method name is name, and the setter method name is name_=
(which, combined with Scala’s syntactic sugar, lets users write p.name = "Winnie
the Bish").
3. Modify the body of the getter and setter methods as desired.
Class Fields Work the Same Way
While these examples use fields in a class constructor, the same
principles hold true for fields defined inside a class.
Discussion
When you define a constructor parameter to be a var field and compile the code,
Scala makes the field private to the class and automatically generates getter and setter
methods that other classes can use to access the field. For instance, given this Stock
class:
class Stock(var symbol: String)
after the class is compiled to a class file with scalac and then decompiled with a tool
like JAD, you’ll see Java code like this:
166
|
Chapter 5: Classes
public class Stock {
public Stock(String symbol) {
this.symbol = symbol;
super();
}
public String symbol() {
return symbol;
}
public void symbol_$eq(String x$1) {
symbol = x$1;
}
private String symbol;
}
You can see that the Scala compiler generates two methods: a getter named symbol
and a setter named symbol_$eq. This second method is the same as a method you
would name symbol_= in your Scala code, but under the hood Scala needs to translate
the = symbol to $eq to work with the JVM.
That second method name is a little unusual, but it follows a Scala convention, and
when it’s mixed with some syntactic sugar, it lets you set the symbol field on a Stock
instance like this:
stock.symbol = "GOOG"
The way this works is that behind the scenes, Scala converts that line of code into this
line of code:
stock.symbol_$eq("GOOG")
This is something you generally never have to think about, unless you want to over‐
ride the mutator method.
5.12 Assigning a Block or Function to a (lazy) Field
Problem
You want to initialize a field in a class using a block of code, or by calling a method or
function.
Solution
Assign the desired block of code or function to a field within the class body. Option‐
ally, define the field as lazy if the algorithm requires a long time to run.
In the following example class, the field text is set equal to a block of code—a try/
catch block—which either returns (a) the text contained in a file, or (b) an error mes‐
sage, depending on whether the file exists and can be read:
5.12 Assigning a Block or Function to a (lazy) Field
|
167
import scala.io.Source
class FileReader(filename: String):
// assign this block of code to the 'text' field
val text =
// 'fileContents' will either contain the file contents,
// or the exception message as a string
val fileContents =
try
Source.fromFile(filename).getLines.mkString
catch
case e: Exception => e.getMessage
println(fileContents)
// print the contents
fileContents
// return the contents from the block
@main def classFieldTest =
val reader = FileReader("/etc/passwd")
Because the assignment of the code block to the text field is in the body of the FileR
eader class, this code is in the class’s constructor and will be executed when a new
instance of the class is created. Therefore, when you compile and run this example it
will print either the contents of the file or the exception message that comes from try‐
ing to read the file. Either way, the block of code is executed—including the println
statement—and the result is assigned to the text field.
Discussion
When it makes sense, define a field like this to be lazy, which means that the field
won’t be evaluated until it’s accessed. To demonstrate this, update the previous exam‐
ple by making text a lazy val field:
import scala.io.Source
class FileReader(filename: String):
// the only difference from the previous example is that
// this field is defined as 'lazy'
lazy val text =
val fileContents =
try
Source.fromFile(filename).getLines.mkString
catch
case e: Exception => e.getMessage
println(fileContents)
fileContents
@main def classFieldTest =
val reader = FileReader("/etc/passwd")
168
| Chapter 5: Classes
Now when this example is run, nothing happens; you see no output, because the text
field isn’t evaluated until it’s accessed. The block of code isn’t executed until you call
reader.text, at which point you’ll see output from the println statement.
This is how a lazy field works: even though it’s defined as a field in a class—meaning
that it’s a part of the class constructor—that code won’t be executed until you explic‐
itly ask for it.
Defining a field as lazy is a useful approach when the field might not be accessed in
the normal processing of your algorithms, or if running the algorithm will take long
and you want to defer that to a later time.
See Also
• try/catch expressions were used in these examples, but the code can be written
more concisely using the Try classes. See Recipe 24.6, “Using Scala’s ErrorHandling Types (Option, Try, and Either)”, for details on how to use Try, Suc
cess, and Failure to make the code more concise.
• See Recipe 5.2 to understand how fields work in class constructors.
5.13 Setting Uninitialized var Field Types
Problem
You want to set the type for an uninitialized var field in a class, so you begin to write
code like this:
var x =
and then wonder how to finish writing the expression.
Solution
In general, the best approach is to define the field as an Option. For certain types,
such as String and numeric fields, you can specify default initial values.
For instance, imagine that you’re starting the next great social network, and to
encourage people to sign up, you only ask for a username and password during the
registration process. Therefore, you define username and password as fields in your
class constructor:
case class Person(var username: String, var password: String) ...
5.13 Setting Uninitialized var Field Types
|
169
However, later on you’ll also want to get other information from users, including
their age, first name, last name, and address. Setting those first three var fields with
default values is simple:
var age = 0
var firstName = ""
var lastName = ""
But what do you do when you get to the address? The solution is to define the
address field as an Option, as shown here:
case class Person(var username: String, var password: String):
var age = 0
var firstName = ""
var lastName = ""
var address: Option[Address] = None
case class Address(city: String, state: String, zip: String)
Later, when a user provides an address, you assign it using a Some, like this:
val p = Person("alvinalexander", "secret")
p.address = Some(Address("Talkeetna", "AK", "99676"))
When you need to access the address field, there are a variety of approaches you can
use, and these are discussed in detail in Recipe 24.6, “Using Scala’s Error-Handling
Types (Option, Try, and Either)”. As one example, you can print the fields of an
Address using foreach:
p.address.foreach { a =>
println(s"${a.city}, ${a.state}, ${a.zip}")
}
If the address field hasn’t been assigned, address will have the value None, and call‐
ing foreach on it does nothing. If the address field is assigned, it will be a Some that
contains an Address, and the foreach method on Some extracts the value out of the
Some and the data is printed with foreach.
Discussion
You can think of the body of None’s foreach method as being defined like this:
def foreach[A,U](f: A => U): Unit = {}
Because None is guaranteed to be empty—it’s an empty container—its foreach
method is essentially a do-nothing method. (It’s implemented differently than this,
but this is a convenient way to think about it.)
Similarly, when you call foreach on Some, it knows that it contains one element—
such as an instance of an Address—so it applies your algorithm to that element.
170
|
Chapter 5: Classes
See Also
• It’s important to stress that Scala provides a terrific opportunity for you to get
away from ever using null values again. Recipe 24.5, “Eliminating null Values
from Your Code”, shows ways to eliminate common uses of null values.
• In Scala frameworks, such as the Play Framework, Option fields are commonly
used. See Recipe 24.6, “Using Scala’s Error-Handling Types (Option, Try,
and Either)”, for a detailed discussion of how to work with Option values.
• On a related note, there are times you may need to override the default type of a
numeric field. For those occasions, see Recipe 3.3, “Overriding the Default
Numeric Type”.
5.14 Generating Boilerplate Code with Case Classes
Problem
You’re working with match expressions, Akka actors, or other situations where you
want to use the case class syntax to generate boilerplate code, including accessor and
mutator methods, along with apply, unapply, toString, equals, and hashCode meth‐
ods, and more.
Solution
When you want your class to have many additional built-in features—such as creat‐
ing classes in functional programming—define your class as a case class, declaring
any parameters it needs in its constructor:
// name and relation are 'val' by default
case class Person(name: String, relation: String)
Defining a class as a case class results in a lot of useful boilerplate code being gener‐
ated, with the following benefits:
• Accessor methods are generated for the constructor parameters because case
class constructor parameters are val by default. Mutator methods are also gener‐
ated for parameters that are declared as var.
• A good default toString method is generated.
• An unapply method is generated, making it easy to use case classes in match
expressions.
• equals and hashCode methods are generated, so instances can easily be com‐
pared and used in collections.
5.14 Generating Boilerplate Code with Case Classes
|
171
• A copy method is generated, which makes it easy to create new instances from
existing instances (a technique used in functional programming).
Here’s a demonstration of these features. First, define a case class and an instance
of it:
case class Person(name: String, relation: String)
val emily = Person("Emily", "niece")
// Person(Emily,niece)
Case class constructor parameters are val by default, so accessor methods are gener‐
ated for the parameters, but mutator methods are not generated:
scala> emily.name
res0: String = Emily
// can’t mutate `name`
scala> emily.name = "Miley"
1 |emily.name = "Miley"
|^^^^^^^^
|Reassignment to val name
If you’re writing code in a non-FP style, you can declare your constructor parameters
as var fields, and then both accessor and mutator methods are generated:
scala> case class Company(var name: String)
defined class Company
scala> val c = Company("Mat-Su Valley Programming")
c: Company = Company(Mat-Su Valley Programming)
scala> c.name
res0: String = Mat-Su Valley Programming
scala> c.name = "Valley Programming"
c.name: String = Valley Programming
Case classes also have a good default toString method implementation:
scala> emily
res0: Person = Person(Emily,niece)
Because an unapply method is automatically created for a case class, it works well
when you need to extract information in match expressions:
scala> emily match { case Person(n, r) => println(s"$n, $r") }
(Emily,niece)
equals and hashCode methods are generated for case classes based on their con‐
structor parameters, so instances can be used in maps and sets, and easily compared
in if expressions:
scala> val hannah = Person("Hannah", "niece")
hannah: Person = Person(Hannah,niece)
172
|
Chapter 5: Classes
scala> emily == hannah
res0: Boolean = false
A case class also generates a copy method that’s helpful when you need to clone an
object and change some of the fields during the cloning process:
scala> case class Person(firstName: String, lastName: String)
// defined case class Person
scala> val fred = Person("Fred", "Flintstone")
val fred: Person = Person(Fred,Flintstone)
scala> val wilma = fred.copy(firstName = "Wilma")
val wilma: Person = Person(Wilma,Flintstone)
This technique is commonly used in FP, and I refer to it as update as you copy.
Discussion
Case classes are primarily intended to create immutable records when you write Scala
code in an FP style. Indeed, pure FP developers look at case classes as being similar to
immutable records found in ML, Haskell, and other FP languages. Because they’re
intended for use with FP—where everything is immutable—case class constructor
parameters are val by default.
Generated code
As shown in the Solution, when you create a case class, Scala generates a wealth of
code for your class. To see the code that’s generated, first compile a simple case class,
then disassemble it with javap. For example, put this code in a file named
Person.scala:
case class Person(var name: String, var age: Int)
Then compile the file:
$ scalac Person.scala
This creates two class files, Person.class and Person$.class. The Person.class file con‐
tains the bytecode for the Person class, and you can disassemble its code with this
command:
$ javap -public Person
5.14 Generating Boilerplate Code with Case Classes
|
173
That results in the following output, which is the public signature of the Person class:
Compiled from "Person.scala"
public class Person implements scala.Product,java.io.Serializable {
public static Person apply(java.lang.String, int);
public static Person fromProduct(scala.Product);
public static Person unapply(Person);
public Person(java.lang.String, int);
public scala.collection.Iterator productIterator();
public scala.collection.Iterator productElementNames();
public int hashCode();
public boolean equals(java.lang.Object);
public java.lang.String toString();
public boolean canEqual(java.lang.Object);
public int productArity();
public java.lang.String productPrefix();
public java.lang.Object productElement(int);
public java.lang.String productElementName(int);
public java.lang.String name();
public void name_$eq(java.lang.String);
public int age();
public void age_$eq(int);
public Person copy(java.lang.String, int);
public java.lang.String copy$default$1();
public int copy$default$2();
public java.lang.String _1();
public int _2();
}
Next, disassemble Person$.class, which contains the bytecode for the companion
object:
$ javap -public Person$
Compiled from "Person.scala"
public final class Person$ implements
scala.deriving.Mirror$Product,java.io.Serializable {
public static final Person$ MODULE$;
public static {};
public Person apply(java.lang.String, int);
public Person unapply(Person);
public java.lang.String toString();
public Person fromProduct(scala.Product);
public java.lang.Object fromProduct(scala.Product);
}
As you can see, Scala generates a lot of source code when you declare a class as a case
class.
As a point of comparison, if you remove the keyword case from that code—making
it a regular class—and then compile it, it only creates the Person.class file. When you
disassemble it, you’ll see that Scala only generates the following code:
174
|
Chapter 5: Classes
Compiled from "Person.scala"
public class Person {
public Person(java.lang.String, int);
public java.lang.String name();
public void name_$eq(java.lang.String);
public int age();
public void age_$eq(int);
}
That’s a big difference. The case class results in a total of 30 methods, while the regu‐
lar class results in only 5. If you need the functionality, this is a good thing, and
indeed, in FP all of these methods are put to use. However, if you don’t need all of this
additional functionality, consider using a regular class declaration instead, and
adding to it as desired.
Case Classes Are Just a Convenience
It’s important to remember that while case classes are very conve‐
nient, there isn’t anything in them that you can’t code for yourself.
Case objects
Scala also has case objects, which are similar to case classes in that many similar addi‐
tional methods are generated. Case objects are useful in certain situations, such as
when creating immutable messages for Akka actors:
sealed trait Message
case class Speak(text: String) extends Message
case object StopSpeaking extends Message
In this example, Speak requires a parameter, so it’s declared as a case class, but Stop
Speaking requires no parameters, so it’s declared as a case object.
However, note that in Scala 3, enums can often be used instead of case objects:
enum Message:
case Speak(text: String)
case StopSpeaking
See Also
• Using case objects for Akka messages is discussed in Recipe 18.7, “Sending Mes‐
sages to Actors”.
• When you want to use multiple constructors with a case class, see Recipe 5.15.
• See Recipe 6.12, “How to Create Sets of Named Values with Enums”, for more
details on how to use enums.
5.14 Generating Boilerplate Code with Case Classes
|
175
5.15 Defining Auxiliary Constructors for Case Classes
Problem
Similar to the previous recipe, you want to define one or more auxiliary constructors
for a case class rather than a plain class.
Solution
A case class is a special type of class that generates a lot of boilerplate code for you.
Because of the way they work, adding what appears to be an auxiliary constructor to a
case class is different than adding an auxiliary constructor to a regular class. This is
because they’re not really constructors: they’re apply methods in the companion
object of the class.
To demonstrate this, start with this case class in a file named Person.scala:
// initial case class
case class Person(var name: String, var age: Int)
This lets you create a new Person instance:
val p = Person("John Smith", 30)
While this code looks the same as a regular class, it’s actually implemented differ‐
ently. When you write that last line of code, behind the scenes the Scala compiler con‐
verts it into this:
val p = Person.apply("John Smith", 30)
This is a call to an apply method in the companion object of the Person class. You
don’t see this—you just see the line that you wrote—but this is how the compiler
translates your code. As a result, if you want to add new constructors to your case
class, you write new apply methods. (To be clear, the word constructor is used loosely
here. Writing an apply method is more like writing a factory method.)
For instance, if you decide that you want to add two auxiliary constructors to let you
create new Person instances, one without specifying any parameters and another by
only specifying name, the solution is to add apply methods to the companion object
of the Person case class in the Person.scala file:
// the case class
case class Person(var name: String, var age: Int)
// the companion object
object Person:
def apply() = new Person("<no name>", 0)
// zero-args constructor
def apply(name: String) = new Person(name, 0) // one-arg constructor
176
|
Chapter 5: Classes
The following code demonstrates that this works as desired:
val a = Person()
val b = Person("Sarah Bracknell")
val c = Person("Sarah Bracknell", 32)
// Person(<no name>,0)
// Person(Sarah Bracknell,0)
// Person(Sarah Bracknell,32)
// verify the setter methods work
a.name = "Sarah Bannerman"
a.age = 38
println(a)
// Person(Sarah Bannerman,38)
Finally, notice that in the apply methods in the companion object, the new keyword is
used to create a new Person instance:
object Person:
def apply() = new Person("<no name>", 0)
---
This is one of the rare situations where new is required. In this situation, it tells the
compiler to use the class constructor. If you leave new off, the compiler will assume
that you’re referring to the apply method in the companion object, which creates a
circular or recursive reference.
See Also
• Recipe 5.14 details the nuts and bolts of how case classes work.
• For more information on factories, see my Java factory pattern tutorial.
5.15 Defining Auxiliary Constructors for Case Classes
|
177
CHAPTER 6
Traits and Enums
Because traits and enums are fundamental building blocks of large Scala applications,
they’re covered here in this second domain modeling chapter.
Traits can be used to define granular units of behavior, and then those granular units
can be combined to build larger components. As shown in Recipe 6.1, in their most
basic use, they can be used like a pre–Java 8 interface, where the primary reason
you use them is to declare the signatures for abstract methods that extending classes
must implement.
However, Scala traits are much more powerful and flexible than this, and you can use
them to define concrete methods and fields in addition to abstract members. Classes
and objects can then mix in multiple traits. These features are demonstrated in Rec‐
ipes 6.2, 6.3, and 6.4.
As a quick demonstration of this approach, rather than attempt to define everything a
dog can do in a single Dog class, Scala lets you define traits for smaller units of func‐
tionality like a tail, legs, eyes, ears, nose, and a mouth. Those smaller units are easier
to think about, create, test, and use, and they can later be combined together to create
a complete dog:
class Dog extends Tail, Legs, Ears, Mouth, RubberyNose
That’s a very limited introduction to what Scala traits can do. Additional features
include:
• Abstract and concrete fields (Recipe 6.2)
• Abstract and concrete methods (Recipe 6.3)
• Classes that can mix in multiple traits, as shown in Recipes 6.4 and 6.5
179
• The ability to limit the classes your traits can be mixed into (demonstrated in
Recipes 6.6, 6.7, and 6.8)
• Traits that can be parameterized, to limit which classes they can be used with
(Recipe 6.9)
• Traits that can have constructor parameters, as shown in Recipe 6.10
• The ability to use traits to build modules, as shown in Recipe 6.11, which is a ter‐
rific way to organize and simplify large applications
All of these features are discussed in the recipes in this chapter.
A Brief Introduction to Traits
As a quick example of how traits are used, here’s the source code for a trait named
Pet, which has one concrete method and one abstract method:
trait Pet:
def speak() = println("Yo")
def comeToMaster(): Unit
// concrete implementation
// abstract method
As shown, a concrete method is a method that has an implementation—a body—and
an abstract method is a method that has no body.
Next, here’s a trait named HasLegs, which has a concrete run method built in:
trait HasLegs:
def run() = println("I’m running!")
Finally, here’s a Dog class that mixes in both the Pet and HasLegs traits, while provid‐
ing a concrete implementation of the comeToMaster method:
class Dog extends Pet, HasLegs:
def comeToMaster() = println("I'm coming!")
Now, when you create a new Dog instance and call its methods, you’ll see output like
this:
val d = Dog()
d.speak()
d.comeToMaster()
d.run()
// yo
// I’m coming!
// I’m running
That’s a small glimpse of some basic trait as an interface features. This is one way of
mixing in multiple traits to create a class.
Trait Construction Order
One point that isn’t covered in the following recipes is the order in which traits are
constructed when a class mixes in several traits. For example, given these traits:
180
|
Chapter 6: Traits and Enums
trait First:
println("First is constructed")
trait Second:
println("Second is constructed")
trait Third:
println("Third is constructed")
and this class that mixes in those traits:
class MyClass extends First, Second, Third:
println("MyClass is constructed")
when a new instance of MyClass is created:
val c = MyClass()
it has this output:
First is constructed
Second is constructed
Third is constructed
MyClass is constructed
This demonstrates that the traits are constructed in order from left to right before the
class itself is constructed.
After covering traits, the final two lessons cover the enum construct, which is new in
Scala 3. An enum—an abbreviation for enumeration—is a shortcut for defining (a) a
sealed class or trait along with (b) values defined as members of the class’s companion
object.
While enums are a shortcut, they’re a powerful, concise shortcut. They can be used to
create sets of constant named values and can also be used to implement algebraic data
types (ADTs). Their use to define a set of constants is demonstrated in Recipe 6.12,
and their use to define ADTs is shown in Recipe 6.13.
6.1 Using a Trait as an Interface
Problem
You’re used to creating pure interfaces in other languages—declaring method signa‐
tures without implementations—and want to create something like that in Scala and
then use those interfaces with concrete classes.
Solution
At their most basic level, Scala traits can be used like pre–Java 8 interfaces, where you
define method signatures but don’t provide an implementation for them.
6.1 Using a Trait as an Interface
|
181
For example, imagine that you want to write some code to model any animal that has
a tail, like a dog or cat. A first thing you might think is that tails can wag, so you
define a trait like this, with two method signatures and no method body:
trait HasTail:
def startTail(): Unit
def stopTail(): Unit
Those two methods don’t take any parameters. If the methods you want to define will
take parameters, declare them as usual:
trait HasLegs:
def startRunning(speed: Double): Unit
def runForNSeconds(speed: Double, numSeconds: Int): Unit
Extending traits
On the flip side of this process, when you want to create a class that extends a trait,
use the extends keyword:
class Dog extends HasTail
When a class extends multiple traits, use extends for the first trait, and separate sub‐
sequent traits with commas:
class Dog extends HasTail, HasLegs, HasRubberyNose
If a class extends a trait but doesn’t implement all of its abstract methods, the class
must be declared abstract:
abstract class Dog extends HasTail, HasLegs:
// does not implement methods from HasTail or HasLegs so
// it must be declared abstract
But if the class provides an implementation for all the abstract methods of the traits it
extends, it can be declared as a normal class:
class Dog extends HasTail, HasLegs:
def startTail(): Unit = println("Tail is wagging")
def stopTail(): Unit = println("Tail is stopped")
def startRunning(speed: Double): Unit =
println(s"Running at $speed miles/hour")
def runForNSeconds(speed: Double, numSeconds: Int): Unit =
println(s"Running at $speed miles/hour for $numSeconds seconds")
Discussion
As shown in those examples, at their most basic level traits can be used as simple
interfaces. Classes then extend traits using the extends keyword, according to these
rules:
182
|
Chapter 6: Traits and Enums
• If a class extends one trait, use the extends keyword.
• If a class extends multiple traits, use extends for the first trait and separate the
rest with commas.
• If a class extends a class (or abstract class) and a trait, always list the class name
first—using extends before the class name—and then use commas before the
additional trait names.
As you’ll see in some of the following recipes, traits can also extend other traits:
trait SentientBeing:
def imAlive_!(): Unit = println("I’m alive!")
trait Furry
trait Dog extends SentientBeing, Furry
See Also
• Objects can also extend traits to create modules, and that technique is demon‐
strated in Recipe 6.11.
6.2 Defining Abstract Fields in Traits
Problem
You want to declare that a trait should have a field, but you don’t want to give the field
an initial value, i.e., you want it to be abstract.
Solution
Over time, Scala developers have learned that the simplest and most flexible way to
define abstract fields in traits is to use a def:
trait PizzaTrait:
def maxNumToppings: Int
This lets you override the field in the classes (and traits) that extend your trait in a
variety of ways, including as a val:
class SmallPizza extends PizzaTrait:
val maxNumToppings = 4
as a lazy val:
class SmallPizza extends PizzaTrait:
lazy val maxNumToppings =
// some long-running operation
Thread.sleep(1_000)
4
6.2 Defining Abstract Fields in Traits
|
183
as a var:
class MediumPizza extends PizzaTrait:
var maxNumToppings = 6
or as a def:
class LargePizza extends PizzaTrait:
def maxNumToppings: Int =
// some algorithm here
42
Discussion
A field in a trait can be concrete or abstract:
• If you assign it a value, it’s concrete.
• If you don’t assign it a value, it’s abstract.
From an implementation standpoint, that’s as simple as this:
trait Foo:
def bar: Int
val a = 1
var b = 2
// abstract
// concrete val
// concrete var
While those options are available, over time Scala developers learned that the most
flexible way—and the most abstract way—to define fields in traits is to declare them
as a def. As shown in the Solution, that gives you a wide variety of ways to implement
the field in classes that extend the trait. Stated another way, if you define an abstract
field as a var or val, you significantly limit your options in extending classes.
I’ve learned that an important consideration is to ask yourself, “When I say that a
base trait should have a field, how specific do I want to be about its implementation?”
By definition, when you define a trait that you want other classes to implement, the
trait is meant to be abstract, and in Scala the way to declare that field in the most
abstract manner is to declare it as a def. This is a way of saying that you don’t want to
tie down the implementation; you want extending classes to implement it in the best
way possible for their needs.
Concrete fields in traits
If you have a situation where you really do want to define a concrete val or var field
in a trait, an IDE like IntelliJ IDEA or VS Code can help you determine what you can
and can’t do in classes that extend your trait. For instance, if you specify a concrete
var field in a trait, you’ll see that you can override that value in extending classes like
this:
184
|
Chapter 6: Traits and Enums
trait SentientBeing:
var uuid = 0
// concrete
class Person extends SentientBeing:
uuid = 1
Similarly, if you define a trait field as a concrete val, you’ll need to use the override
modifier to change that value in an extending class:
trait Cat:
val numLives = 9
// concrete
class BetterCat extends Cat:
override val numLives = 10
In both cases, you can’t implement those fields as def or lazy val values in your
classes.
See Also
Scala developers learned about the def approach over a period of time. Part of the
reason for using this approach has to do with how the JVM works, and therefore how
Scala compiles traits to work with the JVM. This is a long discussion, and if you’re
interested in the details, I write about it in excruciating detail in my blog post “What
def, val, and var Fields in Scala Traits Look Like After They’re Compiled (Including
the Classes that Extend Them)”.
6.3 Using a Trait Like an Abstract Class
Problem
You want to use a trait as something like an abstract class in Java, defining both
abstract and concrete methods.
Solution
Define both concrete and abstract methods in your trait as desired. In classes that
extend the trait, you can override both types of methods, or, for the concrete meth‐
ods, you can inherit the default behavior defined in the trait.
In the following example, a default, concrete implementation is provided for the
speak method in the Pet trait, so implementing classes don’t have to override it. The
Dog class chooses not to override it, whereas the Cat class does. Both classes must
implement the comeToMaster method because it has no implementation in the Pet
trait:
6.3 Using a Trait Like an Abstract Class
|
185
trait Pet:
def speak() = println("Yo")
def comeToMaster(): Unit
// concrete implementation
// abstract method
class Dog extends Pet:
// no need to implement `speak` if you don’t want to
def comeToMaster() = println("I'm coming!")
class Cat extends Pet:
override def speak() = println("meow")
def comeToMaster() = println("That’s not gonna happen.")
If a class extends a trait without implementing its abstract methods, it must be
declared to be abstract. Because FlyingPet doesn’t implement comeToMaster, it must
be declared abstract:
abstract class FlyingPet extends Pet:
def fly() = println("Woo-hoo, I’m flying!")
Discussion
Although Scala has abstract classes, it’s much more common to use traits than
abstract classes to implement base behavior. A class can only extend one abstract
class, but it can implement multiple traits, so using traits is more flexible. Because
Scala 3 also lets traits have constructor parameters, traits will be used in even more
situations.
See Also
• See Recipe 6.9 for details on using trait parameters with Scala 3.
• See “One more thing: When to use abstract classes” on page 136 for information
on when to use an abstract class instead of a trait.
6.4 Using Traits as Mixins
Problem
You want to design a solution where one or more traits can be mixed into a class to
provide a robust design.
Solution
To use traits as mixins, define the methods in your traits as abstract or concrete meth‐
ods, as usual, and then mix the traits into your classes using extends. This can be
done in at least two different ways:
186
|
Chapter 6: Traits and Enums
• Constructing a class with traits
• Mix in traits during variable construction
These approaches are discussed in the following sections.
Constructing a class with traits
A first approach is to create a class while extending one or more traits. For example,
imagine that you have these two traits:
trait HasTail:
def wagTail() = println("Tail is wagging")
def stopTail() = println("Tail is stopped")
trait Pet:
def speak() = println("Yo")
def comeToMaster(): Unit
// abstract
The methods in HasTail are both concrete, while the comeToMaster method in Pet is
abstract because the method has no body. Now you can create a concrete Dog class by
mixing in those traits and implementing comeToMaster:
class Dog(val name: String) extends Pet, HasTail:
def comeToMaster() = println("Woo-hoo, I'm coming!")
val d = Dog("Zeus")
Using the same approach, you can create a Cat class that implements comeToMaster
differently, while also overriding speak:
class Cat(val name: String) extends Pet, HasTail:
def comeToMaster() = println("That’s not gonna happen.")
override def speak() = println("meow")
val c = Cat("Morris")
Mix in traits during variable construction
Another mixin approach is to add traits to a class at the same time as you create a
variable. Imagine that you now have these three traits (which have no methods) and a
Pet class:
trait
trait
trait
class
HasLegs
HasTail
MansBestFriend
Pet(val name: String)
Now you can create a new Pet instance while also mixing in the traits you want for
this particular variable:
val zeus = new Pet("Zeus") with MansBestFriend with HasTail with HasLegs
6.4 Using Traits as Mixins
|
187
Then you can create other variables by mixing in the traits that make sense:
val cat = new Pet("Morris") with HasTail with HasLegs
Discussion
I show both approaches because different people have different definitions of what
mixin means. When I first learned about mixins, the primary use case was the second
example, showing how to mix in a trait at the time you create a variable.
But these days the term mixin can be used any time multiple traits are used to com‐
pose a class. This is because those traits aren’t a sole parent of the class, but instead
they’re mixed into the class. For instance, the Wikipedia mixin page provides a good
way to think about this, stating that mixins are “described as being ‘included’ rather
than ‘inherited.’”
This is a key benefit of traits: they let you build modular units of behavior by decom‐
posing large problems into smaller problems. For instance, rather than attempting to
design a large Dog class, it’s much easier to understand the smaller components that
make up a dog and break the problem into traits related to having a tail, legs, fur, ears,
etc., and then mixing those traits together to create a dog. By doing so you create
small, granular modules that are easier to understand and test, and those modules can
also be used to create other things like cats, horses, etc.
Several keys to using traits as mixins are:
• Create small units of focused scope and functionality.
• Implement the methods you can, and declare the others as abstract.
• Because traits have a focused area of responsibility, they generally implement
unrelated behavior (also known as orthogonal behavior).
Stackable Trait Pattern
To see a great demonstration of the power of mixins, read Bill Ven‐
ners’ short Artima article on stackable trait patterns. By defining
traits and classes as base, core, and stackable components, the article
demonstrates how 16 different classes can be derived from three
traits by stacking the traits together.
As a final note about mixins, the book Scala for the Impatient by Cay S. Horstmann
(Addison-Wesley Professional) makes the point that philosophically, this code:
class Pet(val name: String) extends HasLegs, HasTail, MansBestFriend
188
|
Chapter 6: Traits and Enums
isn’t read as “class Pet extends HasLegs ‘with HasTail and MansBestFriend’” but is
instead read as “class Pet extends ‘HasLegs, HasTail, and MansBestFriend.’” It’s a sub‐
tle point that says that a class mixes in all of those traits equally, rather than favoring
the first trait in any special way.
See Also
When you develop traits, you may want to limit the classes they can be mixed into.
That can be done using the following techniques:
• Recipe 6.6 shows how to mark traits so they can only be used by subclasses of a
certain type.
• Recipe 6.7 demonstrates the technique to use to make sure a trait can only be
mixed into classes that have a specific method.
• Recipe 6.8 shows how to limit which classes can use a trait by declaring
inheritance.
• Recipe 7.7, “Reifying Traits as Objects”, shows how to create an object that
mixes in multiple traits.
• Bill Venners’ short Artima article on stackable trait patterns demonstrates how
many different classes can be derived from stacking traits together.
6.5 Resolving Method Name Conflicts and
Understanding super
Problem
You attempt to create a class that mixes in multiple traits, but those traits have identi‐
cal method names and parameter lists, resulting in a compiler error.
Solution
When two or more mixed-in traits share the same method name, the solution is to
resolve the conflict manually. This can require understanding the meaning of super
when referring to mixed-in traits.
As an example, imagine that you have two traits that both have a greet method:
trait Hello:
def greet = "hello"
trait Hi:
def greet = "hi"
6.5 Resolving Method Name Conflicts and Understanding super
|
189
Now if you attempt to create a Greeter class that mixes in both traits:
class Greeter extends Hello, Hi
you’ll see an error like this:
class Greeter extends Hello, Hi
^
class Greeter inherits conflicting members:
|method greet in trait Hello of type
|=> String and
|method greet in trait Hi of type
|=> String
(Note: this can be resolved by declaring an override in class Greeter.)
The error message tells you the solution—that you can override greet in the Greeter
class. But it doesn’t give you details on how to do this.
There are three main solutions, all of which require that you override greet in
Greeter:
• Override greet with custom behavior.
• Tell greet in Greeter to call the greet method from super, which raises the
question, “What does super refer to when you’re mixing in multiple traits?”
• Tell greet in Greeter to use the greet method from a specific trait that was
mixed in.
The next sections cover each solution in detail.
Override greet with custom behavior
The first solution is to ignore the methods defined in the traits and implement some
custom behavior by overriding the method:
// resolve the conflict by overriding 'greet' in the class
class Greeter extends Hello, Hi:
override def greet = "I greet thee!"
// the 'greet' method override works as expected
val g = Greeter()
g.greet == "I greet thee!"
// true
This is a simple, straightforward solution for the situations where you don’t care how
the traits have implemented this method.
Invoke greet using super
The second solution is to invoke the method as it’s defined in your immediate parent,
i.e., the super instance. In this code the speak method in the Speaker class invokes
super.speak:
190
|
Chapter 6: Traits and Enums
trait Parent:
def speak = "make your bed"
trait Granddad:
def speak = "get off my lawn"
// resolve the conflict by calling 'super.speak'
class Speaker extends Parent, Granddad:
override def speak = super.speak
@main def callSuperSpeak =
println(Speaker().speak)
The question is, what does super.speak print?
The answer is that super.speak prints, "get off my lawn". In an example like this
where a class mixes in multiple traits—and those traits have no mixin or inheritance
relationships between themselves—super will always refer to the last trait that is
mixed in. This is referred to as a back to front linearization order.
Control which super you call
In the third solution you specify which mixed-in trait’s method you want to call with
a super[classname].methodName syntax. For instance, given these three traits:
trait Hello:
def greet = "hello"
trait Hi:
def greet = "hi"
trait Yo:
def greet = "yo"
you can create a Greeter class that mixes in those traits and then defines a series of
greet methods that call the greet methods of those traits:
class Greeter extends Hello, Hi, Yo:
override def greet = super.greet
def greetHello = super[Hello].greet
def greetHi
= super[Hi].greet
def greetYo
= super[Yo].greet
end Greeter
You can test that configuration with this code in the REPL:
val g = Greeter()
g.greet
//
g.greetHello
//
g.greetHi
//
g.greetYo
//
yo
hello
hi
yo
The key to this solution is that the super[Hello].greet syntax gives you a way to
reference the hello method of the Hello trait, and so on for the Hi and Yo traits. Note
in the g.greet example that super again refers to the last trait that is mixed in.
6.5 Resolving Method Name Conflicts and Understanding super
|
191
Discussion
Naming conflicts only occur when the method names are the same and the method
parameter lists are identical. The method return type doesn’t factor into whether a
collision will occur. For example, this code results in a name collision because both
versions of f have the type (Int, Int):
trait A:
def f(a: Int, b: Int): Int = 1
trait B:
def f(a: Int, b: Int): Long = 2
// won’t compile. error: “class C inherits conflicting members.”
class C extends A, B
But this code does not result in a collision, because the parameter lists have different
types:
trait A:
def f(a: Int, b: Int): Int = 1
trait B:
def f(a: Int, b: Long): Int = 2
// (Int, Int)
// (Int, Long)
// this code compiles because 'A.f' and 'B.f' have different
// parameter lists
class C extends A, B
See Also
Traits can be combined in a technique known as stackable modifications.
• The basic technique is well described in Chapter 12 of the first edition of Pro‐
gramming in Scala, which is freely available on the Artima website. See the “Traits
as stackable modifications” section in that online chapter.
• This knoldus.com article has a good discussion about how the linearization of
traits that are mixed into classes works.
6.6 Marking Traits So They Can Only Be Used by Subclasses
of a Certain Type
Problem
You want to mark your trait so it can only be used by types that extend a given base
type.
192
| Chapter 6: Traits and Enums
Solution
To make sure a trait named MyTrait can only be mixed into a class that is a subclass
of a type named BaseType, begin your trait with this syntax:
trait MyTrait:
this: BaseType =>
For instance, to make sure a StarfleetWarpCore can only be mixed into a class that
also mixes in FederationStarship, begin the StarfleetWarpCore trait like this:
trait StarfleetWarpCore:
this: FederationStarship =>
// the rest of the trait here ...
Given that declaration, this code compiles:
// this compiles, as desired
trait FederationStarship
class Enterprise extends FederationStarship, StarfleetWarpCore
But other attempts like this will fail:
class RomulanShip
// this won’t compile
class Warbird extends RomulanShip, StarfleetWarpCore
^
illegal inheritance: self type
Warbird of class Warbird does not conform to self type
FederationStarship of parent trait StarfleetWarpCore
Explanation: You mixed in trait StarfleetWarpCore which requires self
type FederationStarship
The Discussion demonstrates how you can use this technique to require the presence
of multiple other types.
Discussion
As shown in the error message, this approach is referred to as a self type (or self-type).
The Scala glossary includes this statement as part of its description of a self type:
A self type of a trait is the assumed type of this, the receiver, to be used within the trait.
Any concrete class that mixes in the trait must ensure that its type conforms to the
trait’s self type.
One way to think about that statement is by evaluating what this means when using
mixins to compose a class. For instance, given a trait named HasLegs:
trait HasLegs
6.6 Marking Traits So They Can Only Be Used by Subclasses of a Certain Type
|
193
you can define a trait named CanRun that requires the presence of HasLegs whenever
CanRun is mixed into a concrete class:
trait CanRun:
this: HasLegs =>
So when you create a Dog class by mixing in HasLegs and CanRun, you can test what
this means inside that class:
class Dog extends HasLegs, CanRun:
def whatAmI(): Unit =
if this.isInstanceOf[Dog] then println("Dog")
if this.isInstanceOf[HasLegs] then println("HasLegs")
if this.isInstanceOf[CanRun] then println("CanRun")
Now when you create a Dog instance and run whatAmI:
val d = Dog()
d.whatAmI()
you’ll see that it prints the following result, because this inside a Dog is an instance of
all of those types:
Dog
HasLegs
CanRun
The important part to remember is that when you define a self-type like this:
trait CanRun:
this: HasLegs =>
the key is that CanRun knows that when a concrete instance of it is eventually created,
this in that concrete instance can respond, “Yes, I am also an instance of HasLegs.”
A trait can call methods on the required type
A great feature of this approach is that because the trait knows that the other type
must be present, it can call methods that are defined in that other type. For instance,
if you have a type named HasLegs with a method named numLegs:
trait HasLegs:
def numLegs = 0
you might want to create a new trait named CanRun. CanRun requires the presence of
HasLegs, so you make that a contractual requirement with a self-type:
trait CanRun:
this: HasLegs =>
194
| Chapter 6: Traits and Enums
Now you can take this a step further. Because CanRun knows that HasLegs must be
present when CanRun is mixed in, it can safely call the numLegs methods:
trait CanRun:
this: HasLegs =>
def run() = println(s"I have $numLegs legs and I’m running!")
Now when you create a Dog class with HasLegs and CanRun:
class Dog extends HasLegs, CanRun:
override val numLegs = 4
@main def selfTypes =
val d = Dog()
d.run()
you’ll see this output:
I have 4 legs and I’m running!
This is a powerful and safe (compiler-enforced) technique.
Requiring multiple other types be present
A trait can also require that any type that wishes to mix it in must also extend multiple
other types. The following WarpCore definition requires that any type that wishes to
mix it in must extend WarpCoreEjector, FireExtinguisher, and FederationStar
ship:
trait WarpCore:
this: FederationStarship & WarpCoreEjector & FireExtinguisher =>
// more trait code here ...
Because the following Enterprise definition matches that signature, this code com‐
piles:
class FederationStarship
trait WarpCoreEjector
trait FireExtinguisher
// this works
class Enterprise extends FederationStarship, WarpCore, WarpCoreEjector, ↵
FireExtinguisher
See Also
• Regarding the def numLegs code, Recipe 6.2 explains why an abstract field in a
trait is best declared as a def field.
6.6 Marking Traits So They Can Only Be Used by Subclasses of a Certain Type
|
195
6.7 Ensuring a Trait Can Only Be Added to a Type That Has
a Specific Method
Problem
You only want to allow a trait to be mixed into a type (class, abstract class, or trait)
that has a method with a given signature.
Solution
Use a variation of the self-type syntax that lets you declare that any class that attempts
to mix in the trait must implement the method you describe.
In the following example, the WarpCore trait requires that any class that attempts to
mix it in must have an ejectWarpCore method with the signature shown, taking a
String parameter and returning a Boolean value:
trait WarpCore:
this: { def ejectWarpCore(password: String): Boolean } =>
// more trait code here ...
The following definition of the Enterprise class meets these requirements and there‐
fore compiles:
class Starship:
// code here ...
class Enterprise extends Starship, WarpCore:
def ejectWarpCore(password: String): Boolean =
if password == "password" then
println("ejecting core!")
true
else
false
end if
Discussion
This approach is known as a structural type, because you’re limiting what classes the
trait can be mixed into by stating that the class must have a certain structure, i.e., the
method signatures you’ve specified.
A trait can also require that an implementing class have multiple methods. To require
more than one method, add the additional method signatures inside the block. Here’s
a complete example:
196
|
Chapter 6: Traits and Enums
trait WarpCore:
this: {
// an implementing class must have methods with
// these names and input parameters
def ejectWarpCore(password: String): Boolean
def startWarpCore(): Unit
} =>
// more trait code here ...
class Starship
class Enterprise extends Starship, WarpCore:
def ejectWarpCore(password: String): Boolean =
if password == "password" then
println("core ejected")
true
else
false
end if
end ejectWarpCore
def startWarpCore() = println("core started")
In this example, because Enterprise includes the ejectWarpCore and startWarp
Core methods that the WarpCore trait requires, Enterprise is able to mix in the Warp
Core trait.
6.8 Limiting Which Classes Can Use a Trait by Inheritance
Problem
You want to limit a trait so it can only be added to classes that extend a specific
superclass.
Solution
Use the following syntax to declare a trait named TraitName, where TraitName can
only be mixed into classes that extend a type named SuperClass, where SuperClass
may be a class or abstract class:
trait TraitName extends SuperClass
For example, in modeling a large pizza store chain that has a corporate office and
many small retail stores, the legal department creates a rule that people who deliver
pizzas to customers must be a subclass of StoreEmployee and cannot be a subclass of
CorporateEmployee. To enforce this, begin by defining your base classes:
trait Employee
class CorporateEmployee extends Employee
class StoreEmployee extends Employee
6.8 Limiting Which Classes Can Use a Trait by Inheritance
|
197
Because someone who delivers food can only be a StoreEmployee, you enforce this
requirement in the DeliversFood trait:
trait DeliversFood extends StoreEmployee
---------------------
Now you can successfully define a DeliveryPerson class like this:
// this is allowed
class DeliveryPerson extends StoreEmployee, DeliversFood
But because the DeliversFood trait can only be mixed into classes that extend Store
Employee, the following line of code won’t compile:
// won’t compile
class Receptionist extends CorporateEmployee, DeliversFood
The compiler error message looks like this:
illegal trait inheritance: superclass CorporateEmployee
does not derive from trait DeliversFood's super class StoreEmployee
This makes the people in the legal department happy.
Discussion
I don’t use this technique very often, but when you need to limit which classes a trait
can be mixed into by requiring a specific superclass, this is an effective technique.
Note that this approach does not work when CorporateEmployee and StoreEmployee
are traits instead of classes. When you need to use this approach with traits, see
Recipe 6.6.
6.9 Working with Parameterized Traits
Problem
As you become more advanced in working with types, you want to write a trait whose
methods can be applied to generic types, or limited to other specific types.
Solution
Depending on your needs you can use type parameters or type members with traits.
This example shows what a generic trait type parameter looks like:
trait Stringify[A]:
def string(a: A): String
198
|
Chapter 6: Traits and Enums
This example shows what a type member looks like:
trait Stringify:
type A
def string(a: A): String
Here’s a complete type parameter example:
trait Stringify[A]:
def string(a: A): String = s"value: ${a.toString}"
@main def typeParameter =
object StringifyInt extends Stringify[Int]
println(StringifyInt.string(100))
And here’s the same example written using a type member:
trait Stringify:
type A
def string(a: A): String
object StringifyInt extends Stringify:
type A = Int
def string(i: Int): String = s"value: ${i.toString}"
@main def typeMember =
println(StringifyInt.string(42))
Dependent Types
The free book The Type Astronaut’s Guide to Shapeless by Dave
Gurnell (Underscore) shows an example where a type parameter
and type member are used in combination to create something
known as a dependent type.
Discussion
With the type parameter approach you can specify multiple types. For example, this is
a Scala implementation of the Java Pair interface that’s shown on this Java documen‐
tation page about generic types:
trait Pair[A, B]:
def getKey: A
def getValue: B
That demonstrates the use of two generic parameters in a small trait example.
An advantage of parameterizing traits using either technique is that you can prevent
things from happening that should never happen. For instance, given this trait and
class hierarchy:
6.9 Working with Parameterized Traits
|
199
sealed trait Dog
class LittleDog extends Dog
class BigDog extends Dog
you can define another trait with a type member like this:
trait Barker:
type D <: Dog
//type member
def bark(d: D): Unit
Now you can define an object with a bark method for little dogs:
object LittleBarker extends Barker:
type D = LittleDog
def bark(d: D) = println("wuf")
and you can define another object with a bark method for big dogs:
object BigBarker extends Barker:
type D = BigDog
def bark(d: D) = println("WOOF!")
Now when you create these instances:
val terrier = LittleDog()
val husky = BigDog()
this code will compile:
LittleBarker.bark(terrier)
BigBarker.bark(husky)
and this code won’t compile, as desired:
// won’t work, compiler error
// BigBarker.bark(terrier)
This demonstrates how a type member can declare a base type in the initial trait, and
how more specific types can be applied in the traits, classes, and objects that extend
that base type.
6.10 Using Trait Parameters
Problem
In Scala 3, you want to create a trait that takes one or more parameters, in the same
way that a class or abstract class takes constructor parameters.
Solution
In Scala 3 a trait can have parameters, just like a class or abstract class. For instance,
here’s an example of a trait that accepts a parameter:
200
| Chapter 6: Traits and Enums
trait Pet(val name: String)
However, per the Scala 3 trait parameters specification, there are limits on how this
feature can be used:
• A trait T can have one or more parameters.
• A trait T1 can extend T, so long as it does not pass parameters to T.
• If a class C extends T, and its superclass does not, C must pass arguments to T.
• If a class C extends T, and its superclass does too, C may not pass arguments to T.
Getting back to the example, once you have a trait that accepts a parameter, a class
can extend it like this:
trait Pet(val name: String)
// a class can extend a trait with a parameter
class Dog(override val name: String) extends Pet(name):
override def toString = s"dog name: $name"
// use the Dog class
val d = Dog("Fido")
Later in your code, another class can also extend the Dog class:
class SiberianHusky(override val name: String) extends Dog(name)
In a world where all cats are named “Morris,” a class can extend a trait with parame‐
ters like this:
class Cat extends Pet("Morris"):
override def toString = s"Cat: $name"
// use the Cat class
val c = Cat()
These examples show how traits are used in the previous first, third, and fourth bullet
points.
One trait can extend another, with limits
Next, as stated previously, a trait can extend another trait that takes one or more
parameters so long as it does not pass a parameter to it. Therefore, this attempt fails:
// won’t compile
trait Echidna(override val name: String) extends Pet(name)
^^^^^^^^^
trait Echidna may not call constructor of trait Pet
6.10 Using Trait Parameters
|
201
And this attempt, which does not attempt to pass a parameter to Pet, succeeds:
// works
trait FeatheredPet extends Pet
Then, when a class later extends FeatheredPet, the correct approach is to write your
code like this:
class Bird(override val name: String) extends Pet(name), FeatheredPet:
override def toString = s"bird name: $name"
// create a new Bird
val b = Bird("Tweety")
Discussion
In this solution there’s a subtle distinction between these two approaches:
trait Pet(val name: String)
trait Pet(name: String)
// shown in the Solution
When val is not used, name is a simple parameter, but it provides no getter method.
When val is used, it provides a getter for name, and everything in the Solution works
as shown.
When you leave val off the name field in Pet, all the following code works as before,
except the Cat class, which will not compile:
trait Pet(name: String):
override def toString = s"Pet: $name"
trait FeatheredPet extends Pet
// `override` is not needed on these parameters
class Bird(val name: String) extends Pet(name), FeatheredPet:
override def toString = s"Bird: $name"
class Dog(val name: String) extends Pet(name):
override def toString = s"Dog: $name"
class SiberianHusky(override val name: String) extends Dog(name)
// this will not compile
class Cat extends Pet("Morris"):
override def toString = s"Cat: $name"
The Cat approach doesn’t compile because the name parameter in the Pet class isn’t
defined as a val; therefore there is no getter method for it. Again, this is a subtle
point, and how you define the initial field depends on how you want to access name in
the future.
Trait parameters were added to Scala 3 at least in part to help eliminate a Scala 2 fea‐
ture known as early initializers or early definitions. Somewhere in Scala 2 history,
someone found out that you could write code like this:
202
|
Chapter 6: Traits and Enums
// this is Scala 2 code. start with a normal trait.
trait Pet {
def name: String
val nameLength = name.length
// note: this is based on `name`
}
// notice the unusual approach of initializing a variable after 'extends' and
// before 'with'. this is a Scala 2 “early initializer” technique:
class Dog extends {
val name = "Xena, the Princess Warrior"
} with Pet
val d = new Dog
d.name
// Xena, the Princess Warrior
d.nameLength
// 26
The purpose of this approach was to make sure that name was initialized early, so the
nameLength expression wouldn’t throw a NullPointerException. Conversely, if you
wrote the code like this, it will throw a NullPointerException when you try to create
a new Dog:
// this is also Scala 2 code
trait Pet {
def name: String
val nameLength = name.length
}
class Dog extends Pet {
val name = "Xena, the Princess Warrior"
}
val d = new Dog
//java.lang.NullPointerException
I never used this early initializer feature in Scala 2, but it’s known to be hard to imple‐
ment properly, so it’s eliminated in Scala 3 and replaced by trait parameters.
Also note that trait parameters have no effect on how traits are initialized. Given
these traits:
trait A(val a: String):
println(s"A: $a")
trait B extends A:
println(s"B: $a")
trait C:
println(s"C")
the following classes D and E show that the traits can be specified in any order when
they are mixed in:
class D(override val a: String) extends A(a), B, C
class E(override val a: String) extends C, B, A(a)
6.10 Using Trait Parameters
|
203
The output of creating new instances of D and E is shown in the REPL:
scala> D("d")
A: d
B: d
C
scala> E("e")
C
A: e
B: e
As shown, the traits can be listed in any order.
6.11 Using Traits to Create Modules
Problem
You’ve heard that traits are the way to implement modules in Scala, and you want to
understand how to use them in this manner.
Solution
At a detailed level there are several ways to solve this problem, but a common theme
in the solutions is that you use objects to create modules in Scala.
The technique shown in this recipe is generally used for composing large systems, so
I’ll start with a small example to demonstrate it. Imagine that you’ve defined a trait to
implement a method that adds two integers:
trait AddService:
def add(a: Int, b: Int) = a + b
The basic technique to create a module is to create a singleton object from that trait.
The syntax for doing this is:
object AddService extends AddService
In this case you create a singleton object named AddService from the trait AddSer
vice. You can do this without implementing methods in the object because the add
method in the trait is concrete.
Reifying a Trait
Some people refer to this as reifying the trait, where the word reify
means “taking an abstract concept and making it concrete.” I find
that a way to remember that meaning is to think of it as real-ify, as
in, “to make real.”
204
|
Chapter 6: Traits and Enums
The way you use the AddService module—a singleton object—in the rest of your
code looks like this:
import AddService.*
println(add(1,1))
// prints 2
Trying to keep things simple, here’s a second example of the technique where I create
another module by mixing in two traits:
trait AddService:
def add(a: Int, b: Int) = a + b
trait MultiplyService:
def multiply(a: Int, b: Int) = a * b
object MathService extends AddService, MultiplyService
The rest of your application uses this module in the same way:
import MathService.*
println(add(1,1))
println(multiply(2,2))
// 2
// 4
While these examples are simple, they demonstrate the essence of the technique:
• Create traits to model small, logically grouped areas of the business domain.
• The public interface of those traits contains only pure functions.
• When it makes sense, mix those traits together into larger logical groups, such as
MathService.
• Build singleton objects from those traits (reify them).
• Use the pure functions from those objects to solve problems.
That’s the essence of the solution in two small examples. But because traits have all
the other features shown in this chapter, in the real world the implementation can be
as complicated as necessary.
Discussion
The name Scala comes from the word scalable, and Scala is intended to scale: to solve
small problems easily, and also scale to solve the world’s largest computing challenges.
The concept of modules and modularity is how Scala makes it possible to solve those
large problems.
Programming in Scala, cowritten by Martin Odersky—creator of the Scala language—
states that any technique to implement modularity in programming languages must
provide several essentials:
6.11 Using Traits to Create Modules
|
205
• First, a language needs a module construct that provides a separation between
interface and implementation. In Scala, traits provide that functionality.
• Second, there must be a way to replace one module with another that has the
same interface, without changing or recompiling the modules that depend on the
replaced one.
• Third, there should be a way to wire modules together. This wiring task can be
thought of as configuring the system.
Programming in Scala, specifically recommends that programs be divided into single‐
ton objects, which again, you can think of as modules.
A larger example: An order-entry system
As a larger demonstration of how this technique works—while also incorporating
other features from this chapter—let’s look at developing an order-entry system for a
pizza store.
As the old saying goes, sometimes it helps to begin with the end in mind, and follow‐
ing that advice, here’s the source code for an @main method that I’ll create in this
section:
@main def pizzaModuleDemo =
import CrustSize.*
import CrustType.*
import Topping.*
// create some mock objects for testing
object MockOrderDao extends MockOrderDao
object MockOrderController extends OrderController, ConsoleLogger:
// specify a concrete instance of an OrderDao, in this case a
// MockOrderDao for this MockOrderController
val orderDao = MockOrderDao
val smallThinCheesePizza = Pizza(
Small, Thin, Seq(Cheese)
)
val largeThickWorks = Pizza(
Large, Thick, Seq(Cheese, Pepperoni, Olives)
)
MockOrderController.addItemToOrder(smallThinCheesePizza)
MockOrderController.addItemToOrder(largeThickWorks)
MockOrderController.printReceipt()
You’ll see that when that code runs, it prints this output to STDOUT:
206
|
Chapter 6: Traits and Enums
YOUR ORDER
---------Pizza(Small,Thin,List(Cheese))
Pizza(Large,Thick,List(Cheese, Pepperoni, Olives))
LOG:
YOUR ORDER
---------Pizza(Small,Thin,List(Cheese))
Pizza(Large,Thick,List(Cheese, Pepperoni, Olives))
To see how that code works, let’s dig into the code that’s used to build it. First, I start
by creating some pizza-related ADTs using the Scala 3 enum construct:
enum CrustSize:
case Small, Medium, Large
enum CrustType:
case Thin, Thick, Regular
enum Topping:
case Cheese, Pepperoni, Olives
Next, create a Pizza class in a functional style—meaning that it’s a case class with
immutable fields:
case class Pizza(
crustSize: CrustSize,
crustType: CrustType,
toppings: Seq[Topping]
)
This approach is similar to using a struct in other languages like C, Rust, and Go.
Next, I’ll keep the concept of an order simple. In the real world an order will have line
items that may be pizzas, breadsticks, cheesesticks, soft drinks, and more, but for this
example it will only hold a list of pizzas:
case class Order(items: Seq[Pizza])
This example also handles the concept of a database, so I create a database interface
that looks like this:
trait OrderDao:
def addItem(p: Pizza): Unit
def getItems: Seq[Pizza]
A great thing about an interface is that you can create multiple implementations of it,
and then construct your modules with those implementations. For instance, it’s com‐
mon to create a mock database for use in testing, and then other code that connects
to a real database server in production. Here’s a mock data access object (DAO) for
testing purposes that simply stores its items in an ArrayBuffer in memory:
6.11 Using Traits to Create Modules
|
207
trait MockOrderDao extends OrderDao:
import scala.collection.mutable.ArrayBuffer
private val items = ArrayBuffer[Pizza]()
def addItem(p: Pizza) = items += p
def getItems: Seq[Pizza] = items.toSeq
To make things a little more complex, let’s assume that the legal department at our
pizza store requires us to write to a separate log every time we create a receipt. To
support that requirement I follow the same pattern, first creating an interface:
trait Logger:
def log(s: String): Unit
then creating an implementation of that interface:
trait ConsoleLogger extends Logger:
def log(s: String) = println(s"LOG: $s")
Other implementations might include a FileLogger, DatabaseLogger, etc., but I’ll
only use the ConsoleLogger in this example.
At this point the only thing left is to create an OrderController. Notice in this code
that Logger is declared as a self-type, and orderDao is an abstract field:
trait OrderController:
this: Logger =>
def orderDao: OrderDao
// declares a self-type
// abstract
def addItemToOrder(p: Pizza) = orderDao.addItem(p)
def printReceipt(): Unit =
val receipt = generateReceipt
println(receipt)
log(receipt)
// from Logger
// this is an example of a private method in a trait
private def generateReceipt: String =
val items: Seq[Pizza] = for p <- orderDao.getItems yield p
s"""
|YOUR ORDER
|---------|${items.mkString("\n")}""".stripMargin
Notice that the log method from whatever Logger instance this controller mixes in is
called in the printReceipt method. The code also calls the addItem method on the
OrderDao instance, where that instance may be a MockOrderDao or any other imple‐
mentation of the OrderDao interface.
When you look back at the source code, you’ll see that this example demonstrates
several trait techniques, including:
208
|
Chapter 6: Traits and Enums
• How to reify traits into objects (modules)
• How to use interfaces (like OrderDao) and abstract fields (orderDao) to create a
form of dependency injection
• How to use self-types, where I declare that OrderController must have a Logger
mixed in
There are many ways to expand on this example, and I describe a larger version of it
in my book Functional Programming, Simplified. For example, the OrderDao might
grow like this:
trait OrderDao:
def addItem(p: Pizza): Unit
def removeItem(p: Pizza): Unit
def removeAllItems: Unit
def getItems: Seq[Pizza]
PizzaService then provides all the pure functions needed to update a Pizza:
trait PizzaService:
def addTopping(p: Pizza, t: Topping): Pizza
def removeTopping(p: Pizza, t: Topping): Pizza
def removeAllToppings(p: Pizza): Pizza
def setCrustSize(p: Pizza, cs: CrustSize): Pizza
def setCrustType(p: Pizza, ct: CrustType): Pizza
You’ll also want a function to calculate the price of a pizza. Depending on your design
ideas you may want that code in PizzaService, or you might want a separate trait
related to pricing named PizzaPricingService:
trait PizzaPricingService:
def pizzaDao: PizzaDao
def toppingDao: ToppingDao
def calculatePizzaPrice(
p: Pizza,
toppingsPrices: Map[Topping, Money],
crustSizePrices: Map[CrustSize, Money],
crustTypePrices: Map[CrustType, Money]
): Money
As shown in the first two lines, PizzaPricingService requires references to other
DAO instances to get prices from the database.
In all of these examples I use the word “Service” as part of the trait names. I find that
it’s a good name, because you can think of those traits as providing a related collec‐
tion of pure functions or services, such as those you find in a web service or micro‐
service. Another good word to use is Module, in which case you’d have PizzaModule
and PizzaPricingModule. (Feel free to use any name that is meaningful to you.)
6.11 Using Traits to Create Modules
|
209
See Also
• See Recipe 7.3, “Creating Singletons with object”, for more details on singleton
objects.
• I wrote about reification on my blog, “The Meaning of the Word Reify in Pro‐
gramming”.
• The process of reifying traits as objects is discussed in Recipe 7.7, “Reifying Traits
as Objects”.
• See Recipe 6.13 for details about ADTs.
• Recipes in Chapter 10 demonstrate other ways to create and use ADTs and pure
functions.
6.12 How to Create Sets of Named Values with Enums
Problem
You want to create a set of constants to model something in the world, such as direc‐
tions (north, south, east, west), positions on a display (top, bottom, left, right), top‐
pings on a pizza, and other finite sets of values.
Solution
Define sets of constant named values using the Scala 3 enum construct. This example
shows how to define values for crust sizes, crust types, and toppings when modeling a
pizza store application:
enum CrustSize:
case Small, Medium, Large
enum CrustType:
case Thin, Thick, Regular
enum Topping:
case Cheese, Pepperoni, Mushrooms, GreenPeppers, Olives
Once you’ve created an enum, first import its instances, and then use them in expres‐
sions and parameters, just like a class, trait, or other type:
import CrustSize.*
if currentCrustSize == Small then ...
currentCrustSize match
case Small => ...
case Medium => ...
210
| Chapter 6: Traits and Enums
case Large => ...
case class Pizza(
crustSize: CrustSize,
crustType: CrustType,
toppings: ArrayBuffer[Topping]
)
Like classes and traits, enums can take parameters and have members, such as fields
and methods. This example shows how a parameter named code is used in an enum:
enum HttpResponse(val code: Int):
case Ok extends HttpResponse(200)
case MovedPermanently extends HttpResponse(301)
case InternalServerError extends HttpResponse(500)
As described in the Discussion, instances of an enum are similar to case objects, so just
like any other object, you access the code field directly on the object (like a static
member in Java):
import HttpResponse.*
Ok.code
MovedPermanently.code
InternalServerError.code
// 200
// 301
// 500
Members are shown in the discussion that follows.
Enums Contain Sets of Values
In this recipe the word set is used intentionally to describe enums.
Like the Set class, all the values in an enum must be unique.
Discussion
An enum is a shortcut for defining (a) a sealed class or trait along with (b) values
defined as members of the class’s companion object. For example, this enum:
enum CrustSize:
case Small, Medium, Large
is a shortcut for writing this more verbose code:
sealed class CrustSize
object CrustSize:
case object Small extends CrustSize
case object Medium extends CrustSize
case object Large extends CrustSize
In this longer code, notice how the enum instances are enumerated as case objects in
the companion object. This was a common way to create enumerations in Scala 2.
6.12 How to Create Sets of Named Values with Enums
|
211
Enums can have members
As demonstrated with the Planet example on this Scala 3 enum page, enums can also
have members—i.e., fields and methods:
enum Planet(mass: Double, radius: Double):
private final val G = 6.67300E-11
def surfaceGravity = G * mass / (radius * radius)
def surfaceWeight(otherMass: Double) = otherMass * surfaceGravity
case Mercury extends Planet(3.303e+23, 2.4397e6)
case Earth
extends Planet(5.976e+24, 6.37814e6)
// more planets here ...
Notice in this example that the parameters mass and radius are not defined as val or
var fields. Because of this, they are private to the Planet enum. This means that they
can be accessed in internal methods like surfaceGravity and surfaceWeight but
can’t be accessed outside the enum. This is the same behavior you get when using pri‐
vate parameters with classes and traits.
When to use enums
It can seem like the line is blurry about when to use traits, classes, and enums, but a
thing to remember about enums is that they’re typically used to model a small, finite
set of possible values. For instance, in the Planet example, there are only eight (or
nine) planets in our solar system (depending on who’s counting). Because this is a
small, finite set of constant values, using an enum is a good choice to model the
planets.
Compatibility with Java
If you want to define your Scala enums as Java enums, extend java.lang.Enum, which
is imported by default:
enum CrustSize extends Enum[CrustSize]:
case Small, Medium, Large
As shown, you need to parameterize the java.lang.Enum with your Scala enum type.
See Also
• See the Scala 3 enum documentation for more details on enum features.
• The “Domain Modeling” chapter of the Scala 3 Book provides more details on
enums.
• Recipe 6.13 demonstrates additional uses of enums.
212
|
Chapter 6: Traits and Enums
• The Scala Planet example was initially derived from the enum types Java Tuto‐
rial.
6.13 Modeling Algebraic Data Types with Enums
Problem
When programming in a functional programming style, you want to model an alge‐
braic data type using Scala 3.
Solution
There are two main types of ADTs:
• Sum types
• Product types
Both are demonstrated in the following examples.
Sum types
A Sum type is also referred to as an enumerated type because you simply enumerate all
the possible instances of the type. In Scala 3, this is done with the enum construct. For
instance, to create your own boolean data type, start by defining a Sum type like this:
enum Bool:
case True, False
This can be read as “Bool is a type that has two possible values, True and False.” Sim‐
ilarly, Position is a type with four possible values:
enum Position:
case Top, Right, Bottom, Left
Product types
A Product type is created with a class constructor. The Product name comes from the
fact that the number of possible concrete instances of the class is determined by mul‐
tiplying the number of possibilities of all of its constructor fields.
For example, this class named DoubleBoo has two Bool constructor parameters:
case class DoubleBoo(b1: Bool, b2: Bool)
In a small example like this, you can enumerate the possible values that can be created
from this constructor:
6.13 Modeling Algebraic Data Types with Enums
|
213
DoubleBoo(True, True)
DoubleBoo(True, False)
DoubleBoo(False, True)
DoubleBoo(False, False)
As shown, there are four possible values. As implied by the name Product, you can
also derive this answer mathematically. This is covered in the Discussion.
Discussion
Informally, an algebra can be thought of as consisting of two things:
• A set of objects
• The operations that can be applied to those objects to create new objects
Technically an algebra also consists of a third item—the laws that govern the algebra
—but that’s a topic for a larger book on FP.
In the Bool example the set of objects is True and False. The operations consist of the
methods you define for those objects. For instance, you can define and and or opera‐
tions to work with Bool like this:
enum Bool:
case True, False
import Bool.*
def and(a: Bool, b: Bool):
case (True, True)
=>
case (False, False) =>
case (True, False) =>
case (False, True) =>
def or(a: Bool, b:
case (True, _)
case (_, True)
case (_, _)
Bool = (a,b) match
True
False
False
False
Bool): Bool = (a,b) match
=> True
=> True
=> False
These examples show how those operations work:
and(True,True)
and(True,False)
or(True,False)
or(False,False)
//
//
//
//
True
False
True
False
The Sum type
A few important points about Sum types:
• In Scala 3 they’re created as cases of the enum construct.
214
| Chapter 6: Traits and Enums
• The number of enumerated types you list are the only possible instances of the
type. In the previous example, Bool is the type, and it has two possible values,
True and False.
• The phrases is a and or a are used when talking about Sum types. For example,
True is a Bool, and Bool is a True or a False.
Alternate Names for Sum Type Instances
People use different names for the concrete instances in a Sum
type, including value constructors, alternates, and cases.
The Product type
As mentioned, the name Product type comes from the fact that you can determine the
number of possible instances of a type by multiplying the number of possibilities of
all of its constructor fields. In the Solution, I enumerated the four possible Bool val‐
ues, but you can mathematically determine the number of possible instances like this:
1. b1 has two possibilities.
2. b2 has two possibilities.
3. Because there are two parameters, and each has two possibilities, the number of
possible instances of DoubleBoo is 2 times 2, or 4.
Similarly, in this next example, TripleBoo has eight possible values, because 2 times 2
times 2 is 8:
case class TripleBoo(b1: Bool, b2: Bool, b3: Bool)
Using that logic, how many values can this Pair class have?
case class Pair(a: Int, b: Int)
If you answered “a lot,” that’s close enough. An Int has 232 possible values, so if you
multiply the number of possible Int values by itself, you get a very large number.
Much more different than Scala 2
The enum type was introduced in Scala 3, and in Scala 2 you had to use this longer
syntax to define a Sum type:
sealed trait Bool
case object True extends Bool
case object False extends Bool
6.13 Modeling Algebraic Data Types with Enums
|
215
Fortunately, the new syntax is much more concise, which you can appreciate when
enumerating larger Sum types:
enum Topping:
case Cheese, BlackOlives, GreenOlives, GreenPeppers, Onions, Pepperoni,
Mushrooms, Sausage
Why Programmers Don’t Use String or Int for Constants
The Product types portion of this recipe helps to explain why programmers don’t like
to use strings or numbers for constants. To demonstrate this, let’s assume that you
define all the sets of values related to a pizza as strings, starting like this:
val Small = "SMALL"
val Medium = "MEDIUM"
val Large = "LARGE"
If you keep doing that, you’ll end up with this Pizza class constructor:
case class Pizza(
crustSize: String,
crustType: String,
toppings: ArrayBuffer[String]
)
This approach has two problems:
• Scala is a statically typed language, so strong typing should be used here so you
can get all the benefits of type safety. The parameters should use types like Crust
Size, CrustType, and Topping, but strings are used instead.
• Knowing that this constructor creates a Product type, you also know that the
number of possible values it can have are infinite: it has three constructor param‐
eters that each have an infinite number of possibilities (and “infinity cubed” is
infinity).
Conversely, when you use enums to model CrustSize, CrustType, and Topping, a
Pizza with three possible crust sizes, three possible crust types, and 10 possible top‐
pings has only 90 possibilities (3 × 3 × 10).
See Also
• In addition to Sum and Product types, there are other types of ADTs, informally
known as hybrid types. I discuss these in “Appendix: Algebraic Data Types in
Scala”.
• The “Algebraic Data Types” chapter of the Scala 3 Book provides more details
about ADTs and generalized ADTs in Scala.
216
|
Chapter 6: Traits and Enums
CHAPTER 7
Objects
Continuing the domain modeling chapters, the word object has a dual meaning in
Scala. As with Java, you use the name to refer to an instance of a class, but in Scala
object is much more well known as a keyword. This chapter demonstrates both
meanings of the word.
The first two recipes look at an object as an instance of a class. They show how to cast
objects from one type to another and demonstrate the Scala equivalent of
Java’s .class approach.
The remaining recipes demonstrate how the object keyword is used for other pur‐
poses. In the most basic use, Recipe 7.3 shows how to use it to create singletons.
Recipe 7.4 demonstrates how to use companion objects as a way to add static members
to a class, and then Recipe 7.5 shows how to use apply methods in companion
objects as an alternative way to construct class instances.
After those recipes, Recipe 7.6 shows how to create a static factory using an object,
and Recipe 7.7 demonstrates how to combine one or more traits into an object in a
process that’s technically known as reification. Finally, pattern matching is a very
important Scala topic, and Recipe 7.8 demonstrates how to write an unapply method
in a companion object so your classes can be used in match expressions.1
1 The previous version of this book covered package objects, but they’ll be deprecated after Scala 3.0, so they’re
not discussed in this book.
217
7.1 Casting Objects
Problem
You need to cast an instance of a class from one type to another, such as when creat‐
ing objects dynamically.
Solution
In the following example I’ll work with the Sphinx-4 speech recognition library,
which works in a manner similar to creating beans in older versions of the Spring
Framework. In the example, the object returned by the lookup method is cast to an
instance of a class named Recognizer:
val recognizer = cm.lookup("recognizer").asInstanceOf[Recognizer]
This Scala code is equivalent to the following Java code:
Recognizer recognizer = (Recognizer)cm.lookup("recognizer");
The asInstanceOf method is defined in the Scala Any class, and is therefore available
on all objects.
Discussion
In dynamic programming, it’s often necessary to cast from one type to another. For
instance, this approach is needed when reading a YAML configuration file with the
SnakeYAML library:
val yaml = Yaml(new Constructor(classOf[EmailAccount]))
val emailAccount = yaml.load(text).asInstanceOf[EmailAccount]
The asInstanceOf method isn’t limited to only these situations. You can also use it to
cast numeric types:
val a = 10
val b = a.asInstanceOf[Long]
val c = a.asInstanceOf[Byte]
// Int = 10
// Long = 10
// Byte = 10
It can be used in more complicated code too, such as when you need to interact with
Java and send it an array of Object instances:
val objects = Array("a", 1)
val arrayOfObject = objects.asInstanceOf[Array[Object]]
AJavaClass.sendObjects(arrayOfObject)
If you’re programming with the java.net classes, you may need to use it when open‐
ing an HTTP URL connection:
import java.net.{URL, HttpURLConnection}
val connection = (new URL(url)).openConnection.asInstanceOf[HttpURLConnection]
218
|
Chapter 7: Objects
Be aware that this type of coding can lead to a ClassCastException, as demonstrated
in this REPL example:
scala> val i = 1
i: Int = 1
scala> i.asInstanceOf[String]
ClassCastException: java.lang.Integer cannot be cast to java.lang.String
As usual, use a try/catch expression to handle this situation.
7.2 Passing a Class Type with the classOf Method
Problem
When an API requires that you pass in a Class type, you’d call .class on an object in
Java, but that doesn’t work in Scala.
Solution
Use the Scala classOf method instead of Java’s .class. The following example from a
Java Sound API project shows how to pass a class of type TargetDataLine to a
method named DataLine.Info:
val info = DataLine.Info(classOf[TargetDataLine], null)
By contrast, the same method call would be made like this in Java:
// java
info = new DataLine.Info(TargetDataLine.class, null);
The classOf method is defined in the Scala Predef object and is therefore available
without requiring an import.
Discussion
Once you have a Class reference you can begin with simple reflection techniques.
For instance, the following REPL example demonstrates how to access the methods of
the String class:
scala> val stringClass = classOf[String]
stringClass: Class[String] = class java.lang.String
scala> stringClass.getMethods
res0: Array[java.lang.reflect.Method] = Array(public boolean
java.lang.String.equals(java.lang.Object), public java.lang.String
(output goes on for a while ...)
7.2 Passing a Class Type with the classOf Method
|
219
See Also
• The Scala Predef object
7.3 Creating Singletons with object
Problem
You want to create a singleton object to ensure that only one instance of a class exists.
Solution
Create singleton objects in Scala with the object keyword. For instance, you might
create a singleton object to represent something you only want one instance of, such
as a keyboard, mouse, or perhaps a cash register in a pizza restaurant:
object CashRegister:
def open() = println("opened")
def close() = println("closed")
With CashRegister defined as an object, there can be only one instance of it, and its
methods are called just like static methods on a Java class:
@main def main =
CashRegister.open()
CashRegister.close()
Discussion
A singleton object is a class that has exactly one instance. Using this pattern is also a
common way to create utility methods, such as this StringUtils object:
object StringUtils:
def isNullOrEmpty(s: String): Boolean =
if s==null || s.trim.equals("") then true else false
def leftTrim(s: String): String = s.replaceAll("^\\s+", "")
def rightTrim(s: String): String = s.replaceAll("\\s+$", "")
def capitalizeAllWordsInString(s: String): String =
s.split(" ").map(_.capitalize).mkString(" ")
Because these methods are defined in an object instead of a class, they can be called
directly on the object, similar to a static method in Java:
scala> StringUtils.isNullOrEmpty("")
val res0: Boolean = true
scala> StringUtils.capitalizeAllWordsInString("big belly burger")
val res1: String = Big Belly Burger
220
|
Chapter 7: Objects
Singleton case objects also make great reusable messages in certain situations, such as
when using Akka actors. For instance, if you have a number of actors that can all
receive start and stop messages, you can create singletons like this:
case object StartMessage
case object StopMessage
You can then use those objects as messages that can be sent to actors:
inputValve ! StopMessage
outputValve ! StopMessage
See Also
• See Chapter 18 for more examples of passing messages to actors.
• In addition to creating objects in this manner, you can give the appearance that a
class has both static and nonstatic methods using an approach known as a com‐
panion object. See Recipe 7.4 for examples of that approach.
7.4 Creating Static Members with Companion Objects
Problem
You’ve come to Scala from a language like Java and want to create a class that has both
instance and static members, but Scala doesn’t have a static keyword.
Solution
When you want nonstatic (instance) members in a class combined with static mem‐
bers, define the instance members in a class and define the members that you want
to appear as “static” members in an object that has the same name as the class, and is
in the same file as the class. This object is known as the class’s companion object (and
the class is known as the object’s companion class).
Using this approach lets you create what appear to be static members on a class, as
shown in this example:
// Pizza class
class Pizza (var crustType: String):
override def toString = s"Crust type is $crustType"
// companion object
object Pizza:
val CRUST_TYPE_THIN = "THIN"
// static fields
val CRUST_TYPE_THICK = "THICK"
def getPrice = 0.0
// static method
7.4 Creating Static Members with Companion Objects
|
221
With the Pizza class and Pizza object defined in the same file, members of the Pizza
object can be accessed just as static members of a Java class:
println(Pizza.CRUST_TYPE_THIN)
println(Pizza.getPrice)
// THIN
// 0.0
You can also create a new Pizza instance and use it as usual:
val p = Pizza(Pizza.CRUST_TYPE_THICK)
println(p)
// "Crust type is THICK"
Use enums for Constants
In the real world, don’t use strings for constant values. Use enumer‐
ations instead, as shown in Recipe 6.12, “How to Create Sets of
Named Values with Enums”.
Discussion
Although this approach is different than Java, the recipe is straightforward:
• Define your class and object in the same file, giving them the same name.
• Define members that should appear to be “static” in the object.
• Define nonstatic (instance) members in the class.
In this recipe I put the word static in quotation marks because Scala doesn’t refer to
members in objects as static members, but in this context they serve the same pur‐
pose as static members in Java classes.
Accessing private members
It’s important to know that a class and its companion object can access each other’s
private members. In the following code, the static method double in the object can
access the private variable secret of the class Foo:
class Foo:
private val secret = 42
object Foo:
// access the private class field `secret`
def doubleFoo(foo: Foo) = foo.secret * 2
@main def fooMain =
val f = Foo()
println(Foo.doubleFoo(f))
222
| Chapter 7: Objects
// prints 84
Similarly, in the following code the instance member printObj can access the private
field obj of the object Foo:
class Foo:
// access the private object field `obj`
def printObj = println(s"I can see ${Foo.obj}")
object Foo:
private val obj = "Foo’s object"
@main def fooMain =
val f = Foo()
f.printObj
// prints "I can see Foo’s object"
See Also
• See Recipe 7.6 for an example of how to implement a factory using this approach.
7.5 Using apply Methods in Objects as Constructors
Problem
In some situations it may be better, easier, or more convenient to create apply meth‐
ods in a companion object to work as a class constructor, and you want to understand
how to write these methods.
Solution
The techniques in Recipe 5.2, “Creating a Primary Constructor”, and Recipe 5.4,
“Defining Auxiliary Constructors for Classes”, show how to create both single and
multiple class constructors. But another technique you can use to create constructors
is to define apply methods in a class’s companion object—an object that has the same
name as the class and is defined in the same file as the class. Technically these aren’t
constructors, they’re more like functions or factory methods, but they serve a similar
purpose.
Creating a companion object with an apply method takes just a few steps. Assuming
that you want to create constructors for a Person class:
1. Define a Person class and Person object in the same file (making them
companions).
2. Make the Person class constructor private.
3. Define one or more apply methods in the object to serve as builders of the class.
7.5 Using apply Methods in Objects as Constructors
|
223
For the first two steps, create the class and object in the same file, and make the Per
son class constructor private:
class Person private(val name: String):
// define any instance members you need here
object Person:
// define any static members you need here
Then create one or more apply methods in the companion object:
class Person private(val name: String):
override def toString = name
object Person:
// the “constructor”
def apply(name: String): Person = new Person(name)
Given this code, you can now create new Person instances, as shown in these
examples:
val Regina = Person("Regina")
val a = List(Person("Regina"), Person("Robert"))
In Scala 2 a benefit of this approach was that it eliminated the need for the new key‐
word before the class name. But because new isn’t needed in most situations in Scala 3,
you may want to use this technique because you prefer this factory approach, or
because you need it in one of those rare situations.
Discussion
An apply method defined in the companion object of a class is treated specially by
the Scala compiler. Essentially, there’s a little syntactic sugar baked into the compiler
so that when it sees this code:
val p = Person("Fred Flintstone")
one of the things it does is to look around and see if it can find an apply method in a
companion object. When it does, it turns that code into this code:
val p = Person.apply("Fred Flintstone")
Therefore, apply is often referred to as a factory method, function, or perhaps a
builder. Technically it’s not a constructor.
When you want to use this technique and provide multiple ways to build a class,
define multiple apply methods with the desired signatures:
class Person private(var name: String, var age: Int):
override def toString = s"$name is $age years old"
object Person:
224
| Chapter 7: Objects
// three ways to build a Person
def apply(): Person = new Person("", 0)
def apply(name: String): Person = new Person(name, 0)
def apply(name: String, age: Int): Person = new Person(name, age)
That code creates three ways to build new Person instances:
println(Person())
println(Person("Regina"))
println(Person("Robert", 22))
// is 0 years old
// Regina is 0 years old
// Robert is 22 years old
Because apply is just a function, you can implement it however you see fit. For
instance, you can construct a Person from a tuple, or even a variable number of
tuples:
object Person:
def apply(t: (String, Int)) = new Person(t(0), t(1))
def apply(ts: (String, Int)*) =
for t <- ts yield new Person(t(0), t(1))
Those two apply methods are used like this:
// create a person from a tuple
val john = Person(("John", 30))
// create multiple people using a variable number of tuples
val peeps = Person(
("Barb", 33),
("Cheryl", 31)
)
See Also
• For information on how to implement a static factory with apply, see Recipe 7.6.
• See Recipe 5.2, “Creating a Primary Constructor”, for details on how to create a
primary class constructor, and Recipe 5.4, “Defining Auxiliary Constructors for
Classes”, for details on how to define auxiliary class constructors.
• While apply is like a constructor, unapply is its opposite, known as an extractor,
which is discussed in Recipe 7.8.
7.6 Implementing a Static Factory with apply
Problem
To keep object creation logic in one location, you want to implement a static factory
in Scala.
7.6 Implementing a Static Factory with apply
|
225
Solution
A static factory is a simplified version of the factory pattern. To create a static factory,
you can take advantage of Scala’s syntactic sugar and create the factory with an apply
method in an object, typically a companion object.
For instance, suppose you want to create an Animal factory that returns instances of
Cat and Dog classes based on what you ask for. By writing an apply method in the
companion object of an Animal trait, users of your factory can create new Cat and
Dog instances like this:
val cat = Animal("cat")
val dog = Animal("dog")
// creates a Cat
// creates a Dog
To implement this behavior, create a file named Animals.scala, and in that file create
(a) a parent Animal trait, (b) the classes that extend that trait, and (c) a companion
object with a suitable apply method:
package animals
sealed trait Animal:
def speak(): Unit
private class Dog extends Animal:
override def speak() = println("woof")
private class Cat extends Animal:
override def speak() = println("meow")
object Animal:
// the factory method
def apply(s: String): Animal =
if s == "dog" then Dog() else Cat()
Next, in a file named Factory.scala, define an @main method to test that code:
@main def test1 =
import animals.*
val cat = Animal("cat")
val dog = Animal("dog")
// returns a Cat
// returns a Dog
cat.speak()
dog.speak()
When you run that code, you see this output:
meow
woof
226
|
Chapter 7: Objects
A benefit of this approach is that instances of the Dog and Cat classes can only be cre‐
ated through the factory method. Attempting to create them directly will fail:
val c = Cat()
val d = Dog()
// compile error
// compile error
Discussion
There are a variety of ways to implement a static factory, so experiment with different
approaches, in particular regarding how you want to make the Cat and Dog classes
accessible. The idea of the factory method is to make sure that concrete instances can
only be created through the factory; therefore, the class constructors should be hid‐
den from all other classes. The code in the Solution shows one possible solution to
this problem.
See Also
This recipe demonstrates a simple static factory as a way to demonstrate features of a
Scala object. For an example of how to create a true factory method in Scala, see my
blog post “A Scala Factory Pattern Example”.
7.7 Reifying Traits as Objects
Problem
You’ve created one or more traits that contain methods, and now you want to make
them concrete. Or, perhaps you’ve seen code like this and then wondered what that
last line of code is all about:
trait Foo:
println("Foo")
// more code ...
object Foo extends Foo
Solution
When you see that an object extends one or more traits, the object is being used to
reify the trait(s). The word reify means “to take an abstract concept and making it
concrete,” in this case instantiating a singleton object from one or more traits.
For instance, given this trait and two classes that extend it:
trait Animal
// in a world where all dogs and cats have names
case class Dog(name: String) extends Animal
case class Cat(name: String) extends Animal
7.7 Reifying Traits as Objects
|
227
in a functional programming style you might also create a set of animal services as a
trait:
// assumes that all animal have legs
trait AnimalServices:
def walk(a: Animal) = println(s"$a is walking")
def run(a: Animal) = println(s"$a is running")
def stop(a: Animal) = println(s"$a is stopped")
Once you have a trait like this, the next thing many developers do is reify the Animal
Services trait as an object:
object AnimalServices extends AnimalServices
Now you can use the AnimalServices functions:
val zeus = Dog("Zeus")
AnimalServices.walk(zeus)
AnimalServices.run(zeus)
AnimalServices.stop(zeus)
About the Name “Service”
The name service comes from the fact that these functions provide
a series of public services that are available to external clients. I find
that this name makes sense when you imagine that these functions
are implemented as a series of web service calls. For instance, when
you use Twitter’s REST API to write a Twitter client, the functions
it makes available to you are considered to be a series of web
services.
Discussion
The approach shown is used in functional programming, where data is typically
modeled using case classes and the related functions are put in traits. The general
recipe goes like this:
1. Model your data using case classes.
2. Put the related functions in traits.
3. Reify your traits as objects, combining multiple traits as needed for a solution.
A slightly more real-world implementation of the previous code might look as fol‐
lows. First, a simple data model:
trait Animal
trait AnimalWithLegs
trait AnimalWithTail
case class Dog(name: String) extends Animal, AnimalWithLegs, AnimalWithTail
228
|
Chapter 7: Objects
Next, create a series of services, i.e., sets of functions corresponding to the traits:
trait TailServices:
def wagTail(a: AnimalWithTail) = println(s"$a is wagging tail")
def stopTail(a: AnimalWithTail) = println(s"$a tail is stopped")
trait AnimalWithLegsServices:
def walk(a: AnimalWithLegs) = println(s"$a is walking")
def run(a: AnimalWithLegs) = println(s"$a is running")
def stop(a: AnimalWithLegs) = println(s"$a is stopped")
trait DogServices:
def bark(d: Dog) = println(s"$d says ‘woof’")
Now you can reify all those traits into a complete list of dog-related functions:
object DogServices extends DogServices, AnimalWithLegsServices, TailServices
Then you can use those functions:
import DogServices.*
val rocky = Dog("Rocky")
walk(rocky)
wagTail(rocky)
bark(rocky)
Even more specific!
There are times when you’ll want to be more specific with your code and parameter‐
ize your traits, like this:
trait TailServices[AnimalWithTail] ...
---------------trait AnimalWithLegsServices[AnimalWithLegs] ...
----------------
This is a way of saying, “The functions in this trait can only be used with this type.” In
larger applications, this technique can help other developers more easily understand
the purpose of the trait. This is one of the advantages of using a statically typed
language.
To use this technique with the current set of case classes, modify the traits like this:
trait TailServices[AnimalWithTail]:
def wagTail(a: AnimalWithTail) = println(s"$a is wagging tail")
trait AnimalWithLegsServices[AnimalWithLegs]:
def walk(a: AnimalWithLegs) = println(s"$a is walking")
trait DogServices[Dog]:
def bark(d: Dog) = println(s"$d says ‘woof’")
7.7 Reifying Traits as Objects
|
229
Then create the reified object like this:
object DogServices
extends DogServices[Dog], AnimalWithLegsServices[Dog], TailServices[Dog]
Finally, you’ll see that it works as before:
import DogServices.*
val xena = Dog("Xena")
walk(xena)
// Dog(Xena) is walking
wagTail(xena)
// Dog(Xena) is wagging tail
bark(xena)
// Dog(Xena) says ‘woof’
See Also
• When I first learned of the word reify I couldn’t understand why it was used in
this context, so I researched it and summarized my findings on my blog.
• See Recipe 6.11, “Using Traits to Create Modules”, for larger examples of using
this technique to create modules.
7.8 Implementing Pattern Matching with unapply
Problem
You want to write an unapply method for a class so you can extract its fields in a
match expression.
Solution
Write an unapply method in the companion object of your class with the proper
return signature. The solution is shown here in two steps:
1. Writing an unapply method that returns a String
2. Writing an unapply method to work with a match expression
Writing an unapply method that returns a String
To begin demonstrating how unapply works, here’s a Person class with a correspond‐
ing companion object that has an unapply method that returns a formatted string:
class Person(val name: String, val age: Int)
object Person:
def unapply(p: Person): String = s"${p.name}, ${p.age}"
230
|
Chapter 7: Objects
With this configuration you create a new Person instance as usual:
val p = Person("Lori", 33)
The benefit of an unapply method is that it gives you a way to deconstruct a person
instance:
val personAsAString = Person.unapply(p)
// "Lori, 33"
As shown, unapply deconstructs the Person instance it’s given into a String repre‐
sentation. In Scala, when you put an unapply method in a companion object, it’s said
that you’ve created an extractor method, because you’ve created a way to extract the
fields out of the object.
Writing an unapply method to work with a match expression
While that example shows how to deconstruct a Person into a String, if you want to
extract the fields out of Person in a match expression, unapply needs to return a spe‐
cific type:
• If your class has only one parameter and it’s of type A, return an Option[A], i.e.,
the parameter value wrapped in a Some.
• When your class has multiple parameters of types A1, A2, … An, return them in
an Option[(A1, A2 ... An)], i.e., a tuple that contains those values, wrapped in
a Some.
If for some reason your unapply method can’t deconstruct its parameters into proper
values, return a None instead.
For example, if you replace the previous unapply method with this one:
class Person(val name: String, val age: Int)
object Person:
def unapply(p: Person): Option[(String, Int)] = Some(p.name, p.age)
you’ll see that you can now use Person in a match expression:
val p = Person("Lori", 33)
val deconstructedPerson: String = p match
case Person(n, a) => s"name: $n, age: $a"
case null => "null!"
The REPL shows the result:
scala> println(deconstructedPerson)
name: Lori, age: 33
Case classes generate this code automatically, but if you don’t want to use a case class
and you do want your class to work in a match expression, this is how you enable an
extractor in a class.
7.8 Implementing Pattern Matching with unapply
|
231
See Also
• If you’re wondering about the name unapply, it’s used because this “deconstruc‐
tion” process is basically the opposite of writing an apply method in a compan‐
ion class. The apply methods in companion objects are used as factory methods
to construct new instances, and they’re discussed in Recipe 5.15, “Defining Auxil‐
iary Constructors for Case Classes”.
• See the official Scala page on extractor objects for more details on writing unap
ply methods.
232
|
Chapter 7: Objects
CHAPTER 8
Methods
This final chapter on domain modeling covers methods, which can be defined inside
classes, case classes, traits, enums, and objects. An important note—and a big change
in Scala 3—is that methods can also be defined outside of those constructs. As a
result, a complete Scala 3 application can look like this:
def printHello(name: String) = println(s"Hello, $name")
def printString(s: String) = println(s)
@main def hiMom =
printHello("mom")
printString("Look mom, no classes or objects required!")
Scala methods are similar to methods in other typed languages. They’re defined with
the def keyword, typically take one or more parameters, have an algorithm that they
perform, and return some sort of result. A basic method—one that doesn’t have
generic types or using parameters—is defined like this:
def methodName(paramName1: type1, paramName2: type2, ...): ReturnType =
// the method body
// goes here
Declaring the method return type is optional, but I find that for maintaining applica‐
tions I haven’t looked at in months or years, taking a few moments to declare the type
now makes it easier to understand days, months, and years from now. When I don’t
add the type—or when I use other dynamically typed languages—I find that I have to
take a fair amount of time in the future to look through the method body to deter‐
mine what the return type is, and the longer the method, the longer that takes. So
most developers agree that it’s best to declare the return now, while it’s fresh in your
mind. And as I write in “Scala/FP: Pure Function Signatures Tell All”, if you get into
functional programming, you’ll find that pure function signatures are extraordinarily
meaningful.
233
There are several keywords that can be prepended to def. For example, methods can
be declared to be final if you don’t want inheriting classes to override them:
class Foo:
final def foo = "foo"
// FINAL
class FooFoo extends Foo:
override def foo = "foo foo"
// ERROR, won’t compile
Other keywords like protected and private are demonstrated in this chapter to
show how to control method scope.
Scala is considered to be an expression-oriented programming language, meaning
that every line of code is an expression: it returns a value and typically doesn’t have a
side effect. As a result, methods can be extremely concise, because language con‐
structs like if, for/yield, match, and try are all expressions that return values. Code
that’s both concise and readable is called expressive, and to demonstrate this, I’ll show
a small collection of expressive methods that use these constructs.
First, here are some examples that only use equality tests or if expressions as the
method body:
// with return type
def isBetween(a: Int, x: Int, y: Int): Boolean = a >= x && a <= y
def max(a: Int, b: Int): Int = if a > b then a else b
// without return type
def isBetween(a: Int, x: Int, y: Int) = a >= x && a <= y
def max(a: Int, b: Int) = if a > b then a else b
You can also place the body of the method on a separate line, if that’s more readable
to you:
def isBetween(a: Int, x: Int, y: Int): Boolean =
a >= x && a <= y
def max(a: Int, b: Int): Int =
if a > b then a else b
Next, here’s a match expression as the body of a method:
def sum(xs: List[Int]): Int = xs match
case Nil => 0
case x :: tail => x + sum(tail)
A for expression—a combination of for and yield—can also be used as a method
body:
def allThoseBetween3and10(xs: List[Int]): List[Int] =
for
x <- xs
if x >= 3
234
| Chapter 8: Methods
if x <= 10
yield
x
println(allThoseBetween3and10(List(1,3,7,11)))
// List(3, 7)
You can use the same technique with other constructs, such as try/catch expressions.
While those introductory examples show several Scala method features, there’s much
more to know. The following recipes show how to:
• Specify method access control, i.e., the visibility of methods (Recipe 8.1)
• Call methods on a superclass or trait (Recipe 8.2)
• Specify the names of method parameters when calling a method (Recipe 8.3)
• Set default values for method parameters (Recipe 8.4)
• Use varargs fields in methods (Recipe 8.5)
• Force callers to leave parentheses off certain methods (Recipe 8.6)
• Declare the exceptions a method can throw (Recipe 8.7)
• Use special techniques to support a fluent method programming style (Recipe
8.8)
• Use the new Scala 3 extension method syntax (Recipe 8.9)
Finally, in addition to defining methods, it’s important to know that you can also
define functions in Scala using the val keyword. Functions aren’t discussed in this
chapter, but they’re covered in several recipes in Chapter 10, and in “Scala: The Dif‐
ferences Between val and def When Creating Functions” I write at length about those
differences.
8.1 Controlling Method Scope (Access Modifiers)
Problem
Scala methods are public by default, and you want to control their scope.
Solution
Scala lets you control method visibility in a granular and powerful way. In order from
“most restrictive” to “most open,” Scala provides these scope options:
• Private scope
• Protected scope
• Package scope
8.1 Controlling Method Scope (Access Modifiers) |
235
• Package-specific scope
• Public scope
These scopes are demonstrated in the examples that follow.
private[this] and protected[this]
Scala 2 has a notion of private[this] and protected[this] scope
qualifiers, but those have been deprecated. See the Scala 3 reference
page for a discussion of those features.
Private scope
The most restrictive access is to mark a method private, which makes the method
available to (a) the current instance of a class and (b) other instances of the current
class. This code shows how to mark a method as private and how it can be used by
another instance of the same class:
class Cat:
private def isFriendlyCat = true
def sampleMethod(other: Cat) =
if other.isFriendlyCat then
println("Can access other.isFriendlyCat")
// ...
end if
end sampleMethod
end Cat
When a method is marked private it’s not available to subclasses. The following Dog
class won’t compile because the heartBeat method is private to the Animal class:
class Animal:
private def heartBeat() = println("Animal heart is beating")
class Dog extends Animal:
heartBeat()
// ERROR: Not found: heartBeat
To make the method available to the Dog class, use protected scope.
Protected scope
Marking a method protected modifies its scope so it (a) can be accessed by other
instances of the same class, (b) is not visible in the current package, and (c) is avail‐
able to subclasses. The following code demonstrates these points:
class Cat:
protected def isFriendlyCat = true
def catFoo(otherCat: Cat) =
if otherCat.isFriendlyCat then
// this compiles
println("Can access 'otherCat.isFriendlyCat'")
236
|
Chapter 8: Methods
// ...
end if
@main def catTests =
val c1 = Cat()
val c2 = Cat()
c1.catFoo(c2)
// this works
// this code can’t access this method:
// c1.isFriendlyCat
// does not compile
In that code:
• The if other.isFriendlyCat expression in catFoo shows that one Cat instance
can access isFriendlyCat in another instance.
• The c1.catFoo(c2) expression demonstrates that one Cat instance can call cat
Foo on another instance, and catFoo can invoke isFriendlyCat on that other
instance.
• The commented-out c1.isFriendlyCat shows that one Cat instance can’t
directly invoke isFriendlyCat on another Cat instance; protected doesn’t allow
that, even though CatHouse is in the same package as Cat.
Because protected methods are available to subclasses, the following code also
compiles:
class Animal:
protected def heartBeat() = println("Animal heart is beating")
class Dog extends Animal:
heartBeat()
// this
Package scope
To make a method only available to all members of the current package, mark the
method as being private to the current package with the private[packageName]
syntax.
In the following example, the method privateModelMethod can be accessed by other
classes in the same package—the model package—but privateMethod and protected
Method can’t be accessed:
package com.devdaily.coolapp.model:
class Foo:
// this is in “package scope”
private[model] def privateModelMethod = ??? // can be accessed by
// classes in
// com.devdaily.coolapp.model
private def privateMethod = ???
protected def protectedMethod = ???
8.1 Controlling Method Scope (Access Modifiers) |
237
class Bar:
val f = Foo()
f.privateModelMethod
// f.privateMethod
// f.protectedMethod
// compiles
// won’t compile
// won’t compile
Package-specific scope
Beyond making a method available to classes in the current package, Scala also allows
a fine-grained level of access control that lets you make a method available at differ‐
ent levels in a class hierarchy. The following example demonstrates how you can
make the methods doUnderModel, doUnderCoolapp, and doUnderAcme available to dif‐
ferent package levels:
package com.devdaily.coolapp.model:
class Foo:
// available under com.devdaily.coolapp.model
private[model] def doUnderModel = ???
// available under com.devdaily.coolapp
private[coolapp] def doUnderCoolapp = ???
// available under com.devdaily
private[devdaily] def doUnderAcme = ???
import com.devdaily.coolapp.model.Foo
package com.devdaily.coolapp.view:
class Bar:
val f = Foo()
// f.doUnderModel // won’t compile
f.doUnderCoolapp
f.doUnderAcme
package com.devdaily.common:
class Bar:
val f = Foo()
// f.doUnderModel
// f.doUnderCoolapp
f.doUnderAcme
// won’t compile
// won’t compile
In this example, the methods can be seen as follows:
• The method doUnderModel can be seen by other classes in the model package
(com.devdaily.coolapp.model).
• The method doUnderCoolapp can be seen by all classes under the
com.devdaily.coolapp package level.
238
|
Chapter 8: Methods
• The method doUnderAcme can be seen by all classes under the com.devdaily
level.
Public scope
If no access modifier is added to a method declaration, the method is public, meaning
that any piece of code in any package can access it. In the following example, any class
in any package can access the doPublic method:
package com.devdaily.coolapp.model:
class Foo:
def doPublic = ???
package some.other.scope:
class Bar:
val f = com.devdaily.coolapp.model.Foo()
f.doPublic
Discussion
The Scala approach to access modifiers is different than Java. Methods are public by
default, and then when you need flexibility in how you provide access control, Scala
offers the features demonstrated in the Solution.
As a summary, Table 8-1 describes the levels of access control that were demonstrated
in the Solution.
Table 8-1. Descriptions of Scala’s access control modifiers
Access modifier
private
Description
Available to the current instance and other instances of the class it’s declared in.
protected
Available only to instances of the current class and subclasses of the current class.
private[model]
Available to all classes beneath the com.devdaily.coolapp.model package.
private[coolapp]
Available to all classes beneath the com.devdaily.coolapp package.
private[devdaily] Available to all classes beneath the com.devdaily package.
(no modifier)
The method is public.
8.2 Calling a Method on a Superclass or Trait
Problem
To keep your code DRY (don’t repeat yourself), you want to invoke a method that’s
already defined in a parent class or trait.
8.2 Calling a Method on a Superclass or Trait
|
239
Solution
There are several possible situations that need to be accounted for in this recipe:
• A method in a class does not have the same name as a superclass method and
wants to call that superclass method.
• A method in a class with the same name as a superclass method and needs to call
that superclass method.
• A method in a class has the same name as multiple traits that it extends, and you
want to choose which trait behavior to use.
The solutions for these problems are shown in the following sections.
walkThenRun calls walk and run
When a method in a class needs to invoke a method of a superclass, and the method
name in the class is different than the name in the superclass, call the superclass
method without using super:
class AnimalWithLegs:
def walk() = println("I’m walking")
def run() = println("I’m running")
class Dog extends AnimalWithLegs:
def walkThenRun() =
walk()
run()
In this example the method walkThenRun in the Dog class calls the walk and run
methods that are defined in AnimalWithLegs. Because the method names are differ‐
ent, there’s no need to use a super reference. This is normal inheritance of methods in
object-oriented programming.
While I show a superclass in this example, this discussion holds the same if Animal
WithLegs is a trait.
A walk method needs to call super.walk
When a method in a class has the same name as the method in the superclass, and
you want to invoke the superclass method, define the class method with override,
and then invoke the superclass method using super:
class AnimalWithLegs:
// the superclass 'walk' method.
def walk() = println("Animal is walking")
class Dog extends AnimalWithLegs:
// the subclass 'walk' method.
240
|
Chapter 8: Methods
override def walk() =
super.walk()
println("Dog is walking")
// invoke the superclass method.
// add your own body.
In this example, the walk method in Dog has the same name as the method in the
superclass, so it’s necessary to use super.walk to invoke the superclass walk method.
Now when you create a new Dog and invoke its walk method, you’ll see that both lines
are printed:
val d = Dog()
d.walk()
Animal is walking
Dog is walking
In this situation, if you don’t want the superclass walk behavior—you just want to
override it—don’t call the superclass method; just define your own method body:
class Dog extends AnimalWithLegs:
override def walk() =
println("Dog is walking")
Now when you create a new Dog instance and call its walk method, you’ll only see this
output:
Dog is walking
As with the previous example, this discussion is the same if AnimalWithLegs is a trait.
Controlling which trait you call a method from
If your class inherits from multiple traits, and those traits implement the same
method, you can select not only a method name but also a trait name when invoking
a method using super. For instance, given these traits:
trait Human:
def yo = "Human"
trait Mother extends Human:
override def yo = "Mother"
trait Father extends Human:
override def yo = "Father"
The following code shows different ways to invoke the hello methods from the traits
the Child class inherits from:
class Child extends
def printSuper
def printMother
def printFather
def printHuman
Human, Mother, Father:
= super.yo
= super[Mother].yo
= super[Father].yo
= super[Human].yo
8.2 Calling a Method on a Superclass or Trait
|
241
When you create a new Child instance and call its methods, you’ll see this output:
val c = Child()
println(c.printSuper)
println(c.printMother)
println(c.printFather)
println(c.printHuman)
//
//
//
//
Father
Mother
Father
Human
As shown, when a class inherits from multiple traits, and those traits have a common
method name, you can choose which trait to run the method from with the
super[traitName].methodName syntax. Also note that c.printSuper prints Father,
because traits are constructed from left to right, and Father is the last trait mixed into
Child:
class Child extends Human, Mother, Father:
------
When using this technique, you can’t continue to reach up through the parent class
hierarchy unless you directly extend the target class or trait using the extends key‐
word. For instance, the following code won’t compile because this Child doesn’t
directly extend the Human trait:
class Child extends
def printSuper
def printMother
def printFather
def printHuman
Mother, Father:
= super.yo
= super[Mother].yo
= super[Father].yo
= super[Human].yo
// removed `Human`
// won’t compile
When you try to compile the code you get the error, “Human does not name a parent
of class Child.”
8.3 Using Parameter Names When Calling a Method
Problem
You prefer a coding style where you specify the method parameter names when call‐
ing a method.
Solution
The general syntax for calling a method with named parameters is this:
methodName(param1=value1, param2=value2, ...)
This is demonstrated in the following example. Given this Pizza class definition:
242
|
Chapter 8: Methods
enum CrustSize:
case Small, Medium, Large
enum CrustType:
case Regular, Thin, Thick
import CrustSize.*, CrustType.*
class Pizza:
var crustSize = Medium
var crustType = Regular
def update(crustSize: CrustSize, crustType: CrustType) =
this.crustSize = crustSize
this.crustType = crustType
override def toString = s"A $crustSize inch, $crustType crust pizza."
you can create a Pizza:
val p = Pizza()
You can then update the Pizza, specifying the parameter names and corresponding
values when you call the update method:
p.update(crustSize = Large, crustType = Thick)
This approach has the added benefit that you can place the parameters in any order:
p.update(crustType = Thick, crustSize = Large)
Although this approach is more verbose than not using named parameters, it can also
be more readable.
Discussion
This technique is especially useful when several parameters have the same type, such
as having several Boolean or String parameters in a method. For instance, compare
this method call, which does not use named parameters:
engage(true, true, true, false)
to this one, which does:
engage(
speedIsSet = true,
directionIsSet = true,
picardSaidMakeItSo = true,
turnedOffParkingBrake = false
)
When a method specifies default values for its parameters, as demonstrated in Recipe
8.4, you can use this approach to specify only the parameters you want to override.
The combination of these two recipes makes for a flexible, powerful approach.
8.3 Using Parameter Names When Calling a Method
|
243
8.4 Setting Default Values for Method Parameters
Problem
You want to set default values for method parameters so the method can optionally
be called without those parameters having to be assigned.
Solution
Specify the default value for parameters inside the method signature with this syntax:
parameterName: parameterType = defaultValue
For example, in the following code the timeout field is assigned a default value of
5_000 and the protocol field is given a default value of "http":
class Connection:
def makeConnection(timeout: Int = 5_000, protocol: String = "https") =
println(f"timeout = ${timeout}%d, protocol = ${protocol}%s")
// more code here
When you have a Connection instance c, this method can be called in the following
ways, with the results shown in the comments:
val c = Connection()
c.makeConnection()
c.makeConnection(2_000)
c.makeConnection(3_000, "http")
// timeout = 5000, protocol = https
// timeout = 2000, protocol = https
// timeout = 3000, protocol = http
If you like to call methods while supplying the names of the method parameters, make
Connection can also be called in these ways, as shown in Recipe 8.3:
c.makeConnection(timeout=10_000)
c.makeConnection(protocol="http")
c.makeConnection(timeout=10_000, protocol="http")
c.makeConnection(protocol="http", timeout=10_000)
As that shows, these two recipes can be used hand in hand to create readable code
that can be useful in certain situations.
Discussion
Just as with constructor parameters, you can provide default values for method argu‐
ments. Because you’ve provided defaults, consumers of your method can either (a)
supply an argument to override the default value, or (b) skip the argument, letting it
use its default value.
Arguments are assigned from left to right, so the following call assigns no arguments
and uses the default values for both timeout and protocol:
c.makeConnection()
244
|
Chapter 8: Methods
This call sets timeout to 2_000 and leaves protocol to its default:
c.makeConnection(2_000)
This call sets both timeout and protocol:
c.makeConnection(3_000, "ftp")
Note that you can’t set protocol only with this approach—attempting to do so won’t
compile—but as shown in the Solution, you can use a named parameter:
c.makeConnection(protocol="http")
If your method provides a mix of some fields that offer default values and others that
don’t, list the fields that have default values last. This is because the default value fields
can optionally be skipped, while the others can’t. This example shows the correct
approach, with the default value field listed last:
class Connection:
// correct implementation, default value is listed last
def makeConnection(timeout: Int, protocol: String = "https") =
println(f"timeout = ${timeout}%d, protocol = ${protocol}%s")
val c = Connection()
c.makeConnection(1_000)
c.makeConnection(1_000, "http")
// timeout = 1000, protocol = https
// timeout = 1000, protocol = http
Conversely, this code helps demonstrate the problem that’s created when you list a
default value field first:
class Connection:
// intentional error
def makeConnection(timeout: Int = 5_000, protocol: String) =
println(f"timeout = ${timeout}%d, protocol = ${protocol}%s")
This code compiles, and you’ll be able to create a new Connection, but you won’t be
able to take advantage of the default, as shown in these examples:
val c = Connection()
c.makeConnection(1_000, "http")
c.makeConnection(2_000)
c.makeConnection("https")
// timeout = 1000, protocol = http
// compiler error
// compiler error
// but this still works
c.makeConnection(protocol = "http")
// timeout = 5000, protocol = http
8.5 Creating Methods That Take Variable-Argument Fields
Problem
To make a method more flexible, you want to define a method parameter that can
take a variable number of arguments, i.e., a varargs field.
8.5 Creating Methods That Take Variable-Argument Fields
|
245
Solution
Define a varargs field in your method declaration by adding a * character after the
field type:
def printAll(strings: String*) =
strings.foreach(println)
Given that declaration, printAll can now be called with zero or more parameters:
// these all work
printAll()
printAll("a")
printAll("a", "b")
printAll("a", "b", "c")
Use _* to adapt a sequence
By default you can’t pass a sequence—List, Seq, Vector, etc.—into a varargs parame‐
ter, but you can use Scala’s _* operator to adapt a sequence so it can be used as an
argument for a varargs field:
val fruits = List("apple", "banana", "cherry")
printAll(fruits)
// fails (Found: List[String]), Required: String)
printAll(fruits: _*)
// works
Thinking of _* as “Splat”
If you come from a Unix background, it may be helpful to think of
_* as a splat or xargs operator. This operator tells the compiler to
pass each element of the sequence to printAll as a separate argu‐
ment, instead of passing fruits as a single argument.
Discussion
When declaring that a method has a field that can contain a variable number of argu‐
ments, the varargs field must be the last field in the method signature. Attempting to
define a field in a method signature after a varargs field returns an error:
// error: this won’t compile
def printAll(strings: String*, i: Int) =
strings.foreach(println)
Fortunately, the compiler error message is very clear:
def printAll(strings: String*, i: Int) =
^^^^^^^
varargs parameter must come last
As an implication of that rule, a method can have only one varargs field.
246
|
Chapter 8: Methods
8.6 Forcing Callers to Leave Parentheses Off Accessor
Methods
Problem
You want to enforce a coding style where accessor (getter) methods can’t have paren‐
theses when they’re invoked.
Solution
Define your accessor method without parentheses after the method name:
class Pizza:
// no parentheses after 'crustSize'
def crustSize = 12
This forces consumers of your class to call crustSize without parentheses. Attempt‐
ing to use parentheses results in a compiler error:
scala> val p = Pizza()
p: Pizza = Pizza@3a3e8692
// this fails because of the parentheses
scala> p.crustSize()
1 |p.crustSize()
|^^^^^
|method crustSize in class Pizza does not take parameters
// this works
scala> p.crustSize
res0: Int = 12
Discussion
The recommended strategy for calling accessor methods that have no side effects is to
leave the parentheses off when calling the method. As stated in the Scala style guide:
Methods which act as accessors of any sort (either encapsulating a field or a logical
property) should be declared without parentheses, except if they have side effects.
Because a simple accessor method like crustSize doesn’t have side effects, it
shouldn’t be called with parentheses, and this recipe demonstrates how to enforce this
convention. While this is only a convention, it’s a good practice when followed rigor‐
ously. For instance, although I know that a method named printStuff is probably
going to print some output, an extra little warning light goes off in my head when I
see it called as printStuff() instead; I know that it’s a method that has a side effect.
8.6 Forcing Callers to Leave Parentheses Off Accessor Methods
|
247
See Also
• The Scala Style Guide on naming conventions and parentheses has more details
on accessors, mutators, and the use of parentheses.
• See Chapter 10 and Recipe 24.1, “Writing Pure Functions”, for discussions about
side effects.
8.7 Declaring That a Method Can Throw an Exception
Problem
You want to declare that a method can throw an exception, either to alert callers to
this fact or because your method will be called from Java code.
Solution
Use the @throws annotation to declare the exception(s) that can be thrown. You can
declare that a method can throw one exception:
@throws(classOf[Exception])
def play =
// exception throwing code here ...
or multiple exceptions:
@throws(classOf[IOException])
@throws(classOf[FileNotFoundException])
def readFile(filename: String) =
// exception throwing code here ...
Discussion
In the two examples in the Solution, I declare that these methods can throw excep‐
tions for two reasons. First, whether the consumers are using Scala or Java, if they’re
writing robust code, they’ll want to know that an exception can be thrown.
Second, if they’re using Java, the @throws annotation is the Scala equivalent of provid‐
ing the throws method signature to Java consumers. It’s just like declaring that a Java
method throws an exception with this syntax:
// java
public void play() throws Exception {
// code here ...
}
248
|
Chapter 8: Methods
it’s important to note that Scala’s philosophy regarding checked exceptions is different
than Java’s. Scala doesn’t require that methods declare that exceptions can be thrown,
and it also doesn’t require calling methods to catch them. For example, given this
method:
def shortCircuit() = throw Exception("HERE’S AN EXCEPTION!")
It’s not necessary to declare that except throws an exception, and it’s also not neces‐
sary to wrap it in a try/catch block. But if you don’t, it will bring your application to
a halt:
scala> shortCircuit()
java.lang.Exception: HERE’S AN EXCEPTION!
at rs$line$8$.except(rs$line$8:1)
much more output ...
Java Exception Types
As a quick review, Java has (a) checked exceptions, (b) descendants of Error, and (c)
descendants of RuntimeException. Like checked exceptions, Error and RuntimeEx
ception have many subclasses, such as RuntimeException’s famous offspring, Null
PointerException.
According to the Java documentation for the Exception class, “The class Exception
and any subclasses that are not also subclasses of RuntimeException are checked
exceptions. Checked exceptions need to be declared in a method or constructor’s
throws clause if they can be thrown by the execution of the method or constructor
and propagate outside the method or constructor boundary.”
The following links provide more information on Java exceptions and exception
handling:
• “The Catch or Specify Requirement” Java Tutorials page
• “Unchecked Exceptions—The Controversy” Java Tutorials page
• Wikipedia discussion of checked exceptions in the “Exception handling” entry
• “Lesson: Exceptions” Java Tutorials page
• The Java Exception class documentation
See Also
• See Recipe 22.7, “Adding Exception Annotations to Scala Methods”, for other
examples of adding exception annotations to methods.
8.7 Declaring That a Method Can Throw an Exception
|
249
• See Recipe 10.8, “Implementing Functional Error Handling”, for details on how
to handle exceptions in functional programming.
8.8 Supporting a Fluent Style of Programming
Problem
While creating classes in an OOP style, you want to design an API so developers can
write code in a fluent programming style, also known as method chaining.
Solution
A fluent programming style lets users of your API write code by chaining method
calls together, as in this example:
person.setFirstName("Frank")
.setLastName("Jordan")
.setAge(85)
.setCity("Manassas")
.setState("Virginia")
To support this style of programming:
• If your class can be extended, specify this.type as the return type of fluent-style
methods.
• If your class can’t be extended, you can return this or this.type from your
fluent-style methods. (See the note in the Discussion about class modifiers and
extending classes.)
The following code demonstrates how to specify this.type as the return type of the
set* methods shown:
class Person:
protected var _firstName = ""
protected var _lastName = ""
def setFirstName(firstName: String): this.type =
_firstName = firstName
this
def setLastName(lastName: String): this.type =
_lastName = lastName
this
end Person
class Employee extends Person:
protected var employeeNumber = 0
250
|
Chapter 8: Methods
// note `this.type`
// note `this.type`
def setEmployeeNumber(num: Int): this.type =
this.employeeNumber = num
this
override def toString = s"$_firstName, $_lastName, $employeeNumber"
end Employee
The following code demonstrates how these methods can be chained together:
val employee = Employee()
// use the fluent methods
employee.setFirstName("Maximillion")
.setLastName("Alexander")
.setEmployeeNumber(2)
println(employee)
// prints "Maximillion, Alexander, 2"
Discussion
If you’re sure your class won’t be extended, specifying this.type as the return type of
your set* methods isn’t necessary; you can just return the this reference at the end
of each fluent-style method. This approach is shown in the addTopping, setCrust
Size, and setCrustType methods of the following Pizza class, which is declared to
be final, which prevents the class from being extended:
enum CrustSize:
case Small, Medium, Large
enum CrustType:
case Regular, Thin, Thick
enum Topping:
case Cheese, Pepperoni, Mushrooms
import CrustSize.*, CrustType.*, Topping.*
final class Pizza:
import scala.collection.mutable.ArrayBuffer
private val toppings = ArrayBuffer[Topping]()
private var crustSize = Medium
private var crustType = Regular
def addTopping(topping: Topping) =
toppings += topping
this
def setCrustSize(crustSize: CrustSize) =
this.crustSize = crustSize
this
8.8 Supporting a Fluent Style of Programming
|
251
def setCrustType(crustType: CrustType) =
this.crustType = crustType
this
def print() =
println(s"crust size: $crustSize")
println(s"crust type: $crustType")
println(s"toppings:
$toppings")
end Pizza
These methods are demonstrated with the following code:
val pizza = Pizza()
pizza.setCrustSize(Large)
.setCrustType(Thin)
.addTopping(Cheese)
.addTopping(Mushrooms)
.print()
That code results in the following output:
crust size: Large
crust type: Thin
toppings:
ArrayBuffer(Cheese, Mushrooms)
Class Modifiers
Per the documentation for the new open keyword, when creating a class in Scala 3,
“there are three possible expectations of extensibility”:
• Declare the class as open to allow it to be extended.
• Declare the class as final to prohibit the class from being extended.
• Use no modifier if you haven’t made a firm decision either way.
In the third situation, the class can only be extended if one of these conditions is met:
• The extending class is in the same file as the original class.
• The language feature adhocExtensions is enabled for the extending class, such as
by importing scala.language.adhocExtensions in the extending class source
file.
The feature warning for adhocExtensions is not enabled for Scala 3.0, but it will be
produced by default for Scala 3.1 and later versions.
252
| Chapter 8: Methods
See Also
• Wikipedia’s definition of a fluent interface
• Martin Fowler’s discussion of a fluent interface
8.9 Adding New Methods to Closed Classes with
Extension Methods
Problem
You want to add new methods to closed classes, such as adding methods to String,
Int, and other classes where you don’t have access to their source code.
Solution
In Scala 3 you define extension methods to create the new behavior you want. As an
example, imagine that you want to add a method named hello to the String class so
you can write code that works like this:
println("joe".hello)
// prints "Hello, Joe"
To create this behavior, define hello as an extension method with the extension
keyword:
extension (s: String)
def hello: String = s"Hello, ${s.capitalize}"
The REPL shows that this works as desired:
scala> println("joe".hello)
Hello, Joe
Defining multiple extension methods
To define additional methods, put them all under the extension declaration:
extension (s: String)
def hello: String = s"Hello, ${s.capitalize}"
def increment: String = s.map(c => (c + 1).toChar)
def hideAll: String = s.replaceAll(".", "*")
These examples show how those methods work:
"joe".hello
"hal".increment
"password".hideAll
// Hello, Joe
// ibm
// ********
8.9 Adding New Methods to Closed Classes with Extension Methods
|
253
Extension methods that take a parameter
When you need to create an extension method that takes a parameter in addition to
the type it works on, use this approach:
extension (s: String)
def makeInt(radix: Int): Int = Integer.parseInt(s, radix)
These examples show how makeInt works:
"1".makeInt(2)
"10".makeInt(2)
"100".makeInt(2)
// Int = 1
// Int = 2
// Int = 4
"1".makeInt(8)
"10".makeInt(8)
"100".makeInt(8)
// Int = 1
// Int = 8
// Int = 64
"foo".makeInt(2)
// java.lang.NumberFormatException
I show that last example to be clear that, as written, this method doesn’t properly han‐
dle bad string input.
Discussion
Here’s a simplified description of how extension methods work in Scala 3, using the
original hello example:
1. The compiler sees a String literal.
2. The compiler sees that you’re attempting to invoke a method named hello on a
String.
3. Because the String class has no method named hello, the compiler starts look‐
ing around the known scope for methods named hello that take a single String
parameter and return a String.
4. The compiler finds the extension method.
That’s an oversimplification of what happens, but it gives you the general idea of how
extension methods work.
See Also
• For more information on extension methods in Scala 3, read the extension meth‐
ods documentation.
• For a comparison of how this approach used to work in Scala 2, see my article
“Implicit Methods/Functions in Scala 2 and 3 (Dotty Extension Methods)”.
254
| Chapter 8: Methods
CHAPTER 9
Packaging and Imports
Packages are used to build related modules of code, and to help prevent namespace
collisions. In their most common form, you create Scala packages using the same
syntax as Java, so most Scala source code files begin with a package declaration, like
this:
package com.alvinalexander.myapp.model
class Person ...
However, Scala is also more flexible. In addition to that approach you can use a curly
brace packaging style, similar to C++ and C# namespaces. That syntax is shown in
Recipe 9.1.
The Scala approach to importing members is similar to Java, and more flexible. With
Scala you can:
• Place import statements anywhere
• Import packages, classes, objects, and methods
• Hide and rename members when you import them
All of these approaches are demonstrated in this chapter.
Before jumping into those recipes, it helps to know that two packages are implicitly
imported into the scope of all of your source code files:
• java.lang.*
• scala.*
In Scala 3 the * character in import statements is similar to the * character in Java, so
these statements mean “import every member” in those packages.
255
The Predef object
In addition to those two packages, all members from the scala.Predef object are
also implicitly imported into your source code files.
If you want to understand how Scala works, I highly recommend taking a little time
to dig into the Predef object source code. The code isn’t too long, and it demonstrates
many of the features of the Scala language.
As I discuss in “Where do those methods come from?” on page 23, implicit conver‐
sions are brought into scope by the Predef object, and in the Scala 2.13 Predef object
—which is still used by Scala 3.0—that code looks like this:
implicit def long2Long(x: Long): java.lang.Long = x.asInstanceOf[java.lang.Long]
implicit def Long2long(x: java.lang.Long): Long = x.asInstanceOf[Long]
// more implicit conversions ...
Similarly, if you ever wondered why you can invoke code like Map, Set, and println
without needing import statements, you’ll find those in Predef as well:
type Map[A, +B] = immutable.Map[A, B]
type Set[A]
= immutable.Set[A]
def
def
def
def
println(x: Any) = Console.println(x)
printf(text: String, xs: Any*) = Console.print(text.format(xs: _*))
assert(assertion: Boolean) { ... }
require(requirement: Boolean) { ... }
9.1 Packaging with the Curly Braces Style Notation
Problem
You want to use a nested style package notation, similar to the namespace notation in
C++ and C#.
Solution
Wrap one or more classes inside a set of curly braces while supplying a package name,
as shown in this example:
package com.acme.store {
class Foo:
override def toString = "I am com.acme.store.Foo"
}
The canonical name of that class is com.acme.store.Foo. It’s the same as if you
declared the code like this:
256
|
Chapter 9: Packaging and Imports
package com.acme.store
class Foo:
override def toString = "I am com.acme.store.Foo"
Benefits
With this approach you can place multiple packages in one file, and you can also cre‐
ate nested packages. To demonstrate both approaches, the following example creates
three Foo classes, all of which are in different packages:
package orderentry {
class Foo:
override def toString = "I am orderentry.Foo"
}
package customers {
class Foo:
override def toString = "I am customers.Foo"
package database {
class Foo:
override def toString = "I am customers.database.Foo"
}
}
// test/demonstrate the Foo classes.
// the output is shown after the comment tags.
@main def packageTests =
println(orderentry.Foo())
// I am orderentry.Foo
println(customers.Foo())
// I am customers.Foo
println(customers.database.Foo())
// I am customers.database.Foo
This demonstrates that each Foo class is in a different package, and that the database
package is nested inside the customers package.
Discussion
I’ve looked at a lot of Scala code, and from what I’ve seen, declaring a package name
at the top of a file is far and away the most popular packaging style:
package foo.bar.baz
class Foo:
override def toString = "I'm foo.bar.baz.Foo"
However, because Scala code can be very concise, the alternative curly brace packag‐
ing syntax can be convenient when you want to declare multiple classes and packages
in one file. For instance, you’ll see that I often use this style in the source code reposi‐
tory for this book.
9.1 Packaging with the Curly Braces Style Notation
|
257
Chained package clauses
Sometimes when you look at Scala programs you’ll see multiple package declarations
at the top of a source code file, like this:
package com.alvinalexander
package tests
...
That code is exactly the same as writing two nested packages, like this:
package com.alvinalexander {
package tests {
...
}
}
The reason the first form is used is because Scala programmers generally don’t like to
indent their code using the curly brace style, especially in large files. So they use the
first form.
The reason two package clauses are used instead of one has to do with what becomes
available in the current scope with each approach. If you only use this one package
statement:
package com.alvinalexander.tests
then only the members of com.alvinalexander.tests are brought into scope. But if
you use these two package declarations:
package com.alvinalexander
package tests
...
members from both com.alvinalexander and com.alvinalexander.tests are
brought into scope.
The reason for this approach has to do with a situation that was discovered in Scala
2.7 and resolved in Scala 2.8. For details on that, see Martin Odersky’s article on
chained package clauses.
9.2 Importing One or More Members
Problem
You want to import one or more members into the scope of your current code.
Solution
Use this syntax to import one class:
258
|
Chapter 9: Packaging and Imports
import java.io.File
You can import multiple classes like this:
import java.io.File
import java.io.IOException
import java.io.FileNotFoundException
Or more concisely, like this:
import java.io.{File, IOException, FileNotFoundException}
I refer to this as the curly brace syntax, but it’s more formally known as the import
selector clause.
This is how you import everything from the java.io package:
import java.io.*
Discussion
Scala is very flexible and lets you:
• Place import statements anywhere, including the top of a class, within a class or
object, within a method, or within a block of code. That technique is demon‐
strated in Recipe 9.6.
• Import packages, classes, objects, and methods.
• Hide and rename members when you import them. Those techniques are shown
in Recipes 9.3 and 9.4.
9.3 Renaming Members on Import
Problem
You want to rename members when you import them to help avoid namespace colli‐
sions or confusion.
Solution
Give the class you’re importing a new name when you import it with this syntax:
import java.awt.{List as AwtList}
Then, within your code, refer to the class by the alias you’ve given it:
scala> val alist = AwtList(1, false)
val alist: java.awt.List = java.awt.List[list0,0,0,0x0,invalid,selected=null]
9.3 Renaming Members on Import
|
259
This lets you use the java.awt.List class by the name AwtList, while also using the
Scala List class by its usual name:
scala> val x = List(1, 2, 3)
val x: List[Int] = List(1, 2, 3)
You can rename multiple classes at one time during the import process:
import java.util.{Date as JDate, HashMap as JHashMap}
You can also use the * character in the final import position to import everything else
from that package (without renaming those other members):
import java.util.{Date as JDate, HashMap as JHashMap, *}
Because I create these aliases during the import process, I can’t use the original (real)
name of the class in my code. For instance, after using that last import statement, the
following code will fail because the compiler can’t find the java.util.HashMap class,
because I renamed it:
scala> val map = HashMap[String, String]()
<console>:12: error: not found: type HashMap
val map = HashMap[String, String]
^
That fails as expected, but I can refer to this class with the alias I gave it:
scala> val map = JHashMap[String, String]()
map: java.util.HashMap[String,String] = {}
Because I imported everything else from the java.util package using the * at the
end of the import statement, these lines of code that use other java.util classes also
work:
scala> val x = ArrayList[String]()
x: java.util.ArrayList[String] = []
scala> val y = LinkedList[String]()
y: java.util.LinkedList[String] = []
Discussion
As shown, you can create a new name for a class when you import it and can then
refer to it by the new name, or alias. Programming in Scala refers to this as a renaming
clause.
This is helpful when you need to avoid namespace collisions and confusion. Class
names like Listener, Message, Handler, Client, Server, and many more are all very
common, and it can be helpful to give them aliases when you import them.
The syntax for this has changed in Scala 3. The following code shows the differences
from Scala 2:
260
|
Chapter 9: Packaging and Imports
// scala 2
import java.util.{Date => JDate, HashMap => JHashMap, _}
// scala 3
import java.util.{Date as JDate, HashMap as JHashMap, *}
At the time of this writing you can still use the Scala 2 syntax in Scala 3 code, but
because this underscore syntax will eventually be deprecated, the new syntax is
preferred.
As a fun combination of several recipes, not only can you rename classes on import,
you can also rename members from objects and static members from Java classes.
For example, in shell scripts I tend to rename the println method to a shorter name,
as shown in the REPL:
scala> import System.out.{println as p}
scala> p("hello")
hello
This works because out is a static final instance of a PrintStream in the
java.lang.System class, and println is a PrintStream method. The end result is
that p is an alias for the println method.
9.4 Hiding a Class During the Import Process
Problem
To avoid naming conflicts or confusion, you want to hide one or more classes while
importing other members from the same package.
Solution
To hide a class during the import process, use the renaming syntax shown in Recipe
9.3, but point the class name to the _ character. The following example hides the Ran
dom class, while importing everything else from the java.util package:
import java.util.{Random => _, *}
This approach is confirmed in the REPL:
scala> import java.util.{Random => _, *}
import java.util.{Random=>_, _}
// can’t access Random
scala> val r = Random()
1 |val r = Random()
^^
|
|
Not found: Random
9.4 Hiding a Class During the Import Process
|
261
// can access other members
scala> val x = ArrayList()
val x: java.util.ArrayList[Nothing] = []
Discussion
In that example, this portion of the code is what hides the Random class:
import java.util.{Random => _}
After that, the * character inside the curly braces is the same as stating that you want
to import everything else in the package, like this:
import java.util.*
Note that the * import wildcard must be in the last position. It yields an error if you
attempt to use it in other positions:
scala> import java.util.{*, Random => _}
1 |import java.util.{*, Random => _}
^^
|
|
named imports cannot follow wildcard imports
This is because you may want to hide multiple members during the import process,
and to do so you need to list them first.
To hide multiple members, list them before using the final wildcard import:
import java.util.{List => _, Map => _, Set => _, *}
After that import statement, you can use other classes from java.util:
scala> val x = ArrayList[String]()
val x: java.util.ArrayList[String] = []
You can also use the Scala List, Set, and Map classes without having a naming colli‐
sion with the java.util classes that have the same names:
// these are all Scala classes
scala> val a = List(1, 2, 3)
val a: List[Int] = List(1, 2, 3)
scala> val b = Set(1, 2, 3)
val b: Set[Int] = Set(1, 2, 3)
scala> val c = Map(1 -> 1, 2 -> 2)
val c: Map[Int, Int] = Map(1 -> 1, 2 -> 2)
This ability to hide members on import is useful when you need many members from
one package—and therefore want to use the * wildcard syntax—but you also want to
hide one or more members during the import process, typically due to naming
conflicts.
262
|
Chapter 9: Packaging and Imports
9.5 Importing Static Members
Problem
You want to import members in a way similar to the Java static import approach, so
you can refer to member names directly, without having to prefix them with their
package or class names.
Solution
Import the static members by name or with Scala’s * wildcard character. For example,
this is how you import the static cos method from the scala.math package:
import scala.math.cos
val x = cos(0)
// 1.0
This is how you import all members from the scala.math package:
import scala.math.*
With this syntax you can access all the static members of the scala.math package
without having to precede them with the class name:
import scala.math.*
val a = sin(0)
// Double = 0.0
val b = cos(Pi)
// Double = −1.0
The Java Color class also demonstrates the usefulness of this technique:
import java.awt.Color.*
println(RED)
// java.awt.Color[r=255,g=0,b=0]
println(BLUE)
// java.awt.Color[r=0,g=0,b=255]
Discussion
Objects and enumerations are other great candidates for this technique. For instance,
given this StringUtils object:
object StringUtils:
def truncate(s: String, length: Int): String = s.take(length)
def leftTrim(s: String): String = s.replaceAll("^\\s+", "")
you can import and use its methods like this:
import StringUtils.*
truncate("four score and seven ", 4)
leftTrim(" four score and ")
// "four"
// "four score and
"
9.5 Importing Static Members
|
263
Similarly, given a Scala 3 enum:
package days {
enum Day:
case Sunday, Monday, Tuesday, Wednesday,
Thursday, Friday, Saturday
}
you can import and use the enumeration values like this:
// a different package
package bar {
import days.Day.*
@main def enumImportTest =
val date = Sunday
// more code here ...
if date == Saturday || date == Sunday then
println("It’s the weekend!")
}
Although some developers don’t like static imports, I find that this approach makes
enums more readable. In my opinion, even the simple act of specifying the name of a
class or enum before the constant makes the code less readable:
if date == Day.Saturday || date == Day.Sunday then
println("It’s the weekend!")
With the static import approach there’s no need for the leading "Day." in the code,
and it’s easier to read:
if date == Saturday || date == Sunday then ...
9.6 Using Import Statements Anywhere
Problem
You want to use an import statement somewhere other than at the top of a file, gener‐
ally to limit the scope of the import or to make your code clearer.
Solution
You can place an import statement almost anywhere inside a program. In the most
basic use, you import members at the top of a class definition—just like with Java and
other languages—and then use the imported resources later in your code:
264
|
Chapter 9: Packaging and Imports
package foo
import scala.util.Random
class MyClass:
def printRandom =
val r = Random()
//use the imported class
For more control, you can import members inside a class:
package foo
class ClassA:
import scala.util.Random
def printRandom =
val r = Random()
//inside ClassA
class ClassB:
// the import is not visible here
val r = Random()
//error: not found: Random
This limits the scope of the import to the code inside ClassA that comes after the
import statement.
You can also use import statements inside a method:
def getPandoraItem(): Any =
import com.alvinalexander.pandorasbox.*
val p = Pandora()
p.getRandomItem
You can even place an import statement inside a block, limiting the scope of the
import to only the code inside that block that follows the statement. In the following
example, the field r1 is declared correctly because it’s within the block and after the
import statement, but the declaration for field r2 won’t compile because the Random
class is not in scope at that point:
def printRandom =
{
import scala.util.Random
val r1 = Random() //this works, as expected
}
val r2 = Random()
//error: not found: Random
Discussion
Import statements make imported members available after the point at which they
are imported, which also limits their scope. The following code won’t compile
because I attempt to reference the Random class before the import statement is
declared:
9.6 Using Import Statements Anywhere
|
265
// this does not compile
class ImportTests:
def printRandom =
val r = Random()
//error: not found: type Random
import scala.util.Random
When you want to include multiple classes and packages in one file, you can combine
import statements and the curly brace packaging approach (shown in Recipe 9.1) to
limit the scope of the import statements, as shown in these examples:
package orderentry {
import foo.*
// more code here ...
}
package customers {
import bar.*
// more code here ...
package database {
import baz.*
// more code here ...
}
}
In this example, members can be accessed as follows:
• Code in the orderentry package can access members of foo but can’t access
members of bar or baz.
• Code in customers and customers.database can’t access members of foo.
• Code in customers can access members of bar.
• Code in customers.database can access members in bar and baz.
The same concept applies when defining multiple classes in one file:
package foo
// available to all classes defined below
import java.io.File
import java.io.PrintWriter
class Foo:
// only available inside this class
import javax.swing.JFrame
// ...
class Bar:
// only available inside this class
266
| Chapter 9: Packaging and Imports
import scala.util.Random
// ...
Although placing import statements at the top of a file or just before they’re used can
be a matter of style, I find this flexibility to be useful when I have multiple classes or
packages in one file. In these situations it’s nice to keep the imports in the smallest
scope possible to limit namespace conflicts, and to make the code easier to refactor as
it grows.
9.7 Importing Givens
Problem
You need to import one or more given instances into the current scope, while possi‐
bly importing types from that same package at the same time.
Solution
A given instance, known more simply as a given, will typically be defined in a sepa‐
rate module, and it must be imported into the current scope with a special import
statement. For example, when you have this given code in an object named Adder, in
a package named co.kbhr.givens:
package co.kbhr.givens
object Adder:
trait Adder[T]:
def add(a: T, b: T): T
given intAdder: Adder[Int] with
def add(a: Int, b: Int): Int = a + b
import it into the current scope with these two import statements:
@main def givenImports =
import co.kbhr.givens.Adder.*
import co.kbhr.givens.Adder.given
// import all nongiven definitions
// import all `given` definitions
def genericAdder[A](x: A, y: A)(using adder: Adder[A]): A = adder.add(x, y)
println(genericAdder(1, 1))
You can also combine the two import statements into one:
import co.kbhr.givens.Adder.{given, *}
You can import anonymous given instances by their type, as shown in the second
import statement in this example:
9.7 Importing Givens
|
267
package co.kbhr.givens
object Adder:
trait Adder[T]:
def add(a: T, b: T): T
given Adder[Int] with
def add(a: Int, b: Int): Int = a + b
given Adder[String] with
def add(a: String, b: String): String = "" + (a.toInt + b.toInt)
@main def givenImports =
// when put on separate lines, the order of the imports is important.
// the second import statement imports the givens by their type.
import co.kbhr.givens.Adder.*
import co.kbhr.givens.Adder.{given Adder[Int], given Adder[String]}
def genericAdder[A](x: A, y: A)(using adder: Adder[A]): A = adder.add(x, y)
println(genericAdder(1, 1))
// 2
println(genericAdder("2", "2"))
// 4
In that example, these two lines of code show how the Adder trait and the givens are
imported:
import co.kbhr.givens.Adder.*
import co.kbhr.givens.Adder.{given Adder[Int], given Adder[String]}
Depending on your needs, the givens can also be imported by their type, like this:
import co.kbhr.givens.Adder.*
import co.kbhr.givens.Adder.{given Adder[?]}
That second line can be read as, “Import an Adder given of any type, such as
Adder[Int] or Adder[String].”
Discussion
Per the Scala 3 documentation on importing givens, there are two reasons and bene‐
fits for this new syntax:
• It makes clearer where givens in scope are coming from.
• It enables importing all givens without importing anything else.
Given instances replace implicits, which were used in Scala 2. As mentioned, a main
goal of givens is to be clearer than implicits. One of the motivations for givens, and
specifically for given import statements, is that in Scala 2 it wasn’t always clear how
implicits were coming into the current scope.
In an effort to resolve this situation with givens in Scala 3, this new import given syn‐
tax was created. As you can see in these examples, it’s now very easy to look at a list of
import statements to see where givens are coming from.
268
| Chapter 9: Packaging and Imports
See Also
• See Recipe 23.8, “Using Term Inference with given and using”, for more details
on how to use givens.
• See the Scala 3 documentation on given instances for more details on givens.
• See the Scala 3 documentation on importing givens for more details on import‐
ing givens.
• The Scala 3 documentation on contextual abstractions details the motivations
behind changing from implicits to given instances.
9.7 Importing Givens
|
269
CHAPTER 10
Functional Programming
Scala supports both object-oriented programming and functional programming
styles. Indeed, as I recorded here on my website, at a presentation in 2018, Martin
Odersky, the creator of the Scala language, stated that the essence of Scala is a “fusion
of functional and object-oriented programming in a typed setting,” with “functions
for the logic” and “objects for the modularity.” Many of the recipes in this book
demonstrate that fusion, and this chapter focuses solely on functional programming
techniques in Scala—what I’ll refer to as Scala/FP in this chapter.
FP is a big topic, and I wrote over seven hundred pages about it in my book Func‐
tional Programming, Simplified. While I can’t cover all of that material in this chapter,
I’ll try to cover some of the main concepts. The initial recipes will show how to:
• Write and understand function literals
• Pass function literals (also known as anonymous functions) into methods
• Write methods that accept functions as variables
After that you’ll see some very specific functional programming techniques:
• Partially applied functions
• Writing methods that return functions
• Partial functions
The chapter finishes with two examples that help to demonstrate these techniques.
If you’re not familiar with FP, it can be perplexing at first, so it will definitely help to
understand its goals and motivations. Therefore, in the next several pages I’ll try to
provide the best introduction to functional programming I can offer. Functional
271
Programming, Simplified consists of 130 short chapters, and this introduction is an
extremely condensed version of the first 21 chapters of that book.
What Is Functional Programming?
Finding a consistent definition of FP is surprisingly hard, but in the process of writ‐
ing that book I came up with this:
Functional programming is a way of writing software applications using only pure
functions and immutable values.
As you’ll see in this chapter, pure functions are mathematical functions, just like writ‐
ing algebraic equations.
Another nice definition comes from Mary Rose Cook, who states:
Functional code is characterised by one thing: the absence of side effects. It (a pure func‐
tion) doesn’t rely on data outside the current function, and it doesn’t change data that
exists outside the current function. Every other “functional” thing can be derived from
this property.
I expand on these definitions in great detail in Functional Programming, Simplified,
but for our purposes in this chapter, these definitions give us a solid starting point.
Pure Functions
To understand those definitions you also have to understand what a pure function is.
In my world, a pure function is a function:
• Whose algorithm and output depend only on (a) the function’s input parameters
and (b) calling other pure functions
• That doesn’t mutate the parameters it’s given
• That doesn’t mutate anything anywhere else in the application (i.e., any sort of
global state)
• That doesn’t interact with the outside world, such as interacting with files, data‐
bases, networks, or users
Because of that criteria you can also make these statements about pure functions:
• Their internal algorithm doesn’t call other functions whose responses vary over
time, such as date, time, and random number (random anything) functions.
• When called any number of times with the same input, a pure function always
returns the same value.
272
| Chapter 10: Functional Programming
Math functions are good examples of pure functions, including algorithms like min,
max, sum, sin, cosine, tangent, etc. List-related functions like filter, map, and return‐
ing a sorted list from an existing list are also good examples. Called any number of
times with the same input, they always return the same result.
Conversely, examples of impure functions are:
• Any sort of input/output (I/O) function (including input from a user, output to
the user, and reading from and writing to files, databases, and networks)
• Functions that return different results at different times (date, time, and random
functions)
• A function that modifies mutable state (such as a mutable field in a class) some‐
where else in the application
• A function that receives a mutable type like Array or ArrayBuffer, and modifies
its elements
A pure function gives you comfort that when you call it with a given set of inputs,
you’ll always get the exact same answer back, such as:
"zeus".length
sum(2,2)
List(4,5,6).max
// will always be `4`
// will always be `4`
// will always be `6`
Side Effects
It’s said that a purely functional program has no side effects. So what is a side effect?
A function that has a side effect modifies state, mutates variables, and/or interacts
with the outside world. This includes:
• Writing (or reading) data to (from) a file, database, or web service
• Mutating the state of a variable that was given as input, changing data in a data
structure, or modifying the value of a mutable field in an object
• Throwing an exception, or stopping the application when an error occurs
• Calling other functions that have side effects
Pure functions are much easier to test. Imagine writing an addition function, such as
+. Given the two numbers 1 and 2, the result will always be 3. A pure function like
this is a simple matter of (a) immutable data coming in and (b) a result coming out;
nothing else happens. Because a function like this has no side effects and doesn’t rely
on a mutable state somewhere outside of its scope, it’s simple to test.
See Recipe 24.1, “Writing Pure Functions”, for more details on writing pure func‐
tions.
Functional Programming
|
273
Thinking in FP
Writing pure functions is relatively simple, and in fact, they tend to be a joy to write
because you don’t have to think about the entire state of an application when writing
them. All you have to think about is what’s coming in, and what’s going out.
The more difficult parts of FP have to do with (a) handling I/O and (b) gluing your
pure functions together. To succeed in FP, I found that you must have a strong desire
to see your code as math. You need to have a burning desire to see each function as an
algebraic equation, where data goes in, data comes out, there are no side effects, noth‐
ing is mutated, and nothing can go wrong.
What happens is that you write one pure function, then another, then another. When
they’re done, you create your application by combining your pure functions—alge‐
braic equations—just like you’re a mathematician writing a series of equations on a
chalkboard. I can’t stress the importance of this desire strongly enough. You must
want to write code like this—like algebra.
For instance, in mathematics you might have a function like this:
f(x) = x^2 + 2x + 1
In Scala, that function is written like this:
def f(x: Int): Int = x*x + 2*x + 1
Notice a few things about this function:
• The function result depends only on the value of x and the function’s algorithm.
• The function only relies on the * and + operators, which can be thought of as
calling other pure functions.
• The function doesn’t mutate x.
Furthermore:
• The function doesn’t mutate anything else anywhere in the world:
— Its scope only deals with applying an algorithm to the input parameter x, and
it doesn’t mutate any variables outside of that scope.
— It doesn’t read from or write to anything else in the world: no user input, no
files, no database, no network, etc.
• If you call the function an infinite number of times with the same input (such as
2), it will always return the same value (such as 9).
The function is a pure function whose output only depends on its input. FP is about
writing all of your functions like this, and then combining them together to create a
complete application.
274
|
Chapter 10: Functional Programming
Referential Transparency and Substitution
Another important concept in FP is referential transparency (RT), which is the prop‐
erty that an expression can be replaced by its resulting value without changing the
behavior of the program (and vice versa). Again, you can examine this by using alge‐
bra. For instance, if all of these symbols represent immutable values:
a = b + c
d = e + f + b
x = a + d
you can perform substitution rules to determine the value of x:
x
x
x
x
x
=
=
=
=
=
a + d
(b + c) + d
// substitute for 'a'
(b + c) + (e + f + b) // substitute for 'd'
b + c + e + f + b
// remove unneeded parentheses
2b + c + e + f
// can’t reduce the expression any more
When functional programmers say that a program “evaluates to a result,” or that you
run a program by performing substitution rules, this is what they mean. Both you
and the compiler can perform these substitutions. Conversely, if a value like b returns
a random value or user input each time it’s called, you can’t reduce the equations.
While that example uses algebraic symbols, you can do the same thing with Scala
code. For instance, in Scala/FP you write code that looks like this:
val
val
val
val
a
b
c
d
=
=
=
=
f(x)
g(a)
h(y)
i(b, c)
Assuming that f, g, h and i are pure functions—and assuming that all the fields are
val fields—when you write simple expressions like this, both you and the compiler
are free to rearrange the code. For instance, the first and third expressions can hap‐
pen in any order—and can even run in parallel. The only requirement is that the first
three expressions are evaluated before i is invoked.
Also, because the value a will always be exactly the same as f(x), f(x) can always be
replaced by a, and vice versa. The same is also true for b, c, and d.
For instance, this equation:
val b = g(a)
is exactly the same as this equation:
val b = g(f(x))
Because all the fields are immutable and the functions are pure, both you and the
compiler can continue moving equations around and performing substitutions, to the
point that all of these expressions are equivalent:
Functional Programming
|
275
val d = i(b, c)
val d = i(g(a), h(y))
val d = i(g(f(x)), h(y))
As mentioned, one great benefit of functional programming is that pure functions are
easier to test than functions that have side effects, and now you can see a second ben‐
efit: with referentially transparent code like this, g(a) and h(y) can be run on sepa‐
rate threads (or the more random fibers) to take advantage of multiple cores. Because
all the fields are immutable and the functions are pure, you can safely make these
algebraic substitutions. But if the fields are mutable (var fields) and/or the functions
are impure, the pieces can’t be moved around safely.
Lisp—originally named LISP, which stands for LISt Processor—is a programming
language that was originally specified in 1958 and pioneered many important con‐
cepts in high-level programming languages, included higher-order functions. When
you write code in an algebraic/functional style, it naturally leads to a way of thinking
that’s described in the book Land of Lisp by Conrad Barski (No Starch Press):
Some advanced Lispers will cringe when someone says that a function “returns a
value.” In the lambda calculus you “run” a program by performing substitution rules
on the starting program to determine the result of a function. Hence, the result of a set
of functions just sort of magically appears by performing substitutions; never does a
function consciously “decide” to return a value. Because of this, Lisp purists prefer to
say that a function “evaluates to a result.”
The previous examples demonstrate the meaning of that quote.
FP Is a Superset of Expression-Oriented Programming
For a language to support FP, it must first support expression-oriented programming.
In EOP, every line of code is an expression, as opposed to a statement. An expression
is a line of code that returns a result and doesn’t have a side effect. Conversely, state‐
ments are like calling println: they don’t return a result and are called only for their
side effect. (Technically, statements return a result, but it’s a Unit result.)
A feature that makes Scala such a great FP language is that all of your code can be
written as expressions, including if expressions:
val a = 1
val b = 2
val max = if a > b then a else b
match expressions:
val evenOrOdd: String = i match
case 1 | 3 | 5 | 7 | 9 => "odd"
case 2 | 4 | 6 | 8 | 10 => "even"
276
|
Chapter 10: Functional Programming
for expressions:
val xs = List(1, 2, 3, 4, 5)
val ys = for
x <- xs
if x > 2
yield
x * 10
Even try/catch blocks return a value:
def makeInt(s: String): Int =
try
s.toInt
catch
case _ : Throwable => 0
My Rules for Functional Programming in Scala
To help adopt the proper FP mindset, I developed these rules for writing Scala/FP
code in my book Functional Programming, Simplified:
• Never use null values. Forget that Scala even has a null keyword.
• Write only pure functions.
• Use only immutable values (val) for all fields.
• Every line of code must be an algebraic expression. Whenever you use an if, you
must always also use an else.
• Pure functions should never throw exceptions; instead, they yield values like
Option, Try, and Either.
• Don’t create OOP “classes” that encapsulate data and behavior. Instead, create
immutable data structures using case classes, and then write pure functions that
operate on those data structures.
If you adopt these simple rules, you’ll find that:
• Your brain will quit reaching for shortcuts to fight the system. (Throwing in the
occasional var field or impure function will only slow down your learning
process.)
• Your code will become like algebra.
• Over time you’ll come to understand the Scala/FP thought process; you’ll dis‐
cover that one concept logically leads to another.
As an example of that last point, you’ll see that using only immutable fields naturally
leads to recursive algorithms. Then you’ll see that you won’t need recursion that often
Functional Programming
|
277
because of all of the functional methods that are built into the immutable Scala collec‐
tions classes.
Yes, FP Code Uses I/O
While there are different approaches to handling input/output (I/O), of course FP
code uses I/O. This includes handling user I/O, and reading from and writing to files,
databases, and across networks. No application would be useful without I/O, so
Scala/FP (and all other functional languages) have facilities for working with I/O in a
“functional” manner.
For example, Scala code that handles command-line I/O in a functional manner
tends to look like this:
def mainLoop: IO[Unit] =
for
_ <- putStr(prompt)
cmd <- getLine.map(Command.parse _)
_
<- if cmd == Quit then
IO.unit
else
processCommand(cmd) >> mainLoop
yield
()
mainLoop.unsafeRunSync()
In that code, putStr is a functional replacement for println, and getLine is a func‐
tional method that lets you read user input. Also, notice that mainLoop calls itself
recursively. This is how you create a loop with immutable variables.
Unfortunately, it takes a while to explain the techniques and philosophy behind these
I/O functions—potentially one hundred pages or more, depending on your back‐
ground—but I explain them in detail in my book Functional Programming, Simplified.
The Functional Cake and Imperative Icing
As I wrote in the first edition of this book, until you use an FP
library like Cats, ZIO, or Monix, the best advice I can offer to peo‐
ple new to functional programming is to write the core of your
applications using pure functions. This pure functional core can be
thought of as the “cake,” and then the I/O functions that interact
with the outside world can be thought of as the “icing” around that
core. Depending on the application, you may end up with 80% cake
(pure functions) and 20% icing (I/O functions), or it may be the
opposite of that. Some developers describe this technique as having
a “functional core and imperative shell.”
278
|
Chapter 10: Functional Programming
10.1 Using Function Literals (Anonymous Functions)
Problem
You want to use an anonymous function—also known as a function literal—so you
can pass it into a method that takes a function, or assign it to a variable.
Solution
Given this List:
scala> val x = List.range(1, 10)
val x: List[Int] = List(1, 2, 3, 4, 5, 6, 7, 8, 9)
you can pass an anonymous function to the list’s filter method to create a new List
that contains only even numbers:
val evens = x.filter((i: Int) => i % 2 == 0)
----------------------
The anonymous function is underlined in that example. The REPL demonstrates that
this expression yields a new List of even numbers:
scala> val evens = x.filter((i: Int) => i % 2 == 0)
evens: List[Int] = List(2, 4, 6, 8)
In this solution, the following code is a function literal, and when it’s passed into a
method like this it’s also known as an anonymous function, what some programming
languages also refer to as a lambda:
(i: Int) => i % 2 == 0
Although that code works, it shows the most explicit form for defining a function lit‐
eral. Thanks to several Scala shortcuts, the expression can be simplified to this:
val evens = x.filter(_ % 2 == 0)
The REPL shows that this returns the same result:
scala> val evens = x.filter(_ % 2 == 0)
evens: List[Int] = List(2, 4, 6, 8)
Discussion
The first example in this recipe uses this function literal:
(i: Int) => i % 2 == 0
When you look at this code it helps to think of the => symbol as a transformer,
because the expression transforms the parameter list on the left side of the symbol
(an Int named i) into a new result using the algorithm on the right side of the sym‐
bol (in this case, a modulus test that results in a Boolean).
10.1 Using Function Literals (Anonymous Functions)
|
279
As mentioned, this example shows the long form for defining an anonymous func‐
tion, which can be simplified in several ways. The first example shows the most
explicit form:
val evens = x.filter((i: Int) => i % 2 == 0)
And because Scala can determine from the list that it contains integer values, the type
declaration for i isn’t necessary:
val evens = x.filter((i) => i % 2 == 0)
When an anonymous function only has one parameter, the parentheses aren’t needed:
val evens = x.filter(i => i % 2 == 0)
Because Scala lets you use the _ symbol instead of a variable name when the parame‐
ter appears only once in your function, this code can be simplified even more:
val evens = x.filter(_ % 2 == 0)
In other situations you can simplify your anonymous functions further. For instance,
beginning with the most explicit form, you can print each element in the list using
this anonymous function with the foreach method:
x.foreach((i: Int) => println(i))
As before, the Int declaration isn’t required:
x.foreach((i) => println(i))
Because there’s only one argument, the parentheses around the i input parameter
aren’t needed:
x.foreach(i => println(i))
Because i is used only once in the function body, the expression can be further sim‐
plified with the _ wildcard:
x.foreach(println(_))
Finally, if a function literal consists of one statement that takes a single argument, you
don’t need to explicitly name and specify the argument, so the statement can be
reduced to this:
x.foreach(println)
Anonymous functions that have multiple parameters
A Map provides a good example of an anonymous function that takes multiple param‐
eters. For instance, given this Map:
val map = Map(1 -> 10, 2 -> 20, 3 -> 30)
280
|
Chapter 10: Functional Programming
this example shows the syntax for using an anonymous function with the transform
method on an immutable Map instance, where the key and value from each element is
passed to the anonymous function:
val newMap = map.transform((k,v) => k + v)
The REPL shows how this works:
scala> val map = Map(1 -> 10, 2 -> 20, 3 -> 30)
val map: Map[Int, Int] = Map(1 -> 10, 2 -> 20, 3 -> 30)
scala> val newMap = map.transform((k,v) => k + v)
val newMap: Map[Int, Int] = Map(1 -> 11, 2 -> 22, 3 -> 33)
While that’s not a particularly useful algorithm, the important part is that it shows the
syntax for working with the key/value pairs your anonymous function receives from
every Map entry:
(k,v) => k + v
Can Also Treat Map Elements as a Tuple
Depending on the need, another potential approach is to treat each
Map element as a two-element tuple:
scala> map.foreach(x => println(s"${x._1} --> ${x._2}"))
1 --> 10
2 --> 20
3 --> 30
See Also
• For much more detail on this topic, see my post “Explaining Scala’s val Function
Syntax”.
10.2 Passing Functions Around as Variables
Problem
You want to create a function as a variable and pass it around, just like you pass
String, Int, and other variables around in an object-oriented programming
language.
Solution
Use the syntax shown in Recipe 10.1 to define a function literal, and then assign that
literal to a variable. For instance, the following code defines a function literal that
10.2 Passing Functions Around as Variables
|
281
takes an Int parameter and returns a value that is twice the amount of the Int that’s
passed in:
(i: Int) => i * 2
As mentioned in Recipe 10.1, you can think of the => symbol as a transformer. In this
case, the function transforms the Int value i into an Int value that’s twice the value
of i.
Now you can assign that function literal to a variable:
val double = (i: Int) => i * 2
When you paste that code into the REPL, you’ll see that it recognizes double as a
function that transforms an Int into another Int, as shown in this underlined code:
scala> val double = (i: Int) => i * 2
val double: Int => Int = Lambda ...
----------
At this point the variable double is a variable instance, just like an instance of a
String, Int, or other type, but in this case it’s an instance of a function, known as a
function value. You can now invoke double just like calling a method:
double(2)
double(3)
// 4
// 6
Beyond just invoking double like this, you can also pass it to any method that takes a
function parameter that matches its signature. For instance, the map method on a
sequence class like List takes a function parameter that transforms a type A into a
type B, as shown by its signature:
def map[B](f: (A) => B): List[B]
-----------
Because of this, when you’re working with a List[Int], you can give map the double
function, which transforms an Int into an Int:
scala> val list = List.range(1, 5)
list: List[Int] = List(1, 2, 3, 4)
scala> list.map(double)
res0: List[Int] = List(2, 4, 6, 8)
In this example the generic type A is an Int and the generic type B also happens to be
an Int, but in more complicated examples they can be other types. For instance, you
can create a function that transforms a String to an Int:
val length = (s: String) => s.length
Then you can use that String-to-Int function with the map method on a list of
strings:
282
|
Chapter 10: Functional Programming
scala> val lengths = List("Mercedes", "Hannah", "Emily").map(length)
val lengths: List[Int] = List(8, 6, 5)
Welcome to the world of functional programming.
Functions and Methods are Generally Interchangeable
While the first example shows a double function created as a val
variable, you can also define methods using def and generally use
them the same way. See the Discussion for details.
Discussion
You can declare a function literal in at least two different ways. This modulus func‐
tion value—which returns true if i is an even number—infers that the return type of
the function literal is Boolean:
val f = (i: Int) => { i % 2 == 0 }
val f = (i: Int) => i % 2 == 0
// sometimes easier to read with parentheses
// same function without parentheses
In this case, the Scala compiler is smart enough to look at the body of the function
and determine that it returns a Boolean value.
However, if you prefer to explicitly declare the return type of a function literal, or
want to do so because your function is more complex, the following examples show
different forms you can use to explicitly declare that this isEven function returns a
Boolean:
val
val
val
val
isEven:
isEven:
isEven:
isEven:
(Int) => Boolean
Int => Boolean =
Int => Boolean =
Int => Boolean =
=
i
i
_
i => {
=> { i
=> i %
% 2 ==
i % 2 == 0 }
% 2 == 0 }
2 == 0
0
A second example helps demonstrate the difference of these approaches. These func‐
tions all take two Int parameters and return a single Int value, which is the sum of
the two input values:
// implicit approach
val add = (x: Int, y: Int) => { x + y }
val add = (x: Int, y: Int) => x + y
// explicit approach
val add: (Int, Int) => Int = (x,y) => { x + y }
val add: (Int, Int) => Int = (x,y) => x + y
I show the curly braces around the method body in some of these examples because I
find that the code is more readable, especially if this is your first exposure to the func‐
tion syntax. While I’m in this neighborhood, here’s an example of a multiline func‐
tion, without parentheses:
10.2 Passing Functions Around as Variables
|
283
val addThenDouble: (Int, Int) => Int = (x,y) =>
val a = x + y
2 * a
Using a def method like a val function
Scala is very flexible, and thanks to a technology known as Eta Expansion, just like
you can define a function and assign it to a val, you can also define a method using
def and then pass it around as an instance variable. Again using a modulus algo‐
rithm, you can define a def method in any of these ways:
def
def
def
def
isEvenMethod(i:
isEvenMethod(i:
isEvenMethod(i:
isEvenMethod(i:
Int) = i % 2 == 0
Int) = { i % 2 == 0 }
Int): Boolean = i % 2 == 0
Int): Boolean = { i % 2 == 0 }
When a method is passed into another method that expects a function parameter, Eta
Expansion transparently transforms that method into a function. Therefore, any of
these isEven methods can be passed into another method that takes a function
parameter that is defined to take an Int and return a Boolean. For instance, the fil
ter method on sequence classes is defined to take a function that transforms a
generic type A to a Boolean:
def filter(p: (A) => Boolean): List[A]
-----------------
Because in this next example you have a List[Int], you can pass filter the isEven
Method, since it transforms an Int to a Boolean:
val list = List.range(1, 10)
list.filter(isEvenMethod)
Here’s what that looks like in the REPL:
scala> def isEvenMethod(i: Int) = i % 2 == 0
def isEvenMethod(i: Int): Boolean
scala> val list = List.range(1, 10)
val list: List[Int] = List(1, 2, 3, 4, 5, 6, 7, 8, 9)
scala> list.filter(isEvenMethod)
val res0: List[Int] = List(2, 4, 6, 8)
As noted, this is similar to the process of defining a function literal and assigning it to
a variable. For instance, here you can see that isEvenFunction works just like isEven
Method:
val isEvenFunction = (i: Int) => i % 2 == 0
list.filter(isEvenFunction) // List(2, 4, 6, 8)
284
|
Chapter 10: Functional Programming
From your programming standpoint, the obvious difference is that isEvenMethod is a
method, whereas isEvenFunction is a function that’s assigned to a variable. But as a
programmer, it’s great that both approaches work.
Assigning an existing function/method to a function variable
1. Continuing this exploration, you can also assign an existing method or function
to a function variable. For instance, you can create a new function named c from
the scala.math.cos method like this:to function variables
scala> val c = scala.math.cos
val c: Double => Double = Lambda ...
The resulting function value c is called a partially applied function. It’s partially
applied because the cos method requires one argument, which you haven’t yet
supplied.
Now that you have c as a function value, you can use it just like you would have used
cos:
scala> c(0)
res0: Double = 1.0
Improved Eta Expansion in Scala 3
In Scala 2 an underscore was required for this example:
val c = scala.math.cos _
But thanks to the improved Eta Expansion technology in Scala 3,
this is no longer required.
This next example shows how to use this technique to create a square function from
the pow method in scala.math. Note that pow takes two parameters, where the second
parameter is the power that should be applied to the first parameter:
scala> val square = scala.math.pow(_, 2)
val square: Double => Double = Lambda ...
Again, square is a partially applied function. I supply the power parameter, but not
the value parameter, so now square is waiting to receive one additional parameter,
the value to be squared:
scala> square(3)
val res0: Double = 9.0
scala> square(4)
val res1: Double = 16.0
10.2 Passing Functions Around as Variables
|
285
This example shows a typical way of using this technique: you create a more specific
function (square) from a more general method (pow). See Recipe 10.5 for more
information.
Reading square’s REPL Output
Notice that when you create square, you can tell that it still
requires a parameter, because the REPL output shows its type
signature:
val square: Double => Double ...
----------------
This means that it’s a function that takes a Double parameter and
returns a Double value.
In summary, here are a few notes about function variables:
• Think of the => symbol as a transformer. It transforms the input data on its left
side to some new output data, using the algorithm on its right side.
• Use def to define a method, val to create a function.
• When assigning a function to a variable, a function literal is the code on the right
side of the expression.
Storing functions in a Map
When I say that functions are variables, I mean that they can be used just like a
String or Int variable in all ways. They can be used as function parameters, as shown
in several recipes in this chapter. And as this example shows, you can also store func‐
tions (or methods) in a Map:
def add(i: Int, j: Int) = i + j
def multiply(i: Int, j: Int) = i * j
// store the functions in a Map
val functions = Map(
"add" -> add,
"multiply" -> multiply
)
// get a function out of the Map and use it
val f = functions("add")
f(2, 2)
// 4
Functions and methods truly are variables, in every sense of the word.
286
|
Chapter 10: Functional Programming
See Also
• For more information on Eta Expansion, see my article “Using Scala Methods as
If They Were Functions (Eta Expansion)”.
• For much more detail on val functions and def methods, see my blog post “Scala:
The Differences Between val and def When Creating Functions”.
• See Recipe 10.5 for more examples and details about partially applied functions.
10.3 Defining a Method That Accepts a Simple Function
Parameter
Problem
You want to create a method that takes a simple function as a method parameter.
Solution
This solution follows a three-step process:
1. Define your method, including the signature for the function you want to take as
a method parameter.
2. Define one or more functions that match this signature.
3. Sometime later, pass the function(s) as a parameter to your method.
To demonstrate this, define a method named executeFunction, which takes a func‐
tion as a parameter. The method takes one parameter named callback, which is a
function. That function must have no input parameters and must return nothing:
def executeFunction(callback:() => Unit) =
callback()
Two notes about this code:
• The callback:() syntax specifies a function that has no input parameters. If the
function had parameters, the types would be listed inside the parentheses.
• The => Unit portion of the code indicates that this callback function returns
nothing.
I’ll discuss this syntax shortly.
Next, define a function or method that matches this signature. For example, both say
HelloF and sayHelloM take no input parameters and return nothing:
10.3 Defining a Method That Accepts a Simple Function Parameter
|
287
val sayHelloF = () => println("Hello")
def sayHelloM(): Unit = println("Hello")
// function
// method
In the last step of the recipe, because both sayHelloF and sayHelloM match call
back’s type signature, they can be passed to the executeFunction method:
executeFunction(sayHelloF)
executeFunction(sayHelloM)
The REPL demonstrates how this works:
scala> val sayHelloF = () => println("Hello")
val sayHelloF: () => Unit = Lambda ...
scala> def sayHelloM(): Unit = println("Hello")
def sayHelloM(): Unit
scala> executeFunction(sayHelloF)
Hello
scala> executeFunction(sayHelloM)
Hello
Discussion
In this recipe I create a method that takes a simple function so you can see how this
process works with a function that takes no parameters and returns nothing (Unit).
In the next recipe you’ll see examples of more complicated function signatures.
There isn’t anything special about the callback name used in this example. When I
first learned how to pass functions to methods, I preferred the name callback
because it made the meaning clear, but it’s just the name of a method parameter.
These days, just as I name an Int parameter i, I name a function parameter f:
def runAFunction(f:() => Unit) = f()
The part that is special is that any function you pass into the method must match the
function parameter signature you define. In this case, I declare that a function that’s
passed in must take no arguments and must return nothing:
f:() => Unit
More generally, the syntax for defining a function as a method parameter is:
parameterName: (parameterType(s)) => returnType
In the runAFunction example, the parameterName is f, the parameterType area is
empty because the function doesn’t take any parameters, and the return type is Unit
because the function doesn’t return anything:
runAFunction(f:() => Unit)
288
|
Chapter 10: Functional Programming
As another example, to define a function parameter that takes a String and returns
an Int, use one of these two signatures:
executeFunction(f: String => Int)
executeFunction(f: (String) => Int)
See the next recipe for more complicated function signature examples.
A Note About Unit
The Scala Unit shown in these examples is similar to Void in Java
and None in Python. It’s used in situations like this to indicate that a
function returns nothing.
See Also
The syntax for function parameters is similar to the syntax for by-name parameters,
which are discussed in “By-name parameters” on page 127.
10.4 Declaring More Complex Higher-Order Functions
Problem
You want to define a method that takes a function as a parameter, and that function
may have one or more input parameters and may return a value other than Unit.
Your method may also have additional parameters.
Solution
Following the approach described in Recipe 10.3, define a method that takes a func‐
tion as a parameter. Specify the function signature you expect to receive, and then
execute that function inside the body of the method.
The following example defines a method named exec that takes a function as an
input parameter. That function must take one Int as an input parameter and return
nothing:
def exec(callback: Int => Unit) =
// invoke the function we were given, giving it an Int parameter
callback(1)
Next, define a function that matches the expected signature. Both this function and
this method match callback’s signature because they take an Int argument and
return nothing:
val plusOne = (i: Int) => println(i+1)
def plusOne(i: Int) = println(i+1)
10.4 Declaring More Complex Higher-Order Functions
|
289
Now you can pass either version of plusOne into the exec function:
exec(plusOne)
Because plusOne is called inside the method, this code prints the number 2.
Any function that matches this signature can be passed into the exec method. For
instance, define a new function (or method) named plusTen that also takes an Int
and returns nothing:
val plusTen = (i: Int) => println(i+10)
def plusTen(i: Int) = println(i+10)
Now you can pass it into your exec function, and see that it also works:
exec(plusTen)
// prints 11
Although these examples are simple, you can see the power of the technique: you can
easily swap in interchangeable algorithms. As long as the signature of the function or
method that’s passed in matches what your method expects, your algorithms can do
anything you want. This is comparable to swapping out algorithms in the OOP Strat‐
egy design pattern.
Discussion
Not including other features like givens (see Recipe 23.8, “Using Term Inference with
given and using”), the general syntax for describing a function as a method parameter
is this:
parameterName: (parameterType(s)) => returnType
Therefore, to define a function that takes a String and returns an Int, use one of
these two signatures:
exec(f: (String) => Int)
exec(f: String => Int)
The second example works because the parentheses are optional when a function is
declared to have only one input parameter. As an example of something more com‐
plicated, here’s the signature of a function that takes two Int values and returns a
Boolean:
exec(f: (Int, Int) => Boolean)
Finally, this exec method expects a function that takes String, Int, and Double
parameters and returns a Seq[String]:
exec(f: (String, Int, Double) => Seq[String])
290
|
Chapter 10: Functional Programming
Passing in a function with other parameters
A function parameter is just like any other method parameter, so a method can
accept other parameters in addition to a function, and indeed, this is often the case.
The following code demonstrates this. First, define a method named executeXTimes
that takes two parameters, a function and an Int:
def executeXTimes(callback:() => Unit, numTimes: Int): Unit =
for i <- 1 to numTimes do callback()
As its name implies, executeXTimes calls the callback function numTimes times, so if
you pass in a 3, callback will be called three times.
Next, define a function or method that matches callback’s signature:
val sayHello = () => println("Hello")
def sayHello() = println("Hello")
Now pass either version of sayHello and an Int into executeXTimes:
scala> executeXTimes(sayHello, 3)
Hello
Hello
Hello
This demonstrates that you can use this technique to pass variables into a method,
and those variables can then be used by the function inside the method body.
As another example, create this method named executeAndPrint that takes a func‐
tion and two Int parameters:
def executeAndPrint(f:(Int, Int) => Int, x: Int, y: Int): Unit =
val result = f(x, y)
println(result)
In this case the function f takes two Int parameters and returns an Int. This execu
teAndPrint method is more interesting than the previous example because it takes
the two Int parameters it’s given and passes them to the function parameter it’s given
in this line of code:
val result = f(x, y)
To demonstrate this, create two functions that match the signature of the function
that executeAndPrint expects, a sum function and a multiply function:
val sum = (x: Int, y: Int) => x + y
def sum(x: Int, y: Int) = x + y
val multiply = (x: Int, y: Int) => x * y
def multiply(x: Int, y: Int) = x * y
10.4 Declaring More Complex Higher-Order Functions
|
291
Now you can call executeAndPrint as follows, passing in the different functions,
along with two Int parameters:
executeAndPrint(sum, 2, 9)
executeAndPrint(multiply, 3, 9)
// prints 11
// prints 27
This is cool because the executeAndPrint method doesn’t know what algorithm is
actually run. All it knows is that it passes the parameters x and y to the function it’s
given and then prints the result from that function. This is a little like defining an
interface in OOP and then providing concrete implementations of that interface.
Here’s one more example of this three-step process:
// 1 - define the method
def exec(callback: (Any, Any) => Unit, x: Any, y: Any): Unit =
callback(x, y)
// 2 - define a function to pass in
def printTwoThings(a: Any, b: Any): Unit =
println(a)
println(b)
// 3 - pass the function and some parameters to the method
case class Person(name: String)
exec(printTwoThings, "Hello", Person("Dave"))
The output from that last line of code looks like this in the REPL:
scala> exec(printTwoThings, "Hello", Person("Dave"))
Hello
Person(Dave)
See Also
The syntax for function parameters is similar to the syntax for by-name parameters,
which are discussed in “By-name parameters” on page 127.
10.5 Using Partially Applied Functions
Problem
You want to eliminate repetitively passing variables into a function by (a) passing
common variables into the function to (b) create a new function that is preloaded
with those values, and then (c) use the new function, passing it only the unique vari‐
ables it needs.
Solution
The classic example of a partially applied function begins with a sum function:
292
|
Chapter 10: Functional Programming
val sum = (a: Int, b: Int, c: Int) => a + b + c
There’s nothing special about sum, it’s just a function that sums three Int values. But
things get interesting when you supply two of the parameters when calling sum but
don’t provide the third parameter:
val addTo3 = sum(1, 2, _)
Because you haven’t provided a value for the third parameter, the resulting variable
addTo3 is a partially applied function. You can see this in the REPL. First, paste in the
sum function:
scala> val sum = (a: Int, b: Int, c: Int) => a + b + c
val sum: (Int, Int, Int) => Int = Lambda ...
The REPL result shows this output:
val sum: (Int, Int, Int) => Int = Lambda ...
---------------
This output verifies that sum is a function that takes three Int input parameters and
returns an Int. Next, give sum only two of the three input parameters it wants, while
assigning the result to addTo3:
scala> val addTo3 = sum(1, 2, _)
val addTo3: Int => Int = Lambda ...
----------
The underlined portion of the REPL result shows that addTo3 is a function that trans‐
forms a single Int input parameter into an output Int parameter. addTo3 is created
by giving sum the input parameters 1 and 2, and now addTo3 is a function that can
take one more input parameter. So now when you give addTo3 an Int, such as the
number 10, you magically get the sum of the three numbers that have been passed
into the two functions:
scala> addTo3(10)
res0: Int = 13
Here’s a summary of what just happened:
• The first two numbers (1 and 2) were passed into the original sum function.
• That process creates the new function named addTo3, which is a partially applied
function.
• Sometime later in the code, the third number (10) is passed into addTo3.
Note that in this example I create sum as a val function, but it can also be defined as a
def method, and it will work exactly the same:
scala> def sum(a: Int, b: Int, c: Int) = a + b + c
def sum(a: Int, b: Int, c: Int): Int
10.5 Using Partially Applied Functions
|
293
scala> val addTo3 = sum(1, 2, _)
val addTo3: Int => Int = Lambda ...
scala> addTo3(10)
val res0: Int = 13
Discussion
In functional programming languages, when you call a function that has parameters,
you are said to be applying the function to the parameters. When all the parameters are
passed to the function—something you always do with languages like Java—you have
fully applied the function to all the parameters. But when you give only a subset of the
parameters to the function, the result of the expression is a partially applied function.
As demonstrated in the example, the resulting partially applied function is a variable
that you can pass around. For instance, this code shows how the partially applied
function addTo3 can be passed into a wormhole, through the wormhole, and out the
other side before it’s executed:
def sum(a: Int, b: Int, c: Int) = a + b + c
val addTo3 = sum(1, 2, _)
def intoTheWormhole(f: Int => Int) = throughTheWormhole(f)
def throughTheWormhole(f: Int => Int) = otherSideOfWormhole(f)
// supply 10 to whatever function you receive:
def otherSideOfWormhole(f: Int => Int) = f(10)
intoTheWormhole(addTo3)
// 13
As the comment in the last line shows, the result of calling intoTheWormhole will be
13 when addTo3 is finally executed by otherSideOfWormhole.
Function variables are also called function values, and as shown, when you later pro‐
vide all the parameters needed to fully apply the function value, a result is yielded.
Real-world use
One use of this technique is to create a more-specific version of a general function.
For instance, when working with HTML, you may have a method that adds a prefix
and a suffix to an HTML snippet:
def wrap(prefix: String, html: String, suffix: String) =
prefix + html + suffix
If at a certain point in your code you know that you always want to add the same pre‐
fix and suffix to different HTML strings, you can apply those two parameters to the
method, without applying the html parameter:
294
|
Chapter 10: Functional Programming
val wrapWithDiv = wrap("<div>", _, "</div>")
Now you can call the resulting wrapWithDiv function, just passing it the HTML you
want to wrap:
scala> wrapWithDiv("<p>Hello, world</p>")
res0: String = <div><p>Hello, world</p></div>
scala> wrapWithDiv("""<img src="/images/foo.png" />""")
res1: String = <div><img src="/images/foo.png" /></div>
The wrapWithDiv function is preloaded with the <div> and </div> tags you applied,
so it can be called with just one argument, the HTML you want to wrap.
As a nice benefit, you can still call the original wrap function if you want:
wrap("<pre>", "val x = 1", "</pre>")
In general, you can use partially applied functions to make programming easier by
binding some arguments to an existing method (or function) and leaving the others
to be filled in.
Improved Type Inference in Scala 3
In Scala 2 it was often necessary to specify the type of an omitted
parameter, such as specifying the String type for the previous
example:
val wrapWithDiv = wrap("<div>", _: String, "</div>")
---------
But so far with Scala 3 I haven’t needed that. I just declare the miss‐
ing field with the _ character, as shown in the examples:
val wrapWithDiv = wrap("<div>", _, "</div>")
10.6 Creating a Method That Returns a Function
Problem
You want to return a function (algorithm) from a function or method.
Solution
Define an anonymous function, and return that from your method. Then assign that
to a function variable, and later invoke that function variable as needed.
For example, assuming that a variable named prefix exists in the current scope, this
code declares an anonymous function that takes a String argument named str and
returns that string with prefix prepended to it:
10.6 Creating a Method That Returns a Function
|
295
(str: String) => s"$prefix $str"
Now you can return that anonymous function from the body of another function as
follows:
// single line syntax
def saySomething(prefix: String) = (str: String) => s"$prefix $str"
// multiline syntax, which might be easier to read
def saySomething(prefix: String) = (str: String) =>
s"$prefix $str"
That example doesn’t show saySomething’s return type, but you can declare it as
(String => String) if you prefer:
def saySomething(prefix: String): (String => String) = (str: String) =>
s"$prefix $str"
Because saySomething returns a function that transforms one String to another
String, you can assign that resulting function to a variable. saySomething also takes
the String parameter named prefix, so give it that parameter as you create a new
function named sayHello:
val sayHello = saySomething("Hello")
When you paste that code into the REPL, you can see that sayHello is a function that
transforms a String to a String:
scala> val sayHello = saySomething("Hello")
val sayHello: String => String = Lambda ...
----------------
sayHello is essentially the same as saySomething, but with prefix preloaded to the
value "Hello". Looking back at the anonymous function, you see that it takes a
String parameter s and returns a String, so you pass it a String:
sayHello("Al")
Here’s what these steps look like in the REPL:
scala> def saySomething(prefix: String) = (str: String) =>
|
s"$prefix $str"
def saySomething(prefix: String): String => String
// assign "Hello" to prefix
scala> val sayHello = saySomething("Hello")
val sayHello: String => String = Lambda ...
// assign "Al" to str
scala> sayHello("Al")
res0: String = Hello Al
296
|
Chapter 10: Functional Programming
Discussion
You can use this approach any time you want to encapsulate an algorithm inside a
method. A bit like the object-oriented Factory or Strategy patterns, the function your
method returns can be based on the input parameter it receives. For example, create a
greeting method that returns an appropriate greeting based on the language
specified:
def greeting(language: String) = (name: String) =>
language match
case "english" => s"Hello, $name"
case "spanish" => s"Buenos dias, $name"
If it doesn’t seem clear that greeting is returning a String => String function, you
can make the code more explicit by (a) specifying the method return type and (b)
creating function values inside the method:
// [a] declare the 'String => String' return type
def greeting(language: String): (String => String) = (name: String) =>
// [b] create the function values here, then return them from the
// match expression
val englishFunc = () => s"Hello, $name"
val spanishFunc = () => s"Buenos dias, $name"
language match
case "english" => println("returning the english function")
englishFunc()
case "spanish" => println("returning the spanish function")
spanishFunc()
Here’s what this second method looks like when it’s invoked in the REPL:
scala> val hello = greeting("english")
val hello: String => String = Lambda ...
scala> val buenosDias = greeting("spanish")
val buenosDias: String => String = Lambda ...
scala> hello("Al")
returning english function
val res0: String = Hello, Al
scala> buenosDias("Lorenzo")
returning spanish function
val res1: String = Buenos dias, Lorenzo
You can use this recipe any time you want to encapsulate one or more functions
behind a method.
Returning methods from a method
Also, if you prefer, thanks to Scala’s Eta Expansion technology, you can also declare
and return methods from inside a method:
10.6 Creating a Method That Returns a Function
|
297
def greeting(language: String): (String => String) = (name: String) =>
def englishMethod = s"Hello, $name"
def spanishMethod = s"Buenos dias, $name"
language match
case "english" => println("returning the english method")
englishMethod
case "spanish" => println("returning the spanish method")
spanishMethod
The only change to greeting is that this version declares and returns englishMethod
and spanishMethod. I find that the method syntax is easier to read, so I prefer this
approach, and to callers of greeting, everything else looks exactly the same.
Same Technique, Different Uses
In the first example, prefix was used to preload a value in the
resulting function. In the second example, the language parameter
was used to select which algorithm to return, something like the
object-oriented programming Strategy or Template patterns.
10.7 Creating Partial Functions
Problem
You want to define a function that only works for a subset of possible input values, or
you want to define a series of functions that only work for a subset of input values
and then combine those functions to completely solve a problem.
Solution
A partial function is a function that does not provide an answer for every possible
input value it can be given. It provides an answer only for a subset of possible data
and defines the data it can handle. In Scala, a partial function can also be queried to
determine if it can handle a particular value.
For example, imagine a normal function that divides one number by another:
val divide = (x: Int) => 42 / x
As defined, this function blows up when the input parameter is zero:
scala> divide(0)
java.lang.ArithmeticException: / by zero
Although you could handle this particular situation by catching and throwing an
exception, Scala lets you define the divide function as a PartialFunction. When
doing so, you also explicitly state that the function is defined when the input parame‐
ter is not zero:
298
| Chapter 10: Functional Programming
val divide = new PartialFunction[Int, Int] {
def apply(x: Int) = 42 / x
def isDefinedAt(x: Int) = x != 0
}
In this approach, the apply method defines the function signature and body. Now
you can do several nice things. One thing is to test the function before you attempt to
use it:
scala> divide.isDefinedAt(0)
res0: Boolean = false
scala> divide.isDefinedAt(1)
res1: Boolean = true
scala> val x = if divide.isDefinedAt(1) then Some(divide(1)) else None
val x: Option[Int] = Some(42)
In addition to this, you’ll see shortly that other code can take advantage of partial
functions to provide elegant and concise solutions.
Whereas that divide function is explicit about what data it handles, partial functions
can also be written using case statements:
val divide2: PartialFunction[Int, Int] =
case d if d != 0 => 42 / d
With this approach, Scala can infer that divide2 takes an Int input parameter based
on this part of the code:
PartialFunction[Int, Int]
---
Although this code doesn’t explicitly implement the isDefinedAt method, it works
the same as the previous divide function definition:
scala> divide2.isDefinedAt(0)
res0: Boolean = false
scala> divide2.isDefinedAt(1)
res1: Boolean = true
Discussion
The PartialFunction Scaladoc describes partial functions like this:
A partial function of type PartialFunction[A, B] is a unary function where the
domain does not necessarily include all values of type A. The function isDefinedAt
allows [you] to test dynamically if a value is in the domain of the function.
This helps to explain why the last example with the case statement works: the isDefi
nedAt method dynamically tests to see if the given value is in the domain of the
10.7 Creating Partial Functions
|
299
function, i.e., whether it is handled or accounted for. The signature of the Partial
Function trait looks like this:
trait PartialFunction[-A, +B] extends (A) => B
As discussed in other recipes, the => symbol can be thought of as a transformer, and
in this case, the (A) => B can be interpreted as a function that transforms a type A
into a resulting type B.
The divide2 method transforms an input Int into an output Int, so its signature
looks like this:
val divide2: PartialFunction[Int, Int] = ...
--------
But if it returned a String instead, it would be declared like this:
val divide2: PartialFunction[Int, String] = ...
-----------
As an example, the following method uses this signature:
// converts 1 to "one", etc., up to 5
val convertLowNumToString = new PartialFunction[Int, String] {
val nums = Array("one", "two", "three", "four", "five")
def apply(i: Int) = nums(i-1)
def isDefinedAt(i: Int) = i > 0 && i < 6
}
Chaining partial functions with orElse and andThen
A terrific feature of partial functions is that you can chain them together. For
instance, one method may only work with even numbers, and another method may
only work with odd numbers, and together they can solve all integer problems.
To demonstrate this approach, the following example shows two functions that can
each handle a small number of Int inputs and convert them to String results:
// converts 1 to "one", etc., up to 5
val convert1to5 = new PartialFunction[Int, String] {
val nums = Array("one", "two", "three", "four", "five")
def apply(i: Int) = nums(i-1)
def isDefinedAt(i: Int) = i > 0 && i < 6
}
// converts 6 to "six", etc., up to 10
val convert6to10 = new PartialFunction[Int, String] {
val nums = Array("six", "seven", "eight", "nine", "ten")
def apply(i: Int) = nums(i-6)
def isDefinedAt(i: Int) = i > 5 && i < 11
}
300
| Chapter 10: Functional Programming
Taken separately, they can each handle only five numbers. But combined with
orElse, the resulting function can handle 10:
scala> val handle1to10 = convert1to5 orElse convert6to10
handle1to10: PartialFunction[Int,String] = <function1>
scala> handle1to10(3)
res0: String = three
scala> handle1to10(8)
res1: String = eight
The orElse method comes from the PartialFunction trait, which also includes the
andThen method to further help chain partial functions together.
Partial functions in the collections classes
It’s important to know about partial functions, not just to have another tool in your
toolbox but also because they are used in the APIs of some libraries, including the
Scala collections library.
One example of where you’ll run into partial functions is with the collect method
on collections classes. The collect method takes a partial function as input, and as
its Scaladoc describes, collect “builds a new collection by applying a partial function
to all elements of this list on which the function is defined.”
For instance, the divide function shown earlier is a partial function that is not
defined at the Int value zero. Here’s that function again:
val divide: PartialFunction[Int, Int] =
case d: Int if d != 0 => 42 / d
If you attempt to use this partial function with the map method and a list that contains
0, it will explode with a MatchError:
scala> List(0,1,2).map(divide)
scala.MatchError: 0 (of class java.lang.Integer)
stack trace continues ...
However, if you use the same function with the collect method, it won’t throw an
exception:
scala> List(0,1,2).collect(divide)
res0: List[Int] = List(42, 21)
10.7 Creating Partial Functions
|
301
This is because the collect method is written to test the isDefinedAt method for
each element it’s given. Conceptually, it’s similar to this:
List(0,1,2).filter(divide.isDefinedAt(_))
.map(divide)
As a result, collect doesn’t run the divide algorithm when the input value is 0 but
does run it for every other element.
You can see the collect method work in other situations, such as passing it a List
that contains a mix of data types, with a function that works only with Int values:
scala> List(42, "cat").collect { case i: Int => i + 1 }
res0: List[Int] = List(43)
Because it checks the isDefinedAt method under the covers, collect can handle the
fact that your anonymous function can’t work with a String as input.
Another use of collect is when a list contains a series of Some and None values and
you want to extract all the Some values:
scala> val possibleNums = List(Some(1), None, Some(3), None)
val possibleNums: List[Option[Int]] = List(Some(1), None, Some(3), None)
scala> possibleNums.collect{case Some(i) => i}
val res1: List[Int] = List(1, 3)
Or Use flatten
Another approach to reducing a Seq[Option] to only the values
inside its Some elements is to call flatten on the list:
scala> possibleNums.flatten
val res0: List[Int] = List(1, 3)
This works because Option is like a list that contains zero or one
value, and flatten’s purpose in life is to convert a “list of lists”
down to a single list. See Recipe 13.6, “Flattening a List of Lists with
flatten”, for more details.
See Also
• Portions of this recipe were inspired by Erik Bruchez’s blog post “Scala Partial
Functions (Without a PhD)”.
• See the PartialFunction Scaladoc for more details.
302
| Chapter 10: Functional Programming
10.8 Implementing Functional Error Handling
Problem
You’ve started to write code in a functional programming style, but you’re not sure
how to handle exceptions and other errors when writing pure functions.
Solution
Because writing functional code is like writing algebraic equations—and because
algebraic equations always return a value and never throw an exception—your pure
functions don’t throw exceptions. Instead, you handle errors with Scala’s error han‐
dling types:
• Option/Some/None
• Try/Success/Failure
• Either/Left/Right
My canonical example for this is writing a makeInt method. Imagine for a moment
that Scala doesn’t include a makeInt method on a String, so you want to write your
own method. A correct solution looks like this:
def makeInt(s: String): Option[Int] =
try
Some(Integer.parseInt(s))
catch
case e: NumberFormatException => None
This code returns a Some[Int] if makeInt can convert the String to an Int, other‐
wise it returns a None. Callers of this method use it like this:
makeInt("1")
makeInt("a")
// Option[Int] = Some(1)
// Option[Int] = None
makeInt(aString) match
case Some(i) => println(s"i = $i")
case None => println("Could not create an Int")
Given a list of strings listOfStrings that may or may not convert to integers, you
can also use makeInt like this:
val optionalListOfInts: Seq[Option[Int]] =
for s <- listOfStrings yield makeInt(s)
This is great because makeInt doesn’t throw an exception and blow up that for
expression. Instead, the for expression returns a Seq that contains Option[Int] val‐
ues. For instance, if listOfStrings contains these values:
10.8 Implementing Functional Error Handling
|
303
val listOfStrings = List("a", "1", "b", "2")
then optionalListOfInts will contain these values:
List(None, Some(1), None, Some(2))
To create a list that contains only the values that were successfully converted to inte‐
gers, just flatten that list like this:
val ints = optionalListOfInts.flatten
// List(1, 2)
In addition to using the Option types for this solution, you can also use the Try and
Either types. Much shorter versions of the makeInt method that use these three
error-handling types look like this:
import scala.util.control.Exception.*
import scala.util.{Try, Success, Failure}
def makeInt(s: String): Option[Int] = allCatch.opt(Integer.parseInt(s))
def makeInt(s: String): Try[Int] = Try(Integer.parseInt(s))
def makeInt(s: String): Either[Throwable, Int] =
allCatch.either(Integer.parseInt(s))
These examples show the success and error cases for those three approaches:
// Option
makeInt("1")
makeInt("a")
// Try
makeInt("1")
makeInt("a")
// Either
makeInt("1")
makeInt("a")
// Some(1)
// None
// util.Try[Int] = Success(1)
// util.Try[Int] = Failure(java.lang.NumberFormatException:
//
For input string: "a")
// Either[Throwable, Int] = Right(1)
// Either[Throwable, Int] = Left(java.lang.NumberFormatException:
//
For input string: "a")
The key to all of these approaches is that you don’t throw exceptions; instead, you
return these error-handling types.
Using Either Gets You Ready for FP Libraries Like ZIO
Hermann Hueck, one of the reviewers of this book, made the point
that two benefits of using Either are that (a) it’s more flexible than
Try, because you can control the error type, and (b) it gets you
ready to use FP libraries like ZIO, which use Either and similar
approaches extensively.
304
| Chapter 10: Functional Programming
Discussion
A bad (non-FP) approach to this problem is to write the method like this to throw an
exception:
// don’t write code like this!
@throws(classOf[NumberFormatException])
def makeInt(s: String): Int =
try
Integer.parseInt(s)
catch
case e: NumberFormatException => throw e
You don’t write code like this in FP because when other people use your method, it
will blow up their equations when an exception occurs. For instance, imagine that
someone writes this for expression that uses this version of makeInt:
val possibleListOfInts: Seq[Int] =
for s <- listOfStrings yield makeInt(s)
If listOfStrings contains the same values that were shown in the Solution:
val listOfStrings = List("a", "1", "b", "2")
their for expression—which they want to be an algebraic equation—will blow up on
the first element, the "a" in the list.
Again, because algebraic equations don’t throw exceptions, pure functions don’t
throw them either.
See Also
• See Recipe 24.6, “Using Scala’s Error-Handling Types (Option, Try, and Either)”,
for more details on using the Option, Try, and Either error-handling types.
10.9 Real-World Example: Passing Functions Around
in an Algorithm
As a bit of a real-world example, in this lesson I’ll show how to pass methods and
functions around as part of an algorithm that I used back in my aerospace engineer‐
ing days.
Newton’s Method is a mathematical method that can be used to solve the roots of
equations. For instance, this example will find a possible value of x for this equation:
3x + sin(x) - Ex = 0
10.9 Real-World Example: Passing Functions Around in an Algorithm
|
305
As you can see in the following code, the method named newtonsMethod takes func‐
tions as its first two parameters. It also takes two other Double parameters and
returns a Double:
/**
* Newton’s Method for solving equations.
* @param fx The equation to solve.
* @param fxPrime The derivative of `fx`.
* @param x An initial “guess” for the value of `x`.
* @param tolerance Stop iterating when the iteration values are
within this tolerance.
* @todo Check that `f(xNext)` is greater than a second tolerance value.
* @todo Check that `f'(x) != 0`
*/
def newtonsMethod(
fx: Double => Double,
fxPrime: Double => Double,
x: Double,
tolerance: Double
): Double =
/**
* most FP approaches don’t use a `var` field,
* but some people believe that `var` fields are acceptable
* when they are contained within the scope of a method/function.
*/
var x1 = x
var xNext = newtonsMethodHelper(fx, fxPrime, x1)
while math.abs(xNext - x1) > tolerance do
x1 = xNext
println(xNext) // debugging (intermediate values)
xNext = newtonsMethodHelper(fx, fxPrime, x1)
end while
// return xNext:
xNext
end newtonsMethod
/**
* This is the `x2 = x1 - f(x1)/f'(x1)` calculation.
*/
def newtonsMethodHelper(
fx: Double => Double,
fxPrime: Double => Double,
x: Double
): Double =
x - fx(x) / fxPrime(x)
306
|
Chapter 10: Functional Programming
The two functions that are passed into newtonsMethod should be the original equa‐
tion (fx) and the derivative of that equation (fxPrime). Don’t worry too much about
the details inside the two methods: I’m only interested in focusing on how functions
are passed around in a real-world algorithm like this.
The method newtonsMethodHelper also takes two functions as parameters, so you
can see how the functions are passed from newtonsMethod to newtonsMethodHelper.
Here’s an @main driver method that shows how to use Newton’s Method to find the
roots of the fx equation:
/**
* A “driver” function to test Newton’s method. Start with:
*
- the desired `f(x)` and `f'(x)` equations
*
- an initial guess, and
*
- a tolerance value
*/
@main def driver =
// The `f(x)` and `f'(x)` functions. Both functions take a `Double`
// parameter named `x` and return a `Double`.
def fx(x: Double): Double = 3*x + math.sin(x) - math.pow(math.E, x)
def fxPrime(x: Double): Double = 3 + math.cos(x) - math.pow(math.E, x)
val initialGuess = 0.0
val tolerance = 0.00005
// pass `f(x)` and `f'(x)` to the Newton’s Method function, along with
// the initial guess and tolerance.
val answer = newtonsMethod(fx, fxPrime, initialGuess, tolerance)
// note: this is not an FP approach to printing output
println(answer)
The output from this example is:
0.3333333333333333
0.3601707135776337
0.36042168047601975
0.3604217029603242
As you can see, the majority of this code involves defining methods and functions,
passing functions into methods, and then invoking the functions from within the
methods. This gives you an idea of how FP works, especially when writing code for
an algorithm like this.
The method named newtonsMethod works for any two functions fx and fxPrime,
where fxPrime is the derivative of fx, within the limits of the @todo items that are not
implemented. To experiment with this example, try changing the functions fx and
fxPrime, or implement the @todo items.
10.9 Real-World Example: Passing Functions Around in an Algorithm
|
307
Source of the Algorithm
The algorithm shown comes from a 1980s version of the college
textbook Applied Numerical Analysis by Curtis Gerald and Patrick
Wheatley (Pearson), where the approach was demonstrated in
pseudocode.
10.10 Real-World Example: Functional Domain Modeling
As something of a real-world example, let’s look at how to organize an FP-style orderentry application for a pizza store. The code in this example will only focus on pizzas
—no breadsticks, cheesesticks, soft drinks, or salads—but it will model customers,
addresses, and orders, and the operations (pure functions) on those data types.
The Data Model
To get started, here are some enums a pizza class will need. To be clear about what
we’re doing, place this code in a file named Nouns.scala:
enum Topping:
case Cheese, Pepperoni, Sausage, Mushrooms, Onions
enum CrustSize:
case Small, Medium, Large
enum CrustType:
case Regular, Thin, Thick
Next, those enums are used to define a Pizza class. Add this case class to Nouns.scala:
case class Pizza(
crustSize: CrustSize,
crustType: CrustType,
toppings: Seq[Topping]
)
Finally, these classes are used to model the concepts of customers and orders:
case class Customer(
name: String,
phone: String,
address: Address
)
case class Address(
street1: String,
street2: Option[String],
city: String,
state: String,
postalCode: String
)
308
|
Chapter 10: Functional Programming
case class Order(
pizzas: Seq[Pizza],
customer: Customer
)
Add that code to Nouns.scala as well.
That’s all there is to the data model. Notice that the classes are simple, immutable data
structures, defined with enums and case classes. Unlike OOP classes, you don’t encap‐
sulate the behaviors (methods) inside the classes. As a result, this approach feels a lot
like defining a database schema.
Skinny Domain Objects
In his book, Functional and Reactive Domain Modeling (Manning),
Debasish Ghosh states that where OOP practitioners describe their
classes as “rich domain models” that encapsulate data and behav‐
iors, FP data models can be thought of as “skinny domain objects.”
That’s because, as this lesson shows, the data models are defined
using enums and case classes with attributes, but no behaviors.
Functions That Operate on That Model
Now all you have to do is create a series of pure functions to operate on those immut‐
able data structures. A good way to do this is to first sketch out the desired interface
using one or more traits. For the functions that operate on a Pizza I’ll define one
trait. Place this code in a file named Verbs.scala:
trait PizzaServiceInterface:
def addTopping(p: Pizza, t: Topping): Pizza
def removeTopping(p: Pizza, t: Topping): Pizza
def removeAllToppings(p: Pizza): Pizza
def updateCrustSize(p: Pizza, cs: CrustSize): Pizza
def updateCrustType(p: Pizza, ct: CrustType): Pizza
Once you create a concrete implementation of that trait—which you’ll do in a few
moments—you can write code like this:
import Topping.*, CrustSize.*, CrustType.*
@main def pizzaServiceMain =
// PizzaService is a trait that extend PizzaServiceInterface
import PizzaService.*
object PizzaService extends PizzaService
// an initial pizza
val p = Pizza(Medium, Regular, Seq(Cheese))
10.10 Real-World Example: Functional Domain Modeling
|
309
// demonstrating the PizzaService functions
val p1 = addTopping(p, Pepperoni)
val p2 = addTopping(p1, Mushrooms)
val p3 = updateCrustType(p2, Thick)
val p4 = updateCrustSize(p3, Large)
// this is *not* a functional approach to printing output.
// result:
// Pizza(LargeCrustSize,ThickCrustType,List(Cheese, Pepperoni, Mushrooms))
println(p4)
Place that code in a file named Driver.scala.
Because I’m satisfied with how that API looks, I then create a concrete implementa‐
tion of the PizzaServiceInterface trait. To do so, add this code to the Verbs.scala
file:
import ListUtils.dropFirstMatch
trait PizzaService extends PizzaServiceInterface:
def addTopping(p: Pizza, t: Topping): Pizza =
val newToppings = p.toppings :+ t
p.copy(toppings = newToppings)
def removeTopping(p: Pizza, t: Topping): Pizza =
val newToppings = dropFirstMatch(p.toppings, t)
p.copy(toppings = newToppings)
def removeAllToppings(p: Pizza): Pizza =
val newToppings = Seq[Topping]()
p.copy(toppings = newToppings)
def updateCrustSize(p: Pizza, cs: CrustSize): Pizza =
p.copy(crustSize = cs)
def updateCrustType(p: Pizza, ct: CrustType): Pizza =
p.copy(crustType = ct)
end PizzaService
That code requires a method named dropFirstMatch that drops the first matching
element in a list, which I put in a ListUtils object:
object ListUtils:
/**
* Drops the first matching element in a list, as in this example:
* {{{
* val xs = List(1,2,3,1)
* dropFirstMatch(xs, 1) == List(2,3,1)
* }}}
*/
def dropFirstMatch[A](xs: Seq[A], value: A): Seq[A] =
310
|
Chapter 10: Functional Programming
val idx = xs.indexOf(value)
for
(x, i) <- xs.zipWithIndex
if i != idx
yield
x
For our purposes, this method works to drop the first occurrence of a Topping that’s
found in a list of toppings:
val a = List(Pepperoni, Mushrooms, Pepperoni)
val b = dropFirstMatch(a, Pepperoni)
// result: b == List(Mushrooms, Pepperoni)
// first Pepperoni is removed
As shown with PizzaServiceInterface and PizzaService, the implementation of
the functions (the verbs) is often a two-step process. In the first step, you sketch the
contract of your API as an interface. In the second step you create a concrete imple‐
mentation of that interface. This gives you the flexibility of being able to create multi‐
ple concrete implementations of the base interface.
At this point you have a complete, working small application. Experiment with the
application to see if you like the API as it is, or if you want to modify it.
Nouns and Verbs
I specifically use the filenames Nouns.scala and Verbs.scala to
emphasize this FP approach to writing code. As shown, your data
model just consists of the nouns in your application, and the func‐
tions are where the action is, i.e., the verbs.
Use Traits To Create a Dependency Injection Framework
One benefit of using a trait as an interface and then implementing it in another trait
(or object) is that you can use the design to create a dependency injection framework.
For example, imagine that you want to write some code to calculate the price of a
pizza, and that code requires access to a database. One approach to the problem is:
1. Create a data access object (DAO) interface named PizzaDaoInterface.
2. Create different implementations of that DAO interface for your Development,
Test, and Production environments.
3. Create a “pizza pricer” trait that references PizzaDaoInterface.
4. Create specific pizza pricer implementations for the Development, Test, and Pro‐
duction environments.
5. Create unit tests to test your code (or in our case, an @main driver application to
demonstrate the solution).
10.10 Real-World Example: Functional Domain Modeling
|
311
These steps are shown in the following example.
1. Create a DAO interface
First, create a file named Dao.scala, and then place this interface in that file to declare
what you want your DAO to look like:
trait PizzaDaoInterface:
def getToppingPrices(): Map[Topping, BigDecimal]
def getCrustSizePrices(): Map[CrustSize, BigDecimal]
def getCrustTypePrices(): Map[CrustType, BigDecimal]
In the real world, because accessing a database can fail, these methods will return a
type like Option, Try, or Either wrapped around each Map, but I omit those to make
the code a little simpler.
2. Create multiple implementations of that DAO
Next, create concrete implementations of that DAO interface for your Development,
Test, and Production environments. Normally you’ll create one concrete implementa‐
tion for each environment, but for our purposes I’ll just create one “mock” DAO for
the Development environment named DevPizzaDao. The purpose of this is to have a
fast, simulated database during your local development (and testing) process. To do
this, place this code in Dao.scala as well:
object DevPizzaDao extends PizzaDaoInterface:
def getToppingPrices(): Map[Topping, BigDecimal] =
Map(
Cheese
-> BigDecimal(1),
// simulating $1 each
Pepperoni -> BigDecimal(1),
Sausage
-> BigDecimal(1),
Mushrooms -> BigDecimal(1)
)
def getCrustSizePrices(): Map[CrustSize, BigDecimal] =
Map(
Small -> BigDecimal(0),
Medium -> BigDecimal(1),
Large -> BigDecimal(2)
)
def getCrustTypePrices(): Map[CrustType, BigDecimal] =
Map(
Regular -> BigDecimal(0),
Thick
-> BigDecimal(1),
Thin
-> BigDecimal(1)
)
end DevPizzaDao
312
|
Chapter 10: Functional Programming
In the real world you might use this DAO for development and testing, and use a
ProductionPizzaDao for your Production environment. Or you might use a separate
DAO for your Test environment, or wherever you test your code against a Test
database.
3. Create a “pizza pricer” trait
Next, go back to the Verbs.scala file, and create a “pizza pricer” trait that references
PizzaDaoInterface:
trait PizzaPricerTrait:
// this base trait references the DAO interface
def pizzaDao: PizzaDaoInterface
def calculatePizzaPrice(p: Pizza): BigDecimal =
// the key thing here is the use of `pizzaDao`
val crustSizePrice: BigDecimal =
pizzaDao.getCrustSizePrices()(p.crustSize)
val crustTypePrice: BigDecimal =
pizzaDao.getCrustTypePrices()(p.crustType)
val toppingPrices: Seq[BigDecimal] =
for
topping <- p.toppings
toppingPrice = pizzaDao.getToppingPrices()(topping)
yield
toppingPrice
val totalToppingPrice: BigDecimal = toppingPrices.reduce(_ + _) //sum
val totalPrice: BigDecimal =
crustSizePrice + crustTypePrice + totalToppingPrice
totalPrice
// other price-related functions ...
end PizzaPricerTrait
Two keys of this part of the solution are:
• Declare the pizzaDao reference as a def of type PizzaDaoInterface. It will be
replaced by val fields in the concrete objects that you’ll develop next.
• As shown, calculatePizzaPrice can be implemented in this base trait. This way
you only need to implement it in one place, and it will be available in the con‐
crete objects that extend PizzaPricerTrait.
10.10 Real-World Example: Functional Domain Modeling
|
313
4. Create specific pricers for your environments
Next, in the final step of the recipe, create concrete pizza pricer objects for your
Development, Test, and Production environments:
object DevPizzaPricerService extends PizzaPricerTrait:
val pizzaDao = DevPizzaDao
// dev environment
object TestPizzaPricerService extends PizzaPricerTrait:
val pizzaDao = TestPizzaDao
// test environment
object ProductionPizzaPricerService extends PizzaPricerTrait:
val pizzaDao = ProductionPizzaDao // production environment
Because PizzaPricerTrait completely implements its calculatePizzaPrice
method, all these objects need to do is connect to their respective data access objects,
as shown.
In the source code for this project, you’ll see that I created a DevPizzaPricer in the
Verbs.scala file. (Note that in this example, DevPizzaPricerService compiles and
runs because I implemented DevPizzaDao, but TestPizzaPricerService and Produc
tionPizzaPricerService will not compile because I haven’t implemented TestPizza
Dao and ProductionPizzaDao.)
The Uniform Access Principle
In PizzaPricerTrait, pizzaDao is defined as a def:
def pizzaDao: PizzaDaoInterface
but in the concrete DevPizzaPricerService object I define that
field as a val:
val pizzaDao = DevPizzaDao
This works because of the Uniform Access Principle (UAP) imple‐
mentation in Scala. That link is from the Scala Glossary, which says
“The uniform access principle states that variables and parameter‐
less functions should be accessed using the same syntax. Scala sup‐
ports this principle by not allowing parentheses to be placed at call
sites of parameterless functions. As a result, a parameterless func‐
tion definition can be changed to a val, or vice versa, without
affecting client code.”
314
|
Chapter 10: Functional Programming
5. Create unit tests or a driver app
In the real world you’ll create unit tests to test your code, but for our purposes here
I’ll create an @main application to demonstrate the solution. This pizzaPricingMain
application shows how to access and use the pizza pricer algorithm in the Develop‐
ment environment by using the DevPizzaPricerService (which in turn uses the Dev
PizzaDao):
@main def pizzaPricingMain =
object PizzaService extends PizzaService
import PizzaService.*
import DevPizzaPricerService.*
// create a pizza
val p = Pizza(
Medium,
Regular,
Seq(Cheese, Pepperoni, Mushrooms)
)
// determine the pizza price
val pizzaPrice = calculatePizzaPrice(p)
// print the pizza and its price (in a nonfunctional way)
println(s"Pizza: $p")
println(s"Price: $pizzaPrice")
When you run that code you’ll see this output:
Pizza: Pizza(Medium,Regular,List(Cheese, Pepperoni, Mushrooms))
Price: 11.0
This “wiring” technique uses the concepts of modules in Scala, as described in Recipe
6.11, “Using Traits to Create Modules”. A significant benefit of this approach is that
you can use the DevPizzaPricerService in your Development environment, Test
PizzaPricerService in Test, and ProductionPizzaPricerService in Production.
This technique uses the features of the Scala language to create your own
dependency-injection framework.
10.10 Real-World Example: Functional Domain Modeling
|
315
Improve This Code with Opaque Types
This code can be improved by using opaque types in at least two places:
• Where I use a String for a postalCode field
• Where I use BigDecimal for a field to represent currency
If you use opaque types, you can refer to those fields like this instead:
case class Address(
street1: String,
street2: Option[String],
city: String,
state: String,
postalCode: PostalCode
// use PostalCode
// instead of String
)
// in the PizzaDaoInterface:
def getToppingPrices(): Map[Topping, Money]
The advantages of creating custom types like this are that (a) everyone can more
easily see what those fields are, and (b) you can add custom methods and extension
methods to work with those types, such as validating postal code fields.
To keep this recipe relatively simple I didn’t make these changes, but if you’re interes‐
ted in using this technique to create more meaningful types, see Recipe 23.7, “Creat‐
ing Meaningful Type Names with Opaque Types”.
See Also
• For more examples of the module technique shown in this recipe, see Recipe
6.11, “Using Traits to Create Modules”, and Recipe 7.7, “Reifying Traits as
Objects”.
• The source code for this example is in the source code repository for this book, at
github.com/alvinj/ScalaCookbook2Examples.
316
|
Chapter 10: Functional Programming
CHAPTER 11
Collections: Introduction
This is the first of five chapters that cover the Scala collections classes. Because collec‐
tions are so important to any programming language, these chapters provide indepth coverage of Scala’s collections classes and methods. Furthermore, these chap‐
ters have been completely reorganized in this second edition of the Scala Cookbook to
make the recipes easier for you to find.
This first collections chapter provides an introduction to the collections classes. The
intent of this chapter is to demonstrate how the classes are organized, and to help you
choose a collections class for your needs. For example, if you want an indexed,
immutable sequence, Vector is recommended as the go-to sequence, but if you want
an indexed, mutable sequence, ArrayBuffer is recommended instead.
After this chapter, Chapter 12 covers the most commonly used Scala sequence classes,
including Vector, ArrayBuffer, List, and Array. Additional recipes cover List
Buffer and LazyList.
Chapter 13 provides recipes for the most common methods that are available on the
Scala sequence classes. The collections classes are well known for the depth of the
built-in methods that are available, and that chapter demonstrates those methods.
Chapter 14 covers the Map types. Scala maps are like the Java Map, Ruby Hash, or
Python dictionary, in that they consist of key/value pairs, where the key must be
unique. Scala has both immutable and mutable maps, and they’re both covered in this
chapter.
Finally, Chapter 15 covers other collection types, including the commonly used tuple
and Range types, along with sets, queues, and stacks.
317
Scala Is Not Java
Scala’s collections classes are rich, deep, and differ significantly from collections
classes in other languages like Java. In the short term this might be a bit of a speed
bump, but in the long term you’ll come to appreciate their elegance and built-in
methods.
Because of the depth of these methods, you’ll very rarely have to write (or read) cus‐
tom for loops. It turns out that many of those custom for loops developers have been
writing for many years follow certain patterns, so those loops are encapsulated in
built-in collections methods like filter, map, foreach, etc. When the first edition of
the Scala Cookbook was released in 2013, the wealth of the collections methods could
be quite a shock to someone with a Java background, but now that the Java collec‐
tions have more functional interfaces, the transition should be much easier.
However, when you begin working with Scala it’s still best to forget the Java collec‐
tions classes and focus on the Scala collections. For instance, when a Java developer
first comes to Scala, they might think, “OK, I’ll use lists and arrays, right?” Well, no,
not really. The Scala List class is very different from the Java List classes—including
the part where the Scala List is immutable. And while the Scala Array is a wrapper
around the Java array type, and it provides many built-in methods for working with
an array, it’s not even recommended as a go-to sequential collections class.
In my own experience, I came to Scala from Java and kept trying to use the Java col‐
lections classes in my Scala applications. This was a big waste of time. While it’s true
that the Java collections work well in Scala, this functionality is really intended only
for interoperating with Java code. In retrospect, trying to use the Java collections
classes as the default collections in my Scala applications only slowed down my learn‐
ing curve. Rather than do what I did, I encourage you to dive right in and learn the
Scala way! This chapter will help you find the classes you need.
The Scala 2.13 Collections Overhaul
As a final introductory note, the Scala 2.13 release—which concluded in 2018—was
known for its major overhaul to the collections. While the “behind the scenes” imple‐
mentation of the collections involved significant changes to traits and type inheri‐
tance, for the most part the changes are transparent to end users.
This is a good thing, because Scala developers enjoy the end result of the collections.
Therefore, the external API—the classes you use, like List, Vector, ArrayBuffer,
Map, and Set—remain largely the same. If anything, Scala 2.13 and Scala 3 have sim‐
plified these internal representations, so your code and types are simpler than ever
before.
318
|
Chapter 11: Collections: Introduction
I mention this overhaul because Scala 3 quickly follows behind Scala 2.13, so with the
exception of tuples—which have been significantly updated in Scala 3—many of the
collections work just like they did in Scala 2.13. Again, this is a good thing.
If you’re interested in the details of the Scala 2.13 overhaul, here are three great
resources that tell the story behind the changes:
• The Scala 3 page about Scala 2.13’s collections
• The Scala 3 page about the architecture of Scala 2.13’s collections
• An overview of the Scala 2.13 class hierarchy
Understanding the Collections Hierarchy
A first thing to know about the collections is that they are all contained in the pack‐
ages shown in Table 11-1. In general, the collections in scala.collection are super‐
classes (or, more accurately, supertypes) of the collections in scala.collec
tion.immutable and scala.collection.mutable. This means that the base opera‐
tions are supplied to the types in scala.collection, and the immutable and mutable
operations are added to the types in the other two packages.
Table 11-1. The packages that contain the Scala collections
Character sequence
scala.collection
Description
Collections here may be immutable or mutable.
scala.collection.immutable
The immutable collections. They never change after they’re created.
scala.collection.mutable
The mutable collections. They have some (or many) methods that allow the
collection’s elements to be changed.
The Collections Are Deep and Wide
The Scala collections hierarchy is very rich—both deep and wide—and understand‐
ing how it’s organized can be helpful when choosing a collections class or method to
solve a problem.
Figure 11-1 shows the traits inherited by the Vector class and demonstrates some of
the complexity of the Scala collections hierarchy.
Understanding the Collections Hierarchy
|
319
Figure 11-1. The traits inherited by the Vector class
Because (a) Scala classes can inherit from traits and (b) well-designed traits are gran‐
ular, a class hierarchy can look like this. However, don’t let Figure 11-1 throw you for
a loop: you don’t need to know all those traits to use a Vector. In fact, using a Vector
is straightforward:
val x = Vector(1, 2, 3)
x.sum
// 6
x.filter(_ > 1)
// Vector(2, 3)
x.map(_ * 2)
// Vector(2, 4, 6)
x.takeWhile(_ < 3)
// Vector(1, 2)
At a high level, Scala’s collection classes begin with the Iterable trait and extend into
the three main categories of sequences (Seq), sets (Set), and maps (Map). Sequences
further branch off into indexed and linear sequences, as shown in Figure 11-2.
Figure 11-2. A high-level view of the Scala collections
The Iterable trait defines an iterator, which lets you loop through a collection’s ele‐
ments one at a time. But when using an iterator, the collection can be traversed only
once, because each element is consumed during the iteration process.
320
|
Chapter 11: Collections: Introduction
Sequences
Digging a little deeper into the sequence hierarchy, Scala contains a large number of
sequence types. The most common immutable sequences are shown in Figure 11-3,
and the most common mutable sequences are shown in Figure 11-4.
Figure 11-3. A portion of the Scala immutable sequence hierarchy
Figure 11-4. A portion of the Scala mutable sequence hierarchy
Understanding the Collections Hierarchy
|
321
As shown in Figure 11-3, the immutable sequences branch off into two main cate‐
gories: indexed sequences and linear sequences (linked lists). An IndexedSeq indicates
that random access of elements is efficient, such as accessing a Vector element as
xs(1_000_000). By default, specifying that you want an IndexedSeq with Scala 3 cre‐
ates a Vector:
scala> val x = IndexedSeq(1,2,3)
x: IndexedSeq[Int] = Vector(1, 2, 3)
A LinearSeq implies that a collection can be efficiently split into head and tail com‐
ponents, and it’s common to work with them using the head, tail, and isEmpty
methods. Note that creating a LinearSeq in Scala 3 creates a List, which is a singly
linked list:
scala> val xs = scala.collection.immutable.LinearSeq(1,2,3)
xs: scala.collection.immutable.LinearSeq[Int] = List(1, 2, 3)
Of the mutable sequences shown in Figure 11-4, ArrayBuffer is the most commonly
used and is recommended when you need a mutable sequence. Here’s a quick look at
how to use ArrayBuffer:
scala> import scala.collection.mutable.ArrayBuffer
scala> val xs = ArrayBuffer(1,2,3)
val xs: ArrayBuffer[Int] = ArrayBuffer(1, 2, 3)
scala> xs.addOne(4)
val res0: ArrayBuffer[Int] = ArrayBuffer(1, 2, 3, 4)
scala> xs.addAll(List(5,6,7))
val res1: ArrayBuffer[Int] = ArrayBuffer(1, 2, 3, 4, 5, 6, 7)
I show the addOne and addAll methods, but those are relatively new additions; his‐
torically it’s been more common to use += and ++= for these purposes:
scala> xs += 8
val res2: ArrayBuffer[Int] = ArrayBuffer(1, 2, 3, 4, 5, 6, 7, 8)
scala> xs ++= List(9,10)
val res3: ArrayBuffer[Int] = ArrayBuffer(1, 2, 3, 4, 5, 6, 7, 8, 9, 10)
Maps
Like a Java Map, Ruby Hash, or Python dictionary, a Scala Map is a collection of key/
value pairs, where all the keys must be unique. The most common immutable and
mutable Map classes are shown in Figures 11-5 and 11-6, respectively.
322
|
Chapter 11: Collections: Introduction
Figure 11-5. The most common immutable Map classes
Figure 11-6. Common mutable Map classes
Map types are covered in Recipe 14.1, “Creating and Using Maps”, but as a brief
introduction, when you just need a simple immutable map, you can create one
without requiring an import statement:
scala> val m = Map(1 -> "a", 2 -> "b")
val m: Map[Int, String] = Map(1 -> a, 2 -> b)
The mutable map is not in scope by default, so you must import it or specify its full
path to use it:
scala> val mm = collection.mutable.Map(1 -> "a", 2 -> "b")
val mm: scala.collection.mutable.Map[Int, String] = HashMap(1 -> a, 2 -> b)
Sets
Like a Java Set, a Scala Set is a collection of unique elements. The common immuta‐
ble and mutable Set classes are shown in Figures 11-7 and 11-8, respectively.
Understanding the Collections Hierarchy
|
323
Figure 11-7. The most common immutable Set classes
Figure 11-8. Common mutable Set classes
Set traits and classes are covered in Recipe 15.3, “Creating a Set and Adding Elements
to It”, but as a quick preview, if you just need an immutable set, you can create it like
this, without needing an import statement:
scala> val set = Set(1, 2, 3)
val set: Set[Int] = Set(1, 2, 3)
Just like a map, if you want to use a mutable set, you must import it or specify its
complete path:
scala> val mset = collection.mutable.Set(1, 2, 3)
val mset: scala.collection.mutable.Set[Int] = HashSet(1, 2, 3)
In summary, this is an overview of the Scala collections hierarchy.
11.1 Choosing a Collections Class
Problem
You want to choose a Scala collections class to solve a particular problem.
324
|
Chapter 11: Collections: Introduction
Solution
There are three main categories of collections classes to choose from:
• Sequence
• Map
• Set
A sequence is a linear collection of elements and may be indexed or linear (a linked
list). A map contains a collection of key/value pairs with unique keys, like a Java Map,
Ruby Hash, or Python dictionary. A set is a sequence that contains no duplicate
elements.
In addition to these three main categories, there are other useful collection types,
including Range, Stack, and Queue. A few other classes act like collections, including
tuples and the Option, Try, and Either error-handling classes.
Choosing a sequence
When choosing a sequence—a sequential collection of elements—you have two main
decisions:
• Should the sequence be indexed, allowing rapid access to any elements, or should
it be implemented as a linked list?
• Do you want a mutable or immutable collection?
Beginning with Scala 2.10 and continuing with Scala 3, the recommended generalpurpose go-to sequential collections for the combinations of mutable/immutable and
indexed/linear are shown in Table 11-2.
Table 11-2. Scala’s recommended general-purpose sequential collections
Immutable Mutable
Indexed Vector
ArrayBuffer
Linear (Linked lists) List
ListBuffer
As an example of reading that table, if you want an immutable, indexed collection, in
general you should use a Vector; if you want a mutable, indexed collection, use an
ArrayBuffer (and so on).
While those are the general-purpose recommendations, there are many more
sequence alternatives. The most common immutable sequence choices are shown in
Table 11-3.
11.1 Choosing a Collections Class
|
325
Table 11-3. Main immutable sequence choices
Class
LazyList
IndexedSeq LinearSeq Description
✓
Similar to List, it’s a linked list, but it’s lazy, and its elements are
memoized. Good for large or infinite sequences. (Replaces the Scala 2
Stream class.)
List
✓
The go-to immutable linear sequence, it is a singly linked list. Suited for
prepending elements, and for recursive algorithms that work by operating
on the list’s head and tail.
Queue
✓
A first-in, first-out data structure. Available in immutable and mutable
versions.
Range
✓
A range of evenly spaced whole numbers or characters.
Vector
✓
The go-to immutable indexed sequence. The Scaladoc states, “It provides
random access and updates in effectively constant time, as well as very fast
append and prepend.”
The most common mutable sequence choices are shown in Table 11-4. Queue and
Stack are also in this table because there are immutable and mutable versions of these
classes. All quotes in the descriptions come from the Scaladoc for each class.
Table 11-4. Main mutable sequence choices
Class
Array
IndexedSeq LinearSeq Buffer Description
✓
Backed by a Java array, its elements are mutable, but it can’t
change in size.
ArrayBuffer
✓
ArrayDeque
✓
✓
A double-ended queue, it’s a superclass of the mutable Stack
and Queue classes. “Append, prepend, removeFirst, removeLast
and random-access take amortized constant time.”
✓
ListBuffer
The go-to class for a mutable indexed sequence. “Uses an array
internally. Append, update and random access take constant time
(amortized time). Prepends and removes are linear in the buffer
size.”
✓
Like an ArrayBuffer, but backed by a list. The documentation
states, “If you plan to convert the buffer to a list, use List
Buffer instead of ArrayBuffer.” Offers constant-time
prepend and append; most other operations are linear.
Queue
✓
A first-in, first-out data structure.
Stack
✓
A last-in, first-out data structure.
StringBuilder
✓
“A builder for mutable sequence of characters. Provides an API
mostly compatible with java.lang.StringBuilder.”
Note that I list ArrayBuffer and ListBuffer under two columns. That’s because
while they are both descendants of Buffer—which is a Seq that can grow and shrink
—ArrayBuffer behaves like an IndexedSeq and ListBuffer behaves like a Linear
Seq.
326
| Chapter 11: Collections: Introduction
In addition to the information shown in these tables, performance can be a consider‐
ation. See Recipe 11.2 if performance is important to your selection process.
When creating an API for a library, you may want to refer to your sequences in terms
of their superclasses. Table 11-5 shows the traits that are often used when referring
generically to a collection in an API. Note that all quotes in the descriptions come
from the Scaladoc for each class.
Table 11-5. Traits commonly used in library APIs
Trait
Description
IndexedSeq
A sequence that implies that random access of elements is efficient. “Have efficient apply and
length.”
LinearSeq
A sequence that implies that linear access to elements is efficient. “Have efficient head and tail
operations.”
Seq
The base trait for sequential collections. Use when it isn’t important to indicate that the sequence is
indexed or linear in nature.
Iterable
The highest collection level. Use it when you want to be very generic about the type being returned. (It’s
the rough equivalent of declaring that a Java method returns Collection.)
Choosing a Map
While you can often use the base immutable or mutable Map classes, there are many
more types at your disposal. The Map class options are shown in Table 11-6. Note that
all quotes in the descriptions come from the Scaladoc for each class.
Table 11-6. Common Map choices
Class
Immutable Mutable Description
✓
“Implements mutable maps using a hashtable with red-black
CollisionProofHashMap
trees in the buckets for good worst-case performance on hash
collisions.”
HashMap
✓
LinkedHashMap
✓
The immutable version “implements maps using a hash trie”; the
mutable version “implements maps using a hashtable.”
✓
“Implements mutable maps using a hashtable.” Returns
elements by the order in which they were inserted.
ListMap
✓
✓
A map implemented using a list data structure. Returns elements
in the opposite order by which they were inserted, as though
each element is inserted at the head of the map.
Map
✓
✓
The base map, with both mutable and immutable
implementations.
✓
“A generic trait for ordered mutable maps.”
SeqMap
SortedMap
✓
✓
A base trait that stores its keys in sorted order.
TreeMap
✓
✓
A sorted map, implemented as a red-black tree. See the Scaladoc
for multiple performance notes.
11.1 Choosing a Collections Class
|
327
Class
Immutable Mutable Description
✓
Preserves order. Uses insertion order by default, but modification
order can be used.
TreeSeqMap
✓
VectorMap
Uses a vector/map-based data structure, which preserves
insertion order. “Has amortized effectively constant lookup at the
expense of using extra memory and generally lower performance
for other operations.”
✓
WeakHashMap
A hash map with weak references, it’s a wrapper around
java.util.WeakHashMap.
See Recipe 14.1, “Creating and Using Maps”, for details about the basic Map classes,
Recipe 14.2, “Choosing a Map Implementation”, for more information about select‐
ing Map classes, and Recipe 14.10, “Sorting an Existing Map by Key or Value”, for
details about sorting Map classes.
Choosing a Set
When choosing a set there are base mutable and immutable set classes, a SortedSet
to return elements in sorted order by key, a LinkedHashSet to store elements in inser‐
tion order, and other sets for special purposes. The common classes are shown in
Table 11-7. Note that all quotes in the descriptions come from the Scaladoc for each
class.
Table 11-7. Common Set choices
Class
BitSet
HashSet
Immutable Mutable Description
✓
✓
A set of “non-negative integers represented as variable-size arrays of bits
packed into 64-bit words.” Used to save memory when you have a set of
small integers.
✓
LinkedHashSet
✓
The immutable version “implements sets using a hash trie”; the mutable
version “implements sets using a hashtable.”
✓
A mutable set implemented using a hashtable. Returns elements in the order
in which they were inserted.
ListSet
✓
TreeSet
✓
✓
The immutable version “implements immutable sorted sets using a tree.” The
mutable version is “implemented using a mutable red-black tree.”
Set
✓
✓
Generic base traits, with both mutable and immutable implementations.
SortedSet
✓
✓
The base traits for sorted sets.
A set implemented using a list structure. “Suitable only for a small number of
elements.”
See Recipe 15.3, “Creating a Set and Adding Elements to It”, for details about the
basic Set classes, and Recipe 15.5, “Storing Values in a Set in Sorted Order”, for
details about sortable sets.
328
| Chapter 11: Collections: Introduction
Types that act like collections
Scala offers other collection types, and some types that act like collections because
they have methods like map, filter, etc. Table 11-8 provides descriptions of several
types that act somewhat like collections, even though they aren’t.
Table 11-8. Other collections classes (and types that act like collections)
Class/Trait
Iterator
Option
Tuple
Description
Isn’t a collection but instead gives you a way to access the elements in a collection. It does, however,
define many of the methods you’ll see in a normal collections class, including foreach, map, flat
Map, etc. You can also convert an iterator to a collection when needed.
Acts as a collection that contains zero or one element. The Some class and None object extend
Option. Some is a container for one element, and None holds zero elements.
Supports a heterogeneous collection of elements. Has some collection-like methods, including drop,
head, map, size, tail, take, splitAt, and toList.
Because I mention Option in Table 11-8, it’s worth noting that the Either/Left/Right
and Try/Success/Failure classes also have a few collection-like methods such as
flatten and map, but not nearly as many as Option offers.
Strict and lazy collections
Another way to think about collections is whether they are strict or nonstrict (also
known as lazy). To understand strict and lazy collections, it helps to first understand
the concept of a transformer method.
A transformer method constructs a new collection from an existing collection. This
includes methods like map, filter, reverse, etc.—any method that transforms the
input collection to a new output collection. Other methods that don’t return a new
collection—methods like foreach, size, head, etc.—are not transformers.
Given that definition, collections can also be thought of in terms of being strict or
lazy. In a strict collection, memory for the elements is allocated immediately, and all
of its elements are immediately evaluated when a transformer method is invoked.
Conversely, in a lazy collection, memory for the elements is not allocated immedi‐
ately, and transformer methods do not construct new elements until they are
demanded.
In Scala, all collections are strict except for two situations:
• LazyList is a lazy version of List.
• When you create a view on a collection—such as calling Vector(1,2,3).view—
the transformer methods of the resulting view are lazy.
See Recipe 11.4, “Creating a Lazy View on a Collection”, for more details about views.
11.1 Choosing a Collections Class
|
329
See Also
In addition to my own experience using the collections, most of the information used
to create these tables comes from the Scaladoc of each type, and these Scala pages:
• The Scala documentation on mutable and immutable collections
• “The Architecture of Scala Collections”
11.2 Understanding the Performance of Collections
Problem
When choosing a collection for an application where performance is important, you
want to choose the right collection for the algorithm.
Solution
In many cases, you can reason about the performance of a collection by understand‐
ing its basic structure. For instance, a List is a singly linked list, and because it’s not
indexed, if you need to access an element like list(1_000_000), that requires travers‐
ing one million elements. Therefore it’s going to be much slower than accessing the
one-millionth element of a Vector, because Vector is indexed.
In other cases, it can help to look at the tables. For instance, Table 11-10 shows that
the append operation on a Vector is eC, or effectively constant time. As a result, I can
create a large Vector in the REPL on my computer in under a second like this:
var a = Vector[Int]()
for i <- 1 to 50_000 do a = a :+ i
However, as the table shows, the append operation on a List requires linear time, so
attempting to create a List of the same size takes a much longer time—over 15
seconds.
Note that neither of those approaches is recommended for real-world code. I only use
them to demonstrate the performance difference between Vector and List for
append operations.
Performance characteristic keys
Before looking at the performance tables, Table 11-9 shows the performance charac‐
teristic keys that are used in the tables that follow it.
330
|
Chapter 11: Collections: Introduction
Table 11-9. Performance characteristic keys for the subsequent tables
Key Description
Con The operation takes (fast) constant time.
eC
The operation takes effectively constant time, but this might depend on some assumptions, such as maximum length of
a vector, or distribution of hash keys.
aC
The operation takes amortized constant time. Some invocations of the operation might take longer, but if many
operations are performed, on average only constant time per operation is taken.
Log The operation takes time proportional to the logarithm of the collection size.
Lin
The operation is linear, so the time is proportional to the collection size.
-
The operation is not supported.
Performance characteristics for sequential collections
Table 11-10 shows the performance characteristics for operations on immutable and
mutable sequential collections.
Table 11-10. Performance characteristics for sequential collections
head tail apply update prepend append insert
Immutable
List
Con
Con Lin
Lin
Con
Lin
-
LazyList
Con
Con Lin
Lin
Con
Lin
-
ArraySeq
Con
Lin
Con
Lin
Lin
Lin
-
Vector
eC
eC
eC
eC
eC
eC
-
Queue
aC
aC
Lin
Lin
Lin
Con
-
Range
Con
Con Con
-
-
-
-
String
Con
Lin
Con
Lin
Lin
Lin
-
ArrayBuffer
Con
Lin
Con
Con
Lin
aC
Lin
ListBuffer
Con
Lin
Lin
Lin
Con
Con
Lin
StringBuilder Con
Lin
Con
Con
Lin
aC
Lin
Queue
Con
Lin
Lin
Lin
Con
Con
Lin
ArraySeq
Con
Lin
Con
Con
-
-
-
Stack
Con
Lin
Lin
Lin
Con
Lin
Lin
Array
Con
Lin
Con
Con
-
-
-
ArrayDeque
Con
Lin
Con
Con
aC
aC
Lin
Mutable
11.2 Understanding the Performance of Collections
|
331
Table 11-11 describes the column headings used in Table 11-10.
Table 11-11. Descriptions of the column headings used in Table 11-10
Operation Description
head
Selecting the first element of the sequence.
tail
Producing a new sequence that consists of all elements of the sequence except the first one.
apply
Indexing.
update
Functional update for immutable sequences, side-effecting update for mutable sequences.
prepend
Adding an element to the front of the sequence. For immutable sequences, this produces a new sequence. For
mutable sequences, it modifies the existing sequence.
append
Adding an element at the end of the sequence. For immutable sequences, this produces a new sequence. For
mutable sequences, it modifies the existing sequence.
insert
Inserting an element at an arbitrary position in the sequence. This is supported directly only for mutable
sequences.
Map and Set performance characteristics
Table 11-12 shows the performance characteristics for Scala’s common map and set
types, using the keys from Table 11-9.
Table 11-12. The performance characteristics for maps and sets
lookup add remove min
Immutable
HashSet/HashMap eC
eC
TreeSet/TreeMap Log
Log Log
eC
Lin
Log
BitSet
Con
Lin
Lin
eC
VectorMap
eC
eC
aC
Lin
ListMap
Lin
Lin
Lin
Lin
HashSet/HashMap eC
eC
eC
Lin
WeakHashMap
eC
eC
eC
Lin
BitSet
Con
aC
Con
eC
TreeSet
Log
Log Log
Mutable
332
|
Chapter 11: Collections: Introduction
Log
Table 11-13 provides descriptions for the column headings (operations) used in
Table 11-12.
Table 11-13. Descriptions of the column headings used in Table 11-12
Operation Description
lookup
Testing whether an element is contained in a set, or selecting a value associated with a map key.
add
Adding a new element to a set or key/value pair to a map.
remove
Removing an element from a set or a key from a map.
min
The smallest element of the set, or the smallest key of a map.
Discussion
As you can tell from the descriptions of the keys in Table 11-9, when choosing a col‐
lection you’ll generally want to look for the Con, eC, and aC keys to find your best
performance.
For instance, because List is a singly linked list, accessing the head and tail elements
are fast operations, as is the process of prepending elements, so those operations are
shown with the Con key in Table 11-10. But appending elements to a List is a very
slow operation—linear in proportion to the size of the List—so the append opera‐
tion is shown with the Lin key.
See Also
• With permission from EPFL, the tables in this recipe have been reproduced from
the performance characteristics Scala documentation page.
11.3 Understanding Mutable Variables with Immutable
Collections
Problem
You may have seen that mixing a mutable variable ( var) with an immutable collection
makes it appear that the collection is somehow mutable. For instance, when you cre‐
ate a var field with an immutable Vector, it appears you can somehow add new ele‐
ments to the Vector:
var x = Vector(1)
x = x :+ 2
x = x ++ List(3, 4)
// x: Vector(1)
// x: Vector(1, 2)
// x: Vector(1, 2, 3, 4)
How can this be?
11.3 Understanding Mutable Variables with Immutable Collections
|
333
Solution
Though it looks like you’re mutating an immutable collection in that example, what’s
really happening is that the variable x points to a new sequence each time you add
elements. The variable x is mutable—like a non-final field in Java—so what’s going
on is that it’s being reassigned to a new sequence during each step. The end result is
similar to these lines of code:
var x = Vector(1)
x = Vector(1, 2)
x = Vector(1, 2, 3, 4)
// reassign x
// reassign x again
In the second and third lines of code, the x reference is changed to point to a new
sequence.
You can demonstrate that the vector itself is immutable. Attempting to mutate one of
its elements—which doesn’t involve reassigning the variable—results in an error:
scala> x(0) = 100
1 |x(0) = 100
|^
|value update is not a member of Vector[Int] - did you mean
|Vector[Int].updated?
Discussion
This recipe is included among the first collection-related recipes because when you
start working with Scala, the behavior of a mutable variable with an immutable col‐
lection can be surprising. To be clear about variables:
• A mutable variable (var) can be reassigned to point at new data.
• An immutable variable (val) is like a final variable in Java; it can never be
reassigned.
To be clear about collections:
• The elements in a mutable collection (like ArrayBuffer) can be changed.
• The elements in an immutable collection (like Vector or List) cannot be
changed.
In pure functional programming you will use immutable variables in combination
with immutable collections, but in less strict programming styles you can use other
combinations. For instance, these two combinations are also common:
• Immutable variables with mutable collections (e.g., val with ArrayBuffer)
334
|
Chapter 11: Collections: Introduction
• Mutable variables with immutable collections (e.g., var with Vector)
Many recipes in these collection chapters, as well as the domain-modeling chapters,
demonstrate these techniques.
11.4 Creating a Lazy View on a Collection
Problem
You’re working with a large collection and want to create a lazy version of it so it will
only compute and return results as they are needed.
Solution
Create a view on the collection by calling its view method. That creates a new collec‐
tion whose transformer methods are implemented in a nonstrict, or lazy, manner. For
example, given a large list:
val xs = List.range(0, 3_000_000)
// a list from 0 to 2,999,999
imagine that you want to call several transformation methods on it, such as map and
filter. This is a contrived example, but it demonstrates a problem:
val ys = xs.map(_ + 1)
.map(_ * 10)
.filter(_ > 1_000)
.filter(_ < 10_000)
If you attempt to run that example in the REPL, you’ll probably see this fatal “out of
memory” error:
scala> val ys = xs.map(_ + 1)
java.lang.OutOfMemoryError: GC overhead limit exceeded
Conversely, this example returns almost immediately and doesn’t throw an error
because all it does is create a view and then four lazy transformer methods:
val ys = xs.view
.map(_ + 1)
.map(_ * 10)
.filter(_ > 1_000)
.filter(_ < 10_000)
// result: ys: scala.collection.View[Int] = View(<not computed>)
Now you can work with ys without running out of memory:
scala> ys.take(3).foreach(println)
1010
1020
1030
11.4 Creating a Lazy View on a Collection
|
335
Calling view on a collection makes the resulting collection lazy. Now when trans‐
former methods are called on the view, the elements will only be calculated as they
are accessed, and not “eagerly,” as they normally would be with a strict collection.
Discussion
The Scala documentation states that a view “constructs only a proxy for the result col‐
lection, and its elements get constructed only as one demands them…a view is a spe‐
cial kind of collection that represents some base collection, but implements all trans‐
formers lazily.”
A transformer is a method that constructs a new collection from one or more existing
collections. This includes methods like map, filter, take, and many more.
An Official Description of Transformer Methods
While there is some debate about whether methods like filter are
transformer methods, the book Programming in Scala states, “We
call such methods transformers because they take at least one col‐
lection as their receiver object and produce another collection in
their result.” In that statement the authors are referring specifically
to the map, filter, and ++ methods.
Other methods like foreach that don’t transform a collection are evaluated eagerly.
This explains why transformer methods like these return a view:
val a = List.range(0, 1_000_000)
val b = a.view.map(_ + 1)
// SeqView[Int] = SeqView(<not computed>)
val c = b.take(3)
// SeqView[Int] = SeqView(<not computed>)
and why foreach causes action to happen:
scala> c.foreach(println)
1
2
3
The use case for views
The main use case for using a view is performance, in terms of speed, memory, or
both.
Regarding performance, the example in the Solution first demonstrates (a) a strict
approach that runs out of memory, and then (b) a lazy approach that lets you work
with the same dataset. The problem with the first solution is that it attempts to create
new, intermediate collections each time a transformer method is called:
336
|
Chapter 11: Collections: Introduction
val b = a.map(_ + 1)
.map(_ * 10)
.filter(_ > 1_000)
.filter(_ < 10_000)
//
//
//
//
1st
2nd
3rd
4th
copy
copy
copy
copy
of
of
of
of
the
the
the
the
data
data
data
data
If the initial collection a has one billion elements, the first map call creates a new inter‐
mediate collection with another billion elements. The second map call creates another
collection, so now we’re attempting to hold three billion elements in memory, and so
on.
To drive that point home, that approach is the same as if you had written this:
val
val
val
val
val
a
b
c
d
e
=
=
=
=
=
List.range(0, 1_000_000_000)
a.map(_ + 1)
// 1st
b.map(_ * 10)
// 2nd
c.filter(_ > 1_000)
// 3rd
d.filter(_ < 10_000)
// 4th
// 1B elements in RAM
copy of the data (2B elements in RAM)
copy of the data (3B elements in RAM)
copy of the data (~4B total)
copy of the data (~4B total)
Conversely, when you immediately create a view on the collection, everything after
that essentially just creates an iterator:
val ys = a.view
.map ...
// this DOES NOT create another one billion elements
As usual with anything related to performance, be sure to test using a view versus not
using a view in your application to find what works best.
Another performance-related reason to understand views is that it’s become very
common to work with large datasets in a streaming manner, and views work very
similar to streams. See the Spark recipes in this book, such as Recipe 20.1, “Getting
Started with Spark”, for examples of working with large datasets and streams.
11.4 Creating a Lazy View on a Collection
|
337
CHAPTER 12
Collections: Common Sequence Classes
In this chapter on the Scala collections, we’ll examine the most common sequence
classes. As mentioned in Recipe 11.1, “Choosing a Collections Class”, the general
sequence class recommendations are to use:
• Vector as your go-to immutable indexed sequence
• List as your go-to immutable linear sequence
• ArrayBuffer as your go-to mutable indexed sequence
• ListBuffer as your go-to mutable linear sequence
Vector
As discussed in Recipe 11.1, “Choosing a Collections Class”, Vector is the preferred
immutable indexed sequence class because of its general performance characteristics.
You’ll use it all the time when you need an immutable sequence.
Because Vector is immutable, you apply filtering and transformation methods on one
Vector to create another one. As a quick preview, these examples show how to create
and use a Vector:
val a = Vector(1, 2, 3, 4, 5)
val b = a.filter(_ > 2)
// Vector(3, 4, 5)
val c = a.map(_ * 10)
// Vector(10, 20, 30, 40, 50)
List
If you’re coming to Scala from Java, you’ll quickly see that despite their names, the
Scala List class is nothing like the Java List classes, such as the Java ArrayList. The
Scala List class is immutable, so its size as well as the elements it contains can’t
339
change. It’s implemented as a linked list, where the preferred approach is to prepend
elements. Because it’s a linked list, you typically traverse the list from head to tail, and
indeed, it’s often thought of in terms of its head and tail methods (along with
isEmpty).
Like Vector, because a List is immutable, you apply filtering and transformation
methods on one list to create another list. As a quick preview, these examples show
how to create and use a List:
val a = List(1, 2, 3, 4, 5)
val b = a.filter(_ > 2)
// List(3, 4, 5)
val c = a.map(_ * 10)
// List(10, 20, 30, 40, 50)
List Versus Vector
You may wonder when you should use a List instead of a Vector.
The performance characteristics detailed in Recipe 11.2, “Under‐
standing the Performance of Collections”, provide the general rules
about when to select one or the other.
In an interesting experiment, Martin Odersky, the creator of the
Scala language, notes in this thread on the Scala Contributors web‐
site that Tiark Rompf once tried to replace every List in the Scala
compiler with Vector, and the performance was about 10% slower.
This is believed to be because Vector has a certain overhead that
makes it less efficient with small sequences.
So List definitely has its uses, especially when you think of it as
what it is, a simple singly linked list. (In the comment after Mr.
Odersky’s, Viktor Klang—Java Champion and cocreator of Scala
futures—notes that he thinks of List as being an excellent stack.)
ArrayBuffer
ArrayBuffer is the preferred mutable indexed sequence class. Because it’s mutable,
you apply transformation methods directly on it to update its contents. For instance,
where you use the map method with a Vector or List and assign the result to a new
variable:
val x = Vector(1, 2, 3)
val y = x.map(_ * 2)
// y: ArrayBuffer(2, 4, 6)
with ArrayBuffer you use mapInPlace instead of map, and it modifies the value in
place:
import collection.mutable.ArrayBuffer
val ab = ArrayBuffer(1, 2, 3)
ab.mapInPlace(_ * 2)
// ab: ArrayBuffer(2, 4, 6)
340
|
Chapter 12: Collections: Common Sequence Classes
Buffers
In Scala, a buffer is just a sequence that can grow and shrink.
Array
The Scala Array is unique: it’s mutable in that its elements can be changed, but
immutable in size—it can’t grow or shrink. By comparison, other collections like List
and Vector are completely immutable, and ArrayBuffer is completely mutable.
Array has the unique distinction of being backed by the Java array, so a Scala
Array[Int] is backed by a Java int[].
Although the Array may often be demonstrated in Scala examples, the recommenda‐
tion is to use the Vector class as your go-to immutable indexed sequence class, and
ArrayBuffer as your mutable indexed sequence of choice. In keeping with this sug‐
gestion, in my real-world code, I use Vector and ArrayBuffer for those use cases,
and then convert them to an Array when needed.
For some operations the Array can have better performance than other collections, so
it’s important to know how it works. See Recipe 11.2, “Understanding the Perfor‐
mance of Collections”, for those details.
12.1 Making Vector Your Go-To Immutable Sequence
Problem
You want a fast general-purpose immutable sequential collection type for your Scala
applications.
Solution
The Vector class is considered the go-to general-purpose indexed immutable sequen‐
tial collection. Use a List if you prefer working with a linear immutable sequential
collection.
Creating Vectors
Create and use a Vector just like other immutable sequences. You can create a Vector
with initial elements, and then access the elements efficiently by index:
val v = Vector("a", "b", "c")
v(0)
// "a"
v(1)
// "b"
12.1 Making Vector Your Go-To Immutable Sequence
|
341
Because Vector is indexed, this call to x(9_999_999) returns almost instantly:
val x = (1 to 10_000_000).toVector
x(9_999_999)
// 10000000
You can also create an empty Vector and add elements to it, remembering to assign
the result to a new variable:
val a = Vector[String]()
val b = a ++ List("a", "b")
// a: Vector[String] = Vector()
// b: Vector(a, b)
Adding, appending, and prepending elements
You can’t modify a vector, so you add elements to an existing vector as you assign the
result to a new variable:
val a = Vector(1, 2, 3)
val b = a ++ List(4, 5)
val c = b ++ Seq(6)
// b: Vector(1, 2, 3, 4, 5)
// c: Vector(1, 2, 3, 4, 5, 6)
You append and prepend elements to a Vector just like other immutable sequences,
with the following methods:
• The +: method, which is an alias for prepended
• ++: is an alias for prependedAll
• :+ is an alias for appended
• :++ is an alias for appendedAll
Here are some examples where I use a var variable and assign the results of each
operation back to that variable:
// prepending
var a = Vector(6)
a = 5 +: a
a = a.prepended(4)
// a: Vector(5, 6)
// a: Vector(4, 5, 6)
a = List(2,3) ++: a
a = a.prependedAll(Seq(0,1))
// a: Vector(2, 3, 4, 5, 6)
// a: Vector(0, 1, 2, 3, 4, 5, 6)
// appending
var b = Vector(1)
342
b = b :+ 2
b = b.appended(3)
// b: Vector(1, 2)
// b: Vector(1, 2, 3)
b = b :++ List(4,5)
b = b.appendedAll(List(6,7))
// b: Vector(1, 2, 3, 4, 5)
// b: Vector(1, 2, 3, 4, 5, 6, 7)
|
Chapter 12: Collections: Common Sequence Classes
Modifying elements
To modify an element in a Vector, call the updated method to replace one element
while assigning the result to a new variable, setting the index and elem parameters:
val a = Vector(1, 2, 3)
val b = a.updated(index=0, elem=10)
val c = b.updated(1, 20)
// b: Vector(10, 2, 3)
// c: Vector(10, 20, 3)
Similarly, use the patch method to replace multiple elements at one time:
val a = Vector(1, 2, 3, 4, 5, 6)
// specify (a) the index to start at, (b) the new sequence
// you want, and (c) the number of elements to replace
val b = a.patch(0, List(10,20), 2)
// b: Vector(10, 20, 3, 4, 5, 6)
val b = a.patch(0, List(10,20), 3)
// b: Vector(10, 20, 4, 5, 6)
val b = a.patch(0, List(10,20), 4)
// b: Vector(10, 20, 5, 6)
val b = a.patch(2, List(30,40), 2)
val b = a.patch(2, List(30,40), 3)
val b = a.patch(2, List(30,40), 4)
// b: Vector(1, 2, 30, 40, 5, 6)
// b: Vector(1, 2, 30, 40, 6)
// b: Vector(1, 2, 30, 40)
With patch you can insert elements by specifying 0 for the number of elements to
replace:
val a = Vector(10, 20, 30)
val b = a.patch(1, List(15), 0)
val b = a.patch(2, List(25), 0)
// b: Vector(10, 15, 20, 30)
// b: Vector(10, 20, 25, 30)
Discussion
The Scala documentation on concrete immutable collection classes states the
following:
Vector is a collection type that addresses the inefficiency for random access on lists.
Vectors allow accessing any element of the list in “effectively” constant time….Because
vectors strike a good balance between fast random selections and fast random func‐
tional updates, they are currently the default implementation of immutable indexed
sequences.
As noted in “Understanding the Collections Hierarchy” on page 319, when you create
an instance of an IndexedSeq, Scala returns a Vector:
scala> val x = IndexedSeq(1,2,3)
x: IndexedSeq[Int] = Vector(1, 2, 3)
As a result, I’ve seen some developers use an IndexedSeq in their code rather than a
Vector to express their desire to create an indexed immutable sequence and leave the
implementation details to the compiler.
12.1 Making Vector Your Go-To Immutable Sequence
|
343
12.2 Creating and Populating a List
Problem
You want to create and populate a List.
Solution
There are many ways to create and initially populate a List, and the following code
shows six examples, starting with two basic, general use cases:
// (1)
val xs
val xs
val xs
basic, general use cases
= List(1, 2, 3)
// List(1, 2, 3)
= 1 :: 2 :: 3 :: Nil
// List(1, 2, 3)
= 1 :: List(2, 3)
// (2) both of these create an empty list
val xs: List[String] = List()
val xs: List[String] = Nil
Next, these examples demonstrate how to let the compiler implicitly set the List type,
and then how to explicitly control the type:
// (3a) implicit and explicit types, with mixed values
val xs = List(1, 2.0, 33D, 4_000L)
// implicit type (List[AnyVal])
val xs: List[Double] = List(1, 2.0, 33D, 4_000L)
// explicit type
// (3b) another example of explicitly setting the list type,
// where the second example declares the type to be List[Long]
val xs = List(1, 2, 3)
// List[Int] = List(1, 2, 3)
val xs: List[Long] = List(1, 2, 3)
// List[Long] = List(1, 2, 3)
These examples demonstrate a number of ways to create lists from ranges, including
the to and by methods that are available on the Int and Char types (thanks to implicit
conversions on those types):
// (4) using ranges
val xs = List.range(1, 10)
val xs = List.range(0, 10, 2)
// List(1, 2, 3, 4, 5, 6, 7, 8, 9)
// List(0, 2, 4, 6, 8)
(1
(1
(1
(1
//
//
//
//
to 5).toList
until 5).toList
to 10 by 2).toList
to 10 by 3).toList
('a' to 'e').toList
('a' to 'e' by 2).toList
List(1,
List(1,
List(1,
List(1,
2,
2,
3,
4,
3,
3,
5,
7,
4, 5)
4)
7, 9)
10)
// List(a, b, c, d, e)
// List(a, c, e)
These examples demonstrate a variety of ways to fill and populate lists:
// (5) different ways to fill lists
val xs = List.fill(3)("foo")
344
|
Chapter 12: Collections: Common Sequence Classes
// xs: List(foo, foo, foo)
val xs = List.tabulate(5)(n => n * n)
val xs = "hello".toList
// xs: List(0, 1, 4, 9, 16)
// xs: List[Char] = List(h,e,l,l,o)
// create a list of alphanumeric characters
val alphaNum = (('a' to 'z') ++ ('A' to 'Z') ++ ('0' to '9')).toList
// result contains 52 letters and 10 numbers
// create a list of 10 printable characters
val r = scala.util.Random
val printableChars = (for i <- 0 to 10 yield r.nextPrintableChar).toList
// result is like: List(=, *, W, ?, W, 1, L, <, F, d, O)
Finally, if you want to use a List, but the data is frequently changing, use a List
Buffer while the data is changing, and then convert it to a List when the data
changes stop:
// (6) use a ListBuffer while data is
import collection.mutable.ListBuffer
val a = ListBuffer(1)
// a:
a += 2
// a:
a += 3
// a:
frequently changing
ListBuffer(1)
ListBuffer(1, 2)
ListBuffer(1, 2, 3)
// convert it to a List when the changes stop
val b = a.toList
// b: List(1, 2, 3)
A ListBuffer is a Buffer that’s backed by a linked list. It offers constant-time pre‐
pend and append operations, and most other operations are linear.
Discussion
It’s important to know that the Scala List class is not at all like the Java List classes,
such as the Java ArrayList. For example, Recipe 22.1, “Using Java Collections in
Scala”, shows that a java.util.List converts to a Scala Buffer or Seq, not a Scala
List.
A List in Scala is simply a sequential collection of elements that ends with a Nil
element:
// empty list
val xs: List[String] = Nil
// List[String] = List()
// three elements that end with a Nil element
val xs = 1 :: 2 :: 3 :: Nil
// List(1, 2, 3)
// this is an error, because it does not end with a Nil
val xs = 1 :: 2 :: 3
// error
// prepending a `1` to a `List(2, 3)`
val xs = 1 :: List(2, 3)
// List(1, 2, 3)
As shown, the :: method—called cons—takes two arguments:
12.2 Creating and Populating a List
|
345
• A head element, which is a single element
• A tail, which is either the remaining List or the Nil value
The :: method and Nil value have their roots in the Lisp programming language,
where lists like this are heavily used. An important thing about List is that when you
add elements to it, it’s intended to be used in a manner where you always prepend
elements to it, like this:
val a = List(3)
val b = 2 :: a
val c = 1 :: b
// List(3)
// List(2, 3)
// List(1, 2, 3)
This quote from the List class Scaladoc discusses the important properties of the
List class:
This class is optimal for last-in-first-out (LIFO), stack-like access patterns. If you need
another access pattern, for example, random access or FIFO, consider using a collec‐
tion more suited to this than List. List has O(1) prepend and head/tail access. Most
other operations are O(n) on the number of elements in the list.
See Also
• Recipe 4.14, “Working with a List in a Match Expression”, shows how to handle a
List in a match expression, especially the Nil element.
• See Recipe 11.2, “Understanding the Performance of Collections”, for more
information on the List performance characteristics.
• Adding elements to a List is discussed more in Recipe 12.3.
12.3 Adding Elements to a List
Problem
You want to add elements to a List that you’re working with.
Solution
“How do I add elements to a List?” is a bit of a trick question, because a List is
immutable, so you can’t actually add elements to it. If you want a List that’s con‐
stantly changing, consider using a ListBuffer (as described in Recipe 12.5), and then
convert it to a List when necessary.
That advice holds true if you’re constantly modifying data in a list structure, but if
you just want to add a few elements to a list—rather than continuously updating it—
346
|
Chapter 12: Collections: Common Sequence Classes
prepending elements to a List is a fast operation. The preferred approach is to pre‐
pend elements with the :: method, while assigning the results to a new List:
val a = List(2)
// a: List(2)
// prepend with ::
val b = 1 :: a
val c = 0 :: b
// b: List(1, 2)
// c: List(0, 1, 2)
You can also use the ::: method to prepend one list in front of another:
val a = List(3, 4)
val b = List(1, 2) ::: a
// a: List(3, 4)
// b: List(1, 2, 3, 4)
Rather than continually reassigning the result of prepend operations to a new vari‐
able, you can declare your variable as a var and reassign the result to it:
var
x =
x =
x =
x = List(5)
4 :: x
3 :: x
List(1, 2) ::: x
//
//
//
//
x:
x:
x:
x:
List[Int] = List(5)
List(4, 5)
List(3, 4, 5)
List(1, 2, 3, 4, 5)
As these examples illustrate, the :: and ::: methods are right-associative. This
means that lists are constructed from right to left, which you can see more clearly in
these examples:
val
val
val
val
a
b
c
d
=
=
=
=
3
2
1
1
::
::
::
::
Nil
a
b
2 :: Nil
//
//
//
//
a:
b:
c:
d:
List(3)
List(2, 3)
List(1, 2, 3)
List(1, 2)
To be clear about how :: and ::: work, it can help to know that the Scala compiler
converts the code in this first example to the code shown in the second example:
List(1, 2) ::: List(3, 4)
List(3, 4).:::(List(1, 2))
// what you type
// how the compiler interprets that code
Both result in a List(1,2,3,4).
12.3 Adding Elements to a List
|
347
Discussion
This style of creating a list has its roots in the Lisp programming language:
val x = 1 :: 2 :: 3 :: Nil
// x: List(1, 2, 3)
Amazingly, Lisp was first specified in 1958, and because this is such a direct way of
creating a linked list, this style is still used today.
Other methods to prepend, append
Though using :: and ::: are the common methods with lists, there are additional
methods that let you prepend or append single elements to a List:
val x = List(1)
// prepend
val y = 0 +: x
// y: List(0, 1)
// append
val y = x :+ 2
// y: List(1, 2)
But remember that appending to a List is a relatively slow operation, and it’s not rec‐
ommended to use this approach, especially with large lists. As the List class Scaladoc
states, “This class is optimal for last-in-first-out (LIFO), stack-like access patterns. If
you need another access pattern, for example, random access or FIFO, consider using
a collection more suited to this than List.” See Recipe 11.2, “Understanding the Per‐
formance of Collections”, for a discussion of List class performance.
If you don’t work with the List class a lot, another way to concatenate two lists into a
new list is with the ++ or concat methods:
val a = List(1, 2, 3)
val b = List(4, 5, 6)
// '++' is an alias for 'concat', so they work the same
val c = a ++ b
// c: List(1, 2, 3, 4, 5, 6)
val c = a.concat(b)
// c: List(1, 2, 3, 4, 5, 6)
Because these methods are used consistently across immutable collections, they can
be easier to remember.
348
| Chapter 12: Collections: Common Sequence Classes
Methods that end in :
Any Scala method that ends with a : character is evaluated from
right to left. This means that the method is invoked on the right
operand. You can see how this works by analyzing the following
code, where both methods print the number 42:
@main def rightAssociativeExample =
val p = Printer()
p >> 42
// prints "42"
42 >>: p
// prints "42"
class Printer:
def >>(i: Int) = println(s"$i")
def >>:(i: Int) = println(s"$i")
In addition to using the methods as shown in that example, the two
methods can also be invoked like this:
p.>>(42)
p.>>:(42)
In summary, by defining the second method to end in a colon, it
can be used as a right-associative operator.
See Also
• You can also concatenate two lists to create a new list. See Recipe 13.12, “Merging
Sequential Collections”, for examples.
• If you want to use a mutable linear list, see Recipe 12.5 for examples of how to
use the ListBuffer class.
12.4 Deleting Elements from a List (or ListBuffer)
Problem
You want to delete elements from a List or ListBuffer.
Solution
Use methods like filter, take, and drop to filter the elements in a List, and meth‐
ods like -=, --=, and remove to delete elements in a ListBuffer.
12.4 Deleting Elements from a List (or ListBuffer) |
349
List
A List is immutable, so you can’t delete elements from it, but you can filter out the
elements you don’t want while you assign the result to a new variable:
val
val
val
val
val
a
b
b
b
b
=
=
=
=
=
List(5, 1, 4, 3, 2)
a.filter(_ > 2)
//
a.take(2)
//
a.drop(2)
//
a diff List(1)
//
b:
b:
b:
b:
List(5,
List(5,
List(4,
List(5,
4, 3)
1)
3, 2)
4, 3, 2)
Rather than continually assigning the result of operations like this to a new variable,
you can declare your variable as a var and reassign the result of the operation back to
itself:
var x = List(5, 1, 4, 3, 2)
x = x.filter(_ > 2)
// x: List(5, 4, 3)
See Recipe 13.7, “Using filter to Filter a Collection”, for other ways to get subsets of a
collection using methods like filter, partition, splitAt, and take.
ListBuffer
If you’re going to be modifying a list frequently, it can be better to use a ListBuffer
instead of a List. A ListBuffer is mutable, so as with other mutable collections, use
the -= and --= methods to delete elements. For example, assuming you’ve created a
ListBuffer like this:
import scala.collection.mutable.ListBuffer
val x = ListBuffer(1, 2, 3, 4, 1, 2, 3, 4)
// result: x: scala.collection.mutable.ListBuffer[Int] =
// ListBuffer(1, 2, 3, 4, 1, 2, 3, 4)
You can delete one element at a time by value using -=:
x -= 2
// x: ListBuffer(1, 3, 4, 1, 2, 3, 4)
Note that only the first occurrence of the number 2 is removed from the x.
You can delete two or more elements by value using --=:
val x = ListBuffer(1, 2, 3, 4, 5, 6)
// 1, 2, and 3 are removed:
x --= Seq(1,2,3)
// x: ListBuffer(4, 5, 6)
// nothing matched, so nothing removed:
x --= Seq(8, 9)
// x: ListBuffer(4, 5, 6)
You can use remove to delete elements by index position. Either supply the index, or
the starting index and the number of elements to delete:
350
| Chapter 12: Collections: Common Sequence Classes
val x = ListBuffer(1, 2, 3, 4, 5, 6)
// remove the 0th element
val a = x.remove(0)
// a=1, x=ListBuffer(2, 3, 4, 5, 6)
// remove three elements, starting from index 1. this `remove`
// method does not return a value.
x.remove(1, 3)
// x: ListBuffer(2, 6)
// be aware that `remove` can throw an exception
x.remove(100)
// java.lang.IndexOutOfBoundsException
Discussion
When you first start using Scala, the wealth of methods whose names are only sym‐
bols (e.g., methods like ++, --, and --=) can seem daunting. But ++ and -- are used
consistently with immutable collections, and -= and --= are used consistently across
mutable collections, so it quickly becomes second nature to use them.
See Also
Because filtering can be a form of deleting when working with immutable collections,
see the filtering recipes in Chapter 13.
12.5 Creating a Mutable List with ListBuffer
Problem
You want to use a mutable list—e.g., a LinearSeq, as opposed to an IndexedSeq—but
a List isn’t mutable.
Solution
To work with a mutable list, use a ListBuffer as long as the data is changing, and
convert the ListBuffer to a List when needed.
The following examples demonstrate how to create a ListBuffer, then add and
remove elements as desired, and finally convert it to a List when finished:
import scala.collection.mutable.ListBuffer
// create an empty ListBuffer[String]
val b = new ListBuffer[String]()
// add one
b += "a"
b += "b"
b += "c"
element at a time to the ListBuffer
// b: ListBuffer(a)
// b: ListBuffer(a, b)
// b: ListBuffer(a, b, c)
12.5 Creating a Mutable List with ListBuffer
|
351
// add multiple elements (++= is an alias for addAll)
b ++= List("d", "e", "f")
// b: ListBuffer(a, b, c, d, e, f)
b.addAll(Vector("d", "e", "f"))
// b: ListBuffer(a, b, c, d, e, f, d, e, f)
// remove the first "d"
b -= "d"
// b: ListBuffer(a, b, c, e, f, d, e, f)
// remove multiple elements specified by another sequence
b --= Seq("e", "f")
// b: ListBuffer(a, b, c, d)
// convert the ListBuffer to a List when you need to
val xs = b.toList
// xs: List(a, b, c, d)
Discussion
Because a List is immutable, if you need to create a list that is constantly changing, it
can be better to use a ListBuffer while the list is being modified, then convert it to a
List when a List is needed.
The ListBuffer Scaladoc states:
ListBuffer is “a Buffer implementation backed by a list. It provides constant-time
prepend and append. Most other operations are linear.”
So, don’t use ListBuffer if you want to access elements arbitrarily, such as accessing
items by index (like list(1_000_000)); use ArrayBuffer instead. See Recipe 11.2,
“Understanding the Performance of Collections”, for more information.
Small lists
Depending on your needs, it can be OK to create a new List from an existing List,
especially if they’re small and you’re OK prepending elements as you create the new
List:
val a = List(2)
val b = 1 :: a
val c = 0 :: b
// a: List(2)
// b: List(1, 2)
// c: List(0, 1, 2)
This technique is discussed more in Recipe 12.3.
12.6 Using LazyList, a Lazy Version of a List
Problem
You want to use a collection that works like a List but invokes its transformer meth‐
ods (map, filter, etc.) lazily.
352
|
Chapter 12: Collections: Common Sequence Classes
Solution
A LazyList is like a List, except that its elements are computed lazily, in a manner
similar to how a view creates a lazy version of a collection. Because LazyList ele‐
ments are computed lazily, a LazyList can be long…infinitely long. Like a view, only
the elements that are accessed are computed. Other than this behavior, a LazyList
behaves similar to a List.
For instance, just like a List can be constructed with ::, a LazyList can be construc‐
ted with the #:: method, using LazyList.empty at the end of the expression instead
of Nil:
scala> val xs = 1 #:: 2 #:: 3 #:: LazyList.empty
val xs: LazyList[Int] = LazyList(<not computed>)
The REPL output shows that the LazyList has not been computed yet. This means
that the LazyList has been created, but no elements have been allocated yet. As
another example, you can create a LazyList with a range:
scala> val xs = (1 to 100_000_000).to(LazyList)
val xs: LazyList[Int] = LazyList(<not computed>)
Now you can attempt to access the head and tail of the LazyList. The head is
returned immediately:
scala> xs.head
res0: Int = 1
but the tail isn’t evaluated yet:
scala> xs.tail
val res1: LazyList[Int] = LazyList(<not computed>)
The output still shows “not computed.” As discussed in Recipe 11.4, “Creating a Lazy
View on a Collection”, transformer methods are computed lazily, so when transform‐
ers are called, you see the “<not computed>” output in the REPL:
scala> xs.take(3)
val res2: LazyList[Int] = LazyList(<not computed>)
scala> xs.filter(_ < 200)
val res3: LazyList[Int] = LazyList(<not computed>)
scala> xs.filter(_ > 200)
val res4: LazyList[Int] = LazyList(<not computed>)
scala> xs.map { _ * 2 }
val res5: LazyList[Int] = LazyList(<not computed>)
12.6 Using LazyList, a Lazy Version of a List
|
353
However, be careful with methods that aren’t transformers. Calls to the following
strict methods are evaluated immediately and can easily cause java.lang.OutOf
MemoryError errors:
xs.max
xs.size
xs.sum
Transformer Methods
Transformer methods are collection methods that convert a given
input collection to a new output collection, based on an algorithm
you provide to transform the data. This includes methods like map,
filter, and reverse. When using these methods, you’re trans‐
forming the input collection to a new output collection.
Methods like max, size, and sum don’t fit that definition, so they
attempt to operate on the LazyList, and if the LazyList requires
more memory than you can allocate, you’ll get an java.lang.Out
OfMemoryError.
As a point of comparison, if I had attempted to use a List in these examples, I would
have encountered a java.lang.OutOfMemory error as soon as I attempted to create
the List:
val xs = (1 to 100_000_000).toList
// result: java.lang.OutOfMemoryError: Java heap space
Conversely, a LazyList gives you a chance to specify a huge list and begin working
with its elements:
val xs = (1 to 100_000_000).to(LazyList)
xs(0)
// returns 1
xs(1)
// returns 2
Discussion
In the Scala 2.13 collections redesign, LazyList replaced the Stream class, which has
been deprecated. Per the official blog post about the collections redesign, this was
partially done within the overall effort to reduce confusion in the collections design.
Also per that blog post, both the head and tail of a LazyList are accessed lazily,
whereas in Stream only the tail was accessed lazily.
The LazyList Scaladoc contains several more key performance-related notes, includ‐
ing these:
• Elements are memoized, meaning that the value of each element is computed at
most once.
354
|
Chapter 12: Collections: Common Sequence Classes
• Elements are computed in order and never skipped.
• A LazyList can be infinite in length, in which case methods like count, sum, max,
and min will not terminate.
See that Scaladoc page for more details and examples.
See Also
• Recipe 11.4, “Creating a Lazy View on a Collection”, shows how to create views
on collections, which work like LazyList.
12.7 Making ArrayBuffer Your Go-To Mutable Sequence
Problem
You want to create an array whose size can change, i.e., a completely mutable array.
Solution
An Array is mutable in that its elements can change, but its size can’t change. To cre‐
ate a mutable indexed sequence whose size can change, use the ArrayBuffer class.
To use an ArrayBuffer, import it into scope and then create an instance. You can
declare an ArrayBuffer without initial elements by specifying the type it contains,
and then add elements later:
import scala.collection.mutable.ArrayBuffer
val a = ArrayBuffer[String]()
a += "Ben"
a += "Jerry"
a += "Dale"
// a: ArrayBuffer(Ben)
// a: ArrayBuffer(Ben, Jerry)
// a: ArrayBuffer(Ben, Jerry, Dale)
ArrayBuffer has all the methods you’ll find with other mutable sequences. These are
some common ways to add elements to an ArrayBuffer:
import scala.collection.mutable.ArrayBuffer
// initialize with elements
val characters = ArrayBuffer("Ben", "Jerry")
// add one element
characters += "Dale"
// add multiple elements with any IterableOnce type
characters ++= List("Gordon", "Harry")
characters ++= Vector("Andy", "Big Ed")
12.7 Making ArrayBuffer Your Go-To Mutable Sequence
|
355
// another way to add multiple elements
characters.appendAll(List("Laura", "Lucy"))
// `characters` now contains these strings:
ArrayBuffer(Ben, Jerry, Dale, Gordon, Harry, Andy, Big Ed, Laura, Lucy)
Adding elements as shown in the previous examples is appending. The following
examples show a few ways to prepend elements to an ArrayBuffer:
val a = ArrayBuffer(10)
a.prepend(9)
a.prependAll(Seq(7,8))
// a: ArrayBuffer[Int] = ArrayBuffer(10)
// a: ArrayBuffer(9, 10)
// a: ArrayBuffer(7, 8, 9, 10)
// `+=:` is an alias for `prepend`, `++=:` is an alias for `prependAll`
6 +=: a
// a: ArrayBuffer(6, 7, 8, 9, 10)
List(4,5) ++=: a
// a: ArrayBuffer(4, 5, 6, 7, 8, 9, 10)
Discussion
Here are a few ways to update ArrayBuffer elements in place:
import scala.collection.mutable.ArrayBuffer
// creates an ArrayBuffer[Char]
val a = ArrayBuffer.range('a', 'f')
// a: ArrayBuffer(a, b, c, d, e)
a.update(0, 'A')
a(2) = 'C'
// a: ArrayBuffer(A, b, c, d, e)
// a: ArrayBuffer(A, b, C, d, e)
a.patchInPlace(0, Seq('X', 'Y'), 2)
a.patchInPlace(0, Seq('X', 'Y'), 3)
a.patchInPlace(0, Seq('X', 'Y'), 4)
// a: ArrayBuffer(X, Y, C, d, e)
// a: ArrayBuffer(X, Y, d, e)
// a: ArrayBuffer(X, Y)
When using patchInPlace:
• The first Int parameter is the element index where you want the replacing to
start.
• The second Int is the number of elements you want to replace.
The first example shows how to replace two elements with two new elements. The last
example shows how to replace four old elements with two new elements.
Notes about ArrayBuffer and ListBuffer
The ArrayBuffer Scaladoc provides these details about ArrayBuffer performance:
“Append, update, and random access take constant time (amortized time). Prepends
and removes are linear in the buffer size.”
356
|
Chapter 12: Collections: Common Sequence Classes
If you need a mutable sequential collection that works more like a List (i.e., a linear
sequence rather than an indexed sequence), use ListBuffer instead of ArrayBuffer.
The Scala documentation on the ListBuffer states, “A Buffer implementation
backed by a list. It provides constant time prepend and append. Most other opera‐
tions are linear.” See Recipe 12.5 for more ListBuffer details.
12.8 Deleting Array and ArrayBuffer Elements
Problem
You want to delete elements from an Array or ArrayBuffer.
Solution
An ArrayBuffer is a mutable sequence, so you can delete elements with the usual -=,
--=, remove, and clear methods.
With an Array, you can’t change its size, so you can’t directly delete elements. But you
can reassign the elements in an Array, which has the effect of replacing them.
You can also apply other functional methods to both ArrayBuffer and Array while
assigning the results to a new variable.
Deleting ArrayBuffer elements
Given this ArrayBuffer:
import scala.collection.mutable.ArrayBuffer
val x = ArrayBuffer('a', 'b', 'c', 'd', 'e')
you can remove one or more elements by value with -= and --=:
// remove one element
x -= 'a'
// x: ArrayBuffer(b, c, d, e)
// remove multiple elements
x --= Seq('b', 'c')
// x: ArrayBuffer(d, e)
As shown in that last example, use --= to remove multiple elements that are declared
in any collection that extends IterableOnce:
val x = ArrayBuffer.range('a', 'f')
x --= Seq('a', 'b')
x --= Array('c')
x --= Set('d')
// ArrayBuffer(a, b, c, d, e)
// x: ArrayBuffer(c, d, e)
// x: ArrayBuffer(d, e)
// x: ArrayBuffer(e)
Use the remove method to delete one element by its index in the ArrayBuffer, or a
series of elements beginning at a starting index:
12.8 Deleting Array and ArrayBuffer Elements
|
357
val x = ArrayBuffer('a', 'b', 'c', 'd', 'e', 'f')
x.remove(0)
// x: ArrayBuffer(b, c, d, e, f)
// delete three elements, starting at index 1 (results in deleting c, d, and e)
x.remove(1, 3)
// x: ArrayBuffer(b, f)
The clear method removes all the elements from an ArrayBuffer:
val x = ArrayBuffer(1,2,3,4,5)
x.clear
// x: ArrayBuffer[Int] = ArrayBuffer()
clearAndShrink removes all elements from an ArrayBuffer and resizes its internal
representation:
// create and populate an ArrayBuffer
val x = ArrayBuffer.range(1, 1_000_000)
// remove all elements and resize the internal representation
x.clearAndShrink(0)
// x: ArrayBuffer[Int] = ArrayBuffer()
clear and clearAndShrink
Per the ArrayBuffer Scaladoc, clear “does not actually resize the
internal representation; see clearAndShrink if you want to also
resize internally.” The clearAndShrink Scaladoc states, “Clears this
buffer and shrinks to @param size (rounding up to the next natural
size).”
Replacing elements in an Array
The size of an Array can’t be changed, so you can’t directly delete elements. But you
can reassign the elements in an Array, which has the effect of replacing them:
val a = Array("apple", "banana", "cherry")
a(0) = ""
// a: Array("", banana, cherry)
a(1) = null
// a: Array("", null, cherry)
Discussion
With both Array and ArrayBuffer you can also use the usual functional filtering
methods to filter out elements as you assign the result to a new sequence:
val
val
val
val
val
val
a
b
c
d
e
f
=
=
=
=
=
=
Array(1,2,3,4,5)
a.filter(_ > 3)
a.take(2)
a.drop(2)
a.find(_ > 3)
a.slice(0, 3)
//
//
//
//
//
//
a:
b:
c:
d:
e:
f:
Array[Int] = Array(1, 2, 3, 4, 5)
Array(4, 5)
Array(1, 2)
Array(3, 4, 5)
Some(4)
Array(1, 2, 3)
Use other functional filtering methods as desired with both Array and ArrayBuffer.
358
|
Chapter 12: Collections: Common Sequence Classes
12.9 Creating and Updating an Array
Problem
You want to create and optionally populate an Array.
Solution
There are several different ways to define and populate an Array. You can create an
array with initial values, in which case Scala can determine the array type implicitly:
val nums = Array(1,2,3)
val fruits = Array("a", "b", "c")
// Array[Int] = Array(1, 2, 3)
// Array[String] = Array(a, b, c)
If you don’t like the type Scala determines, you can assign it manually:
val a = Array(1, 2)
val a = Array[Long](1, 2)
// a: Array[Int] = Array(1, 2)
// a: Array[Long] = Array(1, 2)
You can create an empty array and then add new elements to it while assigning the
result to a new variable:
val a = Array[Int]()
// a: Array[Int] = Array()
// append one element or multiple elements
val b = a :+ 1
// b: Array(1)
val c = b ++ Seq(2,3)
// c: Array(1, 2, 3)
// prepend one element or multiple elements
val d = 10 +: c
// d: Array(10, 1, 2, 3)
val e = Array(8,9) ++: d
// e: Array(8, 9, 10, 1, 2, 3)
Similarly, you can define an array with an initial size and type and then populate it
later. In the first step, this example creates an Array[String] with one thousand ini‐
tial null elements, and then I start adding elements to it:
// create an array with an initial size
val babyNames = new Array[String](1_000)
// somewhere later in the code ...
babyNames(0) = "Alvin"
// Array(Alvin, null, null ...)
babyNames(1) = "Alexander"
// Array(Alvin, Alexander, null ...)
While we generally try to avoid null values in Scala, you can create a null var refer‐
ence to an array, and then assign it later:
// this makes `fruits` a null value
var fruits: Array[String] = _
// fruits: Array[String] = null
// later in the code ...
fruits = Array("apple", "banana")
// fruits: Array(apple, banana)
12.9 Creating and Updating an Array
|
359
The following examples show a handful of other ways to create and populate an
Array:
val x = (1 to 5).toArray
val x = Array.range(1, 5)
val x = Array.range(0, 10, 2)
val x = List(1, 2, 3).toArray
"Hello".toArray
val x = Array.fill(3)("foo")
val x = Array.tabulate(5)(n => n * n)
//
//
//
//
//
//
//
x:
x:
x:
x:
x:
x:
x:
Array(1, 2, 3, 4, 5)
Array(1, 2, 3, 4)
Array(0, 2, 4, 6, 8)
Array(1, 2, 3)
Array[Char] = Array(H,e,l,l,o)
Array(foo, foo, foo)
Array(0, 1, 4, 9, 16)
Discussion
The Array is an interesting creature:
• It’s backed by a Java array, but Scala arrays can also be generic, so that you can
have an Array[A].
• Like the Java array, it’s mutable in that its elements can be changed, but it’s
immutable in that its size cannot be changed.
• It’s compatible with Scala sequences, so if a function expects a Seq[A] you can
pass it an Array[A].
Because arrays can be mutated, you definitely don’t want to use them when writing
code in a functional programming style.
In regard to being backed by a Java array, the Scala 2.13 arrays page states this about
the Array type:
Scala arrays correspond one-to-one to Java arrays. That is, a Scala array Array[Int] is
represented as a Java int[], an Array[Double] is represented as a Java double[], etc.
You can see that for yourself if you create a file named Test.scala with this code:
class Test:
val nums = Array(1, 2, 3)
If you compile that file with scalac and then decompile it with a tool like JAD, you’ll
see this Java code:
private final int nums[] = {
1, 2, 3
};
Accessing and updating elements
The Array is an indexed sequential collection, so accessing and changing values by
their index position is straightforward and fast. Once you’ve created an Array, access
its elements by enclosing the desired element number in parentheses:
360
|
Chapter 12: Collections: Common Sequence Classes
val a = Array('a', 'b', 'c')
val elem0 = a(0)
// elem0: a
val elem1 = a(1)
// elem1: b
Just as you access an array element by index, you update elements in a similar way:
a(0) = 'A'
a(1) = 'B'
// a: Array(A, b, c)
// a: Array(A, B, c)
Why use Array?
Because the Array type has a combination of immutable and mutable characteristics,
you may wonder when it should be used. One reason is performance. Certain Array
operations are faster than other collections. For instance, in tests on my current com‐
puter, running b.sortInPlace with an Array of five million randomized Int values
consistently takes about 500 ms:
import scala.util.Random
val v: Vector[Int] = (1 to 5_000_000).toVector
// create a randomized Array[Int]
val a: Array[Int] = Random.shuffle(v).toArray
a.sortInPlace
// takes ~500ms
Conversely, creating a randomized Vector in the same way and calling its sorted
method consistently takes over three seconds:
randomVector.sorted
// takes about 3,100ms
So in this example, sorting the Array[Int] with sortInPlace is about six times faster
than sorting a Vector[Int] with sorted. As the saying goes, your mileage (perfor‐
mance) may vary, but it’s important to know that in some situations an Array can be
faster than other collection types. The See Also section has links related to sequence
performance.
How Does Array Work Like Other Sequences?
When you realize that the Scala Array is backed by the Java array,
you may wonder how Array can possibly work like other Scala
sequences. The fourth edition of the book Programming in Scala
states that “arrays are compatible with sequences, because there’s an
implicit conversion from Array to ArraySeq.” Also, another
implicit conversion related to ArrayOps “adds all sequence methods
to arrays, but does not turn the array into a sequence.”
12.9 Creating and Updating an Array
|
361
See Also
• The official Scala website’s page on arrays has a thorough discussion of them
including background on its implementation.
• Recipe 11.2, “Understanding the Performance of Collections”, discusses Array
class performance.
• In his 2016 blog post, “Benchmarking Scala Collections”, Li Haoyi describes run‐
ning a series of performance benchmarks, showing where Array performs well.
His benchmark code is available at github.com/lihaoyi/scala-bench.
12.10 Creating Multidimensional Arrays
Problem
You need to create a multidimensional array, i.e., an array with two or more
dimensions.
Solution
There are two main solutions:
• Use Array.ofDim to create a multidimensional array. You can use this approach
to create arrays of up to five dimensions. With this approach you need to know
the number of rows and columns at creation time.
• Create arrays of arrays as needed.
Both approaches are shown in this solution.
Using Array.ofDim
Use the Array.ofDim method to create the array you need:
val rows = 2
val cols = 3
val a = Array.ofDim[String](rows, cols)
// `a` now looks like this:
Array[Array[String]] = Array(
Array(null, null, null),
Array(null, null, null)
)
362
| Chapter 12: Collections: Common Sequence Classes
After declaring the array, add elements to it:
a(0)(0)
a(0)(1)
a(0)(2)
a(1)(0)
a(1)(1)
a(1)(2)
=
=
=
=
=
=
"a"
"b"
"c"
"d"
"e"
"f"
// row 1
// row 2
Access the elements using parentheses, similar to a one-dimensional array:
a(0)(0)
a(1)(2)
// a
// f
Iterate over the array with a for loop:
scala>
|
|
|
(0)(0)
(0)(1)
(0)(2)
(1)(0)
(1)(1)
(1)(2)
for
i <- 0 until rows
j <- 0 until cols
do println(s"($i)($j) = ${a(i)(j)}")
= a
= b
= c
= d
= e
= f
To create an array with more dimensions, just follow that same pattern. Here’s the
code for a three-dimensional array:
val x, y, z = 10
val a = Array.ofDim[Int](x,y,z)
for
i <- 0 until x
j <- 0 until y
k <- 0 until z
do
println(s"($i)($j)($k) = ${a(i)(j)(k)}")
Using an array of arrays
Another approach is to create an array whose elements are arrays:
val a = Array(
Array("a", "b", "c"),
Array("d", "e", "f")
)
val x = a(0)
val x = a(1)
val x = a(0)(0)
// x: Array(a, b, c)
// x: Array(d, e, f)
// x: a
12.10 Creating Multidimensional Arrays
|
363
This gives you more control of the process and lets you create “ragged” arrays (where
each contained array may be a different size):
val a = Array(
Array("a", "b", "c"),
Array("d", "e"),
Array("f")
)
You can also declare your variable as a var and create the same array in multiple
steps:
var arr = Array(Array("a", "b", "c"))
arr ++= Array(Array("d", "e"))
arr ++= Array(Array("f"))
// result:
Array(Array(a, b, c), Array(d, e), Array(f))
Discussion
Decompiling the Array.ofDim solution helps to understand how this works behind
the scenes. If you create the following Scala class in a file named Test.scala:
class Test:
val arr = Array.ofDim[String](2, 3)
then compile that class with scalac, and then decompile it with a tool like JAD, you
can see the Java code that’s created:
private final String arr[][];
Similarly, creating a Scala three-dimensional Array like this:
val arr = Array.ofDim[String](2, 2, 2)
results in a Java array like this:
private final String arr[][][];
As you might expect, the code generated by using the “array of arrays” approach is
more complicated.
The Array.ofDim approach is unique to the Array class; there is no ofDim method on
a List, Vector, ArrayBuffer, etc. But the “array of arrays” solution is not unique to
the Array class; you can have a “list of lists,” “vector of vectors,” and so on.
Finally, if you have an array of arrays, remember that if needed, you can convert it to
a single array with flatten:
val a = Array.ofDim[Int](2, 3)
val b = a.flatten
364
|
// a: Array(Array(0, 0, 0), Array(0, 0, 0))
// b: Array(0, 0, 0, 0, 0, 0)
Chapter 12: Collections: Common Sequence Classes
12.11 Sorting Arrays
Problem
You want to sort the elements in an Array (or ArrayBuffer).
Solution
Use the sorting methods shown in Recipe 13.14, “Sorting a Collection”, (sortBy, sor
ted, sortWith, sortInPlace, sortInPlaceBy, and sortInPlaceWith), or use the spe‐
cial scala.util.Sorting.quickSort method. This solution demonstrates the quick
Sort method.
If you’re working with an Array that holds elements of a type that extends
scala.math.Ordered, or that has an implicit or explicit Ordering, you can sort the
Array in place using the scala.util.Sorting.quickSort method. For example,
because the String class has an implicit Ordering, it can be used with quickSort:
val fruits = Array("cherry", "apple", "banana")
scala.util.Sorting.quickSort(fruits)
fruits
// Array(apple, banana, cherry)
Notice that quickSort sorts the Array in place; there’s no need to assign the result to
a new variable. This example works because the String class (via StringOps) has an
implicit Ordering.
Discussion
A simple class like this Person class won’t work with Sorting.quickSort because it
doesn’t provide any information on how the data should be sorted:
class Person(val firstName: String, val lastName: String):
override def toString = s"$firstName $lastName"
val peeps = Array(
Person("Jessica", "Day"),
Person("Nick", "Miller"),
Person("Winston", "Bishop"),
Person("", "Schmidt"),
Person("Coach", ""),
)
Attempting to sort that Array results in an error:
// results in this error: “No implicit Ordering defined for Person”
scala.util.Sorting.quickSort(peeps)
12.11 Sorting Arrays
|
365
The solution is to extend the scala.math.Ordered trait, as demonstrated in Recipe
13.14, “Sorting a Collection”, or provide an implicit or explicit Ordering. This solu‐
tion demonstrates an explicit Ordering:
object LastNameOrdering extends Ordering[Person]:
def compare(a: Person, b: Person) = a.lastName compare b.lastName
scala.util.Sorting.quickSort(peeps)(LastNameOrdering)
// result: Array(Coach , Winston Bishop, Jessica Day, Nick Miller, Schmidt)
This approach works because one of the overloaded quickSort methods accepts an
(implicit) Ordering argument in its second parameter list, as shown in its type
signature:
def quickSort[K](a: Array[K])(implicit arg0: math.Ordering[K]): Unit
-------------------------------
Using a given ordering
As mentioned, arg0 is marked as an implicit parameter. A parameter that’s marked
implicit is the Scala 2 equivalent of a Scala 3 using parameter. This means that
when a math.Ordering given value is in the current scope, it will automatically be
used as the arg0 parameter in that parameter group; you don’t even need to specify it.
For example, first define a given value that’s an instance of Ordering[Person]:
given personOrdering: Ordering[Person] with
def compare(a: Person, b: Person) = a.lastName compare b.lastName
Then when you call quickSort on the peeps array, the result is the same as the previ‐
ous example:
import scala.util.Sorting.quickSort
quickSort(peeps)
// result: peeps: Array[Person] =
// Array(Coach , Winston Bishop, Jessica Day, Nick Miller,
Schmidt)
Notice that when I call quickSort, it isn’t necessary to pass in the personOrdering
instance(!). Because personOrdering is defined as a given value, the compiler is nice
enough to find it for us. It knows it needs an Ordering[Person] parameter, and per
sonOrdering has that type, and it’s marked as a given value.
This is what Scala 2 implicit parameters—and Scala 3 using parameters—do for us,
in combination with given values. It’s just as though we had written the quickSort
code like this, manually passing the personOrdering parameter into the second
parameter group:
quickSort(peeps)(personOrdering)
----------------
366
|
Chapter 12: Collections: Common Sequence Classes
Note that because the personOrdering name really isn’t needed in the code, the given
parameter could have also been declared without a variable name, like this:
given Ordering[Person] with
def compare(a: Person, b: Person) = a.lastName compare b.lastName
For more details on this approach, see Recipe 23.8, “Using Term Inference with given
and using”.
Performance
I demonstrate this solution because it’s unique to the Array class, and it may also have
better performance for an Array than the solutions shown in Recipe 13.14, “Sorting a
Collection”. For instance, my tests show that quickSort may be a little faster than
sortInPlace for arrays of integers with a few million elements. But as with any per‐
formance discussion, be sure to test the alternatives in your own application.
See Also
The Scaladoc pages for the Sorting, Ordered, and Ordering types are very good, so
see these pages for more examples and details:
• scala.util.Sorting
• scala.math.Ordering
• scala.math.Ordered
See Recipe 13.14, “Sorting a Collection”, for information about how to mix the
Ordered trait into your own custom classes.
12.11 Sorting Arrays
|
367
CHAPTER 13
Collections: Common Sequence Methods
Where the two previous chapters primarily focused on sequence classes, this chapter
focuses on sequence methods, specifically the most commonly used sequence meth‐
ods. But before digging into those recipes, there are a few important concepts to
know when working with collections class methods:
• Predicates
• Anonymous functions
• Implied loops
Predicate
A predicate is simply a method, function, or anonymous function that takes one or
more input parameters and returns a Boolean value. For instance, the following
method returns either true or false, so it’s a predicate:
def isEven(i: Int): Boolean =
i % 2 == 0
A predicate is a simple concept, but you’ll hear the term so often when working with
collection methods that it’s important to mention it.
Anonymous Functions
The concept of an anonymous function is also important. It’s described in depth in
Recipe 10.1, “Using Function Literals (Anonymous Functions)”, but as a quick exam‐
ple, this code shows the long form for an anonymous function that does the same
work as the isEven method:
369
(i: Int) => i % 2 == 0
Here’s the short form of the same function:
_ % 2 == 0
That doesn’t look like much by itself, but when it’s combined with the filter method
on a collection, it makes for a lot of power in just a little bit of code:
scala> val list = List.range(1, 10)
list: List[Int] = List(1, 2, 3, 4, 5, 6, 7, 8, 9)
scala> val events = list.filter(_ % 2 == 0)
events: List[Int] = List(2, 4, 6, 8)
Implied Loops
The filter method is a nice lead-in to the third topic: implied loops. As you can see
from that example, filter contains a loop that applies your function to every ele‐
ment in the collection and returns a new collection. You could live without the filter
method and write equivalent code like this:
for
e <- list
if e % 2 == 0
yield
e
But I think you’ll agree that the filter approach is both more concise and easier to
read.
Collection methods like filter, foreach, map, reduceLeft, and many more have
loops built into their algorithms. Because of these built-in methods, you’ll write far
fewer custom for loops when writing Scala code than with many other languages.
Recipes in This Chapter
While sequence classes have over one hundred built-in methods, the recipes in this
chapter focus on the most commonly used methods, including:
• filter, which lets you filter a collection with a given predicate
• map, which lets you apply a transformation function to each element in a
collection
• Methods to extract sequences and subsets of an existing sequence
• Methods to find unique elements in a sequence
• Methods to merge and zip sequences together
370
|
Chapter 13: Collections: Common Sequence Methods
• Methods to randomize and sort sequences
• Two methods you can use to convert sequences into strings
These capabilities—and several more—are demonstrated in the following recipes.
13.1 Choosing a Collection Method to Solve a Problem
Problem
There are a large number of methods available to Scala collections classes, and you
need to choose a method to solve a problem.
Solution
The Scala collections classes provide a wealth of methods that can be used to manipu‐
late data. Most methods take either a function or a predicate as an argument.
The methods that are available are listed in two ways in this recipe. In the next few
paragraphs, the methods are grouped into categories to help you find what you need.
Then in the tables that follow, a brief description and method signature are provided.
Methods organized by category
Filtering methods
Methods that can be used to filter a collection include collect, diff, distinct,
drop, dropRight, dropWhile, filter, filterNot, filterInPlace, find, fol
dLeft, foldRight, head, headOption, init, intersect, last, lastOption, slice,
tail, take, takeRight, takeWhile, and union.
Transformer methods
Transformer methods take at least one input collection to create a new output
collection, typically using an algorithm you provide. They include +, ++, +:, ++:,
appended, appendedAll, diff, distinct, collect, concat, flatMap, flatten,
inits, map, mapInPlace, patch, reverse, sorted, sortBy, sortWith, sortIn
Place, sortInPlaceWith, sortInPlaceBy, tails, takeWhile, updated, zip, and
zipWithIndex.
Grouping methods
These methods let you take an existing collection and create multiple groups
from that one collection. They include groupBy, grouped, groupMap, partition,
sliding, span, splitAt, and unzip.
13.1 Choosing a Collection Method to Solve a Problem
|
371
Informational and mathematical methods
These methods provide information about a collection, and include canEqual,
contains, containsSlice, count, endsWith, exists, find, findLast, forAll,
indexOf, indexOfSlice, indexWhere, isDefinedAt, isEmpty, last, lastOption,
lastIndexOf, lastIndexOfSlice, lastIndexWhere, length, lengthIs, max,
maxBy, maxOption, maxByOption, min, minBy, minOption, minByOption, nonEmpty,
product, segmentLength, size, sizeIs, startsWith, and sum. The methods fol
dLeft, foldRight, reduceLeft, and reduceRight can also be used with a func‐
tion you supply to obtain information about a collection.
Others
A few other methods are hard to categorize, including view, foreach, addString,
and mkString. view creates a lazy view on a collection (see Recipe 11.4, “Creating
a Lazy View on a Collection”); foreach is like a for loop, letting you iterate over
the elements in a collection and perform a side effect on each element; addString
and mkString let you build a String from a collection.
There are even more methods than those listed here. For instance, there’s a collection
of to* methods that let you convert the current collection (a List, for example) to
other collection types (toArray, toBuffer, toVector, etc.). Check the Scaladoc for
your collections class to find more built-in methods.
Common collection methods
The following tables list the most common collection methods. Note that all quotes in
the descriptions come from the Scaladoc for each class.
Table 13-1 lists methods that are common to all collections via Iterable. The follow‐
ing symbols are used in the first column of the table:
• c refers to a sequential collection.
• f refers to a function.
• p refers to a predicate.
• n refers to a number.
Additional methods for mutable and immutable collections are listed in Tables 13-2
and 13-3, respectively.
372
| Chapter 13: Collections: Common Sequence Methods
Table 13-1. Common methods on Iterable collections (scala.collection.Iterable)
Method
c collect f
Description
Builds a new collection by applying a partial function to all elements of the collection on
which the function is defined.
c count p
Counts the number of elements in the collection for which the predicate is satisfied.
c drop n
Returns all elements in the collection except the first n elements.
c dropWhile p
Returns a collection that contains the “longest prefix of elements that satisfy the predicate.”
c exists p
Returns true if the predicate is true for any element in the collection.
c filter p
Returns all elements from the collection for which the predicate is true.
c filterNot p
Returns all elements from the collection for which the predicate is false.
c find p
Returns the first element that matches the predicate as Option[A].
c flatMap f
Returns a new collection by applying a function to all elements of the collection c (like
map), and then flattening the elements of the resulting collections.
c flatten
Converts a collection of collections (such as a list of lists) to a single collection (single list).
c foldLeft(s)(f)
Applies the operation f to successive elements, going from left to right (left associative),
starting with the seed value s.
c foldRight(s)(f)
Applies the operation f to successive elements, going from right to left (right associative),
starting with the seed value s.
c forAll p
Returns true if the predicate is true for all elements, false otherwise.
c foreach f
Applies the function f to all elements of the collection (where f is typically a side-effecting
function).
c groupBy f
Partitions the collection into a Map of collections according to the function.
c head
Returns the first element of the collection. Throws a NoSuchElementException if the
collection is empty.
c headOption
Returns the first element of the collection as Some[A] if the element exists, or None if the
collection is empty.
c init
Selects all elements from the collection except the last one. Throws an UnsupportedO
perationException if the collection is empty.
c inits
“Iterates over the inits of this iterable collection.”
c isEmpty
Returns true if the collection is empty, false otherwise.
c knownSize
“The number of elements in the collection, if it can be cheaply computed, -1 otherwise.
Cheaply usually means: Not requiring a collection traversal.”
c last
Returns the last element from the collection. Throws a NoSuchElementException if
the collection is empty.
c lastOption
Returns the last element of the collection as Some[A] if the element exists, or None if the
collection is empty.
c1 lazyZip c2
A lazy version of the zip method.
c map f
Creates a new collection by applying the function to all the elements of the collection.
13.1 Choosing a Collection Method to Solve a Problem
|
373
Method
Description
Returns the largest element from the collection. Can throw java.lang.UnsupportedO
c max
perationException.
c maxOption
Returns the largest element from the collection as an Option.
c maxBy f
Returns the largest element as measured by the function f. Can throw
java.lang.UnsupportedOperationException.
c maxByOption
Returns the largest element as an Option, as measured by the function f.
c min
Returns the smallest element from the collection. Can throw java.lang.Unsupporte
dOperationException.
c minOption
Returns the smallest element from the collection as an Option.
c minBy
Returns the smallest element as measured by the function f. Can throw
java.lang.UnsupportedOperationException.
c minByOption
Returns the smallest element as an Option, as measured by the function f.
c mkString
Several options to convert the sequence into a string.
c nonEmpty
Returns true if the collection contains at least one element, false otherwise.
c partition p
Returns two collections according to the predicate algorithm.
c product
Returns the multiple of all elements in the collection.
c reduceLeft op
The same as foldLeft, but begins at the first element of the collection. Can throw
java.lang.UnsupportedOperationException.
c reduceRight op
The same as foldRight, but begins at the last element of the collection. Can throw
java.lang.UnsupportedOperationException.
c scanLeft op
Similar to reduceLeft, but returns an Iterable.
c scanRight op
Similar to reduceRight, but returns an Iterable.
c size
Returns the size of the collection.
c1 sizeCompare(c2)
Compare the size of c1 to the size of c2. Returns <0 if c1 is smaller; 0 if they are the same
size; >0 if c1 is larger.
c sizeIs n
Compare the size of a collection to the integer n while traversing as few elements as
possible.
c slice(from, to)
Returns the interval of elements beginning at element from and ending at element to.
c sliding(size,step) Works by passing a sliding window over the sequence, returning sequences of a length given
by size. The step parameter lets you skip over elements.
c span p
Returns a collection of two collections; the first created by c.takeWhile(p) and the
second created by c.dropWhile(p).
c splitAt n
Returns a collection of two collections by splitting the collection c at element n.
c sum
Returns the sum of all elements in the collection.
c tail
Returns all elements from the collection except the first element.
c tails
Iterates over the tails of the sequence.
c take n
Returns the first n elements of the collection.
374
|
Chapter 13: Collections: Common Sequence Methods
Method
Description
c takeWhile p
Returns elements from the collection while the predicate is true. Stops when the predicate
becomes false.
c tapEach f
Applies a side-effecting function f to each element in c, while also returning c. Lets you
insert a side effect in a chain of method calls, such as logging.
c unzip
The opposite of zip, breaks a collection into two collections by dividing each element into
two pieces, as in breaking up a collection of Tuple2 elements.
c view
Returns a nonstrict (lazy) view of the collection.
c1 zip c2
Creates a collection of pairs by matching the element 0 of c1 with element 0 of c2,
element 1 of c1 with element 1 of c2, etc.
c zipWithIndex
Zips the collection with its indices.
There are additional methods, but these are the most common. See the Scaladoc for
the collection you’re working with for more methods.
Mutable collection methods
Table 13-2 shows methods that are commonly available on mutable collections.
(Although these are all methods, some of them look like built-in operators.)
Table 13-2. Common operators (methods) on mutable collections
Method
Description
c += x
Adds the element x to the collection c. An alias for addOne.
c1 ++= c2
Adds the elements in the collection c2 to the collection c1. An alias for addAll.
c −= x
Removes the element x from the collection c. An alias for subtractOne.
c −= (x,y,z)
Removes the elements x , y, and z from the collection c.
c1 −−= c2
Removes the elements in the collection c2 from the collection c1. An alias for sub
tractAll.
c(n) = x
Assigns the value x to the element c(n).
c append x
Appends the element x to the collection c.
c1 appendAll c2
Appends the elements in c2 to the collection c1.
c clear
Removes all elements from the collection.
c filterInPlace p
Retains all elements in the collection for which the predicate is true.
c flatMapInPlace f
Assuming that c is a list of lists, updates all elements by applying the function f to the
elements. Works like map and then flatten.
c mapInPlace f
Updates all elements in the collection by applying the function to the elements.
c1.patchInPlace(i,c2,n) Starting at index i, patch in the sequence c2, replacing the number of elements n. Set
n to 0 to insert the new sequence at index i.
c prepend x
Prepends the element x to the collection c.
c1 prependAll c2
Prepends the elements in c2 to the collection c1.
13.1 Choosing a Collection Method to Solve a Problem
|
375
Method
Description
c sortInPlace
Sort the collection in place according to an Ordering.
c sortInPlaceBy f
Sorts the collection in place according to an implicitly given Ordering with the
transformation function f.
c sortInPlaceWith f
Sorts the collection in place according to the comparison function f.
c remove i
Removes the element at index i.
c.remove(i, len)
Removes the elements beginning at index i and continuing for length len.
c.update(i,e)
Updates the element at index i with the new value e.
Note that symbolic method names like += and -= are now aliases for named methods.
For instance, += is an alias for addOne. See the Scaladoc for the mutable collection
you’re working with for more methods.
Immutable collection methods
Table 13-3 shows the common methods for working with immutable collections.
Note that immutable collections can’t be modified, so the result of each expression in
the first column must be assigned to a new variable. (Also, see Recipe 11.3, “Under‐
standing Mutable Variables with Immutable Collections”, for details on using a muta‐
ble variable with an immutable collection.)
Table 13-3. Methods that are unique to immutable collections
Method
Description
c1 ++ c2
Creates a new collection by appending the elements in the collection c2 to the collection c1. An
alias for concat.
c :+ e
Returns a new collection with the element e appended to the collection c. An alias for appended.
c1 :++ c2
Returns a new collection with the elements in c2 appended to the elements in c1. An alias for
appendedAll.
Returns a new collection with the element e prepended to the collection c. An alias for prepen
e +: c
ded.
c1 ++: c2
e :: list
Returns a new collection with the elements in c1 prepended to the elements in c2. An alias for
prependedAll.
Returns a List with the element e prepended to the List named list. (:: works only on
List.)
list1 ::: list2 Returns a List with the elements in list1 prepended to the elements in list2. (::: works
only on List.)
c updated(i,e)
Returns a copy of c with the element at index i replaced by e.
Note that symbolic method names like ++ and ++= are now aliases for named meth‐
ods. For instance, ++ is an alias for concat. Also note that the two methods - and -were deprecated for most sequences several versions ago and are only available on
376
|
Chapter 13: Collections: Common Sequence Methods
sets currently, so use the filtering methods listed in Table 13-1 to return a new collec‐
tion with the desired elements removed.
This table lists only the most common methods available on immutable collections.
There are other methods available, such as the - and -- methods being available on
an immutable Set. See the Scaladoc for your current collection for even more
methods.
Maps
Maps have additional methods, as shown in Table 13-4. In this table, the following
symbols are used in the first column:
• m, m1, and m2 refer to a map.
• mm refers to a mutable map.
• k, k1, and k2 refer to map keys.
• p refers to a predicate (a function that returns true or false).
• v, v1, and v2 refer to map values.
• c refers to a collection.
Table 13-4. Table 13-4. Common methods for immutable and mutable maps
Map method
Methods for immutable maps
Description
m + (k->v)
Returns a map with a new key/value pair added. Can also be used to update the
key/value pair with key k. An alias for updated.
m1 ++ m2
Returns the combination of maps m1 and m2. Can also be used to update key/value
pairs. An alias for concat.
m ++ Seq(k1->v1, k2->v2) Returns the combination of map m and the elements in the Seq. Can also be used
to update key/value pairs. An alias for concat.
m - k
Returns a map with the key k (and its corresponding value) removed. An alias for
removed.
m - Seq(k1, k2, k3)
Returns a map with the keys k1, k2, and k3 removed. An alias for removed.
m -- k
m -- Seq(k1,k2)
IterableOnce. An alias for removedAll.
Returns a map with the key(s) removed. Although Seq is shown, this can be any
Methods for mutable maps
mm(k) = v
Assigns the value v to the key k.
mm += (k -> v)
Adds the key/value pair(s) to the mutable map mm. An alias for addOne.
mm ++= Map(k1 -> v1,
k2 -> v2)
Adds the key/value pair(s) to the mutable map mm. An alias for addAll.
13.1 Choosing a Collection Method to Solve a Problem
|
377
Map method
Description
mm ++= List(k1 -> v1,
k2 -> v2)
addAll.
Adds the elements in the collection c to the mutable map mm. An alias for
mm -= k
Removes map entries from the mutable map mm based on the given key. An alias
for subtractOne.
mm --= Seq(k1, k2, k3)
Removes map entries from the mutable map mm based on the given key(s). An alias
for subtractAll.
Methods for both mutable and immutable maps
m(k)
Returns the value associated with the key k.
m contains k
Returns true if the map m contains the key k.
m filter p
Returns a map whose keys and values match the condition of the predicate p.
m get k
Returns the value for the key k as Some[A] if the key is found, None otherwise.
m getOrElse(k, d)
Returns the value for the key k if the key is found, otherwise returns the default
value d.
m isDefinedAt k
Returns true if the map contains the key k.
m keys
Returns the keys from the map as an Iterable.
m keyIterator
Returns the keys from the map as an Iterator.
m keySet
Returns the keys from the map as a Set.
m values
Returns the values from the map as an Iterable.
m valuesIterator
Returns the values from the map as an Iterator.
You can also update Map values with the updatedWith and updateWith methods,
which are available on immutable and mutable maps, respectively.
For additional methods, see the mutable map class Scaladoc and the immutable map
class Scaladoc.
Discussion
As you can see, Scala collection classes contain a wealth of methods (and methods
that appear to be operators). Understanding these methods will help you become
more productive, because as you understand them, you’ll write less code and fewer
loops and instead write short functions and predicates to work with these methods.
13.2 Looping Over a Collection with foreach
Problem
You want to iterate over the elements in a collection with the foreach method.
378
|
Chapter 13: Collections: Common Sequence Methods
Solution
Supply the foreach method a function, anonymous function, or method that
matches the signature foreach is looking for, while also solving your problem.
The foreach method on Scala sequences has this signature:
def foreach[U](f: (A) => U): Unit
That means that it takes a function as its only parameter, and the function takes a
generic type A and returns nothing (Unit). As a practical matter, A is the type that’s
contained in your collection, such as Int and String.
The way foreach works is that it passes one element at a time from the collection to
your function, starting with the first element and ending with the last element. The
function you supply does whatever you want it to do with each element, though your
function can’t return anything. (If you want to return something, see the map
method.)
As an example, a common use of foreach is to print information. Given a
Vector[Int]:
val nums = Vector(1, 2, 3)
you can write a function that takes an Int parameter and returns nothing:
def printAnInt(i: Int): Unit = println(i)
Because printAnInt matches the signature foreach requires, you can use it with nums
and foreach:
scala> nums.foreach(i => printAnInt(i))
1
2
3
You can also write that expression like this:
nums.foreach(printAnInt(_))
nums.foreach(printAnInt)
// most common
The last example shows the most commonly used form.
Similarly, you can also solve this problem by writing an anonymous function that you
pass into foreach. These examples are all identical to using the printAnInt function:
nums.foreach(i => println(i))
nums.foreach(println(_))
nums.foreach(println)
// most common
13.2 Looping Over a Collection with foreach
|
379
foreach on Maps
foreach is also available on Map classes. The Map implementation of foreach has this
signature:
def foreach[U](f: ((K, V)) => U): Unit
That means that it takes a function that expects two parameters (K and V, standing for
key and value) and returns U, which stands for Unit. Therefore, foreach passes two
parameters to your function. You can handle those parameters as a tuple:
val m = Map("first_name" -> "Nick", "last_name" -> "Miller")
m.foreach(t => println(s"${t._1} -> ${t._2}"))
// tuple syntax
You can also use this approach:
m.foreach {
(fname, lname) => println(s"$fname -> $lname")
}
See Recipe 14.9, “Traversing a Map”, for other ways to iterate over a map.
Side Effects
As shown, foreach applies your function to each element of the
collection, but it requires that your function not return a value, and
foreach also does not return a value. Because foreach doesn’t
return anything, it must logically be used for some other reason,
such as printing output or mutating other variables. Therefore, it’s
said that foreach—and any other method that returns Unit—must
be used for its side effect. Therefore, foreach is a statement, not an
expression. See my blog post “A Note About Expression-Oriented
Programming” for more details on statements and expressions.
Discussion
To use foreach with a multiline function, pass the function as a block enclosed in
curly braces:
val longWords = StringBuilder()
"Hello world it’s Al".split(" ").foreach { e =>
if e.length > 4 then longWords.append(s" $e")
else println("Not added: " + e)
}
When that code is run in the REPL, it produces this output:
Not added: it’s
Not added: Al
val longWords: StringBuilder = Hello world
380
|
Chapter 13: Collections: Common Sequence Methods
See Also
• You can iterate over the elements in a collection using for loops and for expres‐
sions, as detailed in Chapter 4.
13.3 Using Iterators
Problem
You want (or need) to work with an iterator in a Scala application.
Solution
There are several important points to know about working with iterators in Scala:
• Unlike with Java while loops, Scala developers generally don’t directly use the
hasNext and next methods of an Iterator.
• Using iterators makes sense for performance reasons, such as reading large files.
• Iterators are exhausted after using them.
• While an iterator is not a collection, it has the usual collection methods.
• Iterator tranformer methods are lazy.
• A subclass of Iterator named BufferedIterator provides head and headOp
tion methods so you can peek at the value of the next element.
These points (and solutions) are covered in the following sections.
Scala developers don’t directly access hasNext and next
Although using an iterator with hasNext() and next() has historically been a com‐
mon way to loop over a collection in Java, Scala developers normally don’t directly
access those methods. Instead, we use collections methods like map, filter, and fore
ach to loop over collections, or for loops. To be clear, whenever I have an iterator in
Scala, I’ve never directly written code like this:
val it = Iterator(1, 2, 3)
// we don’t do this
val it = collection.iterator
while (it.hasNext) ...
13.3 Using Iterators
|
381
Conversely, I do write code like this:
val a = it.map(_ * 2)
val b = it.filter(_ > 2)
val c = for e <- it yield e*2
// a: Iterator[Int] = <iterator>
// b: Iterator[Int] = <iterator>
// c: Iterator[Int] = <iterator>
Iterators makes sense for performance reasons
While we don’t directly call hasNext() and next(), iterators are an important con‐
cept in Scala. For example, when you read a file with the io.Source.fromFile
method, it returns an iterator that lets you read one line at a time from the file. This
makes sense, because it’s not practical to read large data files into memory.
Iterators are also used in the transformer methods of views, which are lazy. For exam‐
ple, the book Programming in Scala demonstrates that a lazyMap function would be
implemented with an iterator:
def lazyMap[T, U](coll: Iterable[T], f: T => U) =
new Iterable[U] {
def iterator = coll.iterator map f
}
As shown in Recipe 11.4, “Creating a Lazy View on a Collection”, using a view on a
large collection can be an important performance-improving tip.
Iterators are exhausted after using them
An important part of using an iterator is knowing that it’s exhausted (empty) after
you use it. As you access each element, you mutate the iterator (see the Discussion)
and the previous element is discarded. For instance, if you use foreach to print an
iterator’s elements, the call works the first time:
scala> val it = Iterator(1,2,3)
it: Iterator[Int] = nonempty iterator
scala> it.foreach(print)
123
but when you attempt the same call a second time you won’t get any output, because
the iterator has been exhausted:
scala> it.foreach(print)
(no output here)
An iterator behaves like a collection
Technically, an iterator isn’t a collection; instead, it gives you a way to access the ele‐
ments in a collection, one by one. But an iterator does define many of the methods
you’ll see in a normal collection class, including foreach, map, filter, etc. You can
also convert an iterator to a collection when needed:
382
| Chapter 13: Collections: Common Sequence Methods
val i = Iterator(1,2,3)
val a = i.toVector
// i: Iterator[Int] = <iterator>
// a: Vector[Int] = Vector(1, 2, 3)
val i = Iterator(1,2,3)
val b = i.toList
// i: Iterator[Int] = <iterator>
// b: List[Int] = List(1, 2, 3)
Iterators are lazy
Another important point is that iterators are lazy, meaning that their transformer
methods are evaluated in a nonstrict, or lazy, manner. For example, notice that the
following for loop and the map and filter methods don’t return a concrete result,
they simply return an iterator:
val i = Iterator(1,2,3)
// i: Iterator[Int] = <iterator>
val a = for e <- i yield e*2
val b = i.map(_ * 2)
val c = i.filter(_ > 2)
// a: Iterator[Int] = <iterator>
// b: Iterator[Int] = <iterator>
// c: Iterator[Int] = <iterator>
Like other lazy methods, they’re only evaluated when they’re forced to, such as by
calling a strict method like foreach:
scala> i.map(_ + 10).foreach(println)
11
12
13
BufferedIterator lets you peek ahead
A buffered iterator is an iterator that lets you peek at the next element without mov‐
ing the iterator forward. You can create a BufferedIterator from an Iterator by
calling its buffered method:
val it = Iterator(1,2)
val bi = it.buffered
// it: Iterator[Int] = <iterator>
// bi: BufferedIterator[Int] = <iterator>
After that, you can call the head method on the BufferedIterator, and it won’t affect
the iterator:
// call 'head' as many times as desired
bi.head
// 1
bi.head
// 1
bi.head
// 1
On the other hand, notice what happens when you call next on an Iterator or Buf
feredIterator:
// 'next'
bi.next
bi.next
bi.next
advances the iterator
// 1
// 2
// java.util.NoSuchElementException: next on empty iterator
13.3 Using Iterators
|
383
Beware Calling Head
As discussed in Recipe 13.1, you’ll generally want to call headOp
tion instead of head, because head will throw an exception if you
call it on an empty list, or at the end of a list:
// create a one-element BufferedIterator
val bi = Iterator(1).buffered
// result: BufferedIterator[Int] = <iterator>
// 'head' works fine
bi.head
// 1
// advance the iterator
bi.next
// 1
bi.headOption
// None
(headOption works as intended)
// 'head' blows up
bi.head
// result: java.util.NoSuchElementException:
//
next on empty iterator
Discussion
Conceptually, an iterator is like a pointer. When you create an iterator on a List, it
initially points to the list’s first element:
val x = 1 :: 2 :: Nil
^
Then when you call the iterator’s next method, it points at the next element in the
collection:
val x = 1 :: 2 :: Nil
^
Finally, when the iterator gets to the end of the collection, it’s considered to be
exhausted. It doesn’t go back to point at the first element:
val x = 1 :: 2 :: Nil
^
As shown in the Solution, attempting to call next or head at this point will throw a
java.util.NoSuchElementException.
See Also
• The iterators overview Scala documentation.
• The iterator Scaladoc.
• The BufferedIterator Scaladoc.
384
| Chapter 13: Collections: Common Sequence Methods
• Recipe 11.4, “Creating a Lazy View on a Collection”, has more information on
views, iterators, and performance.
13.4 Using zipWithIndex or zip to Create Loop Counters
Problem
You want to loop over a sequence with a for loop or foreach method, and you’d like
to have access to a counter in the loop, without having to manually create a counter.
Solution
Use the zipWithIndex or zip method to create a counter. For example, assuming you
have a list of characters:
val chars = List('a', 'b', 'c')
one way to print the elements in the list with a counter is by using zipWithIndex,
foreach, and a case statement in curly braces:
chars.zipWithIndex.foreach {
case (c, i) => println(s"character '$c' has index $i")
}
// output:
character 'a' has index 0
character 'b' has index 1
character 'c' has index 2
As you’ll see in the Discussion, this solution works because zipWithIndex returns a
series of two-element tuples (tuple-2) in a sequence, like this:
List((a,0), (b,1), ...
It also works because the case statement in the code block matches a tuple-2. Because
foreach passes a tuple-2 to your algorithm, you can also write your code like this:
chars.zipWithIndex.foreach { t =>
println(s"character '${t._1}' has index ${t._2}")
}
Finally, you can also use a for loop:
for
(c, i) <- chars.zipWithIndex
do
println(s"character '$c' has index $i")
All the loops have the same output.
13.4 Using zipWithIndex or zip to Create Loop Counters
|
385
Control the starting value with zip
When you use zipWithIndex, the counter always starts at 0. If you want to control the
starting value, use zip instead:
for (c, i) <- chars.zip(LazyList from 1) do
println(s"${c} is #${i}")
That loop’s output is:
a is #1
b is #2
c is #3
Discussion
When called on a sequence, zipWithIndex returns a sequence of tuple-2 elements.
For instance, given a List[Char], you can see that zipWithIndex yields a list of
tuple-2 values:
scala> val chars = List('a', 'b', 'c')
val chars: List[Char] = List(a, b, c)
scala> val zwi = chars.zipWithIndex
val zwi: List[(Char, Int)] = List((a,0), (b,1), (c,2))
Using a case statement in curly braces
As shown in the Solution, you can use a case statement inside curly braces with
foreach:
chars.zipWithIndex.foreach {
case (c, i) => println(s"character '$c' has index $i")
}
This approach can be used anywhere a function literal is expected. In other situations,
you can use as many case alternatives as needed.
Prior to Scala 2.13, that example could only be written with the case keyword, but
with Scala 2.13 and newer that line of code can be written in any of these ways:
case(c, i) => println(s"character '$c' has index $i")
case(c -> i) => println(s"character '$c' has index $i")
(c, i) => println(s"character '$c' has index $i")
// shown previously
// alternate
// without the 'case'
Using a lazy view
Because zipWithIndex creates a new sequence from an existing sequence, you may
want to call view before invoking zipWithIndex, especially when working with large
sequences:
386
|
Chapter 13: Collections: Common Sequence Methods
scala> val zwi2 = chars.view.zipWithIndex
zwi2: scala.collection.View[(Char, Int)] = View(<not computed>)
As discussed in Recipe 11.4, “Creating a Lazy View on a Collection”, this creates a lazy
view on chars, meaning:
• An intermediate sequence is not created.
• The tuple elements won’t be created until they’re needed, although in the case of
loops they will generally always be needed, unless your algorithm contains a
break or exception.
Because using view prevents an intermediate collection from being created, calling
view before calling zipWithIndex can help when looping over large collections. As
usual, when performance is a concern, test your code with and without a view.
13.5 Transforming One Collection to Another with map
Problem
Like the previous recipe, you want to transform one collection into another by apply‐
ing an algorithm to every element in the original collection.
Solution
Rather than using the for/yield combination as shown in Recipe 4.4, “Creating a
New Collection from an Existing Collection with for/yield”, call the map method on
your collection, passing it a function, an anonymous function, or a method to trans‐
form each element. These examples show how to use anonymous functions:
val a = Vector(1,2,3)
// add 1 to each element
val b = a.map(_ + 1)
val b = a.map(e => e + 1)
// b: Vector(2, 3, 4)
// b: Vector(2, 3, 4)
// double each element
val b = a.map(_ * 2)
val b = a.map(e => e * 2)
// b: Vector(2, 4, 6)
// b: Vector(2, 4, 6)
These examples show how to use a function (or method):
def plusOne(i: Int) = i + 1
val a = Vector(1,2,3)
// three ways to use plusOne with map
val b = a.map(plusOne)
// b: Vector(2, 3, 4)
val b = a.map(plusOne(_))
// b: Vector(2, 3, 4)
val b = a.map(e => plusOne(e))
// b: Vector(2, 3, 4)
13.5 Transforming One Collection to Another with map
|
387
Writing a method to work with map
When writing a method to work with map:
• Define the method to take a single input parameter that’s the same type as the
collection.
• The method return type can be whatever type you need.
For example, imagine that you have a list of strings that can potentially be converted
to integers:
val strings = List("1", "2", "hi mom", "4", "yo")
You can use map to convert that list of strings to a list of integers. The first thing you
need is a method that (a) takes a String and (b) returns an Int. For instance, as a first
step to demonstrate the approach, if you want to determine the length of each string
in the list, this lengthOf method works just fine:
def lengthOf(s: String): Int = s.length
val x = strings.map(lengthOf)
// x: List(1, 1, 6, 1, 2)
However, because I really want to convert each string to an integer—and because
some of the strings won’t properly convert to integers—what I really need is a func‐
tion that returns Option[Int]:
import scala.util.Try
def makeInt(s: String): Option[Int] = Try(Integer.parseInt(s)).toOption
When given a "1" string, that method returns Some(1), and when given a string like
"yo", it returns a None.
Now you can use makeInt with map to start converting each string in the list to an
integer. A first attempt returns a List of Option[Int], i.e., the type
List[Option[Int]]:
scala> val intOptions = strings.map(makeInt)
val intOptions: List[Option[Int]] = List(Some(1), Some(2), None, Some(4), None)
But once you know the collection methods that are available to you, you’ll know that
you can flatten that List[Option[Int]] into a List[Int]:
scala> val ints = strings.map(makeInt).flatten
val ints: List[Int] = List(1, 2, 4)
Discussion
When I first came to Scala my background was in Java, so I initially wrote for/yield
loops. They were an imperative solution that I was more comfortable with. But even‐
tually I realized that map is the same as a for/yield expression without any guards,
and with only one generator:
388
|
Chapter 13: Collections: Common Sequence Methods
val list = List("a", "b", "c")
// list:
List(a, b, c)
// map
val caps1 = list.map(_.capitalize)
// caps1: List(A, B, C)
// for/yield
val caps2 = for e <- list yield e.capitalize
// caps2: List(A, B, C)
Once I understood this, I began using map.
This is a key concept about the dozens of functional methods you’ll find on Scala col‐
lections classes: methods like map, filter, take, etc. are all replacements for custom
for loops. There are many benefits to using these built-in functional methods, but
two important benefits are:
• You don’t have to write custom for loops.
• You don’t have to read custom for loops written by other developers.
I don’t mean those lines to be a snarky comment; instead, I mean it as a way of saying
that for loops require a lot of boilerplate code that you have to read just to find the
custom algorithm—the intent. Conversely, when you use Scala’s built-in collections
methods, it’s much easier to see that intent.
As a small example, given a list like this:
val fruits = List("banana", "peach", "lime", "pear", "cherry")
an imperative solution to (a) find all the strings that are more than two characters
long and (b) less than six characters long, and then (c) capitalize those remaining
strings, which looks like this:
val newFruits = for
f <- fruits
if f.length < 6
if f.startsWith("p")
yield f.capitalize
Because of Scala’s syntax that’s not too hard to read, but notice at least two things:
• You have to explicitly write f <- fruits, i.e., “for each fruit in fruits.”
• Part of the algorithm is inside the for expression, and another part of it comes
after the yield keyword.
Conversely, the idiomatic Scala solution to the same problem looks like this:
val newFruits = fruits.filter(_.length > 2)
.filter(_.startsWith("p"))
.map(_.capitalize)
13.5 Transforming One Collection to Another with map
|
389
Even in a small example like this you can see that you’re writing (a) what you want
instead of (b) a step-by-step imperative algorithm to get what you want. Once you
understand how to use the Scala collections methods, you’ll find that you can focus
more on your intent than on writing the details of a custom for loop, and your code
will become more concise but still very readable—what we call expressive.
Think of map as transform
When I was just starting to use Scala and the map method, I initially
found it helpful to say transform every time I typed map. That is, I
wished the method was named transform instead of map:
fruits.map(_.capitalize)
fruits.transform(_.capitalize)
// what it’s named
// what i wish it was named
This is because map applies your function to each element in the
initial list, and transforms those elements into a new list.
(As I explain in my blog post “The ‘Great FP Terminology Bar‐
rier’”, the name map comes from the field of mathematics.)
13.6 Flattening a List of Lists with flatten
Problem
You have a list of lists—or more generally a sequence of sequences—and want to cre‐
ate one list (sequence) from them.
Solution
Use the flatten method to convert a list of lists into a single list. To demonstrate this,
first create a list of lists:
val lol = List(List(1,2), List(3,4))
Calling the flatten method on this list of lists creates one new list:
val x = lol.flatten
// x: List(1, 2, 3, 4)
As shown, flatten does what its name implies, flattening the two lists held inside the
outer list into one resulting list.
Though I use the term list here, the flatten method isn’t limited to a List; it works
with other sequences (Array, ArrayBuffer, Vector, etc.) as well:
val a = Vector(Vector(1,2), Vector(3,4))
val b = a.flatten
// b: Vector(1, 2, 3, 4)
390
|
Chapter 13: Collections: Common Sequence Methods
Discussion
In a social-networking application, you might do the same thing with a list of your
friends and their friends:
val
val
val
val
val
myFriends = List("Adam", "David", "Frank")
adamsFriends = List("Nick K", "Bill M")
davidsFriends = List("Becca G", "Kenny D", "Bill M")
franksFriends: List[String] = Nil
friendsOfFriends = List(adamsFriends, davidsFriends, franksFriends)
Because friendsOfFriends is a list of lists:
List(
List("Nick K", "Bill M"),
List("Becca G", "Kenny D", "Bill M"),
List()
)
you can use flatten to accomplish many tasks with it, such as creating a unique list
of the friends of your friends:
scala> val uniqueFriendsOfFriends = friendsOfFriends.flatten.distinct
uniqueFriendsOfFriends: List[String] = List(Nick K, Bill M, Becca G, Kenny D)
flatten with Seq[Option]
flatten is particularly useful when you have a list of Option values. Because an
Option can be thought of as a container that holds zero or one elements, flatten has
a very useful effect on a sequence of Some and None elements. Because Some is like a
list with one element, and None is like a list with no elements, flatten extracts the
values out of the Some elements and drops the None elements as it creates a new list:
val x = Vector(Some(1), None, Some(3), None)
val y = x.flatten
// x: Vector[Option[Int]]
// y: Vector(1, 3)
If you’re new to Option/Some/None values, it can help to think of a list of Some and
None values as being similar to a list of lists, where each list contains one or zero
items:
List( Some(1), None,
Some(2) ).flatten
List( List(1), List(), List(2) ).flatten
// List(1, 2)
// List(1, 2)
See Recipe 24.6, “Using Scala’s Error-Handling Types (Option, Try, and Either)”, for
more information on working with Option values.
Combining map and flatten with flatMap
If you ever need to call map on a sequence followed by flatten, you can use flatMap
instead. For instance, given this nums list and makeInt method, which returns an
Option:
13.6 Flattening a List of Lists with flatten
|
391
val nums = List("1", "2", "three", "4", "one hundred")
import scala.util.{Try,Success,Failure}
def makeInt(s: String): Option[Int] = Try(Integer.parseInt(s.trim)).toOption
you can calculate the sum of the strings in that list that properly convert to integers
using map followed by flatten:
nums.map(makeInt).flatten
// List(1, 2, 4)
However, whenever you’re working with a list like this, you can use flatMap instead:
nums.flatMap(makeInt)
// List(1, 2, 4)
This always makes me think that this method should be called “map flat” instead, but
the name flatMap has been around for a long time, and this is just one possible use of
it.
13.7 Using filter to Filter a Collection
Problem
You want to filter the items in a collection to create a new collection that contains
only the elements that match your filtering criteria.
Solution
To filter a sequence:
• Use the filter method on immutable collections.
• Use filterInPlace on mutable collections.
Depending on your needs, you can also use the other functional methods described
in Recipe 13.1 to filter a collection.
Use filter on immutable collections
This is the signature for the filter method on a Seq:
def filter(p: (A) => Boolean): Seq[A]
// general case
Therefore, as a concrete example, this is what that signature looks like when you have
a Seq[Int]:
def filter(p: (Int) => Boolean): Seq[Int]
// specific case for Seq[Int]
This means that filter takes a predicate—a function that returns true or false—
and returns a sequence. The predicate you supply should take an input parameter of
the type that’s held in the sequence (such as Int) and return a Boolean. Your function
392
|
Chapter 13: Collections: Common Sequence Methods
should return true for the elements you want to retain in the new collection, and
false for elements you want to drop. Remember to assign the results of the filtering
operation to a new variable.
For instance, the following examples demonstrate how to use filter with a list of
integers and two different algorithms:
val a = List.range(1, 10)
// a: List(1, 2, 3, 4, 5, 6, 7, 8, 9)
// create a new list of all elements that are less than 5
val b = a.filter(_ < 5)
// b: List(1, 2, 3, 4)
val b = a.filter(e => e < 5)
// b: List(1, 2, 3, 4)
// create a list of all the even numbers in the list
val evens = x.filter(_ % 2 == 0)
// evens: List(2, 4, 6, 8)
As shown, filter returns all elements from a sequence that return true when your
function/predicate is called. There’s also a filterNot method that returns all ele‐
ments from a list for which your function returns false.
Use filterInPlace on mutable collections
When you have a mutable collection like ArrayBuffer, use filterInPlace rather
than filter:
import scala.collection.mutable.ArrayBuffer
val a = ArrayBuffer.range(1,10)
// ArrayBuffer(1, 2, 3, 4, 5, 6, 7, 8, 9)
a.filterInPlace(_ < 5)
a.filterInPlace(_ > 2)
// a: ArrayBuffer(1, 2, 3, 4)
// a: ArrayBuffer(3, 4)
Because ArrayBuffer is mutable, you don’t have to assign the result of filterIn
Place to another variable; the contents of the variable a are directly changed.
Discussion
The main methods you can use to filter a collection are listed in Recipe 13.1 and are
repeated here for your convenience: collect, diff, distinct, drop, dropRight, drop
While, filter, filterNot, filterInPlace, find, foldLeft, foldRight, head, headOp
tion, init, intersect, last, lastOption, slice, tail, take, takeRight, takeWhile,
and union.
Unique characteristics of filter (and filterInPlace) compared to these other
methods include:
• filter walks through all the elements in the collection; some of the other meth‐
ods stop before reaching the end of the collection.
13.7 Using filter to Filter a Collection
|
393
• filter lets you supply a predicate to filter the elements.
Your predicate controls the filtering
How you filter the elements in your collection is entirely up to your algorithm. Using
an immutable collection and filter, the following examples show a few ways to filter
a list of strings:
val
val
val
val
fruits = List("orange", "peach", "apple", "banana")
x = fruits.filter(f => f.startsWith("a"))
// List(apple)
x = fruits.filter(_.startsWith("a"))
// List(apple)
x = fruits.filter(_.length > 5)
// List(orange, banana)
Using the collect method to filter a collection
The collect method is an interesting filtering method. The collect method is
defined in the IterableOnceOps trait, and per the IterableOnceOps Scaladoc, col
lect builds a new list “by applying a partial function to all elements of this list on
which the function is defined.” Because of this, it can be a nice way to filter lists with a
single case statement, as shown in these REPL examples:
scala> val x = List(0,1,2)
val x: List[Int] = List(0, 1, 2)
scala> val y = x.collect{ case i: Int if i > 0 => i }
val y: List[Int] = List(1, 2)
scala> val x = List(Some(1), None, Some(3))
val x: List[Option[Int]] = List(Some(1), None, Some(3))
scala> val y = x.collect{ case Some(i) => i}
val y: List[Int] = List(1, 3)
These examples work because (a) as discussed in Recipe 13.4, the case expression
creates an anonymous function and (b) the collect method works with partial func‐
tions. Note that while these examples show how collect works, the second example
with the List[Option] values is more easily reduced with flatten:
scala> x.flatten
val res0: List[Int] = List(1, 3)
On a related note, there’s also a collectFirst method, which returns the first ele‐
ment it matches as an Option:
scala> val firstTen = (1 to 10).toList
val firstTen: List[Int] = List(1, 2, 3, 4, 5, 6, 7, 8, 9, 10)
scala> firstTen.collectFirst{case x if x > 1 => x}
val res0: Option[Int] = Some(2)
394
|
Chapter 13: Collections: Common Sequence Methods
scala> firstTen.collectFirst{case x if x > 99 => x}
val res1: Option[Int] = None
13.8 Extracting a Sequence of Elements from a Collection
Problem
You want to extract a sequence of contiguous elements from a collection, by specify‐
ing either a starting position and length, or a function.
Solution
There are quite a few collection methods you can use to extract a contiguous list of
elements from a sequence, including drop, dropWhile, head, headOption, init, last,
lastOption, slice, tail, take, and takeWhile.
Given the following Vector:
val x = (1 to 10).toVector
the drop method drops the number of elements you specify from the beginning of the
sequence:
val y = x.drop(3)
// y: Vector(4, 5, 6, 7, 8, 9, 10)
dropRight works like drop but starts at the end of the collection and works forward,
dropping elements from the end of the sequence:
val y = x.dropRight(4)
// y: Vector(1, 2, 3, 4, 5, 6)
dropWhile drops elements as long as the predicate you supply returns true:
val y = x.dropWhile(_ < 6)
// y: Vector(6, 7, 8, 9, 10)
take extracts the first N elements from the sequence:
val y = x.take(3)
// y: Vector(1, 2, 3)
takeRight works the same way as take, but takes elements from the end of the
sequence:
val y = x.takeRight(3)
// y: Vector(8, 9, 10)
takeWhile returns elements as long as the predicate you supply returns true:
val y = x.takeWhile(_ < 5)
// y: Vector(1, 2, 3, 4)
13.8 Extracting a Sequence of Elements from a Collection
|
395
Performance Note
Because of the way the List class is constructed, methods like drop
Right and takeRight will perform slowly on linear sequences like a
List. If you need to use these methods with large sequences, use an
indexed sequence like Vector instead.
slice(from, until) returns a sequence beginning at the index from until the index
until, not including until, and assuming a zero-based index:
val chars = Vector('a', 'b', 'c', 'd')
chars.slice(0,1)
chars.slice(0,2)
// Vector(a)
// Vector(a, b)
chars.slice(1,1)
chars.slice(1,2)
chars.slice(1,3)
// Vector()
// Vector(b)
// Vector(b, c)
chars.slice(2,3)
chars.slice(2,4)
// Vector(c)
// Vector(c, d)
All of these methods provide another way to filter sequences, with their distinguish‐
ing feature being that they return a contiguous sequence of elements.
Discussion
There are even more methods you can use. Given this list:
val nums = Vector(1, 2, 3, 4, 5)
the comments after the following expressions show the values that are returned by
each method:
nums.head
nums.headOption
nums.init
// 1
// Some(1)
// Vector(1, 2, 3, 4)
nums.tail
nums.last
nums.lastOption
// Vector(2, 3, 4, 5)
// 5
// Some(5)
Generally the way those methods work is apparent from their name, but two that
might need a little explanation are init and tail. The init method returns all ele‐
ments from the sequence except for the last element. The tail method returns all of
the elements except the first one.
As a word of caution, be aware that head, init, tail, and last will throw a
java.lang.UnsupportedOperationException on empty sequences. In functional
programming, a pure function is total—meaning that it’s defined for every input and
396
|
Chapter 13: Collections: Common Sequence Methods
doesn’t throw exceptions—and because of this, pure functional programmers gener‐
ally don’t use these methods,. When they do, they’re careful to check that their
sequence isn’t empty.
13.9 Splitting Sequences into Subsets
Problem
Based on an algorithm or location you define, you want to partition a sequence into
two or more sequences that are subsets of the original sequence.
Solution
Use the groupBy, splitAt, partition, or span methods to partition a sequence into
subsequences. These methods are demonstrated in the following examples.
groupBy
The groupBy method lets you split a sequence into subsets according to a predicate
function you provide:
val xs = List(15, 10, 5, 8, 20, 12)
val groups = xs.groupBy(_ > 10)
// Map(false -> List(10, 5, 8), true -> List(15, 20, 12))
groupBy partitions the collection into a Map of N sequences based on your function. In
this example there are two resulting sequences, but depending on your algorithm you
may end up with any number of sequences in a map.
In this particular example, the true key references the elements for which your predi‐
cate returns true, and the false key references the elements that return false. The
sequences in the Map that groupBy creates can be accessed like this:
val listOfTrues = groups(true)
val listOfFalses = groups(false)
// List(15, 20, 12)
// List(10, 5, 8)
Here’s another algorithm that demonstrates how many lists may be created by
groupBy:
val xs = List(1, 3, 11, 12, 101, 102)
// you can also use 'scala.math.log10' for this algorithm
def groupBy10s(i: Int): Int =
assert(i > 0)
if i < 10 then 1
else if i < 100 then 10
else 100
xs.groupBy(groupBy10s)
// result: HashMap(
13.9 Splitting Sequences into Subsets
|
397
//
//
//
// )
1 -> List(1, 3),
10 -> List(11, 12),
100 -> List(101, 102)
splitAt, partition, span
splitAt lets you create two subsequences from an initial sequence by supplying an
index at which to split the original sequence:
val xs = List(15, 5, 20, 10)
val ys = xs.splitAt(1)
val ys = xs.splitAt(2)
// ys: (List(15), List(5, 20, 10))
// ys: (List(15, 5), List(20, 10))
partition and span let you split a sequence into two sequences held in a tuple-2,
according to a predicate function:
val xs = List(15, 5, 25, 20, 10)
val ys = xs.partition(_ > 10)
val ys = xs.partition(_ < 25)
// ys: (List(15, 25, 20), List(5, 10))
// ys: (List(15, 5, 20, 10), List(25))
val ys = xs.span(_ < 20)
val ys = xs.span(_ > 10)
// ys: (List(15, 5), List(25, 20, 10))
// ys: (List(15), List(5, 25, 20, 10))
The splitAt, partition, and span methods create a tuple-2 of sequences that are of
the same type as the original collection. This is how they work:
• splitAt splits the original list according to the element index value you supplied.
• partition creates two lists, one containing values for which your predicate
returned true, and the other containing the elements that returned false.
• span returns a tuple-2 based on your predicate p, consisting of “the longest prefix
of this list whose elements all satisfy p, and the rest of this list.”1
When a tuple-2 of sequences is returned, its two sequences can be accessed like this:
scala> val (a,b) = xs.partition(_ > 10)
val a: List[Int] = List(15, 20)
val b: List[Int] = List(5, 10)
1 See the span method documentation on the Scala List class Scaladoc page for more information.
398
|
Chapter 13: Collections: Common Sequence Methods
Discussion
While those are the grouping methods I most commonly use, there are others,
including sliding and unzip.
sliding
The sliding(size,step) method is an interesting creature that can be used to break
a sequence into multiple groups. It can be called with just a size, or both a size and
step:
val a = Vector(1,2,3,4,5)
// size = 2
val b = a.sliding(2).toList
// size = 2, step = 2
val b = a.sliding(2,2).toList
// size = 2, step = 3
val b = a.sliding(2,3).toList
// b: List(Array(1, 2), Array(2, 3),
//
Array(3, 4), Array(4, 5))
// b: List(Vector(1, 2), Vector(3, 4),
//
Vector(5))
// b: List(Vector(1, 2), Vector(4, 5))
As shown, sliding works by passing a “sliding window” over the original sequence,
returning sequences of a length given by size. The step parameter lets you skip over
elements, as shown in the last two examples.
unzip
The unzip method is also interesting. It can be used to take a sequence of tuple-2 val‐
ues and create two resulting lists: one that contains the first element of each tuple,
and another that contains the second element from each tuple:
val listOfTuple2s = List((1,2), ('a','b'))
val x = listOfTuple2s.unzip
// (List(1, a),List(2, b))
For instance, given a list of couples, you can unzip the list to create a list of women
and a list of men:
val couples = List(("Wilma", "Fred"), ("Betty", "Barney"))
val (women, men) = couples.unzip
// val men: List(Fred, Barney)
// val women: List(Wilma, Betty)
As you might guess from its name, unzip is the opposite of zip:
val couples = women zip men
// List((Wilma,Fred), (Betty,Barney))
See the Scaladoc for any sequence (List, Vector, etc.) for many more methods.
13.9 Splitting Sequences into Subsets
|
399
13.10 Walking Through a Collection with the reduce and
fold Methods
Problem
You want to walk through all the elements in a sequence, applying an algorithm to all
the neighboring elements to obtain a single scalar result from the operations, such as
a sum, product, max, min, etc.
Solution
Use the reduceLeft, foldLeft, reduceRight, and foldRight methods to walk
through the elements in a sequence and apply your custom algorithm to the elements
yielding a single scalar result. reduceLeft is demonstrated here in the Solution, and
the other methods are shown in the Discussion (along with related methods, such as
scanLeft and scanRight, which return a sequence as their final result).
For example, use reduceLeft to walk through a sequence from left to right, from the
first element to the last. Per the IterableOnceOps trait Scaladoc, where these meth‐
ods are defined, you pass in an associative binary operator, and then reduceLeft starts
by applying your operator (algorithm) to the first two elements in the sequence to
create an intermediate result. Next, your algorithm is applied to that intermediate
result and the third element, and that application yields a new result. This process
continues until the end of the sequence is reached.
If you’ve never used these methods before, you’ll see that they give you a surprising
amount of power. The best way to show this is with some examples. First, create a
sample sequence to experiment with:
val xs = Vector(12, 6, 15, 2, 20, 9)
Given that sequence, use reduceLeft to determine different properties about the
sequence. This is how you calculate the sum of the elements in the sequence:
val sum = xs.reduceLeft(_ + _)
// 64
Don’t let the underscores throw you for a loop; they just stand for the two parameters
that reduceLeft passes to your function. You can write your anonymous function
like this, if you prefer:
xs.reduceLeft((x,y) => x + y)
These examples show how to use reduceLeft to get the product of all elements in the
sequence, the smallest value in the sequence, and the largest value:
xs.reduceLeft(_ * _)
xs.reduceLeft(_ min _)
xs.reduceLeft(_ max _)
400
|
// 388800
// 2
// 20
Chapter 13: Collections: Common Sequence Methods
Note that reduceLeft works if the element only contains one element:
List(1).reduceLeft(_ * _)
List(1).reduceLeft(_ min _)
List(1).reduceLeft(_ max _)
// 1
// 1
// 1
However, it throws an exception if the sequence it’s given is empty:
val emptyVector = Vector[Int]()
val sum = emptyVector.reduceLeft(_ + _)
// result: java.lang.UnsupportedOperationException: empty.reduceLeft
Because of this exception behavior, you’ll want to check the collection size before
using reduceLeft, or use foldLeft, which lets you provide an initial seed value in a
first parameter group, helping to avoid this problem:
val emptyVector = Vector[Int]()
emptyVector.foldLeft(0)(_ + _)
emptyVector.foldLeft(1)(_ * _)
// 0
// 1
Discussion
You can demonstrate how reduceLeft works by creating a method to work with it.
The following method does a max comparison like the last example, but it has some
extra debugging code so you can see how reduceLeft works as it marches through
the sequence. Here’s the function:
def findMax(x: Int, y: Int): Int =
val winner = x max y
println(s"compared $x to $y, $winner was larger")
winner
Now call reduceLeft again on the sequence, this time giving it the findMax method:
scala> xs.reduceLeft(findMax)
compared 12 to 6, 12 was larger
compared 12 to 15, 15 was larger
compared 15 to 2, 15 was larger
compared 15 to 20, 20 was larger
compared 20 to 9, 20 was larger
res0: Int = 20
The output shows how reduceLeft marches through the elements in the sequence,
and how it calls the method at each step. Here’s how the process works:
• reduceLeft starts by calling findMax to test the first two elements in the
sequence, 12 and 6. findMax returns 12, because 12 is larger than 6.
• reduceLeft takes that result (12) and calls findMax(12, 15). 12 is the result of
the first comparison, and 15 is the next element in the collection. 15 is larger, so it
becomes the new result.
13.10 Walking Through a Collection with the reduce and fold Methods
|
401
• reduceLeft keeps taking the result from the method and comparing it to the
next element in the sequence, until it marches through all the elements in the
sequence, ending up with the result, 20.
A subtraction algorithm
I’ve mentioned in this recipe that the “left” methods (reduceLeft and foldLeft) start
from the beginning of the collection and move to the end, and the “right” methods
start at the end of the collection and move to the beginning. A good way to demon‐
strate this is with a subtraction algorithm, which is not commutative and therefore
produces a different result when you traverse a list from left to right, or right to left.
For example, given this list and subtract algorithm:
val xs = List(1, 2, 3)
def subtract(a: Int, b: Int): Int =
println(s"a: $a, b: $b")
val result = a - b
println(s"result: $result\n")
result
the REPL demonstrates how reduceLeft and reduceRight work:
scala> xs.reduceLeft(subtract)
a: 1, b: 2
result: -1
a: -1, b: 3
result: -4
val res0: Int = -4
scala> xs.reduceRight(subtract)
a: 2, b: 3
result: -1
a: 1, b: -1
result: 2
val res1: Int = 2
As shown, reduceLeft and reduceRight produce different results with the subtract
algorithm, because the first traverses the list from left to right and the second traver‐
ses the list from right to left.
402
|
Chapter 13: Collections: Common Sequence Methods
Writing Reduce Algorithms
One subtle but important note about the reduce methods: the cus‐
tom function you supply must return the same data type that’s
stored in the collection. This is necessary so the reduce algorithms
can compare the result of your function to the next element in the
collection.
foldLeft, reduceRight, and foldRight
The foldLeft method works just like reduceLeft, but it lets you set a seed value to
be used for the first element. The following examples demonstrate a sum algorithm,
first with reduceLeft and then with foldLeft, to demonstrate the difference:
val xs = List(1, 2, 3)
xs.reduceLeft(_ + _)
xs.foldLeft(20)(_ + _)
xs.foldLeft(100)(_ + _)
// 6
// 26
// 106
In the last two examples, foldLeft uses 20 and then 100 for its first element, which
affects the resulting sum as shown.
If you haven’t seen syntax like that before, foldLeft takes two parameter lists. The
first parameter list takes one field, the seed value. The second parameter list is the
block of code you want to run (your algorithm). Recipe 4.17, “Creating Your Own
Control Structures”, provides more information on the use of multiple parameter
lists.
The reduceRight and foldRight methods work similarly to the reduceLeft and fol
dLeft methods, respectively, but they begin at the end of the collection and work
from right to left, i.e., from the end of the collection back to the beginning.
fold algorithms and identity values
The fold algorithms are related to something known as an identity value for the type
of a list and the operation you’re performing on that list. For example:
• When operating on a Seq[Int], the value 0 adds nothing to an addition or sum
algorithm.
• Similarly, the value 1 adds nothing to a product algorithm.
• When operating on a Seq[String], the empty string—""—adds nothing to an
addition or product algorithm.
13.10 Walking Through a Collection with the reduce and fold Methods
|
403
Therefore, you may see fold operations written like this:
listOfInts.foldLeft(0)(_ + _)
listOfInts.foldLeft(1)(_ * _)
// concatenate a list of strings:
listOfStrings.foldLeft("")(_ + _)
Using these values lets you use fold methods with empty lists. I write more about
identity values in “Tail-Recursive Algorithms in Scala”.
Summary of how the fold and reduce methods work
Here are the key points to know about the fold and reduce methods:
• They walk through the entire sequence.
• As shown in max and min algorithms, you compare neighboring elements in the
sequence.
• As shown in the sum and product algorithms, you create an accumulator as you
walk through the sequence.
• Fold and reduce algorithms are generally used to yield a single scalar value in the
end (rather than another sequence).
• Your custom function must accept two parameters of the type contained in the
collection, and it must return that same type.
scanLeft and scanRight
Two methods named scanLeft and scanRight walk through a sequence like reduce
Left and reduceRight, but they return a sequence instead of a single value. For
instance, per its Scaladoc, scanLeft “produces a collection containing cumulative
results of applying the operator going left to right.” To understand how it works, cre‐
ate another function with a little debug code in it:
def product(x: Int, y: Int): Int =
val result = x * y
println(s"multiplied $x by $y to yield $result")
result
Here’s what scanLeft looks like when it’s used with that function and a seed value:
scala> val xs = Vector(1, 2, 3)
xs: Vector[Int] = Vector(1, 2, 3)
scala> xs.scanLeft(10)(product)
multiplied 10 by 1 to yield 10
multiplied 10 by 2 to yield 20
404
|
Chapter 13: Collections: Common Sequence Methods
multiplied 20 by 3 to yield 60
res0: Vector[Int] = Vector(10, 10, 20, 60)
As shown, like the map method, scanLeft returns a new sequence rather than a single
value. The scanRight method works the same way but marches through the collec‐
tion from right to left.
See the Scaladoc for your sequence for a few more related methods, including reduce,
reduceLeftOption, and reduceRightOption.
See Also
• If you want even more details and illustrations, I dive deeper into the fold and
reduce methods in “Recursion Is Great, but Check out Scala’s fold and reduce!”.
13.11 Finding the Unique Elements in a Sequence
Problem
You have a sequence that contains duplicate elements, and you want to remove the
duplicates, leaving you with only the unique elements.
Solution
Either call the distinct method on the sequence or call toSet:
val x = Vector(1, 1, 2, 3, 3, 4)
val y = x.distinct
// Vector(1, 2, 3, 4)
val z = x.toSet
// Set(1, 2, 3, 4)
Both approaches return a new sequence with the duplicate values removed, but dis
tinct returns the same sequence type that you started with, while toSet returns a
Set.
Discussion
To use these approaches with your own classes, you’ll need to implement the equals
and hashCode methods. For instance, case classes implement those methods for you,
so you can use this Person class with distinct:
case class Person(firstName: String, lastName: String)
val
val
val
val
dale1 = Person("Dale", "Cooper")
dale2 = Person("Dale", "Cooper")
ed = Person("Ed", "Hurley")
list = List(dale1, dale2, ed)
13.11 Finding the Unique Elements in a Sequence
|
405
// correct solution: only one Dale Cooper appears in this result:
val uniques = list.distinct
// List(Person(Dale,Cooper), Person(Ed,Hurley))
val uniques = list.toSet
// Set(Person(Dale,Cooper), Person(Ed,Hurley))
If you don’t want to use a case class, see Recipe 5.9, “Defining an equals Method
(Object Equality)”, for a discussion of how to implement the equals and hashCode
methods.
13.12 Merging Sequential Collections
Problem
You want to join two sequences into one sequence, either keeping all the original ele‐
ments, finding the elements that are common to both collections, or finding the dif‐
ference between the two sequences.
Solution
There are a variety of solutions to this problem, depending on your needs:
• Use the ++ or concat methods to merge all elements from two mutable or
immutable sequences into a new sequence.
• Use the ++= method to merge the elements of a sequence into an existing mutable
sequence.
• Use ::: to merge two Lists into a new List.
• Use the intersect method to find the intersection of two sequences.
• Use the diff method to find the difference of two sequences.
As shown in the following examples, you can also use distinct and toSet to reduce
sequences down to their unique elements.
The ++ or concat methods
The ++ method is an alias for the concat method, so use either one of them to merge
two mutable or immutable sequences while assigning the result to a new variable:
val a = List(1,2,3)
val b = Vector(4,5,6)
406
val c = a ++ b
val c = a.concat(b)
// c: List[Int] = List(1, 2, 3, 4, 5, 6)
// c: List[Int] = List(1, 2, 3, 4, 5, 6)
val d = b ++ a
val d = b.concat(a)
// d: Vector[Int] = Vector(4, 5, 6, 1, 2, 3)
// d: Vector[Int] = Vector(4, 5, 6, 1, 2, 3)
|
Chapter 13: Collections: Common Sequence Methods
The ++= method
Use the ++= method to merge a sequence into an existing mutable sequence like an
ArrayBuffer:
import collection.mutable.ArrayBuffer
// merge sequences into an ArrayBuffer
val a = ArrayBuffer(1,2,3)
a ++= Seq(4,5,6)
// a: ArrayBuffer(1, 2, 3, 4, 5, 6)
a ++= List(7,8)
// a: ArrayBuffer(1, 2, 3, 4, 5, 6, 7, 8)
Use ::: to merge two Lists
If you happen to be working with a List, use the ::: method to prepend the ele‐
ments of one list to another list, assigning the result to a new variable:
val a = List(1,2,3,4)
val b = List(4,5,6,7)
val c = a ::: b
// c: List(1, 2, 3, 4, 4, 5, 6, 7)
intersect and diff
The intersect method finds the intersection of two sequences—the elements that
are common to both sequences:
val a = Vector(1,2,3,4,5)
val b = Vector(4,5,6,7,8)
val c = a.intersect(b)
val c = b.intersect(a)
// c: Vector(4, 5)
// c: Vector(4, 5)
The diff method provides the difference between two sequences—those elements
that are in the first sequence but not in the second sequence. Because of that defini‐
tion, its result depends on which sequence it’s called on:
val
val
val
val
a
b
c
c
=
=
=
=
List(1,2,3,4)
List(3,4,5,6)
a.diff(b)
// c: List(1, 2)
b.diff(a)
// c: List(5, 6)
val
val
val
val
a
b
c
c
=
=
=
=
List(1,2,3,4,1,2,3,4)
List(3,4,5,6,3,4,5,6)
a.diff(b)
// c: List(1, 2, 1, 2)
b.diff(a)
// c: List(5, 6, 5, 6)
The Scaladoc for the diff method states that it returns “a new list which contains all
elements of this list except some [occurrences of the] elements that also appear in
that. If an element value x appears n times in that, then the first n occurrences of x
will not form part of the result, but any following occurrences will.” Because of that
13.12 Merging Sequential Collections
|
407
behavior you may also need to use the distinct method to create lists of distinct
elements:
val a = List(1,2,3,4,1,2,3,4)
val b = List(3,4,5,6,3,4,5,6)
val c = a.diff(b)
val c = b.diff(a)
// c: List(1, 2, 1, 2)
// c: List(5, 6, 5, 6)
val c = a.diff(b).distinct
val c = b.diff(a).distinct
// c: List(1, 2)
// c: List(5, 6)
Discussion
You can use diff to get the relative complement of two sets. The relative complement
of a set A with respect to a set B is the set of elements in B that are not in A.
On a recent project, I needed to find a list of unique elements in one sequence that
were not in another sequence. I did this by first calling distinct on the two sequen‐
ces and then using diff to compare them. For instance, given these two vectors:
val a = Vector(1,2,3,11,4,12,4,4,5)
val b = Vector(6,7,4,4,5)
one way to find the relative complement of each vector is to first call distinct on
that vector and then compare it to the other with diff:
// the elements in a that are not in b
val uniqToA = a.distinct.diff(b)
// Vector(1, 2, 3, 11, 12)
// the elements in b that are not in a
val uniqToB = b.distinct.diff(a)
// Vector(6, 7)
If desired, you can then sum those results to get the list of elements that are either in
the first set or the second set, but not both sets:
val uniqs = uniqToA ++ uniqToB
// Vector(1, 2, 3, 11, 12, 6, 7)
While I’m examining this problem, here’s another way to get that same result:
// create a list of unique elements that are common to both lists
val i = a.intersect(b).toSet
// Set(4, 5)
// subtract those elements from the original lists
val uniqToA = a.toSet -- i
// HashSet(1, 2, 12, 3, 11)
val uniqToB = b.toSet -- i
// Set(6, 7)
val uniqs = uniqToA ++ uniqToB
// HashSet(1, 6, 2, 12, 7, 3, 11)
Note that I use toSet in this solution because it’s another way to create a list of unique
elements in a sequence.
408
|
Chapter 13: Collections: Common Sequence Methods
13.13 Randomizing a Sequence
Problem
You want to randomize (shuffle) an existing sequence, or get a random element from
a sequence.
Solution
To randomize a sequence, import scala.util.Random, then apply its shuffle
method to an existing sequence while assigning the result to a new sequence:
import scala.util.Random
// List
val xs = List(1,2,3,4,5)
val ys = Random.shuffle(xs)
// 'ys' will be shuffled, like List(4,1,3,2,5)
// also works with other sequences
val x = Random.shuffle(Vector(1,2,3,4,5))
val x = Random.shuffle(Array(1,2,3,4,5))
// x: Vector(5,3,4,1,2)
// x: mutable.ArraySeq(1,3,2,4,5)
import scala.collection.mutable.ArrayBuffer
val x = Random.shuffle(ArrayBuffer(1,2,3,4,5))
// x: ArrayBuffer(4,2,3,1,5)
As usual with functional methods, a key to this solution is knowing that shuffle
doesn’t randomize the list it’s given; instead it returns a new list that has been
randomized (shuffled).
Discussion
That solution works great when you want to randomize an entire list. But if you just
want to get a random element from a list, a method like this is much more efficient:
import scala.util.Random
// throws an IllegalArgumentException if `seq` is empty
def getRandomElement[A](seq: Seq[A]): A =
seq(Random.nextInt(seq.length))
As long as the sequence you pass in contains at least one element, that function will
work as desired. It works because nextInt returns a value between 0 (inclusive) and
seq.length (exclusive). So if the sequence contains 100 elements, nextInt returns a
value between 0 and 99, which matches the possible indexes in the sequence.
Now whenever you have a sequence, you can use this function to get a random ele‐
ment from the sequence:
val randomNumber = getRandomElement(List(1,2,3))
val randomString = getRandomElement(List("a", "b", "c"))
13.13 Randomizing a Sequence
|
409
13.14 Sorting a Collection
Problem
You want to (a) sort a sequential collection, (b) implement the Ordered trait in a cus‐
tom class so you can use the sorted method or operators like <, <=, >, and >= to com‐
pare instances of your class, or (c) use an implicit or explicit Ordering when sorting.
Solution
See Recipe 12.11, “Sorting Arrays”, for information on how to sort an Array. Other‐
wise, use the sorted, sortWith, or sortBy methods to sort immutable sequences, and
sortInPlace, sortInPlaceWith, and sortInPlaceBy to sort mutable sequences.
Implement the Ordered or Ordering traits as needed.
Using sorted, sortWith, and sortBy with immutable sequences
The sorted method on sequences can sort collections with type Double, Int, String,
and any other type that has an implicit scala.math.Ordering:
List(10, 5, 8, 1, 7).sorted
List("dog", "mouse", "cat").sorted
// List(1, 5, 7, 8, 10)
// List(cat, dog, mouse)
The sortWith method lets you provide your own sorting algorithm. The following
examples demonstrate how to sort a sequence of String or Int in both directions:
// short form: sorting algorithm uses '_' references
Vector("dog", "mouse", "cat").sortWith(_ < _)
// Vector(cat, dog, mouse)
Vector("dog", "mouse", "cat").sortWith(_ > _)
// Vector(mouse, dog, cat)
// long form: sorting algorithm uses a tuple-2
Vector(10, 5, 8, 1, 7).sortWith((a,b) => a < b)
Vector(10, 5, 8, 1, 7).sortWith((a,b) => a > b)
// Vector(1, 5, 7, 8, 10)
// Vector(10, 8, 7, 5, 1)
Your sorting function needs to take two parameters and can be as simple or compli‐
cated as it needs to be. If your sorting function gets longer, first declare it as a
method:
def sortByLength(s1: String, s2: String): Boolean =
println(s"comparing $s1 & $s2")
s1.length > s2.length
Then use it by passing it into the sortWith method:
scala> val a = List("dog", "mouse", "cat").sortWith(sortByLength)
comparing mouse & dog
comparing cat & mouse
comparing mouse & cat
comparing cat & dog
410
|
Chapter 13: Collections: Common Sequence Methods
comparing dog & cat
a: List[String] = List(mouse, dog, cat)
Per the Scaladoc, the sortBy method “sorts a sequence according to the Ordering
which results from transforming an implicitly given Ordering with a transformation
function.” The sortBy signature for a List looks like this:
def sortBy[B](f: (A) => B)(implicit ord: Ordering[B]): List[A]
Here are a few examples of how to sort with sortBy:
val a = List("peach", "apple", "pear", "fig")
val b = a.sortBy(s => s.length)
// b: List(fig, pear, peach, apple)
// the Scaladoc shows an example like this that works “because scala.Ordering
// will implicitly provide an Ordering[Tuple2[Int, Char]]”
val b = a.sortBy(s => (s.length, s.head))
// b: List(fig, pear, apple, peach)
// a way to sort from the longest
// by the string
val a = List("fin", "fit", "fig",
val b = a.sortBy(s => (-s.length,
// b: List(peach, pear, peas,
to the shortest string, and then
"pear", "peas", "peach", "peat")
s))
peat, fig, fin, fit)
Using sortInPlace, sortInPlaceWith, and sortInPlaceBy with mutable sequences
With mutable sequences like ArrayBuffer you can use the sortInPlace, sortInPla
ceWith, and sortInPlaceBy methods. If the data type in your sequence supports sort‐
ing with an implicit Ordering or by implementing Ordered, sortInPlace is a direct
solution:
import scala.collection.mutable.ArrayBuffer
val a = ArrayBuffer(3,5,1)
a.sortInPlace
// a: ArrayBuffer(1, 3, 5)
val b = ArrayBuffer("Mercedes", "Hannah", "Emily")
b.sortInPlace
// b: ArrayBuffer(Emily, Hannah, Mercedes)
sortInPlaceWith is similar to sortWith:
import scala.collection.mutable.ArrayBuffer
val a = ArrayBuffer(3,5,1)
a.sortInPlaceWith(_ < _)
// a: ArrayBuffer(1, 3, 5)
a.sortInPlaceWith(_ > _)
// a: ArrayBuffer(5, 3, 1)
sortInPlaceBy works like sortBy, letting you specify a function to sort with:
import scala.collection.mutable.ArrayBuffer
val a = ArrayBuffer("kiwi", "apple", "fig")
a.sortInPlaceBy(_.length) // a: ArrayBuffer(fig, kiwi, apple)
13.14 Sorting a Collection
|
411
Discussion
The following discussion demonstrates how to use Ordering and Ordered using
immutable sequences, but the discussion also applies to mutable sequences.
Having an implicit Ordering
If the type that a sequence is holding doesn’t have an implicit Ordering, you won’t be
able to sort it with sorted. For instance, given this Person class and List[Person]:
class Person(val name: String):
override def toString = name
val dudes = List(
Person("Bill"),
Person("Al"),
Person("Adam")
)
if you try to sort this list in the REPL, you’ll see an error stating that the Person class
doesn’t have an implicit Ordering:
scala> dudes.sorted
1 |dudes.sorted
|
^
|
No implicit Ordering defined for B
|
where:
B is a type variable with constraint >: Person
|
I found:
|
scala.math.Ordering.ordered[A](/* missing
|
*/summon[scala.math.Ordering.AsComparable[B]])
|
But no implicit values were found that match type
|
scala.math.Ordering.AsComparable[B].
You can’t use sorted with the Person class as it’s written, so one solution is to write an
anonymous function to sort the Person elements by the name field using sortWith:
dudes.sortWith(_.name < _.name)
dudes.sortWith(_.name > _.name)
// List(Adam, Al, Bill)
// List(Bill, Al, Adam)
Providing an explicit Ordering with sorted
If your class doesn’t have an implicit Ordering, one solution is to provide an explicit
Ordering. For example, by default this Person class doesn’t provide any information
about how sorting should work:
class Person(val firstName: String, val lastName: String):
override def toString = s"$firstName $lastName"
Because of that, trying to sort a list of Person instances with sorted won’t work, as
just shown:
412
|
Chapter 13: Collections: Common Sequence Methods
val peeps = List(
Person("Jessica", "Day"),
Person("Nick", "Miller"),
Person("Winston", "Bishop")
)
scala> peeps.sorted
1 |peeps.sorted
|
^
|No implicit Ordering defined for B ... (long error message) ...
A solution to this problem is to create an explicit Ordering that works with Person:
object LastNameOrdering extends Ordering[Person]:
def compare(a: Person, b: Person) = a.lastName compare b.lastName
Now when you use LastNameOrdering with sorted, sorting works as desired:
scala> val sortedPeeps = peeps.sorted(LastNameOrdering)
val sortedPeeps: List[Person] = List(Winston Bishop, Jessica Day, Nick Miller)
This solution works because (a) sorted is defined to take an implicit Ordering
parameter:
def sorted[B >: A](implicit ord: Ordering[B]): List[A]
-------------------------
and (b) I provide that parameter explicitly:
val sortedPeeps = peeps.sorted(LastNameOrdering)
----------------
Another approach is to declare LastNameOrdering with the implicit keyword, and
then call sorted:
implicit object LastNameOrdering extends Ordering[Person]:
def compare(a: Person, b: Person) = a.lastName compare b.lastName
val sortedPeeps = peeps.sorted
// sortedPeeps: List(Winston Bishop, Jessica Day, Nick Miller)
In this solution, because LastNameOrdering is defined with the implicit keyword,
it’s magically pulled in and used as the implicit Ordering parameter that sorted is
looking for.
Mix in the Ordered trait to use sorted
If you want to use the Person class with the sorted method, another solution is to
mix the Ordered trait into Person, and then implement the Ordered trait’s abstract
compare method. This technique is shown in the following code:
class Person(var name: String) extends Ordered[Person]:
override def toString = name
13.14 Sorting a Collection
|
413
// return 0 if the same, negative if this < that, positive if this > that
def compare(that: Person): Int =
// depends on the definition of `==` for String
if this.name == that.name then
0
else if this.name > that.name then
1
else
-1
Now this new Person class can be used with sorted:
val dudes = List(
Person("Bill"),
Person("Al"),
Person("Adam")
)
val x = dudes.sorted
// x: List(Adam, Al, Bill)
The compare method in Ordered is abstract, so you implement it in your class to pro‐
vide the sorting capability. As shown in the comments, compare works like this:
• Return 0 if the two objects are the same (defining equality however you want to,
but typically using the equals method of your class).
• Return a negative value if this is less than that.
• Return a positive value if this is greater than that.
How you determine whether one instance is greater than another instance is entirely
up to your compare algorithm.
Note that because this compare algorithm only compares two String values, it could
have been written like this:
def compare (that: Person) = this.name.compare(that.name)
However, I wrote it as shown in the first example to be clear about the approach.
An added benefit of mixing the Ordered trait into your class is that it lets you com‐
pare object instances directly in your code:
val bill = Person("Bill")
val al = Person("Al")
val adam = Person("Adam")
if adam > bill then println(adam) else println(bill)
This works because the Ordered trait implements the <=, <, >, and >= methods, and
they call your compare method to make those comparisons.
414
|
Chapter 13: Collections: Common Sequence Methods
See Also
For more information, the Ordered and Ordering Scaladoc is excellent, with several
good examples:
• The Ordering trait
• The Ordered trait
13.15 Converting a Collection to a String with mkString
and addString
Problem
You want to convert elements of a collection to a String, possibly adding a field sepa‐
rator, prefix, and suffix.
Solution
Use the mkString or addString methods to print a collection as a String.
mkString
Given a simple collection:
val x = Vector("apple", "banana", "cherry")
you can convert the elements to a String using mkString:
x.mkString
// "applebananacherry"
That doesn’t look too useful, so add a separator:
x.mkString(" ")
x.mkString("|")
x.mkString(", ")
// "apple banana cherry"
// "apple|banana|cherry"
// "apple, banana, cherry"
mkString is overloaded, so you can add a prefix and suffix when creating a string:
x.mkString("[", ", ", "]")
// "[apple, banana, cherry]"
There’s also an mkString method on Map classes:
val a = Map(1 -> "one", 2 -> "two")
a.mkString
// "1 -> one2 -> two"
a.mkString("|")
// "1 -> one|2 -> two"
a.mkString("| ", " | ", " |")
// "| 1 -> one | 2 -> two |"
13.15 Converting a Collection to a String with mkString and addString
|
415
addString
Beginning with Scala 2.13, a new addString method is similar to mkString, but lets
you fill a mutable StringBuilder with the contents of the sequence. As with
mkString, you can use addString by itself, with a separator, and with start, end, and
separator strings:
val x = Vector("a", "b", "c")
val sb = StringBuilder()
val y = x.addString(sb)
// y: StringBuilder = abc
val sb = StringBuilder()
val y = x.addString(sb , ", ")
// y: StringBuilder = "a, b, c"
val sb = StringBuilder()
val y = x.addString(
sb,
// StringBuilder
"[",
// start
", ",
// separator
"]"
// end
)
// result of the
y: StringBuilder
y(0)
// Char =
y(1)
// Char =
last expression:
= [a, b, c]
'['
'a'
Because this technique uses a StringBuilder instead of a String, it should be faster
with large datasets. (As usual, always test any performance-related concern.)
Discussion
The strings that are created with these techniques are based on the string representa‐
tions of the elements in the sequence, i.e., what you would get by calling their
toString methods. So the technique works well for types like strings and integers,
but if you have a simple class like this Person class that doesn’t implement a toString
method, and then put a Person in a List, the resulting string won’t be very useful:
class Person(val name: String)
val xs = List(Person("Schmidt"))
xs.mkString
// Person@1b17b5cb (not a useful result)
To solve that problem, properly implement the toString method in your class:
class Person(val name: String):
override def toString = name
List(Person("Schmidt")).mkString
416
|
// "Schmidt"
Chapter 13: Collections: Common Sequence Methods
Creating a string from a repeated character
In a slightly related note, you can fill a sequence with a Char or String using this
technique:
val list = List.fill(5)('-')
// List(-, -, -, -, -)
You can then convert that list to a String:
val list = List.fill(5)('-').mkString
// "-----"
I’ve used that approach to generate an underline for a sentence, such as creating 10
underline characters when I knew the length of a sentence was 10 characters. But a
simpler technique is to multiply a desired string to create a resulting string, like this:
"\u2500" * 10
// String = ──────────
I write more about these techniques in “Scala Functions to Repeat a Character n
Times (Blank Padding)”.
13.15 Converting a Collection to a String with mkString and addString
|
417
CHAPTER 14
Collections: Using Maps
Scala Map types are like the Java Map, Ruby Hash, or Python dictionary, in that they
consist of key/value pairs, and the key values must be unique. Recipe 14.1 provides an
introduction to the basics of creating and using immutable and mutable maps.
After that introduction to maps, Recipe 14.2 helps you choose a map implementation
for the times you need to use special map features. Following that, Recipes 14.3 and
14.4 cover the processes of adding, updating, and removing elements in immutable
and mutable maps, respectively.
If you’re coming to Scala from Java, one big difference with maps is that the default
Map in Scala is immutable, so if you’re not used to working with immutable collec‐
tions, this can be a big surprise when you attempt to add, delete, or change elements
in the map.
In addition to adding, removing, and replacing map elements, other common map
tasks are working with their keys and values (shown in Recipes 14.5 through 14.8), as
well as traversing (Recipe 14.9), sorting (Recipe 14.10), and filtering (Recipe 14.11)
maps.
14.1 Creating and Using Maps
Problem
You want to create and use a Map in a Scala application, i.e., a data structure that con‐
tains key/value pairs, like a Java map, Python dictionary, or Ruby hash.
419
Solution
For the times when you need a key/value pair data structure, Scala lets you create
both immutable and mutable Map types.
Immutable map
To create an immutable map, you don’t need an import statement, just create a Map:
val a = Map(
"AL" -> "Alabama",
"AK" -> "Alaska"
)
That example creates an immutable Map with type [String, String], meaning that
both the key and value have type String. For the first element, the string AL is the key,
and Alabama is the value.
Once you have an immutable Map you can specify elements to be added, updated, and
removed, while assigning the resulting Map to a new variable, as shown in these
examples:
// create a map
val a = Map(1 -> "a")
// adding
val b = a
val c = b
val d = c
elements
+ (2 -> "b")
++ Map(3 -> "c", 4 -> "d")
++ List(5 -> "e", 6 -> "f")
// current result:
d: Map[Int, String] = HashMap(5 -> e, 1 -> a, 6 -> f, 2 -> b, 3 -> c, 4 -> d)
// update where the key is 1
val e = d + (1 -> "AA")
// e: HashMap(5 -> e, 1 -> AA, 6 -> f, 2 -> b, 3 -> c, 4 -> d)
// update
val f = e
val g = f
// g:
multiple elements at one time
++ Map(2 -> "BB", 3 -> "CC")
++ List(2 -> "BB", 3 -> "CC")
HashMap(5 -> e, 1 -> AA, 6 -> f, 2 -> BB, 3 -> CC, 4 -> d)
// remove
val h = g
val i = h
// i:
elements by specifying the keys to remove
- 1
-- List(1, 2, 3)
HashMap(5 -> e, 6 -> f, 4 -> d)
When working with an immutable map you can create your variable as a var field, so
you don’t have to keep using different variable names:
420
|
Chapter 14: Collections: Using Maps
// reassign each update to the 'map' variable
var map = Map(1 -> "a")
map = map + (2 -> "b")
// map: Map(1 -> a, 2 -> b)
map = map + (3 -> "c")
// map: Map(1 -> a, 2 -> b, 3 -> c)
Mutable map
To create a mutable map, either use an import statement to bring it into scope, or
specify the full path to the scala.collection.mutable.Map class when you create an
instance. Once you have a mutable map in scope, you can use it as described in the
following recipes. Here’s a brief demonstration of some basic features:
// create an empty, mutable map
val m = scala.collection.mutable.Map[Int, String]()
// adding by assignment
m(1) = "a"
// adding with += and ++=
m += (2 -> "b")
m ++= Map(3 -> "c", 4 -> "d")
m ++= List(5 -> "e", 6 -> "f")
// m: HashMap(1 -> a)
// m: HashMap(1 -> a,
// m: HashMap(1 -> a,
// m: HashMap(1 -> a,
//
5 -> e,
2
2
2
6
->
->
->
->
b)
b, 3 -> c, 4 -> d)
b, 3 -> c, 4 -> d,
f)
// remove elements by specifying the keys to remove
m -= 1
// m: HashMap(2 -> b, 3 -> c, 4 -> d, 5 -> e, 6 -> f)
m --= List(2,3)
// m: HashMap(4 -> d, 5 -> e, 6 -> f)
// updating
m(4) = "DD"
// m: HashMap(4 -> DD, 5 -> e, 6 -> f)
Discussion
Like maps in other programming languages, maps in Scala are a collection of key/
value pairs. If you’ve used a map in Java, a dictionary in Python, or a hash in Ruby,
Scala maps are straightforward. You only need to know a couple new things, includ‐
ing the methods available on map classes and the specialty maps that can be useful in
certain situations, such as using sorted maps.
Note that the syntax that’s used inside parentheses in a map creates a tuple:
"AL" -> "Alabama"
Because you can also declare a tuple-2 as ("AL", "Alabama"), you may see maps cre‐
ated like this:
val states = Map(
("AL", "Alabama"),
("AK", "Alaska")
)
14.1 Creating and Using Maps
|
421
If you want to make it clear that you’re using a mutable map, one technique is to give
the mutable Map class an alias when you import it, and then refer to it using that alias,
as shown here:
import scala.collection.mutable.{Map => MMap}
// MMap is really scala.collection.mutable.Map
val m = MMap(1 -> 'a')
// m: Map[Int, Char] = HashMap(1 -> a)
m += (2 -> 'b')
// m: HashMap(1 -> a, 2 -> b)
This aliasing technique is described more in Recipe 9.3, “Renaming Members on
Import”.
14.2 Choosing a Map Implementation
Problem
You need to choose a Map class for a particular problem.
Solution
Scala has a wealth of Map types to choose from, and you can even use Java Map classes.
The Discussion provides a comprehensive list of most of the classes, but some of the
most popular ones are:
The immutable Map
A basic immutable map, with no guarantee about the order its keys are returned
in
The mutable Map
A basic mutable map, with no guarantee about the order its keys are returned in
SortedMap
Returns its elements in sorted order by its keys
LinkedHashMap
Returns elements in the order they’re inserted in
VectorMap
Preserves insertion order by storing elements in a vector/map-based data
structure
WeakHashMap
Per its Scaladoc, “a map entry is removed if the key is no longer strongly
referenced”
422
| Chapter 14: Collections: Using Maps
The basic immutable and mutable maps are covered in detail in several other recipes,
so they’re not covered here. The SortedMap and LinkedHashMap are covered in Recipe
14.10, so they’re only touched on here.
Basic immutable and mutable maps
If you’re looking for a basic Map class, where sorting or insertion order doesn’t matter,
you can either choose the default immutable Map, or import the mutable Map, as
shown in Recipe 14.1.
SortedMap
If you want a Map that returns its elements in sorted order by keys, use a SortedMap:
import scala.collection.SortedMap
val x = SortedMap(
2 -> "b",
4 -> "d",
3 -> "c",
1 -> "a"
)
If you paste that code into the REPL, you’ll see this result:
val x: scala.collection.SortedMap[Int, String]
= TreeMap(1 -> a, 2 -> b, 3 -> c, 4 -> d)
Remember the insertion order with LinkedHashMap, VectorMap, or ListMap
If you want a Map that remembers the insertion order of its elements, use a Linked
HashMap, VectorMap, or possibly a ListMap. The LinkedHashMap only comes in a
mutable form, so first import it:
import collection.mutable.LinkedHashMap
Now when you create a LinkedHashMap, it stores the elements in the order in which
they’re inserted:
val x = LinkedHashMap(
1 -> "a",
2 -> "b"
)
x += (3 -> "c")
x += (4 -> "d")
// x: LinkedHashMap(1 -> a, 2 -> b)
// x: LinkedHashMap(1 -> a, 2 -> b, 3 -> c)
// x: LinkedHashMap(1 -> a, 2 -> b, 3 -> c, 4 -> d)
Per its Scaladoc, VectorMap “implements immutable maps using a vector/map-based
data structure, which preserves insertion order…VectorMap has amortized effectively
constant lookup at the expense of using extra memory and generally lower perfor‐
mance for other operations.” It works like the base immutable map but preserves the
insertion order:
14.2 Choosing a Map Implementation
|
423
import collection.immutable.VectorMap
val a = VectorMap(
10 -> "a"
)
val b = a ++ Map(7 -> "b")
val c = b ++ Map(3 -> "c")
// a: VectorMap(10 -> a)
// b: VectorMap(10 -> a, 7 -> b)
// c: VectorMap(10 -> a, 7 -> b, 3 -> c)
You can also use an immutable ListMap, but it’s a bit of an unusual creature. Inter‐
nally, elements are stored like a List, with the most recent element stored in the head
position. But per the ListMap Scaladoc, “List map iterators and traversal methods
visit key-value pairs in the order they were first inserted,” which is a tail-to-head walk.
Because of this, performance can be poor, so ListMap is only suitable for small collec‐
tions. See the immutable ListMap Scaladoc for more performance details.
Discussion
Table 14-1 shows a summary of the basic Scala map classes and traits and provides a
brief description of each. The text in quotes comes from the Scaladoc for each class.
Table 14-1. Basic map classes and traits
Class or trait
collection.immutable.Map
Description
This is the default immutable map you get if you don’t import anything.
collection.mutable.Map
A mutable version of the basic map.
collection.immutable.VectorMap
“A vector/map-based data structure, which preserves insertion order;
has amortized effectively constant lookup at the expense of using extra
memory and generally lower performance for other operations.”
collection.mutable.LinkedHashMap
“The iterator and all traversal methods visit elements in the order they
were inserted.”
collection.immutable.SortedMap
Keys of the map are returned in sorted order: “key-value pairs are
sorted according to a scala.math.Ordering on the keys.”
Although those are the most commonly used maps, Scala offers even more map
types. They are summarized in Table 14-2, where the text in quotes comes from the
Scaladoc for each class.
424
|
Chapter 14: Collections: Using Maps
Table 14-2. More map classes and traits
Class or trait
collection.immutable.HashMap
Description
“Implements immutable maps using a Compressed Hash-Array Mapped
Prefix-tree.”
collection.immutable.TreeMap
“This class is optimal when range queries will be performed, or when
traversal in order of an ordering is desired.”
collection.mutable.WeakHashMap
A wrapper around java.util.WeakHashMap, “a map entry is
removed if the key is no longer strongly referenced.”
collection.immutable.ListMap
“Implements immutable maps using a list-based data structure”;
several operations are O(n), “which makes this collection suitable only
for a small number of elements.”
There are a few more map classes in the scala-collection-contrib library, which “pro‐
vides various additions to the Scala 2.13 standard collections.” Its MultiDict class
replaces the old MultiMap class, and “can associate a set of values to a given key.”
There’s also a SortedMultiDict, which is a sorted version of MultiDict.
Parallel map classes
Starting with Scala 2.13, the parallel collections library was moved to a separate JAR
file, and it’s now maintained on GitHub. That library includes parallel/concurrent
map implementations such as collection.parallel.immutable.ParMap, collec
tion.parallel.immutable.ParHashMap, collection.parallel.mutable.ParHash
Map, and others. See that project for more details.
See Also
• When map performance is important, see Recipe 11.2, “Understanding the Per‐
formance of Collections”.
14.3 Adding, Updating, and Removing Immutable Map
Elements
Problem
You want to add, update, or delete elements when working with an immutable map.
Solution
You can’t update an immutable Map in place, so:
14.3 Adding, Updating, and Removing Immutable Map Elements
|
425
• Apply a functional method for each purpose.
• Remember to assign the result to a new variable.
To be clear about the approach, the following examples use an immutable map with a
series of val variables. First, create an immutable map as a val:
val a = Map(1 -> "a")
// a: Map[Int, String] = Map(1 -> a)
Adding elements
Add one key/value pair with the + method, assigning the result to a new variable dur‐
ing the process:
// add one element
val b = a + (2 -> "b")
// b: Map(1 -> a, 2 -> b)
Add two or more key/value pairs using ++ and a collection:
// add multiple elements
val c = b ++ Map(3 -> "c", 4 -> "d")
// c: Map(1 -> a, 2 -> b, 3 -> c, 4 -> d)
val d = c ++ List(5 -> "e", 6 -> "f")
// d: HashMap(5 -> e, 1 -> a, 6 -> f, 2 -> b, 3 -> c, 4 -> d)
Updating elements
To update one key/value pair with an immutable map, reassign the key and value
while using the + method, and the new values replace the old:
val e = d + (1 -> "AA")
// e: HashMap(5 -> e, 1 -> AA, 6 -> f, 2 -> b, 3 -> c, 4 -> d)
To update multiple key/value pairs, supply the new values as a map or as a sequence
of tuples:
// update multiple elements at once with a Map
val e = d ++ Map(2 -> "BB", 3 -> "CC")
// e: HashMap(5 -> e, 1 -> a, 6 -> f, 2 -> BB, 3 -> CC, 4 -> d)
// update multiple elements at once with a List
val e = d ++ List(2 -> "BB", 3 -> "CC")
// e: HashMap(5 -> e, 1 -> a, 6 -> f, 2 -> BB, 3 -> CC, 4 -> d)
Removing elements
To remove one element, use the - method, specifying the key to remove:
val e = d - 1
// e: HashMap(5 -> e, 6 -> f, 2 -> b, 3 -> c, 4 -> d)
To remove multiple elements, use the -- method:
val e = d -- List(1, 2, 3)
426
|
Chapter 14: Collections: Using Maps
// e: HashMap(5 -> e, 6 -> f, 4 -> d)
Discussion
You can also declare an immutable map as a var, and then reassign the result of each
operation back to the same variable. Using a var, the previous examples look like this:
// declare the map variable as a `var`
var a = Map(1 -> "a")
// add one element
a = a + (2 -> "b")
// add multiple elements
a = a ++ Map(3 -> "c", 4 -> "d")
a = a ++ List(5 -> "e", 6 -> "f")
// update where the key is 1
a = a + (1 -> "AA")
// update multiple elements at one time
a = a ++ Map(2 -> "BB", 3 -> "CC")
a = a ++ List(4 -> "DD", 5 -> "EE")
// remove one element by specifying its key
a = a - 1
// remove multiple elements
a = a -- List(2, 3)
In these examples, because a is defined as a var, it’s being reassigned during each step
in the process.
14.4 Adding, Updating, and Removing Elements in
Mutable Maps
Problem
You want to add, remove, or update elements in a mutable map.
Solution
Add elements to a mutable map by:
• Assigning them with this syntax: map(key) = value
• Using +=
• Using ++=
14.4 Adding, Updating, and Removing Elements in Mutable Maps
|
427
Remove elements with:
• -=
• --=
Update elements by reassigning their keys to new values. The Discussion shows addi‐
tional methods you can use, including put, filterInPlace, remove, and clear.
Given a new, mutable Map:
val m = scala.collection.mutable.Map[Int, String]()
you can add an element to a map by assigning a key to a value:
m(1) = "a"
// m: HashMap(1 -> a)
You can also add individual elements with the += method:
m += (2 -> "b")
// m: HashMap(1 -> a, 2 -> b)
Add multiple elements from another collection using ++=:
m ++= Map(3 -> "c", 4 -> "d")
// m: HashMap(1 -> a, 2 -> b, 3 -> c, 4 -> d)
m ++= List(5 -> "e", 6 -> "f")
// m: HashMap(1 -> a, 2 -> b, 3 -> c, 4 -> d, 5 -> e, 6 -> f)
Remove a single element from a map by specifying its key with the -= method:
m -= 1
// m: HashMap(2 -> b, 3 -> c, 4 -> d, 5 -> e, 6 -> f)
Remove multiple elements by key with the --= method:
m --= List(2,3)
// m: HashMap(4 -> d, 5 -> e, 6 -> f)
Update elements by reassigning their key to a new value:
m(4) = "DD"
// m: HashMap(4 -> DD, 5 -> e, 6 -> f)
The Discussion shows more ways to modify mutable maps.
Discussion
The methods shown in the Solution demonstrate the most common approaches. You
can also use:
• put to add a key/value pair, or replace an existing value
• filterInPlace to keep only the elements in the map that match the predicate
you supply
• remove to remove an element by its key value
428
|
Chapter 14: Collections: Using Maps
• clear to delete all elements in the map
For example, given this mutable Map:
val m = collection.mutable.Map(
"AK" -> "Alaska",
"IL" -> "Illinois",
"KY" -> "Kentucky"
)
those methods are shown in the following examples:
// returns None if the key WAS NOT in the map
val x = m.put("CO", "Colorado")
// x: Option[String] = None
// m: HashMap(AK -> Alaska, IL -> Illinois, CO -> Colorado, KY -> Kentucky)
// returns Some if the key WAS in the map
val x = m.put("CO", "Colorado")
// x: Option[String] = Some(Colorado)
// m: HashMap(AK -> Alaska, IL -> Illinois, CO -> Colorado, KY -> Kentucky)
m.filterInPlace((k,v) => k == "AK")
// m: HashMap(AK -> Alaska)
// `remove` returns a Some if the key WAS in the map
val x = m.remove("AK")
// x: Option[String] = Some(Alaska)
// m: collection.mutable.Map[String, String] = HashMap()
// `remove` returns a None if the key WAS NOT in the map
val x = m.remove("FOO")
// x: Option[String] = None
// m: collection.mutable.Map[String, String] = HashMap()
m.clear
// m: HashMap()
The comments in the examples explain when methods like put and remove return
Some and None values.
14.5 Accessing Map Values (Without Exceptions)
Problem
You want to access individual values stored in a map without throwing an exception.
For example, given a little map:
val states = Map(
"AL" -> "Alabama",
)
14.5 Accessing Map Values (Without Exceptions)
|
429
you can access the value associated with a key just like you access array elements:
val s = states("AL")
// s: Alabama
However, a java.util.NoSuchElementException exception is thrown if the map
doesn’t contain the requested key:
val s = states("YO")
// java.util.NoSuchElementException: key not found: YO
Solution
To avoid exceptions, use:
• withDefaultValue when creating the map
• getOrElse when accessing elements
• get to return map values as a Some or None
For example, given a map:
val states = Map(
"AL" -> "Alabama",
"AK" -> "Alaska",
"AZ" -> "Arizona"
)
one way to avoid this problem is to create the map with the withDefaultValue
method:
val states = Map(
"AL" -> "Alabama"
).withDefaultValue("Not found")
As the name implies, this creates a default value that will be returned by the map
whenever a key isn’t found:
val x = states("AL")
val x = states("yo")
// x: Alabama
// x: Not found
Another solution is to use the getOrElse method when attempting to find a value. It
returns the default value you specify if the key isn’t found:
val s = states.getOrElse("yo", "No such state")
// s: No such state
Yet another solution is to use the get method, which returns an Option:
val x = states.get("AZ")
val x = states.get("yo")
// x: Some(Arizona)
// x: None
Having these three options is nice because they give you different ways to work,
depending on your preferred programming style.
430
|
Chapter 14: Collections: Using Maps
14.6 Testing for the Existence of a Key or Value in a Map
Problem
You want to test whether a map contains a given key or value.
Solution
To test for the existence of a key in a map, use the contains or get methods. To test
for the existence of a value in a map, use the valuesIterator method.
Testing for keys
To test for the existence of a key in a map, using the contains method is a straightfor‐
ward solution:
val states = Map(
"AK" -> "Alaska",
"IL" -> "Illinois",
"KY" -> "Kentucky"
)
states.contains("FOO")
states.contains("AK")
// false
// true
Depending on your needs, you can also call get on the map and see if it returns a
None or a Some:
states.get("FOO")
states.get("AK")
// None
// Some(Alaska)
For instance, this approach can be used in a match expression:
states.get("AK") match
case Some(state) => println(s"state = $state")
case None => println("state not found")
As shown in the previous recipe, note that attempting to use a key that isn’t in the
map will throw an exception:
states("AL")
// java.util.NoSuchElementException: key not found: AL
Testing for values
To test whether a value exists in a map, use the valuesIterator method to search for
the value using contains:
states.valuesIterator.contains("Alaska")
states.valuesIterator.contains("Kentucky")
states.valuesIterator.contains("ucky")
// true
// true
// false
14.6 Testing for the Existence of a Key or Value in a Map
|
431
This works because (a) the valuesIterator method returns an Iterator:
states.valuesIterator
// Iterator[String] = <iterator>
and (b) contains returns true if the element you supply is a value in the map. If you
need to perform more of a search operation on your map values, you can also use
these approaches:
states.valuesIterator.exists(_.contains("ucky"))
states.valuesIterator.exists(_.matches("Ala.*"))
// true
// true
Because exists takes a function, you can use this technique with more complex key
values and your own algorithm.
Discussion
When chaining methods like this together, be careful about intermediate results,
especially with large collections. For this recipe I originally used the values methods
to get the values from the map, but this produces a new intermediate collection. If
you have a large map, this can consume a lot of memory. Conversely, the valuesIter
ator method returns a lightweight iterator.
See Also
• Recipe 14.5 shows how to avoid an exception while accessing a map key.
• Recipe 14.7 demonstrates the values and valuesIterator methods.
14.7 Getting the Keys or Values from a Map
Problem
You want to get all of the keys or values from a map.
Solution
Keys
To get the keys, use these methods:
• keySet to get the keys as a Set
• keys to get an Iterable
• keysIterator to get the keys as an iterator
432
|
Chapter 14: Collections: Using Maps
These methods are shown in the following examples:
val states = Map("AK" -> "Alaska", "AL" -> "Alabama", "AR" -> "Arkansas"
states.keySet
// Set[String] = Set(AK, AL, AR)
states.keys
// Iterable[String] = Set(AK, AL, AR)
states.keysIterator
// Iterator[String] = <iterator>
Values
To get the values from a map, use:
• the values method to get the values as an Iterable
• valuesIterator to get them as an Iterator
These methods are shown in the following examples:
states.values
// Iterable[String] = Iterable(Alaska, Alabama, Arkansas)
states.valuesIterator // Iterator[String] = <iterator>
Discussion
As shown in these examples, keysIterator and valuesIterator return an iterator
from the map data. You’ll generally want to use these methods when you have a large
map, because they don’t create a new collection; they just provide an iterator to walk
over the existing elements.
Also note that if you want to transform the map’s values, use the view.mapValues or
transform methods, as shown in Recipe 14.9.
14.8 Finding the Largest (or Smallest) Key or Value in a
Map
Problem
You want to find the largest or smallest key or value in a map.
Solution
Depending on your needs and the map data, use the max and min methods on the
map, or use the map’s keysIterator or valuesIterator with other approaches.
Two approaches to finding the largest and smallest keys are shown here in the Solu‐
tion, and approaches to finding the largest and smallest values are shown in the
Discussion.
To demonstrate the approach to working with Map keys, first create a sample Map:
14.8 Finding the Largest (or Smallest) Key or Value in a Map
|
433
val grades = Map(
"Al" -> 80,
"Kim" -> 95,
"Teri" -> 85,
"Julia" -> 90
)
In this map, the key has the type String, so which key is “largest” depends on your
definition. You can find the largest or smallest key using the natural String sort order
by calling the max and min methods on the map:
grades.max
grades.min
// (Teri,85)
// (Al,80)
Because the T in Teri is furthest down the alphabet in the names, it’s returned as the
max. Al is returned as the min for the same reason.
You can also call keysIterator—which returns a scala.collection.Iterator—to
get an iterator over the map keys and call its max and min methods:
grades.keysIterator.max
grades.keysIterator.min
// Teri
// Al
Additionally, you can find the same max and min values by getting the keysIterator
and using reduceLeft:
scala> grades.keysIterator.reduceLeft((x,y) => if x > y then x else y)
val res2: String = Teri
scala> grades.keysIterator.reduceLeft((x,y) => if x < y then x else y)
val res3: String = Al
This approach is flexible, because if your definition of largest is the longest string, you
can compare string lengths instead:
scala> grades.keysIterator.reduceLeft((x,y) => if x.length > y.length then x else y)
res4: String = Julia
Discussion
When you need to find the largest and smallest values in a Map, use the valuesItera
tor method to iterate through the values, while calling the max or min method on the
iterator:
grades.valuesIterator.max
grades.valuesIterator.min
// 95
// 80
This works because the values in the Map are of the type Int, which has an implicit
Ordering. Per the official documentation for implicit conversions, an “implicit
method Int => Ordered[Int] is provided automatically through scala.Pre
def.intWrapper.”
434
|
Chapter 14: Collections: Using Maps
Conversely, if the type that’s used as the value in a Map doesn’t provide an Ordering,
this approach won’t work. See Recipe 13.14, “Sorting a Collection”, and Recipe 12.11,
“Sorting Arrays”, for more details about implementing the scala.math.Ordered or
scala.math.Ordering traits.
Similarly, you can also use max and min with reduceLeft, if you prefer:
grades.valuesIterator.reduceLeft(_ max _)
grades.valuesIterator.reduceLeft(_ min _)
// 95
// 80
The benefit of using reduceLeft is that you can compare any type of value with your
own custom algorithm, which is representative of what you may need to do with
more complex data types. These examples demonstrate how to use reduceLeft with a
slightly more complicated algorithm:
// max
scala> grades.valuesIterator.reduceLeft((x,y) => if x > y then x else y)
val res5: Int = 95
// min
scala> grades.valuesIterator.reduceLeft((x,y) => if x < y then x else y)
val res6: Int = 80
Now that you’ve seen how to access those x and y values, you can create any algo‐
rithm necessary for your comparison.
See Also
• Recipe 13.10, “Walking Through a Collection with the reduce and fold Methods”
• Recipe 14.10
14.9 Traversing a Map
Problem
You want to iterate over the elements in a map.
Solution
There are several different ways to iterate over the elements in a map. Given a sample
map:
val ratings = Map(
"Lady in the Water"-> 3.0,
"Snakes on a Plane"-> 4.0,
"You, Me and Dupree"-> 3.5
)
14.9 Traversing a Map
|
435
a nice way to loop over all the map elements is with this for loop syntax:
for (k,v) <- ratings do println(s"key: $k, value: $v")
Using foreach with an anonymous function is also a very readable approach:
ratings.foreach {
case(movie, rating) => println(s"key: $movie, value: $rating")
}
This approach shows how to use the tuple syntax to access the key and value fields:
ratings.foreach(x => println(s"key: ${x._1}, value: ${x._2}"))
Note: Those are not my movie ratings. They are taken from the book, Programming
Collective Intelligence by Toby Segaran (O’Reilly).
Discussion
Note that the foreach method with an anonymous function can be written three dif‐
ferent ways with Scala 3:
ratings.foreach {
(movie, rating) => println(s"key: $movie, value: $rating")
}
ratings.foreach {
case movie -> rating => println(s"key: $movie, value: $rating")
}
// works with Scala 2
ratings.foreach {
case(movie, rating) => println(s"key: $movie, value: $rating")
}
In each of those examples, the code inside the curly braces serves as an anonymous
function.
Depending on how you want to traverse the map, you may just want to access the
map’s keys or values.
Keys
If you just want to access the keys in the map, you can use keysIterator to get all the
keys as a lightweight Iterator:
val i = ratings.keysIterator
// the iterator provides access to the map’s keys
i.toList // List(Lady in the Water, Snakes on a Plane, You, Me and Dupree)
436
|
Chapter 14: Collections: Using Maps
The keys method returns an Iterable, so it involves creating a new intermediate col‐
lection (which can be a performance issue if you have a large map), but it works
easily:
scala> ratings.keys.foreach((m) => println(s"$m rating is ${ratings(m)}"))
Lady in the Water rating is 3.0
Snakes on a Plane rating is 4.0
You, Me and Dupree rating is 3.5
Values
If you want to traverse the map to perform an operation on its values, the mapValues
method—which is defined in the MapView trait—may be what you need. First call
view on your map to create a MapView, then call mapValues. It lets you apply a func‐
tion to each map value and returns the modified map:
val a = Map(1 -> "ay", 2 -> "bee")
// a: Map[Int, String] = Map(1 -> ay, 2 -> bee)
val b = a.view.mapValues(_.toUpperCase).toMap
// Map(1 -> AY, 2 -> BEE)
Because a view implements its transformer methods in a nonstrict or lazy manner,
creating a view before calling mapValues only creates a lightweight iterator:
// `view` uses an iterator
a.view
// MapView(<not computed>)
This approach can be especially beneficial if the map is very large. See Recipe 11.4,
“Creating a Lazy View on a Collection”, for more details on views.
Conversely, you can use the values method and map to solve this problem:
a.values.map(_.toUpperCase)
// List(AY, BEE)
But be aware that the first step in this process creates an intermediate Iterable:
a.values
// Iterable(ay, bee)
So for a large map, this approach can create a performance or memory problem
because of that additional intermediate collection.
If you need to transform the values
If you want to traverse a map to transform the map values, the transform method
gives you another way to create a new map from an existing map. Unlike mapValues,
you can use both the key and value to transform the values:
val map1 = Map(1 -> 10, 2 -> 20, 3 -> 30)
// use the map keys and values to create new values
val map2 = map1.transform((k,v) => k + v)
// map2: Map(1 -> 11, 2 -> 22, 3 -> 33)
14.9 Traversing a Map
|
437
For more complicated situations you can also create a view on the initial Map and then
call the map method on that MapView, which gives you access to the Map keys and
values:
val map3 = map1.view.map((k,v) => (k, k + v)).toMap
14.10 Sorting an Existing Map by Key or Value
Problem
You have an unsorted map and want to sort the elements in the map by the key or
value.
Solution
Given a basic immutable Map:
val grades = Map(
"Kim" -> 90,
"Al" -> 85,
"Melissa" -> 95,
"Emily" -> 91,
"Hannah" -> 92
)
you can sort the map by key, from low to high, using sortBy, and then store the result
in a mutable LinkedHashMap or immutable VectorMap. Two solutions are shown here:
import scala.collection.mutable.LinkedHashMap
// Version 1: sorts by key by accessing each tuple as '(k,v)'
val x = LinkedHashMap(grades.toSeq.sortBy((k,v) => k):_*)
// x: LinkedHashMap(Al -> 85, Emily -> 91, Hannah -> 92, Kim -> 90,
//
Melissa -> 95)
// Version 2: sorts by key using the tuple '._1' syntax
val x = LinkedHashMap(grades.toSeq.sortBy(_._1):_*)
// x: LinkedHashMap(Al -> 85, Emily -> 91, Hannah -> 92, Kim -> 90,
//
Melissa -> 95)
You can also sort the keys in ascending or descending order using sortWith and your
own custom algorithm, again storing the result in a LinkedHashMap:
// sort by key, low to high
val x = LinkedHashMap(grades.toSeq.sortWith(_._1 < _._1):_*)
// x: LinkedHashMap(Al -> 85, Emily -> 91, Hannah -> 92, Kim -> 90,
//
Melissa -> 95)
// sort by key, high to low
val x = LinkedHashMap(grades.toSeq.sortWith(_._1 > _._1):_*)
438
|
Chapter 14: Collections: Using Maps
// x: LinkedHashMap(Melissa -> 95, Kim -> 90, Hannah -> 92, Emily -> 91,
//
Al -> 85)
This syntax is explained in the Discussion.
You can sort the map by value using sortBy:
// value, low to high, accessing elements as `(k,v)`
val x = LinkedHashMap(grades.toSeq.sortBy((k,v) => v):_*)
// x: LinkedHashMap(Al -> 85, Kim -> 90, Emily -> 91, Hannah -> 92,
//
Melissa -> 95)
// value, low to high, using the tuple `_` syntax
val x = LinkedHashMap(grades.toSeq.sortBy(_._2):_*)
// x: LinkedHashMap(Al -> 85, Kim -> 90, Emily -> 91, Hannah -> 92,
//
Melissa -> 95)
You can also sort by value in ascending or descending order using sortWith:
// sort by value, low to high
val x = LinkedHashMap(grades.toSeq.sortWith(_._2 < _._2):_*)
// x: LinkedHashMap(Al -> 85, Kim -> 90, Emily -> 91, Hannah -> 92,
//
Melissa -> 95)
// sort by value, high to low
val x = LinkedHashMap(grades.toSeq.sortWith(_._2 > _._2):_*)
// x: LinkedHashMap(Melissa -> 95, Hannah -> 92, Emily -> 91, Kim -> 90,
//
Al -> 85)
In addition to using a LinkedHashMap, you can also store the results in an immutable
VectorMap. When performance is a concern, be sure to test both map types to see
which works best for your situation.
Discussion
To understand these solutions, it’s helpful to break them down into smaller pieces.
First, start with the basic immutable Map:
val grades = Map(
"Kim" -> 90,
"Al" -> 85,
"Melissa" -> 95,
"Emily" -> 91,
"Hannah" -> 92
)
Next, you can see that grades.toSeq creates a sequence of two-element tuple values,
i.e., Seq[(String, Int)]:
val x = grades.toSeq
// x: ArrayBuffer((Hannah,92), (Melissa,95), (Kim,90), (Emily,91), (Al,85))
14.10 Sorting an Existing Map by Key or Value
|
439
You make the conversion to a Seq because it has sorting methods you can use:
// sort by key
val x = grades.toSeq.sortBy(_._1)
// x: Seq[(String, Int)] =
// ArrayBuffer((Al,85), (Emily,91), (Hannah,92), (Kim,90), (Melissa,95))
// sort by key
val x = grades.toSeq.sortWith(_._1 < _._1)
// x: Seq[(String, Int)] =
// ArrayBuffer((Al,85), (Emily,91), (Hannah,92), (Kim,90), (Melissa,95))
In these examples, the _._1 syntax refers to the first element of each tuple, which is
the key. Similarly, _._2 refers to the value.
Once you have the map data sorted as desired, store it in a LinkedHashMap, Vector
Map, or ListMap to retain the sorted order:
val x = LinkedHashMap(grades.toSeq.sortBy(_._1):_*)
// x: scala.collection.mutable.LinkedHashMap[String,Int] =
// Map(Al -> 85, Emily -> 91, Hannah -> 92, Kim -> 90, Melissa -> 95)
LinkedHashMap is only available as a mutable class, and VectorMap is an immutable
map. There’s also an immutable ListMap, but it’s only recommended for small maps.
Use whichever is best for your situation.
About that _*
The _* portion of the code takes a little getting used to. It’s a special syntax used to
convert the data so it will be passed as multiple parameters to LinkedHashMap (or
VectorMap or ListMap). If you’ve ever used the xargs command on Unix systems, it
works in a similar way, taking a sequence of elements as input and passing one ele‐
ment at a time to the next command.
You can see this by again breaking down the code into separate lines. The sortBy
method returns a Seq[(String, Int)], i.e., a sequence of tuples:
val seqOfTuples = grades.toSeq.sortBy(_._1)
// seqOfTuples: Seq[(String, Int)] =
// List((Al,85), (Emily,91), (Hannah,92), (Kim,90), (Melissa,95))
Unfortunately, you can’t construct a VectorMap, LinkedHashMap, or ListMap with a
sequence of tuples:
scala> VectorMap(seqOfTuples)
1 |VectorMap(seqOfTuples)
^^^^^
|
|
Found:
(seqOfTuples : Seq[(String, Int)])
|
Required: (Any, Any)
440
|
Chapter 14: Collections: Using Maps
But because the apply method in the VectorMap companion object accepts a tuple-2
varargs parameter, you can adapt seqOfTuples to work with it by using _* to convert
the sequence of tuple-2 elements into a series of individual tuple-2 values. This gives
the VectorMap’s apply method what it wants:
val x = VectorMap(seqOfTuples: _*)
// x: scala.collection.immutable.VectorMap[String, Int] =
// VectorMap(Al -> 85, Emily -> 91, Hannah -> 92, Kim -> 90, Melissa -> 95)
Another way to see how _* works is to define your own method that takes a varargs
parameter. The following printAll method takes one parameter, a varargs field of
type String:
def printAll(strings: String*): Unit = strings.foreach(println)
If you then create a List like this:
// a sequence of strings
val fruits = List("apple", "banana", "cherry")
you’ll see that you can’t pass that List into printAll; it fails like the previous
example:
scala> printAll(fruits)
1 |printAll(fruits)
^^
|
|
Found:
(fruits : List[String])
|
Required: String
But you can use _* to adapt the List to work with printAll, like this:
// this works
scala> printAll(fruits: _*)
apple
banana
cherry
If you come from a Unix background, it may be helpful to think of _* as a splat
operator. This operator tells the compiler to pass each element of the sequence to
printAll as a separate argument, instead of passing fruits as a single List
argument.
14.11 Filtering a Map
Problem
You want to filter the elements contained in a map, either by directly modifying a
mutable map or by applying a filtering algorithm on an immutable map to create a
new map.
14.11 Filtering a Map
|
441
Solution
Use the filterInPlace method to define the elements to retain when using a muta‐
ble map, and use filterKeys or filter to filter the elements in a mutable or immut‐
able map, remembering to assign the result to a new variable.
Mutable maps
You can filter the elements in a mutable map using the filterInPlace method to
specify which elements should be retained:
val x
1
2
3
)
= collection.mutable.Map(
-> 100,
-> 200,
-> 300
x.filterInPlace((k,v) => k > 1)
x.filterInPlace((k,v) => v > 200)
// x: HashMap(2 -> b, 3 -> c)
// x: HashMap(3 -> 300)
As shown, filterInPlace modifies a mutable map in place. As implied by the
anonymous function signature used in that example:
(k,v) => ...
your algorithm can test both the key and value of each element to decide which ele‐
ments to retain in the map.
Depending on your definition of “filter,” you can also remove elements from a map
using methods like remove and clear, which are shown in Recipe 14.3.
Mutable and immutable maps
When working with a mutable or immutable map, you can use a predicate with the
filterKeys method to define which map elements to retain. To use this method
you’ll first need to call the view method on your Map to create a MapView. Then
remember to assign the filtered result to a new variable:
val x
1
2
3
)
= Map(
-> "a",
-> "b",
-> "c"
val y = x.view.filterKeys(_ > 2).toMap
// y: Map(3 -> c)
The predicate you supply should return true for the elements you want to keep in the
new collection, and false for the elements you don’t want.
Notice that with this approach, if you don’t call toMap at the end, you’ll see this result
in the REPL:
442
|
Chapter 14: Collections: Using Maps
scala> val y = x.view.filterKeys(_ > 2)
val y: scala.collection.MapView[Int, String] = MapView(<not computed>)
Here you see MapView(<not computed>) because calling view creates a lazy view on
the initial map, and the calculation isn’t actually performed until you force it to be
performed by calling a method such as toMap. (See Recipe 11.4, “Creating a Lazy
View on a Collection”, for more details on how views work.)
If your algorithm is longer, you can define a function (or method) and then pass it to
filterKeys, rather than using an anonymous function. For example, first define your
method, such as this somewhat verbose (but clear) method, which returns true when
the value the method is given is 1:
def only1(i: Int) = if i == 1 then true else false
Then pass the method to the filterKeys method:
val x = Map(1 -> "a", 2 -> "b", 3 -> "c")
val y = x.view.filterKeys(only1).toMap
// y: Map(1 -> a)
You can also use a Set with filterKeys to define the elements to retain:
val x = Map(1 -> "a", 2 -> "b", 3 -> "c")
val y = x.view.filterKeys(Set(2,3)).toMap
// y: Map[Int, String] = Map(2 -> b, 3 -> c)
The Discussion demonstrates other filtering methods, such as how to filter a Map by
its values.
Discussion
You can use all the filtering methods that are shown in Recipe 13.7, “Using filter to
Filter a Collection”. For instance, the Map version of the filter method lets you filter
the map elements by key, value, or both. The filter method provides your predicate
a tuple-2, so you can access the key and value as shown in these examples:
// an immutable map
val a = Map(1 -> "a", 2 -> "b", 3 -> "c")
// filter by the key
val b = a.filter((k,v) => k > 1)
// b: Map(2 -> b, 3 -> c)
// filter by the value
val c = a.filter((k,v) => v != "b")
// c: Map(1 -> a, 3 -> c)
Your filter algorithm can also use a tuple, if you prefer:
// filter by the key (t._1)
val b = a.filter((t) => t._1 > 1)
// b: Map(2 -> b, 3 -> c)
// filter by the value (t._2)
val b = a.filter((t) => t._2 != "b")
// b: Map(1 -> a, 3 -> c)
14.11 Filtering a Map
|
443
The take method lets you “take” (keep) the first N elements from the map:
val b = a.take(2)
// b: Map(1 -> a, 2 -> b)
See the filtering recipes in Recipe 13.7, “Using filter to Filter a Collection”, for exam‐
ples of other methods that you can use, including takeWhile, drop, and slice.
444
|
Chapter 14: Collections: Using Maps
CHAPTER 15
Collections: Tuple, Range, Set,
Stack, and Queue
Compared to the previous collection chapters, this chapter covers collection classes
that tend to be a little different than your standard sequence and map types.
A tuple is essentially a sequence, but like a class or trait, it can contain any number of
different types, as shown in this REPL example:
scala> (1, 2.2, "a", 'a')
val res0: (Int, Double, String, Char) = (1, 2.2, a, a)
Tuples are convenient to use when you just want a container for a series of potentially
mixed types like this. Recipe 15.1 demonstrates the use of tuples.
A range is an evenly spaced sequence of whole numbers or characters and is often
used in for loops and to populate other collections. Their use is covered in Recipe
15.2.
A set is a collection that contains only unique elements, where uniqueness is deter‐
mined by the == method of the type the set contains. Because a set only contains
unique elements, if you attempt to add duplicate elements to it, the set ignores the
request. Scala has both immutable and mutable versions of its base Set implementa‐
tion and offers additional set classes for other needs, such as having sorted sets. Sets
are covered in Recipes 15.3 through 15.5.
A queue is a first-in, first-out data structure, and a stack is a last-in, first-out structure.
Scala has both mutable and immutable versions of each type, and they’re demon‐
strated in Recipes 15.6 and 15.7, respectively.
445
15.1 Creating Heterogeneous Lists with Tuples
Problem
You want to create a small collection of heterogeneous elements, but without having
to create a List[Matchable], List[Any], or a class-like structure.
Solution
Where collections like Vector and ArrayBuffer are generally intended to contain a
sequence of homogeneous elements such as Vector[Int] or ArrayBuffer[String], a
tuple lets you create a collection of heterogeneous elements in a sequence.
To create a tuple, just put the values you want inside parentheses, separated by com‐
mas. For instance, these examples show how to create tuples that contain two, three,
and four values of different types, as shown in the comments:
(1, 1.1)
(1, 1.1, 'a')
(1, 1.1, 'a', "a")
// (Int, Double)
// (Int, Double, Char)
// (Int, Double, Char, String)
Tuples are great for those times where you want a little collection of miscellaneous
heterogeneous elements. For example, here’s a method that returns a two-element
tuple:
// return the user name and age
def getUserInfo(): (String, Int) =
// do whatever you need to do to get the data and then
// return it as a tuple
("johndoe", 42)
The (String, Int) return type shows how to declare a tuple as a return type. Specif‐
ically, this is a two-element tuple composed of a String and an Int. You can also
declare that return type as a Tuple2, like this:
def getUserInfo(): Tuple2[String, Int] = ("johndoe", 42)
With either approach, when you call that method, you create a tuple variable:
val userInfo = getUserInfo()
// (String, Int)
With Scala 2 you could only access the tuple elements using this underscore syntax:
userInfo._1
userInfo._2
// "johndoe"
// 42
But with Scala 3 you can also access the elements by their index number, just like
using other sequences:
userInfo(0)
userInfo(1)
446
|
// "johndoe"
// 42
Chapter 15: Collections: Tuple, Range, Set, Stack, and Queue
Another common way to create variables from a tuple is to use pattern matching to
deconstruct the tuple values into variables. This example binds the "johndoe" and 42
values to the variables name and age, respectively:
val (name, age) = getUserInfo()
name
// "johndoe"
age
// 42
Because Scala 3 tuples are more like lists, they have several of the usual collections
methods:
val t = (1,
t.size
t.head
t.tail
t.drop(1)
2.2, "yo")
// 3
// Int = 1
// (Double, String) = (2.2,yo)
// (Double, String) = (2.2,yo)
You can also concatenate two tuples:
val t = (1, "a") ++ (3.3, 'd')
// (Int, String, Double, Char) = (1,a,3.3,d)
There’s also a swap method that’s available with two-element tuples:
val t = (1, 2.2)
t.swap
// (Int, Double) = (1,2.2)
// (Double, Int) = (2.2,1)
However, as you can imagine, it would be hard to implement all the standard collec‐
tion methods on a tuple, because it can contain mixes types, like Int, Double, and
String all in one tuple. So only a limited set of methods is available.
Discussion
Tuples in Scala 3 build on the heterogeneous list (HList) construct that was originally
created by Miles Sabin in his shapeless library for Scala 2. The HList is a very inter‐
esting construct in that it’s something of a cross between a sequence and a class (or at
least a record type).
Tuples are like lists
In theory, you can create sequences of heterogeneous elements using implicit or
explicit typing:
val xs = List(1, 2.2, "a", 'b')
// List[Matchable] = List(1, 2.2, a, b)
val xs: List[Any] = List(1, 2.2, "a", 'b')
// List[Any] = List(1, 2.2, a, b)
However, the problem with this is that you lose the type details. By contrast, a tuple
keeps those details:
(1, 2.2, "a", 'b')
// (Int, Double, String, Char) = (1,2.2,a,b)
15.1 Creating Heterogeneous Lists with Tuples
|
447
An important thing to know is that in Scala 3 you can also create tuples with this *:
syntax:
1 *: "a" *: 2.2 *: EmptyTuple
// (Int, String, Double) = (1,a,2.2)
This is similar to creating a List like this:
1 :: 2 :: Nil
// List[Int] = List(1, 2)
It’s important to know about the *: syntax because you’ll also see it in the REPL out‐
put when working with tuples:
scala> val z = (1,2).zip("a", "b")
val z: (Int, String) *:
scala.Tuple.Zip[Int *: scala.Tuple$package.EmptyTuple.type, String *:
scala.Tuple$package.EmptyTuple.type] = ((1,a),(2,b))
scala> z
val res0: (Int, String) *: (Int, String) *: EmptyTuple = ((1,a),(2,b))
That last line of output can be read as “res0 is a tuple variable that consists of a (Int,
String) tuple combined with another (Int, String) tuple.” You can tell that res0 is
a tuple because it consists of tuple types that are glued together with the *: symbol
and ends with the EmptyTuple.
Tuples and classes
Tuples are nice because in some situations they can be a replacement for a class, as
shown with the getUserInfo method, which returns a tuple instead of a class. Like
other Scala features such as type inference and union and intersection types, tuples
are a feature that makes Scala feel like a dynamic language.
Another use related to classes is that you can convert a simple case class to a tuple, as
shown in this example:
// [1] create a case class and instance of it
case class Stock(symbol: String, price: Double)
val aapl = Stock("AAPL", 123.45)
// [2] create a tuple from the case class
val t = Tuple.fromProductTyped(aapl)
// (String, Double) = (AAPL,123.45)
The benefit of converting a case class to a tuple is that you can write generic methods
like this one that accept any (String, Double) tuple:
def handleTuple(t: (String, Double)): Unit =
println(s"String: ${t(0)}, Double: ${t(1)}")
While this is a simple example, the technique has significant benefits when it comes
to generic programming. See the blog post “Tuples Bring Generic Programming to
Scala 3” for more details on converting between case classes and tuples.
448
|
Chapter 15: Collections: Tuple, Range, Set, Stack, and Queue
Tuples and maps
Finally, you may also see two-element tuples used to create maps. This syntax isn’t
commonly used, but for the times you run into it, it helps to know that this possibility
exists:
val m = Map(
(1, "a"),
(2, "b")
)
In a related note, you can also create a two-element tuple using this arrow syntax:
1 -> "a"
// (Int, String) = (1,a)
This is the same arrow syntax that’s typically used when creating a map:
val m = Map(
1 -> "a",
2 -> "b"
)
See Also
• The blog post “Tuples Bring Generic Programming to Scala 3” has more details
on tuples and generic programming.
• The Type Astronaut’s Guide to Shapeless is available for free in HTML and PDF
formats and begins by describing uses of the original HList that was created by
Miles Sabin.
15.2 Creating Ranges
Problem
You need to create a range of values, such as in a for loop, or create a sequence of
numbers or characters from a range, typically for testing purposes.
Solution
Use the to or until methods of the Int (or Char) class to create a Range with the
desired elements. You can then convert that range to a sequence, if desired. To popu‐
late a sequence you can also use the range method of the desired sequence class
(List, Vector, etc.).
15.2 Creating Ranges
|
449
Creating a range with to
A simple way to create a range is with the to method:
scala> val r = 1 to 5
r: scala.collection.immutable.Range.Inclusive = Range 1 to 5
When using to, you can set an optional step with the by method:
val r = 1 to 10 by 2
val r = 1 to 10 by 3
// will contain Range(1, 3, 5, 7, 9)
// will contain Range(1, 4, 7, 10)
Ranges are commonly used in for loops:
scala> for i <- 1 to 3 do println(i)
1
2
3
Ranges are created lazily, so when you create one in the REPL you’ll see output like
this:
scala> 1 to 10 by 2
val res0: Range = inexact Range 1 to 10 by 2
To verify the actual contents of a range, you can convert it to a sequence with meth‐
ods like toList, toVector, etc.:
scala> (1 to 10 by 2).toList
val res1: List[Int] = List(1, 3, 5, 7, 9)
Creating a range with until
You can also create a range with until instead of to:
scala> for i <- 1 until 3 do println(i)
1
2
until doesn’t include the last element you specify, so it’s considered exclusive, while
to is inclusive, as shown in these examples:
(1 to 3).toVector
(1 until 3).toVector
// Vector(1, 2, 3)
// Vector(1, 2)
(1 to 10 by 3).toList
(1 until 10 by 3).toList
// List(1, 4, 7, 10)
// List(1, 4, 7)
Populating sequences
As mentioned, once you have a Range you can convert it to other sequences. This is a
common way to populate a sequence, such as for testing purposes:
(1 to 5).toList
(1 until 5).toVector
450
|
// List[Int] = List(1, 2, 3, 4, 5)
// Vector[Int] = Vector(1, 2, 3, 4)
Chapter 15: Collections: Tuple, Range, Set, Stack, and Queue
(1 to 5).toBuffer
// mutable.Buffer[Int] = ArrayBuffer(1, 2, 3, 4, 5)
(1 to 5).toSeq
(1 to 5).toSet
(1 to 5).to(LazyList)
// immutable.Range = Range 1 to 5
// Set[Int] = Set(5, 1, 2, 3, 4)
// LazyList[Int] = LazyList(<not computed>)
Notice from the results shown in the comments that most ranges are converted to
actual sequences, while toSeq and to(LazyList) remain lazy (lazily evaluated).
Discussion
When you create a Range, the REPL output looks like this:
scala> val r = 1 to 5
r: scala.collection.immutable.Range.Inclusive = Range 1 to 5
------------
In this way a Range initially behaves like a lazy collection. Indeed, you can run this
code in the REPL and you’ll quickly see the REPL output, and not run out of
memory:
scala> 1 to 999_999_999
res0: scala.collection.immutable.Range.Inclusive = Range 1 to 999999999
However, as soon as you force the Range to become a sequence, such as a Vector, the
elements are created and memory is consumed:
scala> (1 to 999_999_999).toVector
java.lang.OutOfMemoryError: GC overhead limit exceeded
Should you really need a list that large, you can create a range and convert it to a
LazyList:
scala> (1 to 999_999_999).to(LazyList)
val res1: LazyList[Int] = LazyList(<not computed>)
That approach returns almost immediately and doesn’t allocate memory for its ele‐
ments. You can also create a LazyList with its range method:
scala> LazyList.range(1, 999_999_999)
res1: scala.collection.immutable.LazyList[Int] = LazyList(<not computed>)
Using the range method on sequences
As just shown in the LazyList.range example, you can create specific sequence types
with their range methods:
Vector.range(1, 3)
Array.range(1, 6, 2)
List.range(1, 6, 2)
// Vector(1, 2)
// Array(1, 3, 5)
// List(1, 3, 5)
import collection.mutable.ArrayBuffer
ArrayBuffer.range(1, 3)
// ArrayBuffer(1, 2)
15.2 Creating Ranges
|
451
The second parameter is not included in the result, so it works like the until method.
The third parameter is the step size, which defaults to 1:
List.range(1,
List.range(1,
List.range(1,
List.range(1,
10)
10, 2)
10, 3)
10, 4)
//
//
//
//
List(1,
List(1,
List(1,
List(1,
2,
3,
4,
5,
3, 4, 5, 6, 7, 8, 9)
5, 7, 9)
7)
9)
Char ranges
You can use the same approaches with Char values:
// 'to' and 'until' are lazy
'a' to 'e'
// NumericRange a to e
'a' until 'e'
// NumericRange a until e
// 'to' is inclusive, 'until' is not
('a' to 'e').toList
// List(a, b, c, d, e)
('a' until 'e').toList
// List(a, b, c, d)
// you can also use a step with Char
('a' to 'e' by 2).toList
// List(a, c, e)
('a' to 'e').by(2).toList // List(a, c, e)
The Details
Behind the scenes, the to and until methods are available because of implicit conver‐
sions on the Int and Char classes. Per the Scaladoc of those classes:
• For the Int class, the to and until methods are “added by an implicit conversion
from Int to scala.runtime.RichInt, performed by method intWrapper in
scala.LowPriorityImplicits.”
• For Char, the to and until methods are “added by an implicit conversion from
Char to scala.runtime.RichChar, performed by method charWrapper in
scala.LowPriorityImplicits.”
For example, when you type the following portion of code, you’re invoking the to
method of the RichInt class:
1 to
Therefore, these two pieces of code are equivalent:
1 to 5
1.to(5)
Furthermore, you can clearly see that to, by, and until are methods in these
examples:
452
|
Chapter 15: Collections: Tuple, Range, Set, Stack, and Queue
(1 to 10 by 3).toVector
(1 to 10).by(3).toVector
1.to(10).by(3).toVector
1.until(10).by(3).toVector
//
//
//
//
Vector(1,
Vector(1,
Vector(1,
Vector(1,
4,
4,
4,
4,
7, 10)
7, 10)
7, 10)
7)
More ways to populate collections with ranges
By using the map method with a Range, you can create sequences with elements other
than type Int or Char:
scala> val x = (1 to 5).map(_ * 2.0)
val x: IndexedSeq[Double] = Vector(2.0, 4.0, 6.0, 8.0, 10.0)
This can be a nice way to create sample data for testing. Using a similar approach, you
can also return a sequence of Tuple2 elements:
scala> val x = (1 to 5).map(e => (e,e))
val x: IndexedSeq[(Int, Int)] = Vector((1,1), (2,2), (3,3), (4,4), (5,5))
That sequence easily converts to a Map:
scala> val map = (1 to 5).map(e => (e,e)).toMap
val map: Map[Int, Int] = HashMap(5 -> 5, 1 -> 1, 2 -> 2, 3 -> 3, 4 -> 4)
On a note related to populating collections with data, you can also use the tabulate
and fill methods:
List.tabulate(3)(_ + 1)
List.tabulate(3)(_ * 2)
List.tabulate(4)(_ * 2)
Vector.fill(3)("a")
//
//
//
//
List(1, 2, 3)
List(0, 2, 4)
List(0, 2, 4, 6)
Vector(a, a, a)
Those examples show the Vector and List classes, but they work with ArrayBuffer,
Array, and other collections classes.
15.3 Creating a Set and Adding Elements to It
Problem
You want to create a new immutable or mutable set and add elements to it.
Solution
A set is a sequence that contains only unique elements. Immutable and mutable sets
are handled differently, as demonstrated in the following examples.
Immutable Set
The following examples show how to create a new immutable set and then add ele‐
ments to it. First, create an immutable set:
15.3 Creating a Set and Adding Elements to It
|
453
val s1 = Set(1, 2)
// s1: Set[Int] = Set(1, 2)
Notice that there’s no need to import the immutable Set; it’s available by default.
As with other immutable collections, use the + and ++ methods to add new elements
to an immutable Set, remembering to assign the result to a new variable:
// add one element
val s2 = s1 + 3
// s2: Set(1, 2, 3)
// add multiple elements from another sequence
val s3 = s2 ++ List(4, 5)
// s3: Set(5, 1, 2, 3, 4)
I show these examples with immutable variables—val fields—just to be clear about
how the approach works. You can also declare your variable as a var and reassign the
resulting set back to the same variable:
var s = Set(1, 2)
s = s + 3
s += 4
s = s ++ List(5, 6)
//
//
//
//
s:
s:
s:
s:
Set[Int] = Set(1, 2)
Set(1, 2, 3)
Set(1, 2, 3, 4)
HashSet(5, 1, 6, 2, 3, 4)
See Recipe 11.3, “Understanding Mutable Variables with Immutable Collections”, for
more information on the difference between mutable/immutable variables and muta‐
ble/immutable collections.
Mutable Set
As with other mutable collections, add elements to a mutable Set with the +=, ++=,
and add* methods:
// declare that you want a set of Ints
val s = scala.collection.mutable.Set[Int]()
// s: Set[Int] = HashSet()
// add one element; += is an alias for addOne
s += 1
// s: HashSet(1)
s.addOne(2)
// s: HashSet(1, 2)
// add multiple elements; ++= is an alias for addAll
s ++= List(3, 4)
// s: HashSet(1, 2, 3, 4)
s.addAll(List(5, 6)) // s: HashSet(1, 2, 3, 4, 5, 6)
// note that there is no error when you attempt to add a duplicate element
s += 2
// s: HashSet(1, 2, 3, 4, 5, 6)
// add elements from any sequence (any IterableOnce)
s ++= Vector(7, 8)
// s: HashSet(1, 2, 3, 4, 5, 6, 7, 8)
// the `add` method returns true if the element is added to the set,
// false otherwise
454
|
Chapter 15: Collections: Tuple, Range, Set, Stack, and Queue
val res = s.add(99)
val res = s.add(1)
// res=true, s=HashSet(1, 2, 3, 99, 4, 5, 6, 7, 8)
// res=false, s=HashSet(1, 2, 3, 99, 4, 5, 6, 7, 8)
The last two examples demonstrate a unique characteristic of the add method on a
mutable set: it returns true or false depending on whether or not the element was
added. The other methods silently fail if you attempt to add an element that’s already
in the set. If necessary, you can test to see whether a set contains an element before
adding it:
s.contains(5)
// true
Whereas the first example demonstrated how to create an empty set, you can also add
elements to a mutable set when you declare it, just like other collections:
import scala.collection.mutable.Set
val s = Set(1, 2, 3)
// s: scala.collection.mutable.Set[Int] = HashSet(1, 2, 3)
15.4 Deleting Elements from Sets
Problem
You want to remove elements from a mutable or immutable set.
Solution
Immutable and mutable sets are handled differently, as demonstrated in the following
examples.
Immutable Set
By definition, when using an immutable set you can’t remove elements from it, but
you can use the usual - and -- methods to remove elements while assigning the result
to a new variable:
// create an immutable set
val s1 = Set(1, 2, 3, 4, 5, 6)
// s1: Set[Int] = HashSet(5, 1, 6, 2, 3, 4)
// remove one element
val s2 = s1 - 1
// s2 == HashSet(5, 6, 2, 3, 4)
// remove multiple elements defined in another sequence
val s3 = s2 -- Seq(4, 5)
// s3 == HashSet(6, 2, 3)
You can also use all the filtering methods shown in Recipe 13.7, “Using filter to Filter
a Collection”. For instance, you can use methods like filter, take, and drop:
val s1 = Set(1, 2, 3, 4, 5, 6)
val s2 = s1.filter(_ > 3)
// s1: Set[Int] = HashSet(5, 1, 6, 2, 3, 4)
// s2: HashSet(5, 6, 4)
15.4 Deleting Elements from Sets
|
455
val s3 = s1.take(2)
val s4 = s1.drop(2)
// s3: HashSet(5, 1)
// s4: HashSet(6, 2, 3, 4)
However, be aware that because the order in which elements are stored in a set
depends on the value and number of its elements, methods like take and drop are
rarely used with them:
val set = List.range(0, 1_000_000).toSet
set.take(3)
// HashSet(769962, 348877, 864012)
In my experience they’re mostly used when you want to extract a subset of a set for
testing purposes.
Mutable Set
Remove elements from a mutable set using the -= and --= methods, as shown in the
following examples. First, create a mutable set:
val s = scala.collection.mutable.Set(1, 1, 1, 2, 3, 4, 5, 6, 7, 8)
// s: scala.collection.mutable.Set[Int] = HashSet(1, 2, 3, 4, 5, 6, 7, 8)
Notice in the result of that example that the duplicate 1 values are dropped, because
sets only contain unique elements.
Now you can remove one element using the -= method, or subtractOne:
// '-=' is an alias for 'subtractOne'
s -= 1
// s: HashSet(2, 3, 4, 5, 6, 7, 8)
s.subtractOne(2)
// s: HashSet(3, 4, 5, 6, 7, 8)
You can also remove multiple elements that are defined in another sequence using -= or subtractAll:
// '--=' is an alias for 'subtractAll'
s --= List(3,4,5)
// s: HashSet(6, 7, 8)
s.subtractAll(List(6,7)) // s: HashSet(8)
Notice that attempting to remove elements that don’t exist doesn’t throw an exception
and doesn’t report an error; use the remove method (which is shown in a few
moments) to obtain that information:
s -= 99
// s: HashSet(8)
With a mutable set you can use other methods like filterInPlace, clear, and
remove, depending on your needs. These examples demonstrate the first two
methods:
val s = scala.collection.mutable.Set(1, 2, 3, 4, 5)
s.filterInPlace(_ > 2)
// s: HashSet(3, 4, 5)
s.clear
// s: HashSet()
These examples demonstrate that remove returns true if an element is removed, and
false otherwise:
456
| Chapter 15: Collections: Tuple, Range, Set, Stack, and Queue
val s = scala.collection.mutable.Set(1, 2, 3, 4, 5)
val res = s.remove(2)
// res=true, s=HashSet(1,3,4,5)
val res = s.remove(99)
// res=false, s=HashSet(1,3,4,5)
15.5 Storing Values in a Set in Sorted Order
Problem
You want to be able to store elements in a set in a sorted order.
Solution
To store elements in a set in sorted order, use a SortedSet, which comes in both
immutable and mutable versions. To store elements in a set in the order in which ele‐
ments were inserted, use a LinkedHashSet.
SortedSet
A SortedSet returns elements in a sorted order. Here are two examples with an
immutable SortedSet:
import scala.collection.immutable.SortedSet
val s = SortedSet(10, 4, 8, 2)
// s: TreeSet(2, 4, 8, 10)
val s = SortedSet('b', 'a', 'd', 'c')
// s: TreeSet(a, b, c, d)
As with other immutable collections, you can use methods like + and ++ to add ele‐
ments, and - and -- to remove elements:
val
val
val
val
val
s1
s2
s3
s4
s5
=
=
=
=
=
SortedSet(10)
s1 + 4
s2 ++ List(8, 2)
s3 - 8
s4 -- List(2, 10)
//
//
//
//
//
s1:
s2:
s3:
s4:
s5:
TreeSet(10)
TreeSet(4, 10)
TreeSet(2, 4, 8, 10)
TreeSet(2, 4, 10)
TreeSet(4)
LinkedHashSet
A LinkedHashSet is a mutable set that saves elements in the order in which they were
inserted:
import scala.collection.mutable.LinkedHashSet
val s = LinkedHashSet(10, 4, 8, 2)
// s: LinkedHashSet(10, 4, 8, 2)
As with other mutable collections, you can use methods like += and ++= to add ele‐
ments, and -= and --= to remove elements:
val s = LinkedHashSet(10)
s += 4
s ++= List(8, 2)
s -= 4
s --= List(8, 10)
//
//
//
//
//
s:
s:
s:
s:
s:
LinkedHashSet(10)
LinkedHashSet(10, 4)
LinkedHashSet(10, 4, 8, 2)
LinkedHashSet(10, 8, 2)
LinkedHashSet(2)
15.5 Storing Values in a Set in Sorted Order
|
457
// attempting to add an element that’s already in the set
// is quietly rejected
val s = LinkedHashSet(2)
// s: LinkedHashSet(2)
s += 2
// s: LinkedHashSet(2)
s ++= List(2,2,2)
// s: LinkedHashSet(2)
Discussion
The examples shown in the Solution work because the types used in the sets have an
implicit Ordering. Custom types won’t work unless you provide an implicit Order
ing. See Recipe 12.11, “Sorting Arrays”, and Recipe 13.14, “Sorting a Collection”, for
details on how to extend the scala.math.Ordered trait, or provide an implicit or
explicit Ordering when sorting.
See Also
• For more information about the Ordered and Ordering traits, see Recipe 12.11,
“Sorting Arrays”, and Recipe 13.14, “Sorting a Collection”.
• See the base SortedSet trait Scaladoc for other subclasses.
15.6 Creating and Using a Stack
Problem
You want to use a last-in, first-out (LIFO) data structure in a Scala application.
Solution
A stack is a LIFO data structure. In most programming languages you add elements
to a stack using a push method and take elements off the stack with pop, and Scala is
no different.
Scala has both immutable and mutable versions of a stack; the following examples
demonstrate how to use the mutable Stack class.
You can create an empty mutable stack:
import scala.collection.mutable.Stack
val ints = Stack[Int]()
val strings = Stack[String]()
You can also populate a stack with elements when you create it:
val chars = Stack('a', 'b', 'c')
val ints = Stack(1, 2, 3)
val ints: Stack[Int] = Stack(1,2,3)
458
|
// Stack[Char] = Stack(a, b, c)
// Stack[Int] = Stack(1, 2, 3)
// Stack[Int] = Stack(1, 2, 3)
Chapter 15: Collections: Tuple, Range, Set, Stack, and Queue
Once you have a mutable stack, push elements onto it with push:
import scala.collection.mutable.Stack
val s = Stack[String]()
// s: Stack[String] = Stack()
// add one element at a time
s.push("a")
// s: Stack(a)
s.push("b")
// s: Stack(b, a)
// add multiple elements
s.push("c", "d")
// s: Stack(d, c, b, a)
To take elements off the stack, pop them off the top of the stack:
val next = s.pop
// next=d, s=Stack(c, b, a)
You can peek at the next element on the stack without removing it, using top:
val top = s.top
// top=c, s=Stack(c, b, a)
But be careful with pop and top, because they will throw a java.util.NoSuchElemen
tException if the stack is empty.
You can empty a mutable stack with clear or clearAndShrink:
// creates a stack from 0
val nums = Stack.range(0,
nums.clear
nums.clearAndShrink(0)
to 999_999
1_000_000)
// nums: Stack[String] = Stack()
// nums: Stack[String] = Stack()
clear removes all elements, but does not resize the internal representation of the
stack. clearAndShrink reduces the size of the internal representation to the value you
specify.
Discussion
I’ve seen several people recommend using a List instead of an immutable stack for
this use case. A List has at least one less layer of code, and you can push elements
onto the List with :: and access the first element with methods like head and
headOption.
Other methods
Like other collections classes, Stack has dozens of other methods, including these:
val s = Stack("apple", "banana", "kiwi")
s.size
// 3
s.isEmpty
// false
s.count(_.length > 4)
// 2
s.filter(_.length > 4)
// Stack(apple, banana)
15.6 Creating and Using a Stack
|
459
In any programming language, stack constructs typically have push and pop meth‐
ods, and Table 15-1 shows some of the push/pop methods that are available in the
Scala Stack.
Table 15-1. Push and pop methods in the Scala Stack
Method
pop
Description
Remove the top element and return it
popAll
Remove all elements and return them as a Seq
popWhile Remove all elements while the predicate is true
push
Push one or multiple elements onto the stack
pushAll
Push all elements in a traversable onto the stack
These examples show how those methods work:
val s = Stack[Int]()
s.push(1)
s.push(2,3)
s.pushAll(List(4,5))
val a = s.pop
val b = s.popWhile(_ > 2)
val c = s.popAll
//
//
//
//
//
//
//
s: collection.mutable.Stack[Int] = Stack()
s: Stack(1)
s: Stack(3, 2, 1)
s: Stack(5, 4, 3, 2, 1)
a=5, s=Stack(4, 3, 2, 1)
b=List(4, 3), s=Stack(2, 1)
c=List(1, 2), s=Stack()
Stack Extends ArrayDeque
Starting with Scala 2.13, the mutable Stack class is based on the
ArrayDeque class, whose Scaladoc states, “Append, prepend,
removeFirst, removeLast and random-access (indexed-lookup and
indexed-replacement) take amortized constant time. In general,
removals and insertions at i-th index are O(min(i, n-i)) and thus
insertions and removals from end/beginning are fast.”
15.7 Creating and Using a Queue
Problem
You want to create and use a first-in, first-out (FIFO) data structure in a Scala
application.
Solution
A queue is a FIFO data structure, and Scala offers both immutable and mutable
queues. This solution demonstrates the mutable queue. The immutable queue is
briefly demonstrated in the Discussion.
460
|
Chapter 15: Collections: Tuple, Range, Set, Stack, and Queue
You can create an empty mutable queue:
import scala.collection.mutable.Queue
val q = Queue[Int]()
val q = Queue[String]()
You can also create a queue with initial elements:
val q = Queue(1, 2, 3)
// q: Queue[Int] = Queue(1, 2, 3)
Once you have a mutable queue, add elements to it using +=, ++=, enqueue, and
enqueueAll, as shown in the following examples:
import scala.collection.mutable.Queue
val q = new Queue[String]
// q: collection.mutable.Queue[String] = Queue()
// add elements to the queue
q += "a"
q ++= List("b", "c")
q.enqueue("d")
q.enqueue("e", "f")
q.enqueueAll(List("g", "h"))
//
//
//
//
//
q:
q:
q:
q:
q:
Queue(a)
Queue(a,
Queue(a,
Queue(a,
Queue(a,
b,
b,
b,
b,
c)
c, d)
c, d, e, f)
c, d, e, f, g, h)
Notice that new elements are added to the end of the queue. Because a queue is a
FIFO, you typically remove elements from the head of the queue, one element at a
time, using dequeue:
import scala.collection.mutable.Queue
val q = Queue(1, 2, 3)
// q: mutable.Queue[Int] = Queue(1, 2, 3)
// take an
val next =
val next =
val next =
element from the head of the queue
q.dequeue
// next=1, q=Queue(2, 3)
q.dequeue
// next=2, q=Queue(3)
q.dequeue
// next=3, q=Queue()
// `q` is now empty; beware calling dequeue on an empty Queue:
val next = q.dequeue
// result: java.util.NoSuchElementException: empty collection
You can also use the dequeueFirst and dequeueAll methods to remove elements
from the queue by specifying a predicate:
import scala.collection.mutable.Queue
val q = Queue(1,2,3,4,5)
// q: Queue(1, 2, 3, 4, 5)
// found the number 3, so remove it from the queue
val res = q.dequeueFirst(_ > 2)
// res=Some(3),
q=Queue(1, 2, 4, 5)
// no matches
val res = q.dequeueFirst(_ > 5)
q=Queue(1, 2, 4, 5)
// res=None,
// match three elements, remove them from the queue
val res = q.dequeueAll(_ > 1)
// res=List(2, 4, 5), q=Queue(1)
15.7 Creating and Using a Queue
|
461
// no matches
val res = q.dequeueAll(_ > 1)
// res=List(),
q=Queue(1)
Discussion
Like other collections classes, the queue classes have dozens of other methods,
including these:
import scala.collection.mutable.Queue
val q = Queue(1,2,3,4,5)
q.size
// 5
q.isEmpty
// false
q.count(_ > 3)
// 2
q.filter(_ > 3)
// Queue(4, 5)
Immutable queues
When working with the immutable Queue class, you generally add elements with
enqueue and enqueueAll, and remove elements with dequeue:
import scala.collection.immutable.Queue
val q1 = Queue[Int]()
val q2 = q1.enqueue(1)
val q3 = q2.enqueueAll(List(2,3))
// q1: Queue[Int] = Queue()
// q2: Queue(1)
// q3: Queue(1, 2, 3)
val (a, q4) = q3.dequeue
val (b, q5) = q4.dequeue
val (c, q6) = q5.dequeue
// a=1, q4=Queue(2, 3)
// b=2, q5=Queue(3)
// c=3, q6=Queue()
// `q6` is now empty; beware calling dequeue on an empty queue:
val (d, q7) = q6.dequeue
// result: java.util.NoSuchElementException: dequeue on empty queue
As shown in those examples, remember to assign the result to a new variable, because
the data in the queue can’t be mutated.
462
|
Chapter 15: Collections: Tuple, Range, Set, Stack, and Queue
CHAPTER 16
Files and Processes
When it comes to working with files, many of the solutions in this chapter use Java
classes, but for some situations the scala.io.Source class and its companion object
offer some nice simplifications compared to Java. Not only does Source make it easy
to open and read text files, but it also makes it easy to accomplish other tasks, such as
downloading content from URLs or substituting a String for a File.
File recipes in this chapter will demonstrate how to:
• Read and write text and binary files
• Use the Loan Pattern with scala.util.Using to automatically close resources
• Process every character in a file
• Treat a String as a File, typically for the purpose of testing
• Serialize and deserialize objects to files
• List files and directories
Next, when it comes to working with processes, the Scala process classes are written as
a DSL so you can execute external system commands in a way that feels similar to
Unix. The ability to run system commands is useful for applications, and it’s terrific
for scripts.
The classes and methods of the scala.sys.process package let you run external sys‐
tem commands from Scala, with code that looks like this:
val
val
val
val
result: String = "ls -al".!!
result = Seq("ls", "-al").!!
rootProcs = ("ps aux" #| "grep root").!!.trim
contents: LazyList[String] =
sys.process.Process("find /Users -print").lazyLines
463
The Scala process DSL provides five primary ways to execute external commands:
• Use the run method to run an external command asynchronously, retrieving its
exit status when it finishes running.
• Use the ! method to execute a command, and block while waiting for it to return
its exit status.
• Use the !! method to execute a command, and block while waiting for it to
return its output.
• Use the lazyLines method to execute the command asynchronously, and return
its results as a LazyList[String].
• lazyLines will throw an exception if the exit status is nonzero, so use the lazy
Lines_! if you don’t want that behavior.
The process recipes in this chapter will demonstrate how to:
• Execute external commands and access their exit status and output
• Run those commands synchronously and asynchronously
• Access the STDOUT and STDERR from those commands
• Execute command pipelines and use wildcard characters
• Execute commands in different directories, and configure environment variables
for them
Boundaries on What Is Possible
Conceptually, one important point to know about the limitations of these classes is
made in the process library Scala documentation:
The underlying basis for the whole package is Java’s Process and ProcessBuilder
classes. While there’s no need to use these Java classes, they impose boundaries on
what is possible. One cannot, for instance, retrieve a process ID for whatever is
executing.
If you wonder why certain things are the way they are, it’s important to remember this
point.
16.1 Reading Text Files
Problem
You want to open a text file and process the lines in that file.
464
|
Chapter 16: Files and Processes
Solution
There are many ways to open and read text files in Scala, with many of those
approaches using Java libraries, but the solutions shown in this recipe focus on ways
to open and read text files using scala.io.Source.
The two Source solutions in this recipe demonstrate how to use:
• A concise, one-line syntax. This has the side effect of leaving the file open but can
be useful in short-lived programs, like shell scripts.
• A longer approach that properly closes the file.
Using the concise syntax
In Scala shell scripts, where the JVM is started and stopped in a relatively short
period of time, it may not matter that the file is closed, so you can use the Scala
scala.io.Source.fromFile method. For instance, to handle each line in the file as
it’s read, use this approach:
import scala.io.Source
for line <- Source.fromFile("/etc/passwd").getLines do
// do whatever you need to do with each line in the file
println(line)
As a variation of this, use the following approaches to get all the lines from the file as
a List or String:
val linesAsList = Source.fromFile("/etc/passwd").getLines.toList
val linesAsString = Source.fromFile("/etc/passwd").getLines.mkString
The fromFile method returns a scala.io.BufferedSource, and its Scaladoc says its
getLines method treats “any of \r\n, \r, or \n as a line separator (longest match),” so
in the case of the List, each element in the sequence is a line from the file.
This approach has the side effect of leaving the file open as long as the JVM is run‐
ning, but for short-lived shell scripts this shouldn’t be an issue; the file is closed when
the JVM shuts down.
Properly closing the file and handling exceptions
To properly close the file and handle exceptions, use the scala.util.Using object,
which automatically closes the resources for you. If you want to read a file into a
sequence, use one of these approaches:
import scala.util.Using
import scala.util.{Try, Success, Failure}
def readFileAsSeq(filename: String): Try[Seq[String]] =
16.1 Reading Text Files
|
465
Using(io.Source.fromFile(filename)) { bufferedSource =>
bufferedSource.getLines.toList
}
def readFileAsSeq(filename: String): Try[Seq[String]] =
Using(io.Source.fromFile(filename)) { _.getLines.toList }
To work with each line as you read the file, use this approach:
def readFileAsSeq(filename: String): Try[Seq[String]] =
Using(io.Source.fromFile(filename)) { bufferedSource =>
val ucLines = for
line <- bufferedSource.getLines
// 'line' is a String. can work with each Char here,
// if desired, like this:
// char <- line
yield
// work with each 'line' as a String here
line.toUpperCase
ucLines.toSeq
}
As shown in the first comment in that code, work with line inside the for loop if you
want to process each character in the file.
The benefit of using scala.util.Using is that it handles closing the resource for you
automatically. The Using object implements the Loan Pattern, whose basic approach
is:
• Create a resource that can be used
• “Loan” that resource to other code
• Automatically close/destroy the resource when that other code is finished with it,
such as by automatically calling close on a BufferedSource
Per the Using object Scaladoc, it “can be used to perform an operation using resour‐
ces, after which it releases the resources in reverse order of their creation.” For the
approach needed to open and close multiple resources, see that Scaladoc.
Discussion
As mentioned, the first solution leaves the file open as long as the JVM is running:
// leaves the file open
for (line <- io.Source.fromFile("/etc/passwd").getLines)
println(line)
// also leaves the file open
val contents = io.Source.fromFile("/etc/passwd").mkString
466
|
Chapter 16: Files and Processes
On Unix systems you can show whether a file is left open by running an lsof (list
open files) command in another terminal while your app is running. For example,
here are three lsof commands you can use:
lsof -c java | grep '/etc/passwd'
sudo lsof /etc/passwd
sudo lsof -u Al | grep '/etc/passwd'
The first command lists all the open files for processes whose command begins with
the string java and then searches its output for the /etc/passwd file. If this filename is
in the output, it means that it’s open, so you’ll see something like this:
java
17148
Al
40r
REG
14,2
1475 174214161 /etc/passwd
Then, when you shut down the REPL—thereby stopping the JVM process—you’ll see
that the file no longer appears in the lsof output.
Automatically closing the resource
When working with files and other resources that need to be properly closed, it’s best
to use the Loan Pattern, as shown in the second Solution example.
In Scala, this can be ensured with a try/finally clause. In the early Scala 2 days I
first saw this solution implemented in a using method in the first edition of Begin‐
ning Scala (Apress):
// a Scala 2 approach (circa 2009)
import scala.language.reflectiveCalls
object Control:
def using[A <: { def close(): Unit }, B](resource: A)(fun: A => B): B =
try
fun(resource)
finally
resource.close()
As shown, resource is defined as a parameter that must have a close() method
(otherwise the code won’t compile). That close() method is then called in the
finally clause of the try block.
Many io.Source methods
The scala.io.Source object has many methods for reading from different types of
sources, including:
• Eight fromFile methods
• fromInputStream methods, to read from java.io.InputStream resources
• fromIterable, to create a Source from an Iterable
16.1 Reading Text Files
|
467
• fromString, to create a Source from a String
• fromURI, to read from a java.net.URI
• Four fromURL methods, to read from java.net.URL sources
• stdin, to create a Source from System.in
As just one example, if you want to read from a file while specifying an encoding, use
this syntax:
Source.fromFile("example.txt", "UTF-8")
Terrific Java Integration
Because Scala works so well with Java, you can use the Java FileR
eader and BufferedReader classes, as well as other Java libraries,
like the Apache Commons FileUtils class, to read files.
See Also
• The scala.util.Using object Scaladoc.
• The scala.io.Source Scaladoc.
• You can also read text files with the Java BufferedReader and FileReader
classes. I wrote a blog post where I demonstrate “Five Good Ways (and Two Bad
Ways) to Read Large Text Files with Scala”.
16.2 Writing Text Files
Problem
You want to write plain text to a file, such as a text data file or other plain-text
document.
Solution
Scala doesn’t offer any special file-writing capability, so fall back and use the usual
Java approaches. Ignoring possible exceptions, this is a simple approach that uses a
FileWriter and BufferedWriter:
import java.io.{BufferedWriter, File, FileWriter}
// FileWriter
val file = File("hello.txt")
val bw = BufferedWriter(FileWriter(file))
bw.write("Hello, world\n")
468
|
Chapter 16: Files and Processes
bw.write("It’s Al")
bw.close()
If you need to append data to a text file, add the true parameter when creating the
FileWriter:
val bw = BufferedWriter(FileWriter("notes.txt", true))
----
You can also use the java.nio classes. This example shows how to write a string to a
file using the Paths and Files classes:
import java.nio.file.{Files,Paths}
val text = "Hello, world"
val filepath = Paths.get("nio_paths_files.txt")
Files.write(filepath, text.getBytes)
That’s a useful approach if you have one string that you want to write to a file, because
it writes the entire string and then closes the file. This example shows how to write
and then append a Seq[String] to a text file using NIO classes, while also showing
how to work with character sets:
import java.nio.file.{Files,Paths,StandardOpenOption}
import java.nio.charset.StandardCharsets
import scala.collection.JavaConverters.*
// WRITE
val seq1 = Seq("Hello", "world")
val filepath = Paths.get("paths_seq.txt")
Files.write(filepath, seq1.asJava)
// APPEND
val seq2 = Seq("It’s", "Al")
Files.write(
filepath,
seq2.asJava,
StandardCharsets.UTF_8,
StandardOpenOption.APPEND
)
This approach adds a newline character after every string in your sequence, so the
resulting file has these contents:
Hello
world
It’s
Al
Exceptions
All file-reading and file-writing code can throw exceptions. See
Recipe 16.1 for code that shows how to handle exceptions.
16.2 Writing Text Files
|
469
Discussion
If you don’t specify a character set with FileWriter, it uses the platform default Char
set. To control the Charset, use these FileWriter constructors:
FileWriter(File file, Charset charset)
FileWriter(File file, Charset charset, boolean append)
FileWriter(String fileName, Charset charset)
FileWriter(String fileName, Charset charset, boolean append)
See the FileWriter and Charset Javadoc pages for more details on the available
options.
If you want to control the character encoding when using a BufferedWriter, create it
using an OutputStreamWriter and FileOutputStream, as shown in this solution:
import java.io.*
import java.nio.charset.StandardCharsets
val bw = BufferedWriter(
OutputStreamWriter(
FileOutputStream("file.txt"),
StandardCharsets.UTF_8
)
)
bw.write("Hello, world\n")
bw.write("It’s Al")
bw.close()
Using macOS, you can confirm the file’s character encoding with the -I option of the
file command:
$ file -I file.txt
file.txt: text/plain; charset=utf-8
See Also
See these Javadoc pages for more details:
• java.nio.file.Files
• java.io.FileWriter
• java.nio.charset.Charset
16.3 Reading and Writing Binary Files
Problem
You want to read data from a binary file or write data to a binary file.
470
|
Chapter 16: Files and Processes
Solution
Scala doesn’t offer any special conveniences for reading or writing binary files, so use
the Java FileInputStream and FileOutputStream classes and their buffered wrapper
classes.
Reading binary files
Ignoring exceptions, this code demonstrates how to read a file using FileInput
Stream and BufferedInputStream:
import java.io.{FileInputStream, BufferedInputStream}
val bis = new BufferedInputStream(FileInputStream("/etc/passwd"))
Iterator.continually(bis.read())
.takeWhile(_ != -1)
.foreach(b => print(b.toChar)) // print the Char values
bis.close
This solution is intended for reading binary files, but I read a plain text file here to
create an example you can easily experiment with.
A key to this solution is knowing that the Iterator object has a continually method
that simplifies this process. Per its Scaladoc, continually “creates an infinite-length
iterator returning the results of evaluating an expression. The expression is recompu‐
ted for every element.” If you prefer, you can also use the continually method of the
LazyList object, which has the same effect.
Writing binary files
To write a binary file, use the FileOutputStream and BufferedOutputStream classes,
as shown in this example:
import java.io.{FileOutputStream, BufferedOutputStream}
val bos = new BufferedOutputStream(FileOutputStream("file.dat"))
val bytes = "Hello, world".getBytes
bytes.foreach(b => bos.write(b))
bos.close
Discussion
There are many more ways to read and write binary files, but because all the solutions
use Java classes, search the internet for different approaches, or check the Java Cook‐
book by Ian F. Darwin (O’Reilly).
16.3 Reading and Writing Binary Files
|
471
A Caveat
Many solutions you’ll find on the internet don’t use buffering. If
you’re going to read and write large files, always use buffering. For
example, when I read an Apache access log file on my computer
that’s 650,000 lines long with only a FileInputStream, it takes 181
seconds to read the file. By wrapping that FileInputStream with a
BufferedInputStream—as shown in the Solution—that same file is
read in just 1.6 seconds.
See Also
• The Apache Commons FileUtils class has many methods for reading and writ‐
ing files.
16.4 Pretending That a String Is a File
Problem
Typically for the purposes of making code testable, you want to pretend that a String
is a file.
Solution
Because Scala.fromFile and Scala.fromString both extend scala.io.Source, they
are easily interchangeable. As long as your method takes a Source reference, you can
pass it the BufferedSource you get from calling Source.fromFile, or the Source you
get from calling Source.fromString.
For example, the following function takes a Source object and prints the lines it
contains:
import io.Source
def printLines(source: Source) =
for line <- source.getLines do
println(line)
It can be called when the source is constructed from a String:
val source = Source.fromString("foo\nbar\n")
printLines(source)
It can also be called when the source is a file:
val source = Source.fromFile("/Users/Al/.bash_profile")
printLines(source)
472
| Chapter 16: Files and Processes
Discussion
When writing unit tests, you might have a method like this that you’d like to test:
object FileUtils:
def getLinesUppercased(source: io.Source): List[String] =
source.getLines.map(_.toUpperCase).toList
In unit tests you can test the getLinesUppercased method by passing it either a
Source from a File or a String:
import scala.io.Source
var source: Source = null
// test with a File
source = Source.fromFile("foo.txt")
// a file with "foo" as its first line
val lines = FileUtils.getLinesUppercased(source)
assert(lines(0) == "FOO")
// test with a String
source = Source.fromString("foo\n")
val lines = FileUtils.getLinesUppercased(source)
assert(lines(0) == "FOO")
In summary, if you’re interested in making your function easily testable with a String
instead of a file, define it to take a Source instance.
16.5 Serializing and Deserializing Objects to Files
Problem
You want to serialize an instance of a Scala class and save it as a file, or send it across a
network.
Solution
The general approach is the same as Java, but the syntax to make a Scala class serializ‐
able is different. To make a Scala class serializable, extend the Serializable type and
add the @SerialVersionUID annotation to the class:
@SerialVersionUID(1L)
class Stock(var symbol: String, var price: BigDecimal) extends Serializable:
override def toString = s"symbol: $symbol, Price: $price"
Because Serializable is a type—technically a type alias for java.io.Serializable
—you can mix it into a class even if the class already extends another class:
@SerialVersionUID(1L)
class Employee extends Person with Serializable ...
16.5 Serializing and Deserializing Objects to Files
|
473
After marking the class serializable, use the same techniques to write and read the
objects as you did in Java, including the Java deep clone technique that uses serializa‐
tion, which I discuss in my blog post “A Java Deep Clone (Deep Copy) Example”.
Discussion
Ignoring possible exceptions, the following code demonstrates the complete deep
clone approach. The comments in the code explain the process:
import java.io.*
// create a serializable Stock class
@SerialVersionUID(1L)
class Stock(var symbol: String, var price: BigDecimal) extends Serializable:
override def toString = f"$symbol%s is ${price.toDouble}%.2f"
@main def serializationDemo =
val filename = "nflx.obj"
// (1) create a Stock instance
val nflx = Stock("NFLX", BigDecimal(300.15))
// (2) write the object instance out to a file
val oos = ObjectOutputStream(FileOutputStream(filename))
oos.writeObject(nflx)
oos.close
// (3) read the object back in
val ois = ObjectInputStream(FileInputStream(filename))
val stock = ois.readObject.asInstanceOf[Stock]
ois.close
// (4) print the object that was read back in
println(stock)
This code prints the following output when run:
NFLX is 300.15
Serialization Is Going Away (At Some Point)
Note that the current form of serialization in Java may be going
away at some point in the future. This is discussed in a 2018 article
from ADTmag, “Removing Serialization from Java Is a Long-Term
Goal at Oracle”.
474
| Chapter 16: Files and Processes
16.6 Listing Files in a Directory
Problem
You want to create a list of files or directories in a directory, potentially limiting the
list with a filtering algorithm.
Solution
Scala doesn’t offer any special methods for working with directories, so use the list
Files method of the Java File class. For instance, this function creates a list of all
files in a directory:
// assumes that `dir` is a directory known to exist
def getListOfFiles(dir: File): Seq[String] =
dir.listFiles
.filter(_.isFile)
// list only files
.map(_.getName)
.toList
This algorithm does the following:
• Uses the listFiles method of the File class to list all the files in dir as an
Array[File]
• Uses filter to trim that list to contain only files
• Uses map to call getName on each file to return an array of file names (instead of
File instances)
• Uses toList to convert that to a List[String]
This function returns an empty list—List()—if there are no files in the directory,
and a List[File] if the directory has one or more files. The REPL demonstrates this:
scala> getListOfFiles(File("/tmp/empty"))
val res0: List[String] = List()
scala> getListOfFiles(File("/tmp"))
val res1: List[String] = List(/tmp/foo.log, /tmp/bar.txt)
Similarly, this approach creates a list of all directories under dir:
def getListOfSubDirectories(dir: File): Seq[String] =
dir.listFiles
.filter(_.isDirectory)
// list only directories
.map(_.getName)
.toList
16.6 Listing Files in a Directory
|
475
To list all files and directories, remove the filter(_.isFile) line from the code:
def getListOfSubDirectories(dir: File): Seq[String] =
dir.listFiles
.map(_.getName)
.toList
Discussion
If you want to limit the list of files that are returned based on their filename exten‐
sion, in Java you’d implement a FileFilter with an accept method to filter the file‐
names that are returned.
In Scala, you can write the equivalent code without requiring a FileFilter. Assum‐
ing that the File you’re given represents a directory that’s known to exist, the follow‐
ing function shows how to filter a set of files based on the filename extensions that
should be returned:
import java.io.File
def getListOfFiles(dir: File, extensions: Seq[String]): Seq[File] =
dir.listFiles
.filter(_.isFile)
.filter(file => extensions.exists(file.getName.endsWith(_)))
.toList
As an example, you can call this function as follows to list all .wav and .mp3 files in a
given directory:
val okFileExtensions = Seq("wav", "mp3")
val files = getListOfFiles(File("/tmp"), okFileExtensions)
For many other file and directory tasks, a great solution is to use the FileUtils class
of the Apache Commons IO library. It has dozens of methods for working with files
and directories.
See Also
If you want to go deeper and traverse an entire directory tree, and process every file
and directory in that tree, check out the details in my blog post “Scala: How to Search
a Directory Tree with SimpleFileVisitor and Files.walkFileTree”. I wrote my Scala Fil‐
eFind command-line utility using that approach.
476
|
Chapter 16: Files and Processes
16.7 Executing External Commands
Problem
You want to execute an external (system) command from within a Scala application.
You’re not concerned about the output from the command, but you are interested in
its exit code.
Solution
There are two possible approaches:
• Use the ! method to execute the command, and block while waiting for it to
return its exit status.
• Use the run method to run an external command asynchronously, retrieving its
exit status when it finishes running.
Using the ! method
To execute a command and wait (block) to get its exit status, import the necessary
members, put the desired command in a string, and then run it with the ! method:
// necessary import
scala> import sys.process.*
// run a system command
scala> val exitStatus = "ls -al".!
total 32
drwxr-xr-x
3 al staff
96 Feb 17 20:34 .
drwxr-xr-x 22 al staff
704 Feb 17 20:34 ..
-rw-r--r-1 al staff 13112 Feb 17 20:34 simpletest_3.0.0-M3-0.2.0.jar
val exitStatus: Int = 0
scala> println(exitStatus)
0
On Unix systems, an exit status of 0 means that the command executed successfully,
and a nonzero exit status means there was some sort of problem. For instance, you
get an exit status of 1 if you try to use the ls command on a file that doesn’t exist:
scala> val exitStatus = "ls -l noSuchFile.txt".!
ls: noSuchFile.txt: No such file or directory
val exitStatus: Int = 1
The output shows that the exitStatus is 1 after that command is run.
16.7 Executing External Commands
|
477
As you saw in these examples, you can invoke the ! method after a decimal:
"ls -al".!
You can also invoke it after a blank space by including this import statement:
import scala.language.postfixOps
"ls -al" !
All of those commands assume that you have imported import sys.process.*.
Be aware that if your command fails, it can throw an exception:
scala> "foo".!
java.io.IOException: Cannot run program "foo": error=2, No such file
or directory at java.lang.ProcessBuilder.start
Therefore, be sure to wrap it with an error-handling type like Try:
scala> val result = Try(Seq(
|
"/bin/sh",
|
"-c",
|
"ls -l foo.bar"
| ).!!)
ls: foo.bar: No such file or directory
val result: scala.util.Try[String] =
Failure(java.lang.RuntimeException: Nonzero exit value: 1)
As will be shown in the Discussion, you can also run system commands using a Seq:
val exitStatus = Seq("ls", "-a", "-l", "/tmp").!
Run an external command asynchronously
You can run an external command asynchronously by using the run method:
// necessary imports
scala> import sys.process.*
scala> val process = "ls -al".run
val process: scala.sys.process.Process = scala.sys.process.ProcessImpl ...
total 32
drwxr-xr-x
drwxr-xr-x
-rw-r--r--
3 al
22 al
1 al
staff
staff
staff
96 Feb 17 20:34 .
704 Feb 17 20:34 ..
13112 Feb 17 20:34 simpletest_3.0.0-M3-0.2.0.jar
With this approach the external command immediately begins running, and you can
call these methods on the resulting process object:
• isAlive returns true if the process is still running, false otherwise
• destroy lets you kill a running process
478
|
Chapter 16: Files and Processes
• exitStatus lets you get the exit status of the command
A long-running example in the REPL shows how this works:
# start the process
scala> val process = "sleep 20".run
val process: scala.sys.process.Process = scala.sys.process.ProcessImpl ...
# 10 seconds later, it’s still alive
scala> process.isAlive
val res1: Boolean = true
# 21 seconds later
scala> process.isAlive
val res2: Boolean = false
scala> process.exitValue
val res3: Int = 0
When using this approach, don’t call exitValue until isAlive is false. If you call
exitValue while the process is still running, it will block until the process is finished.
Discussion
In addition to calling ! after a String, you can also invoke ! after a Seq. This is espe‐
cially useful when you have a variable number of command arguments.
When using a Seq, the first element should be the name of the command you want to
run, and subsequent elements are considered to be arguments to it, as shown in these
examples:
import sys.process.*
val exitStatus = Seq("ls", "-al").!
val exitStatus = Seq("ls", "-a", "-l").!
val exitStatus = Seq("ls", "-a", "-l", "/tmp").!
I’ve omitted the output from those examples, but each command provides the same
ls directory listing you’d get at the Unix command line.
Using a Process
If you don’t like using implicit conversions with a String or Seq, you can create a
Process object to execute external commands:
import sys.process.*
val status = sys.process.Process("ls -al").!
val status = sys.process.Process(Seq("ls", "-al")).!
16.7 Executing External Commands
|
479
Beware whitespace
When running these commands, be aware of whitespace around your command and
arguments. All the following examples fail because of extra whitespace:
" ls".!
Seq(" ls ", "-al").!
Seq("ls", " -al ").!
// java.io.IOException: Cannot run program ""
// java.io.IOException: Cannot run program " ls "
// ls: -al : No such file or directory
If you type the strings yourself, leave the whitespace out, and if you get the strings
from user input, be sure to trim them.
External commands versus built-in commands
As a final note, you can run any external command from Scala that you can run from
the Unix command line. However, there’s a big difference between an external com‐
mand and a shell built-in command. The ls command is an external command that’s
available on all Unix systems and can be found as a file in the /bin directory:
$ which ls
/bin/ls
Some other commands that can be used at a Unix command line—such as the cd or
for commands—are actually built into your shell, such as the Bash shell; you won’t
find them as files on the filesystem. Therefore, these commands can’t be executed
unless they’re executed from within a shell. See Recipe 16.10 for an example of how to
execute a shell built-in command.
16.8 Executing External Commands and Reading Their
STDOUT
Problem
You want to run an external command and then use the standard output (STDOUT)
from that process in your Scala program.
Solution
Use either of these methods to access the STDOUT from your command:
• Use the !! method to execute the command synchronously, and block while
waiting to receive its output as a String.
• Use the lazyLines method to execute the command asynchronously, and return
its results as a LazyList[String].
480
|
Chapter 16: Files and Processes
• If your command’s exit status is nonzero, lazyLines can throw an exception
when you try to use its result, so use lazyLines_! (optionally with a ProcessLog
ger) if you want to avoid that.
Synchronous solution with !!
Just like the ! command in the previous recipe, you can use !! after a String to exe‐
cute a command, and it returns the STDOUT from the command rather than the
command’s exit code. The result is a multiline string, which you can process in your
application.
Ignoring exception handling, this example shows how to use !! with a String:
import sys.process.*
val result: String = "ls -al".!!
println(result)
The output of that command is a multiline string, which begins like this:
total 64
drwxr-xr-x 10 Al staff
drwxr-xr-x
3 Al staff
more output here ...
340 May 18 18:00 .
102 Apr 4 17:58 ..
For more complicated situations where you want to add error handling, use the Try/
Success/Failure classes:
import sys.process.*
import scala.util.{Try,Success,Failure}
val result: Try[String] = Try("ls -al fred".!!)
result match
case Success(out) => println(s"OUTPUT:\n$out")
case Failure(f)
=> println("Exception happened:\n$f")
Assuming that you don’t have a file named fred in the current directory, the output of
that code will be:
ls: fred: No such file or directory
Exception happened:
val result: util.Try[String] =
Failure(java.lang.RuntimeException: Nonzero exit value: 1)
In addition to using !! with a String, you can use it with a Seq:
val result: String = Seq("ls", "-al").!!
16.8 Executing External Commands and Reading Their STDOUT
|
481
Asynchronous solution with lazyLines
Use the lazyLines method to run a command asynchronously and access its
STDOUT as a LazyList[String]. For example, this command may run for a long
time on Unix systems and can result in thousands of lines of output:
val contents: LazyList[String] =
sys.process.Process("find /Users/al -print").lazyLines
As soon as you issue that line of code in the REPL, the Unix find command begins
running. You won’t see any output in the REPL, but you can see that it’s running by
opening another terminal window and running the Unix top command, or a ps com‐
mand like this:
$ ps a | grep 'find /Users'
19837 s004 S+
0:00.14 find /Users/al -print
As that output shows, your find command is indeed running, in this case as process
ID (PID) 19837.
Back in the REPL you can read from the LazyList and process the command output
as desired, such as with foreach:
scala> contents.foreach(println)
Asynchronous solution with lazyLines_!
If the exit status of your command is nonzero, lazyLines will throw an exception if
you try to use the resulting LazyList. For instance, this command with lazyLines
initially writes its “No such file” output to STDERR:
scala> val x = "ls no_such_file".lazyLines
ls: no_such_file: No such file or directory
val x: LazyList[String] = LazyList(<not computed>)
If you then try to access the contents of x, you’ll throw an exception:
scala> x.foreach(println)
java.lang.RuntimeException: Nonzero exit code: 1 at
scala.sys.process.BasicIO$LazilyListed$ ...
much more exception output here ...
By using lazyLines_! instead of lazyLines, you can eliminate the exception when
you use x:
scala> val x = "ls no_such_file".lazyLines_!
val x: LazyList[String] = LazyList(<not computed>)
ls: no_such_file: No such file or directory
scala> x.foreach(println)
(no output here)
482
|
Chapter 16: Files and Processes
If desired, you can also suppress the STDERR output with this technique:
scala> val x = "ls no_such_file" lazyLines_! ProcessLogger(line => ())
val x: LazyList[String] = LazyList(<not computed>)
(there is no STDERR output here)
Seq and Process
If you don’t like working with implicit methods on a String or Seq, you can work
with a Process:
import sys.process.*
val result: String = sys.process.Process("ls -al").!!
val result: String = sys.process.Process(Seq("ls","-al")).!!
val result: LazyList[String] =
sys.process.Process("find /Users/al -print").lazyLines
16.9 Handling Both STDOUT and STDERR of Commands
Problem
You want to run an external command and get access to both its standard output
(STDOUT) and standard error (STDERR).
Solution
The simplest way to do this is to run your commands as shown in previous recipes
and then capture the output with a ProcessLogger. This code demonstrates the
approach:
import sys.process.*
val stdout = StringBuilder()
val stderr = StringBuilder()
val status = "ls -al . cookie" ! ProcessLogger(stdout append _, stderr append _)
println(s"status: '$status'")
println(s"stdout: '$stdout'")
println(s"stderr: '$stderr'")
Because I have a few files in the current directory, but none of them are named cookie,
I see output like this when I run that script:
status: '1'
stdout: '(a lot of output from the 'ls .' command here)'
stderr: 'ls: cookies: No such file or directory'
Because I use the ! method, when this script is run the status variable contains the
exit status of the command, which is 1 because the file cookie doesn’t exist. The
stdout variable contains the STDOUT of the command, and in this example it
16.9 Handling Both STDOUT and STDERR of Commands
|
483
contains output thanks to the ls . portion of the command. The stderr variable
contains the STDERR from the command if there are problems. If, as in the case of
this command, the command you run writes to both STDOUT and STDERR, both
stdout and stderr will contain data.
Make Sure You Understand the Exit Status Codes
Note that when the find command runs but doesn’t find a file, it
can still return an exit status of 0. This status just means that the
find command ran as desired and there were no exceptions.
Always check the exit status of your system commands at the com‐
mand line to be sure about how their status codes work:
# [1] no files found, but no errors
$ find . -name NonExistentFile.txt
$ echo $?
0
# [2] a non-zero exit status because the directory doesn’t exist
$ find NonExistentDirectory
find: NonExistentDirectory: No such file or directory
$ echo $?
1
Discussion
Here’s another example that uses a Seq and writes to STDOUT and STDERR:
val status = Seq(
"find",
"/usr",
"-name",
"make"
) ! ProcessLogger(stdout append _, stderr append _)
When you look at either of these examples, it can be surprising that this code works:
String ! ProcessLogger(stdout append _, stderr append _)
Seq ! ProcessLogger(stdout append _, stderr append _)
The reason this works is that the scala.sys.process authors have created a little
DSL for you. In the first example shown, this code:
"ls -al . cookie" ! ProcessLogger(stdout append _, stderr append _)
is turned into this code by the compiler:
"ls -al . cookie".!(ProcessLogger(stdout append _, stderr append _))
The way this works is:
• The ! method is added to a String as an implicit conversion.
484
|
Chapter 16: Files and Processes
• The ! method has an overloaded constructor whose signature is !(log: Proces
sLogger): Int.
While this can be a little hard to grok when symbols are used, if the ! method had
been named exec instead, that code would look like this:
// if '!' was named 'exec' instead
"ls -al . cookie".exec(ProcessLogger(stdout append _, stderr append _))
I find that spelling out the method calls is another way to make this code more reada‐
ble, and therefore more maintainable:
val exitStatus = "ls -al . cookie".!(
ProcessLogger(
arg1 => stdout.append(arg1),
arg2 => stdout.append(arg2)
)
)
Also note that depending on your needs, writing to STDOUT and STDERR can get
more complicated very quickly. The Scaladoc states, “If one desires full control over
input and output, then a ProcessIO can be used with run.” See the scala.sys.pro
cess API documentation for the ProcessLogger and ProcessIO classes for more
examples.
See Also
• See the ProcessBuilder Scaladoc for more details on methods like !, !!, and
run.
16.10 Building a Pipeline of External Commands
Problem
You want to execute a series of external commands, redirecting the output from one
command to the input of another command, i.e., you want to pipe the commands
together.
Solution
Use the #| method to pipe the output from one command into the input stream of
another command. When doing this, use the run, !, !!, lazyLines, or lazyLines_!
methods at the end of the pipeline to run the complete series of external commands.
The !! approach is shown in the following example, where the output from the ps
command is piped as the input to the wc command:
16.10 Building a Pipeline of External Commands
|
485
import sys.process.*
val numRootProcs = ("ps aux" #| "grep root" #| "wc -l").!!.trim
println(s"# root procs: $numRootProcs")
Because the output from the ps command is piped into grep and then into a linecount command (wc -l), that code prints the number of processes running on a Unix
system that have the string root in their ps output. Similarly, the following com‐
mands create a list of all processes running that contain the string root:
val rootProcs: String = ("ps auxw" #| "grep root").!!.trim
val rootProcs: LazyList[String] = ("ps auxw" #| "grep root").lazyLines
Discussion
If you come from a Unix background, the #| method makes sense because it’s just like
the Unix pipe symbol (|), but preceded by a # character. In fact, with the exception of
the ### operator (which is used instead of the Unix ; symbol), the Scala process
library is generally consistent with the equivalent Unix commands.
Piping in a string won’t work without a shell
Note that attempting to pipe commands together inside a String and then executing
them with ! or !! won’t work:
// won’t work
scala> val result = ("ls -al | grep Foo").!!
ls: Foo: No such file or directory
ls: grep: No such file or directory
ls: |: No such file or directory
java.lang.RuntimeException: Nonzero exit value: 1
at scala.sys.process.ProcessBuilderImpl ...
more exception output here ...
This doesn’t work because the piping capability comes from a shell (Bourne shell,
Bash, etc.), and when you run a command like this, you don’t have a shell.
To execute a series of commands in a shell, such as the Bourne shell, use a Seq with
multiple parameters, like this:
// this works as desired, piping the 'ps' output into 'grep'
val result = Seq(
"/bin/sh",
"-c",
"ps aux | grep root"
).!!
As described in that recipe, this approach runs the ps aux | grep root command
inside a Bourne shell instance.
486
|
Chapter 16: Files and Processes
CHAPTER 17
Building Projects with sbt
Although you can use tools like Ant, Maven, and Gradle to build your Scala projects,
sbt—originally named Simple Build Tool—is the de facto build tool for Scala applica‐
tions. sbt makes the basic build and dependency management tasks simple and lets
you use the Scala language itself to conquer more difficult tasks.
sbt uses the same directory structure as Maven, and like Maven, it uses a “convention
over configuration” approach that makes the build process incredibly easy for basic
projects. Because it provides a well-known, standard build process, if you work on
one Scala project that’s built with sbt, it’s easy to move to another project that also
uses sbt. The project’s directory structure will be the same, and you’ll know that you
should look at the build.sbt file and the optional project/*.sbt files to see how the build
process is configured.
Starting with version 1.3.0, sbt began using Coursier for library management, a task
the Coursier website refers to as artifact fetching. Prior to 1.3.0, sbt used Apache Ivy
for this task, but Coursier aims to be a faster alternative. When you specify managed
dependencies in your build.sbt file, Coursier is the tool that retrieves the JAR files for
you.
In addition to handling managed dependencies, you can also place unmanaged
dependencies—plain old JAR files—in your project’s lib folder, and sbt will automati‐
cally find them.
As a result of all these features, with very little effort on your part, sbt lets you build
projects that contain both Scala and Java code, unit tests, and both managed and
unmanaged dependencies.
487
sbt’s features
As a brief summary, sbt’s main features are:
• It uses Maven’s standard directory structure, so it’s easy to build standard Scala
projects, and easy to move between different sbt projects.
• Small projects require very little configuration.
• Build definition files use a Scala DSL, so you use Scala code to build Scala
projects.
• sbt supports compiling Scala and Java source code files in the same project.
• It supports both managed and unmanaged dependencies.
• You can use multiple testing frameworks, including ScalaTest, ScalaCheck, and
MUnit, and JUnit is supported with a plugin.
• Source code can be compiled in interactive or batch modes.
• Support for continuous compilation and testing.
• Support for incremental compilation and testing (only changed source code files
are recompiled).
• Support for multiple subprojects.
• The ability to package and publish JAR files.
• Generating and packaging project documentation.
• Simple integration with IntelliJ IDEA and VS Code.
• You can start a Scala REPL from within sbt, and all project classes and dependen‐
cies are automatically available on the classpath.
• Parallel task and test execution.
Understanding the sbt Philosophy
To use sbt it helps to understand its key concepts. The first thing to know is that sbt is
a build tool—it’s used to build Scala projects. You can use other tools like Ant, Maven,
Gradle, and Mill to build Scala projects, but sbt was the first Scala build tool, and it
remains widely used.
Directory Structure
A second thing to know is that sbt uses the same directory structure that Maven uses,
so a simple project with one unmanaged dependency (a JAR file), one source code
file, and one test file has this directory structure:
488
| Chapter 17: Building Projects with sbt
.
|-- build.sbt
|-- lib
|-- my-library.jar
|-- project
|
`-- build.properties
`-- src
|-- main
|
`-- scala
|
`-- example
|
`-- Hello.scala
`-- test
`-- scala
`-- example
`-- HelloTest.scala
As shown, Scala source code files go under src/main/scala, and test files go under src/
test/scala. If you want to include Java source code files in your project, they go under
src/main/java and src/test/java. As mentioned, JAR files in the lib directory will auto‐
matically be used as a dependency when you compile, test, and build your project.
Configuration Files Aren’t Necessary, But…
Strictly speaking, for an extremely simple project, the build.proper‐
ties and even the build.sbt file aren’t necessary, but as a practical
matter you’ll find them on every serious project.
build.sbt
The next thing to know is that most—if not all—of your project’s configuration infor‐
mation goes in a file named build.sbt that belongs in the root directory of your
project. Things to know about build.sbt include:
• It consists of settings, in a form of key/value pairs (name := MyProject), and
Scala code written with sbt’s custom DSL.
• Most projects start with at least three settings: the project name, the project ver‐
sion, and the Scala version that’s used to compile the project. These are specified
with keys named name, version, and scalaVersion.
• Small projects may consist of just a few settings, while large projects may consist
of dozens of lines of settings and Scala code.
• Managed dependencies are also specified in this file using the libraryDependen
cies key.
Building Projects with sbt
|
489
As a preview of that last point, the libraryDependencies setting looks like this:
libraryDependencies ++= Seq(
"org.typelevel" %% "cats-core" % "2.6.0",
"org.typelevel" %% "cats-effect" % "3.1.0"
)
Notice how this is just normal Scala code.
Other Notes
A few other things to know about sbt are:
• You can include multiple projects inside one sbt project. I demonstrate this in my
blog post “How to Create an sbt Project with Subprojects”.
• You can add your own import statements to the build.sbt file to use your own
classes in the build. These packages are imported by default:
— sbt.*
— sbt.Keys.*
— Process.*
As a final note, all the recipes in this chapter were tested with sbt version 1.5.1.
17.1 Creating a Project Directory Structure for sbt
Problem
You want to create the initial files and directories that are needed for a new Scala/sbt
project.
Solution
Use either a shell script or the sbt new command to create new projects. Both
approaches are shown here.
Option 1: Use a shell script
sbt uses the same directory structure as Maven, so if you’re on a Unix system you can
generate a compatible structure using a shell script. For example, the following shell
script creates the initial set of files and directories you’ll want for most projects:
#!/bin/sh
mkdir -p src/{main,test}/{java,resources,scala}
mkdir project
# create an initial build.sbt file
490
|
Chapter 17: Building Projects with sbt
echo 'name := "MyProject"
version := "0.1"
scalaVersion := "3.0.0"
// libraryDependencies ++= Seq(
//
"org.scalatest" %% "scalatest" % "3.2.3" % "test"
// )
' > build.sbt
# create a project/build.properties file with the desired sbt version
echo 'sbt.version=1.5.1' > project/build.properties
Just save that code as a shell script on Unix systems, make it executable, and run it
inside a new project directory to create all the subdirectories and files sbt needs. For
example, assuming this script is on your path and is named mkdirs4sbt, the process
looks like this:
/Users/Al/Projects> mkdir MyNewProject
/Users/Al/Projects> cd MyNewProject
/Users/Al/Projects/MyNewProject> mkdirs4sbt
If you have the tree command installed on your system and run it from the current
directory, you’ll see that those commands create these files and directories:
$ tree .
.
├── build.sbt
├── project
│
└── build.properties
└── src
├── main
│
├── java
│
├── resources
│
└── scala
└── test
├── java
├── resources
└── scala
As implied by the shell script, the build.sbt file has these contents:
name := "MyProject"
version := "0.1"
scalaVersion := "3.0.0"
// libraryDependencies ++= Seq(
//
"org.scalatest" %% "scalatest" % "3.2.3" % "test"
// )
17.1 Creating a Project Directory Structure for sbt
|
491
The first three lines set key/value pairs that you’ll want in every sbt project:
• name declares the name of your project.
• version sets the project’s version level.
• scalaVersion sets the version of Scala used for compilation.
After that the libraryDependencies line declares any dependencies your project has.
Because I use ScalaTest on most projects, I include it here.
I also declare libraryDependencies as a Seq because I usually have more than one
dependency in my projects. If you’re only adding one dependency you can declare
that line like this instead:
libraryDependencies += "org.scalatest" %% "scalatest" % "3.2.3" % "test"
Notice that in the first case I use ++= and in the second example I use +=. In both
cases this is because I’m adding this dependency to any other dependencies that may
be previously defined. Contrast this with the first three parameters, which are set
with :=. In those lines I’m setting a single value, but libraryDependencies lets you
add multiple dependencies.
With this shell script, the project/build.properties file is created with these contents:
sbt.version=1.5.1
This tells the sbt launcher that I want to use version 1.5.1 of sbt on this project.
This is just a simple starter script, and I show it first to demonstrate how easy it is to
create an sbt project. For a more complete shell script, sbtmkdirs, see my blog post
“sbtmkdirs: A Shell Script to Create a Scala SBT Project Directory Structure”.
Controlling scalac
In my projects I typically add a series of options to control how the
scalac compiler works with sbt. These are a few of the options I
use with Scala 3:
scalacOptions ++= Seq(
"-deprecation",
"-explain",
"-explain-types",
"-new-syntax",
"-unchecked",
"-Xfatal-warnings",
"-Xmigration"
)
You can add those options to the end of the build.sbt file, or inside
the settings method you’ll see in the sbt new section that follows.
492
|
Chapter 17: Building Projects with sbt
Option 2: Use sbt new
While that script shows how simple it is to stub out an initial sbt project, you can also
use the sbt new command to create new projects from prebuilt templates. These tem‐
plates are open source and created by other sbt users, and they’re used to create skele‐
ton sbt projects that are preconfigured to use one or more Scala tools, such as Scala‐
Test, Akka, and others. I’ve found that the templates also use different coding styles,
which can be helpful when you want to see different sbt configuration features.
To demonstrate how it works, this sbt new command is the approximate equivalent
of the shell script that I just showed:
$ sbt new scala/scala3.g8
This is what the process looks like from your operating system command line:
$ sbt new scala/scala3.g8
// some initial output here ...
A template to demonstrate a minimal Scala 3 application
name [Scala 3 Project Template]: My New Project
Template applied in ./my-new-project
The my-new-project directory now contains a build.sbt file and other directories and
files so you can use it for a new Scala/sbt project.
Discussion
The sbt new approach differs significantly from using a shell script, so it warrants
some further discussion. First, a few notes about how sbt new works:
• There are several templates available, but the sbt new scala/scala3.g8 com‐
mand finds and runs a template named scala3.g8 using a tool named Giter8.
• In this example, the scala3.g8 template can be found at this GitHub page.
• Per the Giter8 website, “Giter8 is a command line tool to generate files and direc‐
tories from templates published on GitHub or any other Git repository.”
• Because this command pulls a template from GitHub, it may take a few moments
to run.
• The command converts the project name “My New Project” into a directory
named my-new-project.
Because of the template approach, the directory structure and files this command cre‐
ates may change over time, but the structure created from the scala3.g8 template at
the time of this writing looks like this:
17.1 Creating a Project Directory Structure for sbt
|
493
$ tree .
.
├── README.md
├── build.sbt
├── project
│
└── build.properties
└── src
├── main
│
└── scala
│
└── Main.scala
└── test
└── scala
└── Test1.scala
Files created by the template
The template’s build.sbt file looks like this:
val scala3Version = "3.0.0"
lazy val root = project
.in(file("."))
.settings(
name := "scala3-simple",
version := "0.1.0",
scalaVersion := scala3Version,
libraryDependencies += "com.novocode" % "junit-interface" % "0.11" % "test"
)
As usual, the project/build.properties file contains the latest sbt version:
sbt.version=1.5.1
The build.sbt syntax is different than what I use in my shell script. While I find the
style in my shell script is easier to read when you’re first learning sbt, this second style
is preferred as your project gets larger, in part because it looks more like Scala code,
so it’s more like controlling your Scala project configuration with Scala code.
As your needs grow you’ll see additional build.sbt variables. For instance, if you’re
publishing a library to a public repository and want to control what goes in the
pom.xml file, you’ll want to specify organization-related parameters:
organization := "com.alvinalexander"
organizationName := "Alvin Alexander"
organizationHomepage := Some(url("https://alvinalexander.com"))
494
|
Chapter 17: Building Projects with sbt
Other parameters you might want to configure for this use case are shown on the sbt
project metadata page, including:
homepage := Some(url("https://www.scala-sbt.org"))
startYear := Some(2008)
description := "A build tool for Scala."
licenses += "GPLv2" -> url("https://www.gnu.org/licenses/gpl-2.0.html")
In summary, the main benefits of using the sbt new command are:
• Templates have been created to help you get started with ScalaTest, Akka, the
Play Framework, Lagom, Scala Native, and more.
• The templates currently generate build.sbt files that are all a little different, so you
can see different configuration approaches, i.e., what other users prefer.
You can find a list of templates that work with sbt new at the sbt website.
Files and Directories in .gitignore
Assuming that you’re keeping your code in a Git repository, you’ll
also want to create a .gitignore file to tell Git which sbt files and
directories it should ignore. These are two initial directories that
you’ll want to tell Git to ignore:
target/
project/target/
My sbtmkdirs script adds many other entries to account for tools
like IntelliJ IDEA, VS Code, Bloop, and Metals.
17.2 Building Projects with the sbt Command
Problem
You need to see how to compile, test, and run your projects with sbt commands.
Solution
Use the sbt command to build, compile, test, and package your projects. For
instance, this command compiles your project:
$ sbt compile
If you have a testing framework like ScalaTest configured in your project, this com‐
mand runs your project tests:
$ sbt test
And this command runs the main method in your project:
17.2 Building Projects with the sbt Command
|
495
$ sbt run
Creating a JAR file from an sbt project is covered in detail in Recipes 17.4 and 17.11,
but as a quick introduction, you use the package command to package a simple
project into a JAR file:
$ sbt package
Multiple @main Methods
If your project has multiple @main methods, see Recipe 17.10 for
information about how to work with them when using the run and
package commands.
Discussion
An important point to understand is that the sbt command on your system is just a
launcher. It starts the overall sbt process, but because sbt is capable of using different
versions of Scala and sbt, the sbt command just starts the process. When it starts, it
downloads any resources it needs, including the versions of Scala and sbt you want to
use in your project. (In fact, when you run sbt you’re actually running a Bash script
on Unix systems and a batch file on Windows.)
Because of this, it’s recommended that you put a setting like this in your project’s
project/build.properties file:
sbt.version=1.5.1
This tells the sbt launcher that you want to use sbt version 1.5.1 when running com‐
mands on this project. This is done to make sure that in a team environment, every‐
one is using the same version of sbt for the build process. If you don’t set that value,
sbt will set it to its latest version the first time it runs.
Batch and interactive modes
One other note about the sbt command is that it can be run in batch mode or inter‐
actively. The commands I showed previously are batch mode commands:
$
$
$
$
sbt
sbt
sbt
sbt
compile
test
run
package
They’re run from your operating system command line. They start the sbt launcher
and then run whatever command(s) you specify. Because they’re run from your oper‐
ating system command line, it takes sbt a little while to start up, so this is not the
preferred way to run sbt, unless you’re running it from a script, such as in a Unix cron
496
|
Chapter 17: Building Projects with sbt
process. (The cron system in Unix is a way of scheduling jobs to be run at certain
dates and times.)
The preferred way is to run sbt in interactive mode. In this mode you start sbt once
from the operating system command line:
$ sbt
Then you run commands from inside the sbt shell:
>
>
>
>
compile
test
run
package
These commands run significantly faster because sbt is already running, warmed up,
and ready to go. You can also continuously run the compile and test commands, as
shown in Recipe 17.6. In this use, these commands are run every time you change a
file in your project.
sbt Only Requires Java
You don’t need to have Scala installed to run sbt. It only requires
that you have the Java JDK installed.
17.3 Understanding build.sbt Syntax Styles
Problem
You need to write a build.sbt file in a more complicated style in order to take advan‐
tage of more powerful sbt features.
Solution
In Recipe 17.1 I showed that you can use this syntax for a simple project:
name := "MyProject"
version := "0.1"
scalaVersion := "3.0.0"
It’s also important to know that because of the power and flexibility of sbt, you can
also write that configuration in more of a Scala style, like this:
// define the “subproject” located in the current directory
lazy val root = (project in file("."))
.settings(
name := "MyProject",
version := "0.1",
17.3 Understanding build.sbt Syntax Styles
|
497
scalaVersion := "3.0.0"
)
or this bare style:
ThisBuild / scalaVersion := "3.0.0"
ThisBuild / version
:= "0.1"
ThisBuild / name
:= "MyProject"
These Styles Are Preferred
At the time of this writing in mid-2021, these styles are now prefer‐
red. It’s also important to know about them because you’ll see them
if you use the sbt new templates, and you’ll want to be comfortable
with them when your builds get more complicated.
You can also combine these styles. Here’s a combination of the last two examples with
added dependencies:
ThisBuild / scalaVersion := "3.0.0"
ThisBuild / version
:= "0.1"
val catsCore = "org.typelevel" %% "cats-core" % "2.6.0",
val catsEffect = "org.typelevel" %% "cats-effect" % "3.1.0"
lazy val root = (project in file("."))
.settings(
name := "MyProject",
libraryDependencies ++= Seq(
catsCore,
catsEffect
)
)
When your projects get more complicated to build, it’s nice to know that you can
build them with a combination of the sbt DSL and plain Scala code.
Discussion
An important thing to know is that in these examples, this syntax:
(project in file("."))
creates an instance of an sbt Project. Therefore, the .settings code that follows it is
a method that you’re calling on a Project object.
Another important thing to know is that this project in file line of code refers to
an sbt project that can be found in the current directory, where the . syntax refers to
the current directory. See my “How to Create an sbt Project with Subprojects” blog
post for more details on this syntax.
498
|
Chapter 17: Building Projects with sbt
17.4 Compiling, Running, and Packaging a Scala Project
Problem
You want to use sbt to compile and run a Scala project, and package the project as a
JAR file.
Solution
Create an sbt directory structure, add your code, then run sbt compile to compile
your project, sbt run to run your project, and sbt package to package your project
as a JAR file. Use these commands in either batch mode or interactive mode.
To demonstrate this, create a new sbt project as shown in Recipe 17.1, and then create
a file named Hello.scala in the src/main/scala directory with these contents:
package foo.bar.baz
@main def main = println("Hello, world")
As shown, in Scala the file’s package name doesn’t have to match the name of the
directory it’s in. In fact, for simple tests like this, you can place this file in the root
directory of your sbt project, if you prefer.
From the root directory of the project, this is how you compile the project:
$ sbt compile
run the project:
$ sbt run
and package the project:
$ sbt package
Those commands show sbt’s batch mode. When you’re working on a project, it’s gen‐
erally faster to run the same commands from inside the sbt shell in interactive mode:
$ sbt
sbt> compile
sbt> run
sbt> package
Note that the package command doesn’t show the name of the output JAR file it cre‐
ates. To see that name, run show package instead:
sbt> show package
// the output file name and location is shown here
17.4 Compiling, Running, and Packaging a Scala Project
|
499
Discussion
The first time you run sbt it may take a while to download everything it needs, but
after that first run it only downloads new dependencies as needed.
When you create a JAR file with the package command, it creates a normal JAR file,
whose contents you can show with the jar tvf command:
$ jar tvf ./target/scala-3.0.0/my-project_3.0.0-0.1.0.jar
288 Thu Jan 01 00:00:00 MST 1970 META-INF/MANIFEST.MF
969 Thu Jan 01 00:00:00 MST 1970 Main$.class
350 Thu Jan 01 00:00:00 MST 1970 Main.class
649 Thu Jan 01 00:00:00 MST 1970 Main.tasty
Interactive mode
Running sbt in interactive mode is preferred because it’s much faster; the JVM is
already loaded into memory, so there’s no initial startup lag time. Here’s the output
from running the clean, compile, and run commands from within the sbt
interpreter:
$ sbt
sbt> clean
[success] Total time: 0 s
sbt> compile
[info] compiling 1 Scala source ...
[success] Total time: 2 s
sbt> run
[info] Running foo.bar.baz.main
Hello, world
[success] Total time: 1 s
You can also run one command after the other in sbt. This is how you run the clean
command before the compile command:
sbt> clean; compile
Passing arguments to sbt at the command line
While I almost always run sbt in interactive mode, when you run sbt from your oper‐
ating system command line and need to pass arguments to your application, you’ll
need to put sbt’s run command in quotes along with the arguments. For example,
given this little application that prints its command-line arguments:
@main def hello(args: String*) =
print(s"Hello, ")
for a <- args do print(s"$a ")
500
|
Chapter 17: Building Projects with sbt
to pass command-line arguments to this application when running it with sbt,
enclose the run command and the arguments in quotes, like this:
$ sbt "run Charles Carmichael"
// omitted sbt output here ...
Hello, Charles Carmichael
Whether you’re running an application in sbt with this technique or starting sbt to
run it in interactive mode, you can pass JVM options to sbt. For instance, this exam‐
ple shows how to use sbt’s -J and -D options to pass arguments to the JVM while run‐
ning the same application:
$ sbt -v -J-Xmx2048m -Duser.timezone=America/Denver "run Charles Carmichael"
[process_args] java_version = 11
# Executing command line:
java
-Dfile.encoding=UTF-8
-Xmx2048m
-Duser.timezone=America/Denver
-jar
/Users/al/bin/sbt/bin/sbt-launch.jar
"run Charles Carmichael"
// omitted sbt output here ...
Hello, Charles Carmichael
The -v option stands for verbose, so in addition to seeing the output from my applica‐
tion at the very end, the earlier verbose output demonstrates that the -J and -D argu‐
ments are successfully passed into sbt.
Running in a Different JVM
Per the sbt page on forking, “the run task runs in the same JVM as
sbt.” I’ve found that at times—such as when creating a JavaFX or
other multithreaded application—this can be a problem. To fork a
new JVM when running your application from the sbt prompt, add
a line like this to your build.sbt file:
fork := true
There are several other options that let you control the forking pro‐
cess. See that documentation page for more details.
17.5 Understanding Other sbt Commands
Problem
You need to know what other common sbt commands are available, including how to
list all the commands and tasks that are available.
17.5 Understanding Other sbt Commands
|
501
Solution
There are many sbt commands available to you in addition to the clean, compile,
run, and package commands. You can list the available commands in at least three
ways:
• help prints a list of high-level commands.
• tasks shows a list of tasks that are defined for the current project (including
clean, compile, and run).
• You can also press the Tab key twice at the sbt prompt and it will show all the
commands that can be run—over three hundred commands with sbt 1.5.1.
You can get additional help on each command by typing help <command> or inspect
<command>. For example:
• help package provides help on the package command.
• inspect package provides in-depth details on how the package command runs.
Table 17-1 contains descriptions of the most common sbt commands.
Table 17-1. Common sbt commands
Command
clean
Description
Removes files produced by the build, including compiled classes, task caches, and
generated sources.
compile
Compiles source code files in src/main/scala, src/main/java, and the root directory of the
project.
~ compile
Automatically recompiles source code files while you’re running sbt in interactive mode.
console
Compiles the source code files in the project, puts them on the classpath, and starts the
Scala interpreter (REPL).
consoleQuick
Starts the Scala REPL with the project dependencies on the classpath, but without
compiling project source code files.
doc
Generates API documentation from your Scala source code.
help [arg]
Issued by itself, it lists the common commands that are currently available. When given an
argument, it provides a description of that task or key.
inspect [arg]
Displays details about how a given setting or task works (such as inspect package).
package
Creates a JAR file containing the files in src/main/scala, src/main/java, and resources in src/
main/resources.
packageDoc
Creates a JAR file containing API documentation generated from your Scala source code.
publish
Publishes your project to a remote repository. See Recipe 17.12.
publishLocal
Publishes project artifacts to a local Ivy repository.
502
|
Chapter 17: Building Projects with sbt
Command
reload
Description
Reloads the build definition files. Needed in interactive mode if you change any of these
files.
run
Compiles your code, and runs the main class from your project. If your project has multiple
main methods, you’ll be prompted to select one to run.
settings [arg]
Displays the settings defined for the current project. -v displays more settings, --v
displays even more, and -V displays all settings.
show [setting]
Displays the value of a setting, such as show sbtVersion.
show [task]
Evaluates the task and displays the value returned by it.
test
Compiles and runs all tests.
testQuick [test*]
Runs the tests that have not been run yet, failed the last time they were run, or had any
transitive dependencies recompiled since the last successful run
~ test
Automatically recompiles and reruns tests when project source code files change.
test:console
Compiles the source code files in the project, puts them on the classpath, and starts the
Scala REPL in test mode (so you can use ScalaTest, MUnit, ScalaCheck, etc.).
In addition to the built-in commands, when you use plugins they can also make their
own tasks available. For instance, the Scala.js plugin adds a fastLinkJS command to
sbt.
Discussion
As just one example of these commands, the console command starts a Scala REPL
session from your sbt command prompt:
sbt:MyProject> console
[info] Compiling 10 Scala sources to target/scala-3.0.0/classes ...
[info] Done compiling.
[info] Starting scala interpreter...
scala> _
At this point you can use this just like a normal Scala REPL, with the added benefit
that all of your project’s classes are available to you.
See Also
• The sbt command-line reference provides more examples and discussion of the
available commands.
17.5 Understanding Other sbt Commands
|
503
17.6 Continuous Compiling and Testing
Problem
You want to have sbt continuously compile and test your application’s source code
while you’re making changes to it.
Solution
You can continuously compile and test your code by running these commands from
sbt’s interactive mode, i.e., inside the sbt shell:
• ~compile
• ~test
• ~testQuick
When you run any of these commands, sbt watches your source code files and auto‐
matically recompiles them whenever it sees a file change. The ~compile command
simply recompiles your code when a file change is detected, while the test commands
additionally run your tests, as described in Table 17-2.
To demonstrate this, start the sbt shell from the root directory of an sbt project:
$ sbt
Then issue the ~compile command:
sbt:Packaging> ~ compile
[success] Total time: 0 s
[info] 1. Monitoring source files for root/compile ...
[info]
Press <enter> to interrupt or ? for more options.
Now, any time you change and save a source code file, sbt automatically recompiles it.
You’ll see new lines of output like these when sbt recompiles the code:
[info] Build triggered by src/main/scala/Foo.scala. Running 'compile'.
[info] compiling 1 Scala source to target/scala-3.0.0/classes ...
[success] Total time: 0 s
[info] 2. Monitoring source files for root/compile ...
[info]
Press <enter> to interrupt or '?' for more options
Similarly, you can use these sbt commands to automatically run your project’s tests
whenever a change is made:
~ test
~ testQuick
Notice that with all of these commands, spacing after the ~ character is optional.
Table 17-2 provides descriptions of these commands.
504
| Chapter 17: Building Projects with sbt
Table 17-2. sbt’s continuous compile/test commands
Command
~ compile
Description
Automatically recompiles source code files while you’re running sbt in interactive mode
~ test
Automatically recompiles and reruns tests when project source code files change
~ testQuick Automatically recompiles and reruns the tests that have not been run yet, failed the last time they were
run, or had any transitive dependencies recompiled since the last successful run
Using these commands is a little like using a continuous integration server on your
local system, albeit with your own code.
17.7 Managing Dependencies with sbt
Problem
You want to use one or more external libraries (dependencies) in your Scala/sbt
projects.
Solution
You can use both managed and unmanaged dependencies in your sbt projects, as
described in the following sections.
Unmanaged dependencies
If you have JAR files—unmanaged dependencies, or, more accurately, manage-ityourself dependencies—that you want to use in your project, just put them in the lib
folder under the root directory of your sbt project, and sbt will find them automati‐
cally. (You’ll need to run reload if you’re already in an sbt session.) If those JARs
depend on other JAR files, you’ll have to manually download those other JAR files
and copy them to the lib directory as well.
Managed dependencies
If you have a single managed dependency that you want to use in your project, such
ase the Cats core library, add a libraryDependencies line like this to your build.sbt
file:
libraryDependencies += "org.typelevel" %% "cats-core" % "2.6.0"
A simple but complete build.sbt file with one dependency looks like this:
name := "MyCatsProject"
version := "0.1"
scalaVersion := "3.0.0"
libraryDependencies += "org.typelevel" %% "cats-core" % "2.6.0"
17.7 Managing Dependencies with sbt
|
505
To add multiple managed dependencies to your project, add them using a Seq in your
build.sbt file:
libraryDependencies ++= Seq(
"org.typelevel" %% "cats-core" % "2.6.0",
"org.typelevel" %% "cats-effect" % "3.1.0"
)
Using Scala 2.13 dependencies in Scala 3 builds
When you want to use a Scala 2.13 dependency in a Scala 3 build.sbt file, use this
cross(CrossVersion.for3Use2_13) syntax:
libraryDependencies ++= Seq(
("org.scala-js" %%% "scalajs-dom" % "1.1.0").cross(CrossVersion.for3Use2_13),
("org.querki" %%% "jquery-facade" % "2.0").cross(CrossVersion.for3Use2_13)
)
This technique is demonstrated in Recipe 21.2, “Responding to Events with Scala.js”,
and Recipe 21.3, “Building Single-Page Applications with Scala.js”, where I include
Scala 2.13 dependencies into a Scala 3 sbt build file.
You can use Scala 2.13 dependencies in a Scala 3 build, unless those dependencies use
Scala 2 macros. See the Scala 3 Migration Guide for the latest integration details.
Discussion
A managed dependency is a dependency that’s managed by your build tool, in this
case sbt. In this situation, if library a.jar depends on b.jar, and that library depends on
c.jar, and those JAR files are kept in a Maven repository along with this relationship
information, then all you have to do is add a line to your build.sbt file like this:
libraryDependencies += "org.typelevel" %% "cats-core" % "2.6.0"
Through the magic of sbt, Coursier, and other tools in the ecosystem, the other JAR
files will be downloaded and included in your project automatically.
When using a standalone JAR file as an unmanaged dependency, you have to manage
this yourself. Given the same situation as the previous paragraph, if you want to use
the library a.jar in your project, you must manually download a.jar, and then you
have to know about the dependency on b.jar and the transitive dependency on c.jar,
then download all those files yourself and place them in your project’s lib directory.
Most Projects Use Managed Dependencies
Manually managing JAR files in the lib directory can work for very
small projects, but quickly becomes much harder when transitive
dependencies creep in.
506
|
Chapter 17: Building Projects with sbt
As mentioned in Chapter 17, under the hood, sbt uses Coursier for library manage‐
ment. As a result, sbt lets you easily use the wealth of Java libraries that have been
created over the years in your Scala projects.
The libraryDependencies syntax
There are two general forms for adding a managed dependency to a build.sbt file. In
the first form, you specify the groupID, artifactID, and revision:
libraryDependencies += groupID % artifactID % revision
In the second form, you add an optional configuration parameter:
libraryDependencies += groupID % artifactID % revision % configuration
The groupID, artifactID, and revision strings correspond to what tools like Cours‐
ier and Apache Ivy require to retrieve the library you want:
• groupID is typically a Java/Scala-style package name, such as "org.typelevel".
• artifactID states what specific product you want, such as "cats-core".
• revision declares the version/revision of the artifact (module) you want, such as
"2.6.0".
Typically, the module developer states this information in their documentation. For
instance, at the time of this writing, the MUnit GitHub page has a maven-central link
on it, and when you click that you’re taken to an index.scala-lang.org page. The Ver‐
sion Matrix on that page shows that when using Scala 3.0.0, the latest MUnit version
is 0.7.25, and it provides this libraryDependencies string for you:
libraryDependencies += "org.scalameta" %% "munit" % "0.7.25"
To show the relationship between this string and the Maven information for this arti‐
fact, you can also use that same web page and click on the Maven tab, where you’ll see
this information:
<dependency>
<groupId>org.scalameta</groupId>
<artifactId>munit_3.0.0</artifactId>
<version>0.7.25</version>
</dependency>
That shows the correspondence between the sbt configuration strings and the param‐
eter names in a Maven XML file.
Methods used to build libraryDependencies
The symbols +=, %, and %% used in build.sbt are part of sbt’s DSL. They’re described in
Table 17-3.
17.7 Managing Dependencies with sbt
|
507
Table 17-3. Methods used to build libraryDependencies strings
Method Description
Appends to the key’s value. The build.sbt file works with settings defined as key/value pairs. In the examples
+=
shown, libraryDependencies is a key, and it’s shown with several different values.
%
A method used to construct an Apache Ivy “Module ID” from the strings you supply.
%%
When used after the groupID, it automatically adds your project’s Scala version to the end of the artifact name.
%%%
Use this instead of %% when using artifacts for Scala.js and Scala Native.
You can specify %, %%, or %%% after the groupID. This Scala 2.13 example shows the %
method:
libraryDependencies += "org.scalatest" *%* "scalatest_2.13" % "3.0.5" % "test"
I always declare the Scala version I’m using in my project with the scalaVersion
parameter—2.13, in this case—so redeclaring it here can be error-prone. Therefore,
the %% method is almost always used:
libraryDependencies += "org.scalatest" *%%* "scalatest" % "3.0.5" % "test"
When your Scala version is 2.13.x, those two examples are equivalent. The %% method
adds your project’s major Scala version to the end of the artifact name. Adding the
Scala version to the artifactID is required because modules may be compiled for
different Scala versions.
Dependencies for Scala.js and Scala Native
When specifying dependencies that have been specifically packaged for Scala.js and
Scala Native, use three percent symbols between the groupID and artifactID fields,
as shown here:
libraryDependencies += "org.querki" %%% "jquery-facade" % "1.2"
---
As just shown in the previous "org.scalatest" example, you use %% to include libra‐
ries that are compiled for Scala, but when a library is compiled for Scala.js or Scala
Native, use %%% instead. As explained in “Simple Command Line Tools with Scala
Native,” just as two percent symbols tell sbt to use the right version of a dependency,
three percent symbols tell sbt to use the correct target environment, currently either
Scala.js or Scala Native.
The configuration field
Note that in some of the examples, the value Test or the string "test" is added after
the revision:
libraryDependencies += "com.typesafe.akka" %% "akka-testkit" % "2.5.19" % Test
libraryDependencies += "org.scalatest" %% "scalatest" % "3.0.5" % "test"
508
|
Chapter 17: Building Projects with sbt
These examples specify the configuration field for adding a dependency:
libraryDependencies += groupID % artifactID % revision % configuration
This configuration parameter is typically used for testing dependencies, and you
declare them with "test" or Test, as shown. Dependencies declared like this will
only be added to the classpath for sbt’s test configuration. This is useful for adding
dependencies like ScalaTest, MUnit, and Mockito, which are used when you test your
application but not when you compile and run the application.
Where are the dependencies?
You may wonder where your project’s JAR files are located after they’re downloaded.
Per the Coursier cache documentation, its cache location is platform-dependent, and
the files it downloads are kept in these locations:
• On macOS: ~/Library/Caches/Coursier
• On Linux, ~/.cache/coursier/v1 (this also applies to Linux-based CI environments,
and FreeBSD too)
• On Windows: %LOCALAPPDATA%\Coursier\Cache\v1, which, for user Alex,
typically corresponds to C:\Users\Alex\AppData\Local\Coursier\Cache\v1
For instance, when you’re using macOS and have a dependency like this in your
build.sbt file while using Scala 2.13:
libraryDependencies += "org.scalatest" %% "scalatest" % "3.2.3" % "test"
the resulting JAR file will be found in a directory like this:
/Users/al/Library/Caches/Coursier/v1/https/repo1.maven.org/maven2/org/ ↵
scala-lang/scala-library/2.13.3/scala-library-2.13.3.jar
Use Debug Mode When Curious
When you’re curious about how things work inside the sbt shell,
issue its debug command before running your other commands:
sbt> debug
Now when you run sbt commands like this, you’ll see dozens of
lines of output, maybe hundreds:
sbt> clean; compile
After you’ve seen what you wanted to see, you can switch back to
other logging modes, such as error, warning, or info.
17.7 Managing Dependencies with sbt
|
509
Repositories
sbt uses the standard Maven Central repository by default, so it can locate most libra‐
ries when you add a libraryDependencies line to a build.sbt file. In these cases,
there’s no need for you to tell sbt where to look for the file. However, when a library is
not in a standard repository, you can tell sbt how to find the file on the internet. This
process is referred to as adding a resolver, and you can learn more about it in the sbt
resolvers documentation.
17.8 Controlling Which Version of a Managed Dependency
Is Used
Problem
In a Scala/sbt project you want to make sure you always have the desired version of a
managed dependency, including the latest integration release, the milestone release,
or other versions.
Solution
The revision field in the libraryDependencies setting isn’t limited to specifying a
single, fixed version. According to the Apache Ivy dependency documentation you
can specify strings such as latest.integration, latest.milestone, and other
terms.
As an example of this flexibility, rather than specifying version 1.8 of a foobar mod‐
ule, as shown here:
libraryDependencies += "org.foobar" %% "foobar" % "1.8"
you can request the latest.integration version like this:
libraryDependencies += "org.foobar" %% "foobar" % "latest.integration"
The module developer documentation often tells you what versions are available and
should be used, depending on your desires. You can also find all the module versions
on Maven Central, such as all the ScalaTest versions from MvnRepository.
Revision field options
Once you know what version(s) you want, you can specify tags to control the version
of the module that will be downloaded and used. Although as of version 1.3, sbt now
uses Coursier for artifact fetching (rather than Ivy), sbt still supports the Ivy syntax,
and the Ivy dependency documentation states that the following tags can be used:
510
|
Chapter 17: Building Projects with sbt
• latest.integration.
• latest.[any status], such as latest.milestone.
• You can end the revision with a + character. This selects the latest subrevision of
the dependency module. For instance, if the dependency module exists in revi‐
sions 1.0.3, 1.0.7, and 1.1.2, specifying 1.0.+ as your dependency will result in
1.0.7 being selected.
• You can use version ranges, as shown in the following examples:
— [1.0,2.0] matches all versions greater or equal to 1.0 and lower or equal to 2.0
— [1.0,2.0[ matches all versions greater or equal to 1.0 and lower than 2.0
— ]1.0,2.0] matches all versions greater than 1.0 and lower or equal to 2.0
— ]1.0,2.0[ matches all versions greater than 1.0 and lower than 2.0
— [1.0,) matches all versions greater or equal to 1.0
— ]1.0,) matches all versions greater than 1.0
— (,2.0] matches all versions lower or equal to 2.0
— (,2.0[ matches all versions lower than 2.0
These configuration examples are courtesy of the Apache Ivy dependency documen‐
tation.
Discussion
To demonstrate a couple of these revision field options, this example shows the lat
est.integration tag used with ScalaTest:
libraryDependencies += "org.scalatest" %% "scalatest" % "latest.integration" ↵
% "test"
At the time of this writing that configuration retrieves 15 ScalaTest JAR files with
names like these:
scalatest_2.13-3.3.0-SNAP3.jar
scalatest-core_2.13-3.3.0-SNAP3.jar
scalatest-funspec_2.13-3.3.0-SNAP3.jar
You can see that output by putting that configuration line in a build.sbt file, running
reload if you’re in sbt interactive mode, and then running commands like update or
compile.
As a second example, this is how you use the + tag:
libraryDependencies += "org.scalatest" %% "scalatest" % "3.0.+" % "test"
17.8 Controlling Which Version of a Managed Dependency Is Used
|
511
When I run the update command after adding that configuration line, I see that it
retrieves these JAR files:
scalactic_2.13-3.0.9.jar
scalatest_2.13-3.0.9.jar
See Also
For more information on managing sbt dependency versions, see these scala-sbt.org
pages:
• Library dependencies
• Library management
17.9 Generating Project API Documentation
Problem
In an sbt project, you’ve marked up your Scala source code with Scaladoc comments
and want to generate the API documentation for your project.
Solution
Depending on your documentation needs, use any of the sbt commands listed in
Table 17-4.
Table 17-4. sbt commands related to project documentation
sbt Command
doc
Description
Creates Scaladoc API documentation from the Scala source code files located in src/main/
scala
Test / doc
Creates Scaladoc API documentation from the Scala source code files located in src/test/
scala
packageDoc
Creates a JAR file containing the API documentation created from the Scala source code in
src/main/scala
Test / packageDoc
Creates a JAR file containing the API documentation created from the Scala source code in
src/test/scala
publish
Publishes artifacts to the repository defined by the publish-to setting
publishLocal
Publishes artifacts to the local Ivy repository as described
For example, to generate API documentation, use the doc command:
$ sbt doc
512
|
Chapter 17: Building Projects with sbt
When you run this command, its output is written under the target/scala-3.0.0/api
directory, where the 3.0.0 portion represents the Scala version you’re using in your
project, in this case Scala 3.0.0. Similarly, Test/doc output is written to the target/
scala-3.0.0/test-api/ subdirectory, and output from publishLocal is written under a
$HOME/.ivy2/local/ProjectName directory on your system, where ProjectName is the
name of your sbt project. The other commands also show where their output is
written.
Discussion
Some sbt commands don’t show the output files they generate, so if you want to see
those filenames, precede commands like doc or package with show, like this:
sbt> show doc
target/scala-3.0.0/api
sbt> show Test/doc
[info] target/scala-3.0.0/test-api
sbt> show package
target/scala-3.0.0/stringutils_3.0.0-1.0.jar
The commands run as usual and then show their output files when they finish.
See Also
• The sbt command line reference has more information on these commands.
• The Scaladoc tags (@see, @param, etc.) are listed on this Scaladoc for library
authors page.
• See Recipe 17.12 for examples of using publish and publishLocal.
17.10 Specifying a Main Class to Run with sbt
Problem
You have multiple main methods in a Scala/sbt project and you want to specify (a)
which main method should be run when you type sbt run, or (b) the main method
that should be invoked when your project is packaged as a JAR file.
Solution
There are slightly different solutions depending on whether you want to run a main
method with sbt run, or your application is packaged as a JAR file.
17.10 Specifying a Main Class to Run with sbt
|
513
Specifying a main method for sbt run
If you have multiple main methods in your project and want to specify which main
method to run when typing sbt run, add a line like this to your build.sbt file:
// set the main class for the 'sbt run' task
Compile / run / mainClass := Some("com.alvinalexander.Main1")
In this example, Main1 is an @main method in the com.alvinalexander package.
Another option is to use sbt’s run-main command to specify the class to run. This is
how it works from your operating system command line:
$ sbt "runMain com.alvinalexander.Main1"
[info] Running com.alvinalexander.Main1
hello
[success] Total time: 1 s
This is how it works inside the sbt shell:
$ sbt
sbt> runMain com.alvinalexander.Main1
[info] Running com.alvinalexander.Main1
hello
[success] Total time: 1 s
Specifying a main method for a packaged JAR file
To specify the class that will be added to the manifest when your application is pack‐
aged as a JAR file, add this line to your build.sbt file:
Compile / packageBin / mainClass := Some("com.alvinalexander.Main2")
Now when you create a JAR file for your application using the package or show pack
age commands:
sbt> show package
[info] target/scala-3.0.0/myapp_3.0.0-1.0.jar
The resulting META-INF/MANIFEST.MF file inside the JAR file that’s created con‐
tains the main class you specified:
Main-Class: com.alvinalexander.Main2
Discussion
If you have only one @main method in your application, sbt automatically runs that
method. In this case, these configuration lines aren’t necessary.
If you have multiple @main methods in your project and don’t use any of the
approaches shown in the Solution, sbt will prompt you with a list of @main methods it
finds when you execute sbt run:
514
|
Chapter 17: Building Projects with sbt
Multiple main classes detected, select one to run:
[1] com.alvinalexander.myproject.Foo
[2] com.alvinalexander.myproject.Bar
The following code shows what a build.sbt file with both of the mainClass settings
looks like:
name := "MyProject"
version := "0.1"
scalaVersion := "3.0.0"
// set the main class for the 'sbt run' task
Compile / run / mainClass := Some("com.alvinalexander.myproject.Foo")
// set the main class for the 'sbt package' task
Compile / packageBin / mainClass := Some("com.alvinalexander.myproject.Foo")
Those mainClass settings are for an @main method named Foo in the package
com.alvinalexander.myproject.
See Also
See Recipe 1.4, “Compiling with scalac and Running with scala”, for more details on
@main methods and main methods in objects.
17.11 Deploying a Single Executable JAR File
Problem
You’re building a Scala application with sbt that has multiple dependencies, and you
want to deploy a single executable JAR file.
Solution
The sbt package command creates a JAR file that includes the class files it compiles
from your source code, along with the resources in your project in src/main/resources,
but it doesn’t include your project dependencies or the libraries from the Scala distri‐
bution that are needed to execute the JAR file with the java command. Therefore, use
the sbt-assembly plugin to create a single JAR file that includes all of these resources.
Using sbt-assembly
The installation instructions for sbt-assembly may change, but at the time of this
writing all you have to do is create a project/assembly.sbt file under your project’s root
directory that contains this line:
addSbtPlugin("com.eed3si9n" % "sbt-assembly" % "0.15.0")
17.11 Deploying a Single Executable JAR File
|
515
After that, just reload your sbt project and sbt-assembly is ready to use.
Now—assuming that your project has a single @main method—run the sbt assembly
command to create a single executable JAR file:
sbt> assembly
To see the location of the output JAR file when running assembly, prepend that com‐
mand with show:
sbt> show assembly
[info] compiling 1 Scala source to target/scala-3.0.0/classes ...
[info] target/scala-3.0.0/MyApp.jar
As a more concrete example, I’ve written a “Knowledge Browser” with Scala and Jav‐
aFX, and when I build it with sbt-assembly I can see all the dependencies it’s includ‐
ing, as well as the location of the final JAR file:
[info] Including from cache: rome-1.8.1.jar
[info] Including from cache: scala-xml_2.12-1.0.6.jar
// more ooutput here ...
[info] Including from cache: jsoup-1.11.2.jar
[info] Including from cache: jfxrt.jar
[info] Packaging target/scala-2.12/Knol-assembly-1.0.jar ...
[info] Done packaging.
The sbt-assembly plugin works by copying the class files from your source code, your
dependencies, and the Scala library into one single JAR file that can be executed with
the java interpreter.
Discussion
You can customize how sbt-assembly works in a variety of ways. First, if your project
has multiple @main methods, add this setting to your build.sbt file to specify the @main
method for your assembled JAR file:
assembly / mainClass := Some("com.alvinalexander.myproject.Foo")
That setting is for an @main method named Foo in the package com.alvin
alexander.myproject.
To set the name of the generated JAR file, use this setting:
assembly / assemblyJarName := "MyApp.jar"
To skip running the tests during assembly, use this setting:
assembly / test := {}
You can verify that the assemblyJarName setting works when you run the show assem
bly command. To verify the mainClass setting, cd into the directory where your JAR
516
|
Chapter 17: Building Projects with sbt
file is located, extract the META-INF/MANIFEST.MF file from that JAR file, and then
examine its contents:
$ cd target/scala-3.0.0
$ jar xvf MyApp.jar META-INF/MANIFEST.MF
inflated: META-INF/MANIFEST.MF
$ cat META-INF/MANIFEST.MF
Manifest-Version: 1.0
Main-Class: com.alvinalexander.myproject.Foo
// more output ...
As shown, the Main-Class setting in that file matches the mainClass setting in the
build.sbt file.
See Also
• The sbt-assembly project.
• Currently, it’s easiest to see the latest assembly version and other information on
this index.scala-lang.org page.
17.12 Publishing Your Library
Problem
You’ve created a Scala project or library with sbt that you want to share with other
users, creating all the files you need for a Maven/Ivy repository.
Solution
There are just a couple steps for this solution:
1. Define your repository information.
2. Publish your project with sbt publish or sbt publishLocal.
For my StringUtils library I create a build.sbt file that contains the usual project name,
version, and scalaVersion settings. Then I add a publishTo configuration line that
configures the location for where the publish task should send its output:
lazy val root = (project in file("."))
.settings(
name := "StringUtils",
version := "1.0",
scalaVersion := "3.0.0"
)
17.12 Publishing Your Library
|
517
// for the 'publish' task; tells sbt to write its output to the
// "out" subdirectory
publishTo := Some(Resolver.file("file", new File("./out")))
Now when I run sbt publish, I see sbt output that looks like this:
sbt> publish
[info] published sutils_3.0.0 to
out/sutils/sutils_3.0.0/1.0.part/sutils_3.0.0-1.0.pom
[info] published sutils_3.0.0 to
out/sutils/sutils_3.0.0/1.0.part/sutils_3.0.0-1.0.jar
[info] published sutils_3.0.0 to
out/sutils/sutils_3.0.0/1.0.part/sutils_3.0.0-1.0-sources.jar
[info] published sutils_3.0.0 to
out/sutils/sutils_3.0.0/1.0.part/sutils_3.0.0-1.0-javadoc.jar
In that output I changed the actual out/stringutils output directory name to out/sutils
so it would fit in the width allowed (i.e., the actual directory name is out/stringutils).
Next, without doing anything to define a local Ivy repository, I get the following
results when running the publishLocal task:
sbt> publishLocal
[info] Main Scala API documentation successful.
[info] :: delivering :: sutils#sutils_3.0.0;1.0 :: 1.0 ...
[info] delivering ivy file to target/scala-3.0.0/ivy-1.0.xml
[info] published sutils_3.0.0 to
~/.ivy2/local/sutils/sutils_3.0.0/1.0/poms/sutils_3.0.0.pom
[info] published sutils_3.0.0 to
~/.ivy2/local/sutils/sutils_3.0.0/1.0/jars/sutils_3.0.0.jar
[info] published sutils_3.0.0 to
~/.ivy2/local/sutils/sutils_3.0.0/1.0/srcs/sutils_3.0.0-sources.jar
[info] published sutils_3.0.0 to
~/.ivy2/local/sutils/sutils_3.0.0/1.0/out/sutils_3.0.0-javadoc.jar
[info] published ivy to ~/.ivy2/local/sutils/sutils_3.0.0/1.0/ivys/ivy.xml
Again, in that output I changed the name of my library from stringutils to sutils
so the output would fit without wrapping.
Discussion
The sbt publishing documentation says publishing “consists of uploading a descrip‐
tor, such as an Ivy file or Maven POM, and artifacts, such as a jar or war, to a reposi‐
tory so that other projects can specify your project as a dependency.”
518
| Chapter 17: Building Projects with sbt
It further provides these descriptions of the publish and publishLocal tasks:
• The publish action is used to publish your project to a remote repository. To use
publishing, you need to specify the repository to publish to and the credentials to
use. Once these are set up, you can run publish.
• The publishLocal action is used to publish your project to a local Ivy repository.
You can then use this project from other projects on the same machine.
In my example I use publish to publish my project to a local directory. The sbt pub‐
lishing page discusses the steps necessary to publish your artifacts to a remote reposi‐
tory.
See Also
• The sbt artifacts page describes how to control what artifacts should be created
during a build.
• The sbt cross building page shows how to “build and publish your project against
multiple versions of Scala.”
17.12 Publishing Your Library
|
519
CHAPTER 18
Concurrency with Scala Futures
and Akka Actors
In Scala, you can still use Java threads:
val thread = new Thread {
override def run =
// put your long-running code here ...
Thread.sleep(100)
println("Hello, world")
}
thread.start
However, futures and the Actor model are the preferred approaches for concurrency:
Futures
Are good for one-shot, “handle this relatively slow and potentially long-running
computation, and call me back with a result when you’re done” processing.
Actors
Are good for processes that run in parallel, live for a long time, and may respond
to many requests during their lifetime.
Both futures and actors let you write code at a much higher level of abstraction than
threads, and once you’re comfortable with them, they let you focus on solving the
problem at hand, rather than having to worry about the low-level problems of
threads, locks, and shared data.
Akka and Scala 3
At the time of this writing, Akka has not been ported to Scala 3.
Therefore, all the examples in this chapter use the latest version of
Scala 2.
521
Futures
The Future Scaladoc states, “A Future represents a value which may or may not cur‐
rently be available, but will be available at some point, or an exception if that value
could not be made available.”
The Scala Future is a nice improvement over the Java Thread in several ways:
• Like the typical use of a Thread, a Future is used when you want to create a little
“pocket of concurrency” to run a relatively short-lived task in parallel.
• When a Future is finished it’s said to be completed, and when it’s completed you
can process its result using many different callback and transformation methods,
including onComplete, andThen, foreach, map, and recoverWith.
Several of these methods are demonstrated in this chapter.
Akka and the Actor Model
Akka is an Actor model library for Scala and Java programmers. The first edition of
this book covered what is now known as Akka Classic actors. Classic uses untyped
actors, and I found them very easy to get started with back in 2013, and they’re still
supported today.
These days the new approach is called Akka Typed, and as the name implies, these
actors are much more type-safe than the Classic actors, helping to eliminate errors at
compile time. This edition of the book covers Akka Typed.
The Actor model
Before digging into the Akka recipes in this chapter, it will help to understand the
Actor model. The first thing to understand about it is the concept of an actor:
• An actor is the smallest unit when building an actor-based system, like a class in
an OOP system.
• Like a class, an actor encapsulates state and behavior.
• You can’t peek inside an actor to get its state. You can send an actor a message
requesting state information—like asking a person how they’re feeling—but you
can’t reach in and execute one of its methods, or access its fields.
• An actor has a mailbox—an inbox—and its purpose in life is to process the mes‐
sages in its inbox.
• You communicate with an actor by sending it an immutable message. Like send‐
ing someone an email message, these messages go into the actor’s mailbox.
522
|
Chapter 18: Concurrency with Scala Futures and Akka Actors
• When an actor receives a message, it’s like taking a letter out of its mailbox. It
opens the letter, processes the message using one of its algorithms, then moves
on to the next letter in the mailbox. If there are no more messages, the actor
waits until it receives one.
In an application, actors form hierarchies, like a family or a business organization.
Lightbend—the company that created and is the lead maintainer of Akka—recom‐
mends thinking of an actor as being like a person, such as a person in a business
organization:
• An actor has one parent (supervisor): the actor that created it.
• An actor may have children. Thinking of this as a business, a president may have
a number of vice presidents (VPs). Those VPs will have many subordinates, and
so on.
• An actor may have siblings. For instance, there may be 10 VPs directly under the
president in an organization.
A best practice of developing actor systems is to delegate, delegate, delegate, espe‐
cially if behavior will block. In a business, the president may want something done, so
he delegates that work to a VP. That VP delegates work to a manager, and so on, until
the work is eventually performed by one or more subordinates.
Delegation is important. Imagine that the work takes several person-years. If the
president had to handle that work himself, he couldn’t respond to other needs—while
the VPs and other employees would all be idle.
In addition to those general statements about actors, there are a few important things
to know about Akka’s implementation of the Actor model:
• You can’t reach into an Akka actor to get information about its state. When you
instantiate an Actor in your code, Akka gives you an ActorRef, which is essen‐
tially a façade between you and the actor.
• Behind the scenes, Akka actors run on real threads; many actors may share one
thread.
• There are different mailbox implementations to choose from, and you can also
create your own mailbox type.
• When an actor terminates (intentionally or unintentionally), messages in its
mailbox go into the system’s “dead letter mailbox,” as discussed in Recipe 18.8.
Concurrency with Scala Futures and Akka Actors
|
523
Benefits of actors
In general, the Actor model—which has been implemented in other languages such
as Erlang and Dart—gives you the benefit of offering a high level of abstraction for
achieving long-running concurrency and parallelism. Beyond that, the Akka actor
library adds these benefits:
Lightweight, event-driven processes
The documentation states that there can be approximately 2.5 million actors per
gigabyte of RAM, and they can process up to 50 million messages per second.
Fault tolerance
Akka actors can be used to create “self-healing systems.”
Location transparency
Akka actors can span multiple JVMs and servers; they’re designed to work in a
distributed environment using pure message-passing.
A “high level of abstraction” can also be read as “ease of use.” It doesn’t take very long
to understand the Actor model, and once you do, you’ll be able to write complex con‐
current applications much more easily than you can with the basic Java libraries.
Writing actors is like modeling the real world, so for a pizza store you can write one
actor to make the pizza, another to take orders, another one to deliver orders, etc.
While I generally think of actors as being like humans that act independent of other
humans, I also like to think of them as being like a web service on someone else’s
servers that I can’t control. I can send messages to that web service to ask it for infor‐
mation, but I can’t reach into the web service to modify its state or access its resour‐
ces; I can only work through its API, which is just like sending immutable messages
with actors.
Hopefully, these notes about the Actor model in general, and the Akka implementa‐
tion specifically, will be helpful in understanding the recipes in this chapter.
One More Thing: Parallel Collections Classes
The Scala parallel collections classes used to be integrated with the main Scala release,
but they are now available as a separate project.
This example from the first edition of this book gives you an idea of how parallel col‐
lections classes work:
import scala.collection.parallel.immutable.ParVector
val v = ParVector.range(0, 10)
// ParVector(0,1,2,3,4,5,6,7,8,9)
v.foreach{ e => Thread.sleep(10); print(e) }
// 0516273849
As shown in the foreach output, because collections like ParVector are truly imple‐
mented in a parallel manner, output from their methods—even a simple method like
524
|
Chapter 18: Concurrency with Scala Futures and Akka Actors
foreach—is indeterminate. For more information, see my blog post “Examples of
How to Use Parallel Collections in Scala”.
Parallel Versus Concurrent
There are interesting debates about what the terms concurrent and
parallel mean. I tend to use them interchangeably, but for one
interesting discussion of their differences—such as concurrency
being one vending machine with two lines and parallelism being
two vending machines and two lines—see the blog post “Parallel‐
ism and Concurrency Need Different Tools” by Yossi Kreinin.
18.1 Creating a Future
Problem
You want a simple way to run a task concurrently with Future and are willing to
block your application thread until the task is finished.
Solution
A future gives you a simple way to run an algorithm concurrently. A future starts run‐
ning concurrently when you create it and returns a result at some point, well…in the
future. In Scala, it’s said that a future returns eventually.
The following example shows how to create a future and then block to wait for its
result. Blocking when writing parallel algorithms is not a good thing—you should
only block if you really, really have to. But this is useful as an initial example, first
because it’s a little easier to reason about and second because it gets the bad stuff out
of the way early.
This code performs the calculation 1 + 1 at some time in the future. When it’s fin‐
ished with the calculation, it returns its result:
// 1 import
import
import
import
import
the necessary imports
scala.concurrent.{Await, Future}
scala.concurrent.duration.*
scala.concurrent.ExecutionContext.Implicits.global
scala.util.Random
Thread.sleep
@main def futures1 =
// 1: create a Future that runs in a separate thread and
// returns “eventually”
val f = Future {
// this could be any long-running algorithm
18.1 Creating a Future
|
525
sleep(Random.nextInt(500))
1 + 1
}
// 2: this is blocking, i.e., pausing the current thread to wait for a
// result from another thread
val result = Await.result(f, 1.second)
println(result)
sleep(1_000)
Here’s how this code works:
• The import statements bring the code into scope that’s needed.
• The ExecutionContext.Implicits.global import statement imports the
“default global execution context.” You can think of an execution context as being
a thread pool, and this is a simple way to get access to a thread pool.
• A Future is created after the first comment. As shown, creating a future is simple;
just pass it a block of code you want to run. This is the code that will be executed
concurrently, and it will return at some point in the future.
• The Await.result method call declares that it will wait for up to one second for
the Future to return. If the Future doesn’t return within that time, it throws a
java.util.concurrent.TimeoutException.
• The sleep statement at the end of the code is used so the program will keep run‐
ning while the Future is off being calculated. You won’t need this in real-world
programs, but in small example programs like this, you have to keep the main
JVM thread running.
It’s worth repeating that blocking is bad; you shouldn’t write code like this unless you
have to. The examples in the recipes that follow show much better approaches.
If your future takes longer than the wait time you specify, you’ll get an exception that
looks like this:
java.util.concurrent.TimeoutException: Future timed out after [1 second]
You can demonstrate this for yourself by changing the Random.nextInt(500) in the
code to a value like 2_000.
Discussion
Although using a future is straightforward, there are many concepts behind it. The
following statements describe the basic concepts of a future, as well as the Execution
Context that a future relies on:
526
|
Chapter 18: Concurrency with Scala Futures and Akka Actors
• The futures and promises page on the official Scala website defines a future “as a
type of read-only placeholder object created for a result which doesn’t yet exist.”
• Similar to the way an Option[A] is a container that holds either a Some[A] or a
None, a Future[A] is a container that runs a computation concurrently and at
some future time may return either (a) a result of type A or (b) an exception.
• Your algorithm starts running at some nondeterministic time after the future is
created, running on a thread assigned to it by the execution context.
• The result of the computation becomes available once the future completes.
• When it returns a result, a future is said to be completed. It may be either success‐
fully completed or failed.
• As shown in the next several recipes, a future provides an API for reading the
value that has been computed. This includes callback and transformation meth‐
ods such as foreach, onComplete, map, etc. A for comprehension can also be
used and is shown in Recipe 18.4.
• An ExecutionContext executes a task it’s given. You can think of it as being like a
thread pool.
In my code I provide the default global execution context using this ExecutionCon
text import statement:
import scala.concurrent.ExecutionContext.Implicits.global
In reviewing this book, Hermann Hueck noted that there are many ways to import
and use an ExecutionContext. For example, given this initial import statement:
import scala.concurrent.ExecutionContext
these are different ways you can provide an ExecutionContext to your code:
// define a given with name 'ec'
given ec: ExecutionContext = ExecutionContext.global
// for this example we just need the type; the name is not relevant
given ExecutionContext = ExecutionContext.global
// imports all givens in Implicits
import ExecutionContext.Implicits.given
// imports the given of the type ExecutionContext
import ExecutionContext.Implicits.{given ExecutionContext}
When you need flexibility in working with an ExecutionContext, it’s helpful to know
all of these approaches.
18.1 Creating a Future
|
527
See Also
• The futures and promises page on the official Scala website covers futures (and
promises, which I don’t cover) in depth, with many examples.
• The scala.concurrent.ExecutionContext Scaladoc.
18.2 Using Callback and Transformation Methods with
Futures
Problem
You want to run a task concurrently, including having different ways to handle its
result when the task finishes.
Solution
The previous recipe showed a simple way to use a Future, but because it blocks, that
technique should only be used very rarely. Much better approaches are shown in this
recipe.
Common code
To simplify the following code, please note that all the following examples depend on
these import statements:
import
import
import
import
scala.concurrent.Future
scala.concurrent.ExecutionContext.Implicits.global
scala.util.{Failure, Success, Random}
Thread.sleep
Solution 1: Use onComplete
The Future class has three callback methods: onComplete, andThen, and foreach.
The following example demonstrates onComplete:
def getMeaningOfLife() =
sleep(Random.nextInt(500))
42
@main def callbacks1 =
println("starting calculation ...")
val f = Future {
getMeaningOfLife()
}
528
|
Chapter 18: Concurrency with Scala Futures and Akka Actors
println("before onComplete")
f.onComplete {
case Success(value) => println(s"Got the callback, meaning = $value")
case Failure(e) => e.printStackTrace
}
// do the rest of
println("A ...");
println("B ...");
println("C ...");
println("D ...");
println("E ...");
println("F ...");
your work
sleep(100)
sleep(100)
sleep(100)
sleep(100)
sleep(100)
sleep(100)
sleep(2_000)
This example returns the meaning of life (42) after a random delay. The important
part of this example is the f.onComplete method call and the code that follows it.
Here’s how that code works:
• The future f is ready to be run as soon as it’s created (though the actual time it
starts running is nondeterministic).
• The type of f is Future[Int].
• The f.onComplete method call sets up the callback, i.e., what should happen
when the future completes.
• The type signature of onComplete shows that it takes a function that transforms a
Try input parameter into a Unit result. Therefore, in the f.onComplete code
block, your code handles the future result as a Success or Failure.
• The println statements with the slight delays represent other work your code
may be doing on the main thread while the future is off and running on a parallel
thread.
Because the Future is running concurrently on some other thread, and you don’t
know exactly when the result will be computed, the output from this code is nonde‐
terministic, but it can look like this:
starting calculation ...
before onComplete
A ...
B ...
C ...
D ...
E ...
Got the callback, meaning = 42
F ...
18.2 Using Callback and Transformation Methods with Futures
|
529
Because the Future returns eventually—at some nondeterministic time—the “Got the
callback” message may appear anywhere in that output.
As mentioned, the onComplete type signature shows that it takes a function that
transforms a Try parameter:
def onComplete[U](f: (Try[T]) => U)(implicit executor: ExecutionContext): Unit
As a result, another approach you can use here is to replace the previous f.onCom
plete code with a fold call on the Try parameter:
f.onComplete (_.fold(
_.printStackTrace,
value => println(s"Got the callback, meaning = $value")
)
)
In this case, fold takes two parameters:
• The first parameter is a function to apply if Try is a Failure.
• The second parameter is a function to apply if Try is a Success.
See the Try class Scaladoc for more details on this approach.
Solution 2: Use andThen or foreach
There may be times when onComplete isn’t exactly what you want, and in those situa‐
tions you can use the andThen and foreach callback methods instead. Here’s an
example of how to use andThen:
@main def callbacks2 =
println("Creating the future")
val f: Future[Int] = Future {
// sleep for a random time before returning 42
val sleepTime = Random.nextInt(500)
sleep(sleepTime)
println("Leaving the future")
if sleepTime > 250 then throw new Exception("Ka-boom")
42
}
// handle the result of f with andThen
println("Before andThen")
f andThen {
case Success(x) =>
val y = x * 2
println(s"andThen: $y")
case Failure(t) =>
println(s"andThen: ${t.getMessage}")
}
530
|
Chapter 18: Concurrency with Scala Futures and Akka Actors
println("After andThen")
sleep(1_000)
This code is similar to the onComplete example but has these changes:
• The Future block is wired to throw an exception about half the time. If it doesn’t
throw an exception, it eventually yields the value 42.
• andThen block is run after the Future completes.
• andThen blocks are implemented with partial functions. If you don’t want to
implement the Failure portion of the case statement, you don’t have to.
When an exception is thrown, the output from this app is:
Creating the future
Before andThen
After andThen
Leaving the future
andThen: Ka-boom
When it doesn’t throw an exception, the output is:
Creating the future
Before andThen
After andThen
Leaving the future
andThen: 84
Next, here’s a shorter version of the previous example, using foreach instead of
andThen:
@main def callbacks3 =
val f: Future[Int] = Future {
val sleepTime = Random.nextInt(500)
sleep(sleepTime)
if sleepTime > 250 then throw new Exception("Ka-boom")
42
}
f.foreach(println)
sleep(1_000)
In this case, this example prints 42 when an exception is not thrown and prints noth‐
ing at all when an exception is thrown. The Future class Scaladoc tells us why noth‐
ing is printed: “WARNING: (foreach) will not be called if this future is never comple‐
ted or if it is completed with a failure. Since this method executes asynchronously and
does not produce a return value, any nonfatal exceptions thrown will be reported to
the ExecutionContext.”
18.2 Using Callback and Transformation Methods with Futures
|
531
Future has many more callback methods that are categorized as transformation meth‐
ods, including transform, collect, fallbackTo, map, recover, and recoverWith.
Here’s a short example of using fallbackTo:
def getMeaningOfLife() = Future {
sleep(Random.nextInt(500))
42
}
val meaning = getMeaningOfLife() fallbackTo Future(0)
meaning.foreach(println)
The Future class Scaladoc has good examples for other transformation methods.
Discussion
The following statements describe the use of the callback and transformation meth‐
ods that can be used with futures:
• Callback and transformation methods are called asynchronously when a future
completes.
• onComplete, andThen, foreach, and fallbackTo are demonstrated in this recipe.
• A callback method is executed by some thread, some time after the future is com‐
pleted. From the futures and promises page on the official Scala website, “There
is no guarantee that it will be called by the thread that completed the future or the
thread that created the callback.”
• The order in which callbacks are executed is not guaranteed.
• onComplete takes a callback function of type Try[A] => B.
• andThen takes a partial function. You only need to handle the desired case. (See
Recipe 10.7, “Creating Partial Functions”, for more information on partial
functions.)
• onComplete and foreach have the result type Unit, so they can’t be chained
together.
18.3 Writing Methods That Return Futures
Problem
You want to write a method or function that returns a Future.
532
|
Chapter 18: Concurrency with Scala Futures and Akka Actors
Solution
In the real world you’ll want to create methods that return futures. The following
example defines a method named longRunningComputation that returns a
Future[Int]:
import
import
import
import
scala.concurrent.Future
scala.concurrent.ExecutionContext.Implicits.global
scala.util.{Failure, Success, Random}
Thread.sleep
@main def futuresFunction =
// a function that returns a Future
def longRunningComputation(i: Int): Future[Int] = Future {
sleep(100)
i + 1
}
// this does not block
longRunningComputation(11).onComplete {
case Success(result) => println(s"result = $result")
case Failure(e) => e.printStackTrace
}
// keep the jvm from shutting down
sleep(1_000)
In this example I create the body of the method longRunningComputation as a code
block wrapped in a Future. The code block is passed into the apply method of the
Future object. This starts the computation asynchronously and returns a Future[A]
—a Future[Int] in this case—that will hold the result of the computation. This is a
common way to define methods that return a future.
Discussion
In a similar technique, because Future takes a block of code as its input parameter,
you can wrap existing methods that don’t run concurrently inside a Future like this:
// some existing function that does not run concurrently
def getMeaningOfLife() = ???
// wrap that existing function in a Future
val meaning = Future { getMeaningOfLife() }
Again, this approach works because:
• The method is passed to the apply method in the scala.concurrent.Future
object (the Future object, not the Future class).
18.3 Writing Methods That Return Futures
|
533
• That apply method takes a call-by-name block of code as a parameter, as you can
tell from its signature on the Future object Scaladoc page:
final def apply[T](body: => T)(implicit executor: ExecutionContext): Future[A]
----------
• Because a method (or function) is equivalent to a call-by-name block, you can
wrap nonconcurrent methods with a Future as shown.
18.4 Running Multiple Futures in Parallel
Problem
Futures generally start running as soon as they’re created, and you want to see how to
run multiple futures in parallel, and join their results together when they have all
completed.
Solution
If you want to create multiple Scala futures and merge their results together to get a
result in a for expression, the correct approach is:
1. Create the futures.
2. Merge their results in a for expression.
3. Extract the merged result using onComplete or a similar technique.
The correct approach (simplified)
I show the correct approach to using multiple futures in a for expression in the fol‐
lowing code. The important point is to create your futures as shown in Step A, prior
to using them in the for expression in Step B:
import
import
import
import
scala.concurrent.Future
scala.concurrent.ExecutionContext.Implicits.global
scala.util.{Failure, Success}
Thread.sleep
@main def multipleFutures1 =
// (a)
val f1
val f2
val f3
create the
= Future {
= Future {
= Future {
futures
sleep(800); 1 }
sleep(200); 2 }
sleep(400); 3 }
// (b) run them simultaneously in a for-comprehension
534
| Chapter 18: Concurrency with Scala Futures and Akka Actors
val result = for
r1 <- f1
r2 <- f2
r3 <- f3
yield (r1 + r2 + r3)
// (c) process the result
result.onComplete {
case Success(x) => println(s"result = $x")
case Failure(e) => e.printStackTrace
}
// important for a little parallel demo: keep the jvm alive
sleep(3_000)
A thorough example for verification
There’s no way to tell from reading that code that this is the correct approach, so I
also created this next example to show how it works:
import
import
import
import
scala.concurrent.Future
scala.concurrent.ExecutionContext.Implicits.global
scala.util.{Failure, Success}
Thread.sleep
def slowlyDouble(
x: Int,
startTime: Long,
delay: Int,
name: String
): Future[Int] = Future {
println(s"entered $name: ${delta(startTime)}")
sleep(delay)
println(s"leaving $name: ${delta(startTime)}")
x * 2
}
// time-related functions that are used in the code
def delta(t: Long) = System.currentTimeMillis - t
def time() = System.currentTimeMillis
@main def multipleFutures2 =
val t0 = System.currentTimeMillis
// Future #1
println(s"creating f1: ${delta(t0)}")
val f1 = slowlyDouble(x=1, t0, delay=1500, name="f1")
// Future #2
sleep(100)
println(s"\ncreating f2: ${delta(t0)}")
val f2 = slowlyDouble(x=2, t0, delay=250, name="f2")
18.4 Running Multiple Futures in Parallel
|
535
// Future #3
sleep(100)
println(s"\ncreating f3: ${delta(t0)}")
val f3 = slowlyDouble(x=3, t0, delay=500, name="f3")
println(s"\nentering `for`: ${delta(t0)}")
val result = for
r1 <- f1
r2 <- f2
r3 <- f3
yield (r1 + r2 + r3)
println("\nBEFORE onComplete")
result.onComplete {
case Success(x) => {
println(s"\nresult = $x (delta = ${delta(t0)})")
println("note: you don’t get the result until the last future completes")
}
case Failure(e) => e.printStackTrace
}
println("AFTER onComplete\n")
// important for a little parallel demo: keep the jvm alive
sleep(3_000)
If you run that code you’ll see output that looks like this:
creating f1: 0
entered f1: 0
creating f2: 105
entered f2: 105
creating f3: 210
entering `for`: 211
entered f3: 211
BEFORE onComplete
AFTER onComplete
leaving f2: 359
leaving f3: 713
leaving f1: 1501
result = 12 (delta = 1502)
note: you don’t get the result until the last future completes
The output shows several interesting points:
• f1, f2, and f3 begin running immediately. You can’t tell it from this code, but
they immediately begin running on new threads.
• The output rapidly passes over the onComplete statement.
536
|
Chapter 18: Concurrency with Scala Futures and Akka Actors
• After a short pause, the leaving statements are printed, followed quickly by the
result.
• Notice that the delta printed with the result is just a little larger than the delta
for f1. That’s because f1 has the longest sleep time. It makes sense that the total
run time of three futures running in parallel is just a little larger than the future
with the longest run time.
I encourage you to play with that code and make it your own until you’re completely
satisfied that you understand how Scala futures work with a for expression.
Discussion
You can also confirm that the previous approach is correct by doing the wrong thing.
Given the same imports and slowlyDouble, delta, and time methods as the previous
example, the following code shows the wrong way to use futures in a for expression:
@main def multipleFuturesWrong =
val t0 = System.currentTimeMillis
// WARNING: THIS IS THE INTENTIONALLY WRONG APPROACH
println(s"\nentering `for`: ${delta(t0)}")
val result = for
r1 <- slowlyDouble(x=1, t0, delay=1500, name="f1")
r2 <- slowlyDouble(x=2, t0, delay=250, name="f2")
r3 <- slowlyDouble(x=3, t0, delay=500, name="f3")
yield (r1 + r2 + r3)
println("\nBEFORE onComplete")
result.onComplete {
case Success(x) => {
println(s"\nresult = $x (delta = ${delta(t0)})")
println("note that you don't get the result until the last future completes")
}
case Failure(e) => e.printStackTrace
}
println("AFTER onComplete\n")
// important for a little parallel demo: keep the jvm alive
sleep(3_000)
When you run that code you’ll see output similar to this:
entering `for`: 0
entered f1: 1
BEFORE onComplete
AFTER onComplete
leaving
entered
leaving
entered
f1:
f2:
f2:
f3:
1503
1503
1758
1758
18.4 Running Multiple Futures in Parallel
|
537
leaving f3: 2260
result = 12 (delta = 2261)
That output shows:
• The f1 future is quickly entered (at delta = 1).
• The f1 future is exited about 1,500 ms later.
• f2 is entered at that time—after f1 finishes—and does not exit for more than 250
ms
• After f2 finishes, f3 is entered, and the code pauses for another 500+ ms.
This shows that f1, f2, and f3 are not run in parallel but are instead run serially, one
after the other. To be clear, this is wrong and not what you want.
A warning: Future is not referentially transparent
If you’re interested in functional programming, it’s important to know that the Scala
Future is not referentially transparent, and therefore it’s not suitable for FP. Because
Future is eager and begins running immediately, you can’t refactor your code by
replacing an expression with its result (or vice versa).
If you’re interested in functional ways of writing future-like code, see the ZIO library,
the Cats Effect IO monad—discussed in the Typelevel Scala blog post “Concurrency
in Cats Effect 3”—and the Monix task for their approaches to writing functional, lazy,
asynchronous code.
18.5 Creating OOP-Style Actors
Problem
From the introduction to this chapter, you know that you can create Akka Typed
actors in an OOP or FP style and you want to see and understand the OOP style.
Solution
The OOP solution is a combination of a class and companion object:
• In the object you define (a) the messages your actor can handle and (b) an apply
factory method.
• The class extends the Akka AbstractBehavior class and implements the
onMessage method.
538
|
Chapter 18: Concurrency with Scala Futures and Akka Actors
• The class is defined to be private so that no one else can access its constructor,
and callers must use the object’s apply method.
Here’s an example of an object named Tom, based on the Tom character in the movie
50 First Dates. It defines a Message trait, and a Hello case object that extends that
trait. Based on these definitions and the match expression shown in the class, Hello is
the only message this actor can handle.
A Note About Sealed Traits
The sealed trait isn’t necessary for this simple example; you could
just use a single case object for the message. But because this is the
pattern you’ll follow in the real world, I show it like this in this
example.
The object also defines an apply method that others will use to construct this actor.
As I mentioned in Recipe 5.4, “Defining Auxiliary Constructors for Classes”, an
apply method in an object works like a factory method, letting you construct instan‐
ces of a class.
Note that the apply method uses the Akka Behaviors.setup method to create a new
instance of the Tom class:
object Tom {
// “messages” that Tom can handle
sealed trait Message
case object Hello extends Message
// the factory/constructor method
def apply(): Behavior[Message] =
Behaviors.setup(context => new Tom(context))
}
Per its Scaladoc, Behaviors.setup “is a factory for a behavior. Creation of the behav‐
ior instance is deferred until the actor is started….The factory function passes the
ActorContext as parameter and that can be used for spawning child actors. setup is
typically used as the outermost behavior when spawning an actor.”
After creating that object, I define the Tom class like this:
import Tom.{Message, Hello}
private class Tom(context: ActorContext[Message])
extends AbstractBehavior[Message](context) {
override def onMessage(message: Message): Behavior[Message] = {
message match {
case Hello =>
18.5 Creating OOP-Style Actors
|
539
println("Hi, I’m Tom.")
this // return the current behavior
// Behaviors.same
}
}
}
A few points about this class:
• I first import the messages from the Tom object to make the remainder of the class
easier to read.
• I make the class constructor private, so only the companion object can access it.
• The constructor receives an ActorContext instance, typed with the Message that’s
defined in the companion object.
• The class extends the Akka AbstractBehavior class, and implements its abstract
onMessage method.
• onMessage receives an instance of a Message.
• onMessage has a return type of Behavior[Message], so I return Behavior.same.
Although this feels like overkill in this small example, the Behavior Scaladoc
states that this “advises the system to reuse the previous behavior.” This makes
more sense when you work with complicated actors that have multiple behaviors,
and you can use this return value to change behaviors as needed. See Recipe 18.8
for details on changing states.
In this example I also handle the Message in a match expression. This isn’t needed for
this small example, but it’s a common way to handle messages, so I show it right away.
Now that we have the Tom class and companion object, this example App shows how it
works:
import
import
import
import
import
akka.actor.typed.Behavior
akka.actor.typed.ActorSystem
akka.actor.typed.scaladsl.ActorContext
akka.actor.typed.scaladsl.Behaviors
akka.actor.typed.scaladsl.AbstractBehavior
object HiImTomOop extends App {
val actorSystem: ActorSystem[Tom.Message] =
ActorSystem.create(Tom(), "50FirstDatesSystem")
actorSystem ! Tom.Hello
actorSystem ! Tom.Hello
actorSystem ! Tom.Hello
Thread.sleep(500)
actorSystem.terminate()
}
540
| Chapter 18: Concurrency with Scala Futures and Akka Actors
A few notes about this code:
• HiImTomOop is a normal Scala 2 application that’s created with an App object.
• An ActorSystem is created with the type Tom.Message. I could have imported
Tom.Message and Tom.Hello as I did earlier, but I thought I’d show what this
code looks like without those imports.
• The code Tom() calls the apply method in the Tom companion object, construct‐
ing an instance of the Tom class.
• "50FirstDatesSystem" is a name I gave to the ActorSystem instance. The name
can be anything, but if you’ve seen the movie 50 First Dates, you’ll understand
why I chose the name Tom for this actor.
At the end of the App I call this line of code three times:
actorSystem ! Tom.Hello
That results in this output at the sbt prompt:
Hi, I’m Tom.
Hi, I’m Tom.
Hi, I’m Tom.
Creating the Actor and ActorSystem at the Same Time
In this code I create the Tom actor and the actor system at the same
time:
val actorSystem: ActorSystem[Tom.Message] =
ActorSystem.create(Tom(), "50FirstDatesSystem")
This is a little unusual, but what happens here is that because Actor
System extends ActorRef, the actorSystem variable is both an
ActorSystem and an ActorRef. That is, actorSystem is essentially
an instance of Tom, and it would have been just as valid to name the
variable tom instead of actorSystem.
I took this approach in this recipe to try to write as little code as
possible here, and I show the more common technique in later rec‐
ipes when I create the ActorSystem as a Supervisor or Guardian.
Discussion
As a brief reminder of what I mentioned in the introduction to this chapter, at the
time of this writing Akka has not been ported to Scala 3, so the examples in this chap‐
ter use the latest version of Scala 2.
18.5 Creating OOP-Style Actors
|
541
Behaviors
If you’re familiar with Akka Classic, the first thing you’ll probably notice about this
example is the lack of an Actor class. In Akka Typed the concept of an actor is
replaced by the concept of behaviors. I found this confusing at first, until I saw this
quote in the book, Learn Scala Programming, by Slava Schmidt (Packt):
“Any well-defined behavior is a computational entity, and thus can be an actor.”
So, a main concept to know is that in Akka Typed you’ll focus on behaviors rather
than actors.
A repetitive pattern
A second thing to know about Akka Typed OOP-style behaviors is that creating them
follows a consistent pattern. OOP-style behaviors have this template:
object OopActor {
// “messages” that OopActor can handle
sealed trait Message
final case object Message1 extends Message
final case class Message2(param: SomeType) extends Message
// the factory/constructor method
def apply(): Behavior[Message] =
Behaviors.setup(context => new OopActor(context))
}
private class OopActor(context: ActorContext[OopActor.Message])
extends AbstractBehavior[OopActor.Message](context) {
override def onMessage(msg: OopActor.Message): Behavior[OopActor.Message] =
msg match
case Message1 =>
// handle this message here
Behaviors.same
case Message2(param) =>
// handle this message here
Behaviors.same
}
Behaviors.same
Because onMessage is an overridden method that has a Behavior return type, for a
simple example like this, each case of the match expression will return Behav
iors.same. This indicates that the next behavior will be the same as the current one.
Because an actor can potentially have many behaviors, you’ll see alternatives to this in
Recipe 18.8. Also, in the OOP style you can also return this rather than Behav
iors.same, so you may see both styles.
542
|
Chapter 18: Concurrency with Scala Futures and Akka Actors
18.6 Creating FP-Style Actors
Problem
From the introduction to this chapter, you know that you can create Akka Typed
actors in an OOP or FP style, and you want to learn and understand the FP style.
Solution
The FP-style solution is shorter than the OOP solution shown in the previous recipe,
only requiring the creation of an object with an apply method that’s implemented
with Behavior.setup, and the same messages I used with the OOP style:
object Tom {
// the “messages” this actor can respond to
sealed trait Message
final case object Hello extends Message
// the factory method
def apply(): Behavior[Message] = Behaviors.setup {
context: ActorContext[Message] =>
Behaviors.receiveMessage { message: Message =>
message match {
case Hello =>
println("Hi, I’m Tom.")
Behaviors.same
}
}
}
}
A few notes about the code:
• As with the previous recipe, this object defines the messages that Tom can handle,
in this case the Hello message.
• The body of the apply method is implemented with the help of the Akka Behav
ior.setup method.
• That method passes an ActorContext—typed with Message—to the Behav
iors.receiveMessage helper method.
• Inside the receiveMessage block of code, the Message that is received is handled
in a match expression.
• As with the OOP style in the previous recipe, the match expression is overkill for
this example, but since it’s what you typically use in the real world, I show it here.
18.6 Creating FP-Style Actors
|
543
• As I explain in “Creating the Actor and ActorSystem at the Same Time” on page
541, an ActorSystem is an ActorRef, so actorSystem is essentially an actor, and
it would be equally valid to name it tom.
A Note About Sealed Traits
The sealed trait isn’t necessary for this simple example; you could
just use a single case object for the message. But because this is the
pattern you’ll follow in the real world, I show it like this in this
example.
I’ll discuss Behaviors.setup and Behaviors.receiveMessage in the Discussion, but
for now, this App lets me test the Tom FP-style actor:
import akka.actor.typed.{ActorRef, ActorSystem, Behavior}
import akka.actor.typed.scaladsl.{ActorContext, Behaviors}
object HiImTomFp extends App {
import Tom.{Message, Hello}
val actorSystem: ActorSystem[Message] = ActorSystem(
Tom(),
"50FirstDatesSystem"
)
actorSystem ! Hello
actorSystem ! Hello
actorSystem ! Hello
Thread.sleep(500)
actorSystem.terminate()
}
In this code:
• I import the Message and Hello messages from the Tom object to make the rest of
the code easier to read.
• I create an ActorSystem with the type Message (i.e., Tom.Message).
• The Tom() reference calls the apply method in the Tom object to create a new
instance of Tom.
• The string "50FirstDatesSystem" can be any legal string, but since this example
is modeled after the actor Tom in the movie 50 First Dates, I use this name.
• I send three Hello messages to the Tom actor with the ! syntax.
544
|
Chapter 18: Concurrency with Scala Futures and Akka Actors
Those last three lines of code result in this output at the sbt prompt:
Hi, I’m Tom.
Hi, I’m Tom.
Hi, I’m Tom.
Discussion
As I discussed in the previous recipe, a big concept here is that Akka Typed does not
use the word “actor,” but instead uses the words Behavior and Behaviors. So, again,
an important concept to know is that in Akka Typed you’ll focus on behaviors rather
than actors.
The Behaviors Scaladoc states that setup is a factory for a behavior, i.e., for the defi‐
nition of a behavior. It’s used in both the FP and OOP styles.
Behaviors.receiveMessage is one of several ways you can define the body of an
actor/behavior. receiveMessage is used in places where you already have an Actor
Context—which you receive through Behaviors.setup—and only want to imple‐
ment the body of the actor by accessing the message it receives.
Common methods you’ll use in this place are shown in Table 18-1.
Table 18-1. Behaviors methods you’ll use to create Akka Typed actors
Method
Behaviors.receiveMessage
Description
Shown in this recipe, you receive a message and handle it, typically with a
match expression.
Behaviors.receiveMessagePartial The same as receiveMessage, but implement the body of the method
with a PartialFunction, typically implementing only a subset of the
messages an actor can handle.
Behaviors.receive
Receive both an ActorContext and the message.
Behaviors.receivePartial
The same as receive, but implement the body of the method with a
PartialFunction, typically implementing only a subset of the
messages an actor can handle.
See the Behaviors object Scaladoc for detailed descriptions of the different methods
that are available.
A nice thing about Akka Typed is that its developers let you create actors (behaviors)
in either an OOP style or FP style, and you can use both styles in the same applica‐
tion. Use whichever style you’re comfortable with.
18.6 Creating FP-Style Actors
|
545
18.7 Sending Messages to Actors
Problem
You want to see how to send messages to Akka Typed actors.
Solution
The solution to send a message to an Akka Typed actor is the same as the solution for
an Akka Classic actor. First, you need a reference to its ActorRef. Once you have that,
send asynchronous messages to it using the ! method:
anActorRef ! "Hello"
You can also send synchronous messages to it using the ask method, but that should
be used very rarely, because ask blocks until it gets a reply, and blocking is bad in
asynchronous code.
Import statements
These import statements are required by the code that follows:
import akka.actor.typed.{ActorRef, ActorSystem, Behavior}
import akka.actor.typed.scaladsl.{AbstractBehavior, ActorContext, Behaviors}
Modeling the messages
The following example shows how to send messages to Akka Typed actors, and how
to receive them in the actor. It uses an example of a smart thermostat and also uses
the FP-style actors that are shown in Recipe 18.6.
The first two thoughts I normally have when designing Akka actors are:
• What does the actor do?
• What messages should the actor receive?
In the case of a smart thermostat, three of the things it does is to allow querying the
current temperature, increasing the temperature, and decreasing the temperature.
This corresponds to the messages it should be able to receive and handle:
• What is the current temperature setting? (CurrentTemperature)
• Increase the temperature X degrees. (IncreaseTemperature)
• Decrease the temperature X degrees. (DecreaseTemperature)
546
|
Chapter 18: Concurrency with Scala Futures and Akka Actors
Assuming that the smart thermostat receives these messages from an actor with the
type ActorRef[SystemMessage]—more on this in a moment—with Akka Typed you
model those messages like this:
object ThermostatActor {
import ThermostatSupervisor.{SystemMessage, StringMessage}
// our API, i.e., the messages we can respond to
sealed trait MessageToThermostat {
def sender: ActorRef[SystemMessage]
}
final case class CurrentTemperature(sender: ActorRef[SystemMessage])
extends MessageToThermostat
final case class IncreaseTemperature(
sender: ActorRef[SystemMessage],
amount: Int
) extends MessageToThermostat
final case class DecreaseTemperature(
sender: ActorRef[SystemMessage],
amount: Int
) extends MessageToThermostat
// more code here ...
If you’re coming to Akka Typed from Akka Classic, the most unusual thing about this
code is that the messages the ThermostatActor can receive also include information
about a sender:
sender: ActorRef[SystemMessage]
With Akka Typed messages, it’s common to include a reference to the ActorRef that
sent the message to you. In this case I think of myself as being the ThermostatActor,
and actors that contact me should have the type shown, ActorRef[SystemMessage].
Programmers typically give this field names like replyTo or sender. The SystemMes
sage type refers to the type of message the sender is capable of receiving when you
send a message back to it, as you’ll see shortly in the Supervisor portion of the code.
The rest of the ThermostatActor code is similar to what I showed in Recipe 18.6: an
apply method implemented with Behaviors.setup, Behaviors.receiveMessage,
and a match expression:
object ThermostatActor {
// our API, i.e., the messages we can respond to are
// enumerated here ...
var currentTemp = 72
18.7 Sending Messages to Actors
|
547
// we respond to `MessageToThermostat` queries
def apply(): Behavior[MessageToThermostat] = Behaviors.setup {
context: ActorContext[MessageToThermostat] =>
Behaviors.receiveMessage { message => message match {
case CurrentTemperature(sender) =>
sendReply(sender)
Behaviors.same
case IncreaseTemperature(sender, amount) =>
currentTemp += amount
sendReply(sender)
Behaviors.same
case DecreaseTemperature(sender, amount) =>
currentTemp -= amount
sendReply(sender)
Behaviors.same
}}
} // Behaviors.setup/apply
private def sendReply(sender: ActorRef[SystemMessage]) = {
val msg = s"Thermostat: Temperature is $currentTemp degrees"
println(msg)
sender ! StringMessage(msg)
}
}
This is standard Scala and Akka Typed code that was explained in Recipe 18.6, so I
won’t cover it in detail here. The important part is that the match expression enables
the ThermostatActor to respond to all of its messages.
Unless you have an actual thermostat you can connect to, that’s all you have to do to
implement a ThermostatActor. Now we just need to write some code to test it.
Creating a supervisor
Next, we’ll create a supervisor actor. This supervisor will create the ThermostatActor,
send messages to it, and receive messages back from it. I’ve added comments to the
source code that explain how it works:
// import the “messages” from the ThermostatActor
import ThermostatActor.*
object ThermostatSupervisor {
// these are the messages we can receive. some will be sent to us from the
// App, which you’ll see shortly. others are sent to us by the
// ThermostatActor.
sealed trait SystemMessage
case object StartSendingMessages extends SystemMessage
case object StopSendingMessages extends SystemMessage
case class StringMessage(msg: String) extends SystemMessage
548
|
Chapter 18: Concurrency with Scala Futures and Akka Actors
// this is the usual `apply` template.
def apply(): Behavior[SystemMessage] = Behaviors.setup[SystemMessage] {
actorContext =>
// when we’re created, the first thing we do is create a
// ThermostatActor. technically, it is a “child” to us.
val thermostat = actorContext.spawn(
ThermostatActor(),
"ThermostatActor"
)
// this is where we set up the handling of messages that can be
// sent to us.
Behaviors.receiveMessage {
// when we receive the message StartSendingMessages,
// send three messages to the ThermostatActor.
case StartSendingMessages =>
thermostat ! CurrentTemperature(actorContext.self)
thermostat ! IncreaseTemperature(actorContext.self, 1)
thermostat ! DecreaseTemperature(actorContext.self, 2)
Behaviors.same
case StopSendingMessages =>
Behaviors.stopped
case StringMessage(msg) =>
println(s"MSG: $msg")
Behaviors.same
}
}
}
A test application
With those two pieces in place, all we need now is an App to test our system:
object ThermostatApp extends App {
import ThermostatSupervisor.{
SystemMessage, StartSendingMessages, StopSendingMessages
}
val actorSystem: ActorSystem[SystemMessage] = ActorSystem(
ThermostatSupervisor(),
"ThermostatSupervisor"
)
actorSystem ! StartSendingMessages
Thread.sleep(1_000)
actorSystem ! StopSendingMessages
Thread.sleep(500)
actorSystem.terminate()
}
This App does the following things:
18.7 Sending Messages to Actors
|
549
• Imports the messages from the ThermostatSupervisor to make the rest of the
code easier to read
• Creates an ActorSystem by creating an instance of ThermostatSupervisor and
giving the system a name
• Sends a StartSendingMessages message to the ThermostatSupervisor
• Sleeps for 100 ms, then sends a StopSendingMessages message to the Thermo
statSupervisor
Note that when the ThermostatSupervisor receives the StartSendingMessages mes‐
sage, it responds by sending three messages to the ThermostatActor:
case StartSendingMessages =>
thermostat ! CurrentTemperature(actorContext.self)
thermostat ! IncreaseTemperature(actorContext.self, 1)
thermostat ! DecreaseTemperature(actorContext.self, 2)
Behaviors.same
The output of the App looks like this:
Thermostat: Temperature is 72 degrees
Thermostat: Temperature is 73 degrees
Thermostat: Temperature is 71 degrees
MSG: Thermostat: Temperature is 72 degrees
MSG: Thermostat: Temperature is 73 degrees
MSG: Thermostat: Temperature is 71 degrees
Although the order in which messages are delivered in a concurrent system isn’t
guaranteed, Figure 18-1 gives you an idea of how the initial messages are sent and
replied to in this App.
Figure 18-1. A simplified UML Sequence Diagram that shows the initial messages
between the actors
550
| Chapter 18: Concurrency with Scala Futures and Akka Actors
Discussion
In this app, notice that the ThermostatSupervisor sends its own ActorRef to the
ThermostatActor using actorContext.self and the ThermostatActor messages:
thermostat ! CurrentTemperature(actorContext.self)
Those messages are then received in the match expression of the ThermostatActor as
the sender variable, as in this case:
case CurrentTemperature(sender) =>
sendReply(sender)
Sending ActorRefs
Sending an ActorRef as part of a message is a common pattern with Akka Typed. As
shown in my blog post “Akka Typed: Finding Actors with the Receptionist”, you can
also look up actor references, but it’s significantly easier if the actor that contacts you
gives you a way to respond back to it. This is like putting the return address on an
envelope when you send someone a letter, or your email address when you send
someone an email.
Messages as being an actor’s API
I find it helpful to think of these messages as being the actor’s API. They are your way
of declaring the types of messages an actor can receive. In the OOP world, it’s the
equivalent of declaring a class that has these methods:
def currentTemperature(): Int = ???
def increaseTemperature(amount: Int) = ???
def decreaseTemperature(amount: Int) = ???
Or, more accurately:
def currentTemperature(sender: ActorRef[SystemMessage]): Int = ???
def increaseTemperature(sender: ActorRef[SystemMessage], amount: Int) = ???
def decreaseTemperature(sender: ActorRef[SystemMessage], amount: Int) = ???
See Also
There are times when you won’t be able to pass an ActorRef to another actor. In that
situation you’ll need to look up the other actor via the Akka Receptionist. I wrote a
long blog post about this, “Akka Typed: Finding Actors with the Receptionist”.
18.7 Sending Messages to Actors
|
551
18.8 Creating Actors That Have Multiple States (FSM)
Problem
You want to create an actor that can have different behaviors (or states) over time, i.e.,
you want to implement a finite-state machine (FSM) with Akka Typed.
Solution
With Akka Classic we use a become approach to implement an actor that can have
multiple states, but with Akka Typed the approach is different. The solution is to:
• Define a function for each state the actor can be in.
• Define a unique set of messages that should be handled by each state.
For example, imagine modeling Clark Kent and Superman. They are the same actor,
but they can be in two different states at different times, and each state handles differ‐
ent messages. With Akka Typed, you model the messages like this:
sealed trait BaseBehaviors
// clark kent actions
sealed trait ClarkKentBehaviors extends BaseBehaviors
final case object WorkAtNewspaper extends ClarkKentBehaviors
final case object PutOnGlasses extends ClarkKentBehaviors
final case object BecomeSuperman extends ClarkKentBehaviors
// superman actions
sealed trait SupermanBehaviors extends BaseBehaviors
final case object Fly extends SupermanBehaviors
final case object SavePeople extends SupermanBehaviors
final case object BecomeClarkKent extends SupermanBehaviors
Notice that the behaviors are distinct: Clark Kent works at the newspaper, puts on his
glasses so nobody will recognize him, and can become Superman. But he doesn’t Fly,
SavePeople, or BecomeClarkKent. Each state has its own behaviors.
Given those messages, and these import statements:
import akka.actor.typed.{ActorRef, ActorSystem, Behavior}
import akka.actor.typed.scaladsl.{AbstractBehavior, ActorContext, Behaviors}
The rest of the solution is to define an actor that has two functions, one for each state:
• clarkKentState
• supermanState
552
| Chapter 18: Concurrency with Scala Futures and Akka Actors
Here’s the source code:
object ClarkKent {
// initial state
def apply(): Behavior[BaseBehaviors] = clarkKentState()
private def clarkKentState(): Behavior[BaseBehaviors] =
Behaviors.receiveMessagePartial[BaseBehaviors] { message: BaseBehaviors =>
message match {
case WorkAtNewspaper =>
println("normalState: WorkAtNewspaper")
Behaviors.same
case PutOnGlasses =>
println("normalState: PutOnGlasses")
Behaviors.same
case BecomeSuperman =>
println("normalState: BecomeSuperman")
supermanState()
}
}
/**
* `Behaviors.receiveMessagePartial`: Construct an actor `Behavior` from a
* partial message handler which treats undefined messages as unhandled.
*/
private def supermanState(): Behavior[BaseBehaviors] =
Behaviors.receiveMessagePartial[BaseBehaviors] { message: BaseBehaviors =>
message match {
case Fly =>
println("angryState: Fly")
// supermanState()
Behaviors.same
case SavePeople =>
println("angryState: SavePeople")
// supermanState()
Behaviors.same
case BecomeClarkKent =>
println("normalState: BecomeClarkKent")
clarkKentState()
}
}
}
The pattern of that code should be familiar from the previous recipes. The first
change is that rather than put all the behavior inside the apply method, apply simply
declares the initial behavior:
def apply(): Behavior[BaseBehaviors] = clarkKentState()
18.8 Creating Actors That Have Multiple States (FSM)
|
553
Then, when the clarkKentState receives a BecomeSuperman message, it switches the
state to supermanState:
case BecomeSuperman =>
println("normalState: BecomeSuperman")
supermanState()
Some time later supermanState may receive a BecomeClarkKent message, and it
responds by switching to the clarkKentState:
case BecomeClarkKent =>
println("normalState: BecomeClarkKent")
clarkKentState()
The second change is that I use the receiveMessagePartial method rather than
receiveMessage to implement each function. I go over this in the Discussion.
A test App
At this point all we need is a test App to demonstrate the system. If you’ve read the
previous recipes, this pattern will look familiar:
object ClarkKentApp extends App {
val actorSystem: ActorSystem[BaseBehaviors] = ActorSystem(
ClarkKent(),
"SupermanSystem"
)
actorSystem ! WorkAtNewspaper
// these will
actorSystem !
actorSystem !
actorSystem !
fail because the system is in the wrong state
Fly
SavePeople
BecomeClarkKent
// this will work
actorSystem ! WorkAtNewspaper
// now these will work
actorSystem ! BecomeSuperman
actorSystem ! Fly
actorSystem ! SavePeople
actorSystem ! BecomeClarkKent
Thread.sleep(500)
actorSystem.terminate()
}
554
|
Chapter 18: Concurrency with Scala Futures and Akka Actors
I added some comments to the code to explain what happens when you send mes‐
sages to an actor that has multiple states. I wrote this code this way to demonstrate
that when you send SupermanBehaviors messages to the actor when the clarkKent
State is responding to messages, you’ll generate errors, and when you send Clark
KentBehaviors to the actor when supermanState is handling the messages, you’ll
also generate errors.
As a result, the output of this App looks like this:
normalState: WorkAtNewspaper
normalState: WorkAtNewspaper
normalState: BecomeSuperman
angryState: Fly
angryState: SavePeople
normalState: BecomeClarkKent
[date time] [INFO] [akka.actor.LocalActorRef]
[SupermanSystem-akka.actor.default-dispatcher-3] [akka://SupermanSystem/user]
- Message [clark_kent.Fly$] to Actor[akka://SupermanSystem/user] was
unhandled. [1] dead letters encountered. This logging can be turned off or
adjusted with configuration settings 'akka.log-dead-letters' and
'akka.log-dead-letters-during-shutdown'.
more “dead letter” logging here ...
Discussion
As I mentioned in Recipe 18.6, with Behaviors.receiveMessagePartial you imple‐
ment the body of the method with a PartialFunction, implementing only a subset of
the messages an actor can handle. Messages that you don’t handle in your match
expression are considered unhandled messages, and if they are sent to your actor,
they’ll end up in the dead letter system.
In this code I take an approach of defining BaseBehaviors as the root of all behaviors
this actor can handle. Then I handle ClarkKentBehaviors in the clarkKentState
method and handle the SupermanBehaviors in the supermanState method. Because I
use a sealed trait and final case objects, the Scala compiler is able to determine that I
handle a subset of all the messages in each method, and it treats those match expres‐
sions as partial functions.
Dead letters
In a post office system in the physical world, such as in the United States, a dead letter
is a letter that cannot be delivered for a variety of reasons, such as a bad address, so
that letter is sent to a dead letter office. (I have no idea what happens to the letter
there.)
18.8 Creating Actors That Have Multiple States (FSM)
|
555
Similarly, as described in this Akka reference page, “Messages which cannot be deliv‐
ered (and for which this can be ascertained) will be delivered to a synthetic actor
called /deadLetters. This delivery happens on a best-effort basis; it may fail even
within the local JVM….The main use of this facility is for debugging.”
In my example I don’t make any attempt to monitor these dead letters, I just let the
logging facility print them to the console. If you want to monitor dead letters on the
local system, create an actor that subscribes to the akka.actor.DeadLetter class.
This process is described on this Akka event bus page, and the process of subscribing
is similar to the process of finding actors and listening to them, which I demonstrate
in my blog post “Akka Typed: Finding Actors with the Receptionist”.
Note that per the documentation, “dead letters are not propagated over the network,”
so if you have a distributed system and want to collect them all in one place, “you will
have to subscribe one actor per network node and forward them manually.”
556
|
Chapter 18: Concurrency with Scala Futures and Akka Actors
CHAPTER 19
Play Framework and Web Services
This chapter demonstrates recipes for working with web services in Scala, including
how to handle server-side HTTP requests, how to convert between JSON and Scala
objects, and how to write client-side HTTP requests.
In 2021 there are several great libraries for server-side development with Scala, which
you can find on the Awesome Scala list. This chapter focuses on the Play Framework
(Play) because it’s popular, well supported, and relatively easy to get started with,
especially if you’ve used a framework like Ruby on Rails previously.
One important note is that at the time this book was being produced, Play was not yet
updated to work with Scala 3. Therefore, the Play examples you’ll see in this chapter
use the Scala 2 syntax. That being said, the Play API has been fairly stable going back
to 2013 and the release of the first edition of the Scala Cookbook, so these examples
are expected to translate well to Play when it’s available for Scala 3.
The initial recipes in this chapter focus on server-side development with Play. These
recipes include:
• Recipe 19.1, creating a first Play project
• Recipe 19.2, creating a new endpoint, i.e., a URL for a server-side REST service
• Recipe 19.3, returning JSON from a Play GET request
• Recipe 19.4, converting a Scala object to JSON
• Recipe 19.5, converting JSON to a Scala object
557
Then the last recipes demonstrate techniques that can work with server- or client-side
development:
• Recipe 19.6, using the Play JSON library without the Play Framework
• Recipe 19.7, using the sttp HTTP client
19.1 Creating a Play Framework Project
Problem
Most recipes in this chapter use the Play Framework (Play), and if you haven’t used
Play before, you need to know how to create a new Play project.
Solution
The easiest way to create a new Play project is with the sbt seed template:
$ sbt new playframework/play-scala-seed.g8
When that command runs, you just need to give it a project name and organization
name, then cd into the new directory, as shown in this interaction:
$ sbt new playframework/play-scala-seed.g8
[info] Set current project to play ...
This template generates a Play Scala project
name [play-scala-seed]: hello-world
organization [com.example]: com.alvinalexander
Template applied in hello-world
$ cd hello-world
Then inside that project directory, run the sbt run command:
$ sbt run
// a LOT of output here ...
[info] loading settings for project hello-world-build from plugins.sbt ...
[info] loading settings for project root from build.sbt ...
[info] set current project to hello-world ...
--- (Running the application, auto-reloading is enabled) --[info] p.c.s.AkkaHttpServer - Listening for HTTP on /0:0:0:0:0:0:0:0:9000
(Server started, use Enter to stop and go back to the console...)
The first time you run that command there will be a lot of output, hopefully ending
with those last three lines, which indicate that the Play server is running on port 9000.
558
| Chapter 19: Play Framework and Web Services
Now when you open the http://localhost:9000 URL in a browser, you’ll see a “Wel‐
come to Play” web page that looks like the one in Figure 19-1.
Figure 19-1. The “Welcome to Play!” greeting
If you need to run Play on a port other than 9000, use this command at your operat‐
ing system command line:
$ sbt "run 8080"
Or use this command from inside the sbt shell:
sbt> run 8080
Discussion
A Play application consists of the following components:
• The sbt build.sbt file that contains application dependencies and other configura‐
tion information.
• Controllers that are placed in the app/controllers folder.
• Models in the app/models folder. This folder is usually not automatically created.
• Templates that contain HTML, JavaScript, CSS, and Scala code snippets are
placed in the app/views folder.
• A conf/routes file that maps URIs and HTTP methods to controller methods.
Other important files include:
• Application configuration information in the conf/application.conf file. This
includes information on how to access databases.
• Database evolution scripts in the conf/evolutions folder.
• Design assets for the template files are placed in the public/images, public/java‐
scripts, and public/stylesheets folders.
Because this chapter is about building web services—and not Web 1.0 applications—
the primary focus is on these directories and files:
• The conf/routes routing file
• Your custom controllers in app/controllers
19.1 Creating a Play Framework Project
|
559
The conf/routes file
To understand the files in the project, first look at the conf/routes file. The current
Play 2.8 template creates a file with these contents:
# Routes
# This file defines all application routes (Higher priority routes first)
# https://www.playframework.com/documentation/latest/ScalaRouting
# An example controller showing a sample home page
GET / controllers.HomeController.index
# Map static resources from the /public folder to the /assets URL path
GET /assets/*file controllers.Assets.versioned(path="/public", file: Asset)
To understand how the welcome page is displayed, this is the important line in that
file:
GET
/
controllers.HomeController.index
This line can be read as, “When the HTTP GET method is called on the / URI, call
the index method defined in the HomeController class that’s in the controllers pack‐
age.” If you’ve used other frameworks like Ruby on Rails, you’ve seen this sort of thing
before. It binds a specific HTTP method—such as GET or POST—and a URI to a
method in a class.
Two important things to know about routing are:
• The conf/routes file is compiled, so you’ll see routing errors directly in your
browser.
• As you’re about to see in the controller class code, it uses dependency injection.
Per the Play documentation, “Play’s default routes generator creates a router class
that accepts controller instances in an @Inject-annotated constructor. That
means the class is suitable for use with dependency injection and can also be
instantiated manually using the constructor.”
The controller
Next, open the app/controllers/HomeController.scala file and look at its index method:
package controllers
import javax.inject._
import play.api._
import play.api.mvc._
/**
* This controller creates an `Action` to handle HTTP requests to the
* application's home page.
560
| Chapter 19: Play Framework and Web Services
*/
@Singleton
class HomeController @Inject()(val controllerComponents: ControllerComponents)
extends BaseController {
/**
* Create an Action to render an HTML page.
*
* The configuration in the `routes` file means that this method
* will be called when the application receives a `GET` request with
* a path of `/`.
*/
def index() = Action { implicit request: Request[AnyContent] =>
Ok(views.html.index())
}
}
This is a normal Scala source code file, with one method named index. This method
implements a Play Action by calling a method named Ok, and passing in the content
shown. The code views.html.index is the Play way of referring to the app/views/
index.scala.html template file. A terrific thing about the Play architecture is that Play
templates are compiled to Scala functions, so what you’re seeing in this code is a nor‐
mal function call:
Ok(views.html.index())
This code essentially calls a function named index in the views.html package.
The view templates
Knowing that a template compiles to a normal Scala function, open the app/views/
index.scala.html template file, where you see the following contents:
@()
@main("Welcome to Play") {
<h1>Welcome to Play!</h1>
}
Notice the first line of code:
@()
If you think of the template as a function, this is the parameter list of the function. In
this example the parameter list is empty, but if this template took one string parame‐
ter that you named message, that line would look like this:
@(message: String)
The @ symbol in this file is a special character in a Play template file. It indicates that
what follows after it is a Scala expression. For instance, in the line of code shown, the
@ character precedes the function parameter list. In the third line of code, the @
19.1 Creating a Play Framework Project
|
561
character precedes a call to a function named main. Notice in that line of code, the
string “Welcome to Play” is passed to the main method.
As you might have guessed, though main looks like a function, it’s also a template file.
When the code calls main, it actually invokes the app/views/main.scala.html template.
Here’s the default source code for main.scala.html:
@(title: String)(content: Html)
<!DOCTYPE html>
<html lang="en">
<head>
@* Here's where we render the page title `String`. *@
<title>@title</title>
<link rel="stylesheet" media="screen"
href="@routes.Assets.versioned("stylesheets/main.css")">
<link rel="shortcut icon" type="image/png"
href="@routes.Assets.versioned("images/favicon.png")">
</head>
<body>
@* And here's where we render the `Html` object containing
* the page content. *@
@content
<script src="@routes.Assets.versioned("javascripts/main.js")"
type="text/javascript"></script>
</body>
</html>
This file is the default wrapper template file for the project. If every other template file
calls main the same way the index.scala.html file calls it, you can be assured that those
templates will be wrapped with this same HTML, CSS, and JavaScript. As a result, all
of your pages will have the same look and feel.
For the purposes of the lessons in this chapter you won’t need to know these details,
but I wanted to show you these two initial files to give you a flavor of what web appli‐
cations look like in Play.
Single-Page Applications
When I say “web applications,” I mean applications written in
HTML—or in this case, a templating system that supports a mix of
HTML and Scala snippets—with JavaScript and CSS added into the
HTML. For single-page applications (SPAs) written in JavaScript,
where you want to use Play on the server side, you don’t need to
know much more about Scala’s templating system.
562
|
Chapter 19: Play Framework and Web Services
The sbt/Play console
While you’re developing an application, start sbt in the root directory of your project:
$ sbt
From there you can run all the usual sbt commands, and you can also start your
application. As shown in the Solution, this command starts the application on the
default 9000 port:
[play01] $ run
(lots of output here ...)
--- (Running the application, auto-reloading is enabled) --[info] p.c.s.AkkaHttpServer - Listening for HTTP on /0:0:0:0:0:0:0:0:9000
(Server started, use Enter to stop and go back to the console ...)
The last line of the sbt output shows that you press Enter to stop the server and
return to the sbt prompt.
As you’ll see in some of the following recipes, you can also issue a console command
inside sbt:
sbt> console
[info] Starting scala interpreter...
Welcome to Scala 2.13
Type in expressions for evaluation. Or try :help.
scala> _
This starts a Scala REPL with all of your project dependencies loaded. From here you
test Play JSON code and other Play code, including using your custom classes, mod‐
els, etc.
See Also
• For more “getting started” information see the Play Framework website.
• Although it was written for an earlier version of Play, my Play Framework Rec‐
ipes booklet is free to download.
• See Chapter 17 for many examples of how to use sbt.
• See Recipe 21.3, “Building Single-Page Applications with Scala.js” for details
about how to create single-page applications with Scala.js.
19.1 Creating a Play Framework Project
|
563
19.2 Creating a New Play Framework Endpoint
Problem
When using Play as a RESTful server for a single-page application, you want to create
a new endpoint (a term that’s also referred to as a URL, URI, or route when talking
about REST services).
Solution
Creating a new endpoint in a Play application involves creating a new route, a con‐
troller method, and typically a new model or adding to an existing model. The spe‐
cific steps are:
1. Create a new route in the conf/routes file.
2. The new route points to a controller method, so create that controller method;
also create the controller class if it doesn’t already exist.
3. The controller method typically requires a model class, so create that class as
needed.
4. Test your new service.
To demonstrate this process, you’ll add on to the skeleton project created in the pre‐
vious recipe. In this solution you’ll create new code that responds to a GET request at
a /hello URI. When that request is received, your controller method returns a string
as a text/plain response.
1. Create a new route
To begin, you know you want to handle a new URI at /hello, so add a new route to the
conf/routes file. You also know this will be an HTTP GET request, so map the URI by
adding these lines to the end of the file:
# our app
GET /hello
controllers.HelloController.sayHello
This can be read as, “When a GET request is made at the /hello URI, invoke the say
Hello method of the HelloController class in the controllers package.”
2. Create a new controller method
Next, create the HelloController class in a HelloController.scala file in the app/
controllers directory. Add the following code to that class:
package controllers
import javax.inject._
564
|
Chapter 19: Play Framework and Web Services
import play.api._
import play.api.mvc._
import models._
@Singleton
class HelloController @Inject()(val controllerComponents: ControllerComponents)
extends BaseController {
def sayHello() = Action {
Ok("Hello, world")
}
}
When the sayHello method in this class is invoked, it returns an instance of an
Action, with the Ok method implemented as shown. This code is explained in the
Discussion.
3. Create a model
In most situations in the real world you’ll create a model class and database-related
code, but for a small example like this, that isn’t needed.
4. Test your service
With the parts in place—and because this is a simple GET request that doesn’t pass
cookies or header information to the server—you can test this in your browser. Go to
the http://localhost:9000/hello URI in your browser, where you should see the words
Hello, world printed.
You can also test this with a command-line tool like curl:
$ curl --request GET http://localhost:9000/hello
Hello, world
If you want to see the headers that Play returns, use the curl --head command:
$ curl --head http://localhost:9000/hello
HTTP/1.1 200 OK
Date: (the date and time are shown here)
Content-Type: text/plain; charset=UTF-8
Content-Length: 12
(other headers have been omitted)
Notice that when a String is passed into Ok, the content type is automatically set to
text/plain.
Discussion
When you examine the sayHello method, you’ll see that it returns a Play Action:
19.2 Creating a New Play Framework Endpoint
|
565
def sayHello() = Action {
Ok("Hello, world")
}
An Action is a function that handles a request and creates a result that is sent to the
client. More specifically, Action is a function that takes a Request and returns a
Result. Its signature is defined like this:
play.api.mvc.Request => play.api.mvc.Result
In this example I don’t deal with the Request, and the Result is the value that’s
returned to the client. It represents the HTTP response that you create.
Explaining the Ok method
The Ok method used as the last line of the sayHello method constructs a “200 OK”
response. Using Ok inside Action is equivalent to writing this much longer code:
def sayHello = Action {
Result(
header = ResponseHeader(200, Map.empty),
body = HttpEntity.Strict(
ByteString("Hello, world"),
Some("text/plain")
)
)
}
In addition to Ok, other common response methods include Forbidden, NotFound,
BadRequest, MethodNotAllowed, and Redirect. You can also set the status code man‐
ually like this:
Status(5150)("Van Halen status")
When you access the endpoint, that method results in output that looks like this:
$ curl http://localhost:9000/hello
Van Halen status
$ curl --head http://localhost:9000/hello
HTTP/1.1 5150
(other output not shown)
All the available helper methods can be found in the play.api.mvc.Results
Scaladoc.
This code responds to a simple GET request
It’s important to note that the code that’s shown responds to a simple GET request—it
expects no parameters from the client. For instance, if you call the URL with query
parameters, they’re happily ignored by Play:
566
|
Chapter 19: Play Framework and Web Services
$ curl --request GET "http://localhost:9000/hello?x=1&y=2"
Hello, world
You configure what parameters your service can handle in the conf/routes file, and
since I didn’t declare that the /hello URI takes any parameters, ones that are passed to
it are ignored.
Additionally, Play will throw an error if you attempt to use another method to call
this URI, such as PUT, POST, DELETE, or other non-GET methods:
$ curl --request POST http://localhost:9000/hello
(long error message here ...)
Handling query parameters
To handle query parameters with a GET request, follow the same steps:
1. Create a new route. Add a new line for the new service at the end of the conf/routes
file, defining it to take a parameter named name:
GET /hi/:name
controllers.HelloController.sayHi(name: String)
This can be read as, “When a GET request is made at the /hi URI with the name
parameter, pass that name to the sayHi method of the HelloController.”
2. Create a new controller method. Next, update the HelloController class. Add this
new sayHi method after the original sayHello method:
def sayHi(theName: String) = Action {
Ok(s"Hi, $theName")
}
Notice that this method takes a String parameter, and also that it doesn’t need to
have the same name that’s used in the routes file.
3. Create a model. In this case you don’t need a model, so skip this step.
4. Test your service. Test this new service by going to this URL in your browser or by
using curl:
$ curl --request GET http://localhost:9000/hi/Darja
Hi, Darja
There are several more ways to handle routes and query parameters with Play. See the
Play Scala HTTP Routing page for more details.
See Also
• See the Play Framework page on actions, controllers, and results for more details
on creating actions and controllers.
19.2 Creating a New Play Framework Endpoint
|
567
• See Play’s Scala HTTP Routing page for more details on defining routes.
19.3 Returning JSON from a GET Request with Play
Problem
You want to know how to write a Play Framework controller method that returns
JSON in response to a GET request.
Solution
The general solution is:
1. Add an entry to the conf/routes file to define your new endpoint.
2. Create a controller class and method that matches the description in that file.
3. Create the necessary model, and code to serialize that model to JSON.
4. Test your new service with your browser, or a tool like curl.
Depending on your preferred coding approach, the first three steps can happen in
any order. Typically you want to work either from the endpoint back to the model as
shown, or from the model forward to the endpoint.
In this solution you’ll follow the order in the list to create a REST service that returns
information about movies in response to a GET request.
1. Add an entry to the routes file
Following the steps shown, this solution creates the endpoint first and then creates
everything that’s needed to fulfill that service. The first step is to add this code to your
conf/routes file to create that endpoint:
GET
/movies
controllers.MovieController.getMovies
This can be read as “When a GET request is called at the /movies URI, invoke the
getMovies method in the MovieController class in the controllers package.”
2. Create a controller and method
Next, create the getMovies method in the MovieController class. To keep this as
simple as possible initially, the code will convert a list of strings—the names of movies
—into JSON and then return that JSON. The list of movies and the JSON conversion
process are shown in this controller code:
package controllers
568
| Chapter 19: Play Framework and Web Services
import
import
import
import
javax.inject._
play.api.mvc._
play.api.libs.json._
models.Movie
@Singleton
class MovieController @Inject()(val controllerComponents: ControllerComponents)
extends BaseController {
/**
* Let Play convert the `List[String]` to JSON for you.
*/
def getMovies = Action {
// these three steps are shown explicitly so you
// can see the types:
val goodMovies: Seq[String] = Movie.goodMovies()
val json: JsValue = Json.toJson(goodMovies)
Ok(json)
}
}
A few notes about this code:
• It’s a new controller, just like the ones created in the previous recipes.
• The Json.toJson method knows how to convert a Seq[String] into JSON.
• The Ok method constructs a “200 OK response.”
The last two points are detailed in the Discussion.
3. Create a model
Now all you have to do is create a model to match that code:
package models
object Movie {
def goodMovies(): Seq[String] = List(
"The Princess Bride",
"The Matrix",
"Firefly"
)
}
In the real world—and in the following recipes—a model will be more complicated.
But to keep this example as simple as possible, goodMovies is defined as a method
that returns a List[String]. (In the real world, goodMovies retrieves that data from a
database or other data store.)
19.3 Returning JSON from a GET Request with Play
|
569
4. Access the endpoint with your browser or curl
For a GET request like this that doesn’t pass any custom header information to the
server, you can test your code with a browser. Just access the http://localhost:9000/
movies URL in your browser, and you should see this JSON output:
["The Princess Bride","The Matrix","Firefly"]
You can also use a command-line tool like curl:
$ curl --request GET http://localhost:9000/movies
["The Princess Bride","The Matrix","Firefly"]
Assuming you see that—congratulations—you created a Play Framework action that
responds to a GET request and returns JSON output.
Discussion
Let’s look at how the controller code works.
Json.toJson
This step in the code works because the Json.toJson method knows how to convert
a list of strings—our movies—into JSON:
val json: JsValue = Json.toJson(goodMovies)
The way this works in Scala 2 is that the toJson method is defined like this:
Json.toJson[T](T)(implicit writes: Writes[T])
As shown in Recipe 19.4, a Writes value is a converter that knows how to convert a
Scala type into JSON. Play comes with prebuilt Writes converters for basic types like
Int, Double, String, etc. These converters are brought into scope when you import
the types in the play.api.libs.json._ package.
It also has implicit Writes implementations for collections, so if a type A has a
Writes[A] converter, the Json.toJson method can convert a collection that contains
that type A. In this example Play supplies a Writes[String] converter for us, so it can
also convert a Seq[String].
The Ok method
The Ok method used as the last line of the getMovies method constructs a “200 OK”
response. It’s equivalent to writing this longer code:
def index = Action {
Result(
header = ResponseHeader(200, Map.empty),
body = HttpEntity.Strict(
//JSON here ...
570
|
Chapter 19: Play Framework and Web Services
Some("application/json")
)
)
}
As shown, when Ok returns a JsValue object, it sets the content type to "applica
tion/json". You can confirm this in the output of this curl command:
$ curl -I http://localhost:9000/movies
HTTP/1.1 200 OK
Content-Type: application/json
Content-Length: 45
(other output not shown)
The Play JSON types
Like other JSON frameworks, Play has implementations of types that correspond to
the JSON types:
• JsString
• JsNumber
• JsObject
• JsNull
• JsBoolean
• JsArray
• JsUndefined
Each of those types is a subtype of JsValue. Note that JsArray is a sequence, and can
contain a heterogeneous or homogeneous collection of the other JsValue types.
These types are in the play.api.libs.json package, and you can use them in your
code by importing play.api.libs.json._.
How to use Play/JSON in the Scala REPL
You can see how those types work in the Play/sbt REPL. To see this, first start sbt in
the root directory of your Play project:
$ sbt
Then inside the sbt shell, issue its console command:
sbt> console
This starts a Scala REPL. In addition to being a normal REPL, you also have access to
all of your project’s classes on the classpath. So you can import the JSON types:
scala> import play.api.libs.json._
19.3 Returning JSON from a GET Request with Play
|
571
Then you can run any experiment you like. These examples show some expressions
you can execute, and their resulting types:
JsString("hi")
JsNumber(100)
JsNumber(1.23)
JsNumber(BigDecimal(1.23))
JsBoolean(true)
//
//
//
//
//
val x = Json.toJson(4)
val x = Json.toJson(false)
// JsValue = 4
// JsValue = false
// Sequences
Json.toJson(Seq("A", "B", "C"))
JsArray(Array(Json.toJson(1)))
JsArray(Seq(Json.toJson("Hi")))
JsArray(Array(1))
JsString = "hi"
JsNumber = 100
JsNumber = 1.23
JsNumber = 1.23
JsBoolean = true
//
//
//
//
JsValue = ["A","B","C"]
JsArray = [1]
JsArray = ["Hi"]
does not compile
// Map
val map = Map("1" -> "a", "2" -> "b")
Json.toJson(map)
// JsValue = {"1":"a","2":"b"}
// Some
val number = Json.toJson(Some(100))
val number = Json.toJson(Some("Hi"))
// JsValue = 100
// JsValue = "Hi"
// None
val x: Option[Int] = None
val number = Json.toJson(x)
// JsValue = null
See Also
• The Scaladoc for the play.api.libs.json package
19.4 Serializing a Scala Object to a JSON String
Problem
You want to convert a Scala object to a JSON string using the Play Framework.
Solution
The preferred approach is to create an implicit Writes converter for your class and
then use the Json.toJson method to convert (serialize) your class to a JSON string
value.
For example, given this Movie class:
572
| Chapter 19: Play Framework and Web Services
case class Movie(title: String, year: Int, rating: Double)
create an implicit Writes value for Movie like this:
import play.api.libs.json._
implicit val movieWrites = new Writes[Movie] {
def writes(m: Movie) = Json.obj(
"title" -> m.title,
"year" -> m.year,
"rating" -> m.rating
)
}
Now you can create an instance of your class:
val pb = Movie("The Princess Bride", 1987, 8.5)
and then convert it to JSON using Json.toJson:
scala> val json = Json.toJson(pb)
val json: play.api.libs.json.JsValue =
{"title":"The Princess Bride","year":1987,"rating":8.5}
A sequence of objects
A great thing about this approach is that it also works for collections of objects. Just
create your collection:
val goodMovies = List(
Movie("The Princess Bride", 1987, 8.5),
Movie("The Matrix", 1999, 8.8),
Movie("Firefly", 2002, 9.2)
)
then serialize it to JSON:
scala> val json = Json.toJson(goodMovies)
val json: play.api.libs.json.JsValue = [
{"title":"The Princess Bride","year":1987,"rating":8.5},
{"title":"The Matrix","year":1999,"rating":8.8},
{"title":"Firefly","year":2002,"rating":9.2}
]
As you’ll see in the Discussion, the approach also works for nested objects.
Discussion
This approach works because Json.toJson is designed to use an implicit Writes
value that’s available in the current scope:
Json.toJson[T](T)(implicit writes: Writes[T])
19.4 Serializing a Scala Object to a JSON String
|
573
Writes is a trait in the play.api.libs.json package, and when you define an
implicit Writes instance for your class, like this:
implicit val movieWrites = new Writes[Movie] ...
and then import it into the current scope, the Json.toJson method can then process
the conversion. As shown in the Solution, it works for a single instance of a class as
well as a collection of that type.
Nested objects
The same Writes technique also supports nested objects. For instance, given these
two case classes:
case class Address(
street: String,
city: String,
state: String,
postalCode: String
)
case class Person(name: String, address: Address)
you create implicit Writes converters for them:
object WritesConverters {
import play.api.libs.json._
implicit val addressWrites = new Writes[Address] {
def writes(a: Address) = Json.obj(
"street" -> a.street,
"city" -> a.city,
"state" -> a.state,
"postalCode" -> a.postalCode,
)
}
implicit val personWrites = new Writes[Person] {
def writes(p: Person) = Json.obj(
"name" -> p.name,
"address" -> p.address
)
}
}
Then, after you import them into scope, you can create a Person instance that con‐
tains an Address and convert the Person to JSON. This process is shown in this Scala
2 App:
object JsonWrites2AddressPerson extends App {
import WritesConverters._
574
|
Chapter 19: Play Framework and Web Services
val stubbs = Person(
"Stubbs",
Address(
"123 Main Street",
"Talkeetna",
"Alaska",
"99676"
)
)
val jsValue = Json.toJson(stubbs)
println(jsValue)
}
When that code runs you’ll see that jsValue has this type and data:
jsValue: JsValue = {
"name":"Stubbs",
"address":{
"street":"123 Main Street",
"city":"Talkeetna",
"state":"Alaska","postalCode":"99676"
}
}
Other approaches you can use
With Play you can use other approaches to serialize Scala objects into JSON, but the
Writes approach is straightforward, so there doesn’t seem to be a huge advantage to
using other approaches.
As a quick look at one alternative technique, this code shows another way to convert
a Movie instance named m into a JsValue:
import play.api.libs.json._
val json: JsValue =
Seq(
"title" ->
"year"
->
"rating" ->
)
)
JsObject(
JsString(m.title),
JsNumber(m.year),
JsNumber(m.rating)
See the Play page on JSON basics for details on other conversion approaches.
19.4 Serializing a Scala Object to a JSON String
|
575
19.5 Deserializing JSON into a Scala Object
Problem
Your Play Framework code is going to receive a JSON that corresponds to a Scala
class, and you need to know how to convert the JSON to a single Scala object, or
potentially to a sequence of Scala objects.
Solution
Handling JSON for a single Scala object is shown in this Solution. Handling JSON
that represents a sequence of objects is shown in the Discussion.
To convert a JSON string to a single Scala object, follow these steps:
1. Create a class to match the JSON.
2. Create a Play Reads converter.
3. Receive the JSON in a Play controller method.
4. Convert the JSON string to your Scala object, validating the JSON during the
process.
This is essentially the reverse of the previous recipe, with the additional validation
step. Where the previous recipe used an implicit Writes value, this approach uses an
implicit Reads value.
1. Create a Scala class to match the JSON
For example, given a JSON string that represents a Movie class:
val jsonString = """{"title":"The Princess Bride","year":1987,"rating":8.5}"""
create a case class that corresponds to the JSON:
case class Movie(title: String, year: Int, rating: Double)
2. Create a Reads converter
Then create an implicit Reads converter for the Movie type:
import play.api.libs.json._
import play.api.libs.functional.syntax._
// conversion without validation
implicit val movieReads: Reads[Movie] = (
(JsPath \ "title").read[String] and
(JsPath \ "year").read[Int] and
(JsPath \ "rating").read[Double]
)(Movie.apply _)
576
|
Chapter 19: Play Framework and Web Services
Without using validation, you can transform the JSON string into a Scala Movie
object using Json.fromJson:
val json: JsValue = Json.parse(jsonString)
val movie = Json.fromJson(json)
// JsResult[Movie] = JsSuccess(Movie(The Princess Bride,1987,8.5),)
However, you’ll always want to validate any external data coming into your applica‐
tion, so a more real-world approach is to add validation to each value:
// conversion with validation.
// minLength, min, and max are validation methods that come with
// the Reads object.
import play.api.libs.json._
import play.api.libs.functional.syntax._
import play.api.libs.json.Reads._
implicit val movieReads: Reads[Movie] = (
(JsPath \ "title").read[String](minLength[String](2)) and
(JsPath \ "year").read[Int](min(1920).keepAnd(max(2020))) and
(JsPath \ "rating").read[Double](min(0d).keepAnd(max(10d)))
)(Movie.apply _)
Functions like min, minLength, and max are helper validation methods that come with
the Reads object, and those examples show how to apply them to the three incoming
fields.
Readability
If your code gets too difficult to read when you add validators, con‐
sider working with one JsPath field at a time.
3. Receive the JSON in a controller method
This step isn’t used in this recipe, but you’ll want to use a controller method. See the
Discussion for more details.
4. Convert the JSON to a Scala object
Now you can attempt to parse and validate the JSON to construct a Scala object:
val json: JsValue = Json.parse(jsonString)
val jsResult = json.validate[Movie]
When the validation works, jsResult will have this type and data:
jsResult: JsResult[Movie] = JsSuccess(Movie(The Princess Bride,1987,8.5),)
One way to handle the jsResult value—which is either a JsSuccess or a JsError—is
to use a match expression:
19.5 Deserializing JSON into a Scala Object
|
577
jsResult match {
case JsSuccess(movie,_) => println(movie)
case e: JsError
=> println(s"error: $e")
}
That’s a common approach, and the JsResult type also has other methods you can
use, including asOpt, fold, foreach, and getOrElse.
Discussion
This solution is similar to the last recipe, but instead of going from a Scala object to a
JSON string, this recipe does the opposite, going from a JSON string to a Scala object.
Where the last recipe uses an implicit Writes converter and Json.toJson method,
this recipe uses an implicit Reads converter with the Json.fromJson and json.vali
date methods.
JSON and controller methods
Controller methods aren’t shown in this recipe, but they are shown in Recipes 19.1
and 19.2.
When working with JSON in a controller method, you’ll work with the request
object, using code like this:
// one option
def yourMethod = Action { request: Request[AnyContent] =>
val json: Option[JsValue] = request.body.asJson
// more the json here ...
}
// another option ("body parser")
def yourMethod = Action(parse.json) { request: Request[JsValue] =>
// work with 'request' as JSON here
val name = request.body \ "username").as[String]
}
See the Play Framework documentation for more details on using Action, JSON, and
a topic known as body parsers.
Using JsPath
The pattern shown in the solution is known as the combinator pattern:
(JsPath \ "title").read[String] and
(JsPath \ "year").read[Int] and
(JsPath \ "rating").read[Double]
In this code, JsPath is a class that represents a path to a JsValue—i.e., its location in
a JsValue structure. Its use is meant to be analogous to using XPath for working with
XML, and it traverses JsValue structures for the search pattern you provide.
578
| Chapter 19: Play Framework and Web Services
For nested objects, use a search path like this:
val city = JsPath \ "address" \ "city"
For sequences of objects, access sequence elements like this:
val friend0 = (JsPath \ "friends")(0)
See the “Reads” section of the Play documentation on Reads/Writes/Format combina‐
tors for more JsPath details.
Handling bad data
When the data you receive doesn’t pass the validation process, the validate step
returns a JsError. For example, this JSON string uses the incorrect key name instead
of the correct key title:
// intentional mistake here (using 'name' instead of 'title'):
val jsonString = """{"name":"The Princess Bride","year":1987,"rating":8.5}"""
So when you run the validate method, it returns a JsError:
scala> json.validate[Movie]
val res0: play.api.libs.json.JsResult[Movie] =
JsError(List((/title,List(JsonValidationError(List(error.path.missing),
ArraySeq())))))
Now when you use a match expression, the JsError case is triggered:
jsResult match {
case JsSuccess(movie,_) => println(movie)
case e: JsError
=> println(s"error: $e")
}
// output:
JsError(List(
(/title,List(JsonValidationError(List(error.path.missing),ArraySeq())))))
Validators
As shown in the validation example, Play has several validation helpers built in.
They’re contained in the Reads object and are imported like this:
import play.api.libs.json.Reads._
The current built-in validators are:
• email validates that a string has the proper email format.
• minLength validates the minimum length of a collection or string.
• min validates that a value is greater than a minimum.
• max validates that a value is less than a maximum.
19.5 Deserializing JSON into a Scala Object
|
579
It also has the keepAnd, andKeep, and or methods, which work as operators. See the
Play JSON documentation on Reads/Writes/Format combinators for details on these
combinator methods.
Handling a sequence of JSON data
The same approach works when your method receives a sequence of JSON data for a
model. The only thing you have to do is change Movie in this line of code:
val jsResult = json.validate[Movie]
to Seq[Movie]:
val jsResult = json.validate[Seq[Movie]]
You can demonstrate this by starting the sbt console in the root directory of a Play
project:
$ sbt
play> console
scala> _
Then when you paste this code into the REPL:
import play.api.libs.json._
import play.api.libs.json.Reads._
import play.api.libs.functional.syntax._
case class Movie(title: String, year: Int, rating: Double)
val jsonString = """[
{"title":"The Princess Bride","year":1987,"rating":8.5},
{"title":"The Matrix","year":1999,"rating":8.8},
{"title":"Firefly","year":2002,"rating":9.2}
]"""
implicit val movieReads: Reads[Movie] = (
(JsPath \ "title").read[String](minLength[String](2)) and
(JsPath \ "year").read[Int](min(1920).keepAnd(max(2020))) and
(JsPath \ "rating").read[Double](min(0d).keepAnd(max(10d)))
)(Movie.apply _)
val json: JsValue = Json.parse(jsonString)
val jsResult = json.validate[Seq[Movie]]
you’ll see that jsResult contains the list of movies inside a JsSuccess value:
jsResult: play.api.libs.json.JsResult[Seq[Movie]] =
JsSuccess(List(Movie(The Princess Bride,1987,8.5) ...
scala> jsResult.get.foreach(println)
Movie(The Princess Bride,1987,8.5)
Movie(The Matrix,1999,8.8)
Movie(Firefly,2002,9.2)
580
|
Chapter 19: Play Framework and Web Services
See Also
• The Scaladoc for the Play Reads object provides more details on the helper meth‐
ods that are available.
19.6 Using the Play JSON Library Outside of the
Play Framework
Problem
Because you’re comfortable using the Play JSON library inside the Play Framework,
you want to be able to use it outside of the Framework as well.
Solution
Play JSON exists as a standalone library, so you can use it in your Scala projects out‐
side of the Play environment. For instance, when using sbt, just add its dependency to
your build.sbt file:
"com.typesafe.play" %% "play-json" % "2.9.1"
A complete build.sbt file that uses Play JSON and sttp looks like this:
name := "PlayJsonWithoutPlay"
version := "0.1"
scalaVersion := "2.13.5"
libraryDependencies ++= Seq(
"com.typesafe.play" %% "play-json" % "2.9.1",
"com.softwaremill.sttp.client3" %% "core" % "3.2.3"
)
Once you’ve added the dependency, write your JSON application code just as though
you are writing code using the Play Framework.
From a Scala object to JSON
This example shows how to go from a Scala object to JSON with a Writes converter:
import play.api.libs.json._
case class Movie(title: String, year: Int, rating: Double)
object JsonWithoutPlay_WritesExample extends App {
implicit val movieWrites = new Writes[Movie] {
def writes(m: Movie) = Json.obj(
"title" -> m.title,
19.6 Using the Play JSON Library Outside of the Play Framework
|
581
"year" -> m.year,
"rating" -> m.rating
)
}
val pb = Movie("The Princess Bride", 1987, 8.5)
println(Json.toJson(pb))
}
From JSON to a Scala object
This example shows how to use sttp to access a REST API, and then convert the
JSON it receives into a Scala object using Play JSON. Because all of this code is shown
in other recipes, the comments describe how it works:
import
import
import
import
play.api.libs.json._
play.api.libs.functional.syntax._
play.api.libs.json.Reads._
sttp.client3._
// a case class to model the data received from the REST url
case class ToDo(
userId: Int,
id: Int,
title: String,
completed: Boolean
)
object JsonWithoutPlay_ReadsExample extends App {
// the Reads implementation that matches the data.
// the first three fields are also validated.
implicit val todoReads: Reads[ToDo] = (
(JsPath \ "userId").read[Int](min(0)) and
(JsPath \ "id").read[Int](min(0)) and
(JsPath \ "title").read[String](minLength[String](2)) and
(JsPath \ "completed").read[Boolean]
)(ToDo.apply _)
// make the GET request with sttp
val response = basicRequest
.get(uri"https://jsonplaceholder.typicode.com/todos/1")
.send(HttpURLConnectionBackend())
// get the JSON from the response, then convert the JSON string
// to a Scala `ToDo` instance
response.body match {
case Left(e) => println(s"Response error: $e")
case Right(jsonString) =>
val json: JsValue = Json.parse(jsonString)
val jsResult = json.validate[ToDo]
582
|
Chapter 19: Play Framework and Web Services
jsResult match {
case JsSuccess(todo,_) => println(todo)
case e: JsError
=> println(s"JsError: $e")
}
}
}
JSONPlaceholder is a popular service used for testing REST calls and currently serves
about 900 million test requests per month. When you access the URL shown in the
code with curl, you see this JSON result:
$ curl https://jsonplaceholder.typicode.com/todos/1
{
"userId": 1,
"id": 1,
"title": "delectus aut autem",
"completed": false
}
This JSON is transformed into the values you see in the jsResult and todo variables:
jsResult: JsSuccess(ToDo(1,1,delectus aut autem,false),)
ToDo(1,1,delectus aut autem,false)
Discussion
The sttp HTTP client library is used in this example; it’s explained in detail in Recipe
19.7. The important things to know for this example are:
• It makes an HTTP GET request to the URL shown.
• It returns an HTTP response, whose type is Either[String,String].
• The JSON String is extracted in the Right case of the response.body match
expression.
Other Scala JSON libraries
There are several other Scala libraries for working with JSON. Circe is one of the
most popular alternatives. As described in its documentation, Circe is a fork of the
Java Argonaut library and relies on the Cats functional programming library.
uJson, which includes the uPickle project, is another popular JSON library. Its value
is that its API attempts to be similar to JSON libraries in languages like Python, Ruby,
and JavaScript. Also, while most Scala JSON libraries treat JSON as being immutable,
uJson lets you mutate the JSON representation.
19.6 Using the Play JSON Library Outside of the Play Framework
|
583
19.7 Using the sttp HTTP Client
Problem
You need a Scala HTTP client for your applications and want to learn how to use the
popular sttp client library.
Solution
sttp can handle all of your HTTP client needs, including GET, POST, and PUT
requests; request headers, cookies, redirects, and setting timeouts; and using synchro‐
nous and asynchronous backend libraries for making HTTP connections.
In this solution I demonstrate several of sttp’s capabilities.
Basic GET request
This example shows how to make a synchronous GET request with sttp, using the
default backend engine. It doesn’t use any query parameters, headers, or cookies.
First, create an sbt project with the necessary sttp client3 dependency in the build.sbt
file:
lazy val root = project
.in(file("."))
.settings(
name := "Sttp",
version := "0.1.0",
scalaVersion := "3.0.0",
libraryDependencies ++= Seq(
"com.softwaremill.sttp.client3" %% "core" % "3.2.3"
)
)
It’s assumed that this build.sbt file is used in the remainder of this recipe.
Given that configuration, make a GET request to a URL like this:
import sttp.client3.*
@main def basicGet =
val backend = HttpURLConnectionBackend()
val response = basicRequest
.get(uri"http://httpbin.org/get")
.send(backend)
println(response)
The resulting response looks like this:
Response(Right({
"args": {},
584
|
Chapter 19: Play Framework and Web Services
"headers": {
"Accept": "text/html, image/gif, image/jpeg, *; q=.2, */*; q=.2",
"Accept-Encoding": "gzip, deflate",
"Host": "httpbin.org",
"User-Agent": "Java/11.0.9",
"X-Amzn-Trace-Id": "Root=1-6068ea23-1354da2305a7c4b12b4dd4dc"
},
"origin": "148.69.71.19",
"url": "http://httpbin.org/get"
}
),200,OK,
Vector( much more output here ...
While response has the nested type Response(Right(...)), it’s surprisingly easy to
work with. You can use various methods to check the status code, headers, and see if
the request was redirected:
response.code
response.is200
response.isClientError
response.statusText
response.headers
response.header("Content-Length")
response.isRedirect
//
//
//
//
//
//
//
sttp.model.StatusCode = 200
true
false
"OK"
Seq[sttp.model.Header]
Some("344")
false
When you access the response body, the type is an Either, which is a Right when
accessing the URL is successful:
response.body
// Either[String, String] = Right( ...
The use of Either lets you work with both successful and unsuccessful outcomes. For
instance, you can use a match expression to handle the result:
response.body match
case Left(error)
=> println(s"LEFT: $error")
case Right(result) => println(s"RIGHT: $result")
Because response.body has the type Either[String, String], you can also use
methods like foreach, getOrElse, isRight, map, etc. to work with the result.
Backends
It’s important to understand that sttp consists of a frontend, which is the API you just
saw, and a backend. For example, you saw in the previous code that a backend is
referenced:
// create a backend
val backend = HttpURLConnectionBackend()
// send the Request to the backend
val response = basicRequest
.get(uri"http://httpbin.org/get")
.send(backend)
19.7 Using the sttp HTTP Client
|
585
This portion of that code creates a Request:
val request = basicRequest.get(uri"http://httpbin.org/get")
The important pieces in the request are the method (GET, in this case), the uri
string, and whether or not there is a body in the request. The output is a little long, so
for more details, run that code on your system.
When the send method is called, this request is sent to the configured backend. The
backend is an instance of an SttpBackend, and per the sttp documentation, it’s where
most of the work happens:
• The request is translated to a backend-specific form.
• A connection is opened, data is sent and received.
• The backend-specific response is translated to sttp’s Response.
Backends can be synchronous or asynchronous, and they manage the connection
pool, thread pools for handling responses, and have configuration options. According
to the sttp documentation, sttp currently supports at least five backends, including,
“ones based on akka-http, async-http-client, http4s, OkHttp, and HTTP clients which
ship with Java.” These backends integrate with Akka, Monix, fs2, cats-effect, scalaz,
and ZIO.
See the sttp backends documentation for more details on how to configure and use
different backends.
Discussion
This discussion demonstrates a few more sttp capabilities.
A GET request with a header
When you make a request to the GitHub REST API v3, you’re encouraged to send
this header with your request:
Accept: application/vnd.github.v3+json
To do that with sttp, just add a header method to your query. A complete Scala 3
application looks like this:
import sttp.client3.*
@main def basicGetHeader =
val backend = HttpURLConnectionBackend()
// note: all data is sent and received as json
val response = basicRequest
.header("Accept", "application/vnd.github.v3+json")
.get(uri"https://api.github.com")
586
| Chapter 19: Play Framework and Web Services
.send(backend)
println(response.body)
That query returns a long JSON response from GitHub that begins like this:
{"current_user_url":"https://api.github.com/user" ...
A GET request with query parameters
The sttp documentation shows how to create a GET request with query parameters,
using the current GitHub API:
import sttp.client3.*
@main def getWithQueryParameters =
val query = "http language:scala"
val request = basicRequest.get(
uri"https://api.github.com/search/repositories?q=$query"
)
val backend = HttpURLConnectionBackend()
val response = request.send(backend)
println(s"URL: ${request.toCurl}")
// prints the URL that’s created
println(response.body)
When you look at the result of the first println statement to see the URL that’s cre‐
ated, you’ll see output like this:
URL: curl -L --max-redirs 32 -X GET
'https://api.github.com/search/repositories?q=http+language:scala'
That output shows how sttp translates the query parameters into a GET URL that you
can also test with the curl command that’s shown. Also note that the query parame‐
ter is automatically URL-encoded.
A POST example
With sttp you can create queries using any HTTP method, including the POST
method. Here’s an example that sends a POST query to the httpbin.org test service:
import sttp.client3.*
@main def post =
val backend = HttpURLConnectionBackend()
val response = basicRequest
.body("Hello, world!")
.post(uri"https://httpbin.org/post?hello=world")
.send(backend)
println(response)
That query returns a JSON response of over five hundred characters, including a set
of headers, and this data:
19.7 Using the sttp HTTP Client
|
587
"data": "Hello, world!"
Cookies
You can also set and access cookies with sttp. This example shows how to set two
cookies when calling a httpbin.org URL:
import sttp.client3.*
@main def cookies =
val backend = HttpURLConnectionBackend()
val response = basicRequest
.get(uri"https://httpbin.org/cookies")
.cookie("first_name", "sam")
.cookie("last_name", "weiss")
.send(backend)
println(response)
The response looks like this:
Response(Right({
"cookies": {
"first_name": "sam",
"last_name": "weiss"
}
}
),200,OK,
more output omitted ...
Setting timeout values
In production code I always set a timeout on HTTP queries. This code shows how to
set timeout values on both the connection and read attempts:
import sttp.client3.*
import scala.concurrent.duration.*
@main def timeout =
// specify backend options, like a connection timeout
val backend = HttpURLConnectionBackend(
options = SttpBackendOptions.connectionTimeout(5.seconds)
)
// can also set a read timeout
val request = basicRequest
.get(uri"https://httpbin.org/get")
.readTimeout(5.seconds)
val response = request.send(backend)
println(response)
Note that this code can throw an SttpClientException.ConnectException or
SttpClientException.ReadException, so be sure to handle those in your code.
588
|
Chapter 19: Play Framework and Web Services
CHAPTER 20
Apache Spark
This chapter demonstrates recipes for Apache Spark, a unified data analytics engine
for large-scale data processing.
The Spark website describes Spark as a “unified analytics engine for large-scale data
processing.” This means that it’s a big data framework that lets you analyze your data
with different techniques—such as treating the data as a spreadsheet or as a database
—and runs on distributed clusters. You can use Spark to analyze datasets that are so
large that they span thousands of computers.
While Spark is designed to work with enormous datasets on clusters of computers, a
great thing about it is that you can learn how to use Spark on your own computer
with just a few example files.
Spark 3.1.1
The examples in this chapter use Spark 3.1.1, which was released in
March 2021 and is the latest release at the time of this writing.
Spark currently works only with Scala 2.12, so the examples in this
chapter also use Scala 2.12. However, because working with Spark
generally involves using collections methods like map and filter,
or SQL queries, you’ll barely notice the difference between Scala 2
and Scala 3 in these examples.
The recipes in this chapter show how to work with Spark on your own computer,
while demonstrating the key concepts that work on datasets that span thousands of
computers. Recipe 20.1 demonstrates how to get started with Spark and digs into one
of its fundamental concepts, the Resilient Distributed Dataset, or RDD. An RDD lets
you treat your data like a large distributed spreadsheet.
589
That first recipe shows how to create an RDD from a collection inside the REPL, and
then Recipe 20.2 demonstrates how to read a data file into an RDD. It shows several
ways to read data files, manipulate that data using Scala and Spark methods, and
write data to other files.
Next, using a sample dataset from MovieLens, Recipe 20.3 shows how to model a row
in a CSV file with a Scala case class, and then read the data in that file into an RDD
and work with it as desired.
Recipe 20.4 then shows how to convert an RDD into a DataFrame. This process lets
you query your data using a SQL-like API. The examples show how to use that query
syntax, as well as how to define a schema to represent your data.
Recipe 20.5 picks up from there, showing how to read a MovieLens CSV file into a
DataFrame and again query that data. This recipe takes the process a step further and
shows how to create a SQL view on that data, which lets you use a regular SQL query
string to query your data.
As the examples continue to use the MovieLens dataset, Recipe 20.6 shows how to
read multiple CSV files into DataFrames, create views on those, and then query the
data with traditional SQL queries—including joins—like this:
val query = """
select * from movies, ratings
where movies.movieId == ratings.movieId
and rating == 5.0
"""
Finally, Recipe 20.7 shows the complete process of creating a Spark application that
can be packaged as a JAR file using sbt and run from the command line.
Spark is a huge topic, and thick books have been written about it. The goal of the rec‐
ipes in this chapter is to get you quickly up and running with some of its main techni‐
ques. For more details, see the book Spark: The Definitive Guide by Bill Chambers and
Matei Zaharia (O’Reilly).
The MovieLens dataset
The examples in this chapter use the MovieLens dataset. That data‐
set includes real-world movie ratings in the form of CSV files that
are hundreds of megabytes in size and contain ratings and details
from over 62,000 movies. For details on that dataset, see the semi‐
nal paper by F. Maxwell Harper and Joseph A. Konstan, “The Mov‐
ieLens Datasets: History and Context,” ACM Transactions on Inter‐
active Intelligent Systems 5, no. 4 (2016): 1–19, https://doi.org/
10.1145/2827872.
590
|
Chapter 20: Apache Spark
20.1 Getting Started with Spark
Problem
You’ve never used Spark before and want to get started with it.
Solution
When you use Spark professionally, your data will probably be spread across multiple
computers—maybe thousands of computers—but to get started with Spark, you can
do all of your work on one computer system in local mode. The easiest way to do this
is to start the Spark shell, create an array, and go from there.
The Spark installation instructions may vary over time, but currently you just down‐
load Spark from its download page. The download is a tgz file, so just unpack that
and move it to your bin directory, just like you manually install other downloaded
applications. For example, I install Spark under my /Users/al/bin directory.
Once you have Spark installed, start the Scala Spark shell like this:
$ spark-shell
The Spark shell is a modified version of the normal Scala shell you get with the scala
command, so anything you can do in the Scala shell you can also do in the Spark
shell, such as creating an array:
val nums = Array.range(0, 100)
Once you have something like an array or map, you can create a Spark Resilient Dis‐
tributed Dataset (RDD) by calling the Spark Context’s parallelize method:
scala> val rdd = spark.sparkContext.parallelize(nums)
rdd: org.apache.spark.rdd.RDD[Int] = ParallelCollectionRDD[0] at parallelize
at <console>:25
Notice from the output that rdd has the type RDD[Int]. As you’ll see in the Discus‐
sion, an RDD is one of Spark’s basic building blocks. For now you can think of it as
being a collections class like a list or array, but its data can be spread across all the
computers in a cluster. It also has additional methods that can be called. Here are
some examples of methods that look familiar from the Scala collections classes:
rdd.count
rdd.first
rdd.min
rdd.max
rdd.take(3)
rdd.take(2).foreach(println)
//
//
//
//
//
//
Long = 100
Int = 0
Int = 0
Int = 99
Array[Int] = Array(0, 1, 2)
prints 0 and 1 on separate lines
20.1 Getting Started with Spark
|
591
Here are a few RDD methods that may not look familiar:
// “sample” methods return random values from the RDD
rdd.sample(false, 0.05).collect
// Array[Int] = Array(0, 16, 22, 27, 60, 73)
rdd.takeSample(false, 5)
// Array[Int] = Array(35, 65, 31, 27, 1)
rdd.mean
rdd.stdev
rdd.getNumPartitions
// Double = 49.5
// Double = 28.866070047722115
// Int = 8
rdd.stats
// StatCounter = (count: 100, mean: 49.500000,
// stdev: 28.866070, max: 99.000000,
// min: 0.000000)
You can also use familiar collection methods like map and filter:
scala> rdd.map(_ + 5).filter(_ < 8)
res0: org.apache.spark.rdd.RDD[Int] = MapPartitionsRDD[10] at filter at
<console>:26
scala> rdd.filter(_ > 10).filter(_ < 20)
res1: org.apache.spark.rdd.RDD[Int] = MapPartitionsRDD[12] at filter at
<console>:26
However, notice that these methods don’t return a result, at least not the result you
were expecting. In Spark, transformation methods like these are evaluated lazily, so
we refer to them as lazy or nonstrict. To get a result from them, you have to add an
action method. An RDD has a collect method, which is an action method that
forces all previous transformation methods to be run, and then it brings the result
back to the computer your code is being run on. In these examples, adding collect
causes a result to be calculated:
scala> rdd.map(_ + 5).filter(_ < 8).collect
res0: Array[Int] = Array(5, 6, 7)
scala> rdd.filter(_ > 10).filter(_ < 20).collect
res1: Array[Int] = Array(11, 12, 13, 14, 15, 16, 17, 18, 19)
Discussion
In production situations Spark will work with data that’s spread across clusters of
computers, but as shown, in Spark’s local mode all the processing is done on your
local computer.
The spark object and spark context
In the Solution I created an RDD in the Spark shell with these two lines of code:
val nums = Array.range(0, 100)
val rdd = spark.sparkContext.parallelize(nums)
592
| Chapter 20: Apache Spark
As you might guess, spark is a prebuilt object that’s available in the shell. You can see
the type of spark and spark.sparkContext using the shell’s :type command:
scala> :type spark
org.apache.spark.sql.SparkSession
scala> :type spark.sparkContext
org.apache.spark.SparkContext
You’ll use these two objects quite a bit in your Spark programming. Because you use
the SparkContext so often, there’s a shortcut available for it in the shell named sc, so
instead of typing this:
val rdd = spark.sparkContext.parallelize(nums)
you can just type this:
val rdd = sc.parallelize(nums)
RDD
While there are higher-level ways to work with data in Spark—which you’ll see in the
following recipes—the RDD is a fundamental data structure. The Spark RDD Pro‐
gramming Guide describes it as “a collection of elements partitioned across the nodes
of the cluster that can be operated on in parallel.” The Spark creators recommend
thinking of an RDD as a large distributed spreadsheet.
Technically, an RDD is an immutable, fault-tolerant, parallel data structure. The book
Beginning Apache Spark 2 by Hien Luu (Apress) states that an RDD is represented by
five pieces of information:
• A set of partitions, which are the chunks that make up the dataset.
• A set of dependencies on parent RDDs.
• A function for computing all the rows in the dataset.
• Metadata about the partitioning scheme (optional).
• Where the data lives on the cluster (optional). If the data lives on the HDFS, then
it would be where the block locations are located.
When we say that an RDD is a parallel data structure, this means that a single large
file can be split across many computers. In typical use cases, a dataset is so large that
it can’t fit onto a single node, so it ends up being partitioned across multiple nodes in
a cluster. Some basic things to know about partitions are:
• The partition is the main unit of parallelism in Spark.
• Every node in a Spark cluster contains one or more partitions.
• The number of partitions is configurable.
20.1 Getting Started with Spark
|
593
• Spark provides a default value, but you can tune it.
• Partitions do not span multiple nodes.
• Spark runs one task for each partition of the cluster.
When you use an RDD, each row in the data is typically represented as a Java/Scala
object. The structure of this object is unknown to Spark, so it can’t help you with your
processing, other than providing methods like filter and map, which know how to
work with an RDD created from a file (as discussed in Recipe 20.2) that’s broken into
chunks and spread across many computers.
When I say that Spark can’t help with your processing, what this means is that Spark
also provides higher-level techniques that you’ll see in later recipes that demonstrate
the Spark DataFrame and Dataset. When you use these data structures you’ll be able
to use SQL queries, and Spark has an optimization engine that can help with the exe‐
cution of your queries.
Three ways to create an RDD
There are three ways to create an RDD:
• Call parallelize on a collection.
• Read the data from one or more files into an RDD (as you’ll see in the next
recipe).
• Call a transformation method on an existing RDD to create a new RDD.
The parallelize method is shown in the Solution. This method is generally only
used for testing, and per the “Parallelized Collections” section of the RDD Program‐
ming Guide, it copies the contents of a collection “to create a distributed dataset that
can be operated on in parallel.”
The parallelize method takes an optional parameter that lets you specify the num‐
ber of partitions the dataset can be broken into:
val rdd = spark.sparkContext.parallelize(nums, 20)
rdd.getNumPartitions
// Int = 20
RDD methods
There are dozens of methods available on an RDD. You can see these in the REPL as
usual by creating an RDD, then typing a decimal and pressing the Tab key after the
decimal. This includes implementations of the usual Scala collections methods like
distinct, filter, foreach, map, and take, as well as other methods unique to Spark.
There are dozens of methods, so see the RDD class Scaladoc and RDD Programming
Guide for more details on the available methods.
594
|
Chapter 20: Apache Spark
See Also
• The spark.apache.org page on Spark’s standalone mode
• The Spark RDD Programming Guide
These articles provide more details on Spark partitions:
• “How Data Partitioning in Spark Helps Achieve More Parallelism?”
• “An Intro to Apache Spark Partitioning”
• “Spark Partitions”
20.2 Reading a File into a Spark RDD
Problem
You want to start reading data files into a Spark RDD.
Solution
The canonical example for showing how to read a data file into an RDD is a word
count application, so not to disappoint, this recipe shows how to read the text of the
Gettysburg Address by Abraham Lincoln and find out how many times each word in
the text is used.
After starting the Spark shell, the first step in the process is to read a file named
Gettysburg-Address.txt using the textFile method of the SparkContext variable sc
that was introduced in the previous recipe:
scala> val fileRdd = sc.textFile("Gettysburg-Address.txt")
fileRdd: org.apache.spark.rdd.RDD[String] = Gettysburg-Address.txt
MapPartitionsRDD[1] at textFile at <console>:24
This example assumes that Gettysburg-Address.txt is in the current directory.
The textFile method is used to read plain text files, and it returns an object of type
RDD[String]. It’s also lazy, which means that nothing happens yet. In fact, if you spell
the filename incorrectly, you won’t find out until some time later when you call a
nonlazy action method.
The rest of the word count solution is pure Scala code. You just call a series of trans‐
formation methods on the RDD to get the solution you want:
val counts = fileRdd.map(_.replaceAll("[.,]", ""))
.map(_.replace("—", " "))
.flatMap(line => line.split(" "))
.map(word => (word, 1))
20.2 Reading a File into a Spark RDD
|
595
.reduceByKey(_ + _)
.sortBy(_._2)
.collect
The only things unique to Spark in this solution are:
• Calling a map method on fileRdd (which has the type RDD[String])
• Calling the collect method at the end
As mentioned in the previous recipe, because all the Spark transformation methods
are lazy, you have to call an eager action method like collect to get the action
started.
Pasting Multiline Expressions
With Spark 3.1, when you have a multiline expression like this, you
have to paste it into the Spark shell using its :paste command. The
steps are:
1. Type :paste in the shell
2. Copy your expression from a text editor and paste it into the
REPL using Command+V or similar
3. Type Control+D to end the past operation
The shell will then interpret your expression.
Discussion
Here’s an explanation of how that code works. First, I create fileRdd as an
RDD[String] with this code:
val fileRdd = sc.textFile("Gettysburg-Address.txt")
Because textFile is lazy, nothing actually happens yet.
Next, because I want to count words, I get rid of decimals, commas, and hyphens in
the text using these two map transformation calls:
.map(_.replaceAll("[.,]", ""))
.map(_.replace("—", " "))
Then, I use this flatMap expression to convert the text into an array of words:
.flatMap(line => line.split(" "))
596
|
Chapter 20: Apache Spark
If you look at the result of the two map expressions and this flatMap expression, you’d
see an Array[String]:
Array(Four, score, and, seven, years, ago, our, fathers ...
To get from this Array[String] to a solution that has a set of all words and the num‐
ber of times they occur—a Map[String, Int]—the next step is to turn each word
into a tuple:
.map(word => (word, 1))
At this point the intermediate data looks like this:
Array[(String, Int)] = Array((Four,1), (score,1), (and,1), (seven,1) ...
Next, I use reduceByKey:
.reduceByKey(_ + _)
This transforms the intermediate data into this data structure:
Array[(String, Int)] = Array((nobly,1), (under,1), (this,4), (have,5) ...
As shown, this is an array of tuples, where the first value of each tuple is a word from
the speech and the second value is a count of how many times that word occurs. This
is what reduceByKey does for us.
Next, you can sort that data by the second tuple element:
.sortBy(_._2)
Finally, you invoke the collect method to force all the transformations to be run:
.collect
Because the data structure has the type Array[(String, Int)], you can call
counts.foreach(println) on it. The end of its output shows the most common
words in the speech:
scala> counts.foreach(println)
[data omitted here]
(here,8)
(we,8)
(to,8)
(the,9)
(that,13)
Methods to read text files into an RDD
There are two main methods to read text files into an RDD:
• sparkContext.textFile
• sparkContext.wholeTextFiles
20.2 Reading a File into a Spark RDD
|
597
The textFile method reads a file as a collection of lines. It can read a file from the
local filesystem, or from a Hadoop or Amazon S3 filesystem using "hdfs://" and
"s3a://" URLs, respectively.
Per the RDD Programming Guide, textFile “takes an optional second argument for
controlling the number of partitions of the file. By default, Spark creates one partition
for each block of the file (blocks being 128 MB by default in HDFS), but you can also
ask for a higher number of partitions by passing a larger value.”
Here are some examples of how to use textFile:
textFile("/foo/file.txt")
textFile("/foo/file.txt", 8)
textFile("/foo/bar.txt", "/foo/baz.txt")
textFile("/foo/ba*.txt")
textFile("/foo/*")
textFile("/a/1.txt", "/b/2.txt")
textFile("hdfs://.../myfile.csv")
textFile("s3a://.../myfile.csv")
//
//
//
//
//
//
//
//
//
//
read a file, using the default
number of partitions
same, but with 8 partitions
read multiple files
read multiple files
read all files in 'foo'
multiple files in different
directories
use a Hadoop URL
use an Amazon S3 URL
Note that the s3a URL prefix is the name of the Hadoop S3 connector and was previ‐
ously named s3 and s3n, so you may see those uses in older documentation.
The wholeTextFiles method reads the entire file into a single String and returns an
RDD that contains a tuple, so its return type is RDD[(String, String)]. The first
string in the tuple is the filename that was read, and the second string is the entire
contents of the file. This example shows how that works:
scala> val rdd = sc.wholeTextFiles("Gettysburg-Address.txt")
rdd: org.apache.spark.rdd.RDD[(String, String)] = Gettysburg-Address.txt
MapPartitionsRDD[5] at wholeTextFiles at <console>:24
scala> rdd.foreach(t => println(s"${t._1} | ${t._2.take(15)}"))
file:/Users/al/Projects/Books/ScalaCookbook2Examples/16_Ecosystem/Spark/ ↵
SparkApp1/Gettysburg-Address.txt | Four score and
The output from the second expression shows that the tuple contains the filename
and file content.
Spark also contains other methods for reading files into a DataFrame or Dataset:
• spark.read.text() is used to read a text file into DataFrame.
• spark.read.textFile() is used to read a text file into a Dataset[String].
• spark.read.csv() and spark.read.format("csv").load("<path>") are used
to read a CSV file into a DataFrame.
These methods are demonstrated in the following recipes.
598
|
Chapter 20: Apache Spark
Saving an RDD to disk
When you obtain your final result using RDD transformation and action methods,
you may want to save your results. You can save an RDD to disk using its saveAsText
File method. This command saves an RDD to a directory named MyRddOutput
under the /tmp directory:
myRdd.saveAsTextFile("/tmp/MyRddOutput")
After you do this you’ll find a series of files under /tmp/MyRddOutput that represent
the RDD named myRdd. Note that if the directory already exists, this operation will
fail with an exception.
Reading more complicated text file formats
On a macOS system, the /etc/passwd file contains seven fields that are delimited by
the : character, but it also contains initial lines of comments, with each comment line
beginning with the # character. To read this file into an RDD you need to skip those
initial comment lines.
One way to do this is to read the file into an RDD as usual:
val fileRdd = spark.sparkContext.textFile("/etc/passwd")
Next, create a case class to model the seven-column format:
case class PasswordRecord (
username: String,
password: String,
userId: Int,
groupId: Int,
comment: String,
homeDirectory: String,
shell: String
)
Now you can convert fileRdd into a new RDD by first filtering out all records that
start with the # character and then converting the remaining seven-column fields into
a PasswordRecord:
val rdd = fileRdd
.filter(! _.startsWith("#"))
.map { line =>
val row = line.split(":")
PasswordRecord(
row(0), row(1), row(2).toInt, row(3).toInt, row(4), row(5), row(6)
)
}
After doing this, you’ll see that rdd only contains the colon-separated rows from the
file:
20.2 Reading a File into a Spark RDD
|
599
scala> rdd.take(3)
res1: Array[PasswordRecord] = Array(
PasswordRecord(nobody,*,-2,-2,Unprivileged User,/var/empty,/usr/bin/false),
PasswordRecord(root,*,0,0,System Administrator,/var/root,/bin/sh),
PasswordRecord(daemon,*,1,1,System Services,/var/root,/usr/bin/false)
)
Now you can work with this RDD as shown previously.
See Also
• The SparkByExamples.com page on reading text files is an excellent resource.
20.3 Reading a CSV File into a Spark RDD
Problem
You want to read a CSV file into an RDD.
Solution
To read a well-formatted CSV file into an RDD:
1. Create a case class to model the file data.
2. Read the file using sc.textFile.
3. Create an RDD by mapping each row in the data to an instance of your case
class.
4. Manipulate the data as desired.
The following example demonstrates those steps, using a file named TomHanks
MoviesNoHeader.csv, which has these contents:
1995,
2000,
2006,
2012,
1994,
Toy Story,
Cast Away,
The Da Vinci Code,
Cloud Atlas,
Forrest Gump,
8.3
7.8
6.6
7.4
8.8
1. Create a case class to model the file data
First, create a case class that matches the data in the file:
case class Movie(year: Int, name: String, rating: Double)
600
| Chapter 20: Apache Spark
2. Read the file
Next, read the file into an initial RDD:
val fileRdd = sc.textFile("TomHanksMoviesNoHeader.csv")
3. Create an RDD by mapping each row to the case class
Then call map on the fileRdd to create a new RDD named movies:
val movies = fileRdd.map{ row =>
val fields = row.split(",").map(_.trim)
Movie(fields(0).toInt, fields(1), fields(2).toDouble)
}
The first line in the block splits each row on the comma character and then trims
each resulting field in the row. When the block completes, movies has the type
org.apache.spark.rdd.RDD[Movie].
4. Manipulate the data as desired
Now you can work with the movies RDD as desired, using the transformation and
action methods demonstrated in the previous recipes:
scala> :type movies
org.apache.spark.rdd.RDD[Movie]
scala> movies.first
res0: Movie = Movie(1995,Toy Story,8.3)
scala> movies.take(2)
res1: Array[Movie] = Array(Movie(1995,Toy Story,8.3), Movie(2000,Cast Away,7.8))
scala> movies.filter(_.rating > 7).filter(_.year > 2000).collect
res2: Array[Movie] = Array(Movie(2012,Cloud Atlas,7.4))
Discussion
This recipe shows how to read a CSV file into an RDD. You can also work with CSV
files using SQL—from the Spark SQL module—and that’s demonstrated in Recipes
20.5 and 20.6.
Working with a CSV file without using a case class
You can read a CSV file into an RDD without using a case class, but the process is a
little more cumbersome. If you want to use this approach, start by reading the file as
before:
// RDD[String]
val fileRdd = sc.textFile("TomHanksMoviesNoHeader.csv")
Then split each row on the comma character, and trim each resulting field:
20.3 Reading a CSV File into a Spark RDD
|
601
// movies: RDD[Array[String]]
val movies = rdd.map(row => row.split(",")
.map(field => field.trim))
As shown in the comment, movies has the type RDD[Array[String]]. Now you can
work with the data as desired, but you’ll have to treat each row as an array of strings:
scala> movies.take(2)
Array[Array[String]] = Array(Array(Year, Name, IMDB),
Array(1995, Toy Story, 8.3))
scala> movies.filter(row => row(0).toInt > 2000).collect
res0: Array[Array[String]] = Array(
Array(2006, The Da Vinci Code, 6.6),
Array(2012, Cloud Atlas, 7.4)
)
20.4 Using Spark Like a Database with DataFrames
Problem
Rather than using RDDs, you want to use Spark like a SQL database so you can query
your data with SQL commands.
Solution
To begin using Spark like a database, use a DataFrame rather than an RDD. A Data
Frame is the rough equivalent of a database table, though of course in Spark the Data
Frame may be spread out over thousands of computers.
To begin, create an array, and then create an RDD from the array, just like you did in
Recipe 20.1:
val nums = Array.range(1, 10)
val rdd = sc.parallelize(nums)
// Array[Int] = Array(1,2,3,4,5,6,7,8,9)
// RDD[Int]
Next, convert that RDD to a DataFrame using the RDD’s toDF method. When using
an array, the resulting dataset only has one column of data, and this command gives
that column the name "num" as it creates a DataFrame:
val df = rdd.toDF("num")
// org.apache.spark.sql.DataFrame
As shown in the comment, the variable df has the type org.apache.spark.sql.Data
Frame. Now you can begin using some SQL-like capabilities of the DataFrame. First,
here are some database-like metadata methods:
scala> df.printSchema
root
|-- num: integer (nullable = false)
602
|
Chapter 20: Apache Spark
scala> df.show(2)
+---+
|num|
+---+
| 1|
| 2|
+---+
only showing top 2 rows
scala> df.columns
res0: Array[String] = Array(num)
scala> df.describe("num").show
+-------+------------------+
|summary|
num|
+-------+------------------+
| count|
9|
|
mean|
5.0|
| stddev|2.7386127875258306|
|
min|
1|
|
max|
9|
+-------+------------------+
Once again, transformation methods are evaluated lazily, so I use the show method to
see a result in the Spark shell.
Once you have a DataFrame, you can perform SQL-like queries with the Spark SQL
API:
scala> df.select('num).show(2)
+---+
|num|
+---+
| 1|
| 2|
+---+
only showing top 2 rows
scala> df.select('num).where("num > 6").show
+---+
|num|
+---+
| 7|
| 8|
| 9|
+---+
20.4 Using Spark Like a Database with DataFrames
|
603
scala> df.select('num)
.where("num > 6")
.orderBy(col("num").desc)
.show
+---+
|num|
+---+
| 9|
| 8|
| 7|
+---+
Those examples show that there are several different ways to refer to column names.
The following queries show the different approaches, and they all return the same
result:
df.select('num)
df.select(col("num"))
df.select(column("num"))
df.select($"num")
df.select(expr("num"))
As you can see, working with DataFrame queries is similar to working with SQL quer‐
ies and a database, although with Spark you use its Spark SQL API to make your
queries.
Discussion
In the example shown in the Solution, I let the data source—my array—implicitly
define the schema. By converting that array to an RDD and then to a DataFrame with
toDF, Spark was able to infer the type of my data. This approach where you let Spark
infer the data types is called schema-on-read, and it can often be useful.
Explicitly defining the schema
Like a spreadsheet or database table, a DataFrame consists of a series of records, and
those records are modeled by a Spark SQL Row. Using Row and StructType and
StructField types, you can also explicitly define the schema, similar to the way you
work with a traditional SQL database and schema.
To demonstrate this, first create a new RDD with five columns:
import org.apache.spark.sql.Row
val rdd = sc.parallelize(
Array(
Row(1L, 0L, "zero",
Row(2L, 1L, "one",
Row(3L, 2L, "two",
Row(4L, 3L, "three",
604
|
Chapter 20: Apache Spark
"cero",
"uno",
"dos",
"tres",
"zéro"),
"un"),
"deux"),
"trois"),
Row(5L, 4L, "four",
"cuatro", "quatre")
)
)
As shown, each row in the data has five columns. Next, you define a schema that
describes those columns using the Spark SQL StructType and StructField classes:
import org.apache.spark.sql.types._
// 'schema' has the type org.apache.spark.sql.types.StructType
val schema = StructType(
Array(
StructField("id",
LongType,
false),
// not nullable
StructField("value", LongType,
false),
// not nullable
StructField("name",
StringType, true),
// nullable (English)
StructField("nombre", StringType, true),
// nullable (Spanish)
StructField("nom",
StringType, true)
// nullable (French)
)
)
That code declares that the data consists of five columns with these names and
attributes:
• id is a long number and is not nullable.
• value is a long number and is not nullable.
• name is a string and can contain null values (these are the English names of the
numbers).
• nombre is also a string and can contain null values (these are the Spanish names).
• nom is also a string and can contain null values (these are the French names).
With everything in place, you can create a DataFrame using the RDD and the schema:
scala> val df = spark.createDataFrame(rdd, schema)
df: org.apache.spark.sql.DataFrame = [id: bigint, name: string ... 1 more field]
scala> df.printSchema
root
|-- id: long (nullable = false)
|-- value: long (nullable = false)
|-- name: string (nullable = true)
|-- nombre: string (nullable = true)
|-- nom: string (nullable = true)
Querying the DataFrame
Now you can query the DataFrame as before:
scala> df.select('id, 'name, 'nombre)
.limit(2)
.show
20.4 Using Spark Like a Database with DataFrames
|
605
+---+----+------+
| id|name|nombre|
+---+----+------+
| 1|zero| cero|
| 2| one|
uno|
+---+----+------+
scala> df.where("value > 1").show(2)
+---+-----+-----+------+-----+
| id|value| name|nombre| nom|
+---+-----+-----+------+-----+
| 3|
2| two|
dos| deux|
| 4|
3|three| tres|trois|
+---+-----+-----+------+-----+
only showing top 2 rows
scala> df.select('value, 'name, 'nombre, 'nom)
.where("id > 1")
.where("id < 4")
.show
+-----+----+------+----+
|value|name|nombre| nom|
+-----+----+------+----+
|
1| one|
uno| un|
|
2| two|
dos|deux|
+-----+----+------+----+
scala> df.where('id > 1)
.orderBy('name)
.show
+---+-----+-----+------+------+
| id|value| name|nombre|
nom|
+---+-----+-----+------+------+
| 5|
4| four|cuatro|quatre|
| 2|
1| one|
uno|
un|
| 4|
3|three| tres| trois|
| 3|
2| two|
dos| deux|
+---+-----+-----+------+------+
scala> df.select('name, 'nombre, 'nom)
.where("name = 'two'")
.show
+----+------+----+
|name|nombre| nom|
+----+------+----+
| two|
dos|deux|
+----+------+----+
scala> df.filter('nom.like("tro%")).show
+---+-----+-----+------+-----+
| id|value| name|nombre| nom|
+---+-----+-----+------+-----+
606
|
Chapter 20: Apache Spark
| 4|
3|three| tres|trois|
+---+-----+-----+------+-----+
In addition to SQL-like queries, when you’re working with huge datasets it can help
to look at a small subset of the data. Spark SQL has a sample method to help this sit‐
uation. sample takes three parameters:
val withReplacement = false
val fraction = 0.2
val seed = 31
When you call sample it returns a subset of the data, with the number of rows
roughly corresponding to the fraction parameter:
scala> df.sample(withReplacement, fraction, seed).show
+---+-----+-----+------+-----+
| id|value| name|nombre| nom|
+---+-----+-----+------+-----+
| 3|
2| two|
dos| deux|
| 4|
3|three| tres|trois|
+---+-----+-----+------+-----+
For more sample details, see the Spark Dataset documentation.
Why Search for “Dataset”?
When you need to search for DataFrame methods like sample in
the Spark documentation, it can help to search for "Dataset"
rather than "DataFrame". This is because a DataFrame is just a spe‐
cial instance of a Dataset. Specifically, a DataFrame is a Dataset of
Row types.
select and selectExpr
While I tend to use 'foo or col("foo") to refer to a column named "foo", another
approach is to refer to it as expr("foo"). Using this syntax, queries look like this:
df.select(expr("value")).show
df.select(expr("value"), expr("value")).show
Because this is such a common programming pattern, there’s also a method named
selectExpr that combines select and expr into one method. Here are a few exam‐
ples of its usage:
scala> df.selectExpr("value").show(2)
+-----+
|value|
+-----+
|
0|
|
1|
+-----+
20.4 Using Spark Like a Database with DataFrames
|
607
only showing top 2 rows
scala> df.selectExpr("avg(value)").show
+----------+
|avg(value)|
+----------+
|
2.0|
+----------+
scala> df.selectExpr("count(distinct(value))").show
+---------------------+
|count(DISTINCT value)|
+---------------------+
|
5|
+---------------------+
scala> df.selectExpr("count(distinct(nombre))").show
+----------------------+
|count(DISTINCT nombre)|
+----------------------+
|
5|
+----------------------+
See Also
• There are performance considerations when using schema-on-read and its coun‐
terpart, schema-on-write. Search for those terms for the best up-to-date articles
on performance issues.
• The Spark DataTypes Javadoc shows the different DataType values that are avail‐
able when defining a StructField. Those types are: BinaryType, BooleanType,
ByteType, CalendarIntervalType, DateType, DoubleType, FloatType, Integer
Type, LongType, NullType, ShortType, StringType, and TimestampType.
• The Spark Dataset Javadoc shows all the methods that can be called on a Data
Frame (or Dataset).
20.5 Reading Data Files into a Spark DataFrame
Problem
You want to read a CSV file into a DataFrame.
Solution
Given a file named TomHanksMoviesNoHeader.csv:
608
|
Chapter 20: Apache Spark
1995,
2000,
2006,
2012,
1994,
Toy Story,
Cast Away,
The Da Vinci Code,
Cloud Atlas,
Forrest Gump,
8.3
7.8
6.6
7.4
8.8
specify a schema to read the file using either of these two options:
import org.apache.spark.sql.types._
// syntax option 1
val schema = StructType(
Array(
StructField("year", IntegerType, false),
StructField("name", StringType, false),
StructField("rating", DoubleType, false)
)
)
// syntax option 2
val schema = new StructType()
.add("year", IntegerType, false)
.add("name", StringType, false)
.add("rating", DoubleType, false)
Then read the file into a DataFrame like this:
// paste this into the spark shell with ":paste"
val df = spark.read
.format("csv")
.schema(schema)
.option("delimiter", ",")
.load("TomHanksMoviesNoHeader.csv")
For a true CSV file like this one, the delimiter setting isn’t necessary, but I demon‐
strate it for when your files have different separators like a tab, |, or other character.
Once you’ve loaded the file like that, you can work with it as shown in the previous
recipe:
scala> df.printSchema
root
|-- year: long (nullable = true)
|-- name: string (nullable = true)
|-- rating: double (nullable = true)
scala> df.show(2)
+----+----------+------+
|year|
name|rating|
+----+----------+------+
|1995| Toy Story|
8.3|
|2000| Cast Away|
7.8|
+----+----------+------+
only showing top 2 rows
20.5 Reading Data Files into a Spark DataFrame
|
609
scala> df.select('year, 'name, 'rating).limit(2).show
+----+----------+------+
|year|
name|rating|
+----+----------+------+
|1995| Toy Story|
8.3|
|2000| Cast Away|
7.8|
+----+----------+------+
scala> df.where('year > 1998).where('rating > 7.5).show
+----+----------+------+
|year|
name|rating|
+----+----------+------+
|2000| Cast Away|
7.8|
+----+----------+------+
scala> df.where('rating > 7.5).orderBy('rating.desc).show
+----+-------------+------+
|year|
name|rating|
+----+-------------+------+
|1994| Forrest Gump|
8.8|
|1995|
Toy Story|
8.3|
|2000|
Cast Away|
7.8|
+----+-------------+------+
scala> df.filter('name.like("%T%")).show
+----+------------------+------+
|year|
name|rating|
+----+------------------+------+
|1995|
Toy Story|
8.3|
|2006| The Da Vinci Code|
6.6|
+----+------------------+------+
Discussion
Per the Spark DataTypes Javadoc, you can use the following data types when creating
a StructField: BinaryType, BooleanType, ByteType, CalendarIntervalType, Date
Type, DoubleType, FloatType, IntegerType, LongType, NullType, ShortType, String
Type, and TimestampType. Most of those type names are self-explanatory, but see that
Javadoc page for more details, and see this MungingData article, for many more
details on handling null values.
When reading a CSV file you can specify the options as a Map, if you prefer:
val df = spark.read
.options(
Map(
"header" -> "true",
"inferSchema" -> "true",
"delimiter" -> ","
)
610
|
Chapter 20: Apache Spark
)
.csv("TomHanksMoviesNoHeader.csv")
Also, as discussed in Recipe 20.1, the spark variable is an instance of SparkSession.
Its read method returns a DataFrameReader, which is described as an “interface used
to load a Dataset from external storage systems.” That Javadoc page shows over two
dozen options for working with CSV files.
Writing a DataFrame to a file
Once you have the results you want in a DataFrame, you can write them out to a
directory. The example writes the results to a directory named DataFrameResults in
the current directory:
df.write
.option("header","true")
.csv("DataFrameResults")
That directory has a CSV file that contains the results contained in the DataFrame.
Creating a SQL view on a DataFrame
The next recipe shows how to use a DataFrame even more like a database table, but as
a preview, when you call the DataFrame method createOrReplaceTempView, you cre‐
ate a database-like view:
val df = spark.read
.format("csv")
.schema(schema)
.option("delimiter", ",")
.load("TomHanksMoviesNoHeader.csv")
df.createOrReplaceTempView("movies")
createOrReplaceTempView creates a local temporary view—like a lazy view, as
detailed in Recipe 11.4, “Creating a Lazy View on a Collection”—and once you have
that, you can use normal SQL to query your data:
val query = "select * from movies where rating > 7.5 order by rating desc"
scala> spark.sql(query).show
+----+-------------+------+
|year|
name|rating|
+----+-------------+------+
|1994| Forrest Gump|
8.8|
|1995|
Toy Story|
8.3|
|2000|
Cast Away|
7.8|
+----+-------------+------+
More examples of this syntax are shown in the next recipe.
20.5 Reading Data Files into a Spark DataFrame
|
611
20.6 Using Spark SQL Queries Against Multiple Files
Problem
You’d like to see how to use real SQL queries against a dataset, including the use of
joins on multiple files.
Solution
This recipe uses the MovieLens dataset, which contains data from over 62,000 mov‐
ies. To follow along with this recipe, see that link for information on how to down‐
load the dataset.
After you’ve downloaded that data, you can look at the first lines of the CSV files to
see their format. These Unix head commands show the first lines of the three files
used in this recipe, including the header rows at the top of each file:
$ head -3 movies.csv
movieId,title,genres
1,Toy Story (1995),Adventure|Animation|Children|Comedy|Fantasy
2,Jumanji (1995),Adventure|Children|Fantasy
$ head -3 ratings.csv
userId,movieId,rating,timestamp
1,296,5.0,1147880044
1,306,3.5,1147868817
$ head -3 tags.csv
userId,movieId,tag,timestamp
3,260,classic,1439472355
3,260,sci-fi,1439472256
With those data files in the current directory, start the Spark shell with the sparkshell command. Then read each file into a DataFrame, as shown in the previous
recipe:
// paste these into the REPL with ":paste"
val moviesDf = spark.read
.option("header", "true")
.option("inferSchema", "true")
.csv("movies.csv")
val ratingsDf = spark.read
.option("header", "true")
.option("inferSchema", "true")
.csv("ratings.csv")
val tagsDf = spark.read
.option("header", "true")
.option("inferSchema", "true")
.csv("tags.csv")
612
|
Chapter 20: Apache Spark
It will take a few moments for that data to be read in. Next, create temporary views on
each file, giving the views the names shown in each method call:
moviesDf.createOrReplaceTempView("movies")
ratingsDf.createOrReplaceTempView("ratings")
tagsDf.createOrReplaceTempView("tags")
Now you can use real SQL queries as desired to work with the data. For example, to
see all movies and their ratings, join the movies and ratings views:
val query = """
select * from movies, ratings
where movies.movieId == ratings.movieId
and rating == 5.0
"""
spark.sql(query).limit(4).show
Without the limit, that query will return over 3.6 million rows, but with the limit,
the output looks like this:
+-------+--------------------+----------------+------+-------+------+----------+
|movieId|
title|
genres|userId|movieId|rating| timestamp|
+-------+--------------------+----------------+------+-------+------+----------+
|
296| Pulp Fiction (1994)|Comedy|Crime|Dra|
1|
296|
5.0|1147880044|
|
307|Three Colors: Blu...|
Drama|
1|
307|
5.0|1147868828|
|
665| Underground (1995)|Comedy|Drama|War|
1|
665|
5.0|1147878820|
|
1237|Seventh Seal, The...|
Drama|
1|
1237|
5.0|1147868839|
+-------+--------------------+----------------+------+-------+------+----------+
As another example, this query shows one way to find all five-star-rated comedy/
romance movies:
val query = """
select distinct(m.title), r.rating, m.genres
from movies m, ratings r
where m.movieId == r.movieId
and m.genres like \'%Comedy%Romance%'
and r.rating == 5.0
order by m.title"""
scala> spark.sql(query).show
+--------------------+------+--------------------+
|
title|rating|
genres|
+--------------------+------+--------------------+
|(500) Days of Sum...|
5.0|Comedy|Drama|Romance|
| (Girl)Friend (2018)|
5.0|
Comedy|Romance|
|
10 (1979)|
5.0|
Comedy|Romance|
|10 Items or Less ...|
5.0|Comedy|Drama|Romance|
output continues ...
20.6 Using Spark SQL Queries Against Multiple Files
|
613
When you know SQL and the organization of the data, you can run other queries like
this one, which provides a sorted count of all five-star ratings for all comedy/romance
movies:
val query = """
select m.title, count(1) as the_count
from movies m, ratings r
where m.movieId == r.movieId
and m.genres like \'%Comedy%Romance%'
and r.rating == 5.0
group by m.title
order by the_count desc
"""
// using 'false' in 'show' tells spark to print the full column widths
spark> spark.sql(query).show(100, false)
+------------------------------------------------------+---------+
|title
|the_count|
+------------------------------------------------------+---------+
|Forrest Gump (1994)
|25918
|
|Princess Bride, The (1987)
|13311
|
|Amelie (Fabuleux destin d'Amélie Poulain, Le) (2001) |10395
|
|Life Is Beautiful (La Vita è bella) (1997)
|8466
|
(the output continues ...)
Discussion
As shown, views are created by calling createOrReplaceTempView on a DataFrame or
Dataset:
moviesDf.createOrReplaceTempView("movies")
This command creates (or replaces) a temporary table with the name movies. The
lifetime of this view is tied to the SparkSession that was used to create the Data
Frame. Use this command if you want to drop the view:
spark.catalog.dropTempView("movies")
Performance
Spark performance is a huge topic, but one important concept to know is the differ‐
ence between narrow transformations and wide transformations. A narrow transfor‐
mation (also called a narrow dependency) is one where all the data that’s required to
calculate the results of a single partition lives in that partition. In a wide transforma‐
tion (or wide dependency), all the elements that are required to calculate a result may
reside in multiple different partitions.
A wide transformation leads to a shuffle, which occurs when data has to be rear‐
ranged between partitions. Moving data around significantly slows down processing
speed, so shuffling is bad for performance. Narrow transformations tend to involve
614
| Chapter 20: Apache Spark
methods like filter and map, while wide transformations involve methods like group
ByKey and reduceByKey.
For narrow transformations, Spark can pipeline multiple transformations, meaning
that they’ll all be performed in memory. The same cannot happen for wide transfor‐
mations, and when a shuffle has to be performed, results are written to disk.
Google currently returns several hundred thousand results for the search phrase
“spark minimize data shuffling,” so you know this is a big topic.
Using explain to understand queries
As you learn more about Spark SQL, it can sometimes help to use its explain method
to understand how queries work. You call explain on a DataFrame, and when you do
so, you’ll see output like this:
scala> moviesDf.where('movieId > 100).explain
== Physical Plan ==
*(1) Project [movieId#16, title#17, genres#18]
+- *(1) Filter (isnotnull(movieId#16) AND (movieId#16 > 100))
+- FileScan csv [movieId#16,title#17,genres#18] Batched: false,
DataFilters: [isnotnull(movieId#16), (movieId#16 > 100)],
Format: CSV, Location: InMemoryFileIndex[file:/Users/al/...,
PushedFilters: [IsNotNull(movieId), GreaterThan(movieId,100)],
ReadSchema: struct<movieId:int,title:string,genres:string>
and this:
scala> moviesDf.sort("title").explain
== Physical Plan ==
*(1) Sort [title#17 ASC NULLS FIRST], true, 0
+- Exchange rangepartitioning(title#17 ASC NULLS FIRST, 200), true, [id=#667]
+- FileScan csv [movieId#16,title#17,genres#18] Batched: false,
DataFilters: [], Format: CSV, Location: InMemoryFileIndex[file:/Users/al...,
PartitionFilters: [], PushedFilters: [],
ReadSchema: struct<movieId:int,title:string,genres:string>
A few notes about the explain output:
• The first part of the output shows the final result.
• Other portions of the output explain the data sources.
• The keywords at the beginning of each line tend to be important, and in these
examples you see words like Filter, FileScan, Sort, and Exchange.
For more details on the explain operator, this Medium article on mastering query
plans by David Vrba is a good resource, and his video “Physical Plans in Spark SQL”
is too.
20.6 Using Spark SQL Queries Against Multiple Files
|
615
Handling timestamps
Spark SQL includes several methods for working with timestamps. The from_uni
xtime shows one way to display timestamp fields:
val query = """
select userId,movieId,tag,from_unixtime(timestamp) as time
from tags
limit 3
"""
scala> spark.sql(query).show
+------+-------+--------------------+-------------------+
|userId|movieId|
tag|
time|
+------+-------+--------------------+-------------------+
|
3|
260|
classic|2015-08-13 07:25:55|
|
3|
260|
sci-fi|2015-08-13 07:24:16|
|
4|
1732|
dark comedy|2019-11-16 15:33:18|
+------+-------+--------------------+-------------------+
See Also
• If you want to use a schema when reading data files, see how Recipes 20.4 and
20.5 use the MovieLens dataset. For details on that dataset, see the seminal paper
by F. Maxwell Harper and Joseph A. Konstan.
20.7 Creating a Spark Batch Application
Problem
You want to write a Spark application that will be run periodically in a batch mode.
Solution
While all the previous recipes show how to use Spark from its command-line shell
(REPL), in this recipe you’ll create a batch command-line version of the word count
application that was shown in Recipe 20.2.
You create a Spark application just like you create other Scala applications, using a
build tool like sbt and importing the Spark dependencies you require.
Start by creating a build.sbt file:
name := "SparkApp1"
version := "0.1"
scalaVersion := "2.12.12"
libraryDependencies ++= Seq(
616
|
Chapter 20: Apache Spark
"org.apache.spark" %% "spark-sql" % "3.1.1"
)
At the time of this writing, Spark 3.1 currently works with Scala 2.12, which is why I
specify that Scala version.
Next, create your application. For a little one-file application like this, you can put the
following code in a file named WordCount.scala in the root directory of your sbt
project:
import org.apache.spark.sql.SparkSession
import org.apache.spark.rdd.RDD
object WordCount {
def main(args: Array[String]) {
val file = "Gettysburg-Address.txt"
val spark: SparkSession = SparkSession.builder
.appName("Word Count")
.config("spark.master", "local")
.getOrCreate()
val fileRdd: RDD[String] = spark.sparkContext.textFile(file)
val counts = fileRdd.map(_.replaceAll("[.,]", ""))
.map(_.replace("—", " "))
.flatMap(line => line.split(" "))
.map(word => (word, 1))
.reduceByKey(_ + _)
.sortBy(_._2)
.collect
println( "------------------------------------------")
counts.foreach(println)
println( "------------------------------------------")
spark.stop()
}
}
The keys to this solution are knowing how to create a SparkSession with SparkSes
sion.builder, how to configure that session, and how to read a file as an RDD. The
rest of the application is normal Scala code.
Now build the JAR file for your application:
$ sbt package
Once that JAR file is created, run it with the spark-submit command:
$ spark-submit --class WordCount target/scala-2.12/sparkapp1_2.12-0.1.jar
You’ll see a lot of output, and if everything goes well, you’ll see the output from the
counts.foreach statement.
20.7 Creating a Spark Batch Application
|
617
Discussion
For larger real-world applications you’ll need to use an sbt plugin like sbt-assembly to
create a single JAR file that contains all of your application code and dependencies.
See Recipe 17.11, “Deploying a Single Executable JAR File”, for a discussion of sbtassembly.
When your application uses different Spark features, you’ll also need to include other
Spark dependencies. The latest Spark JAR files, including the Spark machine learning
library and Streaming library can be found in the org.apache.spark Maven listings.
At the time of this writing, the current dependency URLs look like this:
"org.apache.spark" %% "spark-mllib" % "3.1.1" % Provided
"org.apache.spark" %% "spark-streaming" % "3.1.1" % Provided
Also, the Provided keyword at the end of those dependencies is the sbt way of stating
that they are only needed for tasks like compiling and testing, and that they will be
provided by some other means later. In this case the dependencies aren’t needed in
production because the Spark runtime environment already includes them.
In the real world you’ll also need to include the -master option to specify the master
URL for your cluster. In addition to that, there are many other spark-submit options
that can be specified. This example command comes from the Spark “Submitting
Applications” page, which shows examples of real-world options for spark-submit:
spark-submit \
--class org.apache.spark.examples.SparkPi \
--master mesos://207.184.161.138:7077 \
--deploy-mode cluster \
--supervise \
--executor-memory 20G \
--total-executor-cores 100 \
http://path/to/examples.jar \
1000
See Also
• The Spark “Submitting Applications” page shows how to run applications with
spark-submit.
• The Spark “Getting Started” page shows how to create and configure a
SparkSession.
• Spark is a big topic, and it’s hard to do it justice in one chapter. For much deeper
coverage, see Spark: The Definitive Guide.
618
|
Chapter 20: Apache Spark
CHAPTER 21
Scala.js, GraalVM, and jpackage
The Scala.js project lets you write Scala code as a powerful, type-safe replacement for
JavaScript. In short, when you need to write JavaScript, use Scala.js instead, and use
sbt and the Scala.js plugin to compile your Scala.js code into JavaScript. Just like sca
lac compiles your code into .class files that work with the JVM, the Scala.js plugin
compiles your Scala code into JavaScript code that runs in the browser.
The Scala.js website describes Scala.js as “a safer way to build robust front-end web
applications.” With benefits like being able to use classes, modules, a strong type sys‐
tem, a huge collection of libraries, and IDE support for easy refactoring, code com‐
pletion, and much more, Scala.js is a strong alternative to JavaScript and other Java‐
Script replacements like CoffeeScript, Dart, and TypeScript. Scala.js lets you use the
same tools you use for server-side development to write client-side code.
The benefits of Scala.js compared to other browser technologies are summarized in
Figure 21-1, which is reproduced here courtesy of the Scala.js website.
This chapter includes three Scala.js recipes to help you get started:
• Recipe 21.1 demonstrates how to get the Scala.js environment up and running.
• With your environment set up, Recipe 21.2 shows how to write Scala/Scala.js
code to respond to events like button clicks.
• Recipe 21.3 then shows how to get started writing single-page web applications.
619
Figure 21-1. The advantages of Scala.js (courtesy of scala-js.org)
After that, Recipe 21.4 demonstrates GraalVM and its native-image command. As
its name implies, this command lets you turn your Scala application into a native
image. By creating a native executable—e.g., an .exe file on Microsoft Windows—
your application will start up immediately, without the initial lag you feel when a
JVM application initially starts.
Finally, a great tool that comes with the Java 14 JDK is the jpackage command. It lets
you package your JVM applications as native applications for the macOS, Windows,
and Linux platforms. jpackage works with any language that generates class files for
the JVM, so Recipe 21.5 shows how to use it to bundle Scala applications as native
applications.
21.1 Getting Started with Scala.js
Problem
You want to start using Scala.js and need to know how to install it and create a “Hello,
world” example.
620
|
Chapter 21: Scala.js, GraalVM, and jpackage
Solution
This recipe demonstrates how to get started with Scala.js, and assumes that you are
familiar with JavaScript, HTML, and the Document Object Model (DOM).
Getting started with Scala.js is a multistep process:
1. Handle the prerequisites
2. Create a new sbt project that uses the Scala.js plugin
3. Create a Scala/Scala.js file
4. Compile and run the Scala code
1. Prerequisites
To get started you’ll need to have these tools installed on your system:
• Scala 3
• sbt (1.5.0 or newer)
• Node.js
On a macOS system, I installed Node.js with the brew install node command, but
you can also follow that link to install it with the provided installers.
2. Create a new sbt project
Create a new sbt project directory structure, as shown in Recipe 17.1, “Creating a
Project Directory Structure for sbt”. Then edit the build.sbt file to have these contents:
ThisBuild / scalaVersion := "3.0.0"
// enable the plugin that’s in 'project/plugins.sbt'
enablePlugins(ScalaJSPlugin)
// this states that this is an application with a main method
scalaJSUseMainModuleInitializer := true
lazy val root = project
.in(file("."))
.settings(
name := "ScalaJs Hello World",
version := "0.1.0"
)
If you’re following along on your computer, I strongly recommend that you use the
exact contents that are shown, because they affect the filename that’s created when
your Scala code is compiled to a JavaScript file.
21.1 Getting Started with Scala.js
|
621
Finally, add this line to your project/plugins.sbt file:
addSbtPlugin("org.scala-js" % "sbt-scalajs" % "1.5.1")
That line tells sbt how to download the Scala.js library.
3. Create a Scala/Scala.js file
With sbt set up, create a simple Scala “Hello, world” application. To do this, create a
Scala source code file named src/main/scala/hello/Hello1.scala with these contents:
package hello
@main def hello() = println("Hello, world")
This code doesn’t do anything specific to Scala.js, but when you compile and run it,
you’ll see how the compilation process works with sbt and the Scala.js plugin.
4. Compile and run the Scala code
To run the Hello1.scala code, first start the sbt shell:
$ sbt
Now issue the run command inside the sbt shell, where you may see a lot of initial
output, eventually finishing with the output from your program:
sbt> run
// possibly more output here ...
[info] compiling 1 Scala source to target/scala-3.0.0/classes ...
[info] Fast optimizing target/scala-3.0.0/scalajs-hello-world-fastopt
[info] Running hello.hello. Hit any key to interrupt.
Hello, world
As shown, Hello, world is printed out after your Scala code is compiled to Java‐
Script. After that, as noted in the scala-js.org basic tutorial, “this code is actually run
by a JavaScript interpreter, namely Node.”
An important thing to notice is that the sbt run command creates this directory:
target/scala-3.0.0/scalajs-hello-world-fastopt
A few notes about this directory:
• The directory name is based on the sbt project name (“Scala.js Hello World”).
This is why I recommended earlier that you use my project name in your
build.sbt file—so our resulting directory names would be the same.
• The Scala.js file-naming process adds -fastopt to the end of that directory
name.
• Inside that directory you’ll find two files, main.js and main.js.map.
622
|
Chapter 21: Scala.js, GraalVM, and jpackage
• If you look at the resulting target/scala-3.0.0/scalajs-hello-world-fastopt/main.js
file with cat, more, or another tool, you’ll see that it contains over two thousand
lines of some hard-to-read JavaScript source code.
At the end of that file you’ll see a line of code that looks like this:
$s_Lhello_hello__main__AT__V(new ($d_T.getArrayOf().constr)([]));
While it’s hard to read, the hello and main references are an indication that this code
results from your Scala @main method.
Congratulations, you just compiled your first Scala code to JavaScript.
Discussion
That’s a great first step in getting started with Scala.js. Of course, you want to see your
code running in a browser, and you can do this with just a few more steps:
5. Update build.sbt.
6. Create an HTML file.
7. Update your Scala code.
8. Run the application with fastLinkJS.
9. Open the HTML file in a browser.
5. Update build.sbt
For the next step, add this line to the end of your build.sbt file:
libraryDependencies += "org.scala-js" %%% "scalajs-dom" % "1.1.0"
This lets us use a Scala.js DOM library in our Scala code, which we’ll do in a few
moments. Note that this particular DOM library is just one of many JavaScript facade
libraries for Scala.js.
If you’re still in the sbt shell, reload the configuration files:
sbt> reload
6. Create hello1.html
Next, create an HTML file named hello1.html in the root directory of your sbt project
with these contents:
<!DOCTYPE html>
<html>
<head>
<meta charset="UTF-8">
<title>Scala.js Hello, World</title>
21.1 Getting Started with Scala.js
|
623
</head>
<body>
<!-- include the Scala.js compiled code -->
<script type="text/javascript"
src="./target/scala-3.0.0/scalajs-hello-world-fastopt.js">
</script>
</body>
</html>
Notice that the script tag includes the target/scala-3.0.0/scalajs-hello-world-fastopt.js
JavaScript file you’re going to generate from your Scala code in a few moments. Also
notice that this filename is different than the name that was generated by the code in
the Solution.
7. Update Hello1.scala
Now update the Hello1.scala file to have these contents:
package hello
import org.scalajs.dom
import dom.document
@main def hello1() =
val parNode = document.createElement("p")
val textNode = document.createTextNode("Hello, world")
parNode.appendChild(textNode)
document.body.appendChild(parNode)
In the example shown in the Solution, this file contained plain Scala code, but now it
uses the DOM library to create code that looks a lot like JavaScript code. This code
creates a paragraph tag, puts some text inside of it, and then adds the paragraph node
to the document body.
8. Compile the code with fastLinkJS
Next, generate the JavaScript file from your Scala source code file. You do this with
the sbt fastLinkJS command:
sbt> fastLinkJS
This command generates the target/scala-3.0.0/scalajs-hello-world-fastopt.js file that
you just included in the HTML file.
Showing the Generated Filename
To see the filename that’s generated by fastLinkJS, prepend show
to the fastLinkJS command:
sbt> show fastLinkJS
[info] target/scala-3.0.0/scalajs-hello-world-fastopt.js
624
|
Chapter 21: Scala.js, GraalVM, and jpackage
9. Open hello1.html in a browser
Now open the HTML file in a browser. On macOS you can do this from the com‐
mand line with this command:
$ open hello1.html
You can also open the file with a file: URL that depends on your project path in the
filesystem. It will look something like file:///Users/al/ScalaJSHelloWorld/hello1.html.
Assuming that works, you should see the “Hello, world” text in the browser.
Have a little fun
As a bonus, if you want to have a little fun, feel free to experiment with this code. I
recommend putting these two lines of code anywhere inside the @main method in the
Hello1.scala file:
println("foo")
System.err.println("bar")
After adding those lines, run the fastLinkJS command again, reload your web page,
and look at your browser console, such as with these steps:
• Chrome and Firefox: Right-click → Inspect → Console
In the browser console you should see that foo is printed in a normal color and bar is
printed in red. This can be a simple way to help debug your Scala.js apps.
See Also
• The Scala.js home page.
• This initial recipe is based heavily on the basic Scala.js tutorial.
21.2 Responding to Events with Scala.js
Problem
You want to learn how to respond to events using Scala.js, such as handling a button
click.
Solution
In the previous recipe I showed how to set up a Scala.js working environment. This
solution builds on that recipe by showing how to respond to the click on an HTML
21.2 Responding to Events with Scala.js
|
625
button using Scala/Scala.js code. As with the previous recipe, this recipe assumes that
you’re familiar with HTML, JavaScript, and the DOM.
This is a multistep solution that builds on the sbt project created in the previous
recipe:
1. Create a new HTML page.
2. Make the sbt updates that are needed to use jQuery.
3. Write the new Scala/Scala.js code.
4. Set the main class in sbt.
5. Run the code.
These steps are demonstrated in the following sections.
1. Create a new HTML page
Assuming that you’re using the sbt project created in Recipe 21.1, the first step is to
create a new HTML web page. Name this file hello2.html, and place it in the root
directory of your project with these contents:
<!DOCTYPE html>
<html>
<head>
<meta charset="UTF-8">
<title>Scala.js, Hello World 2</title>
</head>
<body>
<button type="button" id="hello-button">
Click me!
</button>
<!-- the 'jsdeps' file must be first -->
<script type="text/javascript"
src="./target/scala-3.0.0/scalajs2-jsdeps.js"></script>
<script type="text/javascript"
src="./target/scala-3.0.0/scalajs2-fastopt.js"></script>
</body>
</html>
The important changes to this file compared to the HTML file in the previous recipe
are:
• This page has a <button> element.
• This page includes a new file named scalajs2-jsdeps.js. As the name jsdeps
implies, this file contains dependencies for our code, specifically dependencies
that scalajs2-fastopt.js relies on. You’ll learn more about these dependencies in a
few moments.
626
| Chapter 21: Scala.js, GraalVM, and jpackage
• The new file our Scala/Scala.js code is generating is named scalajs2-fastopt.js. As
mentioned in the previous recipe, this name is based on the project name speci‐
fied in build.sbt.
2. Make sbt updates to use jQuery
To update our sbt configuration, first update the project/plugins.sbt file so it has these
contents:
addSbtPlugin("org.scala-js" % "sbt-scalajs" % "1.5.1")
// for adding webjars
addSbtPlugin("org.scala-js" % "sbt-jsdependencies" % "1.0.1")
The first line was used in the previous recipe, and it adds the Scala.js sbt plugin to the
project. The last configuration line is new for this recipe, and it’s the first step in let‐
ting us use the WebJars library in our code. (More on this shortly.)
Next, the easiest way to handle an HTML button click from Scala.js code is to use a
Scala.js jQuery facade library along with Scala.js. There are multiple facade libraries
available, and to use the library named jquery-facade in this project, add this line to
the libraryDependencies in the build.sbt file:
("org.querki" %%% "jquery-facade" % "2.0").cross(CrossVersion.for3Use2_13)
(You’ll see the complete build.sbt file in a few moments.)
The jquery-facade library is written in Scala, and adding that line in the build.sbt file
adds it as a dependency for this project. An important point about this line is that the
cross(CrossVersion.for3Use2_13) setting is the magic incantation that lets you use
a Scala 2.13 library in a Scala 3 project.
Next, you also need to include the actual jQuery library—written in JavaScript—in
the HTML file. You could just include a line of code like this in the HTML file:
<script src="https://ajax.googleapis.com/ajax/libs/jquery/2.2.1/jquery.min.js">
</script>
But, sbt gives you another way to bring the jQuery JavaScript library into the project.
To use the sbt approach, add this line to the build.sbt file:
jsDependencies += "org.webjars" % "jquery" % "2.2.1" / "jquery.js" minified ↵
"jquery.min.js"
This line lets you use the WebJars “client-side web libraries as packaged JAR files” in
the project. It specifically brings in version 2.2.1 of the jQuery JavaScript library—the
actual JavaScript library, not the Scala facade—and then when you run the fas
tLinkJS command in sbt, that JavaScript code is written to the local target/
scala-3.0.0/scalajs2-jsdeps.js file. This step isn’t necessary—you can include jQuery
21.2 Responding to Events with Scala.js
|
627
using the <script> tag as shown previously—but this demonstrates a possible way to
add JavaScript libraries/dependencies to Scala.js/sbt projects.
At this point, these two lines in the hello2.html file should now make sense:
<!-- the 'jsdeps' file must be first -->
<script type="text/javascript"
src="./target/scala-3.0.0/scalajs2-jsdeps.js"></script>
<script type="text/javascript"
src="./target/scala-3.0.0/scalajs2-fastopt.js"></script>
The first line brings our JavaScript dependencies into our HTML file (jQuery, in this
case), and the second line contains the JavaScript that’s generated from the custom
Scala/Scala.js code you’re writing in src/main/scala/hello/Hello2.scala.
Finally, because the Scala code you’re about to write depends on the jQuery depend‐
ency, the jsdeps file needs to be included first in the HTML file.
3. Write the new Scala/Scala.js code
Now that you have the new HTML file and jQuery is ready to be used in the project,
the main thing that’s left to do is write some Scala/Scala.js code to respond to the
<button> click. Before doing this, an important point to notice is that the <button> in
hello2.html has an id of hello-button:
<button type="button" id="hello-button">
------------
You’ll refer to this id in the Scala code that follows.
The Scala code to respond to a button click and display a JavaScript window with the
jQuery facade library is surprisingly simple. Save this code to a file named src/main/
scala/hello/Hello2.scala:
import org.scalajs.dom
import org.querki.jquery.*
@main def hello2 =
// handle the login button click
$("#hello-button").click{ () =>
dom.window.alert("Hello, world")
}
If you’ve used jQuery before, this code will look familiar. It can be read as, “Find the
HTML element with the id value hello-button, and when it’s clicked, run this little
algorithm to display a JavaScript alert window with the text Hello, world.” It’s nice
that you can use the $ symbol in your Scala code, because that’s consistent with using
jQuery in JavaScript.
628
|
Chapter 21: Scala.js, GraalVM, and jpackage
4. Set the main class in sbt
Before running this example, you need to do one more thing: update the build.sbt file
to account for the fact that there are now two main methods in the project—one in
Hello1.scala from Recipe 21.1 and a new one in Hello2.scala. To do this, add this line
to the build.sbt file, just below the scalaJSUseMainModuleInitializer setting:
Compile/mainClass := Some("hello.Hello2")
With all the changes in this recipe, your complete build.sbt file should now have these
contents:
ThisBuild / scalaVersion := "3.0.0"
// enable the plugin that’s in 'project/plugins.sbt'
enablePlugins(ScalaJSPlugin)
// this states that this is an application with a main method
scalaJSUseMainModuleInitializer := true
Compile/mainClass := Some("hello.Hello2")
lazy val root = project
.in(file("."))
.settings(
name := "ScalaJs2",
version := "0.1",
libraryDependencies ++= Seq(
("org.scala-js" %%% "scalajs-dom" % "1.1.0")
.cross(CrossVersion.for3Use2_13),
("org.querki" %%% "jquery-facade" % "2.0")
.cross(CrossVersion.for3Use2_13)
),
)
// this includes jquery with webjars.
// see: https://github.com/scala-js/jsdependencies
enablePlugins(JSDependenciesPlugin)
jsDependencies += "org.webjars" % "jquery" % "2.2.1" / "jquery.js" ↵
minified "jquery.min.js"
Other notes about this file:
• The enablePlugins(ScalaJSPlugin) line is part of the recipe to use Scala.js in
an sbt project.
• The scalaJSUseMainModuleInitializer says that this is an application with a
main method.
• The Compile/mainClass setting declares that the main method for the build is
hello.Hello2 (a Hello2 main method in the hello package).
• I changed the project name to "ScalaJs2".
21.2 Responding to Events with Scala.js
|
629
• When you include dependencies compiled for Scala.js, use %%% to reference them
(instead of %% for regular Scala dependencies).
Lastly, the cross(CrossVersion.for3Use2_13) syntax lets you use Scala 2.13 depen‐
dencies in a Scala 3 project. If the two libraryDependencies entries were Scala 3
libraries, you’d refer to them like this:
// if this was a Scala 3 library
libraryDependencies += "org.scala-js" %%% "scalajs-dom" % "1.1.0"
But when you need to use a Scala 2.13 library in a Scala 3 project, you use this syntax
instead:
// using a Scala 2.13 library in a Scala 3 build
("org.scala-js" %%% "scalajs-dom" % "1.1.0").cross(CrossVersion.for3Use2_13)
5. Run the code
Now you’re ready to run this example. Assuming that you’re still in the sbt console,
run the reload command to read in the configuration file changes:
sbt> reload
After that, run the fastLinkJS command to compile the Hello2.scala code to Java‐
Script:
sbt> fastLinkJS
Now open the hello2.html file in your browser. On macOS you can do this with the
open command at the Terminal command line:
$ open hello2.html
You can also open the file with a file URL that depends on your project path in the
filesystem. It will look something like file:///Users/al/ScalaJSHelloWorld/hello2.html.
When the file opens in your browser you should see a “Click me” button like the one
shown in Figure 21-2.
Figure 21-2. The “Hello, world” button in the HTML page
When you click that button you should then see an alert dialog like the one shown in
Figure 21-3.
630
|
Chapter 21: Scala.js, GraalVM, and jpackage
Figure 21-3. The JavaScript alert window that’s displayed when the button is clicked
Assuming that everything worked, congratulations—you’ve just written some Scala.js
code to respond to an HTML button click, thanks to Scala, sbt, Scala.js, jQuery, and
the jQuery facade library (and the Scala.JS DOM library, Node.js, etc.).
Discussion
It’s worth noting again that when you add dependencies that are built for Scala.js to
the build.sbt file, you use three percent symbols:
("org.querki" %%% "jquery-facade" % "2.0").cross(CrossVersion.for3Use2_13)
---
The way this works is that you use %% to include libraries that are compiled for Scala,
but if a library has been compiled for Scala.js, you use %%%. As it’s explained in “Sim‐
ple Command Line Tools with Scala Native”, just as two percent symbols tell sbt to
use the right version of a dependency and three percent symbols tell sbt to use the
correct target environment, currently either Scala Native, or in this case, Scala.js.
Continuously compile with fastLinkJS
In the Solution I show the fastLinkJS command in the sbt shell, but as you’re devel‐
oping code in the real world, a better solution is to run it like this:
sbt> ~ fastLinkJS
Just like continuously compiling your code with ~compile or testing it with ~test,
this command tells sbt to watch the files in your project and rerun the fastLinkJS
command any time a source code file changes. When you first issue this command
you should see some output like this:
sbt:ScalaJs2> ~ fastLinkJS
[success] Total time: 0 s, completed Apr 30, 2021, 8:45:03 AM
[info] 1. Monitoring source files
[info]
Press <enter> to interrupt or ? for more options.
Then when you make a change to your code, you’ll see this output get updated. As a
developer this is great, because all you need to do now is refresh your page in the
browser when you make code changes.
21.2 Responding to Events with Scala.js
|
631
See Also
• The jquery-facade library.
• You can find a list of other facades on the Scala.js JavaScript library facades page.
• The WebJars project.
21.3 Building Single-Page Applications with Scala.js
Problem
You want to learn how to build single-page web applications with Scala.js.
Solution
This solution demonstrates how to start building single-page applications (SPA) with
Scala.js. In the previous two recipes I showed how to set up a Scala.js working envi‐
ronment, and this recipe builds on the sbt project created in those two recipes. As
with the previous projects, this recipe assumes that you’re familiar with HTML, Java‐
Script, and the DOM.
The steps in this recipe are:
1. Update build.sbt.
2. Create a new HTML file.
3. Create a new Scala/Scala.js file.
4. Run the code.
These steps are demonstrated in the following sections.
1. Update build.sbt
This recipe uses the Scalatags library, so the first step is to add it as a dependency to
your build.sbt file. If this was a Scala 3 library you’d use this entry:
libraryDependencies += "com.lihaoyi" %%% "scalatags" % "0.9.4"
But because it’s a Scala 2.13 library, and you’re using it in a Scala 3 project, you use
this syntax instead:
("com.lihaoyi" %%% "scalatags" % "0.9.4").cross(CrossVersion.for3Use2_13)
Also, because you’ll be creating a new Hello3.scala file for this recipe, change the main
Class setting in build.sbt to reference that file (which you’ll create shortly):
Compile/mainClass := Some("hello.Hello3")
632
|
Chapter 21: Scala.js, GraalVM, and jpackage
With the changes to the build.sbt file made in this recipe and the previous two rec‐
ipes, your build.sbt file should look like this:
ThisBuild / scalaVersion := "3.0.0"
// enable the plugin that’s in 'project/plugins.sbt'
enablePlugins(ScalaJSPlugin)
// this states that this is an application with a main method
scalaJSUseMainModuleInitializer := true
Compile/mainClass := Some("hello.Hello3")
lazy val root = project
.in(file("."))
.settings(
name := "ScalaJs3",
version := "0.1",
libraryDependencies ++= Seq(
("org.scala-js" %%% "scalajs-dom" % "1.1.0") ↵
.cross(CrossVersion.for3Use2_13),
("org.querki" %%% "jquery-facade" % "2.0") ↵
.cross(CrossVersion.for3Use2_13),
("com.lihaoyi" %%% "scalatags" % "0.9.4") ↵
.cross(CrossVersion.for3Use2_13)
),
)
enablePlugins(JSDependenciesPlugin)
jsDependencies += "org.webjars" % "jquery" % "2.2.1" / "jquery.js" minified ↵
"jquery.min.js"
The jQuery dependencies aren’t necessary for this tutorial, but I added them during
the last tutorial, and you’ll generally want them if you decide to build your own SPAs
using Scala.js. (Also, if you’re not going to use jQuery, then it’s not necessary to
import the jsdeps JavaScript file into your HTML page.)
2. Create a new HTML file
Next, create a hello3.html file in the project’s root directory with these contents:
<!DOCTYPE html>
<html>
<head>
<meta charset="UTF-8">
<title>Scala.js—Hello, world, Part 3</title>
</head>
<body>
<div id="root"></div>
<!-- "jsdeps" must be listed first -->
21.3 Building Single-Page Applications with Scala.js
|
633
<script type="text/javascript"
src="./target/scala-3.0.0/scala-js-hello-world-jsdeps.js"></script>
<script type="text/javascript"
src="./target/scala-3.0.0/scalajs3-fastopt.js"></script>
</body>
</html>
The big change from hello2.html in the last recipe to hello3.html is the removal of the
HTML button and the addition of this code:
<div id="root"></div>
You’ll use this root id in the Scala code we’ll create next. Also, if you’re new to SPAs,
notice how little HTML is in this “HTML” file(!).
3. Create Hello3.scala
Next, create a Scala source code file named Hello3.scala in the src/main/scala/hello
directory with these contents:
package hello
import org.scalajs.dom
import dom.document
import scalatags.JsDom.all.*
@main def hello3 =
// create an html button with scalatags
val btn = button(
"Click me",
onclick := { () =>
dom.window.alert("Hello, world")
}
)
// this is intentional overkill to demonstrate scalatags.
// the most important thing is that the button is added here.
val content =
div(id := "foo",
div(id := "bar",
h2("Hello"),
btn
)
)
val root = dom.document.getElementById("root")
root.innerHTML = ""
root.appendChild(content.render)
634
|
Chapter 21: Scala.js, GraalVM, and jpackage
Here’s a quick description of this code. First, I create a Scalatags button. The button
label is Click me, and when it’s clicked I show a JavaScript alert window, similar to
what I did in the previous recipe:
val btn = button(
"Click me",
onclick := { () =>
dom.window.alert("Hello, world")
}
)
Next, just to demonstrate how Scalatags works, I create a div with the class name foo,
then put another div inside it with the class name bar, then put an h2 element and
the button inside those two divs. The most important thing to notice is that this is
where the button object btn is added to the DOM:
val content =
div(id := "foo",
div(id := "bar",
h2("Hello"),
btn
)
)
The extra div tags aren’t necessary—I just added them to demonstrate how Scalatags
works. One thing I like about Scalatags is how this Scala code corresponds so well to
the HTML code it’s going to emit. Another great thing is that Scalatags is supported
by your IDE, so the code-completion feature of your IDE is a great help in figuring
out how to use Scalatags features.
Finally, I connect my Scala code to the root element of my HTML web page with this
code:
val root = dom.document.getElementById("root")
root.innerHTML = ""
root.appendChild(content.render)
If you’re familiar with working with the DOM when writing JavaScript, this code
should look familiar. One important note is that you need to remember to call the
render method on your Scalatags code to make this work:
root.appendChild(content.render)
------
In my code I tend to forget that part, so it’s worth mentioning it.
4. Run the code
With everything in place you can now compile this Scala code to JavaScript. Go back
to the sbt console, and assuming that it’s still running the ~fastLinkJS command
21.3 Building Single-Page Applications with Scala.js
|
635
from the last recipe, hit the Enter key to stop it. Then issue the reload command to
bring in the build.sbt changes:
sbt> reload
Then restart ~fastLinkJS:
sbt> ~fastLinkJS
Showing the Files Generated by fastLinkJS
If you need to know what files are generated when you run fas
tLinkJS, run the command as show fastLinkJS instead. It shows
the names of any files that are generated:
sbt:ScalaJs3> show fastLinkJS
[info] Attributed(target/scala-3.0.0/scalajs3-fastopt.js)
Now open the hello3.html file in your browser. On macOS you can do this with the
open command:
$ open hello3.html
Otherwise, the URL for your file will be something like file:///Users/al/ScalaJSHello‐
World/hello3.html.
When you open this file you should see the result shown in Figure 21-4 in your
browser.
Figure 21-4. The “Click me” button in the HTML page
Now click the “Click me” button, and you should see the result shown in Figure 21-5.
636
|
Chapter 21: Scala.js, GraalVM, and jpackage
Figure 21-5. The JavaScript alert window that’s displayed when the button is clicked
If you followed along, congratulations, you just created a single-page web application
with Scala.js!
Discussion
If you’ve created SPAs before, hopefully you can see the potential of this approach: it
lets you create single-page web apps using the power of the Scala programming
language.
The next step in the process of writing SPAs is to handle HTTP requests. This scalajs.org page shows that creating and using an XMLHttpRequest is almost identical in
JavaScript ES6 and Scala.js.
The scala-js-dom website shows how similar (and easy) it is to use an XMLHttpRe
quest in Scala.js:
def main(pre: html.Pre) = {
val xhr = new dom.XMLHttpRequest()
xhr.open(
"GET",
"http://api.openweathermap.org/data/2.5/weather?q=Singapore"
)
xhr.onload = { (e: dom.Event) =>
if (xhr.status == 200) {
pre.textContent = xhr.responseText
}
}
xhr.send()
}
That page also shows how to use a WebSocket and how to use the dom.ext.Ajax
object’s get and post methods as a simpler alternative to XmlHttpRequests.
21.3 Building Single-Page Applications with Scala.js
|
637
See Also
For more information on creating SPAs with Scala.js, see these resources:
• The Scala.js website.
• The Scalatags library.
• This Scala.js for JavaScript developers page provides an introduction to using
XMLHttpRequest.
• If you want to try writing a Scala.js WebSocket application, I created this Play
Framework and WebSocket example that includes some JavaScript code that can
be converted to Scala.js.
21.4 Building Native Executables with GraalVM
Problem
You want to build a native executable from your Scala code, so your application will
start up faster and potentially run faster and consume less memory.
Solution
Build a standalone JAR file as usual, such as with sbt package or sbt assembly, and
then use the GraalVM sbt-native-image plugin to build your native image—a native
binary executable for your operating system platform.
For example, I created a little command-line Scala application named sbtmkdirs to
generate new sbt project directory structures. To make sbtmkdirs start almost
instantly, I compile it to a native executable with the sbt-native-image plugin. The
steps are:
1. Configure your sbt project to use the sbt-native-image plugin.
2. Create the native executable with the sbt nativeImage command (which is avail‐
able via the plugin).
1. Configure your sbt project
At the time of this writing, the sbt-native-image plugin is at version 0.3.0, and the
configuration steps are as follows. First, create an sbt project as described in Recipe
17.1, “Creating a Project Directory Structure for sbt”. Then add this line to your
project/plugins.sbt file:
addSbtPlugin("org.scalameta" % "sbt-native-image" % "0.3.0")
638
|
Chapter 21: Scala.js, GraalVM, and jpackage
Next, update your build.sbt file to look like this:
lazy val root = (project in file("."))
.enablePlugins(NativeImagePlugin)
.settings(
name := "Sbtmkdirs",
version := "0.2",
scalaVersion := "3.0.0",
Compile / mainClass := Some("sbtmkdirs.Sbtmkdirs")
)
Then change the name, version, scalaVersion, and mainClass values as needed for
your project.
For this recipe, the key lines in that file are:
• The enablePlugins line tells sbt to use the plugin.
• The mainClass line tells sbt that my @main application is named Sbtmkdirs, and
it’s in the sbtmkdirs package.
The other lines are commonly used in a standard sbt build.sbt file.
2. Create the native executable
Given that setup, just run the nativeImage command inside the sbt shell, or at your
operating system command line:
$ sbt nativeImage
This command compiles your code and builds the native image. The first time it
runs, it may need to download many artifacts, including GraalVM and its nativeimage command. Once it finishes you should see a result like this:
[info] Native image ready!
[info] target/native-image/Sbtmkdirs
[success] Total time: 42 s
Now you can test the native image by moving into the target/native-image directory
and running your new command:
$ cd target/native-image
$ ./Sbtmkdirs
You can also use this plugin command to generate the native image and run it as soon
as it’s built:
$ sbt nativeImageRun
21.4 Building Native Executables with GraalVM
|
639
Discussion
Per the native-image documentation:
GraalVM Native Image allows you to ahead-of-time compile Java code to a standalone
executable, called a native image. This executable includes the application classes,
classes from its dependencies, runtime library classes from JDK and statically linked
native code from JDK. It does not run on the Java VM, but includes necessary compo‐
nents like memory management and thread scheduling from a different virtual
machine, called ‘Substrate VM.’ The resulting program has faster startup time and
lower runtime memory overhead compared to a Java VM.
Note that some other features, such as using Java’s java.net network libraries,
require the use of command-line flags to work:
--enable-http
--enable-https
enable http support in the generated image
enable https support in the generated image
Running native-image separately
You can also run the native-image command yourself, but this requires quite a bit
more work. If you’re interested in trying this, the first step is to download and install
GraalVM, and use it as your Java library. Set your JAVA_HOME and PATH on Unix sys‐
tems like this:
$ export JAVA_HOME=~/bin/graalvm-ce-java11-21.1.0/Contents/Home/
$ export PATH=~/bin/graalvm-ce-java11-21.1.0/Contents/Home/bin:$PATH
Then you need to install the GraalVM native-image command separately, as
described on this GraalVM page.
You’ll also need to have Scala installed, as usual. After that, create a shell script like
this one that I used with Scala 2.13:
# SCALA_HOME needs to be set
export SCALA_HOME=~/bin/scala-2.13.3
# this script assumes that this file was already created
# in this directory with `sbt package` or `sbt assembly`
JAR_FILE=sbtmkdirs_2.13-0.2.jar
JAR_DIR=../target/scala-2.13
echo "deleting old JAR file ..."
rm $JAR_FILE 2> /dev/null
echo "copying JAR file to current dir ..."
cp ${JAR_DIR}/${JAR_FILE} .
echo "running 'native-image' command on ${JAR_FILE} ..."
# create a native image from the jar file and name
# the resulting executable 'sbtmkdirs'
native-image -cp .:${SCALA_HOME}/lib/scala-library.jar:${JAR_FILE} \
640
|
Chapter 21: Scala.js, GraalVM, and jpackage
--no-server \
--no-fallback \
--initialize-at-build-time \
-jar ${JAR_FILE} sbtmkdirs
That script assumes that your JAR file has the name shown and is in the target direc‐
tory shown. It uses that JAR file as input to create the native image.
See Also
• At the time of this writing, GraalVM native-image features are still changing rap‐
idly. See the GraalVM Native Image documentation for the most up-to-date
information.
21.5 Bundling Your Application with jpackage
Problem
You want to package a Scala application to make it look and feel like a native applica‐
tion, such as creating an “.app” distribution that works as a native macOS application
(“App”).
Solution
Build your Scala application as desired, typically using sbt-assembly or a similar tool
to create one JAR file. Then use the jpackage utility that comes with JDK 14
and newer releases to package your application for the macOS, Linux, or Windows
platforms.
For example, imagine that you’ve created this Scala/Swing text editor application and
want to bundle it as a macOS App:
package com.alvinalexander.myapp
import java.awt.{BorderLayout,Dimension}
import javax.swing.*
@main def mySwingApp =
val frame = JFrame("My App")
val textArea = JTextArea("Hello, Scala 3 world")
val scrollPane = JScrollPane(textArea)
SwingUtilities.invokeLater(new Runnable {
def run =
frame.getContentPane.add(scrollPane, BorderLayout.CENTER)
frame.setSize(Dimension(400,300))
frame.setLocationRelativeTo(null)
frame.setDefaultCloseOperation(WindowConstants.EXIT_ON_CLOSE)
21.5 Bundling Your Application with jpackage
|
641
frame.setVisible(true)
})
The first thing you’ll want to do is package your application as a single JAR file, using
the sbt-assembly techniques shown in Recipe 17.11, “Deploying a Single Executable
JAR File”. At the time of this writing, configuring sbt-assembly only requires adding
this line to a project/plugins.sbt configuration file in your sbt build:
// note: the version number changes several times a year
addSbtPlugin("com.eed3si9n" % "sbt-assembly" % "0.15.0")
After that, create the output JAR file using the assembly command at the sbt shell
prompt:
sbt:MySwingApp> assembly
Because I can never remember where assembly writes its output file, I usually use this
command instead:
sbt:MySwingApp> show assembly
[info] target/scala-3.0.0-RC1/MySwingApp-assembly-0.1.0.jar
As shown, the output of that command prints the location where the output JAR file
is written.
Now that I have a single JAR file, the next step is to create a subdirectory where I
build the App, so I create a subdirectory named jpackage and move into that
directory:
$ mkdir jpackage
$ cd jpackage
Inside that directory I create two subdirectories named Input and Output:
$ mkdir Input
$ mkdir Output
The Input directory is where I put resources that are used to build the App, and the
Output directory is where the resulting App will be built.
Now I create a shell script to build the App. I’ll name this file BuildApp.sh:
# this requires JDK 14+
# the jar file must be built with sbt-assembly or similar
JAR_FILE=MySwingApp-assembly-0.1.0.jar
MAIN_CLASS=com.alvinalexander.myapp.mySwingApp
APP_NAME=MyApp
TARGET_DIR=../target/scala-3.0.0-RC1
rm Input/${JAR_FILE}
2> /dev/null
rm -rf Output/${APP_NAME}.app 2> /dev/null
# get the latest sbt-assembly jar file
642
|
Chapter 21: Scala.js, GraalVM, and jpackage
cp ${TARGET_DIR}/${JAR_FILE} Input
# creates Output/MyApp.app (a MacOS app)
echo "Creating a macOS app with jpackage ..."
jpackage \
--name $APP_NAME \
--type app-image \
--input Input \
--dest Output \
--main-jar $JAR_FILE \
--main-class $MAIN_CLASS
# optional: specify an app icon
# --icon Input/MyApp.icns \
echo "Created Output/MyApp.app (hopefully)"
That script:
• Deletes old artifacts in the Input and Output directories
• Copies the latest sbt-assembly JAR file into the Input directory
• Runs the jpackage command to create a macOS App
If you’re not familiar with what a macOS App is, it’s just a collection of files and direc‐
tories underneath a directory whose name ends with the .app extension. The files and
directory under .app must be in a proper format and include certain configuration
files, and jpackage does that work for you.
Next, I make that script executable and then run it:
$ chmod +x BuildApp.sh
$ ./BuildApp.sh
Creating a macOS app with jpackage ...
Created Output/MyApp.app (hopefully)
The script doesn’t account for errors, but assuming that everything works, it creates a
macOS App named MyApp.app under the Output directory. On a macOS system you
can run your App with the open command:
$ open Output/MyApp.app
Assuming that everything works, that opens the Scala/Swing text editor application,
as shown in Figure 21-6.
21.5 Bundling Your Application with jpackage
|
643
Figure 21-6. The Scala/Swing application, shown next to its macOS menu
Discussion
In the example I use this jpackage argument to build a macOS App:
--type app-image
In addition to specifying app-image for the type, the jpackage help text shows that
you can also build other types of packages:
--type -t <type>
The type of package to create
Valid values are: {"app-image", "dmg", "pkg"}
If this option is not specified a platform dependent
default type will be created.
"dmg" and "pkg" represent two types of installers for the macOS platform. jpackage
can also create packages on Linux and Windows systems.
The solution shows only a minimum set of jpackage options. This example shows
the options I use to build a real-world Scala/JavaFX application for macOS:
APP_DIR_NAME=CliffsNotesFx.app
APP_NAME=CliffsNotesFx
APP_MAIN=com.alvinalexander.cliffsnotes.CliffsNotesGui
INPUT_JAR_FILE=${ASSEMBLY_JAR_FILENAME}
ICON_FILE=AlsNotes.icns
jpackage \
--type app-image \
--verbose \
--input input \
--dest release \
--name $APP_NAME \
644
|
Chapter 21: Scala.js, GraalVM, and jpackage
--main-jar $INPUT_JAR_FILE \
--main-class $APP_MAIN \
--icon $ICON_FILE \
--module-path ~/bin/adopt@1.14.0-1/Contents/Home/jmods \
--add-modules java.base,javafx.controls,javafx.web (many more modules) ... \
--mac-package-name $APP_NAME \
--mac-package-identifier $APP_MAIN \
--app-version 1.1 \
--description "A CliffsNotes browser" \
--vendor "Alvin J. Alexander" \
--java-options -Dapple.laf.useScreenMenuBar=true \
--java-options '--add-opens javafx.base/com.sun.javafx.reflect=ALL-UNNAMED' \
--java-options -Xmx2048m
If you want to distribute your application on the Apple App Store, you’ll also need to
sign your App. The jpackage command includes these options for that process:
--mac-sign
--mac-signing-keychain <file path>
--mac-signing-key-user-name <team name>
What jpackage creates
As mentioned, the jpackage command does a lot of work for you when creating a
macOS App. To help demonstrate what it does, here’s the pruned output of the tree
command on the MyApp.app directory:
$ tree MyApp.app
MyApp.app
└── Contents
├── Info.plist
├── MacOS
│
├── MyApp
│
└── libapplauncher.dylib
├── PkgInfo
├── Resources
│
└── MyApp.icns
├── app
│
├── MyApp.cfg
│
├── MyApp.icns
│
└── MySwingApp-assembly-0.1.0.jar
└── runtime
└── Contents
│
a copy of the JVM is under here ...
│
...
82 directories
21.5 Bundling Your Application with jpackage
|
645
Notice that your JAR file is copied into this directory structure. I also used an icon file
named MyApp.icns for my build, and notice that it’s copied under MyApp.app as well.
A copy of the JVM is also added here, so users of your app won’t need to have Java
installed on their system. The JVM is started with the launcher that’s provided by
jpackage.
See Also
• “Packaging Tool User’s Guide” is Oracle’s documentation for packaging
applications.
• The jpackage command help page shows all the options that are available.
646
|
Chapter 21: Scala.js, GraalVM, and jpackage
CHAPTER 22
Integrating Scala with Java
This book was completed in 2021, so this chapter focuses on the integration of Scala 3
and Java 11, which is Oracle’s current Long-Term-Support release. This is important
to mention because there are currently two major Java version releases planned for
every year.
In general, the ability to mix Scala and Java code is pretty seamless. In most cases, you
can create an sbt project, put your Scala code in src/main/scala, put your Java code in
src/main/java, and it just works.
The recipes in this chapter cover issues with converters, traits and interfaces, excep‐
tions, the conversion of numeric types, and more.
In my Scala/Java interactions, the biggest issues I’ve run into deal with the differences
between their collections libraries. However, I’ve always been able to work through
those problems with Scala’s CollectionConverters objects. Starting with Scala 2.13,
there are now two CollectionConverters objects:
• Extension methods for use in Scala code are in scala.jdk.Collection
Converters
• Conversion methods for your Java code are in scala.jdk.javaapi.Collection
Converters
Similarly, conversion methods between Scala’s Option and Java’s Optional are han‐
dled by these conversion objects:
• Extension methods for Scala are in scala.jdk.OptionConverters
• Conversion methods for Java are in scala.jdk.javaapi.OptionConverters
These conversion methods are shown in this chapter’s initial recipes.
647
After the conversion recipes, Recipes 22.5 and 22.6 dig into the relationship between
Scala traits and Java interfaces. Thanks to the features of interfaces in Java 8 and
newer, traits and interfaces are more closely aligned than they were in the first edition
of the Scala Cookbook.
Other integration points between Scala and Java require the use of annotations, and
these are covered in the recipes on exceptions (@throws), varargs parameters (@var
args), and serialization (@SerialVersionUID).
Finally, if you’re familiar with Java but new to Scala, it’s important to mention that
everything in Scala is an object. Specifically this means that Scala doesn’t have primi‐
tive numeric data types. This is shown in Figure 22-1, where I type the number 1 into
the Scala REPL, followed by a decimal and then the Tab key, and the REPL shows all
the methods that are available on an Int instance.
Figure 22-1. In Scala everything is an object, even an integer
22.1 Using Java Collections in Scala
Problem
You’re using Java classes in a Scala application, and those classes either return Java
collections or require Java collections in their method calls, and you need to integrate
those with your use of Scala collections.
Solution
Use the extension methods of the scala.jdk.CollectionConverters object in your
Scala code to make the conversions work. For example, if you have a method named
getNumbers in a public Java class named JavaCollections:
// java
public static List<Integer> getNumbers() {
648
|
Chapter 22: Integrating Scala with Java
return new ArrayList<Integer>(List.of(1,2,3));
}
you can convert that Java list to a Scala Seq in your Scala code like this:
// scala
import scala.jdk.CollectionConverters.*
import java.util.List
def testList =
println("Using a Java List in Scala")
val jlist: java.util.List[Integer] = JavaCollections.getNumbers
// jlist.getClass is "class java.util.ArrayList"
// note that this is `Seq[Integer]` and not `Seq[Int]`:
val slist: Seq[Integer] = jlist.asScala.toSeq
slist.foreach(println)
Similarly, if you have a Java method that returns a Map:
// java
public static Map<String, String> getPeeps() {
return new HashMap<String, String>(Map.of(
"Captain", "Kirk",
"Mr.", "Spock"
));
}
you can convert that to a Scala Map like this:
// scala
import scala.jdk.CollectionConverters.*
import java.util.{Map => JavaMap}
import scala.collection.mutable.{Map => ScalaMap}
@main def testMap =
println("use a Java Map in Scala")
val jmap: JavaMap[String,String] = JavaCollections.getPeeps
val smap: ScalaMap[String,String] = jmap.asScala
for (k,v) <- smap do println(s"key: '$k', value: '$v'")
Similarly, this example shows how to convert a Java Properties object to a Scala Map:
// [1] create and populate a Java Properties object
val javaProps = new java.util.Properties
javaProps.put("first_name", "Charles")
javaProps.put("last_name", "Carmichael")
// [2] convert Java Properties to Scala Map
import scala.jdk.CollectionConverters.*
val scalaProps = javaProps.asScala
println(scalaProps)
The println statement in that code prints output like this:
22.1 Using Java Collections in Scala
|
649
Map(last_name -> Carmichael, first_name -> Charles)
Discussion
This recipe shows how to perform collection conversions in Scala. To perform con‐
versions in your Java code, see the next recipe.
Type conversions
The first example in the Solution shows how to create a Scala Seq[Integer] from a
Java java.util.List<Integer>:
val slist: Seq[Integer] = jlist.asScala.toSeq
Assuming that you really want a Seq[Int]—and not Seq[Integer]—you’ll need to
add an Integer-to-Int conversion process to your code:
def integer2Int(i: Integer): Int = i
val jlist2: java.util.List[Integer] = MyJavaClass.getNumbers()
val slist2: Seq[Int] = jlist2.asScala.map(i => integer2Int(i)).toSeq
That code does the following:
• Creates jlist2 as a java.util.List[Integer]
• Converts that code to a Scala Buffer[Integer] using asScala
• Converts that Buffer[Integer] to a Buffer[Int] with the map method and inte
ger2Int function
• Creates the final Seq[Int] with the toSeq call
Conversion methods
Code like this works because of conversion methods in the CollectionConverters
object. Table 22-1 shows the two-way conversions that are possible using the asScala
and asJava methods.
Table 22-1. The two-way conversions provided by the scala.jdk.CollectionConverters object
Scala collection
Java collection
scala.collection.Iterable
java.lang.Iterable
scala.collection.Iterator
java.util.Iterator
scala.collection.mutable.Buffer java.util.List
scala.collection.mutable.Set
java.util.Set
scala.collection.mutable.Map
java.util.Map
scala.collection.concurrent.Map java.util.concurrent.ConcurrentMap
650
|
Chapter 22: Integrating Scala with Java
For example, you can convert a Scala Buffer to a Java List using asJava, and per‐
form the opposite conversion using asScala.
Table 22-2 shows additional two-way conversions. The conversions to Scala are sup‐
ported with asScala, and the specially named extension methods let you convert the
Scala collections to Java collections.
Table 22-2. Additional two-way conversions, including specially named methods
Scala collection
Java collection
scala.collection.Iterable
java.util.Collection (via asJavaCollection)
scala.collection.Iterator
java.util.Enumeration (via asJavaEnumeration)
scala.collection.mutable.Map java.util.Dictionary (via asJavaDictionary)
Table 22-3 lists one-way conversions that are possible with asJava.
Table 22-3. One-way conversions (Scala to Java) that are provided by the CollectionConvert
ers class
Scala collection
Java collection
scala.collection.Seq
java.util.List
scala.collection.mutable.Seq java.util.List
scala.collection.Set
java.util.Set
scala.collection.Map
java.util.Map
Table 22-4 lists one-way conversions that are possible with asScala.
Table 22-4. One-way conversions that are provided with asScala
Scala collection
Java collection
java.util.Properties scala.collection.mutable.Map[String,String]
See Also
• scala.jdk.CollectionConverters for converting from Java to Scala
• scala.javaapi.CollectionConverters for converting from Scala to Java
• scala.jdk.javaapi.StreamConverters for creating Java streams that work with
Scala collections
22.1 Using Java Collections in Scala
|
651
22.2 Using Scala Collections in Java
Problem
You need to access Scala collections classes in a Java application, converting those
Scala classes into Java classes.
Solution
In your Java code, use the methods of Scala’s scala.javaapi.CollectionConverters
object to make the conversions work. For example, if you have a List[String] like
this in a Scala class:
// scala
class ScalaClass:
val strings = List("a", "b")
you can access that Scala List in your Java code like this:
// java
import scala.jdk.javaapi.CollectionConverters;
ScalaClass sc = new ScalaClass();
// access the `strings` field as `sc.strings()`
scala.collection.immutable.List<String> xs = sc.strings();
// create a Java List<String>
java.util.List<String> listOfStrings = CollectionConverters.asJava(xs);
A few points to notice about that code:
• In your Java code you create an instance of ScalaClass just like an instance of a
Java class.
• ScalaClass has a field named strings, but from Java you access that field as a
method, for example, as sc.strings().
I wrote that code in a long form to help emphasize those points, but you can also per‐
form the conversion in one step like this:
java.util.List<String> listOfStrings2 = CollectionConverters.asJava(
(new ScalaClass()).strings()
);
Discussion
This recipe shows how to perform collections conversions in Java. To perform con‐
versions in your Scala code, see the previous recipe.
652
|
Chapter 22: Integrating Scala with Java
In some cases you can run into an issue with type erasure. For instance, given this
ints field in a Scala class:
class ScalaClass:
val ints = Seq(1,2,3)
you have to access that Scala Seq as a List<Object> in Java:
// java
ScalaClass sc = new ScalaClass();
java.util.List<Object> listInt = CollectionConverters.asJava(sc.ints());
// this also works
java.util.List listInt = CollectionConverters.asJava(sc.ints());
You can see the type erasure problem when you compile the Scala class with scalac,
then disassemble it with javap, where you see this:
public scala.collection.immutable.Seq<java.lang.Object> ints();
As shown, the class file only knows that there’s an ints() method that returns
Seq<java.lang.Object>.
If you have access to the Scala source code, you can make a Seq[Int] easier to access
from Java by first converting it to a Seq[Integer]:
// in a scala class
val jIntegers: Seq[java.lang.Integer] = Seq(1,2,3).map(i => i:java.lang.Integer)
Now you can access that as a List<Integer> in a Java class like this:
// java
java.util.List<Integer> listIntegers =
CollectionConverters.asJava(sc.jIntegers());
If you can’t modify the Scala code, you may have to perform other casting-related
work to handle the java.util.List<Object>, depending on your needs.
See Also
The scala.jdk.javaapi.CollectionConverters object supports the same two-way
conversions as the scala.jdk.CollectionConverters object shown in the previous
recipe. See that recipe for those conversions, and these links for more details:
• scala.jdk.CollectionConverters for converting from Java to Scala
• scala.javaapi.CollectionConverters for converting from Scala to Java
• scala.jdk.javaapi.StreamConverters for creating Java streams that work with
Scala collections
22.2 Using Scala Collections in Java
|
653
22.3 Using Java Optional Values in Scala
Problem
You need to use a Java Optional value in your Scala code.
Solution
When writing Scala code, import the scala.jdk.OptionConverters object and then
use the toScala extension method to convert a Java Optional value to a Scala Option.
To demonstrate this, create a Java class with two Optional<String> values, one con‐
taining a string and the other one empty:
// java
import java.util.Optional;
public class JavaClass {
static Optional<String> oString = Optional.of("foo");
static Optional<String> oEmptyString = Optional.empty();
}
Then in your Scala code you can access those fields. If you just access them directly,
they will both be Optional values:
// scala
import java.util.Optional
val optionalString = JavaClass.oString
val eOptionalString = JavaClass.oEmptyString
// Optional[foo]
// Optional.empty
But by using the scala.jdk.OptionConverters methods, you can convert them to
Scala Option values:
import java.util.Optional
import scala.jdk.OptionConverters.*
val optionalString = JavaClass.oString
val optionString = optionalString.toScala
// Optional[foo]
// Some(foo)
val eOptionalString = JavaClass.oEmptyString
val eOptionString = eOptionalString.toScala
// Optional.empty
// None
This syntax works because toScala is defined as an extension method, so it can be
used on an Optional instance.
654
|
Chapter 22: Integrating Scala with Java
Numeric values
Numeric values also convert well from Java to Scala. Given this Java code:
// java
import java.util.Optional;
import java.util.OptionalInt;
public class JOptionalNumericToScala {
static Optional<Integer> oInt = Optional.of(1);
static Optional<Integer> oEmptyInt = Optional.empty();
static OptionalInt optionalInt = OptionalInt.of(1);
}
you can work with these Optional<Integer> and OptionalInt fields in your Scala
code, as shown previously:
// scala
import java.util.Optional
// Optional[Int]
val optionalInt = JOptionalNumericToScala.oInt
val optionInt = optionalInt.toScala
// Optional[1]
// Some(1)
// Optional[Int] (empty)
val eOptionalInt = JOptionalNumericToScala.oEmptyInt
val eOptionInt = eOptionalInt.toScala
// Optional.empty
// None
// OptionalInt
val optionalInt2 = JOptionalNumericToScala.optionalInt
val sOptionalInt2 = optionalInt2.toScala
// OptionalInt[1]
// Some(1)
Discussion
If you have access to the Java source code, you can also use the conversion methods
from scala.jdk.javaapi.OptionConverters to convert Optional values to Option
values in your Java code rather than in your Scala code. Notice that this object is also
named OptionConverters, but the two objects are used to convert Optional values in
different places:
• Use scala.jdk.OptionConverters in your Scala code
• Use scala.jdk.javaapi.OptionConverters in your Java code
Convert Optional to Option on the Java side
This example shows how to convert Optional fields to Option values in your Java
code, using the methods of the scala.jdk.javaapi.OptionConverters object:
22.3 Using Java Optional Values in Scala
|
655
// java
import java.util.Optional;
import java.util.OptionalInt;
import scala.jdk.javaapi.OptionConverters;
import scala.Option;
public class JOptionalNumericToScala {
static Option<Integer> oInt1 = OptionConverters.toScala(Optional.of(1));
static Option<Integer> oInt2 = OptionConverters.toScala(OptionalInt.of(2));
}
Notice that the first example uses Optional and the second example uses Optiona
lInt, and both convert to a Scala Option. When they’re converted like this in the Java
code, they appear as Option values in your Scala code:
// scala
val oInt1 = JOptionalNumericToScala.oInt1
val oInt2 = JOptionalNumericToScala.oInt2
// Some(1)
// Some(2)
See Also
The two Scala objects for converting Optional and Option values are:
• scala.jdk.OptionConverters for use in your Scala code
• scala.jdk.javaapi.OptionConverters for use in your Java code
22.4 Using Scala Option Values in Java
Problem
You want to access a Scala Option value in your Java code.
Solution
You can convert a Scala Option value to a Java Optional value in your Scala code or
in your Java code. The Scala solution is shown here, and the Java solution is shown in
the Discussion.
In your Scala code, use the toJava extension method to convert a Scala Option to a
Java Optional value, after importing scala.jdk.OptionConverters.
To demonstrate this, create a Scala class with two Option[String] values, one con‐
taining a string and the other one empty, and convert those Option[String] values
into java.util.Optional[String] using toJava:
656
|
Chapter 22: Integrating Scala with Java
// scala
import scala.jdk.OptionConverters.*
// create java.util.Optional[String] values
object Scala:
// convert a Some to Optional
val scalaStringSome = Option("foo").toJava
// convert a None to Optional
val scalaStringNone = Option.empty[String].toJava
Then in your Java code, access those fields directly as Optional values:
// java
import java.util.Optional;
Optional<String> stringSome = Scala.scalaStringSome();
Optional<String> stringNone = Scala.scalaStringNone();
// Optional[foo]
// Optional.empty
The two fields are available as Optional values, and the only difference you see in
your Java code is that Scala fields like scalaStringSome appear as methods in your
Java code—scalaStringSome() rather than as fields.
Options containing numeric values
Converting numeric values that are wrapped in a Scala Option can take a little more
work, but they can also be converted to Java Optional values. The scala.jdk.Option
Converters object provides several methods for these situations. For example, given
this Scala code, which creates Optional and OptionalInt values:
// scala
import scala.jdk.OptionConverters.*
object Scala:
val intOptional1 = Option(1).toJava
val optionalInt = Option(1).toJavaPrimitive
val optionalInt2 = optionalInt.toJavaGeneric
//
//
//
//
Optional[Int], or
Optional[Object]
OptionalInt
Optional[Int]
those fields can be accessed in your Java code like this:
// java
import java.util.Optional;
import java.util.OptionalInt;
Optional intOptional1
= Scala.intOptional1();
OptionalInt optionalInt = Scala.optionalInt();
Optional optionalInt2
= Scala.optionalInt2();
// Optional[1]
// OptionalInt[1]
// Optional[1]
22.4 Using Scala Option Values in Java
|
657
A key to this solution is that the Optional fields in your Java code need to be declared
in one of these ways:
Optional x = ...
Optional<Object> x = ...
OptionalInt x = ...
Because of type erasure, attempting to declare the field type like this will result in a
compile-time error:
Optional<Integer> intOptional1 = ...
// error
Discussion
If you’re working on the Java side and the Scala code only offers you an Option value,
you can convert it into an Optional value on the Java side. Just use the toJava* meth‐
ods in the scala.jdk.javaapi.OptionConverters object.
Same Name, Different Package
Note that while this object has the same name as the object shown
in the Solution (OptionConverters), they’re in different packages,
and this object is meant to be used in Java code.
To demonstrate converting an Option into an Optional value in Java, first create an
Option[String] in your Scala code:
// scala
object Scala:
val optionString = Option("foo")
Now you can convert that to an Optional<String> in your Java code using the
toJava method from OptionConverters:
// java
import scala.jdk.javaapi.OptionConverters.toJava;
Optional<String> stringOptional = toJava(Scala.optionString());
In addition to toJava, other conversion methods you can use in your Java code are:
• toJavaOptionalDouble
• toJavaOptionalInt
• toJavaOptionalLong
658
|
Chapter 22: Integrating Scala with Java
See Also
The two Scala objects for converting Optional and Option values are:
• scala.jdk.OptionConverters for use in your Scala code
• scala.jdk.javaapi.OptionConverters for use in your Java code
22.5 Using Scala Traits in Java
Problem
You’ve written a Scala trait with implemented methods and want to use those meth‐
ods in a Java application.
Solution
This book was tested with Java 11, and with Java 11 you can use a Scala trait just like a
Java interface, even if the trait has implemented methods. For example, given these
two Scala traits, one with an implemented method and one with only an interface:
// scala
trait SAddTrait:
def sum(x: Int, y: Int) =
x + y
trait SMultiplyTrait:
def multiply(x: Int, y: Int): Int
// implemented
// abstract
a Java class can implement both of those interfaces, and implement the multiply
method:
// java
class JMath implements SAddTrait, SMultiplyTrait {
public int multiply(int a, int b) {
return a * b;
}
}
JMath jm = new JMath();
System.out.println(jm.sum(3,4));
System.out.println(jm.multiply(3,4));
// 7
// 12
Discussion
This solution used to require wrapping the Scala trait in a class so the Java application
could use it, but these days the solution is to use the Scala trait just as though it was a
Java interface.
22.5 Using Scala Traits in Java
|
659
22.6 Using Java Interfaces in Scala
Problem
You want to implement a Java interface in a Scala application.
Solution
In your Scala application, use the extends keyword and commas to implement your
Java interfaces, just as though they were Scala traits.
For example, given these three Java interfaces:
// java
interface Animal {
void speak();
}
interface Wagging {
void wag();
}
interface Running {
// an implemented method
default void run() {
System.out.println("I’m running");
}
}
you can create a Dog class in Scala with the usual extends keyword, just as though
you were using traits. All you have to do is implement the speak and wag methods:
// scala
class Dog extends Animal, Wagging, Running:
def speak() = println("Woof")
def wag() = println("Tail is wagging")
Discussion
Notice that the Java Running interface declares a default method named run. As
shown, default methods in Java interfaces are easily used in Scala.
Static methods in Java interfaces are also easily used in Scala:
// java
interface Mathy {
static int add(int a, int b) {
return a + b;
}
}
660
|
Chapter 22: Integrating Scala with Java
// scala
println(Mathy.add(1,1))
// prints "2"
22.7 Adding Exception Annotations to Scala Methods
Problem
You want to let Java users know that a Scala method can throw one or more excep‐
tions, so they can handle those exceptions with try/catch blocks.
Solution
Add the @throws annotation to your Scala methods so Java consumers will know the
exceptions they can throw.
For example, this Scala exceptionThrower method is annotated to declare that it
throws an Exception:
// scala
object SExceptionThrower:
@throws(classOf[Exception])
def exceptionThrower = throw new Exception("Exception from Scala!")
As a result, this Java code won’t compile because I don’t handle the exception:
// java: won’t compile
public class ScalaExceptionsInJava {
public static void main(String[] args) {
SExceptionThrower.exceptionThrower();
}
}
The compiler gives this error:
[error] ScalaExceptionsInJava: unreported exception java.lang.Exception;
must be caught or declared to be thrown
[error] SExceptionThrower.exceptionThrower()
This is good—it’s what you want: the annotation tells the Java compiler that excep
tionThrower can throw an exception. Now when you’re writing Java code you must
handle the exception with a try block or declare that your Java method throws an
exception:
public static void main(String[] args) throws Exception ...
----------------
Conversely, if you leave the annotation off the Scala exceptionThrower method, the
Java code will compile. This is probably not what you want, because the Java code
may not account for the Scala method throwing the exception.
22.7 Adding Exception Annotations to Scala Methods
|
661
Discussion
To declare that a Scala method can throw multiple exceptions, use multiple throws
annotations before declaring your method:
// scala
@throws(classOf[FooException])
@throws(classOf[BarException])
def baz() = ...
Then in your Java code, catch those exceptions as usual:
try {
baz();
} catch(FooException e) {
// handle the exception
} catch(BarException e) {
// handle the exception
} finally {
// code here as needed
}
See Also
While this recipe shows how to annotate exception-throwing methods to work with
Java, the “Scala way” is that your methods should never throw an exception. See
Recipe 10.8, “Implementing Functional Error Handling”, for details on the preferred
approach to working with possible errors.
22.8 Annotating varargs Methods to Work with Java
Problem
You’ve created a Scala method with a varargs field, and would like to be able to call
that method from Java code.
Solution
Mark the Scala method with the @varargs annotation. For example, the printAll
method in this Scala class declares a varargs field—String*—and is marked with
@varargs:
// scala
import annotation.varargs
object VarargsPrinter:
@varargs def printAll(args: String*): Unit = args.foreach(println)
662
|
Chapter 22: Integrating Scala with Java
Because printAll is declared with the @varargs annotation, it can be called from a
Java program with a variable number of parameters, as shown in this example:
// java
public class JVarargs {
public static void main(String[] args) {
VarargsPrinter.printAll("Hello", "world");
}
}
When this code is run, it results in the following output:
Hello
world
Discussion
If the @varargs annotation isn’t used on the printAll method, the Java code shown
won’t even compile, failing with the following compiler errors:
[error] JVarargs.java: method printAll in class VarargsPrinter cannot be
applied to given types;
[error]
required: scala.collection.immutable.Seq<java.lang.String>
[error]
found: java.lang.String,java.lang.String
[error]
reason: actual and formal argument lists differ in length
[error] VarargsPrinter.printAll
From a Java perspective, without the @varargs annotation, the printAll method
appears to take a scala.collection.immutable.Seq<java.lang.String> as its
argument.
Calling a Java varargs method
Calling a Java varargs method from Scala generally just works. For instance, this Java
method:
// java
public class JVarargs {
// a java method with a varargs parameter
static void jPrintAll(String... args) {
for (String s: args) {
System.out.println(s);
}
}
}
can be called from this Scala code, and it works as expected:
// scala
@main def jVarargs =
JVarargs.jPrintAll()
JVarargs.jPrintAll("foo")
JVarargs.jPrintAll("foo", "bar")
22.8 Annotating varargs Methods to Work with Java
|
663
22.9 Using @SerialVersionUID and Other Annotations
Problem
You want to specify that a Scala class is serializable and set the serialVersionUID.
Solution
Use the Scala @SerialVersionUID annotation while also having your class extend the
Serializable type:
@SerialVersionUID(123L)
class Sheep(val name: String) extends Serializable:
override def toString = name
@transient val greet: String = s"Hello, $name"
Given that class and this deepClone function:
// this code ignores possible exceptions
def deepClone(obj: Object): Object =
import java.io.*
val baos = ByteArrayOutputStream()
val oos = ObjectOutputStream(baos)
oos.writeObject(obj)
val bais = ByteArrayInputStream(baos.toByteArray())
val ois = ObjectInputStream(bais)
ois.readObject()
you can clone a Sheep:
// the original sheep
val d = Sheep("Dotty")
println(d)
// Dotty
println(d.greet)
// Hello, Dotty
// the cloned sheep
val d2 = deepClone(d).asInstanceOf[Sheep]
println(d2)
println(d2.greet)
// Dotty
// null
Cloning the Sheep succeeds as expected, but because the greet field has the @transi
ent annotation, it’s null in the cloned sheep. A solution to this problem is shown in
the Discussion.
@transient
The @transient annotation means this field should not be
serialized.
664
|
Chapter 22: Integrating Scala with Java
That code succeeds, but if you attempt to do the same thing with this plain Cat class,
it will throw an exception when you call deepClone:
class Cat(val name: String):
override def toString = name
val c = Cat("Morris")
val c2 = deepClone(c)
// error: java.io.NotSerializableException
This code fails because it does not use @SerialVersionUID and Serializable.
Discussion
The Sheep class shown in the Solution works as expected, but as shown, after the seri‐
alization/deserialization process the greet field ends up null. A solution to this prob‐
lem is to make the greet field a transient lazy val:
@SerialVersionUID(123L)
class Sheep(val name: String) extends Serializable:
override def toString = name
@transient lazy val greet: String = s"Hello, $name"
By using @transient and lazy val together:
• As before, the greet field is not serialized.
• After the deepClone serialization/deserialization process, the greet field is recal‐
culated when it’s accessed as d2.greet.
The result is that greet won’t be null.
Other annotations
Table 22-5 shows other Scala annotations and their Java equivalents. Several of these
annotations are demonstrated in this chapter.
Table 22-5. Scala annotations and their Java equivalents
Scala
scala.deprecated
Java
Used to mark a member as deprecated (shown in an example below).
scala.serializable
java.io.Serializable (shown in this recipe).
scala.SerialVersionUID
serialVersionUID field (shown in this recipe).
scala.throws
throws keyword (shown in Recipe 22.7).
scala.transient
transient keyword (shown in this recipe).
scala.annotation.varargs
Used on a field in a method, function, or constructor, it instructs the compiler to
generate a Java varargs-style parameter (shown in Recipe 22.8).
22.9 Using @SerialVersionUID and Other Annotations
|
665
Scala
Java
@threadUnsafe
When used on a lazy val field, the field will be initialized faster, but in a
manner that is not thread-safe.
@targetName
Define an alternative name for a member. The defined method name is used in
Scala, and the targetName is accessed from another language like Java.
These examples demonstrate a few of those annotations:
@deprecated("wow this method is old", "Version 0.1")
def veryOldMethod(s: String) = ???
@throws(classOf[Exception])
def exceptionThrower = throw new Exception("Exception from Scala!")
import annotation.varargs
@varargs def printAll(args: String*): Unit = args.foreach(println)
This example shows the Scala and Java code necessary to use the @targetName
annotation:
// scala: define a '++' method with the target name 'plus1'
object TargetNameDemo:
import scala.annotation.targetName
@targetName("plus1")
def ++(i: Int): Int = i + 1
// use '++' in scala code
@main def usePlusPlus =
import TargetNameDemo.++
println(++(1))
// java
// use 'plus1' in java code
int i = TargetNameDemo.plus1(1);
System.out.println(i);
This is a nice new way to provide easily usable names in Java code.
See Also
• Recipe 22.7 demonstrates the @throws annotation.
• Recipe 22.8 demonstrates the @varargs annotation.
• The Scala 3 @targetName documentation provides more details on its use.
666
| Chapter 22: Integrating Scala with Java
CHAPTER 23
Types
As you can tell from one look at the Scaladoc for the collections classes, Scala has a
powerful type system. However, unless you’re the creator of a library, you can go a
long way in Scala without having to go too far down into the depths of Scala types.
But once you start creating libraries for other users, you will need to learn them.
This chapter provides recipes for the most common type-related problems you’ll
encounter, but when you need to go deeper, I highly recommend the book Program‐
ming in Scala (Artima). Martin Odersky, one of its authors, is the creator of the Scala
programming language, and I think of that book as “the reference” for Scala.
Scala’s type system uses a set of symbols to express different generic type concepts,
including the concepts of bounds, variance, and constraints. Before jumping into the
recipes, the most common of these symbols are summarized in the following
sections.
A Note About Programming Levels and Types
Way back in January 2011, Martin Odersky defined six levels of
knowledge that are needed for different types of Scala program‐
mers. He uses the levels A1-A3 for application programmers, and
L1-L3 for library designers. The type-related techniques that are
demonstrated in this chapter correspond to his levels L1 through
L3.
Generic Type Parameters
When you first begin writing Scala code, you’ll use types like Int, String, and cus‐
tom types you create, like Person, Employee, and Pizza. Then you’ll create traits,
667
classes, and methods that use those types. Here’s an example of a method that uses the
Int type, as well as a Seq[Int]:
// ignore possible errors that can occur
def first(xs: Seq[Int]): Int = xs(0)
Seq[Int] is a situation where one type is a container of another type. List[String]
and Option[Int] are also examples of types that contain another type.
As you become more experienced in working with types, when you look at the first
method you’ll see that its return type has no dependency at all on what’s inside the
Seq container. The Seq can contain types like Int, String, Fish, Bird, and so on, and
the body of the method would never change. As a result, you can rewrite that method
using a generic type, like this:
def first[A](xs: Seq[A]): A = xs(0)
___
_
_
The underlined portions of the code show how a generic type is specified. Reading
from right to left in the code:
• As noted, the type is not referenced in the method body; there’s only xs(0).
• A is used as the method return type, instead of Int.
• A is used inside the Seq, instead of Int.
• A is specified in brackets, just prior to the method declaration.
Regarding the last point, specifying the generic type in brackets just before the
method signature is the way that you tell the compiler—and readers of the code—that
the generic type may be used in the (a) method signature, (b) return type, or
(c) method body, or any combination of those three locations.
Writing generic code like this makes your code more useful to more people. Instead
of just working for a Seq[Int], the method now works for a Seq[Fish], Seq[Bird],
and in general—hence the word generic—a Seq of any type.
By convention, when you declare generic types in Scala, the first generic type that’s
specified uses the letter A, the second generic type is B, and so on. For instance, if
Scala didn’t include tuples and you wanted to declare your own class that can contain
two different types, you’d declare it like this:
class Pair[A,B](val a: A, val b: B)
Here are a few examples of how to use that class:
Pair(1, 2)
Pair(1, "1")
Pair("1", 2.2)
668
| Chapter 23: Types
// A and B are both Int
// A is Int, B is String
// A is String, B is Double
In the first example, A and B happen to have the same type, and in the last two exam‐
ples, A and B have different types.
Finally, to round out our first generic type examples, let’s create a trait that uses
generic parameters, and then a class that implements that trait. First, let’s create two
little classes that the example will need, along with our previous Pair class:
class Cat
class Dog
class Pair[A,B](val a: A, val b: B)
Given that as background, this is how you create a parameterized trait with two
generic type parameters:
trait Foo[A,B]:
def pair(): Pair[A, B]
Notice that you declare the types you need after the trait name, then reference those
types inside the trait.
Next, here’s a class that implements that trait for dogs and cats:
class Bar extends Foo[Cat, Dog]:
def pair(): Pair[Cat, Dog] = Pair(Cat(), Dog())
This first line of code declares that Bar works for Cat and Dog types, with Cat being a
specific replacement for A and Dog being a replacement for B:
class Bar extends Foo[Cat, Dog]:
If you want to create another class that extends Foo and works with a String and Int,
you’d write it like this:
class Baz extends Foo[String, Int]:
def pair(): Pair[String, Int] = Pair("1", 2)
These examples demonstrate how generic type parameters are used in different
situations.
As you work more with generic types, you’ll find that you want to define certain
expectations and limits on those types. To handle those situations you’ll use bounds,
variance, and type constraints, which are discussed next.
Bounds
Bounds let you place restrictions on type parameters. For instance, imagine that you
want to write a method that returns the uppercase version of the name field of a type:
// this code won’t compile
def upperName[A](a: A) = a.name.toUpperCase
Types
|
669
That code is in the ballpark of what you want, but it won’t work because there’s no
guarantee that the type A has a name field. As a solution to this problem, if you have a
type like SentientBeing, which declares a name field:
trait SentientBeing:
def name: String
you can correctly implement the upperName method by using a bound, as shown in
this underlined code:
def upperName[A <: SentientBeing](a: A) = a.name.toUpperCase
------------------
This tells the compiler that whatever type A is, it must be a subclass of SentientBe
ing, which is guaranteed to have a name field. So if you have classes like these that are
subclasses of SentientBeing:
case class Dog(name: String) extends SentientBeing
case class Person(name: String, age: Int) extends SentientBeing
case class Snake(name: String) extends SentientBeing
the upperName method will work as desired with all of those:
upperName(Dog("rover"))
upperName(Person("joe", 25))
upperName(Snake("Noodles"))
// "ROVER"
// "JOE"
// "NOODLES"
This is the essence of working with bounds. They give you a way to define limits—
bounds, or boundaries—on the possibilities of a generic type. Table 23-1 provides
descriptions of the common bounds symbols.
Table 23-1. Descriptions of Scala’s bounds symbols
Bound
Upper bound
Description
A <: B
A >: B
Lower bound
A must be a supertype of B.
A must be a subtype of B. See Recipe 23.5.
A <: Upper >: Lower Lower and upper bounds used together The type A has both an upper and lower bound.
Lower bounds are demonstrated in several methods of the collections classes. To find
examples of them, search the Scaladoc of classes like List for the >: symbol.
Variance
As its name implies, variance is a concept that’s related to how generic type parame‐
ters can vary when subclasses of your type are created. Scala uses what’s known as
declaration-site variance, which means that you—the library creator—declare var‐
iance annotations on your generic type parameters when you create new types like
670
|
Chapter 23: Types
traits and classes. (This is the opposite of Java, which uses use-site variance, meaning
that clients of your library are responsible for understanding these annotations.)
Because we use collections like List and ArrayBuffer all the time, I find that it’s easi‐
est to demonstrate variance when creating new types like those. So as an example, I’ll
create a new type named Container that contains one element. When I define
Container, variance has to do with whether I define its generic type parameter A as A,
+A, or -A:
class Container[A](a: A) ...
class Container[+A](a: A) ...
class Container[-A](a: A) ...
// invariant
// covariant
// contravariant
How I declare A now affects how Container instances can be used later. For example,
variance comes into play in discussions like this:
When I define a new Container type using one of those annotations and if I also
define a class Dog that is a subtype of Animal, is Container[Dog] a subtype of Con
tainer[Animal]?
In concrete terms, what this means is that if you have a method like this that’s defined
to accept a parameter of type Container[Animal]:
def foo(c: Container[Animal]) = ???
can you pass a Container[Dog] into foo?
Two ways to simplify variance
Variance can take a few steps to explain because you have to talk about both (a) how
the generic parameter is initially declared and (b) how instances of your container are
later used, but I’ve found that there are two ways to simplify the topic.
1. If everything is immutable. The first way to simplify variance is to know that if
everything in Scala was immutable, there would be little need for variance. Specifi‐
cally, in a totally immutable world where all fields are val and all collections are
immutable (like List), if Dog is a subclass of Animal, Container[Dog] will definitely
be a subclass of Container[Animal].
In an Immutable World, Invariance Isn’t Needed
In the following discussion, in a completely immutable world, the
need for invariance goes away.
This is demonstrated in the following code. First I create an Animal trait and then a
Dog case class that extends Animal:
Types
|
671
sealed trait Animal:
def name: String
case class Dog(name: String) extends Animal
Now I define my Container class, declaring its generic type parameter as +A, making
it covariant. While that’s a fancy mathematical term, it just means that when a method
is declared to take a Container[Animal], you can pass it a Container[Dog]. Because
the type is covariant, it’s flexible and is allowed to vary in this direction (i.e., allowed
to accept a subtype):
class Container[+A](a: A):
def get: A = a
Then I create an instance of a Dog as well as a Container[Dog] and then verify that
the get method in the Container works as desired:
val d = Dog("Fido")
val h = Container[Dog](d)
h.get
// Dog(Fido)
To finish the example, I define a method that takes a Container[Animal] parameter:
def printName(c: Container[Animal]) = println(c.get.name)
Finally, I pass that method a Container[Dog] variable, and the method works as
desired:
printName(h)
// "Fido"
To recap, all of that code works because everything is immutable, and I define
Container with the generic parameter +A.
Note that if I defined that parameter as just A or as -A, that code would not compile.
(For more information on this, read on.)
2. Variance is related to the type’s “in” and “out” positions. There’s also a second way to
simplify the concept of variance, which I summarize in the following three
paragraphs:
As you just saw, the get method in the Container class only uses the type A as its
return type. This is no coincidence: whenever you declare a parameter as +A, it can
only ever be used as the return type of Container methods. You can think of this as
being an out position, and your container is said to be a producer: methods like get
produce the type A. In addition to the Container[+A] class just shown, other pro‐
ducer examples are the Scala List[+A] and Vector[+A] classes. With these classes,
once an instance of them is created, you can never add more A values to them.
Instead, they’re immutable and read-only, and you can only access their A values with
the methods that are built into them. You can think of List and Vector as being pro‐
ducers of elements of type A (and derivations of A).
672
|
Chapter 23: Types
Conversely, if the generic type parameter you specify is only used as input parameters
to methods in your container, declare the parameter to be contravariant using -A.
This declaration tells the compiler that values of type A will only ever be passed into
your container’s methods—the “in” position—and will never be returned by them.
Therefore, your container is said to be a consumer. (Note that this situation is rare
compared to the other two possibilities, but in the producer/consumer discussion, it’s
easiest to mention it second.)
Finally, if the generic parameter is used both in the method return type position and
as a method parameter inside your container, define the type to be invariant by
declaring it with the symbol A. Using this type declares that your class is both a pro‐
ducer and a consumer of the A type, and as a side effect of this flexibility, the type is
invariant—meaning that it cannot vary. When a method is declared to accept a Con
tainer[Dog], it can only accept a Container[Dog]. This type is used when defining
mutable containers, such as the ArrayBuffer[A] class, to which you can add new ele‐
ments, edit elements, and access elements.
Here are examples of these three producer/consumer situations.
In the first case, when a generic type is only used as a method return type, the con‐
tainer is a producer, and you mark the type as covariant with +A:
// covariant: A is only ever used in the “out” position.
trait Producer[+A]:
def get: A
Note that for this use case, the C# and Kotlin languages—which also use declarationsite variance—use the keyword out when defining A. If Scala used out instead of +,
the code would look like this:
trait Producer[out A]:
def get: A
// if Scala used 'out' instead
For the second situation, if the generic type parameter is only used as the input
parameter to your container methods, the container can be thought of as a consumer.
Mark the generic type as contravariant using -A:
// contravariant: A is only ever used in the “in” position.
trait Consumer[-A]:
def consume(a: A): Unit
In this case, C# and Kotlin use the keyword in to indicate that A is only used as a
method input parameter (the “in” position). If Scala had that keyword, your code
would look like this:
trait Consumer[in A]:
// if Scala used 'in' instead
def consume(a: A): Unit
Types
|
673
Finally, when a generic type parameter is used as both method input parameters and
method return parameters, it’s considered invariant—not allowed to vary—and desig‐
nated as A:
// invariant: A is used in the “in” and “out” positions
trait ProducerConsumer[A]:
def consume(a: A): Unit
def produce(): A
One Way to Remember the Variance Symbols
While I generally prefer the keywords out and in to declare the
variance of generic parameters—at least in simple, one-parameter
declarations—I’ve found that I can remember the Scala symbols
this way:
• + means that variance is allowed in the positive (subtype)
direction.
• - means that variance is allowed in the negative (supertype)
direction.
• No additional symbol means that no variance is allowed.
Because the subtype direction is far more common than the super‐
type direction, it’s easy to think of this as being the “positive”
direction.
Table 23-2 provides a summary of this terminology, including examples of each from
the Scala standard library.
Table 23-2. Descriptions and examples of Scala type variance
Variance
Covariant
Symbol In or Out Producer/Consumer Examples
Out
Producer
List[+A], Vector[+A]
+A
Contravariant -A
In
Consumer
The -T1 parameter in Function1[-T1, +R]
Invariant
Both
Both
Array[A], ArrayBuffer[A], mutable.Set[A]
A
It’s actually hard to find a consistent definition of these variance terms, but this
Microsoft “Covariance and Contravariance in Generics” page provides good defini‐
tions, which I’ll rephrase slightly here:
Covariance (+A in Scala)
Lets you use a “more derived” type than what is specified. This means that you
can use a subtype where a parent type is declared. In my example this means that
you can pass a Container[Dog] where a Container[Animal] method parameter
is declared.
674
|
Chapter 23: Types
Contravariance (-A)
Essentially the opposite of covariance, you can use a more generic (less derived)
type than what is specified. For instance, you can use a Container[Animal]
where a Container[Dog] is specified.
Invariance (A)
This means that the type can’t vary—you can only use the type that’s specified. If
a method requires a parameter of the type Container[Dog], you can only give it a
Container[Dog]; it won’t compile if you try to give it a Container[Animal].
Testing variance with an implicitly trick
As demonstrated in this Stack Overflow post, and in the book Zionomicon by John De
Goes and Adam Fraser (Ziverge), you can use the implicitly method—which is
defined in the Predef object Scaladoc and automatically in the scope of all your code
—to test variance definitions.
For instance, using this code from my initial variance example:
sealed trait Animal:
def name: String
case class Dog(name: String) extends Animal
class Container[+A](a: A):
def get: A = a
These REPL examples show that by using implicitly, the Scala compiler confirms
that a Container[Dog] is a subtype of a Container[Animal]:
scala> implicitly[Dog <:< Animal]
val res0: Dog <:< Animal = generalized constraint
scala> implicitly[Container[Dog] <:< Container[Animal]]
val res1: Container[Dog] <:< Container[Animal] = generalized constraint
You can tell that these examples work because the code compiles without error. Con‐
versely, if you define Container with -A or A, as in this example:
class Container[A](a: A):
def get: A = a
the implicitly code will fail to compile:
scala> implicitly[Container[Dog] <:< Container[Animal]]
1 |implicitly[Container[Dog] <:< Container[Animal]]
|
^
|
Cannot prove that Container[Dog] <:< Container[Animal].
This turns out to be a nice trick/technique you can use to test your variance code.
Types
|
675
Note that in this example, the expression A <:< B means that when working with
implicit parameters, A must be a subtype of B. This type relation symbol isn’t discussed
in this book, but see Twitter’s Scala School page on advanced types for good examples
of when and where it is needed.
Contravariance is rarely used
To keep things consistent, I’ve mentioned contravariance second in the preceding dis‐
cussions, but as a practical matter, contravariant types are rarely used. For instance,
the Scala Function1 class is one of the few classes in the standard library that declares
a generic parameter to be contravariant, the T1 parameter in this case:
Function1[-T1, +R]
Because it’s not used that often, contravariance isn’t covered in this book, but there’s a
good example of it in the free Scala 3 Book’s “Variance” section.
Multiple Generic Type Parameters with Variance
Also note from the Function1 example that a class can accept mul‐
tiple generic parameters that are declared with variance. -T1 is a
parameter that’s only ever consumed in the Function1 class, and +R
is a type that’s only ever produced in Function1.
Given all this background information, two solutions to common variance problems
are shown in Recipes 23.3 and 23.4.
Type Constraints
In addition to bounds and variance, Scala lets you specify additional type constraints.
These are written with these symbols:
A =:= B
A <:< B
// A must be equal to B
// A must be a subtype of B
These symbols are not covered in this book. See Programming in Scala for details and
examples. Twitter’s Scala School Advanced Types page also shows brief examples of
their use, where they are referred to as type relation operators.
Several Other Type Examples
For the first edition of the Scala Cookbook I wrote about how to
create a timer and how to create your own Try classes. (I excerpted
it for my website). That code uses types heavily and is still relevant
for Scala 3.
676
| Chapter 23: Types
23.1 Creating a Method That Takes a Simple Generic Type
Problem
You’re not concerned about type variance and want to create a method (or function)
that takes a generic type, such as a method that accepts a Seq[A] parameter.
Solution
Specify the generic type parameter in brackets, such as [A]. For example, when creat‐
ing a lottery-style application to draw a random name from a list of names, you might
follow the “do the simplest thing that could possibly work” credo and initially create a
method without using generics:
def randomName(names: Seq[String]): String =
val randomNum = util.Random.nextInt(names.length)
names(randomNum)
As written, this works with a sequence of String values:
val names = Seq("Aleka", "Christina", "Emily", "Hannah")
val winner = randomName(names)
Then at some point in the future, you realize that you could really use a generalpurpose method that returns a random element from a sequence of any type. So, you
modify the method to use a generic type parameter, like this:
def randomElement[A](seq: Seq[A]): A =
val randomNum = util.Random.nextInt(seq.length)
seq(randomNum)
With this change, the method can now be called with a variety of types in immutable
sequences:
randomElement(Seq("Emily", "Hannah", "Aleka", "Christina"))
randomElement(List(1,2,3))
randomElement(List(1.0,2.0,3.0))
randomElement(Vector.range('a', 'z'))
Discussion
This is a relatively simple example that shows how to pass a generic collection to a
method that doesn’t attempt to mutate the collection. See Recipes 23.3 and 23.4 for
more complicated situations you can run into.
23.1 Creating a Method That Takes a Simple Generic Type
|
677
23.2 Creating Classes That Use Simple Generic Types
Problem
You want to create a class (and associated methods) that uses a simple generic type.
Solution
As a library writer, you’ll define generic types when declaring your classes. For
instance, here’s a small linked-list class that’s written so that you can add new ele‐
ments to it. It’s mutable in that way, like an ArrayBuffer:
class LinkedList[A]:
private class Node[A] (elem: A):
var next: Node[A] = _
override def toString = elem.toString
private var head: Node[A] = _
def add(elem: A): Unit =
val n = new Node(elem)
n.next = head
head = n
private def printNodes(n: Node[A]): Unit =
if n != null then
println(n)
printNodes(n.next)
def printAll() = printNodes(head)
Notice how the generic type A is sprinkled throughout the class definition. This
generic type is a placeholder for actual types like Int and String, which the user of
your class can specify.
For example, to create a list of integers with this class, first create an instance of it,
declaring the type that it will contain to be the type Int:
val ints = LinkedList[Int]()
Then populate it with Int values:
ints.add(1)
ints.add(2)
678
|
Chapter 23: Types
Because the class uses a generic type, you can also create a LinkedList of type
String:
val strings = LinkedList[String]()
strings.add("Emily")
strings.add("Hannah")
strings.printAll()
or any other type you want to use:
val doubles = LinkedList[Double]()
doubles.add(1.1)
doubles.add(2.2)
This demonstrates the basic use of a generic type when creating a class.
Discussion
When you use a simple generic parameter like A when defining a class, you can also
define methods inside and outside of that class that use exactly that type. To explain
what this means, start with this type hierarchy:
trait Person { def name: String }
class Employee(val name: String) extends Person
class StoreEmployee(name: String) extends Employee(name)
You might use this type hierarchy when modeling a point-of-sales application for a
pizza store chain, where a StoreEmployee is someone who works at a store location.
(You might then also have an OfficeEmployee type for people who work in the cor‐
porate office.)
The relationship is expressed visually in the class diagram in Figure 23-1.
Figure 23-1. A class diagram for the Person and Employee classes
Given this type hierarchy, you can create a method to print a LinkedList[Employee],
like this:
def printEmps(es: LinkedList[Employee]) = es.printAll()
23.2 Creating Classes That Use Simple Generic Types
|
679
Now you can give printEmps a LinkedList[Employee], and it will work as desired:
// works
val emps = LinkedList[Employee]()
emps.add(Employee("Al"))
printEmps(emps)
So far, so good; this works as desired.
The limits of this approach
Where this simple approach doesn’t work is if you try to give printEmps a Linked
List[StoreEmployee]():
val storeEmps = LinkedList[StoreEmployee]()
storeEmps.add(StoreEmployee("Fred"))
// this line won’t compile
printEmps(storeEmps)
This is the error you get when you try to write that code:
printEmps(storeEmps)
^^^^^^^^^
Found:
(storeEmps : LinkedList[StoreEmployee])
Required: LinkedList[Employee]
The last line won’t compile because:
• printEmps expects a LinkedList[Employee].
• storeEmps is a LinkedList[StoreEmployee].
• LinkedList elements are mutable.
• If the compiler allowed this, printEmps could add plain old Employee elements to
the StoreEmployee elements in storeEmps. This can’t be allowed.
As discussed in “Variance” on page 670, the problem here is that when a generic
parameter is declared as A in a class like LinkedList, that parameter is invariant,
which means that the type is not allowed to vary when used in methods like prin
tEmps. A detailed solution to this problem is shown in Recipe 23.3.
Type parameter symbols
If a class requires more than one type parameter, use the symbols shown in
Table 23-3. For instance, in the official Java documentation on generic types, Oracle
shows an interface named Pair, which takes two types:
680
|
Chapter 23: Types
public interface Pair<K, V> {
public K getKey();
public V getValue();
}
You can port that interface to a Scala trait as follows:
trait Pair[K, V]:
def getKey: K
def getValue: V
If you were to take this further and implement the body of a Pair class (or trait), the
type parameters K and V would be spread throughout your class, just as the symbol A
was used in the LinkedList example.
Generic Symbol Standards
I generally prefer using the symbols A and B for the first two
generic type declarations in a class, but in a case like this where the
types clearly refer to key and value—such as in a Map class—I prefer
K and V. But use whatever makes sense to you.
The documentation mentioned also lists the Java type parameter naming conven‐
tions. These are similar in Scala, except that Java starts naming simple type parame‐
ters with the letter T, and then uses the characters U and V for subsequent types. The
Scala standard is that the first type should be declared as A, the next with B, and so on,
as shown in Table 23-3.
Table 23-3. Standard symbols for generic type parameters in Scala
Symbol Description
A
Refers to a simple type, such as List[A].
B, C, D
Used for the second, third, fourth types, etc. For example:
class List[A]:
def map[B](f: A => B): List[B] = ???
K
Typically refers to a key in a Java map. (I also prefer K in this situation.)
N
Refers to a numeric value.
V
Typically refers to a value in a Java map. (I also prefer V in this situation.)
See Also
• Oracle’s Java documentation on generic types.
• You can find a little more information on Scala’s generic type naming conven‐
tions at the Scala Style Guide’s page on naming conventions.
23.2 Creating Classes That Use Simple Generic Types
|
681
23.3 Making Immutable Generic Parameters Covariant
Problem
You want to create a class whose generic parameters can’t be changed (they’re immut‐
able) and want to understand how to specify it.
Solution
To declare that generic type parameter elements can’t be changed, declare them to be
covariant by defining them with a leading + symbol, such as +A. As an example of this,
immutable collections classes like List, Vector, and Seq are all defined to use cova‐
riant generic type parameters:
class List[+T]
class Vector[+A]
trait Seq[+A]
By making the type parameter covariant, the generic parameter can’t be mutated, but
the benefit is that the class can later be used in a more flexible manner.
To demonstrate the usefulness of this, modify the example from the previous recipe
slightly. First, define the class hierarchy:
trait Animal:
def speak(): Unit
class Dog(var name: String) extends Animal:
def speak() = println("Dog says woof")
class SuperDog(name: String) extends Dog(name):
override def speak() = println("I’m a SuperDog")
Next, define a makeDogsSpeak method, but instead of accepting a mutable Array
Buffer[Dog] as in the previous recipe, accept an immutable Seq[Dog]:
def makeDogsSpeak(dogs: Seq[Dog]): Unit = dogs.foreach(_.speak())
As with the ArrayBuffer in the previous recipe, you can pass a Seq[Dog] into make
DogsSpeak without a problem:
// this works
val dogs = Seq(Dog("Nansen"), Dog("Joshu"))
makeDogsSpeak(dogs)
However, in this case, you can also pass a Seq[SuperDog] into the makeDogsSpeak
method successfully:
// this works too
val superDogs = Seq(
SuperDog("Wonder Dog"),
682
|
Chapter 23: Types
SuperDog("Scooby")
)
makeDogsSpeak(superDogs)
Because Seq is immutable and defined with a covariant generic type parameter as
Seq[+A], makeDogsSpeak can accept both Seq[Dog] and Seq[SuperDog], without the
conflict that was built up in Recipe 23.4.
Discussion
You can further demonstrate this by creating your own custom class with a covariant
generic type parameter. To do this—and to keep things simple—create a collections
class that can hold one element. Because you don’t want the collection element to be
mutated, define the parameter as a val, and make it covariant with +A:
class Container[+A] (val elem: A)
----
Using the same type hierarchy that’s shown in the Solution, modify the makeDogs
Speak method to accept a Container[Dog]:
def makeDogsSpeak(dogHouse: Container[Dog]): Unit = dogHouse.elem.speak()
With this setup, you can pass a Container[Dog] into makeDogsSpeak:
val dogHouse = Container(Dog("Xena"))
makeDogsSpeak(dogHouse)
Finally, because you declared the element to be covariant with the + symbol, you can
also pass a Container[SuperDog] into makeDogsSpeak:
val superDogHouse = Container(SuperDog("Wonder Dog"))
makeDogsSpeak(superDogHouse)
Because the Container element is immutable and its generic type parameter is
marked as covariant, all of this code works successfully. Note that if you change the
Container’s type parameter from +A to A, the last line of code won’t compile.
As discussed in “Variance” on page 670 and demonstrated in these examples, defining
a container type class with an immutable generic type parameter makes the collection
more flexible and useful throughout your code. As shown in this example, you can
pass a Container[SuperDog] into a method that expects to receive a Container[Dog].
23.3 Making Immutable Generic Parameters Covariant
|
683
+A Refers to the “Out” Position
“Variance” on page 670 also notes that the +A symbol is your way of
telling the compiler that the generic parameter A will only be used
as the return type of methods in this class (i.e., the “out” position).
For instance, in this example, this code is valid:
class Container[+A] (val elem: A):
// 'A' is correctly used in the “out” position
def getElemAsTuple: (A) = (elem)
But any attempt to use an element of type A as a method input
parameter inside the class will fail with this error:
class Container[+A] (val elem: A):
def foo(a: A) = ???
^^^^
error: covariant type A occurs in contravariant position
in type A of parameter a
As that code shows, even though I don’t even try to implement the
body of the foo method, the compiler states that the A type can’t be
used in the “in” position.
23.4 Creating a Class Whose Generic Elements Can
Be Mutated
Problem
You want to create a collection-like class whose elements can be mutated and want to
know how to specify the generic type parameter for its elements.
Solution
When defining a parameter that can be changed (mutated), its generic type parame‐
ter should be declared as [A], making it invariant. Therefore, this recipe is similar to
the example shown in Recipe 23.2.
An example of this is that elements in a Scala Array or ArrayBuffer can be mutated,
and their signatures are declared like this:
class Array[A] ...
class ArrayBuffer[A] ...
Discussion
Declaring a type as invariant has two main effects:
• The container can hold the specified type as well as subtypes of that type.
684
|
Chapter 23: Types
• There are later restrictions on how methods can use the container.
To create an example of the first point, the following class hierarchy states that the
Dog and SuperDog classes both extend the Animal trait:
trait Animal:
def speak(): Unit
class Dog(var name: String) extends Animal:
def speak() = println("woof")
override def toString = name
class SuperDog(name: String) extends Dog(name):
def useSuperPower() = println("Using my superpower!")
Given these classes, you can create a Dog and a SuperDog:
val fido = Dog("Fido")
val wonderDog = SuperDog("Wonder Dog")
When you later declare an ArrayBuffer[Dog], you can add both Dog and SuperDog
instances to it:
import collection.mutable.ArrayBuffer
val dogs = ArrayBuffer[Dog]()
dogs += fido
dogs += wonderDog
So a collection with an invariant type parameter can contain (a) elements of the base
type and (b) subtypes of the base type.
The second effect of declaring an invariant type is that there are restrictions on how
the type can later be used. Given that same code, you can define a method as follows
to accept an ArrayBuffer[Dog] and then have each Dog speak:
import collection.mutable.ArrayBuffer
def makeDogsSpeak(dogs: ArrayBuffer[Dog]) =
dogs.foreach(_.speak())
This works fine when you pass it an ArrayBuffer[Dog]:
val dogs = ArrayBuffer[Dog]()
dogs += fido
makeDogsSpeak(dogs)
However, the makeDogsSpeak call won’t compile if you attempt to pass it an Array
Buffer[SuperDog]:
val superDogs = ArrayBuffer[SuperDog]()
superDogs += wonderDog
makeDogsSpeak(superDogs) // ERROR: won't compile
23.4 Creating a Class Whose Generic Elements Can Be Mutated
|
685
This code won’t compile because of the conflict built up in this situation:
• Elements in an ArrayBuffer can be mutated.
• makeDogsSpeak is defined to accept a parameter of type ArrayBuffer[Dog].
• You’re attempting to pass in superDogs, whose type is ArrayBuffer[SuperDog].
• If the compiler allowed this, makeDogsSpeak could replace SuperDog elements in
superDogs with plain old Dog elements. This can’t be allowed.
In summary, a main reason this conflict is created is because ArrayBuffer elements
can be mutated. If you want to write a method to make all Dog types and subtypes
speak, define it to accept a collection of immutable elements by specifying the type as
+A, which is what is done in immutable classes such as List, Seq, and Vector. See
Recipe 23.3 for details on that approach.
Examples in the standard library
The elements of mutable collections classes like Array, ArrayBuffer, and ListBuffer
are defined with invariant type parameters:
class Array[T]
class ArrayBuffer[A]
class ListBuffer[A]
Conversely, immutable collections classes identify their generic type parameters with
the + symbol, as shown here:
class List[+T]
class Vector[+A]
trait Seq[+A]
The + symbol used on the type parameters of the immutable collections defines their
parameters to be covariant. Because their elements can’t be mutated, they can be used
more flexibly, as discussed in Recipe 23.3.
See Also
• You can find the source code for Scala classes by following the “Source code”
links in their Scaladoc.
• To see a good example of an invariant type parameter in a class, the source code
for the ArrayBuffer class isn’t too long, and it shows how the type parameter A
ends up sprinkled throughout the class.
686
|
Chapter 23: Types
23.5 Creating a Class Whose Parameters Implement a
Base Type
Problem
You want to specify that a class has a generic type parameter, and that parameter is
limited so it can only be (a) a base type or (b) a subtype of that base type.
Solution
Define the class or method by specifying the type parameter with an upper bound. For
example, given this type hierarchy:
sealed trait CrewMember
class Officer extends CrewMember
class RedShirt extends CrewMember
trait Captain
trait FirstOfficer
trait ShipsDoctor
trait StarfleetTrained
this is how you create a class named Crew that is parameterized so it will only ever
store instances that are either a CrewMember or subtype of CrewMember:
class Crew[A <: CrewMember]:
import scala.collection.mutable.ArrayBuffer
private val list = ArrayBuffer[A]()
def add(a: A): Unit = list += a
def printAll(): Unit = list.foreach(println)
To demonstrate how this works, first create some objects that extend Officer:
val kirk = new Officer with Captain
val spock = new Officer with FirstOfficer
val bones = new Officer with ShipsDoctor
Given this setup, you can create a Crew that contains only instances of Officer:
val officers = Crew[Officer]()
officers.add(kirk)
officers.add(spock)
officers.add(bones)
The first line lets you create officers as a collection that can only contain types that
are an Officer or subtype of an Officer. A benefit of this approach is that instances
that are of type RedShirt won’t be allowed in the collection because they don’t extend
Officer:
val redShirt = RedShirt()
officers.add(redShirt) // error: this won’t compile:
// Found: (redShirt), Required: (Officer)
23.5 Creating a Class Whose Parameters Implement a Base Type
|
687
A key to this solution is the way the parameter A is defined:
class Crew[A <: CrewMember] ...
---------------
This states that any instance of Crew can only ever have elements that are of type Crew
Member or one of its subtypes. Then when I create a concrete instance of Crew, I
declare that I only want this instance to take types that implement Officer:
val officers = Crew[Officer]()
-------
It also prevents you from writing code like this, because StarTrekFan does not extend
CrewMember:
class StarTrekFan
val officers = Crew[StarTrekFan]()
// error: won’t compile
// error message:
// Type argument StarTrekFan does not conform to upper bound CrewMember
Note that in addition to creating a Crew[Officer], you can also create a Crew[Red
Shirt], if desired:
val redshirts = Crew[RedShirt]()
val redShirt = RedShirt()
redshirts.add(redShirt)
Discussion
Typically, you’ll define a class like Crew so you can create specific instances like
Crew[Officer] and Crew[RedShirt]. The class you create will also typically have
methods like add that are specific to the parameter type you declare, such as CrewMem
ber in this example. By controlling what types are added to Crew, you can be assured
that your methods will work as desired. For instance, Crew could have methods like
beamUp, beamDown, goWhereNoOneElseHasGone, etc.—any method that makes sense
for a CrewMember.
Extending multiple traits
Use the same technique when you need to limit your class to take a type that extends
multiple traits. For example, to create a Crew that only allows types that extend Crew
Member and StarfleetTrained, declare the first line of the Crew class like this:
class Crew[A <: CrewMember & StarfleetTrained]:
Now when you adapt the officer instances to work with this new trait:
val kirk = new Officer with Captain with StarfleetTrained
val spock = new Officer with FirstOfficer with StarfleetTrained
val bones = new Officer with ShipsDoctor with StarfleetTrained
688
|
Chapter 23: Types
you can still construct a list of officers:
class Crew[A <: CrewMember & StarfleetTrained]:
import scala.collection.mutable.ArrayBuffer
private val list = new ArrayBuffer[A]()
def add(a: A): Unit = list += a
def printAll(): Unit = list foreach println
val officers = Crew[Officer & StarfleetTrained]()
officers.add(kirk)
officers.add(spock)
officers.add(bones)
This approach works as long as the instances kirk, spock, and bones have the Offi
cer and StarfleetTrained types somewhere in their type hierarchy.
23.6 Using Duck Typing (Structural Types)
Problem
You’re used to duck typing (structural types) from another language like Python or
Ruby and want to use this feature in your Scala code.
Solution
Scala’s version of duck typing is known as using a structural type. As an example of
this approach, the following Scala 3 code shows how a callSpeak method can require
that its obj type parameter have a speak() method:
import reflect.Selectable.reflectiveSelectable
def callSpeak[A <: {def speak(): Unit}](obj: A): Unit =
obj.speak()
Given that definition—including the required import statement—an instance of any
class that has a speak method that takes no parameters and returns nothing can be
passed as a parameter to callSpeak. For example, the following code demonstrates
how to invoke callSpeak on both a Dog and a Klingon:
import reflect.Selectable.reflectiveSelectable
def callSpeak[A <: {def speak(): Unit}](obj: A): Unit = obj.speak()
class Dog:
def speak() = println("woof")
class Klingon:
def speak() = println("Qapla!")
callSpeak(Dog())
callSpeak(Klingon())
23.6 Using Duck Typing (Structural Types)
|
689
Running this code in the REPL prints the following output:
woof
Qapla!
The class hierarchy of the instance that’s passed in doesn’t matter at all: the only
requirement for the parameter obj is that it’s an instance of a class that has a
speak():Unit method.
Discussion
The structural type syntax is necessary in this example because the callSpeak func‐
tion invokes a speak method on the object that’s passed in. In a statically typed lan‐
guage, there must be some guarantee that the object that’s passed in will have this
method, and this recipe shows the syntax for that situation.
Had the method been written with only the generic type A, it wouldn’t compile,
because the compiler can’t guarantee that the type A has a speak method:
import reflect.Selectable.reflectiveSelectable
// won’t compile
def callSpeak[A](obj: A): Unit = obj.speak()
This is one of the great benefits of type safety in Scala.
Understanding the solution
To understand how this works, it may help to break down the structural type syntax.
First, here’s the entire method:
def callSpeak[A <: {def speak(): Unit}](obj: A): Unit = obj.speak()
The type parameter A that precedes the list of method parameters is defined as a
structural type like this:
[A <: { def speak(): Unit }]
The <: symbol in the code is used to define an upper bound. This is described in
detail in Recipe 23.3. As shown in that recipe, an upper bound is usually defined like
this:
class Stack[A <: Animal] (val elem: A)
-----------
This states that the type parameter A must be a subtype of Animal.
However, in this recipe I use a variation of that syntax to state that A must be a sub‐
type of a type that has a speak():Unit method. Specifically, this code can be read as,
“A must be a subtype of a type that has a speak method. The speak method can’t take
any parameters and must not return anything.”
690
|
Chapter 23: Types
To be clear, the underlined portion of this code states that the type passed in must
have a speak method that takes no input parameters:
[A <: { def speak(): Unit }]
-----------
And this underlined code states that speak must return Unit (i.e., nothing):
[A <: { def speak(): Unit }]
------
To demonstrate another example of the structural type signature, if you wanted to
state that the speak method must take a String parameter and return a Boolean, the
structural type signature would look like this:
[A <: {def speak(s: String): Boolean}]
Structural Types Require Reflection
As a word of caution, at the time of this writing this technique only
works with Scala on the Java virtual machine (JVM) and requires
Java reflection.
23.7 Creating Meaningful Type Names with Opaque Types
Problem
In keeping with practices like domain-driven design (DDD), you want to give values
that have simple types like String and Int more meaningful type names to make
your code safer.
Solution
In Scala 3, use opaque types to create meaningful type names. For an example of the
problem, when a customer orders something on an ecommerce website, you may add
it to a cart using the customerId and the productId:
def addToCart(customerId: Int, productId: Int) = ...
Because both types are Int, it’s possible to confuse them. For instance, developers will
call this method with integers like this:
addToCart(1001, 1002)
And because both fields are integers, it’s possible to confuse them again later in the
code:
// are you sure you have the right id here?
if (id == 1000) ...
23.7 Creating Meaningful Type Names with Opaque Types
|
691
The solution to this problem is to create custom types as opaque types. A complete
solution looks like this:
object DomainObjects:
opaque type CustomerId = Int
object CustomerId:
def apply(i: Int): CustomerId = i
given CanEqual[CustomerId, CustomerId] = CanEqual.derived
opaque type ProductId = Int
object ProductId:
def apply(i: Int): ProductId = i
given CanEqual[ProductId, ProductId] = CanEqual.derived
This lets you write code like this:
@main def opaqueTypes =
// import the types
import DomainObjects.*
// use the `apply` methods
val customerId = CustomerId(101)
val productId = ProductId(101)
// use the types
def addToCart(customerId: CustomerId, productId: ProductId) = ...
// pass the types to the function
addToCart(customerId, productId)
The given CanEqual portion of the solution also creates a compiler error if you
attempt incorrect type comparisons at some future time:
// error: values of types DomainObjects.CustomerId and Int
// cannot be compared with == or !=
if customerId == 1000
// also an error: this code will not compile
if customerId == productId ...
Discussion
When you work in a DDD style, one of the goals is that the names you use for your
types should match the names used in the business domain. For example, when it
comes to variable types you can say:
• A domain expert thinks about things like CustomerId, ProductId, Username,
Password, SocialSecurityNumber, CreditCardNumber, etc.
• Conversely, they don’t think about things like Int, String, and Double.
692
|
Chapter 23: Types
Beyond DDD, an even more important consideration is functional programming.
One of the benefits of writing code in a functional style is that other programmers
should be able to look at our function signatures and quickly see what our function
does. For example, take this function signature:
def f(s: String): Int
Assuming the function is pure, we see that it takes a String and returns an Int.
Given only those facts we can quickly deduce that the function probably does one of
these things:
• Determines the string length
• Does something like calculating the checksum of the string
We also know that the function doesn’t attempt to convert the string to an int,
because that process can fail, so a pure function that converts a string to an int will
return the possible result in an error-handling type, like this:
def f(s: String): Option[Int]
def f(s: String): Try[Int]
def f(s: String): Either[Throwable, Int]
Given that pure function signatures are so important, we also don’t want to write
types like this:
def validate(
username: String,
email: String,
password: String
)
Instead, our code will be easier to read and much more type-safe if we create our
types like this:
def validate(
username: Username,
email: EmailAddress,
password: Password
)
This second approach—using opaque types—improves our code in several ways:
• In the first example, all three parameters are strings, so it can be easy to call vali
date with the parameters in the wrong order. Conversely, it will be much more
difficult to pass the parameters into the second validate method in the wrong
order.
• The validate type signature will be much more meaningful to other program‐
mers in their IDEs and in the Scaladoc.
23.7 Creating Meaningful Type Names with Opaque Types
|
693
• We can add validators to our custom types, so we can validate the username,
email address, and password fields when they are created.
• By deriving CanEqual when creating opaque types, you can make it impossible
for two different types to be compared using == and !=. (See Recipe 23.12 for
more details on using CanEqual.)
• Your code more accurately reflects the verbiage of the domain.
As shown in the Solution, opaque types are a terrific way to create types like User
name, EmailAddress, and Password.
Benefits of the three-step solution
The code in the solution looks like this:
opaque type CustomerId = Int
object CustomerId:
def apply(i: Int): CustomerId = i
given CanEqual[CustomerId, CustomerId] = CanEqual.derived
While it’s possible to create an opaque type with this one line of code:
opaque type CustomerId = Int
each step in the three-step solution serves a purpose:
• The opaque type declaration creates a new type named CustomerId. (Behind the
scenes, a CustomerId is an Int.)
• The object with the apply method creates a factory method (constructor) for
new CustomerId instances.
• The given CanEqual declaration states that a CustomerId can only be compared
to another CustomerId. Attempting to compare a CustomerId to a ProductId or
Int will create a compiler error; it’s impossible to compare them. (See Recipe
23.12 for more details on using CanEqual.)
History
There were several attempts to try to achieve a similar solution in Scala 2:
• Type aliases
• Value classes
• Case classes
Unfortunately, all of these approaches had weaknesses, as described in the Scala
Improvement Process (SIP) page for opaque types. The goal of opaque types, as
694
| Chapter 23: Types
described in that SIP, is that “operations on these wrapper types must not create any
extra overhead at runtime while still providing a type safe use at compile time.” Opa‐
que types in Scala 3 have achieved that goal.
Rules
There are a few rules to know about opaque types:
• They must be defined within the scope of an object, trait, or class.
• The type alias definition is visible only within that scope. (Within that scope,
your code can see that a CustomerId is really an Int.)
• Outside the scope, only the defined alias is visible. (Outside that scope, other
code can’t tell that CustomerId is really an Int.)
As an important note for high-performance situations, the SIP also states “opaque
type aliases are compiled away and have no runtime overhead.”
23.8 Using Term Inference with given and using
Problem
You have a value that’s passed into a series of function calls, such as using an Execu
tionContext when you’re working with futures or Akka actors:
doX(a, executionContext)
doY(b, c, executionContext)
doZ(d, executionContext)
Because this type of code is repetitive and makes the code harder to read, you’d prefer
to write it like this instead:
doX(a)
doY(b, c)
doZ(d)
Therefore, you want to know how to use Scala 3 term inference, what used to be
known in Scala 2 as implicits.
Solution
This solution involves multiple steps:
1. Define your given instances using the Scala 3 given keyword.
This typically involves the use of a base trait and multiple given instances that
implement that trait.
23.8 Using Term Inference with given and using
|
695
2. When declaring the implicit parameter your function will use, put it in a separate
parameter group and define it with the using keyword.
3. Make sure your given value is in the current context when your function is
called.
In the following example I’ll demonstrate the use of an Adder trait and two given
values that implement the Adder trait’s add method.
1. Define your given instances
In the first step you’ll typically create a parameterized trait like this:
trait Adder[T]:
def add(a: T, b: T): T
Then you’ll implement the trait using one or more given instances, which you define
like this:
given intAdder: Adder[Int] with
def add(a: Int, b: Int): Int = a + b
given stringAdder: Adder[String] with
def add(a: String, b: String): String = s"${a.toInt + b.toInt}"
In this example, intAdder is an instance of Adder[Int], and defines an add method
that works with Int values. Similarly, stringAdder is an instance of Adder[String]
and provides an add method that takes two strings, converts them to Int values, adds
them together, and returns the sum as a String. (To keep things simple I don’t
account for errors in this code.)
If you’re familiar with creating implicits in Scala 2, this new approach is similar to
that process. The idea is the same, it’s just that the syntax has changed.
2. Declare the parameter your function will use with the using keyword
Next, declare your functions that use the Adder instances. When doing this, specify
the Adder parameter with the using keyword. Put the parameter in a separate param‐
eter group, as shown here:
def genericAdder[T](x: T, y: T)(using adder: Adder[T]): T =
adder.add(x, y)
The keys here are that the adder parameter is defined with the using keyword in that
separate parameter group:
def genericAdder[A](x: A, y: A)(using adder: Adder[A]): A =
-----------------------
696
|
Chapter 23: Types
Also notice that genericAdder declares the generic type A. This function doesn’t
know if it will be used to add two integers or two strings; it just calls the add method
of the adder parameter.
Context Parameters
In Scala 2, parameters like this were declared using the implicit
keyword, but now, as the entire programming industry has various
implementations of this concept, it is known as a context parame‐
ter, and it’s declared with the using keyword as shown.
3. Make sure everything is in the current context
Finally, assuming that intAdder, stringAdder, and genericAdder are all in scope,
your code can call the genericAdder function with Int and String values, without
having to pass instances of intAdder and stringAdder into genericAdder:
println(genericAdder(1, 1))
println(genericAdder("2", "2"))
// 2
// 4
The Scala compiler is smart enough to know that intAdder should be used in the first
instance, and stringAdder should be used in the second instance. This is because the
first example uses two Int parameters and the second example uses two String
values.
Anonymous givens and unnamed parameters
There’s often no reason to give a given a name, so you can also use this “anonymous
given” syntax instead of the previous syntax:
given Adder[Int] with
def add(a: Int, b: Int): Int = a + b
given Adder[String] with
def add(a: String, b: String): String = "" + (a.toInt + b.toInt)
If you don’t reference a context parameter inside your method, it doesn’t require a
name, so if genericAdder didn’t reference the adder parameter, this line:
def genericAdder[A](x: A, y: A)(using adder: Adder[A]): A = ...
could be changed to this:
def genericAdder[A](x: A, y: A)(using Adder[A]): A = ...
Discussion
In the example shown in the Solution you could have passed the intAdder and
stringAdder values in manually:
23.8 Using Term Inference with given and using
|
697
println(genericAdder(1, 1)(using intAdder))
println(genericAdder("2", "2")(using stringAdder))
But the point of using given values in Scala 3 is to avoid this repetitive code.
The reason for the significant syntax change in Scala 3 is that the Scala creators felt
that the implicit keyword was overused in Scala 2: it could be used in several differ‐
ent places, with different meanings in each place.
Conversely, the new given and using syntax is more consistent and more obvious.
For example, you might read the earlier code as, “Given an intAdder and a string
Adder, use those values as the adder parameter in the genericAdder method.”
Create your own API with extension methods
You can combine this technique with extension methods—which are demonstrated
in Recipe 8.9—to create your APIs. For example, given this trait that has two exten‐
sion methods:
trait Math[T]:
def add(a: T, b: T): T
def subtract(a: T, b: T): T
// extension methods: create your own api
extension (a: T)
def + (b: T) = add(a, b)
def - (b: T) = subtract(a, b)
you can create two given instances as before:
given intMath: Math[Int] with
def add(a: Int, b: Int): Int = a + b
def subtract(a: Int, b: Int): Int = a - b
given stringMath: Math[String] with
def add(a: String, b: String): String = "" + (a.toInt + b.toInt)
def subtract(a: String, b: String): String = "" + (a.toInt - b.toInt)
Then you can create genericAdd and genericSubtract functions:
// `+` here refers to the extension method
def genericAdd[T](x: T, y: T)(using Math: Math[T]): T =
x + y
// `-` here refers to the extension method
def genericSubtract[T](x: T, y: T)(using Math: Math[T]): T =
x - y
Now you can use the genericAdd and genericSubtract functions without manually
passing them the intMath and stringMath instances:
println("add ints:
println("subtract ints:
698
|
Chapter 23: Types
" + genericAdd(1, 1))
" + genericSubtract(1, 1))
// 2
// 0
println("add strings:
" + genericAdd("2", "2"))
println("subtract strings: " + genericSubtract("2", "2"))
// 4
// 0
Once again the compiler can determine that the first two examples need the intMath
instance, and the last two examples need the stringMath instance.
Alias givens
The given documentation states “an alias can be used to define a given instance that
is equal to some expression.” To demonstrate this, imagine that you’re creating a
search engine that understands different contexts. This might be a search engine like
Google, or a tool like Siri and Alexa, where you want your algorithm to participate in
an ongoing conversation with a human.
For example, when someone performs a series of searches, they may be interested in a
particular context like “food” or “life”:
enum Context:
case Food, Life
Given those possible contexts, you can write a search function to look up word defi‐
nitions based on the context:
import Context.*
// imagine some large decision-tree that uses the Context
// to determine the meaning of the word that’s passed in
def search(s: String)(using ctx: Context): String = ctx match
case Food =>
s.toUpperCase match
case "DATE" => "like a big raisin"
case "FOIL" => "wrap food in foil before baking"
case _
=> "something else"
case Life =>
s.toUpperCase match
case "DATE" => "like going out to dinner"
case "FOIL" => "argh, foiled again!"
case _
=> "something else"
In an ongoing conversation between a human and your algorithm, if the current con‐
text is Food, you’ll have a given like this:
given foodContext: Context = Food
That syntax is known as an alias given, and foodContext is a given of type Context.
Now when you call the search function, that context is magically pulled in:
val date = search("date")
This results in date being assigned the value “looks like a big raisin.” Note that you
can still pass in the Context explicitly, if you prefer:
23.8 Using Term Inference with given and using
|
699
val date = search("date")(using Food)
val date = search("date")(using Life)
// "looks like a big raisin"
// "like going out to dinner"
But again, the assumption here is that a function like search may be called many
times, and the desire is to avoid having to manually declare the context parameter.
Importing givens
When a given is defined in a separate module, which it usually will be, it must be
imported into scope with a special import statement. That syntax is demonstrated in
Recipe 9.7, and this example also shows the technique:
object Adder:
trait Adder[T]:
def add(a: T, b: T): T
given intAdder: Adder[Int] with
def add(a: Int, b: Int): Int = a + b
@main def givenImports =
import Adder.*
// import all nongiven definitions
import Adder.given
// import the `given` definition
def genericAdder[A](x: A, y: A)(using adder: Adder[A]): A = adder.add(x, y)
println(genericAdder(1, 1))
Per the documentation on importing givens, there are two benefits to this new import
syntax:
• Compared to Scala 2, it’s more clear where givens in scope are coming from.
• It enables importing all givens without importing anything else.
Note that the two import statements can be combined into one:
import Adder.{given, *}
It’s also possible to import given values by their type:
object Adder:
trait Adder[T]:
def add(a: T, b: T): T
given Adder[Int] with
def add(a: Int, b: Int): Int = a + b
given Adder[String] with
def add(a: String, b: String): String =
s"${a.toInt + b.toInt}"
@main def givenImports =
// when put on separate lines, the order of the imports is important
import Adder.*
import Adder.{given Adder[Int], given Adder[String]}
def genericAdder[A](x: A, y: A)(using adder: Adder[A]): A = adder.add(x, y)
700
|
Chapter 23: Types
println(genericAdder(1, 1))
println(genericAdder("2", "2"))
// 2
// 4
In this example the given imports can also be specified like this:
import Adder.{given Adder[?]}
or this:
import Adder.{given Adder[_]}
See the Importing Givens documentation for all up-to-date import usages.
See Also
• See the Scala 3 documentation on given instances for more details on givens.
• See the Scala 3 documentation on importing givens for more details on import‐
ing givens.
• This Scala 3 page on contextual abstractions details the motivations behind
changing from implicits to given instances.
23.9 Simulating Dynamic Typing with Union Types
Problem
You have a situation where it would be helpful if a value could represent one of sev‐
eral different types, without requiring those types to be part of a class hierarchy.
Because the types aren’t part of a class hierarchy, you’re essentially declaring them in a
dynamic way, even though Scala is a statically typed language.
Solution
In Scala 3, a union type is a value that can be one of several different types. Union
types can be used in a few ways.
In one use, union types let us write functions where a parameter can potentially be
one of several different types. For example, this function, which implements the Perl
definition of true and false, takes a parameter that can be either an Int or a String:
// Perl version of "true"
def isTrue(a: Int | String): Boolean = a match
case 0 => false
case "0" => false
case "" => false
case _ => true
23.9 Simulating Dynamic Typing with Union Types
|
701
Even though Int and String don’t share any direct parent types—at least not until
you go up the class hierarchy to Matchable and Any—this is a type-safe solution. The
compiler is smart enough to know that if I attempt to add a case that tests the param‐
eter against a Double, it will be flagged as an error:
case 1.0 = > false
// ERROR: this line won’t compile
In this example, stating that the parameter a is either an Int or a String is a way of
dynamic typing in a statically typed language. If you wanted to match additional
types, you could just list them all, even if they don’t share a common type hierarchy
(besides Matchable and Any):
class Person
class Planet
class BeachBall
// the type parameter:
a: Int | String | Person | Planet | BeachBall
An Improvement in Scala 3
The only way to write that function prior to Scala 3 was to make
the function parameter have the type Any, and then match the Int
and String cases in the match expression. (In Scala 2 you would
use the type Any, and in Scala 3 you would use the type Matchable.)
In other uses, a function can return a union type, and a variable can be a union type.
For example, this function returns a union type:
def aFunction(): Int | String =
val x = scala.util.Random.nextInt(100)
if (x < 50) then x else s"string: $x"
You can then assign the result of that function to a variable:
val x = aFunction()
val x: Int | String = aFunction()
In either of those uses, x will have the type Int | String, and will contain an Int or
String value.
Discussion
A union type is a value that can be one of several different types. As shown, it’s a way
to create function parameters, function return values, and variables that can be one of
many types, without requiring traditional forms of inheritance for that type. Union
types provide an ad hoc way of combining types.
702
|
Chapter 23: Types
Combining union types with literal types
In another use, you can combine union types with literal types to create code like this:
// create a union type from two literal types
type Bool = "True" | "False"
// a function to use the union type
def handle(b: Bool): Unit = b match
case "True" => println("true")
case "False" => println("false")
handle("True")
handle("False")
handle("Fudge")
// error, won’t compile
// this also works
val t: Bool = "True"
val f: Bool = "False"
val x: Bool = "Fudge"
// error, won’t compile
The ability to create your own types using the combined power of literal types and
union types gives you more flexibility to craft your own APIs.
See Also
• The SIP for literal-based singleton types
23.10 Declaring That a Value Is a Combination of Types
Problem
You want a way to state that a value consists of a combination of types.
Solution
Similar to the way that union types let you state that a value can be one of many pos‐
sible types, intersection types provide an ad hoc way of saying that a value is a combi‐
nation of types.
For example, given these traits:
trait A:
def a = "a"
trait B:
def b = "b"
trait C:
def c = "c"
23.10 Declaring That a Value Is a Combination of Types
|
703
you can define a method that requires its parameter’s type to be a combination of
those types:
def handleABC(x: A & B & C): Unit =
println(x.a)
println(x.b)
println(x.c)
Now you can create a variable that matches that type and pass it into handleABC:
class D extends A, B, C
val d = D()
handleABC(d)
A terrific thing about intersection types is that the order in which the class you’re cre‐
ating implements the other types doesn’t matter, so other examples like these also
work:
class BCA extends B, C, A
class CAB extends C, A, B
// i use 'new' here to make this code easier to read:
handleABC(new BCA)
handleABC(new CAB)
Discussion
An intersection type lets you declare that a value is a combination of multiple types.
As shown in the examples, intersection types are commutative, so the order in which
the types are declared doesn’t affect the match. The intent with Scala 3 is that A & B
will replace A with B.
Here’s another example that demonstrates the difference between union types and
intersection types:
trait HasLegs:
def run(): Unit
trait HasWings:
def flapWings(): Unit
class Pterodactyl extends HasLegs, HasWings:
def flapWings() = println("Flapping my wings")
def run() = println("I’m trying to run")
override def toString = "Pterodactyl"
class Dog extends HasLegs:
def run() = println("I’m running")
override def toString = "Dog"
// returns a union type
def getThingWithLegsOrWings(i: Int): HasLegs | HasWings =
if i == 1 then Pterodactyl() else Dog()
704
|
Chapter 23: Types
// returns an intersection type
def getThingWithLegsAndWings(): HasLegs & HasWings =
Pterodactyl()
@main def unionAndIntersection =
// union type
val d1 = getThingWithLegsOrWings(0)
val p1: HasLegs | HasWings = getThingWithLegsOrWings(1)
// intersection type
val p2 = getThingWithLegsAndWings()
val p3: HasLegs & HasWings = getThingWithLegsAndWings()
// these True/NotTrue tests use my SimpleTest library.
// they all evaluate to 'true'.
True(d1.isInstanceOf[Dog])
NotTrue(d1.isInstanceOf[Pterodactyl])
True(p1.isInstanceOf[Pterodactyl])
True(p1.isInstanceOf[HasLegs])
True(p1.isInstanceOf[HasWings])
NotTrue(p1.isInstanceOf[Dog])
// p2 and p3 are the same, so the p3 tests aren’t shown
True(p2.isInstanceOf[Pterodactyl])
True(p2.isInstanceOf[HasLegs])
True(p2.isInstanceOf[HasWings])
True(p2.isInstanceOf[HasLegs & HasWings])
As mentioned in the comments in the source code, all of those tests in the @main
method evaluate to true, confirming that the types work as expected. And as these
examples show, the ad hoc use of union and intersection types makes Scala feel even
more like a dynamic programming language.
See Also
• The tests shown in the last example use my SimpleTest testing library.
23.10 Declaring That a Value Is a Combination of Types
|
705
23.11 Controlling How Classes Can Be Compared with
Multiversal Equality
Problem
In Scala 2, and by default in Scala 3, any custom object can be compared to any other
object:
class Person(var name: String)
class Customer(var name: String)
val p = Person("Kim")
val c = Customer("Kim")
p == c
// `new` is required before `Person` and
// `Customer` in Scala 2
You may get a warning message to the effect that “this comparison will always be
false,” but code like this will still compile.
To prevent potential errors in situations like this, you want to limit how objects can
be compared to each other in Scala 3.
Solution
To completely disallow different types from being compared to each other, enable the
Scala 3 strict equality feature in one of two ways:
• Import scala.language.strictEquality in files where you want to control
equality comparisons.
• Use the -language:strictEquality command-line option to enable strict equal‐
ity comparisons in all code.
After that, use the Scala 3 CanEqual typeclass to control what instances can be
compared.
Import scala.language.strictEquality
This example shows how to disable comparisons of objects created from different
classes by importing the strictEquality setting:
import scala.language.strictEquality
case class Dog(name: String)
case class Cat(name: String)
val d = Dog("Fido")
val c = Cat("Morris")
706
|
Chapter 23: Types
// this line will not compile with strictEquality enabled
println(d == c)
The last line of that code results in the compiler error “Values of types Dog and Cat
cannot be compared with == or !=.”
Note that this setting is extremely limiting. With strictEquality enabled, you can’t
even compare two instances of the same custom type:
case class Person(name: String)
scala> Person("Ken") == Person("Ken")
1 |Person("Ken") == Person("Ken")
|Values of types Person and Person cannot be compared with == or !=
You must enable equality comparisons
With strictEquality enabled, you can only compare two instances of the same class
by making sure your custom class derives the Scala 3 CanEqual typeclass:
import scala.language.strictEquality
case class Person(name: String) derives CanEqual
// this now works, and results in `true`
Person("Ken") == Person("Ken")
See the next recipe for more details about using CanEqual.
Discussion
This recipe and the next recipe are all about type safety. Because Scala is a type-safe
language, the goal of these recipes is to use that type safety to eliminate potential
errors at compile-time.
23.12 Limiting Equality Comparisons with the
CanEqual Typeclass
Problem
The previous recipe shows how to disable comparisons between different types. Now
you want to enable comparisons between two instances of a custom type, or between
two instances of different types.
23.12 Limiting Equality Comparisons with the CanEqual Typeclass
|
707
Solution
When you use the strictEquality settings described in the previous recipe, you
can’t even compare two instances of the same class:
import scala.language.strictEquality
case class Person(name: String)
Person("Al") == Person("Al")
// error: Values of types Person and Person cannot be compared with == or !=
Assuming that you’ve disabled comparisons of custom types with the strictEqual
ity setting, to enable instances of your custom classes to be compared to each other,
there are two possible solutions:
• Have the class derive the CanEqual typeclass.
• Use a given approach with CanEqual that accomplishes the same thing.
Derive CanEqual
The first solution is simple: just add derives CanEqual to the end of your class
definition:
case class Person(name: String) derives CanEqual
Now Person comparisons will work:
import scala.language.strictEquality
Person("Al") == Person("Al")
// this works, and results in `true`
Person("Joe") == Person("Fred")
// false
The given+CanEqual approach
A second approach is to use the given syntax to accomplish the same result:
case class Person(name: String)
given CanEqual[Person, Person] = CanEqual.derived
The given code states that you want to allow two Person types to be compared to
each other, so once again this code compiles:
import scala.language.strictEquality
Person("Al") == Person("Al")
// this works, and results in `true`
This approach is more flexible than the first approach because you can apply it to
objects as well as classes, and you can also use it to declare that you want to be able to
compare two different types.
For example, imagine a situation where you have a Customer class and an Employee
class. If you’re an enormous store, you may want to know if a customer is also an
708
| Chapter 23: Types
employee so you can give them a discount. Therefore, you’ll want to allow Customer
instances to be compared to Employee instances, so you’ll write some code like this:
import scala.language.strictEquality
case class Customer(name: String):
def canEqual(a: Any) = a.isInstanceOf[Customer] || a.isInstanceOf[Employee]
override def equals(that: Any): Boolean =
if !canEqual(that) then return false
that match
case c: Customer => this.name == c.name
case e: Employee => this.name == e.name
case _ => false
case class Employee(name: String):
def canEqual(a: Any) = a.isInstanceOf[Employee] || a.isInstanceOf[Customer]
override def equals(that: Any): Boolean =
if !canEqual(that) then return false
that match
case c: Customer => this.name == c.name
case e: Employee => this.name == e.name
case _ => false
given
given
given
given
CanEqual[Customer,
CanEqual[Employee,
CanEqual[Customer,
CanEqual[Employee,
Customer]
Employee]
Employee]
Customer]
=
=
=
=
CanEqual.derived
CanEqual.derived
CanEqual.derived
CanEqual.derived
val c = Customer("Barb S.")
val e = Employee("Barb S.")
c == c
// true
e == e
// true
c == e
// true
e == c
// true
Customer("Cheryl") == Employee("Barb")
// false
I took some shortcuts in writing that code, but the keys are:
• The strictEquality setting limits what types can be compared.
• The equals methods in the Customer and Employee classes allow themselves to
be compared.
• The first two given lines allow customers to be compared to customers, and
employees to be compared to employees.
• The second two given lines allow customers to be compared to employees, and
employees to be compared to customers.
• The rest of the code demonstrates a few equality comparisons.
23.12 Limiting Equality Comparisons with the CanEqual Typeclass
|
709
Note that if you want to compare a customer to an employee (c == e) and an
employee to a customer (e == c), you must include both of the last two CanEqual
expressions:
given CanEqual[Customer, Employee] = CanEqual.derived // Customer to Employee
given CanEqual[Employee, Customer] = CanEqual.derived // Employee to Customer
For a proper way to write equals methods, see Recipe 5.9, “Defining an equals
Method (Object Equality)”.
Reflexive and Symmetric Comparisons
When we say that a type Customer can be compared to another Cus
tomer, this is a reflexive property (e.g., a == a). When we say that a
Customer can be compared to an Employee, and an Employee can
be compared to a Customer, this is a symmetric property (e.g., a ==
b and b == a).
Discussion
As with the previous recipe, this approach is all about type safety. First you enable
strictEquality, as shown in the previous recipe, and then you enable only type
comparisons between the types you want to compare. This approach creates compiletime errors, so it’s impossible to compare types that you don’t enable.
Note that with the given approach you can enable comparisons between types you
don’t control. For example, initially this comparison is not allowed:
2 == "2"
// error: Values of types Int and String cannot be
// compared with == or !=
But when you declare that you want to allow String to be compared to Int, the com‐
parison is allowed:
given CanEqual[String, Int] = CanEqual.derived
given CanEqual[Int, String] = CanEqual.derived
2 == "2"
"2" == 2
710
|
// false, but the comparison is allowed
// also false
Chapter 23: Types
CHAPTER 24
Best Practices
When I first came to Scala from Java in 2010, I was happy with the small things, such
as eliminating a lot of ;, (), and {} characters, and working with a less verbose lan‐
guage that reminded me of Ruby. Not knowing much about the history of program‐
ming languages, I thought of Scala as being “Ruby with types,” and all of these were
nice little wins that made for “a better Java.”
Over time, I wanted to add more to my repertoire and use Scala the way it’s intended
to be used. As Ward Cunningham is quoted in the book Clean Code by Robert C.
Martin (Prentice Hall), I wanted to write code that “makes it look like the language
was made for the problem,” so I learned the collections classes and their methods, for
expressions, match expressions, and modular development. That’s what this chapter is
about: trying to share some of the best practices of Scala programming so you can
write code in the “Scala way.”
Before jumping into the recipes in this chapter, here’s a short summary of the best
Scala practices I know.
At the application level:
• As Martin Odersky has stated, write functions for the logic, and create objects for
the modularity.
• When you write functions, try to write as many of them as you can as pure func‐
tions. Following the 80/20 rule, this is like writing 80% of your application as
pure functions, with a thin layer of other code on top of those functions for
things like I/O. As someone once wrote, it’s like putting a thin layer of impure
icing on a pure FP cake (though there are also ways of handling that “impure”
code).
711
• Move behavior from classes into granular traits. I describe this approach in
Chapter 6.
• Use the Scala Future class and Akka library to implement concurrency.
• As you move more into FP, use libraries like Cats, Monix, and ZIO (which also
provide support for concurrency).
At the daily coding level:
• Learn how to write pure functions (Recipe 24.1). At the very least, they simplify
what you have to think about.
• Related to the first point, don’t write functions that throw exceptions. Return
types like Option, Try, or Either instead.
• Similarly, don’t use methods like head, tail, and last that throw exceptions.
• Learn how to pass functions around as variables (see Chapter 10).
• Learn how to use the Scala collections API. Know the most common classes and
methods. Knowing the methods will keep you from writing more verbose custom
for loops.
• Prefer immutable code. Use val fields and immutable collections first (Recipe
24.2).
• Learn expression-oriented programming (Recipe 24.3).
• Functional programming languages are pattern-matching languages, so become
an expert on match expressions (Recipe 24.4).
• Drop the null keyword from your vocabulary (Recipe 24.5). Use the Option, Try,
and Either types instead (Recipe 24.6).
• Organize your code in modules (Recipe 24.7).
• Use test-driven development and/or behavior-driven development testing tools
like ScalaTest and MUnit, and a property-based testing tool like ScalaCheck.
• As you become more proficient with Scala, learn how to use higher-order func‐
tions as a replacement for match expressions when handling the Option, Try, and
Either types Recipe 24.8.
712
|
Chapter 24: Best Practices
Outside the code:
• Learn how to use sbt (as covered in Chapter 17) or other automated build tools.
• Keep a REPL session open while you’re coding so you can run small tests as
needed (Recipe 1.1, “Getting Started with the Scala REPL”), or use online tools
like Scastie or ScalaFiddle.
Other Resources
In addition to the practices shared in this chapter, Twitter’s “Effective Scala” page
remains a good resource. The Twitter team has been a big user and proponent of
Scala, and this document summarizes its experiences.
The Scala Style Guide is also a good resource that shares examples of how to write
code in the Scala style.
24.1 Writing Pure Functions
Problem
You want to write pure functions and also understand the benefits of writing them.
Solution
It’s surprisingly hard to find a consistent definition of a pure function, so I’ll give you
the summary definition that I use in my book Functional Programming, Simplified:
A pure function is a function that depends only on its declared input parameters and its
algorithm to produce its output. It doesn’t read any other values from “the outside
world”—the world outside of the function’s scope—and it doesn’t modify any values in
the outside world. A pure function is total, meaning that its result is defined for every
possible input, and it’s deterministic, meaning that it always returns the same value for
a given input.
To show how to write pure functions and their benefits, in this recipe I’ll convert the
methods in an object-oriented programming style class into pure functions.
The OOP approach
To simplify this solution, the following OOP-style class intentionally has a few flaws.
It not only has the ability to store information about a Stock but also can access the
internet to get the current stock price, and it further maintains a list of historical pri‐
ces for the stock:
24.1 Writing Pure Functions
|
713
// a poorly written OOP-style class
class Stock (
var symbol: String,
var company: String,
var price: BigDecimal,
var volume: Long
):
var html: String = _
// null
// create a url based on the stock symbol
def buildUrl(stockSymbol: String): String = ...
// this method calls out to the internet to get the url content,
// such as getting a page from yahoo finance or a similar site
def getUrlContent(url: String): String = ...
def setPriceFromHtml(html: String): Unit =
this.price = ...
def setVolumeFromHtml(html: String): Unit =
this.volume = ...
def setHighFromHtml(html: String): Unit =
this.high = ...
def setLowFromHtml(html: String): Unit =
this.low = ...
// some DAO-like functionality
private val _history: ArrayBuffer[Stock] = ...
def getHistory = _history
Besides attempting to do too many things, from an FP perspective, it has these other
problems:
• All the fields are mutable.
• All the set* methods mutate the class fields.
• The getHistory method returns a mutable data structure.
The getHistory method is easily fixed by converting the ArrayBuffer to an immuta‐
ble sequence like Vector before sharing it, but this class has deeper problems. Let’s fix
them.
Fixing the problems
The first fix is to separate two concepts that are buried in the class. First, there should
be a concept of a Stock, where a Stock consists only of a symbol and company name.
You can make this a case class:
case class Stock(symbol: String, company: String)
Examples of this are Stock("AAPL","Apple") and Stock("GOOG","Google").
714
|
Chapter 24: Best Practices
Second, at any moment in time there is information related to a stock’s performance
on the stock market. You can call this data structure a StockInstance and also define
it as a case class:
case class StockInstance(
symbol: String,
datetime: String,
price: BigDecimal,
volume: Long
)
A StockInstance example looks like this:
StockInstance("AAPL", "Mar. 1, 2021 5:00pm", 127.79, 107_183_333)
That covers the data portion of the solution. Now let’s look at how to handle the
behaviors.
Behaviors
Going back to the original class, the getUrlContent method isn’t specific to a stock
and should be moved to a different object, such as a general-purpose NetworkUtils
object:
object NetworkUtils:
def getUrlContent(url: String): String = ???
This method takes a URL as a parameter and returns the HTML content from that
URL.
Similarly, the ability to build a URL from a stock symbol should be moved to an
object. Because this behavior is specific to a stock, put it in an object named
StockUtils:
object StockUtils:
def buildUrl(stockSymbol: String): String = ???
The ability to extract the stock price from the HTML (i.e., screen scraping) can also be
written as a pure function and should be moved into the same object:
object StockUtils:
def buildUrl(stockSymbol: String): String = ???
def getPrice(html: String): String = ???
In fact, all of the methods named set* in the previous class should be get* methods
in StockUtils:
object StockUtils:
def buildUrl(stockSymbol: String): String = ???
def getPrice(symbol: String, html: String): String = ???
def getVolume(symbol: String, html: String): String = ???
def getHigh(symbol: String, html: String): String = ???
def getLow(symbol: String, html: String): String = ???
24.1 Writing Pure Functions
|
715
The methods getPrice, getVolume, getHigh, and getLow are all pure functions: given
the same HTML string and stock symbol, they always return the same values, and
they don’t have side effects.
Following this thought process, the code will require date and time functions, so I put
them in a DateUtils object:
object DateUtils:
def currentDate: String = ???
def currentTime: String = ???
These aren’t pure functions, but at least they’re in a logical location.
With this new design, you create an instance of a Stock for the current date and time
as a simple series of expressions. First, retrieve the HTML that describes the stock
from a web page:
val stock = Stock("AAPL", "Apple")
val url = StockUtils.buildUrl(stock.symbol)
val html = NetworkUtils.getUrlContent(url)
Once you have the HTML, extract the desired stock information, get the date, and
create the Stock instance:
val
val
val
val
val
val
price = StockUtils.getPrice(html)
volume = StockUtils.getVolume(html)
high = StockUtils.getHigh(html)
low = StockUtils.getLow(html)
date = DateUtils.currentDate
stockInstance = StockInstance(symbol, date, price, volume, high, low)
Notice that all the variables are immutable, and each line is an expression. In fact, the
code is now so simple that you can eliminate all the intermediate variables, if desired:
val html = NetworkUtils.getUrlContent(url)
val stockInstance = StockInstance(
symbol,
DateUtils.currentDate,
StockUtils.getPrice(html),
StockUtils.getVolume(html),
StockUtils.getHigh(html),
StockUtils.getLow(html)
)
This simplicity is a great benefit of using pure functions. “Output depends only on
input, no side effects” is a simple mantra for pure functions.
As mentioned earlier, the methods getPrice, getVolume, getHigh, and getLow are all
pure functions. But what about methods like getDate? It’s not a pure function, but
the fact is, you need the date and time to solve the problem. This is part of what’s
meant by having a healthy, balanced attitude about pure functions.
716
| Chapter 24: Best Practices
Other Approaches to Handle Impure Functions
There are more powerful ways to handle impure functions, and
those approaches will return Option, Try, or Either or use external
libraries like Cats or ZIO. However, those approaches take a long
time to introduce. Please see Functional Programming, Simplified
for more details on some of those approaches.
As a final note about this example, there’s no need for the Stock class to maintain a
mutable list of stock instances. Assuming that the stock information is stored in a
database, you can create a StockDao (“data access object”) to retrieve the data:
object StockDao:
def getStockInstances(symbol: String): Seq[StockInstance] = ???
// other code ...
Though getStockInstances isn’t a pure function, the resulting Seq class is immuta‐
ble, so you can feel free to share it without worrying that it might be modified some‐
where else in your application.
get and set Aren’t Necessary
Although I use the prefix get in many of those method names, it’s
not necessary (or common) to follow a JavaBeans-like naming con‐
vention. In fact, partly because you write setter methods in Scala
without beginning their names with set and partly to follow the
uniform access principle, many Scala APIs don’t use get or set at
all.
For example, think of Scala classes. Their accessors and mutators
don’t use get or set:
class Person(var name: String)
val p = Person("William")
p.name
// accessor
p.name = "Bill"
// mutator
StockUtils or Stock object?
The methods that were moved to the StockUtils class in the previous examples can
also be placed in the companion object of the Stock class. That is, you could have
placed the Stock class and object in a file named Stock.scala:
case class Stock(symbol: String, company: String)
object Stock:
def buildUrl(stockSymbol: String): String = ???
def getPrice(symbol: String, html: String): String = ???
def getVolume(symbol: String, html: String): String = ???
24.1 Writing Pure Functions
|
717
def getHigh(symbol: String, html: String): String = ???
def getLow(symbol: String, html: String): String = ???
For the purposes of this example, I put these methods in a StockUtils class to be
clear about separating the concerns of the Stock class and object. In your own prac‐
tice, use whichever approach you prefer. See Recipe 7.5 for more details on compan‐
ion objects.
Discussion
If you’re coming to Scala from a pure OOP background, it can be surprisingly diffi‐
cult to write pure functions. Speaking for myself, prior to 2010 my code had followed
the OOP paradigm of encapsulating data and behavior in classes, and as a result, my
methods almost always mutated the internal state of objects. Switching to pure func‐
tions and immutable values took a while to get comfortable with.
But a major benefit of writing pure functions is that it naturally leads you into a func‐
tional programming style, where you write your code as algebraic expressions and
then combine those expressions to solve larger problems. A benefit of this coding
style is that pure functions are easier to test.
For instance, attempting to test the set methods in the original code is harder than it
needs to be. For each field (price, volume, high, and low), you have to follow these
steps:
1. Set the html field in the object.
2. Call the current set method, such as setPriceFromHtml.
3. Internally, this method reads the private html class field.
4. When the method runs, it mutates a field in the class (price).
5. You have to get that field to verify that it was changed.
6. In more complicated classes, it’s possible that the html and price fields may be
mutated by other methods in the class.
The test code for the original class looks like this:
val stock = Stock("AAPL", "Apple", 0, 0)
stock.buildUrl
val html = stock.getUrlContent
stock.getPriceFromHtml(html)
assert(stock.getPrice == 200.0)
This is a simple example of testing one method that has side effects, but of course this
can get much more complicated in a large application.
718
|
Chapter 24: Best Practices
By contrast, testing a pure function is easier:
1. Call the function, passing in a known value.
2. Get a result back from the function.
3. Verify that the result is what you expected.
The functional approach results in test code like this:
val url = NetworkUtils.buildUrl("AAPL")
val html = NetworkUtils.getUrlContent(url)
val price = StockUtils.getPrice(html)
assert(price == 200.0)
Although the code shown isn’t much shorter, it is much simpler. And as shown in
other examples in this book, because pure functions are expressions, they can be
reduced to this form, if you prefer:
val price = getPrice(getUrlContent(buildUrl("AAPL")))
assert(price == 200.0)
In many other situations where you have a series of pure expressions that don’t
depend on being run in a specific order, both you and the compiler are free to run
them in parallel.
24.2 Using Immutable Variables and Collections
Problem
To make your code easier to write, read, test, and use in parallel/concurrent situa‐
tions, you want to reduce the use of mutable objects and data structures in your code.
Solution
Begin with this simple philosophy, stated in the book Programming in Scala: “Prefer
val fields, immutable objects, and methods without side effects. Reach for them first.”
Then use other approaches with justification.
There are two components to “prefer immutability”:
• Prefer immutable collections. For instance, use immutable sequences like List
and Vector before reaching for the mutable ArrayBuffer.
• Prefer immutable variables. That is, prefer val to var.
In Java, mutability is the default, and it can lead to unnecessarily dangerous code and
hidden bugs. In the following example, even though the List parameter taken by the
24.2 Using Immutable Variables and Collections
|
719
trustMeMuHaHa method is marked as final, the method can still mutate the
collection:
// java
class EvilMutator {
// trust me ... mu ha ha (evil laughter)
public static void trustMeMuHaHa(final List<Person> people) {
people.clear();
}
}
Although Scala treats method arguments as val fields, you leave yourself open to the
exact same problem by passing around a mutable collection, like an ArrayBuffer:
def evilMutator(people: ArrayBuffer[Person]) =
people.clear()
Just as with the Java code, the evilMutator method can call clear because the con‐
tents of an ArrayBuffer are mutable.
Though nobody would write malicious code like this intentionally, accidents do hap‐
pen. To make your code safe from this problem, if there’s no reason for a sequence to
be changed, don’t use a mutable sequence class. By changing the sequence to a Seq,
List, or Vector, you eliminate the possibility of this problem. In fact, the following
code won’t even compile:
def evilMutator(people: Seq[Person]) =
// ERROR - won’t compile
people.clear()
Because Seq, List, and Vector are immutable sequences, any attempt to add or
remove elements will fail.
Discussion
There are at least two major benefits to using immutable variables (val) and immuta‐
ble collections:
• They represent a form of defensive coding; you don’t have to worry about your
data being accidentally changed.
• They’re easier to reason about.
The examples shown in the Solution demonstrate the first benefit: if there’s no need
for other code to mutate your reference or collection, don’t let them do it. Scala
makes this easy.
720
|
Chapter 24: Best Practices
The second benefit can be thought of in many ways, but I like to think about it when
using actors and concurrency: If I’m using immutable collections, I can pass them
around freely. There’s no concern that another thread will modify my collection.
Using val + mutable, and var + immutable
When you write pure FP code everything is immutable, but if you’re not writing pure
FP code you can combine these tools. For instance, some developers like to use these
combinations:
• A mutable collection field declared as a val
• An immutable collection field declared as a var
These approaches generally seem to be used as follows:
• A mutable collection field declared as a val is typically made private to its class
(or method).
• An immutable collection field declared as a var in a class is more often made
publicly visible, that is, it’s made available to other classes.
As an example of the first approach, the current Akka FSM class
(scala.akka.actor.FSM) defines several mutable collection fields as private val
fields, like this:
private val timers = mutable.Map[String, Timer]()
// some time later ...
timers -= name
timers.clear()
This is safe to do because the timers field is private to the class, so its mutable collec‐
tion isn’t shared with others.
An approach I used on a teaching project is a variation of this theme:
enum Topping { case Cheese, Pepperoni, Mushrooms }
class Pizza:
private val _toppings = collection.mutable.ArrayBuffer[Topping]()
def toppings = _toppings.toSeq
def addTopping(t: Topping): Unit = _toppings += t
def removeTopping(t: Topping): Unit = _toppings -= t
This code defines _toppings as a mutable ArrayBuffer but makes it a val that’s pri‐
vate to the Pizza class. Here’s my rationale for this approach:
24.2 Using Immutable Variables and Collections
|
721
• I made _toppings an ArrayBuffer because I knew that elements (toppings)
would often be added and removed.
• I made _toppings a val because there was no need for it to ever be reassigned.
• I made it private so its accessor wouldn’t be visible outside of my class.
• I created the methods toppings, addTopping, and removeTopping to let other
code manipulate the collection.
• When other code calls the toppings method, I can give it an immutable copy of
the toppings.
The more you learn about functional programming the more you’ll find that mutable
code like this isn’t necessary. But until you become proficient with libraries like Cats,
Monix, or ZIO, this can be a useful compromise.
In summary, always begin with the “prefer immutability” approach and only relax
that philosophy when it makes sense for the current situation, that is, when you can
properly rationalize your decision. The further you get into functional programming,
the less you’ll need to reach for mutable tools.
24.3 Writing Expressions (Instead of Statements)
Problem
You’re used to writing statements in another programming language and want to
learn how to write expressions in Scala, as well as the benefits of the expressionoriented programming philosophy.
Solution
To understand EOP, you have to understand the difference between a statement and
an expression. Wikipedia’s EOP page provides a concise distinction between the two:
Statements do not return results and are executed solely for their side effects, while
expressions always return a result and often do not have side effects at all.
So statements are like this:
order.calculateTaxes()
order.updatePrices()
println(s"The product $name costs $price.")
and expressions are like this:
val tax = calculateTax(order)
val price = calculatePrice(order)
val s = s"The product $name costs $price."
722
|
Chapter 24: Best Practices
Wikipedia’s EOP page also states:
An expression-oriented programming language is a programming language where
every (or nearly every) construction is an expression, and thus yields a value.
Because purely functional programs are written entirely with expressions, it further
states that all pure FP languages are expression-oriented.
An example
The following example helps to demonstrate EOP. This recipe is similar to Recipe
24.1, so it reuses the class from that recipe to show an initial OOP-style design:
// an intentionally poor design
class Stock(
var symbol: String,
var company: String,
var price: String,
var volume: String,
var high: String,
var low: String
):
var html: String = _
def buildUrl(stockSymbol: String): String = ???
def getUrlContent(url: String): String = ???
def setPriceUsingHtml(): Unit = this.price = ???
def setVolumeUsingHtml(): Unit = this.volume = ???
def setHighUsingHtml(): Unit = this.high = ???
def setLowUsingHtml(): Unit = this.low = ???
Using this class results in code like this:
val stock = Stock("GOOG", "Google", "", "", "", "")
val url = stock.buildUrl(stock.symbol)
stock.html = stock.getUrlContent(url)
// a series of calls on an object (i.e, “statements”)
stock.setPriceUsingHtml()
stock.setVolumeUsingHtml()
stock.setHighUsingHtml()
stock.setLowUsingHtml()
Although the implementation code isn’t shown, all of these set methods extract data
from the HTML that was downloaded from a Yahoo Finance page for a given stock,
and then they update the fields in the current object.
After the first two lines, this code is not expression-oriented at all; it’s a series of calls
on an object to populate (mutate) the class fields, based on other internal data. These
are statements, not expressions; they don’t yield values, and they do mutate state.
Recipe 24.1 shows that by refactoring this class into several different components
with mostly pure functions, you’ll end up with the following code:
24.3 Writing Expressions (Instead of Statements)
|
723
// a series of expressions
val url = StockUtils.buildUrl(symbol)
val html = NetworkUtils.getUrlContent(url)
val price = StockUtils.getPrice(html)
val volume = StockUtils.getVolume(html)
val high = StockUtils.getHigh(html)
val low = StockUtils.getLow(html)
val date = DateUtils.getDate()
val stockInstance = StockInstance(symbol, date, price, volume, high, low)
This code is expression-oriented. It consists of a series of simple expressions that pass
values into pure functions (except for getDate), and each function returns a value
that’s assigned to a variable. The functions don’t mutate the data they’re given, and
they don’t have side effects, so they’re easy to read, easy to reason about, and easy to
test. Because they are simple expressions, most of them can be run in any order, and
even run in parallel.
Discussion
In Scala, most expressions are obvious. For instance, the following two expressions
both return results, which you expect:
val x = 2 + 2
val xs = List(1,2,3,4,5).filter(_ > 2)
// 4
// List(3, 4, 5)
However, for anyone coming from an OOP-style language, it can be more of a sur‐
prise that an if/else expression returns a value:
val max = if a > b then a else b
Match expressions also return a result:
val evenOrOdd = i match
case 1 | 3 | 5 | 7 | 9 => "odd"
case 2 | 4 | 6 | 8 | 10 => "even"
Even a try/catch block returns a value:
val result = try
"1".toInt
catch
case _ => 0
Writing expressions like this is a feature of functional programming languages, and
Scala makes using them feel natural and intuitive, and they also result in concise,
expressive code.
Benefits
Because expressions always return a result and generally don’t have side effects, there
are several benefits to EOP:
724
|
Chapter 24: Best Practices
• Pure functions are easier to reason about. Inputs go in, a result is returned, and
there are no side effects. You don’t have to worry that you just mutated state
somewhere else in the application.
• As I demonstrate in Recipe 24.1, pure functions are easier to test.
• Combined with Scala’s syntax, EOP results in concise, expressive code.
• Although it has only been hinted at in these examples, expressions can often be
executed in any order. This subtle feature lets you execute expressions in parallel,
which can be a big help when you’re trying to take advantage of multiple multi‐
core CPUs.
See Also
• The Wikipedia definition of a statement, and the difference between a statement
and an expression
• The Wikipedia expression-oriented programming language (EOP) page
24.4 Using Match Expressions and Pattern Matching
Problem
Pattern matching is a major feature of the Scala programming language, and you
want to see examples of how to use it in different situations.
Solution
Match expressions—match/case statements—and pattern matching are used all the
time in Scala code. If you’re coming to Scala from Java, the most obvious uses of
match expressions are:
• As a replacement for the Java switch statement
• To replace unwieldy if/then statements
However, pattern matching is so common, you’ll find that match expressions are used
in many more situations:
• As the body of a function
• Handling Option variables
24.4 Using Match Expressions and Pattern Matching
|
725
Case statements are also used in:
• try/catch expressions
• The receive method of Akka Classic actors
The following examples demonstrate these techniques.
Replacement for the Java switch statement and unwieldy if/then statements
Recipe 4.7, “Matching Multiple Conditions with One Case Statement”, shows that a
match expression can be used like a Java switch statement:
val month = i match
case 1 => "January"
// the rest of the months here ...
case 12 => "December"
case _ => "Invalid month"
// the default, catch-all case
It can be used in the same way to replace unwieldy if/then/else statements:
val evenOrOdd = i match
case 1 | 3 | 5 | 7 | 9 => "odd"
case 2 | 4 | 6 | 8 | 10 => "even"
These are simple uses of match expressions, but they’re a good start.
As the body of a function or method
As you get comfortable with match expressions, you’ll use them as the body of your
functions, such as this function that determines whether the value it’s given is true,
using the Perl definition of “true”:
def isTrue(a: Matchable): Boolean = a match
case false | 0 | "" => false
case _ => true
See Recipe 4.8, “Assigning the Result of a Match Expression to a Variable”, for more
examples of using match expressions like this.
Use with Option variables
Match expressions work well with the Option/Some/None types. For instance, given
this method makeInt that returns an Option:
import scala.util.control.Exception.allCatch
def makeInt(s: String): Option[Int] = allCatch.opt(s.trim.toInt)
you can handle the result from makeInt with a match expression:
makeInt(aString) match
case Some(i) => println(i)
case None => println("Error: Could not convert String to Int.")
726
|
Chapter 24: Best Practices
In a similar way, match expressions are a popular way of handling form verifications
with the Play Framework:
verifying("If age is given, it must be greater than zero",
model =>
model.age match {
case Some(age) => age > 0
case None => false
}
)
You can also use the fold method on Option values to handle situations like this. For
instance, those two examples can be written like this:
// first example
makeInt(aString).fold(println("Error..."))(println)
// second example
makeInt(aString).fold(false)(_ > 0)
See Recipe 24.6 for more details and other ways to handle these situations.
In try/catch expressions
Case statements are also used in try/catch expressions. The following example
shows how to write a try/catch expression that returns an Option when lines are
successfully read from a file and returns None if an exception is thrown during the
file-reading process:
def readTextFile(filename: String): Option[List[String]] =
try
Some(Source.fromFile(filename).getLines.toList)
catch
case ioe: IOException =>
None
case fnf: FileNotFoundException =>
None
Note that if the specific error is important in a situation like this, use the Either/
Left/Right or Try/Success/Failure classes so you can return the failure information
to the caller. See Recipe 24.6 for more details.
In Akka actors
If you use the original Akka Classic “untyped” library, it helps to get comfortable with
the use of case statements because they’re used with Akka actors as the primary way
to handle incoming messages:
class SarahsBrain extends Actor {
def receive = {
case StartMessage => handleStartMessage()
24.4 Using Match Expressions and Pattern Matching
|
727
case StopMessage => handleStopMessage()
case _ => log.info("Got something unexpected.")
}
// other code here ...
}
See Also
• match expressions are demonstrated in many examples in Chapter 4.
• As detailed in Recipe 24.8, you can use higher-order functions to work with
Option, Either, and Try values.
24.5 Eliminating null Values from Your Code
Problem
In keeping with modern best practices, you want to eliminate null values from your
code.
Solution
David Pollak, author of the first edition of the book Beginning Scala and creator of the
Lift Framework, offers a wonderfully simple rule about null values:
Ban null from any of your code. Period.
Although I’ve used null values in this book to make some examples easier, in my own
practice I no longer use them. I just imagine that there is no such thing as a null and
write my code in other ways.
There are several common situations where you may be tempted to use null values,
so this recipe demonstrates how not to use null values in those situations:
• When a var field in a class or method doesn’t have an initial default value, declare
it as an Option.
• When a function doesn’t produce the intended result, you may be tempted to
return null. Use Option, Try, or Either instead.
• If you’re working with a Java library that returns null, convert it to an Option or
something else.
Let’s look at each of these techniques.
728
|
Chapter 24: Best Practices
Initialize var fields with Option, not null
Possibly the most tempting time to use a null value is when a field in a class or
method won’t be initialized immediately. For instance, imagine that you’re writing
code for the next great social network app. To encourage people to sign up, during the
registration process, the only information you ask for is an email address and a pass‐
word. Because everything else is initially optional, when you write code in an OOP
style, you might be tempted to write some code like this:
case class Address(city: String, state: String, zip: String)
class User(var email: String, var password: String):
var firstName: String = _
var lastName: String = _
var address: Address = _
The User class is bad news because firstName, lastName, and address are all
declared to be null and can cause problems in your application if they’re not assigned
before they’re accessed. The preferred approach is to define each optional field as an
Option:
class User(var email: String, var password: String):
var firstName = None: Option[String]
var lastName = None: Option[String]
var address = None: Option[Address]
Now you can create a User like this:
val u = User("al@example.com", "secret")
Then at some point later you can assign the other values like this:
u.firstName = Some("Al")
u.lastName = Some("Alexander")
u.address = Some(Address("Talkeetna", "AK", "99676"))
Later in your code, you can access the fields like this:
u.address.foreach { a =>
println(a.city)
println(a.state)
println(a.zip)
}
or this:
println(firstName.getOrElse("<not assigned>"))
In both cases, if the values are assigned, they’ll be printed. In the first example, if
address is None, the foreach loop won’t be executed, so the print statements are
never reached. This is because an Option can be thought of as a collection with zero
or one element: if the value is None, it has zero elements, and if it’s a Some, it has one
24.5 Eliminating null Values from Your Code
|
729
element—the value it contains. With the getOrElse example, if the value isn’t
assigned, the string <not assigned> is printed.
On a related note, you should also use an Option in a constructor when a field is
optional:
case class Address(
street1: String,
street2: Option[String],
city: String,
state: String,
zip: String
)
Don’t return null from methods
Because you should never use null in your code, the rule for returning null values
from functions is easy: don’t do it.
If you can’t return null, what can you do? Return an Option. Or, if you need to know
about an error that may have occurred in the method, use Try or Either instead of
Option.
With an Option, your function signatures should look like this:
def doSomething: Option[String] = ???
def makeInt(s: String): Option[Int] = ???
def lookupPerson(name: String): Option[Person] = ???
For instance, when reading a file, a function could return null if the process fails, but
this code shows how to read a file and return an Option instead:
def readTextFile(filename: String): Option[List[String]] =
try
Some(io.Source.fromFile(filename).getLines.toList)
catch
case e: Exception => None
This method returns a List[String] wrapped in a Some if the file can be found and
read, or None if an exception occurs. If you want the error information, use the Try/
Success/Failure classes (or Either/Right/Left) instead of Option/Some/None:
import scala.util.{Try, Success, Failure}
def readTextFile(filename: String): Try[List[String]] =
Try(io.Source.fromFile(filename).getLines.toList)
This code returns the lines of the file as a List[String] wrapped in a Success if the
file can be read, or it returns an exception wrapped in a Failure if something goes
wrong:
java.io.FileNotFoundException: Foo.bar (No such file or directory)
730
|
Chapter 24: Best Practices
As a word of caution (and balance), the Twitter Effective Scale page recommends not
overusing Option, and using the null object pattern where it makes sense. As usual,
use your own judgment, but try to eliminate all null values with one of these
approaches.
Null Objects
A null object is an object that extends a base type with a null or
neutral behavior. Here’s a Scala implementation of Wikipedia’s Java
example of a null object:
trait Animal:
def makeSound(): Unit
class Dog extends Animal:
def makeSound(): Unit = println("woof")
class NullAnimal extends Animal:
def makeSound(): Unit = ()
// just returns Unit
The makeSound method in the NullAnimal class has a neutral, “do
nothing” behavior. Using this approach, a method defined to return
an Animal can return NullAnimal rather than null.
For more details on why you should never return null from a function, see my blog
post “Pure Function Signatures Tell All”.
Converting a null into an Option, or something else
The third major place you’ll run into null values is in working with legacy Java code.
There is no magic formula here, other than to capture the null value and return
something else from your code. That may be an Option, a null object, an empty list,
or whatever else is appropriate for the problem at hand.
For instance, the following getName method converts a result from a Java method that
may be null and returns an Option[String] instead:
def getName(): Option[String] =
val name = javaPerson.getName()
if name == null then None else Some(name)
Discussion
Tony Hoare, inventor of the null reference for the ALGOL W programming language
way back in 1965, refers to the creation of the null value as his “billion-dollar mis‐
take”. Languages like Java initially dealt with null references and NullPointerExcep
tion’s with the use of try/catch constructs, but modern languages like Scala use
other techniques to eliminate them entirely.
24.5 Eliminating null Values from Your Code
|
731
Eliminating null values in your code leads to these benefits:
• You completely eliminate an entire class of errors: null pointer exceptions.
• You’ll never have to wonder, “Does this method return null if something goes
wrong?”
• You won’t have to write if statements to check for null values.
• Adding an Option[T] return type declaration to a method is a terrific way to
indicate that something is happening in the method such that the caller may
receive a None instead of a Some[T]. Using Option, Try, and Either is a much
better approach than returning null from a method that is expected to return an
object.
• You’ll become more comfortable using Option, Try, and Either, and as a result,
you’ll be able to take advantage of how they’re used in the collection libraries and
other frameworks.
Explicit nulls in Scala 3
At the time of this writing, Scala 3.0.0 includes an opt-in compiler
feature named Explicit Nulls. When you enable this feature, it
changes the Scala type hierarchy so that Null is only a subtype of
Any, instead of being a subtype of every reference type. Therefore,
all the reference types—i.e., any type that extends AnyRef, such as
String, List, and your custom types like User—are non-nullable.
You enable this feature with this scalac option:
-Yexplicit-nulls
When you enable this option, code like this no longer compiles:
val s: String = null
For more details on how this works, see the Explicit Nulls page.
See Also
• Tony Hoare’s “billion-dollar mistake” quote on Wikipedia
• Wikipedia’s page on null object patterns
• The Scala 3 explicit nulls documentation
732
| Chapter 24: Best Practices
24.6 Using Scala’s Error-Handling Types (Option, Try,
and Either)
Problem
For a variety of reasons, including removing null values from your code, you want to
effectively use the Option/Some/None, Try/Success/Failure, and Either/Left/Right
classes.
Solution
There is some overlap between this recipe and Recipe 24.5. That recipe shows how to
use Option instead of null in the following situations:
• Using Option in function and constructor parameters
• Using Option to initialize class fields (instead of using null)
• Converting null results from other code (such as Java code) into an Option
• Returning Option from methods
See Recipe 24.5 for examples of how to use Option in those situations. This recipe
adds these solutions:
• Extracting the value from an Option
• Using Option with collections
• Using Option with frameworks
• Using Try/Success/Failure when you need the error message
• Using Either/Left/Right when you need the error message
Extracting the value from an Option
Here are two ways to define a makeInt function that catches the exceptions that can
be thrown by toInt and return an Option:
import scala.util.control.Exception.allCatch
def makeInt(s: String): Option[Int] = allCatch.opt(s.trim.toInt)
import scala.util.{Try, Success, Failure}
def makeInt(s: String): Option[Int] = Try(s.trim.toInt).toOption
As a consumer of a method that returns an Option, there are several good ways to call
it and access its result:
24.6 Using Scala’s Error-Handling Types (Option, Try, and Either)
|
733
• Use a match expression
• Use foreach
• Use getOrElse
• Use other higher-order functions (HOFs)
Depending on your needs, a good way to access the makeInt result is with a match
expression. You can return a value from a match expression:
val result = makeInt(aString) match
case Some(i) => i
case None => 0
You can also use a match expression to produce a side effect, such as printing to the
outside world:
makeInt(aString) match
case Some(i) => println(i)
case None => println(0)
Because you can think of an Option as a collection with zero or one element, the fore
ach method can be used in situations where you handle the result as a side effect:
makeInt(aString).foreach{ i =>
println(s"Got an int: $i")
}
That example prints the value if makeInt returns a Some, but it bypasses the println
statement if makeInt returns a None.
To (a) extract the value if the method succeeds or (b) use a default value if the method
fails, use getOrElse:
val x = makeInt("1").getOrElse(0)
val y = makeInt("A").getOrElse(0)
// 1
// 0
You can also use the HOFs that are available on Option, as shown in Recipe 24.8.
Using Option with Scala collections
Another great feature of Option is that it’s used often in the Scala collections. For
instance, starting with a list of strings like this:
val possibleNums = List("1", "2", "foo", "3", "bar")
imagine that you want a list of all the integers that can be converted from that list of
strings. By passing the makeInt method into the map method, you can convert every
element in the collection into a Some or None value:
scala> possibleNums.map(makeInt)
res0: List[Option[Int]] = List(Some(1), Some(2), None, Some(3), None)
734
|
Chapter 24: Best Practices
This is a good start. As shown in “flatten with Seq[Option]” on page 391, because an
Option can be thought of as a collection of zero or one element, you can convert this
List[Option[Int]] values into a List[Int] by adding flatten after map:
val a = possibleNums.map(makeInt).flatten
// a: List[Int] = List(1, 2, 3)
As shown in Recipe 13.6, “Flattening a List of Lists with flatten”, this is the same as
calling flatMap:
val a = possibleNums.flatMap(makeInt)
// a: List[Int] = List(1, 2, 3)
The collect method provides another way to achieve the same result:
scala> possibleNums.map(makeInt).collect{case Some(i) => i}
res0: List[Int] = List(1, 2, 3)
That example works because the collect method takes a partial function, and in this
case the anonymous function that I pass in is only defined for Some values; it ignores
the None values. (See Recipe 10.7, “Creating Partial Functions”, for more details on
the collect method.)
All of these examples work for several reasons:
• makeInt is defined to return an Option, specifically an Option[Int].
• Collections methods like flatten, flatMap, and collect are built to work with
Option values.
• You can pass methods, functions, and anonymous functions into the methods of
collections classes.
Using Option with other frameworks
When you use third-party Scala libraries, you’ll find that Option is used to handle sit‐
uations where a variable is optional. For instance, they’re baked into the Play Frame‐
work’s Anorm database library, where you use Option values for database table fields
that can be null. The following example shows how to write a SQL SELECT statement
with Anorm. Here, the third field may be null in the database, so I use pattern
matching with Some and None values in a collect method:
def getAll() : List[Stock] =
DB.withConnection { implicit connection =>
sqlQuery().collect {
// use Some when the 'company' field has a value
case Row(id: Int, symbol: String, Some(company: String)) =>
Stock(id, symbol, Some(company))
// use None when the 'company' field does not have a value
case Row(id: Int, symbol: String, None) =>
24.6 Using Scala’s Error-Handling Types (Option, Try, and Either)
|
735
Stock(id, symbol, None)
}.toList
}
Option is also used extensively in Play Framework validation methods. In this exam‐
ple, model.age is an Option[Int]:
verifying("If age is given, it must be greater than zero",
model => model.age match
case Some(age) => age < 0
case None => true
)
scala.util.control.Exception.allCatch
The scala.util.control.Exception object gives you another way
to use Option, Try, and Either values. For instance, you can
remove try/catch blocks from functions and replace them with
allCatch:
import scala.util.control.Exception.allCatch
import scala.io.Source
def readTextFile(f: String): Option[List[String]] =
allCatch.opt(Source.fromFile(f).getLines.toList)
allCatch is a Catch object that catches everything. The opt
method returns None if an exception is caught—such as a FileNot
FoundException—and a Some if the block of code succeeds. Other
allCatch methods support the Try and Either approaches.
Use Try or Either when you want access to the failure reason
When you want to use the Option/Some/None approach but also want to write a
method that returns error information in the failure case, there are two similar sets of
error-handling classes:
• Try, Success, and Failure
• Either, Left, and Right
In this section I’ll demonstrate the Try/Success/Failure classes.
Try is similar to Option, but it returns exception information in a Failure object, as
opposed to None, which doesn’t give you this information. The result of a computa‐
tion wrapped in a Try will be one of its subclasses:
• Success (which is like Some)
736
|
Chapter 24: Best Practices
• Failure (which is similar to None)
If the computation succeeds, a Success instance is returned and contains the desired
result; if an exception was thrown, a Failure is returned and holds information
about what failed.
To demonstrate this, first import the classes and create a test function:
import scala.util.{Try,Success,Failure}
def divideXByY(x: Int, y: Int): Try[Int] = Try(x/y)
This function returns a successful result as long as y is not zero. When y is zero, an
ArithmeticException is thrown. However, the exception isn’t thrown out of the
method—it’s caught by the Try, and Try returns a Failure object from the method.
The REPL demonstrates how the Success and Failure cases work:
scala> divideXByY(1,1)
res0: scala.util.Try[Int] = Success(1)
scala> divideXByY(1,0)
res1: scala.util.Try[Int] = Failure(java.lang.ArithmeticException: / by zero)
As with Option, you access the Try result using a match expression, foreach, getOr
Else, or the HOFs shown in Recipe 24.8. For instance, one way to access the informa‐
tion in the Failure message is with a match expression:
divideXByY(1, 1) match
case Success(i) => println(s"Success, value is: $i")
case Failure(s) => println(s"Failed, message is: $s")
As with Option, foreach works well for side effects like printing:
divideXByY(1, 1).foreach(println)
divideXByY(1, 0).foreach(println)
// prints 1
// no output is printed
If you don’t care about the error message and just want a result, use getOrElse:
val x = divideXByY(1, 1).getOrElse(0)
val y = divideXByY(1, 0).getOrElse(0)
// x: 1
// y: 0
With the Try class you can chain operations together, catching exceptions as you go.
For example, the following code won’t throw an exception, regardless of what the
actual values of x and y are:
// 'x' and 'y' are String values
val z = for
a <- Try(x.toInt)
b <- Try(y.toInt)
yield
a * b
val answer = z.getOrElse(0) * 2
24.6 Using Scala’s Error-Handling Types (Option, Try, and Either)
|
737
If x and y are String values like "1" and "2", this code works as expected, with
answer resulting in an Int value. If either x or y is a String that can’t be converted to
an Int, z will have a Failure value:
z: scala.util.Try[Int] =
Failure(java.lang.NumberFormatException: For input string: "one")
If x or y is null, z will have this value:
z: scala.util.Try[Int] = Failure(java.lang.NumberFormatException: null)
In either Failure case, the code handles the cases gracefully.
Discussion
You can also use the Either, Left, and Right classes instead of Option or Try. This
code shows two ways to write divideXByY while returning an Either type:
// 1st approach
import scala.util.control.Exception.allCatch
def divideXByY(x: Int, y: Int): Either[Throwable, Int] = allCatch.either(x/y)
// 2nd approach
import scala.util.{Try,Success,Failure}
def divideXByY(x: Int, y: Int): Either[Throwable, Int] = Try(x/y).toEither
As shown in Either’s type signature, you declare both types that can be returned by
your method. By convention, the Left type contains the failure information you want
to return, and the Right type contains the success value.
Either is more flexible than Try in that it’s more general; it’s really just a value that
contains one of two possible types (technically known as a disjoint union). You can
see from its type signature that it’s a container of two possible types, A or B:
Either[+A, +B]
When used in error handling, Left typically contains a Throwable or String that
represents the error, but because Either is really just a container of two types, it can
be used for anything. This code shows one way to write the makeInt method using
Either, where the left value is now a String:
def makeInt(s: String): Either[String, Int] =
try
Right(s.trim.toInt)
catch
case e: Exception => Left(e.getMessage)
These examples show two possible results from calling makeInt:
makeInt("1")
makeInt("a")
738
|
// Right(1)
// Left(For input string: "a")
Chapter 24: Best Practices
Either is right-biased, which means that Right is the default case to operate on, so
methods like map work on the default case:
makeInt("1").map(_ * 2)
makeInt("a").map(_ * 2)
// Right(2)
// Left(For input string: "a")
Because of this, Either works well in for expressions:
val x =
for
a <- makeInt("1")
b <- makeInt("2")
yield
a + b
// result: x == Right(3)
match expressions work just like Option and Try:
makeInt(aString) match
case Right(x) => println(s"Success, x = $x")
case Left(s) => println(s"Failure, message = $s")
Using Either is Preparation for Working with FP Libraries
While reviewing this chapter, Hermann Hueck made the point that
two benefits of using Either are that (a) it’s more flexible than Try,
because you can control the error type, and (b) using it gets you
ready to use FP libraries like Cats and ZIO, which use Either and
similar approaches extensively.
Don’t use the get method
When you first come to Scala you may be tempted to use the get method to access
the result:
val x = makeInt("5").get
// x: 5
But don’t do this. It isn’t any better than a NullPointerException:
val x = makeInt("foo").get
// java.util.NoSuchElementException: None.get
It’s a best practice to never call get on an Option. The preferred approaches are to use
a match expression, foreach, getOrElse, or the HOFs shown in Recipe 24.8. As with
null values, I find it best to imagine that get doesn’t exist.
Other methods
Another distinguishing feature of these types is the methods they support. For
instance, Option, Try, and Either have these common methods:
24.6 Using Scala’s Error-Handling Types (Option, Try, and Either)
|
739
• Collections-like methods in flatMap, flatten, fold, foreach, and map
• Methods to access the enclosed value like getOrElse and orElse
Option and Try have these additional common methods:
• collect, filter
Option has these additional collection-like methods:
• contains, empty, exists, forall, isDefined, isEmpty, nonEmpty, reduce, take,
and takeWhile
Try has additional methods to help you recover from errors:
• recover, recoverWith, and transform, which let you gracefully handle Success
and Failure results
Either has these additional methods:
• contains, filterOrElse, forall, and more generally, additional left/right
manipulation methods like joinLeft, joinRight, left, and swap
See Also
• See the Scaladoc for the Option, Try, and Either classes for more information.
24.7 Building Modular Systems
Problem
You’re familiar with Martin Odersky’s statement that Scala developers should use
“functions for the logic, and objects for the modularity,” so you want to know how to
build modules in Scala.
Solution
To understand this solution, you have to understand the concept of a module. The
book Programming in Scala describes a module as “a ‘smaller program piece’ with a
well defined interface and a hidden implementation.” More importantly, it adds this
discussion:
740
|
Chapter 24: Best Practices
Any technique that aims to facilitate this kind of modularity needs to provide a few
essentials. First, there should be a module construct that provides a good separation of
interface and implementation. Second, there should be a way to replace one module
with another that has the same interface without changing or recompiling the modules
that depend on the replaced one. Lastly, there should be a way to wire modules
together. This wiring task can be thought of as configuring the system.
Regarding these three points, Scala provides these solutions:
• Inheritance and mixins with traits, classes, and objects provide a good separation
of interface and implementation.
• Inheritance also provides a mechanism for one module to be replaced by
another.
• Creating objects (reifying them) from traits provides a way to wire modules
together.
With a modular approach you write code like this:
trait Database { ... }
object MockDatabase extends Database { ... }
object TestDatabase extends Database { ... }
object ProductionDatabase extends Database { ... }
Using this approach you define the desired method signatures—the interface—in the
base Database trait, and potentially you implement some behavior there as well. Then
you create the three objects for your Dev, Test, and Production environments. The
actual implementation may be a little more complicated than this, but that’s the basic
idea.
Programming with modules in Scala goes like this:
• Think about your problem, and create one or more base traits to model the inter‐
face for the problem.
• Implement your interfaces with pure functions in more traits that extend the base
trait.
• Combine (compose) the traits together as needed to create other traits.
• When necessary and desirable, create an object from those traits.
An example
Here’s an example of this technique. Imagine that you want to define the behaviors
for a dog, let’s say an Irish setter. One way to do this is to jump right in and create an
IrishSetter class:
class IrishSetter { ... }
24.7 Building Modular Systems
|
741
This is generally a bad idea. A better idea is to think about the interfaces for different
types of dog behaviors and then build a specific implementation of an Irish setter
when you’re ready.
For example, an initial thought is that a dog is an animal:
trait Animal
More specifically, a dog is an animal with a tail, and that tail has a color:
import java.awt.Color
abstract class AnimalWithTail(tailColor: Color) extends Animal
Next, you might think, “Since a dog has a tail, what kind of behaviors can a tail have?”
With that thought, you’ll sketch a trait like this:
trait DogTailServices:
def wagTail = ???
def lowerTail = ???
def raiseTail = ???
Next, because you know that you only want this trait to be mixed into classes that
extend AnimalWithTail, you’ll add a self-type to the trait:
trait DogTailServices:
// implementers must be a sub-type of AnimalWithTail
this: AnimalWithTail =>
def wagTail = ???
def lowerTail = ???
def raiseTail = ???
As shown in Recipe 6.6, “Marking Traits So They Can Only Be Used by Subclasses of
a Certain Type”, this peculiar looking line declares a self-type:
this: AnimalWithTail =>
This self-type means, “This trait can only be mixed into other traits, classes, and
objects that extend AnimalWithTail.” Trying to mix it into other types results in a
compiler error.
To keep this example simple, I’ll go ahead and implement the functions (services) in
the DogTailServices trait like this:
trait DogTailServices:
this: AnimalWithTail =>
def wagTail() = println("wagging tail")
def lowerTail() = println("lowering tail")
def raiseTail() = println("raising tail")
Next, as I think more about a dog, I know that it has a mouth, so I sketch another
trait like this:
742
|
Chapter 24: Best Practices
trait DogMouthServices:
this: AnimalWithTail =>
def bark() = println("bark!")
def lick() = println("licking")
I could keep going on like this, but I hope you see the idea: you think about the serv‐
ices—the behaviors or functions—that are associated with a domain object (like a
dog), and then you sketch those services as pure functions in logically organized
traits.
Don’t Get Bogged Down
When it comes to designing traits, just start with your best ideas,
then reorganize them as your thinking becomes more clear. As an
example, the Scala collections classes have been redesigned several
times as the designers understood the problems better.
Now I’ll stop defining new dog-related behaviors and will create a module as an
implementation of an Irish setter with the services I’ve defined so far:
object IrishSetter extends
AnimalWithTail(Color.red),
DogTailServices,
DogMouthServices
If you start the REPL and import the necessary Color class:
scala> import java.awt.Color
import java.awt.Color
and then import all of those traits into the REPL (not shown here), you’ll see that you
can call the functions/services on your IrishSetter:
scala> IrishSetter.wagTail()
wagging tail
scala> IrishSetter.bark()
bark!
While this is a relatively simple example, it shows the general process of program‐
ming with modules in Scala.
About service
The name service comes from the fact that these functions provide a series of public
services that are essentially available to other programmers. Although you’re welcome
to use any name, I find that this name makes sense when you imagine that these func‐
tions are implemented as a series of web service calls. For instance, when you use
Twitter’s REST API to write a Twitter client, the functions made available to you in
that API are considered to be a series of web services.
24.7 Building Modular Systems
|
743
Discussion
The reasons for adopting a modular programming approach are described in Pro‐
gramming in Scala:
As a program grows in size, it becomes increasingly important to organize it in a mod‐
ular way. First, being able to compile different modules that make up the system sepa‐
rately helps different teams work independently. In addition, being able to unplug one
implementation of a module and plug in another is useful, because it allows different
configurations of a system to be used in different contexts, such as unit testing on a
developer’s desktop, integration testing, staging, and deployment.
Regarding the first point, in functional programming it’s nice to be able to say, “Hey,
Team A, how about if you work on the Order functions and Team B works on the
Pizza functions?”
Regarding the second point, a good example is that you might use a mock database in
your Dev environment and then use real databases in the Test and Production envi‐
ronments. In this case you’ll create traits like these:
trait Database { ... }
object MockDatabase extends Database { ... }
object TestDatabase extends Database { ... }
object ProductionDatabase extends Database { ... }
A detailed variation of this example is shown in Chapter 27 of Programming in Scala.
24.8 Handling Option Values with Higher-Order Functions
Problem
Using match expressions to handle Option values works well but is somewhat ver‐
bose, and you want to use higher-order functions as a more advanced and concise
way to handle Option values.
Solution
This recipe shows advanced ways to work with Option values in different circumstan‐
ces, specifically how to use higher-order functions as alternatives to match expres‐
sions, which are very readable but can be verbose. Some of the examples also apply to
the Try and Either types.
Sample data
The advanced HOF techniques are demonstrated in Table 24-1. The idea of this table
is that rather than use the match expressions shown in the second column, you can
use the more concise HOF solutions shown in the third column.
744
|
Chapter 24: Best Practices
The table is sorted by the result type of each match expression, which is what you’re
thinking about when trying to solve a problem, e.g., “I need to print the value in a
Some, and I know this is a side effect that returns Unit, how do I do that?” In this case
you look into the table knowing this and find the solution in the first row. Therefore,
you can use the match expression in the second column, or the other options shown
in the third column. Similarly, use the solutions shown in the second and third rows
when you want to extract the value out of the Some, or use the default value; in both
solutions the result has the type A.
As a setup for those solutions, here are some functions and values that will be used in
the table:
// functions
def p(i: Int): Boolean = i == 1
// type: A => Boolean (a predicate)
def f(i: Int): Int = i * 2
// type: A => A
def fo(i: Int): Option[Int] = Some(i * 2) // type: A => Option[A]
// values
val option: Option[Int] = Some(1)
val none: Option[Int] = None
val default = 0
val defaultSome = Some(0)
val stringOption = Option("foo")
In that code:
• p is a predicate of type Int => Boolean (or more generally, A => Boolean)
• f is a function of type Int => Int (or more generally, A => A)
• fo is a function that returns an Option (so fo’s type signature is A => Option[A])
Regarding the examples in Table 24-1:
• Because you know what result type you want when working with an Option in a
specific situation, the table is sorted by the expression return type, which is
shown in the first column.
• While my code uses Int values, in all but one example you can think of the
expressions as using a generic type A.
Given that background, Table 24-1 shows the examples, with the relatively long match
expressions and their equivalent HOFs.
24.8 Handling Option Values with Higher-Order Functions
|
745
Table 24-1. Match expressions and their equivalent HOFs
Result Type
Match Expression
HOF
Unit
// use match for a side effect
option match
case Some(i) => println(i)
case None => ()
option.foreach(println)
A
option match
case Some(i) => i
case None => default
option.getOrElse(default)
A
// apply a function to the
// option value
option match
case Some(i) => f(i)
case None => default
option.map(f)
.getOrElse(default)
option match
case Some(i) => fo(i)
case None => None
option.map(f)
Option[A]
// or this:
for o <- option do println(o)
option.fold(default)(x => x)
option.fold(default)(f)
option.flatMap(i => fo(i))
for i <- option yield f(i)
Option[A]
option match
case Some(x) => Some(x)
case None => defaultSome
option.orElse(defaultSome)
Option[A]
option match
case Some(x) if p(x) =>
Some(x)
case _ => None
option.filter(p)
option.find(p)
Option[A]
option match
case Some(x) if !p(x) =>
Some(x)
case None => None
option.filterNot(p)
Boolean
option match
case Some(x) => p(x)
case None => true
option.forall(p)
Boolean
option match
case Some(x) => p(x)
case None => false
option.exists(p)
Boolean
option match
case Some(a) => false
case None => true
option.isEmpty
Boolean
option match
case Some(x) => true
case None => false
option.isDefined
option.nonEmpty
746
|
Chapter 24: Best Practices
Result Type
Match Expression
HOF
Boolean
// the example uses 'x == 1'
// because I use Option[Int]
option match
case Some(x) => x == 1
case None => false
option.contains(1)
Int
option match
case Some(x) => 1
case None => 0
option.size
Int
option match
case Some(x) if p(x) => 1
case _ => 0
option.count(p)
Seq, List, etc.
option match
case Some(x) => Seq(x)
case None => Nil
option.toSeq
option.toList
(also toVector, toArray,
toSet, etc.)
Either[Int,Int]
= Right
option match
case Some(x) => Right(x)
case None => Left(default)
option.toRight(default)
Either[Int,Int]
= Left
option match
case Some(x) => Left(x)
case None => Right(default)
option.toLeft(default)
A or null
stringOption match
case Some(x) => x
case None => null
// only use this for Java APIs
// that need it
stringOption.orNull
Note that I put the null example in the last row because you should never use that,
unless you’re interacting with a Java API that needs it.
Discussion
Here are some examples to show how the HOFs in the third column of Table 24-1
work:
option.fold(default)(f)
none.fold(default)(f)
// 2
// 0
option.map(f).getOrElse(default)
none.map(f).getOrElse(default)
// 2
// 0
option.flatMap(i => fo(i))
none.flatMap(i => fo(i))
// Some(2)
// None
option.orElse(defaultSome)
none.orElse(defaultSome)
// Some(1)
// Some(0)
option.forall(p)
// true
24.8 Handling Option Values with Higher-Order Functions
|
747
option.find(p)
option.filter(p)
// Some(1)
// Some(1)
option.toSeq
none.toSeq
// Seq[Int] = List(1)
// Seq[Int] = List()
Some examples like the fold example might be a little hard to grasp at first glance,
but if you think about it, its use is consistent with sequences, where fold takes an ini‐
tial seed value and a folding function. Because an Option can be thought of as a col‐
lection of zero or one element, the seed value works as the default in the case where
the Option is None, and the function you supply is applied in the case where Option is
a Some. That being said, I always think that being able to read code in the future—
code maintenance—is extremely important, so I recommend only using code that
you think you’re comfortable with.
See Also
• For more examples of these techniques, watch this LambdaConf 2015 video by
Marconi Lanna, which helps to round out the last few examples in the table.
748
|
Chapter 24: Best Practices
Index
Symbols
! method, executing command and getting exit
code, 477
!! method, executing command and getting
output, 480
" (quotation marks), surrounding multiline
strings, 26
# (hash), MacOS comment lines, 599
#| method, pipelining commands, 485
$ (dollar sign), preceding variable names, 29
% method, libraryDependencies strings, sbt,
507
%% method, sbt
in build.sbt file, 631
libraryDependencies strings, 507
%%% method, sbt
in build.sbt file, 631
libraryDependencies strings, 507
() (parentheses), leaving off accessor methods,
247
* (asterisk)
import statements, 255, 260, 262
varargs field declaration, 246
*: syntax (tuples), 448
+ (variance symbol), 674, 684, 686
+ method
adding elements to immutable Map, 426
adding elements to immutable Set, 454
++ method
adding elements to immutable Set, 454
merging sequential collections, 406
mutable collections, 376
++= method
adding elements to mutable Queue, 461
adding elements to mutable Set, 454
adding multiple elements to mutable Map,
428
in build.sbt file, 492
merging sequential collections, 407
mutable collections, 376
+= method
adding elements to mutable Map, 428
adding elements to mutable Queue, 461
adding elements to mutable Set, 454
in build.sbt file, 492
libraryDependencies strings, 507
, (comma), formatting numbers, 73
- (variance symbol), 674
- method
mutable collections, 376
removing elements from immutable Map,
426
removing elements from immutable Set, 455
-- method
mutable collections, 376
removing elements from immutable Map,
426
removing elements from immutable Set, 455
--= method
deleting elements from mutable Map, 428
deleting elements from mutable Set, 456
-= method
deleting elements from mutable Map, 428
deleting elements from mutable Set, 456
: (colon), for right-to-left evaluation when at
end of method, 349
:: method, 346
::: method, 347, 407
749
<: (upper bound), 690
== method
in defining object equality, 154-162
Set class, 445
testing object equality in Scala, 25
testing string equality, 24
=> function transformer, 279, 282, 286
@() (Play template), 561
@SerialVersionUID annotation, 664-665
_ (underscore)
hiding a class, 261
in numeric literals, 55
to shorten code, 36
wildcard character in Scala, 263
_* operator, 246, 440
{} (curly braces)
case statements in, 386
import syntax, 259
packaging with, 256
to include expressions in strings, 29
to print object fields, 30
| (pipe symbol)
using to create multiline strings, 27
A
abstract classes, 136, 185
abstract fields, using in traits, 183
AbstractBehavior class, Akka, 538
access modifiers, controlling method scope,
235-239
accessor methods, 130
case class constructor parameters, 171
forcing callers to leave parentheses off, 247
overriding defaults, 165-167
preventing from being generated, 162
Action function, Play Framework, 561, 565
action method, Play Framework, 52, 592
Actor and ActorSystem, creating at same time,
541
ActorRef, Akka, 523, 541, 544, 546-548, 551
actors (Actor model), Akka, 522-524, 538-556
case objects and, 175
creating FP-style, 543-545
creating OOP-style, 538-542
creating with multiple states, 552-556
sending messages to, 546-551
Singleton objects as messages for, 221
add method, with mutable Set, 455
AddService module, 204
750
|
Index
addString method, 415
Adler-32 checksum algorithm, 40
ADTs (algebraic data types), 131, 181, 213-216
Akka (Actor model library), 522
(see also actors)
Akka Classic actors, 522, 727
Akka Typed actors, 522, 542, 546-556
Alexander, Alvin
blog posts, xxii
Functional Programming, Simplified, 40,
209, 271, 277, 713
Scala 3 Book, 212
algebraic data types (see ADTs)
algorithms, passing functions around in, 305
alias givens, 699
allCatch method, 122, 736
Ammonite REPL, 2, 5, 8-11
andThen method, 301, 530, 532
annotations, 662-666
Scala and Java equivalents, 665
@SerialVersionUID, 473, 664-665
@throws, 58, 122, 661-662
@transient, 664
@varargs, 662-663
anonymous functions, 279, 280, 369
anonymous givens and unnamed parameters,
697
Anorm database library, 735
Any class, 218
AnyRef class, 25
Apache Commons IO library, 476
Apache Ivy, 510
Apache Spark, 23, 589-618
batch application, 616-618
DataFrame, reading data files into, 608-611
DataFrames to use Spark like database,
602-608
getting started, 591-594
lazy methods and, 51
RDD, reading data files into, 595-602
Spark SQL queries against multiple files,
612-616
APIs
generating project documentation, 512-513
traits commonly used in libraries, 327
applications, building with jpackage, 641-646
Applied Numerical Analysis (Gerald and
Wheatley), 308
apply method
in companion objects, 151
finite-state machine, 553
for creating partial functions, 299
FP-style actors, 543
implementing static factory with, 225
in companion objects, 176, 223
in objects as constructors, 223
OOP-style actors, 538
in writing functions that return futures, 533
Array class, 317
collections and, 341
creating arrays, 359-362
deleting elements from arrays, 357
mutating elements, 684
replacing elements in arrays, 358
updating, 359-362
Array.ofDim method, 362-364
ArrayBuffer class, 317, 326, 684-686
as go-to mutable sequence, 355
collections and, 340
deleting elements from arrays, 357
generic types and, 678
ArrayDeque class, 460
arrays
multidimensional, 362-364
ragged, 364
sorting, 365, 438-441
using notation to access a character in a
String, 46
arrow syntax, creating two-element tuple, 449
artifact fetching, 487
artifactID, libraryDependencies syntax, 507,
508
asInstanceOf method, 60, 218
asJava method, 651
asScala method, 651
asynchronous programming, 478, 482-483
Await.result method, 526
Awesome Scala list, 557
B
Barski, Conrad (Land of Lisp), 276
base type
classes whose parameters implement,
687-689
handling in conversions of strings to inte‐
gers, 57
batch application, Spark, 616-618
batch mode, sbt, 496, 499
Beginning Apache Spark 2 (Apress), 593
Beginning Scala (Pollak), 128, 728
Behavior methods, Akka Typed, 542, 545
Behavior.setup, FP-style actors, 543, 545
Behaviors.receiveMessage, 543, 545
Behaviors.same, 542
best practices in Scala, 711-748
as the body of a method, 725-728
eliminating null values from code, 728-732
error-handling types (Option, Try, Either),
733-740
expression-oriented programming (EOP),
722-725
higher-order functions to handle option val‐
ues, 744-748
immutable variables and collections,
719-722
modules, 740-744
pure functions, 713-719
BigDecimal class, 61
conversions to other numeric types, 67
creating directly from strings, 57
currency formatting with, 73
BigInt, 61
conversions to other numeric types, 67
creating directly from strings, 57
BigInteger class, 67
binary files, reading and writing, 470-472
Bloch, Joshua (Effective Java), 155, 161, 162
boilerplate code, generating with case classes,
171-175
bounds, 669, 687, 690
break method, 127
Breaks class, 128
buffer, 341
BufferedInputStream class, 471
BufferedIterator, 383
BufferedReader class, 468
BufferedSource class, 465, 472
BufferedWriter class, 468, 470
buffering, importance of, 472
build.sbt file, 17, 489, 559
(see also libraryDependencies)
adding dependency for Play JSON library,
581
controlling managed dependencies, 505-510
cross-compiling with Scala 2.13, 506
forking a JVM, 501
import packages, 490
Index
|
751
@main methods, specifying, 514
publishTo configuration, 517
sbt new template approach, 494
Seq for multiple dependencies, 506
syntax styles for creating, 497-498
updating for Scala.js, 623
built-in versus external commands, 480
by method, in Range, 450
by-name parameters, 127
Byte type, 54
C
%c format specifier, 34
call-by-name parameters, 127
callback methods, futures, 532
callback parameter, 287
CanEqual typeclass, limiting equality compari‐
sons with, 707-710
case classes, 16, 130
converting to tuple, 448
defining auxiliary constructors for, 176
generating boilerplate code with, 171-175
in functional programming, 132
parameters in, 143, 171
case objects, 175
case statements
as match expressions, 725, 727
using in foreach, 386
casting, 59-62, 218
catch clause, throwing exception from, 121
(see also try/catch/finally block)
chained package clauses, 258
chaining methods, 22, 250-253, 300
Chambers, Bill (Spark: The Definitive Guide),
590
Char class, Range sequence and, 452
Char numeric type, 54
characters
formatting, 34
notation to access in a String, 46
strings as a sequence of, 22
Unicode, 50
charAt method, 46
Charset, 470
charWrapper method, 452
Child class, 241
ChronoUnit class, 79
Circe library, 583
ClassCastException, 219
752
| Index
classes, 129-177
abstract, 136, 185
adding methods to closed, 253
assigning blocks or functions to lazy fields,
167
case (see case classes)
choosing collection, 324-330
constructing with traits, 187
constructor parameters when extending,
149-152
controlling comparison with multiversal
equality, 706
creating class whose generic elements can be
mutated, 684-686
creating primary constructors, 137-140
default values for constructor parameters,
148
defining auxiliary constructors, 144, 176
defining equals method to compare object
instances, 154-162
defining private primary constructors, 146
disassembling, 164
domain modeling options, 131-137
extending multiple traits, 688
futures (see futures)
for generic types, 678-681
hiding during import process, 261
in object-oriented programming, 133
inheritance as limit on, 197
Map (see Map classes)
overriding default accessors and mutators,
165-167
parallel collections, 524
partial functions in collection, 301
passing with classOf method, 219
preventing accessor and mutator methods
from being generated, 162
Scala/Java conversions, 652-653
sequence (see sequence classes)
setting uninitialized var field types, 169
specifying main class to run with sbt,
513-515
subclasses, 149, 192-195
superclasses, 152, 189, 239-242
tuples as replacements for, 448
utility, 147
whose parameters implement a base type,
687-689
classOf method, passing class type to, 219
classpath
compiling with scalac, 12
Play/JSON in REPL, 571
running JAR file with scala or java com‐
mands, 18
sbt console commands and, 5, 502
in starting REPL, 7
Clean Code (Martin), 711
clean command, sbt, 500
clear method, 357, 428, 459
clearAndShrink method, 358, 459
cloning
deep clone approach, 474
of objects with copy, 173
closing files, 465, 467
code examples, using, xxi
code listings, in this book, xxi
collect method, 592
filtering collections with, 394
Option and, 735
Spark, 596
taking partial function as input, 301
collectFirst method, 394
collection methods
choosing, 371-378
common, 372-375
immutable, 376
mutable, 375
using on strings, 37
CollectionConverters object, 647, 648, 650, 652
collections, 317-337
Array class, 341
ArrayBuffer class, 340
choosing collection classes, 324-330
converting collection to String, 415
filtering, 350, 392-394
fold method, 400-405
foreach method, 378
hierarchy in, 319-324
immutable (see immutable collections)
Java compared with Scala, 318, 648-653
Json.toJson Writes implementations for, 570
lazy, 329, 451
lazy view, 335-337
List class (see List class)
maps, 322, 387-390, 419-444
mutable (see mutable collections)
Option with, 734
parallel, 524
partial functions in, 301
performance of, 330-333
queues, 460-462
ranges, 449-453
reduce method, 400-405
Scala 2.13 release, 318
Scala compared with Java, 318, 648-653
sequence classes (see sequence classes)
sequence methods (see sequence methods)
serializing to JSON, 573
sets, 323, 453-455
stacks, 458-460
strict, 329
tuples, 446-449
Vector class, 319, 339, 341
with for/yield loops, 387-390
Color class, 263
combination of types, declaring as, 703-705
combinators, 578
command-line tasks, 1-18
compiling with scalac, 11
decompiling Scala code, 13-16
disassembling Scala code, 13-16
getting started with Ammonite REPL, 8-11
getting started with REPL, 3-6
loading JAR files into REPL, 6
loading source code into REPL, 6
passing arguments to sbt, 500
running JAR files with Scala and Java, 17
running with scala, 11
sbt commands, 495-497, 501-503
companion objects
apply method, 151, 176, 223
creating static members with, 221
getInstance method in, 147
compare method, 413
~compile (continuous compile) command, sbt,
504
compile command, sbt, 500
compiling
with sbt, 499-500, 504-505
using scalac, 11, 492
complex numbers, working with, 56
computer programmer levels, xvii
concat method, 406
concrete immutable collection classes, 343
concurrency, 712
(see also actors; futures)
conf/routes file, Play Framework, 560, 564, 567
Index
|
753
configuration files (see build.sbt file)
configuration parameter, libraryDependencies,
508
console command, sbt, 5, 503
consoleQuick command, sbt, 5
constants, using enums for, 222
constructor fields, controlling visibility of,
140-144
constructor parameters
accessor methods, 171
handling when extending classes, 149-152
providing default values for, 148
constructors
auxiliary, 144, 176
creating primary, 137-140
private, 146, 539
using apply method in objects as, 223
contains method, 431
context parameters, 697
continually method, 471
continue method, 127
contravariance (-A), 674, 676
control structures
creating, 125
declaring variables before using in try/
catch/finally block, 123
for loops, 88-92
List in a match expression, 117-119
matching one or more exceptions with try/
catch, 120-123
pattern matching, 105-111
switch statement, match expression used
like, 98-102
try/catch/finally blocks, 123
controllers, Play Framework, 560, 564, 567, 570
cookies, sttp, 588
copy method, 173
cos method, 263
Coursier, 18, 487, 507, 509
covariance (+A), 674, 682-684, 686
createOrReplaceTempView method, 611
createOrReplaceTempView method, Spark, 614
cross method for cross-version builds in sbt,
506
CSV files, 28, 600-602, 608-611
csv() method, Spark, 598
Cunningham, Ward, 711
curl command, Unix, 565
currency, formatting, 73
754
|
Index
current class, 155
D
%d format specifier, 33
DAO (data access object), 311
Darwin, Ian F. (Java Cookbook), 471
databases
Anorm database library, 735
DataFrames to use Spark like database,
602-608
Spark SQL module, 602-608
DataFrameReader interface, 611
DataFrames, Spark, 598, 602-608
reading data files into, 608-611
writing to a file, 611
DataSet, Spark, 598, 607
dates (see numbers and dates)
DateTimeFormatter class, 82
DDD (domain-driven design), 691-695
De Goes, John (Zionomicon), 675
dead letters, Akka actors, 555
debug command, sbt, 509
debugging (see testing and debugging)
DecimalFormat class, 74
decimals, in numbers or currency, 73
declaration-site variance, 670
decompilers, 16
decrementing numbers replacement for --, 64
deep clone approach, 474
def keyword, 233
def method, 131, 284
default accessors or mutators, overriding,
165-167
default parameter values, 146, 148, 244
delegation, Actor model, 523
dependencies
adding to build.sbt for JSON library, 581
managed, 487, 489, 505-510
narrow versus wide, 614
unmanaged, 487, 505
dependency injection framework, 311-316
dependent type, 199
dequeue method, 461, 462
dequeueAll method, 461
dequeueFirst method, 461
deserializing JSON into Scala object, 576-581
diff method, 407
directories
listing files in, 475-476
sbt project directory structure, 488, 490-495
disassembling
classes, 164
Scala code, 13-16
distinct method, 405
divide function, using PartialFunction, 298
DOM (Document Object Model), 623
domain modeling, 129, 131-137, 308-316
domain-driven design (see DDD)
domain-specific language (see DSL)
Double type, 54
driver app, 315
drop method, 395
dropRight method, 395
dropWhile method, 395
DRY (don't repeat yourself), 239
DSL (domain-specific language), 125
duck typing (structural types), 689-691
dynamic typing, 701-703
E
early initializers, 202
eC (effectively constant time), 330
Effective Java (Bloch), 155, 161, 162
Either, Left, and Right classes, 122, 303-304,
738-739
enqueue method, 461, 462
enqueueAll method, 461, 462
enumerated type, 213
enumeration, 181
enums (see traits and enums)
EOP (expression-oriented programming), 234,
276, 722-725
equality
== (equality) operator, 24, 25
CanEqual typeclass to limit equality com‐
parisons, 707-710
defining for objects, 154-162
enabling strictEquality, 706, 710
multiversal, 706
testing for String instances, 24
equals method, 154-162, 172
error handling, 733-740
avoiding get method, 739
implementing functional, 303-305
Option type, 733-740
Try/Either, 736-739
Eta Expansion technology, 285, 297
events, responding to in Scala.js, 625-632
Exception class, 249
exceptions
@throws annotations to Scala methods, 58,
122, 661-662
avoiding, 712
declaring methods can throw, 248
Java, 249
matching one or more with try/catch,
120-123
reading and closing files, 465
in Scala methods, 58
ExecutionContext, 526
exit status codes, with processes, 484
explain method, Spark, 615
Explicit Nulls, 732
explicit ordering, 412
expression, 234
expression-oriented programming (see EOP)
expressive code, 38, 140, 234
extends keyword, 182, 242, 660
extension methods
adding methods to closed classes with, 23,
253
to create API, 698
Scala Option to Java Optional value conver‐
sion, 656, 658
that take parameters, 254
external commands
versus built-in commands, Unix, 480
executing and reading STDOUT, 480-483
executing from Scala application, 477-480
pipeline of, 485-486
STDOUT and STDERR access, 483-485
extractor method, 46, 231
F
%f format specifier, 33
f string interpolator, 30, 34, 71
facade libraries, Java, 623, 627
factory method, 539
factory pattern, 226
fastOptJS command, 624, 631
fields
abstract, 183
controlling visibility of constructor, 140-144
initializing var fields with Option instead of
null, 729-730
lazy, 167
Index
|
755
methods that take variable-argument fields,
245
StructField type, Spark, 604
val, 141, 151
var, 141, 169, 729
FIFO (first-in, first out) data structure (see
queues)
File class, 475
file utilities class, 148
FileFilter object, 476
FileInputStream class, 471
FileOutputStream class, 470
FileReader class, 468
files, 463-476
binary files, reading and writing, 470-472
build.sbt (see build.sbt file)
closing, 465, 467
conf/routes file, Play Framework, 560, 564,
567
CSV, 28, 600-602, 608-611
disassembling class files with javap com‐
mand, 13
.gitignore file, 495
JAR (see JAR files)
jsdeps file, Scala.js, 627
listing in directory, 475-476
opening and reading text file, 464-468
reading files into Spark RDD, 595-600
serializing and deserializing objects to,
473-474
Spark SQL queries against multiple files,
612-616
String class and, 465, 472
writing text files, 468-470
FileUtils class, 476
FileWriter class, 468-470
filter method
calling on sString to create new string, 36
filtering a collection, 392-394
filtering maps, 443
implied loops and, 370
Spark, 592
using function literals, 279
filtering
collections, 350, 392-394
maps, 441-444
methods, 371
filterInPlace method, 428, 442
filterKeys method, 442
756
|
Index
filterNot method, 393
findAllIn method, 41
findFirstIn method, 41, 41
finite-state machine (see FSM)
first-in, first out (FIFO) data structure (see
queues)
flatMap method, 391
flatten method, 302, 390
Float type, 54
floating-point numbers
comparing, 65
formatting, 33, 73
fluent programming, 23
fold method, 118, 400-405, 530
foldLeft method, 400-405
foldRight method, 400-405
for expressions, 534-538
as control structures, 85
with guards, 96
walking through characters in string, 36-38
for loops, 38
(see also for/yield loops)
looping over data structures with, 88-92
with strings, 36
for-comprehension, 95
for/yield loops, 36, 38, 70, 387-390
foreach method, 40
anonymous functions with, 280
futures, 530-531, 532
looping over collections with, 378
None and, 170
operating on each element without return‐
ing result, 37
side effects, 380
transformer and, 336
traversing maps, 436
formatting
currency, 73
date/time, 32, 80
numbers, 71-75
strings, 32-35
FP (functional programming), 57, 271-316, 693
creating FP-style Akka actors, 543-545
creating methods that return functions,
295-298
creating partial functions, 298-302
declaring complex high-order functions,
289-292
defining methods that accept simple func‐
tion parameters, 287
domain modeling, 131, 308-316
error handling, 303-305
example, 133
function literals (anonymous functions),
279
and Future as nonreferentially transparent,
538
immutability versus mutability and, 722
input/output (I/O), 278
partially applied functions, 292-295
passing functions around algorithms, 305
passing functions around as variables,
281-287
pure functions, 272
referential transparency (RT), 275
rules for, 277
side effects, 273
substitution, 275
as superset of expression-oriented program‐
ming, 276
thinking in, 274
variables in, 118
Fraser, Adam (Zionomicon), 675
fromFile method, 465, 472
fromString method, 472
from_unixtime method, Spark, 616
FSM (finite-state machine), 552-556
function literals (see anonymous functions)
function parameters, defining methods that
accept, 287
function value, 282, 294
Functional and Reactive Domain Modeling
(Ghosh), 309
functional error handling, 303-305
functional programming (see FP)
Functional Programming, Simplified
(Alexander), 40, 209, 271, 277, 713
functions
anonymous, 279, 280, 369
assigning to function variables, 285
assigning to lazy field, 167
creating methods that return, 295-298
defining, 235
higher-order functions handle option val‐
ues, 744-748
impure, 273
passing around as variables, 281-287
passing around in algorithms, 305
pure (see pure functions)
that return a future, 533-534
storing in maps, 286
without side effects, 57, 272, 278
futures (Future class), 522, 525-538
creating and blocking to wait for its result,
525-528
running multiple futures in parallel,
534-538
transformation methods with, 528-532
writing functions that return, 532-534
G
generic type parameters, 667-669, 677-689
generic types
creating a method that takes, 677
creating classes that use, 678-681
parameter symbols, 680
Gerald, Curtis (Applied Numerical Analysis),
308
get method
accessing map values with, 430
avoiding on Option, 739
get prefix, and Uniform Access Principle, 717
GET requests
creating web service in Play, 566
handling query parameters in Play, 567
returning JSON from request, Play Frame‐
work, 568-572
sttp HTTP client, 584-587
get*Instance methods, Currency class, 75
getBytes method, 40
getCurrencyInstance method, 73
getInstance method, 147
getIntegerInstance method, 72
getLines method, 465
getOrElse method, 430
getter methods, 130
Ghosh, Debasish (Functional and Reactive
Domain Modeling), 309
GitHub, 587
.gitignore file, 495
given and using, using term inference with,
695-701
given+CanEqual approach, 708
givens, importing, 267, 700-701
GraalVM, 620, 638-641
groupBy method, 397
Index
|
757
groupID, libraryDependencies syntax, 507
grouping methods, 371
Gurnell, Dave (The Type Astronaut's Guide to
Shapeless), 199
H
hashCode method, 161, 172, 405
hasNext on Iterator, 381
head element, 346
head method, 339, 383
headOption method, 384
heredoc, 26
hex values, storing as Int or Long, 62
hierarchy, collections, 319-324
higher-order functions (see HOF)
HList (heterogeneous list) construct, 447
Hoare, Tony, 731
HOF (higher-order functions)
declaring complex, 289-292
to handle option values, 744-748
using with map method, 36
Horstmann, Cay S. (Scala for the Impatient),
188
HTML
responding to events with Scala.js, 625
SPAs, 632-638
using jQuery with Scala.js, 627
web applications definition, 562
HTTP client-side development, using sttp,
584-588
HTTP requests, in Scala.js, 637
HTTP, sttp HTTP client, 584-588
Hueck, Hermann, 304, 527
hybrid types, in ADTs, 216
I
I/O (input/output), functional programming
and, 278
identity elements, 119
identity values, 403
if/then/else statements, match expressions as
replacement for, 726
immutability and variance, 671, 682-684
immutable collections
as best practice, 719-722
methods for, 376
mutable variables with, 333
queues, 462
sets, 453, 455, 457
758
|
Index
val+mutable and var+immutable, 721-722
immutable maps, 423
adding elements, 425
creating, 420
filtering maps, 442
removing elements, 425
updating elements, 425
immutable sequences, 410
implicit conversions, 23
(see also term inference)
bringing into scope, 256
Int and Char classes, 452
to add methods to closed String class, 23
implicit Ordering, 412
implicit parameters, 366, 676
implicitly method, 675
implied loops, 370
import ivy command, Ammonite, 9
import selector clause, 259
import statements, using anywhere in Scala,
264-267
imports (see packaging and imports)
impure functions, 273
"in" and "out" positions, variance, 672-675
in keyword, declaring variance (C# and Kotlin),
674
incrementing numbers replacements for ++, 64
index method, Play Framework, 561
indexed sequences, 320
infix notation, 127
informational methods, 372
inheritance, 159, 197, 741
init method, 396
Instant class, 78
Int type, 54, 216, 449-452
Integer class, Java, 57
Integer-to-Int conversion process, 650
integers, formatting, 33
integral types, 53
IntelliJ IDEA IDE, 6, 158
interactive mode, sbt, 497, 499
interfaces
using Java interfaces in Scala, 660-660
using traits as, 181
interpolators, creating, 47-50
intersect method, 407
intersection types, 703-705
intWrapper method, 452
invariance (A), 680, 684, 686
io.Source, 463, 467
isDefinedAt method, 299, 302
isEven method, as anonymous function, 369
isEvenFunction function, 284
isEvenMethod method, 284
isValid method, with numeric types, 61
Iterable trait, 320
Iterator method, traversing maps, 436
Iterator object, working with text files, 471
iterators, 320, 381-384
J
JAR files
dependencies, 487, 505
deploying single, executable file from sbt,
515-517
download location of (sbt), 509
in lib folder, 487
loading into REPL, 6
running with Scala and Java, 17
Spark, 618
Java, 17
adding exception annotations to Scala
methods, 661-662
annotating varargs methods to work with,
662-663
BigDecimal class, 67
BigInteger class, 67
.class, compared to Scala classOf, 219
collection comparison with Scala, 648-653
compared with Scala, 318, 619-620
consequences of mutability, 719
exception types, 249
facade libraries, 623, 627
integration with Scala, 647-666
Java interfaces in Scala, 660-660
reading and writing files, 468
running JAR files with, 17
running sbt with, 497
@SerialVersionUID and other annotations,
664-666
static methods, 222
threads versus Scala futures, 522
traits in Scala, 659
java command, 2
Java Cookbook, 471
java.nio classes, 469
java.textNumberFormat class, 71
java.time.format.DateTimeFormatter class, 80
java.time.format.FormatStyle, 80
java.time.Instant, 76, 83
java.time.LocalDate, 82
java.time.LocalDateTime, 76, 83
java.time.LocalTime, 82
java.time.temporal.ChronoUnit class, 78
java.time.ZonedDateTime, 84
java.time.ZoneId, 76
java.timeZonedDateTime, 76
java.util package, 260
java.util.concurrent.TimeoutException, 526
java.util.HashMap class, 260
java.util.Locale class, 75
JavaBeans, 717
javac command, 2
javap command
disassembling case classes, 173-175
disassembling class files, 13-16
disassembling to see tableswitch, 100
disassembling with private option, 164
jpackage, 620, 641-646
jQuery, 627-628, 633
jsdeps file, Scala.js, 627
JSON (Play Framework)
deserializing into Scala object, 576-581
Play JSON library outside of Framework,
581-583
Play types, 571
returning JSON from GET request, 568-572
serializing Scala object to JSON string, 572
Json.fromJson method, Play Framework, 577
Json.toJson method, 570
Json.toJson method, Play Framework, 572-574
json.validate method, 578
JsPath, 577
JsPath, Play Framework, 578
JsResult type, Play Framework, 577
JVM
forking of, 501
passing options to sbt, 501
structural types, reflection requirement for,
691
switches, 98-102
K
keys
finding largest/smallest in maps, 433
resolvers key in build.sbt file, 510
sorting maps by, 438-441
Index
|
759
testing for existence of in maps, 431
traversing maps, 436
keys method, 432
keySet method, 432
keysIterator method, 432, 436
Klang, Viktor, 340
L
Land of Lisp (Barski), 276
last-in, first out (LIFO) data structure (see
stacks)
lazy collections, 329, 451
lazy fields, 167
lazy methods, 51, 592
lazy view, 335-337, 387
lazyLines and lazyLines_! methods, 482-483
LazyList class, 352, 451, 471
libraries
DOM facade for Scala.js, 623
jQuery library import, 627
Play JSON library outside of Framework,
581-583
publishing your Scala library with sbt,
517-519
scala-collection-contrib, 425
SnakeYAML, 218
Sphinx-4 library, 218
traits commonly used in collection APIs,
327
ZIO library, 304
libraryDependencies, sbt
configuration parameter, 507
declared as Seq trait, 492
managed dependencies in, 489, 505-510
methods for, 507
specifying revisions, 510-512
syntax for, 507-507, 510
test parameter, 509
LIFO (last-in, first out) data structure (see
stacks)
linear sequences, 320
LinkedHashMap class, 422, 438
LinkedHashSet class, 328, 457
Linux OS, building application for, 644
Lisp (LISt Processor), 276
List class, 317
adding elements to lists, 346-349
appending elements to lists, 346
collections and, 339
760
|
Index
creating lists, 344
deleting elements from lists, 349
instead of immutable Stack, 459
lines of file as, 465
populating lists, 344
prepending elements to lists, 346
tuple relationship to, 447
working with a List in a match expression,
117-119
list of lists, flattening with flatten method, 390
ListBuffer class, 326, 345, 356
creating mutable lists with, 351
deleting elements from, 349
listFiles method, Files class, 475
ListMap class, 424
literal types, combining union types with, 703
:load command (REPL), 6
Loan Pattern, 466, 467
local mode, Spark, 592
locale, setting with getIntegerInstance method,
73
Long type, 54
loop counters, creating with zip or zipWithIn‐
dex, 385
loops/looping
for (see for loops)
for/yield, 36, 38, 70, 387-390
foreach (see foreach method)
LowPriorityImplicits class, 452
lsof command (Unix), 467
Luu, Hien (Beginning Apache Spark 2), 593
M
macOS, building application for, 641-646
mailboxes, Actor model, 523
@main methods, 18
passing functions around in an algorithm,
307
sbt commands, 496, 514-515
using traits to create modules, 206
main.scala.html file, 562
makeInt method, 58, 303, 726
managed dependencies, 487, 489, 505-510
Map classes, 325, 380, 419-444
accessing map values without exceptions,
429
adding immutable elements, 425
adding mutable elements, 427
basic classes and traits, 424
choosing, 327, 422-425
collections and, 322, 387-390
creating, 419-422
filtering, 441-444
finding largest key or value in, 433
finding smallest key or value in, 433
getting keys or values, 431
methods for, 377
parallel, 425
performance characteristics for, 332
populating collections with ranges, 453
removing immutable elements, 425
removing mutable elements, 427
sorting by key or value, 438-441
storing functions in, 286
testing for keys or values, 431
traversing, 435-438
two-element tuples to create, 449
updating immutable elements, 425
updating mutable elements, 427
map method, 354
combining with flatMap method, 391
compared to for/yield, 97
creating uppercase string from input string,
36
mapInPlace instead on ArrayBuffer, 340
with Range, 453
signature in List class, 282
Spark, 592, 596
to trim strings in a sequence, 28
transforming one collection to another
with, 387-390
understanding how map works, 39
using collect method instead of, 301
writing method to work with map, 37, 388
mapInPlace method, 340
Martin, Robert C. (Clean Code), 711
match expressions, 725-728
in Akka actors, 727
as body of function or method, 726
equivalent higher-order functions, 745-748
implementing unapply in classes, 130
Message in OOP-style actors, 540
pattern matching with, 105-111, 725
in try/catch expressions, 120-123, 727
using like switch statement, 98-102
with Option/Some/None types, 726
working with a List, 117-119
writing unapply methods for, 231
Matchable, 107, 446, 702
mathematical methods, 372
Maven, 487, 488, 506, 507
Maven Central repository, 9, 510
MaxValue, checking for numeric types, 68
members, importing, 258
merging sequential collections, 406
method chaining, 22, 250-253, 300
methods, 233-254
accessor, 130, 162, 165-167, 171, 247
avoiding returning null from, 730
Behavior (Akka Typed), 542, 545
in body of class, 138
callback methods for futures, 532
calling on superclasses or traits, 239-242
collection, 37, 371-378
controlling method scope (access modi‐
fiers), 235-239
declaring they can throw exceptions, 248
defining method that takes function as
parameter, 287
exception (@throws) annotations to, 58,
122, 661-662
extension (see extension methods)
for Java conversion to Scala, 650-651
io.Source list, 467
with Option, Try, Either, 739
resolving name conflicts, 189-192
that return functions, 295-298
returning methods from, 297
sequence (see sequence methods)
setting default values for method parame‐
ters, 244
Spark RDD, 591
supporting fluent style of programming,
250-253, 250-253
that tale variable-argument fields, 245
transformation (see transformation meth‐
ods)
transformer (see transformer methods)
using parameter names when calling, 242
without side effects (see pure functions)
mixins, using traits as, 186-189
mkString method, on collection classes, 415
modules
best practices in Scala, 740-744
using traits to create, 204-210
MovieLens dataset, 590
multidimensional arrays, 362-364
Index
|
761
multiline expressions, pasting in Spark, 596
multiline strings, 26
multiple parameter lists, 127
multiversal equality, 706
mutable collections, 160, 375
ListBuffer lists, 351
maps, 421, 423, 427, 442
Queue class, 460
sets, 454, 456, 457
Stack class, 458
val+mutable and var+immutable, 721-722
mutable sequences, 411
mutable variables with immutable collections,
333
mutating generic elements, 684-686
mutator methods, 130
(see also accessor methods)
N
named values, creating sets of, 210
native executable, creating (GraalVM), 638-641
native-image command, 620
nativeImage command, sbt, 639-640
NegativeInfinity, 68
nested objects, Play Writes technique for, 574
next method, Iterator, 381
nextPrintableChar method, 51
nextString method, 50
Nil value, 117-119, 346
Node.js, 621
nonstrict methods, 51, 592
now methods, dates and times, 76
null object pattern, 731
null values, 25
avoiding returning from methods, 730
converting into Option or something else,
732
eliminating from code, 124, 728-732
initializing var fields with Option instead of,
729-730
Option/Some/None types, 730
NullPointerException, 24, 203
NumberFormat class, 72
NumberFormatException, 56, 57
numbers and dates, 53-84
calculating differences between two dates,
78
comparing floating-point numbers, 65
complex, 56
762
| Index
converting Strings to Scala numeric types,
59-62
creating new instances of dates, 76-78
formatting, 32, 71-75, 80
generating random numbers, 69-71
handling very large numbers, 67
parsing from strings, 56-59
parsing strings into dates, 82-84
replacements for ++ and --, 64
Scala's built-in numeric types, 54
numeric literals, underscores in, 55
numeric types, 53
casting with asInstanceOf method, 218
data ranges of, 54
Java versus Scala, 648
overriding default, 62
numeric values, converting Java to Scala, 655,
657
O
object keyword, 217, 220
objects, 217-232
apply methods as constructors, 223
case objects, 175
casting, 218
companion, 147, 151, 176, 221, 223
creating from traits, 741-743
creating singletons, 220
equality of, 154-162
in functional programming, 132
in object-oriented programming, 133
passing Class type with classOf method, 219
pattern matching with unapply, 230
Play Writes technique for nested, 574
reifying traits as, 227-230
serializing and deserializing to files, 473-474
static factory with apply, 225
Odersky, Martin
on computer programmer levels, xvii
Programming in Scala, 155, 162, 192, 205,
336, 361, 382, 667, 740, 744
Odersky, Martin (Programming in Scala), xiv
of methods, dates and times, 76, 81
ofLocalizedDate method, 81
ofLocalizedDateTime method, 80
ofLocalizedTime method, 80
ofPattern, 81
Ok method, Play Framework, 566, 570
onComplete method, Future class, 528, 532,
536
onMessage method, Future class, 538, 540
OOP (object-oriented programming)
creating OOP-style actors, 538-542
example, 135
modeling options, 132
objects in, 133
versus writing pure functions, 713
opaque types, 316, 691-695
open keyword, 252
Option type
converting null into, 732
as error-handling type, 733-740
extracting value from, 733
initializing var fields with instead of null,
729-730
Java Optional to Scala Option conversion,
647
Optional to Option conversion, 655
with other frameworks, 735
pattern matching, 726
returned by findFirstIn method, 41
with Scala collections, 734
using Scala Option values in Java, 656-658
Option, Try, Either, 732, 739
Option/Some/None pattern, 730, 736
optional braces syntax, xiv
Optional values, Java, 647, 654-656
Ordered trait, 413
Ordering trait, 458
orElse method, in PartialFunction, 301
out keyword, declaring variance, 684
out keyword, declaring variance (C# and Kot‐
lin), 674
OutputStreamWriter, 470
P
package command, sbt, 500
package scope, 237
package-specific scope, 238
packaging and imports, 255-269
hiding classes during import process, 261
importing givens, 267
importing members, 258
importing static members, 263
packaging with curly braces style notation,
256
renaming members on import, 259
using import statements, 264-267
parallel collections, 524
(see also concurrency)
parallel Map classes, 425
parallelize method, Spark, 591, 594
paramaterized traits, 198
parameter names, using when calling methods,
242
parameters
anonymous functions with multiple, 280
by-name, 127
case classes, 143, 171
classes whose parameters implement base
type, 687-689
constructor, 148, 149-152, 171
context, 697
defining methods that accept functions, 287
extension methods that take, 254
generic type, 667-669, 677-689
GET request with query, 587
implicit, 366, 676
setting default values for method, 244
trait, 200-204
varargs (@varargs), 663
parseInt method, 57
parsing
numbers from strings, 56-59
strings into dates, 82-84
partial functions, 298-302
PartialFunction method, 298, 555
partially applied functions, 285, 292-295
partition method, collections, 398
partitions, in Spark, 593
:paste command, Spark REPL, 596
patterns, 87, 725-728
(see also match expressions)
factory pattern, 226
in regular expressions, 41, 44, 105-111
Loan Pattern, 466, 467
matching objects with unapply, 230
null object, 731
Option/Some/None, 736
Singleton, 147
stackable trait, 188
with unapply method, 230
performance of collections, 330-333
pipelining of multiple transformations, in
Spark, 615
piping commands together, 485-486
Index
|
763
Play Framework, 557-581
Anorm database library, 735
components, 559-563
creating new endpoint, 564-568
creating project, 558-563
deserializing JSON into Scala object,
576-581
returning JSON from GET request, 568-572
serializing Scala object to JSON string, 572
validation methods, 736
play.api.libs.json package, 571
Pollak, David (Beginning Scala), 128, 728
pop method, Stack, 459
PositiveInfinity, 68
POST requests, sttp, 587
pow method, 285
Predef object, 219, 256
predefined value types, 53
predicate, 369, 392
primary constructors, 137-140, 146
printAll method, 246, 441, 663
printf style format specifiers, 30, 34
println method, 29, 31, 140
private access modifier, 163
private constructors, 146, 539
private keyword, 142, 147
private members, accessing, 222
private scope, 236
private val field, 151
Process class, 464
Process object, 478, 479, 483
process package, 463-464
ProcessBuilder class, 464
processed string literals, 29
processes, 463
(see also external commands)
ProcessLogger class, 483
Product type, in ADTs, 213
Programming in Scala (Odersky et al.), xiv, 155,
162, 192, 205, 336, 361, 382, 667, 740, 744
Programming Scala (Wampler), xiv
project documentation, generating, 512-513
Project object, sbt, 498
protected access modifier, 163
protected scope, 236
Provided keyword, sbt, 617
public scope, 239
publish task, sbt, 517
publishLocal task, sbt, 517
764
|
Index
pure functions, 57, 272
best practices, 713-719
EOP and, 725
I/O functions and, 278
meaningful type names and, 693
push method, Stack, 459
put method, Map class, 428
Q
Q interpolator, 50
query parameters, GET request with, 587
queues, 445, 460-462
quickSort method, 365
R
r method, converting String to a Regex, 41
radix, in conversions of strings to integers, 57
ragged arrays, 364
Random class, 50, 70, 262, 265
random numbers, generating, 69-71
random-length ranges, 70
randomizing sequences, 409
range method, 451
ranges, 445, 449-453
populating a collection with, 450-453
random-length, 70
raw interpolator, 31
RDD data structure, 591, 593-594
converting to DataFrame, 602
methods available, 594
reading CSV file into, 600-602
reading data files into, 595-600
saving to disk, 599
Read-Eval-Print-Loop (see REPL)
Reads converter, Play Framework, 576, 578
receiveMessagePartial method, Akka, 554
recursion, 118
reduce method, 118, 400-405
reduceLeft method, 400-405, 435
reduceRight method, 400-405
referential transparency (see RT)
reflexive property, 710
Regex object, 41, 42
regular expressions
match expressions, 105-111
pattern matching, 41, 44, 105-111
with split method, String objects, 28
reification
in functional programming, 132
of traits, 204
traits as objects, 227
remove method, 357, 428, 456
renaming clause, importing members, 259
REPL (Read-Eval-Print-Loop), 1
Ammonite, 8-11
getting started with, 3-6
:load command, 6
loading JAR files into, 6
loading source code into, 6
Play Framework, 563
setting classpath when starting, 7
starting in sbt shell, 503
tab completion, 4
replaceAll method, Regex, 27
replaceAllIn method, Regex, 43
ReplaceFirst method, Regex, 43
ReplaceFirstIn method, Regex, 43
resolvers key, in build.sbt file, 510
RESTful web server, Play Framework, 564
return type, declaring tuple as, 446
reverse method, 354
revision, libraryDependencies syntax, 507,
510-512
RichChar class, 452
RichDouble class, 59
RichInt class, 59, 452
Row type, Spark SQL, 604
RT (referential transparency), 275
run method, with processes, 478
RuntimeException, 249
RxJava, 23
RxScala, 23
S
%s format specifier, 32
s string interpolator, 29, 30
Sabin, Miles, 449
sample method, Spark, 607
saveAsTextFile method, Spark, 599
sbt (Simple Build Tool), 487-519
batch mode for, 496, 499
build.sbt file (see build.sbt file)
building projects with sbt commands,
495-497
compiling, running, and packaging a Scala
project, 499-501
configuration file (build.sbt), 489
console, 563
continuous compiling and testing, 504-505
creating Spark application, 616-618
dependency management, 505-510
deploying single, executable JAR file,
515-517
directory structure, 488, 490-495
generating project API documentation,
512-513
interactive mode for running, 497, 499
list of commands, 501-503
main class to run, specifying, 513-515
publishing your library, 517-519
with Scala.js, 621-632
show assembly command, 17
show fastOptJS command, 636
starting REPL in, 571
syntax styles for build.sbt, 497-498
version setting for project, 496
sbt commands, 495-497
sbt new command, 493-495
sbt plugin, 627
sbt run command, 500-501, 513, 558
sbt seed template, 558
sbt shell, 5
sbt-assembly plugin, 18, 515-517, 618
sbt-native-image plugin, 638
Scala, xiii
best practices (see best practices in Scala)
features of, xv
installing, xxi
Java compared with, 318
running JAR files with, 17
2.13 release, 318
Scala 3
Akka and, 521
type inference, 295
Scala 3 Book (Alexander), 212
scala command, 2, 11
Scala Contributors (website), xxii
Scala for the Impatient (Horstmann), 188
Scala Gitter channel, xxii
Scala Native, 508
Scala object, serializing or deserializing with
JSON, 572-581
scala-collection-contrib library, 425
scala.collection, 319
scala.collection.immutable, 319
scala.collection.mutable, 319
scala.concurrent.Future object, 533
Index
|
765
scala.io.Source, 465
fromFile, 465
methods list, 467
pretending a String is a File, 472
scala.jdk.CollectionConverters object, 648
scala.jdk.javaapi.CollectionConverters object,
652
scala.jdk.javaapi.OptionConverters object, 655,
658
scala.jdk.OptionConverters object, 654
Scala.js, 619-646
adding JavaScript libraries, 627
building single-page applications, 632-638
dependency management, 508
getting started, 620-625
GraalVM, 638-641
jpackage, 641-646
responding to events, 625-632
scala.language.strictEquality, 706
scala.math package, 263
scala.sys.process package, 463-464
scala.util.control.Exception object, 122, 736
scala.util.Using object, 465
scalac command, 2, 11, 492
Scalaclass, 652
scalacOptions, 492
Scaladoc, 158
ScalaFiddle, 6
Scalatags library, 632-635
scanLeft method, 404
scanRight method, 404
Scastie, 6
schema, explicitly defining, 604
schema-on-read approach, 604
sealed traits, 539
selectExpr method, Spark, 607
self type, 193, 196
Seq trait
executing external commands, 478, 479,
481, 483, 484
executing series of commands in a shell, 486
libraryDependencies declared as, 492, 506
seq, extracting sequences from collections, 395
sequence classes
adding elements to List, 346-349
Array (see Array class)
ArrayBuffer class (see ArrayBuffer class)
common, 339-367
LazyList, 352
766
|
Index
List (see List class)
ListBuffer (see ListBuffer class)
Vector, 319, 339, 341-343
VectorMap, 422
sequence methods, 369-417
anonymous functions, 369
choosing collection methods, 371-378
filtering collections using filter method,
392-394
finding unique elements in sequences, 405
flattening lists with flatten method, 390
fold method, 400-405
implied loops, 370
iterators, 381-384
looping over collections with foreach, 378
merging sequential collections, 406
mkString/addString methods to convert col‐
lections to strings, 415
predicate, 369
randomizing sequences, 409
reduce method, 400-405
sorting collections, 410-415
splitting sequences into subsets, 397-399
transforming collections with map method,
387-390
using zip method to create loop counters,
385
using zipWithIndex method to create loop
counters, 385
sequences
choosing, 325
collections and, 321, 331
defined, 325
populating with Range, 450
tuples as, 445
Serializable type/trait, 473, 664
serializing and deserializing objects to files,
473-474
serializing Scala object to JSON string, 572
@SerialVersionUID annotation, 473
server-side development (see Play Framework)
set methods, 717, 718
sets, 445, 453-455
choosing, 328
collections and, 323
defined, 325
deleting elements from, 455-456
immutable, 453, 455
mutable, 454, 456
performance characteristics for, 332
sorted order for storing values, 457-458
setter methods, 130
seven-step process, for implementing equals
method, 155
sevice, 228
shapeless library, 447
shell scripts, creating sbt project directory
structure, 490-492
Short type, 54
show assembly command, 17
show command, sbt, 513
show fastOptJS command, sbt, 636
shuffle method, 409
side effects, 273
foreach method, 380
pure functions as avoiding, 719
significant indentation style (see optional
braces syntax)
single-page applications (see SPAs)
Singleton object, 220
Singleton pattern, enforcing in Scala, 147
skinny domain objects, 309
sleep statement, 526
slice method, 396
sliding method, 399
SnakeYAML library, 218
Socket class, 148
sortBy method, 411, 438
sorted method, 410, 413
SortedMap class, 422
SortedSet class, 328, 457
sorting
arrays, 365, 438-441
collections, 410-415
sets for storing values, 457-458
sortInPlace method, 411
sortInPlaceBy method, 411
sortInPlaceWith method, 411
sortWith method, 410, 438
span method, 398
Spark (see Apache Spark)
spark object, 593
Spark Resilient Distributed Dataset, 591
Spark SQL API module, 602-608
Spark SQL queries, 612-616
spark variable, 611
spark-submit options, 618
Spark: The Definitive Guide, 590
SparkContext (sc) object, 593
SparkSession object, 611, 614, 617
SPAs (single-page applications), 562, 564,
632-638
Sphinx-4 library, 218
Spire project, 56
splat, 246
split method, 28, 28
splitAt method, 398
splitting sequences into subsets, 397
Spring Framework, 218
SQL queries, using in Spark, 602-608, 612-616
square function, and partially applied func‐
tions, 285
Stack class, 445, 458-460
stackable modifications, 192
stackable trait patterns, 188
stacks, List class, 346
statements, 140
static factory, with apply method, 225
static members
creating with companion objects, 221
importing, 263
static methods, 147
STDERR, 483-485
STDOUT, 483-485
strict and nonstrict/lazy collections, 329
strict methods and memory, 354
strictEquality, enabling, 706, 710
String class
adding methods to a closed, 23
executing external commands, 481
lines of file as, 465
pretending a String is a File, 472
split method, 28
string interpolation, 29
f string interpolator, 30
functions for, 30
raw interpolator, 31
string literals, using expressions in, 29
String-to-Int function, 282
StringOps class
capitalize method, 23
split method, 28
strings, 21-52
accessing a character in, 46
chaining method calls together, 22
converting a String to Scala numeric type,
59-62
Index
|
767
converting collection to a String with
mkString/addString, 415
creating interpolators, 47-50
creating random strings, 50
extracting parts that match regular expres‐
sion patterns, 44
features, 22
finding regular expression patterns in, 41
formatting, 32-35
handling base and radix, 57
multiline, creating, 26
parsing into dates, 82-84
parsing numbers from, 56-59
processing one character at a time, 36-40
replacing regular expression patterns in, 43
splitting, 27
substituting variables into, 29-32
testing equality, 24
StringUtils object, 263
stripMargin method, 26
StructField type, Spark, 604
StructType class, 605
structural type, 196
sttp HTTP client, 584-588
SttpBackend, 586
subclasses
constructor parameter in, 149
marking traits and, 192-195
subsets, splitting sequences into, 397
substitution rules, 275
subtract algorithm, 402
subtractAll method, 456
subtractOne method, 456
Sum type, in ADTs, 213
super method, 240
superclasses, 189
calling, 152
calling methods on, 239-242
supervisor actor, creating Akka, 548
swap method, in tuples, 447
switch statements
versus match expression, 725, 726
using match expressions like, 98-102
symmetric property, 710
synchronous programming, executing external
command and reading STDOUT, 481-483
T
tab completion (REPL), 4
768
| Index
tail element, 346
tail method, 339, 396
take method, 395
takeRight method, 395
takeWhile method, 395
TASTy format and .tasty files, 16
template approach, sbt new, 494-495
term inference
alias givens, 699
anonymous givens and unnamed parame‐
ters, 697
context parameters, 697
extension methods to create API, 698
with given instances and using keyword,
695-701
importing givens, 700-701
ternary operator, using if/then as, 97
~test command, sbt, 504
testing and debugging
continuous compiling and testing in sbt,
504-505
equality testing, 24, 25
getting keys or values of Map classes, 431
Play Framework endpoint, 565, 570
pure functions as easier to test, 718
sbt debug command, 509
sending messages to Akka actors, 549-550
testing for existence of keys in maps, 431
variance testing with “implicitly” trick, 675
~testQuick command, sbt, 504
text files
opening and reading, 464-468
writing, 468-470
text() method, Spark, 598
textFile method, Spark, 595, 596, 598
this.type, 250
thread pools, 526
threads (Thread), 522
@throws annotation, 58, 122, 661-662
time
creating new instances, 76-78
formatting, 32
timeout values, sttp client, 588
timestamps, handling, 616
to method, 452
to method, Char and Int classes, 449
to*Option methods, with numbers, 57
toDF method, Spark, 602
toJava extension method, 656, 658
toJson method, Play Framework, 570
top method, Stack class, 459
toString method, 172
trait parameters, 200-204
traits and enums, 179-216
abstract fields in traits, 183
calling methods on, 239-242
commonly used in library APIs, 327
creating objects from traits, 741-743
dependency injection framework, 311-316
ensuring traits can be added to type, 196
enums for constants, 222
extending, 182
extending multiple traits, 688
in functional programming, 131
in object-oriented programming, 132
limiting classes using traits by inheritance,
197
marking traits to be used as subclasses,
192-195
modeling algebraic data types with enums,
213-216
parameterized traits, 198
reifying as objects, 227-230
resolving method name conflicts, 189-192
sets of named values with enums, 210
trait construction order, 180
trait parameters, 200-204
traits as interfaces, 181, 648
traits as mixins, 186-189
using Scala traits in Java, 659
using traits like abstract classes, 185
using traits to create modules, 204-210
transformer, 279, 282, 336
transformer methods, 39, 51, 329, 371
examples of, 354
futures, 528-532
lazy view on collection, 335, 437
narrow versus wide, 614
Spark, 592
@transient annotation, 664
traversing maps, 435-438
trimming strings, 28
Try type/Either type, accessing failure reason,
736-739
Try, Success, and Failure classes
converting Try to Option, 391
with file reading and Using, 465
in file reading method, 122
in functional error handling, 303-304
makeInt example, 58
in match expression, 481
using instead of null values, 730
try/catch expressions, 167
defining methods with, 235
match expressions and pattern matching,
727
try/catch/finally block
declaring variables before using in, 123
matching one or more exceptions with try/
catch, 120-123
try/finally clause, 467
tuples, 445
creating heterogeneous list, 446-449
mutable maps and, 421
type ascription, 63
type command, in REPLs, 5, 593
type conversions, using Java collections in
Scala, 650
type inference, 21, 295
type parameter, 198
The Type Astronaut's Guide to Shapeless (Gur‐
nell), 199
types, 667-710
algebraic data types, 131, 181, 213-216
bounds, 669
constraints, 676
creating a method that takes generic type,
677
creating class whose generic elements can be
mutated, 684-686
creating class whose parameters implement
a base type, 687-689
declaring as a combination of types, 703-705
duck typing (structural types), 689-691
error-handling (Option, Try, Either),
733-740
generic type parameters, 667-669, 677-689
hybrid, ADTs, 216
integral, 53
limiting equality comparisons with CanEq‐
ual typeclass, 707-710
making immutable generic parameters
covariant, 682-684
multiversal equality to control class compar‐
isons, 706
numeric, 53, 54, 59, 218, 648
opaque, 316, 691-695
Index
|
769
term inference with given instances and
using keyword, 695-701
type parameter symbols, 680
variance, 670-676
U
UAP (Uniform Access Principle), 314, 717
uJson library, 583
unapply method, 172, 230, 231
Unicode characters, 50
union types, simulating dynamic typing with,
701-703
Unit, 289
unit tests, 315, 473
Unix commands, equivalency of Scala com‐
mands to, 486
unmanaged dependencies, 487, 505
until method, 450, 452
unzip method, 399
upper bound, 687, 690
use-site variance, 671
Using object, 466
using parameter, 366
utility classes, 147
V
val fields, 141, 151
val keyword, 235, 284
val+mutable and var+immutable, 721-722
validate function, Play Framework, 579
validation methods, Play Framework, 736
validators, Play Framework, 579
values
finding largest/smallest in maps, 433
sorted order for storing in sets, 457-458
sorting maps by, 438-441
testing for existence of in maps, 431
traversing maps, 437
values method, 432
valuesIterator method, 431
var fields, 141
accessors and mutators, relationship to, 165
initializing with Option, not null, 729
setting unitialized types, 169
@varargs annotation, 662-663
variable substitution, into strings, 29-32
variable-argument fields, creating methods that
take, 245
variables
770
|
Index
assigning type to, 63
creating from tuple, 446
declaring before using it in try/catch/finally
block, 123
in functional programming, 118
mix in traits during construction of, 187
passing functions around as, 281-287
variance, 670-676
contravariance rarity, 676
immutability and, 671
"in" and "out" positions, 672
symbols, 674
testing with “implicitly” trick, 675
Vector class, 319
adding elements to, 342
appending elements to, 342
collections and, 339
creating, 341
making go-to immutable sequence, 341
modifying elements of, 343
prepending elements to, 342
VectorMap class, 422
view method, filtering maps, 442
view templates, Play Framework, 561-562
views, lazy, 382
Visual Studio Code (VS Code) IDE, 6
W
Wampler, Dean (Programming Scala), xiv
WeakHashMap class, 422
web applications, 562
web services, 743
(see also Play Framework)
modular programming approach, 743
using Play JSON library outside Play Frame‐
work, 581-583
using sttp HTTP client, 584-588
WebJars, 627
Wheatley, Patrick (Applied Numerical Analy‐
sis), 308
while loops, 126
whileTrue loop, 126
whitespace around commands and arguments,
480
wholeTextFiles method, Spark, 598, 598
Windows OS, building application for, 644
with keyword, 660
withDefaultValue method, Map, 430
Writes converters, Play Framework, 570,
572-574, 581
X
xargs, Unix, 246
XMLHttpRequest, Scala.js, 637
zero-fill integer options, 33
ZIO library, 304
Zionomicon (Ziverge), 675
zip method, 385
zipWithIndex method, 385
Z
Zaharia, Matei (Spark: The Definitive Guide),
590
Index
|
771
About the Author
After graduating from Texas A&M University with a degree in Aerospace Engineer‐
ing, Alvin Alexander became a practicing engineer and was put in charge of main‐
taining his group’s FORTRAN software applications. He quickly came to enjoy this
work, and wanting to learn more about programming, he taught himself the C pro‐
gramming language. That was followed by Unix and network administration, Perl,
Java, Python, Ruby, and more recently Scala and Kotlin. During this process he
started a software consulting firm, grew it to 15 people, sold it, and moved to Alaska.
After returning to the lower 48, he self-published two books, How I Sold My Business:
A Personal Diary and A Survival Guide for New Consultants. Since then he has written
three more books: Scala Cookbook; Functional Programming, Simplified; and Hello,
Scala. He also created alvinalexander.com, which receives millions of page views every
year, and started a new consulting firm, Valley Programming, just outside of Boulder,
Colorado.
Colophon
The animal on the cover of Scala Cookbook is a long-beaked echidna—genus Zaglos‐
sus—of which there are three living mammal species (Z. bruijni, Z. bartoni, and Z.
attenboroughi) found only on the island of New Guinea. Weighing up to 35 pounds,
long-beaked echidnas are nocturnal insectivores that prefer to live in forests at higher
altitudes.
The first specimen was found in 1961 on New Guinea’s Cyclops Mountains, and the
entire species was thought to be extinct in that area until evidence of their activity was
found in 2007. According to data collected in 1982, only 1.6 echidnas existed per
square kilometer of suitable habitat across New Guinea, adding up to a total of
300,000 individuals. Since then, that number has dropped significantly due to habitat
loss as large areas are exploited for farming, logging, and mining. Hunting also
remains a large problem since the long-beaked echidna is considered a delicacy by
locals in Papua New Guinea. The low population numbers and rapid destruction of
habitat make the long-beaked echidna an endangered species, while the short-beaked
variety fares slightly better in both New Guinea and Australia.
The echidna is classified as a monotreme, or a mammal that lays eggs. The mother
holds one egg at a time in her body, providing it with nutrients and a place to live
after it hatches. The only surviving monotremes are the four species of echidna and
the platypus. All of these mammals are native to Australia and New Guinea, although
there is evidence that they were once more widespread. With origins in the Jurassic
era some sixty million years ago, monotremes offer evidence of mammal evolution
away from reptilian forms of reproduction.
Instead of having teeth, echidnas’ tongues are covered in spikes that help draw earth‐
worms and ants into the mouth. The entire body is also covered in fur and spikes that
are used for protection; much like a hedgehog, echidnas can curl up into a spiny ball
when threatened. Although very little echidna behavior has been observed in the
wild, they are believed to be solitary creatures; the short-beaked echidna displays little
evidence of grooming, aggression, courting, or maternal behavior. In captivity, these
creatures can live up to thirty years.
The cover image is a color illustration by Karen Montgomery, based on a black and
white engraving from Natural History of Animals by Vogt & Specht. The cover fonts
are Gilroy Semibold and Guardian Sans. The text font is Adobe Minion Pro; the
heading font is Adobe Myriad Condensed; and the code font is Dalton Maag’s
Ubuntu Mono.
There’s much more
where this came from.
Experience books, videos, live online
training courses, and more from O’Reilly
and our 200+ partners—all in one place.
©2019 O’Reilly Media, Inc. O’Reilly is a registered trademark of O’Reilly Media, Inc. | 175
Learn more at oreilly.com/online-learning